HP Digital Sender 9100C Documentation Update
266
HP Digital Sender 9100C Documentation Update An Addendum for the HP Digital Sender 9100C has been added to the end of this PDF. The Addendum contains information regarding digital sender features that have changed since the User Guide and Administrator Guide were produced. For product information, setup, and use, please read all of the documentation.
-
Upload
khangminh22 -
Category
Documents
-
view
0 -
download
0
Transcript of HP Digital Sender 9100C Documentation Update
HP Digital Sender 9100C Documentation Update
An Addendum for the HP Digital Sender 9100C has been added to the end of this PDF. The Addendum contains information regarding digital sender features that have changed since the User Guide and Administrator Guide were produced. For product information, setup, and use, please read all of the documentation.
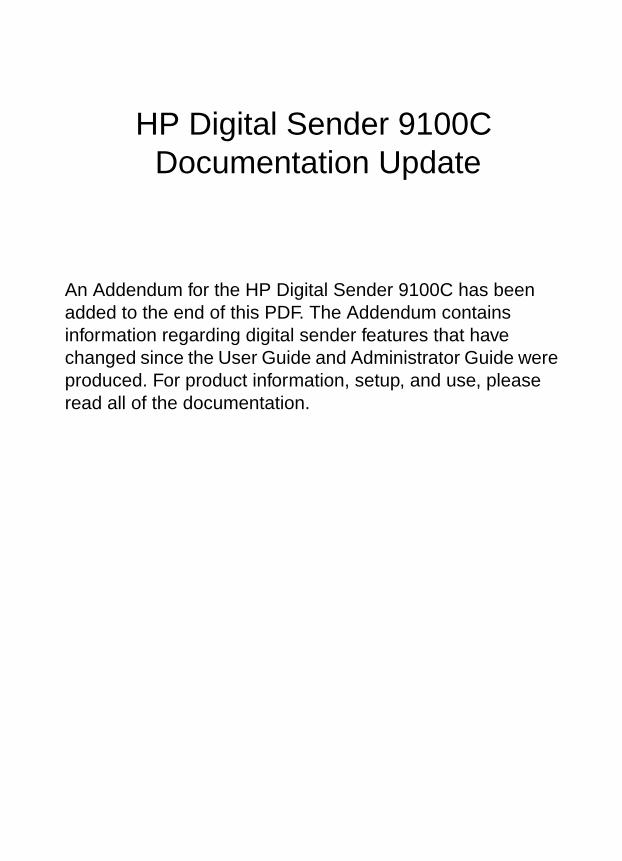
HP 9100CDigital SenderAdministrator Guide
Ad
min
istrator G
uid
e
English
Copyright© 2001Hewlett-Packard Co.
Manual Part No.C1311-90915
*C1311-90915**C1311-90915*
C1311-90915
HP
9100C D
igital S
end
er

HP 9100C Digital Sender
Administrator Guide__________
Copyright information
© Copyright Hewlett-Packard Company 1998
All rights reserved. Reproduction, adaptation, or translation without prior written permission is prohibited, except as allowed under copyright laws.
Publication number C1311-90915
Second Edition, December 2001
Trademark credits
Adobe, the Adobe logo, Acrobat, and the Acrobat logo are trademarks of Adobe Systems Incorporated. CompuServe is a U.S. trademark of CompuServe, Inc. Microsoft, Windows, and Windows NT are U.S. registered trademarks of Microsoft Corporation. PaperPort is a trademark of Visioneer, Inc. in the United States and other countries. Pentium is a U.S. registered product of Intel Corporation.
LDAP code (libldap client library and liblber encoding/decoding library) used courtesy of University of Michigan at Ann Arbor. Copyright 1992-1996 Regents of the University of Michigan. All rights reserved.
All other products mentioned herein may be trademarks of their respective companies.
Warranty
The information contained in this document is subject to change without notice.
Hewlett-Packard makes no warranty of any kind with respect to this information. HEWLETT-PACKARD SPECIFICALLY DISCLAIMS THE IMPLIED WARRANTY OF MERCHANTABILITY AND FITNESS FOR A PARTICULAR PURPOSE.
Hewlett-Packard shall not be liable for any direct, indirect, incidental, consequential, or other damage alleged in connection with the furnishing or use of this information.
NOTICE TO U.S. GOVERNMENT USERS: RESTRICTED RIGHTS COMMERCIAL COMPUTER SOFTWARE: “Use, duplication, or disclosure by the Government is subject to restrictions as set forth in subparagraph (c) (1) (ii) of the Rights in Technical Data Clause at DFARS 52.227-7013.”
Material scanned by this product may be protected by governmental laws and other regulations, such as copyright laws. The customer is solely responsible for complying with all such laws and regulations.
FCC radio frequency interference statementThis equipment has been tested and found to comply with the limits for a Class A digital device, pursuant to Part 15 of FCC rules. These limits are designed to provide reasonable protection against harmful interference when the equipment is operated in a commercial environment. This equipment generates, uses, and can radiate radio frequency energy. If not installed and used in accordance with the instructions, it may cause harmful interference to radio communications. Operation of this equipment in a residential area is likely to cause harmful interference, in which case the user will be required to correct the interference at his own expense.
Note: Any changes or modifications to this equipment that are not expressly approved by Hewlett-Packard may cause harmful interference and void the user’s authority to operate the equipment.
Safety information
WARNING!Electrical shock hazard
To avoid electrical shock, use only supplied power cords and connect only to properly grounded (3-hole) wall outlets.
Hewlett-Packard Company11311 Chinden BoulevardBoise, Idaho 83714 U.S.A.
Hewlett-Packard Company
Contents
1 About the digital sender
Introduction . . . . . . . . . . . . . . . . . . . . . . . . . . . . . . . . . . . . . . . . . . .7Environments and protocols . . . . . . . . . . . . . . . . . . . . . . . . . . . . . .8
Network operating systems . . . . . . . . . . . . . . . . . . . . . . . . . .8Client operating systems . . . . . . . . . . . . . . . . . . . . . . . . . . . . .9Dependency matrix . . . . . . . . . . . . . . . . . . . . . . . . . . . . . . . . . .9
Features . . . . . . . . . . . . . . . . . . . . . . . . . . . . . . . . . . . . . . . . . . . .10Performance . . . . . . . . . . . . . . . . . . . . . . . . . . . . . . . . . . . . .10Paper handling . . . . . . . . . . . . . . . . . . . . . . . . . . . . . . . . . . .10Image processing . . . . . . . . . . . . . . . . . . . . . . . . . . . . . . . . . .11Sending qualities . . . . . . . . . . . . . . . . . . . . . . . . . . . . . . . . . .12File formats and sizes. . . . . . . . . . . . . . . . . . . . . . . . . . . . . . .13Distribution services . . . . . . . . . . . . . . . . . . . . . . . . . . . . . . .15Security. . . . . . . . . . . . . . . . . . . . . . . . . . . . . . . . . . . . . . . . . .18
Components . . . . . . . . . . . . . . . . . . . . . . . . . . . . . . . . . . . . . . . . .19Hardware components . . . . . . . . . . . . . . . . . . . . . . . . . . . . .19Software components . . . . . . . . . . . . . . . . . . . . . . . . . . . . . .21
Specifications . . . . . . . . . . . . . . . . . . . . . . . . . . . . . . . . . . . . . . . .22Equipment specifications . . . . . . . . . . . . . . . . . . . . . . . . . . . .22Environmental ranges. . . . . . . . . . . . . . . . . . . . . . . . . . . . . . .24Supported capabilities . . . . . . . . . . . . . . . . . . . . . . . . . . . . . .25German noise declaration. . . . . . . . . . . . . . . . . . . . . . . . . . . .26French EMC regulation. . . . . . . . . . . . . . . . . . . . . . . . . . . . . .26Declaration of conformity . . . . . . . . . . . . . . . . . . . . . . . . . . . .27
2 Installing and configuring
Introduction . . . . . . . . . . . . . . . . . . . . . . . . . . . . . . . . . . . . . . . . . .29Installation requirements . . . . . . . . . . . . . . . . . . . . . . . . . . . . . . . .30
Environmental requirements . . . . . . . . . . . . . . . . . . . . . . . . .30Network system requirements . . . . . . . . . . . . . . . . . . . . . . . .30Client system requirements . . . . . . . . . . . . . . . . . . . . . . . . . .30Space requirements . . . . . . . . . . . . . . . . . . . . . . . . . . . . . . . .31
What ships in the box . . . . . . . . . . . . . . . . . . . . . . . . . . . . . . . . . .31
EN 3
The configuration process . . . . . . . . . . . . . . . . . . . . . . . . . . . . . . .32Fast-track configuration . . . . . . . . . . . . . . . . . . . . . . . . . . . .32Extended and optional functionality . . . . . . . . . . . . . . . . . . .32Assigning an IP address to the digital sender. . . . . . . . . . . . .33Preparing for configuration . . . . . . . . . . . . . . . . . . . . . . . . . . .33Overview of configuration . . . . . . . . . . . . . . . . . . . . . . . . . . . .35
Fast-track configuration steps . . . . . . . . . . . . . . . . . . . . . . . . . . . .36Install the unit . . . . . . . . . . . . . . . . . . . . . . . . . . . . . . . . . . . .36Configure fast-track parameters at the control panel . . . . . . .38
Extended and optional configuration steps . . . . . . . . . . . . . . . . . .41Configure extended and optional parameters at
the control panel. . . . . . . . . . . . . . . . . . . . . . . . . . . . . . . .41Run the setup program to install the administrative
software . . . . . . . . . . . . . . . . . . . . . . . . . . . . . . . . . . . . . .42Configure extended and optional parameters using the
HP JetAdmin software . . . . . . . . . . . . . . . . . . . . . . . . . . .45Configure the HP Address Book Manager . . . . . . . . . . . . . . .52Distribute the client software to user computers. . . . . . . . . . .55Test the installation. . . . . . . . . . . . . . . . . . . . . . . . . . . . . . . . .57
Customizing the digital sender to support third-party programs . .58Coexisting with the HP Network ScanJet 5 scanner . . . . . . . . . . .61
Administrator matters . . . . . . . . . . . . . . . . . . . . . . . . . . . . . . .61Client matters . . . . . . . . . . . . . . . . . . . . . . . . . . . . . . . . . . . . .61LAN fax service matters . . . . . . . . . . . . . . . . . . . . . . . . . . . . .62
Uninstalling the software . . . . . . . . . . . . . . . . . . . . . . . . . . . . . . . .63Troubleshooting the installation. . . . . . . . . . . . . . . . . . . . . . . . . . .63
Function key problems . . . . . . . . . . . . . . . . . . . . . . . . . . . . . .63Installation problems. . . . . . . . . . . . . . . . . . . . . . . . . . . . . . . .64Installation messages . . . . . . . . . . . . . . . . . . . . . . . . . . . . . . .66
3 Administering
Introduction . . . . . . . . . . . . . . . . . . . . . . . . . . . . . . . . . . . . . . . . . .69Administrator activities . . . . . . . . . . . . . . . . . . . . . . . . . . . . . .69Digital sender parameters. . . . . . . . . . . . . . . . . . . . . . . . . . . .73
Using the configuration menu at the control panel . . . . . . . . . . . .78Configuration menu keys . . . . . . . . . . . . . . . . . . . . . . . . . . . .78Configuration menu parameters . . . . . . . . . . . . . . . . . . . . . . .80
Controlling notifications . . . . . . . . . . . . . . . . . . . . . . . . . . . . . . . . .85Shutting down and restarting. . . . . . . . . . . . . . . . . . . . . . . . . . . . .88Resetting . . . . . . . . . . . . . . . . . . . . . . . . . . . . . . . . . . . . . . . . . . . .90
Resetting address books . . . . . . . . . . . . . . . . . . . . . . . . . . .90Resetting network parameters . . . . . . . . . . . . . . . . . . . . . . .91Resetting to factory defaults . . . . . . . . . . . . . . . . . . . . . . . . .92
Backing up and restoring address books . . . . . . . . . . . . . . . . . . .94Backing up . . . . . . . . . . . . . . . . . . . . . . . . . . . . . . . . . . . . . .94Restoring . . . . . . . . . . . . . . . . . . . . . . . . . . . . . . . . . . . . . . .96
4 Contents EN
Creating and maintaining user profiles . . . . . . . . . . . . . . . . . . . . .98Controlling security . . . . . . . . . . . . . . . . . . . . . . . . . . . . . . . . . . .100
Determining who can use the digital sender . . . . . . . . . . . .100Changing or setting administrator password . . . . . . . . . . .100Erasing administrator password . . . . . . . . . . . . . . . . . . . . . .101Controlling whether the administrator must validate new
or changed user profiles. . . . . . . . . . . . . . . . . . . . . . . . .102Validating a new or changed user profile . . . . . . . . . . . . . . .103
Working with address books . . . . . . . . . . . . . . . . . . . . . . . . . . . .104Maintaining the Public Email address book . . . . . . . . . . . . .105Maintaining the Public Distribution Lists address book . . . .105Importing e-mail addresses into address books . . . . . . . . . .107
Managing printers . . . . . . . . . . . . . . . . . . . . . . . . . . . . . . . . . . . .111Using the activity log . . . . . . . . . . . . . . . . . . . . . . . . . . . . . . . . . .113Displaying the self-test page . . . . . . . . . . . . . . . . . . . . . . . . . . . .116Changing the contrast level on the control panel . . . . . . . . . . . .119Upgrading the digital sender firmware. . . . . . . . . . . . . . . . . . . . .120Maintaining the hardware . . . . . . . . . . . . . . . . . . . . . . . . . . . . . .121
Cleaning the digital sender . . . . . . . . . . . . . . . . . . . . . . . . .121Replacing the delivery guide sheet. . . . . . . . . . . . . . . . . . . .122Replacing the lower rollers . . . . . . . . . . . . . . . . . . . . . . . . . .123Removing and replacing the HP JetDirect print server . . . .124
4 Troubleshooting
Introduction . . . . . . . . . . . . . . . . . . . . . . . . . . . . . . . . . . . . . . . . .127Sources for information about problems . . . . . . . . . . . . . . . . . . .128Clearing paper jams . . . . . . . . . . . . . . . . . . . . . . . . . . . . . . . . . .129Troubleshooting the digital sender . . . . . . . . . . . . . . . . . . . . . . .133
General digital sender troubleshooting . . . . . . . . . . . . . . . . .133Checking the address book database . . . . . . . . . . . . . . . . .139Control panel messages . . . . . . . . . . . . . . . . . . . . . . . . . . . .141
Troubleshooting network problems . . . . . . . . . . . . . . . . . . . . . . .157General network troubleshooting . . . . . . . . . . . . . . . . . . . .157E-mail service troubleshooting . . . . . . . . . . . . . . . . . . . . . . .157Fax service troubleshooting . . . . . . . . . . . . . . . . . . . . . . . . .158HP JetAdmin software troubleshooting. . . . . . . . . . . . . . . . .160HP JetDirect print server troubleshooting . . . . . . . . . . . . . . .168
Activity log messages . . . . . . . . . . . . . . . . . . . . . . . . . . . . . . . . .170Troubleshooting the software . . . . . . . . . . . . . . . . . . . . . . . . . . .189
General software troubleshooting. . . . . . . . . . . . . . . . . . . . .189HP Address Book Manager messages. . . . . . . . . . . . . . . . .190HP Digital Sender Link messages . . . . . . . . . . . . . . . . . . . .195
Restoring old firmware images . . . . . . . . . . . . . . . . . . . . . . . . . .198
EN 5
5 Warranty and support information
Hewlett-Packard limited warranty statement . . . . . . . . . . . . . . .199Replacement parts and accessories . . . . . . . . . . . . . . . . . . . . . .201HP customer support options worldwide . . . . . . . . . . . . . . . . . . .202HP customer support. . . . . . . . . . . . . . . . . . . . . . . . . . . . . . . . . .204Worldwide sales and service offices . . . . . . . . . . . . . . . . . . . . . .206
Index
6 Contents EN
1 About the digital sender
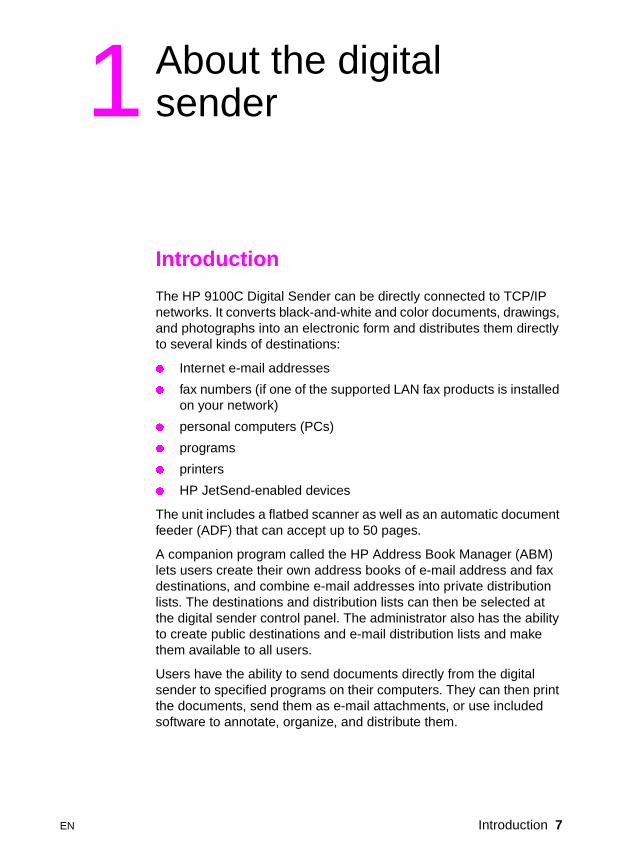
Introduction
The HP 9100C Digital Sender can be directly connected to TCP/IP networks. It converts black-and-white and color documents, drawings, and photographs into an electronic form and distributes them directly to several kinds of destinations:
� Internet e-mail addresses
� fax numbers (if one of the supported LAN fax products is installed on your network)
� personal computers (PCs)
� programs
� printers
� HP JetSend-enabled devices
The unit includes a flatbed scanner as well as an automatic document feeder (ADF) that can accept up to 50 pages.
A companion program called the HP Address Book Manager (ABM) lets users create their own address books of e-mail address and fax destinations, and combine e-mail addresses into private distribution lists. The destinations and distribution lists can then be selected at the digital sender control panel. The administrator also has the ability to create public destinations and e-mail distribution lists and make them available to all users.
Users have the ability to send documents directly from the digital sender to specified programs on their computers. They can then print the documents, send them as e-mail attachments, or use included software to annotate, organize, and distribute them.
EN Introduction 7

The HP 9100C Digital Sender supports LDAP (Lightweight Directory Access Protocol), which allows you to find and use e-mail addresses located on directory servers located elsewhere on a network (such as the Internet) over a TCP/IP connection. See the HP digital sender website for a list of global e-mail address books:
http://www.digitalsender.hp.com
Installing the digital sender is simply a matter of connecting it to your network, configuring network and distribution parameters, and installing the software from the compact disc that comes with the digital sender. The digital sender operates as a standalone unit on the network and does not require network privileges to administer.
The HP JetDirect print server that comes installed in the digital sender handles all protocol support for TCP/IP and SMTP automatically.
The HP 9100C Digital Sender is fully compatible with the LAN fax capabilities found in the HP Network ScanJet 5 scanner. When you install the digital sender, you do not need to upgrade your LAN fax product.
Environments and protocols
Network operating systemsThe HP 9100C Digital Sender can be directly connected to TCP/IP networks, and operates independently within the network operating environments listed below (some features might not be available in all environments—see the dependency matrix on page 9):
� Microsoft® Windows NT 4.0 and 5.0 workstation and server(TCP/IP only)
� LAN Server 3.1 and 4.1 and OS/2 Warp Server (TCP/IP only)
� NetWare 3.x and 4.x with IPX and TCP/IP
Ethernet and Token Ring connections are provided by the HP JetDirect print server that comes installed in the digital sender:
� Fast Ethernet 100Base-TX, Ethernet 10Base-T, or 10Base-2 (BNC).
� Token Ring 4/16 Mbps. Source routing is supported.
Note Network servers are needed only to connect LAN fax and other programs. No network servers are needed to support the remaining features.
8 Chapter 1 - About the digital sender EN
Client operating systemsThe following client operating systems are supported:
� Windows NT 4.0 and 5.0 workstation and server (TCP/IP only)
� Windows 9x (TCP/IP only)
The HP 9100C Digital Sender works correctly with the Microsoft TCP/IP protocol provided as part of these operating systems.
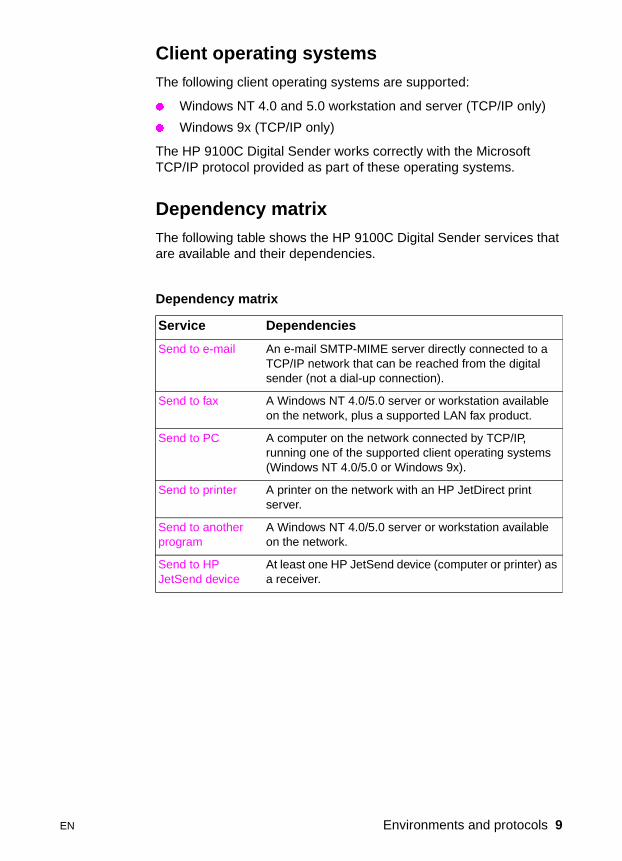
Dependency matrixThe following table shows the HP 9100C Digital Sender services that are available and their dependencies.
Dependency matrix
Service Dependencies
Send to e-mail An e-mail SMTP-MIME server directly connected to a TCP/IP network that can be reached from the digital sender (not a dial-up connection).
Send to fax A Windows NT 4.0/5.0 server or workstation available on the network, plus a supported LAN fax product.
Send to PC A computer on the network connected by TCP/IP, running one of the supported client operating systems (Windows NT 4.0/5.0 or Windows 9x).
Send to printer A printer on the network with an HP JetDirect print server.
Send to another program
A Windows NT 4.0/5.0 server or workstation available on the network.
Send to HP JetSend device
At least one HP JetSend device (computer or printer) as a receiver.
EN Environments and protocols 9
Features
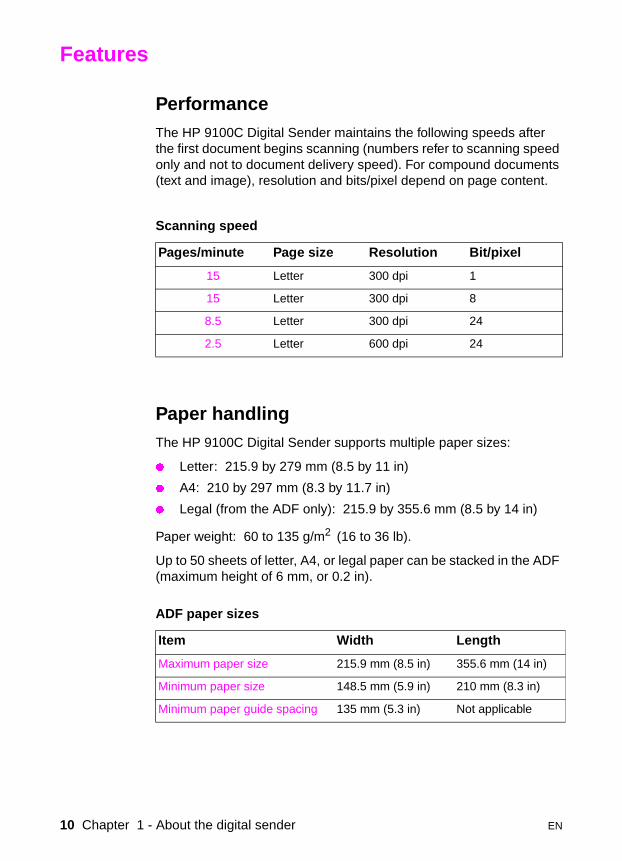
PerformanceThe HP 9100C Digital Sender maintains the following speeds after the first document begins scanning (numbers refer to scanning speed only and not to document delivery speed). For compound documents (text and image), resolution and bits/pixel depend on page content.
Paper handlingThe HP 9100C Digital Sender supports multiple paper sizes:
� Letter: 215.9 by 279 mm (8.5 by 11 in)
� A4: 210 by 297 mm (8.3 by 11.7 in)
� Legal (from the ADF only): 215.9 by 355.6 mm (8.5 by 14 in)
Paper weight: 60 to 135 g/m2 (16 to 36 lb).
Up to 50 sheets of letter, A4, or legal paper can be stacked in the ADF (maximum height of 6 mm, or 0.2 in).
Scanning speed
Pages/minute Page size Resolution Bit/pixel
15 Letter 300 dpi 1
15 Letter 300 dpi 8
8.5 Letter 300 dpi 24
2.5 Letter 600 dpi 24
ADF paper sizes
Item Width Length
Maximum paper size 215.9 mm (8.5 in) 355.6 mm (14 in)
Minimum paper size 148.5 mm (5.9 in) 210 mm (8.3 in)
Minimum paper guide spacing 135 mm (5.3 in) Not applicable
10 Chapter 1 - About the digital sender EN
Image processingImage processing features include:
� one-touch operation by means of predefined settings to obtain the best output for the type of destination (e-mail, fax, computer, printer, other programs, or HP JetSend-enabled device)
� different file format depending on intended use
� optimized image processing for full-color images using color optimization and gamma correction
� smart auto-thresholding to get the best 300-dpi, 1 bit/pixel image ready for OCR (optical character recognition)
� compression method to optimize file size and transmission time (JPEG for 24-bit/pixel color images, and G4 and RLE for 1-bit/pixel, black-and-white images)
� perfect images and text in the smallest file size possible using advanced HP Smart Compression Imaging Technology for best treatment of compound (text and image) pages
EN Features 11
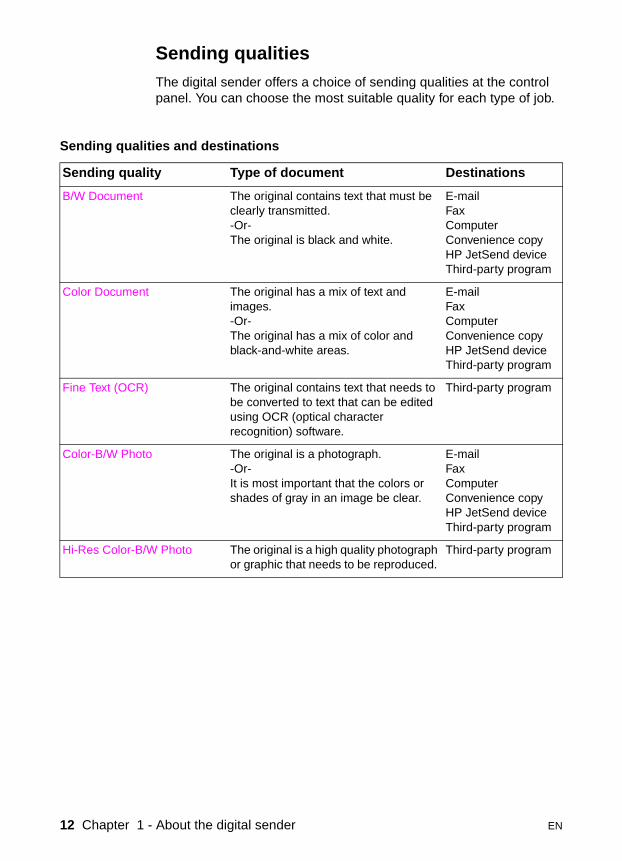
Sending qualitiesThe digital sender offers a choice of sending qualities at the control panel. You can choose the most suitable quality for each type of job.
Sending qualities and destinations
Sending quality Type of document Destinations
B/W Document The original contains text that must be clearly transmitted.-Or-The original is black and white.
E-mail FaxComputerConvenience copyHP JetSend deviceThird-party program
Color Document The original has a mix of text and images.-Or-The original has a mix of color and black-and-white areas.
E-mailFaxComputerConvenience copyHP JetSend deviceThird-party program
Fine Text (OCR) The original contains text that needs to be converted to text that can be edited using OCR (optical character recognition) software.
Third-party program
Color-B/W Photo The original is a photograph.-Or-It is most important that the colors or shades of gray in an image be clear.
E-mailFaxComputerConvenience copyHP JetSend deviceThird-party program
Hi-Res Color-B/W Photo The original is a high quality photograph or graphic that needs to be reproduced.
Third-party program
12 Chapter 1 - About the digital sender EN
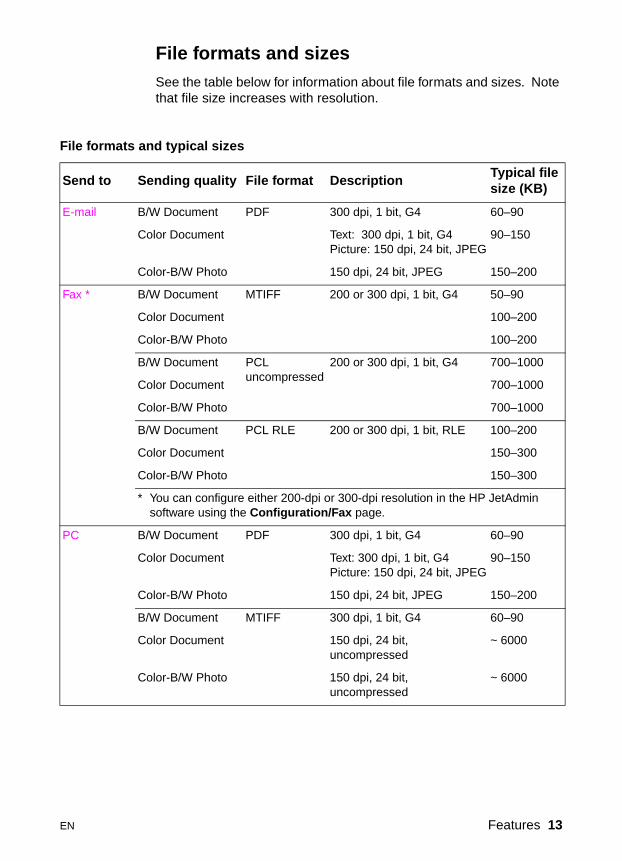
File formats and sizesSee the table below for information about file formats and sizes. Note that file size increases with resolution.
File formats and typical sizes
Send to Sending quality File format DescriptionTypical file size (KB)
E-mail B/W Document PDF 300 dpi, 1 bit, G4 60–90
Color Document Text: 300 dpi, 1 bit, G4Picture: 150 dpi, 24 bit, JPEG
90–150
Color-B/W Photo 150 dpi, 24 bit, JPEG 150–200
Fax * B/W Document MTIFF 200 or 300 dpi, 1 bit, G4 50–90
Color Document 100–200
Color-B/W Photo 100–200
B/W Document PCL uncompressed
200 or 300 dpi, 1 bit, G4 700–1000
Color Document 700–1000
Color-B/W Photo 700–1000
B/W Document PCL RLE 200 or 300 dpi, 1 bit, RLE 100–200
Color Document 150–300
Color-B/W Photo 150–300
* You can configure either 200-dpi or 300-dpi resolution in the HP JetAdminsoftware using the Configuration/Fax page.
PC B/W Document PDF 300 dpi, 1 bit, G4 60–90
Color Document Text: 300 dpi, 1 bit, G4Picture: 150 dpi, 24 bit, JPEG
90–150
Color-B/W Photo 150 dpi, 24 bit, JPEG 150–200
B/W Document MTIFF 300 dpi, 1 bit, G4 60–90
Color Document 150 dpi, 24 bit, uncompressed
~ 6000
Color-B/W Photo 150 dpi, 24 bit, uncompressed
~ 6000
EN Features 13
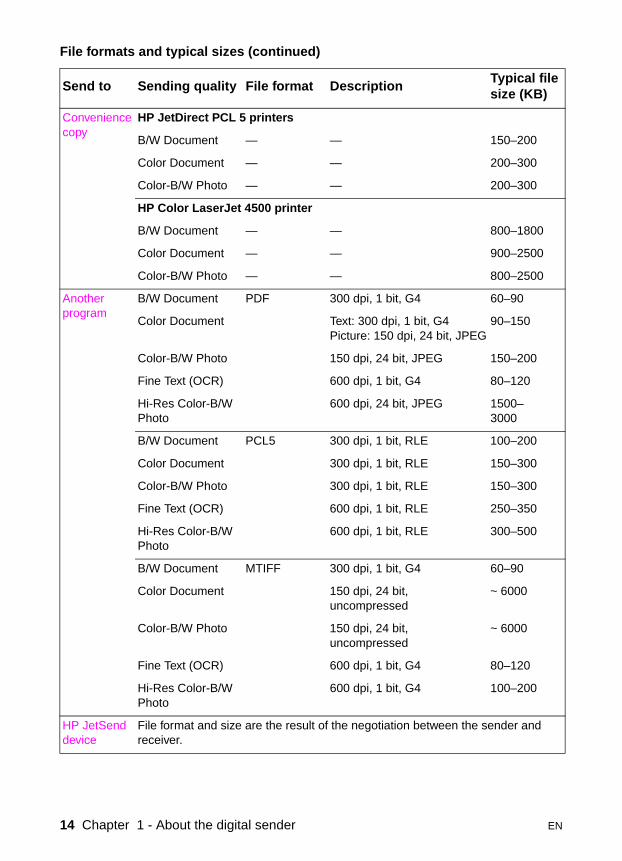
Conveniencecopy
HP JetDirect PCL 5 printers
B/W Document — — 150–200
Color Document — — 200–300
Color-B/W Photo — — 200–300
HP Color LaserJet 4500 printer
B/W Document — — 800–1800
Color Document — — 900–2500
Color-B/W Photo — — 800–2500
Another program
B/W Document PDF 300 dpi, 1 bit, G4 60–90
Color Document Text: 300 dpi, 1 bit, G4Picture: 150 dpi, 24 bit, JPEG
90–150
Color-B/W Photo 150 dpi, 24 bit, JPEG 150–200
Fine Text (OCR) 600 dpi, 1 bit, G4 80–120
Hi-Res Color-B/W Photo
600 dpi, 24 bit, JPEG 1500–3000
B/W Document PCL5 300 dpi, 1 bit, RLE 100–200
Color Document 300 dpi, 1 bit, RLE 150–300
Color-B/W Photo 300 dpi, 1 bit, RLE 150–300
Fine Text (OCR) 600 dpi, 1 bit, RLE 250–350
Hi-Res Color-B/W Photo
600 dpi, 1 bit, RLE 300–500
B/W Document MTIFF 300 dpi, 1 bit, G4 60–90
Color Document 150 dpi, 24 bit, uncompressed
~ 6000
Color-B/W Photo 150 dpi, 24 bit, uncompressed
~ 6000
Fine Text (OCR) 600 dpi, 1 bit, G4 80–120
Hi-Res Color-B/W Photo
600 dpi, 1 bit, G4 100–200
HP JetSend device
File format and size are the result of the negotiation between the sender and receiver.
File formats and typical sizes (continued)
Send to Sending quality File format DescriptionTypical file size (KB)
14 Chapter 1 - About the digital sender EN
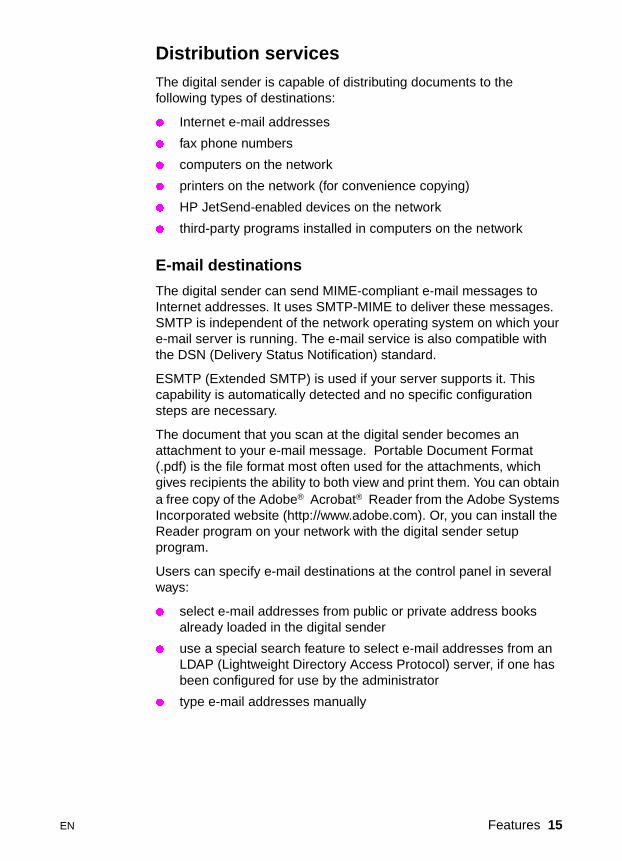
Distribution servicesThe digital sender is capable of distributing documents to the following types of destinations:
� Internet e-mail addresses
� fax phone numbers
� computers on the network
� printers on the network (for convenience copying)
� HP JetSend-enabled devices on the network
� third-party programs installed in computers on the network
E-mail destinations
The digital sender can send MIME-compliant e-mail messages to Internet addresses. It uses SMTP-MIME to deliver these messages. SMTP is independent of the network operating system on which your e-mail server is running. The e-mail service is also compatible with the DSN (Delivery Status Notification) standard.
ESMTP (Extended SMTP) is used if your server supports it. This capability is automatically detected and no specific configuration steps are necessary.
The document that you scan at the digital sender becomes an attachment to your e-mail message. Portable Document Format (.pdf) is the file format most often used for the attachments, which gives recipients the ability to both view and print them. You can obtain a free copy of the Adobe® Acrobat® Reader from the Adobe Systems Incorporated website (http://www.adobe.com). Or, you can install the Reader program on your network with the digital sender setup program.
Users can specify e-mail destinations at the control panel in several ways:
� select e-mail addresses from public or private address books already loaded in the digital sender
� use a special search feature to select e-mail addresses from an LDAP (Lightweight Directory Access Protocol) server, if one has been configured for use by the administrator
� type e-mail addresses manually
EN Features 15
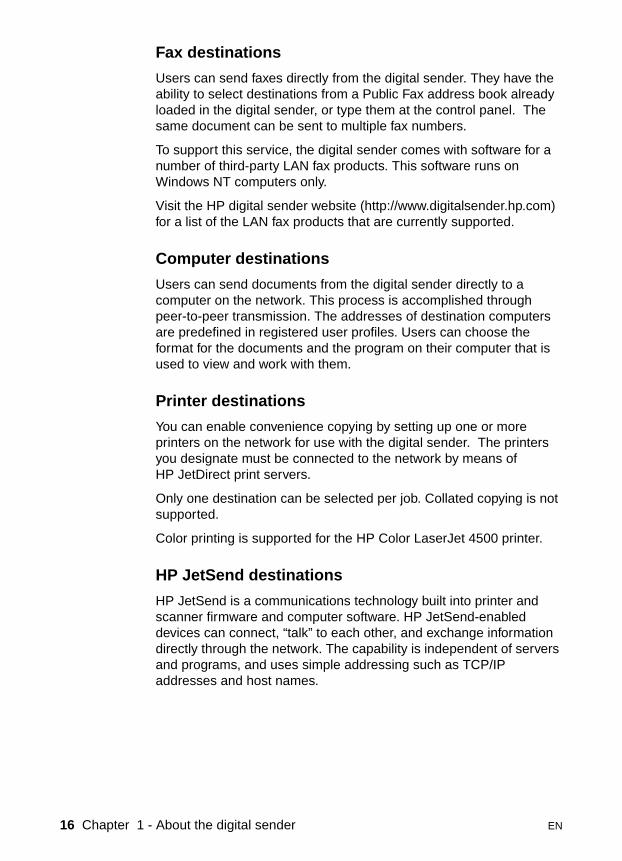
Fax destinations
Users can send faxes directly from the digital sender. They have the ability to select destinations from a Public Fax address book already loaded in the digital sender, or type them at the control panel. The same document can be sent to multiple fax numbers.
To support this service, the digital sender comes with software for a number of third-party LAN fax products. This software runs on Windows NT computers only.
Visit the HP digital sender website (http://www.digitalsender.hp.com) for a list of the LAN fax products that are currently supported.
Computer destinations
Users can send documents from the digital sender directly to a computer on the network. This process is accomplished through peer-to-peer transmission. The addresses of destination computers are predefined in registered user profiles. Users can choose the format for the documents and the program on their computer that is used to view and work with them.
Printer destinations
You can enable convenience copying by setting up one or more printers on the network for use with the digital sender. The printers you designate must be connected to the network by means of HP JetDirect print servers.
Only one destination can be selected per job. Collated copying is not supported.
Color printing is supported for the HP Color LaserJet 4500 printer.
HP JetSend destinations
HP JetSend is a communications technology built into printer and scanner firmware and computer software. HP JetSend-enabled devices can connect, “talk” to each other, and exchange information directly through the network. The capability is independent of servers and programs, and uses simple addressing such as TCP/IP addresses and host names.
16 Chapter 1 - About the digital sender EN
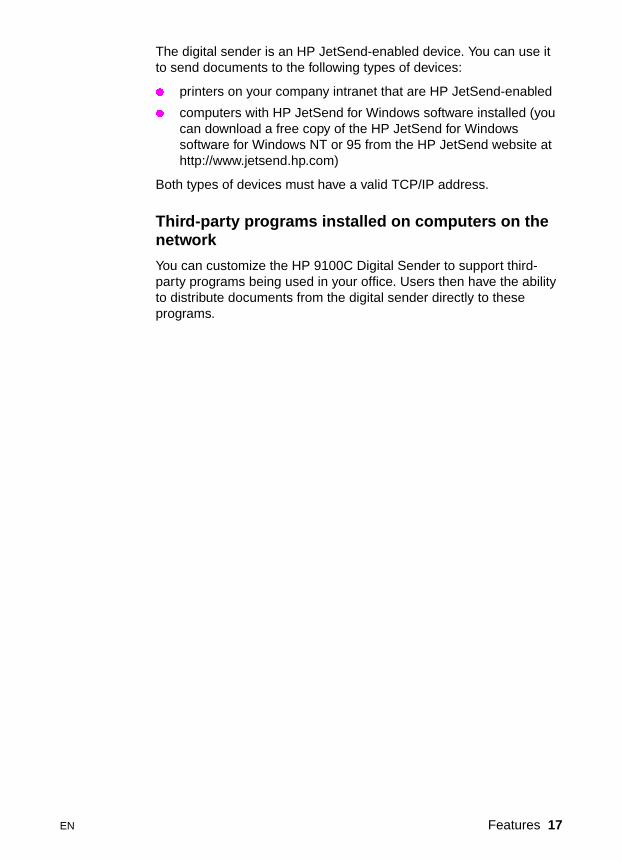
The digital sender is an HP JetSend-enabled device. You can use it to send documents to the following types of devices:
� printers on your company intranet that are HP JetSend-enabled
� computers with HP JetSend for Windows software installed (you can download a free copy of the HP JetSend for Windows software for Windows NT or 95 from the HP JetSend website at http://www.jetsend.hp.com)
Both types of devices must have a valid TCP/IP address.
Third-party programs installed on computers on the network
You can customize the HP 9100C Digital Sender to support third-party programs being used in your office. Users then have the ability to distribute documents from the digital sender directly to these programs.
EN Features 17
SecurityThe HP 9100C Digital Sender operates as a standalone unit on the network. You administer each digital sender independently of any other device on the network under a password that applies only to that digital sender.
The digital sender accepts three types of users:
� registered usersIndividuals who have been set up to use the digital sender by means of a user profile. You must be a registered user to use the HP Address Book Manager. Only registered users have private address books that are accessible at the digital sender.
� guest usersIndividuals who are not registered users and who do not have user profiles. Guest users can use the digital sender and all public address books. However, they cannot see or use private address books, nor can they use the ABM. The administrator can entirely disable guest user access.
� administrator for the digital senderThe individual (referred to as the “administrator” in this guide) who performs administrator activities for the digital sender. Because the digital sender is a standalone unit on the network, these activities can be performed independently of any other network activity. Administrator privileges for the digital sender do not require network privileges. Activities include such things as establishing the level of security for the digital sender and maintaining the public address books. The administrator has access to all private address books, as well as the activity log for each user.
The administrator controls digital sender security in several ways:
� By determining who can use the digital sender (registered users and guest users, or only registered users).
� By requiring passwords. Passwords are available at two levels: administrator and registered users. Both are optional. Passwords control what each type of user can see and do at the digital sender.
� By determining whether new or changed user profiles require administrator validation before they take effect. If validation is required, users do not have access to certain information at the digital sender until their profile has been authorized by the administrator.
18 Chapter 1 - About the digital sender EN
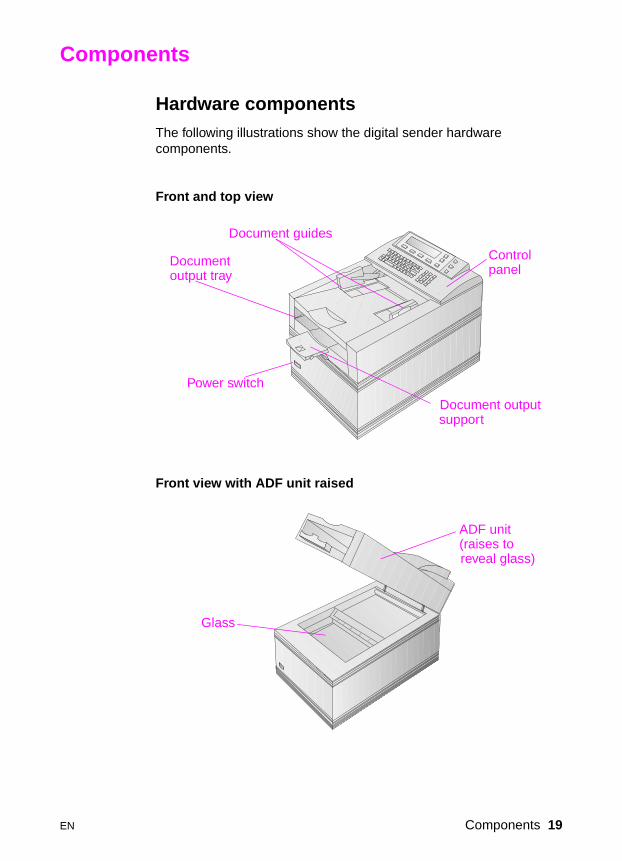
Components
Hardware componentsThe following illustrations show the digital sender hardware components.
Front and top view
Front view with ADF unit raised
1 Control panel
Document output support
Power switch
Document output tray
Document guides
ADF unit (raises to reveal glass)
Glass
EN Components 19
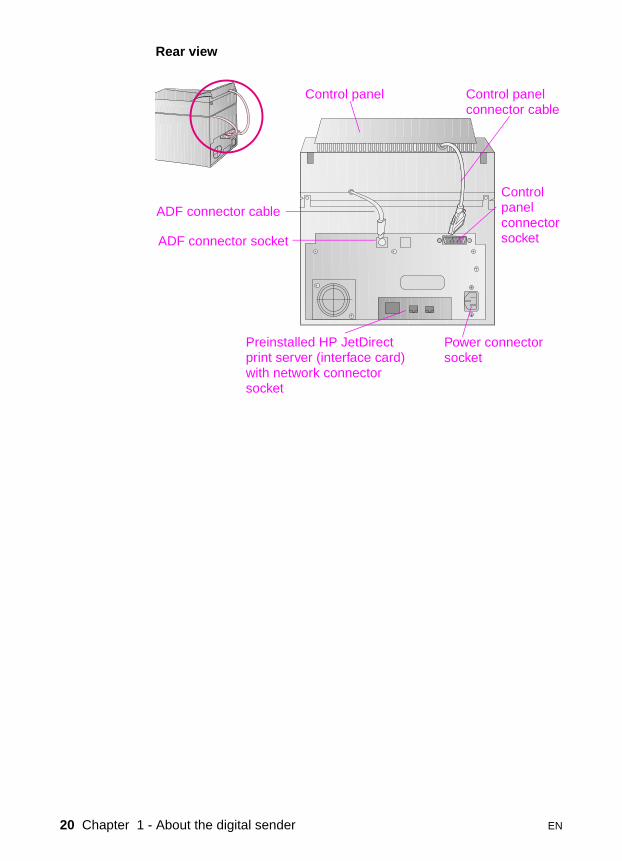
Rear view
ADF connector cable
ADF connector socket
Control panel Control panel connector cable
Power connectorsocket
Preinstalled HP JetDirectprint server (interface card)
Controlpanelconnectorsocket
with network connectorsocket
20 Chapter 1 - About the digital sender EN

Software componentsThe HP 9100C Digital Sender comes with the following software components:
� HP JetAdmin softwareA Windows program that lets you remotely configure, monitor, and control HP network peripherals such as printers, plotters, and scanners. You use it for the digital sender to do the following:
• configure, disable, and enable digital sender distribution services (such as e-mail and fax)
• configure network parameters (such as DNS and WINS name resolution)
• configure security parameters
• monitor the status of the digital sender on the network
• troubleshoot problems
The HP JetAdmin software includes online help.
� HP Address Book Manager (ABM)Used to set up user profiles, as well as public and private address books for sending documents to e-mail or fax destinations directly from the digital sender. Also used to configure printers for use with the digital sender and to customize the control panel. The ABM maintains a log of all digital sender activities, which is useful in monitoring and troubleshooting. The ABM includes online help.
� HP Digital Sender LinkMoves documents from the digital sender to designated folders on the network. Any kind of program can then use the information. The HP Digital Sender Link includes online help.
� HP Digital Sender ServiceSupplied with the digital sender to provide support for LAN fax products and for customizing interfaces with other third-party programs. This software can be installed only on Windows NT computers.
� Online documentationYou can choose to install online versions of the user guide and administrator guide. The Adobe® Acrobat® Reader program can also be installed to view these online documents if it is not already installed on your network or computer.
EN Components 21
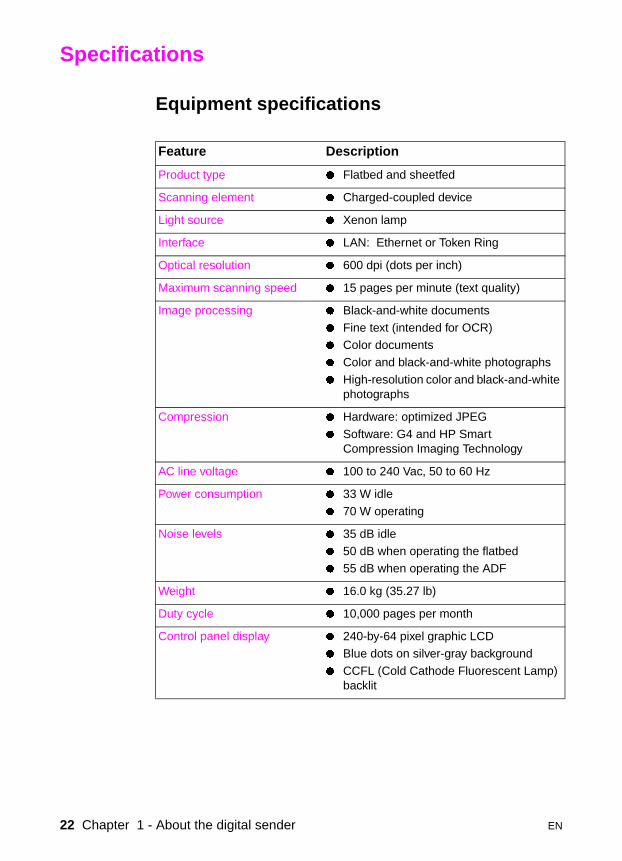
Specifications
Equipment specifications
Feature Description
Product type � Flatbed and sheetfed
Scanning element � Charged-coupled device
Light source � Xenon lamp
Interface � LAN: Ethernet or Token Ring
Optical resolution � 600 dpi (dots per inch)
Maximum scanning speed � 15 pages per minute (text quality)
Image processing � Black-and-white documents
� Fine text (intended for OCR)� Color documents
� Color and black-and-white photographs
� High-resolution color and black-and-white photographs
Compression � Hardware: optimized JPEG
� Software: G4 and HP Smart Compression Imaging Technology
AC line voltage � 100 to 240 Vac, 50 to 60 Hz
Power consumption � 33 W idle
� 70 W operating
Noise levels � 35 dB idle
� 50 dB when operating the flatbed� 55 dB when operating the ADF
Weight � 16.0 kg (35.27 lb)
Duty cycle � 10,000 pages per month
Control panel display � 240-by-64 pixel graphic LCD
� Blue dots on silver-gray background
� CCFL (Cold Cathode Fluorescent Lamp) backlit
22 Chapter 1 - About the digital sender EN
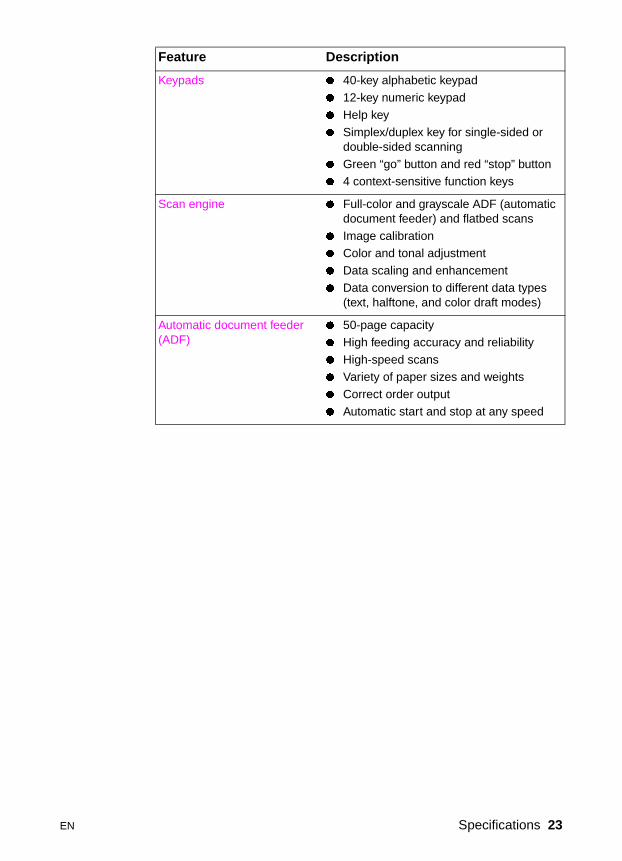
Keypads � 40-key alphabetic keypad
� 12-key numeric keypad
� Help key
� Simplex/duplex key for single-sided or double-sided scanning
� Green “go” button and red “stop” button� 4 context-sensitive function keys
Scan engine � Full-color and grayscale ADF (automatic document feeder) and flatbed scans
� Image calibration� Color and tonal adjustment
� Data scaling and enhancement
� Data conversion to different data types (text, halftone, and color draft modes)
Automatic document feeder (ADF)
� 50-page capacity
� High feeding accuracy and reliability
� High-speed scans� Variety of paper sizes and weights
� Correct order output
� Automatic start and stop at any speed
Feature Description
EN Specifications 23
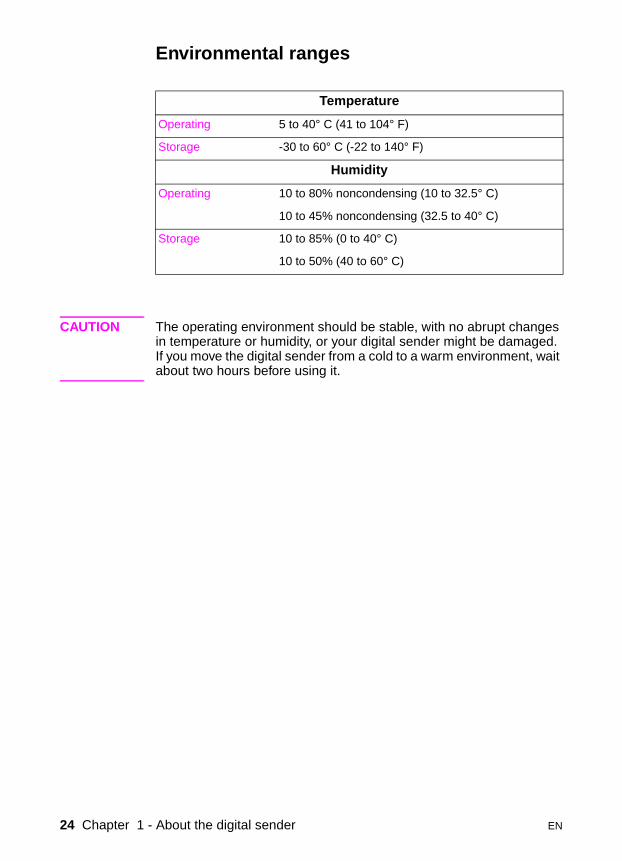
Environmental ranges
CAUTION The operating environment should be stable, with no abrupt changes in temperature or humidity, or your digital sender might be damaged. If you move the digital sender from a cold to a warm environment, wait about two hours before using it.
Temperature
Operating 5 to 40° C (41 to 104° F)
Storage -30 to 60° C (-22 to 140° F)
Humidity
Operating 10 to 80% noncondensing (10 to 32.5° C)
10 to 45% noncondensing (32.5 to 40° C)
Storage 10 to 85% (0 to 40° C)
10 to 50% (40 to 60° C)
24 Chapter 1 - About the digital sender EN
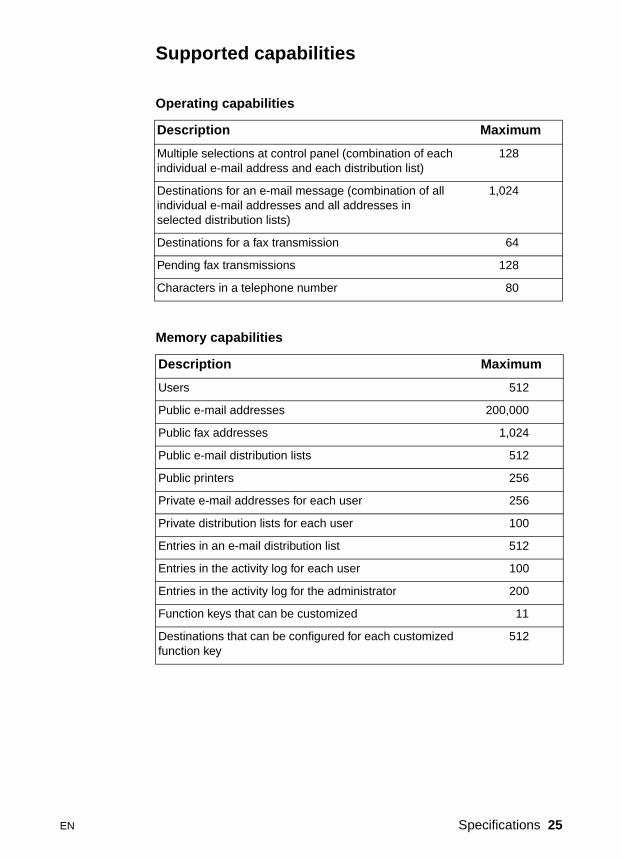
Supported capabilities
Operating capabilities
Description Maximum
Multiple selections at control panel (combination of each individual e-mail address and each distribution list)
128
Destinations for an e-mail message (combination of all individual e-mail addresses and all addresses in selected distribution lists)
1,024
Destinations for a fax transmission 64
Pending fax transmissions 128
Characters in a telephone number 80
Memory capabilities
Description Maximum
Users 512
Public e-mail addresses 200,000
Public fax addresses 1,024
Public e-mail distribution lists 512
Public printers 256
Private e-mail addresses for each user 256
Private distribution lists for each user 100
Entries in an e-mail distribution list 512
Entries in the activity log for each user 100
Entries in the activity log for the administrator 200
Function keys that can be customized 11
Destinations that can be configured for each customized function key
512
EN Specifications 25
German noise declarationGeräuschemission
LpA <70 dBam Arbeitsplatznormaler Betriebnach EN 27779Die Daten sind die Ergebnisse von Typprüfungen.
French EMC regulationNOTE: Réglementation Française - Déclaration d'installation et d'utilisation d'un produit ATI de Classe A.
L'utilisateur d'un appareil de traitement de l'information (ATI) de Classe A suivant la norme de compatibilité électroma- gnétique NFEN 55022, doit être déclaré auprès de la préfecture du département ou l'appareil est installé et utilisé ainsi qu'au Ministère des Telecommunications.
Le formulaire de déclaration a utiliser est disponible auprès des services de la Préfecture.
26 Chapter 1 - About the digital sender EN
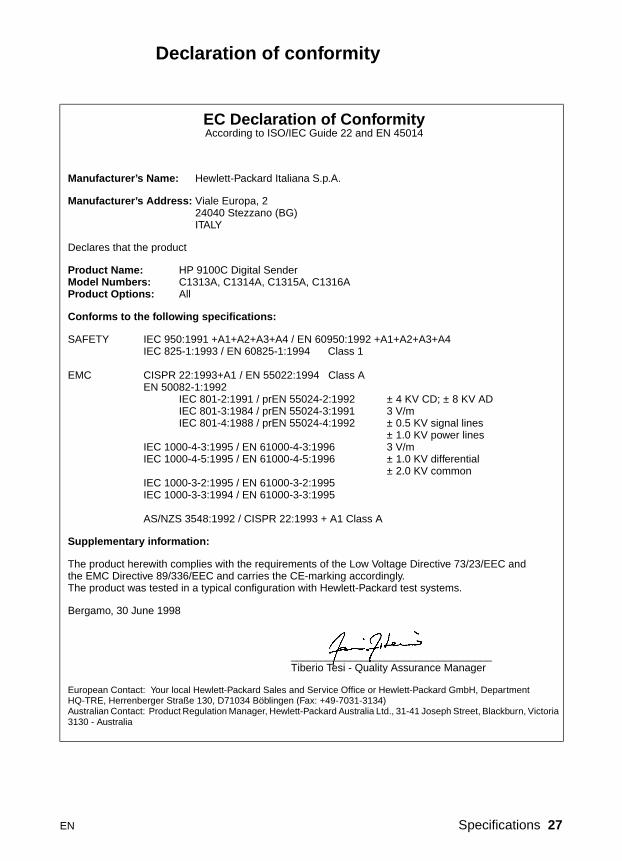
Declaration of conformity
EC Declaration of ConformityAccording to ISO/IEC Guide 22 and EN 45014
Manufacturer’s Name: Hewlett-Packard Italiana S.p.A.
Manufacturer’s Address: Viale Europa, 224040 Stezzano (BG)ITALY
Declares that the product
Product Name: HP 9100C Digital SenderModel Numbers: C1313A, C1314A, C1315A, C1316AProduct Options: All
Conforms to the following specifications:
SAFETY IEC 950:1991 +A1+A2+A3+A4 / EN 60950:1992 +A1+A2+A3+A4IEC 825-1:1993 / EN 60825-1:1994 Class 1
EMC CISPR 22:1993+A1 / EN 55022:1994 Class AEN 50082-1:1992
IEC 801-2:1991 / prEN 55024-2:1992 ± 4 KV CD; ± 8 KV ADIEC 801-3:1984 / prEN 55024-3:1991 3 V/mIEC 801-4:1988 / prEN 55024-4:1992 ± 0.5 KV signal lines
± 1.0 KV power linesIEC 1000-4-3:1995 / EN 61000-4-3:1996 3 V/mIEC 1000-4-5:1995 / EN 61000-4-5:1996 ± 1.0 KV differential
± 2.0 KV commonIEC 1000-3-2:1995 / EN 61000-3-2:1995IEC 1000-3-3:1994 / EN 61000-3-3:1995
AS/NZS 3548:1992 / CISPR 22:1993 + A1 Class A
Supplementary information:
The product herewith complies with the requirements of the Low Voltage Directive 73/23/EEC andthe EMC Directive 89/336/EEC and carries the CE-marking accordingly.The product was tested in a typical configuration with Hewlett-Packard test systems.
Bergamo, 30 June 1998
__________________________________Tiberio Tesi - Quality Assurance Manager
European Contact: Your local Hewlett-Packard Sales and Service Office or Hewlett-Packard GmbH, Department HQ-TRE, Herrenberger Straße 130, D71034 Böblingen (Fax: +49-7031-3134)Australian Contact: Product Regulation Manager, Hewlett-Packard Australia Ltd., 31-41 Joseph Street, Blackburn, Victoria 3130 - Australia
EN Specifications 27

28 Chapter 1 - About the digital sender EN
2 Installing and configuring
Introduction
Installing and configuring the HP 9100C Digital Sender for the first time consists of:
� physically installing the unit
� configuring network and security parameters
� installing the software
� configuring users
� setting up public e-mail and fax destinations
� designating the printers that can be used with the digital sender
Each HP 9100C Digital Sender exists on the network independently of any other digital sender. However, once you have configured one digital sender, you can replicate that configuration for any other digital sender on the same network.
At any time after initial configuration, you can change what you have set up. Depending on what you want to do, you use one of the following methods (explained in chapter 3 on monitoring and maintaining the digital sender).
� digital sender control panel
� HP JetAdmin software
� HP Address Book Manager
� HP Digital Sender Link
Note If your network includes an HP Network ScanJet 5 scanner, see “Coexisting with the HP Network ScanJet 5 scanner” on page 61 for special considerations.
EN Introduction 29
Installation requirements
Environmental requirements� stable environment with no temperature or humidity changes
� room temperature of 5 to 40° C (41 to 104° F)
� relative humidity of 10 to 80% noncondensing
� sturdy, level surface
� well-ventilated room with no exposure to chemicals or direct sunlight
� location free of constant vibrations
Network system requirementsOne of the following operating environments:
� Microsoft Windows 9x
� Windows NT 4.0 or 5.0 (Intel PC) workstation and server
Network:
� Microsoft TCP/IP protocol stack or compatible
� SMTP-MIME e-mail server that can be reached by the digital sender through a dedicated connection (the digital sender does not support dial-up connections)
Administrator:
� Pentium® processor
� Windows 9x: 16 MB of RAM minimum, 32 MB recommendedWindows NT: 32 MB of RAM minimum, 64 MB recommended
� 25 MB of hard disk space
� VGA monitor
Client system requirements� Windows 9x, or Windows NT 4.0 or 5.0 (Intel PC) workstation and
server
� Pentium processor
� Windows 9x: 16 MB of RAM minimum, 32 MB recommendedWindows NT: 32 MB of RAM minimum, 64 MB recommended
� 41 MB of hard disk space
� VGA monitor
30 Chapter 2 - Installing and configuring EN
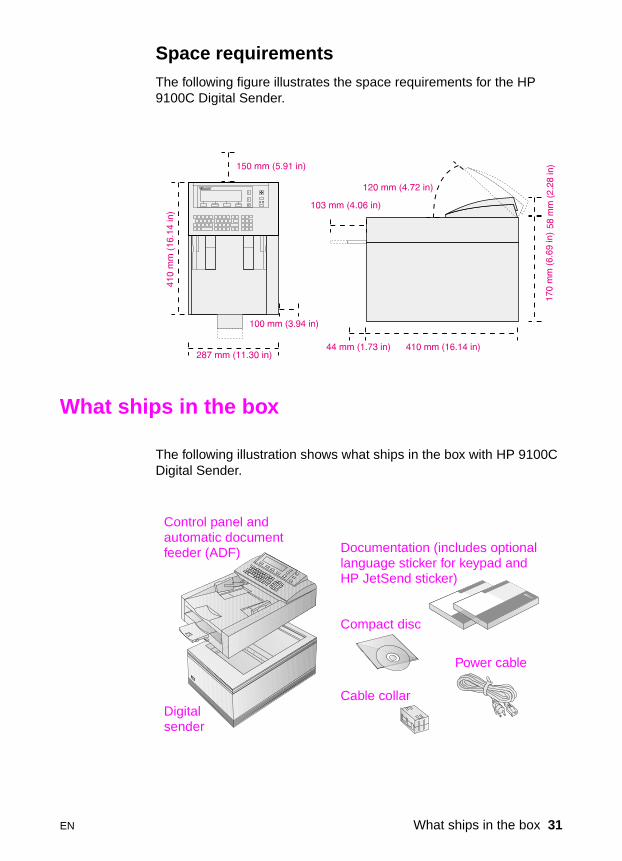
Space requirementsThe following figure illustrates the space requirements for the HP 9100C Digital Sender.
What ships in the box
The following illustration shows what ships in the box with HP 9100C Digital Sender.
Control panel andautomatic document feeder (ADF)
Digitalsender
Compact disc
Power cable
Documentation (includes optionallanguage sticker for keypad andHP JetSend sticker)
Cable collar
EN What ships in the box 31
The configuration process
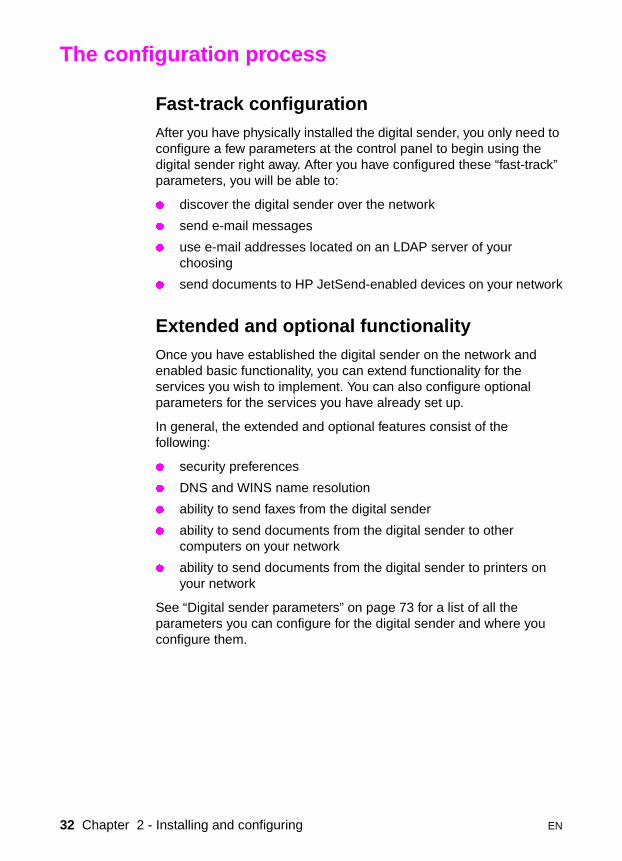
Fast-track configurationAfter you have physically installed the digital sender, you only need to configure a few parameters at the control panel to begin using the digital sender right away. After you have configured these “fast-track” parameters, you will be able to:
� discover the digital sender over the network
� send e-mail messages
� use e-mail addresses located on an LDAP server of your choosing
� send documents to HP JetSend-enabled devices on your network
Extended and optional functionalityOnce you have established the digital sender on the network and enabled basic functionality, you can extend functionality for the services you wish to implement. You can also configure optional parameters for the services you have already set up.
In general, the extended and optional features consist of the following:
� security preferences
� DNS and WINS name resolution
� ability to send faxes from the digital sender
� ability to send documents from the digital sender to other computers on your network
� ability to send documents from the digital sender to printers on your network
See “Digital sender parameters” on page 73 for a list of all the parameters you can configure for the digital sender and where you configure them.
32 Chapter 2 - Installing and configuring EN
Assigning an IP address to the digital senderThe easiest and recommended method for assigning an IP address to the digital sender is by entering it directly at the control panel. Several alternate methods exist:
� assign using the HP JetAdmin softwareYou can use the HP JetAdmin software at your computer to assign or change the IP address for the digital sender.
� assign using a DHCP or BOOTP serverYou might be more familiar with assigning IP addresses to network devices from a DHCP or BOOTP server. In this scenario, you prepare the device attached to the network, make an entry for it on the DHCP or BOOTP server, and then turn the device on. The HP JetDirect print server inside the HP 9100C Digital Sender picks up its IP information from the DHCP or BOOTP server.
Note You can let the digital sender time out to a default IP address. In fact, this happens automatically if you do not manually assign an IP address at the control panel within the timeout period of 2 minutes.
The default IP address is not a valid address. You must change the address to one of your own assignment. You can use the control panel or the HP JetAdmin software to do this at any time.
Preparing for configurationBefore you start configuring the HP 9100C Digital Sender for the first time, take a few minutes to prepare so that you can complete the steps without interruption. Use the checklist on the following page.
EN The configuration process 33
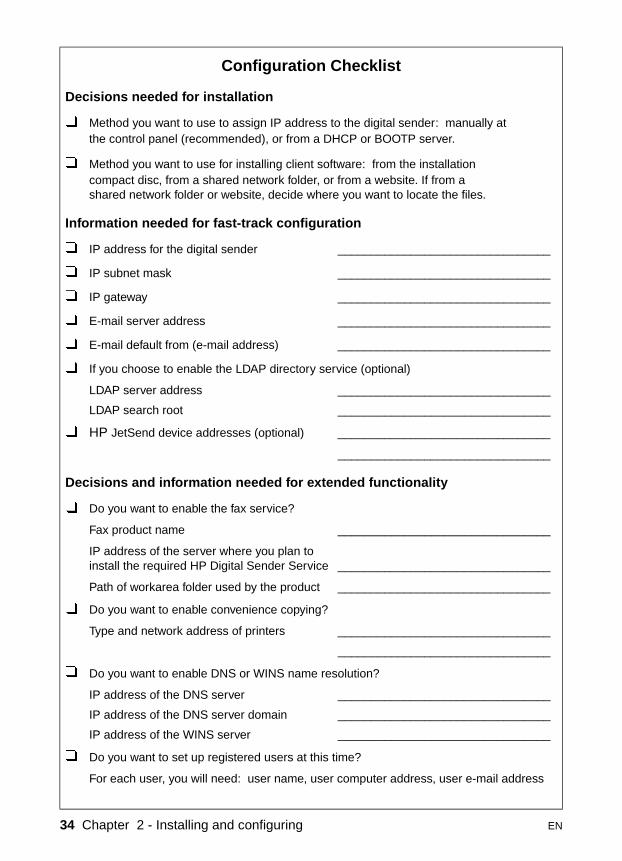
Configuration Checklist
Decisions needed for installation
� Method you want to use to assign IP address to the digital sender: manually atthe control panel (recommended), or from a DHCP or BOOTP server.
� Method you want to use for installing client software: from the installationcompact disc, from a shared network folder, or from a website. If from a shared network folder or website, decide where you want to locate the files.
Information needed for fast-track configuration
� IP address for the digital sender ________________________________
� IP subnet mask ________________________________
� IP gateway ________________________________
� E-mail server address ________________________________
� E-mail default from (e-mail address) ________________________________
� If you choose to enable the LDAP directory service (optional)
LDAP server address ________________________________
LDAP search root ________________________________
� HP JetSend device addresses (optional) ________________________________
________________________________
Decisions and information needed for extended functionality
� Do you want to enable the fax service?
Fax product name ________________________________
IP address of the server where you plan toinstall the required HP Digital Sender Service ________________________________
Path of workarea folder used by the product ________________________________
� Do you want to enable convenience copying?
Type and network address of printers ________________________________
________________________________
� Do you want to enable DNS or WINS name resolution?
IP address of the DNS server ________________________________
IP address of the DNS server domain ________________________________
IP address of the WINS server ________________________________
� Do you want to set up registered users at this time?
For each user, you will need: user name, user computer address, user e-mail address
34 Chapter 2 - Installing and configuring EN
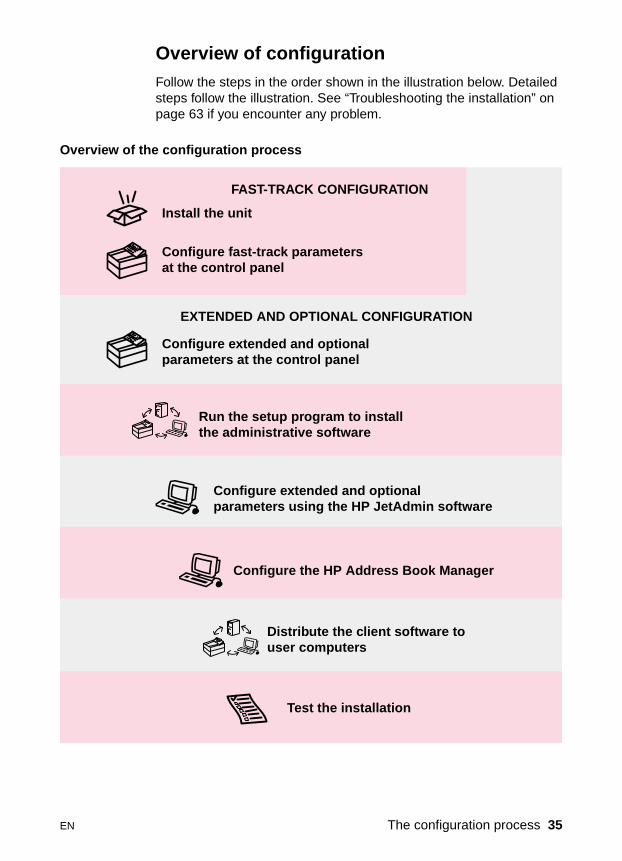
Overview of configurationFollow the steps in the order shown in the illustration below. Detailed steps follow the illustration. See “Troubleshooting the installation” on page 63 if you encounter any problem.
Overview of the configuration process
FAST-TRACK CONFIGURATION
EXTENDED AND OPTIONAL CONFIGURATION
Configure fast-track parametersat the control panel
Configure extended and optionalparameters at the control panel
Run the setup program to installthe administrative software
Configure extended and optionalparameters using the HP JetAdmin software
Configure the HP Address Book Manager
Test the installation
Distribute the client software touser computers
Install the unit
EN The configuration process 35
Fast-track configuration steps
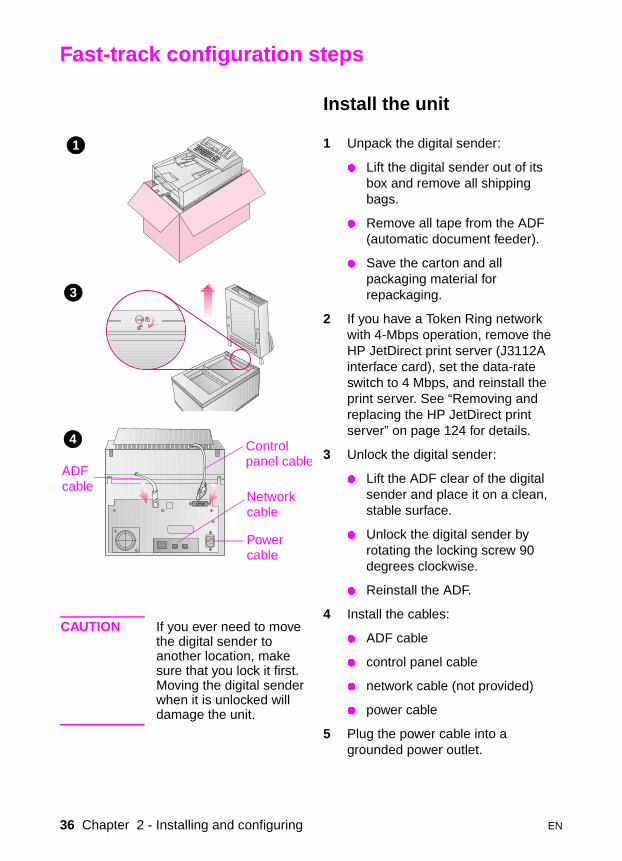
Install the unit
1 Unpack the digital sender:
� Lift the digital sender out of its box and remove all shipping bags.
� Remove all tape from the ADF (automatic document feeder).
� Save the carton and all packaging material for repackaging.
2 If you have a Token Ring network with 4-Mbps operation, remove the HP JetDirect print server (J3112A interface card), set the data-rate switch to 4 Mbps, and reinstall the print server. See “Removing and replacing the HP JetDirect print server” on page 124 for details.
3 Unlock the digital sender:
� Lift the ADF clear of the digital sender and place it on a clean, stable surface.
� Unlock the digital sender by rotating the locking screw 90 degrees clockwise.
� Reinstall the ADF.
4 Install the cables:
� ADF cable
� control panel cable
� network cable (not provided)
� power cable
5 Plug the power cable into a grounded power outlet.
1
3
4
ADFcable
Controlpanel cable
Networkcable
Powercable
CAUTION If you ever need to move the digital sender to another location, make sure that you lock it first. Moving the digital sender when it is unlocked will damage the unit.
36 Chapter 2 - Installing and configuring EN
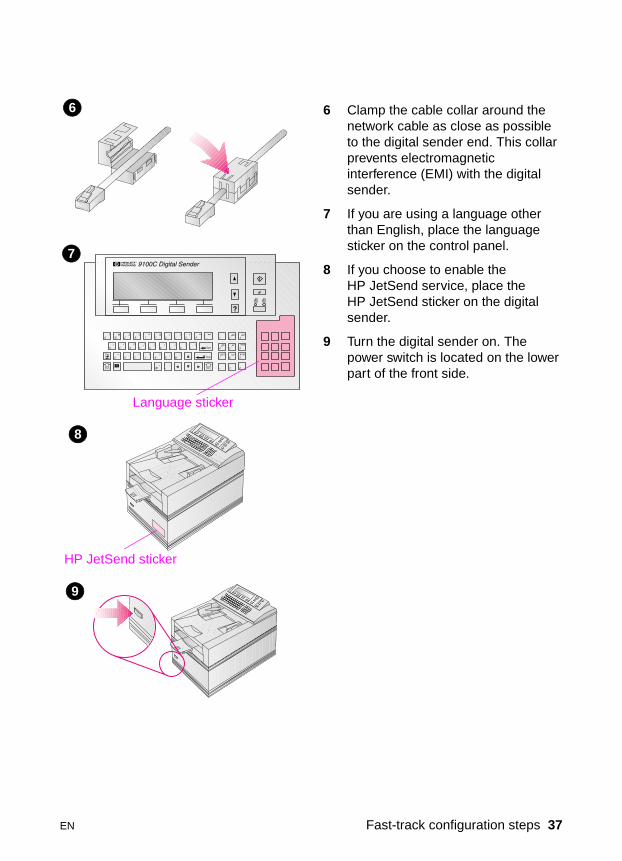
6 Clamp the cable collar around the network cable as close as possible to the digital sender end. This collar prevents electromagnetic interference (EMI) with the digital sender.
7 If you are using a language other than English, place the language sticker on the control panel.
8 If you choose to enable the HP JetSend service, place the HP JetSend sticker on the digital sender.
9 Turn the digital sender on. The power switch is located on the lower part of the front side.
9
7
6
Language sticker
8
HP JetSend sticker
EN Fast-track configuration steps 37
Configure fast-track parameters at the control panel
After you have physically installed the digital sender, you only need to configure a few parameters at the control panel to begin using the digital sender right away. After you have configured these “fast-track” parameters, you will be able to send e-mail messages, use e-mail addresses located on an LDAP server of your choosing, and send documents to HP JetSend-enabled devices on your network. The “fast-track” parameters consist of the following (see “Configuration menu parameters” on page 80 for more detailed explanations):
� IP configuration (to specify how the digital sender is to receive its TCP/IP configuration—manually or from a DHCP or BOOTP server)
� IP Address (of the digital sender)
� IP Subnet Mask (if you use subnets)
� IP Gateway (IP address of the gateway server used to send packets off the local network)
� E-mail Server Addr. (IP address of the SMTP-MIME e-mail server)
� E-mail Default From (default e-mail address for the FROM field of e-mail messages from the digital sender)
� Administrator Password (recommended—not required)
� LDAP Server Address (IP address of the server that hosts the LDAP server—not required)
� LDAP Search Root (basepoint from which to start searches for names on the LDAP server—required if you configure an LDAP server address)
� JetSend (either enabled or disabled—not required)
38 Chapter 2 - Installing and configuring EN
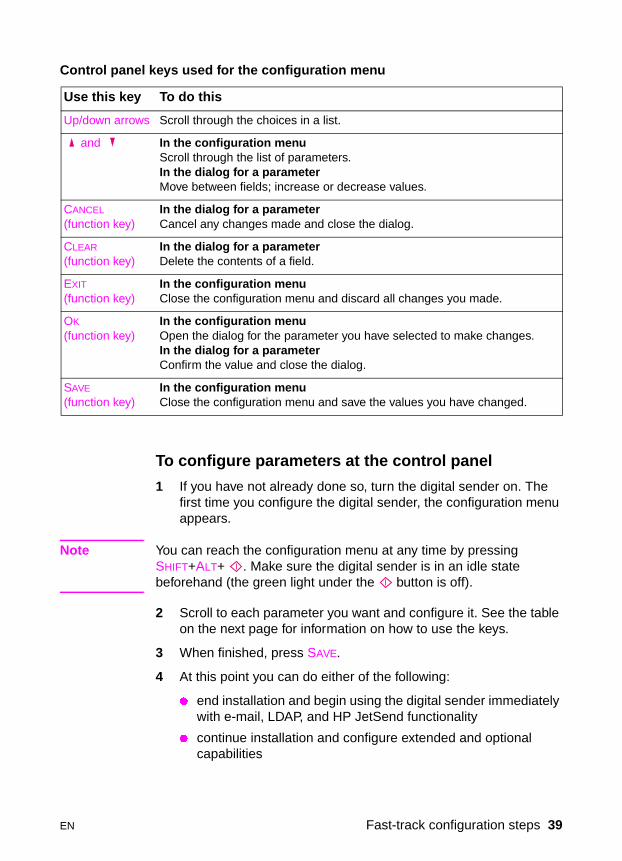
To configure parameters at the control panel
1 If you have not already done so, turn the digital sender on. The first time you configure the digital sender, the configuration menu appears.
Note You can reach the configuration menu at any time by pressing SHIFT+ALT+ . Make sure the digital sender is in an idle state beforehand (the green light under the button is off).
2 Scroll to each parameter you want and configure it. See the table on the next page for information on how to use the keys.
3 When finished, press SAVE.
4 At this point you can do either of the following:
� end installation and begin using the digital sender immediately with e-mail, LDAP, and HP JetSend functionality
� continue installation and configure extended and optional capabilities
Control panel keys used for the configuration menu
Use this key To do this
Up/down arrows Scroll through the choices in a list.
and In the configuration menuScroll through the list of parameters.In the dialog for a parameterMove between fields; increase or decrease values.
CANCEL
(function key)In the dialog for a parameterCancel any changes made and close the dialog.
CLEAR
(function key)In the dialog for a parameterDelete the contents of a field.
EXIT
(function key)In the configuration menuClose the configuration menu and discard all changes you made.
OK
(function key)In the configuration menuOpen the dialog for the parameter you have selected to make changes.In the dialog for a parameterConfirm the value and close the dialog.
SAVE
(function key)In the configuration menuClose the configuration menu and save the values you have changed.
EN Fast-track configuration steps 39
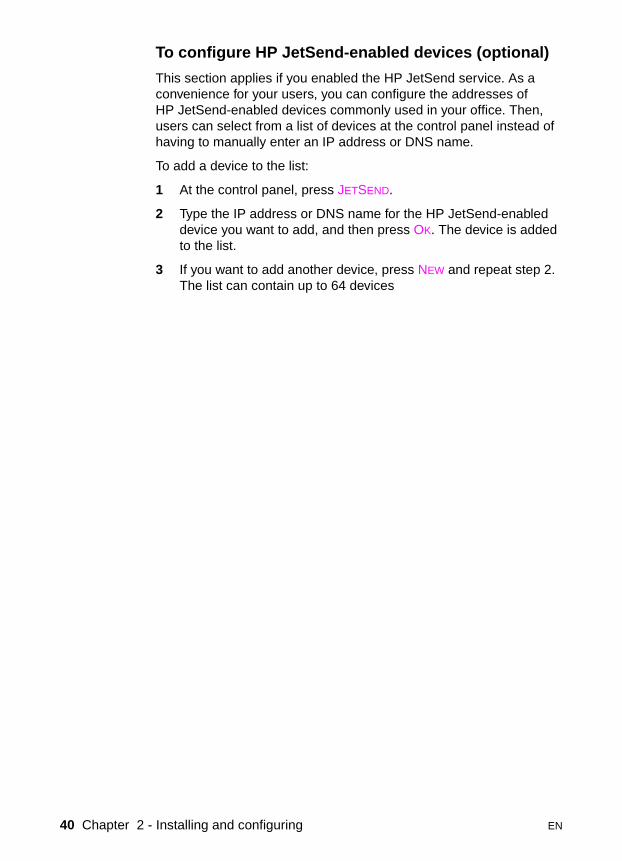
To configure HP JetSend-enabled devices (optional)
This section applies if you enabled the HP JetSend service. As a convenience for your users, you can configure the addresses of HP JetSend-enabled devices commonly used in your office. Then, users can select from a list of devices at the control panel instead of having to manually enter an IP address or DNS name.
To add a device to the list:
1 At the control panel, press JETSEND.
2 Type the IP address or DNS name for the HP JetSend-enabled device you want to add, and then press OK. The device is added to the list.
3 If you want to add another device, press NEW and repeat step 2. The list can contain up to 64 devices
40 Chapter 2 - Installing and configuring EN
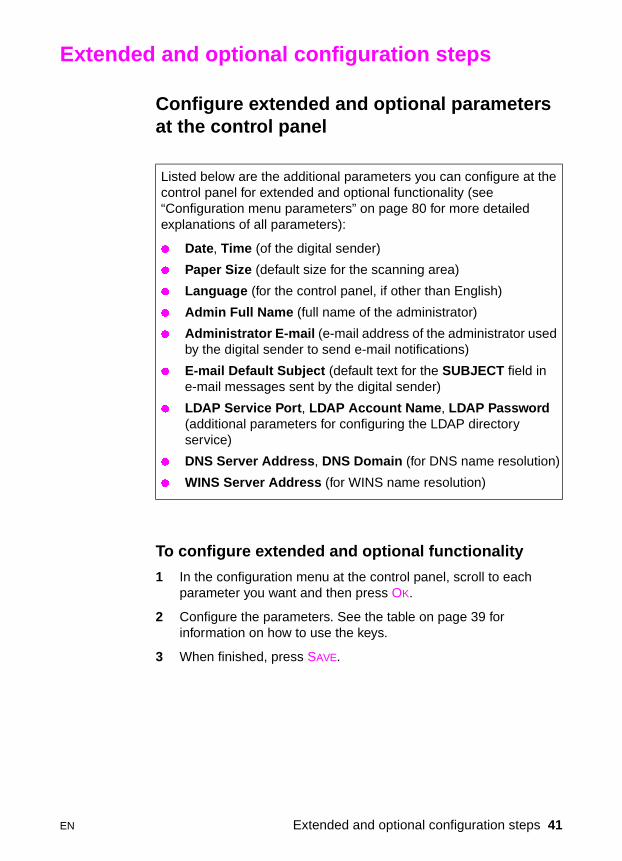
Extended and optional configuration steps
Configure extended and optional parameters at the control panel
To configure extended and optional functionality
1 In the configuration menu at the control panel, scroll to each parameter you want and then press OK.
2 Configure the parameters. See the table on page 39 for information on how to use the keys.
3 When finished, press SAVE.
Listed below are the additional parameters you can configure at the control panel for extended and optional functionality (see “Configuration menu parameters” on page 80 for more detailed explanations of all parameters):
� Date, Time (of the digital sender)
� Paper Size (default size for the scanning area)
� Language (for the control panel, if other than English)
� Admin Full Name (full name of the administrator)
� Administrator E-mail (e-mail address of the administrator used by the digital sender to send e-mail notifications)
� E-mail Default Subject (default text for the SUBJECT field in e-mail messages sent by the digital sender)
� LDAP Service Port, LDAP Account Name, LDAP Password (additional parameters for configuring the LDAP directory service)
� DNS Server Address, DNS Domain (for DNS name resolution)
� WINS Server Address (for WINS name resolution)
EN Extended and optional configuration steps 41
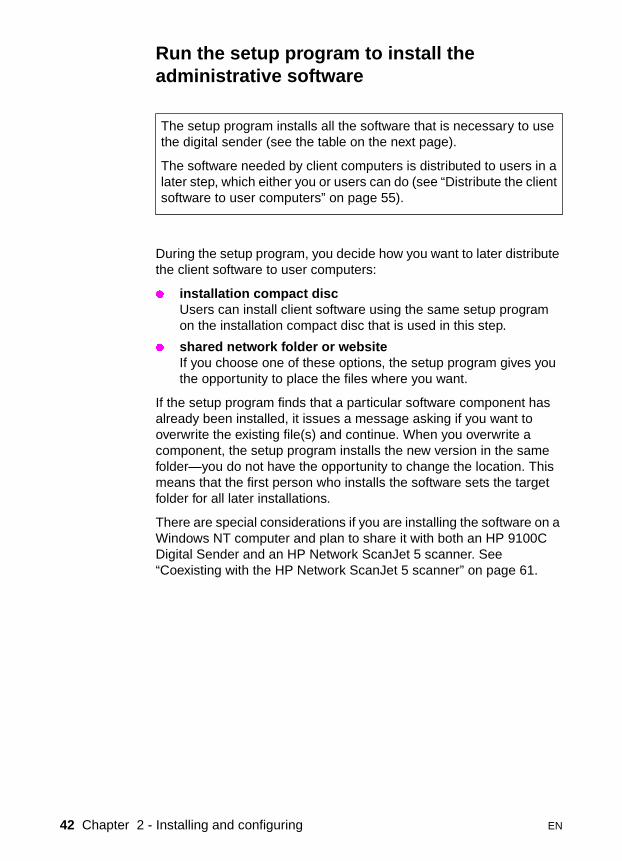
Run the setup program to install the administrative software
During the setup program, you decide how you want to later distribute the client software to user computers:
� installation compact discUsers can install client software using the same setup program on the installation compact disc that is used in this step.
� shared network folder or websiteIf you choose one of these options, the setup program gives you the opportunity to place the files where you want.
If the setup program finds that a particular software component has already been installed, it issues a message asking if you want to overwrite the existing file(s) and continue. When you overwrite a component, the setup program installs the new version in the same folder—you do not have the opportunity to change the location. This means that the first person who installs the software sets the target folder for all later installations.
There are special considerations if you are installing the software on a Windows NT computer and plan to share it with both an HP 9100C Digital Sender and an HP Network ScanJet 5 scanner. See “Coexisting with the HP Network ScanJet 5 scanner” on page 61.
The setup program installs all the software that is necessary to use the digital sender (see the table on the next page).
The software needed by client computers is distributed to users in a later step, which either you or users can do (see “Distribute the client software to user computers” on page 55).
42 Chapter 2 - Installing and configuring EN
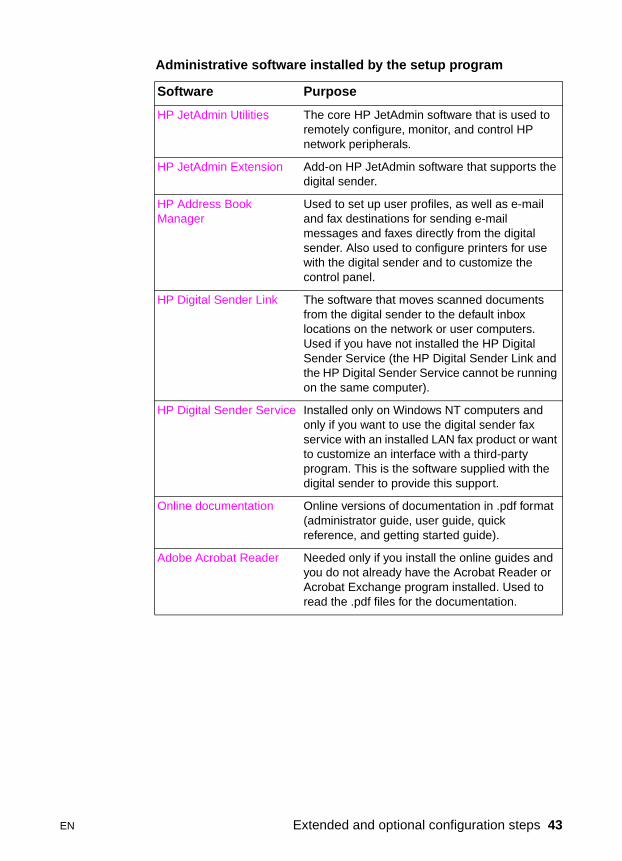
Administrative software installed by the setup program
Software Purpose
HP JetAdmin Utilities The core HP JetAdmin software that is used to remotely configure, monitor, and control HP network peripherals.
HP JetAdmin Extension Add-on HP JetAdmin software that supports the digital sender.
HP Address Book Manager
Used to set up user profiles, as well as e-mail and fax destinations for sending e-mail messages and faxes directly from the digital sender. Also used to configure printers for use with the digital sender and to customize the control panel.
HP Digital Sender Link The software that moves scanned documents from the digital sender to the default inbox locations on the network or user computers. Used if you have not installed the HP Digital Sender Service (the HP Digital Sender Link and the HP Digital Sender Service cannot be running on the same computer).
HP Digital Sender Service Installed only on Windows NT computers and only if you want to use the digital sender fax service with an installed LAN fax product or want to customize an interface with a third-party program. This is the software supplied with the digital sender to provide this support.
Online documentation Online versions of documentation in .pdf format (administrator guide, user guide, quick reference, and getting started guide).
Adobe Acrobat Reader Needed only if you install the online guides and you do not already have the Acrobat Reader or Acrobat Exchange program installed. Used to read the .pdf files for the documentation.
EN Extended and optional configuration steps 43
To run the setup program
1 Turn your computer on. If the computer is already on, close any programs that are running.
2 Insert the installation compact disc into the CD-ROM drive. The setup program starts automatically with a welcome page.
3 Click Next on the welcome page, and then follow the instructions on the screens that follow.
Notes about the choices:
� We recommend that you choose Before Installing before starting the install.
� You can change the language of the setup program using the choices for Setup Language.
� For this installation, choose HP Digital Sender Administrator and then Administrator Software.
� Choose HP Digital Sender Service only if you are installing on a Windows NT computer and want to use the digital sender fax service with an installed LAN fax product.
� The HP JetAdmin software has two parts: Utilities and Extension. Be sure to select both.
� Select Client Software Distribution if you plan to distribute the digital sender software to client computers from the network (a later step, described under “Distribute the client software to user computers” on page 55). During the install, you are asked where on the network you want to place the client software.
4 Be sure to register the digital sender when the registration window appears. (However, you can register the digital sender at any time later by double-clicking the registration icon in the HP 9100C program group.)
5 When the installation is complete, restart the computer.
44 Chapter 2 - Installing and configuring EN
Configure extended and optional parameters using the HP JetAdmin software
There are two ways to navigate through the configuration pages in the HP JetAdmin software.
� interview modeTakes you through the configuration pages one at a time, asking for information in a fixed order. You move to the next question by pressing Next and move back to previous questions by pressing Back. Everything takes effect at once when you click Finish at the end of the interview mode session.
� expert modeDisplays the Configuration window with tabs for all the configuration pages. You select the page you want and fill in the information. You can move between pages at will. Information takes effect whenever you click OK at the bottom of the window.
When the HP JetAdmin software is first installed, the interview mode is active by default. You can change the mode at any time using the steps below.
Using the configuration pages in the HP JetAdmin software that you installed in the previous step, configure any of the information listed below. Note that you might already have configured some of the parameters at the control panel. See “Configuration menu parameters” on page 80 for more detailed explanations of all parameters.
� digital sender description (General page)
� TCP/IP information—if you have not configured this information at the control panel (TCP/IP page)
� Domain Name Service (DNS) and Windows Internet Name Services (WINS) parameters (DNS/WINS page)
� security preferences (Security page)
� e-mail service parameters (E-mail page)
� fax service parameters (Fax page)
� LDAP directory service parameters (LDAP page)
EN Extended and optional configuration steps 45
To change configuration mode
1 Start the HP JetAdmin software. The main window appears.
2 Click the Options menu and note the Interview Mode check box. Interview mode is enabled when a check mark appears in the check box.
3 To change to expert mode, clear the Interview Mode check box.
To select the digital sender you want to configure
1 Start the HP JetAdmin software. The main window appears. The digital sender should be listed in the device list with the IP address you assigned (or a symbolic name, if applicable).
2 In the device list, click the digital sender you want to configure.
3 On the Device menu, click Modify.
Note If you do not see the digital sender in the device list, on the Device menu, click Find. In the Find a device dialog box, type the IP address you assigned and click Find.
Use a different method if the digital sender has been assigned a default IP address. First, at the control panel, display the self-test page by pressing SHIFT+ALT+ . Find the MAC address in the list of parameters. Then, in the HP JetAdmin software, click Device and then New to get the list of unconfigured devices. You should be able to identify the digital sender by the MAC address. Select the device and then click Configure. You can then assign IP information.
To move through the configuration pages
You move differently through information, depending on mode:
Interview mode: Click Next to move to the next question,click Back to move to previous questions.Click Finish at the end of all questions to commit the information you have entered.
Expert mode: Click the tab for the configuration page youwant. Click OK at the bottom of the Configuration window at any time to committhe information you have entered so far.
46 Chapter 2 - Installing and configuring EN
1 General page.
� Optional. Type a Description if one is missing, or change the existing description. The description might include such information as type of device and location.
2 TCP/IP page. Used to configure TCP/IP information if you have not already done so at the control panel.
� Choose the method by which the digital sender receives its TCP/IP configuration (manual, DHCP, or BOOTP).
� If you choose manual, type the required information in the TCP/IP Address, Subnet Mask, and Default Gateway fields.
3 DNS/WINS page. The digital sender uses DNS and WINS to resolve symbolic network names into IP addresses. This feature must be used if you identify e-mail and fax servers, printers, and computer names by network name instead of by IP address.
� Enable the name resolution you want. You can select both Enable Domain Name System (DNS) and Enable Windows Internet Naming Service (WINS) at the same time. When you enable both, the digital sender attempts to resolve network names using WINS first, and then DNS.
� For DNS. Type the Default search domain. In the DNS Server Search Order field, you can specify up to five DNS servers for use in resolving DNS names. At least one DNS server is required if you enable DNS. Enter each as an IP address. To resolve network names, the digital sender contacts DNS servers in the order you specify in the list.
The digital sender uses the Default search domain to build fully qualified network names. For example, if the default search domain is “hp.com” and you specify the e-mail server as “email_gw,” the digital sender tries to contact the computer identified by the fully qualified network name “email_gw.hp.com.” Usually the default search domain corresponds to the network domain where the digital sender is installed. If you do not specify a default, all the network names used by the digital sender must be fully qualified ones. Otherwise, they cannot be resolved.
� For WINS. Type an IP address for the Primary WINS Server (required when WINS is enabled) and a Secondary WINS Server (optional).
EN Extended and optional configuration steps 47
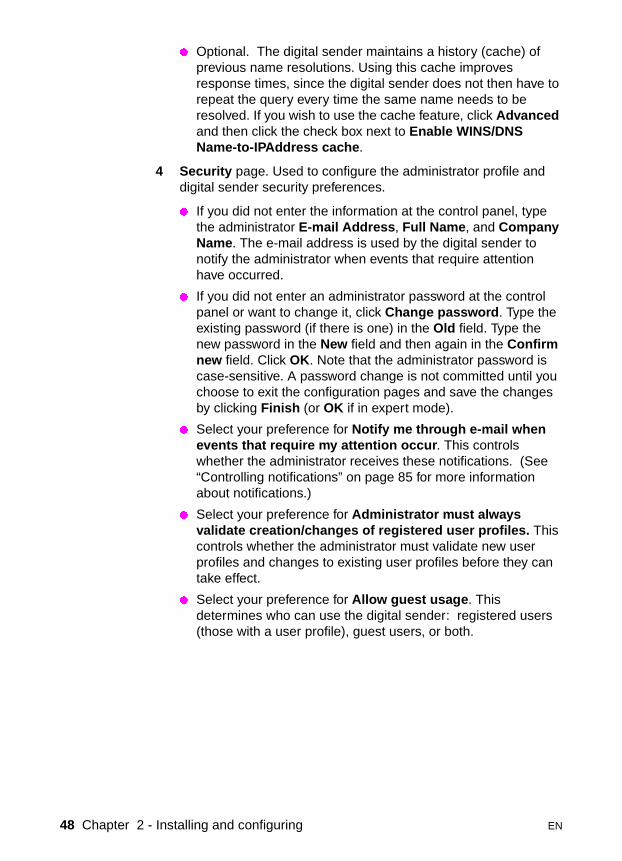
� Optional. The digital sender maintains a history (cache) of previous name resolutions. Using this cache improves response times, since the digital sender does not then have to repeat the query every time the same name needs to be resolved. If you wish to use the cache feature, click Advanced and then click the check box next to Enable WINS/DNS Name-to-IPAddress cache.
4 Security page. Used to configure the administrator profile and digital sender security preferences.
� If you did not enter the information at the control panel, type the administrator E-mail Address, Full Name, and Company Name. The e-mail address is used by the digital sender to notify the administrator when events that require attention have occurred.
� If you did not enter an administrator password at the control panel or want to change it, click Change password. Type the existing password (if there is one) in the Old field. Type the new password in the New field and then again in the Confirm new field. Click OK. Note that the administrator password is case-sensitive. A password change is not committed until you choose to exit the configuration pages and save the changes by clicking Finish (or OK if in expert mode).
� Select your preference for Notify me through e-mail when events that require my attention occur. This controls whether the administrator receives these notifications. (See “Controlling notifications” on page 85 for more information about notifications.)
� Select your preference for Administrator must always validate creation/changes of registered user profiles. This controls whether the administrator must validate new user profiles and changes to existing user profiles before they can take effect.
� Select your preference for Allow guest usage. This determines who can use the digital sender: registered users (those with a user profile), guest users, or both.
48 Chapter 2 - Installing and configuring EN
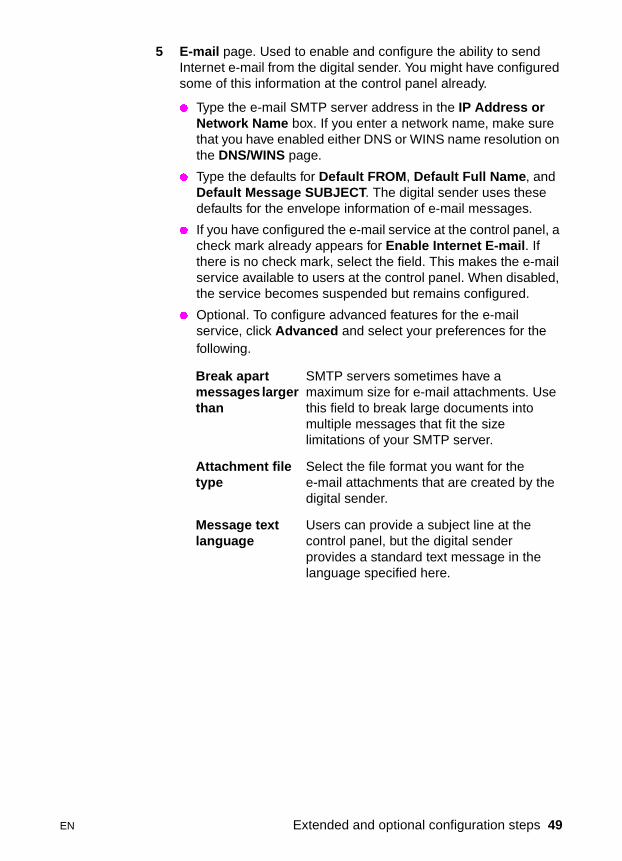
5 E-mail page. Used to enable and configure the ability to send Internet e-mail from the digital sender. You might have configured some of this information at the control panel already.
� Type the e-mail SMTP server address in the IP Address or Network Name box. If you enter a network name, make sure that you have enabled either DNS or WINS name resolution on the DNS/WINS page.
� Type the defaults for Default FROM, Default Full Name, and Default Message SUBJECT. The digital sender uses these defaults for the envelope information of e-mail messages.
� If you have configured the e-mail service at the control panel, a check mark already appears for Enable Internet E-mail. If there is no check mark, select the field. This makes the e-mail service available to users at the control panel. When disabled, the service becomes suspended but remains configured.
� Optional. To configure advanced features for the e-mail service, click Advanced and select your preferences for the following.
Break apart messages larger than
SMTP servers sometimes have a maximum size for e-mail attachments. Use this field to break large documents into multiple messages that fit the size limitations of your SMTP server.
Attachment file type
Select the file format you want for the e-mail attachments that are created by the digital sender.
Message text language
Users can provide a subject line at the control panel, but the digital sender provides a standard text message in the language specified here.
EN Extended and optional configuration steps 49
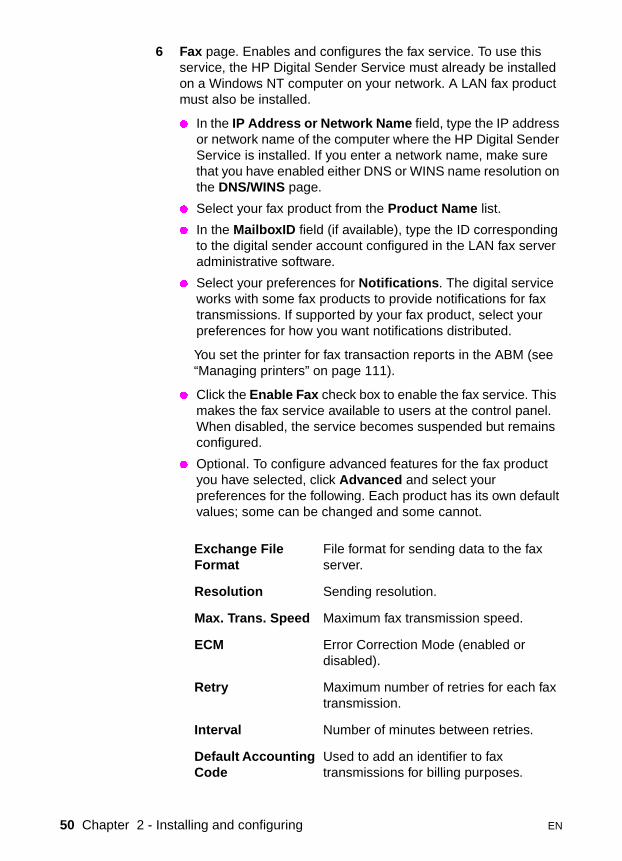
6 Fax page. Enables and configures the fax service. To use this service, the HP Digital Sender Service must already be installed on a Windows NT computer on your network. A LAN fax product must also be installed.
� In the IP Address or Network Name field, type the IP address or network name of the computer where the HP Digital Sender Service is installed. If you enter a network name, make sure that you have enabled either DNS or WINS name resolution on the DNS/WINS page.
� Select your fax product from the Product Name list.
� In the MailboxID field (if available), type the ID corresponding to the digital sender account configured in the LAN fax server administrative software.
� Select your preferences for Notifications. The digital service works with some fax products to provide notifications for fax transmissions. If supported by your fax product, select your preferences for how you want notifications distributed.
You set the printer for fax transaction reports in the ABM (see “Managing printers” on page 111).
� Click the Enable Fax check box to enable the fax service. This makes the fax service available to users at the control panel. When disabled, the service becomes suspended but remains configured.
� Optional. To configure advanced features for the fax product you have selected, click Advanced and select your preferences for the following. Each product has its own default values; some can be changed and some cannot.
Exchange File Format
File format for sending data to the fax server.
Resolution Sending resolution.
Max. Trans. Speed Maximum fax transmission speed.
ECM Error Correction Mode (enabled or disabled).
Retry Maximum number of retries for each fax transmission.
Interval Number of minutes between retries.
Default Accounting Code
Used to add an identifier to fax transmissions for billing purposes.
50 Chapter 2 - Installing and configuring EN
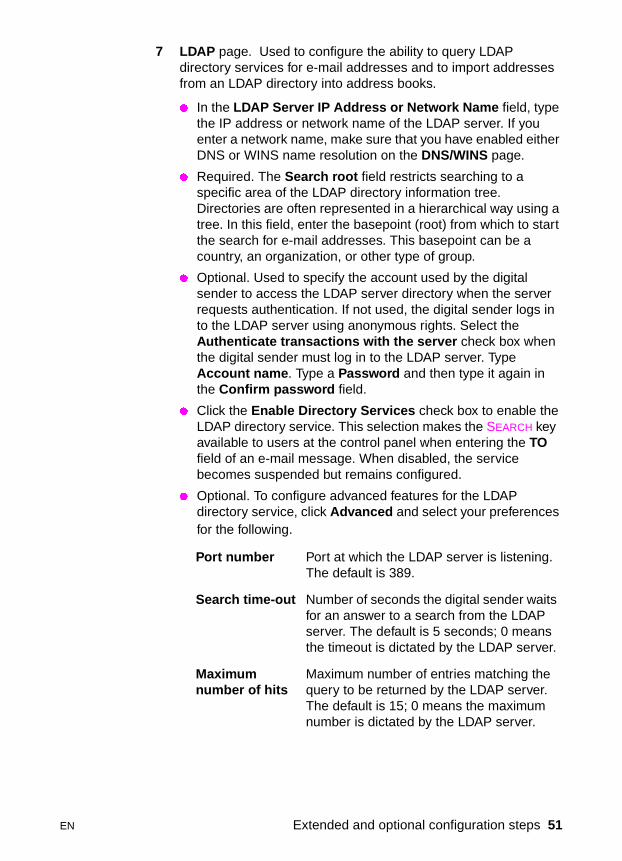
7 LDAP page. Used to configure the ability to query LDAP directory services for e-mail addresses and to import addresses from an LDAP directory into address books.
� In the LDAP Server IP Address or Network Name field, type the IP address or network name of the LDAP server. If you enter a network name, make sure that you have enabled either DNS or WINS name resolution on the DNS/WINS page.
� Required. The Search root field restricts searching to a specific area of the LDAP directory information tree. Directories are often represented in a hierarchical way using a tree. In this field, enter the basepoint (root) from which to start the search for e-mail addresses. This basepoint can be a country, an organization, or other type of group.
� Optional. Used to specify the account used by the digital sender to access the LDAP server directory when the server requests authentication. If not used, the digital sender logs in to the LDAP server using anonymous rights. Select the Authenticate transactions with the server check box when the digital sender must log in to the LDAP server. Type Account name. Type a Password and then type it again in the Confirm password field.
� Click the Enable Directory Services check box to enable the LDAP directory service. This selection makes the SEARCH key available to users at the control panel when entering the TO field of an e-mail message. When disabled, the service becomes suspended but remains configured.
� Optional. To configure advanced features for the LDAP directory service, click Advanced and select your preferences for the following.
Port number Port at which the LDAP server is listening. The default is 389.
Search time-out Number of seconds the digital sender waits for an answer to a search from the LDAP server. The default is 5 seconds; 0 means the timeout is dictated by the LDAP server.
Maximum number of hits
Maximum number of entries matching the query to be returned by the LDAP server. The default is 15; 0 means the maximum number is dictated by the LDAP server.
EN Extended and optional configuration steps 51
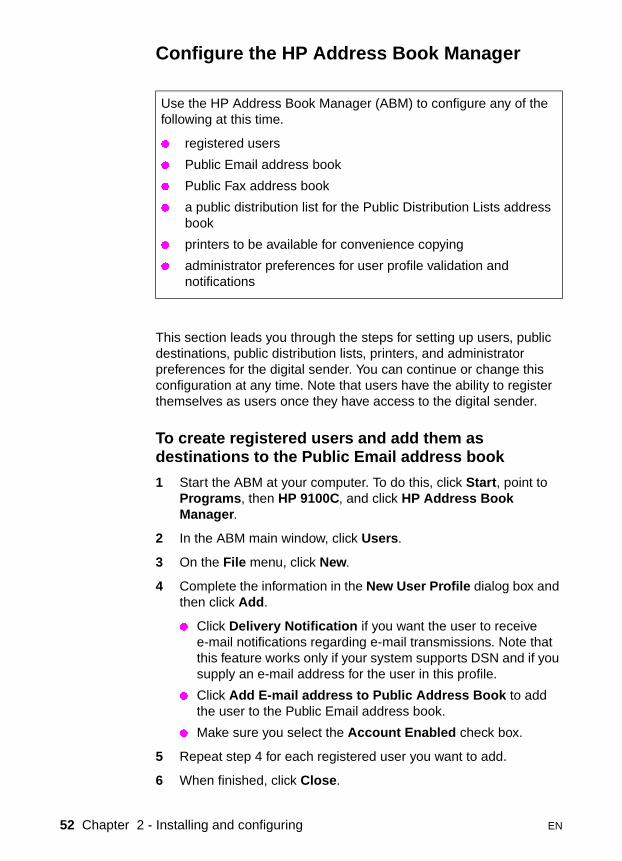
Configure the HP Address Book Manager
This section leads you through the steps for setting up users, public destinations, public distribution lists, printers, and administrator preferences for the digital sender. You can continue or change this configuration at any time. Note that users have the ability to register themselves as users once they have access to the digital sender.
To create registered users and add them as destinations to the Public Email address book
1 Start the ABM at your computer. To do this, click Start, point to Programs, then HP 9100C, and click HP Address Book Manager.
2 In the ABM main window, click Users.
3 On the File menu, click New.
4 Complete the information in the New User Profile dialog box and then click Add.
� Click Delivery Notification if you want the user to receive e-mail notifications regarding e-mail transmissions. Note that this feature works only if your system supports DSN and if you supply an e-mail address for the user in this profile.
� Click Add E-mail address to Public Address Book to add the user to the Public Email address book.
� Make sure you select the Account Enabled check box.
5 Repeat step 4 for each registered user you want to add.
6 When finished, click Close.
Use the HP Address Book Manager (ABM) to configure any of the following at this time.
� registered users
� Public Email address book
� Public Fax address book
� a public distribution list for the Public Distribution Lists address book
� printers to be available for convenience copying
� administrator preferences for user profile validation and notifications
52 Chapter 2 - Installing and configuring EN
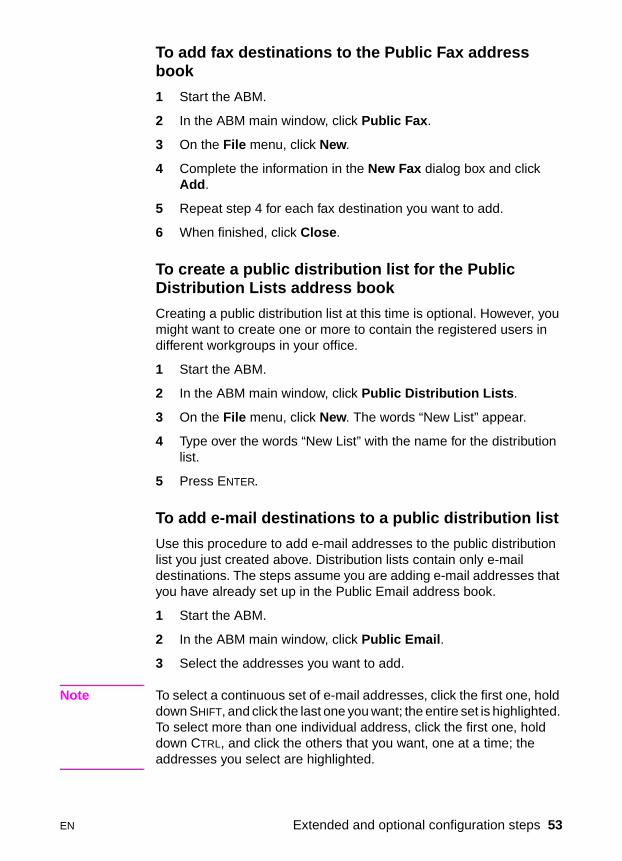
To add fax destinations to the Public Fax address book
1 Start the ABM.
2 In the ABM main window, click Public Fax.
3 On the File menu, click New.
4 Complete the information in the New Fax dialog box and click Add.
5 Repeat step 4 for each fax destination you want to add.
6 When finished, click Close.
To create a public distribution list for the Public Distribution Lists address book
Creating a public distribution list at this time is optional. However, you might want to create one or more to contain the registered users in different workgroups in your office.
1 Start the ABM.
2 In the ABM main window, click Public Distribution Lists.
3 On the File menu, click New. The words “New List” appear.
4 Type over the words “New List” with the name for the distribution list.
5 Press ENTER.
To add e-mail destinations to a public distribution list
Use this procedure to add e-mail addresses to the public distribution list you just created above. Distribution lists contain only e-mail destinations. The steps assume you are adding e-mail addresses that you have already set up in the Public Email address book.
1 Start the ABM.
2 In the ABM main window, click Public Email.
3 Select the addresses you want to add.
Note To select a continuous set of e-mail addresses, click the first one, hold down SHIFT, and click the last one you want; the entire set is highlighted. To select more than one individual address, click the first one, hold down CTRL, and click the others that you want, one at a time; the addresses you select are highlighted.
EN Extended and optional configuration steps 53
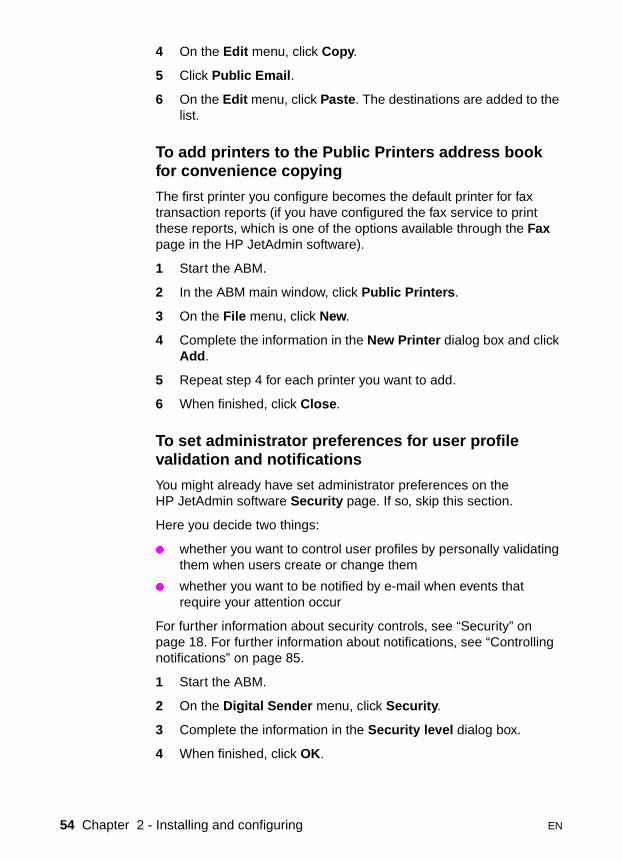
4 On the Edit menu, click Copy.
5 Click Public Email.
6 On the Edit menu, click Paste. The destinations are added to the list.
To add printers to the Public Printers address book for convenience copying
The first printer you configure becomes the default printer for fax transaction reports (if you have configured the fax service to print these reports, which is one of the options available through the Fax page in the HP JetAdmin software).
1 Start the ABM.
2 In the ABM main window, click Public Printers.
3 On the File menu, click New.
4 Complete the information in the New Printer dialog box and click Add.
5 Repeat step 4 for each printer you want to add.
6 When finished, click Close.
To set administrator preferences for user profile validation and notifications
You might already have set administrator preferences on the HP JetAdmin software Security page. If so, skip this section.
Here you decide two things:
� whether you want to control user profiles by personally validating them when users create or change them
� whether you want to be notified by e-mail when events that require your attention occur
For further information about security controls, see “Security” on page 18. For further information about notifications, see “Controlling notifications” on page 85.
1 Start the ABM.
2 On the Digital Sender menu, click Security.
3 Complete the information in the Security level dialog box.
4 When finished, click OK.
54 Chapter 2 - Installing and configuring EN
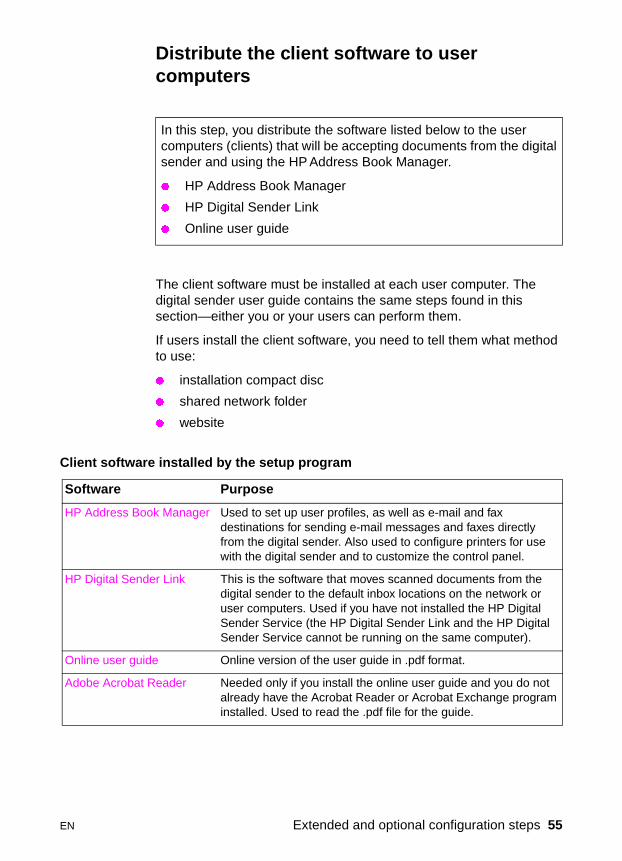
Distribute the client software to user computers
The client software must be installed at each user computer. The digital sender user guide contains the same steps found in this section—either you or your users can perform them.
If users install the client software, you need to tell them what method to use:
� installation compact disc
� shared network folder
� website
In this step, you distribute the software listed below to the user computers (clients) that will be accepting documents from the digital sender and using the HP Address Book Manager.
� HP Address Book Manager
� HP Digital Sender Link
� Online user guide
Client software installed by the setup program
Software Purpose
HP Address Book Manager Used to set up user profiles, as well as e-mail and fax destinations for sending e-mail messages and faxes directly from the digital sender. Also used to configure printers for use with the digital sender and to customize the control panel.
HP Digital Sender Link This is the software that moves scanned documents from the digital sender to the default inbox locations on the network or user computers. Used if you have not installed the HP Digital Sender Service (the HP Digital Sender Link and the HP Digital Sender Service cannot be running on the same computer).
Online user guide Online version of the user guide in .pdf format.
Adobe Acrobat Reader Needed only if you install the online user guide and you do not already have the Acrobat Reader or Acrobat Exchange program installed. Used to read the .pdf file for the guide.
EN Extended and optional configuration steps 55
To install the client software
1 Turn the client computer on. If the computer is already on, close any programs that are running.
2 If the software is being installed from the network, log in to the network, click Start and then Run, type the path to the folder where you placed the installation files, and click OK.- Or -If the software is being installed from the compact disc, insert it in the CD-ROM drive. The setup program begins automatically.- Or -If the software is being installed from a website, open the site where you placed the installation files. Click the download button to download and launch the installation.
3 Follow the instructions on the screen. During the installation, you need to specify the following:
� which programs to install (by default, all programs are installed)
� where to store the programs (you can accept the default location or choose another location on the computer)
� path to the default inbox where the data sent to the computer by the digital sender is stored (you can accept the default location or choose another location on the or the network)
4 When the installation is finished, restart the computer.
All the programs you selected are installed. If you installed the HP Digital Sender Link you can choose which program is the target program, as explained in the user guide in the chapter on the HP Digital Sender Link.
56 Chapter 2 - Installing and configuring EN
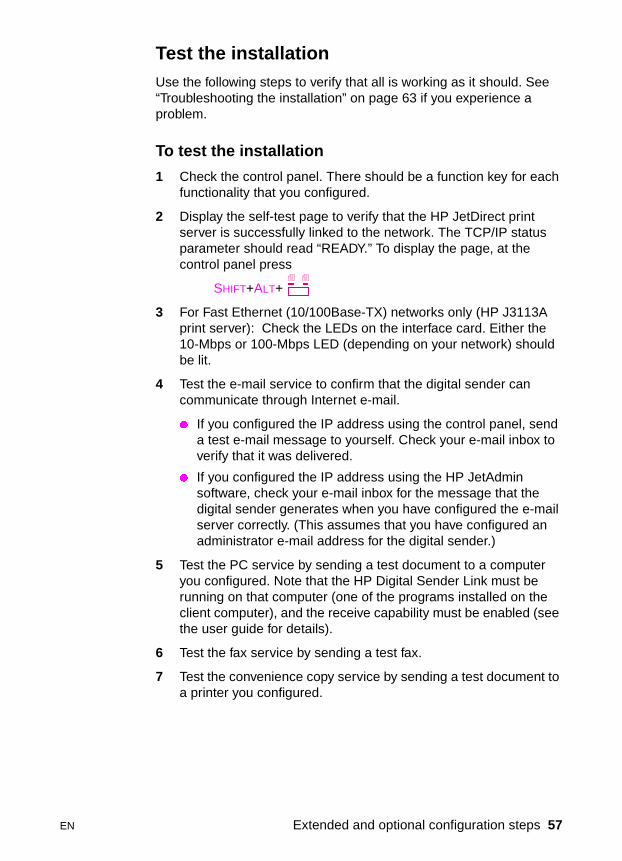
Test the installationUse the following steps to verify that all is working as it should. See “Troubleshooting the installation” on page 63 if you experience a problem.
To test the installation
1 Check the control panel. There should be a function key for each functionality that you configured.
2 Display the self-test page to verify that the HP JetDirect print server is successfully linked to the network. The TCP/IP status parameter should read “READY.” To display the page, at the control panel press
SHIFT+ALT+
3 For Fast Ethernet (10/100Base-TX) networks only (HP J3113A print server): Check the LEDs on the interface card. Either the 10-Mbps or 100-Mbps LED (depending on your network) should be lit.
4 Test the e-mail service to confirm that the digital sender can communicate through Internet e-mail.
� If you configured the IP address using the control panel, send a test e-mail message to yourself. Check your e-mail inbox to verify that it was delivered.
� If you configured the IP address using the HP JetAdmin software, check your e-mail inbox for the message that the digital sender generates when you have configured the e-mail server correctly. (This assumes that you have configured an administrator e-mail address for the digital sender.)
5 Test the PC service by sending a test document to a computer you configured. Note that the HP Digital Sender Link must be running on that computer (one of the programs installed on the client computer), and the receive capability must be enabled (see the user guide for details).
6 Test the fax service by sending a test fax.
7 Test the convenience copy service by sending a test document to a printer you configured.
EN Extended and optional configuration steps 57
Customizing the digital sender to support third-party programs
You can customize the HP 9100C Digital Sender to support third-party programs being used in your office. Users then have the ability to distribute documents from the digital sender directly to these programs.
Note Customizing for third-party support is an advanced feature of the digital sender. The interface with the third-party program is not automatic and requires special programming.
Three steps are involved:
1 Using the HP Address Book Manager, you assign a name for the third-party program to a function key; this is the name that appears on the control panel for users to select. The assignments appear under Customized Function Keys in the ABM main window. Up to 11 function keys can be customized in this way.
2 Then, still in the ABM, you configure at least one destination for the customized function key. You can assign up to 512 destinations to each function key. The destinations appear in the hierarchy under Customized Function Keys in the ABM main window. Each destination you configure is independent of the others. This means that you can have different settings for each (such as destination network address and file format).
3 Prepare the third-party program to accept and use the data from the digital sender. For specific information on how to do this, see the digital sender website (http://www.digitalsender.hp.com).
Once this work has been completed, users can select the third-party program they want by pressing the corresponding function key on the control panel at the digital sender. A list of the preconfigured destinations appears at the control panel and they choose the destination they want.
The table on page 59 explains the items in the ABM that you configure for each function key. Steps for configuring this feature begin on page 60.
58 Chapter 2 - Installing and configuring EN
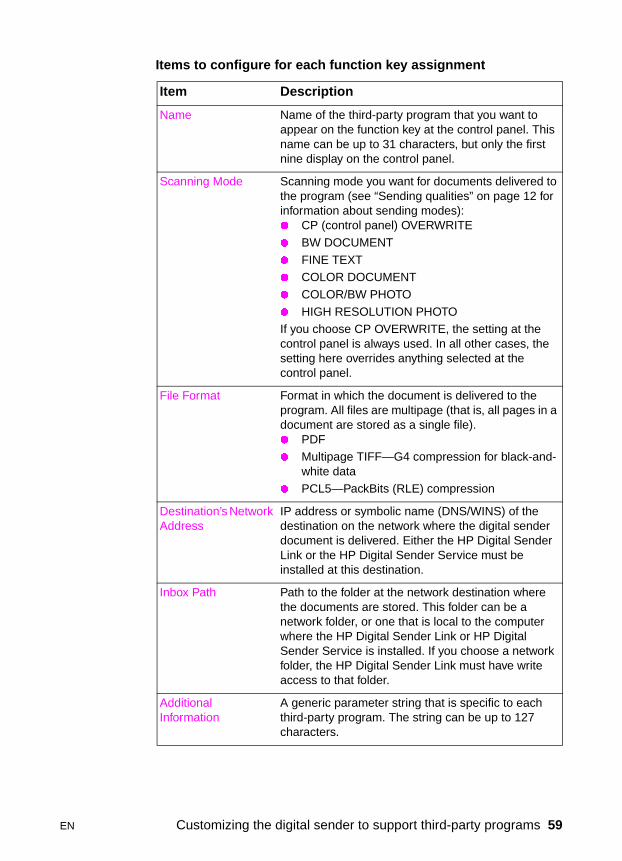
Items to configure for each function key assignment
Item Description
Name Name of the third-party program that you want to appear on the function key at the control panel. This name can be up to 31 characters, but only the first nine display on the control panel.
Scanning Mode Scanning mode you want for documents delivered to the program (see “Sending qualities” on page 12 for information about sending modes):� CP (control panel) OVERWRITE
� BW DOCUMENT
� FINE TEXT� COLOR DOCUMENT
� COLOR/BW PHOTO
� HIGH RESOLUTION PHOTOIf you choose CP OVERWRITE, the setting at the control panel is always used. In all other cases, the setting here overrides anything selected at the control panel.
File Format Format in which the document is delivered to the program. All files are multipage (that is, all pages in a document are stored as a single file).� PDF� Multipage TIFF—G4 compression for black-and-
white data� PCL5—PackBits (RLE) compression
Destination’s Network Address
IP address or symbolic name (DNS/WINS) of the destination on the network where the digital sender document is delivered. Either the HP Digital Sender Link or the HP Digital Sender Service must be installed at this destination.
Inbox Path Path to the folder at the network destination where the documents are stored. This folder can be a network folder, or one that is local to the computer where the HP Digital Sender Link or HP Digital Sender Service is installed. If you choose a network folder, the HP Digital Sender Link must have write access to that folder.
Additional Information
A generic parameter string that is specific to each third-party program. The string can be up to 127 characters.
EN Customizing the digital sender to support third-party programs 59
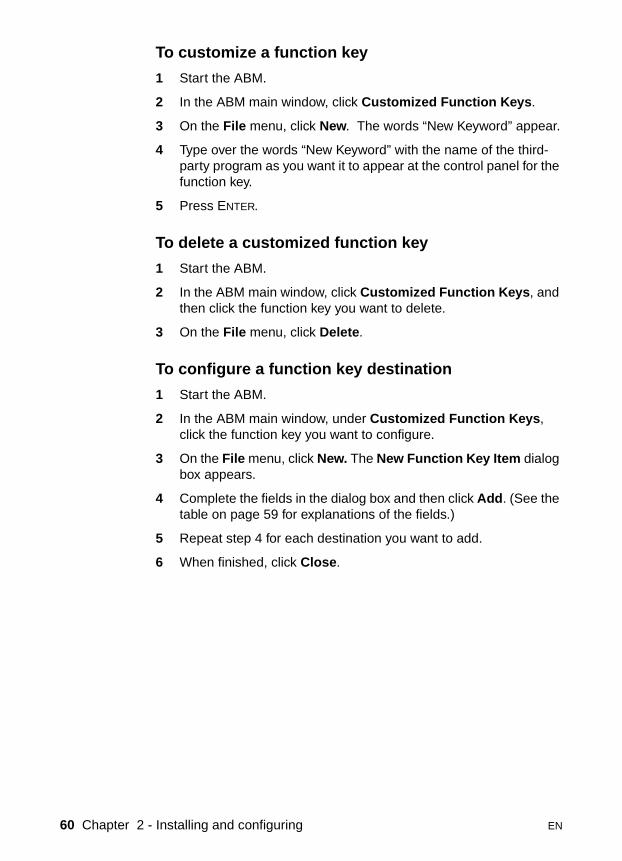
To customize a function key
1 Start the ABM.
2 In the ABM main window, click Customized Function Keys.
3 On the File menu, click New. The words “New Keyword” appear.
4 Type over the words “New Keyword” with the name of the third-party program as you want it to appear at the control panel for the function key.
5 Press ENTER.
To delete a customized function key
1 Start the ABM.
2 In the ABM main window, click Customized Function Keys, and then click the function key you want to delete.
3 On the File menu, click Delete.
To configure a function key destination
1 Start the ABM.
2 In the ABM main window, under Customized Function Keys, click the function key you want to configure.
3 On the File menu, click New. The New Function Key Item dialog box appears.
4 Complete the fields in the dialog box and then click Add. (See the table on page 59 for explanations of the fields.)
5 Repeat step 4 for each destination you want to add.
6 When finished, click Close.
60 Chapter 2 - Installing and configuring EN
Coexisting with the HP Network ScanJet 5 scanner
Administrator mattersThe HP 9100C Digital Sender and the HP Network ScanJet 5 scanner coexist on the same network without conflict.
� The two devices do not use the same resources.
� You do not overwrite or erase anything by installing the digital sender software.
� The version of the HP JetAdmin software that comes with the digital sender can manage both the digital sender and the HP Network ScanJet 5 scanner. (However, previous versions of the HP JetAdmin software do not work with the digital sender.)
Client mattersThe client software for the HP 9100C Digital Sender and the HP Network ScanJet 5 scanner can coexist on the same computer, and in fact can interact.
� HP Network ScanJet 5 scannerDocuments sent to the computer from the HP Network ScanJet 5 scanner are routed using the HP ScanJet Utility. You can continue to use the PaperPort™ software for HP to manage them. All this software can work independently of the client software for the digital sender.
� HP 9100C Digital SenderDocuments sent to the computer from the digital sender are routed using the HP Digital Sender Link. The HP Address Book Manager is an additional software component for the digital sender.
To use one program to manage all documents
It is possible to use just one program on the computer to manage all scanned documents. Users can do this by specifying a program as the preferred inbox for the HP Network ScanJet 5 scanner and setting the file type to .pdf (if available) or multipage .tif (see the documentation for the HP Network ScanJet 5 scanner for information on setting these options). Documents are still routed using the HP ScanJet Utility, but they appear in the target program.
The reverse is not possible. That is, you cannot use the PaperPort software with the digital sender.
EN Coexisting with the HP Network ScanJet 5 scanner 61
When you install the client software on the user computer, the setup program detects if there is an HP Network ScanJet 5 scanner on the network. It gives you the opportunity to designate a target program as the preferred inbox for documents scanned with the HP Network ScanJet 5 scanner.
To move e-mail addresses from the HP Network ScanJet 5 scanner to the digital sender
You can export e-mail addresses in the HP ScanJet Utility to the digital sender HP Address Book Manager. In the HP ScanJet Utility, export the e-mail addresses in .csv (comma-separated value) format. Then use the ABM import procedure to import them for use with the digital sender.
Note The e-mail feature was added to the HP Network ScanJet 5 scanner with firmware version 2.0. The ability to export e-mail addresses assumes you have upgraded to firmware version 2.0.
LAN fax service mattersThis section applies only when you plan to enable the digital sender fax service on a Windows NT server and you have already installed the HP Network ScanJet 5 scanner on that server.
If you do not plan to use the HP Network ScanJet 5 scanner any longer, uninstall it before you install the digital sender. The reason for this is that the digital sender comes with two versions of the HP Digital Sender Service that supports the fax functionality—one to handle networks with just the digital sender, and a more extensive one to handle networks with both the digital sender and the HP Network ScanJet 5 scanner. If the setup program detects an HP Network ScanJet 5 scanner on the network, it installs the more extensive service. This more extensive service places a larger load on your network than the service for the digital sender alone.
If you plan to use both the HP Network ScanJet 5 scanner and the digital sender on the same network, make sure that all the software for the HP Network ScanJet 5 scanner is currently installed before you install the digital sender.
The HP Digital Sender Service is installed as a service associated with an existing user account. The account must have the following characteristics:
� user password never expires
� user is part of the administrator group
� user has rights set to “Logon as service”
62 Chapter 2 - Installing and configuring EN
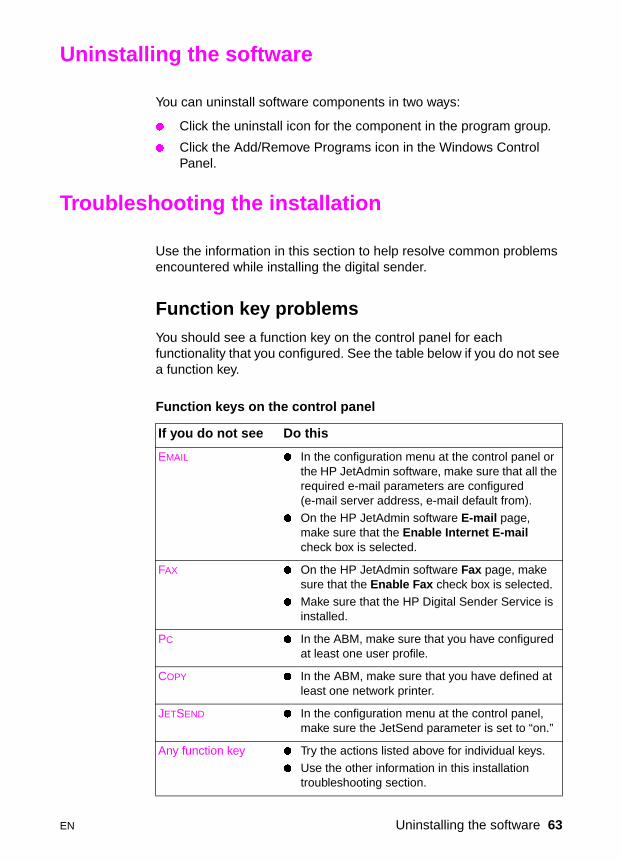
Uninstalling the software
You can uninstall software components in two ways:
� Click the uninstall icon for the component in the program group.
� Click the Add/Remove Programs icon in the Windows Control Panel.
Troubleshooting the installation
Use the information in this section to help resolve common problems encountered while installing the digital sender.
Function key problemsYou should see a function key on the control panel for each functionality that you configured. See the table below if you do not see a function key.
Function keys on the control panel
If you do not see Do this
EMAIL � In the configuration menu at the control panel or the HP JetAdmin software, make sure that all the required e-mail parameters are configured (e-mail server address, e-mail default from).
� On the HP JetAdmin software E-mail page, make sure that the Enable Internet E-mail check box is selected.
FAX � On the HP JetAdmin software Fax page, make sure that the Enable Fax check box is selected.
� Make sure that the HP Digital Sender Service is installed.
PC � In the ABM, make sure that you have configured at least one user profile.
COPY � In the ABM, make sure that you have defined at least one network printer.
JETSEND � In the configuration menu at the control panel, make sure the JetSend parameter is set to “on.”
Any function key � Try the actions listed above for individual keys.
� Use the other information in this installation troubleshooting section.
EN Uninstalling the software 63
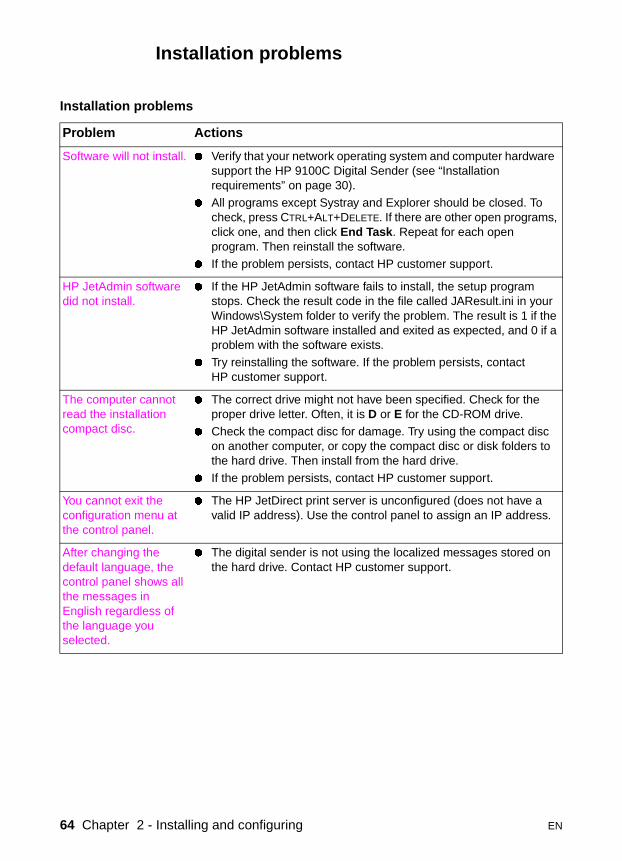
Installation problems
Installation problems
Problem Actions
Software will not install. � Verify that your network operating system and computer hardware support the HP 9100C Digital Sender (see “Installation requirements” on page 30).
� All programs except Systray and Explorer should be closed. To check, press CTRL+ALT+DELETE. If there are other open programs, click one, and then click End Task. Repeat for each open program. Then reinstall the software.
� If the problem persists, contact HP customer support.
HP JetAdmin software did not install.
� If the HP JetAdmin software fails to install, the setup program stops. Check the result code in the file called JAResult.ini in your Windows\System folder to verify the problem. The result is 1 if the HP JetAdmin software installed and exited as expected, and 0 if a problem with the software exists.
� Try reinstalling the software. If the problem persists, contact HP customer support.
The computer cannot read the installation compact disc.
� The correct drive might not have been specified. Check for the proper drive letter. Often, it is D or E for the CD-ROM drive.
� Check the compact disc for damage. Try using the compact disc on another computer, or copy the compact disc or disk folders to the hard drive. Then install from the hard drive.
� If the problem persists, contact HP customer support.
You cannot exit the configuration menu at the control panel.
� The HP JetDirect print server is unconfigured (does not have a valid IP address). Use the control panel to assign an IP address.
After changing the default language, the control panel shows all the messages in English regardless of the language you selected.
� The digital sender is not using the localized messages stored on the hard drive. Contact HP customer support.
64 Chapter 2 - Installing and configuring EN
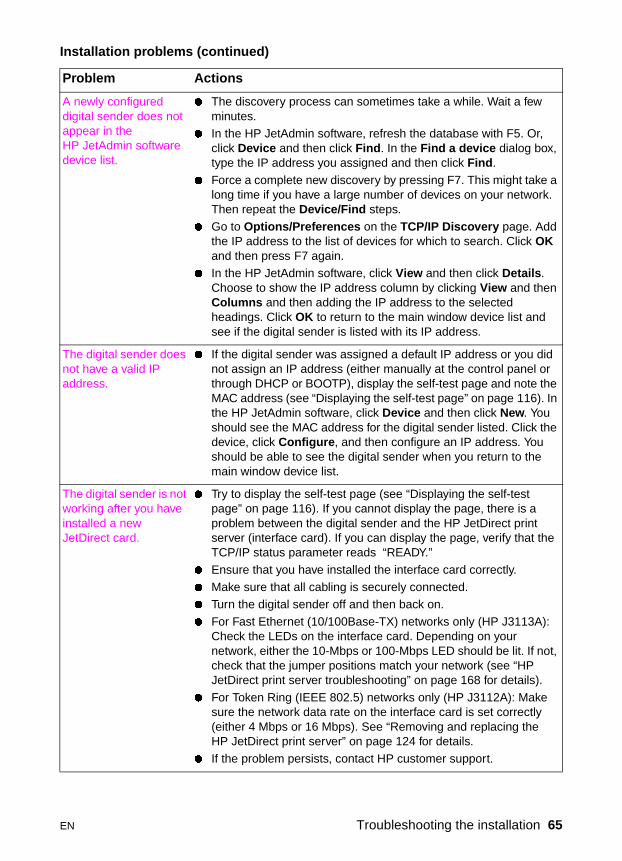
A newly configured digital sender does not appear in the HP JetAdmin software device list.
� The discovery process can sometimes take a while. Wait a few minutes.
� In the HP JetAdmin software, refresh the database with F5. Or, click Device and then click Find. In the Find a device dialog box, type the IP address you assigned and then click Find.
� Force a complete new discovery by pressing F7. This might take a long time if you have a large number of devices on your network. Then repeat the Device/Find steps.
� Go to Options/Preferences on the TCP/IP Discovery page. Add the IP address to the list of devices for which to search. Click OK and then press F7 again.
� In the HP JetAdmin software, click View and then click Details. Choose to show the IP address column by clicking View and then Columns and then adding the IP address to the selected headings. Click OK to return to the main window device list and see if the digital sender is listed with its IP address.
The digital sender does not have a valid IP address.
� If the digital sender was assigned a default IP address or you did not assign an IP address (either manually at the control panel or through DHCP or BOOTP), display the self-test page and note the MAC address (see “Displaying the self-test page” on page 116). In the HP JetAdmin software, click Device and then click New. You should see the MAC address for the digital sender listed. Click the device, click Configure, and then configure an IP address. You should be able to see the digital sender when you return to the main window device list.
The digital sender is not working after you have installed a new JetDirect card.
� Try to display the self-test page (see “Displaying the self-test page” on page 116). If you cannot display the page, there is a problem between the digital sender and the HP JetDirect print server (interface card). If you can display the page, verify that the TCP/IP status parameter reads “READY.”
� Ensure that you have installed the interface card correctly.
� Make sure that all cabling is securely connected.� Turn the digital sender off and then back on.
� For Fast Ethernet (10/100Base-TX) networks only (HP J3113A): Check the LEDs on the interface card. Depending on your network, either the 10-Mbps or 100-Mbps LED should be lit. If not, check that the jumper positions match your network (see “HP JetDirect print server troubleshooting” on page 168 for details).
� For Token Ring (IEEE 802.5) networks only (HP J3112A): Make sure the network data rate on the interface card is set correctly (either 4 Mbps or 16 Mbps). See “Removing and replacing the HP JetDirect print server” on page 124 for details.
� If the problem persists, contact HP customer support.
Installation problems (continued)
Problem Actions
EN Troubleshooting the installation 65
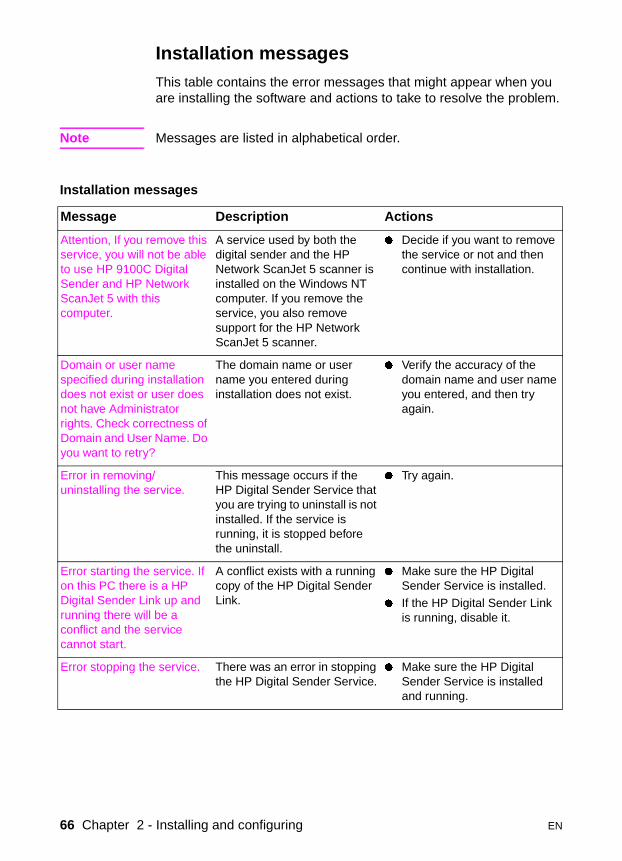
Installation messages This table contains the error messages that might appear when you are installing the software and actions to take to resolve the problem.
Note Messages are listed in alphabetical order.
Installation messages
Message Description Actions
Attention, If you remove this service, you will not be able to use HP 9100C Digital Sender and HP Network ScanJet 5 with this computer.
A service used by both the digital sender and the HP Network ScanJet 5 scanner is installed on the Windows NT computer. If you remove the service, you also remove support for the HP Network ScanJet 5 scanner.
� Decide if you want to remove the service or not and then continue with installation.
Domain or user name specified during installation does not exist or user does not have Administrator rights. Check correctness of Domain and User Name. Do you want to retry?
The domain name or user name you entered during installation does not exist.
� Verify the accuracy of the domain name and user name you entered, and then try again.
Error in removing/uninstalling the service.
This message occurs if the HP Digital Sender Service that you are trying to uninstall is not installed. If the service is running, it is stopped before the uninstall.
� Try again.
Error starting the service. If on this PC there is a HP Digital Sender Link up and running there will be a conflict and the service cannot start.
A conflict exists with a running copy of the HP Digital Sender Link.
� Make sure the HP Digital Sender Service is installed.
� If the HP Digital Sender Link is running, disable it.
Error stopping the service. There was an error in stopping the HP Digital Sender Service.
� Make sure the HP Digital Sender Service is installed and running.
66 Chapter 2 - Installing and configuring EN
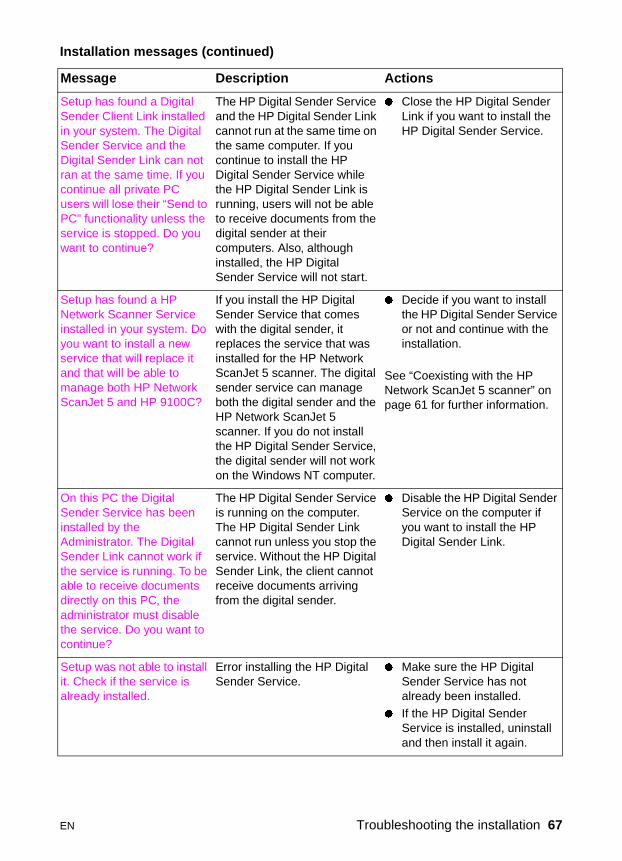
Setup has found a Digital Sender Client Link installed in your system. The Digital Sender Service and the Digital Sender Link can not ran at the same time. If you continue all private PC users will lose their “Send to PC” functionality unless the service is stopped. Do you want to continue?
The HP Digital Sender Service and the HP Digital Sender Link cannot run at the same time on the same computer. If you continue to install the HP Digital Sender Service while the HP Digital Sender Link is running, users will not be able to receive documents from the digital sender at their computers. Also, although installed, the HP Digital Sender Service will not start.
� Close the HP Digital Sender Link if you want to install the HP Digital Sender Service.
Setup has found a HP Network Scanner Service installed in your system. Do you want to install a new service that will replace it and that will be able to manage both HP Network ScanJet 5 and HP 9100C?
If you install the HP Digital Sender Service that comes with the digital sender, it replaces the service that was installed for the HP Network ScanJet 5 scanner. The digital sender service can manage both the digital sender and the HP Network ScanJet 5 scanner. If you do not install the HP Digital Sender Service, the digital sender will not work on the Windows NT computer.
� Decide if you want to install the HP Digital Sender Service or not and continue with the installation.
See “Coexisting with the HP Network ScanJet 5 scanner” on page 61 for further information.
On this PC the Digital Sender Service has been installed by the Administrator. The Digital Sender Link cannot work if the service is running. To be able to receive documents directly on this PC, the administrator must disable the service. Do you want to continue?
The HP Digital Sender Service is running on the computer. The HP Digital Sender Link cannot run unless you stop the service. Without the HP Digital Sender Link, the client cannot receive documents arriving from the digital sender.
� Disable the HP Digital Sender Service on the computer if you want to install the HP Digital Sender Link.
Setup was not able to install it. Check if the service is already installed.
Error installing the HP Digital Sender Service.
� Make sure the HP Digital Sender Service has not already been installed.
� If the HP Digital Sender Service is installed, uninstall and then install it again.
Installation messages (continued)
Message Description Actions
EN Troubleshooting the installation 67
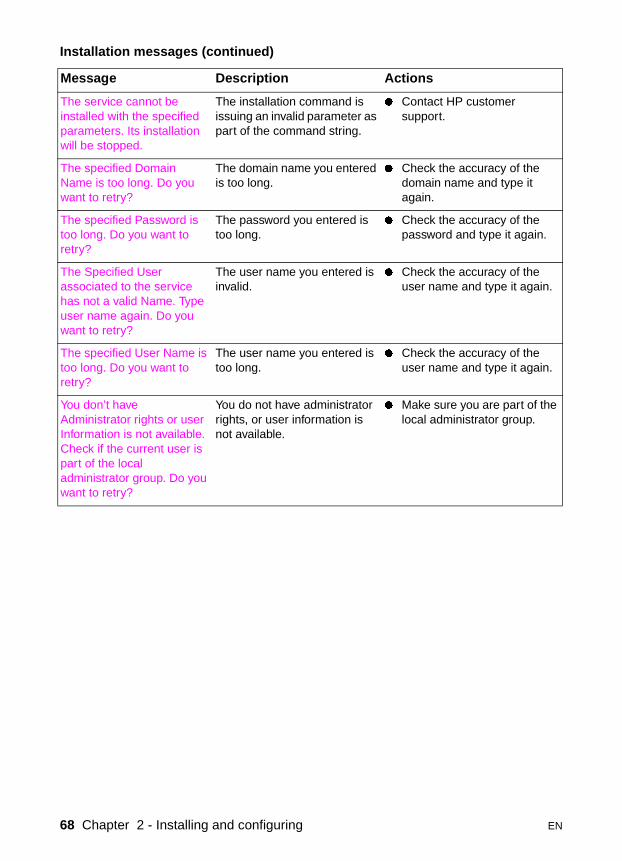
The service cannot be installed with the specified parameters. Its installation will be stopped.
The installation command is issuing an invalid parameter as part of the command string.
� Contact HP customer support.
The specified Domain Name is too long. Do you want to retry?
The domain name you entered is too long.
� Check the accuracy of the domain name and type it again.
The specified Password is too long. Do you want to retry?
The password you entered is too long.
� Check the accuracy of the password and type it again.
The Specified User associated to the service has not a valid Name. Type user name again. Do you want to retry?
The user name you entered is invalid.
� Check the accuracy of the user name and type it again.
The specified User Name is too long. Do you want to retry?
The user name you entered is too long.
� Check the accuracy of the user name and type it again.
You don’t have Administrator rights or user Information is not available. Check if the current user is part of the local administrator group. Do you want to retry?
You do not have administrator rights, or user information is not available.
� Make sure you are part of the local administrator group.
Installation messages (continued)
Message Description Actions
68 Chapter 2 - Installing and configuring EN
3 Administering
Introduction
Administrator activitiesThe table beginning on page 70 lists typical administrator activities. Procedures in this chapter explain how to perform these activities. As the table shows, you perform most of the activities in three places. Sometimes you can do the same thing in more than one place.
� control panelUsed to change configuration parameters and to perform certain administrator activities. Only the administrator has access to the configuration menu for performing these activities.
� HP Address Book Manager (ABM)Used to maintain user profiles, public address books, printers for use with the digital sender, and security, and to back up and restore address books.
� HP JetAdmin softwareUsed to configure, monitor, and control network devices such as the digital sender, and to troubleshoot network problems.
The activity log is an important tool for monitoring all digital sender activities—those initiated by users as well as the administrator. You view this log using the HP Address Book Manager (see “Using the activity log” on page 113).
EN Introduction 69
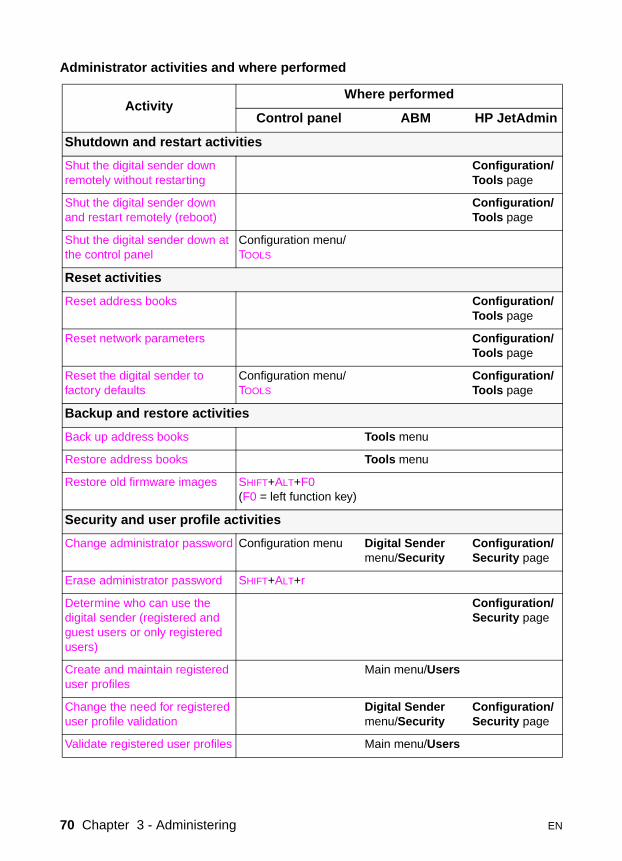
Administrator activities and where performed
ActivityWhere performed
Control panel ABM HP JetAdmin
Shutdown and restart activities
Shut the digital sender down remotely without restarting
Configuration/Tools page
Shut the digital sender down and restart remotely (reboot)
Configuration/Tools page
Shut the digital sender down at the control panel
Configuration menu/TOOLS
Reset activities
Reset address books Configuration/Tools page
Reset network parameters Configuration/Tools page
Reset the digital sender to factory defaults
Configuration menu/TOOLS
Configuration/Tools page
Backup and restore activities
Back up address books Tools menu
Restore address books Tools menu
Restore old firmware images SHIFT+ALT+F0(F0 = left function key)
Security and user profile activities
Change administrator password Configuration menu Digital Sender menu/Security
Configuration/Security page
Erase administrator password SHIFT+ALT+r
Determine who can use the digital sender (registered and guest users or only registered users)
Configuration/Security page
Create and maintain registered user profiles
Main menu/Users
Change the need for registered user profile validation
Digital Sender menu/Security
Configuration/Security page
Validate registered user profiles Main menu/Users
70 Chapter 3 - Administering EN
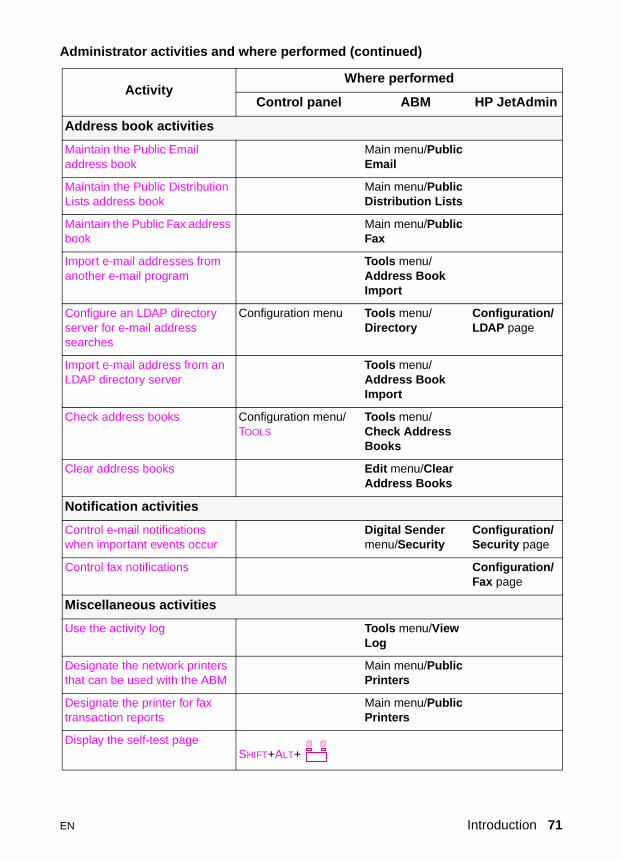
Address book activities
Maintain the Public Email address book
Main menu/Public Email
Maintain the Public Distribution Lists address book
Main menu/Public Distribution Lists
Maintain the Public Fax address book
Main menu/Public Fax
Import e-mail addresses from another e-mail program
Tools menu/Address Book Import
Configure an LDAP directory server for e-mail address searches
Configuration menu Tools menu/Directory
Configuration/LDAP page
Import e-mail address from an LDAP directory server
Tools menu/Address Book Import
Check address books Configuration menu/TOOLS
Tools menu/Check Address Books
Clear address books Edit menu/Clear Address Books
Notification activities
Control e-mail notifications when important events occur
Digital Sender menu/Security
Configuration/Security page
Control fax notifications Configuration/Fax page
Miscellaneous activities
Use the activity log Tools menu/View Log
Designate the network printers that can be used with the ABM
Main menu/Public Printers
Designate the printer for fax transaction reports
Main menu/Public Printers
Display the self-test pageSHIFT+ALT+
Administrator activities and where performed (continued)
ActivityWhere performed
Control panel ABM HP JetAdmin
EN Introduction 71
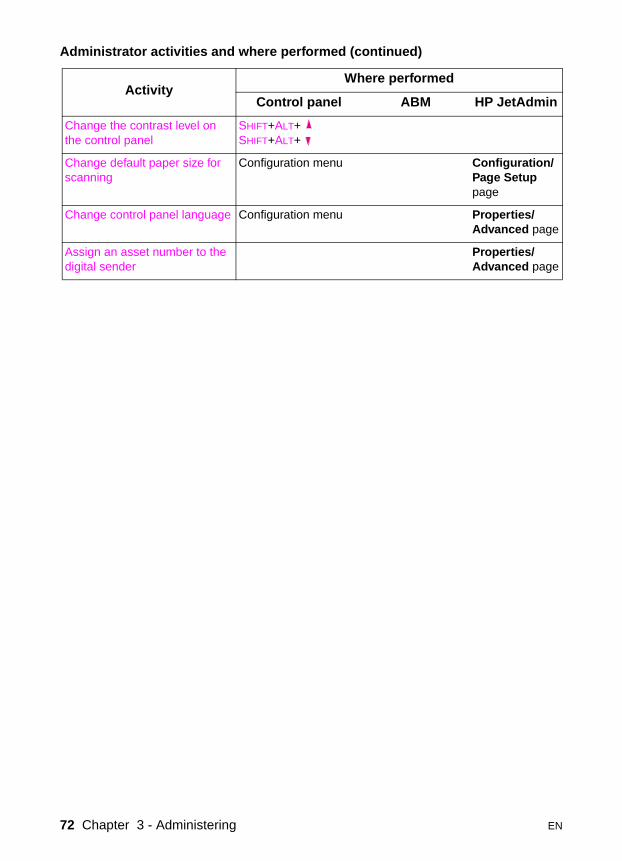
Change the contrast level on the control panel
SHIFT+ALT+ SHIFT+ALT+
Change default paper size for scanning
Configuration menu Configuration/Page Setup page
Change control panel language Configuration menu Properties/Advanced page
Assign an asset number to the digital sender
Properties/Advanced page
Administrator activities and where performed (continued)
ActivityWhere performed
Control panel ABM HP JetAdmin
72 Chapter 3 - Administering EN

Digital sender parametersThe following table lists parameters that determine how the digital sender works and where you can find them.
Administrator parameters and where found
Parameter
Where found
Control panel
ABMHP
JetAdminOther
Network parameters
Method for obtaining TCP/IP configuration
Configuration menu
Configuration/TCP/IP page
IP address of digital sender Configuration menu
Configuration/TCP/IP page
IP subnet mask Configuration menu
Configuration/TCP/IP page
Default IP gateway Configuration menu
Configuration/TCP/IP page
DNS (Domain Name System) enabled/disabled
Configuration menu (server address)
Configuration/DNS/WINS page
DNS server Configuration menu
Configuration/DNS/WINS page
Additional DNS servers and default search domain
Configuration/DNS/WINS page
WINS (Windows Internet Naming Service) enabled/disabled
Configuration menu (server address)
Configuration/DNS/WINS page
WINS primary server Configuration menu
Configuration/DNS/WINS page
WINS secondary server Configuration/DNS/WINS page
WINS/DNS name-to-address cache enabled/disabled
Configuration/DNS/WINS page
EN Introduction 73
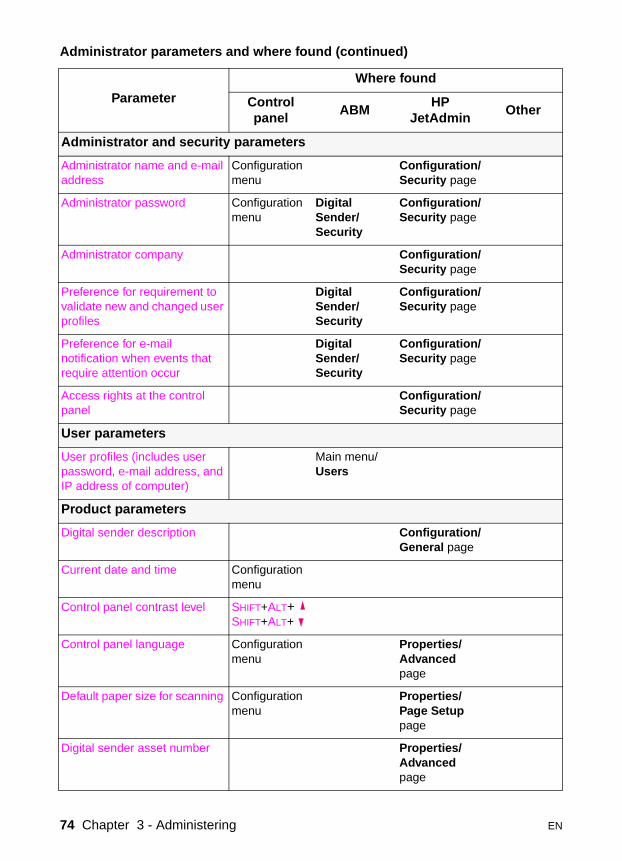
Administrator and security parameters
Administrator name and e-mail address
Configuration menu
Configuration/Security page
Administrator password Configuration menu
Digital Sender/Security
Configuration/Security page
Administrator company Configuration/Security page
Preference for requirement to validate new and changed user profiles
Digital Sender/Security
Configuration/Security page
Preference for e-mail notification when events that require attention occur
Digital Sender/Security
Configuration/Security page
Access rights at the control panel
Configuration/Security page
User parameters
User profiles (includes user password, e-mail address, and IP address of computer)
Main menu/Users
Product parameters
Digital sender description Configuration/General page
Current date and time Configuration menu
Control panel contrast level SHIFT+ALT+SHIFT+ALT+
Control panel language Configuration menu
Properties/Advanced page
Default paper size for scanning Configuration menu
Properties/Page Setup page
Digital sender asset number Properties/Advanced page
Administrator parameters and where found (continued)
Parameter
Where found
Control panel
ABMHP
JetAdminOther
74 Chapter 3 - Administering EN
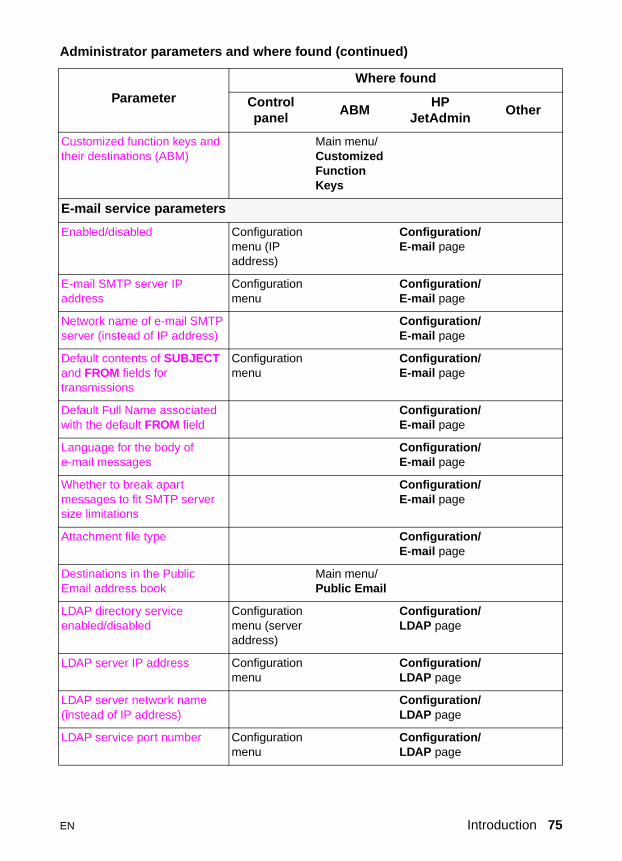
Customized function keys and their destinations (ABM)
Main menu/Customized Function Keys
E-mail service parameters
Enabled/disabled Configuration menu (IP address)
Configuration/E-mail page
E-mail SMTP server IP address
Configuration menu
Configuration/E-mail page
Network name of e-mail SMTP server (instead of IP address)
Configuration/E-mail page
Default contents of SUBJECT and FROM fields for transmissions
Configuration menu
Configuration/E-mail page
Default Full Name associated with the default FROM field
Configuration/E-mail page
Language for the body of e-mail messages
Configuration/E-mail page
Whether to break apart messages to fit SMTP server size limitations
Configuration/E-mail page
Attachment file type Configuration/E-mail page
Destinations in the Public Email address book
Main menu/Public Email
LDAP directory service enabled/disabled
Configuration menu (server address)
Configuration/LDAP page
LDAP server IP address Configuration menu
Configuration/LDAP page
LDAP server network name (instead of IP address)
Configuration/LDAP page
LDAP service port number Configuration menu
Configuration/LDAP page
Administrator parameters and where found (continued)
Parameter
Where found
Control panel
ABMHP
JetAdminOther
EN Introduction 75
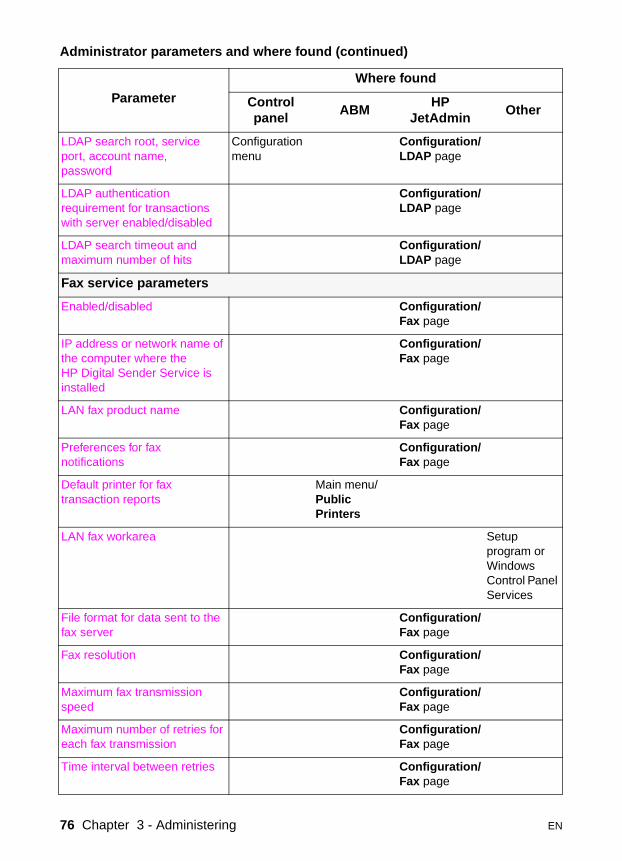
LDAP search root, service port, account name, password
Configuration menu
Configuration/LDAP page
LDAP authentication requirement for transactions with server enabled/disabled
Configuration/LDAP page
LDAP search timeout and maximum number of hits
Configuration/LDAP page
Fax service parameters
Enabled/disabled Configuration/Fax page
IP address or network name of the computer where the HP Digital Sender Service is installed
Configuration/Fax page
LAN fax product name Configuration/Fax page
Preferences for fax notifications
Configuration/Fax page
Default printer for fax transaction reports
Main menu/Public Printers
LAN fax workarea Setup program or Windows Control Panel Services
File format for data sent to the fax server
Configuration/Fax page
Fax resolution Configuration/Fax page
Maximum fax transmission speed
Configuration/Fax page
Maximum number of retries for each fax transmission
Configuration/Fax page
Time interval between retries Configuration/Fax page
Administrator parameters and where found (continued)
Parameter
Where found
Control panel
ABMHP
JetAdminOther
76 Chapter 3 - Administering EN
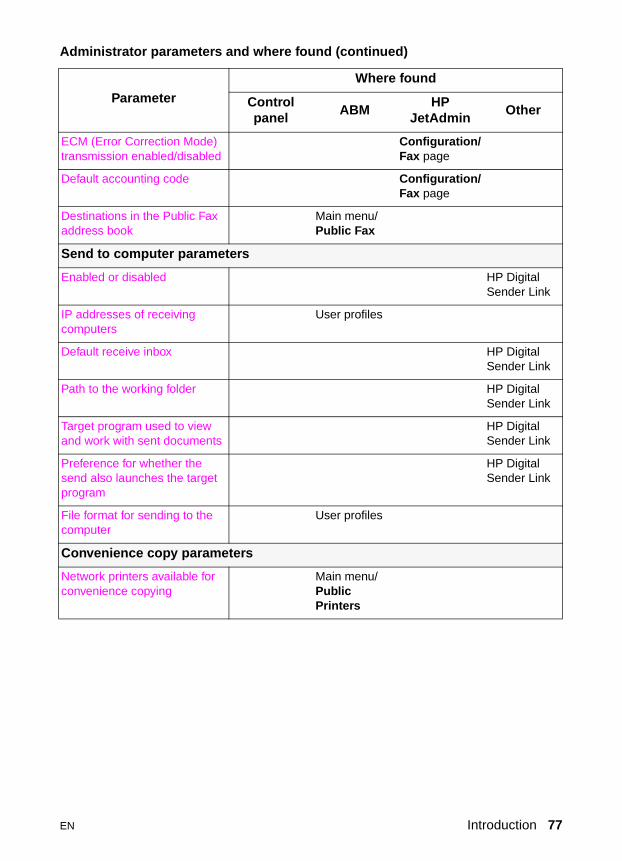
ECM (Error Correction Mode) transmission enabled/disabled
Configuration/Fax page
Default accounting code Configuration/Fax page
Destinations in the Public Fax address book
Main menu/Public Fax
Send to computer parameters
Enabled or disabled HP Digital Sender Link
IP addresses of receiving computers
User profiles
Default receive inbox HP Digital Sender Link
Path to the working folder HP Digital Sender Link
Target program used to view and work with sent documents
HP Digital Sender Link
Preference for whether the send also launches the target program
HP Digital Sender Link
File format for sending to the computer
User profiles
Convenience copy parameters
Network printers available for convenience copying
Main menu/Public Printers
Administrator parameters and where found (continued)
Parameter
Where found
Control panel
ABMHP
JetAdminOther
EN Introduction 77
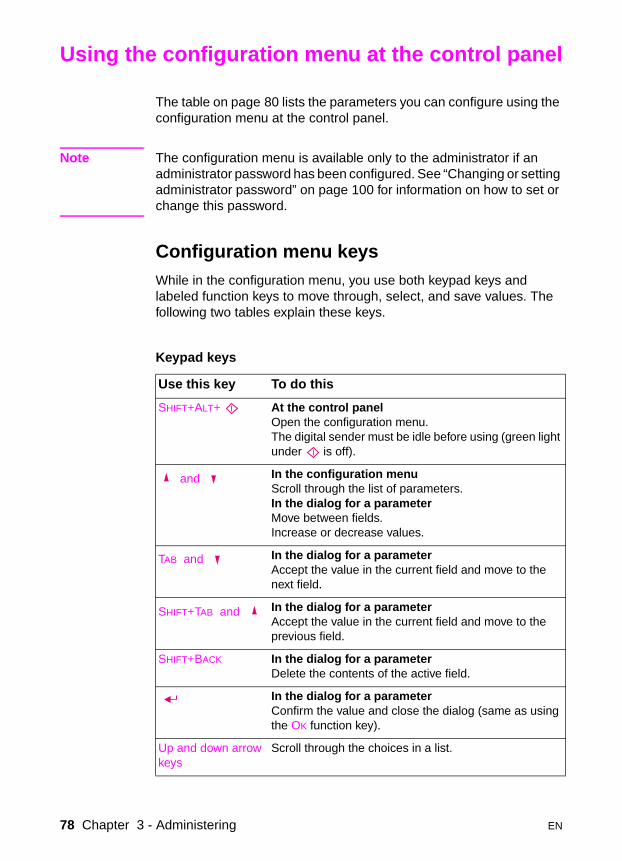
Using the configuration menu at the control panel
The table on page 80 lists the parameters you can configure using the configuration menu at the control panel.
Note The configuration menu is available only to the administrator if an administrator password has been configured. See “Changing or setting administrator password” on page 100 for information on how to set or change this password.
Configuration menu keysWhile in the configuration menu, you use both keypad keys and labeled function keys to move through, select, and save values. The following two tables explain these keys.
Keypad keys
Use this key To do this
SHIFT+ALT+ At the control panelOpen the configuration menu. The digital sender must be idle before using (green light under is off).
and In the configuration menuScroll through the list of parameters.In the dialog for a parameterMove between fields.Increase or decrease values.
TAB and In the dialog for a parameterAccept the value in the current field and move to the next field.
SHIFT+TAB and In the dialog for a parameterAccept the value in the current field and move to the previous field.
SHIFT+BACK In the dialog for a parameterDelete the contents of the active field.
In the dialog for a parameterConfirm the value and close the dialog (same as using the OK function key).
Up and down arrow keys
Scroll through the choices in a list.
78 Chapter 3 - Administering EN
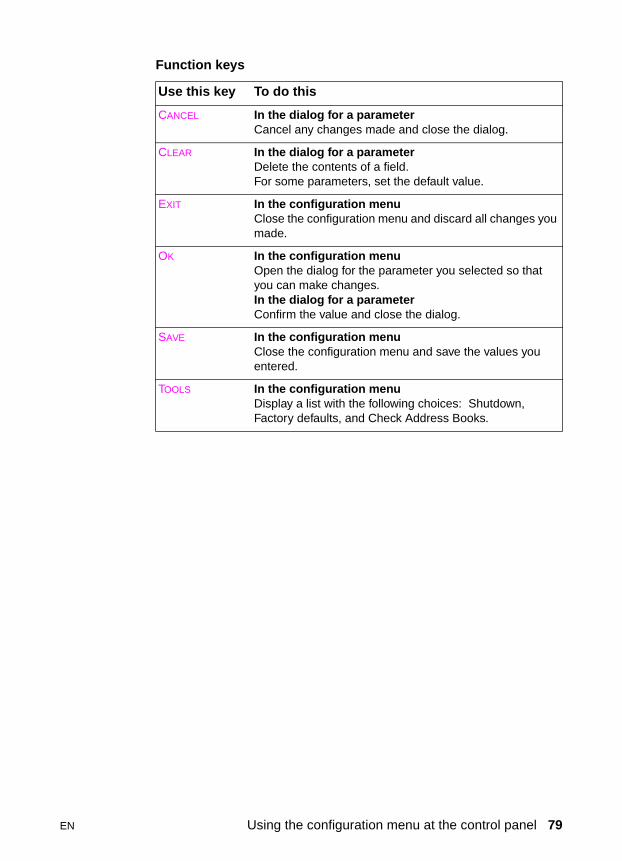
Function keys
Use this key To do this
CANCEL In the dialog for a parameterCancel any changes made and close the dialog.
CLEAR In the dialog for a parameterDelete the contents of a field.For some parameters, set the default value.
EXIT In the configuration menuClose the configuration menu and discard all changes you made.
OK In the configuration menuOpen the dialog for the parameter you selected so that you can make changes.In the dialog for a parameterConfirm the value and close the dialog.
SAVE In the configuration menuClose the configuration menu and save the values you entered.
TOOLS In the configuration menuDisplay a list with the following choices: Shutdown, Factory defaults, and Check Address Books.
EN Using the configuration menu at the control panel 79
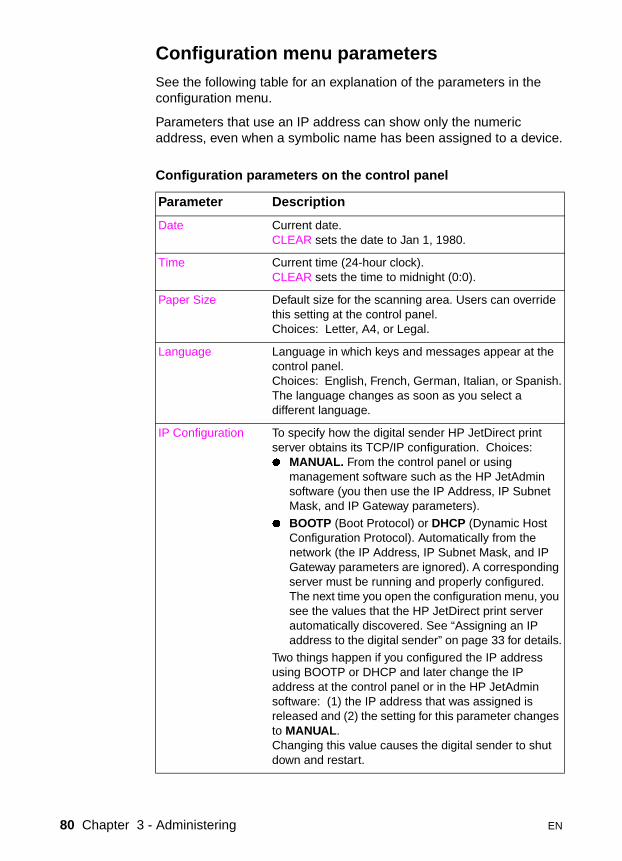
Configuration menu parametersSee the following table for an explanation of the parameters in the configuration menu.
Parameters that use an IP address can show only the numeric address, even when a symbolic name has been assigned to a device.
Configuration parameters on the control panel
Parameter Description
Date Current date.CLEAR sets the date to Jan 1, 1980.
Time Current time (24-hour clock).CLEAR sets the time to midnight (0:0).
Paper Size Default size for the scanning area. Users can override this setting at the control panel.Choices: Letter, A4, or Legal.
Language Language in which keys and messages appear at the control panel.Choices: English, French, German, Italian, or Spanish.The language changes as soon as you select a different language.
IP Configuration To specify how the digital sender HP JetDirect print server obtains its TCP/IP configuration. Choices:� MANUAL. From the control panel or using
management software such as the HP JetAdmin software (you then use the IP Address, IP Subnet Mask, and IP Gateway parameters).
� BOOTP (Boot Protocol) or DHCP (Dynamic Host Configuration Protocol). Automatically from the network (the IP Address, IP Subnet Mask, and IP Gateway parameters are ignored). A corresponding server must be running and properly configured. The next time you open the configuration menu, you see the values that the HP JetDirect print server automatically discovered. See “Assigning an IP address to the digital sender” on page 33 for details.
Two things happen if you configured the IP address using BOOTP or DHCP and later change the IP address at the control panel or in the HP JetAdmin software: (1) the IP address that was assigned is released and (2) the setting for this parameter changes to MANUAL. Changing this value causes the digital sender to shut down and restart.
80 Chapter 3 - Administering EN
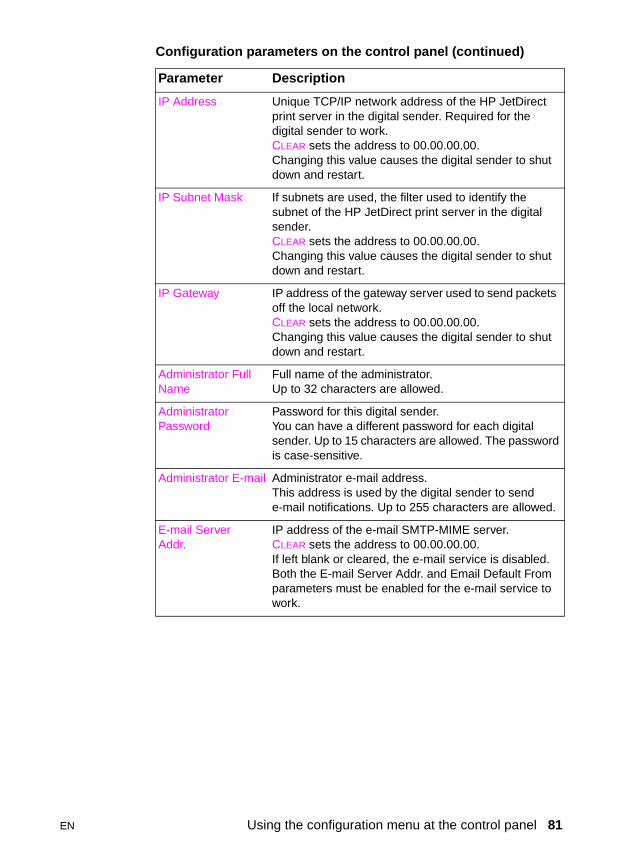
IP Address Unique TCP/IP network address of the HP JetDirect print server in the digital sender. Required for the digital sender to work.CLEAR sets the address to 00.00.00.00.Changing this value causes the digital sender to shut down and restart.
IP Subnet Mask If subnets are used, the filter used to identify the subnet of the HP JetDirect print server in the digital sender.CLEAR sets the address to 00.00.00.00.Changing this value causes the digital sender to shut down and restart.
IP Gateway IP address of the gateway server used to send packets off the local network.CLEAR sets the address to 00.00.00.00.Changing this value causes the digital sender to shut down and restart.
Administrator Full Name
Full name of the administrator. Up to 32 characters are allowed.
Administrator Password
Password for this digital sender. You can have a different password for each digital sender. Up to 15 characters are allowed. The password is case-sensitive.
Administrator E-mail Administrator e-mail address. This address is used by the digital sender to send e-mail notifications. Up to 255 characters are allowed.
E-mail Server Addr.
IP address of the e-mail SMTP-MIME server.CLEAR sets the address to 00.00.00.00.If left blank or cleared, the e-mail service is disabled. Both the E-mail Server Addr. and Email Default From parameters must be enabled for the e-mail service to work.
Configuration parameters on the control panel (continued)
Parameter Description
EN Using the configuration menu at the control panel 81
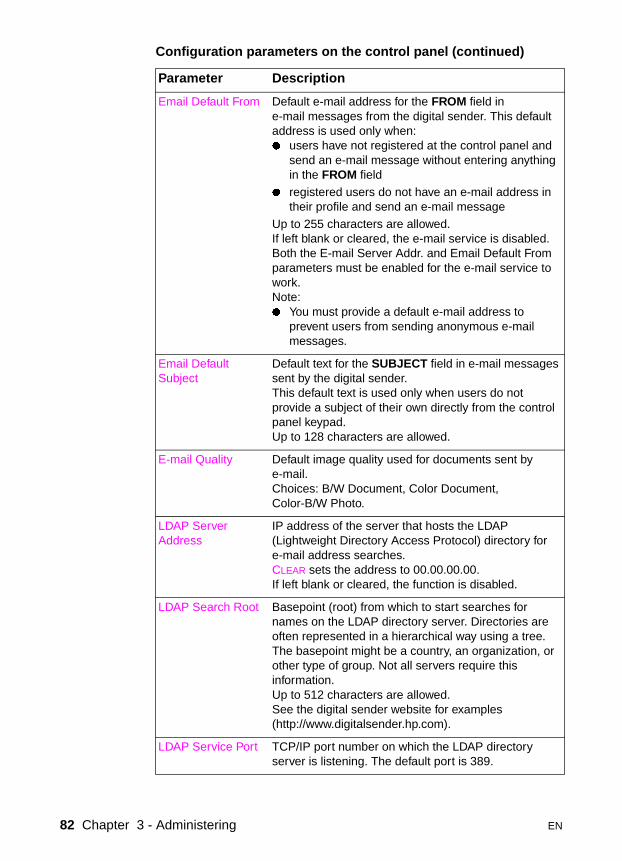
Email Default From Default e-mail address for the FROM field in e-mail messages from the digital sender. This default address is used only when:� users have not registered at the control panel and
send an e-mail message without entering anything in the FROM field
� registered users do not have an e-mail address in their profile and send an e-mail message
Up to 255 characters are allowed.If left blank or cleared, the e-mail service is disabled. Both the E-mail Server Addr. and Email Default From parameters must be enabled for the e-mail service to work.Note: � You must provide a default e-mail address to
prevent users from sending anonymous e-mail messages.
Email Default Subject
Default text for the SUBJECT field in e-mail messages sent by the digital sender. This default text is used only when users do not provide a subject of their own directly from the control panel keypad.Up to 128 characters are allowed.
E-mail Quality Default image quality used for documents sent by e-mail.Choices: B/W Document, Color Document, Color-B/W Photo.
LDAP Server Address
IP address of the server that hosts the LDAP (Lightweight Directory Access Protocol) directory for e-mail address searches.CLEAR sets the address to 00.00.00.00.If left blank or cleared, the function is disabled.
LDAP Search Root Basepoint (root) from which to start searches for names on the LDAP directory server. Directories are often represented in a hierarchical way using a tree. The basepoint might be a country, an organization, or other type of group. Not all servers require this information.Up to 512 characters are allowed.See the digital sender website for examples (http://www.digitalsender.hp.com).
LDAP Service Port TCP/IP port number on which the LDAP directory server is listening. The default port is 389.
Configuration parameters on the control panel (continued)
Parameter Description
82 Chapter 3 - Administering EN
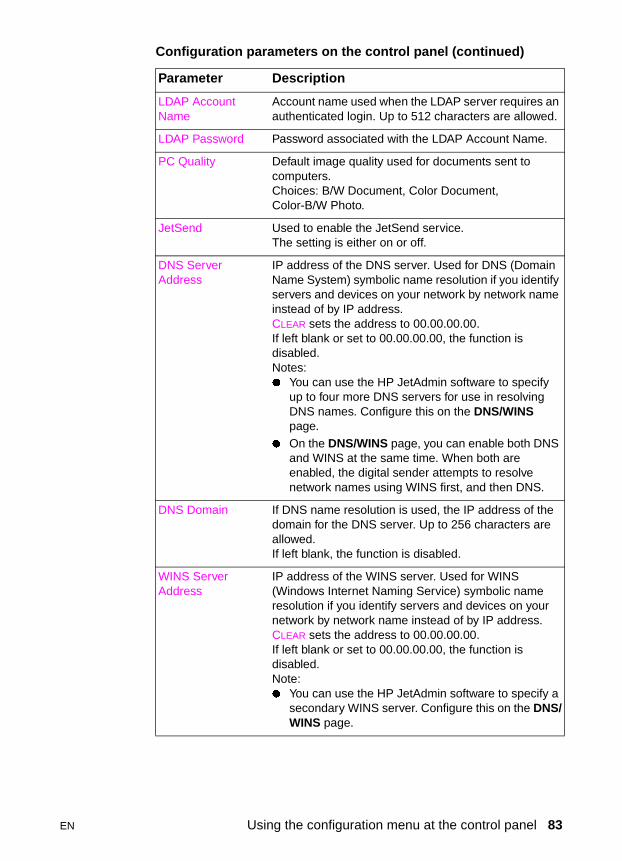
LDAP Account Name
Account name used when the LDAP server requires an authenticated login. Up to 512 characters are allowed.
LDAP Password Password associated with the LDAP Account Name.
PC Quality Default image quality used for documents sent to computers.Choices: B/W Document, Color Document,Color-B/W Photo.
JetSend Used to enable the JetSend service. The setting is either on or off.
DNS Server Address
IP address of the DNS server. Used for DNS (Domain Name System) symbolic name resolution if you identify servers and devices on your network by network name instead of by IP address.CLEAR sets the address to 00.00.00.00.If left blank or set to 00.00.00.00, the function is disabled.Notes:� You can use the HP JetAdmin software to specify
up to four more DNS servers for use in resolving DNS names. Configure this on the DNS/WINS page.
� On the DNS/WINS page, you can enable both DNS and WINS at the same time. When both are enabled, the digital sender attempts to resolve network names using WINS first, and then DNS.
DNS Domain If DNS name resolution is used, the IP address of the domain for the DNS server. Up to 256 characters are allowed.If left blank, the function is disabled.
WINS Server Address
IP address of the WINS server. Used for WINS (Windows Internet Naming Service) symbolic name resolution if you identify servers and devices on your network by network name instead of by IP address.CLEAR sets the address to 00.00.00.00.If left blank or set to 00.00.00.00, the function is disabled.Note:� You can use the HP JetAdmin software to specify a
secondary WINS server. Configure this on the DNS/WINS page.
Configuration parameters on the control panel (continued)
Parameter Description
EN Using the configuration menu at the control panel 83
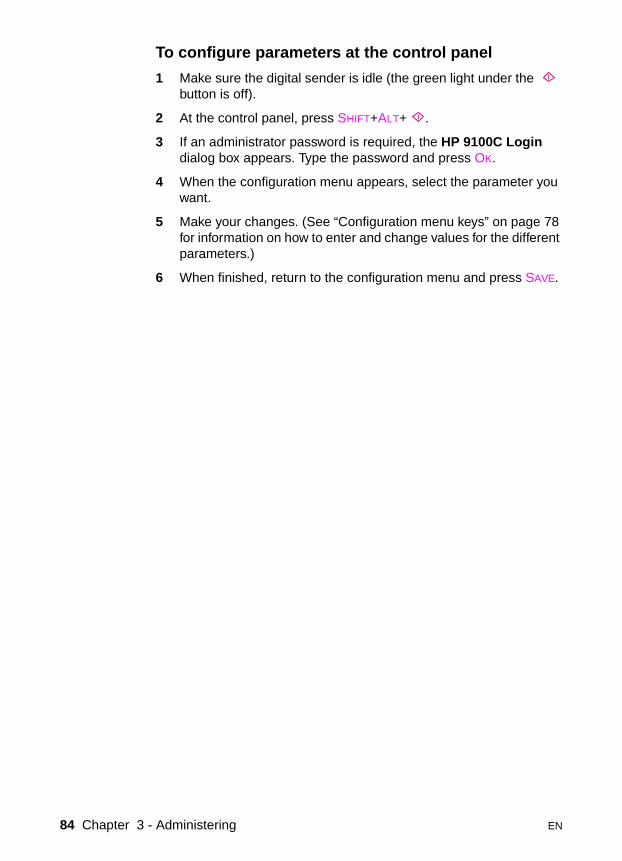
To configure parameters at the control panel
1 Make sure the digital sender is idle (the green light under the button is off).
2 At the control panel, press SHIFT+ALT+ .
3 If an administrator password is required, the HP 9100C Login dialog box appears. Type the password and press OK.
4 When the configuration menu appears, select the parameter you want.
5 Make your changes. (See “Configuration menu keys” on page 78 for information on how to enter and change values for the different parameters.)
6 When finished, return to the configuration menu and press SAVE.
84 Chapter 3 - Administering EN
Controlling notifications
The digital sender notifies administrators and users of events in several ways:
� control panel messagesThese messages report status and error conditions. See “Control panel messages” on page 141 for a list and description of messages.
� activity log entriesThe activity log is a record of digital sender use and system activities. See “Activity log messages” on page 170 for a list and description of entries. See “Using the activity log” on page 113 for information on how to access the activity log.
� e-mail welcome message for new user profileEvery time you or a user creates a user profile, the digital sender sends a “welcome” message to the owner of the profile. The message serves the following purposes:
• notifies to which digital sender the profile has been added
• notifies that the profile is active and available at the control panel
• validates correctness of the “from” information in the profile
• provides a printed copy of the user profile contents
� e-mail message when important events occurThe administrator can choose to receive e-mail messages for important events that occur—for example, if there is a change to a user profile. See “To control whether you receive e-mail messages when important events occur using the ABM” on page 86 or “To control whether you receive e-mail messages when important events occur using the HP JetAdmin software” on page 86.
� fax transmission notificationsPrinted reports and e-mail messages with information about fax transmissions are provided if your LAN fax product supports notifications and if you have configured the digital sender for them. See the description of notifications on the HP JetAdmin software Fax page under “To move through the configuration pages” on page 46.
� notification of e-mail delivery (DSN)Users can enable or disable the Delivery Status Notification (DSN) feature in their user profiles if DSN is supported by your system. If the feature is enabled, the user receives a notification of e-mail delivery, but not a return copy of the message.
EN Controlling notifications 85
Notes about notifications:
� E-mail notifications require that the recipients have an e-mail address configured in their user profile.
� Your system might support DSN, but not all systems do. The route to an e-mail destination might include a node that does not support DSN. If DSN is not supported through the entire path, a return notification might not occur.
� All pending notifications are lost when you reset network parameters and when fatal errors occur in operation. If anyone turns the digital sender off, the notification for the job that was last submitted might also get lost (however, you can check the activity log to see if that particular transmission was successful).
To control whether you receive e-mail messages when important events occur using the ABM
1 Start the ABM.
2 On the Digital Sender menu, click Security.
3 Select your preference for Notify me through e-mail when events that require my attention occur.
4 Click OK.
To control whether you receive e-mail messages when important events occur using the HP JetAdmin software
1 Start the HP JetAdmin software.
2 On the device list, select the digital sender you want.
3 Click Device and then click Modify.
4 In the Configuration window, click Security.
5 Select your preference for Notify me through e-mail when events that require my attention occur.
6 Click OK.
86 Chapter 3 - Administering EN
To control printed transaction reports and e-mail messages for fax transmission
1 Start the HP JetAdmin software.
2 On the device list, click the digital sender you want.
3 Click Device and then click Modify.
4 In the Configuration window, click Fax.
5 Select your preferences for notifications.
6 Click OK.
EN Controlling notifications 87
Shutting down and restarting
Use the shutdown procedure for the following reason:
� to prepare the digital sender to be physically turned off (for example, when you need to replace a part)
Notes about the procedure:
� Shutdown locks the digital sender from use until you restart it. The procedure does not turn the power off. Jobs in process might be interrupted.
� You can shut the digital sender down at the control panel, or do it remotely using the HP JetAdmin software.
� You cannot discover the digital sender on the network using the HP JetAdmin software until you restart it.
To shut down using the control panel
1 Make sure the digital sender is idle (the green light under the button is off).
2 At the control panel, press SHIFT+ALT+ .
3 If an administrator password is required, the HP 9100C Login dialog box appears. Type the password and press OK.
4 When the configuration menu appears, press TOOLS.
5 Select Shutdown and press OK.
6 Press OK to confirm that you want to shut down.
88 Chapter 3 - Administering EN
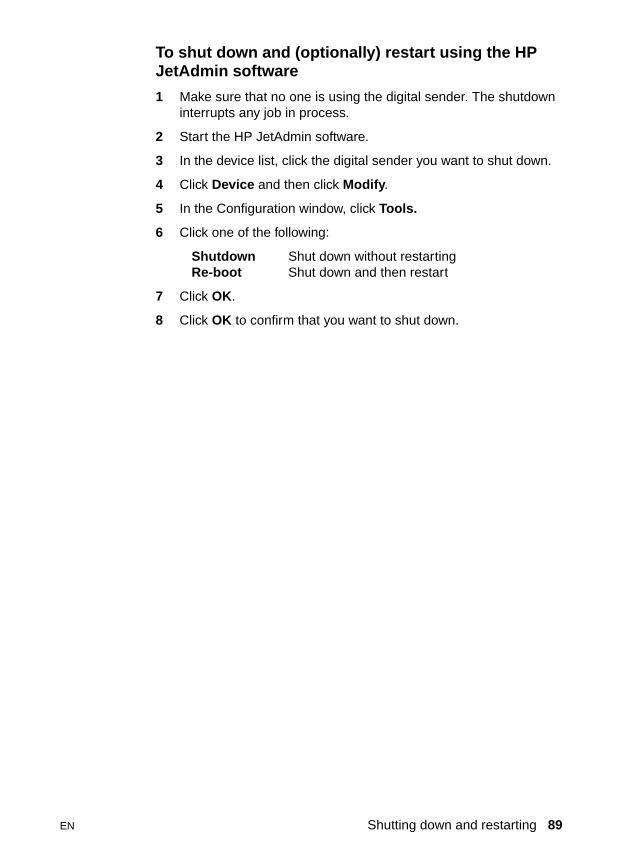
To shut down and (optionally) restart using the HP JetAdmin software
1 Make sure that no one is using the digital sender. The shutdown interrupts any job in process.
2 Start the HP JetAdmin software.
3 In the device list, click the digital sender you want to shut down.
4 Click Device and then click Modify.
5 In the Configuration window, click Tools.
6 Click one of the following:
Shutdown Shut down without restartingRe-boot Shut down and then restart
7 Click OK.
8 Click OK to confirm that you want to shut down.
EN Shutting down and restarting 89
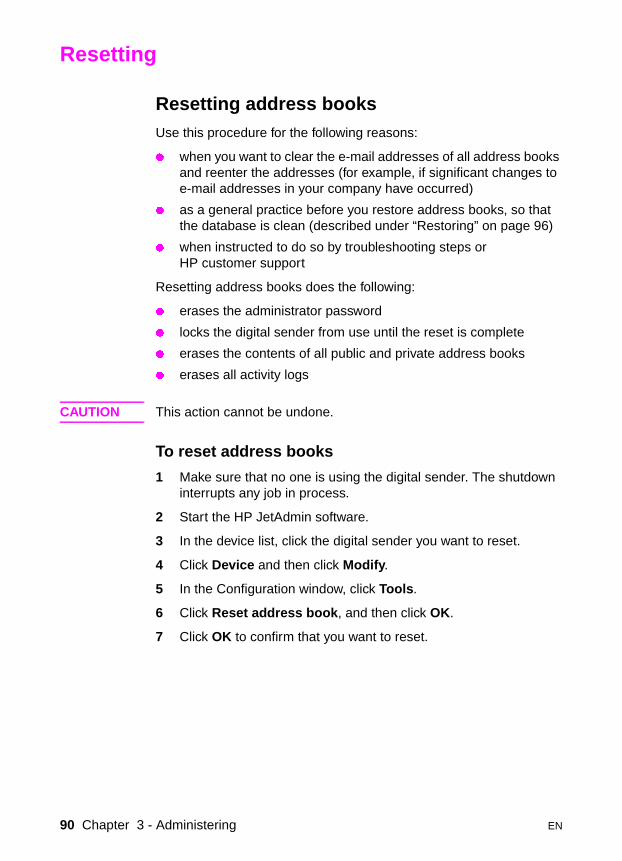
Resetting
Resetting address booksUse this procedure for the following reasons:
� when you want to clear the e-mail addresses of all address books and reenter the addresses (for example, if significant changes to e-mail addresses in your company have occurred)
� as a general practice before you restore address books, so that the database is clean (described under “Restoring” on page 96)
� when instructed to do so by troubleshooting steps or HP customer support
Resetting address books does the following:
� erases the administrator password
� locks the digital sender from use until the reset is complete
� erases the contents of all public and private address books
� erases all activity logs
CAUTION This action cannot be undone.
To reset address books
1 Make sure that no one is using the digital sender. The shutdown interrupts any job in process.
2 Start the HP JetAdmin software.
3 In the device list, click the digital sender you want to reset.
4 Click Device and then click Modify.
5 In the Configuration window, click Tools.
6 Click Reset address book, and then click OK.
7 Click OK to confirm that you want to reset.
90 Chapter 3 - Administering EN
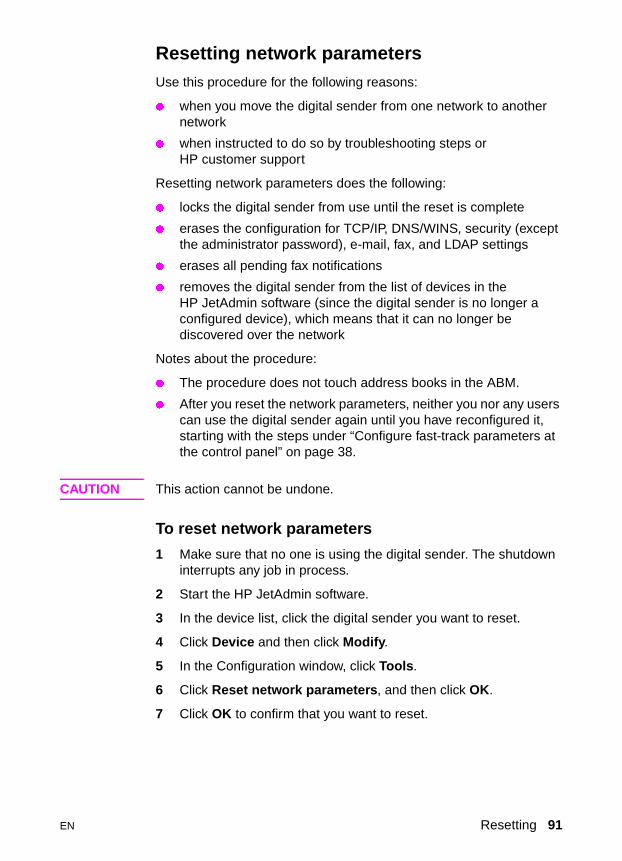
Resetting network parametersUse this procedure for the following reasons:
� when you move the digital sender from one network to another network
� when instructed to do so by troubleshooting steps or HP customer support
Resetting network parameters does the following:
� locks the digital sender from use until the reset is complete
� erases the configuration for TCP/IP, DNS/WINS, security (except the administrator password), e-mail, fax, and LDAP settings
� erases all pending fax notifications
� removes the digital sender from the list of devices in the HP JetAdmin software (since the digital sender is no longer a configured device), which means that it can no longer be discovered over the network
Notes about the procedure:
� The procedure does not touch address books in the ABM.
� After you reset the network parameters, neither you nor any users can use the digital sender again until you have reconfigured it, starting with the steps under “Configure fast-track parameters at the control panel” on page 38.
CAUTION This action cannot be undone.
To reset network parameters
1 Make sure that no one is using the digital sender. The shutdown interrupts any job in process.
2 Start the HP JetAdmin software.
3 In the device list, click the digital sender you want to reset.
4 Click Device and then click Modify.
5 In the Configuration window, click Tools.
6 Click Reset network parameters, and then click OK.
7 Click OK to confirm that you want to reset.
EN Resetting 91
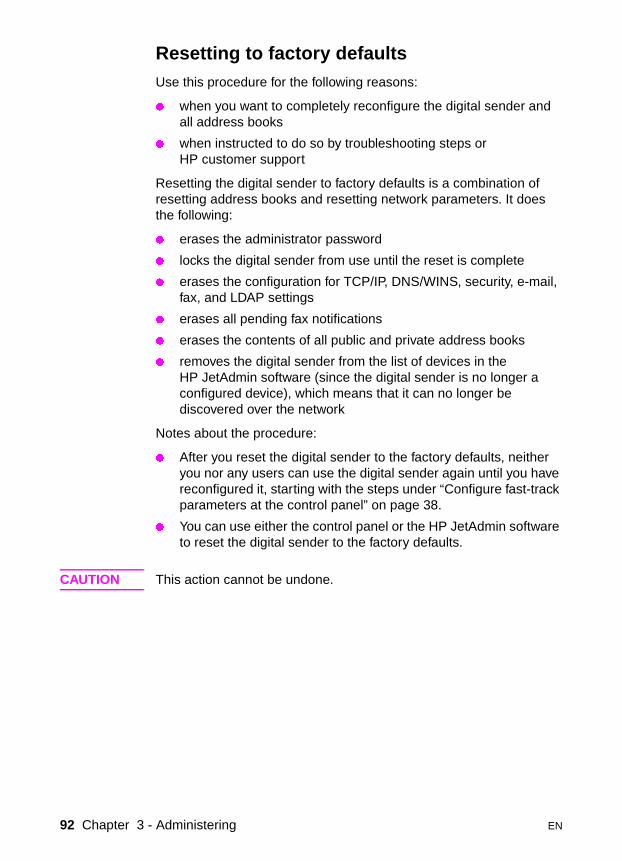
Resetting to factory defaultsUse this procedure for the following reasons:
� when you want to completely reconfigure the digital sender and all address books
� when instructed to do so by troubleshooting steps or HP customer support
Resetting the digital sender to factory defaults is a combination of resetting address books and resetting network parameters. It does the following:
� erases the administrator password
� locks the digital sender from use until the reset is complete
� erases the configuration for TCP/IP, DNS/WINS, security, e-mail, fax, and LDAP settings
� erases all pending fax notifications
� erases the contents of all public and private address books
� removes the digital sender from the list of devices in the HP JetAdmin software (since the digital sender is no longer a configured device), which means that it can no longer be discovered over the network
Notes about the procedure:
� After you reset the digital sender to the factory defaults, neither you nor any users can use the digital sender again until you have reconfigured it, starting with the steps under “Configure fast-track parameters at the control panel” on page 38.
� You can use either the control panel or the HP JetAdmin software to reset the digital sender to the factory defaults.
CAUTION This action cannot be undone.
92 Chapter 3 - Administering EN
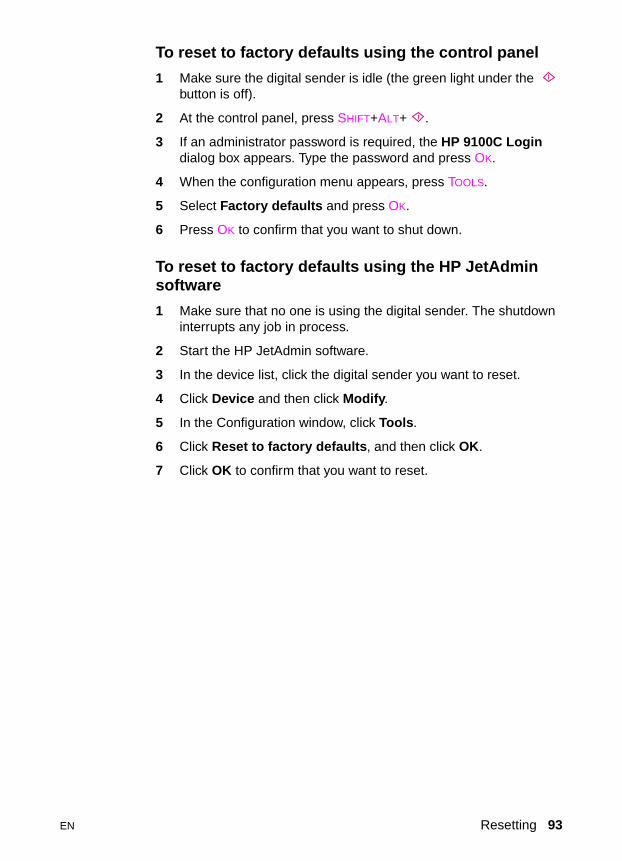
To reset to factory defaults using the control panel
1 Make sure the digital sender is idle (the green light under the button is off).
2 At the control panel, press SHIFT+ALT+ .
3 If an administrator password is required, the HP 9100C Login dialog box appears. Type the password and press OK.
4 When the configuration menu appears, press TOOLS.
5 Select Factory defaults and press OK.
6 Press OK to confirm that you want to shut down.
To reset to factory defaults using the HP JetAdmin software
1 Make sure that no one is using the digital sender. The shutdown interrupts any job in process.
2 Start the HP JetAdmin software.
3 In the device list, click the digital sender you want to reset.
4 Click Device and then click Modify.
5 In the Configuration window, click Tools.
6 Click Reset to factory defaults, and then click OK.
7 Click OK to confirm that you want to reset.
EN Resetting 93
Backing up and restoring address books
Backing upUse this procedure for the following reasons:
� as a part of your regular routine for backing up important information
� before you make a large number of changes in the HP Address Book Manager
� to make a copy of information so that you can replicate it on another digital sender
� when instructed to do so by troubleshooting steps or HP customer support
Notes about the procedure:
� The administrator and users can both back up address books, but they have different capabilities:
• administratorCan save a copy of all public and private address books, user profiles, printer assignments, and function key assignments.
• usersCan save a copy of only their private address books.
� The procedure does not back up any configuration performed at the control panel or through the HP JetAdmin software.
� The complete activity log is included in the backup.
� You can save the backup file only on a computer where the HP Digital Sender Link has write access.
� Backup requires from 10 to 20 minutes (depending on the amount of information being backed up).
� The backup creates 19 files. We recommend that you store these backup files in an otherwise empty folder.
� Backup requires an average of 50 to 100 MB of free hard disk space.
� Do not delete, rename, or make any changes to the backup files. If you do, the complete set becomes unusable.
� Backing up locks the digital sender and the ABM from use until the backup is complete.
94 Chapter 3 - Administering EN
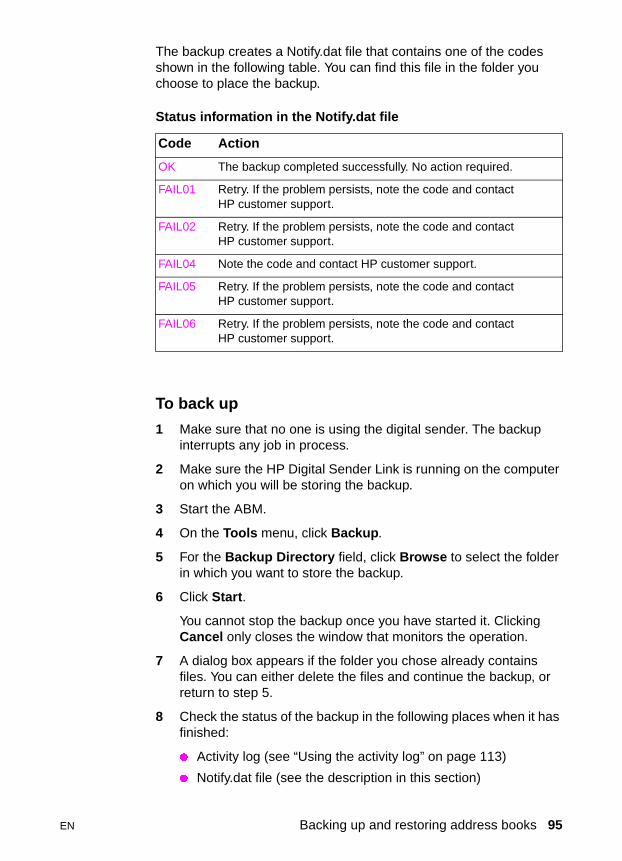
The backup creates a Notify.dat file that contains one of the codes shown in the following table. You can find this file in the folder you choose to place the backup.
To back up
1 Make sure that no one is using the digital sender. The backup interrupts any job in process.
2 Make sure the HP Digital Sender Link is running on the computer on which you will be storing the backup.
3 Start the ABM.
4 On the Tools menu, click Backup.
5 For the Backup Directory field, click Browse to select the folder in which you want to store the backup.
6 Click Start.
You cannot stop the backup once you have started it. Clicking Cancel only closes the window that monitors the operation.
7 A dialog box appears if the folder you chose already contains files. You can either delete the files and continue the backup, or return to step 5.
8 Check the status of the backup in the following places when it has finished:
� Activity log (see “Using the activity log” on page 113)
� Notify.dat file (see the description in this section)
Status information in the Notify.dat file
Code Action
OK The backup completed successfully. No action required.
FAIL01 Retry. If the problem persists, note the code and contact HP customer support.
FAIL02 Retry. If the problem persists, note the code and contact HP customer support.
FAIL04 Note the code and contact HP customer support.
FAIL05 Retry. If the problem persists, note the code and contact HP customer support.
FAIL06 Retry. If the problem persists, note the code and contact HP customer support.
EN Backing up and restoring address books 95
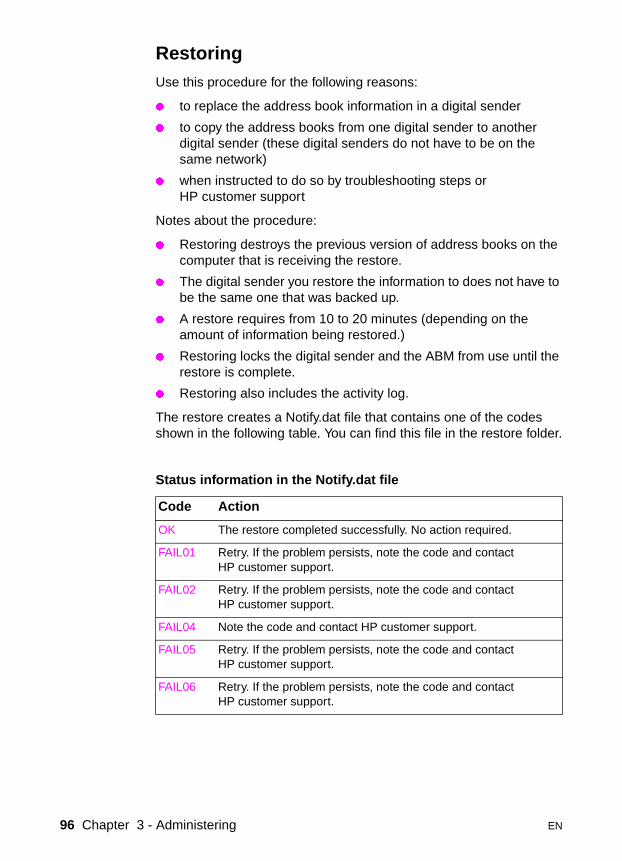
RestoringUse this procedure for the following reasons:
� to replace the address book information in a digital sender
� to copy the address books from one digital sender to another digital sender (these digital senders do not have to be on the same network)
� when instructed to do so by troubleshooting steps or HP customer support
Notes about the procedure:
� Restoring destroys the previous version of address books on the computer that is receiving the restore.
� The digital sender you restore the information to does not have to be the same one that was backed up.
� A restore requires from 10 to 20 minutes (depending on the amount of information being restored.)
� Restoring locks the digital sender and the ABM from use until the restore is complete.
� Restoring also includes the activity log.
The restore creates a Notify.dat file that contains one of the codes shown in the following table. You can find this file in the restore folder.
Status information in the Notify.dat file
Code Action
OK The restore completed successfully. No action required.
FAIL01 Retry. If the problem persists, note the code and contact HP customer support.
FAIL02 Retry. If the problem persists, note the code and contact HP customer support.
FAIL04 Note the code and contact HP customer support.
FAIL05 Retry. If the problem persists, note the code and contact HP customer support.
FAIL06 Retry. If the problem persists, note the code and contact HP customer support.
96 Chapter 3 - Administering EN
To restore
1 Make sure that no one is using the digital sender. The restore interrupts any job in process.
2 Make sure the HP Digital Sender Link is running on the computer that is to receive the restored files.
3 Start the ABM.
4 On the Tools menu, click Restore.
5 For the Restore Directory field, click Browse to locate the folder that contains backup files.
6 Click Start.
You cannot stop the restore once you have started it. Clicking Cancel only closes the window that monitors the operation.
7 Click OK to confirm that you want to continue the restore.
8 Check the status of the restore in the following places when it has finished:
� Activity log (see “Using the activity log” on page 113)
� Notify.dat file (see the description in this section)
EN Backing up and restoring address books 97
Creating and maintaining user profiles
This section contains information about user profiles that pertains to the administrator. See the user guide or the ABM online help for details on other use.
Both users and the administrator have the ability to create a user profile. However, there are important differences in their capabilities:
� Users can see and change only their own profile. The administrator can see and change any user profile.
� Users cannot validate their own profile. If the administrator has set up security to require validation, only the administrator can do the validation (see “Controlling whether the administrator must validate new or changed user profiles” on page 102 and “Validating a new or changed user profile” on page 103).
To create a user profile
1 Start the ABM.
2 In the ABM main window, click Users.
3 On the File menu, click New.
4 Complete the information in the New User Profile dialog box
� Click Delivery Notification if you want the user to receive e-mail notifications regarding e-mail transmissions. Note that this feature works only if your system supports DSN (Delivery Status Notification) and if you supply an e-mail address for the user in this profile.
� Click Add E-mail address to Public Address Book to add the user to the Public Email address book.
� Make sure you select the Account Enabled check box.
5 When finished, click Add.
6 If you want to add another user profile, repeat steps 4 and 5.
7 When finished, click Close.
98 Chapter 3 - Administering EN
To change a user profile
1 Start the ABM.
2 In the ABM main window, click Users.
3 Click the user whose profile you want to change.
4 On the File menu, click Properties.
5 Make your changes in the User Profile Properties dialog box.
6 Click Change to confirm the changes and return to the main window.
To delete a user profile
1 Start the ABM.
2 In the ABM main window, click Users.
3 Click the user whose profile you want to delete.
4 On the File menu, click Delete.
EN Creating and maintaining user profiles 99
Controlling security
Determining who can use the digital senderThe administrator determines who can use the digital sender: only registered users (those with a user profile) or both registered users and guest users.
To determine who can use the digital sender
1 Start the HP JetAdmin software.
2 In the device list, click the digital sender.
3 Click Device and then click Modify.
4 In the Configuration window, click Security.
5 Use the Allow guest users field to indicate your preference (anyone or only registered users).
6 Click OK.
Changing or setting administrator passwordYou can change the administrator password using the control panel, the ABM, or the HP JetAdmin software.
Note The administrator password is case-sensitive.
To change or set administrator password using the control panel
1 Make sure the digital sender is idle (the green light under the button is off).
2 At the control panel, press SHIFT+ALT+ .
3 If an administrator password is already required, the HP 9100C Login dialog box appears. Type the password and press OK.
4 When the configuration menu appears, select Administrator Password and then press OK.
5 Type the old administrator password and press .
6 Type the new password and press .
7 Type the new password again and press CONFIRM.
8 Press SAVE to save the password and exit the menu.
100 Chapter 3 - Administering EN
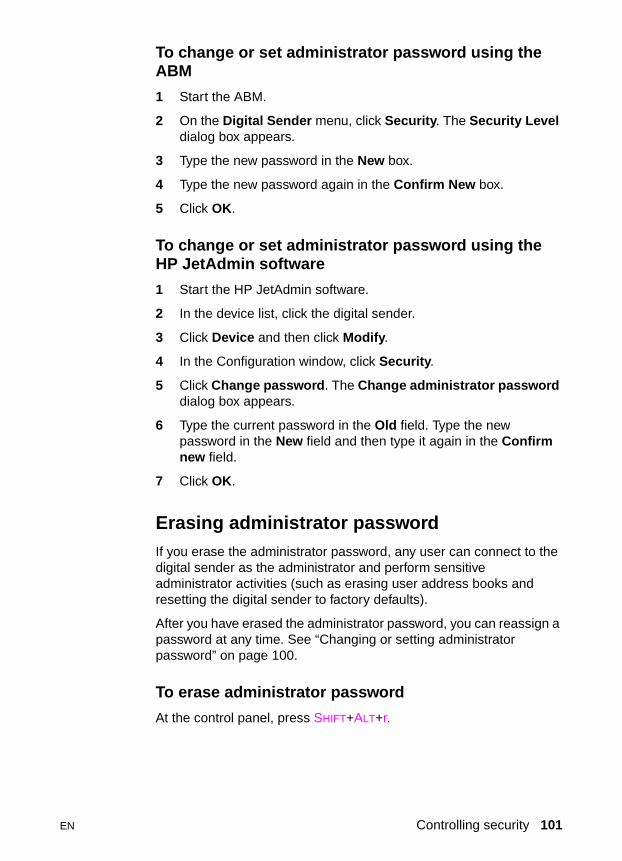
To change or set administrator password using the ABM
1 Start the ABM.
2 On the Digital Sender menu, click Security. The Security Level dialog box appears.
3 Type the new password in the New box.
4 Type the new password again in the Confirm New box.
5 Click OK.
To change or set administrator password using the HP JetAdmin software
1 Start the HP JetAdmin software.
2 In the device list, click the digital sender.
3 Click Device and then click Modify.
4 In the Configuration window, click Security.
5 Click Change password. The Change administrator password dialog box appears.
6 Type the current password in the Old field. Type the new password in the New field and then type it again in the Confirm new field.
7 Click OK.
Erasing administrator passwordIf you erase the administrator password, any user can connect to the digital sender as the administrator and perform sensitive administrator activities (such as erasing user address books and resetting the digital sender to factory defaults).
After you have erased the administrator password, you can reassign a password at any time. See “Changing or setting administrator password” on page 100.
To erase administrator password
At the control panel, press SHIFT+ALT+r.
EN Controlling security 101
Controlling whether the administrator must validate new or changed user profilesAny ABM user can create or change a user profile. However, the administrator controls what happens then:
� New user profile or change is accepted at onceUsers can immediately access public address books and their private address books at the control panel.
� New user profile or change must be validated by the administratorUsers receive a notification that their user profile has been submitted, but needs validation. Work on any private address books is not lost, but private address books are not available on the digital sender until the administrator has validated the user profile. The administrator also receives notification (if the option for notification when important events have occurred is enabled, as described under “Controlling notifications” on page 85).
Note The following user profile changes do not require validation, even if the validation requirement has been set: password, file format, and e-mail delivery notification (DSN).
To change the validation requirement using the ABM
1 Start the ABM.
2 On the Digital Sender menu, click Security.
3 Select your preference for Administrator must always validate creation/changes of user profiles.
4 Click Change.
To change the validation requirement using the HP JetAdmin software
1 Open the HP JetAdmin software.
2 In the device list, click the digital sender.
3 Click Device and then click Modify.
4 In the Configuration window, click Security.
5 Select your preference for Administrator must always validate creation/changes of registered user profiles.
6 Click OK.
102 Chapter 3 - Administering EN
Validating a new or changed user profileUse this procedure when new or changed user profiles require validation (see “Controlling whether the administrator must validate new or changed user profiles” on page 102 for details on how the requirement is set). Users cannot access their private address books at the control panel until their profiles have been validated.
To validate a new or changed user profile
1 Start the ABM.
2 In the ABM main window, click Users.
3 Click the user profile that needs validation.
4 On the File menu, click Properties.
5 In the User Properties dialog box, select the Account Enabled check box.
6 Click Change.
EN Controlling security 103
Working with address books
This section contains information about address books that pertains to the administrator.
When you log in to the HP Address Book Manager as administrator, the main window lists the following:
� Public EmailContains e-mail addresses available to any user. Only the administrator can change information in this address book (see “Maintaining the Public Email address book” on page 105).
� Public FaxContains fax destinations available to any user. Registered users and the administrator can change information in this address book (see the user guide or the ABM online help for steps).
� Public Distribution ListsContains predefined groups of e-mail addresses available to any user. Only the administrator can change information in this address book (see “Maintaining the Public Distribution Lists address book” on page 105).
� UsersContains a list of all registered users (the main window that users see contains only their own name). You can select any user and see and change information in their private address books (see the user guide or the ABM online help for steps).
� Public PrintersContains the network printers that users can access from the digital sender to make copies of a document. Only the administrator can change information in this address book (see “Managing printers” on page 111).
� Customized Function KeysContains the function keys that have been customized to support third-party programs. Only the administrator can configure this advanced feature of the digital sender (see “Customizing the digital sender to support third-party programs” on page 58).
104 Chapter 3 - Administering EN
Maintaining the Public Email address bookOnly the administrator can change information in the Public Email address book.
To add an address to the Public Email address book
1 Start the ABM.
2 In the ABM main window, click Public Email.
3 On the File menu, click New. The New E-mail dialog box appears.
4 Complete the information in the dialog box and then click Add.
5 Repeat step 4 for each address you want to add.
6 When finished, click Close.
To delete an address from the Public Email address book
1 Start the ABM.
2 In the ABM main window, click Public Email.
3 When the list of addresses appears, click the one you want to delete.
4 On the File menu, click Delete.
5 Click Yes to confirm.
Maintaining the Public Distribution Lists address bookOnly the administrator can change information in the Public Distribution Lists address book.
To add a list to the Public Distribution Lists address book
1 Start the ABM.
2 In the ABM main window, click Public Distribution Lists.
3 On the File Menu, click New. The words “New List” appear.
4 Type over the words “New List” with the name for the distribution list.
5 Press ENTER.
EN Working with address books 105
To delete a list from the Public Distribution Lists address book
1 Start the ABM.
2 In the ABM main window, click Public Distribution Lists.
3 Click the distribution list you want to delete.
4 On the File menu, click Delete.
5 Click Yes to confirm.
To add addresses to a distribution list
1 Start the ABM.
2 In the ABM main window, open the e-mail address book or distribution list that contains the addresses you want to add to a list.
3 Select the addresses you want to add.
Note To select a continuous set of e-mail addresses, click the first one, hold down SHIFT, and click the last one you want; the entire set is highlighted. To select more than one individual address, click the first one, hold down CTRL, and click the others that you want, one at a time; the addresses you select are highlighted.
4 On the Edit menu, click Copy.
5 Click Public Distribution Lists.
6 Click the distribution list you want to change.
7 On the Edit menu, click Paste. The new destinations are added to the list.
To delete addresses from a distribution list
1 Start the ABM.
2 In the ABM main window, click the distribution list that contains the addresses you want to delete.
3 Select the addresses. (See the note above for tips on selecting them.)
4 On the File menu, Click Delete.
5 Click OK to confirm the deletion.
106 Chapter 3 - Administering EN
Importing e-mail addresses into address booksThis section contains information about importing e-mail addresses that pertains to the administrator.
Both users and the administrator can import e-mail addresses into the digital sender, but they have different capabilities:
� Users can import e-mail addresses only into their private e-mail address books. The administrator can import e-mail addresses into the Public Email address book.
� Users can import CSV (comma-separated value) files and LDIF (LDAP Data Interchange Format) files. The administrator can import these types of files, as well as HPBC (Hewlett-Packard Batch Configuration) files. See the explanations and examples of these three file formats below.
� The administrator can choose to erase the contents of the address book into which the e-mail addresses are being imported, thus replacing the entire list. Users do not have this option.
The procedures are the same for users and the administrator. See the user guide or the ABM online help for steps.
A record of problems encountered during import is kept in a log file called ImportAB.log. You can find this log in the Windows\Temp folder of the computer on which the ABM is running. If errors occur during the import, a message box asks if you want to view the log file then. You can view the file at a later time as well, using any program (such as Notepad) that reads .txt files.
EN Working with address books 107
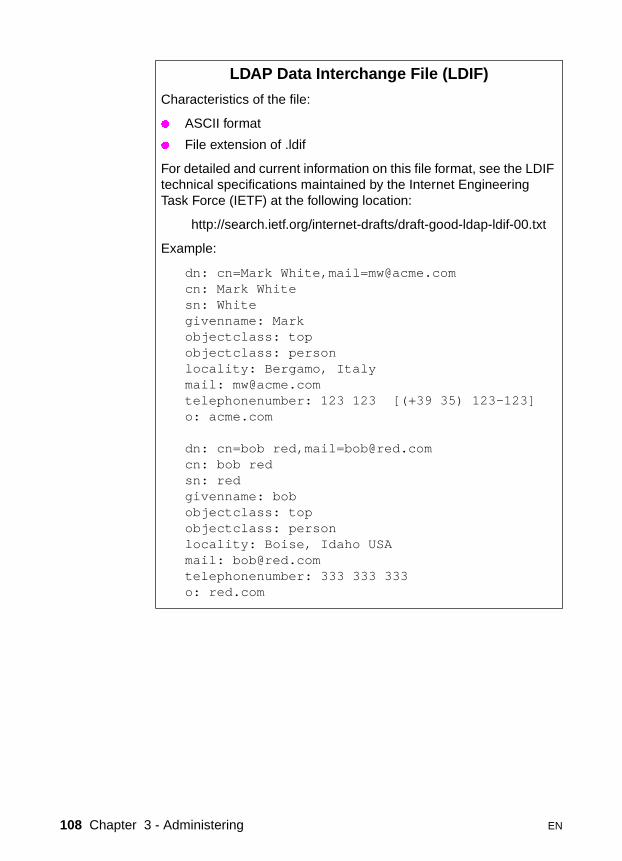
LDAP Data Interchange File (LDIF)
Characteristics of the file:
� ASCII format
� File extension of .ldif
For detailed and current information on this file format, see the LDIF technical specifications maintained by the Internet Engineering Task Force (IETF) at the following location:
http://search.ietf.org/internet-drafts/draft-good-ldap-ldif-00.txt
Example:
dn: cn=Mark White,[email protected]: Mark Whitesn: Whitegivenname: Markobjectclass: topobjectclass: personlocality: Bergamo, Italymail: [email protected]: 123 123 [(+39 35) 123-123]o: acme.com
dn: cn=bob red,[email protected]: bob redsn: redgivenname: bobobjectclass: topobjectclass: personlocality: Boise, Idaho USAmail: [email protected]: 333 333 333o: red.com
108 Chapter 3 - Administering EN
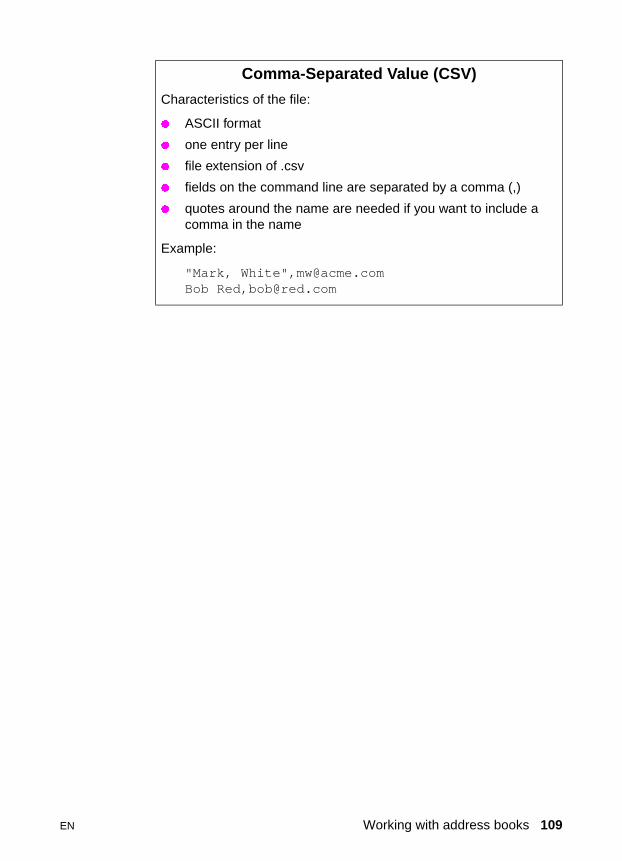
Comma-Separated Value (CSV)
Characteristics of the file:
� ASCII format
� one entry per line
� file extension of .csv
� fields on the command line are separated by a comma (,)
� quotes around the name are needed if you want to include a comma in the name
Example:
"Mark, White",[email protected] Red,[email protected]
EN Working with address books 109
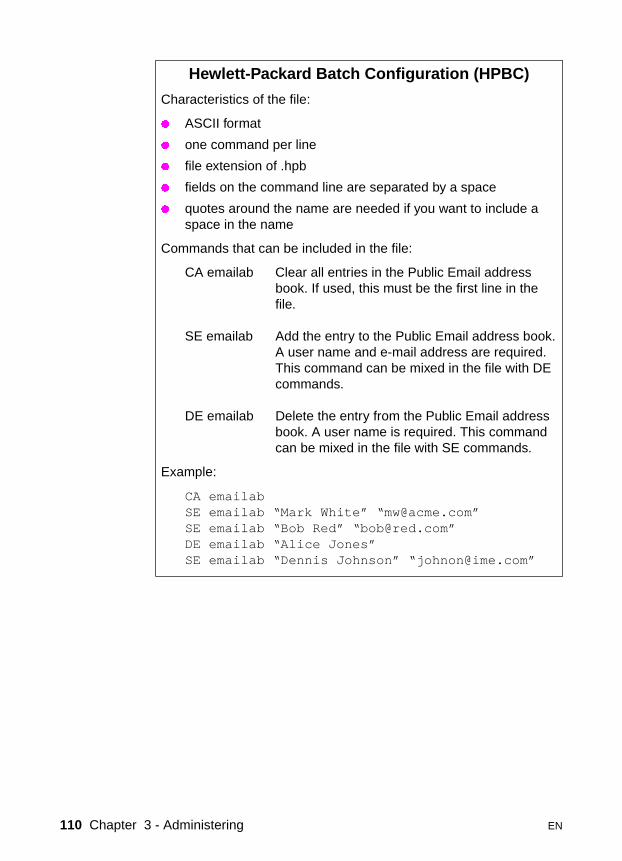
Hewlett-Packard Batch Configuration (HPBC)
Characteristics of the file:
� ASCII format
� one command per line
� file extension of .hpb
� fields on the command line are separated by a space
� quotes around the name are needed if you want to include a space in the name
Commands that can be included in the file:
CA emailab Clear all entries in the Public Email addressbook. If used, this must be the first line in thefile.
SE emailab Add the entry to the Public Email address book.A user name and e-mail address are required.This command can be mixed in the file with DE commands.
DE emailab Delete the entry from the Public Email addressbook. A user name is required. This commandcan be mixed in the file with SE commands.
Example:
CA emailabSE emailab “Mark White” “[email protected]”SE emailab “Bob Red” “[email protected]”DE emailab “Alice Jones”SE emailab “Dennis Johnson” “[email protected]”
110 Chapter 3 - Administering EN
Managing printers
To enable convenience copying or printing of fax transaction reports, you need to set up at least one printer for use with the ABM. The list of printers that you make available appears in the ABM main window under Public Printers.
The printers you choose must already be configured on the network. You can set up any number of printers for convenience copying. At the digital sender, users then select the one they want to use. Only one printer can be used for fax transaction reports (users do not have a choice).
To add a printer to the Public Printers list
1 Start the ABM.
2 In the ABM main window, click Public Printers.
3 On the File menu, click New. The New Printer dialog box appears.
4 Enter Name, Network Address, and Type.
5 If you want this printer to be the one that prints fax transaction reports, select the Set as Default Printer for Reports check box.
If another printer has already been set as the default printer, a dialog box asks you to confirm that you want to change.
6 Click Add.
Note Fax transaction reports are possible only if your LAN fax product supports notifications and if you have enabled them (see the description of notifications on the HP JetAdmin software Fax page under “To move through the configuration pages” on page 46).
To delete a printer from the Public Printers list
1 Start the ABM.
2 Click Public Printers.
3 Click the printer you want to delete.
4 On the File menu, click Delete.
5 Click Yes to confirm.
EN Managing printers 111
To designate the printer for fax transaction reports
If the printer you want to use for fax transaction reports has not been set up for use with the ABM, follow the steps under “To add a printer to the Public Printers list” on page 111). Select the Set as Default Printer for Reports check box.
If the printer has already been set up for use with the ABM, follow the steps below.
Note Fax transaction reports are possible only if your LAN fax product supports notifications and if you have enabled them (see the description of notifications on the HP JetAdmin software Fax page under “To move through the configuration pages” on page 46).
1 Start the ABM.
2 In the ABM main window, click Public Printers.
3 Click the printer you want to use for fax transaction reports.
4 On the File menu, click Properties.
5 Select the Set as Default Printer for Reports check box.
6 Click Change.
If another printer has already been set as the default printer, a dialog box asks you to confirm that you want to change.
112 Chapter 3 - Administering EN

Using the activity log
The digital sender keeps a record of events in an activity log (see the box below). Every event has an “owner”—the individual who initiated the action. System events (such as configuration changes made at the control panel) name the administrator as their owner.
Both users and the administrator can view the log, but they have different capabilities:
� Users can view only the events they own as registered users and the events initiated by guests users. The administrator can view the log for the administrator, or the log for any user (registered or guest).
� The activity log for a user can hold up to 100 events. The log for the administrator can hold up to 200 events.
When the maximum number of entries in the activity log is reached, new events begin overwriting the oldest events.
You can view the log, copy and paste it into another program, save it to a separate file, print it, or clear it.
See “Activity log messages” on page 170 for a list and explanation of the messages.
Events recorded in the activity log
� shutdown and restart
� success or failure of an activity � user profile activity
� erase of address book contents
� backup � restore
� firmware upgrade
� system errors
� changes in configuration made with the configuration menu at the control panel
� change to e-mail configuration� change to fax configuration
� convenience copy enabled or disabled
� change to security configuration
Information recorded about each event
� date� time
� owner
� description of event� severity of event
(normal, warning, error, fatal)
EN Using the activity log 113
To view the activity log for guest user or administrator
1 Start the ABM.
2 On the Tools menu, click View Log.
3 Click either Administrator or Guest.
4 You can keep the activity viewer open while you work on your computer. To close it, on the File menu, click Exit.
To view the activity log for a registered user
1 Start the ABM.
2 Click Users.
3 Click the user whose log you want to see.
4 On the Tools menu, click View Log.
5 Click the user name.
6 You can keep the activity viewer open while you work on your computer. To close it, on the File menu, click Exit.
114 Chapter 3 - Administering EN
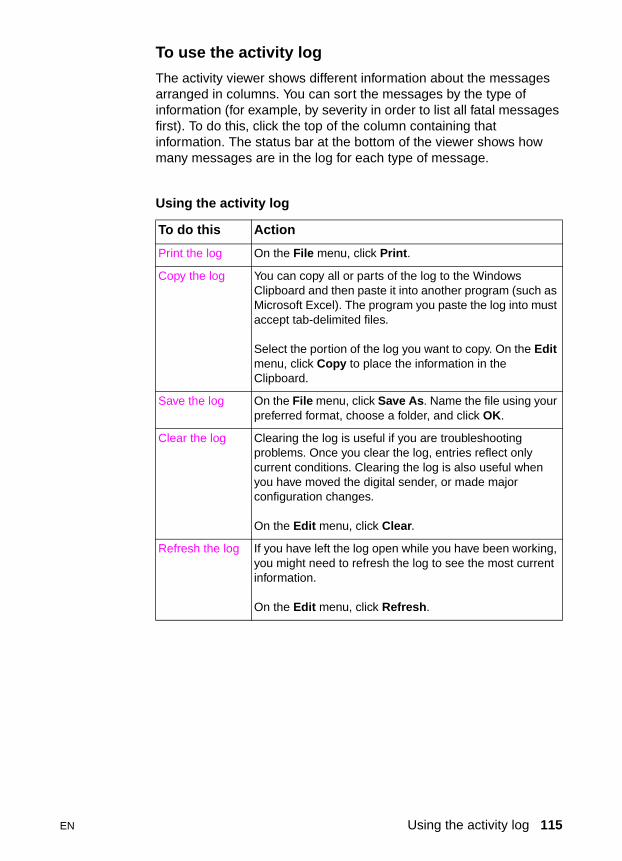
To use the activity log
The activity viewer shows different information about the messages arranged in columns. You can sort the messages by the type of information (for example, by severity in order to list all fatal messages first). To do this, click the top of the column containing that information. The status bar at the bottom of the viewer shows how many messages are in the log for each type of message.
Using the activity log
To do this Action
Print the log On the File menu, click Print.
Copy the log You can copy all or parts of the log to the Windows Clipboard and then paste it into another program (such as Microsoft Excel). The program you paste the log into must accept tab-delimited files.
Select the portion of the log you want to copy. On the Edit menu, click Copy to place the information in the Clipboard.
Save the log On the File menu, click Save As. Name the file using your preferred format, choose a folder, and click OK.
Clear the log Clearing the log is useful if you are troubleshooting problems. Once you clear the log, entries reflect only current conditions. Clearing the log is also useful when you have moved the digital sender, or made major configuration changes.
On the Edit menu, click Clear.
Refresh the log If you have left the log open while you have been working, you might need to refresh the log to see the most current information.
On the Edit menu, click Refresh.
EN Using the activity log 115
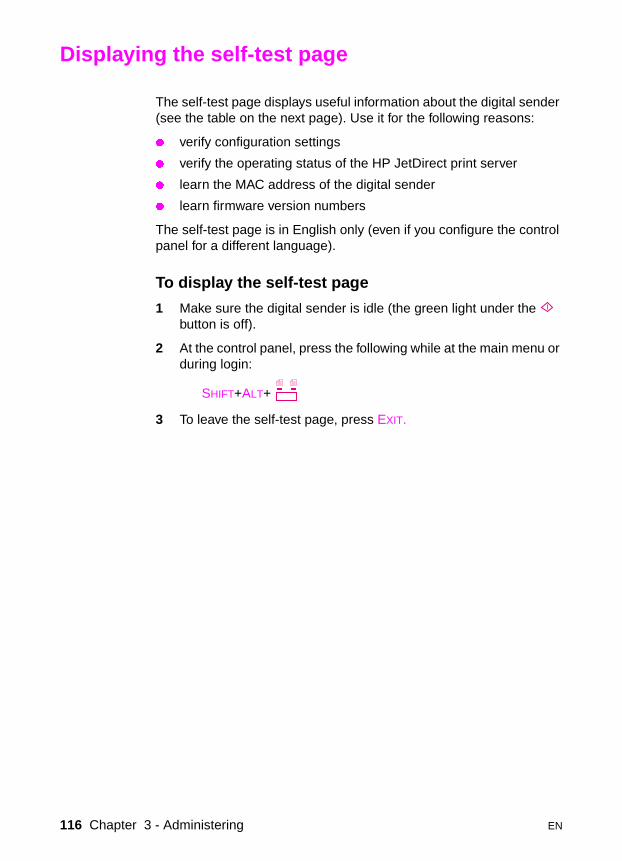
Displaying the self-test page
The self-test page displays useful information about the digital sender (see the table on the next page). Use it for the following reasons:
� verify configuration settings
� verify the operating status of the HP JetDirect print server
� learn the MAC address of the digital sender
� learn firmware version numbers
The self-test page is in English only (even if you configure the control panel for a different language).
To display the self-test page
1 Make sure the digital sender is idle (the green light under the button is off).
2 At the control panel, press the following while at the main menu or during login:
SHIFT+ALT+
3 To leave the self-test page, press EXIT.
116 Chapter 3 - Administering EN
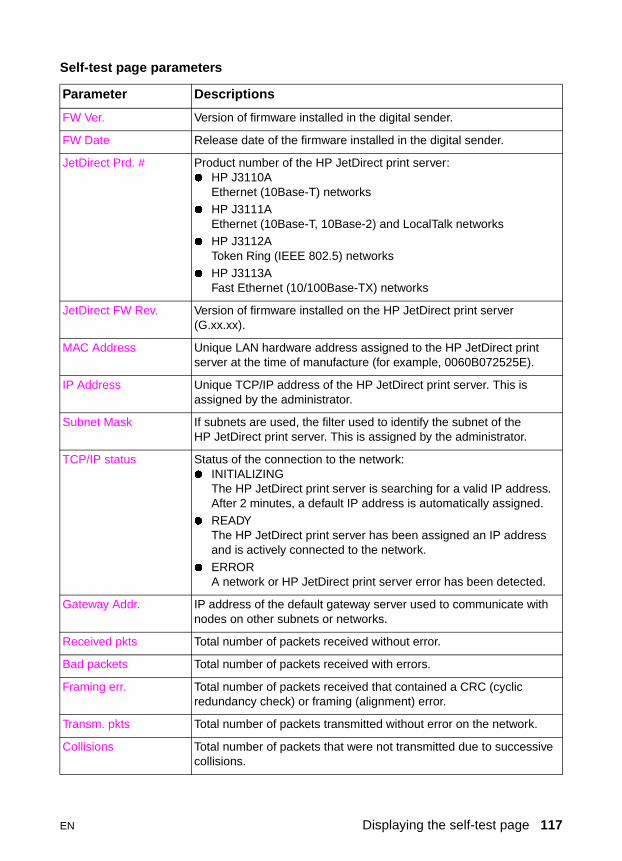
Self-test page parameters
Parameter Descriptions
FW Ver. Version of firmware installed in the digital sender.
FW Date Release date of the firmware installed in the digital sender.
JetDirect Prd. # Product number of the HP JetDirect print server:� HP J3110A
Ethernet (10Base-T) networks� HP J3111A
Ethernet (10Base-T, 10Base-2) and LocalTalk networks � HP J3112A
Token Ring (IEEE 802.5) networks� HP J3113A
Fast Ethernet (10/100Base-TX) networks
JetDirect FW Rev. Version of firmware installed on the HP JetDirect print server (G.xx.xx).
MAC Address Unique LAN hardware address assigned to the HP JetDirect print server at the time of manufacture (for example, 0060B072525E).
IP Address Unique TCP/IP address of the HP JetDirect print server. This is assigned by the administrator.
Subnet Mask If subnets are used, the filter used to identify the subnet of the HP JetDirect print server. This is assigned by the administrator.
TCP/IP status Status of the connection to the network:� INITIALIZING
The HP JetDirect print server is searching for a valid IP address. After 2 minutes, a default IP address is automatically assigned.
� READYThe HP JetDirect print server has been assigned an IP address and is actively connected to the network.
� ERRORA network or HP JetDirect print server error has been detected.
Gateway Addr. IP address of the default gateway server used to communicate with nodes on other subnets or networks.
Received pkts Total number of packets received without error.
Bad packets Total number of packets received with errors.
Framing err. Total number of packets received that contained a CRC (cyclic redundancy check) or framing (alignment) error.
Transm. pkts Total number of packets transmitted without error on the network.
Collisions Total number of packets that were not transmitted due to successive collisions.
EN Displaying the self-test page 117
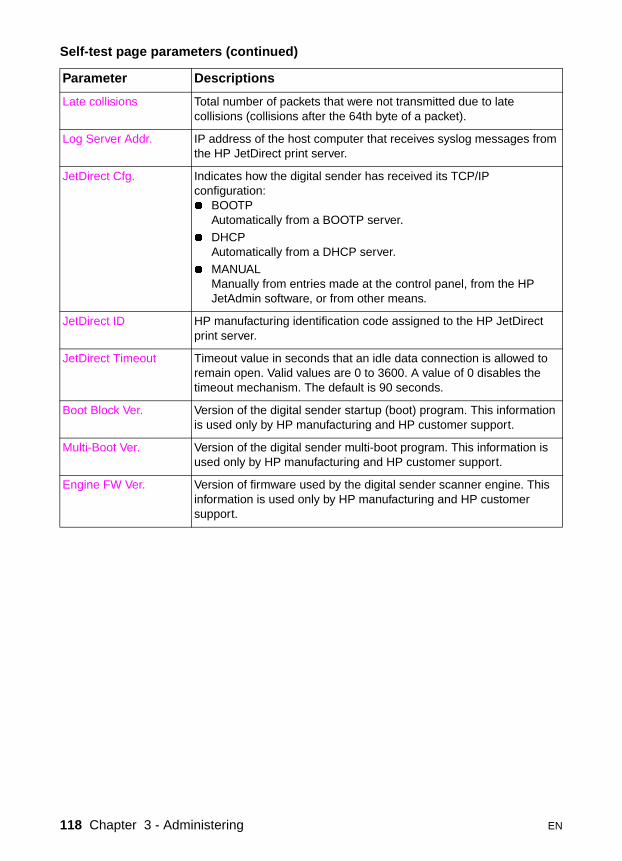
Late collisions Total number of packets that were not transmitted due to late collisions (collisions after the 64th byte of a packet).
Log Server Addr. IP address of the host computer that receives syslog messages from the HP JetDirect print server.
JetDirect Cfg. Indicates how the digital sender has received its TCP/IP configuration:� BOOTP
Automatically from a BOOTP server.� DHCP
Automatically from a DHCP server.� MANUAL
Manually from entries made at the control panel, from the HP JetAdmin software, or from other means.
JetDirect ID HP manufacturing identification code assigned to the HP JetDirect print server.
JetDirect Timeout Timeout value in seconds that an idle data connection is allowed to remain open. Valid values are 0 to 3600. A value of 0 disables the timeout mechanism. The default is 90 seconds.
Boot Block Ver. Version of the digital sender startup (boot) program. This information is used only by HP manufacturing and HP customer support.
Multi-Boot Ver. Version of the digital sender multi-boot program. This information is used only by HP manufacturing and HP customer support.
Engine FW Ver. Version of firmware used by the digital sender scanner engine. This information is used only by HP manufacturing and HP customer support.
Self-test page parameters (continued)
Parameter Descriptions
118 Chapter 3 - Administering EN
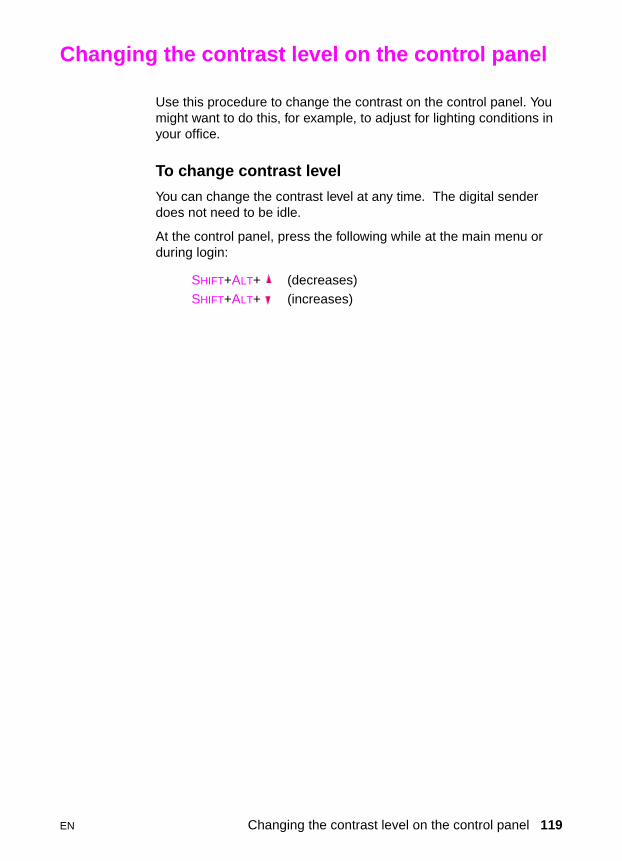
Changing the contrast level on the control panel
Use this procedure to change the contrast on the control panel. You might want to do this, for example, to adjust for lighting conditions in your office.
To change contrast level
You can change the contrast level at any time. The digital sender does not need to be idle.
At the control panel, press the following while at the main menu or during login:
SHIFT+ALT+ (decreases)SHIFT+ALT+ (increases)
EN Changing the contrast level on the control panel 119
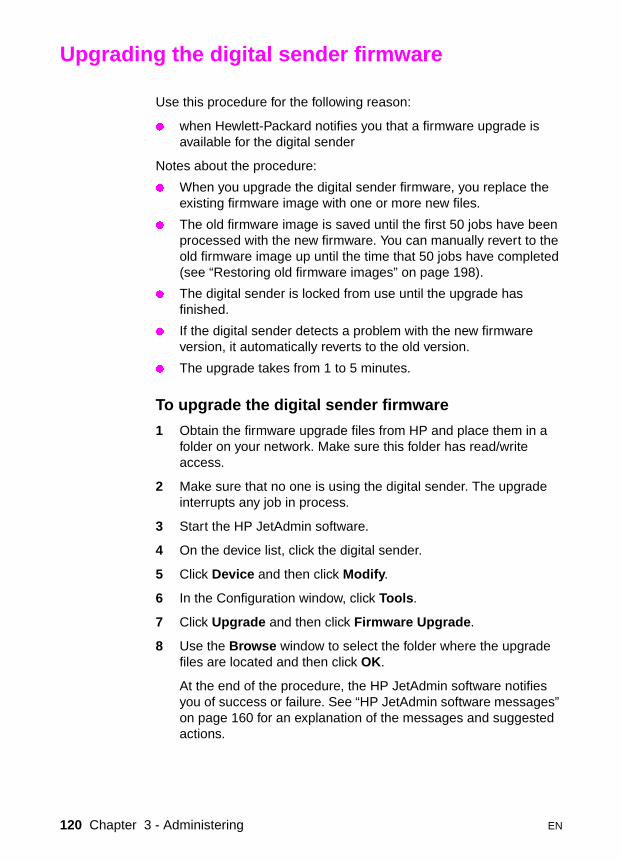
Upgrading the digital sender firmware
Use this procedure for the following reason:
� when Hewlett-Packard notifies you that a firmware upgrade is available for the digital sender
Notes about the procedure:
� When you upgrade the digital sender firmware, you replace the existing firmware image with one or more new files.
� The old firmware image is saved until the first 50 jobs have been processed with the new firmware. You can manually revert to the old firmware image up until the time that 50 jobs have completed (see “Restoring old firmware images” on page 198).
� The digital sender is locked from use until the upgrade has finished.
� If the digital sender detects a problem with the new firmware version, it automatically reverts to the old version.
� The upgrade takes from 1 to 5 minutes.
To upgrade the digital sender firmware
1 Obtain the firmware upgrade files from HP and place them in a folder on your network. Make sure this folder has read/write access.
2 Make sure that no one is using the digital sender. The upgrade interrupts any job in process.
3 Start the HP JetAdmin software.
4 On the device list, click the digital sender.
5 Click Device and then click Modify.
6 In the Configuration window, click Tools.
7 Click Upgrade and then click Firmware Upgrade.
8 Use the Browse window to select the folder where the upgrade files are located and then click OK.
At the end of the procedure, the HP JetAdmin software notifies you of success or failure. See “HP JetAdmin software messages” on page 160 for an explanation of the messages and suggested actions.
120 Chapter 3 - Administering EN
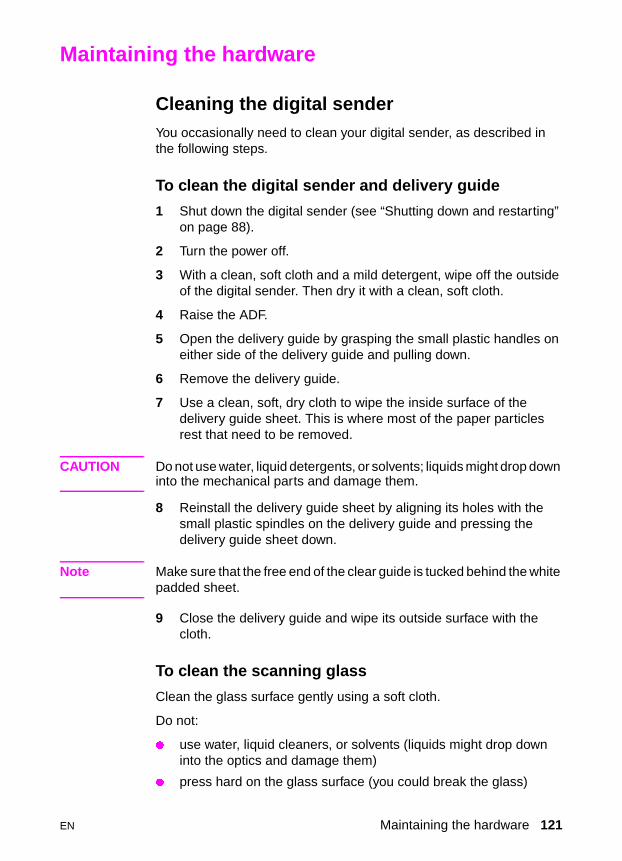
Maintaining the hardware
Cleaning the digital senderYou occasionally need to clean your digital sender, as described in the following steps.
To clean the digital sender and delivery guide
1 Shut down the digital sender (see “Shutting down and restarting” on page 88).
2 Turn the power off.
3 With a clean, soft cloth and a mild detergent, wipe off the outside of the digital sender. Then dry it with a clean, soft cloth.
4 Raise the ADF.
5 Open the delivery guide by grasping the small plastic handles on either side of the delivery guide and pulling down.
6 Remove the delivery guide.
7 Use a clean, soft, dry cloth to wipe the inside surface of the delivery guide sheet. This is where most of the paper particles rest that need to be removed.
CAUTION Do not use water, liquid detergents, or solvents; liquids might drop down into the mechanical parts and damage them.
8 Reinstall the delivery guide sheet by aligning its holes with the small plastic spindles on the delivery guide and pressing the delivery guide sheet down.
Note Make sure that the free end of the clear guide is tucked behind the white padded sheet.
9 Close the delivery guide and wipe its outside surface with the cloth.
To clean the scanning glass
Clean the glass surface gently using a soft cloth.
Do not:
� use water, liquid cleaners, or solvents (liquids might drop down into the optics and damage them)
� press hard on the glass surface (you could break the glass)
EN Maintaining the hardware 121
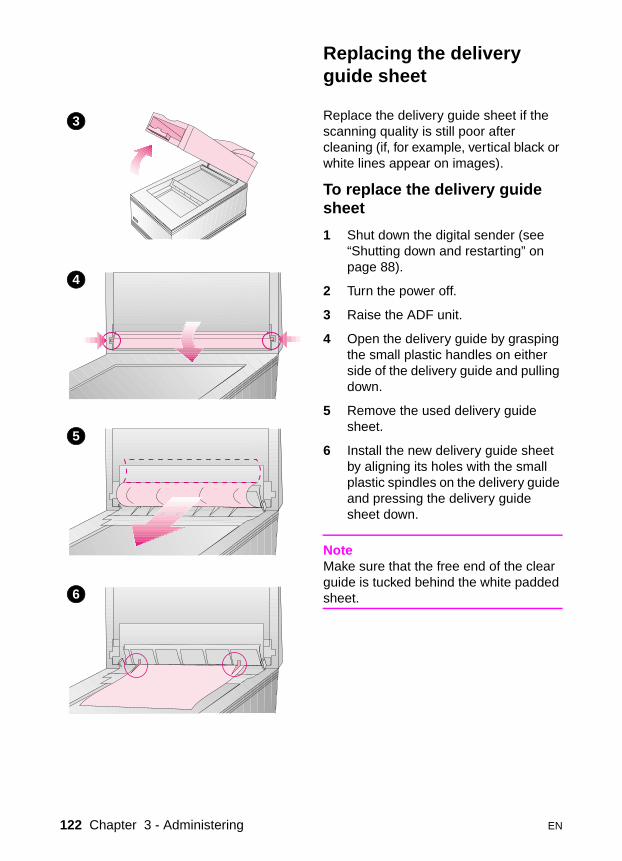
Replacing the delivery guide sheet
Replace the delivery guide sheet if the scanning quality is still poor after cleaning (if, for example, vertical black or white lines appear on images).
To replace the delivery guide sheet
1 Shut down the digital sender (see “Shutting down and restarting” on page 88).
2 Turn the power off.
3 Raise the ADF unit.
4 Open the delivery guide by grasping the small plastic handles on either side of the delivery guide and pulling down.
5 Remove the used delivery guide sheet.
6 Install the new delivery guide sheet by aligning its holes with the small plastic spindles on the delivery guide and pressing the delivery guide sheet down.
NoteMake sure that the free end of the clear guide is tucked behind the white padded sheet.
3
4
5
6
122 Chapter 3 - Administering EN
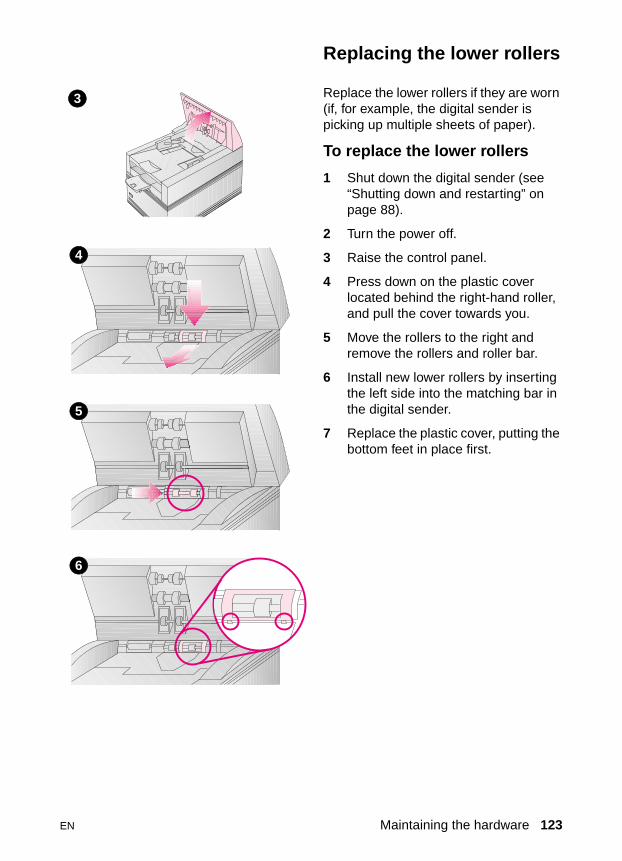
Replacing the lower rollers
Replace the lower rollers if they are worn (if, for example, the digital sender is picking up multiple sheets of paper).
To replace the lower rollers
1 Shut down the digital sender (see “Shutting down and restarting” on page 88).
2 Turn the power off.
3 Raise the control panel.
4 Press down on the plastic cover located behind the right-hand roller, and pull the cover towards you.
5 Move the rollers to the right and remove the rollers and roller bar.
6 Install new lower rollers by inserting the left side into the matching bar in the digital sender.
7 Replace the plastic cover, putting the bottom feet in place first.
3
4
5
6
EN Maintaining the hardware 123
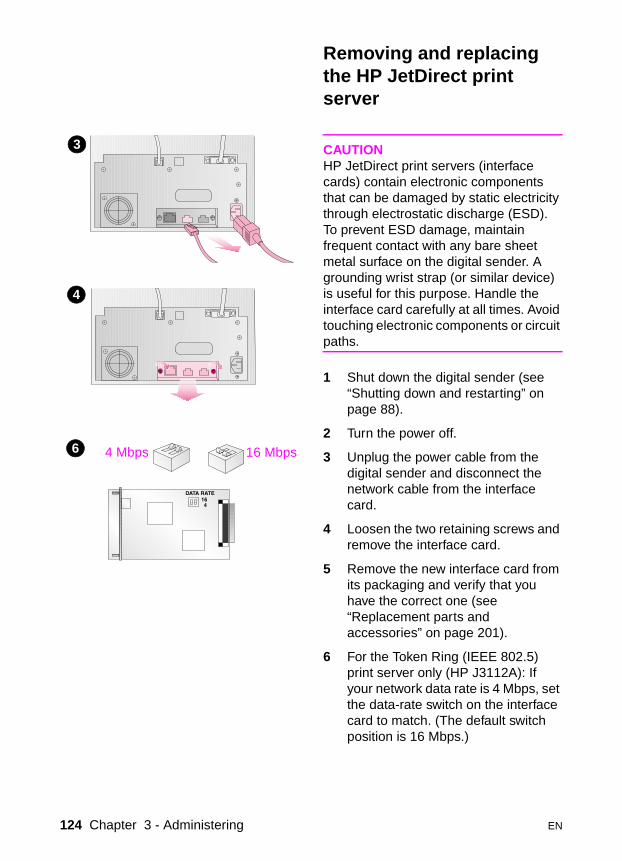
Removing and replacing the HP JetDirect print server
CAUTIONHP JetDirect print servers (interface cards) contain electronic components that can be damaged by static electricity through electrostatic discharge (ESD). To prevent ESD damage, maintain frequent contact with any bare sheet metal surface on the digital sender. A grounding wrist strap (or similar device) is useful for this purpose. Handle the interface card carefully at all times. Avoid touching electronic components or circuit paths.
1 Shut down the digital sender (see “Shutting down and restarting” on page 88).
2 Turn the power off.
3 Unplug the power cable from the digital sender and disconnect the network cable from the interface card.
4 Loosen the two retaining screws and remove the interface card.
5 Remove the new interface card from its packaging and verify that you have the correct one (see “Replacement parts and accessories” on page 201).
6 For the Token Ring (IEEE 802.5) print server only (HP J3112A): If your network data rate is 4 Mbps, set the data-rate switch on the interface card to match. (The default switch position is 16 Mbps.)
3
4
6 4 Mbps 16 Mbps
124 Chapter 3 - Administering EN
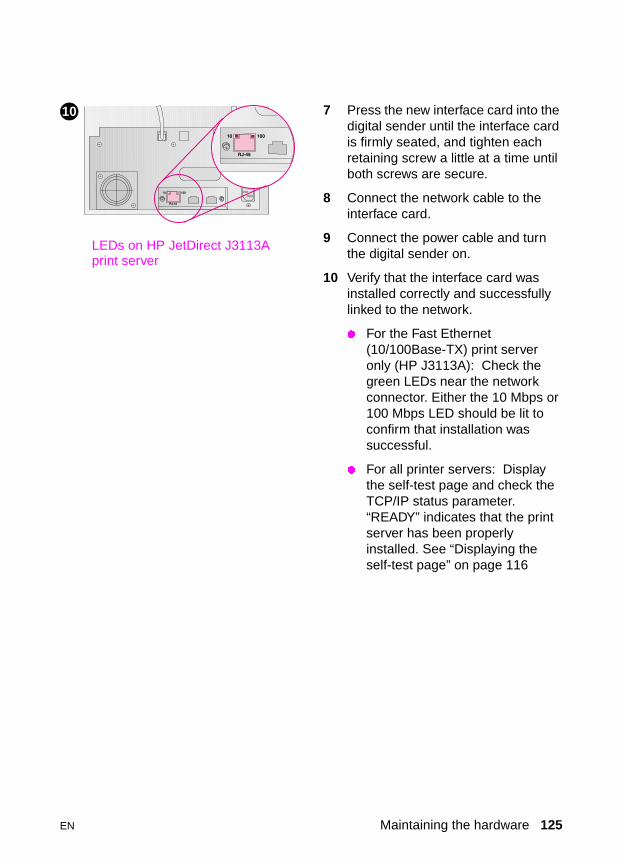
7 Press the new interface card into the digital sender until the interface card is firmly seated, and tighten each retaining screw a little at a time until both screws are secure.
8 Connect the network cable to the interface card.
9 Connect the power cable and turn the digital sender on.
10 Verify that the interface card was installed correctly and successfully linked to the network.
� For the Fast Ethernet (10/100Base-TX) print server only (HP J3113A): Check the green LEDs near the network connector. Either the 10 Mbps or 100 Mbps LED should be lit to confirm that installation was successful.
� For all printer servers: Display the self-test page and check the TCP/IP status parameter. “READY” indicates that the print server has been properly installed. See “Displaying the self-test page” on page 116
LEDs on HP JetDirect J3113A print server
10
EN Maintaining the hardware 125

126 Chapter 3 - Administering EN
4 Troubleshooting
Introduction
This chapter is your guide for resolving problems that might occur while you are using the HP 9100C Digital Sender. The chapter is divided into the following sections:
� sources for information about problems (page 128)
� clearing paper jams (page 129)
� troubleshooting the digital sender (includes a list and explanation of control panel messages) (page 133)
� troubleshooting network problems (includes a list and explanation of HP JetAdmin software messages) (page 157)
� activity log messages (page 170)
� troubleshooting the software (includes lists and explanations of messages from each program) (page 189)
� restoring old firmware images (page 198)
Typically, messages appear on the control panel, in the activity log, or in the program you are using when there are problems. These problem messages usually require some action before sending can continue. All messages are listed in this chapter, along with recommended actions.
EN Introduction 127
Sources for information about problems
Sources for information about problems
Source Description
Control panel light A three-color light under the key on the control panel provides information about operation. See “Control panel messages” on page 141 for a list of messages associated with each condition, and recommended actions.� Off. The digital sender is in an idle state.
� Flashing green and orange. The digital sender is in the process of starting.
� Steady green. The digital sender is ready to send.
� Flashing green. The digital sender is processing a job.� Steady red. The digital sender cannot complete a job for some
reason, usually because more information is needed.� Flashing red. A problem has occurred.
Control panel messages
Messages on the control panel display when there are problems. See “Control panel messages” on page 141 for a list of messages and recommended actions.
Self-test page The self-test page that you can display at the control panel is an important troubleshooting tool. Ability to display the page indicates that the digital sender is operating correctly. Information on the page reveals the status of your network and the HP JetDirect print server. The page is also your reference for information about firmware versions and product numbers (sometimes needed when you contact HP customer support). See “Displaying the self-test page” on page 116 for details.
Activity log The activity log is a record of digital sender use, and is probably your best tool for troubleshooting. It contains messages (warning, error, or fatal) that can help you resolve problems. See “Activity log messages” on page 170 for a list of messages and recommended actions.
E-mail service test This test checks that the link from the digital sender to your e-mail server is working properly. See “E-mail service troubleshooting” on page 157 for details.
Fax service test This test detects if the digital sender is still waiting for notification from the LAN fax server about faxes that have been sent. See “Fax service troubleshooting” on page 158 for details.
HP JetAdmin software
This tool can be used to monitor and troubleshoot the digital sender. See the diagnostics and troubleshooting topics in the HP JetAdmin software online help for details.
Messages for programs
Messages appear in the program you are using when there are problems. See “Troubleshooting the software” on page 189 for lists of these messages and recommended actions.
128 Chapter 4 - Troubleshooting EN
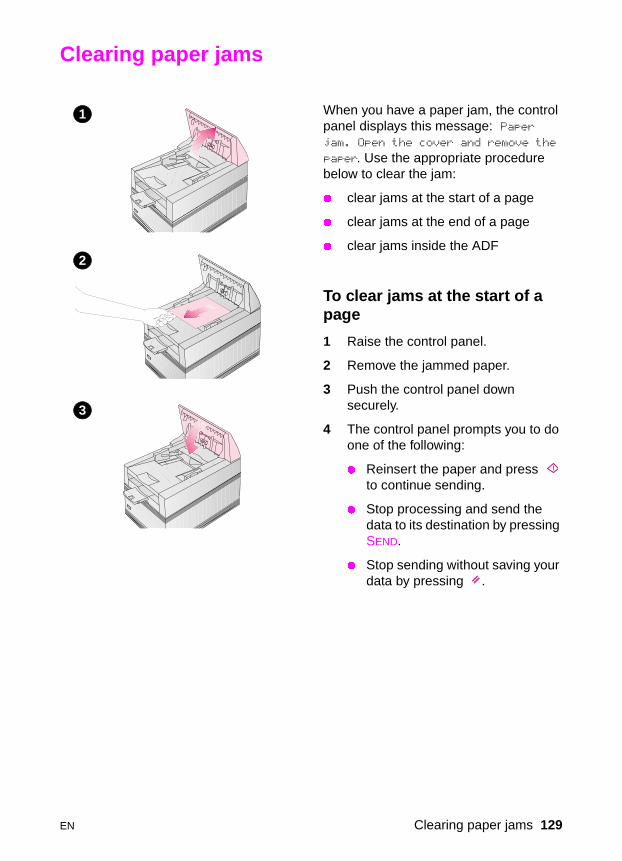
Clearing paper jams
When you have a paper jam, the control panel displays this message: Paper jam. Open the cover and remove the
paper. Use the appropriate procedure below to clear the jam:
� clear jams at the start of a page
� clear jams at the end of a page
� clear jams inside the ADF
To clear jams at the start of a page
1 Raise the control panel.
2 Remove the jammed paper.
3 Push the control panel down securely.
4 The control panel prompts you to do one of the following:
� Reinsert the paper and press to continue sending.
� Stop processing and send the data to its destination by pressing SEND.
� Stop sending without saving your data by pressing .
1
2
3
EN Clearing paper jams 129
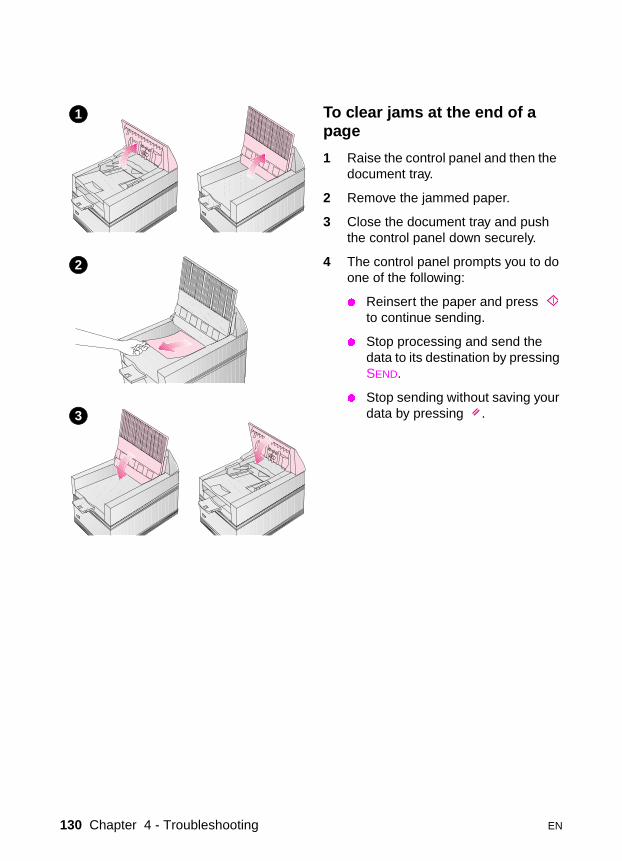
To clear jams at the end of a page
1 Raise the control panel and then the document tray.
2 Remove the jammed paper.
3 Close the document tray and push the control panel down securely.
4 The control panel prompts you to do one of the following:
� Reinsert the paper and press to continue sending.
� Stop processing and send the data to its destination by pressing SEND.
� Stop sending without saving your data by pressing .
1
2
3
130 Chapter 4 - Troubleshooting EN
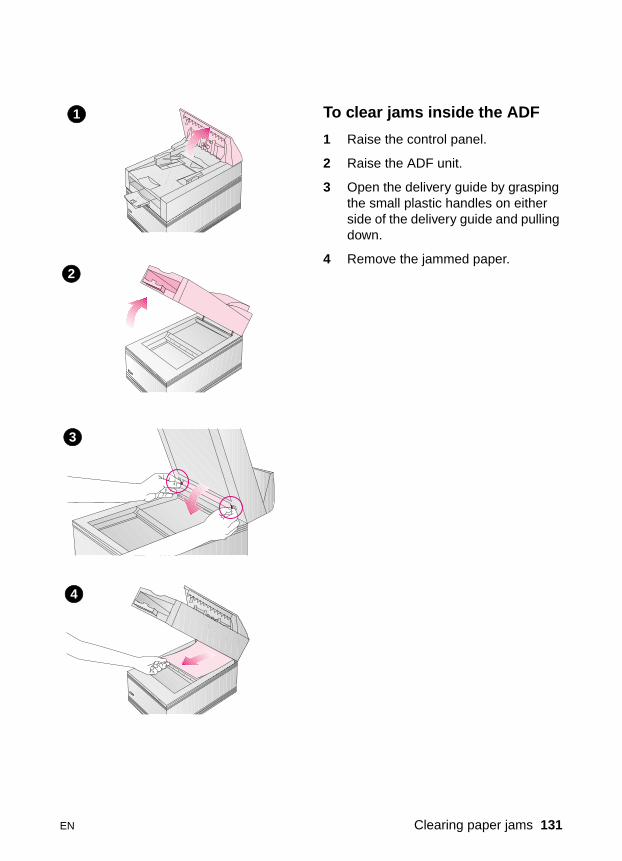
To clear jams inside the ADF
1 Raise the control panel.
2 Raise the ADF unit.
3 Open the delivery guide by grasping the small plastic handles on either side of the delivery guide and pulling down.
4 Remove the jammed paper.
1
2
3
4
EN Clearing paper jams 131
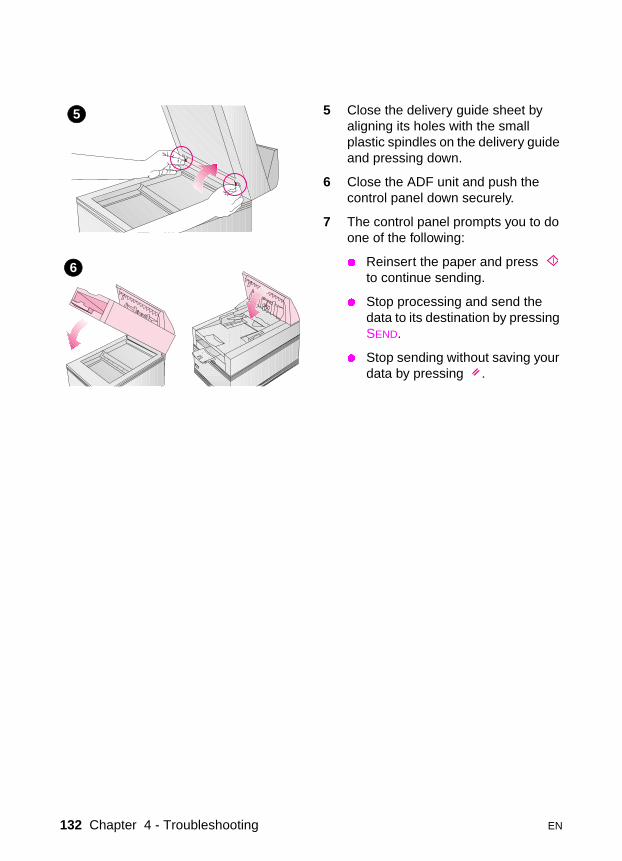
5 Close the delivery guide sheet by aligning its holes with the small plastic spindles on the delivery guide and pressing down.
6 Close the ADF unit and push the control panel down securely.
7 The control panel prompts you to do one of the following:
� Reinsert the paper and press to continue sending.
� Stop processing and send the data to its destination by pressing SEND.
� Stop sending without saving your data by pressing .
5
6
132 Chapter 4 - Troubleshooting EN
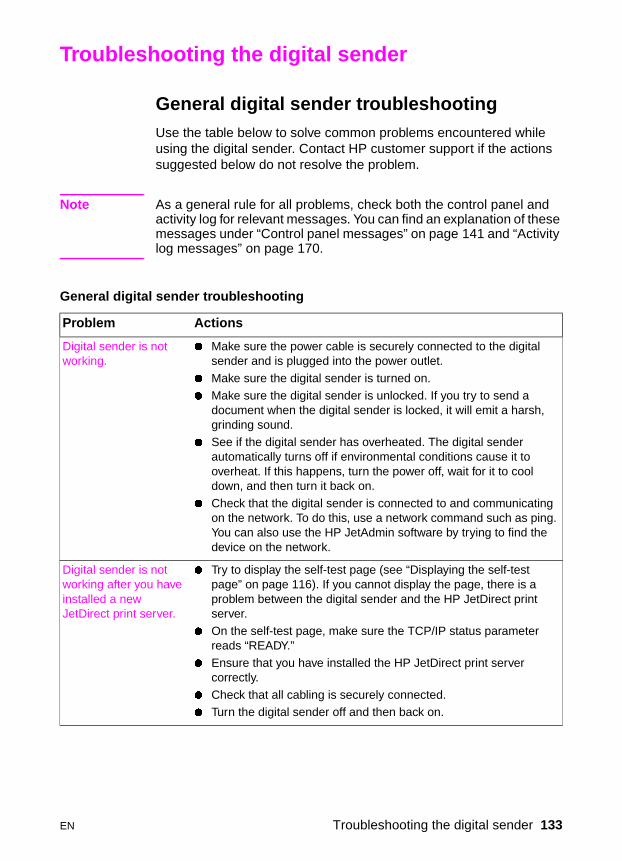
Troubleshooting the digital sender
General digital sender troubleshootingUse the table below to solve common problems encountered while using the digital sender. Contact HP customer support if the actions suggested below do not resolve the problem.
Note As a general rule for all problems, check both the control panel and activity log for relevant messages. You can find an explanation of these messages under “Control panel messages” on page 141 and “Activity log messages” on page 170.
General digital sender troubleshooting
Problem Actions
Digital sender is not working.
� Make sure the power cable is securely connected to the digital sender and is plugged into the power outlet.
� Make sure the digital sender is turned on.
� Make sure the digital sender is unlocked. If you try to send a document when the digital sender is locked, it will emit a harsh, grinding sound.
� See if the digital sender has overheated. The digital sender automatically turns off if environmental conditions cause it to overheat. If this happens, turn the power off, wait for it to cool down, and then turn it back on.
� Check that the digital sender is connected to and communicating on the network. To do this, use a network command such as ping. You can also use the HP JetAdmin software by trying to find the device on the network.
Digital sender is not working after you have installed a new JetDirect print server.
� Try to display the self-test page (see “Displaying the self-test page” on page 116). If you cannot display the page, there is a problem between the digital sender and the HP JetDirect print server.
� On the self-test page, make sure the TCP/IP status parameter reads “READY.”
� Ensure that you have installed the HP JetDirect print server correctly.
� Check that all cabling is securely connected.� Turn the digital sender off and then back on.
EN Troubleshooting the digital sender 133
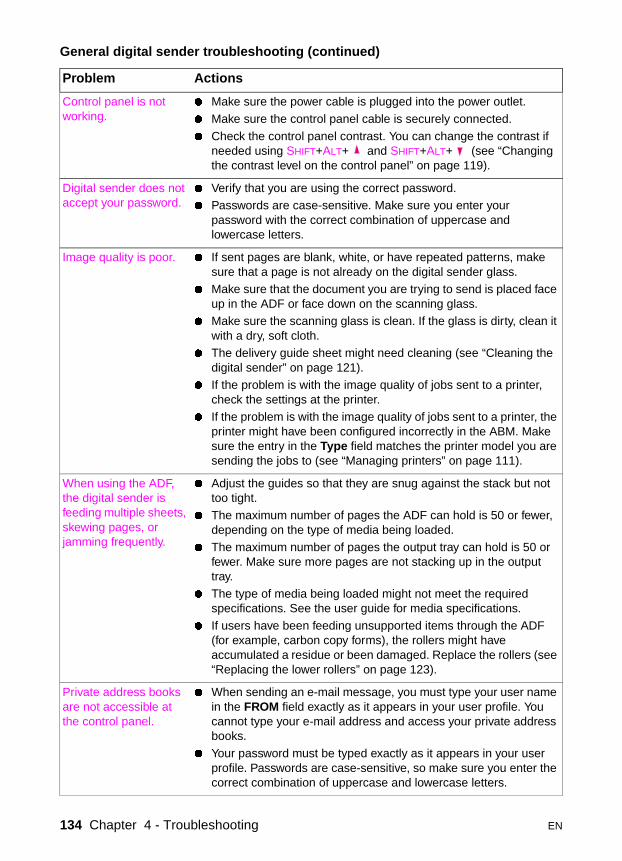
Control panel is not working.
� Make sure the power cable is plugged into the power outlet.
� Make sure the control panel cable is securely connected.
� Check the control panel contrast. You can change the contrast if needed using SHIFT+ALT+ and SHIFT+ALT+ (see “Changing the contrast level on the control panel” on page 119).
Digital sender does not accept your password.
� Verify that you are using the correct password.� Passwords are case-sensitive. Make sure you enter your
password with the correct combination of uppercase and lowercase letters.
Image quality is poor. � If sent pages are blank, white, or have repeated patterns, make sure that a page is not already on the digital sender glass.
� Make sure that the document you are trying to send is placed face up in the ADF or face down on the scanning glass.
� Make sure the scanning glass is clean. If the glass is dirty, clean it with a dry, soft cloth.
� The delivery guide sheet might need cleaning (see “Cleaning the digital sender” on page 121).
� If the problem is with the image quality of jobs sent to a printer, check the settings at the printer.
� If the problem is with the image quality of jobs sent to a printer, the printer might have been configured incorrectly in the ABM. Make sure the entry in the Type field matches the printer model you are sending the jobs to (see “Managing printers” on page 111).
When using the ADF, the digital sender is feeding multiple sheets, skewing pages, or jamming frequently.
� Adjust the guides so that they are snug against the stack but not too tight.
� The maximum number of pages the ADF can hold is 50 or fewer, depending on the type of media being loaded.
� The maximum number of pages the output tray can hold is 50 or fewer. Make sure more pages are not stacking up in the output tray.
� The type of media being loaded might not meet the required specifications. See the user guide for media specifications.
� If users have been feeding unsupported items through the ADF (for example, carbon copy forms), the rollers might have accumulated a residue or been damaged. Replace the rollers (see “Replacing the lower rollers” on page 123).
Private address books are not accessible at the control panel.
� When sending an e-mail message, you must type your user name in the FROM field exactly as it appears in your user profile. You cannot type your e-mail address and access your private address books.
� Your password must be typed exactly as it appears in your user profile. Passwords are case-sensitive, so make sure you enter the correct combination of uppercase and lowercase letters.
General digital sender troubleshooting (continued)
Problem Actions
134 Chapter 4 - Troubleshooting EN

An item loaded in the ADF keeps jamming.
� If you are sending a document that is too large, it might jam in the ADF. The largest document you can place in the ADF is 215.9 by 355.6 mm (8.5 by 14 in). Use the glass on the digital sender to send the document.
� If you are sending a document that is too small, it might jam in the ADF. The smallest document you can place in the ADF is 148.5 by 210 mm (5.9 by 8.3 in). Use the glass on the digital sender to send the document.
Digital sender is sending items very slowly.
� You might have selected a Quality setting that is making the document into a large file that is sending slowly (for example, Color-B/W Photo). To speed up the sending process, try choosing a different setting (for example, B/W Document).
A document sent to a computer did not arrive in the default inbox.
� Make sure the destination computer is turned on.� Make sure the HP Digital Sender Link is running. If it is not, start it
by clicking Start, pointing to Programs, then HP 9100C, and then clicking HP Digital Sender Link.
� Make sure the Enable Receive setting in the HP Digital Sender Link is enabled. To check this, click the Receive inbox tab in the control panel applet and verify that the Enable receive check box is selected.
� Using the control panel applet of the HP Digital Sender Link, make sure a path to the receive inbox has been specified, that the path is correct, and that the HP Digital Sender Link has write access to that path
� Make sure the network access rights are correct.
� The job might have been lost because of a serious internal problem. All pending jobs are sometimes lost when this happens. Resend the document.
If the destination is a Windows NT computer (the computer on which the HP Digital Sender Service is installed):� Check that the HP Digital Sender Service is running and you have
read/write access to the folder being used.
� Check the Windows NT event log for possible error messages.
General digital sender troubleshooting (continued)
Problem Actions
EN Troubleshooting the digital sender 135
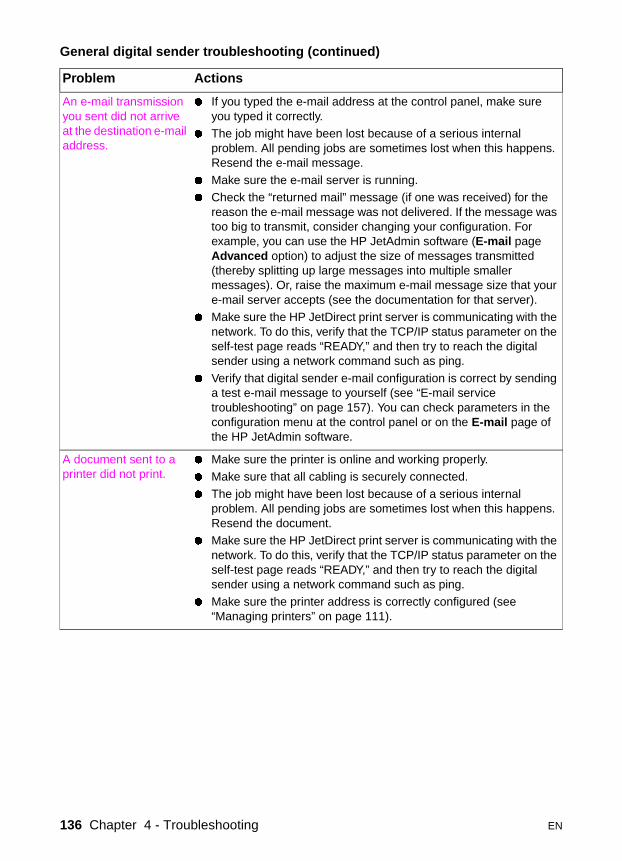
An e-mail transmission you sent did not arrive at the destination e-mail address.
� If you typed the e-mail address at the control panel, make sure you typed it correctly.
� The job might have been lost because of a serious internal problem. All pending jobs are sometimes lost when this happens. Resend the e-mail message.
� Make sure the e-mail server is running.� Check the “returned mail” message (if one was received) for the
reason the e-mail message was not delivered. If the message was too big to transmit, consider changing your configuration. For example, you can use the HP JetAdmin software (E-mail page Advanced option) to adjust the size of messages transmitted (thereby splitting up large messages into multiple smaller messages). Or, raise the maximum e-mail message size that your e-mail server accepts (see the documentation for that server).
� Make sure the HP JetDirect print server is communicating with the network. To do this, verify that the TCP/IP status parameter on the self-test page reads “READY,” and then try to reach the digital sender using a network command such as ping.
� Verify that digital sender e-mail configuration is correct by sending a test e-mail message to yourself (see “E-mail service troubleshooting” on page 157). You can check parameters in the configuration menu at the control panel or on the E-mail page of the HP JetAdmin software.
A document sent to a printer did not print.
� Make sure the printer is online and working properly.� Make sure that all cabling is securely connected.
� The job might have been lost because of a serious internal problem. All pending jobs are sometimes lost when this happens. Resend the document.
� Make sure the HP JetDirect print server is communicating with the network. To do this, verify that the TCP/IP status parameter on the self-test page reads “READY,” and then try to reach the digital sender using a network command such as ping.
� Make sure the printer address is correctly configured (see “Managing printers” on page 111).
General digital sender troubleshooting (continued)
Problem Actions
136 Chapter 4 - Troubleshooting EN
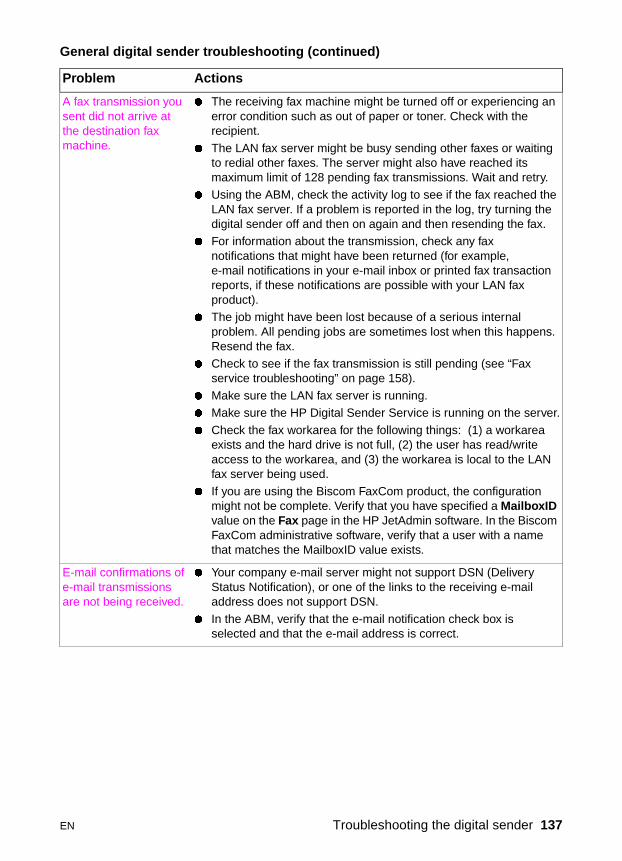
A fax transmission you sent did not arrive at the destination fax machine.
� The receiving fax machine might be turned off or experiencing an error condition such as out of paper or toner. Check with the recipient.
� The LAN fax server might be busy sending other faxes or waiting to redial other faxes. The server might also have reached its maximum limit of 128 pending fax transmissions. Wait and retry.
� Using the ABM, check the activity log to see if the fax reached the LAN fax server. If a problem is reported in the log, try turning the digital sender off and then on again and then resending the fax.
� For information about the transmission, check any fax notifications that might have been returned (for example, e-mail notifications in your e-mail inbox or printed fax transaction reports, if these notifications are possible with your LAN fax product).
� The job might have been lost because of a serious internal problem. All pending jobs are sometimes lost when this happens. Resend the fax.
� Check to see if the fax transmission is still pending (see “Fax service troubleshooting” on page 158).
� Make sure the LAN fax server is running. � Make sure the HP Digital Sender Service is running on the server.
� Check the fax workarea for the following things: (1) a workarea exists and the hard drive is not full, (2) the user has read/write access to the workarea, and (3) the workarea is local to the LAN fax server being used.
� If you are using the Biscom FaxCom product, the configuration might not be complete. Verify that you have specified a MailboxID value on the Fax page in the HP JetAdmin software. In the Biscom FaxCom administrative software, verify that a user with a name that matches the MailboxID value exists.
E-mail confirmations of e-mail transmissions are not being received.
� Your company e-mail server might not support DSN (Delivery Status Notification), or one of the links to the receiving e-mail address does not support DSN.
� In the ABM, verify that the e-mail notification check box is selected and that the e-mail address is correct.
General digital sender troubleshooting (continued)
Problem Actions
EN Troubleshooting the digital sender 137
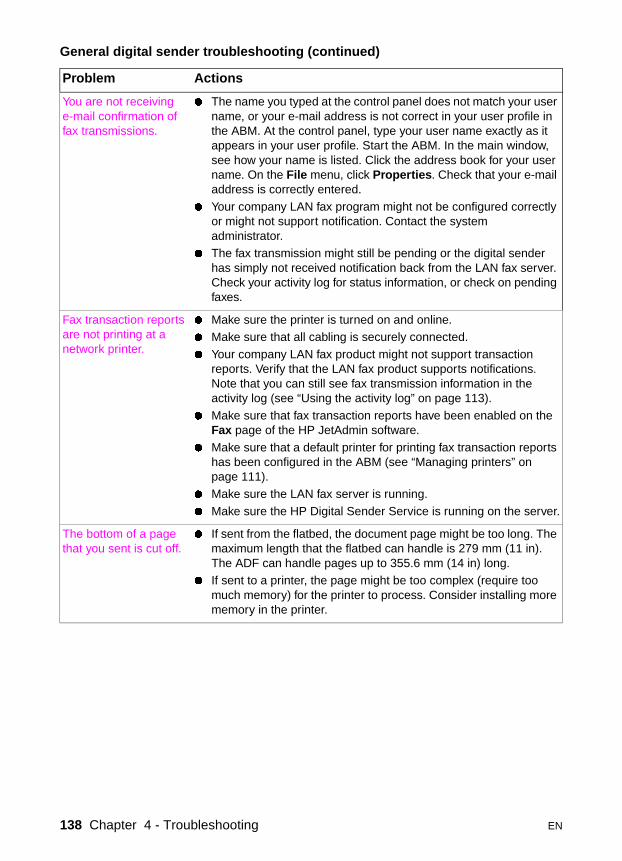
You are not receiving e-mail confirmation of fax transmissions.
� The name you typed at the control panel does not match your user name, or your e-mail address is not correct in your user profile in the ABM. At the control panel, type your user name exactly as it appears in your user profile. Start the ABM. In the main window, see how your name is listed. Click the address book for your user name. On the File menu, click Properties. Check that your e-mail address is correctly entered.
� Your company LAN fax program might not be configured correctly or might not support notification. Contact the system administrator.
� The fax transmission might still be pending or the digital sender has simply not received notification back from the LAN fax server. Check your activity log for status information, or check on pending faxes.
Fax transaction reports are not printing at a network printer.
� Make sure the printer is turned on and online.� Make sure that all cabling is securely connected.
� Your company LAN fax product might not support transaction reports. Verify that the LAN fax product supports notifications. Note that you can still see fax transmission information in the activity log (see “Using the activity log” on page 113).
� Make sure that fax transaction reports have been enabled on the Fax page of the HP JetAdmin software.
� Make sure that a default printer for printing fax transaction reports has been configured in the ABM (see “Managing printers” on page 111).
� Make sure the LAN fax server is running.
� Make sure the HP Digital Sender Service is running on the server.
The bottom of a page that you sent is cut off.
� If sent from the flatbed, the document page might be too long. The maximum length that the flatbed can handle is 279 mm (11 in). The ADF can handle pages up to 355.6 mm (14 in) long.
� If sent to a printer, the page might be too complex (require too much memory) for the printer to process. Consider installing more memory in the printer.
General digital sender troubleshooting (continued)
Problem Actions
138 Chapter 4 - Troubleshooting EN
Checking the address book databaseAt any time, you can check the database of address books to correct problems and inconsistencies in the information.
Perform the database check for the following reasons:
� when the digital sender seems to be performing slowly for no apparent reason
� when the digital sender was inadvertently turned off during a sensitive operation (such as during a backup or restore)
� when you detect inconsistencies between address books and distribution lists
� when instructed to do so by troubleshooting steps or by HP customer support
Notes about the procedure:
� The procedure causes the digital sender to shut down and then restart.
� You can use either the control panel or the ABM to perform the check.
� The procedure can take as long as 25 minutes, based on the amount of information in address books.
Note If the check fails, turn the digital sender off and back on, and then try again. If the problem persists, the address book database is beyond recovery. Try resetting and restoring address books (see “Resetting” on page 90 and “Restoring” on page 96). If neither of these actions resolves the problem, contact HP customer support.
EN Troubleshooting the digital sender 139
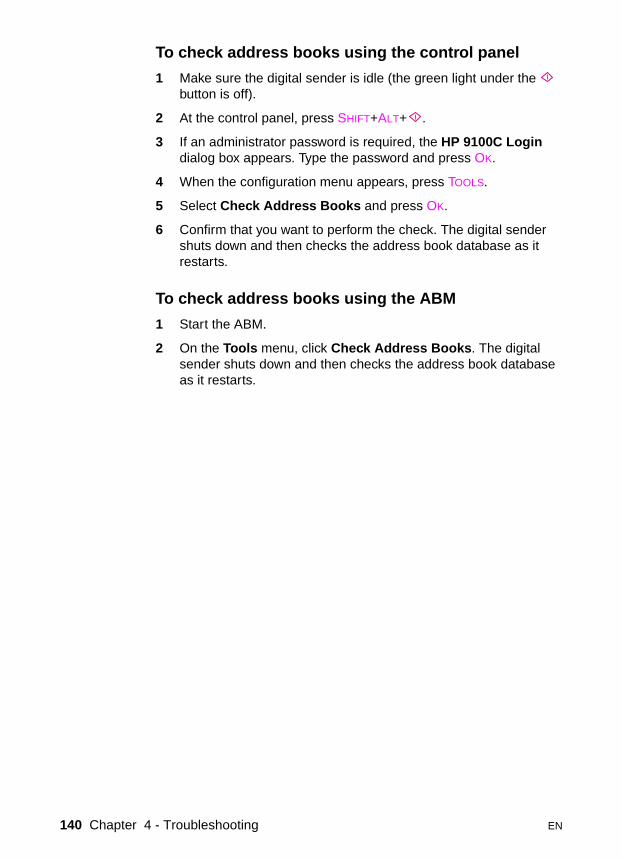
To check address books using the control panel
1 Make sure the digital sender is idle (the green light under the button is off).
2 At the control panel, press SHIFT+ALT+ .
3 If an administrator password is required, the HP 9100C Login dialog box appears. Type the password and press OK.
4 When the configuration menu appears, press TOOLS.
5 Select Check Address Books and press OK.
6 Confirm that you want to perform the check. The digital sender shuts down and then checks the address book database as it restarts.
To check address books using the ABM
1 Start the ABM.
2 On the Tools menu, click Check Address Books. The digital sender shuts down and then checks the address book database as it restarts.
140 Chapter 4 - Troubleshooting EN
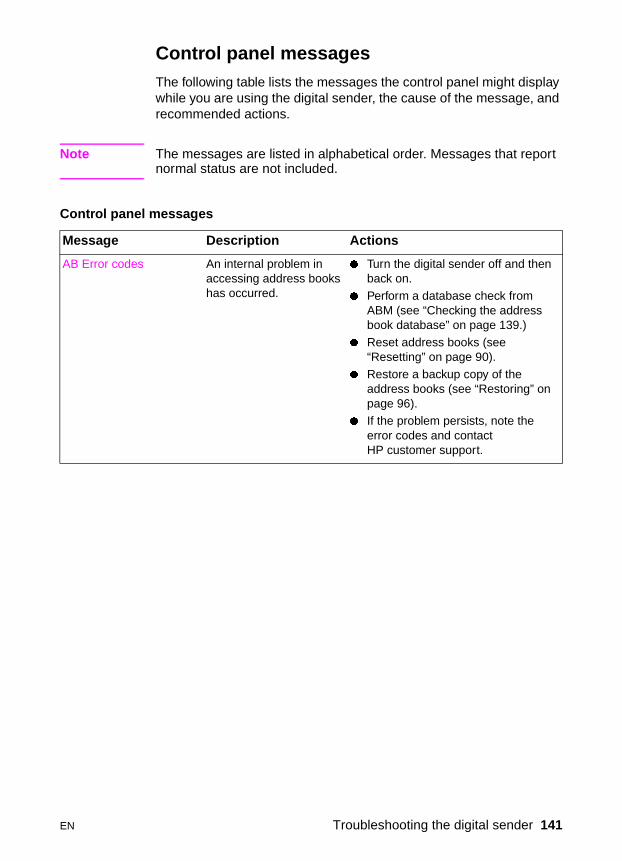
Control panel messagesThe following table lists the messages the control panel might display while you are using the digital sender, the cause of the message, and recommended actions.
Note The messages are listed in alphabetical order. Messages that report normal status are not included.
Control panel messages
Message Description Actions
AB Error codes An internal problem in accessing address books has occurred.
� Turn the digital sender off and then back on.
� Perform a database check from ABM (see “Checking the address book database” on page 139.)
� Reset address books (see “Resetting” on page 90).
� Restore a backup copy of the address books (see “Restoring” on page 96).
� If the problem persists, note the error codes and contact HP customer support.
EN Troubleshooting the digital sender 141

Cannot connect to PC. You selected the PC function, but the destination computer is off or the HP Digital Sender Link is not running on that computer.
� Make sure the destination computer is turned on.
� Make sure the digital sender is connected to the network using a network command such as ping.
� Make sure the HP Digital Sender Link is running on the destination computer. If it is not, start it by clicking Start, pointing to Programs, then HP 9100C, and then clicking HP Digital Sender Link.
� Make sure the Enable Receive setting for the HP Digital Sender Link is enabled. To check this, click the Receive inbox tab in the control panel applet and verify that the Enable receive check box is selected.
� Using the control panel applet of the HP Digital Sender Link, make sure a path to the receive inbox has been specified and that the path is correct.
� Make sure the receive inbox folder exists and the hard drive is not full.
� Make sure the network access rights are correct.
� If the destination is a Windows NT computer, make sure the HP Digital Sender Service is running and you have read/write access to the folder being used.
Configuration changed. Please wait...
The administrator is updating the digital sender with changes. The digital sender is unavailable for use while the update takes place.
� Wait until the message clears.
Device unreachable. You selected the JetSend function, but the destination device is turned off.
� Make sure the destination device is turned on.
� Make sure the digital sender is connected to the network using a network command such as ping.
Control panel messages (continued)
Message Description Actions
142 Chapter 4 - Troubleshooting EN
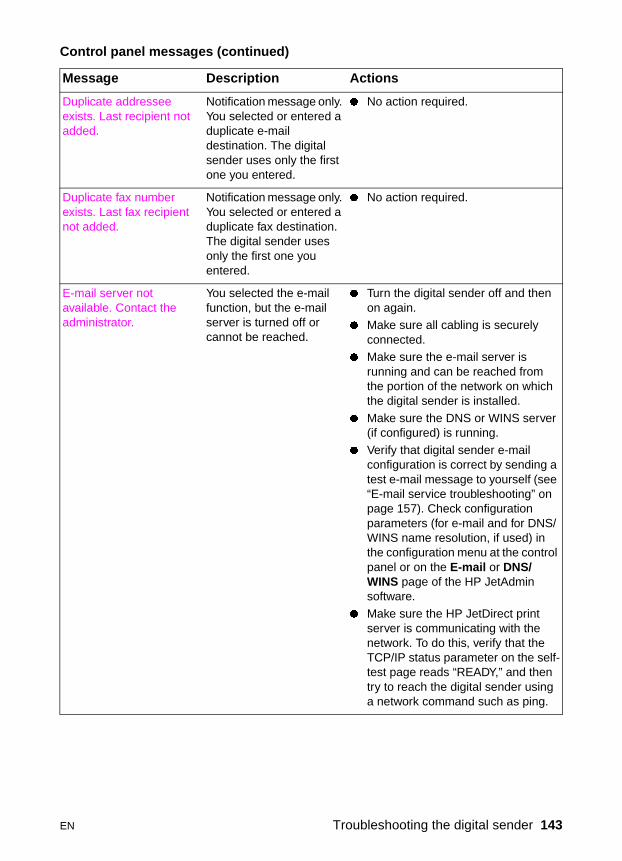
Duplicate addressee exists. Last recipient not added.
Notification message only. You selected or entered a duplicate e-mail destination. The digital sender uses only the first one you entered.
� No action required.
Duplicate fax number exists. Last fax recipient not added.
Notification message only. You selected or entered a duplicate fax destination. The digital sender uses only the first one you entered.
� No action required.
E-mail server not available. Contact the administrator.
You selected the e-mail function, but the e-mail server is turned off or cannot be reached.
� Turn the digital sender off and then on again.
� Make sure all cabling is securely connected.
� Make sure the e-mail server is running and can be reached from the portion of the network on which the digital sender is installed.
� Make sure the DNS or WINS server (if configured) is running.
� Verify that digital sender e-mail configuration is correct by sending a test e-mail message to yourself (see “E-mail service troubleshooting” on page 157). Check configuration parameters (for e-mail and for DNS/WINS name resolution, if used) in the configuration menu at the control panel or on the E-mail or DNS/WINS page of the HP JetAdmin software.
� Make sure the HP JetDirect print server is communicating with the network. To do this, verify that the TCP/IP status parameter on the self-test page reads “READY,” and then try to reach the digital sender using a network command such as ping.
Control panel messages (continued)
Message Description Actions
EN Troubleshooting the digital sender 143
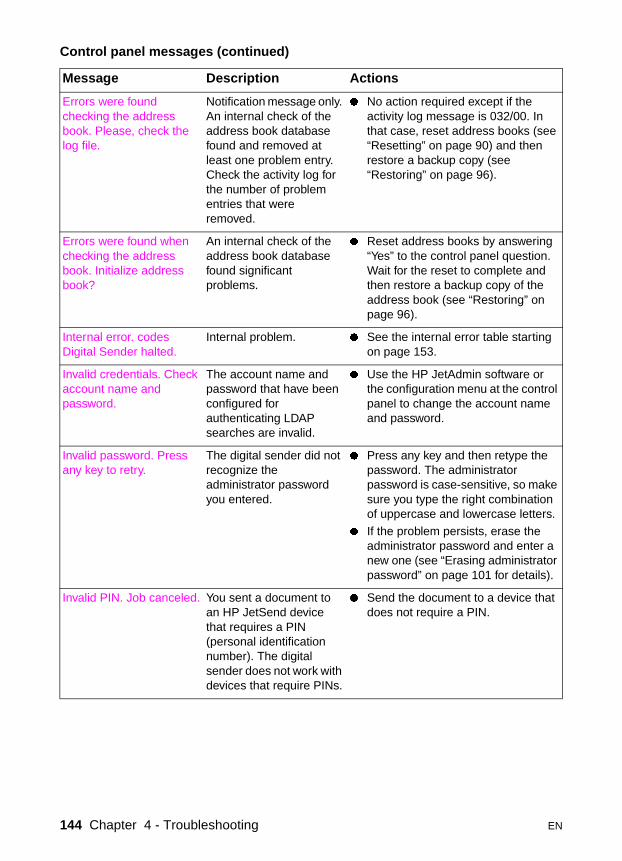
Errors were found checking the address book. Please, check the log file.
Notification message only. An internal check of the address book database found and removed at least one problem entry. Check the activity log for the number of problem entries that were removed.
� No action required except if the activity log message is 032/00. In that case, reset address books (see “Resetting” on page 90) and then restore a backup copy (see “Restoring” on page 96).
Errors were found when checking the address book. Initialize address book?
An internal check of the address book database found significant problems.
� Reset address books by answering “Yes” to the control panel question. Wait for the reset to complete and then restore a backup copy of the address book (see “Restoring” on page 96).
Internal error. codesDigital Sender halted.
Internal problem. � See the internal error table starting on page 153.
Invalid credentials. Check account name and password.
The account name and password that have been configured for authenticating LDAP searches are invalid.
� Use the HP JetAdmin software or the configuration menu at the control panel to change the account name and password.
Invalid password. Press any key to retry.
The digital sender did not recognize the administrator password you entered.
� Press any key and then retype the password. The administrator password is case-sensitive, so make sure you type the right combination of uppercase and lowercase letters.
� If the problem persists, erase the administrator password and enter a new one (see “Erasing administrator password” on page 101 for details).
Invalid PIN. Job canceled. You sent a document to an HP JetSend device that requires a PIN (personal identification number). The digital sender does not work with devices that require PINs.
� Send the document to a device that does not require a PIN.
Control panel messages (continued)
Message Description Actions
144 Chapter 4 - Troubleshooting EN
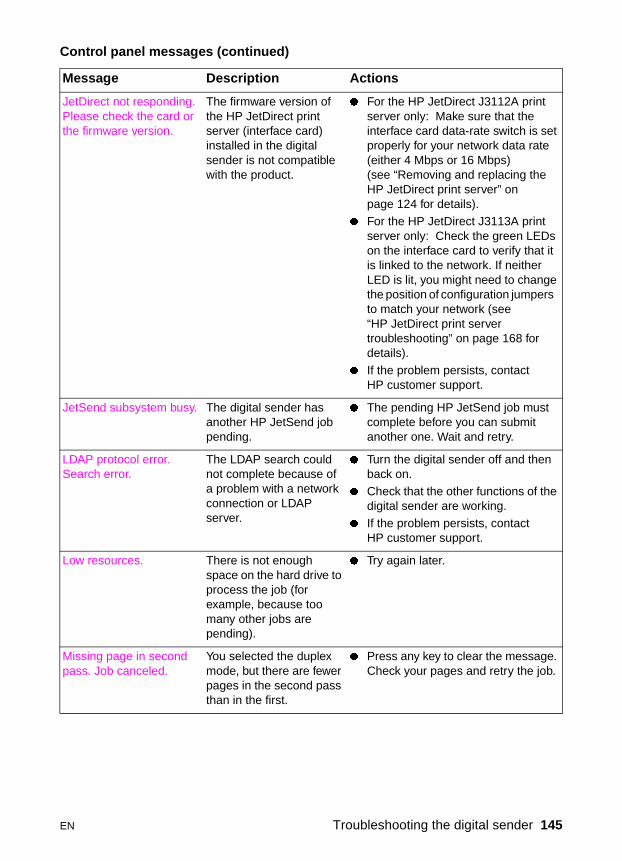
JetDirect not responding. Please check the card or the firmware version.
The firmware version of the HP JetDirect print server (interface card) installed in the digital sender is not compatible with the product.
� For the HP JetDirect J3112A print server only: Make sure that the interface card data-rate switch is set properly for your network data rate (either 4 Mbps or 16 Mbps) (see “Removing and replacing the HP JetDirect print server” on page 124 for details).
� For the HP JetDirect J3113A print server only: Check the green LEDs on the interface card to verify that it is linked to the network. If neither LED is lit, you might need to change the position of configuration jumpers to match your network (see “HP JetDirect print server troubleshooting” on page 168 for details).
� If the problem persists, contact HP customer support.
JetSend subsystem busy. The digital sender has another HP JetSend job pending.
� The pending HP JetSend job must complete before you can submit another one. Wait and retry.
LDAP protocol error.Search error.
The LDAP search could not complete because of a problem with a network connection or LDAP server.
� Turn the digital sender off and then back on.
� Check that the other functions of the digital sender are working.
� If the problem persists, contact HP customer support.
Low resources. There is not enough space on the hard drive to process the job (for example, because too many other jobs are pending).
� Try again later.
Missing page in second pass. Job canceled.
You selected the duplex mode, but there are fewer pages in the second pass than in the first.
� Press any key to clear the message. Check your pages and retry the job.
Control panel messages (continued)
Message Description Actions
EN Troubleshooting the digital sender 145
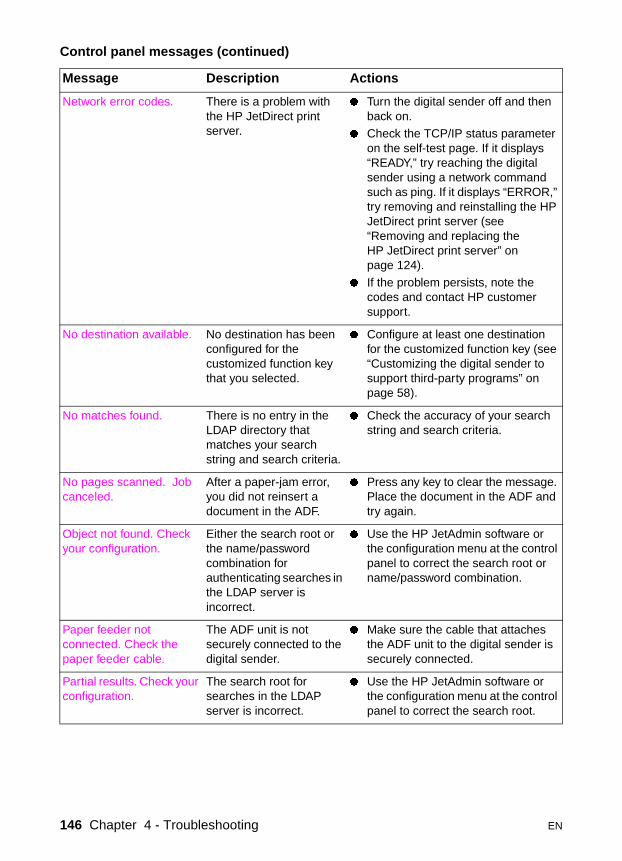
Network error codes. There is a problem with the HP JetDirect print server.
� Turn the digital sender off and then back on.
� Check the TCP/IP status parameter on the self-test page. If it displays “READY,” try reaching the digital sender using a network command such as ping. If it displays “ERROR,” try removing and reinstalling the HP JetDirect print server (see “Removing and replacing the HP JetDirect print server” on page 124).
� If the problem persists, note the codes and contact HP customer support.
No destination available. No destination has been configured for the customized function key that you selected.
� Configure at least one destination for the customized function key (see “Customizing the digital sender to support third-party programs” on page 58).
No matches found. There is no entry in the LDAP directory that matches your search string and search criteria.
� Check the accuracy of your search string and search criteria.
No pages scanned. Job canceled.
After a paper-jam error, you did not reinsert a document in the ADF.
� Press any key to clear the message. Place the document in the ADF and try again.
Object not found. Check your configuration.
Either the search root or the name/password combination for authenticating searches in the LDAP server is incorrect.
� Use the HP JetAdmin software or the configuration menu at the control panel to correct the search root or name/password combination.
Paper feeder not connected. Check the paper feeder cable.
The ADF unit is not securely connected to the digital sender.
� Make sure the cable that attaches the ADF unit to the digital sender is securely connected.
Partial results. Check your configuration.
The search root for searches in the LDAP server is incorrect.
� Use the HP JetAdmin software or the configuration menu at the control panel to correct the search root.
Control panel messages (continued)
Message Description Actions
146 Chapter 4 - Troubleshooting EN
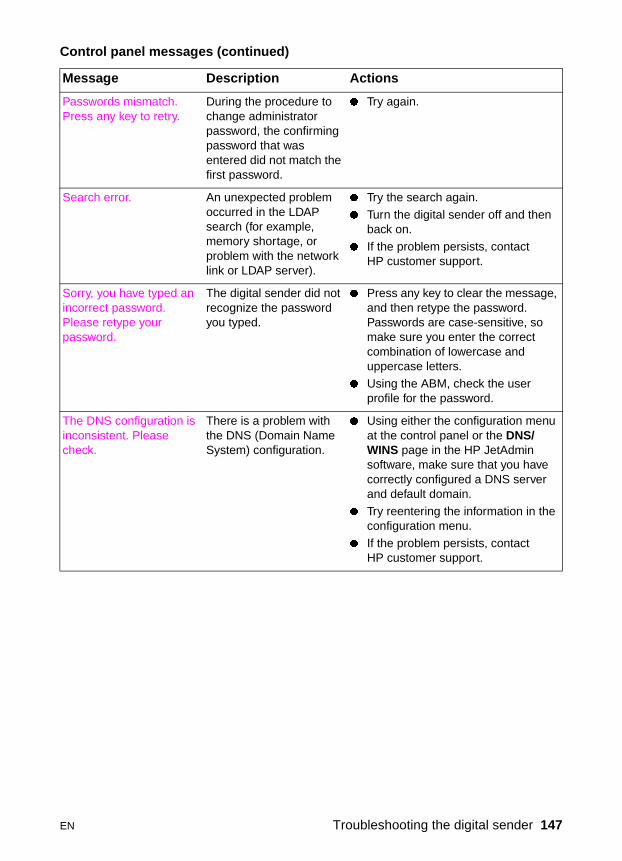
Passwords mismatch. Press any key to retry.
During the procedure to change administrator password, the confirming password that was entered did not match the first password.
� Try again.
Search error. An unexpected problem occurred in the LDAP search (for example, memory shortage, or problem with the network link or LDAP server).
� Try the search again.
� Turn the digital sender off and then back on.
� If the problem persists, contact HP customer support.
Sorry, you have typed an incorrect password. Please retype your password.
The digital sender did not recognize the password you typed.
� Press any key to clear the message, and then retype the password. Passwords are case-sensitive, so make sure you enter the correct combination of lowercase and uppercase letters.
� Using the ABM, check the user profile for the password.
The DNS configuration is inconsistent. Please check.
There is a problem with the DNS (Domain Name System) configuration.
� Using either the configuration menu at the control panel or the DNS/WINS page in the HP JetAdmin software, make sure that you have correctly configured a DNS server and default domain.
� Try reentering the information in the configuration menu.
� If the problem persists, contact HP customer support.
Control panel messages (continued)
Message Description Actions
EN Troubleshooting the digital sender 147
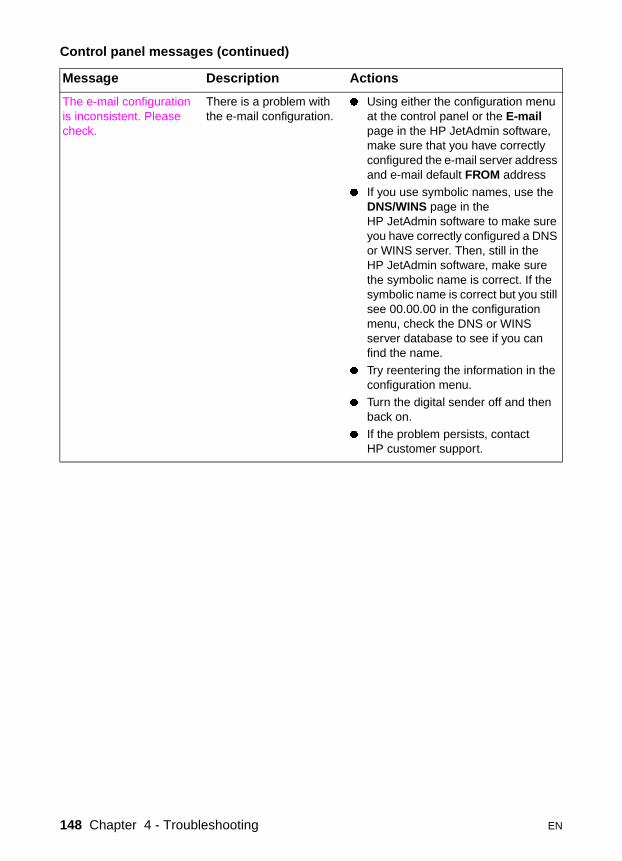
The e-mail configuration is inconsistent. Please check.
There is a problem with the e-mail configuration.
� Using either the configuration menu at the control panel or the E-mail page in the HP JetAdmin software, make sure that you have correctly configured the e-mail server address and e-mail default FROM address
� If you use symbolic names, use the DNS/WINS page in the HP JetAdmin software to make sure you have correctly configured a DNS or WINS server. Then, still in the HP JetAdmin software, make sure the symbolic name is correct. If the symbolic name is correct but you still see 00.00.00 in the configuration menu, check the DNS or WINS server database to see if you can find the name.
� Try reentering the information in the configuration menu.
� Turn the digital sender off and then back on.
� If the problem persists, contact HP customer support.
Control panel messages (continued)
Message Description Actions
148 Chapter 4 - Troubleshooting EN
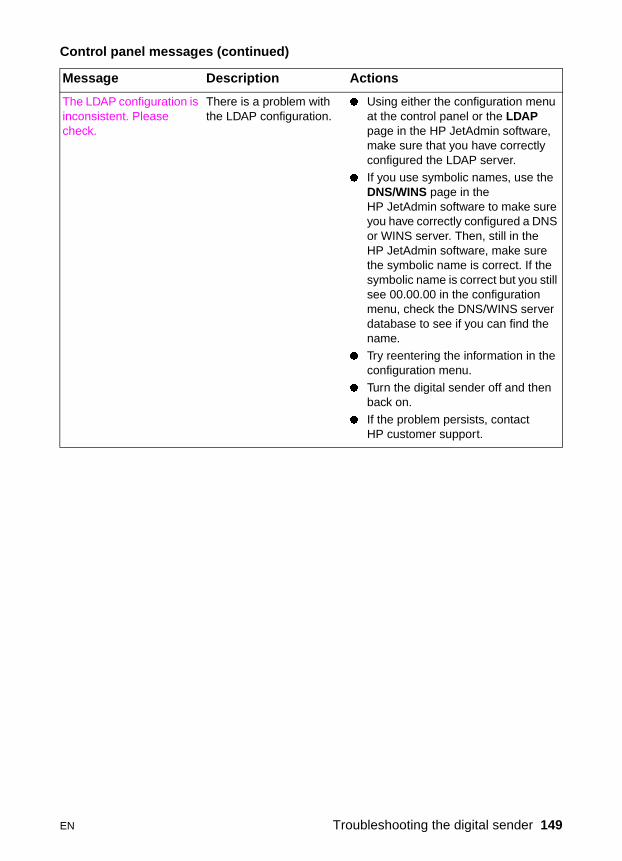
The LDAP configuration is inconsistent. Please check.
There is a problem with the LDAP configuration.
� Using either the configuration menu at the control panel or the LDAP page in the HP JetAdmin software, make sure that you have correctly configured the LDAP server.
� If you use symbolic names, use the DNS/WINS page in the HP JetAdmin software to make sure you have correctly configured a DNS or WINS server. Then, still in the HP JetAdmin software, make sure the symbolic name is correct. If the symbolic name is correct but you still see 00.00.00 in the configuration menu, check the DNS/WINS server database to see if you can find the name.
� Try reentering the information in the configuration menu.
� Turn the digital sender off and then back on.
� If the problem persists, contact HP customer support.
Control panel messages (continued)
Message Description Actions
EN Troubleshooting the digital sender 149
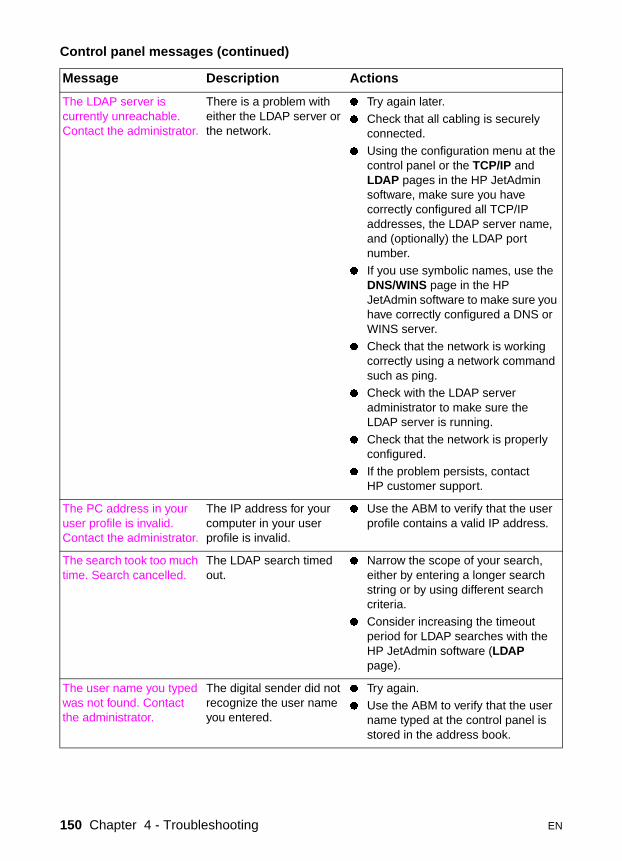
The LDAP server is currently unreachable. Contact the administrator.
There is a problem with either the LDAP server or the network.
� Try again later.
� Check that all cabling is securely connected.
� Using the configuration menu at the control panel or the TCP/IP and LDAP pages in the HP JetAdmin software, make sure you have correctly configured all TCP/IP addresses, the LDAP server name, and (optionally) the LDAP port number.
� If you use symbolic names, use the DNS/WINS page in the HP JetAdmin software to make sure you have correctly configured a DNS or WINS server.
� Check that the network is working correctly using a network command such as ping.
� Check with the LDAP server administrator to make sure the LDAP server is running.
� Check that the network is properly configured.
� If the problem persists, contact HP customer support.
The PC address in your user profile is invalid. Contact the administrator.
The IP address for your computer in your user profile is invalid.
� Use the ABM to verify that the user profile contains a valid IP address.
The search took too much time. Search cancelled.
The LDAP search timed out.
� Narrow the scope of your search, either by entering a longer search string or by using different search criteria.
� Consider increasing the timeout period for LDAP searches with the HP JetAdmin software (LDAP page).
The user name you typed was not found. Contact the administrator.
The digital sender did not recognize the user name you entered.
� Try again.
� Use the ABM to verify that the user name typed at the control panel is stored in the address book.
Control panel messages (continued)
Message Description Actions
150 Chapter 4 - Troubleshooting EN
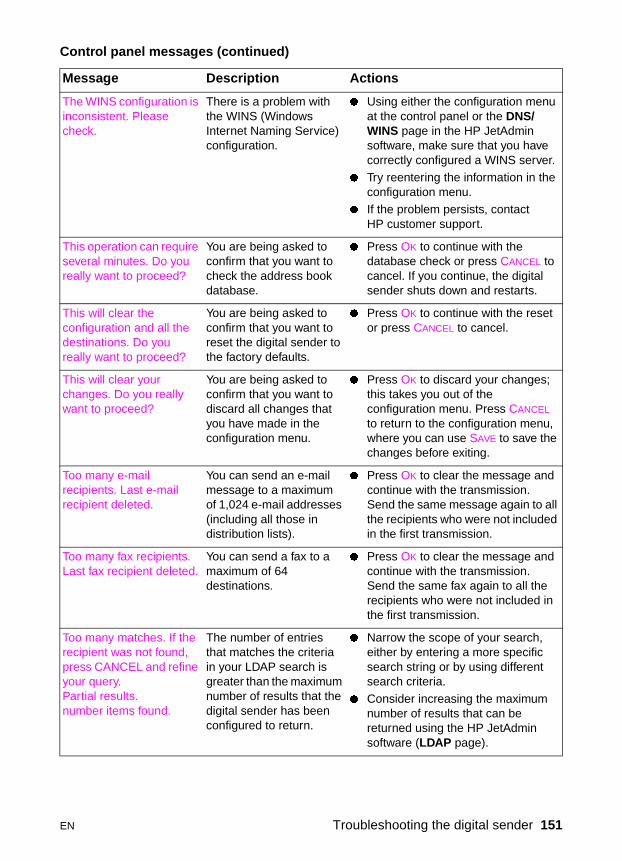
The WINS configuration is inconsistent. Please check.
There is a problem with the WINS (Windows Internet Naming Service) configuration.
� Using either the configuration menu at the control panel or the DNS/WINS page in the HP JetAdmin software, make sure that you have correctly configured a WINS server.
� Try reentering the information in the configuration menu.
� If the problem persists, contact HP customer support.
This operation can require several minutes. Do you really want to proceed?
You are being asked to confirm that you want to check the address book database.
� Press OK to continue with the database check or press CANCEL to cancel. If you continue, the digital sender shuts down and restarts.
This will clear the configuration and all the destinations. Do you really want to proceed?
You are being asked to confirm that you want to reset the digital sender to the factory defaults.
� Press OK to continue with the reset or press CANCEL to cancel.
This will clear your changes. Do you really want to proceed?
You are being asked to confirm that you want to discard all changes that you have made in the configuration menu.
� Press OK to discard your changes; this takes you out of the configuration menu. Press CANCEL to return to the configuration menu, where you can use SAVE to save the changes before exiting.
Too many e-mail recipients. Last e-mail recipient deleted.
You can send an e-mail message to a maximum of 1,024 e-mail addresses (including all those in distribution lists).
� Press OK to clear the message and continue with the transmission. Send the same message again to all the recipients who were not included in the first transmission.
Too many fax recipients. Last fax recipient deleted.
You can send a fax to a maximum of 64 destinations.
� Press OK to clear the message and continue with the transmission. Send the same fax again to all the recipients who were not included in the first transmission.
Too many matches. If the recipient was not found, press CANCEL and refine your query.Partial results. number items found.
The number of entries that matches the criteria in your LDAP search is greater than the maximum number of results that the digital sender has been configured to return.
� Narrow the scope of your search, either by entering a more specific search string or by using different search criteria.
� Consider increasing the maximum number of results that can be returned using the HP JetAdmin software (LDAP page).
Control panel messages (continued)
Message Description Actions
EN Troubleshooting the digital sender 151
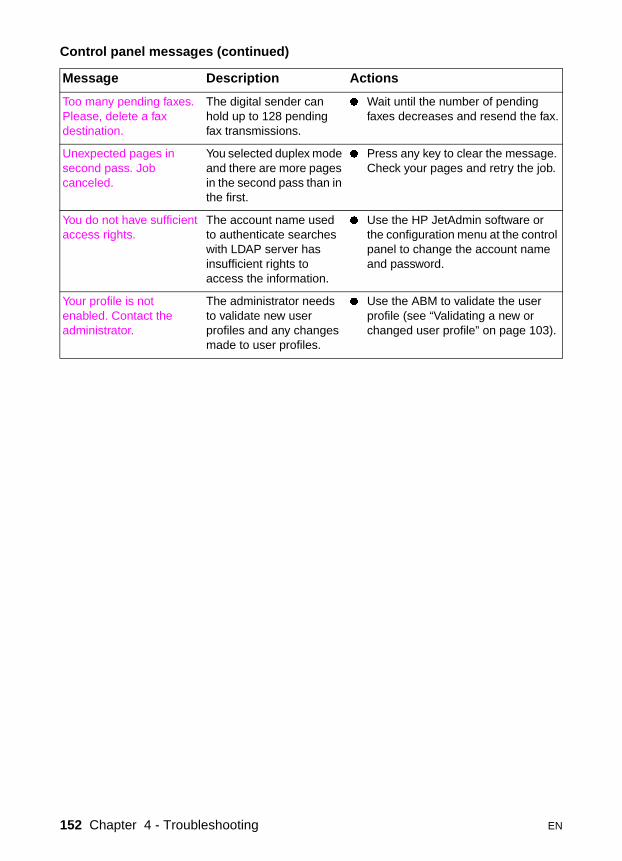
Too many pending faxes. Please, delete a fax destination.
The digital sender can hold up to 128 pending fax transmissions.
� Wait until the number of pending faxes decreases and resend the fax.
Unexpected pages in second pass. Job canceled.
You selected duplex mode and there are more pages in the second pass than in the first.
� Press any key to clear the message. Check your pages and retry the job.
You do not have sufficient access rights.
The account name used to authenticate searches with LDAP server has insufficient rights to access the information.
� Use the HP JetAdmin software or the configuration menu at the control panel to change the account name and password.
Your profile is not enabled. Contact the administrator.
The administrator needs to validate new user profiles and any changes made to user profiles.
� Use the ABM to validate the user profile (see “Validating a new or changed user profile” on page 103).
Control panel messages (continued)
Message Description Actions
152 Chapter 4 - Troubleshooting EN

Internal error message descriptions and actions
Code Description Actions
NOTEEvery internal error message has a code associated with it. Use the code to locate the description and action.
2,12,2
System error while restarting, or an internal error in accessing memory.
� Turn the digital sender off and then back on.
� If the problem persists, note the code and contact HP customer support.
2,32,42,52,62,92,102,11
Failure while executing a job. � Turn the digital sender off and then back on.� Make sure the cable between the ADF unit
and the digital sender is securely connected.� Try the job again.
� If the problem persists, note the code and contact HP customer support.
4,14,24,1024,2014,3014,3024,4014,4024,403
Failure sending a document, or an internal software or hardware problem.
� Turn the digital sender off and then back on.
� If the problem persists, note the code and contact HP customer support.
5,1xxxxx5,2xxxxx5,3xxxxx5,4xxxxx
Internal software or hardware problem.
� Turn the digital sender off and then back on.
� If the problem persists, note the code and contact HP customer support.
5,500001 Hardware problem. � Turn the digital sender off and then back on.
� If the problem persists, note the code and contact HP customer support to arrange return of the digital sender.
5,500002 Scanner lamp problem. � Turn the digital sender off and then back on.
� Make sure the digital sender is operating within normal operating conditions (temperature and humidity).
� If the problem persists, note the code and contact HP customer support to arrange return of the digital sender.
5,500003 Hardware problem. � Make sure the digital sender is unlocked (see “Install the unit” on page 36). Unlock it if necessary.
� If the problem persists, note the code and contact HP customer support.
EN Troubleshooting the digital sender 153
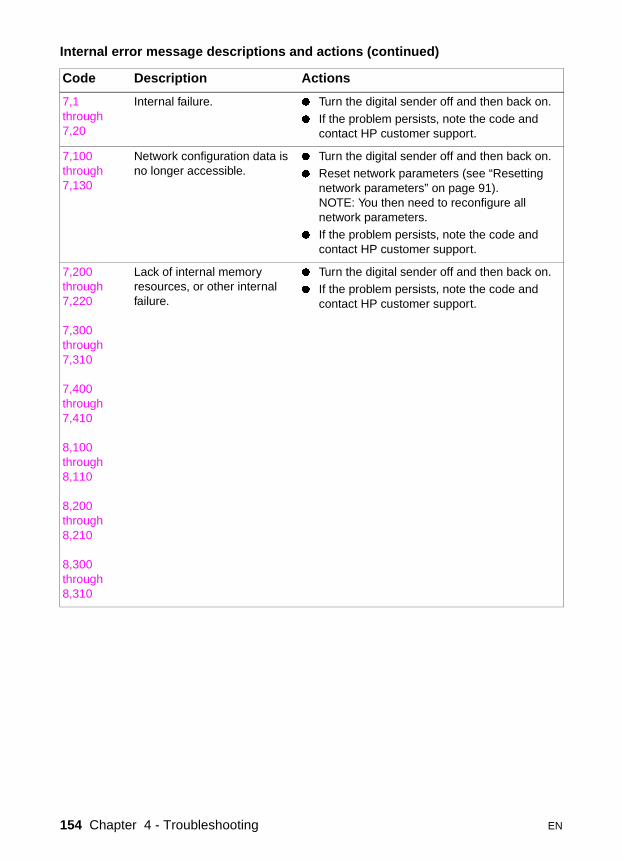
7,1through7,20
Internal failure. � Turn the digital sender off and then back on.
� If the problem persists, note the code and contact HP customer support.
7,100through7,130
Network configuration data is no longer accessible.
� Turn the digital sender off and then back on.� Reset network parameters (see “Resetting
network parameters” on page 91).NOTE: You then need to reconfigure all network parameters.
� If the problem persists, note the code and contact HP customer support.
7,200through7,220
7,300through7,310
7,400through7,410
8,100through 8,110
8,200through8,210
8,300through8,310
Lack of internal memory resources, or other internal failure.
� Turn the digital sender off and then back on.� If the problem persists, note the code and
contact HP customer support.
Internal error message descriptions and actions (continued)
Code Description Actions
154 Chapter 4 - Troubleshooting EN
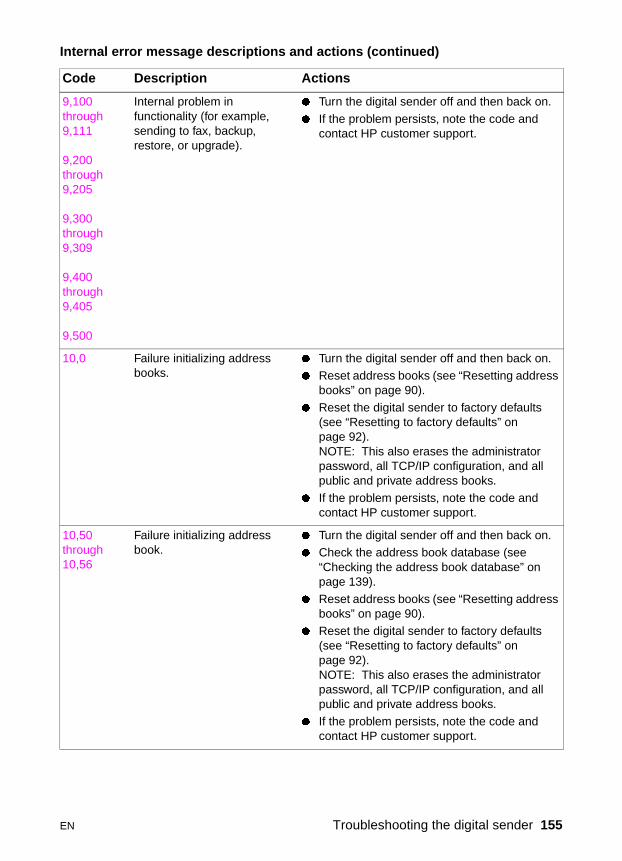
9,100through9,111
9,200through 9,205
9,300through9,309
9,400through9,405
9,500
Internal problem in functionality (for example, sending to fax, backup, restore, or upgrade).
� Turn the digital sender off and then back on.
� If the problem persists, note the code and contact HP customer support.
10,0 Failure initializing address books.
� Turn the digital sender off and then back on.
� Reset address books (see “Resetting address books” on page 90).
� Reset the digital sender to factory defaults (see “Resetting to factory defaults” on page 92). NOTE: This also erases the administrator password, all TCP/IP configuration, and all public and private address books.
� If the problem persists, note the code and contact HP customer support.
10,50through10,56
Failure initializing address book.
� Turn the digital sender off and then back on.� Check the address book database (see
“Checking the address book database” on page 139).
� Reset address books (see “Resetting address books” on page 90).
� Reset the digital sender to factory defaults (see “Resetting to factory defaults” on page 92). NOTE: This also erases the administrator password, all TCP/IP configuration, and all public and private address books.
� If the problem persists, note the code and contact HP customer support.
Internal error message descriptions and actions (continued)
Code Description Actions
EN Troubleshooting the digital sender 155
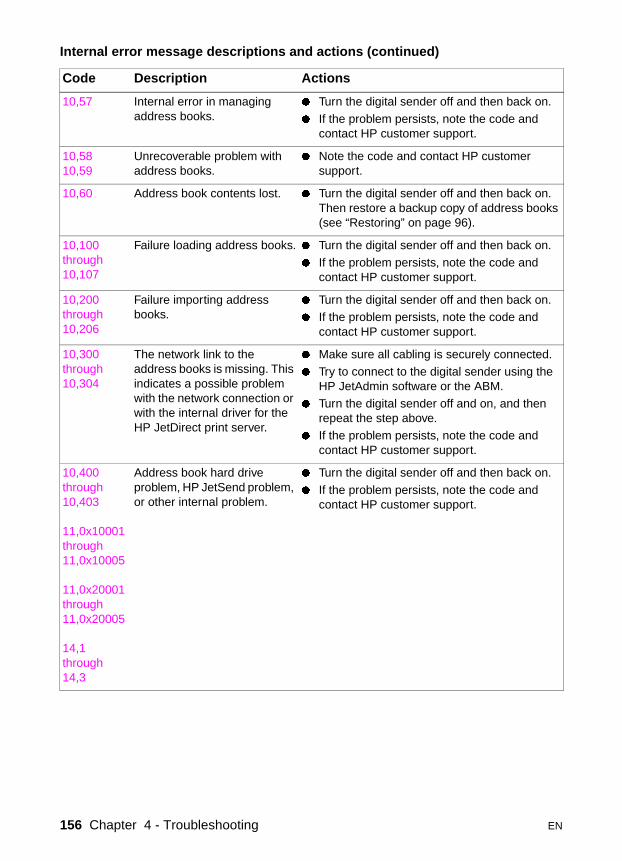
10,57 Internal error in managing address books.
� Turn the digital sender off and then back on.
� If the problem persists, note the code and contact HP customer support.
10,5810,59
Unrecoverable problem with address books.
� Note the code and contact HP customer support.
10,60 Address book contents lost. � Turn the digital sender off and then back on. Then restore a backup copy of address books (see “Restoring” on page 96).
10,100through10,107
Failure loading address books. � Turn the digital sender off and then back on.
� If the problem persists, note the code and contact HP customer support.
10,200through10,206
Failure importing address books.
� Turn the digital sender off and then back on.� If the problem persists, note the code and
contact HP customer support.
10,300through 10,304
The network link to the address books is missing. This indicates a possible problem with the network connection or with the internal driver for the HP JetDirect print server.
� Make sure all cabling is securely connected.
� Try to connect to the digital sender using the HP JetAdmin software or the ABM.
� Turn the digital sender off and on, and then repeat the step above.
� If the problem persists, note the code and contact HP customer support.
10,400through10,403
11,0x10001through11,0x10005
11,0x20001through11,0x20005
14,1through14,3
Address book hard drive problem, HP JetSend problem, or other internal problem.
� Turn the digital sender off and then back on.
� If the problem persists, note the code and contact HP customer support.
Internal error message descriptions and actions (continued)
Code Description Actions
156 Chapter 4 - Troubleshooting EN
Troubleshooting network problems
General network troubleshootingUse the following tools to troubleshoot general network problems:
� self-test page (see “Displaying the self-test page” on page 116)
� network management and monitoring software (for example, the HP JetAdmin software)
E-mail service troubleshootingYou can use the HP JetAdmin software to verify that the path from the digital sender to the e-mail server is properly configured and working. This procedure remotely sends a test e-mail message from the digital sender to the e-mail address that has been configured for the administrator.
The only way to see if data has been successfully transferred from the digital sender to the e-mail server is to check the activity log (see “Using the activity log” on page 113).
To verify the e-mail service
1 Start the HP JetAdmin software.
2 In the device list, click the digital sender.
3 Click Device and then click Modify.
4 In the Configuration window, click Tools.
5 On the Tools page, click Test and then click Send test e-mail.
6 Click OK. A test e-mail message is sent.
7 Check your e-mail inbox for the message.
EN Troubleshooting network problems 157
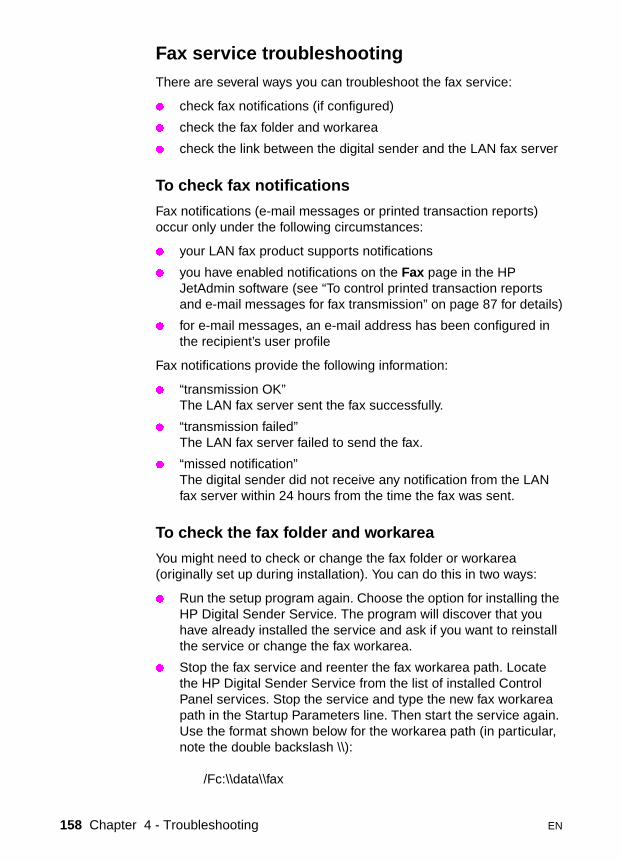
Fax service troubleshootingThere are several ways you can troubleshoot the fax service:
� check fax notifications (if configured)
� check the fax folder and workarea
� check the link between the digital sender and the LAN fax server
To check fax notifications
Fax notifications (e-mail messages or printed transaction reports) occur only under the following circumstances:
� your LAN fax product supports notifications
� you have enabled notifications on the Fax page in the HP JetAdmin software (see “To control printed transaction reports and e-mail messages for fax transmission” on page 87 for details)
� for e-mail messages, an e-mail address has been configured in the recipient’s user profile
Fax notifications provide the following information:
� “transmission OK”The LAN fax server sent the fax successfully.
� “transmission failed”The LAN fax server failed to send the fax.
� “missed notification”The digital sender did not receive any notification from the LAN fax server within 24 hours from the time the fax was sent.
To check the fax folder and workarea
You might need to check or change the fax folder or workarea (originally set up during installation). You can do this in two ways:
� Run the setup program again. Choose the option for installing the HP Digital Sender Service. The program will discover that you have already installed the service and ask if you want to reinstall the service or change the fax workarea.
� Stop the fax service and reenter the fax workarea path. Locate the HP Digital Sender Service from the list of installed Control Panel services. Stop the service and type the new fax workarea path in the Startup Parameters line. Then start the service again. Use the format shown below for the workarea path (in particular, note the double backslash \\):
/Fc:\\data\\fax
158 Chapter 4 - Troubleshooting EN
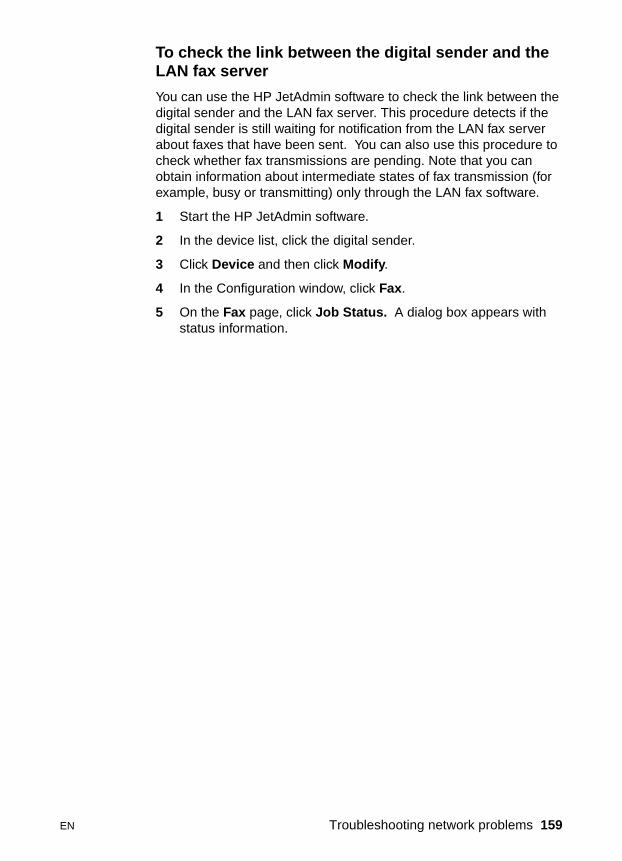
To check the link between the digital sender and the LAN fax server
You can use the HP JetAdmin software to check the link between the digital sender and the LAN fax server. This procedure detects if the digital sender is still waiting for notification from the LAN fax server about faxes that have been sent. You can also use this procedure to check whether fax transmissions are pending. Note that you can obtain information about intermediate states of fax transmission (for example, busy or transmitting) only through the LAN fax software.
1 Start the HP JetAdmin software.
2 In the device list, click the digital sender.
3 Click Device and then click Modify.
4 In the Configuration window, click Fax.
5 On the Fax page, click Job Status. A dialog box appears with status information.
EN Troubleshooting network problems 159
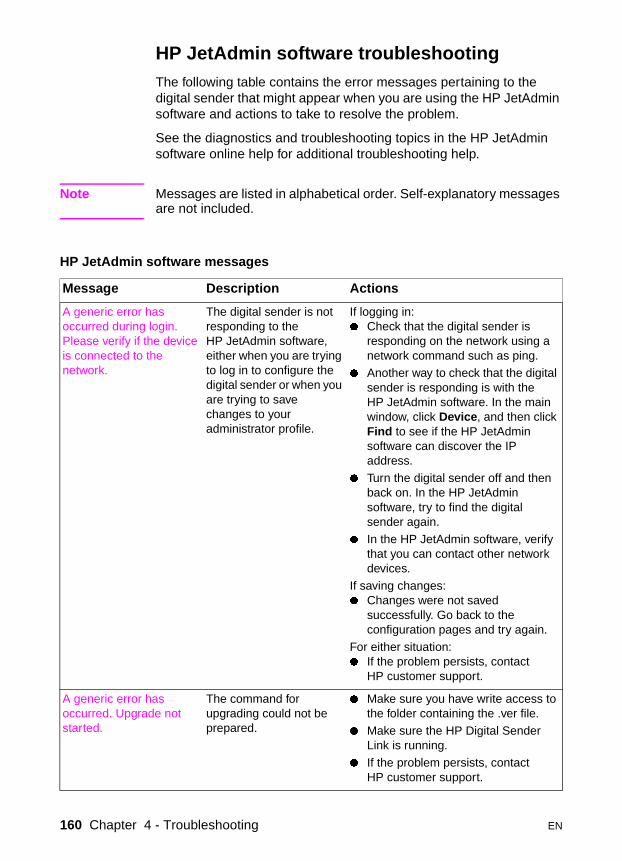
HP JetAdmin software troubleshootingThe following table contains the error messages pertaining to the digital sender that might appear when you are using the HP JetAdmin software and actions to take to resolve the problem.
See the diagnostics and troubleshooting topics in the HP JetAdmin software online help for additional troubleshooting help.
Note Messages are listed in alphabetical order. Self-explanatory messages are not included.
HP JetAdmin software messages
Message Description Actions
A generic error has occurred during login. Please verify if the device is connected to the network.
The digital sender is not responding to the HP JetAdmin software, either when you are trying to log in to configure the digital sender or when you are trying to save changes to your administrator profile.
If logging in: � Check that the digital sender is
responding on the network using a network command such as ping.
� Another way to check that the digital sender is responding is with the HP JetAdmin software. In the main window, click Device, and then click Find to see if the HP JetAdmin software can discover the IP address.
� Turn the digital sender off and then back on. In the HP JetAdmin software, try to find the digital sender again.
� In the HP JetAdmin software, verify that you can contact other network devices.
If saving changes:� Changes were not saved
successfully. Go back to the configuration pages and try again.
For either situation:� If the problem persists, contact
HP customer support.
A generic error has occurred. Upgrade not started.
The command for upgrading could not be prepared.
� Make sure you have write access to the folder containing the .ver file.
� Make sure the HP Digital Sender Link is running.
� If the problem persists, contact HP customer support.
160 Chapter 4 - Troubleshooting EN
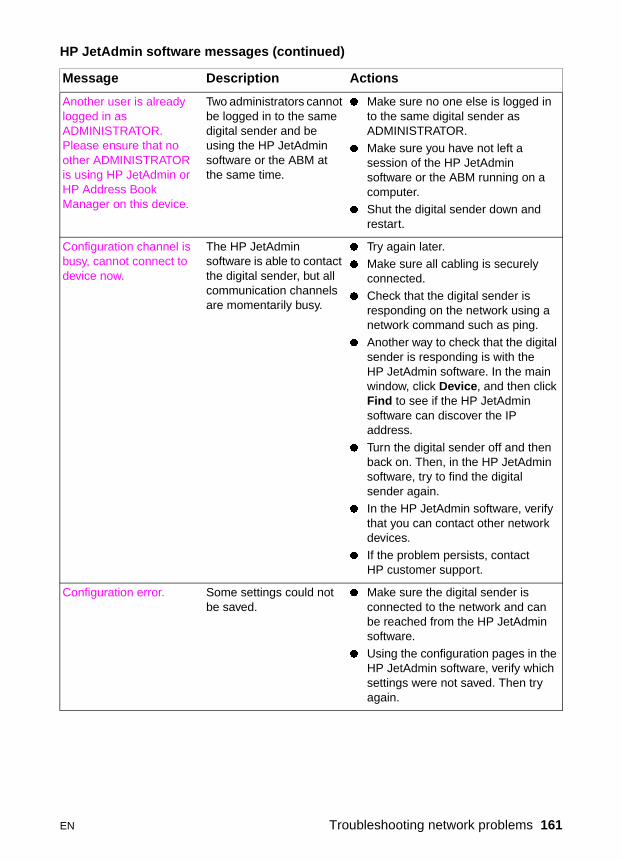
Another user is already logged in as ADMINISTRATOR. Please ensure that no other ADMINISTRATOR is using HP JetAdmin or HP Address Book Manager on this device.
Two administrators cannot be logged in to the same digital sender and be using the HP JetAdmin software or the ABM at the same time.
� Make sure no one else is logged in to the same digital sender as ADMINISTRATOR.
� Make sure you have not left a session of the HP JetAdmin software or the ABM running on a computer.
� Shut the digital sender down and restart.
Configuration channel is busy, cannot connect to device now.
The HP JetAdmin software is able to contact the digital sender, but all communication channels are momentarily busy.
� Try again later.
� Make sure all cabling is securely connected.
� Check that the digital sender is responding on the network using a network command such as ping.
� Another way to check that the digital sender is responding is with the HP JetAdmin software. In the main window, click Device, and then click Find to see if the HP JetAdmin software can discover the IP address.
� Turn the digital sender off and then back on. Then, in the HP JetAdmin software, try to find the digital sender again.
� In the HP JetAdmin software, verify that you can contact other network devices.
� If the problem persists, contact HP customer support.
Configuration error. Some settings could not be saved.
� Make sure the digital sender is connected to the network and can be reached from the HP JetAdmin software.
� Using the configuration pages in the HP JetAdmin software, verify which settings were not saved. Then try again.
HP JetAdmin software messages (continued)
Message Description Actions
EN Troubleshooting network problems 161
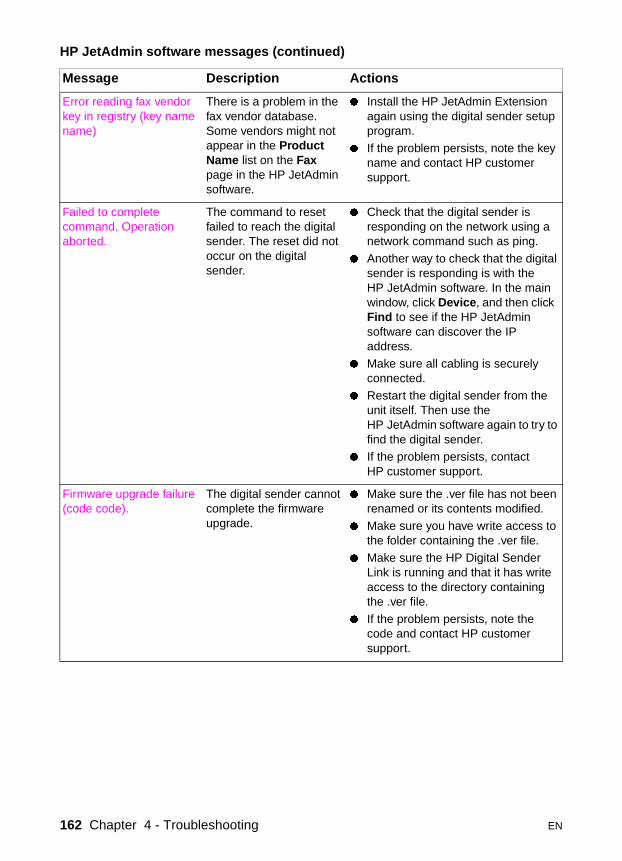
Error reading fax vendor key in registry (key name name)
There is a problem in the fax vendor database. Some vendors might not appear in the Product Name list on the Fax page in the HP JetAdmin software.
� Install the HP JetAdmin Extension again using the digital sender setup program.
� If the problem persists, note the key name and contact HP customer support.
Failed to complete command. Operation aborted.
The command to reset failed to reach the digital sender. The reset did not occur on the digital sender.
� Check that the digital sender is responding on the network using a network command such as ping.
� Another way to check that the digital sender is responding is with the HP JetAdmin software. In the main window, click Device, and then click Find to see if the HP JetAdmin software can discover the IP address.
� Make sure all cabling is securely connected.
� Restart the digital sender from the unit itself. Then use the HP JetAdmin software again to try to find the digital sender.
� If the problem persists, contact HP customer support.
Firmware upgrade failure (code code).
The digital sender cannot complete the firmware upgrade.
� Make sure the .ver file has not been renamed or its contents modified.
� Make sure you have write access to the folder containing the .ver file.
� Make sure the HP Digital Sender Link is running and that it has write access to the directory containing the .ver file.
� If the problem persists, note the code and contact HP customer support.
HP JetAdmin software messages (continued)
Message Description Actions
162 Chapter 4 - Troubleshooting EN
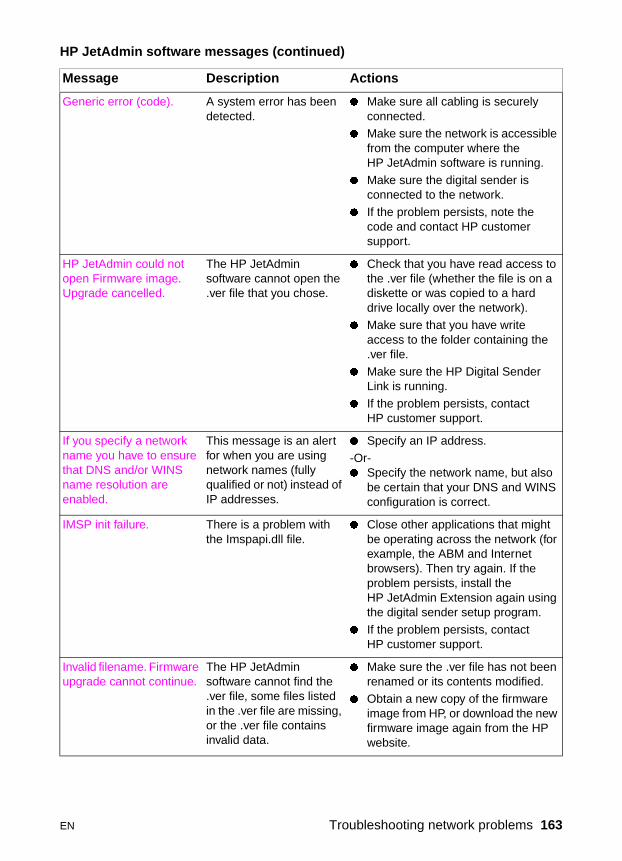
Generic error (code). A system error has been detected.
� Make sure all cabling is securely connected.
� Make sure the network is accessible from the computer where the HP JetAdmin software is running.
� Make sure the digital sender is connected to the network.
� If the problem persists, note the code and contact HP customer support.
HP JetAdmin could not open Firmware image. Upgrade cancelled.
The HP JetAdmin software cannot open the .ver file that you chose.
� Check that you have read access to the .ver file (whether the file is on a diskette or was copied to a hard drive locally over the network).
� Make sure that you have write access to the folder containing the .ver file.
� Make sure the HP Digital Sender Link is running.
� If the problem persists, contact HP customer support.
If you specify a network name you have to ensure that DNS and/or WINS name resolution are enabled.
This message is an alert for when you are using network names (fully qualified or not) instead of IP addresses.
� Specify an IP address.
-Or-� Specify the network name, but also
be certain that your DNS and WINS configuration is correct.
IMSP init failure. There is a problem with the Imspapi.dll file.
� Close other applications that might be operating across the network (for example, the ABM and Internet browsers). Then try again. If the problem persists, install the HP JetAdmin Extension again using the digital sender setup program.
� If the problem persists, contact HP customer support.
Invalid filename. Firmware upgrade cannot continue.
The HP JetAdmin software cannot find the .ver file, some files listed in the .ver file are missing, or the .ver file contains invalid data.
� Make sure the .ver file has not been renamed or its contents modified.
� Obtain a new copy of the firmware image from HP, or download the new firmware image again from the HP website.
HP JetAdmin software messages (continued)
Message Description Actions
EN Troubleshooting network problems 163
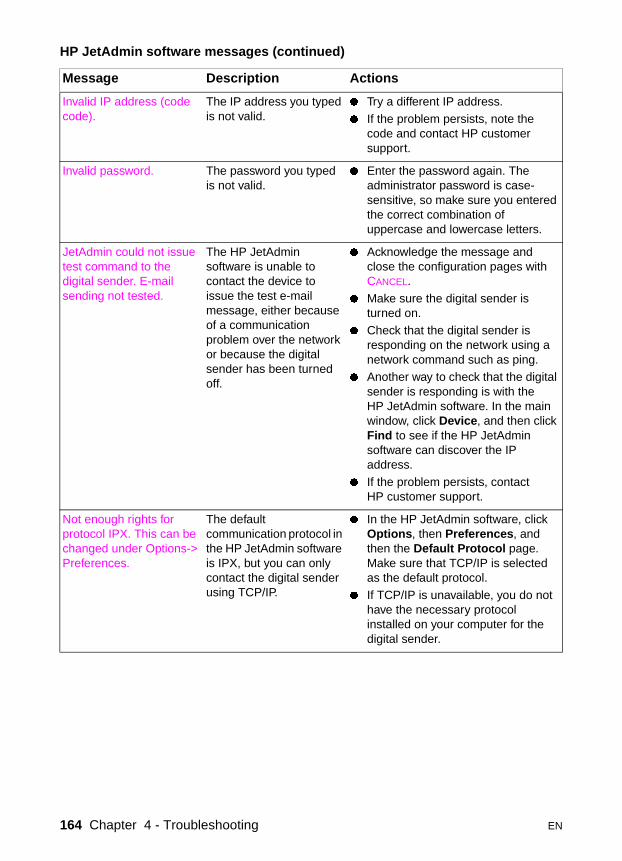
Invalid IP address (code code).
The IP address you typed is not valid.
� Try a different IP address.
� If the problem persists, note the code and contact HP customer support.
Invalid password. The password you typed is not valid.
� Enter the password again. The administrator password is case-sensitive, so make sure you entered the correct combination of uppercase and lowercase letters.
JetAdmin could not issue test command to the digital sender. E-mail sending not tested.
The HP JetAdmin software is unable to contact the device to issue the test e-mail message, either because of a communication problem over the network or because the digital sender has been turned off.
� Acknowledge the message and close the configuration pages with CANCEL.
� Make sure the digital sender is turned on.
� Check that the digital sender is responding on the network using a network command such as ping.
� Another way to check that the digital sender is responding is with the HP JetAdmin software. In the main window, click Device, and then click Find to see if the HP JetAdmin software can discover the IP address.
� If the problem persists, contact HP customer support.
Not enough rights for protocol IPX. This can be changed under Options->Preferences.
The default communication protocol in the HP JetAdmin software is IPX, but you can only contact the digital sender using TCP/IP.
� In the HP JetAdmin software, click Options, then Preferences, and then the Default Protocol page. Make sure that TCP/IP is selected as the default protocol.
� If TCP/IP is unavailable, you do not have the necessary protocol installed on your computer for the digital sender.
HP JetAdmin software messages (continued)
Message Description Actions
164 Chapter 4 - Troubleshooting EN
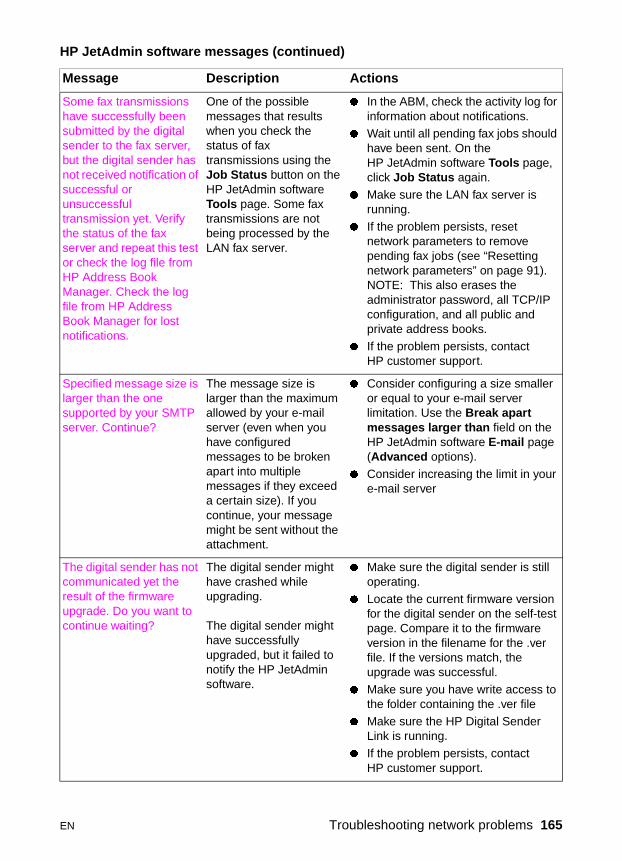
Some fax transmissions have successfully been submitted by the digital sender to the fax server, but the digital sender has not received notification of successful or unsuccessful transmission yet. Verify the status of the fax server and repeat this test or check the log file from HP Address Book Manager. Check the log file from HP Address Book Manager for lost notifications.
One of the possible messages that results when you check the status of fax transmissions using the Job Status button on the HP JetAdmin software Tools page. Some fax transmissions are not being processed by the LAN fax server.
� In the ABM, check the activity log for information about notifications.
� Wait until all pending fax jobs should have been sent. On the HP JetAdmin software Tools page, click Job Status again.
� Make sure the LAN fax server is running.
� If the problem persists, reset network parameters to remove pending fax jobs (see “Resetting network parameters” on page 91). NOTE: This also erases the administrator password, all TCP/IP configuration, and all public and private address books.
� If the problem persists, contact HP customer support.
Specified message size is larger than the one supported by your SMTP server. Continue?
The message size is larger than the maximum allowed by your e-mail server (even when you have configured messages to be broken apart into multiple messages if they exceed a certain size). If you continue, your message might be sent without the attachment.
� Consider configuring a size smaller or equal to your e-mail server limitation. Use the Break apart messages larger than field on the HP JetAdmin software E-mail page (Advanced options).
� Consider increasing the limit in your e-mail server
The digital sender has not communicated yet the result of the firmware upgrade. Do you want to continue waiting?
The digital sender might have crashed while upgrading.
The digital sender might have successfully upgraded, but it failed to notify the HP JetAdmin software.
� Make sure the digital sender is still operating.
� Locate the current firmware version for the digital sender on the self-test page. Compare it to the firmware version in the filename for the .ver file. If the versions match, the upgrade was successful.
� Make sure you have write access to the folder containing the .ver file
� Make sure the HP Digital Sender Link is running.
� If the problem persists, contact HP customer support.
HP JetAdmin software messages (continued)
Message Description Actions
EN Troubleshooting network problems 165
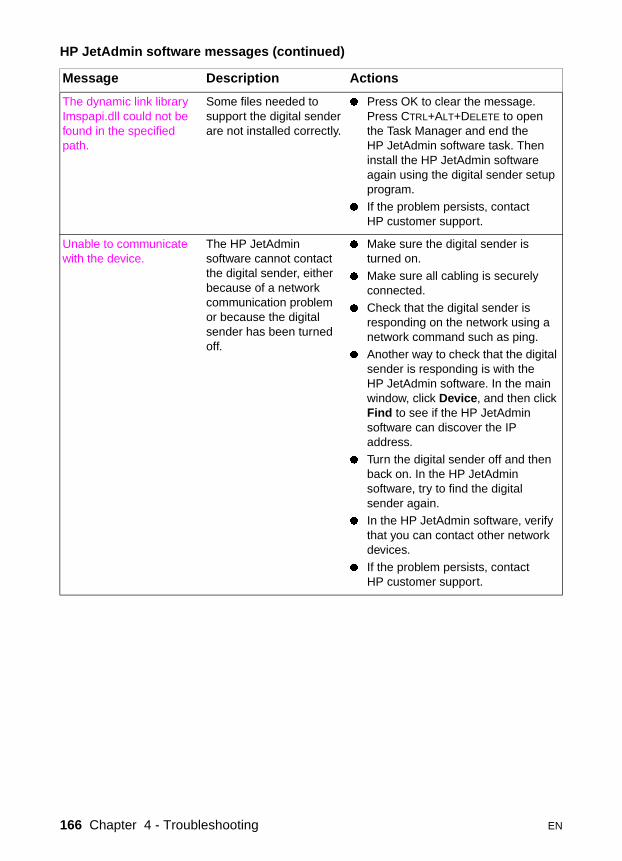
The dynamic link library Imspapi.dll could not be found in the specified path.
Some files needed to support the digital sender are not installed correctly.
� Press OK to clear the message. Press CTRL+ALT+DELETE to open the Task Manager and end the HP JetAdmin software task. Then install the HP JetAdmin software again using the digital sender setup program.
� If the problem persists, contact HP customer support.
Unable to communicate with the device.
The HP JetAdmin software cannot contact the digital sender, either because of a network communication problem or because the digital sender has been turned off.
� Make sure the digital sender is turned on.
� Make sure all cabling is securely connected.
� Check that the digital sender is responding on the network using a network command such as ping.
� Another way to check that the digital sender is responding is with the HP JetAdmin software. In the main window, click Device, and then click Find to see if the HP JetAdmin software can discover the IP address.
� Turn the digital sender off and then back on. In the HP JetAdmin software, try to find the digital sender again.
� In the HP JetAdmin software, verify that you can contact other network devices.
� If the problem persists, contact HP customer support.
HP JetAdmin software messages (continued)
Message Description Actions
166 Chapter 4 - Troubleshooting EN
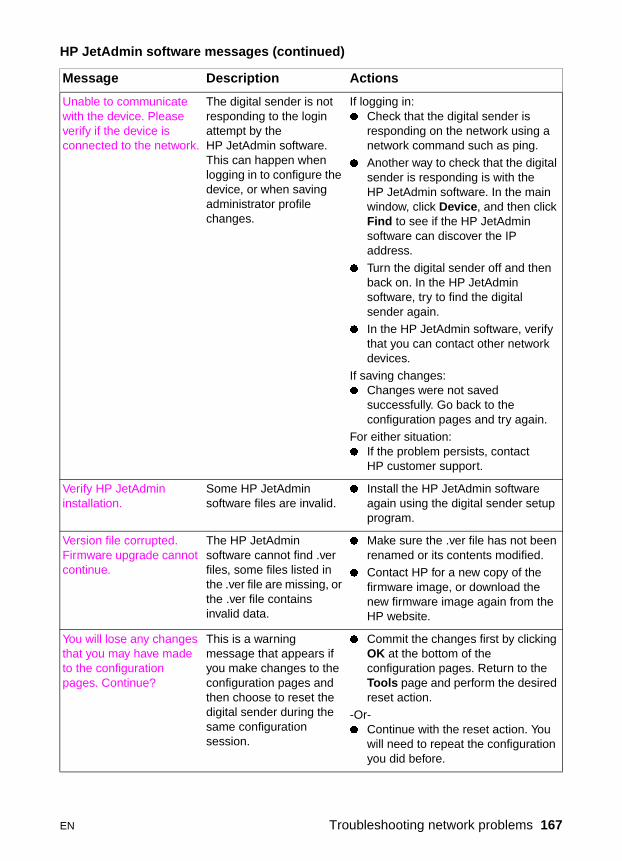
Unable to communicate with the device. Please verify if the device is connected to the network.
The digital sender is not responding to the login attempt by the HP JetAdmin software. This can happen when logging in to configure the device, or when saving administrator profile changes.
If logging in: � Check that the digital sender is
responding on the network using a network command such as ping.
� Another way to check that the digital sender is responding is with the HP JetAdmin software. In the main window, click Device, and then click Find to see if the HP JetAdmin software can discover the IP address.
� Turn the digital sender off and then back on. In the HP JetAdmin software, try to find the digital sender again.
� In the HP JetAdmin software, verify that you can contact other network devices.
If saving changes:� Changes were not saved
successfully. Go back to the configuration pages and try again.
For either situation:� If the problem persists, contact
HP customer support.
Verify HP JetAdmin installation.
Some HP JetAdmin software files are invalid.
� Install the HP JetAdmin software again using the digital sender setup program.
Version file corrupted. Firmware upgrade cannot continue.
The HP JetAdmin software cannot find .ver files, some files listed in the .ver file are missing, or the .ver file contains invalid data.
� Make sure the .ver file has not been renamed or its contents modified.
� Contact HP for a new copy of the firmware image, or download the new firmware image again from the HP website.
You will lose any changes that you may have made to the configuration pages. Continue?
This is a warning message that appears if you make changes to the configuration pages and then choose to reset the digital sender during the same configuration session.
� Commit the changes first by clicking OK at the bottom of the configuration pages. Return to the Tools page and perform the desired reset action.
-Or-� Continue with the reset action. You
will need to repeat the configuration you did before.
HP JetAdmin software messages (continued)
Message Description Actions
EN Troubleshooting network problems 167
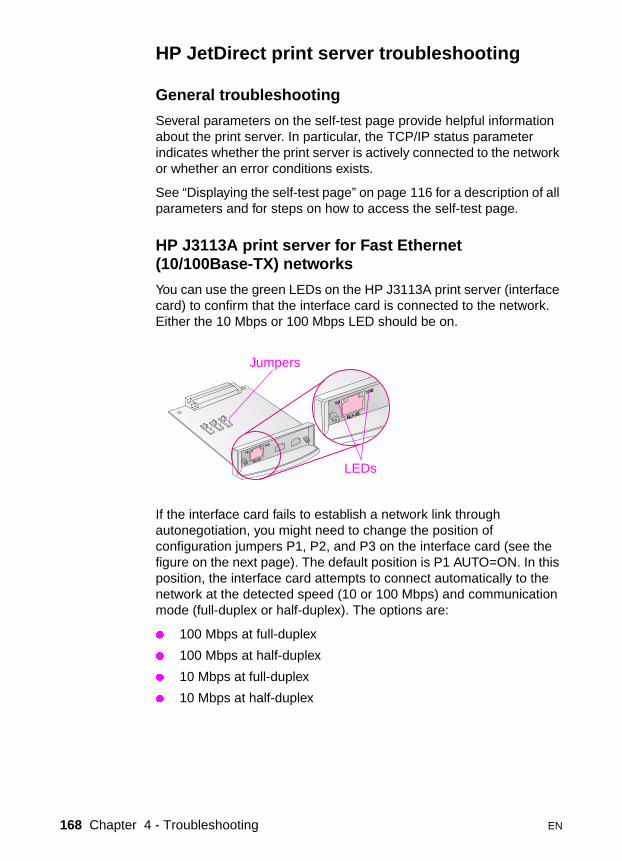
HP JetDirect print server troubleshooting
General troubleshooting
Several parameters on the self-test page provide helpful information about the print server. In particular, the TCP/IP status parameter indicates whether the print server is actively connected to the network or whether an error conditions exists.
See “Displaying the self-test page” on page 116 for a description of all parameters and for steps on how to access the self-test page.
HP J3113A print server for Fast Ethernet(10/100Base-TX) networks
You can use the green LEDs on the HP J3113A print server (interface card) to confirm that the interface card is connected to the network. Either the 10 Mbps or 100 Mbps LED should be on.
If the interface card fails to establish a network link through autonegotiation, you might need to change the position of configuration jumpers P1, P2, and P3 on the interface card (see the figure on the next page). The default position is P1 AUTO=ON. In this position, the interface card attempts to connect automatically to the network at the detected speed (10 or 100 Mbps) and communication mode (full-duplex or half-duplex). The options are:
� 100 Mbps at full-duplex
� 100 Mbps at half-duplex
� 10 Mbps at full-duplex
� 10 Mbps at half-duplex
LEDs
Jumpers
168 Chapter 4 - Troubleshooting EN
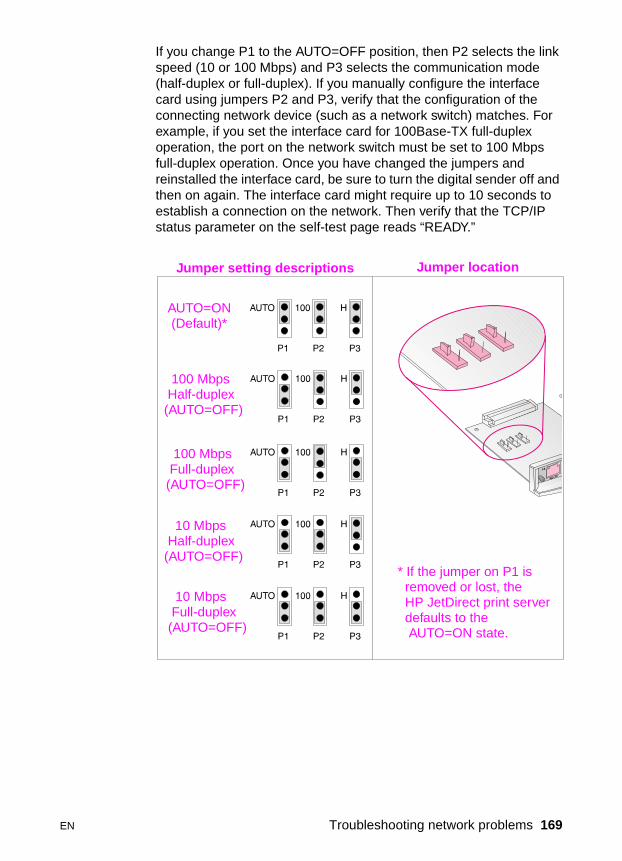
If you change P1 to the AUTO=OFF position, then P2 selects the link speed (10 or 100 Mbps) and P3 selects the communication mode (half-duplex or full-duplex). If you manually configure the interface card using jumpers P2 and P3, verify that the configuration of the connecting network device (such as a network switch) matches. For example, if you set the interface card for 100Base-TX full-duplex operation, the port on the network switch must be set to 100 Mbps full-duplex operation. Once you have changed the jumpers and reinstalled the interface card, be sure to turn the digital sender off and then on again. The interface card might require up to 10 seconds to establish a connection on the network. Then verify that the TCP/IP status parameter on the self-test page reads “READY.”
Jumper locationJumper setting descriptions
AUTO=ON (Default)*
100 Mbps Half-duplex(AUTO=OFF)
100 Mbps Full-duplex(AUTO=OFF)
10 Mbps Half-duplex(AUTO=OFF)
10 Mbps Full-duplex(AUTO=OFF)
* If the jumper on P1 is removed or lost, the HP JetDirect print server defaults to the
AUTO=ON state.
EN Troubleshooting network problems 169
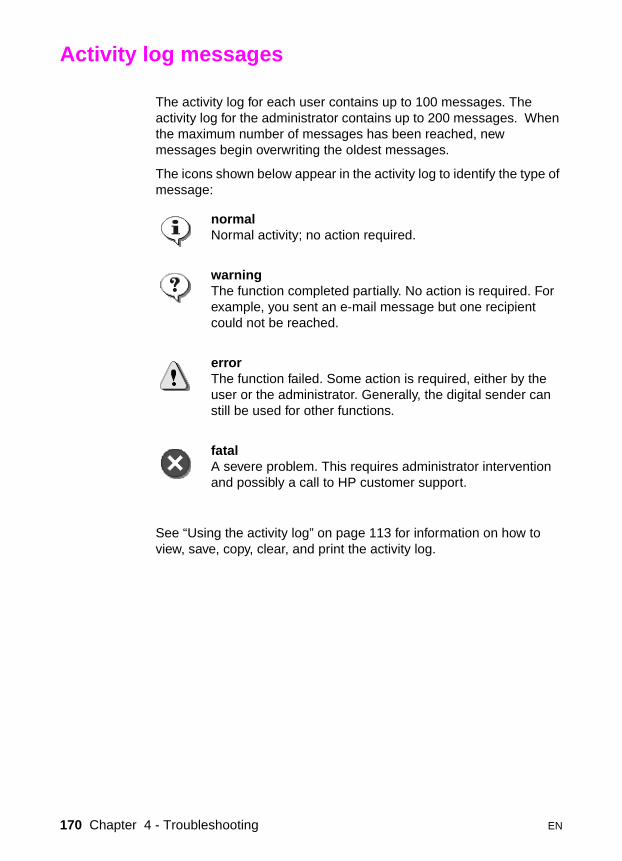
Activity log messages
The activity log for each user contains up to 100 messages. The activity log for the administrator contains up to 200 messages. When the maximum number of messages has been reached, new messages begin overwriting the oldest messages.
The icons shown below appear in the activity log to identify the type of message:
See “Using the activity log” on page 113 for information on how to view, save, copy, clear, and print the activity log.
normalNormal activity; no action required.
warningThe function completed partially. No action is required. For example, you sent an e-mail message but one recipient could not be reached.
errorThe function failed. Some action is required, either by the user or the administrator. Generally, the digital sender can still be used for other functions.
fatalA severe problem. This requires administrator intervention and possibly a call to HP customer support.
170 Chapter 4 - Troubleshooting EN
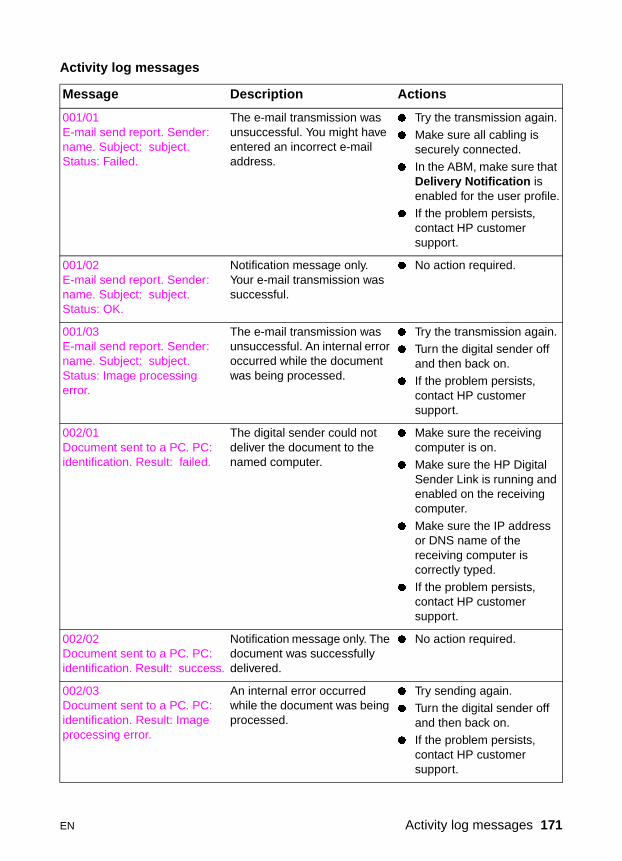
Activity log messages
Message Description Actions
001/01E-mail send report. Sender: name. Subject: subject. Status: Failed.
The e-mail transmission was unsuccessful. You might have entered an incorrect e-mail address.
� Try the transmission again.
� Make sure all cabling is securely connected.
� In the ABM, make sure that Delivery Notification is enabled for the user profile.
� If the problem persists, contact HP customer support.
001/02E-mail send report. Sender: name. Subject: subject. Status: OK.
Notification message only. Your e-mail transmission was successful.
� No action required.
001/03E-mail send report. Sender: name. Subject: subject. Status: Image processing error.
The e-mail transmission was unsuccessful. An internal error occurred while the document was being processed.
� Try the transmission again.� Turn the digital sender off
and then back on.� If the problem persists,
contact HP customer support.
002/01Document sent to a PC. PC: identification. Result: failed.
The digital sender could not deliver the document to the named computer.
� Make sure the receiving computer is on.
� Make sure the HP Digital Sender Link is running and enabled on the receiving computer.
� Make sure the IP address or DNS name of the receiving computer is correctly typed.
� If the problem persists, contact HP customer support.
002/02Document sent to a PC. PC: identification. Result: success.
Notification message only. The document was successfully delivered.
� No action required.
002/03Document sent to a PC. PC: identification. Result: Image processing error.
An internal error occurred while the document was being processed.
� Try sending again.� Turn the digital sender off
and then back on.� If the problem persists,
contact HP customer support.
EN Activity log messages 171
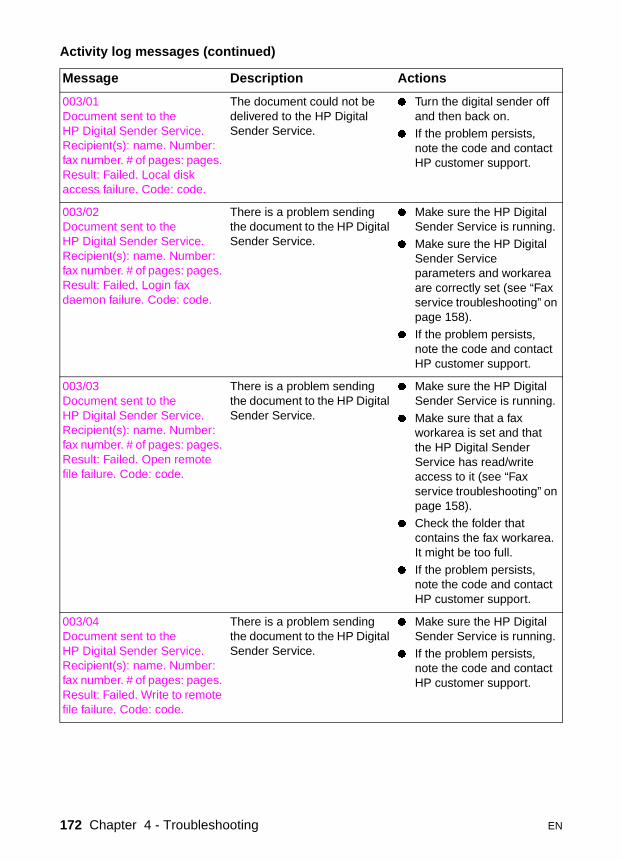
003/01Document sent to the HP Digital Sender Service. Recipient(s): name. Number: fax number. # of pages: pages. Result: Failed. Local disk access failure. Code: code.
The document could not be delivered to the HP Digital Sender Service.
� Turn the digital sender off and then back on.
� If the problem persists, note the code and contact HP customer support.
003/02Document sent to the HP Digital Sender Service. Recipient(s): name. Number: fax number. # of pages: pages. Result: Failed. Login fax daemon failure. Code: code.
There is a problem sending the document to the HP Digital Sender Service.
� Make sure the HP Digital Sender Service is running.
� Make sure the HP Digital Sender Service parameters and workarea are correctly set (see “Fax service troubleshooting” on page 158).
� If the problem persists, note the code and contact HP customer support.
003/03Document sent to the HP Digital Sender Service. Recipient(s): name. Number: fax number. # of pages: pages. Result: Failed. Open remote file failure. Code: code.
There is a problem sending the document to the HP Digital Sender Service.
� Make sure the HP Digital Sender Service is running.
� Make sure that a fax workarea is set and that the HP Digital Sender Service has read/write access to it (see “Fax service troubleshooting” on page 158).
� Check the folder that contains the fax workarea. It might be too full.
� If the problem persists, note the code and contact HP customer support.
003/04Document sent to the HP Digital Sender Service. Recipient(s): name. Number: fax number. # of pages: pages. Result: Failed. Write to remote file failure. Code: code.
There is a problem sending the document to the HP Digital Sender Service.
� Make sure the HP Digital Sender Service is running.
� If the problem persists, note the code and contact HP customer support.
Activity log messages (continued)
Message Description Actions
172 Chapter 4 - Troubleshooting EN
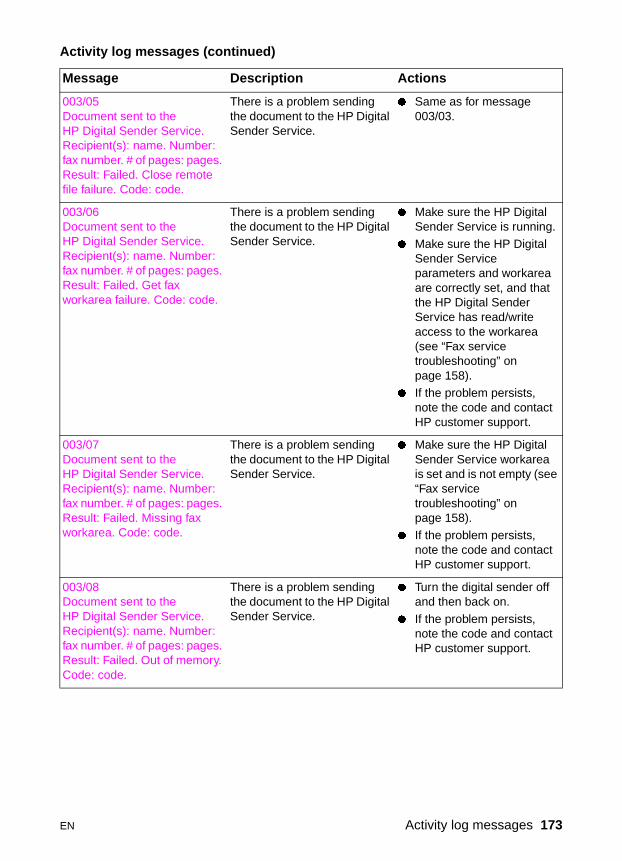
003/05Document sent to the HP Digital Sender Service. Recipient(s): name. Number: fax number. # of pages: pages. Result: Failed. Close remote file failure. Code: code.
There is a problem sending the document to the HP Digital Sender Service.
� Same as for message 003/03.
003/06Document sent to the HP Digital Sender Service. Recipient(s): name. Number: fax number. # of pages: pages. Result: Failed. Get fax workarea failure. Code: code.
There is a problem sending the document to the HP Digital Sender Service.
� Make sure the HP Digital Sender Service is running.
� Make sure the HP Digital Sender Service parameters and workarea are correctly set, and that the HP Digital Sender Service has read/write access to the workarea (see “Fax service troubleshooting” on page 158).
� If the problem persists, note the code and contact HP customer support.
003/07Document sent to the HP Digital Sender Service. Recipient(s): name. Number: fax number. # of pages: pages. Result: Failed. Missing fax workarea. Code: code.
There is a problem sending the document to the HP Digital Sender Service.
� Make sure the HP Digital Sender Service workarea is set and is not empty (see “Fax service troubleshooting” on page 158).
� If the problem persists, note the code and contact HP customer support.
003/08Document sent to the HP Digital Sender Service. Recipient(s): name. Number: fax number. # of pages: pages. Result: Failed. Out of memory. Code: code.
There is a problem sending the document to the HP Digital Sender Service.
� Turn the digital sender off and then back on.
� If the problem persists, note the code and contact HP customer support.
Activity log messages (continued)
Message Description Actions
EN Activity log messages 173
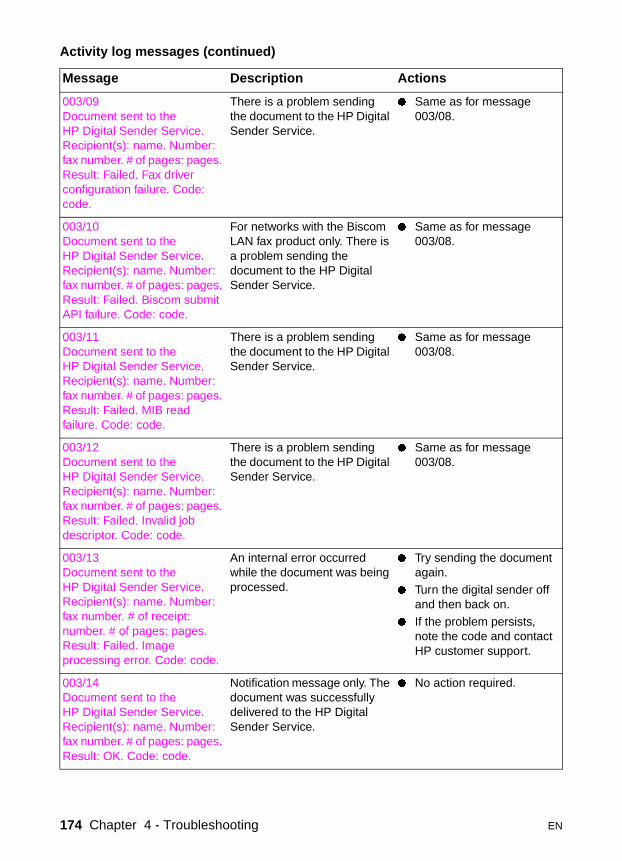
003/09Document sent to the HP Digital Sender Service. Recipient(s): name. Number: fax number. # of pages: pages. Result: Failed. Fax driver configuration failure. Code: code.
There is a problem sending the document to the HP Digital Sender Service.
� Same as for message 003/08.
003/10Document sent to the HP Digital Sender Service. Recipient(s): name. Number: fax number. # of pages: pages. Result: Failed. Biscom submit API failure. Code: code.
For networks with the Biscom LAN fax product only. There is a problem sending the document to the HP Digital Sender Service.
� Same as for message 003/08.
003/11Document sent to the HP Digital Sender Service. Recipient(s): name. Number: fax number. # of pages: pages. Result: Failed. MIB read failure. Code: code.
There is a problem sending the document to the HP Digital Sender Service.
� Same as for message 003/08.
003/12Document sent to the HP Digital Sender Service. Recipient(s): name. Number: fax number. # of pages: pages. Result: Failed. Invalid job descriptor. Code: code.
There is a problem sending the document to the HP Digital Sender Service.
� Same as for message 003/08.
003/13Document sent to the HP Digital Sender Service. Recipient(s): name. Number: fax number. # of receipt: number. # of pages: pages. Result: Failed. Image processing error. Code: code.
An internal error occurred while the document was being processed.
� Try sending the document again.
� Turn the digital sender off and then back on.
� If the problem persists, note the code and contact HP customer support.
003/14Document sent to the HP Digital Sender Service. Recipient(s): name. Number: fax number. # of pages: pages. Result: OK. Code: code.
Notification message only. The document was successfully delivered to the HP Digital Sender Service.
� No action required.
Activity log messages (continued)
Message Description Actions
174 Chapter 4 - Troubleshooting EN
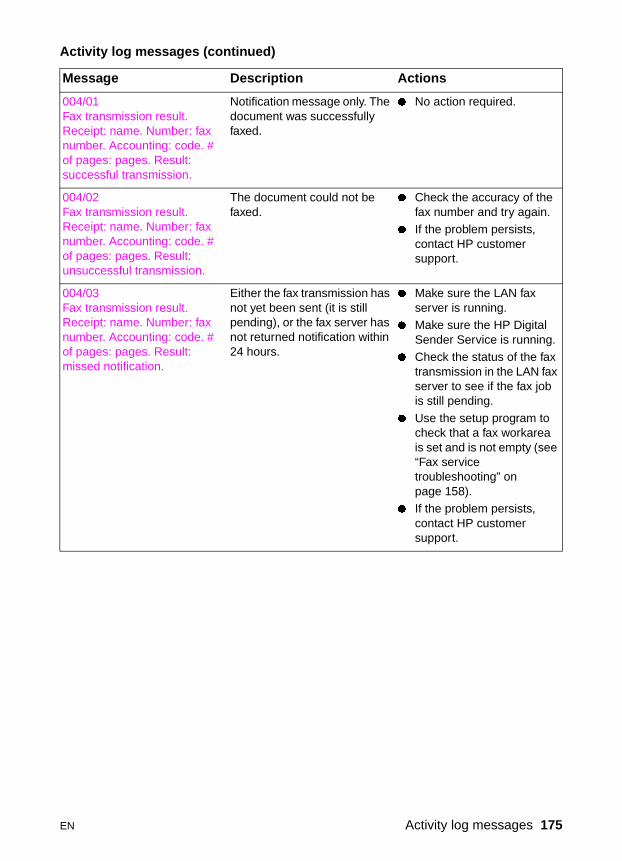
004/01Fax transmission result. Receipt: name. Number: fax number. Accounting: code. # of pages: pages. Result: successful transmission.
Notification message only. The document was successfully faxed.
� No action required.
004/02Fax transmission result. Receipt: name. Number: fax number. Accounting: code. # of pages: pages. Result: unsuccessful transmission.
The document could not be faxed.
� Check the accuracy of the fax number and try again.
� If the problem persists, contact HP customer support.
004/03Fax transmission result. Receipt: name. Number: fax number. Accounting: code. # of pages: pages. Result: missed notification.
Either the fax transmission has not yet been sent (it is still pending), or the fax server has not returned notification within 24 hours.
� Make sure the LAN fax server is running.
� Make sure the HP Digital Sender Service is running.
� Check the status of the fax transmission in the LAN fax server to see if the fax job is still pending.
� Use the setup program to check that a fax workarea is set and is not empty (see “Fax service troubleshooting” on page 158).
� If the problem persists, contact HP customer support.
Activity log messages (continued)
Message Description Actions
EN Activity log messages 175
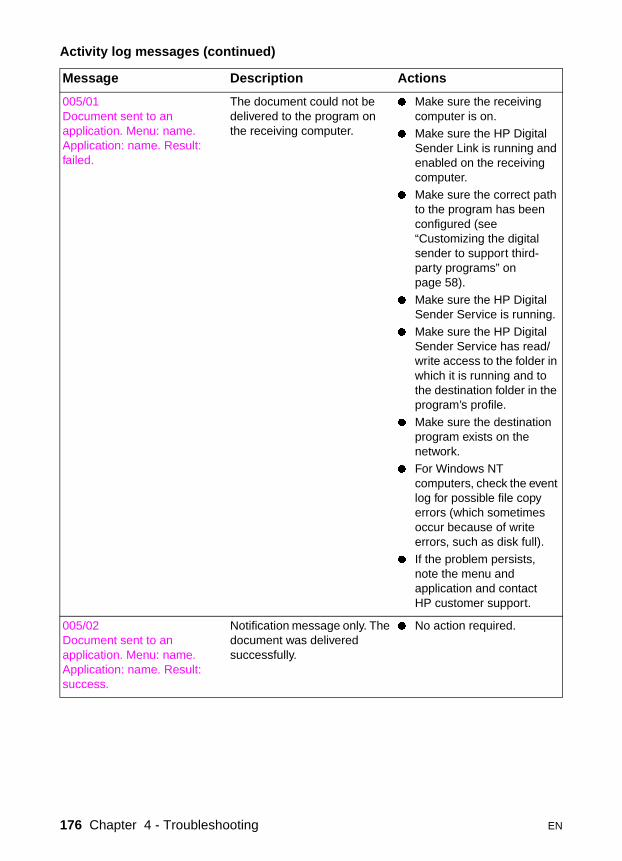
005/01Document sent to an application. Menu: name. Application: name. Result: failed.
The document could not be delivered to the program on the receiving computer.
� Make sure the receiving computer is on.
� Make sure the HP Digital Sender Link is running and enabled on the receiving computer.
� Make sure the correct path to the program has been configured (see “Customizing the digital sender to support third-party programs” on page 58).
� Make sure the HP Digital Sender Service is running.
� Make sure the HP Digital Sender Service has read/write access to the folder in which it is running and to the destination folder in the program’s profile.
� Make sure the destination program exists on the network.
� For Windows NT computers, check the event log for possible file copy errors (which sometimes occur because of write errors, such as disk full).
� If the problem persists, note the menu and application and contact HP customer support.
005/02Document sent to an application. Menu: name. Application: name. Result: success.
Notification message only. The document was delivered successfully.
� No action required.
Activity log messages (continued)
Message Description Actions
176 Chapter 4 - Troubleshooting EN
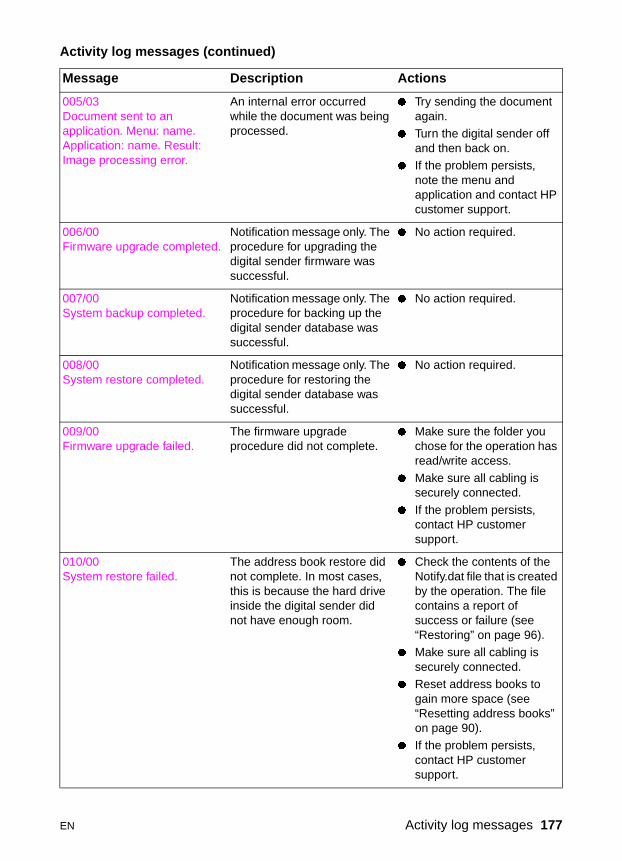
005/03Document sent to an application. Menu: name. Application: name. Result: Image processing error.
An internal error occurred while the document was being processed.
� Try sending the document again.
� Turn the digital sender off and then back on.
� If the problem persists, note the menu and application and contact HP customer support.
006/00Firmware upgrade completed.
Notification message only. The procedure for upgrading the digital sender firmware was successful.
� No action required.
007/00System backup completed.
Notification message only. The procedure for backing up the digital sender database was successful.
� No action required.
008/00System restore completed.
Notification message only. The procedure for restoring the digital sender database was successful.
� No action required.
009/00Firmware upgrade failed.
The firmware upgrade procedure did not complete.
� Make sure the folder you chose for the operation has read/write access.
� Make sure all cabling is securely connected.
� If the problem persists, contact HP customer support.
010/00System restore failed.
The address book restore did not complete. In most cases, this is because the hard drive inside the digital sender did not have enough room.
� Check the contents of the Notify.dat file that is created by the operation. The file contains a report of success or failure (see “Restoring” on page 96).
� Make sure all cabling is securely connected.
� Reset address books to gain more space (see “Resetting address books” on page 90).
� If the problem persists, contact HP customer support.
Activity log messages (continued)
Message Description Actions
EN Activity log messages 177
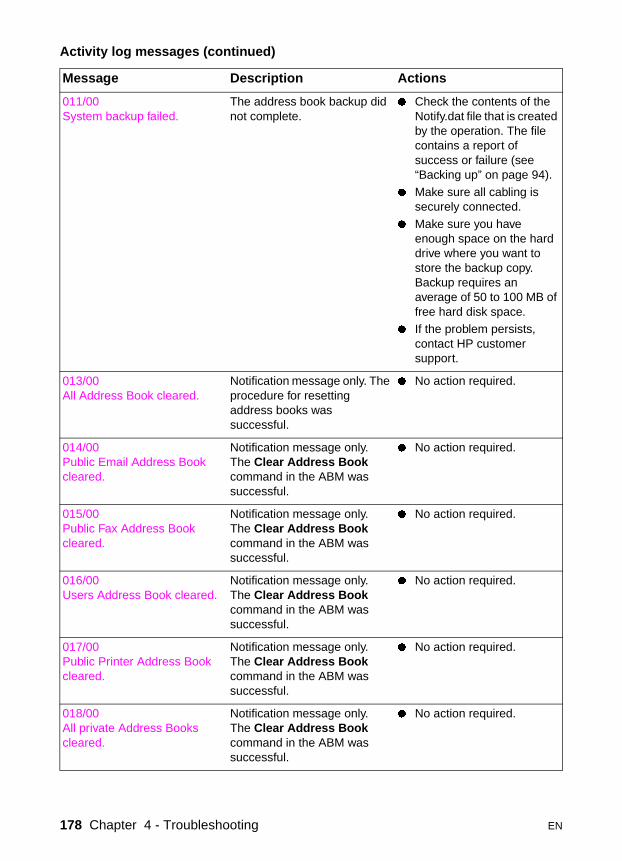
011/00System backup failed.
The address book backup did not complete.
� Check the contents of the Notify.dat file that is created by the operation. The file contains a report of success or failure (see “Backing up” on page 94).
� Make sure all cabling is securely connected.
� Make sure you have enough space on the hard drive where you want to store the backup copy. Backup requires an average of 50 to 100 MB of free hard disk space.
� If the problem persists, contact HP customer support.
013/00All Address Book cleared.
Notification message only. The procedure for resetting address books was successful.
� No action required.
014/00Public Email Address Book cleared.
Notification message only.The Clear Address Book command in the ABM was successful.
� No action required.
015/00Public Fax Address Book cleared.
Notification message only.The Clear Address Book command in the ABM was successful.
� No action required.
016/00Users Address Book cleared.
Notification message only.The Clear Address Book command in the ABM was successful.
� No action required.
017/00Public Printer Address Book cleared.
Notification message only.The Clear Address Book command in the ABM was successful.
� No action required.
018/00All private Address Books cleared.
Notification message only.The Clear Address Book command in the ABM was successful.
� No action required.
Activity log messages (continued)
Message Description Actions
178 Chapter 4 - Troubleshooting EN
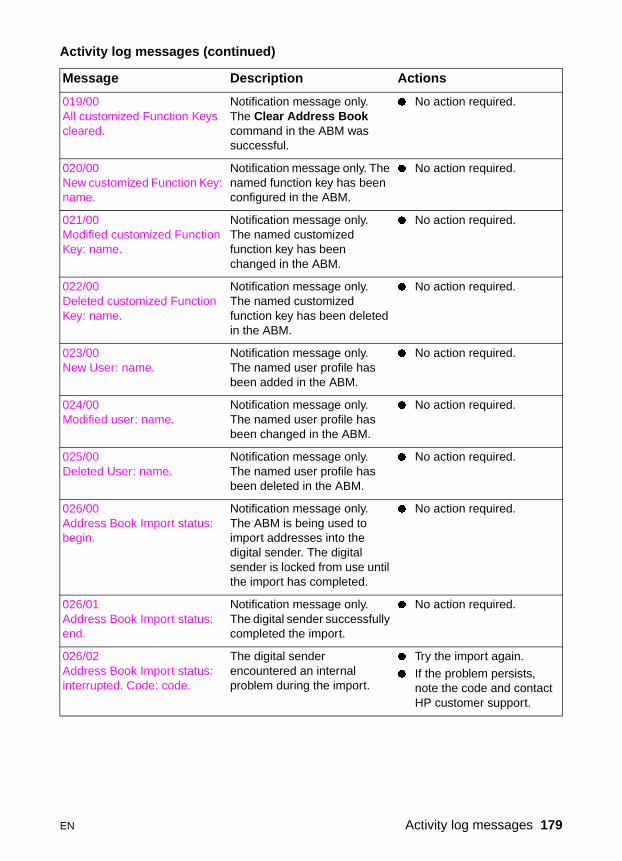
019/00All customized Function Keys cleared.
Notification message only.The Clear Address Book command in the ABM was successful.
� No action required.
020/00New customized Function Key: name.
Notification message only. The named function key has been configured in the ABM.
� No action required.
021/00Modified customized Function Key: name.
Notification message only. The named customized function key has been changed in the ABM.
� No action required.
022/00Deleted customized Function Key: name.
Notification message only.The named customized function key has been deleted in the ABM.
� No action required.
023/00New User: name.
Notification message only.The named user profile has been added in the ABM.
� No action required.
024/00Modified user: name.
Notification message only.The named user profile has been changed in the ABM.
� No action required.
025/00Deleted User: name.
Notification message only.The named user profile has been deleted in the ABM.
� No action required.
026/00Address Book Import status: begin.
Notification message only.The ABM is being used to import addresses into the digital sender. The digital sender is locked from use until the import has completed.
� No action required.
026/01Address Book Import status: end.
Notification message only.The digital sender successfully completed the import.
� No action required.
026/02Address Book Import status: interrupted. Code: code.
The digital sender encountered an internal problem during the import.
� Try the import again.
� If the problem persists, note the code and contact HP customer support.
Activity log messages (continued)
Message Description Actions
EN Activity log messages 179
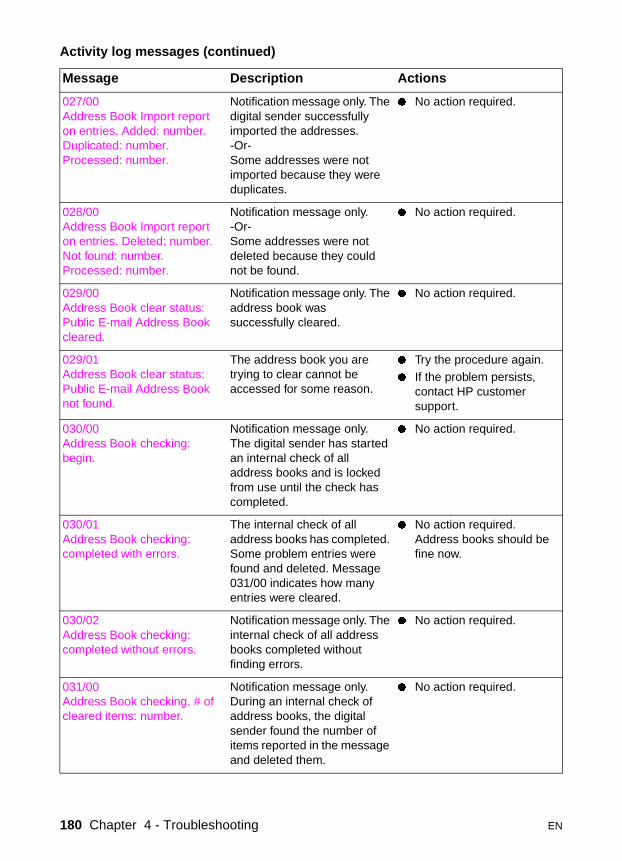
027/00Address Book Import report on entries. Added: number. Duplicated: number. Processed: number.
Notification message only. The digital sender successfully imported the addresses.-Or-Some addresses were not imported because they were duplicates.
� No action required.
028/00Address Book Import report on entries. Deleted: number. Not found: number. Processed: number.
Notification message only.-Or-Some addresses were not deleted because they could not be found.
� No action required.
029/00Address Book clear status: Public E-mail Address Book cleared.
Notification message only. The address book was successfully cleared.
� No action required.
029/01Address Book clear status: Public E-mail Address Book not found.
The address book you are trying to clear cannot be accessed for some reason.
� Try the procedure again.� If the problem persists,
contact HP customer support.
030/00Address Book checking: begin.
Notification message only.The digital sender has started an internal check of all address books and is locked from use until the check has completed.
� No action required.
030/01Address Book checking: completed with errors.
The internal check of all address books has completed. Some problem entries were found and deleted. Message 031/00 indicates how many entries were cleared.
� No action required. Address books should be fine now.
030/02Address Book checking: completed without errors.
Notification message only. The internal check of all address books completed without finding errors.
� No action required.
031/00Address Book checking. # of cleared items: number.
Notification message only. During an internal check of address books, the digital sender found the number of items reported in the message and deleted them.
� No action required.
Activity log messages (continued)
Message Description Actions
180 Chapter 4 - Troubleshooting EN
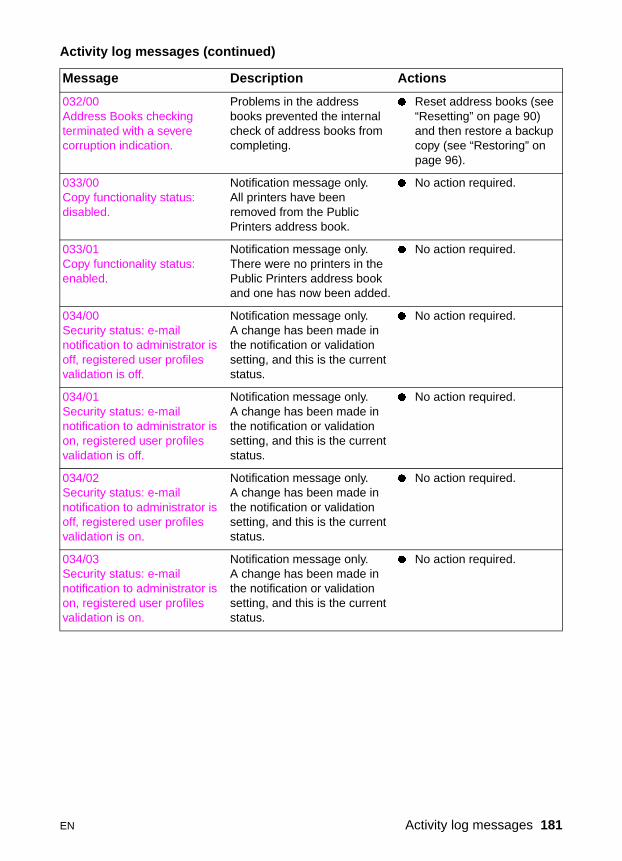
032/00Address Books checking terminated with a severe corruption indication.
Problems in the address books prevented the internal check of address books from completing.
� Reset address books (see “Resetting” on page 90) and then restore a backup copy (see “Restoring” on page 96).
033/00Copy functionality status: disabled.
Notification message only.All printers have been removed from the Public Printers address book.
� No action required.
033/01Copy functionality status: enabled.
Notification message only.There were no printers in the Public Printers address book and one has now been added.
� No action required.
034/00Security status: e-mail notification to administrator is off, registered user profiles validation is off.
Notification message only. A change has been made in the notification or validation setting, and this is the current status.
� No action required.
034/01Security status: e-mail notification to administrator is on, registered user profiles validation is off.
Notification message only.A change has been made in the notification or validation setting, and this is the current status.
� No action required.
034/02Security status: e-mail notification to administrator is off, registered user profiles validation is on.
Notification message only.A change has been made in the notification or validation setting, and this is the current status.
� No action required.
034/03Security status: e-mail notification to administrator is on, registered user profiles validation is on.
Notification message only.A change has been made in the notification or validation setting, and this is the current status.
� No action required.
Activity log messages (continued)
Message Description Actions
EN Activity log messages 181
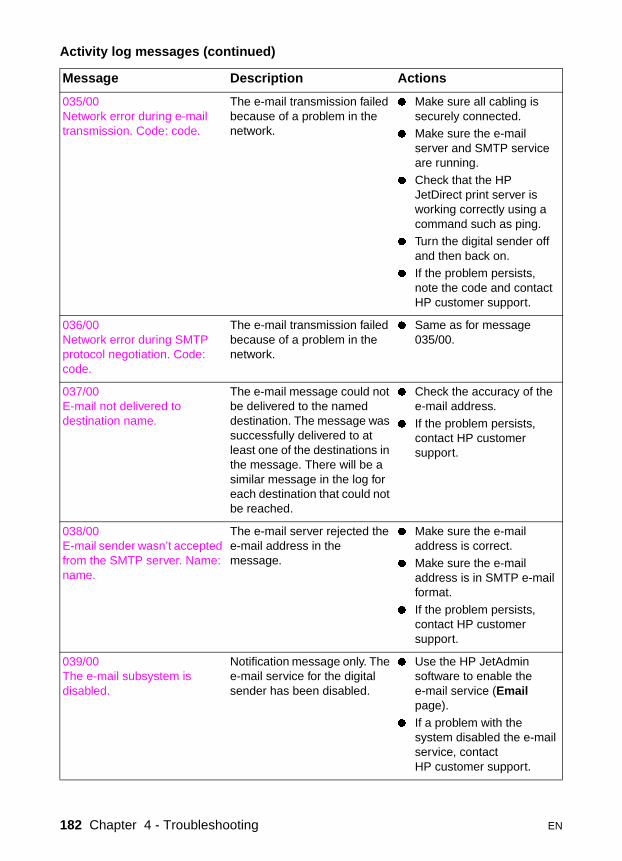
035/00Network error during e-mail transmission. Code: code.
The e-mail transmission failed because of a problem in the network.
� Make sure all cabling is securely connected.
� Make sure the e-mail server and SMTP service are running.
� Check that the HP JetDirect print server is working correctly using a command such as ping.
� Turn the digital sender off and then back on.
� If the problem persists, note the code and contact HP customer support.
036/00Network error during SMTP protocol negotiation. Code: code.
The e-mail transmission failed because of a problem in the network.
� Same as for message 035/00.
037/00E-mail not delivered to destination name.
The e-mail message could not be delivered to the named destination. The message was successfully delivered to at least one of the destinations in the message. There will be a similar message in the log for each destination that could not be reached.
� Check the accuracy of the e-mail address.
� If the problem persists, contact HP customer support.
038/00E-mail sender wasn’t accepted from the SMTP server. Name: name.
The e-mail server rejected the e-mail address in the message.
� Make sure the e-mail address is correct.
� Make sure the e-mail address is in SMTP e-mail format.
� If the problem persists, contact HP customer support.
039/00The e-mail subsystem is disabled.
Notification message only. The e-mail service for the digital sender has been disabled.
� Use the HP JetAdmin software to enable the e-mail service (Email page).
� If a problem with the system disabled the e-mail service, contact HP customer support.
Activity log messages (continued)
Message Description Actions
182 Chapter 4 - Troubleshooting EN
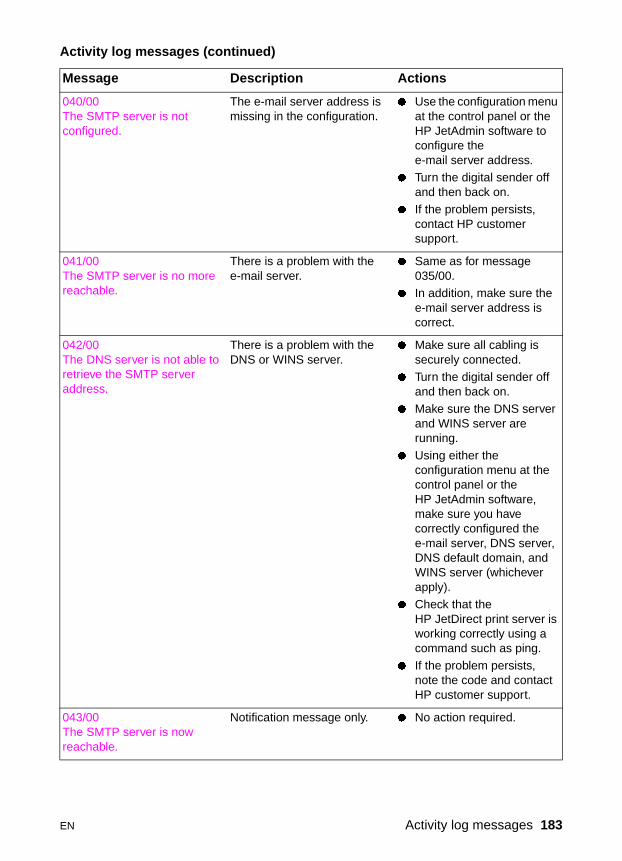
040/00The SMTP server is not configured.
The e-mail server address is missing in the configuration.
� Use the configuration menu at the control panel or the HP JetAdmin software to configure the e-mail server address.
� Turn the digital sender off and then back on.
� If the problem persists, contact HP customer support.
041/00The SMTP server is no more reachable.
There is a problem with the e-mail server.
� Same as for message 035/00.
� In addition, make sure the e-mail server address is correct.
042/00The DNS server is not able to retrieve the SMTP server address.
There is a problem with the DNS or WINS server.
� Make sure all cabling is securely connected.
� Turn the digital sender off and then back on.
� Make sure the DNS server and WINS server are running.
� Using either the configuration menu at the control panel or the HP JetAdmin software, make sure you have correctly configured the e-mail server, DNS server, DNS default domain, and WINS server (whichever apply).
� Check that the HP JetDirect print server is working correctly using a command such as ping.
� If the problem persists, note the code and contact HP customer support.
043/00The SMTP server is now reachable.
Notification message only. � No action required.
Activity log messages (continued)
Message Description Actions
EN Activity log messages 183
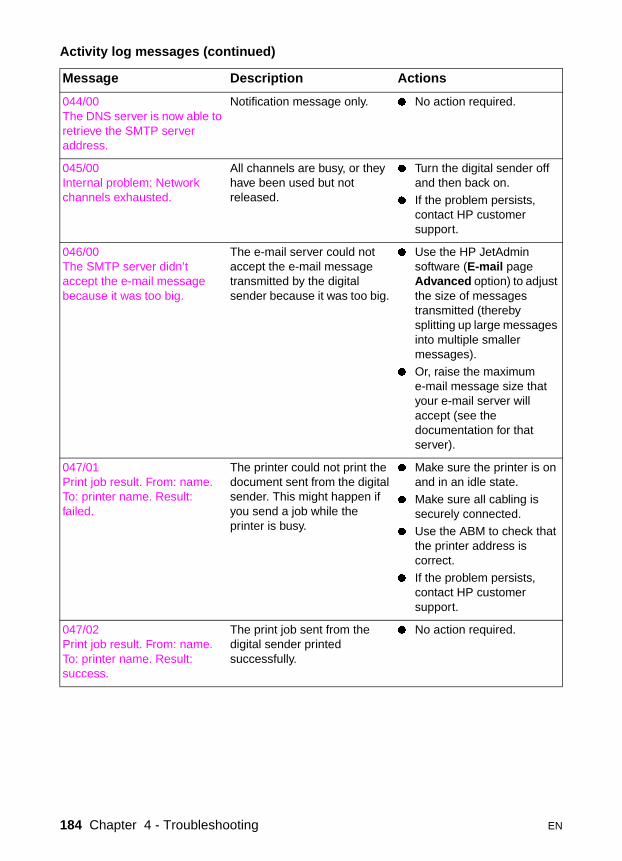
044/00The DNS server is now able to retrieve the SMTP server address.
Notification message only. � No action required.
045/00Internal problem: Network channels exhausted.
All channels are busy, or they have been used but not released.
� Turn the digital sender off and then back on.
� If the problem persists, contact HP customer support.
046/00The SMTP server didn’t accept the e-mail message because it was too big.
The e-mail server could not accept the e-mail message transmitted by the digital sender because it was too big.
� Use the HP JetAdmin software (E-mail page Advanced option) to adjust the size of messages transmitted (thereby splitting up large messages into multiple smaller messages).
� Or, raise the maximum e-mail message size that your e-mail server will accept (see the documentation for that server).
047/01Print job result. From: name. To: printer name. Result: failed.
The printer could not print the document sent from the digital sender. This might happen if you send a job while the printer is busy.
� Make sure the printer is on and in an idle state.
� Make sure all cabling is securely connected.
� Use the ABM to check that the printer address is correct.
� If the problem persists, contact HP customer support.
047/02Print job result. From: name. To: printer name. Result: success.
The print job sent from the digital sender printed successfully.
� No action required.
Activity log messages (continued)
Message Description Actions
184 Chapter 4 - Troubleshooting EN
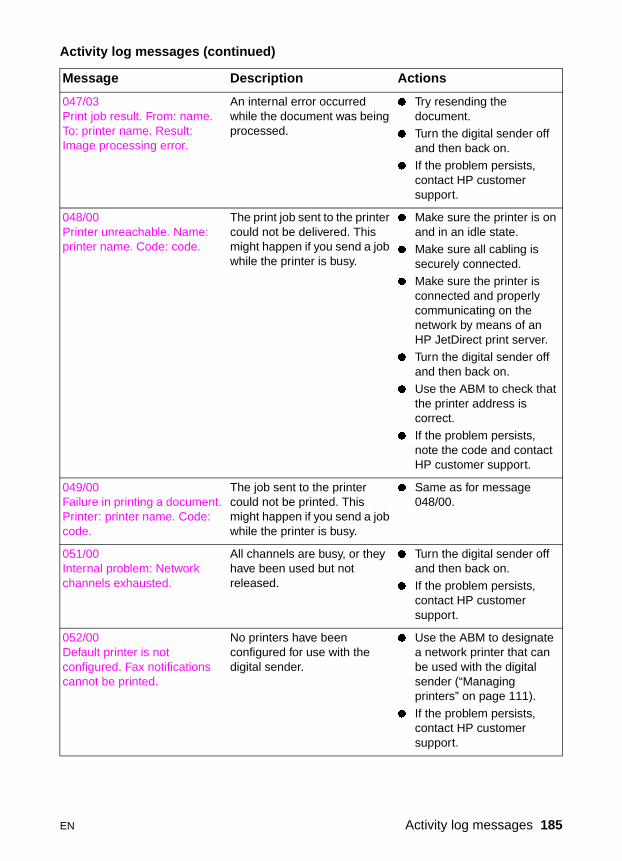
047/03Print job result. From: name. To: printer name. Result: Image processing error.
An internal error occurred while the document was being processed.
� Try resending the document.
� Turn the digital sender off and then back on.
� If the problem persists, contact HP customer support.
048/00Printer unreachable. Name: printer name. Code: code.
The print job sent to the printer could not be delivered. This might happen if you send a job while the printer is busy.
� Make sure the printer is on and in an idle state.
� Make sure all cabling is securely connected.
� Make sure the printer is connected and properly communicating on the network by means of an HP JetDirect print server.
� Turn the digital sender off and then back on.
� Use the ABM to check that the printer address is correct.
� If the problem persists, note the code and contact HP customer support.
049/00Failure in printing a document. Printer: printer name. Code: code.
The job sent to the printer could not be printed. This might happen if you send a job while the printer is busy.
� Same as for message 048/00.
051/00Internal problem: Network channels exhausted.
All channels are busy, or they have been used but not released.
� Turn the digital sender off and then back on.
� If the problem persists, contact HP customer support.
052/00Default printer is not configured. Fax notifications cannot be printed.
No printers have been configured for use with the digital sender.
� Use the ABM to designate a network printer that can be used with the digital sender (“Managing printers” on page 111).
� If the problem persists, contact HP customer support.
Activity log messages (continued)
Message Description Actions
EN Activity log messages 185
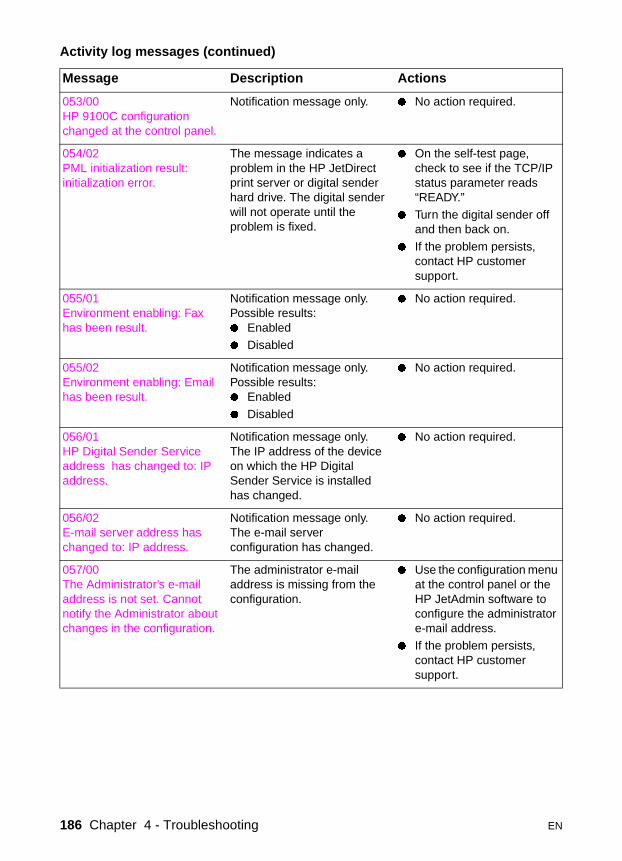
053/00HP 9100C configuration changed at the control panel.
Notification message only. � No action required.
054/02PML initialization result: initialization error.
The message indicates a problem in the HP JetDirect print server or digital sender hard drive. The digital sender will not operate until the problem is fixed.
� On the self-test page, check to see if the TCP/IP status parameter reads “READY.”
� Turn the digital sender off and then back on.
� If the problem persists, contact HP customer support.
055/01Environment enabling: Fax has been result.
Notification message only. Possible results: � Enabled� Disabled
� No action required.
055/02Environment enabling: Email has been result.
Notification message only. Possible results:� Enabled
� Disabled
� No action required.
056/01HP Digital Sender Service address has changed to: IP address.
Notification message only.The IP address of the device on which the HP Digital Sender Service is installed has changed.
� No action required.
056/02E-mail server address has changed to: IP address.
Notification message only.The e-mail server configuration has changed.
� No action required.
057/00The Administrator’s e-mail address is not set. Cannot notify the Administrator about changes in the configuration.
The administrator e-mail address is missing from the configuration.
� Use the configuration menu at the control panel or the HP JetAdmin software to configure the administrator e-mail address.
� If the problem persists, contact HP customer support.
Activity log messages (continued)
Message Description Actions
186 Chapter 4 - Troubleshooting EN
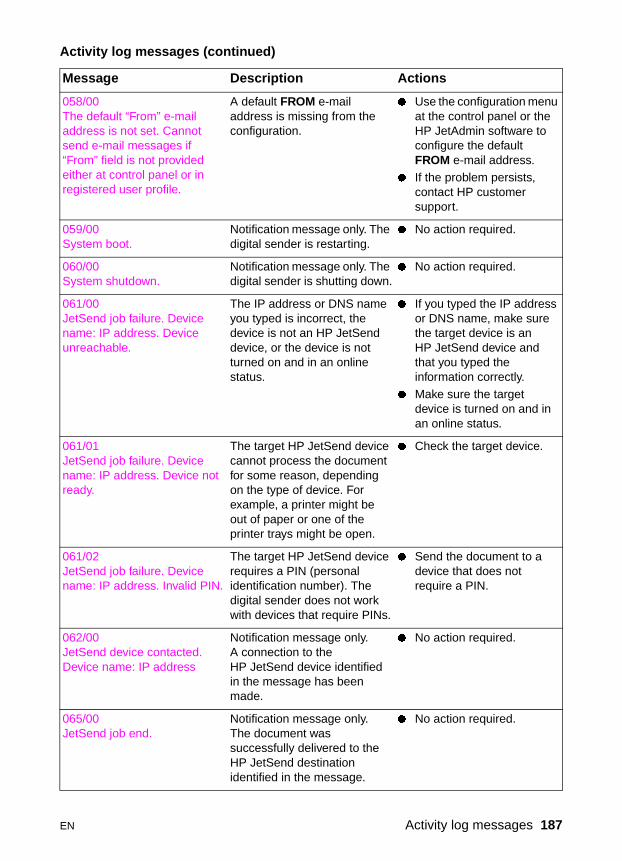
058/00The default “From” e-mail address is not set. Cannot send e-mail messages if “From” field is not provided either at control panel or in registered user profile.
A default FROM e-mail address is missing from the configuration.
� Use the configuration menu at the control panel or the HP JetAdmin software to configure the default FROM e-mail address.
� If the problem persists, contact HP customer support.
059/00System boot.
Notification message only. The digital sender is restarting.
� No action required.
060/00System shutdown.
Notification message only. The digital sender is shutting down.
� No action required.
061/00JetSend job failure. Device name: IP address. Device unreachable.
The IP address or DNS name you typed is incorrect, the device is not an HP JetSend device, or the device is not turned on and in an online status.
� If you typed the IP address or DNS name, make sure the target device is an HP JetSend device and that you typed the information correctly.
� Make sure the target device is turned on and in an online status.
061/01JetSend job failure. Device name: IP address. Device not ready.
The target HP JetSend device cannot process the document for some reason, depending on the type of device. For example, a printer might be out of paper or one of the printer trays might be open.
� Check the target device.
061/02JetSend job failure. Device name: IP address. Invalid PIN.
The target HP JetSend device requires a PIN (personal identification number). The digital sender does not work with devices that require PINs.
� Send the document to a device that does not require a PIN.
062/00JetSend device contacted. Device name: IP address
Notification message only. A connection to the HP JetSend device identified in the message has been made.
� No action required.
065/00JetSend job end.
Notification message only.The document was successfully delivered to the HP JetSend destination identified in the message.
� No action required.
Activity log messages (continued)
Message Description Actions
EN Activity log messages 187
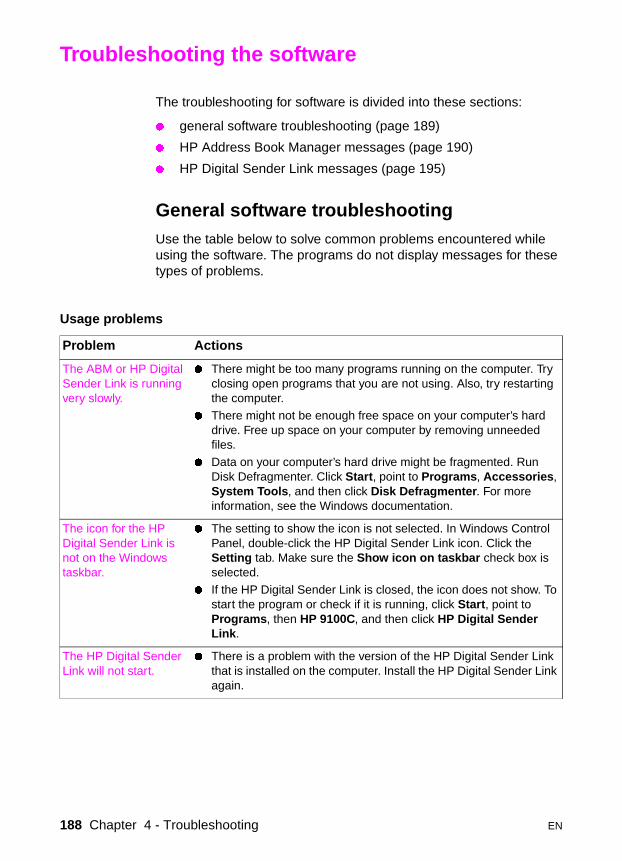
Troubleshooting the software
The troubleshooting for software is divided into these sections:
� general software troubleshooting (page 189)
� HP Address Book Manager messages (page 190)
� HP Digital Sender Link messages (page 195)
General software troubleshootingUse the table below to solve common problems encountered while using the software. The programs do not display messages for these types of problems.
Usage problems
Problem Actions
The ABM or HP Digital Sender Link is running very slowly.
� There might be too many programs running on the computer. Try closing open programs that you are not using. Also, try restarting the computer.
� There might not be enough free space on your computer’s hard drive. Free up space on your computer by removing unneeded files.
� Data on your computer’s hard drive might be fragmented. Run Disk Defragmenter. Click Start, point to Programs, Accessories, System Tools, and then click Disk Defragmenter. For more information, see the Windows documentation.
The icon for the HP Digital Sender Link is not on the Windows taskbar.
� The setting to show the icon is not selected. In Windows Control Panel, double-click the HP Digital Sender Link icon. Click the Setting tab. Make sure the Show icon on taskbar check box is selected.
� If the HP Digital Sender Link is closed, the icon does not show. To start the program or check if it is running, click Start, point to Programs, then HP 9100C, and then click HP Digital Sender Link.
The HP Digital Sender Link will not start.
� There is a problem with the version of the HP Digital Sender Link that is installed on the computer. Install the HP Digital Sender Link again.
188 Chapter 4 - Troubleshooting EN
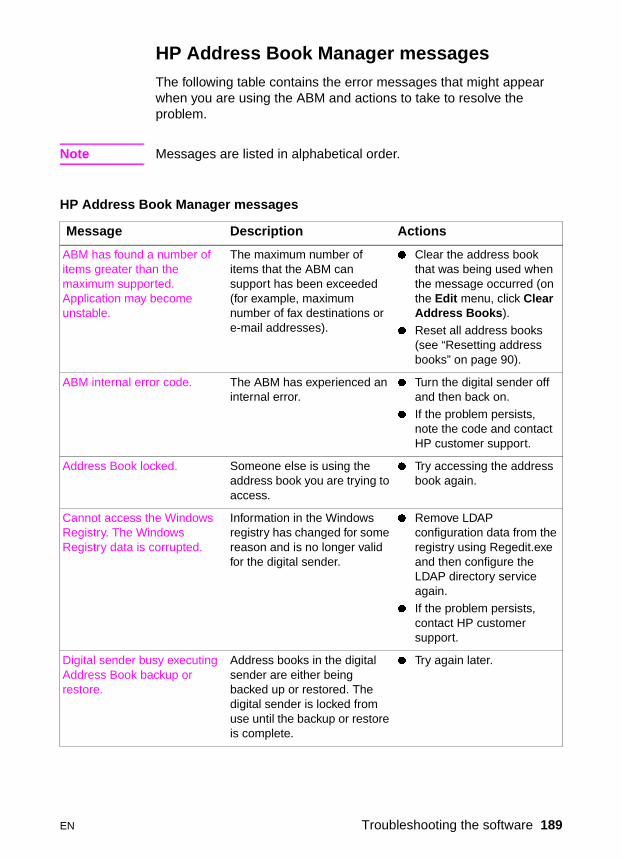
HP Address Book Manager messagesThe following table contains the error messages that might appear when you are using the ABM and actions to take to resolve the problem.
Note Messages are listed in alphabetical order.
HP Address Book Manager messages
Message Description Actions
ABM has found a number of items greater than the maximum supported. Application may become unstable.
The maximum number of items that the ABM can support has been exceeded (for example, maximum number of fax destinations or e-mail addresses).
� Clear the address book that was being used when the message occurred (on the Edit menu, click Clear Address Books).
� Reset all address books (see “Resetting address books” on page 90).
ABM internal error code. The ABM has experienced an internal error.
� Turn the digital sender off and then back on.
� If the problem persists, note the code and contact HP customer support.
Address Book locked. Someone else is using the address book you are trying to access.
� Try accessing the address book again.
Cannot access the Windows Registry. The Windows Registry data is corrupted.
Information in the Windows registry has changed for some reason and is no longer valid for the digital sender.
� Remove LDAP configuration data from the registry using Regedit.exe and then configure the LDAP directory service again.
� If the problem persists, contact HP customer support.
Digital sender busy executing Address Book backup or restore.
Address books in the digital sender are either being backed up or restored. The digital sender is locked from use until the backup or restore is complete.
� Try again later.
EN Troubleshooting the software 189

Duplicated login. You might already have logged in and started the ABM.
A previous connection with the ABM might have been interrupted.
Another user has logged in under the name you used.
� Verify that you have not already started the ABM.
� Unused connections time out after a period of time. Wait a few minutes and try again.
� To prevent another user from using your user name in the future, protect your user profile with a password.
Failed to add the entry. During the procedure to import e-mail addresses, the addresses that were found could not be added to the ABM because the selected address book is full.
� Remove some entries from the selected address book to make room for new entries.
Initialization failed. During the procedure to import e-mail addresses, the ABM could not connect to the server.
� In the directory configuration, make sure you typed the correct DNS name or IP address and port number for the server you want. See the user guide for information on defining directories.
In order to proceed, you have to provide information for all fields.
During the procedure to import e-mail addresses, some of the fields in the directory configuration were not filled.
� In the directory configuration, make sure all fields are filled. See the user guide for information on defining directories.
Invalid user name or password.
The digital sender did not recognize the user name or password that you typed.
� Verify that you are using the user name and password that are in your user profile. The password is case-sensitive, so make sure you enter the correct combination of uppercase and lowercase letters.
HP Address Book Manager messages (continued)
Message Description Actions
190 Chapter 4 - Troubleshooting EN
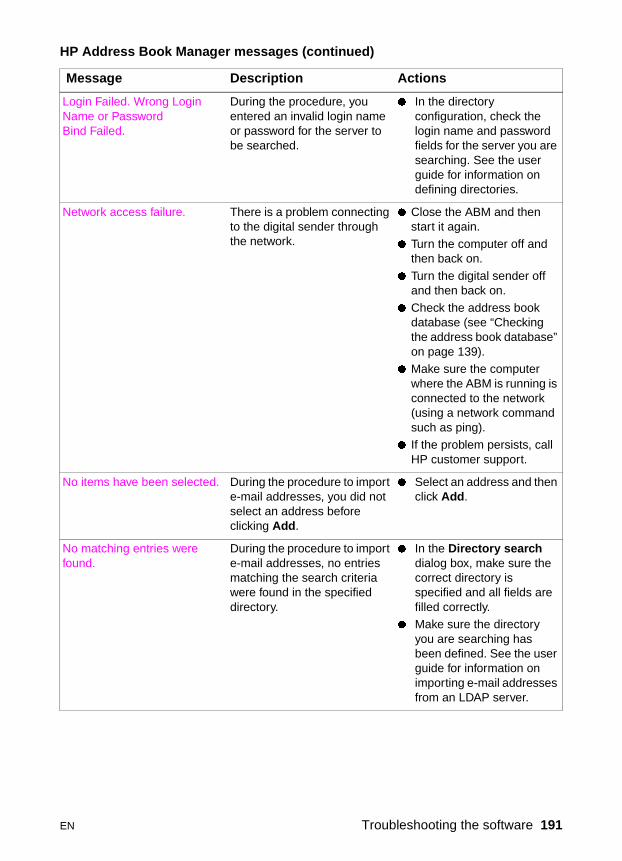
Login Failed. Wrong Login Name or PasswordBind Failed.
During the procedure, you entered an invalid login name or password for the server to be searched.
� In the directory configuration, check the login name and password fields for the server you are searching. See the user guide for information on defining directories.
Network access failure. There is a problem connecting to the digital sender through the network.
� Close the ABM and then start it again.
� Turn the computer off and then back on.
� Turn the digital sender off and then back on.
� Check the address book database (see “Checking the address book database” on page 139).
� Make sure the computer where the ABM is running is connected to the network (using a network command such as ping).
� If the problem persists, call HP customer support.
No items have been selected. During the procedure to import e-mail addresses, you did not select an address before clicking Add.
� Select an address and then click Add.
No matching entries were found.
During the procedure to import e-mail addresses, no entries matching the search criteria were found in the specified directory.
� In the Directory search dialog box, make sure the correct directory is specified and all fields are filled correctly.
� Make sure the directory you are searching has been defined. See the user guide for information on importing e-mail addresses from an LDAP server.
HP Address Book Manager messages (continued)
Message Description Actions
EN Troubleshooting the software 191
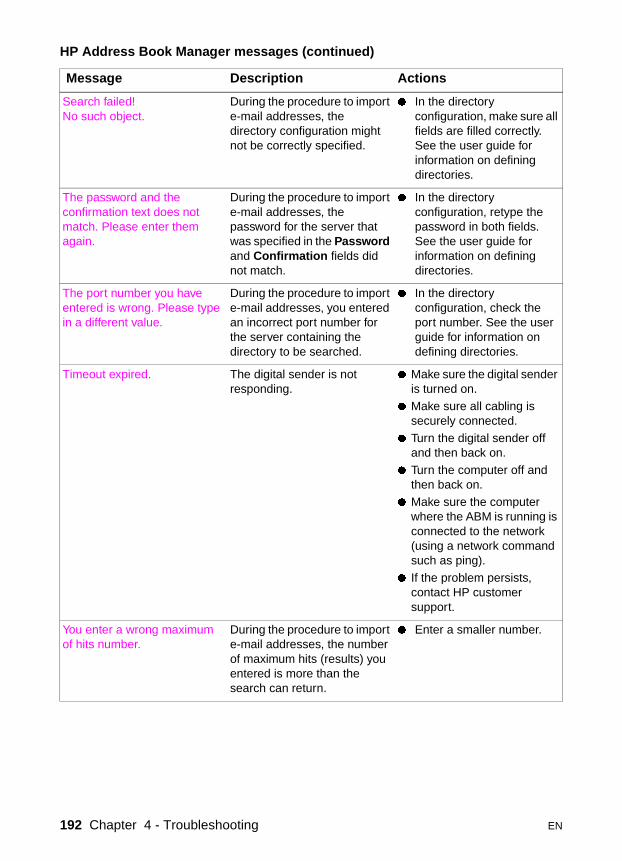
Search failed! No such object.
During the procedure to import e-mail addresses, the directory configuration might not be correctly specified.
� In the directory configuration, make sure all fields are filled correctly. See the user guide for information on defining directories.
The password and the confirmation text does not match. Please enter them again.
During the procedure to import e-mail addresses, the password for the server that was specified in the Password and Confirmation fields did not match.
� In the directory configuration, retype the password in both fields. See the user guide for information on defining directories.
The port number you have entered is wrong. Please type in a different value.
During the procedure to import e-mail addresses, you entered an incorrect port number for the server containing the directory to be searched.
� In the directory configuration, check the port number. See the user guide for information on defining directories.
Timeout expired. The digital sender is not responding.
� Make sure the digital sender is turned on.
� Make sure all cabling is securely connected.
� Turn the digital sender off and then back on.
� Turn the computer off and then back on.
� Make sure the computer where the ABM is running is connected to the network (using a network command such as ping).
� If the problem persists, contact HP customer support.
You enter a wrong maximum of hits number.
During the procedure to import e-mail addresses, the number of maximum hits (results) you entered is more than the search can return.
� Enter a smaller number.
HP Address Book Manager messages (continued)
Message Description Actions
192 Chapter 4 - Troubleshooting EN
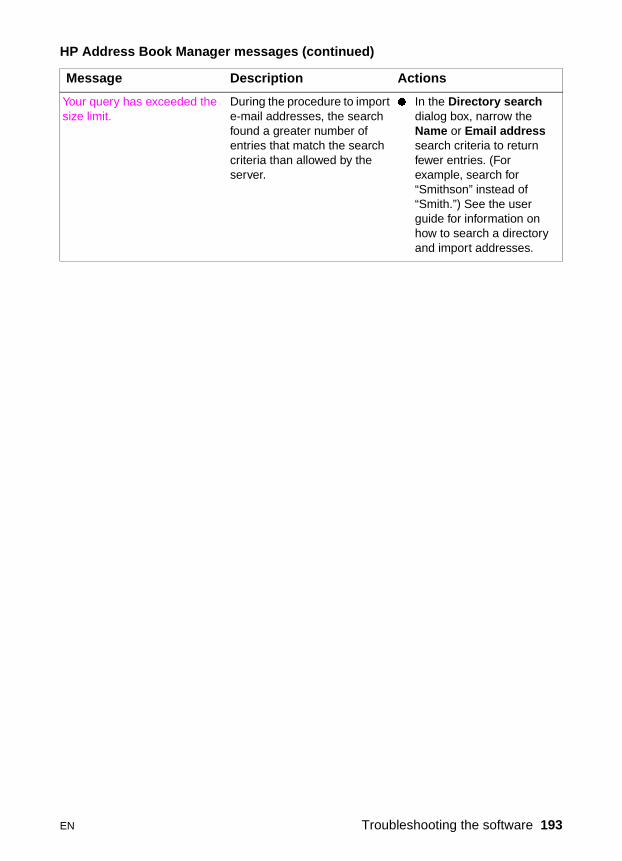
Your query has exceeded the size limit.
During the procedure to import e-mail addresses, the search found a greater number of entries that match the search criteria than allowed by the server.
� In the Directory search dialog box, narrow the Name or Email address search criteria to return fewer entries. (For example, search for “Smithson” instead of “Smith.”) See the user guide for information on how to search a directory and import addresses.
HP Address Book Manager messages (continued)
Message Description Actions
EN Troubleshooting the software 193
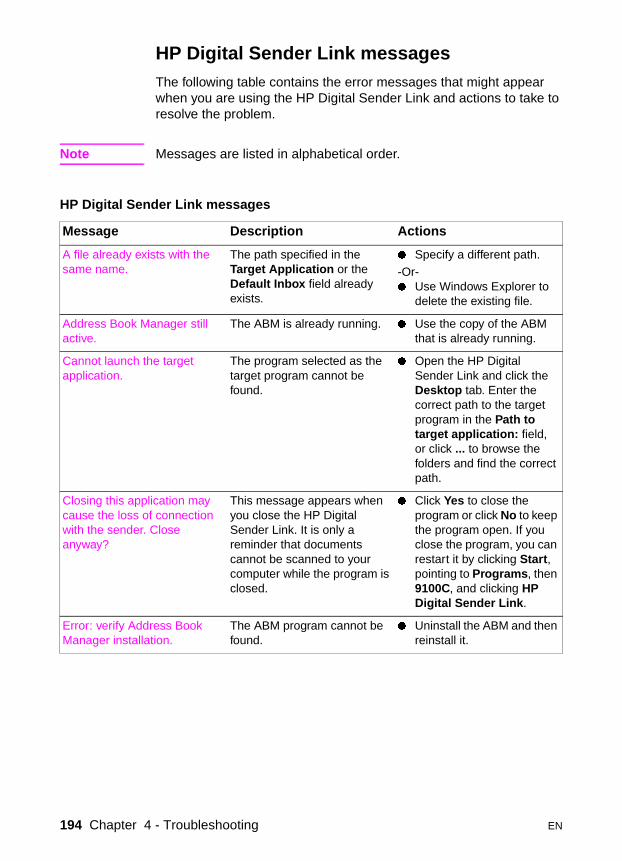
HP Digital Sender Link messagesThe following table contains the error messages that might appear when you are using the HP Digital Sender Link and actions to take to resolve the problem.
Note Messages are listed in alphabetical order.
HP Digital Sender Link messages
Message Description Actions
A file already exists with the same name.
The path specified in the Target Application or the Default Inbox field already exists.
� Specify a different path.
-Or-� Use Windows Explorer to
delete the existing file.
Address Book Manager still active.
The ABM is already running. � Use the copy of the ABM that is already running.
Cannot launch the target application.
The program selected as the target program cannot be found.
� Open the HP Digital Sender Link and click the Desktop tab. Enter the correct path to the target program in the Path to target application: field, or click ... to browse the folders and find the correct path.
Closing this application may cause the loss of connection with the sender. Close anyway?
This message appears when you close the HP Digital Sender Link. It is only a reminder that documents cannot be scanned to your computer while the program is closed.
� Click Yes to close the program or click No to keep the program open. If you close the program, you can restart it by clicking Start, pointing to Programs, then 9100C, and clicking HP Digital Sender Link.
Error: verify Address Book Manager installation.
The ABM program cannot be found.
� Uninstall the ABM and then reinstall it.
194 Chapter 4 - Troubleshooting EN
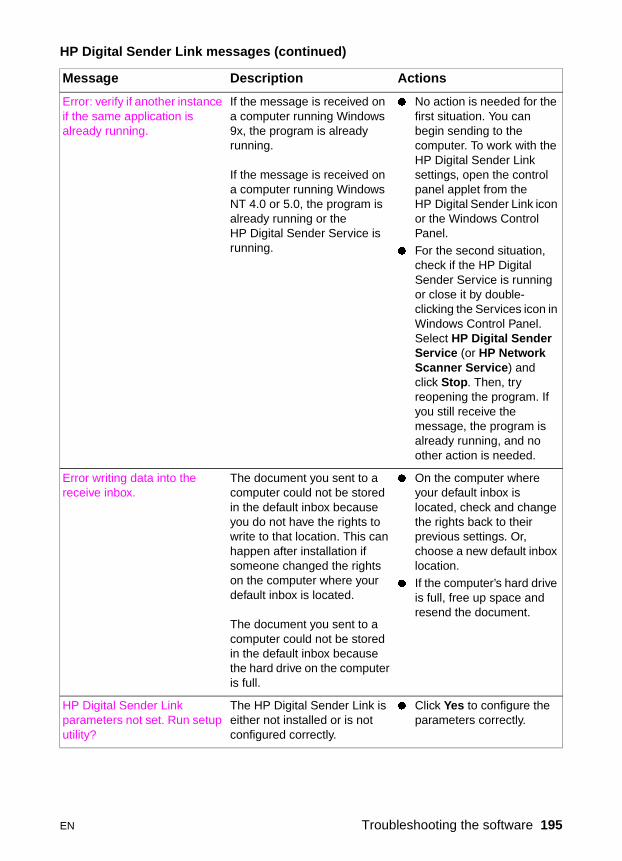
Error: verify if another instance if the same application is already running.
If the message is received on a computer running Windows 9x, the program is already running.
If the message is received on a computer running Windows NT 4.0 or 5.0, the program is already running or the HP Digital Sender Service is running.
� No action is needed for the first situation. You can begin sending to the computer. To work with the HP Digital Sender Link settings, open the control panel applet from the HP Digital Sender Link icon or the Windows Control Panel.
� For the second situation, check if the HP Digital Sender Service is running or close it by double-clicking the Services icon in Windows Control Panel. Select HP Digital Sender Service (or HP Network Scanner Service) and click Stop. Then, try reopening the program. If you still receive the message, the program is already running, and no other action is needed.
Error writing data into the receive inbox.
The document you sent to a computer could not be stored in the default inbox because you do not have the rights to write to that location. This can happen after installation if someone changed the rights on the computer where your default inbox is located.
The document you sent to a computer could not be stored in the default inbox because the hard drive on the computer is full.
� On the computer where your default inbox is located, check and change the rights back to their previous settings. Or, choose a new default inbox location.
� If the computer’s hard drive is full, free up space and resend the document.
HP Digital Sender Link parameters not set. Run setup utility?
The HP Digital Sender Link is either not installed or is not configured correctly.
� Click Yes to configure the parameters correctly.
HP Digital Sender Link messages (continued)
Message Description Actions
EN Troubleshooting the software 195
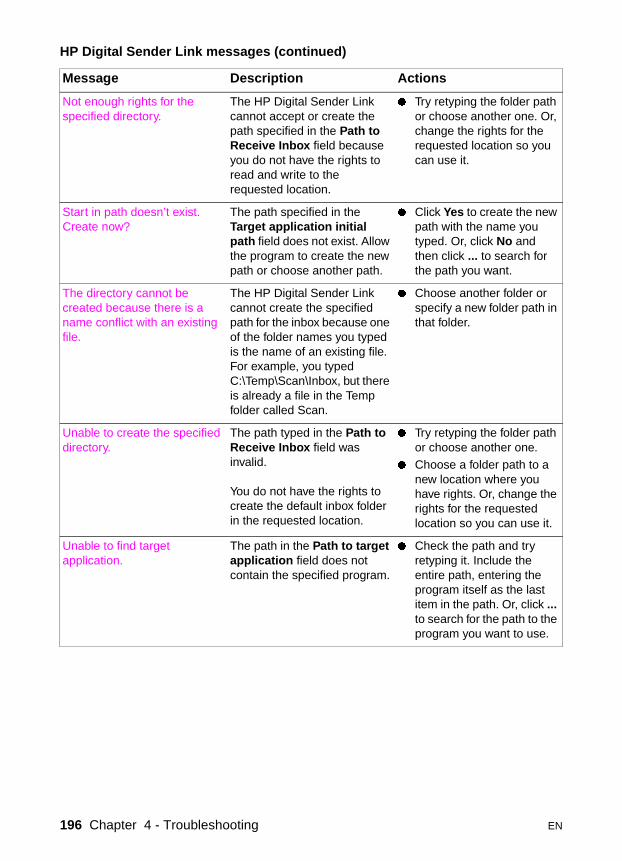
Not enough rights for the specified directory.
The HP Digital Sender Link cannot accept or create the path specified in the Path to Receive Inbox field because you do not have the rights to read and write to the requested location.
� Try retyping the folder path or choose another one. Or, change the rights for the requested location so you can use it.
Start in path doesn’t exist. Create now?
The path specified in the Target application initial path field does not exist. Allow the program to create the new path or choose another path.
� Click Yes to create the new path with the name you typed. Or, click No and then click ... to search for the path you want.
The directory cannot be created because there is a name conflict with an existing file.
The HP Digital Sender Link cannot create the specified path for the inbox because one of the folder names you typed is the name of an existing file. For example, you typed C:\Temp\Scan\Inbox, but there is already a file in the Temp folder called Scan.
� Choose another folder or specify a new folder path in that folder.
Unable to create the specified directory.
The path typed in the Path to Receive Inbox field was invalid.
You do not have the rights to create the default inbox folder in the requested location.
� Try retyping the folder path or choose another one.
� Choose a folder path to a new location where you have rights. Or, change the rights for the requested location so you can use it.
Unable to find target application.
The path in the Path to target application field does not contain the specified program.
� Check the path and try retyping it. Include the entire path, entering the program itself as the last item in the path. Or, click ... to search for the path to the program you want to use.
HP Digital Sender Link messages (continued)
Message Description Actions
196 Chapter 4 - Troubleshooting EN
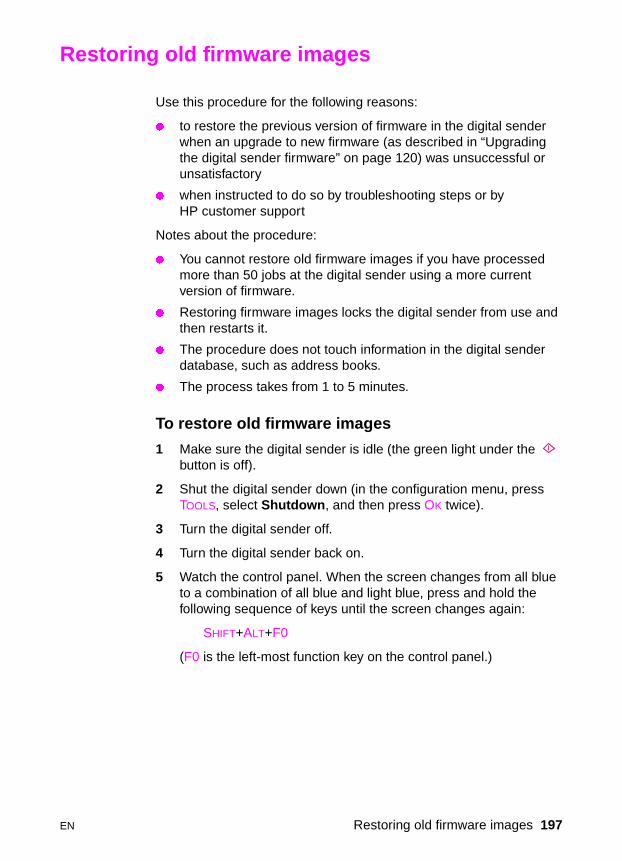
Restoring old firmware images
Use this procedure for the following reasons:
� to restore the previous version of firmware in the digital sender when an upgrade to new firmware (as described in “Upgrading the digital sender firmware” on page 120) was unsuccessful or unsatisfactory
� when instructed to do so by troubleshooting steps or by HP customer support
Notes about the procedure:
� You cannot restore old firmware images if you have processed more than 50 jobs at the digital sender using a more current version of firmware.
� Restoring firmware images locks the digital sender from use and then restarts it.
� The procedure does not touch information in the digital sender database, such as address books.
� The process takes from 1 to 5 minutes.
To restore old firmware images
1 Make sure the digital sender is idle (the green light under the button is off).
2 Shut the digital sender down (in the configuration menu, press TOOLS, select Shutdown, and then press OK twice).
3 Turn the digital sender off.
4 Turn the digital sender back on.
5 Watch the control panel. When the screen changes from all blue to a combination of all blue and light blue, press and hold the following sequence of keys until the screen changes again:
SHIFT+ALT+F0
(F0 is the left-most function key on the control panel.)
EN Restoring old firmware images 197

198 Chapter 4 - Troubleshooting EN
5 Warranty and support information
Hewlett-Packard limited warranty statement
1 HP warrants HP hardware, accessories, and supplies against defects in materials and workmanship for the period specified above. If HP receives notice of such defects during the warranty period, HP will, at its option, either repair or replace products which prove to be defective. Replacement parts may be either new or like-new.
2 HP warrants that HP software will not fail to execute its programming instructions, for the period specified above, due to defects in material and workmanship when properly installed and used. If HP receives notice of such defects during the warranty period, HP will replace software media which does not execute its programming instructions due to such defects.
3 HP does not warrant that the operation of HP products will be uninterrupted or error free. If HP is unable, within a reasonable time, to repair or replace any product to a condition as warranted, customer will be entitled to a refund of the purchase price upon prompt return of the product.
4 HP products may contain remanufactured parts equivalent to new in performance or may have been subject to incidental use.
5 The warranty period begins on the date of the delivery or on the date of installation if installed by HP. If customer schedules or delays HP installation more than 30 days after delivery, warranty begins on the 31st day from delivery.
HP PRODUCTHP 9100C Digital Sender
DURATION OF WARRANTYOne year
EN Hewlett-Packard limited warranty statement 199
6 Warranty does not apply to defects resulting from improper or inadequate maintenance or calibration, software, interfacing, parts or supplies not supplied by HP, unauthorized modification or misuse, operation outside of the published environmental specifications for the product, or improper site preparation or maintenance.
Note Operation of the digital sender beyond the limit of its nominal duty cycle (scanning greater than the equivalent of 10,000 pages per month) shall be deemed digital sender abuse and all repairs thereafter are to be billed on a time-and-materials basis.
7 TO THE EXTEND ALLOWED BY LOCAL LAW, THE ABOVE WARRANTIES ARE EXCLUSIVE AND NO OTHER WARRANTY, WHETHER WRITTEN OR ORAL, IS EXPRESSED OR IMPLIED AND HP SPECIFICALLY DISCLAIMS THE IMPLIED WARRANTIES OF MERCHANTABILITY, SATISFACTORY QUALITY, AND FITNESS FOR A PARTICULAR PURPOSE.
8 HP will be liable for damage to tangible property per incident up to the greater of $300,000 or the actual amount paid for the product that is the subject of the claim, and for damages for bodily injury or death, to the extent that all such damages are determined by a court of competent jurisdiction to have been directly caused by a defective HP product.
9 TO THE EXTENT ALLOWED BY LOCAL LAW, THE REMEDIES IN THIS WARRANTY STATEMENT ARE THE CUSTOMER’S SOLE AND EXCLUSIVE REMEDIES. EXCEPT AS INDICATED ABOVE, IN NO EVENT WILL HP BE LIABLE FOR LOSS OF DATA OR FOR DIRECT, SPECIAL, INCIDENTAL, CONSEQUENTIAL (INCLUDING LOST PROFIT OR DATA), OR OTHER DAMAGE, WHETHER BASED IN CONTRACT, TORT, OR OTHERWISE.
10 FOR CONSUMER TRANSACTIONS IN AUSTRALIA AND NEW ZEALAND; THE WARRANTY TERMS CONTAINED IN THIS STATEMENT, EXCEPT TO THE EXTENT LAWFULLY PERMITTED, DO NOT EXCLUDE, RESTRICT OR MODIFY AND ARE IN ADDITION TO THE MANDATORY STATUTORY RIGHTS APPLICABLE TO THE SALE OF THIS PRODUCT TO YOU.
200 Chapter 5 - Warranty and support information EN
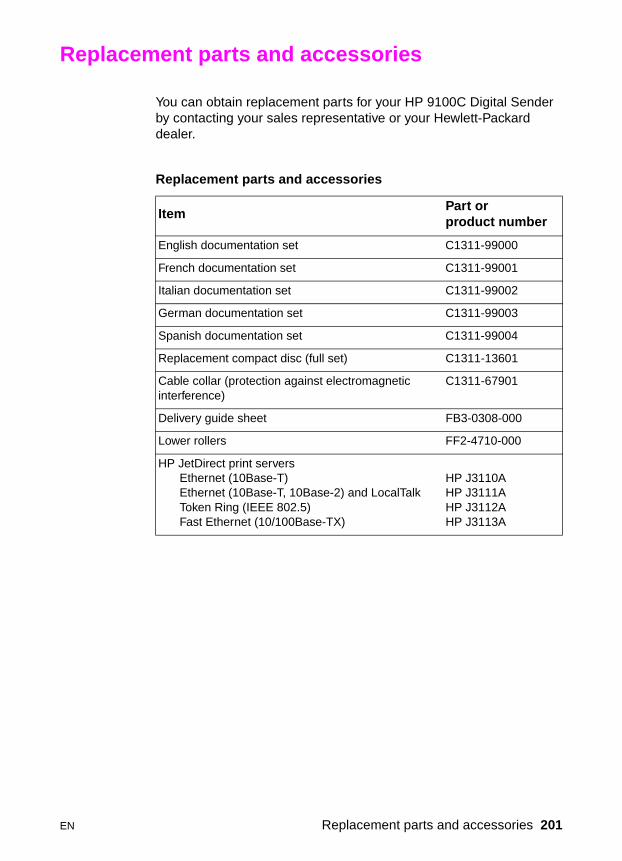
Replacement parts and accessories
You can obtain replacement parts for your HP 9100C Digital Sender by contacting your sales representative or your Hewlett-Packard dealer.
Replacement parts and accessories
ItemPart or product number
English documentation set C1311-99000
French documentation set C1311-99001
Italian documentation set C1311-99002
German documentation set C1311-99003
Spanish documentation set C1311-99004
Replacement compact disc (full set) C1311-13601
Cable collar (protection against electromagnetic interference)
C1311-67901
Delivery guide sheet FB3-0308-000
Lower rollers FF2-4710-000
HP JetDirect print serversEthernet (10Base-T)Ethernet (10Base-T, 10Base-2) and LocalTalk Token Ring (IEEE 802.5)Fast Ethernet (10/100Base-TX)
HP J3110A HP J3111AHP J3112AHP J3113A
EN Replacement parts and accessories 201
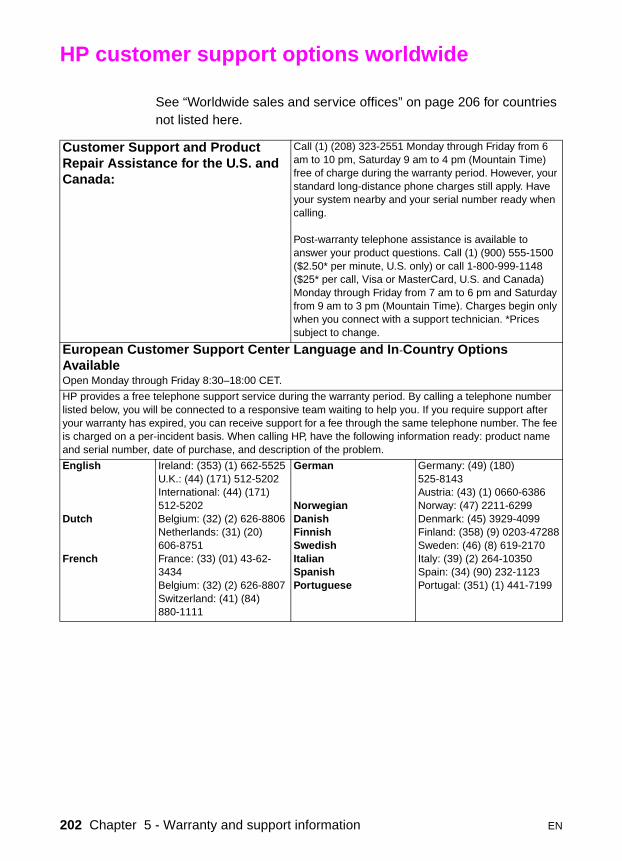
HP customer support options worldwide
See “Worldwide sales and service offices” on page 206 for countries not listed here.
Customer Support and Product Repair Assistance for the U.S. and Canada:
Call (1) (208) 323-2551 Monday through Friday from 6 am to 10 pm, Saturday 9 am to 4 pm (Mountain Time) free of charge during the warranty period. However, your standard long-distance phone charges still apply. Have your system nearby and your serial number ready when calling.
Post-warranty telephone assistance is available to answer your product questions. Call (1) (900) 555-1500 ($2.50* per minute, U.S. only) or call 1-800-999-1148 ($25* per call, Visa or MasterCard, U.S. and Canada) Monday through Friday from 7 am to 6 pm and Saturday from 9 am to 3 pm (Mountain Time). Charges begin only when you connect with a support technician. *Prices subject to change.
European Customer Support Center Language and In-Country Options AvailableOpen Monday through Friday 8:30–18:00 CET.
HP provides a free telephone support service during the warranty period. By calling a telephone number listed below, you will be connected to a responsive team waiting to help you. If you require support after your warranty has expired, you can receive support for a fee through the same telephone number. The fee is charged on a per-incident basis. When calling HP, have the following information ready: product name and serial number, date of purchase, and description of the problem.
English
Dutch
French
Ireland: (353) (1) 662-5525U.K.: (44) (171) 512-5202International: (44) (171) 512-5202Belgium: (32) (2) 626-8806Netherlands: (31) (20) 606-8751France: (33) (01) 43-62-3434Belgium: (32) (2) 626-8807Switzerland: (41) (84) 880-1111
German
NorwegianDanishFinnishSwedishItalianSpanishPortuguese
Germany: (49) (180) 525-8143Austria: (43) (1) 0660-6386Norway: (47) 2211-6299Denmark: (45) 3929-4099Finland: (358) (9) 0203-47288Sweden: (46) (8) 619-2170Italy: (39) (2) 264-10350Spain: (34) (90) 232-1123Portugal: (351) (1) 441-7199
202 Chapter 5 - Warranty and support information EN
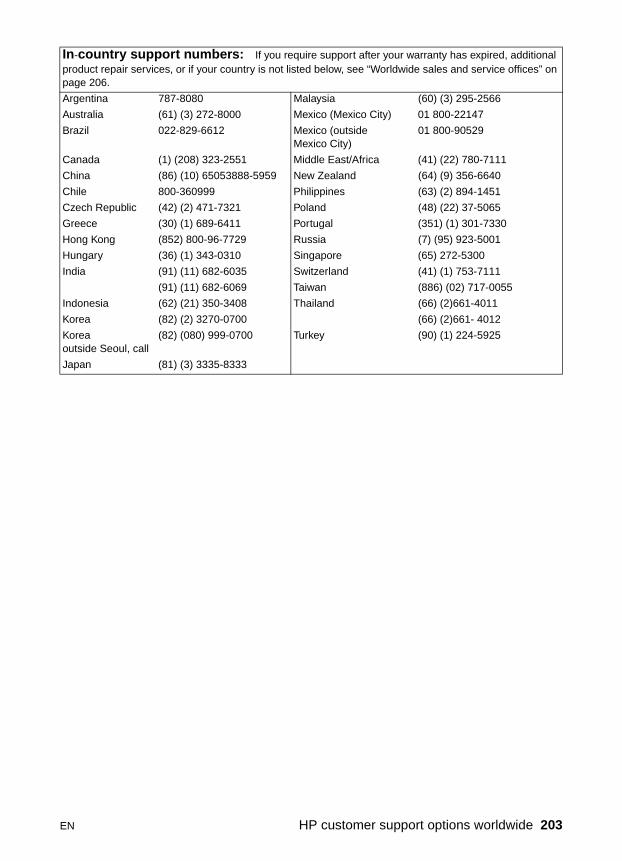
In-country support numbers: If you require support after your warranty has expired, additional product repair services, or if your country is not listed below, see “Worldwide sales and service offices” on page 206.
Argentina 787-8080 Malaysia (60) (3) 295-2566
Australia (61) (3) 272-8000 Mexico (Mexico City) 01 800-22147
Brazil 022-829-6612 Mexico (outside Mexico City)
01 800-90529
Canada (1) (208) 323-2551 Middle East/Africa (41) (22) 780-7111
China (86) (10) 65053888-5959 New Zealand (64) (9) 356-6640
Chile 800-360999 Philippines (63) (2) 894-1451
Czech Republic (42) (2) 471-7321 Poland (48) (22) 37-5065
Greece (30) (1) 689-6411 Portugal (351) (1) 301-7330
Hong Kong (852) 800-96-7729 Russia (7) (95) 923-5001
Hungary (36) (1) 343-0310 Singapore (65) 272-5300
India (91) (11) 682-6035 Switzerland (41) (1) 753-7111
(91) (11) 682-6069 Taiwan (886) (02) 717-0055
Indonesia (62) (21) 350-3408 Thailand (66) (2)661-4011
Korea (82) (2) 3270-0700 (66) (2)661- 4012
Koreaoutside Seoul, call
(82) (080) 999-0700 Turkey (90) (1) 224-5925
Japan (81) (3) 3335-8333
EN HP customer support options worldwide 203

HP customer support
Online services: for 24-hour access to information over your modem, we suggest these services:
World Wide Web URL - Printer drivers, updated HP printer software, plus product and support information may be obtained from the following URLs: for HP 9100C Digital Sender http://www.digitalsender.hp.comin the U.S. http://www.hp.comin Europe http://www2.hp.comPrinter drivers may be obtained from the following sites:in Japan ftp://www.jpn.hp.com/drivers/in Korea http://www.hp.co.krin Taiwan http://www.hp.com.twor the local driver website http://www.dds.com.tw
America Online - America Online/Bertelsmann is available in the U.S., France, Germany, and U.K. - Printer drivers, updated HP printer software, and support documentation to help answer your questions about HP products are available. Use Keyword HP to start your tour or call 1-800-827-6364 preferred customer # 1118 to subscribe. In Europe, call the appropriate number below:Austria 0222 58 58 485France ++353 1 704 90 00Germany 0180 531 31 64Switzerland 0848 80 10 11United Kingdom 0800 279 1234
CompuServe - Printer drivers, updated HP printer software, and interactive sharing of technical information with other members is available on CompuServe’s “HP User’s forums” (GO HP), or call 1-800-524-3388 and ask for representative #51 to subscribe. (CompuServe is also available in the U.K., France, Belgium, Switzerland, Germany, and Austria.)
Obtaining software utilities and electronic information for:
See “HP customer support options worldwide” on page 202.
HP direct ordering for accessories or supplies:
Call 1-800-538-8787 (U.S.) or 1-800-387-3154 (Canada).
HP Support Assistant compact disc:
This support tool offers a comprehensive online information system designed to provide technical and product information on HP products. To subscribe to this quarterly service in the U.S. or Canada, call 1-800-457-1762. In Hong Kong, Indonesia, Malaysia, or Singapore, call Fulfill Plus at (65) 740-4477.
HP Service Information: To locate HP-Authorized Dealers, call 1-800-243-9816 (U.S.) or 1-800-387-3867 (Canada).
HP Service Agreements: Call 1-800-835-4747 (U.S.) or 1-800-268-1221 (Canada).Extended Service 1-800-446-0522.
204 Chapter 5 - Warranty and support information EN
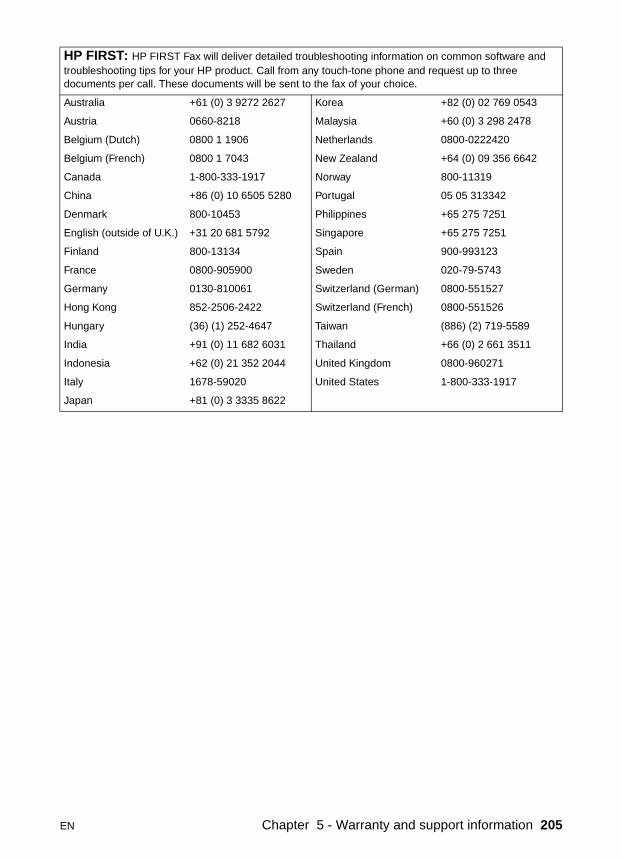
HP FIRST: HP FIRST Fax will deliver detailed troubleshooting information on common software and troubleshooting tips for your HP product. Call from any touch-tone phone and request up to three documents per call. These documents will be sent to the fax of your choice.
Australia +61 (0) 3 9272 2627 Korea +82 (0) 02 769 0543
Austria 0660-8218 Malaysia +60 (0) 3 298 2478
Belgium (Dutch) 0800 1 1906 Netherlands 0800-0222420
Belgium (French) 0800 1 7043 New Zealand +64 (0) 09 356 6642
Canada 1-800-333-1917 Norway 800-11319
China +86 (0) 10 6505 5280 Portugal 05 05 313342
Denmark 800-10453 Philippines +65 275 7251
English (outside of U.K.) +31 20 681 5792 Singapore +65 275 7251
Finland 800-13134 Spain 900-993123
France 0800-905900 Sweden 020-79-5743
Germany 0130-810061 Switzerland (German) 0800-551527
Hong Kong 852-2506-2422 Switzerland (French) 0800-551526
Hungary (36) (1) 252-4647 Taiwan (886) (2) 719-5589
India +91 (0) 11 682 6031 Thailand +66 (0) 2 661 3511
Indonesia +62 (0) 21 352 2044 United Kingdom 0800-960271
Italy 1678-59020 United States 1-800-333-1917
Japan +81 (0) 3 3335 8622
EN Chapter 5 - Warranty and support information 205
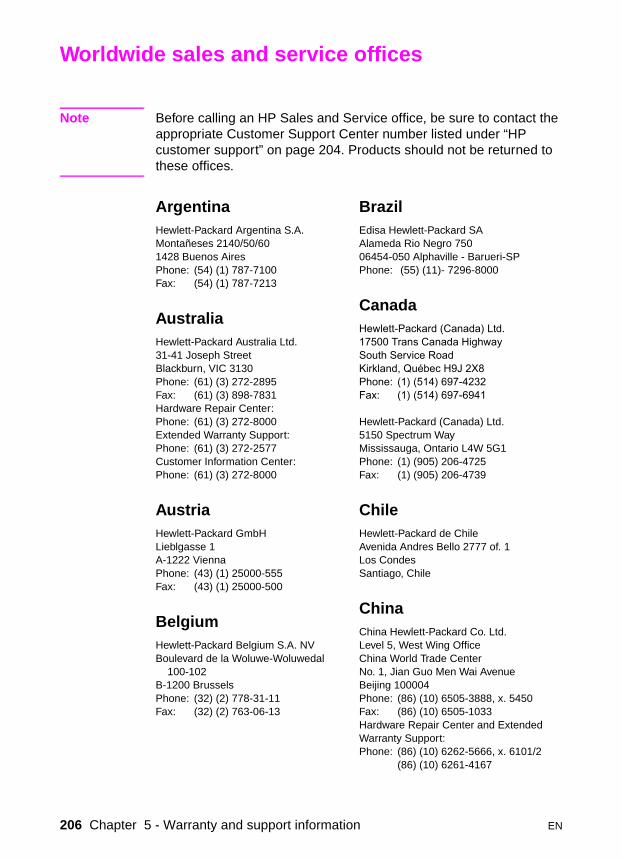
Worldwide sales and service offices
Note Before calling an HP Sales and Service office, be sure to contact the appropriate Customer Support Center number listed under “HP customer support” on page 204. Products should not be returned to these offices.
ArgentinaHewlett-Packard Argentina S.A.Montañeses 2140/50/601428 Buenos AiresPhone: (54) (1) 787-7100Fax: (54) (1) 787-7213
AustraliaHewlett-Packard Australia Ltd.31-41 Joseph StreetBlackburn, VIC 3130Phone: (61) (3) 272-2895Fax: (61) (3) 898-7831Hardware Repair Center:Phone: (61) (3) 272-8000Extended Warranty Support:Phone: (61) (3) 272-2577Customer Information Center:Phone: (61) (3) 272-8000
AustriaHewlett-Packard GmbHLieblgasse 1A-1222 ViennaPhone: (43) (1) 25000-555Fax: (43) (1) 25000-500
BelgiumHewlett-Packard Belgium S.A. NVBoulevard de la Woluwe-Woluwedal
100-102B-1200 BrusselsPhone: (32) (2) 778-31-11Fax: (32) (2) 763-06-13
BrazilEdisa Hewlett-Packard SAAlameda Rio Negro 75006454-050 Alphaville - Barueri-SPPhone: (55) (11)- 7296-8000
CanadaHewlett-Packard (Canada) Ltd.17500 Trans Canada HighwaySouth Service RoadKirkland, Québec H9J 2X8Phone: (1) (514) 697-4232Fax: (1) (514) 697-6941
Hewlett-Packard (Canada) Ltd.5150 Spectrum WayMississauga, Ontario L4W 5G1Phone: (1) (905) 206-4725Fax: (1) (905) 206-4739
ChileHewlett-Packard de ChileAvenida Andres Bello 2777 of. 1Los CondesSantiago, Chile
ChinaChina Hewlett-Packard Co. Ltd.Level 5, West Wing OfficeChina World Trade CenterNo. 1, Jian Guo Men Wai AvenueBeijing 100004Phone: (86) (10) 6505-3888, x. 5450Fax: (86) (10) 6505-1033Hardware Repair Center and Extended Warranty Support:Phone: (86) (10) 6262-5666, x. 6101/2
(86) (10) 6261-4167
206 Chapter 5 - Warranty and support information EN
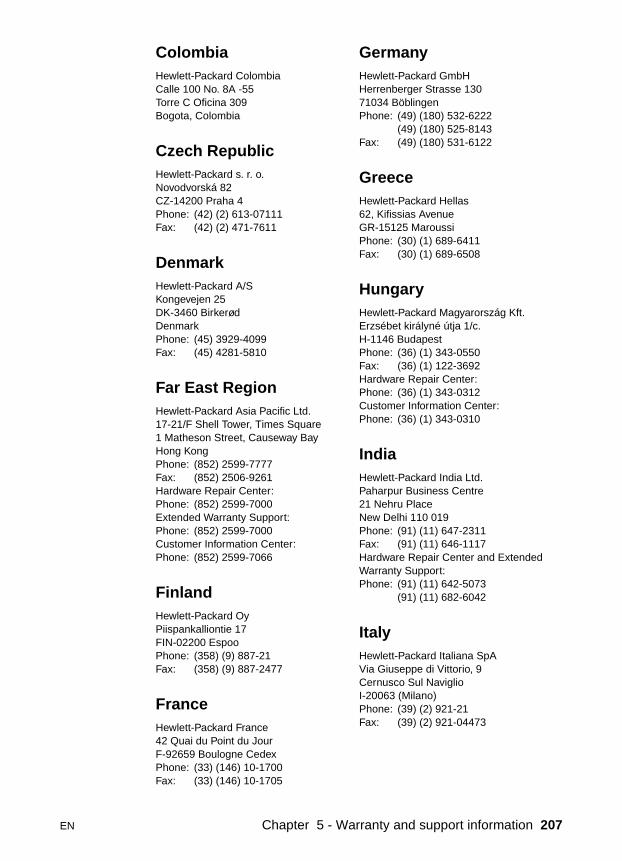
ColombiaHewlett-Packard ColombiaCalle 100 No. 8A -55Torre C Oficina 309Bogota, Colombia
Czech RepublicHewlett-Packard s. r. o.Novodvorská 82CZ-14200 Praha 4Phone: (42) (2) 613-07111Fax: (42) (2) 471-7611
DenmarkHewlett-Packard A/SKongevejen 25DK-3460 BirkerødDenmarkPhone: (45) 3929-4099Fax: (45) 4281-5810
Far East RegionHewlett-Packard Asia Pacific Ltd.17-21/F Shell Tower, Times Square1 Matheson Street, Causeway BayHong Kong Phone: (852) 2599-7777Fax: (852) 2506-9261Hardware Repair Center:Phone: (852) 2599-7000Extended Warranty Support:Phone: (852) 2599-7000Customer Information Center:Phone: (852) 2599-7066
FinlandHewlett-Packard OyPiispankalliontie 17FIN-02200 EspooPhone: (358) (9) 887-21Fax: (358) (9) 887-2477
FranceHewlett-Packard France42 Quai du Point du JourF-92659 Boulogne CedexPhone: (33) (146) 10-1700Fax: (33) (146) 10-1705
GermanyHewlett-Packard GmbHHerrenberger Strasse 13071034 BöblingenPhone: (49) (180) 532-6222
(49) (180) 525-8143Fax: (49) (180) 531-6122
GreeceHewlett-Packard Hellas62, Kifissias AvenueGR-15125 MaroussiPhone: (30) (1) 689-6411Fax: (30) (1) 689-6508
HungaryHewlett-Packard Magyarország Kft.Erzsébet királyné útja 1/c. H-1146 BudapestPhone: (36) (1) 343-0550Fax: (36) (1) 122-3692Hardware Repair Center:Phone: (36) (1) 343-0312Customer Information Center:Phone: (36) (1) 343-0310
IndiaHewlett-Packard India Ltd.Paharpur Business Centre21 Nehru PlaceNew Delhi 110 019Phone: (91) (11) 647-2311Fax: (91) (11) 646-1117Hardware Repair Center and Extended Warranty Support:Phone: (91) (11) 642-5073
(91) (11) 682-6042
ItalyHewlett-Packard Italiana SpAVia Giuseppe di Vittorio, 9Cernusco Sul NaviglioI-20063 (Milano)Phone: (39) (2) 921-21Fax: (39) (2) 921-04473
EN Chapter 5 - Warranty and support information 207
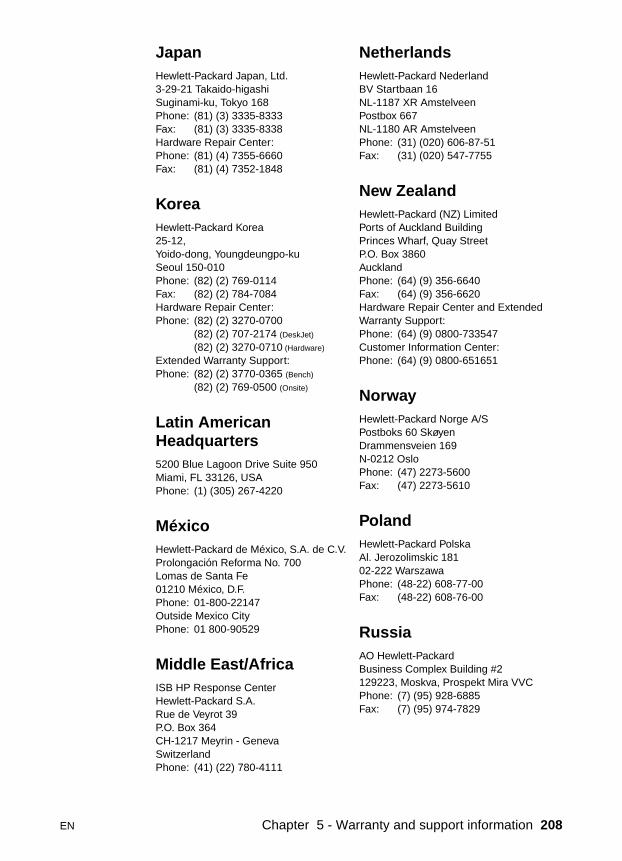
JapanHewlett-Packard Japan, Ltd.3-29-21 Takaido-higashi Suginami-ku, Tokyo 168 Phone: (81) (3) 3335-8333Fax: (81) (3) 3335-8338Hardware Repair Center:Phone: (81) (4) 7355-6660Fax: (81) (4) 7352-1848
KoreaHewlett-Packard Korea25-12, Yoido-dong, Youngdeungpo-kuSeoul 150-010Phone: (82) (2) 769-0114Fax: (82) (2) 784-7084Hardware Repair Center: Phone: (82) (2) 3270-0700
(82) (2) 707-2174 (DeskJet)
(82) (2) 3270-0710 (Hardware)
Extended Warranty Support:Phone: (82) (2) 3770-0365 (Bench)
(82) (2) 769-0500 (Onsite)
Latin AmericanHeadquarters5200 Blue Lagoon Drive Suite 950Miami, FL 33126, USAPhone: (1) (305) 267-4220
MéxicoHewlett-Packard de México, S.A. de C.V.Prolongación Reforma No. 700Lomas de Santa Fe01210 México, D.F.Phone: 01-800-22147 Outside Mexico CityPhone: 01 800-90529
Middle East/AfricaISB HP Response CenterHewlett-Packard S.A.Rue de Veyrot 39P.O. Box 364CH-1217 Meyrin - GenevaSwitzerlandPhone: (41) (22) 780-4111
NetherlandsHewlett-Packard Nederland BV Startbaan 16NL-1187 XR AmstelveenPostbox 667NL-1180 AR AmstelveenPhone: (31) (020) 606-87-51Fax: (31) (020) 547-7755
New ZealandHewlett-Packard (NZ) LimitedPorts of Auckland BuildingPrinces Wharf, Quay StreetP.O. Box 3860AucklandPhone: (64) (9) 356-6640Fax: (64) (9) 356-6620Hardware Repair Center and Extended Warranty Support:Phone: (64) (9) 0800-733547Customer Information Center:Phone: (64) (9) 0800-651651
NorwayHewlett-Packard Norge A/SPostboks 60 SkøyenDrammensveien 169N-0212 OsloPhone: (47) 2273-5600Fax: (47) 2273-5610
PolandHewlett-Packard PolskaAl. Jerozolimskic 18102-222 WarszawaPhone: (48-22) 608-77-00Fax: (48-22) 608-76-00
RussiaAO Hewlett-PackardBusiness Complex Building #2129223, Moskva, Prospekt Mira VVCPhone: (7) (95) 928-6885Fax: (7) (95) 974-7829
EN Chapter 5 - Warranty and support information 208
SingaporeHewlett-Packard Singapore(Sales) Pte Ltd450 Alexandra RoadSingapore (119960)Phone: (65) 275-3888Fax: (65) 275-6839Hardware Repair Center and CustomerInformation Center:Phone: (65) 272-5300Extended Warranty Support:Phone: (65) 272-5333
SpainHewlett-Packard Española, S.A.Carretera de la Coruña km 16.500E-28230 Las Rozas, MadridPhone: (34) (1) 626-1600Fax: (34) (1) 626-1830
SwedenHewlett-Packard Sverige ABSkalholtsgatan 9S-164 97 KistaPhone: (46) (8) 444-2000Fax: (46) (8) 444-2666
SwitzerlandHewlett-Packard (Schweiz) AGIn der Luberzen 29CH-8902 Urdorf/ZürichPhone: (41) (084) 880-11-11Fax: (41) (1) 753-7700Warranty Support:0800-55-5353
TaiwanHewlett-Packard Taiwan Ltd.8th Floor337, Fu-Hsing North RoadTaipei, 10483Phone: (886)(02) 717-0055Fax: (886)(02) 514-0276Hardware Repair Center, call:North (886)(02) 717-9673 Central (886)(04) 327-0153 South (886)(080) 733-733 Extended Warranty Support Contact:Phone: (886)(02) 714-8882
ThailandHewlett-Packard (Thailand) Ltd.23-25/f Vibulthani Tower II2199 Rama 4 Rd, KlongtonKlintoey, Bangkok 10110ThailandPhone: (66) (2) 666-3900-34Fax: (66) (2) 666-3935-37Hardware Repair Center and Extended Warranty Support Contact:Phone: (66) (2) 661-3900 ext. 6001/ 6002Customer Information Center:Phone: (66) (2) 661-3900 ext. 3211Fax: (66) (2) 661-3943
TurkeyHewlett-Packard CompanyBilgisayar Ve ölçüm Sistemleri AS19 Mayis Caddesi NovaBaran Plaza Kat: 1280220 Sisli-IstanbulPhone: (90) (212) 224-5925Fax: (90) (212) 224-5939
United KingdomHewlett-Packard Ltd.Cain RoadBracknellBerkshire RG12 1HNPhone: (44) (134) 436-9222Fax: (44) (134) 436-3344
VenezuelaHewlett-Packard de Venezuela S.A.Los Ruices Norte3A TransversalEdificio Segre Caracas 1071Phone: (58) (2) 239-4244Fax: (58) (2) 239-3080
EN Chapter 5 - Warranty and support information 209

210 Chapter 5 - Warranty and support information EN
Index
Symbols.csv files 107.hpb files 107.ldif files 107.ver file 167
Numerics100Base-TX support 810Base-2 support 810Base-T support 8
AA4-size paper handling 10ABM (Address Book Manager). See Address Book
Manager (ABM)AC line voltage 22accessories and supplies
support numbers for obtaining 201warranty 199
accounting code 50Acrobat Reader
installing 43website for obtaining 15
activity logclearing 115contents 113description 113maximum number of entries 25messages 170printing 115refreshing 115saving 115using for troubleshooting 128viewing 114
address book checkdescription and steps 139errors found 144
Address Book Manager (ABM)configuring 52description 21installing 43messages 190
address booksbacking up 94checking 139clearing 71control panel error messages 141description 104
importing e-mail addresses 107internal errors 153not accessible at control panel 134Public Distribution Lists 104Public Email 104Public Fax 104Public Printers 104replicating 94resetting 90restoring 96
ADF (automatic document feeder)cable 20clearing paper jams 131illustration 19maximum stacked pages 10paper sizes 10specifications 23
administratoractivities 69activity log 113description 18password 100software 42
Administrator E-mail parameter 81Administrator Full Name parameter 81administrator guide
installing 43online 43part numbers 201
Administrator Password parameter 81Adobe Acrobat Reader
installing 43website for obtaining 15
agreements, service 204America Online support service 204applications. See programsasset number, assigning 72assigning IP address
alternatives 33default timeout 33manually 80
attachment file type for e-mail transmissions 49authorized dealers 204automatic document feeder (ADF). See ADF
(automatic document feeder)auto-thresholding 11
BB/W Document sending quality 12
EN Index 211
backing updescription and steps 94problem 178
Biscom FaxCom problem 137blank pages 134BNC support 8boot block version 118BOOTP, using to assign IP address 33box, what ships in 31breaking apart e-mail transmissions 49
Ccable collar
installing 37part number 201
cables, installing 36CANCEL function key 79cards, HP JetDirect. See JetDirect print serverschecking the address book database 139checklist for configuration 33cleaning
delivery guide sheet 121digital sender 121scanning glass 134
CLEAR function key 79clearing
activity log 115address books 71
clearing paper jamsat end of a page 130at start of a page 129inside ADF 131
client softwaredisk space requirement 30distributing 55
code for fax accounting 50coexisting with HP Network ScanJet 5 scanner 61collar for electromagnetic interference
installing 37part number 201
collisions, network 117color
optimization 11printer 14sending 12
Color Document sending quality 12Color LaserJet 4500 printer 14Color-B/W Photo sending quality 12comma-separated value (CSV) files, importing 107components
hardware 19software 21
compressionmethods 11specifications 22
CompuServe support service 204
computer requirements 30computer, sending to
description 16typical file sizes 13
configurationchecklist 33extended and optional 32fast-track 32HP JetAdmin software interview and expert modes
45HP JetAdmin software pages 46minimum 32overview 35parameters in configuration menu 80preparing for 33setup program for administrative software 42setup program for client software 55troubleshooting 63uninstalling 63using HP JetAdmin software 45using the control panel 41
configuration menukeys 78parameters 80using 78
confirmationsenabling 50of e-mail transmissions not arriving 137of fax transmissions not arriving 138
conformity, declaration of 27connectors 20consumption, power 22contrast level, changing 119control panel 134
changing contrast level 119changing language 72illustration 19light 128maximum number of selections 25messages 141not working 134reaching 39specifications 22stickers 37
convenience copyingconfiguring 111description 16enabling 111typical file sizes 14
copyingactivity log 115address books 94convenience 16
CSV (comma-separated value) files, importing 107customer support options worldwide 202Customized Function Keys 58
212 Index EN
customizingfunction keys 58third-party program support 58
cycle, duty 22
Ddaemon. See Digital Sender Servicedatabase of address books
checking 139errors found 144
data-rate switch on HP J3112A print server 36date
firmware 117setting for digital sender 80
Date parameter 80dealers, authorized 204declaration of conformity 27Default Accounting Code 50default inbox not receiving documents 135defaults
DNS search domain 47fax transmission accounting code 50FROM field in e-mail messages 82image quality for documents sent to computers 83image quality for e-mail messages 82IP gateway 73jumper settings on HP J3113A print server 168printer for fax transaction reports 111receive inbox 135resetting to factory 92SUBJECT field in e-mail messages 82timeout for assigning IP address 33
defectsproduct 199software 200
delivery guide sheetcleaning 121part number 201replacing 122
destinationscomputer 16digital sender 15fax 16function key 58JetSend 16maximum supported 25third-party programs 17
device listfinding digital sender 46missing IP address 65
DHCP, using to assign IP address 33Digital Sender Link
description 21icon not showing in taskbar 189installing for administrator 43installing for user 55
messages 195running with HP Digital Sender Service 67will not start 189
Digital Sender Servicedescription 21installing 43running with HP Digital Sender Link 67troubleshooting 172troubleshooting installation 66versions 62
disk space requirements 30distributing client software 55distribution lists
description 104maintaining 105maximum number 25
distribution services 15DNS (Domain Name System)
configuration problem 147configuring 47default search domain 47enabling 47server problem 183servers 47support 15
DNS Domain parameter 83DNS Server Address parameter 83DNS/WINS page 47document guides 19document output support 19document output tray 19documentation
installing 43online 21part numbers 201
documentsnot printing at printer 136pages cut off bottom 138sending color 12sent as e-mail messages not arriving 136sent as faxes not arriving 137sent to computers not arriving 135
Domain Name System (DNS). See DNS (Domain Name System)
dots-per-inch resolution 13dpi resolution 13drivers, printer 204duplex operation 169duty cycle 22
EECM (Error Correction Mode) 50electromagnetic interference (EMI)
cable collar 37precautions 124
e-mail addresses
EN Index 213
adding to Public Email address book 105deleting from Public Email address book 105importing into address books 107
Email Default From parameter 82Email Default Subject parameter 82e-mail messages. See e-mail transmissionsE-mail page 49E-mail Quality parameter 82E-mail Server Addr. parameter 81e-mail server unavailable 143e-mail service
configuration problem 148description 15enabling 49network errors 182test 157troubleshooting 157
e-mail transmissionsattachment file type 49breaking apart 49confirmations not arriving 137maximum destinations 25not arriving at destinations 136setting size 49size problem 165typical file sizes 13
EMC regulation, French 26EMI (electromagnetic interference). See
electromagnetic interference (EMI)Enable Receive setting 135enabling
confirmations 50convenience copying 111DNS or WINS name resolution 47e-mail service 49fax service 50fax transaction reports 112JetSend 38LDAP 51notifications 85
environmentalrequirements 30specifications 24
environments supported 30equipment
cleaning 121components 19specifications 22troubleshooting 133
error activity log messages 170error correction mode (ECM) 50errors. See troubleshootingESMTP support 15Ethernet support 8event log for Windows NT 135Exchange File Format 50
EXIT function key 79expert mode 45Extended SMTP support 15Extension for HP JetAdmin software 43
Ffactory defaults, resetting to 92Fast Ethernet
support 8troubleshooting 168
fast-track configuration 32fatal activity log messages 170fax daemon. See Digital Sender ServiceFax page 50fax service
description 16enabling 50troubleshooting 158
fax support service 205fax transaction reports
designating printer for 112enabling 112not arriving 138using to troubleshoot 158
fax transmissionsaccounting codes 50checking pending 159file format 50interval between retries 50maximum number 25not arriving 137not receiving confirmations 138pending, maximum number 25resolution 50retries 50typical file sizes 13
fax workarea, checking and changing 158FaxCom problem 137feeding problem 134file type for e-mail attachments 49files
compression methods 11CSV (comma-separated value) 107format for fax transmissions 50formats and sizes 13HPBC (Hewlett-Packard Batch Configuration) 107LDIF (LDAP Data Interchange Format) 107resolution 13version (.ver) 167
finding digital sender in device list 46Fine Text (OCR) sending quality 12firmware
digital sender version 117print server version 117restoring old 198scanner engine 118
214 Index EN
upgrade canceled 163upgrade failure 162upgrading 120upgrading problem 177
flashing light on control panel 128formats, file 13framing errors 117French EMC regulation 26FROM field in e-mail messages 82front panel. See control panelfull-duplex operation 169function key destinations
configuring 58maximum number 25
function keysCANCEL 79CLEAR 79customizing 58EXIT 79maximum number 25not appearing 63OK 79SAVE 79TOOLS 79used in the configuration menu 79
GG4 compression 11gamma correction 11General page 47German noise declaration 26getting started guide, installing online 43glass, cleaning 134green light on control panel 128guest users
activity log 113description 18
guide sheet, replacing 122guides
installing 43online 21paper 19
Hhalf-duplex operation 169hardware
cleaning 121components 19compression 22repair assistance 202troubleshooting 133warranty 199
heating problem 133Hewlett-Packard Batch Configuration (HPBC) files,
importing 107Hi-Res Color-B/W Photo sending quality 12
HP Address Book Manager. See Address Book Manager
HP authorized dealers 204HP Color LaserJet 4500 printer 14HP Digital Sender Link. See Digital Sender LinkHP Digital Sender Service. See Digital Sender
ServiceHP FIRST fax support service 205HP J3110A print server product number 201HP J3111A print server product number 201HP J3112A print server
data-rate switch 36product number 201
HP J3113A print serverjumpers 168product number 201troubleshooting 168
HP JetAdmin Extension 43HP JetAdmin software. See JetAdmin softwareHP JetAdmin Utilities 43HP JetDirect PCL 5 printers 14HP JetDirect print servers. See JetDirect print
serversHP JetSend. See JetSendHP Network ScanJet 5 scanner, coexisting with 61HP ScanJet Utility 61HP Smart Compression Imaging Technology 11HP Support Assistant compact disc 204HP worldwide sales and service offices 206HPBC (Hewlett-Packard Batch Configuration) files,
importing 107humidity
operating 24storage 24
IID, JetDirect 118idle state 128IEEE 802.5 support 201image processing
features 11options 22
image qualitydefault for documents sent to computers 83default for e-mail messages 82problems 134
ImportAB.log 107importing
CSV files 107e-mail addresses 107HPBC files 107LDIF files 107
Imspapi.dll file 163inbox
enabling receive 135setting receive 135
EN Index 215
installationdescription 29messages 66methods for client distribution 42troubleshooting 63
installingadministrative software 42Adobe Acrobat Reader 43cable collar 37cables 36client software 55digital sender 36in Token Ring network 36JetSend sticker 37language sticker 37
interface cards. See JetDirect print serversinterface type 22internal errors 144Interval field 50interview mode 45invalid IP address 65IP address
assigning manually 80assigning using BOOTP or DHCP server 33default timeout 33invalid 65missing from HP JetAdmin software 65name resolution 47on self-test page 117subnet mask 73
IP Address parameter 81IP Configuration parameter 80IP Gateway parameter 81IP Subnet Mask parameter 81IPX
problem 164support 8
JJ3110A print server product number 201J3111A print server product number 201J3112A print server
data-rate switch 36product number 201
J3113A print serverjumpers 168product number 201
jamsclearing at end of a page 130clearing at start of a page 129clearing inside ADF 131troubleshooting 134
JetAdmin Extension 43JetAdmin software
configuration pages 46configuring with 45
description 21interview and expert modes 45messages 160missing IP address 65troubleshooting 160
JetAdmin Utilities 43JetDirect print servers
firmware version installed 117for different networks 201ID 118not responding 145product number installed 117product numbers 201replacing 124timeout 118troubleshooting 168troubleshooting installation 65
JetSendconfiguring devices 40description 16destinations 16enabling 38invalid PIN 144not responding 145parameter 83problem 187sticker 37website 17
jumpers on HP J3113A print server 168
Kkeyboard 23keypads 23keys, control panel 78keys, function
customizing 58maximum number 25not appearing 63
LLAN fax daemon. See Digital Sender ServiceLAN Server 3.1 and 4.1 8Language parameter 80language sticker 37languages
changing for setup program 44changing in e-mail message text 49changing on control panel 72manuals in other 201sticker for 37support options 202
late collisions 118LDAP (Lightweight Directory Access Protocol)
authenticating 51configuration problem 149configuring at control panel 75
216 Index EN
configuring in HP JetAdmin software 51enabling 51maximum number of hits 51password (control panel) 76password (JetAdmin software) 51port number (control panel) 76port number (HP JetAdmin software) 51protocol error 145search root (control panel) 76search root (HP JetAdmin software) 51search timeout 51server unavailable 150
LDAP Account Name parameter 83LDAP Data Interchange Format (LDIF) files,
importing 107LDAP page 51LDAP Password parameter 83LDAP Search Root parameter 82LDAP Server Address parameter 82LDAP Service Port parameter 82LDIF (LDAP Data Interchange Format) files,
importing 107LEDs
control panel 128HP J3113A print server 168
legal-size paper handling 10letter-size paper handling 10light on control panel 128light source for scanning 22Lightweight Directory Access Protocol (LDAP). See
LDAP (Lightweight Directory Access Protocol)limited warranty statement 199line voltage 22lists, distribution. See distribution lists 27LocalTalk support 201locked
sending documents when 133undoing 36when moving 36
log server address 118logs
activity. See activity logImportAB.log 107Windows NT event 135
lower rollerspart number 201replacing 123residue problem 134
MMAC address 117MailBoxID 50manuals
in other languages 201installing 43online 21
part numbers 201mask for IP address 81Max. Trans. Speed 50maximum number of hits, LDAP 51memory
capabilities 25requirement 30
messagesactivity log 170Address Book Manager 190control panel 141Digital Sender Link 195installation 66internal error 153JetAdmin software 160network error 146Windows NT events 135
MIME support 15minimum configuration 32modes
expert 45interview 45sending 12
moving the digital sender 36multi-boot program version 118
Nname resolution
cache 48enabling 47
NetWare 3.x and 4.x 8network
collisions 117errors 146framing errors 117interface cards 201Jetdirect print servers 201operating systems supported 8packets 117resetting parameters 91servers needed 8troubleshooting 157
network interface cards. See JetDirect print servers.Network ScanJet 5 scanner, coexisting with 61noise
German declaration 26levels 22problem 133
normal activity log messages 170notifications
description 85enabling 85of e-mail transmissions not arriving 137of faxes not arriving 138
numbers, product and part 201
EN Index 217
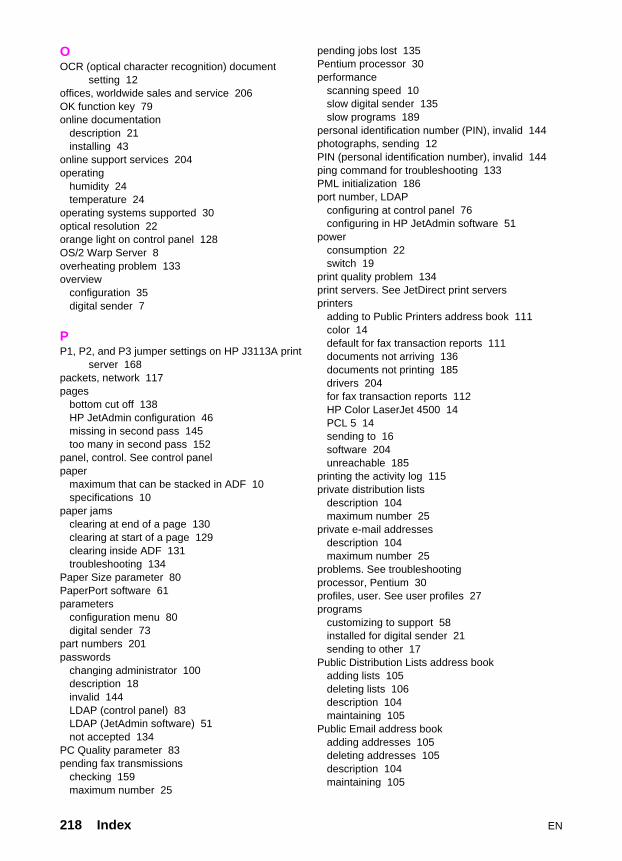
OOCR (optical character recognition) document
setting 12offices, worldwide sales and service 206OK function key 79online documentation
description 21installing 43
online support services 204operating
humidity 24temperature 24
operating systems supported 30optical resolution 22orange light on control panel 128OS/2 Warp Server 8overheating problem 133overview
configuration 35digital sender 7
PP1, P2, and P3 jumper settings on HP J3113A print
server 168packets, network 117pages
bottom cut off 138HP JetAdmin configuration 46missing in second pass 145too many in second pass 152
panel, control. See control panelpaper
maximum that can be stacked in ADF 10specifications 10
paper jamsclearing at end of a page 130clearing at start of a page 129clearing inside ADF 131troubleshooting 134
Paper Size parameter 80PaperPort software 61parameters
configuration menu 80digital sender 73
part numbers 201passwords
changing administrator 100description 18invalid 144LDAP (control panel) 83LDAP (JetAdmin software) 51not accepted 134
PC Quality parameter 83pending fax transmissions
checking 159maximum number 25
pending jobs lost 135Pentium processor 30performance
scanning speed 10slow digital sender 135slow programs 189
personal identification number (PIN), invalid 144photographs, sending 12PIN (personal identification number), invalid 144ping command for troubleshooting 133PML initialization 186port number, LDAP
configuring at control panel 76configuring in HP JetAdmin software 51
powerconsumption 22switch 19
print quality problem 134print servers. See JetDirect print serversprinters
adding to Public Printers address book 111color 14default for fax transaction reports 111documents not arriving 136documents not printing 185drivers 204for fax transaction reports 112HP Color LaserJet 4500 14PCL 5 14sending to 16software 204unreachable 185
printing the activity log 115private distribution lists
description 104maximum number 25
private e-mail addressesdescription 104maximum number 25
problems. See troubleshootingprocessor, Pentium 30profiles, user. See user profiles 27programs
customizing to support 58installed for digital sender 21sending to other 17
Public Distribution Lists address bookadding lists 105deleting lists 106description 104maintaining 105
Public Email address bookadding addresses 105deleting addresses 105description 104maintaining 105
218 Index EN
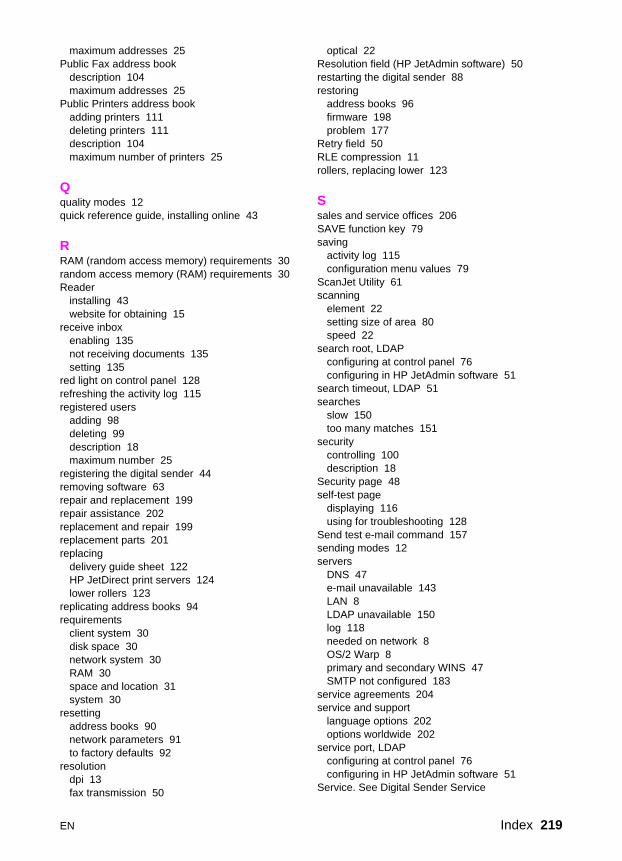
maximum addresses 25Public Fax address book
description 104maximum addresses 25
Public Printers address bookadding printers 111deleting printers 111description 104maximum number of printers 25
Qquality modes 12quick reference guide, installing online 43
RRAM (random access memory) requirements 30random access memory (RAM) requirements 30Reader
installing 43website for obtaining 15
receive inboxenabling 135not receiving documents 135setting 135
red light on control panel 128refreshing the activity log 115registered users
adding 98deleting 99description 18maximum number 25
registering the digital sender 44removing software 63repair and replacement 199repair assistance 202replacement and repair 199replacement parts 201replacing
delivery guide sheet 122HP JetDirect print servers 124lower rollers 123
replicating address books 94requirements
client system 30disk space 30network system 30RAM 30space and location 31system 30
resettingaddress books 90network parameters 91to factory defaults 92
resolutiondpi 13fax transmission 50
optical 22Resolution field (HP JetAdmin software) 50restarting the digital sender 88restoring
address books 96firmware 198problem 177
Retry field 50RLE compression 11rollers, replacing lower 123
Ssales and service offices 206SAVE function key 79saving
activity log 115configuration menu values 79
ScanJet Utility 61scanning
element 22setting size of area 80speed 22
search root, LDAPconfiguring at control panel 76configuring in HP JetAdmin software 51
search timeout, LDAP 51searches
slow 150too many matches 151
securitycontrolling 100description 18
Security page 48self-test page
displaying 116using for troubleshooting 128
Send test e-mail command 157sending modes 12servers
DNS 47e-mail unavailable 143LAN 8LDAP unavailable 150log 118needed on network 8OS/2 Warp 8primary and secondary WINS 47SMTP not configured 183
service agreements 204service and support
language options 202options worldwide 202
service port, LDAPconfiguring at control panel 76configuring in HP JetAdmin software 51
Service. See Digital Sender Service
EN Index 219
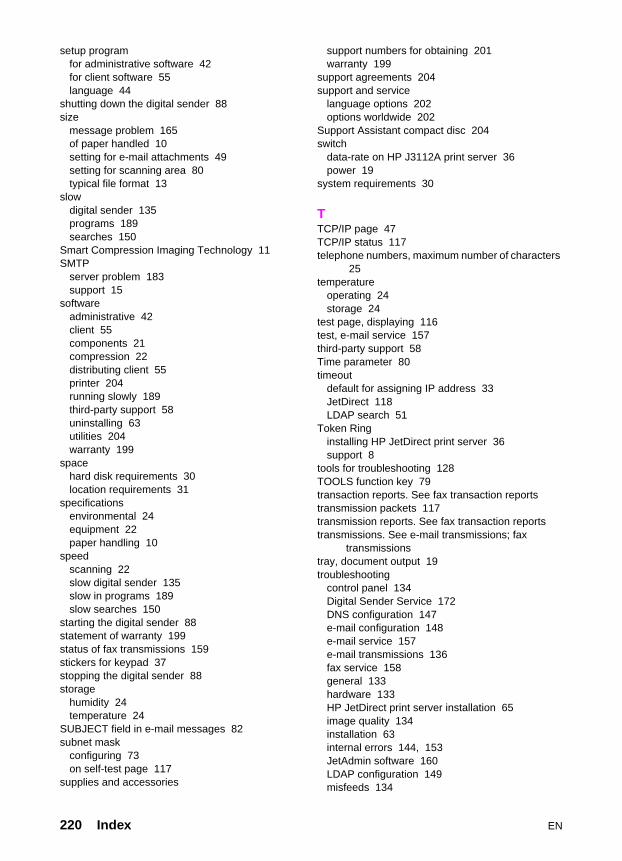
setup programfor administrative software 42for client software 55language 44
shutting down the digital sender 88size
message problem 165of paper handled 10setting for e-mail attachments 49setting for scanning area 80typical file format 13
slowdigital sender 135programs 189searches 150
Smart Compression Imaging Technology 11SMTP
server problem 183support 15
softwareadministrative 42client 55components 21compression 22distributing client 55printer 204running slowly 189third-party support 58uninstalling 63utilities 204warranty 199
spacehard disk requirements 30location requirements 31
specificationsenvironmental 24equipment 22paper handling 10
speedscanning 22slow digital sender 135slow in programs 189slow searches 150
starting the digital sender 88statement of warranty 199status of fax transmissions 159stickers for keypad 37stopping the digital sender 88storage
humidity 24temperature 24
SUBJECT field in e-mail messages 82subnet mask
configuring 73on self-test page 117
supplies and accessories
support numbers for obtaining 201warranty 199
support agreements 204support and service
language options 202options worldwide 202
Support Assistant compact disc 204switch
data-rate on HP J3112A print server 36power 19
system requirements 30
TTCP/IP page 47TCP/IP status 117telephone numbers, maximum number of characters
25temperature
operating 24storage 24
test page, displaying 116test, e-mail service 157third-party support 58Time parameter 80timeout
default for assigning IP address 33JetDirect 118LDAP search 51
Token Ringinstalling HP JetDirect print server 36support 8
tools for troubleshooting 128TOOLS function key 79transaction reports. See fax transaction reportstransmission packets 117transmission reports. See fax transaction reportstransmissions. See e-mail transmissions; fax
transmissionstray, document output 19troubleshooting
control panel 134Digital Sender Service 172DNS configuration 147e-mail configuration 148e-mail service 157e-mail transmissions 136fax service 158general 133hardware 133HP JetDirect print server installation 65image quality 134installation 63internal errors 144, 153JetAdmin software 160LDAP configuration 149misfeeds 134
220 Index EN
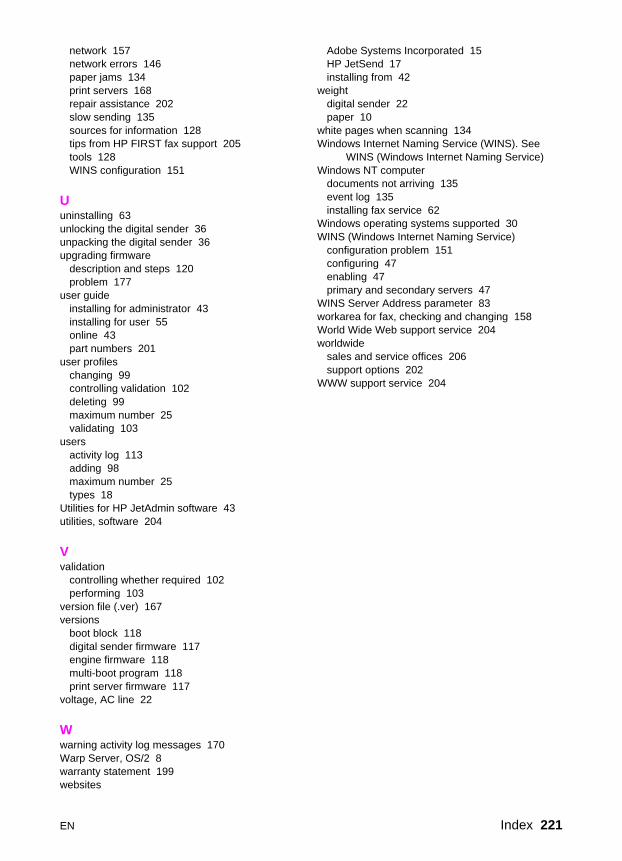
network 157network errors 146paper jams 134print servers 168repair assistance 202slow sending 135sources for information 128tips from HP FIRST fax support 205tools 128WINS configuration 151
Uuninstalling 63unlocking the digital sender 36unpacking the digital sender 36upgrading firmware
description and steps 120problem 177
user guideinstalling for administrator 43installing for user 55online 43part numbers 201
user profileschanging 99controlling validation 102deleting 99maximum number 25validating 103
usersactivity log 113adding 98maximum number 25types 18
Utilities for HP JetAdmin software 43utilities, software 204
Vvalidation
controlling whether required 102performing 103
version file (.ver) 167versions
boot block 118digital sender firmware 117engine firmware 118multi-boot program 118print server firmware 117
voltage, AC line 22
Wwarning activity log messages 170Warp Server, OS/2 8warranty statement 199websites
Adobe Systems Incorporated 15HP JetSend 17installing from 42
weightdigital sender 22paper 10
white pages when scanning 134Windows Internet Naming Service (WINS). See
WINS (Windows Internet Naming Service)Windows NT computer
documents not arriving 135event log 135installing fax service 62
Windows operating systems supported 30WINS (Windows Internet Naming Service)
configuration problem 151configuring 47enabling 47primary and secondary servers 47
WINS Server Address parameter 83workarea for fax, checking and changing 158World Wide Web support service 204worldwide
sales and service offices 206support options 202
WWW support service 204
EN Index 221


HP 9100CDigital SenderAdministrator Guide
Ad
min
istrator G
uid
e
English
Copyright© 2001Hewlett-Packard Co.
Manual Part No.C1311-90915
*C1311-90915**C1311-90915*
C1311-90915
HP
9100C D
igital S
end
er
addendum
hp 9100C digital sender

Contents
Addendum
Receiving technical updates . . . . . . . . . . . . . . . . . . . . . . . . . . . . . . . 5Enhancements to the HP Digital Sender 9100C . . . . . . . . . . . . . . . . 5Configuration methods . . . . . . . . . . . . . . . . . . . . . . . . . . . . . . . . . . . 6
Control panel configuration. . . . . . . . . . . . . . . . . . . . . . . . . . . . . 6Configuration software . . . . . . . . . . . . . . . . . . . . . . . . . . . . . . . . 6Web Access . . . . . . . . . . . . . . . . . . . . . . . . . . . . . . . . . . . . . . . . 6Configuration replication . . . . . . . . . . . . . . . . . . . . . . . . . . . . . . . 7
Enhanced network support . . . . . . . . . . . . . . . . . . . . . . . . . . . . . . . . 8Using a Web server for user authentication . . . . . . . . . . . . . . . . . . . 8
Using the IIS Web server . . . . . . . . . . . . . . . . . . . . . . . . . . . . . . 9Preparing the digital sender to work with a Web server . . . . . . 12
Sending to e-mail . . . . . . . . . . . . . . . . . . . . . . . . . . . . . . . . . . . . . . 15Using blind carbon copy . . . . . . . . . . . . . . . . . . . . . . . . . . . . . . 15Viewing the default subject . . . . . . . . . . . . . . . . . . . . . . . . . . . . 15Entering a message . . . . . . . . . . . . . . . . . . . . . . . . . . . . . . . . . 15Choosing a file format. . . . . . . . . . . . . . . . . . . . . . . . . . . . . . . . 16Specifying the time zone. . . . . . . . . . . . . . . . . . . . . . . . . . . . . . 17Editing the e-mail header . . . . . . . . . . . . . . . . . . . . . . . . . . . . . 17Setting e-mail security . . . . . . . . . . . . . . . . . . . . . . . . . . . . . . . 17Setting SMTP gateway polling frequency . . . . . . . . . . . . . . . . . 17E-mail delivery reliability . . . . . . . . . . . . . . . . . . . . . . . . . . . . . . 17
Sending to fax . . . . . . . . . . . . . . . . . . . . . . . . . . . . . . . . . . . . . . . . . 19Using Public Fax Distribution Lists . . . . . . . . . . . . . . . . . . . . . . 19Entering a billing account code. . . . . . . . . . . . . . . . . . . . . . . . . 19Receiving error messages . . . . . . . . . . . . . . . . . . . . . . . . . . . . 19Using Internet fax . . . . . . . . . . . . . . . . . . . . . . . . . . . . . . . . . . . 20Using Fax for Domino . . . . . . . . . . . . . . . . . . . . . . . . . . . . . . . . 21Configuring Fax for Domino . . . . . . . . . . . . . . . . . . . . . . . . . . . 21Sending a fax when using Lotus Fax for Domino . . . . . . . . . . . 23Preventing transmission of unnecessary fax pages . . . . . . . . . 23
Sending to copy. . . . . . . . . . . . . . . . . . . . . . . . . . . . . . . . . . . . . . . . 24Sending duplex copies . . . . . . . . . . . . . . . . . . . . . . . . . . . . . . . 24Using the HP color LaserJet 8500 printer. . . . . . . . . . . . . . . . . 24Using PCL6 printers . . . . . . . . . . . . . . . . . . . . . . . . . . . . . . . . . 24
Sending to the PC or another program . . . . . . . . . . . . . . . . . . . . . . 25Typing document names . . . . . . . . . . . . . . . . . . . . . . . . . . . . . 25Changing the tag . . . . . . . . . . . . . . . . . . . . . . . . . . . . . . . . . . . 26
EN 1
Sending to HP Jetsend-enabled devices . . . . . . . . . . . . . . . . . . . . 27Sending information to password-protected devices . . . . . . . . 27Code update . . . . . . . . . . . . . . . . . . . . . . . . . . . . . . . . . . . . . . . 27
Contrast settings . . . . . . . . . . . . . . . . . . . . . . . . . . . . . . . . . . . . . . . 28Changing the contrast on a per-job basis . . . . . . . . . . . . . . . . . 28
Additions and enhancements to software . . . . . . . . . . . . . . . . . . . . 29HP Enterprise Center . . . . . . . . . . . . . . . . . . . . . . . . . . . . . . . . 29Using Address Book Manager updates . . . . . . . . . . . . . . . . . . 31Using HP JetAdmin software updates . . . . . . . . . . . . . . . . . . . 32Support for Microsoft Sharepoint Portal Server (MS SPPS). . . 32Using other administration tools . . . . . . . . . . . . . . . . . . . . . . . . 33
HP Customer Care . . . . . . . . . . . . . . . . . . . . . . . . . . . . . . . . . . . . . 33Activity log messages . . . . . . . . . . . . . . . . . . . . . . . . . . . . . . . . . . . 34
New log messages . . . . . . . . . . . . . . . . . . . . . . . . . . . . . . . . . . 34Changes to existing log messages . . . . . . . . . . . . . . . . . . . . . . 36
2 EN

HP Digital Sender 9100C
Addendum
Hewlett-Packard Company11311 Chinden BoulevardBoise, Idaho 83714 U.S.A.
Copyright Information
© Copyright Hewlett-Packard Company 2002
All Rights Reserved. Reproduction, adaptation, or translation without prior written permission is prohibited, except as allowed under copyright laws.
A user of the Hewlett-Packard digital sender associated with this addendum is granted a license to: a) print hard copies of this addendum for PERSONAL, INTERNAL, or COMPANY use subject to the restriction not to sell, re-sell or otherwise distribute the hard copies; and b) place an electronic copy of this addendum on a network server provided access to the electronic copy is limited to PERSONAL, INTERNAL users of the Hewlett-Packard digital sender associated with this addendum.
Part number: C1311-online
Third Edition, April 2002
Trademark Credits
Adobe, the Adobe logo, Acrobat, the Acrobat logo, Adobe Circulate and the Adobe Circulate logo are trademarks of Adobe Systems incorporated. CompuServe is a U.S. trademark of CompuServe, Inc. Microsoft is a U.S. registered trademark of Microsoft Corporation. MS-DOS, Windows, MS Windows, and Windows NT are U.S. registered trademarks of Microsoft Corporation. Pentium is a U.S. registered trademark of Intel Corporation.
All other products mentioned herein may be trademarks of their respective companies.
Warranty
The information contained in this document is subject to change without notice.
Hewlett-Packard makes no warranty of any kind with respect to this information. HEWLETT-PACKARD SPECIFICALLY DISCLAIMS THE IMPLIED WARRANTY OF MERCHANTABILITY AND FITNESS FOR A PARTICULAR PURPOSE.
Hewlett-Packard shall not be liable for any direct, indirect, incidental, consequential, or other damage alleged in connection with the furnishing or use of this information.
Material scanned by this product may be protected by governmental laws and other regulations, such as copyright laws. The customer is solely responsible for complying with all such laws and regulations.
Addendum
This addendum details the enhancements to the HP Digital Sender 9100C since its initial release. These enhancements improve usability as well as product integration into your network environment.
Receiving technical updates
Register now on the Web to make sure you receive technical updates and other HP Digital Sender 9100C special offers. Visit the HP Digital Sender 9100C website at www.digitalsender.hp.com.
Enhancements to the HP Digital Sender 9100C
This section describes the enhancements that affect using the HP Digital Sender 9100C itself. These changes pertain to:
� Configuration methods
� Enhanced network support
� Web Authentication capability
� Sending to e-mail
� Sending to fax
� Sending to copy
� Sending to the PC or another program
� Sending to an HP Jetsend-enabled device
� Contrast levels
� Additions and enhancements to software
EN Receiving technical updates 5
Configuration methods
When configuring the digital sender, a user or administrator may employ several methods. These methods include using the control panel, using configuration software, and using the Web Access tool. Web Access is a new tool that offers increased flexibility when configuring the HP Digital Sender 9100C.
Control panel configurationThis configuration is accomplished using the control panel on the digital sender. An administrator would configure fast-track parameters and extended and optional parameters using the control panel keyboard and menu options.
Configuration softwareAn administrator can use the HP JetAdmin software and Address Book Manager (ABM) to configure a digital sender from a computer.
Web AccessYou can now remotely configure the HP Digital Sender 9100C quickly and easily using the new Web Access tool, which is an embedded Web server in the digital sender. You can configure all necessary settings using this tool and a standard Web browser from any computer on the network. To use the Web Access tool, type the digital sender’s IP address or DNS hostname followed by ":4242" in the address bar of your Web browser. For digital senders with an HP Jetdirect 610n print server (network interface card), there is no need to add ":4242".
Example: With HP Jetdirect 600 print server: http://255.255.255.255:4242
With HP Jetdirect 610n print server: http://255.255.255.255
6 Addendum EN
Configuration replicationWhen you have configured one digital sender, you can replicate that configuration to other digital senders on the network. The Web Access tool allows you to choose which digital sender’s configuration to replicate and which digital senders to be updated.
To replicate a digital sender’s configuration
1 Open the Web Access tool.
2 Select Actions.
3 Select Replicate. The Replicate Settings screen appears.
4 Click Replication Setup.
5 If necessary, click Edit List to choose which digital senders will have their configurations modified.
6 Click Next.
7 Select which settings will be replicated. Click Next.
8 Click Finish to begin the replication process. Replication might require several minutes. Results will not be available until the replication process has completed on all digital senders.
9 When replication is complete, click Replication Status on the Replicate page to view the results.
Note Configuration replication does not replicate address books or user profiles. Use HP Enterprise Center to replicate this data. See “HP Enterprise Center” on page 29 for more information.
EN Configuration methods 7
Enhanced network support
The HP Digital Sender 9100C supports the HP Jetdirect 610n print server (network interface card). This card is required for full use of the Web Access tool over a Token Ring network. The HP Jetdirect 610n also allows access to the digital sender’s embedded Web server without typing ":4242" after the IP address in your Web browser’s address bar (see “Preparing the digital sender to work with a Web server” on page 12).
Using a Web server for user authentication
In the past, users could be authenticated when opening the Address Book Manager (ABM) from their computers or when sending at the digital sender itself. Now you can authenticate users trying to send from the digital sender using a Web server, with or without encryption. With encryption, this method of authentication is a secure method.
A Web server controls access to one or more of its resource items, pages, programs, or other objects, which can be requested by a browser-like client on the computer or on the network. (In this case, the browser-like client is the digital sender.) The Web server can ask the browser-like requestor (digital sender) for user credentials, such as a user account name and corresponding password. Before returning the requested resource, the Web server can verify the user account name and password against a user account database, such as the NT domain user account database, on the local computer or the NT domain controller.
After checking against the user account database, one of the following situations occurs:
� If the Web server authenticates the user, the digital sender must determine the user's e-mail address from its own user profile database or, if that is unsuccessful, from an LDAP server. If the digital sender finds an e-mail address that corresponds to the user name, it adds the user's e-mail address into the From: field and the user can continue using the digital sender. If the digital sender cannot find an e-mail address that corresponds to the user name, authentication is unsuccessful. This process provides greater assurance that someone trying to send an e-mail or fax cannot send it using another person's name.
8 Addendum EN
� If the Web server cannot authenticate the user, access to the digital sender is denied if you have enabled login. If you have disabled login, then the user can use the digital sender and enter any valid e-mail address.
Note For the greatest assurance that users are not sending e-mail and faxes using someone else’s name, you must enable login on all digital senders.
Using the IIS Web server
Although you can use any Web server for authentication, Microsoft® Internet Information Services (IIS) contains a Web server useful for user authentication. Because IIS and its Web server are integrated into the Microsoft operating system, they are easy to use for configuring authentication. IIS, which is part of the Microsoft Back Office, is an option included with Windows® NT 4.0 Server edition, Windows 2000 Server edition, and NT 4.0 Option Pack.
When authenticating users, the IIS Web server checks the user account name and password against the user account database of the local Windows NT or 2000 operating system and/or the NT domain. This check is commonly referred to as NT user authentication, or NTLM. Use the following directions to prepare the IIS Web server to authenticate digital sender users.
Preparing the IIS Web server to work with digital senders
In order for digital sender users to use Web-based authentication against an NT domain or workgroup, the IIS administrator must perform the following general steps. For more specific instructions for working with IIS, see the documentation provided with IIS.
1 If Web-based authentication against an NT Domain is preferred, choose a Windows NT 4.0 server or Windows 2000 server to host the IIS. This server must be a Primary Domain Controller, Domain member, or a member of a trusted Domain against which the administrator wants to authenticate.
2 Install and setup IIS 5.0 for Windows 2000 or IIS 4.0 for Windows NT 4.0 Server.
3 Open Internet Service Manager (IIS) and set up a home directory or virtual directory for the IIS Web server in Default Web Site. It is highly recommended that a home or virtual directory be created just for the purpose of digital sender user authentication against
EN Using a Web server for user authentication 9
Windows. Having a dedicated virtual directory is assumed in the steps outlined from this point forward.
4 In Windows Explorer, place a default html page in the local directory with which the virtual directory is associated. For performance reasons, it is highly recommended that this local directory be located on the same server as the one hosting the IIS Web server.
5 If the IIS administrator wants the NT user account name and password to be encrypted between the digital sender and the IIS Web server, then configure the IIS Web server for server-side SSL (secure socket layer). This means the virtual directory is configured to support only HTTPS requests from browser-like clients. Complete these steps:
a Request an application server SSL certificate from a selected certificate authority.
b Install the application server SSL certificate into the certificate store of the IIS Web server.
6 In Internet Service Manager (IIS), right-click the virtual directory and click Properties.
7 On the Directory Security tab, do the following:
a In the Anonymous access and authentication control area, click Edit. Select the Basic Authentication check box and clear the Anonymous Access and Integrated Windows Authentication check boxes. When the Warning message dialog box regarding clear text passwords on the network appears, click Yes to continue.
b In the Authentication Access area, click Edit. Type the default domain in the Domain Name field and click OK twice.
8 On the Virtual Directory tab, clear the Directory Browsing and Write check boxes, select the Read check box, and click OK. This step provides extra security and is strongly recommended.
9 Close IIS.
10 In Windows Explorer, right-click the local directory associated with the virtual directory and click Properties.
11 Restrict access to the local directory to only those NT account users who you want to be authenticated by the digital sender. Right-click the local directory and click Properties. On the Security tab, select the NT user account names and group names you want.
12 Right-click the default html page in the local directory and click
10 Addendum EN
Properties. On the Security tab, select all of the NT user account names and group names you selected in the previous step.
13 All NT user account names and group names requiring authentication from the virtual directory require the user right to “Log on locally.” While logged on as an NT user account with administrative privileges, set this user right using User Manager (NT 4.0) or Local Security Policy (Windows 2000).
IIS is now ready to support digital sender user authentication against Windows. Go to “Preparing the digital sender to work with a Web server” on page 12.
EN Using a Web server for user authentication 11
Preparing the digital sender to work with a Web serverNo matter which Web server you use for authentication, you will need to prepare the digital sender to work with it.
To prepare the digital sender to work with a Web server
1 Open a Web browser and type the URL for the Web page for the digital sender you want. If DNS is configured, you can use the host name in the URL. Otherwise, you need to use the IP address in the URL. Also, the URL must be followed by :4242, which is the port number of the embedded Web server. For example: http://xxx.xxx.xxx.xxx:4242.
Note If the digital sender has an HP Jetdirect 610n print server (network interface card), you do not have to add :4242.
2 If the Web page is password protected, you will be prompted for the administrator User Name and Password for this digital sender. The User Name is always “Administrator.”
3 When the Web page for the digital sender opens, click Settings and then click Authentication.
4 In the URL field, type the URL of the Web server you want to use for authentication. If DNS is configured, you can use the host name in the URL. Otherwise, you need to use the IP address in the URL.
If you are enabling SSL on the Web server, be sure to:
• type "https" at the beginning of the URL.
• use the hostname you used to create your certificate and not the IP address of the webserver in your URL.
• Enable DNS which is required for hostname resolution.
If this field is empty, Web authentication is disabled.
5 The NT User Domain ID field is blank by default. This is the name of the LDAP attribute used to return e-mail addresses to the From: field on the digital sender. Do one of the following:
• If you want to use e-mail addresses found in an LDAP database, type the name of the LDAP database attribute that contains the user name and ID information.
12 Addendum EN
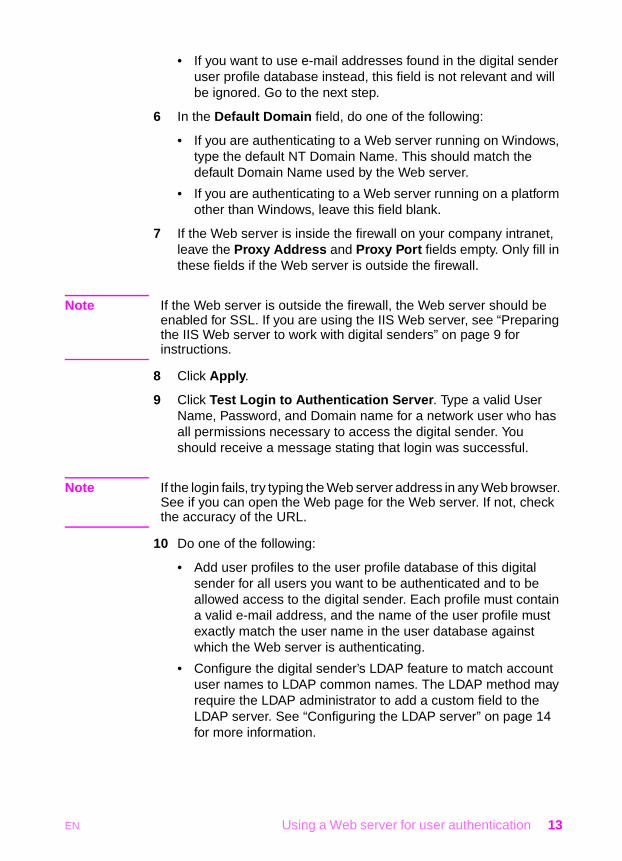
• If you want to use e-mail addresses found in the digital sender user profile database instead, this field is not relevant and will be ignored. Go to the next step.
6 In the Default Domain field, do one of the following:
• If you are authenticating to a Web server running on Windows, type the default NT Domain Name. This should match the default Domain Name used by the Web server.
• If you are authenticating to a Web server running on a platform other than Windows, leave this field blank.
7 If the Web server is inside the firewall on your company intranet, leave the Proxy Address and Proxy Port fields empty. Only fill in these fields if the Web server is outside the firewall.
Note If the Web server is outside the firewall, the Web server should be enabled for SSL. If you are using the IIS Web server, see “Preparing the IIS Web server to work with digital senders” on page 9 for instructions.
8 Click Apply.
9 Click Test Login to Authentication Server. Type a valid User Name, Password, and Domain name for a network user who has all permissions necessary to access the digital sender. You should receive a message stating that login was successful.
Note If the login fails, try typing the Web server address in any Web browser. See if you can open the Web page for the Web server. If not, check the accuracy of the URL.
10 Do one of the following:
• Add user profiles to the user profile database of this digital sender for all users you want to be authenticated and to be allowed access to the digital sender. Each profile must contain a valid e-mail address, and the name of the user profile must exactly match the user name in the user database against which the Web server is authenticating.
• Configure the digital sender’s LDAP feature to match account user names to LDAP common names. The LDAP method may require the LDAP administrator to add a custom field to the LDAP server. See “Configuring the LDAP server” on page 14 for more information.
EN Using a Web server for user authentication 13
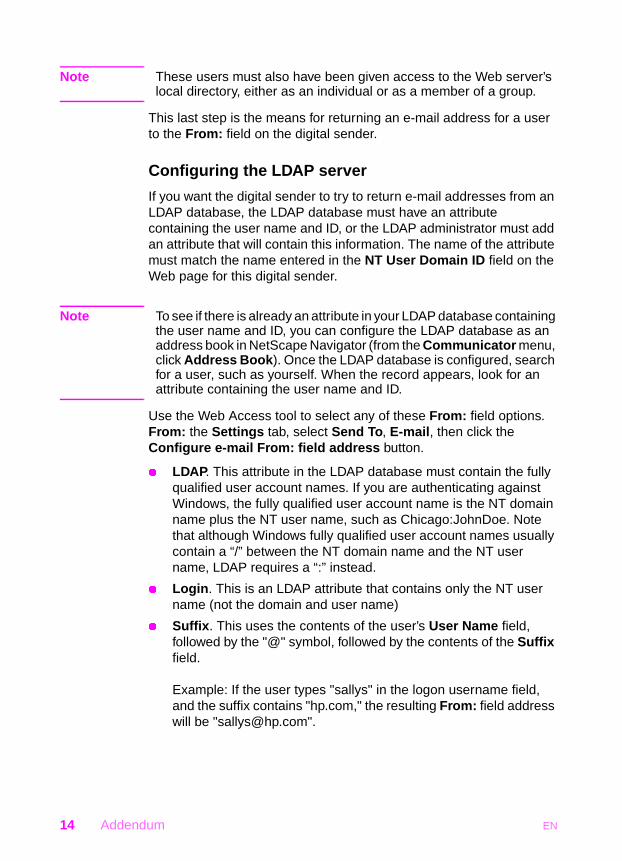
Note These users must also have been given access to the Web server’s local directory, either as an individual or as a member of a group.
This last step is the means for returning an e-mail address for a user to the From: field on the digital sender.
Configuring the LDAP server
If you want the digital sender to try to return e-mail addresses from an LDAP database, the LDAP database must have an attribute containing the user name and ID, or the LDAP administrator must add an attribute that will contain this information. The name of the attribute must match the name entered in the NT User Domain ID field on the Web page for this digital sender.
Note To see if there is already an attribute in your LDAP database containing the user name and ID, you can configure the LDAP database as an address book in NetScape Navigator (from the Communicator menu, click Address Book). Once the LDAP database is configured, search for a user, such as yourself. When the record appears, look for an attribute containing the user name and ID.
Use the Web Access tool to select any of these From: field options. From: the Settings tab, select Send To, E-mail, then click the Configure e-mail From: field address button.
� LDAP. This attribute in the LDAP database must contain the fully qualified user account names. If you are authenticating against Windows, the fully qualified user account name is the NT domain name plus the NT user name, such as Chicago:JohnDoe. Note that although Windows fully qualified user account names usually contain a “/” between the NT domain name and the NT user name, LDAP requires a “:” instead.
� Login. This is an LDAP attribute that contains only the NT user name (not the domain and user name)
� Suffix. This uses the contents of the user’s User Name field, followed by the "@" symbol, followed by the contents of the Suffix field.
Example: If the user types "sallys" in the logon username field, and the suffix contains "hp.com," the resulting From: field address will be "[email protected]".
14 Addendum EN
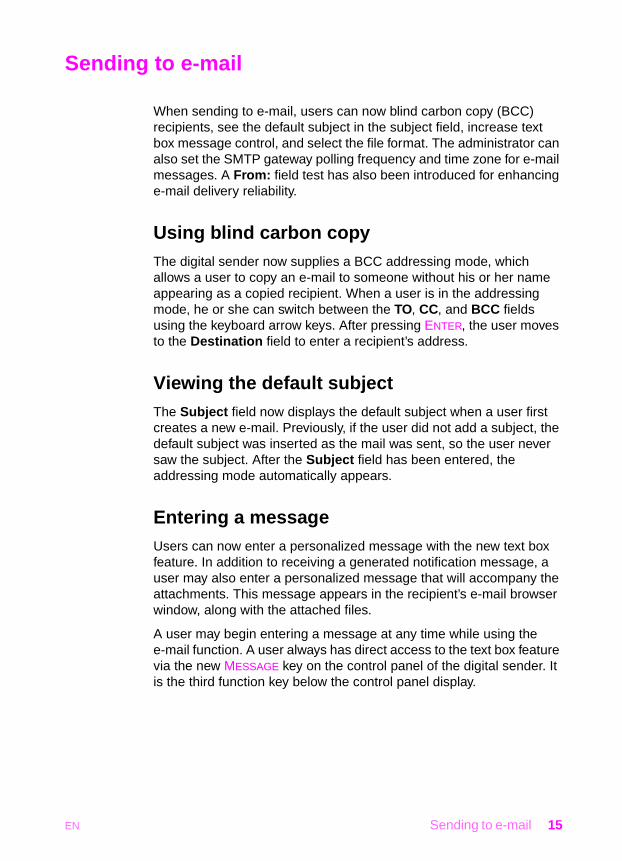
Sending to e-mail
When sending to e-mail, users can now blind carbon copy (BCC) recipients, see the default subject in the subject field, increase text box message control, and select the file format. The administrator can also set the SMTP gateway polling frequency and time zone for e-mail messages. A From: field test has also been introduced for enhancing e-mail delivery reliability.
Using blind carbon copyThe digital sender now supplies a BCC addressing mode, which allows a user to copy an e-mail to someone without his or her name appearing as a copied recipient. When a user is in the addressing mode, he or she can switch between the TO, CC, and BCC fields using the keyboard arrow keys. After pressing ENTER, the user moves to the Destination field to enter a recipient’s address.
Viewing the default subjectThe Subject field now displays the default subject when a user first creates a new e-mail. Previously, if the user did not add a subject, the default subject was inserted as the mail was sent, so the user never saw the subject. After the Subject field has been entered, the addressing mode automatically appears.
Entering a messageUsers can now enter a personalized message with the new text box feature. In addition to receiving a generated notification message, a user may also enter a personalized message that will accompany the attachments. This message appears in the recipient’s e-mail browser window, along with the attached files.
A user may begin entering a message at any time while using the e-mail function. A user always has direct access to the text box feature via the new MESSAGE key on the control panel of the digital sender. It is the third function key below the control panel display.
EN Sending to e-mail 15
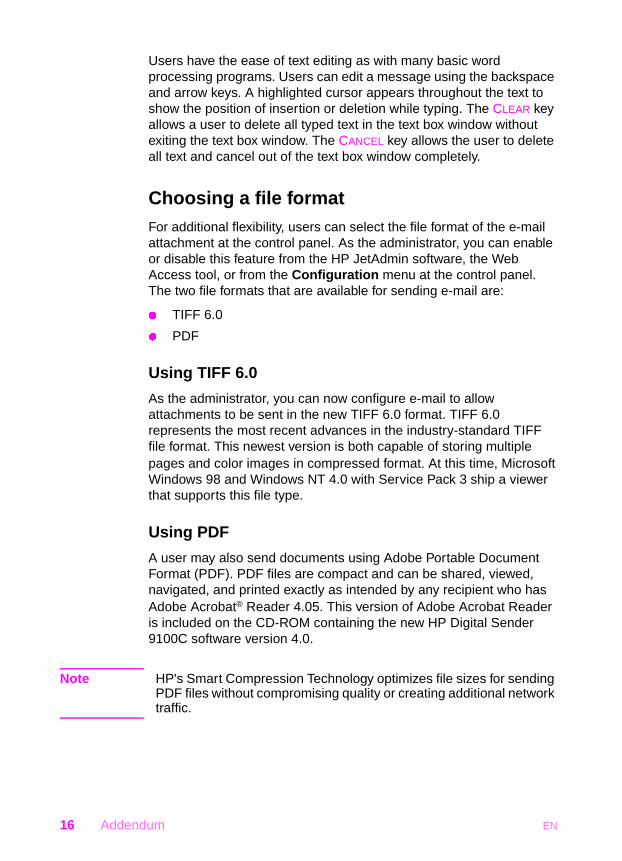
Users have the ease of text editing as with many basic word processing programs. Users can edit a message using the backspace and arrow keys. A highlighted cursor appears throughout the text to show the position of insertion or deletion while typing. The CLEAR key allows a user to delete all typed text in the text box window without exiting the text box window. The CANCEL key allows the user to delete all text and cancel out of the text box window completely.
Choosing a file formatFor additional flexibility, users can select the file format of the e-mail attachment at the control panel. As the administrator, you can enable or disable this feature from the HP JetAdmin software, the Web Access tool, or from the Configuration menu at the control panel. The two file formats that are available for sending e-mail are:
� TIFF 6.0
Using TIFF 6.0
As the administrator, you can now configure e-mail to allow attachments to be sent in the new TIFF 6.0 format. TIFF 6.0 represents the most recent advances in the industry-standard TIFF file format. This newest version is both capable of storing multiple pages and color images in compressed format. At this time, Microsoft
Windows 98 and Windows NT 4.0 with Service Pack 3 ship a viewer that supports this file type.
Using PDF
A user may also send documents using Adobe Portable Document Format (PDF). PDF files are compact and can be shared, viewed, navigated, and printed exactly as intended by any recipient who has Adobe Acrobat® Reader 4.05. This version of Adobe Acrobat Reader is included on the CD-ROM containing the new HP Digital Sender 9100C software version 4.0.
Note HP's Smart Compression Technology optimizes file sizes for sending PDF files without compromising quality or creating additional network traffic.
16 Addendum EN
Specifying the time zoneAs the administrator, you can now specify the time zone for e-mail messages being sent. Use the Configuration menu in the digital sender or the Web Access tool.
Editing the e-mail headerUsing the Web Access tool, you can edit the information in the e-mail header (sometimes known as the e-mail cover page). From the Settings tab, select Send To, E-mail, Configure E-mail Format Settings, and Customize E-mail Header Page.
Setting e-mail securityThe HP Digital Sender 9100C integrates with Omtools Genidocs to provide secure e-mail. The recipient of the e-mail must provide identification, and the e-mail message itself is encrypted during transport. Use the Web Access tool to configure e-mail security. From the Settings tab, select Send To and E-mail to open the e-mail configuration page.
Setting SMTP gateway polling frequencyAs the administrator, you can use the HP JetAdmin software to configure the frequency of the SMTP gateway polling. This feature helps the HP Digital Sender 9100C generate less network traffic while checking the e-mail server/SMTP gateway. Polling frequency ranges from 0 minutes to every 24 hours. You can completely disable polling by setting the value to 0 minutes.
Note If you disable polling, e-mail transmissions may be unsuccessful, and no indication appears on the control panel if the e-mail server is not running. Users must check the transaction log to see the status of sent e-mail messages.
E-mail delivery reliabilityA potential problem with sending e-mails to any destination is that when the From: field is not valid (does not contain an @ or a period, or has embedded spaces), the e-mail may not be sent, and notification would not be given to the user. To prevent this situation, a
EN Sending to e-mail 17

From: field test has been developed that will automatically test a guest user’s From: field and subsequently allow the guest user to select fix, help, or ignore.
The From: field test will only be used for guest users. It will not be used for registered or administrative users. This test can be enabled or disabled by the administrator using the control panel or the Web Access tool.
18 Addendum EN
Sending to fax
Users can now send to fax distribution lists, enter a billing account code, and use Internet fax service (if your company subscribes to it). As a new feature, the digital sender fully functions with the Lotus Fax for Domino add-in.
Using Public Fax Distribution ListsAt the control panel, users can now select predefined fax distribution lists from the Public Fax Address Book. When users choose Send to Fax and begin typing a name, the digital sender searches for both fax numbers and fax distribution lists whose names begin with the letters the user types.
Users create fax distribution lists using the Address Book Manager (ABM). See the Help file for the ABM for more information.
Entering a billing account codeUsing the HP JetAdmin software or the Web Access tool, the administrator can enable or disable the billing account code feature. When this feature is enabled, users can enter at the control panel a billing account code of up to 31 characters for each fax sent. This account code is sent to the fax server to bill the job cost.
If the user enters an account code, it overrides the default assigned using the ABM. If the user leaves the field blank, the default account code assigned to the fax number is used. The fax server verifies the account code’s validity.
Receiving error messagesUsers automatically receive an error message at the control panel if the HP Digital Sender Service is unavailable to transmit faxes to the LAN fax server.
EN Sending to fax 19
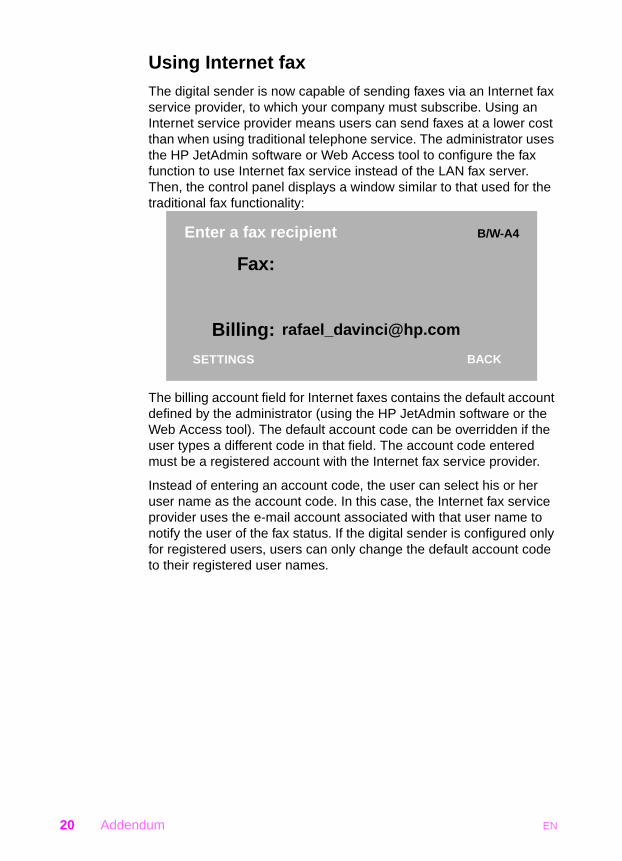
Using Internet faxThe digital sender is now capable of sending faxes via an Internet fax service provider, to which your company must subscribe. Using an Internet service provider means users can send faxes at a lower cost than when using traditional telephone service. The administrator uses the HP JetAdmin software or Web Access tool to configure the fax function to use Internet fax service instead of the LAN fax server. Then, the control panel displays a window similar to that used for the traditional fax functionality:
The billing account field for Internet faxes contains the default account defined by the administrator (using the HP JetAdmin software or the Web Access tool). The default account code can be overridden if the user types a different code in that field. The account code entered must be a registered account with the Internet fax service provider.
Instead of entering an account code, the user can select his or her user name as the account code. In this case, the Internet fax service provider uses the e-mail account associated with that user name to notify the user of the fax status. If the digital sender is configured only for registered users, users can only change the default account code to their registered user names.
Enter a fax recipient B/W-A4
Fax:
SETTINGS BACK
Billing: [email protected]
20 Addendum EN
Using Fax for DominoThe digital sender now supports Fax for Domino, which is a Lotus Domino server add-in. The digital sender supports Lotus Domino server 4.6.5 or later and the Fax for Domino add-in 4.1 or later. The Domino server, the Domino Fax for Domino add-in, and the Domino SMTP/MIME MTA add-in together function as a hybrid between LAN and Internet faxing. Essentially, they are a LAN fax solution with an Internet fax interface.
The HP Digital Sender 9100C is the fastest and easiest way to digitize and send paper-based documents via a Domino mail and fax server. When a user sends a fax from the digital sender, the digital sender sends the fax to the Domino server at 15 pages per minute. Then, the Fax for Domino add-in sends an e-mail to the sender of the fax once the fax is transmitted.
Configuring Fax for DominoTo make the HP Digital Sender 9100C work with Lotus Fax for Domino, you must:
� Install the Fax for Domino add-in and the SMTP/MIME MTA add-in.
� Configure the E-mail function for the digital sender.
� Configure the Fax function for the digital sender.
Note Because the e-mail and fax functions share the SMTP gateway, you must use Lotus Domino for e-mail as well as LAN fax.
The digital sender administrator will need to know the Foreign Fax Domain (FFD) and SMTP domain. You can obtain these items from the Domino administrator.
To prepare Fax for Domino
Note These steps should be performed by the Domino administrator.
1 If not already installed, install the Fax for Domino add-in and the SMTP/MIME MTA add-in.
2 Configure an SMTP/MIME MTA (SMTP gateway) add-in to allow the digital sender to work with Fax for Domino. The Domino SMTP/MIME MTA must be configured to allow ingress of e-mail addressed with the selected SMTP domain.
EN Sending to fax 21
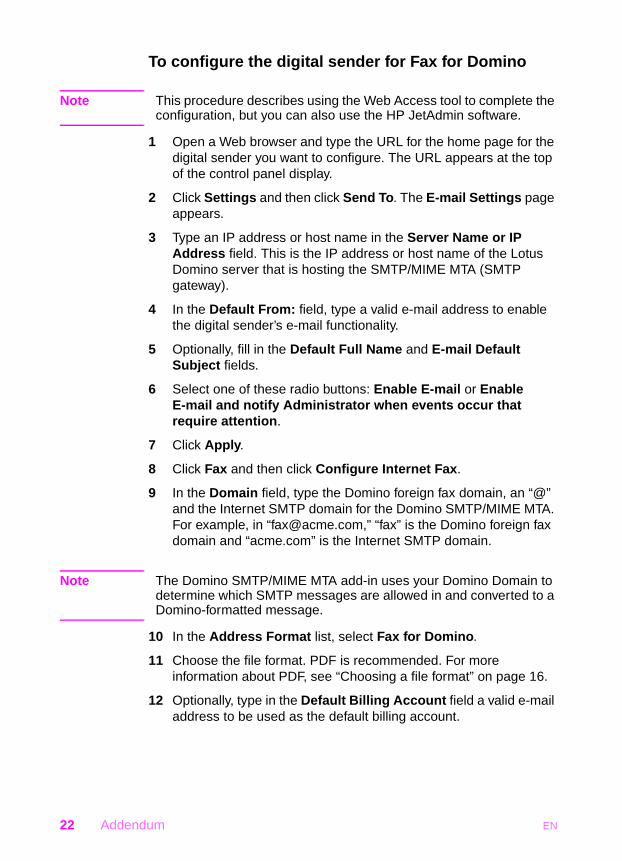
To configure the digital sender for Fax for Domino
Note This procedure describes using the Web Access tool to complete the configuration, but you can also use the HP JetAdmin software.
1 Open a Web browser and type the URL for the home page for the digital sender you want to configure. The URL appears at the top of the control panel display.
2 Click Settings and then click Send To. The E-mail Settings page appears.
3 Type an IP address or host name in the Server Name or IP Address field. This is the IP address or host name of the Lotus Domino server that is hosting the SMTP/MIME MTA (SMTP gateway).
4 In the Default From: field, type a valid e-mail address to enable the digital sender’s e-mail functionality.
5 Optionally, fill in the Default Full Name and E-mail Default Subject fields.
6 Select one of these radio buttons: Enable E-mail or Enable E-mail and notify Administrator when events occur that require attention.
7 Click Apply.
8 Click Fax and then click Configure Internet Fax.
9 In the Domain field, type the Domino foreign fax domain, an “@” and the Internet SMTP domain for the Domino SMTP/MIME MTA. For example, in “[email protected],” “fax” is the Domino foreign fax domain and “acme.com” is the Internet SMTP domain.
Note The Domino SMTP/MIME MTA add-in uses your Domino Domain to determine which SMTP messages are allowed in and converted to a Domino-formatted message.
10 In the Address Format list, select Fax for Domino.
11 Choose the file format. PDF is recommended. For more information about PDF, see “Choosing a file format” on page 16.
12 Optionally, type in the Default Billing Account field a valid e-mail address to be used as the default billing account.
22 Addendum EN
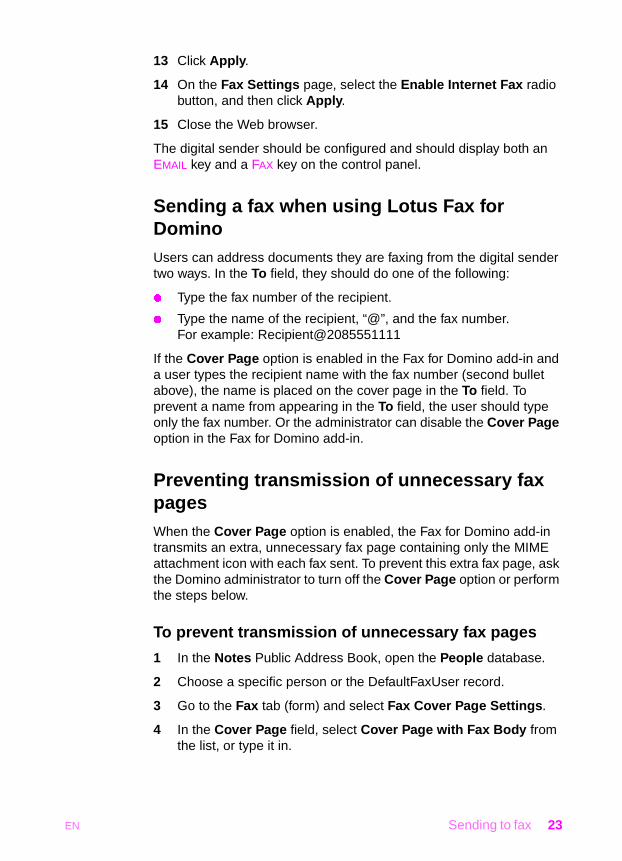
13 Click Apply.
14 On the Fax Settings page, select the Enable Internet Fax radio button, and then click Apply.
15 Close the Web browser.
The digital sender should be configured and should display both an EMAIL key and a FAX key on the control panel.
Sending a fax when using Lotus Fax for DominoUsers can address documents they are faxing from the digital sender two ways. In the To field, they should do one of the following:
� Type the fax number of the recipient.
� Type the name of the recipient, “@”, and the fax number. For example: Recipient@2085551111
If the Cover Page option is enabled in the Fax for Domino add-in and a user types the recipient name with the fax number (second bullet above), the name is placed on the cover page in the To field. To prevent a name from appearing in the To field, the user should type only the fax number. Or the administrator can disable the Cover Page option in the Fax for Domino add-in.
Preventing transmission of unnecessary fax pagesWhen the Cover Page option is enabled, the Fax for Domino add-in transmits an extra, unnecessary fax page containing only the MIME attachment icon with each fax sent. To prevent this extra fax page, ask the Domino administrator to turn off the Cover Page option or perform the steps below.
To prevent transmission of unnecessary fax pages
1 In the Notes Public Address Book, open the People database.
2 Choose a specific person or the DefaultFaxUser record.
3 Go to the Fax tab (form) and select Fax Cover Page Settings.
4 In the Cover Page field, select Cover Page with Fax Body from the list, or type it in.
EN Sending to fax 23
Sending to copy
The copy function supports duplex printing to PCL5-compatible printers. It also supports the HP LaserJet 8500 printer and PCL6 printers.
Sending duplex copiesThe Copy function includes an additional supported printer type within the Address Book Manager printer configuration options. For example, if you have an HP LaserJet 5SI printer with the duplex option, select the new printer type to get duplex copying from the digital sender.
Using the HP color LaserJet 8500 printerThe digital sender supports the HP color LaserJet 8500 printer, which can be used for color convenience copying.
Using PCL6 printersIncluded in the new printer settings is support for a range of PCL6 printers. These printers include:
� HP LaserJet 4000
� HP color LaserJet 4500
� HP LaserJet 5000
� HP LaserJet 8000
� HP LaserJet 8100
Devices that support PCL6 can now be targeted for higher quality grayscale copying of continuous-tone or color photos.
24 Addendum EN
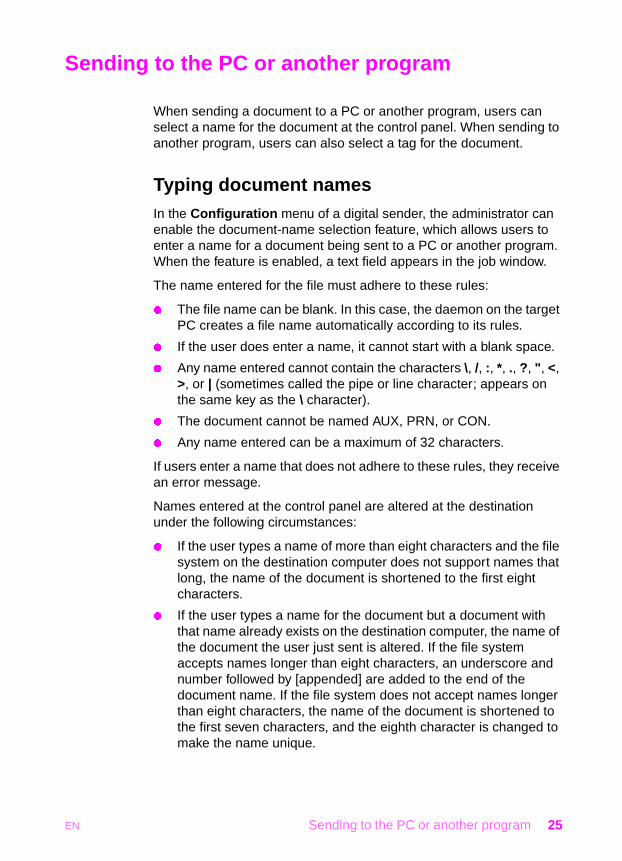
Sending to the PC or another program
When sending a document to a PC or another program, users can select a name for the document at the control panel. When sending to another program, users can also select a tag for the document.
Typing document namesIn the Configuration menu of a digital sender, the administrator can enable the document-name selection feature, which allows users to enter a name for a document being sent to a PC or another program. When the feature is enabled, a text field appears in the job window.
The name entered for the file must adhere to these rules:
� The file name can be blank. In this case, the daemon on the target PC creates a file name automatically according to its rules.
� If the user does enter a name, it cannot start with a blank space.
� Any name entered cannot contain the characters \, /, :, *, ., ?, ", <, >, or | (sometimes called the pipe or line character; appears on the same key as the \ character).
� The document cannot be named AUX, PRN, or CON.
� Any name entered can be a maximum of 32 characters.
If users enter a name that does not adhere to these rules, they receive an error message.
Names entered at the control panel are altered at the destination under the following circumstances:
� If the user types a name of more than eight characters and the file system on the destination computer does not support names that long, the name of the document is shortened to the first eight characters.
� If the user types a name for the document but a document with that name already exists on the destination computer, the name of the document the user just sent is altered. If the file system accepts names longer than eight characters, an underscore and number followed by [appended] are added to the end of the document name. If the file system does not accept names longer than eight characters, the name of the document is shortened to the first seven characters, and the eighth character is changed to make the name unique.
EN Sending to the PC or another program 25
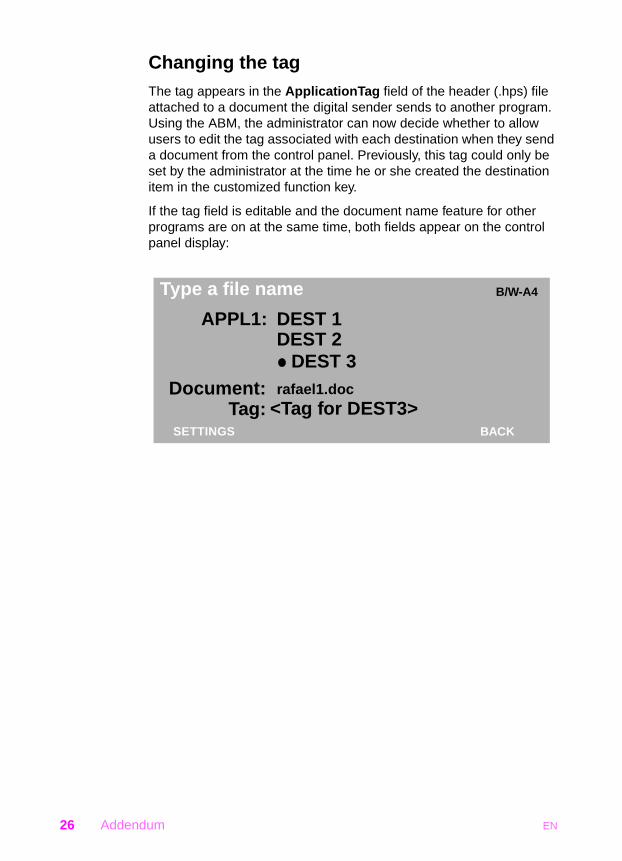
Changing the tagThe tag appears in the ApplicationTag field of the header (.hps) file attached to a document the digital sender sends to another program. Using the ABM, the administrator can now decide whether to allow users to edit the tag associated with each destination when they send a document from the control panel. Previously, this tag could only be set by the administrator at the time he or she created the destination item in the customized function key.
If the tag field is editable and the document name feature for other programs are on at the same time, both fields appear on the control panel display:
SETTINGS BACK
DEST 1DEST 2
Type a file name B/W-A4
DEST 3
APPL1:
Document:Tag:
rafael1.doc<Tag for DEST3>
26 Addendum EN
Sending to HP Jetsend-enabled devices
The ability to use the digital sender with other HP Jetsend-enabled devices has been enhanced.
Sending information to password-protected devicesBy entering the PIN number at the control panel, users can now send information from the digital sender to other HP Jetsend-enabled devices that have been password protected. This allows the digital sender to access any HP Jetsend-enabled devices on the network.
Code updateThis update to the digital sender also includes the latest version of the HP Jetsend distribution code for faster and more reliable transmissions.
Note The HP Jetsend code for Windows can no longer be downloaded from the digital sender website.
EN Sending to HP Jetsend-enabled devices 27
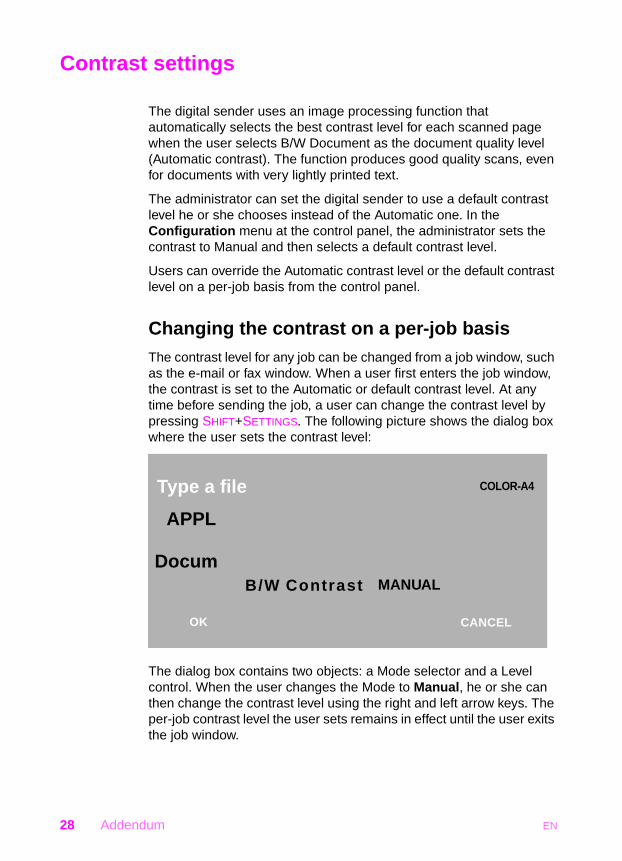
Contrast settings
The digital sender uses an image processing function that automatically selects the best contrast level for each scanned page when the user selects B/W Document as the document quality level (Automatic contrast). The function produces good quality scans, even for documents with very lightly printed text.
The administrator can set the digital sender to use a default contrast level he or she chooses instead of the Automatic one. In the Configuration menu at the control panel, the administrator sets the contrast to Manual and then selects a default contrast level.
Users can override the Automatic contrast level or the default contrast level on a per-job basis from the control panel.
Changing the contrast on a per-job basisThe contrast level for any job can be changed from a job window, such as the e-mail or fax window. When a user first enters the job window, the contrast is set to the Automatic or default contrast level. At any time before sending the job, a user can change the contrast level by pressing SHIFT+SETTINGS. The following picture shows the dialog box where the user sets the contrast level:
The dialog box contains two objects: a Mode selector and a Level control. When the user changes the Mode to Manual, he or she can then change the contrast level using the right and left arrow keys. The per-job contrast level the user sets remains in effect until the user exits the job window.
APPL
DocumB/W Contrast MANUAL
Type a file COLOR-A4
OK CANCEL
28 Addendum EN
Additions and enhancements to software
Since the initial release of the HP Digital Sender 9100C, HP has made additions, enhancements, and deletions to the software, which is called the HP Digital Sender 9100C Software, version 5.0. These features include:
� Support for 200,000 digital sender user profile entries.
� More supported LAN fax solutions.
� Enhanced features for LAN fax solutions.
� Adobe Circulate has been removed.
� HP JetAdmin software 3.42 (replaces 3.40).
� HP Scanjet 5 scanners are no longer supported.
� All HP software supports Windows 2000.
� All Administrator software no longer supports Windows 95. User software continues to support Windows 95.
HP Enterprise CenterThe HP Enterprise Center is a program for Windows that helps administrators manage and maintain several digital senders. The HP Enterprise Center goes beyond command line tools to offer an integrated, graphical environment to host all management tools released with the HP Digital Sender 9100C.
Note Enterprise Center no longer supports Windows 95.
Profiles
Using the Enterprise Center, you as the administrator can create a profile for multiple digital senders you want to manage together. You can:
� add or remove digital senders from a profile.
� view properties of the digital senders in a profile.
� set one of the digital senders in the profile as the master (the digital sender whose data you can replicate to the other digital senders in the profile).
EN Additions and enhancements to software 29
Tools
In a profile, you can administer a particular digital sender using the Tools menu. This menu lists the installed management tools, such as the Address Book Manager, HP JetAdmin software, or the Web Access tool. The Enterprise Center also contains management tools of its own that allow you to:
� upgrade firmware on several digital senders all at once.
� copy address books from the master digital sender of the profile to the other digital senders in the profile.
� back up data from several digital senders at once.
� restore data from a backed up file.
Logging and tracing
You can have certain tools generate log and trace files. The log file reports the final state of the main steps of the processing, while the trace file goes into detail, showing information useful in understanding how the tool worked internally. The log file can be a subset of the information found in the trace file.
More informatiom
See the Help for Enterprise Center for more information about using the program.
30 Addendum EN
Using Address Book Manager updatesThis section lists the new features of the ABM. For instructions on using the ABM, see the Help in that program.
Since the release of the HP Digital Sender 9100C, HP has enhanced the ABM to provide even more sophisticated functionality. These enhancements include:
� A new security level that allows you as the administrator to decide whether or not users can change their user profiles. And, you can completely disable users’ ability to create profiles. (You can also change these options using the HP JetAdmin software or the Web Access tool.)
� An additional LDAP configuration page for advanced configuration of searches for e-mail addresses.
� Ability to import fax numbers, printers, and users (in addition to e-mail addresses) into the appropriate address book in the ABM. You can import files of fax numbers, users, or printers if the files can be saved in comma separated value (CSV) format or Hewlett-Packard Batch configuration (HPB) format. Find more information about the HPB format, which has been enhanced, in the ABIreadme file (ABI subfolder of the Tools folder) on the CD-ROM.
� Ability to create distribution lists consisting of fax numbers.
� Ability to allow users to type a tag in the Tag field when they send a document to another program.
� Increase the number of user profiles that you can configure on any one digital sender from 4,096 to 200,000.
Additionally, the Backup and Restore utilities for the administrator have been moved to the Enterprise Center. (Users can still backup and restore their personal address books using the ABM on their computers.) For more information about using Backup and Restore as an administrator, see the Help for the Enterprise Center.
EN Additions and enhancements to software 31
Using HP JetAdmin software updatesThe administrator's setup program includes an updated version of the HP JetAdmin software. While the digital sender is still fully compatible with the previous version of the HP JetAdmin software, HP wants to provide you with the features available in the most current version.
Default e-mail attachment format
This new version of the HP JetAdmin software, along with the new HP JetAdmin software extensions for the digital sender, allows you to select the default e-mail attachment format. Change this option by selecting a digital sender and in the HP JetAdmin software, choosing Modify from the File menu. Then, click the E-mail tab.
Internet fax configuration
The Fax tab allows you to choose either Internet fax service or a LAN fax server as the method for delivering faxes sent from the digital sender. If you choose Internet fax service, another dialog box appears. This dialog box allows you to set the domain, default file format, and default billing account code.
SMTP gateway polling frequency
In the E-mail advanced settings dialog box, you can set the polling frequency. This feature helps the HP Digital Sender 9100C generate less network traffic while checking the e-mail server/SMTP gateway. Polling frequency ranges from 0 minutes to every 24 hours. You can completely disable the polling by setting the value to 0 minutes. If you do so, no indication appears on the control panel if the e-mail server is not running. Users must check the transaction log for e-mail status.
Security
Addition of a new security level allows you as the administrator to decide whether or not users can change their user profiles. You can also completely disable users’ ability to create profiles.
Support for Microsoft Sharepoint Portal Server (MS SPPS)Customized function keys have been extended to support MS SPPS integration. This allows additional attributes such as additional tag fields, definable drop-down lists, and additional screens to create a
32 Addendum EN
wizard-like interface for users. Implementation of this enhanced functionality requires either the software developer kit (see "Support for third-party programs" on this page) or AutoStore 2000 R5.
Using other administration toolsThe new software offers you as the administrator the ability to create a greater number of user profiles, import address books more easily, determine software setup options more specifically, and gain more extensive logging capabilities during software setup.
Support for third-party programs
You can now use the new software developer kit (SDK) for the HP Digital Sender 9100C to configure the address books in a digital sender. The SDK offers an alternative method to using the ABM to do this task. Download the SDK from www.digitalsender.hp.com.
Determining software setup options
As the administrator, you can select the preferred language and components you want to install on a network drive for clients to access when they install software. Previously, you had to install all languages and components to the network drive.
Logging for the setup program
The software setup program for both Administrator and Client installations now supports improved logging capabilities. These logs list errors that might have occurred during installation and are useful in troubleshooting failed installations.
HP Customer Care
The hours of operation for the HP Customer Care center for the United States and Canada are incorrectly stated in the user and administrator guides. The HP Customer Care center can assist you Monday through Friday from 6 A.M. to 6 P.M. (Mountain Time).
EN HP Customer Care 33

Activity log messages
This section lists the activity log messages that have been added or changed since publication of the original manuals.
New log messagesThese messages have been added since publication of the manuals.
Message Description Actions
067/00Address Book Import to <AB name>,report on entries.Added: <# added>.Duplicated: <# duplicated>.Processed: <# processed>.Skipped: <# skipped>.
Notification message only. The digital sender successfully imported the addresses.-Or-Some addresses were not imported because they were duplicated or skipped because of internal errors.
� No action required.
-Or-� In case of skipped entries,
check the accuracy of the HPB import file.
� If the problem persists, contact HP Customer Care.
068/00Address Book Import to <AB name>,report on entries.Deleted: <# deleted>.Not found: <# not found>.Processed: <# processed>.Skipped: <# skipped>.
Notification message only.
-Or-Some addresses were not deleted because they could not be found or skipped because of internal errors.
� No action required.
-Or-� In case of skipped entries,
check the accuracy of the HPB import file.
� If the problem persists, contact HP Customer Care.
069/00Address Book <AB name> clear status: Address Book cleared.
Notification message only. The address book was cleared.
� No action required.
069/00-01Address Book <AB name>clear status: Address Book not found.
The address book you are trying to clear cannot be accessed for some reason.
� Try the procedure again.
� If the problem persists, contact HP Customer Care.
34 Addendum EN
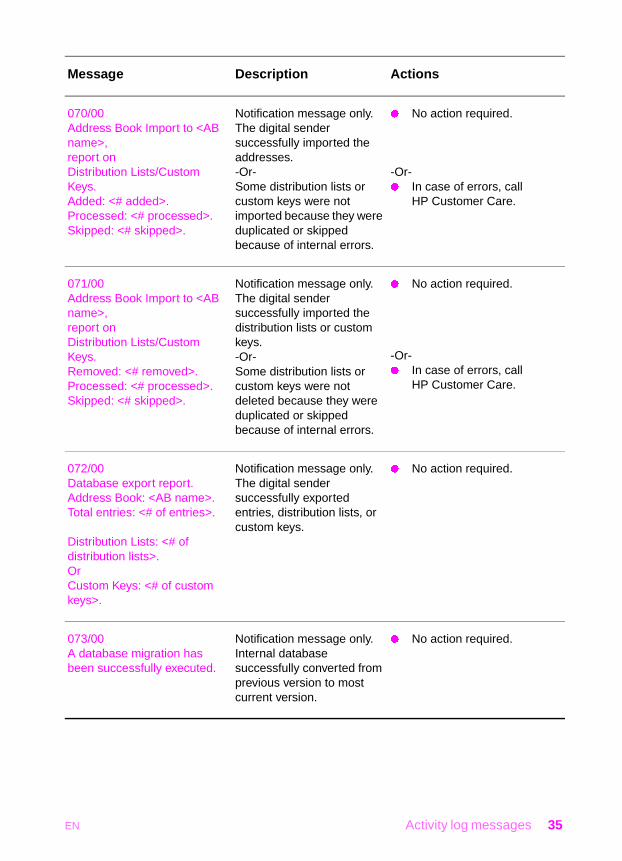
070/00Address Book Import to <AB name>,report onDistribution Lists/Custom Keys.Added: <# added>.Processed: <# processed>.Skipped: <# skipped>.
Notification message only. The digital sender successfully imported the addresses.-Or-Some distribution lists or custom keys were not imported because they were duplicated or skipped because of internal errors.
� No action required.
-Or-� In case of errors, call
HP Customer Care.
071/00Address Book Import to <AB name>,report onDistribution Lists/Custom Keys.Removed: <# removed>.Processed: <# processed>.Skipped: <# skipped>.
Notification message only. The digital sender successfully imported the distribution lists or custom keys.-Or-Some distribution lists or custom keys were not deleted because they were duplicated or skipped because of internal errors.
� No action required.
-Or-� In case of errors, call
HP Customer Care.
072/00Database export report.Address Book: <AB name>.Total entries: <# of entries>.
Distribution Lists: <# of distribution lists>.OrCustom Keys: <# of custom keys>.
Notification message only. The digital sender successfully exported entries, distribution lists, or custom keys.
� No action required.
073/00A database migration has been successfully executed.
Notification message only. Internal database successfully converted from previous version to most current version.
� No action required.
Message Description Actions
EN Activity log messages 35
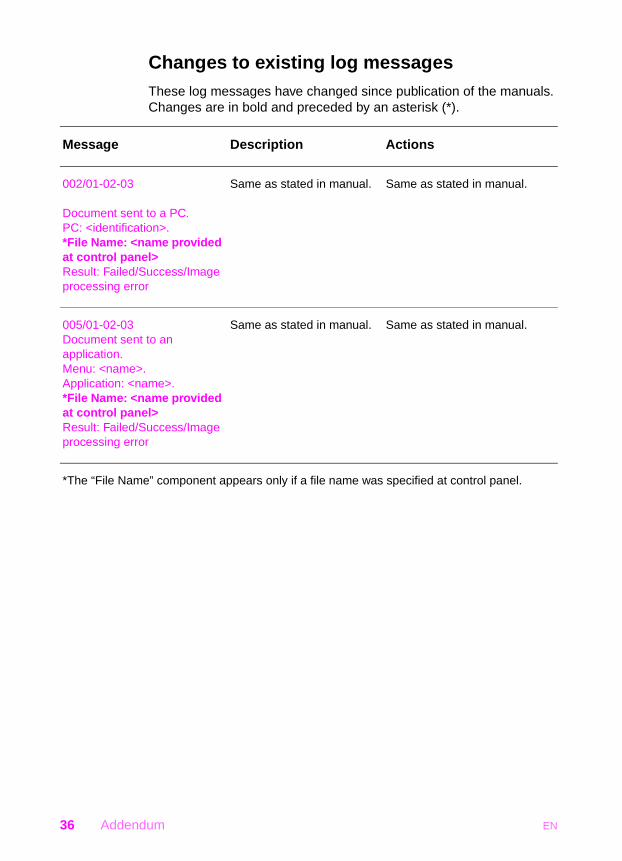
Changes to existing log messagesThese log messages have changed since publication of the manuals. Changes are in bold and preceded by an asterisk (*).
Message Description Actions
002/01-02-03
Document sent to a PC.PC: <identification>.*File Name: <name provided at control panel>Result: Failed/Success/Image processing error
Same as stated in manual. Same as stated in manual.
005/01-02-03Document sent to an application.Menu: <name>.Application: <name>.*File Name: <name provided at control panel>Result: Failed/Success/Image processing error
Same as stated in manual. Same as stated in manual.
*The “File Name” component appears only if a file name was specified at control panel.
36 Addendum EN


copyright © 2001Hewlett-Packard Company
http://www.digitalsender.hp.com