Fulfillment Center Setup Guide (Amazon FBA)
10
Fulfillment Center Setup Guide (Amazon FBA) To see this guide online click here Once you subscribe to and activate the Amazon FBA module and complete the setup steps below, you’ll be able to: Use Amazon FBA as your fulfillment center to automatically ship orders in your MultiChannelWorks account. Synchronize Amazon FBA inventory levels with other sales channels. Receive tracking and shipping status from Amazon FBA. Here are the 4 steps you’ll need to complete: 1. Select which Amazon account will be used as your FBA fulfillment center 2. Map shipping methods 3. Select which channels will use FBA to ship orders 4. Turn on AutoFulfill (Or ship orders manually) Step 1 – Enable and select which Amazon account will be used as your FBA fulfillment center. 1. If not already enabled, activate the Amazon FBA fulfillment center module by subscribing. Goto Integrations > Addon Modules.
-
Upload
khangminh22 -
Category
Documents
-
view
2 -
download
0
Transcript of Fulfillment Center Setup Guide (Amazon FBA)

Fulfillment Center Setup Guide (Amazon FBA) To see this guide online click here Once you subscribe to and activate the Amazon FBA module and complete the setup steps below, you’ll be able to:
Use Amazon FBA as your fulfillment center to automatically ship orders in your MultiChannelWorks account.
Synchronize Amazon FBA inventory levels with other sales channels. Receive tracking and shipping status from Amazon FBA.
Here are the 4 steps you’ll need to complete:
1. Select which Amazon account will be used as your FBA fulfillment center 2. Map shipping methods 3. Select which channels will use FBA to ship orders 4. Turn on AutoFulfill (Or ship orders manually)
Step 1 – Enable and select which Amazon account will be used as your FBA fulfillment center. 1. If not already enabled, activate the Amazon FBA fulfillment center module by subscribing. Goto Integrations > Addon Modules.

2. Once the Amazon FBA module is enabled for your account you’ll need to select the Amazon marketplace channel that is to also act as your Amazon FBA warehouse. Goto ‘Integrations > Marketplace Integrations’ and click ‘Edit Channel Settings’ for the Amazon account you want to act as your Amazon FBA warehouse.
3. Select the checkbox ‘This is an Amazon FBA warehouse’
4. Scroll down and click ‘Save and Close’ To complete the setup for your Amazon FBA fulfillment center module follow the steps below. Step 2 – Setup Shipping Mapping To use fulfillment centers such as Amazon FBA, as soon as you have enabled the fulfillment center in your account by subscribing to the addon module, you’ll then need to let the fulfillment center know which shipping methods should be used to ship your orders. You can do this using the ‘shipping mapping’ settings. Its important to note that orders cannot be shipped from fulfillment centers including Amazon FBA unless you have already mapped shipping methods. (You’ll only be required to setup shipping mapping one time unless you change or add new shipping methods in your sales channel listings) Mapping eBay Shipping Methods To Ship Orders From Amazon FBA Every sales channel has its own unique requirements for shipping methods. In this example below you can see how to map eBay shipping methods to Amazon FBA
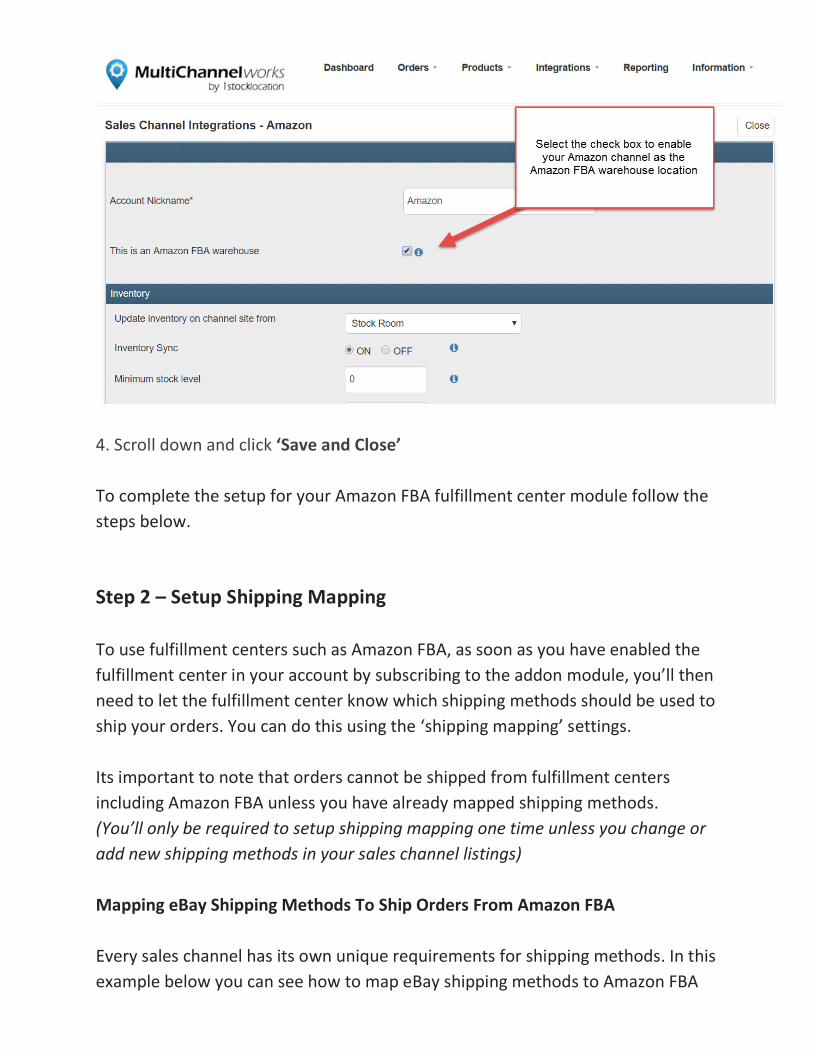
so that when you receive orders from your eBay channel, those orders can then be allocated and shipped from your Amazon FBA account either manually or by using auto fulfill. To access the shipping mapping settings go to ‘Integrations > Marketplace Integrations’ and you’ll see the small truck icon next to each sales channel connected to your account: 1. Click the truck icon to open shipping mapping for the channel.
2. From the eBay shipping methods drop down menu you can select the eBay method that you want to map. 3. From the Fulfillment center shipping methods drop down menu you can select the shipping method to map to.

4. Click submit to save the mapping. 5. Repeat shipping mapping for every shipping method that your listings are using in this channel. Step 3 - Assign Amazon FBA To Ship Orders Received From Sales Channels Now that you have mapped your shipping methods you’ll need to let MultiChannelWorks know which sales channels will use Amazon FBA as the warehouse to ship orders from. You can do this by going to ‘Integrations > Marketplace Integrations’ then click the ‘channel settings’ icon to open the settings for your connected sales channel. On the settings page scroll down to the ‘Warehouse Locations’ section. From here, on the right hand side table you can see the warehouses that are currently available in your MultiChannelWorks account.

From the table on the left side you will see the warehouse locations that are currently ‘Active’ to support this sales channel. (This means that the warehouse locations in the left column are the warehouses assigned to fill orders for this sales channel). Your in house ‘stockroom’ will always be the default warehouse when you connect a sales channel. To change this and assign Amazon FBA to fill all orders on this channel simply click and drag the Amazon FBA Warehouse from the ‘Available Warehouse Locations’ (table on the left side) to the ‘Active Warehouses’ column (table on the right side). MultiChannelWorks supports multiple warehouse locations therefore you can prioritize which warehouse will receive the orders to ship. Orders received from this sales channel will then be allocated to your fulfillment center(s) that you place in the ‘Active’ column.
NOTE: Your sales orders from this sales channel will only be allocated to the highest priority active warehouse that holds enough inventory to fill the order. If your primary warehouse becomes out of stock then your secondary warehouse in the ‘Active’ column will receive the order details, instead.

If all warehouses in your ‘active’ column become out of stock then your orders will be tagged as ‘back order’ until you add more inventory to an active stockroom or warehouse assigned to this sales channel). Step 4 – Turn On Auto-Fulfill Now that you have mapped shipping methods for the sales channel and assigned Amazon FBA as your fulfillment center for the specified sales channels, the final step is to turn on Auto Fulfill. Go to ‘Orders’ and scroll to the bottom of the orders table to see the Auto Fulfill control. You can toggle Auto-Fulfill on or off using this control.
NOTE: When orders are shipped from external fulfillment centers the tracking information will be returned to your MultiChannelWorks account usually within 20 minutes after the orders have been shipped by the fulfillment center. Step 5 – How to Allocate Orders Manually To Ship From Amazon FBA

There may be times when instead of using Auto-Fulfill to ship all orders from a specified sales channel, instead you may want to ship orders from fulfillment centers by allocating them manually. This is useful if you do not want all of your orders from a specific sales channel to be allocated to the fulfillment center. In this case you can allocate orders individually from the orders table to ship from fulfillment centers. 1. Go to ‘Orders’ and select the orders you want to allocate to the fulfillment center.
2. Click the actions button above the orders table and select ‘Ship By’ > Select the fulfillment center to ship from. 3. The order status in the orders table will change from ‘New Order’ to ‘Processing’ and will be updated again to ‘Shipped’ as soon as shipping information is received back from Amazon FBA.

Submit And Allocate Orders Through The ‘Add Order’ Form Alternatively if you are inputting orders directly into MultiChannelWorks via the ‘Add new order’ form you can select the Amazon FBA shipping method and select Amazon FBA as the fulfillment center to ship the order. Goto ‘Orders > Add Order’
A Note About Warehouse Stock Lists You’ll also notice a new warehouse stock list appear in your inventory manager screens for the active warehouse location. When you ship inventory to the warehouse location in this case Amazon FBA and your inventory is received by the warehouse, MyltuChannelWorks will fetch the inventory data and display the quantities against the corresponding stock list in your account.
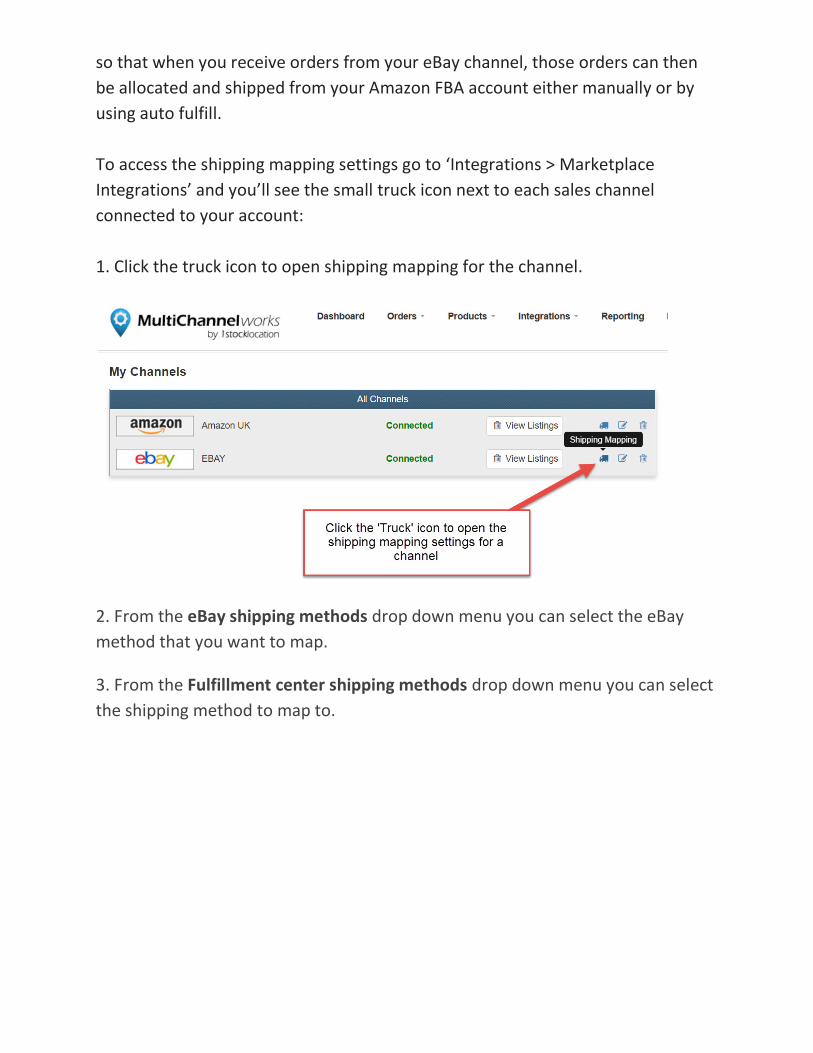
1. To see the warehouse location stock lists go to Products > Inventory Manager.
2. Click a product to see the inventory details. 3. On the inventory details tab you’ll see all the stock lists for all your active
warehouse locations. 4. In the example below we have ‘stockroom’ which is the default in house location
and also a warehouse called the ‘United Kingdom Warehouse’ activated. Of course when adding Amazon FBA the stock list will display the Amazon FBA inventory.
See All Documentation: MultiChannelWorks.com/document
Visit the site:
MultiChannelWorks.com