eProcurement Training Job Aids - SharpSchool
81
eProcurement Training Job Aids San Diego Unified School District August 2016
-
Upload
khangminh22 -
Category
Documents
-
view
2 -
download
0
Transcript of eProcurement Training Job Aids - SharpSchool

eProcurementTraining Job Aids
San Diego Unified School District
August 2016


Table of Contents
How to Login to PeopleSoft Financials ................................................................... 1
PeopleSoft Training & Support ............................................................................... 3
How to Clear Cache Files in Internet Explorer ........................................................ 5
How to Run a Budget Inquiry .................................................................................. 7
How to Order Catalog Items ................................................................................... 9
How to Order with Express Item Entry ................................................................. 21
How to Enter Budget Codes Once for Entire Order .............................................. 22
How to Order Copy/Printer Paper ........................................................................ 23
How to Release Funds from a Canceled Order ..................................................... 27
How to Choose Categories for Special Request Items .......................................... 29
How to Set Default Requisition Settings for Special Request Items ..................... 37
How to Order Special Request Items .................................................................... 43 Goods ........................................................................................................ 43 Assets ........................................................................................................ 44 Services ...................................................................................................... 45 Confirming Orders ..................................................................................... 46 Pay in Advance (Hotels for Field Trips) ...................................................... 47 ICAs (Independent Contractor Agreements) .............................................. 48
How to Order from Web Suppliers ....................................................................... 49
How to Compare Prices Between Office Depot and Independent Stationers ..... 53
How to Track Your Orders on the Office Depot Website ..................................... 55
How to Track & Manage All Your eProcurement Orders ..................................... 58
Important! What to do if this Happens to You ..................................................... 65
How to Use Preset Templates, & Create Your Own Custom Templates .............. 67
How to Upload Attachments to Your ePro Order ................................................. 71
How to Run the eProcurement Report ................................................................. 73
Help for You .......................................................................................................... 76


Pe
op
leSo
ft Fin
ancials 9
.2
September 2015
This Job Aid shows how to login to the San Diego Unified School District’s PeopleSoft Financials online system. You must be a current, active employee of the district, with an Employee ID number and pass-word to login.
1. Launch your browser and go to the www.sandiegounified.org website. On the home page, click theStaff Portal link at the top to navigate to the Employee Portal (you might have to login).
How to Login to PeopleSoft Financials Access to eProcurement, Travel Expenses, Budget Reports, & More
3. Find & click PeopleSoft - Financialon the list of applications:
2. Hover over Resources, and on the right side under Technology & Support, click Applications:
Page 1

Pe
op
leSo
ft Fin
ancials 9
.2
September 2015
5. Single-click the menu choicesat the top left corner to navigate where you want to go.
6. To logout, click the Sign Out link in the topright corner of the screen.
4. Login with your SDUSD Employee IDnumber and password.
How to Login to PeopleSoft Financials Access to eProcurement, Travel Expenses, Budget Reports, & More
Page 2

San D
iego
Un
ifie
d Sch
oo
l District
IT Trainin
g & Su
pp
ort
September 2015
PeopleSoft Training & Support
To support the work you do using our PeopleSoft software applications (such as Time & Labor, PARs, eProcurement, Expenses, Budget Reports, etc.), we provide many training materials, classes, and support resources. You have access to manuals, job aids (illustrated instruction sheets), online narrated tutorial demonstration videos, contact information for SDUSD experts to help you, and more.
To view the online training and support web pages, you will need to sign into the SDUSD website with your SDUSD Employee ID number and password.
2. Underneath Staff Shortcuts on the lower leftside, click the Technical Support link.
1. Go online to the SDUSD Employee Portal web page.
3. Under the Software Applicationssubheading, click the PeopleSoft link.
(over)
1
2
Page 3

San D
iego
Un
ifie
d Sch
oo
l District
IT Trainin
g & Su
pp
ort
September 2015
PeopleSoft Training & Support
4. Click any of the links on this page to access printable or video training materials, and helpfulresources.
5. On the Financial or HCM Printed Training Materials pages, you can access all versions ofPeopleSoft Financials and HCM printable Job Aids, Manuals, and other training relateddocuments.
Page 4

Pe
op
leSo
ft Fin
ancials 9
.2
This Job Aid shows how to clear or delete the cache files in your Internet Explorer browser. This is im-portant to do on a regular basis, if you use PeopleSoft applications (eProcurement , Time & Labor, Ex-penses, Budget Reports, PARs, etc.). When using PeopleSoft apps, they tend to load up your computer with a lot of temporary Internet files and cookies. If you don’t get rid of those regularly, they can collect in your hard drive and start to gum up the works, so to speak. Your computer would become sluggish, and you might start to see weird errors popping up.
It is especially important to clear your cache files right before you start to use any or our PeopleSoft Training Videos, too.
You should clear out your cache files at least once a week.
1. Launch your Internet Explorer browser. The illustrations here were taken using Windows 7 and Inter-net Explorer 9, but any version of IE is fine. In the upper right corner, click the Tools icon, that looks like a wheel-gear:
How to Clear Cache Files in Internet Explorer Important to Do This if You Use PeopleSoft
2. Choose Internet Options
Click Tools.
Click Internet Options.
Page 5

Pe
op
leSo
ft Fin
ancials 9
.2
3. Click Delete.
How to Clear Cache Files in Internet Explorer Important to Do This if You Use PeopleSoft
Click Delete
4. Make sure the Preserve Favorites websitedata is UNCHECKED. Then make sure there ARE checkmarks for Temporary Internet files, Cook-ies, and History.
Then, click the Delete button at the bottom.
It might take a few seconds or several minutes to complete deleting the cache. When done, just close the window.
Click Delete
Page 6
Pe
op
leSo
ft 9
.2 Fin
ancials
Run a Budget Inquiry See How Much You Have in Available Funds
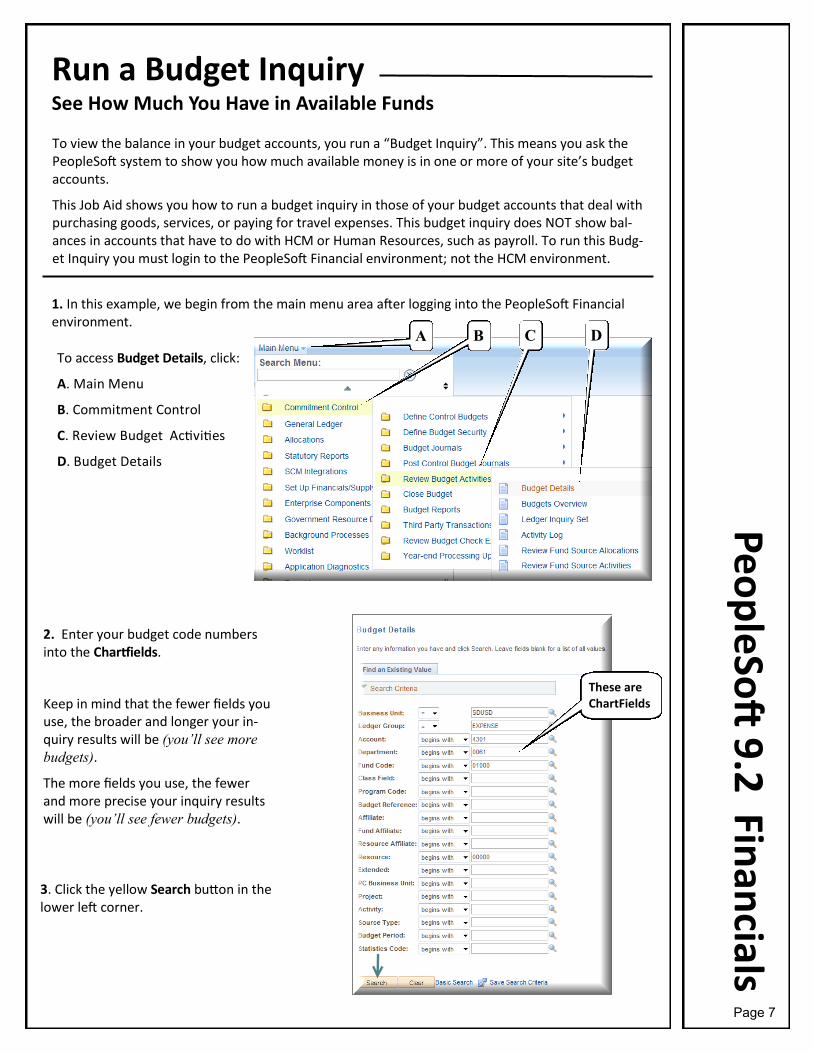
To view the balance in your budget accounts, you run a “Budget Inquiry”. This means you ask the PeopleSoft system to show you how much available money is in one or more of your site’s budget accounts.
This Job Aid shows you how to run a budget inquiry in those of your budget accounts that deal with purchasing goods, services, or paying for travel expenses. This budget inquiry does NOT show bal-ances in accounts that have to do with HCM or Human Resources, such as payroll. To run this Budg-et Inquiry you must login to the PeopleSoft Financial environment; not the HCM environment.
2. Enter your budget code numbersinto the Chartfields.
Keep in mind that the fewer fields you use, the broader and longer your in-quiry results will be (you’ll see more
budgets).
The more fields you use, the fewer and more precise your inquiry results will be (you’ll see fewer budgets).
To access Budget Details, click:
A. Main Menu
B. Commitment Control
C. Review Budget Activities
D. Budget Details
1. In this example, we begin from the main menu area after logging into the PeopleSoft Financialenvironment.
A B C D
3. Click the yellow Search button in thelower left corner.
These are ChartFields
Page 7

Pe
op
leSo
ft 9
.2 Fin
ancials
Run a Budget Inquiry See How Much You Have in Available Funds
4. A list of budget accounts might appear at the bottom of the screen based upon the Chart-Fields selected. If your search criteria was very specific to one budget, the details of that one budget will display instead of a list of budgets.
6. Look towardsthe bottom-left of the next screen to view the Available Budget dollar amount.
Disregard “With Tolerance”
7. You can click the Return to Search buttonin the bottom left corner of this screen to get back to the previous page;
Alternatively, you can logout or navigate to another page in PeopleSoft.
Each line represents a single budget. Click on any area along one horizontal line to display that budget’s details.
5. Click on any one of the horizontal, linked account lines at the bottom of the screen toview available funds
Page 8

eP
rocu
reme
nt 9
.2
Order Catalog Items How to Order Stock/Inventory Items
This Job Aid shows how to use SDUSD’s eProcurement software to order stock/inventory items typical for our school district. Please be sure your computer’s browser meets the minimum requirements to use eProcurement (Internet Explorer 8 or higher is the usual browser).
Order Catalog Items How to Order Stock/Inventory Items
Click PeopleSoft —Financial.
Sign in with your Employee ID number and your password.
To access eProcurement, you need to login to PeopleSoft Financials from the SDUSD website.
First, login to the Staff Portal from www.sandiegounified.org. After that, click Resources and
then click Applications.
Page 9

eP
rocu
reme
nt 9
.2
Order Catalog Items How to Order Stock/Inventory Items
2. The PeopleSoft Financials home page appears:
3. Navigate to a new blank requisition by following these steps :
Click Main Menu. Click eProcurement.
Click Requisition.
Page 10

eP
rocu
reme
nt 9
.2
Order Catalog Items How to Order Stock/Inventory Items
4. The eProcurement home page looks like this:
IMPORTANT NOTES: Be sure to order Special Request or Web items, from the same vendor on
a single ePro requisition. Do not mix vendors, and do not mix Special Requests or Web orders with Catalog orders on the same requisition. It is okay to use different vendors if all the items are Catalog (stock or inventory) items. Also, try to use the same budget string (account information) for all the items on a single requisition. Doing this can help to prevent potential delays in processing.
On the eProcurement home page, you can start placing items on your requisition. There are a couple of methods available to locate stock/inventory items:
I. Keyword Search
Enter a single word from the actual name of the item
II. Express Item Entry (this one is a new feature)
Enter the already-known exact details about the item and locate it immediately
5.
NOTE: The Browse Catalogs search method does not work.
Page 11

eP
rocu
reme
nt 9
.2
Order Catalog Items How to Order Stock/Inventory Items
I. Keyword Search
Follow the illustrated steps below to use keywords to locate any/all of the following items: Cheese, Tardy Slips, Paper (for use in printers or copiers):
Type a single word taken from the name of the item, and then click Search.
To narrow your search, choose Catalog from the menu of search choices.
Enter the quantity you want to order, and then click the Add (shopping cart) button next to the Quantity field.
Page 12
eP
rocu
reme
nt 9
.2
Order Catalog Items How to Order Stock/Inventory Items
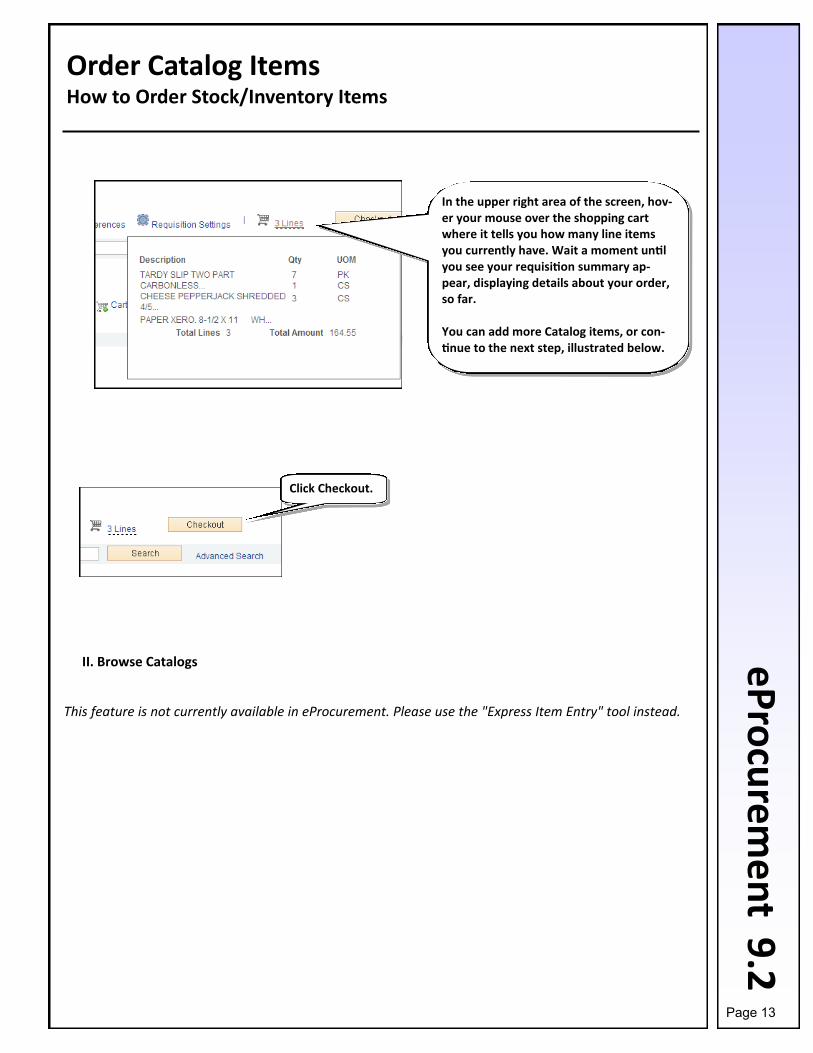
II. Browse Catalogs
This feature is not currently available in eProcurement. Please use the "Express Item Entry" tool instead.
In the upper right area of the screen, hov-er your mouse over the shopping cart where it tells you how many line items you currently have. Wait a moment until you see your requisition summary ap-pear, displaying details about your order, so far.
You can add more Catalog items, or con-tinue to the next step, illustrated below.
Click Checkout.
Page 13

eP
rocu
reme
nt 9
.2
Order Catalog Items How to Order Stock/Inventory Items
III. Express Item Entry
Follow the illustrated steps below to quickly locate a known item, and place it on your requisition. This is a fast way to place an item on your requisition when you already know its name or ID number.
Please Note: If you don’t already know or cannot locate the item’s complete ID number, the Express Item Entry method will only work if you can enter all the other details about the item (Description, UOM, Category, etc.)
Click Express Item Entry.
If you already know the Item ID number, type it
in here. If you don’t know it, leave this field
blank and click the Search icon.
Good Tip!... You can "fake in" the zeroes of an ID number. Let's say the Item ID you want is000000012345, but you can't recall how many zeroes it has. If you don't type the EXACT number with the zeroes, it won't find it. So, do this: Type the 12345 part of the number, and then click your mouse arrow immediately to the left of the 12345 to place your insertion point there. Then, press and hold down the 0 (zero) button on your keyboard until it stops typing 0's. Then you can click the Search icon, and it will find the item. Page 14

eP
rocu
reme
nt 9
.2
Order Catalog Items How to Order Stock/Inventory Items
Use this Look Up Item ID feature to locate the
Item ID number for the Stock/Inventory item
you want to order. Keep in mind you can alpha-
betize the list by clicking the word “Description”. When you find the Item
ID number you want, click it once.
The Item ID number popu-lates the field. You can
then type in the Quantity you want, and click the
Add to Cart button to place this item on your requisi-tion. If you want to see more details about this
item, click the “Show all columns” icon.
Page 15

eP
rocu
reme
nt 9
.2
Order Catalog Items How to Order Stock/Inventory Items
In the upper right area of the screen, hov-er your mouse over the shopping cart where it tells you how many line items you currently have. Wait a moment until you see your requisition summary ap-pear, displaying details about your order, so far.
You can add more Catalog items, or con-tinue to the next step, illustrated below.
Click Checkout.
What To Do After You Click “Checkout”
Type a name for the Requisition.
Click a checkmark for “Select All/Deselect All”.
Page 16

eP
rocu
reme
nt 9
.2
Order Catalog Items How to Order Stock/Inventory Items
Click Mass Change (in the lower right of the screen).
Type in the Budget (Chartfield) String for the one budget that will pay for the entire
order. Then, click the OK button in the lower left corner.
Page 17

eP
rocu
reme
nt 9
.2
Order Catalog Items How to Order Stock/Inventory Items
Make sure “All Distribution Lines” is selected, and click OK. This applies that budget to all the items on this requisition.
At the bottom of the screen, you can use the OPTIONAL “Pre-Check Budget” feature to see whether there’s enough money to
cover this order. Or, you can go straight to “Check Budget” to pre-encumber the funds
immediately.
If you ran the Pre-Check Budget and it passed, it’ll show
“Provisionally Valid”. Then you can run the “Check Budget”.
After running “Check Budget”, if it now says “Budget Checking
Status Valid”, you can click “Save & submit” to process the order.
Page 18

eP
rocu
reme
nt 9
.2
Order Catalog Items How to Order Stock/Inventory Items
The Confirmation screen dis-plays, indicating your requisition has been submitted for approval
and processing.
You can use the Breadcrumbsat the top left of the screen to
navigate elsewhere.
Page 19

eP
rocu
reme
nt 9
.2
This Job Aid shows how to use the new feature, “Express Item Entry”, in eProcurement 9.2. Use this fea-ture to quickly locate and add single Catalog (stock/inventory) items you’re familiar with.
1. From the eProcurement Home Page, click Express Item Entry.
Express Item Entry Fastest Way to Add Known Items to Your Requisition
Click “Express Item Entry”
2. On the Express Item Entry page, you can expand out all the information by clicking the “Show all col-umns” button. If you already know the Item ID number, type it in. If you don’t know it, search for it.
To expand all the information out, click the “Show all columns”
button.
Type the Item ID number, or search for it by clicking the
Search icon (magnifying glass).
Page 20

eP
rocu
reme
nt 9
.2
If you clicked the Search icon for the Item ID field, you will use this
feature to look up the Item ID you want. Using the filters will help narrow and speed up your
search.
When you find the Item you want, single-click on it to place it into the Express Item Entry
Item ID field.
1) The Item ID field is populat-ed with the one you clicked.
2) Enter the quantity you wantof this one item.
3) Click the Add to Cart button, to place this item onyour requisition. Then, you can go on to add more
items, or click the Checkout button to finish the order.
Page 21

eP
rocu
reme
nt 9
.2
If you are ordering more than one line item on an ePro requisition, and all the items will be paid for from the same budget, then you can use this handy shortcut that will save a lot of time. In-stead of entering the 32-digit Chartfield string of budget numbers individually for each line item, you can enter the Chartfield string just once for the entire requisition. You can indicate on the requisition that you want that same budget to be applied to all line items.
NOTE: Once you enter the budget and apply it to all line items, any additional line items youplace on the requisition will not be included. You will have to enter the budget numbers again for additional items you add on.
NOTE: This Job Aid begins at the point at which an ePro requisition has already been createdwith multiple line items added to it. If you don’t know how to arrive at this point, then you are not ready to attempt this Job Aid. Please refer to the Job Aid entitled: How to Order Catalog Items.
Enter Budget Codes Once for Entire Order
1. After you have added all the items youwant to order, navigate to the Review and Submit page. Once there, click the Select All link or checkbox, to select all the items. You’ll know all items are select-ed when you can see a checkmark in each of their little boxes on the far left side.
2. Select the Requisition Setting Hyperlink inthe upper right hand corner of the requisition
3. On this screen, enter the budget codenumbers into the Chartfields for the budget you want to use for the entire requisition.
Then click the OK button.
Page 22
eP
rocu
reme
nt 9
.2
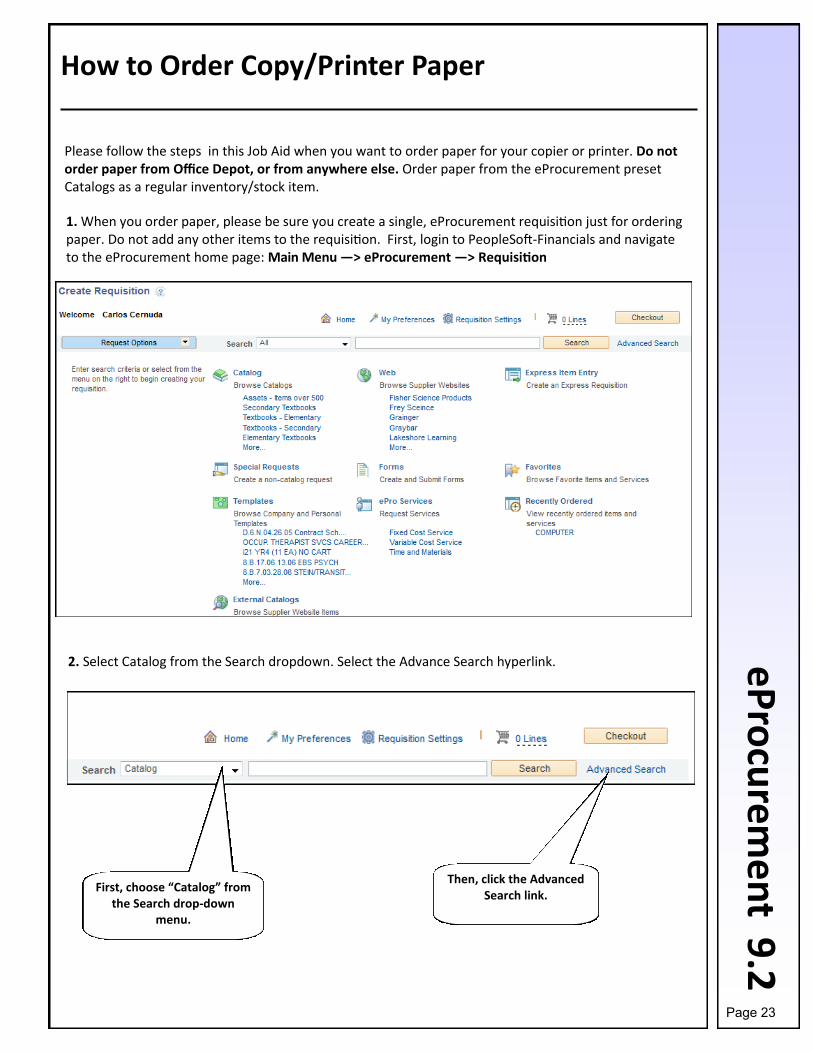
Please follow the steps in this Job Aid when you want to order paper for your copier or printer. Do not order paper from Office Depot, or from anywhere else. Order paper from the eProcurement preset Catalogs as a regular inventory/stock item.
1. When you order paper, please be sure you create a single, eProcurement requisition just for orderingpaper. Do not add any other items to the requisition. First, login to PeopleSoft-Financials and navigate to the eProcurement home page: Main Menu —> eProcurement —> Requisition
How to Order Copy/Printer Paper
2. Select Catalog from the Search dropdown. Select the Advance Search hyperlink.
First, choose “Catalog” from the Search drop-down
menu.
Then, click the Advanced Search link.
Page 23

eP
rocu
reme
nt 9
.2
4. The item information will appear. Enter the Quantity of cases you want, and then click the Addbutton. This places the item on your ePro requisition form.
3. Go to the Item ID field. Select “Contains” from the drop-down menu. Enter the 4-digit Item ID num-ber there, for the type of paper you want. Click the Search Button. The list to choose from is displayed below. All four types of paper are standard white bond.
(If you want to order colored or other specialty paper, use a Web supplier such as Independent Station-ers or Office Depot)
Item ID 7640 — 8 1/2 inch x 11 inch 7641 — 8 1/2 inch x 14 inch 7642 — 8 1/2 inch x 11 inch, 3-hole punched 7643 — 11 inch x 17 inch
Type the Item ID number here, after choosing “Contains” from the drop-
down menu to its left.
Then click the “Search” button.
Enter the number of cases you want in the Quantity field.
Then click the Add button to add this item to your order.
Page 24

eP
rocu
reme
nt 9
.2
5. Once you add the paper to your requisition, the system provides you with a message that the itemhas been added and your shopping cart updates with the number of line items you have so far.
6. To view information about the added items, hover yourmouse over the Line Field next to the shopping cart.
7. Click on the Checkout Button to Submit the requisition.
8. On the Checkout-Review and Submit page, type a Requisition Name for the order.
Page 25

eP
rocu
reme
nt 9
.2
9. Complete the rest of the requisition normally: Enter the Budget String to indicate which funds will payfor the order; run a successful Check Budget ; and then Save & submit the requisition. Remember that the “Pre-Check Budget” feature is optional, and only tells you whether there are enough funds to cover this order by saying “Provisionally Valid”. If you don’t know where to enter the Budget String, please refer to the Job Aid entitled “How to Order Keyword Catalog Items” or “Where to Enter Budget Strings”.
Important Things to Remember When Ordering
Never mix Web items (such as Office Depot or Waxie) with Catalog stock/inventory items (ePro Catalog items) on the same requisition. Always create separate requisitions.
Order from only one supplier per requisition.
Page 26
eP
rocu
reme
nt 9
.2
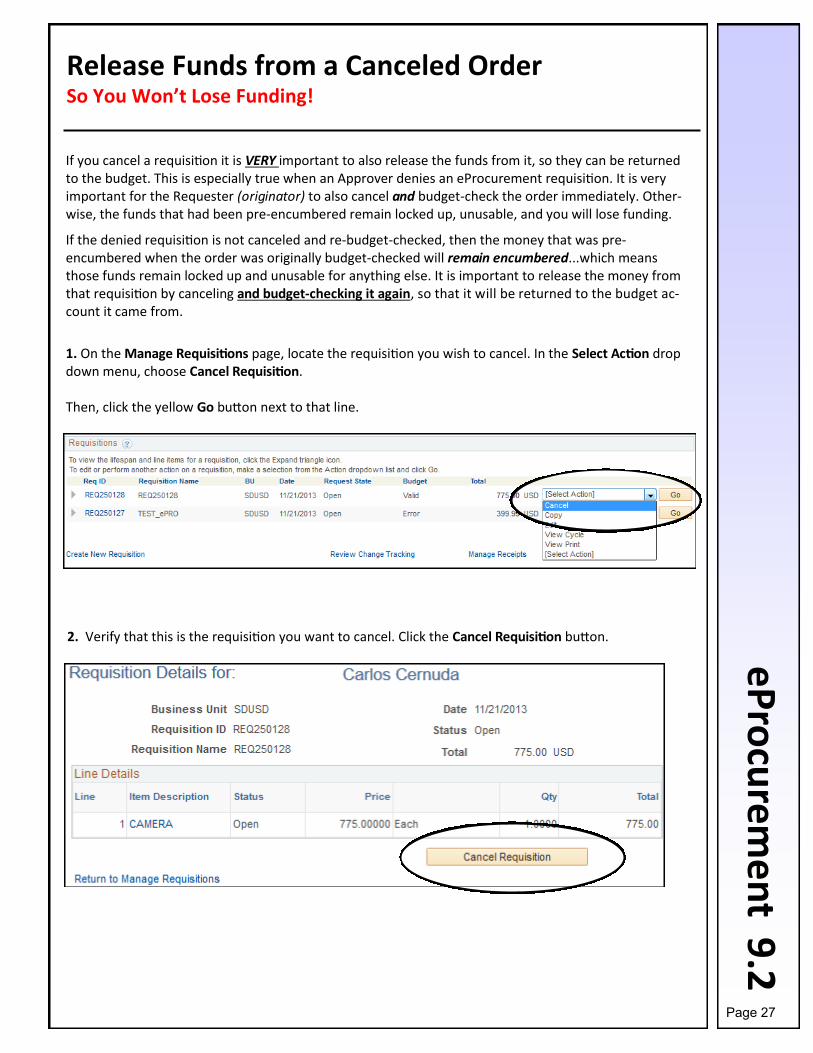
If you cancel a requisition it is VERY important to also release the funds from it, so they can be returned to the budget. This is especially true when an Approver denies an eProcurement requisition. It is very important for the Requester (originator) to also cancel and budget-check the order immediately. Other-wise, the funds that had been pre-encumbered remain locked up, unusable, and you will lose funding.
If the denied requisition is not canceled and re-budget-checked, then the money that was pre-encumbered when the order was originally budget-checked will remain encumbered...which means those funds remain locked up and unusable for anything else. It is important to release the money from that requisition by canceling and budget-checking it again, so that it will be returned to the budget ac-count it came from.
Release Funds from a Canceled OrderSo You Won’t Lose Funding!
1. On the Manage Requisitions page, locate the requisition you wish to cancel. In the Select Action dropdown menu, choose Cancel Requisition.
Then, click the yellow Go button next to that line.
2. Verify that this is the requisition you want to cancel. Click the Cancel Requisition button.
Page 27

eP
rocu
reme
nt 9
.2
3. You are returned to the Manage Requisitions page. Verify that the requisition’s Status shows it isnow Canceled, and its Budget shows Not Chk’d. But the funds are still pre-encumbered… and will re-main stuck there until you run a Budget Check on that requisition one more time.
4. From the Select Action drop-down menuon the far right side, click Budget Check, and click Go.
5. You’ll know the money has been releasedback into the Budget when you see that the Budget Status for the canceled requisition has changed from Not Chk’d to Valid.
Page 28

eP
rocu
reme
nt 9
.2
When you order Special Request goods or services, it’s very important to select the correct Category each time. When you do, the correct budget (account) is automatically chosen to pay for that Special Request item. If you don’t select the correct Category when creating the eProcurement requisition, then the wrong funds will be used to pay for the order. This typically results in your site losing money by spending incorrect funds on things, and can have a negative effect on your funding for the following year. In addition to that, if you select the wrong Catego-ry, it could delay or even cancel your order.
This Job Aid shows you methods to locate and choose the correct Category for a Special Request item.
1. Once you have a new, blank requisition form on your screen, click the Special Request hyper-link to bring it forward.
Find Categories for Special Request Items
Page 29

eP
rocu
reme
nt 9
.2
2. Click the Category Lookup icon, next to the Category field.
3. Verify that Category is selected in the Search by dropdown.
From here, there are several different methods of finding the right Category for your Special Request item. The following pages of this Job Aid show you these methods.
Page 30

eP
rocu
reme
nt 9
.2
I. Find Category by Account Number
Considered by many to be the easiest way, you can use the account number from the budget (Chartfield) string to locate the correct Category for all items (except for Asset items… they work a bit differently, as shown further on).
1. Always make sure that the Search By is set to “Category”. In the textbox between “Category”and the Find button, type a percent sign, and the account number that will be used to pay for the item. Then, click the Find button.
2. The Category that belongs to the account number is displayed below. It shows the Catalog (onthe left), the Category (in the middle), and the Description (on the right) that are connected with that account number. Click anywhere on the linked line.
Page 31

eP
rocu
reme
nt 9
.2
3. The correct Category is now in place, and you can continue to complete the order.
II. Find Category by Group Text Criteria
This method works well if you want to view a list of related Categories to choose from. There are three basic groups of related Categories: Goods, Services, and Assets. You can type one of these Category group names into the look-up field, and display all Categories within that group.
1. Always make sure that the Search By is set to “Category”. In the text field, type the initials forthe Category group you want:
GDS (to look up Goods Categories)
SVC (to look up Services Categories)
A (to look up Asset Categories)
Then, click the Find button.
Page 32

eP
rocu
reme
nt 9
.2
2. The list of individual Categories appears. You can scroll through the list and click to choose theCategory you want. To make it easier, you can alphabetize the list by clicking Description at the top.
Page 33

eP
rocu
reme
nt 9
.2
III. Find Category by Browsing Category Tree
This method is similar to the one shown on the previous page (using Group Text Criteria). It works well if you don’t have the account number handy, and you just want to preliminarily browse through the Category lists.
1. Always make sure that the Search By is set to “Category”. Click the Expand Section icon button(shaped like a tiny arrow) to display the Browse Category Tree feature.
2. In the Select a catalog drop-down menu, click to choose one of the five root Catalogs.
Page 34

eP
rocu
reme
nt 9
.2
3. Ignore the Select Category link, and click the yellow folder with the plus sign on it.
4. The Category list is displayed for that root Catalog. Scroll down the list to find the Categoryyou want. (Unfortunately, you can’t alphabetize this list). Click to choose the desired Category.
Page 35

eP
rocu
reme
nt 9
.2
IV. Find an Asset Category
Asset Categories are the only Categories that cannot be located by account number. Their budg-ets are set up a little differently than other budgets. Probably the best way to find an Asset Cate-gory is the way shown below.
1. Always make sure that the Search By is set to “Category”. In the Find field, type the letter A,and then click the Find button.
2. Scroll to locate and click the Asset Category you want. Some have two that look the same, with G5000and L5000 on the end of the descriptions. G5000 means a single unit of that item is worth Greater Than$5,000 before tax. L5000 is for a single unit that is worth Less Than $5,000 before tax.
Page 36

eP
rocu
reme
nt 9
.2
This Job Aid shows how to use the Requisition Settings feature in eProcurement to set up defaults for your Special Request items on a single order. You can enter information into a few of the fields, and have that same information populate those fields automatically for each Special Request item in that requisi-tion. This works well when you order multiple items from the same supplier, or use the same budget for all items, or generally plan to use the same exact information in a given field for all the Special Request items on one requisition.
1. Start from the PeopleSoft Financials home page:
Requisition Settings for Special Request Items Shortcut for Ordering Multiple Similar Special Request Items
2. On the eProcurement Home Page, in the upper right area, find Requisition Settings.
Click Main Menu, then click eProcurement, and then
click Requisition.
Click Requisition Settings.
Page 37

eP
rocu
reme
nt 9
.2
3. On the Requisition Settings page, fill in whichever available fields (text boxes) you want to have showup automatically on each Special Request item you plan to add to this order. In the example shown be-low, we entered the following fields:
A. Supplier— We chose Meredith Digital from the Supplier (vendor) list.
B. Category— All items will be paid with the same budget, so we chose the GDS_4301 category.
C. Unit of Measure—All items come packaged one to a package/unit, so we chose EA for “Each”.
D. Chartfields—We entered the budget string here so that all items will be paid with the same budget.
E. OK—When done entering the information, click the OK button.
4. Click the Special Requests link to start adding items to this requisition. (All the information you en-tered into the Requisition Settings page will now automatically fill in for each Special Request item you create for this one order).
Page 38

eP
rocu
reme
nt 9
.2
5. The Special Request screen is displayed, with the information you entered earlier from the RequisitionSettings page (Category, Supplier, etc.). This will save you time, as now you don’t have to type all that information repeatedly for each item you add to this order.
6. For the first example item below, we filled in the Item Description, Price, Quantity, and the requiredAdditional Information.
Page 39

eP
rocu
reme
nt 9
.2
7. Since this printer cartridge is something we will be ordering again in the future, we decided to click acheckmark into the checkbox for Request New Item. This sends a request to the Strategic Sourcing De-partment, asking to have this item added as a Catalog (stock or inventory) item. If it’s accepted as such, the next time we order this item we might be able to find it as a Catalog item, instead of having to order it as a time-consuming Special Request item.
Click the Add to Cart button to add this item to your requisition.
8. A fresh, blank Special Request screen is displayed, to allow us to order another item. The same fieldsare automatically filled in for us once again, to save time, since the next item we want to order will be from the same Supplier, and will use the same Unit of Measure, and the same Category and Budget.
Page 40
eP
rocu
reme
nt 9
.2
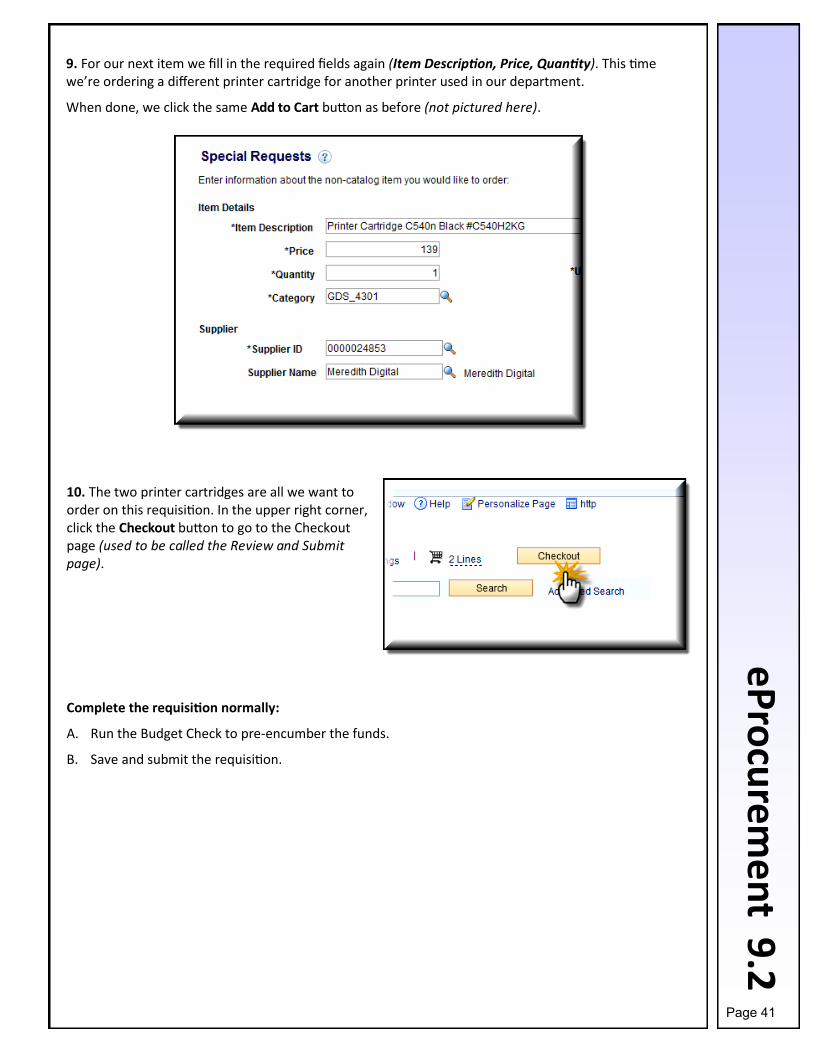
Complete the requisition normally:
A. Run the Budget Check to pre-encumber the funds.
B. Save and submit the requisition.
9. For our next item we fill in the required fields again (Item Description, Price, Quantity). This timewe’re ordering a different printer cartridge for another printer used in our department.
When done, we click the same Add to Cart button as before (not pictured here).
10. The two printer cartridges are all we want toorder on this requisition. In the upper right corner, click the Checkout button to go to the Checkout page (used to be called the Review and Submit page).
Page 41

eP
rocu
rem
en
t 9.2
Special Request Items A Guide to Faster, Correct Ordering
This Job Aid illustrates the ways to fill in the necessary text fields for a Special Request item on an online eProcurement requisition form.
It’s very important to complete these fields correctly, otherwise your orders will be delayed or possi-bly canceled. This is especially true for Special Request orders, because they take longer to fill.
The steps in this Job Aid begin from a blank ePro requisition form. If you don’t know how to log into PeopleSoft eProcurement and arrive at a blank ePro requisition, then please refer to the Job Aid enti-tled How to Log Into PeopleSoft Financials.
NOTE: You should only use the Special Request page if you cannot order your item through the pre-set ePro catalogs, or through a Direct Connect vendor such as Office Depot or Waxie.
Important General Information about the Special Request Fields
Item Description: Always type as much detail as you can about the item you’re ordering. Al-ways begin with the noun for the item:
Type the noun for the item (Examples: Chair or Book or Lamp) Then type the item’s Make (Examples: Acme or Safco or IBM) Then type the item’s Model (Examples: Sec’y. Chair or A2B3C4 or Deluxe) Then type the item’s Color, Size, etc. (Examples: Gray 24” aluminum base)
Price: Price per unit without shipping or tax. Quantity: Numeral indicating how many you want for each Unit Of Measure (UOM). Category: Very important! Please refer to the Job Aid: How to Find Categories for Special Re-
quest Orders Unit of Measure (UOM): Abbreviation indicating how the item comes packaged.
Example UOMs: EA (each) or SET (set) or GL (gallons) Due Date: Depends on what you’re ordering.
For Goods: Leave blank. It will be processed as soon as possible, by default. For Services: Type in the date service is to be completed by.
Supplier: Name of business (vendor) you are buying that item from. Additional Information: First always type your own name, phone, and site location. Include any
additional details about the item you’re ordering that you could not fit into the Item Descriptionfield.
Start from the Special Request screen of a new, blank requisition.
Page 42

eP
rocu
rem
en
t 9.2
Special Request Items A Guide to Faster, Correct Ordering
I. Goods
You’ll know you’re ordering Goods items if the following is true: The item is physical...that is, you can touch it with your hand; it’s not a service. The item is worth less than $500 per unit. The item is not related in any way to an order for an Asset item on the same requisition.
NOTE: If you aren’t sure whether or not the item you’re ordering is a Good, always ask!
Below is an illustration of the correct way to complete the Special Request fields for Goods that are not Assets. Please keep in mind this illustration is only an example, and does not represent information to use on any specific order.
Example: How to Order an Office Chair
Page 43

eP
rocu
rem
en
t 9.2
Special Request Items A Guide to Faster, Correct Ordering
IMPORTANT NOTE: The Item Description must be in ALL CAPITAL LETTERS for Asset Items.
You’ll know you’re ordering an Asset item if the following is true: The item is worth $500 or more per unit. The item is a Good (a physical item, not a service). The item is non-consumable (it can’t be eaten or used up). The item is cheaper to repair than to replace. The item, while not an Asset by itself, is related to an obvious Asset item. For example, if
you order a $650 bookcase and it costs $75 to ship it, then the $75 shipping fee is consid-ered an Asset item and should be entered as such on the requisition. (Shipping fees mustbe entered as separate line items).
NOTE: If you aren’t sure whether or not the item you’re ordering is an Asset, always ask!
Below is an example of the correct way to complete the Special Request fields for an Asset item. Please keep in mind this illustration is only an example, and does not represent in-formation to use on any specific order.
II. Asset Items
Example: How to Order a Computer Printer Notice...all capital letters for Asset Items!
Page 44
eP
rocu
rem
en
t 9.2
Special Request Items A Guide to Faster, Correct Ordering
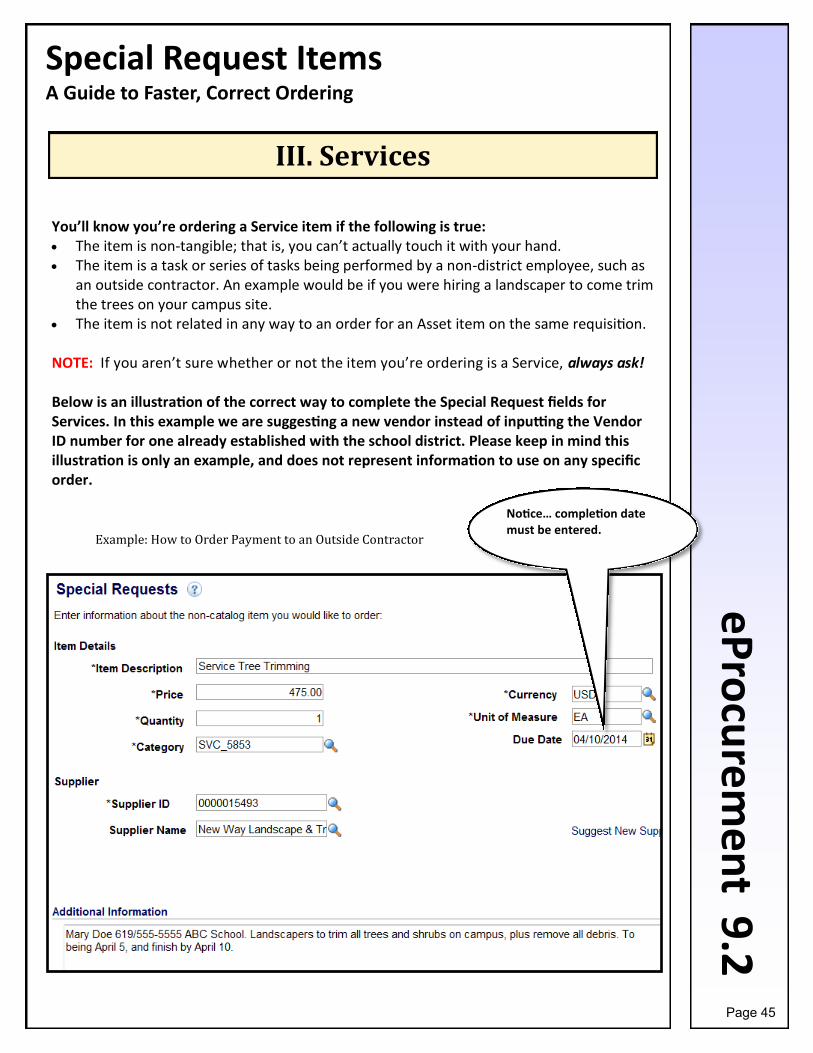
You’ll know you’re ordering a Service item if the following is true: The item is non-tangible; that is, you can’t actually touch it with your hand. The item is a task or series of tasks being performed by a non-district employee, such as
an outside contractor. An example would be if you were hiring a landscaper to come trimthe trees on your campus site.
The item is not related in any way to an order for an Asset item on the same requisition.
NOTE: If you aren’t sure whether or not the item you’re ordering is a Service, always ask!
Below is an illustration of the correct way to complete the Special Request fields for Services. In this example we are suggesting a new vendor instead of inputting the Vendor ID number for one already established with the school district. Please keep in mind this illustration is only an example, and does not represent information to use on any specific order.
III. Services
Example: How to Order Payment to an Outside Contractor
Notice… completion date must be entered.
Page 45

eProcurement 9.2
Special Request Items A Guide to Faster, Correct Ordering
Confirming Orders are Against District Policy (Administra ve Procedure 2415, Sec on C.4)
No one should be doing Confirming Orders
Defini on: A Confirming Order happens when there is a District purchase for goods or ser-vices that is placed without the issuance of an approved requisi on and purchase order. The requisi on is then issued a er the purchase, and the purchase order “confirms” the purchase.
If you violate the above policy, you must use the invoice to issue the eProcurement Requisi-on. Follow these guidelines:
Start Item Descrip on with: CONFIRMING ORDER (as in illustra on, below). Issue the ePro Requisi on to match the invoice. Create a line for each item and shipping, including the descrip on on each line. DO NOT ADD A LINE FOR TAX ON ANY ePRO REQUISITION. This is done automa cally later. Enter the correct supplier (vendor) you bought from on the ePro Requisi on. If the supplier (vendor) is new, use the Suggest Supplier tool to enter the name, address, and contact informa on.
IV. Con irming Orders
Page 46

eProcurement 9.2
Special Request Items A Guide to Faster, Correct Ordering
IMPORTANT! All Hotels Require Payment in Advance.
This Job Aid Refers to Overnight Field Trips with Students.
Submit these requests 6-8 weeks PRIOR to the trip. Most hotels want to receive payment 2-4 weeks prior to arrival date. All paperwork must be submi ed in me for a Purchase Order and warrant (check) to be issued and mailed to the hotel. The following must be provided with the ePro Requisi on:
Copy of hotel reserva on or confirma on, which must state: Hotel name Hotel address Hotel phone and fax Number of rooms reserved Room charge Tax rate to be charged Check-in and Check-out dates Reason for the trip Class or grade level of the students traveling Teacher(s) in charge (their names)
TO START THE PROCESS:
Create a Special Request item on an ePro requisi on. Upload/a ach the reserva on/confirma on/invoice form to the ePro requisi on immediately . (See the Job Aid and/or Online Tutorial showing how to do this). Be Sure to include all details stated in the bulleted list above. ePro Requisi on ID number must be on the faxed paperwork. ePro Requisi on must state:
Reason for the trip Class or grade level of the students a ending Teacher(s) in charge
V. Pay in Advance (Hotels for Field Trips)
Page 47
eProcurement 9.2
Special Request Items A Guide to Faster, Correct Ordering
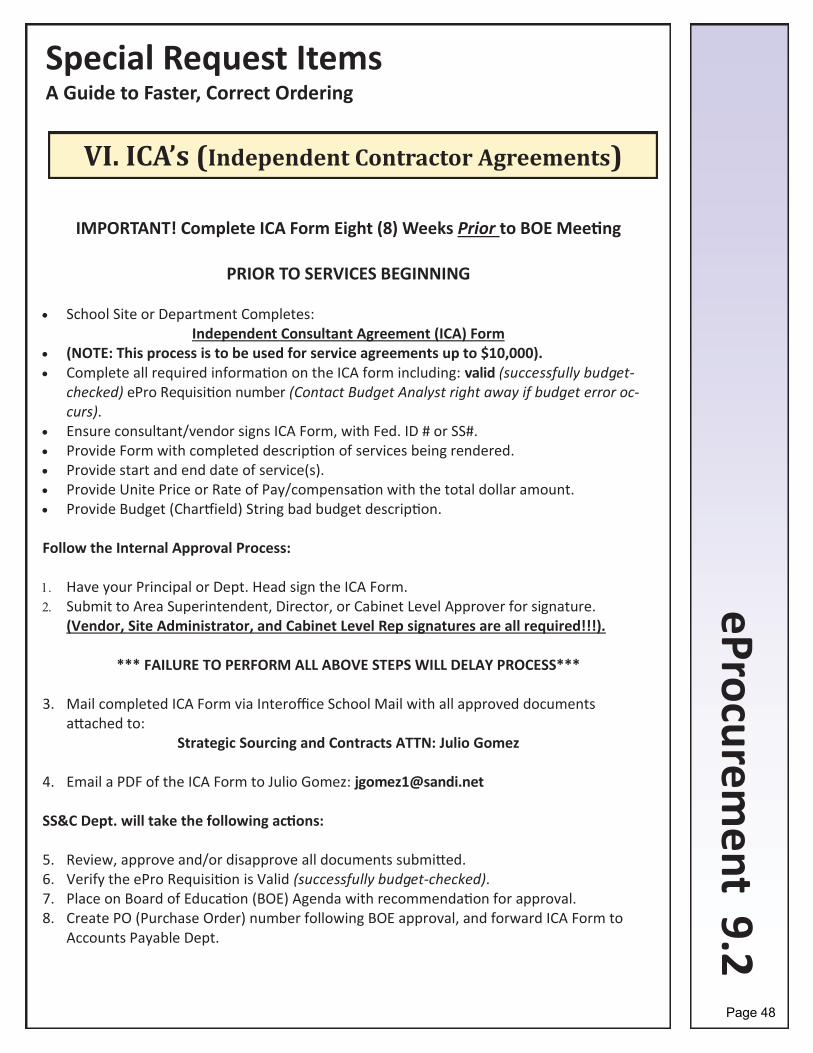
IMPORTANT! Complete ICA Form Eight (8) Weeks Prior to BOE Mee ng
PRIOR TO SERVICES BEGINNING
School Site or Department Completes: Independent Consultant Agreement (ICA) Form
(NOTE: This process is to be used for service agreements up to $10,000). Complete all required informa on on the ICA form including: valid (successfully budget-checked) ePro Requisi on number (Contact Budget Analyst right away if budget error oc-curs). Ensure consultant/vendor signs ICA Form, with Fed. ID # or SS#. Provide Form with completed descrip on of services being rendered. Provide start and end date of service(s). Provide Unite Price or Rate of Pay/compensa on with the total dollar amount. Provide Budget (Char ield) String bad budget descrip on.
Follow the Internal Approval Process:
Have your Principal or Dept. Head sign the ICA Form. Submit to Area Superintendent, Director, or Cabinet Level Approver for signature. (Vendor, Site Administrator, and Cabinet Level Rep signatures are all required!!!).
*** FAILURE TO PERFORM ALL ABOVE STEPS WILL DELAY PROCESS***
3. Mail completed ICA Form via Interoffice School Mail with all approved documentsa ached to:
Strategic Sourcing and Contracts ATTN: Julio Gomez
4. Email a PDF of the ICA Form to Julio Gomez: [email protected]
SS&C Dept. will take the following ac ons:
5. Review, approve and/or disapprove all documents submi ed.6. Verify the ePro Requisi on is Valid (successfully budget-checked).7. Place on Board of Educa on (BOE) Agenda with recommenda on for approval.8. Create PO (Purchase Order) number following BOE approval, and forward ICA Form to
Accounts Payable Dept.
VI. ICA’s (Independent Contractor Agreements)
Page 48
eP
rocu
reme
nt 9
.2
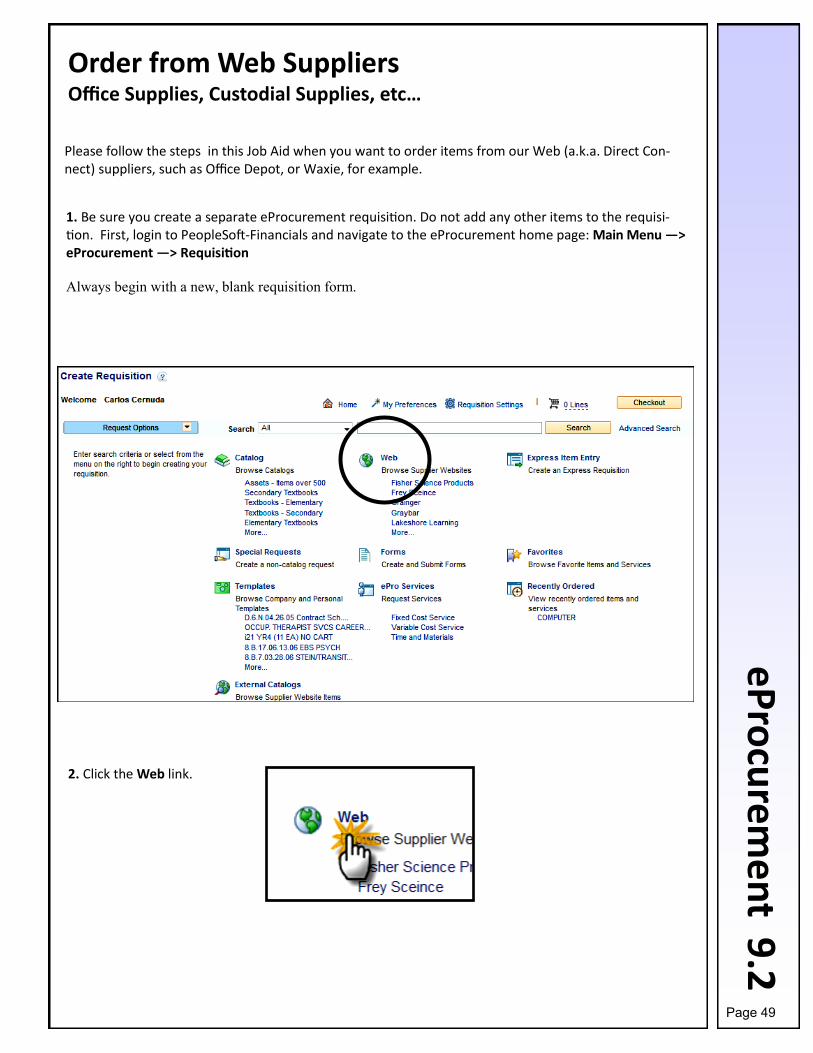
Please follow the steps in this Job Aid when you want to order items from our Web (a.k.a. Direct Con-nect) suppliers, such as Office Depot, or Waxie, for example.
1. Be sure you create a separate eProcurement requisition. Do not add any other items to the requisi-tion. First, login to PeopleSoft-Financials and navigate to the eProcurement home page: Main Menu —> eProcurement —> Requisition
Always begin with a new, blank requisition form.
Order from Web Suppliers Office Supplies, Custodial Supplies, etc…
2. Click the Web link.
Page 49
eP
rocu
reme
nt 9
.2
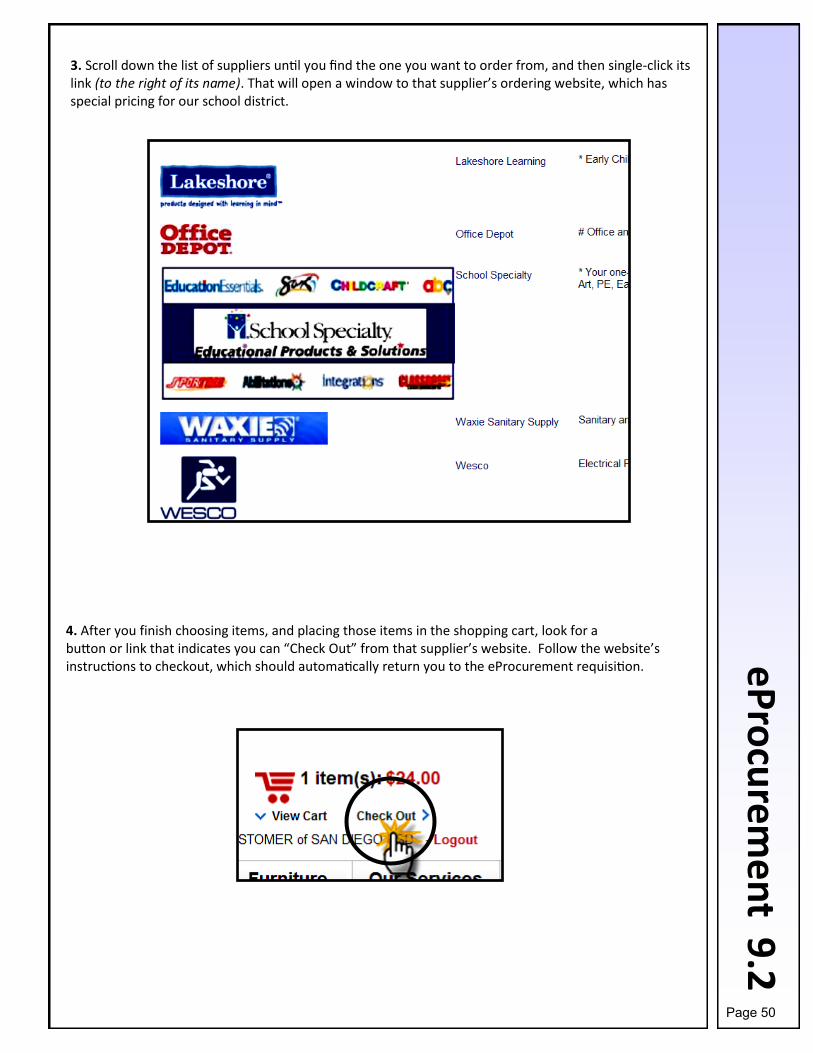
4. After you finish choosing items, and placing those items in the shopping cart, look for abutton or link that indicates you can “Check Out” from that supplier’s website. Follow the website’s instructions to checkout, which should automatically return you to the eProcurement requisition.
3. Scroll down the list of suppliers until you find the one you want to order from, and then single-click itslink (to the right of its name). That will open a window to that supplier’s ordering website, which has special pricing for our school district.
Page 50

eP
rocu
reme
nt 9
.2
5. DO NOT add any other items to this requisition. Use a separate requisition for each order placed witha single supplier.
Give the Requisition a name so you can track it easily later on.
6. Place a checkmark into the Select All/Deselect All check-box, at the lower left corner just below the last item.
7. Towards the right side of the page, click Mass Change.
8. Ignore all the textboxes along the top half of the page, and go directly to the bottom, where you needto fill in the budget Chartfield string. Do this, and then click OK.
Page 51

eP
rocu
reme
nt 9
.2
10. Complete the rest of the requisition normally: Run a successful Check Budget ; and then Save & sub-mit the requisition. Remember that the “Pre-Check Budget” feature is optional, and only tells you whether there are enough funds to cover this order by saying “Provisionally Valid”.
Important Things to Remember When Ordering
Never mix Web items (such as Office Depot or Waxie) with Catalog stock/inventory items (ePro Catalog items) on the same requisition.
Order from only one supplier per requisition.
9. Leave the default choice as All DistributionLines, and then click OK,
Page 52

eP
rocu
reme
nt 9
.2
September 2015
Compare Prices between Office Depot and Independent Stationers
Often, Independent Stationers sells the same product as Office Depot but at a lower price. This Job Aid shows how to take an Office Depot product ID number and enter it on the Independent Stationers website, to see what their price is for the same product. You might be surprised at how often the same product is offered at a much lower price at Independent Stationers.
First, you need to obtain the Office Depot ID number for their product you’re interested in.
1. After you log onto the SDUSD PeopleSoft Financial web portal, click:
Main Menu > eProcurement > Requisition
2. Click the Web link:
3. Click the Independent Stationers link:
Click here.
Page 53

eP
rocu
reme
nt 9
.2
September 2015
Compare Prices between Office Depot and Independent Stationers
4. In the upper left area of the page, enter the Office Depot ID number for their item,into the Independent Stationers search field, and click the orange Search button:
5. Independent Stationers will cross reference Office Depot’s product with their own. The pagewill then display their findings. If they cannot match the exact same product, they will show you an equivalent product. NOTE: You will NOT see the Office Depot web page appear on the Independent Stationers’ screen. You will only see the Independent Stationers’ pricing.
In the example shown here, (August 2015), Independent Stationers sells the exact same Avery
address labels for $62.97 that Office Depot sells for $74.99. That’s a savings of $12.02.
What the same product looks like on the
Independent Stationers website.
What the same product looks like on the Office
Depot website.
Office Depot Item ID number
Independent Stationers
website
Note the price difference.
Page 54

eP
rocu
reme
nt 9
.2
September 2015
Track Your Office Depot Orders on the Office Depot Website
This Job Aid shows how to use our eProcurement’s Office Depot website to easily track items you’ve ordered from Office Depot. This is a great enhancement beyond what eProcurement software alone can do.
1. After you log onto the SDUSD PeopleSoft Financial web portal, click:
Main Menu > eProcurement > Requisition
2. Click the Web link:
3. Click the Office Depot link:
Click here.
Page 55

eP
rocu
reme
nt 9
.2
September 2015
Track Your Office Depot Orders on the Office Depot Website
4. Click the My Account link, and then click “My Account” in the drop-down menu.
5. You cannot find your order byusing the ePro requisition ID number. You can find and track your order by choosing from the Search By menu:
Ship to ID (this is your Dept. IDLocation number: xxxxA)
P.O. Number (the PeopleSoftPurchase Order number, found onthe Manage Requisitions page)
You can also filter your search by Status: “Shipped”, “Delivered”, etc.
6. In the example shown here, we chose to search by the “Ship to Id”, which is the LocationCode for a given site. We used 0003A just as an example. (If you wish to search by this method, you need to ensure you have the correct Location Code for your site).
Page 56

eP
rocu
reme
nt 9
.2
September 2015
Track Your Office Depot Orders on the Office Depot Website
7. A list of your Office Depot orders is displayed. The list offers details about each order. To viewadditional details about an individual order, click on the Order Number in the far left side.
8. Comprehensive details about one order are displayed. There is even a link to “View CartonDetails and Proof of Delivery” (if the order has been delivered).
Page 57

eP
rocu
rem
en
teP
rocu
remen
t 9.2
Track & Manage Your ePro Orders Monitor Your Requisitions; Be Sure You Get Your Orders
You are expected to monitor and track your own eProcurement requisitions, to ensure you receive your items on time. Only by tracking your orders can you resolve delays, or other-wise troubleshoot potential problems.
This Job Aid shows you how to track your requisitions; and it also shows you how you can edit them, when possible. Editing includes changing an order, canceling an order, and reo-pening and/or resubmitting an order.
Important Note: Do not contact the Purchasing (Strategic Sourcing) Department just to ask the status of an order. Only contact them to ask about an order if it is late in coming; that is, at least 30 days have passed since the Purchase Order was created, and you haven’t received the items yet.
There is a screen in the eProcurement software called the Manage Requisitions page:
View all your requisitions past and present, including each one’s current status.
View who has approved a requisition, and when it was approved.
1. After you log into our PeopleSoft Financial online software, click:
Main Menu —> eProcurement —> Manage Requisitions
1
Page 58
eP
rocu
rem
en
teP
rocu
remen
t 9.2
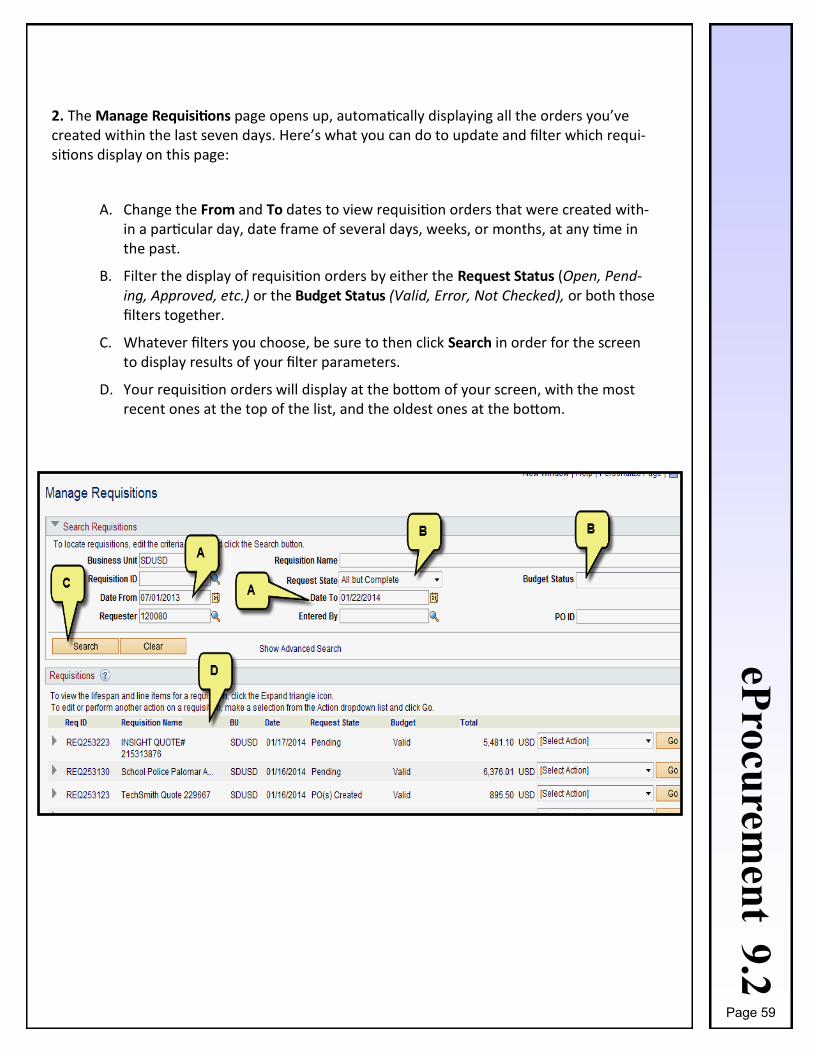
2. The Manage Requisitions page opens up, automatically displaying all the orders you’vecreated within the last seven days. Here’s what you can do to update and filter which requi-sitions display on this page:
A. Change the From and To dates to view requisition orders that were created with-in a particular day, date frame of several days, weeks, or months, at any time in the past.
B. Filter the display of requisition orders by either the Request Status (Open, Pend-ing, Approved, etc.) or the Budget Status (Valid, Error, Not Checked), or both those filters together.
C. Whatever filters you choose, be sure to then click Search in order for the screen to display results of your filter parameters.
D. Your requisition orders will display at the bottom of your screen, with the most recent ones at the top of the list, and the oldest ones at the bottom.
Page 59

eP
rocu
rem
en
teP
rocu
remen
t 9.2
3. Roughly in the center of the Manage Requisitions page, look for the Request State column. Itwill tell you the current status of your requisitions.
Request State Definitions:
Approved: Entire Requisition has been approved for processing.
Canceled: Requisition has been canceled; it remains frozen until you choose to reinstate it.
Completed: Requisition has completed all its steps. Does not necessarily mean your entire orderis received yet.
Denied: Entire Requisition has been denied.
Open: Requisition has been created & saved, but not submitted.
P.O. Partially Canceled: Purchase Order (created off the Requisition) has been partiallycanceled.
P.O. Partially Completed: Purchase Order (created off the Requisition) has been partiallycompleted.
P.O. Partially Created: Purchase Order (created off the Requisition) has been partially created.
P.O. Canceled: Purchase Order (created off the Requisition) has been entirely canceled.
P.O. Completed: Purchase Order (created off the Requisition) has been entirely completed.
P.O. Created: Requisition has generated a Purchase Order.
P.O. Dispatched: Purchase Order (created off the Requisition) has been sent to a supplier forfulfillment.
Partially Dispatched: Part of your order is on its way to you from our Supply Center.
Partially Received: Part of your order has been received at our Supply Center.
Pending: Requisition has been created, saved, and submitted.
Received: Your entire order has been received at our Supply Center.
See Lines: One or more items were denied, while the rest of the items were approved.
Always look at the Request State column 3
Page 60

eP
rocu
rem
en
teP
rocu
remen
t 9.2
4. In the list, after you locate the requisition you want to track, you need to click its ExpandSection button to reveal that requisition’s timeline. The Expand Section button looks like a tiny gray triangle on the far left side.
4
5. The requisition’s lifespan/timeline is displayed, as well as details about the items ordered(below the timeline). Going from left to right, each icon represents a step in the requisition’s pro-gress. If the icon is lit up and brightly colored, then that step is either in process, or has been completed.
5
Requisition Lifespan/Timeline
List of items ordered
Page 61

eP
rocu
rem
en
teP
rocu
remen
t 9.2
Click the tiny gray triangle button again to collapse the Lifespan/Timeline:
Request Lifespan (Timeline) Icon Definitions:
Requisition: Details about the Requisition (information about what is being ordered)
Approvals: Shows any/all district staff who will approve (or has already approved) the Req.
Inventory: This icon lights up if a stock/inventory item is being ordered
Purchase Order: Indicates status of Purchase Order
Change Request: Lights up if you ask our Buyers to make a change on the Req
Receiving: Indicates receipts of items already received at our Supply Center
Returns: RTV processes are being followed; if you want to return an item, contact Purchasing(Strategic Sourcing) Dept. and ask them what to do.
Invoice: Indicates Purchase Order lines, including voucher and receiver
Payment: Displays payment inquiry and results
6. The Select Action drop-down menu on the far right side of the Manage Requisitions page isused to do things or observe things about a given requisition. The choices you see displayed in this menu will change depending on the current status of the requisition. For example, the Cancel choice vanishes once the requisition has generated a Purchase Order, but a new choice might then appear, such as Process Return.
After clicking the action you want, be sure to click the yellow Go button to make it happen.
6
Page 62

eP
rocu
rem
en
teP
rocu
remen
t 9.2
7. In the example shown below, we clicked View Approvals from the Select Action menu. TheApproval Status page is displayed. Here, you can see when the requisition was either denied or approved, who did it, and when they did it.
Be sure to scroll all the way down the page. More information is usually to be seen.
The next page of this Job Aid shows examples of several of the more commonly used features of the Select Action menu choices.
To display a printable version of the requisition, which includes all the details of the order, click here.
Please be sure to read all the way to the last page of this Booklet, tosee some very important information you need to know.
Page 63

eP
rocu
rem
en
teP
rocu
remen
t 9.2
CANCEL: To cancel a requisition, click Cancel, then click Go. On the next screen you see, click the Cancel Requisition button. NOTE: If you don’t see Cancel on the Select Action menu, that means it is too late to cancel it.
COPY: To create and use a copy of a requi-sition, click Copy, then click Go. The next thing you see will be an exact replica of the requisition. You can then edit it, and/or submit it as a new order.
EDIT: To edit a requisition, click Edit, then click Go. If the requisition is waiting to be ap-proved, you’ll see the Message pictured below. To go on and edit the req, you would click OK; to cancel the editing choice, you would click Cancel. NOTE: If you don’t see Edit on the Select Action menu, that means it is too late to edit it.
Page 64

eP
rocu
rem
en
teP
rocu
remen
t 9.2
Important! What to Do if This Happens to You
Requisition Denied for Lack of Information.
Edit the requisition. Provide the missing information they asked for. Budget-check,and resubmit.
Items Not Received Within 30 Days of P. O. (only non-Catalog orders).
Watch for your orders to arrive. If you still haven’t received the items by 30 days afterthe date of the Purchase Order, contact the current eProcurement SME (Subject Matter Expert), and tell her right away. This helps resolve the delay, close out the Pur-chase Order, and save your site’s money. Currently, the SME is Robin Hoffpauir, (858) 522-5805, [email protected]
How to find a requisition’s P.O. from the Manage Requisitions screen:
Special Request Items? Do This.
Whenever you receive any Special Request items you ordered, as soon as you getthem, immediately send an email message to the Supply Center to let them know. Include the P.O. number. Send this message:
“P.O. #____ We’ve received everything.”
Send the email to: [email protected]
Want to Return Something? Do This.
Web items (Office Depot, Waxie, etc.): You can return those yourself.
Any Other Items: Do not return them yourself. Contact Strategic Sourcing Dept.
(858) 522-5808
Page 65
130086
Highlight
eP
rocu
reme
nt 9
.2
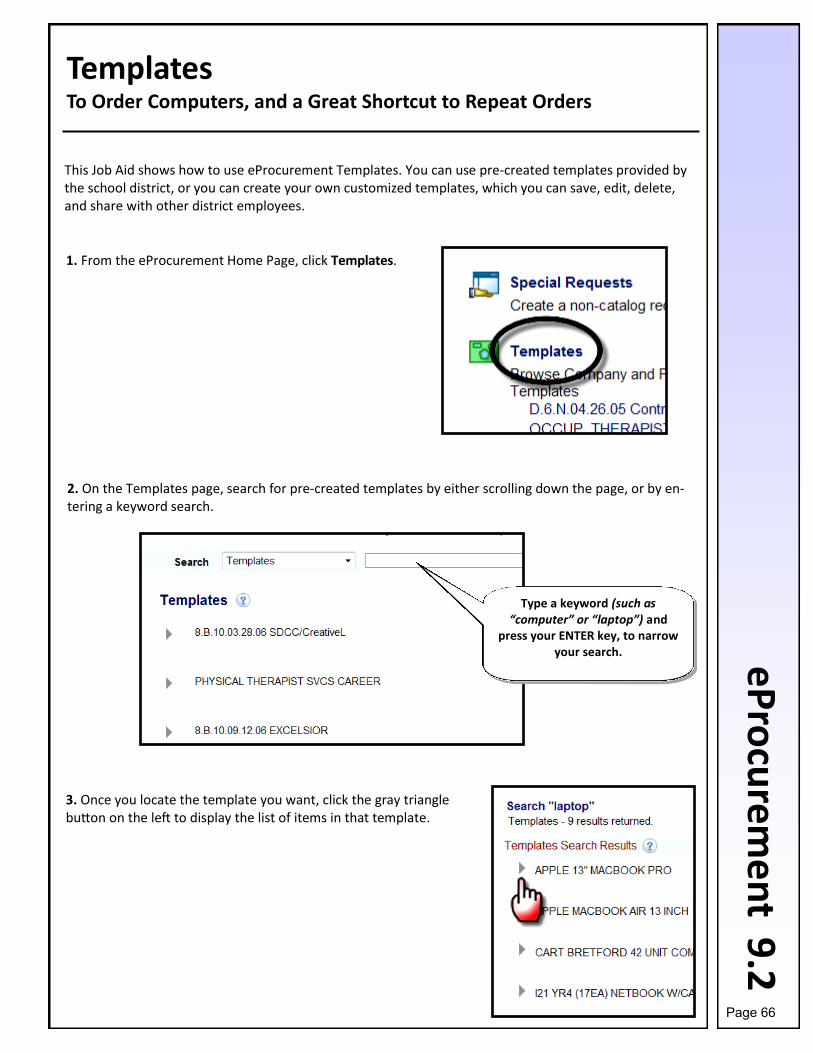
This Job Aid shows how to use eProcurement Templates. You can use pre-created templates provided by the school district, or you can create your own customized templates, which you can save, edit, delete, and share with other district employees.
1. From the eProcurement Home Page, click Templates.
Templates To Order Computers, and a Great Shortcut to Repeat Orders
2. On the Templates page, search for pre-created templates by either scrolling down the page, or by en-tering a keyword search.
Type a keyword (such as “computer” or “laptop”) and
press your ENTER key, to narrow your search.
3. Once you locate the template you want, click the gray trianglebutton on the left to display the list of items in that template.
Page 66

eP
rocu
reme
nt 9
.2
4. The entire list of individual items is displayed, within that template. This means that when you orderthis template, you will automatically place one of each of the listed items on your ePro requisition. In essence, you are going to make a copy of this template and then submit that copy as your ePro requisi-tion.
Type a number into the Quantity field, for how many you want. If you type a 1, you’ll get one of each item. If you type a
2, you’ll get 2 of each item, etc. Then, click the Add button to create your ePro
requisition.
5. Hover your mouse over the Shopping Cart“lines” link in the upper right corner. The summary of your order will pop out, showing what has been placed on the requisition.
You can then edit your requisition as desired, before you submit it.
Click the Checkout button.
Page 67

eP
rocu
reme
nt 9
.2
6. Edit your requisition as desired, and then complete and submit the requisition:
a) Give your order a name (in the Requisition Name field).
b) Enter the budget string to pay for everything.
c) Run a successful “Check Budget” to pre-encumber the funds.
d) Click the Save & Submit button to submit the order for approval and processing.
How to Create Your Own Customized Template
You can turn any eProcurement requisition into a template… even ones that have Special Request items, or Web supplier items. The template will retain anything you put on the requisition, including comments, and the budget strings.
First, build your requisition. Then, before you run the budget check or submit it, check the “Save as Tem-plate” checkbox, and save it. Then you can go ahead and finish the order, and submit it normally. The next time you want to submit that same order again, just call up your template, order a copy of it, edit the copy if you wish, run a successful budget check, and submit it.
TIPS:
When you use your template for the first time, you might want to edit the quantities so that there isonly one of each item, and then resave the template.
Be sure to give your template a good name that reflects what is in it.
Once you create and save a template, you can always edit it or delete it in the future.
You can choose to share your template with another district employee.
Page 68

eP
rocu
reme
nt 9
.2
1. Once you have all the items you want on your eProcure-ment requisition that will become a template, and you also have given it a name, and added the budget numbers to pay for it, you should be on the “Checkout” screen (used to be called the “Review and Submit” page).
Click the Select All checkbox to place a checkmark next to each line item.
Underneath the last line item, about in the center of the screen, look for the Add to Templates link, and click it.
2. You’ll see a page with any previously made templates listed at the top. Below that, in the Add a newtemplate area, type a name and description for your template, and then click OK.
Page 69

eP
rocu
reme
nt 9
.2
3. At this point, you can finish the active requisition that youjust used to make a template and place the order, or not.
To check and see how your new template looks, navigate to the eProcurement Home Page, and click Templates again.
4. Scroll down to the bottom of the Templates list, and you should see your new custom templatethere. Click its gray triangle button to display the details of your template.
5. To manage your templates, at the very bottom of the listof templates, click the Manage Personal Templates link.
6. Here you can edit your templates, allow sharing with other employees, or even delete a template ifyou don’t want it anymore.
Page 70

eP
rocu
reme
nt 9
.2
When any document (estimate, list, spreadsheet, receipt, etc.) must accompany an eProcurement requi-sition, the preferred procedure is to electronically upload (attach) the document to the requisition before submission. Typically, such document attachments provide necessary information in order to process the order. An example of this is when you place an order that includes a written estimate, and you want that estimate to accompany the ePro requisition.
This Job Aid walks you through the steps to upload/attach a document to an item on an ePro requisition. The steps illustrated below begin from the point at which we have already created the requisition, and we are starting from the Checkout screen (used to be called the Review and Submit scree).
1. Locate the line item to which you want to attach a document or other type of file. Scroll over to the farright side of the screen, and click on the Add link next to the empty text bubble.
Upload Attachments to Your ePro Order Attach Files to Go Along with Your Orders
2. Click the Add Attachments button.
3. If you see this SQL error message pop up,just click OK and ignore it. It’s a glitch in the software that doesn’t mean anything. The IT folks are working to get rid of this message. Just know that it won’t keep you from com-pleting any tasks in PeopleSoft.
Page 71

eP
rocu
reme
nt 9
.2
4. Click the Browse button. Locate the document or other type of file on your computer you want toattach to this ePro order. When you find the file, double-click on it.
5. When you see the file loaded into the textbox, click Upload.
6. You’ll see that the file has been attached. You can add another file; click View to see what’s in the fileitself; click a checkmark to Send to Supplier so they will see the attachments; and click OK to continue with the order.
7. After you clicked OK, you’ll be back on the Checkout screen. Over on the right side, where you origi-nally clicked Add, it now says Edit with a paper clip icon, to show that there is an attachment.
You can then finish up the order normally (enter budget string, run the budget check, and submit).
Page 72

eP
rocu
reme
nt 9
.2
This Job Aid shows how to run a query (report) that displays all details about every eProcurement requi-sition created by anyone within your department, office, or school site.
1. After logging into the PeopleSoft Financial online system, you must navigate to the Reporting Toolspage.
The eProcurement Report View Details of All ePro Orders in Your Entire Department/School
Click “Main Menu”, and then click “Reporting Tools”
2. After clicking Reporting Tools, click Query, and then click Query Viewer.
Page 73
eP
rocu
reme
nt 9
.2
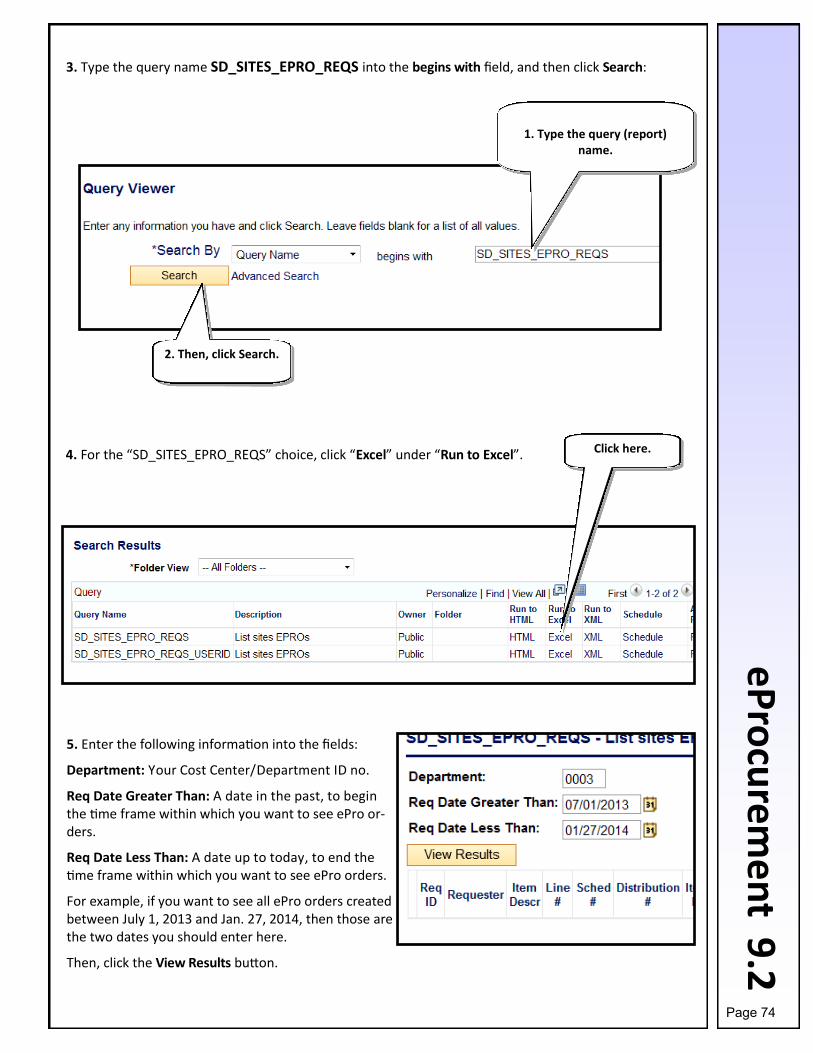
1. Type the query (report)name.
3. Type the query name SD_SITES_EPRO_REQS into the begins with field, and then click Search:
2. Then, click Search.
4. For the “SD_SITES_EPRO_REQS” choice, click “Excel” under “Run to Excel”. Click here.
5. Enter the following information into the fields:
Department: Your Cost Center/Department ID no.
Req Date Greater Than: A date in the past, to begin the time frame within which you want to see ePro or-ders.
Req Date Less Than: A date up to today, to end the time frame within which you want to see ePro orders.
For example, if you want to see all ePro orders created between July 1, 2013 and Jan. 27, 2014, then those are the two dates you should enter here.
Then, click the View Results button.
Page 74

eP
rocu
reme
nt 9
.2
6. If the report does not automatically open in an Excel spreadsheet, look at the bottom of your screen.If you see the message displayed below, click either Open or Save.
7. The spreadsheet should open in Excel. Look at the top of the screen for a possible message saying youare in Protected View. Click to Enable Editing. Then you can filter/edit/save the report.
Click here.
8. To quickly and easily adjust the width of all the Excel columns, so that all the excess spaces are elimi-nated and all the data can be completely seen and not hidden, try this little maneuver:
1. Click the blank gray buttonin between the A and the 1 in
the upper left corner.
2. Hover the mouse on thesmall vertical line that divides the A from the B, until it be-
comes a double-headed black arrow. Then double-click.
3. The columns are instantlyadjusted. Click anywhere to deselect the spreadsheet.
Page 75
eProcurement 9.2
HELP
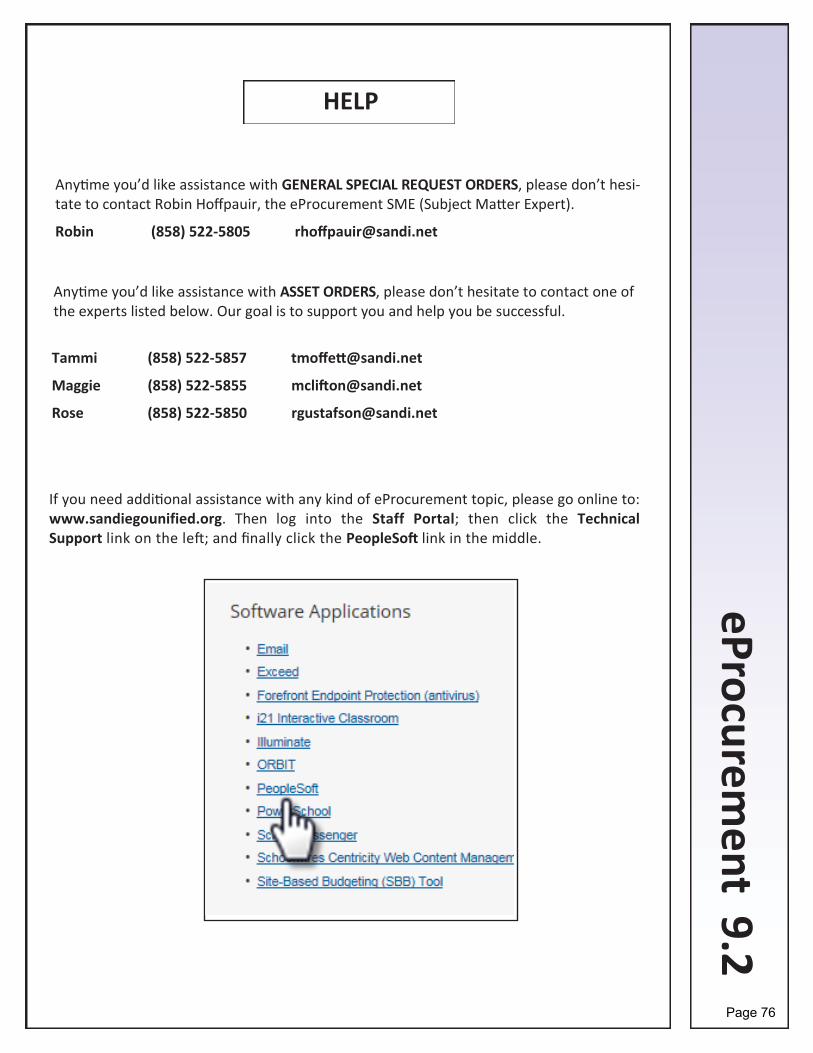
Any me you’d like assistance with GENERAL SPECIAL REQUEST ORDERS, please don’t hesi-tate to contact Robin Hoffpauir, the eProcurement SME (Subject Ma er Expert).
Robin (858) 522-5805 [email protected]
Any me you’d like assistance with ASSET ORDERS, please don’t hesitate to contact one of the experts listed below. Our goal is to support you and help you be successful.
Tammi (858) 522-5857 tmoffe @sandi.net
Maggie (858) 522-5855 mcli [email protected]
Rose (858) 522-5850 [email protected]
If you need addi onal assistance with any kind of eProcurement topic, please go online to: www.sandiegounified.org. Then log into the Staff Portal; then click the Technical Support link on the le ; and finally click the PeopleSo link in the middle.
Page 76