D2008F(A/P/P1) Digital Electronic Weighing Indicator ...
38
I D2008F(A/P/P1) Digital Electronic Weighing Indicator Technical Manual Version: Mar. 2009 ●Please read this manual carefully before using ●Please keep this manual properly for reference Keli Electric Manufacturing (Ningbo) Co., LTD Type text here
-
Upload
khangminh22 -
Category
Documents
-
view
2 -
download
0
Transcript of D2008F(A/P/P1) Digital Electronic Weighing Indicator ...

I
D2008F((((A/P/P1))))
Digital Electronic Weighing Indicator
Technical Manual
Version: Mar. 2009
●Please read this manual carefully before using
●Please keep this manual properly for reference
Keli Electric Manufacturing (Ningbo) Co., LTD
Type text here
Admin
Pro web
Admin
Pro web

II
Index
1 Technical parameter ........................................................................................................................................................ 1
Tham số Kỹ thuật
2 Installation and Connection ............................................................................................................................................ 2
2.1 The connection between indicator and digital load cell ...................................................................................... 2
2.2 The connection between indicator and scoreboard ............................................................................................ 2
2.3 The connection between indicator and computer............................................................................................... 2
2.4 The connection between indicator and battery ................................................................................................... 3
3 Truck scale debugging step introduction ........................................................................................................................ 3
4 Digital load cell debugging .............................................................................................................................................. 3
4.1 Modify the communicating address of load cell .................................................................................................. 3
4.2 Digital load cells assemble scale .......................................................................................................................... 4
4.3 Modify the communication corner position of digial load cells ........................................................................... 4
4.4 Check ISN code of all corners ............................................................................................................................... 5
4.5 Corner-difference correction ............................................................................................................................... 6
5 Calibration Debugging ..................................................................................................................................................... 8
5.1 Calibration ............................................................................................................................................................ 8
5.2 Division automatic switchover ........................................................................................................................... 11
5.3 Calibration error correction ............................................................................................................................... 12
6 Other Operation ............................................................................................................................................................... 13
6.1 Password management ...................................................................................................................................... 13
6.2 Timing Off .......................................................................................................................................................... 14
6.3 System testing .................................................................................................................................................... 15
6.4 Parameter save and recovery ............................................................................................................................. 16
6.5 PC communication parameter setting ............................................................................................................... 16
6.6 Print parameter setting ...................................................................................................................................... 17
6.7 Customized printing format ............................................................................................................................... 19
6.8 Indicator character info input and delete .......................................................................................................... 23
7 Information prompt ...................................................................................................................................................... 26
Appendix A: Communication protocol ............................................................................................................................. 28
Appendix B:weight bill format example: ....................................................................................................................... 31
Appendix C:Detail list and statistic form example ............................................................................................................ 32
Appendix D D2008FA default parameters ........................................................................................................................ 33
Admin
Pro web

1
1 Technical parameter
Type D2008F (A/P/P1)
Digital load cell interface
Communication mode RS485
Signal transmission distance ≤1000m
Transmission baud rate 9600、19200 bps
Excitation power DC12V
Digital interface ability ≤16 digital load cells or digital modules
Display
7 digits of LED,7 digits of status symbols
Keyboard
Number Keys 0 ~ 9
Function keys 30 pcs(10 of 30 are combined with Number keys)
Clock
display year, month, date, hour, minute and second, leap year and leap month automatically.
Scoreboard display interface
transmission mode: Serial transmission mode , current loop and RS232
Transmission baud rate: 600bps
Serial communication interface
transmission mode: RS232/RS485
Baud rate: Options of 600/1200/2400/4800/9600/19200
Printing interface
With standard parallel printing interface, which can be connected with the wide line printers , such as
ESPON LQ-300K+Ⅱ、ESPON LQ-300K 、ESPON LQ-680K、ESPON LQ-730K、 ESPON
LQ-1600K(+)、KX-P1131、DS-300, etc.
D2008FP is with thermal mirco-printer, D2008FP1 is with matrix printing.
Data storage
can store 1,500 groups of vehicle numbers and tare weight, 201 groups of cargo
numbers and cargo name in Chinese and English, 100 groups of customer
numbers and customer names in Chinese and English, and 100 sets of figures or
note information in Chinese and English, 2400 groups weighing records, 20
groups overload records.
Operating environment
Power input : AC110~220V 50~60HZ
DC 12V
Operating temperature: 0℃ ~ 40℃
Storage temperature : -25℃ ~ 55℃
Relative humidity : ≤85%RH
Sizes 339×110×230 mm
Weight about 3.7kg
Type text here
Admin
Pro web

2
2 Installation and Connection
2.1 The connection between indicator and digital load cell
The indicator can connect with C and E series digital load cells, the connection is shown as below:
digital load cell interface and description
2.2 The connection between indicator and scoreboard
Connection with Keli scoreboard is shown as below:
2.2.1. RS232 connection
2.2.2. Current loop
2.3 The connection between indicator and computer
The indicator has two kinds of serial communication, one is RS232, the other one is RS485。
PC interface of indicator
Pin Description C series E series
1 Power + Red Red
2 Power - Black Black
3 Signal A(+) White Green
4 Signal B(-) Green White
PC interface
of indicator
RS485
communication
device
1 (Signal A) Signal A
9(Signal B) Signal B
PC
interface of
indicator
9 cores serial
port of
computer
2 2
3 3
5 5
5 cores load cell interface
RS232 connection between indicator and
computer5 cores load cell interface RS485 connection between indicator and
RS485 communication device
Admin
Pro web

3
2.4 The connection between indicator and battery
Indicator itself has battery charging module. Please use 12V/7Ah battery;At converse
connection, the supply loop of battery will be cut off.
3 Truck scale debugging step introduction
1st step: set up address and assemble scale Method 1:suitable for C and E type digital load cells
1、set up address for every digital load cell (FUNC 0 of 4.1) 2、indicator search and assemble scale (FUNC 1 of 4.2) Method 2:when use E type module which has automatic assemble net function, the
operation is as below 1、automatic assign address (FUNC 3 of 4.1) 2、load for each corner to confirm position(dtype of PST5 in 4.3)
2nd step: check the loading status of each digital load cell Method in 4th section test 0 of Chapter 4 to check the loading status of each digital load
cell. Therein the ISN display unit of Keli digital load cell is kg. Adjust scale to reasonable status according to ISN status.
3rd step: automatically adjust corner error ( can not be done) Method in 4.5, adjusting corner error under good scale environment is better than
manual adjusting corner error. 4th step:linearity calibration for scale Method in 5.1, use standard calibration method. 5th step:check corner error and adjust by hand Manual corner error adjustment has two kinds, please refer to 4.6, when separate load each corner and test corner error, can input weight value to adjust, under other status, can input adjusting coefficient.
4 Digital load cell debugging :Sự chỉnh lý tế bào tải Số
4.1 Modify the communicating address of load cell
4.1.1 The address of all digital load cells in scales can not be repeatable. Setup address for each digital
load cell in accordance with form 3-1-1.
Operation:
Step Operation Display Explanation
1 Press 【F1】 Press 【888888】 Press 【ENTER】
c000000 c- - - - - -
Input calibration password Initial password is “888888”
2 Press 【F1】 Press 【ENTER】
FUNC 0
Select function category no. zero to enter and setup address
3 Press 【ENTER】
S adr -----
Search connected digital load cells.
4 Press 【01】 Press 【ENTER】
Xd** N## Xd** N01
Note 3-1-0 X: load cell communication protocol
1: keli C type 2: keli E type d**digital load cell originalcommunication address N## new communication address Setup new communication address as 01(range is
1~16)
5 Press 【ENTER】
******. Setup successfully and display ISN code of digital load cell
Admin
Pro web

4
6 S adr Back to step 3
Note 3-1-0:when indicator find more than one piece or zero piece of digital load cells, indicator send error
prompt of Err adr
4.1.2 Automatically assign address for digital load cells with E type communication proposal, so no need to
assembly operatioin for digital load cells, method is shown as below:
Step Operation Display Explanation
1 Press 【F1】 Press 【888888】 Press 【ENTER】
c000000 c- - - - - -
Input calibratioin password Initial password is “888888”
2 Press 【3】 Press 【ENTER】
FUNC 0 FUNC 3
Select function category no. 3 to enter into assign address automatically
3 NET Net assembling--- Mạng(lưới) tập hợp
4 NO ** **net assembly successfully,there are ** pieces of digital load cells in the net. Note 3-1-2
5 Press 【1】 Press 【ENTER】
SUrE 0 SUrE 1
If carry out to assign address automatically 0: no and exit 1: yes, to assign address đúng, tới địa chỉ gán.
6 Weighing status
Parameter setting is finished
4.2 Digital load cells assemble scale
4.2.1 Automatically identify digital load cell type and quantity
Step Operation Display Explanation
1 Press 【F1】 Press 【888888】 Press 【ENTER】
c000000 c- - - - - -
Input calibration password Initial password is “888888”
2 Press【1】 Press 【ENTER】
FUNC 0 FUNC 1
Select function category no. 1 to net assembly procedure
3 Press 【ENTER】
T** N** T load cell communication protocol N load cell quantity
4 Press 【1】 Press 【ENTER】
SUrE 0 SUrE 1
If save searched info 0: no, not save 1: yes, save type, quantity, and automatically setup corner position according to address
5 Weighing status
Parameter setting is finished
Note:::
:after finishing above operation, if all digital load cell address are known, and put it at assigned scale position, then no need to do the operation of modifying communication corner position of digital load cell in 4.3 section,corner position 1~N match 1~N address’ digital load cells by size accordingly.
4.2 Modify the communication corner position of digial load cells
Modify the corner position of digital load cells, indicator fix the position for each digital load cell by setting the address of each corner position, there are two kinds of operation, one is automatic load corner to setup corner position(form 4-3-1),the other one is input the address of each corner position(form 4-3-2), detail operation is as below:
Form 4-3-1
Step Operation Display Explanation
1 Press 【SET】 Press【0】,【5】 Press【ENTER】
PST 00 PST 05
Select parameter/function category no. 05 to enter into modify address procesure
2
Press【888888】 Press 【ENTER】
c000000 c- - - - - -
Input calibration password Initial password is “888888” example 888888
Admin
Pro web

5
3 Press【0】 Press【ENTER】
P5 00
00:load cell type 01:load cell quantity 02: setup corner position address
4
Press【0】 Press【ENTER】
dtp ** dtp 00
01:Keli C type module 02: Keli E type module Other are spare options
5
Press【ENTER】
dno ** Load cell quantity ** in net ( parameter range :0~16) Can modify(suggest not to modify)
6
Press【1】 Press【ENTER】
dtype 0 dtype 1
Setup load cell communication address for corner position 0:manual set 1:automatic set by loading corner
7
Press【ENTER】
noLoAd Zero position is confirmed,at the moment nothing is no scale, and wait stable indication lights and then press 【ENTER】。
5
Put a certain weight on a corner which will be set and then press 【ENTER】
d01 ** Setup No. corner ** is the load cell address which will be loaded currently
6 d02
** Setup No.2 corner ** is the load cell address which will be loaded currently
------
7 Automatically exit after loading corner
Weighing status
Parameter setting is finished
Form 4-3-2
6 (02 function parameters)
Press 【0】 Press 【ENTER】
dtype 0 dtype 0
Setup communication address of load cell at corner position
0:manual setting 1:automatic setting by loading corner
7
Press【03】 Press【ENTER】
d01 ** d01 03
Input the address for the load cell at No. 1 corner position: Display the load cell address at this corner Known current the load cell address of No. 1 corner position is 03, then input 03
8
Press【05】 Press【ENTER】
d02 ** d02 05
Input the address for the load cell at No. 2 corner position: Display the load cell address at this corner Known current the load cell address of No. 2 corner position is 03, then input 05
9
Automatically exit after finishing corner loaded
Weighing status
End parameter setting
Note:After modifying address, then can layout the corner position in accordance with the picture below,
if the quantity of load cell is more than 6, then can layout the corner position in the same way too.
4.4 Check ISN code of all corners
In order to make sure the accuracy of corner difference coefficient modification and long term stability of scale, the requirement that digital weighing system needs for foundation and mechanical installation is
Admin
Pro web

6
same as analogy scale. User shall adjust scale platform to be horizontal. Checking ISN code of each corner is helpful for adjusting scale platform. Refer to the method in Form
3-4-1 In order to install scale platform well, User shall install scale well first, the ISN code at corresponding
corner should be close(the difference value shall be within 400,more smaller is more better. If confirm all load cells are loaded, the difference within 800 is acceptable too.)take an example of above picture, the ISN code of No.1 ,No.2, No.6 and No.5 shall be close. And the ISN code of No.3 and No.4 shall be close too, and its value is twice of outside corner’s. If the ISN code of a corner is smaller, then the corresponding load cell is not loaded well, need to increase the hight of load cell. Form 4-4-1
Step Operatioin Display Explanation
1 Press【ENTER】 Press【888888】 Press【ENTER】
c000000 c- - - - - -
Input calibration password Initial password is “888888”
2 Press【ENTER】
tESt 0
Check AD code of each corner
3 Press【0】【1】 Press【ENTER】
dd 01 Input the load cell no. which will be checked
4 Press【ENTER】 ******. Display the ISN code of No.01 load cell
5 Press【ENTER】 dd 02 Display the ISN code of No.02 load cell Press【CHECK】 to see (such as):dd 01
…… …… …… ……
6 Weighing status Checking ends
4.5 Corner-difference correction
After scale platform is horizontal and loaded solid by heavy truck, corner-difference correction shall be
started. Indicator has two methods of automatical correction and manual correction.
4.5.1 Automatic corner-difference correction
Operation:
Step Operation Display Explanation
1 Press【F1】 Press【888888】 Press【ENTER】
c000000 c- - - - - -
Input calibration password Initial password is “888888”
2 Press【2】 Press【ENTER】 Press【ENTER】
FUNC 0 FUNC 2 noLoAd ----
Select function category no. 2 to enter into automatic corner error adjustment Confirm zero position,at the moment there should be nothing on scale, wait stable indication lights and then press【ENTER】。
3 Press【ENTER】 DCR ** Display loaded corner no. ** currently
4 Press【ENTER】 ******. Display the ISN code of load cell at the current corner
5 DCR ** Load other corners note 3-5-1
6 END
Automatic corner-difference correction coefficient is normal Automatic corner-difference correction coefficient is abnormal(>1.2 or <0.8),display ERR 30, please check every corner-difference coefficients, and adjust scale platform
7 Weighing scale
Parameter setting is finished
Note 3-5-1: It automatically calculate coefficient and exit after loading all load cells.
4.5.2 Manual Corner-Difference Correction
Manual corner-difference correction is that adjust single corner-difference coefficient to correct “eccentric
Admin
Pro web

7
load error”. Corner-difference coefficient input method is as following table 4-5-2 and table 4-5-3.
Manual corner-difference correction mainly applies for following conditions:
1. “Eccentric load error” itself is small
2. Some small eccentric load still exists after auto corner-difference correction
3. Auto corner-difference correction can not be carried on.
4. If heavy thing is loaded on adjusting corner only, then can use the adjusting corner method of inputing
weight in Form 3-5-2, under other conditions, please use the method of setting corner-difference
coefficient.
Form 4-5-2
Step Operation Display Explanation
1 Press【SET】
Press【0】,【6】
Press【ENTER】
PST 00 PST 06
Choose parameter/function type No.06 to enter manual corner-difference correction step
2
Press【888888】
Press【ENTER】
c000000 c- - - - - -
Input calibration password
Initial password is “888888”
3 Press【Enter】
P6 00
Enter manual corner-difference coefficient setting mode
0: enter weight mode directly
1~n: set corner-difference coefficient directly
4 Press【Enter】 ADJ ** **means the corner where the current heavy thing is . Do not recommend to modify
5 Press【Enter】 ****** Current displaying weight******
6 Press numbers Press【Enter】
o****** Modify to perfect weight
7 Weighing status
Parameter setting is finished, and back to weighing status
Form 4-5-3
Step Operation Display Explanation
1 Press【SET】
Press【0】,【6】
Press【ENTER】
PST 00
PST 06
Choose parameter/function type No.06 to enter
manual corner-difference correction step
2
Press【888888】
Press【ENTER】
c000000
c- - - - - -
Input calibration password
Initial password is “888888”
3
Press【1】
Press【ENTER】
P6 00
P6 01
Enter manual corner-difference coefficient setting
mode
0: enter weight mode directly
1~n: set corner-difference coefficient directly
4
Press【100200】
Press【ENTER】
0*.******
01.00200
Modify corner-difference coefficient of No.1 load cell
0 ~F means No. 1~16 corners
Note:3-5-3
4
Press【100120】
Press【ENTER】
11.******
11.00120
Modify corner-difference coefficient of No. 2 load cell
5
Press【ENTER】
------ Modify other load cell corner-difference coefficient
within network one by one
Admin
Pro web

8
6 Weighing
status
Parameter setting is finished
Note 3-5-3: reference formula of modifying coefficient
Coefficient of correction = 1+ (corner loading weight-current display weight) *0.9/corner loading weight
▲ Corner-difference formula coefficient number = corner number -1
▲ Corner-difference coefficient of the new member of load cell when networking is 1.00000
5 Calibration Debugging
5.1 Calibration
The linearity calibration of scale has three methods:
1. Under condition of calibration switch on the calibration position (up), carry on calibration debugging as
following steps.
Form 5-1-1
Step Operation Display Explanation
1 Press【Cal】 Put calibration switch (upside) to calibration position
2
Press
【888888】
Press【ENTER】
c000000
c******
Input calibration password
Initial password is “888888”
3
Press【10】
Press【ENTER】
E ***
E 010
Inpur division: 1/2/5/10/20/50/100 optional
For example, 10
4
Press【1】
Press【ENTER】
dc *
dc 0
Enter radix point number (0-4)
For example, no radix point 0
Notes: if radix point is changed, the indicator will
automatically delete weighing records and vehicle
number and tare information
5
Press【13955】
Press【ENTER】
【Pn VWXYZ】
Pn13455
Enter system parameter
V: application W: zero tracking speed
X: zero tracking range
Y: manual zero-setting range
Z: zero-setting range when power on (remark 5-1-1) for
example, 13455
6 Press【0】
Press【ENTER】
FLt *
FLt 0
Filter strength (0~4):the bigger the number is, the
stronger the filter is.
For example, 0
7
Press【50000】
Press【ENTER】
F******
F050000
Input full span value. (notes: full span plus 9 division is
the alarming vlue of overloading)
For example, 50000
8 Press【ENTER】 noLoAd Zero point confirmation, confirm there is nothing on the
scale at this time, and press 【ENTER】after stable
identifier is bright. AD value must not be less than zero
Admin
Pro web

9
9 Press【ENTER】
Press【10000】
Press【ENTER】
or
Press【CHECK】
AdLoAd1
A000000
A010000
Add weights and after stable identifier bright, enter real
weight of the weights on the scale. (note 5-1-2), for
example, 10000
Press 【CHECK】to step 10, multi-point calibration
Press 【ENTER】, two-point calibration and finish it
10 Press【ENTER】
Press【20000】
Press【ENTER】
or
Press【CHECK】
AdLoAd2
A000000
A020000
Add weights and after stable identifier bright, enter real
weight of the weights on the scale.
For example, 20000
11 END Calibration is finished
12 Weighing
status
Calibration is finishe d (note 5-1-3)
Note 5-1-1:::
:Pn parameter setting
Meanings and ranges of each Pn parameter are shown in the tables below 5-1-2、5-1-3、5-1-4、5-1-5、5-1-6。
(Form 5-1-2)
Value of V 0 1
Working area Non-trade scale Trading scale
(Form 5-1-3)
Value of W 0 1 2 3
Zero trace
speed
0.4 second 0.3 second 0.2 second 0.1 second
(Form 5-1-4)
Value of X 0 1 2 3 4 5 6 7 8 9
Zero trace
range
No
tracing 0.5e 1.0e 1.5e 2.0e 2.5e 3.0e 3.5e 4.0e 4.5e
(Form 5-1-5)
Value of Y 1 2 3 4 5
Zero area by typing【zero】
key
2%F.S 4%F.S 10%F.S 20%F.S 100%F.S
(Form 5-1-6)
Value of Z 0 1 2 3 4 5
Start zero
range
0%F.S 2%F.S 4%F.S 10%F.S 20%F.S 100%F.S
Note 5-1-2:::
:Relevant parameters can be printed after debugging.(Details:Type【FORM】,enter【8】【0】,
and press 【ENTER】 to save parameters in case of repeat input)
2, When calibration switch is in the calibration position, do as follows to realize quick calibration of
two-points.
Form 5-1-7
Step Operation Display Explanation
Admin
Pro web

10
1 Press【cal】 Dial calibration switch (upward) to calibration area
2
press
【888888】
press
【ENTER】
c000000
c- - - - - -
Initial password is “888888
3
press 【999】
press
【ENTER】
E ***
E 999
Input division:1/2/5/10/20/50/100 optional
999 stands for entrying quick calibration
4 Input
password 669687 authority reserved
5 press
【ENTER】 noLoAd Prompt to confirm zero
6 press
【ENTER】
press
【WEIGH】
AdloAd1
press 【ENTER】to reconfirm zero and prompt load
calibration
press 【WEIGH】,no change of zero, prompt load
calibration
7 press
【10000】
press
【ENTER】
End
A10000
press 【WEIGHT 】, no change of calibration ratio.
Calibration is finished.
After loading weights, input value and calibrate again.
8
End
123456
Calibration is finished
Back to weighing status
3, When calibration switch is in the calibration area, do as follows to realize quick calibration of three-points.
Form 5-1-8
Step Operation Display Explanation
1 Press 【cal】 Move calibration switch (upward) to calibration area
2
press
【888888】
press
【ENTER】
c000000
c- - - - - -
Input calibration password,
Initial password is “888888”
3
press 【999】
press
【ENTER】
E ***
E 999
Input division:1/2/5/10/20/50/100 optional
999 stands for starting quick calibration
4 Input
password 669687 Rights reserved
5 press
【ENTER】 【
【【
【 noLoAd】】】
】 Prompt to confirm zero
6 press
【ENTER】
press
【WEIGH】
【
【【
【AdloAd1】】】
】
press 【ENTER】to reconfirm zero and prompt to load
calibration
press 【WEIGH】,no change of zero, prompt to load
calibration
Admin
Pro web

11
7 press
【10000】
press
【CHECK】
【
【【
【 10000】】】
】
press 【TARE】,no change of calibration ratio 1,hint to
continually load calibration
After loading weights , input values and confirm
calibration by pressing【CHECK】
8 press 【2500】
press
【CHECK】
【
【【
【AdloAd2】】】
】 After loading weights , input values and confirm
calibration by press ing【CHECK】
【
【【
【 End】】】
】
【
【【
【 123456】】】
】
Calibration is finished
Back to weight condition
5.2 Division automatic switchover
D2008FA provides 3 divisions auto switchover function。Two division auto switchover points can be set:
when gross weight is less than division switchover point 1, it shows to switch division 1 grade downwards
(eg:switchover 50 to 20,switchover 10 to 5);when gross weight is higher than division switchover point
1,it shows to switch division 1 grade upwards(eg:switchover 1 to 2,switchover 5 to 10)。See Form 4-2-2
for setting division switchover points.
▲If seWng division switchover points to be “000000”,it means relavtive switchover functions will not be
used.
▲ If division is 1, it is not allowed to switchover division downwards.
Form 5-2-1
Step Operation Display Explanation
1 press 【SET】
press 【ENTER】
PSt 00 Choose parameter/function category number
00, enter calibration parameter setting
program.
2
press 【888888】
press 【ENTER】
c000000
c- - - - - -
Input calibration password
Initial password is “888888”
3
press 【6】
press 【ENTER】
P0 00
P0 06
Input parameter number
00-division; 01-digit of decimal point
02-parameter; 03- filter intensity.
04-full capacity; 05- modify coefficient
06-division auto switchover point 1
07- division auto switchover point 2
08- calibration linearity parameter
4
press 【0】
press 【ENTER】
n******
n000000
division auto switchover point 1
eg, 000000(no using division 1 switchover
function)
5
press 【0】
press 【ENTER】
H******
H000000
division auto switchover point 2
eg, 000000(no using division 2 switchover
function)
6 press 【ENTER】
……
……
……
……
……
A******
L******
LH*****
b******
o******
oH*****
It displays calibration parameters, do not
modify. If you do not check this, press
【WEIGH】to exit calibration status. (you can
directly input data when changing the indicator,
free of calibration)
Note:
Admin
Pro web

12
A AD code L、LH of Zero digit are calibration
ratio for first section
b AD code of deviding point of first section,o、
oH are calibration ratio for section section
Note: All Deviding point AD code is sign number
999999 if not processed via non-linearity
correction. For example:b is 999999 if only
single point calibration is done.
7 Weighing
status
Parameter setting is finished
5.3 Calibration error correction
After calibration, if finding you input wrong weight value when loading weights, there are two ways to
correct:
(1) Repeat full capacity calibration:repeat quick calibration while keeping the weights(see above
section for quick calibration).
(2) Calculate and modify system correction coefficient:use following formula to calculate correction
coefficient, and input it into system as Form 4-3-1:
coefficient of correction=corner loaded weight/current display weight
Example 1:Actual loading weight is 29500kg,while you input the weight to be 30000kg(that is, 29500kg is
incorrectly set to be 30000kg),which leads to weight error。Modify as following formula:
1) Calculate system correction coefficient:
coefficient of correction=29500/30000=0.98333
2) Input correction coefficient, see table below for details:
Step Operation Display Explanation
1 press 【SET】
press 【ENTER】
PSt 00
Move calibration switch (upward) to
calibration area
2
press 【888888】
press 【ENTER】
c000000
c- - - - - -
Input calibration password
Initial password is“888888”
3
press 【5】
press 【ENTER】
P0 00
P0 05
Input parameter number 05,set general
calibration coefficient
Eg, 05
4
press 【98333】
press 【ENTER】
E1.00000
E0.98333
Input general calibration coefficient after
calculation
Eg, 0.98333
5 press 【WEIGH】 n****** Exit after input
Admin
Pro web

13
6 Weighing status
6 Other Operation
6.1 Password management
Password management includes encryption selection, password modification and random code unlock
6.1.1 Encryption selection and password modification:
D2008FA has encrypting function for operation. Besides for the fixed required to input calibration Password
for the measurement related operations, it can also set Password through encryption options for the options
like testing, parameter setting, weighing record delete or checking, etc. The calibration password before
delivery from factory is “888888”
Change the Password to any numbers except for “000000” and select the encryption options at the same
time. Detailed steps are as follows:
(Form 6-1-1)
Steps Operation Display Explanation
1
【SET】
【20】
【ENTER】
PSt 00
PSt 20
Select Parameter/Function category 20 to modify
the calibration password
2
【888888】
【ENTER】
C000000
C- - - - - -
Input old calibration password
Example 888888
3
【ENTER】
P20 00 Input parameter number
4
【1111】
【ENTER】
【UP WXYZ】
UP 1111
Encryption Selection:
W Testing Function Encryption 0=No 1=Yes
X Parameter Setting Encryption 0=No 1=Yes
Y Record Parameter Encryption 0=No 1=Yes
Z Record Checking Encryption 0=No 1=Yes
(Note 6-1-1)
5
【111111】
【ENTER】
n000000
n111111
Input New calibration password Nhập vào mật khẩu định
kích cỡ Mới
Calibration Password can not be modified to 000000”
Example 123456
6
【123456】
【ENTER】
r000000
r123456
Input new calibration password
Example 123456
(Note 6-1-2)
7
PASS
Weghing
status
Password modification is successful, Back to weighing
status
Note 6-1-1:::
:Encryption Selection is actually to select if the password protection is required or not when
operating the corresponding functions. If select no encryption, there is no need to input password
to finish the corresponding operations. On the other hand, the password must be input before
finishing the corresponding operation.
Admin
Pro web

14
Note 6-1-2:::
:In order to ensure the newly input password correct, it is required to input the new password
again. If the password that input in two times are same then password is modified successfully.
After display【PASS】it automatically returns to the weighing status. If the password that input in
two times are different then back to the step 3 asking to input the new Password.
Để đảm bảo mật khẩu mới đầu vào chính xác, nó là cần thiết để nhập mật khẩu mới một lần nữa. Nếu mật
khẩu mà đầu vào trong hai lần là cùng một mật khẩu sau đó được sửa đổi thành công. Sau khi màn
hình hiển thị 【】 PASS nó sẽ tự động trở về trạng thái cân. Nếu mật khẩu mà đầu vào trong hai lần
khác nhau sau đó trở lại bước 3 yêu cầu nhập mật khẩu mới.
Note 6-1-3:::
:Please keep the modified password properly!! If it is lost then the calibration will not be able to
carried out. it has to be sent back to the factory to initialize the password or reset according to
the Password unlock mode
Hãy ghi mật khẩu sửa đổi đúng! Nếu nó bị mất đi, hiệu chuẩn sẽ không thể thực hiện. nó phải được gửi trở
lại nhà máy để khởi tạo mật khẩu hoặc thiết lập lại theo chế độ Mật khẩu mở khóa
6.1.2. Random code unlock:::
:
This function is adopted when the password is lost or forgotten You may use following methods to
get the temporary password and use it to do some operation like unlock, calibration. Details is
shown as follows:
Mã ngẫu nhiên mở khóa:
Chức năng này được thông qua khi được mật khẩu bị mất hoặc quên mật khẩu Bạn có thể sử dụng
phương pháp sau đây để có được mật khẩu tạm thời và sử dụng nó để làm một số hoạt động như
mở khóa, hiệu chuẩn. Thông tin chi tiết được hiển thị như sau:
1). Get the unlock random code: switch the calibration plug (Up) to the calibration position and then follow
the steps according to form 6-1-2.
Được mở khóa mã ngẫu nhiên: chuyển đổi cắm chuẩn (Up) đến vị trí chuẩn và sau đó làm theo các bước theo
mẫu 6-1-2.
2). Phone sales service number of our company (On the back cover of the manual) and tell the unlock random
code to our technical service people to get a temporary password. 3). Use the temporary password
to do the unlock, calibration operations etc again. Form 6-1-2
Doanh số bán hàng điện thoại số dịch vụ của công ty chúng tôi (Ở bìa sau của hướng dẫn) và nói với mở khóa
mã ngẫu nhiên cho những người dịch vụ kỹ thuật của chúng tôi để có được một mật khẩu tạm
thời.
3). Sử dụng mật khẩu tạm thời để làm việc mở khóa, hoạt động hiệu chuẩn vv một lần nữa. hình thức 6-1-2
Step Operation Display Explanation
1 【SET】
【22】
【ENTER】
PSt 00
PSt 22
Select Parameter/Function category no. 22 to
check the random code
Chọn loại thông số / Chức năng không. 22 để kiểm tra
mã ngẫu nhiên
2 【ENTER】 r****** Write down the data on paper
Viết vào dữ liệu trên giấy
3 Weighing status
6.2 Timing Off
6.2.1 The way to set the expire date of probation
Step Operation Display Explanation
1 Switch the calibration Select Parameter/Function category no. 21 to
Admin
Pro web

15
plug(Up) to the calibration
position,【SET】
【21】
【ENTER】
PSt 00
PSt 21
enter timing off setting
Lựa chọn phạm trù Tham số/ Chức năng số 21
để vào định giờ ra khỏi sự thiết đặt.
2
【888888】
【ENTER】
c000000
c- - - - - -
Enter calibration password selection
Example 888888
3
【090428】
【ENTER】
t**.**.**
t09.04.28
Input expire date Đầu vào hết hạn Ngày tháng
Example 09/04/28
4 Weighing
status
Setting is finished
6.2.2 Remove and modify the timing off:
1) After exceeding the set off time, the indicator will display 【HELP】and can not weigh
2) If want to cancel timing off, only need to set the probation time to 999999
6.3 System testing
D2008FA provides the assistant inspection function for the indicator itself and load cells. It is easier for the
user to analysis and judge the malfunctions in the spot with easy and convenient operation and visual
observation D2008FA Cung cấp chức năng kiểm tra trợ lý (cho) bản thân chỉ tiêu và những tế bào tải. Nó (thì) dễ dàng hơn (cho)
người sử dụng tới sự phân tích và xét đoán những sự trục trặc trong đốm với ô-pe-ra dễ dàng và tiện lợ
6.3.1 Check overloading record
D2008FA can automatically save the top 20 overloading record
The overloading record will be cleaned up after calibration is successfully done. The overloading record can
not be manually cleaned up. Press【FORM】, 【70】to print out overloading record.
Form 6-3-1 Việc chất quá nặng bản ghi sẽ bị sạch lên trên sau khi sự định kích cỡ một cách thành công được làm. Việc chất quá nặng
bản ghi không thể bằng tay bị sạch lên trên Sự ấ�
n Mẫu (dạ� � �
ng) , 70 tới bản in ở ngoài chất quá nặng bản gh
Step Operation Display Explanation
1 【TEST】
【888888】
【ENTER】
c000000
c- - - - - -
Enter calibration password
Initial password is “888888”(Password can be
changed)
Example 888888
2 【1】
【ENTER】
tESt 0
tESt 1
Select testing type :
0: Check the ISN code of each load cell
Kiểm tra mã ISN (của) mỗi tế bào tải.
1: Check overloading record
Kiểm tra chất quá nặng bản ghi
3 【ENTER】 no 01 Display record serial no.
4 【ENTER】 d**.**.** Display the overloading date
5 【ENTER】 t**.**.** Display the overloading time
6 【ENTER】 o****** Display the overloading weight
7 【ENTER】 no 02 Display the next record
…… …… …… ……
8 【ENTER】 End Record display is finished
Admin
Pro web

16
6.4 Parameter save and recovery
24C04 is a backup chip. When doing save and recovery operation, it must be inserted to U15 , and after
operation it must be pulled out insert to U16* to protect the electricity and usage safety of the chip.
24C04 là một chíp sao lưu. việc cất giữ và thao tác khôi phục, nó phải được chèn vào đối với U15, và sau khi thao tác nó phải được kéo
ra ghép đối với U16* để bảo vệ điện và sự an toàn cách dùng (của) chíp
6.4.1 Backup operation methods:
S
tep
Operation Display Explanation
1 【SET】
【26】
【ENTER】
PST 00
PST 26
Select Parameter/Function category no.26 to enter
parameter backup
Calibration plug is ON
2 【888888】
【ENTER】
c000000
c- - - - - -
Enter calibration password
The original password“888888”
3
【1】
【ENTER】
SURE 0
SURE 1
Enter 1 to confirm
4
SAVE
END
Saving
Saving complete
5 Weighing
status
Parameter setting is finished
6.4.2 Restore methods Khôi phục những phương pháp
Restoring operation will clearn original parameters of indicator, please be careful
ý định clearn thao tác Hồi phục nguyên bản những tham số của chỉ tiêu, xin cẩn thận
Step Operation Display Explanation
1 【SET】
【27】
【ENTER】
PST 00
PST 27
Select parameter /function category no 26 to enter
into parameter backup
Calibration switch is ON
2 【888888】
【ENTER】
c000000
c- - - - - -
Enter calibration password
Initial password is“888888” Mật khẩu Ban đầu.
3
【1】
【ENTER】
SURE 0
SURE 1
Enter 1 to confirm
4
Load
END
In restoring
Restoring is finished
5 Restart
automatically
Parameter setting is finished and indicator will
automatically restart.
6.5 PC communication parameter setting
Step Operation Display Explanation
1
Press【SET】 Press 【1】 Press【ENTER】
PSt 00 PSt 01
Input parameter/function category no. “01” If select to input calibration password,then need to enter password input interface C000000。
。。
。
2 P1 00 Input parameter no. e.g. select 00
Admin
Pro web

17
Press【ENTER】
0 communication address ; 1 baud rate ; 2 communication type 3 calibration method
3
Press【1】 Press【ENTER】
Adr *** Adr 001
Communication address(1~255) e.g. select 001
4
Press【4】 Press【ENTER】
bt * bt 4
Serial communication baud rate(0~5) 0 to 5 stand separately for 600、1200、2400、4800、9600、19200 baud rate e.g. 4
5
Press【0】 Press【ENTER】
tF * tF 0
Communication type selection, e.g. select 0 0:continuous transmission 1 ;1:MODBUS command
type; 2 continuous transmission 2 ; 3 : continuous transmission 3; 4:continuous transmission 4。Refer to appendix A
6
Press【0】 Press【ENTER】
jn * jn 0
Check mode selection(0~2) 0:no check 1:even check; 2:odd check; e.g. select 0
7 Weighing
status Communication parameter setting is finished,back to weighing status
6.6 Print parameter setting
Step Operation Display Explanation
1
Press【SET】 Press【2】 Press【ENTER】
PSt 00 PSt 02
Input parameter/function category no. “02” to enter into print parameter setting procedure. If select need to input calibration password, then enter into password input interface C000000 first
2
Press【ENTER】
P2 00 Input parameter no. 0 automatically print 1 printer category 2 printer limit selection 3 sheet quantity 4 minimum printing weight when printing automatically 5 form feeding quantity at sheet printing mode 6 print format selection 7 discount rate selection when filling print 8 store content 9 information print type 10 printing control parameter 11 weight unit 12 working parameter 13 automatic form feeding line quantity e.g. select 00
3
Press【0】 Press【ENTER】
AUto * AUto 0
Automatic printing selection(0~2) 0:manual printing; 1:automatic printing(do not keep automatic printing status when power off); 2:automatic printing(keep automatic printing status when power off) e.g. select 0
4
Press【1】 Press【ENTER】
tyPE * tyPE 1
Printer category(0~3)selection: 0:printing is invalid; 1: faceplate Chinese
character micro print; 2:EPSON LQ-300K(+)、LQ1600K、DS-300、 Panasonic KX-P1131; 3:Panasonic KX-P1121
Admin
Pro web

18
5
Press【99】 Press【ENTER】
HL ** HL 99
Printer limit selection(as follows): 00:print after back to zero; 25:print after back to 25% of weighing capacity; 50:print after back to 50% of weighing capacity; 75:print after back to 75% of weighing capacity印; 99:print at full weighing capacity e.g. select 99
6 Press【3】 Press【ENTER】
Arr * Arr 3
Sheet quantity(1~3) 1 to 3 separately stands for 1 to 3 sheets e.g. select 3
7
Press【1000】 Press 【ENTER】
L****** L001000
Minimum printing weight at automatic printing(must be bigger than 10 times division value) e.g.:1000
8
Press【3】 Press 【ENTER】
b ** b 03
Form feeding line quantity when sheet printing(0~30) e.g. select 3
9
Press【1】 Press【ENTER】
odE * odE 1
Printing format selection(0~9) 0:record format 1:vertical sheet format; 2:horizontal sheet format 3:customized
record format; 4:customized vertical sheet format 5:customized horizontal sheet format; 6: filling type; 7:mirco-printing
horizontal sheet format; 8:micro-printing record format; 9 : micro-printing customized horizontal sheet format. 10: customized filling format; e.g. select 1 refer to appendix B
10 Press【0】 Press【ENTER】
dct * dct 0
Discount rate selection when filling printing(0~1) 0:not use discount rate; 1:use discount rate e.g. select 0
11
Press 【11111】 Press【ENTER】
Uy***** Uy11111
Store contents selection(note 3-1-6): remarks:inputting any non-zero numbers in the step is regarded as 1,the following is same) e.g. select “11111”
12
Press【11111】 Press【ENTER】
Hy***** Hy11111
Information printing type selection: select the output of printing is character or numbers(note 3-1-7)。 e.g. select “11111”
13
Press【110000】 Press【ENTER】
y****** y111111
Printing control parameter(note 3-1-8) e.g. select “111111”
14 Press【0】 Press【ENTER】
Ut * Ut 0
Weight unit selectioin(0~1):0=kg;1=t。 e.g. select 0
15
Press【0110】 Press【ENTER】
yr wxyz yr 0110
Working parameter selection: W spare X printing selection 0=store but not print 1=store and print Y storing time selection 0=first weighing time 1 = second weighing time Z spare
Admin
Pro web

19
16
Press【00】 Press【ENTER】
do ** do 00
Automatic form feeding line quantity after printing group data and form feeding line quantity before printing( mainly used in conveniently tearing paper) e.g. :0(line) note:::
:set as 00 when using DS300 printer 17 Weighing status Printing parameter setting is finished , and back to
weighing status
note 3-1-6:::
:store contents(Uy parameter)have five digits,they are separately 1~5 from left to right,the function of each digit is as follows: 0:not use company name 0:not use remarks
No.1 digit No.2 digit 1:use company name 1:use remarks 0:not use customer 0:not use cargo no.
No. 3 digit No. 4 digit 1:use customer 1:use cargo no. 0:not use vehicle no.
No. 5 digit 1:use vehicle no.
note 3-1-7:information printing type selection(Hy)have five digits,they are separately 1~5 from left to right,the function of each digit is as follows: 0:not print company name 0:print number remarks.
No.1 digit No.2 digit 1:print company name 1:print character remarks 0:print customer no. 0:print cargo no.
No. 3 digit No. 4 digit 1:print customer character info 1:print cargo namer
No. 5 digit spare
note 3-1-8:printing control parameter(y parameter)have 6 digits,they are separately 1~6 from left to right,the function of each digit is as follows:
0:standard printing speed No. 1 digit
1:quick printing(save color tape but printing quality is not good) 0:without frame printing Note:save color tape and improve print speed,this option
is for wide line printer, it is not useful for micro-printer No.2 digit 1:with frame printing
0:not input remarks no. when store printing(use current remarks no.) No. 3 digit
1:input remarks no. when store printing 0:not input customer no. when store printing(use current customer no.)
No. 4 digit 1:input customer no. when store printing 0:not input cargo no. when store printing(use current cargo no.)
No. 5 digit 1:input cargo no. when store printing 0:not input vehicle no. when store printing(use current vehicle no.)
No. 6 digit 1:input vehicle no. when store printing
Remarks:If select not input remarks no. , customer no. , cargo no. , vehicle no. for store printing,then
need to 【SAVE】 to setup not input contents first
6.7 Customized printing format
6.7.1 There are 3 press s of customized printing format
◆Vertical format;
◆Record format (incl. horizontal format, detailed report and micro typing);
Admin
Pro web

20
◆Fill-in format.
6.7.2 Setup printing content: Set the printing content in each line. Parameters are as below:
00: No printing
01: Serial no.
02: Date
03: Time
04: Vehicle no.
05: Cargo no.
06: Gross weight
07: Tare weight
08: Net weight
09: Customer
10: Remark
11: Date/hour (effective only when customized format is used)
12: Discount rate(effective only when customized format is used)
13: Empty (effective only when fill-in format is used)
6.7.3 Setup method: Phương pháp Cài đặt
▲Setting printing contents of horizontal format and detailed report.
Sự thiết đặt in ấn nội dung (của) khuôn dạng và báo cáo chi tiết nằm ngan
Step Operation Display Explanation
1
Press 【SET】
Press 【1】【4】
Press 【ENTER】
PSt 00
PSt 14
Input parameter/function number.
14: customized record format (incl. horizontal format, detailed
report).
15: customized vertical format (incl. vertical format and micro
typing).
16: customized fill-in format.
e.g.: 14
2
Press 【111111】
Press 【ENTER】
C000000
C- - - - - -
Input password.
Press 111111
2
Press 【ENTER】
P14 00 Select the line to be set.
e.g.: 00, set from the first line.
Note: 6-7-3.
3
Press 【1】
Press 【ENTER】
AL0 **
AL0 01
Input the printing content of the first line.
Note 6-7-4
e.g.: select 01
4
Press 【2】
Press 【ENTER】
AL1 **
AL1 02
Input the printing content of the second line.
e.g.: select 02
5
Press 【3】
Press 【ENTER】
AL2 **
AL2 03
Input the printing content of the third line.
e.g.: 03
… … … …
6 Press 【0】
Press 【ENTER】
AL9 **
AL9 00
Input the printing content of the tenth line.
e.g.: 00
Note 6-7-5
7 Weighing
status.
Finish setting and return to weighing status.
Admin
Pro web

21
Note 6-7-3: The indicator supports the customized input up to 10 lines (rows). Because of the width limitation
of the printer, one line may be divided to 2 lines and printed. At this time it’s necessary to reduce the number
of lines (namely set the printing content of extra part as “00”).
Note 6-7-4: If the vertical format and micro typing are selected, bL0** will be displayed. (the same below)
Note 6-7-5: The printing content of 10 lines should all be setted. Set it as 00 if no printing is requested and the
indicator will skip this line (no blank line/row appears during printing)
Ex. below horizontal format is requested to be printed out
Weighing Bill **Year**Month**Day
Serial no. Time Venhical no. Net weight
0001 12. 00. 00 12345 3.000kg
Set parameter AL0 as “01”, AL1 as “03, AL2 as “04”, AL3 as “08”, AL4~AL9 as “00”.
▲ Customized fill-in type includes setting of printing content and margins. The method of printing content
setting is similar to setting of horizontal format and detailed report stated in table 3-2-3. The display is CL0**
and there are 15 lines in all.
E.g.: Setting of weight bill below picture 6-7-1:Set the printing content according to the request of the weight
bill. Detailed operation is as below:
Step Operation Display Explanation
0 【xxxxxx】 Weighing status.
1
Press【SET】
Press【1】【6】
Press【ENTER】
PSt 00
PSt 16
Input parameter/function category number.
16:Printing content setting of customized fill-in format.
e.g.: select 16
2
Press【111111】
Press【ENTER】
c000000
c111111
Input password.
111111(fixed).
3
Press【1】
Press【ENTER】
CL0 **
CL0 01
Input the printing content of the first line.
e.g.: 01
4
Press【2】
Press【ENTER】
CL1 **
CL1 02
Input the printing content of the second line.
e.g.: 02
… … … …
5
Press【0】
Press【ENTER】
CL14 **
CL14 00
Input the printing content of the fourteenth line.
Ex.: 00
6 Weighing
status.
Finish setting and return to weighing status.
Note: 1, The indicator supports the input of customized format up to 15 lines.
2, The printing content of 15 lines should all be set. Set it as 00 if no printing is requested and the indicator
will skip this line/row (no blank line/row appears during printing). Input 13 for blank line (blank line appears
during printing).
Form head length PH=30.40mm
WEIGHT BILL
Operator
SERIAL No. 123
DATE 2004-03-05
Serial no. ofno. 0
line CL0=01
Admin
Pro web

22
distance between two lines
PG=7.82mm
Form footer lenghth PE=22.60mm
Left margin PA=41.00mm
Weight bill width PG=94.00mm Picture 6-7-1
Then set the printing margin:
Measure the PH, PG(overall printing width divided by number of lines), PE, PA, PB with ruler (refer to
picture 6-7-1). Input separately and print.
Adjust the parameters like PE, PF according to the printing result and make all contents to be printed in
corresponding position.
Step Operation Display Explanation
0 【xxxxxx】 Weighing status
1 Press【SET】 Press【1】,【7】 Press【ENTER】
PST 00 PST 17
Select parameter/function category no. 17: enter into printing margin setting of customized fill-in format
2
Press【11111】 Press【ENTER】
c000000 c- - - - - -
Input password Press 111111
3 Press【0】 Press【ENTER】
P17 00
Input function category no. , can skip corresponding setting content
4 Press【3040】 Press【ENTER】
PH xx.xx PH 30.40
Prompt to input form head length of weigh bill e.g. PH=30.40mm, see appendix:fill-in weighing
bill
5 Press【0782】 Press【ENTER】
PG xx.xx PG 07.82
Prompt to input line distance e.g. PG=7.82mm, see appendix:fill-in weighing bill
6 Press【0226】
PE xx.xx PE 22.60
Prompt to input form tail distance of weigh bill e.g. PE=22.60mm, see appendix:fill-in weighing
TIME 12 .35 .28
VEHICLE No. 00001
CARGO No. orange
GROSS 1580 kg
TARE 80 kg
DISCOUNT 10 %
NET 1350 kg
CUSTOMER Ningbo Trading Company
REMARK Mr. Zhang
Serial no. ofno. 0
line CL1=02
Admin
Pro web

23
Press【ENTER】 bill
7 Press【4100】 Press【ENTER】
PA xx.xx PA 41.00
Prompt to input left margin distance of weigh bill. e.g. PA=41.00mm, see appendix:fill-in weighing bill
8 Press【9400】 Press【ENTER】
PB xx.xx PB 94.00
Prompt the width of weigh bill e.g. PB=94.00mm, see appendix:fill-in weighing bill
9 Press【0000】 Press【ENTER】
PF xxxx PF 0000
Prompt to input form feeding adjustment e.g. PU=0000, 当多页走纸后若有偏差可通过它进第 1点长度=0.14毫米
6.8 Indicator character info input and delete
6.8.1 General 1) The indicator provides two kinds of text information input methods,one is direct input,the other one is
computer programmed information conversion mode,When inputting few words or do not have PC,can use direct input,otherwise, recommend to use computer programmed information conversion mode.
2) The indicator can save the company name of 20 pieces letter including numbers,cargo name , customer name or remarks of 10 pieces letter including numbers.
6.8.2 Direct input 1) Input regulation: ▲!Letter including numbers are inputted by inputting code enclosed along with indicator. Code form is shown
as Form 6-8-1《D2008FA letter、numbers code》。 ▲! In order to divide Chinese character and letter, the indicator specify that the info whose top two digits are
not “0” completely is Chinese character ,if they are “0” complete, then it is letter or numbers.,if four digits are “0”, means finish.
▲! Text information input has two kinds of ending methods,one is automatic finish after inputting 10 or 20 pieces of letter,the other one is that required text is less than 10 or 20 letters and end with “0000”
▲!Inputted info will be saved after finish,during the operation, press 【WEIGH】is to exit,inputted info will not be saved. ▲!Under the status of inputting info,the top two digits(left two digits of indicator)display current inputting
position(1 letter take 0.5 position) ▲!Printing output is align right edge,if need align left edge or align center, then need to add relative quantity
letters or numbers’ blank at the end,that is “0001”。 D2008FA letter、
、、
、number code(Form 6-8-1)
Cod e
Charact er
Code Chara cter
Code Character
Code
Chara cter
Code
Charact er
01 21 4 41 H 61 \ 81 p
02 ! 22 5 42 I 62 ] 82 q
03 “ 23 6 43 J 63 ^ 83 r
04 # 24 7 44 K 64 - 84 s
05 $ 25 8 45 L 65 ‘ 85 t
06 % 26 9 46 M 66 a 86 u
07 & 27 : 47 N 67 b 87 v
08 ’ 28 ; 48 O 68 c 88 w
09 ( 29 < 49 P 69 d 89 x
10 ) 30 = 50 Q 70 e 90 y
11 * 31 > 51 R 71 f 91 z
12 + 32 ? 52 S 72 g 92 {
13 , 33 @ 53 T 73 h 93
14 - 34 A 54 U 74 i 94 }
15 . 35 B 55 V 75 j 95 ~
16 / 36 C 56 W 76 k
17 0 37 D 57 X 77 l
18 1 38 E 58 Y 78 m
19 2 39 F 59 Z 79 n
Admin
Pro web
24
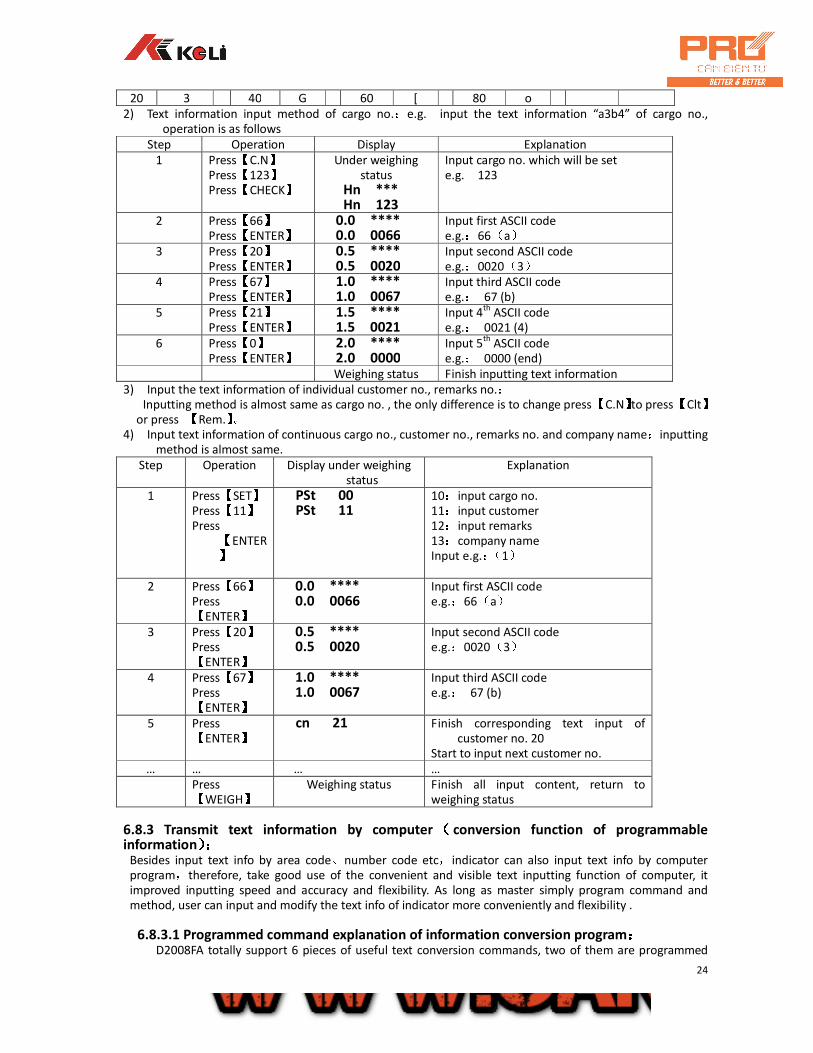
20 3 40 G 60 [ 80 o
2) Text information input method of cargo no.:e.g. input the text information “a3b4” of cargo no., operation is as follows
Step Operation Display Explanation
1 Press【C.N】 Press【123】 Press【CHECK】
Under weighing status
Hn *** Hn 123
Input cargo no. which will be set e.g. 123
2 Press【66】 Press【ENTER】
0.0 **** 0.0 0066
Input first ASCII code e.g.:66(a)
3 Press【20】 Press【ENTER】
0.5 **** 0.5 0020
Input second ASCII code e.g.:0020(3)
4 Press【67】 Press【ENTER】
1.0 **** 1.0 0067
Input third ASCII code e.g.: 67 (b)
5 Press【21】 Press【ENTER】
1.5 **** 1.5 0021
Input 4th
ASCII code e.g.: 0021 (4)
6 Press【0】 Press【ENTER】
2.0 **** 2.0 0000
Input 5th
ASCII code e.g.: 0000 (end)
Weighing status Finish inputting text information
3) Input the text information of individual customer no., remarks no.: Inputting method is almost same as cargo no. , the only difference is to change press 【C.N】to press 【Clt】
or press 【Rem.】。 4) Input text information of continuous cargo no., customer no., remarks no. and company name:inputting
method is almost same.
Step Operation Display under weighing status
Explanation
1 Press【SET】 Press【11】 Press【ENTER】
PSt 00 PSt 11
10:input cargo no. 11:input customer 12:input remarks 13:company name Input e.g.:(1)
2
Press【66】 Press【ENTER】
0.0 **** 0.0 0066
Input first ASCII code e.g.:66(a)
3 Press【20】 Press【ENTER】
0.5 **** 0.5 0020
Input second ASCII code e.g.:0020(3)
4 Press【67】 Press【ENTER】
1.0 **** 1.0 0067
Input third ASCII code e.g.: 67 (b)
5 Press【ENTER】
cn 21 Finish corresponding text input of customer no. 20
Start to input next customer no.
… … … …
Press【WEIGH】
Weighing status Finish all input content, return to weighing status
6.8.3 Transmit text information by computer(
((
( conversion function of programmable information):
):):
): Besides input text info by area code、number code etc,indicator can also input text info by computer program,therefore, take good use of the convenient and visible text inputting function of computer, it improved inputting speed and accuracy and flexibility. As long as master simply program command and method, user can input and modify the text info of indicator more conveniently and flexibility .
6.8.3.1 Programmed command explanation of information conversion program:
::
: D2008FA totally support 6 pieces of useful text conversion commands, two of them are programmed
Admin
Pro web

25
control command, the other four pieces are information conversion command. The 6 pieces of commands in a certain order compose a text file, it is information conversion program accepted by indicator. All commands begin with ‘@’, then follows A、B、C、D、E etc. command type, and end with ‘;’. Common command format:
@ command type [information inside indicator][:’ text information’]
Note: there should not be blank in the first part of command format, the content in “[ ]” is not useful in programmed command. Explanation for the 6 pieces of command as follows: 1)))
)Programmed control command: mainly used in the begin and end of conversion program, to help indicator to execute the begin and end of information conversion. Control command are two pieces, they are as follows: (1) Initial command Command format: @ S ; Function : initialize conversion schedule, indicator starts information conversion when
receiving the command. (2) Program end command
Command format: @ E;;;
; Function: let indicator end information conversion; in addition, the command is also ending
mark of information conversion program. Each information text program starts by initial command, and ends by program ending
command.
2)))
)Information conversion command: (1) Cargo no. Information conversion command: Command format: @ A*** :’$$$$$’; Function: convert a cargo no. to corresponding cargo name. “***”is cargo no. which will be converted(000~200),must be 3 digits,if not enough, then add 0 in the
front. “’$$$$$’” is corresponding cargo name after conversion, it must be included by the mark of single quote “ ’ ”, its length are 10 bytes, namely at most 10 english letters(including number), the redundant part is invalid(below is same).
The content of “$$$$$” is what have been seen, for example “$$$$$” is “LIVE”, then printing result will be “LIVE”. Can use upper computer to support any one input method to input.
For example:@A001:’apple’; Namely convert 001 cargo no. to be cargo name “apple”.
(2) Customer no. information conversion command: Command format:
::
:@ B***:’$$$$$’;;;
; Function:convert a customer no. to be customer name.
“***”is customer no.(000~099),must be 3 digits,if not enough, then add 0 in the front. “’$$$$$’”is corresponding customer name after conversion, it must be included by the mark of single quote “ ’ ”, its length are 10 bytes, namely 10 english letters(including number) , the redundant part is invalid.
For example:@B001:’tem’; Namely convert 001customer no. to be customer name “tem”。
(3) Remarks no. conversion command: Command format:
::
:@ C*** :’$$$$$’;;;
; Function:convert a remarks no. to be text remarks name.
“***” is customer no.(000~099),must be 3 digits,if not enough, then add 0 in the front. “’$$$$$’”is corresponding remarks content after conversion, it must be included by the mark of single quote “ ’ ”, its length are 10 bytes, namely 10 english letters(including number) , the redundant part is invalid.
For example:@C001:’num1’; Namely convert 001 remarks no. to be text remarks content “num1”。
(4) Setting command of user company name: Command format:
::
:@ D:’$$$$$$$$$$’; Function:add company name in the indicator, for outputting when printing weight bill.
“’$$$$$’” is set company name, it must be included by the mark of single quote “ ’ ”, its length are 20 bytes, namely 20 english letters(including number) , the redundant part is invalid.
Admin
Pro web

26
For example:@D: ’live’; Namely set company name is :“live” After knowing above programmed command, can start programme. For example:combine above examples together to be a complete information conversion program.
@S; @A001:’apple’; @B001:’tem’; @C001:’num1’; @D: ’live’; @ E;
In computer save as text file format(rename is “.txt”)to backup to indicator for down load. Note: After information conversion, original number no. still exits, When printing weight bill, please follow print setting parameter to select print content.
6.8.3.2 Operation of computer programmed information conversion. (1)First write information conversion program according to above command, the better way is to contain
one command only in one line, at the time, do not have blank, after finishing program, same it as a text file for spare use(*.txt).
(2)Connect indicator and upper computer well (3)Open serial port communication software in upper computer(e.g. Windows itself own supper
terminal or other serial debugging tool software of sending text file), it is better to adjust baud rate etc parameter.
(4) Press 【SET】, indicator display PSt 00 ,input function no. “30” and then press【ENTER】,indicator display L 00000 ,input download password “200801” and then press【ENTER】,indicator display Ld ----waiting download.
(5) Select sending the information conversion program file written in no. 1 step in the serial port debugging software of upper computer, indicator display Ld ***(*** byte numbers of downloaded information conversion)
(6) After sending is finish, indicator display【【【
【End 】】】
】,and then it return automatically to weighing status. At the moment, user can print out information comparison list for future daily use. After finishing above operation, related numbers etc information conversion inside indicator is finished. If selected print text information function and connected with printer, then weight bill including corresponding text information can be printed out.
6.8.4 Delete information comparison list:::
: Step Operation Display Explanation
1 Press【SET】 Press【40】 Press【ENTER】
PSt 00 PSt 40
Select parameter/function category no. 40 delete the text information of all cargo no. 41 delete the text information of all customer no. 42 delete the text information of all remarks no. 43 delete text company name 49 delete all information comparison list e.g.:40(delete the text of all cargo no.)
2 Press【888888】 Press【ENTER】
c000000 c- - - - - -
If not select “record delete encrypt”, then the step will be jumped, and enter into step 3 directly
3
Press【1】 Press【ENTER】
SUrE 0 SUrE 1
Confirm to delete:0:do not delete 1:delete e.g. :select 1
4 Weighing display status
Delete successfully,return to weighing display status
▲ !Deleted comparison can not be restored, so the operation should be careful.
7 Information prompt
7.1 Normal information prompt:
Admin
Pro web

27
1) …… : Please wait for a moment, inside of indicator is caculating, and do not do any operation.
2) Prnt :Please wait for a moment, there is data transmission between indicator and printer.
3) LoAd : The first time data of two time weighing is saved, displaying time will not over 2
seconds to prompt operator.
4) SAUE :when do not select printing or printer press is 0, only save the complet data records.
5) EnD :End operation.
6) PASS :Successfully revise password.
7.2 Information prompts of wrong operations:
1) Err 03:Overload alarming, must unload all or part of loads.
2) Err 08:There is no record under this condition.
3) Err 09:no this truck number.
4) Err 10:you can only save truck number or weighing records less than 10pcs.
5) Err 12:You can not use micro-printer to print report form.
6) Err 13:Selection of parameter or function is not correct.
7) Err 16:Entering password is not correct.
8) Err 17:Parameter setting is not according to requirement , please refer to requirments of entering
range of mentioned parameters.
9) Err 18:When scale do linearity calibration, the calibrating weight is less than former one
(indicatorcan use multi-point calibration, but it asks for calibrating from light to heavy).
10) Err 19:You can not print when it is zero, minus weight or unstable, also can not print when not meet
the conditions to return to zero.
11) Err 28:Print date is earlier than date of saved weighing record. Please delete the record of later date
or revise present date, make it not earlier than date of saved weighing record.
12) Err 30: The result is abnormal after doing coner auto-rectify.
13) Err 31: When set coner position of scale, the scaned load cell press is different from set value of
indicator.
14) Ecc 01~16: no 01~16 load cell is error.
15) Ecc 71~86: n-70 digital load cell with C type communication protocol with different communication
encrypt.
16) Err adr:When set load cell communication address, you can only connect with one digital load cell,
but here you connect with several digital load cells.
17) Err add:load cell interface is shortcut.
7.3 Information prompts of wrong setting:
Err P:Wrong connection with printer, there is problem with printer or the printer is out of paper,
please add new paper or key [WEIGH] to exit, then reconnect printer or change printer.
Err 23: Memorizer U14 is broken, you must use new chip for replacement.
Err 24: Memorizer U15 is broken or without installment, must install it or use a new chip for
replacement.
Err 25: When restore the backup information, there is no backup information in memorizer.
Err 90: There is error on chip of charater base.
Err 91: It is failed to save set parameters.
7.4 Other information prompts:::
:
ctnu 0:When read stable weighing datas, if indicator can not collect the stable data judged by itself,
Admin
Pro web

28
the indicator will show this prompt. At this time, operator can enter 0 or 1 or 2,
the functions are as follows:
Enter 0:Tell indicator that there is no need to continue this operation, it can
switch to next step.
Enter 1:Tell indicator to try again.
Enter 2:Tell indicator it can use these unstable data.
Appendix A: Communication protocol
Serial data format can be set as:8 digits data bits ,one stop bit,none(even-odd)check bit;Serial communication includes continuous communication and command communication two ways, therein,continuous type includes three kinds according to different communication protocol. User can make flexible selection by TF parameter.
(1). Continuous mode (TF=0): Transmitted data is current weight (gross weight) that indicator display(the weight value is 999999 when
overloading). Each frame data is made of 12 groups of data, format is shown as follows:
No. X bit Content
Note Example ( send +20.00 )
Content Code Content Hexadecimal code
1 begin (XON) 02 XON 02 2 + or - Symbol bit 2B/2D + 2B 3
Weighing data
Top bit 30~39 0 30 4 30~39 0 30 5 30~39 2 32 6 30~39 0 30 7 30~39 0 30 8 Lowest bit 30~39 0 30 9
Decimal digits From right to left(0~4)
30~34 2 32
10 Block check
Higher 4 bits Block check =0x1B
31 11 Lower 4 bits 3b
12 End X0FF 03 XOFF 03
XOR=2⊕3⊕……8⊕9。
(2). MODBUS command mode (TF=1): The communication between indicator and upper computer adopts MODBUS mode.
1. Computer reads indicator data
Wait Bit 0 1 2 3
Time of 4 bits 1~247 0x03 High 8 of beginning address
Low8
Indicator address
Function code Beginning address of reading register
4 5 6 7 Wait
N/2 bit high 8 Low 8 CRC16 low 8 CRC16 high 8 Time of 4 bits
Sending quantity CRC16 check
Data is sent in the format of ASII 2. Indicator feedback Normal feedback
Wait Bit 0 1
Time of 4 bits 1~247 x030
Indicator Function code
Admin
Pro web

29
address
2 3 3+n 3+n
N Data 0 …… Data N(odd number)
CRC16L CRC16h
Data length
Data
1) Read gross weight 0x01(ASII code)
0 1 2 3 4 5 6 7
Indicator address
0x03 0x00 0x01 0x00 0x04 CRC16L CRC16H
Return
0 1 2 3 4 5 6 7 8
Indicator address
0x03 0x08 Symbol +/-
Data5 Data4 Data3 Data2 Data1
9 10 12 13
Data0 Decimal (right to left)
CRC16L CRC16H
2) Read tare 0x02 (ASII code)
0 1 2 3 4 5 6 7
Indicator address
0x03 0x00 0x02 0x00 0x04 CRC16L CRC16H
Return
0 1 2 3 4 5 6 7 8
Indicator address
0x03 0x08 Symbol +/-
Data5 Data4 Data3 Data2 Data1
9 10 12 13
Data 0 Decimal (right to left)
CRC16L CRC16H
3) Read net weight 0x03(ASII code)
0 1 2 3 4 5 6 7
Indicator address
0x03 0x00 0x03 0x00 0x04 CRC16L CRC16H
Return
0 1 2 3 4 5 6 7 8
Indicator address
0x03 0x08 Symbol +/-
Data5 Data4 Data3 Data2 Data1
4)
9 10 12 13
Data 0 Decimal (right to left)
CRC16L CRC16H
5) Get current vehicle no. 0x04(ASII code)
0 1 2 3 4 5 6 7
Indicator address
0x03 0x00 0x04 0x00 0x03 CRC16L CRC16H
Return
0 1 2 3 4 5 6 7 8
Indicator address
0x03 0x06 Blank Data4 Data3 Data2 Data1 Data0
9 10
CRC16L CRC16H
6) Get current cargo no. 0x05(ASII code)
0 1 2 3 4 5 6 7
Admin
Pro web

30
Indicator address
0x03 0x00 0x05 0x00 0x02 CRC16L CRC16H
Return
0 1 2 3 4 5 6 7 8
Indicator address
0x03 0x04 ‘0’ Data2 Data1 Data0 CRC16L CRC16H
7) Get current customer no. 0x06(ASII code)
0 1 2 3 4 5 6 7
Indicator address
0x03 0x00 0x06 0x00 0x01 CRC16L CRC16H
Return
0 1 2 3 4 5 6
Indicator address
0x03 0x02 Data1 Data0 CRC16L CRC16H
8) Read total ISN code after corner-difference correction 0x07(ASII code)
0 1 2 3 4 5 6 7
Indicator address
0x03 0x00 0X07 0x00 0x04 CRC16L CRC16H
Return
0 1 2 3 4 5 6 7 8
Indicator address
0x03 0x08 Symbol +/-
Data5 Data4 Data3 Data2 Data1
9 10 12 13
Data0 Decimal (right to left)
CRC16L CRC16H
9) Read the load cell ISN code at No. N corner after corner-difference correction (ASII code)
0 1 2 3 4 5 6 7
Indicator address
0x03 0x00 10+ corner no. N
0x00 0x04 CRC16L CRC16H
Return
0 1 2 3 4 5 6 7 8
Indicator address
0x03 0x08 Symbol +/-
Data5 Data4 Data3 Data2 Data1
9 10 12 13
Data0 Decimal (right to left)
CRC16L CRC16H
(3). Continuous mode (TF=2): All data are ASCII code,each frame of data is made of 8 bits(including decimal point),data transmission is from low to high bit,there is a group of separator “=” among every frame, sending data is current display weight value, if current display weight is 188.5,continuous sending5.88100=5.88100=……. If current display weight is -1885, continuous sending .58810-=.58810-=……. Under overload, the weight value is 999999, For example: 9.99999=9.99999=…… (4). Continuous mode (TF=3): All data are ASCII code,each frame of data is made of 9 bits(including decimal point),data transmission is from low to high bit, there is a group of separator “=” among every frame, sending data is current display weight value, if current display weight is 188.5,continuous sending 5.88100=5.881000=……If current display weight is -1885, continuous sending .588100-=.588100-=……., Under overload, the weight value is 9999999, for example: 9.999999=9.999999=…… (5). Continuous mode (TF=4): Each byte digit is made of 10 bits,no. 1 is beginning bit,no. 10 is stop bit,middle 8 bits are data bit, each
frame of continuous transmission is 18 bytes.
Continuous output format 2
StX A B C X X X X X X X X X X X X CR CKS
1 2 3 4 5 6
Admin
Pro web

31
Therein : 1. <StX> ASCII beginning symbol (02H) 。 2. status character A , B , C 。 3. display weight , it might be gross weight, also net weight. 6 bits are not with symbol and decimal
numbers. 4. tare , 6 bits are not with symbol and decimal numbers. 5. <CR> ASCII enter symbol (ODH) 6. <CKS> check sum
Status character A
Bits 0 , 1 , 2
0 1 2 Decimal point position
0 1 0 1 0 1 0 1
0 0 1 1 0 0 1 1
0 0 0 0 1 1 1 1
KGKG00 KGKGX0 KGKGKG KGKGX.X KGKG.KG KGX.KGX KG.KGKG X.KGKGX
Bits 3 , 4
3 4 Division factor
1 0 1
0 1 1
X1 X2 X5
Bit 5 Always 1
Bit 6 Always 0
Status character B
Bits function
Bit 0 Gross weight = 0 , net weight = 1
Bit 1 Symbol : positive = 0 , minus = 1
Bit 2 Overload ( or less than zero) = 1
Bit 3 dynamic = 1
Bit 4 unit : kg = 1
Bit 5 Always 1
Bit 6 When Indicator is charged power, the value is 1
Status character C
Bit 0 Always 0
Bit 1 Always 0
Bit 2 Always 0
Bit 3 With print command = 1
Bit 4 Extend display (X10) = 1
Bit 5 Always 1
Bit 6 Always 0
Appendix B::::weight bill format example::::
(
((
(standard)))
)record format:::
: Ningbo Trading Company
Weight Bill Date:2008-03-05
No. Time Vehicle No.
Cargo No.
Gross weight (t)
Tare (t) Net Weight (t)
Customer
Remarks
Admin
Pro web

32
0004 20:44:36 00001 Orange 1.000 0.100 0.900 FAS.Co Mr. Wang
0005 20:45:00 00002 R3 steel 1.000 0.100 0.900 FAS.Co Mr. Zhao
0006 20:45:10 00003 R3 steel 1.000 0.100 0.900 FAS.Co Mr. Zhao
Total: gross weight: 7.003 t net weight: 4.603 t
(
((
(standard)))
)sheet format:::
:(vertical) Ningbo Trading Company Ningbo Trading Company Ningbo Trading Company
weight bill weight bill weight bill
No. 0001 No. 0001 No. 0001 Date 2008-03-05 Date 2008-03-05 Date 2008-03-05 Time 20.45.10 Time 20.45.10 Time 20.45.10 V.N. 00002 V.N. 00002 V.N. 00002 C.N. R3 steel C.N. R3 steel C.N. R3 steel G.W. 1.000(t) G.W. 1.000(t) G.W. 1.000(t) Tare 0.100(t) Tare 0.100(t) Tare 0.100(t) N.W. 0.900(t) N.W. 0.900(t) N.W. 0.900(t) Customer FAS.Co Customer FAS.Co Customer FAS.Co Remarks 赵六 Remarks Mr. Zhao Remarks Mr. Zhao (
((
(standard)))
)sheet format:::
:(horizontal ) Ningbo Trading Company
Weight Bill Date:2008-03-05
No. Time Vehicle No.
Cargo No.
Gross weight (t)
Tare (t) Net Weight (t)
Customer
Remarks
0002 20.46.10 00002 R3 steel 1.000 0.100 0.900 FAS.Co Mr. Zhao
Fill-in format:
WEIGHT BILL No. 1 sheet shall be kept by Operator No. 123 DATE 2004-03-05 TIME 12 .35 .28 VEHICLE No. 00001 CARGO No. orange GROSS 1580 kg TARE 80 kg DISCOUNT 10 % NET 1350 kg CUSTOMER Ningbo trading
company REMARK Mr. Zhang
Appendix C::::Detail list and statistic form example
Detail list ( complete)
No. Date Time Vehicle No.
Cargo No.
G.W. (t)
Tare (t)
N.W. (t)
Customer Remarks
0001 05 20:06 00001 gas 2.003 1.000 1.003 FAS.Co Mr. Zhang
0002 05 20:21 00123 coal 1.000 1.000 0.000 NB company Mr.Zhang
0003 05 20:41 00001 orange 1.000 0.100 0.900 FAS.Co Mr. Wang
Admin
Pro web

33
0004 05 20:44 00001 orange 1.000 0.100 0.900 FAS.Co Mr. Wang
0005 05 20:45 00001 R3 steel 1.000 0.100 0.900 FAS.Co Mr. Zhao
0006 05 20:45 00002 R3 steel 1.000 0.100 0.900 FAS.Co Mr. Zhao
Total: G.W.: 7.003 t N.W.: 4.603
Detail list ( customer)
Statistic form 1 as vehicle no.
No. Vehicle No. Times G.W.(t) Total G.W. (t) Total N.W.(t)
0001 00001 1.000 0004 5.003 3.703
0002 00123 1.000 0001 1.000 0.000
0003 00002 0.100 0001 1.000 0.900
Statistic form 1 as cargo no.
No. Cargo No. Times Total G.W.(t) Total N.W. (t)
0001 Coal 0001 1.000 0.000
0002 Orange 0002 2.000 1.800
0003 R3 steel 0002 2.000 1.800
0004 gas 0001 2.003 1.003
Statistic form 3 as remarks (04-03-05.04-03-05)
No. Remarks Times Total gross weight (t)
Total net weight (t)
0001 Mr. Zhang 0002 3.003 1.003
0002 Mr. Wang 0002 2.000 1.800
Appendix D D2008FA default parameters
Calibrate parameters Name Default parameters
E Division value 10
dc Decimal 0
Pn System parameter 13455
FLt Filter coefficients 2
F Full scale 50000
E Correction factor 1.00000
n Change point 1 of division
value
0
H Change point 2 of division
value
0
A AD code of zero position 0
L The later part of 1st
coefficient 000000
LH The former part of 1st
coefficient
01.00
b AD code of 1st
antimode 500
No. Date Time Vehicle No.
Cargo No.
G.W. (t)
Tare (t)
N.W.(t) Customer Remarks
0001 05 20:21 00123 coal 1.000 1.000 0.000 NB company
Mr. Zhang
Admin
Pro web

34
o The later part of 2nd
coefficient 000000
oH The former part of 2nd
coefficient
01.00
dtp load cell communication
protocol
1(C type )
dno quantity of load cell 1
d01~d16 Corresponding position of
scale angle 1~16
99(invalid)
0.~F. Corner difference coefficients
of load cell 1~16
All of them are 1.00000
Communication parameters Name Default parameters
Adr Indicator address 001
bt Serial interface baud rate of
PC
4
tF Method of communication 0
Jn Method of verification 0
Print parameters Name
Auto Selection of automatically
0
type type of printer D2008FA 2
D2008FP/P1 1
HL Selection of print limitation 50
Arr Sheet quantity 1
L Minimum automatically
printing weight
1000
b Lines of sheet printing D2008FA 3
D2008FP/P1 4
ode Selection of printing format D2008FA 1
D2008FP/P1 7
dct Select discount rate while
doing fill-in print
0
Uy Select saving items 11111
Hy Select information printing
method
11111
y Print controlling parameter 111111
Ut Select weight unit 0
ya Select working parameter 0110
Do Line of printing
paper(convenient to tare off
the paper)
00
Customized print format
AL0~9 Printing contents of line N All of them are 0
BL0~9 Printing contents of line N All of them are 0
Admin
Pro web

35
C0~14 Printing contents of line N All of them are 0
PH Length of weigh bill head 0
PG Distance between two lines of
weigh bill
0
PE Length of weigh bill footer 0
PA Left margin of weigh bill 0
Pb Width of weigh bill 0
PF Fine tuning of running paper 0
Timing off
D------ Timing off 999999(Timing is close)
Admin
Pro web

36
KELI ELECTRIC MANUFACTURING (NINGBO) CO., LTD.
Add:No. 199, Changxing Road, C District, Jiangbei Investment Industrial Park, Ningbo, China
Free service tel:400-887-4165 and 800-857-4165
Fax:0574-87562271
Post:315033
http://www.kelichina.com
Tư vấn hỗ trợ kỹ thuật xin vui lòng liên hệ:CÔNG TY TNHH CÂN ĐIỆN TỬ PRO VIỆT NAMTel: (024) 32062011, 32062019, 6250 0059
Admin
Pro web