cobra CRM Sysadmin Manual
404
Manual for Administrators
-
Upload
khangminh22 -
Category
Documents
-
view
0 -
download
0
Transcript of cobra CRM Sysadmin Manual

Manual for Administrators

©Copyright 2020 cobra – computer’s brainware GmbH
cobra Adress PLUS®, cobra CRM PLUS®, cobra CRM PRO® and cobra CRM BI® are registered trademarks of cobra - computer’s brainware GmbH. Other terms may be trademarks or otherwise protected and are used in this document without any guarantee of their free use.
All rights reserved. Reproduction, also in extracts, is not permitted. No part of this document may be used or reproduced in any form (photocopy, microfilm, scan or a different technique) or by any means – not even for teaching purposes – processed, cop-ied, or published by using electronic systems, without prior written permission of cobra GmbH.
Changes, incorrect documentation and printing errors reserved.
This document does not constitute an assurance of product attributes. The range of functions of your product may differ from the functional range described here.
August 2020
Materials by Harald Borges, Roland Wehage and Astrid Winkle.
www.cobra.de

cobra
3
Content
Important notice ................................................................................................................... 6
Installing and transferring data from the 2018 version ................................................... 7
cobra and the SQL Server .................................................................................................... 8 Prior to the Installation ........................................................................................................................... 8
Installation ............................................................................................................................ 9 Installation as Single Workstation Version ...................................................................................... 9 Installation in a Network ..................................................................................................................... 10 Activating the Software ........................................................................................................................ 15
Updating Clients with the Client Updater ........................................................................ 20 Installation on the first client ............................................................................................................ 22
The SQL Server Wizard ...................................................................................................... 23 Selecting Existing SQL Server (or Existing SQL Server Express Edition) ......................... 25 Locally Installing SQL Server Express Edition ............................................................................ 28 Installing SQL Server Express in the Network ............................................................................ 29
Notes on the Installation ................................................................................................... 30 Management Console ............................................................................................................................ 30 Microsoft SQL Server Management Studio Express (SSMSEE).............................................. 31 User and Security Settings .................................................................................................................. 35
System Settings .................................................................................................................. 37 General ........................................................................................................................................................ 37 Saving Changes on Views .................................................................................................................... 38 Standard Directory for Opening Databases .................................................................................. 38 Address Sorting ........................................................................................................................................ 40 Appointments and Tasks ...................................................................................................................... 44 Defining Contact Types ........................................................................................................................ 45 Selecting the Server ............................................................................................................................... 47 Creating Connection String (ADL File) ............................................................................................ 48 Reading the Content of Existing ADL Files .................................................................................. 49

cobra CRM
4
File Settings ........................................................................................................................ 52 Database ..................................................................................................................................................... 53 Address Fields, Additional Data, Sub-Tables and Contacts.................................................... 57 Postal Codes / ZIPs ................................................................................................................................. 81 Filter ............................................................................................................................................................. 97 Fixed Filters for Tables ......................................................................................................................... 99 Sorting ....................................................................................................................................................... 100 Hierarchy .................................................................................................................................................. 101 Duplicates ................................................................................................................................................ 103 vCards ........................................................................................................................................................ 108 Inactive data records ........................................................................................................................... 109 Reorganizing Databases ..................................................................................................................... 109 Data Backup ............................................................................................................................................ 111 Modification Log (CRM PRO & CRM BI) ....................................................................................... 115
Security System ................................................................................................................ 118 User Adminstration ............................................................................................................................... 118 User Administration with the Active Directory ......................................................................... 125 Access Permissions ............................................................................................................................... 131 Individual-related Data – an Overview ........................................................................................ 155 How to Configure Handling of Personal Data ........................................................................... 156
Document Management Setup ....................................................................................... 177 The Document Migration Wizard .................................................................................................... 189 Managing single letter/single e-mail templates ...................................................................... 191
Views and Entry Masks .................................................................................................... 195 Old views and new entry masks ...................................................................................................... 195 Entry masks ............................................................................................................................................. 200 Views .......................................................................................................................................................... 235
Data Exchange .................................................................................................................. 301 Data Exchange Methods..................................................................................................................... 301 Synchronizing Data .............................................................................................................................. 301 Outlook Synchronization (New)....................................................................................................... 311 Synchronization for Mobile Users .................................................................................................. 311
Keywords .......................................................................................................................... 312
Synchronization for mobile users ................................................................................... 322 Mobile User II ......................................................................................................................................... 334
SMTP Accounts for E-mail Transmission ....................................................................... 335
Creating Sales Projects .................................................................................................... 337 Settings ..................................................................................................................................................... 337

cobra CRM
5
Telephony Set-up ............................................................................................................. 349
Technical Information ...................................................................................................... 352 The Subdirectories ................................................................................................................................ 352
The Efficiency Module (CRM BI & CRM PRO) ................................................................ 357 Setup .......................................................................................................................................................... 357 Assigning Permissions......................................................................................................................... 358
Dashboards ....................................................................................................................... 360 This is what Dashboard looks like .................................................................................................. 360 Creating and Administrating Dashboards ................................................................................... 365 Dashboard Designer ............................................................................................................................. 373 The Dashboard Viewer ........................................................................................................................ 392
Formats for Entry Fields .................................................................................................. 394 Regular Expressions ............................................................................................................................. 394
Keyword Index.................................................................................................................. 398

cobra
6
Important notice
The illustrations in this book show (mostly) screens taken from the cobra version CRM BI.
If you work with either cobra CRM PLUS or CRM PRO your program and its function-ality may be different from the illustrations and explanations given in this document and you will not have all the functions you see here!
Major differences are indicated in this document, e.g. »CRM BI, CRM PRO«.

cobra CRM
7
Installing and transferring data from the 2018 version
Please refer to the system manual and the installation instructions available as PDF files for further details on installation, configuration and data transfer.
During a patch installation from the 2018 to the 2020 version the old version will be updated and completely overwritten in the process. This means that there will be no way to return to the 2018 version should you not have done a complete backup of the old 2018 version before(!). To backup the system completely proceed as follows: 1. Copy the complete server installation including all folders and subfolders to a safe location. 2. In cobra 2018, backup your SQL databases using the command »File: Data-base: Backup«.
Installing the patch to update from cobra 2018 to cobra 2020
You have downloaded the patch file from our customer portal or received it some other way from cobra or your specialist dealer.
When a patch is installed your existing cobra 2018 version will be updated to version 2020. All paths and settings valid now will be retained. This means that you cannot specify new paths during a patch installation.
Make sure that you have the activation data at hand since they will be needed during the update.
Close cobra 2018.
Close the cobra Appointment Manager.
Close Outlook.
Double click the patch file. The patch installation will start. It will automatically detect the existing cobra 2018.
Follow the steps of the wizard.

cobra CRM
8
cobra and the SQL Server
Version 2020 is exclusively interacting with SQL databases.
SQL Server is a comprehensive database and analysis solution for easier and faster access and exchange of data, for automation of administrative functions and routine duties. The SQL Server can hereby increase the performance significantly, especially when managing large databases.
For general information on the SQL language or the basic database concept of the SQL Server, please refer to the Microsoft SQL Server documentation.
Prior to the Installation
There are two ways of using the program:
The single workstation installation. The program is installed isolated on one single PC. This PC does not share any data with other PCs.
The network installation. The program is partially provided on a server. Several PCs access data on this server. Address data can be used and edited by many users.
A network installation is done in two steps:
First, perform the server installation.
After completion, on each individual workstation a client installation from the direc-tory on the server must be executed.
It is not possible to share the data access in the network from several single workstation installations. For this purpose, server and clients must be installed separately in a network installation.

cobra CRM
9
Installation
Installation as Single Workstation Version
For an installation you need administrator authorization for this PC or server.
Open the Windows Explorer, go to the installation CD and double-click the SETUP.EXE file.
Select the »single workstation installation«.
Select the »expert installation method«.
Follow the Installation Wizard instructions.
The SQL Server Wizard opens. For more information please refer to page 23.
Select the setup type »custom«.

cobra CRM
10
In the next step select the Feature »Dashboard Designer«.
Installation in a Network
For a network installation the Windows Installer 4.5 is necessary. Otherwise after the installation there will be an automatic restart of the server!
Overview
In PC networks, the program must be installed on a file server or on another PC which can be accessed by all users.
For the installation on several workstations in the network, proceed in the following order:
Install the software on the server. Should you prefer to use an UNC path definition instead of a connected network drive, select »Browse« and enter the UNC name manually.
During the server installation, a sub-directory \CLIENT-SETUP is created on the server. It contains an installation routine which must be started from each client afterwards.
Perform the adjustments for peer-to-peer networks (optional).
Enter the network license(s) at the program start of cobra.
Create the necessary databases.
Define all database fields.
Define all users and user groups and activate the user administration.

cobra CRM
11
If you want to work with the Active Directory User Administration, please refer to the chapter »Security System« first.
Assign access permissions.
Install all other workstations.
Define the start parameters (see User Manual).
Step 1: Server Installation
Make sure to perform the server installation from a client.
The installation is started automatically when the CD is inserted in the CD drive. If the installation should not start automatically, open the Windows Explorer, go to the installation CD and double-click the SETUP.EXE file.
Select the »Network Installation« command to start the installation.
The selected server can be a dedicated file server.
Create a directory for the cobra files on the server.
The installation on the server will now be started.
The SQL Server Wizard opens. For detailed information please refer to page 23.
Step 2: Client Installation
For each client, a client installation has to be carried out afterwards. To do this, call the SETUP.EXE program in the \CLIENT-SETUP directory of the server installa-tion.
Select the setup type »custom«.

cobra CRM
12
In the next step select the Feature »Dashboard Designer«.
The client installation creates a shortcut to cobra in the client’s Windows Start menu, which can be used to start the program.
The network installation is finished by this.
The system environment is installed on the server, the program itself is installed lo-cally on the client.
Further components can be installed via the »Extras« button from setup.
We highly recommend to install the cobra Client Upgrader on all clients!

cobra CRM
13
Technical Information
Security Aspects
The program can process any number of files with almost any number of addresses. Most commonly, several users will be working with address data from one work field or one company.
Hereby, different forms of cooperation can be possible:
Several people are working on one PC, one after the other.
Several people are working on several computers in a network, either at the same time or one after the other.
These different forms of cooperation result in numerous security requirements. A us-er administration must enable restriction of access permissions for individual users and databases.
After the installation is completed, all users starting the program will have full ac-cess control. So the first step now should be to set up your user environment and the access permissions.
For this purpose, the program provides the following functions:
System password for the identification of the system administrator.
User administration with users and user groups including user password.
Authorization system for defining detailed access permission for every user in every database.
Database passwords for the access of individual databases.
Access Control on Network Level for Program and Sys-tem Directory
Since several users share the same files in a network, files have to be configured in different ways according to their use.
A single workstation installation installs system environment as default in the path C:\Documents and settings\All Users\Application data\cobra ... The program files are stored in the installation directory you have chosen.
A network installation installs the program directory on the local workstation. The system environment is installed in the network. Files are divided into the follow-ing groups:

cobra CRM
14
Workstation
\Program ......................... The Program directory includes the actual program file Adress-Plus.Exe, all Dynamic Link Libraries (DLLs) and some additional files. In the network, all files should have read-only attribute.
System Environment
\User ................................. This directory includes all user-specific entries (like views) and formats for labels, letters and other printed matters. All users need unrestricted access.
\Client Setup ................. This directory is created only for network installations and con-tains the SETUP.EXE file for the installation of the individual workstations.
\Data ................................ The addresses entered by the users are the actual data. The data directory is used for storing the databases. All users need writing permissions. If the users are working in only one data-base, you can modify the start parameters so that the database will be opened immediately at the program start. If you want to store several databases in one directory and the user should select one at the program start, enter this directory as work directory in the desktop shortcut. The »Open File« dia-log will display all databases stored in this directory immedi-ately at the program start.
\Documentation ........... This directory contains the technical documentation.
\Document ..................... This directory can be used as the root directory for the com-plete correspondence if document management has been acti-vated. All users need unrestricted access to this directory.
\Groups ............................ This directory contains all group specific entries (like views) and formats for labels, letters and other printed materials. All users need write privileges.
\Help ................................ This directory contains the Online Help.
\System ........................... The files in the System directory store the current settings (user administration, selection lists, telephone drivers, postcodes, connection to ERP) and formats (for labels, index cards, data export, etc.). Every user can work with them but only the sys-tem administrator can edit the settings. All users need write access.
With this classification, the overview on the individual files is clearer and the as-signment of network access permissions simplified.

cobra CRM
15
Activating the Software
As long as the program has not been activated, it can only be used in demo version mode.
You will receive the data required to activate the cobra software, the login name and the password, from cobra or your cobra partner. Please make sure to save this data.
The Activation Wizard will replace the license numbers used previously. As soon as it has been activated, the software can be used as full version. After a new installation, or the installation of a cobra patch, the activation will have to be done again.
Starting the Activation Wizard
Should you be starting the program for the first time, or have you used the program as demo version before and the allocated time has expired, a selection dialog will be shown. Click the »Activate now« button.
The wizard can also be started under »File: System settings: System settings: Gen-eral« via the »Activate Product« button. This could become necessary if you have purchased an additional license, for example, to use cobra for additional work-stations. If you received a license file directly from cobra or your cobra partner, the software needs to be activated as well.
It is possible to activate the soft-ware online if you are connected to the Internet. Alternatively, offline activation is possible as well.

cobra CRM
16
Online Activation
This is the quickest and most common way of activating your product.
In this dialog, enter the user name and password you received when purchasing the software.
Should your company have several locations, select one from the list.
You can rename the location in this dialog.
To do so, click the button .
Enter the new name for the loca-tion.
Click »Activate product«.
The activation process will be completed and the software can be used as an unrestricted, full version for the number of workstations you defined with the purchase.

cobra CRM
17
A location license is always bound to the installation location and may not be used more than once.
Creating a License File (Offline Activation)
In this dialog, enter the user name and password you received when purchasing the software.
Click »Create license file«.
Save the file on your PC.
Send the file to your cobra partner or directly to cobra. The file can be mailed from any PC connected to the Internet or can be copied to a data medium. Please make sure to add your sender address. If you are working with several loca-tions, please specify for which lo-cation the activation is to apply.

cobra CRM
18
Selecting Activated License File
After you have sent a license file, your cobra partner or cobra will send back an acti-vated license file to you. The file must be imported in order to activate the software. Please make sure to save the activation file on the same PC where the file has been created.
In the wizard, click the »Select acti-vated license file« option.
A dialog is shown where you can ac-tivate cobra using the license file you have received.
Click the button.
Select the file you have received (file extension is usually *.ALF).
Confirm by clicking »Open«.
The file is imported and license in-formation will be shown.

cobra CRM
19
Click »Activate product«.
The activation is completed and the software can be used as an unre-stricted, full version for the number of workstations you defined with the purchase.
Duplicate-Module
The Duplicate-Module must be activated separately.
On the clients select »Data: Show: Duplicate-Module«.
The License Manager is getting started.
Checking the Installation
After finishing the installation, you should check the installation paths and settings on all workstations and the server. The system settings can be found in the »Infor-mation: More: Product info: System info« menu.
For the workstations, check if all computers use the same program version.
Check the settings for file access.
Check which users are currently logged on.
If required, specify the access permissions for the individual data fields so that on-ly the system administrator can access specific data.

cobra CRM
20
Updating Clients with the Client Updater
As owner of an up-to-date warranty you will receive program updates (so-called »Patches«) on a regular basis. The patches will have to be installed in order to up-date your program to the newest release version.
The Client Updater is a plug-in supplied together with cobra. It will ensure that cli-ents are updated automatically so that you do not need to install new software ver-sions on every client manually. All you need to do is to store a patch file on the serv-er and update the server. When clients are then started again, they will recognize that there is a new version and automatically update themselves.
As soon as one client is updated to the actual version, the other clients don't work properly till they are updated too.
To ensure proper software distribution, the Client updater will have to be installed on all clients. Clients where the installation is missing will not be updated.
The easiest way of installing the updater is via the regular cobra setup under »Tools«.
Alternatively:
You can find the Client update on your cobra data medium. Go to the \EXTRAS\CLIENTUPDATER directory.
Double-click the file with file extension *.MSI and follow the instructions of the installation wizard.

cobra CRM
21
Installing the client updater
You need to install the Client Updater separately, on all the clients to be up-dated.
There are two ways to do so:
1. After cobra was installed, you call up »Tools«. Install the Client Updater from here.
2. Or you start installation of the Client Updater later.
You can find the installation file in your cobra server installation. There, go to the subdirectory »Client-Setup: Extras: Client Updater«.
Double-click the CobraClientUpdaterxxx.msi file.
A wizard will guide you through the installation.

cobra CRM
22
Patch File
You will regularly receive patch files to update your cobra installation.
Store the patch file on the cobra server. It must be stored in your server installa-tion in the \Client-Setup subdirectory.
Installation on the first client
First of all, you must install the patch manually once .
Open a client.
In the Windows Explorer, go to directory containing the patch file.
Double click the patch file.
This process will update the server as well as the client.
Installation on a further client
Installation on all the other clients the Client Updater was installed on will be carried out automatically. This is done whenever cobra is started again on a client. During the cobra start, the Client Updater will recognize that the data on the server were updated.
The user will see a message and be asked to wait.
The Client Updater will automatically update the client. cobra is then started.

cobra CRM
23
The SQL Server Wizard
When the installation is completed, a wizard opens that supports you to manage the system databases on the SQL Server. If you want to practice, you can also create a demo database with imaginary data.
You can also start the wizard manually.
To do this, go to the \SYSTEM\SQL SERVER subdirectory of your cobra installation.
Double-click the SQLServerSetupWizard.exe file.
The red icons indicate which databases do not exist. In case of a new installation, all databases will be marked accordingly. With click »Next« on you can go to the next step.

cobra CRM
24
You can choose from three different installation modes:
Select SQL Server Here you define an existing SQL Server where you want to store the database. The server installation must already exist, i.e. it must have been installed before.
If a SQL Server Express installation already exists – in the network or locally – you need to select this option in order to connect to the SQL Server Express.
Locally install SQL Server Express Edition SQL Server Express Edition is the “little brother” of the SQL Server and is provided free of charge within your cobra soft-ware package. Details can be found on page 28 ff.
Install SQL Express in the network In order to use SQL Server Express as server in the network, you need to install SQL Server Express locally on the computer which will be used as server. This means, you cannot install the SQL Server Express from a different server! Later on you con-nect from each client to the SQL Server Express.

cobra CRM
25
Selecting Existing SQL Server (or Existing SQL Server Express Edition)
We recommend the installation of a demo database with imaginary data for practic-ing in the same step.

cobra CRM
26
Authorization ................ There are two different modes to log in to the SQL Server. Windows login This login mode is a good solution if the database is accessed only inside the domain. The SQL Server authenticates the user automatically via the user name or the group membership. As default, two local accounts are configured in the SQL Server: these are the local group account and the local user account, each named »Administrator«.
SQL Server login This login mode is used if external users access the database as well, or, if Windows domains are not used. In this case, the SQL Server checks if the user has typed in a valid SQL Server login name. If the login is incorrect, the connection is denied.
If you want to define additional settings, click »Enhanced Options«.
In this dialog you can save the system files on the SQL Server in databases which are named differently. Just type in the name of the new database.
You can also select one or more existing system databases from a SQL Server.

cobra CRM
27
With click on »Install« the databases are created. Additionally to each of the data-bases, ADL files are created in the system directory. If you are installing cobra anew at a later time and want to access the same database(s), please make sure to have a backup of the ADL files which you can copy to the system directory of the new installation later on.
For a single workstation installation this is the last step and you can now start the program.
For a network installation you need to install the single clients now.

cobra CRM
28
Locally Installing SQL Server Express Edition
It is also possible to install the SQL Server Express locally which is provided within your cobra package. Information about the difference between the SQL Server and SQL Server Express can be found in the Internet.
A wizard opens which guides you through the installation procedure.
We recommend the installation of a demo database with imaginary data for practic-ing in the same step.
For a single workstation installation this is the last step and you can now start the program.
For a network installation you need to install the single clients now.

cobra CRM
29
Installing SQL Server Express in the Network
Information about the difference between the SQL Server and SQL Server Express can be found in the Internet.
Install the SQL Server Express locally on the computer that will be used as a serv-er, following the instructions in this manual.
Afterwards install the single cobra clients on the respective computers.
Now connect to the SQL Server Express on the computer which is used a server.
This is done in the last step of the installation. Choose the option »Select SQL Server« in the SQL Server Wizard.
Now select the SQL Server Express as SQL Server on the computer which is used a server.
The system databases are created on the selected SQL Server Express.
For a single workstation installation this is the last step and you can now start the program.
For a network installation the single clients are installed now. Afterwards the SQL Server Express is configured which is the prerequisite that all clients can access this server instance.
In the Windows Start menu, select the MS SQL Server program group.
Or open your Windows installation. In \SysWOW64 you find the SQLSERVERMANAGERxxx.msc. Double click it.
Define the settings which are shown here:

cobra CRM
30
Notes on the Installation
Management Console
SQL Server runs as a service and is performed under a user account. Changes are ap-plied in the Microsoft Management Console (MMC).
The Management Console can be found in the Control Panel in the »Administrative Tools« section under »Computer Management«.
In the dialog window on the right side, click »SQL Server« (with the right mouse but-ton) and select the »Properties« command from the context menu.

cobra CRM
31
As default, the service is operated under the integrated account »Network service«. Should you prefer to use a different account, you can select it under »This account«.
Microsoft SQL Server Management Studio Ex-press (SSMSEE)
Microsoft SQL Server Management Studio Express (SSMSEE) is a free, easy to use graphical administration tool for the management of SQL Server Express Edition and SQL Server Express Edition with Advanced Services. Please make sure to refer to the Microsoft documentation.
The software can be found on your cobra data medium in the folder \EXTRAS\SQLMANAGEMENTSTUDIO.

cobra CRM
32
Click the»Installation« command to the left.
Click the first option, as selected in the figure.
Confirm with OK.
In this dialog, click »Install«,

cobra CRM
33
Click »Next« until the following dialog is shown:
Make sure to select the option »Start new installation of SQL Server«!
In the following dialogs, click »Next« until the feature selection dialog is shown, as in the figure below:
Select the option »Management tools«.

cobra CRM
34
Click »Next« until the following dialog is shown:
Confirm the summary with click on »Install«.
Confirm setup completion with click on »Next«.
The installation is completed now.

cobra CRM
35
User and Security Settings
During the SQL Server installation, an “sa“ account is created as built-in account with full control permission for the server.
Users are set up via »Security – Authentication«. Right-click to call the context menu and select the »New Login« command.
Under »Login Name« you may choose groups from the domains. This way, you save yourself the individual defining of all group members – but you can just as well de-fine individual group members as users.
A »Server Role«, containing the individual user privileges, is assigned to each user:

cobra CRM
36
Under »User Assignment« you can specify which databases a user can access.
In the »Membership« list you can see which users have been assigned a database role.
Database Role Privileges
db_accessadmin Allow/deny database access db_backupoperator Instruct commands for database backup and
maintenance db_datareader Read-access for all user tables db_datawriter Write-access for all user tables db_ddladmin Execute DDL statements db_denydatareader No read-access for all user tables db_denydatawriter No write-access for all user tables db_owner Unrestricted access permissions for the database db_securityadmin Administrate roles, memberships and privileges
for the database Database roles (db_datareader, db_datawriter) are required for the login
Every user that can access a database is automatically added to the “Public“ database role.

cobra CRM
37
System Settings
This chapter describes system-wide settings that apply independently of the data-base opened and independent of the particular user:
User administration
Program activation
Sorting of changed and new addresses
Displaying the current address in query dialogs
Server settings
Contact types
System settings are only accessible for system administrators, i.e. users to whom the system role »System administrator« was assigned.
In addition those users may access the system settings who can log on as system administrator with the command »File: System administrator login«, using the system password.
Use the command »File: System settings«.
General

cobra CRM
38
The activation of the software is part of the installation and is therefore described as of page 15.
Saving Changes on Views
Use the command »File: System Settings: System Settings: General«.
Activate or deactivate the »Save user-specific view changes« option.
In case this option has been activated, individual view changes done by the user dur-ing program runtime – such as the width of dynamic windows, the table column or-der or the line break in the comment window– will be saved. The changes are saved for the specific user.
In case this option is deactivated, the user-specific changes will be lost when the program is exited.
Standard Directory for Opening Databases
Use the command »File: System Settings: System Settings: General«
Click the »Current directory as default setting« option to specify the path assigned to the shortcut as standard path to your database.
Or enter the path manually.
The standard path to the database is defined.
The standard path is the path suggested by the program in the »File: Open« dialog. Unless specified otherwise, the program will offer the \DATA directory from the in-stallation directory.
This path was assigned to the shortcut in the Windows Start menu automatically dur-ing the installation or entered manually afterwards.
If you activate the option »Current directory as default setting« in the system set-tings, the program will always suggest the path from the shortcut.
If you deactivate this option and select a different path, the program will suggest this different path for the »File: Open« dialog and ignore the setting in the shortcut.

cobra CRM
39
This setting applies to all users, but users can of course browse the Explorer for a dif-ferent path at any time.
Selection List
Sorting
Use the command »File: System Settings: System Settings: General«
Activate or deactivate the »Sort selection lists by ID ...« option in order to sort se-lection lists alphabetically or by ID.
This option is activated as default, effecting that the selection lists assigned to the fields are displayed in alphabetical order or sorted by ID.
Retrieving Selection Lists from the Server
If the selection lists are stored in the cache, network resources are spared but chang-es that have been applied on the selection lists by other users are eventually not shown.
If the cache is deactivated, the selection lists are always retrieved from the server. This ensures that the selection lists are always up to date, but the network load in-creases.
Activate or deactivate the »Always retrieve selection lists from the server« option in the system settings.
Size of the Preview Images
The user decides if images are shown in original size or in preview quality (which is mostly reduced). In this dialog you can specify the size of the preview images.
Use the command »File: System Settings: System Settings: General«.
Define the pixel size under »Size of the preview images«.
If you change the settings, the new values apply only for those images that are added to the database afterwards, the preview images stored before will remain unchanged.
cobra CRM
40
If you want to apply the new values also to the images stored previously, you can use the command »Reorganize all preview images«.
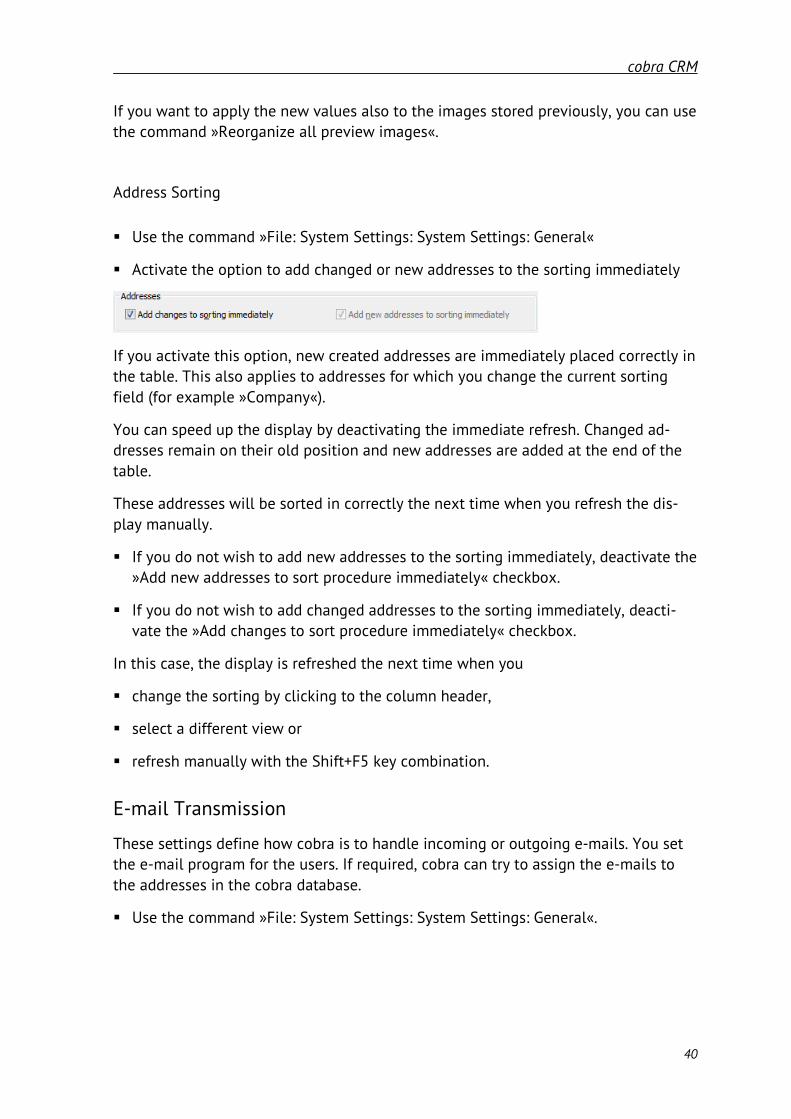
Address Sorting
Use the command »File: System Settings: System Settings: General«
Activate the option to add changed or new addresses to the sorting immediately
If you activate this option, new created addresses are immediately placed correctly in the table. This also applies to addresses for which you change the current sorting field (for example »Company«).
You can speed up the display by deactivating the immediate refresh. Changed ad-dresses remain on their old position and new addresses are added at the end of the table.
These addresses will be sorted in correctly the next time when you refresh the dis-play manually.
If you do not wish to add new addresses to the sorting immediately, deactivate the »Add new addresses to sort procedure immediately« checkbox.
If you do not wish to add changed addresses to the sorting immediately, deacti-vate the »Add changes to sort procedure immediately« checkbox.
In this case, the display is refreshed the next time when you
change the sorting by clicking to the column header,
select a different view or
refresh manually with the Shift+F5 key combination.
E-mail Transmission
These settings define how cobra is to handle incoming or outgoing e-mails. You set the e-mail program for the users. If required, cobra can try to assign the e-mails to the addresses in the cobra database.
Use the command »File: System Settings: System Settings: General«.

cobra CRM
41
Now go to the »E-mail« area and click the »Setup« button. A wizard will be start-ed.
Under »E-mail transmission via« define which program is to be used as default for sending e-mails. This setting will at first be valid for all users.
However, every user can change the e-mail program for their own PC, independent from others, under »File: User-specific settings: User settings«.
This setting will be used, for example, if you are sending an e-mail directly from an e-mail field by right-clicking it or by using the icon to an e-mail address from the da-tabase.
Automatic detection (mailto) E-mails will be sent via the standard e-mail program.
Groupwise ...................... E-mails will be sent via Groupwise. If you want to use this pro-gram, an additional program needs to be installed in the setup di-rectory at »Extras«.
LotusNotes Mail ........... E-mails will be sent via LotusNotes. If you want to use this pro-gram, an additional program needs to be installed in the setup di-rectory at »Extras«.
Microsoft Outlook ....... E-mails will be sent via Microsoft Outlook.

cobra CRM
42
SMTP ................................ You can define an SMTP account. Please note that e-mails sent via such an account cannot be assigned automatically in cobra as contacts.
Select the program of your choice.
The following example explains the procedure when working with Outlook.
Select the default folder for saving incoming e-mails.
cobra will try to assign these e-mails to the corresponding addresses in your database.
By clicking »Select different folder« you can define a different inbox folder than the one suggested by the wizard. All folders from your e-mail program will be offered for se-lection.
The following example explains the procedure when working with Outlook.
Select the default folder for storing incoming e-mails. cobra will try to assign these e-mails to the corresponding addresses of your database.
You can also specify that sent e-mails are to be monitored by cobra and automatical-ly assigned to your cobra email addresses.
You can have – either the actually sent objects – or the outbox
monitored by cobra.
Monitor items sent by cobra Any e-mails sent by cobra will be monitored automatically. As soon as the e-mails have been sent and forwarded to the »Sent items« folder in Outlook, the e-mail will automatically be add-ed as contact to the corresponding address if document man-agement has been activated. The precise date of mailing is stored in the contact. The e-mail will also be assigned should you close cobra before sending the e-mail and send it at a later time.
Monitor ’Outbox’ in Outlook The e-mail sent by cobra will immediately be added as contact to the corresponding address if document management has been activated. The contact date will therefore not match the

cobra CRM
43
exact mailing date but the date when the e-mail was transmit-ted to the outbox folder in Outlook.
E-mails in monitoring list The monitoring list contains e-mails that were not sent yet. Should you close cobra before sending these e-mails they will be monitored anyway and will be added as contacts as soon as they have been sent after restarting cobra.
Flag e-mails after assignment with category In Outlook it is possible to flag e-mails in order to have a bet-ter overview. Here you can define the category name.
In the last step you will see an overview of the functions supported by Outlook using the settings you specified.

cobra CRM
44
Your e-mail connection has now been set up.
Encrypting Mails
cobra supports TLS 1.2 and TLS 1.3 encryption.
When configuring SMTP accounts, you can either specify mail encrypting yourself precisely or leave it to cobra CRM.
Select the command »File: System settings: SMTP settings«.
To leave mail encrypting to cobra CRM, select »Automatic selection (recommended)«:
Appointments and Tasks
Use the command »File: System Settings: System Settings«.

cobra CRM
45
Select the desired program for appointments and tasks
Here you specify which program is used to manage appointments and tasks. You can select either the cobra Appointment Manager or Outlook.
Buffer data in the cache If you are managing very many appointments in Outlook, the activation of this checkbox will speed up your work in cobra. Outlook appointments will be selected only once and buffered afterwards. However, in this case changes for appointments performed in Outlook will only be visible in cobra after manu-ally refreshing the Welcome Screen.
Defining Contact Types
When creating a contact, the type of contact is defined. In the contact view the con-tact type will be identified by an icon. You can also query for types of contact.
You can expand the provided list of contact types, but you cannot delete a provided contact type. However, system contact types can be deactivated remove the checkmark.

cobra CRM
46
Click »New«.
Enter name and shortcut key of the contact type.
By clicking »Edit« you open a small image editor where you can create an appro-priate icon.
The new contact type is added to the list of contact types and functions like the sys-tem contact types.

cobra CRM
47
Selecting the Server
Use the command »File: System Settings: System settings: Server Settings«
Select the desired server and database
You can run several SQL Servers on one computer or in a network. In this register tab you define if a server should be displayed under a different name – for example to save a database. This is only a recommendation and can be changed at any time.
Server name .................. In this dropdown list, all active servers are displayed. You can select the desired server.
Apply SQL Server security Specify the authentication method for the server. The screen-shot displays the standard login that is created automatically during the installation.

cobra CRM
48
Creating Connection String (ADL File)
»File: System Settings: System settings: Server settings«
Click »Create New ADL File«
The SQL database is not opened directly. It is opened via an ADL file. When creating a new database on the SQL Server with the »File: New« command, a new ADL file will be created at the same time.
You can use the command from the system settings for creating further ADL files to existing databases.
Server name .................. Select the SQL Server containing the database.
SQL Server security, User name, Password Specify the authentication mode for this server.
Database ......................... This list displays all databases available on the server. Select the database for which you want to create an ADL file.
File name ........................ Select the path and name for the ADL file. This name can differ from the database name to which the ADL refers.
Check Data ..................... If you click this button, the program will check if the database really exists and if it can be accessed via the ADL file.

cobra CRM
49
Reading the Content of Existing ADL Files
System Databases
In the PROGRAM directory of your installation the SystemADLVerifier.exe can be found. You can use this file to read existing ADL files. Thus, you can recognize to which database a specific ADL file is referring to, on which drive and SQL Server the database is installed, etc.
Go to the program directory of your installation, e.g C:\PROGRAMS\COBRA\...\PROGRAM.
Double-click the SystemADLVerifier.exe file.
You will see a list of the existing databases, but if you click »Details«, a short sta-tus report to all the databases will be shown.
Click to view the content of the ADL file.
You can create another ADL file for the database with click on »New«. Any existing ADL file will be overwritten.

cobra CRM
50
Log on to the SQL Server and select the correct database. This can be a system or address database.
With click on »OK« the new ADL file is created.
Address Databases
Use the command »Add ADL« to open and view all ADL files (i.e. address database ADL files as well).
First select the ADL file, then click .
You can create another ADL file for the database with click on »New«, as described previously.

cobra CRM
51
Use Tracking
Use tracking analyzes user behavior. It will record how often a command in the rib-bon or the backstage view (the »File« menu item) is called. That number is saved lo-cally and sent to cobra once a month, anonymized.
Use tracking is activated by default.
You can deactivate both tracking and sending user data. To do so, issue the com-mand »File: System settings: System settings: Data and activating: Statistics of calls«.
Here you can also send the data immediately to cobra by clicking the button.

cobra CRM
52
File Settings
New databases are created with predefined settings. The settings can be modified with the »File: Database: General settings« command and only apply to the database that is currently opened.
Predefined File Settings → »File: Database: General settings« → Select the tab
Database ......................... Here you can enter a description of the database. This is also used to activate/deactivate Client/Project Management as well as private and group addresses.
Sorting ............................. Specify how to sort multiple levels.
Hierarchy ........................ Addresses can be managed hierarchically. »Primary and sec-ondary addresses« are created, and any number of secondary addresses are assigned to one primary address.
Duplicates ...................... Specify the criteria to detect duplicates, i.e. addresses existing more than once.
vCards .............................. Assign the vCards fields to database fields.

cobra CRM
53
Other settings, e.g. for label or print formats, are global settings and can be used for editing all databases.
Make sure to specify the file settings before entering a large amount of data.
Database
Predefined File Settings → »File: Database: General settings« → Select the »Database« tab
File Description
Use the »File: Database: General settings« command and select the »Database« tab. You can add a memo to the current database in the file description area. This de-scription will be displayed when the users select a database in the »File: Open« menu.
Activating Properties
Client and Project Management With this checkbox you can activate or deactivate Client and Project Management. The commands for »Clients/Projects« are only available if the checkbox has been activated and only then the selection and entry fields for gathering cost factors are displayed at the bottom of the »Contacts« dialog. If you

cobra CRM
54
gathered client/project data and deactivate the Client and Pro-ject Management, this data is not deleted, but hidden. After re-activating the Client and Project Management, the data is shown again.
Start telephone time automatically If this option has been activated, automatic counting of the telephone time will be started and the contact window opened, either automatically or manually.
Phone contacts If this option has been activated, automatic counting of the telephone time is only started if the contact is done via the phone.
A standard project was set up If this option has been activated, automatic counting of the telephone time will only be started if a project has been de-fined as standard project in the Client and Project Management settings.
If visible If this option has been activated, automatic counting of the telephone time is only started if the Client and Project area of the contact dialog is not hidden.
Allow Creating Contacts for Other Group Members As default, users can view the contacts from all other members of their group. It is also possible to create contacts for other users (for example during their absence). Only if this option has been activated, users can create contacts for different users from their group.
Private Addresses and Contacts If you activate these options, you can create private addresses and group addresses. Private addresses can only be read and edited by their owner; other users as well as the system admin-istrator cannot see these addresses. Group addresses can only be read and edited by the members of a specific group; mem-bers of different groups as well as the system administrator cannot see these addresses.
Group addresses and group contacts
If you activate the option »Show addresses outside the group in read-only mode«, members of different groups can only read the addresses but not edit them.

cobra CRM
55
If addresses not belonging to the group are shown in read-only mode, some functions cannot be used. For example, keywords cannot be amended or replaced; contacts cannot be added to queried addresses. Work with additional data is limited.
These functions are deactivated not only for any addresses not belonging to the group, but in fact for all addresses. The func-tion »Start: Address: Delete: Delete queried addresses« is also blocked for all addresses if addresses not belonging to the group are released for read access. It is possible to write letters to these addresses, but the letters cannot be added to contacts.
Should you be working in larger address lists with private ad-dresses, the search and query functions might be slowed down remarkably. The creating group addresses function will only reduce such processes insignificantly or not at all. So should you notice a significant loss of performance when working with private addresses, it is recommended to work with user groups instead of private addresses.
Here you also specify whether users are to be allowed to see contacts from other groups or not.
CRM BI & CRM PRO: The »Number of user groups per address« is important for defining address properties. An address can be-long to more than one user group; actually an address can be-long to up to 20 groups. Here you can specify how many groups will be assigned to one address.
Quick Mode
There is a new option »Activate quick mode« in the database structure. This option is set per table and will limit filtering and sorting to those fields that are in first place in the sortings/indices fields for this table.
Issue the command »File: Database: Database structure«.
Use the »Manage« button to select the »Activate quick mode« option.

cobra CRM
56
Now it is no longer possible to sort, filter and search in any data columns for which indices/sortings were not specified. Users can identify such columns because their icons are missing or inactive.
Users can deactivate the mode while cobra is running. When the program is started again, it will be activated automatically. If quick mode was not activated in the data-base structure, there is nothing the user can do.
Activating and deactivating is done in the ribbon using the command »Layout: Da-ta access: Quick mode«.

cobra CRM
57
Address Fields, Additional Data, Sub-Tables and Contacts
File Settings → »File: Database: Database structure« → Select table
In a database you can create almost any number of address fields. Among such
fields could be e.g. address fields (name, street, ZIP code, etc.), comments, specific information, birthdays, and many other data.
Contacts are managed in a separate table. For contacts you can also add any new fields you might require.
There are two types of additional tables: additional data and sub-tables. For both types, you can specify your own fields.
Additional data are always allocated to one specific address record. Additional data are a certain type of sub-tables assigned automatically to the address ta-ble.
Sub-tables are always assigned to one specific single table. This can be a table for addresses, documents, contacts, additional data, or another sub-table.

cobra CRM
58
Free tables are data tables that can be connected using relation fields in CRM BI and CRM PRO. This will enable complex solutions, such as managing work-shops, seminar rooms and attendants. Working with free tables and relation fields is not part of this manual. Should you require sophisticated database so-lutions, please contact your retailing specialist. There can be up to 1024 free tables in
An Example:
In the address table, you are administrating the addresses of customers who have bought a PC.
A customer may buy any number of different PCs. Every single PC is a separate data record in the additional table »Devices« and is linked to the customer ad-dress record. This record contains a specific configuration of that device (memory, hard disc, device number).
The different service orders per device are stored in a sub-table »Service«. The sub-table »Service« is related only to the additional table »Devices«.
Managing Tables
Use the command »File: Database: Database structure«.
Select a data table on the left side.
Click the button »Manage«.

cobra CRM
59
Here you can define settings for the selected table. Available options depend on the type of table.
Display format .............. You can specify which data from the data records should be shown in the dialog boxes.
To add the field content to the display format, select a field at the left and click the arrow button.
Filter management ..... Here you open the dialog to edit filters. Details can be found in the User Manual.
Data templates ............. A data template already contains specific values. This will sim-plify entering data. Such values could be data entered manual-ly, or data from the database, or attributes. It is thus possible

cobra CRM
60
to create extensive data records for specific devices which can be reused in case such a device is sold or needs to be repaired. It is not necessary to enter new data. Details can be found in the User Manual.
Entry masks ................... You can design individual entry masks and specify which entry mask should be offered for which data table. Details can be found in this manual. Please look up »Entry mask: Own« in the in-dex.
Allow new data records for This option is only available for additional data. You can speci-fy whether additional data are allowed for all addresses, or on-ly for single addresses; and whether primary addresses or sec-ondary addresses will be allowed.
Managing Fields
Should you not posses sufficient access rights, please log in as system administra-tor.
As default, fields in the field list are sorted in alphabetical order. If you deactivate the »Sort alphabetically« option, two buttons will be shown at the right of the field list.

cobra CRM
61
You can define the order within the field list yourself. To do so, move selected fields within the field list upwards or downwards using the two buttons.
To sort the field list alphabetically again click the »Sort alphabetically« option.
Adding Fields to the Database
Click the button »New« below the field list. The dialog »New field« opens.
Enter the name for the new field.
Select a field type from the list.
Depending on the field type, you can also define the »Field length«. Field type and length cannot be changed later on.
Close the »New field« dialog with »OK«.
Apply any changes in the »Address fields« tab under »Field properties«. The prop-erties of some fields cannot be changed. These settings can only be specified when the fields are created, since data would be lost if they are modified later.
The fields you are creating in the database are not automatically shown in the address mask. You first have to add the fields via the View Editor to the ad-dress mask.

cobra CRM
62
Skype Field
A connection via Skype can be established directly from the Skype field.
Calculation Fields
Create a new field.
Name the field »Sales forecast«.
Select the field type »Special: Calculation field«.

cobra CRM
63
Click the »Configure field« button.
On the left-hand side you will find all numeric fields from this table. With double-click you can allocate the fields to arithmetic operations.
Enter the required formula.
Available arithmetic operations are: + - * /
Use brackets in accordance with mathematic rules.
Curly brackets are used for fields.
Square brackets are used for arithmetic operations as well as aggregations.
Calculation fields are not only used in the address table but in all sub-tables as well.

cobra CRM
64
Auto Value
You can use the »Auto Value« type of field to create simple counters for contacts and sales projects.
Issue the command »File: Database: Database structure«.
Go to the data table required.
Click the »New« button.
Create a field with the field type »Auto Value«.
Integrate this field into an entry mask.
From now on, any new data record will be provided with a number generated auto-matically. This number is computed in the SQL Server. It will be preserved and not computed again.
Counters
Select the additional table »Service« from the »Additional data« tab.
Create a new field.
Name the field »Consecutive number«.
Select the field type »Special: Counter«.
Click the »Configure field« button.
Specify the following number and the increment of the counter.

cobra CRM
65
Virtual fields
Formatting
Virtual fields can be formatted. For example, you can add a currency icon to a calcu-lated field to show automatically computed costs.
Issue the command »File: Database: Database structure«.
In a table, create a virtual field, e.g. of the »Calculated field« type.
Enter the formula.
Specify the format. To do so, click the button besides »Format«. The enter the format in the field »Format mask«.
Click the »Save and close« button.
Field type »Calculated field«
The editor for virtual fields has been completely redesigned and now has a new type of field, calculated fields. Virtual fields are created in the database structure, but not shown there. They can be integrated into entry masks in the GUI.
Calculated fields offer an extensive range of functions. However, working with them requires basic knowledge of programming languages.
Issue the command »File: Database: Database structure«.
In a table, create a virtual field, e.g. of the »Calculated field« type.
The field shown in the example is a date field showing how many days at the latest repairs must have been done after a service case was reported, provided that no due date was entered manually. The due date here depends on the priority of the service case. The higher the priority of the service case, the quicker repairs must be done.

cobra CRM
66
Compile your formula from the items shown in the lower range. If you click one of the items below, it is taken over into the field »Details«.
You can have formulas tested for syntactical correctness by using the button below right. Inaccurate formulas cannot be saved.
Should you want to close the dialog to cancel working with a formula, you must first undo all your work steps. To do so, click the required button in the ribbon bar.
Different obligatory fields for primary and secondary ad-dresses
You can select certain types of addresses for which you want a field to be obligatory. You can use this function to control entering of data even more effectively.
Issue the command »File: Database: Database structure«.

cobra CRM
67
Obligatory for primary or secondary addresses You can specify fields as obligatory separately for primary or secondary addresses. In this way you can make sure that bank details will be entered for primary, but not for secondary ad-dresses.
Obligatory for single addresses These are addresses that do not have secondary addresses.

cobra CRM
68
Field Help
The button »Field help« is located below the field list.
You can select a field from the field list and assign an individual help text to this field.
The help text you enter here should provide users information about the purpose of this field.
Click the »Home« tab to define additional settings.
You can also format the text in this dialog. If the »Help icon visible [Hilfesymbol sichtbar]« option has been activated, a question mark is shown in the field. Use this icon to call the help.
You can close the field help definition dialog and save your entries by returning to the tab »File«, use the »Finish editing« command and then »Close«.

cobra CRM
69
Deleting Fields from the Database
Select the field you are going to delete from the table. You can use the Shift or CTRL key to select multiple fields.
Click »Delete«.
After the dialog has been closed, deletions become immediately effective.
This process cannot be undone. Field and content will be lost irreversibly.
Changing Field Definitions
Select the field whose properties you want to change.
Apply the changes in the lower part of the dialog »Field properties«. Some fields may have settings that cannot be changed. These settings can only be defined for new fields, since changing them later could cause a loss of data.
After closing the dialog the changes will become effective immediately.

cobra CRM
70
Field Properties
In the lower part of the field properties tab you can define for every field which se-lection list is to be provided, whether the field requires an entry, etc.
Name
The field name can be changed at any time. Please note that eventually the labelling of the field will have to be changed in the View Editor.
Format
If you click the list arrow, a selection list with predefined formats will be opened.
If you click the […] button to the right, a window will be opened where you can define individual formats. For individual formats, please also refer to the chapter »Formats for entry fields«, starting from page 360ff.

cobra CRM
71
Values such as EUR amounts are right-aligned so that commas are clearly aligned in all fields, underneath each other.
Field content in the database
Format Display Displayed value
Date fields
13.06.2005 10:29:56 D Date 13.06.2005
13.06.2005 10:29:56 T Time 10:29:56
13.06.2005 10:29:56 DT Date time 13.06.2005 10:29:56
$SYSTEM Short date format, as defined in the Windows Control Panel.
Short formats for numer-ic fields
100,2578 $SYSTEM Numeric format as defined in the Windows Control Panel.
100,2578 ,2 Number of decimal places. The output is rounded to the number of decimal places.
100,26
Other formats
% Is positioned at the beginning of each format definition, except for short formats (mandatory entry).
100,25 - The entry is shown left-aligned.
Without this character, leading blanks (indicated by dots) or lead-ing zeros will be shown.
100,25
....100,25
275,43 0 Leading zeros are shown. How many zeros are shown will depend on the total number of displayed digits. Leading zeros are only shown if the format is not left-aligned.
0000275,43
n Total number of digits (decimal point and comma will be counted as character).
100,2578 ,m Number of decimal places. 100,25

cobra CRM
72
Field content in the database
Format Display Displayed value
100,2578 d Whole number without comma, decimal places will not be shown (mandatory entry, you need to add d or f at the end of the format).
100
f Floating point number (mandatory entry, you need to add d or f at the end of the format).
Examples
1,5298 %010,3f Leading zeros, 10 digits in total, 3 decimal places, floating point.
000001,530
1,5298 %03d Leading zeros, 3 digits in total, whole number.
001
1,5298 %5,2f No leading zeros, 5 digits in total, 2 decimal places, floating point.
1,53
These formats define the display of data but do not define how data are entered. This would mean:
You have defined the format %5,2f for an entry field.
Users can enter the value 1,5298. This value is written directly to the database.
If you go to a different address and return to this entry mask later on, the value 1,53 is shown.
The database format you have defined here for tables can be overruled for single views in the View Editor using the »Column selection« dialog box.
Additional formats are described starting from page 394.

cobra CRM
73
Amount of digits after the decimal point in numeric fields
The producer of our databases has determined how many digits after the decimal point there are to be in numeric fields by default. This parameter cannot be changed.
However, in the cobra database there are individual parameters for numeric fields regarding the amount of digits after the decimal point that can be set separately for each field per database. They can deviate from the producer's parameters. So when you export data you can decide whether the amount of digits after the decimal point specified by the producer is to be used or that specified in the database structure of cobra.
You set the cobra parameters for the field using the command »File: Database : Database structure«.
Click a numeric field there. Specify a format for this field.
You have now set the cobra format for this field throughout the database.
This is how you use the cobra format for exporting:
Issue the »Format: Export« command.
Activate the option »Use cobra formatting«.

cobra CRM
74
Default Values
The default input value is a suggested value which will be assigned to each newly created address in the selected field.
Example: should you have assigned the default input value »GmbH & Co. KG« to the »company2« field, each newly created address will have the text »GmbH & Co. KG« in the »Company2« field. Users can change this entry later on.
Info Line
A line can be entered for every field supporting the user by showing information about the field content or the format required in the status line. Such information will be entered here.
Options
Entry Required
Should you specify the property entry required for a field, the user can leave the ad-dress mask for an address only after something has been entered in this field.
If you have activated this option for a field, and you are editing an already existing address where the field is blank, you cannot leave the address mask with this address before something was entered in this field. This does not apply for addresses that you are just viewing, but not editing.

cobra CRM
75
Telephone Field
If you activate this checkbox, the field will be listed in the selection lists for possible phone numbers when you are using one of the »Dial telephone number« commands like »Start: Action: Phone call«. Telephone fields will be also offered for configuration under »File: System settings: Telephone settings«. The telephone field cannot be ac-tivated for Skype telephony.
For Secondary Addresses /Primary Addresses Write-Protected
It may be useful to restrict changes of a field only for primary or for secondary ad-dresses. For example, the field »Customer since« may be changed only in the primary address, but be viewable in the secondary addresses (contact persons).
Show Button for Context Help
An icon is shown to call a help text for this field and to edit the text.
Warn Field
Text can be entered in this field (e.g. »Attention! Delivery only against payment in advance!«). If the user clicks the data record, the warning will be shown immediately.
Lock Flag (Only for Yes/No Fields)´
Yes/No fields can be used for lock flags. Should a user try to contact the addressee by letter, e-mail or over the phone, the existing lock flag will be shown. For example, an inactive data record will be crossed out in the table, but still behave like a regular record. Thus you can, for example, mark previous contacts at companies where you do not want to delete the entire company data.
Selection Lists
Configuring Selection Lists for Fields
For every field, you can configure which selections lists will be available for inserting text modules via the F3 and F8 function keys.
Click the »Selection list« tab in the field properties.
This function can also be accessed via »File: System settings: Selection lists«.
Available selection list are for example:
Text modules
Salutations

cobra CRM
76
Town names and postcodes (available for certain countries only)
Icons
Individual selection lists
Choose a list or create a new one.
Creating New Selection Lists
If you need further selection lists in order to add predefined texts to specific fields, you can create them here. Or use the menu »File: System settings: Selection lists«.
For example: you can create a list of bank codes, products, articles or other lists and assign specific fields. These lists will then be available in the field via the F3 and F8 function keys.
These additional selection lists exist globally for all users and in all databases, just like text modules and salutations. You can create additional individual selection lists by clicking on »New Selection List«.

cobra CRM
77
All selection lists are available for viewing and editing via the »File: System settings: Selection Lists« command. Further information on this command can be found in the User Manual.
Display As
Here you specify the selection list type.
There are list fields where you can only choose from the existing entries – we re-fer to them as “Selection lists”.
In addition, there are so-called “Entry fields“ that do not offer a selection but pro-vide space for entries.
Furthermore, there is a mixed mode of both where you can choose from the en-tries of a list or make your own entry. However, this typed-in entry is not added to the selection list.
Dependent Selection Lists
Selection lists can be defined field dependent from the entries of a different field. For example: After selecting the entry »Alfa Romeo« from the »Car manufacturer« field, the next field »Model« should offer only entries for this manufacturer and not show the models from different producers. It is possible to build up an interleaving system of field dependent selection lists. In the example above, the next selection field could offer model-specific extra equipment, etc.
Defining dependent selection lists will reduce errors during data collection, but it might lead to an increased number of selection lists which will have to be main-tained.

cobra CRM
78
Define a field from which a second field should be dependent. This initial field can be defined in the usual manner. Assign a selection list.
Now create a second field which should depend on the first field. Please make sure that you:
1. Do not select a specific »Selection list« but activate the »Field dependent selec-tion list« option, and
2. Under »Dependent on« define from which field (or the field’s selection list) the new selection list should be dependent.

cobra CRM
79
For each entry of the »Car manufactur-er« selection list you should now create selection lists of the same name, con-taining models of the manufacturer. I.e. you should create a new selection list »Alfa Romeo« holding only Alfa Romeo cars, another selection list »BMW« holding only BMW cars, etc.
These fields need to be added to the view, using the View Editor.
Multiple Selection Lists
An additional option is offered for selection lists: the multiple selection list. A multi-ple selection list will now offer you the option to select different list items per checkbox. Thus you can select several items at once, i.e., select multiple items.
In the query function, a multiple selection list will be treated as an OR query.
To create a multiple selection list, in cobra select an entry mask containing the field required.
Click the »File« tab to call the new function.
Then select »Database«.
The function »Database structure dialog« is in the »Configuration« section. Select it.

cobra CRM
80
In the Database structure dialog you can select »Multiple selection list« in the field properties of that field a multiple selection list has been assigned to or is to be as-signed to:
In the example shown here the entry mask has the field »Department« in the »Ad-dresses« table. In the multiple selection list you can now compile several properties:

cobra CRM
81
Postal Codes / ZIPs
Installing Codes Manually
Sometimes it might become necessary to install the postal codes manually. Proceed as follows:
You will receive a ZIP file with the new postal codes from cobra; copy it to the co-bra system directory into the \ZipFiles directory.
Should you not be sure where the system directory is located, you can look it up in cobra.
In the »Info« tab click the »Product information« button.
Select »System info«.
You will now see the different paths where the cobra components have been placed.
In this directory you can now see, besides the ZIP file containing the postal codes, a file called »ZipDataInstaller.exe«.
This file will install the new postal codes.
Double-click the file.
The postal code wizard will open.
Click the »Install« button.
The process is now completed and the current postal codes will have been installed.

cobra CRM
82
Presettings: User
Issue the command »File: User-specific settings: ZIP Codes«.
Automatic postalcode system active This automatic system will search for a unique assignment be-tween street, postal code and city. If, e.g. you enter the value 78479 into the field »Postal code«, automatically »Reichenau« will be entered as »City«. And, vice versa, you can also enter a city or a street and, if your entry is unambiguous, the other da-ta will be complemented automatically by the system. In the example shown only »Wallgut« was entered by the user, the other data were added automatically from the postal code da-ta.
Default country code This code will show which country will be offered by default when a new address is created. In each case, users can specify a different country. This parameter will also determine which postal codes the system will suggest if the data are not ambig-uous.
Auto-completing Specify when a matching entry in the postal code list is to be searched while creating an entry: After each character entered or only when leaving the entry field.
Presettings: Database
This settings are valid for the database just opened. Users can modify some of these settings for their own tasks.
Issue the command »File: Database: Configure ZIP codes«.

cobra CRM
83
Default country code The postal codes of the German-speaking countries Germany, Austria and Switzerland have been included in the software as default. If users then create an address, the country selected here will be suggested to them and the relevant postal code database will be loaded. If a different value was entered in the database structure, any templates or the user settings, then that will be suggested.
ISO-Standard for country codes There are several standards for representing country codes. Se-lect here the code to be used for the current database. e.g. Germany could be coded as »D« (German automobile code), »DE« (ISO-3166 ALPHA 2) or as »DEU« (ISO-3166 ALPHA 3).
Reorganizing country codes If you alter the country code setting, you must re-
organize the codes. All codes already specified in the database will be replaced by the currently se-lected codes and all existing data records will be modified.
Click the »Reorganize country codes« an. but-ton.

cobra CRM
84
In this dialog you can see which country codes are replaced by which other country codes.
Click »Convert« to replace the country codes.
Country code when creating a new data record If you activate this option, the country code set before will be entered in the corresponding field when the data record is cre-ated; however, you can alter it here..
State when selecting and altering If you activate this option, the state allocated to the code se-lected will also be entered (in capital letters) when creating a data record. You can specify in which language the name of the state is to appear.
Checking address data for plausibility If this option has been activated, the address data entered will be compared to the entries in the postal code database when the record is saved. If they do not match the entries in the da-tabase, there will be an error message.
Checking only the correct length of the postal code If this option has been activated, only the length of the postal code will be checked, not the complete address data (in Ger-many it has five digits, in Switzerland four etc.).
Install postal code data Sometimes a cobra update you receive from us will include up-dated postal codes. So after an update, click this button to up-date your data.

cobra CRM
85
Postal code list settings Here you specify which fields from the database are to be used for the different postal code lists (postal code automatic func-tion).
At »Postal code list« select for which country you want to spec-ify the settings. You must enter the settings for all countries separately. So first select at »Postal code list« at the top for which country the following settings are to be valid.
If the automatic function is active, the field contents marked in these presettings will be used for the postal code automatic function. If an unambiguous data record matching the entries up to now is found, the automatic function will become effec-tive. If, e.g. the user enters a unique street name or an unam-biguous postal code, the other fields marked here will auto-matically be filled with the data from the postal code database.
Field Types
Every database field is characterized by a special type. There are a large numbers of field types defining the exact purpose. If you work with formats, in addition to the field name, the program saves the field type for the fields you specified.
If you open another database containing completely different field names, the pro-gram can still use your formats because the correct fields are identified via the field types.

cobra CRM
86
The field types (only the ones that are used most often are listed) belong to different areas.
Text field length is set to 50 characters as default, but you can change this value to a maximum of 255 characters.
General
Amount (text) text field
Comment comment
Currency number field
Date and time date field
Date date field
Time date field Number number field Text text field Yes/No Option field (TRUE=-1, FALSE=0)
Address
BR-Town* text field for bulk recipients location
BR-Postcode* text field for bulk recipients postcode
Country shortcut* text field
Town* text field
Postcode* text field for postcode
PO box* text field
PO box postcode* text field for PO box postcode
Country text field
Street* text field
Special
Bank code text field
Birthday date field
Account number text field
Source/Occasion text field
Icon text field

cobra CRM
87
Hold-file date field
Company
Department text field
Company* text field
Customer number text field
Communication
E-mail text field
Internet text field
Skype text field
Telephone telephone field
Telephone direct telephone field
Telephone mobile telephone field
Telephone private telephone field
Person
ToPerson text field
Salutation text field
Name text field
Position text field
Title text field
First name text field
* These fields cannot be deleted!

cobra CRM
88
Creating New Additional Data Tables and Sub-Tables
You can see that the tables »Service« and »Technical data« are sub-tables of the ad-ditional table »Devices«.
Right-click the table area to the left.
Use the command »New: Table« from the context menu.
Enter a name for the table.
Define the dependencies for this table. Should you select the addresses the new table will become an additional table.
Should you select an additional table the new table will become a sub-table.
Assign fields to the table.

cobra CRM
89
Quick printing format
You as the system administrator can specify which output format is to be offered to the user by defining it in the database structure individually for each data table. To do so you use index card formats.
Issue the command »File: Database: Database structure«.
Right-click the data table required at »Tables«.
Select a format. You will be offered all existing index card formats.
Should you need a new format, specify it in the »Output: Print« area. To open for-mat editing there click the lower part of the »Index card« button.
The parameter you specify here is a default value. When you print you can still select another format.
Display format for Tooltips
In the same context menu you find the command »Display format«.

cobra CRM
90
They determine which contents will e.g. be displayed in the »delete addresses« dia-log box.
Dynamic reloading of comment and notes fields' content
In the database structure you can specify that content of comment fields is reloaded dynamically. This is true for both of the field types »Notes« and »Comment (RTF)«.
By dynamic loading, loading is optimized and, ideally, faster. In this case, field con-tent is only loaded when the field is actually opened.
Fields that are reloaded dynamically may no longer be integrated in tables. Such a field is tacitly removed from tables where this field is shown as a col-umn.
The comment field in contacts would be such an example.

cobra CRM
91
The settings in the database structure:
If it is reloaded dynamically and you try to have it shown in a contact table using the Column selecting function, you will receive an error message.
Rules that make data records unique (CRM BI, CRM PRO)
These rules avoid errors and ensure that data records will always be unique. In the example below that means that a rule is defined that avoids a customer number be-ing entered twice by mistake.
Issue the command »File: Database: Database structure«.
Right-click the table you want to define such a rule for.
In the context menu, click the »Rules for unambiguity« command.
The dialog to define rules for unique data opens.

cobra CRM
92
Click the »New« button.
Error message ............... This text will pop up when a user tries to enter a duplicate.
Unique fields ................. Click the field or fields that are to be checked.
If you confirm with »OK« this rule for unique data will be activated.
Should you see an error message after clicking »OK« this means that there al-ready are duplicates in the field selected. In this case please clean the data-base of duplicates. After that you can enter the rules for unique data again.
Should a user try to enter a customer number in future that already exists he will see the warning message.

cobra CRM
93
Yes ..................................... The user is directed back to the entry mask where he can as-sign a different customer number.
No ...................................... The user cancels entering the new data record.
Details .............................. See here the value that was to be entered as a duplicate.
Copying Rules – Change field contents automatically (CRM BI, CRM PRO)
The Copying Rules Wizard will ensure that certain field contents change automatical-ly when other field contents are specified.
Such a copying rule can also be specified reaching across tables so that the field con-tents of a data table will be changed whenever the contents of another data table change.
In the example shown a rule is specified in the seminar management of the demo database that makes sure that the possible maximum amount of participants of a training will be adjusted automatically if the event is relocated to a (smaller or larg-er) room.
Issue the command »File: Database: Database structure«.
In this example in the database structure there is
1. a data table »Seminar room« with the field »Number of workstations«, this is the source field, as well as
2. a data table »Seminar« with the field »Participants max.« (maximum number of participants), this is the target field.
A relation field connects both tables.
The aim is that the field content of »Participants max.« at 2. is changed whenever a different room is selected. »Participants max.« is to have the value entered for the room selected at 1. as »Number of workstations«.
In the data base structure right-click the free table »Seminar«, i.e. the target table.

cobra CRM
94
In the context menu issue the command »Rules for copying«.
In the copying rules dialog click the »New« button.
In this dialog select the target table at »Table«. This is that table where something is to be changed automatically whenever something is changed in the source ta-ble.
You are now in the Copying Rules Wizard.
Activate copying rule The copying rule will only be applied if it was activated before. This means that you can deactivate the rule any time, instead of deleting it. The copying rule will be retained and be used again later.
Name ................................ Give the copying rule a descriptive name.

cobra CRM
95
Type .................................. Select here which condition must be fulfilled in the source field so that the content of the target field is changed. So this is the triggering event in the source field. If necessary, you will have to specify a copying rule for each of the different changes in the source field (such as changing field content, deleting field content).
Field content changed The content of the source field is changed.
Field content deleted The content of the source field is deleted.
Filter You can define a filter limiting the event. In such a filter it is mandatory that you name the source field.
In the second step you specify which target field is to be changed or filled with new data.
At the top select a field that is to be filled if the rule applies.
Click the »Add« button. This results in a new line for the field selected being cre-ated in the overview below. You can assign several events in target fields to an event in the source field.
Here click one of the two buttons at the right. One button will open a field selec-tion dialog, the other one the user attributes as well as date and time.

cobra CRM
96
In the field selection dialog the fields of the table selected will be available as well as fields of tables that are connected to the current table by a relation field.
In the example shown the target field »Maximum number of participants« that was named in the previous step is to be overwritten with the content of the field »Num-ber of workstations« from the data table »Seminar room«. This means that in the tar-get field there will always be that amount of participants allowed as the seminar room has workstations.
Select the field »Amount of workstations« shown there and confirm by clicking »OK«.
In the user attributes you will find the details from the user administration as well as date fields.
You have now specified which field contents are to be taken over into the target field.
In the last step of the wizard you can determine different types of actions.

cobra CRM
97
Do not replace existing field contents The target field will only be filled if it is empty, fields contain-ing data will not be changed.
Complete existing field values Should the target already contain data, the new content will be added to the existing one.
Replace existing field values Should the target field already contain data, the existing con-tent will be replaced by the new one.
Message before replacing You can enter a warning message for replacing data.
Add address to campaign You can have the address added automatically to a campaign.
In future, a prompt will pop up whenever a room scheduled for a seminar is changed. If this is answered »Yes«, the maximum number of participants of a seminar will au-tomatically be adjusted to the number of workstations available in the seminar room whenever the room is changed.
Filter
Use the command »File: Database: Database structure«.
You can define individual filters for contacts and additional data.
For example, select the »Contacts« table.
Click the button »Manage« below the table area.

cobra CRM
98
Click the filter management.
Then click »New«.
Enter the filter criteria.
Confirm with »OK«.
Enter a name for the filter.
Confirm with »OK«.

cobra CRM
99
This filter is immediately available for filtering contacts.
Fixed Filters for Tables
Further explanations on filters can be found in the User Manual.
You can also create own fixed filters for contacts, additional data and sub-tables. When using these filters, the data tables will present only filtered data. The user cannot influence the presentation.
Fixed filters can be defined in the View Editor, under »Table properties« in the tab »Reference source«.
Data filter ....................... If you click the red entry under »Filter«, a list of all logical links is opened. You can also create additional conditions and delete the filter here.
• A click on the + icon creates a new condition for the filter.
• A click on the x icon removes a single condition from the filter.

cobra CRM
100
• A click on the blue entry opens a list of all available condi-tions.
• A click on the green entry opens the list of all comparison op-tions.
• A click on the grey entry allows entering a value, e.g. a date, text or numerical value.
Only data according to the filter criteria will be shown. However, the user will not know that a filter is used, as there is no indication of an active filter, and cannot change this filter setting.
Sorting Use the command »File: Database: General settings: Sortings«.
Addresses can be sorted according to several criteria. Data is sorted in multiple lev-els, i.e. by several hierarchical criteria.
With click on »New« or »Edit« you start the definition or redefinition of a sorting.
A sub-sorting defines the next hierarchical sorting field if the entries of several addresses are equal for the sorting field above.

cobra CRM
101
At the end you have to add the new sorting to the »Sorting« menu by clicking on »Apply«. When you delete the sorting later, it is deleted from the menu as well.
Hierarchy
• Use the command »File: Database: General settings: Hierarchy«
The program can manage addresses hierarchically. Primary and secondary addresses are created and you can define any number of contacts (secondary addresses) to one company (primary address).
Preparing Databases for Addresses with Several Contacts
Open the database.
In the »Field names« list, select all fields that should have the same content for the primary address and all secondary addresses. (Further information on primary and secondary addresses can be found in the User Manual.)
The »Company« field is always a hierarchy field.
Activate the »Use hierarchy« checkbox. Now the capturing of primary and second-ary addresses is activated.

cobra CRM
102
It is also possible to show the contacts and additional data of secondary addresses together with the primary address. When calling the primary address of a compa-ny, you can see the contacts and all contact persons in this company at the same time. These entries are displayed in grey font color. The entries are write-protected.
If you activate the »Sub-data records ...« checkbox, all sub-data records (also those of the primary address) and other secondary addresses are shown in all secondary addresses. By this users can see, for example when looking at a contact person, how many devices in total have been bought by the company for which the person is working.
Configuring
Click the »Configure« button in the »Hierarchy« tab.
At »Create new addresses« you have several options. These options will only become functional if data related to an individual are entered for an address. Data related to an individual are data for which the option »Individual-related field« has been acti-vated.
Enter an address related to an individual (Single address) (Standard) In this case you can also enter addresses related to an individ-ual. A typical address related to an individual would be one of a company consisting of one person only, where the data relat-ed to the company and to the individual are to be maintained in a single data record.

cobra CRM
103
Check whether an address hierarchy... In this case it will be suggested to create an address hierarchy when an address is entered containing data related to an indi-vidual.
Create an address hierarchy An address hierarchy will always be created, that is, a primary and a secondary address will always be created, even if none of the hierarchy fields has any content.
Duplicates
Use the command »File: Database: General settings«.
Select the »Duplicates« tab.
The program can identify duplicates during entry and import and can search for du-plicates in an address database. Prior to this, you have to define the criteria for dupli-cate checking so that they can be recognized.
What are the Advantages of Duplicate Checking?
Creation of new addresses: After entering a new address (when you exit the ad-dress mask), the program checks the address for duplicates and a prompt appears on the screen.
Address import: If a duplicate is detected during import or merging of files, you will be prompted if the duplicate should be imported.
Duplicate query: The duplicate query searches for duplicates in a database and fil-ters them for further manual editing.

cobra CRM
104
Activating Duplicate Checking
Configuring
You can put together criteria to check for duplicates in a very granular way to specify precisely when a data record is to be suspected of being a duplicate of another data record. Thus you can prevent formation of duplicate data records.
There is also a separate add-on module for cobra that checks existing data pools for duplicates and assists with cleaning them up. This section is not about that add-on. In fact, this is about checking for duplicates while creat-ing addresses.
Issue the command »File: Database: Configure duplicate check«.
Go to the »Configuration« tab.
Real-time duplicate check Use this option to turn duplicate checking on and off. If this option was not activated, there will be no duplicate check while entering data.

cobra CRM
105
Should you be using the real-time check, you will detail this check in a different tab.
Table Right now, duplicate checking is only available for address data.
Duplicate check Specify when a check is to be done. You can on-ly have data checked while they are being en-tered the first time or, in addition, when they are being modified.
Begin checking Specify how many fields of the search profile must have been filled in for the check to begin. In this dialog, you compile the actual search profile from the fields of the data table.
Sensitivity Specify also whether the duplicate check is to be case sensitive. Using it, it could be that »Co-bra« might not be identified as a duplicate of »cobra«.

cobra CRM
106
Handling Specify whether you want a dialog called on suspicion of a duplicate. In this dialog you will see an overview of the existing data and can decide how to proceed with them.
You will find details about this dialog in the following section.
Fields Specify here the contents of which fields are to be used to find duplicates. The fields of the da-ta table will be available. You can have a max-imum of 15 fields checked. The fields to be checked will be complied in a »Search profile«.
When you click a field of the selection »Fields of the table«, it will be added to the »Fields of the search profile« and thus be considered in future whenever there is a real-time check.
If you add a yes/no-field or a field with a se-lection list to the search profile, you do not have to configure it.
To remove a field from the search profile dou-ble-click it.

cobra CRM
107
The amount of check characters may at the most be as many as the maximum length of that field. If the amount of check characters is less, the system will identify quite a number of suspicious addresses, if it is more, it will identi-fy less.
If you enter a name such as »Beckenbauer«, three check characters will lead to all names beginning with »Bec« being identified as possi-ble duplicates, i.e., »Becker«, »Beck« etc. also, with six check characters only such names as »Becker« where six initial characters match the entry.
The system will begin to automatically search for duplicates as soon as the amount of fields specified for starting to check has been arrived at and in the field to be checked the amount of check characters specified for checking has been arrived at.

cobra CRM
108
vCards
Predefined File Settings → »File: Database: General settings« → Select the »More« tab → Click the upper »Edit« button
The program can exchange addresses with other programs via vCards. In this window you assign the vCard fields to the database fields.
Click »Edit«.
Here you can assign the vCard to fields in cobra.
Use the buttons below left to create new field assignments or delete existing ones.

cobra CRM
109
Inactive data records
You can configure which functions are to be deactivated when a data record is marked as »Inactive«.
Issue the command »File: Database: General settings: More«. Besides the field for inactive data records, click the »Edit« button.
Select here which functions are to be deactivated. This will be done separately for addresses and for other data records. "Other data records" are to be understood here as tool-, event- or other additional data records.
Reorganizing Databases
Reorganizing the Database → Select »File: Database: Reorganize«.
If problems occur when working with the program, or cobra shuts down due to ex-ternal factors, it may happen that not all database files are saved correctly. In this case, this command reorganizes and compresses the database, resulting in faster da-tabase opening.
By using this command on a regular basis you may eliminate database irregularities that were unnoticed before.
A reorganisation is only possible in exclusive mode, i.e. users cannot access the database while the reorganisation is executed.

cobra CRM
110
Select the data that should be checked during the process.
Make sure to have a backup of your data prior to reorganizing the database.

cobra CRM
111
Data Backup
The program provides its own function for backup and recovery of address and sys-tem databases.
The backup procedure described here can only be used for the databases mentioned. Formats, appointments, documents, etc. will not be included in the backup.
Database Backup
Backup Data → Command »File: Database: Backup«
Step 1
This command will call the wizard.
Use the buttons »Next« and »Back« to move within the wizard.
Define the database type you want to backup. You can backup address databases and system databases.
Specify the storage location for the database backup. Possible storage locations are hard discs where the SQL Server is running

cobra CRM
112
Please note that the folder for the backup must exist on the hard disc and eventually needs to be created manually. If the folder does not exist yet, please create it now using the Windows Explorer.
Should you want to perform data backup at a specified time later or backup is to be executed automatically at regular time intervals, click the option »Setup of sched-uled database backup«.
Step 2
Should you have decided on scheduled automatic backup, define here how often and at what time the backup should be started.
The system will then ask you to confirm the setting as authorized user. Please enter your password.
In the next step you will see an overview of your settings and can activate the data backup by clicking the »Finish« button.

cobra CRM
113
Restoring Backup
Restore Data to a Database → Command »File: Database: Restore«
Restoring databases is done in the same way as the data backup. Select the location of the backup file and define to which location it should be copied to.
Click the database type you want to restore.
Click »Select« in order to define the SQL Server where the backup file is stored.

cobra CRM
114
Data can be restored from an ADL file, or you can alternatively log on to the SQL Server directly.
Select the database to which you want to restore the data as target database.
Any existing data in the target database will be overwritten during restoring!
After you have defined the SQL Server, you can select any database on the SQL Server as target database.
If you click the button next to the target da-tabase selection list, you can create a new da-tabase for receiving the backup data.
As backup file, select the backup database for which you want to restore the data.
In the address database line, click the button with the question mark in the col-umn ADL. You can now create a new ADL as the backup database. The name of the target database will be suggested.
You cannot change other ADL databases, they will be overwritten.
In the next step, confirm with »Finish«.

cobra CRM
115
Finally, a detailed report will be shown, containing the operations which have been performed.
Modification Log (CRM PRO & CRM BI)
Setup and Management
If desired, the modification log records in detail which data have been changed and by which users.
Use the command »File: Database: Modification log setup«.
You can create detailed logs for modifications of all data of the existing databases.
Select a data table on the left hand side.
On the right hand side you can select all fields where modifications should be logged.
Log files not needed any longer can be removed by using the command »Delete modification log«.

cobra CRM
116
Viewing and Evaluating
Use the command »Data: Show: Modification log«.
The log file is shown within an editor.
The data can be sorted and filtered. Old and new field content will be recorded for every change, as well as deleted data, changed data and time, user name and com-puter name.
If you right-click a column header, you can call a context menu to remove col-umns, define filters, search and filter lines etc.
If you select a log entry for an address data modification and then click the button, the address will be queried in the cobra database. After closing the modifi-cation log, you can activate the query in the address database and detect easily which address(es) has (have) been changed.
Use the delete history to follow up when modification logs were removed.

cobra CRM
117
Data are printed in list form. Besides the layout provided by co-bra, you can also define your individual one.
Export the modifications to Excel (.xls), to PDF (.pdf), as Rich Text (.rtf), as HTML file (.htm) or as text file (.txt).
Undo all changes to the layout of your log.

cobra CRM
118
Security System
This chapter provides information about the user administration and access permis-sions.
Security System setup → Set up the user administration → Assign the access permissions on system level → Assign the access permissions on database level
The security system enables you to individually define every user’s access permis-sions, for each database as well as for various program functions. But first you have to set up users and user groups.
User Adminstration
The security system, which handles the user administration and the access permis-sions, protects your data within a closed installation from unwanted access. Other applications do not necessarily adhere to this security system. When used in open systems, the protection by the security system is not always guaranteed.
Setting up User Administration → Create users → Set up groups → Define group membership for users → Request login
The user administration performs the following tasks:
Personal settings ......... Individual data is stored for every user. Program settings, cur-rent query, formats last used for views, labels, letters, etc. To save these formats, a personal subdirectory is created for every user on the hard disk.
System fields .............. Some fields in the database are filled automatically. Two date and time fields specify the date of creation and the last change for an address. In addition to these fields, the program saves

cobra CRM
119
the name of the user that created the address or changed it last.
Access Permissions .... You can assign or restrict certain functions to every user. These settings are defined for every database separately.
Users and user groups You can define several users as a user group. This makes as-signing access rights a lot easier for the system administrator. User groups may also share formats for labels, index cards, ta-ble views, etc. To save these formats, a personal subdirectory is created for every user group on the hard disk
Managing formats ....... The different formats for labels, index cards, views, etc. are saved separately for every user. They may be made available to a user group or to all users by the system administrator.
Starting Point
Directly after the installation is completed, the user administration is deactivated. Users do not have to log on when they start the program; all users are automatically logged on under the name »Guest«.
When the installation is completed, there is only one user called »Guest«, having all rights of the system administrator until you have set up the system security. (From this moment, the guest – as well as all users created later on – must enter the system password to log in as system administrator.)
Issue the command »File: System settings: System settings«.

cobra CRM
120
Go to the »User administration« tab.
There, select the administrative system.
None If you select this option, log-in information will not be requested at start-up. Any person starting the software will be signed-in as user »Guest« and has system administrator rights. This function has the same effect as deactivat-ing »Request login« in former versions of co-bra.
cobra You are using the cobra user administration described below.
Windows The name of the currently logged-on user will be used for login. Users and groups will be administrated as described for the cobra user administration below.
Active Directo-ry
You will be using the Active Directory as user administration. The name of the user will be taken over from Windows if the user is in one of the groups named in the Active Directory.

cobra CRM
121
User administration with cobra
Here you can enter users and groups and match them.
In the »System settings«, click the »User administration« button.
New User
In this dialog, you can collect information about individual users. This includes user attributes you can use, e.g. for writing letters.
Editing User Data
You can reset the user password.
To edit a user account, open it. To do so, double-click the user in the list or click the »Edit« button.
Click the »Reset password« button.

cobra CRM
122
Assign the user a different password.
Users may also change their own password.
To do so, issue the command »File: User-specific settings: General: Change login password«.
You can also edit the user name and the user attributes. However, the user shortcut cannot be changed once it has been assigned.
New Group
A group consists of a name and a shortcut. Group memberships serve to simultane-ously assign or revoke specific rights to several users.
Editing a Group
You can change the name - but not the shortcut - of a group.
Open a group for editing. To do so, double-click the Group in the list or click the »Edit« button.
Matching Users and Groups
You can assign an individual user specific groups as well as a group specific users.
if you click a User, you will see a list of all groups available at the right. Click those groups the user is to belong to.

cobra CRM
123
If you click a Group, you will see a list of all users available at the right. Click those users to be added to this group.
Exporting Users
You can export users to an Excel file (*.xlsx) and also re-import them.
In the User administration, click the »User-Export« button.
Specify where the file is to be stored.
User name and user shortcut are listed in the Excel file. Additional details such as user attributes or group membership will not be exported.

cobra CRM
124
Import Users
Users can be imported from an Excel file.
Users can be taken over directly from the Active Directory. To do so, enter the root path as well as the groups to be imported.
Displaying User Names
In the system settings you can specify in which format user names are to be dis-played in the software. Should you not specify a specific format, the user shortcut will be used automatically.
Issue the command »File: System settings: System settings«.
Go to the »User administration« tab.
You can take over specific field contents from the user attributes into the user names as well as add free texts.
Display format .............. In this field you can compile the name format you want dis-played. On the right-hand side you can see a selection list of the user attributes. To take over an attribute into the display format, - place the cursor in the field, - click the attribute in the list and confirm by clicking »Add«. - You can also add free text [»(cobra)« in the following figure].
Start cobra again.

cobra CRM
125
In various instances of cobra the user name will be displayed as specified here. If this field remains empty, the shortcut entered in the user administration will be shown.
User Administration with the Active Directory
You can change the cobra user administration to the Active Directory user admin-istration. By doing this, you do not have to manage the user administration twice, in Windows and cobra. It is handled now only in the Active Directory. This will lower the level of the administrative activities because you no longer have to manage the user administration in cobra after the setup is defined.
Prerequisite: Workstations and users must be logged on in a Windows domain.
We recommend maintaining one group in the Active Directory where all groups working with cobra are members of. This group can serve as basis group for further configurations. Such a group, for example, could be a »cobra« group with respective sub-groups. If you are removing or adding groups from/to the basis group later on, you will change the groups in cobra at the same time.
cobra works directly with the Windows Active Directory user administration and reads information from the Active Directory. This means, cobra does not perform any changes in the Active Directory!
The Active Directory settings are stored in the cobra system database (Default set-ting: cobra_Main).

cobra CRM
126
Configuration
You can find the AD Wizard within your installation in the subdirectory \PROGRAMM. The wizard is called ActiveDirAssistent.exe and is started via double-click.
Step 1 and 2
You receive a welcome message. Click »Next«.
Select »Login«. You have to log on as system administrator.
Enter the system password.
Step 3
Specify the LDAP root directory. The »Search« button may help you to locate the di-rectory. When entering the directory manually, you can verify the path by clicking on »Test«.

cobra CRM
127
Step 4
Enter the basis groups here. Basis groups are groups that (may) contain different groups. You are assisted by the wizard.
Click the »Change« button.
All groups existing in the Active Directory are offered. Specify which groups you want to accept for the user administration with cobra.
Confirm with »OK« to return to the previous dialog.

cobra CRM
128
Click »Test«. Depending on your selection, all users and/or groups will be listed which are members of the chosen basis groups.
Step 5
If you already defined access permissions to groups and users in cobra, you can as-sign the cobra groups to the Active Directory groups. By doing this, the groups from the Active Directory will receive the access permissions from the cobra groups when opening a database later on. If you like, you can also transfer the administrative rights in cobra to the Active Directory users. You may assign the same rights to the mobile (former “external”) users having the privilege for data synchronization. Noth-ing will be written to the Active Directory. cobra stores the information in an internal database.
First, you assign the users and groups existing in both systems to each other via the »Users« and »Groups« buttons. The dialog boxes appearing work identical.
You may use the »Suggestion« to impact the depth of the search. The lower the val-ue, the higher the congruence of the two suggested entries will be. »Long« names and »Shortcuts/ID’s« will be considered.

cobra CRM
129
If there should remain some users and/or groups existing in cobra but not in the Ac-tive Directory, you can assign their settings as well. When opening a database with contacts owned by a former employee who left the company long ago, you can as-sign these contacts to a user that exists in the Active Directory. This also applies to groups.
Step 6
Within cobra, private folders are created for all users and groups from the Active Di-rectory, storing user or group specific settings and formats.
You should apply these settings for users and groups that were assigned to each oth-er in the previous step. Here you specify in particular, which users/groups should be copied from the former to the new user administration.
Step 7
The procedure is finished. You may repeat the process at any time in order to modify your settings.

cobra CRM
130
Impact on cobra
When a database will be opened with the Active Directory user administration for the first time, a message is prompted.
Go to the systems settings in the »Tools« menu. Select the »User Administration« tab and click »Settings«.
Here, you can deactivate the Active Directory user administration at any time.
In addition, you can define a user as a prototype user by activating the »For the first login, copy settings from this user« option. The settings of this specific user, defined under »File: User-specific settings«, will be copied to all users logging on to cobra via Active Directory for the first time.
Attributes that you may have defined for cobra users before, are now overwritten by the user attributes specified in the Active Directory.
With the »Copy Attributes« button you copy user-specific attributes from the Active Directory. The purpose: mobile users do not dispose of an Active Directory user ad-ministration while they are offline. In order to make the user attributes visible to them even when they are offline, user attributes can be copied to the cobra user ad-ministration. Additionally, the attributes must be maintained only in the Active Direc-tory.
Deactivating
If you want to deactivate the Active Directory user administration, remove the check mark from the »Active Directory login activated« checkbox. Afterwards, cobra is closed.
After restarting the program, the former cobra user administration is activated again.
Re-activating
To switch back to the Active Directory user administration, again call the system set-tings and then the »Settings« button.

cobra CRM
131
Activate the »Use Active Directory user administration« checkbox.
Or use the Active Directory Wizard again with the same or modified settings.
After re-starting cobra, the Active Directory user administration is activated again.
Access Permissions
The security system with user administration and access permissions protects your data within a closed installation from unwanted access. Other applications do not necessarily adhere to the security system. When used in open systems, the protection by the security system is not always guaranteed.
There are two levels of authorizations:
System roles regulate the access permissions of users or user groups for the entire program, independently of the currently opened database.
Database roles regulate the access permissions of users or user groups for specific databases. It is thus possible to define specific access rights per database.
User roles simplify the user administration, as it is not necessary to define the per-missions for every user individually. A role is a compilation of access permission that is applied to every user to whom this role was assigned.
Should you change the access permissions of a role later on, this change is automati-cally applied for all users to whom this role was assigned.
System-wide Permissions – System Roles
Use the command »File: System Settings: System settings: User Administration«.
Click the »System Security« button.
When the software is delivered, the security system is deactivated and all users are having unrestricted rights. You can stepwise activate the security system. By this you are restricting the user rights or you are assigning dedicated administrative rights.
Function authorizations These are functions such as the view or format man-agement, i.e. permissions for tasks that a limited num-ber of users is taking over for other users.

cobra CRM
132
Command authorizations Commands can be defined as system administrator commands. These commands cannot be used by »regu-lar« users; they are exclusively reserved for system ad-ministrators. Typical commands are the creation of new databases or the data backup.
Click the »Activate system authorization« option to start the assignment of per-missions for basic management functions.
Click the »Restrict authorizations for commands« option in order to mark specific commands as system administrator commands later on.
In the first step users and user groups are registered in the security system.
Click the »Users/Groups« tab.

cobra CRM
133
In this window the system role(s) is/are assigned to individual users or groups.
Any system authorizations for users resulting from the different settings will also be listed here.
Every user and group can have several roles. Rights will then be applied addi-tive. A user will have the sum of all rights of all roles that have been assigned to him – and not only the common subset of these rights.
Further Information
»Inherited system roles« indicate which system roles the selected user has – on the one hand as individual, on the other hand due to his group membership(s). If you select a group, you will see the system roles of this group.
In »Membership information« you can see to which groups the selected user be-longs, and also who is member of the selected group.
Click »Effective Authorizations« to view the available rights of individual users.
»Authorization overview« will list the rights of all registered users.
Assigning Permissions
Users and groups must be added to the system security management before you can assign roles and functions to them.
Click «Add«.
You will see all the users and groups created in cobra that don't have system rights now.
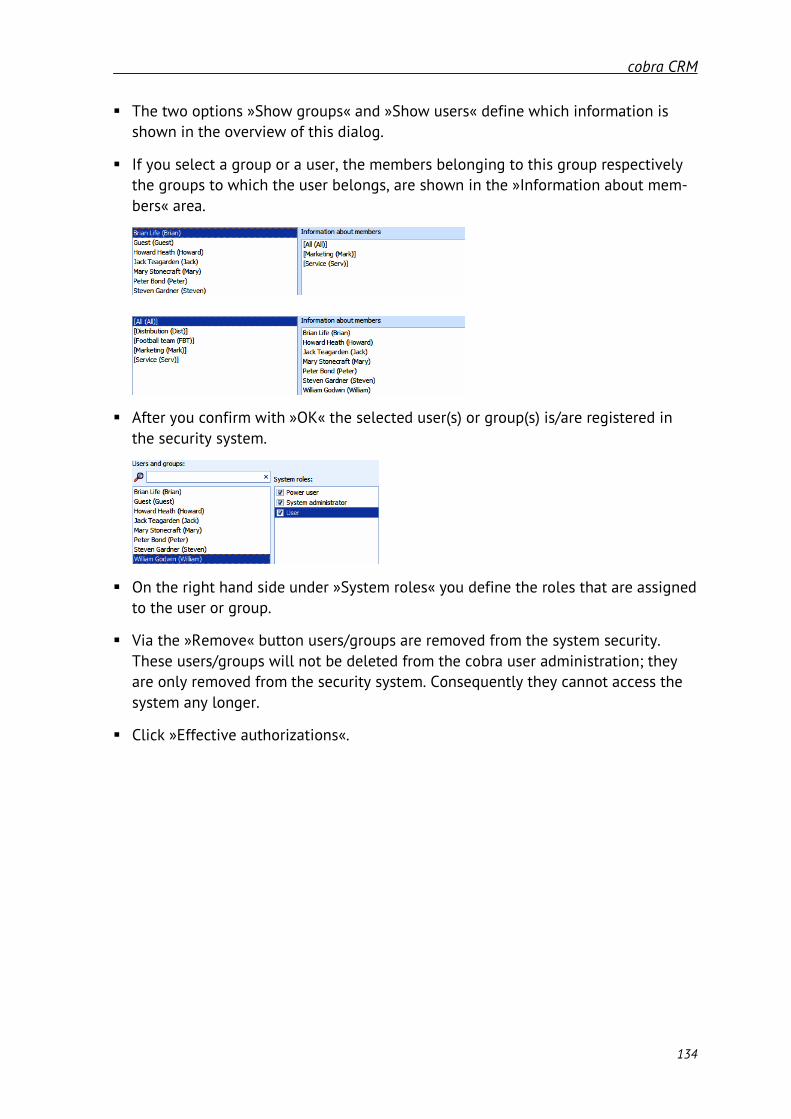
cobra CRM
134
The two options »Show groups« and »Show users« define which information is shown in the overview of this dialog.
If you select a group or a user, the members belonging to this group respectively the groups to which the user belongs, are shown in the »Information about mem-bers« area.
After you confirm with »OK« the selected user(s) or group(s) is/are registered in the security system.
On the right hand side under »System roles« you define the roles that are assigned to the user or group.
Via the »Remove« button users/groups are removed from the system security. These users/groups will not be deleted from the cobra user administration; they are only removed from the security system. Consequently they cannot access the system any longer.
Click »Effective authorizations«.

cobra CRM
135
In the »Functions« tab you will see the functions that the user or group can ac-tually use. These permissions result from the roles that are assigned to the user or group. Therefore the permissions are defined in the »Roles« tab.
In the »Commands« tab you will see the commands that are accessible for the user or group, i.e. all commands with the exception of system administrator commands and those commands that have been explicitly denied for the role.
Via the button a list of the effective authorizations can be exported to an Excel file.
Click » Authorization overview« in the »System security« dialog.
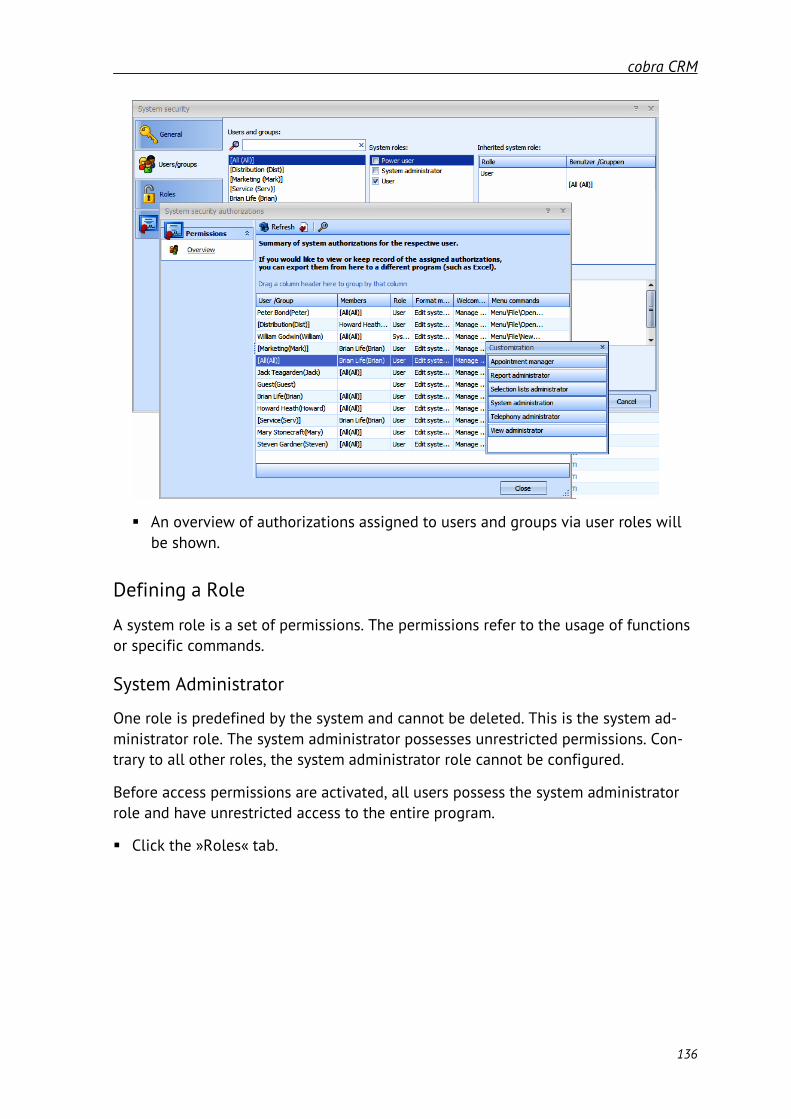
cobra CRM
136
An overview of authorizations assigned to users and groups via user roles will be shown.
Defining a Role
A system role is a set of permissions. The permissions refer to the usage of functions or specific commands.
System Administrator
One role is predefined by the system and cannot be deleted. This is the system ad-ministrator role. The system administrator possesses unrestricted permissions. Con-trary to all other roles, the system administrator role cannot be configured.
Before access permissions are activated, all users possess the system administrator role and have unrestricted access to the entire program.
Click the »Roles« tab.

cobra CRM
137
Here you define which role is authorized to use which functions and commands.
For the system administrator role you can define a system password in the »Gen-eral« tab. In this case, any user who knows this password can log on as system administrator. This is done via the command »File: System administrator login«. If no system password has been defined, only those users will have system adminis-trator rights to whom the system administrator role was assigned.
By using the option »Use system password during login«, every user will become system administrator when logging on to cobra with the system password instead of his own user password.
Use the tab »Members« to add users to the system administrator role. This is done with the command »Add«.
Additional Roles
Click the options »Restrict functional authorizations« and »Restrict authorizations for commands«.

cobra CRM
138
If you want to create an additional role, click »New«.
Specify a name for the role. The name can be changed later on at any time.
Select the role in the overview.
Directly after a new role has been created, it is automatically assigned with all rights. Click the options »Restrict functional authorizations« and »Restrict authori-zations for commands« and specify the privileges for the new role.
Go to the »Members« tab and allocate the role to the users.
In the »Functions« tab the administrator functions are maintained. You can assign specific functions to the role.
To do this, click a field in the »Stages« column. A selection list opens where you can assign privileges for the respective administrative task. The stages/levels of authorizations vary, depending on the administrative task. In the example shown here, the role is assigned with the permission to access system settings, system security and database management.

cobra CRM
139
The security settings for a selected role can be exported and imported. By this an XML file is created which contains the required information.
In the »Menu commands« tab you lock specific commands for the role.
Please note that this dialog offers only those commands that are not system ad-ministrator commands. System administrator commands are not shown in this se-lection.
Commands that you want to deny for the role, are simply deselected. By this the command will be hidden in the menus.
System Administrator Commands
Go to the »System Administrator« tab.

cobra CRM
140
Select all commands that should be restricted to the system administrators only. These commands will only be shown to system administrators, but not to the »regular« users.
You can use the import and export function if you want to load or download the data in XML format.
Overview of System-Wide Functional Authorizations
Function / Level Level Authorization
View manager
Edit views If a register tab is to be added to the currently selected view (e.g. by a wizard like the Reporting module), the system checks whether the user is authorized to edit the view.
The system will check whether the user is allowed to ed-it this view in the View Editor.
At regular time intervals the systems will check the us-er’s permission for the “Edit views” command.
Selection list manager
Edit selection lists When the selection list manager is called, the access right is validated. If permission to edit selection lists has not been granted, the selection list manager will be started in read-only mode.
Report manager
Manage reports This authorization will grant access to the administra-tion area for reports.
Create reports Only if this authorization has been granted the button in the Reporting dialog will be activated, otherwise it is greyed-out.
Edit reports Only if this authorization has been granted the button in the Reporting dialog will be activated, otherwise it is greyed-out.
Delete reports Only if this authorization has been granted the button in the Reporting dialog will be activated, otherwise it is greyed-out.
Display reports If this authorization has been granted, the output of re-ports, displaying of the reports module in the view, or the output of reports will be possible.
Format manager

cobra CRM
141
Function / Level Level Authorization
Edit system formats This authorization specifies whether system formats can be edited using the format management or via the different functions using formats.
Edit group formats This authorization specifies whether group formats can be edited in the format management or via the different functions using formats.
Edit all system, group and user formats
This authorization specifies whether the formats can be edited in the format management or via the different functions using formats.
System management
System settings Only if this authorization has been granted the system settings can be viewed and edited.
When querying for group addresses, only addresses of the user's group will be shown if this authorization is missing.
System security Grants access to the system security command in the system settings.
Database administra-tor
Grants access to database security functions.
Configure mobile us-ers
This authorization specifies how replication with mo-bile users can be configured.
Telephony manager
System settings For all users to whom this authorization has not been assigned the dialog for configuring the telephony will be displayed greyed-out.
Appointment manager
System settings This authorization allows editing the system settings of the Appointment Manager.
Group management This authorization allows editing the group planning of the Appointment Manager.
Welcome screen manager
Manage system stand-ard
A user to whom this authorization has been granted can edit not only his own Welcome screen, but also the Welcome screen system-wide.
Adjust Welcome screen
This authorization will specify whether the link »Cus-tomize« for the configuration of the screen will be of-

cobra CRM
142
Function / Level Level Authorization
fered or not.
Database Permissions
Overview
Similar to system permissions, database authorizations can be assigned. The alloca-tion of the database permissions works identical to the allocation of system permis-sions.
Use the command »File: Database: Database Security«.
Several levels of permissions can be assigned. Depending on your choice, the selec-tion possibilities given in this dialog will vary. The permissions are assigned / denied to the user by the usage of roles.
Database authorizations Here the access permissions for databases are acti-vated or deactivated.
Functional range Here some general administrative tasks are speci-fied, such as the setup of sales projects, reorganiza-tion of databases and data exchange.
Tables Here the access on single data tables is controlled, for example on addresses, contacts and sales pro-jects.
If you are working with access rights on tables, you can also define the access rights on field level sepa-

cobra CRM
143
rately. This is useful, for example if specific users should not see the »Turnover« field.
Addresses outside of the group If the display of group-external addresses has been activated in the file settings, you can define the ac-cess permission for addresses outside of the group in detail in this dialog.
Via the user and group administration users and groups existing in cobra are added to the database security. In an additional step specific database roles are assigned. A role is a set of access permissions.
Use the buttons »Add« and »Remove« to manage the database permissions per user.
Under »Database roles« all roles defined so far can be displayed.
Click a user or group on the left side of the dialog. On the right hand side select the role(s). The selected roles are assigned to the user or group.
Per user and group several roles can be assigned, resulting in additive user rights. The user’s access permission is the sum of all rights from all roles that have been assigned to him – and not only the common subset of these rights.

cobra CRM
144
Assign views per user (CRM BI & CRM PRO)
The system administrator can assign users the view they work with. This is to be set for each database and for each user. In this case the user cannot change the view and must work with the view set for him for this database. You can use this function to specify which data of a database the user will see and which not.
Issue the command »File: Database: Database security«.
Go to the »Users/groups« tab.
Besides the »View set for the user« option click the selection button.
Select the view.
If the user opens this database, it will be shown in the view specified here. The user cannot load a different view since the view selection function is disabled.

cobra CRM
145
Defining Database Roles
The permissions described in this chapter can be allocated for every database role. Click the roles in the »General« tab. You can select the different authorization levels that you activated previously in the »General« tab.
In the »Members« tab the database roles are allocated to users and user groups.
To create a new role, click »New« and define a name for the role. If you want to remove the database role, click »Delete«.
In the next step user (groups) are allocated to the role.
Select the role in the left part of the dialog under »Database roles«.

cobra CRM
146
Click »Add«. In the selection which is offered by the program select the entries that exist in the cobra user administration.
After you confirmed your selection with »OK« the database role is assigned to the user.
Use the buttons »Import« and »Export« if you want to download or upload the da-tabase roles in XML format.
Function Authorization
In the »Functions« tab the access to specific administrative tools is managed.
If you click an entry in the »Stage« column, a selection list is shown that lists all available permissions for the entry. Select the permissions for the database role.

cobra CRM
147
Table Authorizations
In this tab all tables are configured that should be accessed by the users to whom the role is assigned.
Tables that are not listed here will be invisible for the user and can therefore not be edited.
For the system administrator role no additional configuration is required be-cause this role possesses automatically unrestricted permissions.
Click »Add«. A selection with all tables from the database is shown. Click the ta-bles that should be accessible for the database role. Tables not selected in this di-alog cannot be accessed by the users to whom the role is assigned. In the example shown here this is the table »Press«.
After you confirmed with »OK« the tables are added to the authorizations selec-tion.

cobra CRM
148
Three different permissions can be defined for the individual tables:
Authorization ................ In this column you define for each table the permissions for accessing data from own addresses and addresses from the group. These are addresses belonging either to the user him-self or to a group where he is member of.
Of other groups ............ In this column you define for each table the permissions for accessing data from addresses of other groups. These are ad-dresses that do not belong to the user but to members of for-eign groups.
Field authorizations ... If you click this option you can define permissions for fields from the corresponding table, or you can deny the permissions.
If you click an entry in the authorizations column, the program offers a selection where you can mark the desired permissions. It is thus possible for example to de-fine a read-only access for specific data.
At the bottom of the tab you will find some buttons for using different functions. Via these functions tables can be added or removed from the authorizations list. Other buttons will start a configuration dialog for the assignment of authoriza-tions per column.
You add a new table to the selection. The table will become visible for all users to whom the corresponding database role is assigned.
You remove a table from the database role.
For the functions described in the following you can select one or several tables (by keeping the CTRL key pressed).
The database role users do not receive access permission for the corresponding tables.
A dialog is shown where you are asked if the changes should be applied for addresses of your own group and/or addresses belong-ing to other groups.

cobra CRM
149
The database role users receive unrestricted access permission for the corresponding tables.
The database role users receive read-only access permission for the corresponding tables.
The database role users receive the access permission to create new data for the corresponding tables.
Field Authorizations
If table authorizations have been assigned, all fields of the table will be accessible for all users to whom this database role is assigned. However, you can control the ac-cess to specific fields. It is thus possible to hide information for some users.
Click a table in the »Tables« tab.
Activate the »Field authorizations« option in the last column.
Go to the »Fields« tab.
Here you assign permissions for all fields of these tables where you activated the field authorizations in the last dialog; or you can deny the permissions. The assign-ment of authorizations is done separately for »Own fields« and »Fields not belonging to the group«.

cobra CRM
150
For all fields that are not listed in this dialog, the database role possesses the permissions that have been defined in the last step.
You can configure a field by clicking on »Add«.
In the field selection to the left, click the table, where permissions should be as-signed to one or several fields. If you want to search for tables and fields, you can use the search function above the column.
Add the desired fields with the button. After clicking on OK you will go back to the »Fields« tab.
Assign the necessary access permission for every single field.
If you do not assign any access permission to a field, the users to whom the data-base role is assigned cannot see the field or edit it.
When assigning access permission, please keep in mind that these are additive permissions. Please make sure that users cannot access a field you blocked be-forehand, because a different database role is assigned as well where the field is not locked.
Herewith the setup of access permissions is completed.
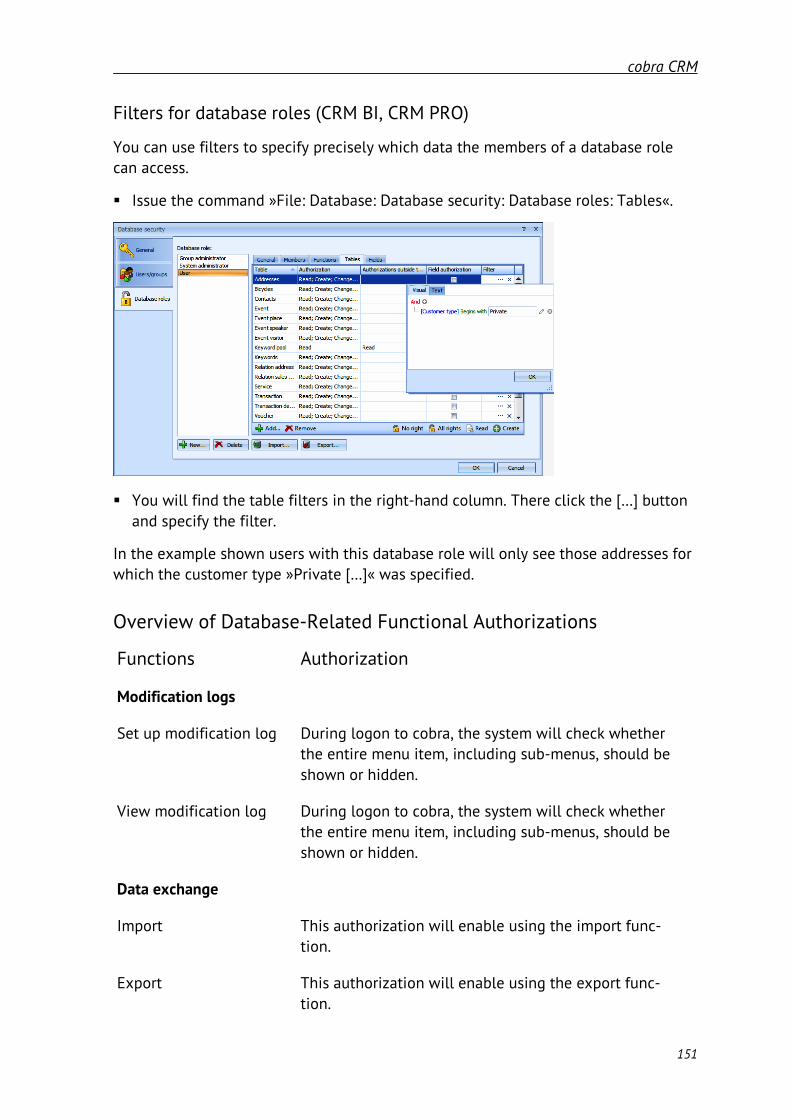
cobra CRM
151
Filters for database roles (CRM BI, CRM PRO)
You can use filters to specify precisely which data the members of a database role can access.
Issue the command »File: Database: Database security: Database roles: Tables«.
You will find the table filters in the right-hand column. There click the […] button and specify the filter.
In the example shown users with this database role will only see those addresses for which the customer type »Private […]« was specified.
Overview of Database-Related Functional Authorizations
Functions Authorization
Modification logs
Set up modification log During logon to cobra, the system will check whether the entire menu item, including sub-menus, should be shown or hidden.
View modification log During logon to cobra, the system will check whether the entire menu item, including sub-menus, should be shown or hidden.
Data exchange
Import This authorization will enable using the import func-tion.
Export This authorization will enable using the export func-tion.

cobra CRM
152
Functions Authorization
Synchronize Authorization for synchronizing with mobile users.
Database backup Authorization for creating database backups.
Export serial letter This authorization will enable the user to export ad-dress data for a serial letter.
Database
Setup ERP This authorization will enable the user to configure the ERP system.
Manage addresses If this authorization has been granted, a radio button is shown in the address properties enabling the user to apply changes for the current address as well as for all addresses queried.
If the database administrator authorization has been granted, this right is automatically assigned.
Manage contacts Authorization to change the contact table within the database structure.
Manage Databases Authorization to edit the database structure.
Reorganize databases Authorization to reorganize the database.
Database security Authorization to edit database security functions.
Edit field help This authorization will enable the user to add a help text in a field.
Data templates
Manage data templates If this authorization has been granted, the user can create, change and delete data templates. If this per-mission has not been granted, accessing data tem-plates will not be possible.
Duplicate module
Edit This authorization will enable the user to edit dupli-cates.
Manage This authorization will enable the user to change the configuration of the duplicate module.

cobra CRM
153
Functions Authorization
Efficiency module (CRM BI & CRM PRO)
Configuration This authorization will grant access to the setup wizard for the Efficiency Module.
Switch between active addresses/all addresses
This authorization will allow switching between active addresses and all addresses.
Show reports (current user)
Together with the reports authorization, this authoriza-tion will enable viewing the reports of the current user.
Show reports (all users) Together with the reports authorization, this authoriza-tion will enable viewing the reports of all users.
Show all addresses Enables the user to view also such addresses not de-tected by the Efficiency Module.
Entry masks
Manage entry masks Only if this authorization has been granted the user can open the dialog to configure entry masks.
Event management (CRM BI & CRM PRO)
Manage events During program start the system will check whether the user logging on has the required authorization. If not, the menu item is not shown.
Group addresses
Create public addresses Only if this authorization has been granted a public address can be created.
Campaigns
Plan campaigns This authorization is required for planning campaigns.
Evaluate campaigns This authorization is required for evaluating cam-paigns.
Manage activities This authorization is required for creating activities.
Messaging system (CRM BI & CRM PRO)

cobra CRM
154
Functions Authorization
Respond to messages If this authorization has not been granted, the entries in the »Communication« menu will be hidden when the user is logging in at the program start of cobra.
Create messages If this authorization has not been granted, the buttons will be hidden, in the messaging system as well when reading a message.
Forward messages If this authorization has not been granted, forwarding of messages will not be possible and the function is deactivated.
Read messages Only if this authorization has been granted messages received via the cobra messaging system can be viewed.
This authorization is also required for sending messag-es to sales projects.
E-mail transmission via SMTP
Only if this authorization has been granted can mes-sages be sent per SMTP.
Table configuration
Create filter If this authorization has not been granted, the buttons are greyed-out.
Configure toolbar If this authorization has been granted, the user can ac-cess the context menu by right-clicking the toolbar and editing the toolbar. Only in this case the icon for toolbar configuration will be accessible. Otherwise the command will be greyed-out.
Delete filter Without this authorization the buttons are greyed-out.
Edit group filter This authorization is checked when the filter manage-ment function is called. If the authorization does not exist, the buttons are greyed-out.
Edit filter This authorization is checked when the filter manage-ment function is called. If the authorization does not exist, the buttons are greyed-out.

cobra CRM
155
Functions Authorization
Edit system filter This authorization is checked when the filter manage-ment function is called. If the authorization does not exist, the buttons are greyed-out.
Sales project
Configure If this authorization has been granted, the user can open the dialog to configure the Sales Projects Module.
Group-wide If this authorization has been granted, the user can view all sales projects belonging to any group where he is member of.
Manage lists If this authorization has been granted, sales project lists can be stored system-wide.
System-wide If this authorization has been granted, the user can view sales projects system-wide.
Individual-related Data – an Overview
When working with addresses of any type, individual-related data (IRD) will be gen-erated every day.
The data we are dealing with here are data of natural persons, not of legal en-tities.
The EU General Data Protection Regulation (EU-GDPR): regulates how to deal with such individual-related data.
»The protection of natural persons in relation to the processing of personal data is a fundamental right. Article 8(1) of the Charter of Fundamental Rights of the European Union (the ‘Charter’) and Article 16(1) of the Treaty on the Functioning of the Europe-an Union (TFEU) provide that everyone has the right to the protection of personal da-ta concerning him or her. The principles of, and rules on the protection of natural persons with regard to the processing of their personal data should, whatever their nationality or residence, respect their fundamental rights and freedoms, in particular their right to the protection of personal data.«1
1 Regulation (EU) 2016/679 of the European Parliament and of the Council of 27 April 2016 on the protection of natural persons with regard to the processing of personal data and on the free movement of such data, and repealing Directive 95/46/EC (General Data Protection Regulation) https://eur-lex.europa.eu/legal-content/EN/TXT/?uri=uriserv:OJ.L_.2016.119.01.0001.01.ENG&toc=OJ:L:2016:119:TOC
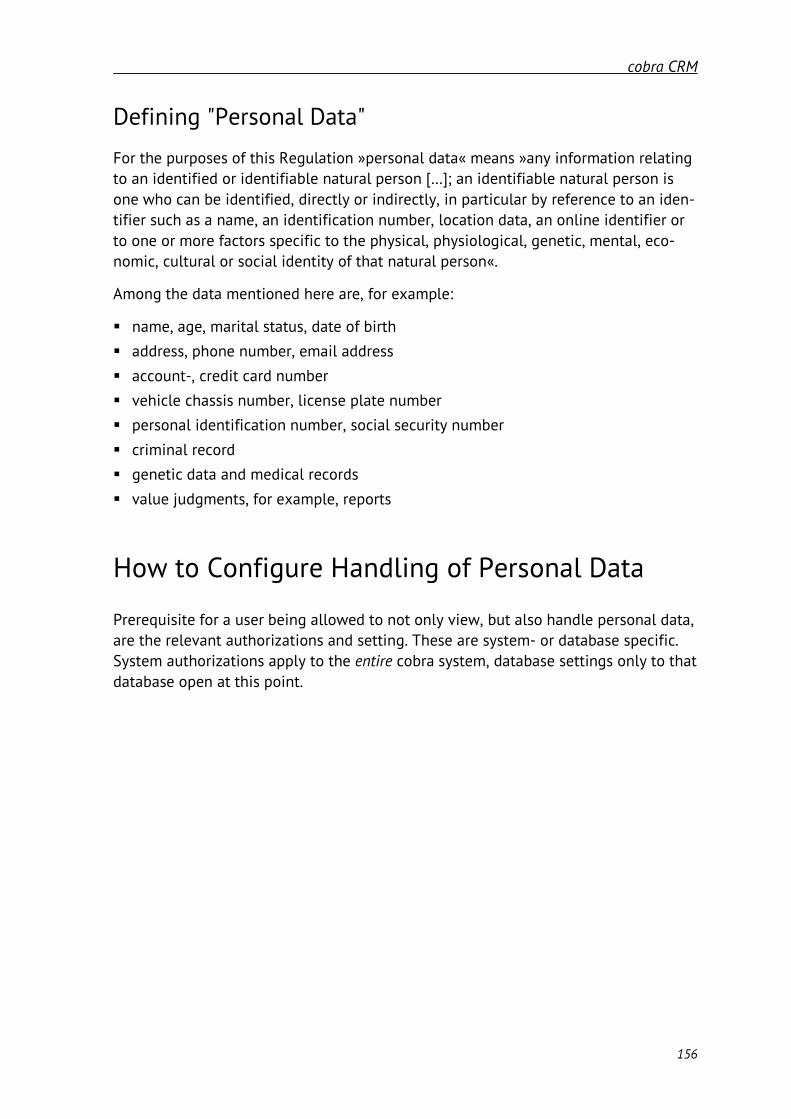
cobra CRM
156
Defining "Personal Data"
For the purposes of this Regulation »personal data« means »any information relating to an identified or identifiable natural person […]; an identifiable natural person is one who can be identified, directly or indirectly, in particular by reference to an iden-tifier such as a name, an identification number, location data, an online identifier or to one or more factors specific to the physical, physiological, genetic, mental, eco-nomic, cultural or social identity of that natural person«.
Among the data mentioned here are, for example:
name, age, marital status, date of birth address, phone number, email address
account-, credit card number vehicle chassis number, license plate number personal identification number, social security number
criminal record genetic data and medical records
value judgments, for example, reports
How to Configure Handling of Personal Data
Prerequisite for a user being allowed to not only view, but also handle personal data, are the relevant authorizations and setting. These are system- or database specific. System authorizations apply to the entire cobra system, database settings only to that database open at this point.

cobra CRM
157
Setting up the System
System settings are always effective when working with cobra, that is, independent of which database might be open at this point. In addition, you can also assign au-thorizations for databases.
The aim of system authorizations is to make the functions described here available to only a few, specialized employees of a company. They are to ensure that only spe-cially trained persons, such as data protection officers, may access some of these functions.
Issue the command »File: System settings: System settings«.
Switch to the »User administration« tab.
Click the »System security« tab.
Here, you can assign specific authorizations at »Roles«. Every user who has a specific role is assigned the authorizations associated with the role. If a user has several roles, the authorizations of all these roles will be accumulated.
Click a role.
At »Functions« you will find the settings for personal data.
Configuration of personal data This is the authorization to configure settings for personal da-ta. Using this, you can configure handling personal data at »File: Database«.
Configuring and administrating the data blacklist This is the authorization to edit the list of such data that may not be created or imported again.
Administrator of personal data Persons with this authorization may view, edit and erase all personal data contained in the database. All persons responsi-

cobra CRM
158
ble for deleting personal data in accordance with legal stipula-tions require this authorization.
Configuring and administering the deleting plan Persons with this authorization may set up automatic deleting of personal data and edit erase jobs.
Managing the email blacklist Persons with this authorization may create, erase and modify the list of email addresses that may not be contacted.
As an alternative, you could also declare commands to be system administrator commands that may only be issued by system administrators.
Switch to the »System administrator« tab.
Here you can declare certain ribbon commands to be system administrator com-mands. Such commands will then be hidden for all users who do not have the system administrator role. They will only be available for system administrators.
Setting up a Database for Personal Data
There is no field type »Personal data« of its own in the database. In fact, in the data-base configuration you can specify which of the fields of your database are to contain personal data.
In the database structure, you can assign a field the property »Individual-related field (build hierarchy)« (in previous versions, this field was named »Personal field«). This property has nothing to do with the personal data de-scribed in this document, but is solely intended to set up address hierarchies. For example, a name field can have both properties and contain personal data for data protection as well as be a personal field for setting up hierarchies.

cobra CRM
159
Activating and Selecting a Field
In order to realize the legal right of access, it is essential to identify which fields con-tain personal data. The standard functions of cobra CRM are not affected here, they apply even if the data protection functions have been disabled. However, managing personal data in accordance with data protection aspects is only possible if they are labeled as such. Here you can label the fields accordingly.
You activate working with personal data by clicking the option »Activate personal data« right at the top.
You can switch personal data on and off at any time.
If you disable working with personal data again by switching off this option, all fields or data tables that you create in the next steps using the configuring func-tion here will be preserved. Reactivating the functions might require repeating sub-steps of the initialization (e.g., if required fields have already been erased from the database structure).
When personal data fields are erased, Yes/No-fields are set to »No«. So con-sider carefully whether you really want to save personal data in Yes/No-fields.

cobra CRM
160
At the left you see the data tables of the database. Generally, personal data might be stored in any of the tables of the database.
At »Fields of table« you can find the data fields existing in the data table concerned. Click a field with personal data and take it over to right into the column for personal data. These fields are now marked as fields with contents worth protection. Only such fields will appear in log files, deleting plans etc.
As rule of thumb it might be as-sumed that most or all of those da-ta contained in the »Contact« area in the demo provided contain per-sonal data. In addition, especially for single addresses other fields might also contain data covered by the EU-GDPR.
Personal data might also be con-tained in other data tables than on-ly in the address table.
In the entry masks, fields marked as personal data will be labeled by a small lock icon .
Personal data
can be queried at field level,
will, when edited, be logged by a specific log independent of the modification, covering all changed made,
can be erased according to schedule,
can object of a specific report created by a dialog of their own.

cobra CRM
161
Configuration
Field Assignment and Selection Lists
There are several functions relating to data protection. Some of these functions, such as lock flags for emails, have already existed in earlier versions of cobra.
Using the field assignment function, you can specify which fields are to have which functions. All field functions labeled with a red cross are obligatory.
Fields derived from e.g. the messaging system and the campaign management will not be offered in the field assignment feature.
In the selection list »Field assignment«, select the field for the function you re-quire. If it does not exist yet, you can create it using the green cross.
cobra users can modify the data structure at will and create new data fields and data tables. Per data table in which at least one field was selected as personal data field, a source field must be specified indicating where the information comes from. Due to the right of access of data subjects, it is required to create log files naming the data source.
You can enter the field with the data source in a suitable entry mask, otherwise the software will request the data source.
Any field assignments marked with a red icon are obligatory, so you must specify a suitable field of the field type required.
You can select a field already existing in the database. If there is no such field, click the green icon at the right. Now you can create the field directly in the data-base structure.

cobra CRM
162
Table ................................ The data tables of the database will be listed at the left.
Function .......................... There are certain function fields for personal data. Every func-tion requires a specific type of field. In the selection list »Field assignment« you will always be offered only such fields that have the correct type of field.
[Email etc.] lock flag .. Lock flags are Yes/No fields which were assigned the relevant field option »Lock flag« by the database structure. If such fields already exist in your database, they will have been preconfig-ured and will be shown here. If there are no such fields, you can create them here.
Lock flag for editing personal data To save the personal data stored in a data record from being processed any further, a special lock flag can be attached. This lock flag will also affect contacts, additional- and subdata of the address, there being some exceptions though. The lock flag will warn any user trying to edit or change personal data. It is intended to sensitize the user to handle these data very con-scientiously and not carelessly enrich or alter them. There are several reasons for setting such a lock flag: it can thus be en-sured, that a correction of their data requested by data subjects cannot be cancelled. It can thus also be ensured that data scheduled for deleting that should only be erased at a later date due to e.g. legal obligation to retain data, are not modi-fied before.
Source of the original data record Enter here in which field you will manage the source of the personal data for each data table.
Selection lists for functions
For certain procedures you must specify certain details, such as the reason for delet-ing. These functions are hardcoded in the software and, in part, required due to legal provisions.

cobra CRM
163
Here you specify in which selection list you will manage the entries for the relevant field. Using the green icon you can create a new selection list.
By default, in cobra you can enter field contents into selection list entries. However, in this case you may not do so. Selection list entries with field con-tents will not be shown when working with personal data.
Data Protection Officer
Data protection officer Every company must name a data protection officer responsi-ble for complying with the EU-GDPR. You can create a suitable address link indicating the data protection officer of a company (such as: "John Doe is data protection officer of ACME Corpora-tion").
Processing and Transmitting
Processing and Transmitting Here you automatically create a free table in the database structure. It contains the period of validity and information about the explicit permission to process and store personal da-ta. This is useful for all further proceedings such as providing information about, Transmitting or deleting personal data. If this area of the dialog is not active, it means that this table has been created at an earlier date and already exists.
List of Sources
Be sure to specify the sources of an address, such as »Address purchasing«, »Fair con-tact«, »Telephone canvassing«, »Customer call« etc. Naming one or more sources is necessary due to the right of access of a natural person.
At table level you can store the source of an entire data record. However, if the source of specific fields deviates from the data record source, this must also be stored in order to be able to name the correct source. For example, it can thus be in-dicated that mere address data come from address purchasing, while other personal data were derived from e.g. an interview with the customer.

cobra CRM
164
Activate source request Set this option to On in order to ask for the source. When an address is then created, the source will be requested. Request-ing the address is done per data record. Should you also want to have such a request for a field, you can configure that in the lower part of the dialog.
Default value for automatic operations If you import addresses or carry out some other automatic pro-cedure, you can specify a default value here that will then be entered as source of these addresses. This option ensures that the source field will not remain empty. If required, you can search for the contents of these fields later and replace them.
Fields requiring the source […] This function is important to meet legal requirements. If you select fields here, their data sources will be requested not only when data are created, but also whenever they are modified or enriched. You will be offered all fields that you have marked as personal data fields. Form these, select a subgroup of fields where you want to activate querying the source whenever they are modified and/or enriched. We recommend to select all per-sonal fields. Comment fields might be exceptions here.
Modifications of personal data are logged per field. The original source will be stored in the data record. Any later modifications will be documented in the log. Not the subject of the modification will be stored, but only the fact that there was a modification.

cobra CRM
165
Outputting, Exporting and Transmitting
Here you specify how personal data are to be put out and exported. This will affect, e.g., the functions to be found in the »Output« tab of the ribbon.
In cobra CRM, personal data can be exported and forwarded in a variety of ways . From a legal point of view, it is required to disclose to data subjects to whom per-sonal data were passed on if they exercise their right.
However, that does e.g. not apply if data are forwarded within the same com-pany.
cobra CRM can only log what happens within cobra CRM or was initialized by cobra CRM. For example, it can be logged that personal data were sent by mail to an ad-dress XY if that address exists in cobra.
But it is not, for example, possible to log the address forwarded to if personal data were transferred to Outlook for mailing and then recipient addresses are entered manually in Outlook.
Of course, cobra cannot log after an export whether exported data were forwarded, since cobra is no longer responsible for the exported data.
The functions offered here serve to document such forwarding manually. This is why the user is asked whether personal data are to be forwarded and to whom and what the reason is.
You can differentiate which queries you want logged. When the feature is activated for the first time, all checkboxes will have been selected and must be deselected in-dividually or by column.
Output
Permit data selection […] If you activate this option, you can specify exactly which data

cobra CRM
166
are to be put out when personal data are put out. If you do not check the option here, all data will be put out automatically.
Export and Disclosure
For each export (except the exports of reports and the modification log) the user can be asked to give the reason for exporting - and this reason will be recorded. The user can also be asked whether the exported data are to be disclosed and to whom. There is a special view showing disclosure of the export, it can be put out as PDF or CSV file.
Export and Transmission Users will be asked about the reason why they are exporting personal data. There are many possible reasons, for example exporting addresses for a serial letter or forwarding to a third party.
Reason obligatory If you activate this option, entering the reason for export-ing becomes obligatory. This means that exporting can on-ly be completed if the user has entered a reason.
Request permission to transmit data to third parties It will be asked whether the data may be disclosed.
Transmission target obligatory If the data are to be transferred later, entering the target can be made obligatory. This means that exporting can on-ly be completed if the user has entered a reason.
Allow export of the modification log The modification log can be exported and put out. This export will not be recorded.
Allow exporting or printing of reports […] If you activate exporting and printing of reports, you are doing so at your own risk.
Exporting personal data in reports will not be recorded.
Show warning […] Since it cannot be excluded that a report might also contain per-sonal data, a warning can be shown while exporting data and cre-ating a report.

cobra CRM
167
Data Blacklist
This list will document which data may not be added to the system (again). If the da-ta have been erased once, it will thus be prevented that the same data are entered or imported again later. When trying to import or create again a locked data record, us-ers will be warned.
Addresses may - either be entered manually in this list - or be entered automatically into the blacklist when entire addresses are erased or individual personal data field contents are added to the blacklist.
It can thus be prevented that addresses are imported to cobra or created there again manually.
If importing is done automatically, it is predefined how addresses are to be handled that have been added to the blacklist.
This blacklist will only supervise data in the »Addresses« data tables, not in other data tables.
Settings
Activate data blacklist Here you activate the blacklist.
Preselect “Include in data blacklist” […] Activating this option will lead to the function of adding erased data to the blacklist being offered automatically as default set-ting.

cobra CRM
168
Behavior during automatic operations If you have data imported automatically, e.g. via the Automa-tion Server, you can prevent importing of data records listed in the blacklist. However, this option will not be effective if you synchronize databases or mobile users.
Fields of the data blacklist
In order to lock data they must be uniquely identifiable. To do so, you can select fields from the address table whose content will be checked by cobra. These fields are assigned an AND link and will be checked whenever an address is created or im-ported as well as whenever an address is modified. It is thus determined whether the data in all these fields match. Here you select which fields are to be added to the da-ta blacklist.
If you should add additional fields to the data blacklist later, you must complete any entries existing already.
Should you later remove fields from the data blacklist, the blacklist data will also be erased permanently.
Managing data blacklist entries
In this dialog you can manually add data records to the blacklist. Click the »New « button. Enter the data to be locked.

cobra CRM
169
Delete plan
Time-controlled erasure of personal data is done according to an erase schedule. The plan documents future as well as already overdue erasures. Any modifications of the erase schedule are recorded.
Activate delete plan Here you activate the deleting plan.
Activate automatic time-controlled deleting (CRM PRO and CRM BI) Should you select this option, the data will be erased automat-ically when their period of validity has expired.
Send information email […] Specify here how many days before deleting an email is to be sent. In this email (e.g. to the data protection officer) you can inform about the erasure.
SMTP account ............... Automatic email transmission is done via an SMTP account. Se-lect that account here or create it. This account must be in the »System« area and not in a user or group area.
Recipients ....................... Enter the email addresses of the addressees in the mail. Sepa-rate multiple addresses by a semicolon.
Format for info email Enter here the content of the mail informing about the sched-uled erasure.

cobra CRM
170
Format for conflicts […] It is possible that the date specified in the data table »Pro-cessing and disclosure« in the »Valid until« field is later than the erase date planned in the erase schedule. This means that there is a conflict that can be reported by mail. Specify here the format of the email reporting the conflict.
Managing the erase schedule
In this area you manage erase tasks. Personal data are to be erased if there is no pur-pose or legal obligation to retain them. If erasure is overdue, they are highlighted in color.
Whenever cobra is started or the erase schedule activated, it is checked whether there are data to be erased. ,
- If that is the case and automatic erasing has been activated, the data are erased if they do not have a purpose any longer. If data are not erased automatically due to their purpose, they are highlighted in color. After the purpose has expired, data are erased automatically then.
- If automatic erasure has not been activated, any erasures falling due are highlight-ed in color.
Actions
Mark one or more erase tasks in the erase schedule to be able to execute further actions in the erase schedule.
Erase tasks always relate to only one field of a data record. This is shown in the »Field« column.
Modify delete date Using this function, you can set a different erase date. Click this button to edit the highlighted erase tasks. Enter the new erase date and state why the date has been modified.

cobra CRM
171
Cancel delete jobs Using this function you cancel the erase task for a field. You can thus undo an erase task, e.g., if a customer prolongs an ex-piring contract indefinitely. Mark the relevant task or tasks and click this button. Enter a reason for canceling erasure.
Delete data immediately Clicking this button will erase the data highlighted immediate-ly.
Delete job log ............... If you click a task in the erase schedule, you can view the re-port to see how this task was modified. The report is stored separately and linked to the data record. Thus it will be re-tained even after the erase schedules have been executed and can be viewed somewhere else.

cobra CRM
172
Edit Views and Entry Masks
Table and Entry Mask for Processing and Forwarding Data (CRM PLUS, CRM PRO, CRM BI)
In order to be able to work constructively with the free table »Processing and for-warding«, it is recommended to integrate it in a view and, in addition, specify an en-try mask for recording data.
1. Step
Use the command »File: View: Edit view.« to access the view editor.
In the table, click under the address list.
From the context menu, issue the command »Wizards: Register Tabs«.
Create a new tab. Assign a name to it, such as »Processing and forwarding«.
Drag an additional data table into the empty tab area.

cobra CRM
173
Configure the table.
Specify which columns are to be displayed in the table.
You have thus created an additional tab containing information on handling personal data in the area below the address table.
2. Step
In this step you create an entry mask for entering details.
Issue the command »File: View: Edit entry mask«.
Select the table »Processing and forwarding«.
Click the »New« button.

cobra CRM
174
The system will automatically suggest an entry mask already containing all the fields of the table. You can now move and edit fields and drag them back from the entry mask to the control elements. But you are also free to take over the entry mask as shown.
Confirm with »OK«.
You can access this entry mask as a dialog. Configure that in the lower part of this dialog.
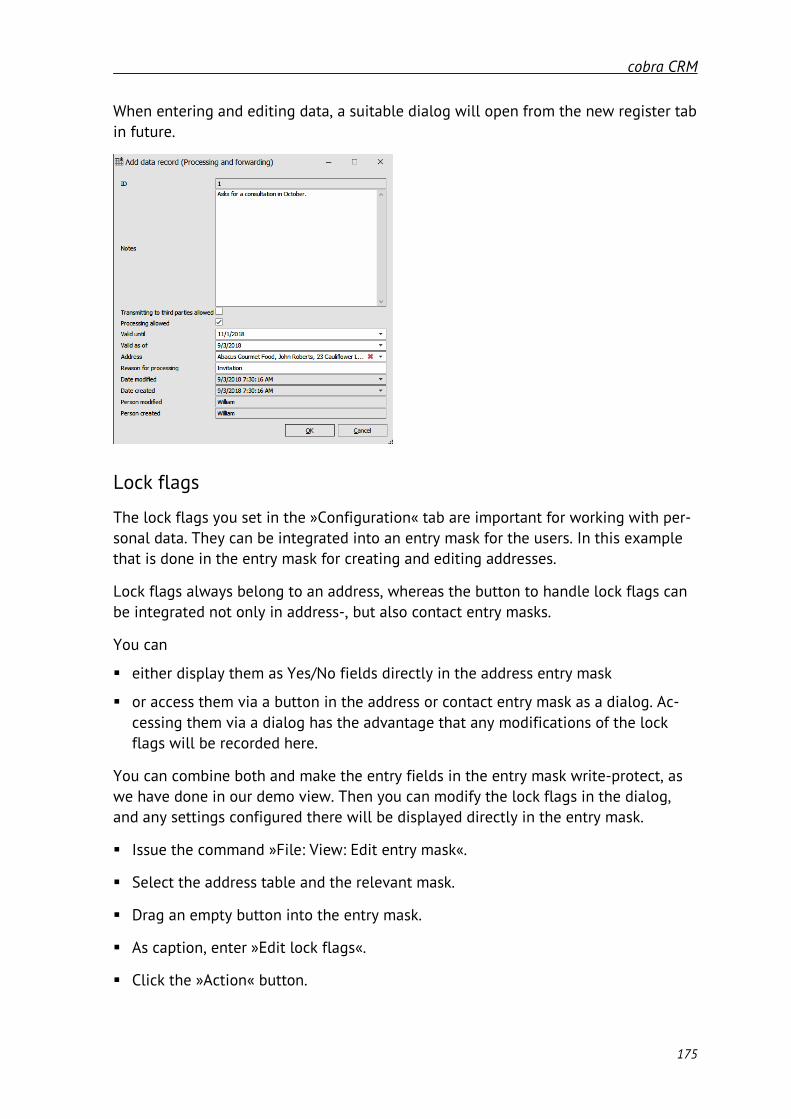
cobra CRM
175
When entering and editing data, a suitable dialog will open from the new register tab in future.
Lock flags
The lock flags you set in the »Configuration« tab are important for working with per-sonal data. They can be integrated into an entry mask for the users. In this example that is done in the entry mask for creating and editing addresses.
Lock flags always belong to an address, whereas the button to handle lock flags can be integrated not only in address-, but also contact entry masks.
You can
either display them as Yes/No fields directly in the address entry mask
or access them via a button in the address or contact entry mask as a dialog. Ac-cessing them via a dialog has the advantage that any modifications of the lock flags will be recorded here.
You can combine both and make the entry fields in the entry mask write-protect, as we have done in our demo view. Then you can modify the lock flags in the dialog, and any settings configured there will be displayed directly in the entry mask.
Issue the command »File: View: Edit entry mask«.
Select the address table and the relevant mask.
Drag an empty button into the entry mask.
As caption, enter »Edit lock flags«.
Click the »Action« button.

cobra CRM
176
At »Further commands« select »Settings of personal data«. Confirm with »OK«.
Now mark a lock flag in the entry mask. Activate the write protect function.
Repeat the procedure for the other lock flags.
Close the entry mask editor.
In the entry mask itself there now is a suitable button accessing a dialog.
In this dialog you activate the lock flags required. You can also view a history there. All modifications of lock flags will be recorded here.

cobra CRM
177
Document Management Setup
Use the command »File: Database: Document management«.
The following paragraphs describe the settings for the cobra document man-agement. Other document management systems compatible to cobra may process the settings you define in a different way than the one described here.
Should you have imported data from a former version, a wizard is started directly when calling the document management. This wizard will enable you to integrate the old documents into the current version of the document management. This Data Transfer Wizard is described below on page 155.
Any number of document fields can be allocated to every data table in cobra. The document management will define if, how and where these documents are filed in your system. If required, documents created using cobra, such as serial letters, can be linked to contacts.
You can specify how the document management function is to proceed with external documents that, in cobra, you have e.g. linked to a contact or a document field.
Issue the command »File: Database: Document management«.
Document management system Per default, Document management will not be activated. The selection in this field activates or deactivates the document management.
The cobra internal document management is offered for selec-tion.

cobra CRM
178
If another document management system compatible with co-bra has been installed, you can select this system here as well, in order to activate it for cobra. This will most likely require the setup of an interface, which is normally subject to costs.
External documents ... You can take over external documents into the document man-agement or leave them where they are. If you take them over into the document management, a copy is stored in the docu-ment management system.
Action on deleting ...... You can specify what is to happen when contacts are deleted that are linked to a document.
Delete always . The document is to be deleted without further warning.
Inquire ............... A question pops up whether the document is really to be de-leted together with the contact.
Delete never ... Documents are not deleted.

cobra CRM
179
General Options
Select in this dialog which document types created with cobra are to be added to the Document management. For each document type you specify whether it should be added to document management always, never, or on request.
Specify for the different document types whether they should be added to the docu-ment management, and if so, when they should be added. If documents are added to the document management, they are filed in the corresponding path and eventually created as contact. Select one of the following options:
Always – a contact is created automatically and can be edited later on using the con-tact overview.
Never – no contact is created for this document type.
Query in each case – the system will always ask whether a contact is to be created for the document.
Show contact dialog – if contacts and documents are saved in the document man-agement, this option will show the contact window prior to creating the contact. The user can thus create the entire contact (for others as well), assign the contact with the document to a project, etc. If this option has not been activated, a contact with the default comment text will be created automatically. The contact can be edited on demand.
Individual Letter Options
If you edit several single letters in MS Word at the same time, in Windows you will see several Word shortcuts. As default, date and time will appear when you hover over the shortcut.
To make it easier for you to recognize which Word shortcut you must click to be able to edit a certain letter, you can now decide yourself which detail the shortcuts are to show when hovering. Temporary file names will be used for this function.
Issue the command »File: Database: Document management«.
Click the »Option« button. Go to the »Single letter documents« register.

cobra CRM
180
Here you can enter your own text to be displayed. If you want to display the con-tents of a field, put the field name in angle brackets.
The Word shortcut will then supply the following text when hovering:
You can now click the Word file you want to continue editing.
Serial Letter Options
The following options are offered to the user when sending serial letters using the Mail Merge Wizard. The options are called via the command »Output: Letter: Serial letter«. As a precondition contacts must have been created for serial letters. This is defined in the »General« tab.
Serial letter Word document and the entire export […] This option is recommended, as it requires the least storage capac-ity and will later provide the most extensive information.
In this case, the same document is created for every contact containing the complete serial letter. When opening the docu-ment, the serial letter belonging to the current address will be restored.
Serial letter Word document and the respective export data […] This option requires more storage capacity and will provide less information.
In this case, a unique document is created per contact, contain-ing the personalized letter.

cobra CRM
181
Add serial letter Word document to contact as document In this case the master document is linked to the contacts. If it is opened in Word, an error message is shown, indicating that the associated data source could not be found. You can confirm the message and then view the document, but the personalized information will be missing.
Keywords
Before you begin to set up document management, please carefully plan which keywords you want to assign. This is of great importance, as such key-words will enable you to access the documents later on much faster!
You can assign almost any number of key-words to documents. If you are working with cobra document management, the keywords will become part of the directory path where the document is saved.
In the left part of the dialog you will find all document fields existing in the database. These document fields are configured independently from each other in the right part of the dialog. This configuration is done for each database and each document field separately. Documents linked to a specific document field can thus be stored in a separate path. In the example shown here, device instructions can be stored in a dif-ferent location than documents linked to a contact.

cobra CRM
182
On the left hand side, click the document field you are going to configure.
The following keywords are available:
The fields in the database tables,
the user attributes defined in the control panel,
fixed texts, selection or entry fields,
and other elements (such as user name, database name, date, etc.)
The sequence of these elements for the document management path can be defined later on in the settings.
Select all fields that should become keywords in the »Active« column.
Use the »Suggestion« button to open keywords predefined by cobra.
Use the upper search line to look up data quickly. You can also use the common fil-ter possibilities available via the column headers.

cobra CRM
183
Settings
Root directory ............... Define a directory where the documents are to be stored auto-matically by the document management.
A suffix or subdirectories will then be added to the file name specified in this field, containing the fields you selected at »file name«. A link to this path will be added to the contact. Users can then open the document using this link.
All users need full access to this folder, i.e. need the authoriza-tion to write, read, delete and create new folders.
Database field............... Select the document field you are going to configure.
Storage ............................ The keywords you selected will be offered. Use the arrows to add the keywords to the document path, or remove
them from it.
Static text ....................... Static text, independent of any field content. Click this field and enter the text.
Keyword .......................... Here you can see the database field, user attribute, etc. If you want to remove it from the filing path, select it and click .
Length ............................. As »Length« specify the length of the entry. If the field has more characters, the entry will be truncated.
Separator ........................ This character is placed behind the selected field. The “\” sepa-rator will create a new subdirectory.

cobra CRM
184
Order ................................ If you want to change the order of keywords within the filing path, select a keyword and move up or down using the arrows
at the right.
Keep document file names This option is used to store a document added by a user to the document management using the original file name. If you do not select this option, a file name will be generated automati-cally.
Storage location path Here you can preview the entire path in the document man-agement with the current settings.
The View Editor allows displaying an element for the document search in views. Us-ing this element, users can search for specific documents. The search criteria are de-fined in the tab »Search«.
Add .................................... You can save your search routines using an individual name. To do so, click »Add«. A new search is created.
Name ................................ Enter a name for the search routine to be shown to the users.
Fields ................................ Define which document fields from the database are to be in-cluded in the search.
Suffix ................................ Select the document type for the search. Example: search for e-mails.

cobra CRM
185
Own .................................. Here you can specify additional data types to limit your search. The syntax for entering a suffix is: *.xxx, e.g. *.rtf. Several en-tries are separated by semicolon, e.g. *.doc;*.docx.
Extended Settings
These settings will apply to that part of the directory path that was marked in the »Keywords« tab. Click the »Extended settings« button.
Minimum amount of characters per directory path
This parameter makes sense for numeric entries such as customer numbers. Here you specify how many characters the directory path must have at least. You also enter which is to be the fill chraracter and whether it is to be inserted before or after the preceding text.
Conditions for the storage path
You can use this function to stipulate conditions so that this part of the storage path will be used only under certain conditions. So, depending on the type of contact, cus-tomer letters can be stored in other folders than technical documents.

cobra CRM
186
Examples for Path Names
The file name is assembled from all fields of the address and the following fields: current date (YYYY-MM-DD), group, user and project.
Multiple usage of fields is possible (examples see below).
The field length defines the maximum number of characters for this folder or part of the file name. If the specified field is empty, the field name is shown in brackets in the defined length. Example: (company).
Prefixed separators are: _, -, \, " " (blank), _Author= and NULL. It is possible to com-bine characters individually. A backslash will create a folder.
Files created on the same day for the same person in the same company will be numbered automatically, e.g. ..._Author=Petra.doc, _Author=Petra_0001.doc, ..._Author=Petra_0002.doc.
The file name extension refers to the corresponding application, e.g. .doc or .xls.
Multiple letters and serial letters will be stored in related folders with the current date and user.
Suggestion (Default field content) Field name Length Separator Example Database name 20 \ Company 20 \ University Heinric\ Current data 10 _ 2003-08-30_ Name 20 _Author= Bergerhausen_Autor= User 10 NULL Petra K:\Addresses\Correspondence\University Heinric\2003-08-30_Bergerhausen_Author=Petra.doc K:\Addresses\Correspondence\University Heinric\2003-08-30_Wollner_Author=Petra.xls

cobra CRM
187
1. Alphabet
For a better overview, add the alphabet of the first field to the folder structure, e.g. »Company«.
Field name Length Separator Company 1 \ A\ Company 20 \ Adam Opel KG\ Current date 10 _ 2003-08-30_ Name 20 _Author= Oertmann-Fabian_Author= User 10 NULL Ha K:\Correspondence\A\Anton Meier KG\2003-08-29_Hinz_Author=Ha.doc K:\Correspondence\B\Bauunternehmung Schwa\2003-08-28_Faller_Author=Br.doc
2. Database with large companies and many subsidiaries in different cities
Field name Length Separator
Company 20 _ Adam Opel KG_
Town 15 \ Ruesselsheim\ or Bochum\
Current date 10 _ 2003-08-30_
Name 20 _Author= Oertmann-Fabian_Author=
User 10 NULL Ha K:\Correspondence\Adam Opel KG_Ruesselsheim\2003-08-29_Hinz_Author=Ha.doc K:\Correspondence\Adam Opel KG_Bochum\2003-08-28_Faller_Author=Ha.doc
3. Databases mostly with private individuals, without company name
Field name Length Separator Name 20 _ Kraus_ First name 15 _ Hannes_ Town 15 \ Konstanz\ Current date 10 _Author= 2003-08-30_Author= User 10 NULL Petra K:\Correspondence\Kraus_Hannes_Konstanz\2003-08-30_Author=Petra.doc K:\Correspondence\Mueller_Klaus_Berlin\2003-08-28_Author=Oliver.doc K:\Correspondence\Schwarz_Nora_Frankfurt\2003-08-26_Author=Michael.doc

cobra CRM
188
4. Database with customer number
Please note: it is also required to assign a customer number to potential customers, partners, suppliers, employees, etc. If documents are allocated to data records with-out a customer number, »(Customer number)« will be used as keyword.
Field name Lentgh Separator Customer number 6 \ 654321 Current date 10 _ 2003-08-30_ Name 20 _Author= Mai_Author= User 10 NULL Petra K:\Correspondence\654321\2003-08-30_Mai_Author=Petra.doc
5. If the year is to be added to the path name, use the field »Current date«
Field name Length Separator Example Company 20 \ University Heinric\ Year: Current date 4 \ 2003 Current date 10 _ 2003-08-30_ Name 20 _Author= Bergerhausen_Author= User 10 NULL Petra K:\Correspondence\2003\2003-08-30_Bergerhausen_Author=Petra.xls
6. Project folder to file all associated documents and simply archive them later
Field name Length Separator Example Project 6 \ Hotlin\ Company 20 \ University Heinric\ Current date 10 _ 2003-08-30_ Name 20 _Author= Bergerhausen_Author= User 10 NULL Petra K:\Correspondence\Hotlin\University Heinric\2003-08-30_Bergerhausen_Author=Petra.doc

cobra CRM
189
The Document Migration Wizard
Unlike in former versions, documents are no longer stored system-wide, but per da-tabase. Therefore documents will have to be migrated from the system environment of the former version to the current database. The documents are still filed in the as-signed file system, but the document links are no longer stored system-wide. Instead, they are stored per database.
The wizard is started when the document management setup will be started for the first time and documents from a previous version are found.
When starting data migration, a new directory for filing the documents needs to be created now. Do not forget to specify the settings in the document management af-terwards.

cobra CRM
190
Specify the root directory of your document management in the next step. This root directory refers to the database. You can use a new directory or use the previous one.
Should you decide to use a new directory the document can remain at the old loca-tion by using the »Copy options«.
The wizard will indicate how many documents have been found for the current set-tings. If you click the »Show« button, the missing documents will be shown for verifi-cation.
Click »Start« to begin document migration.

cobra CRM
191
Managing single letter/single e-mail templates
Managing single letter and single e-mail templates in configurations is very similar. This is why here only the e-mail template version is described.
Template manager
You can put groups (so-called »Configurations«) of e-mail templates together and present them to users for selection. These configurations will be created for each da-tabase individually.
In the ribbon, click »File: Formats: Manage e-mail template selection«.
Click the »Administration« button. Select »New«.
Name the new configuration.
Now you can choose among the existing templates.
If you select an area at »Pool«, you will be shown the templates available in this area. In a configuration you can mix templates from several areas.
Double-click the templates you need (or tick the button in the middle) to take them over into the style picker. In a configuration you can mix templates from several areas.
It might happen that users will be offered templates in such a configuration they may not access. These templates will then either be marked accordingly or filtered out.

cobra CRM
192
You are free to enter any name for the template. Thus you can make sure that the user will see the template with a name that is meaningful to him. To do so, click the name in the column »Display as« or mark the entry and tick the »Edit« button below the configuration.
You can also specify how the e-mails created with this template will be sent. To do so, click one of the options presented at »Mailing via«. Besides your own e-mail software, you will be offered all SMTP accounts stored in cobra. This parameter is a default value that the user can change later.
You can change the sequence of the templates with the »Up« and »Down« but-tons.
You can arrange the selection more clearly by grouping the templates according to their contents.
Click the »New grouping« button.
A new grouping is added. In the »Display as« column you can enter the label of the grouping. If you do not enter any label, there will only be a dividing bar. Groupings, too, can be positioned with the »Up« and »Down« buttons.
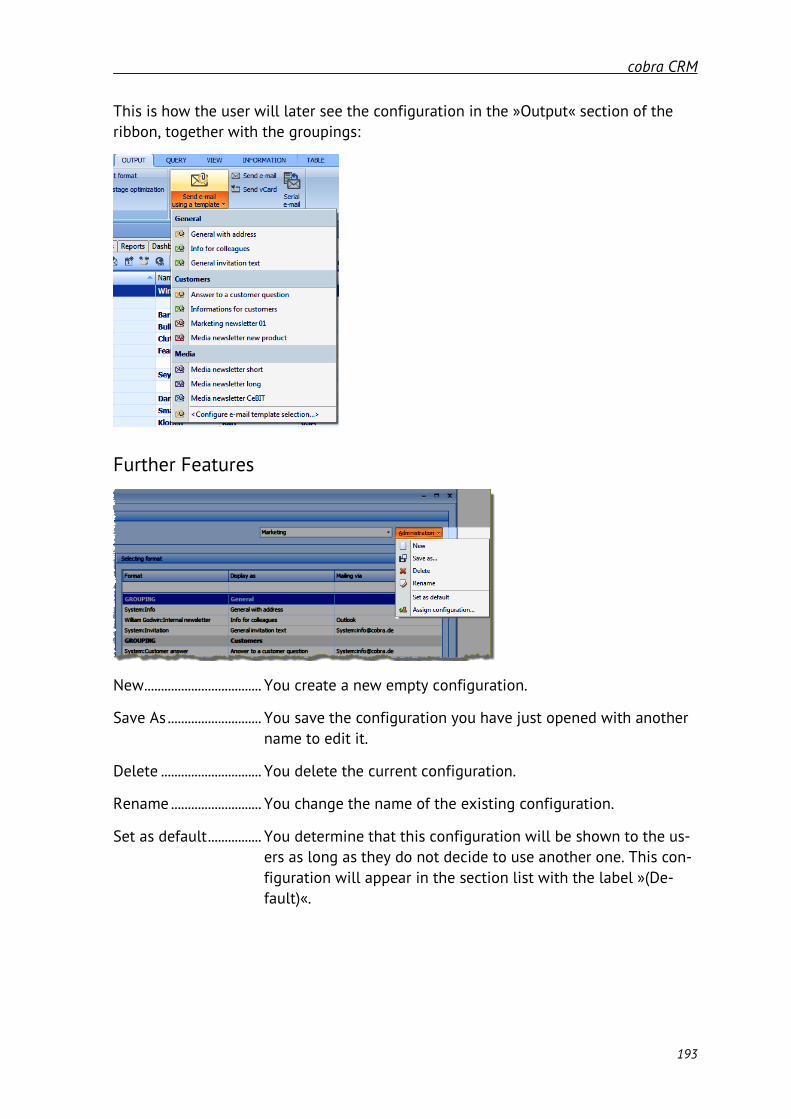
cobra CRM
193
This is how the user will later see the configuration in the »Output« section of the ribbon, together with the groupings:
Further Features
New ................................... You create a new empty configuration.
Save As ............................ You save the configuration you have just opened with another name to edit it.
Delete .............................. You delete the current configuration.
Rename ........................... You change the name of the existing configuration.
Set as default ................ You determine that this configuration will be shown to the us-ers as long as they do not decide to use another one. This con-figuration will appear in the section list with the label »(De-fault)«.

cobra CRM
194
Assign a configuration You can assign a specific configuration to each user. This is on-ly a proposed value and users can still compile their own con-figuration or select another one of those predefined by you.

cobra CRM
195
Views and Entry Masks
Old views and new entry masks
For quite some time now, in cobra there is an editor for entry masks, besides the fa-miliar view editor. This entry mask editor has many more functions to configure indi-vidual entry masks that you can open as dialog or integrate in views. For instance, in entry masks you can specify very detailed conditions as to when a field is to be ob-ligatory or write-protected. There you also have many more visual options for fields and masks. So its far greater range of functions support working with the entry mask editor.
If you are content with the look and the functions of your views up to now, you can just continue working with the views without having to do anything.
If, however, in your views you want to work with fields using these new functionali-ties, you need to recreate that part of a view in the entry mask editor and then inte-grate the newly completed masks in a view in the view editor.
It is not possible to automatically convert old views into new entry masks.
Here we want to give you a practical example of how to design an entry mask and in-tegrate it into a view.
You can find both tools at »File: View«.
You can also access the entry mask editor directly from the view editor.
First, in the view editor, you create an empty area and allocate an entry mask to it. Then you edit the entry mask.
Open the view editor.
Create an empty area. This can also be a tab or a split area.
Drag the »Entry mask« object from the pool of components to the empty area.

cobra CRM
196
At the same time, a dialog will open where you can choose which data you want to use in the new entry mask.
Go to the »Entry mask« tab.
Click the »Add entry mask« button.

cobra CRM
197
A new entry mask will open in which all entry fields of the data table selected have been placed in alphabetical order.
At »Name« enter the designation of this entry mask.
To create a complete entry mask, first remove all preconfigured entry fields so that an empty mask is generated.
Click individual entry fields and press the Del key. If you want to remove all entry fields from the dialog at once, in the »Control elements« dialog click the »New en-try mask« button which will completely clear the entry mask.
Then drag four objects of the »Empty space« type into the entry mask.
You can specify further properties for the empty spaces by right-clicking on them. Via the context menu you could, e.g., fix their size.
Group the first empty space. Right-click the context menu and issue the »Group« command.

cobra CRM
198
In the »Control« dialog specify the properties of the grouping. For instance, the »Text« entry is important. This is the group labeling. There you can influence many other parameters, such as text properties, spacing and colors.
Now allocate entry fields to the grouping.
To do so, drag the field from the »Control elements« dialog into the dialog.
If you mark a field, you can specify its properties in the »Control elements« dialog.
Besides many visual properties there are also important functional settings for entry fields. You can, e.g., specify whether a field is to be obligatory, write-protected or how it is to be dis-played.
Besides entry fields, you can also work with completely different components. Such as empty spaces, separator lines and splitters to visually and creatively or-ganize the entry mask.

cobra CRM
199
You will find some buttons in the »Control ele-ments« box. Here you can, amongst others, specify size values and scalability of the entire entry mask.
When you have completed it, close and save the entry mask.
As mentioned above, you can edit entry masks directly in the entry mask editor as well as in the view editor. To do so in the view editor, call up the view editor from the entry mask editor; this means that the functions to edit an entry mask are the same in both cases.
However, you directly specify which entry mask will be shown in a view in the view editor.
In the view editor, mark an entry mask.
Right-click it.
From the context menu select »Properties: Additional settings: Configuration«.
In the configuration dialog go to the »Advanced« tab.
Mark the entry mask required. Then click »OK«.
You can only integrate such entry masks that, in the entry mask editor, you have previously exported to a file.

cobra CRM
200
Should the export file contain several entry masks, the rule is that the first one will be used, you cannot access the other entry masks.
Entry masks
In cobra, commands can be assigned to buttons
You can integrate a button in an entry mask. Such a button will now not only activate any application, it can also execute a predefined cobra command.
In the ribbon, at »File: View« issue the command »Edit entry mask«.
Open the entry mask required or create a new one.
In the properties of the button, at »Action«, click the selection button.
You can now select one of three options:
Application You activate a different program.

cobra CRM
201
Menu command ........... You issue a command from the cobra menu.
Further commands Issue a cobra command that cannot be found in a cobra menu and configure it.
Application
You can activate an external application directly from an entry mask.
Menu command
Open a selection list representing the structure of cobra menus.
Select here the menu command that is to be activated.
Specify the additional properties of the button.

cobra CRM
202
A button is created in the entry mask which serves to activate the menu command required.
Additional commands
These are various cobra commands from very different fields.
Select the command desired from the list.
Use »Configure action« to specify further details. It depends on the command se-lected which details will be available.
Enter the caption and further properties as usual.
A button is created in the entry mask to activate the cobra command required.

cobra CRM
203
Fields can be integrated into the same mask more than once
CRM PLUS: This function is available here only for text boxes, text boxes with selection lists, Yes/No fields, date fields and comment fields.
You can integrate the same field more than once into the same entry mask.
Select the entry mask required for editing.
Go to the tab »Hidden elements« in the »Control elements« dialog.
Drag an item to the position in the entry mask you want.
Select the field required.
In the example, the result is that an additional field »Company« is added to the exist-ing one. The content of these two fields will always be identical. In the figure the second field is write protected, so that it is for information only.
Show field contents from higher level tables
In an entry mask, you can have data from a higher-level table displayed. For instance, in an entry mask with details on devices or other additional data you can also have information on the higher-level address displayed.
In the »Control elements« dialog go to the »Hidden elements« tab.

cobra CRM
204
Drag the »Field content« element into the entry mask.
A configuration dialog is opened.
In this dialog the higher-level table (»Addresses«) will also be shown.
Open it.
Mark the field of the higher-ranking table you require and confirm with »OK«.
The location of a device is shown in the example. It was combined from the name and location of the company - this information comes from the higher-level table »Addresses« - while the other details were taken from the dialog of the table con-cerning the devices.

cobra CRM
205
Creating an aggregate field (CRM BI, CRM PRO)
In entry masks you can aggregate field contents from a data table, such as calculat-ing sums, averages etc.
Add an aggregate field to the entry mask.
Click in the »Configuration« field.
You are opening a dialog to specify details for the field.
Show as link .................. This option will only have effect if the entry mask is integrated into a tab. It will not have effect if the entry mask is shown as a dialog. If this option is active, a link is shown which you can use to go directly to the table with the underlying values. If not, only the result of the calculation will be shown here.

cobra CRM
206
View and Entry Mask Editor: New Browser Control
There now is a revised view element for accessing the Internet that is available in the view editor as well as in the entry mask editor. Here you can see the procedure in the view editor, editing the entry mask is similar.
Administrator
The system administrator will allow users to access certain data via the browser ele-ment. For example, cobra addresses can be transferred to Google Maps and thus be displayed in the Internet map. But you can also use this control to show files from the system directory or display customer-specific data.
System administrators can find the browser module in the view editor among the ad-ditional modules as »Browser«. Part of its functions are the same as those of the Browser Control valid up to now.
Advanced
Show address bar An address bar can be shown at the top of the browser. With this address bar users can access the address specified by you as well as navigate as they like.

cobra CRM
207
Call URL only after clicking "Switch to". This option is intended to prevent a URL from being loaded unnecessarily while browsing through addresses and thus re-ducing performance. If activated, a user must first press the »Go to« button to reach the preset URL.
Deactivate context menu (right click) The user can activate further functions by using a context menu.
General
Administrators use this tab to configure the browser. There are various, basically dif-ferent ways of showing objects in a browser. They predefine what the user can see or visit in the browser. user is The functions provided here are familiar from the previ-ous Control function.
Entry masks: Under certain conditions fields are write-protected (CRM BI, CRM PRO)
In entry masks you can specify certain conditions for individual fields which will pro-vide write-protection for such a field. For example, you can ensure that the field »Customer No.« is shown as write-protected in secondary addresses and can thus be edited in the primary address field only.
In the properties for this field select the checkbox at »Write protected«.
A dialog to enter the condition opens.

cobra CRM
208
Enter here the condition(s) required to show the field as write-protected.
The condition shown here will ensure that the field »Customer No.« is write-protected in secondary addresses.
This option can be set individually for every entry mask. It will overrule the write protection parameter you have set for each field at »File: Settings: Data-base structure«.
Dynamic showing/hiding, dynamic write protection (CRM BI, CRM PRO)
You can have certain fields of an entry mask shown only if there is a specific content in another field. It is possible to have the field »Company2« only shown if the field »Company1« is not empty, or show the field »Customer No.« only if the customer type has been enters as »Retail Customer«.
Click the field that is to be assigned a display condition. In the example shown here that is »Customer No.«.
Click in the field for the »Show« property. A selection box will appear at the right-hand side of the field. Click the box.
Now specify the display condition for this field. In the example shown here the condition is: If »Customer type« is »Potential customer«, then the field »Customer no.« will not be displayed.

cobra CRM
209
In future, the field »Customer no.« will only be displayed in the entry mask if the cus-tomer is a potential customer.
Write protected In the same way you can specify conditions here to write-protect a field. So, e.g., the field »Company2« can be write-protected if the field »Company1« is empty.
Fields can become obligatory
Entry fields can be made obligatory so that a user cannot close the mask without having entered something in the required field.
This parameter will only be valid for this specific entry mask. So it is not the case that the corresponding field will be obligatory in all the masks it appears in.
In the »Control elements« dialog you determine the properties a field should have in an entry mask.

cobra CRM
210
You can find the »Entry required« option in the »General« tab of the field proper-ties. If you want the field to become obligatory, set this property to »True«.
For the user, the field will be marked in the entry mask with a colored button. He cannot close the dialog without having entered something in this field.
Printing address lists direct from an entry mask
Drag the element »Button« to the position in the entry mask you want.
Click the button besides »Action«.

cobra CRM
211
At »Further commands« select the »Address list« from the selection list.
Click »Configure action«. Select the template to be used for the address lists print-ed via this button.
A button to print address lists is integrated in the entry mask and configured accord-ingly.
Entry mask: Parameter »First field for entering«
In an entry mask you can specify in which field the cursor is to be when the mask is opened.
Select »File: View: Edit entry mask«.
In the dialog »Control elements« click the button »Settings«.
There are settings for entry masks that apply especially to visual properties.
Open an entry mask for editing.

cobra CRM
212
In the »Control elements« dialog, click the »Select basic area« button to select the entire basic area. This basic area is the area lying beneath all other elements, such as empty spaces, groupings etc.
For this basic area you can specify some settings that will partly be used as preset-tings for the elements lying above it.
In this example the basic area was colored red.
The font settings do not apply to the basic area itself, but are the default settings for the labeling of the groupings lying above. They will only be shown in the preview if you right-click the basic area and, from the context menu, issue the »Hide customiza-tion windows« command. Later you can reopen the »Control elements« dialog by right-clicking and using the context menu.
Padding specifies how far, on the basic area, objects must be removed from the inner borders.
New settings for entry fields
You now have more options to design the layout of individual entry fields.
Mark an entry field.
In the »Control elements« dialog open an area, e.g. »Expert«.

cobra CRM
213
Here you can specify the look of an entry field in accordance with its function. Enter what you want the field to look like, e.g. when it is write-protected or deactivated.
In the example shown here an entry field will be given a characteristic font when it is write-protected.
You can also use the padding to specify spacing between entry fields and the space between captions and the actual entry field.
For groupings, there are border, write protect and color settings.
The size of empty spaces can be defined in pixel.

cobra CRM
214
Putting out an entry mask
Use this function to process an entry mask for printing. A text editor will open show-ing a preview and containing limited editing functions.
Issue the command »File: View: Edit entry mask«.
Switch to the input mask required and open it for editing.
Drag a field of the »Button« type into the entry mask.
In the properties of the button, at »Action«, click the selection button.
Select the function shown:
A button is now inserted into the mask selected. You can also change labeling, size etc. using the button properties.
Exit the entry mask editor.
A corresponding button will now appear in the entry mask.

cobra CRM
215
When you click the button, a selection list opens. From there, you can print and export the entry mask.
New type of button
The action button can be configured so that it will list appointments or tasks created for a data record (an address, a contact, a case where service is required etc.).
Open the entry mask required.
Add a button to the mask.
In the configuration menu, click the »Action« button.

cobra CRM
216
A dialog showing the different actions available opens.
At the »Further commands« option select the »Appointment/task for this record« option.
Click the »Configure action« button.
Close the dialogs.
When you are working with the entry mask in future, you will find the button show-ing the number of appointments there.

cobra CRM
217
Click the button.
The list of appointments belonging to this data record will open.
At the upper left you can select what you want to be displayed. Those could be your own appointments/tasks as well as such from other calendars.
Use »Edit« to edit a highlighted list entry in the Appointment Manager.
Search line in the entry mask editing function
When editing entry masks, search lines will assist you at different positions. You can thus find the elements you are searching for much quicker.
»E-mail with a template (interactive)« button
You can integrate a button in a dialog that will send an e-mail. You can also simulta-neously create a contact. When it is sent via the interactive transmission, the e-mail will also be displayed again so that you can edit it.
Issue the command »File: View: Edit entry mask«.
Open the entry mask required.
Place a control element of the »Button« type in the dialog.

cobra CRM
218
In the next steps you will be configuring this button.
Click the selection button besides »Action«.
Here select the action shown at »Further commands«.
Click the »Configure action« button.

cobra CRM
219
Specify those e-mail fields that are to be searched for a recipient address.
Click »Add e-mail«.
All those fields will be presented that have been specified as e-mail fields in the da-tabase structure.
Take over the fields you require. Assign them a higher or lower priority.
When the e-mail is then actually sent, it is checked whether the field with the high-est priority contains an e-mail address. If so, the mail is sent to this address. If not, the field with the next-lower priority is checked and, if required, the e-mail is sent to this address.
At »E-mail content and sender«, select the template you need as well as the send-ing settings.
Specify whether you want the mail documented automatically as a contact. If so, you can choose among the following options:
Static The contact entered here will be created, regardless of what has been specified in the system and user settings.
Dynamic The predefined settings for contacts and documents valid at this moment will be used. If the user settings differ from the system set-tings, the user settings will be used.
In the dialog there is now a button to send an e-mail.

cobra CRM
220
If you click the button, the mail opens. You can edit the mail.
After sending the mail, the contact will be created if necessary.
»Edit data record« button
You can create a button in an entry mask to edit the current data record.
Issue the command »File: View: Edit entry mask«.
Open the entry mask required for editing.
From the »Control« dialog, drag an object of the »Button« type into the entry mask.
In the properties of this element click the »Action« feature.
Select the »Further commands« option.
From the list, select the »Edit data record (interactive)« option.
Click the »Configure action« button.
A list of the entry masks available for this data table will be displayed.
Select in which of these entry masks you want the data record to be edited shown.
Go back to the properties of the control elements and, if required, specify addi-tional properties of this element.
In future, this button will be used to access the data record displayed for editing in the entry mask selected.

cobra CRM
221
Navigation buttons
You can now add navigation buttons to entry masks to switch to other address data records and have their data shown in this entry mask.
Issue the command »File: View: Edit entry mask«.
Open the entry mask for editing.
Add a field of the »Button« type into the entry mask.
Configure this button. To do so, click »Action«.
In the configuration area, at »Further commands«, select the »Navigate (interac-tive)« option.
Also specify here where this button is to navigate to.
You can place several buttons besides each other to create a navigation bar.

cobra CRM
222
In cobra, the navigation buttons will then serve to switch between records.
»Field contents« element comes with an action button
You can make a call, access an internet address and use similar functions now direct-ly from entry masks.
Issue the command »File: View: Edit entry mask«.
Open a mask.
Drag an object of the »Field content« type into the entry mask.

cobra CRM
223
Assign the content of the field »Telephone« or a comparable field to the button. A selection list opens.
The field will now be entered with a function button into the mask. Using this but-ton, the telephone number entered in the field can be called directly.

cobra CRM
224
You can choose between different functional buttons. These can be set at »Button type«.
Display Conditions
Displaying entry masks can be controlled by conditions. A condition consists of a name, the entry mask to be displayed, the mode the condition is to be valid in (new data record, edit data record, query), the condition itself and the option whether the condition is to be valid or not.
Conditions will be processed according to the sequence specified. If a condition is true, this entry mask will be displayed. If no condition is true, the default mask will be used.
Conditions are not valid if a specific entry mask is to be opened (if, e.g. a specific en-try mask is to be opened via a button).
In cobra, a condition can be configured using the field contents of the data record or using groups and users.
To activate the conditions for entry masks, click the »File« tab and then »View«. Here choose »Edit entry mask«.
Here click »Select entry mask« and then »Configure conditions...«.
The dialog »Configure conditions for displaying entry masks« will open.
To specify a condition, click the »New…« button in the »Configure conditions for displaying entry masks« dialog.

cobra CRM
225
A new dialog will open where you can specify the conditions required.
Read Only
Entry masks can be displayed as Read only in the 2020 version. The Read only fea-ture is set in the view editor.
To do so, call the view editor, using either »Edit current view« or »Create new view«.
In the view editor, the »Entry mask« component can be dragged onto the view. The following dialog will open:
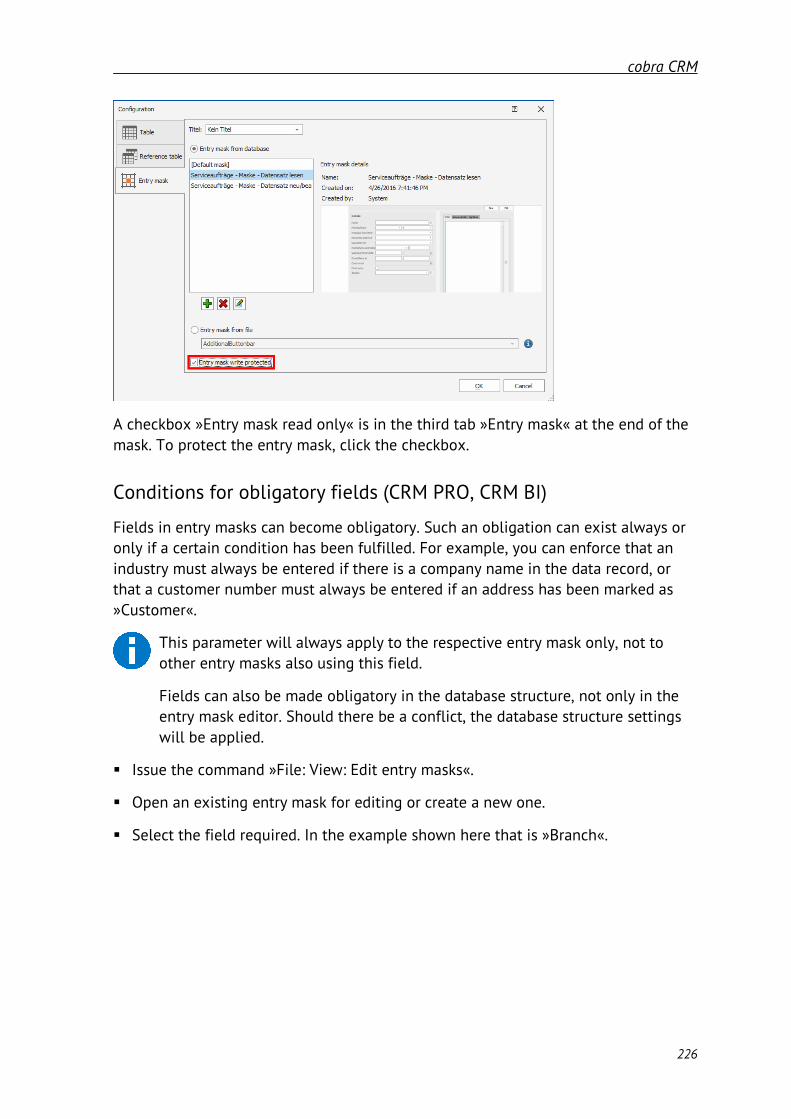
cobra CRM
226
A checkbox »Entry mask read only« is in the third tab »Entry mask« at the end of the mask. To protect the entry mask, click the checkbox.
Conditions for obligatory fields (CRM PRO, CRM BI)
Fields in entry masks can become obligatory. Such an obligation can exist always or only if a certain condition has been fulfilled. For example, you can enforce that an industry must always be entered if there is a company name in the data record, or that a customer number must always be entered if an address has been marked as »Customer«.
This parameter will always apply to the respective entry mask only, not to other entry masks also using this field.
Fields can also be made obligatory in the database structure, not only in the entry mask editor. Should there be a conflict, the database structure settings will be applied.
Issue the command »File: View: Edit entry masks«.
Open an existing entry mask for editing or create a new one.
Select the field required. In the example shown here that is »Branch«.

cobra CRM
227
Click the button at the right-hand side in the »Entry required« field.
Default ............................. The settings for obligatory fields from the database will be ap-plied.
Always obligatory........ This field will always be an obligatory field.
If condition fulfilled ... Here you can specify one or more conditions that have to be fulfilled for the field to become obligatory.
Write-protected fields in entry masks
In the entry mask editor, fields can become write-protected. In this case any input as-sisting functions will be hidden. That might be a button to open a selection list, or a postal-code lookup tool or similar input assisting functions.
This parameter will always apply to the respective entry mask only, not to other entry masks also using this field.
Fields can also be made write-protected in the database structure safety op-tion, not only in the entry mask editor. Should there be a conflict, the database structure safety settings will be applied.
In the example shown below the fields Street and City are write-protected:

cobra CRM
228
And here, for comparison, the same fields without write-protection:
Colors in Entry masks
You can add individual font-, background- etc. colors to elements such as texts and areas.
Highlight the element of the en-try mask to be colored.
Open a color option in the set-tings (in the figure that is »Back-ground color«).
Switch to one of the register tabs such as »User defined«.
Right-click one of the empty color fields at the lower border.
A color selection field is opened where you can create your own color.
In the selection field, click »Add Color«.
The color is taken over for the object in the entry mask.
In addition, the color is added to the user-colors palette.
Transfer formatting from one entry field to another
If you want to transfer formatting deviating from the default formatting, you do not need to tediously set that for each entry field manually, but can transfer formatting from one field to one or more others.
Mark that entry field whose visual properties you want to transfer to other fields.
In the »Control elements« dialog click the »Copy format« button.
Hold down the Ctrl key and mark several other fields you want the format trans-ferred to.
In the »Control elements« dialog click the »Copy format« button.

cobra CRM
229
The fields selected will now look like the field marked initially.
The send e-mail with template button
In entry masks you can operate with a »Send e-mail using a template« button.
Open the entry mask for editing.
From the »Control elements« dialog, drag an object of the »Button« type into the entry mask.
Click this element.
Click the selection button in the »Action« field.
The familiar menu for buttons will open.
At »Further commands« select the »Send e-mail from template (interactive)« op-tion.
Click the »Configure action« button.

cobra CRM
230
Specify to which recipient from the cobra da-tabase or, if required, also permanent e-mail addresses you want the e-mail to be sent to.
Select the e-mail template and the sending options. The e-mail can also be sent via an SMTP-Account.
You can have the mail documented automati-cally as a contact. Use the lower part of the dialog to specify the contact details.
Address toolbar
There now is an element to enter address icons in entry masks.
An icon used for this address is displayed in the line. Click the icon field to show the icons avail-able.

cobra CRM
231
List views of relationship fields (CRM PRO, CRM BI)
When you are selecting a data record for linking from a relationship field, data of this record will be shown as table for your guidance. You can specify for each relationship field which data are to be shown. If you do not specify anything, those data tables assigned in the database structure for this data table as »Columns displayed« will be used.
Open the Entry mask-Editor.
Highlight the relationship field.
Click the column header besides »Columns displayed«.
A menu will appear where you can select the columns you require.
At the bottom of the dialog you can specify according to which of the columns shown the display is to be sorted.

cobra CRM
232
Access a data table or an entry mask from a relationship field (CRM PRO, CRM BI)
To be able to use this function, the following settings must have been made in the database structure for the relationship field required:
In this case, the relationship field itself looks like this:
You can then use this relationship field to access the data table connected via this relationship field or to access specific entry masks.
Use the entry mask editor to select the relationship field. Highlight the rela-tionship field.
Click the checkbox at »Target«.

cobra CRM
233
Access record .......... Use this button to access the data record. Here you can specify how this data record is to be shown: Either in the table it be-longs to or in the entry mask selected.
Create data record Use this button to create a new data record that will be linked directly via the relationship field. Specify here which entry mask you want to use to do so.
Allocating Several Commands to one Button
You can allocate several commands to a button that will then be processed in the or-der you specified.
Issue the command »File: View: Edit entry mask«.
Select the entry mask you need and open it for editing.
Drag a button into the entry mask.

cobra CRM
234
In the »Control elements« dialog click the »Action« field. A small button will pop up that you can use to open the configuration dialog.
You can now combine actions from the »Further commands« area with each other.
Click the button.
From the commands shown, select the one you need.

cobra CRM
235
Using the arrows, you can alter the order of the commands.
To edit commands, such as using different data record templates or other default settings, click the »Configure« button.
If you then need the button later when editing an address, the actions you specified will be performed.
Views
A database includes all database fields that were created under »File: Database«. For displaying the fields, a corresponding view is required which is defined separately and depends on the created database fields as well as on the individual preferences regarding display, placing and positioning on the screen.
Via the View Editor, you can customize the look of your cobra desktop as you like. You can display exactly the information that is required for each database and every

cobra CRM
236
user. To do this, so-called “views” are created and saved. When cobra is started and a database is loaded, it is always displayed in the view that was selected last. However, you may select a different view at any time.
The View Manager is a program that works independently from cobra. It can be load-ed:
Via the menu bar within cobra (»File: View: Edit View« command)
or directly from the cobra program directory (...\PROGRAM\VIEWEDITOR.EXE)
Views are saved as files with the file name extension FMA (format view). In cobra, these files are created in XML format and can be viewed with any text editor, if you have good knowledge on XML. Depending on the selected area (system, guest, user name, and group name), the view is stored in different directories and can be ac-cessed by specific users:
Area cobra Directory Access Permissions System ..\SYSTEM\*.FMA Read: all
Change: system administrator
Guest ..\BENUTZER\*.FMA Read and change: guest, system adminis-trator
User name ..\BENUTZER\YOUR_USERID\*.FMA Read and change: only users that are members of this group, system administra-tor
Group name ..\GRUPPEN\YOUR_GROUPID\*.FMA Read: only users that are members of this group, system administrator Change: group administrator, system ad-ministrator
The view management is started via the com-mand »File: Formats: Format Management«.
You can assign specific views to dedicated us-ers or groups.
Under »Format type« select the views.
Under »Source area« select the area from where you want to copy the views.
Define the »Target area« where you want to paste the views.
If you want to delete a view, select the source are as »Target area«. Then select the view and click »Delete«.

cobra CRM
237
Example:
The user “User1“ is member of the group “Group1“ but does not belong to any other group.
If User1 calls the »View: Select« command, the following area selection may be pre-sented:
All views that can be accessed exclusively by “User1” are saved in the »User1« ar-ea.
All views that can be accessed exclusively by members of “Group1” are saved in the »Group1« area.
All views that can be accessed read-only by all users but where only the system administrator can perform changes are saved in the »System« area.
If a user loads a view that is not appropriate for the database, important data may eventually not be displayed. Only those database fields that were inte-grated in the active view by the system administrator are visible on the screen. Other fields are hidden and will be shown only after the appropriate view has been loaded.
Therefore it is recommended to create views to the individual databases as system administrator and store them in the »System« area, using a self-explanatory name, because only this way, all users can access the views.

cobra CRM
238
Creating or Editing Views
There are several ways of working:
Creating a View for the First Time I → Use the command »File: View: Create View« while the database will be started → The View Editor will be started with a new, empty view. You can select the
fields from the currently opened database.
Creating a View for the First Time II → Open the Windows Explorer.
→ Change to the \PROGRAM subdirectory of your cobra installation. → Double-click the VIEWEDITOR.EXE file.
→ Log on as system administrator. → Define for which database the view should be created. This selection deter-
mines which fields will be offered for the view.
→ The View Editor will be started with a new, empty view.
Editing a View → Use the command »File: View: Edit View«. → The current view will be opened for editing in the View Editor.
Creating a View from a Template → Open an existing view for editing in the View Editor. → Use the »File: Save view as« command from the View Editor menu.
→ Save the view under a new name and then perform further changes on the view under this new name.
The View Editor starts with a window such as the following screenshot and appears as new task in the Windows task bar.

cobra CRM
239
Showing and Hiding the Toolbar, Defining the View Size
Component selection, status line and other elements can be shown or hidden via the »View« menu.
The toolbar can also be shown or hidden by clicking to the menu bar with the right mouse button.
The Component Pool of the Toolbox Bar
The component pool provides all components available for editing a view on differ-ent register tabs.
You add a component to a view by clicking on the desired component in the com-ponent pool and dragging it to the desktop while keeping the left mouse button pressed. A grey stroke indicates the possible insertion position on the desktop.

cobra CRM
240
When you release the mouse button, the element is anchored at the respective view position and can then be edited.
Here you can find all elements for the desktop.
The list arrow upwards or downwards allows access-ing further components via a mouse click.
Components Parenting elements for the graphic design and partitioning of the views: • Address tab with address table and ad-
dress mask • Separate address mask • Register tabs • Dividing bars for the partitioning of areas
in two eventually dynamical sub-areas that may contain different elements.
• Area – an empty area for placing other elements on it.
• Grouping – an empty area with an attrac-tive frame. The labelling appears within the frame line.
• Button – an empty button that can be as-signed with a variety of functions and in-formation from the database.
Field for the presentation of documents Field for the presentation of images Field for the presentation of messages RTF field for the presentation of formatted
text and graphics

cobra CRM
241
Addresses The address components include the common elements of the user interface and, in addition, specific elements like icon or image field: Address tab with table mask and address
mask Table mask and address mask separately Entry fields or bars where several entry
fields are grouped (country-postcode-town)
Field, for example, for a branch typical icon
Bar for the status display Button bar for switching, for example, to
comments, keywords and appointments Keyword list Address links Appointment display Activity list from the campaign manage-
ment Sales Projects list
Contacts
Additional Data
Documents
In addition to the general elements de-scribed above, you can find specific mask el-ements for editing contacts, additional data and documents.
System Modules
User mod-ules
Different view elements consisting of several single components.
Additional Modules
Several cobra additional modules are availa-ble that you may purchase and install. These independently working programs for specific tasks can or must be integrated in existing or new views. This is done with the components of this element.

cobra CRM
242
The Status Line
The status line is shown at the bottom of the screen directly above the task bar.
It displays information on the selected size of the view (Size: width x height), the se-lected view element (»Selection«), how many sub-elements belong to the selected element and on which layer the selected element is placed. The orientation on the correct layer is of crucial importance when working with the View Editor.
The Area and its Layers
When a new view is created, the complete view is displayed as grey area with the la-beling “Empty area”. You may then start to divide this area and fill it with view com-ponents.
Please note: an area can only be filled with elements that are specifically aligned to each other. For example, entry fields must be aligned next to each other or under-neath each other. If you want to arrange two-columned entry fields, which means they are arranged next to each other as well as underneath each other, they must be placed on different layers. The areas are located next to each other and the entry fields on the areas below each other.
Horizontal dividing of an area means inserting two new areas that are arranged hori-zontally.
Example:
The empty area is layer 0. When you insert register tabs, these tabs together form layer 1 whereas the area on the register tabs forms layer 2. If an area on the register tab is divided via the Assistant Wizard, the areas that were created by the dividing together form layer 3 etc.

cobra CRM
243
The following steps may illustrate the principle (the shaded area is the selected ar-ea):
Step 1: »File: View: Create View« Empty area (layer 0):

cobra CRM
244
Step 2: »Insert: Register Tabs« (layer 2):
Step 2.1 (included in 2): Tab areas layer 2:

cobra CRM
245
Step 3: »Divide Area« layer 3:
Components and areas can only be arranged by using a layer structure. They can be moved to another layer as well. A double-click selects an element. The status line displays the layer on which a selected element is located.
The »Navigation« menu command simplifies navigating between layers, from sub-elements to higher elements – always based on the actual selected element.
Menu Bar and Toolbar in Detail
Menus
In general, menu bar and toolbars only provide those functions that apply to the cur-rently selected element. All other commands or icons are blocked and displayed in grey color.
The menus display the written commands and, if available, the icons and key combi-nations.

cobra CRM
246
In the View Editor, there are three possibilities for creating a new view:
1. Menu command File: New
2. Icon
3. Key combination CTRL+N
»File« Menu
New Creates a new view.
Open Opens an existing view via a Windows Explorer window.
Save Saves the currently edited view via a Windows Explorer window.
Save As Saves the currently edited view under a new name and/or in a different directory via a Windows Explorer window.
Open View Opens an existing view via the view selection dialog of co-bra.
Save View Saves changes on a previously saved view.
Save View As Saves a view under a different name and in a different area. The cobra window »Save View As« will open.
Exit Closes the View Editor.

cobra CRM
247
»Edit« Menu
Undo Undoes the last step of an action. This may be repeated as often until the status of the last saving is restored.
Cut Cuts out the selected element and adds it to the clipboard.
Copy Copies the selected element to the clipboard.
Paste Pastes the element from the clipboard to the selected ele-ment. This function is not available, if no element is select-ed.
Delete Removes the selected element from the desktop.
Save Module Saves one or several elements as a single module to add it to a view later on. Several entry fields are selected with double-click and the Ctrl/Shift key. You may also save an ar-ea with elements located on it as module.
In order to save register tabs, you have to select the area underneath.
If you choose the option »System directory«, modules are filed as*.FVA files under SYSTEM\COMPONENTS.
If you choose the option »User directory«, modules are filed under \User\ID\COMPONENTS\.
If you select the option »Free choice« modules are filed un-der a storage location you define via the selection button to the right.
Load Module Inserts a saved module on a selected area. If no area is se-
lected, this function will not be available.
If you should notice, while you are working on a view, that the elements should be stored on a different layer or tab, - save the elements as module - create the view one more time - and paste the saved module on the correct position.

cobra CRM
248
Delete Module Use this menu command to delete unused modules. First se-lect the »Area« where the unused module is stored. Select the »Name« of the module you want to delete in the selec-tion list. Confirm with »OK«. The module is deleted. Please note that the deletion cannot be undone.

cobra CRM
249
Break Grouping Apart Some objects are inserted as blocks, such as contact masks, status lines or button bars. When a new version of cobra is installed, program updates automatically apply to these blocks.
If you want to remove or edit individual elements from such a block or prevent the automatic updating, you have - to select the blocks - and call this function.
A grouping that is broken apart cannot be assembled again.
Cancel Selection Cancels the current selection for one or more elements.
View Properties For Windows XP, this view is displayed in XP style. In addi-tion, entry fields can have the XP-typical frame.
If you select the »Freeze current palette« option the view will always have the color and design you specified in the View Editor. This setting cannot be changed even if the user defines a different color palette in the user settings under »Presentation«. The palette is defined in the View Editor with the command »View: Palette«. The option ensures that the user has to work with the view setting you defined.
The »Comment« is hidden for others and exclusively serves as comment field for the system administrator.
»Wizards« Menu
Wizards support you when dividing an area or inserting a table, entry fields or regis-ter tabs. You may call them either via the »Wizards« menu item or via the context menu by clicking to a selected area.

cobra CRM
250
Dividing Area
By the division of an area new areas are created e.g. columns where data can be dis-played next to each other.
Please select ... ............. An area can be divided vertically or horizontally.
Should the new areas have a changeable size? If you select a dynamical area size, users may change the area size with the mouse as they like.
How many areas do you want to create? You can create up to 10 new areas.
On which of the new areas do you want to display the existing elements? If an area you are going to divide already contains elements, you have to define on which of the areas the existing elements should be placed.
Table
This wizard opens automatically whenever you are adding a table from the com-ponent storage to the view, e.g. an address table, contact table or additional data table.
The wizard can also be called in the following way: Click a table that already ex-ists in the view and use the command »Wizards: Table«.

cobra CRM
251
Register tab »Table«
In the upper tab, specify which data from which table you want to view. You can se-lect from any table available in the database. Depending on your selection in this tab, the tab »Reference source« can be accessed or not. This also applies for the se-lection in other tabs.
Register tab »Reference source«
The reference source defines which data will be shown in the table. If, e.g., you want to view only those devices belonging to the activated address, select the »Devices: SuperID (Addresses)« option using the »Add« button. This relation has already been preset and will be used as default unless you select a different option.
You can also specify fixed filters showing only data matching the filter criteria.
CRM BI and CRM PRO: The other options can only be used for tables containing rela-tion fields.

cobra CRM
252
Using Relations to Display Data
Instead of in a subordinated data table, several data tables, even higher-level ones, can be displayed in one view only if they were linked by relation fields. This makes it possible to view the payments listed in a specific statement even if there is a table structure such as: »Table of payments -> Table of postings -> Table of statements -> Table of accounts«. Or you display all the machines altogether with service tickets, repair reports or other relating data.
To do so, a new option was created in the view editor when configuring a table for the reference source.
Load the view required into the view editor.
Therefore issue the command »File: View: Edit view«.
In the view, right-click the data table required. In the context menu, issue the command »Wizards: Table configuration«.
Switch to the »Reference source« tab.
Here you can »Add parent relations«.

cobra CRM
253
All data tables linked to the data table se-lected will now be available.
You could thus ensure that all payments linked to an account will be displayed when you click an account in the view.
Register tab »Reference table«
A table can be selected here, depending on the reference source. You can choose from all tables existing in the view. Should the user go to another data record in this table, the sub-data records are updated in accordance with the reference source.

cobra CRM
254
Register tab »Column selection«
As available columns you can see all database fields that can be used as column of the table.
You can also create »Mixed« tables. Such tables contain data from higher ranking ta-bles, e.g. addresses. So in this table, e.g., you can have not only device data, but also the company name of the device owner be displayed!:
Click or double-click the button and add a column to the »Displayed columns« in the table. Click to remove the column again.
Use to add all available columns to the table, to remove all columns from the table.
The and buttons can be used to specify the column order within the ta-bles.
Use »Column properties« to: – allow multiline entries, – label the column differently from default labeling which is with the field name, – allow only entries of a predefined view format specified in the database structure.

cobra CRM
255
Register tab »Enhanced«
Here you can select further control elements and viewing properties for the user. Among these are:
The search line is the first line of the table, still empty. If the user enters a search term, only data matching the search criterion for this column will be displayed from the table.
Full-text search will allow you to perform a column-independent search in all dis-played fields of the table.
There are some more functions in the table details that can be used to disable certain editing functions for this table in a specific view. This means that data will be shown in a table but cannot be deleted, entered or edited. This func-tion is intended especially for free tables, less so for the address table.
Open the view editor.
Select the table you need. Right-click it and select »Properties«.
In the properties, select the »Table« tab.
Click the »Configure« button.
In configuration go to the »Advanced« tab.

cobra CRM
256
Deactivate editing a data record If you activate this function, it will be prevented that data records of this table can be opened for editing. The function will be deactivated in the context menu as well as the toolbar.
Deactivate double-clicking a data record If you activate this function, it will be prevented that data records of this table can be opened for editing by double-clicking them.
Deactivate deleting a data record If you activate this function, it will be prevented that data records of this table can be deleted. The function will be deactivated in the context menu as well as the toolbar.
Deactivate creating a data record If you activate this function, it will be prevented that data records can be created in this table. The function will be deactivated in the context menu as well as the toolbar.

cobra CRM
257
Formatting rows and columns depending on the content of the field (CRM BI and CRM PRO)
You can format rows and columns in tables differently if certain conditions prevail. For example, you can have a certain type of customer displayed in its individual font color in the address table.
Issue the command »File: View: Edit view«.
Right-click the table and in the context menu issue the command »Wizard: Table configuration«.
Go to the »Formatting conditions« tab.
Click the »New« button.
Specify the formatting and the condition to be fulfilled.

cobra CRM
258
If data are grouped in tables, a footer line containing sums etc. can be displayed per column
To display group footer lines of a table, these options must have been set in the view editor before:
allow grouping
activate »Show group footer«.
Go back into the data table.
Drag a field into the grouping area.
The table data will be grouped in accordance with this field and be shown below each group in a footer line.
Right-click into the group footer line.
From the context menu select the option required for this column.

cobra CRM
259
The value requested will be shown in all group footer lines.
Entry fields
Open this wizard with click on an entry field. Use the command »Wizards: Entry Fields«.
The Entry Fields Wizard consists of two steps. You can navigate between the two dia-logs with »Back« and »Next«.
1. Step: Number of columns
Define how many columns your entry field’s mask should have.

cobra CRM
260
2. Step: Field selection
Available fields ............ In the column to the left, all available fields of the database are displayed. You can move them to the columns on the right with - with the mouse or - per double-click or - via the button
If you are moving the fields with the mouse to the columns, you can distribute them to the columns as you may.
The number of fields within the columns is automatically com-pensated so that a possibly equal number of fields will be dis-tributed over all columns. You can use the mouse to move the fields between the columns according to your needs.
The icon deletes a field selected in the right column.
The icon moves a field selected in the right column one position upwards.
The icon moves a field selected in the right column one po-sition downwards.
The checkboxes located underneath the left column define which fields will be offered and which way they should be sorted. If you deactivate »Display complete storage«, only fields that were not assigned yet will be offered.
Database name ............ When you select a field under »Table columns«, it’s »Native-Name« in the database is displayed. This name can differ from the user-defined field name. .
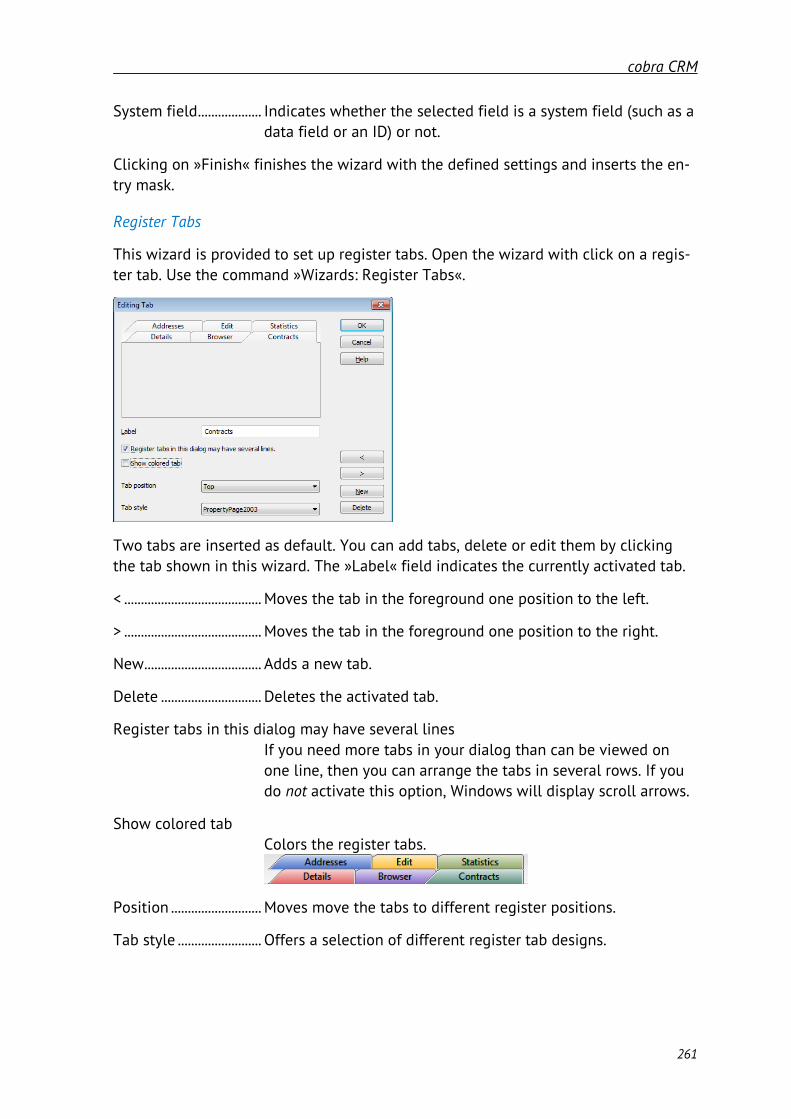
cobra CRM
261
System field ................... Indicates whether the selected field is a system field (such as a data field or an ID) or not.
Clicking on »Finish« finishes the wizard with the defined settings and inserts the en-try mask.
Register Tabs
This wizard is provided to set up register tabs. Open the wizard with click on a regis-ter tab. Use the command »Wizards: Register Tabs«.
Two tabs are inserted as default. You can add tabs, delete or edit them by clicking the tab shown in this wizard. The »Label« field indicates the currently activated tab.
< ......................................... Moves the tab in the foreground one position to the left.
> ......................................... Moves the tab in the foreground one position to the right.
New ................................... Adds a new tab.
Delete .............................. Deletes the activated tab.
Register tabs in this dialog may have several lines If you need more tabs in your dialog than can be viewed on one line, then you can arrange the tabs in several rows. If you do not activate this option, Windows will display scroll arrows.
Show colored tab Colors the register tabs.
Position ........................... Moves move the tabs to different register positions.
Tab style ......................... Offers a selection of different register tab designs.

cobra CRM
262
Tabulator Sequence
You can define the sequence for the tabulator and return key to move through the fields of the address mask.
Use the command »Wizards: Tabulator Sequence«.
Click a field and move it with the arrow keys to the desired position.
Or drag a field with the mouse to the desired position in the list.
Birthday Fields
If the view includes a birthday field, you may use this wizard for the configuration of the field.
Drag an entry field from the component pool on the left to the view.
Select the type »Birthday field«.
Use the command »Wizards: Birthday Field« from the context menu. This wizard impacts the presentation of the date of birth.
If you want to display the date in several ways (age, days until the next birthday, etc.), like in this example, it is recommended to insert a multi-entry field and as-sign the birthday field in multiple numbers, before calling the wizard.

cobra CRM
263
The available display options for the birthday field can be chosen from the selec-tion list in the lower part of the »Birthday Fields« dialog. Only fields with the »Standard« option can be changed later on. All other options create fields which are automatically filled by the system, i.e. you can view but not edit them.
In the view this configuration may look as follows:
In this example the lower line is just a multi-entry field with three birthday fields with these birthday settings:
When the user enters a date of birth, the program automatically fills the related fields and shows the data according to what you defined in the configuration.
»Insert« Menu
Via the commands of this menu item, individual components can be added to the view. A component is added to the current selection. The new element is inserted af-ter the last element (seen from left to right and from top to bottom). You may not in-sert a new field between two fields, for example.

cobra CRM
264
»Navigation« Menu
This menu item simplifies navigating on the areas and layers as it is not always obvi-ous on which layer you are currently working. This especially applies to layers locat-ed directly below one another where it might sometimes be difficult to click the cor-rect layer.
Lowest Element Changes to the fundamental area, i.e. the lowest element of the view.
Sub-Element Changes to the first subordinated element of the selection, i.e. the first sub-element of the selection; for example from a register tab on layer 8 to the area where the register tab is located, on layer 7.
Previous Element Goes back one element on the layer.
Next Element Changes to the next element on the layer.
First Higher Element Changes to the first element of a higher level, for example from an area on layer 7 where a register tab is located, to the register tab on layer 8.
»View« Menu
Properties Opens the properties dialog for the currently selected ele-ment.
Toolbar Activates or deactivates the display of the toolbar.
Status Line Activates or deactivates the display of the status line.
Component Storage Activates or deactivates the display of the component pool (the toolbox bar at the left margin).
Variable Size Activates or deactivates a variable size of the Views window. If a variable size is defined, the size of the individual com-ponents is adjusted to the window size. By this, the defini-tion of fixed element and area sizes is ceased for the ad-vantage of a variable window size.
Size As in cobra The view window is adjusted to the actual database view. This allows directly comparing with the cobra windows. (The function is only available if the View Editor was started from cobra; it is not available if the View Editor is started from the hard disk.)
Size: 800 x 600 etc. The view with an 800x600 resolution is simulated.

cobra CRM
265
User-defined Define an individual size in pixels for the display in the view.
Palette Select between different predefined table layouts. If you want to ensure that all users have to work with the palette you defined here, use the command »Edit: View Properties« and then select the option »Freeze current palette«.
»Selection« Menu
With the items of this menu you define how objects selected in the View Editor will be highlighted.
Thin Frame:
Broken Line Frame:
Slashed Rectangle:
»?« Menu
This menu allows accessing the View Editor online help and offers information on the program version, release, and build.
The Toolbar
File: New Table Wizard
File: Open Entry Field Wizard
File: Save Register Tab Wizard
Cut Divide Area Wizard
Copy Info
Paste Cancel Selection
Properties On/Off The icons are only activated if the corresponding command can be used. Otherwise the icons are blocked and displayed in grey color.

cobra CRM
266
The Component Storage
Several individual components and pre-assembled component parts from this bar located on the left, can be moved to the areas per drag and drop.
Drag and drop technique means:
Click one of the components,
drag it to the target position on the desktop where you want to insert it while keeping the mouse button pressed,
make sure that the inserting position, indicated by a grey stroke, is really the desired position,
and then release the mouse button.
Now you can start editing the element in the »Properties« dialog.
»Components« Tab
This tab offers some view elements of great importance.
Address Tab
The address tab component consists of a combination of several indi-vidual components. Two tabs are created as default: one tab for the ad-dress table and another tab for the entry fields that contain address de-tails. In the lower part of both tabs, a comment field, the contacts, links and keywords are shown. It is the standard cobra view provided by the program which can by this be inserted in one step and then further ed-ited.

cobra CRM
267
Address Mask
The address mask contains entry fields which can be further edited later on. The mask corresponds to the »Details« tab of the »Address Register« component.
In general, it is purposeful to insert one or several tabs in the view prior to adding this component to a tab.
Register Tabs
Empty register tabs can be inserted individually. The program will offer two tabs. Supported by the wizard, additional tabs can be added, delet-ed, renamed or further edited.
Dividing Bar / Area Divider
An area divider always consists of two areas and the actual dividing bar.
If the »Can be changed by user« option in the »Area divider« tab has been activated, the user may change the dividing bar po-sition dynamically with the mouse later on and by this change the size of the are-as you defined beforehand.
The position can be defined absolutely in pixel or relative in 1/10 percent.
Besides common settings, one important option for dividing bars is defined in the »Properties: General« tab
»User dependent settings« Define if changes on the dividing bar position done by the user should be saved.

cobra CRM
268
It may happen that a dynamic area divider cannot be easily selected (for ex-ample if you want to delete the divider). We recommend to proceed as fol-lows:
Click one of the areas belonging to the area divider.
Use the command »Navigation: Sub-Element«.
The dividing bar including associated areas is now selected.
Area
Besides general and labelling properties, you can assign a bitmap to an area. This is only purposeful for areas that are not covered by other are-as.
The »Image display« options define how the image will be presented. You can also specify the storage location. You can choose from
1. the view directory (the directory where the currently edited area is saved too),
2. the system directory of your installation, or
3. the original storage location. However, this is not purposeful if you want to copy the view to a different computer.
Grouping
A grouping will have an optical effect for ele-ments placed on this component.

cobra CRM
269
You should add the labelling (in the example »Communication«) for the grouping manually in order to provide a clear overview.
Button
A button has general properties as well as button-specific properties.
Function to be executed Here you find a list of possible functions that can be assigned to the button.
Database table ............. Here you define the sub-table which will be used for a function that switches between data records.
Alignment ....................... Define the alignment of the button labeling.
Labeling .......................... Enter the text that will be displayed on the button.
Minimum width ............ This setting (in pixel) will effect that a button is not hidden when placed on a dynamical area, if the area is reduced.
Document View
This field can be added to any table as often as required. If you want to add the field to the view, use the »Document view« component. It works just like linking a document with a contact.

cobra CRM
270
Image Display
The image display is used for showing Images. Images can be added to addresses as well as to each table.
It is important to define additional settings in the »Extended settings« tab.
Here you specify in which data table the image should are stored (images are stored in a separate images tables). For example, it is possible to show an image of the owner of company X in the address mask, and additionally show device images on a tab that holds service data.

cobra CRM
271
Different layout modes for images are available. The size of the preview images is defined in the system settings.
Message Display (CRM BI & CRM PRO)
When the message display is available in the view, messages sent by the system or other cobra users can be viewed. It is also possible to send messages from here.
The message display is configured in the right area of the dialog. Besides some lay-out properties, you also define if a toolbar is available for the user. If the toolbar is hidden, the functions can be found in the context menu which is called with the right mouse button.

cobra CRM
272
Besides internal messages to other cobra users, e-mails to external recipients can be sent via the messaging system. Prerequisite is the setup of a standard SMTP account.
Rich Text Entry
This component is a text field where users can enter and format text in RTF format. It is also possible to add images.
This object type provides multiple settings possibilities, especially for the design of menus.
Define in which database and field the comments should be stored. The database field must be a »Comment (RTF)« field.
Use the »Configure menu« command to define which menu functions should be of-fered to the user. The button »Customize« opens a dialog with the common settings options.
Entry Masks
You can create individual entry masks and integrate them in the view or show them as individual dialogs. If you want to integrate a mask, drag the icon to a free area, e.g. within a register tab.
You can create different entry masks assigned to one data table each. Several entry masks can be assigned to one data table. These entry masks can offer totally differ-ent allocations of the data fields of the table, as well as other elements. It is thus possible to assemble individual entry masks for different purposes, e.g. to query only specific data.
In the View Editor, entry masks can be found within the »Components«.
As soon as the object is positioned in the view, data selection will be opened.

cobra CRM
273
Table
In this dialog all data tables from the current database are available for selection
Select the table whose data you want to display in the mask.
Reference Table
If several data tables are available, select the reference table in this dialog. The ref-erence table will specify which data are offered in the entry mask.
Should the user go to another entry in the reference table, the entry mask will show different data.

cobra CRM
274
Entry Mask
Entry masks can be customized by adding any number of
database fields
graphic and text elements
In the figure to the left you can see an entry mask in the work area as it is suggested by the system. This mask has been pre-filled will all database fields. You can delete a field or move it to a different position, or design the mask differently by using addi-tional objects.
On the right, you can see the control elements available for this mask. Two register tabs offer functionalities: »Hid-den elements« and »Tree view«.
The first tab provides access to dif-ferent design elements.
The second tab lists all available fields and design elements.
A toolbar will offer different design functions.
Left-click an object in the work area on the left. The object properties will be dis-played on the right of the »Control elements« dialog and you can change some of them. Depending on the object type, different editing functions are available.

cobra CRM
275
In the next figure the »DateCreated« field is renamed to »Booked«.
If you want to add an element to the entry mask you are designing, drag it from the »Hidden elements« or »Tree view« tab to the required position on the work ar-ea.
If you want to remove an element from the entry mask, click it and drag it to the »Hidden elements« tab.
If you want to position several elements in the same line, next to each other,
first insert an empty line at the required position,
add a separator to the empty line
and then add two single elements to the different parts of the empty line. In the figure below an empty space is placed between the two lines »DateCreat-ed« and »DateChanged«, then it is divided and the two elements are added.

cobra CRM
276
A context menu offers further editing functions.
The first option will hide »Control elements«. You can preview the entry mask layout as it will be shown in the program later.
Use »Rename« to change labeling of the element.
»Text position« defines where label is to be posi-tioned on the element.
»Hide text option« will hide the text.
»Hide object« will move the selected element back to the right-hand dialog con-taining the elements.
Click »OK« to complete designing the entry mask. You will be returning to the overview where the new entry mask will be displayed.
The option »Show title« will display the table names.
If you click »OK«, the entry mask will be embedded in the view.
The object properties dialog appears.
In the Extras tab an important setting can be defined: use »First field for« to specify that in case of a specific action, cobra will always go to this entry mask embedded in the view.

cobra CRM
277
Further Settings
Close the View Editor.
Go to cobra.
Use the command »File: View: Edit entry mask«.
Select a »Table« to display the entry masks available for this table.
Use the option »Always show a dialog for this ta-ble« to ensure that the en-try masks are always dis-played as separate dialog, even if embedded in a tab.
Click the required entry mask in the list. If you se-lect the »Set as default« option, the entry mask will in future always be shown for the data from this table.
Relation Field (CRM BI and CRM PRO)
Relation fields link tables with each other.
Overall Components
The following components can be found in several register tabs of the component storage.
Entry Field
An entry field consists of a labeling, a field type and an area for entering data. When an entry field is inserted, a dialog for selecting the database field appears.
Comment Field
If you want to insert a comment field, you first have to add an entry field and then define the properties »Comment« and »Multi-lined« for this field via »Properties: En-try Field«. A comment field is not restricted to 255 characters.

cobra CRM
278
Multiple-Entry Field
A multiple-entry field functions like a single-entry field but with one difference: as default
the combination field »Country-Postcode-Town« will be inserted and
three fields are arranged in a row
You have to change the individual field types and their width via the properties and the »Entry Field« tab. All other properties function in analogy to simple entry fields.
Selection Field / Option Field
A selection field can have two or three of the following values: true, false, without value.
Option field settings:
There is a third condition ... With this option a third value is assigned to the option field. Besides check marked (True) and not check marked (False) the third status for the option field can be (No value):
Icon
Inserts an icon field. The selection list for icons is automatically as-signed. Only the »General«, »Labeling« and »Text Mapping« properties apply. These icons characterize for example addresses and contact types.

cobra CRM
279
Status Line
Inserts a status line. Only the »General« property applies to a status line.
Toolbar
Insert a toolbar. This bar differs depending on the area from which it is se-lected. Only the »General« property applies to a toolbar
Addresses ....................... This toolbar includes the components shown here. %s and %d are variables for a number (the actual number of appointments, documents etc.). The arrow buttons on the right are used for switching between addresses.
Contacts, Additional Data This toolbar allows creating and deleting of contacts or addi-tional data and switching between them.
Documents ..................... Allows creating, adding and deleting of documents and switch-ing between them.

cobra CRM
280
Keywords
Inserts a keyword table. In addition to the »General« and »Labeling« tab, the »List Field« tab is provided.
Selection bar ................. This setting defines an individual color for the currently select-ed line.
Uneven text lines ........ This setting defines a different color for each uneven line number. Thus, they can be distinguished by their optical ap-pearance.
Address Links, Address Display, Appointment Display
These components function the same way as all other view objects described before.
»Address« Tab
Additional components for the presentation of addresses can be found, amongst oth-ers:
Address Tab
The description can be found on page 266.
Table
The table element adds a table to the area. Details can be found on page 267ff.

cobra CRM
281
Address Mask
The description can be found on page 267.
Image Preview
A small image preview can be added to the view. This allows displaying an image which can be enlarged per mouse click.
In the View Editor, the image preview is displayed as welled grey area.
The image preview only includes the common properties »Gen-eral«, »Labeling« and »Text Mapping« – although text mapping has no function in this case.
An image cannot be loaded before the view is assigned to a database.
The dialog box for editing the image will open when you double-click the grey col-ored holding area.
In the dialog that appears, click on »Load Image« to open the Explorer windows where you can select the image file. The image is clearly shown in the grey area.
Sales Project List
A sales project list can be added to the view. As system administrator, you define what should be shown in this list:
All sales projects.
Only sales projects to the current address.
Should you decide for »To current address«, an additional column »In-volvement« is added to the sales projects list.
»Contacts«, »Additional Data« and »Documents« Tabs
There are three more register tabs »Contacts«, »Additional Data« and »Documents« assembled by the same schema as the »Addresses« tab.

cobra CRM
282
»System Modules« / »User Modules« Tabs
User modules are only available for the currently logged on user, but system modules are available for all users. This tab provides the view modules that were created with the »Edit: Save Module« command. You can move the elements to the desktop of your view using drag and drop.
»Additional Modules« Tabs
On the one hand you can integrate additional modules that were purchased and in-stalled separately in your view. A description on this process can be found in the documentation of the external module.
On the other hand the program is already equipped with some additional modules. You can configure these modules in the View Editor.
Additional Module Browser
The additional module Browser offers the possibility to access the Internet or respec-tive files in the Internet directly from cobra. For example, you can forward addresses from cobra to Google Maps and show the addresses on the map in the Internet. Moreover, you can use this control to show data from the system directory or present customer-specific data.
The Browser module can be found under the additional modules as »APBrowser«.
Drag the module to a free view area.
Configure the Browser. To do this, click the »Settings« button. Basically, there are several possibilities for showing objects within a Browser. The setting defines what the user will see in the Browser, respectively what he is allowed to see.
Show address bar ........ An address bar can be shown in the upper area of the Browser. The users can use the bar to call the address you specified, or navigate within the Browser.

cobra CRM
283
If you do not show the address bar, when the Browser is started the URL you predefined in the settings will be loaded automat-ically. If you are embedding the Browser, for example in the same register tab as an address table, the navigation perfor-mance can eventually slow down remarkably. Therefore it is recommended to activate the address bar and the »Go to« but-ton in this case.
The URL is activated after click on "Go to" This option is provided to prevent that the URL is unnecessari-ly often loaded when viewing different addresses. It effects that the user first has to click the »Go to« button to load the predefined URL.
Attaching a Dynamic URL
A dynamic URL consists of different components that you define in this dialog.
Click the option »The Browser control URL is retrieved from a database field«.
Single field..................... You define that the URL should be loaded to the Browser from a specific database field. By this a different URL is called for every address from the database (e.g. the homepage belonging to the address).
You can use the real database name (»Logical name«) or the field name that you defined in the file settings and which is visible for the user (»Userlevel name«). In case the logical name is used, it is mandatory to prefix it with a comma.
If for example the Browser should call an URL that is defined in the »Internet« field, configure the setting as follows:
Format string ................ Here you define a string that integrates data from the database in the URL. If you want to use this option, you need to know how to format an URL.
In this example any address from the cobra database can be called directly in Google Maps and shown in the Internet map.

cobra CRM
284
For the data you enter under »Dynamic part« the Stand-ard RFC 1738 URL encoding is used.
Attaching a Fixed URL
You can also attach a defined fix URL, from the Internet or the Intranet.
Click the option »The URL is fix«.
cobra system directory This option refers to the subdirectory SYSTEM\HTML of the co-bra installation, in case of a single workstation installation as well as for a network installation.
If you do not refer to this directory and you leave the »Name« field blank, all documents from the directory are shown in the Browser. The user can open the documents with a double click directly from the Browser on his PC.
If you enter a file name in the »Name« field, the user can only see the specified file from the directory within the Browser.
Path................................... Enter a path, for example an URL in the Internet or any directo-ry path.
Name ................................ If you want to show a specific file from the directory you de-fined, enter the file name in this field.
Additional Module DMS Search
Different search routines for documents can be stored in the document search. These routines can be narrowed down by using filters.
Drag the module via Drag&Drop to a free area in the view.

cobra CRM
285
More settings
In the view editor there are more layout settings.
In the view editor, issue the »Edit: View Properties« command.
Colors of register tabs
The background color is that of the register tab background. The register background color is that of the background behind the tabs on register cards.
Here you can also choose different colors for activated and not activated tabs.
Dividing bar
At the dividing bars you can zoom the tab parts in or out. You can import an image of 20x4 pixels and thus superimpose a different image instead of the five dots to the dividing bar.
New option for browser elements
There is a new option for browser elements
Open the view in the view editor. Go to the browser element.
Click »Configure«.
Go to the »Enhanced« tab.

cobra CRM
286
Allow showing dialogs When you are working in the Internet, it might be that you will be shown many messages such as script errors etc. If you deac-tivate this function, these messages will no longer be shown. However, if you are using Browser Control to access sites where you need to log on or enter other data, activate this op-tion to be able to view such dialogs.
Labelling register tabs in capitals
In the view editor you can label all register tabs with capital letters. This function will only have visible effects if labeling in the »Labeling« field was not done in capi-tals already.
Open the view for editing. To do so, issue the command »File: View: Edit view«.
In the view, mark a register tab.
Issue the command Ctrl+K. Or right-click the register tab and from the context menu issue the command »Wizard: Register tabs«.
Here, click the option »Show label in uppercase letters«.

cobra CRM
287
Editing Components
Context Menu
Every element provides an context menu. Select an element and click on it with the right mouse button.
Depending on the chosen element, context menu functions are available or blocked.
All commands of the context menu can as well be called via the menu bar.
Editing Properties
You can define the properties of an element by selecting it via double-click. Elements that were added by drag and drop are already selected after the insertion. The status line displays the currently selected element and you should refer to it to make sure you really selected the desired element – for example: .
After inserting entry fields, the »Edit Properties« dialog opens automatically.
If the dialog is not opened automatically,
click the element with the right mouse button and use the »Properties« command from the context menu
or enter F8
or use the command »View: Properties«
or click the icon in the toolbar.
The dialog for editing element properties offers several register tabs. The specific properties of an element can vary for the different elements, or some properties are deactivated / displayed in grey color if the property does not apply to a type of ele-ment.
On the next pages, you will find a detailed description of the entry field. Descriptions of other object properties will be provided only if the difference is obvious.

cobra CRM
288
»General« Properties
In the »General« tab, settings like color, size, font type, etc. are defined.
Element alignment ..... This property does not apply to entry fields and therefore they are blocked here. On an area, the parent elements are arranged underneath or next to each other.
Width / Height .............. Width and height can be adjusted automatically or manually, independently of each other. If they are adjusted »Automatical-ly«, the size changes dynamically and the field will occupy the maximal expansion available on the area. Or width and height will share the available area with further elements that are set to »Automatically«. If you select »Manually«, the values for width and height are fixed.
Pixel: This is the element size in absolute values.
1/10 %: This is a value defining the element size relative to the sub-element (parent) and is specified per thousand.
Colors ............................... If the »User-defined« checkbox has been activated, the color adjusts to the user settings in cobra. The view background can be predefined in the View Editor as well.
To do this, the »User-defined« checkbox must be deactivated and the color schema called via the selection button.

cobra CRM
289
Depending on the color palette the user has chosen in his user setting, another color may be shown.
If you want to use a color which does not depend on the user settings, select the color via the »More colors» button.
Font................................... Like the background color, the font type may be
• user’s choice (checkbox »User-defined« with check mark)
• or predefined in the view (checkbox »User-defined« without check mark and selection of font type via the button)
• or inherited from the subordinated element (Checkbox »In-herited«).
This font type
• can only be applied to the »Selected element«
• or is also applied to the »Parenting / higher elements«.
Info text .......................... The text entered here is displayed in the status line of the loaded database providing user instructions for the entry. If nothing is defined here, the info text from the file settings will be used.
User dependent settings This setting applies to tables (column width), dividing bars (ar-ea dynamically changeable) and multi-lined entry fields (line break on or off). This setting allows the program to remember changes performed by a user so that the view will be the same when the program will be started again as it was when it was closed.

cobra CRM
290
»Labeling« Properties
In this tab, text is assigned to the element.
Text ................................... Without text The element is not labeled.
Automatic The field name from the database is used as labeling.
Manual With this option, you can enter any text in the field below.
Manual labeling only changes the field labeling in the view but not the actual field name!
Color ................................. Color of text and background may be obliged to the user (»Us-er-defined«) or defined for all users in the view definition.
Font................................... Just like the background color the font
• is up to the user (checkbox »User-defined« is activated); or
• is predefined in the view (checkbox »User-defined« is deac-tivated and the font is chosen via the button ); or
• is inherited from the subordinated element (checkbox »in-herited«).
This font type
• can only be applied to the »Selected element«
• or is also applied to the »Parenting / higher elements«.

cobra CRM
291
Width ................................ Automatic In width, the labeling orients on the label field with the great-est width of the subordinated entry field area. All other label-ing is adjusted respectively, except for a fixed width.
Manual If you want to predefine the width, you can specify the value absolutely in pixel or relative in 1/10 percent.
Position ........................... You can choose where the field labeling will be positioned:
On top .. .....
To the left
At the bottom
To the right
Placing ............................. The placing of the field labeling in vertical order is defined the same way.
On top .. .....
Centered ...
At the bottom
Alignment ....................... Left-aligned
Centered
Right-aligned

cobra CRM
292
»Entry Field« Properties
In this tab, the field properties are defined.
Current field number . The current field number for single-entry fields is always 1 and cannot be changed. For multiple-entry fields, the property of the corresponding en-try field within the multiple-entry field is defined by the selec-tion of the current field number.
Database ......................... Here you define the database field that will be assigned to the entry field. Under »Table«, several types of table are available and under »Field« you can select from their fields:
For multiple-entry fields, the table selection applies to all fields.
Wide frame..................... You define if the entry field will have a wide frame which re-sult in a 3D layout.
Multi-lined (only for single-entry fields) Entry fields are single-lined as default. You may define multi-lined single-entry fields such as the comment field. This prop-erty does not apply to multiple-entry fields
Multiple-entry fields / Multiple fields You can change a single-entry field to a multiple-entry field. Some examples for multiple-entry fields will be common to you: the “PO box postcode” or “Country-Postcode-Town” from

cobra CRM
293
the provided standard view are multiple-entry fields. You may combine database fields to multiple fields as you like.
To do this, insert additional entry fields via the »Add« button. The fields will be arranged horizontally in a row but a new field is always added on the left (!).The individual fields within a multiple field can then be accessed via the »Current field number«.
With the »Remove« button you can remove the currently dis-played entry field.
Width ................................ The width of all parts of a multiple-entry field, except for the one on the very right, is defined for every field separately:
The field width on the right margin automatically adjusts to the remaining width of the area that contains the multiple-entry field.
Please note: a multiple-entry field has only one labeling, even if it consists of several fields. For automatic labeling, the field name of the last field to the right will be used. You may of course assemble the labeling from several terms like “Country-Postcode-Town”.

cobra CRM
294
»Text Mapping« Properties
In this tab, you can assign different values for the display of field values whereas the database value is still preserved. This function is called »Text Mapping« and it only applies to text fields in the database. The text mapping property will display specific field contents in a database differently from what is actually stored in the database. For example: if a database field »State shortcut«has the value “Bav”, it is exchanged by “Bavaria” in the display. Text mapping is case-sensitive. If you enter “Bavaria” in the field, the shortcut »Bav« is written to the database. If a value is entered with no corresponding entry in text mapping, this value will be added to the database with-out any changes.
The text mapping function should be used by experienced users only.
The entries in the upper dialog section apply to text fields, the entries in the lower section apply to Yes/No fields. Entries for text fields have no relevance for Yes/No fields and vice versa.
Text Fields
You define the alternate value via the »Add« button. Any number of alternate values can be defined.
The result:

cobra CRM
295
Yes/No Fields
For option fields linked to a database text field, such as »Non-smoker«, text mapping for Yes/No fields will effect that the text “Non-smoker” is written to the database when the option is check marked whereas the text “Smoker” is used if the option is deactivated.
The »No value« setting will only be used by the program if you explicitly defined this specification in the »Option Field« register tab. (see Page 278).
»Extras« Properties
In this tab, function keys are assigned.
Function button ........... Function keys are small icons on the right entry field margin that perform specific actions on mouse-click, such as dialing if assigned to a telephone field, or run a specific application.
Without No function key is assigned to the field.
Field dependent A function key corresponding to the field type is assigned au-tomatically.
Telephone A function key of the telephone type is assigned to the field. When you click the icon, the number displayed in the field is dialed.
E-mail A function key of the e-mail type is assigned to the field. When

cobra CRM
296
you click the icon, the e-mail program is called and an empty mail with the address of this field already inserted in the Mail-to field is created.
Run application A function key linked to an external application is assigned to the field. The path to the application must be specified in the entry field next to the option. For the example below:
the following function button appears next to the entry field.
A click on the function key automatically opens the program NOTEPAD. At the same time the field content is copied to the clipboard.
Browse A function key for the Internet is assigned to the field.
First field for ................. With this option you can specify if a field should be defined as the first field for one of the displayed actions:
For example: if you define that the »Company« field should be the first field for new addresses, the cursor will automatically be placed in this field when you are creating a new address. If the field is not visible because it is located on a different tab, the program automatically switches to this tab.
Creating Views by Plan
It is important to have an exact idea of the view you are going to create. For this purpose, you should plan a scheme and use it for orientation while you are editing your view. It would be a great disadvantage to spend a lot of time working on a view and to find out, shortly before it is finished, that an important element is missing which can hardly be inserted at this state of work.
If this should happen to you: The module function under »Edit: Save Module« can help to recreate the view from the starting point, as you can save elements that were already inserted as composed elements and use them later on.
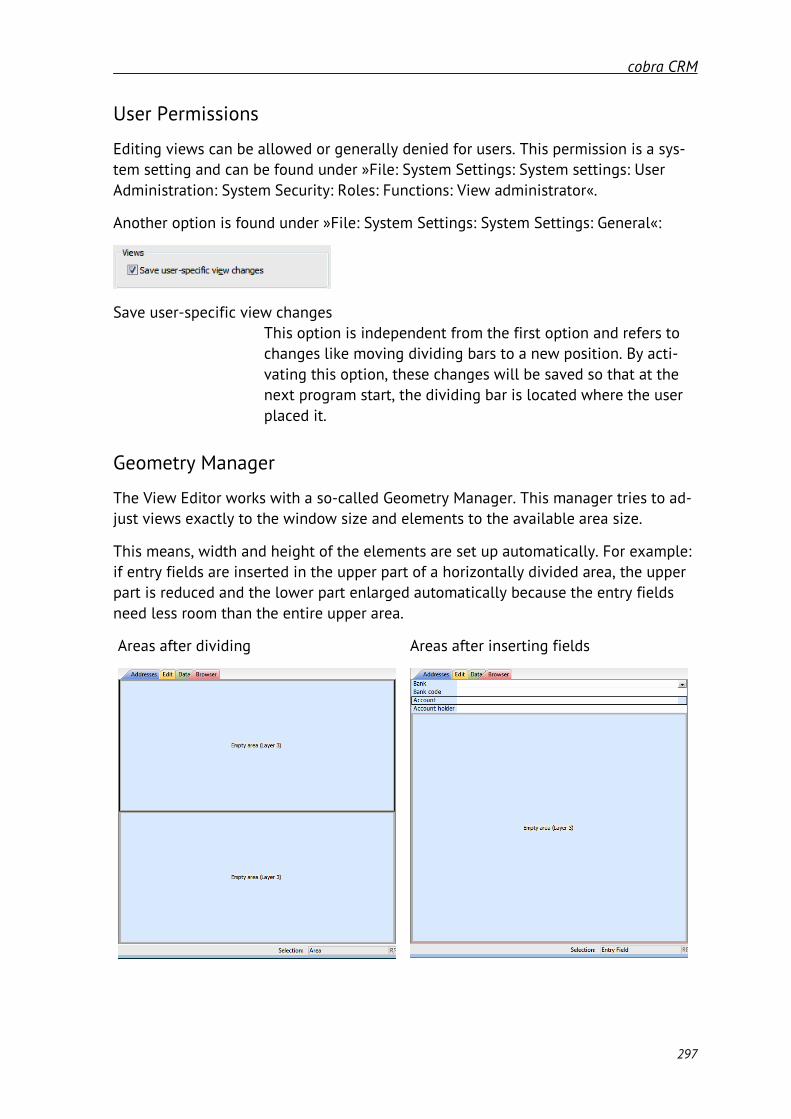
cobra CRM
297
User Permissions
Editing views can be allowed or generally denied for users. This permission is a sys-tem setting and can be found under »File: System Settings: System settings: User Administration: System Security: Roles: Functions: View administrator«.
Another option is found under »File: System Settings: System Settings: General«:
Save user-specific view changes This option is independent from the first option and refers to changes like moving dividing bars to a new position. By acti-vating this option, these changes will be saved so that at the next program start, the dividing bar is located where the user placed it.
Geometry Manager
The View Editor works with a so-called Geometry Manager. This manager tries to ad-just views exactly to the window size and elements to the available area size.
This means, width and height of the elements are set up automatically. For example: if entry fields are inserted in the upper part of a horizontally divided area, the upper part is reduced and the lower part enlarged automatically because the entry fields need less room than the entire upper area.
Areas after dividing Areas after inserting fields

cobra CRM
298
The right screenshot illustrates that, after entry fields have been inserted, the upper area is reduced to the size of the inserted entry fields whereas the lower area occu-pies the remaining space.
If a dynamical dividing bar is inserted during the area tiling, the area size can be changed later on.
Editing Properties of Several Elements in One Work Step
If you inserted several elements, you can edit them one after the other by this tech-nique: Leave the properties window opened and then simply select a different ele-ment with a double-click. The still opened properties window adjusts to the new se-lected element. By this, you can first place all elements on the view area and then assign properties to the elements one after the other in a second work step.
Changing Field Definition
Fields may be freely redefined. Via the properties, you can change an address field »Company« to a contact field »Action«, or a document field »Description«.
This is done by selecting the field and then choosing the »Table« and »Field« in the properties.
Moving Columns
If a table is inserted, you can move the column headline with the mouse to a differ-ent position. Therefore, the table must not be selected. You can then capture the ta-ble headline with the mouse and move it via drag and drop to the new position while keeping the mouse button pressed. Two red arrows indicate positions where insert-ing is possible. Release the mouse button when you reached the target position and the column sequence will be changed.

cobra CRM
299
Selecting Subordinated Areas
Example: three entry fields cover the complete upper area optically.
There are two possibilities for selecting the subordinated area underneath these en-try fields:
1.
a) Double-click one of the entry fields.
b) Press CTRL and double-click again: the element underneath (i.e. the area) is selected.
2.
a) Double-click one of the entry fields.
b) »Navigation: Sub-Element«.

cobra CRM
300
Shortkeys in the View Editor
CTRL + N File: New
CTRL + O File: Open
CTRL + S File: Save
CTRL + Z Undo
CTRL + X Cut
CTRL + C Copy
CTRL + V Paste
DELETE Delete
F7 Cancel Selection
CTRL + F Divide Area Wizard
CTRL + T Table Wizard
CTRL + E Entry Field Wizard
CTRL + K Register Tab Wizard
HOME Lowest Element
CTRL + ↓
CTRL + Double-click on element
Sub-Element
CTRL + ← Previous Element
CTRL + → Next Element
CTRL + ↑ First Higher Element
F8 Properties
F1 Content and Help Index

cobra CRM
301
Data Exchange
Data Exchange Methods
The data exchange helps you to match the addresses of two databases and import existing changes from one database to the other.
You can exchange data by the integrated synchronization module. If you are work-ing exclusively with SQL Server Express and not with SQL Server, data exchange must be performed this way.
If you are working with SQL Server, you may use the SQL Server replication as well.
Synchronization with Outlook is described in the User Manual.
Synchronizing Data
“Synchronizing“ means importing changes for an address that already exists in both databases. “Merging” means the import of entire address data which only exists in one of the two databases. Data synchronization only works in one direction and uses one external and one master database. The external database is only read (i.e. not changed) and the found changes are saved in the master database – depending on the settings you defined.
When you are comparing two databases, several questions will occur:
There may be addresses that only exist in one of the two databases. Should they be copied to the other database?
Should addresses that exist in both databases, simply be overwritten? Or should they be displayed for manual synchronization or inserted as duplicates?
Should only addresses which have just been changed – i.e. within a certain time frame – be matched?
Should two databases be synchronized regularly, for example, weekly, or should this be done just once?
What are the properties for identifying addresses that appear in both databases?
If there were changes performed, which fields for the matched data should be im-ported from one database to the other?
cobra CRM
302
Should comments, keywords, contacts, documents and additional data also be im-ported?
How do you know which addresses have been changed after the synchronization is complete?
The program offers several options:
Identical addresses that contain different information in some fields only, can be synchronized manually, automatically, or be skipped.
Synchronized and/or skipped addresses are recorded in a log file.
Addresses that exist only in one database can be copied.
Copied addresses are recorded in a log file.
All changed addresses can be assigned with a new keyword.
All these settings are saved in so-called formats so that you do not have to define them again for every new synchronizing process. Each format contains a unique name and can be used for synchronization as often as required.
The format does not only store your settings, but also logs the databases that are linked. Address synchronization formats are saved on the system directory in the APREP.XRF file.
Step-by-Step Data Synchronization
The following paragraphs will guide you through all the necessary steps for the first synchronization of two databases. For all following synchronizations, you simply call the saved format and start the actual synchronization immediately.

cobra CRM
303
Defining Settings
Creating a Format
Use the command »Data: Data exchange: Synchronization«.
The main synchronization dialog opens.
Select the area for which you want to view the synchronization formats. Formats already existing in this area will be displayed to be edited. If you create a new format, it will also be added to the selected area.
Click »New«.
If you want to apply the settings from an already existing format, copy the format, save it using a different name, and then edit it.
Database Selection
The area defines which users will be able to access the format later.
In the »Name« field enter a description for the settings.

cobra CRM
304
Specify which databases are to be synchronized.
Click the radio button next to the fields »Master database« and »External data-base« and select the databases from your hard disc. Data is imported from the ex-ternal database and stored in the target database.
We recommend to click »Apply« at every step of this wizard. This will ensure that your settings are saved. You will also be informed about any incorrect settings and can correct them right away.
Defining the Time
Here you can select whether synchronization is to be started, and if so, in which in-tervals and at what time.
Should the synchronization be started automatically, the program needs to log on to the database with your username and password. For this purpose, enter your user name and password here.

cobra CRM
305
Log File
You can activate the creation of a log file to allow tracing any issues arising. Here you can specify path and file name. You can also decide whether the log is to be cre-ated again for every synchronization process, or if it should be updated with current data.
Data Tables
Select which data tables of the target database are to be synchronized.

cobra CRM
306
Enhanced
Specify whether further data should be added to the target database, in addition to the data already selected.
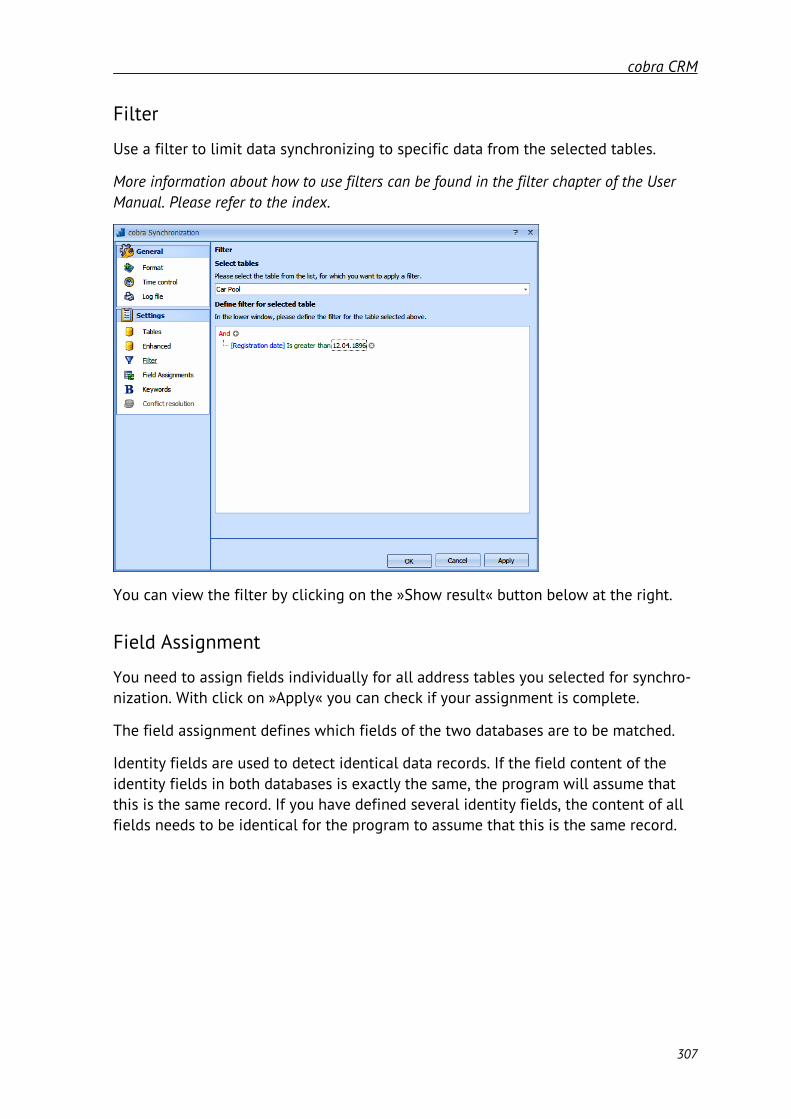
cobra CRM
307
Filter
Use a filter to limit data synchronizing to specific data from the selected tables.
More information about how to use filters can be found in the filter chapter of the User Manual. Please refer to the index.
You can view the filter by clicking on the »Show result« button below at the right.
Field Assignment
You need to assign fields individually for all address tables you selected for synchro-nization. With click on »Apply« you can check if your assignment is complete.
The field assignment defines which fields of the two databases are to be matched.
Identity fields are used to detect identical data records. If the field content of the identity fields in both databases is exactly the same, the program will assume that this is the same record. If you have defined several identity fields, the content of all fields needs to be identical for the program to assume that this is the same record.

cobra CRM
308
Table ................................ Specify the data table to which the assignment refers. The as-signment shown in the lower part of the dialog will only be valid for the selected table. You need to define the assignment for each table separately.
Propose ........................... If you click here, cobra will try to suggest a reasonable field as-signment.
Target fields .................. Target fields refer to the target database.
Source fields ................. Source fields are the fields of the source database. If you want to assign a different source field to the target field, click the source field. A selection containing all available fields from the source database table will be opened. You can now select the source field best matching the target field.
Field lengths ................. Here you can see the field lengths specified in the field defini-tion. This will indicate whether the data from the source file will fit to the fields of the target file.

cobra CRM
309
Keywords
Keyword allocation .... You can allocate keywords to the changed as well as new ad-dresses in the database. Via the keywords the addresses can be queried later on.
Import keywords .......... Here you can define whether keywords are to be imported from the source database to the target database.
Import single keywords If you select this option, you can specify whether a keyword is to be imported or not.

cobra CRM
310
Conflict Resolution
In the conflict resolution dialog you can define for each of the selected database ta-bles individually what should happen if field content in the databases conflicts.
No selection .................. If you do not select anything, the data of the target database will be used.
Activate conflict resolution This option will allow you to specify in detail how the program is to handle conflicting field content.
Define conflict resolution Specify the solution for each single table.
Always overwrite with external content In case of conflicting field content, field content of the source field will always be imported to the target field.
Overwrite with external content, if newer In case of conflicting field content, field content of the source field will be imported to the target field only if it was created more recently than the target field content.
Only fill empty fields In this case, the content of the source field is only imported to the target field if the target field is empty.
Comment fields ............ These fields are available in many different data tables. If you click the »Add content…« option, the already existing com-

cobra CRM
311
ments in the target file will remain unchanged. The comment texts of the target fields will be added to the already existing text in the comment fields.
If you do not select this option, comment fields are handled in accordance with the settings you specified in the list for the table.
Confirm the format settings and return to the main dialog.
Synchronizing
Use the command »Data: Data Exchange: Synchronization«.
Select the area and the format for synchronizing.
You can either:
Import the tables selected in the synchronization format. This will ignore filters and conflict resolution, but simply perform the import. This may lead to duplicates in the database. With this option information from the source database is merged with the target database.
Or synchronize using the rules you have defined in the format.
Click the command »Start import« or »Start synchronization« to start processing.
If the process is aborted, any address changes already completed cannot be un-done.
After synchronization has been completed, you can view the log file.
Should you have assigned keywords, you can now query the changed addresses.
Outlook Synchronization (New)
The Outlook synchronization is described in the User Manual.
Synchronization for Mobile Users

cobra CRM
312
Keywords
Rights
A new right has been created on database level to manage keywords. on database level It will be effective as soon as database authorizations have been activated and permissions have been restricted to the range of functions.
Issue the command »File: Database: Database security«.
Using database authorizations, you can also ensure that specific user (groups) will only see specific keywords at all.
Issue the command »File: Database: Database security«.
Restrict permissions for tables.

cobra CRM
313
Now create a special role. You will later assign it to all users who are to be able to see a specific keyword container.
Restrict table authorizations for this role.
Go to the »Tables« tab. There define a filter permitting access to one or more of the relevant keyword containers.
Assign the right »Read«.
In addition, you can define a role for keyword managers and also assign them the right to create and erase keywords.
You might also want to create an additional database role »General« or the like, containing keywords that are to be accessible to all users. You can then assign this role to all users.

cobra CRM
314
Users will then see only such keywords they have been assigned access rights here.
Some general explanations about important elements of the keyword system.
Container
Issue the command »File: Database: Configure keywords«.
Keywords are stored in so-called containers. Containers are only repositories intend-ed to keeping keywords organized, they are not used as keywords themselves.

cobra CRM
315
Hierarchy
Keywords can be arranged in up to ten levels of hierarchy. They will the take this form:
Sets of Keywords
Several keywords are pooled in a keyword set. So if you want to assign new custom-ers some keywords, you do not need to assign these keywords individually, but can summarize them in a set »New customer«. In a keyword set there can only be key-words coming from the same container.
You edit keyword sets from a keyword list. Right click an select »keyword pool«.
In a keyword list you can select »Apply« from the context menu.
Select the tab »Keyword sets« and issue the command »Assign set«.

cobra CRM
316
The keywords will then appear as individual keywords in the address data record.
Configuring
There is a new command in the database settings to expand the keyword pool. Here you can centrally create keywords for the database you have opened.
Issue the command »File: Database: Configuring keywords«.
Creating Containers
When you open a new database, at the beginning it will contain only a container »System«, but now keywords or hierarchies.
Issue the command »File: Database: Configuring keywords«.

cobra CRM
317
You can add keywords to the existing container »System« and also create containers of your own. By assigning access rights to specific containers you can assign users or user groups precisely those keywords intended for them. After all, keywords are as-signed separately for each database.
You can neither rename nor erase the container »Sys-tem«.
Creating the First Keywords
As a rule, keywords are stored in containers.
Mark that container in which the new keyword is to be stored.
Click the »New keywords« button.
Should there be any previous modifications to the keyword system that have not been saved, you will be asked whether you want to save them now.
Enter the keyword and confirm with »OK«.
A keyword »Customer« is created in the »System« container. This keyword might con-tain further sub-keywords, i.e. become the starting point of a hierarchy.
To create sub-keywords, mark the keyword.
Click the »New keywords« button.
Enter the new keyword and confirm by clicking »OK«.

cobra CRM
318
You have now created the first sub-keyword. Together with other keywords a hierar-chy will form which in turn can be the starting point for other subordinate hierar-chies.
Deleting Keywords
There are several types of keywords:
1. Those standing alone, 2. those standing on the lowest level of a hierarchy, and 3. those having subordinate keywords of their own.
1. Keywords Standing Alone:
Click the keyword required.
Click the »Delete« button.

cobra CRM
319
You will be asked whether you really want to delete this keyword.
2. Keywords on the Lowest Level of a Hierarchy:
Mark the keyword required.
Click the »Delete« button.
You will be asked whether you really want to delete this keyword.
Confirm by clicking »Yes«.
3. Keywords with Sub-Keywords
You can either delete a keyword complete with its sub-keywords or assign the subor-dinated keywords to another keyword. This can only be done within the current con-tainer, it is not possible to move keywords among several containers.
Mark the keyword required.
Click the »Delete« button.

cobra CRM
320
This is what will happen in the example shown:
- The keyword »Campaign« will be deleted in the »Marketing« container.
- Any keywords subordinated to the »Campaign« keyword (as well as their hierar-chies, if any) will be taken over within the container to another selected keyword.
After Deleting Keywords
After deleting a keyword you can click the »Apply« button.
Otherwise you will be asked, before the next action, whether you want to save the changes.
And if you leave the dialog by clicking »OK«, you will also be asked whether you want to save the changes.

cobra CRM
321
Deleting a Container
Containers can only be deleted if they do not contain any more keywords. So, if re-quired, delete all keywords from a container before you attempt to delete that con-tainer. Otherwise there will be an error message.

cobra CRM
322
Synchronization for mobile users
The mobile user function will only work if the modification log is turned off. So before you configure mobile users make sure that no modification log will be recorded.
The system administrator can configure users as so-called »Mobile users« in the user administration. He thus enables them to use databases offline with a notebook and synchronize it regularly with the master database. Mobile users will permanently use a license even if they are not online.
Note on synchronizing databases
The »Mobile user« function will use the Microsoft SQL synchronization (replication).
Background
When synchronization is set up, the cobra databases selected will be published in the SQL Server (see the Microsoft documentation on the SQL Server). Both snapshot and merge publications will be created.
When synchronization is done for the first time, a push subscription is configured for every mobile user.
Configuring replications is only possible on an SQL Server, but not on an SQL Server Express! For using notebooks the SQL Express Version is sufficient. Make sure that the SQL Server involved are using the same version.
Prerequisites
The replication function (»Mobile user«) is not a cobra, but a basic function of the MS SQL Server.
This is why configuring and administrating mobile users necessitate excellent know how of MS SQL, SQL Management Studio and the SQL Diagnostic Tools.
The service »SQL Server Agent« required for replication does not come with the freeware SQL Express Version. This is why it is mandatory that an MS SQL Server (Full version) exists on the server side.

cobra CRM
323
When you install the SQL Server please make sure that the replication compo-nents required are installed also and that the services and log files required are active after installation.
If required, use the SYNCHRONIZE.EXE software to speed up an existing synchro-nization, if, e.g.e only a dial-up connection with little band width is available. You will find it in the local cobra client installation folder (e.g. ..\CRMPLUS\program\).
This software will synchronize the database directly at SQL Server level. Tem-plates, views etc. will not be considered.
The »mobile user« function is only possible with the CRM versions.
The SQL Agent service on the server must have been started, otherwise it is not possible to set up or execute synchronization. You can start the SQL Agent e.g. via the SQL Server configuration manager.
It is mandatory that this SQL Agent can access the SQL Server Express or the SQL Server of the mobile users.
If required, specify a domain account with the required rights as service account of the SQL Agent service.
Structural adjustment of the database in replication
Before setting up the synchronization the structure of the database should have been configured (Sub-tables, Fields, …). If, however, changes must be done, they must be done at the master database. A new Snapshot must then be created and distributed by the SQL Server Management Studio.
Up to the 2018 version it is required to resolve the replication before supple-menting the database.

cobra CRM
324
It is recommended to create several reserve fields beforehand that, if required, can quickly be renamed and used. This can be synchronized directly. Please note that SQL Synchronization will allow a maximum of about 200 fields per table.
Setting up Mobile Users
Only set up your mobile users if the database structure has been defined (see above).
Users to be synchronized must have been labeled in the cobra user administration as mobile users. als You can find this option at »File: System settings: System set-tings: User administration«.
Prerequisite for installing the synchronization is an existing Client installation on the respective notebook. A single-user installation will not work.
All SQL services must have been started on the server.
On his notebook the mobile user must have write- authorization for all those fold-ers that will be used for synchronizing.
Firewalls etc. must have been configured so that the network can be accessed both ways. See also cobra Knowledge Base (WDB-ID: 1096): http://www.cobrasystem.de/faq/index.php?action=artikel&cat=31&id=97&artlang=de&highlight=1096
The notebooks to be configured must be in the LAN and be accessible. It is not recommended to set up a WLAN connection.

cobra CRM
325
Configuration
System administrator rights are required to configure synchronization.
In cobra: »File: System settings: Set up mobile user«.
System files
In the upper part you as the system administrator specify which data are to be syn-chronized and how.
If data are available as copy for the mobile user, these data will be transmitted from the server installation to the notebook. Any files of the same name will be overwrit-ten.
If data are Synchronized with the mobile user, they will be synchronized between the mobile device and the server; data may be exchanged in both directions. This means that also data on the server might be changed.
System formats have one direction only: they are transmitted to the user's com-puter. System formats are all formats available in the main system; they might al-so be group- or user formats.
Selection lists and contact types can be transferred to the mobile user's computer or be synchronized with it.
Appointments and tasks can be transferred to the mobile user's computer or be synchronized with it.
The user's database can be transferred to the mobile user's computer or be syn-chronized with it.

cobra CRM
326
SQL Server
Click this button to configure the settings for the mobile user. You will see all mobile users. This is where you enter the settings for the local SQL Servers on their note-books.
Click a mobile user.
Select the button »Change«.
Enter here the instance of the SQL Server of the user's notebook.
To enable accessing the SQL Server on the notebook a logon type to this SQL in-stance must be entered.
This parameter is essential for the synchronization feature. Make sure that the SQL (Primary-)Server can indeed access the notebook instance via this logon type. cobra will not verify this.
Any subsequent changes of this parameter will have no effect. If required, this user would have to be set up again.

cobra CRM
327
Databases
Specify which server databases are to be synchronized. Click »Add«.
Enter the path as UNC-Pfad (e.g. \\Server1\cobra\data\... ).
You can specify access permissions for this database via »Properties«.
You can permit all mobile users access to synchronization of this database, but then the following parameters will not be available.
At the right, mobile users and groups available are listed.
Double-click users or groups to be synchronized in this list at the right. They are then taken over into the list of users authorized for synchronization at the left.
If you select a group, all mobile users of this group are assigned the right to synchro-nize.
Using the button »System administration«, you access the user administration direct to define users as mobile users there.

cobra CRM
328
Further settings
Specify where the cobra system directory is to be stored on the mobile device.
Application data: Installed in the individual Windows user folders.
Installation directory: Will store the system directory in the Windows Programs(x86) folder.
Please note that it is mandatory that the mobile user (Windows user) be write-enabled in this area. Depending on the settings, the Windows User Account Control (UAC) might also affect accessing negatively.
The first step of the server configuration is now completed. Now we will configure mobile use.
Depending on the amount and size of the databases selected initialization might take some time.
Snapshot folder
When you are configuring for the first time you will be prompted to enter a shared network folder.
The following services must be able to share this folder:
the SQL agent of the server
the SQL server of the mobile user

cobra CRM
329
Enter a folder that all SQL servers involved can access. It is mandatory that you use a UNC path (e.g. \\Server1\Repl ).
If you later enter new databases or users in the synchronization, this dialog will not appear again.
After initializing and then synchronizing the data for the first time, the notebook is ready for use and can be used offline.
While synchronization is set up, the database snapshots (»Snapshots«) of the cobra database are stored in this folder. They serve to create the offline-databases when the notebooks are synchronized for the first time. After the first synchronization, in future only the incremental data will be synchronized.
Tips
Basics
The replication function (»Mobile user«) is not a cobra feature, but a basic function of the MS SQL Server.
This is why configuring and administrating mobile users necessitate excellent know how of MS SQL, SQL Management Studio and the SQL Diagnostic Tools.
The service »SQL Server Agent« required for replication does not come with the freeware SQL Express Version. This is why it is mandatory that an MS SQL Server (Full version) exists on the server side.
When you install the SQL Server please make sure that the replication compo-nents required are installed also and that the services and log files required are active after installation.
If required, use the SYNCHRONIZE.EXE software to speed up an existing synchro-nization, if, e.g.e only a dial-up connection with little band width is available. You will find it in the local cobra client installation folder (e.g. ..\CRMPLUS\program\).
• This software will synchronize the database directly at SQL Server level. Tem-plates, views etc. will not be considered.
The »mobile user« function is only possible with the CRM versions.
Modifying the mobile user settings
If the user has synchronized once, any modifications of the SQL Server settings of the user will have no effect. This is especially important if the user has e.g. a new laptop or some other basic feature of his installation has changed.

cobra CRM
330
To be able to set up a new synchronization for him, you must manually delete a file.
Use the Windows Explorer on the server to go to user folder of this user, e.g. \\Server\cobra\User\xxx.
There delete the file USERSYNCSTATE.CONFIG.
You can now set up synchronization again for this user.
Configuration of the mobile users is stored in a file. can find this file in the SYSTEM-Directory of the main cobra installation. It is named PACKANDGO.CONFIG.
After the first synchronization a file USERSYNCHSTATE.CONFIG is created on the serv-er in the user's directory. Delete this file manually if you want to transfer all data again during synchronization. Usually, during synchronization, only those data will be transferred that have changed.
Enforcing offline mode
For work environments where full offline mode is not guaranteed, offline mode can be enforced in the current cobra version.
You will find this option in the user settings of the mobile user after you have suc-cessfully synchronized for the first time:
When the client is started again the next time, the following option is presented:

cobra CRM
331
Removing a database from the replication
There are two ways to remove a database from the replication again (»to normalize it«):
1. Save the database with a different name at »Save as…«. The database will also be normalized during this process.
2. Use the wizard provided by cobra. It can be found in the program directory of the client. For example: C:\Program Files (x86)\cobra\CRMPLUS\Program\ReplicationRemover.exe
Setting up replication of a mobile user again
Should a notebook have continuous synchronizing problems it might be advisable to re-set up replication of the problematic notebook and synchronize it again.
If required, back up the offline SQL databases of the notebook.
Remove the local cobra offline system area of the notebook. Saving location de-pends on the settings (e.g. C:\Program Data\...)
Remove the local offline cobra databases in the cobra SQL Express instance.
Remove the »Usersyncstate.config« in the user directory (of the mobile user) of the cobra main system area ( \User\<User ID>).
Remove the »local publications« from the notebook in the »Replication« area of the SQL Server.
Start cobra again at the notebook.
Then synchronize again (tick all).
Das verknüpfte Bild kann nicht angezeigt werden. Möglicherweise wurde die Datei verschoben, umbenannt oder gelöscht. Stellen Sie sicher, dass die Verknüpfung auf die korrekte Datei und den korrekten Speicherort zeigt.

cobra CRM
332
Diagnostic tools
The tools included in the MS SQL Management Studio will help the expert with syn-chronization problems:
1. SQL replication monitor:
Use an internet search to obtain more information regarding the error messages shown.
2. Agent service log file:

cobra CRM
333
Please note that as a rule the actual tip about the error is given in the work step be-fore.
Use an internet search to obtain more information regarding the error messages shown.
Please also check the cobra log file for suggestions: See also cobra knowledge base (WDB-ID: 1314): http://www.cobrasystem.de/faq/
If required, after consultation our cobra team of expert can support you with remote maintenance, subject to a charge. http://www.cobra.de/service/support/fernwartung.html

cobra CRM
334
Mobile User II
In their user settings mobile users can specify whether they want to work online or offline.
If a mobile user is connected to the company's network and starts cobra, he will usu-ally be working automatically in the company network with the cobra database.
If this option is activated, the mobile user will be prompted to decide whether he wants to work online or offline when he starts cobra. He can decide whether he wants to work online with the database on the company's server or offline with the cobra database on his mobile device.

cobra CRM
335
SMTP Accounts for E-mail Transmission
The Serial Mail Wizard will enable you to send e-mails via your e-mail program, or via SMTP accounts. An existing e-mail program is automatically detected and offered whereas SMTP accounts need to be created first (usually by the system administra-tor).
If you want to set up a new SMTP account for sending e-mails, call the command »File: System settings: SMTP settings«.
Or set up the SMTP account in the last step of the Serial Mail Wizard.
For the messaging system, a standard SMTP account needs to be set up should you want to send messages not only internally via the cobra messaging system in CRM BI & CRM PRO, but also as external e-mails. An SMTP account can only be defined as standard account by adding it to the »System« area.
Click the »New« button and enter a name for the account.
In the dialog box, specify settings for the SMTP account, similar to the account en-tries for your e-mail program. You can specify several accounts for different pur-poses, for example for internal and external mailings.
If you want to encrypt the e-mails for secure transmission via the Internet, activate the SSL encryption protocol.
The server port settings depend on your e-mail provider. Please refer to your pro-vider; you might find the data at your provider’s homepage.

cobra CRM
336
After the account settings have been entered, click »Test connection«. The pro-gram will send an e-mail to a recipient address you can enter here.
Some e-mail providers will limit the number of e-mails to be sent successively in order to prevent spam mailing. Use the settings »Group size« und »Time interval« to force the wizard to pause while transmitting e-mails.
Should you not be able to send e-mails even though all settings are correct, a specific firewall tool might be the reason why e-mails cannot be sent directly. In this case, please change the settings of your firewall, or send the e-mails via your e-mail program.

cobra CRM
337
Creating Sales Projects
Settings
The configuration of the Sales Module is possible for system and group administra-tors.
The settings are valid per database.
The Sales Module configurations that can be defined are general pre-settings and da-ta lists. Amongst other things, you can define which information should be available for the user in the selection lists.
Select the command »File: Set up sales projects«.
Via this dialog you can set up your sales projects and the associated data entry screen.
On the left side you will find different categories (configuration, sales process, etc.). If you click one of these categories, the corresponding settings options will be shown in the upper part of the dialog (settings, mask editor, etc.).
In the right part of the dialog, the actual settings can be defined. Here you can call the associated editing function by clicking on the »Settings« button.

cobra CRM
338
General Settings
Address display ............ The Sales Project dialog displays associated addresses by the content of two address fields. Here you can define the content of these fields.
Currency .......................... Defines the standard currency used for the sales calculation. In the Sales Module, you can work with one currency per data-base. If you change the currency later on, the currency is changed retrospectively for all sales projects that already exist! Therefore you should be very careful with this setting.
Prognosis ........................ Here you can define which prognoses will be added to the forecast. Using the option »Do not change«, the settings from the previous step will remain unchanged.
Additional Fields
You can create custom fields for sales projects and then integrate them in dialogs us-ing the entry mask editor.
Issue the command »File: Set up sales projects: Additional fields«.
You will enter the database structure. Here you can find tables for sales projects and items of sales projects. You can also create customized new fields.

cobra CRM
339
You can choose whether you want to create custom-ized fields for a) sales projects or b) to enter items. Both options are essentially the same.
Select the data table required.
You cannot change the »Positions Pool« table directly (see below).
Below the list of fields, click the »New« button.
Create the field.
Use the entry mask editor to then inte-grate newly created fields into the dia-logs required, otherwise they would not be available for the users.
The items are divided into the two data tables »Sales projects items« und »Sales pro-jects items stocks«.
Enter new fields for items in the »Sales projects positions« table. These fields will be taken over automatically into the »Sales projects positions' stock« table. This will en-sure that the stock of items as well as the entering items function for a sales projects will always have the same amount of fields.

cobra CRM
340
Mask Editor
You can design individual entry masks for the data tables with sales projects main-tained in the database structure. To do so, all fields of that data table will be availa-ble.
You can also issue the command »File: View: Edit entry mask«.
At the top, select the table required.
Select the dialog and click »Edit«.
Or select »New« for a new dialog.
In the Mask Editor you edit the mask for capturing sales projects. You can move, de-lete and add individual elements. For this purpose two dialogs are available. The functions of this Editor and the options for combination are versatile to such an ex-tent that this manual will only point out some common examples.

cobra CRM
341
Editing Dialogs
The »Customization« dialog:
In the »Hidden objects« tab all available objects that can be added to the dialog are shown. As well as the addi-tional fields you have created, elements related to the optical layout of the mask are also available.
The »Tree view« tab contains a logically structured over-view of the setup of the »Edit layout« dialog. A context menu offers further options for editing.
The functions of the context menu for this dialog are identical to the context menu command of the »Edit layout« dialog (see next paragraph).
The »Edit layout« dialog to the right is the dialog for capturing sales projects, but the view is slightly different from the common editing view. Here you will see the indi-vidual elements that this window consists of.
You can right-click an individual element and edit it via the context menu.
You can drag entry fields with the mouse and move them back to the »Customiza-tion« window. By doing this, you remove them from the dialog, but they will re-main in the storage and can be added again at any time.
Editing Options
Changes on the layout of the Sales Projects dialog are not automatically stored. Therefore, please make sure to save any changes prior to exiting the dialog.
For both dialogs, the editing options available via the context menu are identical. The context menu can be accessed via the right mouse button.

cobra CRM
342
Overview of the context menu functions:
Hidden customization window
or
The »Hidden customization window« command hides the »Customization« dialog on the left side. You will see the entry mask for the sales project in a test view, where for instance it is possible to open the selection lists for testing purposes.
Customizing layout The »Customizing layout« command shows the dialog with the hidden objects and the tree view and activates the editing mode.
Reset layout You go back to the most recently saved status of the dialog.
Rename Click a field and then use the command »Rename« which can be accessed via the right mouse button.
Now you can change the field caption. In this figure it is
»&Name:«, where the & character indicates the keyboard shortcut.
Confirm your settings by using the Enter key.
Hide text / Show text You can hide or show the caption of a field using this com-mand.
Text position Using this command, you can define the position of a caption – relative to the field where it is located.
Hide object The field is hidden. It is therefore no longer visible in this dia-log, but will remain in the storage of available fields.
A hidden field is added to the »Hidden objects«, from where it can be integrated in the dialog layout at any time.
Grouping or Release grouping
If you are grouping objects, you can move them together as one block and, for example, place them on an individual reg-ister tab.
Click several objects one after the other while keeping the Ctrl key pressed.
Use the command »Grouping.

cobra CRM
343
Objects are combined as a group and an individual group name is assigned. They will also appear as separate object in the »Customizing« dialog.
Create tab group To use this command, right-click the group name, which can be found at the top of the group.
In this way you can create a new block of register tabs with a first tab on which the object group is automatically placed.
Adding tab To use this command, right-click into a tab group.
A new tab is added where you can place additional elements or groups.
If you want to rename the tab, click this tab and use the re-naming context menu command.
Create empty area Using this command you can create an empty area where you can place objects.
You can change the area size by dragging on its margins.
Size limitation This command will ensure that the field is not enlarged or re-duced when the user changes the size of the dialog.
Save You can save the current status.
Cancel You can undo all changes and exit the editing mode.
Reset With this command you can reset the dialog for capturing sales projects to the last stored status. All changes that have not been saved will be lost.

cobra CRM
344
These two buttons in the »Customization« dialog allow you to undo or restore the last action.
You can now close the »Editing layout« dialog. Should you later create or edit a sales project, the dialog will be shown in the new format.
Predefined Masks for Individual Additional Fields
cobra provides predefined entry masks where users can capture data only in a certain format. You can select these masks from the different selection lists. If you define a name for the masks and save them, the masks can be integrated in your Sales Pro-jects mask using the Mask Editor.
If these predefined masks do not meet your requirements, you can define you own masks. In this case, please refer to your cobra partner or the cobra project team to find the most suitable individual solution.
Positions
Here you create and change positions. When creating or editing positions there are some additional functions in the context menu.
Via a context menu you can access additional options in this dialog such as selecting columns or filtering.
Right-click a column header and select the function required from the context menu.

cobra CRM
345
Causes
When closing sales projects, the reasons for winning or losing a project can be en-tered. Those reasons have been specified in selection lists. You can specify for every single list entry in which cases it should be available.
Issue the command »File: Set up sales projects: Causes«.
Click on the »Causes« tab to create selection lists.
Always ............................. This reason may be used for losing as well as winning.
Won, Lost ...................... This reason is available only if a project is won or lost.
No longer ........................ Use this option to deactivate a reason so that it is not offered any longer. Since reasons given previously in a sales project may not be deleted, this option serves to have such reasons disappear from the selection lists.
Relation fields for sales projects (CRM BI, CRM PRO)
You can have sales projects shown directly in a view tab together with addresses etc. and there link addresses to sales projects.
The database structure has been extended for this function: The sales project table is now shown there and relation fields can now also be mapped to the sales project ta-ble. Such a relation field links the sales project table and the address table.
1st Step – Setting up the database structure
First of all, link the address table to the sales project table in the database structure.
Issue the command »File: Database: Database structure«.

cobra CRM
346
Create a new table.
In this new table enter two relation fields linking the address and/or sales project table.
2nd Step – Editing the entry mask
In the next step you integrate the free table into an entry mask.
Issue the command »File: View: Edit entry mask«.
Drag a table to the entry mask and edit this table.

cobra CRM
347
The settings you specify in the configuration of the table are especially important. If you click this field a button pops up to open the configuration dialog.
3rd Step – Configuring the table
In the configuration dialog select the free table you have just created.
Use the »Relation (options)« tab to specify which functions are to be permitted.
In the »Column selection« tab specify which columns are to be shown in the table.
After you have saved your entries, the table will appear in your entry mask and the view also, if applicable.

cobra CRM
348
Enhanced features for Sales projects
»Virtual fields«
To edit virtual fields, go to the database structure.
There, click the »Virtual fields« button.
Sales projects may also contain virtual fields such as calculated fields. Using the view- and/or the entry mask editor, you can integrate these fields into sales projects, -reports etc..
Formatting fields
Fields in the data tables for sales projects and for details of sales projects can be formatted just as fields in other data tables.

cobra CRM
349
Telephony Set-up
As a system administrator you can define common telephony settings for all cobra users. This is reasonable if identical telephones and drivers are used almost every-where in the company. However, you still have the possibility to define an individual configuration for each single computer.
Use the command »File: System settings: Telephone settings«.
Driver settings
TAPI provider ................ All telephony drivers available on this computer are listed for selection.
Telephone settings
Accuracy call number detection If a call is received, cobra tries to find the caller in the address database, unless the call number is suppressed. The telephone setting for call precision define how exactly the number of the incoming call must match the phone numbers stored in the da-tabase in order for them to be detected. The higher the value

cobra CRM
350
(number) is that you define here, the lower the number of matches will be; i.e. the more phone numbers of possible call-ers will normally be found.
Number of calls in absence cobra logs all calls that you cannot accept. Via this setting you define how many calls should be logged. If the defined number is exceeded, the oldest call is deleted and the latest call is added to the list.
Number of redialing ... If you are trying to do a phone call but nobody is answering the phone, this call is logged in the redialing list and you can repeat the call at any time. The setting you can define here specifies how many of such calls are added to the redialing list.
Numbers of calls list .. Enter the number of calls that shall be listed in your calls list.
Prefix ................................ Prefix specification used to connect private branch exchange (PBX) to the public telephone network. For example, if you have to dial a 0 to make external calls, enter 0 in this field. If no prefix is used, leave this field blank.
Address display format
You can define how cobra should display the addresses that have been found for in-coming calls. If you click the selection button to the right, a dialog will be opened.
In this dialog the address fields from the database are shown in the selection list to the right. Via the button you can add the desired fields to the address format.
Reorganizing the Telephone index
To speed up the telephony, cobra manages all telephone numbers in a separate in-dex. It is recommended that you reorganize this index from time to time, especially if you are working with larger databases or you are frequently changing the data.

cobra CRM
351
Info
The information is intended for your system administrator.
Info .................................... Lists the driver information.
Log file ............................ All system activities are logged which allows for analysis of er-rors.

cobra CRM
352
Technical Information
The program administrates it’s databases, data and system files autonomously. As a user, you will usually not need knowledge of the files used by the program except the name of your address database.
This chapter provides additional information for the interested expert and the system administrator for exploring the operation mode and data flow of the program. With this knowledge, skilled users may further enhance the program operation, especially in a computer network.
The Subdirectories
See page 13ff.
System Files In the SYSTEM directory of the installation some of the following files and subdirec-tories can be found:
File Function
LZ.XDB Settings for the provided postcode directories. This file is saved in a cobra specific file format and cannot be viewed.
TELEINFO.XDB Settings for the supported telephone number CDs. This file is saved in a cobra specific file format and cannot be viewed.
TEXTPROG.XDB Settings for the supported text programs. This file is saved in a cobra specific file format and cannot be viewed.
WINPLUS.XDB Replaced by the file GLOBALSETTINGS.XDB (XML file) Contains system settings.
*.BAK Backup files that were created together with the data syn-chronization.
*.DB System databases *.DOC Installation of the address transfer to MS Word *.FMA View formats in the system area *.FME Label formats in the system area
cobra CRM
353
File Function
*.FMI Import formats in the system area *.FMK Index card formats in the system area *.FML Address list formats in the system area *.FMR Formats in the system area for printing clients and projects *.FMT Letter formats in the system area *.FMX Export formats in the system area *.FMZ Formats for the import of additional data. *.LDB Lock file for the database files *.MDB Access databases (e.g. TERMINE.MDB) *.RPX Template for the project and client evaluation *.TXT Text files containing lists *.VBS Internal VB scripts *.XDB Settings files *.XML Settings files *.XRF Formats for the data synchronization \BITMAPS Contains graphics that are used in views \COMPONENTS Contains individual modules for the creation of views \LOGS The protocols of the performed data synchronizations \PLZFILES The postcode databases of the individual countries \VORLAGEN Contains files such as templates for new databases, an
EXCEL.XLS file for the export to MS Excel and a backup of the user database.
\Reports Reporting \Oppportunity_lists
Sales project list views
\Offers.dot Output templates (sales projects)

cobra CRM
354
Reporting The wizard for the creation of new reports is described in the User Manual.
The files belonging to the Reporting system are stored within the system folder in the \REPORTS subdirectory. The system directory \REPORTS\CATEGORIES holds the saved reports supplied by cobra and those reports stored by the users – under their previous or a different name. The reports are sorted by category. The categories are subfolders of \CATEGORIES.
Categories

cobra CRM
355
Program view (user view):
Categories are displays as bars on the left side of the dialog: »Sales projects«, »Ad-dresses«, »Campaigns«, etc. It is not possible for a user to create new categories.
The categories refer to the subdirectories 100 - OPPORTUNITIES, 200 - ADRESSES, 300 – CAMPAIGN etc., located within the installation directory under SYSTEM\CATEGORIES.
The order for categories is not alphabetical but depends on the prefixed number.
The displayed category name in the Reporting system does not depend on the di-rectory name in the installation directory; it is written to the file DISPLAYNAME.TXT which is stored in the categories folder:
The icon which is displayed in the category bar is stored as CATEGORY.PNG file in the corresponding category folder.
Reports
Reports are stored in the corresponding category, as two files:
as XML file,
as PNG file with identical name which contains the preview image for the corre-sponding report.

cobra CRM
356
The XML file contains – amongst others – the following information:
<ReportDataSource xmlns:xsi="http://www.w3.org/2001/XMLSchema-instance" xmlns:xsd="http://www.w3.org/2001/XMLSchema"> <Name>Sales Opportunities TOP 20</Name> <Note>A list of outstanding sales projects, sorted by expected sales figures is issued. Sort report descending by expected sales figures Report columns: customer, project name, planned sales figures, expected sales figures, sales phase, probability Diagram: Bar diagram Filter: all outstanding sales projects Dataset count: max. 20 datasets </Note>
»Name« is the report name shown to the users. You can change the name at any time.
»Note« is the comment text for the report. Just like the name, you can change the note at any time.
Then the SQL statement follows.
Creating New Category
Create a new folder and name the folder according to the syntax rules NNN - Name, whereby NNN stands for the three numbers at the beginning which define the order for displaying the categories.
Within this folder, create a file DISPLAYNAME.TXT and enter the display name.
Within the folder, store a graphic for the category bar as CATEGORY.PNG
You can now copy reports from different categories to this category and modify the displayed name directly by using an XML editor. Via the cobra Reporting sys-tem and/or an XML editor, the reports can be modified according to your needs.

cobra CRM
357
The Efficiency Module (CRM BI & CRM PRO)
Setup
Use the command »File: Database: Efficiency Module«.
A wizard opens.
Potential field ............... The potential field is a number field where the user enters the economic potential applies to the (customer) address. Please ensure that the field has the correct format.
Responsibility field ..... Select the field where the name of the responsible customer care person is stored. The users will not enter their user name, but their user ID.
Contact reason field ... Specify where the contact reason is managed. This is an indi-vidual field stored in the contact data table. The field belongs to the four free definable fields that you can rename in the da-tabase according to your needs.

cobra CRM
358
When a report is created, it is possible to apply a filter on con-tacts for which a contact reason has been entered. The report will then consider only the contacts with contact reason.
The threshold value of an address is the value which must be exceeded in order to consider an address as potential address.
Enter the default threshold value.
Create a filter for potential addresses.
View the potential addresses in a preview.
In the lower part of the dialog you define deviating threshold values for individual users.
With click on »Add« an additional user is added to the selection. Enter the deviat-ing value for this user.
With click on »Next« the setup of the Efficiency Module is completed.
Assigning Permissions
Use the command »File: Database: Database Security«.
Go to the database roles and select the database role.
Click the »Functions« tab.

cobra CRM
359
You will find the »Efficiency Module« entry.
The following authorization levels are possible.
The »Show all addresses« level will only have an effect if the »Switch between ac-tive/all addresses« permission is also assigned to the role.
»Configuration« enables access to the command »File: Database: Efficiency Mod-ule«.
»Switch between active/all addresses« together with the »Show all addresses« permission effects that the user can filter for potential addresses. A user, who does not have this privilege, cannot use the Efficiency Module.
It is configurable if a user can see only own reports or all available reports.
If the authorization level »Show all addresses« is also assigned to the user, he can see all addresses, also those where no potential value has been defined. If the us-er does not have the required permission, he can only see potential addresses.

cobra CRM
360
Dashboards
The Dashboard Designer is included in cobra CRM BI.
For the other cobra versions you can buy it as a separate software tool.
The Dashboard Designer to create evaluations and the Dashboard Viewer to visualize evaluations and reports. This has effects on the installation. During installation, the Dashboard Viewer will be installed automatically on every computer. However, you must have the Dashboard Designer installed explicitly on the computers required when installing single workstations or clients.
This is what Dashboard looks like
Dashboard is basically made up of two completely different elements: Designer and Viewer.
In networks, users can use the Dashboard Designer to create dashboards and make them available to all users via the Dashboard Viewer.

cobra CRM
361
Dashboard Designer
The Dashboard Designer is a standalone program. Use it to create your own dash-boards. Dashboards can be designed using many different elements such as charts, graphs, pie charts, texts, figures etc. You can use a dashboard to display and view da-ta not only from cobra, but also from other programs such as an enterprise resource planning program (ERP). Under certain conditions they can even be displayed togeth-er.

cobra CRM
362
Dashboard Viewer
The Dashboard Viewer is a view element linked to a dashboard and showing it direct-ly in cobra. The system administrator will integrate the Dashboard Viewer into one or more cobra views.
Important Elements
Pivot Tables
Pivot tables represent data in tabular form and allows you to aggregate them.

cobra CRM
363
Grid
The grid is a data grid to show data neatly arranged in tabular form.
Chart
This is the classic X-Y-diagram existing in many forms that can visualize data in dif-ferent ways: as a Gantt chart, scatter, line, area, region, bubble, and financial chart.
Pie
This is the traditional pie chart showing how individual values contribute to the overall sum.

cobra CRM
364
Gauge
These view elements resemble the needles in the cockpit of a car or motor bike. Sev-eral gauges can be shown in a chart. Every gauge can show and compare two differ-ent values: one via the mark set previously, the other via the needle itself.
Cards
Cards show two different values being compared to each other. Such a comparison can be done in absolute values or on a percentage basis.
Image
An image element can hold an optional photo, a logo, graphics etc.
Text Box
A text box can hold any text.
Range Filter
A range filter enables a user to filter a specific range of data interactively, e.g. using a slide control. All the other charts of the dashboard will be adjusted automatically and will then evaluate only the period selected here.
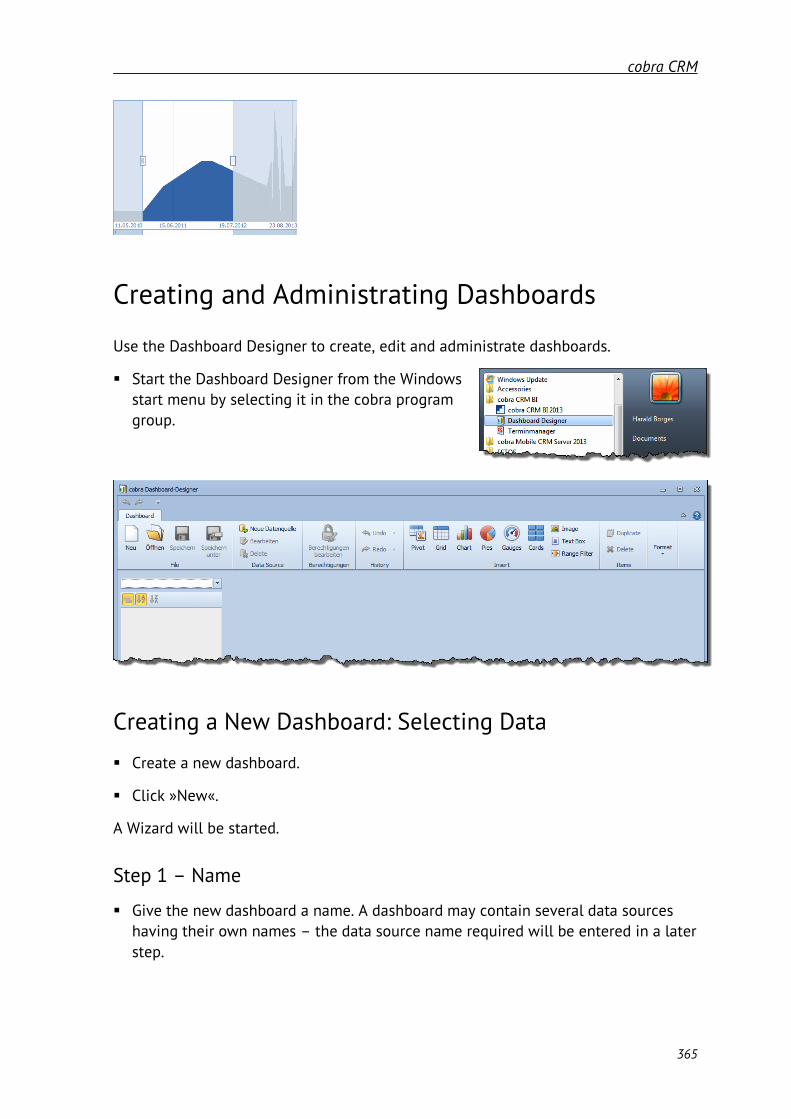
cobra CRM
365
Creating and Administrating Dashboards
Use the Dashboard Designer to create, edit and administrate dashboards.
Start the Dashboard Designer from the Windows start menu by selecting it in the cobra program group.
Creating a New Dashboard: Selecting Data
Create a new dashboard.
Click »New«.
A Wizard will be started.
Step 1 – Name
Give the new dashboard a name. A dashboard may contain several data sources having their own names – the data source name required will be entered in a later step.

cobra CRM
366
Step 2 – Selecting a Database I
In step 2 select the source of the data you want represented in the dashboard. You can choose between cobra and other databases. In the next step you will specify which data are to be evaluated.
If you do not want to work with a cobra SQL database, click »Free choice«.
You must specify a data source here. Later you can use the command »New data source« to assign additional data sources to the dashboard.
Besides cobra databases you can also work with other types of data sources, not only SQL databases, but also databases of a variety of other formats.
Please note that the viewer will always use the cobra database open at this moment. It can, however, also display data from any other sources.
Step 3 – Selecting a Database II
3 a) – cobra database (ADL)
If you want to evaluate a cobra database, click the button and enter the location of the ADL file containing the connection link to the required database. By default these files will be in your cobra installation in the \data subdirectory.
Later you can add other data sources to this dashboard coming from cobra or oth-er applications.

cobra CRM
367
3 b) – free choice
Here you can choose from various database formats. Dashboard supports more than a dozen different data providers, among them MS SQL Server, MS Access, Oracle and MySQL.
Provider ........................... Select here the type of database to be integrated. This choice will determine which additional options will be offered to you.
Connection Name........ You can access different data sources in one and the same da-tabase, such as marketing data as well as address data. For each of these data tables within the same database you need to enter a separate data connection. Each of these data con-nections will be addressed via its own connection name.
Data from different sources can only be connected if there is a field with the same name in both data sources (such as »Customer name«).

cobra CRM
368
Arranging the Data
As soon as a new data source has been entered the data select dialog will appear.
Designer View
In this dialog you will see all data tables available in the database you have connect-ed to the dashboard. Select here which data you want represented in the dashboard.
To do so, left-click the data table required, keep the key pressed and drag the ta-ble into the top right-hand area.
Or just double-click the data table required.

cobra CRM
369
The data table and all its fields are now available for the dashboard.
To later remove the data table from the dashboard drag it back to the overview at the left. Or right-click the data table and use the »Delete« command in the con-text menu.
The data table fields are listed in the right-hand area of the dialog. Click here the fields you want evaluated in the dashboard.

cobra CRM
370
In the right-hand area of the dialog click those data fields you want to have evalu-ated in the dashboard. The data fields selected will then be listed below.
Basically, you could select all data fields and only specify in the dashboard later which fields you really want to evaluate. That would, however, slow down considera-bly the performance of the program. This is why we recommend to select only those data fields you will really be using later.
The »Query« function is an exception among the data available. If you select that function, the user logged on at this moment will be entered here automatically.
The left-hand part of the dialog has also changed. Now only those data tables will be shown that are using the data table selected as their data source. In the dialog shown above the addresses were selected first. This is why at the left only tables such as contacts and marketing projects are available for selection. They depend on addresses (e.g., a contact will always belong to an address). All the other data tables are grayed out.

cobra CRM
371
For data tables dependent on other data tables specify which field represents the connection to the data source table. More than one field can be selected here.
The program will offer you fields to select, but you can also specify fields of your own.
To do so, click the select button to the right of the name of the initial data table.
Here you can specify two types of connection:
The join type »Inner« will ensure that only such addresses will be displayed for which sales projects exist [devices, postings, or whatever].
The join type »Left Outer« will ensure that all addresses will be displayed.
Use »Preview Results« to access a preview. You can then see the data of up to one thousand data columns of your selection.

cobra CRM
372
If you click a column header, you will see the familiar filter icon you can use to de-fine a filter.
SQL View
Click the register tab »SQL View« to view your data selection in SQL format.
Completing Data Selection
Click »OK« in the »Edit data source« dialog to confirm your selection and access the Dashboard Designer itself.

cobra CRM
373
Dashboard Designer
In a previous step you have selected the data for a dashboard. The Dashboard De-signer now is the tool to design your evaluations. After having completed the steps described above you now see a new, empty dashboard with a data source.
Save the dashboard. To do so click the »Save« button.
By default, dashboards are entered in your cobra installation in the \system\dashboard subdirectory. You can, however, also select a different path. They are stored as XML format files.
Entering an Additional Data Source
You can add further data sources to the dashboard. These can be data from the cobra database selected or from other applications.
Click the button »New data source«.

cobra CRM
374
Proceed as described for entering a new data source. Only this step will be differ-ent:
If you want to specify another program as data source, select here »Enter new da-tabase connection«.
Should you want to enter the existing data source (in this case: cobra) you can now select different fields from the same database. You can access fields that could not be selected initially due to interdependencies of the data tables.
After this, configure the selection of datafields as described before.
Here you can find the data sources available in a dashboard:

cobra CRM
375
Changing the Data Selection
You can change the data selected for the dashboard at any time.
In the »Data Source« area click the »Edit« button.
The dialog to enter data sources will open. Here you can see the current data selec-tion and can delete and add data.

cobra CRM
376
Editing a Dashboard
An empty dashboard consists of two areas showing the data selected at the left and the work area at the right. At the top border you can also find the tools arranged in tabs. You can use the buttons to access them.
Access Rights
The dashboard function has been integrated into the cobra rights management. This is why you can determine whether all or only a few users of all the users available in cobra may access the dashboard. By default, all users may access the dashboard.
Click the »Edit access permissions« button.
The Dashboard rights management dialog will open.

cobra CRM
377
To activate the rights management at all click the »Activate rights manage-ment« button.
Clicking on the »Import from cobra« button will take over the users and groups entered in the cobra user ad-ministration to Dashboard.
Click all users and groups who may view the current dashboard.
Creating Diagrams and Charts and other Dashboard Ele-ments
Organize your evaluation reports in the work area at the right. A dashboard may con-tain different evaluations as well as additional elements such as texts and range fil-ters.
At the left-hand side of the program view there is also the control range »Data Items«, where, for every individual view, you can specify the data to be shown and other settings.
At the far left-hand side of the program view there is an Explorer view showing the data selected.
If you click an element in the tool bar at the top, beneath »Insert«, it will be en-tered in the work area. In the image below this is a pie chart.

cobra CRM
378
For data to be shown at all they must have been connected to fields of the data source. Every type of Dashboard items has very specific parameters: A pie chart has a specific set of values, series of data, arguments etc. A data grid will use columns, a Pivot table values, columns, and rows. Every data area belongs to a certain Dash-board element and ensures that it is connected to the data source required and that it is mapped to the correct fields of the data source.
Drag the data fields required from the data selection at the left to the buttons of the data items. You can remove such an element again by dragging it back to the data selection.
The »Hidden Data Items« are special. These data will not be shown in the dia-grams themselves. But they can still be used as filter (dimension) and as sort cri-teria (measure) even though they are not visible themselves.
To remove an element from the data items drag it back to the data selection.

cobra CRM
379
Configuring Dashboard Elements
Depending on the type of the element (pie chart, Pivot table etc.) there are very dif-ferent setting options.
In the Data Items Area
To set and change the data functions click a field in the data items and use the list arrow options.

cobra CRM
380
»Format« will open a further dialog where you can set the number format for numeric displays.
Use the »Group Separator« function to in-sert points between groups of thousands of large numbers.
And, as with all other settings of this dialog, you will see a preview in the lower part of the dialog.
Use the list arrow in other data items to set the sorting function. The hidden item »Measure« will also be of-fered for sorting here.
Depending on the type of element there are various additional options to be found in a dropdown list. Among these are sort-ing, aggregating, formatting and visualizing.
Use the list arrow button besides the data items and hidden data items to access these options.

cobra CRM
381
On the Work Area
By right-clicking an element you can use the context menu to enter settings.
The following settings are valid for most of the diagram and chart types. Some dia-grams and charts also have additional options:
Edit Filter ........................ Set a filter for the data to be displayed.
To set filters you can also use those data not dis-played that are available as »Hidden Data Items«.
Clear ................................. Clear a filter set previously.
Show Caption ................ Show and hide the caption of an element. Define the caption in the same context menu using »Edit Names«.
Duplicate ........................ Duplicate an element on the work area that you can then edit.
Delete .............................. Delete the element from the work area.
Edit Names ..................... Enter different texts (names) depending on what the ele-ment contains.
The »Item Name« is the diagram heading, the oth-er entries are the captions of the data elements.

cobra CRM
382
Settings for Range Filters
Such a filter will allow you to filter interactively a specific data area using, e.g., two slide controls.
Here you can see a range filter »Filter Periods« which you can use to define a certain period. This setting will affect all other diagrams shown. This means that if you alter the area to be evaluated in the range filter, the diagrams and charts will only show data from the period set previously.
If you alter one or both of the slide controls, the other diagrams will automatically take over this setting.

cobra CRM
383
Use the data items to specify which periods can be filtered here.
Settings for Text Elements
The text element »Text Box« contains informing texts of optional type and length.
Right-click the textbox and use the »Edit« command from the context menu. Use the texteditor to enter and format the required text.

cobra CRM
384
Changing the Position of the Elements
You can move the elements on the work area back and forth by keeping the mouse button pressed.
Grab an element at its caption and drag it, keeping the mouse button pressed, to a different position on the work area. Should the element not have a caption, a cross will appear where you can grab it.
A colored mark will show you where you can embed the element.
When you release the mouse button, the element will be pasted at that position.

cobra CRM
385
Changing the Size of the Elements
Elements are arranged automatically in rows and columns. You can, however, change width or height of the elements within this arrangement. The size of the other sur-rounding elements will be adjusted automatically.
Click between two elements and drag them with the left mouse button to be as wide or long as required.

cobra CRM
386
Changing Layout and Caption of Diagrams
The options you have here will, of course, depend on the type of diagram or other el-ement.
Click an element on the work area.
Switch to the »Layout & Style« tab (the example shown deals with a Gantt chart).
Filtering Data
The register tab »Data« offers additional options for filtering. However, these apply only to the element currently marked on the work area.

cobra CRM
387
Filtering
Use the »Edit Filter« button to access the familiar filtering options you can also reach via the context menu of the element itself.
To deactivate the filter click the »Clear« button.
Further Options
You may not only use range filters to limit data areas, in certain charts you can also display only such data that you have marked explicitly in another chart.
In the example shown you can see that the entry »Travel agency« has been marked in the left »Line of business« diagram. In this case, only data belonging to this entry will be displayed in the Gantt chart to the right.

cobra CRM
388
You can deactivate such a mark by clicking the »Clear Selec-tion« button below left.
This button is inactive as long as no entry has been marked in the diagram or chart it belongs to.
Filtering According to Series/Arguments
Arguments and/or series must have been defined in an element previously.
You can use this function to ensure that in all diagrams or charts only such data will be displayed in the work area that belong to an argument or a series marked by you previously.
In the example shown the »Positions« chart has been marked.
Click the »Filter by Arguments« button.
Now mark one of the arguments (i.e., one of the blue bars) of the positions. These bars represent sales stages.

cobra CRM
389
As soon as you mark it, this bar is hatched and the »Line of business« diagram be-low will now only display such businesses for which negotiations at this stage of sales have been entered.

cobra CRM
390
Displaying Details
Under certain conditions you can access interactively the details of a certain entry within a chart by, e.g., clicking a sector of a pie chart. Preqeuisite would be that, as arguments, you have entered data from highest to lowest (year - half year - quarter), or as series e.g. category - sub-category - product (i.e., from the least itemized to the most itemized).
In the example shown below you can view the list of projected sales arranged ac-cording to sales managers and to lines of business.

cobra CRM
391
Now click the »Drill down on Arguments« button. Projected sales are sorted ac-cording to account managers.
Use the top right button to go back to the previous view.
If you now click the »Alexander Sum« sector, you will see what this sector is com-posed of.
If you now click the »Drill down on Arguments« button you will be back in the first view and that button at the top right of the chart will disappear again.

cobra CRM
392
The Dashboard Viewer
The Dashboard Viewer is a view element linked to a dashboard and showing it direct-ly in cobra. The system administrator integrates the Dashboard Viewer into one or more cobra views.
Open the cobra view editor.
If required, create a register tab for the Dashboard.
Use the mouse to drag the Dashboard Viewer element from the »Additional mod-ules« area to a free area of a view.
If you release the mouse button now, the Dashboard Viewer will be positioned in the view.
The Dashboard Viewer configu-ration dialog will open.
Select which dashboard you want displayed in the view.

cobra CRM
393
If something is changed in a dashboard in the Dashboard Designer, such changes will only be visible in the Dashboard Viewer
if cobra is started again
or you have issued the command »View: View: Refresh« (Ctrl+F5) while cobra is operating.

cobra CRM
394
Formats for Entry Fields
Regular Expressions2
cobra uses regular expressions, amongst other functions, for view formats of fields. They are stored in the database structure. If you want to define such a format, you need to work with regular expressions and create specific character strings. The aim of regular expressions is to prevent users entering incorrect characters and to en-force correct entering of e-mail addresses – at least syntactically.
A regular expression (as is shown in the upper part of the figure) is composed of any number of digits and letters in combination with the following meta characters:
. [ ] ( ) { } | ? + - * ^ $ \
Regular expressions are case-sensitive.
Exact Match
Characters need to match precisely and are therefore entered directly. Example: the entry ‘Flowers’ will not allow the user to enter anything else than ‘Flowers’.
Placeholders
The dot is a placeholder for any single character. The regular expression ‚Act ., sce-ne 3’ will allow the user to enter e.g. Act 1, scene 3 or Act 2, scene 3 or Act Z, scene 3, but not Act 10, scene 3 or Act ZZ, scene 3 [here two dots .would be required as placeholder].
If a meta character is to be used in its real meaning, i.e. the dot is not to serve as placeholder, but as dot, backslashes will have to be used as prefix.
2 Important parts of this text have been kindly provided by CODES / webalytics e.K., www.webalytics.de. An additional resource is the article "Reguläre Ausdrücke" in the German page of Wikipedia (status: 05.06.2011, 01:31 o’clock). Here links to further In-ternet pages can also be found which might be useful for the phrasing of regular ex-pressions.

cobra CRM
395
E.g. Flowers will allow for entries such as eG Flowers etc, e\.g\. Flowers will only allow entering e.g. Flowers.
Ranges of Characters
[] Square brackets define a range of characters..
[aky] Will allow entering one of the three characters a, k, y, but not any different character. The expression in square brackets defines exact-ly one character from this range.
[-] The hyphen defines From-To ranges. Market Square [0-9] will allow entering Market Square 1, Market Square 3, Market Square 4, etc, but not Market Square 12 or Market Square 9A.
^ The caret specifies a negation. Market Square ^0-3] will allow entering e.g. Market Square 4 or Market Square 7, but not Market Square 1, Market Square 2 or Market Square 3.
[A-Za-z0-9] Will allows entering any upper or lower case Latin character, or any digit.
[a-z,-] Will allow entering characters in lower cases, a comma or a hyphen.
Quantifiers
? The question mark corresponds to the amount 0 or 1 of the preceding element. 17 and 4? will allow entering the character strings 17 and as well as 17 and 4 but no other characters. This means that only the character 4 can be entered or none at all.

cobra CRM
396
+ The preceding expression must be contained at least once or may be contained several times.
17 and 4+ will correspond to 17 and 4, 17 and 44, 17 and 44444 etc.
[a-zA-Z0-9]+ will allow entering any number of letters and digits in any sequence. However, it is not allowed to enter e.g. space char-acters, hyphens, etc. You can enter House 9876 as well as 3Windows4U.
[a-zA-Z0-9._%-]+ will allow entering character strings of any length which can also contain dots, underscores, percent character and hyphens, but not commas, colons, etc.
[a-zA-Z0-9._%-]+@ defines the first part of an e-mail address: bernd.schlegel@ or cobra_info@.
* The asterisk corresponds to 0 or 1 times, or more, of the preceding element.
17 and 4* correspond to 17 and, 17 and 4, 17 and 44444 etc. Different from the + character, the preceding element must not necessarily be contained.
[A-Za-z0-9]* will allow entering any number of letters in upper and lower cases.
{n} The preceding element must be contained n times.
4{2} will allow entering exactly 44 but no other character string.
{min,} The preceding element must be contained at least min times.
4{3,} will result in 4 having to be entered at least 3 times.
{min,max} The preceding element must be contained at least min times and at most max times.
4{3,8} will result in 4 having to be entered at least 3 times and at the most 8 times.
[0-9]{2,5} will enforce entering two, three, four or five consecu-tive digits, e.g. 42 or 33942, but no character strings such as 0, 1.1 or a1a1.
{0,max} The preceding element must be contained at most max times.
4{0,8} will result in 4 having to be entered at least 0 (nil) times and at most 8 times.

cobra CRM
397
Grouping
() Round brackets define a grouping.
([fF]lowers) will allow entering flowers and Flowers.
Alternatives
| This character separates alternatives.
Wednesday|Thursday will allow entering either Wednesday or Thursday.
Predefined Classes of Characters
\d Digit, one digit [0-9].
\d\d\d\d will force entering four digits, for example 1985, 2011 etc.
\D No digit, a character other than a digit, e.g. [^\d] or [^0-9]
\w Word character, a letter, a digit, or an underscore. Corresponds to [a-zA-Z_0-9_]
\w* Will allow entering any number of digits, upper or lower case characters and underscores.
\W No word character, a character which is neither letter nor digit nor underscore. Corresponds to [^\w] or [^a-zA-Z0-9_]. Charac-ters such as comma, dot or hyphen may be entered.
\s Whitespace, the space character.
\S No whitespace, a character which is not a whitespace, all characters except for the space character.
Examples
E-mail address [a-zA-Z0-9._%-]+@[a-zA-Z0-9.-]+\.[a-zA-Z]{2,4}
ZIP code [0-9]{5}
Credit card ((4\d{3})|(5[1-5]\d{2})|(6011))-?\d{4}-?\d{4}-?\d{4}|3[4,7]\d{13}

cobra CRM
398
Keyword Index
A Access Permissions ................................ 131
Database ................................................... 36 Field ........................................................ 149 Function ....................................... 131, 146 Role ......................................................... 136 Tables ..................................................... 147 User ............................................................ 35 View ........................................................ 237
Activating and Selecting a Field ...... 159 Activation ..................................................... 15 Additional Data .......................................... 57
Add Field .................................................. 61 Delete Field ............................................. 69 Field Properties ..................................... 70 Field Types .............................................. 85 Only Primary and Single Address ... 60 Only Secondary Address .................... 60
Additional Table New ............................................................ 88
Address Groups ............................................... 52, 54 Groups- ..................................................... 54 Not Editable ............................................ 55 Of Other Groups .................................... 54 Private ....................................................... 52 Private- ..................................................... 54 Read Only ................................................ 55 Read-only ................................................. 54 Write-protected ..................................... 54
Address Database ADL File .................................................... 50
Address Fields ............................................ 57 Add ............................................................. 61 Change Definition ................................. 69 Delete ........................................................ 69 Field Properties ..................................... 70 Field Types .............................................. 85
ADL File ......................................................... 48 Read ........................................................... 49
Appointment Manager ............................ 44 Authorizations .......................................... 131
B Backup ......................................................... 111 Birthday Field ........................................... 262 blacklist
Data .......................................................... 167
C Cache
Selection Lists ....................................... 39 Changed ...................................................... 118 Client ............................................................. 11
Update ...................................................... 20 Client and Project Management
Activate..................................................... 53 Telephone Time .................................... 54
Client Management On/Off ....................................................... 52
Column Selection.................................... 254 Configuration ............................................ 161 Connection String ..................................... 48 Contact ................................................ 57, 101
For Others ................................................ 54 Groups- ..................................................... 54 Settings .................................................... 57 Type ........................................................... 45
Container .................................................... 316 Context Help ............................................... 75 Created ........................................................ 118
D Dashboard .................................................. 360
Designer ................................................. 373 New ................................................ 365, 376 View ......................................................... 392 Viewer ..................................................... 362
Data Backup .............................................. 111

cobra CRM
399
data blacklist ............................................ 167 Data Directories ......................................... 14 Data exchange ........................................ 322 Data Exchange ........................................ 311 Data Migration
Documents ........................................... 189 Data protection
Configure............................................... 156 Setting up ............................................. 155
Data protection officer ......................... 163 Data Record
Inactive ..................................................... 75 Data Tables
Manage ..................................................... 58 Database
ADL File ............................................ 49, 50 Merge ............................................ 301, 311 Role ............................................................ 36 Synchronize .......................................... 301
Database Name ....................................... 260 Database Role ............................... 131, 142 Database settings
Personal data ....................................... 158 Default country code ............................... 83 Default Value .............................................. 74 Delete plan ............................................... 169 Description
File .............................................................. 53 Designer ..................................................... 361 Dialog
Edit .......................................................... 272 Directories .......................................... 13, 352
Data ............................................................ 14 System ....................................................... 14
Display Format ........................................... 70 Document
From Former Version ........................ 189 Document Management
Activate .................................................. 177 Keywords ............................................... 181 Serial Letter ......................................... 180 View ........................................................ 284
Duplicate Checking Activate .................................................. 104
Duplicates .................................................. 103
E Effective Authorizations ....................... 133 Efficiency Module ................................... 357 E-mail .......................................................... 335
Settings .................................................... 40 Entry Mask ................................................. 272
Own .......................................................... 274 Table ........................................................ 277
Entry Required ........................................... 74 External Module
Integrate ................................................ 282 External User ............................................ 311
F Field
Authorization ....................................... 149 Birthday- ................................................ 262 Name ....................................................... 260 Write-Protected ..................................... 75
Field assignment ..................................... 161 Field Definition
Selection List ......................................... 77 Field Definitions ........................................ 57
Default Value ......................................... 74 Entry Required ....................................... 74 Format ....................................................... 70 Info Line ................................................... 74 Selection List ......................................... 75
Field Dependent Selection List ........... 77 Field Help .................................................... 68 Field List ....................................................... 60 Field Name ................................................ 260 Field Properties ......................................... 70 Field Types .................................................. 85 File
Description .............................................. 53 Open
Standard Path .................................... 38 Reorganizing ........................................ 109 Settings .................................................... 52
Filter ........................................................ 97, 99

cobra CRM
400
Format Entry- ......................................................... 70 Field Definition ...................................... 70 Merging .................................................. 303 Synchronization .................................. 303
Function Authorization ....................................... 146
Function Authorization ........................ 131
G Group
View ........................................................ 237 Group Address
On/Off........................................................ 52 Guest ........................................................... 119
H Help Text
Own ............................................................ 68 Hierarchy ................................................... 101
Configure............................................... 102
I Icons ............................................................... 75 Image .......................................................... 270
Size ............................................................. 39 Import ......................................................... 311 Inactive Record .......................................... 75 Info Line ........................................................ 74 Installation ......................................................9
Check ......................................................... 19 Clients ....................................................... 11 Directories ............................................ 352 Network .................................................... 10 Server ........................................................ 11 Single Workstation ..................................9 SQL Server Management Studio
Express (SSMSEE) ............................. 31
K Keyword ..................................................... 312
Container ............................................... 316
Keywords Document Management .................. 181
L License ................................... see Activation Link ................................................................. 14 list of sources ........................................... 163 Lock flag ..................................................... 175 Lock Flag ...................................................... 75 Log
Modification- ........................................ 115
M MailTo ........................................................... 40 Management Console (MMC) ............... 30 Merge ................................................. 301, 311
Settings .................................................. 303 Messages .................................................... 271 Messaging System
Setup ....................................................... 335 SMTP Account ...................................... 335
Mixed Table .............................................. 254 MMC ............................................................... 30 Mobile user ................................................ 322 Mobile User ............................................... 311 Modification Log ..................................... 115
N Name
Field ......................................................... 260 NativeName .............................................. 260 Network ........................................................ 10
Security ..................................................... 13
O Outlook ......................................................... 44
Synchronization .................................. 311 Output, Export and Transmission ..... 165
P Patch .............................................................. 20 Permissions
View Editor ............................................ 236

cobra CRM
401
Person Changed ...................................... 118 Person Created ........................................ 118 Personal data
Database settings .............................. 158 Postal Code .................................................. 81 Postal Codes
Country ..................................................... 83 Postcodes ..................................................... 75 Preview Image ............................................ 39 Primary Address ...................................... 101
Additional Data ...................................... 60 Field Write-Protected .......................... 75
Private Address On/Off........................................................ 52
processing and transmitting .............. 163 processing and Transmitting
View ........................................................ 172 Program Directory ..................................... 13 Project Management
On/Off........................................................ 52 Properties
Table ....................................................... 251
Q Queried Addresses
Delete Issue ....................................................... 55
Quick Mode .................................................. 55
R Reference Source ................................... 251 Reference Table ...................................... 253 Reorganizing ............................................ 109 Reporting ................................................... 354 Role
Defining ................................................. 136 New ......................................................... 137
RTF Entry ................................................... 272
S Sales Project
Settings .................................................. 338 Sales Projects
Settings .................................................. 337 Salutations ................................................... 75 Search
Documents ............................................ 284 Search Line ................................................ 255 Secondary Address ................................. 101
Additional Data ..................................... 60 Field Write-Protected ......................... 75
Security ......................................................... 13 Security System ....................................... 118 Selection List
Settings .................................................... 75 Selection List .............................................. 75 Selection List
New ............................................................ 76 Selection List
Display As ................................................ 77 Selection List
Field Dependent ................................... 77 Selection Lists
Cache ......................................................... 39 Sorting ...................................................... 39
Serial Mail SMTP Account ...................................... 335
Server............................................................. 11 Selecting .................................................. 47
Settings ......................................................... 52 Additional Data ..................................... 57 Contact ..................................................... 57 Database .................................................. 53 Default Value ......................................... 74 Duplicates .............................................. 103 Entry Required ....................................... 74 Field Definitions ................................... 57 Hierarchy ................................................ 101 Info Line ................................................... 74 Merge ...................................................... 303 Selection List ......................................... 75 Synchronization .................................. 303
Shortcut ........................................................ 38 Single Workstation ...................................... 9 SMTP Account .......................................... 335
Messaging System .............................. 335

cobra CRM
402
Software Activate ..................................................... 15 Update ....................................................... 20
Sorting ........................................................ 100 New Address ........................................... 40 Selection Lists ........................................ 39
SQL Server ......................................................8 User Settings .......................................... 35
SQL Server Management Studio Express (SSMSEE) ................................. 31
SSL Encryption ........................................ 335 SSMSEE ......................................................... 31 Subdirectories .......................................... 352 Sub-sorting ............................................... 100 Sub-Table ..................................................... 57
New ............................................................ 88 Synchronization ...................................... 301 Synchronization
Settings .................................................. 303 Synchronization
Start ......................................................... 311 Synchronization
Outlook .................................................. 311 Synchronization ...................................... 311 Synchronization ...................................... 322 System Administrator ................. 119, 136
Command .............................................. 139 Commands
Remove from Menus ....................... 45 Login ....................................................... 137
System Database ADL File .................................................... 49
System Directory ............................... 13, 14 System Files ............................................. 352 System Password .......................... 119, 137 System Role .............................................. 131 System settings
PD ............................................................. 157 System Settings ......................................... 37
General ...................................................... 37 SystemADLVerifier.exe ............................ 49
T Table ............................................................ 250
Authorization ....................................... 147 Entry Mask ............................................. 277 Mixed ....................................................... 254 Properties .............................................. 251
Tables Manage ..................................................... 58
Technical Information ........................... 352 Telephone Field ........................................ 75 Telephone Time
Client and Project Management ..... 54 Text Modules .............................................. 75 Town Names ............................................... 75 Tracking ........................................................ 51
U Update ........................................................... 20 User
Access Permissions .................... 35, 131 Mobile ..................................................... 311 View ......................................................... 237
User Mobile ..................................................... 322
User Administration ............................... 118 UserLevelName ....................................... 260
V View.............................................................. 235
Access Permission .............................. 237 Address Mask ....................................... 281 Address tab ........................................... 266 Comment Field .................................... 277 Context Menu ...................................... 287 Divide Area ............................................ 250 Document Management .................. 284 Empty area ............................................ 243 Entry Field ................................... 259, 277
Multi-columned .............................. 259 Entry Masks ........................................... 272 Group ....................................................... 237 Grouping ................................................ 249 Icon .......................................................... 278

cobra CRM
403
Integrate External Module ............. 282 Keyboard Shortcuts ........................... 300 Keywords ............................................... 280 Layers ..................................................... 242 Module ................................................... 247 Navigation ............................................ 245 Overview ............................................... 238 Permissions .......................................... 236 processing and Transmitting......... 172 Properties
Entry Field ........................................ 292 General .............................................. 288 Labeling ............................................ 290 Multiple Field .................................. 278 Multiple Fields ................................ 293 Register Tab .................................... 281 Text Mapping .................................. 294
Register tab .......................................... 261 Saving Changes ..................................... 38 Search Line ........................................... 255
Selection Field ..................................... 278 Settings
Extras .................................................. 295 Start ......................................................... 236 Status Line ............................................ 279 Table .............................................. 250, 280 Tabulator Sequence .......................... 262 Toolbar ......................................... 265, 279 User .......................................................... 237 Wizards ................................................... 249
Views Navigation ............................................. 264
W Warn Field.................................................... 75
Z ZIP ............................................................ 81, 83

cobra - computer's brainware GmbHWeberinnenstraße 7D-78467 Konstanz
Telefon 07531 8101-0Telefax 07531 [email protected]
www.cobra.de