Double Cobra Belt PDF - Paracord Planet
7
DOUBLE COBRA BELT TUTORIAL Do you have paracord laying around and need a belt? This smart-look- ing double cobra belt allows you to carry over 100 ft. of paracord on your person. No one will believe that it’s homemade! Materials: • #550 Paracord (about 120 ft.) • Belt buckle Tools: • Scissors • Lighter • Fid needle (optional) Core Strand #1 Double your waist and add 24” (34“ + 34” + 24” = 92”) Weave color #1 Every inch of belt length takes a ft. of cord. Multiply waist by 12 and then add 6 ft. (34” x12 = 34’ + 6’ = 40’) Core Strand #2 Double your waist and add 24” (34“ + 34” + 24” = 92”) Weave color #2 Every inch of belt length takes a ft. of cord. Multiply waist by 12 and then add 6 ft. (34” x12 = 34’ + 6’ = 40’) How Much Cord Do I Need? (Example lengths are for a 34” waist) You will need 5 pieces of paracord for this project. About 100-150’ total. Retention Strap (not pictured) An additional 3 ft. of cord
-
Upload
khangminh22 -
Category
Documents
-
view
4 -
download
0
Transcript of Double Cobra Belt PDF - Paracord Planet

DOUBLE COBRABELT TUTORIAL
Do you have paracord laying around and need a belt? This smart-look-ing double cobra belt allows you to carry over 100 ft. of paracord on your person. No one will believe that it’s homemade!
Materials:• #550 Paracord (about 120 ft.)• Belt buckle
Tools:• Scissors• Lighter• Fid needle (optional)
Core Strand #1Double your waist and add 24”(34“ + 34” + 24” = 92”)
Weave color #1Every inch of belt length takes a ft. of cord. Multiply waist by 12 and then add 6 ft.(34” x12 = 34’ + 6’ = 40’)
Core Strand #2Double your waist and add 24”(34“ + 34” + 24” = 92”)
Weave color #2Every inch of belt length takes a ft. of cord. Multiply waist by 12 and then add 6 ft. (34” x12 = 34’ + 6’ = 40’)
How Much Cord Do I Need?(Example lengths are for a 34” waist)
You will need 5 pieces of paracord for this project. About 100-150’ total.
Retention Strap(not pictured) An additional 3 ft. of cord
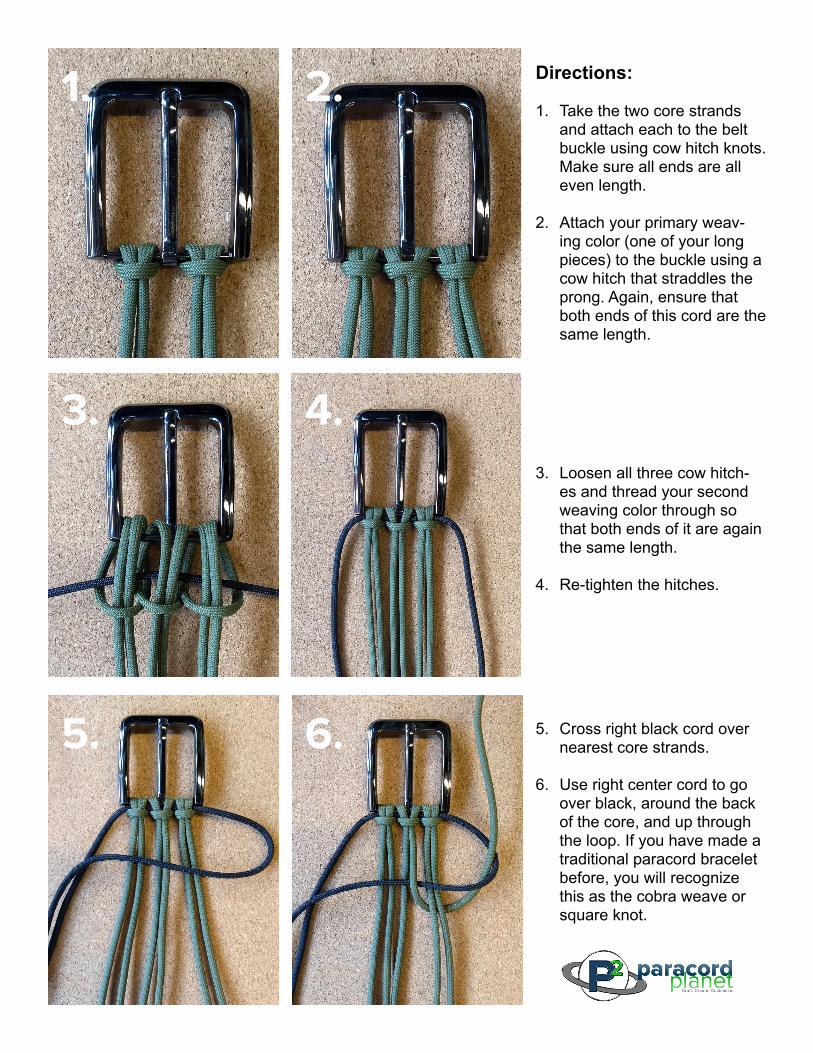
1. 2. Directions:
1. Take the two core strands and attach each to the belt buckle using cow hitch knots. Make sure all ends are all even length.
2. Attach your primary weav-ing color (one of your long pieces) to the buckle using a cow hitch that straddles the prong. Again, ensure that both ends of this cord are the same length.
3. Loosen all three cow hitch-es and thread your second weaving color through so that both ends of it are again the same length.
4. Re-tighten the hitches.
5. Cross right black cord over nearest core strands.
6. Use right center cord to go over black, around the back of the core, and up through the loop. If you have made a traditional paracord bracelet before, you will recognize this as the cobra weave or square knot.
4.3.
6.5.

11. Now we are going to mirror steps 5-10 on the left side. Cross the outer black cord over the left cores. The green cord goes over the black, around the back, and through the loop.
12. Now bring your black back to the outside. Cross black over the top, green goes over black, behind the core, and through the black loop.
11. 12.
10.9. 9. Pull the green cord around back and through the loop, just as before. You may find it easier to pull a loop through, and then pull the excess through after that. This way you don’t have to find the end of your very long cord.
10. Your knot should look like this after you pull the extra through. Tighten the knot you just made.
7. 8.7. Pull the knot tight, now we
are going to do another one, going back the other way.
8. Cross the same black strand over the right core strands. Cross your green strand over the black.

17. Do the same thing on the left side (Steps 14-16) so that both sides are again even.
18. Your weave should be looking something like this. Notice the center diagonal pattern is 2 one way, then 2 the other way. You can decide on your own pattern. Be sure to pull your center cords tight after every couple of weaves. This will ensure your weave is tight and your belt is the intended length.
18.17.
13. Once you pull that knot tight, your sides should look even, like this. Now comes the “new” part that is unique to the double cobra. Cross your green strands so that they are now on opposite sides. Be conscious of which cord crosses on top. Doing the same one will result in diag-onal lines, alternating them will result in a zigzag line. Look ahead a few steps to see.
14. Cross the right black over the core again, as in step 5.
14.13.
15. This time, use the green strand from the left side and pull it over black, behind the core, and through the loop.
16. Weave back the other way so that green is again in the middle.
16.15.

23. Next, take the other two core strands. These are now your weaving cords. Tie them around your green weaving cords that are in the middle using one or two passes of the cobra/square knot.
24. Pull tight.
24.23.
19. Optional: The buckle prong should be able to poke through the belt at any place, but if you want to, you can make holes specifically for this. To do so, simply don’t cross your center cords for one set.
20. This image is a close up of a finished belt hole. (Finger is pointing to it)
20.19.
21. When you reach your de-sired length, it is time to finish off the end. Take the innermost of each core set and thread them back through the weave. Go over the first cord and under the next two or more. A fid nee-dle makes this very easy, but you can also loosen your last few weaves just enough to poke your cord through.
22. This is how the 2 cords should look when tucked.
22.21.

29. Melt the ends of your para-cord stubs. It should now look about like this.
30. Now it is time to make the retention strap. Count about 4 or 5 loops in from the end and thread a 3 ft. length through.
30.29.
25. Take your black cords and do the same thing.
26. Make sure to complete that square knot by doing one cobra stitch each direction.
26.25.
27. Check to make sure all of your cords are pulled tight.
28. Cut all cords about 1/4 inch away from the belt.
28.27.

35. You know the how to do it at this point, here is another picture of how your weave should go.
36. After you have finished, cut and melt your ends. You’re finally done!!
36.35.
31. Take the other end of the 3 ft. length and poke that through as well. A fid makes this easy, but again, you can make-do with a piece of wire, a hanger, or even a pen. Pull it through so you have a small loop.
32. Pull the ends through the loop you just formed.
32.31.
33. Buckle the belt. Wrap your two strands around the belt excess, and through the corresponding loop on the other side of the belt. Your loop should be just big enough to fit the belt excess plus one finger.
34. Start weaving the cords back on themselves using the same cobra pattern.
34.33.