SAP CRM Mobile Client Component Release CRM 7.0
144
Installation Guide SAP CRM Mobile Client Component Release CRM 7.0
-
Upload
khangminh22 -
Category
Documents
-
view
3 -
download
0
Transcript of SAP CRM Mobile Client Component Release CRM 7.0
Installation Guide
SAP CRM Mobile ClientComponent
Release CRM 7.0

© Copyright 2008 SAP AG. All rights reserved.
No part of this publication may be reproduced or transmitted in anyform or for any purpose without the express permission of SAP AG.The information contained herein may be changed without priornotice.
Some software products marketed by SAP AG and its distributorscontain proprietary software components of other software vendors.
Microsoft, Windows, Outlook, and PowerPoint are registeredtrademarks of Microsoft Corporation.IBM, DB2, DB2 Universal Database, System i, System i5, System p,System p5, System x, System z, System z10, System z9, z10, z9,iSeries, pSeries, xSeries, zSeries, eServer, z/VM, z/OS, i5/OS, S/390,OS/390, OS/400, AS/400, S/390 Parallel Enterprise Server, PowerVM,Power Architecture, POWER6+, POWER6, POWER5+, POWER5,POWER, OpenPower, PowerPC, BatchPipes, BladeCenter, SystemStorage, GPFS, HACMP, RETAIN, DB2 Connect, RACF, Redbooks,OS/2, Parallel Sysplex, MVS/ESA, AIX, Intelligent Miner,WebSphere, Netfinity, Tivoli and Informix are trademarks orregistered trademarks of IBM Corporation.
Linux is the registered trademark of Linus Torvalds in the U.S. andother countries.
Adobe, the Adobe logo, Acrobat, PostScript, and Reader are eithertrademarks or registered trademarks of Adobe Systems Incorporated inthe United States and/or other countries.
Oracle is a registered trademark of Oracle Corporation.
UNIX, X/Open, OSF/1, and Motif are registered trademarks of theOpen Group.Citrix, ICA, Program Neighborhood, MetaFrame, WinFrame,VideoFrame, and MultiWin are trademarks or registered trademarks ofCitrix Systems, Inc.
HTML, XML, XHTML and W3C are trademarks or registeredtrademarks of W3C®, World Wide Web Consortium, MassachusettsInstitute of Technology.
Java is a registered trademark of Sun Microsystems, Inc.
JavaScript is a registered trademark of Sun Microsystems, Inc., usedunder license for technology invented and implemented by Netscape.
MaxDB is a trademark of MySQL AB, Sweden.
SAP, R/3, xApps, xApp, SAP NetWeaver, Duet, PartnerEdge,ByDesign, SAP Business ByDesign, and other SAP products andservices mentioned herein as well as their respective logos aretrademarks or registered trademarks of SAP AG in Germany and inseveral other countries all over the world. All other product andservice names mentioned are the trademarks of their respectivecompanies. Data contained in this document serves informationalpurposes only. National product specifications may vary.
These materials are subject to change without notice. These materialsare provided by SAP AG and its affiliated companies ("SAP Group")for informational purposes only, without representation or warranty ofany kind, and SAP Group shall not be liable for errors or omissionswith respect to the materials. The only warranties for SAP Groupproducts and services are those that are set forth in the expresswarranty statements accompanying such products and services, if any.Nothing herein should be construed as constituting an additionalwarranty.
DisclaimerSome components of this product are based on Java™. Anycode change in these components may cause unpredictableand severe malfunctions and is therefore expressivelyprohibited, as is any decompilation of these components.
Any Java™ Source Code delivered with this product isonly to be used by SAP’s Support Services and may not bemodified or altered in any way.
Documentation in the SAP Service MarketplaceYou can find this documentation at the following address:http://service.sap.com/crm-inst
SAP AGDietmar-Hopp-Allee 1669190 WalldorfGermanyT +49/18 05/34 34 24F +49/18 05/34 34 20www.sap.com
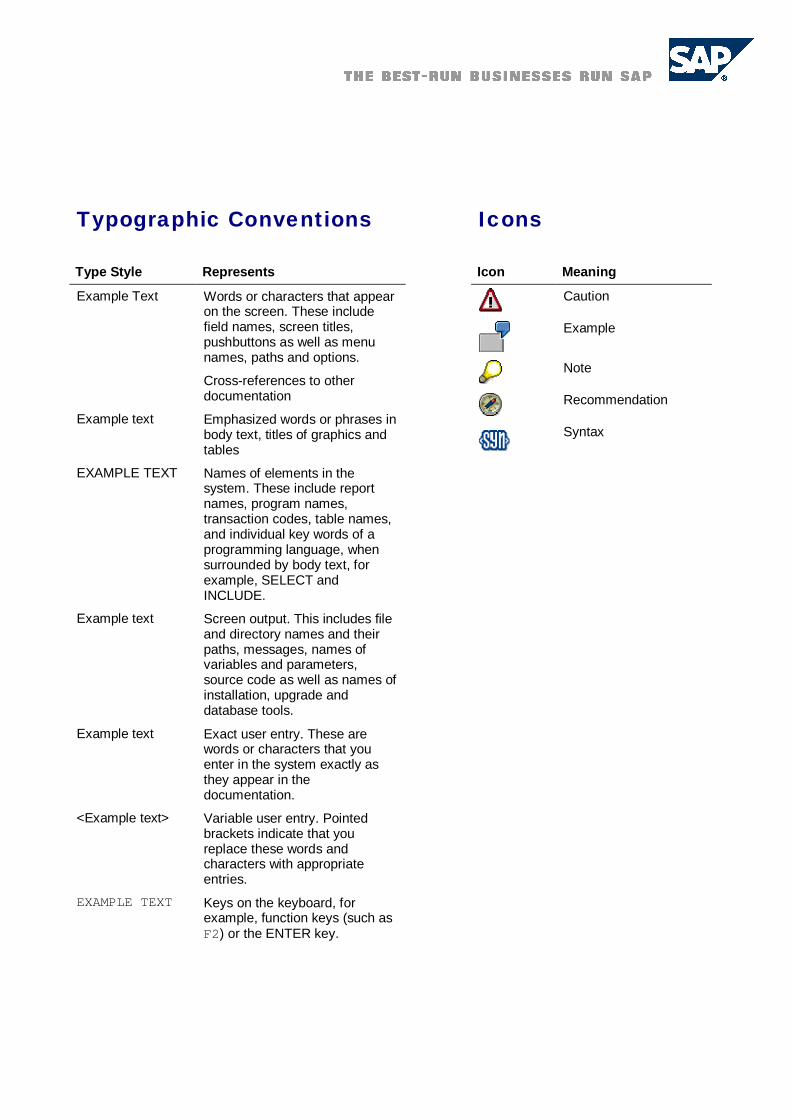
Typographic Conventions
Type Style Represents
Example Text Words or characters that appearon the screen. These includefield names, screen titles,pushbuttons as well as menunames, paths and options.
Cross-references to otherdocumentation
Example text Emphasized words or phrases inbody text, titles of graphics andtables
EXAMPLE TEXT Names of elements in thesystem. These include reportnames, program names,transaction codes, table names,and individual key words of aprogramming language, whensurrounded by body text, forexample, SELECT andINCLUDE.
Example text Screen output. This includes fileand directory names and theirpaths, messages, names ofvariables and parameters,source code as well as names ofinstallation, upgrade anddatabase tools.
Example text Exact user entry. These arewords or characters that youenter in the system exactly asthey appear in thedocumentation.
<Example text> Variable user entry. Pointedbrackets indicate that youreplace these words andcharacters with appropriateentries.
EXAMPLE TEXT Keys on the keyboard, forexample, function keys (such asF2) or the ENTER key.
Icons
Icon Meaning
Caution
Example
Note
Recommendation
Syntax
System Landscape
ContentsInstallation of SAP CRM Mobile Client Component ....................... 71 System Landscape ................................................................................ 82 Prerequisites for Hardware and Software......................................... 11
2.1 Hardware Requirements ...................................................................... 112.2 Software Requirements ....................................................................... 13
3 Machine Descriptions and Installation Process .............................. 203.1 Machine Descriptions .......................................................................... 203.2 Mobile Repository Server .................................................................... 223.3 Mobile Development Workstation ...................................................... 223.4 Workgroup Server................................................................................ 223.5 Mobile Client ........................................................................................ 22
4 Installation Process ............................................................................ 234.1 Development Environment Installation Process ............................... 244.2 Test and Production Environment Installation Process ................... 26
5 Installing the Mobile Client Component: Applications .................... 275.1 Contents of the Installation DVDs ...................................................... 275.2 General Installation Instructions for Mobile Client Component ...... 29
5.2.1 Prerequisites ...................................................................................................... 295.2.2 Setting Up a Network Installation Area ................................................................ 295.2.3 Installing Via Network Share ............................................................................... 295.2.4 Installing Via DVD............................................................................................... 30
6 Installing the Mobile Repository Server............................................ 336.1 Prerequisites ........................................................................................ 336.2 Procedure ............................................................................................. 33
7 Installing the Communication Station............................................... 398 Installing the Mobile Development Workstation .............................. 409 Installing the Mobile Client Application ............................................ 49
9.1 Prerequisites ........................................................................................ 499.2 Procedure ............................................................................................. 49
10 Installing the Workgroup Server........................................................ 5910.1Prerequisites ....................................................................................... 5910.2Procedure ............................................................................................ 59
11 Installing the Workgroup Client ......................................................... 6711.1Prerequisites ....................................................................................... 6711.2Procedure ............................................................................................ 67
12 Installing Several Mobile Client Applications Simultaneously ....... 7612.1Prerequisites ....................................................................................... 7612.2Procedure ............................................................................................ 76

13 Restarting the Installation (Maintenance Mode) .............................. 8813.1Modifying Installed Applications ....................................................... 9113.2Repairing Installed Applications ........................................................ 9313.3Removing All Installed Applications ................................................. 94
13.3.1 Procedure........................................................................................................... 9413.3.2 Result ................................................................................................................. 95
14 Appendix A: Central Service Reference Guide ................................ 9614.1Command Line Options ...................................................................... 9614.2Guidelines for Using Command Line Options .................................. 9614.3Updating Central Service Port Number in the Application Repository
9714.3.1 Procedure........................................................................................................... 9714.3.2 Result ................................................................................................................. 99
15 Appendix B: Installing Databases Using SwitchDB ...................... 10015.1General User Interface Information ................................................. 10015.2SwitchDB Application – UI Mode ..................................................... 10915.3Checking connection to the SQL Server ......................................... 11015.4Installing a Database ......................................................................... 11015.5Uninstalling a Database .................................................................... 11215.6Archiving and uninstalling a Database ........................................... 11315.7SwitchDB Application- CommandLine Mode .................................. 11515.8SwitchDB File Structure ................................................................... 11715.9Example Scenarios ........................................................................... 117
15.9.1 Installing a Database with Windows Authentication ........................................... 11715.9.2 Installing a Database without Windows Authentication ...................................... 11715.9.3 Uninstalling a Database with Windows Authentication ....................................... 11815.9.4 Uninstalling a Database without Windows Authentication .................................. 11815.9.5 Removing a Database with Windows Authentication ......................................... 11815.9.6 Removing a Database without Windows Authentication .................................... 118
15.10 Log Files ....................................................................................... 11916 Appendix C: Code Page Settings for Language Versions ............ 12017 Appendix D: Mobile Repository Server Configuration .................. 123
17.1Configure the Mobile Repository Server ......................................... 12317.1.1 Purpose ............................................................................................................ 12317.1.2 Process ............................................................................................................ 12317.1.3 Result ............................................................................................................... 123
17.2Installing the CRM Transport Component ...................................... 12317.2.1 Use .................................................................................................................. 12317.2.2 Prerequisites .................................................................................................... 12417.2.3 Procedure......................................................................................................... 124
17.3Creating a CRM Server User Account ............................................. 12917.3.1 Use .................................................................................................................. 12917.3.2 Prerequisites .................................................................................................... 12917.3.3 Procedure......................................................................................................... 13017.3.4 Result ............................................................................................................... 130
17.4Assigning the MAR ID ....................................................................... 13017.4.1 Use .................................................................................................................. 130
System Landscape
17.4.2 Prerequisites .................................................................................................... 13017.4.3 Procedure......................................................................................................... 13017.4.4 Result ............................................................................................................... 131
17.5Adding a Namespace ........................................................................ 13117.5.1 Prerequisites .................................................................................................... 13117.5.2 Procedure......................................................................................................... 13117.5.3 Result ............................................................................................................... 131
17.6Creating User Accounts in User Manager ....................................... 13217.6.1 Use .................................................................................................................. 13217.6.2 Procedure......................................................................................................... 13217.6.3 Result ............................................................................................................... 132
17.7Troubleshooting ................................................................................ 13217.7.1 Transport Agent Service Failed ......................................................................... 13217.7.2 MAR Initialization Failed ................................................................................... 13317.7.3 Connection to the CRM Server Failed ............................................................... 13317.7.4 Change Lists Are Not Moving from the Repository to the CRM Server .............. 13417.7.5 Unable to Specify the Repository ID in the CRM Server .................................... 134
17.8Technical Details ............................................................................... 13517.8.1 Ownership Transfer Parameters ....................................................................... 135
18 Appendix E: Mobile Application Repository Transport Concepts13618.1Overview ............................................................................................ 13618.2Transport Component ....................................................................... 13618.3Transport ........................................................................................... 13718.4Architecture ....................................................................................... 13818.5Client Upgrade ................................................................................... 139
19 Appendix F: Mobile Client Applications Installation withInitialization File ..................................................................................... 141
19.1Creating the Initialization File........................................................... 14119.1.1 Procedure......................................................................................................... 141
19.2Installing Multiple Mobile Clients ..................................................... 14219.2.1 Use .................................................................................................................. 14219.2.2 Procedure......................................................................................................... 142
20 Appendix G - Import of Consolidated_Prefill.Car File ................... 14321 Appendix H - Internet Pricing and Configuration Post InstallationMandatory Steps .................................................................................... 144
Installation of SAP CRM Mobile Client Component
October 2008 7
Installation of SAP CRM Mobile ClientComponentIntroductionThis document contains information for installing SAP CRM Mobile Client Component: Applicationsand Repositories. It includes a system landscape definition, hardware and software prerequisiteinformation, as well as step-by-step instructions for installing the software in the defined systemlandscape.
Before you install the CRM Mobile Client Component you must understand the landscape of thenetwork in which it runs. The CRM Mobile Client Component depends on other machines in order toaccess all information; this fact affects the installation procedure.

System Landscape
8 October 2008
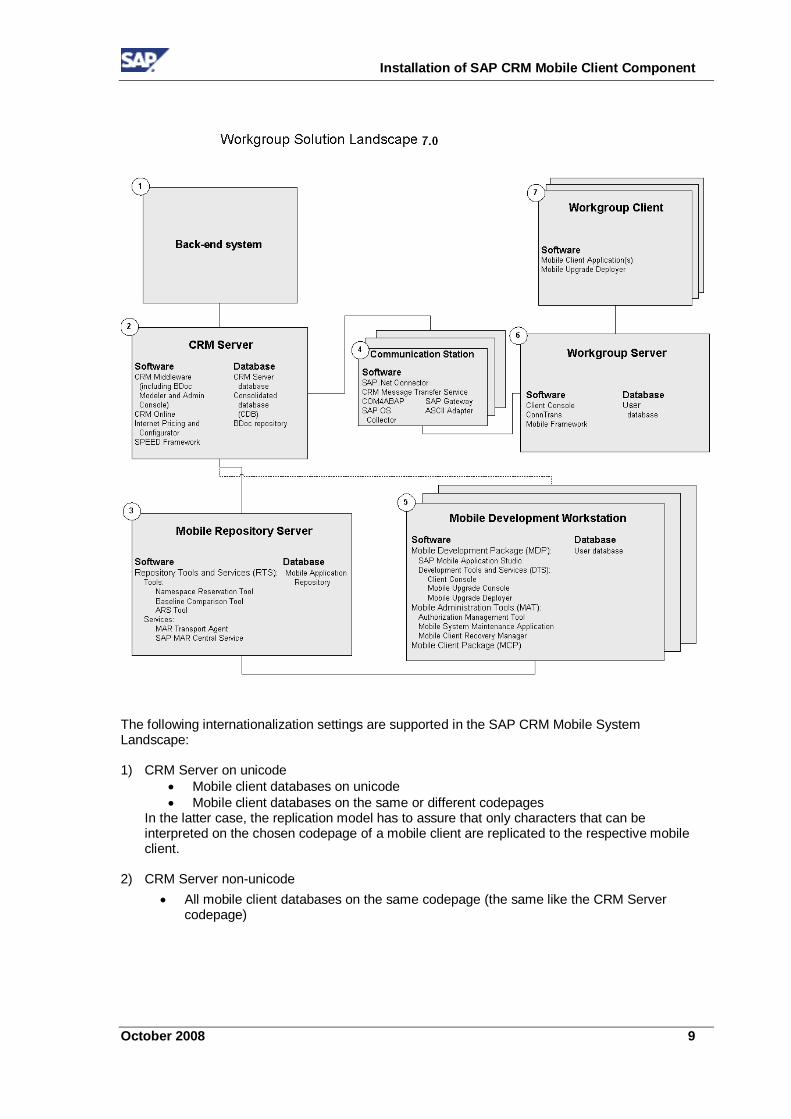
1 System LandscapeThe following diagrams depict the system landscape for a development environment, consolidation(Testing) environment, and production environment. Two scenarios are possible, a typical solutionand a workgroup solution. Each diagram contains the required machines for running the MobileClient solution software.
While all machines are required in the Production environment only, we recommendthat you set up an identical landscape in all three environments.
This installation routine does not include the installation routines for the back-end system, the CRMServer, nor the Communication Station. The back-end server, the CRM Server, and theCommunication Station are included in the diagrams to provide a complete system landscape; thenumbers representing each machine indicate the order in which these machines must be installed.The Mobile Client Component: Application installation assumes that the back-end system and theCRM Server are already in place.
Installation of SAP CRM Mobile Client Component
October 2008 9
The following internationalization settings are supported in the SAP CRM Mobile SystemLandscape:
1) CRM Server on unicode Mobile client databases on unicode Mobile client databases on the same or different codepages
In the latter case, the replication model has to assure that only characters that can beinterpreted on the chosen codepage of a mobile client are replicated to the respective mobileclient.
2) CRM Server non-unicode All mobile client databases on the same codepage (the same like the CRM Server
codepage)
System Landscape
10 October 2008
For more information on unicode enabled mobile clients, refer to SAP Note 985294.
For information on the various scenarios of the CRM server and the mobile client in a 7.0 SP01environment, refer to SAP Note 1018164.
Installation of SAP CRM Mobile Client Component
October 2008 11
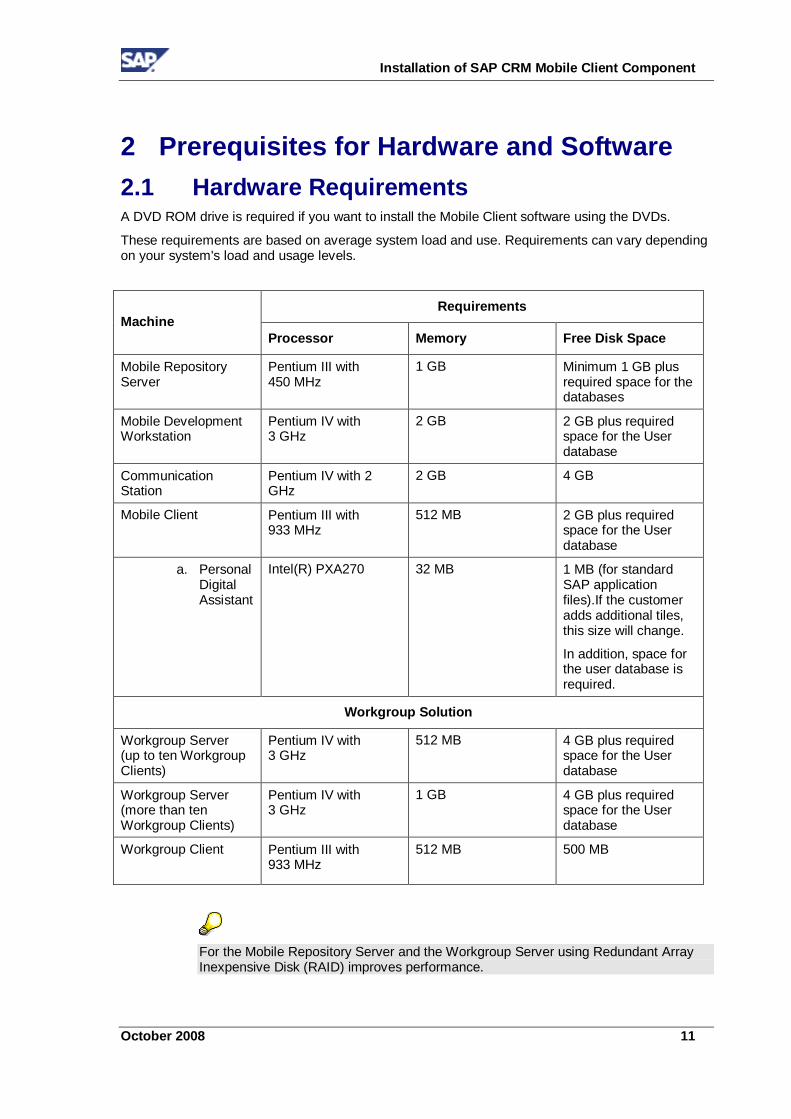
2 Prerequisites for Hardware and Software2.1 Hardware RequirementsA DVD ROM drive is required if you want to install the Mobile Client software using the DVDs.
These requirements are based on average system load and use. Requirements can vary dependingon your system's load and usage levels.
MachineRequirements
Processor Memory Free Disk Space
Mobile RepositoryServer
Pentium III with450 MHz
1 GB Minimum 1 GB plusrequired space for thedatabases
Mobile DevelopmentWorkstation
Pentium IV with3 GHz
2 GB 2 GB plus requiredspace for the Userdatabase
CommunicationStation
Pentium IV with 2GHz
2 GB 4 GB
Mobile Client Pentium III with933 MHz
512 MB 2 GB plus requiredspace for the Userdatabase
a. PersonalDigitalAssistant
Intel(R) PXA270 32 MB 1 MB (for standardSAP applicationfiles).If the customeradds additional tiles,this size will change.
In addition, space forthe user database isrequired.
Workgroup Solution
Workgroup Server(up to ten WorkgroupClients)
Pentium IV with3 GHz
512 MB 4 GB plus requiredspace for the Userdatabase
Workgroup Server(more than tenWorkgroup Clients)
Pentium IV with3 GHz
1 GB 4 GB plus requiredspace for the Userdatabase
Workgroup Client Pentium III with933 MHz
512 MB 500 MB
For the Mobile Repository Server and the Workgroup Server using Redundant ArrayInexpensive Disk (RAID) improves performance.

Prerequisites for Hardware and Software
12 October 2008
If the total number of records in a fresh Mobile Client Companion database is around40,000 records, then the approximate size of the sdf file will be 15 MB.
The size of the user database on a Mobile Client is directly proportional to the amount of datadownloaded to the Mobile Client from the CRM Server.
The size of the user database on a Mobile Client Companion is directly proportional to the amount ofdata downloaded to it from the Mobile Client.

Installation of SAP CRM Mobile Client Component
October 2008 13
2.2 Software RequirementsFor Mobile Repository Server
Microsoft Windows 2000 SP04 and above, Microsoft Windows 2003 Server, Microsoft WindowsXP SP02, Microsoft Windows Vista.
Microsoft Internet Explorer version IE 6.0, SP 01, SP02, IE 7.0
MSSQL Server 2000 SP04 and above (Standard or Enterprise Edition) or SQL Server 2005 upto SP02 (Developer or Enterprise Edition).
For information about compatibility between different versions of Microsoft Windowsand Microsoft SQL Server, see the documentation provided by Microsoft atwww.microsoft.com.
MSSQL Server installation should be checked for ‘Mixed mode’ and ‘Default instance’during installation.
Some of the Microsoft SQL Server Editions (Express) have size limitations on themaximum size of the database file that can be handled by the server. For moreinformation on threshold values and other configuration details, please refer Microsoftwebsite to get updated results.
Please refer to the Microsoft website for information on the terms of use andrestrictions for the individual product versions.
MSSQL Server 2000 SP04 and above installs a default instance and allows you toinstall several (named) instances. The SAP CRM Mobile Client Component databasesmust be installed in the default instance of MSSQL Server 2000 SP04 and above.
For more information about SQL Server instances, see the documentation provided byMicrosoft at www.microsoft.com.
Microsoft .NET Framework Runtime 2.0
SUN Java 2 Software Development Kit version 1.4.2_02 to 1.4.2_09
Sun Java 2 Runtime Environment, Standard Edition Version 1.4.2_07 to 1.4.2_09
http://java.sun.com/j2se/1.4.2/download.html
For the latest information about Java 2 Runtime Environment, refer to SAPNote433855.
Software required on the Mobile Repository Server for the Mobile Client Companionapplication
Prerequisites for Hardware and Software
14 October 2008
Embedded Visual Tools 3.0 (Install embedded Visual Tools 3.0 and Microsoft Windows SDK forPocket PC 2002). This is required only for migration from lower version (CRM4.0)
For Mobile Development Workstation
The Mobile Development Workstation installation package includes the MobileApplication Studio, the Mobile Client Application(s), and the Mobile SystemMaintenance application. For this reason all third-party software is a prerequisite onthis machine.
Microsoft Windows 2000 SP04 and above or Microsoft Windows XP SP02 Microsoft Internet Explorer version IE 6.0, SP 01, SP02, IE 7.0
MSSQL Server 2000 SP04 and above (Standard or Enterprise Edition) or SQL Server 2005 upto SP02 (Developer or Enterprise Edition).
For information about compatibility between different versions of Microsoft Windowsand Microsoft SQL Server, see the documentation provided by Microsoft atwww.microsoft.com.
MSSQL Server installation should be checked for ‘Mixed mode’ and ‘Default instance’during installation.
Some of the Microsoft SQL Server Editions (Express) have size limitations on themaximum size of the database file that can be handled by the server. For moreinformation on threshold values and other configuration details, please refer Microsoftwebsite to get updated results.
Please refer to the Microsoft website for information on the terms of use andrestrictions for the individual product versions.
MSSQL Server 2000 SP04 and above installs a default instance and allows you toinstall several (named) instances. The SAP CRM Mobile Client Component databasesmust be installed in the default instance of MSSQL Server 2000 SP04 and above.
For more information about SQL Server instances, see the documentation provided byMicrosoft at www.microsoft.com.
Microsoft .NET Framework Runtime 2.0
SUN Java 2 Software Development Kit version 1.4.2_02 to 1.4.2_09
Sun Java 2 Runtime Environment, Standard Edition Version 1.4.2_07 to 1.4.2_09
http://java.sun.com/j2se/1.4.2/download.html
Microsoft Visual Studio.NET 2005 (Professional or Enterprise Edition)
Installation of SAP CRM Mobile Client Component
October 2008 15
Microsoft Visual Studio 2005 Documentation should be installed with Microsoft VisualStudio 2005 installation.
Microsoft Office 2000 SR1, Microsoft Office XP, Microsoft Office 2003 or Microsoft Office2007(Complete Installation)
ARS cache size of 200 MB
The Mobile Development Workstation installation package includes the SAP Mobile
Application Studio, administration tools, and the Mobile Client Application(s).
Microsoft Outlook 2000 (optional, for integration with Mobile Client Daily Activities/ Calendar)
Lotus Notes 5.0 (optional, for integration with Mobile Client Daily Activities/Calendar)
Seagate Crystal Reports 10.0(optional, required if you want to design your own reports)
Adobe Acrobat Reader 6.0 (optional)
PcAnywhere (optional; required for support). If you use Microsoft Windows 2000 SP04 andabove, make sure that PcAnywhere is version 9.2.1
Additional software requirements for Mobile Client Companion
Microsoft ActiveSync 4.0 or higher(based on device requirements)
Windows Mobile 5.0 SDK
Embedded Visual Tools 3.0 (Install embedded Visual Tools 3.0 and Microsoft Windows SDKfor Pocket PC 2002). This is required only for migration from Lower versions (CRM 4.0).
For Communication Station
Microsoft Windows NT Enterprise or Server 4.0, SP 4 or higher or Microsoft Windows 2000SP04 and above ServerU.S. versions only
For Mobile Client
Microsoft Windows 2000 SP04 and above, Windows XP SP02, Microsoft Windows Vista. Microsoft Internet Explorer version IE 6.0, SP 01, SP02 and IE 7.0
MSSQL Server 2000 SP04 and above (Standard or Enterprise Edition) or SQL Server 2005 upto SP02 (Developer or Enterprise Edition).
MSSQL Server installation should be checked for ‘Mixed mode’ and ‘Default instance’during installation.
Some of the Microsoft SQL Server Editions (Express) have size limitations on themaximum size of the database file that can be handled by the server. For more
Prerequisites for Hardware and Software
16 October 2008
information on threshold values and other configuration details, please refer Microsoftwebsite to get updated results.
Please refer to the Microsoft website for information on the terms of use andrestrictions for the individual product versions.
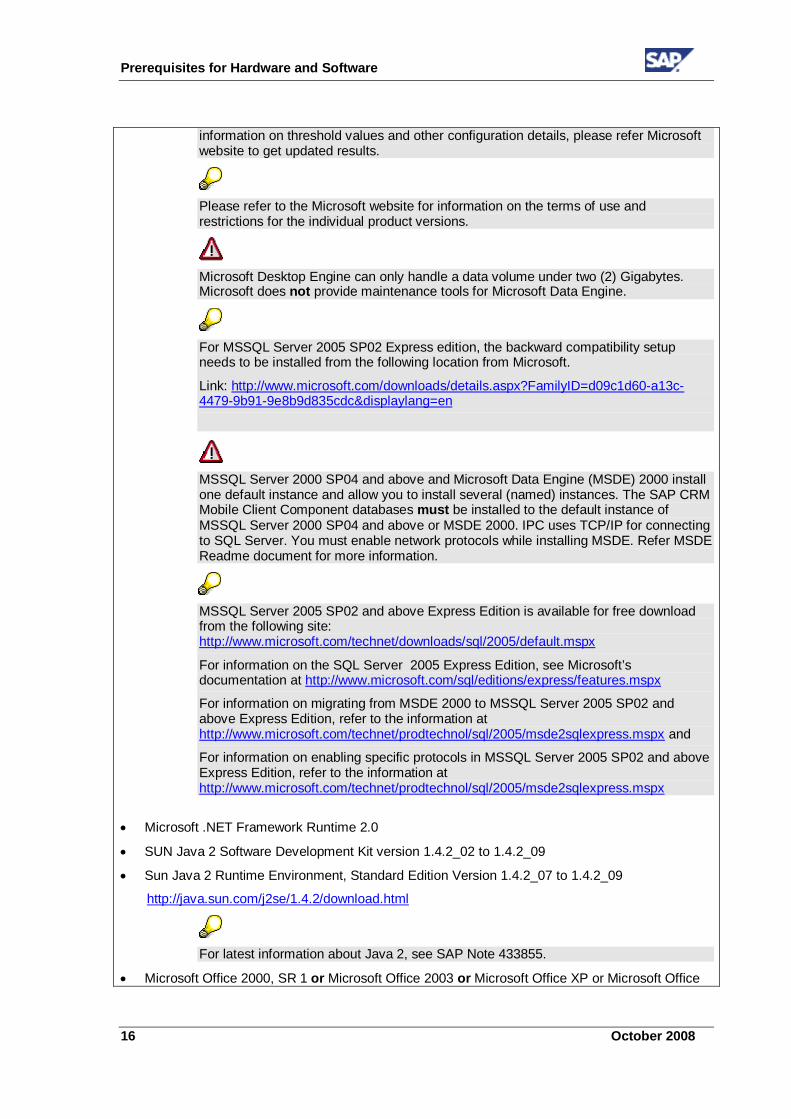
Microsoft Desktop Engine can only handle a data volume under two (2) Gigabytes.Microsoft does not provide maintenance tools for Microsoft Data Engine.
For MSSQL Server 2005 SP02 Express edition, the backward compatibility setupneeds to be installed from the following location from Microsoft.
Link: http://www.microsoft.com/downloads/details.aspx?FamilyID=d09c1d60-a13c-4479-9b91-9e8b9d835cdc&displaylang=en
MSSQL Server 2000 SP04 and above and Microsoft Data Engine (MSDE) 2000 installone default instance and allow you to install several (named) instances. The SAP CRMMobile Client Component databases must be installed to the default instance ofMSSQL Server 2000 SP04 and above or MSDE 2000. IPC uses TCP/IP for connectingto SQL Server. You must enable network protocols while installing MSDE. Refer MSDEReadme document for more information.
MSSQL Server 2005 SP02 and above Express Edition is available for free downloadfrom the following site:http://www.microsoft.com/technet/downloads/sql/2005/default.mspx
For information on the SQL Server 2005 Express Edition, see Microsoft’sdocumentation at http://www.microsoft.com/sql/editions/express/features.mspx
For information on migrating from MSDE 2000 to MSSQL Server 2005 SP02 andabove Express Edition, refer to the information athttp://www.microsoft.com/technet/prodtechnol/sql/2005/msde2sqlexpress.mspx and
For information on enabling specific protocols in MSSQL Server 2005 SP02 and aboveExpress Edition, refer to the information athttp://www.microsoft.com/technet/prodtechnol/sql/2005/msde2sqlexpress.mspx
Microsoft .NET Framework Runtime 2.0
SUN Java 2 Software Development Kit version 1.4.2_02 to 1.4.2_09
Sun Java 2 Runtime Environment, Standard Edition Version 1.4.2_07 to 1.4.2_09
http://java.sun.com/j2se/1.4.2/download.html
For latest information about Java 2, see SAP Note 433855.
Microsoft Office 2000, SR 1 or Microsoft Office 2003 or Microsoft Office XP or Microsoft Office
Installation of SAP CRM Mobile Client Component
October 2008 17
2007(Complete Installation)
Microsoft Outlook 2000 (optional, for integration with Mobile Client Daily Activities/ Calendar)
Lotus Notes 5.0 (optional, for integration with Mobile Client Daily Activities/Calendar)
Adobe Acrobat Reader 6.0 (optional)
PcAnywhere (optional; required for support).For Microsoft Windows 2000 SP04 and above,install version 9.2.1
Software required on the Mobile Client for the Mobile Client Companion application
Microsoft ActiveSync 4.0 or higher(based on device requirements)
For Personal Digital Assistant
Operating System - Windows Mobile 2003 Second Edition or Windows Mobile 2005 only
Microsoft .NET Compact Framework Runtime 2.0 Redistributable (SP2 or above)
Windows Mobile 5.0 SDK
Microsoft SQL Mobile 2005 (Including SQL Mobile 2005 Replication)
SQL Client 2.0
These software is present with installation of the Microsoft .NET Visual Studio, however do check forthe latest SP releases.
Prerequisites for Hardware and Software
18 October 2008
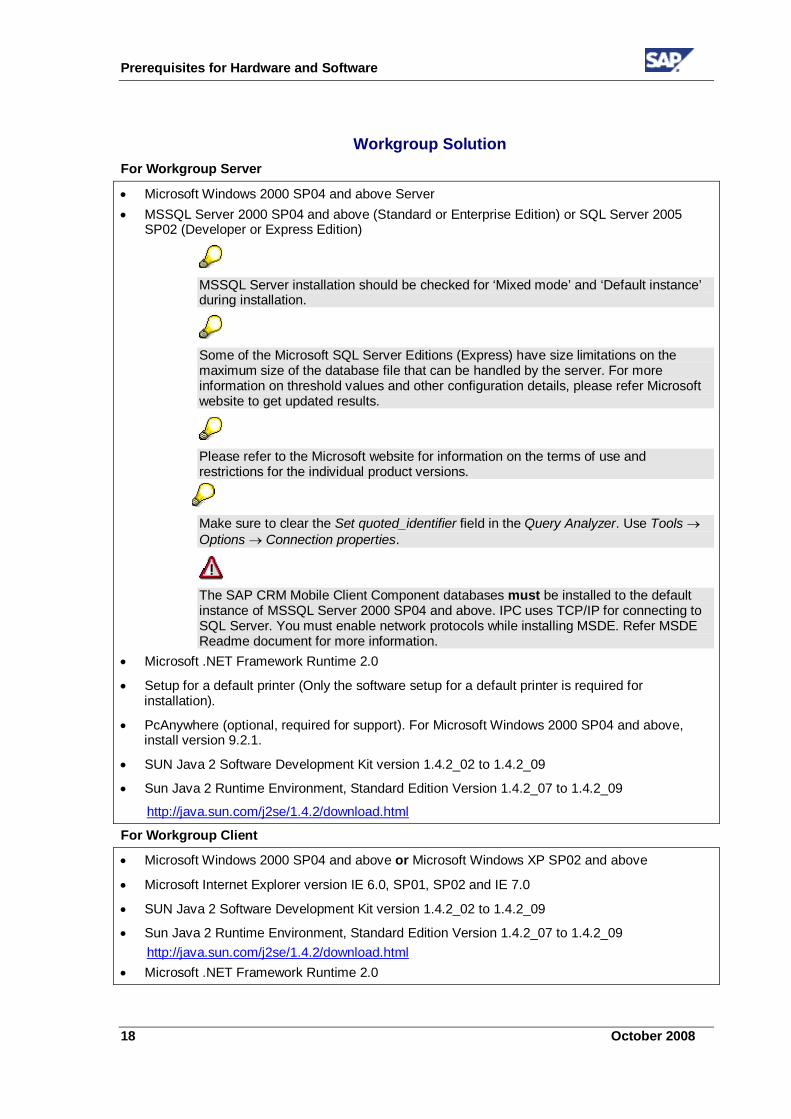
Workgroup SolutionFor Workgroup Server
Microsoft Windows 2000 SP04 and above Server MSSQL Server 2000 SP04 and above (Standard or Enterprise Edition) or SQL Server 2005
SP02 (Developer or Express Edition)
MSSQL Server installation should be checked for ‘Mixed mode’ and ‘Default instance’during installation.
Some of the Microsoft SQL Server Editions (Express) have size limitations on themaximum size of the database file that can be handled by the server. For moreinformation on threshold values and other configuration details, please refer Microsoftwebsite to get updated results.
Please refer to the Microsoft website for information on the terms of use andrestrictions for the individual product versions.
Make sure to clear the Set quoted_identifier field in the Query Analyzer. Use ToolsOptions Connection properties.
The SAP CRM Mobile Client Component databases must be installed to the defaultinstance of MSSQL Server 2000 SP04 and above. IPC uses TCP/IP for connecting toSQL Server. You must enable network protocols while installing MSDE. Refer MSDEReadme document for more information.
Microsoft .NET Framework Runtime 2.0
Setup for a default printer (Only the software setup for a default printer is required forinstallation).
PcAnywhere (optional, required for support). For Microsoft Windows 2000 SP04 and above,install version 9.2.1.
SUN Java 2 Software Development Kit version 1.4.2_02 to 1.4.2_09
Sun Java 2 Runtime Environment, Standard Edition Version 1.4.2_07 to 1.4.2_09
http://java.sun.com/j2se/1.4.2/download.html
For Workgroup Client
Microsoft Windows 2000 SP04 and above or Microsoft Windows XP SP02 and above
Microsoft Internet Explorer version IE 6.0, SP01, SP02 and IE 7.0
SUN Java 2 Software Development Kit version 1.4.2_02 to 1.4.2_09
Sun Java 2 Runtime Environment, Standard Edition Version 1.4.2_07 to 1.4.2_09http://java.sun.com/j2se/1.4.2/download.html
Microsoft .NET Framework Runtime 2.0
Installation of SAP CRM Mobile Client Component
October 2008 19
Database Server Client Connectivity Components (SQLDMO)
Microsoft Office 2000, SR 1 or Microsoft Office 2003 or Microsoft Office XP or Microsoft Office2007(Complete Installation)
Microsoft Outlook 2000 (optional, for integration with Mobile Client Daily Activities/ Calendar)
Lotus Notes 5.0 (optional, for integration with Mobile Client Daily Activities/ Calendar)
Adobe Acrobat Reader 6.0 (optional)
PcAnywhere (optional, required for support). For Microsoft Windows 2000 SP04 and above,install version 9.2.1.
Software required on the Mobile Client for the Mobile Client Companion application
Microsoft ActiveSync 4.0 or higher(based on device requirements)
• The CRM Mobile Client Component requires approximately 5 MB of freespace on the registry.
• If you are using Microsoft SQL Server, you must purchase the appropriatelicenses from Microsoft.
• Make sure that you have installed the most current Microsoft SQL ServerService Pack. For more information, see SAP Note 62988.
• The SAP collective note for Field Sales installation and setup is SAP Note1226055.

Machine Descriptions and Installation Process
20 October 2008
3 Machine Descriptions and InstallationProcess
Use the installation DVDs to install CRM Mobile Client Component: Applications software on thefollowing machines.
Mobile Repository Server Mobile Development Workstation Mobile Client Workgroup Server Workgroup Client
3.1 Machine DescriptionsThe following table provides the names of the machines required for running the Mobile Clientsoftware and a description of each.
Machine Description CRM Software / Database
Back-end server
This installationpackage assumes thatthis system is alreadyin place.
This refers to any type ofonline transaction processingsystem with which you want toshare data. This can be anSAP R/3 system or any othertype of business applicationservice.
Not applicable
CRM server
The installationprogram and setupinformation are notcontained in thisdocument. See theCRM/EBP ServerInstallation Guide andthe CRM ServerConfiguration for moreinformation.
Server designated for all CRMMiddleware software and theConsolidated Database
Middleware Services andAdapters
CRM Server Component Application Database
(ADB) Admin Console BDoc Activation Consolidated Database
(DVDB) CRM DDIC BDoc Repository Middleware Queues ARS Transport Queues ARS Transport System

Installation of SAP CRM Mobile Client Component
October 2008 21
Machine Description CRM Software / Database
Mobile Repository Server Server designated for thecentral Mobile ApplicationRepository and test applicationdatabase
Mobile ApplicationRepository
MAR Central Server Reservation tool for
customer name spaces ARS Transport Agent
Service ARS Transport Order
Service
Mobile DevelopmentWorkstation
Server, PC, or laptopdesignated for customizingand designing the MobileClient Component:Applications and for assigninguser access definitions andtemplates, if required, forusing the Mobile ClientComponent: Application(s).
Mobile Application Studio
Mobile ClientApplication(s)
Upgrade Console Mobile Framework (UI,
BOL, TL) Authorization
Management Tool (AMT)(Only required for the testand productionenvironments)
Mobile SystemMaintenance
Communication Station Machine designated forexchanging data between theCRM server and MobileClients.
See the CommunicationStation Guide.
Mobile Client Server, PC, or laptop whichsales and service people usefor their work.
Mobile Client Application Client Upgrade Console Mobile Framework (UI,
BOL, TL) ConnTrans Client Console User database Internet Pricing and
Configurator MS Outlook / Lotus Notes
integration (optional)
Workgroup Server Server designated for storingthe central database to whichthe Workgroup Clientsconnect. The server isconnected to the CRM Servervia the CommunicationStation.
User database ConnTrans ConnTransService ClientConsole
Machine Description CRM Software / Database
Machine Descriptions and Installation Process
22 October 2008
Workgroup Client PC or laptops which connectto the Workgroup Server touse the same databaseconcurrently.
Mobile Application Internet Pricing and
Configurator Mobile Framework (UI,
BOL, TL)
3.2 Mobile Repository ServerThe Mobile Application Repository resides on this server. We recommend that you install thedevelopment, test, and production environment Mobile Application Repositories on separatemachines.
3.3 Mobile Development WorkstationThis machine contains software for system administration, development, and maintenance tasks.The software includes the following components. Mobile Application Studio (MAS) System Maintenance application for Mobile Sales, Mobile Sales Consumer Packaged Goods,
Mobile Service and Mobile Sales Pharmaceuticals
The MAS is an integrated development environment with which you can customize your MobileClient Application. The MAS requires a connection to the Mobile Application Repository on theMobile Repository Server. We recommend that you install the MAS on its own machine or laptop.Doing so allows you to have several developers working on customization changes simultaneously.MAS Workstations can access the same repository concurrently. In the test and productionenvironments, we recommend that one MAS Workstation be dedicated to the Mobile ApplicationRepository on each Mobile Repository Server for emergency fixes.
3.4 Workgroup ServerThe Workgroup scenario allows a group of employees to share a User database on a commonserver. The server also contains the files required to enable the Workgroup Client applications tosend data to the CRM server. In this case the Workgroup Server replicates data from the CRMserver.
3.5 Mobile ClientSales and service representatives use the CRM Mobile Client Applications in or out of the office.You can install either a Mobile Client or a Workgroup Client. You can also use this installationprogram to install a demo client version of each. The demo client uses a pre-filled demo Userdatabase; this database is not replicated with the CRM Server.
You can choose among three types of Mobile Sales Applications. Mobile Sales Mobile Sales Consumer Packaged Goods Mobile Sales Pharmaceuticals
You can choose between two types of Mobile Service Applications. Mobile Service Client
Installation of SAP CRM Mobile Client Component
October 2008 23
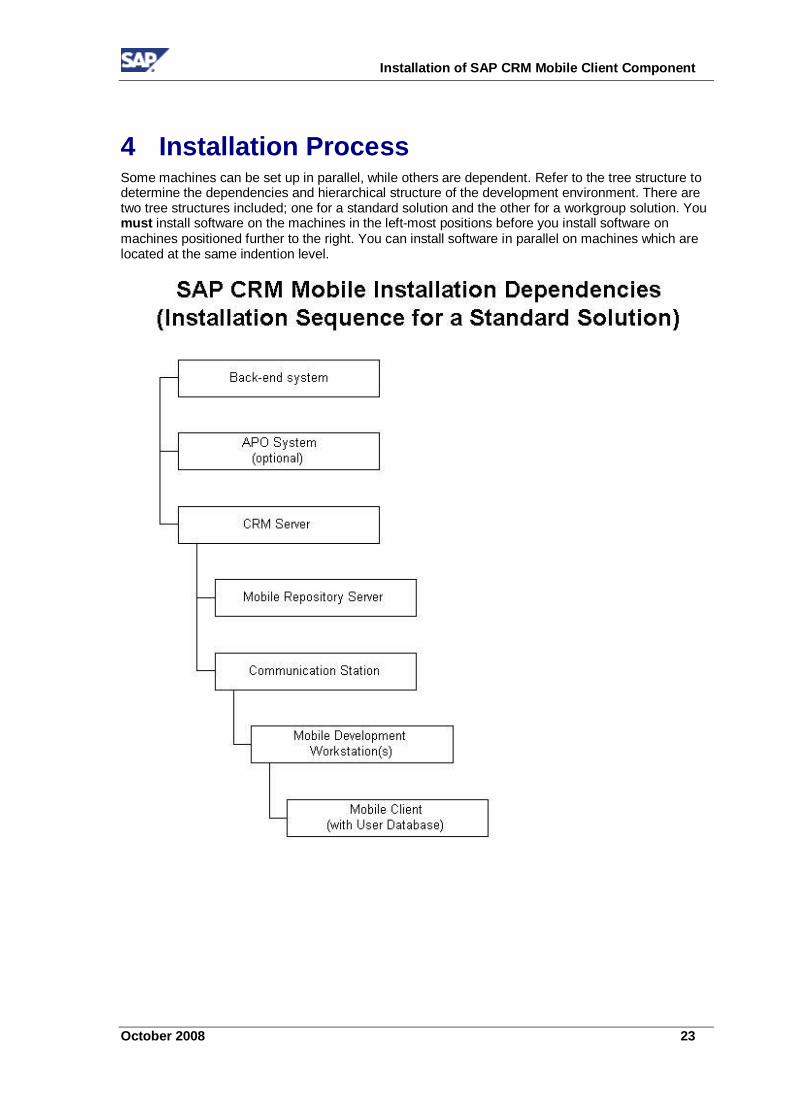
4 Installation ProcessSome machines can be set up in parallel, while others are dependent. Refer to the tree structure todetermine the dependencies and hierarchical structure of the development environment. There aretwo tree structures included; one for a standard solution and the other for a workgroup solution. Youmust install software on the machines in the left-most positions before you install software onmachines positioned further to the right. You can install software in parallel on machines which arelocated at the same indention level.

Installation Process
24 October 2008
4.1 Development Environment InstallationProcess
After you install the CRM server, make sure that you have all components in place for the MobileClient Component: Applications scenario. In the development environment, you must installsoftware on the CRM Server, the Mobile Repository Server, and the Mobile DevelopmentWorkstation. These machines and the back-end system are mandatory for the Mobile Sales
Installation of SAP CRM Mobile Client Component
October 2008 25
Development environment. The other machines are optional, unless you want to perform the initialdownload and do some preliminary testing in the development environment before moving into thetest environment.
We recommend that you use the same setup in your development, test, and productionenvironments. This ensures that you develop and test in an environment similar to theenvironment you use productively.
Installation Process
26 October 2008
4.2 Test and Production Environment InstallationProcess
After you install the CRM server, make sure that you have all components in place for the MobileClient Component: Applications scenario. In the test environment, you must install software on theCRM Server, the Mobile Repository Server, the Mobile Development Workstation, the Mobile AdminWorkstation and the Mobile Client for a typical solution. If you are using the Workgroup solution,then you must have software installed on a Workgroup Server as well.
We recommend that you use the same setup in your development, test, and productionenvironments. This ensures that you develop and test in an environment similar to theenvironment you use productively.

Installation of SAP CRM Mobile Client Component
October 2008 27
5 Installing the Mobile Client Component:Applications
The installation tools first check the machine to ensure that the prerequisite hardware and softwarecomponents exist. If the installation program cannot find the prerequisite software and hardware, itsends error messages and aborts the installation process. The installation also checks for the user'sauthorization. You must have administrator rights in Microsoft Windows operating system in order toinstall the Mobile Client Component and Applications.
5.1 Contents of the Installation DVDsThis package contains two installation DVDs.
CRM Mobile Client Installation (SAPDVD: Mobile Client Installation) contains the followingdirectories and software.
This directory... Contains...
Communication Station The SAP Communications setup program.
Documentation The documentation index for the Mobile ClientInstallation/Upgrade DVDs
MARLanguageInstallation Additional Mobile Application RepositoryLanguages.
Mobile_Client_Installation Files and folders required for the installation ofMobile Client.
html The files for SAP CRM Mobile ClientComponent HTML Page
Consolidated Prefill The file with standard customization data to beused by the Mobile System Maintenance(MSY) application
Env Files The Mobile Client,Mobile ApplicationRepository,Development Workstation EnvFiles.
Groupware Integration The setup program for installing the groupwaresynchronization software.
SAP Mobile Application Studio help Integration To Access MSDN from Mobile ApplicationStudio.
SwitchDB Files required for the installation of Databases.
The following files are also present in the CD Structure.
1) AUTORUN.INF – the setup information
2) favicon.ico – the SAP icon image
3) msvbvm50.dll – Visual Basic Virtual Machine
4) README.TXT – A text file containing information on the start.html
5) Start.exe – The Mobile Client Installation file
6) start.htm – Starts the internet browser to install the Mobile Client Application
Installing the Mobile Client Component: Applications
28 October 2008
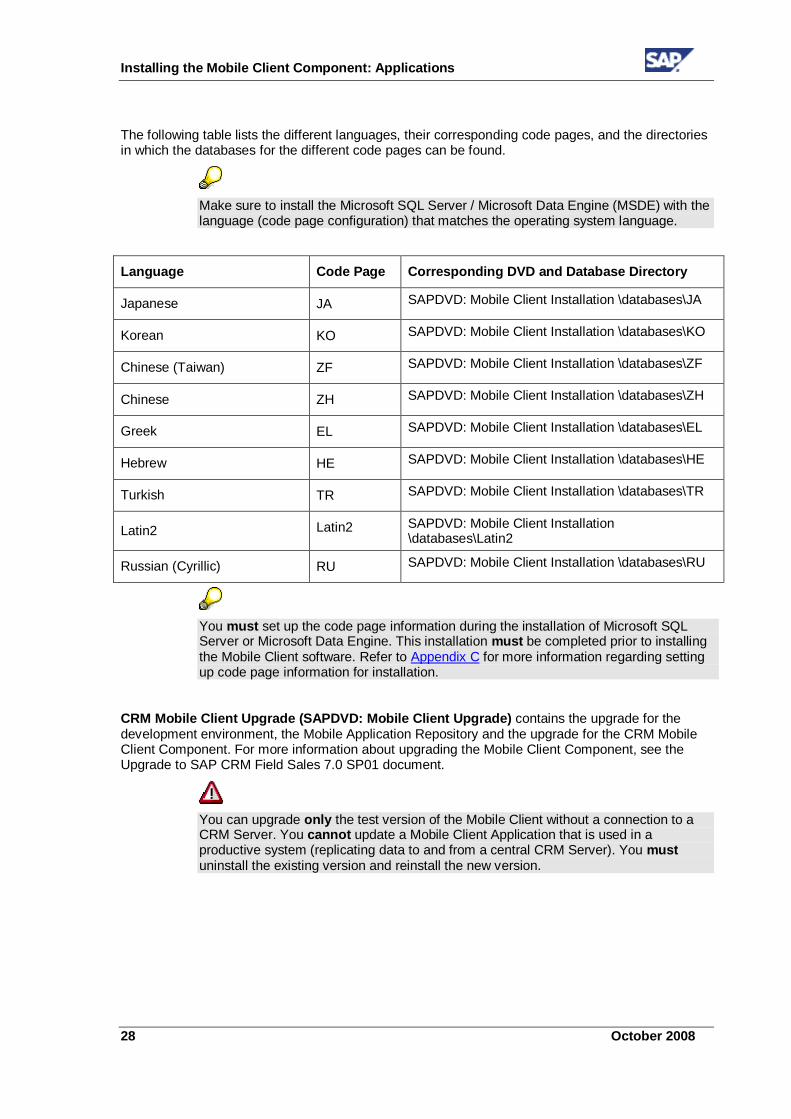
The following table lists the different languages, their corresponding code pages, and the directoriesin which the databases for the different code pages can be found.
Make sure to install the Microsoft SQL Server / Microsoft Data Engine (MSDE) with thelanguage (code page configuration) that matches the operating system language.
Language Code Page Corresponding DVD and Database Directory
Japanese JA SAPDVD: Mobile Client Installation \databases\JA
Korean KO SAPDVD: Mobile Client Installation \databases\KO
Chinese (Taiwan) ZF SAPDVD: Mobile Client Installation \databases\ZF
Chinese ZH SAPDVD: Mobile Client Installation \databases\ZH
Greek EL SAPDVD: Mobile Client Installation \databases\EL
Hebrew HE SAPDVD: Mobile Client Installation \databases\HE
Turkish TR SAPDVD: Mobile Client Installation \databases\TR
Latin2 Latin2 SAPDVD: Mobile Client Installation\databases\Latin2
Russian (Cyrillic) RU SAPDVD: Mobile Client Installation \databases\RU
You must set up the code page information during the installation of Microsoft SQLServer or Microsoft Data Engine. This installation must be completed prior to installingthe Mobile Client software. Refer to Appendix C for more information regarding settingup code page information for installation.
CRM Mobile Client Upgrade (SAPDVD: Mobile Client Upgrade) contains the upgrade for thedevelopment environment, the Mobile Application Repository and the upgrade for the CRM MobileClient Component. For more information about upgrading the Mobile Client Component, see theUpgrade to SAP CRM Field Sales 7.0 SP01 document.
You can upgrade only the test version of the Mobile Client without a connection to aCRM Server. You cannot update a Mobile Client Application that is used in aproductive system (replicating data to and from a central CRM Server). You mustuninstall the existing version and reinstall the new version.

Installation of SAP CRM Mobile Client Component
October 2008 29
5.2 General Installation Instructions for MobileClient Component
You can choose between two types of installation. You can install Mobile Client Component directlyfrom the DVD, or you can create a network share installation by setting up a network installationarea and copying the DVDs onto the network share.
5.2.1 PrerequisitesYou must have administrator rights in Microsoft Windows operating system in order to install theMobile Client Component: Applications.
Make sure that Microsoft SQL Server or Microsoft Data Engine (MSDE) is installed on each machinerequiring a local database before starting the installation process. The user ID and password mustbe set to Microsoft's default setting. For more information, refer to Appendix C.
If you are using MSSQL Server 2000 SP04 and above, make sure to clear the Setquoted_identifier field in the Query Analyzer. Use Options Connection properties.
5.2.2 Setting Up a Network Installation Area1. Create a network share.
2. Copy the DVDs to the network share folder.
You must copy SAPDVD: Mobile Client Installation to a network share folder.
5.2.3 Installing Via Network Share1. On the target machine, connect to the network drive and map to the network installation area
share folder.
Make sure that you have mapped to the network drive. Using a machine namerather than a mapped drive may cause the installation to fail.
Make sure you select Reconnect at Logon when you establish the networkconnection to the drive.
Make sure the installation path for the network drive does not contain any blanks.
2. In the \\<Mapped Drive> path, select start.exe.
The first installation screen opens in Microsoft Internet Explorer.
3. Continue with step 3 in the next section, Installing Via DVD.
Installing the Mobile Client Component: Applications
30 October 2008
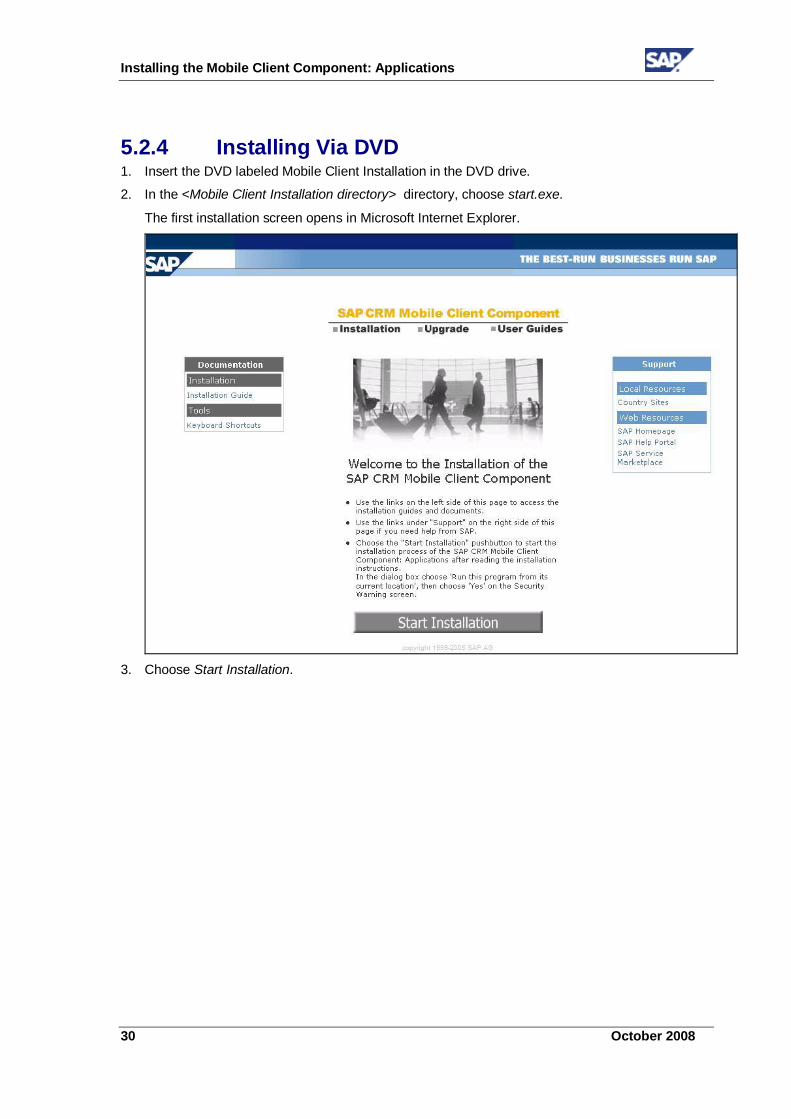
5.2.4 Installing Via DVD1. Insert the DVD labeled Mobile Client Installation in the DVD drive.
2. In the <Mobile Client Installation directory> directory, choose start.exe.
The first installation screen opens in Microsoft Internet Explorer.
3. Choose Start Installation.
Installation of SAP CRM Mobile Client Component
October 2008 31
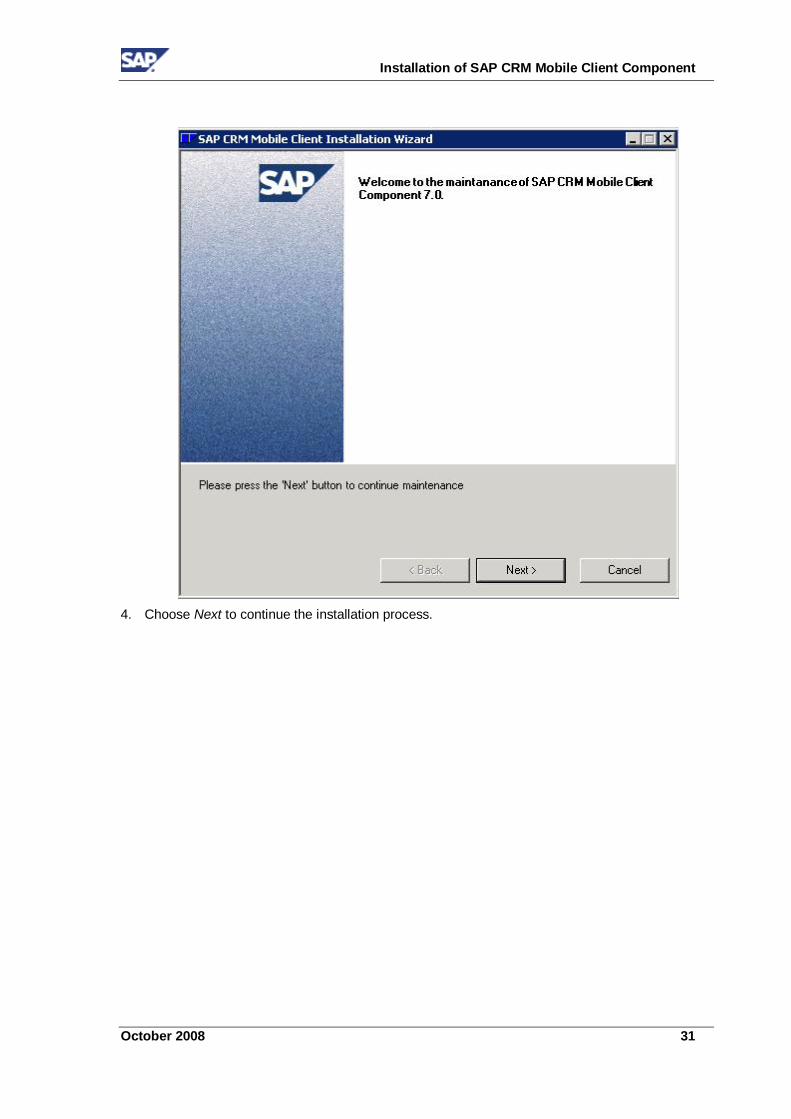
4. Choose Next to continue the installation process.

Installing the Mobile Client Component: Applications
32 October 2008
5. Choose Next to accept the path for the installation's destination folder on your PC.-or-Choose Change to use a customized path as the installation's destination folder, then chooseNext.
If you choose a different destination folder, the installation program insures that thepath string contains ..\SAP\Mobile\ at the end.
Installation of SAP CRM Mobile Client Component
October 2008 33
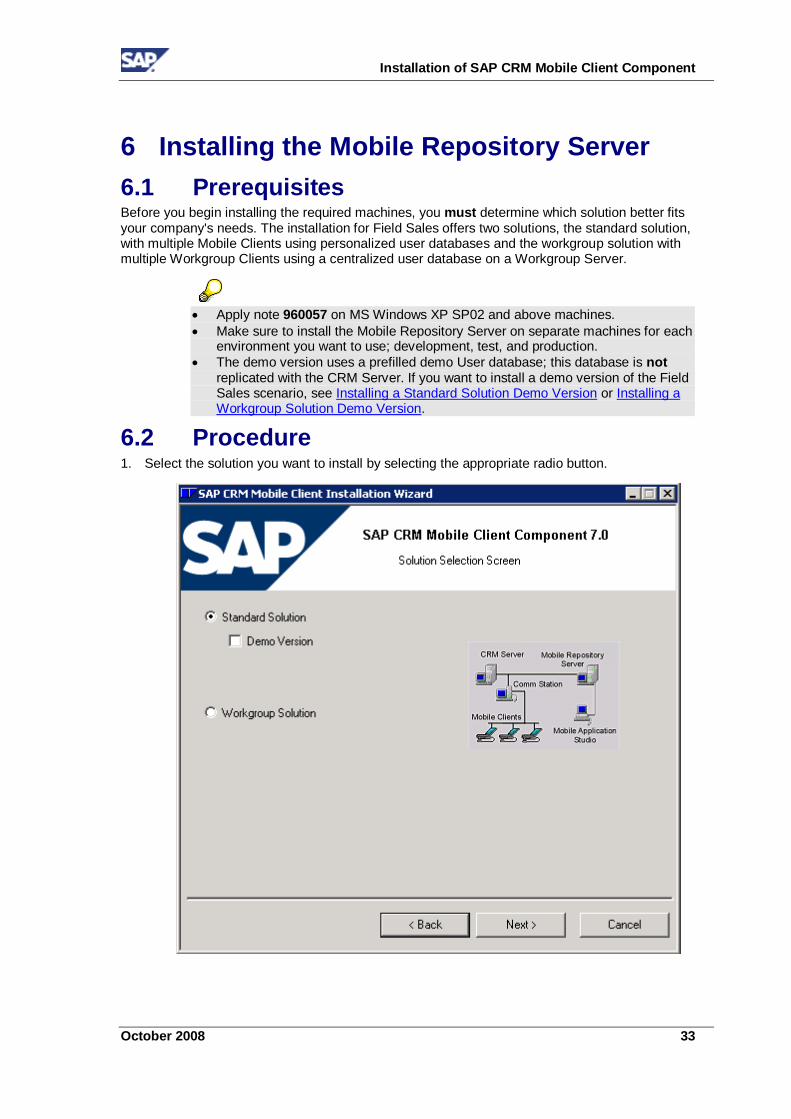
6 Installing the Mobile Repository Server6.1 PrerequisitesBefore you begin installing the required machines, you must determine which solution better fitsyour company's needs. The installation for Field Sales offers two solutions, the standard solution,with multiple Mobile Clients using personalized user databases and the workgroup solution withmultiple Workgroup Clients using a centralized user database on a Workgroup Server.
Apply note 960057 on MS Windows XP SP02 and above machines. Make sure to install the Mobile Repository Server on separate machines for each
environment you want to use; development, test, and production. The demo version uses a prefilled demo User database; this database is not
replicated with the CRM Server. If you want to install a demo version of the FieldSales scenario, see Installing a Standard Solution Demo Version or Installing aWorkgroup Solution Demo Version.
6.2 Procedure1. Select the solution you want to install by selecting the appropriate radio button.
Installing the Mobile Repository Server
34 October 2008
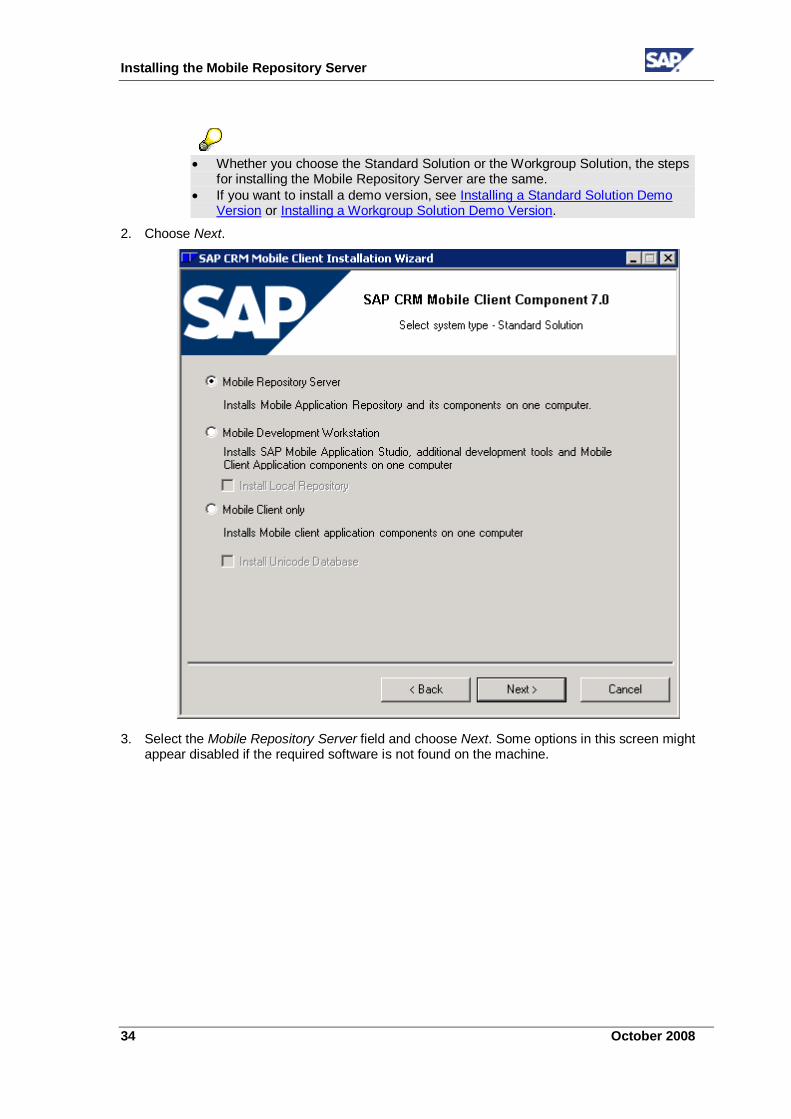
Whether you choose the Standard Solution or the Workgroup Solution, the stepsfor installing the Mobile Repository Server are the same.
If you want to install a demo version, see Installing a Standard Solution DemoVersion or Installing a Workgroup Solution Demo Version.
2. Choose Next.
3. Select the Mobile Repository Server field and choose Next. Some options in this screen mightappear disabled if the required software is not found on the machine.

Installation of SAP CRM Mobile Client Component
October 2008 35
4. Please enter the following Middle related settings.
Field Description
System ID System ID of the CRM Server
Message Server The URL of the message server
Description A textual description of the entry
Port The TCP/IP port on which the message server islistening.
User ID User ID to connect to CRM Server
Password Password used to connect to CRM Server
Language Enter the appropriate Local ID like EN/DE
Site ID Name of the client in the Administrative Consoleof the CRM Server
Client Client of the CRM Server.
You can ignore this screen if you would like to manually configure the sapmsg.ini and theservices file later.
Installing the Mobile Repository Server
36 October 2008
Installation of SAP CRM Mobile Client Component
October 2008 37
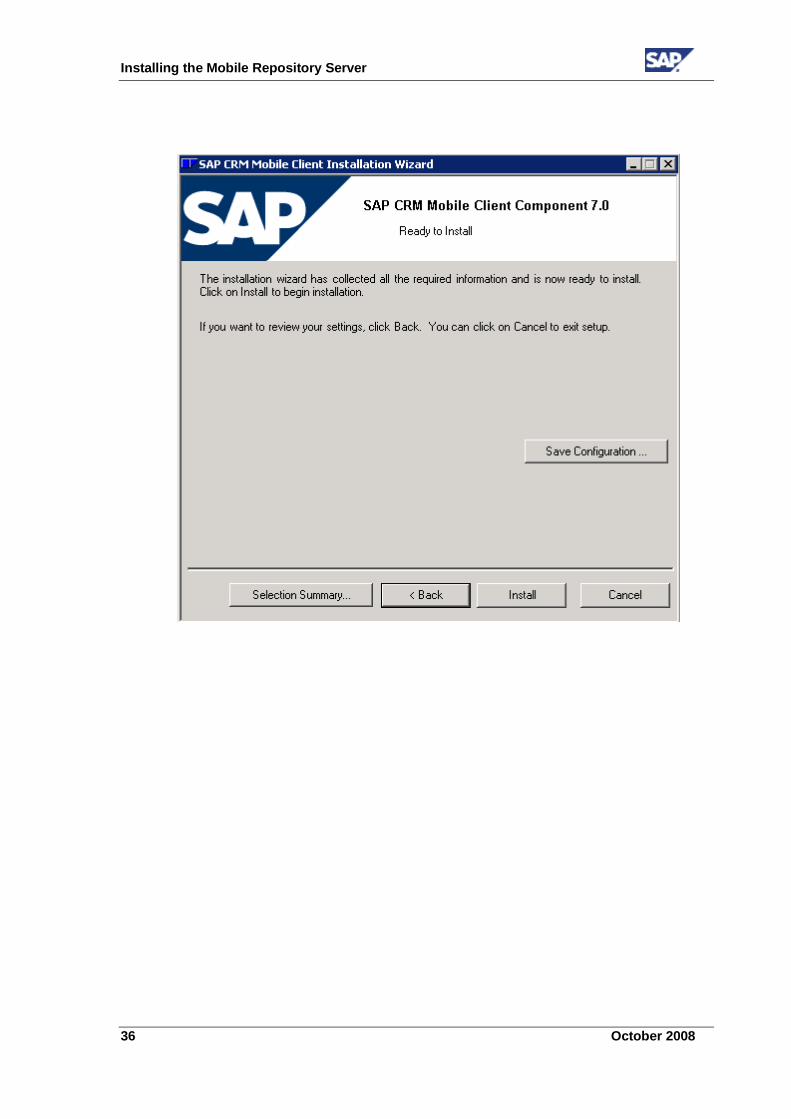
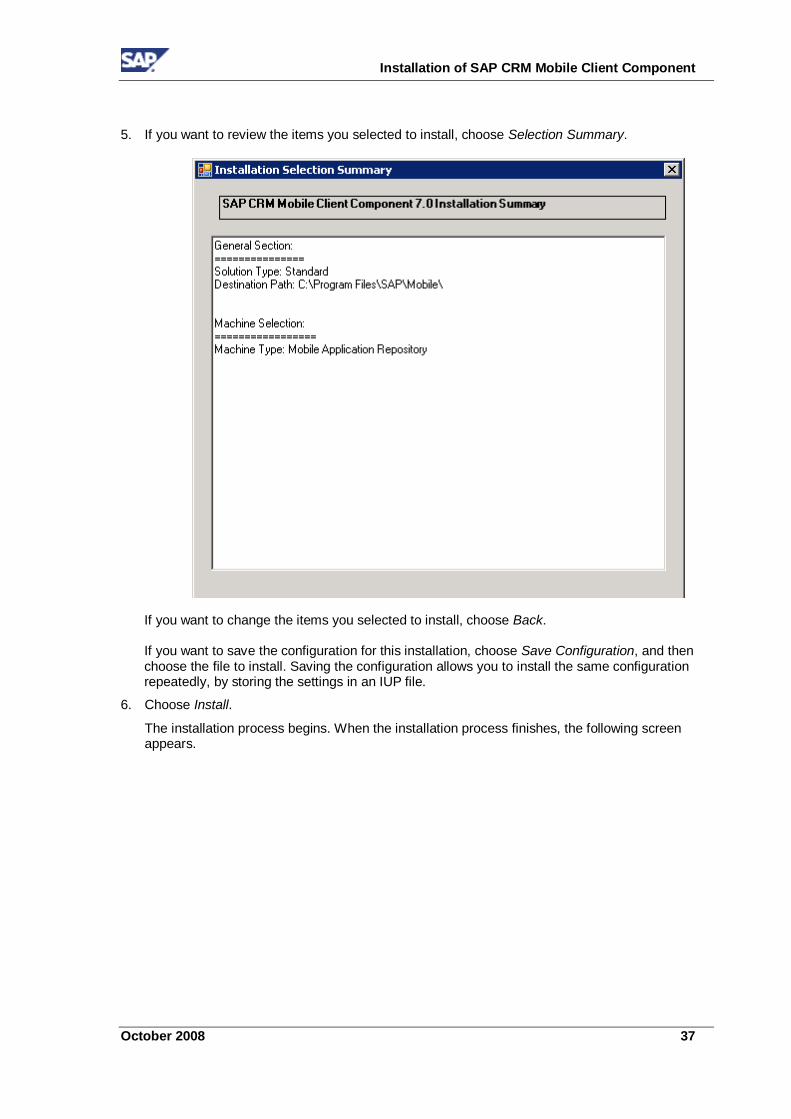
5. If you want to review the items you selected to install, choose Selection Summary.
If you want to change the items you selected to install, choose Back.
If you want to save the configuration for this installation, choose Save Configuration, and thenchoose the file to install. Saving the configuration allows you to install the same configurationrepeatedly, by storing the settings in an IUP file.
6. Choose Install.
The installation process begins. When the installation process finishes, the following screenappears.

Installing the Mobile Repository Server
38 October 2008
7. Choose Finish.Depending on what you have selected to install, the following screen can appear.
8. Choose Yes.The computer reboots.
You have installed the SAP CRM Mobile Client Component: Application Repository for theMobile Repository Server.
If you receive a message Locked file detected, choose OK, and continuerebooting the machine. This message does not affect the installation.
The default login information for the Mobile Application Repository isDSN: ars_dbUser: arsadminPassword: <none>
Installation of SAP CRM Mobile Client Component
October 2008 39
7 Installing the Communication StationAt this point in the installation process, you need to set up and install the Communication Station.For more information, see the Communication Station Guide.
Installing the Mobile Development Workstation
40 October 2008
8 Installing the Mobile DevelopmentWorkstation
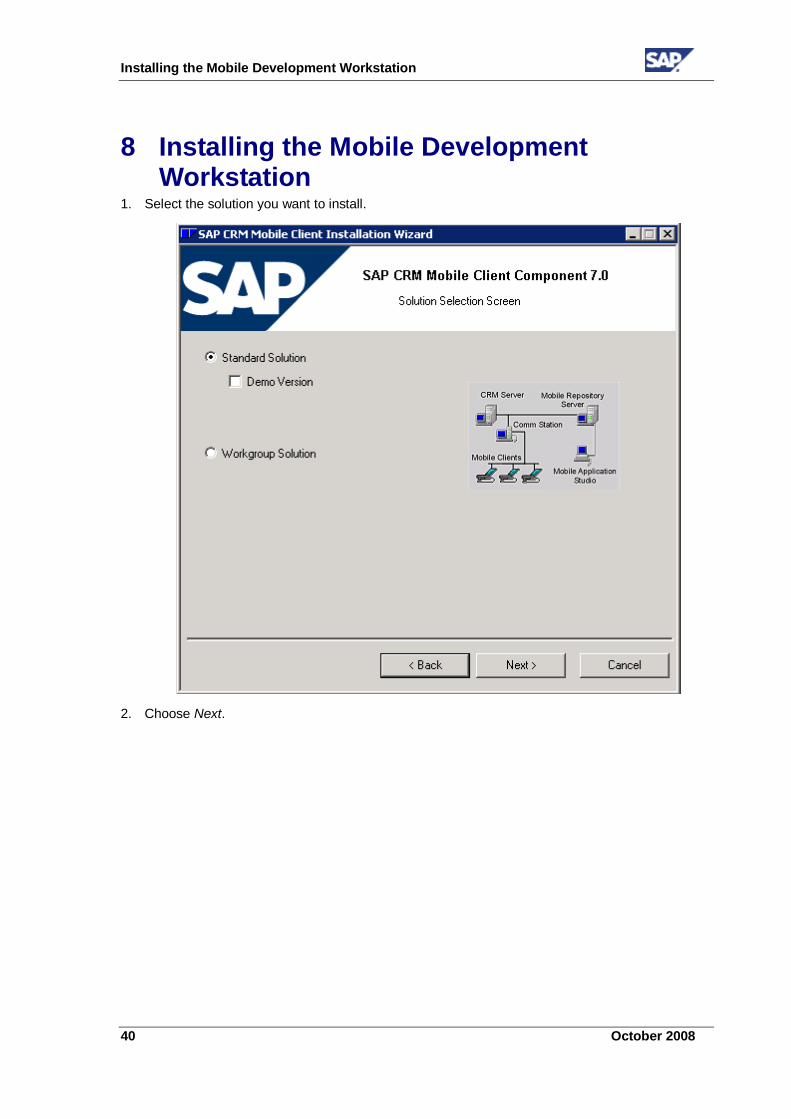
1. Select the solution you want to install.
2. Choose Next.

Installation of SAP CRM Mobile Client Component
October 2008 41
3. Choose the Mobile Development Workstation field and choose next. If you would like to installthe repository on the same machine as the Mobile Development Workstation, check the InstallLocal Repository checkbox. You can also check the Install Unicode Database checkbox, if youneed to install the Unicode user database instead of the one specific to the default collation ofthe SQL Server. However, it is recommended that you have one central repository and have adevelopment workstation connect to it. Some options in this screen might appear disabled if therequired software is not found on the machine.

Installing the Mobile Development Workstation
42 October 2008
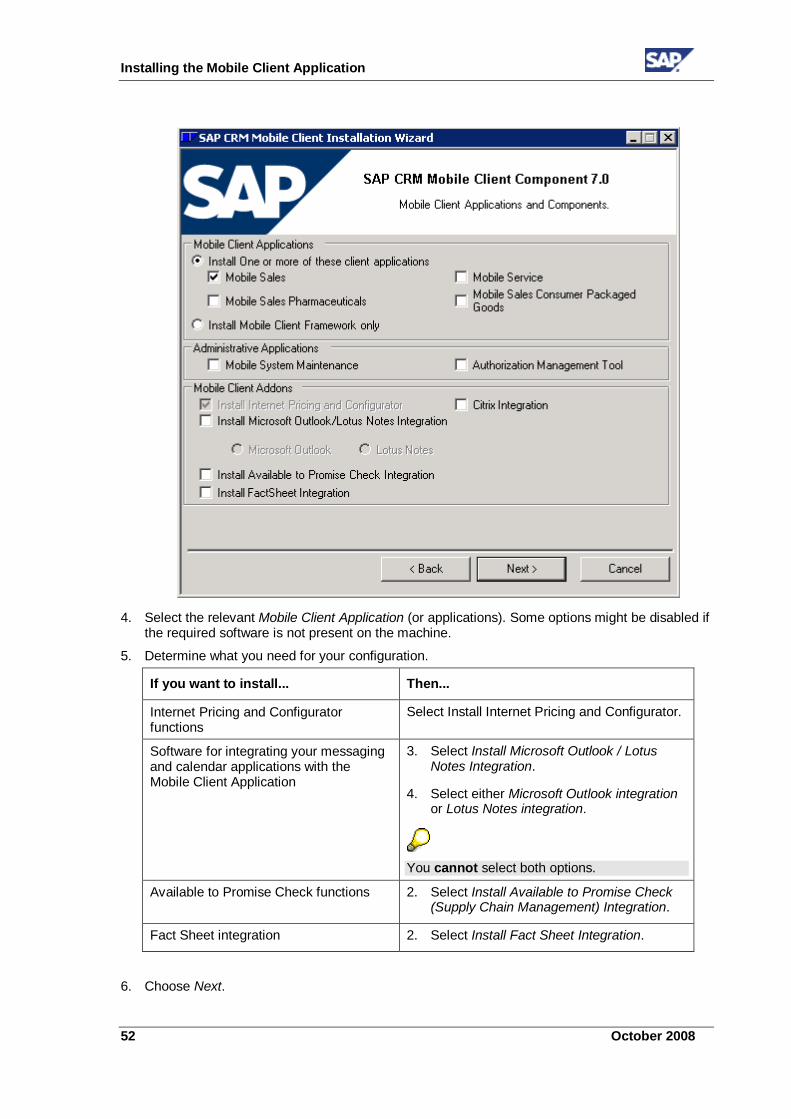
4. Select the relevant Mobile Client Application (or applications) for your Mobile DevelopmentWorkstation. Some options in this screen might appear disabled if the required software is notfound on the target machine.
The Mobile Application Studio requires that you install at least one type of MobileClient Application on the machine.
5. Determine what you need for your configuration.
If you want to install... Then...
Internet Pricing and Configuratorfunctions
Select Install Internet Pricing and Configurator.
Software for integrating your messagingand calendar applications with theMobile Client Application
1. Select Install Microsoft Outlook / LotusNotes Integration.
2. Select either Microsoft Outlook integrationor Lotus Notes integration.
You cannot select both options.
Available to Promise Check functions 1. Select Install Available to Promise Check
Installation of SAP CRM Mobile Client Component
October 2008 43
(Supply Chain Management) Integration.
Fact Sheet integration 1. Select Install Fact Sheet Integration.
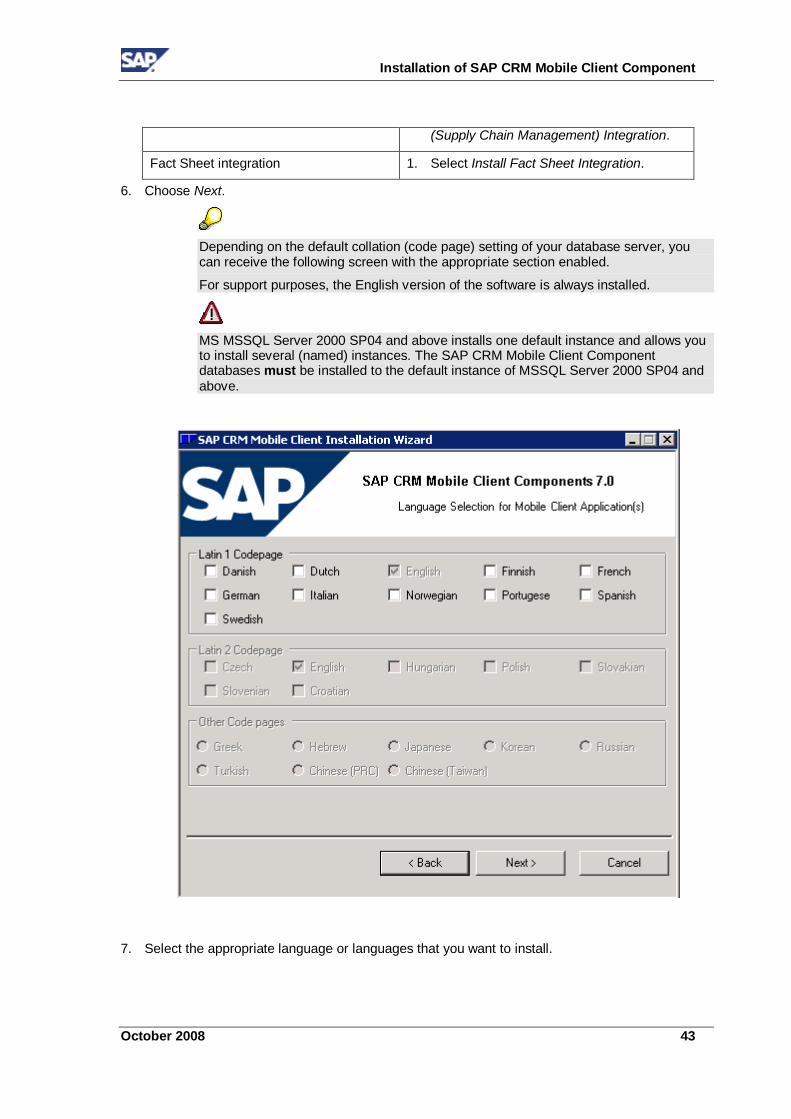
6. Choose Next.
Depending on the default collation (code page) setting of your database server, youcan receive the following screen with the appropriate section enabled.
For support purposes, the English version of the software is always installed.
MS MSSQL Server 2000 SP04 and above installs one default instance and allows youto install several (named) instances. The SAP CRM Mobile Client Componentdatabases must be installed to the default instance of MSSQL Server 2000 SP04 andabove.
7. Select the appropriate language or languages that you want to install.
Installing the Mobile Development Workstation
44 October 2008
You must ensure that the language(s) match the Microsoft SQL Server / Microsoft DataEngine code page. For more information, see Content of the Installation DVDs andAppendix C.
8. In the Server name or IP Address field, type the name or the IP address of the CommunicationStation then choose Next. Some options in this screen might appear disabled based on theaddons selected in the Mobile Client Applications and Addons screen.
Available to Promise 1. In the Server field, type the name of theserver on which the software resides.
2. In the System ID field, type theidentification name for the server.
3. In the System No. field, type the numberfor the server.
FactSheet Integration 1. In the Server field, type the name of theserver on which the software resides.
2. In the System ID field, type theidentification name for the server.
3. In the System No. field, type the numberfor the server.

Installation of SAP CRM Mobile Client Component
October 2008 45
Connection to Communication Station Enter the IP Address or the Server name ofthe Communication Station.
Connection to Mobile Application Repository Enter the IP Address or the Server name ofthe Mobile Application Repository.
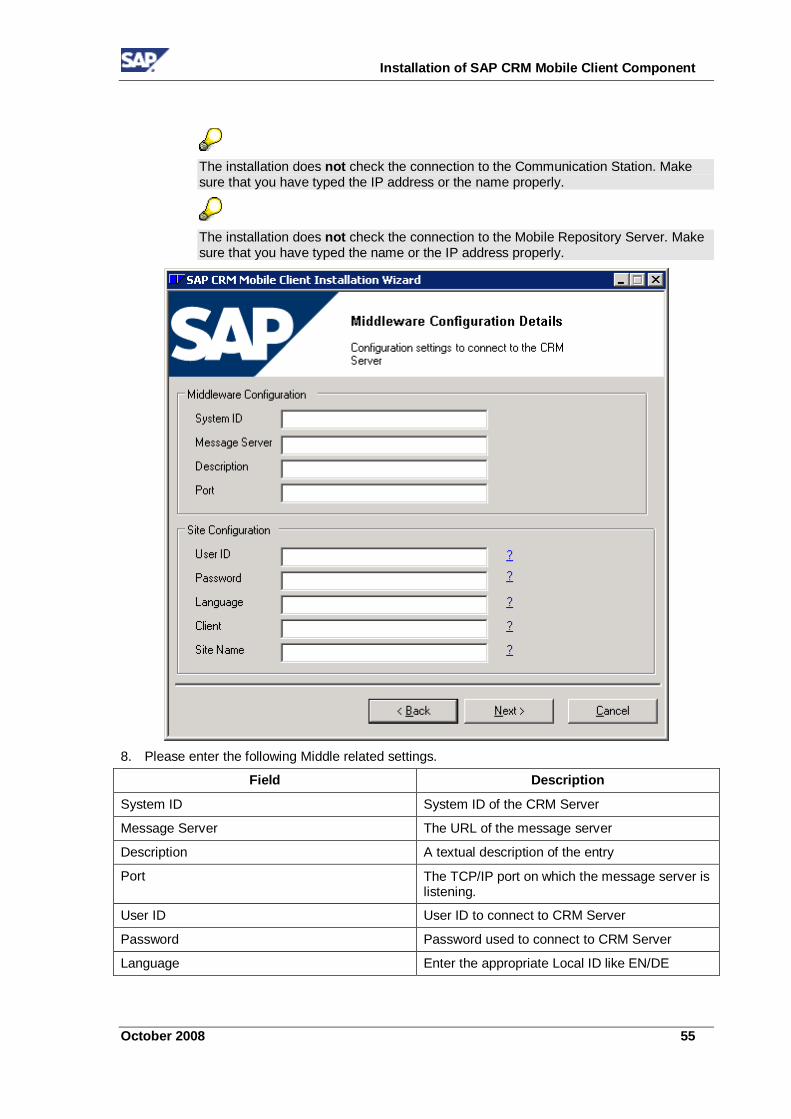
The installation does not check the connection to the Communication Station. Makesure that you have typed the IP address or the name properly.
The installation does not check the connection to the Mobile Repository Server. Makesure that you have typed the name or the IP address properly.
9. Please enter the following middleware related settings.
Field Description
System ID System ID of the CRM Server
Message Server The URL of the message server
Description A textual description of the entry

Installing the Mobile Development Workstation
46 October 2008
Port The TCP/IP port on which the message server islistening.
User ID User ID to connect to CRM Server
Password Password used to connect to CRM Server
Language Enter the appropriate Local ID like EN/DE
Site ID Name of the client in the Administrative Consoleof the CRM Server
Client Client of the CRM Server.
You can ignore this screen if you would like to manually configure the sapmsg.ini and theservices file later.
Installation of SAP CRM Mobile Client Component
October 2008 47
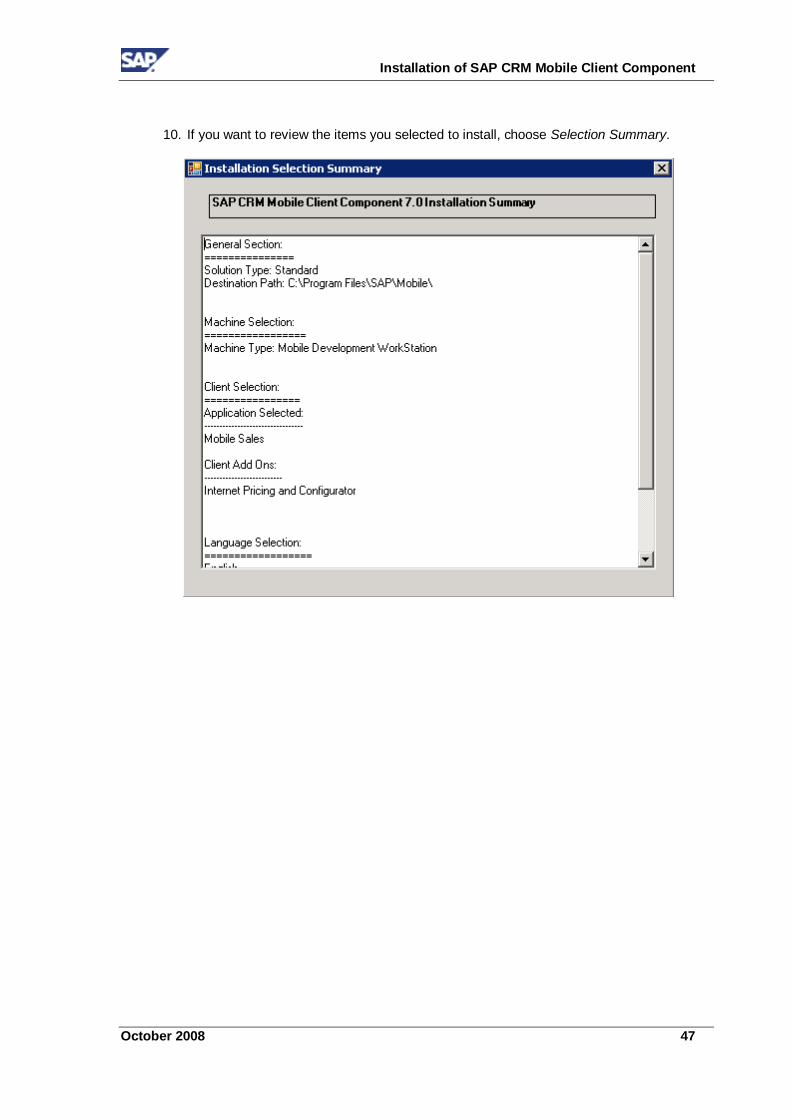
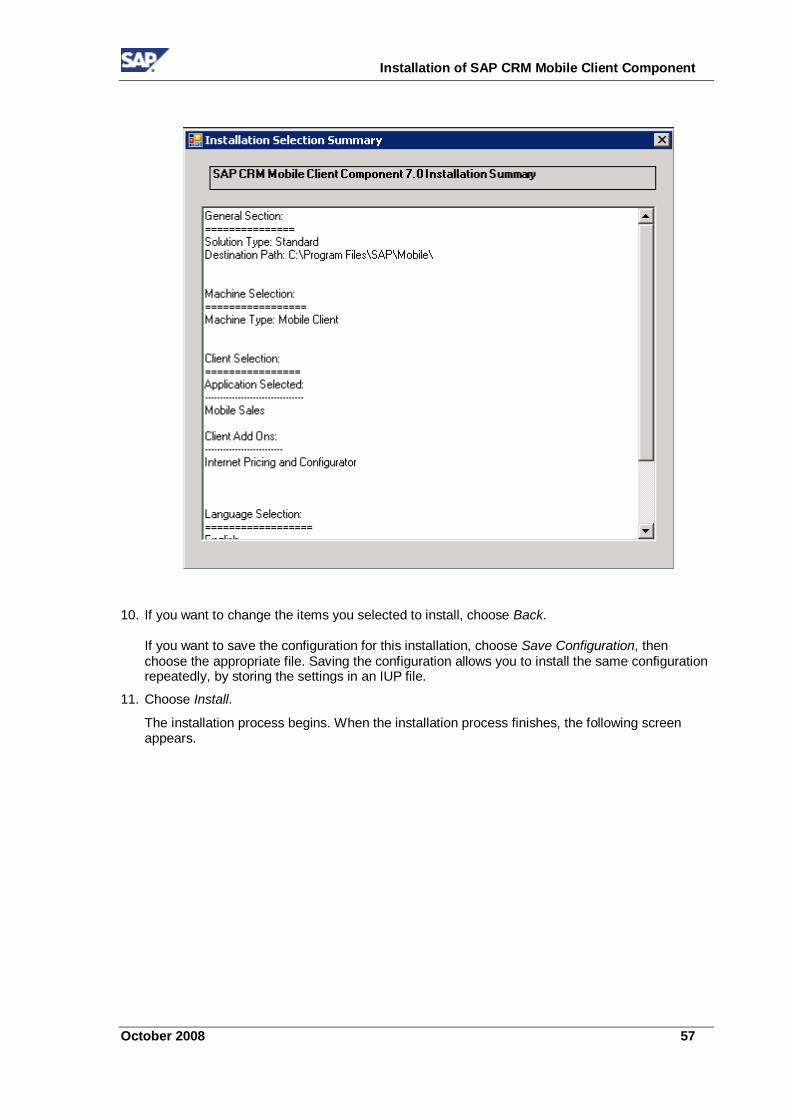
10. If you want to review the items you selected to install, choose Selection Summary.
Installing the Mobile Development Workstation
48 October 2008
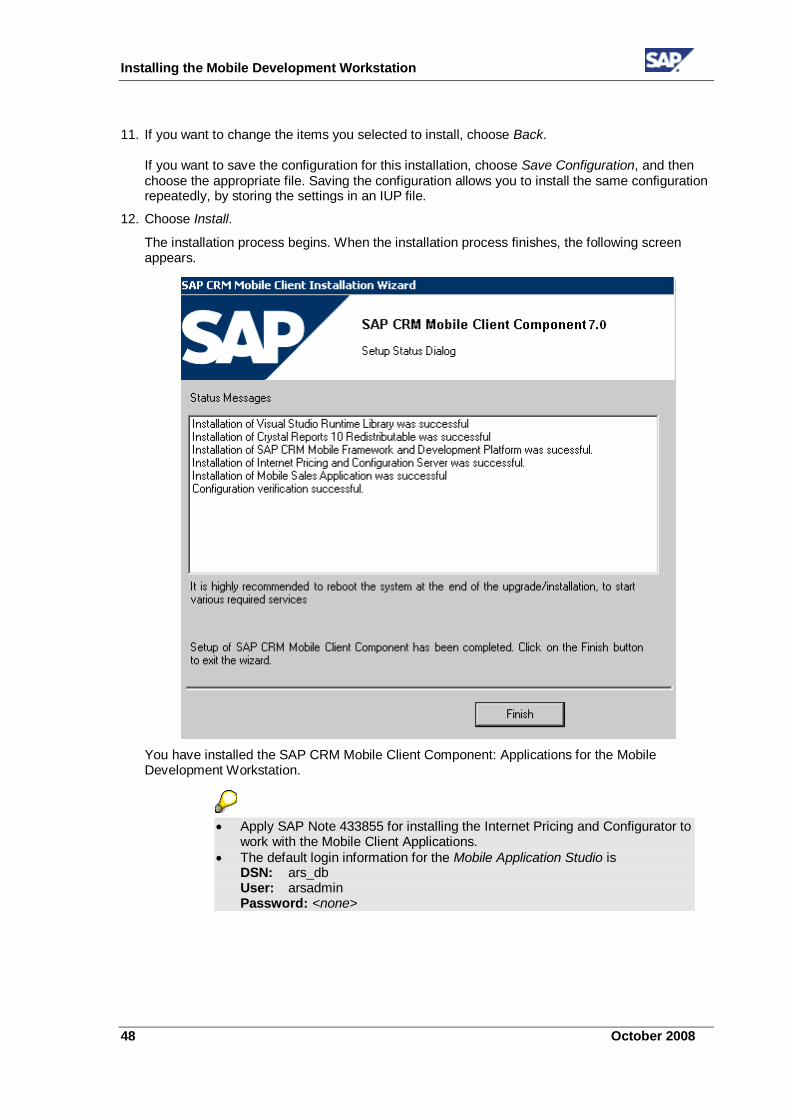
11. If you want to change the items you selected to install, choose Back.
If you want to save the configuration for this installation, choose Save Configuration, and thenchoose the appropriate file. Saving the configuration allows you to install the same configurationrepeatedly, by storing the settings in an IUP file.
12. Choose Install.
The installation process begins. When the installation process finishes, the following screenappears.
You have installed the SAP CRM Mobile Client Component: Applications for the MobileDevelopment Workstation.
Apply SAP Note 433855 for installing the Internet Pricing and Configurator towork with the Mobile Client Applications.
The default login information for the Mobile Application Studio isDSN: ars_dbUser: arsadminPassword: <none>

Installation of SAP CRM Mobile Client Component
October 2008 49
9 Installing the Mobile Client ApplicationNo matter which type of Mobile Client Application you want to install, the installation programcontinues in the same way. You can install several Mobile Client Applications simultaneously. If youwant to use this option, see Installing Several Mobile Client Applications Simultaneously.
9.1 PrerequisitesThe Mobile Client configuration depends on the type of scenario you want to implement.
Workgroup SolutionThe workgroup solution requires that the User database be installed on the Workgroup Server. If youare using this solution and you have not yet installed the Workgroup Server, continue with Installingthe Workgroup Server.
Standard SolutionThe standard solution requires that the User database be installed on each Mobile Client. If you areusing this solution, you must select the options that are specific to it.
If you select Standard Solution, you install an empty local User database and the local CRM Client isconnected to a central CRM Server. This means that the user data replication is made via thisconnection. After the installation of the CRM Client connected to Middleware on CRM Server theempty User database has to be filled by an initial download from the CRM Server.
If you also select Demo Installation, you install a prefilled User database for demonstration or testingpurposes. This configuration is not intended for a production environment. See Testing Scenario,below.
Testing ScenarioYou must select both Standard Solution and Demo Installation for a test environment. It is notintended for a production environment.
If you do not select Demo Installation, an empty local User database and the local CRM Client isconnected to a central CRM Server. This means that the user data replication is made via thisconnection. After the installation of the CRM Client connected to Middleware on CRM Server theempty User database has to be filled by an initial download from the CRM Server.
9.2 Procedure1. Select Standard Solution.

Installing the Mobile Client Application
50 October 2008
2. Determine whether or not you need to select Demo Version.
If you want to install a ... Then ...
Mobile Client for the productionenvironment
Choose Next.
Mobile Client for the test or developmentenvironment
Select Demo Version, then continue withInstalling the Mobile DevelopmentWorkstation.
Mobile Client for demonstration purposes Select Demo Version, then choose Next.
See Prerequisites for more information.

Installation of SAP CRM Mobile Client Component
October 2008 51
3. Select Mobile Client only, then choose Next. Some options in this screen might be disabledbased on the software present on your machine. You can also check the Install UnicodeDatabase checkbox, if you need to install the Unicode user database instead of the one specificto the default collation of the SQL Server.
Installing the Mobile Client Application
52 October 2008
4. Select the relevant Mobile Client Application (or applications). Some options might be disabled ifthe required software is not present on the machine.
5. Determine what you need for your configuration.
If you want to install... Then...
Internet Pricing and Configuratorfunctions
Select Install Internet Pricing and Configurator.
Software for integrating your messagingand calendar applications with theMobile Client Application
3. Select Install Microsoft Outlook / LotusNotes Integration.
4. Select either Microsoft Outlook integrationor Lotus Notes integration.
You cannot select both options.
Available to Promise Check functions 2. Select Install Available to Promise Check(Supply Chain Management) Integration.
Fact Sheet integration 2. Select Install Fact Sheet Integration.
6. Choose Next.

Installation of SAP CRM Mobile Client Component
October 2008 53
Depending on the default collation (code page) setting of your database server, youcan receive the following screen with the appropriate section enabled.
For support purposes, the English version of the software installs by default.
7. Select the appropriate language or languages that you want to install.
You must ensure that the language(s) match the Microsoft SQL Server / Microsoft DataEngine code page. For more information, see Content of the Installation DVDs andAppendix C.

Installing the Mobile Client Application
54 October 2008
Available to Promise 4. In the Server field, type the name of theserver on which the software resides.
5. In the System ID field, type theidentification name for the server.
6. In the System No. field, type the numberfor the server.
FactSheet Integration 4. In the Server field, type the name of theserver on which the software resides.
5. In the System ID field, type theidentification name for the server.
6. In the System No. field, type the numberfor the server.
Connection to Communication Station Enter the IP Address or the Server name ofthe Communication Station.
Connection to Mobile Application Repository Enter the IP Address or the Server name ofthe Mobile Application Repository.
Installation of SAP CRM Mobile Client Component
October 2008 55
The installation does not check the connection to the Communication Station. Makesure that you have typed the IP address or the name properly.
The installation does not check the connection to the Mobile Repository Server. Makesure that you have typed the name or the IP address properly.
8. Please enter the following Middle related settings.
Field Description
System ID System ID of the CRM Server
Message Server The URL of the message server
Description A textual description of the entry
Port The TCP/IP port on which the message server islistening.
User ID User ID to connect to CRM Server
Password Password used to connect to CRM Server
Language Enter the appropriate Local ID like EN/DE

Installing the Mobile Client Application
56 October 2008
Site ID Name of the client in the Administrative Consoleof the CRM Server
Client Client of the CRM Server.
You can ignore this screen if you would like to manually configure the sapmsg.ini and theservices file later.
9. If you want to review the items you selected to install, choose Selection Summary.
Installation of SAP CRM Mobile Client Component
October 2008 57
10. If you want to change the items you selected to install, choose Back.
If you want to save the configuration for this installation, choose Save Configuration, thenchoose the appropriate file. Saving the configuration allows you to install the same configurationrepeatedly, by storing the settings in an IUP file.
11. Choose Install.
The installation process begins. When the installation process finishes, the following screenappears.

Installing the Mobile Client Application
58 October 2008
12. Choose Finish.You have installed the SAP CRM Mobile Client Component: Applications for the Mobile Client.

Installation of SAP CRM Mobile Client Component
October 2008 59
10 Installing the Workgroup Server10.1 Prerequisites
The Workgroup Server installation installs the same language version as theoperating system uses. You cannot change this setting in the installation. Youmust ensure that the same language versions are installed on the WorkgroupServer and the Workgroup Clients connected to that server.
MSSQL Server 2000 SP04 and above installs one default instance and allowsyou to install several (named) instances. The SAP CRM Mobile ClientComponent databases must be installed to the default instance of MSSQLServer 2000 SP04 and above.
The Workgroup Server configuration depends on which environment you want to install.
Workgroup Server for ProductionIf you select Workgroup Solution, you establish the connection with the CRM Server. This meansthat the user data replication is made via this connection. After the installation of the CRM Clientconnected to Middleware on CRM Server, the empty User database has to be filled by an initialdownload from the CRM Server. This is the standard setting for a productive environment.
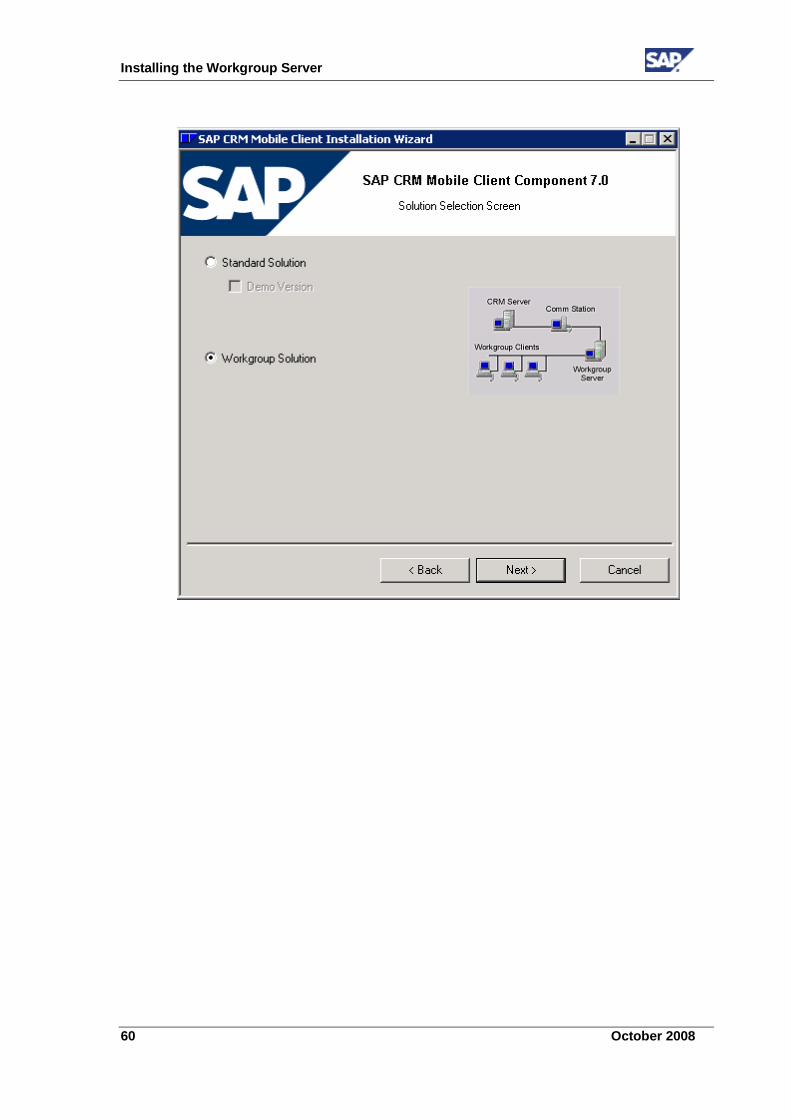
10.2 Procedure1. Select Workgroup Solution.
Installing the Workgroup Server
60 October 2008

Installation of SAP CRM Mobile Client Component
October 2008 61
2. Determine whether or not you need to select Demo Version.
If you want to install a ... Then ...
Workgroup Server for the productionenvironment
Choose Next.
See Prerequisites for more information.
3. Select Workgroup Server. Select the Install Internet Pricing and Configurator checkbox if yourequire Internet Pricing and Configurator on the Workgroup Server. You can also check theInstall Unicode Database checkbox, if you need to install the Unicode user database instead ofthe one specific to the default collation of the SQL Server. Then choose Next. Certain optionsmight be disabled if the required software is not present on the machine.
Installing the Workgroup Server
62 October 2008
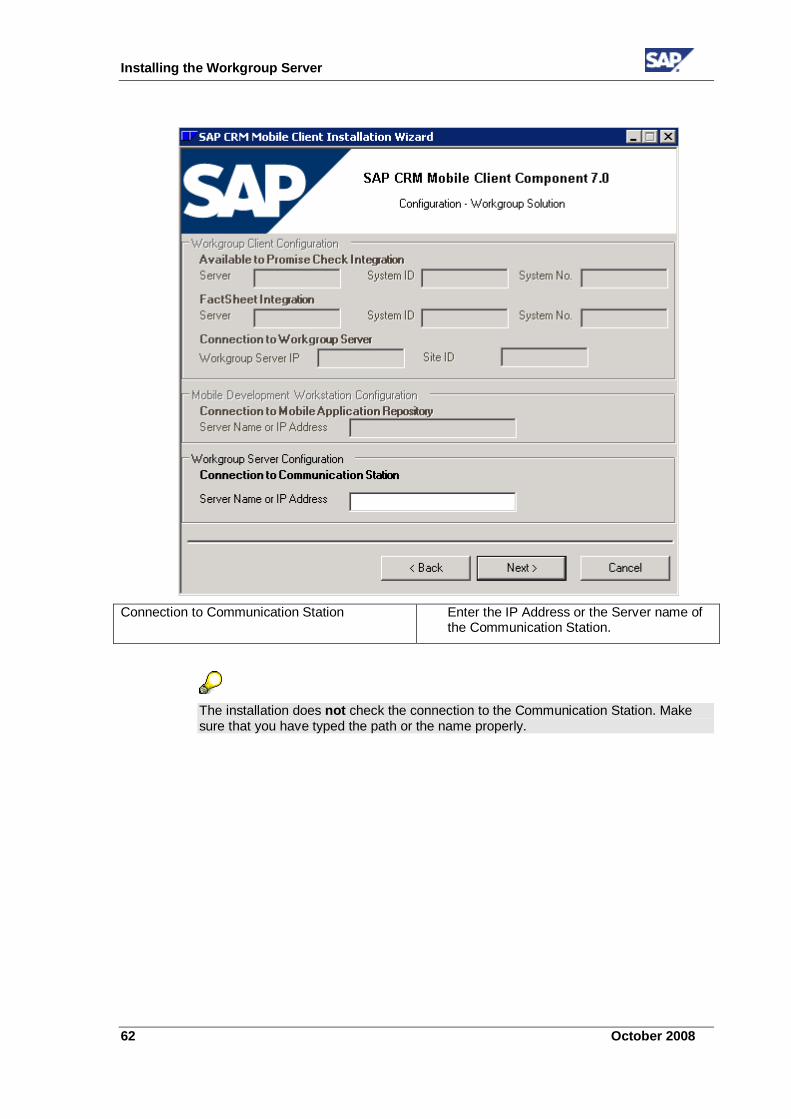
Connection to Communication Station Enter the IP Address or the Server name ofthe Communication Station.
The installation does not check the connection to the Communication Station. Makesure that you have typed the path or the name properly.
Installation of SAP CRM Mobile Client Component
October 2008 63
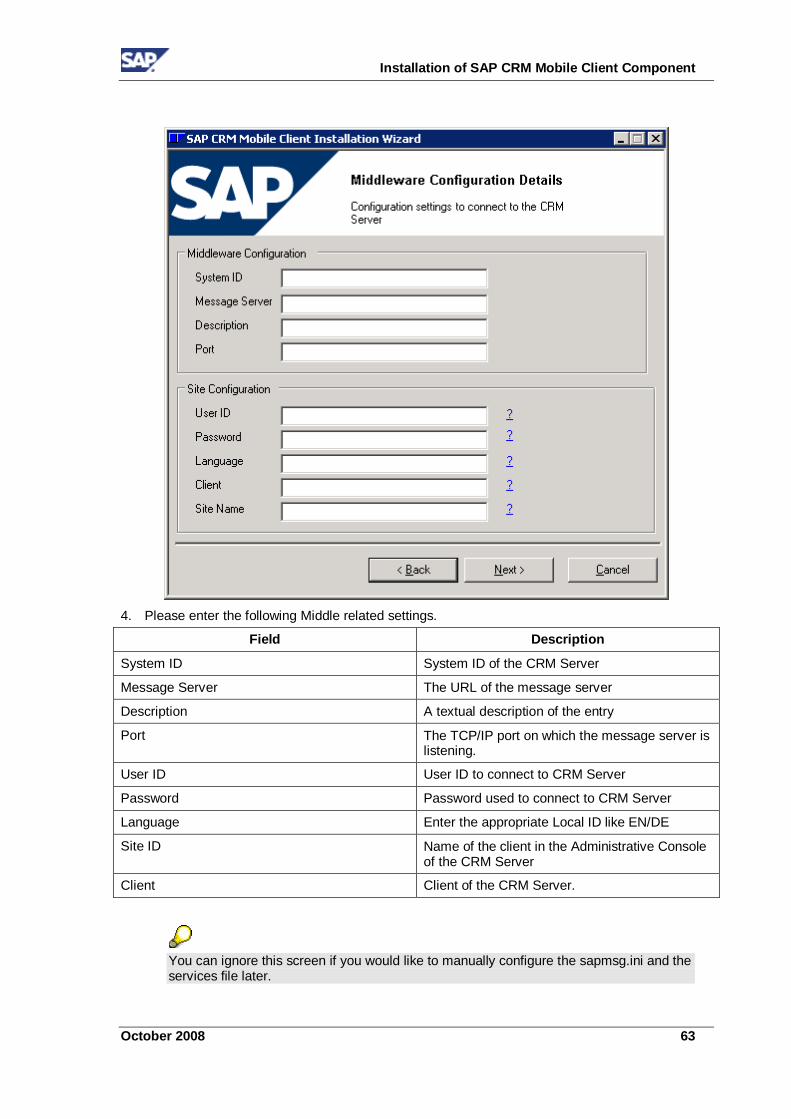
4. Please enter the following Middle related settings.
Field Description
System ID System ID of the CRM Server
Message Server The URL of the message server
Description A textual description of the entry
Port The TCP/IP port on which the message server islistening.
User ID User ID to connect to CRM Server
Password Password used to connect to CRM Server
Language Enter the appropriate Local ID like EN/DE
Site ID Name of the client in the Administrative Consoleof the CRM Server
Client Client of the CRM Server.
You can ignore this screen if you would like to manually configure the sapmsg.ini and theservices file later.

Installing the Workgroup Server
64 October 2008
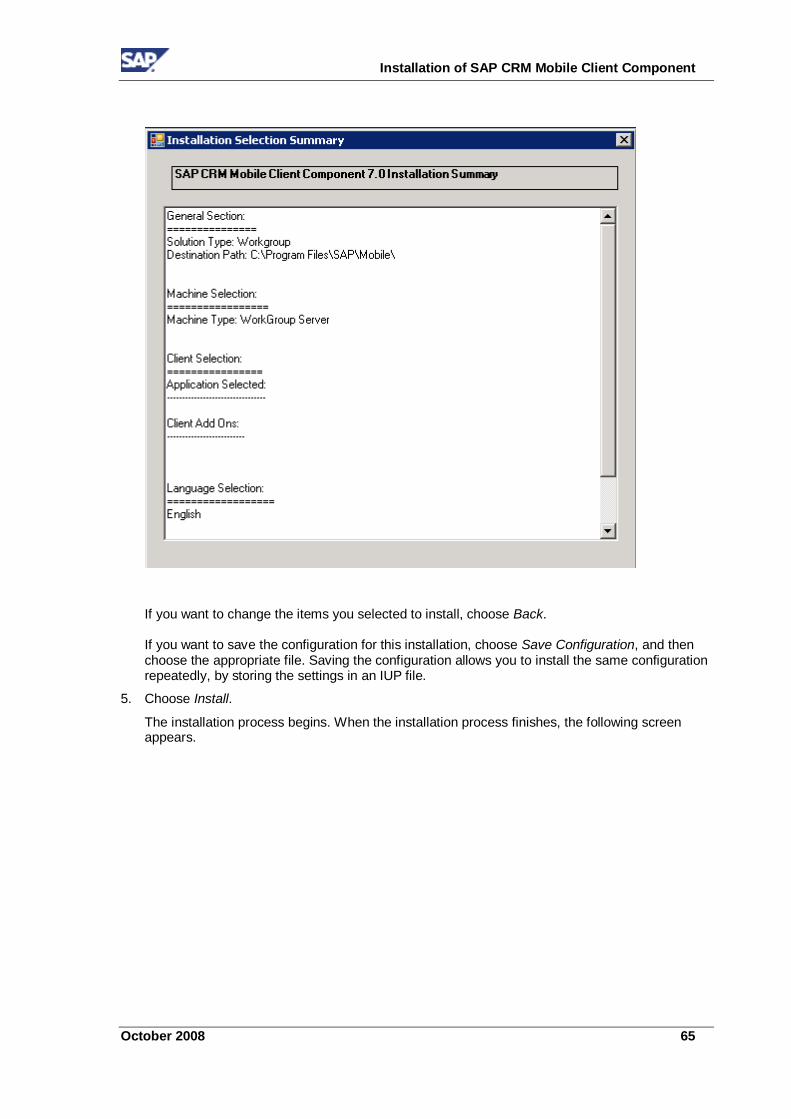
If you want to review the items you selected to install, choose Selection Summary.
Installation of SAP CRM Mobile Client Component
October 2008 65
If you want to change the items you selected to install, choose Back.
If you want to save the configuration for this installation, choose Save Configuration, and thenchoose the appropriate file. Saving the configuration allows you to install the same configurationrepeatedly, by storing the settings in an IUP file.
5. Choose Install.
The installation process begins. When the installation process finishes, the following screenappears.

Installing the Workgroup Server
66 October 2008
6. Choose Finish.
7. Choose Yes.The computer reboots.
You have installed the SAP CRM Mobile Client Component: Applications for the WorkgroupServer.
MSSQL Server 2000 SP04 and above and Microsoft Data Engine 2000 install onedefault instance and allow you to install several (named) instances. The SAP CRMMobile Client Component databases must be installed to the default instance ofMSSQL Server 2000 SP04 and above or MSDE 2000.
Installation of SAP CRM Mobile Client Component
October 2008 67
11 Installing the Workgroup ClientNo matter which type of Mobile Client Application you want to install, the installation programcontinues in the same way. You can install several Mobile Client Applications simultaneously. If youwant to use this option, see Installing Several Mobile Client Applications Simultaneously.
11.1 PrerequisitesMake sure that the operating system language of the Workgroup Server is the same as is used onthe Workgroup Client.
You must ensure that the same language versions are installed on the WorkgroupServer and the Workgroup Clients connected to that server.
The Workgroup Server configuration depends on which environment you want to install.
Workgroup Client for ProductionIf you select Workgroup Solution, you establish the connection with the CRM Server. This meansthat the user data replication is made via this connection. After the installation of the CRM Clientconnected to Middleware on CRM Server, the empty User database has to be filled by an initialdownload from the CRM Server. This is the standard setting for a productive environment.
11.2 Procedure1. Select Workgroup Solution.

Installing the Workgroup Client
68 October 2008
Installation of SAP CRM Mobile Client Component
October 2008 69
2. Determine whether or not you need to select Demo Version.
If you want to install a ... Then ...
Workgroup Client for the productionenvironment
Choose Next.
See Prerequisites for more information.
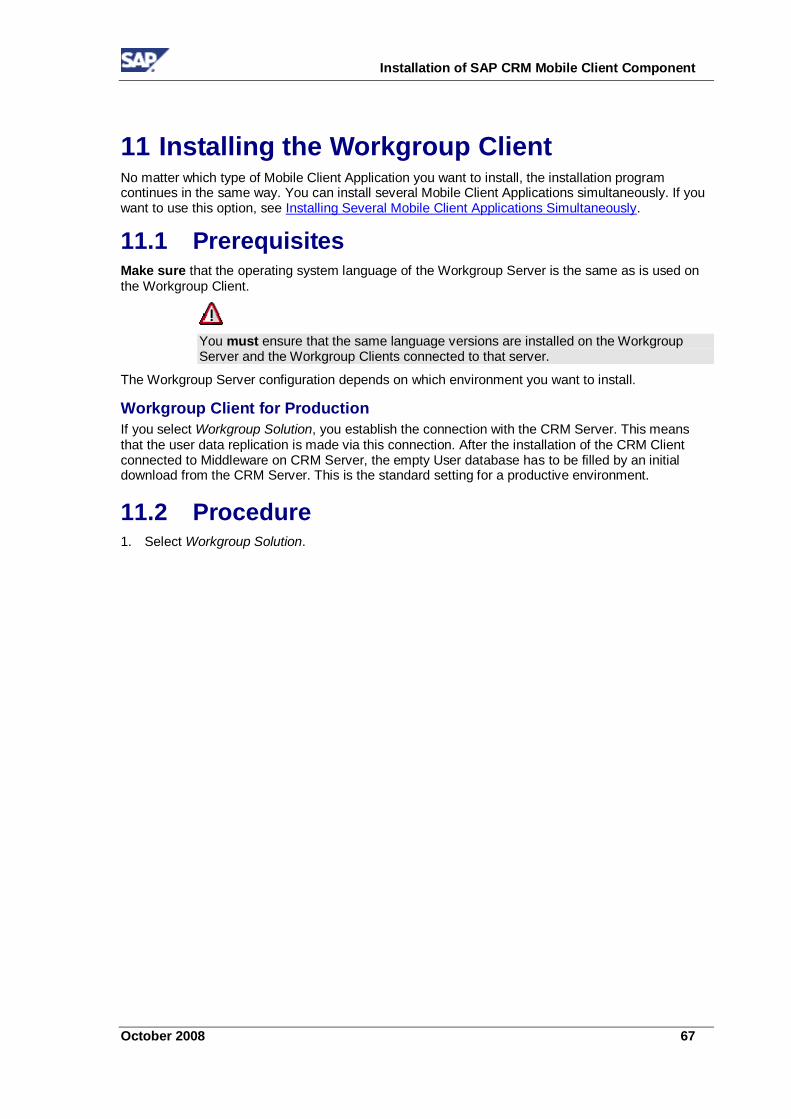
3. Select Workgroup Client, then choose Next.

Installing the Workgroup Client
70 October 2008
4. Select the relevant Mobile Client Application or applications. Some options might appeardisabled if the required software is not present on the machine.
5. Determine what you need for your configuration.
If you want to install... Then...
Internet Pricing and Configuratorfunctions
Select Install Internet Pricing and Configurator.
Software for integrating your messagingand calendar applications with theMobile Client Application
5. Select Install Microsoft Outlook / LotusNotes Integration.
6. Select either Microsoft Outlook integrationor Lotus Notes integration.
You cannot select both options.
Available to Promise Check functions 3. Select Install Available to Promise Check(Supply Chain Management) Integration.
Fact Sheet integration 3. Select Install Fact Sheet Integration.
Installation of SAP CRM Mobile Client Component
October 2008 71
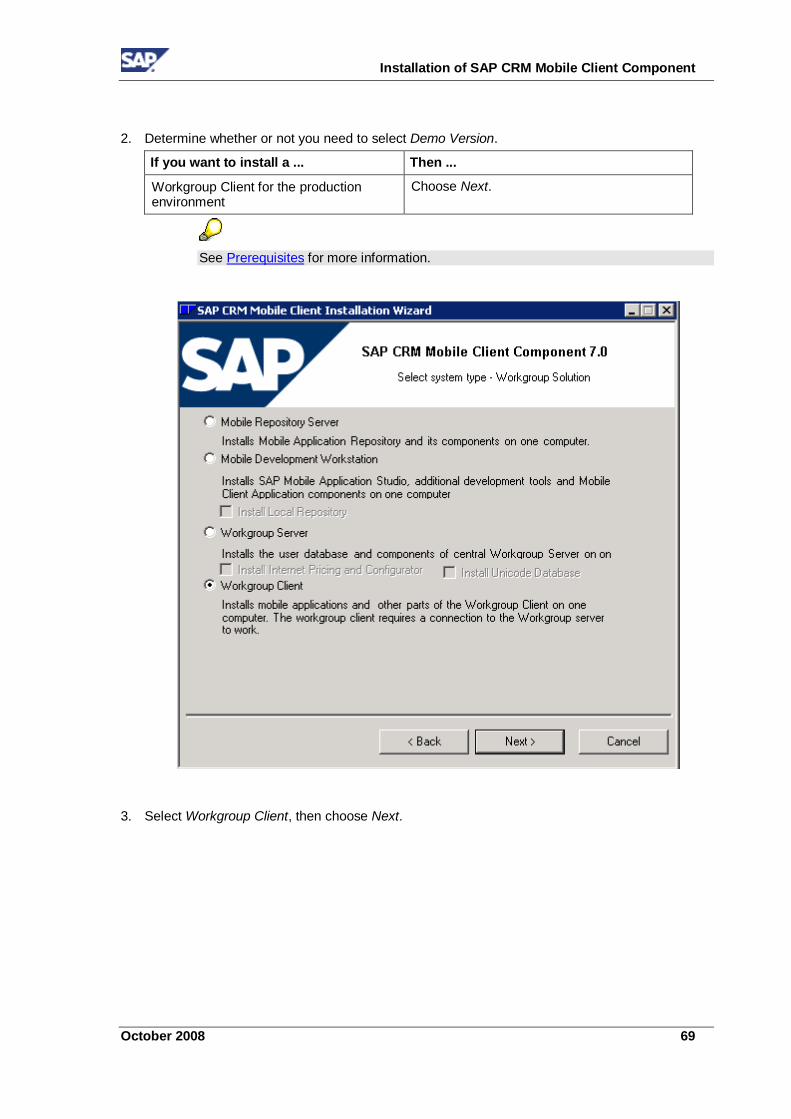
6. Choose Next.
Depending on the default collation (code page) setting of your database server, youcan receive the following screen with the appropriate section enabled.
For support purposes, the English version of the software installs by default.
MSSQL Server 2000 SP04 and above and Microsoft Data Engine 2000 install onedefault instance and allow you to install several (named) instances. The SAP CRMMobile Client Component databases must be installed to the default instance ofMSSQL Server 2000 SP04 and above or MSDE 2000.
7. Select the appropriate language or languages that you want to install.

Installing the Workgroup Client
72 October 2008
You must ensure that the same language versions are installed on the WorkgroupServer and the Workgroup Clients connected to that server.
You must ensure that the language(s) match the Microsoft SQL Server / Microsoft DataEngine code page. For more information, see Content of the Installation DVDs andAppendix C.
Available to Promise 1. In the Server field, type the name of theserver on which the software resides.
2. In the System ID field, type theidentification name for the server.
3. In the System No. field, type the numberfor the server.
FactSheet Integration 1. In the Server field, type the name of theserver on which the software resides.
2. In the System ID field, type theidentification name for the server.
3. In the System No. field, type the number
Installation of SAP CRM Mobile Client Component
October 2008 73
for the server.
Workgroup Server IP Enter the IP Address or the Server name ofthe Workgroup Server.
Site ID Enter the SiteID assigned by the CRMServer for this station.
The installation does not check the connection to the Workgroup Server. Make surethat you have typed the path or the name properly.
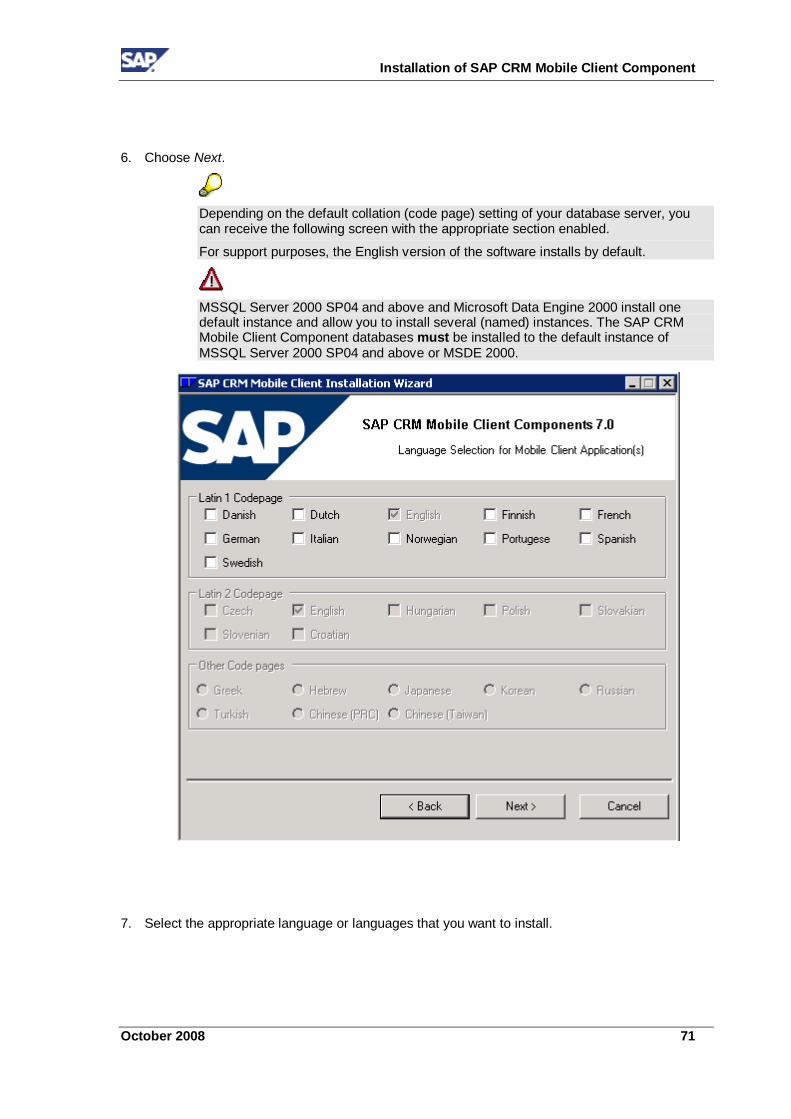
If you want to review the items you selected to install, choose Selection Summary.
Installing the Workgroup Client
74 October 2008
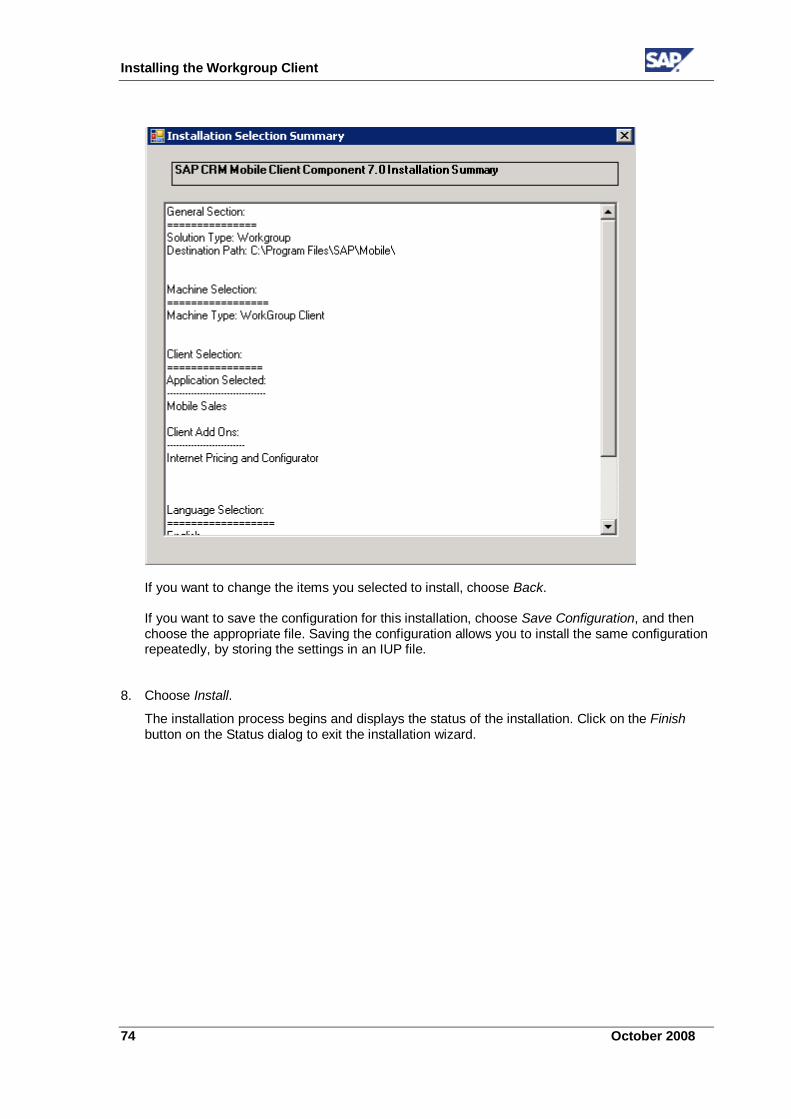
If you want to change the items you selected to install, choose Back.
If you want to save the configuration for this installation, choose Save Configuration, and thenchoose the appropriate file. Saving the configuration allows you to install the same configurationrepeatedly, by storing the settings in an IUP file.
8. Choose Install.
The installation process begins and displays the status of the installation. Click on the Finishbutton on the Status dialog to exit the installation wizard.

Installation of SAP CRM Mobile Client Component
October 2008 75
9. Choose Finish.You have installed the SAP CRM Mobile Client Component: Applications for the WorkgroupClient.
Installing Several Mobile Client Applications Simultaneously
76 October 2008
12 Installing Several Mobile ClientApplications Simultaneously
12.1 PrerequisitesThe Mobile Client configuration depends on the type of scenario you want to implement.
Workgroup SolutionMake sure that the operating system language of the Workgroup Server is the same as is used onthe Workgroup Client.
You must ensure that the same language versions are installed on the WorkgroupServer and the Workgroup Clients connected to that server.
The workgroup solution requires that the User database be installed on the Workgroup Server. If youare using this solution, continue with Installing the Workgroup Server. After you have installed theWorkgroup Server, continue with this installation.
Standard SolutionThe standard solution requires that the User database be installed on each Mobile Client. If you areusing this solution, you must select the options that are specific to it.
If you select Standard Solution, you install an empty local User database and the local CRM Client isconnected to a central CRM Server. This means that the user data replication is made via thisconnection. After the installation of the CRM Client connected to Middleware on CRM Server theempty User database has to be filled by an initial download from the CRM Server.
If you also select Demo Installation, you install a prefilled User database for demonstration or testingpurposes. This configuration is not intended for a production environment. See Testing Scenario,below.
Testing ScenarioYou must select both Standard Solution and Demo Installation for a test environment. It is notintended for a production environment.
If you do not select Demo Installation, an empty local User database and the local CRM Client isconnected to a central CRM Server. This means that the user data replication is made via thisconnection. After the installation of the CRM Client connected to Middleware on CRM Server theempty User database has to be filled by an initial download from the CRM Server.
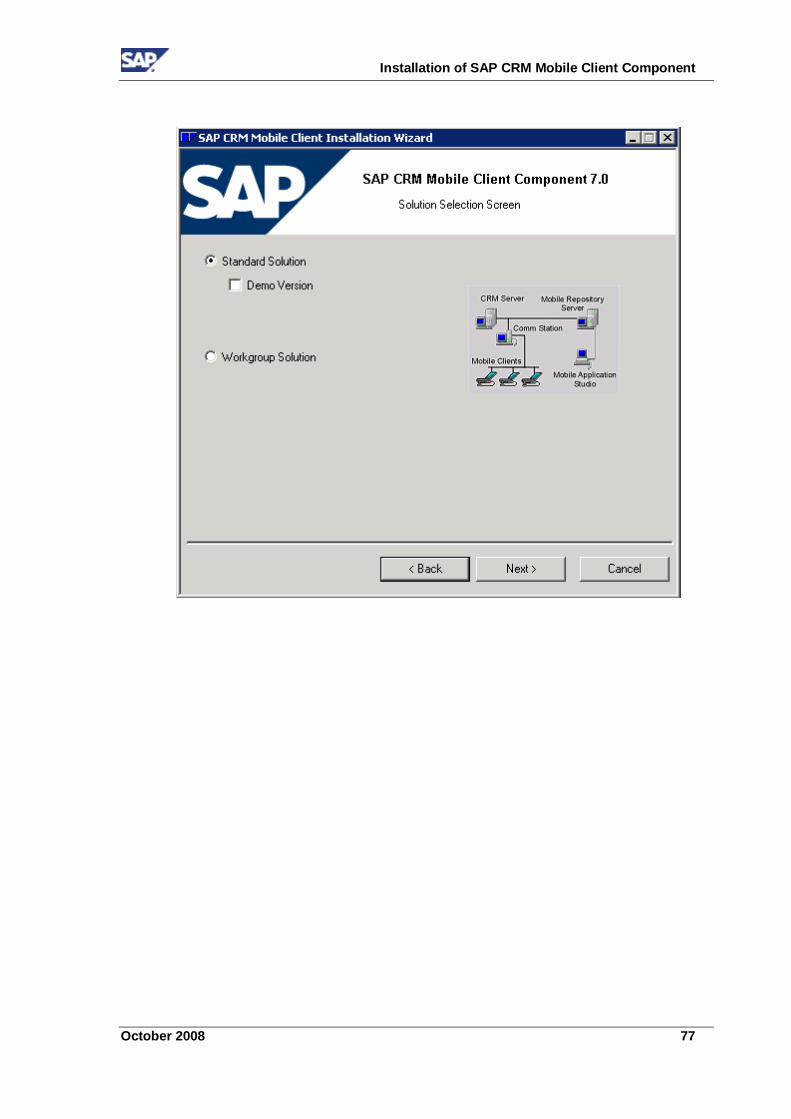
12.2 Procedure1. Select either Standard Solution or Workgroup Solution.
Installation of SAP CRM Mobile Client Component
October 2008 77

Installing Several Mobile Client Applications Simultaneously
78 October 2008
2. Choose Next.Depending on which solution you selected, one of the following screens appears.

Installation of SAP CRM Mobile Client Component
October 2008 79
3. Select either Mobile Client or Workgroup Client, and then choose Next.
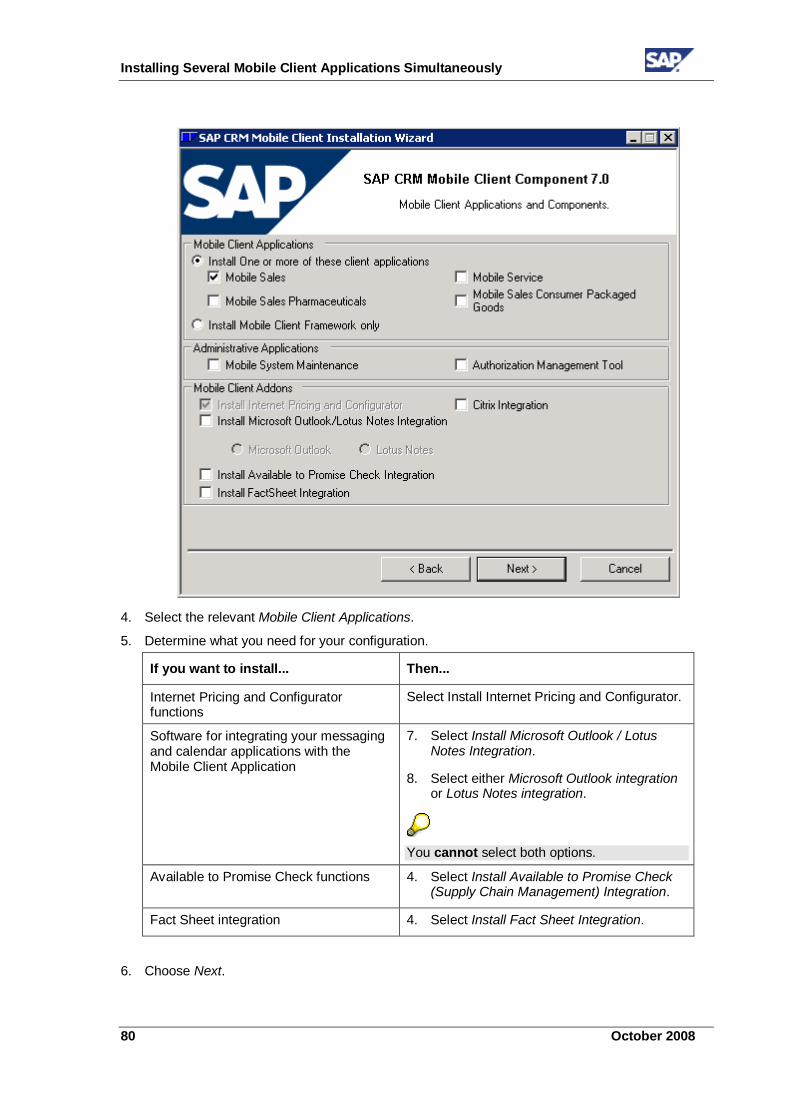
Installing Several Mobile Client Applications Simultaneously
80 October 2008
4. Select the relevant Mobile Client Applications.
5. Determine what you need for your configuration.
If you want to install... Then...
Internet Pricing and Configuratorfunctions
Select Install Internet Pricing and Configurator.
Software for integrating your messagingand calendar applications with theMobile Client Application
7. Select Install Microsoft Outlook / LotusNotes Integration.
8. Select either Microsoft Outlook integrationor Lotus Notes integration.
You cannot select both options.
Available to Promise Check functions 4. Select Install Available to Promise Check(Supply Chain Management) Integration.
Fact Sheet integration 4. Select Install Fact Sheet Integration.
6. Choose Next.

Installation of SAP CRM Mobile Client Component
October 2008 81
Depending on the default collation (code page) setting of your database server, youcan receive the following screen with the appropriate section enabled.
For support purposes, the English version of the software installs by default.
MSSQL Server 2000 SP04 and above and Microsoft Data Engine 2000 install onedefault instance and allow you to install several (named) instances. The SAP CRMMobile Client Component databases must be installed to the default instance ofMSSQL Server 2000 SP04 and above or MSDE 2000.
7. Select the appropriate language or languages that you want to install.
For a Workgroup solution, you must ensure that the same language versions areinstalled on the Workgroup Server and the Workgroup Clients connected to that server.
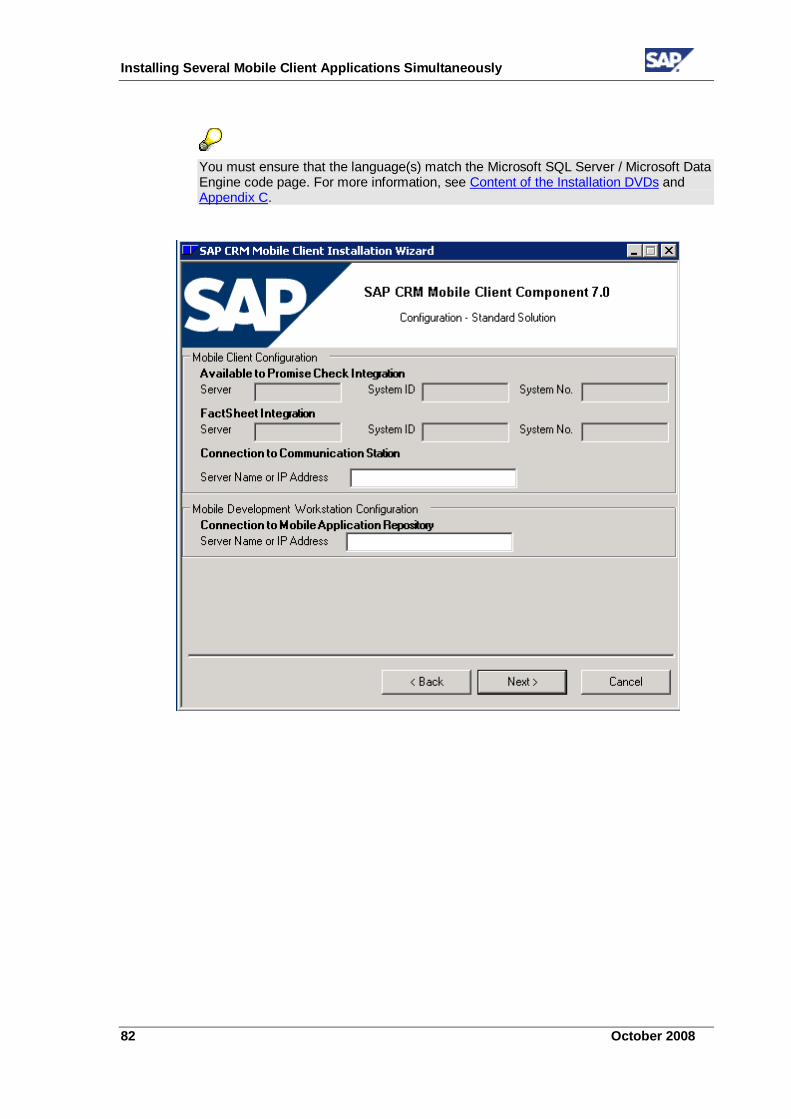
Installing Several Mobile Client Applications Simultaneously
82 October 2008
You must ensure that the language(s) match the Microsoft SQL Server / Microsoft DataEngine code page. For more information, see Content of the Installation DVDs andAppendix C.
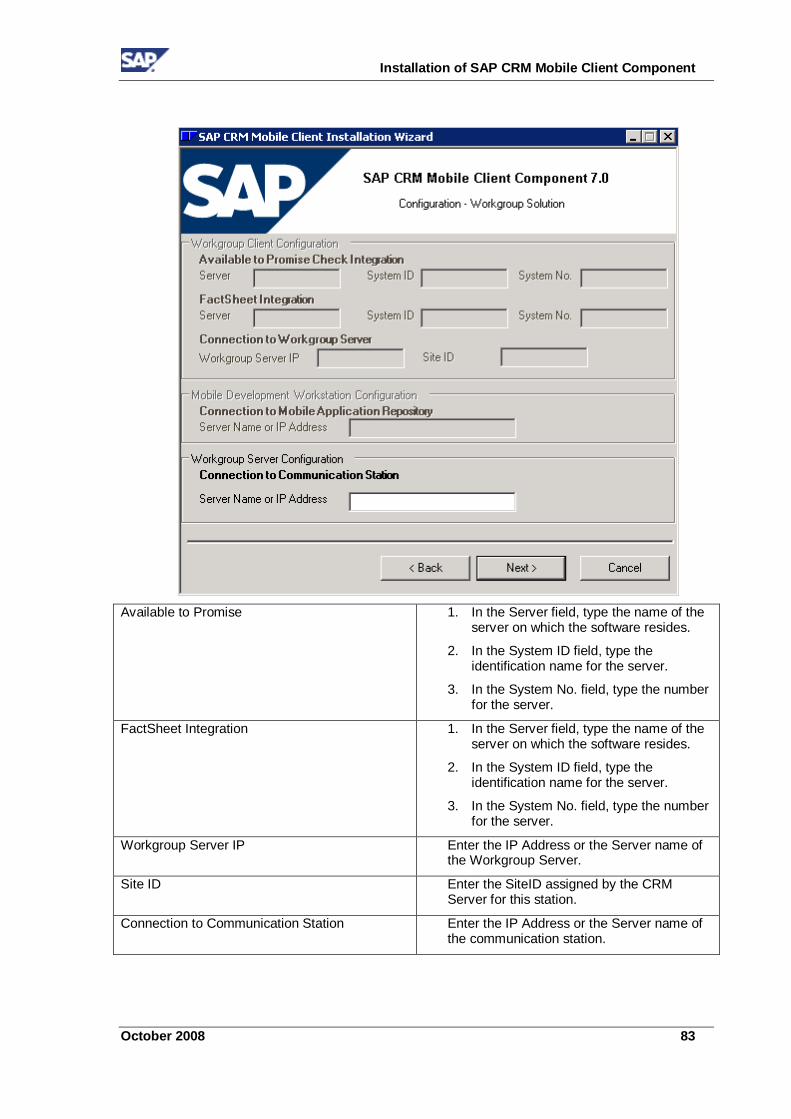
Installation of SAP CRM Mobile Client Component
October 2008 83
Available to Promise 1. In the Server field, type the name of theserver on which the software resides.
2. In the System ID field, type theidentification name for the server.
3. In the System No. field, type the numberfor the server.
FactSheet Integration 1. In the Server field, type the name of theserver on which the software resides.
2. In the System ID field, type theidentification name for the server.
3. In the System No. field, type the numberfor the server.
Workgroup Server IP Enter the IP Address or the Server name ofthe Workgroup Server.
Site ID Enter the SiteID assigned by the CRMServer for this station.
Connection to Communication Station Enter the IP Address or the Server name ofthe communication station.

Installing Several Mobile Client Applications Simultaneously
84 October 2008
8. Please enter the following Middle related settings.
Field Description
System ID System ID of the CRM Server
Message Server The URL of the message server
Description A textual description of the entry
Port The TCP/IP port on which the message server islistening.
User ID User ID to connect to CRM Server
Password Password used to connect to CRM Server
Language Enter the appropriate Local ID like EN/DE
Site ID Name of the client in the Administrative Consoleof the CRM Server
Client Client of the CRM Server.
You can ignore this screen if you would like to manually configure the sapmsg.ini and theservices file later.

Installation of SAP CRM Mobile Client Component
October 2008 85
If you want to review the items you selected to install, choose Selection Summary.

Installing Several Mobile Client Applications Simultaneously
86 October 2008
If you want to change the items you selected to install, choose Back.
If you want to save the configuration for this installation, choose Save Configuration, and thenchoose the appropriate file. Saving the configuration allows you to install the same configurationrepeatedly, by storing the settings in an IUP file.
9. Choose Install.
The installation process begins. When the installation process finishes, the following screenappears.

Installation of SAP CRM Mobile Client Component
October 2008 87
10. Choose Finish.You have installed the Mobile Client Applications.
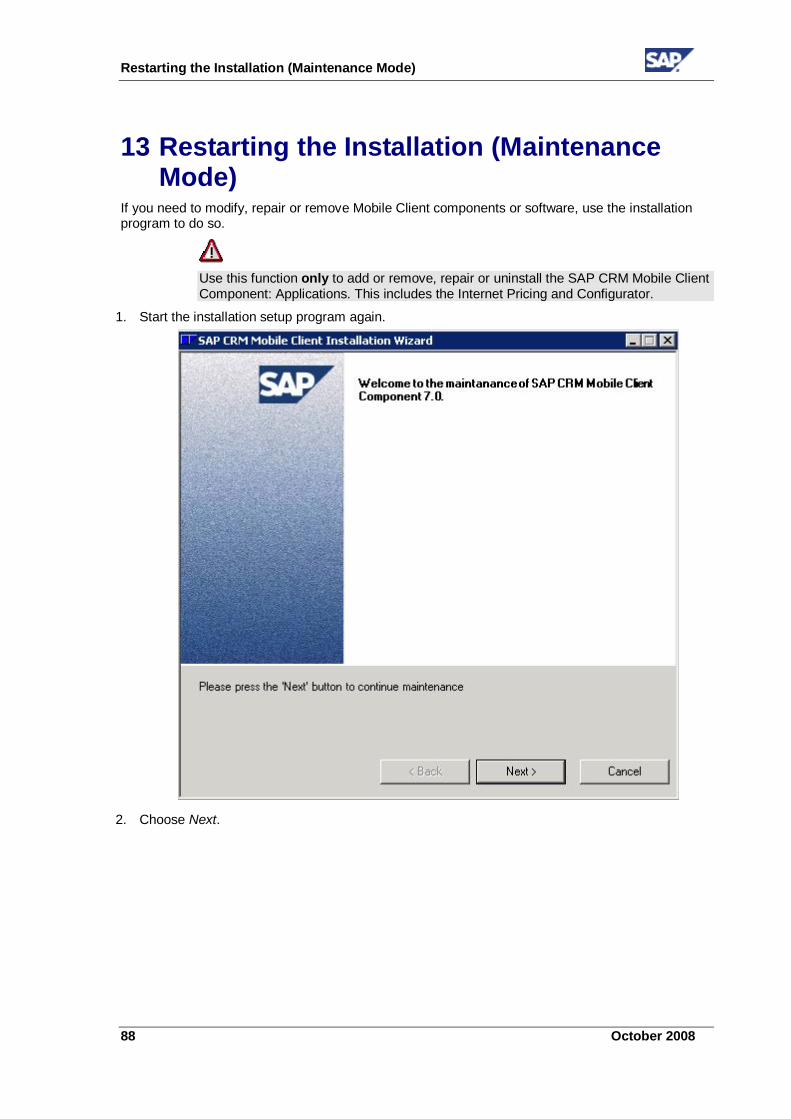
Restarting the Installation (Maintenance Mode)
88 October 2008
13 Restarting the Installation (MaintenanceMode)
If you need to modify, repair or remove Mobile Client components or software, use the installationprogram to do so.
Use this function only to add or remove, repair or uninstall the SAP CRM Mobile ClientComponent: Applications. This includes the Internet Pricing and Configurator.
1. Start the installation setup program again.
2. Choose Next.
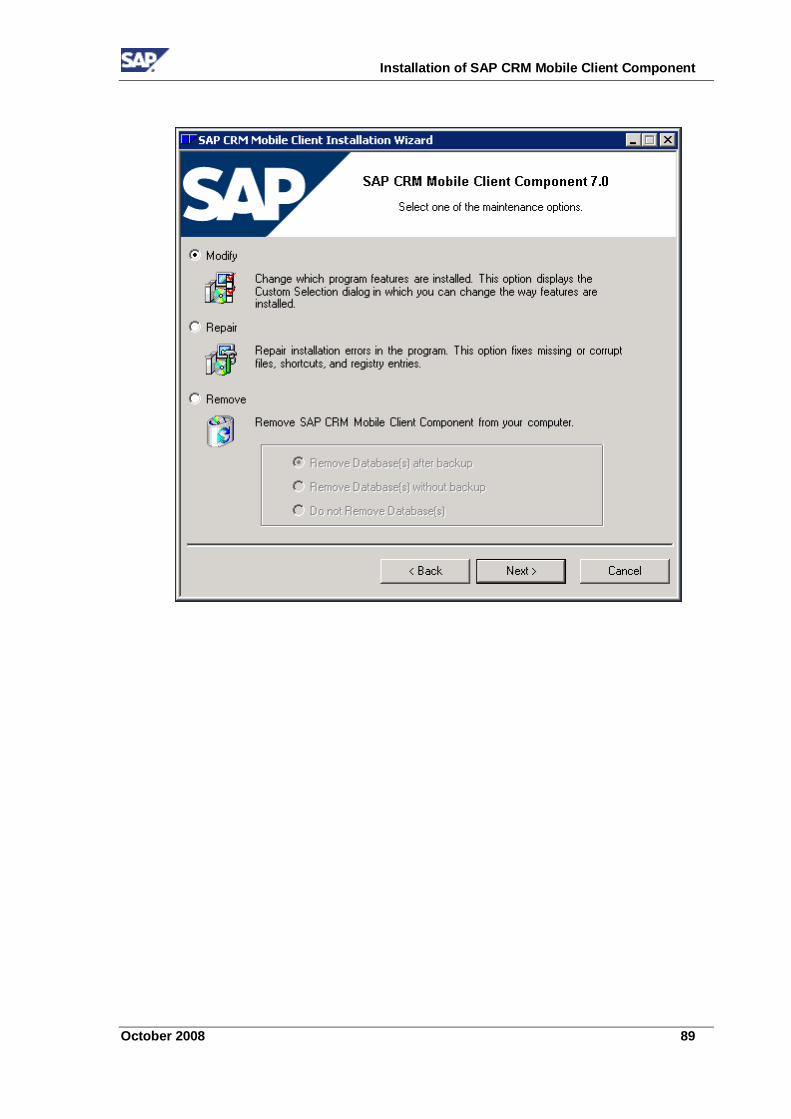
Installation of SAP CRM Mobile Client Component
October 2008 89

Restarting the Installation (Maintenance Mode)
90 October 2008
3. Determine what you need to do.
If you want to... Then...
Modify an existing installation by addinganother application or removing anapplication installed by mistake
Select Modify and choose Next.
Continue with Modifying Installed Applications.
Repair programs which you have alreadyinstalled
Select Repair and choose Next.
Continue with Repairing Installed Applications.
Remove all applications you haveinstalled
Select Remove and choose Next.
Continue with Removing All InstalledApplications.

Installation of SAP CRM Mobile Client Component
October 2008 91
13.1 Modifying Installed Applications1. Select the appropriate machine type configuration for the current machine.

Restarting the Installation (Maintenance Mode)
92 October 2008
2. If you want to uninstall one of these components, clear that field.-OR-If you want to install an additional component, select that field.
Make sure that you leave all components selected that you have installed on yourmachine already. If you clear selected fields for the software components you haveinstalled already, these software components will be uninstalled.
3. Choose Next and follow the instructions for the software you want to add. The maintenance willprovide similar screens as displayed in the installation mode. Please refer the appropriatesections for more information. Installing the Mobile Repository Server, Installing the MobileDevelopment Workstation, Installing the Mobile Client Application, Installing the WorkgroupServer, Installing the Workgroup Client
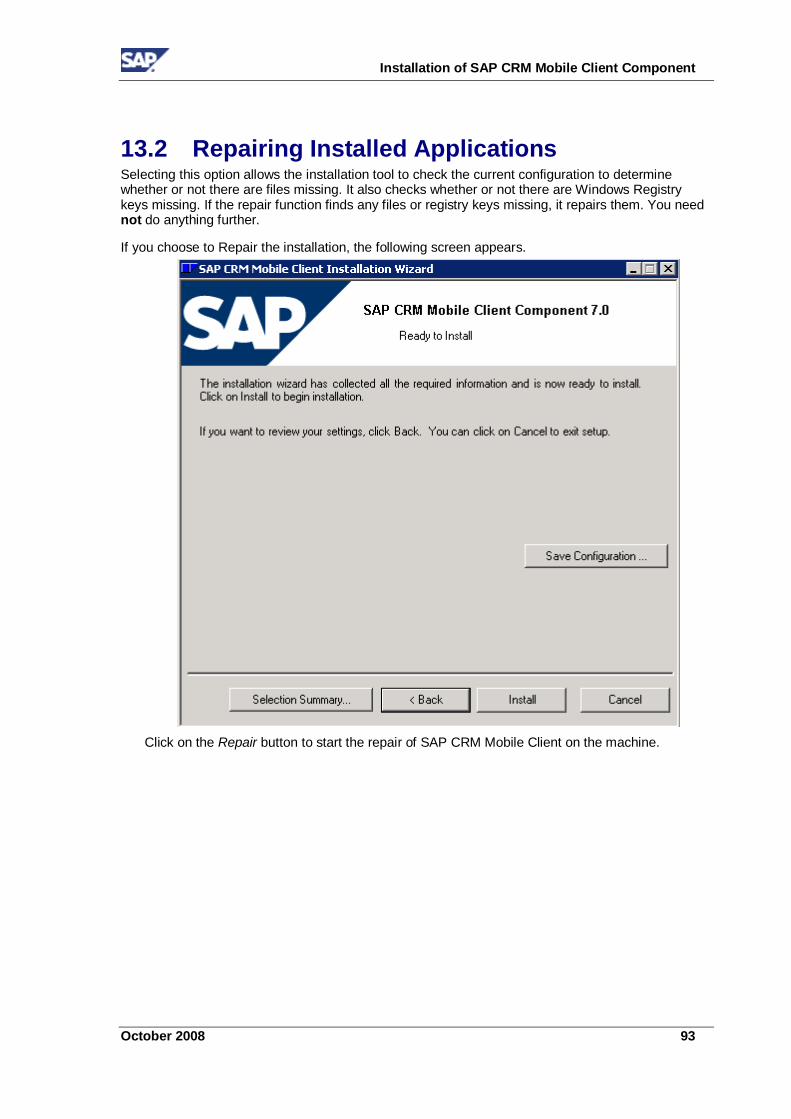
Installation of SAP CRM Mobile Client Component
October 2008 93
13.2 Repairing Installed ApplicationsSelecting this option allows the installation tool to check the current configuration to determinewhether or not there are files missing. It also checks whether or not there are Windows Registrykeys missing. If the repair function finds any files or registry keys missing, it repairs them. You neednot do anything further.
If you choose to Repair the installation, the following screen appears.
Click on the Repair button to start the repair of SAP CRM Mobile Client on the machine.
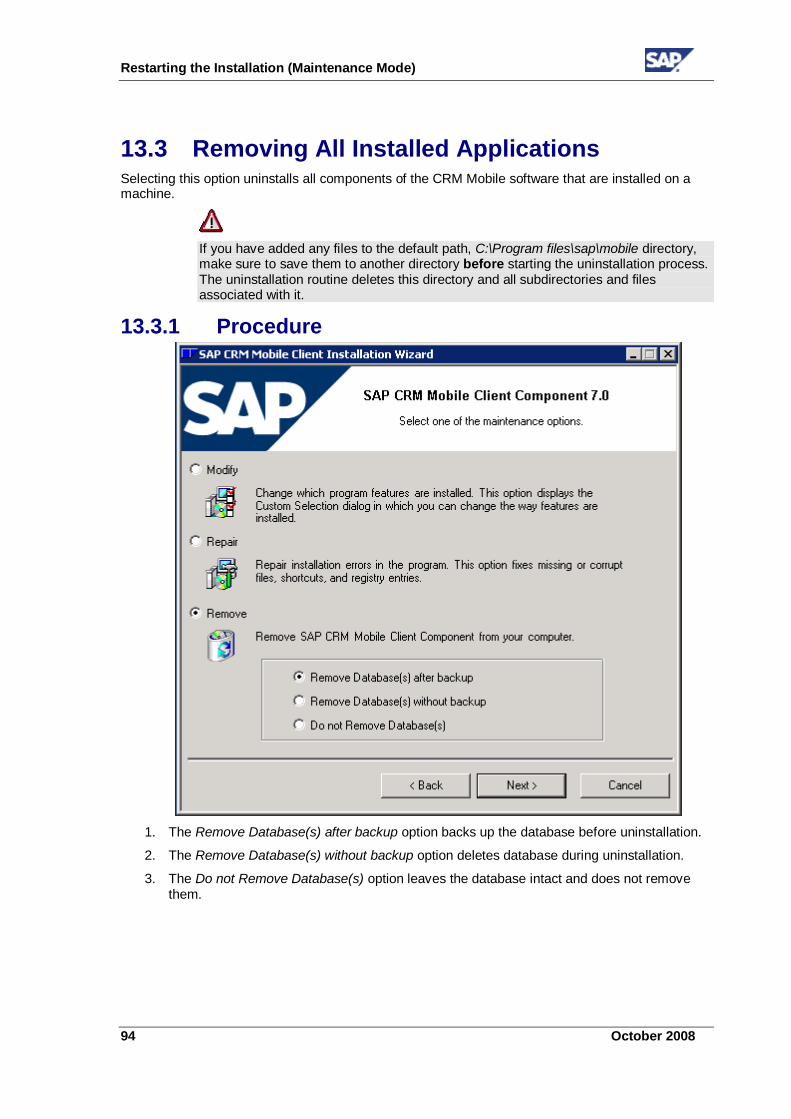
Restarting the Installation (Maintenance Mode)
94 October 2008
13.3 Removing All Installed ApplicationsSelecting this option uninstalls all components of the CRM Mobile software that are installed on amachine.
If you have added any files to the default path, C:\Program files\sap\mobile directory,make sure to save them to another directory before starting the uninstallation process.The uninstallation routine deletes this directory and all subdirectories and filesassociated with it.
13.3.1 Procedure
1. The Remove Database(s) after backup option backs up the database before uninstallation.
2. The Remove Database(s) without backup option deletes database during uninstallation.
3. The Do not Remove Database(s) option leaves the database intact and does not removethem.
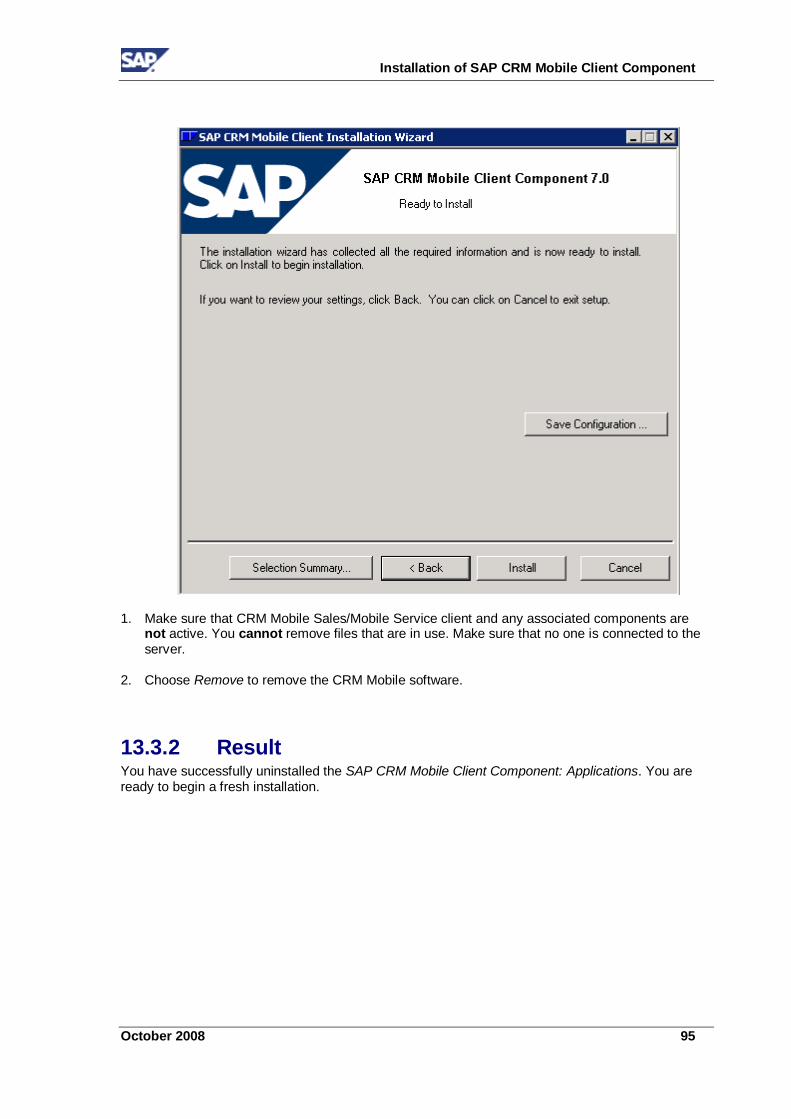
Installation of SAP CRM Mobile Client Component
October 2008 95
1. Make sure that CRM Mobile Sales/Mobile Service client and any associated components arenot active. You cannot remove files that are in use. Make sure that no one is connected to theserver.
2. Choose Remove to remove the CRM Mobile software.
13.3.2 ResultYou have successfully uninstalled the SAP CRM Mobile Client Component: Applications. You areready to begin a fresh installation.

Appendix A: Central Service Reference Guide
96 October 2008
14 Appendix A: Central Service ReferenceGuide
The Central Server is installed on the Mobile Repository Server. For more information, see SoftwareRequirements for the Mobile Repository Server.
14.1 Command Line OptionsThe Central Service provides the following command line options.
Command line options Function
/DNT[install or uninstall] install uninstall
Specifies the NT command Installs a new NT Service Uninstalls an existing NT Service
/PRT[Number] Specifies the port number
/SNM[Service Name] Specifies the service name
/SHD[Port Number] Shuts down the Central Service running on thespecified port number
/NAM[Information String] Displays the information string on the CentralService form
14.2 Guidelines for Using Command Line OptionsWhen you use a command line option, do not type a space between the command line option andits value.
For example, specify port number 1002 as /PRT1002.
To install a new NT Service, use the /DNTinstall option followed by a space and the /PRT option. Ifyou want to add a service name, use the /SNM option followed by the name you want. If you want toinclude spaces in the service name, you must enclose the phrase in quotation marks.
For example, use this command to install the Central Service as an NT Service with SCMnamed “Central Service For TextRep“.ARSCentralServerInstaller.exe /DNTinstall /SNM"Central Service For TextRep"/PRT1002
If you do not specify the port number, the installation fails.
To uninstall an existing NT Service, use the /DNTuninstall option. If you want to add a service name,use the /NAM option. If you want to add a port number, use the /PRT option.
Use this command to uninstall the Central Service as an NT Service with name“CentralServiceForTextRep“.ARSCentralServerInstaller.exe /DNTuninstall /NAM"Central Service For TextRep"
Use this command to uninstall the same Central Service as an NT ServiceARSCentralServerInstaller.exe /DNTuninstall /PRT1002
Installation of SAP CRM Mobile Client Component
October 2008 97
If you specify both a service name and a port number, the port number, /PRT, optionhas priority over the service name, /NAM, option.
You can change the NT Service name from its default name, SAP Mobile Application RepositoryCentral Service, to whatever name meets your business requirements using the /SNM option. If youwant to include spaces in the service name, you must enclose the phrase in quotation marks.
To start the Central Service from the command line, use the /PRT option to specify the port number.
For example, use this command to start the Central Service on port number 1002.
ARSCentralServerInstaller.exe /PRT1002
You can use the /SNM[Service Name] option only with the /DNT[install or uninstall] option.
14.3 Updating Central Service Port Number in theApplication Repository
14.3.1 Procedure1. Start Microsoft SQL Server's Query Analyzer application.
Make sure that you have System Administrator rights.
2. In the DB combo field, select the name of the application repository, for which Central Service isinstalled as a service.
The default name of the repository, ars_db, already exists from the SAP CRM 7.0SP01 Mobile Installation.
3. Use the following SQL script in the Query Analyzer.
/* Script : Begin */Update ars_systable set value = '<Server Machine Name>' where
param = 'ServerMachineName'
Update ars_systable set value = '<Port Number>' where
param = 'RemoteSocketPort'
/* Script : End */
4. Replace all values in the SQL script for the required parameters.
Replace <Server Machine Name> with the name of the Mobile Repository Server, on whichthe Central Service is installed.
Replace <Port Number> with the port number of the Mobile Repository Server, on which theCentral Service is installed.

Appendix A: Central Service Reference Guide
98 October 2008
You must specify all values in the SQL script with single quotes.
5. Execute the SQL script.
Installation of SAP CRM Mobile Client Component
October 2008 99
14.3.2 ResultThe ars_systable entries <Port Number> and <Server Machine Name> for the selected applicationrepository have been updated with the values specified.

Appendix B: Installing Databases Using SwitchDB
100 October 2008
15 Appendix B: Installing Databases UsingSwitchDB
You can use the SwitchDB tool to install SAP Provided databases (user database IDES and MobileApplication Repository ARS Database) on many machines without having to go through theinstallation routine every time. SwitchDB and its associated reference components can be found inthe Mobile\Bin.NET folder, and also on the installation DVD.
You can use SwitchDB either from the UI mode or the command line mode to install databases.SwitchDB uses the attachment method to install a database on a machine. It requires a compressed.mdf file that was created with the SAPCAR compression utility.
The SwitchDB provided with this Service Pack onwards has better logging, both for UI and consolemode. In either case, the log files are created in the directory%PROGRAMFILES%\sap\mobile_installation_logfiles in the format: switchdb-date-time-MachineName.log. Apart from that, the UI has a detailed event log in the main windowwhich logs every activity the user performs. This is useful when debugging any issues. When facedwith any issues from the UI mode, the user can select the entire text content from the text loggerwindow and paste the same in the support message.
The SwitchDB available from 7.0 SP01 onwards has been re-designed with .NETFramework 2.0. Hence, it cannot be run over the network directly. If you wish to installthe database without installing SAP CRM Mobile Client Application, you need to copythe Folder SwitchDB from the DVD onto the local machine where you wish to install thedatabase and then run the tool.
The compressed file (*.car file) and the database (*.mdf file) it contains must havethe same name. Do not rename the database car files provided by SAP. Although youcan rename the database using the Databasename parameter, the individual files,*.car and *.mdf, must remain as they are delivered.
15.1 General User Interface InformationDatabase server
This is the local machine name and it cannot be edited or changed.
Authentication Type
Following are the two types of authentication:
a) Windows Authentication: Uses the windows logon to connect to the SQL Server for furtheroperation.
b) SQL Server Authentication: Uses the SQL Server Administrator (equivalent) information toconnect to the SQL Server for further operation. (Text fields User Name and Passwordseditable only when SQL Server authentication type is selected).
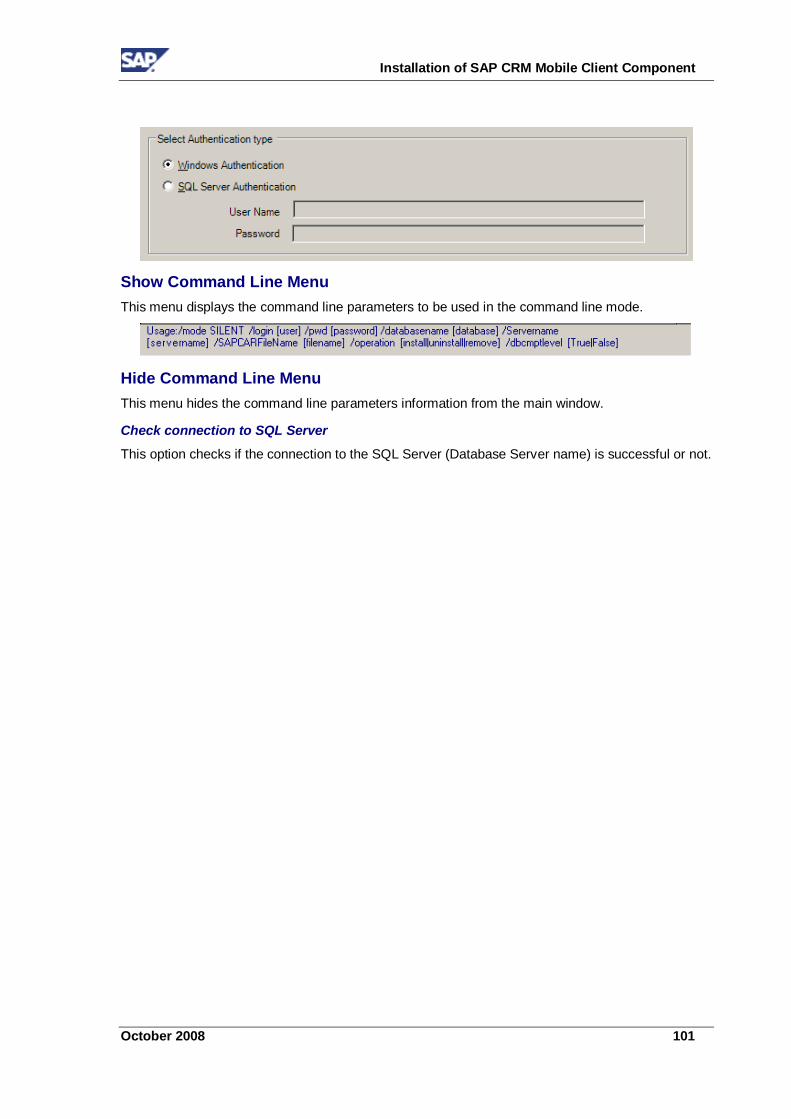
Installation of SAP CRM Mobile Client Component
October 2008 101
Show Command Line MenuThis menu displays the command line parameters to be used in the command line mode.
Hide Command Line MenuThis menu hides the command line parameters information from the main window.
Check connection to SQL Server
This option checks if the connection to the SQL Server (Database Server name) is successful or not.
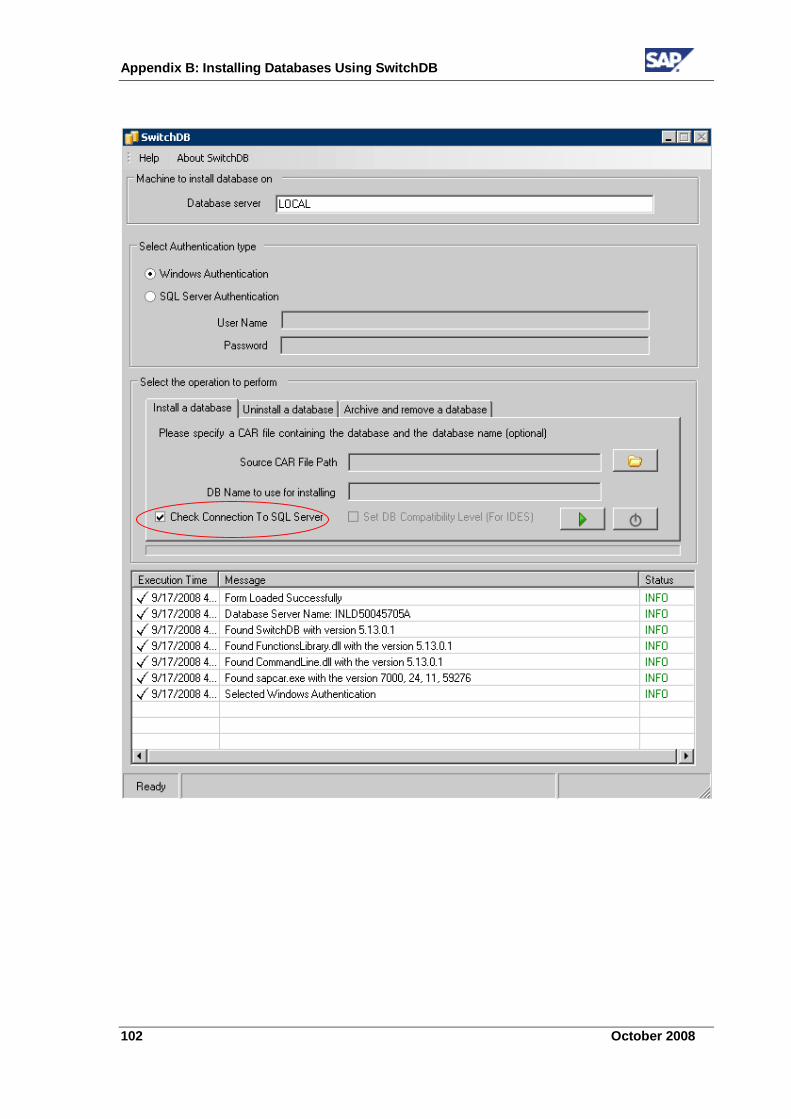
Appendix B: Installing Databases Using SwitchDB
102 October 2008
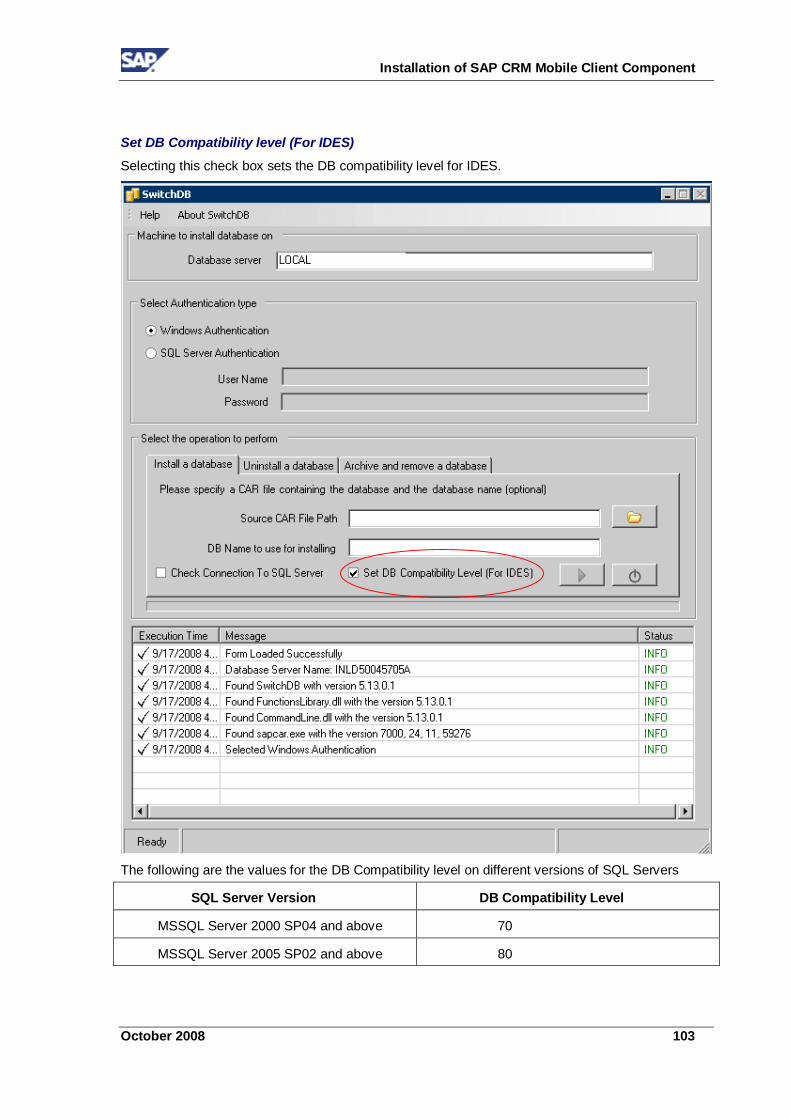
Installation of SAP CRM Mobile Client Component
October 2008 103
Set DB Compatibility level (For IDES)
Selecting this check box sets the DB compatibility level for IDES.
The following are the values for the DB Compatibility level on different versions of SQL Servers
SQL Server Version DB Compatibility Level
MSSQL Server 2000 SP04 and above 70
MSSQL Server 2005 SP02 and above 80
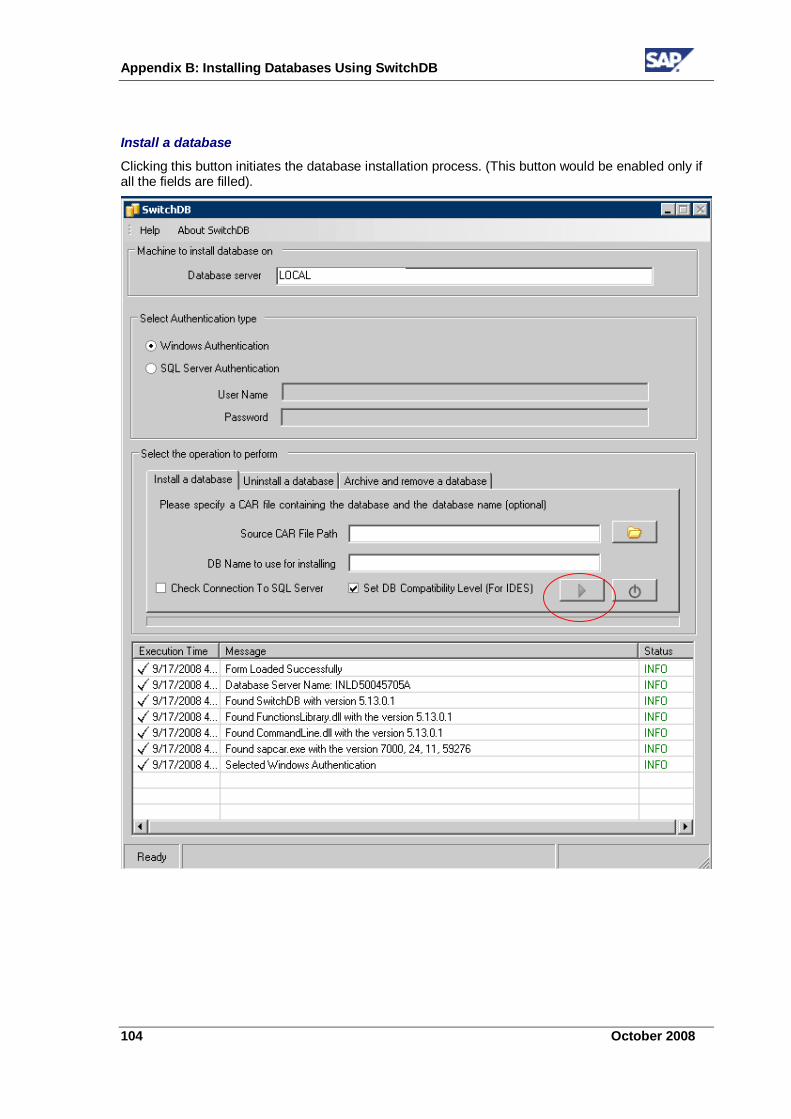
Appendix B: Installing Databases Using SwitchDB
104 October 2008
Install a database
Clicking this button initiates the database installation process. (This button would be enabled only ifall the fields are filled).
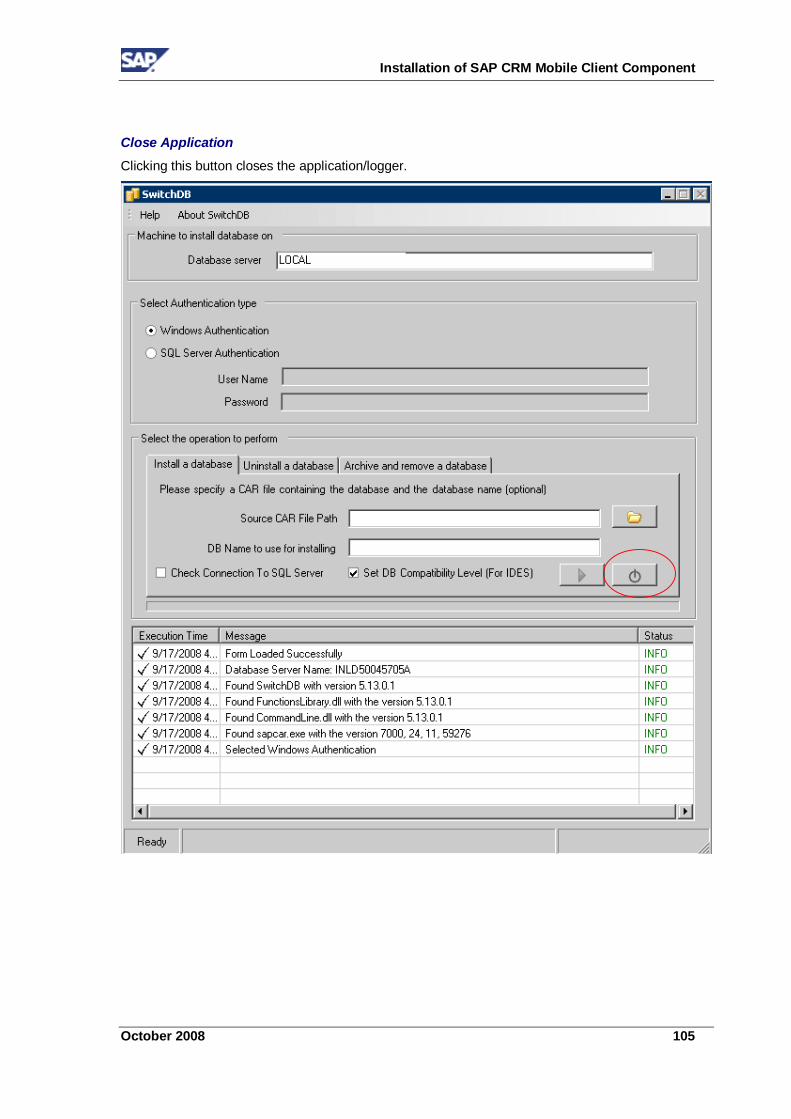
Installation of SAP CRM Mobile Client Component
October 2008 105
Close Application
Clicking this button closes the application/logger.
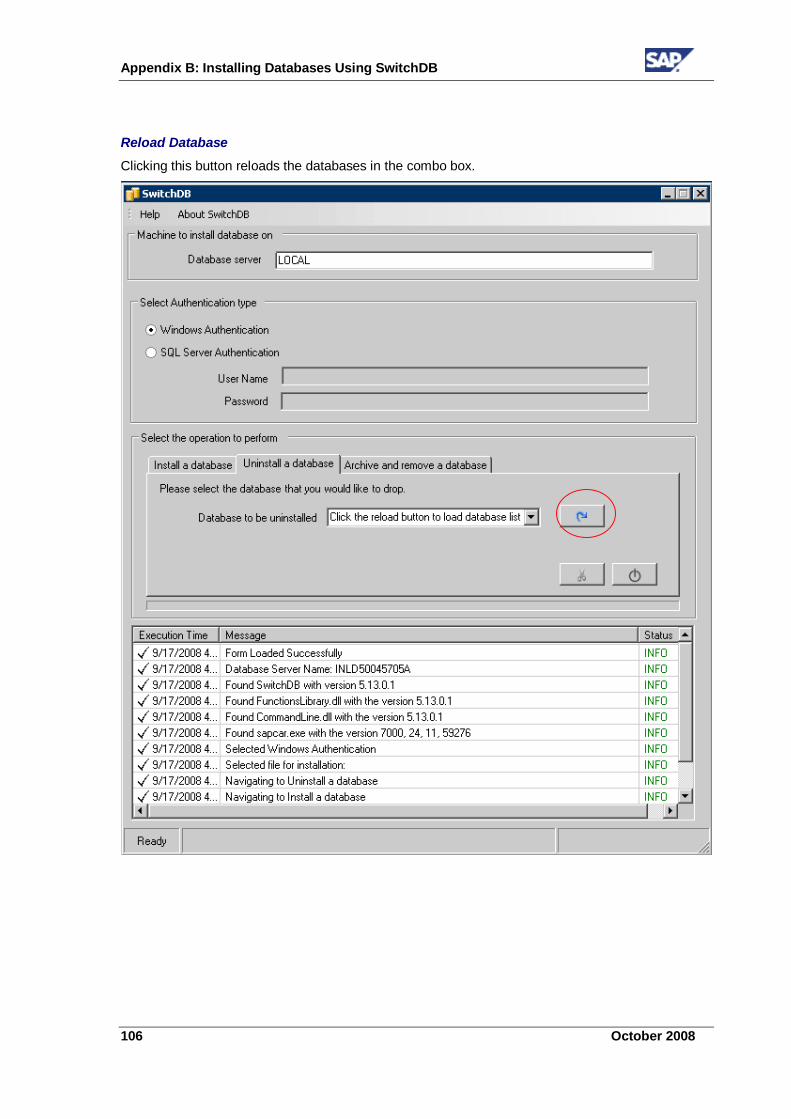
Appendix B: Installing Databases Using SwitchDB
106 October 2008
Reload Database
Clicking this button reloads the databases in the combo box.

Installation of SAP CRM Mobile Client Component
October 2008 107
Drop Database
Clicking this button drops the database selected in the combo box (this should be done only afterreloading the database through the Reload Databases button). This button would be enabled onlyafter selecting the proper database for uninstallation.

Appendix B: Installing Databases Using SwitchDB
108 October 2008
Archive Database
Clicking this button archives the database selected in the combo box and then uninstalls the same.(This should be done only after reloading the database through the Reload Databases button)
You must ensure that the following are stopped / closed before proceeding with the databaseremoval or archiving process:
Installation of SAP CRM Mobile Client Component
October 2008 109
The SAP Mobile Client Companion Synchronization Server service.
IPC Service (Right click on the IPC Notification Icon in the system tray and select Stop IPCto shutdown the IPC Service).
Make sure all the SAP CRM Mobile Application windows are closed.
15.2 SwitchDB Application – UI ModeYou can launch SwitchDB from the Bin.NET directory (or from the local folder to which you havecopied the SwitchDB directory from the installation DVD), by double-clicking the fileSwitchDB.exe.
The following components must be available in the same location as SwitchDB.exe or else thetool will fail to launch.
FunctionsLibrary.dll
CommandLine.dll
Sapcar.exe

Appendix B: Installing Databases Using SwitchDB
110 October 2008
15.3 Checking connection to the SQL ServerTo check the connection to the SQL Server:
1. Select the Check Connection To SQL Server check box.
2. If the connection to the SQL Server fails (This could happen if the SQL Server is not installedproperly or the server is shutdown), the tool displays the error information in the status bar panelin the bottom of the screen. In such a case the user needs to check if:
a. The SQL Server is installed and/or configured properly.
b. The service is currently running.
15.4 Installing a DatabaseTo install a database:
1. Browse for the path of the Compressed Archive (CAR) file using the browse button.
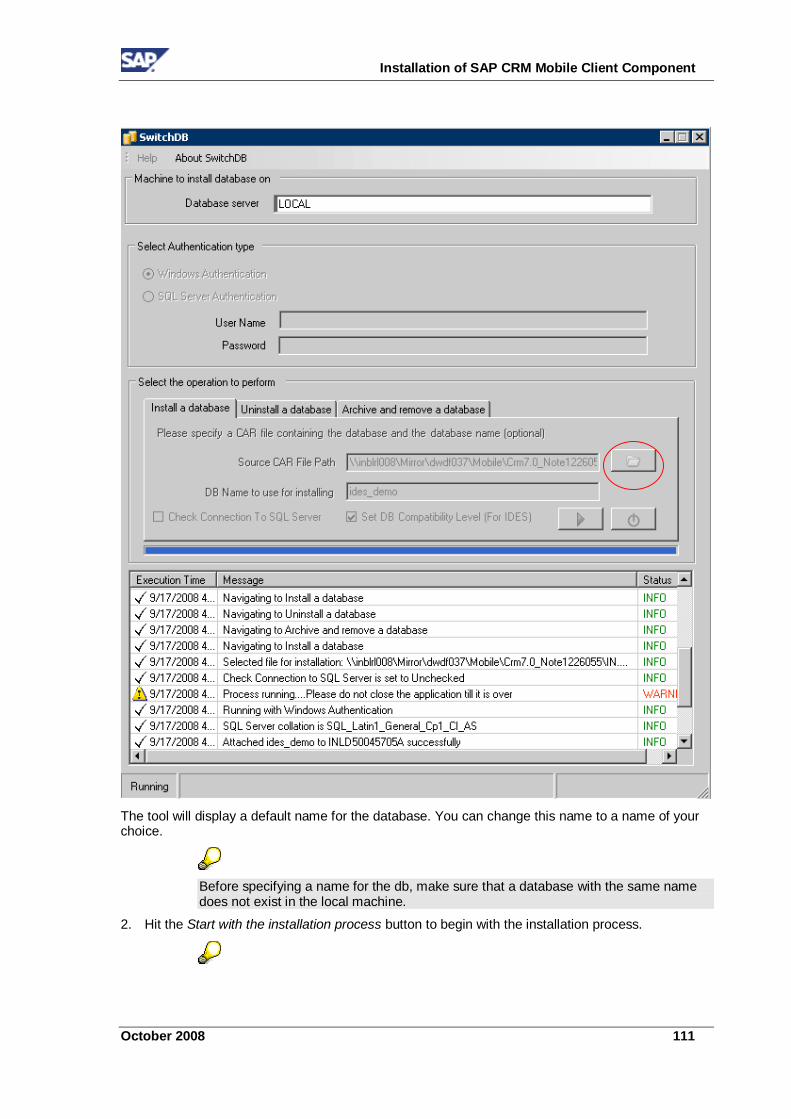
Installation of SAP CRM Mobile Client Component
October 2008 111
The tool will display a default name for the database. You can change this name to a name of yourchoice.
Before specifying a name for the db, make sure that a database with the same namedoes not exist in the local machine.
2. Hit the Start with the installation process button to begin with the installation process.
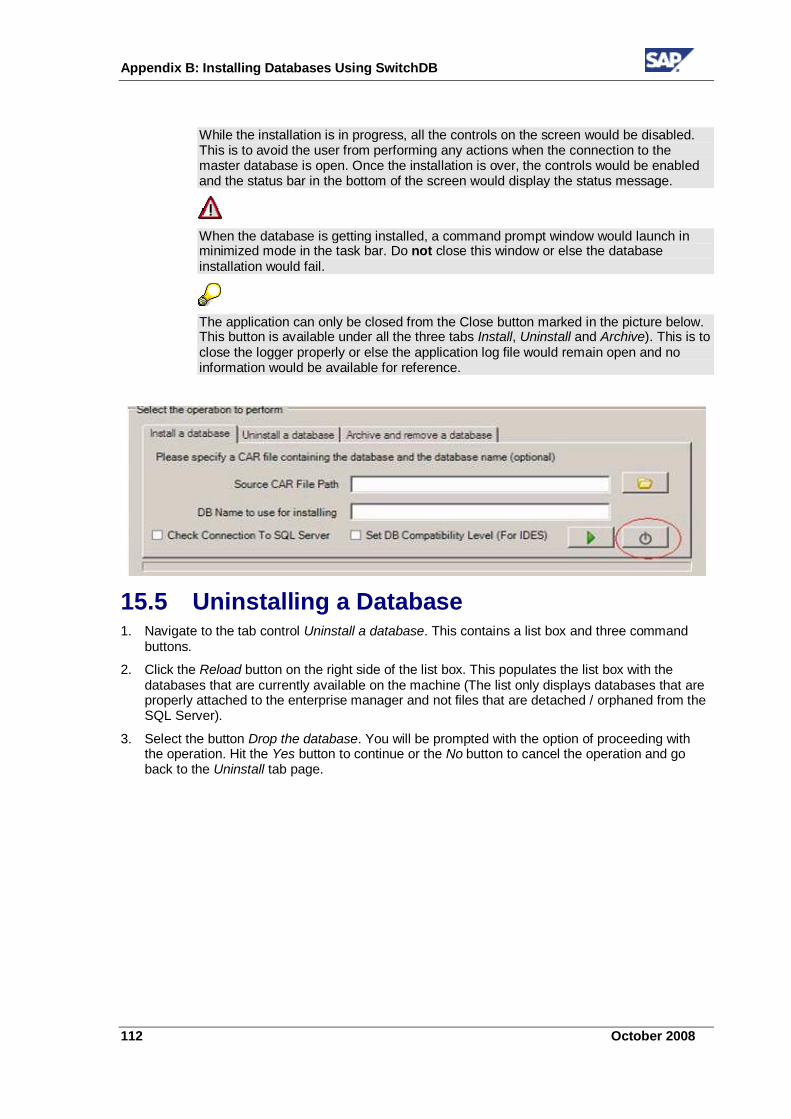
Appendix B: Installing Databases Using SwitchDB
112 October 2008
While the installation is in progress, all the controls on the screen would be disabled.This is to avoid the user from performing any actions when the connection to themaster database is open. Once the installation is over, the controls would be enabledand the status bar in the bottom of the screen would display the status message.
When the database is getting installed, a command prompt window would launch inminimized mode in the task bar. Do not close this window or else the databaseinstallation would fail.
The application can only be closed from the Close button marked in the picture below.This button is available under all the three tabs Install, Uninstall and Archive). This is toclose the logger properly or else the application log file would remain open and noinformation would be available for reference.
15.5 Uninstalling a Database1. Navigate to the tab control Uninstall a database. This contains a list box and three command
buttons.
2. Click the Reload button on the right side of the list box. This populates the list box with thedatabases that are currently available on the machine (The list only displays databases that areproperly attached to the enterprise manager and not files that are detached / orphaned from theSQL Server).
3. Select the button Drop the database. You will be prompted with the option of proceeding withthe operation. Hit the Yes button to continue or the No button to cancel the operation and goback to the Uninstall tab page.
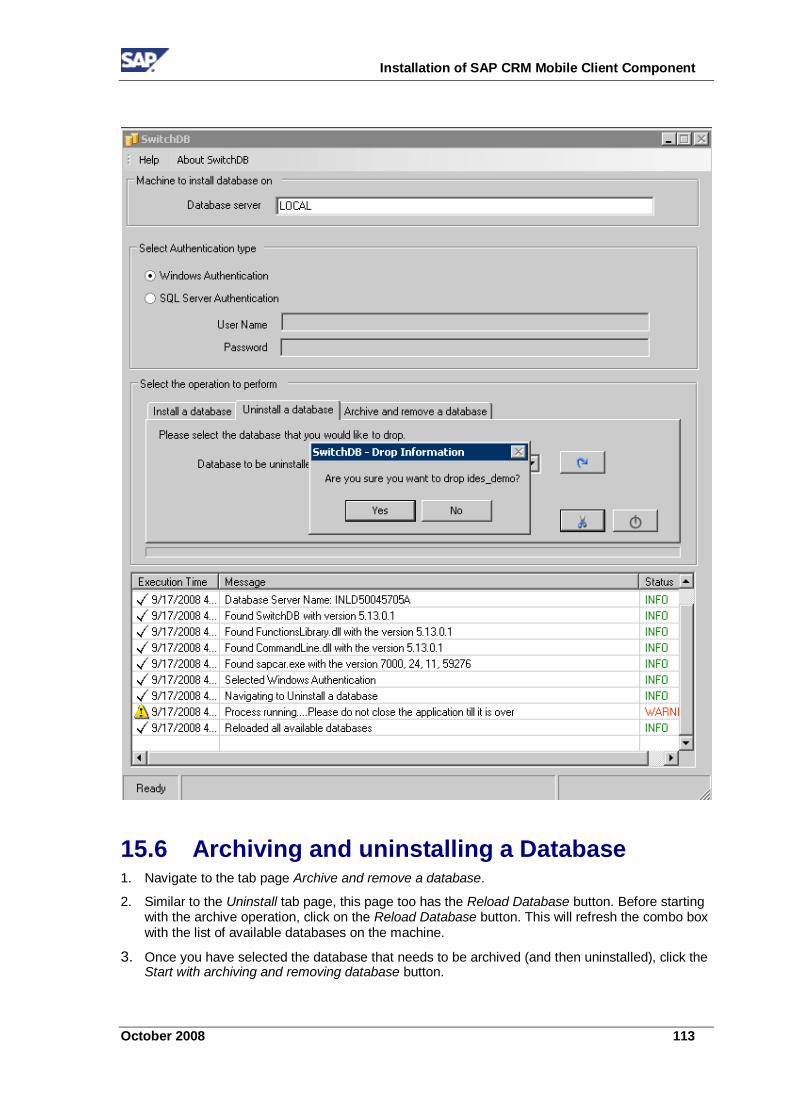
Installation of SAP CRM Mobile Client Component
October 2008 113
15.6 Archiving and uninstalling a Database1. Navigate to the tab page Archive and remove a database.
2. Similar to the Uninstall tab page, this page too has the Reload Database button. Before startingwith the archive operation, click on the Reload Database button. This will refresh the combo boxwith the list of available databases on the machine.
3. Once you have selected the database that needs to be archived (and then uninstalled), click theStart with archiving and removing database button.
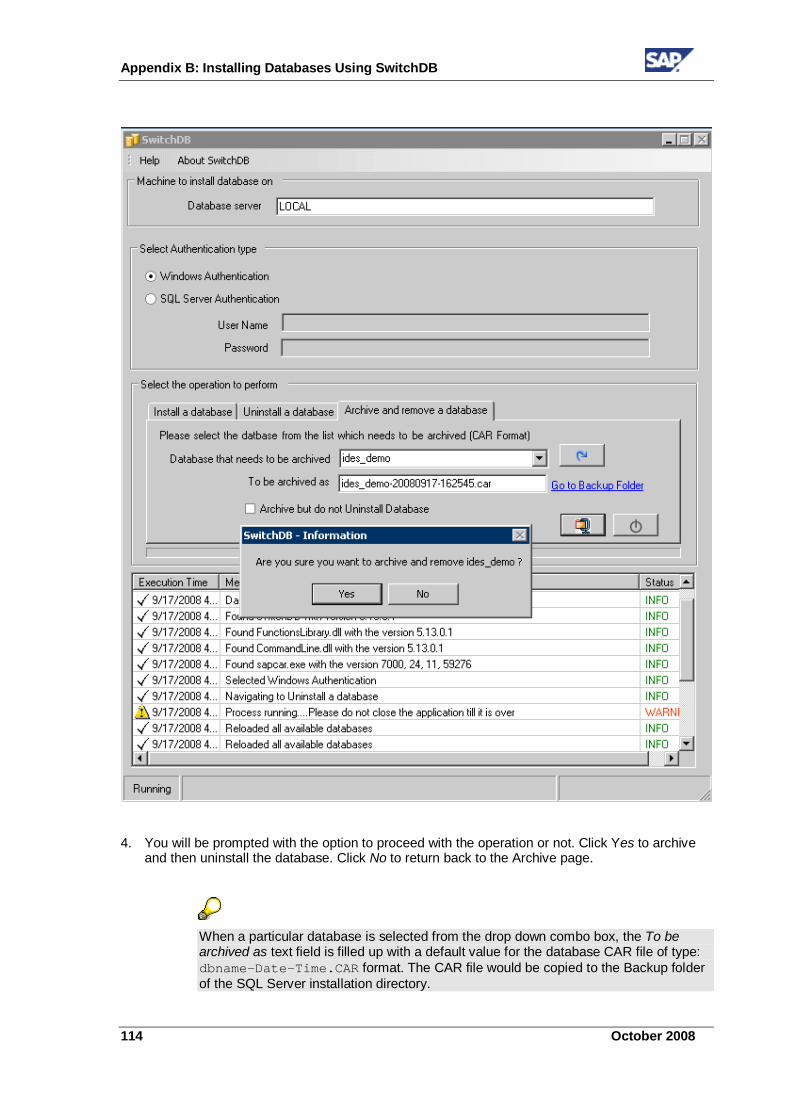
Appendix B: Installing Databases Using SwitchDB
114 October 2008
4. You will be prompted with the option to proceed with the operation or not. Click Yes to archiveand then uninstall the database. Click No to return back to the Archive page.
When a particular database is selected from the drop down combo box, the To bearchived as text field is filled up with a default value for the database CAR file of type:dbname-Date-Time.CAR format. The CAR file would be copied to the Backup folderof the SQL Server installation directory.

Installation of SAP CRM Mobile Client Component
October 2008 115
Do not close the application from the task manager when a database is beingarchived, as this would leave the archiving process in an inconsistent state. Wait forthe operation to finish before closing the tool.
15.7 SwitchDB Application- CommandLine ModeAs in the previous tool, the command line mode is supported with this new release too. Thecommand line arguments used are similar to the previous one. The one additional feature is theverbose logging which makes error tracking less tedious.
To check the list of command line options available for use, launch SwitchDB from thecommand line with the /? Or /help switches. This would display a message box with thelist of parameters available for use.
Make sure the command line arguments cases are as mentioned in the help, as thetool is case sensitive and would not perform the requested operation if the parametersare not of the same case.
Command Line options:
Switches Description Required/Optional/mode
SILENT
Launches the tool in command line(Silent) mode.
Required
/login [user] Login information for SQL Server. Optional
/pwd [password] Password for connecting to SQLServer.
Optional
/databasename[dbname]
Name to use when installing adatabase.
Required
/Servername[servername]
The server to attach DB to. (Thetool only attaches db to themachine on which it is run (localinstallation). So either pass thelocal machine name or the value{local} (recommended with thisswitch)
Required
/SAPCarFileName[filename]
The name of the car file to use forinstalling.
Only required for installingoperation. Do not use foruninstalling or archiving.
/operation
install
uninstall
Installs the database
Uninstalls the database
Required
Required
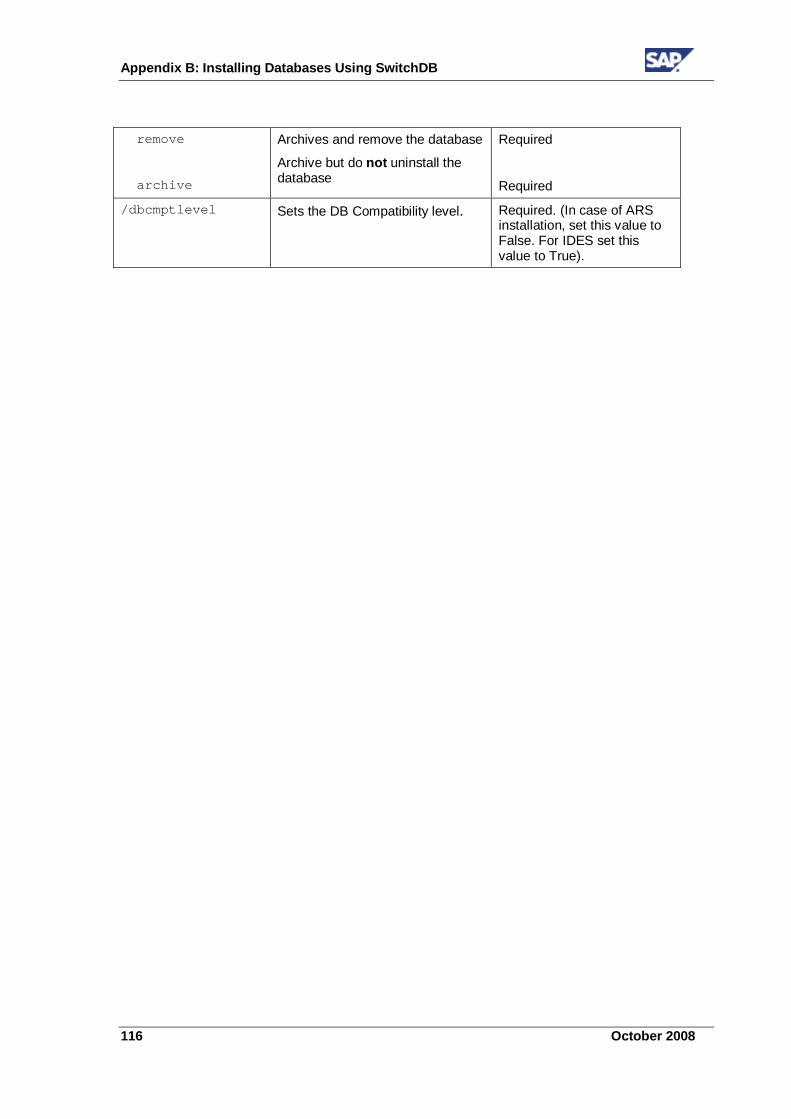
Appendix B: Installing Databases Using SwitchDB
116 October 2008
remove
archive
Archives and remove the database
Archive but do not uninstall thedatabase
Required
Required
/dbcmptlevel Sets the DB Compatibility level. Required. (In case of ARSinstallation, set this value toFalse. For IDES set thisvalue to True).
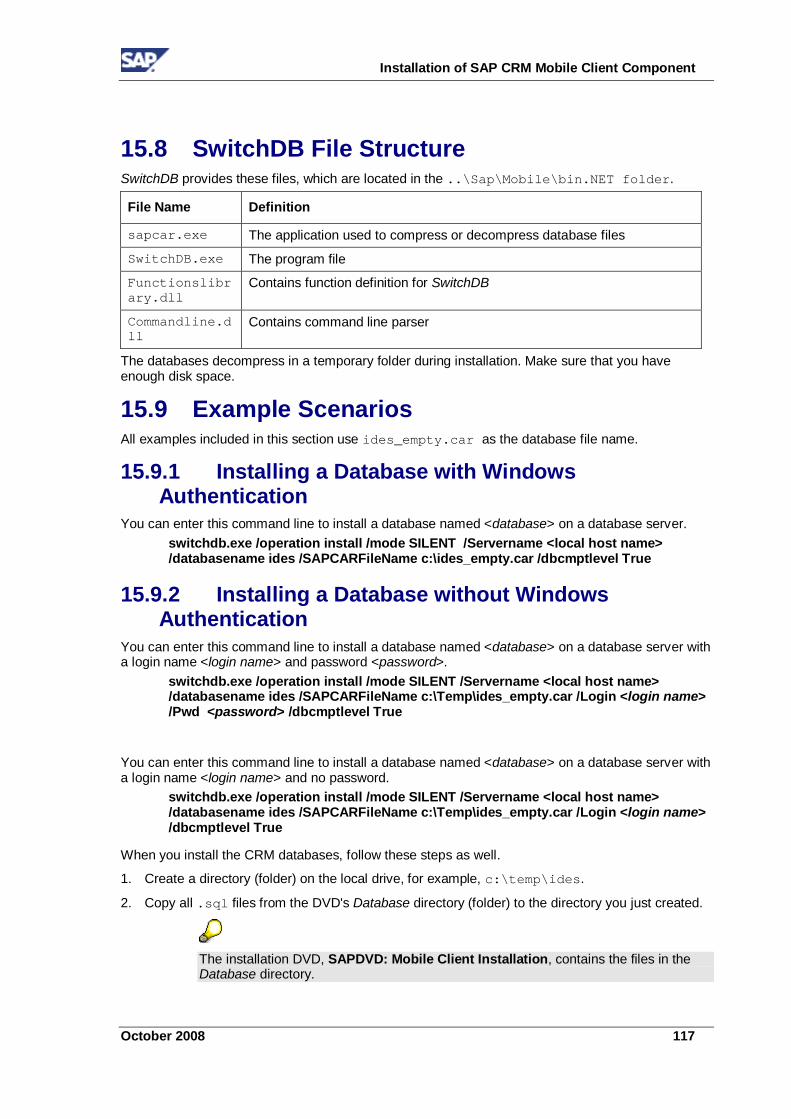
Installation of SAP CRM Mobile Client Component
October 2008 117
15.8 SwitchDB File StructureSwitchDB provides these files, which are located in the ..\Sap\Mobile\bin.NET folder.
File Name Definition
sapcar.exe The application used to compress or decompress database files
SwitchDB.exe The program file
Functionslibrary.dll
Contains function definition for SwitchDB
Commandline.dll
Contains command line parser
The databases decompress in a temporary folder during installation. Make sure that you haveenough disk space.
15.9 Example ScenariosAll examples included in this section use ides_empty.car as the database file name.
15.9.1 Installing a Database with WindowsAuthentication
You can enter this command line to install a database named <database> on a database server.switchdb.exe /operation install /mode SILENT /Servername <local host name>/databasename ides /SAPCARFileName c:\ides_empty.car /dbcmptlevel True
15.9.2 Installing a Database without WindowsAuthentication
You can enter this command line to install a database named <database> on a database server witha login name <login name> and password <password>.
switchdb.exe /operation install /mode SILENT /Servername <local host name>/databasename ides /SAPCARFileName c:\Temp\ides_empty.car /Login <login name>/Pwd <password> /dbcmptlevel True
You can enter this command line to install a database named <database> on a database server witha login name <login name> and no password.
switchdb.exe /operation install /mode SILENT /Servername <local host name>/databasename ides /SAPCARFileName c:\Temp\ides_empty.car /Login <login name>/dbcmptlevel True
When you install the CRM databases, follow these steps as well.
1. Create a directory (folder) on the local drive, for example, c:\temp\ides.
2. Copy all .sql files from the DVD's Database directory (folder) to the directory you just created.
The installation DVD, SAPDVD: Mobile Client Installation, contains the files in theDatabase directory.

Appendix B: Installing Databases Using SwitchDB
118 October 2008
3. Run isql.bat file from the local directory (created in step 1).
15.9.3 Uninstalling a Database with WindowsAuthentication
You can enter this command line to uninstall a database named <database> on a database server.This command archives the database and subsequently uninstalls it.
switchdb.exe /operation uninstall /mode SILENT /Servername <local host name>/databasename ides
15.9.4 Uninstalling a Database without WindowsAuthentication
You can enter this command line to uninstall a database named <database> on a database serverwith a login name <login name> and password <password>. This command archives the databaseand subsequently uninstalls it.
switchdb.exe /operation uninstall /mode SILENT /Servername <local host name>/databasename ides /Login <login name> /Pwd <password>
switchdb.exe /operation uninstall /mode SILENT /Servername <local host name>/databasename ides /Login <login name>
Ensure that all files reside in the same directory. If you want to use SwitchDB more than once, youcan set a path variable. If not, you can copy the files from the DVD to a directory (folder) on yourmachine and run SwitchDB from that directory.
15.9.5 Removing a Database with WindowsAuthentication
You can enter this command line to uninstall a database named <database> on a database server.
This command archives the database before removing it.
switchdb.exe /operation remove /mode SILENT /Servername <local host name>/databasename ides
15.9.6 Removing a Database without WindowsAuthentication
You can enter this command line to uninstall a database named <database> on a database serverwith a login name <login name> and password <password>.
This command archives the database before removing it.
switchdb.exe /operation remove /mode SILENT /Servername <local host name>/databasename ides /Login <login name> /Pwd <password>
switchdb.exe /operation remove /mode SILENT /Servername <local host name>/databasename ides /Login <login name>
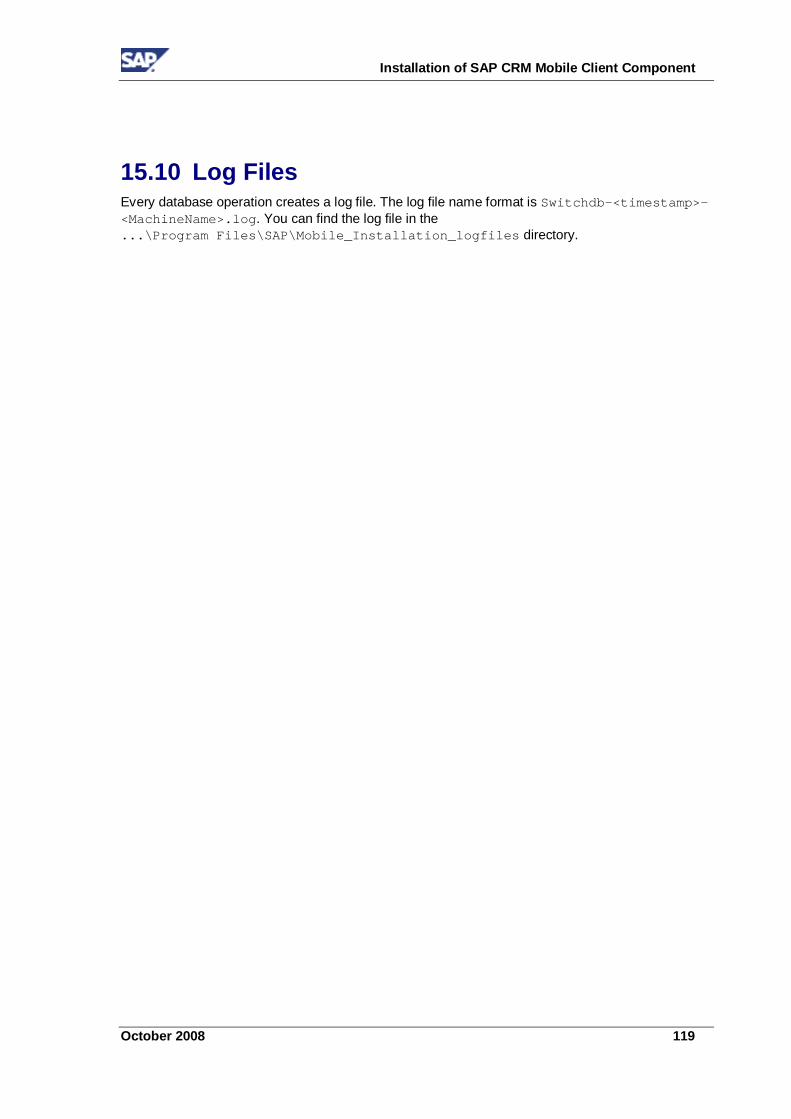
Installation of SAP CRM Mobile Client Component
October 2008 119
15.10 Log FilesEvery database operation creates a log file. The log file name format is Switchdb-<timestamp>-<MachineName>.log. You can find the log file in the...\Program Files\SAP\Mobile_Installation_logfiles directory.
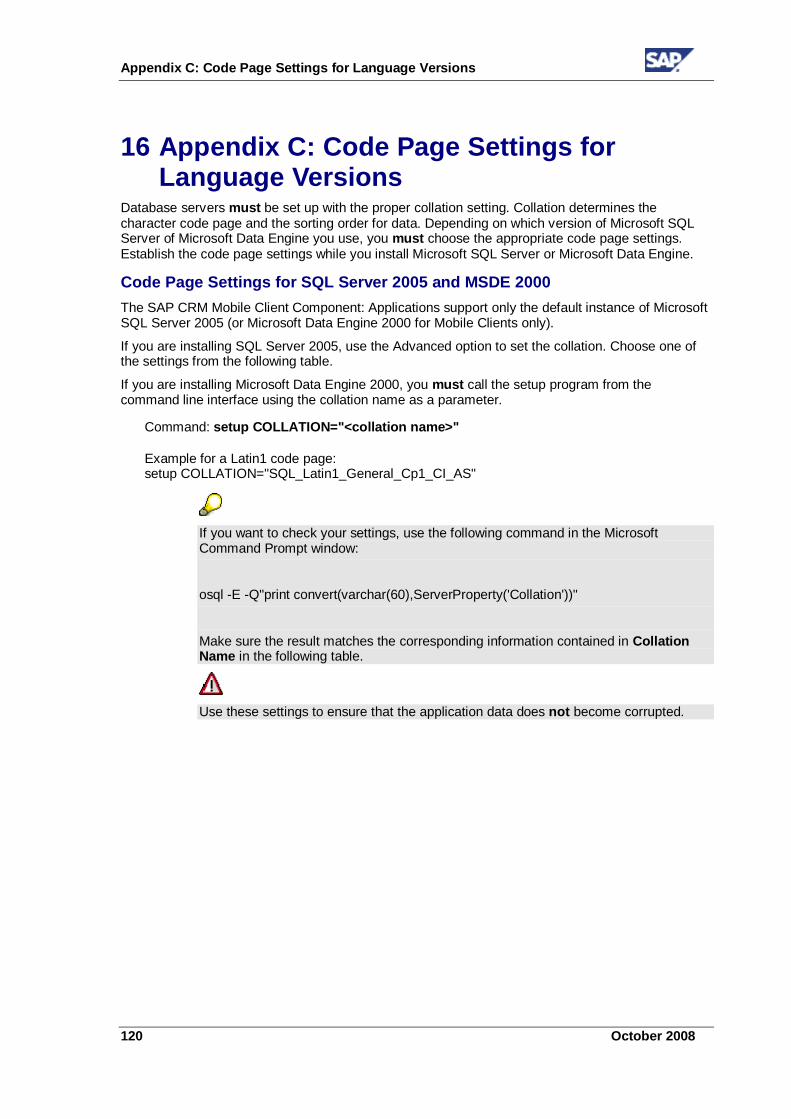
Appendix C: Code Page Settings for Language Versions
120 October 2008
16 Appendix C: Code Page Settings forLanguage Versions
Database servers must be set up with the proper collation setting. Collation determines thecharacter code page and the sorting order for data. Depending on which version of Microsoft SQLServer of Microsoft Data Engine you use, you must choose the appropriate code page settings.Establish the code page settings while you install Microsoft SQL Server or Microsoft Data Engine.
Code Page Settings for SQL Server 2005 and MSDE 2000The SAP CRM Mobile Client Component: Applications support only the default instance of MicrosoftSQL Server 2005 (or Microsoft Data Engine 2000 for Mobile Clients only).
If you are installing SQL Server 2005, use the Advanced option to set the collation. Choose one ofthe settings from the following table.
If you are installing Microsoft Data Engine 2000, you must call the setup program from thecommand line interface using the collation name as a parameter.
Command: setup COLLATION="<collation name>"
Example for a Latin1 code page:setup COLLATION="SQL_Latin1_General_Cp1_CI_AS"
If you want to check your settings, use the following command in the MicrosoftCommand Prompt window:
osql -E -Q"print convert(varchar(60),ServerProperty('Collation'))"
Make sure the result matches the corresponding information contained in CollationName in the following table.
Use these settings to ensure that the application data does not become corrupted.
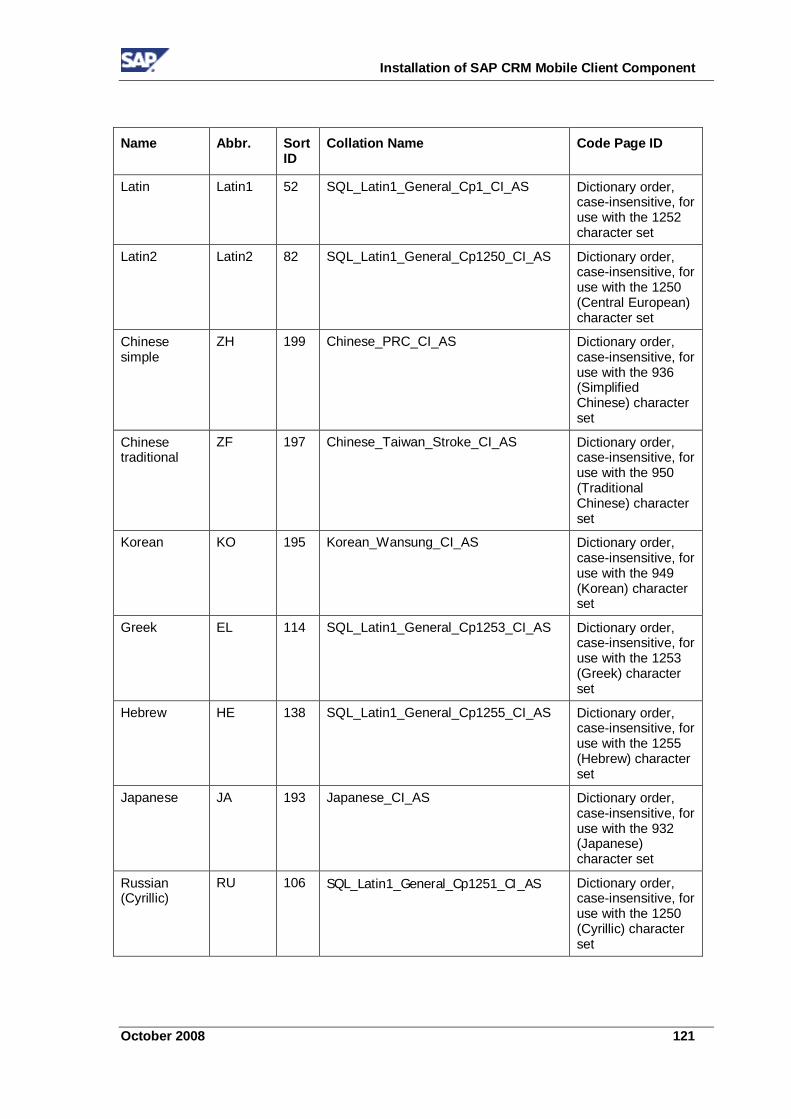
Installation of SAP CRM Mobile Client Component
October 2008 121
Name Abbr. SortID
Collation Name Code Page ID
Latin Latin1 52 SQL_Latin1_General_Cp1_CI_AS Dictionary order,case-insensitive, foruse with the 1252character set
Latin2 Latin2 82 SQL_Latin1_General_Cp1250_CI_AS Dictionary order,case-insensitive, foruse with the 1250(Central European)character set
Chinesesimple
ZH 199 Chinese_PRC_CI_AS Dictionary order,case-insensitive, foruse with the 936(SimplifiedChinese) characterset
Chinesetraditional
ZF 197 Chinese_Taiwan_Stroke_CI_AS Dictionary order,case-insensitive, foruse with the 950(TraditionalChinese) characterset
Korean KO 195 Korean_Wansung_CI_AS Dictionary order,case-insensitive, foruse with the 949(Korean) characterset
Greek EL 114 SQL_Latin1_General_Cp1253_CI_AS Dictionary order,case-insensitive, foruse with the 1253(Greek) characterset
Hebrew HE 138 SQL_Latin1_General_Cp1255_CI_AS Dictionary order,case-insensitive, foruse with the 1255(Hebrew) characterset
Japanese JA 193 Japanese_CI_AS Dictionary order,case-insensitive, foruse with the 932(Japanese)character set
Russian(Cyrillic)
RU 106 SQL_Latin1_General_Cp1251_CI_AS Dictionary order,case-insensitive, foruse with the 1250(Cyrillic) characterset
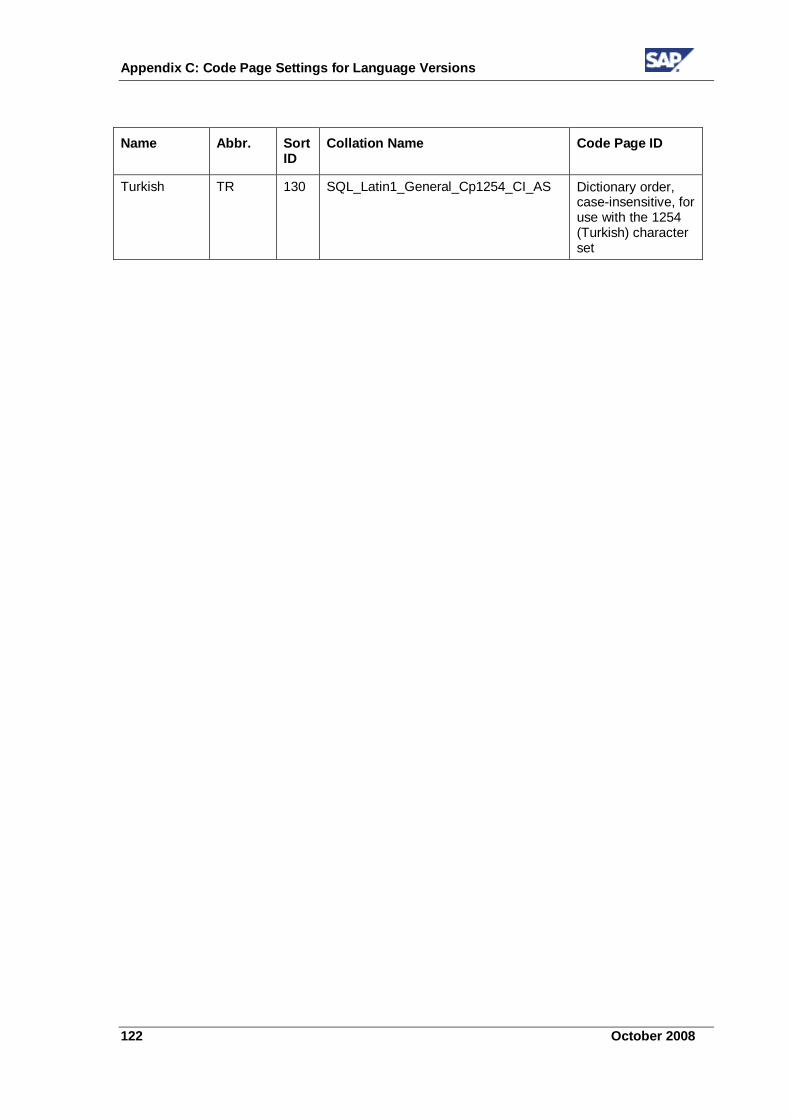
Appendix C: Code Page Settings for Language Versions
122 October 2008
Name Abbr. SortID
Collation Name Code Page ID
Turkish TR 130 SQL_Latin1_General_Cp1254_CI_AS Dictionary order,case-insensitive, foruse with the 1254(Turkish) characterset

Installation of SAP CRM Mobile Client Component
October 2008 123
17 Appendix D: Mobile Repository ServerConfiguration
17.1 Configure the Mobile Repository Server17.1.1 PurposeThis process describes how to configure a mobile repository server in the development environment.It requires: Managing the multiuser development by providing the required services Setting up communication with the CRM server and the Mobile Application Workstation to
facilitate transport of the repository objects
For more information regarding the Mobile Repository Server configuration, see thecollection SAP Note 417454. For specific information regarding single and multipleenvironment transports, see SAP Note 429039.
17.1.2 Process1. Install the CRM transport component as a Microsoft Windows service and link the application
repository to the CRM server using the Transport Installer.
2. Create a user account for access to the CRM server.
3. Assign the MAR ID and the Queue Locking parameters to the respective CRM server tables.
4. Add a namespace to the application repository.
You can add a customer namespace (Y or Z) or a top-level namespace. For moreinformation, see Working with the Namespaces in the online help.
For the application repositories in the test and production environments, you must addsubnamespaces only. For example, if Z were the namespace added to thedevelopment application repository, Z_Test would be the subnamespace to be addedto the test application repository.
5. Create user accounts for development workstations to access the application repository.
17.1.3 ResultYou have completed configuring the mobile repository server in the development environment. Youcan continue with configuring the mobile repository servers in the test and production environmentsusing this process.
17.2 Installing the CRM Transport Component17.2.1 UseYou perform this procedure to:

Appendix D: Mobile Repository Server Configuration
124 October 2008
Install the transport component, Transport Agent as a service on the Mobile Repository Server(MRS).
Provide and test the logon and destination details. These details enable the MRS to establish aconnection with a specific CRM Server.
If you have established a three-system landscape, you must perform this procedure in all the threeenvironments, development, test and production.
The Transport Agent, which you install as a service, transports the metadata of a customized mobileclient application from: The development environment to the test environment, enabling you to test the changes made
to the metadata during the customization of the mobile client application The test environment to the production environment, enabling you to make the customized
mobile client application available for creating client upgrades. Later, these upgrades are sent toall Mobile Clients, which enable the mobile client users to access and use the customizedapplication.
17.2.2 PrerequisitesYou have: Established a system landscape that supports transports Installed Mobile Application Repository (MAR) on each Mobile Repository Server (MRS) existing
in the system landscape
17.2.3 ProcedureChoose Start Programs SAP CRM Mobile Administrative Tools SAP MAR TransportConfigurator.
The SAP MAR Transport Configurator appears.
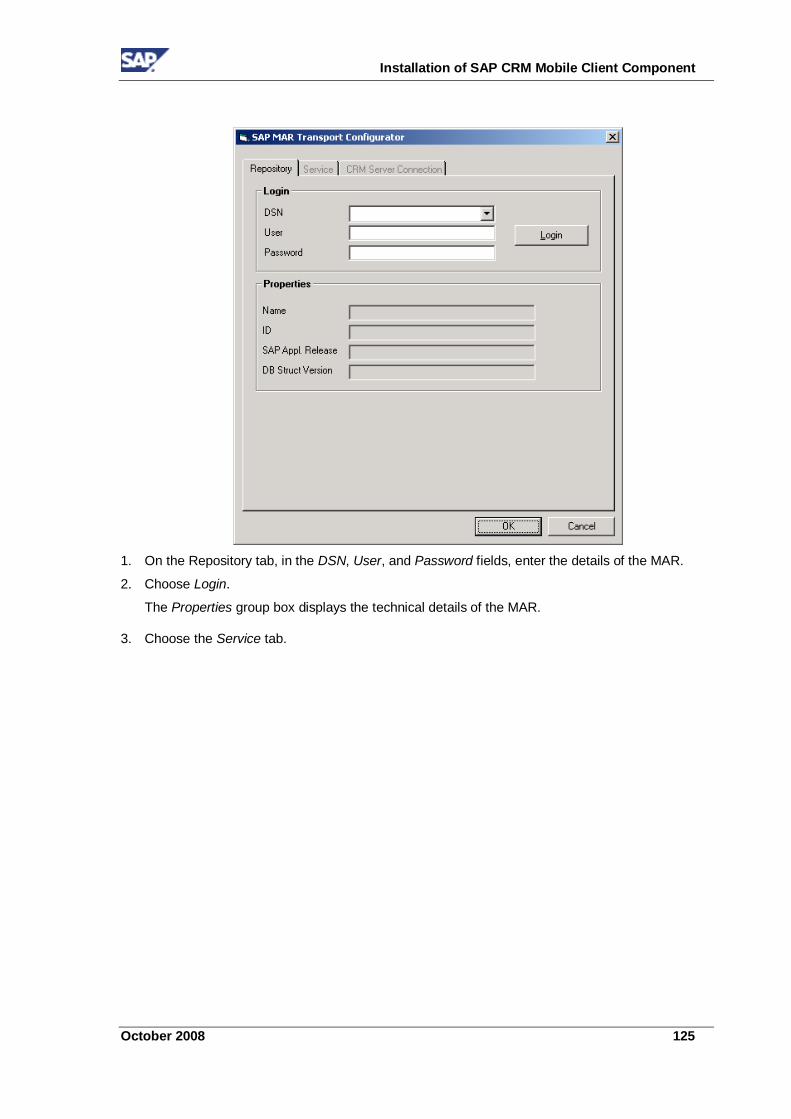
Installation of SAP CRM Mobile Client Component
October 2008 125
1. On the Repository tab, in the DSN, User, and Password fields, enter the details of the MAR.
2. Choose Login.
The Properties group box displays the technical details of the MAR.
3. Choose the Service tab.

Appendix D: Mobile Repository Server Configuration
126 October 2008
4. In the Transport Agent Parameters group box, Service Name field, enter a name for theTransport Agent to be installed as a service.
The name that you enter for the TA service appears in Control Panel Services. Youmust ensure that the name is unique and descriptive. (No other service can have thesame name.)
5. Choose Install.
The SAP MAR Transport Configurator installs the Transport Agent as a service. The text,appearing beside the Service Name field, changes to “Installed”.
When you start the SAP MAR Transport Configurator subsequently, the Service Namefield displays the TA service that is installed already. The Install pushbutton appears asan Uninstall pushbutton. You can choose this Uninstall pushbutton to uninstall theexisting TA service.
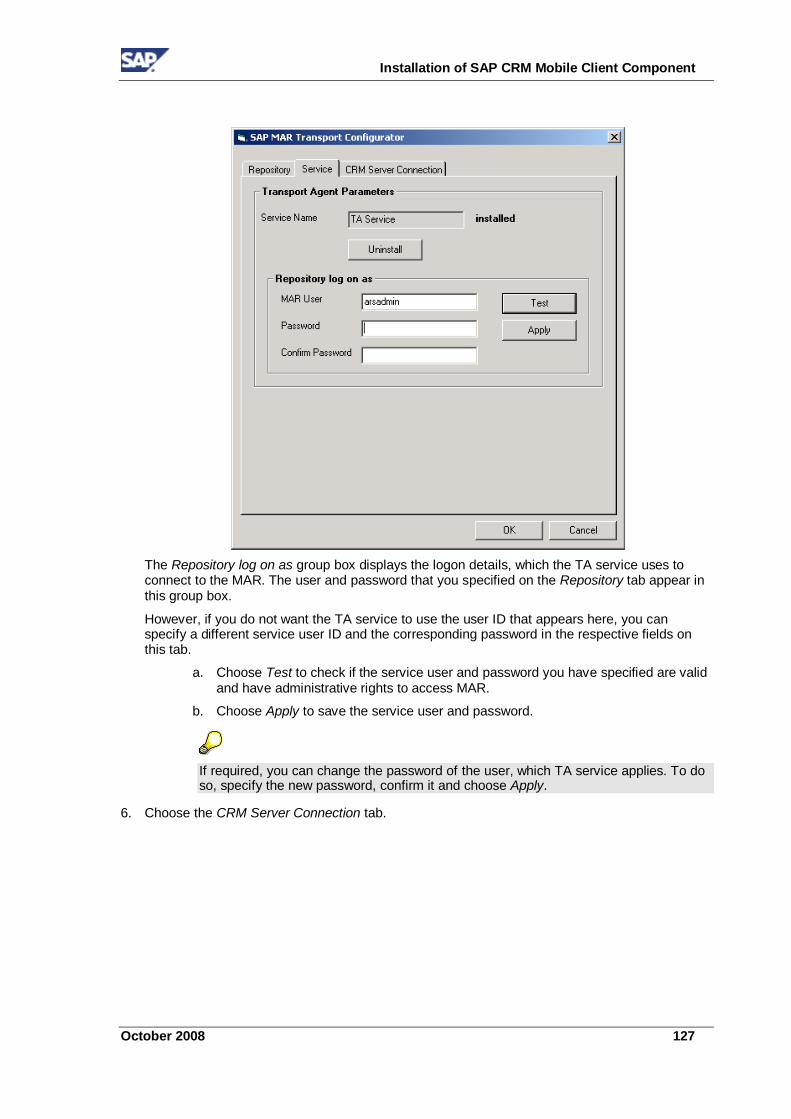
Installation of SAP CRM Mobile Client Component
October 2008 127
The Repository log on as group box displays the logon details, which the TA service uses toconnect to the MAR. The user and password that you specified on the Repository tab appear inthis group box.
However, if you do not want the TA service to use the user ID that appears here, you canspecify a different service user ID and the corresponding password in the respective fields onthis tab.
a. Choose Test to check if the service user and password you have specified are validand have administrative rights to access MAR.
b. Choose Apply to save the service user and password.
If required, you can change the password of the user, which TA service applies. To doso, specify the new password, confirm it and choose Apply.
6. Choose the CRM Server Connection tab.
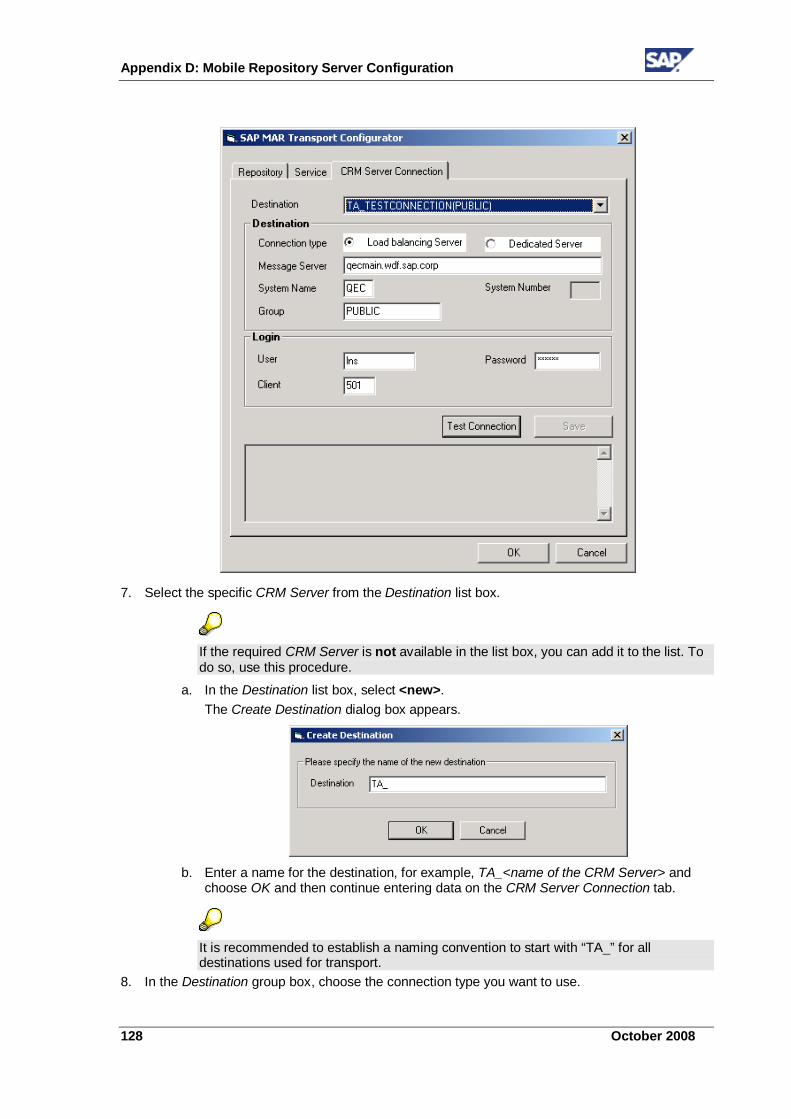
Appendix D: Mobile Repository Server Configuration
128 October 2008
7. Select the specific CRM Server from the Destination list box.
If the required CRM Server is not available in the list box, you can add it to the list. Todo so, use this procedure.
a. In the Destination list box, select <new>.The Create Destination dialog box appears.
b. Enter a name for the destination, for example, TA_<name of the CRM Server> andchoose OK and then continue entering data on the CRM Server Connection tab.
It is recommended to establish a naming convention to start with “TA_” for alldestinations used for transport.
8. In the Destination group box, choose the connection type you want to use.
Installation of SAP CRM Mobile Client Component
October 2008 129
The Load Balancing Server allows the message server to choose a free application serverusing a group logon.
The Dedicated Server allows a direct logon to the application server.9. Use the following table to determine the appropriate information you need to add to the fields,
based on the connection type you selected.
If you selected the... Then this field... Requires the...
Load Balancing Server Message Server IP address or DNS host nameof the message server thathas to be used for logon
System Name Name of the CRM server
Group Logon group of the SAPsystem, for example, PUBLIC
Dedicated Server Application Server IP address or DNS host nameof the application server thathas to be used for logon
System Number System number of the CRMServer
10. In the Login group box, specify the user, password, and client number that will be used toconnect to the CRM Server.
11. Choose Test Connection to test whether or not a connection to the CRM Server is establishedsuccessfully.
If the connection is not established, then verify and correct the information youprovided in the CRM Server Connection tab. Then repeat step 12.
12. When the connection is established successfully, choose Save.
13. Choose OK.
17.3 Creating a CRM Server User Account17.3.1 UseUse this procedure to create a user account for the Transport Agent of the Mobile ApplicationRepository. This user account must be unique. Make sure that it is not used in any other context.
17.3.2 PrerequisitesThe system landscape is established and the software is installed.
Appendix D: Mobile Repository Server Configuration
130 October 2008
17.3.3 Procedure1. Logon to the CRM Server.
2. Choose Tools Administration User Maintenance User.
The User Maintenance screen appears.
3. Enter the appropriate information into the fields.
• Choose the user account type as Communications.• Provide necessary rights for this user account to create, modify, and release
transport orders.• For more information about creating user accounts, see the SAP online help.
4. Choose Save.
17.3.4 ResultThe user account you have created allows you to distinguish the transport orders created for themobile application repository. This helps in identifying the required transport orders to be transportedto the target system.
17.4 Assigning the MAR ID17.4.1 UseThe Mobile Application Repository ID identifies the specific repository in the corresponding CRMserver. The CRM server then identifies this repository while establishing a connection with it.
17.4.2 PrerequisitesYou have obtained the ID of the repository you want to specify, from the ARS_SYSTABLE.
17.4.3 Procedure1. Logon to the CRM Server.
2. Locate the transaction SMOBREPMAIN under the folder User Menu for <User Name> anddouble-click on it.
The Display Mobile Application Repositories screen appears. It displays a list of repositories (ifany exist) in the read-only mode.
3. Choose Repository Change/Display.
The Change Mobile Application Repositories screen appears, displaying the list of repositories(if any exist) in write mode.
4. Choose Repository Create to specify the repository.
An empty row appears in the list of repositories.
To specify a repository in the CRM Server is to create the respective repository entryusing the transaction SMOBREPMAIN.
5. Specify repository name and repository ID in the corresponding fields.
Installation of SAP CRM Mobile Client Component
October 2008 131
The option Client Upgrade allowed has no significance for the replication. It is requiredonly to facilitate the client upgrades. This option indicates that the repository ispermitted to send client upgrades through this CRM Server.
6. Repeat steps 4 and 5 to specify more than one repository in the CRM Server. When you arefinished, continue with step 7.
7. Choose Repository Save.
17.4.4 ResultThe CRM server can receive the objects sent by the specified application repository duringtransport. You can continue with assigning the MAR ID for the test and production applicationrepositories in their corresponding CRM servers using this procedure.
You have completed the setup. You can start using the transport services. Make sure that theCentral Service is also running on the repository to which the transport services connect.
17.5 Adding a Namespace17.5.1 PrerequisitesYou have requested a namespace from SAP.
You have received the repository ID, your namespace, and its checksum value from SAP.
17.5.2 Procedure1. On the Mobile Development Workstation, login to the Mobile Application Studio.
The SAP Mobile Application Studio screen appears.
2. Choose Tools Namespace Manager Register Namespace.
The Add NameSpace window appears.
3. In the Prefix field, enter your namespace.
4. From the Repository ID combo control, select the appropriate repository ID.
5. In the Checksum field, enter your checksum information.
6. Select a version for the namespace.
7. Choose OK.
17.5.3 ResultThe namespace is stored in the corresponding mobile application repository.
For more information regarding the namespace, see the online help.
Appendix D: Mobile Repository Server Configuration
132 October 2008
17.6 Creating User Accounts in User Manager17.6.1 UseCreate and maintain user accounts that require access to the Mobile Application Repository. Formore information regarding User Manager, see the Mobile Application Studio online help.
17.6.2 Procedure1. Logon to the Mobile Application Studio.
The SAP Mobile Application Studio screen appears.
2. Choose Tools User Manager.
The User Manager window appears.
3. Choose Create.
4. Enter the appropriate Name and Password.
5. Using the following table, assign a profile for this user account.
Profile Definition
ARSAdmin Provides read and write access to all tables, such as, User, Profile, andMAR related tables.
ARSDeveloper Provides read and write access to all MAR related tables, read-onlyaccess to the User table, with the exception of password modification,and no access to the Profile table.
ARSUser Provides read-only access to all MAR related tables, read-only accessto the User table, with the exception of password modification, and noaccess to the Profile table.
6. Choose Save.
7. Confirm the password.
You can create a user account without assigning a profile to it. If you do this, you mustadd a profile to the user account using Modify, before you log into the MobileApplication Studio.
17.6.3 ResultYou have completed the configuration of the Mobile Repository Server.
17.7 Troubleshooting17.7.1 Transport Agent Service FailedReason Solution
The Transport Agent (TA) cannotconnect to the CRM Server.
Check and correct the login parameters specifiedduring the TA installation.
The MAR initialization failed. See MAR Initialization Failed for possible causes.

Installation of SAP CRM Mobile Client Component
October 2008 133
17.7.2 MAR Initialization FailedReason Solution
Invalid login parameters such as DSN,username and password
Ensure that the DSN entered is available on thelocal system and the username and passwordare valid.
Try using the parameters to logon to SAP MobileApplication Studio.
Although you modified the password after youconfigured the TA using TransportConfigurator,TA still uses the old password. Update thepassword using the Service tab of theTransportConfigurator.
If the user management feature is enabled, thenmake sure the user name is mapped to a validprofile.
Invalid DSN The DSN does not refer to a valid applicationrepository. Ensure that the default repository in theDSN is set to a valid repository.
Incompatible database structureversion
Ensure that the version of the ARS.DLL is compatiblewith the current version of the application repository.For more information, contact your systemadministrator.
Unknown error Check whether the files ErrComp.DLL,ARS.DLL and LockManager.DLL are installed.If these files are not installed, install and registerthem now. If they are already installed, registerthem.
Check whether the Central Service is running.
Unable to connect to the CentralService Component
Ensure that the Central Service has been startedand is running.
Check if the entries ServerMachineName andRemoteSocketPort in the ARS_SYSTABLEare consistent with the Central Service.
Incompatible build version Upgrade to the latest ARS.DLL file. If initialization stillfails, contact your system administrator.
17.7.3 Connection to the CRM Server FailedReason Solution
Password of the user on the CRMServer has been changed.
Stop the TA service. Update the password of the userusing the CRM Server Connection option in theTransportConfigurator.

Appendix D: Mobile Repository Server Configuration
134 October 2008
17.7.4 Change Lists Are Not Moving from theRepository to the CRM Server
Reason Solution
The TA service is not started. Start the TA service.
The CRM Server is not recognizing therepository.
Check whether or not the repository ID isspecified in the CRM Server. If not, enter the IDusing the SMOBREPMAIN transaction in theCRM Server.
Check whether or not the specified repository IDis correct. If not, make sure that there is notanother repository specified in the CRM Serverand then modify the ID using theSMOBREPMAIN transaction in the CRM Server.
Connection to the CRM Server failed. Refer to the previous section.
The reasons and solutions provided in this table also apply if change lists are notmoving from the CRM Server to the repository.
17.7.5 Unable to Specify the Repository ID in the CRMServer
Reason Solution
You do not have the authorization tospecify the repository ID in the CRMServer.
Contact your system administrator to get theSAP_MAS_TRANSPORT_ADMIN role authorizationand then try again.
Installation of SAP CRM Mobile Client Component
October 2008 135
17.8 Technical Details17.8.1 Ownership Transfer ParametersTo enable ownership transfer, you must specify values for the corresponding parameters. Beforespecifying values, make sure that the repositories to which you want to transfer the ownership arespecified in the ARS_KNOWNREP table. The following table describes the ownership transferparameters to which values must be specified:
Parameter Description Value
OTALREP Contains a list of repository IDs. While transferring theownership of object(s), you can choose a repository to whichthe ownership of the object(s) has to be transferred.
<RepID1>,<RepID2>,…..<RepIDn>
OTN Determines whether to allow ownership transfer from thecurrent repository.
Yes or No
If values are not specified for the OTALREP parameter, the SAP Mobile Application Studio displaysall repositories that are specified in the ARS_KNOWNREP table.
The ARS_KNOWNREP table contains other repositories in addition to the repositoriesyou specify. The other repositories include SAP delivery repository and repositoriesfrom the previous releases. If you do not specify values for OTALREP, the MobileApplication Studio user can see all available repositories in the ARS_KNOWNREPtable. This can cause severe problems. If the Mobile Application Studio user selectsSAP delivery repository or a repository from a previous release, the source repositorytransfers the ownership. However, this transfered ownership cannot reach the targetrepository.
Appendix E: Mobile Application Repository Transport Concepts
136 October 2008
18 Appendix E: Mobile Application RepositoryTransport Concepts
18.1 OverviewCRM Mobile Client Component software requires two transport types. One handles transports ofdevelopment objects within a development landscape; the other handles the transport fordeployment and installation of applications and runtime objects.
Transport delivers development results in a distributed development landscape. Developmentobjects, such as source code or tile definitions, are distributed among multiple applicationrepositories. The Mobile CRM transport functionality is based on the functionality of the R/3transport system.
You can transport CRM server customizations and ABAP-Workbench changes along withchanges made in the Mobile Application Studio in the same change request.
You can reuse the predefined transport paths between CRM servers.Upgrade Console deploys and installs executable software and other runtime objects, such asHTML files, to the machines where the SAP Mobile Application Studio components are installed.Use the Upgrade Console functionality to send the upgrade files to these machines and itensures that the upgrade is executed at the proper time. The Upgrade Console uses the BDocdistribution mechanism of the CRM Middleware. It sends an upgrade to all mobile clients thathave subscribed to a specific publication. The upgrade software on the client machineautomatically executes the upgrade after it has received the new software. To avoid sendinglarge upgrades over a low-bandwidth network, such as a telephone line, the upgrade files canalso be shipped on a DVD. In this case, only the trigger to execute the upgrade is transmittedvia the BDoc distribution mechanism.
18.2 Transport ComponentThe Transport Management services of the SAP Mobile Application Studio facilitate setting updistributed development landscapes. Landscapes typically consist of three systems; Development,Test (Quality Assurance), and Production.
These three systems build a transport chain where the development systems deliver objects to thetest system, which in turn delivers to the production system.
The Transport Service (Transport.exe) is a Microsoft Windows service. The service uses: A console, which allows the user to monitor (and configure) a number of transport related
activities. This component is integrated into the Mobile Application Studio. An agent, which monitors the local repository for data that needs to be transported, and the
CRM server for data that needs to be imported. It also triggers the transport and import of thisdata.
The transport component establishes the connection between the SAP Mobile Application Studioand the CRM server. A Mobile Application Studio user can query the server for existing TransportOrders and attach a change list to an existing transport order so that it is exported to the next(target) system in the landscape.
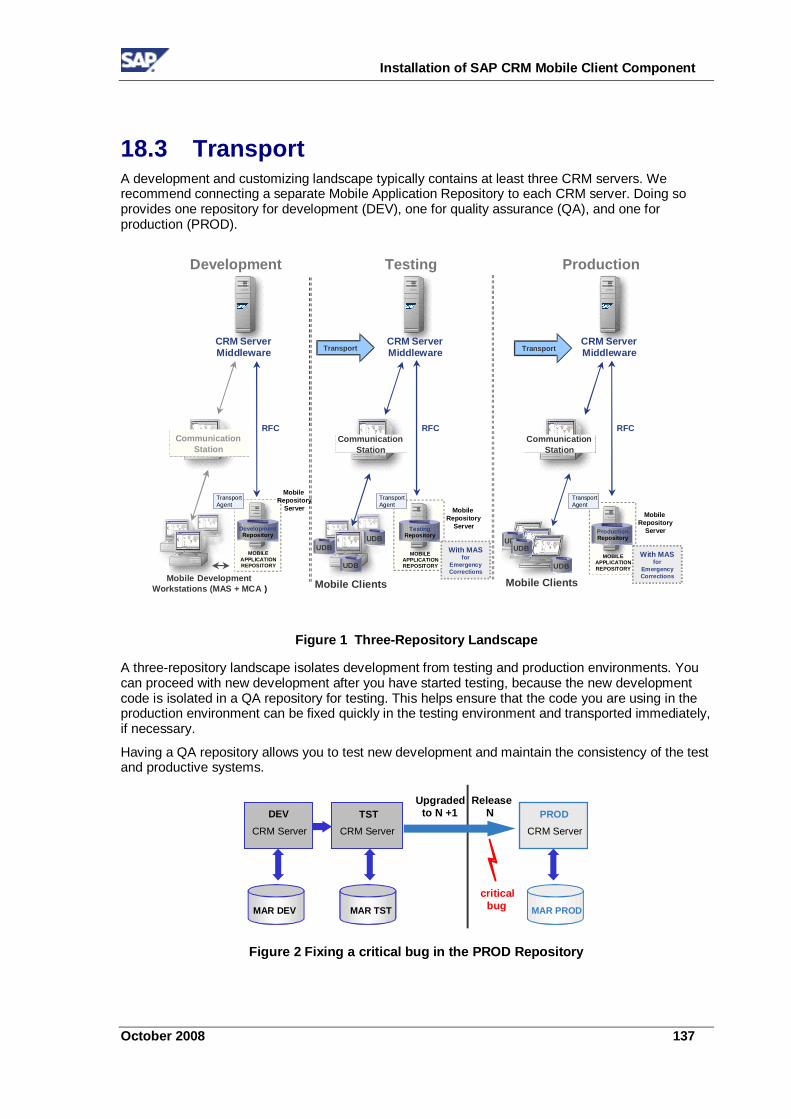
Installation of SAP CRM Mobile Client Component
October 2008 137
18.3 TransportA development and customizing landscape typically contains at least three CRM servers. Werecommend connecting a separate Mobile Application Repository to each CRM server. Doing soprovides one repository for development (DEV), one for quality assurance (QA), and one forproduction (PROD).
UDB
Production
CRM ServerMiddlewareTransport
Mobile Clients
ProductionRepository
RFC
TransportAgent
CommunicationStation
MOBILEAPPLICATIONREPOSITORY
With MASfor
EmergencyCorrections
MobileRepository
ServerUDB
UDB
Testing
CRM ServerMiddlewareTransport
Mobile Clients
TransportAgent
TestingRepository
With MASfor
EmergencyCorrections
RFCCommunication
Station
MOBILEAPPLICATIONREPOSITORYUDB
UDBUDB
MobileRepository
Server
Development
CRM ServerMiddleware
RFC
TransportAgent
CommunicationStation
MOBILEAPPLICATIONREPOSITORY
DevelopmentRepository
Mobile DevelopmentWorkstations (MAS + MCA )
MobileRepository
Server
Figure 1 Three-Repository Landscape
A three-repository landscape isolates development from testing and production environments. Youcan proceed with new development after you have started testing, because the new developmentcode is isolated in a QA repository for testing. This helps ensure that the code you are using in theproduction environment can be fixed quickly in the testing environment and transported immediately,if necessary.
Having a QA repository allows you to test new development and maintain the consistency of the testand productive systems.
Upgradedto N +1
ReleaseN
criticalbug
DEV TST
MAR DEV MAR TST
PROD
MAR PROD
CRM Server CRM Server CRM Server
Figure 2 Fixing a critical bug in the PROD Repository
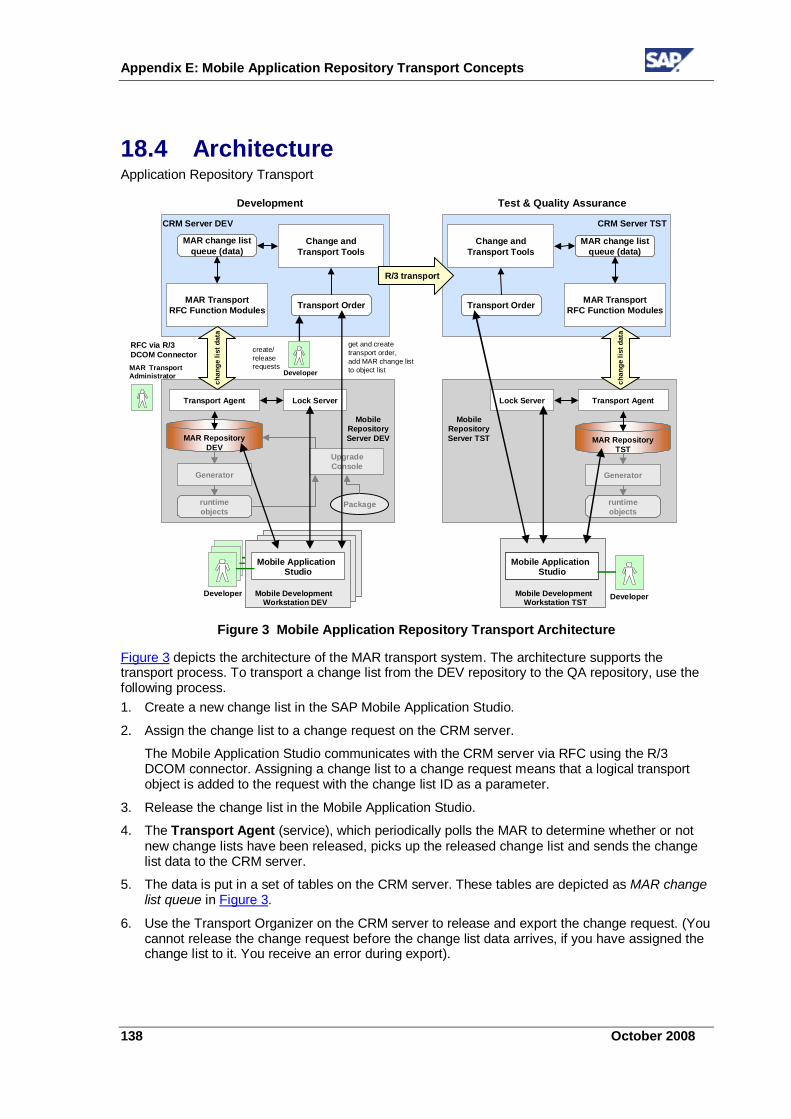
Appendix E: Mobile Application Repository Transport Concepts
138 October 2008
18.4 ArchitectureApplication Repository Transport
Development Test & Quality Assurance
MAR change listqueue (data)
Transport Order
Change andTransport Tools
MAR TransportRFC Function Modules
R/3 transport
MAR change listqueue (data)
Change andTransport Tools
Transport Order MAR TransportRFC Function Modules
CRM Server DEV CRM Server TST
Mobile DevelopmentWorkstation DEV
Mobile ApplicationStudio
Developer Mobile DevelopmentWorkstation TST
Mobile ApplicationStudio
Developer
Developer
create/releaserequests
get and createtransport order,add MAR change listto object list
RFC via R/3DCOM Connector
Transport Agent
MobileRepositoryServer DEV
MobileRepositoryServer TSTMAR Repository
DEVMAR Repository
TST
Transport Agent
chan
ge li
st d
ata
chan
ge li
st d
ata
Generator
runtimeobjects
UpgradeConsole
Package
Lock Server
MAR TransportAdministrator
Generator
runtimeobjects
Lock Server
Figure 3 Mobile Application Repository Transport Architecture
Figure 3 depicts the architecture of the MAR transport system. The architecture supports thetransport process. To transport a change list from the DEV repository to the QA repository, use thefollowing process.1. Create a new change list in the SAP Mobile Application Studio.
2. Assign the change list to a change request on the CRM server.
The Mobile Application Studio communicates with the CRM server via RFC using the R/3DCOM connector. Assigning a change list to a change request means that a logical transportobject is added to the request with the change list ID as a parameter.
3. Release the change list in the Mobile Application Studio.
4. The Transport Agent (service), which periodically polls the MAR to determine whether or notnew change lists have been released, picks up the released change list and sends the changelist data to the CRM server.
5. The data is put in a set of tables on the CRM server. These tables are depicted as MAR changelist queue in Figure 3.
6. Use the Transport Organizer on the CRM server to release and export the change request. (Youcannot release the change request before the change list data arrives, if you have assigned thechange list to it. You receive an error during export).
Installation of SAP CRM Mobile Client Component
October 2008 139
7. The exported change request is transported along the default path and imported into the QACRM server (Middleware). During the import the change list data are imported into the MARchange list queue of the target.
For more information regarding transporting change requests, see SAP Note 429039and the online help.
8. The transport agent, which periodically polls the queue on the QA CRM server, takes theimported change lists and imports them into the repository. The imported change lists arereleased. Download, import and release of change lists occurs automatically.
9. Using the Mobile Application Studio, check whether or not the import caused collisions. (Thisoccurs when changes, such as bug fixes, were made in the target system.)
For more information regarding collisions, see the online help.
18.5 Client UpgradeThe Transport Agent is required in order to move data from the Mobile Repository Server to theCRM Server. The transport must connect to the CRM server's transport system, because the ClientUpgrade must send data to the inbound adapters of CRM Middleware. To minimize the number ofservices, the Upgrade Console reuses the Transport Agent to send data to the CRM server.
Figure 4 depicts the architecture used for the Upgrade Console. After completing development, usethe Mobile Application Studio to generate the runtime files. The Upgrade Console creates anupgrade configuration by selecting files and assigning target locations. In package mode you cansend an upgrade you saved to the file system previously.
Because the transport agent transports change lists between the Mobile Repository Server and theCRM server, the upgrade is created as a special type of change list and imported to the MAR. Theseare runtime object change lists, which contain compressed run time files (DLLs, HTML files, etc.) ofthe Mobile Client application. Runtime object change lists cannot be attached to change requestson the server. You send client upgrades only to mobile clients in the same system to upgrade theirruntime environment. Runtime object change lists cannot be transported to any other system, forexample, from a DEV system to a QA system.
Once the runtime object change list has been created and released by the Upgrade Console, theTransport Agent sends it to the CRM server as any other change list. A function module on theserver determines that it is a runtime object change list and moves it into a special queue for runtimeobjects. This queue is an intermediate buffer that stores the upgrade change lists. When theTransport Agent sends another command, push runtime objects to clients, to the CRM server, theupgrade moves into the queues of the subscribed clients as BDocs where the Middleware's inboundadapter can pick them up.
All mobile clients that are subscribed for upgrade BDocs receive the upgrade the next time theyconnect to the server. After the last subscribed client receives the upgrade, it is removed from thequeue.
After the mobile client receives the upgrade data, the Client Upgrade target service executes theupgrade automatically.

Appendix E: Mobile Application Repository Transport Concepts
140 October 2008
Mobile Client Mobile Client
Middleware Queues for BDocs
CRM ServerMiddleware
runtime objectqueue
FunctionModule
FunctionModule
BD
OC
BD
OC
...Client UpgradeTarget
Client UpgradeTarget
Transport AgentService Lock Server Transport Order
Service
MAR RepositoryMobile Repository
Server
Generator
runtimeobjects
UpgradeConsole
Package
push
push
runt
ime
obje
cts
to c
lient
dlls, layout filesetc
Mobile DevelopmentWorkstation
Mobile ApplicationStudio
runtime objectswrapped in aspecial type ofchange list
Figure 4 Mobile Client Upgrade Architecture
The upgrade configuration can contain any type of file and script, registry files and sql batch filesthat are executed on the target machine in a user defined order.
In addition to the online upgrade, where the complete upgrade is sent via BDocs, a DVD upgradecan be used. With DVD upgrade, the upgrade files are copied to the target machine from DVD orfrom an ftp or http server. The middleware only sends the trigger to install the upgrade. Theadvantage is that the user can choose when the files are copied but the middleware still controlswhen the upgrade is activated. This way it ensures that upgrades of server and clients aresynchronized.
If you do not want to grant administrator permissions to the mobile client users, youneed to install the Client Upgrade Helper Service on the laptops. Doing so enables theClient Upgrade to install new software even if the user has no administratorpermissions.
For more information regarding the Upgrade Console, see the online help in theUpgrade Console application on the Mobile Repository Server.
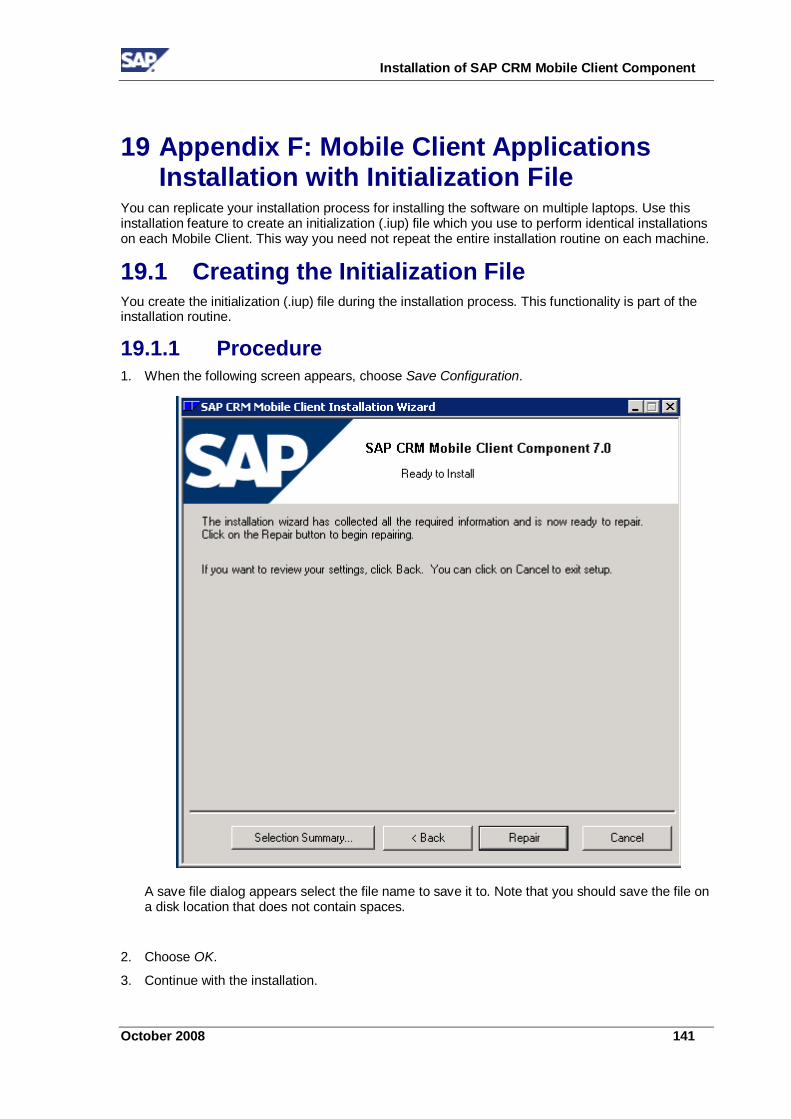
Installation of SAP CRM Mobile Client Component
October 2008 141
19 Appendix F: Mobile Client ApplicationsInstallation with Initialization File
You can replicate your installation process for installing the software on multiple laptops. Use thisinstallation feature to create an initialization (.iup) file which you use to perform identical installationson each Mobile Client. This way you need not repeat the entire installation routine on each machine.
19.1 Creating the Initialization FileYou create the initialization (.iup) file during the installation process. This functionality is part of theinstallation routine.
19.1.1 Procedure1. When the following screen appears, choose Save Configuration.
A save file dialog appears select the file name to save it to. Note that you should save the file ona disk location that does not contain spaces.
2. Choose OK.
3. Continue with the installation.

Appendix F: Mobile Client Applications Installation with Initialization File
142 October 2008
19.2 Installing Multiple Mobile Clients19.2.1 UseUse this procedure to install the identical software on all Mobile Clients using the MUP file youcreated. The installation from the MUP file installs in quiet mode, meaning that you do not need toprovide information during this installation process.
19.2.2 Procedure1. Choose Start Programs Accessories Command Prompt.
The Command Prompt screen appears.
2. Type the appropriate command including the option and parameters you require, for example,setup.exe /qn RESPONSEFILENAME="<path>"
For example, setup.exe /qn RESPONSEFILENAME="C:\TEST.IUP"
3. Press Enter to start the installation.
Installation of SAP CRM Mobile Client Component
October 2008 143
20 Appendix G - Import ofConsolidated_Prefill.Car File
In order to import the consolidated_prefill.car refer to the following links:
http://help.sap.com/scenarios_bus2008/helpdata/EN/BA/D90B4E87058D4DBDC879E5F8B938AD/content.htm
http://aiokeh.wdf.sap.corp:50000/SAPIKS2/contentShow.sap?IWB_INDUSTRY=BBPCRM&TMP_IWB_TASK=PREVIEW2&_CLASS=BCO_COMMON&_LOIO=45DCF62744F52E97E10000000A155369&_SLOIO=595E5E3C6F5DB86AE10000000A11405A&LANGUAGE=EN&RELEASE=700&_SCLASS=IWB_STRUCTad
Appendix H - Internet Pricing and Configuration Post Installation Mandatory Steps
144 October 2008
21 Appendix H - Internet Pricing andConfiguration Post Installation MandatorySteps
After the installation of IPC (if IPC has been marked for installation)
Download the Microsoft JDBC driver from the following site:
http://www.microsoft.com/downloads/details.aspx?familyid=e22bc83b-32ff-4474-a44a-22b6ae2c4e17&displaylang=en
Copy the jar sqljdbc.jar file extracted from the exe to the following location:
%mobilerootdir%/tomcat5/webapps/tomcatstart/web-inf/lib