AWS Greenplum Getting Started Guide - VLDB Solutions
25
AWS Greenplum Getting Started Guide Ó VLDB Solutions Ltd v6.2 E&OE Page 1 of 25 1. INTRODUCTION 3 2. PRE-REQUISITES 4 2.1 EC2 Instance Types 4 2.2 Greenplum Parameters 4 2.3 EC2 Key Pair 4 3. CREATE STACK & INSTALL GREENPLUM 7 3.1 Subscribe & Launch Configuration 7 3.2 Delivery Method, Version & Region 7 3.3 Configuration Review & Launch 8 3.4 Step 1 - Specify Template 9 3.5 Step 2 - Specify Stack Details 10 3.6 Step 3 – Configure Stack Options 12 3.7 Step 4 - Review 12 3.8 Stack Creation 12 3.9 IP Address 13 3.10 Greenplum DBMS Installation 13 3.11 Check Greenplum Installation 14 3.12 Check Greenplum Database 15 3.13 Check Greenplum Command Centre (GPCC) 17 4. ENABLE CLIENT ACCESS 19 4.1 Create user (role) 19 4.2 Configure Client Authentication 19 4.3 Reload Configuration Files 20 4.4 Test Remote Access 20 5. GREENPLUM CLIENT ACCESS 21 5.1 Command Line (psql) 21 5.2 Graphical SQL Client Access 22
-
Upload
khangminh22 -
Category
Documents
-
view
4 -
download
0
Transcript of AWS Greenplum Getting Started Guide - VLDB Solutions

AWS Greenplum Getting Started Guide
Ó VLDB Solutions Ltd v6.2 E&OE Page 1 of 25
1. INTRODUCTION 3
2. PRE-REQUISITES 4
2.1 EC2 Instance Types 4
2.2 Greenplum Parameters 4
2.3 EC2 Key Pair 4
3. CREATE STACK & INSTALL GREENPLUM 7
3.1 Subscribe & Launch Configuration 7
3.2 Delivery Method, Version & Region 7
3.3 Configuration Review & Launch 8
3.4 Step 1 - Specify Template 9
3.5 Step 2 - Specify Stack Details 10
3.6 Step 3 – Configure Stack Options 12
3.7 Step 4 - Review 12
3.8 Stack Creation 12
3.9 IP Address 13
3.10 Greenplum DBMS Installation 13
3.11 Check Greenplum Installation 14
3.12 Check Greenplum Database 15
3.13 Check Greenplum Command Centre (GPCC) 17
4. ENABLE CLIENT ACCESS 19
4.1 Create user (role) 19
4.2 Configure Client Authentication 19
4.3 Reload Configuration Files 20
4.4 Test Remote Access 20
5. GREENPLUM CLIENT ACCESS 21
5.1 Command Line (psql) 21
5.2 Graphical SQL Client Access 22

AWS Greenplum Getting Started Guide
Ó VLDB Solutions Ltd v6.2 E&OE Page 2 of 25
6. LOADING DATA 23
6.1 COPY 23
6.2 COPY Example 23
6.3 gpfdist 24
6.4 gpfdist Example 24

AWS Greenplum Getting Started Guide
Ó VLDB Solutions Ltd v6.2 E&OE Page 3 of 25
1. Introduction This ‘AWS Greenplum Getting Started Guide’ covers the following products available from VLDB via the AWS Marketplace:
• Pivotal Greenplum Cloud Data Warehouse (BYOL) • Open Source Greenplum Cloud Data Warehouse
Pivotal Greenplum and Open Source Greenplum contain the same Greenplum database engine. The Pivotal version of Greenplum is a paid-for offering that includes product support and value-added extra features from Pivotal, such as the Greenplum Command Centre (GPCC). The Open Source version of Greenplum does not offer product support or value-added features. The aim of this document is to provide a quick & easy route to getting started with Greenplum on AWS. It is not intended to replace any of the existing documentation. The following topics are covered:
• AWS stack creation & Greenplum software installation • testing access via SSH, SQL & GPCC • data loading
It is hoped that this document will allow new Greenplum users to get up and running in better shape than if they tried it on their own. Enjoy!

AWS Greenplum Getting Started Guide
Ó VLDB Solutions Ltd v6.2 E&OE Page 4 of 25
2. Pre-Requisites 2.1 EC2 Instance Types Greenplum can be configured with various EC2 instance types and sizes. Considerations include cost, storage capacity, number of CPU cores, amount of RAM, networking throughput and disk persistence. As part of the setup process it will be necessary to choose an EC2 instance type and size from those made available by the VLDB Cloud Formation Template (CFT). For further information: https://aws.amazon.com/ec2/instance-types/ 2.2 Greenplum Parameters A preferred ‘gpadmin’ (Greenplum superuser) password and required IP address ranges will be requested during the setup process. For further information: https://gpdb.docs.pivotal.io/6-4/admin_guide/intro/arch_overview.html 2.3 EC2 Key Pair A pre-existing EC2 Key Pair is required in order to create a Greenplum cluster. For further information: https://docs.aws.amazon.com/AWSEC2/latest/UserGuide/ec2-key-pairs.html

AWS Greenplum Getting Started Guide
Ó VLDB Solutions Ltd v6.2 E&OE Page 5 of 25
In the absence of a pre-existing EC2 Key Pair, one can be created as follows: 1. Open the Amazon EC2 console at https://console.aws.amazon.com/ec2/ 2. In the navigation pane, under ‘NETWORK & SECURITY’, select ‘Key Pairs’:
3. Click ‘Create Key Pair’:

AWS Greenplum Getting Started Guide
Ó VLDB Solutions Ltd v6.2 E&OE Page 6 of 25
4. Enter a name (alphanumeric characters only) for the key pair and click ‘Create’:
The private key file is automatically downloaded by your browser with a filename of ‘<keypairname>.<extension>’ . In the example above the filename is ‘gpdemo.pem’. Important: This is the only chance to save the private key file. It cannot be re-downloaded. 5. For Mac or Linux users only, AWS requires permissions to be set to ‘read only’ on the key pair file.
From a terminal set permissions on the .pem file as follows: chmod 400 /<path-to-key-pair>/<keypairname>.<extension> Important: the key file will not work unless the file permissions are set as above. Windows users can ignore this step.
AWS Greenplum Getting Started Guide
Ó VLDB Solutions Ltd v6.2 E&OE Page 7 of 25
3. Create Stack & Install Greenplum 3.1 Subscribe & Launch Configuration Before a Greenplum cluster can be configured, it is necessary to Subscribe to the chosen product - in this case ‘Pivotal Greenplum Cloud Data Warehouse (BYOL) - via the AWS Marketplace. Click ‘Continue to Subscribe’ to continue:
Once Subscribed, click ‘Continue to Configuration’ to continue:
3.2 Delivery Method, Version & Region The Region in which an EC2 Key Pair already exists must be chosen before ‘Continue to Launch’ is clicked:

AWS Greenplum Getting Started Guide
Ó VLDB Solutions Ltd v6.2 E&OE Page 8 of 25
3.3 Configuration Review & Launch The Fulfilment Option, Software Version & Region can be reviewed before ‘Launch’ is clicked:
The ‘Usage Instructions’ box contains a link to this document. Clicking ‘Launch’ proceeds to ‘CloudFormation > Stacks > Create Stack’ within the AWS Console.

AWS Greenplum Getting Started Guide
Ó VLDB Solutions Ltd v6.2 E&OE Page 9 of 25
3.4 Step 1 - Specify Template The Cloud Formation Template used to build the Greenplum cluster is pre-filled with an S3 URL:
Click ‘Next’ to continue.

AWS Greenplum Getting Started Guide
Ó VLDB Solutions Ltd v6.2 E&OE Page 10 of 25
3.5 Step 2 - Specify Stack Details The following details must be provided: Stack name – Greenplum cluster name. Must contain only letters, numbers, dashes and start with an alpha character:
AvailabilityZone – select one of those available in the deployment Region:
InstanceType – select AWS EC2 Instance Type to be launched from those available:
Encryption – disk encryption availability depends on instance type:
KeyPair - existing EC2 key pair to enable SSH access to the cluster:
ClusterConfiguration – select the required cluster size/number of nodes:
DatabaseName – initial database name within the cluster. Must contain only lowercase alphabetic characters:
GPCommandCentre – select ‘Yes’ to install Greenplum Command Centre (not available with Open Source Greenplum):

AWS Greenplum Getting Started Guide
Ó VLDB Solutions Ltd v6.2 E&OE Page 11 of 25
GPStandbyMaster – select ‘Yes’ to activate a standby/failover Greenplum master server:
For further information:
https://gpdb.docs.pivotal.io/6-4/admin_guide/highavail/topics/g-overview-of-master-mirroring.html GPSegmentMirroring – select ‘Yes’ to activate Segment Mirroring:
For further information:
https://gpdb.docs.pivotal.io/6-4/admin_guide/highavail/topics/g-overview-of-segment-mirroring.html
SSHLocation – initial permitted inbound network address range for SSH access to the Greenplum node(s):
GPLocation – initial permitted inbound network address range for direct Greenplum database access:
AdminPassword – initial Greenplum database ‘gpadmin’ (superuser) password. Must only contain alpha-numeric characters.
Click ‘Next’ to continue.

AWS Greenplum Getting Started Guide
Ó VLDB Solutions Ltd v6.2 E&OE Page 12 of 25
3.6 Step 3 – Configure Stack Options Theses fields are optional and can be left as default. For further information: https://docs.aws.amazon.com/AWSCloudFormation/latest/UserGuide/cfn-console-add-tags.html Click ‘Next’ to continue. 3.7 Step 4 - Review The Template, Details and Options entered on the previous screens can be reviewed before the stack is created. It may be necessary to ensure the ‘IAM resources’ box is ticked:
Click ‘Create stack’ to continue. 3.8 Stack Creation On the ‘Cloud Formation > Stacks’ page, set the filter to ‘Active’ and the stack will display with a status of ‘CREATE_IN_PROGRESS’:
Once complete, the status will change to ‘CREATE_COMPLETE’:
AWS Greenplum Getting Started Guide
Ó VLDB Solutions Ltd v6.2 E&OE Page 13 of 25
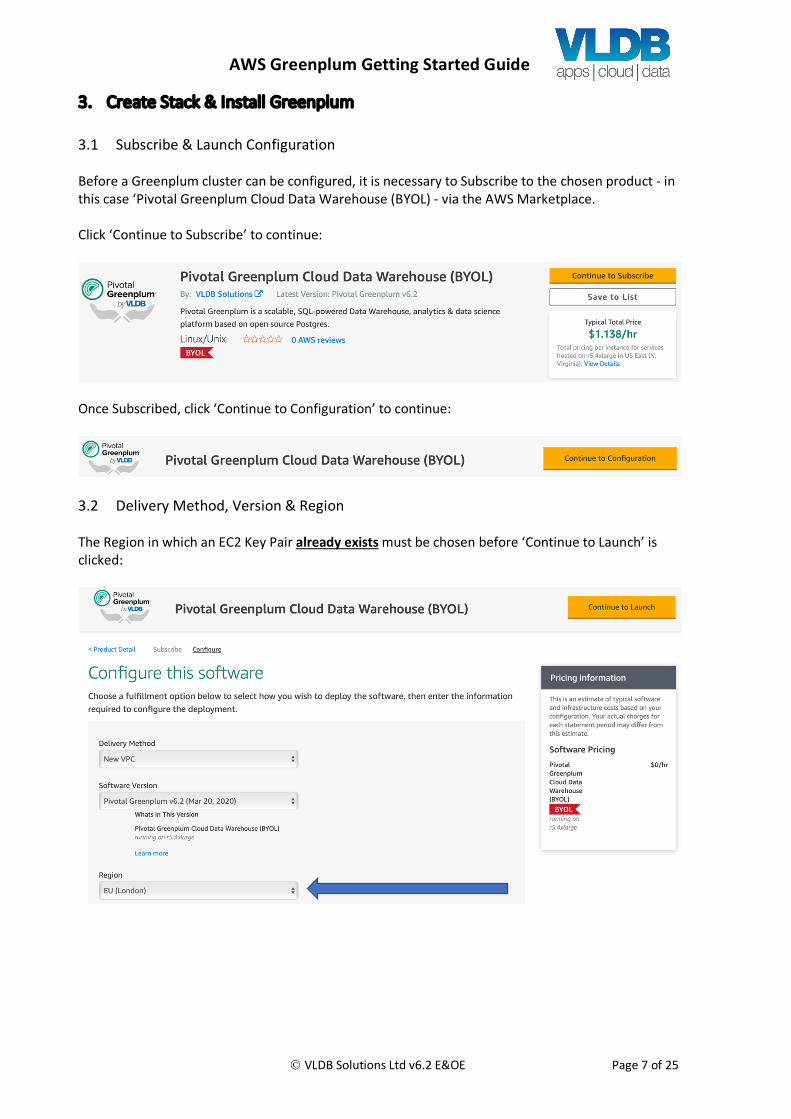
3.9 IP Address Click on the ‘Outputs’ tab to determine the Master IP address of the newly created AWS stack:
This is the IP address that will be used to access the AWS stack/Greenplum cluster. 3.10 Greenplum DBMS Installation Once the AWS stack is created the process of installing and configuring the Greenplum DBMS software begins. This is handled automatically by the custom AMI. Typical install times are 10 minutes or so, but may take up to 60 mins for XXL clusters.

AWS Greenplum Getting Started Guide
Ó VLDB Solutions Ltd v6.2 E&OE Page 14 of 25
3.11 Check Greenplum Installation The status of the Greenplum DBMS installation can be monitored by logging into the stack as the default Linux system user account ‘ec2-user’. This requires the local Key Pair (.pem) file and for the file permissions to have been set correctly. For Mac/Linux users, open a terminal window and use SSH: ssh -i /<keypairname>.<extension> ec2-user@<MasterHostIP> Windows users should use Putty (www.putty.org). Note that the PEM file (key pair) will need to be converted to PPK format using PuTTYgen utility before a connection can be made. Once connected, either WARNING or NOTICE messages will be displayed. WARNING messages will be displayed until the Greenplum software installation is complete:
NOTICE messages will be displayed once the Greenplum DBMS and (optionally) Greenplum Command Centre (GPCC) have been installed successfully:
Important : the ec2-user will not be used to access the Greenplum database. It is now safe to disconnect as ec2-user using the ‘exit’ command.

AWS Greenplum Getting Started Guide
Ó VLDB Solutions Ltd v6.2 E&OE Page 15 of 25
3.12 Check Greenplum Database The default Greenplum database superuser (GPAdminUser below) is ‘gpadmin’. Once the Greenplum software has been successfully installed, it is necessary to test database access as gpadmin. Similarly to connecting as the Linux ‘ec2-user’, a connection can be made as gpadmin via either SSH (Mac/Linux) or Putty (Windows). Unlike when connecting as ec2-user, the Key pair (*.pem) file is not required. When connecting as gpadmin it will be necessary to enter the password created as part of the stack creation process. This is visible under the AWS ‘Outputs’ tab as ‘GPAdminPassword’:
Once disconnected as ec2-user, simply re-connect as gpadmin@<MasterHostIP>:

AWS Greenplum Getting Started Guide
Ó VLDB Solutions Ltd v6.2 E&OE Page 16 of 25
Once connected to the Linux command line as gpadmin, connect to the initial database created as part of the installation (DatabaseName above) via the PostgreSQL command line client ‘psql’: psql –d greenplum
The hash (#) prompt denotes that a database connection has been made as the superuser ‘gpadmin’. A few simple SQL commands can be entered to ensure the database is functioning correctly: select current_time; select current_date; select 1+1; select count(*) from pg_class;
To disconnect from psql/Greenplum and return to the Linux command prompt simple enter ‘\q’.

AWS Greenplum Getting Started Guide
Ó VLDB Solutions Ltd v6.2 E&OE Page 17 of 25
3.13 Check Greenplum Command Centre (GPCC) Greenplum Command Centre (GPCC) is an option with the Pivotal version of Greenplum only. GPCC is not available with Open Source Greenplum. However, it is not required in order to use the Greenplum database. If it has been installed, GPCC can be accessed via http://<MasterHostIP>:28080 (GPCCWebAddress) with userid ‘gpmon’ and the same password used for ‘gpadmin’ (GPAdminPassword).
The following screenshots are from a 16 node cluster with 1,024 segments. GPCC dashboard:
GPCC segment status:
AWS Greenplum Getting Started Guide
Ó VLDB Solutions Ltd v6.2 E&OE Page 18 of 25
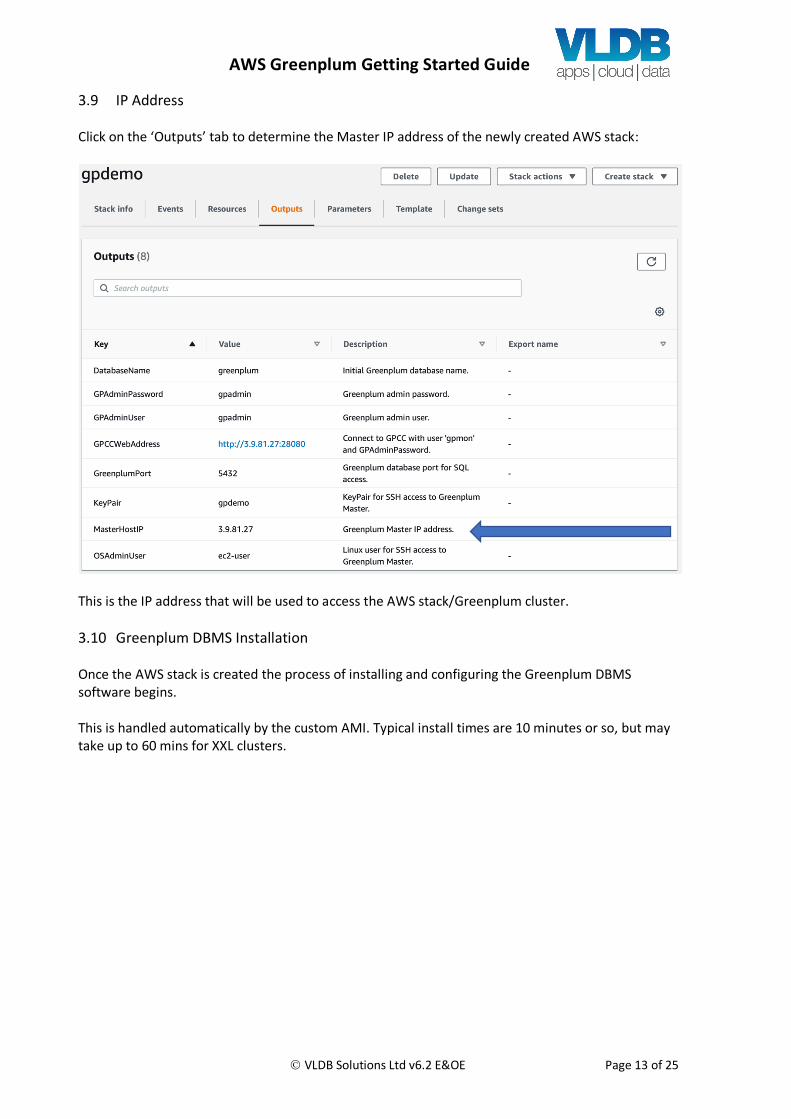
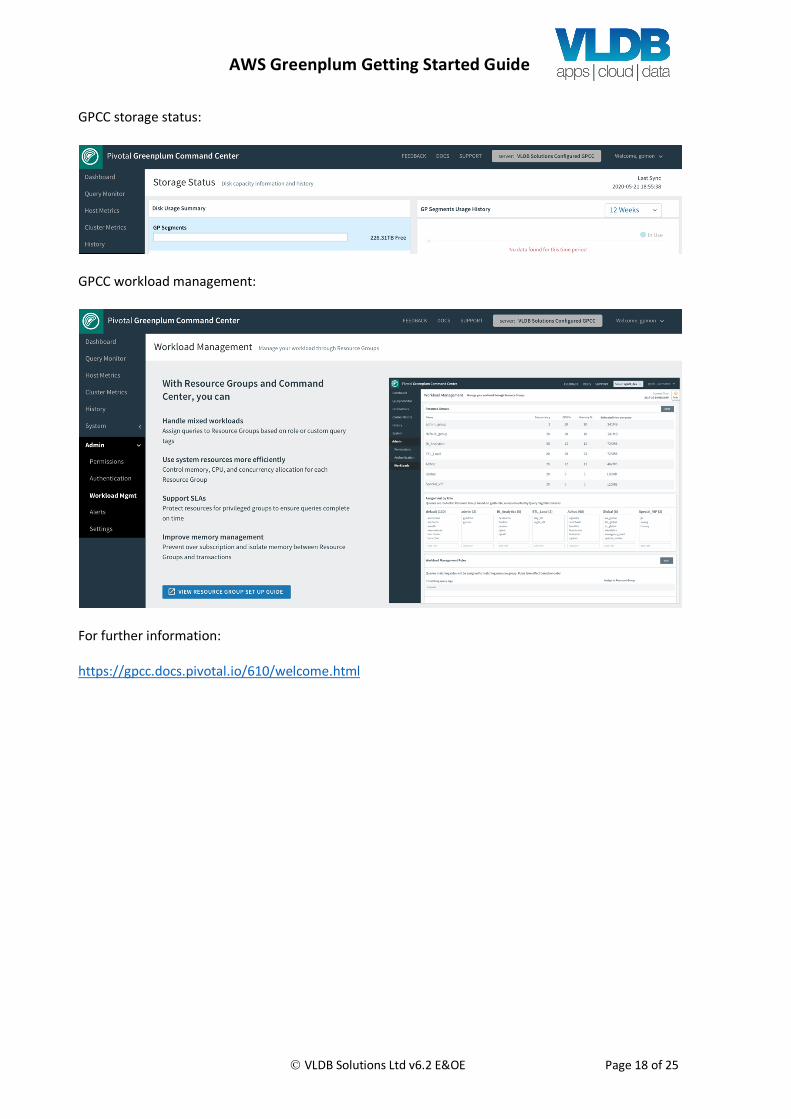
GPCC storage status:
GPCC workload management:
For further information: https://gpcc.docs.pivotal.io/610/welcome.html

AWS Greenplum Getting Started Guide
Ó VLDB Solutions Ltd v6.2 E&OE Page 19 of 25
4. Enable Client Access By default there is no remote client access enabled to a new Greenplum instance. The tests in the previous section were carried out as the ‘gpadmin’ database superuser, via SSH to the Master server, only as a means of checking the health of the system. To create a new non-admin user called ‘sqluser’, and allow remote access, SSH to the Greenplum server as ‘gpadmin’ (password = GPAdminPassword, IP = MasterHostIP) and perform the following steps. 4.1 Create user (role) Create a new user using the SQL client ‘psql’: psql -d <DatabaseName> -c “create user sqluser with login password ‘sqluser’;” This creates a user called ‘sqluser’ with a password of ‘sqluser’ and grants Greenplum login rights. Note : copy/paste from above will probably fail unless you over-type the single and double quotes at the command line. Once you’ve fallen for that a thousand times you’ll remember! For further information: https://gpdb.docs.pivotal.io/6-4/ref_guide/sql_commands/CREATE_ROLE.html 4.2 Configure Client Authentication
Grant client access to database ‘greenplum’ to ‘sqluser’: echo 'host greenplum sqluser 0.0.0.0/0 md5' >> $MASTER_DATA_DIRECTORY/pg_hba.conf This grants ‘host’ (remote) access to the ‘gpexample’ database to user ‘sqluser’ from any IP address using md5 (encrypted password) authentication. For further information: https://gpdb.docs.pivotal.io/6-4/admin_guide/client_auth.html

AWS Greenplum Getting Started Guide
Ó VLDB Solutions Ltd v6.2 E&OE Page 20 of 25
4.3 Reload Configuration Files Reload the Greenplum configuration files to enable remote access for the newly created user: gpstop -u
4.4 Test Remote Access The psql client can be used to test remote Greenplum client access from any Mac, Linux or Windows environment:

AWS Greenplum Getting Started Guide
Ó VLDB Solutions Ltd v6.2 E&OE Page 21 of 25
5. Greenplum Client Access Once new users have been created and remote access enabled, client access can be rolled out across the Greenplum user community. There are two main ways to connect remotely to Greenplum:
• command line – psql • graphical SQL client
The command line client ‘psql’ is predominantly used by developers and as a means to implement scheduled ETL jobs. It is not necessary to use psql as a Greenplum business user – don’t worry, your favourite graphical SQL client will probably work just fine! For further information: http://docs.greenplum.org/6-4/admin_guide/client_auth.html 5.1 Command Line (psql) As mentioned previously, local access to Greenplum via SSH to the Master server should be reserved for the ‘gpadmin’ superuser only. The Pivotal Greenplum psql client for Windows and Linux can be downloaded from the VMWare Tanzu Network (registration required): https://network.pivotal.io/products/pivotal-gpdb - /releases/574280 Alternately, psql can be installed as a ‘client packages only’ installation of PostgreSQL: https://www.compose.com/articles/postgresql-tips-installing-the-postgresql-client/ The main ways psql can be used are as follows: 1. Connect interactively to a remote Greenplum database: psql -h <MasterHostIP> –d <DatabaseName> -U <username> 2. Run SQL against a remote Greenplum database: psql -h <MasterHostIP> –d <DatabaseName> -U <username> -c “<SQL command>” 3. Run SQL from a file against a remote Greenplum database: psql -h <MasterHostIP> –d <DatabaseName> -U <username> -f <SQL script> For further information: https://gpdb.docs.pivotal.io/6-4/utility_guide/ref/psql.html

AWS Greenplum Getting Started Guide
Ó VLDB Solutions Ltd v6.2 E&OE Page 22 of 25
5.2 Graphical SQL Client Access Most popular graphical SQL clients will work with Greenplum. As general guidance, PostgreSQL compliant tools will normally work ‘as is’. The DBeaver ‘Universal Database Tool’ can be downloaded from https://dbeaver.io
The pgAdmin DBA tool can be downloaded https://www.pgadmin.org

AWS Greenplum Getting Started Guide
Ó VLDB Solutions Ltd v6.2 E&OE Page 23 of 25
6. Loading Data 6.1 COPY The PostgreSQL COPY command is best used for small data volumes. It is a simple method to load data from a delimited file to a table. 6.2 COPY Example Create data file ‘copy.txt’ on Greenplum master (mdw): 1,a 2,b 3,c 4,d 5,e 6,f 7,g 8,h 9,i 10,j Create table ‘copy_example’: create table copy_example (col1 smallint ,col2 char(01)) distributed by (col1) ; Copy file to table (run as per any other valid SQL): copy copy_example from '/home/gpadmin/copy.txt' delimiter ',' ; Select all data from table ‘copy_example’: select * from copy_example; col1 | col2 ------+------ 3 | c 7 | g 1 | a 9 | i 6 | f 4 | d 2 | b 10 | j 8 | h 5 | e (10 rows) For further information: https://www.postgresql.org/docs/current/sql-copy.html

AWS Greenplum Getting Started Guide
Ó VLDB Solutions Ltd v6.2 E&OE Page 24 of 25
6.3 gpfdist The Greenplum ‘gpfdist’ utility is a parallel file server. It is used in conjunction with external tables to serve & load large files directly to Greenplum database segments in parallel. 6.4 gpfdist Example SSH to the Greenplum master (mdw) and start gpfdist as a background task to serve files from /home/gpadmin: gpfdist -d /home/gpadmin -p 8081 -l /home/gpadmin/log.txt & <snip> Serving HTTP on port 8081, directory /home/gpadmin Create external table ‘ext_example’ to be loaded from file ‘copy.txt’: create external table ext_example (col1 smallint ,col2 char(01)) location ('gpfdist://mdw:8081/copy.txt') format 'csv' (delimiter ',') ; Create target table ‘example’; create table example (col1 smallint ,col2 char(01)) distributed by (col1) ; Select all data from external table ‘ext_example’, which is actually file ‘copy.txt’: select * from ext_example; col1 | col2 ------+------ 1 | a 2 | b 3 | c 4 | d 5 | e 6 | f 7 | g 8 | h 9 | i 10 | j (10 rows)

AWS Greenplum Getting Started Guide
Ó VLDB Solutions Ltd v6.2 E&OE Page 25 of 25
Select all data from target table ‘example’ to show initial empty state: select * from example; col1 | col2 ------+------ (0 rows) Insert all data from external table ‘ext_example’ to target table ‘example’ via simple insert/select: insert into example select * from ext_example ; Select all data from target table ‘example’ to show loaded data: col1 | col2 ------+------ 4 | d 1 | a 9 | i 8 | h 3 | c 6 | f 2 | b 10 | j 7 | g 5 | e (10 rows) For detailed information see: https://gpdb.docs.pivotal.io/6-4/ref_guide/sql_commands/CREATE_EXTERNAL_TABLE.html https://gpdb.docs.pivotal.io/6-4/utility_guide/ref/gpfdist.html