Getting Started in Oracle Procurement
15
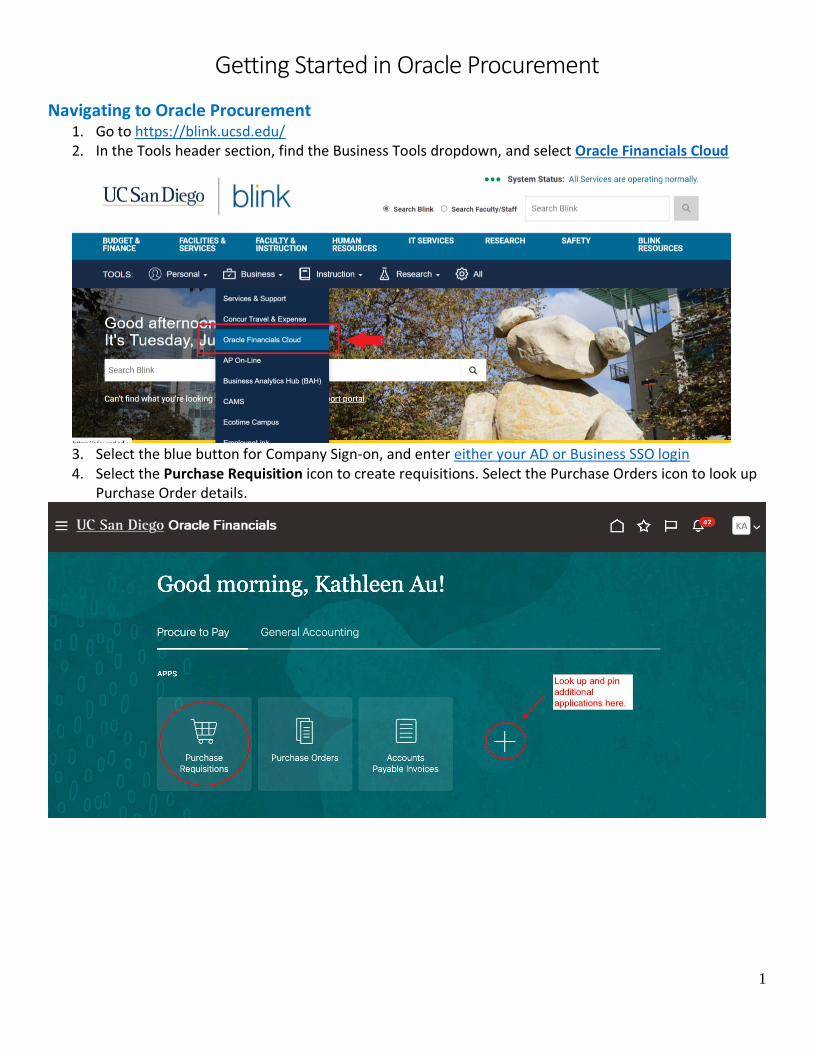
1 Getting Started in Oracle Procurement Navigating to Oracle Procurement 1. Go to https://blink.ucsd.edu/ 2. In the Tools header section, find the Business Tools dropdown, and select Oracle Financials Cloud 3. Select the blue button for Company Sign-on, and enter either your AD or Business SSO login 4. Select the Purchase Requisition icon to create requisitions. Select the Purchase Orders icon to look up Purchase Order details.
-
Upload
khangminh22 -
Category
Documents
-
view
1 -
download
0
Transcript of Getting Started in Oracle Procurement
1
Getting Started in Oracle Procurement
Navigating to Oracle Procurement 1. Go to https://blink.ucsd.edu/ 2. In the Tools header section, find the Business Tools dropdown, and select Oracle Financials Cloud
3. Select the blue button for Company Sign-on, and enter either your AD or Business SSO login 4. Select the Purchase Requisition icon to create requisitions. Select the Purchase Orders icon to look up
Purchase Order details.
2
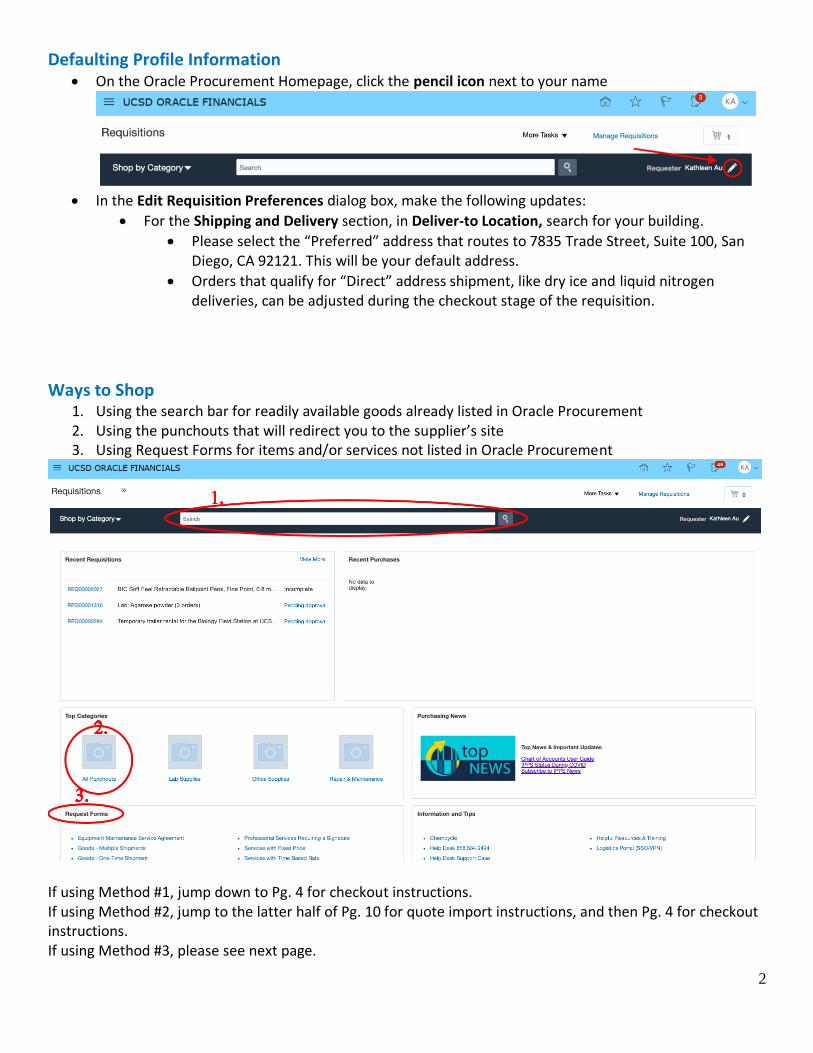
Defaulting Profile Information • On the Oracle Procurement Homepage, click the pencil icon next to your name
• In the Edit Requisition Preferences dialog box, make the following updates:
• For the Shipping and Delivery section, in Deliver-to Location, search for your building.
• Please select the “Preferred” address that routes to 7835 Trade Street, Suite 100, San Diego, CA 92121. This will be your default address.
• Orders that qualify for “Direct” address shipment, like dry ice and liquid nitrogen deliveries, can be adjusted during the checkout stage of the requisition.
Ways to Shop
1. Using the search bar for readily available goods already listed in Oracle Procurement 2. Using the punchouts that will redirect you to the supplier’s site 3. Using Request Forms for items and/or services not listed in Oracle Procurement
If using Method #1, jump down to Pg. 4 for checkout instructions. If using Method #2, jump to the latter half of Pg. 10 for quote import instructions, and then Pg. 4 for checkout instructions. If using Method #3, please see next page.
3
Using Request Forms First, obtain a quote from the vendor you are wishing to purchase from. If you cannot get a quote, please screenshot the vendor’s website of the item(s) and/or. Make sure it includes essential information like model numbers, serial numbers, prices, etc. Determining the right form for you Check the Blink page to see which form is most appropriate for your purchase. 1. Fill out the form with information pertaining to the first line item of your quote
• No need to add attachments to this form. You can do this during the checkout stage.
• For Category Name, please check this list to search which is best suited for your needs. Please take note of the taxation code for each.
• For any equipment service maintenance orders, please make sure to include the UCID# of the existing equipment you are servicing.
2. Add to cart 3. Fill out your room number and make sure your deliver-to address is correct 4. Fill out your billing information: Project, Task, Expenditure Type, Expenditure Org (Procurement)
• The Expenditure Type should be identical, if not, as congruous as possible to the Category Name. However, sometimes the Expenditure Types differ. You can refer to this list to search which is best suited for your needs.
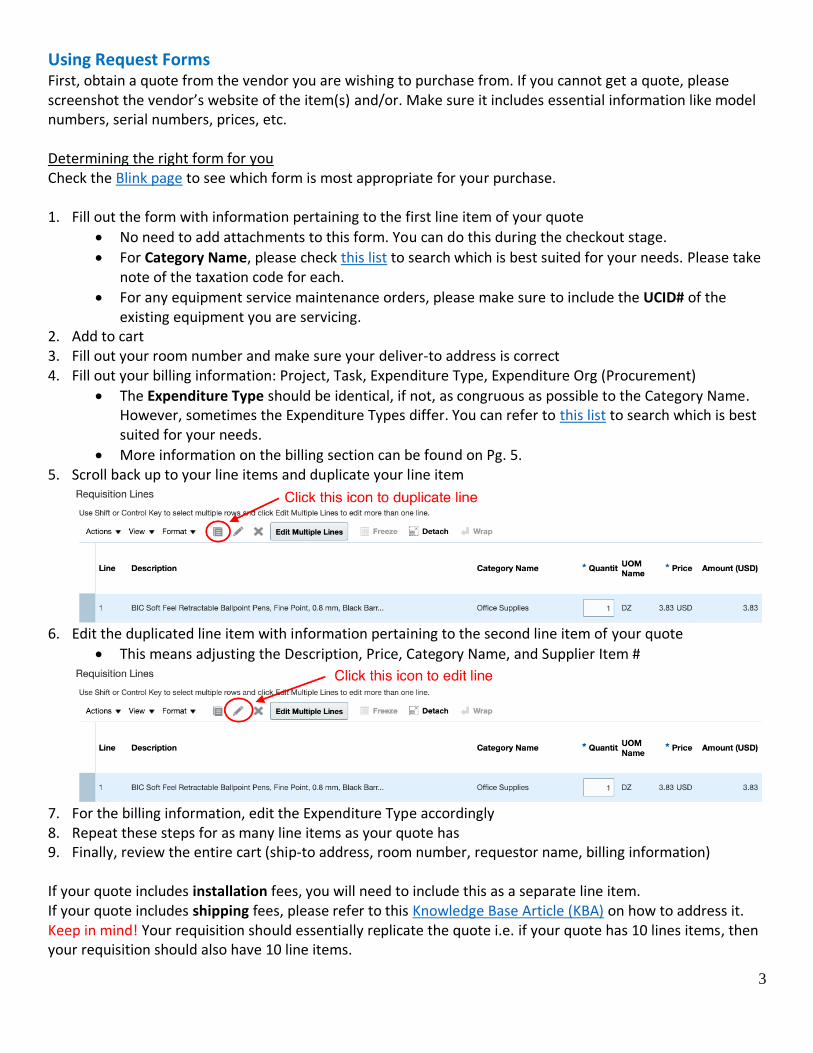
• More information on the billing section can be found on Pg. 5. 5. Scroll back up to your line items and duplicate your line item
6. Edit the duplicated line item with information pertaining to the second line item of your quote
• This means adjusting the Description, Price, Category Name, and Supplier Item #
7. For the billing information, edit the Expenditure Type accordingly 8. Repeat these steps for as many line items as your quote has 9. Finally, review the entire cart (ship-to address, room number, requestor name, billing information) If your quote includes installation fees, you will need to include this as a separate line item. If your quote includes shipping fees, please refer to this Knowledge Base Article (KBA) on how to address it. Keep in mind! Your requisition should essentially replicate the quote i.e. if your quote has 10 lines items, then your requisition should also have 10 line items.
4
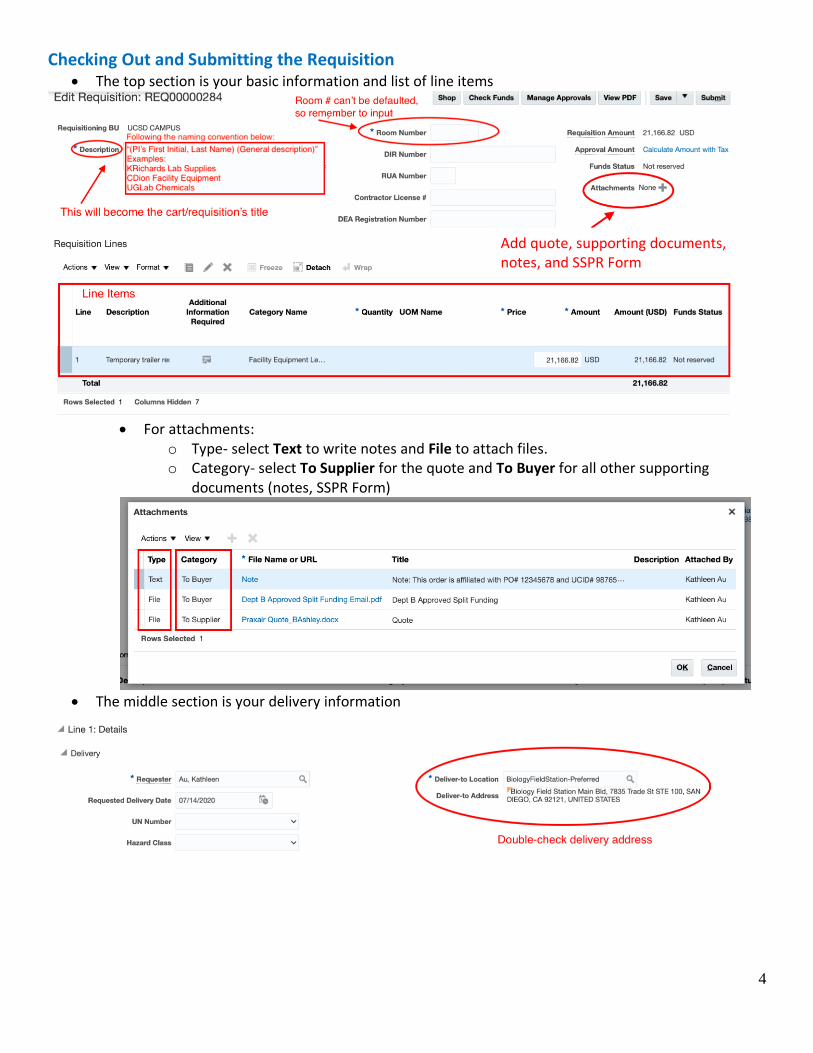
Checking Out and Submitting the Requisition • The top section is your basic information and list of line items
• For attachments:
o Type- select Text to write notes and File to attach files. o Category- select To Supplier for the quote and To Buyer for all other supporting
documents (notes, SSPR Form)
• The middle section is your delivery information
Add quote, supporting documents, notes, and SSPR Form
5
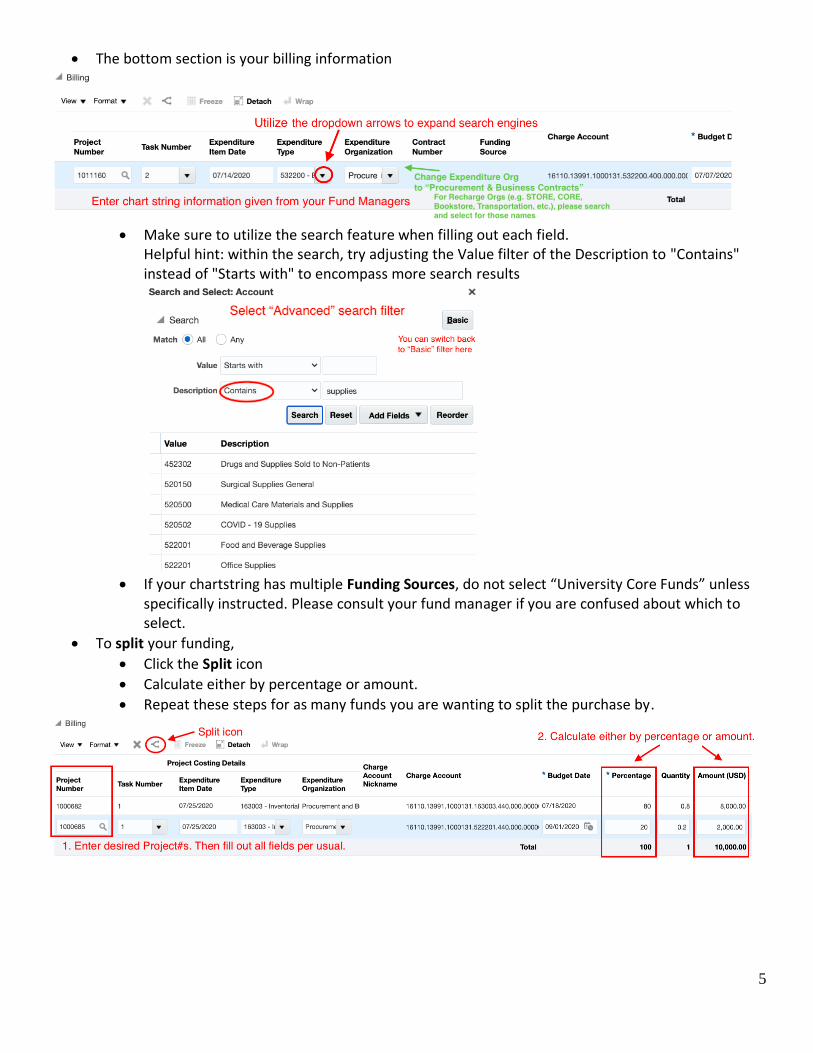
• The bottom section is your billing information
• Make sure to utilize the search feature when filling out each field.
Helpful hint: within the search, try adjusting the Value filter of the Description to "Contains" instead of "Starts with" to encompass more search results
• If your chartstring has multiple Funding Sources, do not select “University Core Funds” unless
specifically instructed. Please consult your fund manager if you are confused about which to select.
• To split your funding,
• Click the Split icon
• Calculate either by percentage or amount.
• Repeat these steps for as many funds you are wanting to split the purchase by.
6
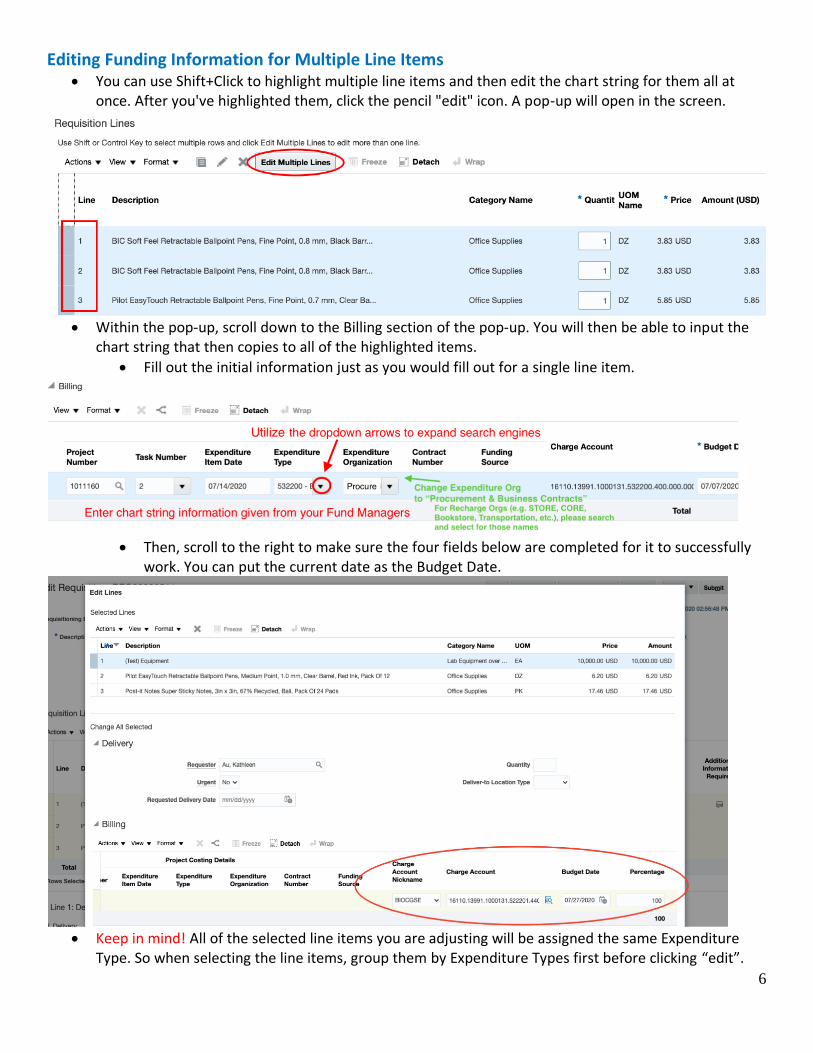
Editing Funding Information for Multiple Line Items • You can use Shift+Click to highlight multiple line items and then edit the chart string for them all at
once. After you've highlighted them, click the pencil "edit" icon. A pop-up will open in the screen.
• Within the pop-up, scroll down to the Billing section of the pop-up. You will then be able to input the
chart string that then copies to all of the highlighted items.
• Fill out the initial information just as you would fill out for a single line item.
• Then, scroll to the right to make sure the four fields below are completed for it to successfully
work. You can put the current date as the Budget Date.
• Keep in mind! All of the selected line items you are adjusting will be assigned the same Expenditure
Type. So when selecting the line items, group them by Expenditure Types first before clicking “edit”.
7
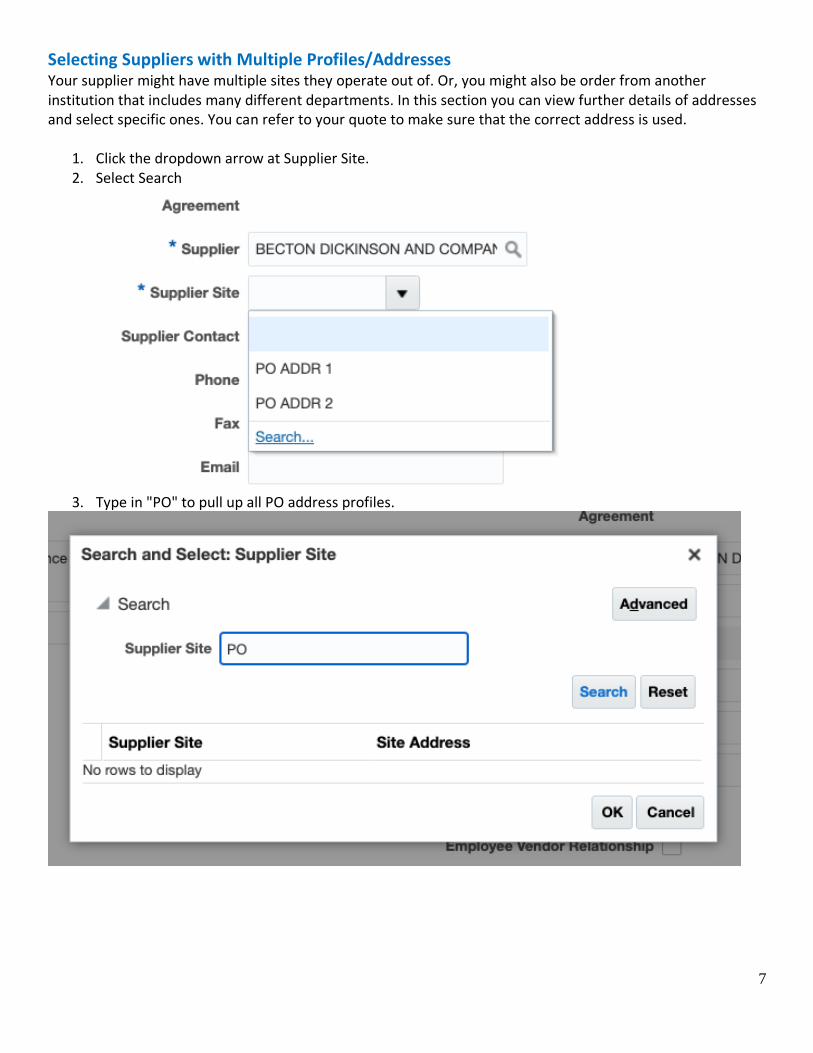
Selecting Suppliers with Multiple Profiles/Addresses Your supplier might have multiple sites they operate out of. Or, you might also be order from another institution that includes many different departments. In this section you can view further details of addresses and select specific ones. You can refer to your quote to make sure that the correct address is used.
1. Click the dropdown arrow at Supplier Site. 2. Select Search
3. Type in "PO" to pull up all PO address profiles.
8
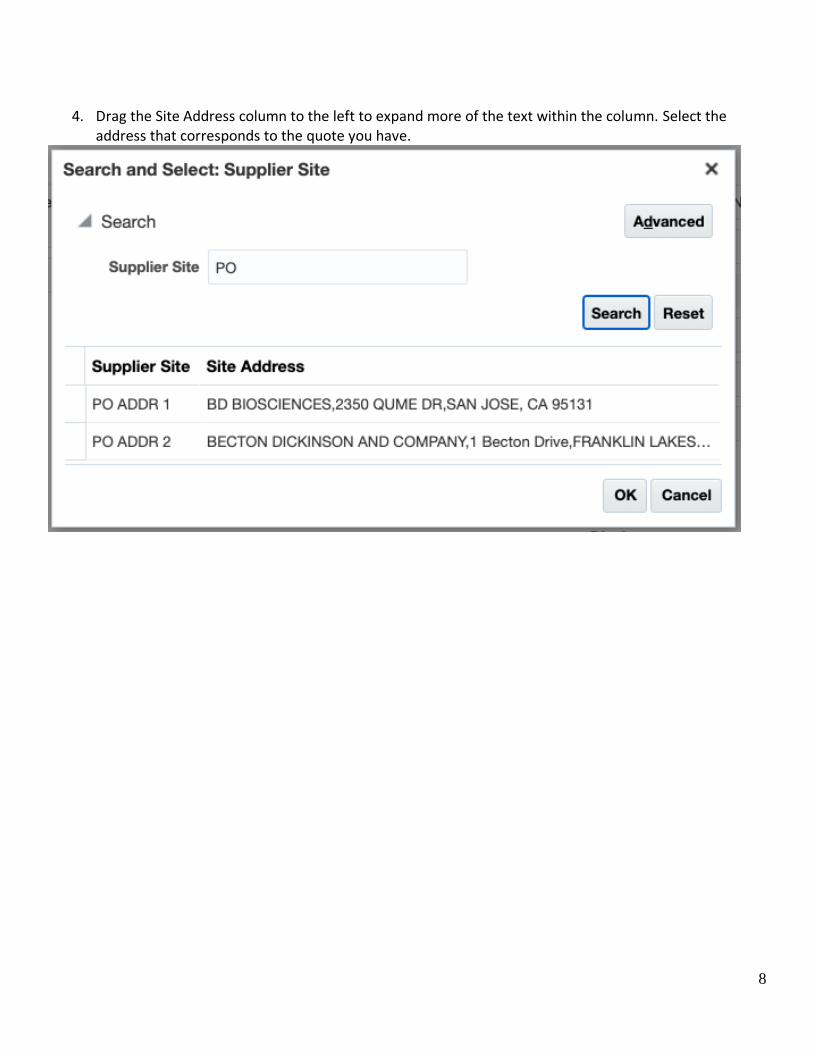
4. Drag the Site Address column to the left to expand more of the text within the column. Select the address that corresponds to the quote you have.
9
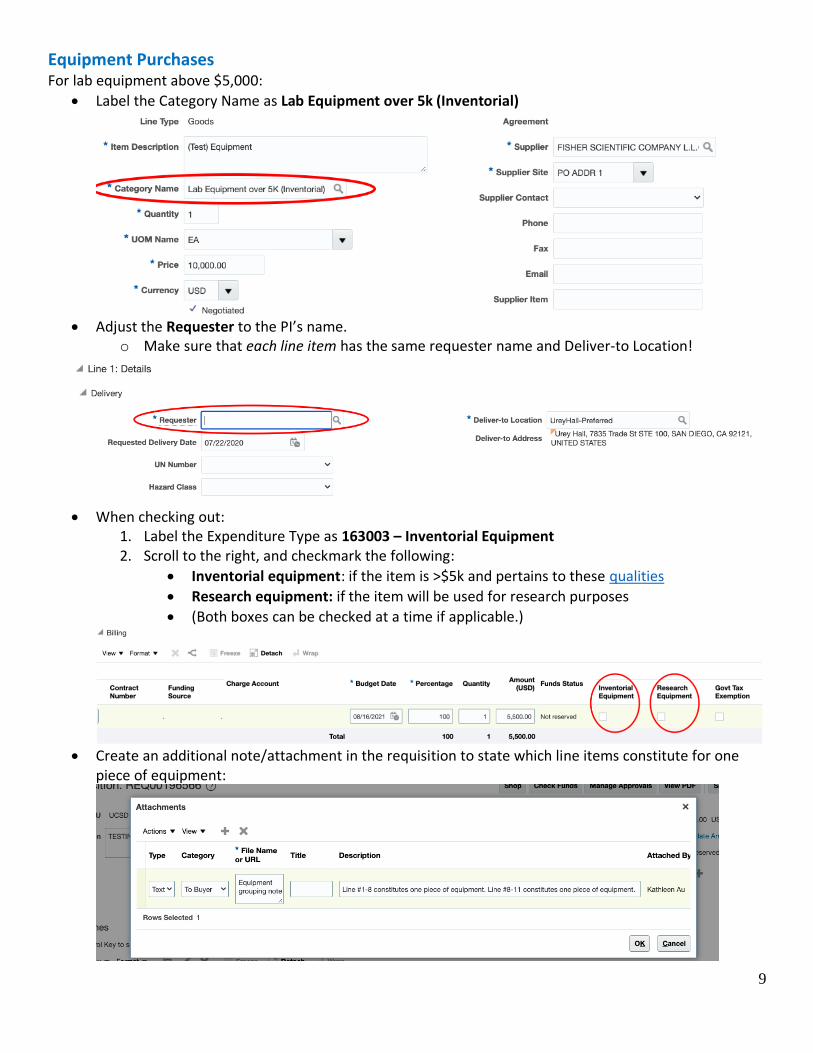
Equipment Purchases For lab equipment above $5,000:
• Label the Category Name as Lab Equipment over 5k (Inventorial)
• Adjust the Requester to the PI’s name.
o Make sure that each line item has the same requester name and Deliver-to Location!
• When checking out:
1. Label the Expenditure Type as 163003 – Inventorial Equipment 2. Scroll to the right, and checkmark the following:
• Inventorial equipment: if the item is >$5k and pertains to these qualities
• Research equipment: if the item will be used for research purposes
• (Both boxes can be checked at a time if applicable.)
• Create an additional note/attachment in the requisition to state which line items constitute for one
piece of equipment:
10
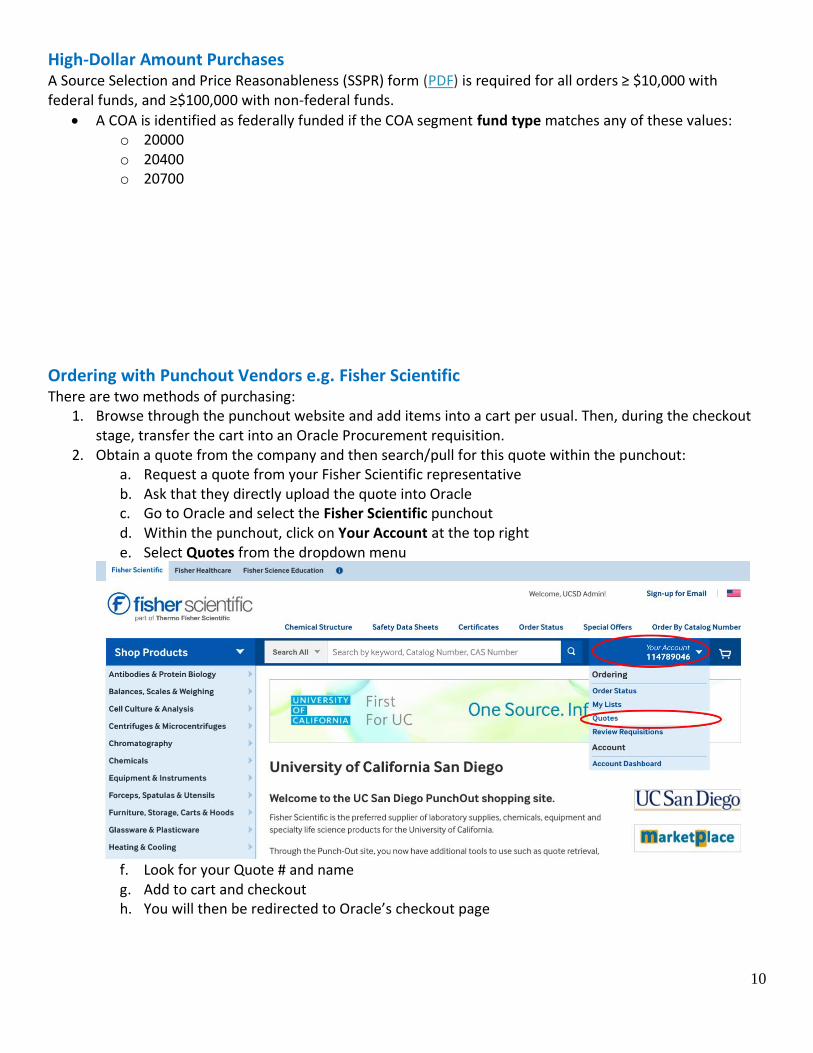
High-Dollar Amount Purchases A Source Selection and Price Reasonableness (SSPR) form (PDF) is required for all orders ≥ $10,000 with federal funds, and ≥$100,000 with non-federal funds.
• A COA is identified as federally funded if the COA segment fund type matches any of these values: o 20000 o 20400 o 20700
Ordering with Punchout Vendors e.g. Fisher Scientific There are two methods of purchasing:
1. Browse through the punchout website and add items into a cart per usual. Then, during the checkout stage, transfer the cart into an Oracle Procurement requisition.
2. Obtain a quote from the company and then search/pull for this quote within the punchout: a. Request a quote from your Fisher Scientific representative b. Ask that they directly upload the quote into Oracle c. Go to Oracle and select the Fisher Scientific punchout d. Within the punchout, click on Your Account at the top right e. Select Quotes from the dropdown menu
f. Look for your Quote # and name g. Add to cart and checkout h. You will then be redirected to Oracle’s checkout page

11
Re-assigning a Cart to Someone Else 1. Go to the Purchase Requisitions homepage 2. Select the desired cart from the Recent Requisitions
3. On the top right corner, click the Actions dropdown menu 4. Select Re-assign
5. Search for the person you are re-assigning to 6. Check mark the box for “Send notification to this person”
12
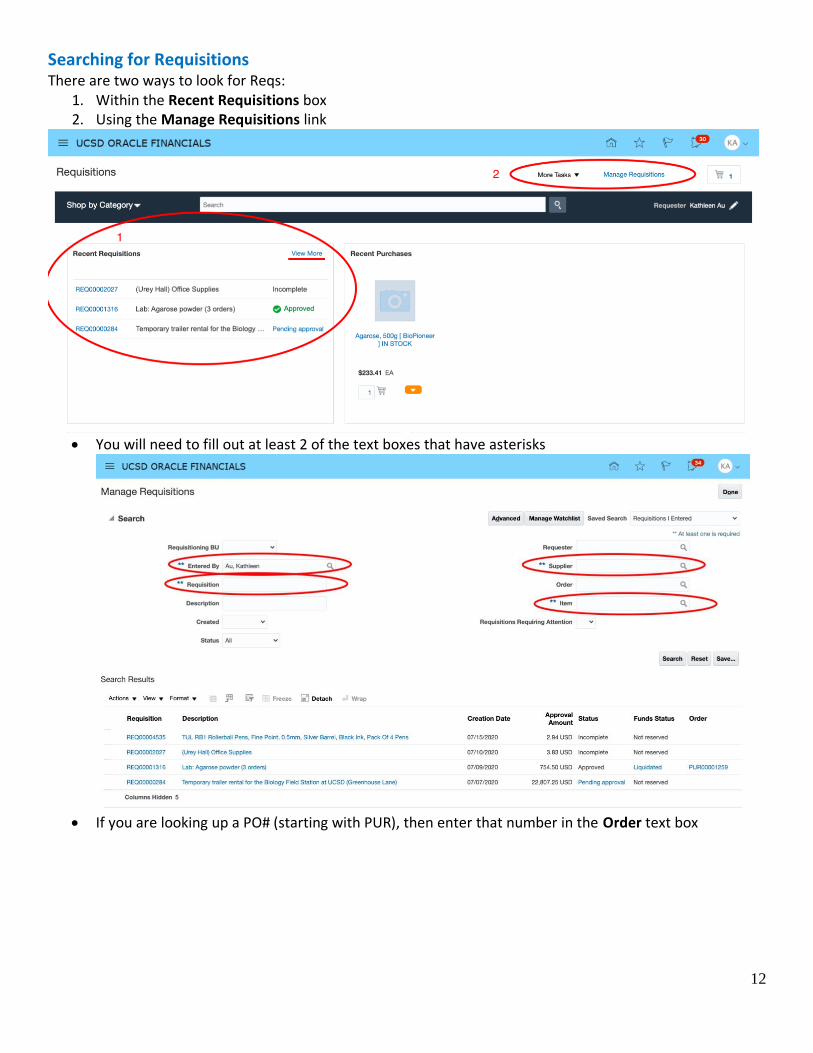
Searching for Requisitions There are two ways to look for Reqs:
1. Within the Recent Requisitions box 2. Using the Manage Requisitions link
• You will need to fill out at least 2 of the text boxes that have asterisks
• If you are looking up a PO# (starting with PUR), then enter that number in the Order text box
13
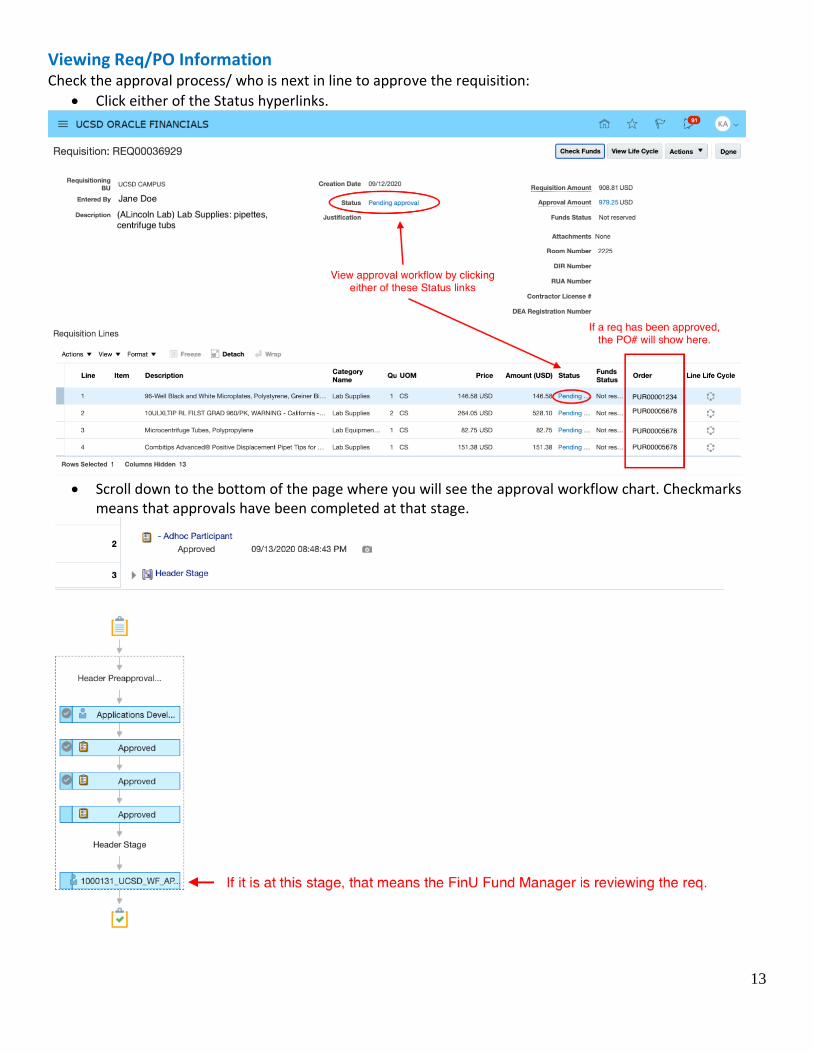
Viewing Req/PO Information Check the approval process/ who is next in line to approve the requisition:
• Click either of the Status hyperlinks.
• Scroll down to the bottom of the page where you will see the approval workflow chart. Checkmarks
means that approvals have been completed at that stage.
14
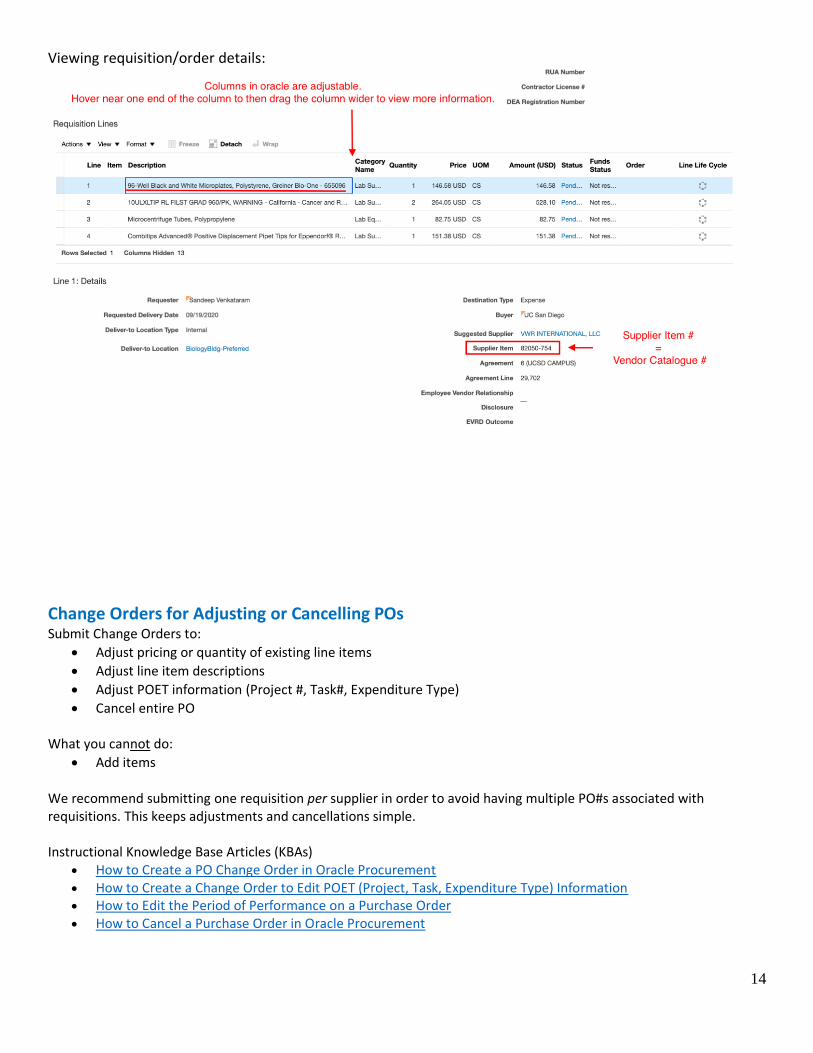
Viewing requisition/order details:
Change Orders for Adjusting or Cancelling POs Submit Change Orders to:
• Adjust pricing or quantity of existing line items
• Adjust line item descriptions
• Adjust POET information (Project #, Task#, Expenditure Type)
• Cancel entire PO What you cannot do:
• Add items We recommend submitting one requisition per supplier in order to avoid having multiple PO#s associated with requisitions. This keeps adjustments and cancellations simple. Instructional Knowledge Base Articles (KBAs)
• How to Create a PO Change Order in Oracle Procurement • How to Create a Change Order to Edit POET (Project, Task, Expenditure Type) Information • How to Edit the Period of Performance on a Purchase Order • How to Cancel a Purchase Order in Oracle Procurement
15
More Things to Keep in Mind!
• Always save your work. Marketplace used to autosave work but with Oracle, you will need to remember to manually save it (a button on the top right corner).
• Do not use your Browser’s back button. Instead, click the “done” or “home” buttons.
• Expense Types must be selected for each line item.
• Invoices for inventorial equipment totaling $5,000 and above will require requisitioner approval. Invoices totaling $10,000 and above will require requisitioner and financial unit approval.
More Training Resources! • Services & Support. In the Find Answers section, you can view all of the Knowledge Base Articles
(KBAs) across multiple departments. Most of them include step-by-step screenshots. If you have questions on something that's not listed, you can submit a SNOW ticket. In this area too, you can ask questions to various offices throughout campus.
• Oracle Procurement FAQ Page.
• UC Learning Training Courses: o Introduction to Oracle Procurement & Payables o Oracle: Buying and Paying for PO Requisitioners (2hrs) o Oracle: Buying and Paying for Financial Unit Approvers (1hr 30mins)