
Getting started with SimaPro Share
14
Getting started with SimaPro Share
-
Upload
khangminh22 -
Category
Documents
-
view
5 -
download
0
Transcript of Getting started with SimaPro Share

Getting started with SimaPro Share
Getting started with SimaPro Share
2
About SimaPro SimaPro was developed by PRé with the goal of making sustainability a fact-
based endeavor. PRé has been a leading voice in sustainability metrics and
life cycle thinking development for nearly 30 years, pioneering the field of
environmental and social impact assessment. We develop tools that help
you create value and drive sustainable change.
SimaPro is distributed through a Global Partner Network. All partners were carefully selected by
PRé. A partner in your country will act as your local SimaPro sales and support representative
and can show you a personal demo or provide more information.
Find your local partner: simapro.com/global-partner-network
Get in touch
T +31 33 450 40 10
W simapro.com | support.simapro.com | pre-sustainability.com
Title: Getting started with SimaPro Share
Written by: Synnøve Hjellvik, PRé Sustainability
Version: 2.3
Date: March 2021
Copyright: © 2021 PRé Sustainability B.V. All rights reserved.
PRé grants the right to distribute and print the unchanged PDF
version of this manual for non-commercial purposes only.
Parts of the manual may be reproduced in other work only after
permission and if a clear reference is made that PRé is the author.
Getting started with SimaPro Share
3
Table of contents
1 Introduction .................................................................................... 4
2 Preparing your SimaPro project ....................................................... 5
2.1 Guidelines and tips for your SimaPro model 5
2.2 Creating a new SimaPro Flow model 6
2.3 Exporting your SimaPro model 7
2.3.1 Exporting projects with processes only 7
2.3.2 Import your SimaPro model in the online platform 8
3 Creating a new SimaPro Share project ............................................. 8
3.1 Setting up the calculation and calculate results 8
4 Building your SimaPro Share project ............................................... 9
4.1 Adding project information 9
4.2 Adding hotspots 10
4.3 Building scenarios 12
4.4 Viewing impact assessment results 12
4.5 Calculation settings 13
5 Assigning users and publishing your project .................................. 13
5.1 Adding users and creating your invite 13
5.2 Publishing your project 14
Getting started with SimaPro Share
4
1 Introduction SimaPro Share is an interactive, web-based platform that
makes your LCA results accessible for all your relevant
stakeholders. It enables efficient, fact-based decision-
making and stimulates supply chain involvement and
real-time collaboration.
To use Share, you start with creating a model in SimaPro Flow or uploading a model you have
built in SimaPro desktop. This model is then expanded on in Share, where you can build various
scenario projects and make them accessible to other users. Both Expert and Business users can
build scenarios and analyze their impact to investigate and understand the impact of their
decisions.
This guide is meant to help you, the Expert user, with creating your first Share project.
Please note that while working with SimaPro Share, you will be using a component of SimaPro Flow,
which is currently in beta. That means that it is still being tested and is not fully supported. We welcome
your feedback to make it better!
For additional support, please visit our SimaPro Help Center at support.simapro.com, or contact
us on the online platform by going to Support in the left-side menu and click Contact support.
Getting started with SimaPro Share
5
2 Preparing your SimaPro project As mentioned in the introduction, in order to use SimaPro Share, you start with uploading the
model you have built in SimaPro desktop or create a new model in SimaPro Flow. This model is
then expanded on in the online extension, where you can build various Share projects and make
them accessible to other non-LCA-expert users, also called Business users.
For optimal use of Share, there are some general guidelines that should be taken into
consideration when building your SimaPro model, as explained in the following section. Section
2.2 then explains how to export your SimaPro desktop project to Share.
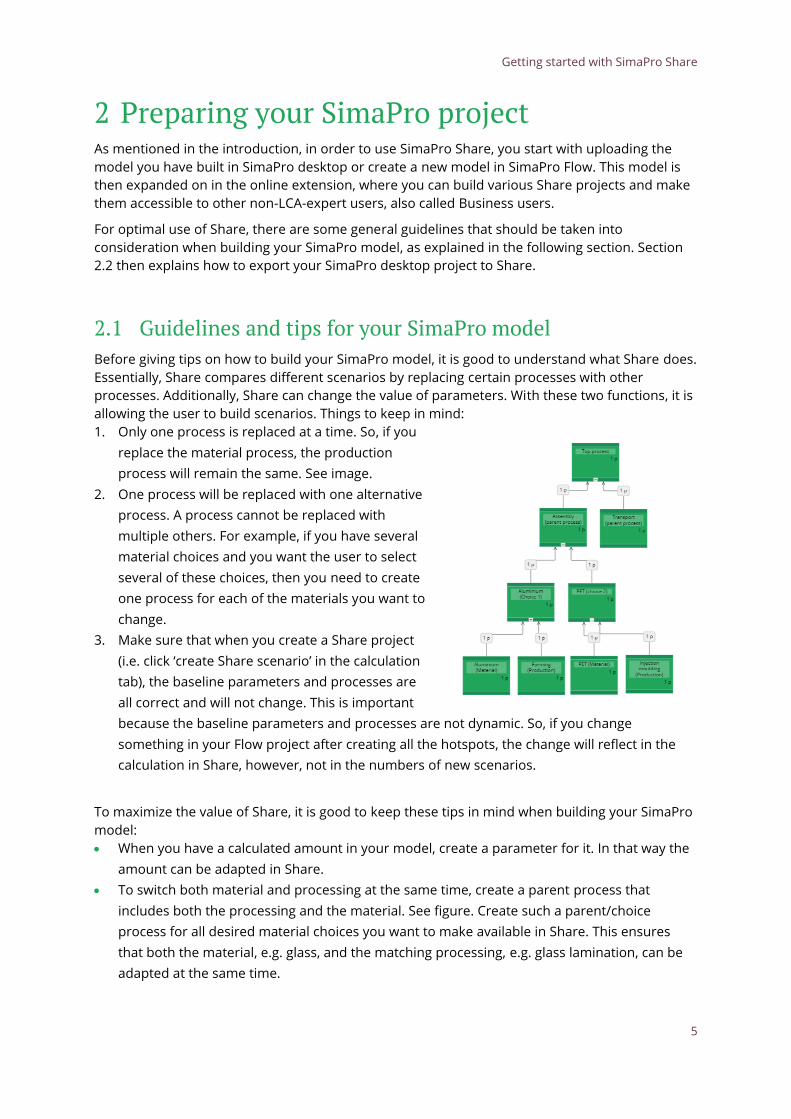
2.1 Guidelines and tips for your SimaPro model Before giving tips on how to build your SimaPro model, it is good to understand what Share does.
Essentially, Share compares different scenarios by replacing certain processes with other
processes. Additionally, Share can change the value of parameters. With these two functions, it is
allowing the user to build scenarios. Things to keep in mind:
1. Only one process is replaced at a time. So, if you
replace the material process, the production
process will remain the same. See image.
2. One process will be replaced with one alternative
process. A process cannot be replaced with
multiple others. For example, if you have several
material choices and you want the user to select
several of these choices, then you need to create
one process for each of the materials you want to
change.
3. Make sure that when you create a Share project
(i.e. click ‘create Share scenario’ in the calculation
tab), the baseline parameters and processes are
all correct and will not change. This is important
because the baseline parameters and processes are not dynamic. So, if you change
something in your Flow project after creating all the hotspots, the change will reflect in the
calculation in Share, however, not in the numbers of new scenarios.
To maximize the value of Share, it is good to keep these tips in mind when building your SimaPro
model:
• When you have a calculated amount in your model, create a parameter for it. In that way the
amount can be adapted in Share.
• To switch both material and processing at the same time, create a parent process that
includes both the processing and the material. See figure. Create such a parent/choice
process for all desired material choices you want to make available in Share. This ensures
that both the material, e.g. glass, and the matching processing, e.g. glass lamination, can be
adapted at the same time.
Getting started with SimaPro Share
6
• To allow the user to create scenarios with multiple materials choices, add dummy processes
to the top processes. For example, you have a component consisting of three materials, but
you want to allow the user the possibility to make this component from five materials, then
add two dummy processes to the assembly (top process) of the component.
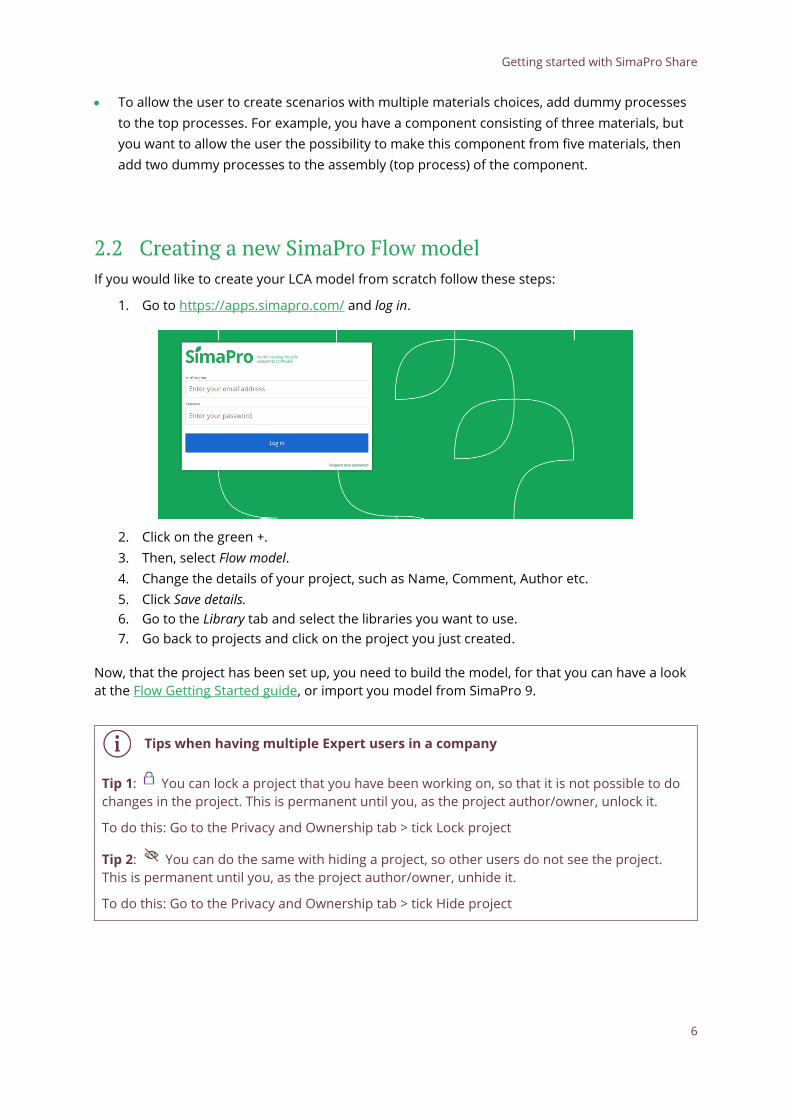
2.2 Creating a new SimaPro Flow model If you would like to create your LCA model from scratch follow these steps:
1. Go to https://apps.simapro.com/ and log in.
2. Click on the green +.
3. Then, select Flow model.
4. Change the details of your project, such as Name, Comment, Author etc.
5. Click Save details.
6. Go to the Library tab and select the libraries you want to use.
7. Go back to projects and click on the project you just created.
Now, that the project has been set up, you need to build the model, for that you can have a look
at the Flow Getting Started guide, or import you model from SimaPro 9.
Tips when having multiple Expert users in a company
Tip 1: You can lock a project that you have been working on, so that it is not possible to do
changes in the project. This is permanent until you, as the project author/owner, unlock it.
To do this: Go to the Privacy and Ownership tab > tick Lock project
Tip 2: You can do the same with hiding a project, so other users do not see the project.
This is permanent until you, as the project author/owner, unhide it.
To do this: Go to the Privacy and Ownership tab > tick Hide project
Getting started with SimaPro Share
7
2.3 Importing an existing SimaPro model
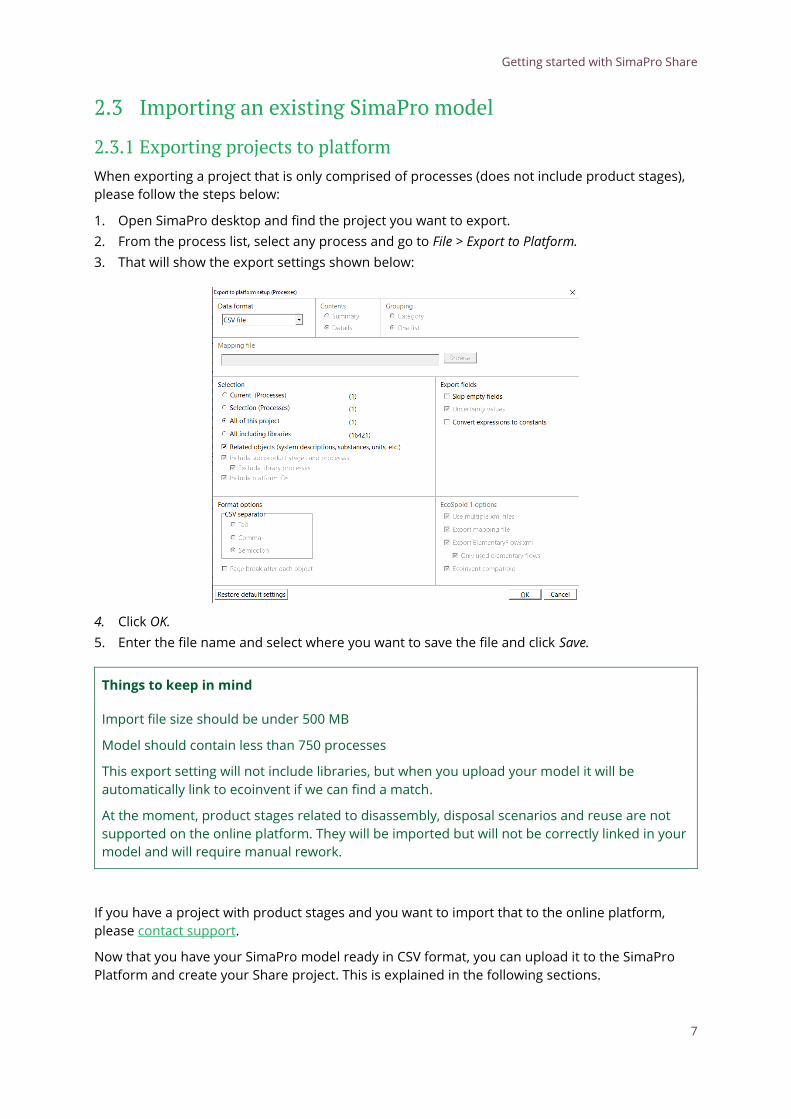
2.3.1 Exporting projects to platform When exporting a project that is only comprised of processes (does not include product stages),
please follow the steps below:
1. Open SimaPro desktop and find the project you want to export.
2. From the process list, select any process and go to File > Export to Platform.
3. That will show the export settings shown below:
4. Click OK.
5. Enter the file name and select where you want to save the file and click Save.
Things to keep in mind
Import file size should be under 500 MB
Model should contain less than 750 processes
This export setting will not include libraries, but when you upload your model it will be
automatically link to ecoinvent if we can find a match.
At the moment, product stages related to disassembly, disposal scenarios and reuse are not
supported on the online platform. They will be imported but will not be correctly linked in your
model and will require manual rework.
If you have a project with product stages and you want to import that to the online platform,
please contact support.
Now that you have your SimaPro model ready in CSV format, you can upload it to the SimaPro
Platform and create your Share project. This is explained in the following sections.
Getting started with SimaPro Share
8
2.3.2 Import your SimaPro model in the online platform 1. Log into the platform.
2. Click on the green +.
3. Then, select Flow model.
4. Change the details of your project, such as Name, Comment, Author etc.
5. Click Save details.
6. Go to the Library tab and select the libraries you use.
7. Then, go back to projects and click on the project you just created.
8. Drag and drop the .CSV file anywhere in the project
9. Wait for the loading to finish. It is recommended to read through and download the report
before clicking Continue.
10. Your project will now open in Flow.
SimaPro Flow still in Beta
Please note that while working with SimaPro Share, you will be using a component of SimaPro
Flow, which is currently in beta version. That means that it is still being tested and is not fully
supported yet. We welcome your feedback to make it better!
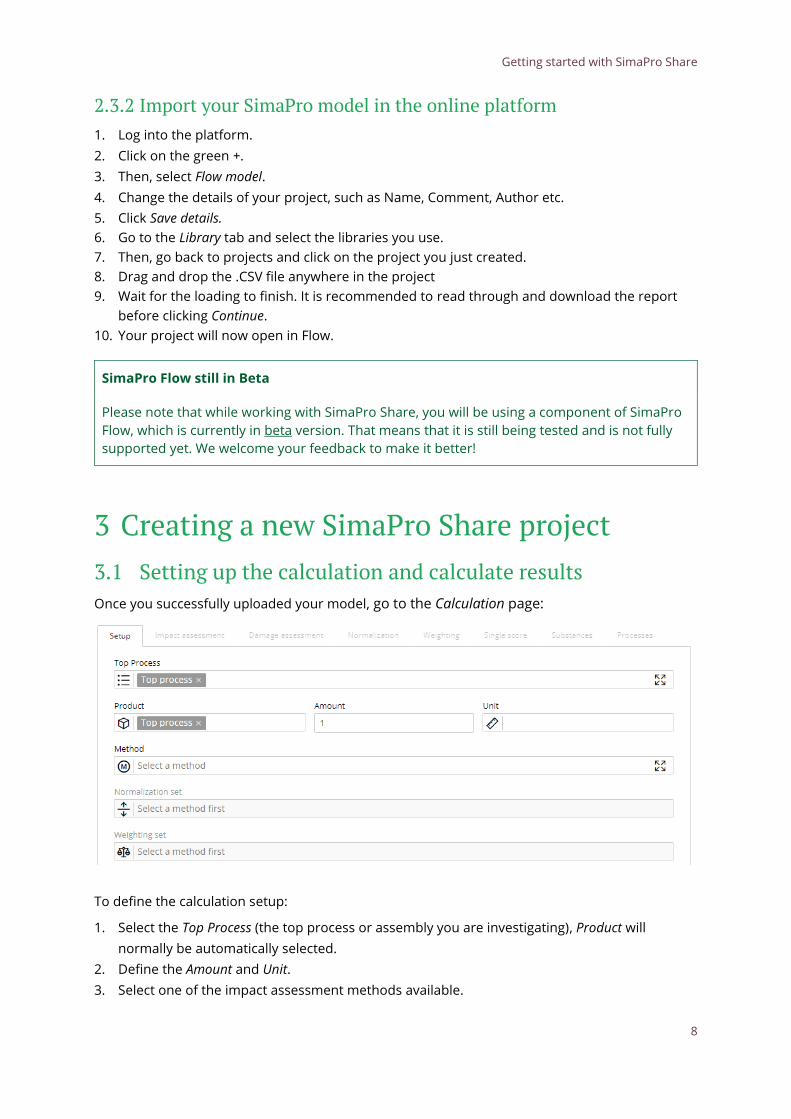
3 Creating a new SimaPro Share project 3.1 Setting up the calculation and calculate results Once you successfully uploaded your model, go to the Calculation page:
To define the calculation setup:
1. Select the Top Process (the top process or assembly you are investigating), Product will
normally be automatically selected.
2. Define the Amount and Unit.
3. Select one of the impact assessment methods available.
Getting started with SimaPro Share
9
4. Select the Normalization and Weighting sets (if available in the chosen method).
5. Click Calculate.
6. You will be directed to the Impact Assessment tab where you can see the impact of the model
you have created.
7. Click
8. Enter a name for your Share project and click Confirm.
Your Share project has now been created in Share and you can see the impact of your model (as
you did in Flow), which is considered as the ‘baseline’ scenario. As an Expert user, you can now
further expand on your project and determine which changes other users can make to create
their own scenarios. This is explained in the following chapters.
4 Building your SimaPro Share project Share projects consist of two tabs: Overall results and Project scenarios.
• Under the Overall results tab, you can add general project information, findings,
instructions, and you can create hotspots.
• Under the Product scenarios tab, you can build scenarios, analyze and compare their
environmental impact. We will describe how to create all those elements in this chapter.
Practical example
Hotspots are usually the object of study. For example, your client is a procurement manager
and are wondering which types of materials they should use for their new jeans. Then you, as
an Expert, can make an LCA model which considers all the parts of a jean and add it to Share.
In Share, the procurement manager could see the effect of the choices which are made. In this
case, the material type is the hotspot.
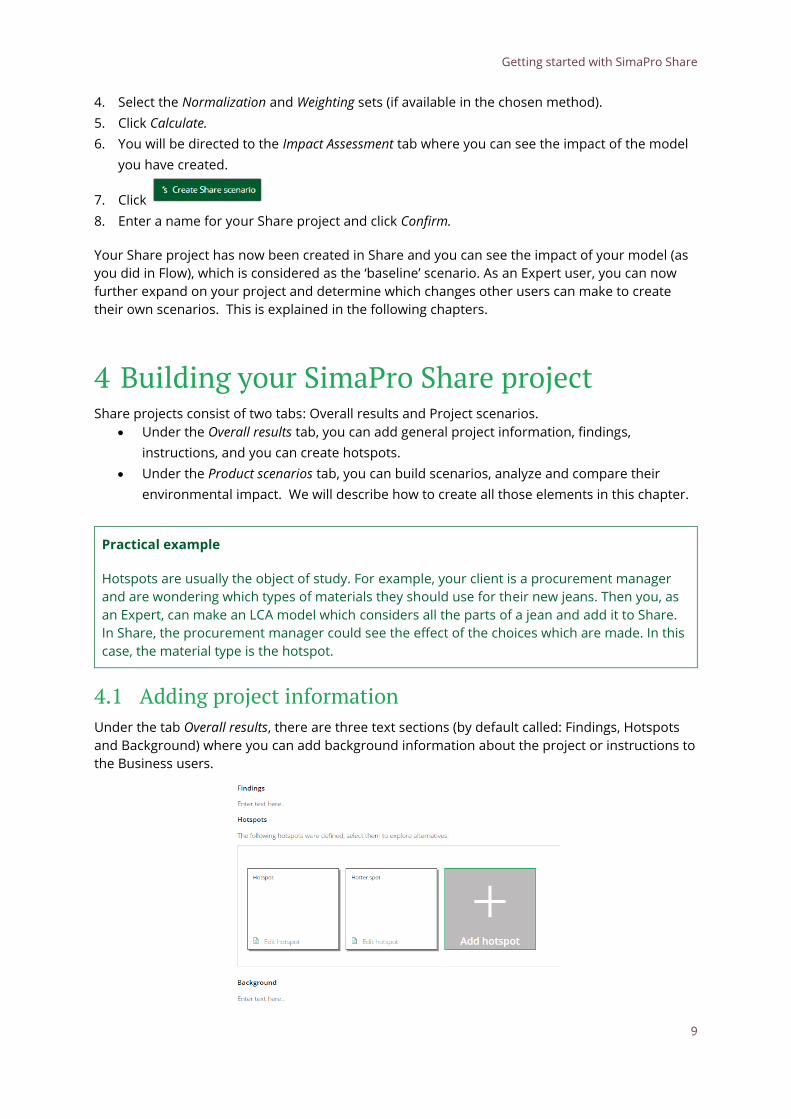
4.1 Adding project information Under the tab Overall results, there are three text sections (by default called: Findings, Hotspots
and Background) where you can add background information about the project or instructions to
the Business users.
Getting started with SimaPro Share
10
All section headings and content can be edited by the Expert user and will be seen by the
Business users you assign to your project (Note! The Business user can only view and not edit this
text).
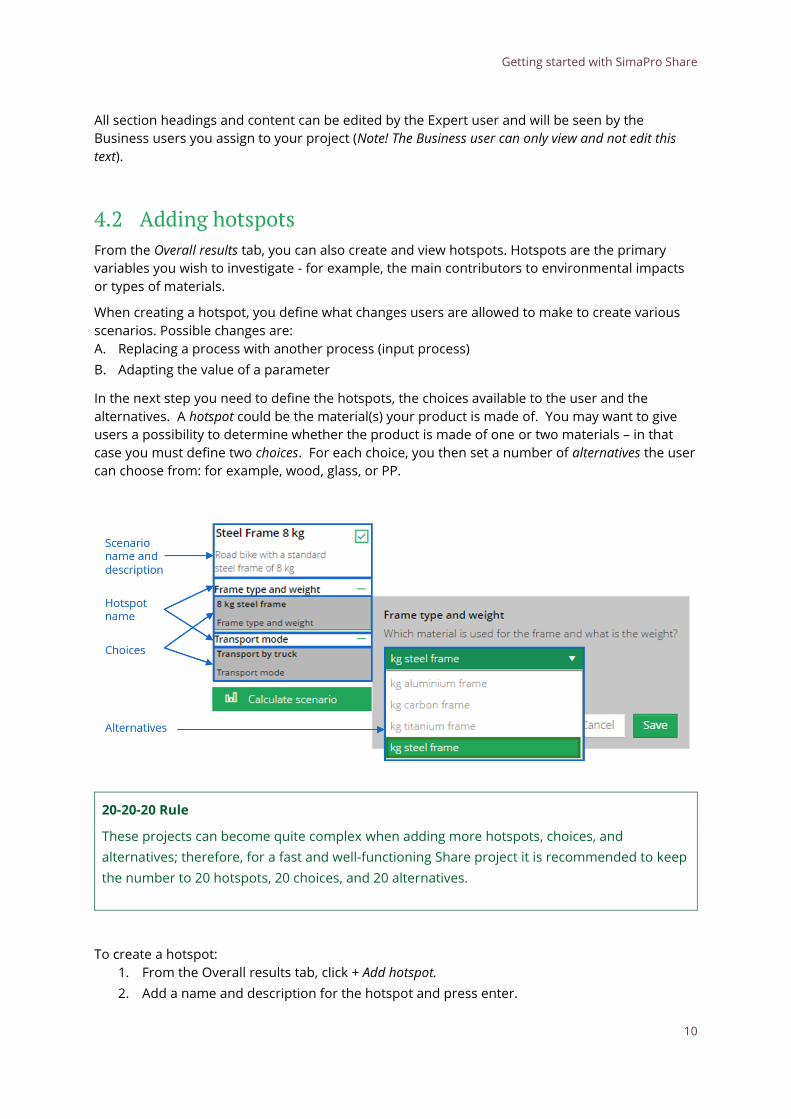
4.2 Adding hotspots From the Overall results tab, you can also create and view hotspots. Hotspots are the primary
variables you wish to investigate - for example, the main contributors to environmental impacts
or types of materials.
When creating a hotspot, you define what changes users are allowed to make to create various
scenarios. Possible changes are:
A. Replacing a process with another process (input process)
B. Adapting the value of a parameter
In the next step you need to define the hotspots, the choices available to the user and the
alternatives. A hotspot could be the material(s) your product is made of. You may want to give
users a possibility to determine whether the product is made of one or two materials – in that
case you must define two choices. For each choice, you then set a number of alternatives the user
can choose from: for example, wood, glass, or PP.
20-20-20 Rule
These projects can become quite complex when adding more hotspots, choices, and
alternatives; therefore, for a fast and well-functioning Share project it is recommended to keep
the number to 20 hotspots, 20 choices, and 20 alternatives.
To create a hotspot:
1. From the Overall results tab, click + Add hotspot.
2. Add a name and description for the hotspot and press enter.
Getting started with SimaPro Share
11
3. Click Add new choice. Give the choice a name and describe the question (as guidance to
the Business user).
4. Select whether you want to vary an input process or a parameter value.
Input types that can be varied
Input process: Change the input of a process to another material/ process. For example,
replace European Electricity by US Electricity, or replace oak wood by pine wood.
Parameter value: Change the value of a parameter in your SimaPro model. For example,
allow users to choose the value of the parameter delivery_distance_km or user_large_truck,
that you had defined in your SimaPro model.
If you choose to vary an input process:
1. Click Parent process and select the process to which you want the changes to be applied
(i.e. the parent process).
2. Click Input to vary and specify which process you want to replace.
3. The default amount shown is based on the value you added in your Flow model. This
cannot be edited in Share.
4. You now need to add alternatives to the choice. Click Add new alternative and give the
alternative a name.
5. Select Alternative process and specify the process you want the user to be able to replace
the default with. If you want to add a process from a library, you will need to tick the box
Show library processes at the bottom of the window.
6. If desired, change the default amount.
7. Select the checkbox Make amount editable by Business user if you wish the user to be able
to adapt the amount of material. If selected, set the minimum and maximum values the
user can enter.
8. All entries are saved automatically; click Back to save and return to the Overall results tab.
9. Repeat the steps above to add as many alternatives, choices and hotspots as you wish.
10. To delete a choice or an alternative, drag it from and drop it in the Trash.
If you choose to vary a parameter value:
1. Select the Parameter to vary from the list of available parameters
2. The default amount shown is based on the value you added in your SimaPro model.
3. Select the checkbox Make amount editable by Business user and set the minimum a
maximum value the user can enter.
4. All entries are saved automatically; click Back to save and return to the Overall results tab.
5. Repeat the steps above to add as many alternatives, choices and hotspots as you wish.
6. To delete a choice or an alternative, drag it from and drop it in the Trash.
Getting started with SimaPro Share
12
4.3 Building scenarios After you have created hotspots, go to the tab Product scenarios. There you will see that there is
already one scenario created for you. This is the baseline scenario, which contains the default
amounts, as you had defined in your SimaPro model (these cannot be edited). You can edit the
name and description of the baseline scenario, by clicking the name and description.
As an Expert user, you can build as many additional scenarios as you wish for your Business
users. When you build a scenario, you basically vary the choices and alternatives you had defined
for every hotspot. To build a scenario:
1. Click + Add new scenario.
2. You can edit the name and description of the scenario.
3. The scenario still contains the default values of the baseline scenario. You can edit
these by clicking the grey boxes. Click Save.
4. Note! The grey boxes become a darker shade, indicating that the value selected
differs from the baseline scenario.
5. Repeat the steps above to build more scenarios.
After setting up the hotspots, the Expert user can share the project with Business users. This is
further explained in the following sections, but it is good to keep in mind the differences between
these roles:
Expert users:
- Can add scenarios before and after publishing the project (scenarios created by the
Expert user are visible to all assigned users)
- Can view all scenarios made by Business users
- Can delete scenarios made by Business users
Business users:
- Can build their own scenarios after the project has been published
- Can only view scenarios created by themselves and by the Expert user
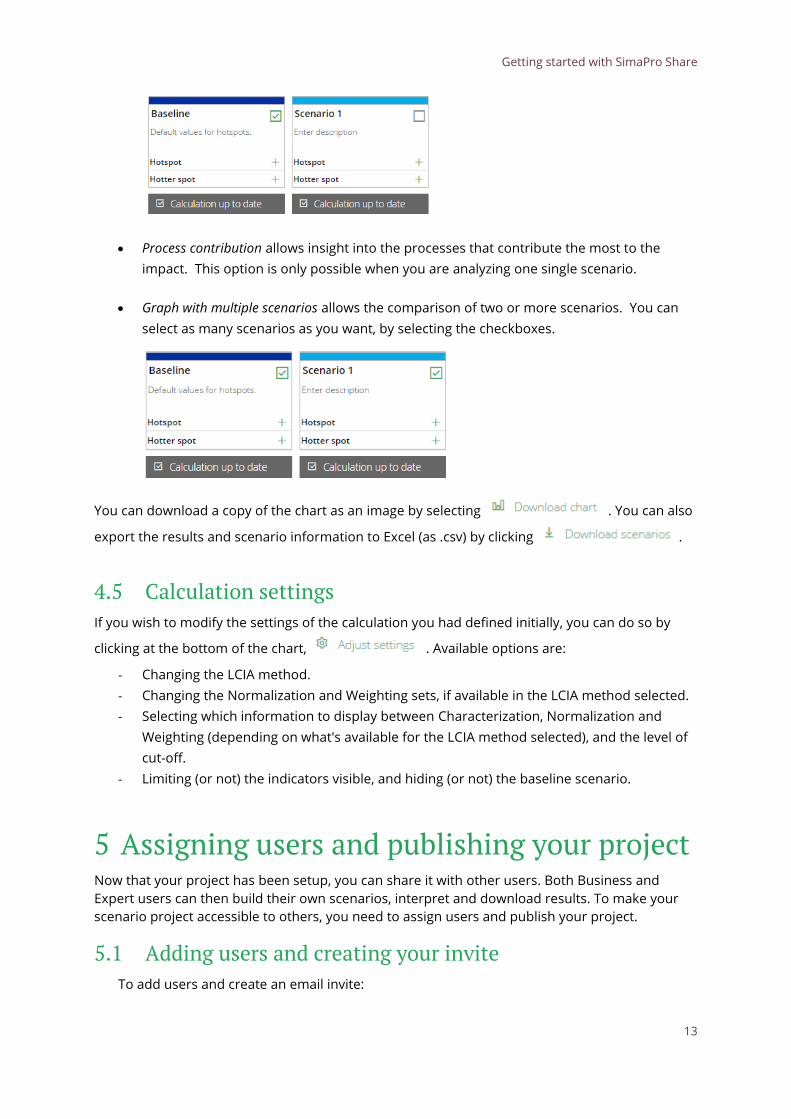
4.4 Viewing impact assessment results At any point while working with your scenarios, you can calculate the impact of one scenario to
see the details or compare two or more scenarios. The impact of the baseline scenario is already
shown and has been calculated based on the settings you had selected earlier in Flow.
There are several interpretation options:
• Graph with a single scenario allows insight into the hotspots and can be filtered per impact
category (if defined in the calculation settings). Make sure to select only one scenario.
Getting started with SimaPro Share
13
• Process contribution allows insight into the processes that contribute the most to the
impact. This option is only possible when you are analyzing one single scenario.
• Graph with multiple scenarios allows the comparison of two or more scenarios. You can
select as many scenarios as you want, by selecting the checkboxes.
You can download a copy of the chart as an image by selecting . You can also
export the results and scenario information to Excel (as .csv) by clicking .
4.5 Calculation settings If you wish to modify the settings of the calculation you had defined initially, you can do so by
clicking at the bottom of the chart, . Available options are:
- Changing the LCIA method.
- Changing the Normalization and Weighting sets, if available in the LCIA method selected.
- Selecting which information to display between Characterization, Normalization and
Weighting (depending on what's available for the LCIA method selected), and the level of
cut-off.
- Limiting (or not) the indicators visible, and hiding (or not) the baseline scenario.
5 Assigning users and publishing your project Now that your project has been setup, you can share it with other users. Both Business and
Expert users can then build their own scenarios, interpret and download results. To make your
scenario project accessible to others, you need to assign users and publish your project.
5.1 Adding users and creating your invite To add users and create an email invite:
Getting started with SimaPro Share
14
1. Click Manage users and then + New user to create a new Business user. You can add a
user regardless of them having an account already or not, and from any organization.
2. Click Edit email template to review the default invite that is sent to users.
3. Make your changes and click Save. Information in capital letters and in between two
pair of brackets (e.g. [[PROJECTNAME]]) are automatically generated and adapted to
the context of the recipient.
It is recommended to click Send test mail to receive an email preview of what the respondent will
see.
Inviting more users
One user license allows you to share your scenario project with one Business user. If you
would like to collaborate with more Business users, you can purchase additional user
bundles. Please contact us for more information.
5.2 Publishing your project It is important to mention that once your scenario project is published, you cannot make changes
to everything anymore, please try this before finishing the whole project, since you might have to
start again to make certain changes. That is why a copy of your published project remains in the
Draft section. You can make any changes in the draft and re-publish the project. The published
project will then be updated to the newer version.
To publish the project:
1. Click Publish project.
2. Several checks will be carried out to ensure that the project is complete. If any warning
messages appear, you need to make the necessary changes in your project before you try
to publish it again.
3. Once all checks have been successfully validated, an email will be sent out to all assigned
users to access your project.
Your Share scenario project will now be shown as ‘Published’ in the projects overview.
Good luck and enjoy the SimaPro online platform! For additional support, please visit the SimaPro Help Center.


![PIPEPHASE Getting Started Guide[1] - baixardoc](https://static.fdokumen.com/doc/165x107/6315b7d1aca2b42b580df6a1/pipephase-getting-started-guide1-baixardoc.jpg)