
Getting Started - Oracle Help Center
139
Getting Started Oracle ® Health Sciences Clintrial Release 4.7.5 Part Number: E87220-01
-
Upload
khangminh22 -
Category
Documents
-
view
1 -
download
0
Transcript of Getting Started - Oracle Help Center

Getting Started
Oracle® Health Sciences Clintrial Release 4.7.5
Part Number: E87220-01

Copyright © 1998, 2017, Oracle and/or its affiliates. All rights reserved.
This software and related documentation are provided under a license agreement containing restrictions on use and disclosure and are protected by intellectual property laws. Except as expressly permitted in your license agreement or allowed by law, you may not use, copy, reproduce, translate, broadcast, modify, license, transmit, distribute, exhibit, perform, publish, or display any part, in any form, or by any means. Reverse engineering, disassembly, or decompilation of this software, unless required by law for interoperability, is prohibited.
The information contained herein is subject to change without notice and is not warranted to be error-free. If you find any errors, please report them to us in writing.
If this is software or related documentation that is delivered to the U.S. Government or anyone licensing it on behalf of the U.S. Government, the following notice is applicable:
U.S. GOVERNMENT END USERS: Oracle programs, including any operating system, integrated software, any programs installed on the hardware, and/or documentation, delivered to U.S. Government end users are "commercial computer software" pursuant to the applicable Federal Acquisition Regulation and agency-specific supplemental regulations. As such, use, duplication, disclosure, modification, and adaptation of the programs, including any operating system, integrated software, any programs installed on the hardware, and/or documentation, shall be subject to license terms and license restrictions applicable to the programs. No other rights are granted to the U.S. Government.
This software or hardware is developed for general use in a variety of information management applications. It is not developed or intended for use in any inherently dangerous applications, including applications that may create a risk of personal injury. If you use this software or hardware in dangerous applications, then you shall be responsible to take all appropriate fail-safe, backup, redundancy, and other measures to ensure its safe use. Oracle Corporation and its affiliates disclaim any liability for any damages caused by use of this software or hardware in dangerous applications.
Oracle and Java are registered trademarks of Oracle and/or its affiliates. Other names may be trademarks of their respective owners.
Intel and Intel Xeon are trademarks or registered trademarks of Intel Corporation. All SPARC trademarks are used under license and are trademarks or registered trademarks of SPARC International, Inc. AMD, Opteron, the AMD logo, and the AMD Opteron logo are trademarks or registered trademarks of Advanced Micro Devices. UNIX is a registered trademark of The Open Group.
This software or hardware and documentation may provide access to or information about content, products, and services from third parties. Oracle Corporation and its affiliates are not responsible for and expressly disclaim all warranties of any kind with respect to third-party content, products, and services unless otherwise set forth in an applicable agreement between you and Oracle. Oracle Corporation and its affiliates will not be responsible for any loss, costs, or damages incurred due to your access to or use of third-party content, products, or services, except as set forth in an applicable agreement between you and Oracle.
This documentation may include references to materials, offerings, or products that were previously offered by Phase Forward Inc. Certain materials, offerings, services, or products may no longer be offered or provided. Oracle and its affiliates cannot be held responsible for any such references should they appear in the text provided.
Clintrial 4.7.5 iii
Contents
Chapter 1 The Clintrial software overview 1
What is the Clintrial software? ............................................................................................................................................ 2 Client/server architecture ...................................................................................................................................... 3
Core modules ......................................................................................................................................................................... 4 About the Admin module ...................................................................................................................................... 5 About the Design module ...................................................................................................................................... 5 About the Enter module ........................................................................................................................................ 5 About the Manage module .................................................................................................................................... 6 About the Retrieve module ................................................................................................................................... 6
Extended modules ................................................................................................................................................................ 7 About the Classify module..................................................................................................................................... 7 About the Lab Loader module.............................................................................................................................. 7 About the Multisite module ................................................................................................................................... 7 About the Resolve module .................................................................................................................................... 8
Clintrial 4.7 compatibility with other Oracle Health Sciences products ..................................................................... 9 Clinical data management .................................................................................................................................................. 10
Key benefits ............................................................................................................................................................ 10 How the Clintrial software provides flexibility ................................................................................................ 10 How the Clintrial software provides security ................................................................................................... 11 How the Clintrial software standardizes data ................................................................................................... 11 How the Clintrial software ensures data accuracy ........................................................................................... 11 How the Clintrial software audits data .............................................................................................................. 12 How the Clintrial software helps review data ................................................................................................... 12
The Clintrial data ................................................................................................................................................................ 13 Relationship to the Oracle database ................................................................................................................... 13 About the Clintrial protocol ................................................................................................................................ 13
How the Clintrial software stores clinical data .............................................................................................................. 15 About items ............................................................................................................................................................ 15 About panels .......................................................................................................................................................... 15 Types of clinical data tables ................................................................................................................................. 15 About records ........................................................................................................................................................ 16 Structure of a clinical data table .......................................................................................................................... 16 Data flow within the Clintrial software ............................................................................................................. 17
Types of users ...................................................................................................................................................................... 18 Starting a module ................................................................................................................................................................ 19 The Clintrial module basic tasks ...................................................................................................................................... 20
Using Switchboard ................................................................................................................................................ 20 Setting a protocol .................................................................................................................................................. 20 Switching databases ............................................................................................................................................... 20 Re-ordering columns in list windows ................................................................................................................ 21 Changing your password ...................................................................................................................................... 21 Accessing the Server Registry Information....................................................................................................... 21 Exiting a module .................................................................................................................................................... 21
About Help .......................................................................................................................................................................... 22 Searching for information .................................................................................................................................... 22 Getting help on windows and dialog boxes...................................................................................................... 22
Chapter 2 Preparing to install or upgrade the server to this release 23
System requirements .......................................................................................................................................................... 24 Using the Oracle database with the Clintrial Core Server software ........................................................................... 25
Contents
iv Clintrial 4.7.5
The Oracle database .............................................................................................................................................. 25
Chapter 3 Performing a new installation of the Clintrial Server software37
Overview of the Clintrial Server installation .................................................................................................................. 38 Preparing for the installation ............................................................................................................................................ 39
Before installing the server software .................................................................................................................. 39 Running a script from a Windows directory .................................................................................................... 39 Create a Clintrial main installation directory .................................................................................................... 40 Create shared directories for use of the Oracle Data Pump Export and Import utilities ........................ 40 Create tablespace data files with the cttspace.sql script .................................................................................. 40 Shut down the Oracle database........................................................................................................................... 42 Restart the Oracle database ................................................................................................................................. 42 Using the Japanese version of the Clintrial Installation Wizard on an English Windows Operating System .................................................................................................................................................. 43
Installing the Clintrial Core Server and additional modules ........................................................................................ 44 Run the Clintrial installation wizard ................................................................................................................... 44 Verify your complete Server installation ........................................................................................................... 53
Post-installation actions ..................................................................................................................................................... 54 If you are using Central Coding .......................................................................................................................... 54 Create a verify function to ensure that passwords meet security standards ................................................ 55 Configure Network Data Encryption and Integrity for Oracle Servers and Clients ................................. 58
Chapter 4 Upgrading the server to this release 59
Overview .............................................................................................................................................................................. 60 Upgrade options .................................................................................................................................................... 60 Limitations of upgrading by import ................................................................................................................... 61
Before you begin the upgrade ........................................................................................................................................... 62 Before upgrading the database instance.......................................................................................................................... 63
Backing up your Clintrial database ..................................................................................................................... 63 Checking other requirements .............................................................................................................................. 63 Running a script from a Windows directory .................................................................................................... 63 Upgrade tips and considerations ......................................................................................................................... 64
Upgrading the Clintrial software using the upgrade wizard ........................................................................................ 65 Running the Clintrial upgrade wizard ................................................................................................................ 65 Details of the Clintrial server upgrade from Clintrial 4.5, 4.6, or 4.7 to 4.7.5 ............................................ 69 Verifying your server upgrade ............................................................................................................................. 72
Post-upgrade actions .......................................................................................................................................................... 73 Recreating Multisite Distribution database links ............................................................................................. 73 Rescheduling Multisite Replication .................................................................................................................... 73 Upgrading Data Discrepancy Forms (DDFs) .................................................................................................. 73 If you are using Central Coding .......................................................................................................................... 76 Create a verify function to ensure that passwords meet security standards ................................................ 77 Configure Network Data Encryption and Integrity for Oracle Servers and Clients ................................. 80
Chapter 5 Installing, upgrading, and maintaining the client software 81
Installing the Oracle client software ................................................................................................................................ 82 Important configuration information ............................................................................................................................. 83 Installing or upgrading the Clintrial client software ..................................................................................................... 84 Starting a Clintrial module ................................................................................................................................................. 86
Chapter 6 The Clintrial client software Windows Registry settings 87
Overview .............................................................................................................................................................................. 88 Editing the Windows registry .............................................................................................................................. 88
Setting registry entries manually ....................................................................................................................................... 89 About the ct_temp_path key ............................................................................................................................... 89
Getting Started
Clintrial 4.7.5 v
About the ct_help_path key ................................................................................................................................ 89 About the ct_user_help_path key ...................................................................................................................... 89
About the Ct4user.reg file ................................................................................................................................................. 90 Contents of the Ct4user.reg file .......................................................................................................................... 90 Running the Ct4user.reg file ................................................................................................................................ 91 Verifying registry settings ..................................................................................................................................... 91
Setting up multiple users on a single client .................................................................................................................... 92 Example .................................................................................................................................................................. 92 When a system administrator installs the Clintrial software .......................................................................... 93
About network installation ................................................................................................................................................ 94 Modifying the ct_path and the ct_exe_path keys ............................................................................................ 94
Chapter 7 Exporting, importing, and setting up codelists and protocols 95
Exporting and importing codelists and protocols ........................................................................................................ 96 Run the import/export directory creation script ............................................................................................. 96
Set up protocols for added functionality ........................................................................................................................ 98 Setting up the CTL_REFERENCE protocol .................................................................................................. 98 Setting up the CTRESOLVEREF protocol ..................................................................................................... 99 Setting up the CT_MEDDRA thesaurus protocol ......................................................................................... 99 Setting up the GCT_MEDDRA thesaurus protocol .................................................................................... 100 Setting up the GCT_WHODD thesaurus protocol ...................................................................................... 100 Setting up the Mini Medika Sample Study ...................................................................................................... 101 Setting up the Medika or CDISC Medika Clinical Sample Studies ............................................................ 101 Sample study protocols and files ...................................................................................................................... 114 Examples of the Clintrial functionality in the Medika Clinical Sample Study .......................................... 119 Examples of the Clintrial functionality in the CDISC Medika Clinical Sample Study ............................ 121 Troubleshooting .................................................................................................................................................. 123
Chapter 8 Deinstalling the Clintrial software 125
Running the deinstallation wizard for the Clintrial core software ........................................................................... 126 Modifying, repairing, or removing the Clintrial 4.7 client software ......................................................................... 131
About the documentation 133
Where to find the product documentation ..................................................................................................... 133 Documentation accessibility .............................................................................................................................. 133 Access to Oracle Support .................................................................................................................................. 133

Contents
vi Clintrial 4.7.5
Clintrial 4.7.5 1
In this chapter What is the Clintrial software? .............................................................................................................. 2
Core modules ........................................................................................................................................... 4
Extended modules .................................................................................................................................. 7
Clintrial 4.7 compatibility with other Oracle Health Sciences products ........................................ 9
Clinical data management .................................................................................................................... 10
The Clintrial data ................................................................................................................................... 13
How the Clintrial software stores clinical data ................................................................................. 15
Types of users ........................................................................................................................................ 18
Starting a module .................................................................................................................................. 19
The Clintrial module basic tasks ......................................................................................................... 20
About Help ............................................................................................................................................ 22
C H A P T E R 1 The Clintrial software overview
Chapter 1 The Clintrial software overview
2 Clintrial 4.7.5
What is the Clintrial software? The Clintrial software is a comprehensive clinical research system for the collection, management, and review of clinical trials data. The Clintrial software is designed for use by companies that must both:
• Collect clinical data to meet regulatory requirements for conducting clinical trials.
• Analyze data that is collected during clinical trials.
The Clintrial software allows you to unify all of your clinical data collection and management, regardless of source or phase of development (pre- or post-market).
The Clintrial software consists of a set of integrated modules that allow you to create metadata, and to collect, manage, and review clinical data according to your study needs.
• The Clintrial core modules—Essential parts of the basic Clintrial product.
Using the Clintrial core modules, you can efficiently manage clinical data.
For more information, see Core modules (on page 4).
• The Clintrial extended modules—Valuable additions to the data management capabilities of the core modules.
You can purchase and install extended modules as needed.
For more information, see Extended modules (on page 7).
The Clintrial software provides a user interface that allows you to enter, verify, edit, and retrieve clinical data using data-entry windows called study pages, which look like pages from case report forms (CRFs).
Getting Started
Clintrial 4.7.5 3
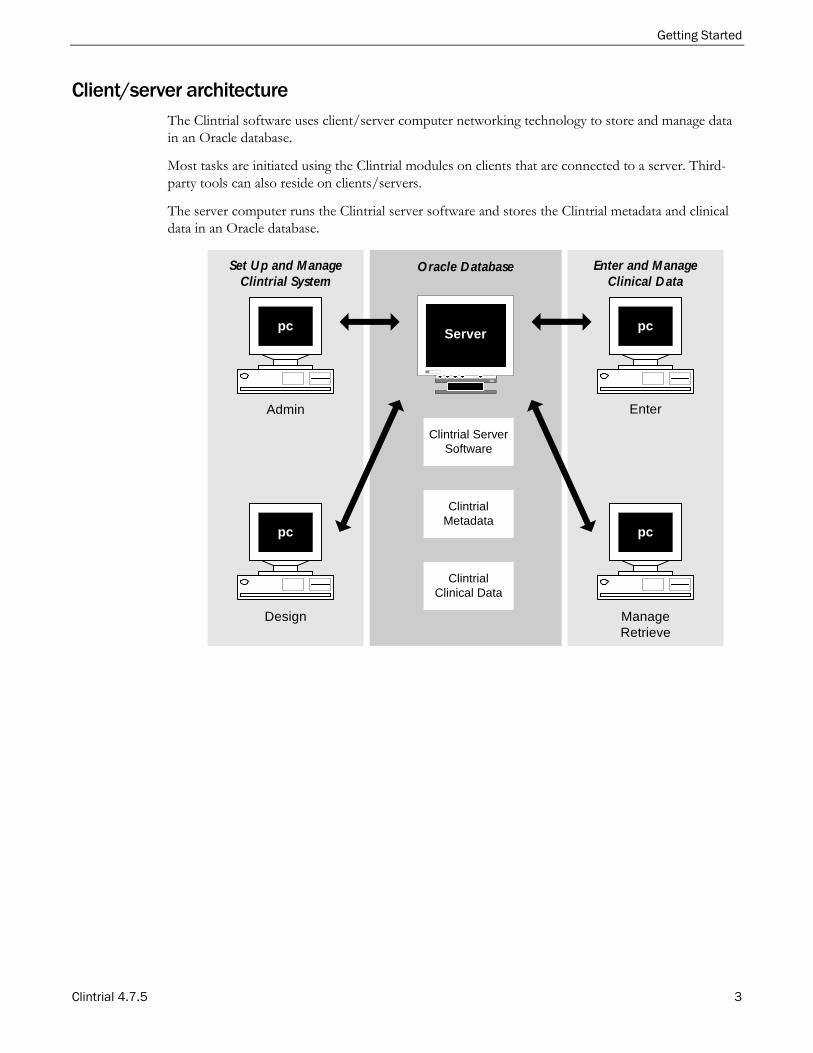
Client/server architecture The Clintrial software uses client/server computer networking technology to store and manage data in an Oracle database.
Most tasks are initiated using the Clintrial modules on clients that are connected to a server. Third-party tools can also reside on clients/servers.
The server computer runs the Clintrial server software and stores the Clintrial metadata and clinical data in an Oracle database.
SITE 6
Server
Oracle Database
Clintrial ServerSoftware
ClintrialMetadata
ClintrialClinical Data
pc
pc
pc
pc
Admin
Set Up and M anageClintrial System
Enter
ManageRetrieve
Enter and M anageClinical Data
Design

Chapter 1 The Clintrial software overview
4 Clintrial 4.7.5
Core modules The Clintrial software consists of these interacting core modules:
• Admin module
• Design module
• Enter module
• Manage module
• Retrieve module
Set Up andMaintain SecurityAdmin
Design
Enter
Manage
Retrieve
Set Up and Manage Clintrial System
Enter and Manage Clintrial Data
Set Up andMaintain Users
Advanced Editand Batch Load
Validate andMerge Data
Create QueriesReview QueryResults
Enter and Edit DataVerify Data
Design theDatabase s
Create ClintrialObjects
Getting Started
Clintrial 4.7.5 5
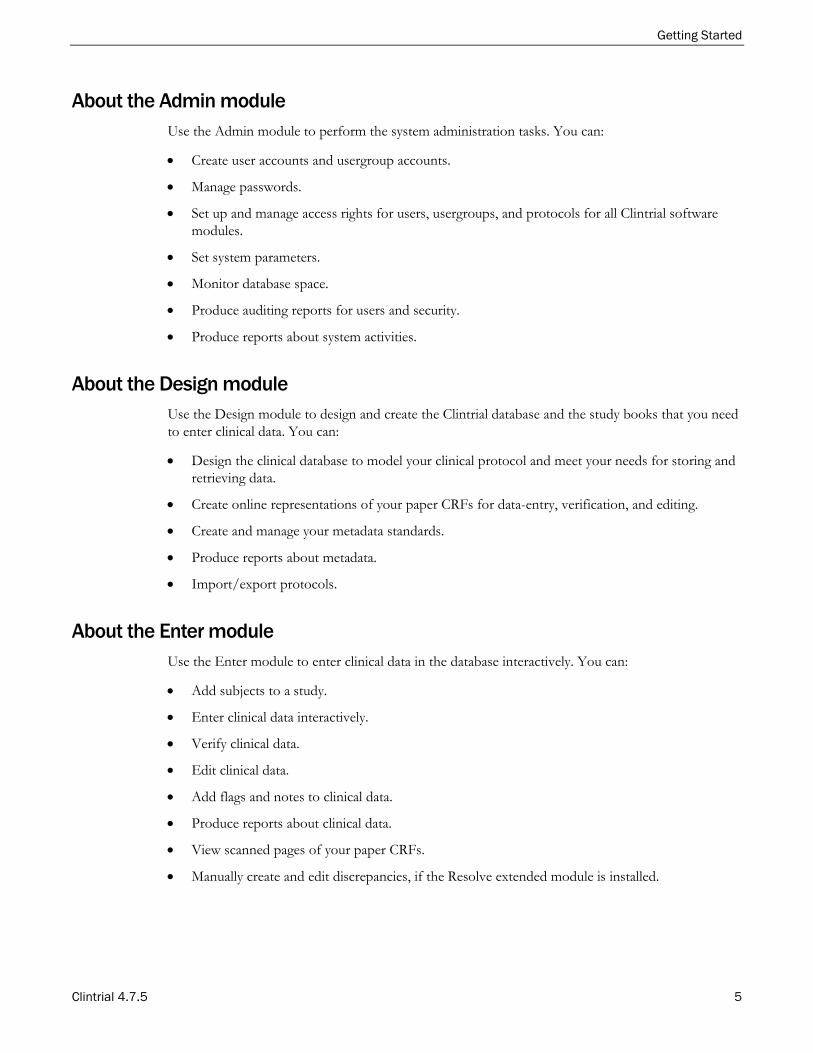
About the Admin module Use the Admin module to perform the system administration tasks. You can:
• Create user accounts and usergroup accounts.
• Manage passwords.
• Set up and manage access rights for users, usergroups, and protocols for all Clintrial software modules.
• Set system parameters.
• Monitor database space.
• Produce auditing reports for users and security.
• Produce reports about system activities.
About the Design module Use the Design module to design and create the Clintrial database and the study books that you need to enter clinical data. You can:
• Design the clinical database to model your clinical protocol and meet your needs for storing and retrieving data.
• Create online representations of your paper CRFs for data-entry, verification, and editing.
• Create and manage your metadata standards.
• Produce reports about metadata.
• Import/export protocols.
About the Enter module Use the Enter module to enter clinical data in the database interactively. You can:
• Add subjects to a study.
• Enter clinical data interactively.
• Verify clinical data.
• Edit clinical data.
• Add flags and notes to clinical data.
• Produce reports about clinical data.
• View scanned pages of your paper CRFs.
• Manually create and edit discrepancies, if the Resolve extended module is installed.

Chapter 1 The Clintrial software overview
6 Clintrial 4.7.5
About the Manage module Use the Manage module to perform data management tasks. You can:
• Batch load and apply data-entry checks to clinical data.
• Code clinical data using a coding thesaurus.
• Validate and merge clinical data in the database.
• Make global changes to or delete clinical data.
• Edit records using an Error Log.
• Track the auditing of data.
• Produce reports about metadata objects.
About the Retrieve module Use the Retrieve module to access and extract clinical data from the database. You can:
• Create queries using:
Query By Form.
Query By Panel.
Ad Hoc Query.
Query By SQL.
• Save query specifications in a query library.
• Save query results to a variety of formats, such as SAS or spreadsheet files.
Getting Started
Clintrial 4.7.5 7
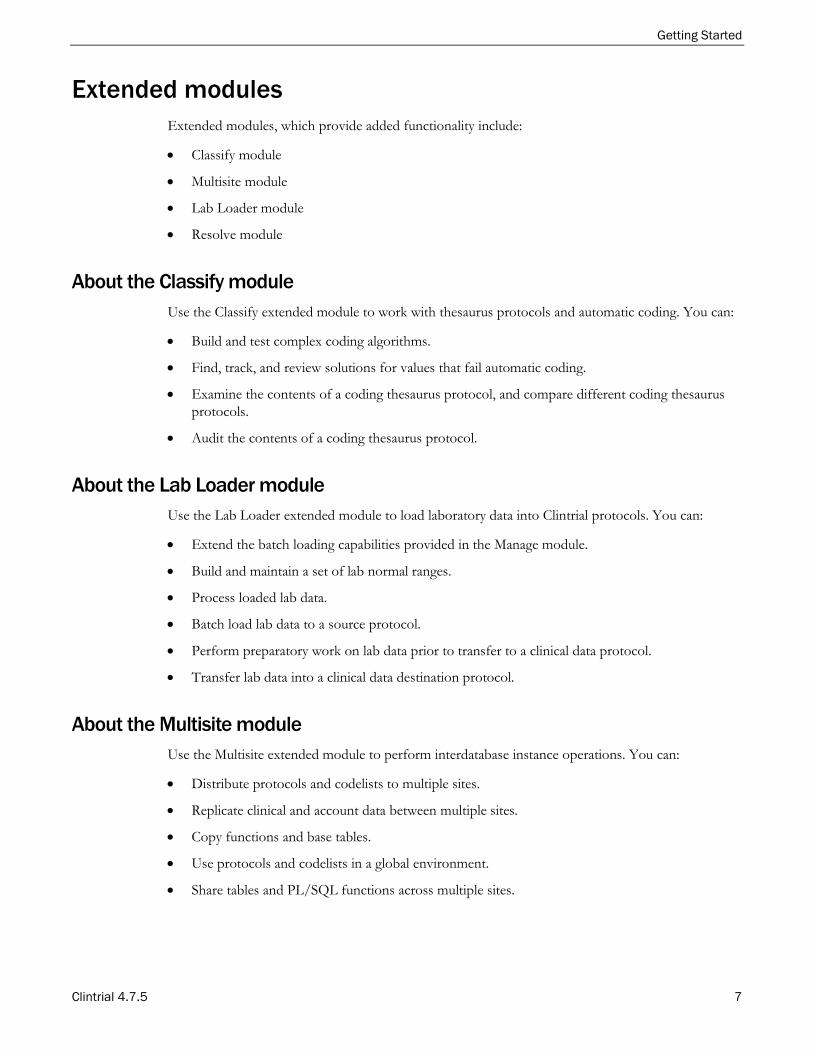
Extended modules Extended modules, which provide added functionality include:
• Classify module
• Multisite module
• Lab Loader module
• Resolve module
About the Classify module Use the Classify extended module to work with thesaurus protocols and automatic coding. You can:
• Build and test complex coding algorithms.
• Find, track, and review solutions for values that fail automatic coding.
• Examine the contents of a coding thesaurus protocol, and compare different coding thesaurus protocols.
• Audit the contents of a coding thesaurus protocol.
About the Lab Loader module Use the Lab Loader extended module to load laboratory data into Clintrial protocols. You can:
• Extend the batch loading capabilities provided in the Manage module.
• Build and maintain a set of lab normal ranges.
• Process loaded lab data.
• Batch load lab data to a source protocol.
• Perform preparatory work on lab data prior to transfer to a clinical data protocol.
• Transfer lab data into a clinical data destination protocol.
About the Multisite module Use the Multisite extended module to perform interdatabase instance operations. You can:
• Distribute protocols and codelists to multiple sites.
• Replicate clinical and account data between multiple sites.
• Copy functions and base tables.
• Use protocols and codelists in a global environment.
• Share tables and PL/SQL functions across multiple sites.
Chapter 1 The Clintrial software overview
8 Clintrial 4.7.5
About the Resolve module Use the Resolve extended module to manage discrepancy and resolution capabilities that support the work you perform in other Clintrial software modules. You can:
• Identify, track, and resolve potential or actual discrepancies in clinical data (inconsistent or missing data).
• Check for discrepancies automatically or by manual inspection.
• Record investigation and resolution information.
Enter is accessible through the Switchboard module or from the Windows Start menu, and is installed when the Clintrial client module is installed.
For more information, see the Clintrial on-line Help.
Getting Started
Clintrial 4.7.5 9
Clintrial 4.7 compatibility with other Oracle Health Sciences products
Clintrial is compatible with several other Oracle products, including:
• Clintrial Integration Solution (CIS).
• Central Coding.
Oracle maintains the following software compatibility matrixes:
• Product Compatibility Matrix—Identifies Clintrial compatibility with other Oracle Health Sciences products.
• Product Technology Compatibility Matrix—Identifies Clintrial compatibility with other Oracle and external software products.
Both matrixes can be downloaded from My Oracle Support in Article ID 180430.1: Oracle Health Sciences Applications Supported Technology Stack (https://support.oracle.com/epmos/faces/DocumentDisplay?id=180430.1).
Chapter 1 The Clintrial software overview
10 Clintrial 4.7.5
Clinical data management The Clintrial software provides the tools to store clinical data, ensure data accuracy and consistency, and access data for reports and analysis throughout the phases of clinical trials. You can:
• Model a clinical research study by creating database structures that are stored in an Oracle database account.
• Create data-entry windows, called study pages, which represent pages in paper CRFs.
• Group related study pages in study books that correspond to the CRF for the study.
• Enter, verify, and edit clinical data, or batch load and screen clinical data.
• Code clinical data using the Oracle Central Coding application or the Clintrial Classify extended module.
• Verify and validate clinical data.
• Identify, manage, and resolve discrepancies in the clinical data.
• Audit changes to clinical data and metadata, beginning at a specified point in the data management process.
• Retrieve clinical data for analysis and reports.
Key benefits The Clintrial software expedites the mandatory approval process for new products and shortens time-to-market by allowing you to do the following:
• Meet the extensive data management requirements of a clinical trial.
• Tailor your clinical data management system to meet your unique data management needs and conform to your SOPs.
• Build checks to ensure data quality.
• Standardize data definitions.
The Clintrial software helps you to conduct clinical trials in accordance with Good Clinical Practice (GCP) guidelines.
How the Clintrial software provides flexibility You can design your clinical database and organize clinical data to meet your data management needs and workflow. For example, you can:
• Define database objects that are specific to a clinical trial, or create a library of objects to standardize clinical trials.
• Refine and revise your data definitions.
• Establish standard objects, such as panels, to store demographic data that facilitate analysis of similar studies and data pooling.

Getting Started
Clintrial 4.7.5 11
How the Clintrial software provides security You can assign rights to users and to studies, to determine the level of access to clinical data definitions and clinical data in studies. For example, you can:
• Assign rights to a data-entry operator to allow that person to enter data in only one study.
• Deny the right to edit or delete data in a study.
• Audit changes to user access.
How the Clintrial software standardizes data You can standardize the data definitions for clinical data and the study pages that you use to collect data. You can make decisions about database design once, and then store the design to use as a prototype for other clinical trials.
For example, you can define database objects that are common to all of your clinical trials.
You can also standardize clinical data by:
• Requiring data-entry operators to select values from predefined codelists of valid codes for data.
• Translating terms into codes from standard coding dictionaries, using Oracle's Central Coding or Clintrial coding.
Examples of supported standard dictionaries include:
• Medical Dictionary for Regulatory Activities (MedDRA and MedDRAJ).
• Coding Symbols for a Thesaurus of Adverse Reaction Terminology (COSTART).
• World Health Organization Adverse Reaction Terminology (WHOART).
• World Health Organization Drug Dictionary (WHO-DD).
• World Health Organization Drug Dictionary C Format (WHO-DD C).
• Data File for Ethical Drugs (Coding Table) from Iyaku-Joho-Kenkyujo, Inc. (JDrug).
How the Clintrial software ensures data accuracy You can check data for accuracy, consistency, and logic by:
• Defining valid ranges for clinical data values (range checking).
• Checking data through double-entry (verification).
• Running site-defined checks for certain conditions on clinical data (validation).
• Manipulating data with data-entry processing procedures.
Chapter 1 The Clintrial software overview
12 Clintrial 4.7.5
How the Clintrial software audits data You can set up the Clintrial software to begin auditing changes to clinical data at various points in the data management cycle. For example, auditing can begin as soon as data is entered, or only after data has been merged.
How the Clintrial software helps review data You can retrieve clinical data from database tables with:
• Query By Form.
• Query By Panel.
• Ad Hoc Query.
• Query By SQL.
For example, you can create a Query By Form and save the query results in a Microsoft Excel spreadsheet for further analysis.
Getting Started
Clintrial 4.7.5 13
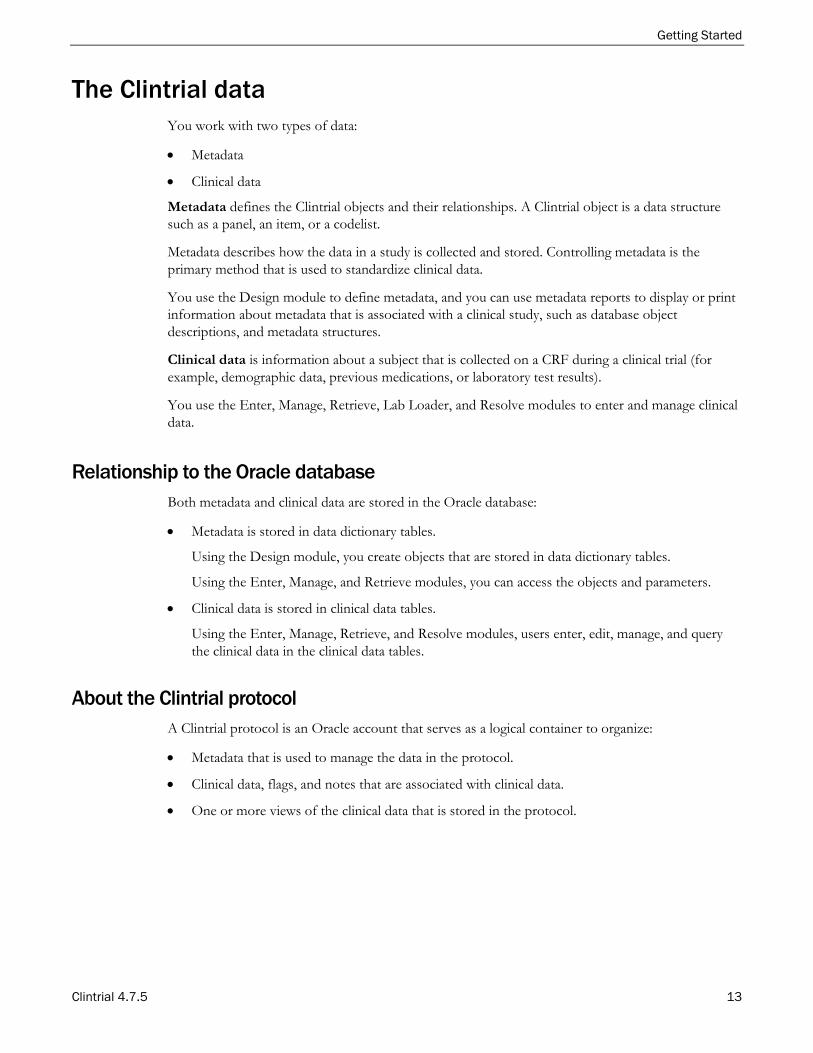
The Clintrial data You work with two types of data:
• Metadata
• Clinical data
Metadata defines the Clintrial objects and their relationships. A Clintrial object is a data structure such as a panel, an item, or a codelist.
Metadata describes how the data in a study is collected and stored. Controlling metadata is the primary method that is used to standardize clinical data.
You use the Design module to define metadata, and you can use metadata reports to display or print information about metadata that is associated with a clinical study, such as database object descriptions, and metadata structures.
Clinical data is information about a subject that is collected on a CRF during a clinical trial (for example, demographic data, previous medications, or laboratory test results).
You use the Enter, Manage, Retrieve, Lab Loader, and Resolve modules to enter and manage clinical data.
Relationship to the Oracle database Both metadata and clinical data are stored in the Oracle database:
• Metadata is stored in data dictionary tables.
Using the Design module, you create objects that are stored in data dictionary tables.
Using the Enter, Manage, and Retrieve modules, you can access the objects and parameters.
• Clinical data is stored in clinical data tables.
Using the Enter, Manage, Retrieve, and Resolve modules, users enter, edit, manage, and query the clinical data in the clinical data tables.
About the Clintrial protocol A Clintrial protocol is an Oracle account that serves as a logical container to organize:
• Metadata that is used to manage the data in the protocol.
• Clinical data, flags, and notes that are associated with clinical data.
• One or more views of the clinical data that is stored in the protocol.
Chapter 1 The Clintrial software overview
14 Clintrial 4.7.5
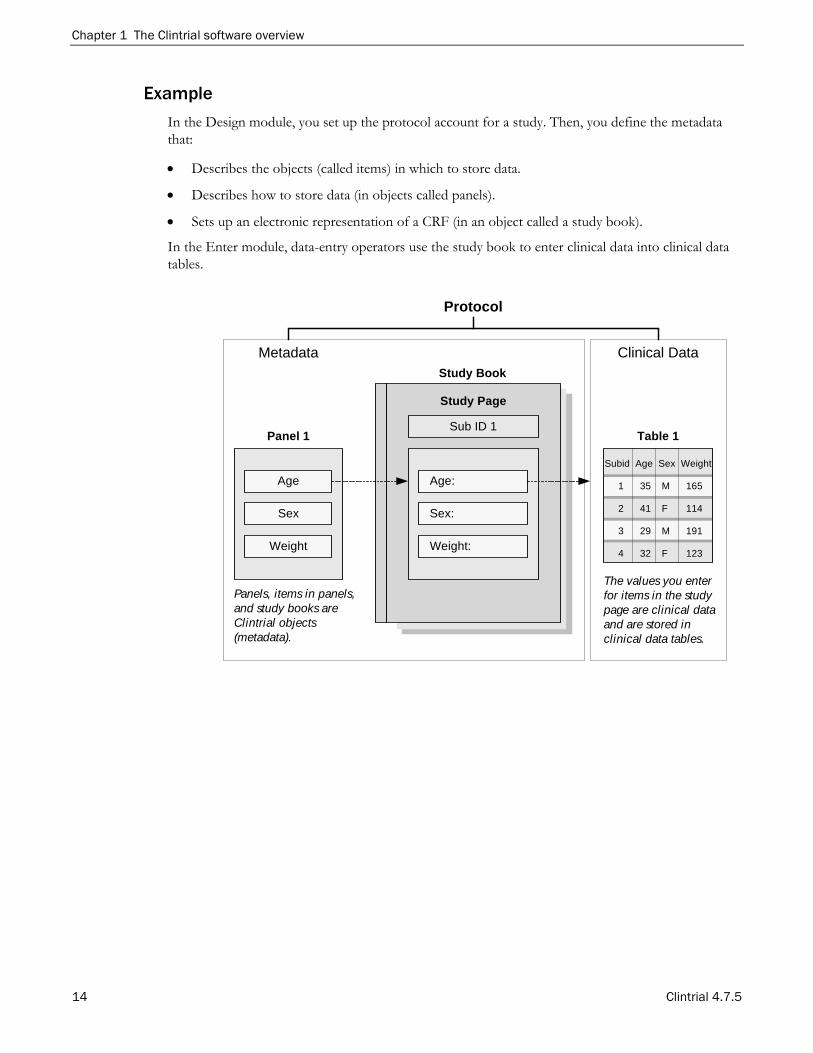
Example In the Design module, you set up the protocol account for a study. Then, you define the metadata that:
• Describes the objects (called items) in which to store data.
• Describes how to store data (in objects called panels).
• Sets up an electronic representation of a CRF (in an object called a study book).
In the Enter module, data-entry operators use the study book to enter clinical data into clinical data tables.
Study Page
Sub ID 1
Age
Sex
Weight
Panels, items in panels,and study books areClintrial objects(metadata).
The values you enterfor items in the studypage are clinical dataand are stored inclinical data tables.
Age:
Sex:
Weight:
Study Book
Panel 1 Table 1
Protocol
Clinical DataMetadata
Subid Age Sex Weight
1 35 M 165
2 41 F 114
3 29 M 191
4 32 F 123
Getting Started
Clintrial 4.7.5 15
How the Clintrial software stores clinical data In the Design module, you create items and panels to tell the Clintrial software how to store clinical data in Oracle database tables.
About items An item is a Clintrial object that stores a piece of data, such as the data collected in a single field on a study page, or a single field in a batch-loaded file. For example, a study page for concomitant medications might contain the following items:
• DRUG—The name of a concomitant medication.
• DOSE—The dosage for the concomitant medication.
You define items within panels, and each item corresponds to one column in a clinical data table. For example, the DRUG item would be stored in one column in the clinical data table for the MEDS panel.
About panels A panel is a collection of logically or clinically related items.
For example, the items DRUG and DOSE might be grouped together in a MEDS panel.
Types of clinical data tables When you install a panel, the following clinical data tables are created:
• Update table—When data is first entered, it is stored in the update table until it is validated.
Users can verify, screen, edit, code, and validate data in the update table.
• Data table—After data is validated in the update table, it can be merged (moved) to the data table.
Users can edit, code, and validate data in the data table.
• Audit table—While auditing is in effect, each time data is changed or deleted, a copy of the data before it was modified or deleted is stored in the audit table.
Data in the audit table cannot be changed.
Note: Data for a record can be stored in the update table or the data table, but not in both.
Chapter 1 The Clintrial software overview
16 Clintrial 4.7.5
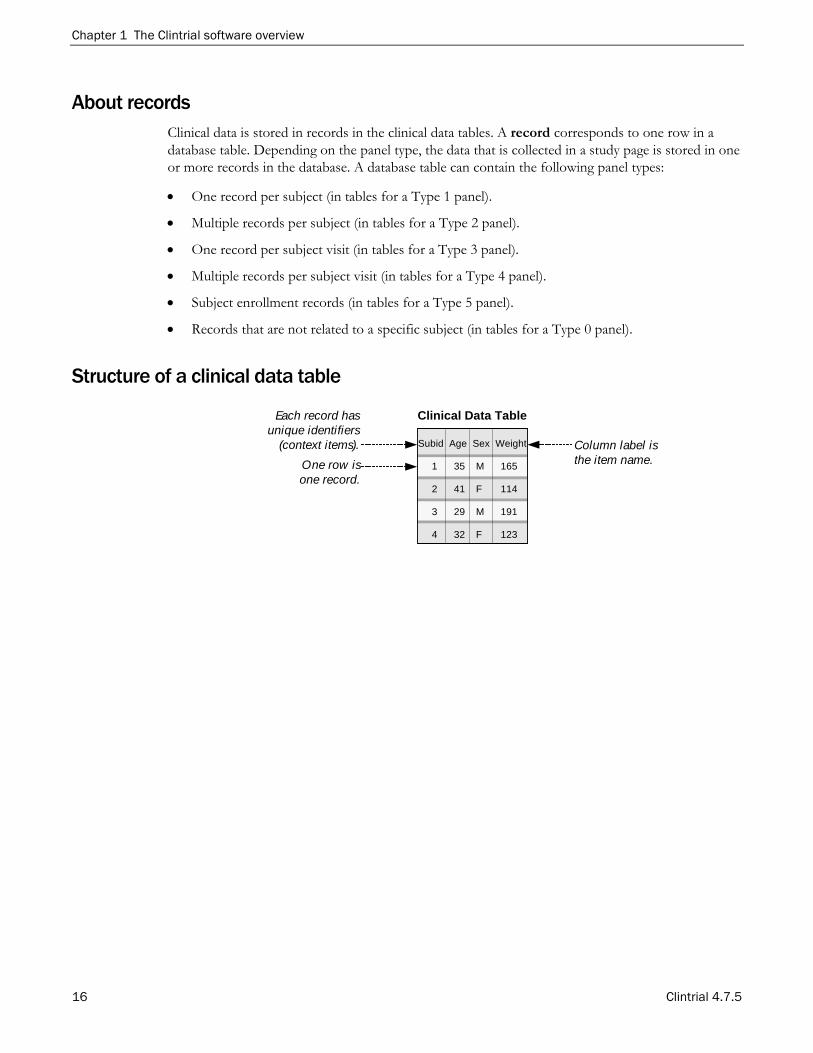
About records Clinical data is stored in records in the clinical data tables. A record corresponds to one row in a database table. Depending on the panel type, the data that is collected in a study page is stored in one or more records in the database. A database table can contain the following panel types:
• One record per subject (in tables for a Type 1 panel).
• Multiple records per subject (in tables for a Type 2 panel).
• One record per subject visit (in tables for a Type 3 panel).
• Multiple records per subject visit (in tables for a Type 4 panel).
• Subject enrollment records (in tables for a Type 5 panel).
• Records that are not related to a specific subject (in tables for a Type 0 panel).
Structure of a clinical data table
Clinical Data Table
Subid Age Sex Weight
1 35 M 165
2 41 F 114
3 29 M 191
4 32 F 123
Column label isthe item name.
Each record hasunique identifiers
(context items).One row isone record.

Getting Started
Clintrial 4.7.5 17
Data flow within the Clintrial software
If auditing is set
Data Table
Subid Age Sex Weight
1 35 M 165
2 41 F 114
3 29 M 191
4 32 F 123
Update Table
Subid Age Sex Weight
1 35 M 165
2 41 F 114
3 29 M 191
4 32 F 123
Audit Table
Subid Age Sex Weight
1 35 M 165
2 41 F 114
3 29 M 191
4 32 F 123
MergeData
Enter / LoadData
EditCode
ValidateAudit
EditScreenVerifyCode
ValidateAudit Data
Chapter 1 The Clintrial software overview
18 Clintrial 4.7.5
Types of users Clintrial users are categorized according to:
• Their roles in clinical data research and clinical data management.
• The types of tasks they perform.
The Clintrial documentation refers to the following types of users. You might use different job titles, or assign tasks and roles in a different way. For example, one person can perform both data manager and designer tasks.
• The Clintrial administrator
• Maintains user accounts and manages security for all of the Clintrial modules.
• Sets system-wide parameters and default user parameters.
• Manages the Clintrial database instance.
• Designer
• Designs the Clintrial studies.
• Programmer
• Uses PL/SQL to build rules, derivations, and data-entry processing procedures.
• Data-entry operator
• Enters data from paper CRFs into the Clintrial study books.
• Verifies data.
• Edits unmerged data in the update table.
• Data manager
• Batch loads clinical data.
• Manages the clinical data.
• Validates and merges records.
• Makes global modifications.
• Codes data.
• Retrieves clinical data from the database and produces reports.
• Medical reviewer
• Uses query tools to retrieve data from the database for record review or statistical analysis.
Getting Started
Clintrial 4.7.5 19
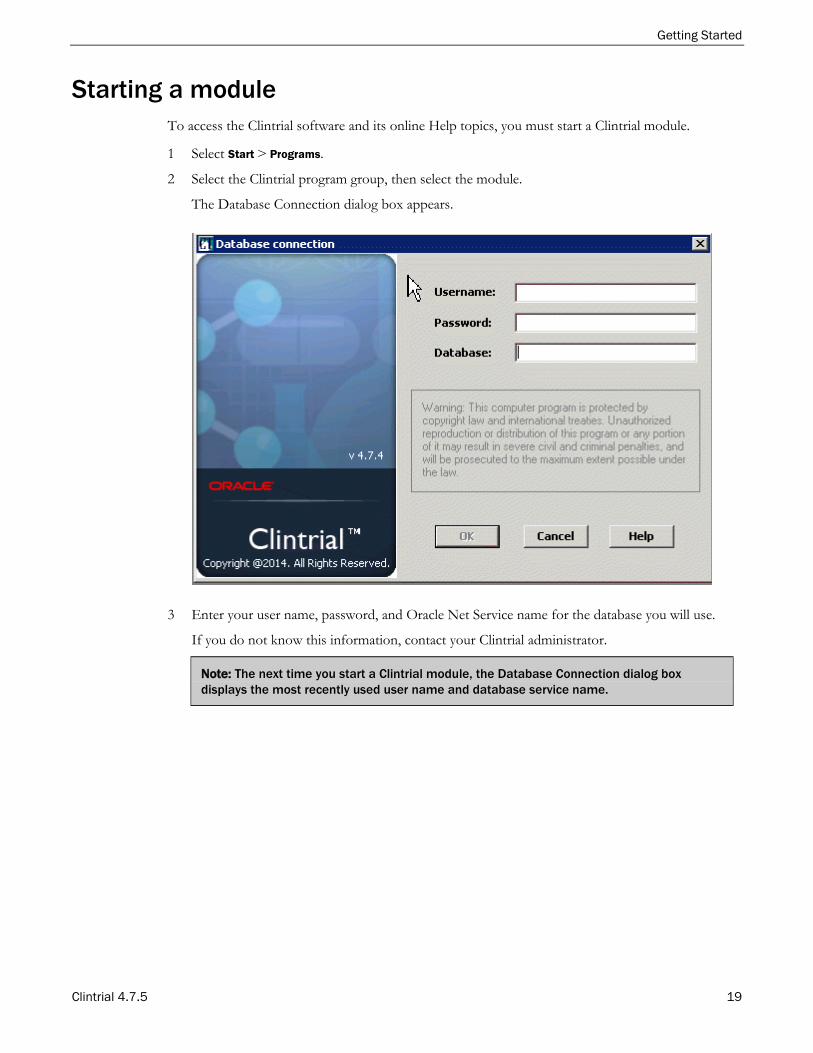
Starting a module To access the Clintrial software and its online Help topics, you must start a Clintrial module.
1 Select Start > Programs.
2 Select the Clintrial program group, then select the module.
The Database Connection dialog box appears.
3 Enter your user name, password, and Oracle Net Service name for the database you will use.
If you do not know this information, contact your Clintrial administrator.
Note: The next time you start a Clintrial module, the Database Connection dialog box displays the most recently used user name and database service name.
Chapter 1 The Clintrial software overview
20 Clintrial 4.7.5
The Clintrial module basic tasks The basic tasks for using the Clintrial modules include:
• Using Switchboard.
• Setting the protocol.
• Switching databases.
• Changing your password.
• Exiting the module.
Using Switchboard Using Switchboard, you can start any of the installed Clintrial modules from the Run menu.
• When you start Switchboard, provide a user name, password, and database service name.
• Each time you start a different Clintrial module from Switchboard, the Clintrial software uses the database connection information that you provided when you started Switchboard.
For more information, see the Clintrial Basics online Help.
Note: Menu commands in the modules are available only if you have the appropriate access rights.
Setting a protocol A Clintrial protocol is a logical container that organizes the objects and clinical data for a clinical study.
• When you first connect to the database, the Set Protocol dialog box appears.
• Select the protocol in which to work.
If you do not know the protocol to use, see your Clintrial administrator.
• The next time you start the protocol is selected automatically.
Switching databases 1 Close all open windows.
2 Select File > Connect.
For more information, see the Clintrial Basics online Help.
Getting Started
Clintrial 4.7.5 21
Re-ordering columns in list windows For windows that display list grid views, such as list of logs in Manage or list of Discrepancies in Resolve, you may use the mouse to drag columns to new positions to tailor the view to your needs. For example, you can change the column order in a Discrepancy window by dragging and dropping the most significant columns to the left portion of the open window.
Changing your password To change your password, select File > Password.
For more information, see the Clintrial Basics online Help.
Accessing the Server Registry Information You can access the Server Registry Information report from any Clintrial module. This report lists the version, patch level and build ID for the Clintrial core server and each module installed in the application.
1 Select Help > About.
2 Click More.
The Server Registry Information dialog box appears.
Exiting a module To exit a module, select File > Exit.
The main window of the module closes and the Clintrial software disconnects you from the database.
For more information, see the Clintrial Basics online Help.
Chapter 1 The Clintrial software overview
22 Clintrial 4.7.5
About Help Each Clintrial module includes Help, which contains:
• Context-sensitive help for windows and dialog boxes.
• Procedural instructions for tasks.
• Brief overviews of concepts.
• Descriptions of menus and options.
• A glossary of Clintrial terms.
Note: A Clintrial Help file is installed automatically for each module.
Searching for information 1 Select Help > Help Topics.
The Help Topics dialog box appears.
2 To find a topic in the Help, do one of the following:
• To view topics by category, select the Contents tab.
• To view a list of index entries, select the Index tab.
• To search for specific words in the Help, select the Find tab.
Getting help on windows and dialog boxes To get help on an open window or dialog box, do one of the following:
• Press F1.
• On the toolbar, click .
• Click Help.

Clintrial 4.7.5 23
In this chapter System requirements ............................................................................................................................. 24
Using the Oracle database with the Clintrial Core Server software .............................................. 25
C H A P T E R 2 Preparing to install or upgrade the server to this release

Chapter 2 Preparing to install or upgrade the server to this release
24 Clintrial 4.7.5
System requirements See the Clintrial 4.7.5 Release Notes for:
• Clintrial database server hardware and software requirements.
• Clintrial client hardware and software requirements.

Getting Started
Clintrial 4.7.5 25
Using the Oracle database with the Clintrial Core Server software
When installing or upgrading to Clintrial 4.7.5, you may choose to use either a Unicode or non-Unicode database for Oracle 11.2.0.4 or 12.1.0.2. If you plan to use non-English languages or multiple languages, a Unicode database is appropriate.
The Oracle database The new Oracle database must be created with the following requirements before you install the Clintrial software:
• The compatible parameter must be equal to or begin with 11.2.0 or 12.1.0.
• There must be at least one temporary tablespace in the database that holds temporary contents.
• If you are a global company and want to use a Unicode database, you must set the character set to Unicode (AL32UTF8) and set the nls_length_semantics to CHAR in the Oracle database's All Initialization Parameters.
Note: An example of the effect this setting has on data in a Clintrial Unicode protocol is the setting of varchar2(2000) (4000 bytes) for an item (usually a text item) in panel using the Design module. In a language using Western characters (like English or French), where each character takes no more than 2 bytes, this sets the limit at 2000 characters. In Japanese, a character requires 3 bytes or more, so the limit could be as few as 1333 characters (4000 bytes divided by 3).
If an existing Oracle database does not meet the above requirements, you must delete the Oracle database instance and recreate it.
Note: For a list of features that are specific to Oracle 11g or 12c, see the Oracle database New Features documentation.
You must also set other database initialization parameters to run the Clintrial software. You can include these parameters in your database creation, upgrade, or adjustment, or you can wait and change the parameters just before you install or upgrade to the current Clintrial software. For more information, see Required database instance parameters (on page 33).
Note: Choose a method of creating the database that allows you to manipulate the database parameters. Pre-configured databases might not allow you to do this.
For the recommended space and other parameter settings, see your system administrator.
Chapter 2 Preparing to install or upgrade the server to this release
26 Clintrial 4.7.5
Recommendations for creating and upgrading the Oracle database Review this section if you are creating a new Oracle database or upgrading an existing Clintrial database to the Oracle 11.2.0.4 or 12.1.0.2 software.
Note: If you are upgrading from a previous Oracle version to an Oracle 12c database, follow the instructions provided in the Oracle Database Upgrade Guide (http://docs.oracle.com/database/121/UPGRD/preup.htm#UPGRD12358).
Oracle recommends reviewing your Oracle database documentation before you perform a new installation or an upgrade. Oracle also recommends that you test the Clintrial software and the Oracle database software before you upgrade or install the software in a production environment.
Note: Clintrial 4.7 and later does not support Oracle transparent data encryption.
Upgrading an existing Clintrial database Oracle recommends that you upgrade the entire database rather than creating a new instance of the database and using export/import. If you are upgrading from a previous Oracle version to an Oracle 12c database, follow the instructions provided in the Oracle Database Upgrade Guide (http://docs.oracle.com/database/121/UPGRD/preup.htm#UPGRD12358).
If you decide to use Unicode databases, after upgrading your existing databases, you should create new Unicode databases and export/import your upgraded databases using Oracle Data Pumps to the new Unicode databases.
If you decide not to use Unicode databases, when using Multisite Distribution, if you export databases from and then import them to a different Oracle release, you must manually recreate all Multisite database links after you upgrade to the Clintrial 4.7.5 software.
Whether or not you use Unicode, if your Clintrial upgrade includes Multisite Replication, you must reschedule the time and the date for replication for all sites. If you do not, the status will not be updated. For details, see the document entitled Multisite, Chapter 5: Replication, the section entitled "Scheduling replication".
After your upgrade to Oracle 11.2.0.4 or 12.1.0.2 (Unicode or non-Unicode), invalid packages, functions, and synonyms can be listed in all_object (select owner, object_name, object_type from all_objects where status ='INVALID')
Most of the invalid objects will become valid after running the below SQL*Plus commands.
Getting Started
Clintrial 4.7.5 27
To upgrade an existing database to Oracle 11.2.0.4 or Oracle 12.1.0.2, do the following:
1 Run the following SQL*Plus commands:
a C:\>SET ORACLE_SID=db_ct47
b C:\> sqlplus /NOLOG
c SQL> CONNECT SYS AS SYSDBA
d Enter password: SYS_password
e SQL> SHUTDOWN IMMEDIATE
f SQL> STARTUP UPGRADE
g SQL> @ORACLE_BASE\ORACLE_HOME\rdbms\admin\catupgrd.sql
2 Check the log files for errors.
3 If necessary, rerun the catupgrd.sql script after correcting any errors.
4 Restart the database:
a SQL> SHUTDOWN IMMEDIATE
b SQL> STARTUP
5 Run the utlrp.sql script to recompile all invalid PL/SQL packages now instead of when the packages are accessed for the first time.
SQL> @ORACLE_BASE\ORACLE_HOME\rdbms\admin\utlrp.sql The Oracle 9.2 software and subsequent releases support locally managed tablespaces. If you are upgrading from a previous version of the Oracle software, you can take advantage of this feature by migrating your existing tablespaces.
Several database requirements must be set prior to installing the Clintrial software. For more information, see The Oracle database (on page 25) above.
Exporting and importing an entire database This is the only option to migrate the old Oracle 9.2 or 10.2 database to a Unicode database. You cannot change the Oracle database character set after the database has been created.
Before exporting the database
Before exporting the database, do the following:
1 Back up the original database.
2 Update the Oracle version to 11.2.0.4 or 12.1.0.2.
3 If you are converting the database to UNICODE, check the existing database to determine whether it uses BYTE or CHAR. For more information, see the Oracle Database documentation.
If the database is already CHAR, skip to Step 8.
4 If the database is using BYTE, change the NLS_LENGTH_SEMANTICS parameter from BYTE to CHAR.
5 Restart the database and make sure the NLS_LENGTH_SEMANTICS is CHAR.
6 Run the ChangeByteToChar.sql file against the database. Modify the file if necessary. For more information, see ChangeByteToChar.sql (on page 28).

Chapter 2 Preparing to install or upgrade the server to this release
28 Clintrial 4.7.5
7 For Clintrial 4.5 database, login as SYS and execute the following: CREATE OR REPLACE DIRECTORY export_dump_dir AS 'D:\oradump\'; GRANT READ, WRITE ON DIRECTORY export_dump_dir TO sys;
Note: Actual commands could be different in Unix and Windows. Please reference Oracle database documentation for specific commands.
8 If you are upgrading a Multisite environment, ensure:
• There are no partially imported protocols.
• There are no partially imported codelists.
• There are no panels marked for revision.
• There are no distributed objects open for revision.
• All replicated accounts are halted.
ChangeByteToChar.sql Below are the contents of the ChangeByteToChar.sql. Modify the file as necessary.
set feedback off set verify off set serveroutput on set termout on exec dbms_output.put_line('Start generating columns to be altered'); --drop table sys.columns_to_char; --/ create table sys.columns_to_char(s_owner varchar2(40), s_table_name varchar2(40), s_column_name varchar2(40), s_data_type varchar2(40), s_char_length number, s_updated varchar2(1 char)); / insert into sys.columns_to_char select C.owner, C.table_name, C.column_name, C.data_type, C.char_length, 'N' from all_tab_columns C, all_tables T where C.owner = T.owner and C.table_name = T.table_name and C.data_type in ('VARCHAR2', 'CHAR') and C.char_used = 'B' and T.TABLESPACE_NAME is not null and T.STATUS = 'VALID' and T.DROPPED = 'NO' and T.owner not in ('DBSNMP','MGMT_VIEW','SYSMAN','TRACESVR','AURORA$ORB$UNAUTHENTICATED', 'AURORA$JIS$UTILITY$','OSE$HTTP$ADMIN','MDSYS','MDDATA','ORDSYS','OUTLN', 'ORDPLUGINS','SI_INFORMTN_SCHEMA','CTXSYS','WKSYS','WKUSER','WK_TEST', 'REPADMIN','LBACSYS','DVF','DVSYS','ODM','ODM_MTR','DMSYS','OLAPSYS', 'WMSYS','ANONYMOUS','XDB','EXFSYS','DIP','TSMSYS','SYSTEM','SYS'); / commit; / declare cursor c1 is select rowid,s.* from sys.columns_to_char s where s_updated='N'; v_statement varchar2(255); v_nc number(10); v_nt number(10); begin execute immediate
Getting Started
Clintrial 4.7.5 29
'select count(*) from sys.columns_to_char where s_updated=''N''' into v_nc; execute immediate 'select count(distinct s_table_name) from sys.columns_to_char where s_updated=''N''' into v_nt; dbms_output.put_line ('ALTERing ' || v_nc || ' columns in ' || v_nt || ' tables'); for r1 in c1 loop v_statement := 'ALTER TABLE "' || r1.s_owner || '"."' || r1.s_table_name; v_statement := v_statement || '" modify ("' || r1.s_column_name || '" '; v_statement := v_statement || r1.s_data_type || '(' || r1.s_char_length; v_statement := v_statement || ' CHAR))'; -- dbms_output.put_line(v_statement); execute immediate v_statement; update sys.columns_to_char set s_updated = 'Y' where rowid=r1.rowid; Commit; end loop; dbms_output.put_line('Done'); end; /
Export steps
1 Open a DOS window and go to the folder where you want to store the exported dump file. (e.g. D:\oradump)
2 From the command line, type and execute the following: expdp 'sys/password@dbct45 as sysdba' full=Y directory=export_dump_dir dumpfile=ct45.dmp logfile=expdpct45.log
3 Check the log file for errors. If there are errors, correct them and rerun the export command until it runs without errors.
Before importing the database
Before you import the database, do the following:
• Follow the Oracle database documentation to create a new Unicode database (if applicable).
• If there is a Multisite environment, make sure that the database instance names remain the same in the new database.
• Create the Clintrial tablespaces by running CTTSPACE.SQL.
• Make sure all the data files are auto-extended and have enough space.
Import steps
To import the newly exported database:
1 Open a DOS window and navigate to the folder that contains the exported dump file.
2 If a folder does not already exist, use the following command to create one: CREATE OR REPLACE DIRECTORY export_dump_dir AS 'D:\oradump\'; GRANT READ, WRITE ON DIRECTORY export_dump_dir TO sys;
3 From the command line, type and execute the following:
impdp 'sys/password@dbct45 as sysdba' full=Y directory=export_dump_dir dumpfile=ct45.dmp logfile=impdpct45.log
4 Check the log file. Ignore all the “object already exists” errors.
Chapter 2 Preparing to install or upgrade the server to this release
30 Clintrial 4.7.5
After importing the database
1 Recompile all invalid objects.
For example: C:\> sqlplus /NOLOG SQL> CONNECT SYS AS SYSDBA Enter password: SYS_password SQL> @ORACLE_BASE\ORACLE_HOME\rdbms\admin\utlrp.sql
Note: For more detailed information and step by step instructions, see the Oracle database documentation.
2 After the import has finished, check the upgraded database to ensure the upgrade was successful.
If necessary, restore the backup, correct the errors and repeat all the steps.
3 Run the server Clintrial Installation Wizard and select the Upgrade option to upgrade the database to the current Clintrial release.
Installing a new Clintrial database If you are installing the Clintrial software and the Oracle database software for the first time (that is, not upgrading from a previous release), Oracle recommends that you do the following:
1 Install the Oracle database software.
2 Use the Oracle Database Configuration Assistant to create the database.
Note: Oracle recommends that you do not use a pre-configured or starter database because it does not allow you to set the required database parameters prior to database creation. Some of the required parameter settings (such as including the compatible parameter set) are difficult to reset after you have created the database.
The following information assumes that you are using the Oracle Database Configuration Assistant to create the Oracle database. The information is presented in the order in which the tool prompts for it.
You must install the Oracle server software before you install the Clintrial server software.
Note: The database character set value and the initialization parameters indicated here are of particular importance. Additional parameter settings that are required by the Clintrial software can be set during the Oracle installation or after the database is created. For the complete list of database instance parameters that you can set after the Oracle software installation or upgrade, see Required database instance parameters.

Getting Started
Clintrial 4.7.5 31
Use the following information to help guide the initial installation or upgrade of the Oracle database software:
• Create a Custom Database, not a Data Warehouse, General Purpose or Transaction Processing database.
• Ensure that all default Standard Database Components are selected.
• If you are going to create a Unicode database, the Database Character Set should be the AL32UTF8 Unicode character set. If you are not going to use Unicode, the National Character set can be set as desired.
This is set in the Character Set tab.
• Set the following parameters with the values given, so that they are set at database creation.
Use the All Initialization Parameters button to set 'compatible' = 11.2.0 or 12.1.0.
Chapter 2 Preparing to install or upgrade the server to this release
32 Clintrial 4.7.5
Database storage parameters
The following storage parameters may not be set by the Configuration Manager in the Oracle 11g or 12c software, but should be configured prior to installing the Clintrial software:
• The USER tablespace can be removed because it is not used by the Clintrial software.
• The SYSTEM tablespace must be PERMANENT and online.
• Set its storage parameter as follows:
Enable Logging: Yes
All other settings can be adjusted for your environment.
• The TEMP tablespace must be of Type TEMPORARY, and the Set as Default Tablespace must not be checked.
• If you are using MANUAL undo management, create a tablespace for the Rollback Segments (for example, RBS).
This tablespace must be PERMANENT and Online.
• Set its storage parameter as follows:
Enable Logging: Yes
Retrieving the Oracle database instance name
Note: Oracle recommends that the Global Name, the Clintrial Site Name, and the Site Service Name be identical to the database instance name.
You can view the database instance name, which is set during the creation of the database, by using the following command in SQL*Plus:
SQL>SHOW parameter db_name
Getting Started
Clintrial 4.7.5 33
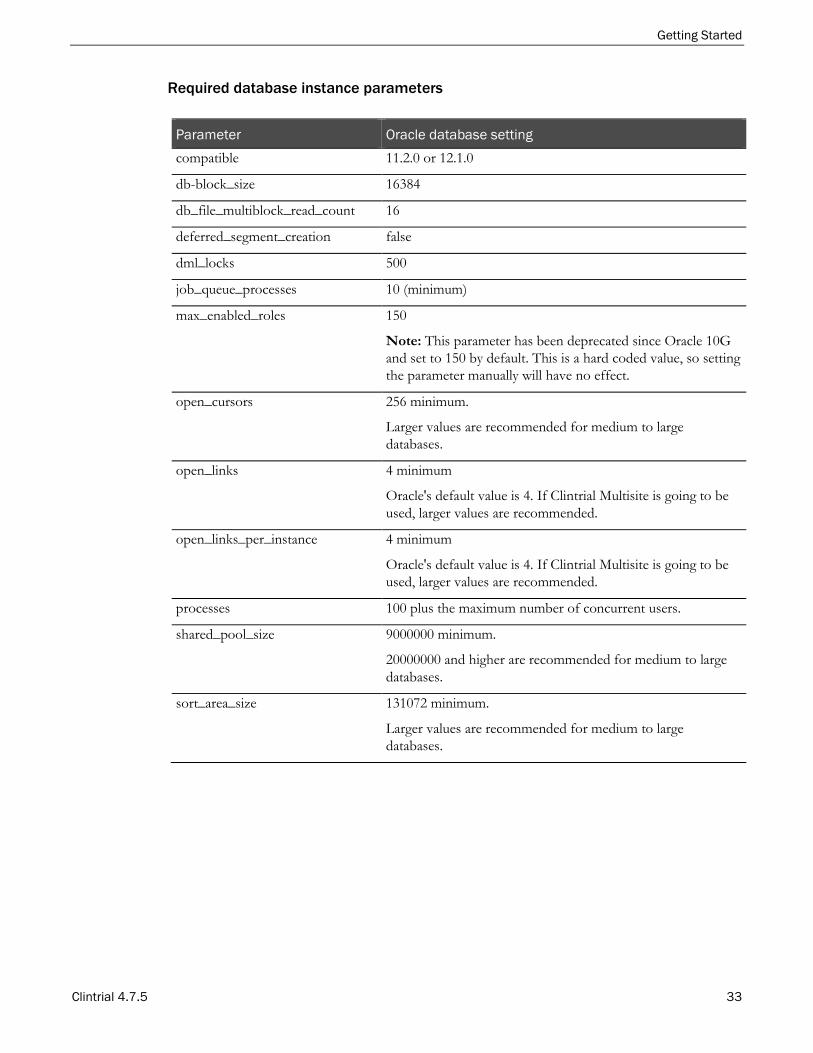
Required database instance parameters
Parameter Oracle database setting compatible 11.2.0 or 12.1.0
db-block_size 16384
db_file_multiblock_read_count 16
deferred_segment_creation false
dml_locks 500
job_queue_processes 10 (minimum)
max_enabled_roles 150
Note: This parameter has been deprecated since Oracle 10G and set to 150 by default. This is a hard coded value, so setting the parameter manually will have no effect.
open_cursors 256 minimum.
Larger values are recommended for medium to large databases.
open_links 4 minimum
Oracle's default value is 4. If Clintrial Multisite is going to be used, larger values are recommended.
open_links_per_instance 4 minimum
Oracle's default value is 4. If Clintrial Multisite is going to be used, larger values are recommended.
processes 100 plus the maximum number of concurrent users.
shared_pool_size 9000000 minimum.
20000000 and higher are recommended for medium to large databases.
sort_area_size 131072 minimum.
Larger values are recommended for medium to large databases.

Chapter 2 Preparing to install or upgrade the server to this release
34 Clintrial 4.7.5
Restarting the database instance
In the following procedures:
• <password> is the password for the SYS user.
• <instance> is the name of the instance (or service name) you connect to.
• On UNIX-based systems, enter the following commands:
% sqlplus /nolog
SQL> connect sys/<password>@<instance> as sysdba
SQL> startup
SQL> exit
Alternatively, on Windows 2008 and Windows 2012 systems, use the Services dialog box to restart the Oracle database service.
For more information, see the Oracle database documentation.
Preparing the Oracle database server to use the Export/Import utilities with the Clintrial software
To make sure that the Clintrial software can access the Dump Directory and the Log Directory on a UNIX or Linux Oracle database server, create a Windows share on the Linux or UNIX machine.
To do this, you can either set up NFS, or use a utility such as Samba on Linux. Oracle recommends using a utility such as Samba.
Neither Linux nor UNIX can connect to UNC paths. Therefore, you must create a symbolic link from the absolute path to a new path that matches the UNC path.
On a Linux server use Samba to do the following:
1 Create a Samba share.
2 Add users to the Samba share.
3 Create a symbolic link to the shared directory.
For example, if the UNC path is \\linuxdb\ct_dir_dump, enter:
ln -s <full_pathname_to_directory_in_linux> /linuxdb/ct_dir_dump
(where linuxdb is the machine name and ct_dir_dump is the symbolic link to the shared directory)
When you run the script ctdirect.sql during installation or upgrade to set up the directories, you must specify forward slashes in the directory name.
If you attempt to write a log file to a directory to which you do not have WRITE privileges, you receive an error message.
Note: Regardless of the server operating system, allow READ and WRITE access to the physical folder designated as the DATA PUMP directory to every Clintrial user required to do import and export. The directory should be accessible from the Oracle server and from Client PCs. This is mandated by Oracle.

Getting Started
Clintrial 4.7.5 35
Multisite naming conventions
The Oracle Net Services Names
If you are using Multisite Distribution, or Multisite Distribution and Multisite Replication, the Oracle Net Services Names and the Global Database Names must adhere to the following conventions:
• Unique–Must be unique across all database instances in a Multisite environment.
• Consistent–Used to access database instances running the Multisite module must be consistent across all database instances in a Multisite environment.
• Fully qualified–Must be fully qualified.
A fully qualified Oracle Net Services Name would be in this format: <database_name>.<company_name>.com. For more information, see the Oracle Master Glossary.
• Length–Maximum of 60 characters.
Multisite naming conventions
Note: Oracle recommends that the Global Name, the Clintrial Site Name, and the Site Service Name be identical to the database instance name.
The database instance name, which is set when the database is created, can be viewed by using the following command in SQL*Plus:
SQL>SHOW parameter db_name
The Global Name (Global Name in the Multisite Site browser) is automatically defined during the Clintrial core server installation, and is derived from the instance global name. The instance global name may be viewed by using the following command in SQL*Plus:
SQL>SELECT global_name FROM sys.global_name;
The Clintrial Site Name (Site in the Multisite Site browser) is defined during the Clintrial Core Server installation and captured in the CTINST.log file. It may be viewed by using the following command in SQL*Plus:
SQL>SELECT name FROM cts.database WHERE TYPE = 1
The Clintrial Site Service Name (Service Name in the Multisite Site browser) is defined during the Clintrial Multisite Distribution installation, and is captured in CTCINST.LOG. It may be viewed by using the following command in SQL*Plus:
SQL>SELECT SQLNET FROM cts.database WHERE TYPE = 1

Clintrial 4.7.5 37
In this chapter Overview of the Clintrial Server installation .................................................................................... 38
Preparing for the installation ............................................................................................................... 39
Installing the Clintrial Core Server and additional modules .......................................................... 44
Post-installation actions ....................................................................................................................... 54
C H A P T E R 3 Performing a new installation of the Clintrial Server software
Chapter 3 Performing a new installation of the Clintrial Server software
38 Clintrial 4.7.5
Overview of the Clintrial Server installation 1 Create a Clintrial main installation directory (on page 40).
2 Create shared directories for use of the Oracle Data Pump Export and Import utilities (on page 40).
3 Create tablespace data files with the cttspace.sql script (on page 40).
4 Shut down the Oracle database (on page 42).
5 Restart the Oracle database (on page 42)
6 Run the Clintrial software installation wizard (on page 44).
7 Verify your complete Server installation (on page 53).
8 Run the import/export directory creation script (on page 96).
9 Set up protocols for added functionality (on page 98).
Note: All scripts record the time stamps for the start and end of an activity. When you review a log file, verify that both of these time stamps exist.
Getting Started
Clintrial 4.7.5 39
Preparing for the installation 1 Backup your Oracle database.
2 Upgrade your Oracle database to Oracle 11.2.0.4 or 12.1.
3 If desired, create a new Oracle database using Unicode.
4 Set file permissions so that the cttspace.sql script is writeable. (on page 40)
5 Shut down the Oracle database instance. (on page 42)
6 Set the database instance parameters (on page 33).
7 Restart the Oracle database instance. (on page 34)
8 Retrieve the Oracle database instance name. (on page 32)
Before installing the server software Before beginning the installation, check the Oracle Software Delivery Cloud (https://edelivery.oracle.com) or My Oracle Support (http://support.oracle.com) for the latest service packs and hot fixes, the Release Notes document, and the latest versions of the documentation.
If you are installing on UNIX or Linux platforms and you have more than one database instance on a server, make sure that the default SID is the database instance for the Clintrial software.
On supported versions of Windows, back up your Oracle database before proceeding with the Clintrial installation. For more information, see the Oracle database documentation
Running a script from a Windows directory When using SQL*Plus on a Windows server, you need an alias in the current directory, with the shortcut property Start in either blank or with the full path. You must do one of the following:
• Change to the installation directory in DOS, and then run SQL*Plus from DOS.
• Create and configure a shortcut for SQL *Plus in the installation directory.
To configure and use a SQL*Plus shortcut:
1 Create the SQL*Plus shortcut.
2 Right-click the SQL*Plus shortcut icon.
3 From the pop-up menu, select Properties.
4 The SQL*Plus Properties dialog box appears.
5 Select the Shortcut tab.
6 Clear the Start in field, and then click OK.
7 Copy the SQL*Plus shortcut to each installation directory. Then, when you run the upgrade script for a module, open SQL*Plus using the shortcut in the installation directory for that module.
Chapter 3 Performing a new installation of the Clintrial Server software
40 Clintrial 4.7.5
Create a Clintrial main installation directory To create the main installation directory \ct4server\ct47:
• On a Windows server, use Windows Explorer to add the ct4server\ct47 folders to the $ORACLE_HOME directory.
• On UNIX or Linux systems, enter the following commands:
% cd $ORACLE_HOME
% mkdir -p ct4server/ct47
Create shared directories for use of the Oracle Data Pump Export and Import utilities
If you are going to use the Oracle Data Pump Export and Import utilities for migration or upgrade, you must create shared directories for the reading and writing of dump files.
Create tablespace data files with the cttspace.sql script Before you run the installation wizard, you should create tablespace data files for the Clintrial software.
Note: If you have not created tablespaces before you run the installation wizard, it creates them. However, running the cttspace.sql script to create these data files gives you more flexibility in how they are created.
Use the cttspace.sql script to create these data files. By default, this script prompts for the system password, the path name where the tablespace data files are created, and the data file extension. You can modify this script as follows:
• If all the data files are created in the same location, you can comment out the prompt that asks for the path name, and then insert the path name as a variable.
For more information, see the comments in the cttspace.sql script.
• If all the data files have the same extension, you can comment out the prompt that asks for the extension, and then insert the extension as a variable.
For more information, see the comments in the cttspace.sql script.
Note: You can change the initial sizes of tablespaces and associated storage parameters to meet your data storage needs.
To create tablespaces:
1 Optionally, edit the cttspace.sql file.
2 If you are using the default tablespace sizes in the cttspace.sql file, make sure that you have at least 185 MB of disk space.
3 If you have changed the initial tablespace sizes, make sure that you have the appropriate amount of free disk space.

Getting Started
Clintrial 4.7.5 41
4 Start SQL*Plus from the module's installation directory and log on to the database instance.
5 Run the cttspace.sql script to create the tablespace data files:
SQL> @cttspace
You are prompted to enter language_option.
6 Enter e or j (for English or Japanese). These are the only valid options.
7 Press Enter to accept the default, or enter the log file name.
You are prompted to enter a connection string.
8 Enter the @ symbol followed by the instance (or service) name to connect to.
You are prompted to enter the Oracle SYSTEM Account Password.
9 Enter the Oracle SYSTEM Account Password.
If you use the default method for typing the path for the tablespace data files, you are prompted to enter the full path.
Caution: You must include the trailing delimiter (such as “\”) in the path. Otherwise, the last subdirectory name in the path is included in the file name. For example: C:\oracle\Database\Files\
The trailing delimiter is specific to the operating system on which the script is running.
10 If you use the default method for typing the file extension of the tablespace data files, you are prompted to enter the file extension.
You can enter the file extension with or without the period.
For example, if the name of the database instance is ora1025b, the file extension could be:
.ORA1025B
In this example, the cttspace.sql script creates the following tablespace data files in the C:\Ora102\Database\Files\ subdirectory:
CT_META_D.ORA1025B
CT_META_I.ORA1025B
CT_DATA_D.ORA1025B
CT_DATA_I.ORA1025B
CT_USERS.ORA1025B
11 When the script has finished creating the tablespace data files, review the log file for Oracle errors.
Chapter 3 Performing a new installation of the Clintrial Server software
42 Clintrial 4.7.5
Shut down the Oracle database Using the Oracle SQL*Plus utility, shut down the Oracle database instance that you will be using with the Clintrial software.
<password> is the password for the SYS user. <instance> is the name of the instance (service name) you connect to.
• On UNIX or Linux systems, enter the following commands:
% sqlplus /nolog
SQL> connect sys/<password>@<instance> as sysdba
SQL> shutdown immediate
SQL> exit
• On a Windows server, enter the following commands:
C:\ sqlplus sys/<password>@<instance>as sysdba
SQL> shutdown immediate
SQL> exit
Alternatively, on Windows, use the Services dialog box to shut down the Oracle database service.
The Oracle service stops, shutting down the database instance.
For more information, see your Oracle documentation.
Restart the Oracle database In the following procedures:
• <password> is the password for the SYS user.
• <instance> is the name of the instance (or service name) you connect to.
• On UNIX-based systems and on Windows, enter the following commands:
% sqlplus /nolog
SQL> connect sys/<password>@<instance> as sysdba
SQL> startup
SQL> exit
Alternatively, on Windows systems, use the Services dialog box to restart the Oracle database service.
For more information, see the Oracle database documentation.

Getting Started
Clintrial 4.7.5 43
Using the Japanese version of the Clintrial Installation Wizard on an English Windows Operating System
If you choose Japanese as the setup language when you start to run the Clintrial Installation Wizard to install or upgrade Clintrial 4.7.1, and it displays the message:
The Japanese won't be displayed properly. Please refer to the user documentation.
you are trying to run the Japanese version of the wizard on an English Windows Operating System. Use this procedure to view Japanese on English OS:
1 From the Windows Control Panel, choose Regional and Language Options.
2 Click on Language tab.
3 Select the checkbox Install files for East Asian languages.
4 Click on OK and follow prompted instructions.
(If it requires a restart the Windows, do so.)
5 Return to the Control Panel's Regional and Language Options.
6 Click on Advanced tab.
7 Make sure that Japanese code page is selected from Code page conversion tables.
8 Select Japanese from the dropdown list under Select a language to match the language version of the non-Unicode programs you want to use.
9 Click on OK and re-boot Windows.
You may now run the Clintrial Installation Wizard, and the Japanese characters will be displayed correctly on the English OS.

Chapter 3 Performing a new installation of the Clintrial Server software
44 Clintrial 4.7.5
Installing the Clintrial Core Server and additional modules 1 Run the Clintrial software installation wizard (on page 44).
2 Verify your complete Server installation (on page 53).
Note: All scripts record the time stamps for the start and end of an activity. When you review a log file, verify that both of these time stamps exist.
Run the Clintrial installation wizard
Note: The server installation and upgrade wizard is a 32-bit application. If you need to install the server application on a machine with a 64-bit operating system, you should do so from a 32-bit networked computer, and then connect to the server with Oracle credentials.
1 Navigate to the location of the installation files and double-click CTServerInstaller.exe.
For the first-time installation, the Choose Setup Language window appears.
If you want to choose a language other than English on an English operating system, the proper language pack must be installed and the Windows default language must be changed. For example, if you want to conduct the installation in Japanese, the Asian language pack must be installed and the default language must be changed to Japanese.
For more information, see your Windows documentation.
2 Select the language you want the wizard to use during setup. This also the language that will be used for the labels and descriptions for codelists and tags.
Note: The language for the application post-setup is chosen later.
3 Click Next.
The Welcome window appears.
4 Click Next.
The Setup type window appears.
5 To install the Clintrial server, click Install, then Next.
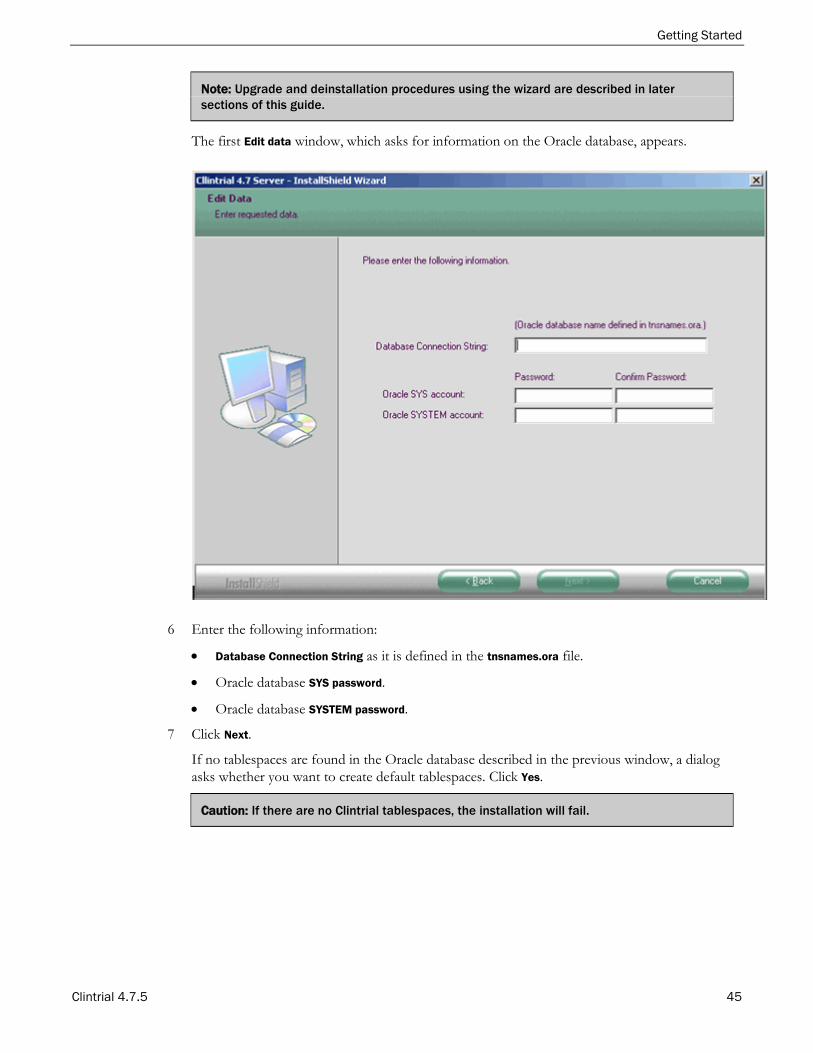
Getting Started
Clintrial 4.7.5 45
Note: Upgrade and deinstallation procedures using the wizard are described in later sections of this guide.
The first Edit data window, which asks for information on the Oracle database, appears.
6 Enter the following information:
• Database Connection String as it is defined in the tnsnames.ora file.
• Oracle database SYS password.
• Oracle database SYSTEM password.
7 Click Next.
If no tablespaces are found in the Oracle database described in the previous window, a dialog asks whether you want to create default tablespaces. Click Yes.
Caution: If there are no Clintrial tablespaces, the installation will fail.
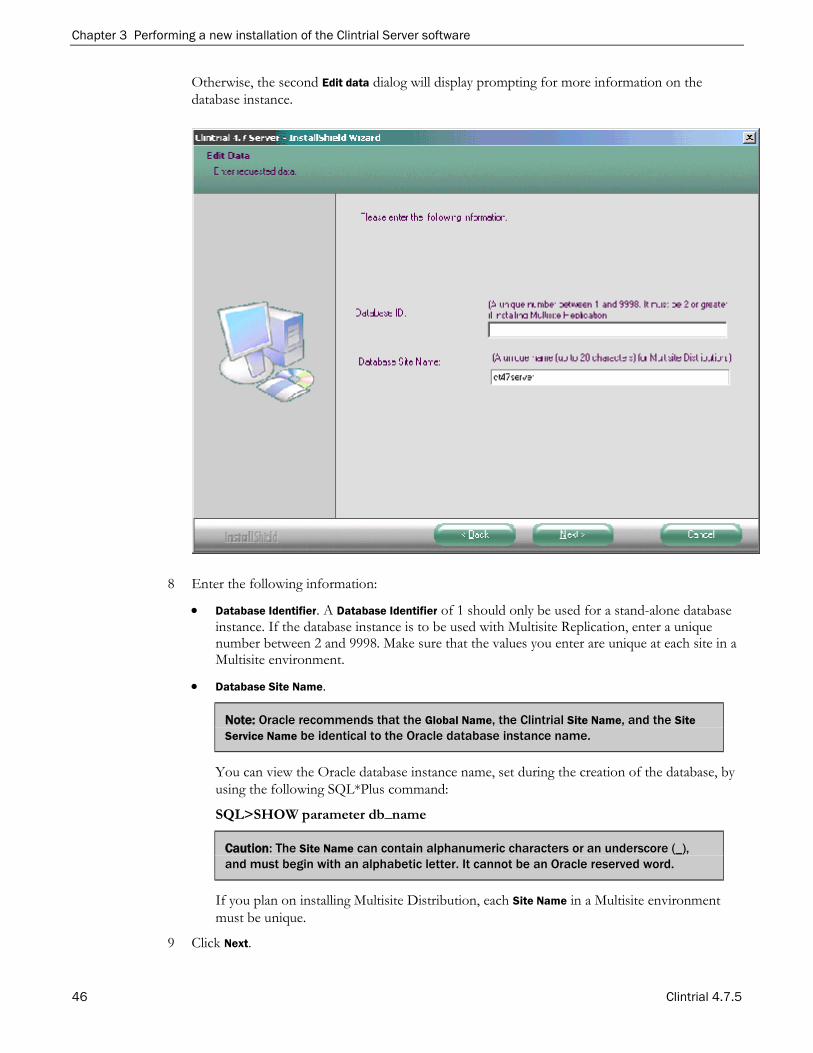
Chapter 3 Performing a new installation of the Clintrial Server software
46 Clintrial 4.7.5
Otherwise, the second Edit data dialog will display prompting for more information on the database instance.
8 Enter the following information:
• Database Identifier. A Database Identifier of 1 should only be used for a stand-alone database instance. If the database instance is to be used with Multisite Replication, enter a unique number between 2 and 9998. Make sure that the values you enter are unique at each site in a Multisite environment.
• Database Site Name.
Note: Oracle recommends that the Global Name, the Clintrial Site Name, and the Site Service Name be identical to the Oracle database instance name.
You can view the Oracle database instance name, set during the creation of the database, by using the following SQL*Plus command:
SQL>SHOW parameter db_name
Caution: The Site Name can contain alphanumeric characters or an underscore (_), and must begin with an alphabetic letter. It cannot be an Oracle reserved word.
If you plan on installing Multisite Distribution, each Site Name in a Multisite environment must be unique.
9 Click Next.
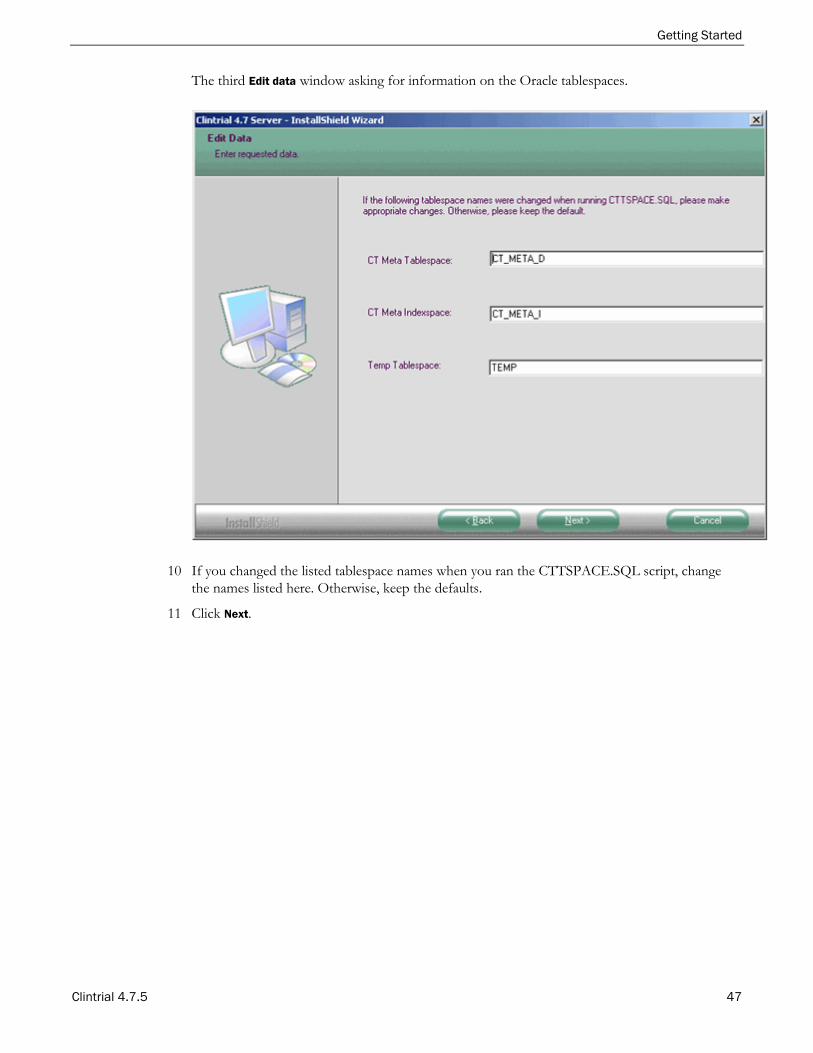
Getting Started
Clintrial 4.7.5 47
The third Edit data window asking for information on the Oracle tablespaces.
10 If you changed the listed tablespace names when you ran the CTTSPACE.SQL script, change the names listed here. Otherwise, keep the defaults.
11 Click Next.
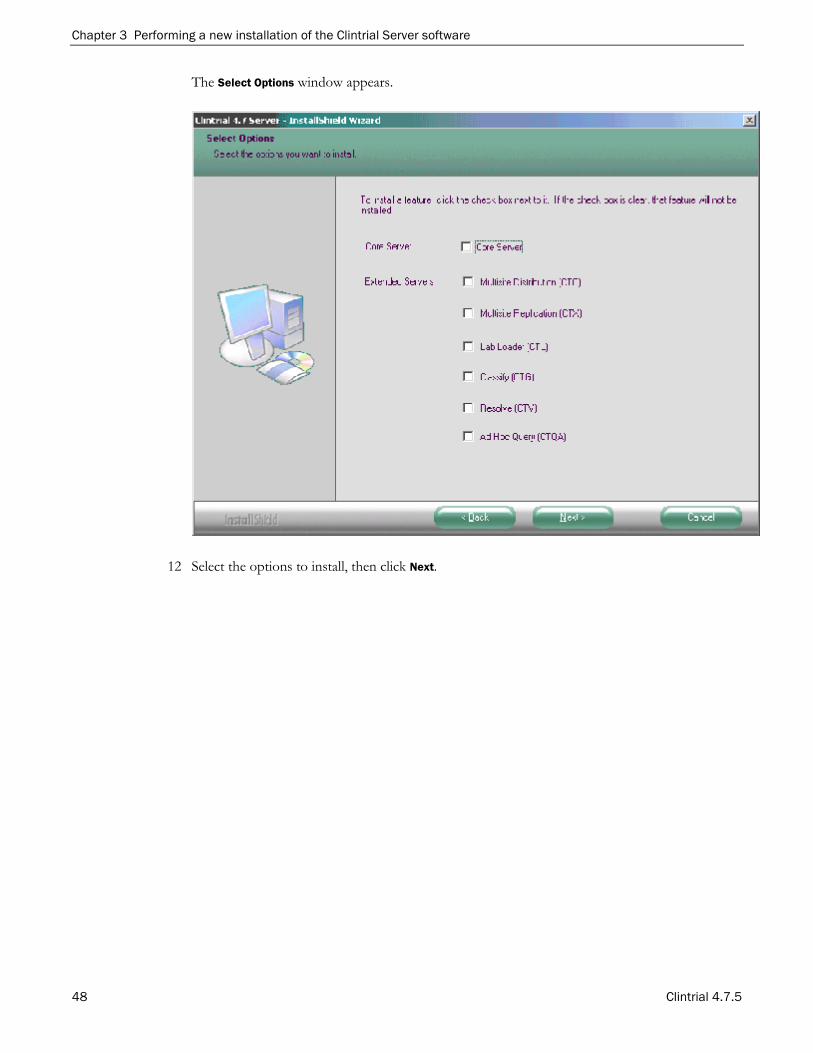
Chapter 3 Performing a new installation of the Clintrial Server software
48 Clintrial 4.7.5
The Select Options window appears.
12 Select the options to install, then click Next.

Getting Started
Clintrial 4.7.5 49
The Edit Data window for the CTSYS and CTPROC accounts appears.
13 Enter and confirm the passwords for the CTSYS and CTPROC accounts.
• CTSYS system account—Clintrial System Administrator account.
• CTPROC system account—stores internal Clintrial software procedures.
These account passwords are necessary for all installations.
14 Click Next.
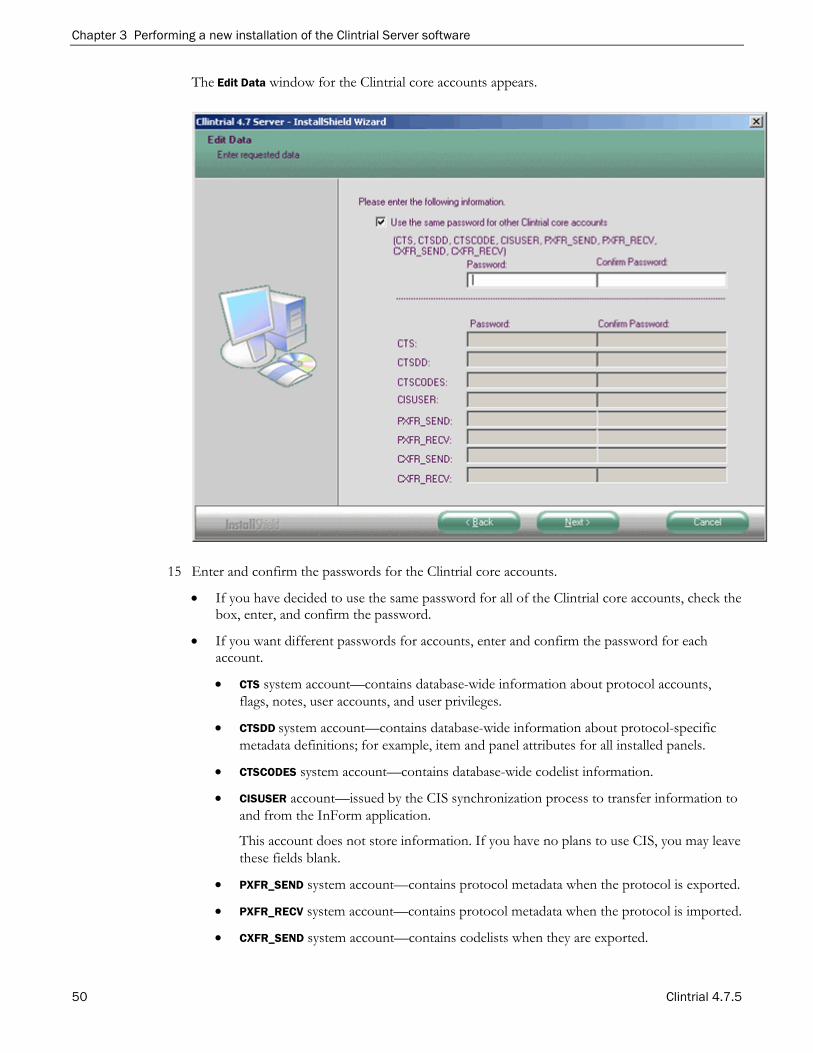
Chapter 3 Performing a new installation of the Clintrial Server software
50 Clintrial 4.7.5
The Edit Data window for the Clintrial core accounts appears.
15 Enter and confirm the passwords for the Clintrial core accounts.
• If you have decided to use the same password for all of the Clintrial core accounts, check the box, enter, and confirm the password.
• If you want different passwords for accounts, enter and confirm the password for each account.
• CTS system account—contains database-wide information about protocol accounts, flags, notes, user accounts, and user privileges.
• CTSDD system account—contains database-wide information about protocol-specific metadata definitions; for example, item and panel attributes for all installed panels.
• CTSCODES system account—contains database-wide codelist information.
• CISUSER account—issued by the CIS synchronization process to transfer information to and from the InForm application.
This account does not store information. If you have no plans to use CIS, you may leave these fields blank.
• PXFR_SEND system account—contains protocol metadata when the protocol is exported.
• PXFR_RECV system account—contains protocol metadata when the protocol is imported.
• CXFR_SEND system account—contains codelists when they are exported.
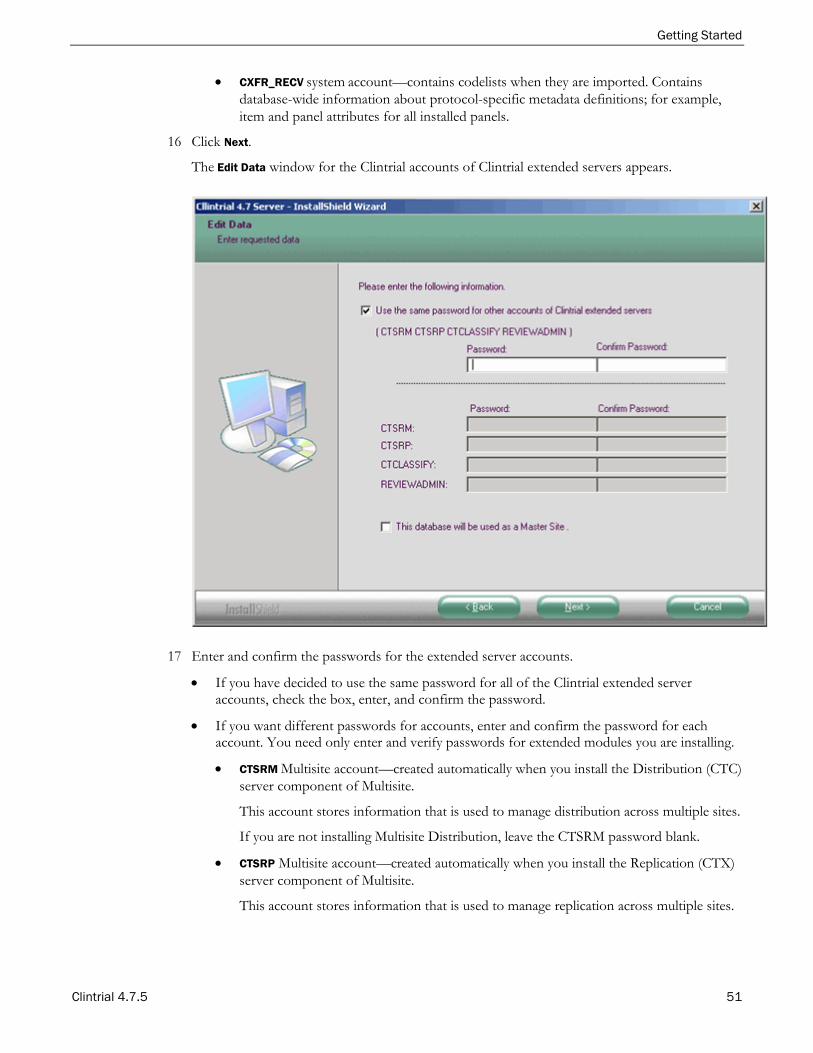
Getting Started
Clintrial 4.7.5 51
• CXFR_RECV system account—contains codelists when they are imported. Contains database-wide information about protocol-specific metadata definitions; for example, item and panel attributes for all installed panels.
16 Click Next.
The Edit Data window for the Clintrial accounts of Clintrial extended servers appears.
17 Enter and confirm the passwords for the extended server accounts.
• If you have decided to use the same password for all of the Clintrial extended server accounts, check the box, enter, and confirm the password.
• If you want different passwords for accounts, enter and confirm the password for each account. You need only enter and verify passwords for extended modules you are installing.
• CTSRM Multisite account—created automatically when you install the Distribution (CTC) server component of Multisite.
This account stores information that is used to manage distribution across multiple sites.
If you are not installing Multisite Distribution, leave the CTSRM password blank.
• CTSRP Multisite account—created automatically when you install the Replication (CTX) server component of Multisite.
This account stores information that is used to manage replication across multiple sites.
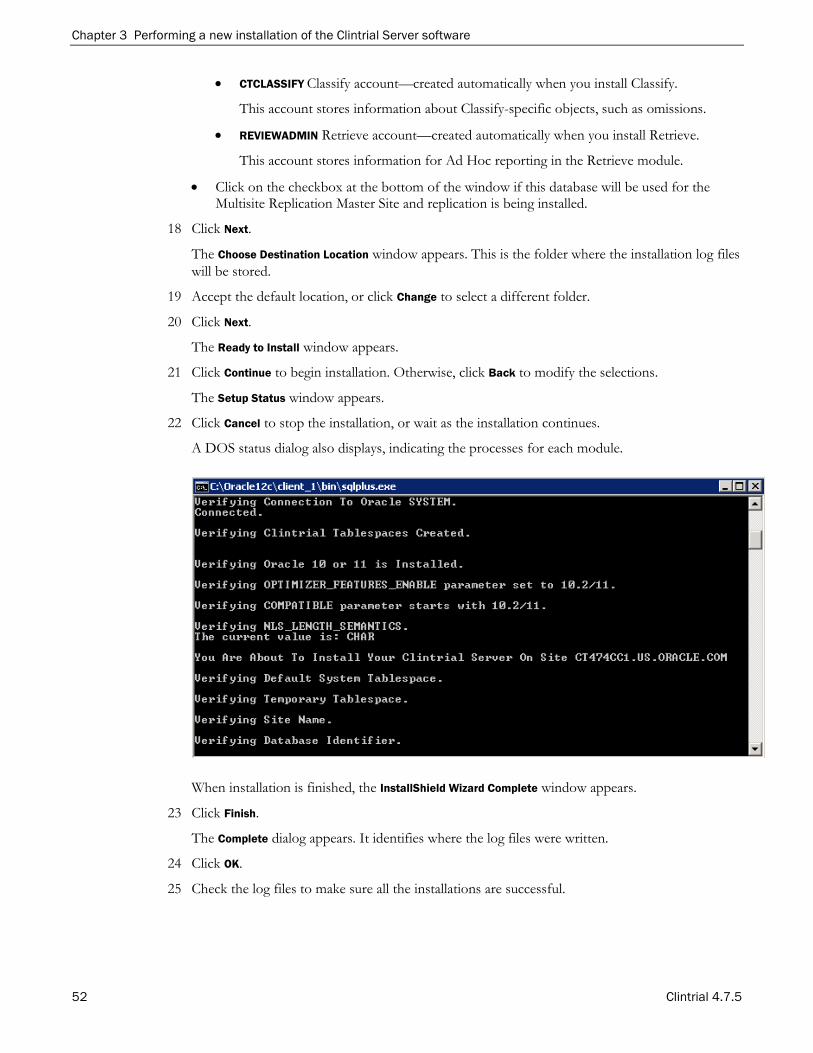
Chapter 3 Performing a new installation of the Clintrial Server software
52 Clintrial 4.7.5
• CTCLASSIFY Classify account—created automatically when you install Classify.
This account stores information about Classify-specific objects, such as omissions.
• REVIEWADMIN Retrieve account—created automatically when you install Retrieve.
This account stores information for Ad Hoc reporting in the Retrieve module.
• Click on the checkbox at the bottom of the window if this database will be used for the Multisite Replication Master Site and replication is being installed.
18 Click Next.
The Choose Destination Location window appears. This is the folder where the installation log files will be stored.
19 Accept the default location, or click Change to select a different folder.
20 Click Next.
The Ready to Install window appears.
21 Click Continue to begin installation. Otherwise, click Back to modify the selections.
The Setup Status window appears.
22 Click Cancel to stop the installation, or wait as the installation continues.
A DOS status dialog also displays, indicating the processes for each module.
When installation is finished, the InstallShield Wizard Complete window appears.
23 Click Finish.
The Complete dialog appears. It identifies where the log files were written.
24 Click OK.
25 Check the log files to make sure all the installations are successful.
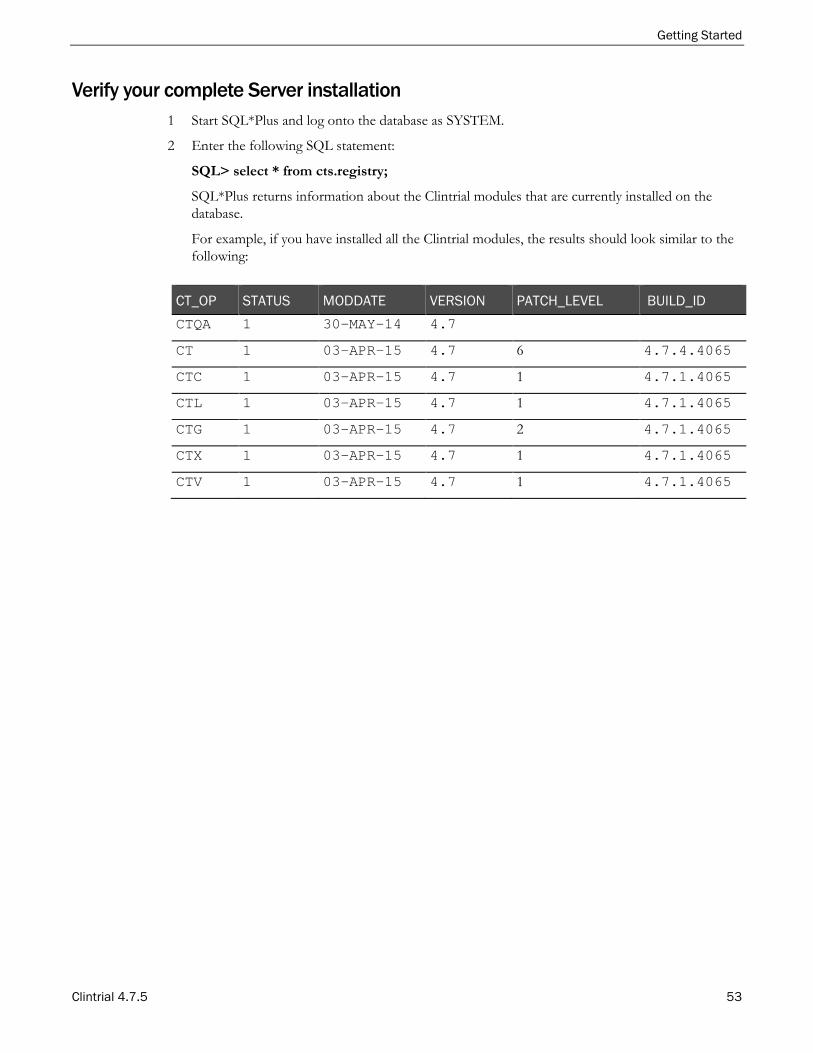
Getting Started
Clintrial 4.7.5 53
Verify your complete Server installation 1 Start SQL*Plus and log onto the database as SYSTEM.
2 Enter the following SQL statement:
SQL> select * from cts.registry;
SQL*Plus returns information about the Clintrial modules that are currently installed on the database.
For example, if you have installed all the Clintrial modules, the results should look similar to the following:
CT_OP STATUS MODDATE VERSION PATCH_LEVEL BUILD_ID CTQA 1 30-MAY-14 4.7
CT 1 03-APR-15 4.7 6 4.7.4.4065
CTC 1 03-APR-15 4.7 1 4.7.1.4065
CTL 1 03-APR-15 4.7 1 4.7.1.4065
CTG 1 03-APR-15 4.7 2 4.7.1.4065
CTX 1 03-APR-15 4.7 1 4.7.1.4065
CTV 1 03-APR-15 4.7 1 4.7.1.4065

Chapter 3 Performing a new installation of the Clintrial Server software
54 Clintrial 4.7.5
Post-installation actions
If you are using Central Coding • If you are planning to use the Oracle Central Coding application, you must specifically grant
permissions via Access Control Lists (ACLs) for the HTTP requests.
• To use the Central Coding application with Oracle 11.2 or 12.1, you must explicitly grant permissions via ACLs to enable the HTTP request to connect to the Central Coding server.
1 Login to the Oracle Clintrial database as SYS.
2 Execute code similar to the following: BEGIN DBMS_NETWORK_ACL_ADMIN.CREATE_ACL ( acl => 'ct_cc.xml', description => 'Sample ACL for Central Coding', principal => 'CTPROC', is_grant => TRUE, privilege => 'connect'); end; / BEGIN DBMS_NETWORK_ACL_ADMIN.ASSIGN_ACL ( acl => 'ct_cc.xml', host => '<Central Coding Server''); END; / For further information on using Network ACLs, see Managing Fine-Grained Access in PL/SQL Network Utility Packages in the Oracle Database Security Guide.
• If you are planning to use the WCF-SECURE Central Coding service, you must:
• Create a user in Central Coding to authenticate the web service from Clintrial and enter user credentials in the CC_USER_NAME and CC_USER_PWD parameters.
For more information, see the Central Coding User Guide.
• Create an Oracle Wallet importing the Central Coding certificate on Clintrial database server and enter the Oracle Wallet details in the ORA_WALLET_LOC and ORA_WALLET_PWD parameters.
For more information, see Using Oracle Wallet Manager in the Oracle Database Advanced Security Administrator's Guide.

Getting Started
Clintrial 4.7.5 55
Create a verify function to ensure that passwords meet security standards You can create a password verification function to ensure that passwords meet the standards contained in the Clintrial system parameters or a database profile. This function can be assigned in the Clintrial application using the Admin system parameters, or be part of an Oracle database profile created for users or usergroups.
The Oracle Database Security Guide describes a method for enforcing password complexity for database user accounts. Briefly, the database administrator creates a password verification function and associates it with a user profile. In the Clintrial application, you also can associate the function using the system parameter in the Admin module. The sample given in the Oracle Database Security Guide associates this function with the DEFAULT profile. However, there are special considerations when applying this methodology to Clintrial.
• Non-user accounts, such as system accounts and the accounts for each protocol, use the DEFAULT database profile. The passwords are assigned during installation or upgrade, and encrypted. The resulting encrypted password strings are not constrained to specific characters, and therefore you cannot expect any verification function which relies on character comparisons, such as checking for the existence of at least one number and one non-number to work correctly. For that reason, Oracle strongly suggests that you do not add a verification function to the DEFAULT profile.
• In the case where the Clintrial PASSWORD_ENCRYPTION system parameter is set to No in the Admin module, an encryption verification function can be created and assigned using the Admin module. At least one additional profile must be created for use with Clintrial users, and that profile also can be associated with the verification function. For example, the below command creates a new profile. When creating users in Admin, you should create a profile like the below example and set additional profile limits like those in the DEFAULT profile:
CREATE PROFILE CT_USER_PROFILE LIMIT PASSWORD_VERIFY_FUNCTION <function_name>;
• In the case where the PASSWORD_ENCRYPTION system parameter is set to Yes, the verification function should not be associated with any profiles which are used for Clintrial users in the Admin module system parameters. Similar to the Protocol account case, the encrypted passwords would not function as expected.
This new system parameter that has been added (PASSWORD_VFY_FUNC) allows the Administrator to specify the name of a password verification function which will be called from Clintrial before the encryption of the password. The function is applied to all Clintrial users created in Admin during creation of the users as well as modification of the password by either the Administrator or the user.
The function must have the same parameters as described in the Oracle database documentation. It does not have to be installed into the SYS account. The value of the system parameter should specify the owner and function name, for example, SYS.CT_VFY_FUNC. Additionally, execute privileges on this function must be granted to the system account CTPROC, using this command:
Grant execute on <function_name> to CTPROC;
For the Clintrial system account CTSYS, the function cannot be defined and called until after core server installation has succeeded, so the initial CTSYS password supplied during installation is not checked in this way.

Chapter 3 Performing a new installation of the Clintrial Server software
56 Clintrial 4.7.5
Example verify function CREATE OR REPLACE FUNCTION verify_function_11G_1 (username varchar2, password varchar2, old_password varchar2) RETURN boolean IS n boolean; m integer; differ integer; isdigit boolean; ischar boolean; ispunct boolean; db_name varchar2(40); digitarray varchar2(20); punctarray varchar2(25); chararray varchar2(52); i_char varchar2(10); simple_password varchar2(10); reverse_user varchar2(32); BEGIN digitarray:= '0123456789'; chararray:= 'abcdefghijklmnopqrstuvwxyzABCDEFGHIJKLMNOPQRSTUVWXYZ'; -- Check for the minimum length of the password IF length(password) < 8 THEN raise_application_error(-20001, 'Password length less than 8'); END IF; -- Check if the password is same as the username or username(1-100) IF NLS_LOWER(password) = NLS_LOWER(username) THEN raise_application_error(-20002, 'Password same as or similar to user'); END IF; FOR i IN 1..100 LOOP i_char := to_char(i); if NLS_LOWER(username)|| i_char = NLS_LOWER(password) THEN raise_application_error(-20005, 'Password same as or similar to user name '); END IF; END LOOP; -- Check if the password is same as the username reversed FOR i in REVERSE 1..length(username) LOOP reverse_user := reverse_user || substr(username, i, 1); END LOOP; IF NLS_LOWER(password) = NLS_LOWER(reverse_user) THEN raise_application_error(-20003, 'Password same as username reversed'); END IF; -- Check if the password is the same as server name and or servername(1-100) select name into db_name from sys.v$database; if NLS_LOWER(db_name) = NLS_LOWER(password) THEN raise_application_error(-20004, 'Password same as or similar to server name'); END IF; FOR i IN 1..100 LOOP i_char := to_char(i); if NLS_LOWER(db_name)|| i_char = NLS_LOWER(password) THEN raise_application_error(-20005, 'Password same as or similar to server name '); END IF; END LOOP;
Getting Started
Clintrial 4.7.5 57
-- Check if the password is too simple. A dictionary of words may be -- maintained and a check may be made so as not to allow the words -- that are too simple for the password. IF NLS_LOWER(password) IN ('welcome1', 'database1', 'account1', 'user1234', 'password1', 'oracle123', 'computer1', 'abcdefg1', 'change_on_install') THEN raise_application_error(-20006, 'Password too simple'); END IF; -- Check if the password is the same as oracle (1-100) simple_password := 'oracle'; FOR i IN 1..100 LOOP i_char := to_char(i); if simple_password || i_char = NLS_LOWER(password) THEN raise_application_error(-20007, 'Password too simple '); END IF; END LOOP; -- Check if the password contains at least one letter, one digit -- 1. Check for the digit isdigit:=FALSE; m := length(password); FOR i IN 1..10 LOOP FOR j IN 1..m LOOP IF substr(password,j,1) = substr(digitarray,i,1) THEN isdigit:=TRUE; GOTO findchar; END IF; END LOOP; END LOOP; IF isdigit = FALSE THEN raise_application_error(-20008, 'Password must contain at least one digit, one character'); END IF; -- 2. Check for the character <<findchar>> ischar:=FALSE; FOR i IN 1..length(chararray) LOOP FOR j IN 1..m LOOP IF substr(password,j,1) = substr(chararray,i,1) THEN ischar:=TRUE; GOTO endsearch; END IF; END LOOP; END LOOP; IF ischar = FALSE THEN raise_application_error(-20009, 'Password must contain at least one \ digit, and one character'); END IF; <<endsearch>> -- Check if the password differs from the previous password by at least -- 3 letters IF old_password IS NOT NULL THEN differ := length(old_password) - length(password); differ := abs(differ); IF differ < 3 THEN IF length(password) < length(old_password) THEN m := length(password); ELSE m := length(old_password); END IF; FOR i IN 1..m LOOP IF substr(password,i,1) != substr(old_password,i,1) THEN
Chapter 3 Performing a new installation of the Clintrial Server software
58 Clintrial 4.7.5
differ := differ + 1; END IF; END LOOP; IF differ < 3 THEN raise_application_error(-20011, 'Password should differ from the \ old password by at least 3 characters'); END IF; END IF; END IF; -- Everything is fine; return TRUE ; RETURN(TRUE); END; / CREATE PROFILE CT_USER_PROFILE1 LIMIT PASSWORD_VERIFY_FUNCTION verify_function_11G_1; /
Configure Network Data Encryption and Integrity for Oracle Servers and Clients If you are planning to configure network data encryption and integrity, add the following settings to server and client sqlnet.ora files.
On the server:
SQLNET.ENCRYPTION_SERVER = REQUIRED SQLNET.ENCRYPTION_TYPES_SERVER = (valid_encryption_algorithm) SQLNET.CRYPTO_CHECKSUM_SERVER = REQUIRED SQLNET.CRYPTO_CHECKSUM_TYPES_SERVER = (valid_crypto_checksum_algorithm)
On the client:
SQLNET.ENCRYPTION_CLIENT = REQUIRED SQLNET.ENCRYPTION_TYPES_CLIENT = (valid_encryption_algorithm) SQLNET.CRYPTO_CHECKSUM_CLIENT = REQUIRED SQLNET.CRYPTO_CHECKSUM_TYPES_CLIENT = (valid_crypto_checksum_algorithm)
For more information on setting up the network data encryption, see Configuring Network Data Encryption and Integrity for Oracle Servers and Clients in the Oracle Database Advanced Security Administrator's Guide.
Clintrial 4.7.5 59
In this chapter Overview ................................................................................................................................................ 60
Before you begin the upgrade ............................................................................................................. 62
Before upgrading the database instance ............................................................................................ 63
Upgrading the Clintrial software using the upgrade wizard ........................................................... 65
Post-upgrade actions ............................................................................................................................ 73
C H A P T E R 4 Upgrading the server to this release
Chapter 4 Upgrading the server to this release
60 Clintrial 4.7.5
Overview You can upgrade to the Clintrial 4.7.5 software from the Clintrial 4.5 or Clintrial 4.6 software. If you are using a release earlier than the Clintrial 4.5 software, you must first upgrade to the Clintrial 4.5 software and then upgrade to the current release.
The following Clintrial server modules can be upgraded:
• Core server.
• Multisite Distribution server.
• Multisite Replication server.
• Classify server.
• Lab Loader server.
Note: The Ad Hoc Query feature and the Resolve module are upgraded as part of the Core upgrade.
Upgrade options You can upgrade to the Clintrial 4.7.5 software in one of two ways:
• Upgrade the entire Clintrial 4.5, 4.6, or 4.7 database instance to the Clintrial 4.7.5 database instance, as described in this chapter.
• Export codelists and protocols from the current Clintrial database instance, then import codelists and protocols into a Clintrial 4.7.5 database instance.
For more information, see Limitations of upgrading by import (on page 61).
Note: Oracle recommends that you upgrade the entire database instance.
When considering these upgrade options, keep in mind the following requirements:
• Do not export to a temporary tablespace.
Oracle recommends that you export using a tablespace that does not exist in the Clintrial 4.7 database instance.
• If you plan to use Multisite Distribution with your existing Clintrial Multisite 4.5, 4.6, or 4.7 configuration, you must upgrade all database instances.
For more information, see the Design section in the Admin and Design guide and the Design Help.
Getting Started
Clintrial 4.7.5 61
Limitations of upgrading by import Exporting protocols from a Clintrial 4.5, 4.6, or 4.7 database instance, and then importing them into a Clintrial 4.7.5 database instance by using the Oracle Import/Export utility requires many steps.
Oracle recommends that you upgrade the entire database instance.
If you are using external tables for view protocols, you cannot export or import these protocols.
If you perform a full database export from a non-Unicode database in a Clintrial 4.5 or Clintrial 4.6 application (or a Unicode Clintrial 4.7 on Oracle 10.2.0.4 to Clintrial 4.7.1 on Oracle 11.2), and import to a Unicode database in a Clintrial 4.7.1 application, you must run the prv_sys.sql script to re-grant Select privileges on the SYS tables for the core modules.
If you are using the Multisite module, you must also perform these grants:
grant select on sys.dba_db_links to prv$wxrm; grant select on sys.dba_tablespaces to prv$wxrm; grant select on sys.dba_objects to prv$wxrm; grant select on sys.dba_source to ctsrm;
For more information, contact the Global Support Center.
Chapter 4 Upgrading the server to this release
62 Clintrial 4.7.5
Before you begin the upgrade Before beginning the installation, check the Oracle Software Delivery Cloud (https://edelivery.oracle.com) or My Oracle Support (http://support.oracle.com) for the latest service packs and hot fixes, the Release Notes document, and the latest versions of the documentation.
If you are installing on UNIX or Linux platforms and you have more than one database instance on a server, make sure that the default SID is the database instance for the Clintrial software.
On supported versions of Windows, back up your Oracle database before proceeding with the Clintrial installation. For more information, see the Oracle database documentation

Getting Started
Clintrial 4.7.5 63
Before upgrading the database instance 1 Verify that the Clintrial software 4.5, 4.6, or an earlier release of 4.7 software is installed.
If you are using a release earlier than Clintrial 4.5, you must first upgrade to a Clintrial 4.5 or 4.6 release, and then upgrade to the Clintrial 4.7.5 software.
2 Back up the database instance.
3 Check the Oracle and the Clintrial requirements.
4 Upgrade to the Oracle 11.2 or 12.1 database software.
5 Decide if you want to use an Oracle Unicode database. If so, refer to Preparing to install or upgrade to this release (on page 23).
6 Migrate your Clintrial database to the Oracle software.
Backing up your Clintrial database Back up your Clintrial 4.5, 4.6, or 4.7 database instance at the following stages in the upgrade process:
• Before migrating from an earlier release of the Oracle database software to the current Oracle software.
• Before running the script to upgrade your Clintrial 4.5, 4.6, or 4.7 server to the Clintrial 4.7.5 core server.
Checking other requirements Confirm the following:
• Your environment meets the hardware and software requirements for the Clintrial software and the Oracle database software. For more information, the Release Notes.
• Your environment can support a Clintrial server installation.
• All protocol and codelists imports are completed.
• No panels are marked for revision.
• If you are using Multisite Distribution, no protocols or codelists are open for revision.
• If you are using Multisite Replication, all replication accounts are aborted.
Running a script from a Windows directory If you are running a Windows server, do one of the following:
• Change to the installation directory in DOS, and then run SQL*Plus from DOS.
• Create and configure a shortcut for SQL*Plus in the installation directory.
To configure and use a SQL*Plus shortcut:
1 Create the SQL*Plus shortcut.
2 Right click the SQL*Plus shortcut icon.
Chapter 4 Upgrading the server to this release
64 Clintrial 4.7.5
3 From the pop-up menu, select Properties.
4 The SQL*Plus Properties dialog box appears.
5 Select the Shortcut tab.
6 Clear the Start in field, and then click OK.
Copy the SQL*Plus shortcut to each installation directory, and then, when running the upgrade script for a module, open SQL*Plus using the shortcut.
After checking all the requirements listed in the previous sections, you can migrate from the Oracle 9.2.0.6 software to a supported version of the Oracle software, as described in your Oracle documentation.
Upgrade tips and considerations The following are some tips and considerations to keep in mind when upgrading to this release of the Clintrial software:
• Carefully read Chapter 2. Ensure that your database objects meet the necessary criteria.
• Consider the impact on any custom changes made to Clintrial software objects outside the Clintrial software. Any changes made outside the Clintrial software could cause the upgrade to fail. For example, dropping tables or changing views to reference external objects could cause the upgrade to fail.
• Check your tables, views, packages, and functions to ensure all are present and valid.
• Check the upgrade log for errors when the upgrade completes. If the upgrade completes successfully, your registry entry will indicate release 4.7. However, there could still be errors written to the upgrade log.
For information on protocols that you need to import for additional Clintrial software functionality, see Protocols for added functionality (on page 98).
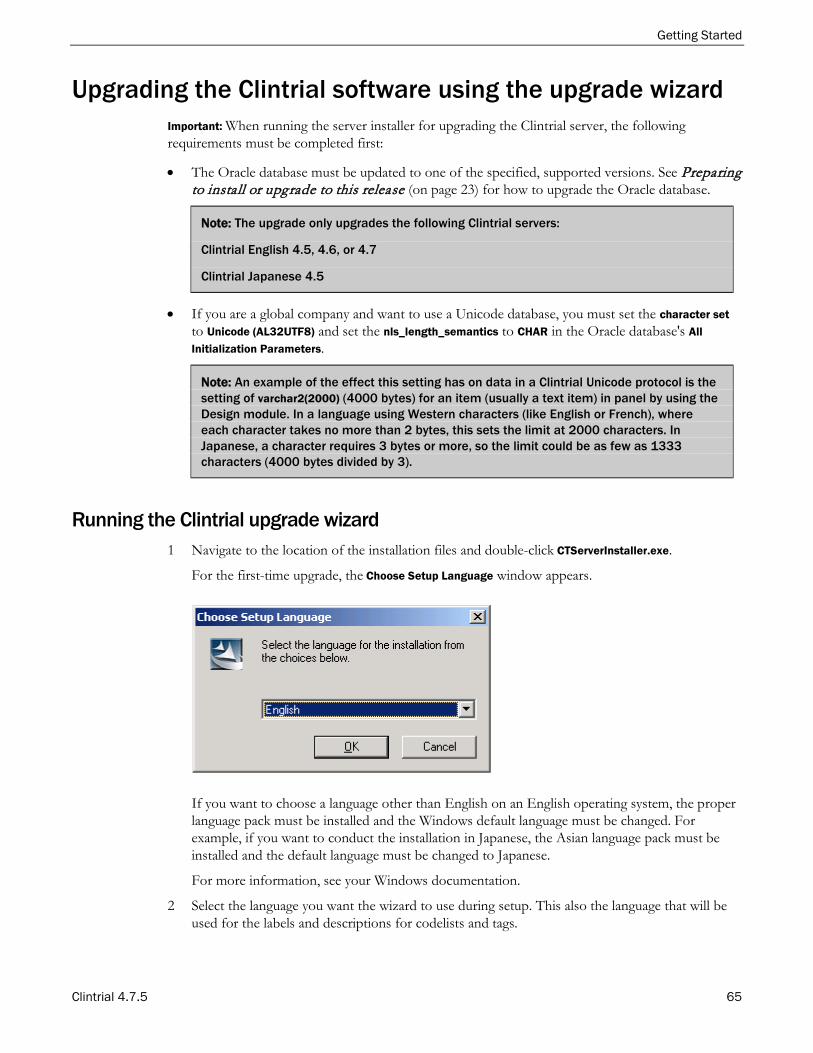
Getting Started
Clintrial 4.7.5 65
Upgrading the Clintrial software using the upgrade wizard Important: When running the server installer for upgrading the Clintrial server, the following requirements must be completed first:
• The Oracle database must be updated to one of the specified, supported versions. See Preparing to install or upgrade to this release (on page 23) for how to upgrade the Oracle database.
Note: The upgrade only upgrades the following Clintrial servers:
Clintrial English 4.5, 4.6, or 4.7
Clintrial Japanese 4.5
• If you are a global company and want to use a Unicode database, you must set the character set to Unicode (AL32UTF8) and set the nls_length_semantics to CHAR in the Oracle database's All Initialization Parameters.
Note: An example of the effect this setting has on data in a Clintrial Unicode protocol is the setting of varchar2(2000) (4000 bytes) for an item (usually a text item) in panel by using the Design module. In a language using Western characters (like English or French), where each character takes no more than 2 bytes, this sets the limit at 2000 characters. In Japanese, a character requires 3 bytes or more, so the limit could be as few as 1333 characters (4000 bytes divided by 3).
Running the Clintrial upgrade wizard 1 Navigate to the location of the installation files and double-click CTServerInstaller.exe.
For the first-time upgrade, the Choose Setup Language window appears.
If you want to choose a language other than English on an English operating system, the proper language pack must be installed and the Windows default language must be changed. For example, if you want to conduct the installation in Japanese, the Asian language pack must be installed and the default language must be changed to Japanese.
For more information, see your Windows documentation.
2 Select the language you want the wizard to use during setup. This also the language that will be used for the labels and descriptions for codelists and tags.
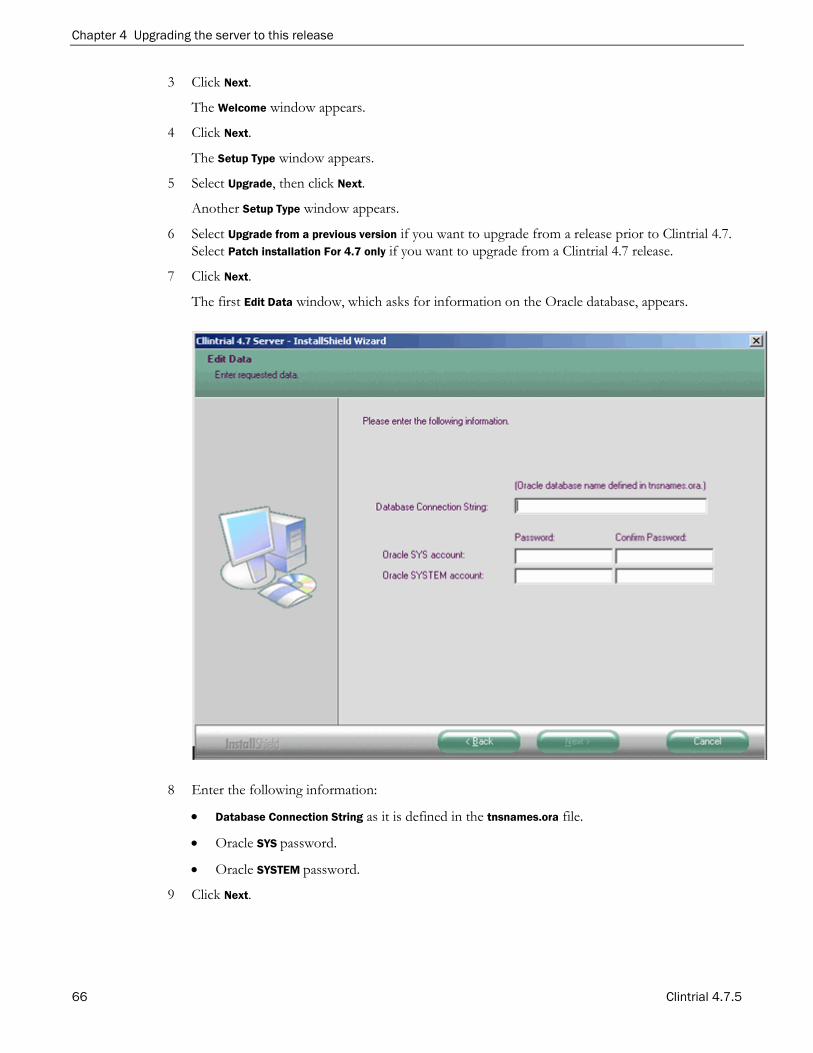
Chapter 4 Upgrading the server to this release
66 Clintrial 4.7.5
3 Click Next.
The Welcome window appears.
4 Click Next.
The Setup Type window appears.
5 Select Upgrade, then click Next.
Another Setup Type window appears.
6 Select Upgrade from a previous version if you want to upgrade from a release prior to Clintrial 4.7. Select Patch installation For 4.7 only if you want to upgrade from a Clintrial 4.7 release.
7 Click Next.
The first Edit Data window, which asks for information on the Oracle database, appears.
8 Enter the following information:
• Database Connection String as it is defined in the tnsnames.ora file.
• Oracle SYS password.
• Oracle SYSTEM password.
9 Click Next.
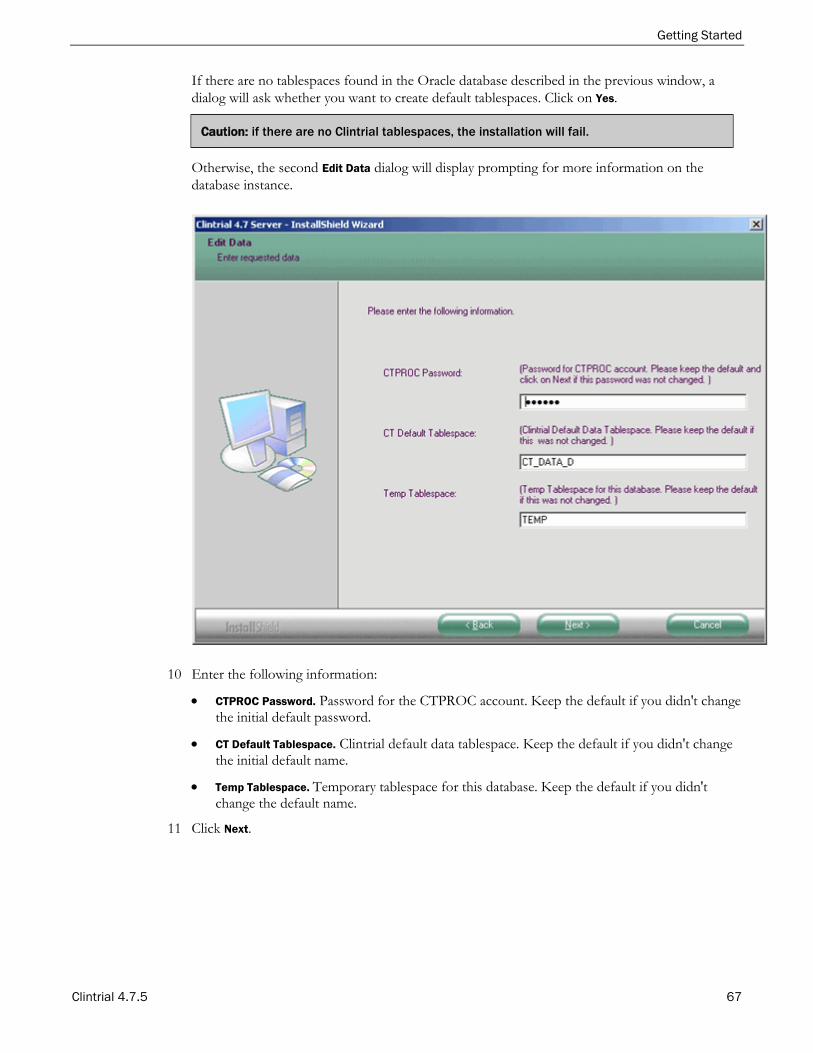
Getting Started
Clintrial 4.7.5 67
If there are no tablespaces found in the Oracle database described in the previous window, a dialog will ask whether you want to create default tablespaces. Click on Yes.
Caution: if there are no Clintrial tablespaces, the installation will fail.
Otherwise, the second Edit Data dialog will display prompting for more information on the database instance.
10 Enter the following information:
• CTPROC Password. Password for the CTPROC account. Keep the default if you didn't change the initial default password.
• CT Default Tablespace. Clintrial default data tablespace. Keep the default if you didn't change the initial default name.
• Temp Tablespace. Temporary tablespace for this database. Keep the default if you didn't change the default name.
11 Click Next.
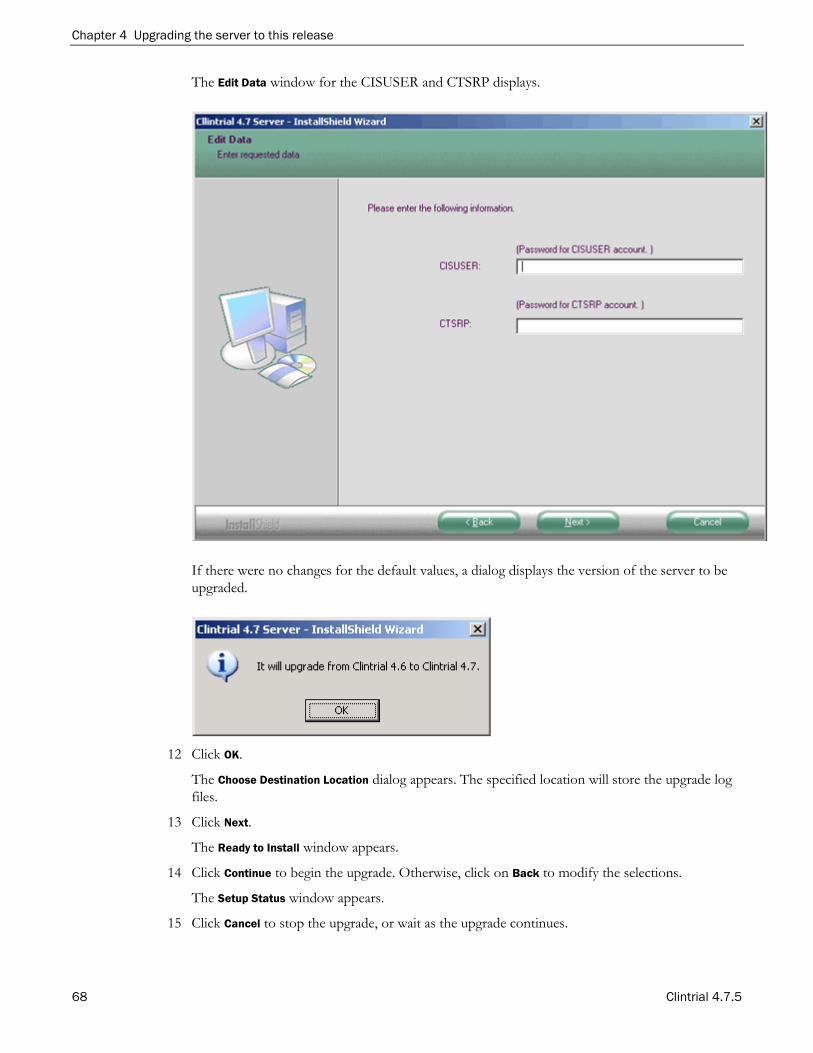
Chapter 4 Upgrading the server to this release
68 Clintrial 4.7.5
The Edit Data window for the CISUSER and CTSRP displays.
If there were no changes for the default values, a dialog displays the version of the server to be upgraded.
12 Click OK.
The Choose Destination Location dialog appears. The specified location will store the upgrade log files.
13 Click Next.
The Ready to Install window appears.
14 Click Continue to begin the upgrade. Otherwise, click on Back to modify the selections.
The Setup Status window appears.
15 Click Cancel to stop the upgrade, or wait as the upgrade continues.
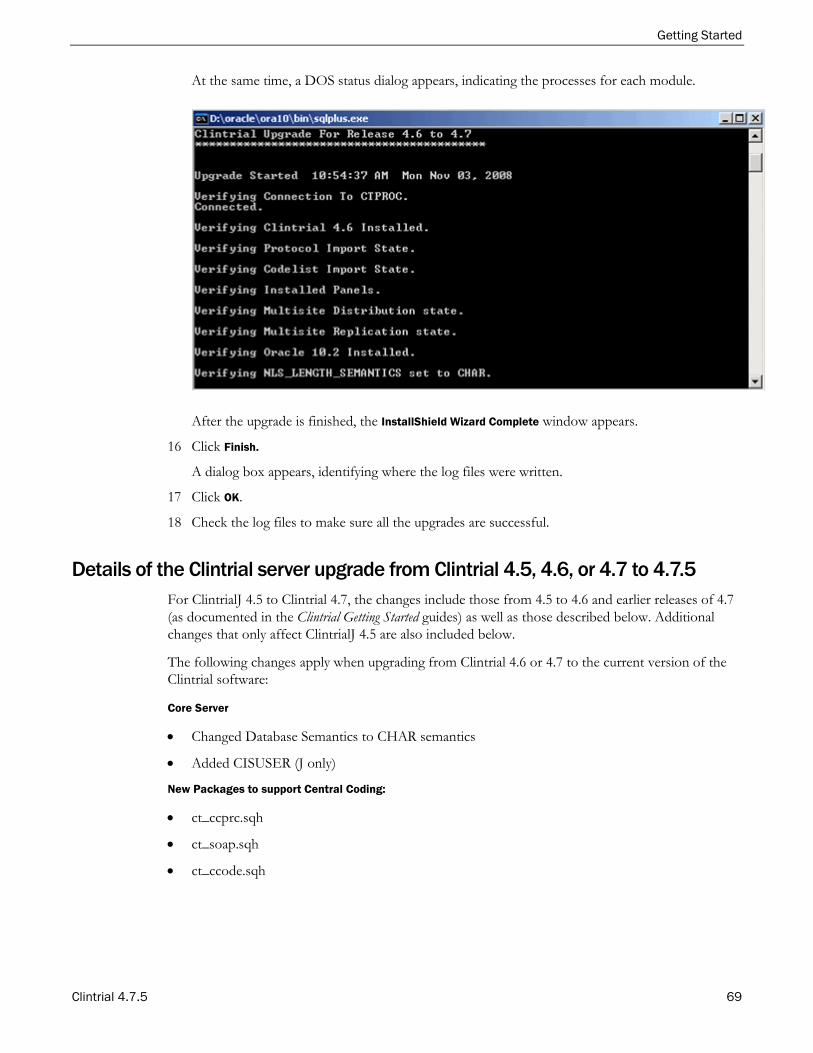
Getting Started
Clintrial 4.7.5 69
At the same time, a DOS status dialog appears, indicating the processes for each module.
After the upgrade is finished, the InstallShield Wizard Complete window appears.
16 Click Finish.
A dialog box appears, identifying where the log files were written.
17 Click OK.
18 Check the log files to make sure all the upgrades are successful.
Details of the Clintrial server upgrade from Clintrial 4.5, 4.6, or 4.7 to 4.7.5 For ClintrialJ 4.5 to Clintrial 4.7, the changes include those from 4.5 to 4.6 and earlier releases of 4.7 (as documented in the Clintrial Getting Started guides) as well as those described below. Additional changes that only affect ClintrialJ 4.5 are also included below.
The following changes apply when upgrading from Clintrial 4.6 or 4.7 to the current version of the Clintrial software:
Core Server
• Changed Database Semantics to CHAR semantics
• Added CISUSER (J only)
New Packages to support Central Coding:
• ct_ccprc.sqh
• ct_soap.sqh
• ct_ccode.sqh

Chapter 4 Upgrading the server to this release
70 Clintrial 4.7.5
New Parameters
• System
• SERVER_LANG (internal)
• ORA_WALLET_LOC
• ORA_WALLET_PWD
• CC_SERVICE_TYPE
• CC_USER_NAME
• CC_USER_PWD
• Protocol
• USE_CENTRAL_CODING
• CC_HOST
• CC_SERVICE_TYPE
• CC_USER_NAME
• CC_USER_PWD
New Table
CTS.PARAM_DESCRIPTION—holds language dependegnt descriptions of the parameters.
• SELECT privileges on this table are granted to all Clintrial users.
• CTS.OBJINDX.I25 (previous description column) is now obsolete and is set to null.
• Both English and Japanese parameter descriptions are inserted into this table.
New Codelist Row
Added to CTS_CULTURE for ja-JP
Exception Messages; CTS.EXCEPTION_MESSAGE
• Added Rows for both English and Japanese. The Japanese rows now have a language_id of 2.
• Added additional rows for new messages (15)
Modified Packages:
• Modified for Central Coding
• Ct_proto—additional execute privilege
• Ct_panl2vdelete requests if panel deinstalled
• Ct_gbldevdelete requests for deleted records (.sqh,.sql)
• Ct_gblc2—cause request resend for key changes
• Ct_encodvcreate different encoding proc if CC
• ct_panl1
• ct_impp
Getting Started
Clintrial 4.7.5 71
• ct_targe
• ct_targc
• Modified for Globalization—use byte functions
• Ct_valid (both SP0 and SP0a)
• Ct_syntx
• Modified for other bug fixes For more information, see Clintrial 4.7.5 Release Notes:
• ct_util—CTG-28
• ct_testm—CTG-28
• ct_audit—CTG-28
• ct_expp—CTG-338
Extended Modules
• Resolve and Lab Loader
Inserted the E and J versions of the parameter descriptions
• Classify
• Inserted the E and J versions of the parameter descriptions.
• Modified packages to support J version:
• Ctg_con
• Ctg_lex
• Multisite Replication
Modified ctx_con for new version
• Multisite Distribution and Ad Hoc Query
No changes
The Lab Loader upgrade procedure from Clintrial 4.5 was changed to include an additional package, and to remove obsolete transfer packages in Clintrial 4.7 SP0a.
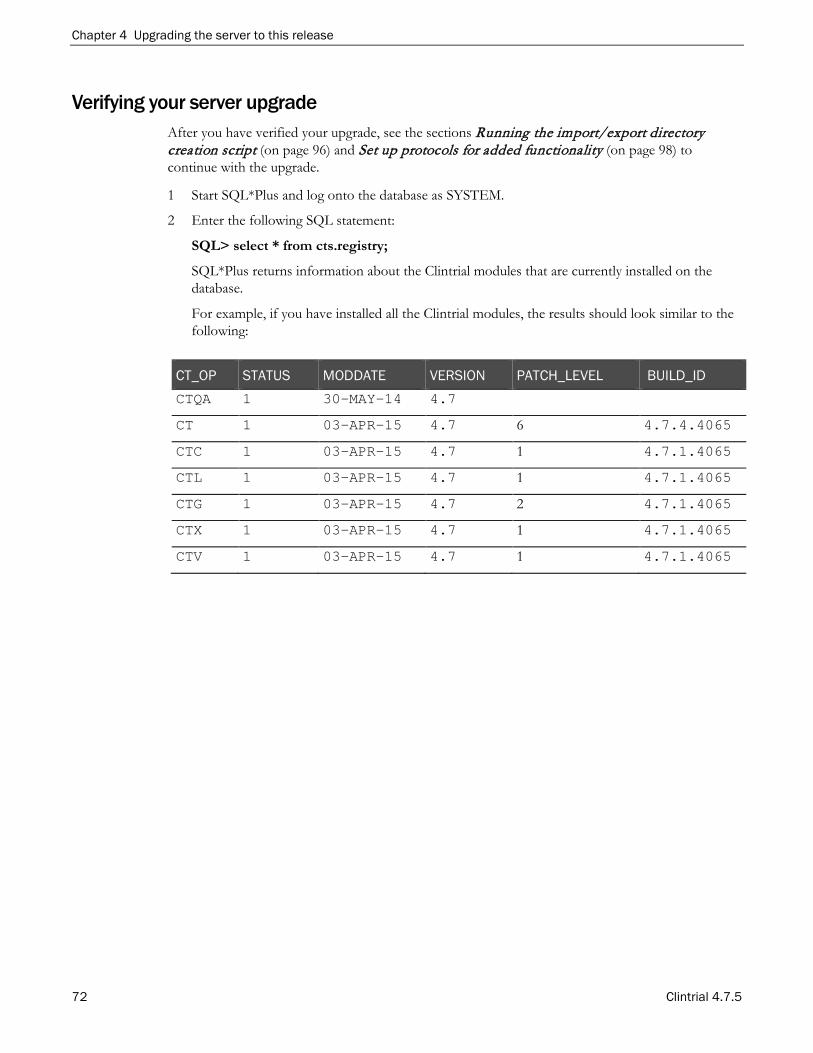
Chapter 4 Upgrading the server to this release
72 Clintrial 4.7.5
Verifying your server upgrade After you have verified your upgrade, see the sections Running the import/export directory creation script (on page 96) and Set up protocols for added functionality (on page 98) to continue with the upgrade.
1 Start SQL*Plus and log onto the database as SYSTEM.
2 Enter the following SQL statement:
SQL> select * from cts.registry;
SQL*Plus returns information about the Clintrial modules that are currently installed on the database.
For example, if you have installed all the Clintrial modules, the results should look similar to the following:
CT_OP STATUS MODDATE VERSION PATCH_LEVEL BUILD_ID CTQA 1 30-MAY-14 4.7
CT 1 03-APR-15 4.7 6 4.7.4.4065
CTC 1 03-APR-15 4.7 1 4.7.1.4065
CTL 1 03-APR-15 4.7 1 4.7.1.4065
CTG 1 03-APR-15 4.7 2 4.7.1.4065
CTX 1 03-APR-15 4.7 1 4.7.1.4065
CTV 1 03-APR-15 4.7 1 4.7.1.4065

Getting Started
Clintrial 4.7.5 73
Post-upgrade actions
Recreating Multisite Distribution database links If you decide not to use Unicode databases, when using Multisite Distribution, if you export databases from and then import them to a different Oracle release, you must manually recreate all Multisite database links after you upgrade to the Clintrial 4.7.5 software.
Rescheduling Multisite Replication Whether or not you use Unicode, if your Clintrial upgrade includes Multisite Replication, you must reschedule the time and the date for replication for all sites. If you do not, the status will not be updated. For details, see the document entitled Multisite, Chapter 5: Replication, the section entitled "Scheduling replication".
Upgrading Data Discrepancy Forms (DDFs) You need to perform the tasks below only if you have customized Data Discrepancy Forms (DDFs) in a prior release of Clintrial.
1 Upgrade from the installed version of PowerBuilder to PowerBuilder 12.5 on the Clintrial Client computer you wish to use for DDF customization. See your PowerBuilder documentation for upgrade instructions.
2 Copy the latest ctv_rept.pbl with your changes to a new directory. References to ctv_rept.pbl in the rest of this document refer to the one in the new directory.
3 Start PowerBuilder 12.5.
4 Click the New icon.
5 In the window that appears, select the Workspace tab and click the Workspace icon.
6 It will ask you for a new workspace file name. Navigate to the directory where you put the copied ctv_rept.pbl and type in a name for the workspace, e.g. DDF.
7 Click on the Library icon.
8 Select the ctv_rept.pbl in the new directory in the left-side window.
9 In the right-side window, double-click on the application in ctv_rept.pbl named default.
You will be asked if you want to add this target to your current workspace.
10 Click Yes.
You will be asked to select a library and application.
11 Select the application in ctv_rept.pbl (which is named default in the original ctv_rept.pbl) and click Next.
The next window displays the search path and shows the ctv_rept.pbl file.
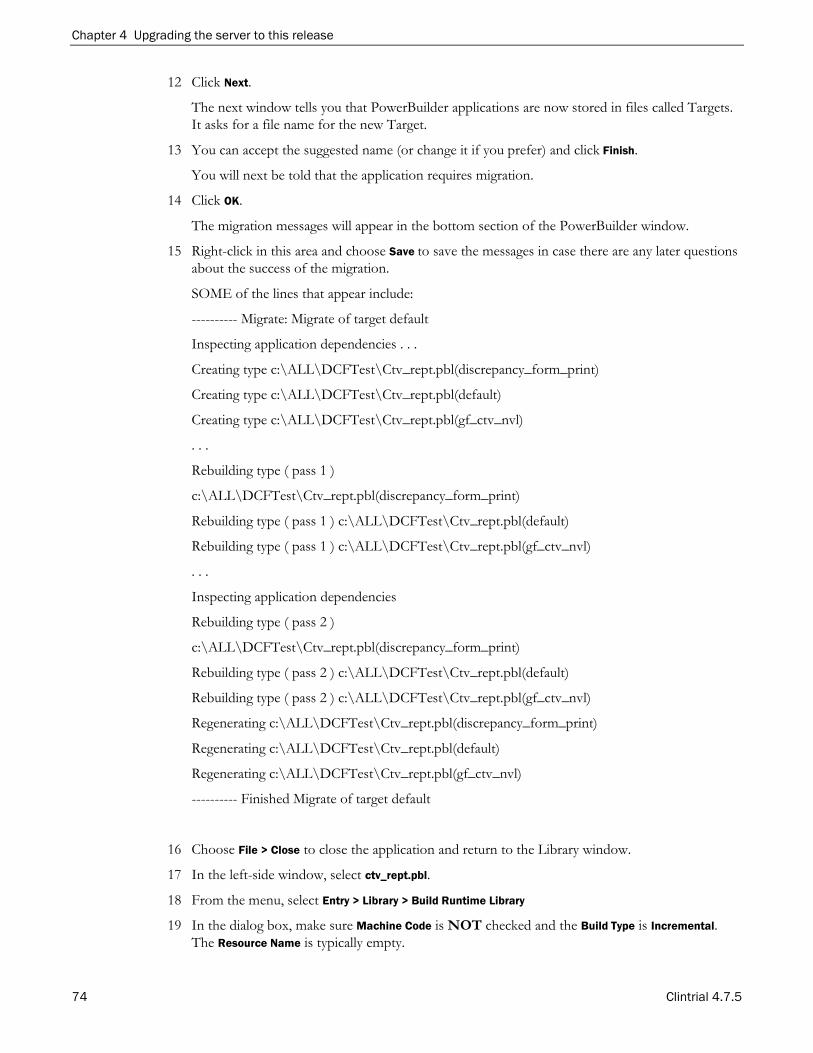
Chapter 4 Upgrading the server to this release
74 Clintrial 4.7.5
12 Click Next.
The next window tells you that PowerBuilder applications are now stored in files called Targets. It asks for a file name for the new Target.
13 You can accept the suggested name (or change it if you prefer) and click Finish.
You will next be told that the application requires migration.
14 Click OK.
The migration messages will appear in the bottom section of the PowerBuilder window.
15 Right-click in this area and choose Save to save the messages in case there are any later questions about the success of the migration.
SOME of the lines that appear include:
---------- Migrate: Migrate of target default
Inspecting application dependencies . . .
Creating type c:\ALL\DCFTest\Ctv_rept.pbl(discrepancy_form_print)
Creating type c:\ALL\DCFTest\Ctv_rept.pbl(default)
Creating type c:\ALL\DCFTest\Ctv_rept.pbl(gf_ctv_nvl)
. . .
Rebuilding type ( pass 1 )
c:\ALL\DCFTest\Ctv_rept.pbl(discrepancy_form_print)
Rebuilding type ( pass 1 ) c:\ALL\DCFTest\Ctv_rept.pbl(default)
Rebuilding type ( pass 1 ) c:\ALL\DCFTest\Ctv_rept.pbl(gf_ctv_nvl)
. . .
Inspecting application dependencies
Rebuilding type ( pass 2 )
c:\ALL\DCFTest\Ctv_rept.pbl(discrepancy_form_print)
Rebuilding type ( pass 2 ) c:\ALL\DCFTest\Ctv_rept.pbl(default)
Rebuilding type ( pass 2 ) c:\ALL\DCFTest\Ctv_rept.pbl(gf_ctv_nvl)
Regenerating c:\ALL\DCFTest\Ctv_rept.pbl(discrepancy_form_print)
Regenerating c:\ALL\DCFTest\Ctv_rept.pbl(default)
Regenerating c:\ALL\DCFTest\Ctv_rept.pbl(gf_ctv_nvl)
---------- Finished Migrate of target default
16 Choose File > Close to close the application and return to the Library window.
17 In the left-side window, select ctv_rept.pbl.
18 From the menu, select Entry > Library > Build Runtime Library
19 In the dialog box, make sure Machine Code is NOT checked and the Build Type is Incremental. The Resource Name is typically empty.
Getting Started
Clintrial 4.7.5 75
20 Click OK.
If you have a previous version of ctv_rept.pbd in the directory, you will be asked if it is okay to replace it.
21 Click Yes.
22 Check the informational messages at the bottom of the PowerBuilder window. There should not be any errors.
23 Find the directory on your system where Clintrial 4.7.5 is installed. Rename the ctv_rept.pbl and ctv_rept.pbd files that are there to indicate they are the original ones and from what patch level of Clintrial 4.7. If you prefer, you can put them in some other directory with the same information.
24 Copy the ctv_rept.pbl and ctv_rept.pbd files that you migrated to PowerBuilder 12.5 from the directory where you were working to the directory where Clintrial 4.7.5 is installed.
25 Exit PowerBuilder 12.5.
26 Test the Resolve module's use of your DDF.
Chapter 4 Upgrading the server to this release
76 Clintrial 4.7.5
If you are using Central Coding • If you are planning to use the Oracle Central Coding application, you must specifically grant
permissions via Access Control Lists (ACLs) for the HTTP requests.
• To use the Central Coding application with Oracle 11.2 or 12.1, you must explicitly grant permissions via ACLs to enable the HTTP request to connect to the Central Coding server.
1 Login to the Oracle Clintrial database as SYS.
2 Execute code similar to the following: BEGIN DBMS_NETWORK_ACL_ADMIN.CREATE_ACL ( acl => 'ct_cc.xml', description => 'Sample ACL for Central Coding', principal => 'CTPROC', is_grant => TRUE, privilege => 'connect'); end; / BEGIN DBMS_NETWORK_ACL_ADMIN.ASSIGN_ACL ( acl => 'ct_cc.xml', host => '<Central Coding Server''); END; / For further information on using Network ACLs, see Managing Fine-Grained Access in PL/SQL Network Utility Packages in the Oracle Database Security Guide.
• If you are planning to use the WCF-SECURE Central Coding service, you must:
• Create a user in Central Coding to authenticate the web service from Clintrial and enter user credentials in the CC_USER_NAME and CC_USER_PWD parameters.
For more information, see the Central Coding User Guide.
• Create an Oracle Wallet importing the Central Coding certificate on Clintrial database server and enter the Oracle Wallet details in the ORA_WALLET_LOC and ORA_WALLET_PWD parameters.
For more information, see Using Oracle Wallet Manager in the Oracle Database Advanced Security Administrator's Guide.

Getting Started
Clintrial 4.7.5 77
Create a verify function to ensure that passwords meet security standards You can create a password verification function to ensure that passwords meet the standards contained in the Clintrial system parameters or a database profile. This function can be assigned in the Clintrial application using the Admin system parameters, or be part of an Oracle database profile created for users or usergroups.
The Oracle Database Security Guide describes a method for enforcing password complexity for database user accounts. Briefly, the database administrator creates a password verification function and associates it with a user profile. In the Clintrial application, you also can associate the function using the system parameter in the Admin module. The sample given in the Oracle Database Security Guide associates this function with the DEFAULT profile. However, there are special considerations when applying this methodology to Clintrial.
• Non-user accounts, such as system accounts and the accounts for each protocol, use the DEFAULT database profile. The passwords are assigned during installation or upgrade, and encrypted. The resulting encrypted password strings are not constrained to specific characters, and therefore you cannot expect any verification function which relies on character comparisons, such as checking for the existence of at least one number and one non-number to work correctly. For that reason, Oracle strongly suggests that you do not add a verification function to the DEFAULT profile.
• In the case where the Clintrial PASSWORD_ENCRYPTION system parameter is set to No in the Admin module, an encryption verification function can be created and assigned using the Admin module. At least one additional profile must be created for use with Clintrial users, and that profile also can be associated with the verification function. For example, the below command creates a new profile. When creating users in Admin, you should create a profile like the below example and set additional profile limits like those in the DEFAULT profile:
CREATE PROFILE CT_USER_PROFILE LIMIT PASSWORD_VERIFY_FUNCTION <function_name>;
• In the case where the PASSWORD_ENCRYPTION system parameter is set to Yes, the verification function should not be associated with any profiles which are used for Clintrial users in the Admin module system parameters. Similar to the Protocol account case, the encrypted passwords would not function as expected.
This new system parameter that has been added (PASSWORD_VFY_FUNC) allows the Administrator to specify the name of a password verification function which will be called from Clintrial before the encryption of the password. The function is applied to all Clintrial users created in Admin during creation of the users as well as modification of the password by either the Administrator or the user.
The function must have the same parameters as described in the Oracle database documentation. It does not have to be installed into the SYS account. The value of the system parameter should specify the owner and function name, for example, SYS.CT_VFY_FUNC. Additionally, execute privileges on this function must be granted to the system account CTPROC, using this command:
Grant execute on <function_name> to CTPROC;
For the Clintrial system account CTSYS, the function cannot be defined and called until after core server installation has succeeded, so the initial CTSYS password supplied during installation is not checked in this way.

Chapter 4 Upgrading the server to this release
78 Clintrial 4.7.5
Example verify function CREATE OR REPLACE FUNCTION verify_function_11G_1 (username varchar2, password varchar2, old_password varchar2) RETURN boolean IS n boolean; m integer; differ integer; isdigit boolean; ischar boolean; ispunct boolean; db_name varchar2(40); digitarray varchar2(20); punctarray varchar2(25); chararray varchar2(52); i_char varchar2(10); simple_password varchar2(10); reverse_user varchar2(32); BEGIN digitarray:= '0123456789'; chararray:= 'abcdefghijklmnopqrstuvwxyzABCDEFGHIJKLMNOPQRSTUVWXYZ'; -- Check for the minimum length of the password IF length(password) < 8 THEN raise_application_error(-20001, 'Password length less than 8'); END IF; -- Check if the password is same as the username or username(1-100) IF NLS_LOWER(password) = NLS_LOWER(username) THEN raise_application_error(-20002, 'Password same as or similar to user'); END IF; FOR i IN 1..100 LOOP i_char := to_char(i); if NLS_LOWER(username)|| i_char = NLS_LOWER(password) THEN raise_application_error(-20005, 'Password same as or similar to user name '); END IF; END LOOP; -- Check if the password is same as the username reversed FOR i in REVERSE 1..length(username) LOOP reverse_user := reverse_user || substr(username, i, 1); END LOOP; IF NLS_LOWER(password) = NLS_LOWER(reverse_user) THEN raise_application_error(-20003, 'Password same as username reversed'); END IF; -- Check if the password is the same as server name and or servername(1-100) select name into db_name from sys.v$database; if NLS_LOWER(db_name) = NLS_LOWER(password) THEN raise_application_error(-20004, 'Password same as or similar to server name'); END IF; FOR i IN 1..100 LOOP i_char := to_char(i); if NLS_LOWER(db_name)|| i_char = NLS_LOWER(password) THEN raise_application_error(-20005, 'Password same as or similar to server name '); END IF; END LOOP;

Getting Started
Clintrial 4.7.5 79
-- Check if the password is too simple. A dictionary of words may be -- maintained and a check may be made so as not to allow the words -- that are too simple for the password. IF NLS_LOWER(password) IN ('welcome1', 'database1', 'account1', 'user1234', 'password1', 'oracle123', 'computer1', 'abcdefg1', 'change_on_install') THEN raise_application_error(-20006, 'Password too simple'); END IF; -- Check if the password is the same as oracle (1-100) simple_password := 'oracle'; FOR i IN 1..100 LOOP i_char := to_char(i); if simple_password || i_char = NLS_LOWER(password) THEN raise_application_error(-20007, 'Password too simple '); END IF; END LOOP; -- Check if the password contains at least one letter, one digit -- 1. Check for the digit isdigit:=FALSE; m := length(password); FOR i IN 1..10 LOOP FOR j IN 1..m LOOP IF substr(password,j,1) = substr(digitarray,i,1) THEN isdigit:=TRUE; GOTO findchar; END IF; END LOOP; END LOOP; IF isdigit = FALSE THEN raise_application_error(-20008, 'Password must contain at least one digit, one character'); END IF; -- 2. Check for the character <<findchar>> ischar:=FALSE; FOR i IN 1..length(chararray) LOOP FOR j IN 1..m LOOP IF substr(password,j,1) = substr(chararray,i,1) THEN ischar:=TRUE; GOTO endsearch; END IF; END LOOP; END LOOP; IF ischar = FALSE THEN raise_application_error(-20009, 'Password must contain at least one \ digit, and one character'); END IF; <<endsearch>> -- Check if the password differs from the previous password by at least -- 3 letters IF old_password IS NOT NULL THEN differ := length(old_password) - length(password); differ := abs(differ); IF differ < 3 THEN IF length(password) < length(old_password) THEN m := length(password); ELSE m := length(old_password); END IF; FOR i IN 1..m LOOP IF substr(password,i,1) != substr(old_password,i,1) THEN

Chapter 4 Upgrading the server to this release
80 Clintrial 4.7.5
differ := differ + 1; END IF; END LOOP; IF differ < 3 THEN raise_application_error(-20011, 'Password should differ from the \ old password by at least 3 characters'); END IF; END IF; END IF; -- Everything is fine; return TRUE ; RETURN(TRUE); END; / CREATE PROFILE CT_USER_PROFILE1 LIMIT PASSWORD_VERIFY_FUNCTION verify_function_11G_1; /
Configure Network Data Encryption and Integrity for Oracle Servers and Clients If you are planning to configure network data encryption and integrity, add the following settings to server and client sqlnet.ora files.
On the server:
SQLNET.ENCRYPTION_SERVER = REQUIRED SQLNET.ENCRYPTION_TYPES_SERVER = (valid_encryption_algorithm) SQLNET.CRYPTO_CHECKSUM_SERVER = REQUIRED SQLNET.CRYPTO_CHECKSUM_TYPES_SERVER = (valid_crypto_checksum_algorithm)
On the client:
SQLNET.ENCRYPTION_CLIENT = REQUIRED SQLNET.ENCRYPTION_TYPES_CLIENT = (valid_encryption_algorithm) SQLNET.CRYPTO_CHECKSUM_CLIENT = REQUIRED SQLNET.CRYPTO_CHECKSUM_TYPES_CLIENT = (valid_crypto_checksum_algorithm)
For more information on setting up the network data encryption, see Configuring Network Data Encryption and Integrity for Oracle Servers and Clients in the Oracle Database Advanced Security Administrator's Guide.

Clintrial 4.7.5 81
In this chapter Installing the Oracle client software .................................................................................................. 82
Important configuration information ................................................................................................ 83
Installing or upgrading the Clintrial client software ........................................................................ 84
Starting a Clintrial module ................................................................................................................... 86
C H A P T E R 5 Installing, upgrading, and maintaining the client software
Chapter 5 Installing, upgrading, and maintaining the client software
82 Clintrial 4.7.5
Installing the Oracle client software This section applies to customers who are installing the Oracle 11.2.0.4 or 12.1 client software for the first time or upgrading the Oracle client software.
Getting Started
Clintrial 4.7.5 83
Important configuration information If you have multiple Oracle Homes on your computer, make sure the Default Oracle Home is set to the Oracle client that matches the version of the Oracle database to which you are connecting. The Default Oracle Home can be changed using the Universal Installer.
Review the NLS_LANG setting for the Oracle client prior to using the Clintrial software. The Oracle database uses the client's NLS_LANG setting to determine the character set that the client is sending and to determine if character set conversion is necessary. If the NLS_LANG setting is not correct, data integrity and consistency might be compromised.
For example, if you are using the Windows Japanese client, and the SQL scripts or control files you will use to load data into the new or upgraded Clintrial database will be in ANSI, then the NLS_LANG setting for the client could be either the default JAPANESE_JAPAN.JA16SJIS or JAPANESE_JAPAN.JA16SJISTILDE.
If, on the other hand, you are using the Windows Japanese client, and the SQL scripts or control files you will use to load data into the new or upgraded Clintrial database will be in UTF-8, then the NLS_LANG setting for the client should be JAPANESE_JAPAN.AL32UTF8.
The NLS_LANG equivalents for the Windows English client are:
• ANSI - AMERICAN_AMERICA.WE8MSWIN1252
• UTF-8 - AMERICAN_AMERICA.AL32UTF8
For more information, on the SQL scripts and control files for loading data, see Chapter 30: Control Files in Clintrial 4.7 Manage, Classify, and Labloader guide.
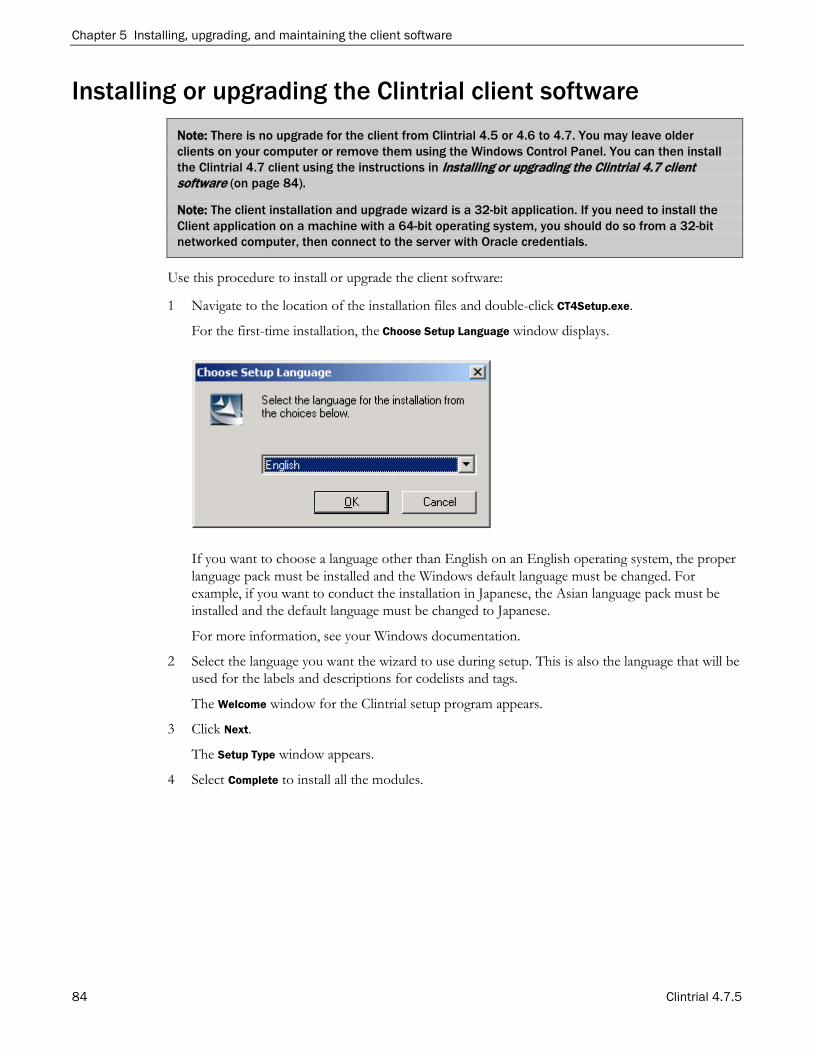
Chapter 5 Installing, upgrading, and maintaining the client software
84 Clintrial 4.7.5
Installing or upgrading the Clintrial client software Note: There is no upgrade for the client from Clintrial 4.5 or 4.6 to 4.7. You may leave older clients on your computer or remove them using the Windows Control Panel. You can then install the Clintrial 4.7 client using the instructions in Installing or upgrading the Clintrial 4.7 client software (on page 84).
Note: The client installation and upgrade wizard is a 32-bit application. If you need to install the Client application on a machine with a 64-bit operating system, you should do so from a 32-bit networked computer, then connect to the server with Oracle credentials.
Use this procedure to install or upgrade the client software:
1 Navigate to the location of the installation files and double-click CT4Setup.exe.
For the first-time installation, the Choose Setup Language window displays.
If you want to choose a language other than English on an English operating system, the proper language pack must be installed and the Windows default language must be changed. For example, if you want to conduct the installation in Japanese, the Asian language pack must be installed and the default language must be changed to Japanese.
For more information, see your Windows documentation.
2 Select the language you want the wizard to use during setup. This is also the language that will be used for the labels and descriptions for codelists and tags.
The Welcome window for the Clintrial setup program appears.
3 Click Next.
The Setup Type window appears.
4 Select Complete to install all the modules.
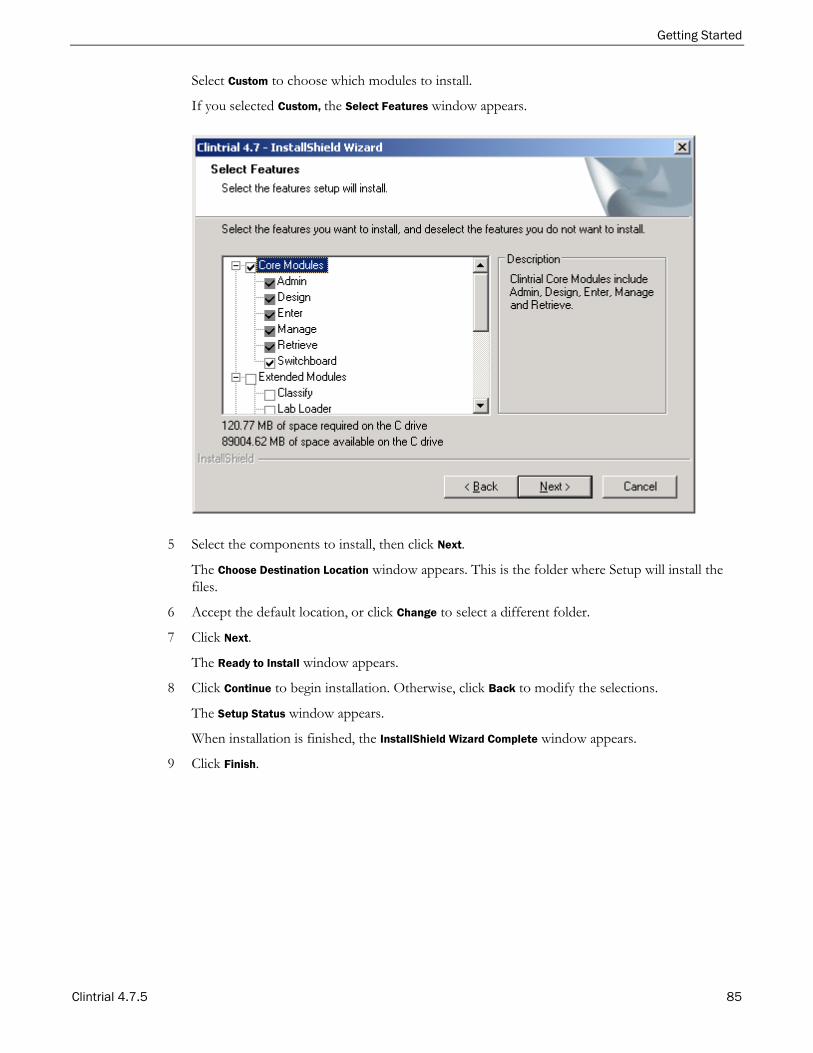
Getting Started
Clintrial 4.7.5 85
Select Custom to choose which modules to install.
If you selected Custom, the Select Features window appears.
5 Select the components to install, then click Next.
The Choose Destination Location window appears. This is the folder where Setup will install the files.
6 Accept the default location, or click Change to select a different folder.
7 Click Next.
The Ready to Install window appears.
8 Click Continue to begin installation. Otherwise, click Back to modify the selections.
The Setup Status window appears.
When installation is finished, the InstallShield Wizard Complete window appears.
9 Click Finish.
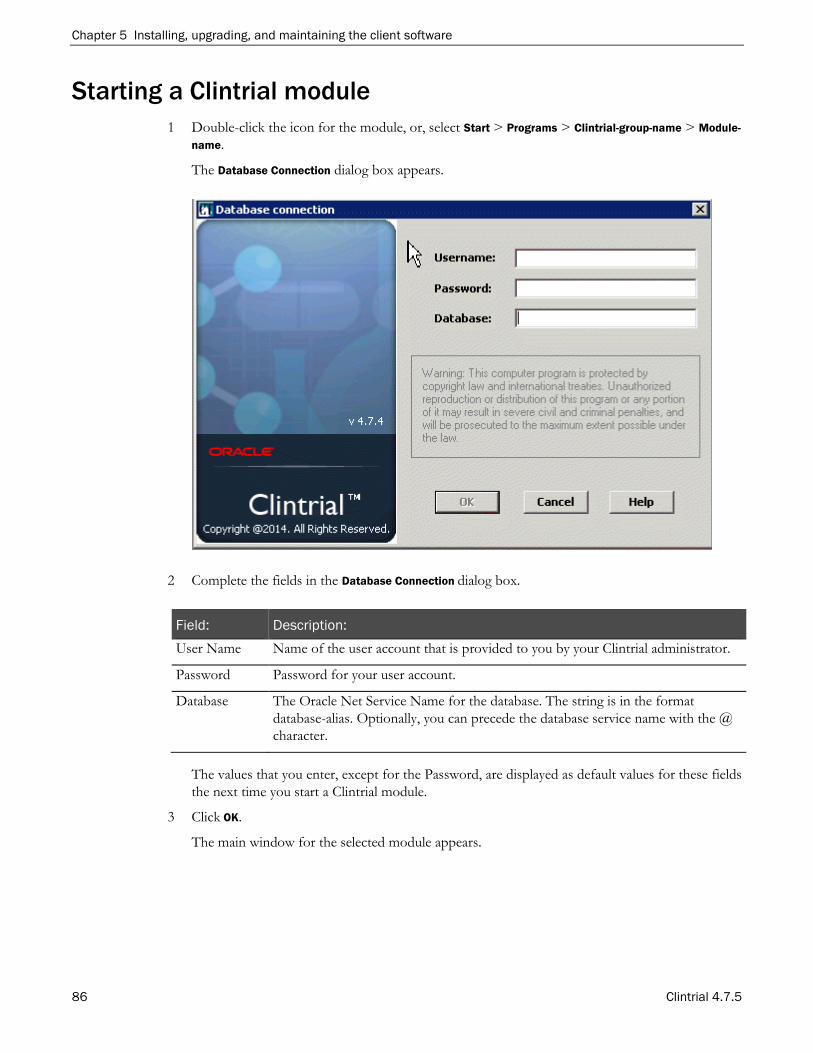
Chapter 5 Installing, upgrading, and maintaining the client software
86 Clintrial 4.7.5
Starting a Clintrial module 1 Double-click the icon for the module, or, select Start > Programs > Clintrial-group-name > Module-
name.
The Database Connection dialog box appears.
2 Complete the fields in the Database Connection dialog box.
Field: Description: User Name Name of the user account that is provided to you by your Clintrial administrator.
Password Password for your user account.
Database The Oracle Net Service Name for the database. The string is in the format database-alias. Optionally, you can precede the database service name with the @ character.
The values that you enter, except for the Password, are displayed as default values for these fields the next time you start a Clintrial module.
3 Click OK.
The main window for the selected module appears.

Clintrial 4.7.5 87
In this chapter Overview ................................................................................................................................................ 88
Setting registry entries manually ......................................................................................................... 89
About the Ct4user.reg file ................................................................................................................... 90
Setting up multiple users on a single client ....................................................................................... 92
About network installation .................................................................................................................. 94
C H A P T E R 6 The Clintrial client software Windows Registry settings
Chapter 6 The Clintrial client software Windows Registry settings
88 Clintrial 4.7.5
Overview You do not need to set any registry entries manually. However, there are several registry entries that you might want to set.
Caution: Do not edit registry entries unless you are an experienced user. If you edit other entries, you could create a Clintrial configuration that could lead to unexpected results. Always back up your registry before making any changes. For more information, see your system administrator.
Much of the Clintrial configuration information is stored in the Clintrial database as system parameters, user preferences, and protocol parameters. However, some configuration information is specific to each computer and is stored in the Windows registry of the client. Most of this client-based information is generated automatically from the following sources:
• Control Panel setting:
For example, the Windows registry of each client uses the values in the Regional Settings Properties dialog box to define the display format of a number, such as the decimal point character, or the number of decimal places.
• Information supplied by users through the Clintrial modules.
For example:
• Database connection information that the user supplies in the Database Connection dialog box is stored in the registry for use at the next database connection attempt from that client.
• Information about site-specific menus is stored in the registry.
Note: Each new client installation uses the Windows registry settings from the previous installation, unless the settings are changed during the installation.
Editing the Windows registry 1 Select Start > Run.
2 Enter Regedit and click OK.
The Registry Editor window appears.
3 Expand the HKEY_CURRENT_USER folder, and navigate to the Windows registry key for the Clintrial entries:
HKEY_CURRENT_USER\Software\OracleHS\Clintrial 4.7\CT
4 Create a new registry entry and enter a value, or select an existing entry and modify the value as needed.
Getting Started
Clintrial 4.7.5 89
Setting registry entries manually You may want to create and set the following registry settings:
• ct_temp_path key (on page 89).
• ct_help_path key (on page 89).
• ct_user_help_path key (on page 89).
Note: These keys are not created automatically during the Clintrial installation and must be created manually using the Windows Regedit program.
About the ct_temp_path key When you install the Clintrial client, the ct_path value is set to the location of the Clintrial executables, as specified in the setup program. The default ct_path value is c:\ct47.
You should create and specify the ct_temp_path value if you install the Clintrial software to a folder whose name contains a space. For the ct_temp_path value, you must manually create a folder whose name does not contain a space and edit the Windows registry accordingly. In the Windows registry, create a new string value named ct_temp_path and give it the value of the temporary folder.
Note: Because the previous Oracle Utilities could not export or import to a folder whose name contains spaces, the folder you create for the ct_temp_path value is used when you perform imports of legacy files.
About the ct_help_path key When you install the Clintrial client, the Help files are installed at the location of the Clintrial client executables, as specified in the setup program. If you change the location of Help files, you must create the ct_help_path value in the Windows registry and point it to that location.
About the ct_user_help_path key If you create your own protocol-specific Help file, you must create and specify a ct_user_help_path value in the Windows registry to point to the location of the Help file.
Chapter 6 The Clintrial client software Windows Registry settings
90 Clintrial 4.7.5
About the Ct4user.reg file The Ct4user.reg file, that is installed with all client software, creates the ct_exe_path key and the ct_path key during client installation. You must edit and rerun the Ct4user.reg file if you are:
• Setting up multiple users on a single client (on page 92).
• Installing the Clintrial Client over a network (on page 94).
Note: The registry settings that are established when you run the ct4user.reg file affect only the current Windows user. Each Windows user who wants to run the Clintrial software must run the Ct4user.reg file.
Contents of the Ct4user.reg file The Ct4user.reg file contents are as follows:
REGEDIT4
;; ------------------------------------ ;; CT4USER.REG ;; ;; Clintrial 4 User Registration File ;; ------------------------------------ ;; Notes: This file is distributed as a template. The values ;; used for ct_path and ct_exe_path are default values ;; and may not reflect the location to which the software ;; was installed. The values may be modified according to ;; the following: ;; ;; "ct_exe_path" Points to the directory where the Clintrial4 ;; client software was installed. ;; ;; "ct_path" Points to a user specific directory. By default ;; it is set to the same directory as ct_exe_path, ;; but may be modified to reference a user specific ;; location. This may be desirable in the case of ;; multiple users running the software on a single ;; workstation, or in the case of a shared network ;; installation. Clintrial uses this location to ;; write log files and other user specific data. ;; ;; "language_id" Refers to the language selected during installation. [HKEY_CURRENT_USER\Software\OracleHS\Clintrial 4.7\CT] "ct_path"="C:\\Program Files\\OracleHS\\Clintrial 4.7" "ct_exe_path"="C:\\Program Files\\OracleHS\\Clintrial 4.7" "ct_temp_path"="C:\\temp" "language_id"="1"
Note: The Ct4user.reg file is delivered with the default values shown (C:\CT47) for ct_path and ct_exe_path. The Ct4user.reg file will contain the new values even if the destination folder is changed.

Getting Started
Clintrial 4.7.5 91
Running the Ct4user.reg file
Note: Before you run the Ct4user.reg file, modify the values of ct_path and ct_exe_path in the ct4user.reg file. Then, when you run the file, the ct_path and ct_exe_path are set according to the modifications you made.
• Double-click the ct4user.reg file.
The ct_path and ct_exe_path are set in the current Windows user’s registry on the client.
Verifying registry settings Run Switchboard.
If ct_path and ct_exe_path are set correctly, the bitmaps for all installed client modules appear in the Switchboard window.
If the module bitmaps do not appear, there is a problem with the registry settings.
For more information, see When a system administrator installs the Clintrial software (on page 93).
Chapter 6 The Clintrial client software Windows Registry settings
92 Clintrial 4.7.5
Setting up multiple users on a single client Note: To avoid possible conflicts in files that are stored on the client and are used by the Clintrial software, different users of a single client (that is, users who log on to the same client with different Windows user names) must run the Ct4user.reg file and set the ct_path and ct_exe_path.
For each user of a single client:
• Set the ct_exe_path to the folder where the Clintrial software is installed.
• Set the ct_path to a unique folder for each Windows user name.
Caution: If the ct_path is not set to a different folder for each Windows user, conflicts can occur in log files and import/export files.
If multiple Clintrial users log on to a single client, each user must:
1 Create a different folder, separate from the folder that contains the Clintrial client software.
2 Edit the Ct4user.reg file:
• Setting ct_path to the folder created in Step 1.
• Setting ct_exe_path to the folder where the Clintrial software is installed.
3 Run the Ct4user.reg file.
For more information, see Running the Ct4user.reg file (on page 91).
Example Dr. Smith and Dr. Jones want to use the Clintrial software on the same client.
Dr. Smith must:
1 Log on to the client using his client user account.
2 Create a folder for the files.
3 Edit the Ct4user.reg file to reflect the locations of the ct_path and ct_exe_path folders.
For example:
ct_path:c:\CT47_Dr_Smith ct_exe_path:c:\CT47
4 Run the Ct4user.reg file.
Dr. Jones must:
1 Log on to the client using the client user account.
2 Create a folder for the files, different from Dr. Smith’s folder.
Getting Started
Clintrial 4.7.5 93
3 Edit the Ct4user.reg file to reflect the locations of the ct_path and ct_exe_path folders.
For example:
ct_path:c:\CT47_Dr_Jones ct_exe_path:c:\CT47
4 Run the Ct4user.reg file.
When a system administrator installs the Clintrial software Depending on your procedures, a system administrator may log on to your client and install the Clintrial software. When you use the Clintrial software, you will probably log on to the client under a different user account than the administrator.
Caution: In this situation, the registry entries for your client user account are not set, and you cannot use the Clintrial software.
1 Log on to the client using your own client user account.
2 Edit the Ct4user.reg file:
• Set ct_path to the folder where you will store the Clintrial software-related files.
• Set ct_exe_path to the folder where the system administrator installed the Clintrial software.
3 Run the ct4user.reg file.
For more information, see Running the Ct4user.reg file (on page 91).
Chapter 6 The Clintrial client software Windows Registry settings
94 Clintrial 4.7.5
About network installation If you setup a network installation, you must modify the ct_path and ct_exe_path keys and run the Ct4user.reg file on each client using the network installation. For more information, see Running the Ct4user.reg file (on page 91).
Caution: Oracle does not recommend network installations of the Clintrial client software because performance is typically degraded in such configurations.
Note: Setting up clients with a network installation does not automatically create desktop shortcuts to the Clintrial software. You must manually create shortcuts to network applications.
Modifying the ct_path and the ct_exe_path keys For the ct_path key:
• On each client, in ct4user.re file, change the ct_path key so that it points to a location on the client to store log files.
For example:
ct_path:d:\CT47_Dr_Jones
This location is also used as the default folder when importing and exporting protocols, and when batch loading data.
Caution: Do not point the ct_path to a shared location on the network.
For the ct_exe_path key:
• On each client, in ct4user.re file, change the ct_pathkey so that it points to the location of the shared Clintrial installation on the network.
For example:
ct_exe_path:G:\ct47_network_installation

Clintrial 4.7.5 95
In this chapter Exporting and importing codelists and protocols ........................................................................... 96
Set up protocols for added functionality ........................................................................................... 98
C H A P T E R 7 Exporting, importing, and setting up codelists and protocols
Chapter 7 Exporting, importing, and setting up codelists and protocols
96 Clintrial 4.7.5
Exporting and importing codelists and protocols Two methods of exporting and importing codelists and protocols are supported in the current release of the Clintrial software.
The recommended method uses Oracle’s Data Pump Export and Import utilities (named expdp and impdp by Oracle). The design of these utilities results in greatly enhanced data movement performance over the original Export and Import utilities. They are available as Export and Import in the Design module.
Note: If you are exporting then importing a non-Unicode database to an Oracle 11.2 or 12.1 installation, you must use the expdp and impdp utilities.
The second method supported for export and import uses the original Oracle utilities (named exp and imp by Oracle). These are the same utilities supported in Clintrial 4.6, and are now called Legacy Export and Legacy Import, and are available in Design.
For more information, see Chapter 20 in the Clintrial Admin and Design document.
Note: When importing a protocol from Clintrial 4.6, there may be Oracle errors generated in the associated logs with error ORA-39152. Despite these error messages, the protocol has been successfully imported. These error messages may be safely ignored.
Run the import/export directory creation script To use the Clintrial software to import/export protocols or codelists using Oracle’s Data Pump Export (expdp) and Import (impdp) utilities, you must create at least one Oracle directory on the Clintrial server to hold the files.
Oracle provides a script (ctdirect.sql) to assist in this process. The script creates two directories; one for data (CT_DATAPUMP_DIR) and one for log files (CT_DATAPUMP_LOG) and grants rights to the Design users.
Caution: At any of the prompts for an account password, the installation aborts if you enter the incorrect password.
1 Start SQL*Plus from the appropriate installation directory and log on to the database instance.
2 Run the ctdirect.sql script:
SQL> @ctdirect
You are prompted to enter a connection string.
3 Enter the @ symbol followed by the instance (or service) name to connect to.
You are prompted to enter the Clintrial CTPROC Account Password.
4 Enter the CTPROC Account Password.
You are prompted to enter the full path for the directory files for the Clintrial Import/Export.
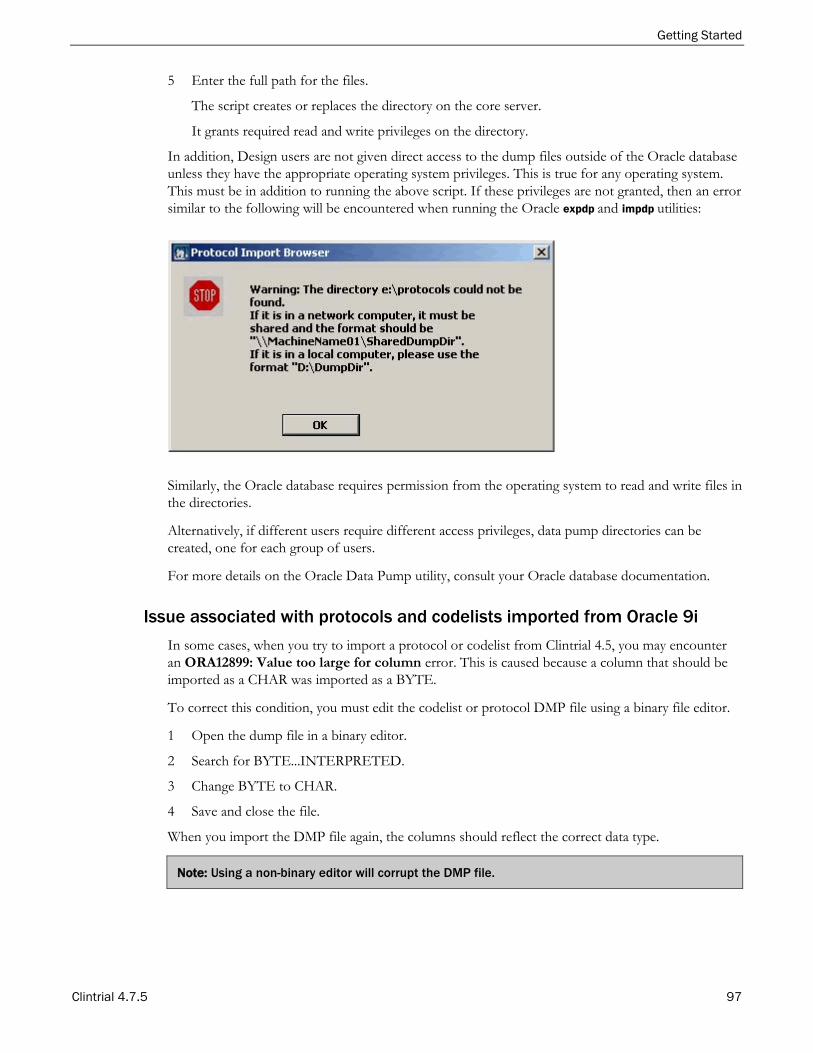
Getting Started
Clintrial 4.7.5 97
5 Enter the full path for the files.
The script creates or replaces the directory on the core server.
It grants required read and write privileges on the directory.
In addition, Design users are not given direct access to the dump files outside of the Oracle database unless they have the appropriate operating system privileges. This is true for any operating system. This must be in addition to running the above script. If these privileges are not granted, then an error similar to the following will be encountered when running the Oracle expdp and impdp utilities:
Similarly, the Oracle database requires permission from the operating system to read and write files in the directories.
Alternatively, if different users require different access privileges, data pump directories can be created, one for each group of users.
For more details on the Oracle Data Pump utility, consult your Oracle database documentation.
Issue associated with protocols and codelists imported from Oracle 9i In some cases, when you try to import a protocol or codelist from Clintrial 4.5, you may encounter an ORA12899: Value too large for column error. This is caused because a column that should be imported as a CHAR was imported as a BYTE.
To correct this condition, you must edit the codelist or protocol DMP file using a binary file editor.
1 Open the dump file in a binary editor.
2 Search for BYTE...INTERPRETED.
3 Change BYTE to CHAR.
4 Save and close the file.
When you import the DMP file again, the columns should reflect the correct data type.
Note: Using a non-binary editor will corrupt the DMP file.

Chapter 7 Exporting, importing, and setting up codelists and protocols
98 Clintrial 4.7.5
Set up protocols for added functionality • CTL_REFERENCE—Protocol that adds to Lab Loader functionality.
• CTRESOLVEREF—Protocol that stores discrepancy configuration information in the Resolve module.
• CT_MEDDRA—Thesaurus protocol that you can use to hold MedDRA dictionary data for use with the Manage module.
• CTG_MEDDRA—Extended thesaurus protocol that you can use to hold MedDRA dictionary data for use with the Classify module.
• CTG_WHODD—Extended thesaurus protocol that you can use to hold your WHO-DD data for use with the Classify module.
To set up these protocols, you must use a Clintrial client on which the following components have been installed:
• The Oracle Import utility.
• The Design module.
The Clintrial DMP files must be copied to the server in an accessible directory, for example:
CT_DATAPUMP_DIR
Note: The required DMP files are also included with the ct47_smp.tar file and the respective server TAR files.
For more information about setting up the protocols distributed with the Clintrial software, see Medika Sample Studies (on page 101).
Setting up the CTL_REFERENCE protocol To complete the setup of the Lab Loader module, you must import the CTL_REFERENCE protocol, and then run the script to install the CTL_FUNC package.
1 Install the client software, as described in Installing , upgrading, and maintaining the client software (on page 81).
2 Start the Design module with the user name CTSYS, for which the default password is CTSYS.
3 Import the following protocol export DMP file:
ctl_re_md.dmp
Note: You must name the protocol that you are importing CTL_REFERENCE.
4 From the Lab Loader installation directory, run the ctlinstfunc.sql script:
SQL> @ctlinstfunc
Getting Started
Clintrial 4.7.5 99
Setting up the CTRESOLVEREF protocol
Importing the CTRESOLVEREF protocol To complete the Resolve installation, you must import the CTRESOLVEREF protocol.
1 Install the client software, as described in Installing , upgrading, and maintaining the client software (on page 81).
2 Start the Design module with the user name CTSYS.
3 Import the following protocol export DMP file, which is located in the ct47\resolve directory on the client and in the ct47_smp.tar file:
ct_reso_md.dmp
You must name the new protocol that you are importing CTRESOLVEREF.
For more information about setting up the Medika Clinical Sample Study, see Medika Sample Studies (on page 101).
For more information about importing protocols, see the Design section in the Admin and Design guide and the Design Help.
Setting up the CT_MEDDRA thesaurus protocol If you plan to use the MedDRA dictionary with the Manage module, you must:
1 Import the CT_MEDDRA protocol, including creating the tables.
The DMP file for this protocol is:
ct_med_m.dmp
2 Optionally, log on to the CTPROC account in SQL*Plus and execute the functions in the ct_meddra_util.create_meddra_indexes and ct_meddra_util.create_medra_functions packages, as follows:
SQL> EXECUTE ct_meddra_util.create_meddra_indexes(‘CT_MEDDRA’)
SQL> EXECUTE ct_meddra_util.create_meddra_functions(‘CT_MEDDRA’);
For more information, see:
• The description of the CT_MEDDRA thesaurus protocol in the Design section in the Admin and Design guide.
• The description of the MedDRA-related functions in the Clintrial Reference Guide.
3 Batch load MedDRA data into this protocol.
For more information about importing protocols, thesaurus protocols, and protocol parameters, see the Admin and Design guide and the Design online Help.

Chapter 7 Exporting, importing, and setting up codelists and protocols
100 Clintrial 4.7.5
Setting up the GCT_MEDDRA thesaurus protocol The GCT_MEDDRA protocol is delivered with the Clintrial software. This is an extended thesaurus protocol to hold MedDRA data for use with the Classify module. If you plan to use MedDRA with the Classify module, you must set up this protocol, including setting its associated extended thesaurus protocol parameter.
1 Import the GCT_MEDDRA protocol.
The metadata DMP file for this protocol is:
gct_meddra_m.dmp
2 In the Design module, in the Protocol Browser, select the GCT_MEDDRA protocol.
Select Protocol > Parameters.
The Modify Protocol Parameters dialog box appears.
3 From the drop-down list next to the CTG_THES_TYPE parameter, select MEDDRA.
4 If the name of the column holding the lower level term text in the LOW_LEVEL_TERM table has been changed from LLT_NAME, enter the correct name in the CTG_MEDDRA_TERM_COL parameter.
5 Click OK.
6 Batch load MedDRA data into the protocol.
For more information about importing protocols, thesaurus protocols, and protocol parameters, see the Admin and Design guide and the Design Help.
For more information about using thesaurus protocols with the Classify module, see the Manage, Classify, & Lab Loader guide and the Classify online Help.
Setting up the GCT_WHODD thesaurus protocol The GCT_WHODD thesaurus protocol is delivered with the Clintrial software. This is an extended thesaurus protocol to hold WHO-DD data for use with the Classify module. If you plan to use the WHO-DD with the Classify module, you must set up this protocol, including setting its associated extended thesaurus protocol parameter.
1 Import the GCT_WHODD protocol.
The metadata and data DMP file for this protocol is:
gct_whodd_md.dmp
2 In the Design module, in the Protocol Browser, select the GCT_WHODD protocol.
Select Protocol > Parameters.
The Modify Protocol Parameters dialog box appears.
Getting Started
Clintrial 4.7.5 101
3 From the drop-down list next to the CTG_THES_TYPE parameter, select the value WHODD.
Click OK.
For more information about importing protocols, thesaurus protocols, and protocol parameters, see the Admin and Design guide and the Design online Help.
For more information about using thesaurus protocols with the Classify module, see the Manage, Classify, and Labloader guide and the Classify online Help.
Setting up the Mini Medika Sample Study The Mini Medika Sample Study is a simple clinical data protocol that you can import immediately after installation without any additional setup. Use it to test protocol import and see an example of a Clintrial study book.
1 Install the Oracle and the Clintrial software on the server.
2 Install the Oracle and the Clintrial software on the client computers.
3 Using the Design module, import ct_mini_md.dmp to create the MINI_MEDIKA clinical data protocol.
For more information, see the Design section in the Admin and Design guide.
Setting up the Medika or CDISC Medika Clinical Sample Studies For details about each step in setting up the Medika Sample Studies, see the following sections:
Workflow Steps References
� Install:
• The Oracle and the Clintrial software.
• The Resolve module (optional).
Step 1 (on page 103)
Install the Oracle and Clintrial 4.7 software on the client computers (including, optionally, the Resolve module).
Step 2 (on page 103)
� Using the Design module, import the following optional protocols:
• CTRESOLVEREF protocol—Optional, for use with the Resolve module.
• CTL_REFERENCE protocol—Optional, for use with the Lab Loader module.
• LAB_NORMALS protocol—Optional, for use with the Lab Loader module only in the sample study.
Step 3 (on page 104)
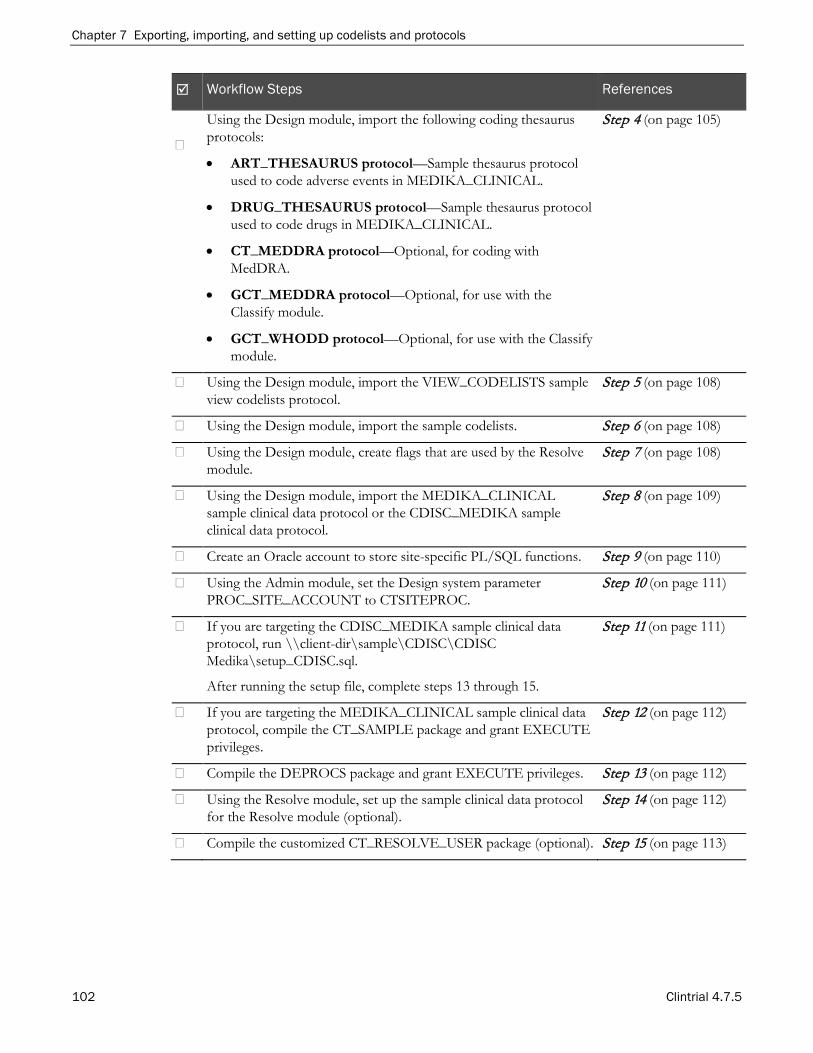
Chapter 7 Exporting, importing, and setting up codelists and protocols
102 Clintrial 4.7.5
Workflow Steps References
�
Using the Design module, import the following coding thesaurus protocols:
• ART_THESAURUS protocol—Sample thesaurus protocol used to code adverse events in MEDIKA_CLINICAL.
• DRUG_THESAURUS protocol—Sample thesaurus protocol used to code drugs in MEDIKA_CLINICAL.
• CT_MEDDRA protocol—Optional, for coding with MedDRA.
• GCT_MEDDRA protocol—Optional, for use with the Classify module.
• GCT_WHODD protocol—Optional, for use with the Classify module.
Step 4 (on page 105)
� Using the Design module, import the VIEW_CODELISTS sample view codelists protocol.
Step 5 (on page 108)
� Using the Design module, import the sample codelists. Step 6 (on page 108)
� Using the Design module, create flags that are used by the Resolve module.
Step 7 (on page 108)
� Using the Design module, import the MEDIKA_CLINICAL sample clinical data protocol or the CDISC_MEDIKA sample clinical data protocol.
Step 8 (on page 109)
� Create an Oracle account to store site-specific PL/SQL functions. Step 9 (on page 110)
� Using the Admin module, set the Design system parameter PROC_SITE_ACCOUNT to CTSITEPROC.
Step 10 (on page 111)
� If you are targeting the CDISC_MEDIKA sample clinical data protocol, run \\client-dir\sample\CDISC\CDISC Medika\setup_CDISC.sql.
After running the setup file, complete steps 13 through 15.
Step 11 (on page 111)
� If you are targeting the MEDIKA_CLINICAL sample clinical data protocol, compile the CT_SAMPLE package and grant EXECUTE privileges.
Step 12 (on page 112)
� Compile the DEPROCS package and grant EXECUTE privileges. Step 13 (on page 112)
� Using the Resolve module, set up the sample clinical data protocol for the Resolve module (optional).
Step 14 (on page 112)
� Compile the customized CT_RESOLVE_USER package (optional). Step 15 (on page 113)
Getting Started
Clintrial 4.7.5 103
Sample protocol-specific help The Medika Sample Study provides protocol-specific Help for entering or editing data in the MEDIKA study book of the MEDIKA_CLINICAL protocol. In addition, the sample study provides an example of metadata help for one of the study pages.
When the Clintrial client is installed, the protocol-specific Help is also installed. No further setup is required.
You can write similar Help for your own protocols. You can also write Help to describe your internal business practices and system requirements. You can provide step-by-step instructions for processes and procedures and include conceptual information where applicable.
Step 1: Install the Oracle and the Clintrial software on the server To install the Oracle and Clintrial software on the server, follow the instructions in Preparing to install or upgrade to the Clintrial 4.7 Server (on page 23) and Performing a new installation of the Clintrial 4.7 software (on page 37).
You can use the Medika Sample Study with or without the Resolve module. If you plan to use the Resolve module with the sample study, you must install the Resolve module on the server. To install the Resolve module, run the ctvinst.sql script as described in Performing a new installation of the Clintrial 4.7 software (on page 37). You do not yet need to import the CTRESOLVEREF protocol or set up a protocol for the Resolve module.
For more information, see Step 3 (on page 104) and Step 14 (on page 112).
Step 2: Install the Oracle software and the Clintrial software on the client To install the Oracle and the Clintrial software on the clients, install the client software for all the Clintrial modules that you will use and follow the client installation instructions in Installing or upgrading the Clintrial 4.7 client software (on page 84). On at least one client, install the following software, which you will need to set up the Medika Sample Study:
• Oracle utilities, as described in Installing or upgrading the Clintrial 4.7 client software (on page 81).
• A third-party tool that allows you to write, compile, and work with PL/SQL
If you use the Resolve module, install the Resolve client software, which you will use to set up the MEDIKA_CLINICAL protocol for the Resolve module in Step 14 (on page 112). To install the Resolve client software:
1 Select the Custom option from the client installation wizard.
2 Select Extended Modules and Sample Study.
This installs all extended modules and all of the Medika Sample Studies.
You choose the study to work with by opening the proper protocol after installation.
If you do not want to install all extended modules, click Change, and check the specific extended modules to install.
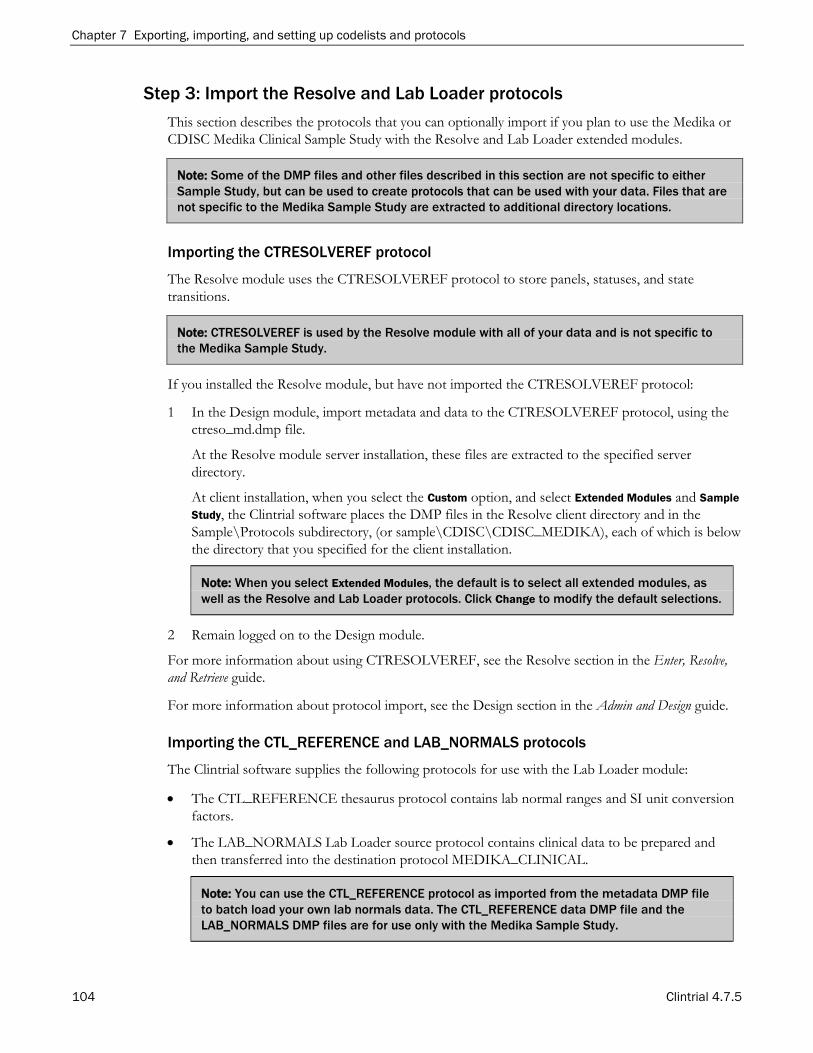
Chapter 7 Exporting, importing, and setting up codelists and protocols
104 Clintrial 4.7.5
Step 3: Import the Resolve and Lab Loader protocols This section describes the protocols that you can optionally import if you plan to use the Medika or CDISC Medika Clinical Sample Study with the Resolve and Lab Loader extended modules.
Note: Some of the DMP files and other files described in this section are not specific to either Sample Study, but can be used to create protocols that can be used with your data. Files that are not specific to the Medika Sample Study are extracted to additional directory locations.
Importing the CTRESOLVEREF protocol
The Resolve module uses the CTRESOLVEREF protocol to store panels, statuses, and state transitions.
Note: CTRESOLVEREF is used by the Resolve module with all of your data and is not specific to the Medika Sample Study.
If you installed the Resolve module, but have not imported the CTRESOLVEREF protocol:
1 In the Design module, import metadata and data to the CTRESOLVEREF protocol, using the ctreso_md.dmp file.
At the Resolve module server installation, these files are extracted to the specified server directory.
At client installation, when you select the Custom option, and select Extended Modules and Sample Study, the Clintrial software places the DMP files in the Resolve client directory and in the Sample\Protocols subdirectory, (or sample\CDISC\CDISC_MEDIKA), each of which is below the directory that you specified for the client installation.
Note: When you select Extended Modules, the default is to select all extended modules, as well as the Resolve and Lab Loader protocols. Click Change to modify the default selections.
2 Remain logged on to the Design module.
For more information about using CTRESOLVEREF, see the Resolve section in the Enter, Resolve, and Retrieve guide.
For more information about protocol import, see the Design section in the Admin and Design guide.
Importing the CTL_REFERENCE and LAB_NORMALS protocols
The Clintrial software supplies the following protocols for use with the Lab Loader module:
• The CTL_REFERENCE thesaurus protocol contains lab normal ranges and SI unit conversion factors.
• The LAB_NORMALS Lab Loader source protocol contains clinical data to be prepared and then transferred into the destination protocol MEDIKA_CLINICAL.
Note: You can use the CTL_REFERENCE protocol as imported from the metadata DMP file to batch load your own lab normals data. The CTL_REFERENCE data DMP file and the LAB_NORMALS DMP files are for use only with the Medika Sample Study.

Getting Started
Clintrial 4.7.5 105
If you installed the Lab Loader module and you have not imported the CTL_REFERENCE and LAB_NORMALS protocols:
1 In the Design module, import metadata and data to protocols named CTL_REFERENCE and LAB_NORMALS, using:
• ctl_re_md.dmp—Metadata and data DMP file for CTL_REFERENCE
• lab_normals_md.dmp—Metadata and data DMP file for LAB_NORMALS
At the Lab Loader server installation, ctl_re_md.dmp, and the batch load control files ctl_unit_conversion.ctl and ctl_normal_range.ctl, are extracted to the specified server directory.
During the Clintrial server installation, the ctl_re_md.dmp was placed in the LabLoader-server-dir. At client installation, when you select the Custom option, and select Extended Modules and Sample, the Clintrial software places the ctl_re_md.dmp in the Lab Loader client directory, which is below the directory that you specified for the client installation.
The lab_normals_md.dmp file was placed in the in the LabLoader-server-dir\LabNormals subdirectory.
Note: When you select Extended Modules, the default is to select all extended modules, as well as the Resolve and Lab Loader protocols. You can modify the default selections by clicking Change.
2 Remain logged on to the Design module.
Step 4: Import the thesaurus protocols This section describes how to import:
• ART_THESAURUS and DRUG_THESAURUS—The coding thesaurus protocols that are used by the CDISC Medika Clinical Sample Study.
Note: If you are going to use the coding feature in the CDISC MEDIKA Sample Study, you must import the ART_THESAURUS protocol.
• CT_MEDDRA—The coding thesaurus protocol that is used to code against the MedDRA dictionary, whether or not you use the Medika Sample Study.
• GCT_MEDDRA and WHO-DD—The optional coding thesaurus protocols that are used to code against the MEDDRA dictionary with the Classify module, whether or not you use the Medika Sample Study.
Note: Oracle supports the standard drug dictionary metadata WHO-DD format B2. A custom dictionary may be created to support any format.

Chapter 7 Exporting, importing, and setting up codelists and protocols
106 Clintrial 4.7.5
Importing the ART_THESAURUS and DRUG_THESAURUS protocols
In the Design module, import the sample coding thesaurus protocols. Items in the ADV panel of the MEDIKA_CLINICAL protocol refer to the coding thesaurus protocol ART_THESAURUS. Items in PRVMED and CONMED panels refer to the coding thesaurus protocol DRUG_THESAURUS. If you use a different name for the new coding thesaurus protocol, you must change the Thesaurus attribute for coding items in the MEDIKA_CLINICAL clinical data protocol.
1 In the Design module, as the user CTSYS, import metadata and thesaurus data to a protocol named ART_THESAURUS, using the ct_art_thes_md.dmp file.
Note: If you plan to use the coding feature in the CDISC_MEDIKA sample study, you must import the ART_THESAURUS protocol.
2 In the Design module, as the user CTSYS, import metadata and thesaurus data to a protocol named DRUG_THESAURUS, using ct_drug_thes_md.dmp file.
Importing the CT_MEDDRA thesaurus protocol
The Clintrial software supplies the CT_MEDDRA protocol for use with coding to the MedDRA dictionary. CT_MEDDRA contains the panels, panel keys, and views to receive and use batch-loaded data from the MedDRA dictionary.
Note: You can use CT_MEDDRA to code your own data to the MedDRA dictionary and with the Medika Sample Study. You must purchase and load the MedDRA dictionary data to use CT_MEDDRA.
Note: The MEDIKA_CLINICAL sample clinical data protocol codes against the ADV (Adverse Events) panel using the ART_THESAURUS protocol. However, you can substitute the ADVLLT or the ADVPT page sections (based on panels of the same name) on the ADV page template. The ADVLLT and ADVPT panels contain coding targets to code against CT_MEDDRA.
1 In the Design module, import metadata and data to a protocol named CT_MEDDRA, using:
• ct_med_m.dmp—Metadata DMP file for CT_MEDDRA.
• *.ctl—control files you can use to create batch load files for the MedDRA data, which you then batch load into CT_MEDDRA.
At the Clintrial core server software installation, the DMP file and control files are extracted to the core server installation directory.
2 Optionally, log on to the CTPROC account in SQL*Plus and execute the functions in the ct_meddra_util.create_meddra_indexes and ct_meddra_util.create_meddra_functions packages, as follows:
SQL> EXECUTE ct_meddra_util.create_meddra_indexes(‘CT_MEDDRA’);
SQL> EXECUTE ct_meddra_util.create_meddra_functions(‘CT_MEDDRA’);
3 Remain logged on to the Design module.
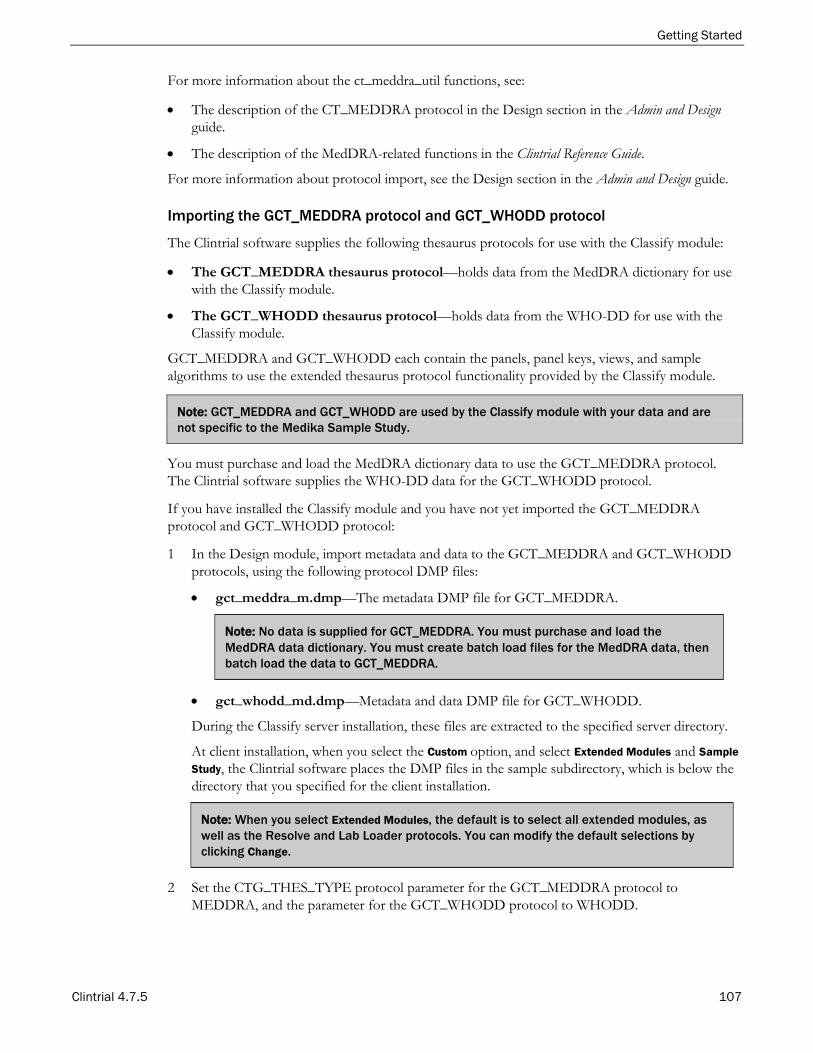
Getting Started
Clintrial 4.7.5 107
For more information about the ct_meddra_util functions, see:
• The description of the CT_MEDDRA protocol in the Design section in the Admin and Design guide.
• The description of the MedDRA-related functions in the Clintrial Reference Guide.
For more information about protocol import, see the Design section in the Admin and Design guide.
Importing the GCT_MEDDRA protocol and GCT_WHODD protocol
The Clintrial software supplies the following thesaurus protocols for use with the Classify module:
• The GCT_MEDDRA thesaurus protocol—holds data from the MedDRA dictionary for use with the Classify module.
• The GCT_WHODD thesaurus protocol—holds data from the WHO-DD for use with the Classify module.
GCT_MEDDRA and GCT_WHODD each contain the panels, panel keys, views, and sample algorithms to use the extended thesaurus protocol functionality provided by the Classify module.
Note: GCT_MEDDRA and GCT_WHODD are used by the Classify module with your data and are not specific to the Medika Sample Study.
You must purchase and load the MedDRA dictionary data to use the GCT_MEDDRA protocol. The Clintrial software supplies the WHO-DD data for the GCT_WHODD protocol.
If you have installed the Classify module and you have not yet imported the GCT_MEDDRA protocol and GCT_WHODD protocol:
1 In the Design module, import metadata and data to the GCT_MEDDRA and GCT_WHODD protocols, using the following protocol DMP files:
• gct_meddra_m.dmp—The metadata DMP file for GCT_MEDDRA.
Note: No data is supplied for GCT_MEDDRA. You must purchase and load the MedDRA data dictionary. You must create batch load files for the MedDRA data, then batch load the data to GCT_MEDDRA.
• gct_whodd_md.dmp—Metadata and data DMP file for GCT_WHODD.
During the Classify server installation, these files are extracted to the specified server directory.
At client installation, when you select the Custom option, and select Extended Modules and Sample Study, the Clintrial software places the DMP files in the sample subdirectory, which is below the directory that you specified for the client installation.
Note: When you select Extended Modules, the default is to select all extended modules, as well as the Resolve and Lab Loader protocols. You can modify the default selections by clicking Change.
2 Set the CTG_THES_TYPE protocol parameter for the GCT_MEDDRA protocol to MEDDRA, and the parameter for the GCT_WHODD protocol to WHODD.
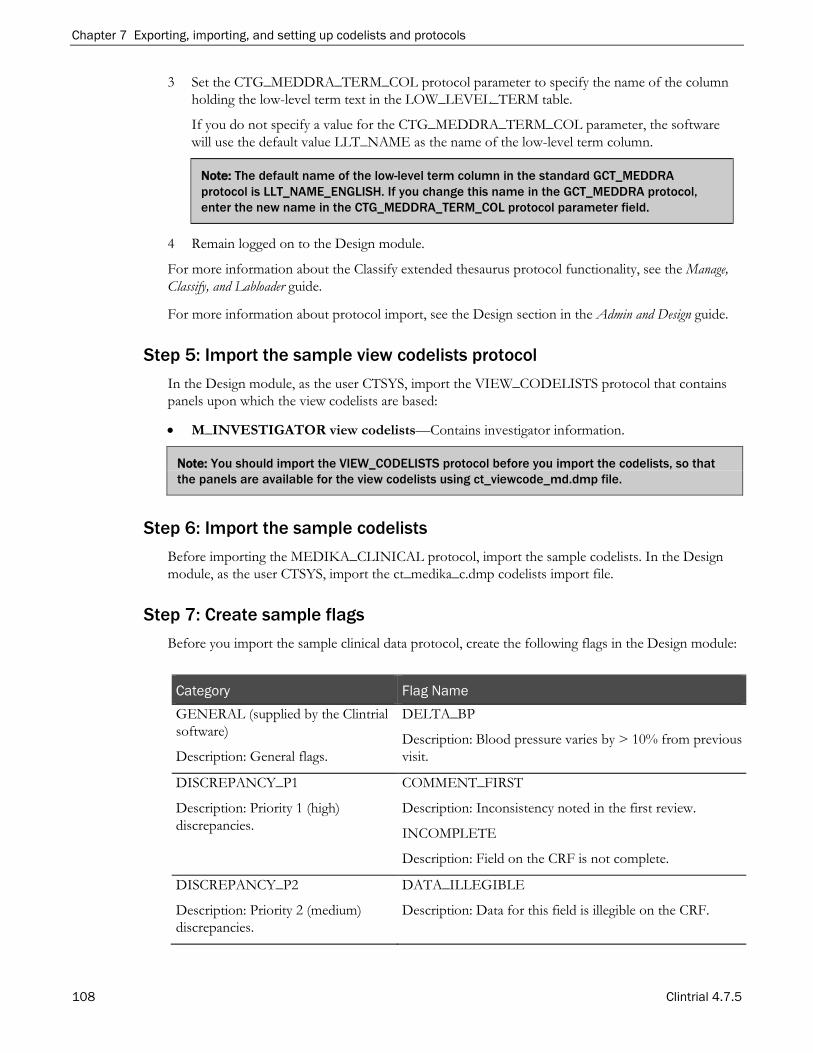
Chapter 7 Exporting, importing, and setting up codelists and protocols
108 Clintrial 4.7.5
3 Set the CTG_MEDDRA_TERM_COL protocol parameter to specify the name of the column holding the low-level term text in the LOW_LEVEL_TERM table.
If you do not specify a value for the CTG_MEDDRA_TERM_COL parameter, the software will use the default value LLT_NAME as the name of the low-level term column.
Note: The default name of the low-level term column in the standard GCT_MEDDRA protocol is LLT_NAME_ENGLISH. If you change this name in the GCT_MEDDRA protocol, enter the new name in the CTG_MEDDRA_TERM_COL protocol parameter field.
4 Remain logged on to the Design module.
For more information about the Classify extended thesaurus protocol functionality, see the Manage, Classify, and Labloader guide.
For more information about protocol import, see the Design section in the Admin and Design guide.
Step 5: Import the sample view codelists protocol In the Design module, as the user CTSYS, import the VIEW_CODELISTS protocol that contains panels upon which the view codelists are based:
• M_INVESTIGATOR view codelists—Contains investigator information.
Note: You should import the VIEW_CODELISTS protocol before you import the codelists, so that the panels are available for the view codelists using ct_viewcode_md.dmp file.
Step 6: Import the sample codelists Before importing the MEDIKA_CLINICAL protocol, import the sample codelists. In the Design module, as the user CTSYS, import the ct_medika_c.dmp codelists import file.
Step 7: Create sample flags Before you import the sample clinical data protocol, create the following flags in the Design module:
Category Flag Name GENERAL (supplied by the Clintrial software)
Description: General flags.
DELTA_BP
Description: Blood pressure varies by > 10% from previous visit.
DISCREPANCY_P1
Description: Priority 1 (high) discrepancies.
COMMENT_FIRST
Description: Inconsistency noted in the first review.
INCOMPLETE
Description: Field on the CRF is not complete.
DISCREPANCY_P2
Description: Priority 2 (medium) discrepancies.
DATA_ILLEGIBLE
Description: Data for this field is illegible on the CRF.
Getting Started
Clintrial 4.7.5 109
The first flag is used to check data in the VITAL panel of the MEDIKA_CLINICAL protocol. The other two are used by data that is related to the Resolve module.
Note: Create all three flags whether or not you use the Resolve module.
Step 8: Import the CDISC_MEDIKA sample clinical data protocol In the Design module, as the user CTSYS, import the sample clinical data protocol.
If you are importing the CDISC_MEDIKA sample clinical data protocol, import metadata and clinical data to the CDISC_MEDIKA protocol, using the CDISC_MEDIKA_md.dmp file in the \\client-dir\samples\CDISC\CDISC MEDIKA subdirectory.
The dictionary protocol (CDISC_SDTM_31) contains panel definitions that are based on the SDTM v3.1. It may be used as a reference library by users when building SDTM-compliant study protocols.
To import this reference library, use the protocol CDISC_SDTM_311_m.dmp file in the \client-dir\samples\CDISC\CDISC STDM 31 subdirectory.
Note: If you are not also importing the MEDIKA_CLINICAL sample study, proceed to steps 13 and 14.
If you are importing the MEDIKA_CLINICAL clinical data protocol, import metadata and clinical data to a protocol named MEDIKA_CLINICAL, using the following protocol ct_med_clin_md.dmp file in the \client-dir\samples\Protocols subdirectory.
Chapter 7 Exporting, importing, and setting up codelists and protocols
110 Clintrial 4.7.5
Step 9: Create an account for site-specific PL/SQL Oracle recommends that you create an Oracle account to store site-specific and protocol-specific PL/SQL packages, procedures, and functions used by the Clintrial derivations, rules, and data-entry processing procedures. The sample study includes the grnt.sql script to create this account.
Start SQL*Plus from the module's installation directory and log on to the database instance.
The server module software and verification scripts are placed in directories called one of the following:
$HOME/ct4server/ct47/ct47_<Clintrial_module>
$HOME/local/ct4server/ct47/ct47_<Clintrial_module>
Where
$HOME is the $ORACLE_HOME directory
<Clintrial_module> is one of the following:
• srv—core server
• ctc—Multisite Distribution server
• ctx—Multisite Replication server
• ctg—Classify server
• ctl—Lab Loader server
• ctv—Resolve server
• ctqa—Ad Hoc Query (the Retrieve module)
For example, on a Windows system, the path name and directory name for the core server installation directory could be:
1 C:\oracle\ct4server\ct47\ct47_srv
2 Run the grnt.sql script from the \\ct47_smp\Packages directory:
SQL> @grnt
Here are the names of scripts you may run:
• ctpost—core server
• ctcpost—Multisite Distribution server
• ctxpost—Multisite Replication server
• ctgpost—Classify server
• ctlpost—Lab Loader server
• ctvpost—Resolve server
• ctqpost—Retrieve server
You are prompted to enter the name for the log file.
Getting Started
Clintrial 4.7.5 111
3 Press Enter to accept the default, or enter the log file name.
You are prompted to enter a connection string.
4 Enter the @ symbol followed by the instance (or service) name to connect to.
You are prompted to enter the SYSTEM Account Password.
5 Enter the SYSTEM Account Password.
You are prompted to enter the Clintrial CTPROC Account Password.
6 Enter the Clintrial CTPROC Account Password.
You are prompted to enter the CTSITEPROC Account Password to use for the CTSITEPROC account.
7 Enter the CTSITEPROC Account Password.
You are prompted for default tablespace to use for the CTSITEPROC user.
Note: This cannot be the SYSTEM tablespace.
8 Press Enter to accept the default, or enter the CTSITEPROC default tablespace.
You are prompted to enter the temporary tablespace for the CTSITEPROC user.
Note: This tablespace must have temporary storage (contents must be TEMPORARY). Also, this cannot be the SYSTEM tablespace.
Step 10: Set PROC_SITE_ACCOUNT • After creating the CTSITEPROC account, start the Admin module and set the Design system
parameter PROC_SITE_ACCOUNT to CTSITEPROC.
Step 11: Run setup_CDISC.sql if you are targeting CDISC_MEDIKA 1 Log on as CTSITEPROC.
2 Run the setup_CDISC.sql script (assuming that C:\ct48\sampleCDISC\CDISC Medika is the location of the file and the SQL command is run from that folder):
SQL> connect ctsiteproc/ctsiteproc@instance-name;
SQL> @setup_CDISC.sql;
The setup_CDISC script calls the deprocs_CDISC.sql and ctsample.sql packages.
3 Complete steps 13 through 15.
Chapter 7 Exporting, importing, and setting up codelists and protocols
112 Clintrial 4.7.5
Step 12: Compile CT_SAMPLE and grant EXECUTE if you are targeting the MEDIKA_CLINICAL
The ctsample.sql script:
• Compiles the CT_SAMPLE package, which contains stored functions for use by sample study rules and derivations.
• Includes statements that drop and add a public synonym for the CT_SAMPLE package.
1 Log on as CTSITEPROC, and run the script (assuming that C:\ct47\samples\Packages is the location of the file and the SQL command is run from that folder).
2 Grant EXECUTE privileges on CT_SAMPLE to CTSITEPROC, using the GRANT_EXECUTE_PRIVS command in the CT_PROC_ACCOUNT package:
SQL> connect ctsiteproc/ctsiteproc@instance-name; SQL> @ctsample.sql; SQL> execute ct_proc_account.grant_execute_privs(‘CT_SAMPLE’);
Step 13: Compile DEPROCS and grant EXECUTE. The deprocs.sql file:
• Compiles the DEPROCS package, which contains data-entry processing procedures that are used by the sample study.
• Includes statements that drop and add a public synonym for deprocs.
While logged in as CTSITEPROC, run the deprocs.sql file as follows (assuming that C:\ct47\samples\Packages is the location of the file and the SQL command is run from that folder):
SQL> connect ctsiteproc/ctsiteproc@instance-name;
SQL> @deprocs.sql;
Step 14: Set clinical data protocol for the Resolve module If you plan to use the Resolve module with a Medika Sample Study, you must set up the MEDIKA_CLINICAL or CDISC_MEDIKA protocol for the Resolve module, as follows:
1 Start the Resolve module as a user who has the Full access level for the non-protocol access right Admin System.
Access levels and rights are set and appear in the Admin module.
For example, you can start the Resolve modules as the user CTSYS.
2 Set the protocol to MEDIKA_CLINICAL or CDISC_MEDIKA.
3 Select Setup > Setup for Resolve.
Getting Started
Clintrial 4.7.5 113
Step 15: Compile the CT_RESOLVE_USER package If you use the Resolve module, you may want to customize it so that the investigator number and name from the INVESTIGATORS panel determines the list of investigators in several Resolve dialog boxes for the protocol. To do so, you create a customized version of the CT_RESOLVE_USER package that is delivered with the Clintrial software. The Clintrial software includes the following files that allow you to customize the Resolve module for the sample study:
• sm_ruser.sqh—Package specification for the customized CT_RESOLVE_USER package.
• sm_ruser.sql—Package body for the customized CT_RESOLVE_USER package.
This has been customized for MEDIKA_CLINICAL.
You can add changes for your own protocols.
• before.sql—Grants access to the CTSITEPROC account for the INVESTIGATORS_DATA table and INVESTIGATORS_UPDATE table in the MEDIKA_CLINICAL protocol, as required by the CT_RESOLVE_USER package.
• af_ruser.sql—Grants access to the CTSITEPROC account for the INVESTIGATOR_UPDATE table in the CTRESOLVEREF protocol, as required by the CT_RESOLVE_USER package.
To use the customized CT_RESOLVE_USER package:
1 After setting appropriate permissions on the before.sql and af_ruser.sql scripts, if you gave the imported MEDIKA_CLINICAL or CDISC_MEDIKA protocol another name, set the appropriate permission on the sm_ruser.sql file and edit it to refer to that name.
2 Log on to the CTSITEPROC account (assuming that C:\ct47\samples\Packages is the location of the file and you run the SQL command from that folder).
3 Enter the following command:
SQL> @before.sql;
Note: Because this file logs on to the CTPROC account, when it has finished running, you must log back in to the CTSITEPROC account.
4 Log on to the CTSITEPROC account and enter the following commands:
SQL> @sm_ruser.sqh;
SQL> @sm_ruser.sql;
If you find errors in sm_ruser.sql, correct them in your editor and run the file again.
5 Change the public synonym for the CT_RESOLVE_USER package and grant access to it:
SQL> drop public synonym ct_resolve_user;
SQL> create public synonym ct_resolve_user for ctsiteproc.ct_resolve_user;
SQL> grant execute on ct_resolve_user to ct_user;
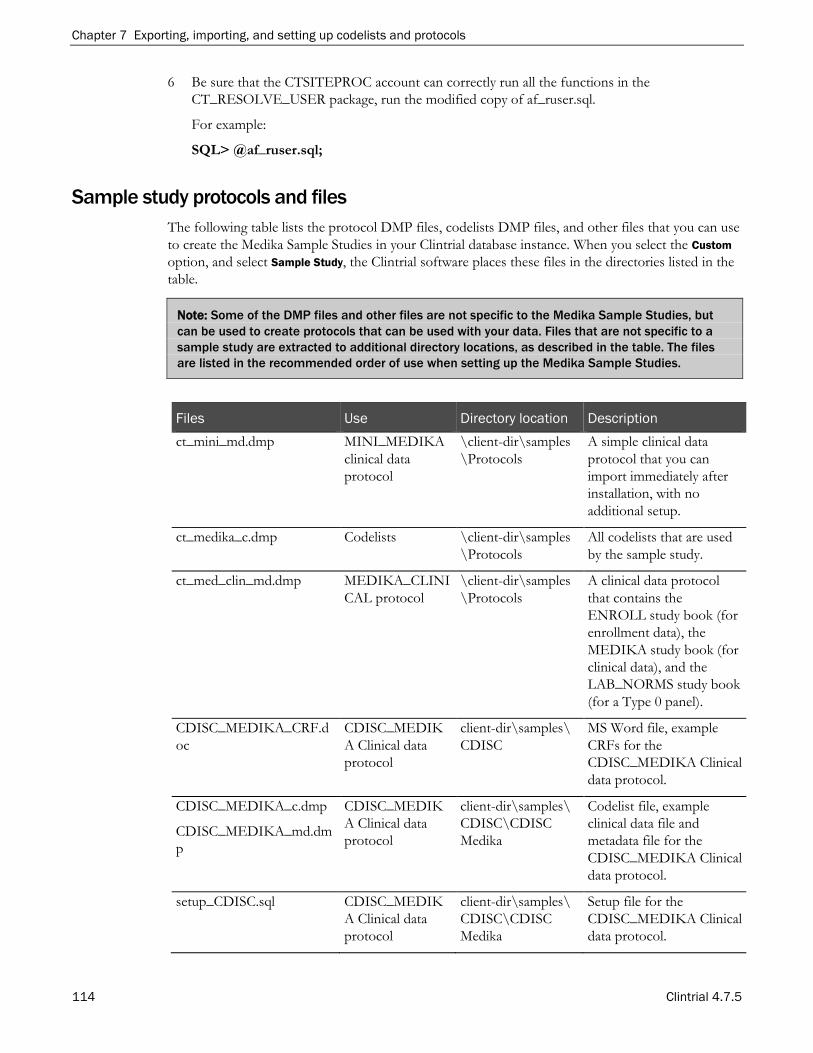
Chapter 7 Exporting, importing, and setting up codelists and protocols
114 Clintrial 4.7.5
6 Be sure that the CTSITEPROC account can correctly run all the functions in the CT_RESOLVE_USER package, run the modified copy of af_ruser.sql.
For example:
SQL> @af_ruser.sql;
Sample study protocols and files The following table lists the protocol DMP files, codelists DMP files, and other files that you can use to create the Medika Sample Studies in your Clintrial database instance. When you select the Custom option, and select Sample Study, the Clintrial software places these files in the directories listed in the table.
Note: Some of the DMP files and other files are not specific to the Medika Sample Studies, but can be used to create protocols that can be used with your data. Files that are not specific to a sample study are extracted to additional directory locations, as described in the table. The files are listed in the recommended order of use when setting up the Medika Sample Studies.
Files Use Directory location Description ct_mini_md.dmp MINI_MEDIKA
clinical data protocol
\client-dir\samples \Protocols
A simple clinical data protocol that you can import immediately after installation, with no additional setup.
ct_medika_c.dmp Codelists \client-dir\samples \Protocols
All codelists that are used by the sample study.
ct_med_clin_md.dmp MEDIKA_CLINICAL protocol
\client-dir\samples \Protocols
A clinical data protocol that contains the ENROLL study book (for enrollment data), the MEDIKA study book (for clinical data), and the LAB_NORMS study book (for a Type 0 panel).
CDISC_MEDIKA_CRF.doc
CDISC_MEDIKA Clinical data protocol
client-dir\samples\ CDISC
MS Word file, example CRFs for the CDISC_MEDIKA Clinical data protocol.
CDISC_MEDIKA_c.dmp
CDISC_MEDIKA_md.dmp
CDISC_MEDIKA Clinical data protocol
client-dir\samples\ CDISC\CDISC Medika
Codelist file, example clinical data file and metadata file for the CDISC_MEDIKA Clinical data protocol.
setup_CDISC.sql CDISC_MEDIKA Clinical data protocol
client-dir\samples\ CDISC\CDISC Medika
Setup file for the CDISC_MEDIKA Clinical data protocol.

Getting Started
Clintrial 4.7.5 115
Files Use Directory location Description ctsample.sql CDISC_MEDIK
A protocol client-dir\samples\ CDISC\CDISC Medika
Example PL/SQL Package for CDISC_MEDIKA.
deprocs_CDISC.sql
CDISC_MEDIKA protocol
client-dir\ samples\ CDISC\CDISC Medika
Example PL/SQL DEPPS Package for CDISC_MEDIKA.
grnt.sql CDISC_MEDIKA protocol
client-dir\samples\ CDISC\CDISC Medika
Used to create the CTSITEPROC account for CDISC_MEDIKA.
CDISC_STDM_31_m.dmp CDISC STDM 3.1 protocol
client-dir\samples\ CDISC\CDISC STDM 31
STDM 3.1 Compliant protocol.
ct_reso_md.dmp CTRESOLVEREF protocol
\Resolve-server-dir
\client-dir\Resolve
\client-dir\ Samples\Protocols
A clinical data protocol used by the Resolve module.
ctl_re_md.dmp CTL_REFERENCE protocol
\LabLoader-server-dir ((both .dmp files)
\client-dir\Lab Loader (ctl_re_md.dmp only)
A Lab Loader thesaurus protocol that contains lab normal ranges and SI unit conversion factors, and sample data for use with MEDIKA_CLINICAL. (Optionally, you can batch load your own data using the ctl_unit_conversion.ctl and ctl_normal_range.ctl control files.)
ctl_unit_conversion.ctl
ctl_normal_range.ctl
CTL_REFERENCE protocol
\LabLoader-server-dir
\client-dir\Lab Loader
Control files that are used to create batch load files from which you can batch load your own data to the CTL_REFERENCE protocol. (Optionally, you can use the sample data provided in the ctl_re_d.dmp file.)
lab_normals_md.dmp LAB_NORMALS \LabLoader-server-dir\ LabNormals
A Lab Loader source protocol that contains clinical data to be prepared and then transferred into the destination protocol MEDIKA_CLINICAL.
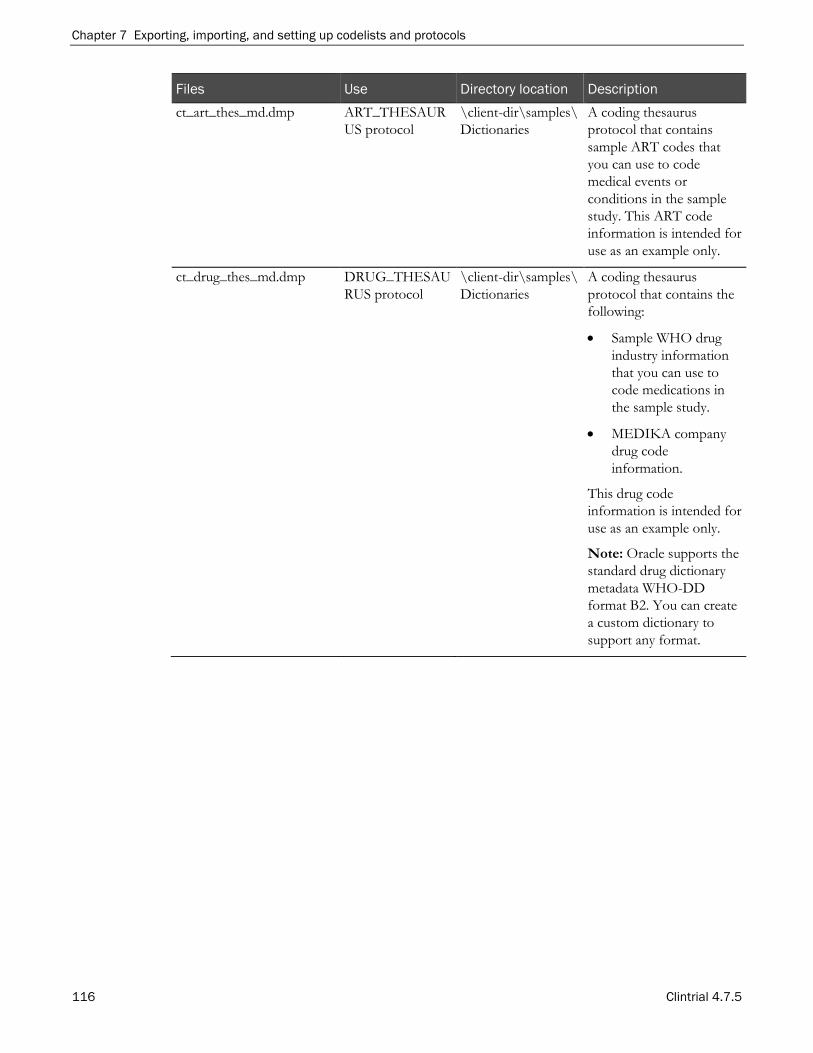
Chapter 7 Exporting, importing, and setting up codelists and protocols
116 Clintrial 4.7.5
Files Use Directory location Description ct_art_thes_md.dmp ART_THESAUR
US protocol \client-dir\samples\ Dictionaries
A coding thesaurus protocol that contains sample ART codes that you can use to code medical events or conditions in the sample study. This ART code information is intended for use as an example only.
ct_drug_thes_md.dmp DRUG_THESAURUS protocol
\client-dir\samples\ Dictionaries
A coding thesaurus protocol that contains the following:
• Sample WHO drug industry information that you can use to code medications in the sample study.
• MEDIKA company drug code information.
This drug code information is intended for use as an example only.
Note: Oracle supports the standard drug dictionary metadata WHO-DD format B2. You can create a custom dictionary to support any format.
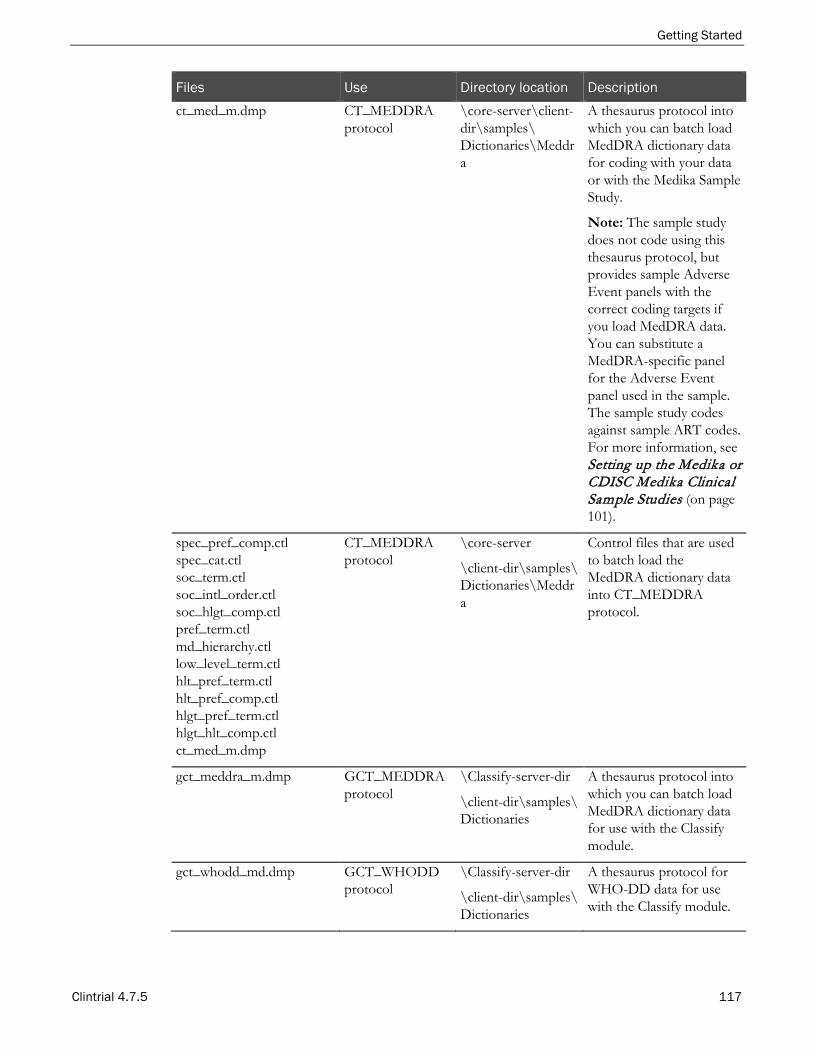
Getting Started
Clintrial 4.7.5 117
Files Use Directory location Description ct_med_m.dmp CT_MEDDRA
protocol \core-server\client-dir\samples\ Dictionaries\Meddra
A thesaurus protocol into which you can batch load MedDRA dictionary data for coding with your data or with the Medika Sample Study.
Note: The sample study does not code using this thesaurus protocol, but provides sample Adverse Event panels with the correct coding targets if you load MedDRA data. You can substitute a MedDRA-specific panel for the Adverse Event panel used in the sample. The sample study codes against sample ART codes. For more information, see Setting up the Medika or CDISC Medika Clinical Sample Studies (on page 101).
spec_pref_comp.ctl spec_cat.ctl soc_term.ctl soc_intl_order.ctl soc_hlgt_comp.ctl pref_term.ctl md_hierarchy.ctl low_level_term.ctl hlt_pref_term.ctl hlt_pref_comp.ctl hlgt_pref_term.ctl hlgt_hlt_comp.ctl ct_med_m.dmp
CT_MEDDRA protocol
\core-server
\client-dir\samples\ Dictionaries\Meddra
Control files that are used to batch load the MedDRA dictionary data into CT_MEDDRA protocol.
gct_meddra_m.dmp
GCT_MEDDRA protocol
\Classify-server-dir
\client-dir\samples\ Dictionaries
A thesaurus protocol into which you can batch load MedDRA dictionary data for use with the Classify module.
gct_whodd_md.dmp GCT_WHODD protocol
\Classify-server-dir
\client-dir\samples\ Dictionaries
A thesaurus protocol for WHO-DD data for use with the Classify module.

Chapter 7 Exporting, importing, and setting up codelists and protocols
118 Clintrial 4.7.5
Files Use Directory location Description ct_viewcode_md.dmp
VIEW_CODELISTS protocol
\client-dir\samples\ Dictionaries
A clinical data protocol that contains information that is used by view codelists in MEDIKA_CLINICAL for the following:
• Investigator information.
• Signature meaning codes.
grnt.sql \client-dir\samples\ Packages
Used to create the CTSITEPROC account.
ctsample.sql CT_SAMPLE package
\client-dir\samples\ Packages
Used to set up the CT_SAMPLE package.
deprocs.sql DEPROCS package
\client-dir\samples\ Packages
Used to set up the DEPROCS data entry processing procedure package.
before.sql af_ruser.sql sm_ruser.sqh sm_ruser.sql
CT_RESOLVE_USER package
\client-dir\samples\ Packages
Used to customize the CT_RESOLVE_USER package.
compile.sql All protocols client-dir\samples\ Packages
medika.hlp medika.cnt metadata.hlp metadata.cnt tracegloss.hlp tracegloss.cnt
Protocol-specific help in MEDIKA_CLINICAL
Used to illustrate company-specific context-sensitive Help for use in study books in the Enter module.
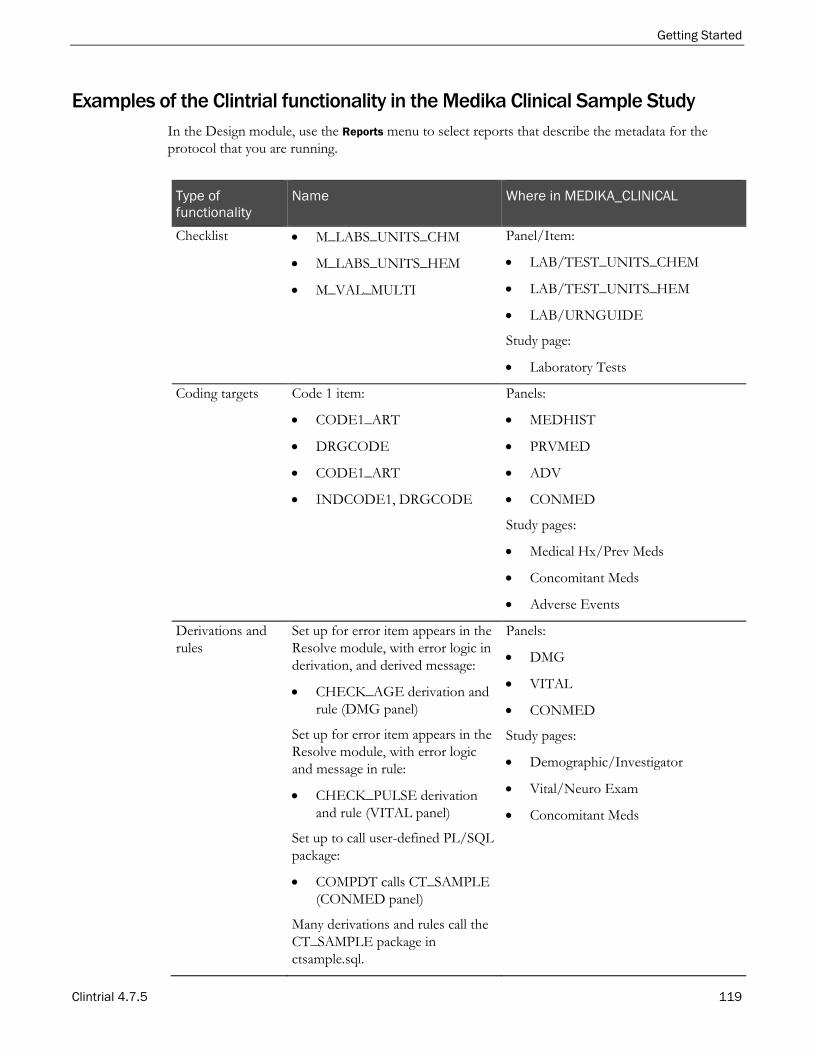
Getting Started
Clintrial 4.7.5 119
Examples of the Clintrial functionality in the Medika Clinical Sample Study In the Design module, use the Reports menu to select reports that describe the metadata for the protocol that you are running.
Type of functionality
Name Where in MEDIKA_CLINICAL
Checklist • M_LABS_UNITS_CHM
• M_LABS_UNITS_HEM
• M_VAL_MULTI
Panel/Item:
• LAB/TEST_UNITS_CHEM
• LAB/TEST_UNITS_HEM
• LAB/URNGUIDE
Study page:
• Laboratory Tests
Coding targets Code 1 item:
• CODE1_ART
• DRGCODE
• CODE1_ART
• INDCODE1, DRGCODE
Panels:
• MEDHIST
• PRVMED
• ADV
• CONMED
Study pages:
• Medical Hx/Prev Meds
• Concomitant Meds
• Adverse Events
Derivations and rules
Set up for error item appears in the Resolve module, with error logic in derivation, and derived message:
• CHECK_AGE derivation and rule (DMG panel)
Set up for error item appears in the Resolve module, with error logic and message in rule:
• CHECK_PULSE derivation and rule (VITAL panel)
Set up to call user-defined PL/SQL package:
• COMPDT calls CT_SAMPLE (CONMED panel)
Many derivations and rules call the CT_SAMPLE package in ctsample.sql.
Panels:
• DMG
• VITAL
• CONMED
Study pages:
• Demographic/Investigator
• Vital/Neuro Exam
• Concomitant Meds

Chapter 7 Exporting, importing, and setting up codelists and protocols
120 Clintrial 4.7.5
Type of functionality
Name Where in MEDIKA_CLINICAL
Data-Entry Processing Procedures (DEPPs)
Value Changed Procedure DEPP (cursor movement):
• DEPROCS.ITEMFOCUS
Value Changed Procedure DEPP (calculate new value or check a value):
• DEPROCS.CONVERT-TEMP
• DEPROCS.CHK_PREV- _BP_SYS
Page Opened, Page Saved, and Initializing Page Section DEPP:
• DEPROCS.LOCKSUBJECT
All DEPPs call the DEPROCS PL/SQL package in deprocs.sql.
Page section (for cursor movement or new value):
• DMG
• VITAL
Page template: (for Page Opened and Page Saved):
• ADV
Page template/page section (for Initializing Page Section):
• ADV/CONTEXT
Study pages:
• Demographic/Investigator
• Vital Signs/Neuro Exam
• Adverse Events
Master-detail panels
Panels with cross-panel master- detail relationship:
• VITAL and NEUROL
Panels with within-panel master-detail relationship:
• MEDHIST
• PRVMED
• CONMED
• ADV
Study pages:
• Vital Signs/Neuro Exam
• Medical Hx/Prev Meds
• Concomitant Meds
• Adverse Events
Page sections based on a single panel, but displaying different items
• BOTDISP
• DRGCMP
• BOTRET
• BOTRETFINAL
Panel:
• DRGCMP
Study pages:
• First Bottle Dispensed
• Drug Administration
• Bottle Returned and Dispensed
• Last Bottle Returned
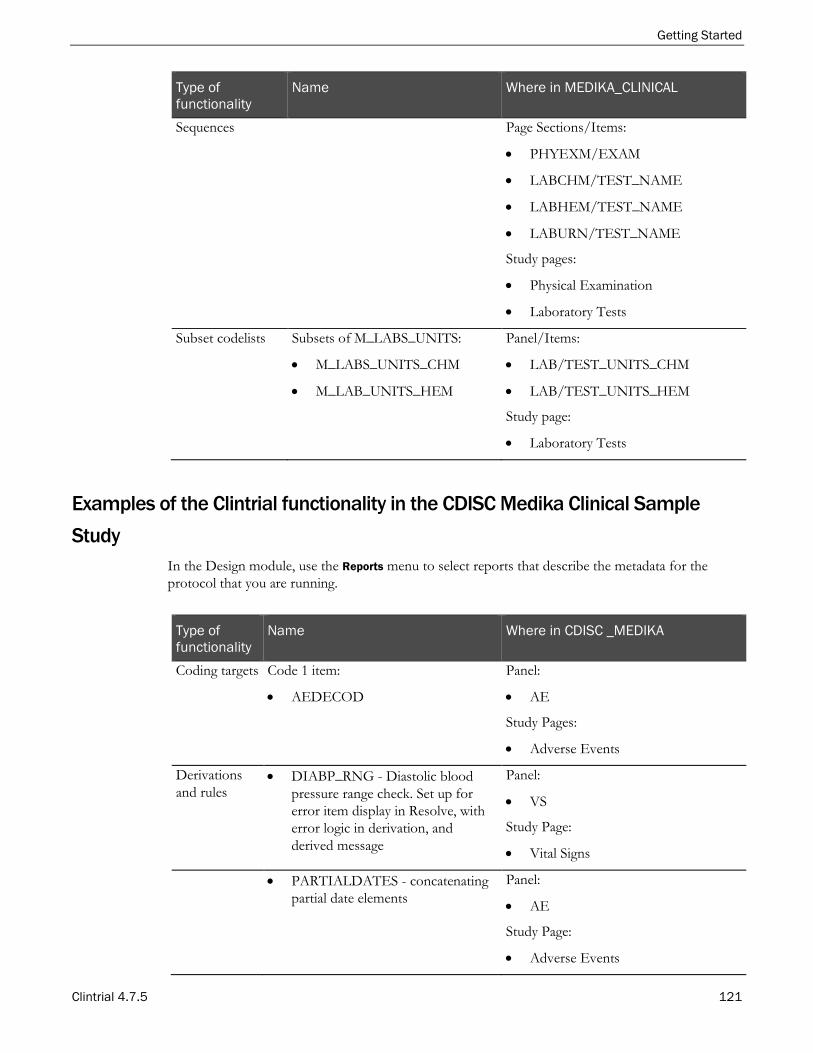
Getting Started
Clintrial 4.7.5 121
Type of functionality
Name Where in MEDIKA_CLINICAL
Sequences Page Sections/Items:
• PHYEXM/EXAM
• LABCHM/TEST_NAME
• LABHEM/TEST_NAME
• LABURN/TEST_NAME
Study pages:
• Physical Examination
• Laboratory Tests
Subset codelists Subsets of M_LABS_UNITS:
• M_LABS_UNITS_CHM
• M_LAB_UNITS_HEM
Panel/Items:
• LAB/TEST_UNITS_CHM
• LAB/TEST_UNITS_HEM
Study page:
• Laboratory Tests
Examples of the Clintrial functionality in the CDISC Medika Clinical Sample Study
In the Design module, use the Reports menu to select reports that describe the metadata for the protocol that you are running.
Type of functionality
Name Where in CDISC _MEDIKA
Coding targets Code 1 item:
• AEDECOD
Panel:
• AE
Study Pages:
• Adverse Events
Derivations and rules
• DIABP_RNG - Diastolic blood pressure range check. Set up for error item display in Resolve, with error logic in derivation, and derived message
Panel:
• VS
Study Page:
• Vital Signs
• PARTIALDATES - concatenating partial date elements
Panel:
• AE
Study Page:
• Adverse Events
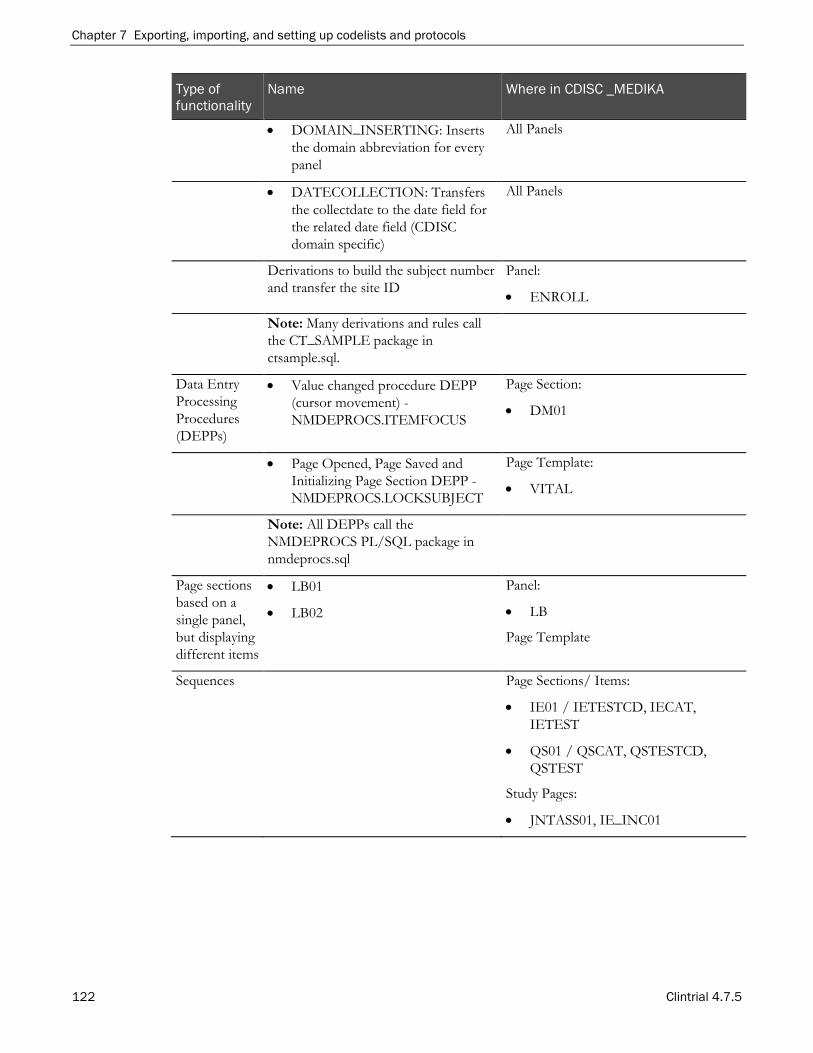
Chapter 7 Exporting, importing, and setting up codelists and protocols
122 Clintrial 4.7.5
Type of functionality
Name Where in CDISC _MEDIKA
• DOMAIN_INSERTING: Inserts the domain abbreviation for every panel
All Panels
• DATECOLLECTION: Transfers the collectdate to the date field for the related date field (CDISC domain specific)
All Panels
Derivations to build the subject number and transfer the site ID
Panel:
• ENROLL
Note: Many derivations and rules call the CT_SAMPLE package in ctsample.sql.
Data Entry Processing Procedures (DEPPs)
• Value changed procedure DEPP (cursor movement) - NMDEPROCS.ITEMFOCUS
Page Section:
• DM01
• Page Opened, Page Saved and Initializing Page Section DEPP - NMDEPROCS.LOCKSUBJECT
Page Template:
• VITAL
Note: All DEPPs call the NMDEPROCS PL/SQL package in nmdeprocs.sql
Page sections based on a single panel, but displaying different items
• LB01
• LB02
Panel:
• LB
Page Template
Sequences Page Sections/ Items:
• IE01 / IETESTCD, IECAT, IETEST
• QS01 / QSCAT, QSTESTCD, QSTEST
Study Pages:
• JNTASS01, IE_INC01

Getting Started
Clintrial 4.7.5 123
Troubleshooting
Deleting and reimporting for use with the Resolve module If you deleted the MEDIKA_CLINICAL or the CDISC_MEDIKA sample study and are reimporting it for use with the Resolve module, you must perform the following steps:
1 Rerun the before.sql script, as described in Step 14 (on page 112).
2 Log on to the CTSITEPROC account and recompile the CT_RESOLVE_USER package as follows:
SQL> alter package ctsiteproc.ct_resolve_user compile body;
3 In the Resolve module, run Setup for Resolve.

Chapter 7 Exporting, importing, and setting up codelists and protocols
124 Clintrial 4.7.5
Clintrial 4.7.5 125
In this chapter Running the deinstallation wizard for the Clintrial core software .............................................. 126
Modifying, repairing, or removing the Clintrial 4.7 client software ............................................ 131
C H A P T E R 8 Deinstalling the Clintrial software

Chapter 8 Deinstalling the Clintrial software
126 Clintrial 4.7.5
Running the deinstallation wizard for the Clintrial core software
1 Navigate to the location of the installation files and double-click CTServerInstaller.exe.
The Choose Setup Language window appears.
If you want to choose a language other than English on an English operating system, the proper language pack must be installed and the Windows default language must be changed. For example, if you want to conduct the installation in Japanese, the Asian language pack must be installed and the default language must be changed to Japanese.
For more information, see your Windows documentation.
2 Select the language you want the wizard to use during setup. This also the language that will be used for the labels and descriptions for codelists and tags.
3 Click Next.
The Welcome window appears.
4 Click Next.
The Setup Type window appears.
5 To deinstall the server or the extended modules, select Deinstall.
6 Click Next.
A confirmation dialog appears.
7 Click Yes.
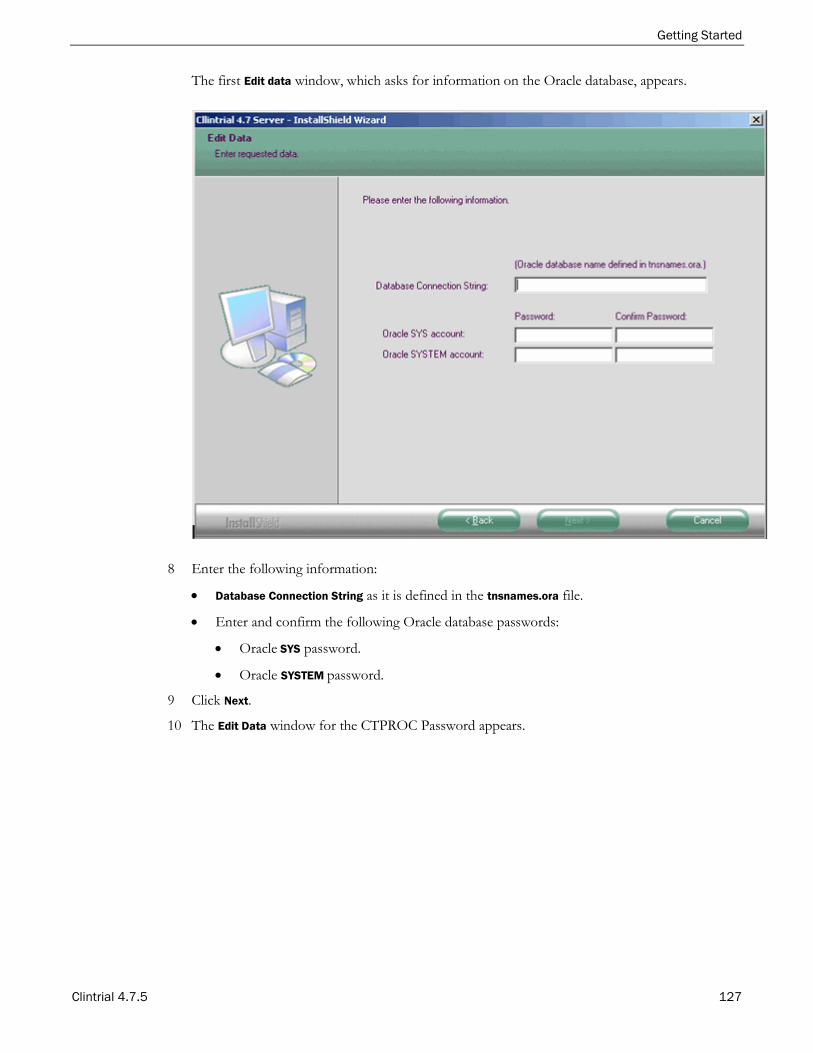
Getting Started
Clintrial 4.7.5 127
The first Edit data window, which asks for information on the Oracle database, appears.
8 Enter the following information:
• Database Connection String as it is defined in the tnsnames.ora file.
• Enter and confirm the following Oracle database passwords:
• Oracle SYS password.
• Oracle SYSTEM password.
9 Click Next.
10 The Edit Data window for the CTPROC Password appears.

Chapter 8 Deinstalling the Clintrial software
128 Clintrial 4.7.5
11 Enter the password for the CTPROC account.
12 Click Next.

Getting Started
Clintrial 4.7.5 129
The Select Options screen appears. The features that are installed are selected automatically.
13 Clear the boxes for features you do not want to deinstall.
14 Click Next.
The Choose Destination Location screen appears. The specified location will store the deinstallation log files.
15 Accept the default location (which is where the Clintrial server is currently installed), or choose a new location.
16 Click Next.
The Ready to Deinstall window appears.
17 Click Deinstall to begin. Otherwise, click Back to modify the selections.
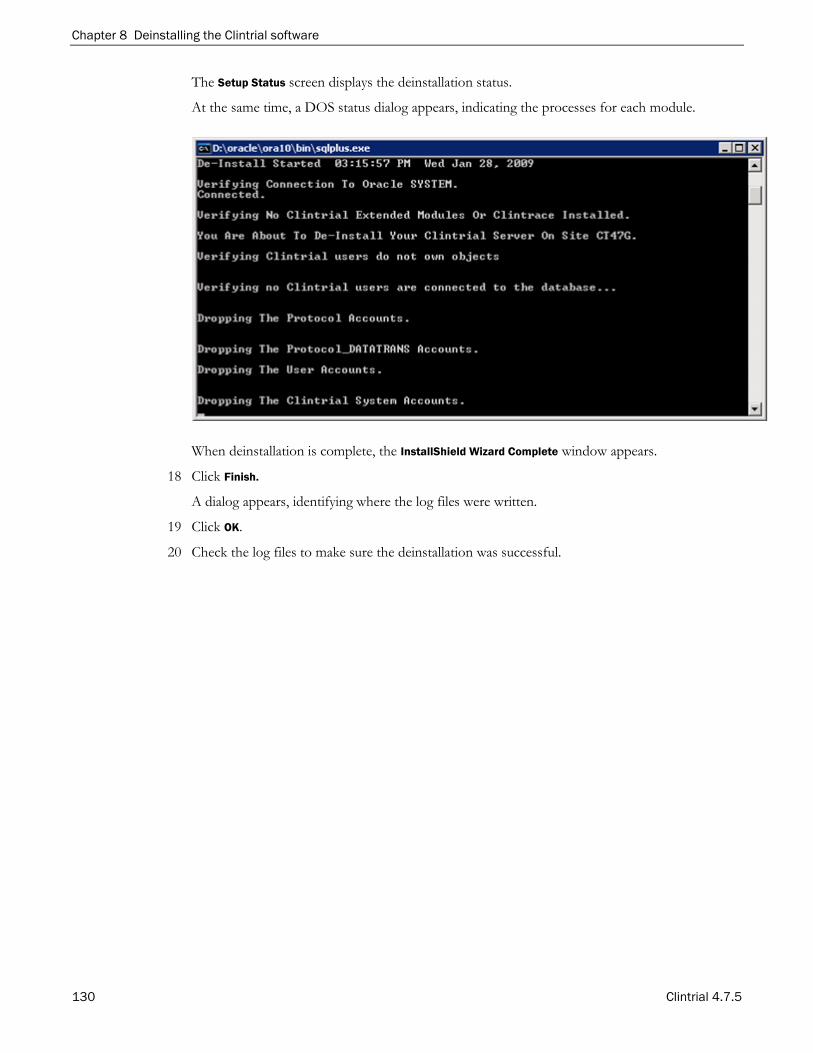
Chapter 8 Deinstalling the Clintrial software
130 Clintrial 4.7.5
The Setup Status screen displays the deinstallation status.
At the same time, a DOS status dialog appears, indicating the processes for each module.
When deinstallation is complete, the InstallShield Wizard Complete window appears.
18 Click Finish.
A dialog appears, identifying where the log files were written.
19 Click OK.
20 Check the log files to make sure the deinstallation was successful.
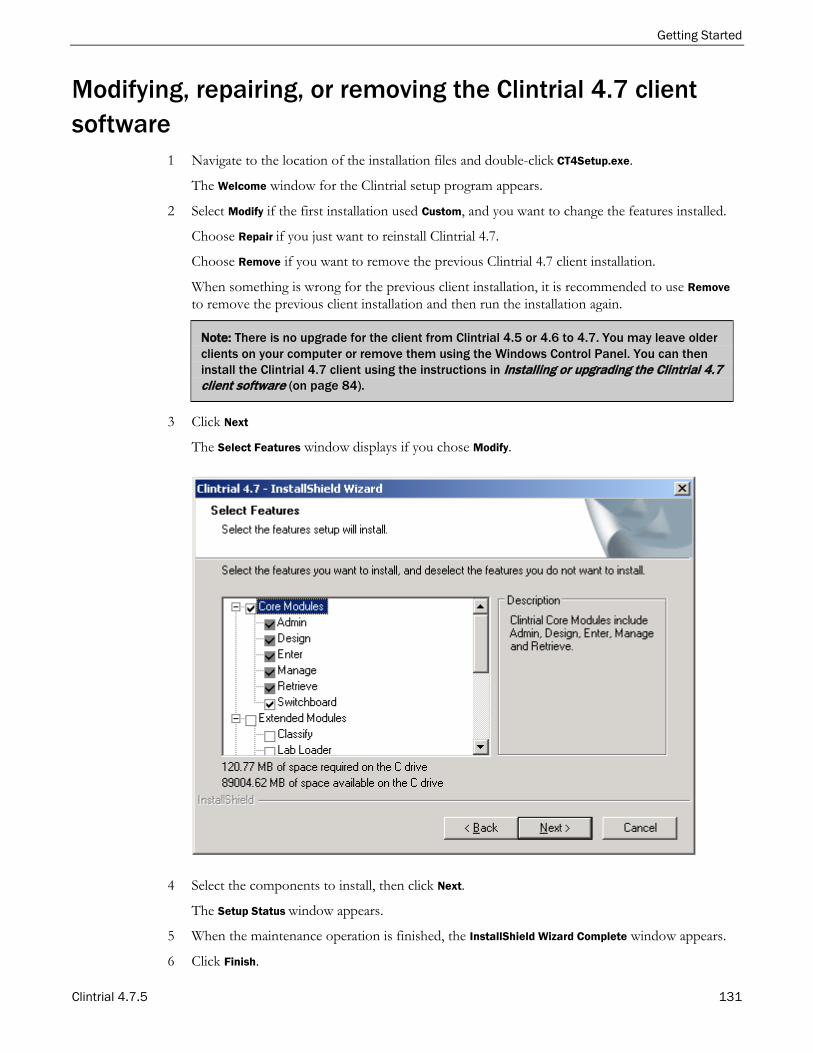
Getting Started
Clintrial 4.7.5 131
Modifying, repairing, or removing the Clintrial 4.7 client software
1 Navigate to the location of the installation files and double-click CT4Setup.exe.
The Welcome window for the Clintrial setup program appears.
2 Select Modify if the first installation used Custom, and you want to change the features installed.
Choose Repair if you just want to reinstall Clintrial 4.7.
Choose Remove if you want to remove the previous Clintrial 4.7 client installation.
When something is wrong for the previous client installation, it is recommended to use Remove to remove the previous client installation and then run the installation again.
Note: There is no upgrade for the client from Clintrial 4.5 or 4.6 to 4.7. You may leave older clients on your computer or remove them using the Windows Control Panel. You can then install the Clintrial 4.7 client using the instructions in Installing or upgrading the Clintrial 4.7 client software (on page 84).
3 Click Next
The Select Features window displays if you chose Modify.
4 Select the components to install, then click Next.
The Setup Status window appears.
5 When the maintenance operation is finished, the InstallShield Wizard Complete window appears.
6 Click Finish.

Chapter 8 Deinstalling the Clintrial software
132 Clintrial 4.7.5
Clintrial 4.7.5 133
Where to find the product documentation The product documentation is available from the following locations:
• My Oracle Support (https://support.oracle.com)—Release Notes and Known Issues.
• Oracle Help Center (http://docs.oracle.com/en/industries/health-sciences/clintrial/index.html) —The most current documentation set.
Documentation accessibility For information about Oracle's commitment to accessibility, visit the Oracle Accessibility Program website: http://www.oracle.com/pls/topic/lookup?ctx=acc&id=docacc.
Access to Oracle Support Oracle customers that have purchased support have access to electronic support through My Oracle Support. For information, visit http://www.oracle.com/us/support/contact/health-sciences-cloud-support/index.html or visit http://www.oracle.com/pls/topic/lookup?ctx=acc&id=trs if you are hearing impaired.
About the documentation