XMU+ Quick Start Guide and User Manual - Interalia Inc.
308
-
Upload
khangminh22 -
Category
Documents
-
view
4 -
download
0
Transcript of XMU+ Quick Start Guide and User Manual - Interalia Inc.


Copyrights
This manual and the software accompanying it are copyrighted © 2009-2016 by Interalia Inc. ®
XMU+ QuickStart Guide 18-UM-000-001-11-EN-85
All rights reserved. No part of this book, including interior design, cover
design, and icons, may be reproduced or transmitted in any form, by any
means (electronic, photocopying, recording, or otherwise) without the
prior written permission of Interalia Inc.
Interalia Inc. Marketing Department 275 - 6815 8th Street NE
Calgary, Alberta, Canada T2E 7H7 Phone: (403) 288-2706
Interalia and the publisher have used their best efforts in preparing this
book as accurately and completely as possible, however we do not
make any guarantees or warranties regarding its content.
Trademarks
Interalia is a registered trademark of Interalia Inc. XMU+ is a registered trademark of Interalia Inc.
All other product names and services identified throughout this book are used in an
editorial fashion only, and for the benefit of such companies. No such use, or the use
of any trade name, is intended to convey endorsement or other affiliation with the
book.

Note: For the latest revision of this guide please go to http://www.interalia.com/xmu.php
Table of Contents
Chapter 1: Introducing XMUCOM+ In This Chapter .................................................................................................... 1 About the XMU+ Announcement and Call Processing System .......................... 3
Who Uses XMU+ ........................................................................................... 3 About the XMUCOM+ Application ................................................................. 3 XMU+ Product Overview ................................................................................ 4 Typical Uses for XMU+ .................................................................................. 5 About XMU+ Line Cards ................................................................................ 7
In This Book ........................................................................................................ 8 For More Information ........................................................................................ 10
Chapter 2: Installing the XMUCOM+ Application In This Chapter ................................................................................................. 11 Overview .......................................................................................................... 13 About the Installation Process.......................................................................... 14 Meeting System Requirements ........................................................................ 15
Operating System Requirements ................................................................ 15 Installing Microsoft Dial-Up Networking for Modem ......................................... 15 Removing XMUCOM Software ........................................................................ 16 Removing Older Versions Of XMUCOM+ Software ........................................ 16 Installing XMUCOM+ Software ........................................................................ 17
To Install XMUCOM+ Software ................................................................... 17 To Start XMUCOM+ .................................................................................... 18 To Back Up XMUCOM+ Site Information ................................................... 19

Understanding the XMUCOM+ Application Interface ...................................... 21 XMUCOM+ Toolbar .................................................................................... 22 XMUCOM+ Menu Commands .................................................................... 24
Tools Menu. ........................................................................................... 24 File Menu ............................................................................................... 24 Communication Menu ............................................................................ 25 Configuration Menu ............................................................................... 26 Administration Menu .............................................................................. 27 Window Menu ........................................................................................ 27 About Menu ........................................................................................... 28
About XMUCOM+ File Formats ...................................................................... 28 About .XMP Files ........................................................................................ 28 About .WAV Message and Music Files ....................................................... 29 About .CSV Files ......................................................................................... 29
Chapter 3: Planning and Defining Your XMU+ Sites
In This Chapter ................................................................................................. 31 Overview - Site Preparation ............................................................................. 33
About XMU+ Sites ....................................................................................... 33 Preparing to Manage Multiple Sites ................................................................. 34 Setting Up Directories For Each Site ............................................................... 38
To create site specific directories from Windows Explorer ......................... 38 Entering Site Specific Information .................................................................... 40
Site Book Window ....................................................................................... 40 New Site and Edit Site Windows................................................................. 41
To set file handling defaults ................................................................... 44
Chapter 4: Setting Up PC to XMU+ Communication
In This Chapter ................................................................................................. 45 Overview .......................................................................................................... 47
Process Flow for XMU+ Communication Setup.......................................... 49 About Connecting the XMU+ Units with XMUCOM+ PC ................................. 50 Preparing for Networking ................................................................................. 51
To prepare for standard networking ............................................................ 51 To prepare for dial-up networking ............................................................... 52
About Microsoft Dial-Up Networking ................................................................ 53 Process flow for Setting Up Dial-Up Networking ........................................ 53 To set up Dial-Up Networking for Modem Connections for Windows XP ... 54 To set up Dial-Up Networking for Modem Connections for Windows 7...... 61
To Set Properties for all dial-up connections ......................................... 64 Setting the Physical Communications for XMU+ ............................................. 69

XMU+ QuickStart Guide rev.10 iii
Setting up Modem Based PC to XMU+ Connections ................................. 70 To connect to the XMU+ modem with an analog line ............................ 70 To set up XMUCOM+ to use a modem connection ............................... 71
Testing Modem Communication ................................................................. 71 To test modem communication ............................................................. 72
Setting up LAN or Ethernet Based PC to XMU+ Communication .............. 73 To connect the XMU+ unit to the PC through an Ethernet network ...... 73
Testing Ethernet Communication ................................................................ 75 To test Ethernet connections ................................................................. 75
Specifying XMUCOM+ Connection Information ............................................... 77 To specify connection details to the XMUCOM+ ........................................ 77
Testing XMU+ to XMUCOM+ Communication................................................. 79 Testing the Physical Connection Between XMU+ and PC ......................... 79
To test a modem connection ................................................................. 80 Testing Information Transfer between XMUCOM+ and XMU+ .................. 82
To retrieve XMU+ system information ................................................... 82 Using the XMU+ debug interface via a Telnet session. .............................. 84
To access the debug interface. ............................................................. 84 A description of the XMU+ Debug Interface .......................................... 85
Troubleshooting XMU+ Communication .......................................................... 86 To determine and correct modem communication failure........................... 86 To determine and correct Ethernet communication failure ......................... 87
Chapter 5: Configuring XMU+ Line Cards
In This Chapter ................................................................................................. 89 About XMU+ Line Cards .................................................................................. 91
Line cards supported by XMU+ .................................................................. 92 Validating XMU+ Line Cards ............................................................................ 94
To validate XMU+ line cards from the Delivery Checklist ........................... 94 To upload the default XMU+ configuration ................................................. 94
Specifying Line Cards to the XMUCOM+ ........................................................ 95 To specify line cards to the XMUCOM+ application .............................. 95
Configuring XMU+ Line Cards ......................................................................... 98 About PBX types ......................................................................................... 99 About XMU+ Operating Modes .................................................................. 100 Applying Line Card Configurations ............................................................ 101
To return line card configurations to their default values ..................... 101 To view current line card configurations ............................................... 102 To edit or change line card configurations ........................................... 103 To send configurations to XMU+ .......................................................... 105
Mapping Start Nodes to XMU+ Lines ............................................................. 106

iv Table of Contents
To set the start node .................................................................................. 106
Chapter 6: Recording, Playing, and Transferring Messages
In This Chapter ................................................................................................ 109 About XMU+ Music and Messages ................................................................. 111
XMU+ Message Administration Methods ................................................... 112 About .WAV Message and Music Files ........................................................... 112
Naming Message Files .............................................................................. 112 About Recording and Playing Messages ........................................................ 113
Recording Messages ................................................................................. 114 To record messages from the Front Panel ........................................... 114 To record messages with Remote Telephone Access ......................... 114 To record messages in a Studio ........................................................... 115 To record messages and music from your PC ..................................... 115
Playing Messages ...................................................................................... 117 To play messages from the Front Panel .............................................. 117 To play messages via Remote Access ................................................ 117 To play messages and music on your PC ............................................ 118
Deleting Messages .................................................................................... 119 To delete messages from the Front Panel ........................................... 119 To delete messages with Remote Telephone Access ......................... 119
Sending Messages to the XMU+ .................................................................... 120 To send messages from your PC to XMU+ Unit .................................. 120
Receiving Messages from XMU+ 123 To receive messages from XMU+ to your PC ...................................... 123
Chapter 7: About XMU+ Nodes and Program Configurations
In This Chapter ................................................................................................ 127 Accessing XMU+ ............................................................................................. 129 About Programming XMU+ For Your Use ...................................................... 131 About XMU+ Ports .......................................................................................... 132 About Basic XMU+ Commands ...................................................................... 132 About XMU+ Nodes ........................................................................................ 133
Types of nodes........................................................................................... 133 Field Descriptions For Nodes ..................................................................... 138
Command Node. .................................................................................. 138 List Node ............................................................................................... 139 Time/Date nodes .................................................................................. 139 Time node ............................................................................................. 139 Date node (Day and Date configurations) ............................................ 140 DTMF/AUTO nodes .............................................................................. 140

XMU+ QuickStart Guide rev.10 v
VOX node ...................................................................................................................... 143 Xfer/Style nodes ............................................................................................................. 144
Style node ................................................................................................... ...................... 146
Message node ................................................................................................................. 148
MOH node .................................................................................................................... ..... 149
Table node ........................................................................................................................ 151
NIS node ............................................................................................................................ 153
DBN Node .......................................................................................................................... 154
DIR Node ............................................................................................................................ 157
About XMU+ Program Configurations ................................................................................. 159
Planning for an XMU+ Program Configuration ......................................................... 159
XMU+ Program Configurations: Types and Description ........................................ 161
Sample XMU+ Call Flow Diagram ................................................................................... 165
Chapter 8: Tutorials: Audio Text and Dial By Name
In This Chapter ............................................................................................................................... 167 Overview .................................................................................................................... ...................... 169
About Programming Audio Text Configurations ............................................................. 169
System Prerequisites ............................................................................................................ 170
Before You Start............................................................................................................................. 172
Configuration Chart for this Program Configuration .............................................. 174
Using XMU+ Nodes ...................................................................................................................... 176
DTMF Nodes for Audio Text Tutorial ............................................................................. 176
MSG Nodes for the Audio Text Tutorial ........................................................................ 177
Audio Text Call Flow Diagrams and Tables.............................................................. ........... 178
Call Flow Sequence Table for Audio Text Tutorial ................................................... 178
Call Flow Diagram for Audio Text Tutorial .................................................................. 179
Entering Audio Text Call Flow into XMUCOM+................................................................. 181
Set up a New Program Configuration ........................................................................... 182
To start a new program configuration ............................................ ....................... 182
To set partition and system parameters for the program configuration .. 183
Working with Message Nodes ......................................................................................... 184
To create message nodes for each message ....................................................... 184
Working with DTMF Nodes ............................................................................................... 186
To create a DTMF node ................................................................................................ 187
To enter DTMF prompts ............................................................................................. . 188
To enter DTMF actions ................................................................................................. 189
To enter DTMF exceptions .......................................................................................... 190
To enter DTMF controls ............................................................................................... 191
Assigning a Line card and Start Node for the Audio Text Program........................... 192
To assign a line card, start node, and operating mode ................................... 192

vi Table of Contents
Sending and Testing the Configuration ..................................................... 195 To download the configuration to XMU+ unit ....................................... 195 To send Audio Text messages to the XMU+ ........................................ 195 To test the configuration ....................................................................... 197
Dial By Name Tutorial ..................................................................................... 197 Create a Dial by Name Application ............................................................ 198
Create a DBN Node .............................................................................. 199 Edit the XFER Nodes ................................................................................. 200
Edit The Style Node .............................................................................. 200 Edit The DIR Node ............................................................................... 201 Edit MSG Nodes ................................................................................... 202 Card Configuration ............................................................................... 202 Send the Configuration to the XMU+ .................................................... 205 Record the Messages ........................................................................... 206 Dial by Name Application Completed! .................................................. 206
Chapter 9: Troubleshooting Configuration
In This Chapter ................................................................................................ 207 About Troubleshooting Program Configurations ............................................. 209 Setting Start Nodes ......................................................................................... 210
To ensure the start node is set properly .................................................... 210 Checking Messages ........................................................................................ 211
To perform an integrity check .................................................................... 211 To download, verify, and resend messages to the XMU+ unit .................. 212 To verify and correct total record time for a partition ................................. 212 To increase the message length ................................................................ 214
Dealing with Communication Failures ............................................................. 215 About SchedulerPlus ................................................................................. 215 To check SchedulerPlus ............................................................................ 216
When XMU+ is Not Answering 218 Working with XMUCOM+ Tools ...................................................................... 220
Retrieving XMU+ Statistics ........................................................................ 220 To retrieve XMU+ statistics .................................................................. 220
Retrieving configurations from the XMU+ .................................................. 222 To retrieve a configuration from XMU+ ................................................ 222
Retrieving messages from the XMU+ ........................................................ 224 To retrieve messages from the XMU+ .................................................. 224
Chapter 10: About Statistics
In This Chapter ................................................................................................ 227 About Statistical Reports ................................................................................. 229

XMU+ QuickStart Guide rev.10 vii
Overview .................................................................................................... 229 Sample Statistical Reports .............................................................................. 230
Line Call Counts ......................................................................................... 230 Simultaneously Active Lines ...................................................................... 231 Node Access Count ................................................................................... 232 Line Xfer Count .......................................................................................... 234 Selections Made......................................................................................... 236 DTMF, AUTO and VOX Selection Count ................................................... 237
Clearing Statistics ........................................................................................... 241
Chapter 11: Mini Weather Radio
In This Chapter ................................................................................................ 243 Overview ......................................................................................................... 244
Who uses MWR ......................................................................................... 244 Equipment Necessary ..................................................................................... 244 Enabling MWR in XMUCOM+ ......................................................................... 245 XMU+: MWR Functionality .............................................................................. 246
Default Settings .......................................................................................... 246 Default Settings (Quebec Region) ............................................................. 246
Configuring the XMU+ MWR Line Card .......................................................... 247 Using the List Node as the Starting Node .................................................. 247 Creating A Message Node ......................................................................... 248 MWR Message Attributes .......................................................................... 248 Setting up an XMU+ MWR Application ...................................................... 249 Application Design ..................................................................................... 249 Mode of Operation (Card Configuration Window) ...................................... 249 Assigning Messages to a Line ................................................................... 249 Recording / Sending the messages to the XMU+ ...................................... 250
MWR Remote Access (Telephone & AVIPADS®) .......................................... 254 Specific Area Message Encoding (S.A.M.E.).................................................. 257
Introduction ................................................................................................ 257 Front Panel Configuration .......................................................................... 258
Remote Telephone Access Operation ............................................................ 258 S.A.M.E. Format......................................................................................... 259
XMU+ FTP Function Reference ...................................................................... 265 Function Reference .................................................................................... 265 Connection Establishment ......................................................................... 265 Security Commands ................................................................................... 265 Message Transfer Commands ................................................................... 266 S.A.M.E. message creation ....................................................................... 268 Node Manipulation commands .................................................................. 268

viii Table of Contents
S.A.M.E. format .......................................................................................... 269 UTILITY Commands .................................................................................. 270 Other Responses ....................................................................................... 270 Example 1 .................................................................................................. 270 Example 2 - S.A.M.E. file creation ............................................................. 271
Example 3 - S.A.M.E. Set Command 271 XMUCOM+ S.A.M.E. Watchdog Timer ...................................................... 272 Setting up a Watchdog S.A.M.E. event ..................................................... 274 Field Description ........................................................................................ 275 Time Zone .................................................................................................. 275 Originator ................................................................................................... 275
Glossary
Index
End User License Agreement Important Read Carefully ........................................................................... 296 Software Product License .......................................................................... 296 General Public License .............................................................................. 296

Introducing XMUCOM+
1
Read this chapter to gain an understanding of the XMUCOM+ application
and of how this QuickStart guide can help you get started in installing and
using this application to create program configurations for the XMU+.
In This Chapter
About the XMU+ Announcement and Call Processing System on page 3. Who Uses XMU+ on page 3 About the XMUCOM+ Application on page 3. XMU+ Product Overview on page 4. Typical Uses for XMU+ on page 5. About XMU+ Line Cards on page 7.
In This Book on page 8. For More Information on page 10.

Chapter 1 Introducing XMUCOM+

ACD Automatic Call
Distribution
UCD Uniform Call Distribution
XMU+ QuickStart Guide rev.10 3 About the XMU+ Announcement and Call Processing System
About the XMU+
Announcement and Call Processing System The XMU+ Digital Call Processor is a microprocessor based, voice announcement and
call processing system. Modular in design and field upgradable, the XMU+ offers major advantages in
processing customer calls for a broad range of customer needs. The XMU+ delivers: High quality ACD/UCD announcements. Interactive auto attendant functionality. Pre-recorded messages that play to assigned port(s) when the unit is
activated by an incoming call. Ability for users to navigate through different levels of messages by
entering commands with a touch-tone telephone. Flash memory that ensures configurations and messages are not lost in the
event of power failures.
Who Uses XMU+
XMU+ is used by a broad range of industries for a variety of functions such as:
Passive announcements. Interactive announcements. Music on Hold. Public Announcements. Interactive Auto Attendants. Call Processing and Transferring.
See Typical Uses for XMU+ on page 5 for more information about each of the above
functions.
About the XMUCOM+
Application The XMUCOM+ application is a Windows based program that works in conjunction
with the XMU+ unit, and allows you to program, receive, download, update, and backup configurations and messages between the PC and XMU+ unit. The intuitive XMUCOM+ interface displays configuration outlines and structures
within a tree-style navigational pane, and provides detailed node information in a
parallel pane. Configurations designed with XMUCOM+ are transmitted to the XMU+ unit through an
XMU+ to PC connection, a modem connection, or a LAN based (Ethernet) network.

Chapter 1
Introducing XMUCOM+
XMU+
Product Overview XMU+ units are compatible with all major telephone systems and can be remotely
managed through a modem, telephone, or Ethernet connection that uses XMUCOM+.
See About the XMUCOM+ Application on page 3 for more information.
XMU+ is available in two sizes: Large Chassis. Small Chassis.
XMU+ Large Chassis 2-64 channels
XMU+ Small Chassis 2-8 channels
XMU+ large chassis provides state-of-
the-art design, and flexible
configuration options for users
requiring up to: 64 analog channels. 48 T1 channels. 6 hours of recording time for
music and messages.
The XMU+ large chassis handles up to
8 line cards for call processing, Audio
Text, ACD announcements, and Auto
Attendant. It can also act as a music/messaging on-hold system with 2 music inputs and 4 different outputs on each card.
The XMU+ small chassis provides an
effective solution for users requiring
only one line card. The XMU+ small chassis provides
up to: 8 analog channels.
24 T1 channels.

XMU+ QuickStart Guide rev.10 5 About the XMU+ Announcement and Call Processing System
Typical Uses for XMU+
The XMU+ can be used for a broad range of purposes.
XMU+
is used as a... In this manner...
Passive Announcer An XMU+ can be used as a Passive Announcement
system. Typical uses include:
Š ACD/UCD customized announcements.
Š Day of week announcement.
Š Time of day announcements.
Š Date specific announcements.
Interactive Auto An XMU+ can be used as an Interactive Auto
Attendant Attendant system. Typical uses include:
Š Audio Text/Information lines that provide
automated messages to callers. An extremely
flexible system, the XMU+ can be configured to
play different messages depending on:
Š Time of day.
Š Day of week.
Š Date and selections made by a caller.
Š Interactive Auto Attendants such as: Š Press 1 for Sales, Press 2 for Technical
Support.
Š Please enter the extension of the person you
wish to speak to.

Chapter 1
Introducing XMUCOM+
XMU+
is used as a... In this manner...
DTMF Call Processing An XMU+ can be used as a DTMF Call Processing
DTMF System system.
Typical uses include Call Centre routing with either
Dual Tone
front ending or back ending ACD queues: Multi Frequency Š In front-ending ACD queues, XMU+ presents a
menu, and transfers the call to the appropriate
queue.
Š In back-ending ACD queues, the client’s telephone
system answers the call and places the user in the
queue. XMU+ plays the appropriate holding
messages, and transfers the caller to the
appropriate person when the line becomes
DNIS available.
Dialed number Music On Hold Player An XMU+ equipped with a Music On Hold (MOH) line
identification service. card can be set up to combine music and messages to
create an “On Hold” environment for your callers.
The music source (such as radio or CD) can be:
Š Stored in and played from a solid state medium on
the Control card’s flash memory.
Š Played directly to the MOH from an external audio
feed.
Each MOH system provides up to six hours of
recording time. Messages can be recorded from four
sources: Telephone handset. Tape unit. Remote access using a touch tone telephone. WAV files that are downloaded using a PC.

XMU+ QuickStart Guide rev.10 7 About the XMU+ Announcement and Call Processing System
About XMU+
Line Cards Depending on the chassis size, the XMU+ can support several different line cards. As
well, each line card may have several variants, depending on the number of ports required and the country of use.
The XMU+ supports the following types of line cards:
Hybrid Analog line card. Low Impedance line card. MWR (Mini Weather Radio) line card - Canada only. MOH (Music On Hold) line card. T1 line card.
For more information about XMU+ line cards:
See Chapter 5: Configuring XMU+ Line Cards for more information about
configuring XMU+ line cards with the XMUCOM+ application. Visit the Interalia website at www.interalia.com for details and
descriptions of each line card. See “XMU+ Technical Specifications and Approvals” in the XMU+
Installation and Maintenance Guide for more information about the XMU+
approving bodies in the countries where XMU+ is used.

Chapter 1
Introducing XMUCOM+
In This Book
This guide helps you to set up the XMUCOM+ application on your
Personal Computer and introduces you to the fundamentals of
designing and building program configurations for the XMU+
system.
See the following for a brief description about each chapter.
Read this chapter... To understand...
Chapter 1: Introducing The XMU+ product and how it can be
XMUCOM+ used to address the needs of your
organization.
Chapter 2: Installing The prerequisites for installing the
the XMUCOM+ XMUCOM+ application and the
Application installation procedure you must
follow. This chapter also introduces
you to the fundamentals of the
XMUCOM+ application interface.
Chapter 3: Planning How to set up the physical
and Defining Your connections between your personal
XMU+ Sites computer and the XMU+ unit. Also
learn how to set up the individual
XMU+ sites that your organization
requires.
Chapter 4: Setting Up How to set up the communication
PC to XMU+ systems between your personal
Communication computer and the XMU+ unit.
Chapter 5: Configuring How to configure and prepare the line
XMU+ Line Cards cards in your XMU+ unit.
Chapter 6: Recording, The techniques and methodology for
Playing, and preparing, generating, and working
Transferring Messages with messages and music for your
XMU+ unit.
In the QuickStart Guide...
Introducing
XMUCOM+
2 Installing the
XMUCOM+ Application
3 Planning and Defining
your XMU+ Sites
4 Setting up PC to
XMU+ Comm unication
Configuring
XMU+ Line Cards
6 Recording, Playing, and
Transferring Messages
7 About XMU+ Nodes and
Program Configurations
8 Tutorials
Troubleshooting
Configuration
10 Glossary
Special
Applications
Index

XMU+ QuickStart Guide rev.10 9
In This Book
Read this chapter... To understand...
Chapter 7: About The basic concepts and ideas behind
XMU+ Nodes and using nodes and developing program
Program configurations for the XMU+ system.
Configurations
Chapter 8: Tutorials: How to develop, test, and operate
Audio Text and Dial your own XMU+ program
By Name configuration. The tutorials in this
chapter provide all the fundamentals
you require to get started in using the
XMUCOM+ application and
implement a simple program
configuration.
Chapter 9: Typical errors that users encounter
Troubleshooting when developing program
Configuration configurations, and how to resolve
these errors.
Chapter 10: About The basic concepts and ideas behind
Statistics developing program configurations
for the XMU+ system and producing
statistical reports.
Chapter 11: Mini Information about Mini Weather
Weather Radio Radio and Estimated Wait Times.
Glossary Industry standard terminology used
in our documentation.
Index Alphabetic list of all the activities and
concepts documented in this guide.

For More Information
Interalia provides a number of additional information resources for XMU+ users. Please refer to the following for more information:
XMU+ Installation and Maintenance Guide XMU+ Installation Handbook Interalia Web Site at www.interalia.com.
In addition, as a customer, you can call any of the following technical support lines for
expert help during normal business hours. Š United States: 1-800-661-9406 (403-288-2706)
Š Canada/Latin America: 1-800-661-9406 (403-288-2706)
Š Europe/Middle East/Africa: +44 203 6082606
Š Asia/Pacific: 1-800-661-9406 (403-288-2706)

Installing the XMUCOM+
2 Application
Read this chapter to ensure you meet system prerequisites for using the
XMUCOM+ application, to install the application, and to learn about the
XMUCOM+ interface.
In This Chapter
Overview on page 13. About the Installation Process on page 14. Meeting System Requirements on page 15.
Operating System Requirements on page 15 Installing Microsoft Dial-Up Networking for Modem on page 15. Removing XMUCOM Software on page 16. Removing Older Versions Of XMUCOM+ Software on page 16 Installing XMUCOM+ Software on page 17.
To Install XMUCOM+ Software on page 17 To Start XMUCOM+ on page 18
Understanding the XMUCOM+ Application Interface on page 21. XMUCOM+ Toolbar on page 22. XMUCOM+ Menu Commands on page 24
About XMUCOM+ File Formats on page 28. About .XMP Files on page 28. About .WAV Message and Music Files on page 29. About .CSV Files on page 29.

Chapter 2
Installing the XMUCOM+ Application

XMU+ QuickStart Guide rev.10 13
Overview
Overview
The XMUCOM+ application is a Windows compatible program capable of running on
Windows XP, Windows Vista Ultimate (32 bit), and Windows 7 Professional (32 and 64
bit). (Please ensure latest service packs are installed.) It provides an intuitive interface
for: Easily developing XMU+ program configurations for your organization. Quickly downloading and uploading XMU+ system and program configurations
and messages from the XMU+ unit to the PC, and vice-versa. Managing and maintaining XMU+ units.
The XMUCOM+ application provides standard pull-down menus, graphical interfaces,
popup dialog boxes, and other components familiar to all Windows users.
With XMUCOM+, users can download, upload, and modify program configurations
quickly and easily. There is little guesswork on the part of the user since the pull-down
menus and pop-up windows only present programmable options.
Note: Your XMUCOM+ CD is in the bag of accessories.
Note: Administrator privileges are required to install on Windows XP, Windows Vista, and Windows 7.

Chapter 2
Installing the XMUCOM+ Application
About the Installation Process
Users should complete the following activities before actually installing the
XMUCOM+ software application.
Ensure you meet all system requirements.
Ensure Microsoft
Networking is set up on your PC.
XMUCOM+ Installation Process
If required, export Site Book information and
back up configurations.
Back up all MSG files.
Uninstall pre-existing
versions of XMUCOM+ software.
Install the current
version of XMUCOM+.
See the following procedures for more information: Meeting System Requirements on page 15. Installing Microsoft Dial-Up Networking for Modem on page 15. Removing XMUCOM Software on page 16. Installing XMUCOM+ Software on page 17.

XMU+ QuickStart Guide rev.10 15
Meeting System Requirements
Meeting System Requirements
XMUCOM+ is a versatile tool that can operate on Windows XP, Windows Vista, or
Windows 7. Ensure that your operating system has had the latest service packs installed and meets the
following requirements before installing XMUCOM+.
Operating System Requirements
The following list outlines the suggested minimum operating system requirements for
running XMUCOM+. Intel Pentium 4 processors or equivalent XP, Vista Ultimate (32 bit) or Windows 7 Professional (32 or 64 bit) 100 MB of available hard drive space A CD-ROM drive A network or modem interface for communications Monitor resolution setting no lower than 800x600
Installing Microsoft Dial-Up Networking for Modem
In order for XMUCOM+ software to function correctly, Microsoft Dial-Up Networking
must be installed on your PC. Dial-Up Networking enables you to connect one computer
to another by using a modem.
Depending on the type of communication option you have selected, you must set up the
appropriate Microsoft Networking options. Set up individual Microsoft Dial-Up Networking for Modem connections. Set up Standard Microsoft Networking with TCP/IP for LAN/WAN
connections.
Please refer to your PC and Windows documentation for detailed procedures about
setting up Microsoft Dial-Up and Standard Networking. The setup process varies
depending on the Operating System that you are currently running.
Note: XMUCOM+ will not operate correctly unless Microsoft Dial-Up Networking is installed before installing XMUCOM+ on your system.

Chapter 2
Installing the XMUCOM+ Application
Removing XMUCOM Software
XMUCOM+ only operates with XMU+ units. It cannot be used to operate older XMUs. So if you have XMUs, you should keep the older XMUCOM program installed. Otherwise, you can uninstall XMUCOM.
Removing Older Versions Of XMUCOM+ Software
Before you install a new version of XMUCOM+, use the following procedure to
uninstall the old version.
This procedure only removes the application. It does not remove files created
(configuration files, message files, music files) when the older version was used.
However you may still wish to back up your site information, as described in To Back
Up XMUCOM+ Site Information on page 19, before uninstalling the old version.
Choose Start > Programs > XMUCOM+ > Uninstall XMUCOM+ from the
Windows Start menu.
Click YES when the Windows Installer confirmation window is displayed.
Follow the on-screen instructions to complete the uninstall.

XMU+ QuickStart Guide rev.10 17
Installing XMUCOM+ Software
Installing XMUCOM+
Software Installing the XMUCOM+ software is a simple process. The Install Shield Wizard guides you through the complete installation process.
Note: If you are upgrading from a previous version of XMUCOM+, you must first
remove the older version before installing the new version. See Removing Older Versions Of XMUCOM+ Software on page 16.
To Install XMUCOM+
Software Insert the XMUCOM+ CD in the computer’s CD-ROM drive.
Choose Start > Run.
Click Browse and select the Setup.exe file on the XMUCOM+ CD.
Click OK to begin the installation.
Follow the on-screen instructions to complete the installation.
If prompted, restart your computer.
Note: The Installation Program uses Windows Installer to install the software. If your
PC does not have an installed version of Windows Installer, the installation
program will first install Windows Installer. You may be prompted to restart
Windows before the XMU+ installation process can continue.

Chapter 2
Installing the XMUCOM+ Application
Tip... The XMUCOM+
installation process
creates a shortcut
on your desktop.
To Start XMUCOM+
Choose Start > Programs > XMUCOM+ >
XMUCOM+. XMUCOM+ displays the startup window.
Go to step 2 to create
new configurations.
Go to step 3 to work
with existing and stored
configurations.
Go to Understanding the
XMUCOM+ Application
Interface on page 21 for
more information about
importing existing sites into
the XMUCOM+ database.
Choose File > New to start a new program configuration.

XMU+ QuickStart Guide rev.10 19
Installing XMUCOM+ Software
Choose File >Open and find and select the configuration with which you want to
work.
Navigate to the folder
where your existing XMU+
configurations are stored.
Select the Configuration
you want to work with
and click Open.
Use the XMUCOM+ menu options to control and manage your XMU+ unit.
See the following pages for more information about the XMUCOM+ interface
and its features.
To Back Up XMUCOM+ Site Information
To back up site information:
Start the current version of XMUCOM+.
Choose Communicate > Export Site Book.
Select the folder in which
you want to store the
backup configurations.
Enter the filename in
which the site information
can be stored.
Enter a filename under which the Site information can be stored and click Save.

Chapter 2
Installing the XMUCOM+ Application
The Export Site command extracts the site information from the database and
saves it as a .xms file which can be imported into the new database.
Choose File>Exit to exit XMUCOM+.
Now, if your installation of XMUCOM+ get corrupted, you can reinstall the
software and import this backup by choosing Communication > Import Site
Book.
This also allows you to share configuration information with other users who are
also using XMUCOM+. Any version of XMUCOM+ can read a site book
exported from any other version of XMUCOM+.

XMU+ QuickStart Guide rev.10 21 Understanding the XMUCOM+ Application Interface
Understanding the XMUCOM+
Application Interface
The XMUCOM+ interface consists of a main screen, pull-down menus, tab-based
series of screens, and button-based options that provide access to a variety of
functions.
The following illustration shows some of the key components of the XMUCOM+
interface, and uses the Site Book and Edit Site windows as examples.
Menu Bar Tool Bar
Site List window
Edit Site window
Command button.

Chapter 2
Installing the XMUCOM+ Application
XMUCOM+
Toolbar
The XMUCOM+ Toolbar provides quick access to commonly used commands and tools. The Toolbar remains accessible through all XMUCOM+ functions and screens.
Exit
Open Configuration
XMUCOM+ Builder for current
New System
View
Card System Configuration. Configuration Configuration
Open
System
Communicate Configuration with XMU+
Save Current View System
Configuration Configuration
The following table provides a brief description of each of these toolbar commands.
This command... Is used to...
Exit XMUCOM+ Exit the XMUCOM+ application. You will be asked to
confirm and save changes.
New System Create a new system configuration. System configurations
Configuration can be applied to any number of XMU+ sites.
Open System Open an existing system configuration. This command
Configuration also opens the Config Builder window so that you can
immediately begin editing program configurations for this
site.
Save Current Save the current system configuration to the database.
Configuration
View System Display a text-based view of your current system
Configuration configuration. This file provides summary information
about all the partitions, cards, default nodes, program
nodes, commands, and messages that make up your
current system configuration.

XMU+ QuickStart Guide rev.10 23 Understanding the XMUCOM+ Application Interface
This command... Is used to...
Communicate with Open the Communication window so that you can send or
XMU+ receive system configurations and messages to and from
the XMU+ unit. This window also lets you schedule
retrieval and resetting of statistics for each XMU+ unit.
View Card Open the Card Configuration window so that you can
Configuration configure and set options for the various cards in the
XMU+ unit. This includes:
Š Specifying the types of cards on your XMU+ unit.
Š Identifying the program configuration (start nodes)
that are to run from each line and partition.
Š Setting Line and Partition behaviors.
Once these options are set and stored in the system
configuration for this site, users can use the Communicate
command to download these settings to the XMU+ unit.
Open Config Builder Open the Config Builder window where you can design,
edit, modify, or delete program configurations, their
associated nodes, and their partition settings.
Developers can create the program configuration on the XMUCOM+ (independent of the XMU+ unit) and download them by using the Communication command when they are ready to test and implement them.

Chapter 2
Installing the XMUCOM+ Application
XMUCOM+
Menu Commands
The XMUCOM+ application uses pull-down menus to provide access to all the main
elements of the system. Menus include File, Communication, Configuration,
Administration, and About. The following provides a brief description of each menu
command and its function.
Tools Menu.
This command... Is used to...
Select Site Book Choose a site book stored on the local drive of your PC,
or one saved onto a network drive if shared access is
required.
Options Enable, disable or modify the Auto Save feature, the User
Login feature, and notify unprocessed completed tasks.
File Menu
This command... Is used to...
New Create a new XMU+ system configuration.
Open Open an existing system configuration.
Close Close current configuration.
Save Save the current program or system configuration to the
database.
Save As Save the current system configuration under a new file
name.
Recent Files Open the nine most recently used configurations.
Exit Exit the XMUCOM+ application.

XMU+ QuickStart Guide rev.10 25 Understanding the XMUCOM+ Application Interface
Communication Menu
This command... Is used to...
Site Book Manage and enter site specific information such as site
name, site ID, connection methods, file handling
standards, and configuration and statistic file handling
guidelines.
Import Site Book Import previously stored site information into
XMUCOM+. Imported site information is stored in the
XMUCOM+ database. This process will overwrite any
existing entries.
Export Site Book Export site information from XMUCOM+ into a backup
file. See To Back Up XMUCOM+ Site Information on page
19.
Communicate Enter and manage uploads and downloads of
configurations to and from the XMU+. These tabs allow
you to identify the elements to be downloaded or
uploaded, and lets you set schedules for certain activities,
such as generating statistics.
Completed Scheduled View a list of completed scheduled tasks. This menu lets
Tasks you determine which scheduled communication tasks are
completed and can be processed.
Delete Partition Delete a selected partition from the XMU+ configuration
Synchronize This feature allows the user to cross reference the PC
software configuration with the one currently residing on
the XMU+. A list of nodes/messages existing on the
XMU+, but not found in the PC software file will be
displayed and can be deleted from the XMU+ at this time
if required.
Launch ReScheduler Open an application which tracks all tasks scheduled
and/or repeated in the future before submitting them to
SchedulerPlus to be executed.
Launch Dashboard Open the communication dashboard which displays
progress and status on a scheduled event.

Chapter 2
Installing the XMUCOM+ Application
Configuration Menu
This command... Is used to...
Card Configuration Open the Card Configuration window so that you can
configure and set options for the various cards in the
XMU+ unit. This includes:
Š Specifying the types of cards on your XMU+ unit.
Š Identifying the program configuration (start nodes)
that are to run from each line and partition.
Š Setting Line and Partition behaviors.
Once these options are set and stored in the system
configuration for this site, users can use the
Communicate command to download these settings to
the XMU+ unit.
Configuration Builder Open the Config Builder window, where you can design,
edit, modify, or delete program configurations, their
associated nodes, and their partition settings.
Developers can create the program configuration on the
XMUCOM+ (independent of the XMU+ unit) and
download them using the Communications command
when they are ready to test and implement them.
View Configuration Display a text-based view of your current system
configuration. This file provides summary information
about all the partitions, cards, default nodes, program
nodes, commands, and messages that make up your
current system configuration.

XMU+ QuickStart Guide rev.10 27 Understanding the XMUCOM+ Application Interface
Administration Menu
This command... Is used to...
System Set XMU+ system settings, access codes, session limits,
partitioning, and other XMU+ options. The four main
sub-menu options are:
XMU+ Settings: Use this window to set access codes,
session limits, enable partitioning, modes of operation,
and language of operation.
Override: Use this window to set the start node for the
override configuration (for each line on each card) of an
XMU+ unit.
Daylight Savings: Use this window to set the start and
stop dates for daylight savings. This command is only
required for those parts of the country that implement
daylight savings.
System Commands: Lets you set, retrieve, and send date,
time, and firmware related information to the selected
XMU+ unit. These tasks are not commonly used. Most of
these tasks can also be performed directly from the Front
Panel of the XMU+ box.
Statistics Retrieve and view statistics for a specific site and
partition of the selected XMU+ unit. Users can also
choose to view existing or already retrieved statistics.
Window Menu
This command... Is used to...
Cascade Cascade open windows for easy access.

Chapter 2
Installing the XMUCOM+ Application
About Menu
This command... Is used to...
About Interalia’s Provide general information about the XMUCOM+
XMUCOM+ application, its version, and contact information.
About XMUCOM+
File Formats There are three major types of files generated by the XMUCOM+ program. These are:
Configuration files stored with an .XMP file extension. Audio messages and music files are stored with a .WAV file extension. Statistic files are stored with a .CSV file extension.
Note: XMUCOM+ uses the following default directories (if you do not enter specific directories) for storage of these files.
For WIndows XP: C:\Program Files\XMUCOM+\CONFIGS C:\Program Files\XMUCOM+\MSGS C:\Program Files\XMUCOM+\STATS
For Windows Vista and Windows 7: C:\Users\Public\Documents\Interalia\XMUCOM+\configs C:\Users\Public\Documents\Interalia\XMUCOM+\Msgs C:\Users\Public\Documents\Interalia\XMUCOM+\Stats
About .XMP Files
. XMP files store XMUCOM+ configurations or programs. They can be downloaded to
and from the XMU+ unit.
For example, if you design a Music on Hold (MOH) configuration on the XMUCOM+,
the .XMP file would contain all the instructions for when to play each music file, how
long to play it, and any other details that you specified. The actual music files are stored
separately as .WAV files.

XMU+ QuickStart Guide rev.10 29
About XMUCOM+ File Formats
You must set up a default directory for storing these .XMP configuration files. See
Setting Up Directories For Each Site on page 38 for more information.
About .WAV Message and Music Files
All music and message files must be stored in .WAV format. In order to be included or
used within a program configuration, the WAV files must have the following properties:
8 bit compression. Š Mono sound 8K sampling rate.Š CCITT µ-Law Format - providing compliance with the lowest
common denominator for WAV files.
See Chapter 6: Recording, Playing, and Transferring Messages for more information
about .WAV files, naming of message and music files, and the processes involved in
creating, receiving, and sending .WAV files to the XMU+ unit.
About .CSV Files
XMU+ Statistics and reports are generated in .CSV (comma separated) files. These
.CSV text files can be imported into any word processor or spreadsheet for viewing,
editing, or report generation purposes.
All statistics for a site are downloaded to the default directory specified in the File
Handling section of the Site Book window. You must set up a default directory, for
each XMU+ site, where .CSV statistic files can be stored.
See Setting Up Directories For Each Site on page 38 for more information.

Chapter 2
Installing the XMUCOM+ Application

Planning and Defining Your
3 XMU+ Sites
Follow the instructions in this chapter to connect your XMU+ units to your
XMUCOM+ PC, and to ensure that organizations using multiple XMU+ units
are properly planned and set up.
In This Chapter
Overview - Site Preparation on page 33. About XMU+ Sites on page 33.
Preparing to Manage Multiple Sites on page 34. Setting Up Directories For Each Site on page 38.
To create site specific directories from Windows Explorer on page 38
Entering Site Specific Information on page 40. Site Book Window on page 40 New Site and Edit Site Windows on page 41

Chapter 3 Planning and Defining Your XMU+ Sites

XMU+ QuickStart Guide rev.10 33
Overview - Site Preparation
Overview - Site Preparation
XMU+ units can be installed at multiple sites or locations. Organizations that choose to
install XMU+ at multiple sites must properly organize, document, and prepare site
specific information. XMUCOM+ site management features let you manage multiple
XMU+ sites from a single location.
Setting up XMU+ Obtain site specific
information for the
XMU+ unit.
Set up directories on
your PC for the
XMU+ site.
Repeat
this
procedure for Enter site specific each XMU+ unit information into
n your organization. XMUCOM+.
Set up telecommunication Modem Communication.
between XMU+ and the
XMUCOM+ software.
Ethernet Communication.
Tip... Follow the
procedures in the
XMU+ Installation
and Maintenance
Guide to install
each XMU+ unit
at its specific site.
About XMU+ Sites A single organization can place multiple XMU+ units at different locations within a
city, in multiple cities, or across the country. Using XMUCOM+, each unit can be
programmed, to execute only the program configurations specific to that site. XMUCOM+ supports easy management and control of these sites by allowing you to
develop and administer all system and program configurations, for all sites, from a
single central XMUCOM+ system. Developed configurations are downloaded to the
appropriate site through Ethernet or modem connections. To set up your sites, you must
carry out the following procedures: Preparing to Manage Multiple Sites on page 34. Setting Up Directories For Each Site on page 38. Entering Site Specific Information on page 40. Setting Up PC to XMU+ Communication on page 45

Chapter 3 Planning and Defining Your XMU+ Sites
Site A site refers to the
location of any
single XMU+ unit. Each XMU+ unit
is considered to
be a site. Each site is managed
individually within
XMUCOM+. Each site has a
system configuration
and associated pro-
gram configurations.
Preparing to Manage Multiple Sites Each XMU+ unit is considered to be an individual site. A location with multiple
XMU+ units is considered to contain multiple XMU+ sites. Each unit must be
individually set up and managed. Effective management and organization of site specific information, configurations,
messages, and so on is critical for proper functioning of multiple XMU+ units. To do
this, Installers must collect and provide the following information about each site in the
XMU+ Delivery Checklist, which is a part of the XMU+ Installation and Maintenance
Guide:
Collect... Description...
Modem Phone Number Obtain the modem phone number for XMU+ units that use a modem connection to communicate with
the XMUCOM+ application.
IP Address & Netmask Obtain the IP address for XMU+ units that use an Ethernet LAN/WAN connection to communicate with
the XMUCOM+ application. Provide this information
to the installer of the XMU+ unit.
Remote Telephone Obtain the remote telephone access phone number if Access Phone Number you plan to access and control the XMU+ unit
and Code remotely with a telephone. Remote telephone access
also requires an access code that the installer may have
to set up for you.
Access Codes Every XMU+ unit can be assigned unique access codes during installation. This access code is required to
update configurations and administrate the XMU+
unit.
Note: Site book access code must be the same as the XMU+ “XMUCOM+ access”
code, see front panel - System / Access Codes / XMUCOM+ access.

XMU+ QuickStart Guide rev.10 35 Preparing to Manage Multiple Sites
Collect... Description...
XMU+ Delivery This checklist should have been completed, and
Checklist delivered to you, by the XMU+ Installer. It includes
information about one or more of the following:
Š Installation Specifications.
Š Power Supply Specifications.
Š Control card Specifications.
Š Line card Specifications.
Š Firmware Specifications
Š Message Specifications.
Š Hybrid Hardware Settings.
Š MOH Hardware Settings.
Š T1 Hardware Settings.
Š Telephone and Extension Specifications.
Š PBX Specifications.
Š XMU+ to XMUCOM+ Specifications.
You will require this information to complete the Site
and Communications setup for the XMUCOM+.
In addition to this installation information, the operator of the XMUCOM+
application must also decide on how to organize and maintain the site setup
information for each site.
For... Determine the following...
Site ID Number Each XMU+ site should be assigned a Site ID. Site ID’s
can be a maximum of 15 characters. XMUCOM+ does
not require these numbers to be unique.
Site Name Each site should be given an identifying site name. Use
a logical system for naming each site. Site ID’s can be a
maximum of 25 characters. For example, to allow easy
site identification for XMU+ units in different cities,
you may want to include the city name in each site
name.
XMUCOM+ does not require these names to be
unique.

Chapter 3
Planning and Defining Your XMU+ Sites
For... Determine the following...
System Configuration Each XMU+ unit contains one system configuration.
Files System configurations contain all relevant XMU+
information such as system settings, partitioning
information, card configurations, and the various
program configurations that can run on that XMU+
unit.
Keep the following in mind when defining your system
configurations.
Š Include the site ID when saving system
configuration file names. For a shorter file name,
you may want to prefix the configuration name with
the site ID number.
For example: 1243-MOH where 1243 is the site ID,
and MOH is the type of system configuration.
Š Allow the XMUCOM+ application to auto-
increment system configuration file names, so that
new or updated system configurations do not
accidentally overwrite existing system
configurations.
Š It is possible to define and store multiple system
configurations for a single site by using your
XMUCOM+. You can choose to download only the
configuration that meets your current needs.
Š Define a site-specific directory to which you can
download configurations belonging to each site.
Enter this unique directory name as the Default
Pathname for all configurations for this site.
Š Label the starting node for each program
configuration with a meaningful name that
describes the purpose of this program
configuration.

XMU+ QuickStart Guide rev.10 37 Preparing to Manage Multiple Sites
For... Determine the following...
Message Files Many XMU+ program configurations use message files
as part of their program. Message files can contain
voice messages or music. To allow for easy
identification of these message files, consider doing
the following:
Š Include the Site ID and program configuration type
in all message names or message labels. For a
shorter file name, you may want to prefix the
message name with the Site ID number, followed by
an abbreviation for the type of configuration you
are creating.
For example: 1243-MOH-Hello Msg.
Š Define a site-specific directory to which you can
download messages belonging to that site. Enter
this unique directory name as the Default Pathname
for all messages for this site.
Note: Messages uploaded from the XMU+ unit are
assigned default file names. See Naming Message
Files on page 112 for more information.
Statistics Files Statistic files are generated when you generate
statistics reports from XMUCOM+. To quickly identify
these files, and when they were created, consider doing
the following:
Š Include the Site ID in the name of all statistics files.
Š Allow the system to auto-increment statistic file
names, so that new statistic reports do not
accidentally overwrite existing reports.
Š Define a site-specific directory to which you can
upload statistics belonging to that site. Enter this
unique directory name as the Default Pathname for
all statistics generated for this site.

Chapter 3
Planning and Defining Your XMU+ Sites
Setting Up Directories For Each Site
Ideally, each physical XMU+ site should have an associated directory on the
XMUCOM+ PC. All files belonging to that site should exist within sub-directories for
that site, and have unique names that identify the site and configuration to which they
belong. For more information, see: Preparing to Manage Multiple Sites on page 34. Entering Site Specific Information on page 40.
The following diagram illustrates a sample directory organization for an organization
with multiple XMU+ sites:
Configurations in Calgary could be named: 1243-MOH.XMP 1243-Welcome.XMP
Messages for MOH in Calgary could be named:
1243-MOH_Welcome.WAV 1243-MOH_Sales.WAV
You can create site specific directories from Windows Explorer, and specify site
information in XMUCOM+ with the Site Book feature. These site specific folders are
used by XMUCOM+ to download messages, statistics, and configurations that were
retrieved from the XMU+ unit. See: To create site specific directories from Windows Explorer on page 38. For Windows XP: on page 41. To set file handling defaults on page 44.
To create site specific directories from Windows Explorer
Perform the following steps for each XMU+ site in your organization.
Decide on a unique site name and Site ID for each XMU+ location. Record these
decisions for convenient access.
Collect and prepare site information for this site. See Preparing to Manage
Multiple Sites on page 34 for details.

XMU+ QuickStart Guide rev.10 39 Setting Up Directories For Each Site
Tip... 3. Open Windows Explorer and navigate to the XMUCOM+ application folder.
For Windows XP, the default location for this folder is: During installation,
XMUCOM+ C:\Doucuments and Settings\All Users\Documents\Interalia\XMUCOM+ automatically creates
For Windows Vista and Windows 7, the default location for this folder is: default folders for
storing system C:\Users\Public\Documents\Interalia\XMUCOM+ configurations,
messages, and Default folder for System Configurations. statistics.
If you do not create site specific folders, Default folder for Message.
XMUCOM+ will use
these default folders
to hold these
elements. Default folder for XMU+ Statistics and Reports.
Within the main XMUCOM+ folder, create a folder for each XMU+ site in your
organization. Use the File > New > Folder command to add these folders, and
then rename them to suit your site. In this example we named it “XMU+ Sites”.
Include the site location (and optionally the site number) in the folder name. For
example: Calgary 1243
Within each new site folder, create sub-folders for Configurations, Messages,
and Statistics.
Repeat steps 4-5 for each XMU+ site in your organization. Upon completion,
your directory structure should look similar to the following, but with your
unique, site specific names.
Optionally, you can create a master folder called XMU+ Sites, that contains all your site specific information. This lets you easily back up all XMUCOM+ site information.
Folder containing Configuration, Messages, and Statistics folders for the Edmonton site.
For each site, enter site details as described in Entering Site Specific
Information on page 40.

Chapter 3
Planning and Defining Your XMU+ Sites
Entering Site Specific Information
Every XMU+ site must be defined, named, and have its defaults set before you begin
building and using program configurations. This ensures clean operation of the XMU+
and XMUCOM+, and helps you manage and organize your site specific information.
You can enter all site specific information directly into the XMUCOM+ application,
where you can easily maintain site information and ensure that all standards for
multiple XMU+ sites are met.
Ensure that you have collected and prepared the following information about each site
before beginning to enter site information into XMUCOM+, and before setting
Microsoft Dial-Up Network Connections. Site Name. Site ID. Access codes for each site. Modem phone number (for modem based connections). IP address of site (for Ethernet based connections). Path name of directories where configurations, messages, and statistics are to be
stored for this site.
See the following for entering and managing site specific information: Site Book Window on page 40. New Site and Edit Site Windows on page 41.
Site Book Window
The Site Book window lets you: View a list of existing sites. Add new sites.
Š Edit existing sites. Š Sort by column Delete sites.
List of sites currently defined to
XMUCOM+.
Click these buttons to edit selected sites,
add new sites, or delete selected sites.

XMU+ QuickStart Guide rev.10 41
Entering Site Specific Information
New Site and Edit Site Windows
Use the New Site and Edit Site windows to enter information about each site, to set site
defaults, and to specify site specific connection information. See the following topics for
more information about each topic: For Windows XP: on page 41. To set file handling defaults on page 44. To specify connection details to the XMUCOM+ on page 77.
To enter site information:
For Windows XP:

Chapter 3
Planning and Defining Your XMU+ Sites
For Windows Vista and Windows 7:
Choose Communication > Site Book to navigate to the Site Book window.
List of sites currently defined to XMUCOM+.
Click New to add a new site, or select an existing site and click Edit.

XMU+ QuickStart Guide rev.10 43
Entering Site Specific Information
Enter the following information into the Site Information section of the New
Site window:
Site Name - Apply the naming conventions that you selected for your sites.
See Preparing to Manage Multiple Sites on page 34 for more information
about naming conventions. Site ID - Enter a brief, unique Site ID. Access Code - See the XMU+ Delivery Checklist for the access code assigned
to the XMU+ unit during installation. Leave this field blank if no access code
has been assigned.
Click Apply to save your changes.
Follow the procedures in:
To set file handling defaults on page 44 to enter the default directories to which you want to save files.
To specify connection details to the XMUCOM+ on page 77 to specify the
type of connections you will be using to communicate between XMU+ and
XMUCOM+.
Click OK to save your changes and return to the Site Book window.
Note: Site book access code must be the same as the XMU+ “XMUCOM+ access”
code, see front panel - System / Access Codes / XMUCOM+ access.

Chapter 3
Planning and Defining Your XMU+ Sites
To set file handling defaults
Ensure that you have followed the instructions in Setting Up Directories For
Each Site on page 38 before beginning this procedure.
Navigate to the New Site or Edit Site window, and review the contents of the File
Handling section.
Browse directories button.
Click this button to search for
the directory in which you want
to store these files.
XMUCOM+ displays the default
file locations for new sites.
For each section, click the Browse button, and locate the directories you have
defined for Messages, Configurations, and Statistics.
Select the appropriate folders for the site that you are currently working with.
If you have not completed Step 1, XMUCOM+ lets you define new folders as
required.
Choose the appropriate incrementation options for Configuration and Statistic
files. These incrementation options are only applied when the user schedules
retrieval of configurations, messages, or statistics from the XMU+ unit. They are
not applied when the user performs Save or Save As.
Overwrite:XMUCOM+ overwrites the current version of the system
configuration with the new version. This overwrite only
affects the file on the PC. The system configuration on the
XMU+ unit is not overwritten until you download the file to
the XMU+ unit.
Auto increment: XMUCOM+ automatically increments the name of the file to
ensure that the original system configuration file is not
overwritten.
Click Apply to save your changes.
Click OK to save your changes and return to the Site Book window.

Setting Up PC to XMU+
4 Communication
This chapter describes how to set up, test, maintain, and troubleshoot
communication between the XMU+ unit and the XMUCOM+ application.
In This Chapter
Overview on page 47. About Connecting the XMU+ Units with XMUCOM+ PC on page 50. Preparing for Networking on page 51. About Microsoft Dial-Up Networking on page 53. Setting the Physical Communications for XMU+ on page 69. Specifying XMUCOM+ Connection Information on page 77. Testing XMU+ to XMUCOM+ Communication on page 79. Troubleshooting XMU+ Communication on page 86.

Chapter 4 Setting Up PC to XMU+ Communication

XMU+ QuickStart Guide rev.10 47
Overview
Overview
XMU+ is an extremely versatile unit that allows you to use a couple of connection
options to connect the unit to a PC (from either a local or remote location). It is
important to consider all possible options before setting up your communications.
Your decisions on which communications option to use should be made before the
XMU+ unit is installed. The best way for XMU+ to communicate with XMUCOM+ is
dependant upon the communication systems currently available in your organization’s
environment. You can choose from one of the following communication options:
Modem. Ethernet (network).
Whichever method is chosen XMUCOM+ always uses the same sequence for tracking
and executing the communication. For communications which are to happen
immediately SchedulerPlus carries out the selected tasks, for communications which
have been scheduled in the future and/or which need to be repeated regularly,
ReScheduler stores and tracks the selected tasks, only submitting them, automatically, to
SchedulerPlus when the time of execution arrives.
Access the ReScheduler window by clicking
the clock icon in the Windows Program Bar.

Chapter 4
Setting Up PC to XMU+ Communication
The progress and status of a communication session can be viewed via the
SchedulerPlus window. The dashboard, located at the bottom of the SchedulerPlus
window displays data transfer in real time.
You will need to provide the appropriate information to the XMU+ installer about the
selected communication option. Ideally, the physical XMU+ communication setup will
have been completed by the installer of the XMU+ unit.
The installer of the XMU+ unit should have recorded the selected communication
option and any additional information in the XMU+ Delivery Checklist. Refer to this
checklist in the XMU+ Installation and Maintenance Guide for more information.
Note: You can setup XMUCOM+ and XMU+ to use all possible communications. However, at any one time, only one communication option can be used.

XMU+ QuickStart Guide rev.10 49
Overview
Process Flow for XMU+ Communication Setup
You need to complete all the steps in the following process flow for each XMU+ unit in
your organization. These basic procedures must be followed for each type of connection.
Execute this process for EACH XMU+ unit that you are installing.
Prepare for networking.
Set up Dial-Up Networking.
Set up and test
physical connections.
Specify communication
options.
Test communication.
Setting Up PC to XMU+ Communications
Set up dial-up networking for modems.
Set up modem connections.
Set up Ethernet
connections.
Test modem connections.
Test Ethernet connections.
Troubleshoot
communications.

Chapter 4
Setting Up PC to XMU+ Communication
About Connecting the XMU+ Units with XMUCOM+ PC
Users that have XMU+ units distributed across multiple geographical sites must consider
how they want to interconnect and communicate with the various units. Depending on
the location, available network facilities, and modem capabilities of the XMUCOM+
system and XMU+ units, users can choose to apply one or more of the following
connection methods to their XMU+ sites:
Use... To let the XMU+ communicate with XMUCOM+...
Modem Connection Through a dial-up modem connection. This method is
effective for sites that are not linked through LAN/WAN
networks.
Modem connections require PC’s with a modem, and the
modem phone numbers for the XMU+ unit. See Setting up
Modem Based PC to XMU+ Connections on page 70 for more
information.
Ethernet Through LAN/WAN networks. This method is effective for
Connection organizations that have existing LAN/WAN networks
operating at all XMU+ sites.
Ethernet connections require: A network card to be installed within the XMUCOM+ PC. Both the PC and XMU+ unit be connected to the network. A static IP address for the XMU+ unit. An IP address for the XMUCOM+ PC.
See Setting up LAN or Ethernet Based PC to XMU+ Communication on page 73 for more information.

XMU+ QuickStart Guide rev.10 51 Preparing for Networking
Use... To let the XMU+ communicate with XMUCOM+...
Direct Ethernet With a non-LAN Ethernet connection by connecting the
Connection network port of a PC directly to the network port on the
XMU+ using an Ethernet cable.
Use this method if your PC is equipped with a network card,
but does not have an available LAN to connect with.
Use an Ethernet cable between the PC’s Ethernet port and
the XMU+ unit and create a separate network connection
between the two components.
Direct Ethernet connections require: A network card to be installed within the XMUCOM+ PC. An Ethernet crossover cable. A static IP address for the XMU+ unit.
You must verify that Microsoft Networking is set up and operating on the PC for this network card. The selected network card is then used exclusively for the XMU+ connection, and is not available to connect to other networks.
Preparing for Networking
Complete the following procedures to prepare for the type of connections you want to
use.
To prepare for standard networking Ensure that the physical connections between XMU+ and XMUCOM+ have been
set up and are operating correctly. See the following for more information: Setting
up LAN or Ethernet Based PC to XMU+ Communication on page 73.
Obtain the IP address for the XMU+ unit.
Ensure that networking has been set up on your PC.

Chapter 4
Setting Up PC to XMU+ Communication
To prepare for dial-up networking
Dial-Up Networking only needs to be set up for modem connections. Ethernet
connections require implementation of standard networking.
1. Ensure Windows Dial-Up Networking application has been installed on your PC.
2. Ensure you have installed XMUCOM+ on your PC.
3. Execute the appropriate procedures to set up dial-up networking for modems. See the following:
To set up Dial-Up Networking for Modem Connections for Windows XP on
page 54. To set up Dial-Up Networking for Modem Connections for Windows 7 on
page 61 4. Ensure that the physical connections between XMU+ and XMUCOM+ have
been set up and are operating correctly. Š See Setting up Modem Based PC to XMU+ Connections on page 70.
Test Dial-Up Networking by following the procedures in To test a modem
connection on page 80.
6. Obtain the following information for each XMU+ unit that you are connecting to
this PC. This information should be available in the XMU+ Delivery Checklist.
XMU+ Modem Phone Number.
7. Complete the procedures detailed in Specifying XMUCOM+ Connection
Information on page 77 to finish connecting the PC to the XMU+ unit.

XMU+ QuickStart Guide rev.10 53
About Microsoft Dial-Up Networking
About Microsoft Dial-Up Networking
XMU+ uses FTP protocols to communicate between itself and the PC containing the
XMUCOM+ application. This communication protocol is used with all XMU+
communication options (modem and Ethernet) and requires the setup of Windows Dial-
Up Networking for each XMUCOM+ PC in the organization.
Dial-Up Networking enables users to connect one computer (XMU+ unit) to another
computer (in this case with XMUCOM+) by using a modem connection. XMU+ and
XMUCOM+ require the implementation and definition of Windows Dial-Up
Networking in order to communicate information between each other.
The set up and definition of the Windows Dial-Up Networking occurs outside of the
XMUCOM+ application, and uses the standard Windows tools. Search the Windows
Help system for more information about Windows Networking.
Process flow for Setting Up Dial-Up Networking
This sub-process shows the steps you must follow to set up Dial-Up Networking on
your PC. Execute this process before beginning to detail all the communication
options within the XMUCOM+ application.
P r e p a r e fo r
N e tw o r k in g .
S e ttin g U p D ia l- U p N e tw o r k in g
fo r M o d e m C o n n e c tio n s
U s e M o d e m S e t u p D ia l- U p
Y E S
N e tw o rk in g fo r M o d e m C o n n e c tio n ?
C o n n e c tio n s .
N O
S e t u p E th e rn
e t C o n n e c tio n
s .
S e t D ia l- U p N e tw o r k in g P r o p e r tie s .
V e r ify P h y s ic a l
C o n n e c tio n s .
T e s t D ia l- U p N e tw o r k in g .

Chapter 4
Setting Up PC to XMU+ Communication
To set up Dial-Up Networking for Modem
Connections for Windows XP
Users only need to set up one dial-up networking connection for XMU+ modems.
XMUCOM+ uses this definition as a template for all subsequent modem connections.
The modem phone number is changed during run-time by the XMUCOM+ software to
match the site that is being communicated with.
The XMUCOM+ program group provides a shortcut to Windows Network
Connections.
Go to START > All Programs > Interalia > XMUCOM+ > Dial-Up Networking
Select Create a new connection from the left side options.

XMU+ QuickStart Guide rev.10 55
About Microsoft Dial-Up Networking
Press Next.
Select Connect to the network at my workplace and press Next.

Chapter 4
Setting Up PC to XMU+ Communication
Select Dial-up Connection and press Next.
Create a name for the new Dial-up connection and press Next.

XMU+ QuickStart Guide rev.10 57
About Microsoft Dial-Up Networking
Enter a phone number for the Dial-up connection and press Next.
Note: The number you enter will not be used to dial the XMU+. The phone number for
the XMU+ will be specified within the XMUCOM+ administration software as a
site book entry.
Select who will be using the XMUCOM+ application and press Next.

Chapter 4
Setting Up PC to XMU+ Communication
N .Press Finished.
This is a Dial-up connection example. The Username and Dial number is not required for
the purpose of XMU+ communication.

XMU+ QuickStart Guide rev.10 59
About Microsoft Dial-Up Networking
This is an example of the Dial-up connection properties.
These are typical setup options.

4. Chapter 4 Setting Up PC to XMU+ Communication
Ensure the TCP/IP protocol is selected.

XMU+ QuickStart Guide rev.10 61
About Microsoft Dial-Up Networking
To set up Dial-Up Networking for Modem
Connections for Windows 7
Users only need to set up one dial-up networking connection for XMU+ modems.
XMUCOM+ uses this definition as a template for all subsequent modem connections.
The modem phone number is changed during run-time by the XMUCOM+ software to
match the site that is being communicated with.
5. On the PC or laptop, choose Start > Control Panel > Network and Sharing
Center:
6. Select Set up a new connection or network.

Š Chapter 4
Setting Up PC to XMU+ Communication
Now select the modem you will be using by double clicking the selected
modem.
Š Enter any number in the phone number field. Also you may customize the
name in the Connection name field if required for identification.

XMU+ QuickStart Guide rev.10 63
About Microsoft Dial-Up Networking
Š Click Connect . You modem will then dial out the number as entered. Once the
modem dialer completes dialing the number, click Skip.
80 When the Skip button is clicked, the connection will stop. This may take a few
seconds.

1. Chapter 4
Setting Up PC to XMU+ Communication
The connection is now ready for use. Click Close.
To Set Properties for all dial-up connections
3. Choose Start > Control Panel > Network and Sharing Center.

XMU+ QuickStart Guide rev.10 65
About Microsoft Dial-Up Networking
4. Select Change adapter setting. Then select (by double clicking) the dial up
connection that you just made.
6. Click Properties.

Š Chapter 4
Setting Up PC to XMU+ Communication
Make sure that all settings are as follows.
Please verify the correct modem is selected.

XMU+ QuickStart Guide rev.10 67
About Microsoft Dial-Up Networking
82 Set the remaining settings as follow.
f

1. Chapter 4 Setting Up PC to XMU+ Communication

XMU+ QuickStart Guide rev.10 69 Setting the Physical Communications for XMU+
Setting the Physical Communications for XMU+
Each XMU+ connection requires the execution of a similar set of activities that starts
with the physical installation and testing of the XMU+ unit and its wiring, set up of PC
Networking, entering of communication options into XMUCOM+. Finally, the
communication between the XMU+ and XMUCOM+ PC is tested by retrieving
information from the XMU+.
Execute the following procedures after choosing the connection option that best suits
your organization’s needs: 2. Setting up Modem Based PC to XMU+ Connections on page 70. 3. Setting up LAN or Ethernet Based PC to XMU+ Communication on page 73.
Set up Physical Communication to XMU+
Set up Dial-Up
Networking.
Set up and test physical connections.
Specify communication
options.
Set up modem connections.
Set up Ethernet
connections.
The best way for XMU+ to communicate with XMUCOM+ depends on the
communication systems currently available in the environment in which the XMU+
will be placed. Record the selected communication option in the XMU+ Delivery
Checklist of the XMU+ Installation and Maintenance Guide.
Note: Ideally, the XMUCOM+ software and the XMU+ unit should be installed
concurrently so that full testing can be completed.

84 Chapter 4 Setting Up PC to XMU+ Communication
Modem connections
require the following:
Setting up Modem Based PC to XMU+ Connections The XMU+ unit has an internal modem that is pre-configured for correct operation. The
XMU+ modem access port is accessed through the MODEM connector on the Control
card and is connected with an analog line (using a standard telephone jack and POTS
cable) to the XMU+. See “Cabling the XMU+” in the XMU+ Installation and
Maintenance Guide for more information. Modem connections require the following: 1. Operating and testing modem in the XMUCOM+ PC. 2. Telephone connections for XMUCOM+ PC. 3. Telephone connections for XMU+ Unit. 4. Modem phone number for XMU+ Unit. 5. Microsoft Dial-Up Networking is set up in the XMUCOM+ PC.
POTS Line
POTS Plain Old Telephone Service
To connect to the XMU+ modem with an analog line 2. Ensure that a vacant, active telephone outlet is nearby. If one is not nearby,
install one. Always take the following safety precautions when installing or
modifying telephone lines:
Never install wiring during a lightning storm. Never install a jack in a wet location unless the jack is specifically designed
for wet locations. Never touch uninsulated wires or terminals unless the lines have been
disconnected at the network interface. 3. Connect the one end of the POTS line or analog extension to the RJ-11 modem
port on the XMU+. 4. Plug the RJ-11 Mating Connector (telephone jack) on the opposite end of the
POTS line or analog extension into the vacant, active telephone outlet. 5. Enter XMU+ site information into XMUCOM+.
See For Windows XP: on page 41 and To specify connection details to the
XMUCOM+ on page 77 for more information. 6. Test the connection between XMUCOM+ and XMU+.
To test modem communication on page 72.

XMU+ QuickStart Guide rev.10 71 Setting the Physical Communications for XMU+
To set up XMUCOM+ to use a modem connection
1. Ensure that a modem is installed and operational on the XMUCOM+ PC.
2. Ensure that modem setup is completed for the XMU+ unit. See To connect to the XMU+ modem with an analog line on page 70 and the
XMU+ Installation and Maintenance Guide for more information.
86 Enter XMU+ site information into XMUCOM+.
See For Windows XP: on page 41 and To specify connection details to the
XMUCOM+ on page 77 for more information.
87 Test the connection between XMUCOM+ and XMU+.
Execute the following procedures to test your connection:
To test modem communication on page 72. To retrieve XMU+ system information on page 82.
Testing Modem Communication
Modem communication with XMU+ can be verified by connecting the modem port on
the XMU+ to a nearby active telephone outlet and conducting a communication test.
This test may be conducted on any PC or laptop with a modem connection from
anywhere.
Test Modem Connection
Ensure XMU+ is properly cabled.
Ensure Dial-Up
Networking is installed.
Obtain XMU+ modem telephone number.
Set up modem and
define its properties.
Activate modem
connection.
Ping
XMU+.

Š Chapter 4
Setting Up PC to XMU+ Communication
To test modem communication
Conducting a modem communication test involves the following tasks:
Š Ensure modem connection is dialed-up.
Š Ensure the modem on the PC or laptop that will be used for the communication
test is connected to a telephone outlet.
Š Obtain the telephone number to which the XMU+ modem is connected, and
record that number in the Delivery Checklist.
See “The XMU+ Delivery Checklist” in the XMU+ Installation and Maintenance
Guide.
Š Using Dial-Up Networking, create a modem and connect to the XMU+.
See Preparing for Networking on page 51.
Š Activate Dial-Up Networking to connect to the XMU+.
See the following:
To set up Dial-Up Networking for Modem Connections for Windows XP on page 54
To set up Dial-Up Networking for Modem Connections for Windows 7 on page 61
Š Confirm the connection by pinging the XMU+.
See To test a modem connection on page 80.

XMU+ QuickStart Guide rev.10 73 Setting the Physical Communications for XMU+
Setting up LAN or Ethernet Based PC to
XMU+ Communication
If your organization has a LAN/WAN network connecting the various XMU+ sites, you
can use the Ethernet network to connect the XMU+ units to the XMUCOM+ PC.
Ethernet connections require the following: 1. PC connected to the network. 2. Static IP address for the XMU+ unit. 3. An IP Sub Netmask. 4. CAT5 Cable for connecting XMU+ to the network.
Note: It is possible to create a non-LAN Ethernet connection by connecting the network
port of a PC directly to the network port on the XMU+ using an Ethernet cable.
Refer to the XMU+ Installation and Maintenance Guide to learn how to set the static IP
addresses for the XMU+ unit. See To determine and correct Ethernet communication
failure on page 87 for LAN/Ethernet troubleshooting tips.
To connect the XMU+ unit to the PC through an Ethernet network
The XMU+ provides an RJ-45 port to connect to the XMU+ to a PC via a network. See
“Cabling the XMU+” in the XMU+ Installation and Maintenance Guide for more
information.
1. Ensure that a vacant, active network outlet is nearby. If one is not nearby, install
one. Always take the following safety precautions when installing or modifying
network lines:
Never install wiring during a lightning storm. Never install a jack in a wet location unless the jack is specifically designed
for wet locations. Never touch uninsulated wires or terminals unless the lines have been
disconnected at the network interface.
2. Connect one end of the CAT5 cable to the NETWORK RJ-45 port on the XMU+.
See “Cable Checklist” in Chapter 1 of the XMU+ Installation Handbook for more
information about the CAT5 cable.
3. Plug the jack on the opposite end of the CAT5 cable into the vacant, active
network outlet.
4. Ensure the “link” LED is on (green). If it is not on, troubleshoot.

88 Chapter 4
Setting Up PC to XMU+ Communication
See the troubleshooting section of the XMU+ Installation and Maintenance
Guide section for more information.
6. Enter XMU+ site information into XMUCOM+.
See For Windows XP: on page 41 and To specify connection details to the
XMUCOM+ on page 77 for more information.
7. Test the connection between XMUCOM+ and XMU+.
Execute the following procedures to test your connection:
To test Ethernet connections on page 75. To retrieve XMU+ system information on page 82.

XMU+ QuickStart Guide rev.10 75 Setting the Physical Communications for XMU+
Testing Ethernet Communication
LAN Ethernet communication with XMU+ can be verified by connecting the Ethernet
port on the XMU+ to a network and conducting a communication test. This test can be
conducted from a PC with a network (internal or external) connection, as long as a static
IP address has been assigned to the XMU+.
Test Ethernet Connection
Ensure XMU+ is properly cabled.
Obtain XMU+ IP address.
Assign IP address
to XMU+.
Ping IP address
to test connection.
Conducting an Ethernet communication test involves the following tasks:
Š Ensure the XMU+ is properly cabled:
For LAN connections, ensure that the Ethernet port on the XMU+ and the PC
or laptop that will be used for the communication test are connected to the
network outlet. See To connect the XMU+ unit to the PC through an Ethernet
network on page 73 For direct Ethernet connections, ensure that the Ethernet port on the
XMU+ is connected to the PC or laptop that will be used for the
communication test.
Š Obtain the appropriate XMU+ static IP address from the appropriate source
(normally the IT department), and ensure it is recorded in the XMU+ Delivery
Checklist. See “Communication Specifications” in the XMU+ Installation and
Maintenance Guide for more information.
Š Assign the IP settings to the XMU+ from the system menu on the Front Panel.
See “To assign an IP address” in Chapter 8 of the XMU+ Installation and
Maintenance Guide for more information.
Š Ping the IP address to ensure the Ethernet connection is operative. See To test
Ethernet connections on page 75.
To test Ethernet connections
Perform this test after physically connecting the XMU+ and XMUCOM+ to each other
through LAN or Modem connections. This test is performed outside of the XMUCOM+
application and requires the presence of an active network.

90 Chapter 4
Setting Up PC to XMU+ Communication
If your system does not allow you to ping from the Run window, then test by using the
procedure in To test a modem connection on page 80, but by using the static IP address
of the XMU+ unit.
Š From the Windows Start menu, choose Start > Run to display the Run dialog
box.
Š Enter the following command in the Open field and click OK:
‘ping IP Address of XMU+ box’
For LAN connections - enter the IP address of the XMU+ box
as assigned by your system
administrator.
Windows displays a DOS window showing the status of the test and sends four
packets of information to the XMU+ IP address.
If the connection is valid, you will see 3 or 4 pings with a reply from IP
address that details how long the information transfer took and whether the
transfer was successful. If the connection failed, you will get a Timeout error which indicates that
the information packet was not received. Š If unsuccessful, check and verify that all connections and static IP addresses are
correct.

XMU+ QuickStart Guide rev.10 77 Specifying XMUCOM+ Connection Information
Specifying XMUCOM+ Connection Information
Once you have completed the physical connections between the XMU+ and the
XMUCOM+ PC, you must provide the connection information for that site to the
XMUCOM+ application. Before carrying out this procedure you must first:
92 Ensure that Microsoft Dial-Up Networking has been set up and is operational. 93 Ensure that the XMU+ unit is physically connected to the XMUCOM+ PC. Follow
the instructions in Setting the Physical Communications for XMU+ on page 69 for
more information. 94 Ensure that all modem and LAN connections have been tested and are
operational. 95 Obtain the following information from the XMU+ Delivery Checklist in the
XMU+ Installation and Maintenance Guide: Modem Connection: XMU+ modem phone number. LAN connection: IP address for XMU+.
To specify connection details to the XMUCOM+
Ensure that you have followed the instructions in Setting the Physical
Communications for XMU+ on page 69 before beginning this procedure.
Š Navigate to the New Site or Edit Site window, and review the contents of the
Connection section.
XMUCOM+ shows the default connection settings:
94 Choose the appropriate connection option from the Connect Method drop-down
list and carry out the appropriate step to connect your XMU+ unit to the
XMUCOM+ PC.
Modem: Go to step 4. LAN or Ethernet Cable: Go to step 5.

Š Chapter 4
Setting Up PC to XMU+ Communication
Set the following options to set up a Modem connection.
Connect Method: Modem.
Dial Up Connection: Select the XMU+
Modems definition that
you created earlier.
Number to Dial: Enter the modem phone
number for the XMU+
unit to which you want to
connect. Ensure that you
enter the complete phone
number with appropriate
prefixes, area codes, etc.
1. Set the following options to set up an Ethernet connection.
Connect Method:
LAN.
IP Address:
Enter the IP Address for
the XMU+ unit.
1. Click Apply to save your changes.
2. Click OK to save your changes and return to the Site Book window.
3. Test your connections by following the procedures detailed inTesting
Information Transfer between XMUCOM+ and XMU+ on page 82.

XMU+ QuickStart Guide rev.10 79 Testing XMU+ to XMUCOM+ Communication
Testing XMU+ to XMUCOM+ Communication
It is important to test the PC to XMU+ communication since information is passed
between the two units whenever: 1. System configurations are updated and sent to the XMU+. 2. System configurations are received from an XMU+ unit. 3. Program configurations are added, removed, or changed. 4. XMU+ usage statistics are received from the XMU+. 5. Messages are transferred between XMUCOM+ and XMU+ units.
Users should conduct two major types of communication tests.
96 The first set of tests validates that the physical connection between the two
machines is operating correctly. You should have performed these when you
installed the physical connections between the PC and XMU+ unit. 97 The second set of tests validates that information is being correctly
transferred between XMU+ and XMUCOM+.
If communication tests fail, follow the procedures detailed in Troubleshooting XMU+
Communication on page 86 to determine and correct the problem.
Testing the Physical Connection Between XMU+ and PC
It is important to ensure the physical connection between the PC and XMU+ units are
working properly. Execute one of the following procedures (depending on the type of
connection you are using) to test your connections: 4. To test modem communication on page 72. 5. To test Ethernet connections on page 75.
If these connections are not working, carry out the procedures in Troubleshooting
XMU+ Communication on page 86 to correct the problem.

5. Chapter 4
Setting Up PC to XMU+ Communication
To test a modem connection
Only execute this step after establishing your modem connection as shown in the
previous procedure.
98 Ensure cables connecting the XMU+ and PC are properly installed.
See Setting up Modem Based PC to XMU+ Connections on page 70 for more
information
99 Choose Start > Programs > XMUCOM+ > Open Dial-Up Networking Folder
to open your Dial-Up Networking folder.
This window displays a list of the
dial-up network connections that
you have set up fo the modem.
Š Double-click on the appropriate modem connection icon in the Dial-Up
Networking folder and click Connect in the Connect To window.

XMU+ QuickStart Guide rev.10 81 Testing XMU+ to XMUCOM+ Communication
Š Choose Start > Run to display the Run window.
Š Type ‘command’ in the Open field and click OK to display a DOS window.
100 At the command line prompt, enter the following command:
Š For modem connections, type ping 192.168.101.2 A successful communication will show a result similar to the following:
A failed communication will return a result such as the following:

Š Chapter 4
Setting Up PC to XMU+ Communication
Testing Information Transfer between XMUCOM+
and XMU+
Although you have already validated that the physical connection between the PC and
XMU+ units are functional, you should still test to ensure information is properly
transferred between the two systems. This is best accomplished by transferring and
receiving information to and from the XMU+ unit.
To retrieve XMU+ system information
Use this procedure to retrieve the current system information from the selected XMU+
unit. This is a short retrieval and should occur very quickly. If this works, you have
confirmed that XMUCOM+ is able to retrieve information from the selected XMU+ unit
and it will also auto-populate the system information with the firmware version for that
site to facilitate smooth operation of information transfer.
Š Choose Administration > System > System Commands to display the System
Commands window.
1. Select the XMU+ unit and site from the Select Site drop-down list box.
2. Select Retrieve XMU+ System Information option.
3. Click OK.
SchedulerPlus submits your retrieval request to the selected XMU+ site, and
waits for XMU+ to return the requested information to XMUCOM+.

XMU+ QuickStart Guide rev.10 83 Testing XMU+ to XMUCOM+ Communication
A Successful Communication would look similar to the following:
A Communication Failure would show the following in the SchedulerPlus
window.
Access the SchedulerPlus window by clicking
this icon in the Windows Program Bar.
Note: The SchedulerPlus window is accessed from the Windows Program Bar. It
shows the current status of jobs submitted to various XMU+ sites. The
ReScheduler application queues scheduled jobs, and submits them to
SchedulerPlus to execute them when the scheduled time arrives. The
ReScheduler window is accessed from the Communication menu.
Your PC must remain on and active for ReScheduler and SchedulerPlus to
operate correctly. Scheduled tasks will not run if you shut down your PC.
Use the Communications > Completed Scheduled Tasks command to
review the results of scheduled activities and jobs.

102 Chapter 4
Setting Up PC to XMU+ Communication
Using the XMU+ debug interface via a Telnet session.
The XMU+ has the ability to communicate with a PC via a telnet session. This feature
can be started from within XMUCOM+ by clicking on ‘Launch Telnet Session’ under
the communication menu.
Note: Windows Vista and Windows 7 may not have telnet installed.
To access the debug interface.
Use this procedure to start a telnet session with an XMU+
5. Choose Communication > Launch Telnet Session to display the Telnet Session
window.
1. Select the XMU+ unit from the list box.
2. Click OK.
3. A telnet window will open and you will be prompted for a username and
password. The username is ‘admin’ and the default password is blank (just hit
enter.) If however the XMU+ is configured with an XMUCOM+ Access Code,
that code must be entered as the password to establish a connection.

XMU+ QuickStart Guide rev.10 85 Testing XMU+ to XMUCOM+ Communication
A successful user login would look like the following.
A description of the XMU+ Debug Interface
1. Line Status displays current activity on all lines connected to the XMU+
2. Display log lists a record of all changes to the XMU+ configuration and
messages as well as any login attempts that have occurred. The log shows all
changes no matter if they were made from the front panel, PC or the analog
remote line.
3. Virtual Front Panel allows a remote user control of the front panel keys of the
XMU+ by using the cursor keys on the PC keyboard. Left and right arrows are
the same as the left and right arrows on the XMU+ front panel, up and down
keys act as ‘Exit’ and ‘Enter’ respectively. The telnet window displays a virtual
front panel display to show current positions in the firmware menu structure.
4. System Information displays firmware version, bootloader, canned prompts
version, memory installed, modem & Ethernet information, MAC address,
chassis type, which line cards are installed and what power supply units are
installed.
5. Simply select which function you want from the menu and press enter. Press Q to
quit the session.
Note: Depending on the speed of your connection you may notice a delay between
making a selection on the keyboard and the response from the XMU+

104 Chapter 4
Setting Up PC to XMU+ Communication
Troubleshooting XMU+ Communication
Complete the following troubleshooting tasks to resolve the problem if
communication between the XMU+ and XMUCOM+ software fails during
configuration, firmware, or message downloads and uploads.
If XMU+ has Communication Failures...
Check installed vs. available m em ory.
Modem
Correct cause of com m unication
failure.
Ethernet
First, check to ensure that sufficient memory is available in the XMU+ to store the
configuration and messages. The manner in which you check available memory differs,
depending on whether the XMU+ is configured for a single partition or for multiple
partitions. See Chapter 10 of the XMU+ Installation and Maintenance Guide for more
information about the following topics: 5. “To check installed and available memory - Single Partition Mode” 6. “To check installed and available memory - Multiple Partition Mode”
If the memory is sufficient, there could be a connection failure. Complete the
troubleshooting task appropriate to the connection type chosen for this XMU+. See the
following procedures:
6. To determine and correct modem communication failure on page 86.
7. To determine and correct Ethernet communication failure on page 87.
To determine and correct modem communication failure
Modem communication between the XMU+ and XMUCOM+ is established by
connecting the modem port on the XMU+ and PC to a nearby active telephone outlet.
Modem communication can be verified by ensuring that modems are properly connected
on both the XMU+ and the XMUCOM+ PC, and by conducting a communication test.

XMU+ QuickStart Guide rev.10 87 Troubleshooting XMU+ Communication
1. Ensure the modem connection is properly cabled. See To connect to the XMU+
modem with an analog line on page 70 and To set up XMUCOM+ to use a
modem connection on page 71.
2. If the modem connection is properly cabled, ensure the telephone lines are
working.
If phone lines are not working, contact the appropriate repair/maintenance
department at the telephone company.
3. If phone lines are working, perform another modem communication test. See
To test modem communication on page 72.
4. Start your XMUCOM+ application and validate the Connection information in
the Edit Site window.
See For Windows XP: on page 41.
To determine and correct Ethernet
communication failure
Ethernet communication between the XMU+ and XMUCOM+ is established by
connecting the RJ-45 port on the XMU+ to a communications network.
Ethernet communication can be verified by connecting the Ethernet port on the XMU+
to a network and conducting a communication test. This test can be conducted from a PC
with a network (internal or external) connection, as long as a static IP address has been
assigned to the XMU+.
Conducting an Ethernet communication test involves the following tasks:
106 Ensure the network connection is properly cabled and that the Ethernet port on the
XMU+ is connected to the network outlet. See To connect the XMU+ unit to the
PC through an Ethernet network on page 73.
107 Ensure the PC or laptop that will be used for the communication test is
connected to the network.
108 If the network connection is properly cabled, ensure the network is up. If the network is down, contact the appropriate personnel in the IT department or
the network provider.
109 If network is up, perform another network communication test by pinging the
network.
See To test Ethernet connections on page 75.
110 Obtain the following values from the appropriate source (normally the IT
department or the XMU+ Delivery Checklist).
Š An IP address.

Š Chapter 4
Setting Up PC to XMU+ Communication
An IP netmask. An IP gateway. See “The XMU+ Delivery Checklist” in the XMU+ Installation and Maintenance
Guide.
1. Ensure the various IP settings have been assigned to the XMU+ by using the
system menu on the XMU+ Front Panel. See “To assign an IP address” in
Chapter 8 of the XMU+ Installation and Maintenance Guide.

Configuring XMU+
Line
5 Cards
XMU+ units can come with a variety of different XMU+ line cards.
Organizations order the line cards that best suit and meet their corporate
needs. Before programming the XMU+ unit with the applications that you
want to run, you must first configure each line card, for each XMU+ unit.
This process ensures that the XMUCOM+ applications that you design will
operate correctly on the appropriate line cards.
This chapter describes the various line cards and how to use XMUCOM+ to
configure and manage them.
In This Chapter
3. About XMU+ Line Cards on page 91. 4. Validating XMU+ Line Cards on page 94. 5. Specifying Line Cards to the XMUCOM+ on page 95. 6. Configuring XMU+ Line Cards on page 98. 7. Mapping Start Nodes to XMU+ Lines on page 106.

‚ Chapter 5 Configuring XMU+ Line Cards

XMU+ QuickStart Guide rev.10 91
About XMU+ Line Cards
About XMU+
Line Cards Your XMU+ unit is shipped, pre-installed, with the line cards you ordered. During the
installation procedure, the Installer should have verified that the correct cards were
installed. Refer to the “XMU+ Delivery Checklist” in the XMU+ Installation and
Maintenance Guide to ensure that all the correct cards were installed in your XMU+
unit. XMU+ supports the following types of line cards:
� Hybrid Analog line card. � Low Impedance line card. � MWR (Mini Weather Radio) line card. � MOH (Music On Hold) line card. � T1 line card.
Once you have done this, you need to configure each XMU+ line card to suit the needs
and purposes of the applications that you are implementing. The following flow chart
summarizes the major tasks involved in configuring line cards.
Configuring XMU+ Ensure all line cards are
installed and documented in Line Cards
Delivery Checklist.
Review line card features, capabilities, and details.
Enter line card Enter line card
information
information into the into XMUCOM+. Card Configuration window.
Apply default settings
for each line card. Configure each line card
to meet your system
Set mode of operation
requirements.
for each line card.
If required, configure
line card by PBX type.
Configure the startup nodes for each port
and partition, on each line card.
For more information about XMU+ line cards, refer to the following information
resources: 4. Interalia Website at www.interalia.com. Choose the Support tab. 5. XMU+ Installation and Maintenance Guide.

7. Chapter 5 Configuring XMU+ Line Cards
Hybrid Analog Card
Low Impedance Card
MWR Card
Line cards supported by XMU+
Depending on the chassis size, the XMU+ can support
several different line cards. As well, each line card may
have several variants, depending on the number of
ports required and the country of use. Review the
following table for a summary description of each of
these cards.
This Line Lets Part Number
Card... the XMU+... Numbers of ports
Hybrid Analog Provide Auto Attendant/Audio Text 47365 8
line card announcements, 1-800 ACD call routing, 47363 4
and ACD/UCD intercept messages within
the same XMU+ unit.
Hybrid Analog line cards combine the features of Passive and Interactive line cards
used in older XMU+ units and can be used
to replace these other card formats.
By combining multiple Hybrid Analog line For use
cards, users can have access to 4 to 64 ports
on the large XMU+ and 4 to 8 ports on the with a
Siemens
small XMU+. Each of the ports (also known
as lines) can be configured as a passive ACD PBX: announcement line or as an interactive line 47670 8
with a menu structure. 47672 4
Low Impedance Provide ACD/UCD messages just like a For use Hybrid Analog line card, but can connect with a
one (1) passive line to up to twenty-four (24) Nortel
PBX trunks. PBX:
47260 8
47220 4
MWR (Mini Broadcast weather information for 47366 8
Weather Radio) Environment Canada (available only in
Canada).

MOH Card
T1 Card
XMU+ QuickStart Guide rev.10 93 About XMU+ Line Cards
This Line Lets Part Number
Card... the XMU+... Numbers of ports
MOH (Music Combine music (from an existing source) 47804 4 output,
On Hold) and messages to create an “On Hold” 2 input
environment.
T1 Connect to a T1 communication link to 47367 24
provide 24 T1 user ports. The T1 card
provides support for industry standard
digital communication interfaces.
For more information about XMU+ cards, see:
108 Chapter 5: Configuring XMU+ Line Cards for more information about
configuring XMU+ line cards with the tools provided by the XMUCOM+
application. 109 Visit the Interalia website at www.interalia.com for more information
about each line card. 110 See “XMU+ Technical Specifications and Approvals” in the XMU+
Installation and Maintenance Guide for more information about the XMU+
approving bodies in the countries where XMU+ is used.

Š Chapter 5
Configuring XMU+ Line Cards
Validating XMU+
Line Cards Before entering information about your XMU+ cards into XMUCOM+, you must first validate which cards are actually in the XMU+ unit. You can do this in one of two ways.
110 By checking the Delivery Checklist provided by the Installer. This checklist should
have been completed by the Installer at the time the XMU+ unit was installed and
set up. 111 By uploading the default configuration from the XMU+ unit.
To validate XMU+ line cards from the Delivery Checklist
112 Obtain the XMU+ Delivery Checklist from the Installer.
113 Review the section for Line Cards Installed to determine exactly which cards are
installed in this XMU+ unit.
114 Keep this information available for the next few procedures.
115 Proceed to Specifying Line Cards to the XMUCOM+ on page 95.
To upload the default XMU+ configuration
Use the following procedure to upload the default XMU+ configuration that is currently
loaded on your XMU+ unit. This configuration will provide information about the cards
installed in your XMU+ unit.
Š Start XMUCOM+ and choose File > New.
Š Choose Communication > Communicate to open the Communication window.
Š Select the Step 1: Operations tab, and select the Receive Entire Configuration option.
Š Select the Step 2: Site/Schedule tab, select the site whose configuration you want to
upload, click Add, and click Apply.
XMUCOM+ displays a dialog box with the message
“Communicating with XMU+”.
Š Click YES when you are asked if you want to “Save the current configuration” and
follow the process for saving your current configuration with the Save As dialog box.
XMUCOM+ submits a request to the XMU+ unit for the system information and
displays a dialog box with the message “Processing Data”.
Š Click OK when XMUCOM+ displays the message “Completed retrieve entire
configuration”.
Š Choose Configuration > Card Configuration to display the Card Configuration
window with details about the line cards that are installed on the selected XMU+ unit.
Š Proceed to Specifying Line Cards to the XMUCOM+ on page 95.

XMU+ QuickStart Guide rev.10 95 Specifying Line Cards to the XMUCOM+
Specifying Line Cards to the XMUCOM+
Once you have identified the line cards in your XMU+ unit, you must specify and configure them within the XMUCOM+ application.
Since the type of XMU+ line card installed in the XMU+ unit determines the types of
program configurations that you can build or implement, you must first provide line
card information before beginning to build program configurations for your XMU+ unit.
All specified line card information is stored with the XMU+ system configuration on
your PC. This information, along with program configurations, can be downloaded to
your XMU+ unit when you are ready.
To specify line cards to the XMUCOM+
application Start XMUCOM+.
Ensure you have the information from Validating XMU+ Line Cards ready for
use.
Choose File > Open and select the configuration file for the XMU+ unit with
which you want to work.
Choose Configuration > Card Configuration to display the default Card
Configuration window.

Chapter 5
Configuring XMU+ Line Cards
This window lets you enter information about each card, in each slot, of your
XMU+ unit.
Each line card is placed in a specific slot on your XMU+ unit. You must know the physical disposition of each card in the XMU+ unit before proceeding to the next step.

XMU+ QuickStart Guide rev.10 97 Specifying Line Cards to the XMUCOM+
Select the appropriate card number and click Edit to view the Card Editor
window.
Select the line card that lives in this slot.
Click the arrow buttons to quickly view the details for each specified line card.
Select the line card for each slot from the drop-down list box and click Apply.
Click the Right Arrow key to move to the next input slot, and repeat step 5.
Repeat steps 5 and 6 until you have specified all the line cards in your XMU+
unit.
Proceed to Configuring XMU+ Line Cards on page 98 to configure each line
card for your organization.

Chapter 5
Configuring XMU+ Line Cards
Configuring XMU+
Line Cards The Card Configuration window, and its accompanying Card Editor and Line Editor
windows let you view and configure each of the line cards residing in your XMU+ unit.
The configuration process lets you define partitions, starting nodes for each partition,
volume controls, and modes of operation for each card. Every card, and every line, must be
configured. See the following for more information about configuring XMU+ line cards.
About PBX types on page 99. Applying Line Card Configurations on page 101.
The following table describes the editable fields in the Card Editor window.
This field... Is used to...
Card Number Specify the XMU+ slot number that is occupied by this card.
Card Type Select the type of card, present in each XMU+ slot, from the drop-
down selection list.
Line Indicate the line or port numbers available in that card.
XMUCOM+ automatically shows the appropriate number of lines
for the selected card type.
Partition Specify partition information for each partition and its lines.
Š Partitions are typically used for multi-tenant services.
Š Partitions must be specified from the Config Builder window
before this option is enabled.
Š Most cards have only one partition.
Note: Partitioning must be enabled before this option can be used. Choose
Administration > System > XMU+ Settings, select the Partitioning
Enabled option, and click OK. Re-open the Config Builder window to
activate your new settings.
Starting Node Specify the starting node for each active line or port. The starting
node determines which program configuration is to be executed
when the current line or port is called.
Volume Set the volume for the line or port. The default value is HIGH.
Mode Set the mode of operation and the signaling protocol between the
XMU+ and the PBX. XMUCOM+ lists the modes appropriate to
each card type.
Labels Assign a descriptive label to each line or card. This field can
accept 31 alpha/numeric characters.

XMU+ QuickStart Guide rev.10 99
Configuring XMU+ Line Cards
About PBX types
XMU+ Card configuration is dependant upon the type of PBX to which your XMU+
unit is connected. Before completing card configurations, you must know: The type of line card you are configuring. The type of PBX to which your XMU+ unit is connected. The mode of operation you want to use for that line card and PBX.
Use the following table to determine the modes of operation (operating mode) that are
compatible with your XMU+ unit and PBX system.
This type of PBX... Can use these operational modes
Public Telephone Network Ring Start (R).
PBX Analog Station Port
Analog Centrex Line
AT&T System 75/85 Pulse Start/Level Return (PS/LR NO).
AT&T G2, AT&T G3 Pulse Start/Level Return (PS/LR NO).
Definity (option 1)
AT&T G2, G3, and Definity (option 2) Level Start/Pulse Return (LS/PR NO).
AT&T Dimension 2000 Pulse Start/Level Return (PS/LR NC).
Ericsson MD 110 Pulse Start/Level Return Single Play (PS/LR SP NO).
Harris 20/20 LH and 20/20 M Level Start/Pulse Return Single Play (LS/PR SP NO).
Hitachi EDX, MDX, and LDX Level Start/Pulse Return Single Play (LS/PR SP NO).
Hitachi HCX-5000 Level Start/Pulse Return Single Play (LS/PR SP NO).
NEC NEAX2400 Level Start/Pulse Return Single Play (LS/PR SP NO.
Northern Telecom SL-1 Continuous Play (CP NO).
Meridian-1® (option 1)
DMS-100
SL-100
Centrex
Northern Telecom SL-1® Pulse Start/Level Return (PS/LR NO).
Meridian-1®
(option 2)
Microtel GTD-5 Pulse Start/Level Return Multiple Play (PS/LR MP NO).
Microtel Omni Pulse Start/Level Return (PS/LR NO).
ROLM 9200 Level Start/Pulse Return (LS/PR NO).
Siemens Saturn Pulse Start/Level Return (PS/LR NC).
Solid State Junior and Senior Executive Synchronized Continuous Play (SCP NC).
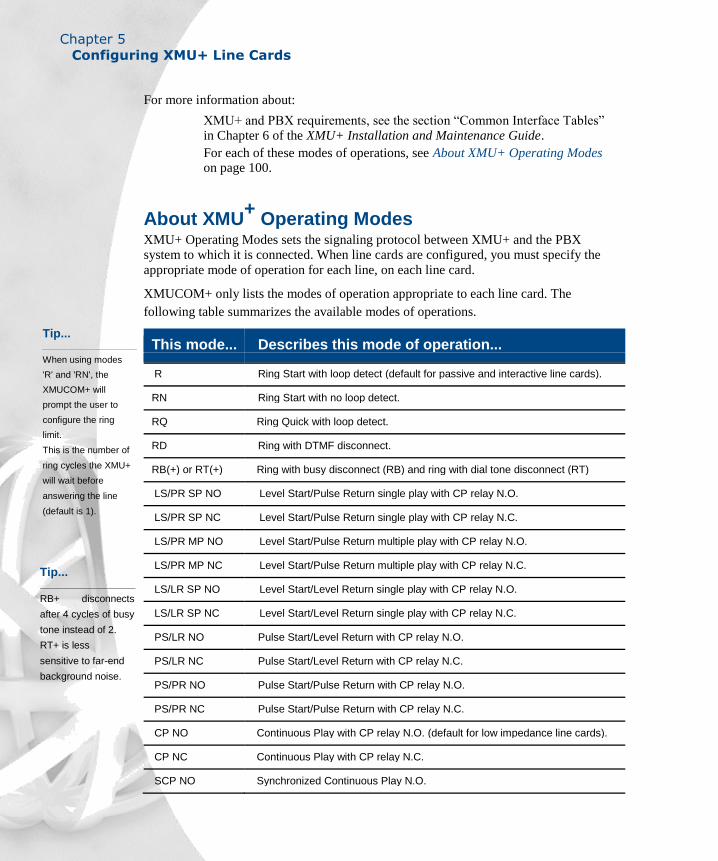
Chapter 5
Configuring XMU+ Line Cards
For more information about:
XMU+ and PBX requirements, see the section “Common Interface Tables” in Chapter 6 of the XMU+ Installation and Maintenance Guide.
For each of these modes of operations, see About XMU+ Operating Modes on page 100.
Tip...
When using modes
'R' and 'RN', the
XMUCOM+ will
prompt the user to
configure the ring
limit. This is the number of
ring cycles the XMU+
will wait before
answering the line
(default is 1).
Tip...
RB+ disconnects
after 4 cycles of busy
tone instead of 2. RT+ is less
sensitive to far-end
background noise.
About XMU+
Operating Modes XMU+ Operating Modes sets the signaling protocol between XMU+ and the PBX system to which it is connected. When line cards are configured, you must specify the
appropriate mode of operation for each line, on each line card. XMUCOM+ only lists the modes of operation appropriate to each line card. The
following table summarizes the available modes of operations.
This mode... Describes this mode of operation...
R Ring Start with loop detect (default for passive and interactive line cards).
RN Ring Start with no loop detect.
RQ Ring Quick with loop detect.
RD Ring with DTMF disconnect.
RB(+) or RT(+) Ring with busy disconnect (RB) and ring with dial tone disconnect (RT)
LS/PR SP NO Level Start/Pulse Return single play with CP relay N.O.
LS/PR SP NC Level Start/Pulse Return single play with CP relay N.C.
LS/PR MP NO Level Start/Pulse Return multiple play with CP relay N.O.
LS/PR MP NC Level Start/Pulse Return multiple play with CP relay N.C.
LS/LR SP NO Level Start/Level Return single play with CP relay N.O.
LS/LR SP NC Level Start/Level Return single play with CP relay N.C.
PS/LR NO Pulse Start/Level Return with CP relay N.O.
PS/LR NC Pulse Start/Level Return with CP relay N.C.
PS/PR NO Pulse Start/Pulse Return with CP relay N.O.
PS/PR NC Pulse Start/Pulse Return with CP relay N.C.
CP NO Continuous Play with CP relay N.O. (default for low impedance line cards).
CP NC Continuous Play with CP relay N.C.
SCP NO Synchronized Continuous Play N.O.

XMU+ QuickStart Guide rev.10 101 Configuring XMU+ Line Cards
This mode... Describes this mode of operation...
SCP NC Synchronized Continuous Play N.C.
OFFLINE Line will not operate.
Applying Line Card Configurations
Before configuring line cards, you should plan for, and know the following: The purpose and use of each line card. Which program configurations you plan to execute.
See Field Descriptions For Nodes on page 138 for more information. The starting node for each program configuration. The number of lines (in each card) that will run each specified program
configuration. The PBX to which the XMU+ unit is connected. The correct mode of operation for each line and card on the XMU+ unit.
See About XMU+ Operating Modes on page 100 for more information.
Once you have determined and prepared this information, you can execute one or
more of the following procedures to configure each line card in your XMU+ unit. Applying default values to line cards on page 101. Viewing current line card configurations on page 102. Editing line card configurations on page 103. Sending updated card configurations to the XMU+ on page 105.
To return line card configurations to their default values
Perform this procedure to ensure you have a clean starting point before setting card
configurations.
Start XMUCOM+, choose File > Open, and select the configuration file for the
XMU+ unit with which you want to work.
Choose Configuration > Card Configuration to display the Card
Configuration window.
Double-click the line card that you want to modify to open the Line Card Editor
window.
Click Default to reset all the lines in the current card to their original default
values.

Chapter 5
Configuring XMU+ Line Cards
Click OK to return to the Card Configuration window.
To view current line card configurations
Start XMUCOM+, choose File > Open, and select the configuration file for the
XMU+ unit with which you want to work.
Choose Configuration > Card Configuration to display the Card
Configuration window.
This window lets you view the card configuration details for all identified line
cards in your XMU+ unit. See To specify line cards to the XMUCOM+
application on page 95 to add new line cards to your card configuration.
Click the + icon to view details about the selected line card.
Click on the + icon to view the details about each line card installed in your XMU+ unit.
All this information must be entered by yourself, as part of the card configuration.

XMU+ QuickStart Guide rev.10 103
Configuring XMU+ Line Cards
To edit or change line card configurations
Start XMUCOM+, choose File > Open, and select the configuration file for the
XMU+ unit with which you want to work.
Choose Configuration > Card Configuration to display the Card
Configuration window.
Double-click the line card that you want to modify to open the Line Card Editor
window.
Click the Default
button to return all
values to their original
default state.
Select the line card
that lives in this slot.
Select one or more of
the input lines that
you want to edit.
Click the arrow buttons
to quickly view the
details for each
specified line card.

Chapter 5
Configuring XMU+ Line Cards
Select one or more of the Input lines that you want to change, and click Edit
Line(s) to display the Line Editor window.
Select the appropriate information for each field and click OK to apply your
edits to all selected lines on the current line card.
Partition: Select the partition (if required) with which you want to work. The default is Partition 1.
Starting Node: Select the starting node for the program configuration you want to run on this line and on this card.
Volume: Set the volume option to either High or Low. The default value is High.
Modes: Set the signaling protocol between the XMU+ unit and your PBX.
Label: Add a descriptive label to each line or card. This field will accept 31 alpha/numeric characters.
Note: If you choose R, RN, RT, RB or RD as your Mode, an additional field will
appear where you must identify the number of rings that must occur
before the line is answered. For example, if you choose Ring_Loop =
1, XMU+ will not answer the line until one ring has occurred.
Repeat steps 4 and 5 for each line that you want to modify. If required, use the arrow keys at the bottom of the Card Editor window to
navigate to other line cards that you want to edit.
Click OK from the Card Editor window to return to the Card Configuration
window where you can view your applied and saved changes.
Download the program and system configuration to your XMU+ unit and test the
functionality.
See To upload the default XMU+ configuration on page 94 for details.

XMU+ QuickStart Guide rev.10 105
Configuring XMU+ Line Cards
To send configurations to XMU+
All configurations (system and program) designed with the XMUCOM+ application
must be sent or downloaded to the XMU+ unit in order to make them operational.
Choose Communication > Communicate to display the Communication
window.
Select the Step1: Operations tab and select the Send Entire Configuration option.
Select the Step2: Site/Schedule tab, select the site to which you want to send the
configuration, and click Add>>.
Select the appropriate Scheduling Option.
Immediate: XMUCOM+ schedules the submission of this configuration on
the SchedulerPlus. A series of response dialog windows show the current
status of the request, and notify you when the send is complete. These
windows include: Processing Data Communicating with XMU+ Completed Send Entire Configuration
Schedule: Enter the time and date that this submission should occur.
XMUCOM+ schedules the submission of this task on the SchedulerPlus,
and allows you to continue performing other activities with XMUCOM+.
Click Apply.
XMUCOM+ submits the configuration to the selected XMU+ unit. For
scheduled tasks, XMUCOM+ displays a dialog box with the message
“Required Action(s) scheduled successfully”.
Click OK when XMUCOM+ displays the message “Completed Send Entire
Configuration”.
This message is only displayed when the Immediate Scheduling Option is
selected.
Note: View the list of submitted tasks in the Scheduler window. View the list of completed tasks in the Completed Scheduled Tasks window.

Chapter 5
Configuring XMU+ Line Cards
Mapping Start Nodes to XMU+
Lines
For more
information...
About building program configurations, see: Chapter 6:
Recording, Playing,
and Transferring
Messages. Chapter 7: About
XMU+ Nodes
and Program
Configurations. Chapter 8: Tutorials:
Audio Text and Dial
By Name.
Once you have defined your card configuration, you can begin building the program configurations that your XMU+ unit will execute.
Each of these new program configurations must be mapped to a specific port or line on
an XMU+ line card. This mapping is done by specifying the start node of each program
configuration to the XMUCOM+ application. This mapping process lets you:
Control which cards and lines in the XMU+ unit are responsible for executing specific programs.
Specify to XMU+ unit which programs to execute, and when to execute them.
Note: You do not need to define start nodes until you have completed creating the various program configurations that your XMU+ unit will execute.
To set the start node
Ensure you have the following information prepared:
The start node for each program configuration that you want to apply. For example: LIST1, DTMF4, etc.
Identify the card and line(s) which you want to have executing each program configuration.
If required, define partitions for units that will be operated by multiple clients.
Ensure that all line cards in the XMU+ unit have been
identified and configured in the XMUCOM+ application.
See Applying Line Card Configurations on page 101. Navigate to the Line Editor window for the card and line(s) that you want to edit.
See To edit or change line card configurations on page 103.

XMU+ QuickStart Guide rev.10 107
Mapping Start Nodes to XMU+ Lines
Select the appropriate Starting Node and Number.
Select the appropriate starting node
from this drop-down list box. Select the appropriate node number.
Verify that the other values in this window are correct and click OK.
Repeat steps 2 and 3 until you have set the starting nodes for all the program
configurations in your XMU+ unit.
Choose Configuration > Card Configuration to view your final settings in the
Card Configuration window.
The Card Configuration window displays information about the starting node for each line, in each line card, for your XMU+ unit.
Download the program and system configuration to your XMU+ unit and test the
functionality.
See To upload the default XMU+ configuration on page 94 for details.

Chapter 5 Configuring XMU+ Line Cards

Recording, Playing, and
6 Transferring Messages
Review this chapter to understand how to prepare, use, and manage music
and messages that are used by XMU+ configurations.
In This Chapter
About XMU+ Music and Messages on page 111. About .WAV Message and Music Files on page 112. About Recording and Playing Messages on page 113. Sending Messages to the XMU+ on page 120. Receiving Messages from XMU+ on page 123.

Chapter 6
Recording, Playing, and Transferring Messages

XMU+ QuickStart Guide rev.10 111
About XMU+ Music and Messages
About XMU+ Music and Messages
The XMU+ unit is capable of storing and playing messages as part of its various
program configurations. Users can upload messages from the XMU+ unit or
download messages from XMUCOM+ to the XMU+ unit.
Recording and Playing Messages and Music
Understanding XMU+
music and message formats.
Recording and playing
.WAV files.
Sending messages and music to the XMU+ unit.
Receiving messages and
music from the XMU+ unit.
These music and message files can be recorded directly into the XMU+ unit, or be
provided as files on the PC, that are then integrated into configurations, and
downloaded to the XMU+ unit.
Music and messages can be used in conjunction with the MOH card to create a seamless
on-hold environment for your callers. With the MOH card, you can combine on-hold
promotional and/or information messages with music. The XMU+ can fade the music
out before the messages are played, and then fade the music back in. Users can configure
both the volume and music fade time.
Other XMU+ line cards can run programs that use message nodes to play messages,
prompts, and so on to your callers.
Note: You cannot play messages and music from the XMUCOM+ application. All production of music and message files is carried out with tools outside of
the XMUCOM+ application.

Chapter 6
Recording, Playing, and Transferring Messages
XMU+ Message Administration Methods
Messages are stored and managed separately from the program configurations that are
developed with the XMUCOM+ application. Program configurations can be developed
independently of the messages and music files that they call. The two components
(messages and program configurations) are only integrated in the XMU+ unit.
Messages can be administered and managed from: XMU+ Front Panel. XMUCOM+ Application. Remote Telephone Access.
About .WAV Message and Music Files
All music and message files used in XMUCOM+ configurations must be stored in .WAV format. In order to be included within a configuration, the WAV files must
have the following properties:
8 bit compression. Š Mono sound. 8K sampling rate.Š CCITT µ-Law Format - providing compliance with the lowest
common denominator for WAV files.
Note: Messages that are recorded from either the XMU+ front panel, or from a remote
port, will be automatically configured with the properties listed in this section.
Naming Message Files
During Configuration development, users can create message files with any name that
they want, as long as it is in .WAV format. These files can be located in any folder that is
accessible to the XMUCOM+ application. They do not have to be stored in the default
site folders defined for the site.
XMUCOM+ applies a standardized naming methodology to all message files that are
received from the XMU+ unit.
When messages (.WAV files) are received from the XMU+ into the XMUCOM+
application, each message is re-assigned a default filename such as P01M001. To

XMU+ QuickStart Guide rev.10 113 About Recording and Playing Messages
uniquely identify a message file with a meaningful name, users must enter a filename or
description in the Label field of the MSG node.
The default naming structure is as shown here:
PxxMxxx
Pxx refers to the XMU+ Partition
number, if the partitioning feature
is activated. If not, this will default
to P01 (Partition #1).
Each message on the XMU+ has an
associated index number. The Mxxx refers
to the message number. For example, M001
identifies message number 1, M002
identifies message number 2 and so on
Note: Messages that are saved or reside in the XMU+ Unit are automatically
converted to the .WAV format when received from the XMU+. Files received
from the XMU+ unit are saved with auto-numbered file names, not with the
original file name the message had during configuration development.
About Recording and Playing Messages
Ideally, you should plan, record, play, and test your messages and music files outside of
the XMUCOM+ application, and before building your program configurations. During
this process, you should: Use logical filenames that reflect the content of the message file. Keep an index of the filenames, their actual content, and the program
configuration in which you plan to use them. Copy all the messages and music to an easily accessible directory for
development of program configurations. Store a backup copy of all messages and music files in an area that is not
impacted by the XMUCOM+ downloads and uploads.
Note: When a message file has been created in the Config Builder window and has a .WAV file associated with it, a play button is enabled to allow you to hear the file.
See the following topics for more information about: Recording Messages on page 114. Playing Messages on page 117. Deleting Messages on page 119.

Chapter 6
Recording, Playing, and Transferring Messages
Recording Messages
You must record all music and messages used by your program configurations. Ideally,
this task should be completed after planning the program configuration, but before
building the program configuration in XMUCOM+. This ensures that required messages
are readily available for use, testing, and for download to the XMU+.
Messages and music can be recorded by using one of the following procedures. To record messages from the Front Panel on page 114. To record messages with Remote Telephone Access on page 114. To record messages in a Studio on page 115.
To record messages from the Front Panel
Connect a handset (included with the XMU+) or tape deck
to the XMU+ unit.
TIP... To pause while
recording, press
Enter. To resume
recording, press
Enter again.
Press Enter to access the Main Menu. Press Enter to select Messages. Press the Right Arrow button until you reach the desired
message number and press Enter. Press the Right Arrow button until you reach Record and
press Enter. Press Enter (again) to begin recording your message.
XMU+ monitors your recording time. Press Exit to stop recording. Press Exit until the menu returns to the main display.
To record messages with Remote Telephone Access
Identify the message number you want to record.
Remotely access the XMU+.
See “Working with Remote Telephone Access Messages” in Chapter 7 of the
XMU+ Installation and Maintenance Guide for more information.
When the XMU+ responds Enter Command, press 7.
Press the message number (nnn) you want to record, followed by #.
When the XMU+ responds with a short beep, record the message.
Press # to stop recording. The XMU+ responds with Message ‘nnn’ recorded.

XMU+ QuickStart Guide rev.10 115 About Recording and Playing Messages
To record messages in a Studio
Prepare a list of messages or music that you need for your program
configurations.
Detail the contents of each message in written text format and specify the name of
the file you want to use.
Record the messages in the studio with the properties detailed in
About .WAV Message and Music Files on page 112.
Save each message as an individual .WAV file, using the names you specified
in step 2.
Copy these messages to the default XMU+ Messages directory.
Download or send these messages to XMU+ when you are ready to test and use
them as part of the XMU+ program configurations.
To record messages and music from your PC
A broad range of tools are available for recording and playing messages and music on
your PC. For the purposes of this manual, we are using Microsoft Sound Recorder for the
following procedure.
Prepare a list of messages or music that you need for your program
configurations.
Detail the contents of each message in written text format and specify the name of
the file you want to use.
Ensure that you have microphone connection to your PC, and that it is
operational.
Ensure that you have sound recording application such as Microsoft Sound
Recorder.
Choose Start > Programs > Accessories > Entertainment > Sound Recorder
to start Microsoft Sound Recorder.
Rewind Forward Play Stop Record Click the Record button to record
your voice through the microphone.

Chapter 6
Recording, Playing, and Transferring Messages
Click the Record button, and read your selected message into the microphone.
Click the Stop button when you are done.
Click the Play button to test your recording.
Repeat steps 6-8 until you are happy with your recording.
Choose File > Save As and save your recording as a .WAV file to the default
directory for the site with which you are working.
Your WAV file must meet the following criteria:
Format = CCITT_LAW Attributes = 8hx, 8 bit Mono, 8KBs Quality = telephone quality
Repeat steps 6 through 10 until you have recorded all the messages you require.

TIP... To pause while
playing, press Enter.
To resume playing,
press Enter again.
XMU+ QuickStart Guide rev.10 117 About Recording and Playing Messages
Playing Messages Messages can be played from the XMU+ Front Panel, through Remote Access, or
directly from your PC. See the following procedures for more information: To play messages from the Front Panel on page 117. To play messages via Remote Access on page 117. To play messages and music on your PC on page 118
To play messages from the Front Panel Connect a handset (included with the XMU+) or tape deck to
the XMU+ unit. Press Enter to access the Main Menu. Press Enter to select Messages. Press the Right Arrow button until you reach the desired
message number and press Enter. Press Enter to select Play on the menu.
XMU+ plays the message, and displays the total playing
time of the message. Press Enter again to play the message.
XMU+ plays the message, counting-down the remaining
playing time of the message. Press Exit to stop playing (or allow the message to play
itself out). Press Exit until the menu returns to the main display. To play messages via Remote Access Identify the message number you want to play. Remotely access the XMU+.
See “Working with Remote Telephone Access Messages” in Chapter 7 of the
XMU+ Installation and Maintenance Guide for more information. Press 8 when the XMU+ responds Enter Command. Press the message number (nnn) you want to play, followed by #.
XMU+ plays the message. Press # to stop playing the message.

Chapter 6
Recording, Playing, and Transferring Messages
To play messages and music on your PC
A broad range of tools are available for recording and playing messages and music on
your PC. For the purposes of this manual, we are using Microsoft Sound Recorder for the
following procedure.
Using Windows Explorer, locate the folder which contains the .WAV file that you
want to play.
Double-click on the .WAV file to launch Microsoft Sound Recorder.
Click the Play button to play the
currently selected.WAV file.
Click the Play button to play the selected file.

XMU+ QuickStart Guide rev.10 119 About Recording and Playing Messages
Deleting Messages
Unused messages should be deleted from the XMU+ unit to reduce the amount of
memory occupied by these files. Deletion of old files would also serve to increase the
rate of upload of information from the XMU+ unit to the XMUCOM+ PC. See the
following procedures for more information: To delete messages from the Front Panel on page 119. To delete messages with Remote Telephone Access on page 119.
TIP... To cancel the delete
command and return
to the previous menu,
press Exit when
XMU+ asks Are you
sure?.
To delete messages from the Front Panel Press Enter to access the Main Menu. Press Enter to select Messages. Press the Right Arrow button until you reach the
desired message number and press Enter. Press the Right Arrow button until you reach Delete
and press Enter.
XMU+ displays a message asking if you are sure that
you want to delete this message. Press Enter to delete the message. When XMU+ re-displays Message # <Delete>, press
Exit until the menu returns to the main display.
Main Menu Messages >
Select Message #
< 1 >
Message # 1 < Delete >
Are you sure? EXIT = no
Message # 1 < Delete >
To delete messages with Remote Telephone Access
TIP... To cancel the Delete
command, press the
zero (0) key or hang
up before you reach
Step 3.
Identify the message number you want to delete. Remotely access the XMU+.
See “Working with Remote Telephone Access Messages” in Chapter 7 of the
XMU+ Installation and Maintenance Guide for more information. When the XMU+ responds Enter Command, press 39. Press the message number (nnn) you want to delete, followed by #. The XMU+ responds with Done.

Chapter 6
Recording, Playing, and Transferring Messages
Sending Messages to the XMU+
You will want to send messages and music to the XMU+ unit when you have updated or
created new configurations that use these messages, or if you have updated or changed
messages used by existing message nodes in the program configurations for the XMU+
unit.
When you send or download messages from your PC to the XMU+ unit, XMU+ will:
Store these message files in 8 bit, 8 K, µ-Law format. Ignore all filename information. Map the messages to the program configurations that use them. Use these messages when the program configurations require them.
To send messages from your PC to XMU+
Unit Choose Communication > Communicate to display the Communication
window.
Select the Step1: Operations tab and select an option from the Send Messages
section.

XMU+ QuickStart Guide rev.10 121
Sending Messages to the XMU+
Select the Send
Messages option.
Select the partition
to which you want to
send messages.
Select the messages
you want to send and
click the Add button.
Click Apply to send the selected messages to the XMU+.
Select the messages you want to send from the Available Messages list box, and
click Add>>.
XMUCOM+ displays a list of all the messages in the current configuration. The
filename for each message is defined within the message nodes of the current
configuration.

Chapter 6
Recording, Playing, and Transferring Messages
Select the Step2: Site/Schedule tab, select the sites to which you want to send the
messages, and click Add>>.
Select your scheduling option from the drop-down Select Schedule Option list
box.
Choose Immediate to call the XMU+ unit and immediately send the messages.
Choose Scheduled to set a time to send these messages. Your PC must remain turned ON, for this option to work.
Click Apply to send the selected messages to the XMU+.
Wait patiently for the messages to be sent and downloaded to your system. The
download process could take time depending on the speed of your selected
communication connection and the number of messages you are downloading.
XMUCOM+ displays a response dialog box while it is sending the messages, and
notifies you once all messages are sent.
This response dialog box is only displayed when the Immediate Scheduling
Option is selected.

XMU+ QuickStart Guide rev.10 123
Receiving Messages from XMU+
Receiving Messages from XMU+
You will want to receive messages from the XMU+ unit when you are debugging,
modifying, or otherwise editing program configurations that already exist in the
XMU+ unit. In such cases, you will want to retrieve all the messages for a specific
partition or for the entire XMU+ unit.
When you receive and store message files from the XMU+ onto your PC, XMUCOM+
will:
Place all uploaded messages in the default directory defined in the Site
Information window. As administrators, you must set up a default directory
for storing these .WAV files. See Setting Up Directories For Each Site on
page 38 for more information. Name all message and music files using the naming syntax detailed in
Naming Message Files on page 112. Original message and music file names
are not retained in the XMU+ unit. For your convenience, be sure to specify
the filename in the comments field of your program configurations.
To receive messages from XMU+ to your PC
Use this procedure to receive music and message files from the selected XMU+ unit.
The retrieval time for this procedure will vary depending on the number of messages
selected for retrieval.
Choose Communication > Communicate to display the Communication
window.
Select the site from which you want to receive the messages and click Add>>.

Select your scheduling option from the drop-down Option list box.
Choose Immediate to communicate with the XMU+ unit and to immediately begin retrieval of the messages.
Click the Step1: Operations tab and select an option from the Receive Messages
section.

XMU+ QuickStart Guide rev.10 125
Receiving Messages from XMU+
Select the Receive Messages option.
Select the
partition from which
you want to retrieve
messages.
Click View XMU+
to view a list of
messages on the
XMU+ unit.
Select the
messages you want
to retrieve and click
the Add button.
Click Apply to
receive the selected
messages from the
XMU+.
Click View XMU+ to retrieve a list of messages that reside on the selected
XMU+ and partition.
Select the messages you want to retrieve from the Available Messages list box,
and click Add>>.
Click OK to retrieve the selected messages from the XMU+.
Wait patiently for the messages to be retrieved and uploaded to your system.
The upload process could take time depending on the speed of your selected
communication connection and the number of messages you are uploading.
XMUCOM+ displays a response dialog box while it is retrieving the messages,
and notifies you once all messages are retrieved.
Retrieved messages are placed in the default directory specified in To set file
handling defaults . They will be assigned names according to the naming
conventions specified in Naming Message Files .

Chapter 6
Recording, Playing, and Transferring Messages

About XMU+
Nodes and
7 Program Configurations
Read this chapter to understand the basic concepts and ideas behind
developing program configurations for the XMU+ system.
In This Chapter
Accessing XMU+ on page 129. About Programming XMU+ For Your Use on page 131. About XMU+ Ports on page 132. About Basic XMU+ Commands on page 132. About XMU+ Nodes on page 133.
Types of nodes on page 133 Field Descriptions For Nodes on page 138.
About XMU+ Program Configurations on page 159 Planning for an XMU+ Program Configuration
on page 159. XMU+ Program Configurations: Types and
Description on page 161. Sample XMU+ Call Flow Diagram on page 165.

Chapter 7
About XMU+ Nodes and Program Configurations

XMU+ QuickStart Guide rev.10 129
Accessing XMU+
Accessing XMU+
XMU+ is an extremely versatile system that allows users to access, define, set up, or run program configurations from a number of access points. Users can choose to
access XMU+ from the: XMUCOM+ application software. See To Start XMUCOM+ on page 18. Front Panel of the XMU+ unit. See the XMU+ Installation and Maintenance
Guide. Remote Telephone Access. See the XMU+ Installation and Maintenance Guide.
Not all features are available from each of these three methods. Read the following
summary for a better understanding of the pros and cons of each of these access
methods.
This access method... Lets you...
XMUCOM+ Application Configure, download, and backup XMU+ program
configurations by using your PC and the XMUCOM+
See To Start XMUCOM+ application. Its pull-down menus, graphic interfaces,
on page 18. intuitive navigation and design make it easy for you to
control and manage your XMU+ system.
Use this software to perform most of your XMU+
related activities including system setup, system
maintenance, program configuration design, node
setup and design, and implementation of program
configurations into the XMU+ unit.
All XMU+ program configuration design and
implementation should be performed with this
software.
See Interalia’s web site at www.interalia.com for
additional information about the features,
functionality, and use of the XMUCOM+ application.
Chapter 7
About XMU+ Nodes and Program Configurations
This access method... Lets you...
Front Panel of XMU+ Access XMU+ functionality through a menu-driven
See the XMU+ interface controlled by four navigation keys on the
front panel. Current progress through the system is Installation and
displayed on an LCD panel. Maintenance Guide.
Use the front panel for reviewing system startup,
running basic diagnostic tests, and for quick changes
to message nodes.
See Chapter 7 of the XMU+ Installation and
Maintenance Guide for more information about using
the XMU+ Front Panel.
Remote Telephone Access Access XMU+ from a remote location by using a
See the XMU+ touch-tone telephone. Access codes ensure that only
authorized personnel can control the XMU+ unit Installation and
remotely. Maintenance Guide.
Use Remote Telephone Access to record, play, and
replace messages, change access codes, obtain line
counts, and turn messages on and off.
You cannot use Remote Telephone Access to configure,
load, or otherwise change program configurations or
nodes.

XMU+ QuickStart Guide rev.10 131 About Programming XMU+ For Your Use
About Programming XMU+
For Your Use XMU+ is an extremely versatile call processing and management tool. Each XMU+
unit can be programmed to perform a broad range of activities. XMU+ program
configurations are composed of commands, nodes, messages, and music that are
executed when a call is received.
You can develop and build your own program configurations from either the
XMUCOM+ application (recommended, and most intuitive method) or from the Front
Panel of the XMU+ (only recommended for very simple configurations).
The remainder of this chapter provides a brief overview of each of these components,
and how they fit together. See the following for more information: About XMU+ Ports on page 132. About Basic XMU+ Commands on page 132. About XMU+ Nodes on page 133. Field Descriptions For Nodes on page 138.
You can learn how to apply and integrate these concepts into an XMU+ program
configuration in Chapter 8: Tutorials: Audio Text and Dial By Name
Note: See the XMU+ Installation and Maintenance Guide for more information
about programming from the XMU+ Front Panel.

Chapter 7
About XMU+ Nodes and Program Configurations
PSTN Public Switched
Telephone Network
such as the public
telephone system
that operates the
normal phone
system.
PBX Private branch
exchanges. This is
typically a private
telephone network
used within an
enterprise. Users
of the PBX share a
certain number of
outside lines for
making telephone
calls external to
the PBX.
About XMU+
Ports The XMU+ connects to either a PBX or a Public Switched Telephone Network (PSTN)
through the ports on the XMU+ line cards. Each line card can have 2, 4, 6 or 8 ports,
giving the XMU+ a range of 2 to 8 ports for the small chassis, and 2 to 64 ports for the
large chassis. This design provides for extended flexibility since the user can decide to
run separate program configurations on each port, or the same program configuration on
multiple ports. The type of line card installed determines the functionality of its ports. For more
information about the various line cards, please see: About XMU+ Line Cards on page 7. XMU+ Installation and Maintenance Guide. Our web site at www.interalia.com.
About Basic XMU+
Commands XMU+ Commands are the most basic elements required to direct the actions and
results of an XMU+ program configuration. All commands in XMU+ are numbered
sequentially in the order that they were created. For example, you could have Play1,
Play2, Play3. Basic commands include:
This basic command... Is used to...
PLAY Play the message number specified by the program
configuration.
PAUSE Introduce a pause for a specified number of seconds.
This command is typically used to provide the caller
with time to make a decision.
BEEP Generate a short beep tone.
NOOP Move the user to the next step without pauses, beeps,
(No Operation) or other messages.

Node XMU+ building blocks
consisting of a group
of commands or
XMU+ settings that
are used to build
XMU+ program
configurations.
XMU+ QuickStart Guide rev.10 133 About XMU+ Nodes
About XMU+
Nodes XMU+ Nodes comprise the second category of XMU+ commands and are a fundamental component of all XMU+ program configurations. A node consists of a group of commands or XMU+ settings. Nodes are building blocks
that are linked together to create a program configuration (or program) to control the
actions that XMU+ performs. The actions performed by each node are based on specific
commands and parameters that are coded within that node. Nodes are used as steps within a call flow, to add menu choices, play additional
messages, add time/date screening, provide user interaction and responses, transfer
calls, or allow branching to new actions. XMU+ program configuration design and implementation requires a good understanding
of the nodes that can be used, and the best way in which to interlink and apply them.
Typically, during the design of your program configuration, you will develop a call flow
diagram that details the types of nodes to be used, and the parameters that must be
applied to each. See Chapter 8: Tutorials: Audio Text and Dial By Name to learn how to implement
nodes into a sample program configuration.
Types of nodes XMU+ provides a number of different types of nodes that can be used to develop
program configurations and applications for your organization. See the following for
more details:
Š Auto Nodes on page 134. Š VOX Nodes on page 136.
Š CMD (command) Nodes on page 134. Š XFER Nodes on page 137.
Š Date Nodes on page 134. Š XFER Style Nodes on page 137.
Š Time Nodes on page 134. Š TABLE Nodes on page 137.
Š DTMF Nodes on page 135. Š NIS Nodes on page 137
Š List Nodes on page 135. Š DBN Nodes on page 137
Š MOH Nodes on page 136. Š DIR Nodes on page 137
Š MSG Nodes on page 136. Š Starting Nodes on page 136.

Chapter 7
About XMU+ Nodes and Program Configurations
Auto-Attendant
Applications
Are used to provide
personalized
automated greetings
to incoming callers, a
menu of choices, and
call transferring.
The following table provides a summary of the types of nodes available for use in your
program configurations.
This type of node... Is used to...
Auto Nodes Develop Auto-Attendant program configurations. It
lets you provide a menu that allows callers to select the
target or extension to which they want to be
transferred.
Example: “If you know the extension of the party you
are trying to reach dial it now, or press 0 to be
transferred to the Operator.”
CMD (command) Nodes Contain other commands and nodes to group a related
set of commands. It is typically used to execute of
series of commands that can send the caller to various
destinations.
Example: Command Node is often used for Time/Date
filtering before presenting the caller with the
appropriate auto-attendant menu.
Command nodes can call AUTO, CMD, DATE, DTMF,
LIST, MOH, MSG, TIME, VOX, TABLE and XFER nodes
and the PAUSE command.
Date Nodes Execute a set of commands on a specific date or day, or
within a range of dates. Typically, Date Nodes are used
to play different messages on different days or to
transfer calls to a different extension for weekends and
holidays.
Calls arriving outside of the specified ranges are
ignored by the Date Node, allowing the call flow to
move on to the next command.
DATE and TIME nodes can be combined together.
Time Nodes Execute a group of commands when a call is received
within a specified time range. If the call arrives outside
of this time range, XMU+ ignores the Time Node and
moves the call flow to the next command.
Use Time Nodes to play different messages at different
times of the day or to transfer calls to a different
extension after hours.
Date and Time nodes can be combined together.

DTMF Stands for Dual-Tone
Multi-Frequency. A
telephone’s touch tone
system uses pairs of
tones to represent the
various keys. There is
a “low tone” and a
“high tone” associated
with each button (0
through 9,
(star), and #
(pound symbol). These tones can
be used to
uniquely identify
each button on a
touch-tone phone.
XMU+ QuickStart Guide rev.10 135 About XMU+ Nodes
This type of node... Is used to...
DTMF Nodes Present menu selection prompts to a caller, and to
execute specific actions depending on the digits the
caller entered. Each action has pre-defined targets
such as messages, transfers to specific extensions or
telephone numbers, or to sub-menus.
Example: “Press 1 for directions to our office, press 2 to
reach customer service, press 3 to reach Mary Hill in
Accounting or press 4 for additional options.”
DTMF nodes can call AUTO, CMD, DATE, DTMF, LIST,
MSG, TIME, VOX, TABLE and XFER nodes.
DTMF nodes require the installation of one of the
following types of cards in the XMU+ unit.
Š Interactive Card.
Š Hybrid Analog line card.
Š T1 Card.
DTMF nodes will not operate on any other type of card.
XMU+ will simply ignore the DTMF signals and
continue with its program.
List Nodes Insert a series of messages into an XMU+ program
configuration. List nodes are typically used to:
Š Play a list of different advertising messages. By
applying the Rotate mode of operation, the next
message in the list is played whenever a new call is
received.
Š Act as second ACD announcement for callers who
are held in queue for extended periods of time.
When the List Node is in Rotate mode, the caller will
hear different messages while cycling to the same
XMU+ port.
Š Allow users to sequentially access all messages that
have been configured at one time, rather than
rotating through the list one at a time. The List
Node must be placed in ALL Mode for this action.
List nodes can call MSG nodes to play a list of
messages, and to set modes of operation (all, rotate,
and skip).

Chapter 7
About XMU+ Nodes and Program Configurations
This type of node... Is used to...
MOH Nodes Group instructions that configure the XMU+ into a
Music on Hold source for delivering a combination of
messages and music to callers on hold.
The MOH node can only be used in conjunction with
an MOH card. The MOH program configuration lets
you control the delivery of voice, music, volume, and
fade time.
MOH Nodes can call CMD, DATE, LIST, MSG, TABLE
and TIME nodes and PAUSE, and NOOP commands.
MSG Nodes Identify and store message file information. Each
message node, with its associated message or music
file, can be re-used in multiple locations within a
single program configuration, or within a different
program configuration.
Message nodes are referenced using the PLAY
command. The PLAY command is typically
incorporated into the command structure of other
nodes such as MOH, CMD, and LIST nodes.
Message nodes cannot call other nodes.
Starting Nodes Set the first action that XMU+ must perform when a
call is received at a specific port. This is a one-step
entry. Each XMU+ port must be assigned a Starting
Node.
The Starting Node indicates the beginning point of an
XMUCOM+ program configuration.
The same starting node can be applied to multiple
ports. This is a useful feature when the same program
configuration is run on multiple ports.
VOX Nodes Provide a menu node that responds to voice prompts
instead of DTMF prompts. It allows rotary callers to
use speech to select their option from the menu.
The XMU+ listens for audio on the line after each
prompt, but does not interpret the actual word the
caller speaks.
VOX nodes can call CMD, DATE, LIST, PAUSE, TIME,
VOX, TABLE and XFER nodes as well as the PLAY
command.

XMU+ QuickStart Guide rev.10 137 About XMU+ Nodes
This type of node... Is used to...
XFER Nodes Group settings and commands that allow the XMU+ to
(Transfer Node) perform call transfers.
XFER nodes carry out a call transfer based on user
generated DTMF signals in a DTMF or Auto node, or
with a voice signal in a VOX node.
XFER nodes can call CMD, AUTO, DATE, DTMF, LIST,
TIME, VOX, TABLE and XFER nodes as well as the
PLAY command
All program configurations using XFER nodes must
also include at least one XFER Style node.
XFER Style Nodes Enter settings to ensure the XMU+ unit performs in a
(Transfer Style Node) manner compatible with the PBX. This includes PBX
specific information such as hookflash, timings, ring
cadence, and supervised vs. non-supervised transfers.
At least one XFER Style node must be included with all
program configurations using XFER nodes.
TABLE Nodes Carry out an action based on a user defined schedule.
This schedule can be activated using the following
modes: Time, Date, Month, Day, Weekly, Hourly,
Monthly & Calendar.
The table node contains a mode of operation, an
‘invalid’ instruction and a ‘continue’ instruction
followed by a list of action table entries.
NIS Nodes Carry out an action, usually a transfer, based on DTMF
digits received after going off hook, such as DNIS/ANI
digits. Actions can be based on the whole DTMF string
or sub sections within it.
DBN Nodes Contain details used by the XMU+ to perform Dial By
Name applications.
DIR Nodes Contains the Directory of names and extensions used
by the DBN node.

Chapter 7
About XMU+ Nodes and Program Configurations
Field Descriptions For Nodes
The XMUCOM+ PC software offers various methods of configuring the different nodes
that make up an XMU+ configuration. To avoid confusion, the various drop down
menus and pop up windows only present the options that are available for each node. In
this point and click environment, buttons, drop down menus and pop up windows are
used to make selections and configure nodes. These conventions are similar to those
used in many other Windows based programs. Double click on any node in your
configuration to edit it.
Command Node.
The Command node is used when
an application requires multiple
steps. A command node may be
configured to play a series of
messages, to screen for times and
dates before playing a message or
presenting a menu to callers. Any
combination of nodes and
commands may be programmed
into a command node. The user may set up the Command
node pressing the CMD button in
the Config Builder window to
create a new entry, modify an existing entry (double click the current entry), delete or rename an entry by
right clicking on it.

XMU+ QuickStart Guide rev.10 139
About XMU+ Nodes
List Node
The All/Rotate boxes allow the
user to program the XMU+ to play
all messages to callers or to rotate
messages to ensure all messages
get equal play. The Skip option
allows a caller to jump over a
message by pressing a DTMF key
on their phone. Clicking on the
Edit box in the List node will
display a window that will allow
the user to Add/ Update/Delete a
play message.
Time/Date nodes
These two nodes instruct the XMU+ to play messages or execute actions on specified
days, dates or times. These nodes are inserted into Command nodes as steps in a call
process. Each call is screened to determine if the call is arriving during a specified time
frame (Time node) or on a specific day or date (Date node). When the call makes a
match, the Time or Date node takes control of the call. The XMU+ follows the
commands configured in that particular node. Multiple Time and Date nodes may be
configured in a call flow.
Time node
Configure the Start and Stop fields in
Time node. Then configure the action
by clicking on the Edit button. In this
example message 1 will play between
5 pm and 8 am.

Chapter 7
About XMU+ Nodes and Program Configurations
Date node (Day and Date configurations)
Select Day or Date mode, then configure the Start and Stop fields. Configure the action
using in the Edit button.
DTMF/AUTO nodes
DTMF Node: Specifies the action taken on the DTMF digit(s) collected.
AUTO Node: Specifies the action taken on the DTMF digit(s) collected. The action will
only be executed if the DTMF digits collected match the programmed range of digits.
The range must have a beginning and an end.

XMU+ QuickStart Guide rev.10 141
About XMU+ Nodes
Field Name Description
Prompts Specifies the prompts message(s) that are played to the caller.
Timeout Specifies the action taken when the caller does not make a
selection. Enter No Operation (NOOP) if the caller should return
to the prompts message.
Invalid Specifies the action taken when a selection is made that is not
defined in the Action Table.
Abort Specifies the action taken when the retry limit has been reached.
Action Table The left side of the Action Table is made up of digits that can be
entered by the caller. The right side of the table contains the
XMU+ action instructions.
Number of Digits Specifies the number of digits to be collected, from one to seven
digits.
Terminating Digit Specifies the optional terminating digit, # or *.
Selection Specifies the digit collection timeout period, one to sixty
Timeout (sec) seconds. The default is 5 seconds.

Chapter 7
About XMU+ Nodes and Program Configurations
Field Name Description
Digit Timeout Specifies the inter-digit timeout value in seconds, one to 15.
(sec)
Retry Limit Specifies the number of retries that are allowed, one to five, if
invalid selections or timeouts occur.
DTMF Clear Erases the DTMF buffer. Options are Yes or No; not applicable to
AUTO Nodes
Note: Click on the Edit button to view the options available to each node.

XMU+ QuickStart Guide rev.10 143
About XMU+ Nodes
VOX node
Field Name Description
Prompts Specifies the prompt message(s) that are played to the
caller.
Timeout Specifies the action taken when the caller does not make a
selection. Enter NOOP if the caller should return to the
prompt message.
Abort Specifies the action taken when the retry limit has been
reached.
DTMF Specifies the action taken when the caller presses a DTMF
key.
Action Table The entry consists of two items, a prompt and an action.
The Action Table specifies the action taken based on the
VOX selection.
Beep Specifies whether or not a BEEP is presented to the caller
after each VOX Prompt.
Threshold Specifies the sensitivity level of detecting a voice activation
selection; zero to seven, zero is the least sensitive and seven
is the most sensitive.
Wait (sec) Specifies the amount of time the XMU+ waits to receive a
response from the caller.

Chapter 7
About XMU+ Nodes and Program Configurations
Field Name Description
Retry Limit Specifies the number of retries that are allowed; one to five,
if invalid selections or timeouts occur.
Xfer/Style nodes
These two nodes work together to allow the XMU+ to perform a call transfer. The Xfer
target (extension) is configured in the Xfer node and the Style node identifies the
sequence (hookflash only or hookflash plus an access code) that the PBX requires to
transfer a call.
Xfer node
Field Name Description
Dial Specifies the DTMF String to be transferred to. The letters AUTO
can be entered when the Xfer Node is collecting digits entered in
an AUTO Node. If the PBX uses least cost routing, you may require
delays at the end of the dial string. One comma (,) represents a
half second delay.
X Style Specifies the Xfer Style Node to be referenced when transferring a
call.

XMU+ QuickStart Guide rev.10 145 About XMU+ Nodes
Field Name Description
Hold Specifies the message to play to the caller prior to transferring the
call.
MOH Specifies the message to play that contains the music on hold
message while callers are waiting on hold in the XMU+.
Busy 1 Specifies the action to be taken in response to the first busy
condition; this applies to supervised transfers only.
Busy 2 Specifies the action to be taken in response to further busy
conditions; this applies to supervised transfers only.
No Answer Specifies the action to be taken in response to a no answer
condition; this applies to supervised transfers only.
Answer Specifies the action to be taken in response to an answer
condition (this applies to supervised transfers only.
Note: Each Xfer Node must refer to a valid x-style.

Chapter 7
About XMU+ Nodes and Program Configurations
Style node
The following characters are used to configure the Transfer, Disconnect and Retrieve
fields: 0-9, *, and # are DTMF entries that can be used in a dial string. An exclamation
mark (!) is the entry used to represent a Hook Flash. The duration of the Hook Flash is
configured in the Hook Flash field. A comma (,) is used to represent a half second pause.

XMU+ QuickStart Guide rev.10 147
About XMU+ Nodes
Field Name Description
HookFlash (msec) Defines the duration of the hook flash, 50 to 2000
milliseconds. Default is 500 msec.
Supervised Specifies the treatment required during a call transfer;
Blind, Partial, Full, D&C or Enhanced:
Š Blind - no call progress monitoring
Š Partial - busy condition monitoring only
Š Full - busy and no answer call monitoring
Š D&C - issues re-route digits to a network provider
Š Enhanced - Dual busy condition monitoring only (fast/
slow busy)
Note: If Blind Supervision is selected, the programming
features after Disconnect are not available.
Threshold Defines the level at which call progress monitoring is
carried out. The default is 'Low.' If problems with noisy
lines are experienced during supervised transfers, Medium
or High can be selected.
Transfer Specifies the dial string needed to perform a call transfer/
conference function; default = !.
Disconnect Specifies the dial string used to perform a disconnect
function; default = blank.
Retrieve Specifies the dial string used to perform a retrieve
function; default = !
Busy Retry (sec) Specifies the duration between call transfer retries on a
busy condition; one to 30 seconds
Num. Retries Specifies the number of times the XMU+ should attempt a
retry when a busy condition is detected; one to 30 retries.
Ring Limit Specifies the number of rings needed to determine a ring
no answer condition; one to 20 seconds.
Busy On (msec) Specifies the duration of the busy on tone; 50 to 1500
milliseconds.

Chapter 7
About XMU+ Nodes and Program Configurations
Field Name Description
Busy Off (msec) Specifies the duration of the busy off tone; 50 to 1500
milliseconds.
Ring On (msec) Specifies the duration of the ring on tone; 50 to 10000
milliseconds.
Ring Off (msec) Specifies the duration of the ring off tone; 50 to 10000
milliseconds.
Note: When Enhanced Supervision is selected, the Busy On/Busy Off changes to
Busy1/On Busy2/On. The setting in milliseconds represents half of the busy signal.
For example, a setting of 500 milliseconds looks for a busy signal that is 500
milliseconds of tone and 500 milliseconds of silence. A fast busy signal is set for half
the time of a regular busy tone or 250 milliseconds.
Message node
Each message has several configurable fields that affect its functionality. To view
message fields, double click on the desired message number in the Config Builder.
Messages can be assigned the following characteristics:
Maximum Message Length - this limits the length of the message so that one
message cannot be recorded and utilize all of the recording time in the XMU+.
This feature is useful when different people may be recording messages. On/Off State - messages can be turned off and on remotely from any touch tone
telephone. The default is On. DTMF - the message can be interrupted by a DTMF tone if configured. Rather
than listen to the message, callers can enter any DTMF digit and skip to the next
message or node in the call flow. Backup to Flash Memory - default is to back up so message will be stored even in
a power fail situation. De-select if you don't wish to use Flash memory Access Code - if set, you must enter a password before changing this message
using the remote access feature. Each message can have it's own password or a
password may be shared. Filename - When messages are uploaded from the XMU+ each message is stored as
a separate file and assigned a default filename. You can assign a new filename to the
messages. Directory - reflects the path or directory location of the .WAV file for this
message.

XMU+ QuickStart Guide rev.10 149
About XMU+ Nodes
Comment - available for additional information about the message.
MOH node
In order to use the XMU+ as a MOH source, you will need a MOH Card. The MOH
Card connects to the MOH input(s) on the PBX. Using the MOH Card, music and
messages are combined to create a seamless on-hold environment. The MOH Card is
designed for use as an on-hold source for your PBX. The MOH Card is used to combine
on-hold promotional and/or information messages and music. Music and messages may
be recorded within the XMU+ or the music may be provided from an external source. In
either case, the XMU+ will insert messages into the music at configured intervals. The
XMU+ fades the music out before the messages are played. When the messages are
finished, the XMU+ fades the music in again. The music volume and the duration of the
music fade time is user configurable. When a MOH Card has finished executing the
commands configured in the MOH Node, it loops back to Starting Node and executes
the configured commands again. Note: The MOH Card may be used to provide the
MOH for callers on hold in the XMU+.
The MOH Card has 2 inputs and 4 outputs: The audio inputs are used when music is
provided by an external source (this is typically an existing source, such as muzak).
When the music source is a message recorded within the XMU+, the audio inputs are not
used. The MOH Card audio outputs connect to the MOH input(s) on the PBX. The

Chapter 7
About XMU+ Nodes and Program Configurations
audio outputs are used in one of two ways: To output messaging in combination with an
existing music source. To output music and messages that reside in the XMU+ (when the
music source is a message recorded within XMU+). The PBX will be configured in the
same way as it would be when a stand alone MOH source is installed. When the PBX
connects a caller to a MOH port, the caller hears music or music and messages from the
MOH Card that resides in the XMU+.
The MOH Node can only be used in conjunction with a MOH Card. The MOH Node is
used to configure the MOH Card. The MOH Node has four fields as follows:
Fade Time is the time it will take for the music to fade in and out before and after
the promotional and/or information messages are played to callers on hold. Default
is 2.5 seconds. Music Level field is configured to control the music level during the fade in and
fade out. Default is 6. The range is 1-9; with 1 representing quiet and 9
representing loud. Voice field is configured to instruct the XMU+ which messages to insert into the
music. Other available options are: Play, CMD, List, Date, Time, Table, Pause and
NOOP. Music field is configured to identify the music source for the MOH Card. The
music source may be an internal (a message in the XMU+) or an external source:
Internal Music

XMU+ QuickStart Guide rev.10 151
About XMU+ Nodes
Source: A message recorded within the XMU+. The music field can be configured to
play a message (this uses recording memory). Options available are: Play, CMD, List,
Date, Time, Table, Pause and NOOP.
External Music Source: Music coming from an external source. The music can be
provided by an external source via the input ports on the MOH card that resides in the
XMU+ (muzak, etc.).
Card and input/output configurations available are: Card ‘X’ - input 1 or 2 Card ‘X’ -
output 1 through 4
For an example MOH configuration see the SBX MOH Tutorial included on your CD.
The XMU+ MOH card has more inputs & outputs than the SBX, but the configuration is
identical.
Table node
The Table node is used to allow the XMU+ to perform different actions at different
periods or intervals (daily, time, date, month, day, weekly, hourly, monthly & calendar).
It contains a Mode of operation, an ‘invalid’ and a ‘continue’ instruction, followed by a
list of Action Table entries. Each Action Table entry contains a starting and ending
value, followed by an instruction. When the Table node is encountered in the call flow,
the contents of the Table are checked and if any of the entries matches, the Action is
executed. If none of the entries matches, the XMU+ executes the ‘Invalid’ instruction.

Chapter 7
About XMU+ Nodes and Program Configurations
Field Name Description
Mode The Mode specifies the period that is being compared in the
Action Table. For example; weekly, hourly, monthly.
Invalid The invalid instruction is executed if there was no match in the
Action Table
Continue The Continue instruction is executed if the Action Table
instruction executed was a PLAY or LIST node
Action Table The Action Table contains a variable number of “start - end”
choices depending on which Mode was selected.
The Action Table is scanned from top to bottom to find a match,
once a match is found, the corresponding instruction is carried
out.

XMU+ QuickStart Guide rev.10 153
About XMU+ Nodes
NIS node
The NIS node allows callers to be directed to a different call flow based on the number
they dialed or based on the number of the caller. The NIS feature allows the XMU+ to
handle DNIS/ANI information and to direct the caller accordingly. The XMU+ receives
the digits either before going off hook (T1 wink start or immediate start) or after going
off hook (Hybrid line card.) The digits are captured into a NIS buffer, the call flow is
directed using a TABLE node to decode portions of the NIS buffer.
Field Name Description
Number of Digits Specifies the number of digits to be collected, from 1 to 31
digits.
Terminating Digit Specifies the optional terminating digit.
Selection Time Out Specifies the digit collection timeout period, from 1 to 60
seconds. Default is 5 seconds.
Digit Time Out Specifies the inter-digit timeout value in seconds. From 1 to
15 seconds.

Chapter 7
About XMU+ Nodes and Program Configurations
DBN Node
The Dial By Name (DBN) node allows callers to be directed to an extension by entering
the first / last name of the person they wish to contact into the telephone keypad. The
most common application (and default for this node) is to prompt the incoming caller to
enter the first three (3) digits of the last name of the person they wish to contact. For
example to contact John Brown, the caller would enter 276 (BRO) into the keypad. Once
the person is recognized, the XMU+ will transfer the call to the correct extension. The
XMU+ is flexible enough to allow the DBN node to accept first name only, last name
only, first then last names, last then first name, etc. Also to allow the number of digits
required from the caller to range between one (1) to nine (9)
DBN node when ‘Default Last Name’ is selected in the method field.

XMU+ QuickStart Guide rev.10 155
About XMU+ Nodes
Field Name Description
Greeting Specifies which MSG node will be used as the greeting
message for callers
Directory Specifies which DIR node will be referenced by this DBN
node
Method Choose either Default (last name only) or choose Custom
for additional options
Language 1; Language 2 Select which language prompts will be used for this dial
by name feature. Two languages can be used if required.
Action Table Displays what action will take place when a condition is
seen by the XMU+
DBN node when ‘Custom’ is selected in the Method field.

Chapter 7
About XMU+ Nodes and Program Configurations
Field Name Description
Mode settings Select which criteria you wish the caller to enter and the XMU+ to
match from. Selections are First name, Last name, Both names,
Extension. Then select the minimum and maximum number of
digits the caller should enter. Finally choose a Prompt message
which should instruct the caller what they are expected to enter.
Error Settings Retry Limit - set the number of retries a caller can make if invalid
selections or timeouts occur.
Confirmation If you have matching names within your directory, it may be
necessary to select “yes” for confirmation. This allows the caller to
select from a list of matching names. For example “Press 1 for John
B, press 2 for John T.”
Before Name - Select a message to play before the XMU+ lists the
matching names. (Or select No-op if no message is required)
After Names - Select a message to play after the XMU+ lists the
matching names. (Or select No-op.)
Name 1, Name 2, etc - Select a message to play before the XMU+ lists
each matching name in turn.
On Exit Exit Prompt - Select a message to play before the XMU+ transfers
the caller, e.g. “transferring your call.”
Play Name - Select if you'd like the XMU+ to play the name of the
person to which the caller is being transferred.

XMU+ QuickStart Guide rev.10 157
About XMU+ Nodes
DIR Node
The DIR or Directory node is referenced by the DBN node when attempting to make a
match from the callers key presses. The DIR node contains a list of all possible matches
(i.e., people in the company) and their telephone extension number. In order for a dial-
by-name application to work, both a DBN and a DIR node must be configured.
Field Name Description
Access Code Optional. Enter an access code for remote telephone users to
access and modify this node.
Starting Prompt Set the message number you wish your directory prompts to start
from. This message will typically contain the person's name and
will be played out when the “Play Name” field in the DBN Node is
set to “Yes.”

Chapter 7
About XMU+ Nodes and Program Configurations
Field Name Description
CSV Filename The DIR node will allow you to import a CSV file (e.g. M/S Excel)
that contains a list of personnel and their extension numbers. The
format of the CSV file must be Last Name, First Name, Extension
Directory Table This table shows all the people in the directory, their extension
and the message prompt assigned to that person. You can
manually enter names into this table or import them as described
above.

XMU+ QuickStart Guide rev.10 159
About XMU+ Program Configurations
About XMU+
Program Configurations XMU+ program configurations are simple programs that you, the user, can develop with the XMUCOM+ application, and that run on the XMU+ unit.
XMU+ program configurations are composed of commands, nodes, messages, and
music that are executed when a call is received.
You can develop and build your program configurations from either the XMUCOM+
application (recommended, and most intuitive method) or from the Front Panel of the
XMU+ (only recommended for very simple configurations).
Planning for an XMU+
Program Configuration
It is important to spend some time planning and designing your XMU+ program configurations, before creating and implementing them in XMUCOM+.
Planning a Program Configuration
Determine your
configuration requirements.
Plan your Call Flow
Process.
Draw your Call Flow Diagram.
Detail and document the contents of your commands
and nodes.
During the planning phase, you should:
Determine your program configuration requirements.
Your requirements will depend on the type of program configuration you are
designing, the size of your organization, options and variances you need to
include, and the complexity and depth of your call flow requirements.

Chapter 7
About XMU+ Nodes and Program Configurations
See XMU+ Program Configurations: Types and Description on page 161 for
more information about the types of program configurations you can design and
the XMU+ Program Configuration Templates (on our website) for examples of
the various types of program configurations you can design.
Plan your call flow order.
Begin by determining what should happen when a call is first received, and
proceed to call completion in a logical fashion, through all the options and paths
that the call can take. This plan should provide a clear representation of all of
your desired call flow.
Draw a call flow diagram (node map plan) showing the calls, menu selections,
messages, transfers to extensions, music, and other options you want to include in
your program configuration.
The call flow diagram helps you to understand how the various nodes are linked
together to create and execute program configurations. Review the node
information provided in Types of nodes on page 133 and in the XMU+ Online
Documentation to ensure optimal use of each node and its features. See Sample
XMU+ Call Flow Diagram on page 165 for an example of a typical call flow
diagram.
Detail and document the contents of your commands and nodes.
Use the Sample XMU+ Call Flow Diagram on page 165 to plan, detail, and
organize the details for the nodes, messages, and music in your program
configuration.
These program configuration Charts will serve as a quick visual reference to your
XMU+ program configurations if you need to speak to our technical support
staff. For detailed information about programming each type of node and
command, refer to the XMU+ Online Documentation and to the XMU+ Program
Configuration Templates available online.
See the following topics for more information: XMU+ Program Configurations: Types and Description on page 161. Sample XMU+ Call Flow Diagram on page 165.

XMU+ QuickStart Guide rev.10 161
About XMU+ Program Configurations
XMU+
Program Configurations: Types and Description
The following table provides a brief description of the various types of program configurations that can be built with XMUCOM+, and executed by XMU+.
Auto Attendant on page 161. Audio Text on page 162. Automatic Call Distribution (ACD) Announcements on page 162. Call Processing on page 162. DNIS Dialed Number ID Service on page 162. Dial and Continue on page 163. Holiday Automatic Call Distribution on page 163. List ACD on page 164. Music on Hold (MOH) on page 164. Dial By Name on page 164
The XMU+ can execute many program configurations simultaneously. The messages
can be shared between multiple program configurations.
This program Is used to...
configuration...
Auto Attendant Courteously and quickly greet callers, request an
extension, choose from a menu of options that you have
recorded, hear messages you have composed, or be
transferred to an operator.
Auto Attendant program configurations let you use user
recorded system prompts, time/date/holiday
parameters, conditions, and messages to create the right
first impression for your organization.
Typically, Auto Attendant program configurations are
used to transfer the caller to a person.

Chapter 7
About XMU+ Nodes and Program Configurations
This program Is used to...
configuration...
Audio Text Provide a verbal bulletin board that uses an interactive
menu to provide your callers with selections and
options that quickly take them to the information they
require.
Audio Text program configurations can greet callers
with a menu explaining available choices, and let them
select the information messages that they want to hear.
Automatic Call Play messages to callers that are held in an ACD queue.
Distribution (ACD) ACD announcements are typically used to inform callers
Announcements of potential on-hold delays, entertain callers on hold, or
to prompt callers to have important information
available before talking to an agent.
Call Processing Provide auto-attendant functionality for outside callers
and for internal staff. The front-end main phone lines
prompt callers for the location to which they want to be
directed, and then rapidly connects the caller to the
appropriate number.
Program configurations can be designed to direct
callers to ACD queues, extensions, informational
messages, IVR ports, or to voicemail solutions. If
required, calls can be directed to other call centers or
alternative locations.
DNIS Provide XMU+ with the number that was initially
Dialed Number ID dialled by the caller (through the Central Office or the
Service telephone network). XMU+ uses that original number
to determine which menu to play. This is dependant
upon your PBX.
For example: Some companies have multiple 1-800
numbers. All calls to any of these 1-800 numbers can
arrive at the same call center. The XMU+ unit that
receives the call evaluates the original number and
determines which menu to play based on the DNIS
number.

XMU+ QuickStart Guide rev.10 163 About XMU+ Program Configurations
This program Is used to...
configuration...
Dial and Continue Allow the XMU+ to interface with additional routing
features provided by long distance network vendors.
This feature is designed to re-route incoming calls to
alternate locations over the same trunk.
When this feature is purchased from your service
provider, the network constantly monitors the trunks
for DTMF notes. At any point in the call, if the correct
series of DTMF tones are issued, the network will take
the call back on the same trunk, and send it to an
alternate location. This provides the benefit of only
using one trunk per call to re-route. The alternative is to
allow callers to come into the PBX on one trunk and go
out to the alternate site on another trunk, thereby
requiring two trunks per call.
Based on a menu selection, or if there are too many calls
waiting in an ACD queue, the PBX routes the call to an
available XMU+ port. The XMU+ then outpulses the
DTMF digits which the long distance vendor is looking
for to take the call back and transfer it to another
location.
Dial and Continue program configurations can use the
XFER, XFER STYLE, and DTMF nodes (if Network
Confirmation Tones are going to be issued).
Holiday Automatic Call Play special messages to callers during holiday periods.
Distribution XMU+ plays the designated messages when a specific
holiday period occurs. Holiday ACD program
configurations allow organizations to pre-plan and play
date specific messages and music to callers without
further operator intervention.
This program configuration is used in conjunction with
DATE/TIME nodes, and is often part of a normal List
ACD program configuration.

Chapter 7
About XMU+ Nodes and Program Configurations
This program Is used to...
configuration...
List ACD Play selected messages or music from a pre-defined list
of messages for callers waiting in an ACD queue.
The messages are played in the order listed in the
program configuration until the caller is routed to the
appropriate attendant.
Music on Hold (MOH) Provide Music on Hold (MOH) for callers on hold.
Music and messages may be recorded within the XMU+
or the music may be provided from an external source.
In either case, the XMU+ inserts messages into the
music at configured intervals, fades messages and music
in and out, allows volume control, and duration control.
The XMU+ unit must be equipped with an MOH card
that connects to the MOH inputs on the PBX. Using the
MOH Card, music and messages can be combined to
create a seamless on-hold environment.
Dial By Name Allows an incoming caller to be directed to an extension
by entering the first / last name of the person they
would like to contact.

XMU+ QuickStart Guide rev.10 165
About XMU+ Program Configurations
Sample XMU+
Call Flow Diagram You should develop call flow diagrams that document and show the transfer of control from one node to the next for every program configuration that you plan to create and
implement.
Call Flow diagrams provide a visual means for documenting and showing how callers
are moved through the XMU+ system. They are effective for showing all the possible
paths that a caller can take through your system
The following diagram illustrates a typical call flow diagram. You should create
similar, detailed call flows for each of your program configurations.
Sample Call Flow Diagram
Caller
Central Office Switch
DTMF 1
Prompt: MSG 1, Pause 2 sec, MSG 2
"Thank you for your call. If you would like to: make a collect call to the USA…
or charge any international call to a credit card…
or charge a US call to a US calling card…
press 1 now & we will connect you.
(PAUSE FOR 2 SECONDS)
Otherwise, stay on the line & we will connect you to the service you dialled.
Thank you for your call."
Timeout : XFER 2
Invalid : MSG 4
I'm sorry that selection is invalid, please try again
Abort : MSG 99
1 : XFER 1
XFER 2 MSG 99
MSG 6: Please hold while we transfer your call No message recorded, unit disconnects Enter the telephone number here
Location: ____________________ Card: _____________________
Always record specifics about the site, Lines: _____________________ Modem #: _____________________
card, lines, modem, and IP address on the
IP Address: _____________________
Call Flow Diagram.
Include Node Type and
number, as well as a
detailed description of the
message to be played in
all references to Nodes.
XFER 1
MSG 6: Please hold while we transfer your call
Enter the telephone number here

Chapter 7
About XMU+ Nodes and Program Configurations

Tutorials: Audio Text and
8 Dial By Name
Try the following tutorials to learn how to build a simple Audio Text or Dial
By Name program configuration for your XMU+ unit. This tutorial introduces
the basic concepts and ideas behind building a program configuration with the
XMUCOM+ application. Once you understand these basic concepts, you can
begin to build other types of program configurations for your XMU+ unit.
In This Chapter
Overview on page 169. About Programming Audio Text Configurations on page 169. Before You Start on page 172. Using XMU+ Nodes on page 176. Audio Text Call Flow Diagrams and Tables on page 178. Entering Audio Text Call Flow into XMUCOM+ on page 181. Assigning a Line card and Start Node for the Audio Text
Program on page 192. Dial By Name Tutorial on page 197.

Chapter 8 Tutorials: Audio Text and Dial By Name

Note: This Audio Text program configuration will not operate on XMU+ units using the T1 card, unless it is connected to a PBX system.
XMU+ QuickStart Guide rev.10 169 Overview
Overview Many organizations provide information services during the day or at night, rather than
having staff to answer frequently asked questions. Companies may publish a telephone
number to provide information about health care, store hours, location, current mortgage
rates, instructions, and so on. XMU+ is used to answer the call and presents a menu of
pre-recorded informational messages. In this simple Audio Text tutorial, you will learn to use the XMUCOM+ application to
build program configurations for your XMU+ units. Upon completion of this tutorial you
should:
Be comfortable with the design and organization of the XMUCOM+ interface.
Understand the basic steps and processes you must complete to build easy to maintain, operational program configurations.
Have programmed, implemented, and tested a simple Audio Text program configuration.
The concepts, ideas, and procedures in this tutorial can be used and expanded upon to
build more complex systems of your own design.
About Programming Audio Text Configurations This tutorial describes an organization that needs to set up phone lines providing callers
with a variety of information about the company. XMUCOM+ and XMU+ are used to
create a program that serves as an information resource for the caller, but which does
not transfer callers to other lines within the company. The program configuration does
not require a specialized phone system or PBX.

Chapter 8
Tutorials: Audio Text and Dial By Name
The resulting program configuration can be downloaded to any XMU+ unit that
supports Hybrid line cards, and that is connected to a standard analog phone line.
Programming a Meet Program
Configuration prerequisites.
Plan and organize
program configuration.
Document nodes and node details.
Create Call Flow diagrams.
Enter configuration into XMUCOM+
System Prerequisites
Ensure that your XMU+ unit meets these prerequisites before developing or
implementing this program configuration.
Meet this prerequisite... More Information....
XMU+ Installation: Ensure XMU+ Ensure the XMU+ unit has been
unit is installed and configured. properly installed and configured
as per the instructions in the XMU+
Installation and Maintenance
Guide, the XMU+ Installation
Handbook, and chapters 1 thru 7 of
this guide.
Program Installation: Ensure
XMUCOM+ application is installed
and configured on the appropriate
personal computer.
Ensure the XMUCOM+ application
has been installed and configured as
per the instructions in chapters 1
thru 7 of this guide.

XMU+ QuickStart Guide rev.10 171 About Programming Audio Text Configurations
Meet this prerequisite... More Information....
Line Cards: Ensure correct line For Audio Text programs you can
cards are installed and connected. use the following combination of
line cards and connections:
Hybrid Analog line card connected to
an analog phone line.
T1 line card connected to a PBX
system.
See the XMU+ Installation and
Maintenance Guide and the XMU+
Installation Handbook for more
information.
Tools: For recording messages. Ensure you have appropriate tools
for recording the messages you
need for the Audio Text program.
You can choose to use either:
Telephone with remote access to the
XMU+ unit.
PC computer with a microphone and
Windows Sound Recorder (or other
recording application).

Chapter 8
Tutorials: Audio Text and Dial By Name
Before You Start
It is important to spend some time planning, organizing, and collecting required
information before developing a program configuration. The following checklist
identifies the major steps you should execute before beginning to use XMUCOM+ to
create the program configuration.
For your program... For this tutorial....
Goal: Determine your company’s needs To set up a program that provides
and requirements for this Audio Text callers with information about
program configuration. your company.
Program requirements: Decide on the In this tutorial, we will create
number of options, type of user action, messages for the following
and types of messages you want to information categories:
include in the program configuration. ; Hours of Operation (key press).
; Website Address (key press).
; Our Location (key press).
; Prompt (On entry to system).
; Invalid Selection (standard for all
Audio Text).
; Time Out (standard for all Audio Text).
; Abort (standard for all Audio Text).
Messages: Decide on the exact content
of each message. This should include
content for your: Introductory prompt. Each message Invalid user selections. Timeouts. Aborts.
Record each message and save them as
.WAV files. Messages must meet the
following format requirements: 8 bit compression. 8K sampling rate. Mono sound. CCITT µ-Law Format.
See the MSG Nodes for the Audio
Text Tutorial on page 177 for
details about the messages in our
tutorial. See the following to learn how to
record and save the messages: To record messages from the
Front Panel on page 114. To record messages with
Remote Telephone Access on
page 114. To record messages in a
Studio on page 115. To record messages and music
from your PC on page 115.

XMU+ QuickStart Guide rev.10 173 Before You Start
For your program... For this tutorial....
Cards and Ports: Determine port sizing by
Identify which cards and ports you will calculating the expected call
volume. For the tutorial, we use to run the program configuration.
entered the following values into Consider the following when making
the Port Sizing calculator. this decision:
Š 300 callers per hour. Š Call volume. Estimate the number of
Š 30 seconds per caller. calls/hour that you expect to receive.
If you expect to receive many calls, Based on these values, the Port
then you should use multiple ports. Sizing calculator indicated that 4 to
Otherwise, a single port may serve 8 ports should be assigned to this
your needs. program configuration.
Š Line cards: If you expect very high call volumes, you may want to assign
multiple line cards to this program
configuration.
Š Call Times: Estimate the time spent by each user, on each call.
See the following page on the Interalia website for a port sizing calculator that
can aid you in determining the
optimum number of ports to use for
your program configuration:
Š www.interalia.com. Š Click the Port Sizing Tool link. Š Click Port Calculator link.
Call Flow Diagrams: See the Call Flow Diagram for
Decide on the order of presentation for Audio Text Tutorial on page 179 for
a sample diagram. the information and the call flow order.
Create a diagram, from an end-user perspective, and add appropriate details
to assist you in your program
development.

Chapter 8
Tutorials: Audio Text and Dial By Name
For your program... For this tutorial....
System Configuration Information:
Document system configuration
information before beginning to
develop your program configurations.
Your system configurations will
determine the type of programs that
you can develop.
Detail the following as shown in
the Call Flow Sequence Table for
Audio Text Tutorial on page 178. General system settings. Card and line override and
partition information.
Configuration Chart for this Program Configuration
Use a table similar to the following example to document XMU+ system configuration
information. You will need this information when you are ready to download the
program configuration to the XMU+ unit. Some of this information is available from the
XMU+ Delivery Checklist submitted by the installer, while others must be calculated.
The following table details the information you will require to complete the Audio
Text tutorial.
For this XMU+ Unit #1 Description
XMU+ unit for tutorial
Partition Number 1 The default value is one partition. For multiple
partition systems, enable partitioning with
the Administrator > System > XMU+ Setting
command.
Partition Name Fitness Assign a name to the default partition.
Remote Access Code 0101 Enter a remote access code for this partition.
Front Panel Access Code N/A Specify the access code for the Front Panel.
Total Rec Time (MM:SS) 05:33 Review the messages you have recorded, and
calculate the total recorded time.
Remote Language English Set your language of operation for remote
access.
No MSG Recorded Disconnect If XMU+ does not find the appropriate
recorded message, it will disconnect the user.
Selection Limit 1 The number of selections a caller can input
before XMU+ responds.
Time Limit 2:00 The maximum duration of a call in minutes
and seconds.

XMU+ QuickStart Guide rev.10 175 Before You Start
For this XMU+ Unit #1 Description
XMU+ unit for tutorial
Command NOOP When a selection limit or timeout occurs, the
Command field is referenced:
NOOP: Drops the call.
PLAY: Plays a message.
Partitioning Disabled If partitioning is disabled, then XMUCOM+
treats the entire line card as a single partition.
See To set partition and system parameters for the program configuration for details on
how to enter these values into XMUCOM+.

Chapter 8
Tutorials: Audio Text and Dial By Name
Using XMU+ Nodes
Although not all program configurations use every type of node, you should have an
understanding of the use and application of each type of XMU+ node. See About XMU+
Nodes on page 133 for more information about the various types of nodes and
commands.
For the Audio Text application, you will only use the following node types: DTMF: See DTMF Nodes on page 135. MSG: See MSG Nodes on page 136.
During the development of your Audio Text program configuration, you should create
and maintain a table to track the nodes that you use, their purpose, when they are called,
and any other node specific information.
The following describes the types of tables you may want to use to document each
node that you use. Use this information when you are developing your call flow
diagrams and when you are entering information into XMUCOM+.
For the purposes of this tutorial, we have populated these tables with information
relevant to the Audio Text tutorial.
DTMF Nodes for Audio Text Tutorial
Use a DTMF node table like the following to enter DTMF node details for more than one
node. Add a separate column for each DTMF node in your program configuration. For
our configuration, we will be creating only one DTMF node. The details are shown here.
For each DTMF Node DTMF Node DTMF Node DTMF Node
DTMF node... #1 for Tutorial #2 #3 #4
DTMF Clear: YES N/A N/A N/A
Num Digit: 1
Term Digit: NO
Sel Timeout: 15
Digit Timeout: 2 seconds
Retry Limit: 1
Prompts: Play MSG 1
Play MSG 2
Timeout: Play MSG 7
Invalid: Play MSG 8
Abort: Play MSG 99
Action Table:

XMU+ QuickStart Guide rev.10 177 Using XMU+ Nodes
For each DTMF Node DTMF Node DTMF Node DTMF Node DTMF node... #1 for Tutorial #2 #3 #4
1 Play MSG 3
2 Play MSG 4
3 Play MSG 5
MSG Nodes for the Audio Text Tutorial
Enter information about each message into a table similar to the following:
MSG Access Maximum DTMF Description
# Code Length
1 N/A 15 sec Interrupt Thank you for your call. Please select one of
the following options for more information
about Fitness for the World.
2 N/A 15 sec Interrupt Press 1 for hours of operation.
Press 2 for our location.
Press 3 for information about our programs.
3 N/A 15 sec Interrupt Fitness for the World is open from 6 AM to 10
PM, each day.
4 N/A 15 sec Interrupt Fitness for the world is located at 154
Magnolia Place, in High Wagon, California.
5 N/A 15 sec Interrupt Fitness for the World provides fitness
programs for Endurance Training, Aerobic
Improvement, Stretching, and Yoga. Please
call our office at 555-4478 to book a personal
tour.
7 N/A 15 sec Interrupt We are sorry. Your call has timed out. Please
call again.
8 N/A 15 sec Interrupt That was an invalid selection. Please try again.
99 N/A 15 sec Interrupt You have made too many invalid selections.
Please call again.

Chapter 8
Tutorials: Audio Text and Dial By Name
Audio Text Call Flow Diagrams and Tables
You should develop call flow diagrams to document and show the transfer of control
from one node to the next for every program configuration that you plan to create and
implement.
Call Flow diagrams provide a visual means for documenting and showing how callers
are moved through the XMU+ system. They are effective for showing all the possible
paths that a caller can take through your system.
In addition to the call flow diagram, you should also create Call Flow Sequence tables
that show the logical flow of information in a table format.
Call Flow Sequence Table for Audio Text Tutorial
Prepare a call flow sequence for your program configuration. Use this sequence to
enter information into the XMUCOM+ application.
Step... Action...
1 Answer Call
2 Go to DTMF Node 1.
3 Play Prompts message combination: Play MSG 1, Pause 2 sec, Play MSG
2
4 Wait for a single DTMF entry (based on the Num Digits field) from the
caller. When you get a number that matches the entries in the DTMF
Node Action table, execute the appropriate action.
5 If the caller presses:
1 then play MSG 3.
2 then play MSG 4.
3 then play MSG 5.
6 If an invalid entry is made, play MSG 8 and return to the DTMF
prompts menu.
7 If the caller exceeds the Sel Time-out period (time to wait for a
selection), play MSG 7 and return the user to the DTMF prompts menu.
8 If the entries continue to be invalid, play MSG 99 and disconnect.

XMU+ QuickStart Guide rev.10 179 Audio Text Call Flow Diagrams and Tables
Call Flow Diagram for Audio Text Tutorial
Ensure your call flow diagram identifies or diagrams the following:
Path that the caller can take through the program. Identify and diagram all possible branches.
List all the nodes used by the program configuration. These should be
numbered logically. See Using XMU+ Nodes on page 176 to learn how to
document and detail these nodes. List the messages that should be played by each node. See
Using XMU+ Nodes on page 176 to learn how to document these messages. Detail the conditions associated with playing a message. Identify the card and ports on which this program configuration should
run.

Chapter 8
Tutorials: Audio Text and Dial By Name
Provide details about the XMU+ unit, modem phone number, IP addresses, line cards, and ports used.
Audio Text
Caller Call Flow Diagram
Central Office Switch
Starting Node: DTMF 1
DTMF 1
Num Digits: 1 Sel Timeout: 15 sec Retry Limit: 1
Prompt: Play MSG 1, Pause 2 sec, Play MSG 2
"Thank you for your call. Please select one of the
following options for more information about Fitness for the World…. "
(PAUSE FOR 2 SECONDS)
"Press 1 for our hours of operation. Press 2 for our location Press 3 for information about our programs."
MSG 3 Timeout : MSG 7
"We are sorry, your call has timed out. Please call again." Invalid : MSG 8
"That was an invalid selection. Please try again" Abort : MSG 99
"You have made too many invalid selections. Please call again."
1 : Play MSG 3
2 : Play MSG 4
3 : Play MSG 5
XMU+ Site: 5555 - Fitness for the World Card: Hybrid Analog
Lines: 4
Modem #: 555-5555
IP Address: N/A
"Fitness for the World is open
from 6 AM to 10 PM each day."
MSG 4
"Fitness for the World is
located at 154 Magnolia
Place, in High Wagon, CA."
MSG 5
"Fitness for the World
provides fitness programs for Endurance Training, Aerobic Improvement, Stretching, and Yoga.
Please call our office at 555-4478 to book a
personal tour."

XMU+ QuickStart Guide rev.10 181 Entering Audio Text Call Flow into XMUCOM+
Entering Audio Text Call Flow into XMUCOM+
You are ready to use XMUCOM+ to create your Audio Text program configuration once you complete the sections:
Before You Start on page 172. Audio Text Call Flow Diagrams and Tables on page 178.
Set up new program
configuration.
Entering Call Flows into
XMUCOM+
Create all MSG nodes.
Create DTMF nodes.
Assign line card, start node, lines, and operating mode
for the program configuration.
Send the program
configuration to XMU+.
Call and test the program
configuration.
You will execute the following processes with the XMUCOM+ Config Builder to create
your configurations. Set up a New Program Configuration on page 182. Working with Message Nodes on page 184. Working with DTMF Nodes on page 186. Assigning a Line card and Start Node for the Audio Text Program on page 192. Sending and Testing the Configuration on page 195.

Chapter 8 Tutorials: Audio Text and Dial By Name
Tip... Click the Edit button
to delete, modify, or
rename nodes.
Set up a New Program Configuration When you have all your information ready, you must first start the new program
configuration, and then set the partition and system information for that program
configuration.
To start a new program configuration Start XMUCOM+ and choose File > New to open a blank Config Builder
window.
Create Node buttons.
View the Partition Menu to
define partition details and edit
partition definitions.
Select node type to view.
View Edit Node Menu for access to
Edit, Delete, and Rename functions.
Check for unreferenced nodes.
Search nodes by label and type.
View Call Flow diagram of
current configuration View Message Directory Editor to edit
the location of stored messages. Node List showing list of nodes
in current configuration. Node Details describing all details
for a selected node.
Choose File > Save As and save this configuration with a unique identifying
name such as ‘YourName_AudioTextTutorial’.
Perform a File > Save after completing each of the procedures in the tutorial.
Begin creating your program configuration.
See To set partition and system parameters for the program configuration on
page 183 for the next step in this process.

XMU+ QuickStart Guide rev.10 183 Entering Audio Text Call Flow into XMUCOM+
To set partition and system parameters for the program configuration
Click the Partition button from the Config Builder to display the Partition
Menu.
Click Edit Partition Settings to display the Partition Settings window.
By default, XMU+ assumes that you are using a single partition in which to run
your program configuration. The default is correct for the purposes of this tutorial.
Enter the values specified in the Configuration Chart for this Program
Configuration on page 174 into this window and click OK.
Partition Number - the default value
is one partition.
Partition Name - Name your partition.
Access Code - This access code is
required for remote access of the
messages in the partition.
Remote Language - sets the language
of operation for this partition. It is
primarily used for remote access.
Total Rec. Time - Enter a value for the
amount of XMU+ memory that is to be
used for storing messages. For single
partition XMU+ units, enter the full
amount of available message time. See
To retrieve XMU+ system information
on page 82 to obtain the total available
message time for your system.
No MSG Recorded - Specify what the XMU+
unit should do if there is No MSG recorded. For
the tutorial, we will simply Disconnect.
However, you should normally assign a special
message before disconnecting.
Selection Limit - The number of
selections a caller is allowed to make
before the XMU+ disconnects. Time limit - The amount of time a caller
is allowed for a session. Command - Specify what should happen
if the caller exceeds the specified Time
Limit for a call.
NOOP - XMU+ will disconnect the caller.
MSG # - XMU+ plays the specified message number.

Chapter 8
Tutorials: Audio Text and Dial By Name
See Working with Message Nodes on page 184 for the next step in this process.
Working with Message Nodes
For increased efficiency, it is best to define all your message nodes at the beginning of
program development. Use the list of messages that you generated earlier and enter all
the MSG node information for each message.
If required, you can always add additional messages later in your program
development. If this occurs, be sure to update your Message Table and Call Flow
Diagram and Processes to reflect the new additions.
To create message nodes for each message
Obtain the list of messages you want to create.
See MSG Nodes for the Audio Text Tutorial on page 177 for details.
Click the MSG button in the Config Builder window to add a new message node
to your program configuration.
XMUCOM+ assigns the next available MSG node number (MSG1) and displays
the default definition for the message node.
Double-click on either the MSG node number, or on its Details section to open
the MSG Node Editor window.
4.
Tip...
You must enter an
Access Code if you
plan to use Remote
Telephone Access
for modifying or
editing this message.
For simplicity, use the same Access Code for all messages in a program configuration.
Enter the appropriate values for this message into the MSG Node Editor and
click OK.
Shows the current MSG node you
are working with.
1. Enter a unique label for this message.
2. Enter the maximum length (in seconds) for
this message. The message can be any
length if you accept the default value of ‘0’.
3. Set the message state to ON so that the
message is played when requested.
OFF disables the message.
4. Set the DTMF state to Interrupt so that
when the user presses a button, an
action can occur.
5. Browse and locate the .WAV file that
you recorded earlier.
6. Enter a comment to describe this message.

XMU+ QuickStart Guide rev.10 185 Entering Audio Text Call Flow into XMUCOM+
Click on the MSG node to view its details in the Config Builder.
Repeat steps 2 through 5 until you have added message nodes for each message
used by your call flow process. Upon completion, your Nodes table should look
like the following: Click the Edit button in the
Config Builder to delete,
modify, or rename nodes.
For this tutorial we renamed
MSG 9 to MSG99,
See Working with DTMF Nodes on page 186 for the next step in this process.

Chapter 8
Tutorials: Audio Text and Dial By Name
Working with DTMF Nodes
The DTMF node is used to recognize DTMF digits entered by the user from a touch-
tone telephone, and defines and controls the subsequent actions that XMU+ must then
take.
DTMF node creation requires the specification of four major categories of
information:
DTMF Prompts describe the actions to be executed when the DTMF node
is first called by XMU+. For example, play an introductory message. DTMF Actions describes the actions to be executed by the XMU+ when a
DTMF digit is entered by the user. DTMF Exceptions describes the actions to be executed by the XMU+ when
invalid digits are entered, or if the system times-out or aborts. DTMF Controls describes the various controls that must be set to correctly
operate a DTMF node. This includes number of digits, terminating digit, retry
limit, selection time out, digit time out, and DTMF clear.
Developing a DTMF Node Create the DTMF Node.
Add DTMF Prompts.
Add DTMF Actions.
Specify DTMF Exceptions.
Specify DTMF Controls.
Execute the following procedures to define the DTMF start node for the Audio Text
program configuration: To create a DTMF node on page 187. To enter DTMF prompts on page 188. To enter DTMF actions on page 189. To enter DTMF exceptions on page 190. To enter DTMF controls on page 191.

XMU+ QuickStart Guide rev.10 187 Entering Audio Text Call Flow into XMUCOM+
To create a DTMF node
Obtain the list of DTMF nodes you want to create.
See DTMF Nodes for Audio Text Tutorial on page 176 for details.
Click the DTMF button in the Config Builder window to add a new DTMF node
to your program configuration.
Double-click on either the DTMF node number, or on its Details section to open
the DTMF Node Editor window.
Shows the current DTMF node. Use
the buttons to see the next or
previous DTMF node.
Displays the prompt that is played
when the DTMF node is called.
Click this Edit button to edit
the Prompts section.
Displays the actions taken when a
DTMF digit is pressed by the caller.
Click this Edit button to edit the
Actions section.
Displays the actions taken when an
exception situation is encountered.
Click this Edit button to edit
the Exceptions section.
Enter the appropriate DTMF options:
Number of Digits the caller must press.
Terminating Digit - Enter NO since we do not require a terminating digit, such as #, after the caller makes a selection.
Retry Limit - number of times node can
be called or returned to by the caller.
Selection Time Out - Enter the number of seconds that XMU+ will wait for a DTMF response.
Digit time Out - Specify the maximum
amount of time XMU+ should wait to receive consecutive digits.
DTMF Clear - Select YES to clear the DTMF
input after a DTMF selection is made.
See To enter DTMF prompts on page 188 for the next step in this process.

Chapter 8
Tutorials: Audio Text and Dial By Name
To enter DTMF prompts
This procedure defines the first action executed by the DTMF node when it is called. For
our tutorial, we want XMU+ to play MSG 1 (Intro MSG) and MSG 2 (Options), one
after another.
Ensure you have the call flow diagram and call flow process available.
See Call Flow Sequence Table for Audio Text Tutorial on page 178 and Call Flow
Diagram for Audio Text Tutorial on page 179 for details.
Double-click on DTMF 1 to navigate to the DTMF Node Editor window.
Click the Add button in the Prompts section of the DTMF Node Editor window to
add an additional prompt, then click the Edit button to begin editing this entry.
Using the drop down menu, change MSG 1 to MSG 2 as shown in the screenshot
above.
Now click the Edit Off button.
XMUCOM+ adds the selected message to the Prompts list. MSG1 will be played
first, followed immediately by MSG2.
See To enter DTMF actions on page 189 for the next step in this process.

XMU+ QuickStart Guide rev.10 189 Entering Audio Text Call Flow into XMUCOM+
To enter DTMF actions
This procedure defines the actions to be executed when the caller presses a DTMF
digit in response to the Prompt message.
Ensure you have the call flow diagram and call flow process available.
See Call Flow Sequence Table for Audio Text Tutorial on page 178 and Call Flow
Diagram for Audio Text Tutorial on page 179 for details.
Find the Actions sections of the DTMF Node Editor window.
Select Key Press 1 from the Actions list and then click the Edit button. Change
MSG 1 to MSG 3 using the drop down menu.
When the caller presses 1 on his telephone, XMU+ plays MSG 3.
Select Key Press 2 from the Actions list. Change MSG 1 to MSG 4 using the drop
down menu.
When the caller presses 2 on his telephone, XMU+ plays MSG 4.
Select Key Press 3 from the Actions list. Change MSG 1 to MSG 5 using the drop
down menu.
When the caller presses 3 on his telephone, XMU+ plays MSG 5.
Click Edit Off then click Apply to save your DTMF actions.
See To enter DTMF exceptions on page 190 for the next step in this process

Chapter 8
Tutorials: Audio Text and Dial By Name
To enter DTMF exceptions
This procedure defines the actions to be executed when the caller presses an invalid
DTMF digit, times-out due to long delays on the line, or performs an action that causes
the system to abort.
Ensure you have the call flow diagram and call flow process available.
See Call Flow Sequence Table for Audio Text Tutorial on page 178 and Call Flow
Diagram for Audio Text Tutorial on page 179 for details.
Select the Time Out option in the Exceptions section of the DTMF Node Editor
window and click the Edit button.
Change MSG 1 to MSG 7 using the drop down menu
In our tutorial, MSG 7 has been designated to play when a caller times-out
during a call.
Repeat steps 2 to 4 after:
Choosing the Invalid option in the Exceptions section and applying MSG 8 (the message that plays when an invalid DTMF digit is entered).
Choosing the Abort option in the Exceptions section and applying MSG 99 (the message that plays when an XMU+ aborts a call).
See To enter DTMF controls on page 191 for the next step in this process

XMU+ QuickStart Guide rev.10 191 Entering Audio Text Call Flow into XMUCOM+
To enter DTMF controls
This procedure lets you specify XMU+ controls specific to the DTMF node.
Ensure you have the call flow diagram and call flow process available.
See Call Flow Sequence Table for Audio Text Tutorial on page 178 and Call Flow
Diagram for Audio Text Tutorial on page 179 for details.
Enter the following values in the control section of the DTMF Node Editor.
Number of Digits - enter the maximum number of DTMF digits the caller can press for a selection. For our tutorial, we only require one DTMF digit.
Terminating Digit - enter a value, such as a # sign, that the
user must enter to indicate that his /her DTMF entry is complete. This may be required for phone extension. We do not require this feature for our tutorial.
Retry Limit - number of times the DTMF node can be called
or returned to by the caller. If the user exceeds this limit, XMU+ will play the Abort message.
Selection Time Out - enter the number of seconds that XMU+
should wait for a valid DTMF response. If the user does not enter a response within that time frame, XMU+ will play the Time Out message. Digit time Out - specify the maximum amount of time
XMU+ should wait to receive consecutive digits. DTMF Clear - select YES to clear the DTMF input after a
DTMF selection is made.
Click OK to save all your changes and return to the Config Builder window. Your node
list should now look like the following:
Now that you have completed the creation of the Audio Text program configuration, you are
ready to load and test the configuration on the XMU+ unit.
See Assigning a Line card and Start Node for the Audio Text Program on page 192
for details.

Chapter 8
Tutorials: Audio Text and Dial By Name
Assigning a Line card and Start Node for the Audio Text Program
Now that you have created the nodes for your configuration, you must assign the line
card on the XMU+ that will run this configuration, and specify the lines (or ports) on the
selected card that will be available to execute this program. These decisions were made
in Before You Start on page 172.
For this tutorial, we will use the Hybrid Analog line card, and will assign four lines (or
ports) to the Audio Text program configuration.
This tutorial assumes that you have already completed all the configuration procedures
in this guide, and that all the cards in your XMU+ unit have been defined and entered
into XMUCOM+. If you have not already done so, then ensure you have followed the
procedures in Configuring XMU+ Line Cards on page 89.
To assign a line card, start node, and operating mode
Choose Configuration > Card Configuration to view the Card Configuration
window.
Shows the expanded view
of the Hybrid Analog Card.
Shows a list of all the other
cards on this XMU+ unit. This
example contains only one
Hybrid Analog line card.
Shows the details for each
line of the Hybrid Analog
line card, with information
about partitions, starting
nodes, and so on.

Start Node The start node tells
XMU+ which node to
execute when a call is
received on that line.
Typically start nodes
provide a starting
message that is
played to the caller.
XMU+ QuickStart Guide rev.10 193 Assigning a Line card and Start Node for the Audio Text Program
Double-click on the Hybrid card area to open the Card Editor window showing the
current assignments of the lines on the Hybrid Analog line.
Shift-click to select lines 1 to 4, and click Edit Line(s) to display the Line Editor
window. Select the options shown here and click OK.
Set the starting node to DTMF1 for the Audio Text program configuration. When
you click OK, XMUCOM+ applies the selected values to all four selected lines.
Set the mode (signaling
protocol) that is appropriate to
your XMU+ unit and the PBX to
which it is connected.
See About PBX types on page 99
to determine the correct mode for
your XMU+ unit.
Repeat steps 3 and 4 for lines 5 to 8, but select Empty as the starting node for
these lines.

Chapter 8 Tutorials: Audio Text and Dial By Name
Operating Mode The operating mode
indicates the type of
communication protocol
the XMU+ must use
with the PBX system
Ensure you select the
correct operating mode
for your PBX system.
Verify that the values in the Card Editor are correct and click OK to return to the
Card Configuration window.
DTMF 1 is the start of
the Audio Text program
configuration that we
created in our tutorial.
This indicates that
these four lines start
from DTMF 1 when
they receive an
incoming call.
At this time, the
remaining four lines of
the Hybrid Analog card
are empty and are not
used for any program
configuration.
Click Close to close the Card Configuration window.
See To download the configuration to XMU+ unit on page 195 for the next step
in this tutorial.
Choose File > Save to save your Audio Text program configuration.

XMU+ QuickStart Guide rev.10 195
Assigning a Line card and Start Node for the Audio Text Program
Sending and Testing the Configuration
Once you have entered all the details from your Call Flow diagram and process table into
XMUCOM+, you are ready to test the new program configuration. To do this, you must
first download the new configuration and all its messages to the XMU+ unit. You can
then begin testing.
To download the configuration to XMU+ unit
Your configuration is now ready for downloading to the XMU+ unit.
Choose Communication > Communicate to open the Communication window.
Select the Step1: Operations tab.
Select Send Partition in Configuration from the Send to XMU+ section.
Ensure Partition is set to Partition 1. In the tutorial example, we named the partition Fitness -1.
Select the Step2: Site/Schedule tab.
Select the site to which you want to send the Audio Text tutorial and click
Add>>.
Select Immediate from the Select Schedule list box.
Click Apply to submit the new program configuration to the selected XMU+
unit.
XMUCOM+ sends the Audio Text program configuration to Scheduler+.
Scheduler+ communicates with XMU+ and submits the program configuration.
You will receive a confirmation message once the submission has been accepted
by XMU+.
See To send Audio Text messages to the XMU+ on page 195 to learn how to send
the messages for the Audio Text tutorial to the XMU+ unit.
To send Audio Text messages to the XMU+
Messages for the program configuration must be sent separately to the XMU+ unit.
Choose Communication > Communicate to open the Communication window.
Select the Step1: Operations tab.
Ensure Partition is set to Partition 1. In the tutorial example, we named the partition Fitness -1.
Select Send Messages in Partition from the Send Messages+ section.

Chapter 8
Tutorials: Audio Text and Dial By Name
XMUCOM+ displays all the messages used by the Audio Text program
configuration.
Select all the messages in the Available Message(s) list box and click Add>>.
XMUCOM+ copies the selected messages to the Selected Message(s) list box.
Select the Step2: Site/Schedule tab.
Select the site to which you want to send the Audio Text tutorial and
click Add>>.
Select Immediate from the Select Schedule list box.
Click Apply to submit the messages to the selected XMU+ unit.
XMUCOM+ sends the selected messages to Scheduler+. Scheduler+
communicates with XMU+ and submits the messages. You will receive a
confirmation message once the submission has been accepted by XMU+.
See To test the configuration on page 197 to test your program configuration
and complete this tutorial.

XMU+ QuickStart Guide rev.10 197
Dial By Name Tutorial
To test the configuration
Using a touch-tone telephone, dial the number for your XMU+ unit.
The XMU+ unit should answer with the first and second messages that you
programmed into the DTMF node.
Select each of the options you programmed in your Call Flow diagram and test
your call flow and messages.
See Chapter 9: Troubleshooting Configuration for details on solving any
problems that you may encounter.
If you plan to use this configuration at more than one site, then call each site
and repeat steps 1 to 3.
Congratulations...you have created your first program configuration with XMUCOM+.
Continue to experiment and try different types of program configurations. For more
information, refer to Interalia’s website at www.interalia.com. We are constantly adding
more XMUCOM+ information.
Dial By Name Tutorial
This guide is to aid your understanding of how to set up a simple Dial by Name
application on your XMU+ unit using XMUCOM+ administration software. The
following is a step by step guide to creating a Dial by Name configuration, then
transferring that configuration to the XMU+ unit. In this guide we give you an example
Dial by Name application as a teaching aid, but it can be easily modified and adapted to
be a fully functional application for your place of work.

Chapter 8
Tutorials: Audio Text and Dial By Name
Create a Dial by Name Application
First double click the XMUCOM+ icon on your desktop or select XMUCOM+ from
your Windows Start menu. Then Click File > New
Tool bar
Displays
nodes as you
create them. View node details in this Click to view
details in the pane.
other pane,
or double
click to edit.
This window is divided into two large panes and a tool bar. The tool bar across the top
has a number of buttons (MSG, CMD, LIST etc.) which are referred to as ‘nodes.’ These
nodes are used in various combinations to create a ‘configuration.’ The configuration is
sent to the XMU+ along with any audio files (.WAV files) and is the program that
instructs the XMU+ how to handle calls and what the call flow will be.
To create a node for the configuration you simply click on the relevant button in the tool
bar and the node will appear in the left hand pane. The details of that node will appear in
the right hand pane. When you have multiple nodes in the left hand pane, you can click
on any one to view its details in the right hand pane, or double click on one to edit those
details.

XMU+ QuickStart Guide rev.10 199
Dial By Name Tutorial
Create a DBN Node
The DBN (Dial by Name) Node contains the information the XMU+ needs in order to
process incoming calls in a Dial by Name application. i.e. what to do if it matches the
digits entered by the caller, with a name from its DIR (Directory) listing. Also what to do
if it can’t make a match. To create a DBN Node click on the DBN button in the tool bar
of the Config Builder window. The node will appear in the left hand pane of the window.
Now double click on that node to display the DBN editor window.
For this example we’ll label this node with the fictitious name of “Company 101.”
Change the ‘Greeting’ field to MSG 1, using the drop down buttons. MSG 1 will be the
main greeting heard by callers, we will record it later with a message such as: “Thank
you for calling Company 101.” The Directory field can stay as default DIR 1. Next select
which language prompts you’d like the callers to hear, for this example we’ll use English
only.
Now we need to edit the Action table. These settings tell the XMU+ what to do after it
receives digits from the caller. Click the ‘Edit’ button then change the setting to match
the screen-shot above. Valid Match = XFER1; Abort = XFER2; * = DBN1; # = NOOP
and 0 = XFER2.

Chapter 8
Tutorials: Audio Text and Dial By Name
Click the OK button. XMUCOM+ will ask you if you wish to create the unreferenced
nodes, click ‘Yes To All.’
Edit the XFER Nodes
By clicking ‘Yes to All’ in the previous step, you can now see that XMUCOM+ has
automatically created MSG1, XFER1, XFER2 and DIR1. Our next step is to edit the
XFER Nodes. XFER 1 will be used to transfer calls when a name match has been made,
and XFER 2 will be used to transfer to an attendant (in this case at extn 100) should the
XMU+ fail to make a match from the digits the caller enters, or if the caller chooses to
‘zero out’ of the dial by name application.
Double click on XFER 1 and edit the fields as shown above in the screen-shot, click
OK, click ‘Yes To All’ to automatically create any unreferenced nodes, then double
click on XFER 2 and edit the fields as shown above.
Edit The Style Node
XMUCOM+ has automatically created a Style node for you. This node tells the XMU+
how to transfer calls on your PBX / telephone system. Not many edits required here,
simply change the label to something more suitable - such as “Transfer method.” The

XMU+ QuickStart Guide rev.10 201
Dial By Name Tutorial
default setting for the hook-flash is 500ms. This may need to be changed to 100ms if
your PBX uses a European style ‘Time break recall’ to transfer calls. Click OK.
Edit The DIR Node
The DIR (Directory) Node contains a list of people or departments within your company
that incoming callers can reach using this application. For this example we have created
five employees for Company 101. We will enter their names and telephone extension
numbers into the DIR node. It is also possible to import a .CSV file into the DIR node
that contains a list of names and extensions. The .CSV file must be formatted as
Lastname,firstname,extension for the import operation to be successful.
Double click on the DIR 1 node. Change the label to “Company 101 directory.” The
Access code is used for employees to access the XMU+ remotely and record their own
names. This is a useful feature if you have a large number of employees to record
messages for. In this example I’ve used an access code of 1234. More detail on recording
messages remotely will follow. Next we need to change the Starting Prompt, since MSG
1 is already being used as the main greeting message. Change the Starting Prompt to
MSG 2.

Chapter 8
Tutorials: Audio Text and Dial By Name
Now we add the names (unless you have already imported them.) To do this click on the
‘Add’ button five times - because we are going to add five names. Next click on the first
line to highlight it and then click ‘Edit.’ Enter all the names as shown above (or use your
own company’s names.) When done, click ‘Edit off.” You can now save this list as a
.CSV file if you wish. Finally click OK and ‘Yes to All’ to create the unreferenced
nodes.
Edit MSG Nodes
XMUCOM+ has automatically created and labelled MSG (message) Nodes 2,3,4,5 & 6.
We still need to label MSG 1 however. Double click on MSG 1 and change the label to
“Main Greeting.” Click OK.
Card Configuration
We have now created all the nodes required for our Dial By Name configuration. We
now need to tell the XMU+ which of its line cards and which port(s) on that line card to
run this application on. Here we are going to use Card one, ports 1 through 8. At the top
of your XMUCOM+ screen, click on Configuration > Card Configuration. The following
window will open.

XMU+ QuickStart Guide rev.10 203
Dial By Name Tutorial
Next double click on Card One to open the Card Editor window. Configure this window
as shown in the screen-shot below. First select the line card that you have (e.g. Hybrid-
01) then highlight all the lines and click ‘Edit line(s).’
In the Line Editor window we tell the XMU+ which node is the starting point when it
receives an incoming call. In this application the ‘Starting Node’ is DBN 1. Leave all
other settings at default, and add a label such as “Company 101 Dial by Name” to
describe the application running on the lines you just assigned this configuration to.
Click OK to close the Line Editor window, click OK to close the Card Editor window,
and click ‘Close’ to close the Card Configuration window.
Note: If the Config Builder window should disappear from view, simply click on the Configuration Builder button near the top of your XMUCOM+ window.

Chapter 8
Tutorials: Audio Text and Dial By Name
We have finished the configuration and your Config Builder window should look like
this.
You can save this configuration by clicking File > Save as.

XMU+ QuickStart Guide rev.10 205
Dial By Name Tutorial
Send the Configuration to the XMU+
Now that we have completed the configuration, we need to send it to the XMU+. From
the menu bar at the top of your XMUCOM+ screen, click on Communication >
Communicate. The following window will open.
In the screen-shot above you can see we have selected “Send entire Configuration.”
Next we need to tell XMUCOM+ where to send it. Click on the “Step 2: Site/Schedule”
tab to show the following screen.

Chapter 8
Tutorials: Audio Text and Dial By Name
Highlight the site you wish to send the configuration to by clicking on it. Then click the
‘Add’ button. Now click the ‘Apply’ button and XMUCOM+ will send the configuration
to the XMU+ unit.
Record the Messages
The only thing remaining is to record the messages. In this example we have 6 messages
(MSG Nodes).
Message 1 is the main greeting message and can be recorded as described in Chapter 6; see
Recording, Playing, and Transferring Messages on page 109
Messages 2,3,4,5 & 6 are the recorded names of the people in the Dial by Name
application. These can also be recorded as described in Chapter 6, or by using the remote
telephone access port and entering the access code programmed into the DIR Node. In
our example we used 1234 as an access code to this node.
To record the messages using this method: Dial the remote telephone access port on the XMU+ The XMU+ will answer and prompt “Enter access code.” Enter the DIR Node’s access code - e.g. 1234 The XMU+ will respond “Enter user number” Enter the extension number you are recording the message for - e.g. 104 The XMU+ will respond “Enter command.” Enter 7 (to record the message.) Record the name of the person at that extension - e.g. “Brian Jones” Press the # key when finished recording. The XMU+ will respond “Message recorded. Enter command.” You can now enter ‘0’ to disconnect, or enter ‘00’ to enter the next extension
and record the next name.
Note: An administrator can record all the names using this method, or each person can call into the XMU+ remote telephone access port and
record their own names.
Dial by Name Application Completed!
Congratulations, you have set up a Dial by Name application on your XMU+. In this
example we have two people with the same second name, Jones. When a caller enters the
digits to speak to a Jones, the XMU+ will prompt them if they want to speak to Brian Jones
or Dean Jones. The caller selects which one and their call is transferred accordingly.
The XMU+ unit is now ready and waiting to process calls!

Troubleshooting 9
Configuration
This chapter provides hints and tips for troubleshooting and correcting
problems that may arise during the development of program
configurations.
In This Chapter
About Troubleshooting Program Configurations on page 209. Setting Start Nodes on page 210. Checking Messages on page 211. Dealing with Communication Failures on page 215. When XMU+ is Not Answering on page 218. Working with XMUCOM+ Tools on page 220.

Chapter 9
Troubleshooting Configuration

XMU+ QuickStart Guide rev.10 209 About Troubleshooting Program Configurations
About Troubleshooting Program Configurations
You may find that errors or problems occur after you have created and downloaded a
program configuration to your XMU+ unit. Typical problems can include: Start node is not identified for each line. Missing messages for message nodes. Communication failure between the XMU+ and XMUCOM+ application. Program configurations were not successfully downloaded to the XMU+ unit. Messages were not successfully downloaded to the XMU+ unit. XMU+ unit is not responding.
Use the troubleshooting procedures in this chapter to determine and resolve the cause of
your problem.
About Troubleshooting Program Configurations
Determine
type of problem.
Program Messages do
Communication
XMU+ does not failure between configuration
not play. XMU+ and answer. does not start.
XMUCOM+
Ensure start node is Perform integrity
Check job status on Perform status checks
check to ensure defined for each line. on the XMU+.
messages are recorded. SchedulerPlus.
Receive and validate Resend messages and messages from XMU+. configurations as
required.
Set Record Times for
each partition. Test communication
links.
Set message length
parameters.

Chapter 9
Troubleshooting Configuration
Setting Start Nodes
Every program configuration must have a defined start node that is assigned to each line
(on each line card) that will be running this program configuration. Start nodes tell
XMU+ the start point for a specific program configuration, and provide the first
message to be played when a call is received. If the start node is not defined, XMU+
will not know what to play when a call is received on that line.
For example, in our tutorial, we identified the start point of the program configuration
as DTMF 1, and assigned four lines in the Hybrid Analog line card to run this program
configuration.
Execute the following procedure to ensure that the start nodes have been set correctly for
each line on the Hybrid Analog line card.
To ensure the start node is set properly
Retrieve the program configuration from the XMU+ unit as described in To
retrieve a configuration from XMU+ on page 222. Use the Immediate
scheduling option to retrieve the configuration immediately.
This ensures you are working with the latest version of the program
configuration.
Check the Status column in the Config Builder to identify the Start Nodes for
your program configurations.
DTMF 1 was defined as the start node for the Audio Text tutorial.
Tip...
Previous versions of XMU+ documentation referred to lines (on a line card) as ports.
The Start Node is indicated with an asterisk (*) in the Status column.
If required, repeat the procedure To assign a line card, start node, and operating
mode on page 192 to assign the start node to each line (port) on each line card.
Send the corrected configuration to XMU+ and test the program operation
again.

XMU+ QuickStart Guide rev.10 211
Checking Messages
Checking Messages
All messages used in a program configuration must be downloaded or sent to the
XMU+ in order for that program configuration to execute correctly. Problems can
occur if:
All the required messages have not been downloaded to the XMU+. To
ensure that all the correct messages are downloaded, you can either resend
the messages to the XMU+ or perform an integrity check on the XMU+
unit. See To perform an integrity check on page 211. Insufficient total record time was assigned to the partition. If the total length
of all your messages was greater than the time assigned to that partition, then
XMU+ will be unable to store all the required messages for that program.
See To verify and correct total record time for a partition on page 212. Messages weren’t transferred properly. Check the SchedulerPlus window to
see if there was communication failure between the XMU+ and XMUCOM+.
See To send messages from your PC to XMU+ Unit on page 120. Message nodes and lengths were not defined properly. The maximum length
of each message node must be equal to or greater than the length of the
.WAV file to which it is associated. For convenience, use the default value of
‘0’ or ‘undefined’ since it allows the use of any length of message. See To
increase the message length on page 214.
If you update or change the MSG nodes in the program configuration, then you must
resend the configuration to the XMU+.
To perform an integrity check
The Integrity Check feature of the XMU+ unit checks the configuration to ensure that all
messages used by a configuration are recorded in the XMU+. This check can only be
performed at the XMU+ site.

Chapter 9
Troubleshooting Configuration
At the XMU+ unit, press Enter to access the Main Menu.
Press the Right Arrow to reach System on the Main
Menu, and press Enter.
Press the Right Arrow to reach Diagnostics, and press
Enter.
Press the Right Arrow to reach Integrity Check, and
press Enter. The XMU+ runs the integrity check.
If an error message is displayed:
Record it on paper, and press Enter to view the next
error. Repeat this step until you have reviewed and
recorded all errors. Correct all errors appropriately.
To download, verify, and resend messages to the
XMU+ unit
Retrieve the messages from the XMU+ unit as described in
Retrieving messages from the XMU+ on page 224.
Verify that the message content is correct by playing each message.
See To play messages and music on your PC on page 118.
Check the details for each MSG node and ensure that each MSG node is calling
the correct .WAV file.
See Working with Message Nodes on page 184.
Make any necessary corrections and resend the corrected messages to the
XMU+.
Send the messages to the XMU+ by following the procedures in
To send Audio Text messages to the XMU+ on page 195.
To verify and correct total record time for a partition
Upload, review, and print the system information for the XMU+ site.

Partition Menu
XMU+ QuickStart Guide rev.10 213 Checking Messages
See To retrieve XMU+ system information on page 82.
The values for your site may differ from those shown in this example.
If Available Message Time = 0, then
you have no further memory in which to
store messages. You may need to
reduce the size of your .WAV files in
order to include all required messages.
Open your program configuration and navigate to the Config Builder window.
If required, download the latest version of the program configuration from the
appropriate XMU+ site. See To retrieve a configuration from XMU+ on page 222
for details. Click the Partition button from the Config Builder to display the Partition
Menu. Click the Edit Partition Settings button to display the Partition Settings
window. Select the partition with which you want to work.
For the Audio Text tutorial, we used the default setting of one partition. Set the Total Rec. Time to the value shown in Total Message Time field of the
XMU+ System Information window to ensure that you have enough memory for
all the messages in your configuration.
Click OK to save your changes.

Chapter 9
Troubleshooting Configuration
Make any other required changes to your program configuration and then
resend the updated configuration to the XMU+ unit.
See To download the configuration to XMU+ unit on page 195 for details.
Test the updated configuration and ensure that it works correctly.
To increase the message length
Perform this check if your messages are getting cut off, or are not playing properly.
Open your program configuration and navigate to the Config Builder window.
If required, upload the latest version of the program configuration from the
appropriate XMU+ site. See To retrieve a configuration from XMU+ on page 222
for details.
Click the View button and select MSG to display only the MSG nodes in
the Nodes list.
Double-click on the first MSG node to view the MSG Node Editor window.
Verify the details and change the value of the Max Length field to zero (0).
This default value removes message length restrictions.
Click these arrow keys to navigate through
all the messages in the current program
configuration.
Set the Max Length of the message to the default value of zero (0).
Click Apply to save your changes.
If required, repeat steps 3-5 for each MSG node in the configuration.
Click OK to save your changes.
Make any other required changes to your program configuration and then
resubmit the configuration to the XMU+ unit.
See To download the configuration to XMU+ unit on page 195 for details.
Test the updated configuration and ensure that it works correctly.

XMU+ QuickStart Guide rev.10 215
Dealing with Communication Failures
Dealing with Communication Failures
Communication failures between the XMU+ and XMUCOM+ can occur for a number of
reasons:
The physical links between the two units have failed. See Testing XMU+ to
XMUCOM+ Communication on page 79 and Troubleshooting XMU+
Communication on page 86 to learn how to resolve this type of problem. SchedulerPlus had problems with the transfer of information (configurations
or messages) between the two units. This typically occurs when lines are
busy or if the computer on which SchedulerPlus operates has been shut
down. See About SchedulerPlus on page 215 for information about how to
identify and resolve these problems.
About SchedulerPlus
SchedulerPlus schedules all communication between the XMU+ and XMUCOM+. All
activities are recorded here and executed at the scheduled times. SchedulerPlus is
designed to live in the Windows System Tray as a background task. This allows
scheduled tasks to run after XMUCOM+ is closed. However, the computer must remain
ON and running for SchedulerPlus to complete its tasks.

Chapter 9
Troubleshooting Configuration
XMU+ is busy with another
session or is being accessed
from the front panel. Job executed without errors.
Job is waiting to run.
SchedulerPlus is dialing
the XMU+ through the
modem connection.
An error occurred. Click Tools > Debug Error to
determine the cause. SchedulerPlus is sending data
to the XMU+. SchedulerPlus is receiving
data from the XMU+.
To check SchedulerPlus
Find the SchedulerPlus icon in the system tray.
2. Double-click the icon in the Windows Program Bar to display the
SchedulerPlus window.
Check the status of scheduled jobs and see if the Send Configuration and Send
Message jobs failed.
If these jobs failed, then resend the configuration and messages as needed.
See To download the configuration to XMU+ unit on page 195 for details.

XMU+ QuickStart Guide rev.10 217
Dealing with Communication Failures
If your submitted jobs are complete, then choose Communication > Completed
Scheduled Tasks to display the Completed Scheduled Tasks window.
Check this window to ensure that your tasks have completed properly. If they do
not appear in this list, then resubmit your configuration and messages to the
XMU+ site.
See To download the configuration to XMU+ unit on page 195 for details.

Chapter 9
Troubleshooting Configuration
When XMU+ is Not Answering
You may need to check the physical status of the XMU+ unit to determine why a
configuration is not working properly. These procedures are documented in detail in the
“Troubleshooting XMU+ Installation” chapter of the XMU+ Installation and
Maintenance Guide.
If XMU+ Is Not Answering...
Verify that a
message is recorded.
Ensure that a message is assigned to the line.
Check line card
operating modes.
Check line
card status.
Perform a line check.
Execute one or more of the following procedures from the XMU+ front panel to check
the physical status of the XMU+ unit. All these procedures are detailed in Chapter 10 of
the XMU+ Installation and Maintenance Guide.
Perform this procedure.... To...
Verify that a message is recorded. Ensure the required message actually
exists in the XMU+ unit.
Ensure that the message is assigned Check that each line has an assigned start
to a line. node and an associated message that plays
when that node is called.
You can also check the start node from
XMUCOM+ with To ensure the start node
is set properly on page 210.

XMU+ QuickStart Guide rev.10 219 When XMU+ is Not Answering
Perform this procedure.... To...
Check and correct the operating The operating modes specified for each
mode. XMU+ line card controls the signaling
protocols used between the PBX and the
XMU+. Communication failures occur if
the wrong operating mode is used.
To check and correct the operating mode
from XMUCOM+, see About XMU+
Operating Modes on page 100 and To edit
or change line card configurations on
page 103.
Check line status. The Status Check feature on the XMU+
unit checks the lines to ensure that a card
is installed, and to show the status of each
card (for example, idle, ringing, etc.).
Perform a line check for Ring Start
mode of operation.
The Line Check feature checks the lines to
ensure a telephone line is connected to the
channel. It is only used for lines that are
configured to Ring Start mode.

Chapter 9
Troubleshooting Configuration
Working with XMUCOM+ Tools
XMUCOM+ provides a number of tools with which you can manage your site, view
site related information, and quickly make changes to program configurations. The
following procedures detail some of the more commonly used processes: Retrieving XMU+ Statistics on page 220. To retrieve a configuration from XMU+ on page 222. To retrieve messages from the XMU+ on page 224.
Retrieving XMU+ Statistics
Use this procedure to retrieve system usage statistics from the selected XMU+ unit.
This is a short retrieval and should occur very quickly. If the procedure works, it
confirms that XMUCOM+ is able to retrieve information from the selected XMU+
unit.
To retrieve XMU+ statistics
Choose Administration > Statistics to display the Statistics window.
Select the Retrieve and View Statistics option.
Select the XMU+ unit and site from the Select Site drop-down list box.
Select the appropriate partition from the Select Partition drop-down list box.
You only need to do this step for XMU+ units that have multiple partitions. The
default setting of Part 1-1 applies to all un-partitioned XMU+ units, and retrieves
statistics for all ports.
Click OK.

XMU+ QuickStart Guide rev.10 221
Working with XMUCOM+ Tools
XMUCOM+ submits this task to the SchedulerPlus.
SchedulerPlus submits your retrieval request to the selected XMU+ site, and
returns the information to your XMUCOM+.
Successful Communication would look similar to the following:
Communication Failure would show the following in the SchedulerPlus window. Access the SchedulerPlus
window by clicking
this icon in the Windows
Program Bar.
Open the returned statistics file (.CSV file) in any application that accepts
comma separated values (CSV).

Chapter 9
Troubleshooting Configuration
Retrieving configurations from the XMU+
Retrieve configurations from the XMU+ when you are correcting or updating a
program configuration.
Use the following procedure to retrieve the current system configuration from the
selected XMU+ site. The retrieval time for this procedure will vary depending on the
complexity of the configuration. Long complex configurations, units with multiple
partitions, or units with multiple program configurations may take a long time to
retrieve.
To retrieve a configuration from XMU+
Choose Communication > Communicate to display the Communication
window.
Click the Step1: Operations tab and select the Receive Entire Configuration
option.
Select the Step2: Site/Schedule tab.

XMU+ QuickStart Guide rev.10 223
Working with XMUCOM+ Tools
Select the site from which you want to receive the configuration and
click Add>>.
Select the appropriate Scheduling Option and click Apply.
Immediate: XMUCOM+ requests the immediate retrieval of this configuration This is the best option to use when you are troubleshooting.
Schedule: Enter the time and date that this retrieval should occur.
XMUCOM+ schedules the retrieval of this task on the ReScheduler, and
allows you to continue performing other activities with XMUCOM+.
XMUCOM+ retrieves the requested configuration for the selected site and:
If the Immediate option was selected, XMUCOM+ retrieves the configuration and opens it automatically in the Config Builder.
If the Scheduled option was selected, XMUCOM+ submits the task to the ReScheduler and waits for a response at the scheduled time.
For scheduled tasks:
Choose Communication > Completed Scheduled Tasks to view the Completed Scheduled Tasks window.
Check to see if the task completed successfully. Select the completed task and click Process to save the configuration to the
appropriate default site directory.

Chapter 9
Troubleshooting Configuration
Choose File > Open, navigate to the site directory, select the newly
retrieved configuration, and click OK to view the details of the selected
configuration.
Retrieving messages from the XMU+
Retrieve messages from the XMU+ when you are correcting or updating a program
configuration and want to change or validate message contents. You can choose to
retrieve ALL the messages for every partition, or just selected messages from a single
partition.
When retrieving from a single partition, XMU+ displays a list of MSG nodes and lets
you select the messages to be retrieved. All messages are retrieved to the default
directory specified in the Site Book, and are renamed using the standard conventions
detailed in Naming Message Files on page 112.
To retrieve messages from the XMU+
Choose Communication > Communicate to display the Communication
window.
Select the Step2: Site/Schedule tab.
Select the site from which to retrieve the messages and click Add>>.
Click the Step1: Operations tab and select the Receive Messages - Partition
option.

XMU+ QuickStart Guide rev.10 225
Working with XMUCOM+ Tools
Select the Partition whose messages you want to retrieve.
Click View XMU+ to retrieve a list of messages in that partition.
XMUCOM+ submits a request to retrieve a list of messages from the selected
XMU+ site, and displays this list in the Communications window.
Select the messages you want to retrieve from the Available Message(s) list box
and click Add>> to copy these messages to the Selected Messages list box.
Click Apply to submit your request to retrieve messages from the selected
XMU+ site.
XMUCOM+ submits the retrieval request and notifies you when the messages
have been retrieved to your computer. All retrieved messages are saved to the
default directory specified for the selected site, and are renamed using the
naming convention specified in Naming Message Files on page 112.

Chapter 9
Troubleshooting Configuration

About Statistics
10
Read this chapter to understand the basic concepts and ideas behind
developing program configurations for the XMU+ system and producing
statistical reports.
In This Chapter.
About Statistical Reports on page 229 Sample Statistical Reports on page 230
Line Call Counts on page 230 Simultaneously Active Lines on page 231 Node Access Count on page 232 Line Xfer Count on page 234 Selections Made on page 236 DTMF, AUTO and VOX Selection Count on page 237
Clearing Statistics on page 241

Chapter 10
About Statistics

XMU+ QuickStart Guide rev.10 229
About Statistical Reports
About Statistical Reports
The XMU+ provides eight reports on call activity. Keep in mind that if the XMU+ ports
are configured as ACD extensions on your PBX, these reports are in addition to your
ACD statistics. You must “Retrieve XMU+ System Information” before retrieving
statistics.
Overview
Reports are available on the XMU+ to track the number of calls processed by the XMU+
and the call flow activity of callers. These reports are retrieved by accessing the Statistics
from under the Administration menu.
There are 2 categories of reports available on the XMU+:
Line Reports - display the amount of activity on each line of each line card for sizing
purposes. The reports in this category are: Line Call Counts and Simultaneously Active
Lines.
Node Reports - calculate the amount of activity for each software node to identify call
flow activity. The reports in this category are: Node Access Counts, Line Xfer Counts,
Selections Made, DTMF Selection Counts, VOX Selections Counts, AUTO Selection
Counts.
Note: If a particular node has a count of zero, it won’t be displayed in the statistical report.

Chapter 10
About Statistics
Sample Statistical Reports
Line Call Counts
Line Call Count report provides the number of calls for each XMU+ line to determine
system activity. The combined total of all lines represents the total card activity. The
combined total of all cards represents the total system activity.
Field Name Field Description Comments
Header The header information displays the This information is
Information Partition for which this report was displayed on all
generated. For example: Partition 1. statistical reports.
The last time and date the statistics were cleared in this partition is also
displayed. For example: 8th May, 2003
at 11:17:39
Card X Specifies the card number To calculate total
system traffic, total all
line counts for each
card. Add each card
total for total system
activity.

XMU+ QuickStart Guide rev.10 231
Sample Statistical Reports
Field Name Field Description Comments
Line 1 Provides a call count for each line on Uninstalled cards and
each card. Here, Card 1; Line 1 lines are displayed
processed 11,252 call since these stats as —.
were last cleared on 8 May 2003, at
11:17:39
Simultaneously Active Lines
Simultaneously Active Lines Count provides an indicator of the number of times
calls were received while “n” number of lines were active.
Field Name Field Description Comments
Lines Active Indicates the number of lines in
use while the call counts were
taken

Chapter 10
About Statistics
Field Name Field Description Comments
Count Indicates the number of calls received while “n” lines were
active. This count includes each
new call, so 7475 calls were
received while no other lines
were active. 607 calls were
received while 1 other line was
active for a total of two
simultaneously active lines.
This statistic is helpful in
trending the system activity. For example 12 calls were
received when 8 lines were
active. In a 12 port system
this means lines were still
available even during this
period of heavy activity.
Node Access Count
Node Access Count provides a count of the number of times each node configured on
the XMU+ was accessed by a caller, and how many times each message was played.

XMU+ QuickStart Guide rev.10 233
Sample Statistical Reports
Field Name Field Description Comments
Node # Identifies the node index number. For example, #1 is the index
number for Node 1. Each node
type is listed across the top of this
report.
MSG This peg count identifies the number of times a message was
played. If this message is
referenced in multiple nodes, this
count is the total number of times
that message was played system
wide.
CMD Identifies the total number of calls that accessed Command
Node X for the duration of this
report.
TIME Identifies the total number of calls that accessed Time Node X
for the duration of this report.
DATE Identifies the total number of calls that accessed Date Node X
for the duration of this report.
XFER Identifies the total number of Configuring each “transfer to”
calls that accessed Xfer Node X extension in a DTMF Node as
for the duration of this report. its own Xfer Node provides a
count of how many times each
DTMF selection was made.
STYLE Identifies the total number of times a particular style was used
to transfer a call.
DTMF Identifies the total number of Configuring each “transfer to”
calls that accessed DTMF Node X extension in a DTMF Node as
for the duration of this report. For its own Xfer Node provides a
example, DTMF Node 1 processed count of how many times each
11 callers. DTMF selection was made.

234 Chapter 10
About Statistics
Field Name Field Description Comments
VOX Identifies the total number of calls that accessed VOX Node X
for the duration of this report.
LIST Identifies the total number of calls that accessed List Node X for
the duration of this report.
AUTO Identifies the total number of calls that accessed Auto Node X
for the duration of this report.
MOH Identifies the total number of This is a count of how many
calls that accessed MOH Node X times the MOH Node
for the duration of this report. instructions “cycled” through.
(It is not the number of callers
who listened to the music or
messages on hold.)
TABLE Identifies the total number of calls that accessed Table Node X
for the duration of this report.
NIS Identifies the total number of calls that accessed NIS Node X for
the duration of this report.
DBN Identifies the total number of calls that accessed DBN Node X
for the duration of this report.
DIR Identifies the total number of calls that accessed DIR Node X for
the duration of this report.
Line Xfer Count
Line Xfer Count provides information regarding call transfers carried out by the
XMU+. If the XMU+ is performing ‘blind’ transfers, only the Xfer node and Dial String
is presented along with the average hold time the caller waited. In addition to this, if the
XMU+ is performing ‘partially’ supervised transfers the report will show how many
times a call transfer encountered a busy condition at that extension. Finally if the XMU+
is performing ‘fully’ or ‘enhanced’ transfers, the report will also detail how many of
those transfers were answered or not answered.

XMU+ QuickStart Guide rev.10 235
Sample Statistical Reports
Field Name Field Description
Node # Defines the software index number of each node.
Dial String This field identifies the transfer target (dialed number) of the
Xfer Node.
Busy The number of times the XMU+ encountered a busy signal when
transferring to this extension.
Disconnect The number of times the XMU+ received a disconnect signal
from a caller while waiting to be transferred.
Answer The number of times the transferred call was answered by the
transfer to party. Note: The supervised transfer must be
configured for “Full” to capture this statistic.
No Answer The number of times the XMU+ determined that the target
transfer did not answer (based on the ring limit field in the Xfer
Style Node).
Avg. Hold (sec) On a supervised transfer, once the XMU+ detects a busy signal,
the caller is queued in the XMU+ while waiting for the XMU+ to
continue to try the busy extension. This field identifies the
amount of time the callers waited for the XMU+ to find that
extension available and transfer the call.

Chapter 10
About Statistics
Selections Made
Selections Made provides a list of how many total DTMF selections were made per
call. For example, 27 callers made 1 selection, 3 callers made 3 selections.
Field Name Field Description Comments
Selections The number of menu selections per call
Voice The number of voice selections Useful for determining the value
made. to set for the maximum Number
of Selections parameter.
DTMF The number of DTMF Useful for determining the value
selections made. For example 1 to set for the maximum Number
caller made 2 selections. of Selections parameter.

XMU+ QuickStart Guide rev.10 237
Sample Statistical Reports
DTMF, AUTO and VOX Selection Count
DTMF, VOX and AUTO Selection Count provides a count of the number of times each
selection was made when a caller is presented with a choice of options in a menu.

Chapter 10
About Statistics
Field Name Field Description Comments
DTMF Node # Identifies the DTMF Node index number.
Invalid Count Identifies the number of times This pegs when an
callers made invalid selections and entry is not valid based
followed the action in the Invalid on the entries in the
field; in this example 1. Action Table of the
node.
Abort Count Indicates the number of times callers exceeded the Retry limits
and followed the Abort field; in
this example 0.
Timeout Count Identifies the number of times callers reached the Selection
Timeout limit and followed the
action in the Timeout field; in this
example 7.

XMU+ QuickStart Guide rev.10 239
Sample Statistical Reports
Field Name Field Description Comments
(Action)x
(Action)x
(Action)x
This field(s) specifies the menu
configuration for this node: The 1,2,3, etc. represent the menu
choices in this node. The action field represents the
action the XMU+ takes if a caller
selects this menu choice. In this
example, choice 1 goes to DTMF 6,
choice 2 goes to DTMF 7 and
choice 3 goes to DTMF Node 8. The x refers to the peg count of
how many times this option was
selected. In this example, the callers chose
selection one 15 times, selection
two 11 times and selection three 24
times.
The ‘Action’ section
can be configured to a
number of different
nodes, including simply
playing a message to
the caller.
Field Name Field Description Comments
AUTO node # Identifies the AUTO Node index number
Invalid Count Identifies the number of times This pegs when an
callers made invalid selections and entry is not valid based
followed the action in the Invalid on the entries in the
field; in this example 23. Action Table of the
node.
Abort Count Indicates the number of times callers exceeded the Retry limits
and followed the Abort field; in
this example 9.

240 Chapter 10
About Statistics
Field Name Field Description Comments
Timeout Count Identifies the number of times callers reached the Selection
Timeout limit and followed the
action in the Timeout field; in this
example 23.
xxxx-xxxx: This field(s) specifies the menu
(Action) x configuration for this node:
xxxx-xxxx: The xxxx-xxxx represents a range
(Action) x of extension numbers. There may
xxxx-xxxx: be several valid ranges.
(Action) x The action field represents the
action the XMU+ takes if a caller
selects this menu choice. In this
example the choices are directed to
a Xfer Node to transfer the caller to
the extension they entered.
The x refers to the peg count of
how many times this option was
selected.
In this example, the callers entered
extension numbers in the 100-107
range 2169 times. Callers entered
extension numbers in the 110-115
range 2268 times, etc.
The entries here may be
extension ranges of
varying lengths and/or
specific entries with
pre-defined targets. An
example of a range
might be 100-312, an
example of a specific
entry might be 1-1 or 2-
2 or 456-456 etc.
Field Name Field Description Comments
VOX Node # Identifies the VOX Node index number.
DTMF Count Identifies the number of times a DTMF tone was entered to
interrupt the VOX Node and re-
direct the caller; in this example 5.

XMU+ QuickStart Guide rev.10 241
Clearing Statistics
Field Name Field Description Comments
Abort Count Indicates the number of times callers exceeded the Retry limits
and followed the Abort field; in
this example 0.
No Selection Identifies the number of times Count callers reached the Selection
Timeout limit and followed the action in the Timeout field; in this example 4.
Play x : (Action) x This field(s) specifies the menu
configuration for this node:
The Play x represents the menu choices in this node with the associated Play message.
The action field represents the action the XMU+ takes if a caller selects this menu choice.
The x refers to the peg count of how many times this option was selected.
In this example, the callers spoke during message 11, nine times, and were transferred via XFER 3.
Clearing Statistics
Reports are stored as cumulative totals until the totals are cleared. To Clear Statistics,
you can use the front panel, or from XMUCOM+ go to Communication > Communicate
> Reset Statistics. If report totals are cleared in the morning and retrieved in the evening,
one full day of data is available. Alternatively, report totals may be cleared and pulled
weekly or monthly to view cumulative call activity. The report header information
identifies the time and date the reports were last cleared. This header information
appears on the first page of the first report in each category.

Chapter 10
About Statistics

Mini Weather Radio
11
Read this chapter to gain an understanding of the special applications listed
below.
In This Chapter
Overview on page 244 Equipment Necessary on page 244 Enabling MWR in XMUCOM+ on page 245 XMU+: MWR Functionality on page 246 Configuring the XMU+ MWR Line Card on page 247 MWR Remote Access (Telephone & AVIPADS®) on page 254 Specific Area Message Encoding (S.A.M.E.) on page 257 Recording / Sending the messages to the XMU+ on page 250 XMU+ FTP Function Reference on page 265

Chapter 11
Mini Weather Radio
Overview
Mini weather radio (MWR) systems are used to play messages to a transmitter and/or
telephone line 24 hours a day, 7 days a week. They are typically used to broadcast
weather conditions, highway information or emergency situations. A mini weather radio
system allows the public to tune to a specific radio channel, or call a telephone number
for the latest weather report or highway closures 24 hours a day, 7 days a week.
A mini weather radio system can interrupt its broadcast to announce an emergency
situation, such as a major road closure or dangerous driving condition (“The Alpine
pass is closed due to severe weather conditions, please use an alternative route”).
Who uses MWR
Typical users are:
Environment Canada NOAA National Weather Service Federal Emergency Management Agency State Emergency Management Agencies Automobile associations (CAA & AAA)
Equipment Necessary
The following equipment is needed to use the XMU+ in a MWR application. XMU+ MWR line card Windows XP / PC or laptop. XMUCOM+ Dedicated telephone line for Remote Telephone Access Dedicated telephone line for Modem Access (Optional) Network connection for TCP/IP access (Optional)

XMU+ QuickStart Guide rev.10 245
Enabling MWR in XMUCOM+
Enabling MWR in XMUCOM+
After installing XMUCOM+ as described in chapter 2, simply select Administration >
System > XMU+ Settings from the menu bar.
In the XMU+ System Settings window that opens, under Misc Options, change
Message Type from Normal to MWR and click OK.
MWR message functionality is now enabled.

Chapter 11
Mini Weather Radio
XMU+: MWR Functionality
Use the following instructions and explanations to understand how the XMU+ MWR
delivers messages via radio broadcast and telephone interface. This section will cover the
following items: Configuring the XMU+ MWR Line Card. Creating a Message Node. Understanding the XMU+ MWR Message Attributes.
Default Settings
The default settings for the MWR Message Node are as follows: Message to Line Configuration is not set. Skip Counts are set to zero. No Warning Tone. Permission is Read / Write.
The default settings for the MWR Line Card are as follows: Messages play in numerical sequence. Mode is set to R=1 (answer on the first ring.)
Default Settings (Quebec Region)
XMU+ MWR Line Cards are shipped to the Quebec region with a distinct ID chip. This
ID chip sets the default Message to Line Assignment of line 1 on the MWR Line Card to
play messages 1-60. When using the Quebec Region ID chip, the Starting Node on Card
1 Line 1 must be configured as EMPTY.
All other default settings are the same.
Note: Once the messages are recorded, verify that the Mode of Operation is XON (transmitter on.)

XMU+ QuickStart Guide rev.10 247 Configuring the XMU+ MWR Line Card
Configuring the XMU+ MWR Line Card
Before the XMU+ MWR can broadcast or play messages, each line on the MWR’s line
card(s) must be configured. The Card Configurations window in XMUCOM+ contains
the attributes that must be assigned to each line of each line card.
Use the following instructions to configure the XMU+ MWR line card.
1)Select Configuration >XMU+ Card/SBX Line Configurations. This opens the Card
Configurations window.
2)Select Card “X”, click Edit.
3)Select Card Type > MWR from the drop-down box.
4)While holding down the Shift key, click on Line 8 to select all lines. Click on the Edit
line(s) button.
5)Leave the Default setting as 1 for Partition. Select Empty for the Starting Node. Leave the default setting as High for Volume.
6)Configure the Mode section to indicate the Operation Mode of each line on the
MWR line card. (See Example below)
Example:
The XMU+ MWR lines used for radio broadcast are configured as XON (Transmitter
ON).
The XMU+ MWR lines used for telephone interface are configured as R=1 (Answer on
the first ring).
Using the List Node as the Starting Node
It is possible to set the XMU+ MWR Starting Node to List “X”. This allows the XMU+
MWR to play a list of messages in sequence. The user can set up a series of List Nodes
that play different messages or different combinations of the same messages.
More detailed information pertaining to the List Node can be found in chapter 7.
Note: When the List Node is used as the Starting Node, the Rotate / Skip functionality is ignored by the XMU+. Only the ALL mode is functional.

Chapter 11
Mini Weather Radio
Creating A Message Node
Regardless of whether the XMU+ MWR is configured to play a group of messages over
a radio broadcast or to incoming calls over a telephone line, each message must be
assigned to a Line on the XMU+ Line Card.
This section outlines how to create and configure a Message Node.
Click the MSG button on the list of available nodes in the Config Builder window.
MSG “X” will appear in the left hand side of the Config Builder window, with the
details pertaining to this Node appearing in the right hand side. To configure these
details, double click anywhere in “Details” section.
MWR Message Attributes
The four (4) message attributes outlined below
pertain specifically to the XMU+ MWR
functionality. Information pertaining to other
message attributes can be found in chapter 7
of this manual. Skip Count: All configured messages play in
sequence and in a continuous loop, the Skip
Count allows messages to be ‘skipped.’ Zero is the default setting and this means the
message is never skipped.
Example: If the Skip Count is set to 3,
message “X” will play every 3rd time the
list of messages is played out.
Permission: The Read/Write option allows a
message to be played and recorded or only
played.
Warning Tone: The XMU+ has the ability to
interrupt the current message, emit a Warning
Tone (the Warning Tone is a set ten second, 1050Hz tone), play a new “emergency” message, and play the next configured
message. Select Send Tone to play a warning tone before the message.
Line Assignment: Messages must be assigned to a line on the XMU+ Line Card. Click
the Line Assignment button to assign Message “X” to each line that will play the
message (See the ‘Message to Line Assignment’ section for complete details.)

XMU+ QuickStart Guide rev.10 249 Configuring the XMU+ MWR Line Card
Note: The Skip Count & Warning Tone attributes do not apply to messages used for telephone applications.
Setting up an XMU+ MWR Application
Once you have reviewed the previous sections you should be able to understand what the
XMU+ MWR can do and how messages can be modified for use in MWR applications.
Application Design
The setup of the XMU+ MWR is quite simple, but it is important to consider the
following items before you start programming the XMU+.
What will the XMU+ MWR be used for? Radio Broadcast Telephone dial up Both
What role will the messages play in the application?
How many messages are going to be recorded? What attributes will these messages have? Which messages will be used for Radio Broadcast? Which messages will be used for Telephone dial up? Which messages will be used for both?
Mode of Operation (Card Configuration Window)
The application will dictate the Operation Mode of each line on the XMU+. Use the
two options to decide which Mode of Operation to use for the XMU+ MWR
application. Assign one of these options to each line of the XMU+ MWR line card.
Assigning Messages to a Line
In a MWR application, any message can be assigned to any line on an XMU+ Line
card. This allows for each line on the XMU+ to deliver customized messages. Each
XMU+ line can be assigned a maximum of 999 messages.

Chapter 11
Mini Weather Radio
Once you decide which messages are going to be used for the different
applications (Radio / Telephone), each message must be assigned to a line on
the XMU+.
This section will outline how to assign messages to different lines on the
XMU+.
Create a new MSG Node or
select a MSG Node from the
Config Builder window. This
will open the MSG Node
editor window.
Click on the Line
Assignment button in the
MSG Node Editor window.
This will open the Message
Assignment window.
Decide which Card(s) and
Line(s) will play MSG “X”.
Move the mouse pointer to the
desired Card / Line. Click the
mouse and the letter will change from an “N” to a “Y” or vice versa. N = do not assign MSG “X” Y = assign MSG “X” to this card/line.
Click OK when the message has been assigned to the desired lines.
Note: When using the List Node as the starting node, the messages are
assigned to List Node “X”. List Node “X” is then configured as the
Starting Node on the desired Line Card. It is not possible to assign
messages to lines when using a List Node as the Starting Node.
Recording / Sending the messages to the XMU+
There are several ways to record / send messages into the XMU+. AVIPADS® using the Remote Telephone Access Port on the XMU+ Front Panel using the touch pad and the Interalia handset provided with the
XMU+ A telephone can be used to dial the Remote Telephone Access Port.

XMU+ QuickStart Guide rev.10 251 Configuring the XMU+ MWR Line Card
XMUCOM+
AVIPADS®: Connect the AVIPADS® device to dial up the XMU+.
Note: AVIPADS® is a product used by Environment Canada. It interfaces to the XMU+ using DTMF tones versus voice prompts. E.g. DTMF 1 = positive response,
DTMF 0 = negative response.
Front Panel:
The XMU+ MWR functionality can be programmed from the front panel. This section
outlines the principal XMU+ MWR menus.
Message Menu
Recording a Standby Message:
Front Panel Displays... Action
Time and Date Press Enter
Main Menu / Messages Press Enter
Select Message # / “X” __ : __ Scroll to desired message #. Press
Enter
Message # “X” / Play Scroll to RECORD. Press Enter.

252 Chapter 11
Mini Weather Radio
Front Panel Displays... Action
Strt / Pause: Enter / Stop: Exit Press Enter
Speak message into handset
Press EXIT to stop.
Note: Record new messages using the Standby function, then Replace.
Playing a Message:
Front Panel Displays... Action
Time and Date Press Enter
Main Menu / Messages Press Enter
Select Message # / “X” __ : __ Scroll to desired message #. Press
Enter
Message # “X” / Play Press Enter
Standby msg </Selected msg:> Scroll to Standby or Selected msg.
Strt / Pause: Enter / Stop: Exit Press Enter to play msg “X”.
Replacing a Message:
Front Panel Displays... Action
Time and Date Press Enter
Main Menu / Messages Press Enter
Select Message # / “X” __ : __ Scroll to desired message #. Press
Enter
Message # “X” / Play Scroll to Replace. Press Enter.

XMU+ QuickStart Guide rev.10 253 Configuring the XMU+ MWR Line Card
Front Panel Displays... Action
Are you sure? / Exit = No Press Enter to Replace selected message.
Watchdog Menu:

Chapter 11
Mini Weather Radio
Card Menu: if
MWR Remote Access (Telephone & AVIPADS®)
This section outlines the different functions that can be executed on the XMU+ MWR
using the Remote Access port on the Control Card.
Remote Access Codes
Communication Type Access Code
AVIPADS® Access *8615 (default)
Remote Telephone Access 8615 (default)

XMU+ QuickStart Guide rev.10 255 MWR Remote Access (Telephone & AVIPADS®)
Remote Access Protocol Commands
Command Remote Access Protocol
Change access code for message # xxx 1xxx#
Change system access code 10#
Play line counts for card x (1..8), line y 2xy# (1..8)
Play line counts for card n 2n0#
Turn off message 30xxx#
Turn on message 31xxx#
Write protect message 32xxx#
Enable message (Read / Write) 33xxx#
Set starting node to List or Table node “X” 34xxx#yz# on Card #y Line #z
Assign Warning Tone to message 35xxx#
Assign Skip counts 36xxx#yz#
Unassign Message #xxx to Card #y, Line #z 37xxx#yz#
Assign Message #xxx to Card #y, Line #z 38xxx#yz#
Change language prompt to English 401#
Change language prompt to French 402#
Change language prompt to Spanish 403#
Change language prompt to German 404#
Change language prompt to Portuguese 405#
Get unit type / S/W version 499#
Turn off transmitter, Card x, Line y 60xy#
Turn on transmitter, Card x, Line y 61xy#

256 Chapter 11
Mini Weather Radio
Command Remote Access Protocol
Set Line to Ring Loop mode 64xy#
Set Line to Off-line mode 65xy#
Set remote Watchdog timer to nn hours 66#nn#
Enable SAME 67xx#
Monitor Transmitter (Card / Line) 68xy#
Record Message #xxx 7xxx#
Play Message #xxx 8xxx#
Replace Message #xxx (with message #0) 9xxx#
Disconnect 0#
Terminate / Restart (ask for new 000 (Remote Telephone Access only)
password)
Note: See section Remote Telephone Access Operation on page 258.
XMU+ to AVIPADS® alarms.
The following is a list of the DTMF tones that the XMU+ sends to AVIPADS® in
response to system alarms.
In response to this alarm... The XMU+ MWR sends DTMF
Negative / Re-send last command 0
Acknowledge 1
Hard Reset 2
Watchdog Timer has expired 3

XMU+ QuickStart Guide rev.10 257 Specific Area Message Encoding (S.A.M.E.)
Clearing Reset Alarms
Use the following instructions to clear the reset alarms that the XMU+ MWR sends to AVIPADS®
Reset Alarm type To clear the alarm...
Hard Reset 1. Dial the remote telephone access
2. Record a message
3. Hang up
Watchdog Timer has expired 1. Press “0” then “0” then “#”
2 Hang up and dial again
Note: When the watchdog timer expires, several things happen. The XMU+ will send a
SAME message (the watchdog SAME message configured into the system).
After the message is broadcasted, the system will play the messages configured
in the watchdog LIST. To revert to normal operation, record a standby message
and replace a regular message. Alternatively, recording a message will revert
the system to normal operation.
Specific Area Message Encoding (S.A.M.E.)
Introduction
When a S.A.M.E. command is sent to the XMU+ via FTP (Ethernet or modem) or the
remote analog line, an audio message with the S.A.M.E. encoded message is created. All
of the transmitter channels in the XMU+ will stop the broadcast that is in progress, and
will broadcast the S.A.M.E. message. Once the message is broadcast, the transmitter
channels will resume their normal programming.
To view SAME logs go to:
Start > Programs > XMUCOM+ > SAME Logs

Chapter 11
Mini Weather Radio
Front Panel Configuration
The configuration for S.A.M.E. operation is contained in the system menu of the front
panel. The menu tree is:
Originator Code - The originator code is sent within the S.A.M.E. broadcast to identify
the originator of the message. Weather offices typically use the World Meteorological
Organization office identification, while radio and television stations use the stations
call sign. Examples of originator codes are “KDTX/NWS”, “KTOP/ NWS”,
“KFAB/AM”, “WDAF/FM”.
Time Zone - The date and time sent within the S.A.M.E. broadcast is formatted in UTC
(Universal Time Coordinated) format, also known as GMT (Greenwich Mean Time).
The time zone is set to indicate the offset from GMT. For example, Mountain Standard
Time (MST) is GMT - 07:00.
Remote Telephone Access Operation
To trigger a S.A.M.E. broadcast from the remote telephone access port:
1.Identify the message number you want to create
2.Remotely access the XMU+
Note: See “Working with Remote Telephone Access Messages” in Chapter 7 of the XMU+ Installation and Maintenance Guide for more information

XMU+ QuickStart Guide rev.10 259
Remote Telephone Access Operation
3.When the XMU+ responds Enter Command, press 67.
4.Press the message number (nnn) you want to record, followed by #.
5.When the XMU+ responds with Enter Number, enter in the S.A.M.E. string followed
by # (see S.A.M.E. format below).
6.The XMU+ will respond with Done.
S.A.M.E. Format
The format of the S.A.M.E. string is
ee*pssccc*pssccc**tttt*w*mmm# (used for all transmitters)
There is an alternative format that allows an individual transmitter to be selected
ee*pssccc*pssccc**tttt*w*mmm*c*l#
where c is the card number, and l is the line number.
The event code “ee” is a two digit number from the following table:
Action Description
58 ADR Administrative
Message
26 AVA Avalanche Watch
27 AVW Avalanche Warning
59 BHW Biological Hazard
Warning
60 BWW Boil Water Warning
17 BZW Blizzard Warning
61 CAE Child Abduction
Agency
34 CDW Civil Danger Warning
35 CEM Civil Emergency
23 CFA Coastal Flood Watch

Chapter 11
Mini Weather Radio
# Action Description
24 CFW Coastal Flood
Warning
62 CHW Chemical Hazard
Warning
63 CWW Contaminated Water
Warning
64 DBA Dam Watch
65 DBW Dam Break Warning
66 DEW Contagious Disease
Warning
46 DMO System Demo /
Practice
67 DSW Dust Storm Warning
01 EAN Emergency Action
Notification
02 EAT Emergency Action
Termination
68 EQW Earthquake Warning
69 EVA Earthquake Watch
31 EVI Immediate
Evacuation
70 FCW Flood Contamination
Warning
12 FFA Flash Flood Watch
49 FFS Flash Flood
Statement
13 FFW Flash Flood Warning

XMU+ QuickStart Guide rev.10 261
Remote Telephone Access Operation
Action Description
14 FLA Flood Watch
50 FLS Flood Statement
15 FLW Flood Warning
72 FZW Freeze Warning
51 HLS Hurricane Statement
40 HMW Hazardous Material
Warning
19 HUA Hurricane/Tropical
Storm Watch
20 HUW Hurricane Warning
53 HWA High Wind Watch
18 HWW High Wind/Dust
Storm Warning
73 IBW Iceberg Warning
74 IFW Industrial Fire
Warning
36 LAE Local Area
Emergency
41 LEW Law Enforcement
Warning
75 LSW Land Slide Warning
76 NAT National Audible Test
03 NIC National Information
Center
43 NMN Network Message
Notification
05 NPT National Periodic Test

Chapter 11
Mini Weather Radio
# Action Description
77 NST National Silent Test
78 NUW Nuclear Power Plant
Warning
79 POS Power Outage
Advisory
38 RHW Radiological Hazard
Warning
44 RMT Required Monthly
Test
45 RWT Required Weekly Test
25 SMW Special Marine
Warning
48 SPS Special Weather
Statement
32 SPW Shelter In-Place
Warning
09 SVA Severe Thunderstorm
Watch
10 SVR Severe Thunderstorm
Warning
47 SVS Severe Weather
Statement
06 TOA Tornado Watch
80 TOE 911 Telephone Outage
Emergency
07 TOR Tornado Warning
81 TRA Tropical Storm Watch

XMU+ QuickStart Guide rev.10 263
Remote Telephone Access Operation
Action Description
82 TRW Tropical Storm
Warning
21 TSA Tsunami Watch
22 TSW Tsunami Warning
55 TXB Transmitter Backup
On
57 TXF Transmitter Carrier
Off
56 TXO Transmitter Carrier
On
54 TXP Transmitter Primary
On
29 VOW Volcano Warning
83 WFA Wild Fire Watch
84 WFW Wild Fire Warning
52 WSA Winter Storm Watch
16 WSW Winter Storm
Warning
42 FRW Fire Warning
71 FSW Flash Freeze Warning
Optional Codes
85 ??A Unrecognized Watch
(optional)
86 ??E Unrecognized
Emergency (optional)

Chapter 11
Mini Weather Radio
Action Description
87 ??S Unrecognized
Statement (optional)
88 ??W Unrecognized
Warning (optional)
Old Codes
33 CDA Civil Danger Watch
(old)
39 HMA Hazardous Material
Watch (old)
30 IEW Immediate
Evacuation Warning
04 NHW National Hazard
Warning
37 RHA Radiological Hazard
Watch
11 SVW Severe Thunderstorm
Warning
08 TOW Tornado Warning
28 VOA Volcano Watch
The geographic area code “pssccc” is entered as a 6 digit number. If multiple area codes
are required, they are separated by the star character “*”. The last area code is followed
by two star characters “**”.
The dwell time “tttt” is entered as a 4 digit number indicating the number of minutes that
the alarm will be in effect.
The warning tone “w” is set to “0” if no 1050Hz warning tone is required and “1” if a
ten second warning tone is required.
The warning message “mmm” is the 3 digit message number of the audio to include in
the broadcast.

XMU+ QuickStart Guide rev.10 265
XMU+ FTP Function Reference
XMU+ FTP Function Reference
Function Reference
This function reference is a detailed guide on how to use the FTP protocol to
manipulate messages and node attributes.
Connection Establishment
When a connection is made to the FTP port on the XMU+, one of the following
responses is generated:
220 Service ready for new user. 421 Service not available, closing control connection.
If the administration port is not in use, a 220 response is generated. If the
administration port is already in use, a 421 response is generated.
Security Commands
To log into the XMU+, connect to the FTP port, and use the standard USERNAME / PASSWORD login. The following is the username and password to enter the system:
username: partition password: xxxxxxxx
The password used is the partition password that is setup by the administrator. If the
partition 1 password (access code) is entered, then items in partition 1 may be modified.
If the user wants to change items in partition 2, the user must logout and log back in
using the partition 2 password.
The username is entered first. If the username is as described above, the system responds
with 331. If the number of parameters given is not equal to 1, a 501 response is sent. If
the username does not match any of the ones listed above, a 530 response is sent.
USER <SP> <username> <CRLF>
331 User name okay, need password. 501 Syntax error in parameters or arguments. 530 Not logged in.
After the 331 response is returned from the USER command, the password must be
sent. If the password is accepted, a 230 response is sent, and the user is logged in. If
the number of parameters given is not equal to 1, a 501 response is sent. If the PASS

Chapter 11
Mini Weather Radio
command is given before the USER command was successful, a 503 response is sent. Finally, if the password is wrong, a 530 response is sent.
PASS <SP> <password> <CRLF>
230 User logged in, proceed. 501 Syntax error in parameters or arguments. 503 Bad sequence of commands. 530 Not logged in.
When the user is done their session, the quit command is sent, and the 221 response is
returned.
QUIT <CRLF>
221 Service closing control connection.
Message Transfer Commands
All of the message files in the XMU+ are transferred and manipulated via standard FTP
commands. The messages are stored as individual files where the filenames msg.001 -
msg.999 correspond to messages 1 - 999. In addition, the file must be converted to the
message format that is supported on the XMU+. The file must be a raw audio file (no
headers or non-audio data), and it must be 8kHz, 8bit, µ-law. There are four commands
that are provided: TYPE, RETR, STOR, and DELE.
The TYPE command is used to specify the format of the data coming from the client:
ascii or image (binary). The XMU+ will accept either of these settings, but the data will
always be sent and received in image format. For ascii mode, send an “A” for the type.
For image mode, send an “I” for the type. If the command succeeded, the 200 response is
sent. If the number of parameters given is not equal to 1 or if the type is not “A” or “I”, a
501 response is sent. Finally, if the user has not logged into the system yet, the 530
response is given.
TYPE <SP> <type> <CRLF>
200 Command OK. 501 Syntax error in parameters or arguments. 530 Not logged in.
The retrieve (RETR) command is used to transfer a file from XMU+ to the client. If the
command completes normally, a 150 followed by a 226 response will be sent. If the data
port cannot be opened, a 425 will be sent. If there is a local file manipulation error, the
451 response is sent. If the number of parameters given is not equal to 1, a 501 response
is sent. If the user has not logged into the system yet, the 530 response is

XMU+ QuickStart Guide rev.10 267
XMU+ FTP Function Reference
given. If the user does not have permission to see this file, or if the file does not exist,
the 550 response is sent.
RETR <SP> <filename> <CRLF>
150 Opening data connection. 226 File transfer complete. 425 Can’t open data connection. 451 Requested action aborted: local error in processing. 501 Syntax error in parameters or arguments. 530 Not logged in. 550 Requested action not taken.
The store (STOR) command is used to transfer a file from the client to the XMU+. If the
command completes normally, a 150 followed by a 226 response will be sent. If the data
port cannot be opened, a 425 will be sent. If there is a local file manipulation error, the
451 response is sent. If the number of parameters given is not equal to 1, a 501 response
is sent. If the user has not logged into the system yet, the 530 response is given. If the
user does not have permission to see this file, or if the file does not exist, the 550
response is sent. If there is no storage space left in the system, the 552 response is sent.
STOR <SP> <filename> <CRLF>
150 Opening data connection. 226 File transfer complete. 425 Can’t open data connection. 451 Requested action aborted: local error in processing. 552 Requested action aborted: Exceeded storage allocation. 501 Syntax error in parameters or arguments. 530 Not logged in. 550 Requested action not taken.
The delete (DELE) command is used to delete a file from the XMU+. If the command
completes normally, a 250 response will be sent. If the number of parameters given is not
equal to 1, a 501 response is sent. If the user has not logged into the system yet, the 530
response is given. If the user does not have permission to see this file, or if the file does
not exist, the 550 response is sent.
DELE <SP> <filename> <CRLF>
250 File deleted. 501 Syntax error in parameters or arguments. 530 Not logged in. 550 Requested action not taken.

Chapter 11
Mini Weather Radio
The PORT command is used to specify the port number to use when making the data
connection. The IP address is specified as 4 octets (i.e. 192.168.1.1 = 192, 168, 1, 1) and
the PORT number is specified as 2 octets (i.e. port 1000 = 0x03E8 = 3, 232). If the
command completes successfully, a 200 response is sent. If there is an error in any of the
parameters, a 501 response is sent. If the user has not logged in yet, a 530 response is
sent.
PORT <SP> <IP1>, <IP2>, <IP3>, <IP4>, <PORT1>, <PORT2> <CRLF>
200 Command OK. 501 Syntax error in parameters or arguments. 530 Not logged in.
S.A.M.E. message creation
A S.A.M.E. message may be created by STORing a file called “same.txt”. The format of
the same.txt file is as follows:
msg_num, warn_msg, warn_tone, same_string
where:
“msg_num” is the message that will be created. It may be any number from 1 to
999. “warn_msg” is the optional verbal message. It may be from 1 to 999, or 0 if no
message is required. “warn_tone” is the optional warning tone. It is 1 if a warning tone is required, 0 if
not. “same_string” is the S.A.M.E string in ASCII format
For example, if the file “same.txt” was transferred to the XMU+ with the following
contents,
1,2,1,ZCZC-WXR-FFW-039173-039051-139069+0060-1421600-KCLE/NWS-
the contents of message 1 would be overwritten with the new S.A.M.E. audio. It would
include the verbal warning message in message 2, and it would include a warning tone.
Node Manipulation commands
The SET command is used to manipulate specific node attributes. The SET command is
not a standard FTP command, but most FTP clients allow the user to send arbitrary
commands to the server. If the command succeeded, the 200 response is sent. If the
request is invalid, a 550 response is sent. Finally, if the user has not logged into the
system yet, the 530 response is given.

XMU+ QuickStart Guide rev.10 269
XMU+ FTP Function Reference
SET <SP> <object><SP><attribute><SP><value><CRLF>
200 Command OK. 530 Not logged in. 550 Requested action not taken.
The allowable object/attribute/value sets are:
Object Attribute Value
msg. state Change the state of a message
<msgnum> on - turn the message on
off - turn the message off
warntone Turn on the warning tone of a message
on - turn the warning tone on for this message
same S.A.M.E. string (see format below.)
card<cardnum start Change the starting node for a line
>. <linenum> list.<listnum> - Change the starting node to list
node # listnum
table.<tablenum> - Change the starting node to
the table node # tablenum
S.A.M.E. format
The format of the S.A.M.E. set command will be
set msg.<msg_num> same ee*pssccc*pssccc**tttt*w*mmm
The “msg_num” is the message number where the S.A.M.E. sequence will be created.
The geographic area code “pssccc” is entered as a 6 digit number. If multiple area codes
are required, they are separated by the star character “*”. The last area code is followed
by two star characters “**”.
The dwell time “tttt” is entered as a 4 digit number indicating the number of minutes that
the alarm will be in effect.
The warning tone “w” is set to “0” if no 1050Hz warning tone is required and “1” if a
ten second warning tone is required.

Chapter 11
Mini Weather Radio
The warning message “mmm” is the 3 digit message number of the audio to include in
the broadcast.
There is another format that includes an optional card and line (*c*l). Which is
appended to the end of the SAME set command.
UTILITY Commands
The no operation command is used as a connection check or ping. It returns a 200
response.
NOOP <CRLF>
200 Command okay.
Other Responses
If the command sent to the XMU+ is not supported or recognized, it will reply with:
500 Unknown command.
Example 1
An example exchange of data would look as follows:
PC: XMU+: PC: XMU+: PC: XMU+: PC: XMU+: PC: XMU+: XMU+: PC: XMU+: PC: XMU+: PC: XMU+: PC: XMU+:
Connect 220 Service ready for new user. USER xxxxxxxx 331 User name okay, need password. PASS xxxxxxxx 230 User logged in, proceed. TYPE IMAGE 200 Command okay. STOR msg.001 150 Opening data connection. 226 File transfer complete. SET msg.001 warntone on 200 Command OK. SET msg.001 state on 200 Command OK. SET msg.099 state off 200 Command OK. SET card2.1 start list.001 200 Command OK.

XMU+ QuickStart Guide rev.10 271
XMU+ FTP Function Reference
PC: XMU+: PC: XMU+:
SET card2.2 start table.003 200 Command OK. QUIT 221 Service closing control connection.
Example 2 - S.A.M.E. file creation
In this example, the verbal warning message is transferred first (msg.002), and then the
S.A.M.E. sequence is generated by sending same.txt. This will replace msg.001 with a
S.A.M.E. audio sequence that contains the AFSK coded header (x3), the warning tone,
the voice message, and the AFSK coded end of message (x3).
PC: Connect
XMU+: 220 Service ready for new user.
PC: USER xxxxxxxx
XMU+: 331 User name okay, need password.
PC: PASS xxxxxxxx
XMU+: 230 User logged in, proceed.
PC: TYPE IMAGE
XMU+: 200 Command okay.
PC: STOR msg.002
XMU+: 150 Opening data connection.
XMU+: 226 File transfer complete.
PC: STOR same.txt
XMU+: 150 Opening data connection.
XMU+: 226 File transfer complete.
PC: QUIT
XMU+: 221 Service closing control connection.
A sample S.A.M.E. file (same.txt) is:
1,2,1,ZCZC-WXR-FFW-039173-039051-139069+0060-1421600-KCLE/NWS-
Example 3 - S.A.M.E. Set Command
Here the verbal warning message is transferred first (msg.002), then the S.A.M.E.
sequence is generated by sending an FTP set command. This will replace msg.001 with a
S.A.M.E. audio sequence that contains the AFSK coded header (x3), the warning tone,
the voice message, and the AFSK coded end of message (x3).
PC: XMU+: PC: XMU+:
Connect 220 Service ready for new user. USER xxxxxxxx 331 User name okay, need password.

Chapter 11 Mini Weather Radio
PC: XMU+: PC: XMU+: PC: XMU+: XMU+: PC: XMU+: PC: XMU+:
PASS xxxxxxxx 230 User logged in, proceed. TYPE IMAGE 200 Command okay. STOR msg.002 150 Opening data connection. 226 File transfer complete. SET msg.001 same 13*039173*039051*139069**0060*1*002 200 Command okay. QUIT 221 Service closing control connection.
XMUCOM+ S.A.M.E. Watchdog Timer
The configuration for S.A.M.E. operation in XMUCOM+ is contained in the System
Settings window.
When the MWR system does not receive a message update for a period of time longer
than the Watchdog timer, the Watchdog operation is initiated. When the Watchdog
operation is initiated, a single S.A.M.E. message is transmitted (the Watchdog S.A.M.E.
broadcast). In addition, normal MWR operation is suspended and the messages contained
in the Watchdog List are broadcast instead. The list messages will continue to play until
the Watchdog timer has been reset or another configuration is sent to the XMU+.

XMU+ QuickStart Guide rev.10 273
XMU+ FTP Function Reference
The Watchdog S.A.M.E. feature can only be administered via the XMUCOM+ software
or from the front panel. No remote access commands exist.

Chapter 11
Mini Weather Radio
Setting up a Watchdog S.A.M.E. event
Step 1: Enable Watchdog timer feature by setting how many hours the Watchdog timer
should wait before sending the S.A.M.E. transmission.
Step 2: Specify the List node number that contains the messages you want to hear after
the Watchdog timer expires and the S.A.M.E. broadcast is transmitted.
Step 3: Click on the Watchdog S.A.M.E. button and populate the fields.
Step 4: Download the configuration to the XMU+.

XMU+ QuickStart Guide rev.10 275
XMU+ FTP Function Reference
Field Description
Label: This field is simply an internal information field only.
Card: This specifies which line will be affected by the Watchdog S.A.M.E. timer.
Message: This is the message number that will be used as a place holder for the new
modified S.A.M.E. message that will be generated and used from the S.A.M.E.
broadcast. Note: This message will not exist until the Watchdog S.A.M.E. event is
activated.
Warning Tone: If the warning tone is set to enabled, then a 1050 Hz warning tone will
play for 10 seconds preceding the S.A.M.E. broadcast.
Warning Message: This field specifies the message number that will be used to create
the S.A.M.E. broadcast message. This is the message number that will be broadcast
when the Watchdog S.A.M.E. is broadcast. This message should be recorded before the
Watchdog S.A.M.E. is activated.
Event Code: This field is used to specify a two digit event code. For example,
administrative message, boil water warning, etc.
Dwell Time: This field is used to specify how long the S.A.M.E. broadcast would stay
in the buffer of the recipient Mini Weather Radios. This setting is measured in minutes.
Area Codes: These fields are used to specify which areas will be affected by the
S.A.M.E. broadcast.
Time Zone
The time zone is set to specify the time offset from GMT (Greenwich Mean Time). For
example, Mountain Standard Time in North America is GMT-07:00. The S.A.M.E.
broadcast transmits time in UTC format (Universal Time Coordinated), which is
equivalent to GMT time.
Originator
The originator code is included with the S.A.M.E. broadcast to indicate the source of
the transmission. It can be set to any legal 8 character string.

Chapter 11 Mini Weather Radio

Glossary

Glossary

Automatic Call Distribution (ACD)
The XMU+ can be configured for ACD
applications, which automatically routes
incoming calls to available personnel.
In front-ending ACD queues, XMU+
answers all incoming calls, checks
caller requirements, forwards, and
queues the caller into the appropriate
queue. In back-ending ACD queues, the
XMU+ answers the call and places
the user in the queue. XMU+
controls the queue, plays appropriate
holding messages, and forwards the
caller to the requested person when
the line becomes available.
ACD
See Automatic Call Distribution.
Auto-Attendant
The XMU+ can be configured for Auto- Attendant applications, which provide:
Personalized, automated greetings
to incoming callers. A menu of choices. Call forwarding.
Call Router
An XMU+ equipped with a Hybrid
Analog line card can be configured to
transfer callers to pre-programmed
extensions or telephone numbers.
XMU+ QuickStart Guide rev.10 279
Carrier Detect Indicator The carrier detect indicator is associated
with the modem port on the Control Card.
This indicator should be lit during data
transfer by modem. It indicates that the
local modem has detected the remote
modem's carrier, which is a basic attribute
of the data transmission.
Channels Channels are the virtual assignment of T1
lines within a cable into separate lines.
Designating channels gives XMU+ the
ability to use up to 24 lines on a T1 line
card.
Chassis The XMU+ large chassis provides
flexible configuration options for users
requiring 2 to 64 analog ports (48 T1
ports), while the XMU+ small chassis
provides an effective solution for users
requiring 2 - 8 analog ports (24 T1
ports). See XMU+ Product Overview on page 4.
Collision Indicator The collision indicator is associated with
the network (Ethernet) port on the
Control card. This indicator is on when a
data collision on the network is detected.
Such collisions will normally occur in
Ethernet, but if too many are indicated the
network may have too much traffic and/or
too many devices on it. Such a network
problem could be solved by sub-dividing
the network with a switching hub.

Glossary
Configurations
XMU+ configurations are composed of
commands, nodes, messages, and music
that are executed when a call is received.
Configurations are designed on
XMUCOM+ software and then
downloaded to the XMU+ unit.
Control Pulse
A Control Pulse signal is provided to
certain types of PBX equipment by the
XMU+. This is used by those PBX types
to detect the off hook condition (instead
of detecting loop current).
DS0
Digital Signal - Level Zero (0). In the
digital communications hierarchy, this is
the individual channel. The data rate is 64
Kbps (the rate required to digitize a voice
message).
DS1
Digital Signal - Level One (1). In the
digital communications hierarchy,
individual channels are bundled into
basic multi-channel groups called DS1.
In North America, DS1 equates to T1
service (24 channels x 64 Kbps + 8 Kbps
control = 1.544 Mbps). In Europe, DS1
equates to E1 service (30 channels x 64
Kbps + 128 Kbps control = 2.048 Mbps)
Dual Tone Multi Frequency (DTMF)
A telephone’s touch tone system uses
pairs of tones to represent the various
keys. There is a “low tone” and a “high
tone” associated with each button (0
through 9, * (star), and # (pound) tones
uniquely identify each button on a touch-
tone phone.
The XMU+ uses a DTMF node to
identify the unique tones pressed by a
caller on a touch-tone telephone and
route the call accordingly.
Ethernet Ethernet is a popular Local Area Network
(LAN) type originally introduced by
Xerox and now supported by an IEEE
standard. Ethernet uses a Carrier Sense
Multiple Access / Collision Detect
(CSMA/CD) technique to accommodate
multiple devices on a common medium
such as twisted pair cable. The XMU+
Control Card network port is an Ethernet
port. It supports data transfer at 10 or 100
Mbps (less control “overhead”).
Hot Swap Cards with hot swap capability can be
changed while the XMU+ system is
operating. Line cards and power supply
cards are hot swap types. For line cards,
only those channels connected to the card
to be removed and replaced are disrupted
(or need to be taken out of service).
Power supply cards can be swapped with
no disruption to system operation so long
as there is a second (redundant) power
supply card.
Hybrid Analog A hybrid analog line card incorporates
both passive (ring detect, start signal
detect, control pulse) and interactive
(DTMF detect) announcement
functionality.

Line Cards
XMU+ supports a variety of line cards
that provide a broad range of program
functionality.
See About XMU+ Line Cards on page 91
for details.
Lines
Lines are the telephone lines (extensions)
that can connect to the XMU+ ports. The
terms lines and ports are used
interchangeably in the XMUCOM+
documentation.
Link Indicator
The link indicator is associated with the
network (Ethernet) port on the Control
Card. This indicator is on when the port
is connected to an active Ethernet
network.
Loop Current
For PSTN lines and certain PBX
equipment types, the current that flows
in the audio pair when the terminal
equipment (XMU+ line card port) is off
hook is detected and used for control
purposes.
Low Impedance
The Low Impedance card is a variant of
the hybrid analog line card specially
equipped to drive audio and signaling to
24 RAN (Recorded ANnouncement)
ports in parallel on Nortel Meridian PBX
equipment.
XMU+ QuickStart Guide rev.10 281
Memory Module Memory Modules reside on the Control
Card, and provide working and non-
volatile memory storage for messages
and configurations within the XMU+.
Memory Modules are replaceable and
upgradeable.
Mini Weather Radio (MWR) The MWR line card is used for
Environment Canada weather
broadcasting applications.
Modem A device for transferring digital data over
analog telephone lines. Modem is the
contraction of the words MODulator
DEModulator.
Music on Hold (MOH) An XMU+ equipped with a Music On
Hold (MOH) line card can be set up to
combine music and messages to create
an On Hold environment for your
callers.
MWR See Mini Weather Radio.
Node XMU+ building blocks consisting of a
group of commands or XMU+ settings
that are used to build XMU+
configurations.
Partition The XMU+ can be configured for single
or multi-partition mode. When multi-
partitioning is configured, each partition
acts as an individual XMU+ unit.

Glossary
Passive announcements
Passive announcements are those
configured to simply playout with a ring
or control pulse start then disconnect.
DTMF detection is not used during a
passive announcement.
PBX
See Private Branch Exchange
Port
A female connector on the XMU+ for
connecting the (male) connector of
various external devices. In XMUCOM+
documentation, the port is also referred to
as a line on an XMU+ line card.
Private Branch Exchange (PBX)
This is typically a private telephone
network used within an enterprise. Users
of the PBX share a certain number of
outside lines for making telephone calls
external to the PBX.
PSTN
See Public Switched Telephone Network.
Public Switched Telephone Network (PSTN)
The public telephone system that
operates the normal phone system.
Start Signal
Certain types of PBX equipment provide
a start signal to the XMU+. This is used
instead of a conventional ring signal
superimposed on the audio pair.
T1 T1 is a North American high-speed,
dedicated “DS1” connection that is
capable of transferring digital signals at
1.554 Mbps (mega-bits per second). The
payload of a T1 connection is twenty-
four (24) 64 Kbps “DS0” voice channels.
UCD See Uniform Call Distribution.
Uniform Call Distribution (UCD) The XMU+ can be configured for UCD
applications, which distributes all
incoming calls uniformly among a group
of people.
Uninterruptible Power Supply (UPS) The XMU+ can be connected to a UPS,
which will maintain the XMU+ for a
limited time in case of a power failure.
XMU+ The XMU+ Digital Call Processor is a
microprocessor based, voice
announcement and call processing
system.
XMUCOM+ The software application that
accompanies the XMU+ unit, and runs on
a Windows operating system. This
program allows users to quickly develop
program configurations for use by the
XMU+ unit. It also lets users download,
update, and backup configurations and
messages to the XMU+ from a PC.
Configurations designed with
XMUCOM+ are transmitted to the
XMU+ unit through a modem connection
or through LAN based networks.

Index
A
access codes obtaining 34 specifying 43 system settings 27
ACD about 279 back-ending ACD 6 call centre routing 6 definition of 3 front-ending ACD 6 program configuration 162 queues 279
audio text 172 about 162, 169 prerequisites 170 program configuration 162, 169
auto attendant about 279 program configuration 161
AUTO node about 134
automatic call distribution program configuration 162 see also ACD

B
BEEP about the command 132
before you start 172 defining messages 172 determining
requirements 172 documenting
system information 174 drawing call
flows 173 selecting line cards 173
setting goals 172
C
cabling ethernet connections to XMUCOM+ 73
modem connections to XMUCOM+ 70
call flow about 165, 173 commands and nodes 160 order of instructions 160, 178 planning 178 planning diagram 160 sample diagram 165, 178, 179
call flow sequence table of tasks 178
call processing program configuration 162
call routing applications about 279
calls estimating call volume 173
card configuration applying defaults 101 editing settings 103 menu command 26 View Card Configuration command
23 viewing details 102 channels
about 279 DS0 280 DS1 280
large XMU+ chassis 4
small XMU+ chassis
4 CMD node
about 134 commands
basic XMU+ commands
132 communication about types of 47, 50
Communicate with XMU+
23 connecting modems 70
Ethernet 73, 75 failures 215
LAN connection 75 receiving messages from XMU+
123 sending messages to XMU+
120 setting up communication 45
setup process 49 specifying details to XMUCOM+ 77
testing Ethernet (Direct) connection
75 testing Ethernet (LAN) connection
75 testing information transfer 82
testing modem connection 71, 72
troubleshooting failures 86, 87
Config Builder window setting start node 210 status column 210
configuration charts detailing contents 174
configurations about 280 about program configurations 159
applying default line card values 101
applying programs to line cards 101
changing line card configurations
103 checking message integrity 211
commands for 26 default directories 44
downloading from XMU+ 94
error resolution 209 receiving
configurations 222 retrieving
configurations 222 sending to
XMU+ 105 setting start node
104 storing as XMP files 28
storing as XMS files 20
troubleshooting 207, 209, 218

viewing 26 configuring
line cards 89, 95 process flow for line cards
91 connecting
physically connecting to XMU+ 69, 70, 73
specifying details to XMUCOM+
77 types of 50, 69 see also communication
connecting XMU+ to PC specifying details to XMUCOM+
77 types of 69 see also communication and
connect-ing
continuous play operating mode 100
control card carrier detect indicator 279 hot swap 280 link indicator 281
cross-over cable direct Ethernet connections 51
CSV about 29 default storage directory 29 storing statistics 28
D
DATE node about 134
daylight savings setting 27
DBN Node 154 default directories
message files 28 site files 28 statistic files 29
deleting messages 119
delivery checklist for site management 35 line cards 91 obtaining 35
XMU+ QuickStart Guide rev.10 285
validating line cards 94
dial and continue program configuration 163
Dial by name tutorial 197 Dial-Up Networking
about 15, 53 preparing for 52 process flow for setup 53 requirements 15 requirements for 52 setting up modem connections 54
uses for 53
digital signals DS0 channels 280 DS1 channels 280
DIR Node 157 directory organization
defining 38, 44 entering into XMUCOM+ 38 message files 28 setup 38 site files 28 statistic files 28
DNIS definition of 6 program configuration 162
downloading configurations to the XMU+ 195
messages from XMU+ 123
messages to the XMU+ 120
XMU+ configurations 94 DTMF
about 135 definition 6, 135 nodes 135
DTMF applications about 6, 280 nodes 135 setting start node 210
dual tone multi-frequency see also DTMF applications
E errors

Index
see also troubleshooting
Ethernet connections about 50, 280 collision indicator 279 communication option 47 direct connections 51 physically connecting 73 port link indicator 281 specifying to XMUCOM+ 78 testing 75 troubleshooting failures 87
exiting XMUCOM+ 24
exporting Export Site Book command
25 site book 19, 25
F
file formats about 28 CSV 29 WAV 29, 112 XMS 20 XMU+ 28
file handling directory organization 38, 44 setting defaults 44
flowcharts configuring line cards 91 planning program configurations 159
programming a configuration 169
setting up Dial-Up Networking 53
setting up PC to XMU+ communication
49 setting up XMU+ 33 setup physical communication
to XMU+ 69 testing Ethernet communications 75
testing modem communications 71
troubleshooting communication 86
troubleshooting program 209
tutorial 169 XMU+ not answering 218
XMUCOM+ installation process 14
front panel accessing messages 130
deleting messages 119
playing messages 117
recording messages 114
H
help where to look 10 see also troubleshooting
holiday automatic call distribution about program configuration 163
hybrid analog line cards about 92, 280 audio text tutorial 171 uses for 5
I importing
Import Site Book command
25 installing XMUCOM+ 11
about 14 installing 17, 21 process flowchart 14 removing old versions 16 system requirements 15
integrity check configurations 211 messages 211
interactive auto attendant about 5
interface description of 21 see also menu
commands see also
menus see also toolbar see also windows
IP address obtaining 34 requirements for 50, 51

J
job status checking SchedulerPlus 215,
216 status indicators 216
L
LAN about connecting 50 requirements for 15 see also Ethernet connections
large chassis about 279 overview 4 see also XMU+
level start operating mode 100
line card configurations about 98 applying programs 101 editing settings 103 PBX operating modes 99 returning to default settings 101 setting start nodes 106 viewing current configurations 102
line cards
about 7, 89, 91, 92 applying configurations 101 audio text tutorial 171, 173 changing configurations 103 configuring 89, 98 hot swap 280 hybrid analog 7 hybrid analog line cards 5, 92, 171,
280 identifying line cards in XMU+ 94 low impedance line cards 92, 281 MOH 6, 93, 281 MWR 92, 281 passive 5 ports 132 setting start nodes 106 setting to default configuration values
XMU+ QuickStart Guide rev.10 287
101
specifying to XMUCOM+ 95,
98 T1 line cards 93, 282 types
of 7, 92 uses for 5, 92 validating existence 94 XMU+ compatible 92
line check troubleshooting 219
line status checking status 219
lines about 281 mapping start nodes 106
List ACD about program configuration 164
LIST node about 135
low impedance line cards about 92, 281
M memory
about 281 menu commands
about 24 About Interalia’s XMUCOM+ 27, 28
Card Configuration 26, 101, 102, 103, 107
Communicate 25, 105 Completed Scheduled Tasks 25 Configuration Builder 26 Exit 24 Export Site Book 25 Import Site Book 25 New 18, 24 Open 19, 24, 95, 101, 102, 103 Save 24 Save As 24 Site Book 25 Statistics 27 System 27 System Commands 82 View Configuration 26

Index
XMU+ Settings 174
menus About Menu 28 Administration Menu 27 Communication Menu 25, 120, 123 Configuration Menu 26 File menu 24
message files about 29, 112 accessing from front panel 130 default directories 44 deleting 119 naming 112 playing 117, 118 recording 114 retrieving from XMU+ 224 sending to XMU+ 120
messages about 36, 37 checking against configurations
211 default directories 44 delete with remote access 119 deleting 119 determining content 172 error handling 211 front panel access 130 playing 117, 118 program configurations 37 receiving from XMU+ 123 record time 212 recording 114, 115 remote access 117 retrieving 224 sending to XMU+ 120 set length 214 site definition 37 site descriptions 36 troubleshooting 211, 212, 218 verifying 218
Microsoft Dial-Up Networking see also Dial-Up Networking
Microsoft Sound Recorder playing messages 118 recording messages 115
mode setting operating mode 98
modem communications
see also modem connections modem connections
connecting to XMU+ 70 requirements for 52 setting up 71 setting up Dial-Up Networking 53, 54 specifying to XMUCOM+ 78 testing 71, 72, 80 troubleshooting failures 86
modems about 281 about connecting 50
communication option 47
connecting to XMU+ 71
phone numbers 34 setting up Dial-Up Networking 15, 53
MOH about 6 about program configuration 164
nodes used 93, 281 MOH line cards
about 93, 281 uses for 6
MOH node about 136
MSG node about 136 set length 214
Music on Hold about 6 see also MOH
MWR line cards about 92, 281
N netmask
obtaining 34 network connection
collision indicator 279 preparing for 51 see also communication see also Ethernet
networking dial-up networking 15
Microsoft networking 15

preparing for 51 requirements for 51 see also communication
nodes about 127, 133, 134, 136, 281 AUTO node 134 CMD node 134 DATE node 134 description of 133, 134, 136 DTMF node 135 LIST node 135 MOH node 136 MSG node 136 START node 136 TIME node 134 types of 133 VOX node 136 XFER node 137 XFER Style node 137
NOOP about command 132
O
offline operating mode 101
operating mode continuous play 100 level start 100 offline 101 PBX types 99 pulse return 100 pulse start 100 ring start 100 setting 104 setting for XMU+ 98 synchronized continuous 100 troubleshooting 219 types of 100
override start node 27
P
part numbers
XMU+ QuickStart Guide rev.10 289
line cards 92 partitions
about 281 selecting for configurations 104 specifying information 98
passive announcer about 5
passive applications about 282
passive line card uses for 5
PAUSE about command 132
PBX
about 282 control pulse signal 280 loop current 281 operating mode 99, 100, 219 signaling protocols 219 start signal 282 troubleshooting 219 types of 99
PC communication process 49 playing messages 118 recording messages 115 sending messages to XMU+ 120 setting up communication 45
pinging testing connections 80
playing from front panel 117 messages 117
playing messages from front panel 117 from PC 118 from remote access 117 messages 117, 118
ports about 127, 132, 282 line card ports 92, 93
private branch exchange see also PBX
program configurations about 127, 131, 159

Index
ACD 162 applying programs to line cards 101 audio text 162 auto attendant 161 automatic call distribution 162 call processing 162 configuration charts 174 dial and continue 163 DNIS 162 holiday automatic call distribution 163
lines and start nodes 106 List ACD
164 mapping to start nodes 106 MOH 164 planning 159 prerequisites 170 retrieving 222 saving 24 setting start node 106 starting node 104 troubleshooting 209 types of 161
programming XMU+ 131
pulse return operating mode 100
pulse start operating mode 100
R
receiving configurations from XMU+ 222 messages from XMU+ 123, 224 system information 82, 84
recording messages 114 remote access 114
recording messages front panel 114 messages 114, 115 PC 115
studio 115 remote access 119
access codes 34 delete message 119 playing messages 117
recording messages 114 remote telephone access
changing messages 130
see also remote access
removing old versions of XMUCOM+ 16
retrieving messages from XMU+ 224
system information 82, 84
ring start line check 219 operating mode 100, 219
S scheduled tasks
automatic uses for 44 checking status 216 Completed Scheduled Tasks command
25 failure tracking 83 retrieving XMU+ system information
82 reviewing status 83 sending messages to XMU+ 122
sending programs to XMU+ 105
SchedulerPlus failure tracking 83 job status 215, 216 retrieving XMU+ system information
82 reviewing status 83 sending messages to XMU+
122 sending programs to
XMU+ 105 troubleshooting 215
sending messages to XMU+ 120 program configurations to XMU+ 105
signaling protocols operating modes 219 see also PBX
site book file handling 29 importing 25 see also Site Book window
Site Book window about 40 see also site book
site ID number

about 35 entering 43
sites about 33 collecting information 34 defining 31 delivery checklist uses 35 directory organization 38 directory setup 38 entering site information 40 ID number 35, 43 information to collect 34 multiple sites 34 naming 31, 35 planning 31, 34 preparing site information 33 sending messages to 122 system configuration files 36
sizing ports estimating calls 173 see also ports
small chassis about 279 overview 4
start node about 98, 136 checking 218 checking status 210 mapping to lines 106 override option 27 setting 104, 106, 210
starting XMUCOM+ application 18
statistics about 37 default directories 29, 44 file format 29 site definition 37 XMP 29
status check checking SchedulerPlus 216 job status indicators 215 line status 219
synchronized continuous operating mode 100
system configuration
XMU+ QuickStart Guide rev.10 291
daylight savings 27 new 22 opening 22, 24 override 27 saving 22, 24 site definition 36 system commands 27 viewing 22 XMU+ settings 27
system configuration files default directories 44
system information retrieving from XMU+ 82, 84
system requirements operating system 15
T T1 applications
about channels 279 T1 line cards
about 282 audio text tutorial 171
TCP/IP requirements for 15
telephone lines PSTN system 282
testing Ethernet (direct) connection 75
Ethernet connections 75 information
transfer to XMU+ 82 modem
connection 71, 72, 80 XMU+ to
XMUCOM+ communication
79 TIME node
about 134 toolbar
about 22 Communicate with XMU+ 23 description of 22 Exit XMUCOM+ 22 New Program Configuration 22 Open Configuration 22 Open Configuration Builder 23 Save Current Configuration 22 View Card Configuration 23

Index
View System Configuration 22
troubleshooting communication 86, 87, 215 configuration 207 flowchart 209 integrity check 211 line check 219 line status 219 messages 211, 212 operating modes 219 SchedulerPlus 215 signaling protocols 219 types of errors 209 XMU+ not answering 218
tutorial about 169 before you start 172 goals 169 prerequisites 170 process flow 169
U
UCD applications about 282 definition of 3
uniform call distribution see also UCD applications
282 uploading
configurations to the XMU+ 195 messages from XMU+ 123
UPS about 282
V
volume setting 98, 104
VOX node about 136
W
WAN about connecting 50
WAV about 29, 112 default storage directory 123 music and message files 28 naming 112 properties required 29
website address 7
windows Card Configuration 23, 95, 101, 102,
103, 107 Card Editor 97 Communication 23, 105, 120, 122,
123, 124, 224, 225 Completed Scheduled Tasks 216 Edit Site 41 Line Card Editor 101, 103 Line Editor 104 MSG Node Editor 214 New Site 41 SchedulerPlus 83, 221 Site Book 40 System Commands 82, 84
X XFER node
about 137 XFER Style node
about 137 XMP
configuration files 28 file type 28
XMS files 20 XMU+
about 3, 4, 282 about sites
33 checking start node
218 checking status 218
communication process
49 delivery checklist 35
integrity check 211 large
chassis 4
line cards supported 92 nodes 281 not answering 218

XMU+ QuickStart Guide rev.10 293
partitions 281 physical communication setup 69 physically connecting to 70, 73 planning sites 31 receiving configurations 105 receiving messages 123 retrieving configurations 222 retrieving messages 224 sending messages to XMUCOM+ 120 setting up communication 45 site definitions 31 small chassis 4 types of access 129 uploading configurations to XMUCOM+
94 uses for 3, 5
XMU+ settings access codes 27
XMUCOM+ about 1, 3, 243 connecting to XMU+ 69 exiting 24 installing 17 interface information 21 modem connections 71 receiving messages 123 sending configurations 105 sending messages to XMU+ 120 set up modem connection 71 specifying connection details 77 starting the application 18 testing information transfer to XMU+
82 toolbar 22 uses for 129

Index

End User License Agreement
Limited Warranty Interalia® warrants this equipment to be free
of defects in material and workmanship for a period of one year
from the date of shipment. All defects will be repaired without
charge upon return of the unit to the factory.
This warranty is null and void if any modifications have been
made to the unit or if the unit has been subject to physical or
electrical stress as determined by the manufacturer.
This warranty covers parts and labour only and does not
include shipping costs, traveling expenses or travel time.
Installation of the equipment is the sole responsibility of the
purchaser. The manufacturer, its agents or distributors, accept
no responsibility for malfunction or damage caused by
improper connection of the unit.
THE MANUFACTURER, ITS AGENT OR DISTRIBUTORS,
ARE NOT LIABLE FOR LOSSES INCURRED THROUGH THE
USE OF THE EQUIPMENT, OR BY THE MALFUNCTION OF
THE EQUIPMENT, OR FOR ANY LOSSES OR DAMAGE
INCURRED BY THE USE OF THE EQUIPMENT IN ANY
MEANS WHATSOEVER.
THIS WARRANTY IS LIMITED TO THE REPAIR OF THE
EQUIPMENT TO ITS NORMAL FUNCTIONAL CAPABILITY.
THIS WARRANTY IS COMPLETE AS STATED AND ALL OTHER
WARRANTIES, EXPRESSED OR IMPLIED, ARE NOT VALID.

Important Read Carefully
This End-User License Agreement is a legal agreement between you (either
an individual or a single entity) and Interalia®. This legal agreement is
specific for the XMU+ hardware and software that you have purchased.
Software Product License
Grant of License. This grants you the following rights.
Software: You may install and use one copy of the software product on the computer.
Storage Use: You may also store or install a copy of the software product
on the computer to allow other computers within your company to use the
software product over an internal network. However, you must acquire and
dedicate a license for the software product for each computer on which the
software product is used. A license for the software product may not be
shared or used concurrently on different computers.
Back up Utility: You may create a back-up copy of the software product
solely for archival purposes.
Description of Other Rights and Limitations.
Limitations on Reverse Engineering, Decompilation and Disassembly.
You may not reverse engineer, decompile, or disassemble the software
package, except and only to the extent that such activity is expressly
permitted by application law notwithstanding this limitation.
Termination. Without prejudice to any other rights, Interalia® may
terminate this agreement if you fail to comply with the terms and conditions
of this agreement. In such event, you must destroy all copies of the
software product and all of its component parts.
Upgrades: If the software product is an upgrade from a previous
version, you may use or transfer the Software Product only in
conjunction with that upgraded product.
Copyright: All title and copyrights in and to the software product and
accompanying printed materials, and any copies of the software
product, are owned by Interalia®. You may not copy the printed
material accompanying the software product.


For over 40 years Interalia has been
a global leader in the design and
manufacture of high quality audio
announcement solutions for the
telecommunication and transportation
markets. During this time, we have
installed more than 250,000 systems
in 60 countries around the world.
Interalia recognizes that to be
successful today we need to listen to
our customer’s suggestions and
implement them in our products.
Our solutions are the result of
collective input from our
Customers and the engineering
excellence Interalia has become
known for over the last 40+ years.
275 - 6815 8th Street NE. Calgary, Alberta
Canada T2E 7H7 Tel: +1 403 288 2706
[email protected] 701 - 24th Ave. SE Minneapolis, Minnesota USA 55414 Tel: +1 403 288 2706 [email protected] Kerkenbos 10-123 6546 BJ Nijmegen The Netherlands Phone: +31 858 882046 [email protected]
www.interalia.com