WashConnect - User Manual - Focused Car Wash Solutions
808
Innovative Control Systems is an industry leading provider of innovative business solutions in the car wash industry. It is our mission to help car wash operators build successful businesses through advanced control products and management solutions. Corporate Office: 1349 Jacobsburg Road, Wind Gap, PA 18091 | Production Facility: 3370 Fox Hill Road, Easton, PA 18045 Sales: 800.642.9396 | Email: [email protected] | icscarwashsystems.com Copyright © 2015 Innovative Control Systems, Inc. Portions of this document may contain information that is ICS proprietary. WashConnect User Manual— June 17, 2015 Software Version 1.3.2
-
Upload
khangminh22 -
Category
Documents
-
view
2 -
download
0
Transcript of WashConnect - User Manual - Focused Car Wash Solutions

Innovative Control Systems is an industry leading provider of innovative business solutions in
the car wash industry. It is our mission to help car wash operators build successful businesses
through advanced control products and management solutions.
Corporate Office: 1349 Jacobsburg Road, Wind Gap, PA 18091 | Production Facility: 3370 Fox Hill Road, Easton, PA 18045
Sales: 800.642.9396 | Email: [email protected] | icscarwashsystems.com
Copyright © 2015 Innovative Control Systems, Inc. Portions of this document may contain information that is ICS proprietary.
WashConnect
User Manual—June 17, 2015
Software Version 1.3.2
WashConnect User Manual—Version 6.0
2
Information in this manual is subject to change without notice. Companies, names and data used in examples within the manual are fictitious unless
otherwise noted. No part of this manual may be reproduced or transmitted in any form or by any means, electronic or mechanical, for any purpose without
the express written permission of Innovative Control Systems, Inc.
© 2015 Innovative Control Systems, Inc. All rights reserved.
Innovative Control Systems, Inc.
1349 Jacobsburg Road
Wind Gap, PA 18091
(610) 881-8000

User Manual—Version 6.0 WashConnect®
3
Table of Contents
Chapter 1: Getting Started . . . . . . . . . . . . . . . . . . . . . . . . . . . . . . . . . . . . . . . . . . . . . . . . . . . . . . . . . . . . . . . . . . . . . . . . . . 37
Version Considerations . . . . . . . . . . . . . . . . . . . . . . . . . . . . . . . . . . . . . . . . . . . . . . . . . . . . . .39
What’s New . . . . . . . . . . . . . . . . . . . . . . . . . . . . . . . . . . . . . . . . . . . . . . . . . . . . . . . . . . . . . . . . .40
Supports Single-site and Multi-site . . . . . . . . . . . . . . . . . . . . . . . . . . . . . . . . . . . . . . . . . . .41
System Requirements. . . . . . . . . . . . . . . . . . . . . . . . . . . . . . . . . . . . . . . . . . . . . . . . . . . . . . . .42
Software/Hardware Validation . . . . . . . . . . . . . . . . . . . . . . . . . . . . . . . . . . . . . . . . . . . . . . .43
About the Interface . . . . . . . . . . . . . . . . . . . . . . . . . . . . . . . . . . . . . . . . . . . . . . . . . . . . . . . . . .44
System Overview . . . . . . . . . . . . . . . . . . . . . . . . . . . . . . . . . . . . . . . . . . . . . . . . . . . . . . . . . . . .45
About the Menu Bar . . . . . . . . . . . . . . . . . . . . . . . . . . . . . . . . . . . . . . . . . . . . . . . . . . . . . . . . .50
Search for a Menu Item . . . . . . . . . . . . . . . . . . . . . . . . . . . . . . . . . . . . . . . . . . . . 50
Scroll for a Menu Item . . . . . . . . . . . . . . . . . . . . . . . . . . . . . . . . . . . . . . . . . . . . . 52
About Scroll Buttons . . . . . . . . . . . . . . . . . . . . . . . . . . . . . . . . . . . . . . . . . . . . . . . . . . . . . . . . .53
About the Menu Tab . . . . . . . . . . . . . . . . . . . . . . . . . . . . . . . . . . . . . . . . . . . . . . . . . . . . . . . . .55
About Workspace Tabs. . . . . . . . . . . . . . . . . . . . . . . . . . . . . . . . . . . . . . . . . . . . . . . . . . . . . . .56
About the Status Bar . . . . . . . . . . . . . . . . . . . . . . . . . . . . . . . . . . . . . . . . . . . . . . . . . . . . . . . . .57
About Data Replication . . . . . . . . . . . . . . . . . . . . . . . . . . . . . . . . . . . . . . . . . . . . . . . . . . . . . .58
About Users . . . . . . . . . . . . . . . . . . . . . . . . . . . . . . . . . . . . . . . . . . . . . . . . . . . . . . . . . . . . . . . . .59
About Clubs . . . . . . . . . . . . . . . . . . . . . . . . . . . . . . . . . . . . . . . . . . . . . . . . . . . . . . . . . . . . . . . . .60
About Reports . . . . . . . . . . . . . . . . . . . . . . . . . . . . . . . . . . . . . . . . . . . . . . . . . . . . . . . . . . . . . . .61
About Report Toolbar. . . . . . . . . . . . . . . . . . . . . . . . . . . . . . . . . . . . . . . . . . . . . . . . . . . . . . . .64
About Report Headers . . . . . . . . . . . . . . . . . . . . . . . . . . . . . . . . . . . . . . . . . . . . . 65
Scrolling a Multi-Page Report . . . . . . . . . . . . . . . . . . . . . . . . . . . . . . . . . . . . . . 65
Printing a Report . . . . . . . . . . . . . . . . . . . . . . . . . . . . . . . . . . . . . . . . . . . . . . . . . . 66
Export a Report. . . . . . . . . . . . . . . . . . . . . . . . . . . . . . . . . . . . . . . . . . . . . . . . . . . . 67
Zoom In and Zoom Out on a Report . . . . . . . . . . . . . . . . . . . . . . . . . . . . . . . . 68
Searching a Report . . . . . . . . . . . . . . . . . . . . . . . . . . . . . . . . . . . . . . . . . . . . . . . . 69
Starting WashConnect® . . . . . . . . . . . . . . . . . . . . . . . . . . . . . . . . . . . . . . . . . . . . . . . . . . . . . . .70
Logging In . . . . . . . . . . . . . . . . . . . . . . . . . . . . . . . . . . . . . . . . . . . . . . . . . . . . . . . . . . . . . . . . . .71
Changing Default User Login . . . . . . . . . . . . . . . . . . . . . . . . . . . . . . . . . . . . . . 72
Chapter 2: Report Default Date . . . . . . . . . . . . . . . . . . . . . . . . . . . . . . . . . . . . . . . . . . . . . . . . . . . . . . . . . . . 73
Default Date Range . . . . . . . . . . . . . . . . . . . . . . . . . . . . . . . . . . . . . . . . . . . . . . . . . . . . . . . . . .74

WashConnect® User Manual—Version 6.0
4
Set a Default Date Range . . . . . . . . . . . . . . . . . . . . . . . . . . . . . . . . . . . . . . . . . . 74
Report Default Date preset buttons . . . . . . . . . . . . . . . . . . . . . . . . . . . . . . . . 76
Select a different date range for an open report . . . . . . . . . . . . . . . . . . . . 77
Chapter 3: Customers . . . . . . . . . . . . . . . . . . . . . . . . . . . . . . . . . . . . . . . . . . . . . . . . . . . . . . . . . . . . . . . . . . . . . . . . . . . . . . 79
About the Manage Menu . . . . . . . . . . . . . . . . . . . . . . . . . . . . . . . . . . . . . . . . . . . . . . . . . . . . .80
Add a Customer . . . . . . . . . . . . . . . . . . . . . . . . . . . . . . . . . . . . . . . . . . . . . . . . . . . 81
Add Vehicle . . . . . . . . . . . . . . . . . . . . . . . . . . . . . . . . . . . . . . . . . . . . . . . . . . . . . . . 84
Add Recurring Credit Card for Club Memberships. . . . . . . . . . . . . . . . . . . 86
Edit Club Member’s Billing Date . . . . . . . . . . . . . . . . . . . . . . . . . . . . . . . . . . . . 88
Sort the Columns for the Customer List. . . . . . . . . . . . . . . . . . . . . . . . . . . . . 89
Edit Vehicle Information . . . . . . . . . . . . . . . . . . . . . . . . . . . . . . . . . . . . . . . . . . . 91
Search for a Club Member . . . . . . . . . . . . . . . . . . . . . . . . . . . . . . . . . . . . . . . . . 91
Terminate a Customer . . . . . . . . . . . . . . . . . . . . . . . . . . . . . . . . . . . . . . . . . . . . . 93
Terminate/Suspend a Customer. . . . . . . . . . . . . . . . . . . . . . . . . . . . . . . . . . . . 94
View Vehicle Transaction History . . . . . . . . . . . . . . . . . . . . . . . . . . . . . . . . . . . 96
View Membership History. . . . . . . . . . . . . . . . . . . . . . . . . . . . . . . . . . . . . . . . . . 97
Customer Notes or Vehicle Notes . . . . . . . . . . . . . . . . . . . . . . . . . . . . . . . . . . 97
Edit a Customer . . . . . . . . . . . . . . . . . . . . . . . . . . . . . . . . . . . . . . . . . . . . . . . . . . . 99
Print a Customer List. . . . . . . . . . . . . . . . . . . . . . . . . . . . . . . . . . . . . . . . . . . . . . 100
Export a Customer Membership List. . . . . . . . . . . . . . . . . . . . . . . . . . . . . . . 101
Create Customer Mailing Labels using Export to Excel . . . . . . . . . . . . . 101
About the Group menu. . . . . . . . . . . . . . . . . . . . . . . . . . . . . . . . . . . . . . . . . . . . . . . . . . . . . 102
Add a Customer Group . . . . . . . . . . . . . . . . . . . . . . . . . . . . . . . . . . . . . . . . . . . 103
Add a Schedule for a Customer Group Profile. . . . . . . . . . . . . . . . . . . . . . 104
Edit a Customer Group. . . . . . . . . . . . . . . . . . . . . . . . . . . . . . . . . . . . . . . . . . . . 105
Delete a Customer Group . . . . . . . . . . . . . . . . . . . . . . . . . . . . . . . . . . . . . . . . . 106
Chapter 4: Clubs . . . . . . . . . . . . . . . . . . . . . . . . . . . . . . . . . . . . . . . . . . . . . . . . . . . . . . . . . . . . . . . . . . . . . . . . . . . . . . . . . . 109
About Club Membership . . . . . . . . . . . . . . . . . . . . . . . . . . . . . . . . . . . . . . . . . . . . . . . . . . . 110
About the Reports Menu . . . . . . . . . . . . . . . . . . . . . . . . . . . . . . . . . . . . . . . . . . . . . . . . . . . 112
About the Profitability Report . . . . . . . . . . . . . . . . . . . . . . . . . . . . . . . . . . . . . . . . . . . . . . 113
View Profitability Report . . . . . . . . . . . . . . . . . . . . . . . . . . . . . . . . . . . . . . . . . 113
About the Club Usage Report . . . . . . . . . . . . . . . . . . . . . . . . . . . . . . . . . . . . . . . . . . . . . . . 115
View the Club Usage Report . . . . . . . . . . . . . . . . . . . . . . . . . . . . . . . . . . . . . . 116
Expand Club Usage Report. . . . . . . . . . . . . . . . . . . . . . . . . . . . . . . . . . . . . . . . 119
About the Vehicle History Report . . . . . . . . . . . . . . . . . . . . . . . . . . . . . . . . . . . . . . . . . . . 121
View the Vehicle History Report . . . . . . . . . . . . . . . . . . . . . . . . . . . . . . . . . . . 122
Vehicle History Report Descriptions . . . . . . . . . . . . . . . . . . . . . . . . . . . . . . . 124
About the Club Summary Report . . . . . . . . . . . . . . . . . . . . . . . . . . . . . . . . . . . . . . . . . . . 125
View the Club Summary Report . . . . . . . . . . . . . . . . . . . . . . . . . . . . . . . . . . . 126
Club Summary Report Descriptions . . . . . . . . . . . . . . . . . . . . . . . . . . . . . . 128

User Manual—Version 6.0 WashConnect®
5
About the Declined Payment Report . . . . . . . . . . . . . . . . . . . . . . . . . . . . . . . . . . . . . . . . 129
Search for a Customer from the Declined Payment Report . . . . . . . . . 130
Edit Customer Notes in the Declined Payment Report. . . . . . . . . . . . . . 131
Edit a Customer in the Declined Payment Report . . . . . . . . . . . . . . . . . . 133
Mark Bill in Declined Payment Club Report . . . . . . . . . . . . . . . . . . . . . . . . 133
Print the Declined Payment Report. . . . . . . . . . . . . . . . . . . . . . . . . . . . . . . . 134
Declined Payment Report Descriptions . . . . . . . . . . . . . . . . . . . . . . . . . . . . 135
About the Club Revenue Distribution Report . . . . . . . . . . . . . . . . . . . . . . . . . . . . . . . . 136
View the Club Revenue Distribution Report. . . . . . . . . . . . . . . . . . . . . . . . 136
Club Revenue Distribution Report Field Descriptions . . . . . . . . . . . . . . 138
About Autobill Revenue Report. . . . . . . . . . . . . . . . . . . . . . . . . . . . . . . . . . . . . . . . . . . . . 139
View the Autobill Revenue Distribution Report . . . . . . . . . . . . . . . . . . . . 140
Autobill Revenue Report Descriptions . . . . . . . . . . . . . . . . . . . . . . . . . . . . . 141
About the Credit Card Expiration Report . . . . . . . . . . . . . . . . . . . . . . . . . . . . . . . . . . . . 142
View Credit Card Expiration Report. . . . . . . . . . . . . . . . . . . . . . . . . . . . . . . . 142
Credit Card Expiration Report Descriptions . . . . . . . . . . . . . . . . . . . . . . . . 143
About the Renewal and Termination Report . . . . . . . . . . . . . . . . . . . . . . . . . . . . . . . . . 144
View the Renewal & Termination Report. . . . . . . . . . . . . . . . . . . . . . . . . . . 144
Renewal & Termination Report Descriptions . . . . . . . . . . . . . . . . . . . . . . . 145
About Advance Expiration . . . . . . . . . . . . . . . . . . . . . . . . . . . . . . . . . . . . . . . . . . . . . . . . . 146
Advance Expiration for Club Members . . . . . . . . . . . . . . . . . . . . . . . . . . . . 146
Chapter 5: Fleet . . . . . . . . . . . . . . . . . . . . . . . . . . . . . . . . . . . . . . . . . . . . . . . . . . . . . . . . . . . . . . . . . . . . . . . . . . . . . . . . . . . 147
About the Fleet Accounts . . . . . . . . . . . . . . . . . . . . . . . . . . . . . . . . . . . . . . . . . . . . . . . . . . 148
Add a Fleet Account . . . . . . . . . . . . . . . . . . . . . . . . . . . . . . . . . . . . . . . . . . . . . . 149
Add Member(s) to a Fleet Account . . . . . . . . . . . . . . . . . . . . . . . . . . . . . . . . 151
Add a Vehicle to a Fleet Account . . . . . . . . . . . . . . . . . . . . . . . . . . . . . . . . . . 154
Edit a Fleet Account . . . . . . . . . . . . . . . . . . . . . . . . . . . . . . . . . . . . . . . . . . . . . . 156
Edit a Fleet Customer and Edit a Vehicle in a Fleet . . . . . . . . . . . . . . . . . 156
Terminate or Suspend a Fleet Account . . . . . . . . . . . . . . . . . . . . . . . . . . . . 157
About Fleet Rules . . . . . . . . . . . . . . . . . . . . . . . . . . . . . . . . . . . . . . . . . . . . . . . . . . . . . . . . . . 158
Add Fleet Rules. . . . . . . . . . . . . . . . . . . . . . . . . . . . . . . . . . . . . . . . . . . . . . . . . . . 159
Edit Fleet Rules . . . . . . . . . . . . . . . . . . . . . . . . . . . . . . . . . . . . . . . . . . . . . . . . . . . 160
Close Fleet Account Rules. . . . . . . . . . . . . . . . . . . . . . . . . . . . . . . . . . . . . . . . . 160
Fleet Rules Examples . . . . . . . . . . . . . . . . . . . . . . . . . . . . . . . . . . . . . . . . . . . . . 161
About Fleet Invoice . . . . . . . . . . . . . . . . . . . . . . . . . . . . . . . . . . . . . . . . . . . . . . . . . . . . . . . . 162
Search for an Invoice . . . . . . . . . . . . . . . . . . . . . . . . . . . . . . . . . . . . . . . . . . . . . 163
Fleet Search Field Descriptions. . . . . . . . . . . . . . . . . . . . . . . . . . . . . . . . . . . . 164
Generate Invoice . . . . . . . . . . . . . . . . . . . . . . . . . . . . . . . . . . . . . . . . . . . . . . . . . 164
Print an Invoice. . . . . . . . . . . . . . . . . . . . . . . . . . . . . . . . . . . . . . . . . . . . . . . . . . . 166
Fleet Invoice Field Descriptions . . . . . . . . . . . . . . . . . . . . . . . . . . . . . . . . . . . 168
Export Invoice . . . . . . . . . . . . . . . . . . . . . . . . . . . . . . . . . . . . . . . . . . . . . . . . . . . . 169

WashConnect® User Manual—Version 6.0
6
Terminate Fleet Invoice . . . . . . . . . . . . . . . . . . . . . . . . . . . . . . . . . . . . . . . . . . . 170
Email Invoice . . . . . . . . . . . . . . . . . . . . . . . . . . . . . . . . . . . . . . . . . . . . . . . . . . . . . 170
About Fleet Manage . . . . . . . . . . . . . . . . . . . . . . . . . . . . . . . . . . . . . . . . . . . . . . . . . . . . . . . 171
View Invoices with Open Balances . . . . . . . . . . . . . . . . . . . . . . . . . . . . . . . . 171
Chapter 6: Financial . . . . . . . . . . . . . . . . . . . . . . . . . . . . . . . . . . . . . . . . . . . . . . . . . . . . . . . . . . . . . . . . . . . . . . . . . . . . . . . 173
Frequently Asked Questions . . . . . . . . . . . . . . . . . . . . . . . . . . . . . . . . . . . . . . 176
About the Financial Overview Report . . . . . . . . . . . . . . . . . . . . . . . . . . . . . . . . . . . . . . . 178
View the Financial Overview Report . . . . . . . . . . . . . . . . . . . . . . . . . . . . . . . 179
Open a Report from the Financial Overview Report . . . . . . . . . . . . . . . . 180
Export Data from the Financial Overview Report . . . . . . . . . . . . . . . . . . . 181
About the Shift Detail Report . . . . . . . . . . . . . . . . . . . . . . . . . . . . . . . . . . . . . . . . . . . . . . . 186
View a Shift Detail Report . . . . . . . . . . . . . . . . . . . . . . . . . . . . . . . . . . . . . . . . . 187
Shift Detail Report Sections . . . . . . . . . . . . . . . . . . . . . . . . . . . . . . . . . . . . . . . 189
Shift Detail Report Example . . . . . . . . . . . . . . . . . . . . . . . . . . . . . . . . . . . . . 190
Unverified Journal Entries. . . . . . . . . . . . . . . . . . . . . . . . . . . . . . . . . . . . . . . . . 193
Unverified Shifts . . . . . . . . . . . . . . . . . . . . . . . . . . . . . . . . . . . . . . . . . . . . . . . . . . 194
Shift Detail Report Field Descriptions. . . . . . . . . . . . . . . . . . . . . . . . . . . . . . 195
. . . . . . . . . . . . . . . . . . . . . . . . . . . . . . . . . . . . . . . . . . . . . . . . . . . . . . . . . . . . . . . . . . 196
About the Credit Card Summary . . . . . . . . . . . . . . . . . . . . . . . . . . . . . . . . . . . . . . . . . . . . 200
About the Credit Cards Report . . . . . . . . . . . . . . . . . . . . . . . . . . . . . . . . . . . . . . . . . . . . . . 202
View the Credit Cards Report. . . . . . . . . . . . . . . . . . . . . . . . . . . . . . . . . . . . . . 202
Credit Cards Report Example. . . . . . . . . . . . . . . . . . . . . . . . . . . . . . . . . . . . . . 204
Credit Cards Report Descriptions . . . . . . . . . . . . . . . . . . . . . . . . . . . . . . . . . . 204
About Credit Cards Reconciliation . . . . . . . . . . . . . . . . . . . . . . . . . . . . . . . . . . . . . . . . . . 205
About the Gift Cards Report . . . . . . . . . . . . . . . . . . . . . . . . . . . . . . . . . . . . . . . . . . . . . . . . 209
View the Gift Cards Report . . . . . . . . . . . . . . . . . . . . . . . . . . . . . . . . . . . . . . . . 209
Gift Card Report Example . . . . . . . . . . . . . . . . . . . . . . . . . . . . . . . . . . . . . . . . 211
Gift Cards Report Descriptions . . . . . . . . . . . . . . . . . . . . . . . . . . . . . . . . . . . . 212
About the Checks Report . . . . . . . . . . . . . . . . . . . . . . . . . . . . . . . . . . . . . . . . . . . . . . . . . . . 213
View the Checks Report. . . . . . . . . . . . . . . . . . . . . . . . . . . . . . . . . . . . . . . . . . . 213
Checks Report Example . . . . . . . . . . . . . . . . . . . . . . . . . . . . . . . . . . . . . . . . . . . 215
Checks Report Field Descriptions. . . . . . . . . . . . . . . . . . . . . . . . . . . . . . . . . . 215
About the Fleet Activity Report . . . . . . . . . . . . . . . . . . . . . . . . . . . . . . . . . . . . . . . . . . . . . 217
View the Fleet Activity Report . . . . . . . . . . . . . . . . . . . . . . . . . . . . . . . . . . . . . 217
Fleet Activity Report Example . . . . . . . . . . . . . . . . . . . . . . . . . . . . . . . . . . . . . 219
Fleet Activity Report Descriptions . . . . . . . . . . . . . . . . . . . . . . . . . . . . . . . . . 220
About the Deposits Report . . . . . . . . . . . . . . . . . . . . . . . . . . . . . . . . . . . . . . . . . . . . . . . . . 221
View the Deposits Report . . . . . . . . . . . . . . . . . . . . . . . . . . . . . . . . . . . . . . . . . 221
Deposits Report Example . . . . . . . . . . . . . . . . . . . . . . . . . . . . . . . . . . . . . . . . . 222
Deposits Report Descriptions . . . . . . . . . . . . . . . . . . . . . . . . . . . . . . . . . . . . . 223

User Manual—Version 6.0 WashConnect®
7
About the Free Wash Report. . . . . . . . . . . . . . . . . . . . . . . . . . . . . . . . . . . . . . . . . . . . . . . . 224
View the Free Wash Report . . . . . . . . . . . . . . . . . . . . . . . . . . . . . . . . . . . . . . . 224
Free Wash Report Example. . . . . . . . . . . . . . . . . . . . . . . . . . . . . . . . . . . . . . . . 226
Free Wash Report Descriptions. . . . . . . . . . . . . . . . . . . . . . . . . . . . . . . . . . . . 226
About the Re-Wash Report . . . . . . . . . . . . . . . . . . . . . . . . . . . . . . . . . . . . . . . . . . . . . . . . . 228
View the Re-Wash Report . . . . . . . . . . . . . . . . . . . . . . . . . . . . . . . . . . . . . . . . . 228
Rewash Report Example . . . . . . . . . . . . . . . . . . . . . . . . . . . . . . . . . . . . . . . . . . 230
Rewash Report Descriptions . . . . . . . . . . . . . . . . . . . . . . . . . . . . . . . . . . . . . . 231
About the Payouts Report . . . . . . . . . . . . . . . . . . . . . . . . . . . . . . . . . . . . . . . . . . . . . . . . . . 232
View the Payouts Report . . . . . . . . . . . . . . . . . . . . . . . . . . . . . . . . . . . . . . . . . . 232
Payouts Report Example . . . . . . . . . . . . . . . . . . . . . . . . . . . . . . . . . . . . . . . . . . 234
Payouts Report Descriptions . . . . . . . . . . . . . . . . . . . . . . . . . . . . . . . . . . . . . . 234
About the ROA (Received on Account) Report. . . . . . . . . . . . . . . . . . . . . . . . . . . . . . . . 235
View the ROA (Received on Account) Report . . . . . . . . . . . . . . . . . . . . . . 236
Received on Account Report Example . . . . . . . . . . . . . . . . . . . . . . . . . . . . . 237
Received on Account Report Descriptions . . . . . . . . . . . . . . . . . . . . . . . . . 238
About the Voids Report . . . . . . . . . . . . . . . . . . . . . . . . . . . . . . . . . . . . . . . . . . . . . . . . . . . . 239
View the Voids Report . . . . . . . . . . . . . . . . . . . . . . . . . . . . . . . . . . . . . . . . . . . . 239
Voids Report Example . . . . . . . . . . . . . . . . . . . . . . . . . . . . . . . . . . . . . . . . . . . . 240
Voids Report Descriptions . . . . . . . . . . . . . . . . . . . . . . . . . . . . . . . . . . . . . . . . 241
About the Refunds Report. . . . . . . . . . . . . . . . . . . . . . . . . . . . . . . . . . . . . . . . . . . . . . . . . . 242
About the Fund Raiser Report . . . . . . . . . . . . . . . . . . . . . . . . . . . . . . . . . . . . . . . . . . . . . . 243
View the Fund Raiser Report . . . . . . . . . . . . . . . . . . . . . . . . . . . . . . . . . . . . . . 244
Fund Raiser Example . . . . . . . . . . . . . . . . . . . . . . . . . . . . . . . . . . . . . . . . . . . . . 244
About View Register . . . . . . . . . . . . . . . . . . . . . . . . . . . . . . . . . . . . . . . . . . . . . . . . . . . . . . . 245
Set previous days privilege on View Register Report . . . . . . . . . . . . . . . 245
Reprint a Customer’s Receipt. . . . . . . . . . . . . . . . . . . . . . . . . . . . . . . . . . . . . . 246
View Register Transactions. . . . . . . . . . . . . . . . . . . . . . . . . . . . . . . . . . . . . . . . 247
About Book Report . . . . . . . . . . . . . . . . . . . . . . . . . . . . . . . . . . . . . . . . . . . . . . . . . . . . . . . . 249
Introduction to the Audit Controls menu . . . . . . . . . . . . . . . . . . . . . . . . . . . . . . . . . . . . 249
About the Wash to Register Comparison Report . . . . . . . . . . . . . . . . . . . . . . . . . . . . . 251
View the Wash To Register Comparison Report . . . . . . . . . . . . . . . . . . . . 251
Wash to Register Comparison Report Example. . . . . . . . . . . . . . . . . . . . . 252
Wash to Register Comparison Report Descriptions. . . . . . . . . . . . . . . . . 253
About the Ticket Comparison Report. . . . . . . . . . . . . . . . . . . . . . . . . . . . . . . . . . . . . . . . 254
View the Ticket Comparison Report . . . . . . . . . . . . . . . . . . . . . . . . . . . . . . . 254
Identifying Potential Theft . . . . . . . . . . . . . . . . . . . . . . . . . . . . . . . . . . . . . . . . 255
Ticket Comparison Report Example . . . . . . . . . . . . . . . . . . . . . . . . . . . . . . . 256
Ticket Comparison Field Descriptions . . . . . . . . . . . . . . . . . . . . . . . . . . . . . 257
About Transactional Detail . . . . . . . . . . . . . . . . . . . . . . . . . . . . . . . . . . . . . . . . . . . . . . . . . 258
WashConnect® User Manual—Version 6.0
8
View Transaction Detail Report. . . . . . . . . . . . . . . . . . . . . . . . . . . . . . . . . . . . 258
Transaction Detail Field Descriptions . . . . . . . . . . . . . . . . . . . . . . . . . . . . . . 260
About Terminal Balance Report. . . . . . . . . . . . . . . . . . . . . . . . . . . . . . . . . . . . . . . . . . . . . 261
View Terminal Balance Report. . . . . . . . . . . . . . . . . . . . . . . . . . . . . . . . . . . . . 261
Terminal Balance Field Descriptions . . . . . . . . . . . . . . . . . . . . . . . . . . . . . . . 263
About Sales Commission . . . . . . . . . . . . . . . . . . . . . . . . . . . . . . . . . . . . . . . . . . . . . . . . . . . 263
View Sales Commission . . . . . . . . . . . . . . . . . . . . . . . . . . . . . . . . . . . . . . . . . . . 264
About View Site Tickets . . . . . . . . . . . . . . . . . . . . . . . . . . . . . . . . . . . . . . . . . . . . . . . . . . . . 265
View Site Tickets. . . . . . . . . . . . . . . . . . . . . . . . . . . . . . . . . . . . . . . . . . . . . . . . . . 265
About the Services Washed Report. . . . . . . . . . . . . . . . . . . . . . . . . . . . . . . . . . . . . . . . . . 267
About the Controller Services Report . . . . . . . . . . . . . . . . . . . . . . . . . . . . . . . . . . . . . . . 269
View Controller Services Report . . . . . . . . . . . . . . . . . . . . . . . . . . . . . . . . . . . 269
About the Audit Trail Log . . . . . . . . . . . . . . . . . . . . . . . . . . . . . . . . . . . . . . . . . . . . . . . . . . 270
About Cash Management . . . . . . . . . . . . . . . . . . . . . . . . . . . . . . . . . . . . . . . . . . . . . . . . . . 271
About Journals . . . . . . . . . . . . . . . . . . . . . . . . . . . . . . . . . . . . . . . . . . . . . . . . . . . . . . . . . . . . 272
Search for a Journal Entry . . . . . . . . . . . . . . . . . . . . . . . . . . . . . . . . . . . . . . . . . 273
View the Journal Entry History . . . . . . . . . . . . . . . . . . . . . . . . . . . . . . . . . . . . 274
About Journal History Actions . . . . . . . . . . . . . . . . . . . . . . . . . . . . . . . . . . . . 276
Verify or Edit a Journal Entry . . . . . . . . . . . . . . . . . . . . . . . . . . . . . . . . . . . . . . 277
Edit a Verified Journal Entry . . . . . . . . . . . . . . . . . . . . . . . . . . . . . . . . . . . . . . . 279
Journal Safe Actions . . . . . . . . . . . . . . . . . . . . . . . . . . . . . . . . . . . . . . . . . . . . . . . . . . . . . . . 280
Add from Bank . . . . . . . . . . . . . . . . . . . . . . . . . . . . . . . . . . . . . . . . . . . . . . . . . . . 281
Add from Other Source . . . . . . . . . . . . . . . . . . . . . . . . . . . . . . . . . . . . . . . . . . . 282
Convert Currency. . . . . . . . . . . . . . . . . . . . . . . . . . . . . . . . . . . . . . . . . . . . . . . . . 283
Deposit to Bank . . . . . . . . . . . . . . . . . . . . . . . . . . . . . . . . . . . . . . . . . . . . . . . . . . 285
Remove to Other Source . . . . . . . . . . . . . . . . . . . . . . . . . . . . . . . . . . . . . . . . . . 286
Verify Safe. . . . . . . . . . . . . . . . . . . . . . . . . . . . . . . . . . . . . . . . . . . . . . . . . . . . . . . . 287
Print Journal Detail Receipt . . . . . . . . . . . . . . . . . . . . . . . . . . . . . . . . . . . . . . . 288
About Terminal Balances. . . . . . . . . . . . . . . . . . . . . . . . . . . . . . . . . . . . . . . . . . . . . . . . . . . 289
View Terminal Balances . . . . . . . . . . . . . . . . . . . . . . . . . . . . . . . . . . . . . . . . . . . 289
About the Operations Report . . . . . . . . . . . . . . . . . . . . . . . . . . . . . . . . . . . . . . . . . . . . . . . 294
View Operations Report . . . . . . . . . . . . . . . . . . . . . . . . . . . . . . . . . . . . . . . . . . 294
Operations Report Field Descriptions. . . . . . . . . . . . . . . . . . . . . . . . . . . . . . 296
About Ticket Redeemed. . . . . . . . . . . . . . . . . . . . . . . . . . . . . . . . . . . . . . . . . . . . . . . . . . . . 296
About Ticket Redeemed Summary . . . . . . . . . . . . . . . . . . . . . . . . . . . . . . . . . . . . . . . . . . 297
View, Print or Export the Ticket Redeemed Summary . . . . . . . . . . . . . . 297
Ticket Redeemed Summary Field Descriptions. . . . . . . . . . . . . . . . . . . . . 299
About Ticket Redeemed Detail . . . . . . . . . . . . . . . . . . . . . . . . . . . . . . . . . . . . . . . . . . . . . 299
View Ticket Redeemed Detail . . . . . . . . . . . . . . . . . . . . . . . . . . . . . . . . . . . . . 300
Ticket Redeemed Detail Field Descriptions . . . . . . . . . . . . . . . . . . . . . . . . 302

User Manual—Version 6.0 WashConnect®
9
Search for a Fuel Ticket Number. . . . . . . . . . . . . . . . . . . . . . . . . . . . . . . . . . . 302
Chapter 7: Performance . . . . . . . . . . . . . . . . . . . . . . . . . . . . . . . . . . . . . . . . . . . . . . . . . . . . . . . . . . . . . . . . . . . . . . . . . . . 305
Performance Reports Menu FAQs . . . . . . . . . . . . . . . . . . . . . . . . . . . . . . . . . 306
Performance Reports Menu Descriptions . . . . . . . . . . . . . . . . . . . . . . . . . . 307
About the Performance Menu. . . . . . . . . . . . . . . . . . . . . . . . . . . . . . . . . . . . . 308
About the Dashboard Report . . . . . . . . . . . . . . . . . . . . . . . . . . . . . . . . . . . . . . . . . . . . . . . 310
View Dashboard Reports. . . . . . . . . . . . . . . . . . . . . . . . . . . . . . . . . . . . . . . . . . 310
Change Dashboard Cards . . . . . . . . . . . . . . . . . . . . . . . . . . . . . . . . . . . . . . . . . 312
View Historical Data . . . . . . . . . . . . . . . . . . . . . . . . . . . . . . . . . . . . . . . . . . . . . . 313
Access to Dashboard Directly through Web Browser . . . . . . . . . . . . . . . 314
About the Vehicle Statistical Performance Report (VSPR) . . . . . . . . . . . . . . . . . . . . . 315
View the Vehicle Statistical Performance Report (VSPR) . . . . . . . . . . . . 315
Vehicle Statistical Performance Report Example . . . . . . . . . . . . . 319
Vehicle Statistical Performance Report Descriptions . . . . . . . . . . . . . . . 320
Site Selection Search Tools for Vehicle Statistical Performance Report321
View Daily VSPR . . . . . . . . . . . . . . . . . . . . . . . . . . . . . . . . . . . . . . . . . . . . . . . . . . 322
View Annual VSPR . . . . . . . . . . . . . . . . . . . . . . . . . . . . . . . . . . . . . . . . . . . . . . . . 324
View Weekly VSPR . . . . . . . . . . . . . . . . . . . . . . . . . . . . . . . . . . . . . . . . . . . . . . . . 325
Empty Sites Selection Tree . . . . . . . . . . . . . . . . . . . . . . . . . . . . . . . . . . . . . . . . 325
About the Performance Gauge Report . . . . . . . . . . . . . . . . . . . . . . . . . . . . . . . . . . . . . . 327
View the Performance Gauge report . . . . . . . . . . . . . . . . . . . . . . . . . . . . . . 327
Performance Gauge Report Example . . . . . . . . . . . . . . . . . . . . . . . . . . . . . . 328
Performance Gauge Report Descriptions . . . . . . . . . . . . . . . . . . . . . . . . . . 330
About the Sales Distribution Report . . . . . . . . . . . . . . . . . . . . . . . . . . . . . . . . . . . . . . . . 332
View the Sales Distribution Report . . . . . . . . . . . . . . . . . . . . . . . . . . . . . . . . 332
Sales Distribution Example. . . . . . . . . . . . . . . . . . . . . . . . . . . . . . . . . . . . . . . . 333
Sales Distribution Report Descriptions. . . . . . . . . . . . . . . . . . . . . . . . . . . . . 334
About the Touch ’N Clean Usage Report . . . . . . . . . . . . . . . . . . . . . . . . . . . . . . . . . . . . . 335
View TouchNClean Usage Report . . . . . . . . . . . . . . . . . . . . . . . . . . . . . . . . . 335
. . . . . . . . . . . . . . . . . . . . . . . . . . . . . . . . . . . . . . . . . . . . . . . . . . . . . . . . . . . . . . . . . . 336
Touch ’N Clean Services Report Descriptions . . . . . . . . . . . . . . . . . . . . . . 336
About RFID Statistics. . . . . . . . . . . . . . . . . . . . . . . . . . . . . . . . . . . . . . . . . . . . . . . . . . . . . . . 337
View RFID Transactions Reads. . . . . . . . . . . . . . . . . . . . . . . . . . . . . . . . . . . . . 338
RFID Statistics Report . . . . . . . . . . . . . . . . . . . . . . . . . . . . . . . . . . . . . . . . . . . . . 339
RFID Statistics Report Color Descriptions . . . . . . . . . . . . . . . . . . . . . . . . . . 340
RFID Statistics Report Admin Swipes Only . . . . . . . . . . . . . . . . . . . . . . . . 341
RFID Statistics Report Multiple RFID Reads Only Example . . . . . . . . . 342
RFID Statistics Report Descriptions . . . . . . . . . . . . . . . . . . . . . . . . . . . . . . . 343
About Statistical Comparison Report. . . . . . . . . . . . . . . . . . . . . . . . . . . . . . . . . . . . . . . . 344
View Statistical Comparison. . . . . . . . . . . . . . . . . . . . . . . . . . . . . . . . . . . . . . . 344
Statistical Comparison Report Descriptions . . . . . . . . . . . . . . . . . . . . . . 346

WashConnect® User Manual—Version 6.0
10
About the Projection Report. . . . . . . . . . . . . . . . . . . . . . . . . . . . . . . . . . . . . . . . . . . . . . . . 346
View the Projection Analysis . . . . . . . . . . . . . . . . . . . . . . . . . . . . . . . . . . . . . . 346
Chapter 8: Monitoring System . . . . . . . . . . . . . . . . . . . . . . . . . . . . . . . . . . . . . . . . . . . . . . . . . . . . . . . . . . . . . . . . . . . . . 349
Monitoring System Menu FAQ . . . . . . . . . . . . . . . . . . . . . . . . . . . . . . . . . . . . 350
About the Monitoring System . . . . . . . . . . . . . . . . . . . . . . . . . . . . . . . . . . . . . . . . . . . . . . 352
View an Error Code . . . . . . . . . . . . . . . . . . . . . . . . . . . . . . . . . . . . . . . . . . . . . . . 352
About Status . . . . . . . . . . . . . . . . . . . . . . . . . . . . . . . . . . . . . . . . . . . . . . . . . . . . . . . . . . . . . . 354
View Status. . . . . . . . . . . . . . . . . . . . . . . . . . . . . . . . . . . . . . . . . . . . . . . . . . . . . . . 355
About the Status of Entities, Devices and Components. . . . . . . . . . . . . 356
Site Device Key . . . . . . . . . . . . . . . . . . . . . . . . . . . . . . . . . . . . . . . . . . . . . . . . . . . 358
Status and Error Message Descriptions . . . . . . . . . . . . . . . . . . . . . . . . . . . . 358
Wash Status . . . . . . . . . . . . . . . . . . . . . . . . . . . . . . . . . . . . . . . . . . . . . . . . . . . . . . . . . . . . . . . 359
About Event History . . . . . . . . . . . . . . . . . . . . . . . . . . . . . . . . . . . . . . . . . . . . . . . . . . . . . . . 361
View Event History Log . . . . . . . . . . . . . . . . . . . . . . . . . . . . . . . . . . . . . . . . . . . 361
Search for an Event Code . . . . . . . . . . . . . . . . . . . . . . . . . . . . . . . . . . . . . . . . . 362
About Device Statistics. . . . . . . . . . . . . . . . . . . . . . . . . . . . . . . . . . . . . . . . . . . . . . . . . . . . . 365
View Device Statistics. . . . . . . . . . . . . . . . . . . . . . . . . . . . . . . . . . . . . . . . . . . . . 366
Device Statistics Descriptions . . . . . . . . . . . . . . . . . . . . . . . . . . . . . . . . . . . . . 367
About Version History . . . . . . . . . . . . . . . . . . . . . . . . . . . . . . . . . . . . . . . . . . . . . . . . . . . . . 368
View Version History. . . . . . . . . . . . . . . . . . . . . . . . . . . . . . . . . . . . . . . . . . . . . . 369
Version History Descriptions . . . . . . . . . . . . . . . . . . . . . . . . . . . . . . . . . . . . . . 370
Chapter 9: Configuration . . . . . . . . . . . . . . . . . . . . . . . . . . . . . . . . . . . . . . . . . . . . . . . . . . . . . . . . . . . . . . . . . . . . . . . . . . 371
Configuration Menu FAQs . . . . . . . . . . . . . . . . . . . . . . . . . . . . . . . . . . . . . . . . 373
Managing Clubs . . . . . . . . . . . . . . . . . . . . . . . . . . . . . . . . . . . . . . . . . . . . . . . . . . 374
Managing Fleets. . . . . . . . . . . . . . . . . . . . . . . . . . . . . . . . . . . . . . . . . . . . . . . . . . 374
Goods and Services . . . . . . . . . . . . . . . . . . . . . . . . . . . . . . . . . . . . . . . . . . . . . . . . . . . . . . . . 374
About Club Services . . . . . . . . . . . . . . . . . . . . . . . . . . . . . . . . . . . . . . . . . . . . . . . . . . . . . . . 375
Add a Club Service. . . . . . . . . . . . . . . . . . . . . . . . . . . . . . . . . . . . . . . . . . . . . . . . 376
Edit a Club Service . . . . . . . . . . . . . . . . . . . . . . . . . . . . . . . . . . . . . . . . . . . . . . . . 382
Terminate a Club Service . . . . . . . . . . . . . . . . . . . . . . . . . . . . . . . . . . . . . . . . . 383
Reorder Club Service Columns in Ascending/Descending Order. . . . 384
Filter the Club Service List. . . . . . . . . . . . . . . . . . . . . . . . . . . . . . . . . . . . . . . . . 385
Club Rules Examples. . . . . . . . . . . . . . . . . . . . . . . . . . . . . . . . . . . . . . . . . . . . . . 388
Wash Club Customer Experience . . . . . . . . . . . . . . . . . . . . . . . . . . . . . . . . . . 390
About Sales Items . . . . . . . . . . . . . . . . . . . . . . . . . . . . . . . . . . . . . . . . . . . . . . . . . . . . . . . . . 392
Add Sales Item . . . . . . . . . . . . . . . . . . . . . . . . . . . . . . . . . . . . . . . . . . . . . . . . . . . 393
Set Up Gift Card . . . . . . . . . . . . . . . . . . . . . . . . . . . . . . . . . . . . . . . . . . . . . . . . . . 401
About Audio Visual Specifications . . . . . . . . . . . . . . . . . . . . . . . . . . . . . . . . . . . . . . . . . . 403

User Manual—Version 6.0 WashConnect®
11
About Variable Pricing . . . . . . . . . . . . . . . . . . . . . . . . . . . . . . . . . . . . . . . . . . . . 405
Apply Variable Pricing to Sales Item . . . . . . . . . . . . . . . . . . . . . . . . . . . . . . . 405
About Custom Advertise Video . . . . . . . . . . . . . . . . . . . . . . . . . . . . . . . . . . . 406
About Extra Advertise Video . . . . . . . . . . . . . . . . . . . . . . . . . . . . . . . . . . . . . . 407
Sort Sales Item List. . . . . . . . . . . . . . . . . . . . . . . . . . . . . . . . . . . . . . . . . . . . . . . . 407
Sales Item Search . . . . . . . . . . . . . . . . . . . . . . . . . . . . . . . . . . . . . . . . . . . . . . . . . 407
Edit Sales Item. . . . . . . . . . . . . . . . . . . . . . . . . . . . . . . . . . . . . . . . . . . . . . . . . . . . 408
Delete Sales Item . . . . . . . . . . . . . . . . . . . . . . . . . . . . . . . . . . . . . . . . . . . . . . . . . 409
About Sales Item PLUs and Profiles. . . . . . . . . . . . . . . . . . . . . . . . . . . . . . . . 410
Flex / Retail Standard Screen . . . . . . . . . . . . . . . . . . . . . . . . . . . . . . . . . . . . . . 411
Sensing a High Vehicle Profile. . . . . . . . . . . . . . . . . . . . . . . . . . . . . . . . . . . . . 413
Sales Item Descriptions . . . . . . . . . . . . . . . . . . . . . . . . . . . . . . . . . . . . . . . . . . . 414
About Packages . . . . . . . . . . . . . . . . . . . . . . . . . . . . . . . . . . . . . . . . . . . . . . . . . . . . . . . . . . . 417
Packages . . . . . . . . . . . . . . . . . . . . . . . . . . . . . . . . . . . . . . . . . . . . . . . . . . . . . . . . . 418
Create a Package . . . . . . . . . . . . . . . . . . . . . . . . . . . . . . . . . . . . . . . . . . . . . . . . . 418
Delete a Package . . . . . . . . . . . . . . . . . . . . . . . . . . . . . . . . . . . . . . . . . . . . . . . . . 421
Edit a Package . . . . . . . . . . . . . . . . . . . . . . . . . . . . . . . . . . . . . . . . . . . . . . . . . . . . 421
Create an Upsell Package . . . . . . . . . . . . . . . . . . . . . . . . . . . . . . . . . . . . . . . . . 422
About Frequency Promotion Packages . . . . . . . . . . . . . . . . . . . . . . . . . . . . 423
About Wash Books. . . . . . . . . . . . . . . . . . . . . . . . . . . . . . . . . . . . . . . . . . . . . . . . . . . . . . . . . 424
Add Base Wash Sales Item for Wash Book offering . . . . . . . . . . . . . . . . . 425
Add Wash Book as a Sales Item. . . . . . . . . . . . . . . . . . . . . . . . . . . . . . . . . . . . 426
Purchase Wash Books at the Auto Sentry . . . . . . . . . . . . . . . . . . . . . . . . . . 428
Recharge Wash Book at Auto Sentry. . . . . . . . . . . . . . . . . . . . . . . . . . . . . . . 429
Redeem Wash Book at Auto Sentry. . . . . . . . . . . . . . . . . . . . . . . . . . . . . . . . 430
View Wash Books in Shift Detail Report . . . . . . . . . . . . . . . . . . . . . . . . . . . . 431
Email Wash Book Receipt . . . . . . . . . . . . . . . . . . . . . . . . . . . . . . . . . . . . . . . . . 432
Sell Wash Books at Convenience Stores . . . . . . . . . . . . . . . . . . . . . . . . . . . 433
About Profiles . . . . . . . . . . . . . . . . . . . . . . . . . . . . . . . . . . . . . . . . . . . . . . . . . . . . . . . . . . . . . 434
Add a Profile with a Base Wash and Extra Service . . . . . . . . . . . . . . . . . . 435
Enable Profile . . . . . . . . . . . . . . . . . . . . . . . . . . . . . . . . . . . . . . . . . . . . . . . . . . . . 438
Add Extra Services to a Profile. . . . . . . . . . . . . . . . . . . . . . . . . . . . . . . . . . . . . 438
Edit a Profile. . . . . . . . . . . . . . . . . . . . . . . . . . . . . . . . . . . . . . . . . . . . . . . . . . . . . . 440
About Schedules . . . . . . . . . . . . . . . . . . . . . . . . . . . . . . . . . . . . . . . . . . . . . . . . . 441
Profile and Schedule Descriptions . . . . . . . . . . . . . . . . . . . . . . . . . . . . . . . . . 442
Add Profile Schedule . . . . . . . . . . . . . . . . . . . . . . . . . . . . . . . . . . . . . . . . . . . . . 444
Edit Schedule. . . . . . . . . . . . . . . . . . . . . . . . . . . . . . . . . . . . . . . . . . . . . . . . . . . . . 445
Delete Schedule . . . . . . . . . . . . . . . . . . . . . . . . . . . . . . . . . . . . . . . . . . . . . . . . . . 446
Add a Wash Book Profile with Base Washes and Extra Services . . . . . 447
Schedule a Wash Book Profile . . . . . . . . . . . . . . . . . . . . . . . . . . . . . . . . . . . . . 449
About POS Profiles. . . . . . . . . . . . . . . . . . . . . . . . . . . . . . . . . . . . . . . . . . . . . . . . . . . . . . . . . 451
Add a POS Profile . . . . . . . . . . . . . . . . . . . . . . . . . . . . . . . . . . . . . . . . . . . . . . . . . 452
Add a POS Profile Schedule . . . . . . . . . . . . . . . . . . . . . . . . . . . . . . . . . . . . . . . 452
About Promotions . . . . . . . . . . . . . . . . . . . . . . . . . . . . . . . . . . . . . . . . . . . . . . . . . . . . . . . . . 454

WashConnect® User Manual—Version 6.0
12
About Bonus Points. . . . . . . . . . . . . . . . . . . . . . . . . . . . . . . . . . . . . . . . . . . . . . . . . . . . . . . . 455
Add Bonus Point Promotion . . . . . . . . . . . . . . . . . . . . . . . . . . . . . . . . . . . . . . 456
Enable Promotion . . . . . . . . . . . . . . . . . . . . . . . . . . . . . . . . . . . . . . . . . . . . . . . . 458
Disable Promotion. . . . . . . . . . . . . . . . . . . . . . . . . . . . . . . . . . . . . . . . . . . . . . . . 459
Terminate Promotion . . . . . . . . . . . . . . . . . . . . . . . . . . . . . . . . . . . . . . . . . . . . . 459
Bonus Points Specific to PLU . . . . . . . . . . . . . . . . . . . . . . . . . . . . . . . . . . . . . . 460
View Bonus Points . . . . . . . . . . . . . . . . . . . . . . . . . . . . . . . . . . . . . . . . . . . . . . . . 462
Edit Bonus Point Counts . . . . . . . . . . . . . . . . . . . . . . . . . . . . . . . . . . . . . . . . . . 462
View History of Bonus Points Edits . . . . . . . . . . . . . . . . . . . . . . . . . . . . . . . . 464
Cascade Pricing. . . . . . . . . . . . . . . . . . . . . . . . . . . . . . . . . . . . . . . . . . . . . . . . . . . . . . . . . . . . 465
Cascade Pricing Example . . . . . . . . . . . . . . . . . . . . . . . . . . . . . . . . . . . . . . . . . 466
Configure Cascade Pricing . . . . . . . . . . . . . . . . . . . . . . . . . . . . . . . . . . . . . . . . 467
Apply Cascade Pricing Sales Item . . . . . . . . . . . . . . . . . . . . . . . . . . . . . . . . . 467
About Punch Card . . . . . . . . . . . . . . . . . . . . . . . . . . . . . . . . . . . . . . . . . . . . . . . . . . . . . . . . . 469
Add a Punch Card Promotion . . . . . . . . . . . . . . . . . . . . . . . . . . . . . . . . . . . . . 470
View Punch Card Statistics . . . . . . . . . . . . . . . . . . . . . . . . . . . . . . . . . . . . . . . . 471
Edit Punch Card Counts. . . . . . . . . . . . . . . . . . . . . . . . . . . . . . . . . . . . . . . . . . . 472
View History of Punch Card Edits . . . . . . . . . . . . . . . . . . . . . . . . . . . . . . . . . . 474
Customer Date . . . . . . . . . . . . . . . . . . . . . . . . . . . . . . . . . . . . . . . . . . . . . . . . . . . . . . . . . . . . 475
Calendar Date . . . . . . . . . . . . . . . . . . . . . . . . . . . . . . . . . . . . . . . . . . . . . . . . . . . . . . . . . . . . . 478
Frequent Car . . . . . . . . . . . . . . . . . . . . . . . . . . . . . . . . . . . . . . . . . . . . . . . . . . . . . . . . . . . . . . 479
Frequent Customer . . . . . . . . . . . . . . . . . . . . . . . . . . . . . . . . . . . . . . . . . . . . . . . . . . . . . . . . 480
Discount Price List Promotion . . . . . . . . . . . . . . . . . . . . . . . . . . . . . . . . . . . . . . . . . . . . . . 481
About Promo Setup . . . . . . . . . . . . . . . . . . . . . . . . . . . . . . . . . . . . . . . . . . . . . . . . . . . . . . . . 482
Setup a Frequency Promotion . . . . . . . . . . . . . . . . . . . . . . . . . . . . . . . . . . . . 483
Disable a Frequency Promotion . . . . . . . . . . . . . . . . . . . . . . . . . . . . . . . . . . . 484
Frequency Promotion Package. . . . . . . . . . . . . . . . . . . . . . . . . . . . . . . . . . . . 485
Disable a Frequency Promotion . . . . . . . . . . . . . . . . . . . . . . . . . . . . . . . . . . . 490
Frequency Promotion Package. . . . . . . . . . . . . . . . . . . . . . . . . . . . . . . . . . . . 491
About Promo Receipt Text . . . . . . . . . . . . . . . . . . . . . . . . . . . . . . . . . . . . . . . . . . . . . . . . . 492
Add Promo Receipt Text . . . . . . . . . . . . . . . . . . . . . . . . . . . . . . . . . . . . . . . . . . 492
Edit Promo Receipt Text . . . . . . . . . . . . . . . . . . . . . . . . . . . . . . . . . . . . . . . . . . 494
Delete a Frequency Promotion Receipt Text . . . . . . . . . . . . . . . . . . . . . . . 495
About Alerts. . . . . . . . . . . . . . . . . . . . . . . . . . . . . . . . . . . . . . . . . . . . . . . . . . . . . . . . . . . . . . . 496
Subscribe to Email Alerts. . . . . . . . . . . . . . . . . . . . . . . . . . . . . . . . . . . . . . . . . . 497
Test Alerts . . . . . . . . . . . . . . . . . . . . . . . . . . . . . . . . . . . . . . . . . . . . . . . . . . . . . . . . 498
Send a Test Alert . . . . . . . . . . . . . . . . . . . . . . . . . . . . . . . . . . . . . . . . . . . . . . . . . 499
Alert Configuration Example . . . . . . . . . . . . . . . . . . . . . . . . . . . . . . . . . . . . . . 499
Alert Configuration Dialog Box field descriptions . . . . . . . . . . . . . . . . . . 500
About Export System Data . . . . . . . . . . . . . . . . . . . . . . . . . . . . . . . . . . . . . . . . . . . . . . . . . 501
About the Accounting Interface . . . . . . . . . . . . . . . . . . . . . . . . . . . . . . . . . . . . . . . . . . . . 503

User Manual—Version 6.0 WashConnect®
13
About Manage Accounts . . . . . . . . . . . . . . . . . . . . . . . . . . . . . . . . . . . . . . . . . . . . . . . . . . . 504
Add an Account . . . . . . . . . . . . . . . . . . . . . . . . . . . . . . . . . . . . . . . . . . . . . . . . . . 504
Terminate an Account . . . . . . . . . . . . . . . . . . . . . . . . . . . . . . . . . . . . . . . . . . . . 505
Reactivate an Account . . . . . . . . . . . . . . . . . . . . . . . . . . . . . . . . . . . . . . . . . . . . 506
About Import Accounts . . . . . . . . . . . . . . . . . . . . . . . . . . . . . . . . . . . . . . . . . . . . . . . . . . . . 507
Import Chart of Accounts . . . . . . . . . . . . . . . . . . . . . . . . . . . . . . . . . . . . . . . . . 507
About Payment Account . . . . . . . . . . . . . . . . . . . . . . . . . . . . . . . . . . . . . . . . . . . . . . . . . . . 509
Edit Payment Account . . . . . . . . . . . . . . . . . . . . . . . . . . . . . . . . . . . . . . . . . . . . 509
About System Items . . . . . . . . . . . . . . . . . . . . . . . . . . . . . . . . . . . . . . . . . . . . . . . . . . . . . . . 511
Search for a System Service . . . . . . . . . . . . . . . . . . . . . . . . . . . . . . . . . . . . . . . 512
Edit System Service Items . . . . . . . . . . . . . . . . . . . . . . . . . . . . . . . . . . . . . . . . . 512
About Commissions . . . . . . . . . . . . . . . . . . . . . . . . . . . . . . . . . . . . . . . . . . . . . . . . . . . . . . . 513
About Commissions Positions . . . . . . . . . . . . . . . . . . . . . . . . . . . . . . . . . . . . . . . . . . . . . . 514
Add Commission Position. . . . . . . . . . . . . . . . . . . . . . . . . . . . . . . . . . . . . . . . . 514
Straight Commission . . . . . . . . . . . . . . . . . . . . . . . . . . . . . . . . . . . . . . . . . . . . . 516
About Commissions Eligibility Rules . . . . . . . . . . . . . . . . . . . . . . . . . . . . . . . . . . . . . . . . 516
Add Eligibility Rules for a Commission. . . . . . . . . . . . . . . . . . . . . . . . . . . . . 516
Remove Eligibility Rules. . . . . . . . . . . . . . . . . . . . . . . . . . . . . . . . . . . . . . . . . . . 519
Advanced Eligibility Rules. . . . . . . . . . . . . . . . . . . . . . . . . . . . . . . . . . . . . . . . . 519
About Commissions Schedules . . . . . . . . . . . . . . . . . . . . . . . . . . . . . . . . . . . . . . . . . . . . . 520
Add a Sales Commission Schedule . . . . . . . . . . . . . . . . . . . . . . . . . . . . . . . . 520
Edit a Sales Commission Schedule. . . . . . . . . . . . . . . . . . . . . . . . . . . . . . . . . 522
Delete a Sales Commission Schedule . . . . . . . . . . . . . . . . . . . . . . . . . . . . . . 523
Sales Commission Example . . . . . . . . . . . . . . . . . . . . . . . . . . . . . . . . . . . . . . . 524
Chapter 10: Users . . . . . . . . . . . . . . . . . . . . . . . . . . . . . . . . . . . . . . . . . . . . . . . . . . . . . . . . . . . . . . . . . . . . . . . . . . . . . . . . . . 525
Manage Users Example . . . . . . . . . . . . . . . . . . . . . . . . . . . . . . . . . . . . . . . . . . . 526
About Security Roles . . . . . . . . . . . . . . . . . . . . . . . . . . . . . . . . . . . . . . . . . . . . . . . . . . . . . . . 528
Security Roles . . . . . . . . . . . . . . . . . . . . . . . . . . . . . . . . . . . . . . . . . . . . . . . . . . . . . . . . . . . . . 529
Add User Security Role. . . . . . . . . . . . . . . . . . . . . . . . . . . . . . . . . . . . . . . . . . . . 531
Edit Security Role . . . . . . . . . . . . . . . . . . . . . . . . . . . . . . . . . . . . . . . . . . . . . . . . . 532
Delete Security Role . . . . . . . . . . . . . . . . . . . . . . . . . . . . . . . . . . . . . . . . . . . . . . 534
Example for Users and Roles . . . . . . . . . . . . . . . . . . . . . . . . . . . . . . . . . . . . . . 534
About Manage Users . . . . . . . . . . . . . . . . . . . . . . . . . . . . . . . . . . . . . . . . . . . . . . . . . . . . . . . 541
Manage Users . . . . . . . . . . . . . . . . . . . . . . . . . . . . . . . . . . . . . . . . . . . . . . . . . . . . 541
Add User . . . . . . . . . . . . . . . . . . . . . . . . . . . . . . . . . . . . . . . . . . . . . . . . . . . . . . . . . 543
Search for Users . . . . . . . . . . . . . . . . . . . . . . . . . . . . . . . . . . . . . . . . . . . . . . . . . . 545
Manage User Field Descriptions . . . . . . . . . . . . . . . . . . . . . . . . . . . . . . . . . . . 546
Add or Edit Wages for a User . . . . . . . . . . . . . . . . . . . . . . . . . . . . . . . . . . . . . . 547
Edit User . . . . . . . . . . . . . . . . . . . . . . . . . . . . . . . . . . . . . . . . . . . . . . . . . . . . . . . . . 549
Delete User. . . . . . . . . . . . . . . . . . . . . . . . . . . . . . . . . . . . . . . . . . . . . . . . . . . . . . . 551

WashConnect® User Manual—Version 6.0
14
Add User’s Fingerprints . . . . . . . . . . . . . . . . . . . . . . . . . . . . . . . . . . . . . . . . . . . 552
Delete a Fingerprint . . . . . . . . . . . . . . . . . . . . . . . . . . . . . . . . . . . . . . . . . . . . . . 554
. . . . . . . . . . . . . . . . . . . . . . . . . . . . . . . . . . . . . . . . . . . . . . . . . . . . . . . . . . . . . . . . . . 555
Chapter 11: TOUCH POS . . . . . . . . . . . . . . . . . . . . . . . . . . . 557
Open Shift . . . . . . . . . . . . . . . . . . . . . . . . . . . . . . . . . . . . . . . . . . . . . . . . . . . . . . . . . . . . . . . . 559
About Add / Remove from POS . . . . . . . . . . . . . . . . . . . . . . . . . . . . . . . . . . . . . . . . . . . . . 562
Close Shift. . . . . . . . . . . . . . . . . . . . . . . . . . . . . . . . . . . . . . . . . . . . . . . . . . . . . . . . . . . . . . . . . 564
PreSell Terminal . . . . . . . . . . . . . . . . . . . . . . . . . . . . . . . . . . . . . . . . . . . . . . . . . . . . . . . . . . . 566
Point of Sale with PreSell and without RFID. . . . . . . . . . . . . . . . . . . . . . . . . . . . . . . . . . 568
Purchase new club membership (for the first vehicle) . . . . . . . . . . . . . . 568
Renew Club Membership . . . . . . . . . . . . . . . . . . . . . . . . . . . . . . . . . . . . . . . . . 569
Add Customer Information . . . . . . . . . . . . . . . . . . . . . . . . . . . . . . . . . . . . . . . 571
Purchase Club Membership for a 2nd Vehicle (for an Existing Customer)571
Terminate or Suspend Vehicles but NOT Customer . . . . . . . . . . . . . . . . 572
Terminate or Suspend Customer and All Vehicles . . . . . . . . . . . . . . . . . . 573
RFID is Not Working . . . . . . . . . . . . . . . . . . . . . . . . . . . . . . . . . . . . . . . . . . . . . . 574
Available Promotions . . . . . . . . . . . . . . . . . . . . . . . . . . . . . . . . . . . . . . . . . . . . . 575
Recharge Wash Books . . . . . . . . . . . . . . . . . . . . . . . . . . . . . . . . . . . . . . . . . . . . 576
About Touch POS Sales Entry . . . . . . . . . . . . . . . . . . . . . . . . . . . . . . . . . . . . . . . . . . . . . . . 579
About POS and Presell Service Buttons . . . . . . . . . . . . . . . . . . . . . . . . . . . . . . . . . . . . . . 580
Enter a New Sales Transaction at Touch POS. . . . . . . . . . . . . . . . . . . . . . . 582
Paying with a credit card (3rd party credit card provider). . . . . . . . . . . 586
Remove Sales Items . . . . . . . . . . . . . . . . . . . . . . . . . . . . . . . . . . . . . . . . . . . . . . 586
Clear Sales Items . . . . . . . . . . . . . . . . . . . . . . . . . . . . . . . . . . . . . . . . . . . . . . . . . 587
Purchase a Club Membership at the Auto Sentry terminal . . . . . . . . . . 588
Purchase a Club Membership with a Gift Card at Touch POS. . . . . . . . 589
Split Payments . . . . . . . . . . . . . . . . . . . . . . . . . . . . . . . . . . . . . . . . . . . . . . . . . . . 590
. . . . . . . . . . . . . . . . . . . . . . . . . . . . . . . . . . . . . . . . . . . . . . . . . . . . . . . . . . . . . . . . . . 590
Search for a Sales Transaction in Touch POS . . . . . . . . . . . . . . . . . . . . . . . 590
About Voids . . . . . . . . . . . . . . . . . . . . . . . . . . . . . . . . . . . . . . . . . . . . . . . . . . . . . . . . . . . . . . . 591
Void Sales Transaction . . . . . . . . . . . . . . . . . . . . . . . . . . . . . . . . . . . . . . . . . . . . . . . . . . . . . 592
About Refunds . . . . . . . . . . . . . . . . . . . . . . . . . . . . . . . . . . . . . . . . . . . . . . . . . . . . . . . . . . . . 594
Refund with a Receipt . . . . . . . . . . . . . . . . . . . . . . . . . . . . . . . . . . . . . . . . . . . . . . . . . . . . . . 594
Refund without a Receipt . . . . . . . . . . . . . . . . . . . . . . . . . . . . . . . . . . . . . . . . . . . . . . . . . . 595
Free Wash or ReWash . . . . . . . . . . . . . . . . . . . . . . . . . . . . . . . . . . . . . . . . . . . . . . . . . . . . . . 596
Free Wash / ReWash . . . . . . . . . . . . . . . . . . . . . . . . . . . . . . . . . . . . . . . . . . . . . . 596
Tracking Rewash or Free Washes . . . . . . . . . . . . . . . . . . . . . . . . . . . . . . . . . . 598
ROA (Received on Account). . . . . . . . . . . . . . . . . . . . . . . . . . . . . . . . . . . . . . . . . . . . . . . . . 598
Payout . . . . . . . . . . . . . . . . . . . . . . . . . . . . . . . . . . . . . . . . . . . . . . . . . . . . . . . . . . . . . . . . . . . . 601

User Manual—Version 6.0 WashConnect®
15
About Ticket Generation . . . . . . . . . . . . . . . . . . . . . . . . . . . . . . . . . . . . . . . . . . . . . . . . . . . 602
Ticket Generation for 5-digit Wash Codes. . . . . . . . . . . . . . . . . . . . . . . . . . 602
Setup your Auto Sentry to Redeem Wash Codes . . . . . . . . . . . . . . . . . . . 604
Ticket Generation for 6-digit Wash Codes. . . . . . . . . . . . . . . . . . . . . . . . . . 605
Ticket Generation for 6-digit Wash Code Example . . . . . . . . . . . . . . . . . 607
About Stack . . . . . . . . . . . . . . . . . . . . . . . . . . . . . . . . . . . . . . . . . . . . . . . . . . . . . . . . . . . . . . . 607
About Generated Books. . . . . . . . . . . . . . . . . . . . . . . . . . . . . . . . . . . . . . . . . . . . . . . . . . . . 609
Chapter 12: System Setup . . . . . . . . . . . . . . . . . . . . . . . . . . . . . . . . . . . . . . . . . . . . . . . . . . . . . . . . . . . . . . . . . . . . . . . . . . 611
System Setup FAQs . . . . . . . . . . . . . . . . . . . . . . . . . . . . . . . . . . . . . . . . . . . . . . . 613
About the System Setup Menu. . . . . . . . . . . . . . . . . . . . . . . . . . . . . . . . . . . . 615
Devices . . . . . . . . . . . . . . . . . . . . . . . . . . . . . . . . . . . . . . . . . . . . . . . . . . . . . . . . . . 616
Profit Centers. . . . . . . . . . . . . . . . . . . . . . . . . . . . . . . . . . . . . . . . . . . . . . . . . . . . . 617
About Sales Tax . . . . . . . . . . . . . . . . . . . . . . . . . . . . . . . . . . . . . . . . . . . . . . . . . . . . . . . . . . . 617
Add Sales Tax . . . . . . . . . . . . . . . . . . . . . . . . . . . . . . . . . . . . . . . . . . . . . . . . . . . . 618
Edit a Sales Tax . . . . . . . . . . . . . . . . . . . . . . . . . . . . . . . . . . . . . . . . . . . . . . . . . . . 619
Assign Inventory to Item Tax Only. . . . . . . . . . . . . . . . . . . . . . . . . . . . . . . . . 620
About Define Payment Types. . . . . . . . . . . . . . . . . . . . . . . . . . . . . . . . . . . . . . . . . . . . . . . 621
About Report Subscriptions . . . . . . . . . . . . . . . . . . . . . . . . . . . . . . . . . . . . . . . . . . . . . . . . 621
Schedule Report to be sent via Email . . . . . . . . . . . . . . . . . . . . . . . . . . . . . . 621
Edit a Report Email Subscription . . . . . . . . . . . . . . . . . . . . . . . . . . . . . . . . . . 623
Delete a Report Email Subscription. . . . . . . . . . . . . . . . . . . . . . . . . . . . . . . . 624
About the Organizational Layout . . . . . . . . . . . . . . . . . . . . . . . . . . . . . . . . . . . . . . . . . . . 625
Organizational Layout Advanced Concepts. . . . . . . . . . . . . . . . . . . . . . . . . . . . . . . . . . 627
Organizational Layout Details . . . . . . . . . . . . . . . . . . . . . . . . . . . . . . . . . . . . . 627
Organizational Layout Diagram with Four Assigned Sites . . . . . . . . . . 628
About Create Levels . . . . . . . . . . . . . . . . . . . . . . . . . . . . . . . . . . . . . . . . . . . . . . . . . . . . . . . 631
Add a Level. . . . . . . . . . . . . . . . . . . . . . . . . . . . . . . . . . . . . . . . . . . . . . . . . . . . . . . 632
Edit a Level . . . . . . . . . . . . . . . . . . . . . . . . . . . . . . . . . . . . . . . . . . . . . . . . . . . . . . . 633
Delete a Level . . . . . . . . . . . . . . . . . . . . . . . . . . . . . . . . . . . . . . . . . . . . . . . . . . . . 633
About Manage Sites . . . . . . . . . . . . . . . . . . . . . . . . . . . . . . . . . . . . . . . . . . . . . . . . . . . . . . . 634
Manage Sites Field Descriptions. . . . . . . . . . . . . . . . . . . . . . . . . . . . . . . . . . . 635
Add Site. . . . . . . . . . . . . . . . . . . . . . . . . . . . . . . . . . . . . . . . . . . . . . . . . . . . . . . . . . 636
Edit Site . . . . . . . . . . . . . . . . . . . . . . . . . . . . . . . . . . . . . . . . . . . . . . . . . . . . . . . . . . 636
Assign Sites . . . . . . . . . . . . . . . . . . . . . . . . . . . . . . . . . . . . . . . . . . . . . . . . . . . . . . . . . . . . . . . 638
Add a Level to the Organizational Layout. . . . . . . . . . . . . . . . . . . . . . . . . . 639
Edit a Level in the Organizational Layout . . . . . . . . . . . . . . . . . . . . . . . . . . 641
Delete a Level in the Organizational Layout . . . . . . . . . . . . . . . . . . . . . . . 642
About Define Tokens . . . . . . . . . . . . . . . . . . . . . . . . . . . . . . . . . . . . . . . . . . . . . . . . . . . . . . 644
Add a Token. . . . . . . . . . . . . . . . . . . . . . . . . . . . . . . . . . . . . . . . . . . . . . . . . . . . . . 644

WashConnect® User Manual—Version 6.0
16
Edit Token. . . . . . . . . . . . . . . . . . . . . . . . . . . . . . . . . . . . . . . . . . . . . . . . . . . . . . . . 645
Delete Token . . . . . . . . . . . . . . . . . . . . . . . . . . . . . . . . . . . . . . . . . . . . . . . . . . . . . 646
About Device Groups . . . . . . . . . . . . . . . . . . . . . . . . . . . . . . . . . . . . . . . . . . . . . . . . . . . . . . 647
Add A Device Group . . . . . . . . . . . . . . . . . . . . . . . . . . . . . . . . . . . . . . . . . . . . . . 648
Assign Devices to a Device Group . . . . . . . . . . . . . . . . . . . . . . . . . . . . . . . . . 648
Edit Device Group . . . . . . . . . . . . . . . . . . . . . . . . . . . . . . . . . . . . . . . . . . . . . . . . 649
Delete Device Group . . . . . . . . . . . . . . . . . . . . . . . . . . . . . . . . . . . . . . . . . . . . . 650
Refresh Device Group Configuration . . . . . . . . . . . . . . . . . . . . . . . . . . . . . . 651
Assign Settings for a Device Group . . . . . . . . . . . . . . . . . . . . . . . . . . . . . . . . 652
About Settings . . . . . . . . . . . . . . . . . . . . . . . . . . . . . . . . . . . . . . . . . . . . . . . . . . . . . . . . . . . . 654
Search for Device Settings . . . . . . . . . . . . . . . . . . . . . . . . . . . . . . . . . . . . . . . . 654
Settings Description Tables . . . . . . . . . . . . . . . . . . . . . . . . . . . . . . . . . . . . . . . 654
Auto Sentry > Backup. . . . . . . . . . . . . . . . . . . . . . . . . . . . . . . . . . . . . . . . . . . . . 657
Auto Sentry > Books . . . . . . . . . . . . . . . . . . . . . . . . . . . . . . . . . . . . . . . . . . . . . . 657
Auto Sentry > Clubs . . . . . . . . . . . . . . . . . . . . . . . . . . . . . . . . . . . . . . . . . . . . . . 657
Auto Sentry > Clubs . . . . . . . . . . . . . . . . . . . . . . . . . . . . . . . . . . . . . . . . . . . . . . 658
Sell Both Gift Cards and Clubs at Auto Sentry . . . . . . . . . . . . . . . . . . . . . . 659
Renew Membership for existing clubs only Settings . . . . . . . . . . . . . . . 660
Renew Membership with the Option to Select a Different Club Settings661
Auto Sentry > Coin Acceptor . . . . . . . . . . . . . . . . . . . . . . . . . . . . . . . . . . . . . . 663
Auto Sentry > TouchConfiguration > Control . . . . . . . . . . . . . . . . . . . . . . 663
Auto Sentry > TouchConfiguration > CreditCard. . . . . . . . . . . . . . . . . . . 665
Auto Sentry Gift Card . . . . . . . . . . . . . . . . . . . . . . . . . . . . . . . . . . . . . . . . . . . . . 665
Auto Sentry > Gift Card Settings. . . . . . . . . . . . . . . . . . . . . . . . . . . . . . . . . . . 667
Selling Style for Gift Cards at the Auto Sentry . . . . . . . . . . . . . . . . . . . . . . 668
Auto Sentry > InBay Wash . . . . . . . . . . . . . . . . . . . . . . . . . . . . . . . . . . . . . . . . 669
Auto Sentry > InBay Wash . . . . . . . . . . . . . . . . . . . . . . . . . . . . . . . . . . . . . . . . 670
Auto Sentry > TouchConfiguration > Language . . . . . . . . . . . . . . . . . . . 670
Auto Sentry Main Options Buttons . . . . . . . . . . . . . . . . . . . . . . . . . . . . . . . . 670
Auto Sentry > Main Options . . . . . . . . . . . . . . . . . . . . . . . . . . . . . . . . . . . . . . 673
Set up purchase buttons for the Main Options menu . . . . . . . . . . . . . . 674
Auto Sentry > TouchConfiguration Pay Cash . . . . . . . . . . . . . . . . . . . . . . 676
Auto Sentry > Receipt . . . . . . . . . . . . . . . . . . . . . . . . . . . . . . . . . . . . . . . . . . . . 677
Auto Sentry > Receipt Footer . . . . . . . . . . . . . . . . . . . . . . . . . . . . . . . . . . . . . 678
Auto Sentry > Receipt Header. . . . . . . . . . . . . . . . . . . . . . . . . . . . . . . . . . . . . 679
Auto Sentry > Service FontColor . . . . . . . . . . . . . . . . . . . . . . . . . . . . . . . . . . 679
Auto Sentry > Shift . . . . . . . . . . . . . . . . . . . . . . . . . . . . . . . . . . . . . . . . . . . . . . . 679
Auto Sentry > StackNControl Communication . . . . . . . . . . . . . . . . . . . . . 679
Auto Sentry > Tickets . . . . . . . . . . . . . . . . . . . . . . . . . . . . . . . . . . . . . . . . . . . . . 681
Auto Sentry > TouchDebug . . . . . . . . . . . . . . . . . . . . . . . . . . . . . . . . . . . . . . . 681
Auto Sentry > TouchService. . . . . . . . . . . . . . . . . . . . . . . . . . . . . . . . . . . . . . . 681
Auto Sentry > Vandalism Deterrent . . . . . . . . . . . . . . . . . . . . . . . . . . . . . . . 682
Auto Sentry > VideoQueue Communication . . . . . . . . . . . . . . . . . . . . . . . 683
Auto Sentry > WBC Connection . . . . . . . . . . . . . . . . . . . . . . . . . . . . . . . . . . . 683
Global > GlobalConfiguration > CentralLogServer . . . . . . . . . . . . . . . . . 683
User Manual—Version 6.0 WashConnect®
17
Global> GlobalConfiguration > Clubs . . . . . . . . . . . . . . . . . . . . . . . . . . . . . 684
Global > GlobalConfiguration > Email Server Setup . . . . . . . . . . . . . . . . 686
Global > GlobalConfiguration > Global . . . . . . . . . . . . . . . . . . . . . . . . . . . . 686
Global > GlobalConfiguration > Hand Services >
HandService_AutoStartCarToBay. . . . . . . . . . . . . . . . . . . . . . . . . . . . . . . . 687
Global > GlobalConfiguration > InvoiceFleet . . . . . . . . . . . . . . . . . . . . . . 688
Global > GlobalConfiguration > Reporting . . . . . . . . . . . . . . . . . . . . . . . . 688
Global > GlobalConfiguration > Surcharge Config. . . . . . . . . . . . . . . . . 688
Global > GlobalConfiguration > Weather . . . . . . . . . . . . . . . . . . . . . . . . . . 688
Create a Weather API Key . . . . . . . . . . . . . . . . . . . . . . . . . . . . . . . . . . . . . . . . . 689
Setup Weather Settings for the Vehicle Performance Report . . . . . . . 691
Lube > LubeServiceConfiguration. . . . . . . . . . . . . . . . . . . . . . . . . . . . . . . . . 693
POS > TouchPOSConfiguration > Cage Configuration. . . . . . . . . . . . . . 693
POS> TouchPOSConfiguration > Clubs . . . . . . . . . . . . . . . . . . . . . . . . . . . . 693
POS > TouchPOSConfiguration > Credit Card Settings . . . . . . . . . . . . . 694
POS > TouchPOSConfiguration > General . . . . . . . . . . . . . . . . . . . . . . . . . 694
POS > TouchPOSConfiguration > Hide POS Buttons . . . . . . . . . . . . . . . 696
POS > TouchPOSConfiguration > ProfitCenterDescriptionColor . . . . 698
POS > TouchPOSConfiguration > Prompt Settings . . . . . . . . . . . . . . . . . 700
POS > TouchPOSConfiguration > Quick Money Configuration. . . . . . 701
POS > TouchPOSConfiguration > ReceiptFooter . . . . . . . . . . . . . . . . . . . 701
POS > TouchPOSConfiguration > ReceiptHeader . . . . . . . . . . . . . . . . . . 702
POS > TouchPOSConfiguration > ReceiptToPrint . . . . . . . . . . . . . . . . . . 702
POS > TouchPOSConfiguration > Refunds Using Credit Card . . . . . . . 703
POS > TouchPOSConfiguration > Report Server . . . . . . . . . . . . . . . . . . . 703
POS > TouchPOSConfiguration > SoundSettings . . . . . . . . . . . . . . . . . . 703
POS > TouchPOSConfiguration > Stack Management . . . . . . . . . . . . . . 704
POS > TouchPOSConfiguration > Stacking . . . . . . . . . . . . . . . . . . . . . . . . 704
POS > TouchPOSConfiguration > Tickets . . . . . . . . . . . . . . . . . . . . . . . . . . 706
POS > TouchPOSConfiguration > Wash Book
POS > WashConnectConfiguration > Menu . . . . . . . . . . . . . . . . . . . . . . 706
Touch ES . . . . . . . . . . . . . . . . . . . . . . . . . . . . . . . . . . . . . . . . . . . . . . . . . . . . . . . . . 706
POS > TouchESConfiguration > Config . . . . . . . . . . . . . . . . . . . . . . . . . . . . 707
POS > TouchESConfiguration > Configuration . . . . . . . . . . . . . . . . . . . . . 707
POS > TouchESConfiguration > Display . . . . . . . . . . . . . . . . . . . . . . . . . . . 707
POS > TouchESConfiguration > Roller . . . . . . . . . . . . . . . . . . . . . . . . . . . . . 707
POS > ETLConfiguration > Logging . . . . . . . . . . . . . . . . . . . . . . . . . . . . . . . 708
TNC > Component Port > UpCounter . . . . . . . . . . . . . . . . . . . . . . . . . . . . . 708
About Controller Services . . . . . . . . . . . . . . . . . . . . . . . . . . . . . . . . . . . . . . . . . . . . . . . . . . 708
Assign an Output or Controller Service . . . . . . . . . . . . . . . . . . . . . . . . . . . . 708
About TouchNClean Outputs . . . . . . . . . . . . . . . . . . . . . . . . . . . . . . . . . . . . . . . . . . . . . . . 710
Add a TouchNClean Service with Output . . . . . . . . . . . . . . . . . . . . . . . . . . 711
Edit a TouchNClean Output . . . . . . . . . . . . . . . . . . . . . . . . . . . . . . . . . . . . . . . 712
Delete a TouchNClean Output . . . . . . . . . . . . . . . . . . . . . . . . . . . . . . . . . . . . 713
Sorting TouchNClean Outputs . . . . . . . . . . . . . . . . . . . . . . . . . . . . . . . . . . . . 714
WashConnect® User Manual—Version 6.0
18
TouchNClean Dependency . . . . . . . . . . . . . . . . . . . . . . . . . . . . . . . . . . . . . . . 715
About My Devices . . . . . . . . . . . . . . . . . . . . . . . . . . . . . . . . . . . . . . . . . . . . . . . . . . . . . . . . . 717
Rename a Device . . . . . . . . . . . . . . . . . . . . . . . . . . . . . . . . . . . . . . . . . . . . . . . . . 717
Assign Denominations . . . . . . . . . . . . . . . . . . . . . . . . . . . . . . . . . . . . . . . . . . . . . . . . . . . . . 719
Add Currency Value for the Coin Acceptor. . . . . . . . . . . . . . . . . . . . . . . . . 719
About Manage Profit Centers . . . . . . . . . . . . . . . . . . . . . . . . . . . . . . . . . . . . . . . . . . . . . . . 721
Add Profit Center and Description. . . . . . . . . . . . . . . . . . . . . . . . . . . . . . . . . 721
Edit a Profit Center and Description . . . . . . . . . . . . . . . . . . . . . . . . . . . . . . . 723
Delete a Profit Center and Description . . . . . . . . . . . . . . . . . . . . . . . . . . . . 725
Disable a Profit Center and Description. . . . . . . . . . . . . . . . . . . . . . . . . . . . 726
Assign Devices to a Profit Center . . . . . . . . . . . . . . . . . . . . . . . . . . . . . . . . . . 727
Profit Center Order . . . . . . . . . . . . . . . . . . . . . . . . . . . . . . . . . . . . . . . . . . . . . . . . . . . . . . . . 728
Reorder your list of Profit Centers . . . . . . . . . . . . . . . . . . . . . . . . . . . . . . . . . 729
Performance Indicator . . . . . . . . . . . . . . . . . . . . . . . . . . . . . . . . . . . . . . . . . . . . . . . . . . . . . 730
Add a Performance Indicator. . . . . . . . . . . . . . . . . . . . . . . . . . . . . . . . . . . . . . 730
About Performance Indicator . . . . . . . . . . . . . . . . . . . . . . . . . . . . . . . . . . . . . 731
About Req Man Hours. . . . . . . . . . . . . . . . . . . . . . . . . . . . . . . . . . . . . . . . . . . . . . . . . . . . . . 732
Set Req. Man Hours . . . . . . . . . . . . . . . . . . . . . . . . . . . . . . . . . . . . . . . . . . . . . . . 732
Required Man Hours Descriptions . . . . . . . . . . . . . . . . . . . . . . . . . . . . . . . . . 733
Chapter 13: StackNControl . . . . . . . . . . . . . . . . . . . . . . . . . . . . . . . . . . . . . . . . . . . . . . . . . . . . . . . . . . . . . . . . . . . . . . . . . 735
About Stack Management . . . . . . . . . . . . . . . . . . . . . . . . . . . . . . . . . . . . . . . . . . . . . . . . . . 735
Edit the Order of the Stack . . . . . . . . . . . . . . . . . . . . . . . . . . . . . . . . . . . . . . . . 736
Edit a Ticket for a car in Stack or Pending Queue . . . . . . . . . . . . . . . . . . . 737
Fire Roller . . . . . . . . . . . . . . . . . . . . . . . . . . . . . . . . . . . . . . . . . . . . . . . . . . . . . . . . 738
Controller Service Buttons . . . . . . . . . . . . . . . . . . . . . . . . . . . . . . . . . . . . . . . . 739
Retract Controller Services . . . . . . . . . . . . . . . . . . . . . . . . . . . . . . . . . . . . . . . . 739
Move from Stack to Pending . . . . . . . . . . . . . . . . . . . . . . . . . . . . . . . . . . . . . . 740
Move Vehicle in Pending back to the Stack . . . . . . . . . . . . . . . . . . . . . . . . 741
Stack Color Key . . . . . . . . . . . . . . . . . . . . . . . . . . . . . . . . . . . . . . . . . . . . . . . . . . . 741
About Gate Management . . . . . . . . . . . . . . . . . . . . . . . . . . . . . . . . . . . . . . . . . . . . . . . . . . 742
Remove Vehicle from Gate Queue. . . . . . . . . . . . . . . . . . . . . . . . . . . . . . . . . 742
Reset the Gate Queue. . . . . . . . . . . . . . . . . . . . . . . . . . . . . . . . . . . . . . . . . . . . . 744
Raise Gate Manually . . . . . . . . . . . . . . . . . . . . . . . . . . . . . . . . . . . . . . . . . . . . . . . . . . . . . . . 745
No Wash Purchased . . . . . . . . . . . . . . . . . . . . . . . . . . . . . . . . . . . . . . . . . . . . . . 745
Wash Purchased but Gate Doesn’t Open . . . . . . . . . . . . . . . . . . . . . . . . . . 745
Hand Service Management . . . . . . . . . . . . . . . . . . . . . . . . . . . . . . . . . . . . . . . . . . . . . . . . . 746
View Vehicles in Hand Services. . . . . . . . . . . . . . . . . . . . . . . . . . . . . . . . . . . . 747
Complete Service for Vehicle in Hand Services . . . . . . . . . . . . . . . . . . . . . 748
Camera for Hand Finished Services Management . . 749Standard Hand Services Management Graphics . . . . . . . . . . . . . . . . . . . 750
User Manual—Version 6.0 WashConnect®
19
Chapter 14: Time Clock . . . . . . . . . . . . . . . . . . . . . . . . . . . . . . . . . . . . . . . . . . . . . . . . . . . . . . . . . . . . . . . . . . . . . . . . . . . . . 753
Log In and Log Out. . . . . . . . . . . . . . . . . . . . . . . . . . . . . . . . . . . . . . . . . . . . . . . . . . . . . . . . . 753
Change Labor . . . . . . . . . . . . . . . . . . . . . . . . . . . . . . . . . . . . . . . . . . . . . . . . . . . . 755
Time Clock Report . . . . . . . . . . . . . . . . . . . . . . . . . . . . . . . . . . . . . . . . . . . . . . . . 756
Edit Time Clock . . . . . . . . . . . . . . . . . . . . . . . . . . . . . . . . . . . . . . . . . . . . . . . . . . . . . . . . . . . . 758
About the Time Clock Reports . . . . . . . . . . . . . . . . . . . . . . . . . . . . . . . . . . . . . . . . . . . . . . 759
Employee Time Clock Summary. . . . . . . . . . . . . . . . . . . . . . . . . . . . . . . . . . . . . . . . . . . . . 760
View the Employee Time Clock Summary. . . . . . . . . . . . . . . . . . . . . . . . . . 760
Employee Time Clock Detail . . . . . . . . . . . . . . . . . . . . . . . . . . . . . . . . . . . . . . . . . . . . . . . . 762
View the Employee Time Clock Detail Report . . . . . . . . . . . . . . . . . . . . . . 762
Employees Working Today . . . . . . . . . . . . . . . . . . . . . . . . . . . . . . . . . . . . . . . . . . . . . . . . . 764
View the Employee Working Today Report . . . . . . . . . . . . . . . . . . . . . . . . 764
Employees Not Working Today . . . . . . . . . . . . . . . . . . . . . . . . . . . . . . . . . . . . . . . . . . . . . 765
View the Employees Not Working Today Report . . . . . . . . . . . . . . . . . . . 766
Chapter 15: What’s New Archive . . . . . . . . . . . . . . . . . . . . . . . . . . . . . . . . . . . . . . . . . . . . . . . . . . . . . . . . . . . . . . . . . . . . 767
VERSION 1.3.2.213 . . . . . . . . . . . . . . . . . . . . . . . . . . . . . . . . . . . . . . . . . . . . . . . . . . . . . . . . . 767
VERSION 1.3.1 . . . . . . . . . . . . . . . . . . . . . . . . . . . . . . . . . . . . . . . . . . . . . . . . . . . . . . . . . . . . . 774
VERSION 1.3.0 . . . . . . . . . . . . . . . . . . . . . . . . . . . . . . . . . . . . . . . . . . . . . . . . . . . . . . . . . . . . . 777
VERSION 1.2.3 . . . . . . . . . . . . . . . . . . . . . . . . . . . . . . . . . . . . . . . . . . . . . . . . . . . . . . . . . . . . . 779
Chapter 16: Marketing - Quick Starts . . . . . . . . . . . . . . . . . . . . . . . . . . . . . . . . . . . . . . . . . . . . . . . . . . . . . . . . . . . . . . . . 783
Coupon Codes - Quick Start . . . . . . . . . . . . . . . . . . . . . . . . . . . . . . . . . . . . . . . . . . . . . . . . 783
Create a Barcode - QuickStart. . . . . . . . . . . . . . . . . . . . . . . . . . . . . . . . . . . . . . . . . . . . . . . 785
Wash Club Offerings - Quick Start . . . . . . . . . . . . . . . . . . . . . . . . . . . . . . . . . . . . . . . . . . . 786
Frequency Promotions - Quick Start. . . . . . . . . . . . . . . . . . . . . . . . . . . . . . . . . . . . . . . . . 789
Gift Cards Promotional Selling - Quick Start . . . . . . . . . . . . . . . . . . . . . . . . . . . . . . . . . 790
Fund Raiser - Quick Start . . . . . . . . . . . . . . . . . . . . . . . . . . . . . . . . . . . . . . . . . . . . . . . . . . . 791
Sell a discounted Gift Card at Touch POS - Quick Start . . . . . . . . . . . . . . . . . . . . . . . . 793
Sales Commission - Quick Start . . . . . . . . . . . . . . . . . . . . . . . . . . . . . . . . . . . . . . . . . . . . . 793
Fundraiser - If tracking Individual Volunteer Sales - Quick Start . . . . . . . . . . . . . . 794
FAQs. . . . . . . . . . . . . . . . . . . . . . . . . . . . . . . . . . . . . . . . . . . . . . . . . . . . . . . . . . . . . . . . . . . . . . 795
Change History . . . . . . . . . . . . . . . . . . . . . . . . . . . . . . . . . . . . . . . . . . . . . . . . . . . . . . . . . . . . 809

WashConnect® User Manual—Version 6.0
20

User Manual—Version 6.0 WashConnect®
21
List of Figures
Figure 1. Version Considerations for WashConnect . . . . . . . . . . . . . . . . . . . . . . . . . . . . . . . . . 39
Figure 2. Workspace and Menu Bar . . . . . . . . . . . . . . . . . . . . . . . . . . . . . . . . . . . . . . . . . . . . . . . . 44
Figure 3. Menu Search box . . . . . . . . . . . . . . . . . . . . . . . . . . . . . . . . . . . . . . . . . . . . . . . . . . . . . . . . 51
Figure 4. Menu Search box example . . . . . . . . . . . . . . . . . . . . . . . . . . . . . . . . . . . . . . . . . . . . . . . 51
Figure 5. Menu Selection Process . . . . . . . . . . . . . . . . . . . . . . . . . . . . . . . . . . . . . . . . . . . . . . . . . . 52
Figure 6. Scroll Down and Scroll Up . . . . . . . . . . . . . . . . . . . . . . . . . . . . . . . . . . . . . . . . . . . . . . . . 53
Figure 7. POS menu item scroll arrow buttons. . . . . . . . . . . . . . . . . . . . . . . . . . . . . . . . . . . . . . 54
Figure 8. Menu Bar Expanded and Collapsed . . . . . . . . . . . . . . . . . . . . . . . . . . . . . . . . . . . . . . . 55
Figure 9. Tabs in the Workspace . . . . . . . . . . . . . . . . . . . . . . . . . . . . . . . . . . . . . . . . . . . . . . . . . . . 56
Figure 10. Status Bar . . . . . . . . . . . . . . . . . . . . . . . . . . . . . . . . . . . . . . . . . . . . . . . . . . . . . . . . . . . . . . 57
Figure 11. Example Shift Detail Report . . . . . . . . . . . . . . . . . . . . . . . . . . . . . . . . . . . . . . . . . . . . . 61
Figure 12. Gift Cards Report Toolbar (Example) . . . . . . . . . . . . . . . . . . . . . . . . . . . . . . . . . . . . . 64
Figure 13. Report Header example. . . . . . . . . . . . . . . . . . . . . . . . . . . . . . . . . . . . . . . . . . . . . . . . . 65
Figure 14. Report Navigator Scroll Buttons . . . . . . . . . . . . . . . . . . . . . . . . . . . . . . . . . . . . . . . . . 66
Figure 15. Print Button on Report Toolbar. . . . . . . . . . . . . . . . . . . . . . . . . . . . . . . . . . . . . . . . . . 66
Figure 16. Export Button on Report Toolbar . . . . . . . . . . . . . . . . . . . . . . . . . . . . . . . . . . . . . . . . 67
Figure 17. Export Format Options. . . . . . . . . . . . . . . . . . . . . . . . . . . . . . . . . . . . . . . . . . . . . . . . . . 67
Figure 18. Search Report . . . . . . . . . . . . . . . . . . . . . . . . . . . . . . . . . . . . . . . . . . . . . . . . . . . . . . . . . . 69
Figure 19. WashConnect® Icon on Desktop . . . . . . . . . . . . . . . . . . . . . . . . . . . . . . . . . . . . . . . . . 70
Figure 20. Login Screen . . . . . . . . . . . . . . . . . . . . . . . . . . . . . . . . . . . . . . . . . . . . . . . . . . . . . . . . . . . 71
Figure 21. Log in Button . . . . . . . . . . . . . . . . . . . . . . . . . . . . . . . . . . . . . . . . . . . . . . . . . . . . . . . . . . . 71
Figure 22. Set Date Range tab . . . . . . . . . . . . . . . . . . . . . . . . . . . . . . . . . . . . . . . . . . . . . . . . . . . . . 75
Figure 23. Default Date in Status Bar . . . . . . . . . . . . . . . . . . . . . . . . . . . . . . . . . . . . . . . . . . . . . . . 76
Figure 24. Report Default Date Preset Range buttons. . . . . . . . . . . . . . . . . . . . . . . . . . . . . . . 76
Figure 25. Year to Date in Status Bar . . . . . . . . . . . . . . . . . . . . . . . . . . . . . . . . . . . . . . . . . . . . . . . 77
Figure 26. Manage tab . . . . . . . . . . . . . . . . . . . . . . . . . . . . . . . . . . . . . . . . . . . . . . . . . . . . . . . . . . . . 82
Figure 27. Customer Information tab . . . . . . . . . . . . . . . . . . . . . . . . . . . . . . . . . . . . . . . . . . . . . . 83
Figure 28. Add Vehicle . . . . . . . . . . . . . . . . . . . . . . . . . . . . . . . . . . . . . . . . . . . . . . . . . . . . . . . . . . . . 84
Figure 29. Credit Card Information on File. . . . . . . . . . . . . . . . . . . . . . . . . . . . . . . . . . . . . . . . . . 86
Figure 30. Manage tab - Customer List . . . . . . . . . . . . . . . . . . . . . . . . . . . . . . . . . . . . . . . . . . . . . 89
Figure 31. Select Columns Dialog Box for Customer Membership List . . . . . . . . . . . . . . . 90
Figure 32. Customer Record Selected . . . . . . . . . . . . . . . . . . . . . . . . . . . . . . . . . . . . . . . . . . . . . . 93
WashConnect® User Manual—Version 6.0
22
Figure 33. Customer Information Screen with Sale Promotions Example . . . . . . . . . . . 100
Figure 34. Customer - Add a Customer to a Group. . . . . . . . . . . . . . . . . . . . . . . . . . . . . . . . . 104
Figure 35. Customer - Saved Groups . . . . . . . . . . . . . . . . . . . . . . . . . . . . . . . . . . . . . . . . . . . . . . 104
Figure 36. Schedule Dialog Box . . . . . . . . . . . . . . . . . . . . . . . . . . . . . . . . . . . . . . . . . . . . . . . . . . . 105
Figure 37. Customer - Edit Group . . . . . . . . . . . . . . . . . . . . . . . . . . . . . . . . . . . . . . . . . . . . . . . . . 106
Figure 38. Customer - Group Closed . . . . . . . . . . . . . . . . . . . . . . . . . . . . . . . . . . . . . . . . . . . . . . 106
Figure 39. Profitability Report with Total Base Wash popup . . . . . . . . . . . . . . . . . . . . . . . . 114
Figure 40. Club Usage Report . . . . . . . . . . . . . . . . . . . . . . . . . . . . . . . . . . . . . . . . . . . . . . . . . . . . . 117
Figure 41. Club Usage Report . . . . . . . . . . . . . . . . . . . . . . . . . . . . . . . . . . . . . . . . . . . . . . . . . . . . . 119
Figure 42. Club Usage Report 91-100% expanded for source detail . . . . . . . . . . . . . . . . 119
Figure 43. Vehicle History Date Range . . . . . . . . . . . . . . . . . . . . . . . . . . . . . . . . . . . . . . . . . . . . 122
Figure 44. Vehicle History Report . . . . . . . . . . . . . . . . . . . . . . . . . . . . . . . . . . . . . . . . . . . . . . . . . 123
Figure 45. Club Summary Report . . . . . . . . . . . . . . . . . . . . . . . . . . . . . . . . . . . . . . . . . . . . . . . . . 127
Figure 46. Declined Payment Report . . . . . . . . . . . . . . . . . . . . . . . . . . . . . . . . . . . . . . . . . . . . . . 131
Figure 47. Selected Customer in Declined Payment Report . . . . . . . . . . . . . . . . . . . . . . . . 132
Figure 48. Notes Dialog Box . . . . . . . . . . . . . . . . . . . . . . . . . . . . . . . . . . . . . . . . . . . . . . . . . . . . . . 132
Figure 49. Club Revenue Distribution Report . . . . . . . . . . . . . . . . . . . . . . . . . . . . . . . . . . . . . . 137
Figure 50. Autobilling Revenue Distribution Report . . . . . . . . . . . . . . . . . . . . . . . . . . . . . . . 141
Figure 51. Fleet Account Dialog Box . . . . . . . . . . . . . . . . . . . . . . . . . . . . . . . . . . . . . . . . . . . . . . 150
Figure 52. Fleet Accounts. . . . . . . . . . . . . . . . . . . . . . . . . . . . . . . . . . . . . . . . . . . . . . . . . . . . . . . . . 152
Figure 53. Fleet Accounts Customer Information tab . . . . . . . . . . . . . . . . . . . . . . . . . . . . . . 153
Figure 54. Fleet Account Scroll Buttons . . . . . . . . . . . . . . . . . . . . . . . . . . . . . . . . . . . . . . . . . . . 154
Figure 55. Fleet Rules Dialog Box . . . . . . . . . . . . . . . . . . . . . . . . . . . . . . . . . . . . . . . . . . . . . . . . . 159
Figure 56. Fleet Invoice Search Example . . . . . . . . . . . . . . . . . . . . . . . . . . . . . . . . . . . . . . . . . . 164
Figure 57. Invoice example . . . . . . . . . . . . . . . . . . . . . . . . . . . . . . . . . . . . . . . . . . . . . . . . . . . . . . . 166
Figure 58. Fleet Invoice Page 1 Example . . . . . . . . . . . . . . . . . . . . . . . . . . . . . . . . . . . . . . . . . . 167
Figure 59. Fleet Invoice Page 2 Example . . . . . . . . . . . . . . . . . . . . . . . . . . . . . . . . . . . . . . . . . . 167
Figure 60. Manage Fleet Unpaid Invoice example . . . . . . . . . . . . . . . . . . . . . . . . . . . . . . . . . 172
Figure 61. Financial Overview Tab . . . . . . . . . . . . . . . . . . . . . . . . . . . . . . . . . . . . . . . . . . . . . . . . 179
Figure 62. Financial Overview Preferences . . . . . . . . . . . . . . . . . . . . . . . . . . . . . . . . . . . . . . . . 179
Figure 63. Financial Overview Report . . . . . . . . . . . . . . . . . . . . . . . . . . . . . . . . . . . . . . . . . . . . . 180
Figure 64. Financial Overview Report with Underlined Total . . . . . . . . . . . . . . . . . . . . . . . 181
Figure 65. Financial Overview Report Export tools . . . . . . . . . . . . . . . . . . . . . . . . . . . . . . . . . 182
Figure 66. Financial Overview Report . . . . . . . . . . . . . . . . . . . . . . . . . . . . . . . . . . . . . . . . . . . . . 183

User Manual—Version 6.0 WashConnect®
23
Figure 67. Shift Detail Report Tab . . . . . . . . . . . . . . . . . . . . . . . . . . . . . . . . . . . . . . . . . . . . . . . . . 187
Figure 68. Export button located on Shift Detail Report toolbar . . . . . . . . . . . . . . . . . . . . 188
Figure 69. Shift Detail Report, Page 1 . . . . . . . . . . . . . . . . . . . . . . . . . . . . . . . . . . . . . . . . . . . . . 190
Figure 70. Shift Detail Report, Page 2 . . . . . . . . . . . . . . . . . . . . . . . . . . . . . . . . . . . . . . . . . . . . . 191
Figure 71. Shift Detail Report page 3 . . . . . . . . . . . . . . . . . . . . . . . . . . . . . . . . . . . . . . . . . . . . . . 192
Figure 72. Shift Detail Report with Edited Customer Promotions at bottom of report193
Figure 73. Unverified Journal Entries at the bottom of the Shift Detail Report. . . . . . . 193
Figure 74. Shift Detail Report with Shift(s) not verified hyperlink . . . . . . . . . . . . . . . . . . . 194
Figure 75. Credit Cards tab . . . . . . . . . . . . . . . . . . . . . . . . . . . . . . . . . . . . . . . . . . . . . . . . . . . . . . . 201
Figure 76. Credit Cards Summary Example . . . . . . . . . . . . . . . . . . . . . . . . . . . . . . . . . . . . . . . . 201
Figure 77. Credit Cards tab . . . . . . . . . . . . . . . . . . . . . . . . . . . . . . . . . . . . . . . . . . . . . . . . . . . . . . . 203
Figure 78. Credit Cards Report Example . . . . . . . . . . . . . . . . . . . . . . . . . . . . . . . . . . . . . . . . . . . 203
Figure 79. Shift Detail Report with Total Credit Cards amount shown . . . . . . . . . . . . . . 206
Figure 80. Credit Card Processor on-line login screen - translink example . . . . . . . . . . 207
Figure 81. Translink Credit Card Processor’s Report Detail page example . . . . . . . . . . . 207
Figure 82. Credit Cards Report . . . . . . . . . . . . . . . . . . . . . . . . . . . . . . . . . . . . . . . . . . . . . . . . . . . . 208
Figure 83. Gift Cards tab . . . . . . . . . . . . . . . . . . . . . . . . . . . . . . . . . . . . . . . . . . . . . . . . . . . . . . . . . . 210
Figure 84. Gift Card Report Toolbar . . . . . . . . . . . . . . . . . . . . . . . . . . . . . . . . . . . . . . . . . . . . . . . 210
Figure 85. Gift Card Report . . . . . . . . . . . . . . . . . . . . . . . . . . . . . . . . . . . . . . . . . . . . . . . . . . . . . . . 211
Figure 86. Checks tab . . . . . . . . . . . . . . . . . . . . . . . . . . . . . . . . . . . . . . . . . . . . . . . . . . . . . . . . . . . . 214
Figure 87. Checks Report . . . . . . . . . . . . . . . . . . . . . . . . . . . . . . . . . . . . . . . . . . . . . . . . . . . . . . . . . 215
Figure 88. Fleet Activity tab. . . . . . . . . . . . . . . . . . . . . . . . . . . . . . . . . . . . . . . . . . . . . . . . . . . . . . . 217
Figure 89. Fleet Activity - Customer(s) dialog box. . . . . . . . . . . . . . . . . . . . . . . . . . . . . . . . . . 218
Figure 90. Fleet Activity Report Example . . . . . . . . . . . . . . . . . . . . . . . . . . . . . . . . . . . . . . . . . . 219
Figure 91. Deposits Report . . . . . . . . . . . . . . . . . . . . . . . . . . . . . . . . . . . . . . . . . . . . . . . . . . . . . . . 222
Figure 92. Free Wash Report . . . . . . . . . . . . . . . . . . . . . . . . . . . . . . . . . . . . . . . . . . . . . . . . . . . . . . 226
Figure 93. Rewash Report Example . . . . . . . . . . . . . . . . . . . . . . . . . . . . . . . . . . . . . . . . . . . . . . . 230
Figure 94. Payouts Report Example . . . . . . . . . . . . . . . . . . . . . . . . . . . . . . . . . . . . . . . . . . . . . . . 234
Figure 95. Received on Account Register Report . . . . . . . . . . . . . . . . . . . . . . . . . . . . . . . . . . 237
Figure 96. Voids Register Report . . . . . . . . . . . . . . . . . . . . . . . . . . . . . . . . . . . . . . . . . . . . . . . . . . 240
Figure 97. Refunds Report . . . . . . . . . . . . . . . . . . . . . . . . . . . . . . . . . . . . . . . . . . . . . . . . . . . . . . . . 243
Figure 98. Fund Raiser Register Report . . . . . . . . . . . . . . . . . . . . . . . . . . . . . . . . . . . . . . . . . . . . 244
Figure 99. View Register tab . . . . . . . . . . . . . . . . . . . . . . . . . . . . . . . . . . . . . . . . . . . . . . . . . . . . . . 246
Figure 100. View Register Unlimited Club Transaction Example . . . . . . . . . . . . . . . . . . . . 247
WashConnect® User Manual—Version 6.0
24
Figure 101. View Register Transaction Details example . . . . . . . . . . . . . . . . . . . . . . . . . . . . 248
Figure 102. Book Report Example. . . . . . . . . . . . . . . . . . . . . . . . . . . . . . . . . . . . . . . . . . . . . . . . . 249
Figure 103. Wash to Register Comparison Report. . . . . . . . . . . . . . . . . . . . . . . . . . . . . . . . . . 252
Figure 104. Ticket Comparison Example . . . . . . . . . . . . . . . . . . . . . . . . . . . . . . . . . . . . . . . . . . 256
Figure 105. Transactional Detail tab and toolbar . . . . . . . . . . . . . . . . . . . . . . . . . . . . . . . . . . 258
Figure 106. Transaction Detail . . . . . . . . . . . . . . . . . . . . . . . . . . . . . . . . . . . . . . . . . . . . . . . . . . . . 259
Figure 107. Terminal Balance Report . . . . . . . . . . . . . . . . . . . . . . . . . . . . . . . . . . . . . . . . . . . . . . 262
Figure 108. Salesman Commission Report . . . . . . . . . . . . . . . . . . . . . . . . . . . . . . . . . . . . . . . . 264
Figure 109. View Site Tickets Example. . . . . . . . . . . . . . . . . . . . . . . . . . . . . . . . . . . . . . . . . . . . . 266
Figure 110. Services Washed Report . . . . . . . . . . . . . . . . . . . . . . . . . . . . . . . . . . . . . . . . . . . . . . 268
Figure 111. Controller Services . . . . . . . . . . . . . . . . . . . . . . . . . . . . . . . . . . . . . . . . . . . . . . . . . . . 270
Figure 112. Audit Trail Example . . . . . . . . . . . . . . . . . . . . . . . . . . . . . . . . . . . . . . . . . . . . . . . . . . . 271
Figure 113. Journal Entry Cash Detail Popup . . . . . . . . . . . . . . . . . . . . . . . . . . . . . . . . . . . . . . 274
Figure 114. Select Journal Entry. . . . . . . . . . . . . . . . . . . . . . . . . . . . . . . . . . . . . . . . . . . . . . . . . . . 275
Figure 115. View Journal History example. . . . . . . . . . . . . . . . . . . . . . . . . . . . . . . . . . . . . . . . . 275
Figure 116. Journal History with a cash detail pop-up. . . . . . . . . . . . . . . . . . . . . . . . . . . . . . 276
Figure 117. Verify Journals Dialog Box . . . . . . . . . . . . . . . . . . . . . . . . . . . . . . . . . . . . . . . . . . . . 278
Figure 118. Journals Verified Time and Date Stamp. . . . . . . . . . . . . . . . . . . . . . . . . . . . . . . . 279
Figure 119. Verified Journal. . . . . . . . . . . . . . . . . . . . . . . . . . . . . . . . . . . . . . . . . . . . . . . . . . . . . . . 280
Figure 120. Safe Actions Buttons. . . . . . . . . . . . . . . . . . . . . . . . . . . . . . . . . . . . . . . . . . . . . . . . . . 281
Figure 121. Safe Action - Add from Bank . . . . . . . . . . . . . . . . . . . . . . . . . . . . . . . . . . . . . . . . . . 282
Figure 122. Safe Action - Add from Other Source . . . . . . . . . . . . . . . . . . . . . . . . . . . . . . . . . . 283
Figure 123. Convert Currency Journal Entry dialog box . . . . . . . . . . . . . . . . . . . . . . . . . . . . 284
Figure 124. Convert Journal Entry. . . . . . . . . . . . . . . . . . . . . . . . . . . . . . . . . . . . . . . . . . . . . . . . . 284
Figure 125. Safe Action - Convert Currency. . . . . . . . . . . . . . . . . . . . . . . . . . . . . . . . . . . . . . . . 285
Figure 126. Safe Action - Deposit to Bank . . . . . . . . . . . . . . . . . . . . . . . . . . . . . . . . . . . . . . . . . 286
Figure 127. Safe Action - Remove to Other Source. . . . . . . . . . . . . . . . . . . . . . . . . . . . . . . . . 287
Figure 128. Safe Action - Verify Safe. . . . . . . . . . . . . . . . . . . . . . . . . . . . . . . . . . . . . . . . . . . . . . . 288
Figure 129. Terminal Balances example of Touch ’N Clean (TNC). . . . . . . . . . . . . . . . . . . 290
Figure 130. Terminal Balances AS - Flex Far Lane . . . . . . . . . . . . . . . . . . . . . . . . . . . . . . . . . . 291
Figure 131. Terminal Balances Lobby POS. . . . . . . . . . . . . . . . . . . . . . . . . . . . . . . . . . . . . . . . . 292
Figure 132. Terminal Balances Safe . . . . . . . . . . . . . . . . . . . . . . . . . . . . . . . . . . . . . . . . . . . . . . . 292
Figure 133. Terminal Balances Cash On Hand . . . . . . . . . . . . . . . . . . . . . . . . . . . . . . . . . . . . . 293
Figure 134. Operations Report . . . . . . . . . . . . . . . . . . . . . . . . . . . . . . . . . . . . . . . . . . . . . . . . . . . . 295

User Manual—Version 6.0 WashConnect®
25
Figure 135. Ticket Redeemed Summary . . . . . . . . . . . . . . . . . . . . . . . . . . . . . . . . . . . . . . . . . . . 298
Figure 136. Ticket Redeemed Detail. . . . . . . . . . . . . . . . . . . . . . . . . . . . . . . . . . . . . . . . . . . . . . . 301
Figure 137. Dashboard - real time example. . . . . . . . . . . . . . . . . . . . . . . . . . . . . . . . . . . . . . . . 311
Figure 138. Dashboard tab banner with Total Cars Washed per site . . . . . . . . . . . . . . . . 312
Figure 139. Settings dialog box . . . . . . . . . . . . . . . . . . . . . . . . . . . . . . . . . . . . . . . . . . . . . . . . . . . 312
Figure 140. Dashboard Settings . . . . . . . . . . . . . . . . . . . . . . . . . . . . . . . . . . . . . . . . . . . . . . . . . . 313
Figure 141. Vehicle Performance tab. . . . . . . . . . . . . . . . . . . . . . . . . . . . . . . . . . . . . . . . . . . . . . 316
Figure 142. Vehicle Performance tab with Preferences. . . . . . . . . . . . . . . . . . . . . . . . . . . . . 317
Figure 143. Vehicle Statistical Performance with Day Resolution and Weather icons 318
Figure 144. Vehicle Statistical Performance Report Example . . . . . . . . . . . . . . . . . . . . . . . 319
Figure 145. Example Organizational Layout . . . . . . . . . . . . . . . . . . . . . . . . . . . . . . . . . . . . . . . 322
Figure 146. Site Selection Tree with Day Resolution . . . . . . . . . . . . . . . . . . . . . . . . . . . . . . . 323
Figure 147. Site Selection Tree with Annual Resolution . . . . . . . . . . . . . . . . . . . . . . . . . . . . 324
Figure 148. Empty Site Selection Tree . . . . . . . . . . . . . . . . . . . . . . . . . . . . . . . . . . . . . . . . . . . . . 326
Figure 149. Performance Gauge Tab . . . . . . . . . . . . . . . . . . . . . . . . . . . . . . . . . . . . . . . . . . . . . . 327
Figure 150. Performance Gauge Report . . . . . . . . . . . . . . . . . . . . . . . . . . . . . . . . . . . . . . . . . . . 329
Figure 151. Sales Distribution tab . . . . . . . . . . . . . . . . . . . . . . . . . . . . . . . . . . . . . . . . . . . . . . . . . 332
Figure 152. Sales Distribution Report . . . . . . . . . . . . . . . . . . . . . . . . . . . . . . . . . . . . . . . . . . . . . 334
Figure 153. TouchNClean Usage Tab . . . . . . . . . . . . . . . . . . . . . . . . . . . . . . . . . . . . . . . . . . . . . . 335
Figure 154. Touch ’N Clean Services Report . . . . . . . . . . . . . . . . . . . . . . . . . . . . . . . . . . . . . . . 336
Figure 155. RFID Statistics tab . . . . . . . . . . . . . . . . . . . . . . . . . . . . . . . . . . . . . . . . . . . . . . . . . . . . 338
Figure 156. RFID Statistics Report . . . . . . . . . . . . . . . . . . . . . . . . . . . . . . . . . . . . . . . . . . . . . . . . . 339
Figure 157. RFID Statistics Report Admin Swipes Only . . . . . . . . . . . . . . . . . . . . . . . . . . . . 341
Figure 158. RFID Statistics Report Multiple RFID Reads Only . . . . . . . . . . . . . . . . . . . . . . 342
Figure 159. Statistical Comparison tab . . . . . . . . . . . . . . . . . . . . . . . . . . . . . . . . . . . . . . . . . . . . 344
Figure 160. Statistical Comparison Report Example. . . . . . . . . . . . . . . . . . . . . . . . . . . . . . . . 345
Figure 161. Projection Analysis . . . . . . . . . . . . . . . . . . . . . . . . . . . . . . . . . . . . . . . . . . . . . . . . . . . 347
Figure 162. Projection Analysis Chart . . . . . . . . . . . . . . . . . . . . . . . . . . . . . . . . . . . . . . . . . . . . . 348
Figure 163. Monitoring System Site Device. . . . . . . . . . . . . . . . . . . . . . . . . . . . . . . . . . . . . . . . 352
Figure 164. Site Status component error message . . . . . . . . . . . . . . . . . . . . . . . . . . . . . . . . . 353
Figure 165. Event Code for Error Message Coin Acceptor example . . . . . . . . . . . . . . . . . 353
Figure 166. Component Error Message. . . . . . . . . . . . . . . . . . . . . . . . . . . . . . . . . . . . . . . . . . . . 355
Figure 167. Site Status. . . . . . . . . . . . . . . . . . . . . . . . . . . . . . . . . . . . . . . . . . . . . . . . . . . . . . . . . . . . 356
Figure 168. Devices and Components. . . . . . . . . . . . . . . . . . . . . . . . . . . . . . . . . . . . . . . . . . . . . 357
WashConnect® User Manual—Version 6.0
26
Figure 169. Entity, Device and Component Status Icons . . . . . . . . . . . . . . . . . . . . . . . . . . . 358
Figure 170. Wash Status tab . . . . . . . . . . . . . . . . . . . . . . . . . . . . . . . . . . . . . . . . . . . . . . . . . . . . . . 360
Figure 171. Event History Tab. . . . . . . . . . . . . . . . . . . . . . . . . . . . . . . . . . . . . . . . . . . . . . . . . . . . . 361
Figure 172. Event History Tab. . . . . . . . . . . . . . . . . . . . . . . . . . . . . . . . . . . . . . . . . . . . . . . . . . . . . 363
Figure 173. Event History . . . . . . . . . . . . . . . . . . . . . . . . . . . . . . . . . . . . . . . . . . . . . . . . . . . . . . . . . 364
Figure 174. Device Statistics . . . . . . . . . . . . . . . . . . . . . . . . . . . . . . . . . . . . . . . . . . . . . . . . . . . . . . 366
Figure 175. Site Device Statistics Example. . . . . . . . . . . . . . . . . . . . . . . . . . . . . . . . . . . . . . . . . 367
Figure 176. Version History . . . . . . . . . . . . . . . . . . . . . . . . . . . . . . . . . . . . . . . . . . . . . . . . . . . . . . . 369
Figure 177. Version History . . . . . . . . . . . . . . . . . . . . . . . . . . . . . . . . . . . . . . . . . . . . . . . . . . . . . . . 370
Figure 178. Club Services Tab. . . . . . . . . . . . . . . . . . . . . . . . . . . . . . . . . . . . . . . . . . . . . . . . . . . . . 377
Figure 179. Add Club Service Dialog Box . . . . . . . . . . . . . . . . . . . . . . . . . . . . . . . . . . . . . . . . . . 378
Figure 180. Multi-Rule Clubs. . . . . . . . . . . . . . . . . . . . . . . . . . . . . . . . . . . . . . . . . . . . . . . . . . . . . . 381
Figure 181. Warning Message . . . . . . . . . . . . . . . . . . . . . . . . . . . . . . . . . . . . . . . . . . . . . . . . . . . . 383
Figure 182. Club Services Columns. . . . . . . . . . . . . . . . . . . . . . . . . . . . . . . . . . . . . . . . . . . . . . . . 384
Figure 183. Sales Items tab . . . . . . . . . . . . . . . . . . . . . . . . . . . . . . . . . . . . . . . . . . . . . . . . . . . . . . . 394
Figure 184. Sales Item Dialog Box. . . . . . . . . . . . . . . . . . . . . . . . . . . . . . . . . . . . . . . . . . . . . . . . . 396
Figure 185. Custom Buttons with Videos Enabled from Auto Sentry flex. . . . . . . . . . . . 399
Figure 186. Sales Items List . . . . . . . . . . . . . . . . . . . . . . . . . . . . . . . . . . . . . . . . . . . . . . . . . . . . . . . 401
Figure 187. Sales Items tab . . . . . . . . . . . . . . . . . . . . . . . . . . . . . . . . . . . . . . . . . . . . . . . . . . . . . . . 402
Figure 188. Gift Card Dialog Box . . . . . . . . . . . . . . . . . . . . . . . . . . . . . . . . . . . . . . . . . . . . . . . . . . 402
Figure 189. Variable Pricing on Auto Sentry screen example . . . . . . . . . . . . . . . . . . . . . . . 405
Figure 190. Sales Items tab . . . . . . . . . . . . . . . . . . . . . . . . . . . . . . . . . . . . . . . . . . . . . . . . . . . . . . . 405
Figure 191. Sales Items Variable Price . . . . . . . . . . . . . . . . . . . . . . . . . . . . . . . . . . . . . . . . . . . . . 406
Figure 192. Sales Items & Profile for Retail menu Wash Options Example . . . . . . . . . . . 410
Figure 193. Additional Standard Screen Flex / Retail Buttons. . . . . . . . . . . . . . . . . . . . . . . 411
Figure 194. Packages Tab. . . . . . . . . . . . . . . . . . . . . . . . . . . . . . . . . . . . . . . . . . . . . . . . . . . . . . . . . 418
Figure 195. Package setup. . . . . . . . . . . . . . . . . . . . . . . . . . . . . . . . . . . . . . . . . . . . . . . . . . . . . . . . 420
Figure 196. Wash Book tab . . . . . . . . . . . . . . . . . . . . . . . . . . . . . . . . . . . . . . . . . . . . . . . . . . . . . . . 426
Figure 197. Add new Wash Book. . . . . . . . . . . . . . . . . . . . . . . . . . . . . . . . . . . . . . . . . . . . . . . . . . 427
Figure 198. Profile Tab . . . . . . . . . . . . . . . . . . . . . . . . . . . . . . . . . . . . . . . . . . . . . . . . . . . . . . . . . . . 436
Figure 199. Profile Dialog Box . . . . . . . . . . . . . . . . . . . . . . . . . . . . . . . . . . . . . . . . . . . . . . . . . . . . 436
Figure 200. Base Dialog Box . . . . . . . . . . . . . . . . . . . . . . . . . . . . . . . . . . . . . . . . . . . . . . . . . . . . . . 437
Figure 201. Extra Dialog Box . . . . . . . . . . . . . . . . . . . . . . . . . . . . . . . . . . . . . . . . . . . . . . . . . . . . . . 439
Figure 202. Profile with Base Washes and Extra Services . . . . . . . . . . . . . . . . . . . . . . . . . . . 439
User Manual—Version 6.0 WashConnect®
27
Figure 203. Schedule Dialog Box. . . . . . . . . . . . . . . . . . . . . . . . . . . . . . . . . . . . . . . . . . . . . . . . . . 444
Figure 204. Profile Tab . . . . . . . . . . . . . . . . . . . . . . . . . . . . . . . . . . . . . . . . . . . . . . . . . . . . . . . . . . . 447
Figure 205. Profile Dialog Box . . . . . . . . . . . . . . . . . . . . . . . . . . . . . . . . . . . . . . . . . . . . . . . . . . . . 448
Figure 206. Base Dialog Box . . . . . . . . . . . . . . . . . . . . . . . . . . . . . . . . . . . . . . . . . . . . . . . . . . . . . . 448
Figure 207. Schedule Dialog Box. . . . . . . . . . . . . . . . . . . . . . . . . . . . . . . . . . . . . . . . . . . . . . . . . . 450
Figure 208. POS Profiles . . . . . . . . . . . . . . . . . . . . . . . . . . . . . . . . . . . . . . . . . . . . . . . . . . . . . . . . . . 451
Figure 209. Schedule POS Profile . . . . . . . . . . . . . . . . . . . . . . . . . . . . . . . . . . . . . . . . . . . . . . . . . 453
Figure 210. Available Promotions Example . . . . . . . . . . . . . . . . . . . . . . . . . . . . . . . . . . . . . . . . 455
Figure 211. Promotions list . . . . . . . . . . . . . . . . . . . . . . . . . . . . . . . . . . . . . . . . . . . . . . . . . . . . . . . 456
Figure 212. Promotion - Bonus Point. . . . . . . . . . . . . . . . . . . . . . . . . . . . . . . . . . . . . . . . . . . . . . 457
Figure 213. Sales Item Bonus Points Example. . . . . . . . . . . . . . . . . . . . . . . . . . . . . . . . . . . . . . 461
Figure 214. Vehicle History . . . . . . . . . . . . . . . . . . . . . . . . . . . . . . . . . . . . . . . . . . . . . . . . . . . . . . . 463
Figure 215. Update Customer Information Bonus Points . . . . . . . . . . . . . . . . . . . . . . . . . . . 463
Figure 216. Customer Notes for Customer’s Bonus Points Edits . . . . . . . . . . . . . . . . . . . . 465
Figure 217. Cascade Pricing Discount Visual Diagram. . . . . . . . . . . . . . . . . . . . . . . . . . . . . . 466
Figure 218. Cascade Price for Express Basic Wash example. . . . . . . . . . . . . . . . . . . . . . . . . 468
Figure 219. Available Promotions screen with Cascade Pricing example. . . . . . . . . . . . 469
Figure 220. Promotions - Punch Card . . . . . . . . . . . . . . . . . . . . . . . . . . . . . . . . . . . . . . . . . . . . . 470
Figure 221. Available Promotions at POS. . . . . . . . . . . . . . . . . . . . . . . . . . . . . . . . . . . . . . . . . . 471
Figure 222. Customers Manage Punch Card Counter . . . . . . . . . . . . . . . . . . . . . . . . . . . . . . 472
Figure 223. Vehicle History . . . . . . . . . . . . . . . . . . . . . . . . . . . . . . . . . . . . . . . . . . . . . . . . . . . . . . . 473
Figure 224. Update Customer Information Punch Card . . . . . . . . . . . . . . . . . . . . . . . . . . . . 473
Figure 225. Customer Notes for Customer’s Punch Card Edits . . . . . . . . . . . . . . . . . . . . . . 475
Figure 226. Promotions Customer Date . . . . . . . . . . . . . . . . . . . . . . . . . . . . . . . . . . . . . . . . . . . 476
Figure 227. Customer Information, Promotions, Birthday Example . . . . . . . . . . . . . . . . . 477
Figure 228. Promotions Calendar Date . . . . . . . . . . . . . . . . . . . . . . . . . . . . . . . . . . . . . . . . . . . . 478
Figure 229. Promotions Frequent Car . . . . . . . . . . . . . . . . . . . . . . . . . . . . . . . . . . . . . . . . . . . . . 479
Figure 230. Frequent Customer Promotion. . . . . . . . . . . . . . . . . . . . . . . . . . . . . . . . . . . . . . . . 481
Figure 231. Discount Price List example of discount Types . . . . . . . . . . . . . . . . . . . . . . . . . 482
Figure 232. Sales Items Cascading Pricing Promo example. . . . . . . . . . . . . . . . . . . . . . . . . 486
Figure 233. Package tab for Frequency Promotion Discount . . . . . . . . . . . . . . . . . . . . . . . 487
Figure 234. Frequency Promotion Receipt Text example. . . . . . . . . . . . . . . . . . . . . . . . . . . 488
Figure 235. Promo Setup for cascading price promo example. . . . . . . . . . . . . . . . . . . . . . 489
Figure 236. Settings to allow cascading pricing discount wash codes . . . . . . . . . . . . . . 489

WashConnect® User Manual—Version 6.0
28
Figure 237. Promo Receipt Text New Receipt Example. . . . . . . . . . . . . . . . . . . . . . . . . . . . . 493
Figure 238. Alerts tab . . . . . . . . . . . . . . . . . . . . . . . . . . . . . . . . . . . . . . . . . . . . . . . . . . . . . . . . . . . . 497
Figure 239. Alert Email Test. . . . . . . . . . . . . . . . . . . . . . . . . . . . . . . . . . . . . . . . . . . . . . . . . . . . . . . 498
Figure 240. Alert Configuration Dialog Box at Corporate Login. . . . . . . . . . . . . . . . . . . . . 500
Figure 241. Export System Data tab . . . . . . . . . . . . . . . . . . . . . . . . . . . . . . . . . . . . . . . . . . . . . . . 502
Figure 242. Accounting Interface Payment Account . . . . . . . . . . . . . . . . . . . . . . . . . . . . . . . 510
Figure 243. System Services List . . . . . . . . . . . . . . . . . . . . . . . . . . . . . . . . . . . . . . . . . . . . . . . . . . 512
Figure 244. Accounts (System Service) . . . . . . . . . . . . . . . . . . . . . . . . . . . . . . . . . . . . . . . . . . . . 513
Figure 245. Commission Positions . . . . . . . . . . . . . . . . . . . . . . . . . . . . . . . . . . . . . . . . . . . . . . . . 514
Figure 246. Commission Position . . . . . . . . . . . . . . . . . . . . . . . . . . . . . . . . . . . . . . . . . . . . . . . . . 515
Figure 247. Commission Eligibility Rules . . . . . . . . . . . . . . . . . . . . . . . . . . . . . . . . . . . . . . . . . . 517
Figure 248. Eligibility Rule . . . . . . . . . . . . . . . . . . . . . . . . . . . . . . . . . . . . . . . . . . . . . . . . . . . . . . . . 518
Figure 249. Advanced Eligibility Rules. . . . . . . . . . . . . . . . . . . . . . . . . . . . . . . . . . . . . . . . . . . . . 520
Figure 250. Commission Schedule Example . . . . . . . . . . . . . . . . . . . . . . . . . . . . . . . . . . . . . . . 521
Figure 251. Commission Schedule Example . . . . . . . . . . . . . . . . . . . . . . . . . . . . . . . . . . . . . . . 522
Figure 252. Commission Schedule Delete Example . . . . . . . . . . . . . . . . . . . . . . . . . . . . . . . . 523
Figure 253. Manage Users Example . . . . . . . . . . . . . . . . . . . . . . . . . . . . . . . . . . . . . . . . . . . . . . . 527
Figure 254. Roles Dialog Box. . . . . . . . . . . . . . . . . . . . . . . . . . . . . . . . . . . . . . . . . . . . . . . . . . . . . . 530
Figure 255. Regional Manager Role . . . . . . . . . . . . . . . . . . . . . . . . . . . . . . . . . . . . . . . . . . . . . . . 531
Figure 256. Regional Manager Role Example . . . . . . . . . . . . . . . . . . . . . . . . . . . . . . . . . . . . . . 533
Figure 257. Example Levels and Organizational Layout . . . . . . . . . . . . . . . . . . . . . . . . . . . . 535
Figure 258. Security Roles . . . . . . . . . . . . . . . . . . . . . . . . . . . . . . . . . . . . . . . . . . . . . . . . . . . . . . . . 535
Figure 259. Privileges for Two Security Roles . . . . . . . . . . . . . . . . . . . . . . . . . . . . . . . . . . . . . . 536
Figure 260. Two Users with Different Security Roles . . . . . . . . . . . . . . . . . . . . . . . . . . . . . . . 537
Figure 261. Regional VP User . . . . . . . . . . . . . . . . . . . . . . . . . . . . . . . . . . . . . . . . . . . . . . . . . . . . . 538
Figure 262. List of Users . . . . . . . . . . . . . . . . . . . . . . . . . . . . . . . . . . . . . . . . . . . . . . . . . . . . . . . . . . 538
Figure 263. Invalid and Valid Login Locations . . . . . . . . . . . . . . . . . . . . . . . . . . . . . . . . . . . . . 539
Figure 264. Two Differently configured User Menus . . . . . . . . . . . . . . . . . . . . . . . . . . . . . . . 540
Figure 265. Manage Users . . . . . . . . . . . . . . . . . . . . . . . . . . . . . . . . . . . . . . . . . . . . . . . . . . . . . . . . 542
Figure 266. Add User . . . . . . . . . . . . . . . . . . . . . . . . . . . . . . . . . . . . . . . . . . . . . . . . . . . . . . . . . . . . . 544
Figure 267. Manage Users employee list . . . . . . . . . . . . . . . . . . . . . . . . . . . . . . . . . . . . . . . . . . 548
Figure 268. User Wages screen . . . . . . . . . . . . . . . . . . . . . . . . . . . . . . . . . . . . . . . . . . . . . . . . . . . 548
Figure 269. Edit User . . . . . . . . . . . . . . . . . . . . . . . . . . . . . . . . . . . . . . . . . . . . . . . . . . . . . . . . . . . . . 550
Figure 270. User Fingerprints . . . . . . . . . . . . . . . . . . . . . . . . . . . . . . . . . . . . . . . . . . . . . . . . . . . . . 552
User Manual—Version 6.0 WashConnect®
29
Figure 271. Fingerprint Captured Print message. . . . . . . . . . . . . . . . . . . . . . . . . . . . . . . . . . . 553
Figure 272. Capture Print successfully registered message. . . . . . . . . . . . . . . . . . . . . . . . . 553
Figure 273. User - Capture Fingerprints . . . . . . . . . . . . . . . . . . . . . . . . . . . . . . . . . . . . . . . . . . . 554
Figure 274. Delete User Fingerprints . . . . . . . . . . . . . . . . . . . . . . . . . . . . . . . . . . . . . . . . . . . . . . 555
Figure 275. Touch POS Screen . . . . . . . . . . . . . . . . . . . . . . . . . . . . . . . . . . . . . . . . . . . . . . . . . . . . 558
Figure 276. Open Shift tab. . . . . . . . . . . . . . . . . . . . . . . . . . . . . . . . . . . . . . . . . . . . . . . . . . . . . . . . 560
Figure 277. Add / Remove tab . . . . . . . . . . . . . . . . . . . . . . . . . . . . . . . . . . . . . . . . . . . . . . . . . . . . 563
Figure 278. Close Shift tab . . . . . . . . . . . . . . . . . . . . . . . . . . . . . . . . . . . . . . . . . . . . . . . . . . . . . . . . 565
Figure 279. Touch PreSell Sales Screen . . . . . . . . . . . . . . . . . . . . . . . . . . . . . . . . . . . . . . . . . . . . 568
Figure 280. Club Expired Dialog box . . . . . . . . . . . . . . . . . . . . . . . . . . . . . . . . . . . . . . . . . . . . . . 569
Figure 281. Renew Club Credit Card Renewal Options . . . . . . . . . . . . . . . . . . . . . . . . . . . . . 570
Figure 282. Available Promotions screen example. . . . . . . . . . . . . . . . . . . . . . . . . . . . . . . . . 576
Figure 283. Open Shift - Recharge My Wash Books button . . . . . . . . . . . . . . . . . . . . . . . . . 577
Figure 284. Available Recharge Washes screen . . . . . . . . . . . . . . . . . . . . . . . . . . . . . . . . . . . . 578
Figure 285. Touch POS Service Color grouped buttons . . . . . . . . . . . . . . . . . . . . . . . . . . . . 581
Figure 286. Touch POS Sales entry screen . . . . . . . . . . . . . . . . . . . . . . . . . . . . . . . . . . . . . . . . . 583
Figure 287. Inventory Search . . . . . . . . . . . . . . . . . . . . . . . . . . . . . . . . . . . . . . . . . . . . . . . . . . . . . 583
Figure 288. Payment(s) Touch POS screen. . . . . . . . . . . . . . . . . . . . . . . . . . . . . . . . . . . . . . . . . 584
Figure 289. 3rd Party Credit Card - Select Card screen . . . . . . . . . . . . . . . . . . . . . . . . . . . . . 586
Figure 290. Void Transaction screen . . . . . . . . . . . . . . . . . . . . . . . . . . . . . . . . . . . . . . . . . . . . . . 593
Figure 291. ROA dialog box. . . . . . . . . . . . . . . . . . . . . . . . . . . . . . . . . . . . . . . . . . . . . . . . . . . . . . . 599
Figure 292. ROA Payment Screen without an invoice number. . . . . . . . . . . . . . . . . . . . . . 600
Figure 293. ROA Payment(s) screen check example. . . . . . . . . . . . . . . . . . . . . . . . . . . . . . . . 600
Figure 294. PayOuts screen . . . . . . . . . . . . . . . . . . . . . . . . . . . . . . . . . . . . . . . . . . . . . . . . . . . . . . . 601
Figure 295. Ticket Generation screen . . . . . . . . . . . . . . . . . . . . . . . . . . . . . . . . . . . . . . . . . . . . . 603
Figure 296. Ticket Generation screen . . . . . . . . . . . . . . . . . . . . . . . . . . . . . . . . . . . . . . . . . . . . . 606
Figure 297. Open Shift Stack button . . . . . . . . . . . . . . . . . . . . . . . . . . . . . . . . . . . . . . . . . . . . . . 608
Figure 298. Sales Tax . . . . . . . . . . . . . . . . . . . . . . . . . . . . . . . . . . . . . . . . . . . . . . . . . . . . . . . . . . . . . 618
Figure 299. Sales Tax Dialog Box . . . . . . . . . . . . . . . . . . . . . . . . . . . . . . . . . . . . . . . . . . . . . . . . . . 618
Figure 300. Sales Tax Accounts Dialog box example . . . . . . . . . . . . . . . . . . . . . . . . . . . . . . . 619
Figure 301. Sales Tax Dialog Box . . . . . . . . . . . . . . . . . . . . . . . . . . . . . . . . . . . . . . . . . . . . . . . . . . 620
Figure 302. Report Subscription tab . . . . . . . . . . . . . . . . . . . . . . . . . . . . . . . . . . . . . . . . . . . . . . 622
Figure 303. Report Subscriptions tab. . . . . . . . . . . . . . . . . . . . . . . . . . . . . . . . . . . . . . . . . . . . . . 622
Figure 304. Organizational Layout Concept Diagram . . . . . . . . . . . . . . . . . . . . . . . . . . . . . . 626

WashConnect® User Manual—Version 6.0
30
Figure 305. Organizational Layout with Four Assigned Sites . . . . . . . . . . . . . . . . . . . . . . . 628
Figure 306. Organizational Layout with Eight Assigned Sites. . . . . . . . . . . . . . . . . . . . . . . 629
Figure 307. Four Sites with NJ as a Parent . . . . . . . . . . . . . . . . . . . . . . . . . . . . . . . . . . . . . . . . . 629
Figure 308. Login Screen and Site Selection Tree Examples . . . . . . . . . . . . . . . . . . . . . . . . 630
Figure 309. Level and Site Icons. . . . . . . . . . . . . . . . . . . . . . . . . . . . . . . . . . . . . . . . . . . . . . . . . . . 630
Figure 310. Create Levels Tab. . . . . . . . . . . . . . . . . . . . . . . . . . . . . . . . . . . . . . . . . . . . . . . . . . . . . 632
Figure 311. Create Levels Tab. . . . . . . . . . . . . . . . . . . . . . . . . . . . . . . . . . . . . . . . . . . . . . . . . . . . . 633
Figure 312. Create Levels Tab. . . . . . . . . . . . . . . . . . . . . . . . . . . . . . . . . . . . . . . . . . . . . . . . . . . . . 633
Figure 313. Delete Level Warning . . . . . . . . . . . . . . . . . . . . . . . . . . . . . . . . . . . . . . . . . . . . . . . . . 634
Figure 314. Cannot Delete Level Warning Message . . . . . . . . . . . . . . . . . . . . . . . . . . . . . . . . 634
Figure 315. Site Selected to Edit . . . . . . . . . . . . . . . . . . . . . . . . . . . . . . . . . . . . . . . . . . . . . . . . . . 636
Figure 316. Site Contact Dialog Box . . . . . . . . . . . . . . . . . . . . . . . . . . . . . . . . . . . . . . . . . . . . . . . 637
Figure 317. Assign Sites . . . . . . . . . . . . . . . . . . . . . . . . . . . . . . . . . . . . . . . . . . . . . . . . . . . . . . . . . . 639
Figure 318. Assigning Sparkle Car Wash to Sparkle Site . . . . . . . . . . . . . . . . . . . . . . . . . . . . 639
Figure 319. Organization Layout / Assign Site . . . . . . . . . . . . . . . . . . . . . . . . . . . . . . . . . . . . . 640
Figure 320. Site Selected to Edit . . . . . . . . . . . . . . . . . . . . . . . . . . . . . . . . . . . . . . . . . . . . . . . . . . 641
Figure 321. Organization Layout / Assign Site . . . . . . . . . . . . . . . . . . . . . . . . . . . . . . . . . . . . . 641
Figure 322. Level Selected to Delete . . . . . . . . . . . . . . . . . . . . . . . . . . . . . . . . . . . . . . . . . . . . . . 642
Figure 323. Delete Site Warning . . . . . . . . . . . . . . . . . . . . . . . . . . . . . . . . . . . . . . . . . . . . . . . . . . 643
Figure 324. Cannot Delete Group Warning Message. . . . . . . . . . . . . . . . . . . . . . . . . . . . . . . 643
Figure 325. Define Tokens . . . . . . . . . . . . . . . . . . . . . . . . . . . . . . . . . . . . . . . . . . . . . . . . . . . . . . . . 644
Figure 326. Token Dialog Box. . . . . . . . . . . . . . . . . . . . . . . . . . . . . . . . . . . . . . . . . . . . . . . . . . . . . 645
Figure 327. Token Dialog Box. . . . . . . . . . . . . . . . . . . . . . . . . . . . . . . . . . . . . . . . . . . . . . . . . . . . . 645
Figure 328. Device Groups example . . . . . . . . . . . . . . . . . . . . . . . . . . . . . . . . . . . . . . . . . . . . . . 648
Figure 329. Device Group . . . . . . . . . . . . . . . . . . . . . . . . . . . . . . . . . . . . . . . . . . . . . . . . . . . . . . . . 648
Figure 330. Assign Devices to Device Group. . . . . . . . . . . . . . . . . . . . . . . . . . . . . . . . . . . . . . . 649
Figure 331. Edit Device Group . . . . . . . . . . . . . . . . . . . . . . . . . . . . . . . . . . . . . . . . . . . . . . . . . . . . 650
Figure 332. Refresh Device Configuration . . . . . . . . . . . . . . . . . . . . . . . . . . . . . . . . . . . . . . . . . 652
Figure 333. Device Group Settings example . . . . . . . . . . . . . . . . . . . . . . . . . . . . . . . . . . . . . . . 653
Figure 334. Passive Sell Style for Clubs and Gift Cards. . . . . . . . . . . . . . . . . . . . . . . . . . . . . . 659
Figure 335. Active Sell Style for Club Membership . . . . . . . . . . . . . . . . . . . . . . . . . . . . . . . . . 660
Figure 336. Settings Renew Membership with Option to Select a Different Club . . . . 661
Figure 337. Auto Sentry Main Menu, Gift Card Passive Sell Style. . . . . . . . . . . . . . . . . . . . 668
Figure 338. Auto Sentry Main Menu, Gift Card Active Sell Style. . . . . . . . . . . . . . . . . . . . . 669

User Manual—Version 6.0 WashConnect®
31
Figure 339. Hierarchy of buttons on Main Options screen. . . . . . . . . . . . . . . . . . . . . . . . . . 671
Figure 340. Settings for Main Options . . . . . . . . . . . . . . . . . . . . . . . . . . . . . . . . . . . . . . . . . . . . . 675
Figure 341. Auto Sentry Main Menu Options . . . . . . . . . . . . . . . . . . . . . . . . . . . . . . . . . . . . . . 675
Figure 342. Global Settings for Prorate Clubs . . . . . . . . . . . . . . . . . . . . . . . . . . . . . . . . . . . . . . 685
Figure 343. Weather Underground API Key form . . . . . . . . . . . . . . . . . . . . . . . . . . . . . . . . . . 690
Figure 344. Weather Underground API Key example . . . . . . . . . . . . . . . . . . . . . . . . . . . . . . 691
Figure 345. Controller Services . . . . . . . . . . . . . . . . . . . . . . . . . . . . . . . . . . . . . . . . . . . . . . . . . . . 709
Figure 346. Controller Service Add or Edit dialog box. . . . . . . . . . . . . . . . . . . . . . . . . . . . . . 709
Figure 347. Add TNC Service. . . . . . . . . . . . . . . . . . . . . . . . . . . . . . . . . . . . . . . . . . . . . . . . . . . . . . 711
Figure 348. Add TouchNClean Output Dialog Box . . . . . . . . . . . . . . . . . . . . . . . . . . . . . . . . . 711
Figure 349. Edit TouchNClean Output. . . . . . . . . . . . . . . . . . . . . . . . . . . . . . . . . . . . . . . . . . . . . 712
Figure 350. Edit TNC Outputs Dialog Box. . . . . . . . . . . . . . . . . . . . . . . . . . . . . . . . . . . . . . . . . . 713
Figure 351. TouchNClean Output Termination Warning Message . . . . . . . . . . . . . . . . . . 714
Figure 352. TNC Service . . . . . . . . . . . . . . . . . . . . . . . . . . . . . . . . . . . . . . . . . . . . . . . . . . . . . . . . . . 714
Figure 353. TouchNClean Wash Service Dependency . . . . . . . . . . . . . . . . . . . . . . . . . . . . . . 716
Figure 354. Site Device List . . . . . . . . . . . . . . . . . . . . . . . . . . . . . . . . . . . . . . . . . . . . . . . . . . . . . . . 718
Figure 355. Assign Denominations Tab . . . . . . . . . . . . . . . . . . . . . . . . . . . . . . . . . . . . . . . . . . . 719
Figure 356. Assign Denominations Dialog Box . . . . . . . . . . . . . . . . . . . . . . . . . . . . . . . . . . . . 720
Figure 357. Profit Center Descriptions. . . . . . . . . . . . . . . . . . . . . . . . . . . . . . . . . . . . . . . . . . . . . 722
Figure 358. Profit Center Description Dialog Box . . . . . . . . . . . . . . . . . . . . . . . . . . . . . . . . . . 722
Figure 359. Profit Center Description . . . . . . . . . . . . . . . . . . . . . . . . . . . . . . . . . . . . . . . . . . . . . 724
Figure 360. Edit a Profit Center Description . . . . . . . . . . . . . . . . . . . . . . . . . . . . . . . . . . . . . . . 724
Figure 361. Profit Center Description . . . . . . . . . . . . . . . . . . . . . . . . . . . . . . . . . . . . . . . . . . . . . 725
Figure 362. Manage Profit Center Description . . . . . . . . . . . . . . . . . . . . . . . . . . . . . . . . . . . . . 726
Figure 363. Profit Center Dialog Assign Device Dialog Box . . . . . . . . . . . . . . . . . . . . . . . . . 727
Figure 364. Profit Center Order tab example . . . . . . . . . . . . . . . . . . . . . . . . . . . . . . . . . . . . . . 729
Figure 365. Performance Indicator Add Example . . . . . . . . . . . . . . . . . . . . . . . . . . . . . . . . . . 731
Figure 366. Req. Man Hours . . . . . . . . . . . . . . . . . . . . . . . . . . . . . . . . . . . . . . . . . . . . . . . . . . . . . . 733
Figure 367. Ticket ID and Details for the Selected car in the Stack . . . . . . . . . . . . . . . . . . 738
Figure 368. Controller Services example . . . . . . . . . . . . . . . . . . . . . . . . . . . . . . . . . . . . . . . . . . 739
Figure 369. Gate queue area example of 3 lanes. . . . . . . . . . . . . . . . . . . . . . . . . . . . . . . . . . . 743
Figure 370. Gate Management from the POS . . . . . . . . . . . . . . . . . . . . . . . . . . . . . . . . . . . . . . 743
Figure 371. Gate Management tab with Double Tunnels on Touch ES . . . . . . . . . . . . . . 744
Figure 372. Hand Service Mgmt tab. . . . . . . . . . . . . . . . . . . . . . . . . . . . . . . . . . . . . . . . . . . . . . . 747

WashConnect® User Manual—Version 6.0
32
Figure 373. Hand Service Mgmt displaying Wash Ticket . . . . . . . . . . . . . . . . . . . . . . . . . . . 748
Figure 374. Hand Service Mgmt Tab (camera) Example . . . . . . . . . . . . . . . . . . . . . . . . . . . . 749
Figure 375. Hand Service Mgmt with close up and wash Ticket example . . . . . . . . . . . 750
Figure 376. Hand Service Mgmt standard icons . . . . . . . . . . . . . . . . . . . . . . . . . . . . . . . . . . . 752
Figure 377. Log In / Log Out Employee ID . . . . . . . . . . . . . . . . . . . . . . . . . . . . . . . . . . . . . . . . . 755
Figure 378. Edit Time Clock Employee Search Results List . . . . . . . . . . . . . . . . . . . . . . . . . . 758
Figure 379. Employee Time Clock Summary Report sample . . . . . . . . . . . . . . . . . . . . . . . . 761
Figure 380. Employee Time Clock Details Report sample. . . . . . . . . . . . . . . . . . . . . . . . . . . 763
Figure 381. Employees Working Today sample report . . . . . . . . . . . . . . . . . . . . . . . . . . . . . 765
Figure 382. Employees Not Working Today Report sample . . . . . . . . . . . . . . . . . . . . . . . . 766
Figure 383. Auto Sentry Main Options Coupon Code button. . . . . . . . . . . . . . . . . . . . . . . 785
Figure 384. Add Fundraiser Sales Item . . . . . . . . . . . . . . . . . . . . . . . . . . . . . . . . . . . . . . . . . . . . 791
Figure 385. Main Options Screen on Auto Sentry Touch Screen . . . . . . . . . . . . . . . . . . . . 793
User Manual—Version 6.0 WashConnect®
33
List of TablesTable 1. Date Range FAQs . . . . . . . . . . . . . . . . . . . . . . . . . . . . . . . . . . . . . . . . . . . . . . . . . . . . . . . . . . . .77
Table 2. Profitability Report Descriptions. . . . . . . . . . . . . . . . . . . . . . . . . . . . . . . . . . . . . . . . . . . . . .114
Table 3. Club Usage Report Field Descriptions. . . . . . . . . . . . . . . . . . . . . . . . . . . . . . . . . . . . . . . . .120
Table 4. Vehicle History Report Descriptions . . . . . . . . . . . . . . . . . . . . . . . . . . . . . . . . . . . . . . . . . .124
Table 5. Club Summary Report Field Descriptions . . . . . . . . . . . . . . . . . . . . . . . . . . . . . . . . . . . . .128
Table 6. Declined Payment Description . . . . . . . . . . . . . . . . . . . . . . . . . . . . . . . . . . . . . . . . . . . . . . .135
Table 7. Club Revenue Distribution Report . . . . . . . . . . . . . . . . . . . . . . . . . . . . . . . . . . . . . . . . . . . .138
Table 8. Autobill Revenue Report . . . . . . . . . . . . . . . . . . . . . . . . . . . . . . . . . . . . . . . . . . . . . . . . . . . . .141
Table 9. Credit card Expiration Report. . . . . . . . . . . . . . . . . . . . . . . . . . . . . . . . . . . . . . . . . . . . . . . . .143
Table 10. Renewal & Termination Report . . . . . . . . . . . . . . . . . . . . . . . . . . . . . . . . . . . . . . . . . . . . . .145
Table 11. Fleet Invoice Find Account Search Field Descriptions . . . . . . . . . . . . . . . . . . . . . . . .164
Table 12. Fleet Invoice Field Descriptions . . . . . . . . . . . . . . . . . . . . . . . . . . . . . . . . . . . . . . . . . . . . .168
Table 13. Financial Menu FAQs . . . . . . . . . . . . . . . . . . . . . . . . . . . . . . . . . . . . . . . . . . . . . . . . . . . . . . .176
Table 14. Register Reports Descriptions . . . . . . . . . . . . . . . . . . . . . . . . . . . . . . . . . . . . . . . . . . . . . . .177
Table 15. Financial Overview Report Descriptions . . . . . . . . . . . . . . . . . . . . . . . . . . . . . . . . . . . . .184
Table 16. Shift Detail Report Field Descriptions . . . . . . . . . . . . . . . . . . . . . . . . . . . . . . . . . . . . . . . .196
Table 17. Credit Cards Report Descriptions . . . . . . . . . . . . . . . . . . . . . . . . . . . . . . . . . . . . . . . . . . . . 204
Table 18. Checks Report Field Descriptions. . . . . . . . . . . . . . . . . . . . . . . . . . . . . . . . . . . . . . . . . . . . 216
Table 19. Fleet Activity Report . . . . . . . . . . . . . . . . . . . . . . . . . . . . . . . . . . . . . . . . . . . . . . . . . . . . . . . . 220
Table 20. Deposits Report Field Descriptions . . . . . . . . . . . . . . . . . . . . . . . . . . . . . . . . . . . . . . . . . . 223
Table 21. Free Wash Report Field Descriptions . . . . . . . . . . . . . . . . . . . . . . . . . . . . . . . . . . . . . . . . 227
Table 22. Rewash Report Descriptions . . . . . . . . . . . . . . . . . . . . . . . . . . . . . . . . . . . . . . . . . . . . . . . . 231
Table 23. Payouts Report Descriptions . . . . . . . . . . . . . . . . . . . . . . . . . . . . . . . . . . . . . . . . . . . . . . . . 234
Table 24. Received on Account Report Descriptions . . . . . . . . . . . . . . . . . . . . . . . . . . . . . . . . . . . 238
Table 25. Voids Report Descriptions. . . . . . . . . . . . . . . . . . . . . . . . . . . . . . . . . . . . . . . . . . . . . . . . . . . 241
Table 26. Wash to Register Comparison Descriptions . . . . . . . . . . . . . . . . . . . . . . . . . . . . . . . . . . 253
Table 27. Ticket Comparison Field Descriptions . . . . . . . . . . . . . . . . . . . . . . . . . . . . . . . . . . . . . . . 257
Table 28. Transaction Detail Field Descriptions . . . . . . . . . . . . . . . . . . . . . . . . . . . . . . . . . . . . . . . . 260
Table 29. Terminal Balance Report Descriptions . . . . . . . . . . . . . . . . . . . . . . . . . . . . . . . . . . . . . . . 263
Table 30. View Journal History and Verify Journal Action Descriptions. . . . . . . . . . . . . . . . . . 276
Table 31. Operations Report field descriptions . . . . . . . . . . . . . . . . . . . . . . . . . . . . . . . . . . . . . . . . 296
Table 32. Ticket Redeemed Summary field descriptions . . . . . . . . . . . . . . . . . . . . . . . . . . . . . . . 299
Table 33. Ticket Redeemed Summary Field Descriptions. . . . . . . . . . . . . . . . . . . . . . . . . . . . . . . 302
Table 34. Performance Menu FAQs . . . . . . . . . . . . . . . . . . . . . . . . . . . . . . . . . . . . . . . . . . . . . . . . . . . 306

WashConnect® User Manual—Version 6.0
34
Table 35. Performance Menu Report Descriptions . . . . . . . . . . . . . . . . . . . . . . . . . . . . . . . . . . . . . 307
Table 36. Vehicle Statistical Performance Report Descriptions . . . . . . . . . . . . . . . . . . . . . . . . . 320
Table 37. Sales Distribution Report Descriptions. . . . . . . . . . . . . . . . . . . . . . . . . . . . . . . . . . . . . . . 334
Table 38. TouchNClean Services Report Descriptions . . . . . . . . . . . . . . . . . . . . . . . . . . . . . . . . . . 336
Table 39. RFID Statistics Color Code Key. . . . . . . . . . . . . . . . . . . . . . . . . . . . . . . . . . . . . . . . . . . . . . . 340
Table 40. RFID Statistics Report Descriptions . . . . . . . . . . . . . . . . . . . . . . . . . . . . . . . . . . . . . . . . . 343
Table 41. RFID Statistics Report Descriptions . . . . . . . . . . . . . . . . . . . . . . . . . . . . . . . . . . . . . . . . . 346
Table 42. Monitoring System Menu FAQs . . . . . . . . . . . . . . . . . . . . . . . . . . . . . . . . . . . . . . . . . . . . . 350
Table 43. Status and Error Message Descriptions . . . . . . . . . . . . . . . . . . . . . . . . . . . . . . . . . . . . . . 359
Table 44. Event History Descriptions . . . . . . . . . . . . . . . . . . . . . . . . . . . . . . . . . . . . . . . . . . . . . . . . . . 364
Table 45. Device Statistics Descriptions . . . . . . . . . . . . . . . . . . . . . . . . . . . . . . . . . . . . . . . . . . . . . . . 367
Table 46. Version History . . . . . . . . . . . . . . . . . . . . . . . . . . . . . . . . . . . . . . . . . . . . . . . . . . . . . . . . . . . . . 370
Table 47. Configuration Menu FAQs . . . . . . . . . . . . . . . . . . . . . . . . . . . . . . . . . . . . . . . . . . . . . . . . . . 373
Table 48. Club Service Descriptions . . . . . . . . . . . . . . . . . . . . . . . . . . . . . . . . . . . . . . . . . . . . . . . . . . . 386
Table 49. Sales Item Descriptions . . . . . . . . . . . . . . . . . . . . . . . . . . . . . . . . . . . . . . . . . . . . . . . . . . . . . 414
Table 50. Profiles and Schedule Descriptions . . . . . . . . . . . . . . . . . . . . . . . . . . . . . . . . . . . . . . . . . . 442
Table 1. Alert Configuration Dialog Box . . . . . . . . . . . . . . . . . . . . . . . . . . . . . . . . . . . . . . . . . . . . . . . 500
Table 2. Payment Account Field Descriptions . . . . . . . . . . . . . . . . . . . . . . . . . . . . . . . . . . . . . . . . . 511
Table 3. Users Menu FAQs . . . . . . . . . . . . . . . . . . . . . . . . . . . . . . . . . . . . . . . . . . . . . . . . . . . . . . . . . . . . 526
Table 4. User Field Descriptions. . . . . . . . . . . . . . . . . . . . . . . . . . . . . . . . . . . . . . . . . . . . . . . . . . . . . . . 546
Table 5. System Setup FAQs . . . . . . . . . . . . . . . . . . . . . . . . . . . . . . . . . . . . . . . . . . . . . . . . . . . . . . . . . . 613
Table 6. Manage Sites Field Descriptions . . . . . . . . . . . . . . . . . . . . . . . . . . . . . . . . . . . . . . . . . . . . . . 635
Table 7. Auto Sentry Backup . . . . . . . . . . . . . . . . . . . . . . . . . . . . . . . . . . . . . . . . . . . . . . . . . . . . . . . . . . 657
Table 8. Auto Sentry Books . . . . . . . . . . . . . . . . . . . . . . . . . . . . . . . . . . . . . . . . . . . . . . . . . . . . . . . . . . . 657
Table 9. Auto Sentry Clubs. . . . . . . . . . . . . . . . . . . . . . . . . . . . . . . . . . . . . . . . . . . . . . . . . . . . . . . . . . . . 658
Table 10. Auto Sentry Coin Acceptor . . . . . . . . . . . . . . . . . . . . . . . . . . . . . . . . . . . . . . . . . . . . . . . . . . 663
Table 11. Auto Sentry TouchConfiguration Control . . . . . . . . . . . . . . . . . . . . . . . . . . . . . . . . . . . . 663
Table 12. Auto Sentry TouchConfiguration Credit Card . . . . . . . . . . . . . . . . . . . . . . . . . . . . . . . . 665
Table 13. Auto Sentry Credit Card. . . . . . . . . . . . . . . . . . . . . . . . . . . . . . . . . . . . . . . . . . . . . . . . . . . . . 665
Table 14. Auto Sentry Gift Card Settings. . . . . . . . . . . . . . . . . . . . . . . . . . . . . . . . . . . . . . . . . . . . . . . 667
Table 15. Auto Sentry InBay Wash . . . . . . . . . . . . . . . . . . . . . . . . . . . . . . . . . . . . . . . . . . . . . . . . . . . . 670
Table 16. Auto Sentry TouchConfiguration Language . . . . . . . . . . . . . . . . . . . . . . . . . . . . . . . . . 670
Table 17. Auto Sentry Main Options . . . . . . . . . . . . . . . . . . . . . . . . . . . . . . . . . . . . . . . . . . . . . . . . . . 673
Table 18. Auto Sentry TouchConfiguration Pay Cash . . . . . . . . . . . . . . . . . . . . . . . . . . . . . . . . . . 676
Table 19. Auto Sentry Receipt . . . . . . . . . . . . . . . . . . . . . . . . . . . . . . . . . . . . . . . . . . . . . . . . . . . . . . . . 677
Table 20. Auto Sentry Receipt Footer . . . . . . . . . . . . . . . . . . . . . . . . . . . . . . . . . . . . . . . . . . . . . . . . . 678

User Manual—Version 6.0 WashConnect®
35
Table 21. Auto Sentry Receipt Header. . . . . . . . . . . . . . . . . . . . . . . . . . . . . . . . . . . . . . . . . . . . . . . . . 679
Table 22. Auto Sentry Service FontColor . . . . . . . . . . . . . . . . . . . . . . . . . . . . . . . . . . . . . . . . . . . . . . 679
Table 23. Auto Sentry Shift . . . . . . . . . . . . . . . . . . . . . . . . . . . . . . . . . . . . . . . . . . . . . . . . . . . . . . . . . . . 679
Table 24. Auto Sentry StackNControl Communication . . . . . . . . . . . . . . . . . . . . . . . . . . . . . . . . . 679
Table 25. Auto Sentry Tickets . . . . . . . . . . . . . . . . . . . . . . . . . . . . . . . . . . . . . . . . . . . . . . . . . . . . . . . . . 681
Table 26. Auto Sentry TouchDebug . . . . . . . . . . . . . . . . . . . . . . . . . . . . . . . . . . . . . . . . . . . . . . . . . . . 681
Table 27. Auto Sentry TouchService. . . . . . . . . . . . . . . . . . . . . . . . . . . . . . . . . . . . . . . . . . . . . . . . . . . 681
Table 28. Auto Sentry Vandalism Deterrent . . . . . . . . . . . . . . . . . . . . . . . . . . . . . . . . . . . . . . . . . . . 682
Table 29. . . . . . . . . . . . . . . . . . . . . . . . . . . . . . . . . . . . . . . . . . . . . . . . . . . . . . . . . . . . . . . . . . . . . . . . . . . . . 683
Table 30. Auto Sentry WBC Connection . . . . . . . . . . . . . . . . . . . . . . . . . . . . . . . . . . . . . . . . . . . . . . . 683
Table 31. Global Configuration CentralLogServer. . . . . . . . . . . . . . . . . . . . . . . . . . . . . . . . . . . . . . 683
Table 32. . . . . . . . . . . . . . . . . . . . . . . . . . . . . . . . . . . . . . . . . . . . . . . . . . . . . . . . . . . . . . . . . . . . . . . . . . . . . 684
Table 33. Global EmailServer Setup . . . . . . . . . . . . . . . . . . . . . . . . . . . . . . . . . . . . . . . . . . . . . . . . . . . 686
Table 34. Global Global . . . . . . . . . . . . . . . . . . . . . . . . . . . . . . . . . . . . . . . . . . . . . . . . . . . . . . . . . . . . . . . 686
Table 35. Global Hand Services HandService_AutoStart CarToBay. . . . . . . . . . . . . . . . . . . . . . 687
Table 36. Global Invoice Fleet. . . . . . . . . . . . . . . . . . . . . . . . . . . . . . . . . . . . . . . . . . . . . . . . . . . . . . . . . 688
Table 37. Reporting . . . . . . . . . . . . . . . . . . . . . . . . . . . . . . . . . . . . . . . . . . . . . . . . . . . . . . . . . . . . . . . . . . 688
Table 38. Global Surcharge Config . . . . . . . . . . . . . . . . . . . . . . . . . . . . . . . . . . . . . . . . . . . . . . . . . . . . 688
Table 39. Weather. . . . . . . . . . . . . . . . . . . . . . . . . . . . . . . . . . . . . . . . . . . . . . . . . . . . . . . . . . . . . . . . . . . . 688
Table 40. Lube Lube Service Configuration. . . . . . . . . . . . . . . . . . . . . . . . . . . . . . . . . . . . . . . . . . . . 693
Table 41. POS TouchPOSConfiguration Cage Configuration. . . . . . . . . . . . . . . . . . . . . . . . . . . . 693
Table 42. POS TouchPOSConfiguration Clubs . . . . . . . . . . . . . . . . . . . . . . . . . . . . . . . . . . . . . . . . . 693
Table 43. POS TouchPOSConfiguration Credit Card Settings . . . . . . . . . . . . . . . . . . . . . . . . . . . 694
Table 44. POS TouchPOSConfiguration General . . . . . . . . . . . . . . . . . . . . . . . . . . . . . . . . . . . . . . . 694
Table 45. POS TouchPOSConfiguration Hide POS Buttons . . . . . . . . . . . . . . . . . . . . . . . . . . . . . 696
Table 46. POS TouchConfiguration LayoutDirection . . . . . . . . . . . . . . . . . . . . . . . . . . . . . . . . . . . 696
Table 47. ProfitCenterDescriptionColor . . . . . . . . . . . . . . . . . . . . . . . . . . . . . . . . . . . . . . . . . . . . . . . 698
Table 48. Prompt Settings . . . . . . . . . . . . . . . . . . . . . . . . . . . . . . . . . . . . . . . . . . . . . . . . . . . . . . . . . . . .700
Table 49. Quick Money Configuration. . . . . . . . . . . . . . . . . . . . . . . . . . . . . . . . . . . . . . . . . . . . . . . . .701
Table 50. ReceiptFooter . . . . . . . . . . . . . . . . . . . . . . . . . . . . . . . . . . . . . . . . . . . . . . . . . . . . . . . . . . . . . .701
Table 51. ReceiptHeader . . . . . . . . . . . . . . . . . . . . . . . . . . . . . . . . . . . . . . . . . . . . . . . . . . . . . . . . . . . . .702
Table 52. ReceiptToPrint . . . . . . . . . . . . . . . . . . . . . . . . . . . . . . . . . . . . . . . . . . . . . . . . . . . . . . . . . . . . .702
Table 53. Refunds Using Credit Card . . . . . . . . . . . . . . . . . . . . . . . . . . . . . . . . . . . . . . . . . . . . . . . . . .703
Table 54. POS TouchPOSConfiguration Report Server . . . . . . . . . . . . . . . . . . . . . . . . . . . . . . . . .703
Table 55. POS TouchPOSConfiguration SoundSettings . . . . . . . . . . . . . . . . . . . . . . . . . . . . . . . .703
Table 56. Stack Management . . . . . . . . . . . . . . . . . . . . . . . . . . . . . . . . . . . . . . . . . . . . . . . . . . . . . . . . .704

WashConnect® User Manual—Version 6.0
36
Table 57. Stacking. . . . . . . . . . . . . . . . . . . . . . . . . . . . . . . . . . . . . . . . . . . . . . . . . . . . . . . . . . . . . . . . . . . .704
Table 58. Tickets . . . . . . . . . . . . . . . . . . . . . . . . . . . . . . . . . . . . . . . . . . . . . . . . . . . . . . . . . . . . . . . . . . . . .706
Table 59. Wash Book . . . . . . . . . . . . . . . . . . . . . . . . . . . . . . . . . . . . . . . . . . . . . . . . . . . . . . . . . . . . . . . . .706
Table 60. Menu . . . . . . . . . . . . . . . . . . . . . . . . . . . . . . . . . . . . . . . . . . . . . . . . . . . . . . . . . . . . . . . . . . . . . .706
Table 61. Config. . . . . . . . . . . . . . . . . . . . . . . . . . . . . . . . . . . . . . . . . . . . . . . . . . . . . . . . . . . . . . . . . . . . . .707
Table 62. Configuration . . . . . . . . . . . . . . . . . . . . . . . . . . . . . . . . . . . . . . . . . . . . . . . . . . . . . . . . . . . . . .707
Table 63. Display . . . . . . . . . . . . . . . . . . . . . . . . . . . . . . . . . . . . . . . . . . . . . . . . . . . . . . . . . . . . . . . . . . . . .707
Table 64. Roller . . . . . . . . . . . . . . . . . . . . . . . . . . . . . . . . . . . . . . . . . . . . . . . . . . . . . . . . . . . . . . . . . . . . . .707
Table 65. Logging . . . . . . . . . . . . . . . . . . . . . . . . . . . . . . . . . . . . . . . . . . . . . . . . . . . . . . . . . . . . . . . . . . . .708
Table 66. UpCounter . . . . . . . . . . . . . . . . . . . . . . . . . . . . . . . . . . . . . . . . . . . . . . . . . . . . . . . . . . . . . . . . .708
Table 67. Req. Man Hours Descriptions. . . . . . . . . . . . . . . . . . . . . . . . . . . . . . . . . . . . . . . . . . . . . . . .734
Table 68. Req. Man Hours Descriptions. . . . . . . . . . . . . . . . . . . . . . . . . . . . . . . . . . . . . . . . . . . . . . . .734
Table 69. Stack Management . . . . . . . . . . . . . . . . . . . . . . . . . . . . . . . . . . . . . . . . . . . . . . . . . . . . . . . . .736
Table 70. Stack Management Example of a Popup Bubble . . . . . . . . . . . . . . . . . . . . . . . . . . . . .740
Table 71. Document Change History . . . . . . . . . . . . . . . . . . . . . . . . . . . . . . . . . . . . . . . . . . . . . . . . . . 809
User Manual—Version 6.0 WashConnect® Getting Started
37
CHAPTER 1:
GETTING STARTED
Welcome to Innovative Control Systems (ICS), and the industry leading car wash management system, WashConnect®. Utilizing the latest internet technology, WashConnect® connects you to the information you need most no matter where you are in the world as long as you have an internet connection. Our powerful, scalable system helps operators manage the critical day to day processes like reporting, workflow, scheduling, and device management.
Anticipating the most essential activities a site manager performs to administer clubs, fleets and other membership programs, WashConnect® provides highly detailed analysis of your membership programs with all of the different reports. Maintaining flexible relationships, auto billing for club customers, tracking usage, analyzing membership programs, real-time replication and error checking are just to name a few of the benefits of WashConnect® For wash clubs, you can edit club rules and configure club settings. For your unattended, in-bay wash terminals, you can set up sales items, profiles and fleets. For your Touch ‘N Clean bays, you can configure Touch ‘N Clean services.
See “Version Considerations” on page 39.
See “Wash clubs” on page 40.
See “What’s New” on page 40.
See “System Requirements” on page 42.
See “System Overview” on page 45.
See “About the Menu Bar” on page 50.

Getting Started WashConnect® User Manual—Version 6.0
38
See “About Scroll Buttons” on page 53.
See “About the Menu Tab” on page 55.
See “About Workspace Tabs” on page 56.
See “About the Status Bar” on page 57.
See “About Data Replication” on page 58.
See “About Users” on page 59.
See “About Clubs” on page 60.
See “About Reports” on page 61.
See “Starting WashConnect®” on page 70.
See “Logging In” on page 71.

User Manual—Version 6.0 WashConnect® Getting Started
39
Version Considerations
The contents of this document are based on version 1.3.2.
You can view the software versions at any time while working in WashConnect®.
Click the Version text link to view the current Versions.
Figure 1. Version Considerations for WashConnect
Current Version
WashConnect® Container Version 1.3.2.203
WashConnect® Version 1.3.2.205
ICS Core Version 1.3.2.204
Database Version 1.3.2.205
ICS will attempt to inform WashConnect® customers of software updates and new documentation as the contents are subject to change. If you are unsure about whether you have the latest version, we encourage you to contact ICS Support at 1-800-246-3469.
See “Getting Started” on page 37.

Getting Started WashConnect® User Manual—Version 6.0
40
What’s New
At ICS, we are making it easier than ever to manage your facility and grow your
bottom line with WashConnect®.
You can view the archived What’s New documents including our new features and enhancements.
“What’s New Archive”
If you are having trouble with your Adobe pdf file,
see http://get.adobe.com/reader/
See “Getting Started” on page 37.
Wash clubs
In-bay automatic devices
Touch ‘N Clean
User Manual—Version 6.0 WashConnect® Getting Started
41
Supports Single-site and Multi-site
The WashConnect®system supports both single-site and multi-site car washes.
Multi-site installation is used when various locations and layers in the organization exist. For example: corporate headquarters, regional offices, district headquarters and multiple sites below that level.
WashConnect®can also be used for a single site without a corporate location. In this case, data is kept locally and not backed up to corporate location.
NOTE: Contact Inside Sales for the ICS Technical Support Contract to have auto
backups configured. The contract is optional and additional fees apply.
See “Getting Started” on page 37.

Getting Started WashConnect® User Manual—Version 6.0
42
System Requirements
This version of WashConnect® TouchPOS requires:
Microsoft® Internet Explorer 9, 10, or 11
Set Default Browser to Microsoft Internet Explorer in order to view WashConnect® Online Help.
In Internet Explorer settings > Internet Options > Privacy tab, Turn off Pop-up Blocker.
See “Getting Started” on page 37.

User Manual—Version 6.0 WashConnect® Getting Started
43
Software/Hardware Validation
When starting up Innovative Control applications, ICS will check if the hardware has been validated. This is a new requirement to run ICS software and must be completed. There will be only a handful of employees, for security purposes, that will have the ability to complete this operation. WashConnect will need to be validated. If WashConnect is not validated, the system will count down a trial period of 30 days. If not validated, WashConnect will refuse to launch. Those who can complete the Hardware validation process, can also validate WashConnect.

Getting Started WashConnect® User Manual—Version 6.0
44
About the Interface
The WashConnect®interface includes two main areas:
The menu bar
The workspace
The menu bar changes according to login level and User privileges.
Figure 2. Workspace and Menu Bar
See “Getting Started” on page 37.

User Manual—Version 6.0 WashConnect® Getting Started
45
System Overview
WashConnect® includes the following menus and commands:
Report Default Date
▪ Set Date Range
▪ Today
▪ Yesterday
▪ Current Pay Period
▪ Last Pay Period
▪ Month to Date
▪ Last Month
▪ Year to Date
▪ Last Year
Customers
▪ Manage
▪ Group
Clubs
▪ Reports
• Profitability
• Club Usage
• Vehicle History
• Club Summary
• Declined Payment
• Club Revenue
• Autobill Revenue
• Credit Card Expiration
• Renewal & Termination
Fleet
▪ Accounts
▪ Rules
▪ Invoice (Available at Corporate)

Getting Started WashConnect® User Manual—Version 6.0
46
▪ Manage (Available at Corporate)
Financial
▪ Register Reports
• Financial Overview
• Shift
• Credit Cards Summary
• Credit Cards
• Gift Cards
• Checks
• Fleet Activity
• Deposits
• Free Wash
• Re-Wash
• Payouts
• ROA
• Voids
• Fund Raiser
• View Register
▪ Audit Controls
• Wash to Register
• Ticket Comparison
• Journal Verify
• Transactional Details
• Terminal Balance
• Sales Commission
• View Site Tickets
▪ Cash Management
• Terminal Balances
• Operations Report
Performance
▪ Vehicle Performance

User Manual—Version 6.0 WashConnect® Getting Started
47
▪ Performance Gauge
▪ Sales Distribution
▪ TouchNClean Usage
▪ RFID Statistics
Monitoring System
▪ Status
▪ Event History
▪ Device Statistics
▪ Version History
Configuration
▪ Goods and Services
• Club Services (Available at Corporate Only)
• Sales Items
• Packages
• Wash Book (Available at Corporate Only)
• Profiles
• POS Profiles
• Promotions (Available at Corporate Only)
• System Items (Available at Corporate Only)
▪ Frequency Promotions
• Promo Setup
• Promo Receipt Text
▪ Alerts
▪ Export System Data
▪ Accounting Interface
• Manage
• Payment Account
• System Items
Commissions
▪ Positions
▪ Eligibility Rules
Getting Started WashConnect® User Manual—Version 6.0
48
▪ Schedules
Users
▪ Security Roles (Available at Corporate Only)
▪ Manage Users
System Setup
▪ Sales Tax
▪ Report Subscriptions
▪ Organizational Layout
• Create Levels
• Manage Sites
• Assign Sites
▪ Devices
• Define Tokens (Available at Corporate)
• Device Groups
• Settings
• Controller Services
• TouchNClean Outputs
• My Devices
• Assign Denominations
▪ Profit Centers
• Manage Profit Centers
• Profit Center Ordinal
• Performance Indicator
• Req. Man Hours
Touch POS
▪ Open Shift (Available at POS site Log In)
▪ Close Shift (Available at POS site Log In)
▪ Add / Remove (Available with open POS Shift)
▪ Ticket Generation (Available with Corporate Log In)
▪ Generated Books
StackNControl
User Manual—Version 6.0 WashConnect® Getting Started
49
▪ Stack Management
▪ Gate Management
Time Clock
▪ Log In / Log Out
▪ Edit Time Clock
▪ Time Clock Reports
• Employee Time Clock Summary
• Employee Time Clock Detail
• Employees Working Today
• Employees Not Working Today
See “Getting Started” on page 37.
Getting Started WashConnect® User Manual—Version 6.0
50
About the Menu Bar
The menu bar was designed to have the menu items in order of popularity from the top down so that the most frequently used menu items appear closer to the top of the menu, and the items used infrequently towards the bottom. The menu bar adjusts automatically based on the commands available for the logon level and security roles that are set up for the user who is currently logged in. Also, some menu items may or may not appear based on the type of devices for the site.
You can select different menus and commands from the menu bar. When you select a menu, it becomes active and if submenus are available they expand. When selecting the menu button again, it contracts the submenu. When selecting a command button, the action is performed (i.e., a dialog box appears, the date changes, a report opens, etc.).
If you know the name of the menu item, you can quickly and easily locate the menu item by performing a search from the main WashConnect menu Search box.
Search for a Menu Item
If you know the name of the menu item, you can use the menu search box located at the top of the main menu.
1 In Search box, type the menu item you would like to search.The item(s) appear on the right-side.
2 In the Search box, if you would like to clear the search, click the clear Search button.

User Manual—Version 6.0 WashConnect® Getting Started
51
You can locate the Menu Search box in the following figure.
Figure 3. Menu Search box
In the following figure, Settings was typed in the Search box.
Figure 4. Menu Search box example

Getting Started WashConnect® User Manual—Version 6.0
52
Scroll for a Menu Item
Figure 5. Menu Selection Process
Click the Users menu. (See Figure 5, “Menu Selection Process.”)
The Users menu expands, and then becomes the active menu, allowing you to select its commands: Security Roles and Manage Users.
See “Getting Started” on page 37.
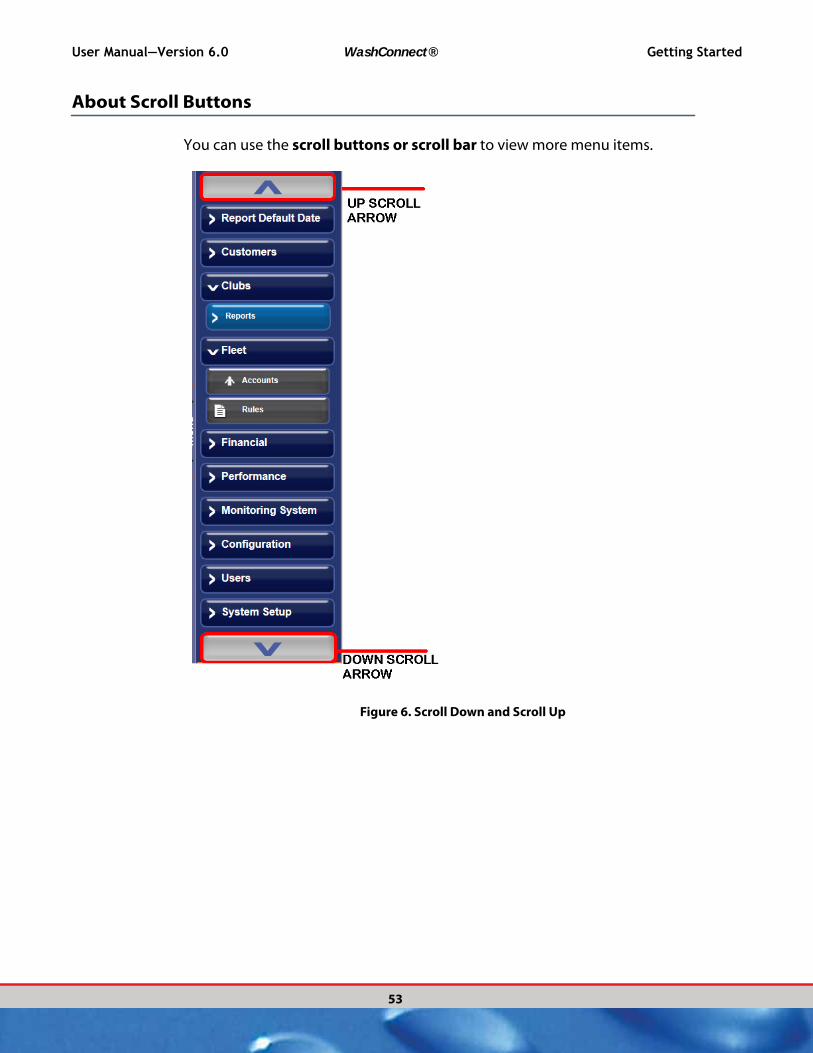
User Manual—Version 6.0 WashConnect® Getting Started
53
About Scroll Buttons
You can use the scroll buttons or scroll bar to view more menu items.
Figure 6. Scroll Down and Scroll Up
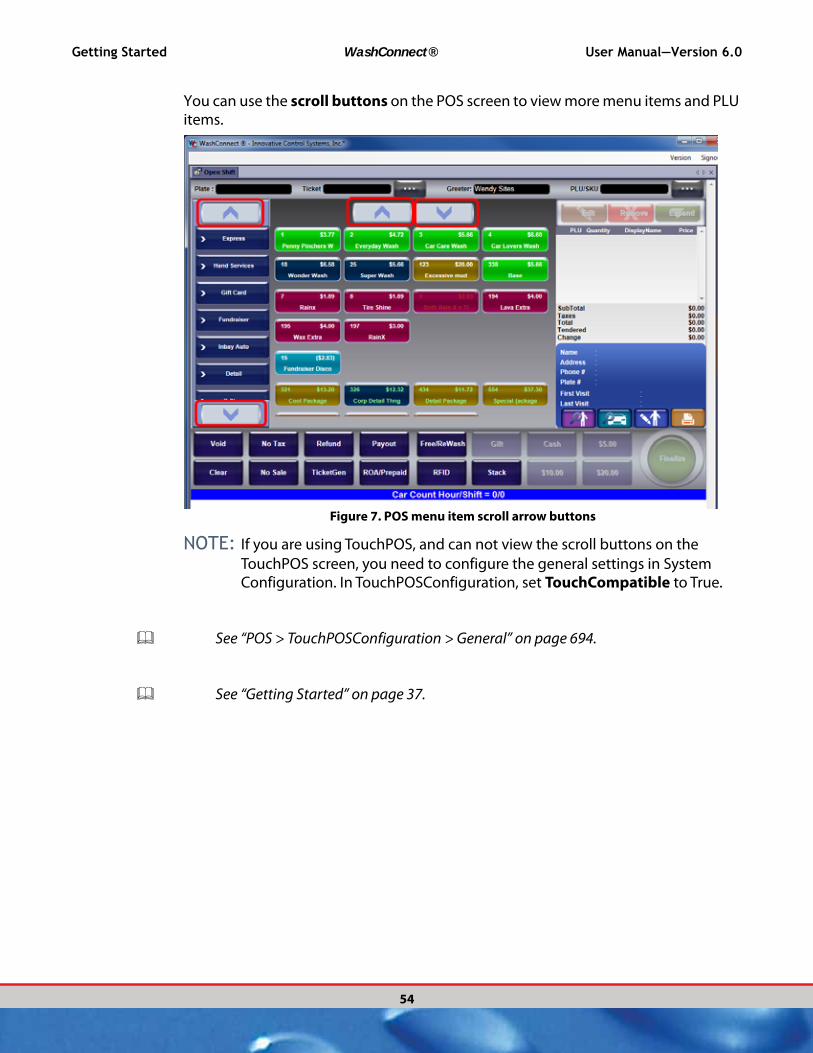
Getting Started WashConnect® User Manual—Version 6.0
54
You can use the scroll buttons on the POS screen to view more menu items and PLU items.
Figure 7. POS menu item scroll arrow buttons
NOTE: If you are using TouchPOS, and can not view the scroll buttons on the
TouchPOS screen, you need to configure the general settings in System Configuration. In TouchPOSConfiguration, set TouchCompatible to True.
See “POS > TouchPOSConfiguration > General” on page 694.
See “Getting Started” on page 37.
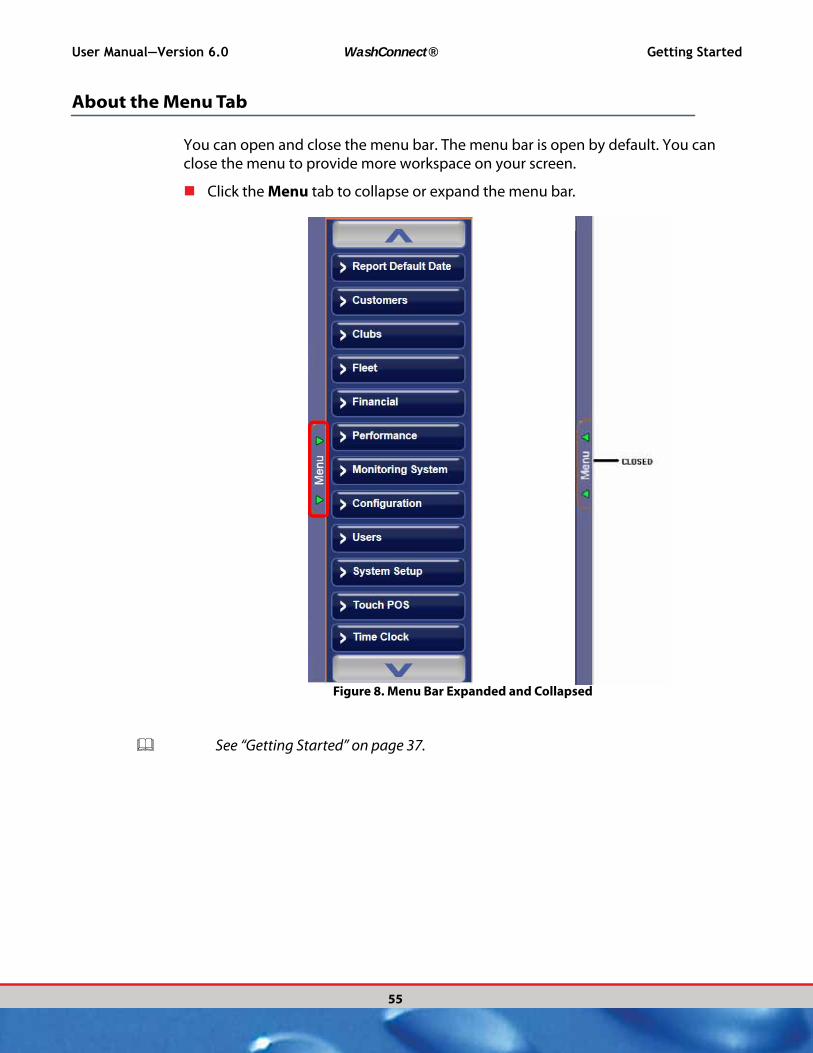
User Manual—Version 6.0 WashConnect® Getting Started
55
About the Menu Tab
You can open and close the menu bar. The menu bar is open by default. You can close the menu to provide more workspace on your screen.
Click the Menu tab to collapse or expand the menu bar.
Figure 8. Menu Bar Expanded and Collapsed
See “Getting Started” on page 37.

Getting Started WashConnect® User Manual—Version 6.0
56
About Workspace Tabs
When you choose a command from a menu, a new tab will appear in the workspace bar.
Figure 9. Tabs in the Workspace
The name of the active tab appears in the workspace bar with a darker background color (e.g., Shift Detail).
Click a tab from the workspace bar to make it active.
When the number of open tabs displayed on the workspace bar exceed the horizontal space available, the right or left browse buttons are enabled. You can
use the browse buttons when they become shaded . Click the left or right shaded browse buttons to locate more tabs. When you can no longer go any further to the right or left, the browse button becomes dim again.
From the workspace tab bar, you can click the Close button to close the active tab.
If you select a menu command, and a tab is already open for that command, then that tab becomes the active tab. You cannot create duplicate tabs for the same command. For example, if you select the Profitability command from the Clubs Reports menu, a Profitability tab is created. Then if you select the Profitability command again, the same tab becomes the active tab, a new tab is not created.
Click the Help (question mark) icon. The help file topic associated with the corresponding tab opens. You can view help topics from a Table of Contents or Index. You can also find help topics by performing a Search.
See “Getting Started” on page 37.

User Manual—Version 6.0 WashConnect® Getting Started
57
About the Status Bar
The status bar shows the user name, today’s date, region or hierarchy level selected upon log in, and selected default report date.
Figure 10. Status Bar
See “Getting Started” on page 37.

Getting Started WashConnect® User Manual—Version 6.0
58
About Data Replication
Car wash data at a site is shared up the organization’s hierarchy to the corporate level. This enables aggregated reporting and data management. The following types of data are replicated within seconds:
Transactions
Vehicle
Customers
Clubs
See “Getting Started” on page 37.

User Manual—Version 6.0 WashConnect® Getting Started
59
About Users
An administrative user and password for the manager or owner are created by the ICS technician who installed WashConnect®. A user with the appropriate rights can set other users’ passwords. The technician will explain user rights and assist with creating additional users.
User ID example:
USERNAME
Password example:
Password123
See “Getting Started” on page 37.
See “Manage Users” on page 541.
See “Add User” on page 543.
Optional Fingerprint Reader:
See “Add User’s Fingerprints” on page 552.

Getting Started WashConnect® User Manual—Version 6.0
60
About Clubs
Unlimited / Limited Wash Clubs work like a membership to your local gym.
1 Customers join a wash at the terminal, for example, $15 or $25 a month.
2 Club members credit card on file can automatically be charged the monthly flat fee until the membership is terminated.
3 Customer receives an RFID tag. An RFID tag, with an electronic chip inside, is adhered to the windshield which can be read at the RFID tag reader placed by the Auto Sentry. The RFID card prefix symbol pound (#) sign will indicate a club customer to WashConnect. This tag is tamper proof and inoperable if removed. Club cards with magnetic-stripes are also available to distinguish customer as a club member who will receive club benefits. If a club membership is detected, the Auto Sentry adjusts the screens accordingly.
NOTE: Magnetic-Stripe Club Cards are not recommended because the card’s
mobility makes it easy to be used from car to car when the club membership is designed for one vehicle only. These RFID tags (stickers) have an electronic chip inside to identify the vehicle and are attached the windshield of the vehicle. The RFID tags are disabled automatically if tampered or removed.
4 The club member’s vehicle can receive as many washes as allowed through the club specified limits for that vehicle and it will be honored at all of your car wash locations.
Once establishing a base of monthly members, you can expect their credit card revenue every month, providing a steady source of monthly income before a single car is washed.
Club Members Price Totals
Deluxe 500 $ 15.00 $ 7,500.00
Supreme 300 $ 25.00 $ 7,500.00
Total $ 15,000.00
See “Getting Started” on page 37.
See “Managing Clubs” on page 374.
See “Add a Club Service” on page 376.
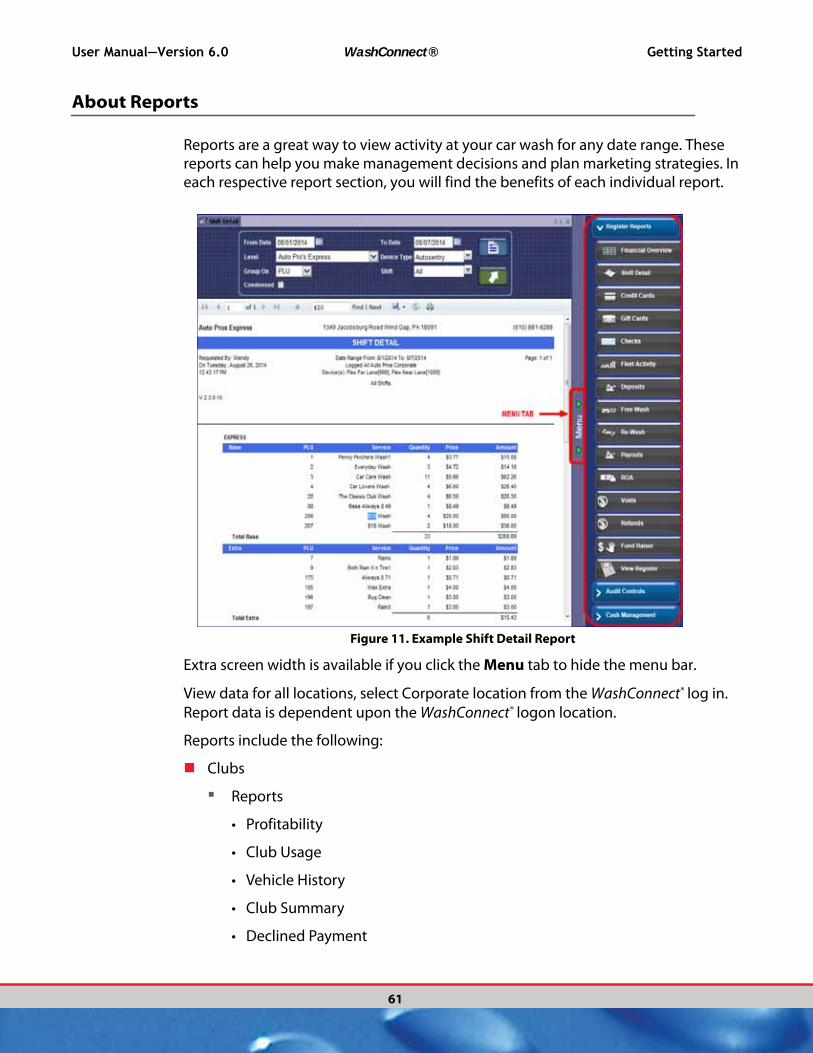
User Manual—Version 6.0 WashConnect® Getting Started
61
About Reports
Reports are a great way to view activity at your car wash for any date range. These reports can help you make management decisions and plan marketing strategies. In each respective report section, you will find the benefits of each individual report.
Figure 11. Example Shift Detail Report
Extra screen width is available if you click the Menu tab to hide the menu bar.
View data for all locations, select Corporate location from the WashConnect® log in.
Report data is dependent upon the WashConnect® logon location.
Reports include the following:
Clubs
▪ Reports
• Profitability
• Club Usage
• Vehicle History
• Club Summary
• Declined Payment
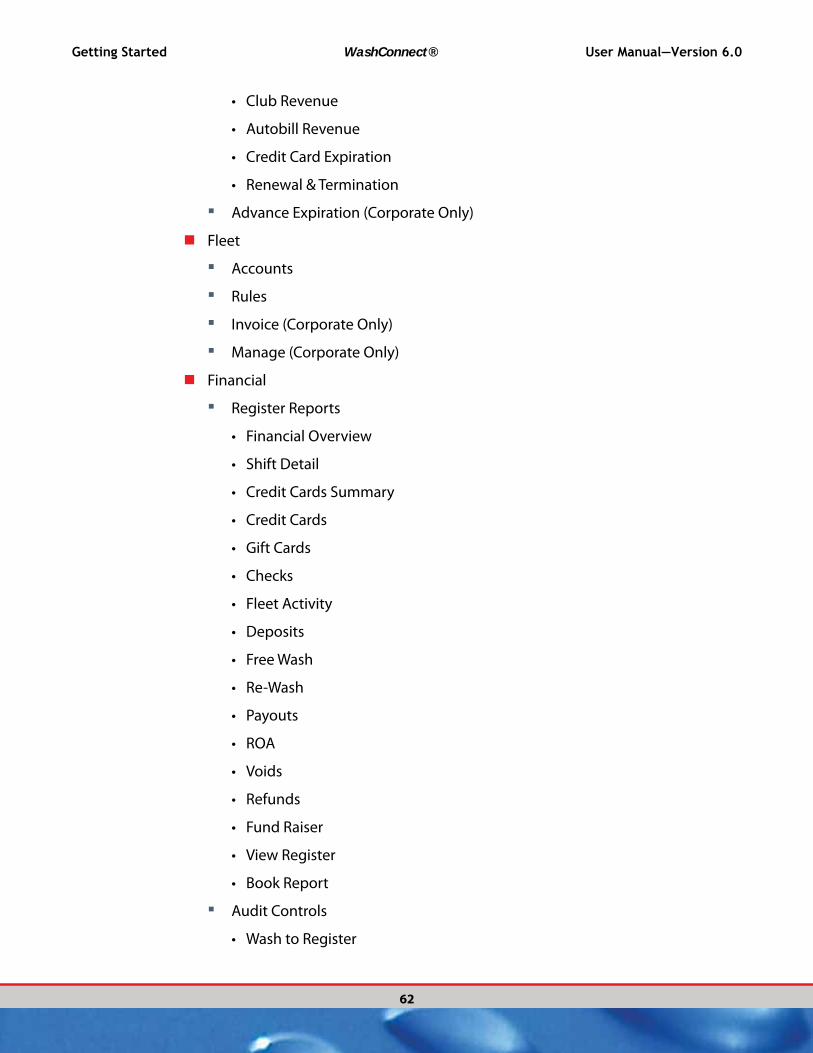
Getting Started WashConnect® User Manual—Version 6.0
62
• Club Revenue
• Autobill Revenue
• Credit Card Expiration
• Renewal & Termination
▪ Advance Expiration (Corporate Only)
Fleet
▪ Accounts
▪ Rules
▪ Invoice (Corporate Only)
▪ Manage (Corporate Only)
Financial
▪ Register Reports
• Financial Overview
• Shift Detail
• Credit Cards Summary
• Credit Cards
• Gift Cards
• Checks
• Fleet Activity
• Deposits
• Free Wash
• Re-Wash
• Payouts
• ROA
• Voids
• Refunds
• Fund Raiser
• View Register
• Book Report
▪ Audit Controls
• Wash to Register

User Manual—Version 6.0 WashConnect® Getting Started
63
• Ticket Comparison
• Transactional Detail
• Terminal Balance
• Sales Commission
• View Site Tickets
• Services Washed
• Controller Services
• Audit Trail
▪ Cash Management
• Journals
• Terminal Balances
• Operations Report
▪ Ticket Redeemed
• Summary
• Detail
Performance
▪ Dashboard
▪ Vehicle Performance
▪ Performance Gauge
▪ Sales Distribution
▪ RFID Statistics
▪ Statistical Comparison
▪ Projection
Time Clock
▪ Time Clock Reports
• Employee Time Clock Summary
• Employee Time Clock Detail
• Employees Working Today
• Employees Not Working Today
See “Getting Started” on page 37.
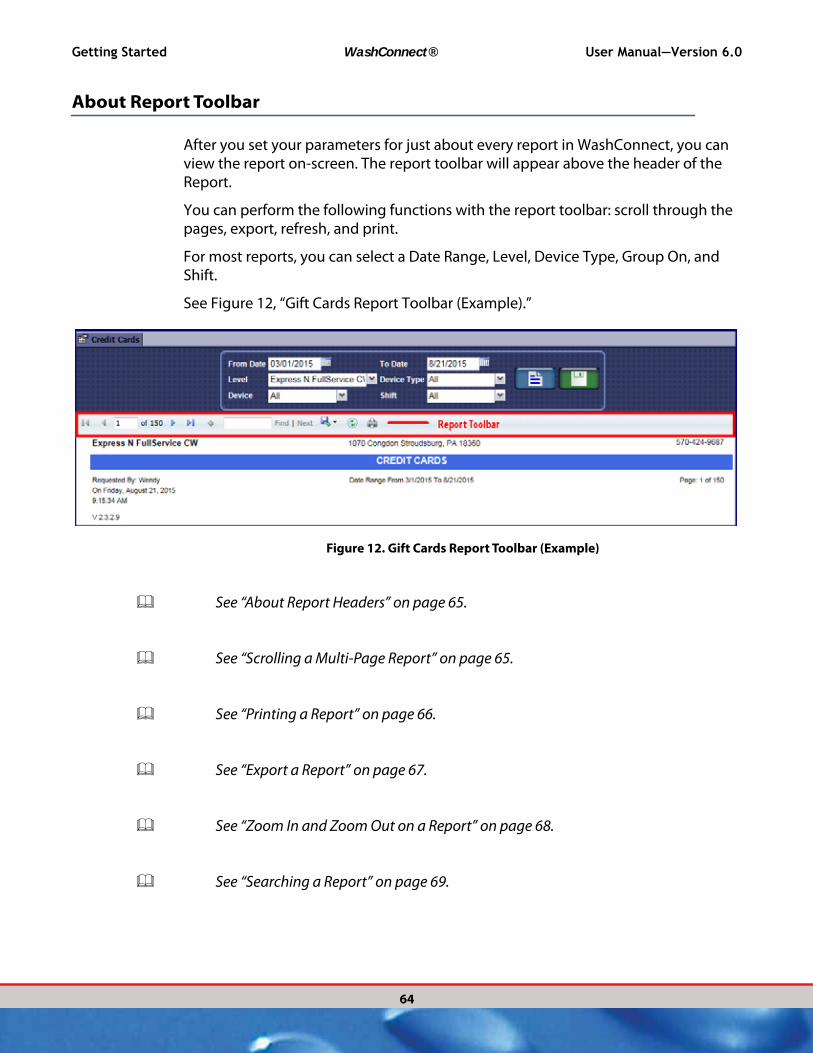
Getting Started WashConnect® User Manual—Version 6.0
64
About Report Toolbar
After you set your parameters for just about every report in WashConnect, you can view the report on-screen. The report toolbar will appear above the header of the Report.
You can perform the following functions with the report toolbar: scroll through the pages, export, refresh, and print.
For most reports, you can select a Date Range, Level, Device Type, Group On, and Shift.
See Figure 12, “Gift Cards Report Toolbar (Example).”
Figure 12. Gift Cards Report Toolbar (Example)
See “About Report Headers” on page 65.
See “Scrolling a Multi-Page Report” on page 65.
See “Printing a Report” on page 66.
See “Export a Report” on page 67.
See “Zoom In and Zoom Out on a Report” on page 68.
See “Searching a Report” on page 69.

User Manual—Version 6.0 WashConnect® Getting Started
65
About Report Headers
Report headers include details about who requested the report, time requested, and report date range.
Figure 13. Report Header example
Your Car Wash name and address appear above the Title Bar.
The report title is CREDIT CARDS.
The report was requested by Wendy on Thursday, August 20, 2015 at 11:17:42 AM.
V 2.3.2.9 is the current WashConnect® Report Version.
The Date Range From 3/1/2015 to 7/1/2015 shows the range of dates the user selected for the report.
Shows number of pages generated by the report. This report example includes 150 pages, and is currently displaying page 1 of 150.
See “About Report Toolbar” on page 64.
See “Scrolling a Multi-Page Report” on page 65.
See “Printing a Report” on page 66.
See “Export a Report” on page 67.
See “Zoom In and Zoom Out on a Report” on page 68.
See “Searching a Report” on page 69.
Scrolling a Multi-Page Report
You can scroll through pages of a multi-page report.
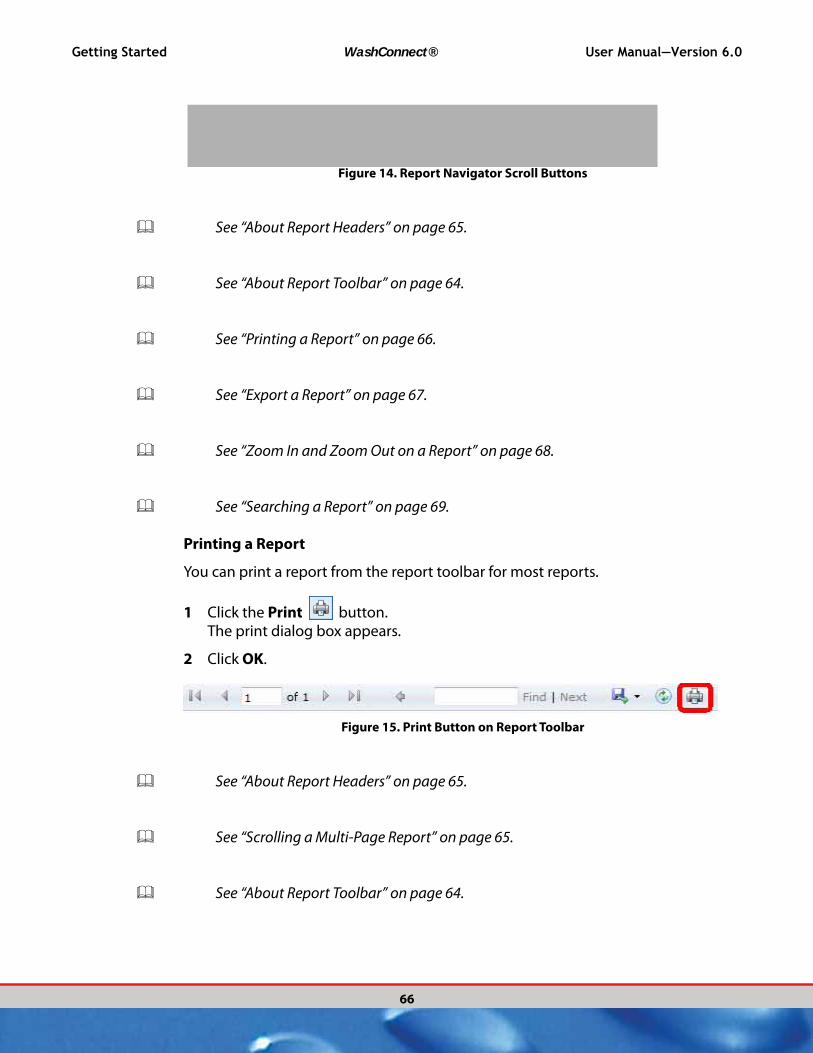
Getting Started WashConnect® User Manual—Version 6.0
66
Figure 14. Report Navigator Scroll Buttons
See “About Report Headers” on page 65.
See “About Report Toolbar” on page 64.
See “Printing a Report” on page 66.
See “Export a Report” on page 67.
See “Zoom In and Zoom Out on a Report” on page 68.
See “Searching a Report” on page 69.
Printing a Report
You can print a report from the report toolbar for most reports.
1 Click the Print button.The print dialog box appears.
2 Click OK.
Figure 15. Print Button on Report Toolbar
See “About Report Headers” on page 65.
See “Scrolling a Multi-Page Report” on page 65.
See “About Report Toolbar” on page 64.

User Manual—Version 6.0 WashConnect® Getting Started
67
See “Export a Report” on page 67.
See “Zoom In and Zoom Out on a Report” on page 68.
See “Searching a Report” on page 69.
Export a Report
You can export a report.
1 After selecting a report in WashConnect, you can export the report.
Figure 16. Export Button on Report Toolbar
2 From the report toolbar, select the Export button.\
Figure 17. Export Format Options
3 Select an Export format option from the Export list:
▪ XML file with report data
▪ CSV (comma delimited)
▪ MHTML (web archive)
▪ Excel
▪ TIFF file
▪ WordThe file download dialog box appears.
Getting Started WashConnect® User Manual—Version 6.0
68
4 Click Open. The file opens in the related application.-or-Click Save. The Save As dialog box appears.-or-Click Cancel.
See “About Report Headers” on page 65.
See “Scrolling a Multi-Page Report” on page 65.
See “Printing a Report” on page 66.
See “About Report Toolbar” on page 64.
See “Zoom In and Zoom Out on a Report” on page 68.
See “Searching a Report” on page 69.
Zoom In and Zoom Out on a Report
You can zoom in and zoom out on a report.
1 On the keyboard, hold down the Ctrl key and press the plus (+) key if necessary to zoom in on the report.The report will not print bigger, this is just for viewing on the screen.
2 On the keyboard, hold down the Ctrl key and press the minus (-) key if necessary to zoom out on the report.The report will not print bigger, this is just for viewing on the screen.
See “About Report Headers” on page 65.
See “Scrolling a Multi-Page Report” on page 65.
See “Printing a Report” on page 66.
See “Export a Report” on page 67.

User Manual—Version 6.0 WashConnect® Getting Started
69
See “About Report Toolbar” on page 64.
See “Searching a Report” on page 69.
Searching a Report
You can search for text or numbers in a report. Searches will find matches on all pages of a multi-page report one by one. Follow these steps to search in a report:
NOTE: Collapsed data in the report is not searchable.
1 In Search box, type the characters you are searching.
Figure 18. Search Report
2 Click Find.The search result is highlighted on the report.
3 Click Next to continue searching the document for more results.
For example, from a multi-page Checks report, you can type a specific check number and click Find.
If duplicate matches are found, click Next to view each result.
See “About Report Toolbar” on page 64.
See “About Report Headers” on page 65.
See “Scrolling a Multi-Page Report” on page 65.
See “Printing a Report” on page 66.
See “Export a Report” on page 67.
See “Zoom In and Zoom Out on a Report” on page 68.
See “Getting Started” on page 37.

Getting Started WashConnect® User Manual—Version 6.0
70
Starting WashConnect®
To start WashConnect®, double-click the icon on the Desktop.
Figure 19. WashConnect® Icon on Desktop
The login screen appears.
See “Getting Started” on page 37.

User Manual—Version 6.0 WashConnect® Getting Started
71
Logging In
Figure 20. Login Screen
Follow these steps to log in:
1 Select a login region on the corporate hierarchy. The location you select is highlighted. In the Figure 20, “Login Screen.”, Corpo-rate is selected.
2 In the User ID box, type your user name.
3 In the Password box, type your password.
Figure 21. Log in Button
4 Click the Log in button. The workspace and menu appears.
See “Getting Started” on page 37.
Getting Started WashConnect® User Manual—Version 6.0
72
Optional: Fingerprint Reader can be used to login to WashConnect®.
See “Add User’s Fingerprints” on page 552.
Logging In to the Corporate Server
If you log in to WashConnect®at the Corporate location in the hierarchy, then you can access the corporate server to view reports and data for all sites in the organization.
This is true even if you are not physically at the corporate location. For example, you can be at a site-level location and log in to the WashConnect® corporate server and be able to view replicated data and reports for every site, provided the user has privileges to do so.
To edit a user name and password, see “Edit User” on page 549.
To learn more about the hierarchy, see “Example for Users and Roles”.
See “Getting Started” on page 37.
See “Logging In” on page 71.
Changing Default User Login
Set Global Configuration to enable or disable the Default user from automatically populating the User ID and Password fields within the WashConnect login page.
See “Global > GlobalConfiguration > Global” on page 686.
User Manual—Version 6.0 WashConnect® Report Default Date
73
CHAPTER 2:REPORT DEFAULT DATE
The Report Default Date menu is a time saving feature allowing the user to change the report default date with the following standard settings: Today, Yesterday, Current Pay Period, Last Pay Period, Month to Date, Last Month, Year to Date, and Last Year. You can also set up your own date range from the Set Date Range command button.
Sometimes you can only identify business trends with information from longer periods of time-- a week, month, etc. The Set Date Range function allows you to set date time frame to print all the reports.
See “Default Date Range” on page 74.
See “Default Date Range” on page 74.
See “Report Default Date preset buttons” on page 76.
See “Select a different date range for an open report” on page 77.
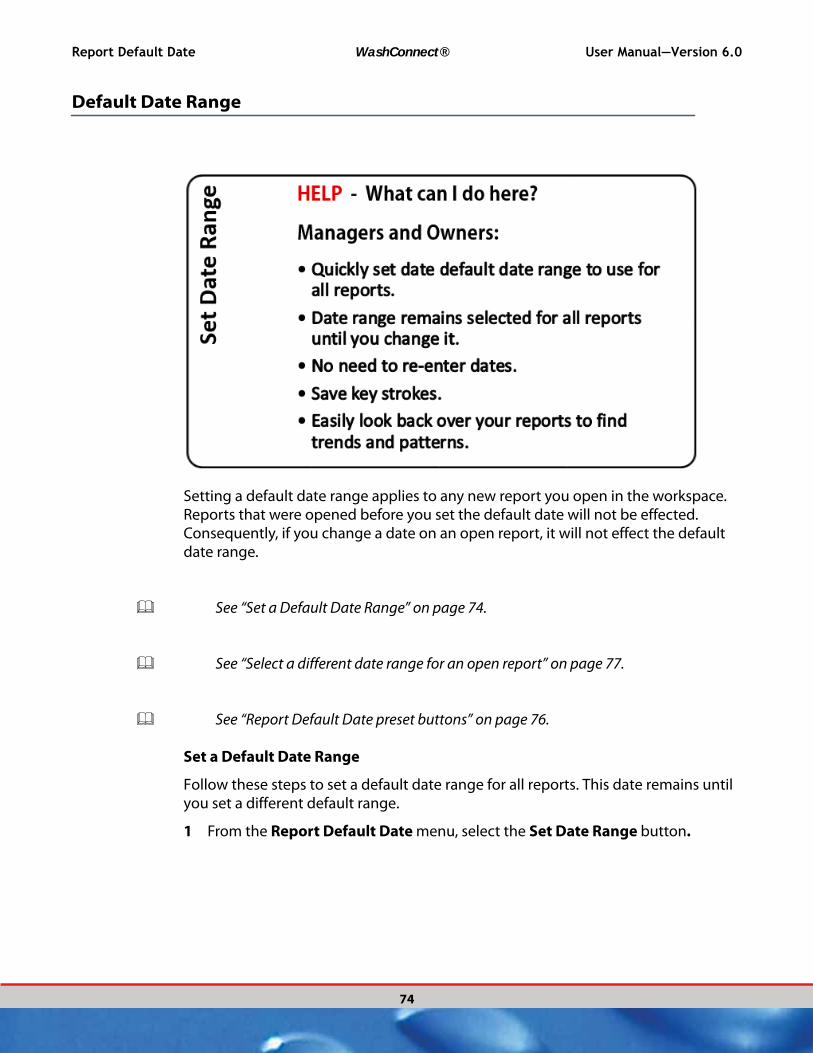
Report Default Date WashConnect® User Manual—Version 6.0
74
Default Date Range
Setting a default date range applies to any new report you open in the workspace. Reports that were opened before you set the default date will not be effected. Consequently, if you change a date on an open report, it will not effect the default date range.
See “Set a Default Date Range” on page 74.
See “Select a different date range for an open report” on page 77.
See “Report Default Date preset buttons” on page 76.
Set a Default Date Range
Follow these steps to set a default date range for all reports. This date remains until you set a different default range.
1 From the Report Default Date menu, select the Set Date Range button.

User Manual—Version 6.0 WashConnect® Report Default Date
75
The Set Date Range tab appears.
Figure 22. Set Date Range tab
2 In the From Date and To Date boxes, select a date range. Either type a date or select it from the drop-down calendar by clicking on the exact date in the calendar.-or-Click one of the following preset buttons:
▪ Today
▪ Yesterday
▪ Current Pay Period
▪ Last Pay Period
▪ Month to Date
▪ Last Month
▪ Year to Date
▪ Last Year
3 Click the Save button. The Report date range is set message appears.
4 Click OK.This range will remain until another date range is selected from the Report Default Date menu.

Report Default Date WashConnect® User Manual—Version 6.0
76
NOTE: If you change a date on an open report, it will only effect that report and not
effect the default date range.The default report date appears in the status bar.
Figure 23. Default Date in Status Bar
See “Report Default Date preset buttons” on page 76.
See “Select a different date range for an open report” on page 77.
Report Default Date preset buttons
You can quickly change the default date for reports with a submenu of preset dates.
NOTE: This menu can be hidden. From Security Roles at Corporate login, select the
Report Default Date privilege check box.
1 Click the Report Default Date menu button.
Figure 24. Report Default Date Preset Range buttons

User Manual—Version 6.0 WashConnect® Report Default Date
77
2 Click a preset date range button.A message Report date range is set box appears.
3 If the date is correct, select OK. The new default date range appears in the status bar. This date will be used for every report you open until you change the Report Default Date again.
Note: The new date range will not affect any open reports on your current workspace. If you want to view the new date range in one of the open reports on your workspace, you need to close the report tab, and then click the report again to open it with the new date range.
See “Default Date Range” on page 74.
See “Select a different date range for an open report” on page 77.
Select a different date range for an open report
1 From the open report, select a different date range for the report from the drop-down From Date and To Date boxes.
2 Click the View Report button.This date will be used for this report only and any newly selected reports will use the current Default Report Date.
Figure 25. Year to Date in Status Bar
Table 1: Date Range FAQs
Question Answer
Why should I set a
custom date range?
In the car wash business, there is a need to look back over your
numbers to find trends and patterns. For example, if you ran more than
one marketing campaign throughout the year, you will have the ability to
go back and set a specific date range to see the results on sales
performance. Or if you changed management at a site, you could
compare the labor percentages from before and after the change.
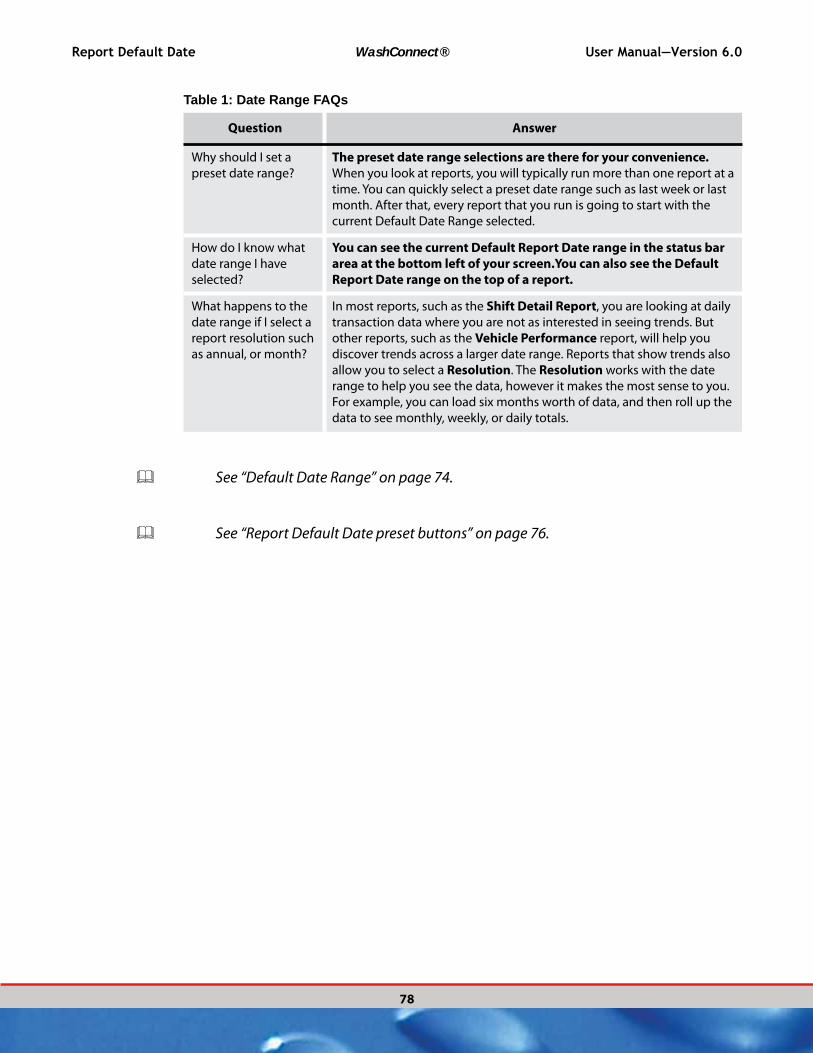
Report Default Date WashConnect® User Manual—Version 6.0
78
See “Default Date Range” on page 74.
See “Report Default Date preset buttons” on page 76.
Why should I set a
preset date range?
The preset date range selections are there for your convenience.
When you look at reports, you will typically run more than one report at a
time. You can quickly select a preset date range such as last week or last
month. After that, every report that you run is going to start with the
current Default Date Range selected.
How do I know what
date range I have
selected?
You can see the current Default Report Date range in the status bar
area at the bottom left of your screen.You can also see the Default
Report Date range on the top of a report.
What happens to the
date range if I select a
report resolution such
as annual, or month?
In most reports, such as the Shift Detail Report, you are looking at daily
transaction data where you are not as interested in seeing trends. But
other reports, such as the Vehicle Performance report, will help you
discover trends across a larger date range. Reports that show trends also
allow you to select a Resolution. The Resolution works with the date
range to help you see the data, however it makes the most sense to you.
For example, you can load six months worth of data, and then roll up the
data to see monthly, weekly, or daily totals.
Table 1: Date Range FAQs
Question Answer

User Manual—Version 6.0 WashConnect® Customers
79
CHAPTER 3:
CUSTOMERS
Wash clubs, fleets and other membership programs have become a very successful component of the overall value proposition at many of the nation's top car washes. Because of their great popularity, membership programs also require diligent management activity. Programs can grow to include hundreds or even thousands of customers over time. The goals of the Customers and Clubs menus are to put customer management activities and reporting at your fingertips.
The main focus of your activity from the Customers > Manage menu is to enter customer data for you customers. Fleet customer data can be viewed and edited from the Manage menu, but must be set up from the Fleet Accounts Menu. Customers can sign up for a club at the Auto Sentry flex; however, the pay station only collects the credit card information, and it is still necessary for a car wash employee to complete the club sign up process with the customer by the customer agreeing and signing the Wash Club Contract, employee adhering an RFID tag and adding the following important customer data in WashConnect from the Customers Manage menu:
Adhere the RFID tag to the customers windshield
Enter RFID tag number or club card number
Required:
License plate number
Optional:
Email address
Additional vehicle information
Mailing address
You can link customers and their vehicles to membership programs, and can also print or export customer data. Exporting customer data to a Microsoft® Excel spreadsheet is helpful for mailings.
The Manage menu can help you perform the most common tasks.

Customers WashConnect® User Manual—Version 6.0
80
NOTE: The Manage menu is used to manage the customers who have already
signed up for a club or fleet program.
See “About the Manage Menu” on page 80.
See “About the Group menu” on page 102.
About the Manage Menu
Keeping your customer information up-to-date has never been easier.
See “Search for a Club Member” on page 91.
See “Add a Club Customer” on page 86.
See “Add a Customer” on page 81.
See “Add Member(s) to a Fleet Account” on page 151.

User Manual—Version 6.0 WashConnect® Customers
81
See “Edit Club Member’s Billing Date” on page 88.
See “Add Recurring Credit Card for Club Memberships” on page 86.
See “Retire a Customer” on page 93.
See “View Vehicle Transaction History” on page 96.
See “Customer Notes or Vehicle Notes” on page 97.
See “Print a Customer List” on page 100.
See “Export a Customer Membership List” on page 101.
See “Edit Club Member’s Billing Date” on page 88.
See “About the Group menu” on page 102.
Add a Customer
You can add a new customer including club customers from the Customers Manage menu with an exception of a fleet customer. While you cannot add a fleet customer from this menu, you can manage the fleet customers that have already been added.
See “Add Member(s) to a Fleet Account” on page 151.
See “Add a Club Customer” on page 86.
1 From the Customers menu, select Manage.

Customers WashConnect® User Manual—Version 6.0
82
The Manage tab appears.
Figure 26. Manage tab
2 From the Manage tab, click the Add Customer button.The Manage tab opens. The Customer Information, Vehicle Information, and Customer Group(s) tabs appear with the essential tools needed to setup the Customer.
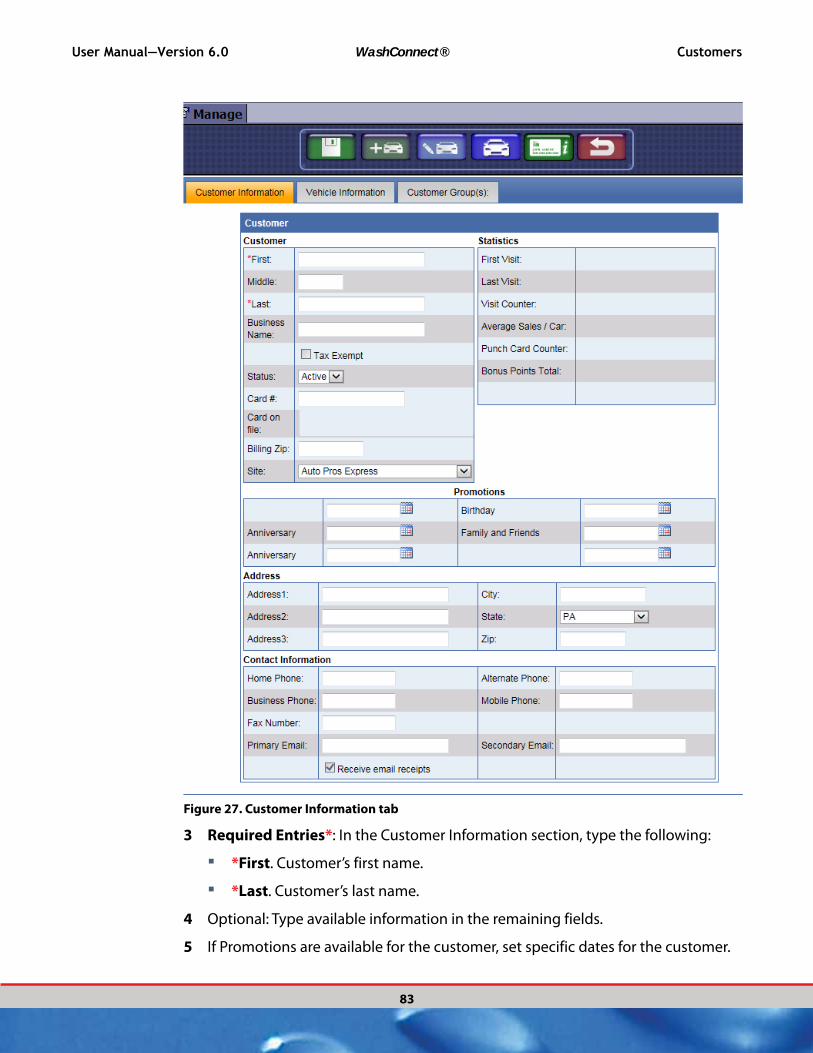
User Manual—Version 6.0 WashConnect® Customers
83
Figure 27. Customer Information tab
3 Required Entries*: In the Customer Information section, type the following:
▪ *First. Customer’s first name.
▪ *Last. Customer’s last name.
4 Optional: Type available information in the remaining fields.
5 If Promotions are available for the customer, set specific dates for the customer.

Customers WashConnect® User Manual—Version 6.0
84
See “About Promotions” on page 454.
6 Click the Save button.
Add Vehicle
After adding a customer including name and license plate number, you can attach a vehicle to the customer. This is an important step for club members, as the club membership is per vehicle. One Customer can have many vehicles each with their own club membership.
1 Click the Add Vehicle button. The Customer Vehicle dialog box appears.
Figure 28. Add Vehicle
The required field is Plate No.
2 In State, select a state where the car is licensed.
3 In Plate No: box, type the customer license plate number.
4 In Site, select a site.
NOTE: Must have security role with permission to change the Site ID for customer
and vehicle.
5 In Make, Model and Year boxes, select the appropriate vehicle.

User Manual—Version 6.0 WashConnect® Customers
85
6 In Color box, type color of vehicle.
7 In RFID Tag box, type the corresponding RFID tag number.
NOTE: RFID Tag is necessary for auto billing (additional equipment may be
needed). Also, technical support can drop the leading zeros of the RFID Tag number before the entry is saved if necessary.
8 (Fleet Account only) In PIN box, type the customer’s PIN.
9 In Barcode box, type a barcode number (This is not the ICS RFID tag number. You can search vehicle by barcode).
10 In Status, select Active.
11 Click the OK button.The customer vehicle information is saved.
12 From the Customer Group(s) tab, click to select the check box for the group(s).
See “Add a Customer Group” on page 103.
13 Click the Save button.All of the customer information is now saved.

Customers WashConnect® User Manual—Version 6.0
86
See “Add a Club Customer” on page 86.
See “Add Member(s) to a Fleet Account” on page 151.
Add Recurring Credit Card for Club Memberships
Credit Cards are the only way to pay for the monthly recurring charges of a club membership. In this instance, you need to enter a customer’s credit card to be charged monthly.
1 From the Customers menu, select Manage.The Manage tab appears.
2 From the Manage tab, click the Add Customer button. The Customer Information, Vehicle Information, and Customer Group(s) tabs appear.
3 If adding a credit card for recurring monthly club billing, click the Recurring ID
button. The message Is credit card present appears.
4 If you can swipe the credit card, click Yes, and then swipe the credit card.–or–If you cannot swipe the credit card for any reason, click No.
NOTE: If system is able to connect with Cage-PADSS, you will be asked to enter
your Username and password. To manually enter a credit card, Cage-PADSS needs to be logged in for authorization and to confirm you have authorization to manually enter the credit card.
Figure 29. Credit Card Information on File
▪ Cage PADSS opens a Credit Card entry form:

User Manual—Version 6.0 WashConnect® Customers
87
▪From the Credit Card box, completion of all fields are required:
▪In Account Number, type the credit card account number.
▪In Name on Card, type name as it appears on the credit card.
▪In Expiration, select the expiration date of the credit card.
▪In Type, select the type of Credit Card
▪In Zip Code, type the credit card billing zip code.The credit card information is secure as it is not located in any databases on your car wash computers or devices for PCI Compliance. For verification, you can view the basic credit card information in Club Card on File.
WARNING: Must be connected to Cage so the credit card can be verified. Safe and secure data transmission via SSL connection with verification or decline notification within seconds. Verification will fail without a connection to Cage.
NOTE: PCI Compliance for safe and secure data: Cage PADSS will approve the credit
card overnight without the need to save the credit card number in any car wash database. For security reasons, the only credit card information available is the credit card’s last four digits.
5 Click the Save button.
The customer information and vehicle information is saved. If the Billing Status or Expiration Date was changed, and the customer’s Status is Active, then will autobill overnight on the Expiration Date.
See “Edit Club Member’s Billing Date” on page 88.
See “Sort the Columns for the Customer List” on page 89.
See “Retire a Customer” on page 93.
See “View Vehicle Transaction History” on page 96.
See “Customer Notes or Vehicle Notes” on page 97.
See “Print a Customer List” on page 100.

Customers WashConnect® User Manual—Version 6.0
88
See “Export a Customer Membership List” on page 101.
Edit Club Member’s Billing Date
In a few specific situations and with the manager’s approval, the expiration date of the club can be manually changed or delayed up to 2 months from the current date.
WARNING: The following steps will change the date of the recurring auto billing date (Expiration Date) for the club membership.
1 From the Customers menu, select Manage.The Manage tab appears.
2 Search and locate customer.
3 Click to select or highlight Customer record, and the click the Edit button.The Customer Information tab appears.
4 Click to select the Vehicle Information tab.
5 Click to select or highlight Club Member’s Vehicle record.
6 Click the Edit Vehicle button.The Vehicle dialog box appears.
7 In Expiration Date, type or select the new date to attempt auto billing.
8 In Billing Status, select Bill.
NOTE: Active status will also attempt billing on the expiration date. Auto Billing will
attempt billing overnight both the status of Bill and Active.
9 Click OK.
10 Click the Save button.When the expiration date is mature, the auto billing will take place at midnight or overnight on the expiration date. After the system bills the first time, the status will automatically switch to Active, and then charge the credit card on the monthly club expiration date until the customer cancels the club or the credit card declines.
See “Add Recurring Credit Card for Club Memberships” on page 86.
See “Edit Vehicle Information” on page 91.
See “Retire a Customer” on page 93.
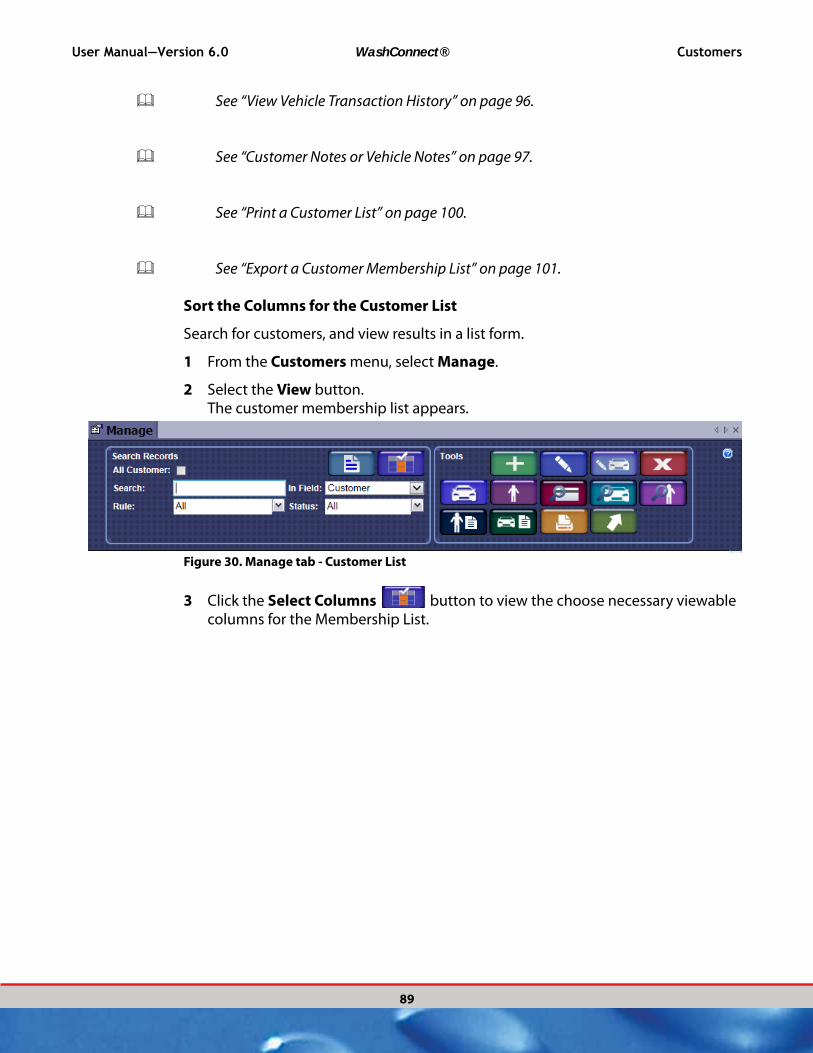
User Manual—Version 6.0 WashConnect® Customers
89
See “View Vehicle Transaction History” on page 96.
See “Customer Notes or Vehicle Notes” on page 97.
See “Print a Customer List” on page 100.
See “Export a Customer Membership List” on page 101.
Sort the Columns for the Customer List
Search for customers, and view results in a list form.
1 From the Customers menu, select Manage.
2 Select the View button.The customer membership list appears.
Figure 30. Manage tab - Customer List
3 Click the Select Columns button to view the choose necessary viewable columns for the Membership List.
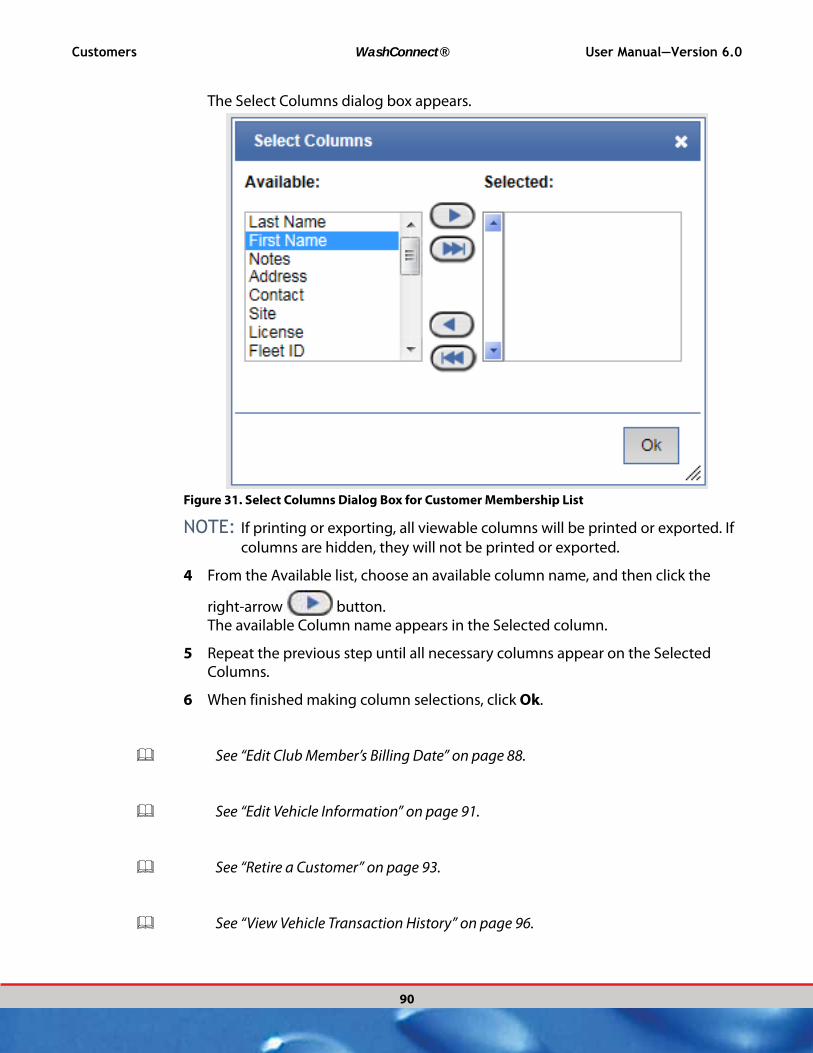
Customers WashConnect® User Manual—Version 6.0
90
The Select Columns dialog box appears.
Figure 31. Select Columns Dialog Box for Customer Membership List
NOTE: If printing or exporting, all viewable columns will be printed or exported. If
columns are hidden, they will not be printed or exported.
4 From the Available list, choose an available column name, and then click the
right-arrow button.The available Column name appears in the Selected column.
5 Repeat the previous step until all necessary columns appear on the Selected Columns.
6 When finished making column selections, click Ok.
See “Edit Club Member’s Billing Date” on page 88.
See “Edit Vehicle Information” on page 91.
See “Retire a Customer” on page 93.
See “View Vehicle Transaction History” on page 96.
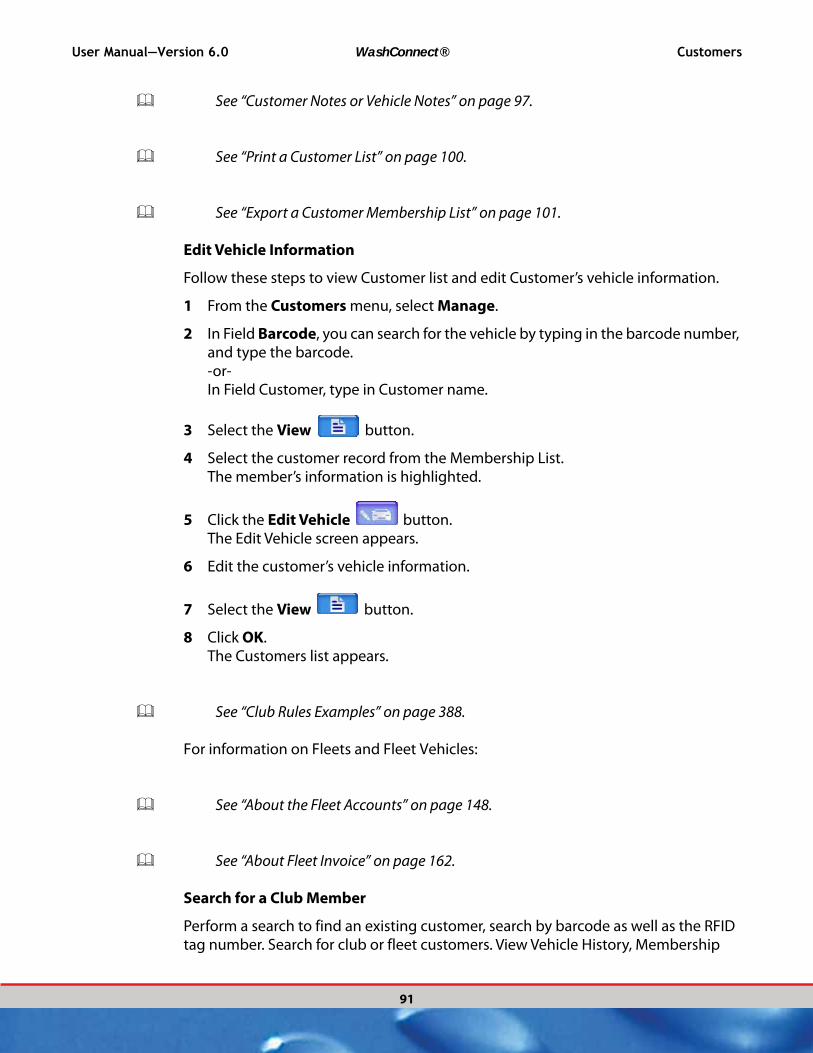
User Manual—Version 6.0 WashConnect® Customers
91
See “Customer Notes or Vehicle Notes” on page 97.
See “Print a Customer List” on page 100.
See “Export a Customer Membership List” on page 101.
Edit Vehicle Information
Follow these steps to view Customer list and edit Customer’s vehicle information.
1 From the Customers menu, select Manage.
2 In Field Barcode, you can search for the vehicle by typing in the barcode number, and type the barcode.-or-In Field Customer, type in Customer name.
3 Select the View button.
4 Select the customer record from the Membership List.The member’s information is highlighted.
5 Click the Edit Vehicle button.The Edit Vehicle screen appears.
6 Edit the customer’s vehicle information.
7 Select the View button.
8 Click OK.The Customers list appears.
See “Club Rules Examples” on page 388.
For information on Fleets and Fleet Vehicles:
See “About the Fleet Accounts” on page 148.
See “About Fleet Invoice” on page 162.
Search for a Club Member
Perform a search to find an existing customer, search by barcode as well as the RFID tag number. Search for club or fleet customers. View Vehicle History, Membership

Customers WashConnect® User Manual—Version 6.0
92
history, or Notes for a customer and search for a license plate number from Advanced Search.
From Search Records section, you can perform a search based on the parameters you select:
1 From the Customers menu, select Manage.The Manage tab appears.
2 In All Customers box, click to select the check box.-and/or-In the Rule box, click to select one or more Club or Fleet Rule(s) from a list of all available Rules.-and/or-In the Status box, click to select one or more Status selections:
▪All
▪Active
▪Suspended
▪Terminated
▪Declined
▪Duplicate
▪Bill
▪NotSignedUp
NOTE: Click the All box to select all status check marks, or click the All box
again to clear.
3 Click the View button.The Customers search results appear in a list.
4 In Search, type item to search.
5 In Field, select one of the following that pertains to the text you typed in the Search field:
▪ Customer
▪ AccountID
▪ Phone
▪ License
▪ RFID
▪ Barcode
▪ CreditCard

User Manual—Version 6.0 WashConnect® Customers
93
▪ CustomerNumber
▪ Fleet Invoice
▪ Fleet Prepaid
6 Click the View button.The Customer’s search results appear in a list format, and can be exported to a file or printed.
7 Click to select an individual customer.The customer record will be highlighted.
See “Export a Customer Membership List” on page 101.
See “Print a Customer List” on page 100.
See “Edit Club Member’s Billing Date” on page 88.
Terminate a Customer
Follow these steps to retire a customer:
1 From the Customers menu, select Manage.The Manage tab appears.
2 Click the View button.
3 From the Membership list, click to select the customer record. The customer record is highlighted.
Selected Customer Record
Figure 32. Customer Record Selected
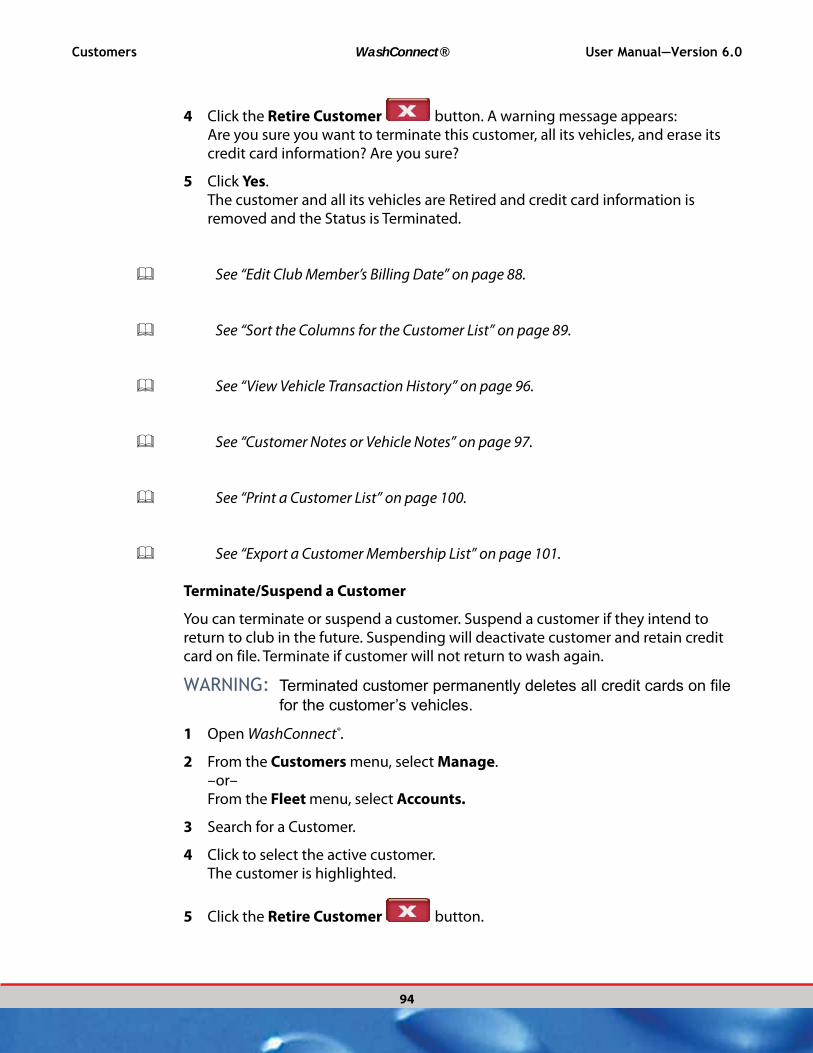
Customers WashConnect® User Manual—Version 6.0
94
4 Click the Retire Customer button. A warning message appears:Are you sure you want to terminate this customer, all its vehicles, and erase its credit card information? Are you sure?
5 Click Yes.The customer and all its vehicles are Retired and credit card information is removed and the Status is Terminated.
See “Edit Club Member’s Billing Date” on page 88.
See “Sort the Columns for the Customer List” on page 89.
See “View Vehicle Transaction History” on page 96.
See “Customer Notes or Vehicle Notes” on page 97.
See “Print a Customer List” on page 100.
See “Export a Customer Membership List” on page 101.
Terminate/Suspend a Customer
You can terminate or suspend a customer. Suspend a customer if they intend to return to club in the future. Suspending will deactivate customer and retain credit card on file. Terminate if customer will not return to wash again.
WARNING: Terminated customer permanently deletes all credit cards on file for the customer’s vehicles.
1 Open WashConnect®.
2 From the Customers menu, select Manage.–or–From the Fleet menu, select Accounts.
3 Search for a Customer.
4 Click to select the active customer.The customer is highlighted.
5 Click the Retire Customer button.

User Manual—Version 6.0 WashConnect® Customers
95
A message Are you sure you want to terminate this customer, and all its customer groups? appears.
6 Click Yes.
7 The message Vehicle terminated successfully appears.
8 Click OK.
9 In Status, select Terminated or Suspended.If terminated, this clears any credit card information immediately at both the current location and at corporate. Even though terminated, the club is still valid until the expiration date. Upon expiration, all vehicles will automatically be terminated.If suspended, customers’ credit card information will be retained.
10 Click the Save button.
11 Click OK.
See “Sort the Columns for the Customer List” on page 89.
See “View Vehicle Transaction History” on page 96.
See “Customer Notes or Vehicle Notes” on page 97.
See “Print a Customer List” on page 100.
See “Export a Customer Membership List” on page 101.
See “Edit Club Member’s Billing Date” on page 88.
See “Sort the Columns for the Customer List” on page 89.
See “Retire a Customer” on page 93.
See “View Vehicle Transaction History” on page 96.

Customers WashConnect® User Manual—Version 6.0
96
See “Customer Notes or Vehicle Notes” on page 97.
See “Print a Customer List” on page 100.
See “Export a Customer Membership List” on page 101.
View Vehicle Transaction History
You can view, print or export Vehicle Transaction History for a particular customer all you need is their license plate or RFID number. The Vehicle Transaction History button is a short cut button.
NOTE: You can also select the Vehicle Transaction History from the main menu,
select Clubs > Reports > Vehicle History.
1 From the Customers menu, select Manage.The Manage tab appears.
2 From the list of Members, click to select the customer record. The customer record is highlighted.
3 Click the Vehicle Transaction History button.The Vehicle History Report opens in a new tab named Vehicle History with the license plate for the selected Customer’s vehicle.
4 After viewing, printing or exporting, click the Close button to close the Vehicle History tab.
See “Sort the Columns for the Customer List” on page 89.
See “Retire a Customer” on page 93.
See “View Vehicle Transaction History” on page 96.
See “Customer Notes or Vehicle Notes” on page 97.
See “Print a Customer List” on page 100.
See “Export a Customer Membership List” on page 101.

User Manual—Version 6.0 WashConnect® Customers
97
View Membership History
Follow these steps to view the Club Membership History information:
1 From the Customers menu, select Manage.The Manage tab appears.
2 Search for a member.
3 From the list of members, click to select the customer record. The customer record is highlighted.
4 Click the Membership History button.
The customer’s Membership History information appears including Edited At, Rule, Status, Status Date, Joined Date, Expiration Date, Modified on, Modified by, and Application.
5 Click the Close button to continue.
See “Sort the Columns for the Customer List” on page 89.
See “Retire a Customer” on page 93.
See “Customer Notes or Vehicle Notes” on page 97.
See “Print a Customer List” on page 100.
See “Export a Customer Membership List” on page 101.
Customer Notes or Vehicle Notes
You can add a note or if a note has been added for a customer or a vehicle, you can view or print Notes.
WARNING: After a Note is saved, it cannot be deleted or removed.
1 Click to select an individual customer record from the list, the customer line highlights.

Customers WashConnect® User Manual—Version 6.0
98
2 Select either the Customer Notes button -or-
the Vehicle Notes button.
3 Click the Add button.
4 In the Add Customer Notes or Add Vehicle Notes box, type a note for that customer or vehicle respectively.
5 Click the Save button.The message Customer notes saved successfully appears.
6 Click OK.The note is saved with a created on date that is automatically generated with a date and time stamp.
7 Click Close.
8 From the Notes column, you can review the note.
Select the Note button to review the note. If there are two Note buttons for same customer, the top Note is for Customer notes and the bottom Note is for Vehicle notes.
9 You can Print the note.
See “Sort the Columns for the Customer List” on page 89.
See “Retire a Customer” on page 93.
See “View Vehicle Transaction History” on page 96.

User Manual—Version 6.0 WashConnect® Customers
99
See “Print a Customer List” on page 100.
See “Export a Customer Membership List” on page 101.
Edit a Customer
Follow these steps to edit customer information:
1 From the Customers menu, select Manage.The Manage tab appears.
2 Search for a customer. From the list of Customers, click to select the customer record. The customer record is highlighted.
3 Click the Edit Customer button. The Customer dialog box appears.
4 Edit the customer information.
5 If Promotions section is available, add dates.
6 Click the Save button.The Customer Information is saved.

Customers WashConnect® User Manual—Version 6.0
100
Figure 33. Customer Information Screen with Sale Promotions Example
See “Edit Club Member’s Billing Date” on page 88.
See “Sort the Columns for the Customer List” on page 89.
See “Retire a Customer” on page 93.
See “View Vehicle Transaction History” on page 96.
See “Customer Notes or Vehicle Notes” on page 97.
See “Print a Customer List” on page 100.
See “Export a Customer Membership List” on page 101.
Print a Customer List
After searching for the customer(s) or members, the Customer List appears from the Manage tab, and you can Print this list.
1 From the Customers menu, select Manage.
2 Search for the customer.
3 After search results appear in the Membership list, click the Print button.The print dialog box appears.
4 Select the Print button.The list prints.
See “Edit Club Member’s Billing Date” on page 88.
See “Sort the Columns for the Customer List” on page 89.
See “Retire a Customer” on page 93.

User Manual—Version 6.0 WashConnect® Customers
101
See “Export a Customer Membership List” on page 101.
See “View Vehicle Transaction History” on page 96.
See “Customer Notes or Vehicle Notes” on page 97.
Export a Customer Membership List
After searching for the member or members, the list appears from the Manage tab, you can Export this list to either a PDF document or a Microsoft® Excel spreadsheet. If you want to send a mailing to your customers, export your customer’s addresses to a Microsoft Excel Spreadsheet.
1 From the Customers menu, select Manage.
2 Search for customer(s).
3 After search results appear in the Membership list, select the Export button.
4 Select either PDF or Excel.The File Download dialog box appears.
5 Click one of the following buttons: Open, Save, or Cancel.
▪ Click Open to view the list as a PDF or Excel file.
▪ Click Save to save the file on your computer.
▪ Click Cancel to close the File Download dialog box.
See “Create Customer Mailing Labels using Export to Excel” on page 101.
Create Customer Mailing Labels using Export to Excel
After exporting Excel file, you can use that file for a mail merge in Microsoft® Word. Follow these steps if you want to create labels:
1 First, export Excel file with addresses.
See “Export a Customer Membership List” on page 101.
2 Open Microsoft® Word.
3 Create a Mail Merge.
4 Select Labels (to be placed on envelopes).
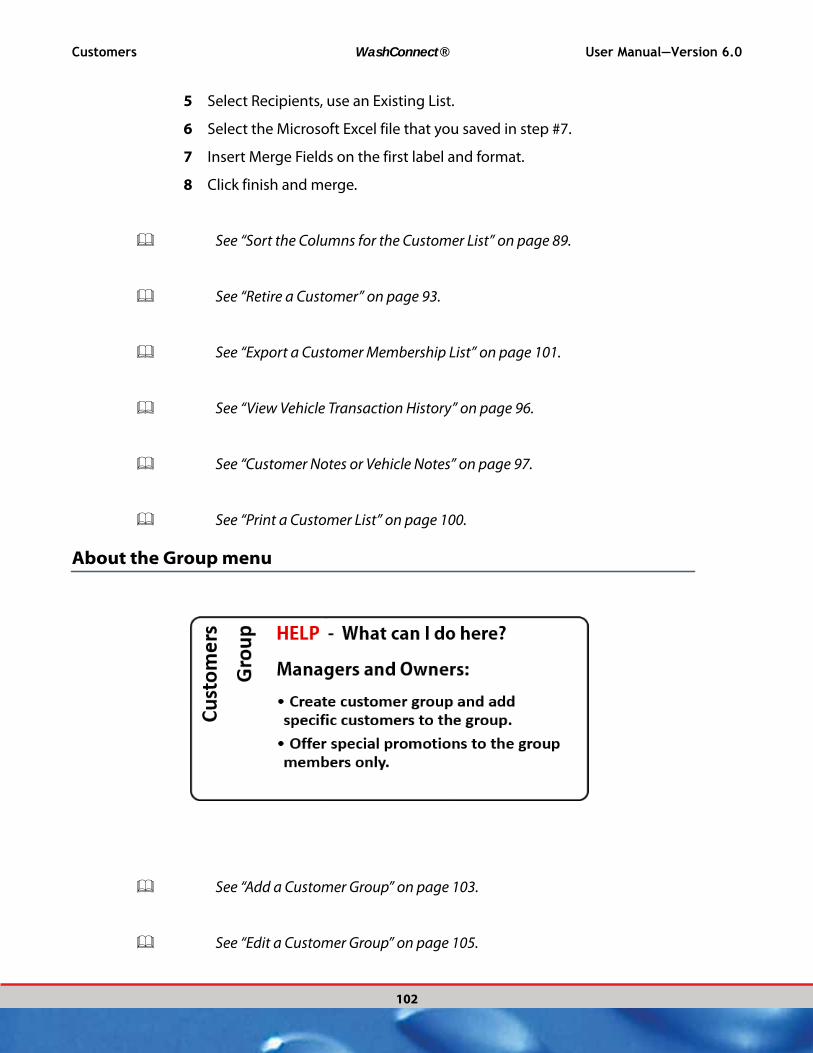
Customers WashConnect® User Manual—Version 6.0
102
5 Select Recipients, use an Existing List.
6 Select the Microsoft Excel file that you saved in step #7.
7 Insert Merge Fields on the first label and format.
8 Click finish and merge.
See “Sort the Columns for the Customer List” on page 89.
See “Retire a Customer” on page 93.
See “Export a Customer Membership List” on page 101.
See “View Vehicle Transaction History” on page 96.
See “Customer Notes or Vehicle Notes” on page 97.
See “Print a Customer List” on page 100.
About the Group menu
See “Add a Customer Group” on page 103.
See “Edit a Customer Group” on page 105.
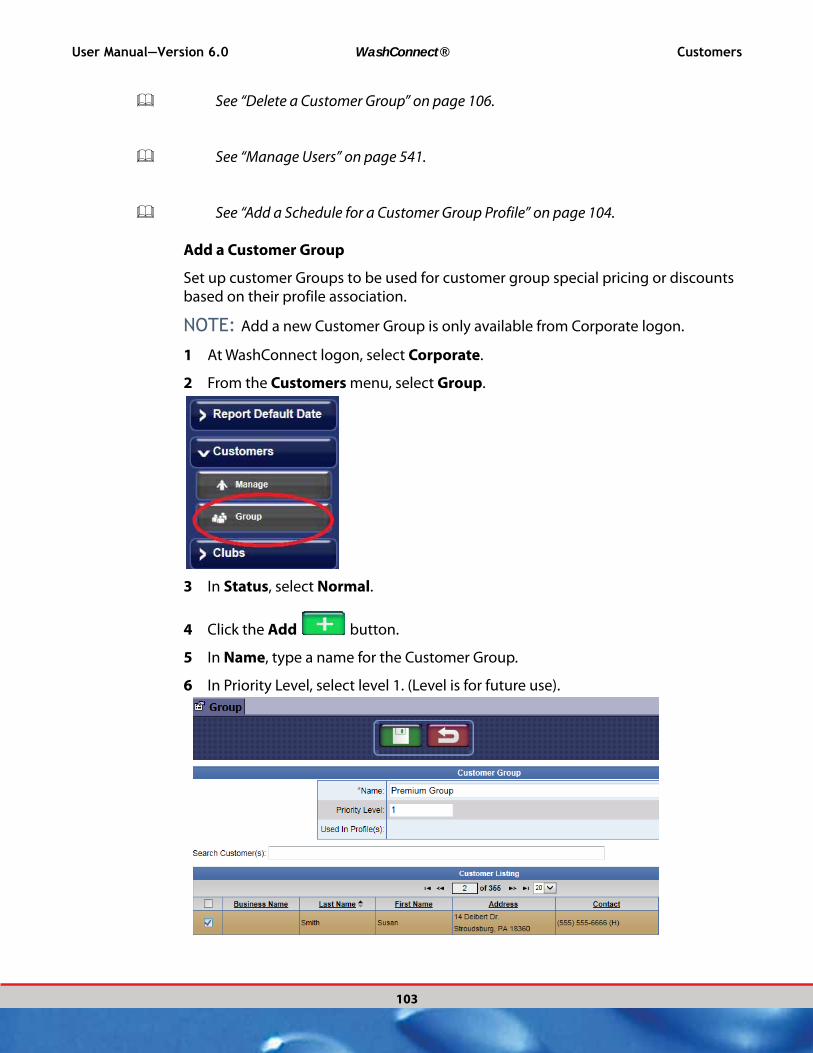
User Manual—Version 6.0 WashConnect® Customers
103
See “Delete a Customer Group” on page 106.
See “Manage Users” on page 541.
See “Add a Schedule for a Customer Group Profile” on page 104.
Add a Customer Group
Set up customer Groups to be used for customer group special pricing or discounts based on their profile association.
NOTE: Add a new Customer Group is only available from Corporate logon.
1 At WashConnect logon, select Corporate.
2 From the Customers menu, select Group.
3 In Status, select Normal.
4 Click the Add button.
5 In Name, type a name for the Customer Group.
6 In Priority Level, select level 1. (Level is for future use).
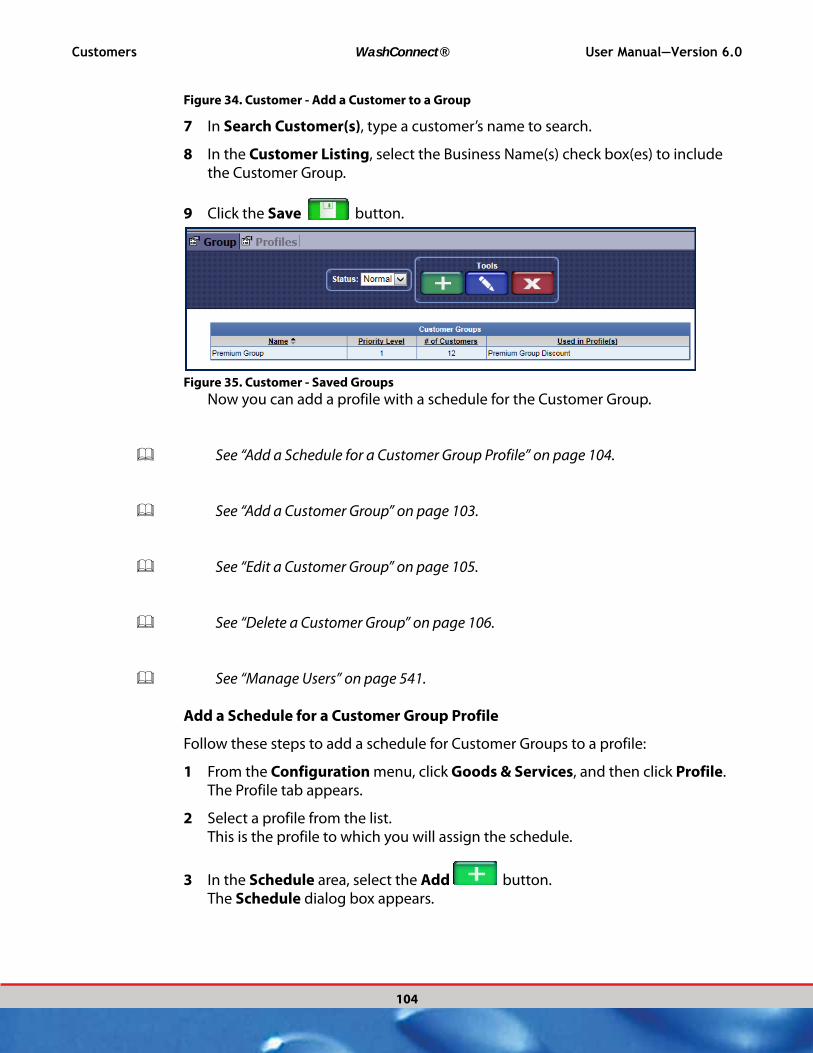
Customers WashConnect® User Manual—Version 6.0
104
Figure 34. Customer - Add a Customer to a Group
7 In Search Customer(s), type a customer’s name to search.
8 In the Customer Listing, select the Business Name(s) check box(es) to include the Customer Group.
9 Click the Save button.
Figure 35. Customer - Saved Groups
Now you can add a profile with a schedule for the Customer Group.
See “Add a Schedule for a Customer Group Profile” on page 104.
See “Add a Customer Group” on page 103.
See “Edit a Customer Group” on page 105.
See “Delete a Customer Group” on page 106.
See “Manage Users” on page 541.
Add a Schedule for a Customer Group Profile
Follow these steps to add a schedule for Customer Groups to a profile:
1 From the Configuration menu, click Goods & Services, and then click Profile. The Profile tab appears.
2 Select a profile from the list. This is the profile to which you will assign the schedule.
3 In the Schedule area, select the Add button. The Schedule dialog box appears.

User Manual—Version 6.0 WashConnect® Customers
105
Figure 36. Schedule Dialog Box
4 Select an item for each of the fields relating to time:
5 In Vehicle Height, select Normal or High Vehicle.
6 In Applies To, select a Customer Group.
7 In Rule, select the Name of the Customer Group.
See “About Profiles” on page 434.
8 Click OK.The schedule is assigned to the profile.
9 Click the Enable button, if necessary.If the Status column displays Enabled, and the profile has a valid schedule, at this time, the profile will be completely enabled.
NOTE: Click the Enable button again to disable.
See “About Profiles” on page 434.
See “About the Group menu” on page 102.
Edit a Customer Group
You can edit the customers in a group.
1 From the Customers menu, select Group.
2 Make necessary changes.

Customers WashConnect® User Manual—Version 6.0
106
Figure 37. Customer - Edit Group
3 Click the Save button.You can view the customer group in the list and the number of customers in each group as well as the Profiles they are used in.
See “Add a Customer Group” on page 103.
See “Edit a Customer Group” on page 105.
See “Delete a Customer Group” on page 106.
See “Manage Users” on page 541.
Delete a Customer Group
You can delete a Customer Group.
1 From the Customers menu, select Group.
2 Click to select a customer group from the list.
3 Click the Delete button.The deleted Customer Group will appear in the Closed status listing.The customer group is moved from the Normal Status and to the Closed Status.
Figure 38. Customer - Group Closed

User Manual—Version 6.0 WashConnect® Customers
107
See “Add a Customer Group” on page 103.
See “Edit a Customer Group” on page 105.
See “Delete a Customer Group” on page 106.
See “Manage Users” on page 541.

Customers WashConnect® User Manual—Version 6.0
108

User Manual—Version 6.0 WashConnect® Clubs
109
CHAPTER 4:
CLUBS
Review the success of your programs and fleet accounts with ten different Reports from the Clubs menu.
For step-by-step instructions for these standard reports:
See “About the Profitability Report” on page 113.
See “About the Club Usage Report” on page 115.
See “About the Vehicle History Report” on page 121.
See “About the Club Summary Report” on page 125.
See “About the Declined Payment Report” on page 129.
See “About the Club Revenue Distribution Report” on page 136.
See “About Autobill Revenue Report” on page 139.
See “About the Credit Card Expiration Report” on page 142.
See “About the Renewal and Termination Report” on page 144.
See “About Advance Expiration” on page 146.

Clubs WashConnect® User Manual—Version 6.0
110
About Club Membership
Managing club memberships is an easy task with WashConnect.
The system was designed for flexible relationships between the following:
Customers
Vehicles
Membership Programs
For example:
Offer two programs: a deluxe club and a basic club. A customer with an old vehicle and a new vehicle can join both clubs. The old vehicle can belong to the basic club. The new vehicle can belong to the deluxe club. The system allows you to manage the customer, both vehicles and their associated memberships. This is presented in an easy-to-read summary from the customer screen.
Autobill Customers and Track Usage
NOTE: If ICS hosts Corporate, you cannot autobill from Corporate.
Once the customer and his data are in the system, the customer can be auto billed each month. As the customer redeems wash services, the system tracks usage.
Autobilling and Usage Tracking are essential to the success of your membership programs.
You can evaluate the profitability of a club by seeing whether members are costing you more money than you are collecting in the monthly billing cycle. It is easy to run a Profitability report that shows you this data.
See “About the Profitability Report” on page 113.
You can drill down to discover who visited the wash more than anyone else during a given time frame. These are the customers who may be eating into your club membership profits by abusing the program’s terms of use.
You can see the customers who have not visited the wash as frequently as other club members. These might be customers who have stopped visiting the wash. You can reach out to them with a reminder about the program’s value, convenience and speed of service. If you can’t reach them, and after X months of them not visiting the wash, you can put their membership on hold and stop auto bill. Also, there is a global setting to configure for customers who have not used the wash in X days so they are not charged.
User Manual—Version 6.0 WashConnect® Clubs
111
Autobilling Notes for Renewing/Billing Individual Sites
There are several configurations that need to be in place to support the billing/renewal of memberships at the individual sites. These settings will need to be set with Technical Support at the Corporate site.
For example, if attempting to redeem a membership at a different site than the Site ID attached to the membership, the site will attempt to contact the Autobilling site to determine the membership status.
If the membership is expired at the originating site, the local site will state that the membership is expired and only offer the Buy Wash button to continue. It will not attempt to renew the membership because Autobilling is set to happen at individual sites and now the membership is out of range.
If when attempting to redeem the membership at a remote site and the originating site reports the membership to be valid, the remote site will honor the membership and give the wash.
See “Add a Club Customer” on page 85.
Analyze Club Memberships
The Club Reports menu makes it possible for you to carefully analyze your club membership. The top three reports: Profitability, Usage and Vehicle History can give you the necessary data required to make strategic decisions:
Increase or decrease the price of a membership
Add a new membership
Eliminate an under-performing membership
Other reports help you track down expired customers, compare one club against another, and examine the revenue distribution between where a customer joined vs. where the customer most often redeemed wash services.
See “About the Profitability Report” on page 113.
See “About the Club Usage Report” on page 115.
See “About the Vehicle History Report” on page 121.
Get Near-Time Replication and Error Checking
As with everything in WashConnect® software, Membership functions are multi-site enabled with near-time replication. When a customer signs up at one site, all the

Clubs WashConnect® User Manual—Version 6.0
112
other sites receive that data soon after the transaction is finalized. Duplicate customer error checking thins out accidental sign ups at multiple locations. With WashConnect®, there are no concerns about data lag between sites or a customer signing up at two locations on the same day.
See “About the Reports Menu” on page 112.
See “About Club Membership” on page 110.
About the Reports Menu
You can use the Clubs Reports menu and view the ten different reports to determine the success of your programs.
1 From the WashConnect® log in screen, connect to the necessary region to view the corresponding report data. To see data for all locations, log in with the Corporate region selected.
2 You can set default report date ranges from the Report Default Date menu in the Set Date Range.
NOTE: To give reports extra screen width, you can click the vertical Menu tab to
hide the menu bar.
See “About the Menu Bar” on page 50.
See “About Reports” on page 61.
See “Clubs” on page 109.
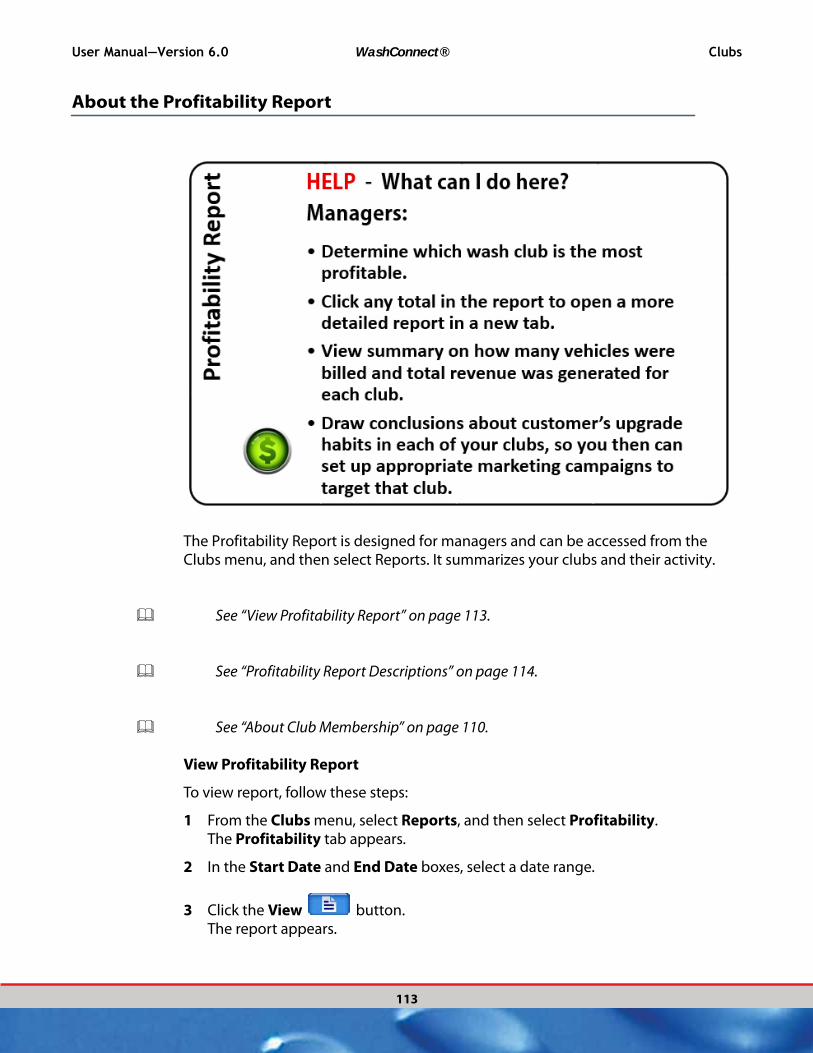
User Manual—Version 6.0 WashConnect® Clubs
113
About the Profitability Report
The Profitability Report is designed for managers and can be accessed from the Clubs menu, and then select Reports. It summarizes your clubs and their activity.
See “View Profitability Report” on page 113.
See “Profitability Report Descriptions” on page 114.
See “About Club Membership” on page 110.
View Profitability Report
To view report, follow these steps:
1 From the Clubs menu, select Reports, and then select Profitability. The Profitability tab appears.
2 In the Start Date and End Date boxes, select a date range.
3 Click the View button. The report appears.
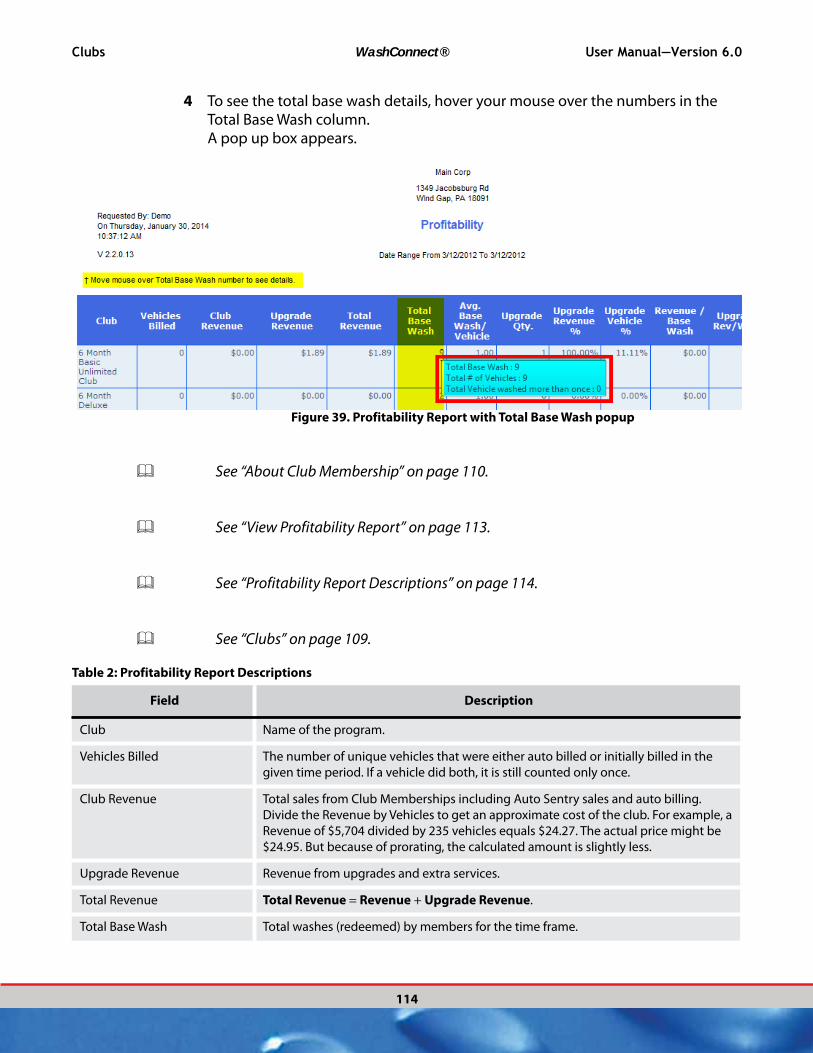
Clubs WashConnect® User Manual—Version 6.0
114
4 To see the total base wash details, hover your mouse over the numbers in the Total Base Wash column.A pop up box appears.
Figure 39. Profitability Report with Total Base Wash popup
See “About Club Membership” on page 110.
See “View Profitability Report” on page 113.
See “Profitability Report Descriptions” on page 114.
See “Clubs” on page 109.
Table 2: Profitability Report Descriptions
Field Description
Club Name of the program.
Vehicles Billed The number of unique vehicles that were either auto billed or initially billed in the
given time period. If a vehicle did both, it is still counted only once.
Club Revenue Total sales from Club Memberships including Auto Sentry sales and auto billing.
Divide the Revenue by Vehicles to get an approximate cost of the club. For example, a
Revenue of $5,704 divided by 235 vehicles equals $24.27. The actual price might be
$24.95. But because of prorating, the calculated amount is slightly less.
Upgrade Revenue Revenue from upgrades and extra services.
Total Revenue Total Revenue = Revenue + Upgrade Revenue.
Total Base Wash Total washes (redeemed) by members for the time frame.

User Manual—Version 6.0 WashConnect® Clubs
115
See “View Profitability Report” on page 113.
See “Profitability Report Descriptions” on page 114.
See “About Club Membership” on page 110.
See “Clubs” on page 109.
About the Club Usage Report
Avg. Base Wash /Vehicle Average number of washes per vehicle for the time frame.
Upgrade Qty. Upgrade quantity. Number of times customers purchased an upgrade in addition to
the included service.
Upgrade Revenue % Percentage of revenue coming from upgrades. Upgrade Revenue divided by Total
Revenue.
Upgrade Vehicle % Upgrade Quantity divided by Total Wash, expressed as a percentage. Say the vehicle
visited 10 times. An upgrade wash purchased 5 times. The Upgrade Vehicle % is 50
percent.
Revenue / Base Wash Average Revenue per wash. Revenue divided by Total Wash.
Upgrade Rev / Base Wash Average Upgrade revenue per wash. Upgrade Revenue divided by Total Wash.
Total Rev./Base Wash Total revenue per wash. Total Revenue divided by Total Wash.
Table 2: Profitability Report Descriptions
Field Description

Clubs WashConnect® User Manual—Version 6.0
116
See “About Club Membership” on page 110.
See “View Profitability Report” on page 113.
See “Profitability Report Descriptions” on page 114.
See “Clubs” on page 109.
See “View the Club Usage Report” on page 116.
See “About the Menu Bar” on page 50.
See “About the Reports Menu” on page 112.
View the Club Usage Report
The Club Usage Report is a tool for managers at site level to view the usage of the club membership wash information is broken down in percentiles.
To view the Usage report, follow these steps:
1 From the Clubs menu, click Reports, and then click Club Usage. The Usage tab appears.
2 In the Start Date and End Date boxes, select a date range.
3 In the Program box, select one or more programs.
4 Click the View button.

User Manual—Version 6.0 WashConnect® Clubs
117
The Club Usage report appears.
Figure 40. Club Usage Report
See “Club Usage Report Synopsis” on page 117.
See “About the Club Usage Report” on page 115.
See “Clubs” on page 109.
Club Usage Report Synopsis
The Figure 40, “Club Usage Report,” shows all active members and redeemed washes for the period. The total of Unique Active Licenses or memberships is 1,680. Look at the top row in the report, and then read across. It represents the top tenth percentile (91%-100%) of customers. The report date range is set to one month. For that month, there were 168 customers in the top percentile. They visited 207 times for an average of 1.23 visits per vehicle for the month. The average days between visits were 2.4. In the last column, you can see that since these customers redeemed an average of 1.23 washes, the revenue per wash is low—$1.26.Compare that to the bottom row, the 1%-10% percentile. There were 168 customers who did not visit the wash at all, but were auto billed for their
Clubs WashConnect® User Manual—Version 6.0
118
memberships. Therefore, the revenue for these customers is a summation of their auto billing renewals, which was $3,006.35 for the month. Finally, look at the totals row, which shows you an average of all percentiles. You can see that Active Club Members visited the wash 471 times in the month. They visited an average of .28 times, or every 10.7 days. Total revenue per wash (displayed in the last column) shows that each wash generated an average of $6.56 in revenue.For interpretation, you can consider the actual price of a wash and the monthly auto billing charge for the club, both of which are not shown in the report. Consider the following:
▪ A basic wash is priced at $5.00.
▪ Unlimited basic washes for $14.95 in a wash club, and then customers are billed monthly.
▪ The internal break-even price for the basic wash is around $2.00.Given these factors, the revenue per wash of $4.68 is favorable. While it is slightly less than the $5.00 which would be charged to non-club members for the basic wash, it is still more than the actual break-even price of the basic wash. And finally, consider the $30.00 monthly auto billing occurs regardless of weather conditions so a rainy month will positively effect the customer revenue. You will still be collecting the club revenue but more than likely running the wash less, increasing your average revenue per wash.
See “About the Club Usage Report” on page 115.
See “View the Club Usage Report” on page 116.
See “About the Reports Menu” on page 112.
See “Clubs” on page 109.

User Manual—Version 6.0 WashConnect® Clubs
119
Expand Club Usage Report
Auto Pros Express
1349 Jacobsburg Road Wind Gap, PA 18091
(610) 881-8288
CLUB USAGE
Requested By: Wendy On Monday, December 01, 2014 11:51:56 AM
Date Range From: 3/1/2013 To: 3/31/2013 Program(s) : Wash Three Club, Wash Two Club, Wash One Club
Page: 1 of 1
V 2.3.0.6
Note: Please use 14x8.5 inch paper to print this report.
Most Visited Vehicle
Name License Plate Visits Avg. Visits / Month / Vehicle
Avg Days between
Visits
Club Revenue Upgrade Revenue
Total Revenue Upgrade Qty Upgrade Revenue %
Rev / Wash Upgrade Rev / Wash
Total Rev / Wash
91-100% 25.00 20 0.80 38.75 $1,064.91 $120.52 $1,185.43 13 10.17 % $53.25 $6.03 $59.27
81-90% 25.00 0 0.00 31.00 $562.63 $0.00 $562.63 0 0.00 % $562.63 $0.00 $562.63
71-80% 25.00 0 0.00 31.00 $624.39 $0.00 $624.39 0 0.00 % $624.39 $0.00 $624.39
61-70% 23.00 0 0.00 31.00 $497.74 $0.00 $497.74 0 0.00 % $497.74 $0.00 $497.74
51-60% 24.00 0 0.00 31.00 $497.92 $0.00 $497.92 0 0.00 % $497.92 $0.00 $497.92
41-50% 24.00 0 0.00 31.00 $603.60 $0.00 $603.60 0 0.00 % $603.60 $0.00 $603.60
31-40% 24.00 0 0.00 31.00 $468.25 $0.00 $468.25 0 0.00 % $468.25 $0.00 $468.25
21-30% 24.00 0 0.00 31.00 $516.58 $0.00 $516.58 0 0.00 % $516.58 $0.00 $516.58
11-20% 24.00 0 0.00 31.00 $480.22 $0.00 $480.22 0 0.00 % $480.22 $0.00 $480.22
1-10% 24.00 0 0.00 31.00 $466.85 $0.00 $466.85 0 0.00 % $466.85 $0.00 $466.85
Total 242.00 20 0.08 375.10 $5,783.09 $120.52 $5,903.61 13 2.04 % $289.15 $6.03 $295.18
Figure 41. Club Usage Report
Expand Club Usage Report for more Details
To examine the report more closely, you can click to expand a percentile ranking.
Auto Pros Express
1349 Jacobsburg Road Wind Gap, PA 18091
(610) 881-8288
CLUB USAGE
Requested By: Wendy On Monday, December 01, 2014 11:51:56 AM
Date Range From: 3/1/2013 To: 3/31/2013 Program(s) : Wash Three Club, Wash Two Club, Wash One Club
Page: 1 of 1
V 2.3.0.6
Note: Please use 14x8.5 inch paper to print this report.
Most Visited Vehicle
Name License Plate Visits Avg. Visits / Month / Vehicle
Avg Days between
Visits
Club Revenue Upgrade Revenue
Total Revenue Upgrade Qty Upgrade Revenue %
Rev / Wash Upgrade Rev / Wash
Total Rev / Wash
91-100% Evan Abraham PPL321 7 7.00 4.43 $509.37 $22.57 $531.94 3 4.24 % $72.77 $3.22 $75.99
Adam Brown AWL1234 4 4.00 7.75 $20.73 $49.92 $70.65 4 70.66 % $5.18 $12.48 $17.66
Jim Dean DDM567 2 2.00 15.50 $29.95 $0.00 $29.95 0 0.00 % $14.98 $0.00 $14.98
John Doe FDG55656 2 2.00 15.50 $29.95 $11.32 $41.27 2 27.43 % $14.98 $5.66 $20.64
Joseph King 4321ABC 1 1.00 31.00 $24.99 $0.00 $24.99 0 0.00 % $24.99 $0.00 $24.99
Aaron Nell BBB789 1 1.00 31.00 $39.99 $9.41 $49.40 1 19.05 % $39.99 $9.41 $49.40
John Stan CLSC9909 1 1.00 31.00 $24.99 $9.41 $34.40 1 27.35 % $24.99 $9.41 $34.40
Leroy Jenkins DDG-44568 1 1.00 31.00 $14.15 $8.48 $22.63 1 37.47 % $14.15 $8.48 $22.63
Lord Thelma ddd3222 1 1.00 31.00 $39.99 $9.41 $49.40 1 19.05 % $39.99 $9.41 $49.40
Ashish Alani SDDS45 0 0.00 31.00 $39.99 $0.00 $39.99 0 0.00 % $39.99 $0.00 $39.99
Brett Binkley TEK4454 0 0.00 31.00 $19.95 $0.00 $19.95 0 0.00 % $19.95 $0.00 $19.95
Terri Reddy SOQ234 0 0.00 31.00 $19.95 $0.00 $19.95 0 0.00 % $19.95 $0.00 $19.95
DJ Dean TRN3322 0 0.00 31.00 $14.15 $0.00 $14.15 0 0.00 % $14.15 $0.00 $14.15
Fred Jones WRT54G 0 0.00 31.00 $14.15 $0.00 $14.15 0 0.00 % $14.15 $0.00 $14.15
George Gong WFE45689 0 0.00 31.00 $19.95 $0.00 $19.95 0 0.00 % $19.95 $0.00 $19.95
Jay Mutchler TTR4589 0 0.00 31.00 $19.95 $0.00 $19.95 0 0.00 % $19.95 $0.00 $19.95
Figure 42. Club Usage Report 91-100% expanded for source detail
1 Click the expansion box to expand for more details.
2 Click again to contract detailed data.In the example, the 91%-100% percentile is expanded.
See “Club Usage Report Synopsis” on page 117.

Clubs WashConnect® User Manual—Version 6.0
120
See “Club Usage Report Field Descriptions” on page 120.
See “About the Club Usage Report” on page 115.
See “Clubs” on page 109.
Table 3: Club Usage Report Field Descriptions
Field Description
Most Visited Vehicle The Most Visited Vehicle column divides the total vehicles for the date
range into ten equal percentiles. You can click a percentile to see
customers and vehicles.
Name Customer name. If the row is a summary percentile (i.e., not expanded),
this field is empty. If the row is expanded, it contains customer names.
License Plate Vehicle license plate. If the row is a summary percentile (i.e., not
expanded), this field shows a car count. If the row is expanded, it
contains license plates.
Visits Number of visits for the time frame.
Avg. Visits/Month/
Vehicle
Average number of visits per month for each vehicle. If the row is a
summary percentile (i.e., not expanded), this field shows an average of
all vehicles. If the row is expanded, it contains the actual number of visits
for each vehicle.
Avg. Days Between
Visits
Average number of days between visits. This takes into account the date
range of the report. For example, if the date range is a month, Avg. Days
Between Visits accounts for the number of visits only for the number of
days in the month. It would not represent the average since the
customer joined the club. To see the average number of visits since a
customer joined the club, you can adjust the date range.
Club Revenue Total revenue collected over time frame for the set of or individual Club members listed.
Upgrade Revenue Revenue from upgrades and extra services.
Total Revenue Total Revenue = Revenue + Upgrade Revenue.
Upgrade Qty Upgrade quantity. Number of times customers purchased an upgrade in
addition to the included service.
Upgrade
Revenue %
Percentage of revenue coming from upgrades. Upgrade Revenue
divided by Total Revenue.
Rev/Wash Revenue per wash. Revenue divided by Total Wash.
Upgrade Rev/Wash Upgrade revenue per wash. Upgrade Revenue divided by Total Wash.
Total Rev/Wash Total revenue per wash. Total Revenue divided by Total Wash.

User Manual—Version 6.0 WashConnect® Clubs
121
About the Vehicle History Report
The vehicle history report is useful for viewing a club customer’s details within a selected date range:
Auto billing Revenue
Upgrade Revenue
Total Revenue per Wash
Separate Lists for Auto billing Transactions and Usage
See “Profitability Report Descriptions” on page 114.
See “About Club Membership” on page 110.
See “View Profitability Report” on page 113.
See “Clubs” on page 109.

Clubs WashConnect® User Manual—Version 6.0
122
See “View the Vehicle History Report” on page 122.
See “About the Menu Bar” on page 50.
See “About the Reports Menu” on page 112.
See “Vehicle History Report Descriptions” on page 124.
View the Vehicle History Report
To view the Vehicle History Report, follow these steps:
1 You will need the following information before you begin:
▪ Customer’s license plate number.–or–
▪ Customer’s RFID tag number.
2 From the Clubs > Reports menu, click Vehicle History. The Vehicle History tab appears.
3 In the Start Date and End Date boxes, select a date range.
4 In the In Field box select a field to search:
▪ License–or–
▪ RFID
5 In the Search box, type the necessary characters.
Figure 43. Vehicle History Date Range
6 Click the View button.The Vehicle History Report appears.
NOTE: The report includes information for the current login location. If you logged
in to a site location, for example, then the report will show vehicle history for that site only. To see vehicle history across sites, you can log in at a higher level in the hierarchy, such as the corporate location.
You can view the Vehicle History Report for a customer:

User Manual—Version 6.0 WashConnect® Clubs
123
Figure 44. Vehicle History Report
Tip Increase Revenue if you do the following: You can use the vehicle history report in conjunction with other reports. For example, you can first view the usage report to see customers who visit the wash very frequently. Then you can find those customers by searching for the license plate or RFID tag in the vehicle history report. Customers who visit the wash very frequently have a lower total revenue per wash amount. By enticing these customers to purchase upgrades, you can increase the total revenue per wash.
See “Vehicle History Report Descriptions” on page 124.
See “About Club Membership” on page 110.
See “Clubs” on page 109.

Clubs WashConnect® User Manual—Version 6.0
124
Vehicle History Report Descriptions
Table 4: Vehicle History Report Descriptions
Field Description
Last Name Customer last name.
First Name Customer first name.
Address Customer address.
Contact Customer contact information.
Recurring ID TransFirst® customer ID. If no TransFirst ID is established, this field
contains the number 1.
License Customer license plate on file.
RFID RFID tag number associated with the plate shown.
Revenue Revenue from non-club purchases and recurring CLub Fees. Revenue is summed by the grouping and date range.
You may see revenue of $0.00 for the vehicle. This may be the case if
the price of the service redeemed (e.g., $5.66) was offset by the price
of the discount (e.g., $5.66).
Upgrade Revenue Revenue from upgrades and extra services.
Total Revenue Revenue plus upgrade revenue.
Total Wash Total washes (redeemed) by members for the time frame.
Average Days Between
Visits
Average number of days between visits. This takes into account the
date range of the report. For example, if the date range is a month,
Average Days Between Visits accounts for the number of visits only
for the number of days in the month. It would not represent the
average since the customer joined the club. To see the average
number of visits since a customer joined the club, you can adjust the
date range.
Upgrade Qty. Number of times the customer purchased an upgrade in addition to
the included service.
Upgrade Revenue % Percentage of revenue coming from upgrades. Upgrade Revenue
divided by Total Revenue.
Upgrade Vehicle % Upgrade Quantity divided by Total Wash, expressed as a
percentage. Say the vehicle visited 10 times. An upgrade wash
purchased 5 times. The Upgrade Vehicle % is 50 percent.
Revenue / Wash Average Revenue per wash.
Upgrade Rev / Wash Average Upgrade Revenue per wash.
Total Rev./Wash Average Total Revenue (club revenue and upgrades) per wash.
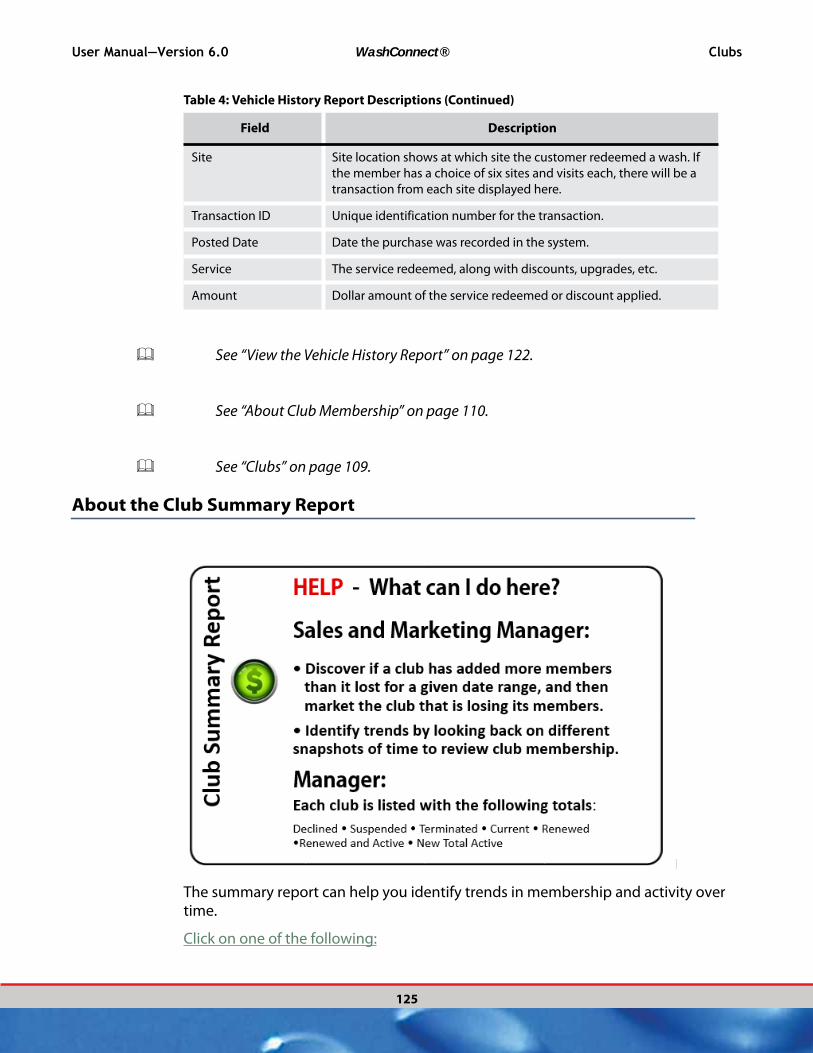
User Manual—Version 6.0 WashConnect® Clubs
125
See “View the Vehicle History Report” on page 122.
See “About Club Membership” on page 110.
See “Clubs” on page 109.
About the Club Summary Report
The summary report can help you identify trends in membership and activity over time.
Click on one of the following:
Site Site location shows at which site the customer redeemed a wash. If
the member has a choice of six sites and visits each, there will be a
transaction from each site displayed here.
Transaction ID Unique identification number for the transaction.
Posted Date Date the purchase was recorded in the system.
Service The service redeemed, along with discounts, upgrades, etc.
Amount Dollar amount of the service redeemed or discount applied.
Table 4: Vehicle History Report Descriptions (Continued)
Field Description

Clubs WashConnect® User Manual—Version 6.0
126
See “View the Club Summary Report” on page 126.
See “Club Summary Report Descriptions” on page 128.
See “About the Menu Bar” on page 50.
See “About Reports” on page 61.
See “Clubs” on page 109.
View the Club Summary Report
To view the Club Summary report, follow these steps:
1 Click Club Summary.The Club Summary tab appears.
2 In the Start Date and End Date boxes, select a date range.
3 Click the View button.The Summary report appears.

User Manual—Version 6.0 WashConnect® Clubs
127
Figure 45. Club Summary Report
Identifying trends in membership can easily be discovered from the Club Summary.
The Declined, Suspended and Terminated columns show negative activity. The Declined column means the credit card was rejected. If a customer is declined, you might decide to suspend, terminate or renew the membership.
The report shows the most recent program membership that applies to each program member. Therefore, if a customer was declined to start the month and later in the month opted to terminate the membership, the report counts the membership as terminated and not declined. But if the report date ends before the termination, the report would count the membership as declined. The sum of

Clubs WashConnect® User Manual—Version 6.0
128
Renewed & Active, Current, & New columns give you the Total Active for the time frame.
See “Club Summary Report Descriptions” on page 128.
See “About Club Membership” on page 110.
See “Clubs” on page 109.
Club Summary Report Descriptions
Table 5: Club Summary Report Field Descriptions
Field Description
Club Name of each club.
Vehicle This entire report is tracked by vehicles.
Declined Number of members who received a declined response from the processor
(e.g., TransFirst) during auto-billing for the time period.
Suspended Number of members who were manually suspended for the time period. For
example, someone who leaves town for the season and does not want to be
billed or terminated can be suspended for the time period.
Terminated Number of members who were manually terminated for the time period.
Current Number of members who joined prior to start date of the report, currently
active but not autobilled between the date range.
Renewed Total pre-existing members that were autobilled for the date range selected.
Renewed & Active Number of members autobilled between the date range and also currently
active. This number can be equal to or less than Renewed.
New Number of new members that joined during the date range.
Total Active The Total or Sum of Current, Renewed & Active, and New members for the
date range selected.
See “View the Club Summary Report” on page 126.
See “About Club Membership” on page 110.
See “Clubs” on page 109.

User Manual—Version 6.0 WashConnect® Clubs
129
About the Declined Payment Report
The declined payment report is interactive, allowing you to update information directly in the report.
See “Search for a Customer from the Declined Payment Report” on page 130.
See “Edit Customer Notes in the Declined Payment Report” on page 131.
See “Edit a Customer in the Declined Payment Report” on page 133.
See “Mark Bill in Declined Payment Club Report” on page 133.
See “About the Menu Bar” on page 50.
See “About Reports” on page 61.
See “Declined Payment Report Descriptions” on page 135.
See “Clubs” on page 109.
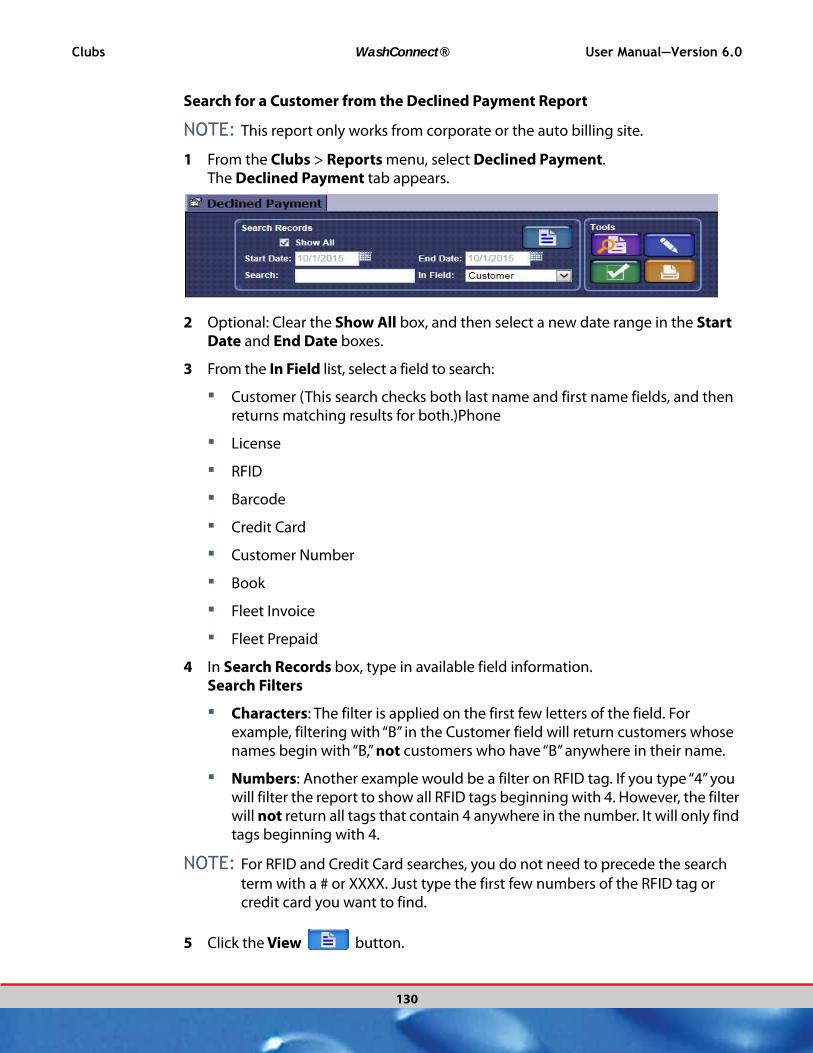
Clubs WashConnect® User Manual—Version 6.0
130
Search for a Customer from the Declined Payment Report
NOTE: This report only works from corporate or the auto billing site.
1 From the Clubs > Reports menu, select Declined Payment.The Declined Payment tab appears.
2 Optional: Clear the Show All box, and then select a new date range in the Start Date and End Date boxes.
3 From the In Field list, select a field to search:
▪ Customer (This search checks both last name and first name fields, and then returns matching results for both.)Phone
▪ License
▪ RFID
▪ Barcode
▪ Credit Card
▪ Customer Number
▪ Book
▪ Fleet Invoice
▪ Fleet Prepaid
4 In Search Records box, type in available field information.Search Filters
▪ Characters: The filter is applied on the first few letters of the field. For example, filtering with “B” in the Customer field will return customers whose names begin with “B,” not customers who have “B” anywhere in their name.
▪ Numbers: Another example would be a filter on RFID tag. If you type “4” you will filter the report to show all RFID tags beginning with 4. However, the filter will not return all tags that contain 4 anywhere in the number. It will only find tags beginning with 4.
NOTE: For RFID and Credit Card searches, you do not need to precede the search
term with a # or XXXX. Just type the first few numbers of the RFID tag or credit card you want to find.
5 Click the View button.
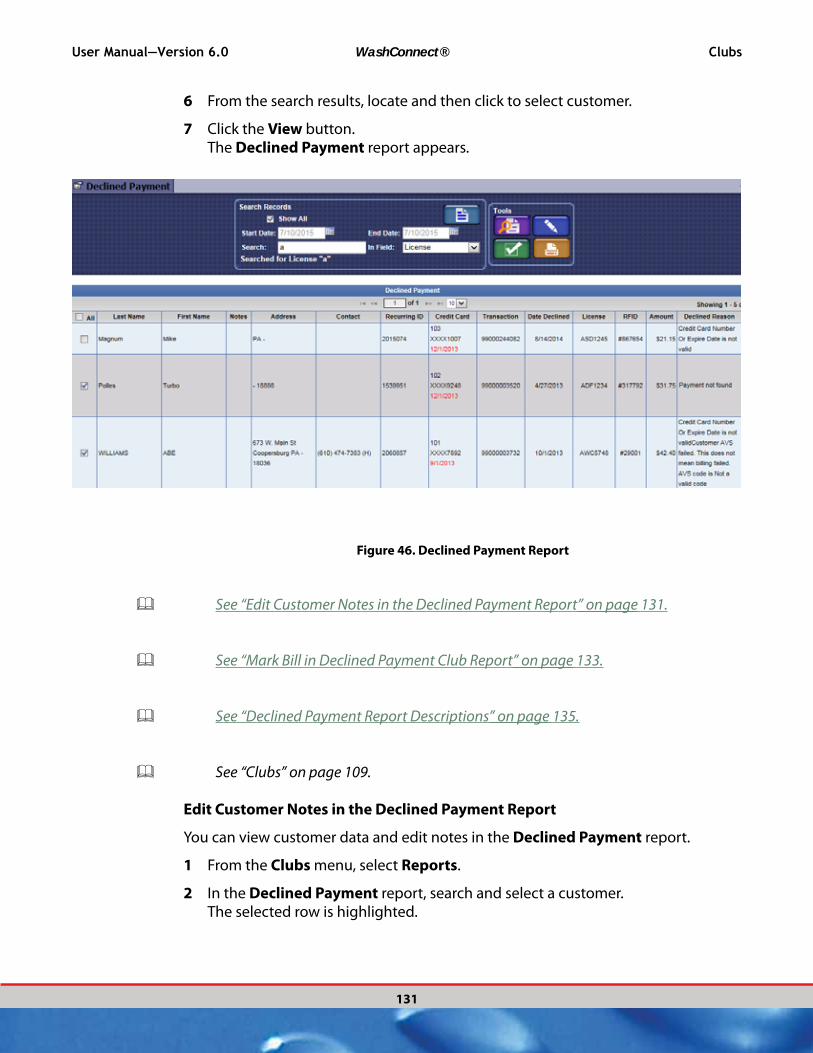
User Manual—Version 6.0 WashConnect® Clubs
131
6 From the search results, locate and then click to select customer.
7 Click the View button.The Declined Payment report appears.
Figure 46. Declined Payment Report
See “Edit Customer Notes in the Declined Payment Report” on page 131.
See “Mark Bill in Declined Payment Club Report” on page 133.
See “Declined Payment Report Descriptions” on page 135.
See “Clubs” on page 109.
Edit Customer Notes in the Declined Payment Report
You can view customer data and edit notes in the Declined Payment report.
1 From the Clubs menu, select Reports.
2 In the Declined Payment report, search and select a customer. The selected row is highlighted.

Clubs WashConnect® User Manual—Version 6.0
132
Figure 47. Selected Customer in Declined Payment Report
3 Click the View Notes button. The Notes dialog box appears.
Figure 48. Notes Dialog Box
4 Click the Add Button from the Notes Dialog Box.
5 In the Add Customer Notes box, type the necessary note.
6 Click the Save button. The Note is added to the customer’s history.
See “Mark Bill in Declined Payment Club Report” on page 133.
See “Search for a Customer from the Declined Payment Report” on page 130.
User Manual—Version 6.0 WashConnect® Clubs
133
See “Edit a Customer in the Declined Payment Report” on page 133.
See “Declined Payment Report Descriptions” on page 135.
See “Clubs” on page 109.
Edit a Customer in the Declined Payment Report
You can edit a customer in the Declined Payment report. For example, you might change the customer status.
1 From the Clubs menu, select Reports.
2 In the Declined Payment report, select a customer. The selected row is highlighted.
3 Click the Edit button. The Customer screen appears. You can edit the customer information, credit card information or vehicle information.
4 Click the Save button.
See “Search for a Customer from the Declined Payment Report” on page 130.
See “Edit Customer Notes in the Declined Payment Report” on page 131.
See “Mark Bill in Declined Payment Club Report” on page 133.
See “Declined Payment Report Descriptions” on page 135.
See “Clubs” on page 109.
Mark Bill in Declined Payment Club Report
Autobilling may have failed or you may want to give customers another chance to bill their credit card. From the Declined Payment interactive report, you can select the customer’s and then mark them all to bill overnight.
1 From the Clubs > Reports menu, select Declined Payment.
2 If necessary, edit customers in the Declined Report.

Clubs WashConnect® User Manual—Version 6.0
134
See “Edit a Customer in the Declined Payment Report” on page 133.
3 From the All column, you can select the All box to select all customers on this report or select the boxes from this column to mark the individual customers to bill overnight directly on the declined payment report. They will then be billed in the next auto billing cycle.
4 Click the Mark Bill button.The message Are you sure you want to mark selected membership(s) to Bill appears.
5 Click Yes.The customer will be removed from the Declined Report and be marked as Bill. The club membership will renew and bill overnight.
See “Clubs” on page 109.
Print the Declined Payment Report
The Declined Payment Report can be printed.
1 You can limit the Declined Payment report based on Start Date, and End Date.
2 View the report.
3 Click the Print button to print the Declined Payment report. The Print dialog box appears.
4 In the Print dialog box, select a printer, and then click Print. The report is sent to the printer.
See “Search for a Customer from the Declined Payment Report” on page 130.
See “Edit a Customer in the Declined Payment Report” on page 133.
See “Declined Payment Report Descriptions” on page 135.
See “Clubs” on page 109.
See “Mark Bill in Declined Payment Club Report” on page 133.
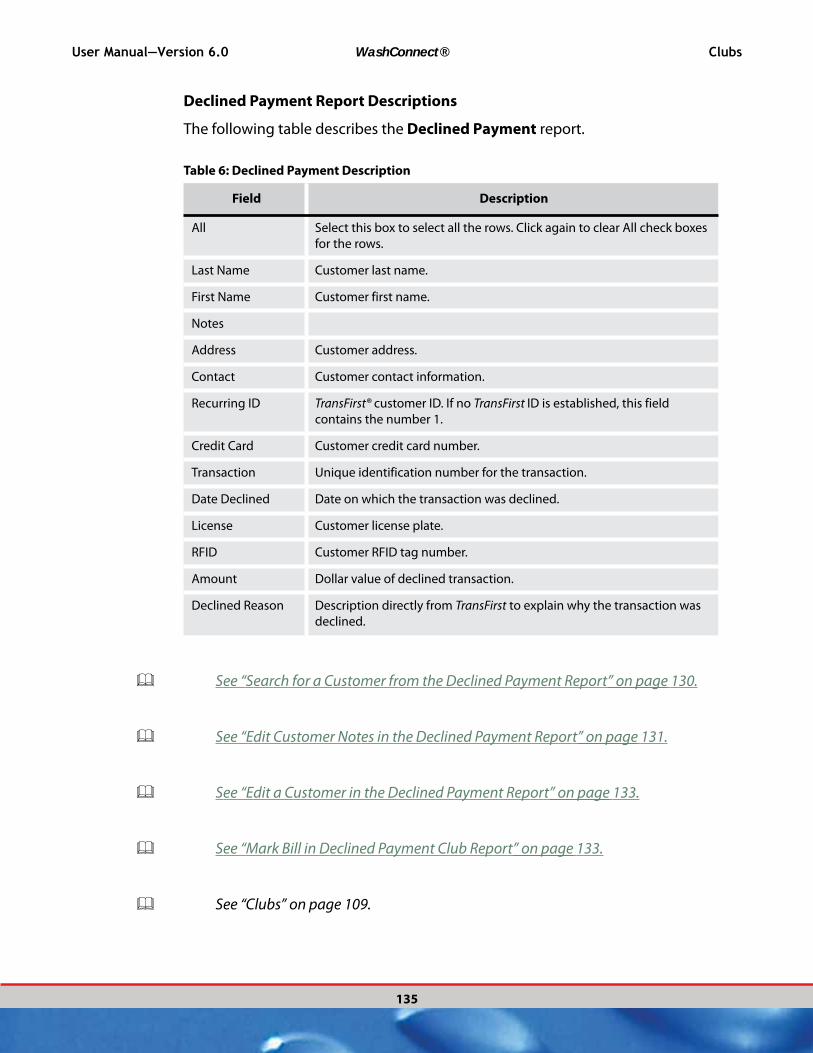
User Manual—Version 6.0 WashConnect® Clubs
135
Declined Payment Report Descriptions
The following table describes the Declined Payment report.
Table 6: Declined Payment Description
Field Description
All Select this box to select all the rows. Click again to clear All check boxes
for the rows.
Last Name Customer last name.
First Name Customer first name.
Notes
Address Customer address.
Contact Customer contact information.
Recurring ID TransFirst® customer ID. If no TransFirst ID is established, this field
contains the number 1.
Credit Card Customer credit card number.
Transaction Unique identification number for the transaction.
Date Declined Date on which the transaction was declined.
License Customer license plate.
RFID Customer RFID tag number.
Amount Dollar value of declined transaction.
Declined Reason Description directly from TransFirst to explain why the transaction was
declined.
See “Search for a Customer from the Declined Payment Report” on page 130.
See “Edit Customer Notes in the Declined Payment Report” on page 131.
See “Edit a Customer in the Declined Payment Report” on page 133.
See “Mark Bill in Declined Payment Club Report” on page 133.
See “Clubs” on page 109.

Clubs WashConnect® User Manual—Version 6.0
136
About the Club Revenue Distribution Report
See “Club Revenue Distribution Report Field Descriptions” on page 138.
See “View the Club Revenue Distribution Report” on page 136.
See “About the Reports Menu” on page 112.
View the Club Revenue Distribution Report
NOTE: This report only works from auto-billing site and corporate.
To view the Club Revenue Distribution Report, follow these steps:
1 From the Clubs menu, select Reports, and then click Club Revenue.The Club Revenue tab appears.
2 In the From Date and To Date boxes, select a date range.
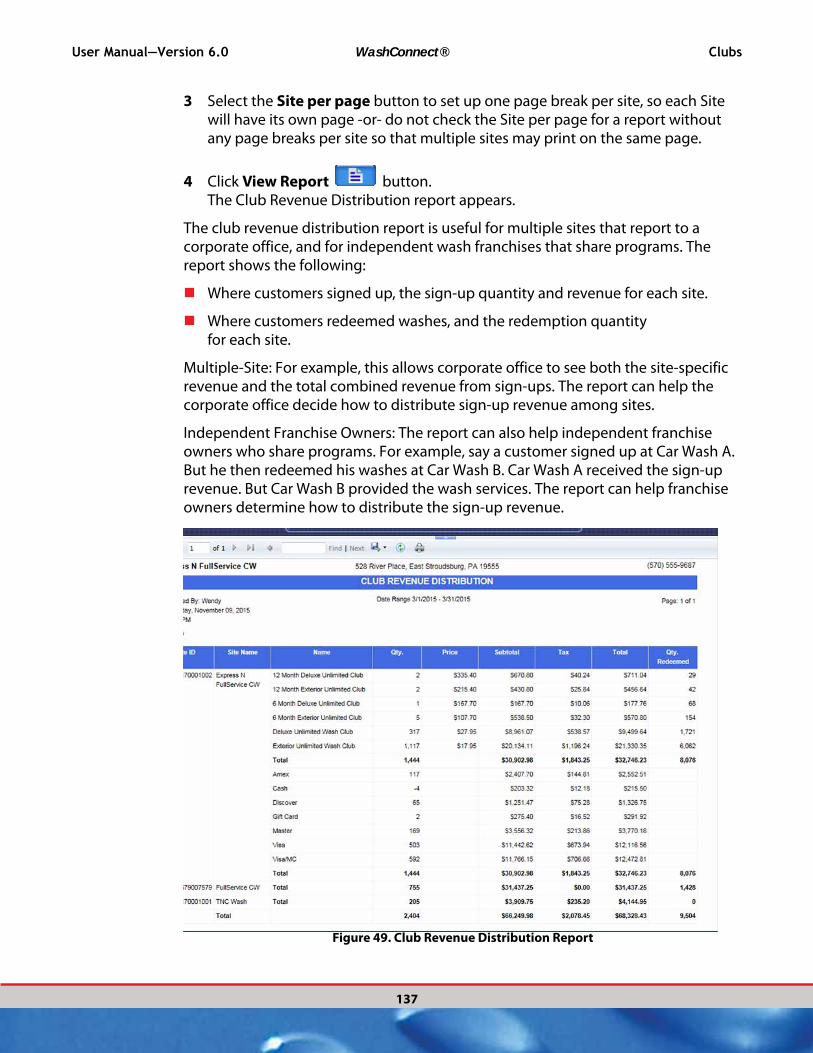
User Manual—Version 6.0 WashConnect® Clubs
137
3 Select the Site per page button to set up one page break per site, so each Site will have its own page -or- do not check the Site per page for a report without any page breaks per site so that multiple sites may print on the same page.
4 Click View Report button. The Club Revenue Distribution report appears.
The club revenue distribution report is useful for multiple sites that report to a corporate office, and for independent wash franchises that share programs. The report shows the following:
Where customers signed up, the sign-up quantity and revenue for each site.
Where customers redeemed washes, and the redemption quantity for each site.
Multiple-Site: For example, this allows corporate office to see both the site-specific revenue and the total combined revenue from sign-ups. The report can help the corporate office decide how to distribute sign-up revenue among sites.
Independent Franchise Owners: The report can also help independent franchise owners who share programs. For example, say a customer signed up at Car Wash A. But he then redeemed his washes at Car Wash B. Car Wash A received the sign-up revenue. But Car Wash B provided the wash services. The report can help franchise owners determine how to distribute the sign-up revenue.
Figure 49. Club Revenue Distribution Report

Clubs WashConnect® User Manual—Version 6.0
138
Review the first row of the example Club Revenue Distribution Report. Shine Car Wash sold 130 Deluxe Unlimited Wash membership for $24.95 each. The total income including tax was $3,434.00. The last column shows that 717 washes were redeemed.
Review the Second row of the example Club Revenue Distribution Report. Shine Car Wash has 433 Unlimited Wash memberships. The last column shows that 3605 washes were redeemed at this location for ALL members of this club regardless of location of sign up. This works out to an Average of 8.3 washes per paid customer for
this site.
Review the next site, Sparkle Car Wash. The Second row for Sparkle Car Wash shows that they have 606 Active Unlimited Wash memberships at this location. But the last column shows only1802 washes were redeemed. This works out to an average of 2.97 washes per paid customer for this site. Compare the 2.97 wash/ paid car to the estimated 8.3 washes provided per paid car by Shine Car Wash. This shows an example case in which sign-up income at one site may need to be distributed to a
different site to offset that site’s costs for providing washes..
Table 7: Club Revenue Distribution Report
Field Description
Site ID Site ID shows the site identification for each site in the hierarchy. You can
click to expand the Site ID row.
Site Name Name of the site.
Name Name of the wash club.
Qty. Quantity of wash clubs sold for the time frame.
Price Sales price of the wash club.
Sub Total Wash income excluding taxes. Sub Total = Qty × Price.
Tax Taxes paid on Sub Total income.
Total Wash income including taxes. Total = Sub Total + Tax.
Qty Redeemed Quantity of washes redeemed at the site.
Club Revenue Distribution Report Field Descriptions
See “View the Club Revenue Distribution Report” on page 136.
See “About the Club Revenue Distribution Report” on page 136.
See “Clubs” on page 109.
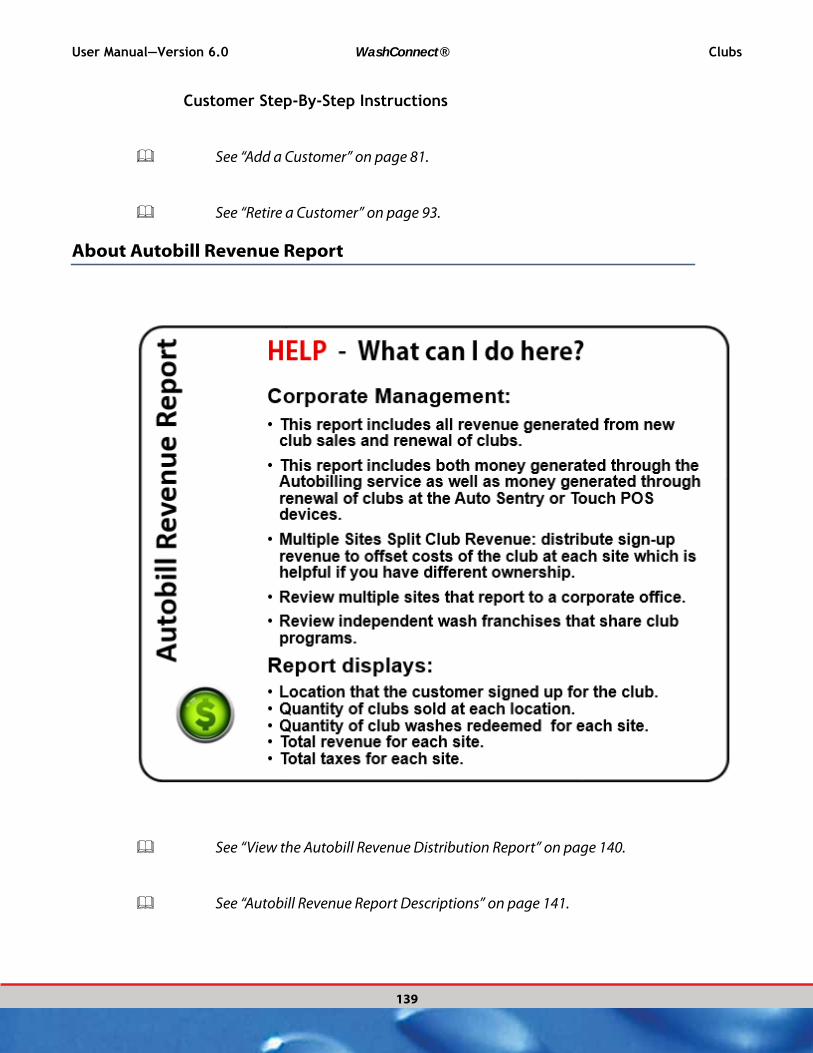
User Manual—Version 6.0 WashConnect® Clubs
139
Customer Step-By-Step Instructions
See “Add a Customer” on page 81.
See “Retire a Customer” on page 93.
About Autobill Revenue Report
See “View the Autobill Revenue Distribution Report” on page 140.
See “Autobill Revenue Report Descriptions” on page 141.

Clubs WashConnect® User Manual—Version 6.0
140
View the Autobill Revenue Distribution Report
The Autobill Revenue Distribution Report only includes those memberships that were renewed through the actual Autobilling service. The Club Revenue Report includes all revenue generated by the renewal of clubs, including money generated through the Autobilling service as well as money generated through the renewal of clubs at the Auto Sentry or Touch POS device.
This report only works from autobilling site and corporate.
To view the Autobill Revenue Distribution Report, follow these steps:
1 Select Clubs menu, select Reports, and then click Autobill Revenue Distribution.The Club Revenue Distribution tab appears.
2 In the From Date and To Date boxes, select a date range.
3 Click the View button.The Autobill Revenue Distribution Report appears.
The Autobilling Revenue Distribution report is useful for multiple sites that report to a corporate office, and for independent wash franchises that share programs. The report shows the following:
Where customers signed up, the sign-up quantity and revenue for each site.
NOTE: Self-renew at the terminals and new club members are not found in this
report but can be found in the Club Revenue Report.
Multiple-Site Owners: For example, this allows corporate office to see both the site-specific revenue and the total combined revenue from sign-ups. The report can help the corporate office decide how to distribute sign-up revenue among sites.
Independent Franchise Owners: The Autobill Revenue Report can also help independent franchise owners who share programs. For example, say a customer signed up at Car Wash A. But he then redeemed his washes at Car Wash B. Car Wash
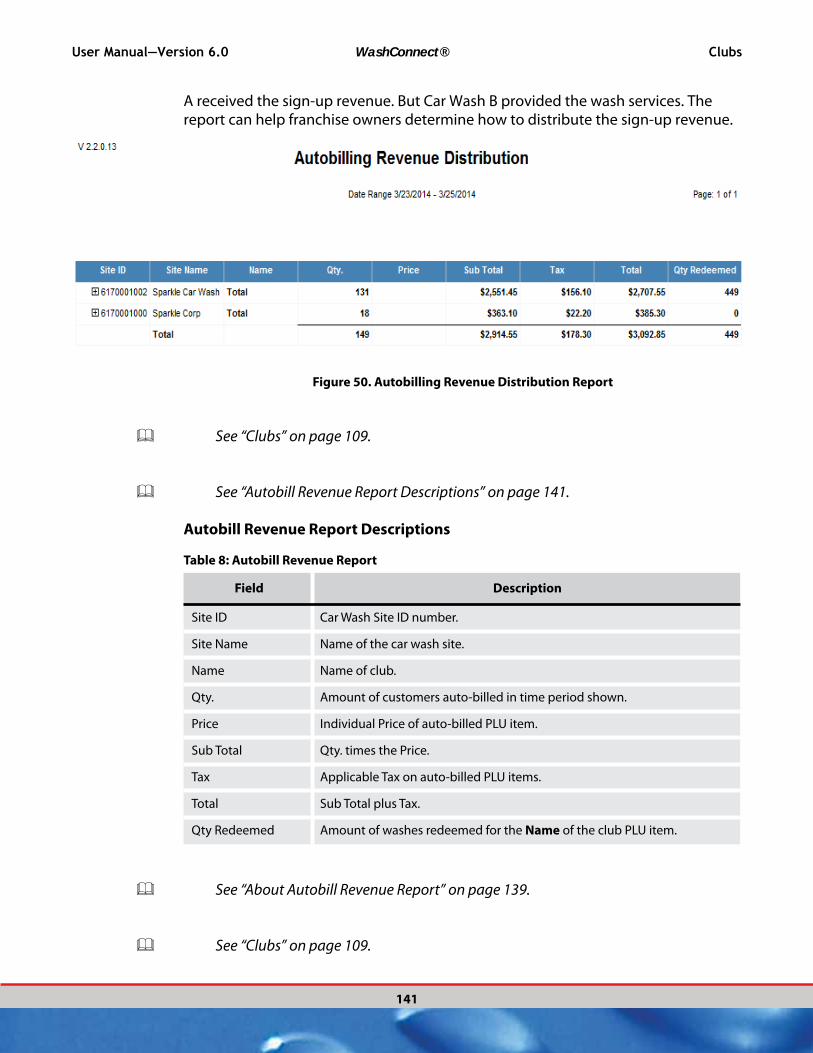
User Manual—Version 6.0 WashConnect® Clubs
141
A received the sign-up revenue. But Car Wash B provided the wash services. The report can help franchise owners determine how to distribute the sign-up revenue.
Figure 50. Autobilling Revenue Distribution Report
See “Clubs” on page 109.
See “Autobill Revenue Report Descriptions” on page 141.
Autobill Revenue Report Descriptions
Table 8: Autobill Revenue Report
Field Description
Site ID Car Wash Site ID number.
Site Name Name of the car wash site.
Name Name of club.
Qty. Amount of customers auto-billed in time period shown.
Price Individual Price of auto-billed PLU item.
Sub Total Qty. times the Price.
Tax Applicable Tax on auto-billed PLU items.
Total Sub Total plus Tax.
Qty Redeemed Amount of washes redeemed for the Name of the club PLU item.
See “About Autobill Revenue Report” on page 139.
See “Clubs” on page 109.

Clubs WashConnect® User Manual—Version 6.0
142
About the Credit Card Expiration Report
See “About the Reports Menu” on page 112.
See “View Credit Card Expiration Report” on page 142.
See “Clubs” on page 109.
View Credit Card Expiration Report
To view the Credit Card Expiration Report, follow these steps:
1 From the Clubs menu, select Reports, and then click Credit Card Expiration.The Credit Card Expiration tab appears.
2 In Expiring By box, select a credit card expires by date.
3 Click to mark the Include Expired Cards box if necessary.

User Manual—Version 6.0 WashConnect® Clubs
143
4 In Site, click to select one or more sites.
5 In Program, select one or more programs.
6 In Status, select one or more status types.
7 In Show Columns, select All or Individual fields to view.
8 Click View. The Credit Card Expiration report appears.
See “Credit Card Expiration Report Descriptions” on page 143.
See “Clubs” on page 109.
Credit Card Expiration Report Descriptions
Table 9: Credit card Expiration Report
Field Description
Last Name Last name.
First Name First name.
Phone Customer’s Phone number.
Email Customer’s email address.
Address Customer’s mailing address.
Site Name Name of the car wash site.
Credit Card # Last four digits of credit card on file.
Expiration Date Date the Credit Card on file expires.
Plate Alpha Numeric License Plate of Vehicle Identifier.
RFID A numeric entry for the RFID tag or bar-code number located on the
vehicle’s windshield assigned to the selected vehicle.
Program Name Name of the wash club or fleet.
Joined Date Date joined as a club or fleet member.
Status Status of club member.
Status Date Date the status took effect.
See “View Credit Card Expiration Report” on page 142.
See “Clubs” on page 109.
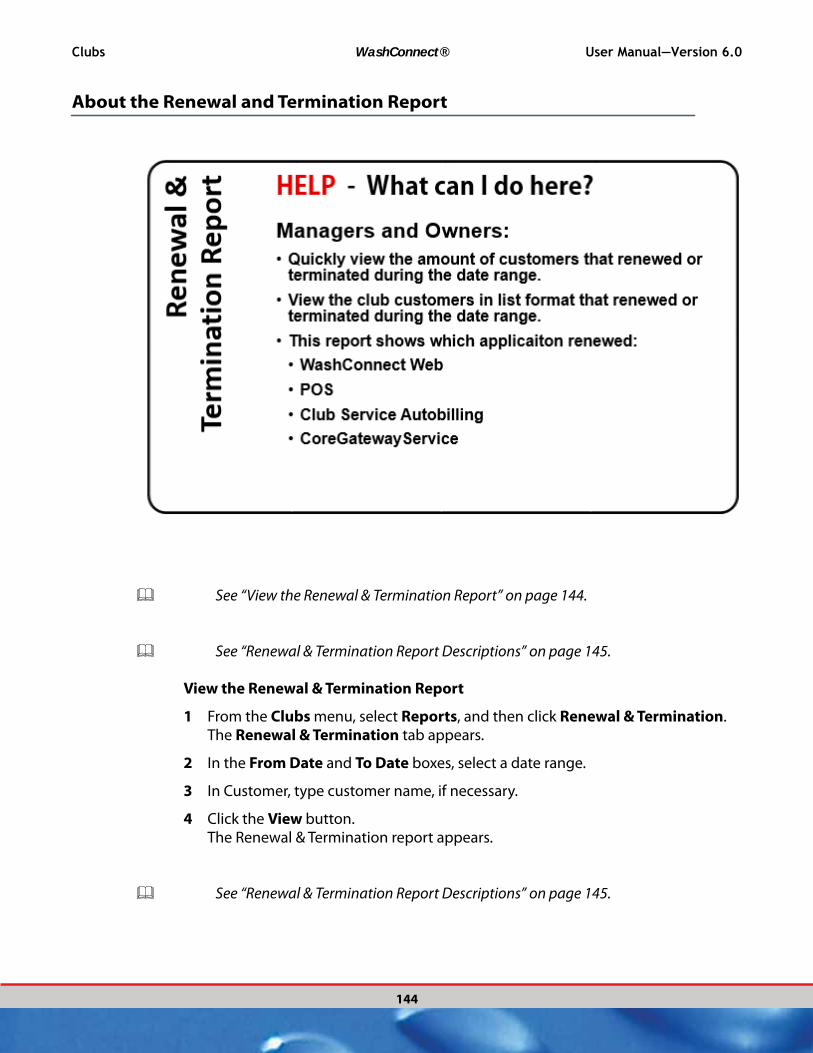
Clubs WashConnect® User Manual—Version 6.0
144
About the Renewal and Termination Report
See “View the Renewal & Termination Report” on page 144.
See “Renewal & Termination Report Descriptions” on page 145.
View the Renewal & Termination Report
1 From the Clubs menu, select Reports, and then click Renewal & Termination.The Renewal & Termination tab appears.
2 In the From Date and To Date boxes, select a date range.
3 In Customer, type customer name, if necessary.
4 Click the View button. The Renewal & Termination report appears.
See “Renewal & Termination Report Descriptions” on page 145.
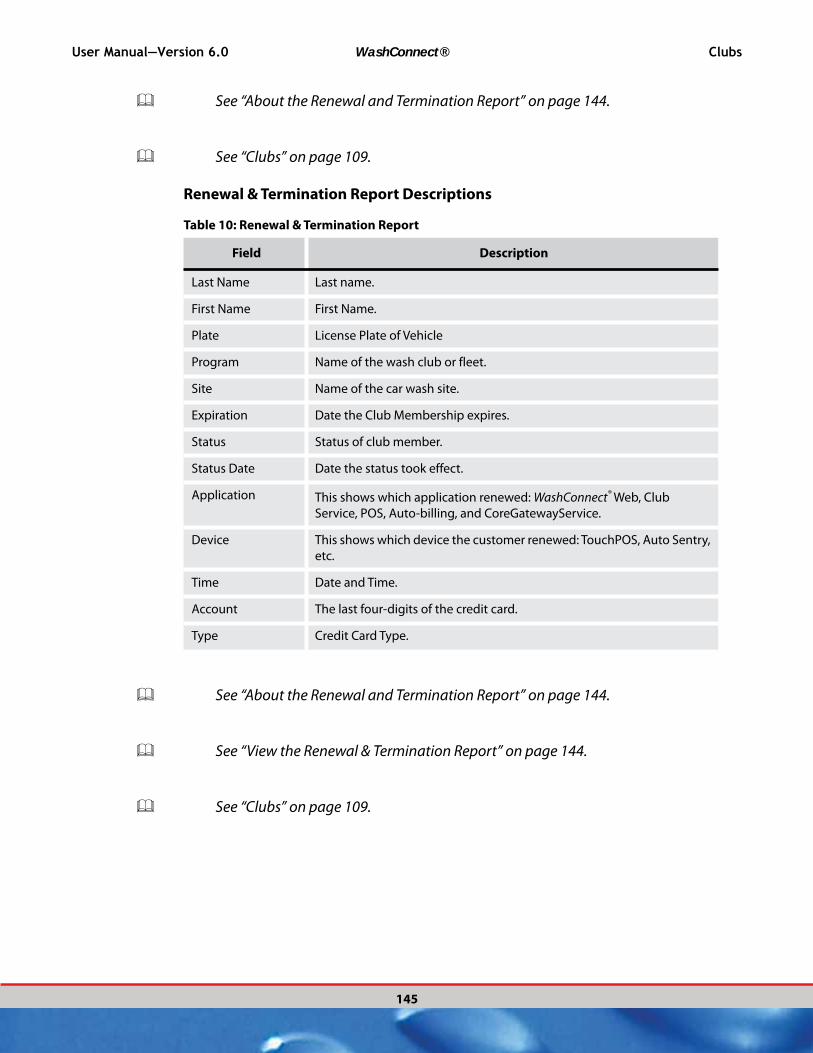
User Manual—Version 6.0 WashConnect® Clubs
145
See “About the Renewal and Termination Report” on page 144.
See “Clubs” on page 109.
Renewal & Termination Report Descriptions
Table 10: Renewal & Termination Report
Field Description
Last Name Last name.
First Name First Name.
Plate License Plate of Vehicle
Program Name of the wash club or fleet.
Site Name of the car wash site.
Expiration Date the Club Membership expires.
Status Status of club member.
Status Date Date the status took effect.
Application This shows which application renewed: WashConnect® Web, Club
Service, POS, Auto-billing, and CoreGatewayService.
Device This shows which device the customer renewed: TouchPOS, Auto Sentry,
etc.
Time Date and Time.
Account The last four-digits of the credit card.
Type Credit Card Type.
See “About the Renewal and Termination Report” on page 144.
See “View the Renewal & Termination Report” on page 144.
See “Clubs” on page 109.
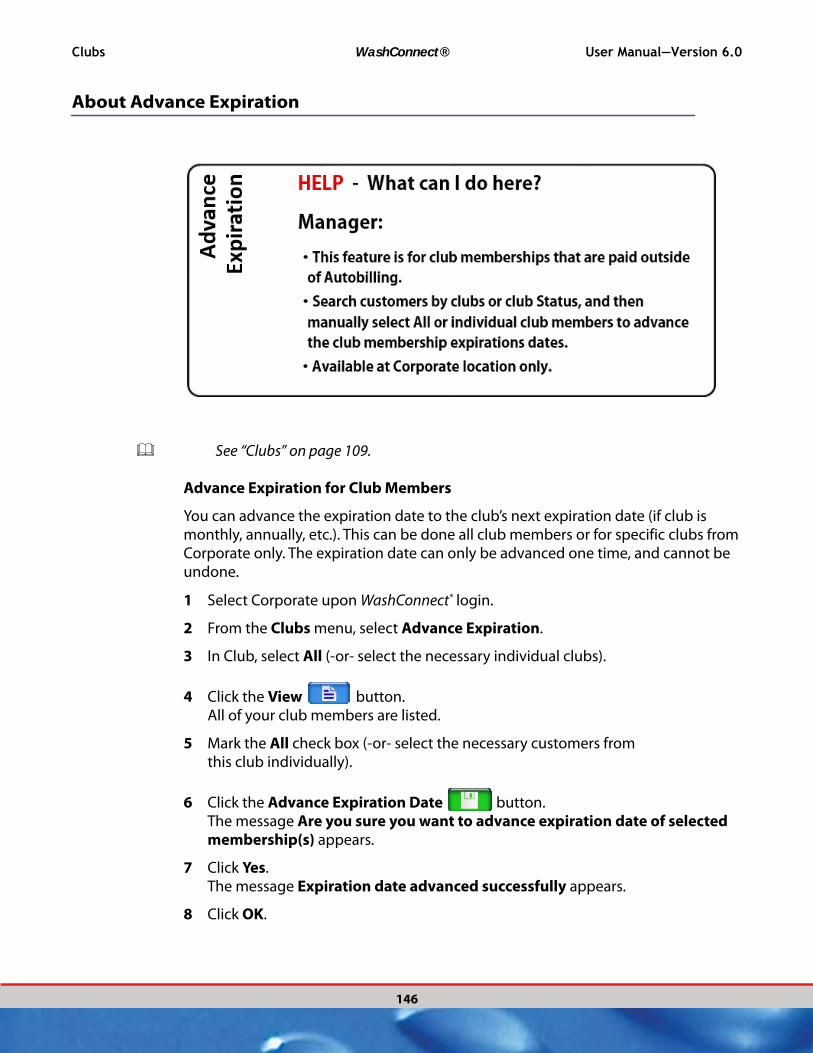
Clubs WashConnect® User Manual—Version 6.0
146
About Advance Expiration
See “Clubs” on page 109.
Advance Expiration for Club Members
You can advance the expiration date to the club’s next expiration date (if club is monthly, annually, etc.). This can be done all club members or for specific clubs from Corporate only. The expiration date can only be advanced one time, and cannot be undone.
1 Select Corporate upon WashConnect® login.
2 From the Clubs menu, select Advance Expiration.
3 In Club, select All (-or- select the necessary individual clubs).
4 Click the View button.All of your club members are listed.
5 Mark the All check box (-or- select the necessary customers from this club individually).
6 Click the Advance Expiration Date button.The message Are you sure you want to advance expiration date of selected membership(s) appears.
7 Click Yes.The message Expiration date advanced successfully appears.
8 Click OK.
User Manual—Version 6.0 WashConnect® Fleet
147
CHAPTER 5:
FLEET
The fleet menu is comprised of the following commands: Accounts, Rules, Invoice, and Manage.
NOTE: The fleet rules in this WashConnect® User Manual pertain to the full version
of WashConnect®. If you are still using Tunnel Master software for any reason, see Fleets in the Tunnel Master User Manual.
See “About the Fleet Accounts” on page 148.
See “About Fleet Rules” on page 158.
See “About Fleet Invoice” on page 162.
See “About Fleet Manage” on page 171.

Fleet WashConnect® User Manual—Version 6.0
148
About the Fleet Accounts
See “Add a Fleet Account” on page 149.
See “Add Member(s) to a Fleet Account” on page 151.
See “Add a Vehicle to a Fleet Account” on page 154.
See “Edit a Fleet Account” on page 156.
See “Terminate or Suspend a Fleet Account” on page 157.
See “Edit a Fleet Customer and Edit a Vehicle in a Fleet” on page 156.
See “About the Fleet Accounts” on page 148.
See “About Fleet Rules” on page 158.

User Manual—Version 6.0 WashConnect® Fleet
149
See “About Fleet Invoice” on page 162.
See “About Fleet Manage” on page 171.
Add a Fleet Account
Fleet Accounts (Charge Accounts) provide an accurate way of tracking fleet account business. Fleet Account customers can be offered a dollar or percentage discount off regular wash services. The fleet account can be identified as Tax Exempt entity.
To add a corporate or business fleet account, follow these steps:
WARNING: Set up your Fleet Rules first.
See “About Fleet Invoice” on page 162.
1 From the Fleet menu, click to select Accounts. The Accounts tab appears.
2 Click the Add Account button.The Fleet dialog box appears.

Fleet WashConnect® User Manual—Version 6.0
150
Figure 51. Fleet Account Dialog Box
3 Required: Type your account number in the Account # box.–or– Click the Next ID button to have the computer generate an Account ID number for you.
4 Required: In Account #, type your account number. –OR–Click the Account # Next ID button, the WashConnect system automatically generates an Account ID number.
5 Required: In Business Name, type a name for the fleet account.
6 Required: In Rule box, select a rule name that applies to this fleet account.
7 In the Tax Exempt box, click to select if you have proper documentation on file for the company (or individual) that claims they are tax exempt.
User Manual—Version 6.0 WashConnect® Fleet
151
8 In Discount, type a number (dollar amount or percentage) for the Fleet Discount to be applied at the POS.
9 Type the information in each of the other fields as available.
10 Click Save.The fleet account saved successfully message box appears.
11 Click OK to continue.
See “Add a Fleet Account” on page 149.
See “Add Member(s) to a Fleet Account” on page 151.
See “Add a Vehicle to a Fleet Account” on page 154.
See “Edit a Fleet Account” on page 156.
See “Terminate or Suspend a Fleet Account” on page 157.
See “Edit a Fleet Customer and Edit a Vehicle in a Fleet” on page 156.
See “About the Fleet Accounts” on page 148.
See “About Fleet Invoice” on page 162.
See “About Fleet Manage” on page 171.
Add Member(s) to a Fleet Account
After setting up a Fleet program, you can add fleet members to the fleet account.
1 From the Fleet menu, click to select Accounts. The Accounts tab appears.
NOTE: A Fleet Account needs to be set up prior to adding any members.
2 Click to select the Fleet.

Fleet WashConnect® User Manual—Version 6.0
152
The fleet is highlighted and the Customer section appears below the Fleet Account list.
Figure 52. Fleet Accounts
3 Click the Add Customer button.
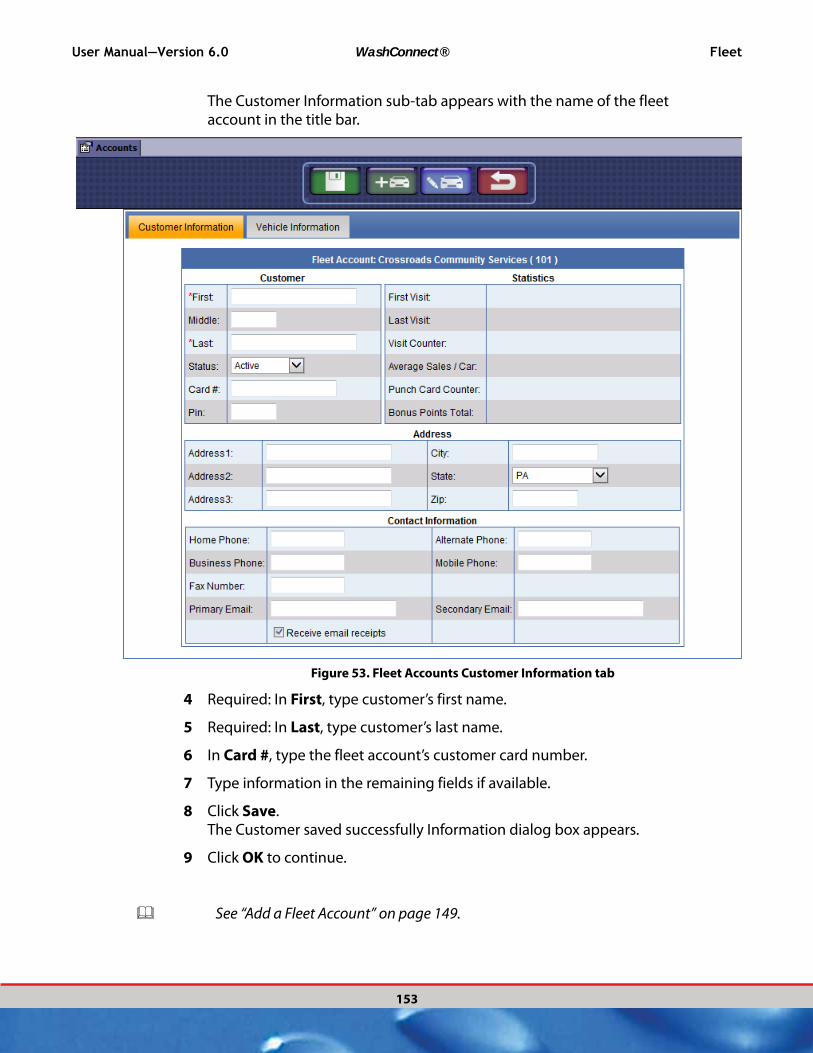
User Manual—Version 6.0 WashConnect® Fleet
153
The Customer Information sub-tab appears with the name of the fleet account in the title bar.
Figure 53. Fleet Accounts Customer Information tab
4 Required: In First, type customer’s first name.
5 Required: In Last, type customer’s last name.
6 In Card #, type the fleet account’s customer card number.
7 Type information in the remaining fields if available.
8 Click Save.The Customer saved successfully Information dialog box appears.
9 Click OK to continue.
See “Add a Fleet Account” on page 149.
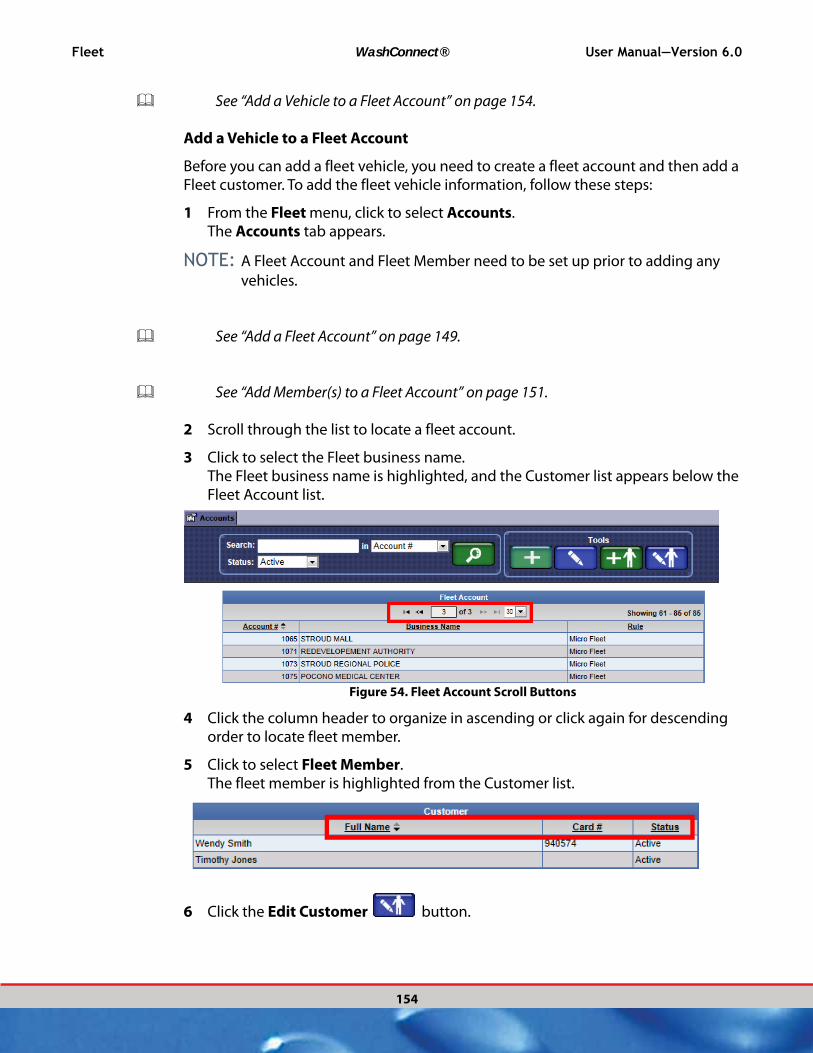
Fleet WashConnect® User Manual—Version 6.0
154
See “Add a Vehicle to a Fleet Account” on page 154.
Add a Vehicle to a Fleet Account
Before you can add a fleet vehicle, you need to create a fleet account and then add a Fleet customer. To add the fleet vehicle information, follow these steps:
1 From the Fleet menu, click to select Accounts. The Accounts tab appears.
NOTE: A Fleet Account and Fleet Member need to be set up prior to adding any
vehicles.
See “Add a Fleet Account” on page 149.
See “Add Member(s) to a Fleet Account” on page 151.
2 Scroll through the list to locate a fleet account.
3 Click to select the Fleet business name.The Fleet business name is highlighted, and the Customer list appears below the Fleet Account list.
Figure 54. Fleet Account Scroll Buttons
4 Click the column header to organize in ascending or click again for descending order to locate fleet member.
5 Click to select Fleet Member.The fleet member is highlighted from the Customer list.
6 Click the Edit Customer button.
User Manual—Version 6.0 WashConnect® Fleet
155
The Customer Information and Vehicle sub-tab appears with the name of the fleet account in the title bar.
7 Click the Add Vehicle button.
8 Fill in the Vehicle fields which you have information:
▪ State
▪ Plate No (Required)
▪ Make
▪ Model
▪ Year
▪ Color
▪ RFID Tag
▪ Pin
▪ Barcode
▪ Status: Active or Terminated
9 Click OK.
10 Click the Save button.
See “Add a Fleet Account” on page 149.
See “Add Member(s) to a Fleet Account” on page 151.
See “Add a Vehicle to a Fleet Account” on page 154.
See “Edit a Fleet Account” on page 156.
See “Terminate or Suspend a Fleet Account” on page 157.
See “Edit a Fleet Customer and Edit a Vehicle in a Fleet” on page 156.
See “About the Fleet Accounts” on page 148.

Fleet WashConnect® User Manual—Version 6.0
156
See “About Fleet Invoice” on page 162.
See “About Fleet Manage” on page 171.
Edit a Fleet Account
You can edit an existing Fleet Account.
1 From the Fleet menu, click to select Accounts. The Accounts tab appears.
2 Scroll through the list, and click to select the Fleet.Underneath the Fleet accounts, the valid Customer list appears for that Fleet account.
3 Click the Edit Account button.The Fleet box appears.
4 Make necessary changes.
5 Click the Save button. The fleet account changes are saved.
See “Add a Fleet Account” on page 149.
See “Add Member(s) to a Fleet Account” on page 151.
See “Add a Vehicle to a Fleet Account” on page 154.
See “Terminate or Suspend a Fleet Account” on page 157.
Edit a Fleet Customer and Edit a Vehicle in a Fleet
You can edit an existing fleet customer or fleet vehicle at any time.
1 From the Fleet menu, click to select Accounts. The Accounts tab appears.
2 Click to select the Fleet Account Business Name.The fleet is highlighted and the Customer section appears below the Fleet Account list.
3 From the Customers list, click the column header to organize it in ascending order or click again for descending order to find fleet member.
4 Click to select Fleet Member’s name.

User Manual—Version 6.0 WashConnect® Fleet
157
The fleet member is highlighted from the Customer list.
5 Click the Edit Customer button.The Customer Information tab appears.
6 Type information in each of the fields if necessary.
7 Click Save. The message Customer Saved Successfully appears.
8 Click OK to continue.
9 From the Customer section, click to select the customer name, and then click the Edit Customer button.
10 Click to select the Vehicle Information tab.
11 Click the Edit Vehicle button.The vehicle dialog box appears.
12 Make any necessary changes.
13 Click Ok.
14 Click the Save button.The message Customer saved successfully appears.
15 Click Ok.
16 Click the Close button to exit out of the Accounts tab.
See “Add a Fleet Account” on page 149.
See “Terminate or Suspend a Fleet Account” on page 157.
Terminate or Suspend a Fleet Account
You can terminate or suspend a fleet program.
NOTE: Fleet must have no members before you can terminate. Move Members to
another fleet before terminating the fleet.
Follow these steps:
1 From the Fleet menu, click Accounts.The Accounts tab appears.
2 Click to select the Fleet.The fleet is highlighted.
3 Click the Edit Account button.

Fleet WashConnect® User Manual—Version 6.0
158
The Fleet dialog box appears.
4 In the Status box, select Terminate or Suspend.
NOTE: Terminate permanently removes the customer account and their informa-
tion. Suspend is an inactive status used to preserve customer account infor-mation.
5 Click Save. The fleet is terminated or suspended.
See “About Fleet Manage” on page 171.
About Fleet Rules
For each fleet account, you need to assign its redemption rules:
See “Add Fleet Rules” on page 159.
See “Edit Fleet Rules” on page 160.
See “Close Fleet Account Rules” on page 160.
See “Fleet Rules Examples” on page 161.
See “About the Fleet Accounts” on page 148.
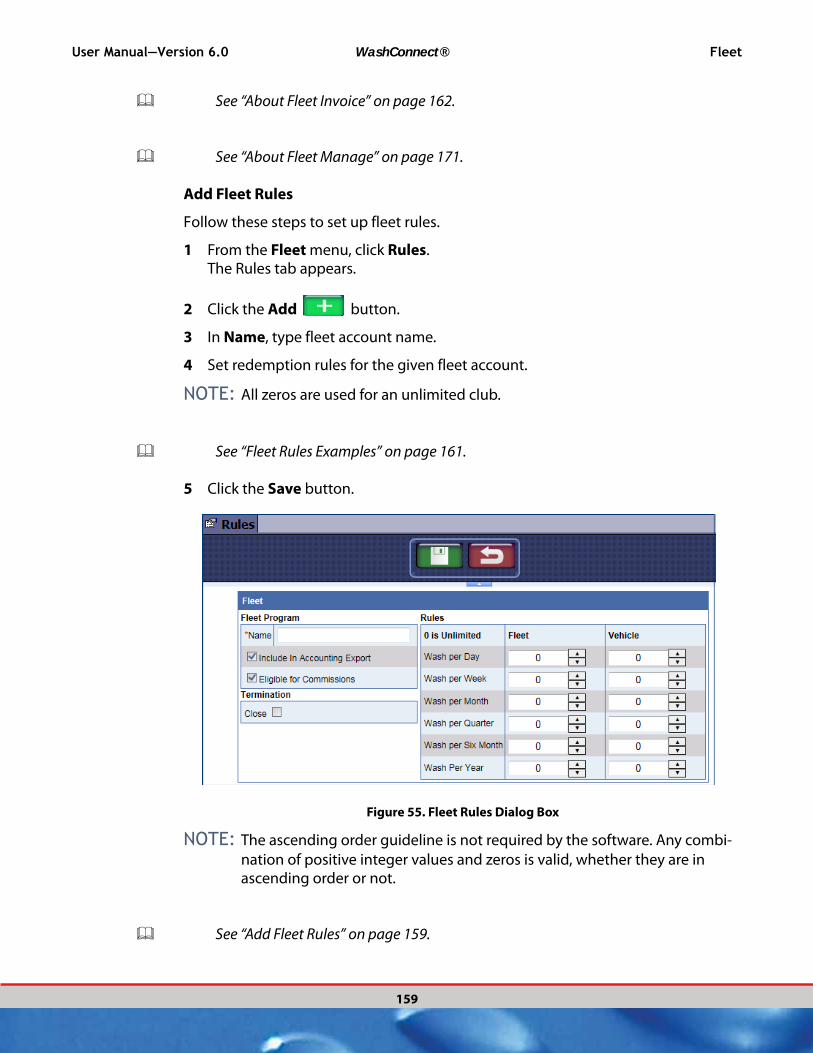
User Manual—Version 6.0 WashConnect® Fleet
159
See “About Fleet Invoice” on page 162.
See “About Fleet Manage” on page 171.
Add Fleet Rules
Follow these steps to set up fleet rules.
1 From the Fleet menu, click Rules.The Rules tab appears.
2 Click the Add button.
3 In Name, type fleet account name.
4 Set redemption rules for the given fleet account.
NOTE: All zeros are used for an unlimited club.
See “Fleet Rules Examples” on page 161.
5 Click the Save button.
Figure 55. Fleet Rules Dialog Box
NOTE: The ascending order guideline is not required by the software. Any combi-
nation of positive integer values and zeros is valid, whether they are in ascending order or not.
See “Add Fleet Rules” on page 159.
Fleet WashConnect® User Manual—Version 6.0
160
See “Edit Fleet Rules” on page 160.
See “Close Fleet Account Rules” on page 160.
See “Fleet Rules Examples” on page 161.
Edit Fleet Rules
You can edit and apply fleet rules to all the fleet members.
NOTE: Any changes you make to the fleet rules will be applied to all participating
fleet members.
1 From the Fleet menu, click Rules.The Rules tab appears.
2 Click the Edit button.
3 Make any necessary changes.
4 Click the Save button.
See “Add Fleet Rules” on page 159.
See “Close Fleet Account Rules” on page 160.
See “Fleet Rules Examples” on page 161.
Close Fleet Account Rules
You can close or terminate the fleet account rules by following these steps:
WARNING: After closing Fleet Account Rules, they are no longer available to be edited.
1 From the Fleet menu, click Rules.The Rules tab appears.
2 Click the Edit button.
3 Click to select the Close box.These fleet account rules will no longer be available.
4 Click Save.The fleet account rules are terminated.
User Manual—Version 6.0 WashConnect® Fleet
161
See “Add Fleet Rules” on page 159.
See “Edit Fleet Rules” on page 160.
See “Close Fleet Account Rules” on page 160.
See “Fleet Rules Examples” on page 161.
Fleet Rules Examples
Following is an example of fleet rules specifying 31-washes per month, 365-washes per year:
Wash per Day = 0
Wash per Week = 0
Wash per Month = 31
Wash per Quarter = 0
Wash per 6 Months = 0
Wash per Year = 365
In this example, customers may redeem up to 31 washes per month or 365 per year. No limits are imposed for 3- and 6-month intervals. However, if a customer attempted to redeem more than 365 washes in a 3- or 6-month period, he would be denied because the Year limit of 365 was reached.
Following is an example of fleet rules specifying seven washes per week and 31 washes per month:
Wash per Day = 0
Wash per Week = 7
Wash per Month = 31
In this example, the customer can redeem no more than seven washes per week and no more than 31 washes per month. The wash per day limit is assigned zero, meaning there is no explicit maximum number of washes per day. Implicitly, however, it is limited to seven as a consequence of the wash per week limit of seven.
See “Add Fleet Rules” on page 159.
See “Edit Fleet Rules” on page 160.
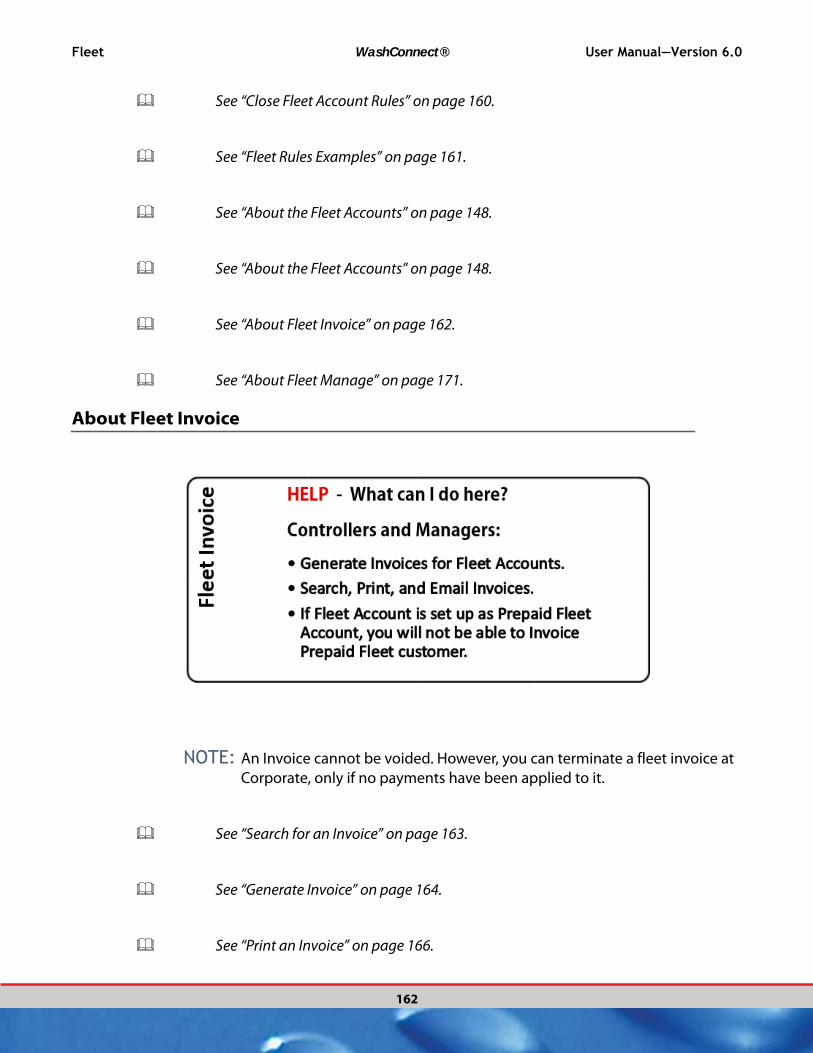
Fleet WashConnect® User Manual—Version 6.0
162
See “Close Fleet Account Rules” on page 160.
See “Fleet Rules Examples” on page 161.
See “About the Fleet Accounts” on page 148.
See “About the Fleet Accounts” on page 148.
See “About Fleet Invoice” on page 162.
See “About Fleet Manage” on page 171.
About Fleet Invoice
NOTE: An Invoice cannot be voided. However, you can terminate a fleet invoice at
Corporate, only if no payments have been applied to it.
See “Search for an Invoice” on page 163.
See “Generate Invoice” on page 164.
See “Print an Invoice” on page 166.

User Manual—Version 6.0 WashConnect® Fleet
163
See “Terminate Fleet Invoice” on page 170.
See “Email Invoice” on page 170.
See “About Fleet Manage” on page 171.
Search for an Invoice
You can search for any Invoices that have already been generated.
1 From the Fleet menu, select Invoice.
2 In Invoice() Generated Between, type or select a beginning invoice date for your search.
3 In And, type or select an end date for your search.
4 In Business/Account# click the drop-down list and click to select specific company –or– select --All-- to search all invoices.
5 Click the Find Account button.The Fleet Invoice list appears.
6 From the Fleet Invoice list, click to select a company name.
7 Click the View Invoice button.The Invoice X tab appears with the selected Invoice that you can print or export.
See “Print an Invoice” on page 166.
See “Generate Invoice” on page 164.
See “Terminate Fleet Invoice” on page 170.
See “Email Invoice” on page 170.

Fleet WashConnect® User Manual—Version 6.0
164
See “About Fleet Invoice” on page 162.
Figure 56. Fleet Invoice Search Example
Fleet Search Field Descriptions
Table 11: Fleet Invoice Find Account Search Field Descriptions
Field Description
All Select All Check box for all Fleet Invoice or individually select the specific
invoice box(es).
Invoice # Fleet Invoice Number.You can reorder the invoices with the column header
toggle.
Invoice Date The date the Invoice was generated. You can recorder the Invoice Date
column with a double-click on the header title.
Account # The account number assigned to the fleet account.
Business Name The name of fleet account business.
Email Fleet account Email address recipient who would receive fleet invoices sent
as attachments.
Billing Period The selected date range for billing the Fleet customer.
Total Invoiced
Amount
Amount due in the billing period (not necessarily the selected date range).
Amount Received on
Invoice
This amount is the total outstanding balance for that fleet account.
Current OPen
Balance
Billing period balance.
Generate Invoice
Invoices can be generated for a company fleet from Corporate Login of WashConnect.

User Manual—Version 6.0 WashConnect® Fleet
165
NOTE: When attempting to generate an invoice for a Fleet or House account with a
non-billable amount such as $0, you can view it in the list but cannot gener-ate or print the invoice.
1 Login to WashConnect Corporate.
2 From the Fleet menu, select Invoice.
3 In Billing Start Date, type or select the beginning date for the Invoice period to be generated.
4 In End Date, type or select the ending date for the Invoice period to be generated.
NOTE: The End Date must be less than the current date.
5 In Business / Account #, select the individual company from the list.
6 Click to select the Generate Invoice button.The Generate Invoice(s) dialog box appears.
NOTE: If the date range selected already has a generated invoice for an account,
the invoice will not show up in the generate invoice list.
7 Click to mark the Account check boxes.
8 Click the Generate button.The message Invoice(s) generated successfully appears.
9 Click OK.The Invoice appears from the Fleet Invoice list.
See “Search for an Invoice” on page 163.
See “Generate Invoice” on page 164.
See “Print an Invoice” on page 166.
See “Terminate Fleet Invoice” on page 170.
See “Email Invoice” on page 170.
See “About Fleet Invoice” on page 162.
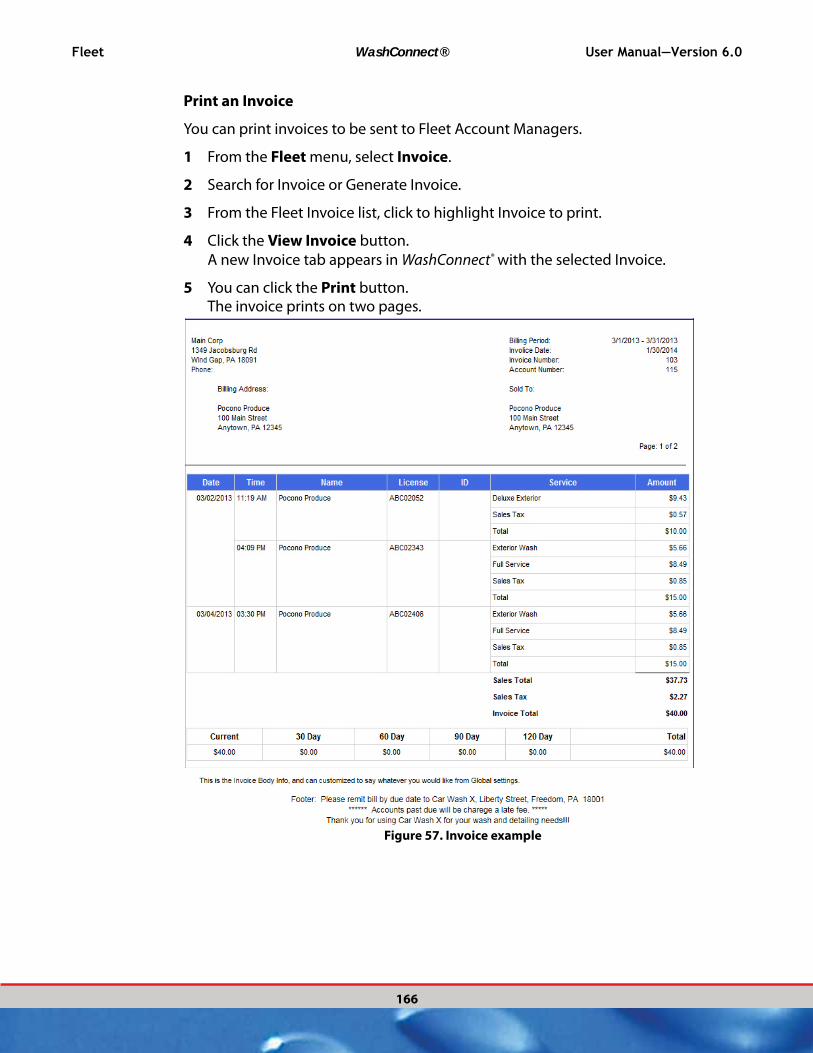
Fleet WashConnect® User Manual—Version 6.0
166
Print an Invoice
You can print invoices to be sent to Fleet Account Managers.
1 From the Fleet menu, select Invoice.
2 Search for Invoice or Generate Invoice.
3 From the Fleet Invoice list, click to highlight Invoice to print.
4 Click the View Invoice button.
A new Invoice tab appears in WashConnect® with the selected Invoice.
5 You can click the Print button.The invoice prints on two pages.
Figure 57. Invoice example

User Manual—Version 6.0 WashConnect® Fleet
167
Figure 58. Fleet Invoice Page 1 Example
Figure 59. Fleet Invoice Page 2 Example
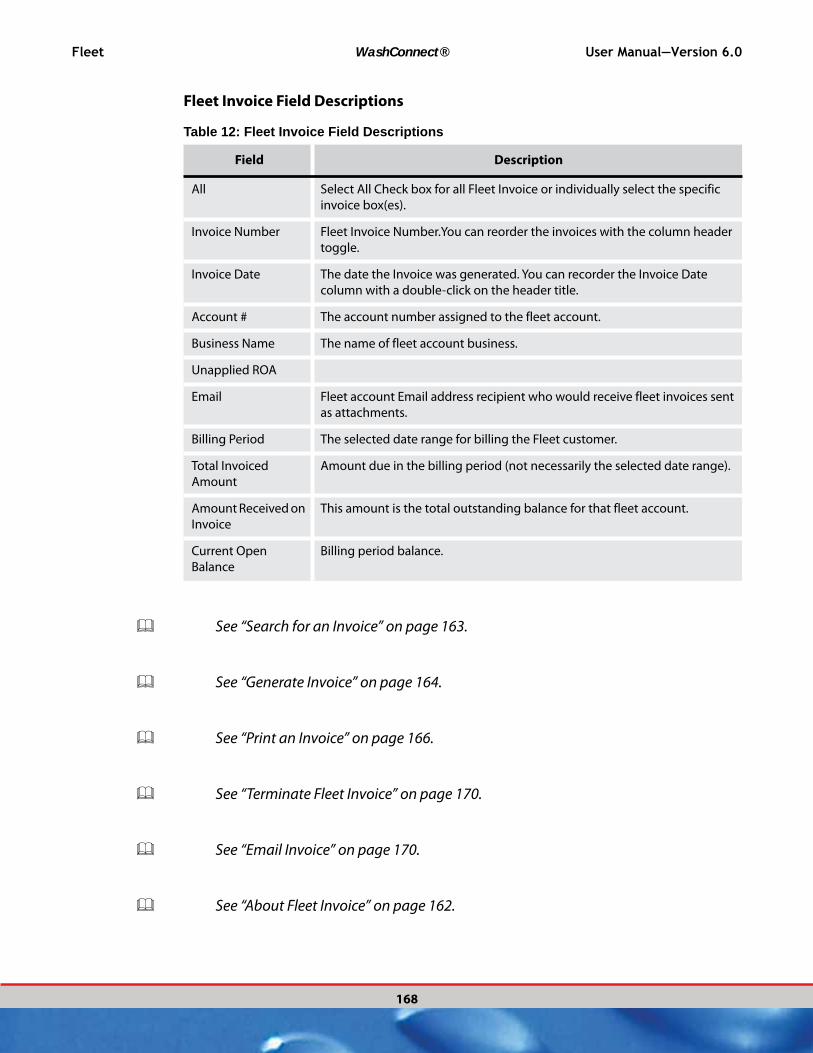
Fleet WashConnect® User Manual—Version 6.0
168
Fleet Invoice Field Descriptions
Table 12: Fleet Invoice Field Descriptions
Field Description
All Select All Check box for all Fleet Invoice or individually select the specific
invoice box(es).
Invoice Number Fleet Invoice Number.You can reorder the invoices with the column header
toggle.
Invoice Date The date the Invoice was generated. You can recorder the Invoice Date
column with a double-click on the header title.
Account # The account number assigned to the fleet account.
Business Name The name of fleet account business.
Unapplied ROA
Email Fleet account Email address recipient who would receive fleet invoices sent
as attachments.
Billing Period The selected date range for billing the Fleet customer.
Total Invoiced
Amount
Amount due in the billing period (not necessarily the selected date range).
Amount Received on
Invoice
This amount is the total outstanding balance for that fleet account.
Current Open
Balance
Billing period balance.
See “Search for an Invoice” on page 163.
See “Generate Invoice” on page 164.
See “Print an Invoice” on page 166.
See “Terminate Fleet Invoice” on page 170.
See “Email Invoice” on page 170.
See “About Fleet Invoice” on page 162.

User Manual—Version 6.0 WashConnect® Fleet
169
Export Invoice
You can export invoices to be sent to Fleet Customers.
1 From the Fleet menu, select Invoice.
2 Search for Invoice or Generate Invoice.
3 From the Fleet Invoice list, click to highlight Invoice to print.
4 Click the View Invoice button.
A new Invoice tab appears in WashConnect® with the selected Invoice.
5 You can select the Export button.
6 Select an Export format from the Export drop-down list:
▪ XML file with report data
▪ CSV (comma delimited)
▪ MHTML (web archive)
▪ Excel
▪ TIFF file
▪ WordThe File Download dialog Do you want to open or save this file? appears.
7 Select one of the following: Open file, Save file, or Cancel this command.
See “Search for an Invoice” on page 163.
See “Generate Invoice” on page 164.
See “Terminate Fleet Invoice” on page 170.
See “Email Invoice” on page 170.
See “About Fleet Invoice” on page 162.

Fleet WashConnect® User Manual—Version 6.0
170
Terminate Fleet Invoice
You can terminate a fleet invoice at Corporate, only if no payments have been applied to it.
NOTE: If the invoice is paid partially or fully, then it cannot be terminated.
1 From the Fleet menu, select Invoice.
2 Search for Invoice.
3 From the Fleet Invoice list, click to highlight Invoice.
4 Click the Terminate button.A message Are you sure you want to terminate invoice # appears.
5 Click Yes.The message Invoice terminated successfully appears.
6 Click OK.The Invoice is removed from list.
See “Search for an Invoice” on page 163.
See “Generate Invoice” on page 164.
See “Print an Invoice” on page 166.
See “Email Invoice” on page 170.
See “Terminate Fleet Invoice” on page 170.
See “About Fleet Invoice” on page 162.
Email Invoice
You can email a generated invoice.
NOTE: Email address must be entered in Fleet Account details.
1 From the Fleet menu, select Invoice.
2 Search for an Invoice.
3 From Fleet Invoice list, click to select an Invoice.
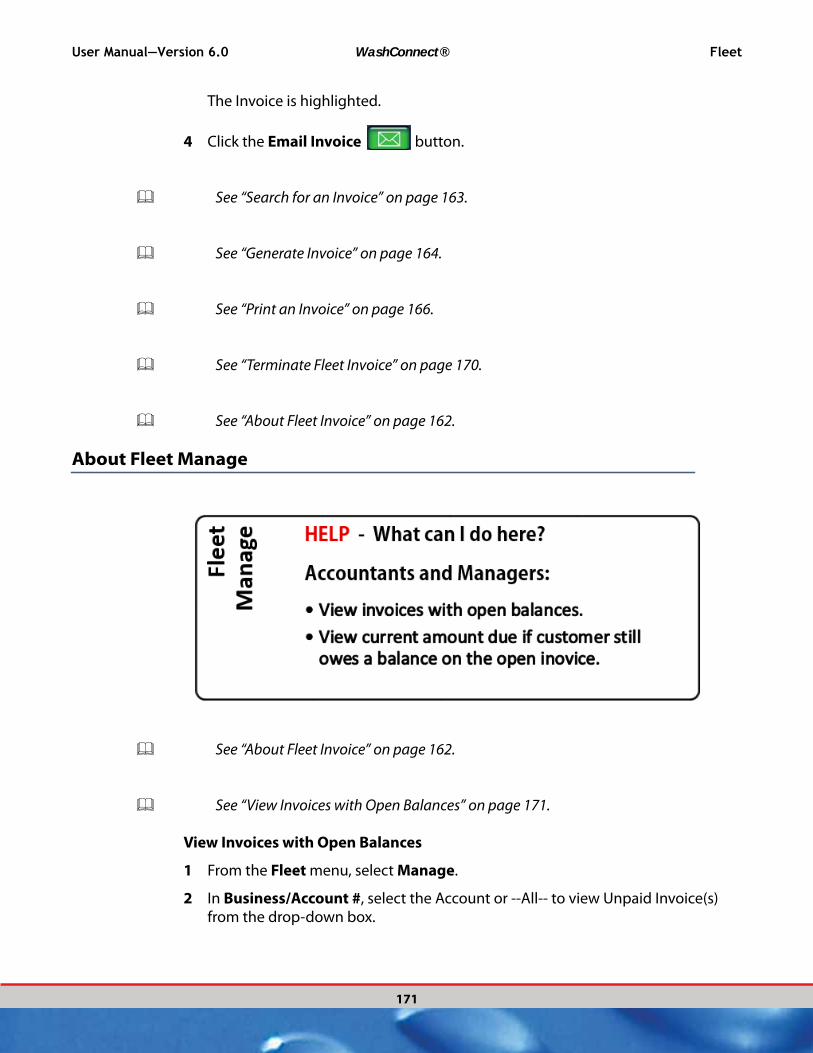
User Manual—Version 6.0 WashConnect® Fleet
171
The Invoice is highlighted.
4 Click the Email Invoice button.
See “Search for an Invoice” on page 163.
See “Generate Invoice” on page 164.
See “Print an Invoice” on page 166.
See “Terminate Fleet Invoice” on page 170.
See “About Fleet Invoice” on page 162.
About Fleet Manage
See “About Fleet Invoice” on page 162.
See “View Invoices with Open Balances” on page 171.
View Invoices with Open Balances
1 From the Fleet menu, select Manage.
2 In Business/Account #, select the Account or --All-- to view Unpaid Invoice(s) from the drop-down box.

Fleet WashConnect® User Manual—Version 6.0
172
You can view the current amount which is the balance due. The Amount Billed is the total of the original invoice.
3 If customer wants to pay on their fleet account, you need to go to the POS and perform an ROA.
NOTE: Payments at the POS are automatically applied to open Fleet invoices, you
do not have to apply them manually.
See “ROA (Received on Account)” on page 598.
Figure 60. Manage Fleet Unpaid Invoice example

User Manual—Version 6.0 WashConnect® Financial
173
CHAPTER 6:
FINANCIAL
From WashConnect® Financial menu, as the name indicates, is where you can manage the financial aspects of your business. It is broken down into four main sections for Register Reports, Audit Controls, Cash Management, and Ticket Redeemed.
There are 15 Register Reports including the Financial Overview showing a summary of all financial activity where data is consolidated at a shift level per device at each site. The Shift Detail Report was designed to facilitate and streamline balancing the books from the perspective of an accountant or controller who needs to see all the numbers, prove out the day, and then post the data or export to an accounting system such as Quickbooks, Peachtree, Alere, MAS-90, and ProfData. After proving out the numbers in the Register Reports menu, you can use the Audit Controls menu to verify tunnel activity against paid services. Register Reports alone cannot show this comparison but reports such as the Wash to Register Comparison and Ticket Comparison can help identify potential theft by showing tunnel activity versus paid services.
For example, a customer was given an extra service but that extra service was not included on the customer’s ticket. If that service was manually provided by an attendant but not recorded as a part of the transaction, you need to ask: Did the attendant collect money for the service, and where is it?
Register Report:
See “About the Financial Overview Report” on page 178.
See “About the Shift Detail Report” on page 186.
See “About the Credit Cards Report” on page 202.
See “About Credit Cards Reconciliation” on page 205.
Financial WashConnect® User Manual—Version 6.0
174
See “About the Gift Cards Report” on page 209.
See “About the Checks Report” on page 213.
See “About the Fleet Activity Report” on page 217.
See “About the Deposits Report” on page 221.
See “About the Free Wash Report” on page 224.
See “About the Re-Wash Report” on page 228.
See “About the Payouts Report” on page 232.
See “About the ROA (Received on Account) Report” on page 235.
See “About the Voids Report” on page 239.
See “About the Fund Raiser Report” on page 243.
See “See “About the Fund Raiser Report” on page 243.” on page 245.
See “About View Register” on page 245.
Audit Controls Report:
See “Introduction to the Audit Controls menu” on page 249.
See “View the Wash To Register Comparison Report” on page 251.
See “View the Ticket Comparison Report” on page 254.
User Manual—Version 6.0 WashConnect® Financial
175
See “About Transactional Detail” on page 258.
See “About Terminal Balance Report” on page 261.
See “About Sales Commission” on page 263.
See “About View Site Tickets” on page 265.
See “About the Services Washed Report” on page 267.
See “About the Controller Services Report” on page 269.
See “About the Audit Trail Log” on page 270.
Cash Management:
See “About Journals” on page 272.
See “About Terminal Balances” on page 289.
See “About the Operations Report” on page 294.
Ticket Redeemed:
See “About Ticket Redeemed Summary” on page 297.
See “About Ticket Redeemed Detail” on page 299.
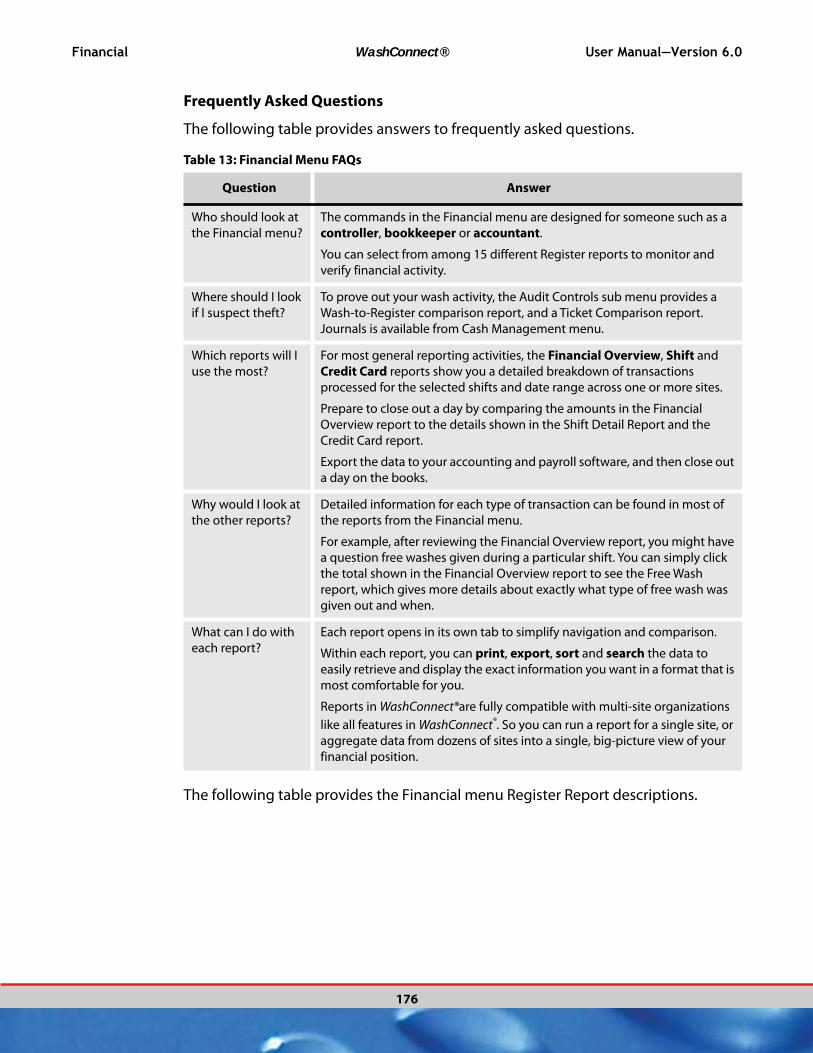
Financial WashConnect® User Manual—Version 6.0
176
Frequently Asked Questions
Table 13: Financial Menu FAQs
Question Answer
Who should look at
the Financial menu?
The commands in the Financial menu are designed for someone such as a
controller, bookkeeper or accountant.
You can select from among 15 different Register reports to monitor and
verify financial activity.
Where should I look
if I suspect theft?
To prove out your wash activity, the Audit Controls sub menu provides a
Wash-to-Register comparison report, and a Ticket Comparison report.
Journals is available from Cash Management menu.
Which reports will I
use the most?
For most general reporting activities, the Financial Overview, Shift and
Credit Card reports show you a detailed breakdown of transactions
processed for the selected shifts and date range across one or more sites.
Prepare to close out a day by comparing the amounts in the Financial
Overview report to the details shown in the Shift Detail Report and the
Credit Card report.
Export the data to your accounting and payroll software, and then close out
a day on the books.
Why would I look at
the other reports?
Detailed information for each type of transaction can be found in most of
the reports from the Financial menu.
For example, after reviewing the Financial Overview report, you might have
a question free washes given during a particular shift. You can simply click
the total shown in the Financial Overview report to see the Free Wash
report, which gives more details about exactly what type of free wash was
given out and when.
What can I do with
each report?
Each report opens in its own tab to simplify navigation and comparison.
Within each report, you can print, export, sort and search the data to
easily retrieve and display the exact information you want in a format that is
most comfortable for you.
Reports in WashConnect®are fully compatible with multi-site organizations
like all features in WashConnect®. So you can run a report for a single site, or
aggregate data from dozens of sites into a single, big-picture view of your
financial position.
The following table provides answers to frequently asked questions.
The following table provides the Financial menu Register Report descriptions.

User Manual—Version 6.0 WashConnect® Financial
177
Table 14: Register Reports Descriptions
Report Description
Financial Overview The Financial Overview report is a versatile report for streamlining the steps
required to close out the day on the books.
You can click any underlined total in the report which then opens a more
detailed report in a new tab.
After you are satisfied, you can resolve a day and post to accounting by
exporting the report.
Shift Detail The Shift Detail Report summarizes all register transactions. This is the main
report for accounting purposes.
Includes both cash and non cash transactions.
Lists all services sold for the selected date range and shifts.
Credit Card The Credit Card report summarizes all credit card transactions details for
the selected date range and shifts.
The report includes Card Name, Card #, Transaction, Date, Time, Ticket
and amount Charged.
Gift Cards The Gift Card Report shows all gift card transactions.
The report includes Gifts Sold, Gifts Redeemed and Gifts Free.
Checks The Checks report shows a detailed list of all transactions paid by check.
The report includes Check Number, Check Amount and Transaction
Number (if applicable).
Fleet Activity The Fleet Activity report shows all fleet account transactions.
The report includes Transaction ID, License (if known), Service and
amount Charged.
Deposits The Deposits report shows all deposits.
The report includes Date, Time, unique Journal transaction ID, Cash,
Checks, and Total.
Free Wash The Free Washes report shows all free washes.
The report includes Date, Time, Ticket, Service, Price, and Reason (if
applicable).
Re-wash The Re-wash report shows all rewashes.
The report includes Transaction, Date, Time, Ticket, Service, Price, and
Reason (if applicable).
Payouts The Payouts report shows all payouts.
The report includes Transaction, Account (where item is expensed to),
Date, Time, Item Description and Amount.
ROA The ROA or Received on Account report shows account payments received.
The report includes Transaction, Account, Date, Time, Customer Name,
Payment Type and Price.

Financial WashConnect® User Manual—Version 6.0
178
About the Financial Overview Report
See “View the Financial Overview Report” on page 179.
See “Open a Report from the Financial Overview Report” on page 180.
See “Export Data from the Financial Overview Report” on page 181.
Voids The voided transactions allow you to view voids at a glance.
Refunds The Refunds report shows the refunds.
Fund Raiser The Fund Raiser report shows the fund raiser profit center sales.
View Register The View Register report shows the transactions.
Table 14: Register Reports Descriptions (Continued)
Report Description
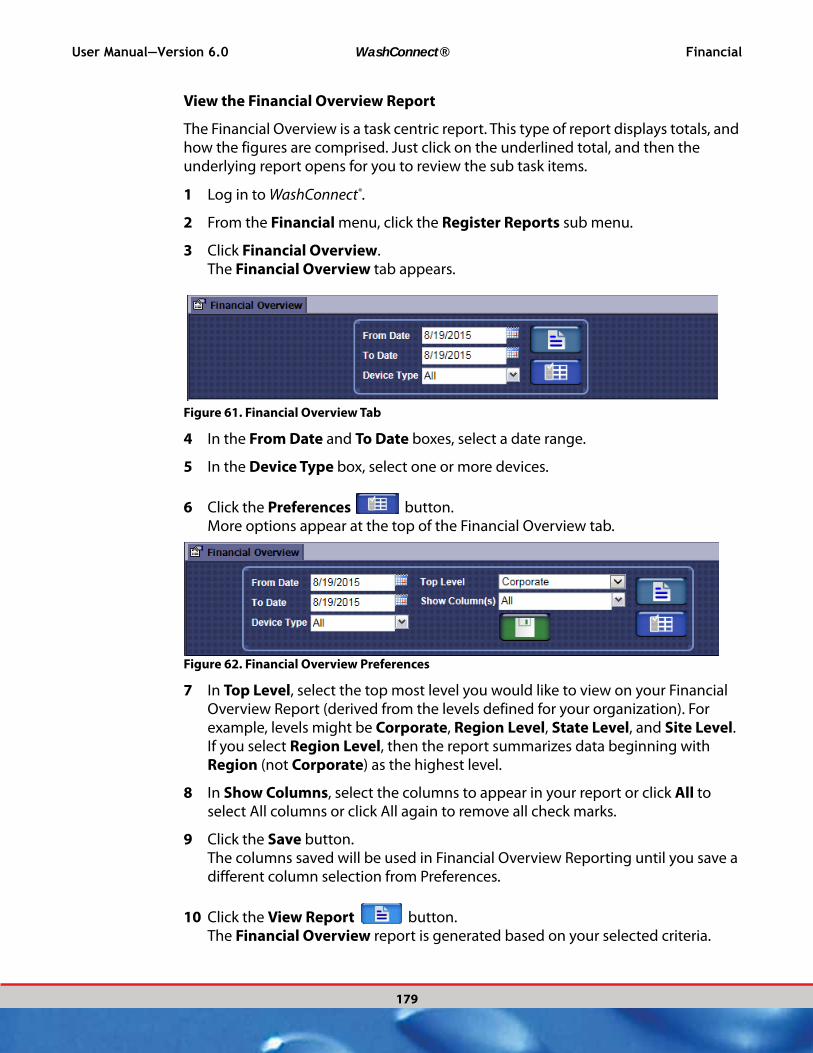
User Manual—Version 6.0 WashConnect® Financial
179
View the Financial Overview Report
The Financial Overview is a task centric report. This type of report displays totals, and how the figures are comprised. Just click on the underlined total, and then the underlying report opens for you to review the sub task items.
1 Log in to WashConnect®.
2 From the Financial menu, click the Register Reports sub menu.
3 Click Financial Overview. The Financial Overview tab appears.
Figure 61. Financial Overview Tab
4 In the From Date and To Date boxes, select a date range.
5 In the Device Type box, select one or more devices.
6 Click the Preferences button.More options appear at the top of the Financial Overview tab.
Figure 62. Financial Overview Preferences
7 In Top Level, select the top most level you would like to view on your Financial Overview Report (derived from the levels defined for your organization). For example, levels might be Corporate, Region Level, State Level, and Site Level. If you select Region Level, then the report summarizes data beginning with Region (not Corporate) as the highest level.
8 In Show Columns, select the columns to appear in your report or click All to select All columns or click All again to remove all check marks.
9 Click the Save button.The columns saved will be used in Financial Overview Reporting until you save a different column selection from Preferences.
10 Click the View Report button.The Financial Overview report is generated based on your selected criteria.
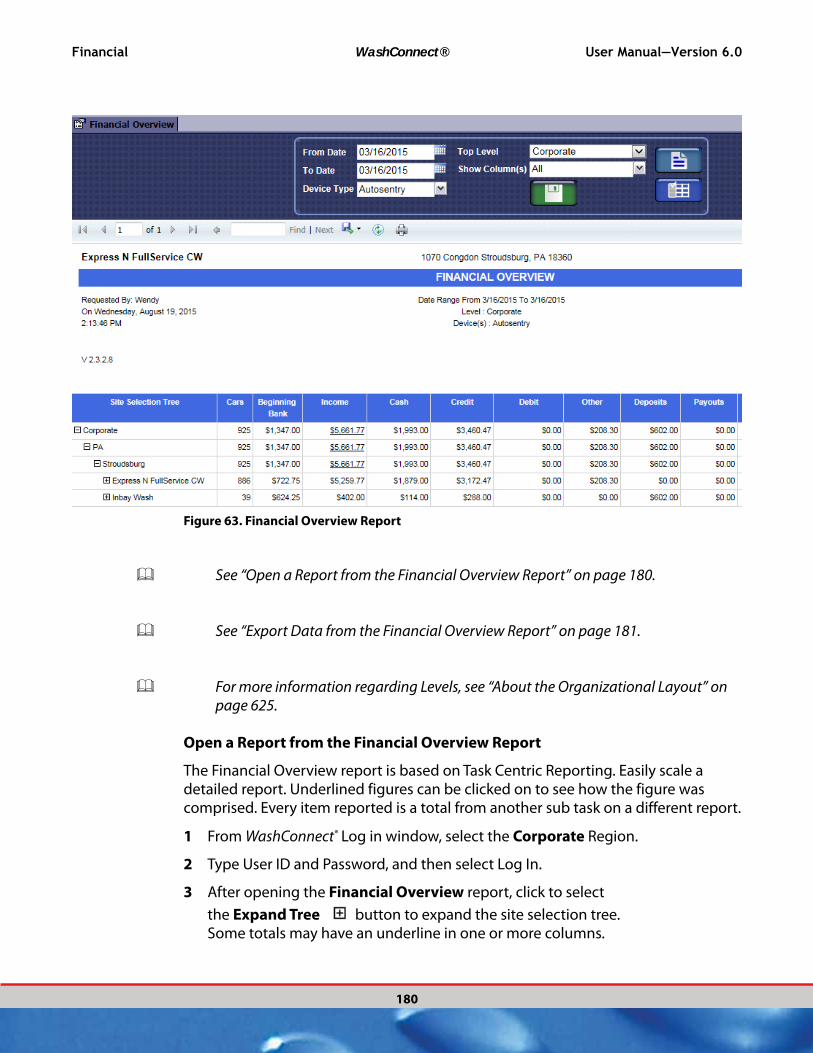
Financial WashConnect® User Manual—Version 6.0
180
Figure 63. Financial Overview Report
See “Open a Report from the Financial Overview Report” on page 180.
See “Export Data from the Financial Overview Report” on page 181.
For more information regarding Levels, see “About the Organizational Layout” on page 625.
Open a Report from the Financial Overview Report
The Financial Overview report is based on Task Centric Reporting. Easily scale a detailed report. Underlined figures can be clicked on to see how the figure was comprised. Every item reported is a total from another sub task on a different report.
1 From WashConnect® Log in window, select the Corporate Region.
2 Type User ID and Password, and then select Log In.
3 After opening the Financial Overview report, click to select
the Expand Tree button to expand the site selection tree.Some totals may have an underline in one or more columns.

CLICK AN UNDERLINED TOTAL TO VIEW THE UNDERLYING REPORT THAT AGGREGATES THIS TOTAL.
User Manual—Version 6.0 WashConnect® Financial
181
Figure 64. Financial Overview Report with Underlined Total
4 From the Financial Overview report, click to select the underlined total. A new report opens in a new tab. For example, if you click an underlined total in the Income column, the Shift Detail Report appears in a new tab, displaying the details of the Income total.
See “Open a Report from the Financial Overview Report” on page 180.
See “Export Data from the Financial Overview Report” on page 181.
For more information regarding Levels, see “About the Organizational Layout” on page 625.
Export Data from the Financial Overview Report
You can export financial overview report data to a format compatible with your accounting system. Export one shift at a time. Each shift is saved in a separate file, which you can export to an accounting program such as QuickBooks®, Peachtree, Alere, MAS-90, and ProfData.
Follow these instructions to export Financial Overview report data:
1 After opening the Financial Overview report, expand and contract the site selection tree until the necessary lines appear.

Financial WashConnect® User Manual—Version 6.0
182
Figure 65. Financial Overview Report Export tools
2 From the toolbar, click the Export button drop-down arrow.
3 From the list, select one of the following formats:
▪ XML file with report data
▪ CSV (comma delimited)
▪ MHTML (web archive)
▪ Excel
▪ TIFF file
▪ WordThe File Download dialog box appears.
4 Click Open to View, and then Print or Save the file.–or–Click Save to Save the file without viewing.–or–Click Cancel.
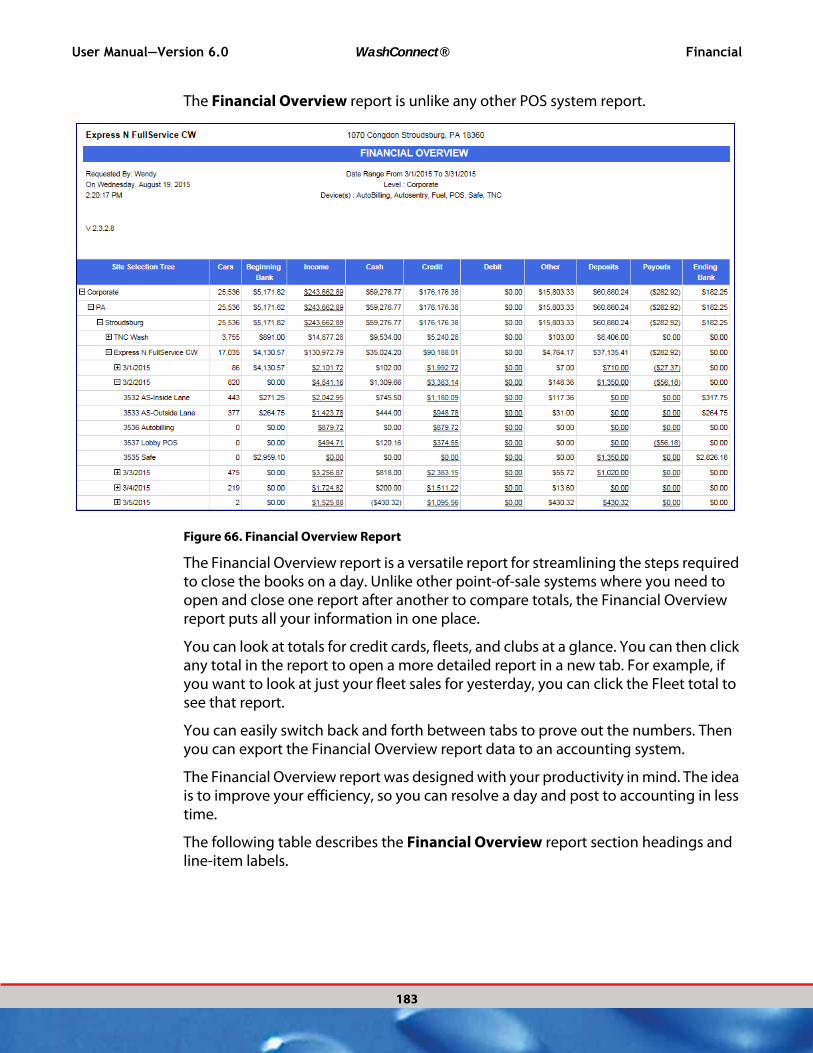
User Manual—Version 6.0 WashConnect® Financial
183
The Financial Overview report is unlike any other POS system report.
Figure 66. Financial Overview Report
The Financial Overview report is a versatile report for streamlining the steps required to close the books on a day. Unlike other point-of-sale systems where you need to open and close one report after another to compare totals, the Financial Overview report puts all your information in one place.
You can look at totals for credit cards, fleets, and clubs at a glance. You can then click any total in the report to open a more detailed report in a new tab. For example, if you want to look at just your fleet sales for yesterday, you can click the Fleet total to see that report.
You can easily switch back and forth between tabs to prove out the numbers. Then you can export the Financial Overview report data to an accounting system.
The Financial Overview report was designed with your productivity in mind. The idea is to improve your efficiency, so you can resolve a day and post to accounting in less time.
The following table describes the Financial Overview report section headings and line-item labels.

Financial WashConnect® User Manual—Version 6.0
184
Table 15: Financial Overview Report Descriptions
Label Description
Site Selection Tree Column is frozen. The row headers will scroll to the left as you navigate
across the report. The Resolution is the line that is being shown.
Cars Number of cars. Cars count only reflects base wash sold under conveyor
profit center. For TouchNClean, the car count is reflected in the Self Serve
Profit Center.
Beginning Bank The dollar amount entered into the system as Beginning Bank at the
opening of the shift.
Income Total receipts for the shift type. Includes both cash and non-cash totals.
Cash Portion of the income that was processed as cash.
Credit Portion of the income that was processed as credit. Click a total to see
the Credit report.
Debit
Other Portion of the income that was processed as neither cash nor credit.
Deposits Dollar amount removed from the Safe or POS to be deposited in the
bank. Click a total to see the Deposits report.
Payouts This entry includes the number and total dollar value of all cash payouts
made during the shift. Click a total to see the Payouts report.
Ending Bank The dollar amount entered into the system as ending amount at the
closing of the shift.
Over Under Dollar amount at end of shift for the difference in the POS, AS terminal
and Safe totals. Over means the devices ended the shift with extra
money than what was recorded by the software. Under means the
devices ended the shift with less money than what was recorded by the
software. See Under or Over in Shift Detail Report for more information.
Free Wash All free washes for the selected shifts. Click a total to see the Free Wash
report.
Rewash All rewashes for the selected shift. Click a total to see the Re-wash
report.
Sales Revenue Total representative of the Income received from Sales for the time frame
not inclusive of Over Under, payouts, etc.
ROA ROA (Received on Account)
Total amount received as payment on an account (i.e. fleet). Click a total
to see the Received on Account report.
Gift Sales This entry includes the number and total dollar value of all Gift
Certificates and Gift Cards sold during the shift.
Gift Redeemed This entry includes the number and total dollar value of all Gift
Certificates and Gift Cards redeemed during the shift.
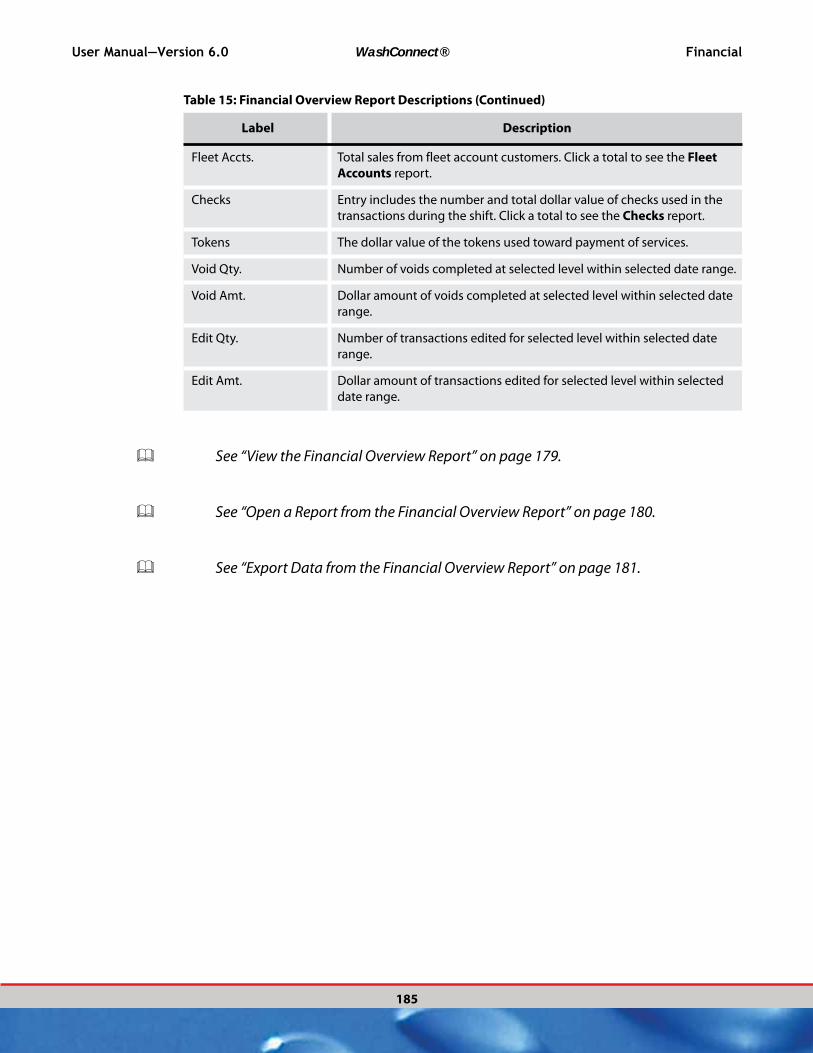
User Manual—Version 6.0 WashConnect® Financial
185
See “View the Financial Overview Report” on page 179.
See “Open a Report from the Financial Overview Report” on page 180.
See “Export Data from the Financial Overview Report” on page 181.
Fleet Accts. Total sales from fleet account customers. Click a total to see the Fleet
Accounts report.
Checks Entry includes the number and total dollar value of checks used in the
transactions during the shift. Click a total to see the Checks report.
Tokens The dollar value of the tokens used toward payment of services.
Void Qty. Number of voids completed at selected level within selected date range.
Void Amt. Dollar amount of voids completed at selected level within selected date
range.
Edit Qty. Number of transactions edited for selected level within selected date
range.
Edit Amt. Dollar amount of transactions edited for selected level within selected
date range.
Table 15: Financial Overview Report Descriptions (Continued)
Label Description
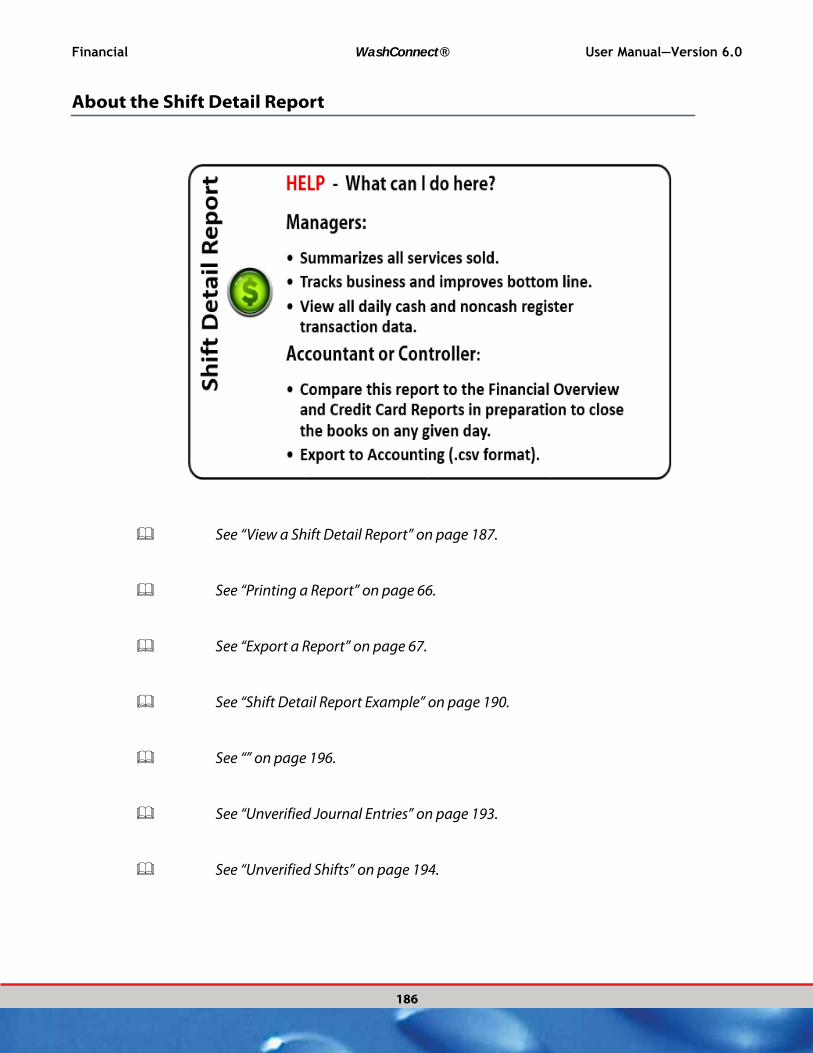
Financial WashConnect® User Manual—Version 6.0
186
About the Shift Detail Report
See “View a Shift Detail Report” on page 187.
See “Printing a Report” on page 66.
See “Export a Report” on page 67.
See “Shift Detail Report Example” on page 190.
See “” on page 196.
See “Unverified Journal Entries” on page 193.
See “Unverified Shifts” on page 194.
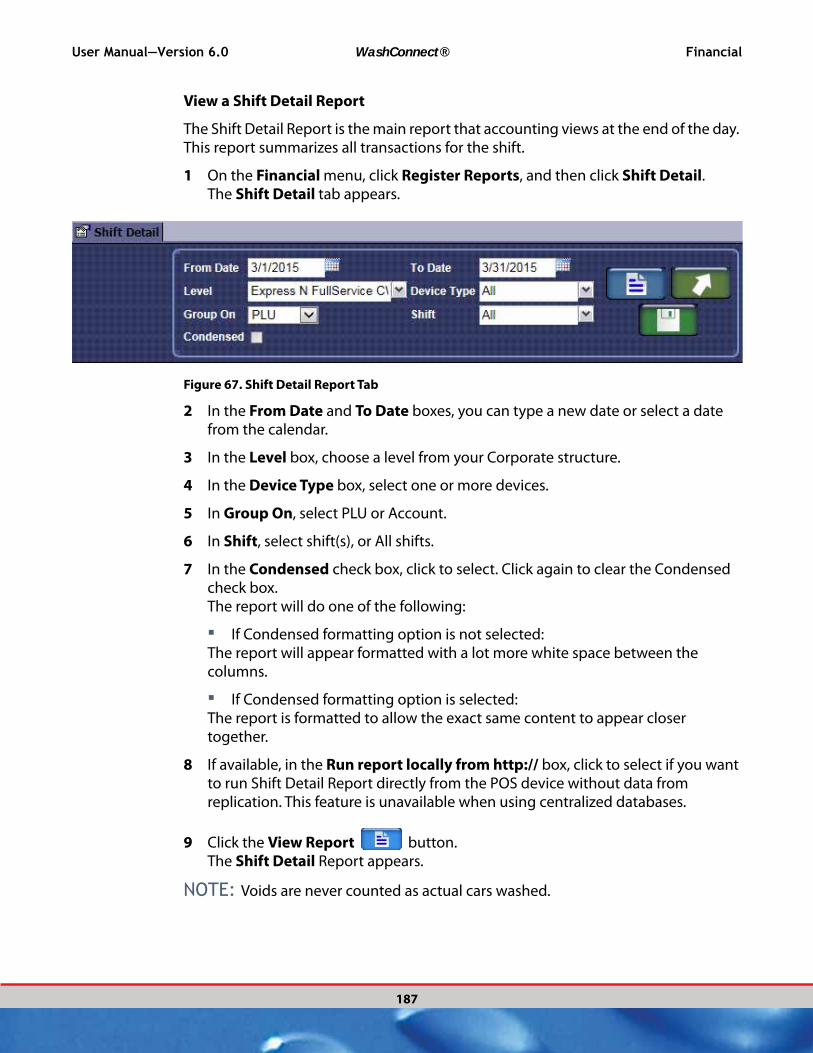
User Manual—Version 6.0 WashConnect® Financial
187
View a Shift Detail Report
The Shift Detail Report is the main report that accounting views at the end of the day. This report summarizes all transactions for the shift.
1 On the Financial menu, click Register Reports, and then click Shift Detail. The Shift Detail tab appears.
Figure 67. Shift Detail Report Tab
2 In the From Date and To Date boxes, you can type a new date or select a date from the calendar.
3 In the Level box, choose a level from your Corporate structure.
4 In the Device Type box, select one or more devices.
5 In Group On, select PLU or Account.
6 In Shift, select shift(s), or All shifts.
7 In the Condensed check box, click to select. Click again to clear the Condensed check box.The report will do one of the following:
▪ If Condensed formatting option is not selected:The report will appear formatted with a lot more white space between the columns.
▪ If Condensed formatting option is selected: The report is formatted to allow the exact same content to appear closer together.
8 If available, in the Run report locally from http:// box, click to select if you want to run Shift Detail Report directly from the POS device without data from replication. This feature is unavailable when using centralized databases.
9 Click the View Report button. The Shift Detail Report appears.
NOTE: Voids are never counted as actual cars washed.
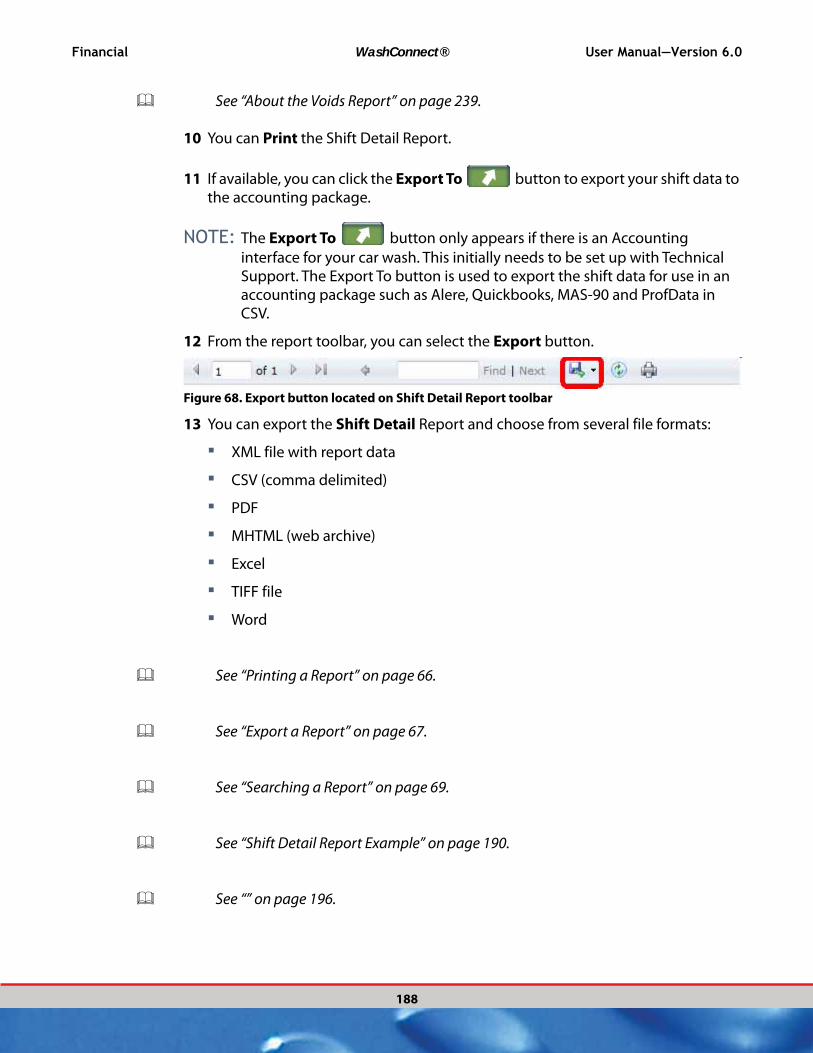
Financial WashConnect® User Manual—Version 6.0
188
See “About the Voids Report” on page 239.
10 You can Print the Shift Detail Report.
11 If available, you can click the Export To button to export your shift data to the accounting package.
NOTE: The Export To button only appears if there is an Accounting
interface for your car wash. This initially needs to be set up with Technical Support. The Export To button is used to export the shift data for use in an accounting package such as Alere, Quickbooks, MAS-90 and ProfData in CSV.
12 From the report toolbar, you can select the Export button.
Figure 68. Export button located on Shift Detail Report toolbar
13 You can export the Shift Detail Report and choose from several file formats:
▪ XML file with report data
▪ CSV (comma delimited)
▪ MHTML (web archive)
▪ Excel
▪ TIFF file
▪ Word
See “Printing a Report” on page 66.
See “Export a Report” on page 67.
See “Searching a Report” on page 69.
See “Shift Detail Report Example” on page 190.
See “” on page 196.
User Manual—Version 6.0 WashConnect® Financial
189
See “Shift Detail Report Sections” on page 189.
See “Verify or Edit a Journal Entry” on page 277.
See “Unverified Journal Entries” on page 193.
See “Unverified Shifts” on page 194.
Shift Detail Report Sections
▪ Net Sales (total sales before tax)
▪ Sales Tax (tax based on taxable Net Sales)
▪ Total Income (All Monies received for report period including Gift Cards Sold, Received on Accounts (Fleets), and PLU discounts before any payouts or over unders are accounted for).
▪ Total Non-Cash Income (credit cards, gift cards, and fleet charges)
▪ Cash To Account For = Beginning Banks + Adds + Refunds Due + Cash & Checks from Operations
▪ Cash Accounted for = Payouts + Removes + Bank Deposits + Ending Banks
NOTE: The Cash to Account For and Cash Accounted For should balance.
See “Printing a Report” on page 66.
See “Export a Report” on page 67.
See “Shift Detail Report Example” on page 190.
See “” on page 196.
See “Unverified Journal Entries” on page 193.
See “Unverified Shifts” on page 194.
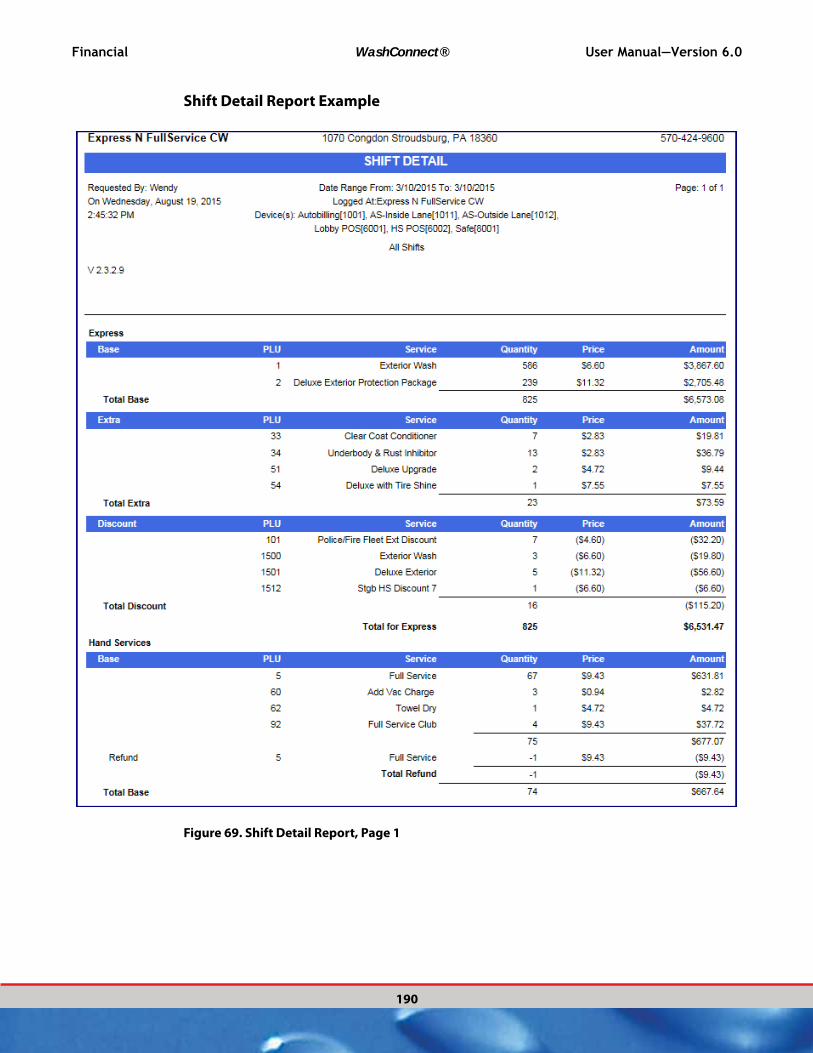
Financial WashConnect® User Manual—Version 6.0
190
Shift Detail Report Example
Figure 69. Shift Detail Report, Page 1
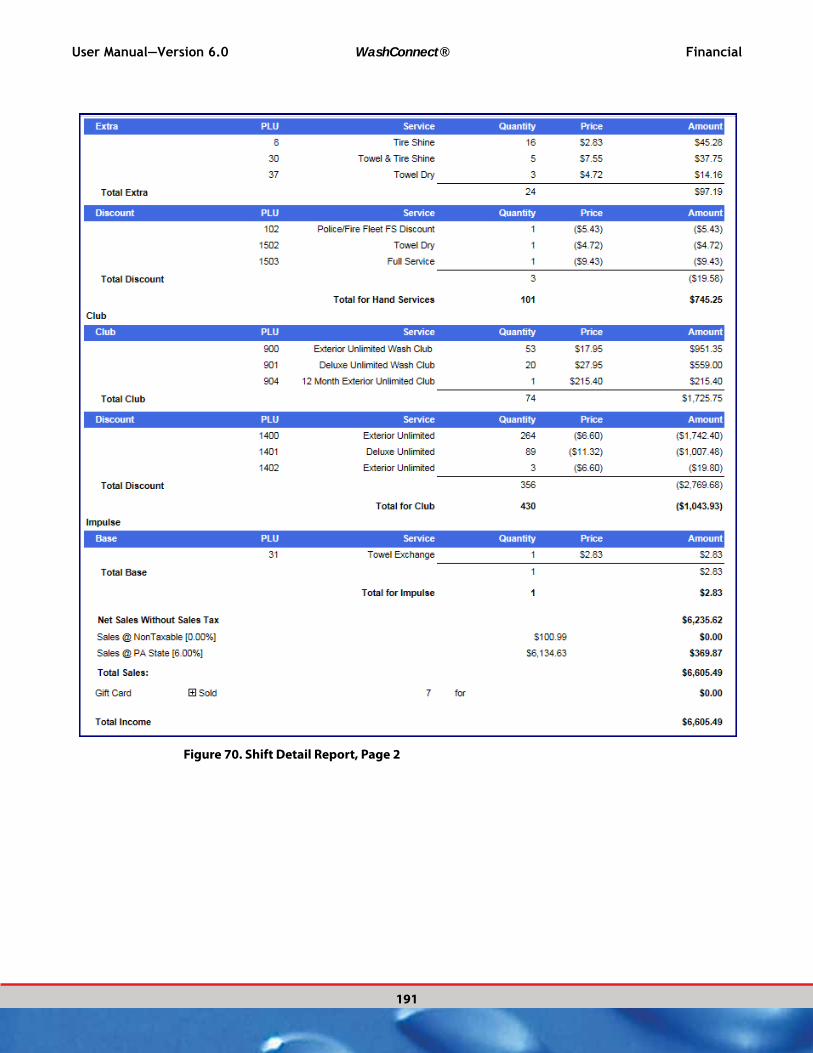
User Manual—Version 6.0 WashConnect® Financial
191
Figure 70. Shift Detail Report, Page 2
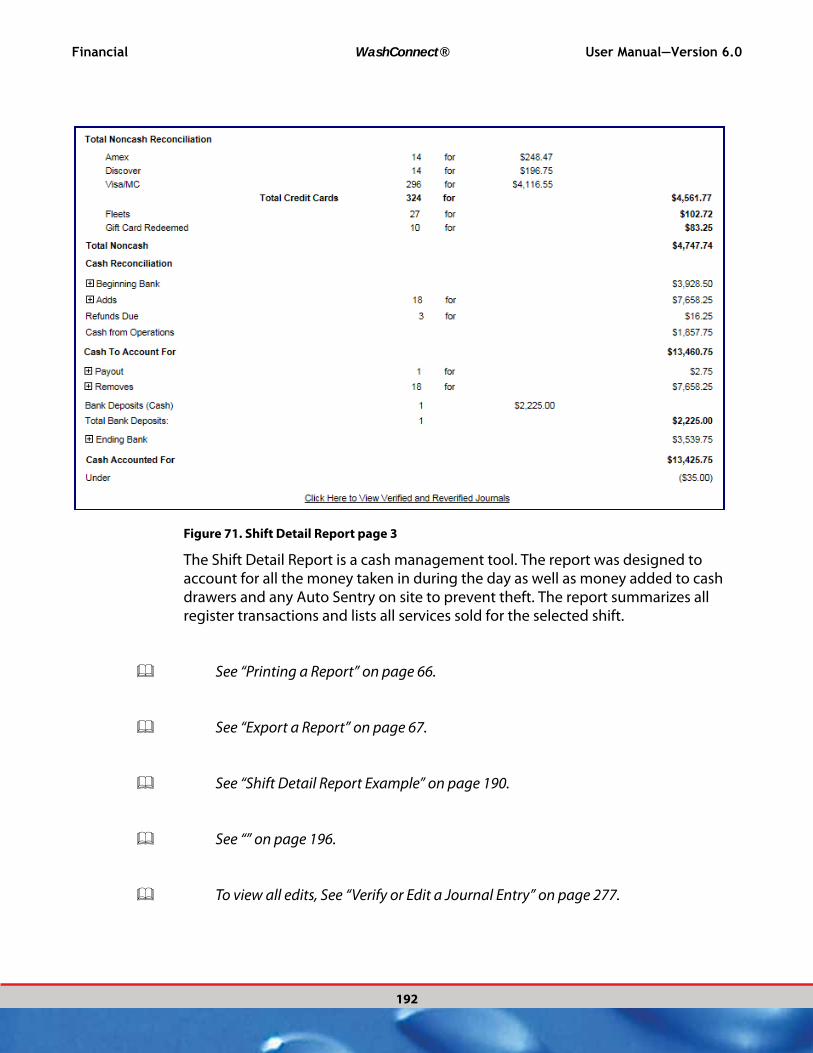
Financial WashConnect® User Manual—Version 6.0
192
Figure 71. Shift Detail Report page 3
The Shift Detail Report is a cash management tool. The report was designed to account for all the money taken in during the day as well as money added to cash drawers and any Auto Sentry on site to prevent theft. The report summarizes all register transactions and lists all services sold for the selected shift.
See “Printing a Report” on page 66.
See “Export a Report” on page 67.
See “Shift Detail Report Example” on page 190.
See “” on page 196.
To view all edits, See “Verify or Edit a Journal Entry” on page 277.
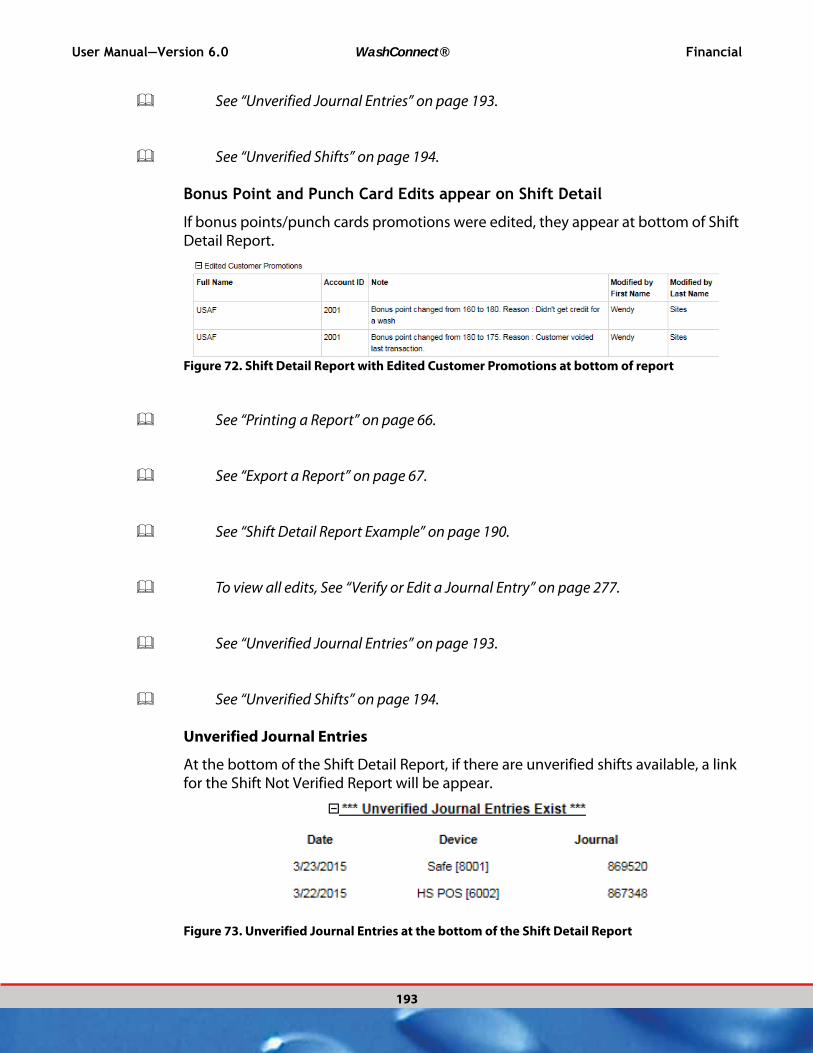
User Manual—Version 6.0 WashConnect® Financial
193
See “Unverified Journal Entries” on page 193.
See “Unverified Shifts” on page 194.
Bonus Point and Punch Card Edits appear on Shift Detail
If bonus points/punch cards promotions were edited, they appear at bottom of Shift Detail Report.
Figure 72. Shift Detail Report with Edited Customer Promotions at bottom of report
See “Printing a Report” on page 66.
See “Export a Report” on page 67.
See “Shift Detail Report Example” on page 190.
To view all edits, See “Verify or Edit a Journal Entry” on page 277.
See “Unverified Journal Entries” on page 193.
See “Unverified Shifts” on page 194.
Unverified Journal Entries
At the bottom of the Shift Detail Report, if there are unverified shifts available, a link for the Shift Not Verified Report will be appear.
Figure 73. Unverified Journal Entries at the bottom of the Shift Detail Report
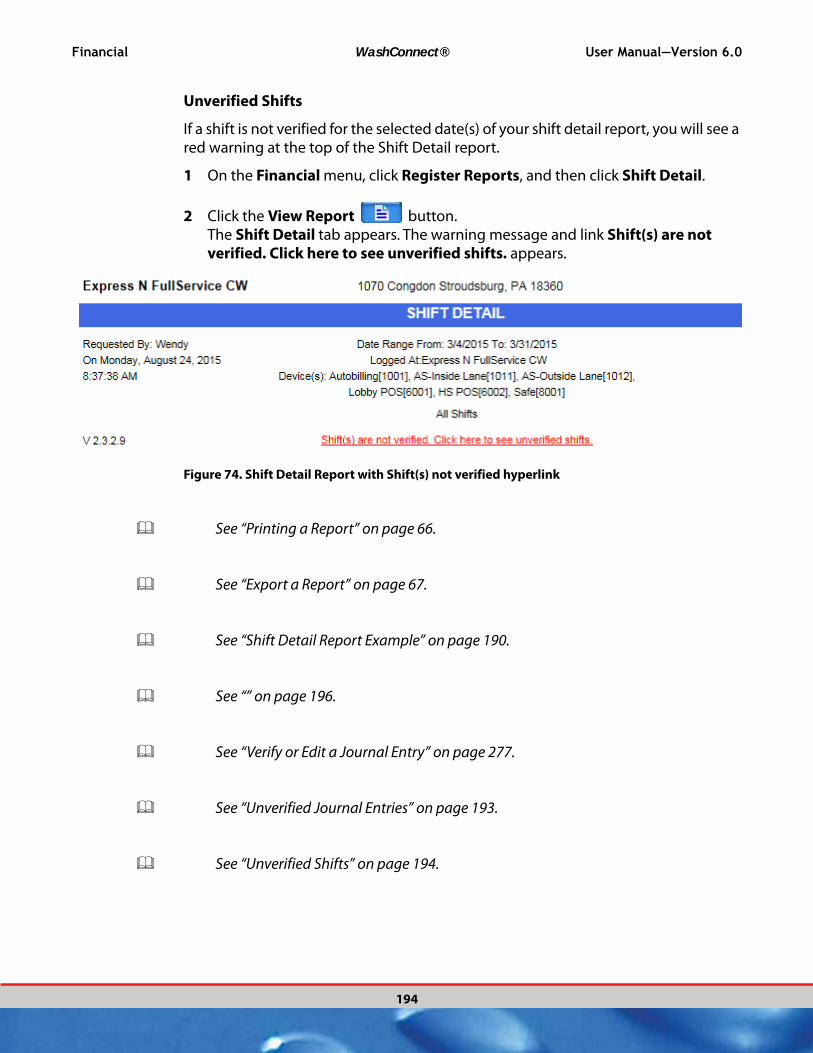
Financial WashConnect® User Manual—Version 6.0
194
Unverified Shifts
If a shift is not verified for the selected date(s) of your shift detail report, you will see a red warning at the top of the Shift Detail report.
1 On the Financial menu, click Register Reports, and then click Shift Detail.
2 Click the View Report button. The Shift Detail tab appears. The warning message and link Shift(s) are not verified. Click here to see unverified shifts. appears.
Figure 74. Shift Detail Report with Shift(s) not verified hyperlink
See “Printing a Report” on page 66.
See “Export a Report” on page 67.
See “Shift Detail Report Example” on page 190.
See “” on page 196.
See “Verify or Edit a Journal Entry” on page 277.
See “Unverified Journal Entries” on page 193.
See “Unverified Shifts” on page 194.

User Manual—Version 6.0 WashConnect® Financial
195
Shift Detail Report Field Descriptions
The following table describes the Shift Detail Report section headings and line-item labels. The table is comprehensive and not every Shift Detail Report includes all the labels described in the table. For example, if there were no fuel sales to show in your report, then the Fuel Sales heading does not appear on the report.
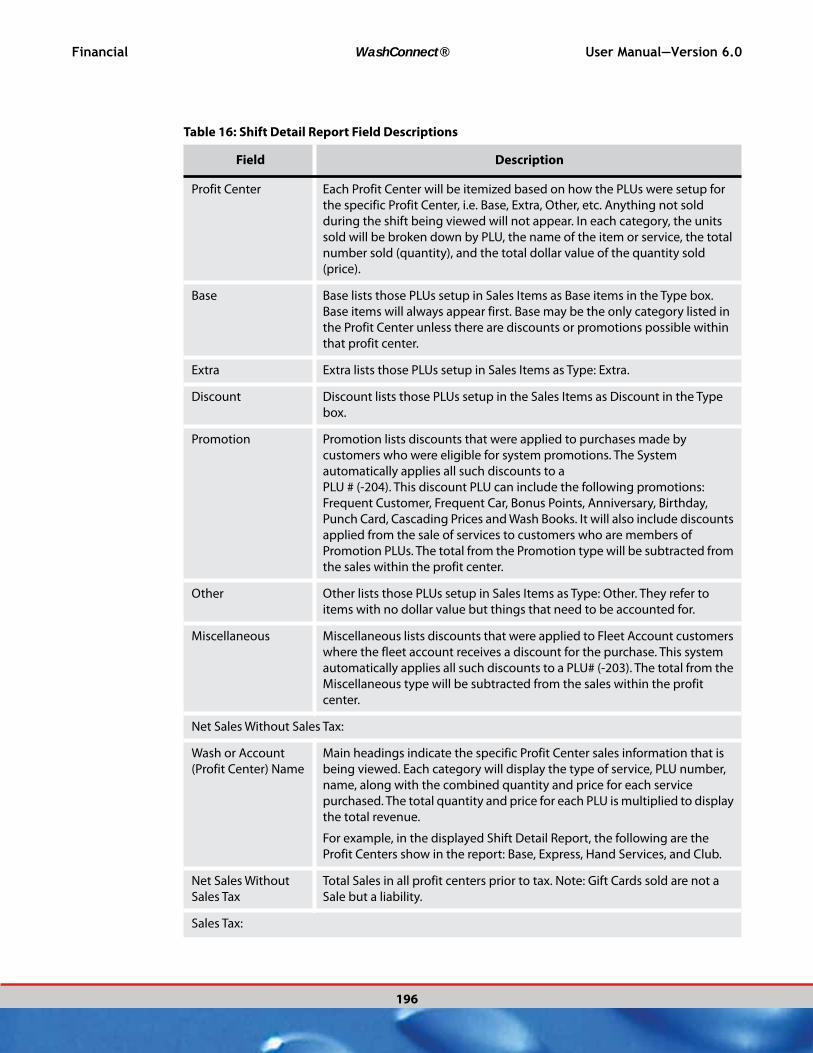
Financial WashConnect® User Manual—Version 6.0
196
Table 16: Shift Detail Report Field Descriptions
Field Description
Profit Center Each Profit Center will be itemized based on how the PLUs were setup for
the specific Profit Center, i.e. Base, Extra, Other, etc. Anything not sold
during the shift being viewed will not appear. In each category, the units
sold will be broken down by PLU, the name of the item or service, the total
number sold (quantity), and the total dollar value of the quantity sold
(price).
Base Base lists those PLUs setup in Sales Items as Base items in the Type box.
Base items will always appear first. Base may be the only category listed in
the Profit Center unless there are discounts or promotions possible within
that profit center.
Extra Extra lists those PLUs setup in Sales Items as Type: Extra.
Discount Discount lists those PLUs setup in the Sales Items as Discount in the Type
box.
Promotion Promotion lists discounts that were applied to purchases made by
customers who were eligible for system promotions. The System
automatically applies all such discounts to a
PLU # (-204). This discount PLU can include the following promotions:
Frequent Customer, Frequent Car, Bonus Points, Anniversary, Birthday,
Punch Card, Cascading Prices and Wash Books. It will also include discounts
applied from the sale of services to customers who are members of
Promotion PLUs. The total from the Promotion type will be subtracted from
the sales within the profit center.
Other Other lists those PLUs setup in Sales Items as Type: Other. They refer to
items with no dollar value but things that need to be accounted for.
Miscellaneous Miscellaneous lists discounts that were applied to Fleet Account customers
where the fleet account receives a discount for the purchase. This system
automatically applies all such discounts to a PLU# (-203). The total from the
Miscellaneous type will be subtracted from the sales within the profit
center.
Net Sales Without Sales Tax:
Wash or Account
(Profit Center) Name
Main headings indicate the specific Profit Center sales information that is
being viewed. Each category will display the type of service, PLU number,
name, along with the combined quantity and price for each service
purchased. The total quantity and price for each PLU is multiplied to display
the total revenue.
For example, in the displayed Shift Detail Report, the following are the
Profit Centers show in the report: Base, Express, Hand Services, and Club.
Net Sales Without
Sales Tax
Total Sales in all profit centers prior to tax. Note: Gift Cards sold are not a
Sale but a liability.
Sales Tax:
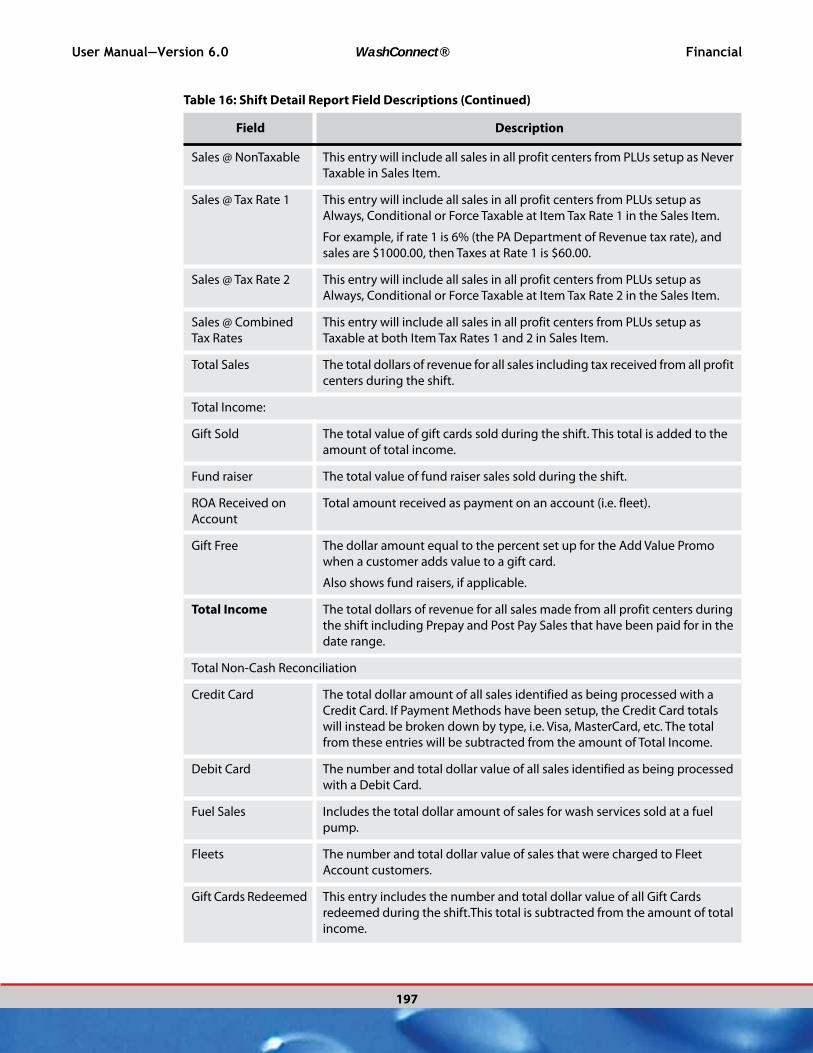
User Manual—Version 6.0 WashConnect® Financial
197
Sales @ NonTaxable This entry will include all sales in all profit centers from PLUs setup as Never
Taxable in Sales Item.
Sales @ Tax Rate 1 This entry will include all sales in all profit centers from PLUs setup as
Always, Conditional or Force Taxable at Item Tax Rate 1 in the Sales Item.
For example, if rate 1 is 6% (the PA Department of Revenue tax rate), and
sales are $1000.00, then Taxes at Rate 1 is $60.00.
Sales @ Tax Rate 2 This entry will include all sales in all profit centers from PLUs setup as
Always, Conditional or Force Taxable at Item Tax Rate 2 in the Sales Item.
Sales @ Combined
Tax Rates
This entry will include all sales in all profit centers from PLUs setup as
Taxable at both Item Tax Rates 1 and 2 in Sales Item.
Total Sales The total dollars of revenue for all sales including tax received from all profit
centers during the shift.
Total Income:
Gift Sold The total value of gift cards sold during the shift. This total is added to the
amount of total income.
Fund raiser The total value of fund raiser sales sold during the shift.
ROA Received on
Account
Total amount received as payment on an account (i.e. fleet).
Gift Free The dollar amount equal to the percent set up for the Add Value Promo
when a customer adds value to a gift card.
Also shows fund raisers, if applicable.
Total Income The total dollars of revenue for all sales made from all profit centers during
the shift including Prepay and Post Pay Sales that have been paid for in the
date range.
Total Non-Cash Reconciliation
Credit Card The total dollar amount of all sales identified as being processed with a
Credit Card. If Payment Methods have been setup, the Credit Card totals
will instead be broken down by type, i.e. Visa, MasterCard, etc. The total
from these entries will be subtracted from the amount of Total Income.
Debit Card The number and total dollar value of all sales identified as being processed
with a Debit Card.
Fuel Sales Includes the total dollar amount of sales for wash services sold at a fuel
pump.
Fleets The number and total dollar value of sales that were charged to Fleet
Account customers.
Gift Cards Redeemed This entry includes the number and total dollar value of all Gift Cards
redeemed during the shift.This total is subtracted from the amount of total
income.
Table 16: Shift Detail Report Field Descriptions (Continued)
Field Description

Financial WashConnect® User Manual—Version 6.0
198
Tokens Redeemed The dollar value of the tokens used toward payment of services. This
amount is part of the non-cash total.
Total Non-Cash Combined amount of non-cash items which include credit cards, debit
cards, tokens, gift cards, fleet accounts, and fuel sales.
Cash Reconciliation:
Cash To Account For:
Beginning Bank The dollar amount entered into the system as Beginning Bank at the
opening of the shift.
Adds A sum added to any device that is in addition to the Beginning Bank. This
can be verified by reviewing the Cash Management Summary Report for
the Adds to count the total number of transactions and confirm the total
amount.
Refunds Due The Refund Due amount does not carry over to the next day. Refunds that
are not paid out during the same shift, will cause an overage that will be
included in the total cash amount for the day.
Checks from
Operations
Entry includes the number and total dollar value of checks used in the
transactions during the shift.
Cash from
Operations
Entry includes the total dollar value of cash used in the transactions during
the shift.
Cash To Account For
Cash Accounted For:
Payouts This entry includes the number and total dollar value of all cash Paid outs
made during the shift.
Removes A sum removed from the Safe to an Auto Sentry or POS device. It does not have to have the safe enabled. This can be verified by reviewing the
Cash Management Summary report for the Removes to count the total
number of transactions and confirm the total amount.
Bank Deposits
(Checks)
Total of checks being taken from the system and sent to the Bank for
Deposit. Checks deposited to the Bank will be deducted from your total
Cash on Hand.
Bank Deposits (Cash) Total of cash being taken from the system and sent to the Bank for Deposit.
Cash deposited to the Bank will be deducted from your total Cash on Hand.
Total Bank Deposits Total Amount taken in Cash and Check to be deposited in the Bank.
Dispenser Edits Dollar amount for edits completed for the Auto Sentry terminal bill
dispenser or coin hopper. Each edit references a cash management journal
number. Also shows modifications (i.e., re-verifying and already verified
entry).
Table 16: Shift Detail Report Field Descriptions (Continued)
Field Description
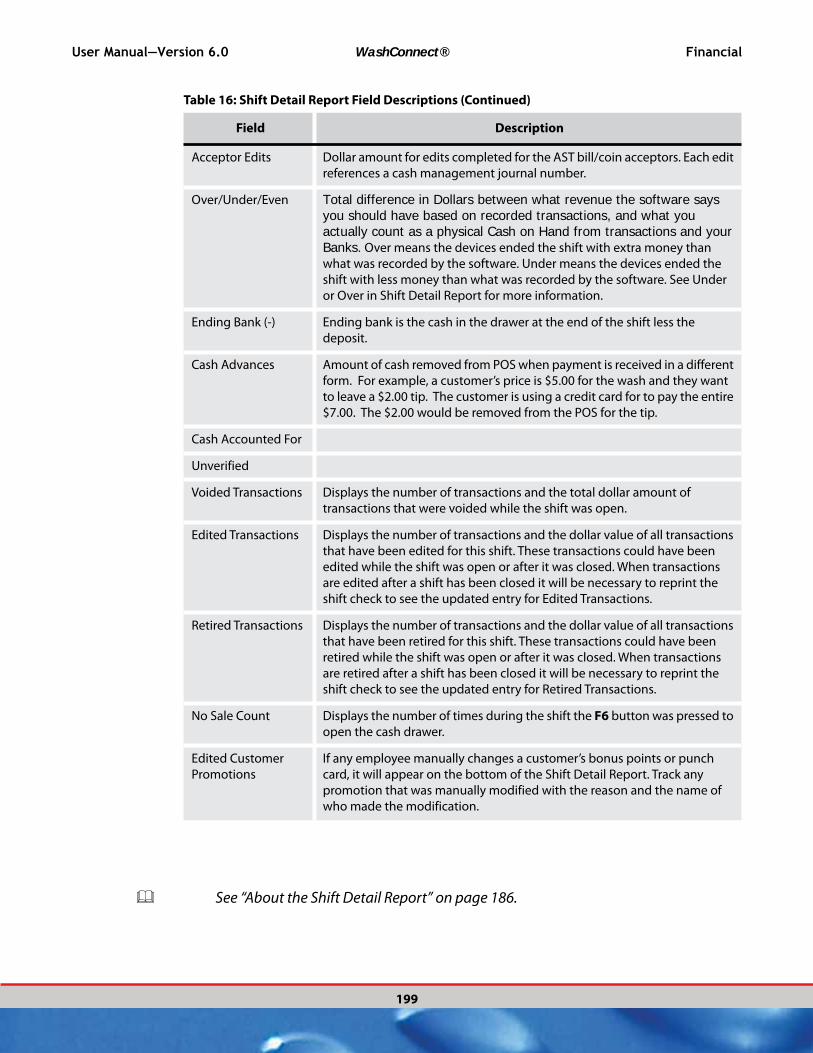
User Manual—Version 6.0 WashConnect® Financial
199
See “About the Shift Detail Report” on page 186.
Acceptor Edits Dollar amount for edits completed for the AST bill/coin acceptors. Each edit
references a cash management journal number.
Over/Under/Even Total difference in Dollars between what revenue the software says you should have based on recorded transactions, and what you actually count as a physical Cash on Hand from transactions and your Banks. Over means the devices ended the shift with extra money than
what was recorded by the software. Under means the devices ended the
shift with less money than what was recorded by the software. See Under
or Over in Shift Detail Report for more information.
Ending Bank (-) Ending bank is the cash in the drawer at the end of the shift less the
deposit.
Cash Advances Amount of cash removed from POS when payment is received in a different
form. For example, a customer’s price is $5.00 for the wash and they want
to leave a $2.00 tip. The customer is using a credit card for to pay the entire
$7.00. The $2.00 would be removed from the POS for the tip.
Cash Accounted For
Unverified
Voided Transactions Displays the number of transactions and the total dollar amount of
transactions that were voided while the shift was open.
Edited Transactions Displays the number of transactions and the dollar value of all transactions
that have been edited for this shift. These transactions could have been
edited while the shift was open or after it was closed. When transactions
are edited after a shift has been closed it will be necessary to reprint the
shift check to see the updated entry for Edited Transactions.
Retired Transactions Displays the number of transactions and the dollar value of all transactions
that have been retired for this shift. These transactions could have been
retired while the shift was open or after it was closed. When transactions
are retired after a shift has been closed it will be necessary to reprint the
shift check to see the updated entry for Retired Transactions.
No Sale Count Displays the number of times during the shift the F6 button was pressed to
open the cash drawer.
Edited Customer
Promotions
If any employee manually changes a customer’s bonus points or punch
card, it will appear on the bottom of the Shift Detail Report. Track any
promotion that was manually modified with the reason and the name of
who made the modification.
Table 16: Shift Detail Report Field Descriptions (Continued)
Field Description
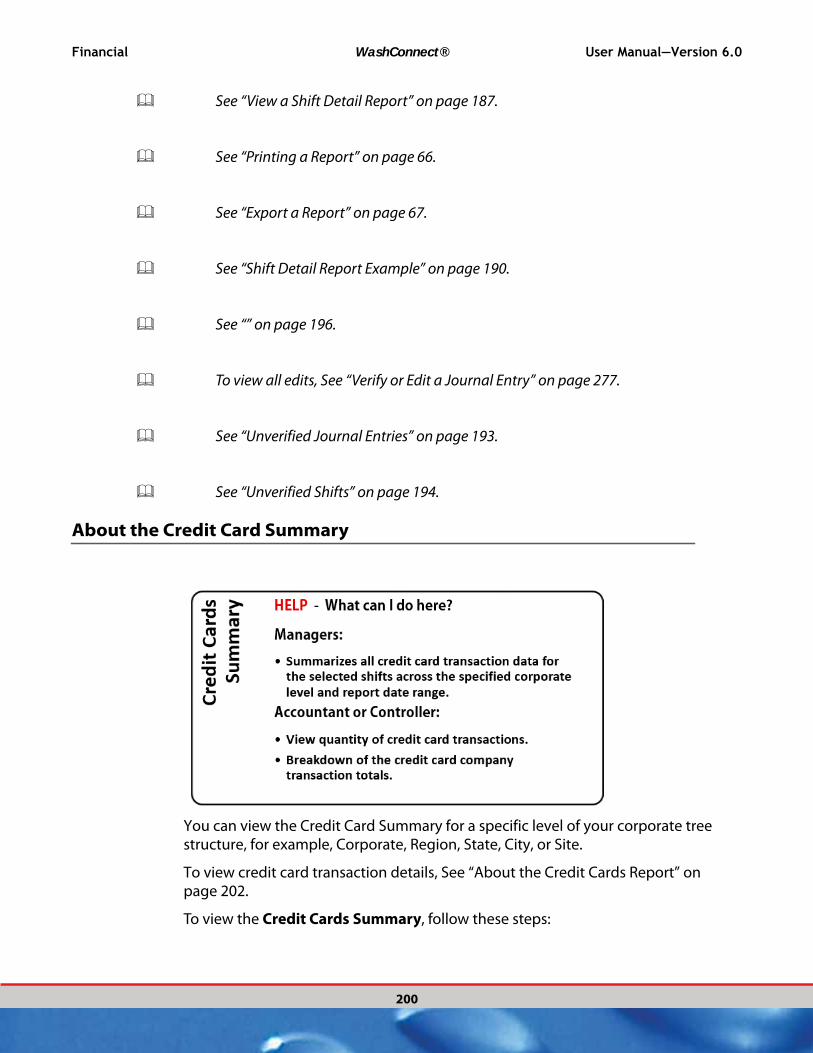
Financial WashConnect® User Manual—Version 6.0
200
See “View a Shift Detail Report” on page 187.
See “Printing a Report” on page 66.
See “Export a Report” on page 67.
See “Shift Detail Report Example” on page 190.
See “” on page 196.
To view all edits, See “Verify or Edit a Journal Entry” on page 277.
See “Unverified Journal Entries” on page 193.
See “Unverified Shifts” on page 194.
About the Credit Card Summary
You can view the Credit Card Summary for a specific level of your corporate tree structure, for example, Corporate, Region, State, City, or Site.
To view credit card transaction details, See “About the Credit Cards Report” on page 202.
To view the Credit Cards Summary, follow these steps:
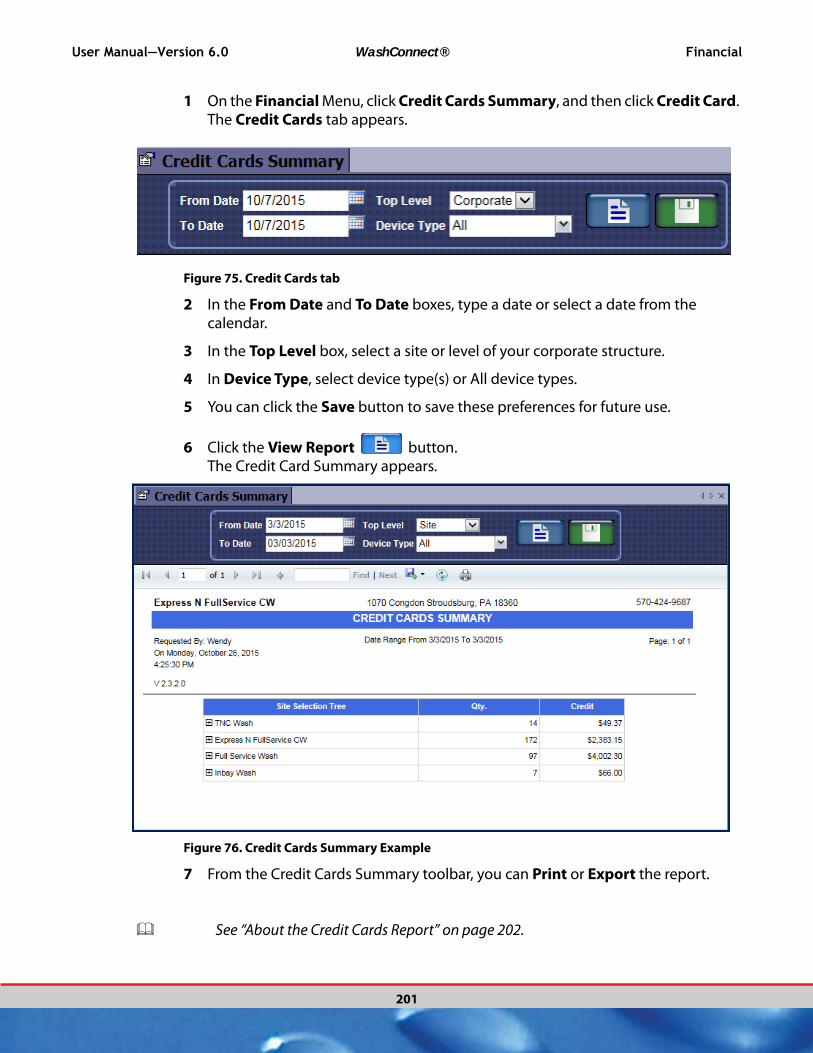
User Manual—Version 6.0 WashConnect® Financial
201
1 On the Financial Menu, click Credit Cards Summary, and then click Credit Card. The Credit Cards tab appears.
Figure 75. Credit Cards tab
2 In the From Date and To Date boxes, type a date or select a date from the calendar.
3 In the Top Level box, select a site or level of your corporate structure.
4 In Device Type, select device type(s) or All device types.
5 You can click the Save button to save these preferences for future use.
6 Click the View Report button.The Credit Card Summary appears.
Figure 76. Credit Cards Summary Example
7 From the Credit Cards Summary toolbar, you can Print or Export the report.
See “About the Credit Cards Report” on page 202.
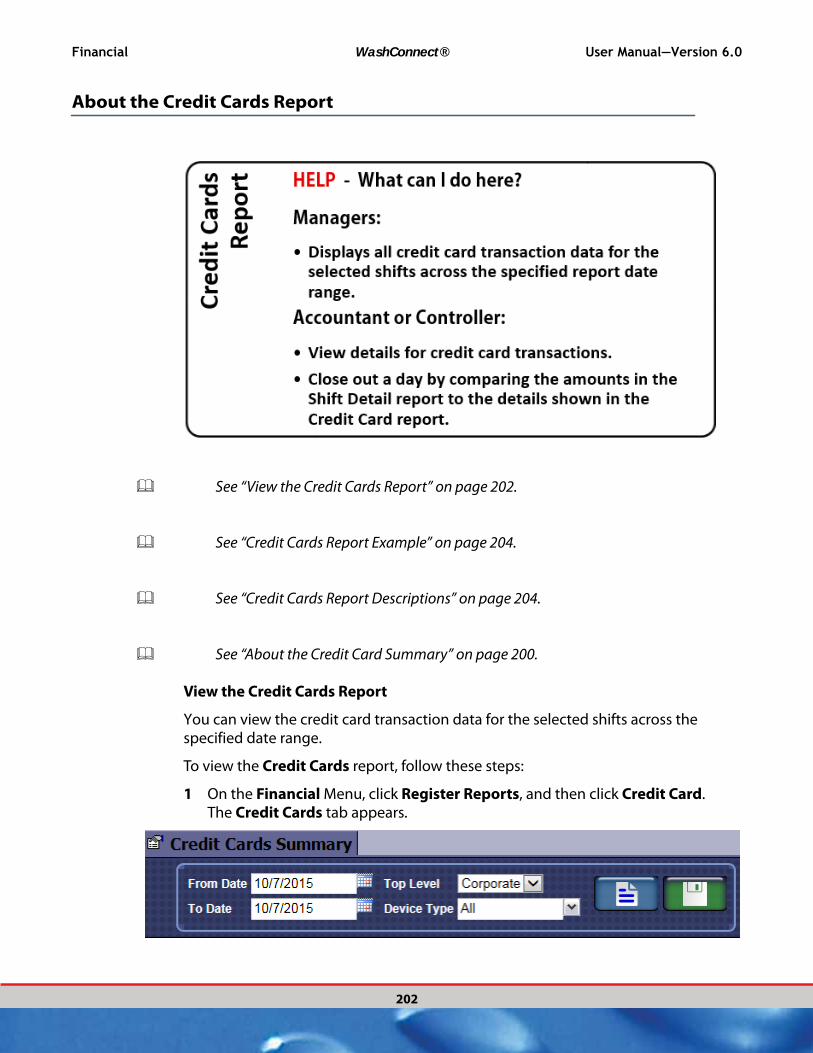
Financial WashConnect® User Manual—Version 6.0
202
About the Credit Cards Report
See “View the Credit Cards Report” on page 202.
See “Credit Cards Report Example” on page 204.
See “Credit Cards Report Descriptions” on page 204.
See “About the Credit Card Summary” on page 200.
View the Credit Cards Report
You can view the credit card transaction data for the selected shifts across the specified date range.
To view the Credit Cards report, follow these steps:
1 On the Financial Menu, click Register Reports, and then click Credit Card. The Credit Cards tab appears.
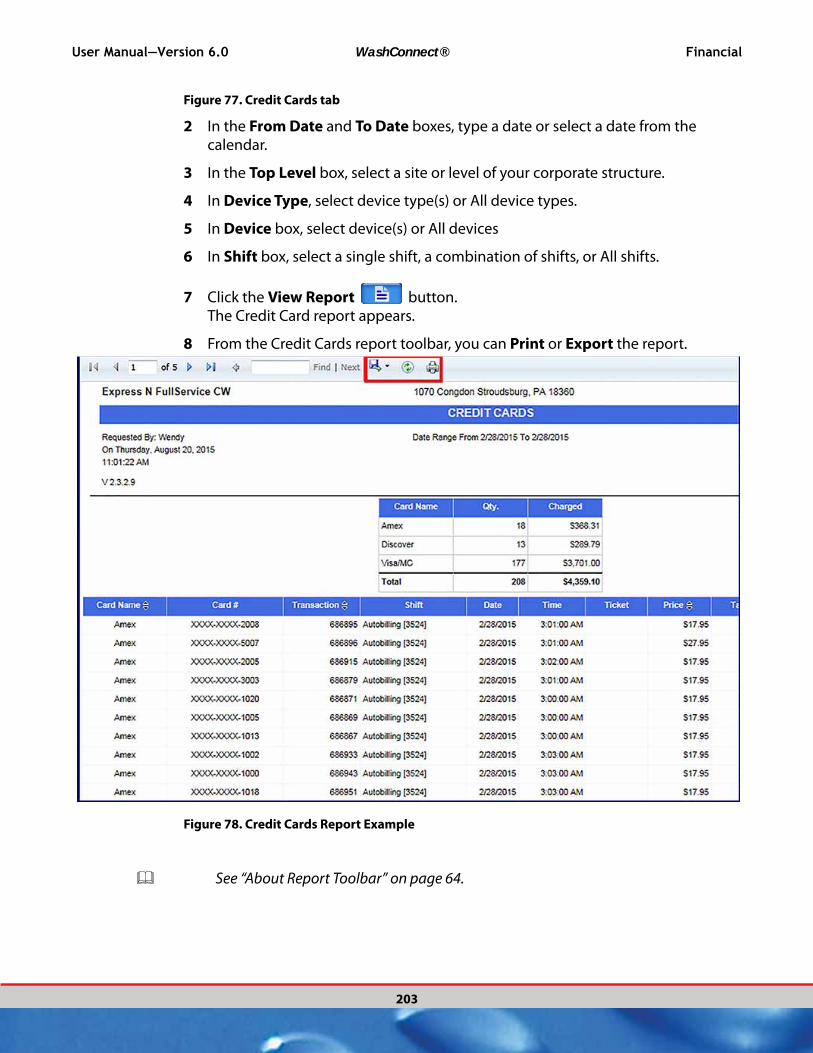
User Manual—Version 6.0 WashConnect® Financial
203
Figure 77. Credit Cards tab
2 In the From Date and To Date boxes, type a date or select a date from the calendar.
3 In the Top Level box, select a site or level of your corporate structure.
4 In Device Type, select device type(s) or All device types.
5 In Device box, select device(s) or All devices
6 In Shift box, select a single shift, a combination of shifts, or All shifts.
7 Click the View Report button.The Credit Card report appears.
8 From the Credit Cards report toolbar, you can Print or Export the report.
Figure 78. Credit Cards Report Example
See “About Report Toolbar” on page 64.

Financial WashConnect® User Manual—Version 6.0
204
Credit Cards Report Example
In the previous Figure 78, “Credit Cards Report Example,” the body of the report includes details on actual credit card transactions for the register on 2/28/2015. All of these credit card sales are Autobilling and do not generate ticket numbers.
See “Searching a Report” on page 69.
See “Credit Cards Report Example” on page 204.
See “Credit Cards Report Descriptions” on page 204.
See “Printing a Report” on page 66.
See “Export a Report” on page 67.
Credit Cards Report Descriptions
The following table describes the Credit Cards report section headings and line-item labels.
Table 17: Credit Cards Report Descriptions
Field Description
Card Name Amex, Discover, Visa/MC
Card # Only the last four digits of the card.
Transaction Unique transaction ID number. Click the column header to sort on this field.
Shift Selected shift: all shifts, a single shift, or a combination of shifts.
Date Date the transaction was finalized. Click the column header to sort on this
field.
Time Time the transaction was finalized.
Ticket Ticket number, if a ticket was generated for the transaction. Zero if no ticket
was generated.
Price Price of the transaction. Refunds appear in parenthesis.

User Manual—Version 6.0 WashConnect® Financial
205
See “About the Credit Cards Report” on page 202.
See “Credit Cards Report Example” on page 204.
See “Printing a Report” on page 66.
See “Export a Report” on page 67.
About Credit Cards Reconciliation
NOTE: The Credit Cards Report can only be viewed at Corporate.
This report displays a break down of the credit cards for a period of time.
Use this report to reconcile your credit cards every day and then compare the amounts to this report to your Detail report from your credit card processor. If all goes well, both amounts will match the Shift Detail Report Total Credit Cards.
Credit Card Reconciliation Example
This is a step by step instruction on reconciling a credit card statement. It is strongly recommended to reconcile credit cards daily or at the very latest, every other day. You can reconcile with any time period but it makes it difficult to track down any possible error or omission.
IMPORTANT: Internet access needs to be available through your credit card clearing to reconcile credit cards every day.
1 Login to WashConnect.
2 From the Financial menu, select the Shift Detail Report.
Tax Tax on the transaction.
Total Price plus tax.
Charged Actual billed amount on the card. Billed can account for split payment
amounts. For example, if a transaction costs $100.00 and $20.00 was on a
gift card and $80.00 was on a credit card, then Total is $100.00, but billed is
$80.00. Cannot split payment on two of the same card types: i.e., cannot use
2 credit cards.
Table 17: Credit Cards Report Descriptions (Continued)
Field Description

Financial WashConnect® User Manual—Version 6.0
206
Figure 79. Shift Detail Report with Total Credit Cards amount shown
3 From the Total Noncash Reconciliation amount, you can view the Total Credit Cards amount that you will need to confirm against both the credit card processor detail report and the Credit Card Report in WashConnect. Follow the next steps to do this comparison.
4 Log in to your credit card clearing company. In this example, Log in to TransLink (TransFirst).
5 In Merchant ID, type your merchant ID number.
6 In Search by, select Merchant ID.
7 In Start Date, enter start date of reconciliation. September 30
8 In End Date, enter end date of reconciliation. September 30

User Manual—Version 6.0 WashConnect® Financial
207
9 Select the Find Merchant button.
Figure 80. Credit Card Processor on-line login screen - translink example
10 Click Create Report to view all credit card details for that date range..
Figure 81. Translink Credit Card Processor’s Report Detail page example
11 Click the Printable Version button.
12 Click the Print button.
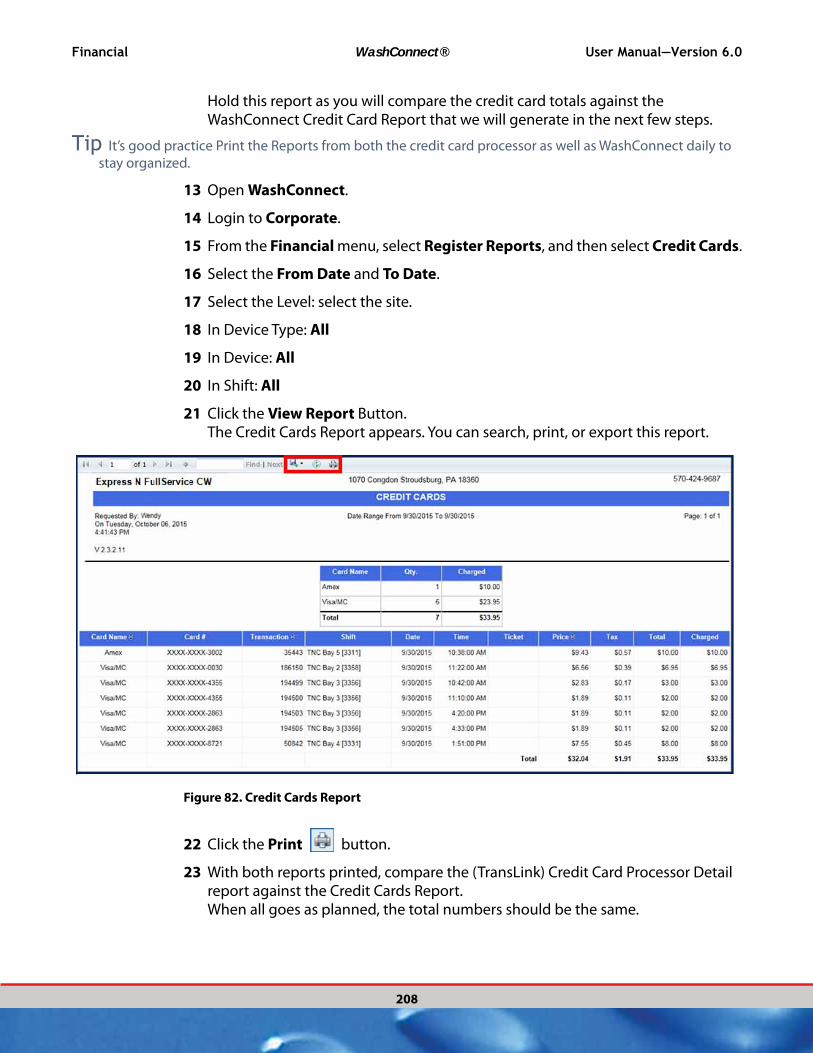
Financial WashConnect® User Manual—Version 6.0
208
Hold this report as you will compare the credit card totals against the WashConnect Credit Card Report that we will generate in the next few steps.
Tip It’s good practice Print the Reports from both the credit card processor as well as WashConnect daily to stay organized.
13 Open WashConnect.
14 Login to Corporate.
15 From the Financial menu, select Register Reports, and then select Credit Cards.
16 Select the From Date and To Date.
17 Select the Level: select the site.
18 In Device Type: All
19 In Device: All
20 In Shift: All
21 Click the View Report Button.The Credit Cards Report appears. You can search, print, or export this report.
Figure 82. Credit Cards Report
22 Click the Print button.
23 With both reports printed, compare the (TransLink) Credit Card Processor Detail report against the Credit Cards Report.When all goes as planned, the total numbers should be the same.

User Manual—Version 6.0 WashConnect® Financial
209
24 Next, wait until the total credit card amount for the selected date appears in your corporate bank account. You can view the amounts on-line with your bank. This could take a few days.
25 After this amount appears in your corporate bank account, you can post this entry to your general ledger.Congratulations, you have completed all the steps to reconcile the credit cards for this day.
See “About the Credit Cards Report” on page 202.
See “About the Shift Detail Report” on page 186.
About the Gift Cards Report
See “View the Gift Cards Report” on page 209.
See “Gift Card Report Example” on page 211.
See “Gift Cards Report Descriptions” on page 212.
See “Printing a Report” on page 66.
See “Export a Report” on page 67.
View the Gift Cards Report
To view the Gift Cards report, follow these steps:
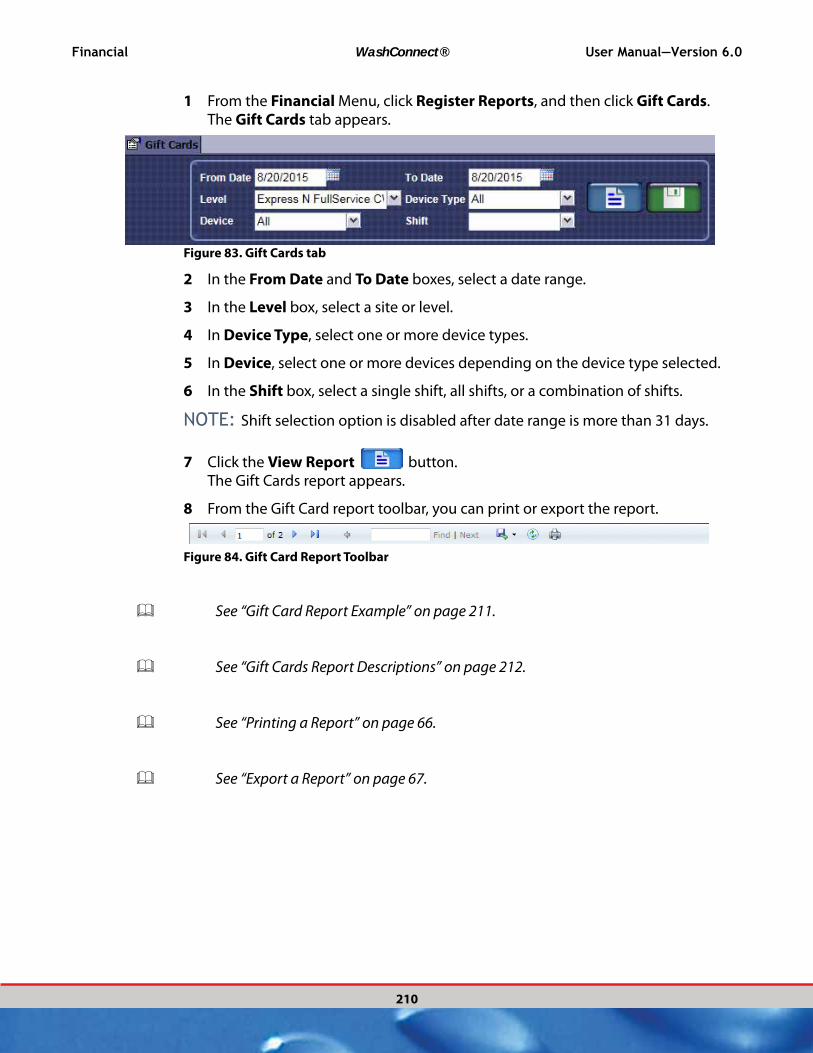
Financial WashConnect® User Manual—Version 6.0
210
1 From the Financial Menu, click Register Reports, and then click Gift Cards. The Gift Cards tab appears.
Figure 83. Gift Cards tab
2 In the From Date and To Date boxes, select a date range.
3 In the Level box, select a site or level.
4 In Device Type, select one or more device types.
5 In Device, select one or more devices depending on the device type selected.
6 In the Shift box, select a single shift, all shifts, or a combination of shifts.
NOTE: Shift selection option is disabled after date range is more than 31 days.
7 Click the View Report button. The Gift Cards report appears.
8 From the Gift Card report toolbar, you can print or export the report.
Figure 84. Gift Card Report Toolbar
See “Gift Card Report Example” on page 211.
See “Gift Cards Report Descriptions” on page 212.
See “Printing a Report” on page 66.
See “Export a Report” on page 67.

User Manual—Version 6.0 WashConnect® Financial
211
Gift Card Report Example
Figure 85. Gift Card Report

Financial WashConnect® User Manual—Version 6.0
212
The body of the report includes details on actual gift card transactions for the AS-Inside Lane, AS-Outside Lane, and Lobby POS on 3/10/15. In the example, you can see the report includes six transactions on the AS-Inside Lane, and four transactions on the AS-Outside Lane include gift cards redeemed. On 3/10/2015, customers purchased a $225 Gift cards.
See “View the Gift Cards Report” on page 209.
See “Gift Cards Report Descriptions” on page 212.
See “Printing a Report” on page 66.
See “Export a Report” on page 67.
Gift Cards Report Descriptions
The following table describes the Gift Cards report section headings and line-item labels.
Field Description
Shift Indicates during what shift and at which device the gift card transaction
was done. Select a shift: all shifts, a single shift, or a combination of shifts
can appear on the Gift Card Report.
Transaction ID Unique transaction ID number.
Date Date the transaction was placed.
Time Time the transaction was finalized.
Card # The last four digits of the gift card number used for the gift card sale
transaction.
Service This shows Gift Redeemed or Gift Card Sale.
Price Amount of Gift Card Redeemed or sold in that transaction. The Price of the
Transaction is independent of the amount redeemed or sold.
See “View the Gift Cards Report” on page 209.
See “Gift Card Report Example” on page 211.

User Manual—Version 6.0 WashConnect® Financial
213
See “Searching a Report” on page 69.
See “Printing a Report” on page 66.
See “Export a Report” on page 67.
About the Checks Report
See “View the Checks Report” on page 213.
See “Checks Report Example” on page 215.
See “Searching a Report” on page 69.
See “Printing a Report” on page 66.
See “Export a Report” on page 67.
View the Checks Report
Search for all checks received on account or to pay for a sales transaction by a specified date range, shift, or site. To view the Checks Report, follow these steps:
1 From the Financial menu, click Register Reports, and then click Checks. The Checks tab appears.

Financial WashConnect® User Manual—Version 6.0
214
Figure 86. Checks tab
2 In the From Date and To Date boxes, select a date range.
3 In the Level box, select a site or level.
4 In Shift, select shift(s) or All.
5 Click the View Report button. The Checks Report appears including Check #, Price, Tax, Total, Billed, and Ticket number (if applicable).
6 From the Checks report toolbar, you can Print or Export the report.
See “About Report Toolbar” on page 64.
See “Checks Report Example” on page 215.
See “Checks Report Field Descriptions” on page 215.
See “Export a Report” on page 67.
See “Printing a Report” on page 66.
See “Export a Report” on page 67.
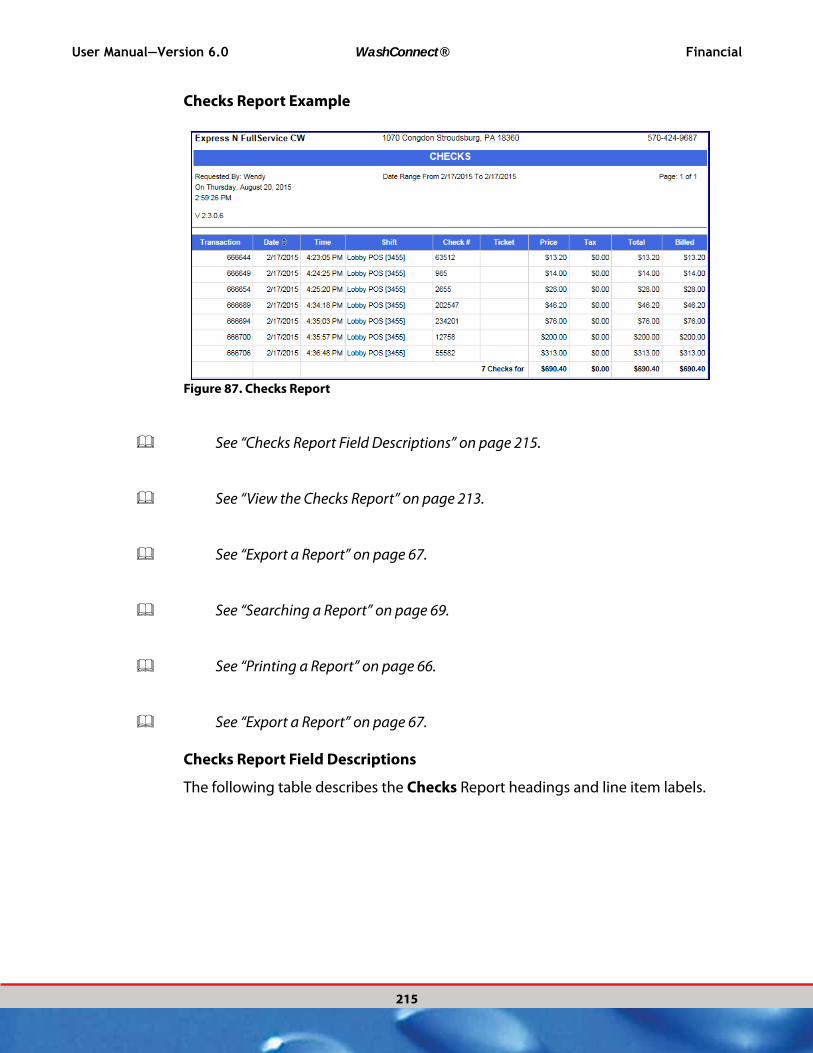
User Manual—Version 6.0 WashConnect® Financial
215
Checks Report Example
Figure 87. Checks Report
See “Checks Report Field Descriptions” on page 215.
See “View the Checks Report” on page 213.
See “Export a Report” on page 67.
See “Searching a Report” on page 69.
See “Printing a Report” on page 66.
See “Export a Report” on page 67.
Checks Report Field Descriptions
The following table describes the Checks Report headings and line item labels.

Table 18: Checks Report Field Descriptions
Field Description
Transaction Unique transaction ID number.
Date Date the transaction was placed. Click the column header to sort on this
field.
Time Time the transaction was finalized.
Shift The shift that was open when the transaction took place.
Check # Number on the customer’s check.
Ticket Ticket number, if a ticket was generated for the transaction. If there is not a
ticket number generated, then nothing appears in this column.
Price Price of the transaction.
Tax Tax on the transaction.
Total Price plus tax.
Billed Total amount billed.
Financial WashConnect® User Manual—Version 6.0
216
See “View the Checks Report” on page 213.
See “Checks Report Example” on page 215.
See “Printing a Report” on page 66.
See “Export a Report” on page 67.
See “Searching a Report” on page 69.

User Manual—Version 6.0 WashConnect® Financial
217
About the Fleet Activity Report
See “View the Fleet Activity Report” on page 217.
See “Fleet Activity Report Descriptions” on page 220.
See “Printing a Report” on page 66.
See “Export a Report” on page 67.
See “Searching a Report” on page 69.
View the Fleet Activity Report
To view the Fleet Activity report, follow these steps:
1 From the Financial menu, click Register Reports, and then click Fleet Activity. The Fleet Activity tab appears.
Figure 88. Fleet Activity tab
2 In the From Date and To Date boxes, type or select a date range.
3 In the Site(s) box, select site(s) or All.

Financial WashConnect® User Manual—Version 6.0
218
4 Click the Select Customer box, to search for one or more fleet accounts.The Customer(s) dialog box appears.
Figure 89. Fleet Activity - Customer(s) dialog box
5 In Search box, you can type text if searching for a Business Name or type number if searching for an Account #.
6 In Customer Status, make a selection:
▪ All means all of the fleet customers.
▪ Active means the fleet customer is paid and current.
▪ Suspended means the fleet customer is not paid.
▪ Terminated means the fleet customer account is canceled.
7 Click the Search button.
8 Select the individual fleet customer(s) or All.
9 After making Customer selection, click the Close button.
10 Click the View Report button.
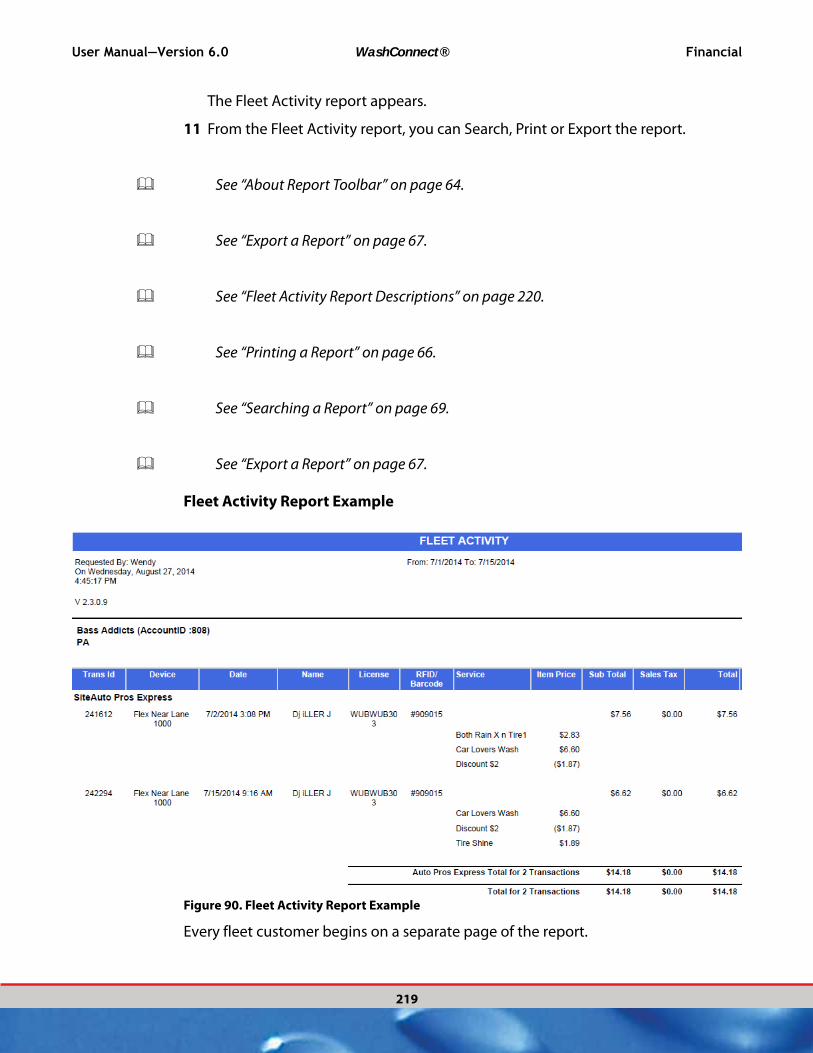
User Manual—Version 6.0 WashConnect® Financial
219
The Fleet Activity report appears.
11 From the Fleet Activity report, you can Search, Print or Export the report.
See “About Report Toolbar” on page 64.
See “Export a Report” on page 67.
See “Fleet Activity Report Descriptions” on page 220.
See “Printing a Report” on page 66.
See “Searching a Report” on page 69.
See “Export a Report” on page 67.
Fleet Activity Report Example
Figure 90. Fleet Activity Report Example
Every fleet customer begins on a separate page of the report.
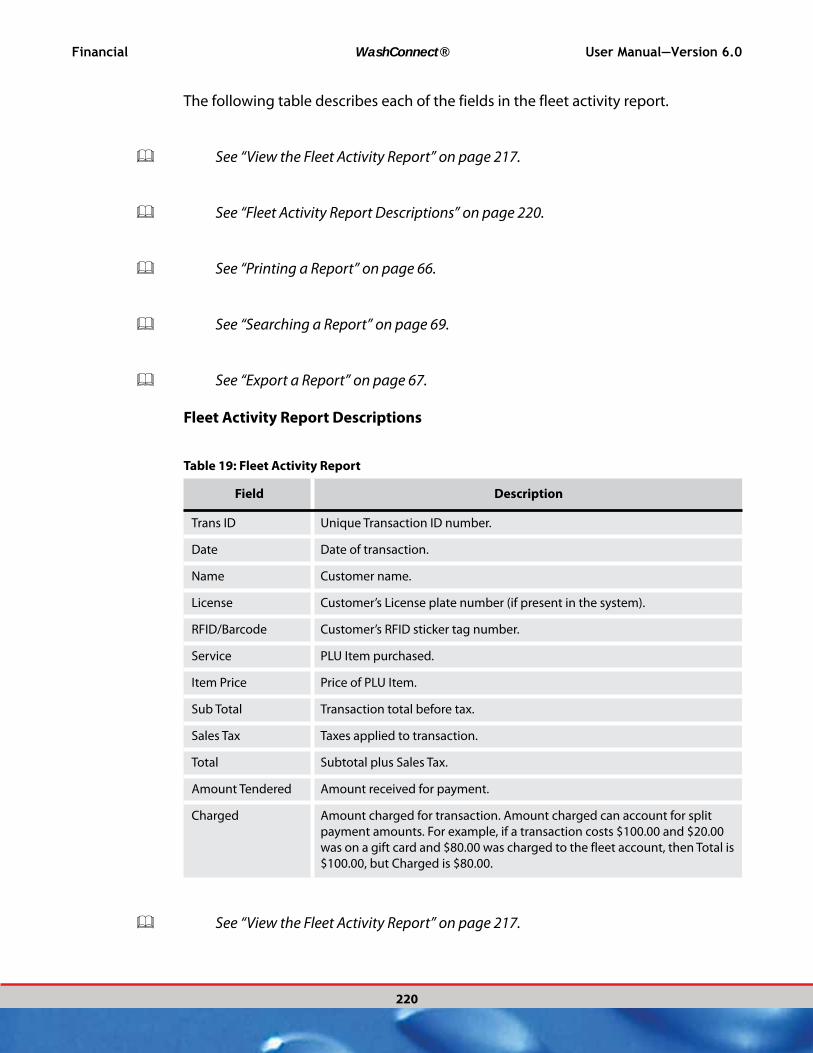
Financial WashConnect® User Manual—Version 6.0
220
The following table describes each of the fields in the fleet activity report.
See “View the Fleet Activity Report” on page 217.
See “Fleet Activity Report Descriptions” on page 220.
See “Printing a Report” on page 66.
See “Searching a Report” on page 69.
See “Export a Report” on page 67.
Fleet Activity Report Descriptions
Table 19: Fleet Activity Report
Field Description
Trans ID Unique Transaction ID number.
Date Date of transaction.
Name Customer name.
License Customer’s License plate number (if present in the system).
RFID/Barcode Customer’s RFID sticker tag number.
Service PLU Item purchased.
Item Price Price of PLU Item.
Sub Total Transaction total before tax.
Sales Tax Taxes applied to transaction.
Total Subtotal plus Sales Tax.
Amount Tendered Amount received for payment.
Charged Amount charged for transaction. Amount charged can account for split
payment amounts. For example, if a transaction costs $100.00 and $20.00
was on a gift card and $80.00 was charged to the fleet account, then Total is
$100.00, but Charged is $80.00.
See “View the Fleet Activity Report” on page 217.

User Manual—Version 6.0 WashConnect® Financial
221
See “See “Export a Report” on page 67.” on page 219.
See “Printing a Report” on page 66.
See “Searching a Report” on page 69.
See “Export a Report” on page 67.
About the Deposits Report
See “View the Deposits Report” on page 221.
See “Deposits Report Example” on page 222.
See “Deposits Report Descriptions” on page 223.
View the Deposits Report
To view the Deposits report, follow these steps:
1 Select Register Reports, and then click Deposits. The Deposits tab appears.
2 In the From Date and To Date boxes, select a date range.
3 In the Site box, select a site.
4 In the Shift box, select a shift.
5 Click the View Report button. The deposits report appears.

Financial WashConnect® User Manual—Version 6.0
222
6 From the Deposits report toolbar, you can Print or Export the report.
See “About Report Toolbar” on page 64.
See “Deposits Report Example” on page 222.
See “Deposits Report Descriptions” on page 223.
See “Printing a Report” on page 66.
See “Export a Report” on page 67.
Deposits Report Example
Figure 91. Deposits Report
See “Searching a Report” on page 69.
See “View the Deposits Report” on page 221.
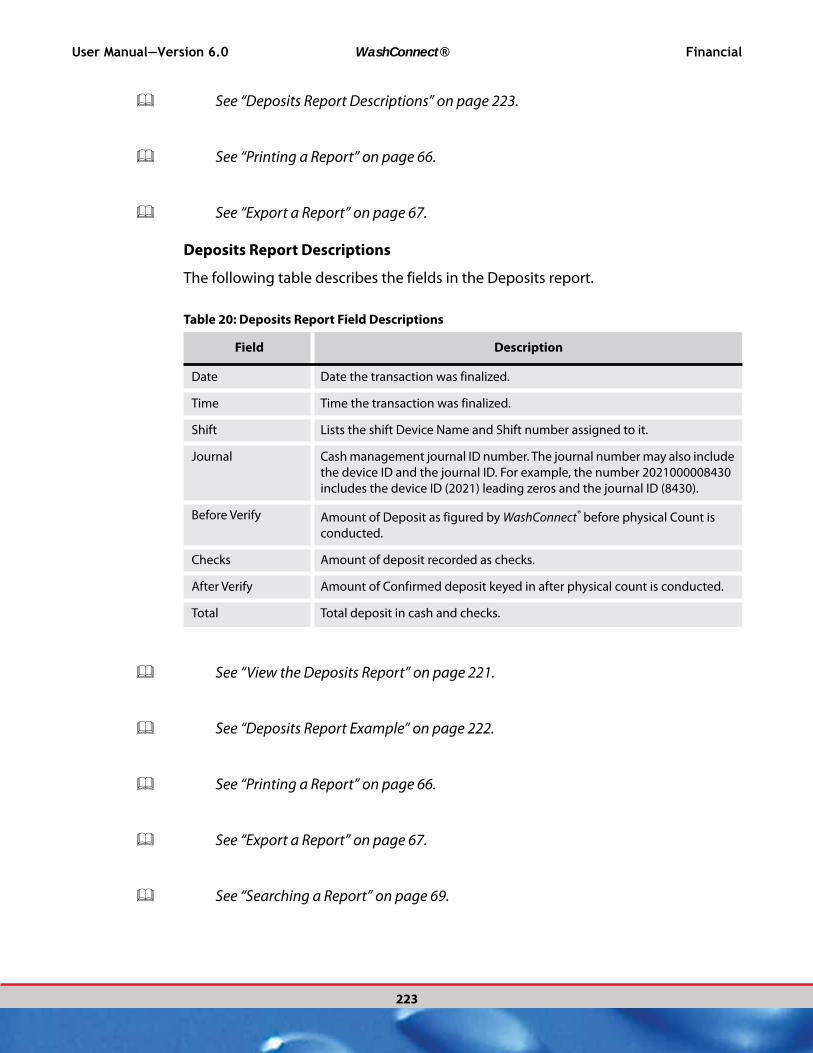
User Manual—Version 6.0 WashConnect® Financial
223
See “Deposits Report Descriptions” on page 223.
See “Printing a Report” on page 66.
See “Export a Report” on page 67.
Deposits Report Descriptions
The following table describes the fields in the Deposits report.
Table 20: Deposits Report Field Descriptions
Field Description
Date Date the transaction was finalized.
Time Time the transaction was finalized.
Shift Lists the shift Device Name and Shift number assigned to it.
Journal Cash management journal ID number. The journal number may also include
the device ID and the journal ID. For example, the number 2021000008430
includes the device ID (2021) leading zeros and the journal ID (8430).
Before Verify Amount of Deposit as figured by WashConnect® before physical Count is
conducted.
Checks Amount of deposit recorded as checks.
After Verify Amount of Confirmed deposit keyed in after physical count is conducted.
Total Total deposit in cash and checks.
See “View the Deposits Report” on page 221.
See “Deposits Report Example” on page 222.
See “Printing a Report” on page 66.
See “Export a Report” on page 67.
See “Searching a Report” on page 69.

Financial WashConnect® User Manual—Version 6.0
224
About the Free Wash Report
See “View the Free Wash Report” on page 224.
See “Free Wash Report Example” on page 226.
See “Free Wash Report Descriptions” on page 226.
See “Tracking Rewash or Free Washes” on page 598.
See “Printing a Report” on page 66.
See “Export a Report” on page 67.
See “Searching a Report” on page 69.
View the Free Wash Report
To view the free wash report, follow these steps:
1 Select Register Reports, and then click Free Wash.

User Manual—Version 6.0 WashConnect® Financial
225
The Free Wash tab appears.
2 In the From Date and To Date boxes, select a date range.
3 In the Site box, select a site.
4 In the Shift box, select a shift.
5 Click the View Report button. The free wash report appears.
6 From the Free Wash report toolbar, you can Search, Print or Export the report.
See “About Report Toolbar” on page 64.
7 You can save the preferences for the next time you want to generate the report,
click the Save Preference button.
See “View the Free Wash Report” on page 224.
See “Free Wash Report Example” on page 226.
See “Free Wash Report Descriptions” on page 226.
See “Tracking Rewash or Free Washes” on page 598.
See “Printing a Report” on page 66.
See “Searching a Report” on page 69.
See “Export a Report” on page 67.
NOTE: Tracking Customer Data and Reason for the Free Washes / Rewashes is
optional. Tracking the actual washes is not optional.
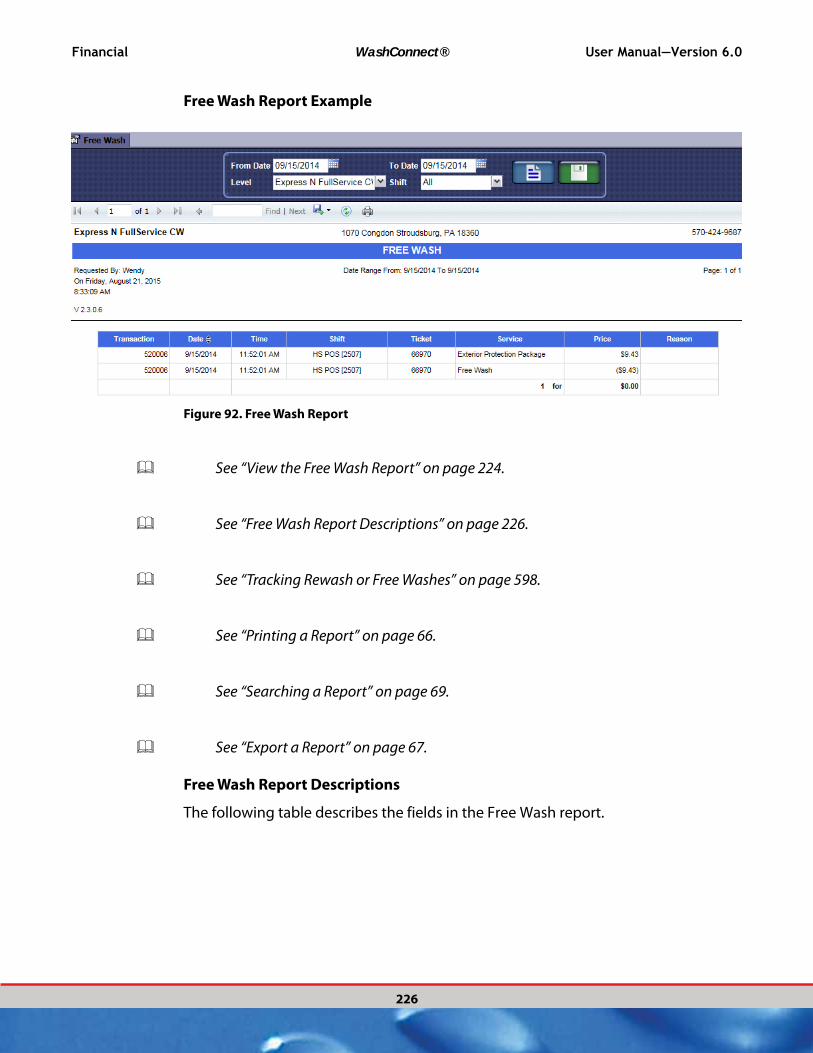
Financial WashConnect® User Manual—Version 6.0
226
Free Wash Report Example
Figure 92. Free Wash Report
See “View the Free Wash Report” on page 224.
See “Free Wash Report Descriptions” on page 226.
See “Tracking Rewash or Free Washes” on page 598.
See “Printing a Report” on page 66.
See “Searching a Report” on page 69.
See “Export a Report” on page 67.
Free Wash Report Descriptions
The following table describes the fields in the Free Wash report.

Table 21: Free Wash Report Field Descriptions
Field Description
Transaction Unique transaction ID number.
Date Date the transaction was placed. Click the column header to sort on this
field.
Time Time the transaction was finalized.
Shift The POS device is listed along with the shift number assigned by the
system.
Ticket Ticket number, if a ticket was generated for the transaction. Zero if no ticket
was generated.
Service PLU Item purchased.
Price Price of the transaction. Refunds appear in parenthesis.
Reason This is typed in by the POS cashier or manager who set up the Free Wash in
the system.
User Manual—Version 6.0 WashConnect® Financial
227
See “View the Free Wash Report” on page 224.
See “Free Wash Report Example” on page 226.
See “Tracking Rewash or Free Washes” on page 598.
See “Printing a Report” on page 66.
See “Export a Report” on page 67.
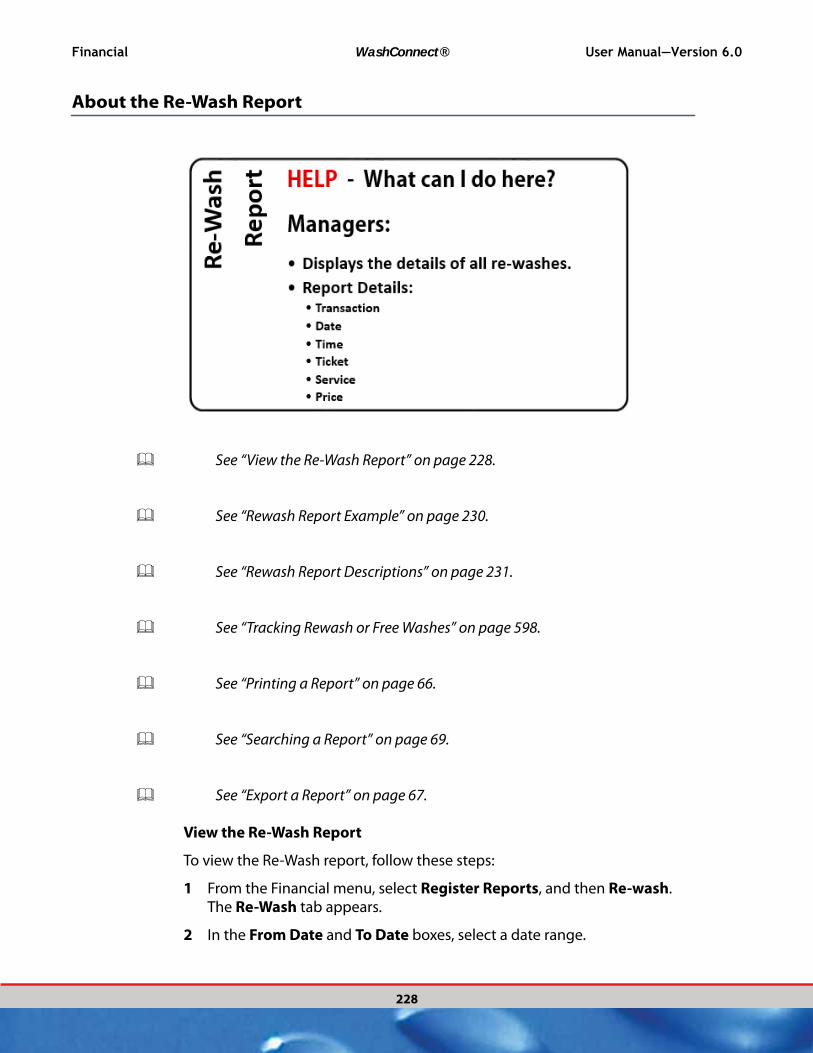
Financial WashConnect® User Manual—Version 6.0
228
About the Re-Wash Report
See “View the Re-Wash Report” on page 228.
See “Rewash Report Example” on page 230.
See “Rewash Report Descriptions” on page 231.
See “Tracking Rewash or Free Washes” on page 598.
See “Printing a Report” on page 66.
See “Searching a Report” on page 69.
See “Export a Report” on page 67.
View the Re-Wash Report
To view the Re-Wash report, follow these steps:
1 From the Financial menu, select Register Reports, and then Re-wash. The Re-Wash tab appears.
2 In the From Date and To Date boxes, select a date range.

User Manual—Version 6.0 WashConnect® Financial
229
3 In the Level box, select a site or level.
4 In the Shift box, select a shift(s) or All.
5 Click the View Report button. The REWASH Report appears.
6 From the Rewash Report toolbar, you can Search, Print or Export the report.
See “About Report Toolbar” on page 64.
7 You can save the preferences for the next time you want to generate the report,
click the Save Preference button.
NOTE: Tracking Customer Data and Reason for the Free Washes / Rewashes is
optional. Tracking the actual washes is not optional.
See “View the Re-Wash Report” on page 228.
See “Rewash Report Descriptions” on page 231.
See “Tracking Rewash or Free Washes” on page 598.
See “Printing a Report” on page 66.
See “Searching a Report” on page 69.
See “Export a Report” on page 67.

Financial WashConnect® User Manual—Version 6.0
230
Rewash Report Example
Figure 93. Rewash Report Example
See “View the Re-Wash Report” on page 228.
See “Rewash Report Descriptions” on page 231.

User Manual—Version 6.0 WashConnect® Financial
231
See “Tracking Rewash or Free Washes” on page 598.
See “Printing a Report” on page 66.
See “Export a Report” on page 67.
Rewash Report Descriptions
The following table describes the fields in the Rewash report.
Table 22: Rewash Report Descriptions
Field Description
Transaction Unique transaction ID number.
Date Date the transaction was placed. Click the column header to sort on this
field.
Time Time the transaction was finalized.
Shift The POS device is listed along with the shift number assigned by the
system.
Ticket Ticket number, if a ticket was generated for the transaction. Zero if no ticket
was generated.
Service Name of PLU Item purchased.
Price Price of the transaction. Refunds appear in parenthesis.
Reason This is typed in by the POS cashier or manager who set up the Rewash in the
system.
See “View the Re-Wash Report” on page 228.
See “Rewash Report Example” on page 230.
See “Tracking Rewash or Free Washes” on page 598.
See “Printing a Report” on page 66.
See “Searching a Report” on page 69.

Financial WashConnect® User Manual—Version 6.0
232
See “Searching a Report” on page 69.
See “Export a Report” on page 67.
About the Payouts Report
See “About the Payouts Report” on page 232.
See “Payouts Report Example” on page 234.
See “Payouts Report Descriptions” on page 234.
See “Printing a Report” on page 66.
See “Searching a Report” on page 69.
See “Export a Report” on page 67.
View the Payouts Report
To view the payouts report, follow these steps:

User Manual—Version 6.0 WashConnect® Financial
233
1 On the Financial menu, click Register Reports, and then click Payouts. The Payouts tab appears.
2 In the From Date and To Date boxes, select a date range.
3 In the Level box, select a site or other level.
4 In the Shift box, select a shift.
5 Click the View Report button. The payouts report appears.
6 From the Payouts report toolbar, you can Print or Export the report.
See “About Report Toolbar” on page 64.
See “About Report Toolbar” on page 64.
See “Payouts Report Example” on page 234.
See “Payouts Report Descriptions” on page 234.
See “Printing a Report” on page 66.
See “Searching a Report” on page 69.
See “Export a Report” on page 67.
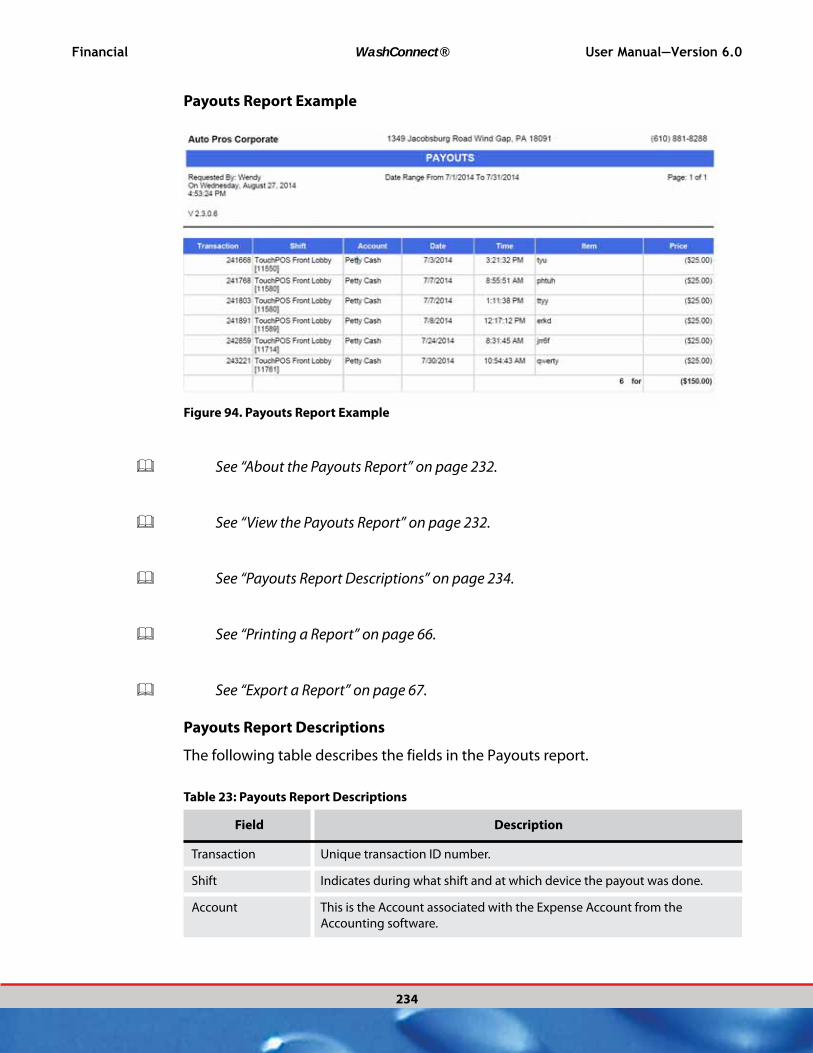
Financial WashConnect® User Manual—Version 6.0
234
Payouts Report Example
Figure 94. Payouts Report Example
See “About the Payouts Report” on page 232.
See “View the Payouts Report” on page 232.
See “Payouts Report Descriptions” on page 234.
See “Printing a Report” on page 66.
See “Export a Report” on page 67.
Payouts Report Descriptions
The following table describes the fields in the Payouts report.
Table 23: Payouts Report Descriptions
Field Description
Transaction Unique transaction ID number.
Shift Indicates during what shift and at which device the payout was done.
Account This is the Account associated with the Expense Account from the
Accounting software.
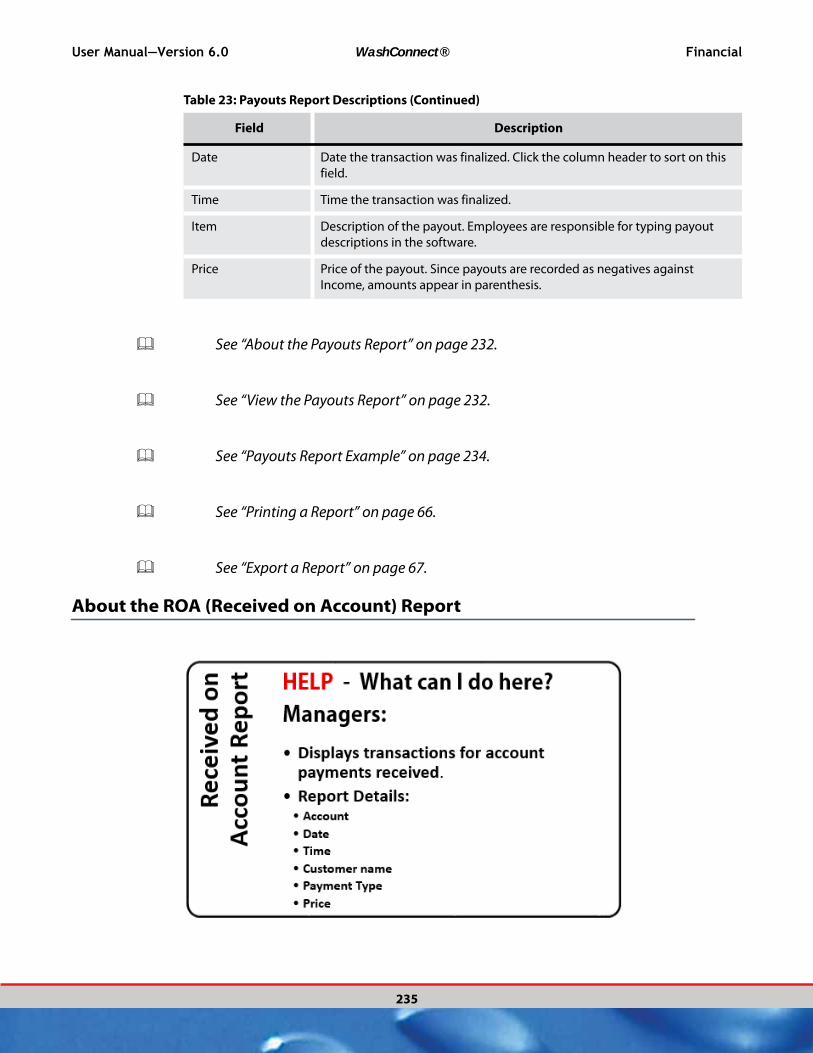
User Manual—Version 6.0 WashConnect® Financial
235
See “About the Payouts Report” on page 232.
See “View the Payouts Report” on page 232.
See “Payouts Report Example” on page 234.
See “Printing a Report” on page 66.
See “Export a Report” on page 67.
About the ROA (Received on Account) Report
Date Date the transaction was finalized. Click the column header to sort on this
field.
Time Time the transaction was finalized.
Item Description of the payout. Employees are responsible for typing payout
descriptions in the software.
Price Price of the payout. Since payouts are recorded as negatives against
Income, amounts appear in parenthesis.
Table 23: Payouts Report Descriptions (Continued)
Field Description

Financial WashConnect® User Manual—Version 6.0
236
See “View the ROA (Received on Account) Report” on page 236.
See “Received on Account Report Example” on page 237.
See “Received on Account Report Descriptions” on page 238.
See “Printing a Report” on page 66.
See “Searching a Report” on page 69.
See “Export a Report” on page 67.
View the ROA (Received on Account) Report
To view the received on account report, follow these steps:
1 Select Register Reports, and then click ROA.The ROA tab appears.
2 In the From Date and To Date boxes, select a date range.
3 In the Level box, select a site or level.
4 In the Shift box, select a shift.
5 Click to mark the Show Accounts per page check box to show one customer per page on the ROA Report.
NOTE: If Show Accounts per page is unmarked, the ROA report will show all
customers instead of showing one customer per page.
6 Click the View Report button. The received on account report appears.
7 From the Received on Account report toolbar, you can Search, Print or Export the report.
See “About Report Toolbar” on page 64.
See “Received on Account Report Example” on page 237.
See “Received on Account Report Descriptions” on page 238.

User Manual—Version 6.0 WashConnect® Financial
237
See “Printing a Report” on page 66.
See “Searching a Report” on page 69.
See “Export a Report” on page 67.
Received on Account Report Example
Figure 95. Received on Account Register Report
See “View the ROA (Received on Account) Report” on page 236.
See “Received on Account Report Descriptions” on page 238.
See “Printing a Report” on page 66.
See “Searching a Report” on page 69.
See “Export a Report” on page 67.

Financial WashConnect® User Manual—Version 6.0
238
Received on Account Report Descriptions
The following table describes the fields in the Received on Account report:
Table 24: Received on Account Report Descriptions
Field Description
Transaction Unique transaction ID number.
Shift Indicates during what shift and at what device the payout was done.
Account This is the Account associated with the Expense Account from the
Accounting software.
Date Date the transaction was placed. Click the column header to sort on this
field.
Time Time the transaction was finalized.
Customer Name Customer name on the account.
Payment Type Type of payment used to settle the account balance.
Price Amount of payment received.
See “View the ROA (Received on Account) Report” on page 236.
See “Received on Account Report Example” on page 237.
See “Printing a Report” on page 66.
See “Searching a Report” on page 69.
See “Export a Report” on page 67.

User Manual—Version 6.0 WashConnect® Financial
239
About the Voids Report
See “Void Sales Transaction” on page 592.
View the Voids Report
To view the voids report, follow these steps:
1 From the Financial menu, select Register Reports, and then click Voids.The Voids tab appears.
2 In the From Date and To Date boxes, select a date range.
3 In the Level box, select a site or level.
4 In the Shift box, select a shift.
5 Click the View Report button. The Voids report appears.
6 From the Voids report toolbar, you can Search, Print or Export the report.
See “About Report Toolbar” on page 64.
NOTE: Voids are never counted as actual cars washed.
See “Searching a Report” on page 69.
See “Printing a Report” on page 66.
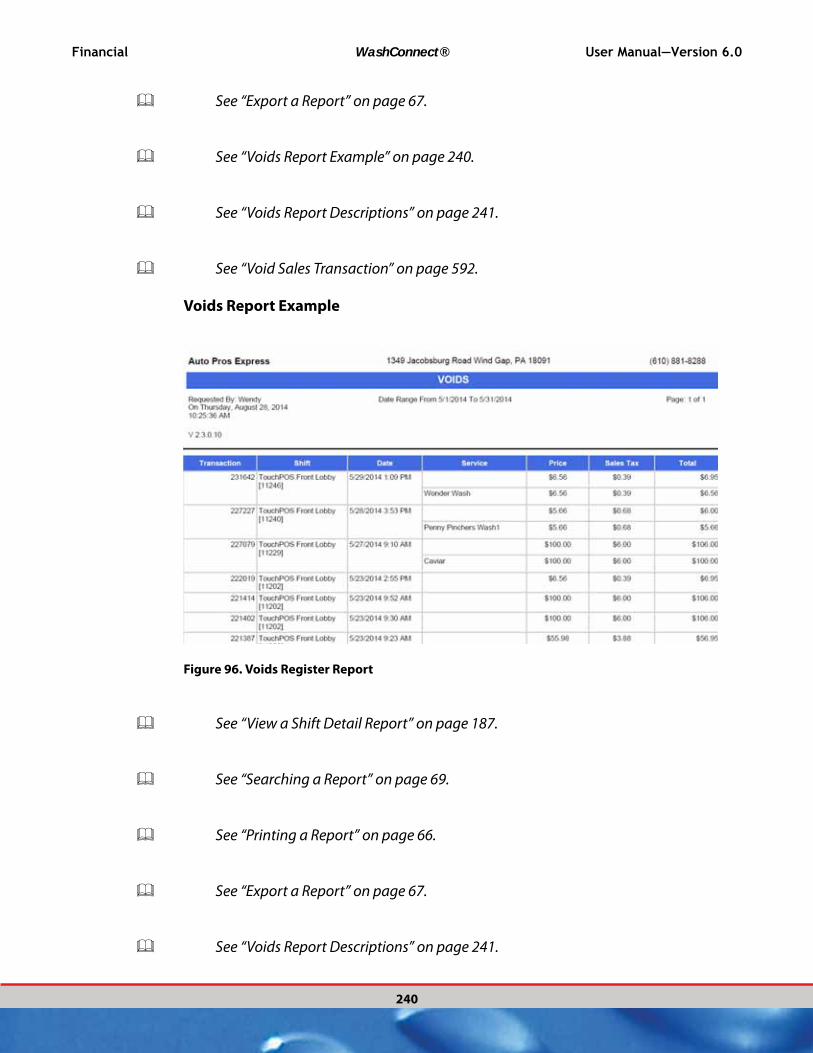
Financial WashConnect® User Manual—Version 6.0
240
See “Export a Report” on page 67.
See “Voids Report Example” on page 240.
See “Voids Report Descriptions” on page 241.
See “Void Sales Transaction” on page 592.
Voids Report Example
Figure 96. Voids Register Report
See “View a Shift Detail Report” on page 187.
See “Searching a Report” on page 69.
See “Printing a Report” on page 66.
See “Export a Report” on page 67.
See “Voids Report Descriptions” on page 241.
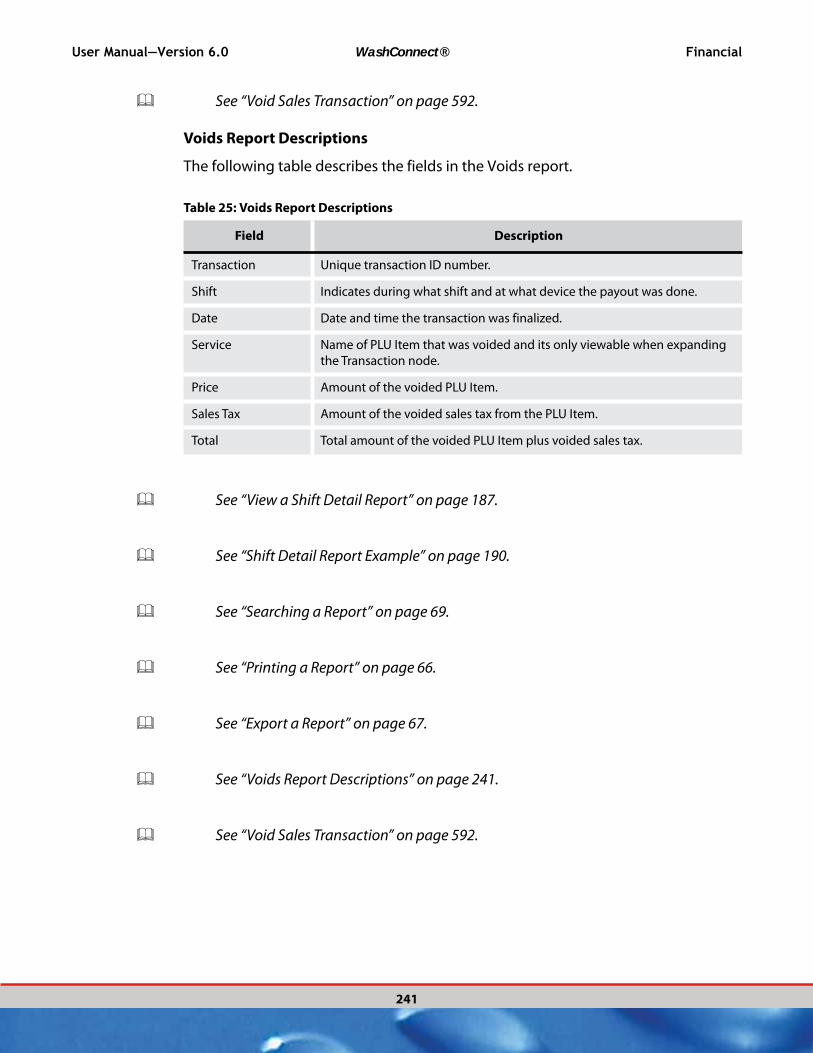
User Manual—Version 6.0 WashConnect® Financial
241
See “Void Sales Transaction” on page 592.
Voids Report Descriptions
The following table describes the fields in the Voids report.
Table 25: Voids Report Descriptions
Field Description
Transaction Unique transaction ID number.
Shift Indicates during what shift and at what device the payout was done.
Date Date and time the transaction was finalized.
Service Name of PLU Item that was voided and its only viewable when expanding
the Transaction node.
Price Amount of the voided PLU Item.
Sales Tax Amount of the voided sales tax from the PLU Item.
Total Total amount of the voided PLU Item plus voided sales tax.
See “View a Shift Detail Report” on page 187.
See “Shift Detail Report Example” on page 190.
See “Searching a Report” on page 69.
See “Printing a Report” on page 66.
See “Export a Report” on page 67.
See “Voids Report Descriptions” on page 241.
See “Void Sales Transaction” on page 592.
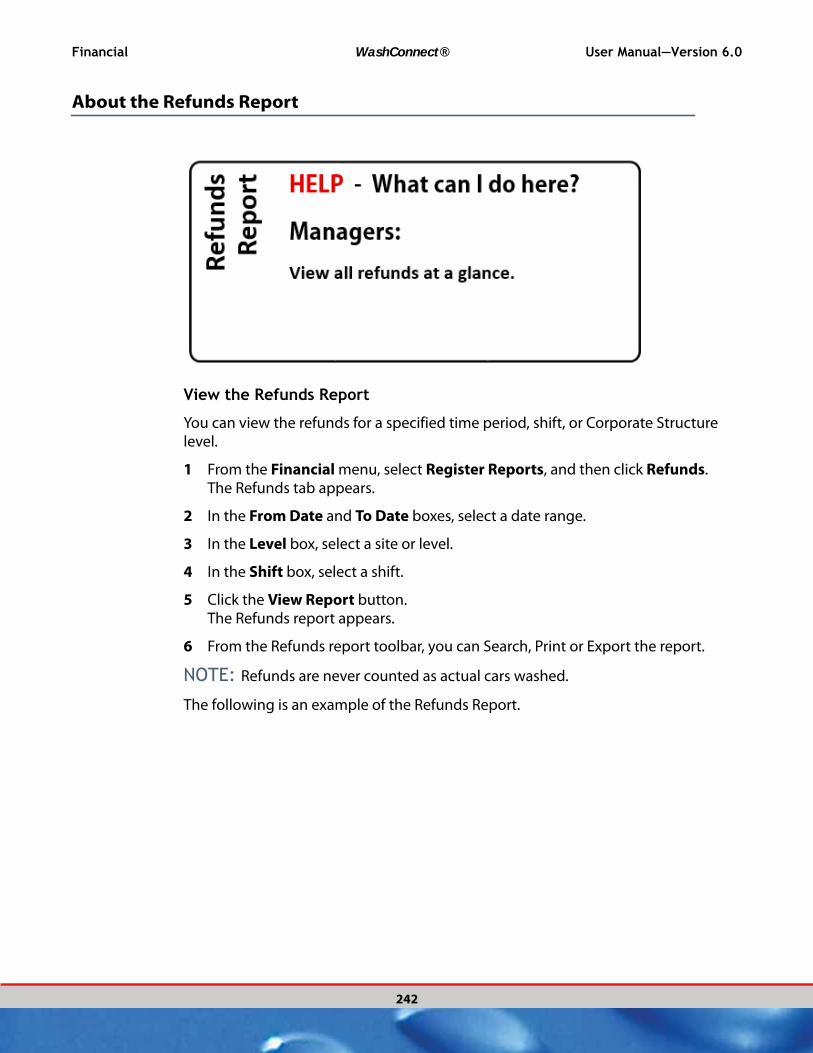
Financial WashConnect® User Manual—Version 6.0
242
About the Refunds Report
View the Refunds Report
You can view the refunds for a specified time period, shift, or Corporate Structure level.
1 From the Financial menu, select Register Reports, and then click Refunds.The Refunds tab appears.
2 In the From Date and To Date boxes, select a date range.
3 In the Level box, select a site or level.
4 In the Shift box, select a shift.
5 Click the View Report button.The Refunds report appears.
6 From the Refunds report toolbar, you can Search, Print or Export the report.
NOTE: Refunds are never counted as actual cars washed.
The following is an example of the Refunds Report.
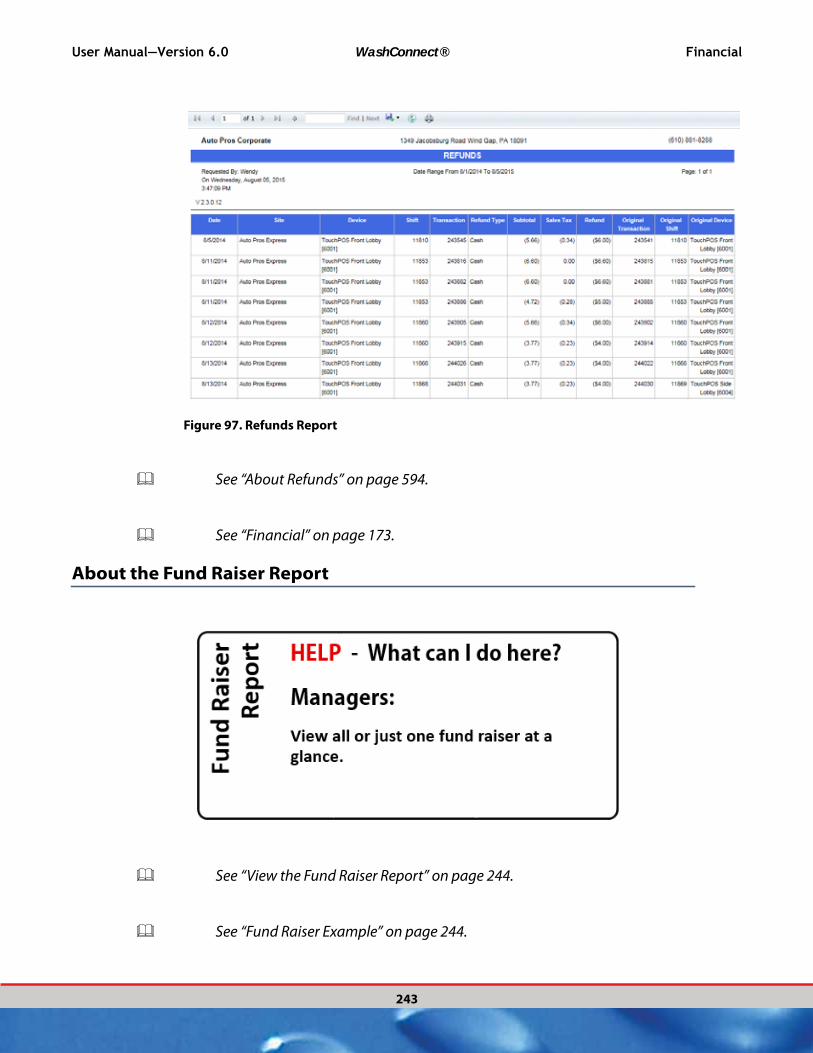
User Manual—Version 6.0 WashConnect® Financial
243
Figure 97. Refunds Report
See “About Refunds” on page 594.
See “Financial” on page 173.
About the Fund Raiser Report
See “View the Fund Raiser Report” on page 244.
See “Fund Raiser Example” on page 244.
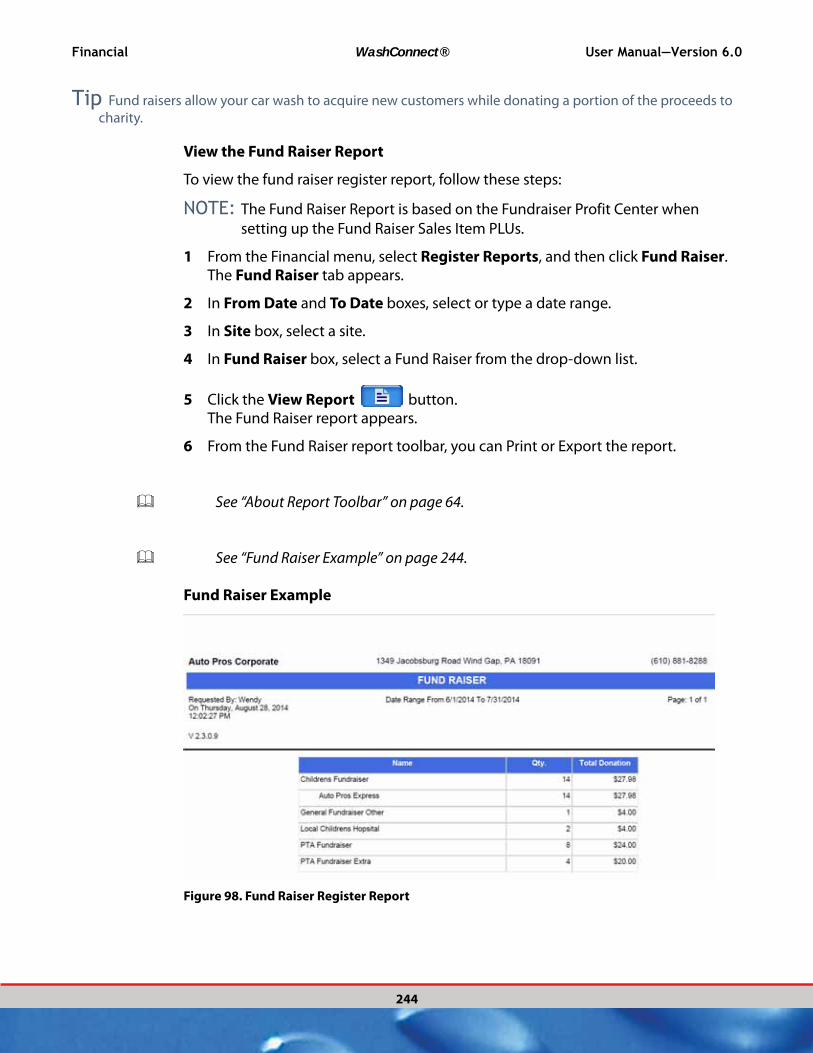
Financial WashConnect® User Manual—Version 6.0
244
Tip Fund raisers allow your car wash to acquire new customers while donating a portion of the proceeds to charity.
View the Fund Raiser Report
To view the fund raiser register report, follow these steps:
NOTE: The Fund Raiser Report is based on the Fundraiser Profit Center when
setting up the Fund Raiser Sales Item PLUs.
1 From the Financial menu, select Register Reports, and then click Fund Raiser.The Fund Raiser tab appears.
2 In From Date and To Date boxes, select or type a date range.
3 In Site box, select a site.
4 In Fund Raiser box, select a Fund Raiser from the drop-down list.
5 Click the View Report button. The Fund Raiser report appears.
6 From the Fund Raiser report toolbar, you can Print or Export the report.
See “About Report Toolbar” on page 64.
See “Fund Raiser Example” on page 244.
Fund Raiser Example
Figure 98. Fund Raiser Register Report

User Manual—Version 6.0 WashConnect® Financial
245
See “About the Fund Raiser Report” on page 243.
About View Register
See “Set previous days privilege on View Register Report” on page 245.
See “Reprint a Customer’s Receipt” on page 246.
See “View Register Transactions” on page 247.
Set previous days privilege on View Register Report
Someone with a security role can change privileges. There is a privilege setting available to view previous days within the View Register Report on devices other than the Global device.
1 From the Users menu, select Security Roles.
2 Click to select the name of a security role to allow this privilege.
3 Click the Edit button.
4 From the Select Privileges section, scroll and click in the box to select Register Reports.
5 Scroll down and select View Register Transactions check box.
6 If necessary, click to select View Previous Days check box.
7 Click the Save button.
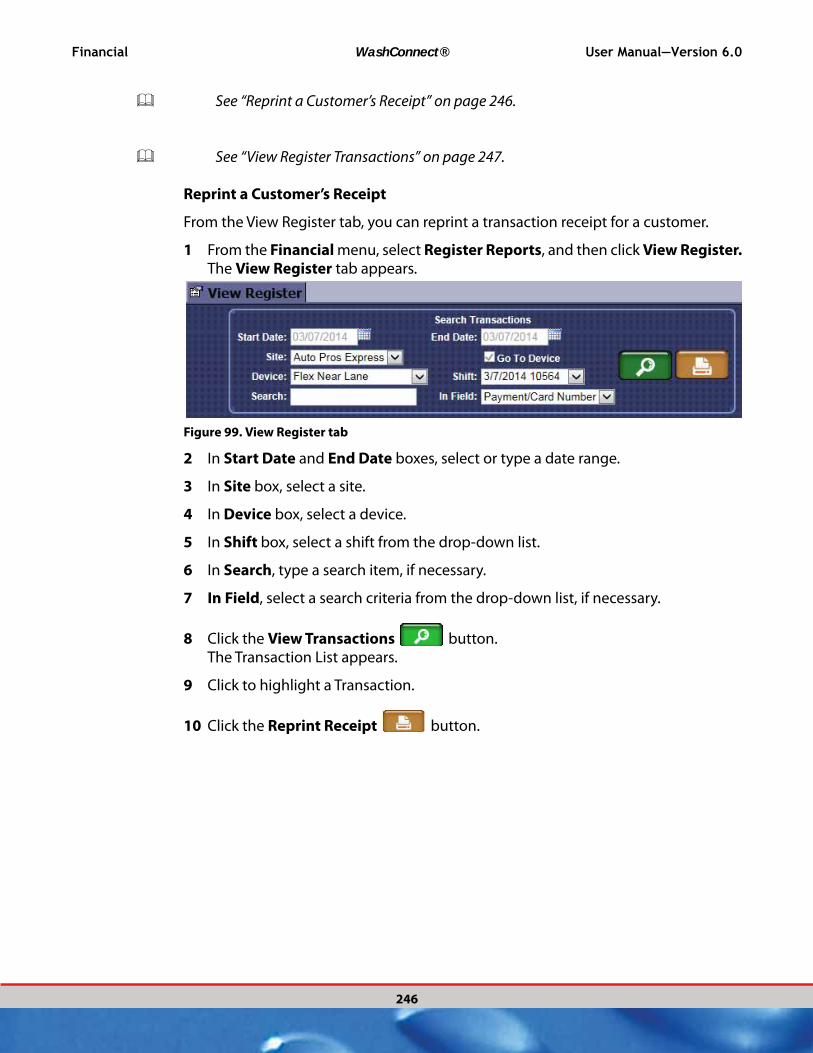
Financial WashConnect® User Manual—Version 6.0
246
See “Reprint a Customer’s Receipt” on page 246.
See “View Register Transactions” on page 247.
Reprint a Customer’s Receipt
From the View Register tab, you can reprint a transaction receipt for a customer.
1 From the Financial menu, select Register Reports, and then click View Register.The View Register tab appears.
Figure 99. View Register tab
2 In Start Date and End Date boxes, select or type a date range.
3 In Site box, select a site.
4 In Device box, select a device.
5 In Shift box, select a shift from the drop-down list.
6 In Search, type a search item, if necessary.
7 In Field, select a search criteria from the drop-down list, if necessary.
8 Click the View Transactions button. The Transaction List appears.
9 Click to highlight a Transaction.
10 Click the Reprint Receipt button.

User Manual—Version 6.0 WashConnect® Financial
247
The receipt prints.
Figure 100. View Register Unlimited Club Transaction Example
See “About View Register” on page 245.
See “View Register Transactions” on page 247.
View Register Transactions
Throughout the day, various customer transactions take place at POS, TNC and Auto Sentry terminals. You can click the View Register to search for a specific transaction or view a list of transactions for a designated date range.
1 From the Financial menu, select Register Reports, and then click View Register.The View Register tab appears.
2 In Start Date and End Date boxes, select or type a date range.
3 In Site box, select a site.
4 In Shift box, select a shift from the drop-down list.
5 In Search, type a search item, if necessary.
6 From the In Field list, select one of the following search criteria:
▪ Amount Tendered
▪ CTN
▪ Payment/Card Number
▪ RFID
▪ Sub Total

Financial WashConnect® User Manual—Version 6.0
248
▪ Tax
▪ Ticket ID
▪ Time
▪ Total Sale
▪ Transaction ID
▪ Transaction Status
7 Click the View Transactions button. The Transaction List appears.
Figure 101. View Register Transaction Details example
To view the current balances for the Auto Sentry terminal, other devices and the virtual safe, see “About Terminal Balances” on page 289.
See “Reprint a Customer’s Receipt” on page 246.
See “About View Register” on page 245.
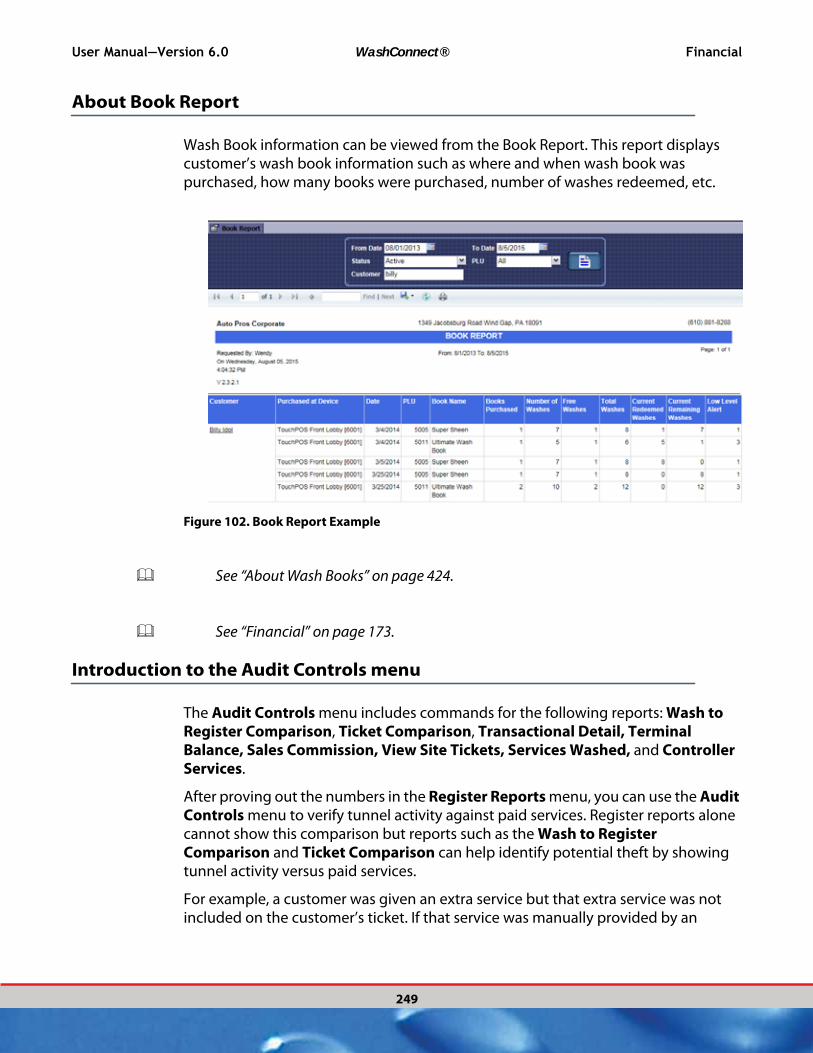
User Manual—Version 6.0 WashConnect® Financial
249
About Book Report
Wash Book information can be viewed from the Book Report. This report displays customer’s wash book information such as where and when wash book was purchased, how many books were purchased, number of washes redeemed, etc.
Figure 102. Book Report Example
See “About Wash Books” on page 424.
See “Financial” on page 173.
Introduction to the Audit Controls menu
The Audit Controls menu includes commands for the following reports: Wash to Register Comparison, Ticket Comparison, Transactional Detail, Terminal Balance, Sales Commission, View Site Tickets, Services Washed, and Controller Services.
After proving out the numbers in the Register Reports menu, you can use the Audit Controls menu to verify tunnel activity against paid services. Register reports alone cannot show this comparison but reports such as the Wash to Register Comparison and Ticket Comparison can help identify potential theft by showing tunnel activity versus paid services.
For example, a customer was given an extra service but that extra service was not included on the customer’s ticket. If that service was manually provided by an
Financial WashConnect® User Manual—Version 6.0
250
attendant but not recorded as a part of the transaction, you need to ask: Did attendant collect money for the service, and where is it?
Audit Controls Step-By-Step Instructions
For more information on an individual Audit Control, click on one of the following:
See “About the Wash to Register Comparison Report” on page 251.
See “View the Ticket Comparison Report” on page 254.
See “About Transactional Detail” on page 258.
See “About Terminal Balance Report” on page 261.
See “About Sales Commission” on page 263.
See “About View Site Tickets” on page 265.
See “About the Services Washed Report” on page 267.
See “About the Controller Services Report” on page 269.
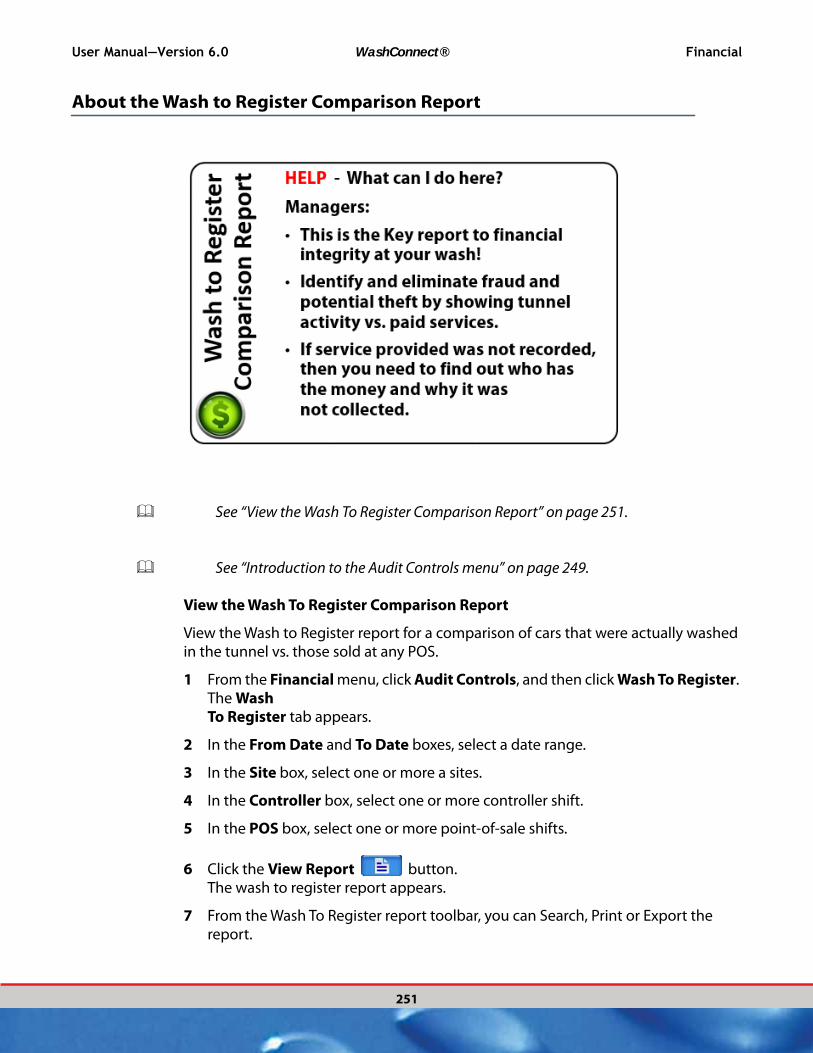
User Manual—Version 6.0 WashConnect® Financial
251
About the Wash to Register Comparison Report
See “View the Wash To Register Comparison Report” on page 251.
See “Introduction to the Audit Controls menu” on page 249.
View the Wash To Register Comparison Report
View the Wash to Register report for a comparison of cars that were actually washed in the tunnel vs. those sold at any POS.
1 From the Financial menu, click Audit Controls, and then click Wash To Register. The Wash To Register tab appears.
2 In the From Date and To Date boxes, select a date range.
3 In the Site box, select one or more a sites.
4 In the Controller box, select one or more controller shift.
5 In the POS box, select one or more point-of-sale shifts.
6 Click the View Report button. The wash to register report appears.
7 From the Wash To Register report toolbar, you can Search, Print or Export the report.

Financial WashConnect® User Manual—Version 6.0
252
See “About Report Toolbar” on page 64.
See “About the Wash to Register Comparison Report” on page 251.
See “Introduction to the Audit Controls menu” on page 249.
See “Wash to Register Comparison Report Descriptions” on page 253.
Wash to Register Comparison Report Example
Figure 103. Wash to Register Comparison Report
See “About the Wash to Register Comparison Report” on page 251.
See “View the Wash To Register Comparison Report” on page 251.

User Manual—Version 6.0 WashConnect® Financial
253
See “Introduction to the Audit Controls menu” on page 249.
See “Wash to Register Comparison Report Descriptions” on page 253.
Wash to Register Comparison Report Descriptions
The following table describes the fields in the Wash to Register Comparison Report.
Table 26: Wash to Register Comparison Descriptions
Field Description
PLU Sales Item number.
Service Name of PLU Item that was actually performed.
Paid Count
Wash Count
Paid Dollars
Wash Dollars
Quantity Difference
Amount Difference
See “View the Wash To Register Comparison Report” on page 251.
See “Introduction to the Audit Controls menu” on page 249.

Financial WashConnect® User Manual—Version 6.0
254
About the Ticket Comparison Report
See “View the Ticket Comparison Report” on page 254.
See “Identifying Potential Theft” on page 255.
See “Ticket Comparison Report Example” on page 256.
See “Printing a Report” on page 66.
See “Searching a Report” on page 69.
See “Export a Report” on page 67.
View the Ticket Comparison Report
The Ticket Comparison Report compares services sold to services processed by ticket number. To view the Ticket Comparison report, follow these steps:
1 In the Financial menu, click Audit Controls, and then click Ticket Comparison. The Ticket Comparison tab appears.
2 In the From Date and To Date boxes, select a date range.
User Manual—Version 6.0 WashConnect® Financial
255
3 In the Site box, select one or more sites.
4 In the Controller box, select one or more controller shifts.
5 In the POS box, select one or more point-of-sale shifts.
6 Click the View Report button. The ticket comparison report appears.
See “Identifying Potential Theft” on page 255.
See “Ticket Comparison Report Example” on page 256.
See “Ticket Comparison Field Descriptions” on page 257.
See “Printing a Report” on page 66.
See “Searching a Report” on page 69.
See “Export a Report” on page 67.
See “View the Ticket Comparison Report” on page 254.
See “Identifying Potential Theft” on page 255.
Identifying Potential Theft
Compare the Wash to Register Report with the Ticket Comparison Report. For Cash Management, you can use the comparison to identify potential theft by showing tunnel activity versus paid services. Also, if a service is provided by an attendant and not recorded, then you may want to question, where is the missing revenue is?
See “View the Ticket Comparison Report” on page 254.
See “Ticket Comparison Report Example” on page 256.
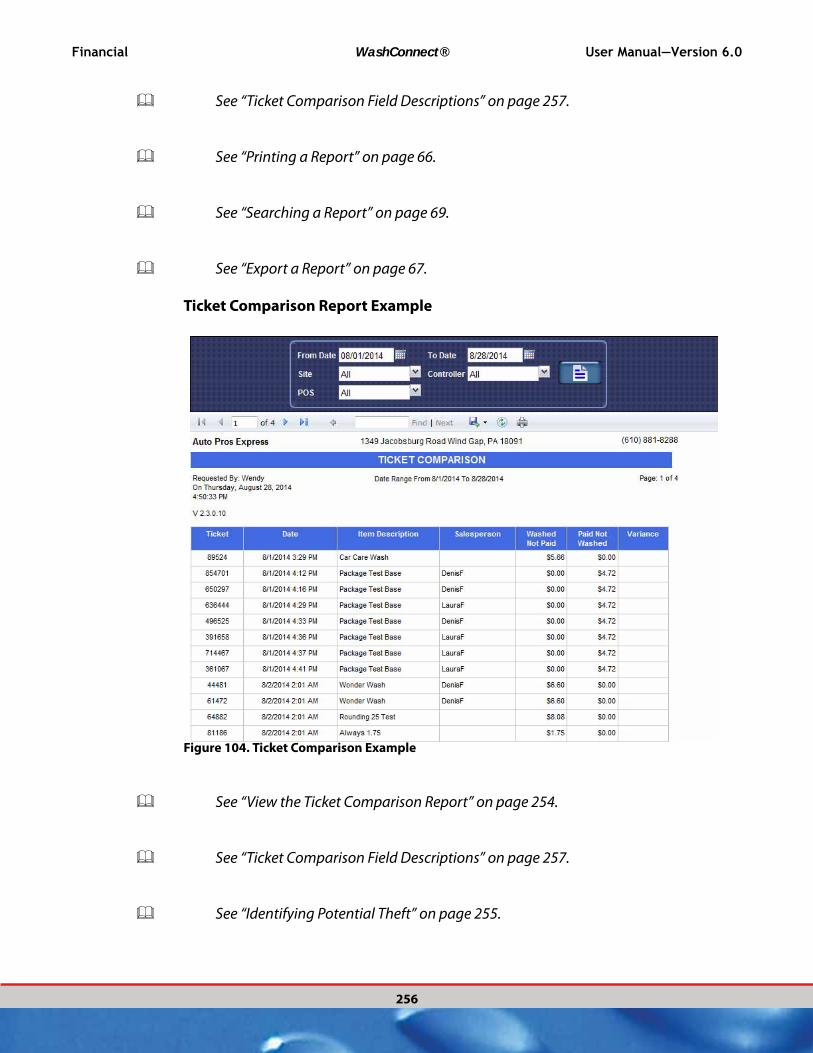
Financial WashConnect® User Manual—Version 6.0
256
See “Ticket Comparison Field Descriptions” on page 257.
See “Printing a Report” on page 66.
See “Searching a Report” on page 69.
See “Export a Report” on page 67.
Ticket Comparison Report Example
Figure 104. Ticket Comparison Example
See “View the Ticket Comparison Report” on page 254.
See “Ticket Comparison Field Descriptions” on page 257.
See “Identifying Potential Theft” on page 255.
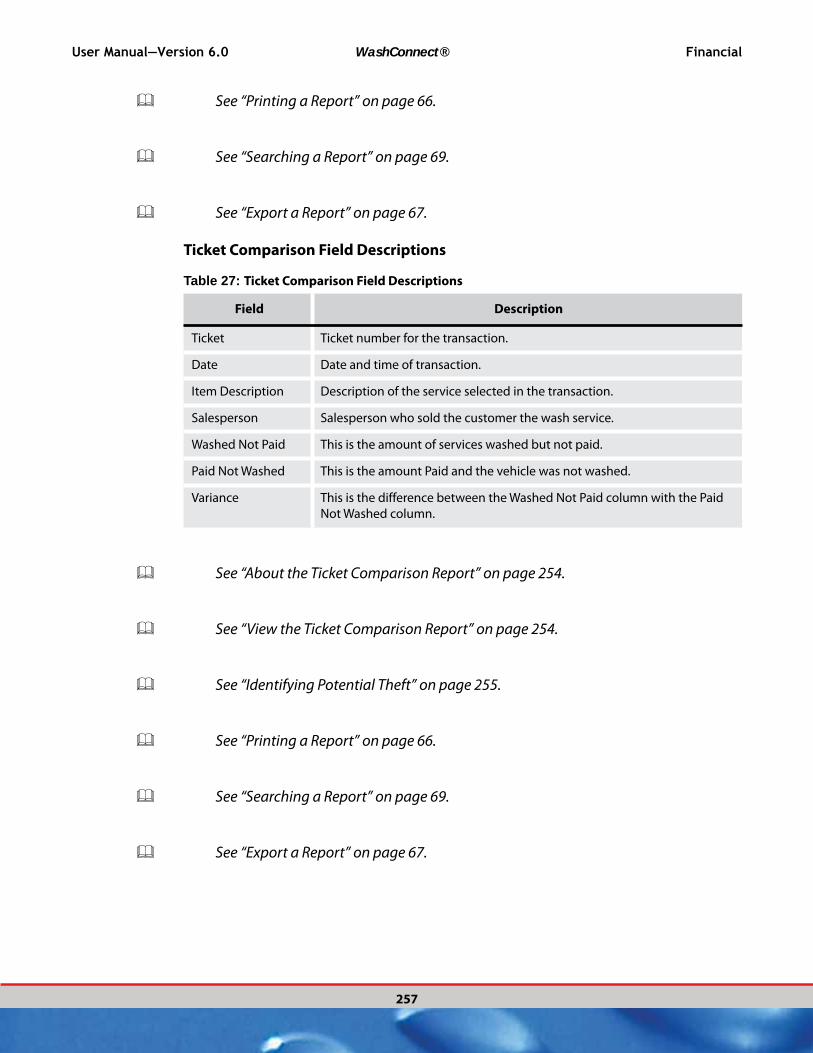
User Manual—Version 6.0 WashConnect® Financial
257
See “Printing a Report” on page 66.
See “Searching a Report” on page 69.
See “Export a Report” on page 67.
Ticket Comparison Field Descriptions
Table 27: Ticket Comparison Field Descriptions
Field Description
Ticket Ticket number for the transaction.
Date Date and time of transaction.
Item Description Description of the service selected in the transaction.
Salesperson Salesperson who sold the customer the wash service.
Washed Not Paid This is the amount of services washed but not paid.
Paid Not Washed This is the amount Paid and the vehicle was not washed.
Variance This is the difference between the Washed Not Paid column with the Paid
Not Washed column.
See “About the Ticket Comparison Report” on page 254.
See “View the Ticket Comparison Report” on page 254.
See “Identifying Potential Theft” on page 255.
See “Printing a Report” on page 66.
See “Searching a Report” on page 69.
See “Export a Report” on page 67.
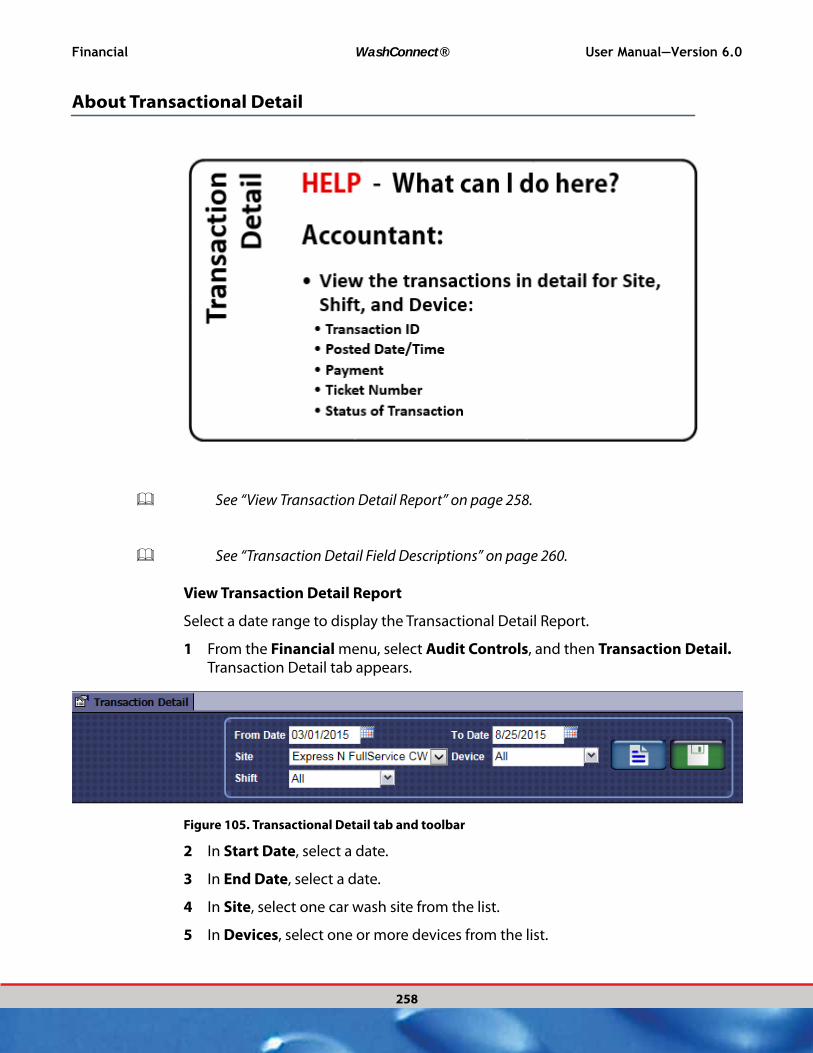
Financial WashConnect® User Manual—Version 6.0
258
About Transactional Detail
See “View Transaction Detail Report” on page 258.
See “Transaction Detail Field Descriptions” on page 260.
View Transaction Detail Report
Select a date range to display the Transactional Detail Report.
1 From the Financial menu, select Audit Controls, and then Transaction Detail.Transaction Detail tab appears.
Figure 105. Transactional Detail tab and toolbar
2 In Start Date, select a date.
3 In End Date, select a date.
4 In Site, select one car wash site from the list.
5 In Devices, select one or more devices from the list.
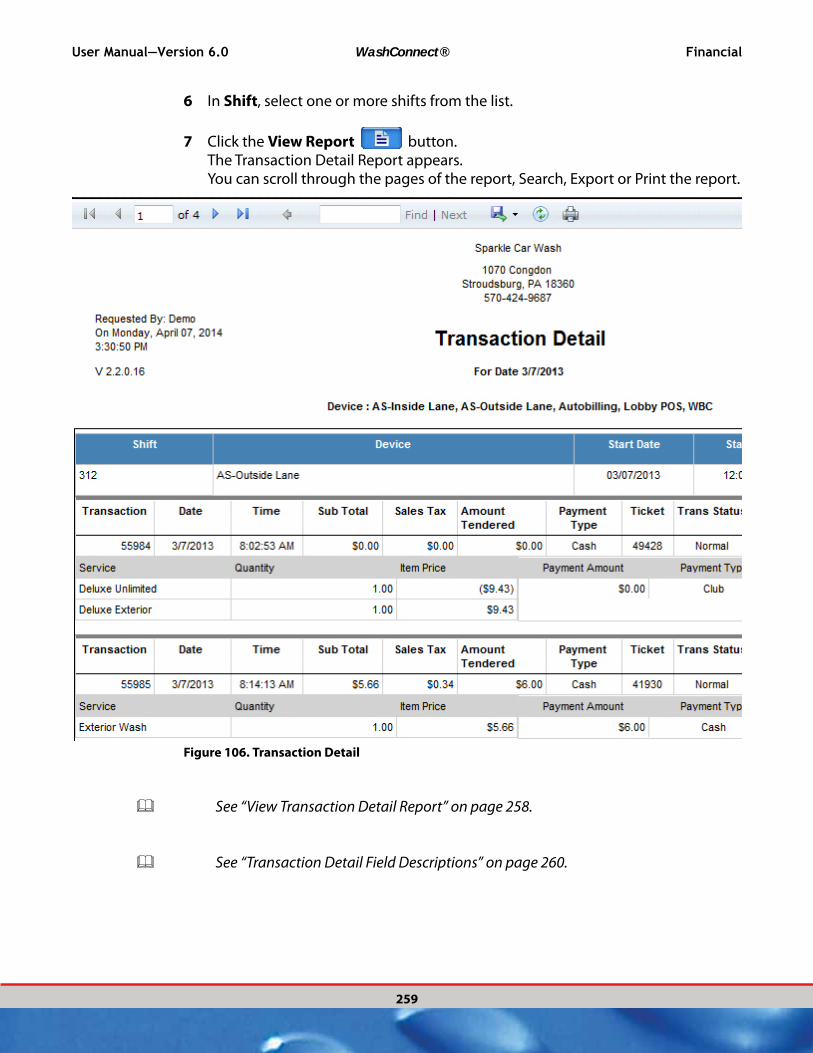
User Manual—Version 6.0 WashConnect® Financial
259
6 In Shift, select one or more shifts from the list.
7 Click the View Report button.The Transaction Detail Report appears.You can scroll through the pages of the report, Search, Export or Print the report.
Figure 106. Transaction Detail
See “View Transaction Detail Report” on page 258.
See “Transaction Detail Field Descriptions” on page 260.
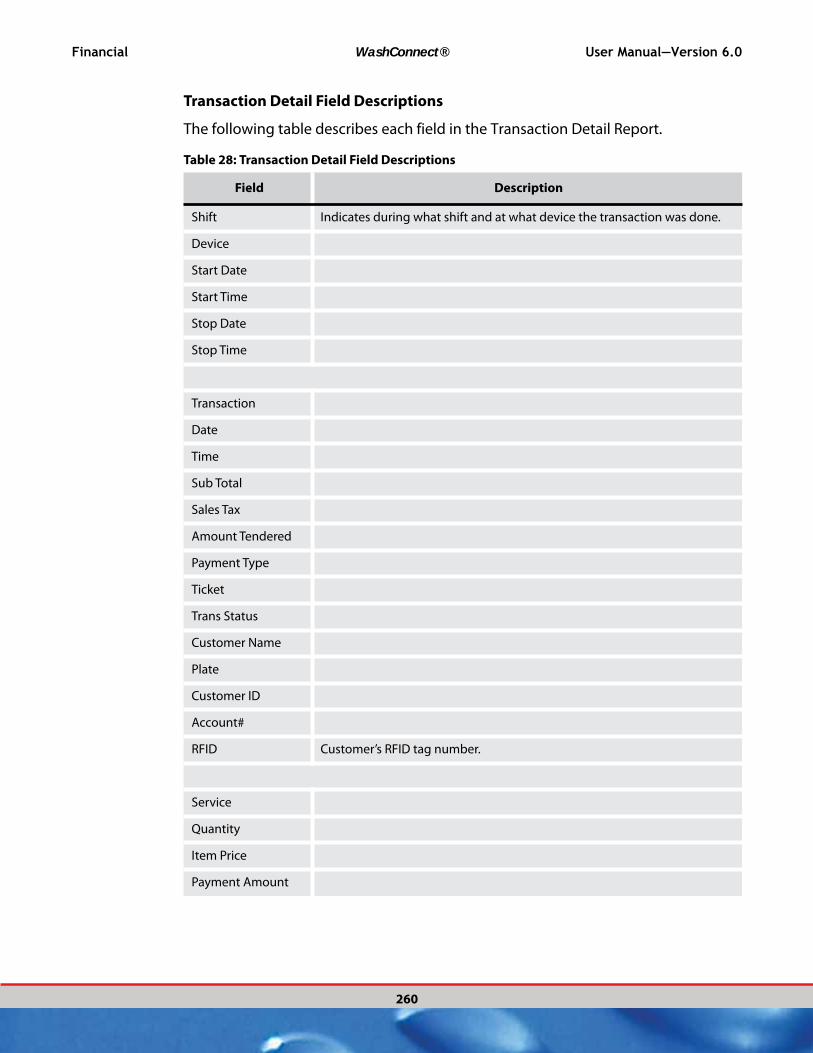
Financial WashConnect® User Manual—Version 6.0
260
Transaction Detail Field Descriptions
The following table describes each field in the Transaction Detail Report.
Table 28: Transaction Detail Field Descriptions
Field Description
Shift Indicates during what shift and at what device the transaction was done.
Device
Start Date
Start Time
Stop Date
Stop Time
Transaction
Date
Time
Sub Total
Sales Tax
Amount Tendered
Payment Type
Ticket
Trans Status
Customer Name
Plate
Customer ID
Account#
RFID Customer’s RFID tag number.
Service
Quantity
Item Price
Payment Amount
User Manual—Version 6.0 WashConnect® Financial
261
See “View Transaction Detail Report” on page 258.
See “Transaction Detail Field Descriptions” on page 260.
About Terminal Balance Report
See “View Terminal Balance Report” on page 261.
View Terminal Balance Report
You can select any date to view the ending total balance from the Terminal Balance Report.
1 From the Financial menu, select Audit Controls, and then Terminal Balance.
2 In Start Date, select a date.
3 Click the View Report button.The ending balance for the Date selected appears in the heading of the Terminal Balance Report.
Payment Type
Account
Auth Code
Table 28: Transaction Detail Field Descriptions
Field Description
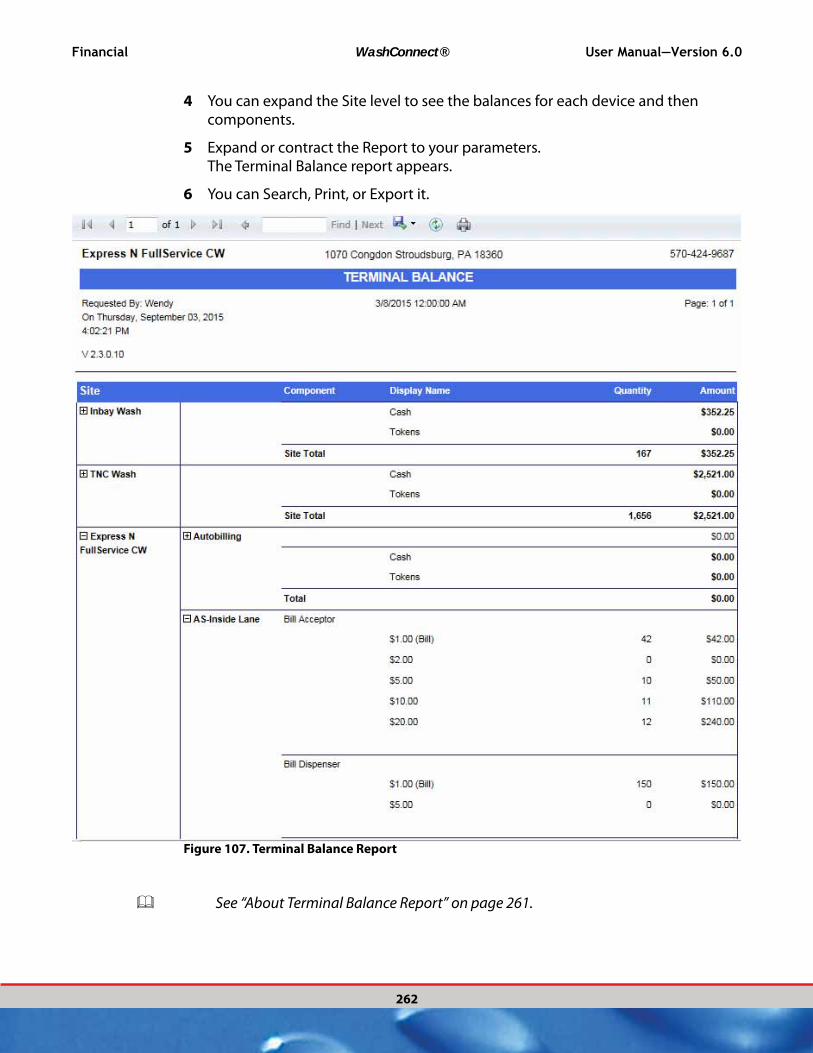
Financial WashConnect® User Manual—Version 6.0
262
4 You can expand the Site level to see the balances for each device and then components.
5 Expand or contract the Report to your parameters.The Terminal Balance report appears.
6 You can Search, Print, or Export it.
Figure 107. Terminal Balance Report
See “About Terminal Balance Report” on page 261.

User Manual—Version 6.0 WashConnect® Financial
263
Terminal Balance Field Descriptions
The following table describes each field in the Terminal Balance Report.
Table 29: Terminal Balance Report Descriptions
Field Description
Site
Component
Display Name
Quantity
Amount
See “View Terminal Balance Report” on page 261.
See “About Terminal Balance Report” on page 261.
About Sales Commission
See “About Commissions” on page 513.
See “View Sales Commission” on page 264.

Financial WashConnect® User Manual—Version 6.0
264
View Sales Commission
The Sales Commission Report requires that Schedules and Eligibility rules be configured and incorporated into a Position before it can be used. To view Sales Commission report, follow these steps.
NOTE: For sales commissions to be paid, a user must have a Commission Position
assigned, clocked in and signed in as Greeter from the POS terminal at the time of sale.
1 In From Date and To Date, set a date range by typing or selecting dates.
2 In Greeter, select a Greeter.
3 Click the View Report button.The Sales Commission Report appears.
4 You can Search, Print or Save the report.
Figure 108. Salesman Commission Report
See “About Sales Commission” on page 263.
See “About Commissions” on page 513.
User Manual—Version 6.0 WashConnect® Financial
265
About View Site Tickets
See “View Site Tickets” on page 265.
View Site Tickets
Follow these steps to view tickets for any day or date range from all or a specific status such as Fuel, Unpaid, Paid, etc..
1 In Start Date and End Date, set a date range by typing or selecting dates.
2 In Status, select All or one of the following:
▪ Created
▪ Fuel
▪ Unpaid
▪ Paid
▪ Washed
▪ Delete
▪ Upgrade
▪ etc.
–or–
▪ In Ticket ID, type the Ticket ID number.
3 Click the View Tickets button.

Financial WashConnect® User Manual—Version 6.0
266
The Ticket List appears.
Figure 109. View Site Tickets Example
See “About View Site Tickets” on page 265.

User Manual—Version 6.0 WashConnect® Financial
267
About the Services Washed Report
This report displays only those services that have been washed. The Services Washed Report records only PLUs that were sent to the Controller from Wash Connect and completed.
1 From the Financial menu, select Audit Controls, and then Services Washed.-or- In menu Search box, type Services Washed. The Services Washed tab appears.
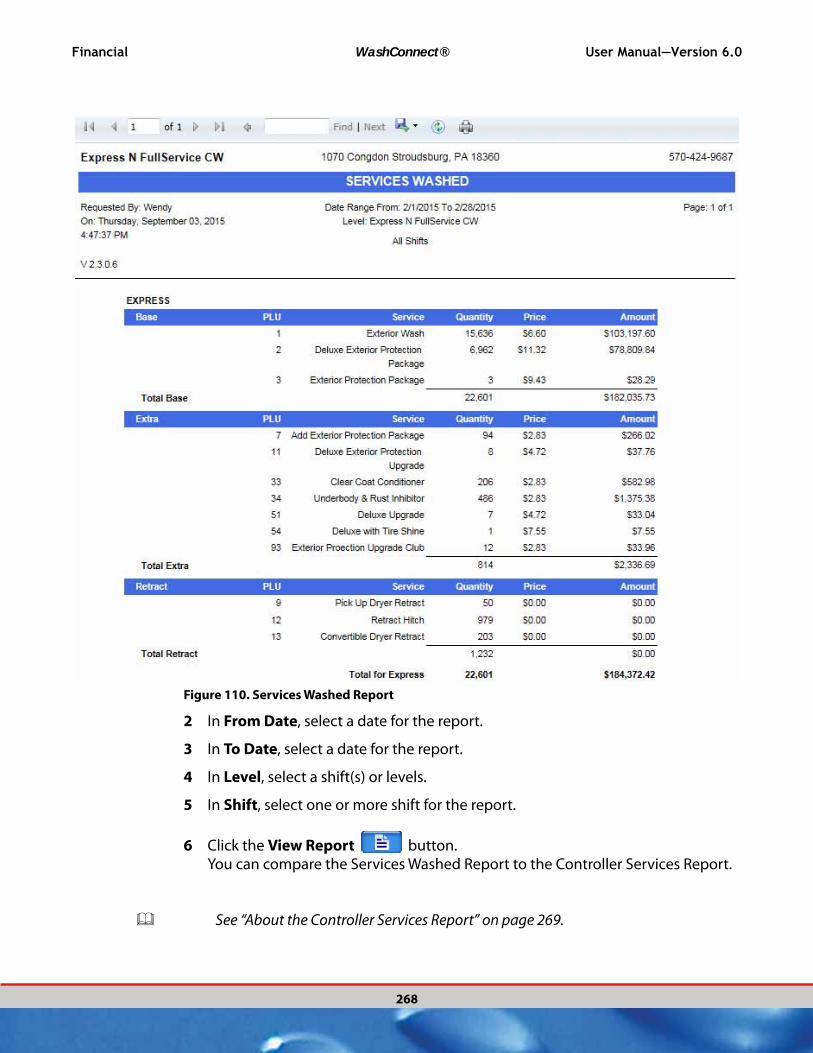
Financial WashConnect® User Manual—Version 6.0
268
Figure 110. Services Washed Report
2 In From Date, select a date for the report.
3 In To Date, select a date for the report.
4 In Level, select a shift(s) or levels.
5 In Shift, select one or more shift for the report.
6 Click the View Report button.You can compare the Services Washed Report to the Controller Services Report.
See “About the Controller Services Report” on page 269.

User Manual—Version 6.0 WashConnect® Financial
269
See “About the Shift Detail Report” on page 186.
About the Controller Services Report
See “View Controller Services Report” on page 269.
View Controller Services Report
This report shows the number of services provided by the controller for each washed car for a selected date range. It also tracks unloaded vehicles (cars washed, but not programmed with a base wash service).
1 From the Financial menu, select Audit Controls, and then Controller Services.The Controller Services tab appears.
2 In From Date, select a date for the report.
3 In To Date, select a date for the report.
4 In Level, select site(s) or level for the report.
5 In Shift, select one or more shift for the report.
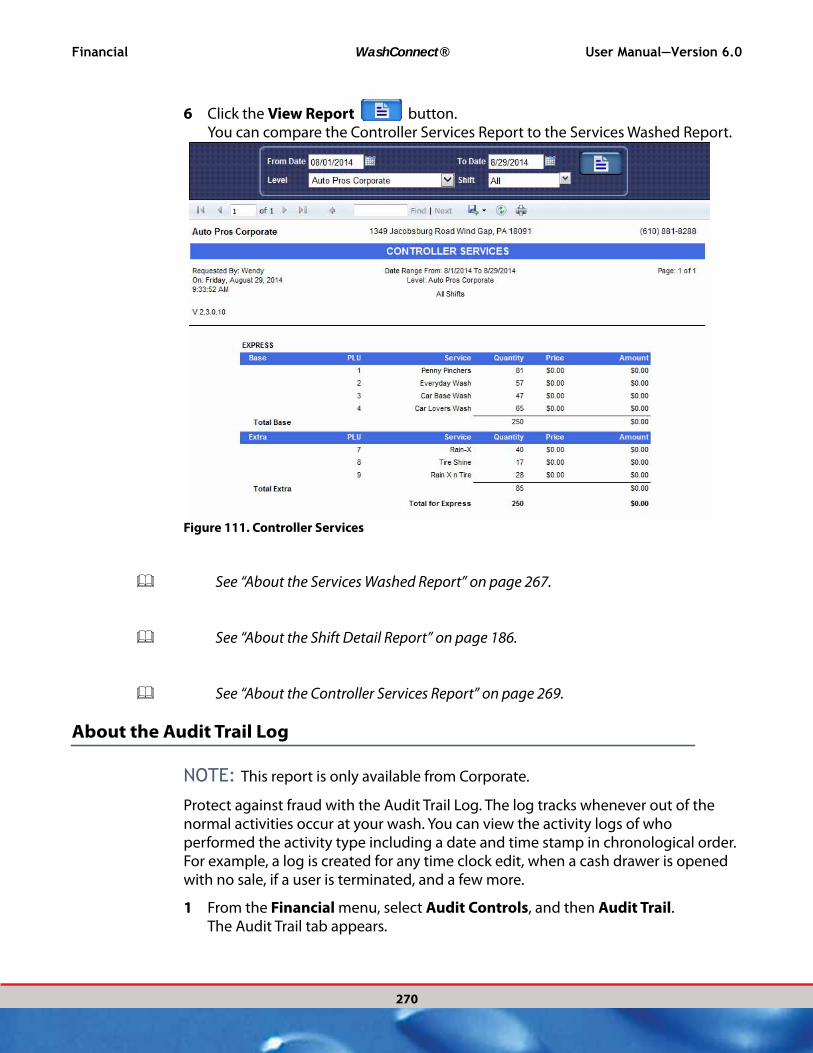
Financial WashConnect® User Manual—Version 6.0
270
6 Click the View Report button.You can compare the Controller Services Report to the Services Washed Report.
Figure 111. Controller Services
See “About the Services Washed Report” on page 267.
See “About the Shift Detail Report” on page 186.
See “About the Controller Services Report” on page 269.
About the Audit Trail Log
NOTE: This report is only available from Corporate.
Protect against fraud with the Audit Trail Log. The log tracks whenever out of the normal activities occur at your wash. You can view the activity logs of who performed the activity type including a date and time stamp in chronological order. For example, a log is created for any time clock edit, when a cash drawer is opened with no sale, if a user is terminated, and a few more.
1 From the Financial menu, select Audit Controls, and then Audit Trail.The Audit Trail tab appears.

User Manual—Version 6.0 WashConnect® Financial
271
2 In Start Date, select a date for the report.
3 In End Date, select a date for the report.
4 In Audit Log Type, select the type the report.
5 Click the View Report button.
Figure 112. Audit Trail Example
About Cash Management
Cash Management menu is comprised of three tools: Journals, Terminal Balances, and Operations Report.
1 Journals is a cash management tool to verify journal entries, print journal detail receipts, and safe actions.
2 Terminal Balances is a cash management tool. This tool allows you to view how much money is in each terminal in real time. You can view it by quantity or amount.

Financial WashConnect® User Manual—Version 6.0
272
3 The Operations Report is another cash management tool. This report displays the details of Beginning Balance, Adds, Transactions, Removes and Ending Balance for the shift on a given date.
See “About Journals” on page 272.
See “View Terminal Balances” on page 289.
See “About the Operations Report” on page 294.
About Journals
See “Journal Safe Actions” on page 280.
See “Search for a Journal Entry” on page 273.
See “View the Journal Entry History” on page 274.
See “About Journal History Actions” on page 276.
See “Verify or Edit a Journal Entry” on page 277.

User Manual—Version 6.0 WashConnect® Financial
273
See “Edit a Verified Journal Entry” on page 279.
Search for a Journal Entry
You can view journals for each device and shift combination. You cannot simultaneously view multiple shifts and multiple devices.
NOTE: If you are operating with a Safe connected to all devices, only the Safe
journals will appear as everything moves back and forth from the safe.
To search for a journal, follow these steps:
1 On the Financial menu, click Cash Management, and then click Journals. The Journals tab appears.
2 In the Start Date and End Date boxes, select a date range.
3 In the Site box, select a site.
4 In the Device box, select a device.
5 In the Shift box, select a shift.
6 In Show Journals box, click to select one of the following:
▪ Unverified (not yet manually verified)
▪ Unverified and Verified (not yet manually verified and manually verified)
▪ All (auto verified, unverified and manually verified.)
7 Click the Search button. The journals for that shift and device appears.
See “View the Journal Entry History” on page 274.
See “About Journal History Actions” on page 276.
See “Search for a Journal Entry” on page 273.

Financial WashConnect® User Manual—Version 6.0
274
See “Verify or Edit a Journal Entry” on page 277.
See “Edit a Verified Journal Entry” on page 279.
View the Journal Entry History
To view journal entry history, following these steps:
1 In the Financial menu, click Cash Management, and click Journals. The Journals tab appears.
2 In the Start Date and End Date boxes, select a date range.
3 In the Site box, select a site.
4 In the Device box, select a device.
5 In the Shift box, select a shift.
6 In Show Journals box, click to select one of the following:
▪ Unverified (not yet manually verified)
▪ Unverified and Verified (not yet manually verified and manually verified)
▪ All (auto verified, unverified and manually verified.)
7 Click the Search button. The journals for that shift and device appears.
8 Move the pointer over the journal entry.Cash detail will appear in a pop up.
Figure 113. Journal Entry Cash Detail Popup
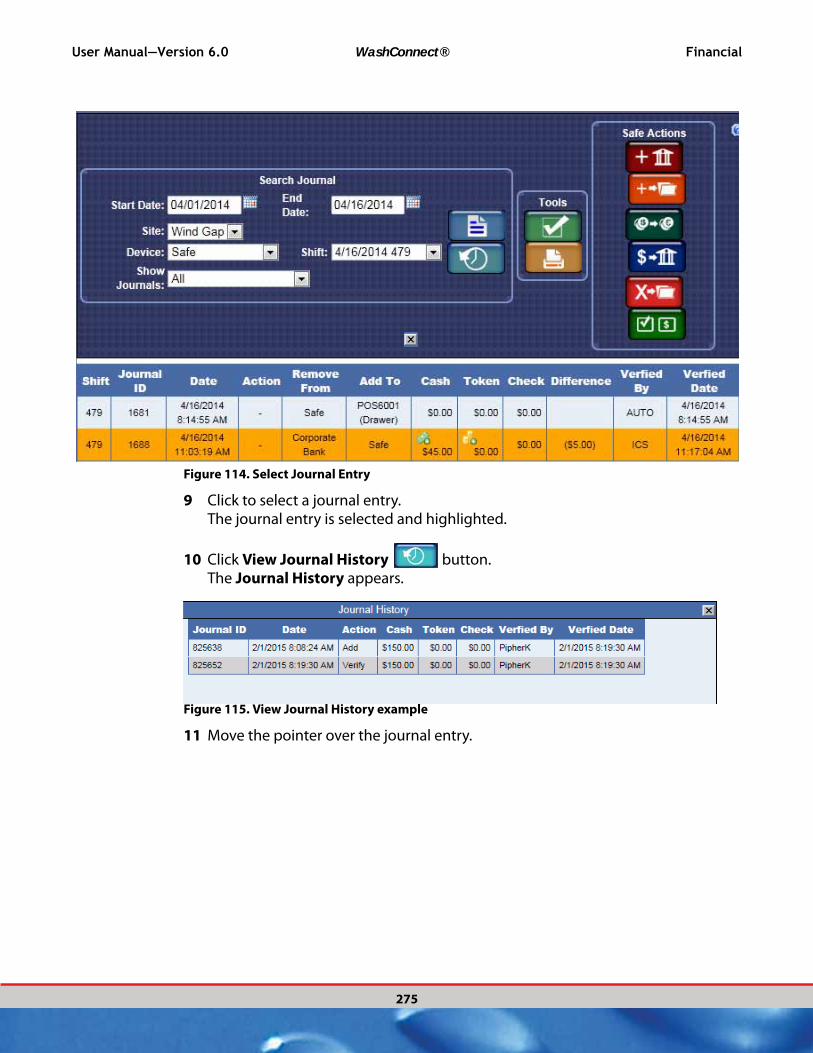
User Manual—Version 6.0 WashConnect® Financial
275
Figure 114. Select Journal Entry
9 Click to select a journal entry.The journal entry is selected and highlighted.
10 Click View Journal History button.The Journal History appears.
Figure 115. View Journal History example
11 Move the pointer over the journal entry.

Financial WashConnect® User Manual—Version 6.0
276
A pop-up window gives additional cash detail for the journal entry.
Figure 116. Journal History with a cash detail pop-up.
12 Click the Close button to exit the Journal History box.
See “Search for a Journal Entry” on page 273.
See “View the Journal Entry History” on page 274.
See “About Journal History Actions” on page 276.
See “Verify or Edit a Journal Entry” on page 277.
See “Edit a Verified Journal Entry” on page 279.
About Journal History Actions
The Action column shows what activity occurred for the journal entry. The following table describes each of the possible descriptions that can appear in the Action column.
Table 30: View Journal History and Verify Journal Action Descriptions
Label Description
Deposit Amount of funds added to the bank.
Add Amount of funds added to a device.
Verify Amount confirmed.

User Manual—Version 6.0 WashConnect® Financial
277
See “Search for a Journal Entry” on page 273.
See “View the Journal Entry History” on page 274.
See “About Journal History Actions” on page 276.
See “Edit a Verified Journal Entry” on page 279.
Verify or Edit a Journal Entry
Add and remove journal entries should be verified as soon as possible preferably on the same day by the person who did the add or remove. You can verify a journal entry from the Journals tab. Use the Verify command to confirm cash movements across your devices. For instance, use the Verify button when change is added to the drawer from the safe.
Auto Safe journal entries are added at midnight. It’s not recommended that every day the safe is verified and counted but from time to time, it’s good to verify the contents of the bank matches what the system has calculated.
You cannot verify an Ending Bank.
You cannot verify an Auto Journal entry.
To verify or edit an unverified entry, follow these steps:
1 Log in to WashConnect at the site level to verify an entry.
Remove Amount of money removed from a device.
BeginningBank Beginning Balance is the amount of funds in a device at the
beginning of its shift.
EndingBank Ending Balance is the amount of funds in a device at the end of its
shift.
Bank Deposit Amount of funds removed from a device.
Site Safe Deposit Amount of funds added to a device.
Edit Amount of funds edited at the device (e.g., using the service unit
screen on the Auto Sentry Flex). For example, Edit appears if you
verify a coin hopper, and then make changes at the Auto Sentry
Flex.
Table 30: View Journal History and Verify Journal Action Descriptions (Continued)
Label Description

Financial WashConnect® User Manual—Version 6.0
278
NOTE: If you are not logged in at the site level, then the following message
appears: Journals from selected site cannot be edited/verified.
2 In the Financial menu, click Cash Management, and then click Journals. The Journals tab appears.
3 Search for an unverified Journal entry, and then click to select the entry. The entry is selected.
4 Click the Verify button.
Figure 117. Verify Journals Dialog Box
5 Verify totals by typing amounts in the New Quantity column. Make changes, if necessary.

User Manual—Version 6.0 WashConnect® Financial
279
6 Click the Save button. The entry is verified with any changes and now appears in the Journal as verified. The Verified Date column shows the date and time the journal entry was verified. The Verified By column will display who was logged in when the entry was verified.
Figure 118. Journals Verified Time and Date Stamp
See “Search for a Journal Entry” on page 273.
See “View the Journal Entry History” on page 274.
See “About Journal History Actions” on page 276.
See “Edit a Verified Journal Entry” on page 279.
Edit a Verified Journal Entry
You can edit a journal entry that has already been verified.
To edit a verified journal entry, follow these steps:
1 In the Financial menu, click Cash Management, and then click Journals. The Journals tab appears.
2 Search for a Verified Journal entry, and then click to select the entry. The Verified entry is selected.
3 Click the Verify button.4
A Verify Journal message Warning! Journal is verified Are you sure you want to verify again. appears.
5 Click Yes.

Financial WashConnect® User Manual—Version 6.0
280
6 Type changes in the New Qty. boxes.
7 Click the Save button.The entry is adjusted to reflect the changes.
Figure 119. Verified Journal
See “Search for a Journal Entry” on page 273.
See “View the Journal Entry History” on page 274.
See “About Journal History Actions” on page 276.
See “Verify or Edit a Journal Entry” on page 277.
Journal Safe Actions
Manage your physical safe and virtual safe with the Safe Actions section from the Journals tab. In the Safe Actions toolbox, you can quickly make a safe journal entry. The six Safe Actions buttons will allow a valid user to make additions to and removals from the safe as well as convert currency and verify Safe Balance:
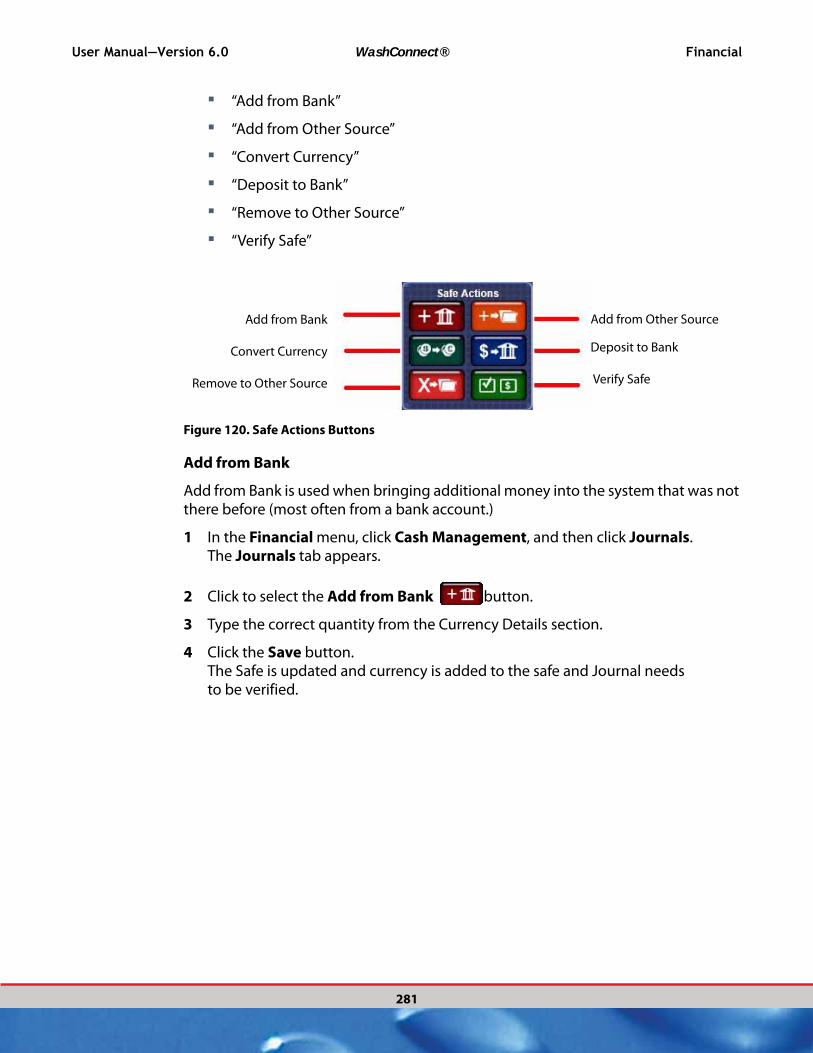
User Manual—Version 6.0 WashConnect® Financial
281
▪ “Add from Bank”
▪ “Add from Other Source”
▪ “Convert Currency”
▪ “Deposit to Bank”
▪ “Remove to Other Source”
▪ “Verify Safe”
Add from Bank
Convert Currency
Remove to Other Source
Add from Other Source
Deposit to Bank
Verify Safe
Figure 120. Safe Actions Buttons
Add from Bank
Add from Bank is used when bringing additional money into the system that was not there before (most often from a bank account.)
1 In the Financial menu, click Cash Management, and then click Journals. The Journals tab appears.
2 Click to select the Add from Bank button.
3 Type the correct quantity from the Currency Details section.
4 Click the Save button.The Safe is updated and currency is added to the safe and Journal needs to be verified.

Financial WashConnect® User Manual—Version 6.0
282
Figure 121. Safe Action - Add from Bank
See “Journal Safe Actions” on page 280.
Add from Other Source
Add from another Source is used when bringing additional money into the system from another source other than bank account. From the Safe Actions toolbox, you can quickly make a safe journal entry.
1 In the Financial menu, click Cash Management, and then click Journals. The Journals tab appears.
2 Click to select the Add from Other Source button.
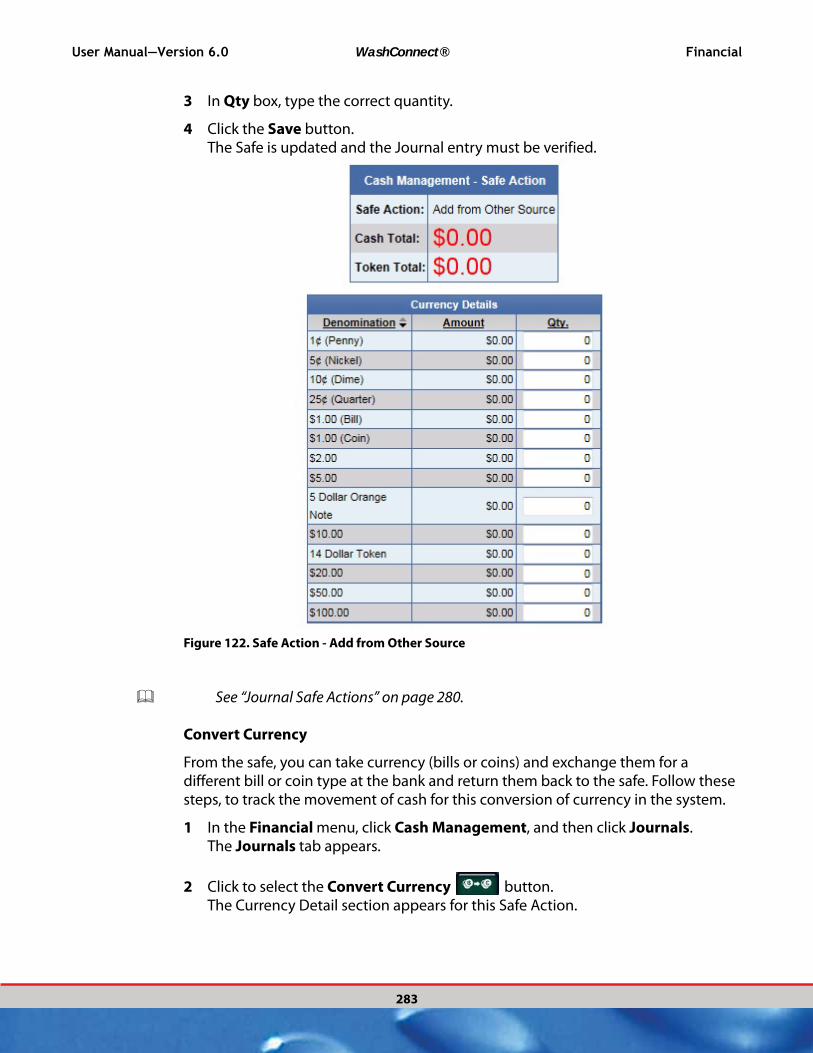
User Manual—Version 6.0 WashConnect® Financial
283
3 In Qty box, type the correct quantity.
4 Click the Save button.The Safe is updated and the Journal entry must be verified.
Figure 122. Safe Action - Add from Other Source
See “Journal Safe Actions” on page 280.
Convert Currency
From the safe, you can take currency (bills or coins) and exchange them for a different bill or coin type at the bank and return them back to the safe. Follow these steps, to track the movement of cash for this conversion of currency in the system.
1 In the Financial menu, click Cash Management, and then click Journals. The Journals tab appears.
2 Click to select the Convert Currency button.The Currency Detail section appears for this Safe Action.
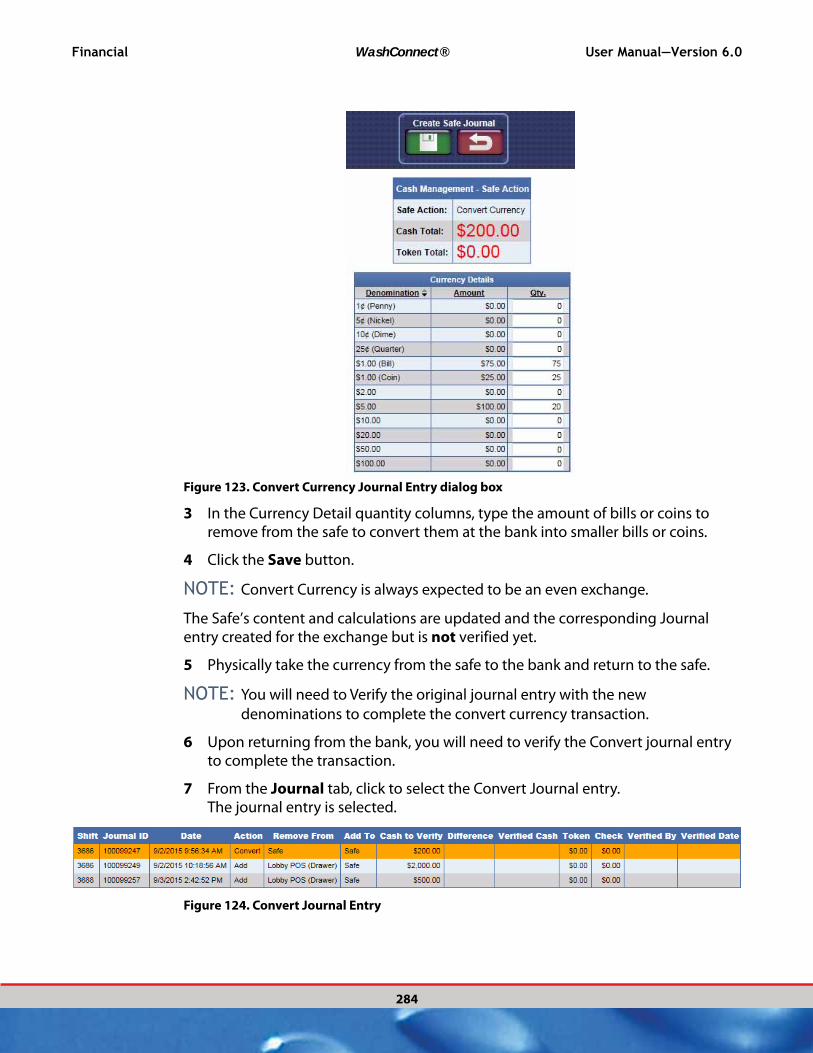
Financial WashConnect® User Manual—Version 6.0
284
Figure 123. Convert Currency Journal Entry dialog box
3 In the Currency Detail quantity columns, type the amount of bills or coins to remove from the safe to convert them at the bank into smaller bills or coins.
4 Click the Save button.
NOTE: Convert Currency is always expected to be an even exchange.
The Safe’s content and calculations are updated and the corresponding Journal entry created for the exchange but is not verified yet.
5 Physically take the currency from the safe to the bank and return to the safe.
NOTE: You will need to Verify the original journal entry with the new
denominations to complete the convert currency transaction.
6 Upon returning from the bank, you will need to verify the Convert journal entry to complete the transaction.
7 From the Journal tab, click to select the Convert Journal entry.The journal entry is selected.
Figure 124. Convert Journal Entry

User Manual—Version 6.0 WashConnect® Financial
285
8 Click the Verify button.
Figure 125. Safe Action - Convert Currency
9 In the New Qty. column, type the correct quantities of the Converted Currency that you are putting back into the safe.The system tracks Convert Currency by creating a journal entry and it’s now verified.
See “Journal Safe Actions” on page 280.
Deposit to Bank
For safety reason, make a bank deposit during bank hours. With WashConnect system, you can remove money from the safe any time and make a deposit at the bank when it’s convenient for you.
NOTE: If you are breaking bills to make change or converting money, that needs to
be tracked separately from your deposit.
From the Safe Actions toolbox, you can quickly make a Deposit to Bank:
1 In the Financial menu, click Cash Management, and then click Journals. The Journals tab appears.
2 In the Safe Actions section, click the Deposit to Bank button.The Currency Detail section appears for this Safe Action.
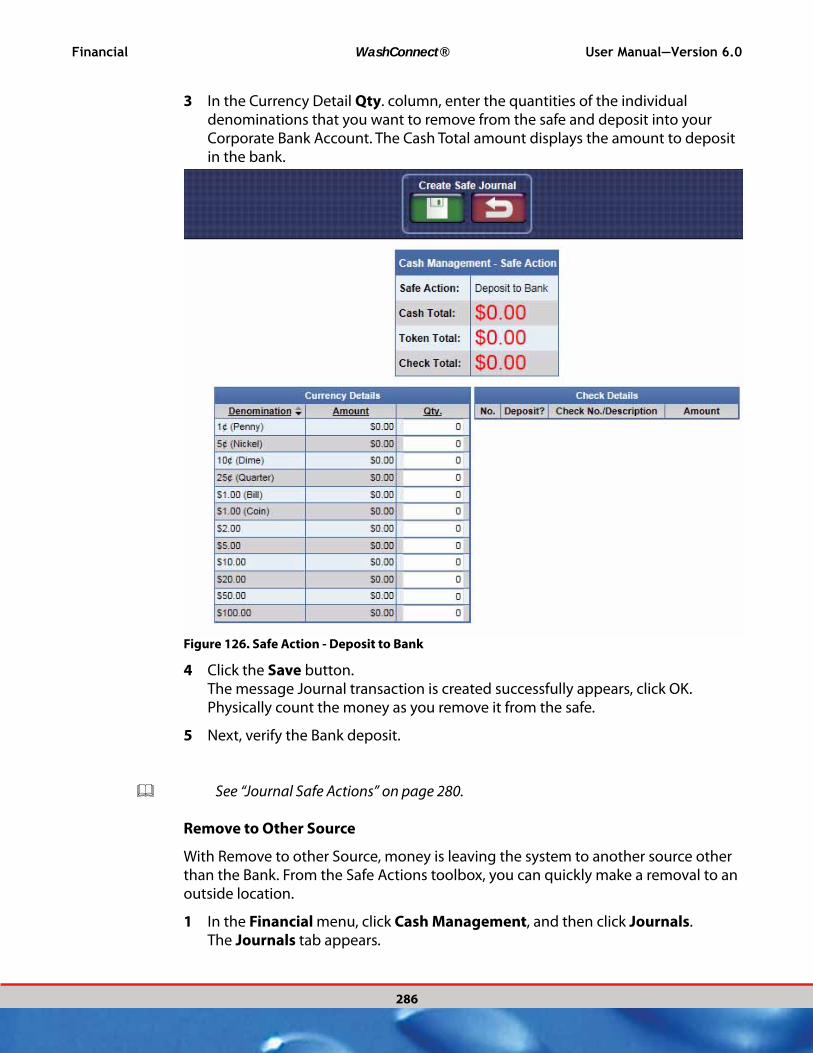
Financial WashConnect® User Manual—Version 6.0
286
3 In the Currency Detail Qty. column, enter the quantities of the individual denominations that you want to remove from the safe and deposit into your Corporate Bank Account. The Cash Total amount displays the amount to deposit in the bank.
Figure 126. Safe Action - Deposit to Bank
4 Click the Save button.The message Journal transaction is created successfully appears, click OK. Physically count the money as you remove it from the safe.
5 Next, verify the Bank deposit.
See “Journal Safe Actions” on page 280.
Remove to Other Source
With Remove to other Source, money is leaving the system to another source other than the Bank. From the Safe Actions toolbox, you can quickly make a removal to an outside location.
1 In the Financial menu, click Cash Management, and then click Journals. The Journals tab appears.
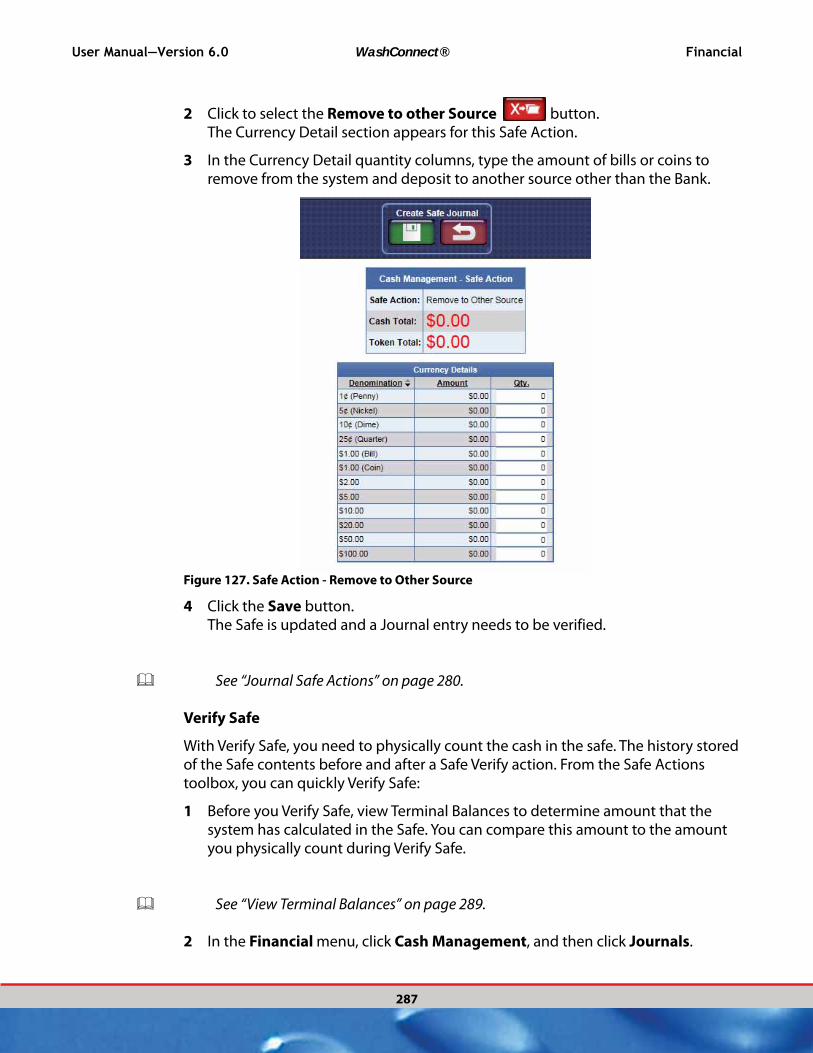
User Manual—Version 6.0 WashConnect® Financial
287
2 Click to select the Remove to other Source button.The Currency Detail section appears for this Safe Action.
3 In the Currency Detail quantity columns, type the amount of bills or coins to remove from the system and deposit to another source other than the Bank.
Figure 127. Safe Action - Remove to Other Source
4 Click the Save button.The Safe is updated and a Journal entry needs to be verified.
See “Journal Safe Actions” on page 280.
Verify Safe
With Verify Safe, you need to physically count the cash in the safe. The history stored of the Safe contents before and after a Safe Verify action. From the Safe Actions toolbox, you can quickly Verify Safe:
1 Before you Verify Safe, view Terminal Balances to determine amount that the system has calculated in the Safe. You can compare this amount to the amount you physically count during Verify Safe.
See “View Terminal Balances” on page 289.
2 In the Financial menu, click Cash Management, and then click Journals.
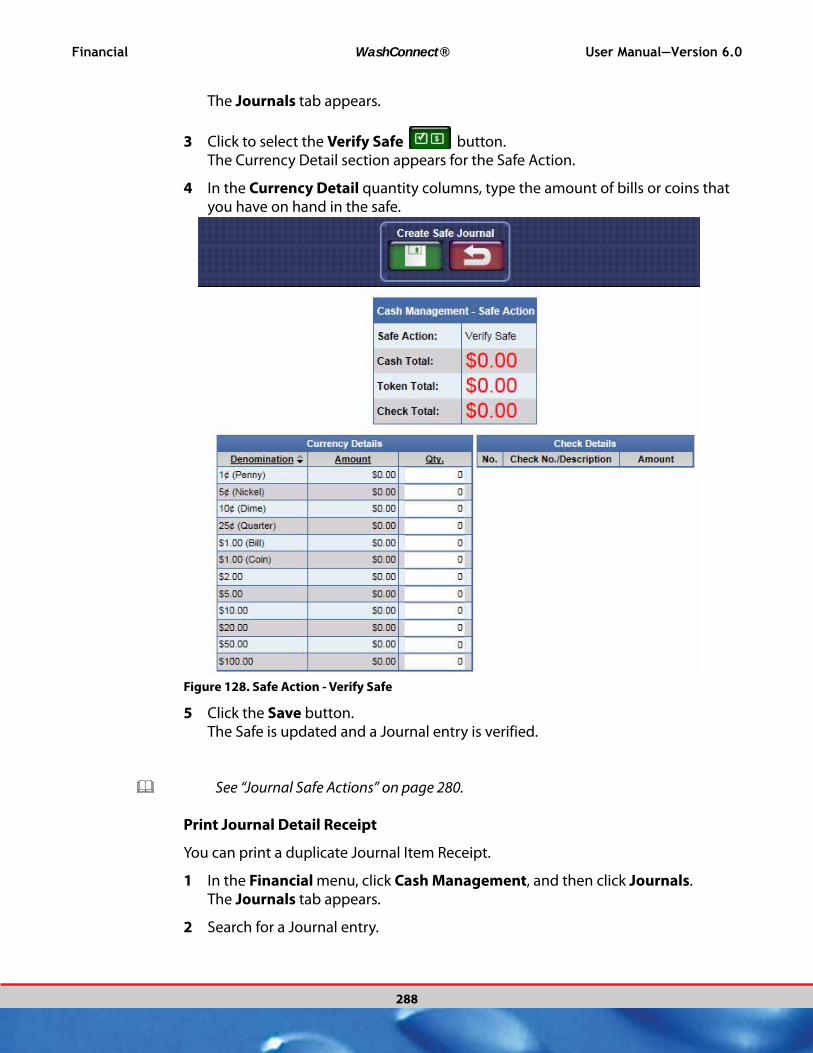
Financial WashConnect® User Manual—Version 6.0
288
The Journals tab appears.
3 Click to select the Verify Safe button.The Currency Detail section appears for the Safe Action.
4 In the Currency Detail quantity columns, type the amount of bills or coins that you have on hand in the safe.
Figure 128. Safe Action - Verify Safe
5 Click the Save button.The Safe is updated and a Journal entry is verified.
See “Journal Safe Actions” on page 280.
Print Journal Detail Receipt
You can print a duplicate Journal Item Receipt.
1 In the Financial menu, click Cash Management, and then click Journals. The Journals tab appears.
2 Search for a Journal entry.

User Manual—Version 6.0 WashConnect® Financial
289
3 Click to select the journal entry.The journal entry is highlighted.
4 Click the Print button.The Journal Receipt prints.
NOTE: This print button will only appear if there is a printer set up for the Site.
See “About Journals” on page 272.
About Terminal Balances
See “View Terminal Balances” on page 289.
See “About Terminal Balance Report” on page 261.
View Terminal Balances
Terminal Balances is a cash management tool. You can view exactly how much money is in each device in real time by quantity or amount.
1 From the Financial menu, select Cash Management, and then Terminal Balances.The Terminal Balances tab appears.
2 In Site, select a site or select All to display the Terminal Balances.
3 In View, select Quantity or Amount to display the Terminal Balances Report.
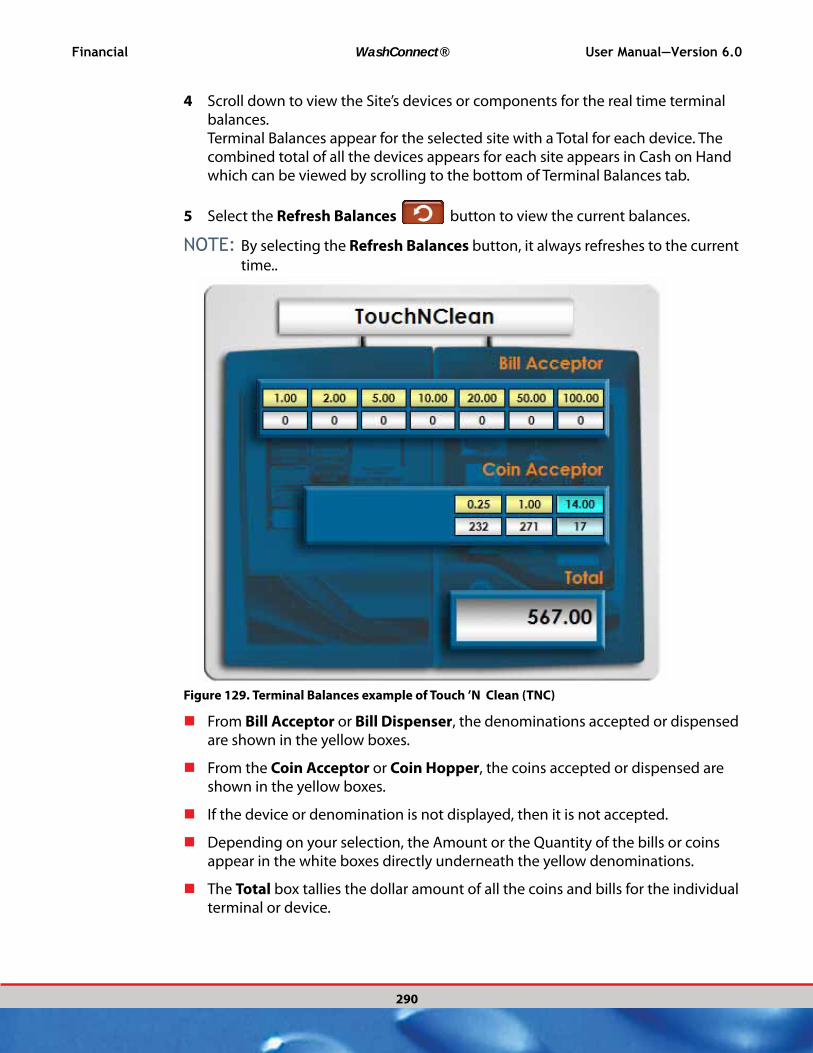
Financial WashConnect® User Manual—Version 6.0
290
4 Scroll down to view the Site’s devices or components for the real time terminal balances.Terminal Balances appear for the selected site with a Total for each device. The combined total of all the devices appears for each site appears in Cash on Hand which can be viewed by scrolling to the bottom of Terminal Balances tab.
5 Select the Refresh Balances button to view the current balances.
NOTE: By selecting the Refresh Balances button, it always refreshes to the current
time..
Figure 129. Terminal Balances example of Touch ’N Clean (TNC)
From Bill Acceptor or Bill Dispenser, the denominations accepted or dispensed are shown in the yellow boxes.
From the Coin Acceptor or Coin Hopper, the coins accepted or dispensed are shown in the yellow boxes.
If the device or denomination is not displayed, then it is not accepted.
Depending on your selection, the Amount or the Quantity of the bills or coins appear in the white boxes directly underneath the yellow denominations.
The Total box tallies the dollar amount of all the coins and bills for the individual terminal or device.

User Manual—Version 6.0 WashConnect® Financial
291
Set an alert email to be sent when device is low on cash. See “Subscribe to Email Alerts” on page 497.
Figure 130. Terminal Balances AS - Flex Far Lane
From the Terminal Balances tab, you are only able to view a snapshot of the current cash amounts in the devices or the terminal balances in real time.
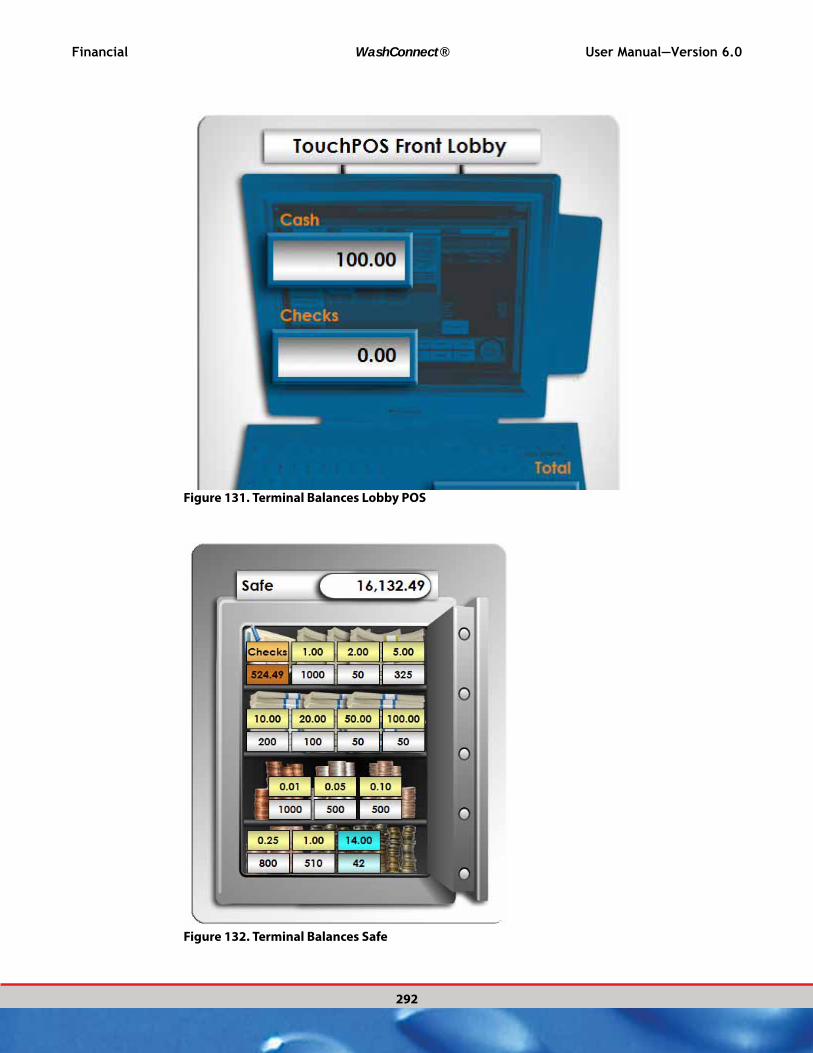
Financial WashConnect® User Manual—Version 6.0
292
Figure 131. Terminal Balances Lobby POS
Figure 132. Terminal Balances Safe

User Manual—Version 6.0 WashConnect® Financial
293
6 Scroll down to view all the terminals that accept cash or checks at the selected site.You can view all the individual terminals Bills, Coins of the Auto Sentries and the Touch ’N Cleans. The POS cash drawers do not keep track of which bills and coins are received and given out as change. POS Cash is simply totaled as well as Checks.
7 Scroll to the bottom and view the collective Cash On Hand of all the payment terminals.You can view the total of all the terminals for the selected site(s).
Figure 133. Terminal Balances Cash On Hand
See “About Terminal Balances” on page 289.
See “About Terminal Balance Report” on page 261.

Financial WashConnect® User Manual—Version 6.0
294
About the Operations Report
See “View Operations Report” on page 294.
View Operations Report
You can review the cash management Operations Report from a Particular Shift Date and Site.
1 From the Financial menu, select Cash Management, and then Operations Report.The Operation Report tab appears.
2 In Shift Date, select a date for the report.
3 In Site, select one or more sites for the report.
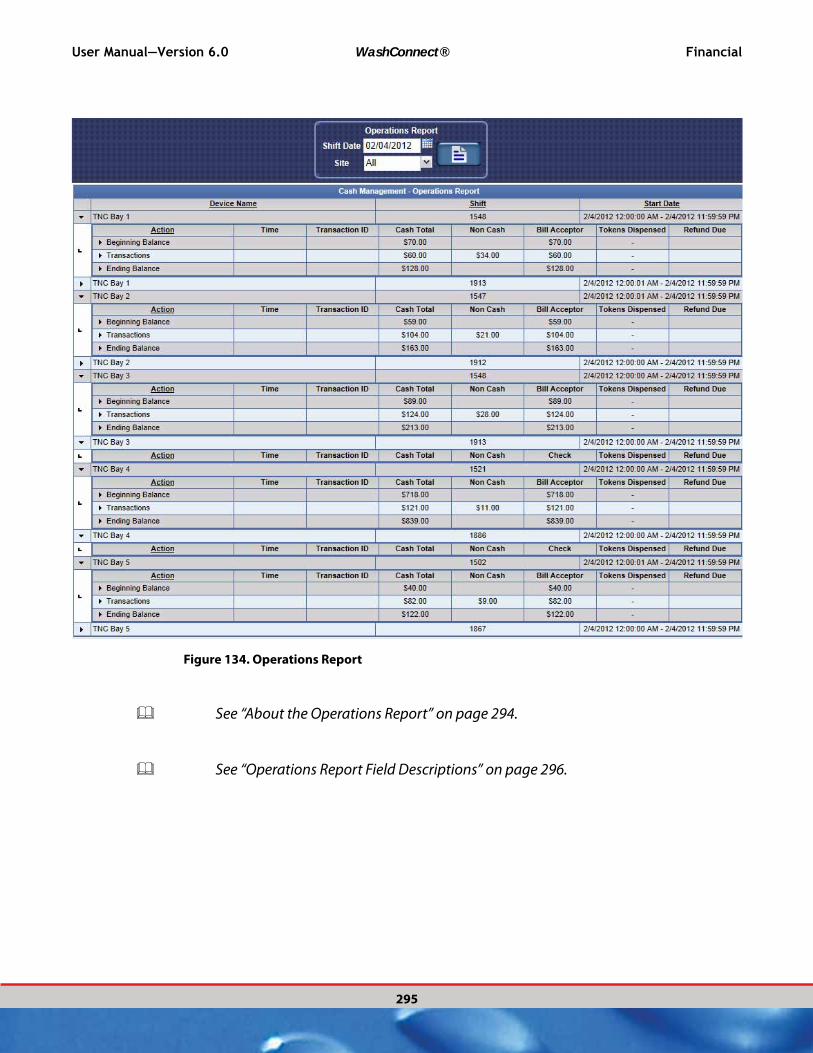
User Manual—Version 6.0 WashConnect® Financial
295
Figure 134. Operations Report
See “About the Operations Report” on page 294.
See “Operations Report Field Descriptions” on page 296.

Financial WashConnect® User Manual—Version 6.0
296
Operations Report Field Descriptions
Table 31: Operations Report field descriptions
Label Description
Device Name The name of the Device.
Shift The Shift number assigned by WashConnect®.
Start Date The date range including the start date and time and end date and
time.
Action General Ledger description for the action.
Time The time stamp.
Transaction ID The Transaction ID for the General ledger entry.
Cash Total The total amount of the entry.
Non Cash
Bill Acceptor The amount in Bill Acceptor for the shift.
Tokens Dispensed Tokens dispensed.
Refund Due Total dollar amount due to customers that are owed a refund from
the Auto Sentry. The Refund Due amount does not carry over to
the next day. Refunds that are not paid out during the same shift,
will cause an overage that will be included in the total cash
amount for the day.
See “About the Operations Report” on page 294.
See “View Operations Report” on page 294.
About Ticket Redeemed
Track fuel tickets in WashConnect® with two Ticket Redeemed reports: Summary and Detail. Both reports are available for Fuel Shifts only.
See “About Ticket Redeemed Summary” on page 297.
See “About Ticket Redeemed Detail” on page 299.
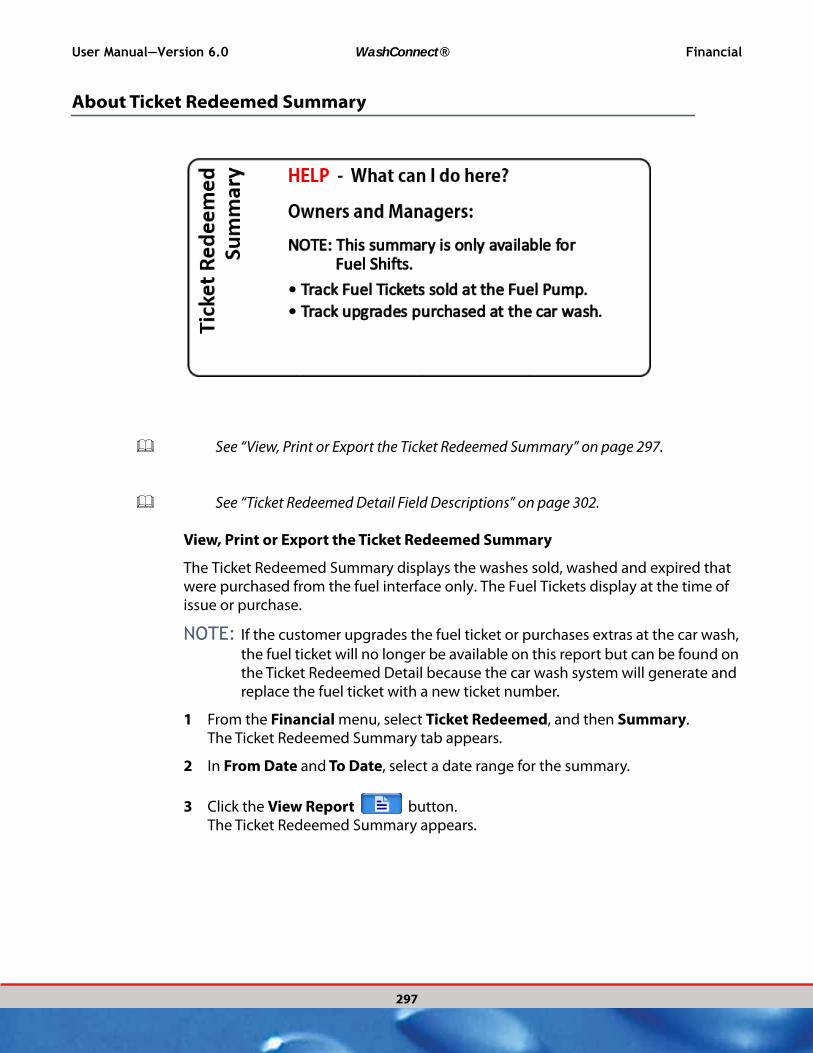
User Manual—Version 6.0 WashConnect® Financial
297
About Ticket Redeemed Summary
See “View, Print or Export the Ticket Redeemed Summary” on page 297.
See “Ticket Redeemed Detail Field Descriptions” on page 302.
View, Print or Export the Ticket Redeemed Summary
The Ticket Redeemed Summary displays the washes sold, washed and expired that were purchased from the fuel interface only. The Fuel Tickets display at the time of issue or purchase.
NOTE: If the customer upgrades the fuel ticket or purchases extras at the car wash,
the fuel ticket will no longer be available on this report but can be found on the Ticket Redeemed Detail because the car wash system will generate and replace the fuel ticket with a new ticket number.
1 From the Financial menu, select Ticket Redeemed, and then Summary.The Ticket Redeemed Summary tab appears.
2 In From Date and To Date, select a date range for the summary.
3 Click the View Report button.The Ticket Redeemed Summary appears.

Financial WashConnect® User Manual—Version 6.0
298
4 Click the Print Report button from the Report toolbar.
Figure 135. Ticket Redeemed Summary
Important: If the originating wash was purchased as a fuel ticket and the customer upgraded or purchased extras at the car wash, you can view these tickets from Ticket Redeemed Detail Report in Status Upgraded.
5 Click the Export button to export the Ticket Redeemed Summary file.
See “About Ticket Redeemed Detail” on page 299.
See “About Ticket Redeemed” on page 296.
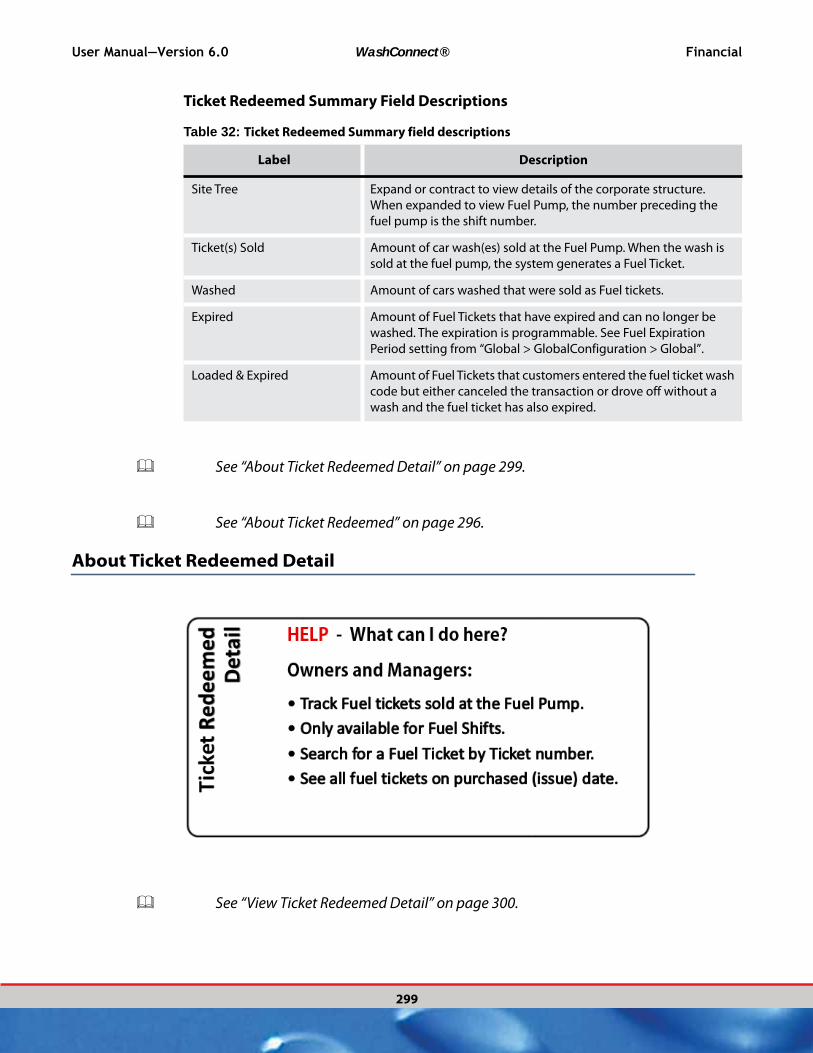
User Manual—Version 6.0 WashConnect® Financial
299
Ticket Redeemed Summary Field Descriptions
Table 32: Ticket Redeemed Summary field descriptions
Label Description
Site Tree Expand or contract to view details of the corporate structure.
When expanded to view Fuel Pump, the number preceding the
fuel pump is the shift number.
Ticket(s) Sold Amount of car wash(es) sold at the Fuel Pump. When the wash is
sold at the fuel pump, the system generates a Fuel Ticket.
Washed Amount of cars washed that were sold as Fuel tickets.
Expired Amount of Fuel Tickets that have expired and can no longer be
washed. The expiration is programmable. See Fuel Expiration
Period setting from “Global > GlobalConfiguration > Global”.
Loaded & Expired Amount of Fuel Tickets that customers entered the fuel ticket wash
code but either canceled the transaction or drove off without a
wash and the fuel ticket has also expired.
See “About Ticket Redeemed Detail” on page 299.
See “About Ticket Redeemed” on page 296.
About Ticket Redeemed Detail
See “View Ticket Redeemed Detail” on page 300.

Financial WashConnect® User Manual—Version 6.0
300
See “Ticket Redeemed Detail Field Descriptions” on page 302.
See “Search for a Fuel Ticket Number” on page 302.
View Ticket Redeemed Detail
1 Track fuel tickets sold at the Fuel Pump and any upgrades purchased at the car wash.
NOTE: This report is only available for fuel shifts.
2 From the Financial menu, select Ticket Redeemed, and then Detail.The Ticket Redeemed Detail tab appears.
3 In From Date and To Date, select a date range for the report.
4 From the Level drop-down box, select a Level within your Corporate structure.
See “About Create Levels” on page 631.
5 In Shift, select one or more shifts.
6 Click the View Report button.The Ticket Redeemed Detail Report appears. From Figure 136, “Ticket Redeemed Detail,” you can see all the Fuel Tickets that were purchased (issued) on 5/28/14 at Auto Pro’s Express during All shifts are listed in this report. You can see Fuel Ticket number 96403 was washed on 6/2/14. Fuel Ticket 96238 was upgraded and washed on 5/28/14.
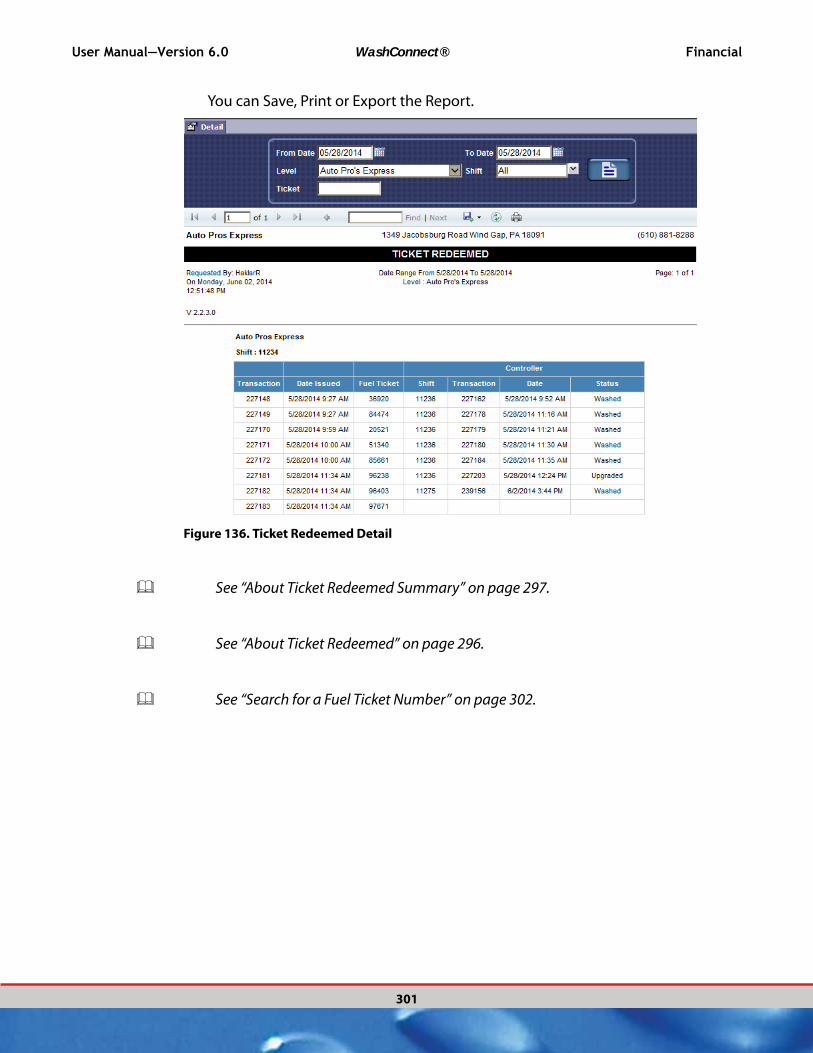
User Manual—Version 6.0 WashConnect® Financial
301
You can Save, Print or Export the Report.
Figure 136. Ticket Redeemed Detail
See “About Ticket Redeemed Summary” on page 297.
See “About Ticket Redeemed” on page 296.
See “Search for a Fuel Ticket Number” on page 302.
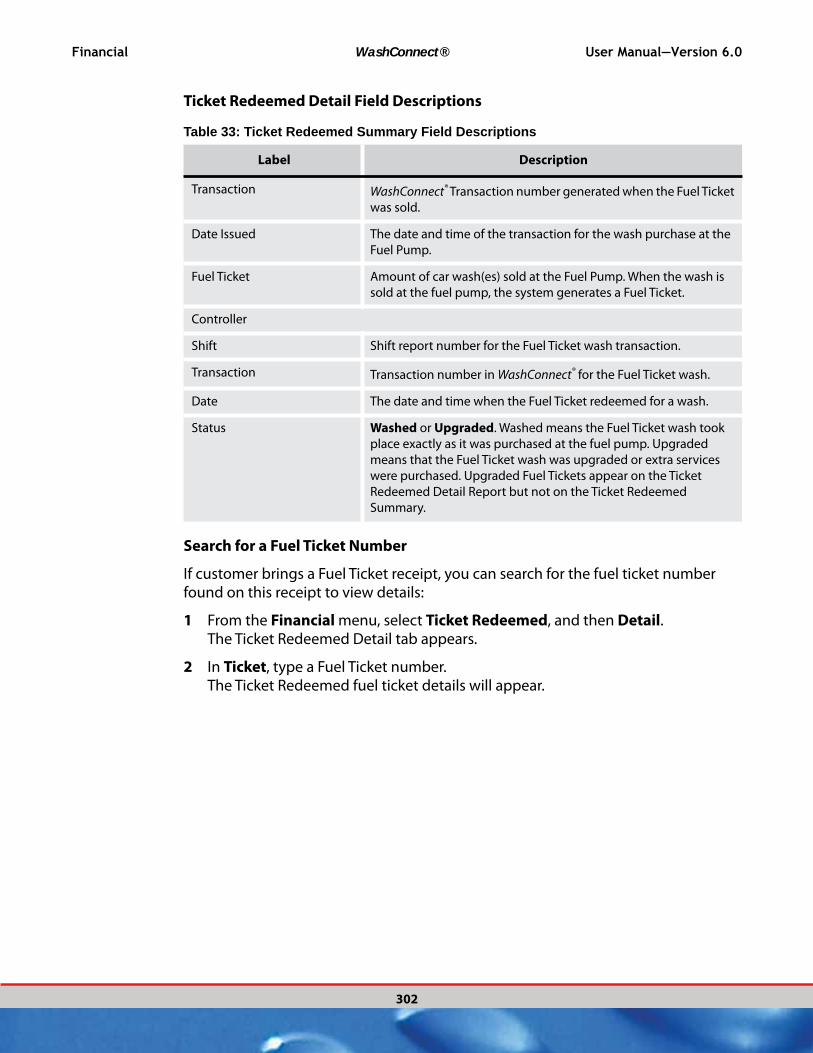
Financial WashConnect® User Manual—Version 6.0
302
Ticket Redeemed Detail Field Descriptions
Table 33: Ticket Redeemed Summary Field Descriptions
Label Description
Transaction WashConnect® Transaction number generated when the Fuel Ticket
was sold.
Date Issued The date and time of the transaction for the wash purchase at the
Fuel Pump.
Fuel Ticket Amount of car wash(es) sold at the Fuel Pump. When the wash is
sold at the fuel pump, the system generates a Fuel Ticket.
Controller
Shift Shift report number for the Fuel Ticket wash transaction.
Transaction Transaction number in WashConnect® for the Fuel Ticket wash.
Date The date and time when the Fuel Ticket redeemed for a wash.
Status Washed or Upgraded. Washed means the Fuel Ticket wash took
place exactly as it was purchased at the fuel pump. Upgraded
means that the Fuel Ticket wash was upgraded or extra services
were purchased. Upgraded Fuel Tickets appear on the Ticket
Redeemed Detail Report but not on the Ticket Redeemed
Summary.
Search for a Fuel Ticket Number
If customer brings a Fuel Ticket receipt, you can search for the fuel ticket number found on this receipt to view details:
1 From the Financial menu, select Ticket Redeemed, and then Detail.The Ticket Redeemed Detail tab appears.
2 In Ticket, type a Fuel Ticket number.The Ticket Redeemed fuel ticket details will appear.
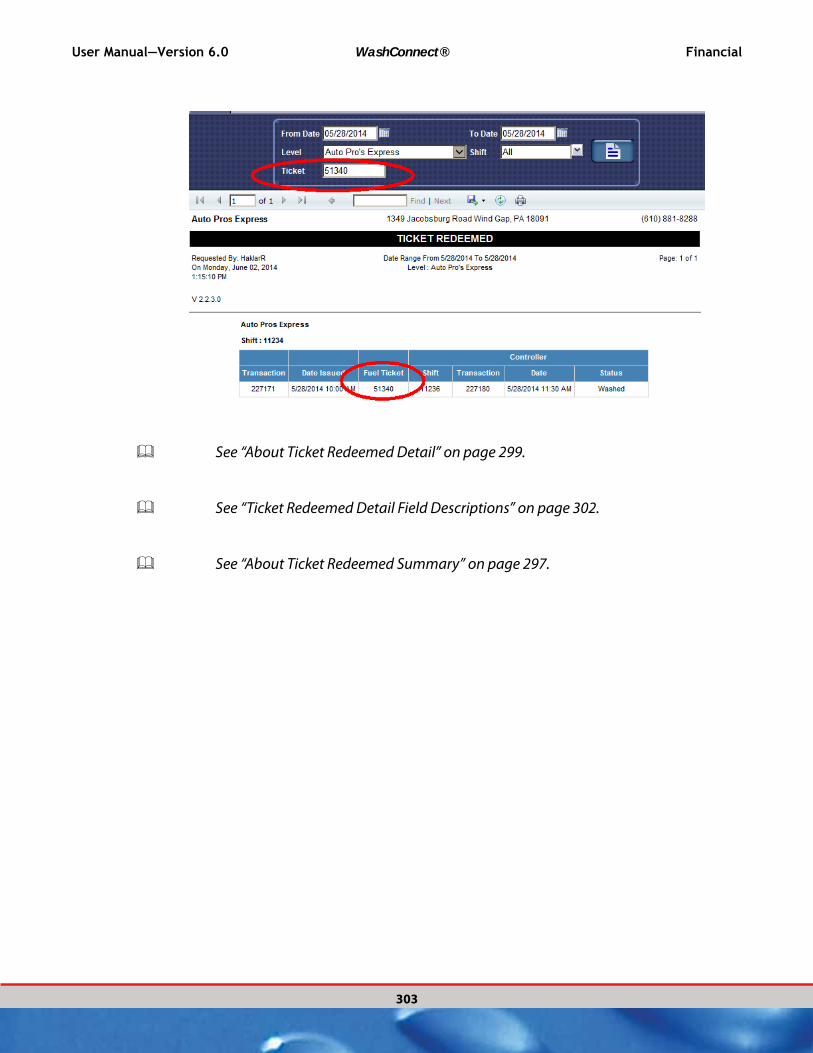
User Manual—Version 6.0 WashConnect® Financial
303
See “About Ticket Redeemed Detail” on page 299.
See “Ticket Redeemed Detail Field Descriptions” on page 302.
See “About Ticket Redeemed Summary” on page 297.
Financial WashConnect® User Manual—Version 6.0
304

User Manual—Version 6.0 WashConnect® Performance
305
CHAPTER 7:
PERFORMANCE
The Performance menu includes the following reports:
Dashboard
Vehicle Performance
Performance Gauge
Sales Distribution
TouchNClean Usage (Installed TouchNClean Devices only)
RFID Statistics
Statistical Comparison (Corporate Only)
Projection (Corporate Only)
For step-by-step instructions on each report, click on one of the following:
See “About the Dashboard Report” on page 310.
See “View the Vehicle Statistical Performance Report (VSPR)” on page 315.
See “About the Performance Gauge Report” on page 327.
See “View the Sales Distribution Report” on page 332.
See “About the Touch ’N Clean Usage Report” on page 335.
See “About RFID Statistics” on page 337.
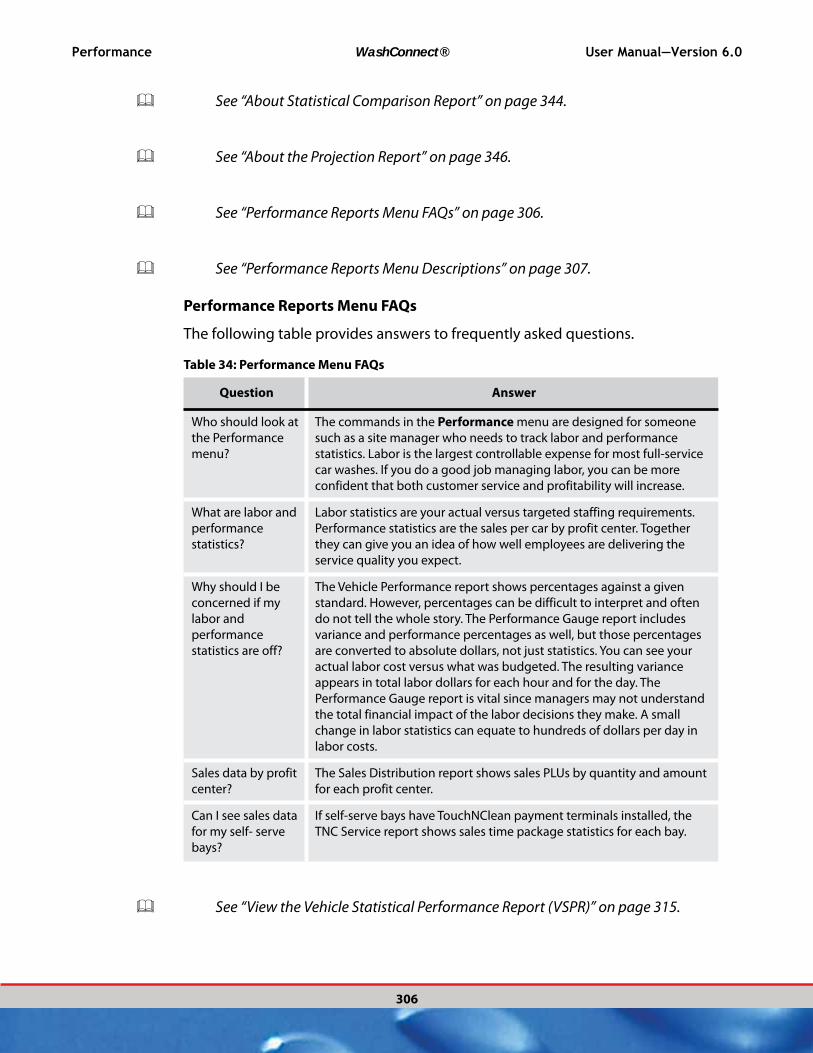
Performance WashConnect® User Manual—Version 6.0
306
See “About Statistical Comparison Report” on page 344.
See “About the Projection Report” on page 346.
See “Performance Reports Menu FAQs” on page 306.
See “Performance Reports Menu Descriptions” on page 307.
Performance Reports Menu FAQs
Table 34: Performance Menu FAQs
Question Answer
Who should look at
the Performance
menu?
The commands in the Performance menu are designed for someone
such as a site manager who needs to track labor and performance
statistics. Labor is the largest controllable expense for most full-service
car washes. If you do a good job managing labor, you can be more
confident that both customer service and profitability will increase.
What are labor and
performance
statistics?
Labor statistics are your actual versus targeted staffing requirements.
Performance statistics are the sales per car by profit center. Together
they can give you an idea of how well employees are delivering the
service quality you expect.
Why should I be
concerned if my
labor and
performance
statistics are off?
The Vehicle Performance report shows percentages against a given
standard. However, percentages can be difficult to interpret and often
do not tell the whole story. The Performance Gauge report includes
variance and performance percentages as well, but those percentages
are converted to absolute dollars, not just statistics. You can see your
actual labor cost versus what was budgeted. The resulting variance
appears in total labor dollars for each hour and for the day. The
Performance Gauge report is vital since managers may not understand
the total financial impact of the labor decisions they make. A small
change in labor statistics can equate to hundreds of dollars per day in
labor costs.
Sales data by profit
center?
The Sales Distribution report shows sales PLUs by quantity and amount
for each profit center.
Can I see sales data
for my self- serve
bays?
If self-serve bays have TouchNClean payment terminals installed, the
TNC Service report shows sales time package statistics for each bay.
The following table provides answers to frequently asked questions.
See “View the Vehicle Statistical Performance Report (VSPR)” on page 315.

User Manual—Version 6.0 WashConnect® Performance
307
See “About the Performance Gauge Report” on page 327.
See “View the Sales Distribution Report” on page 332.
See “About the Touch ’N Clean Usage Report” on page 335.
See “About RFID Statistics” on page 337.
See “Performance Reports Menu Descriptions” on page 307.
See “About the Performance Menu” on page 308.
Performance Reports Menu Descriptions
The following table describes each report type.
Table 35: Performance Menu Report Descriptions
Report Description
Dashboard In a quick glimpse you can now see ALL the information that YOU
want! The NEW Dashboard Reporting for WashConnect® allows you
to choose the reports you care about and see them ALL on ONE
screen. No more clicking back and forth refreshing information to
see how you wash is doing. Simply Log in and watch your profits
soar. View tables and Charts. Organize to suit your needs. Real Time
Data
Vehicle Statistical
Performance
The Vehicle Statistical Performance report shows volume, sales and
labor key performance indicators, hour-by-hour, for the selected
date range. Indicators include required man hours, man hours, cars
per man hour, labor cost per car, and the percentage of labor to
sales. Call support to set up your Vehicle Statistical Performance
report to show data by Tunnel.
Performance Gauge Like the Vehicle Performance report, the Performance Gauge
report shows volume, sales and labor key performance indicators,
hour-by-hour, for the selected date range and profit center. It also
includes variance and performance numbers, which show absolute
dollars, not just statistics.

Performance WashConnect® User Manual—Version 6.0
308
See “View the Vehicle Statistical Performance Report (VSPR)” on page 315.
See “About the Performance Gauge Report” on page 327.
See “View the Sales Distribution Report” on page 332.
See “About the Touch ’N Clean Usage Report” on page 335.
See “About RFID Statistics” on page 337.
See “Performance Reports Menu FAQs” on page 306.
See “About the Performance Menu” on page 308.
About the Performance Menu
The Performance menu can help change how you manage your wash and gauge the performance of your employees, leading to greater insight about your business and improved profitability.
The system helps to guarantee customers receive the speed of service and quality you intended within the costs you have budgeted.
Staffing in the car wash industry is about optimizing, not minimizing labor. Inadequate staffing causes:
Lines
Drive-offs
Poor quality
Sales Distribution The Sales Distribution report shows sales PLUs by quantity and
amount for each profit center.
TouchNClean Usage The TNC Service report shows sales time package statistics for each
bay.
RFID Statistics Filter RFID Statistics report by Admin Card Swipes Only or multiple
RFID Reads for the date range selected.
Table 35: Performance Menu Report Descriptions (Continued)
Report Description
User Manual—Version 6.0 WashConnect® Performance
309
All three result in lower sales. But too much labor has a negative impact on the bottom line. Whether you have an express exterior, full-service, or flex-service—you can set specific labor requirements for your particular business model.
You also have the flexibility to manage separate profit centers—whether they are part of the wash itself, such as the wash tunnel and the hand finished services area—or whether they are separate from the wash, such as a quick lube or convenience store. The Performance menu can show multiple profit centers and multiple facilities.
You can see the labor cost for only the hand finished services profit center, for example. Then you can compare it to the exterior wash profit center. You can start to see where labor is utilized effectively and the sales per car by profit center. This can give you an idea of how well employees are delivering the service quality you expect.
See “View the Sales Distribution Report” on page 332.
See “View the Vehicle Statistical Performance Report (VSPR)” on page 315.
See “About the Performance Gauge Report” on page 327.
See “About the Touch ’N Clean Usage Report” on page 335.
See “About RFID Statistics” on page 337.
See “Vehicle Statistical Performance Report Example” on page 319.
See “Vehicle Statistical Performance Report Descriptions” on page 320.
See “Site Selection Search Tools for Vehicle Statistical Performance Report” on page 321.

Performance WashConnect® User Manual—Version 6.0
310
About the Dashboard Report
See “View Dashboard Reports” on page 310.
See “Change Dashboard Cards” on page 312.
See “View Historical Data” on page 313.
View Dashboard Reports
You can view several reports at one time from the Dashboard from WashConnect or from a web browser. The reports are on cards that have a link to the underlying report from WashConnect. You must be logged in at your site to see the underlying reports.
NOTE: From the Users menu, Privileges can be set up to access the Dashboard
Reports upon logon.
To view the Dashboard reports, follow these steps:
1 From the Performance menu, click Dashboard.

User Manual—Version 6.0 WashConnect® Performance
311
The Dashboard tab appears with all the available cards or reports..
Figure 137. Dashboard - real time example
2 If you have more than one site, you can view Total Cars Washed at each site by scrolling left and right across the banner.
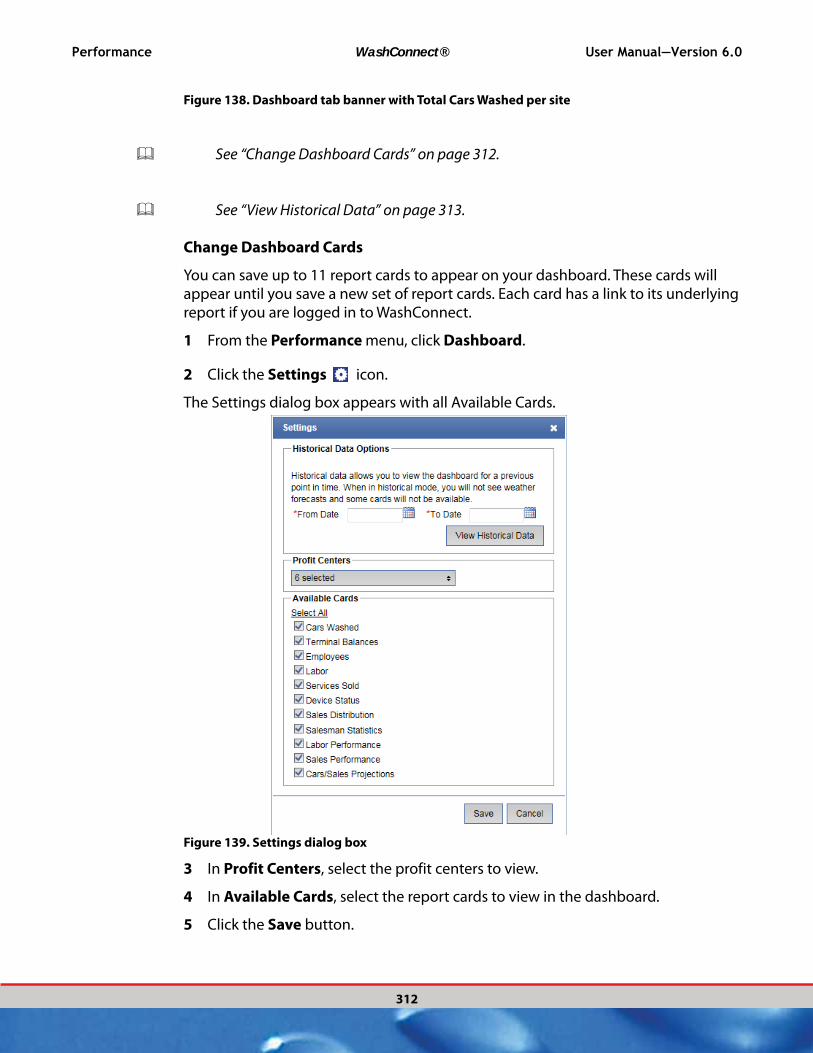
Performance WashConnect® User Manual—Version 6.0
312
Figure 138. Dashboard tab banner with Total Cars Washed per site
See “Change Dashboard Cards” on page 312.
See “View Historical Data” on page 313.
Change Dashboard Cards
You can save up to 11 report cards to appear on your dashboard. These cards will appear until you save a new set of report cards. Each card has a link to its underlying report if you are logged in to WashConnect.
1 From the Performance menu, click Dashboard.
2 Click the Settings icon.
The Settings dialog box appears with all Available Cards.
Figure 139. Settings dialog box
3 In Profit Centers, select the profit centers to view.
4 In Available Cards, select the report cards to view in the dashboard.
5 Click the Save button.
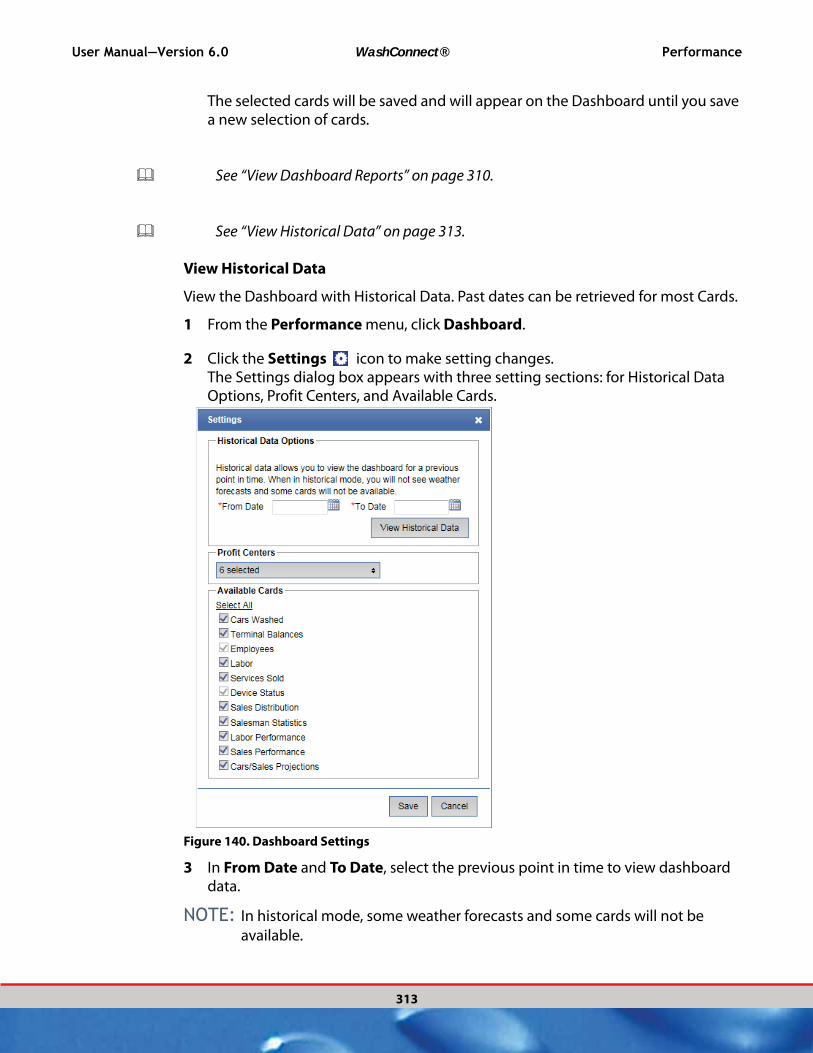
User Manual—Version 6.0 WashConnect® Performance
313
The selected cards will be saved and will appear on the Dashboard until you save a new selection of cards.
See “View Dashboard Reports” on page 310.
See “View Historical Data” on page 313.
View Historical Data
View the Dashboard with Historical Data. Past dates can be retrieved for most Cards.
1 From the Performance menu, click Dashboard.
2 Click the Settings icon to make setting changes.The Settings dialog box appears with three setting sections: for Historical Data Options, Profit Centers, and Available Cards.
Figure 140. Dashboard Settings
3 In From Date and To Date, select the previous point in time to view dashboard data.
NOTE: In historical mode, some weather forecasts and some cards will not be
available.
Performance WashConnect® User Manual—Version 6.0
314
4 In Profit Centers, select the profit centers to view.
5 In Available Cards, select the report cards to view in the dashboard.
6 Click the View Historical Data.
7 Click the Save button.View the cards for the selected dates and profit centers.
8 After selecting and viewing historical data, select the Settings icon.
9 Click the View Live Data button.
NOTE: This button only appears after you viewed historical dates and have not
closed the Dashboard tab.
10 Click the Save button.The settings are saved with the selected profit centers and cards for real-time data.
See “View Dashboard Reports” on page 310.
See “Change Dashboard Cards” on page 312.
Access to Dashboard Directly through Web Browser
This feature will allow the site’s Dashboard reports to be accessed outside of the WashConnect application through the use of a Web Browser. The customer needs to enter the URL to reach their WashConnectWeb. The Login page is presented. The default login will be disabled, and user must enter a valid WashConnect username and password to gain access to the Dashboard report. The Region selection tree will be disabled, and only those Dashboard reports that the logged in user has privileges to see will be displayed.
The Dashboard report will not refresh every 10 minutes so if the user doesn’t refresh manually, the session will expire and the user will be signed out.
All links to the reports from the Dashboard report will be disabled.
Added support for the dashboard to work in Chrome, Firefox, and Safari.

User Manual—Version 6.0 WashConnect® Performance
315
About the Vehicle Statistical Performance Report (VSPR)
See “View the Vehicle Statistical Performance Report (VSPR)” on page 315.
See “Vehicle Statistical Performance Report Example” on page 319.
See “Vehicle Statistical Performance Report Descriptions” on page 320.
See “Site Selection Search Tools for Vehicle Statistical Performance Report” on page 321.
View the Vehicle Statistical Performance Report (VSPR)
The Vehicle Statistical Performance Report (VSPR) will allow expansion of each hour to see the number of cars that went through each tunnel at that hour. Cars count
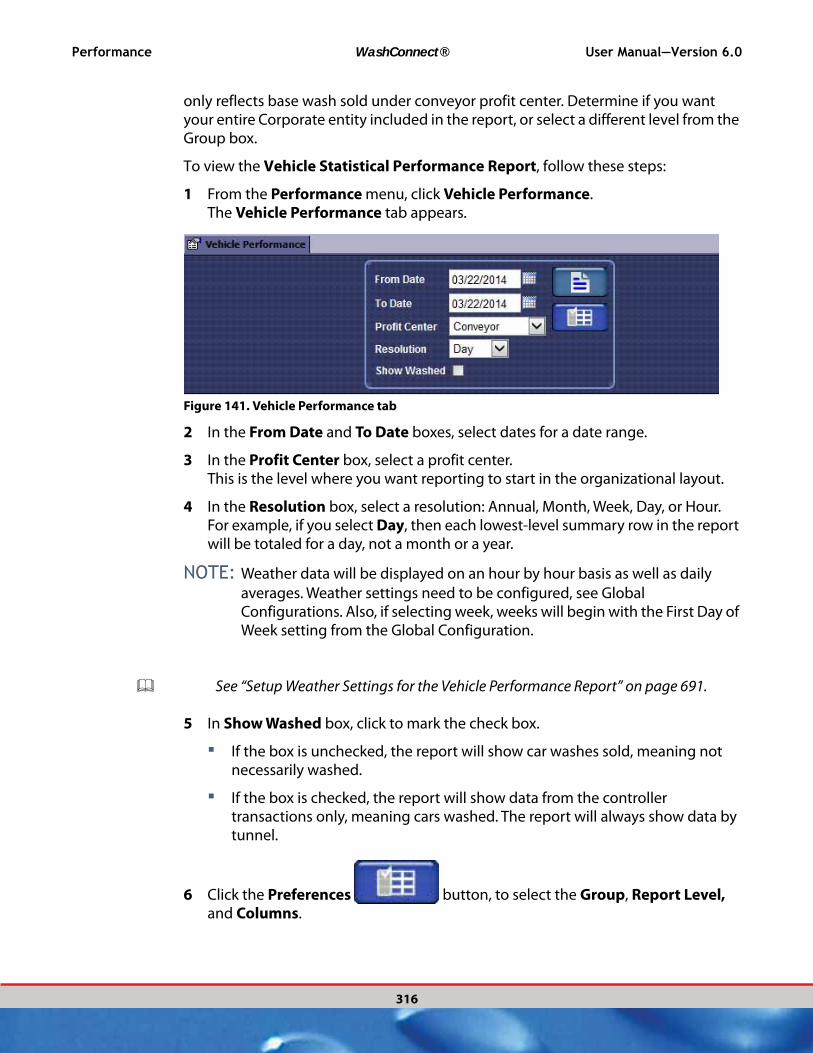
Performance WashConnect® User Manual—Version 6.0
316
only reflects base wash sold under conveyor profit center. Determine if you want your entire Corporate entity included in the report, or select a different level from the Group box.
To view the Vehicle Statistical Performance Report, follow these steps:
1 From the Performance menu, click Vehicle Performance. The Vehicle Performance tab appears.
Figure 141. Vehicle Performance tab
2 In the From Date and To Date boxes, select dates for a date range.
3 In the Profit Center box, select a profit center. This is the level where you want reporting to start in the organizational layout.
4 In the Resolution box, select a resolution: Annual, Month, Week, Day, or Hour.For example, if you select Day, then each lowest-level summary row in the report will be totaled for a day, not a month or a year.
NOTE: Weather data will be displayed on an hour by hour basis as well as daily
averages. Weather settings need to be configured, see Global Configurations. Also, if selecting week, weeks will begin with the First Day of Week setting from the Global Configuration.
See “Setup Weather Settings for the Vehicle Performance Report” on page 691.
5 In Show Washed box, click to mark the check box.
▪ If the box is unchecked, the report will show car washes sold, meaning not necessarily washed.
▪ If the box is checked, the report will show data from the controller transactions only, meaning cars washed. The report will always show data by tunnel.
6 Click the Preferences button, to select the Group, Report Level, and Columns.

User Manual—Version 6.0 WashConnect® Performance
317
Figure 142. Vehicle Performance tab with Preferences
▪ In the Group box, select a Group.
▪ In the Report Level box, select a report level where you want reporting to end in the hierarchy.
▪ In the Show Column(s) box, select one or more columns to determine the report column headers.
▪ Click the Save button to save the Group, Report Level and Show Columns preferences for future ease of use.
7 Click the View Report button. The Vehicle Performance report appears.
The Vehicle Statistical Performance Report includes familiar car wash industry metrics, such as Labor Costs per Car, Cars per Man Hour and Percent of Labor to Sales. But those metrics alone do not take labor minimums or labor efficiencies into account. For a truer picture, you can view the Performance Gauge report.
See “View the Performance Gauge report” on page 327.
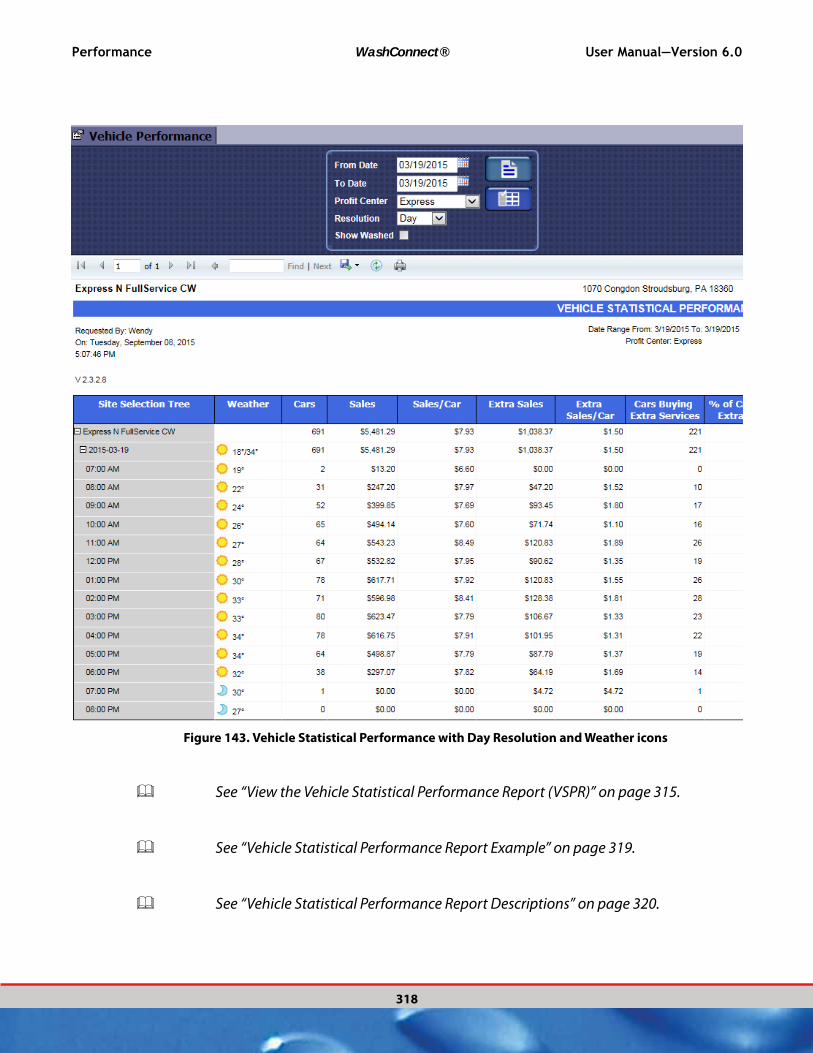
Performance WashConnect® User Manual—Version 6.0
318
Figure 143. Vehicle Statistical Performance with Day Resolution and Weather icons
See “View the Vehicle Statistical Performance Report (VSPR)” on page 315.
See “Vehicle Statistical Performance Report Example” on page 319.
See “Vehicle Statistical Performance Report Descriptions” on page 320.

User Manual—Version 6.0 WashConnect® Performance
319
See “Site Selection Search Tools for Vehicle Statistical Performance Report” on page 321.
Vehicle Statistical Performance Report Example
Figure 144. Vehicle Statistical Performance Report Example
See “View the Vehicle Statistical Performance Report (VSPR)” on page 315.
See “Vehicle Statistical Performance Report Example” on page 319.
See “Vehicle Statistical Performance Report Descriptions” on page 320.
See “Site Selection Search Tools for Vehicle Statistical Performance Report” on page 321.
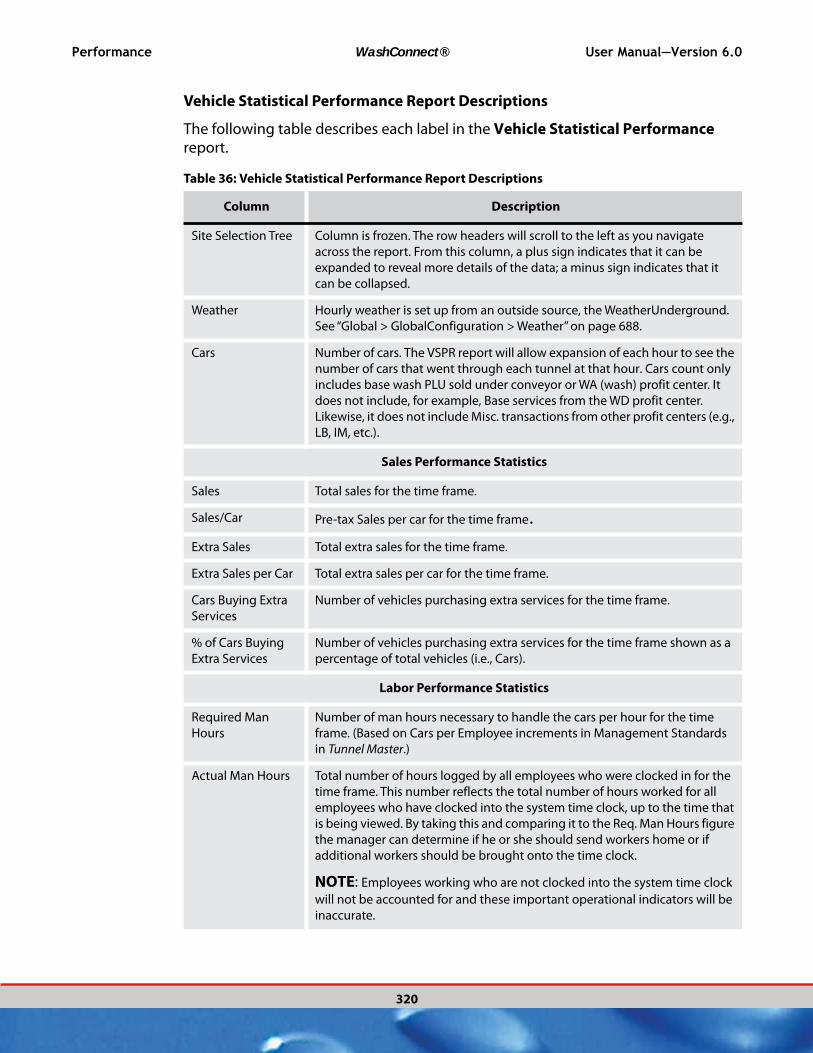
Performance WashConnect® User Manual—Version 6.0
320
Vehicle Statistical Performance Report Descriptions
The following table describes each label in the Vehicle Statistical Performance report.
Table 36: Vehicle Statistical Performance Report Descriptions
Column Description
Site Selection Tree Column is frozen. The row headers will scroll to the left as you navigate
across the report. From this column, a plus sign indicates that it can be
expanded to reveal more details of the data; a minus sign indicates that it
can be collapsed.
Weather Hourly weather is set up from an outside source, the WeatherUnderground.
See “Global > GlobalConfiguration > Weather” on page 688.
Cars Number of cars. The VSPR report will allow expansion of each hour to see the
number of cars that went through each tunnel at that hour. Cars count only
includes base wash PLU sold under conveyor or WA (wash) profit center. It
does not include, for example, Base services from the WD profit center.
Likewise, it does not include Misc. transactions from other profit centers (e.g.,
LB, IM, etc.).
Sales Performance Statistics
Sales Total sales for the time frame.
Sales/Car Pre-tax Sales per car for the time frame.
Extra Sales Total extra sales for the time frame.
Extra Sales per Car Total extra sales per car for the time frame.
Cars Buying Extra
Services
Number of vehicles purchasing extra services for the time frame.
% of Cars Buying
Extra Services
Number of vehicles purchasing extra services for the time frame shown as a
percentage of total vehicles (i.e., Cars).
Labor Performance Statistics
Required Man
Hours
Number of man hours necessary to handle the cars per hour for the time
frame. (Based on Cars per Employee increments in Management Standards
in Tunnel Master.)
Actual Man Hours Total number of hours logged by all employees who were clocked in for the
time frame. This number reflects the total number of hours worked for all
employees who have clocked into the system time clock, up to the time that
is being viewed. By taking this and comparing it to the Req. Man Hours figure
the manager can determine if he or she should send workers home or if
additional workers should be brought onto the time clock.
NOTE: Employees working who are not clocked into the system time clock
will not be accounted for and these important operational indicators will be
inaccurate.

User Manual—Version 6.0 WashConnect® Performance
321
See “View the Vehicle Statistical Performance Report (VSPR)” on page 315.
See “Vehicle Statistical Performance Report Example” on page 319.
See “Vehicle Statistical Performance Report Descriptions” on page 320.
See “Site Selection Search Tools for Vehicle Statistical Performance Report” on page 321.
Site Selection Search Tools for Vehicle Statistical Performance Report
You can use the Group, Report Level, Profit Center, and Resolution fields to narrow the results of your report. These fields work together to build the Site Selection Tree for the report.
The following examples show the results of different settings for each field. In each example, the hierarchy is as follows:
Corporate > Region > State > Site
The organization layout is shown in the following illustration.
Cars/Man Hour Number of vehicles processed each hour for the time frame. Cars per Man
Hour (CPMH) is an industry standard in the calculation of labor productivity
for full service car washes. Though the car wash industry has identified a 3.0
ratio as being the benchmark level for most full service car wash operations,
this ratio becomes impossible to achieve at lower car volume levels and
possible to exceed at higher volumes. Other factors such as facility layout,
type of wash operation, (e.g., hand wash vs. equipment) will affect the
productivity of a particular facility. It is therefore recommended that the
operator carefully review the facility to ascertain the desired ratio and
manage this ratio on an hourly basis, based on car volumes. The Cars/Man
Hour ratio is determined by dividing the number of transactions which
include a "Base" service divided by the number of hours worked of all
employees who have clocked into the system time clock.
Labor Cost The sum of wages for each employee on the clock for the time frame.
Labor/Car The sum of wages for each employee on the clock divided by the number of
cars sold.
% of Labor to Sales Sum of total sales divided by sum of total labor costs shown as a percentage.
Table 36: Vehicle Statistical Performance Report Descriptions (Continued)
Column Description
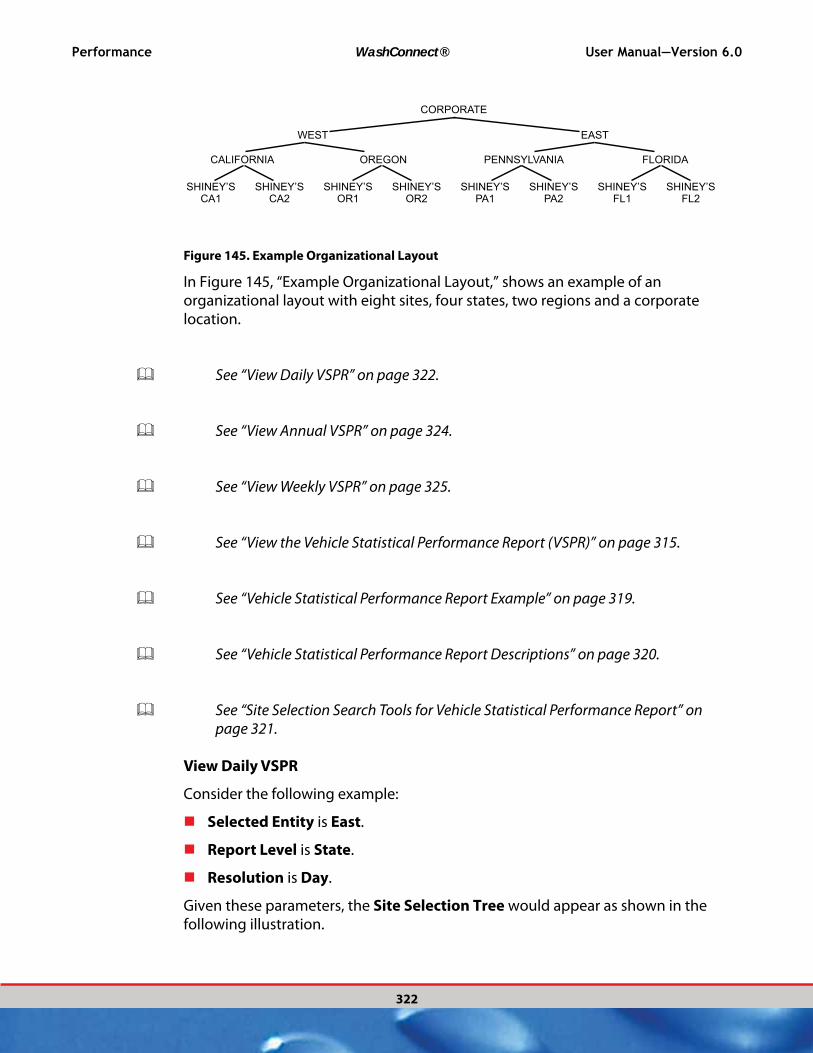
CORPORATE
WEST EAST
CALIFORNIA OREGON
SHINEY’S SHINEY’S SHINEY’S SHINEY’S SHINEY’S SHINEY’S SHINEY’S SHINEY’S
PENNSYLVANIA FLORIDA
OR1CA1 CA2 OR2 PA1 PA2 FL1 FL2
Performance WashConnect® User Manual—Version 6.0
322
Figure 145. Example Organizational Layout
In Figure 145, “Example Organizational Layout,” shows an example of an organizational layout with eight sites, four states, two regions and a corporate location.
See “View Daily VSPR” on page 322.
See “View Annual VSPR” on page 324.
See “View Weekly VSPR” on page 325.
See “View the Vehicle Statistical Performance Report (VSPR)” on page 315.
See “Vehicle Statistical Performance Report Example” on page 319.
See “Vehicle Statistical Performance Report Descriptions” on page 320.
See “Site Selection Search Tools for Vehicle Statistical Performance Report” on page 321.
View Daily VSPR
Consider the following example:
Selected Entity is East.
Report Level is State.
Resolution is Day.
Given these parameters, the Site Selection Tree would appear as shown in the following illustration.

SELECTED GROUP
REPORT LEVEL
RESOLUTION
User Manual—Version 6.0 WashConnect® Performance
323
Figure 146. Site Selection Tree with Day Resolution
In Figure 146, “Site Selection Tree with Day Resolution,” the Site Selection Tree includes East as the top-level and State as the lowest level. The Resolution is Day. You are building a Site Selection Tree that starts reporting at East, reports down to the State level, and totals the results by Day.
Notice how each hour of the day is also displayed. This is because you can expand the report down to each hour for the breakdown of the daily totals. You cannot expand these rows. The Resolution setting controls the lowest-level summary row, which always appears directly above the hourly totals.
See “View Daily VSPR” on page 322.
See “View Annual VSPR” on page 324.
See “View Weekly VSPR” on page 325.
See “View the Vehicle Statistical Performance Report (VSPR)” on page 315.
See “Vehicle Statistical Performance Report Example” on page 319.
See “Vehicle Statistical Performance Report Descriptions” on page 320.
See “Site Selection Search Tools for Vehicle Statistical Performance Report” on page 321.
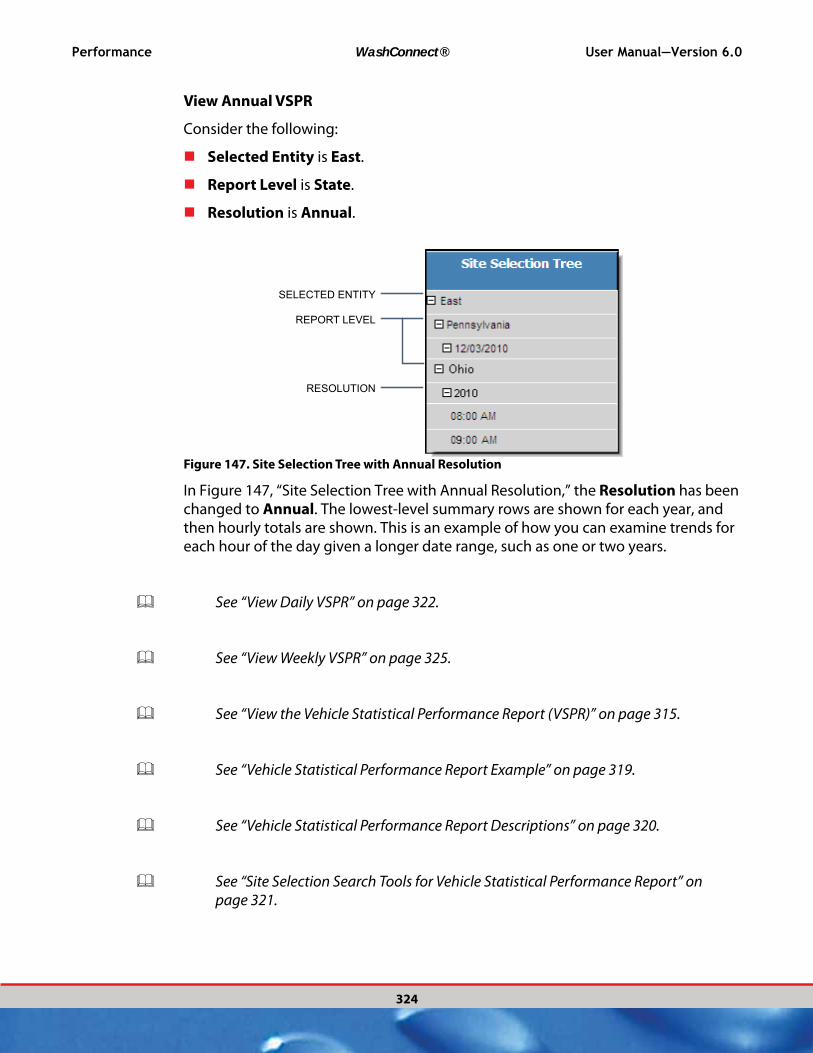
Performance WashConnect® User Manual—Version 6.0
324
View Annual VSPR
Consider the following:
Selected Entity is East.
Report Level is State.
Resolution is Annual.
SELECTED ENTITY
REPORT LEVEL
RESOLUTION
Figure 147. Site Selection Tree with Annual Resolution
In Figure 147, “Site Selection Tree with Annual Resolution,” the Resolution has been changed to Annual. The lowest-level summary rows are shown for each year, and then hourly totals are shown. This is an example of how you can examine trends for each hour of the day given a longer date range, such as one or two years.
See “View Daily VSPR” on page 322.
See “View Weekly VSPR” on page 325.
See “View the Vehicle Statistical Performance Report (VSPR)” on page 315.
See “Vehicle Statistical Performance Report Example” on page 319.
See “Vehicle Statistical Performance Report Descriptions” on page 320.
See “Site Selection Search Tools for Vehicle Statistical Performance Report” on page 321.

User Manual—Version 6.0 WashConnect® Performance
325
View Weekly VSPR
Consider the following:
Group is Auto Pro’s Corporate.
Report Level is Region.
Resolution is Week.
SELECTED GROUP
REPORT LEVEL
RESOLUTION
In the illustration, the Site Selection Tree includes Auto Pro’s Corporate as the top-level and State as the lowest level. The Resolution is Week. You are building a Site Selection Tree that starts reporting at Corporate, reports down to the State level, and totals the results by Week.
Notice how the weeks will now be broken up by the first Day of the Week Setting from the Global Settings. Each week displays the date for the beginning of the week through the ending date of the week. This is because you can set the resolution to week which expands the report down to each week as the final displayed totals. You can only expand these rows to show the hourly breakdown for the week. The Resolution setting controls the lowest-level summary row, which always appears directly above the hourly totals.
To setup the First Day of Week Setting, See “Global > GlobalConfiguration > Global” on page 686.
Empty Sites Selection Tree
Finally, you should be careful to not select mismatched parameters. Consider the following:
Selected Group is Shiney’s PA1.

Performance WashConnect® User Manual—Version 6.0
326
Report Level is Corporate.
Resolution is Day.
Figure 148. Empty Site Selection Tree
In Figure 148, “Empty Site Selection Tree,” the Site Selection Tree is empty and the report contains no data because the parameters were mismatched. You should not select a site in the Selected Entity box, and then select Corporate in the Report Level box. This is a mismatch because you cannot start reporting at a site, and then report down to Corporate. Selected Entity should be higher than Report Level in the organizational layout.
See “View Daily VSPR” on page 322.
See “View Annual VSPR” on page 324.
See “View the Vehicle Statistical Performance Report (VSPR)” on page 315.
See “Vehicle Statistical Performance Report Example” on page 319.
See “Vehicle Statistical Performance Report Descriptions” on page 320.
See “Site Selection Search Tools for Vehicle Statistical Performance Report” on page 321.
See “About the Performance Gauge Report” on page 327.
See “About the Touch ’N Clean Usage Report” on page 335.
See “View the Sales Distribution Report” on page 332.
See “About RFID Statistics” on page 337.
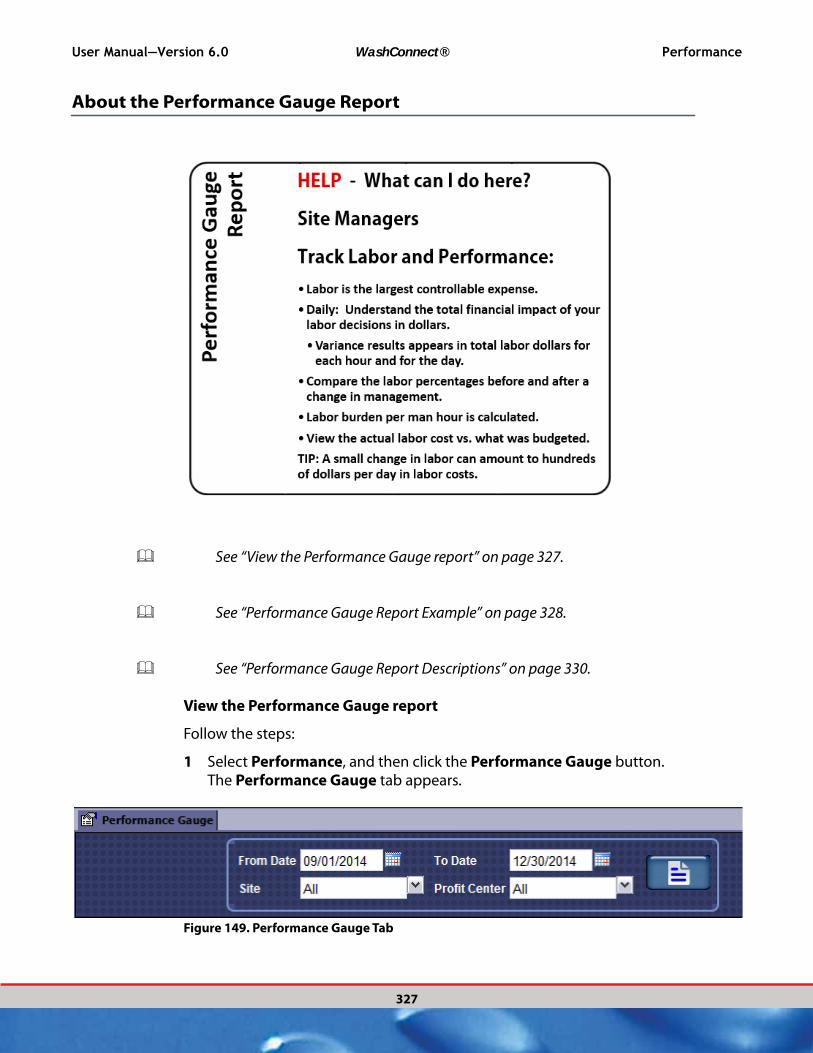
User Manual—Version 6.0 WashConnect® Performance
327
About the Performance Gauge Report
See “View the Performance Gauge report” on page 327.
See “Performance Gauge Report Example” on page 328.
See “Performance Gauge Report Descriptions” on page 330.
View the Performance Gauge report
Follow the steps:
1 Select Performance, and then click the Performance Gauge button. The Performance Gauge tab appears.
Figure 149. Performance Gauge Tab
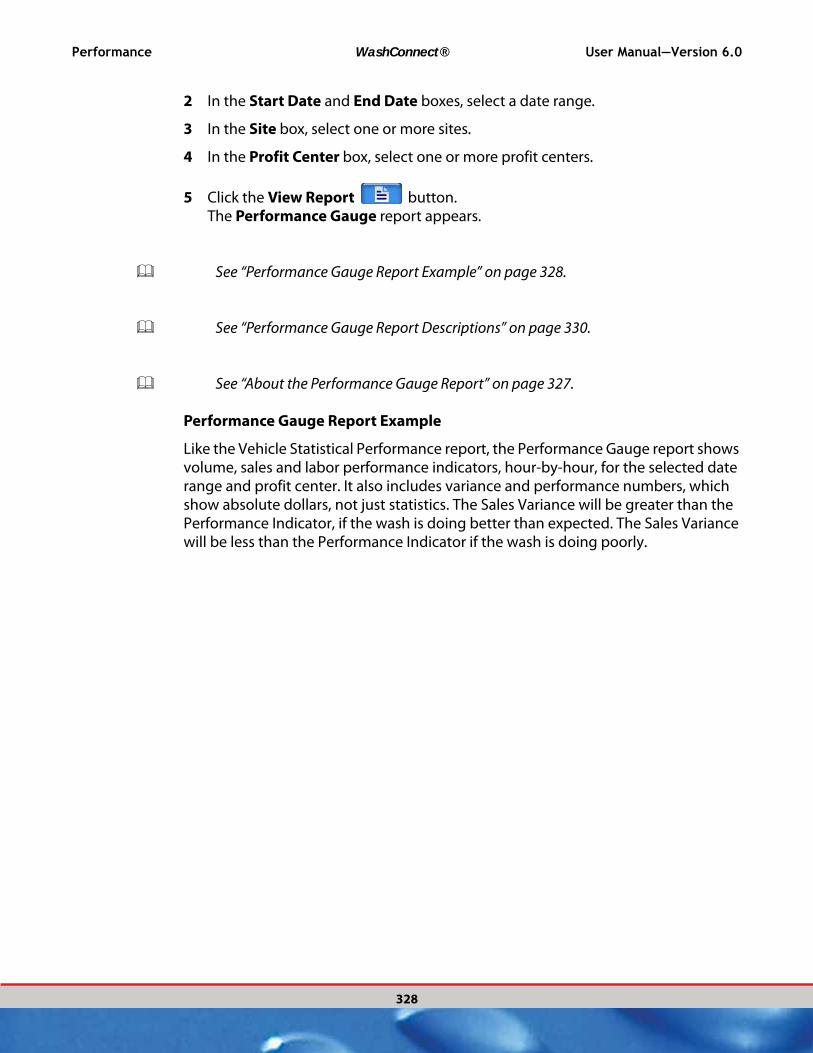
Performance WashConnect® User Manual—Version 6.0
328
2 In the Start Date and End Date boxes, select a date range.
3 In the Site box, select one or more sites.
4 In the Profit Center box, select one or more profit centers.
5 Click the View Report button.The Performance Gauge report appears.
See “Performance Gauge Report Example” on page 328.
See “Performance Gauge Report Descriptions” on page 330.
See “About the Performance Gauge Report” on page 327.
Performance Gauge Report Example
Like the Vehicle Statistical Performance report, the Performance Gauge report shows volume, sales and labor performance indicators, hour-by-hour, for the selected date range and profit center. It also includes variance and performance numbers, which show absolute dollars, not just statistics. The Sales Variance will be greater than the Performance Indicator, if the wash is doing better than expected. The Sales Variance will be less than the Performance Indicator if the wash is doing poorly.
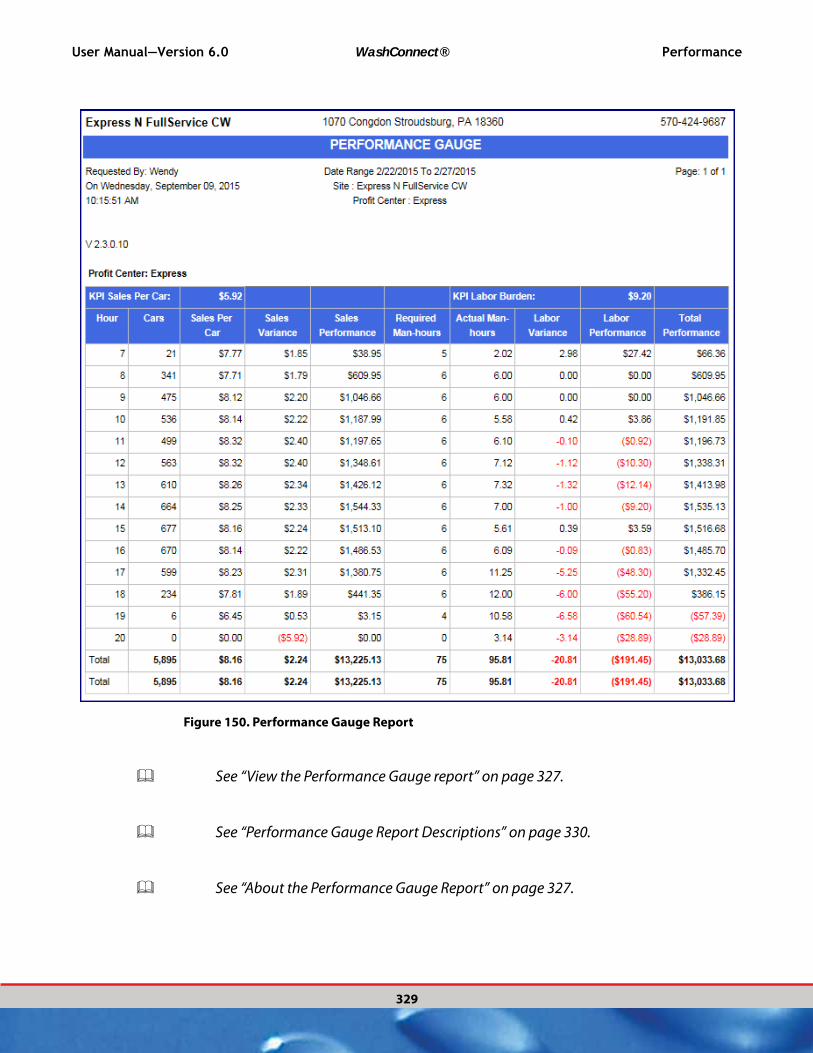
User Manual—Version 6.0 WashConnect® Performance
329
Figure 150. Performance Gauge Report
See “View the Performance Gauge report” on page 327.
See “Performance Gauge Report Descriptions” on page 330.
See “About the Performance Gauge Report” on page 327.

Performance WashConnect® User Manual—Version 6.0
330
Performance Gauge Report Descriptions
The following table describes each label in the Performance Gauge report.
Label Description
KPI Sales per Car Key performance indicator for sales per car. This value is entered in the
Performance Indicator. See “Performance Indicator” on page 730.
This is the targeted amount in sales per car expected for the profit
center.
KPI Labor Burden Key performance indicator for labor burden. This is the fully burdened
hourly pay rate of a single employee for the selected profit center. Labor
Burden includes workers compensation, payroll taxes, etc. It typically
factors in a 22 to 23 percent markup on the base hourly rate.
Hour Hour of the day for the date range selected.
Cars Number of cars. Cars count only reflects base wash sold under conveyor
profit center.
Sales Performance Statistics
Sales Per Car Sales per car for the time period. Sales/Car = Sales amount/Number of
cars washed.
Sales Variance Sales per car - KPI sales per car. The Sales Variance will be greater if the
wash is doing better than expected and less (negative) if the wash is
doing poorly.
Sales Performance Sales Variance * Cars.
Labor Performance Statistics
Required Man
Hours
Number of required man necessary to wash given number of cars at that
hour in the profit center. Based on Cars per Employee increments in
Management Standards in Tunnel Master. See “About Req Man Hours” on
page 732.
Actual Man Hours Actual man hours worked at that hour.
Labor Variance Required man hours minus Actual man hours.
Labor Performance Labor Variance multiplied by KPI Labor Burden.
Labor Performance figure represents dollars spent over or under
targeted labor costs.
Total Performance Sales Performance plus Labor Performance.
At the end of the day after you have managed the labor for each profit center, you can view the Performance Gauge report. It is like your ultimate report card, and shows you in real dollars how you did managing labor for the day.
Your labor burden per man hour appears in the report. You can see the actual labor cost vs. what was budgeted. The resulting variance appears in total labor dollars for each hour and for the day.
User Manual—Version 6.0 WashConnect® Performance
331
This report is vital since some managers may not understand the total financial impact of the labor decisions they make. A small change in labor statistics can equate to hundreds of dollars per day in labor costs.
All together, the system helps customers receive the consistent speed of service and quality you intend, at the costs you have budgeted.
The Performance Gauge screen is only as good as your targets. Go back and review those estimates first in the Config/Management Standards screen. The Sales Per Car and Labor Burden amounts are the key drivers of this screen.Try changing them, and then re-run the report to see how it affects your numbers. You can also change the date range to view the Performance Gauge for a month, a quarter or the whole year to date. All the numbers for the date range you select are boiled down to a single representative workday.
Adjusting your targets and reviewing the numbers like this can quickly show you whether your facility is overstaffed or understaffed during peak hours, and whether your employees are exceeding their sales performance targets, or costing you money.
See “View the Performance Gauge report” on page 327.
See “Performance Gauge Report Example” on page 328.
See “Performance Gauge Report Descriptions” on page 330.
See “View the Performance Gauge report” on page 327.
See “Performance Gauge Report Descriptions” on page 330.
See “View the Vehicle Statistical Performance Report (VSPR)” on page 315.
See “About the Performance Gauge Report” on page 327.
See “View the Sales Distribution Report” on page 332.
See “About the Touch ’N Clean Usage Report” on page 335.

Performance WashConnect® User Manual—Version 6.0
332
See “About the Performance Gauge Report” on page 327.
About the Sales Distribution Report
See “View the Sales Distribution Report” on page 332.
See “Sales Distribution Example” on page 333.
See “Sales Distribution Report Descriptions” on page 334.
View the Sales Distribution Report
The Sales Distribution report shows sales PLUs by quantity and amount for each profit center.
1 In the Performance menu, click Sales Distribution. The Sales Distribution tab appears.
Figure 151. Sales Distribution tab
2 In the From Date and To Date boxes, select a date range.
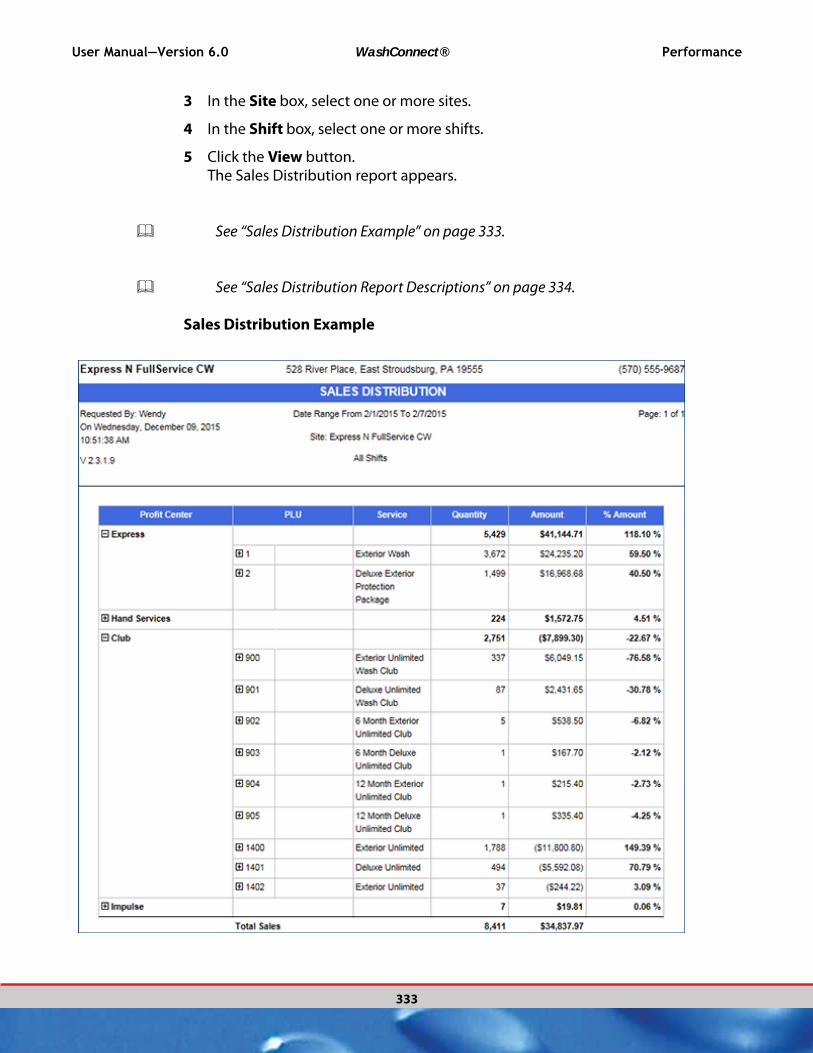
User Manual—Version 6.0 WashConnect® Performance
333
3 In the Site box, select one or more sites.
4 In the Shift box, select one or more shifts.
5 Click the View button. The Sales Distribution report appears.
See “Sales Distribution Example” on page 333.
See “Sales Distribution Report Descriptions” on page 334.
Sales Distribution Example
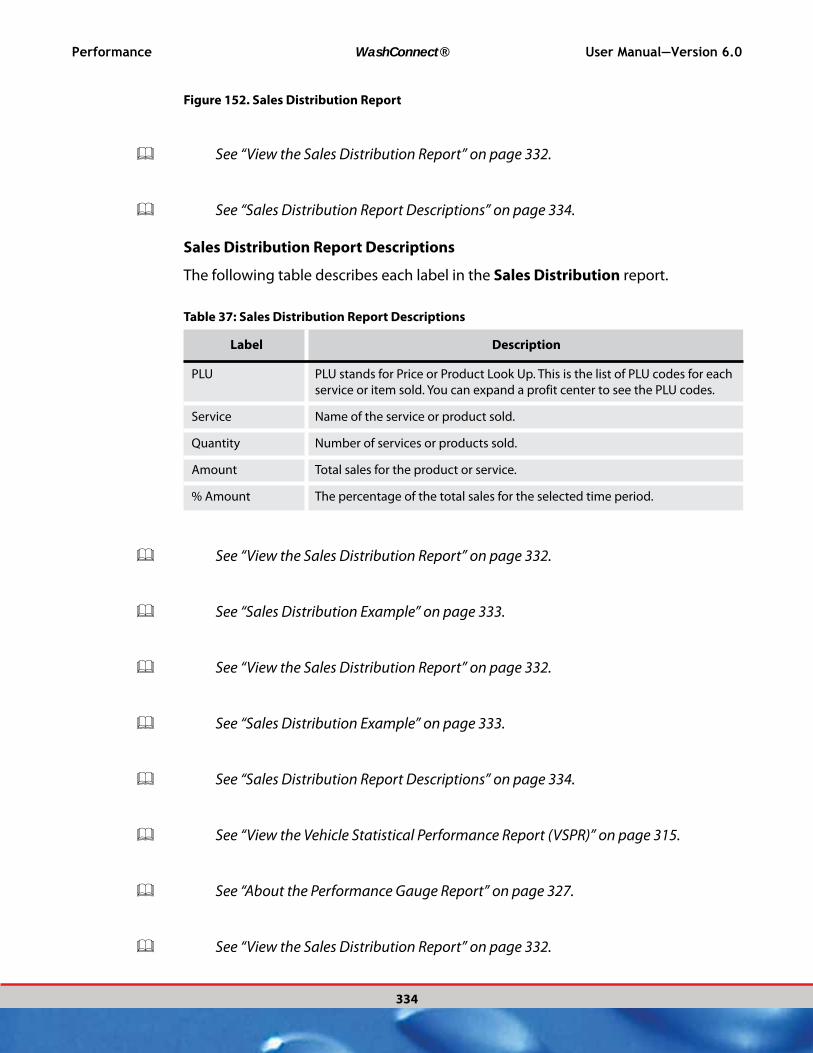
Performance WashConnect® User Manual—Version 6.0
334
Figure 152. Sales Distribution Report
See “View the Sales Distribution Report” on page 332.
See “Sales Distribution Report Descriptions” on page 334.
Sales Distribution Report Descriptions
The following table describes each label in the Sales Distribution report.
Table 37: Sales Distribution Report Descriptions
Label Description
PLU PLU stands for Price or Product Look Up. This is the list of PLU codes for each
service or item sold. You can expand a profit center to see the PLU codes.
Service Name of the service or product sold.
Quantity Number of services or products sold.
Amount Total sales for the product or service.
% Amount The percentage of the total sales for the selected time period.
See “View the Sales Distribution Report” on page 332.
See “Sales Distribution Example” on page 333.
See “View the Sales Distribution Report” on page 332.
See “Sales Distribution Example” on page 333.
See “Sales Distribution Report Descriptions” on page 334.
See “View the Vehicle Statistical Performance Report (VSPR)” on page 315.
See “About the Performance Gauge Report” on page 327.
See “View the Sales Distribution Report” on page 332.
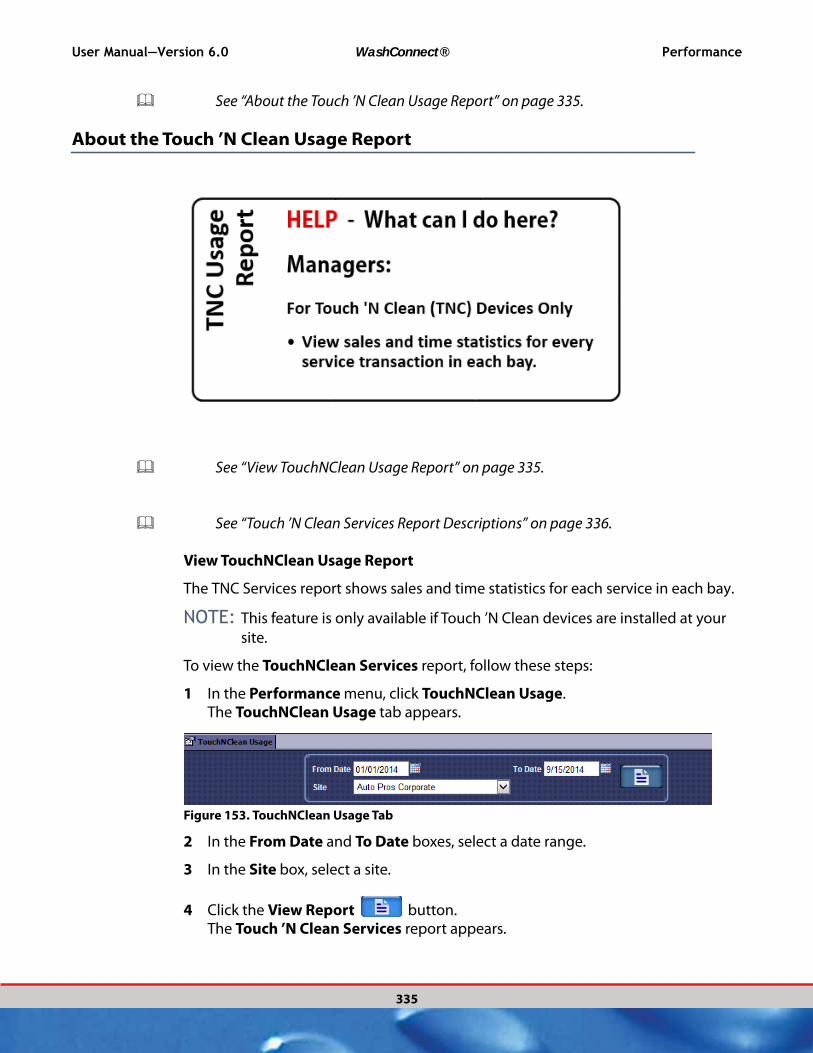
User Manual—Version 6.0 WashConnect® Performance
335
See “About the Touch ’N Clean Usage Report” on page 335.
About the Touch ’N Clean Usage Report
See “View TouchNClean Usage Report” on page 335.
See “Touch ’N Clean Services Report Descriptions” on page 336.
View TouchNClean Usage Report
The TNC Services report shows sales and time statistics for each service in each bay.
NOTE: This feature is only available if Touch ’N Clean devices are installed at your
site.
To view the TouchNClean Services report, follow these steps:
1 In the Performance menu, click TouchNClean Usage. The TouchNClean Usage tab appears.
Figure 153. TouchNClean Usage Tab
2 In the From Date and To Date boxes, select a date range.
3 In the Site box, select a site.
4 Click the View Report button. The Touch ’N Clean Services report appears.

Performance WashConnect® User Manual—Version 6.0
336
Figure 154. Touch ’N Clean Services Report
See “View TouchNClean Usage Report” on page 335.
See “Touch ’N Clean Services Report Descriptions” on page 336.
See “About the Touch ’N Clean Usage Report” on page 335.
Touch ’N Clean Services Report Descriptions
NOTE: This feature is only available if Touch ‘N Clean devices are installed at your
site.
The following table describes each label in the Touch ’N Clean Services report.
Table 38: TouchNClean Services Report Descriptions
Label Description
Bay The bay number.
Service Name of the service or product sold.
Total Transaction Total transactions.
Total Minutes Total minutes purchased for the service during the date range.
Avg. Minutes /
Service
Transaction
Average number of minutes per service transaction during the date range.

User Manual—Version 6.0 WashConnect® Performance
337
See “View TouchNClean Usage Report” on page 335.
See “About the Touch ’N Clean Usage Report” on page 335.
About RFID Statistics
Avg. Minutes /
Transaction
Average number of minutes per transaction for the service during the date
range.
Total Dollars Total dollars or cash collected at each device for the service during the time
date range.
% Revenue Percentage of total revenue for the service at the bay during the date range.
Maint. Min. (TBD. This total is not yet available in the report. Results are zeros.) Total
minutes logged as maintenance for the bay and the service during the date
range. Maintenance minutes are logged whenever a user swipes the wash
bay card at the unit.
Unused Min. Number of minutes logged after users pressed Stop. Amount shown is per
bay during the date range.
Table 38: TouchNClean Services Report Descriptions (Continued)
Label Description
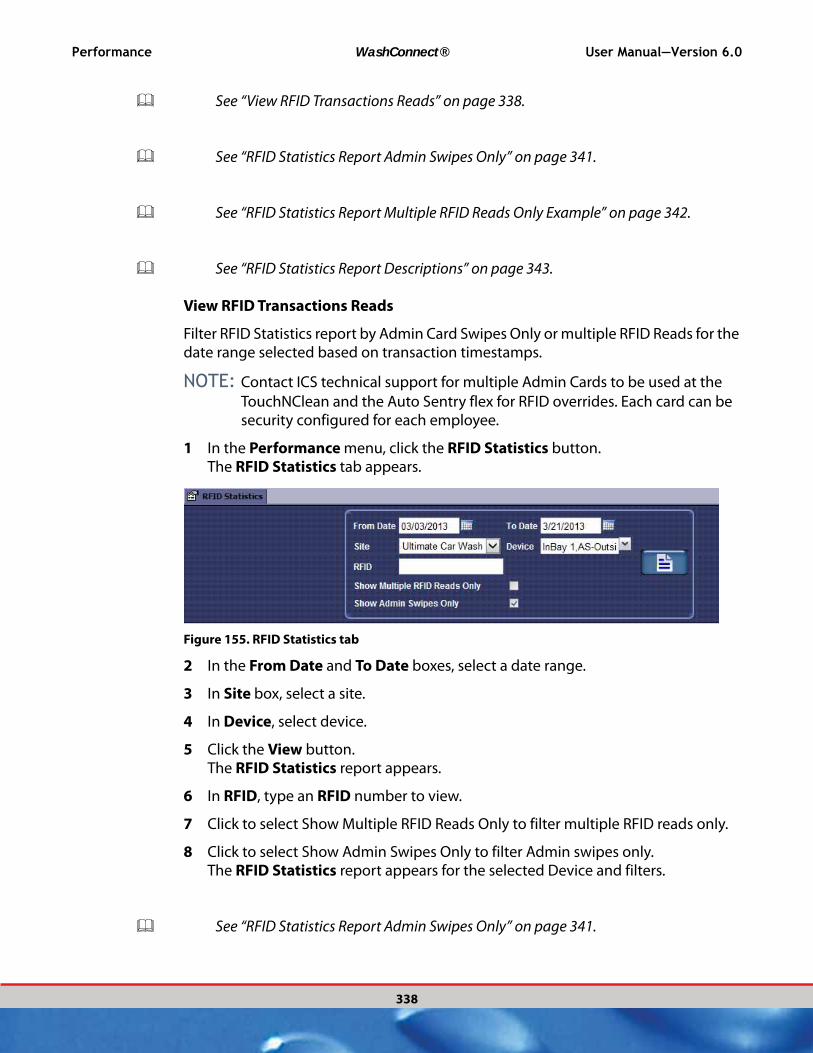
Performance WashConnect® User Manual—Version 6.0
338
See “View RFID Transactions Reads” on page 338.
See “RFID Statistics Report Admin Swipes Only” on page 341.
See “RFID Statistics Report Multiple RFID Reads Only Example” on page 342.
See “RFID Statistics Report Descriptions” on page 343.
View RFID Transactions Reads
Filter RFID Statistics report by Admin Card Swipes Only or multiple RFID Reads for the date range selected based on transaction timestamps.
NOTE: Contact ICS technical support for multiple Admin Cards to be used at the
TouchNClean and the Auto Sentry flex for RFID overrides. Each card can be security configured for each employee.
1 In the Performance menu, click the RFID Statistics button. The RFID Statistics tab appears.
Figure 155. RFID Statistics tab
2 In the From Date and To Date boxes, select a date range.
3 In Site box, select a site.
4 In Device, select device.
5 Click the View button. The RFID Statistics report appears.
6 In RFID, type an RFID number to view.
7 Click to select Show Multiple RFID Reads Only to filter multiple RFID reads only.
8 Click to select Show Admin Swipes Only to filter Admin swipes only.The RFID Statistics report appears for the selected Device and filters.
See “RFID Statistics Report Admin Swipes Only” on page 341.

User Manual—Version 6.0 WashConnect® Performance
339
See “RFID Statistics Report Multiple RFID Reads Only Example” on page 342.
See “RFID Statistics Report Descriptions” on page 343.
RFID Statistics Report
Figure 156. RFID Statistics Report
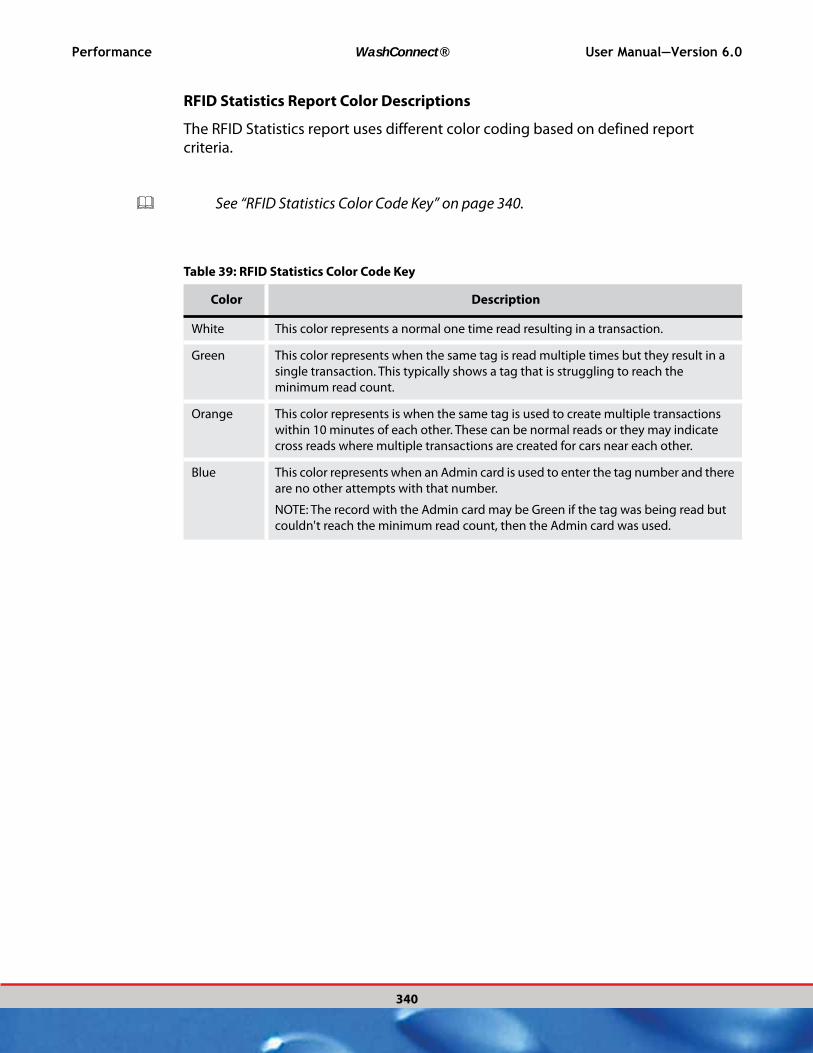
Performance WashConnect® User Manual—Version 6.0
340
RFID Statistics Report Color Descriptions
The RFID Statistics report uses different color coding based on defined report criteria.
See “RFID Statistics Color Code Key” on page 340.
Table 39: RFID Statistics Color Code Key
Color Description
White This color represents a normal one time read resulting in a transaction.
Green This color represents when the same tag is read multiple times but they result in a
single transaction. This typically shows a tag that is struggling to reach the
minimum read count.
Orange This color represents is when the same tag is used to create multiple transactions
within 10 minutes of each other. These can be normal reads or they may indicate
cross reads where multiple transactions are created for cars near each other.
Blue This color represents when an Admin card is used to enter the tag number and there
are no other attempts with that number.
NOTE: The record with the Admin card may be Green if the tag was being read but
couldn't reach the minimum read count, then the Admin card was used.

User Manual—Version 6.0 WashConnect® Performance
341
RFID Statistics Report Admin Swipes Only
Figure 157. RFID Statistics Report Admin Swipes Only
See “View RFID Transactions Reads” on page 338.
See “RFID Statistics Report Multiple RFID Reads Only Example” on page 342.

Performance WashConnect® User Manual—Version 6.0
342
See “RFID Statistics Report Descriptions” on page 343.
RFID Statistics Report Multiple RFID Reads Only Example
Figure 158. RFID Statistics Report Multiple RFID Reads Only
See “View RFID Transactions Reads” on page 338.
See “RFID Statistics Report Admin Swipes Only” on page 341.
See “RFID Statistics Report Descriptions” on page 343.

User Manual—Version 6.0 WashConnect® Performance
343
RFID Statistics Report
Table 40: RFID Statistics Report Descriptions
Label Description
Date Date.
RFID RFID sticker tag number.
Time Time of RFID read.
Device Device used for RFID read.
Antenna Antenna number.
Reads Number of reads that the RFID reader captures.
Transaction ID The transaction number for the RFID lead. The ID is also a link to View
Register Transactions for the actual transaction.
Descriptions
See “View RFID Transactions Reads” on page 338.
See “RFID Statistics Report Admin Swipes Only” on page 341.
See “RFID Statistics Report Multiple RFID Reads Only Example” on page 342.
See “View the Vehicle Statistical Performance Report (VSPR)” on page 315.
See “About the Performance Gauge Report” on page 327.
See “View the Sales Distribution Report” on page 332.
See “About the Touch ’N Clean Usage Report” on page 335.

Performance WashConnect® User Manual—Version 6.0
344
About Statistical Comparison Report
See “View Statistical Comparison” on page 344.
See “Statistical Comparison Report Descriptions” on page 346.
View Statistical Comparison
1 In the Performance menu, select Statistical Comparison. The Statistical Comparison tab appears.
Figure 159. Statistical Comparison tab
2 In the Base Start Date and Base End Date boxes, select a Base period date range.
3 In the Comparison Start Date and Comparison End Date boxes, select a comparison period date range.
4 In Level box, click to select a site from the Corporate tree structure.
5 In Profit Center list, select one or more profit centers to compare.
6 Click the Save button to save these preferences for future use of this report.
7 Click the View Report button.

User Manual—Version 6.0 WashConnect® Performance
345
The Statistical Comparison report appears.
Figure 160. Statistical Comparison Report Example
See “Statistical Comparison Report Descriptions” on page 346.
See “About Statistical Comparison Report” on page 344.
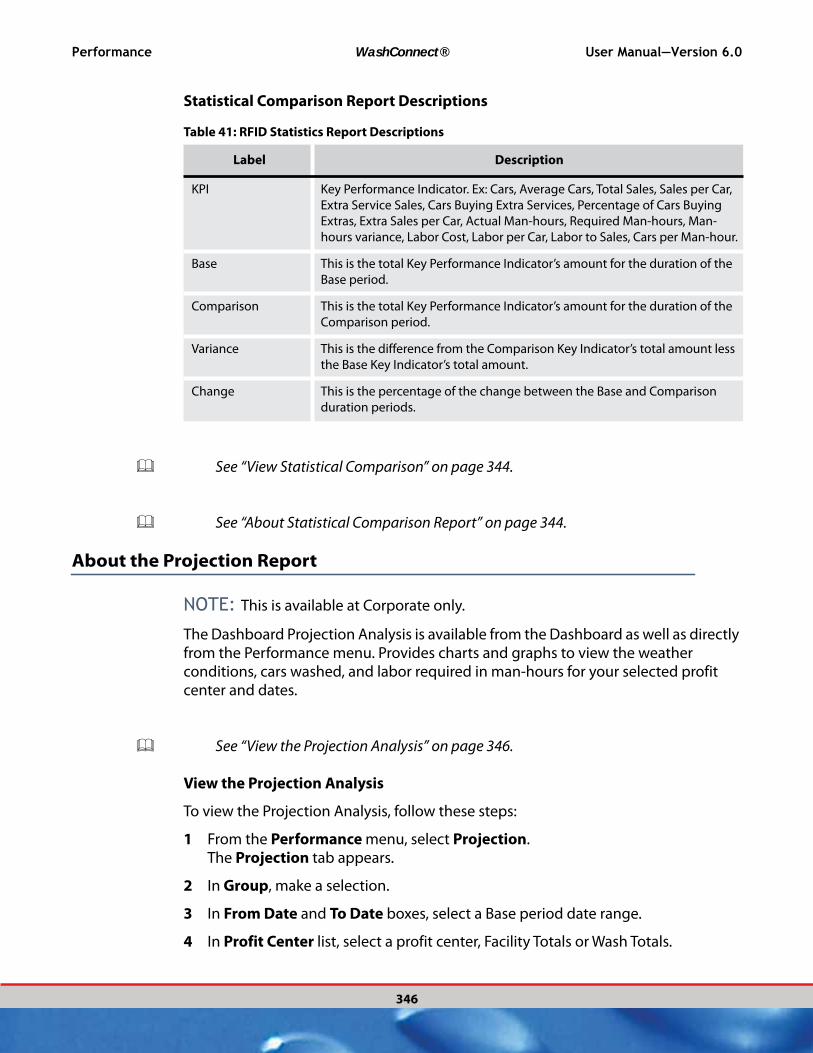
Performance WashConnect® User Manual—Version 6.0
346
Statistical Comparison Report
Table 41: RFID Statistics Report Descriptions
Label Description
KPI Key Performance Indicator. Ex: Cars, Average Cars, Total Sales, Sales per Car,
Extra Service Sales, Cars Buying Extra Services, Percentage of Cars Buying
Extras, Extra Sales per Car, Actual Man-hours, Required Man-hours, Man-
hours variance, Labor Cost, Labor per Car, Labor to Sales, Cars per Man-hour.
Base This is the total Key Performance Indicator’s amount for the duration of the
Base period.
Comparison This is the total Key Performance Indicator’s amount for the duration of the
Comparison period.
Variance This is the difference from the Comparison Key Indicator’s total amount less
the Base Key Indicator’s total amount.
Change This is the percentage of the change between the Base and Comparison
duration periods.
Descriptions
See “View Statistical Comparison” on page 344.
See “About Statistical Comparison Report” on page 344.
About the Projection Report
NOTE: This is available at Corporate only.
The Dashboard Projection Analysis is available from the Dashboard as well as directly from the Performance menu. Provides charts and graphs to view the weather conditions, cars washed, and labor required in man-hours for your selected profit center and dates.
See “View the Projection Analysis” on page 346.
View the Projection Analysis
To view the Projection Analysis, follow these steps:
1 From the Performance menu, select Projection. The Projection tab appears.
2 In Group, make a selection.
3 In From Date and To Date boxes, select a Base period date range.
4 In Profit Center list, select a profit center, Facility Totals or Wash Totals.
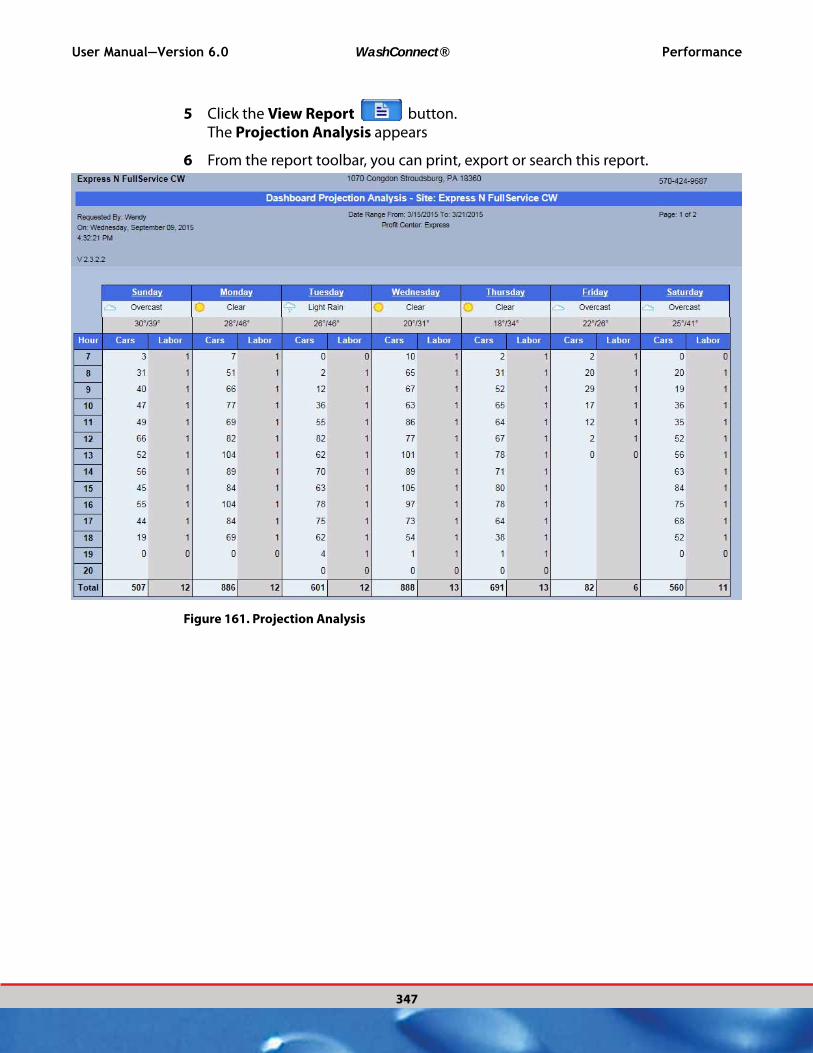
User Manual—Version 6.0 WashConnect® Performance
347
5 Click the View Report button.The Projection Analysis appears
6 From the report toolbar, you can print, export or search this report.
Figure 161. Projection Analysis

Performance WashConnect® User Manual—Version 6.0
348
Figure 162. Projection Analysis Chart
See “About the Projection Report” on page 346.

User Manual—Version 6.0 WashConnect® Monitoring System
349
CHAPTER 8:
MONITORING SYSTEM
The commands in the Monitoring System menu are designed for someone like an operations manager who needs to monitor site statistics, devices and components. The Monitoring System menu includes:
Status
Wash Status
Event History
Device Statistics
Version History
See “About the Monitoring System” on page 352.
See “About Status” on page 354.
See “About the Status of Entities, Devices and Components” on page 356.
See “Wash Status” on page 359.
See “View Event History Log” on page 361.
See “View Device Statistics” on page 366.
See “About Version History” on page 368.
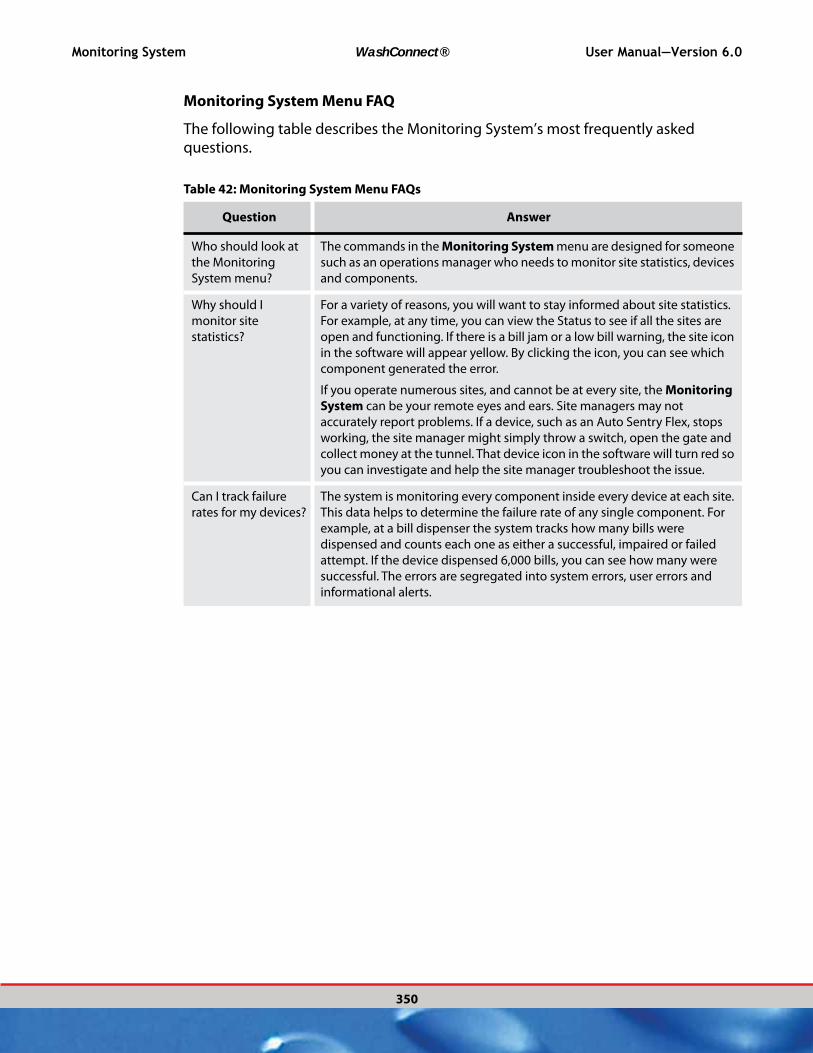
Monitoring System WashConnect® User Manual—Version 6.0
350
Monitoring System Menu FAQ
The following table describes the Monitoring System’s most frequently asked questions.
Table 42: Monitoring System Menu FAQs
Question Answer
Who should look at
the Monitoring
System menu?
The commands in the Monitoring System menu are designed for someone
such as an operations manager who needs to monitor site statistics, devices
and components.
Why should I
monitor site
statistics?
For a variety of reasons, you will want to stay informed about site statistics.
For example, at any time, you can view the Status to see if all the sites are
open and functioning. If there is a bill jam or a low bill warning, the site icon
in the software will appear yellow. By clicking the icon, you can see which
component generated the error.
If you operate numerous sites, and cannot be at every site, the Monitoring
System can be your remote eyes and ears. Site managers may not
accurately report problems. If a device, such as an Auto Sentry Flex, stops
working, the site manager might simply throw a switch, open the gate and
collect money at the tunnel. That device icon in the software will turn red so
you can investigate and help the site manager troubleshoot the issue.
Can I track failure
rates for my devices?
The system is monitoring every component inside every device at each site.
This data helps to determine the failure rate of any single component. For
example, at a bill dispenser the system tracks how many bills were
dispensed and counts each one as either a successful, impaired or failed
attempt. If the device dispensed 6,000 bills, you can see how many were
successful. The errors are segregated into system errors, user errors and
informational alerts.
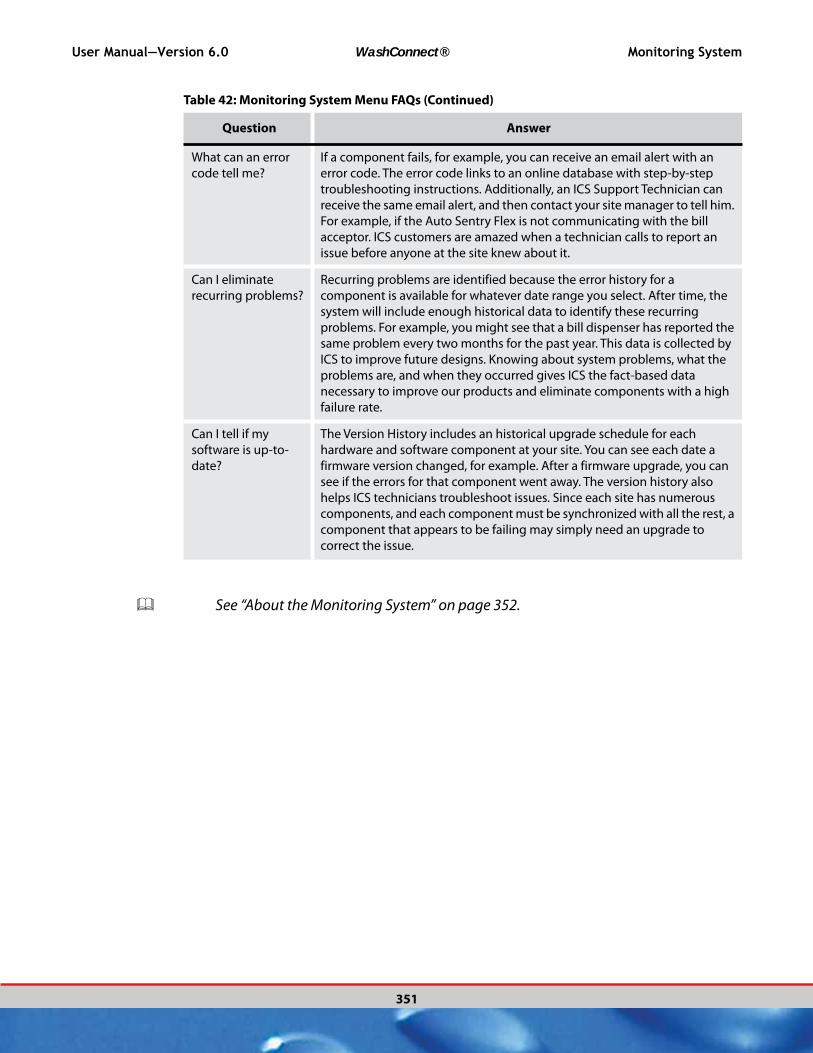
User Manual—Version 6.0 WashConnect® Monitoring System
351
See “About the Monitoring System” on page 352.
What can an error
code tell me?
If a component fails, for example, you can receive an email alert with an
error code. The error code links to an online database with step-by-step
troubleshooting instructions. Additionally, an ICS Support Technician can
receive the same email alert, and then contact your site manager to tell him.
For example, if the Auto Sentry Flex is not communicating with the bill
acceptor. ICS customers are amazed when a technician calls to report an
issue before anyone at the site knew about it.
Can I eliminate
recurring problems?
Recurring problems are identified because the error history for a
component is available for whatever date range you select. After time, the
system will include enough historical data to identify these recurring
problems. For example, you might see that a bill dispenser has reported the
same problem every two months for the past year. This data is collected by
ICS to improve future designs. Knowing about system problems, what the
problems are, and when they occurred gives ICS the fact-based data
necessary to improve our products and eliminate components with a high
failure rate.
Can I tell if my
software is up-to-
date?
The Version History includes an historical upgrade schedule for each
hardware and software component at your site. You can see each date a
firmware version changed, for example. After a firmware upgrade, you can
see if the errors for that component went away. The version history also
helps ICS technicians troubleshoot issues. Since each site has numerous
components, and each component must be synchronized with all the rest, a
component that appears to be failing may simply need an upgrade to
correct the issue.
Table 42: Monitoring System Menu FAQs (Continued)
Question Answer

Monitoring System WashConnect® User Manual—Version 6.0
352
About the Monitoring System
Figure 163. Monitoring System Site Device
The Monitoring System menu can help you to stay informed about site statistics: see if all the sites are open and functioning, identify a bill jam or a low bill warning, etc.
See “View an Error Code” on page 352.
View an Error Code
1 From the Monitoring System menu, select Status.
2 Click the device in question.The component that generated an error will be red or yellow.
3 Click the component to view error details.The error code appears with an error message, and incident date and time.

User Manual—Version 6.0 WashConnect® Monitoring System
353
Figure 164. Site Status component error message
4 Click on the Code link.Each error or event code links to an online database with step-by-step troubleshooting instructions.
Figure 165. Event Code for Error Message Coin Acceptor example
You can receive email alerts with error codes. If a device stops working, the device icon in the software will turn red, indicating that you should investigate and troubleshoot the issue. The system monitors and collects data for every component and device. This data helps to determine the failure rate of any single component. The errors are segregated into system errors, user errors and informational alerts.
The Version History includes the upgrade schedule for each hardware and software component. After a firmware upgrade, you can see if the errors for a particular component disappeared.
For more information on email alerts, See “Subscribe to Email Alerts” on page 497.
For step-by-step instructions on the Monitoring System:

Monitoring System WashConnect® User Manual—Version 6.0
354
See “About Status” on page 354.
See “About the Status of Entities, Devices and Components” on page 356.
See “View Event History Log” on page 361.
See “View Device Statistics” on page 366.
See “About the Monitoring System” on page 352.
About Status
See “View Status” on page 355.
See “About the Status of Entities, Devices and Components” on page 356.
See “Site Device Key” on page 358.
See “Status and Error Message Descriptions” on page 358.

User Manual—Version 6.0 WashConnect® Monitoring System
355
View Status
The site status report allows you to see if all your sites are open and functioning properly. View the status or error message associated with that component.
To view the status of an device or component, follow these steps:
1 In the Monitoring System menu, click the Status button. The Status tab appears.
2 Click the Expand Tree node to view devices and components. Status icons appear.
3 Only components report messages, click to select a component.
▪ Select a red component to see error messages.
▪ Select a blue component to see status messages.
▪ Select a yellow component to see status message. (This indicates a minor system issue such as a device out of paper.)
Figure 166. Component Error Message

Monitoring System WashConnect® User Manual—Version 6.0
356
Figure 167. Site Status
See “About the Status of Entities, Devices and Components” on page 356.
See “Site Device Key” on page 358.
See “Status and Error Message Descriptions” on page 358.
About the Status of Entities, Devices and Components
A component is hardware or software that operates as part of a device. For example, a printer is a component of the Auto Sentry Flex device.
Replication is a component of the main corporate database device.
An entity is a logical level in the organizational hierarchy.
Entities often represent sites, states and regions in the hierarchy.
Entities can also represent special groupings such as all sites with hand finishing services, or all in-bay sites.
For a variety of reasons, you will want to stay informed about site Status statistics. For example, perhaps there is a bill jam or a low bill warning. In that case, the site icon in the software will appear yellow. You can click the icon to see which component generated the error.

User Manual—Version 6.0 WashConnect® Monitoring System
357
If you operate numerous sites, you can access remotely and be the eyes and ears from the Monitoring System. Site managers may not accurately report problems. If a device, such as an Auto Sentry flex, stops working, then the site manager might simply throw a switch, open the gate and collect money at the tunnel. The device icon in the software will turn red, so you can investigate and help the site manager troubleshoot the issue.
ENTITY
DEVICE
COMPONENT
DEVICE
COMPONENT
Figure 168. Devices and Components
See “View Status” on page 355.
See “Site Device Key” on page 358.
See “Status and Error Message Descriptions” on page 358.

Monitoring System WashConnect® User Manual—Version 6.0
358
See “About the Monitoring System” on page 352.
Site Device Key
Each entity, device and component is designated with an icon. Icon colors indicate status.
ENTITY STATUS ICONS
DEVICE STATUS ICONS
COMPONENT STATUS ICONS
Figure 169. Entity, Device and Component Status Icons
Site Monitoring Color Key
Red: Stopped responding.
Blue: Has been Repaired.
Green: Operating normally.
Yellow: Requires attention.
See “View Status” on page 355.
See “About the Status of Entities, Devices and Components” on page 356.
See “Status and Error Message Descriptions” on page 358.
See “About the Monitoring System” on page 352.
Status and Error Message Descriptions
The following table describes each column in the message screen.
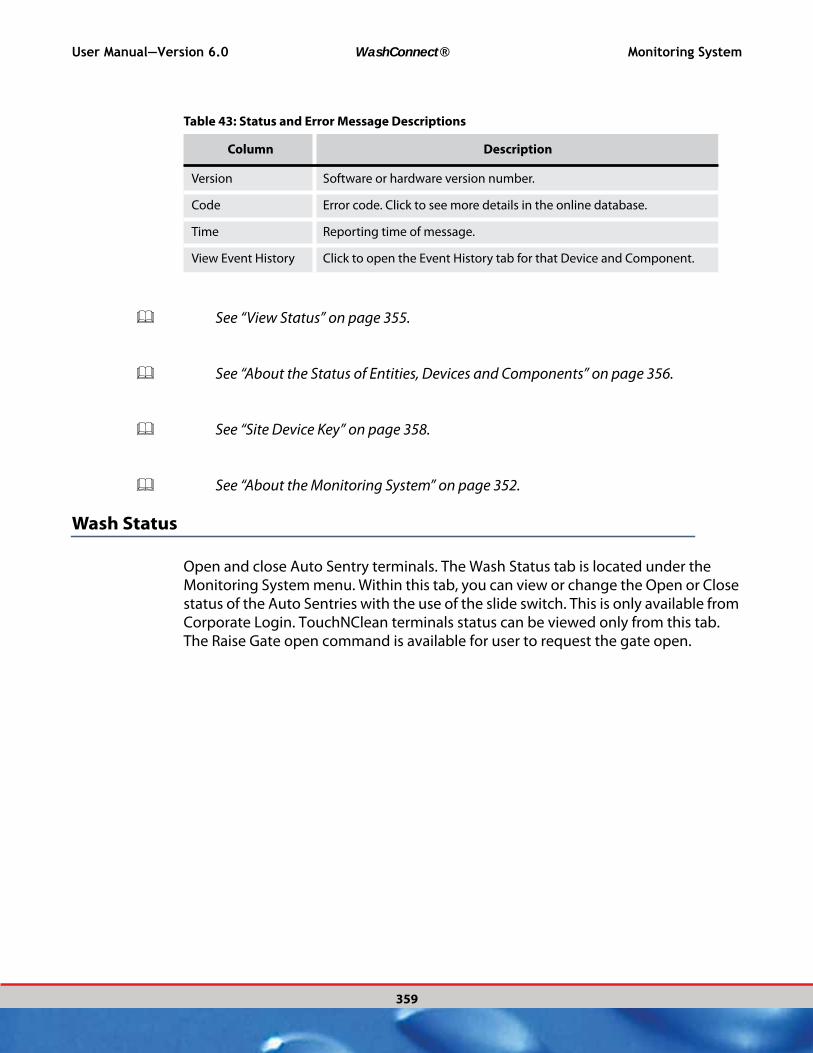
Table 43: Status and Error Message Descriptions
Column Description
Version Software or hardware version number.
Code Error code. Click to see more details in the online database.
Time Reporting time of message.
View Event History Click to open the Event History tab for that Device and Component.
User Manual—Version 6.0 WashConnect® Monitoring System
359
See “View Status” on page 355.
See “About the Status of Entities, Devices and Components” on page 356.
See “Site Device Key” on page 358.
See “About the Monitoring System” on page 352.
Wash Status
Open and close Auto Sentry terminals. The Wash Status tab is located under the Monitoring System menu. Within this tab, you can view or change the Open or Close status of the Auto Sentries with the use of the slide switch. This is only available from Corporate Login. TouchNClean terminals status can be viewed only from this tab. The Raise Gate open command is available for user to request the gate open.

Monitoring System WashConnect® User Manual—Version 6.0
360
Figure 170. Wash Status tab

User Manual—Version 6.0 WashConnect® Monitoring System
361
About Event History
See “View Event History Log” on page 361.
See “Search for an Event Code” on page 362.
View Event History Log
To view event history, follow these steps:
1 In the Monitoring System menu, click Event History. The Event History tab appears.
Figure 171. Event History Tab
2 In the Site box, select a site.
3 In the Device box, select a device.
4 In the Component box, select a component.
5 In the Start Date and End Date boxes, select a date range.
6 Optional: Check Include cleared events to see cleared events.
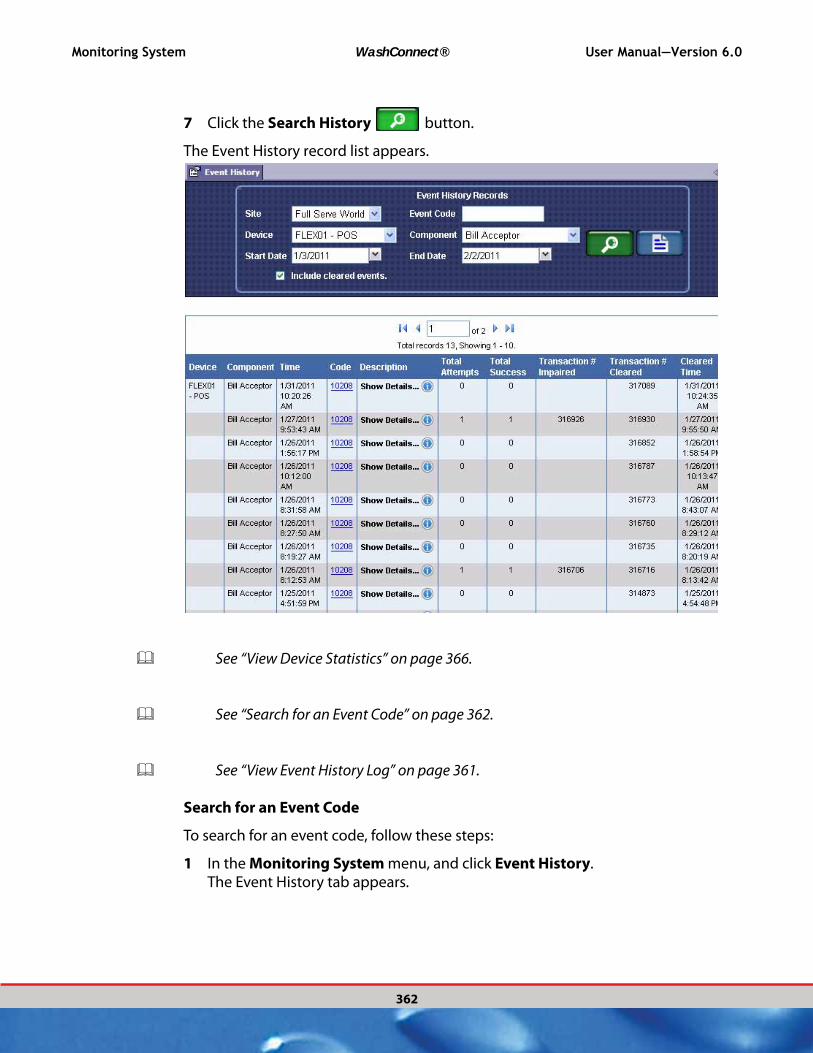
Monitoring System WashConnect® User Manual—Version 6.0
362
7 Click the Search History button.
The Event History record list appears.
See “View Device Statistics” on page 366.
See “Search for an Event Code” on page 362.
See “View Event History Log” on page 361.
Search for an Event Code
To search for an event code, follow these steps:
1 In the Monitoring System menu, and click Event History.The Event History tab appears.

User Manual—Version 6.0 WashConnect® Monitoring System
363
Figure 172. Event History Tab
2 In the Site box, select a site.
3 In the Event Code box, type an event code number.
4 Optional: Select parameters in any of the other fields.
5 Click the Search History button.The Events History record list appears for the event code and any additional parameters.
6 From the Code column, click on the Event Code link, and be directed to the ICS website Event Code directory.
This data helps to determine the failure rate of any single component. For example, at a bill dispenser, the system tracks how many bills were dispensed and counts each one as either a successful, impaired or failed attempt. If the device dispensed 6,000 bills, you can see how many were successful. The errors are segregated into system errors, user errors and informational alerts.
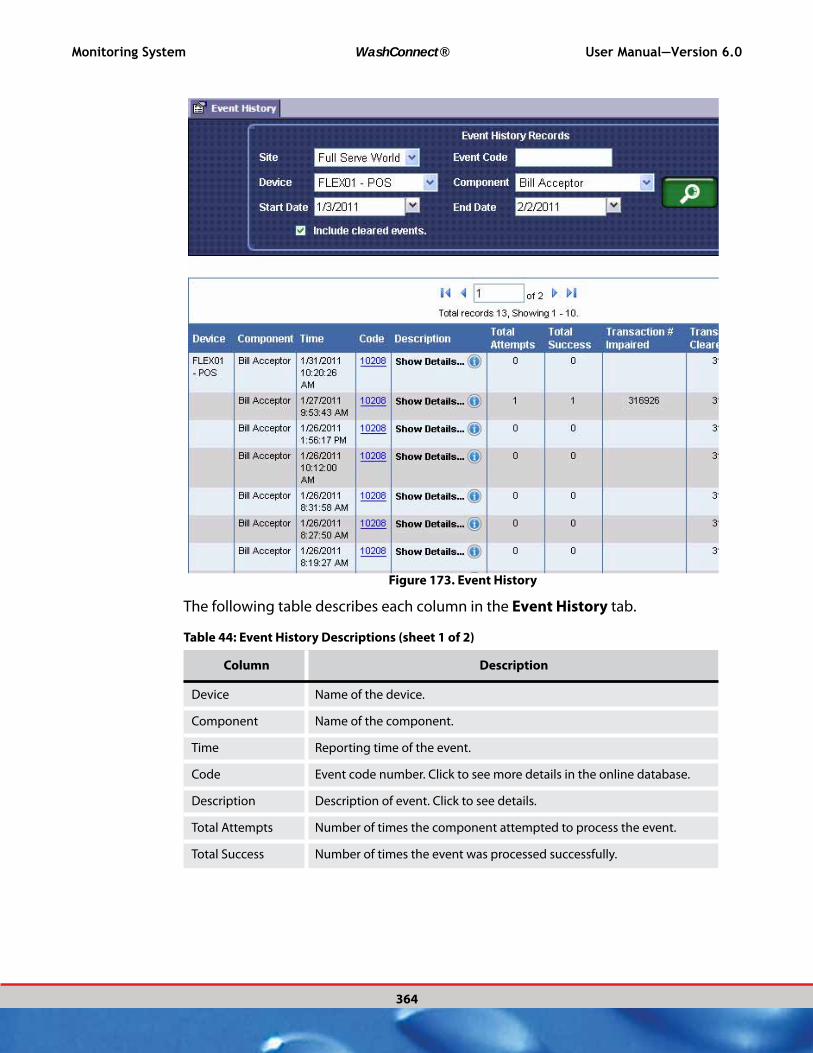
Monitoring System WashConnect® User Manual—Version 6.0
364
Figure 173. Event History
The following table describes each column in the Event History tab.
Table 44: Event History Descriptions (sheet 1 of 2)
Column Description
Device Name of the device.
Component Name of the component.
Time Reporting time of the event.
Code Event code number. Click to see more details in the online database.
Description Description of event. Click to see details.
Total Attempts Number of times the component attempted to process the event.
Total Success Number of times the event was processed successfully.
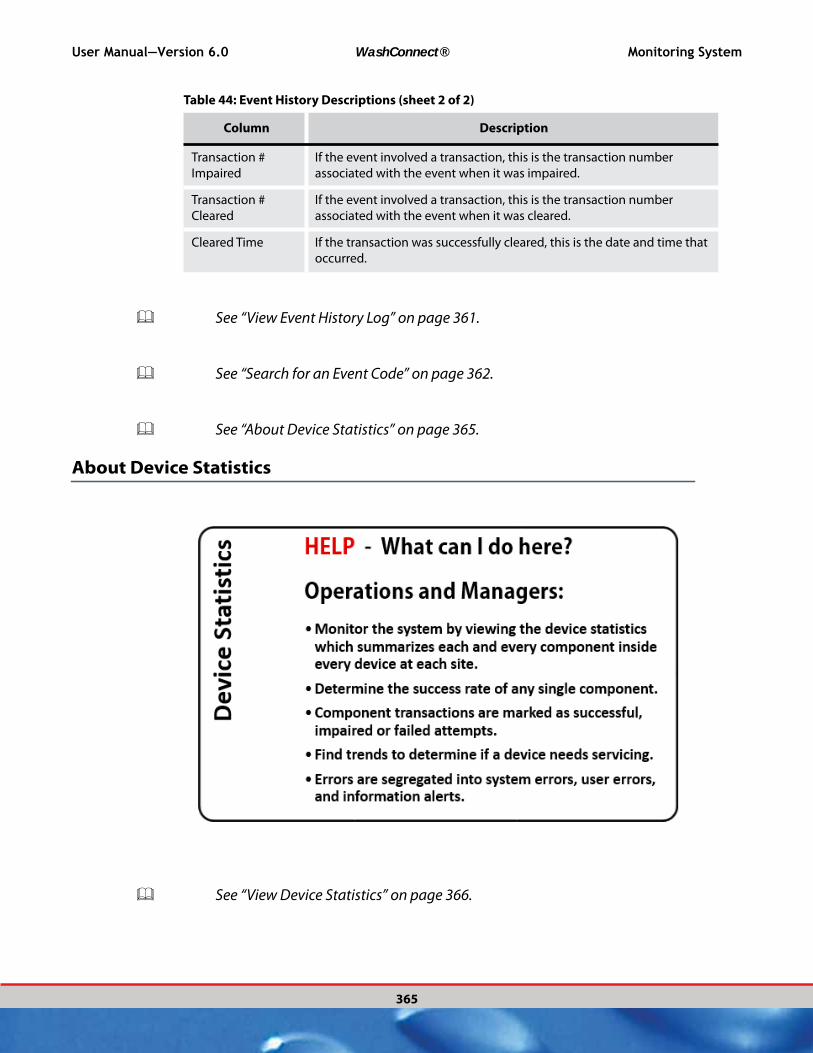
User Manual—Version 6.0 WashConnect® Monitoring System
365
See “View Event History Log” on page 361.
See “Search for an Event Code” on page 362.
See “About Device Statistics” on page 365.
About Device Statistics
See “View Device Statistics” on page 366.
Transaction #
Impaired
If the event involved a transaction, this is the transaction number
associated with the event when it was impaired.
Transaction #
Cleared
If the event involved a transaction, this is the transaction number
associated with the event when it was cleared.
Cleared Time If the transaction was successfully cleared, this is the date and time that
occurred.
Table 44: Event History Descriptions (sheet 2 of 2)
Column Description

Monitoring System WashConnect® User Manual—Version 6.0
366
See “Device Statistics Descriptions” on page 367.
View Device Statistics
To view Site Device Statistics, follow these steps:
1 From the Monitoring System menu, click Device Statistics. The Device Statistics tab appears.
Figure 174. Device Statistics
2 In the Site box, select a site.
3 In the Device box, select a device or select All to see all devices.
4 In the Component box, select a component or select All to see all components.
5 In the From Date and To Date boxes, select a date range.
6 Click the View Report button. The device statistics appear.
For example, at a bill dispenser, the system tracks how many bills were dispensed and counts each one as either a successful, impaired or failed attempt. If the device dispensed 6,000 bills, you can see how many were successful. The errors are segregated into system errors, user errors and informational alerts.
From the Monitoring System menu, you can view the Site Device Statistics report.
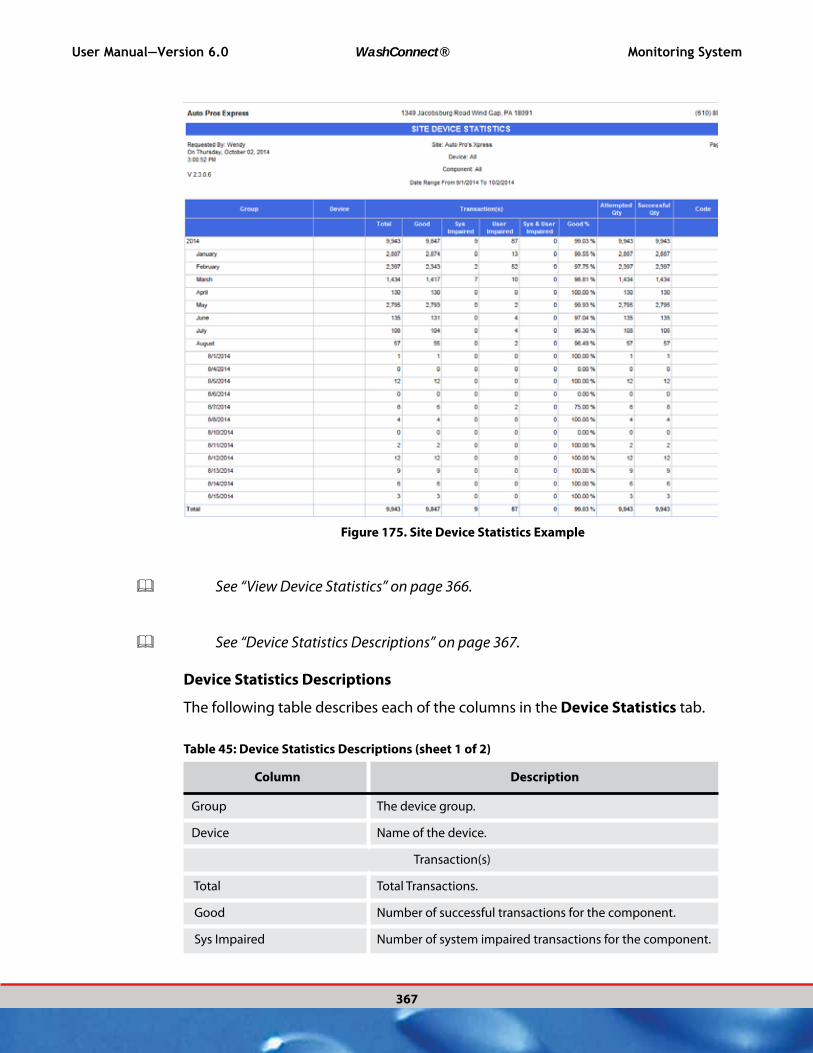
User Manual—Version 6.0 WashConnect® Monitoring System
367
Figure 175. Site Device Statistics Example
See “View Device Statistics” on page 366.
See “Device Statistics Descriptions” on page 367.
Device Statistics Descriptions
The following table describes each of the columns in the Device Statistics tab.
Table 45: Device Statistics Descriptions (sheet 1 of 2)
Column Description
Group The device group.
Device Name of the device.
Transaction(s)
Total Total Transactions.
Good Number of successful transactions for the component.
Sys Impaired Number of system impaired transactions for the component.

Monitoring System WashConnect® User Manual—Version 6.0
368
See “View Device Statistics” on page 366.
See “About Device Statistics” on page 365.
About Version History
See “View Version History” on page 369.
See “Version History Descriptions” on page 370.
User Impaired Number of user impaired transactions for the component.
Sys & User Impaired Combined total of system and user impaired transactions for
the component.
Good % Percentage of good transactions out of all transactions.
Attempted Quantity Attempted quantity of transactions.
Successful Quantity Successful quantity of transactions.
Code Most reported error codes.
Table 45: Device Statistics Descriptions (sheet 2 of 2)
Column Description

User Manual—Version 6.0 WashConnect® Monitoring System
369
View Version History
The Version History includes a historical upgrade schedule for each hardware and software component at your site. From the Monitoring System menu, you can view the Version History. Follow these steps:
1 From the Monitoring System menu, and click Version History.The Version History tab appears.
Figure 176. Version History
2 In the Site box, select a site.
3 Click to check the box for Current Version listing only.
4 In the Device box, select a device or select --Show All-- to see all devices.
5 In the Component box, select a component or select --Show All-- to see all components.
6 In the From Date and To Date boxes, select a date range.
7 Click the Search button. The Version History appears.

Monitoring System WashConnect® User Manual—Version 6.0
370
Figure 177. Version History
See “Version History Descriptions” on page 370.
See “About Version History” on page 368.
Version History Descriptions
The following table describes each of the columns in the Version History table.
Table 46: Version History
Column Description
Component Name Name of the component.
Component ID Number. Component ID.
Version Version of the software associated with the component.
Date Time Date and time the of the software.
Dependent
Component
Name of dependent sub-component, usually software.
The Version History includes a historical upgrade schedule for each hardware and software component at your site. For example, you can see each date a firmware version changed. After a firmware upgrade, you can see if the errors for that component went away. The version history also helps ICS technicians troubleshoot issues. Since each site has numerous components, and each component must be synchronized with all the rest, a component that appears to be failing may simply need an upgrade to correct the issue.
See “View Version History” on page 369.
See “About Version History” on page 368.

User Manual—Version 6.0 WashConnect® Configuration
June 17, 2015 371
CHAPTER 9:
CONFIGURATION
The commands in the Configuration menu are designed for someone who is a high-level decision maker since these commands often affect all sites within the organizational layout.
The Configuration menu includes:
Goods and Services
▪ Club Services (Available at Corporate Only)
▪ Sales Items
▪ Packages
▪ Wash Book (Available at Corporate Only)
▪ Profiles
▪ POS Profiles
▪ Promotions (Setup at Corporate Only)
Frequency Promotions
▪ Promo Setup (Available at Corporate Only)
▪ Promo Receipt Text (Available at Corporate Only)
Alerts
Export System Data
Accounting Interface
▪ Manage
▪ Import Accounts (Available at Corporate Only)
▪ Payment Account (Available at Corporate Only)
▪ System Items (Available at Corporate Only)
Commissions
Configuration WashConnect® User Manual—Version 6.0
372 June 17, 2015
▪ Positions
▪ Eligibility Rules
▪ Schedules
Goods and Services Menu Step By Step Instructions:
See “Edit Sales Item” on page 408.
See “Delete Sales Item” on page 409.
See “Add a Profile with a Base Wash and Extra Service” on page 435.
See “Edit a Profile” on page 440.
See “About Frequency Promotion Packages” on page 340.
See “Add a Club Service” on page 376.
See “Edit a Club Service” on page 382.
Frequency Promotions Step-By-Step Instructions:
See “About Frequency Promotion Packages” on page 340.
See “Add Promo Receipt Text” on page 389.
See “About Alerts” on page 392.
See “Test Alerts” on page 394.
Accounting Interface Step-By-Step Instructions:
See “About Accounting Interface Manage” on page 398.
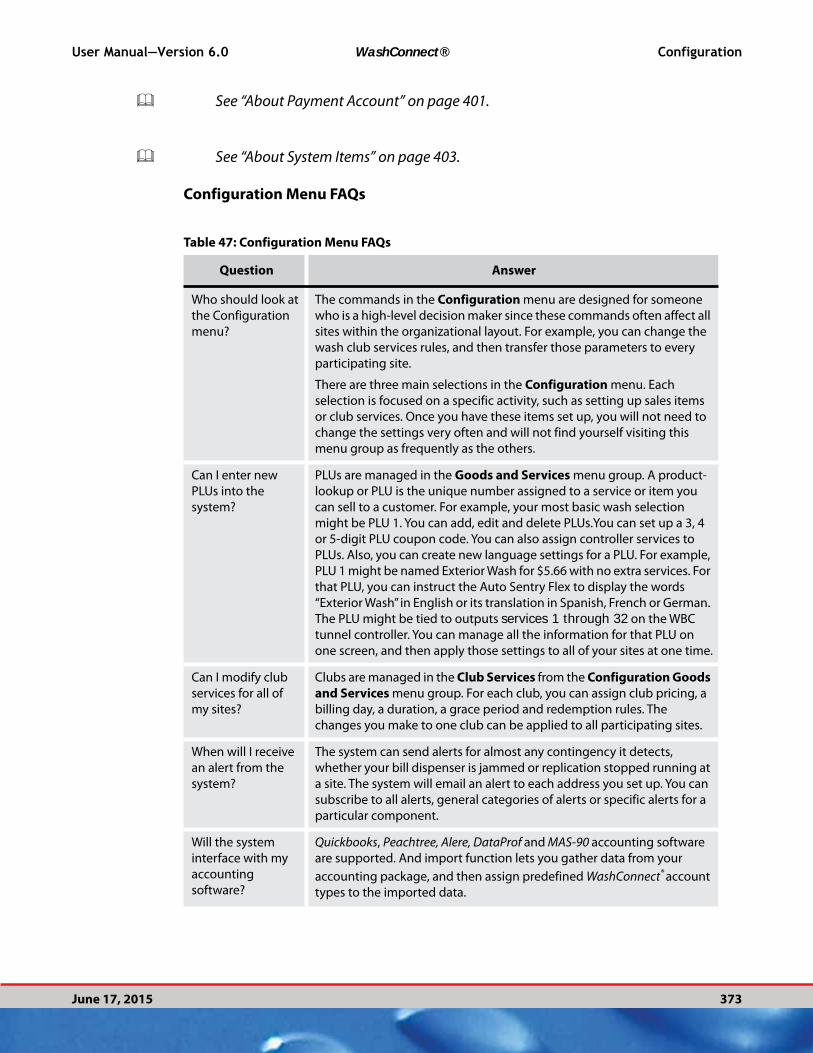
User Manual—Version 6.0 WashConnect® Configuration
June 17, 2015 373
See “About Payment Account” on page 401.
See “About System Items” on page 403.
Configuration Menu FAQs
Table 47: Configuration Menu FAQs
Question Answer
Who should look at
the Configuration
menu?
The commands in the Configuration menu are designed for someone
who is a high-level decision maker since these commands often affect all
sites within the organizational layout. For example, you can change the
wash club services rules, and then transfer those parameters to every
participating site.
There are three main selections in the Configuration menu. Each
selection is focused on a specific activity, such as setting up sales items
or club services. Once you have these items set up, you will not need to
change the settings very often and will not find yourself visiting this
menu group as frequently as the others.
Can I enter new
PLUs into the
system?
PLUs are managed in the Goods and Services menu group. A product-
lookup or PLU is the unique number assigned to a service or item you
can sell to a customer. For example, your most basic wash selection
might be PLU 1. You can add, edit and delete PLUs.You can set up a 3, 4
or 5-digit PLU coupon code. You can also assign controller services to
PLUs. Also, you can create new language settings for a PLU. For example,
PLU 1 might be named Exterior Wash for $5.66 with no extra services. For
that PLU, you can instruct the Auto Sentry Flex to display the words
“Exterior Wash” in English or its translation in Spanish, French or German.
The PLU might be tied to outputs services 1 through 32 on the WBC
tunnel controller. You can manage all the information for that PLU on
one screen, and then apply those settings to all of your sites at one time.
Can I modify club
services for all of
my sites?
Clubs are managed in the Club Services from the Configuration Goods
and Services menu group. For each club, you can assign club pricing, a
billing day, a duration, a grace period and redemption rules. The
changes you make to one club can be applied to all participating sites.
When will I receive
an alert from the
system?
The system can send alerts for almost any contingency it detects,
whether your bill dispenser is jammed or replication stopped running at
a site. The system will email an alert to each address you set up. You can
subscribe to all alerts, general categories of alerts or specific alerts for a
particular component.
Will the system
interface with my
accounting
software?
Quickbooks, Peachtree, Alere, DataProf and MAS-90 accounting software
are supported. And import function lets you gather data from your
accounting package, and then assign predefined WashConnect® account
types to the imported data.
Configuration WashConnect® User Manual—Version 6.0
374 June 17, 2015
See “Configuration” on page 295.
Managing Clubs
Club Services are managed from Goods and Services on the Configuration menu from Corporate login.
A wash club typically offers individual customers unlimited washes for a flat monthly fee. You can sell the wash club membership at the Auto Sentry Flex. Customers must use a credit card to purchase their club memberships because the membership fees are billed to a credit card on a recurring basis. Club members are identified with an RFID tag adhered on the inside of the vehicle windshield. The vehicle is identified by the system with the RFID tags preceding pound (#) sign and RFID number. Therefore, the club membership is limited to the vehicle in which the RFID tag is located. One customer can have multiple vehicles join clubs. Each vehicle is billed separately.
See “Clubs Menu” on page 87.
Managing Fleets
Fleets are managed in the Fleet menu group. Fleets are typically designed for corporate customers with a fleet of vehicles. A fleet customer can add as many vehicles as necessary to the fleet account. Fleets can have a monthly invoice can be sent to customer. The vehicle is also identified with an RFID tag or a customer card. A customer card is a magnetic-stripe card that is distinguished in the system with a percentage (%) symbol as apposed to the RFID numbers that begin with a pound (#) sign. Once the system identifies the fleet customer, the Auto Sentry Flex presents the applicable wash selection profile based on the customer or vehicle. Fleet accounts typically limit the wash menu to the most basic wash and can set up a Profile for the customized wash menu.
See “About the Fleet Menu” on page 127.
Goods and Services
From the Goods and Services menu, you can manage Club Services, Sales Items, Packages, Wash Books, Profiles, POS Profiles, and Promotions.
See “About Club Services” on page 299.
See “Add Sales Item” on page 393.

User Manual—Version 6.0 WashConnect® Configuration
June 17, 2015 375
See “About Packages” on page 335.
See “Add Base Wash Sales Item for Wash Book offering” on page 341.
See “About Profiles” on page 346.
See “About POS Profiles” on page 361.
See “About Sale Promotions” on page 363.
About Club Services
See “Add Sales Item” on page 393.
Configuration WashConnect® User Manual—Version 6.0
376 June 17, 2015
See “Edit a Club Service” on page 382.
See “Terminate a Club Service” on page 383.
See “Reorder Club Service Columns in Ascending/Descending Order” on page 384.
See “Filter the Club Service List” on page 385.
See “Filter the Club Service List” on page 385.
See “Club Rules Examples” on page 388.
See “Wash Club Customer Experience” on page 390.
See “Packages” on page 418.
See “Add a Profile with a Base Wash and Extra Service” on page 435.
Add a Club Service
This is step one in setting up a club to sell.
NOTE: This command will only appear for users who login at the Corporate level.
To add a club service, follow these steps:
1 At WashConnect® Login screen, click to select Corporate, and then Login.
2 From the Configuration menu, click Goods & Services, and then click Club Services. The Club Services tab appears including a list of all clubs.
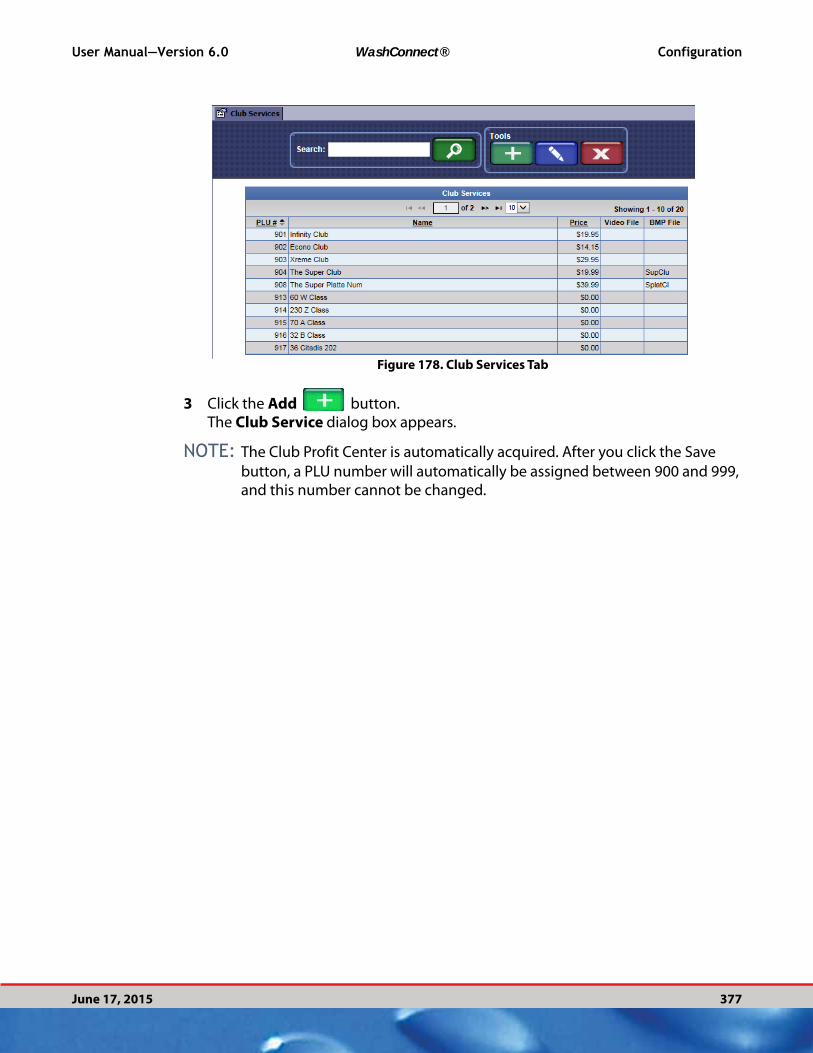
User Manual—Version 6.0 WashConnect® Configuration
June 17, 2015 377
Figure 178. Club Services Tab
3 Click the Add button. The Club Service dialog box appears.
NOTE: The Club Profit Center is automatically acquired. After you click the Save
button, a PLU number will automatically be assigned between 900 and 999, and this number cannot be changed.
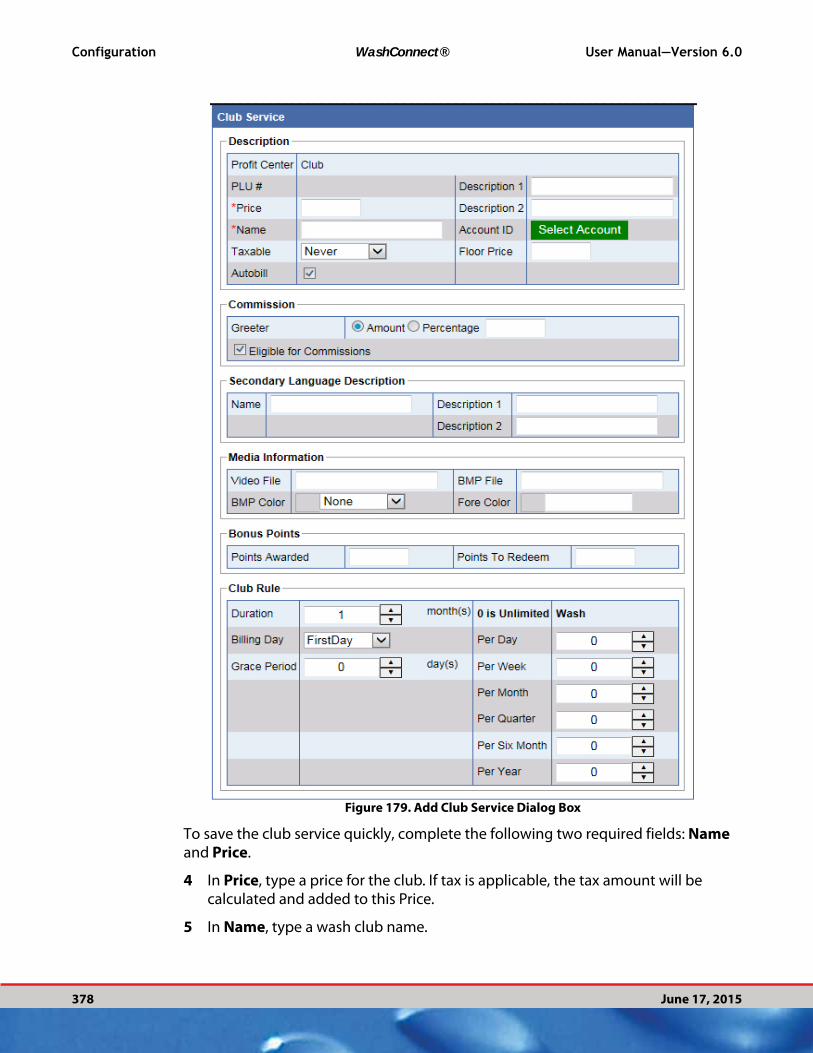
Configuration WashConnect® User Manual—Version 6.0
378 June 17, 2015
Figure 179. Add Club Service Dialog Box
To save the club service quickly, complete the following two required fields: Name and Price.
4 In Price, type a price for the club. If tax is applicable, the tax amount will be calculated and added to this Price.
5 In Name, type a wash club name.
User Manual—Version 6.0 WashConnect® Configuration
June 17, 2015 379
6 In Description 1 & 2, type a description for the wash club.
7 In the Account ID, click to select the Select Account button.The Accounts dialog box appears.
▪ Click to select the Apply account to all sites box or select an individual site, and then select the Account from the drop-down list.
▪ Click OK.
8 In the Taxable drop-down box, select one of the following: Always, Never, Conditional, or Force.
9 Prorating Clubs must be able to apply a Floor Price. There is a setting to enable Floor Price. In the Floor Price, type a minimum price to be applied as the prorated club purchase price. The Floor Price is the lowest amount that the customer would be charged in the initial month when purchasing a prorated club membership.
NOTE: The prorated amount can be more than the floor price, but not less.
See “Global> GlobalConfiguration > CentralLogServer” on page 515.
10 In Autobill, click to remove the Autobill check mark if not allowing this club to autobill. Click to mark the Autobill checkbox if allowing this club to autobill.
11 In Commission for Greeter, click to select Amount or Percentage.
▪ If Percentage, type numeric percentage.
12 In Secondary Language DescriptionThis is where you can create secondary language descriptions to appear on the button for an unattended terminal.
▪ In Name, type the correct sales item name in a secondary language.
▪ In Description 1, type the correct sales item descriptions in one secondary language.
▪ In Description 2, type the correct sales item descriptions in one secondary language.
13 In Media Information, you can add custom videos to be played and custom artwork (bitmaps) for the various buttons that are displayed. In both cases, there are separate videos for English or a second language, just as there are bitmaps for English or a second language. To make these videos and bitmaps accessible for use, they must be placed within the proper folder locations. The following example specifies the required locations for the custom Video File and custom Button (bitmaps):
Configuration WashConnect® User Manual—Version 6.0
380 June 17, 2015
To play an English video named polish.avi it must exist within the \ICS\AVIFiles\Primary\ directory. In Video File, type the file name of the video as polish.
To play a second language video named polish.avi it must exist within the \ICS\AVIFiles\Secondary\ directory. In Video File, type the file name of the video as polish.
To display an English custom button named polishX.bmp it must exist within the \ICS\BMPFiles\Primary\Custom directory. In BMP File, type the file name as polish.
To display a second language custom button named polishX.bmp it must exist within the \ICS\BMPFiles\Secondary\Custom directory. In BMP File, type the file name as polish.
NOTE: When setting up the Media Information in WashConnect®, the BMP file
names do not include a suffix (e.g., X, L, M or S) or a file extension.
As soon as the videos are saved in the WashConnect® directory, they are automatically enabled for any PLU that uses the custom button with the same name.
In the BMP File box, type the file name of the custom button. Do not type the size suffix (e.g., S, M, L or X). Do not type the .bmp file extension.The following BMP example specifies the difference between Primary and Secondary location:
▪ Saved primary language custom button bitmap files here: \ICS\BMPFiles\Primary\Custom
▪ Saved secondary language custom button bitmap files here: \ICS\BMPFiles\Secondary\Custom
For more Custom Button Graphic information, see the Auto Sentry/Touch ’N Clean User Manual or contact Technical Support if you would like the marketing department at ICS to create custom graphics.
NOTE: If selecting a custom graphic .bmp file, the color selections are unnecessary.
In BMP Color drop-down box, select a color for the standard button.
In Fore Color, select a color from the color swatch chart for the standard button.
14 In Bonus Points section, set the Bonus Points parameters.
In Points Awarded, set the customer tracking Points to award customer if they purchase this sales item.
In Points to Redeem, set the customer tracking Points to Redeem this sales item for free.

User Manual—Version 6.0 WashConnect® Configuration
June 17, 2015 381
NOTE: Bonus Points are available for Express, Inbay Auto, and Full Service POS only.
This feature does not apply at the Auto Sentry.
15 In Club Rule section, set the following club billing parameters:
In Duration, select a number representing how many months to bill the club. For example, an unlimited monthly club will have the duration be 1 month. Type 6 for a prepaid 6 month club which can even be purchased as a gift and then after the 6 months can renew month to month.
In Billing Day drop-down box, select First Day or Sign Up Day
In Grace Period, select a number representing an amount of days that the customer can receive unlimited car washes after a credit card declines. This is the grace period to stay in good standing with your customers until they can work things out with their bank or provide another credit card.
0 is Unlimited. Wash.
▪ Unlimited Clubs. If you type zero (0) in each of the Wash per boxes, then the club is not limited. Customers may redeem unlimited washes for the given Duration.
▪ Single-Rule Clubs. Establishing a single rule is the simplest club scenario. For example, in Wash per Month, you can type 31. This establishes a monthly limit for club customers. Other limits are not enforced.
▪ Multi-Rule Clubs. If you want to establish multiple rules (e.g., day, week and month), follow the general guideline of ascending order (e.g., week is greater than day, month is greater than week, quarter is greater than month, etc.).
Figure 180. Multi-Rule Clubs
NOTE: The ascending order guideline is not required by the software. Any
combination of positive integer values and zeros are valid, whether they are in ascending order or not.
16 Click the Save button. The club is added to the list.
Configuration WashConnect® User Manual—Version 6.0
382 June 17, 2015
NOTE: The Club Service PLUs are between 900 and 999. The Club Service PLU
number is automatically generated for the club. You cannot change the PLU number.
For Step Two in setting up a club, setup up a discount PLU for the wash price, See “Add Sales Item” on page 393.
See “Edit a Club Service” on page 382.
See “Terminate a Club Service” on page 383.
See “Reorder Club Service Columns in Ascending/Descending Order” on page 384.
See “Filter the Club Service List” on page 385.
See “Club Rules Examples” on page 388.
See “Wash Club Customer Experience” on page 390.
Edit a Club Service
To edit a club service, follow these steps:
1 From the Configuration menu, select Goods and Services, and then select Club Services. The Club Services tab appears including a list of all clubs.
2 Click to select a club service from the list.The club service is highlighted.
3 Click the Edit button. The Club Service dialog box appears.
4 Make your changes, and then click Save. The club service is saved.
See “Add Sales Item” on page 316.
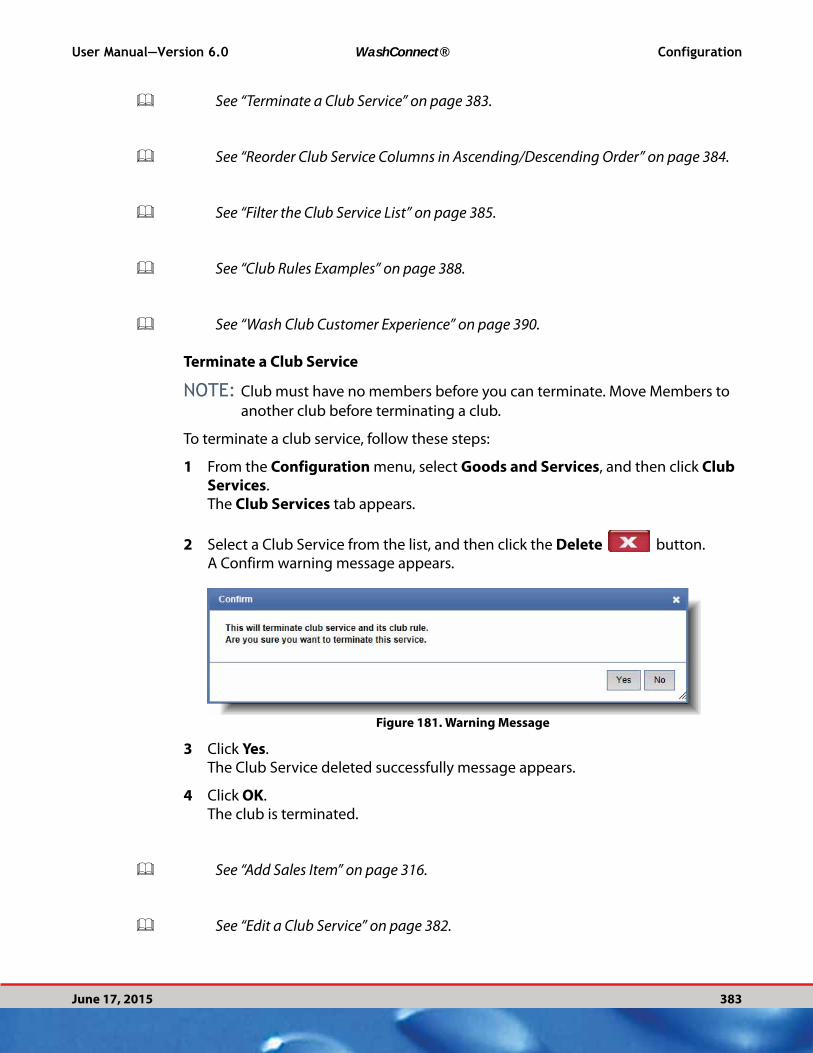
User Manual—Version 6.0 WashConnect® Configuration
June 17, 2015 383
See “Terminate a Club Service” on page 383.
See “Reorder Club Service Columns in Ascending/Descending Order” on page 384.
See “Filter the Club Service List” on page 385.
See “Club Rules Examples” on page 388.
See “Wash Club Customer Experience” on page 390.
Terminate a Club Service
NOTE: Club must have no members before you can terminate. Move Members to
another club before terminating a club.
To terminate a club service, follow these steps:
1 From the Configuration menu, select Goods and Services, and then click Club Services. The Club Services tab appears.
2 Select a Club Service from the list, and then click the Delete button. A Confirm warning message appears.
Figure 181. Warning Message
3 Click Yes. The Club Service deleted successfully message appears.
4 Click OK.The club is terminated.
See “Add Sales Item” on page 316.
See “Edit a Club Service” on page 382.

Configuration WashConnect® User Manual—Version 6.0
384 June 17, 2015
See “Reorder Club Service Columns in Ascending/Descending Order” on page 384.
See “Filter the Club Service List” on page 385.
See “Club Rules Examples” on page 388.
See “Wash Club Customer Experience” on page 390.
Reorder Club Service Columns in Ascending/Descending Order
Figure 182. Club Services Columns
To reorder Club Service columns, follow these steps:
1 Select Configuration menu, select Goods and Services, and then click Club Services. The Club Services tab appears.
2 Sort the list in ascending/descending order:
▪ Click to select a Column header for ascending order, and click again for descending order.
3 Reorder the columns in the list.
▪ Click to select a column heading, and then drag the column to the new location in the list.
See “Add Sales Item” on page 316.
See “Edit a Club Service” on page 382.
See “Terminate a Club Service” on page 383.
User Manual—Version 6.0 WashConnect® Configuration
June 17, 2015 385
See “Filter the Club Service List” on page 385.
See “Club Rules Examples” on page 388.
See “Wash Club Customer Experience” on page 390.
Filter the Club Service List
The Search can apply a filter to the Club Service list to locate a club service. You can filter the report on the PLU and Name fields:
Type a letter or first few letters or a word. For example, filtering with “B” will return clubs whose names begin with “B,” and/ or clubs who have “B” anywhere in the field.
The Clubs Services dialog box describes a club service and is similar to the Sales Item dialog box. A Sale Item is anything that can be sold, whether it is a physical item (e.g., a scented tree) or a description of a service. (e.g., the Unlimited Wash Club). However, all the club services are not set up in the Sales Items dialog box but in the Club Services dialog box. The Club Services automatically applies a PLU from 900 to 999.
See “Add Sales Item” on page 393.
See “Edit a Club Service” on page 382.
See “Terminate a Club Service” on page 383.
See “Reorder Club Service Columns in Ascending/Descending Order” on page 384.
See “Club Rules Examples” on page 388.
See “Wash Club Customer Experience” on page 390.
Club Service Descriptions
The following table describes a Club Service dialog box.

Configuration WashConnect® User Manual—Version 6.0
386 June 17, 2015
See “Add Sales Item” on page 316.
Table 48: Club Service Descriptions
Field Parameter Description
Club Service Description
Profit Center Informational Defines various profit centers or income sources for labor tracking
income. You cannot change this selection.
PLU Informational Product Lookup. Unique numbers used by the ICS system to identify
club inventory items. These are assigned automatically, starting at 900
and continuing sequentially whenever a new one is created. You cannot
change this selection.
Price Integer. Max. length is
8.
Price of the service or item.
Name Alphanumeric. Max.
length is 52.
This is the name of the service or item. It is for your reference, and is not
displayed to customer.
Description 1 Alphanumeric. Max.
length is 50.
Club service description for reporting.
Description 2 Alphanumeric. Max.
length is 50.
Club service description for reporting.
Account ID Integer. Max. 16 Unique Identifier. Account number assigned to PLU# created in a customer supplied accounting package. See “Import Chart of
Accounts” on page 507.
Taxable List Select Always, Never, Conditional or Force.
Always means the service is always taxed.
Never means the service is never taxed.
Conditional means the service is taxed only if a Forced service is also
included in the transaction.
Forced means the service is taxed and also forces its tax rate onto any
Conditional services included with the transaction.
Floor Price Minimum price to charge customers if pro-rating club customers initial
wash club purchase price.
Taxable List Always, Never, Conditional, Force
Autobill Checkbox The Autobill check box is to enable or disable autobilling for club
members. Check mark enables autobilling for all club members. Remove
the check mark to disable autobilling for all club members.
Commission
Commission
Greeter
Numeric Amount or Percentage of Sales.
Secondary Language Description

User Manual—Version 6.0 WashConnect® Configuration
June 17, 2015 387
Name Alphanumeric. Max.
length is 52.
This is the name of the secondary Language: English, French, German or
Spanish.
It is for your reference, and is not displayed to the customer.
Description 1 Alphanumeric. Max.
length is 50.
Description 1 appears on the button’s first line on the touch-screen.
Description 2 Alphanumeric. Max.
length is 50.
Description 2 appears on the button’s second line on the touch-screen.
Media Information
Video File Alphanumeric. Max.
length is 50.
Name of video file to load for service. Video file will play on screen. See
“About Audio Visual Specifications” on page 403.
BMP Color List Background color selection for the sales item or club service button.
BMP File Alphanumeric. Max.
length is 50.
Name of graphic bitmap (.bmp) file to load for button. File will be used
on screen.
Fore Color List Foreground text color for the sales item or club service button.
Bonus Points
Points Awarded Bonus points accumulate from a Sales Item assigned Bonus Points (ONLY for Express, InBay and Full Service washes) and are awarded
to customer who purchases sales item with bonus points at a Touch POS terminal.
Points to Redeem Bonus points can be redeemed from a Sales Item assigned Bonus Points (ONLY for Express, InBay and Full Service washes) against a
customer at a Touch POS terminal.
Club Rule Options
Duration Numeric In months. Time period between recurring billing cycles for the club
members. Examples of durations are as follows:
▪ 1 (monthly billing)▪ 2 (billing every two months)▪ 3 (quarterly billing)▪ 6 (billing every six months)▪ 12 (annual billing)
Billing Day List Automatic billing date. Select FirstDay or SignUp Day. FirstDay is the
first of the month. SignUpDay is the club customer sign-up date.
Customers will be automatically billed on that day (according to the
cycle you select in the Duration list).
Table 48: Club Service Descriptions
Field Parameter Description
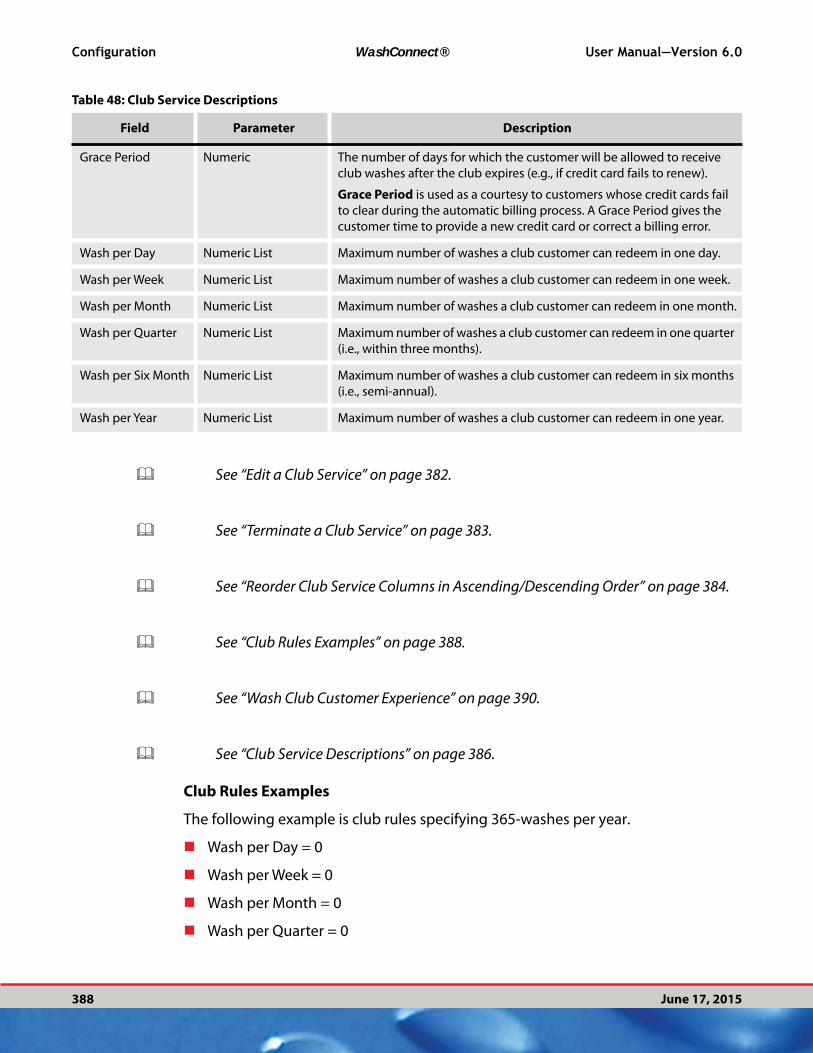
Configuration WashConnect® User Manual—Version 6.0
388 June 17, 2015
See “Edit a Club Service” on page 382.
See “Terminate a Club Service” on page 383.
See “Reorder Club Service Columns in Ascending/Descending Order” on page 384.
See “Club Rules Examples” on page 388.
See “Wash Club Customer Experience” on page 390.
See “Club Service Descriptions” on page 386.
Club Rules Examples
The following example is club rules specifying 365-washes per year.
Wash per Day = 0
Wash per Week = 0
Wash per Month = 0
Wash per Quarter = 0
Grace Period Numeric The number of days for which the customer will be allowed to receive
club washes after the club expires (e.g., if credit card fails to renew).
Grace Period is used as a courtesy to customers whose credit cards fail
to clear during the automatic billing process. A Grace Period gives the
customer time to provide a new credit card or correct a billing error.
Wash per Day Numeric List Maximum number of washes a club customer can redeem in one day.
Wash per Week Numeric List Maximum number of washes a club customer can redeem in one week.
Wash per Month Numeric List Maximum number of washes a club customer can redeem in one month.
Wash per Quarter Numeric List Maximum number of washes a club customer can redeem in one quarter
(i.e., within three months).
Wash per Six Month Numeric List Maximum number of washes a club customer can redeem in six months
(i.e., semi-annual).
Wash per Year Numeric List Maximum number of washes a club customer can redeem in one year.
Table 48: Club Service Descriptions
Field Parameter Description

User Manual—Version 6.0 WashConnect® Configuration
June 17, 2015 389
Wash per 6 Months = 0
Wash per Year = 365
The following example is club rules specifying 31-washes per month, 365-washes per year:
Wash per Day = 0
Wash per Week = 0
Wash per Month = 31
Wash per Quarter = 0
Wash per 6 Months = 0
Wash per Year = 365
In the previous example, customers may redeem up to 31 washes per month or 365 per year. No limits are imposed for 3- and 6-month intervals. However, if a customer attempted to redeem more than 365 washes in a 3- or 6-month period, he would be denied because it is impossible due to the 31 per month imposed limit.
The following example of club rules specifying seven-washes per week and 31 washes per month:
Wash per Day = 0
Wash per Week = 7
Wash per Month = 31
Wash per Quarter = 0
Wash per 6 Months = 0
Wash per Year = 0
In the previous example, the customer can redeem no more than seven washes per week and no more than 31 washes per month. The wash per day limit is assigned zero, meaning there is no explicit maximum number of washes per day. It is implicitly limited to seven as a consequence of the wash per week limit of seven.
See “Edit a Club Service” on page 382.
See “Terminate a Club Service” on page 383.
See “Reorder Club Service Columns in Ascending/Descending Order” on page 384.

Configuration WashConnect® User Manual—Version 6.0
390 June 17, 2015
See “Club Rules Examples” on page 388.
See “Wash Club Customer Experience” on page 390.
See “Club Service Descriptions” on page 386.
Wash Club Example
When logged into a corporate location, you can create your entire wash club. This is an example of how to set up your wash club step by step from beginning to end.
1 Club Service - Setup the name of two wash club offerings.
2 Sales Items - Setup Discounts for the free wash.
3 Packages - Create a package for the wash and then the free wash as the customer already paid for the wash by purchasing the wash club.
4 Profile - Create two profiles. Each profile includes the base wash, extras and upsells for each wash club setting up the rules for the club.
5 Profile - Create a Profile for all clubs that applies to Club Sales for the complete list of Wash Clubs to sell.
See “Edit a Club Service” on page 382.
See “Terminate a Club Service” on page 383.
See “Reorder Club Service Columns in Ascending/Descending Order” on page 384.
See “Club Rules Examples” on page 388.
See “Wash Club Customer Experience” on page 390.
See “Club Service Descriptions” on page 386.
Wash Club Customer Experience
The Auto Sentry is fast and easy for the customer when setting up a Club Membership. The Customer Experience is important for word of mouth advertisement.
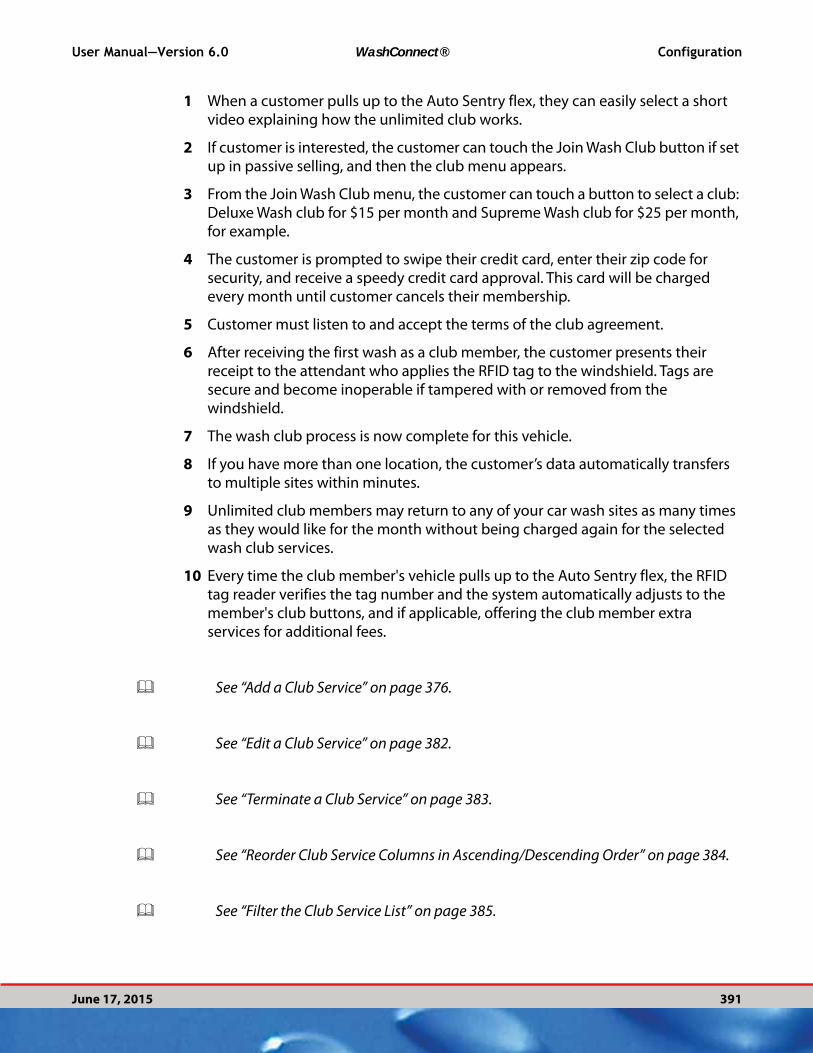
User Manual—Version 6.0 WashConnect® Configuration
June 17, 2015 391
1 When a customer pulls up to the Auto Sentry flex, they can easily select a short video explaining how the unlimited club works.
2 If customer is interested, the customer can touch the Join Wash Club button if set up in passive selling, and then the club menu appears.
3 From the Join Wash Club menu, the customer can touch a button to select a club: Deluxe Wash club for $15 per month and Supreme Wash club for $25 per month, for example.
4 The customer is prompted to swipe their credit card, enter their zip code for security, and receive a speedy credit card approval. This card will be charged every month until customer cancels their membership.
5 Customer must listen to and accept the terms of the club agreement.
6 After receiving the first wash as a club member, the customer presents their receipt to the attendant who applies the RFID tag to the windshield. Tags are secure and become inoperable if tampered with or removed from the windshield.
7 The wash club process is now complete for this vehicle.
8 If you have more than one location, the customer’s data automatically transfers to multiple sites within minutes.
9 Unlimited club members may return to any of your car wash sites as many times as they would like for the month without being charged again for the selected wash club services.
10 Every time the club member's vehicle pulls up to the Auto Sentry flex, the RFID tag reader verifies the tag number and the system automatically adjusts to the member's club buttons, and if applicable, offering the club member extra services for additional fees.
See “Add a Club Service” on page 376.
See “Edit a Club Service” on page 382.
See “Terminate a Club Service” on page 383.
See “Reorder Club Service Columns in Ascending/Descending Order” on page 384.
See “Filter the Club Service List” on page 385.

Configuration WashConnect® User Manual—Version 6.0
392 June 17, 2015
See “Edit a Club Service” on page 382.
See “Terminate a Club Service” on page 383.
See “Reorder Club Service Columns in Ascending/Descending Order” on page 384.
See “Club Rules Examples” on page 388.
See “Wash Club Customer Experience” on page 390.
See “Club Service Descriptions” on page 386.
About Sales Items
WARNING: The following instructions are for WashConnect® only sites. If Tunnel Master software is part of your system, see Sales Items in the Tunnel Master user manual.
See “Sort Sales Item List” on page 407.
See “Sales Item Search” on page 407.

User Manual—Version 6.0 WashConnect® Configuration
June 17, 2015 393
See “Edit Sales Item” on page 408.
See “Delete Sales Item” on page 409.
See “About Sales Item PLUs and Profiles” on page 410.
See “Sales Item Descriptions” on page 414.
See “Add Sales Item” on page 316.
See “Edit a Club Service” on page 382.
See “Flex / Retail Standard Screen” on page 411.
See “About Extra Advertise Video” on page 407.
See “About Audio Visual Specifications” on page 403.
Add Sales Item
To add a sales item, follow these steps:
1 From the Configuration menu, select Goods & Services, and then click Sales Items. The Sales Items tab appears.
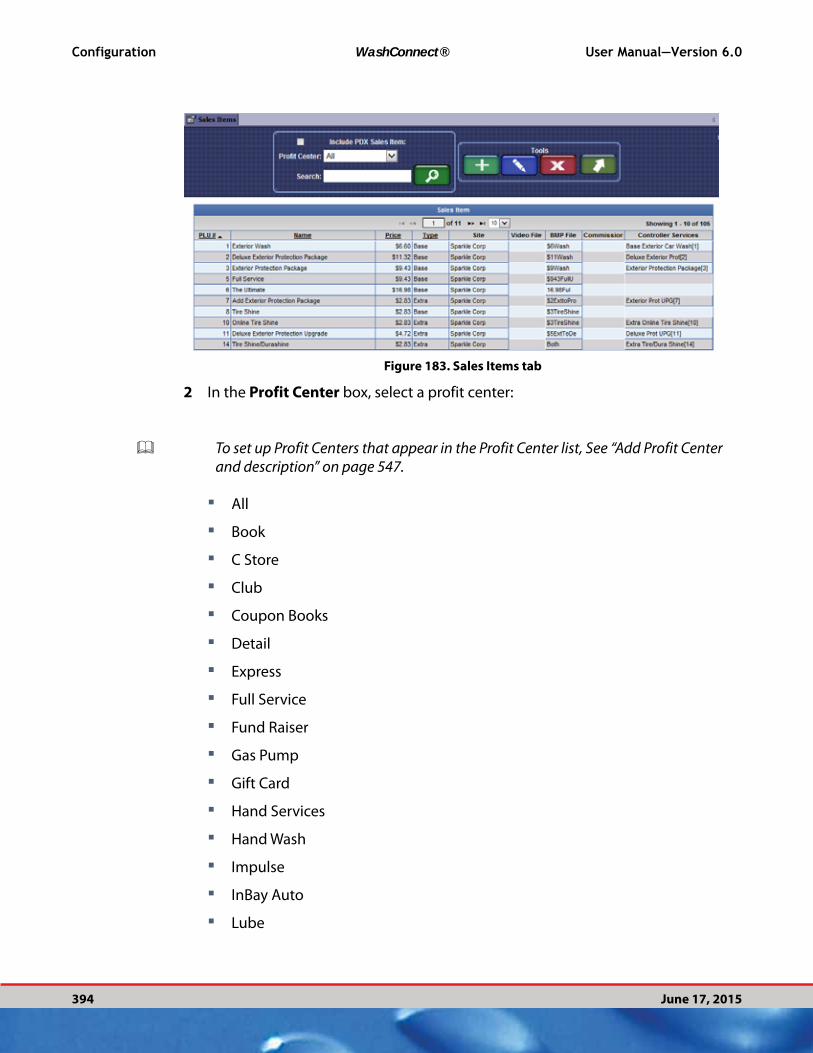
Configuration WashConnect® User Manual—Version 6.0
394 June 17, 2015
Figure 183. Sales Items tab
2 In the Profit Center box, select a profit center:
To set up Profit Centers that appear in the Profit Center list, See “Add Profit Center and description” on page 547.
▪ All
▪ Book
▪ C Store
▪ Club
▪ Coupon Books
▪ Detail
▪ Express
▪ Full Service
▪ Fund Raiser
▪ Gas Pump
▪ Gift Card
▪ Hand Services
▪ Hand Wash
▪ Impulse
▪ InBay Auto
▪ Lube

User Manual—Version 6.0 WashConnect® Configuration
June 17, 2015 395
▪ Maintenance
▪ Propane
▪ Self Serve
▪ Vacuum
NOTE: A Profit Center is the income source created for income and labor tracking
purposes. Figure 183, “Sales Items tab,” is an example.
3 Click the Add button. The Sales Item dialog box appears.
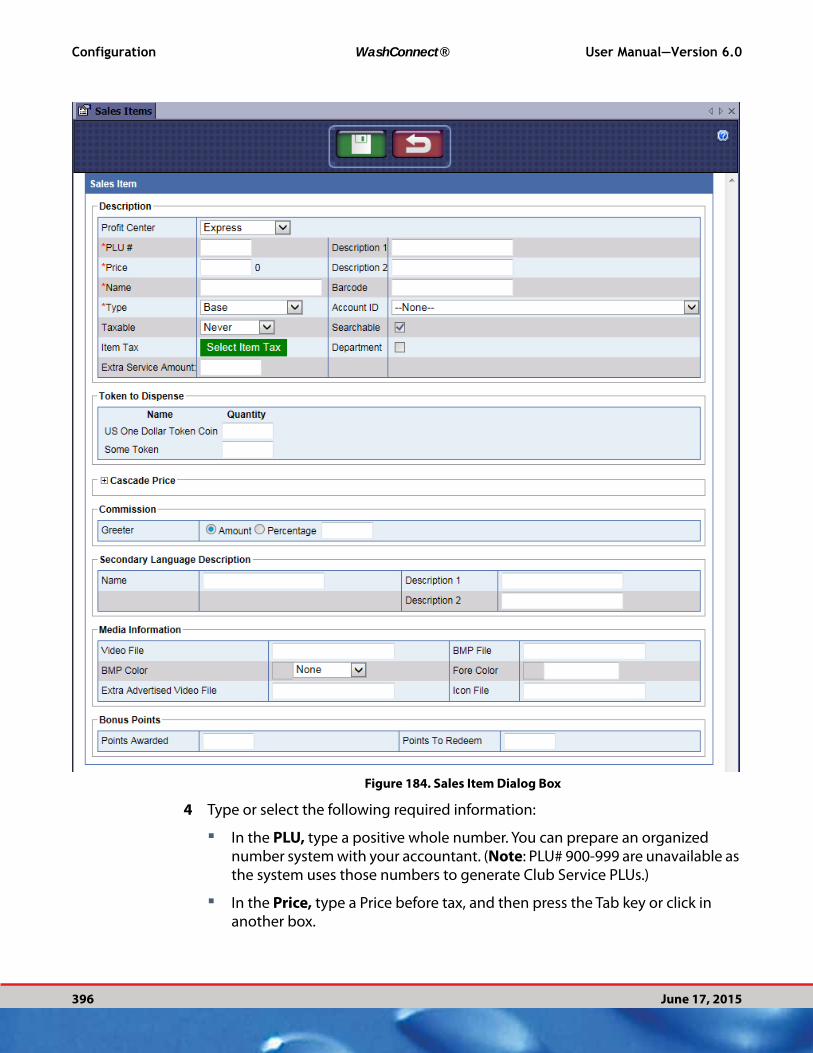
Configuration WashConnect® User Manual—Version 6.0
396 June 17, 2015
Figure 184. Sales Item Dialog Box
4 Type or select the following required information:
▪ In the PLU, type a positive whole number. You can prepare an organized number system with your accountant. (Note: PLU# 900-999 are unavailable as the system uses those numbers to generate Club Service PLUs.)
▪ In the Price, type a Price before tax, and then press the Tab key or click in another box.
User Manual—Version 6.0 WashConnect® Configuration
June 17, 2015 397
To the right of the Price box, the item price, tax and total for the sales item will display as the price is entered.
▪ In the Name, type the name of the sales item or service.
▪ In the Type drop-down box, select one of the following:
Base
Extra
Discount
Other
Miscellaneous
See “Coupons - Quick Start” on page 616.
NOTE: PLUs for Coupon Codes can be 3-, 4- or 5-digits in length.
5 All other fields are optional, click the Save button –or– continue to step number 6.
6 In the Description section, fill in the following fields if necessary:
In Taxable drop-down box, select one of the following:
▪ Always
▪ Never
▪ Conditional
▪ Force
In Select Item Tax, click the Select Item Tax button, to assign a specific tax to item. (ex: alcohol, cigarettes, etc.)
▪ In Site, select the site.
▪ Click to select the Item Tax.
In Description 1, type a correct description for the sales item. This is the description that will appear on button for customers if no custom buttons are present.
In Description 2, type a second line of the sales item description. This is the description that will appear on button for customer if no custom buttons are present.
In Barcode, type a barcode for the sales item.
NOTE: The barcode scanner works for presell tickets as well as coupons. Barcode
scanners are optional at time of purchase and additional fees may apply.
Configuration WashConnect® User Manual—Version 6.0
398 June 17, 2015
Three Barcode types that can be read at the Auto Sentry and the Touch POS. The barcode readers incorporate a pound (#) sign prefix and are designed to work Code 93, Code 128, and Code UCC/EAN 128.
In Account ID drop-down box, select an account.
NOTE: Selecting an account is important.
In Searchable, check if you want to be able to search for this item.
If the sales item type is an extra service, then in the Extra Services Amount, type an amount.
NOTE: Some washes track portions of a base price as extra service: Base $5, Extra
Service Amount $2
Click to select Department check-box if open PLU.
From the Token to Dispense section, type an amount in the quantity for the following if necessary: US One Dollar Token Coin box, Some Token box, Vacuum, etc.
7 If setting up a Cascade Price promotion, fill in this section. If not using cascade price, remove all cascade sequences.
8 If setting up a Variable Price breaks on extra services, fill in this section. If not using Variable Price, remove all variable price PLU items from this section.
9 In Commission section, set up Greeter Commission Amount or Percentage.
10 In Secondary Language Description, set up secondary language descriptions to appear on buttons for unattended terminal:
▪ In Name, type the correct sales item name in a secondary language.
▪ In Description 1, type the correct sales item descriptions in one secondary language.
▪ In Description 2, type the correct sales item descriptions in one secondary language.
11 From the Media Information section, you can add custom videos to be played and custom artwork (bitmaps) for the various buttons that are displayed. In both cases, there are separate videos for English or a second language, just as there are bitmaps for English or a second language. To make these videos and bitmaps accessible for use, the file must be placed within the proper folder locations. The following example specifies the required locations for the custom Video File and custom Button (bitmaps):
In Video File (Info Buttons):To play a primary video named deluxewash.avi it must exist within the \ICS\AVIFiles\Primary\ directory. In Video File, type the file name of the video as polish.
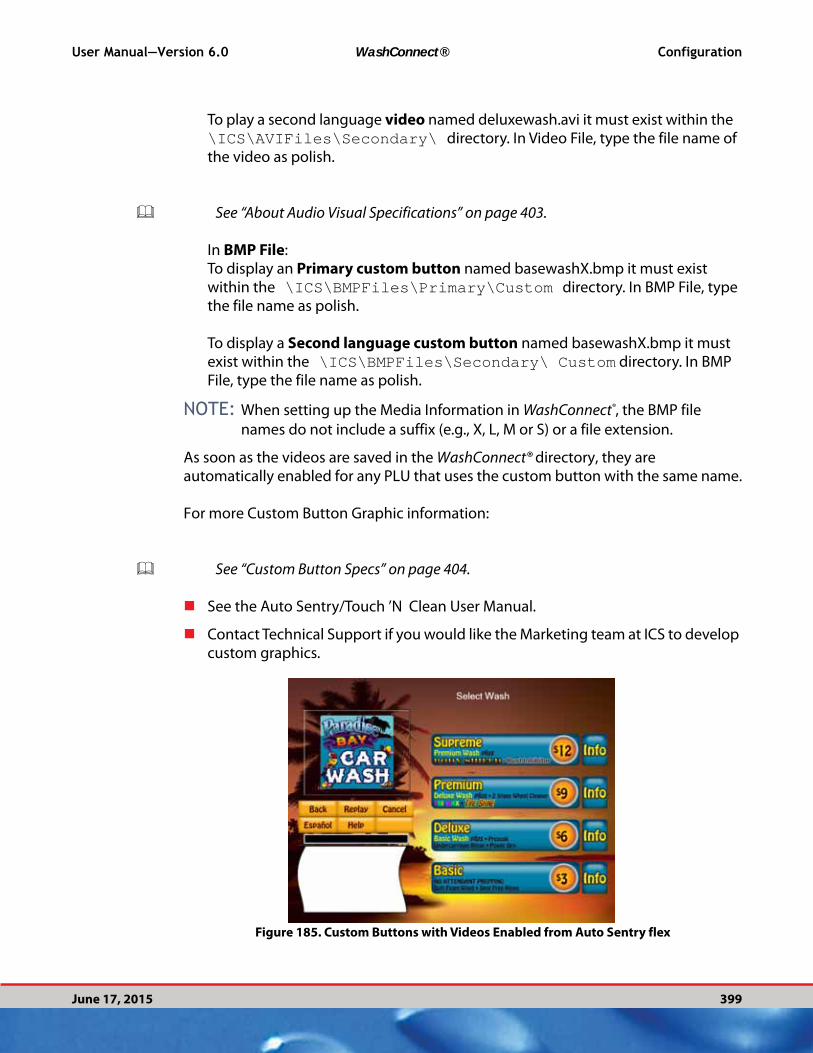
User Manual—Version 6.0 WashConnect® Configuration
June 17, 2015 399
To play a second language video named deluxewash.avi it must exist within the \ICS\AVIFiles\Secondary\ directory. In Video File, type the file name of the video as polish.
See “About Audio Visual Specifications” on page 403.
In BMP File:To display an Primary custom button named basewashX.bmp it must exist within the \ICS\BMPFiles\Primary\Custom directory. In BMP File, type the file name as polish.
To display a Second language custom button named basewashX.bmp it must exist within the \ICS\BMPFiles\Secondary\ Custom directory. In BMP File, type the file name as polish.
NOTE: When setting up the Media Information in WashConnect®, the BMP file
names do not include a suffix (e.g., X, L, M or S) or a file extension.
As soon as the videos are saved in the WashConnect® directory, they are automatically enabled for any PLU that uses the custom button with the same name.
For more Custom Button Graphic information:
See “Custom Button Specs” on page 404.
See the Auto Sentry/Touch ’N Clean User Manual.
Contact Technical Support if you would like the Marketing team at ICS to develop custom graphics.
Figure 185. Custom Buttons with Videos Enabled from Auto Sentry flex
Configuration WashConnect® User Manual—Version 6.0
400 June 17, 2015
NOTE: If selecting a custom graphic .bmp file, the following color selections are
unnecessary.
In BMP Color drop-down box, select a color for the standard button.
In Fore Color, select a text color from the color swatch chart for the standard button.
In Extra Advertised Video File, type the name of the Extra Advertised Video Service file without the file extension .avi.
In Icon File, type the name of the Hand Finished Services icon to display.
See “About Extra Advertise Video” on page 325.
12 In Bonus Points, type the Points Awarded and then Points to Redeem for the
bonus point system. The WashConnect® customer tracking system automatically tallies all the Promotions for each customer.
NOTE: Before a customer can redeem bonus points, a PLU is created with the
amount of bonus points awarded for purchase and the amount of bonus points needed to redeem the sales item for free.
13 In Assign Controller Services available at site level, click the drop-down arrow. (Can be available at corporate if all services are created at corporate.
▪ From the Controller Services dialog box, select controller service(s) that controls the tunnel equipment for a sales item.
NOTE: Controller services must be set up in WashConnect® so they can be assigned
to services.
See “About Controller Services” on page 535.
14 Click the Save button.The sales item is added to the list.
You can sort, edit, or delete items.
NOTE: PLUs that are sold or redeemed appear on the Shift Detail Report. See “View
a Shift Detail Report”. If a PLU name or price have been edited, the PLU will appear on the Shift Detail Report with two different line entries for the same PLU number. This is a safety feature to alert you that some user with privileges has made a change to the PLU name or price.
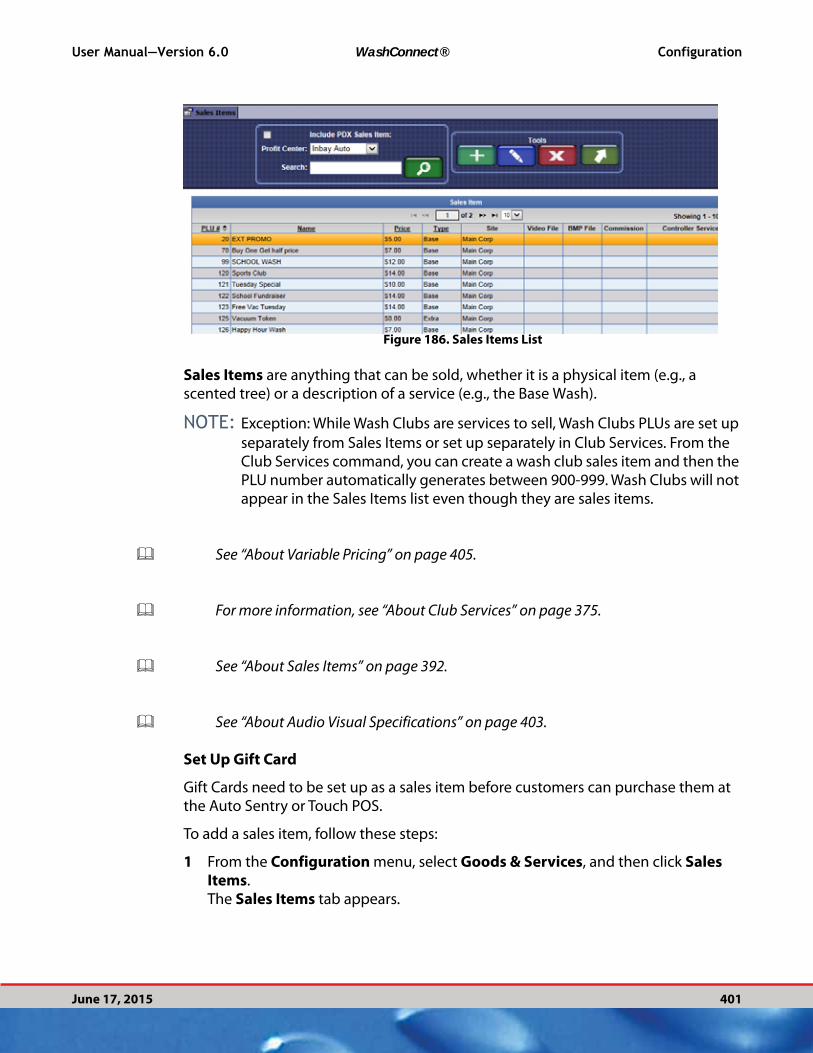
User Manual—Version 6.0 WashConnect® Configuration
June 17, 2015 401
Figure 186. Sales Items List
Sales Items are anything that can be sold, whether it is a physical item (e.g., a scented tree) or a description of a service (e.g., the Base Wash).
NOTE: Exception: While Wash Clubs are services to sell, Wash Clubs PLUs are set up
separately from Sales Items or set up separately in Club Services. From the Club Services command, you can create a wash club sales item and then the PLU number automatically generates between 900-999. Wash Clubs will not appear in the Sales Items list even though they are sales items.
See “About Variable Pricing” on page 405.
For more information, see “About Club Services” on page 375.
See “About Sales Items” on page 392.
See “About Audio Visual Specifications” on page 403.
Set Up Gift Card
Gift Cards need to be set up as a sales item before customers can purchase them at the Auto Sentry or Touch POS.
To add a sales item, follow these steps:
1 From the Configuration menu, select Goods & Services, and then click Sales Items. The Sales Items tab appears.

Configuration WashConnect® User Manual—Version 6.0
402 June 17, 2015
Figure 187. Sales Items tab
2 In the Profit Center box, select a profit center:
▪ Gift Card
NOTE: A Profit Center is the income source created for income and labor tracking
purposes.
To set up Profit Centers that appear in the Profit Center list, See “Add Profit Center and description” on page 547.
3 Click the Add button. The Gift Card dialog box appears.
Figure 188. Gift Card Dialog Box
4 Type or select the following required information:
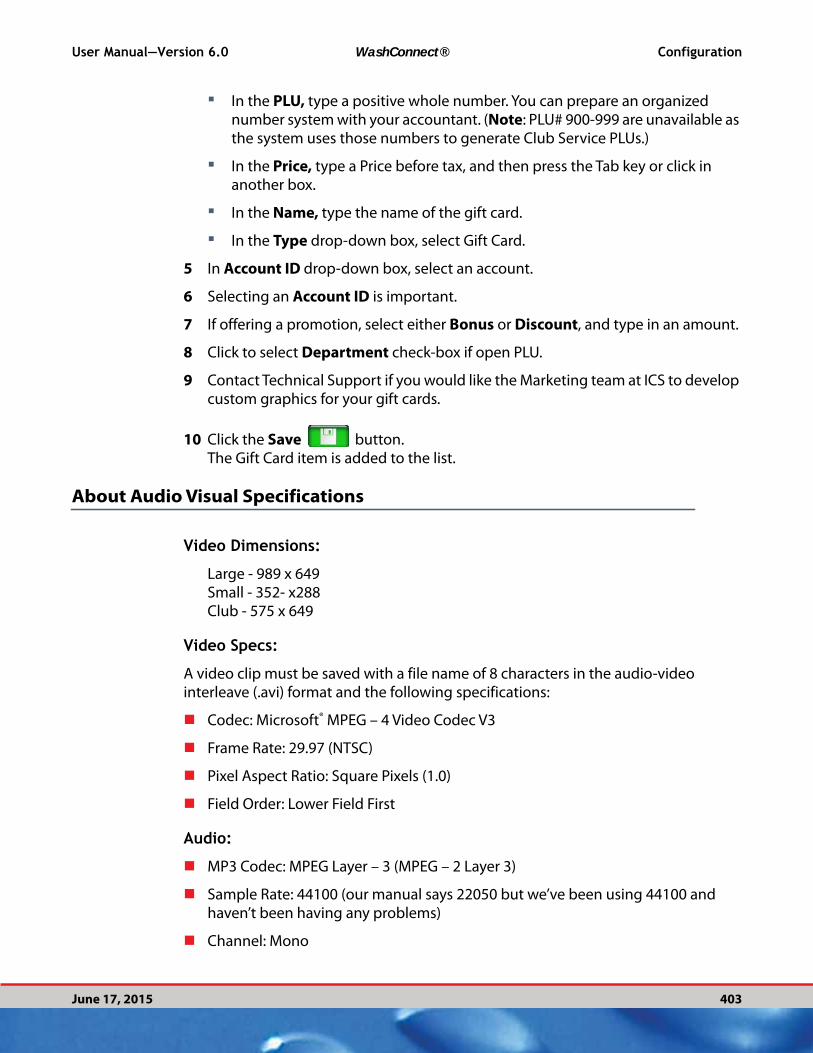
User Manual—Version 6.0 WashConnect® Configuration
June 17, 2015 403
▪ In the PLU, type a positive whole number. You can prepare an organized number system with your accountant. (Note: PLU# 900-999 are unavailable as the system uses those numbers to generate Club Service PLUs.)
▪ In the Price, type a Price before tax, and then press the Tab key or click in another box.
▪ In the Name, type the name of the gift card.
▪ In the Type drop-down box, select Gift Card.
5 In Account ID drop-down box, select an account.
6 Selecting an Account ID is important.
7 If offering a promotion, select either Bonus or Discount, and type in an amount.
8 Click to select Department check-box if open PLU.
9 Contact Technical Support if you would like the Marketing team at ICS to develop custom graphics for your gift cards.
10 Click the Save button.The Gift Card item is added to the list.
About Audio Visual Specifications
Video Dimensions:
Large - 989 x 649Small - 352- x288Club - 575 x 649
Video Specs:
A video clip must be saved with a file name of 8 characters in the audio-video interleave (.avi) format and the following specifications:
Codec: Microsoft® MPEG – 4 Video Codec V3
Frame Rate: 29.97 (NTSC)
Pixel Aspect Ratio: Square Pixels (1.0)
Field Order: Lower Field First
Audio:
MP3 Codec: MPEG Layer – 3 (MPEG – 2 Layer 3)
Sample Rate: 44100 (our manual says 22050 but we’ve been using 44100 and haven’t been having any problems)
Channel: Mono
Configuration WashConnect® User Manual—Version 6.0
404 June 17, 2015
Bit Depth: 32 kBits/s
Bitrate: 128
Custom Button Specs
Extra-large-1.55 in. x.767 in. / 465 pixels x230 pixels.Large-1.55 in. x .5 in. / 465 pixels x 150 pixels.Medium-1.55 in. x .333 in. / 465 pixels x 100 pixels.Small-1.55 in. x .27 in. / 465 pixels x 81 pixels.
All of these are 300 pixels per inch. (All measurements are included.)
Size of buttons depend on how many buttons:
1 or 2 buttons- Extra-Large3 buttons- Large4 buttons- Medium5 or 6 buttons- Small
Naming Convention
File names can only be 8 characters long and the last letter must be uppercase and must be either X, L, M or S to correspond with the size of the button (X-extra-large, L- large, M-medium, S-small.) These buttons will need to be in bitmap (.bmp) format.
Please include both English and Spanish versions of the buttons if the site offers Spanish or plans to in the future.
See “About Sales Items” on page 392.
See “Edit a Club Service” on page 382.
See “Terminate a Club Service” on page 383.
See “Reorder Club Service Columns in Ascending/Descending Order” on page 384.
See “Club Rules Examples” on page 388.
See “Wash Club Customer Experience” on page 390.
See “Club Service Descriptions” on page 386.
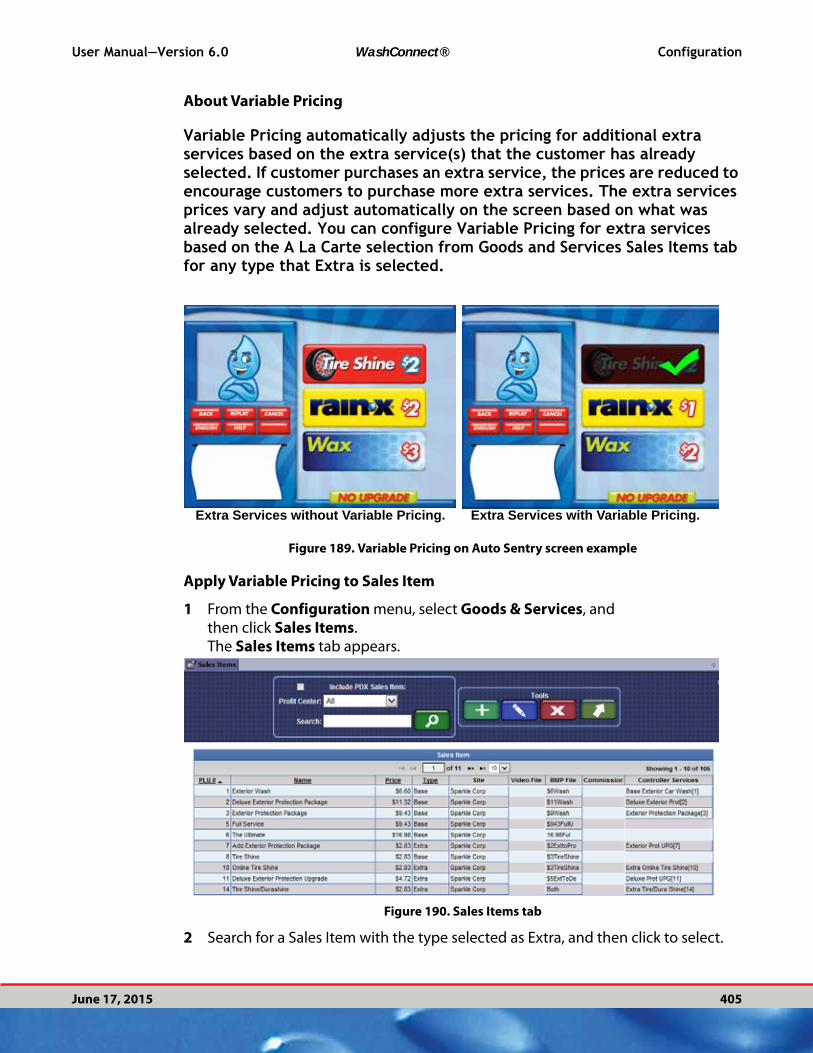
User Manual—Version 6.0 WashConnect® Configuration
June 17, 2015 405
About Variable Pricing
Variable Pricing automatically adjusts the pricing for additional extra services based on the extra service(s) that the customer has already selected. If customer purchases an extra service, the prices are reduced to encourage customers to purchase more extra services. The extra services prices vary and adjust automatically on the screen based on what was already selected. You can configure Variable Pricing for extra services based on the A La Carte selection from Goods and Services Sales Items tab for any type that Extra is selected.
Extra Services without Variable Pricing. Extra Services with Variable Pricing.
Figure 189. Variable Pricing on Auto Sentry screen example
Apply Variable Pricing to Sales Item
1 From the Configuration menu, select Goods & Services, and then click Sales Items. The Sales Items tab appears.
Figure 190. Sales Items tab
2 Search for a Sales Item with the type selected as Extra, and then click to select.
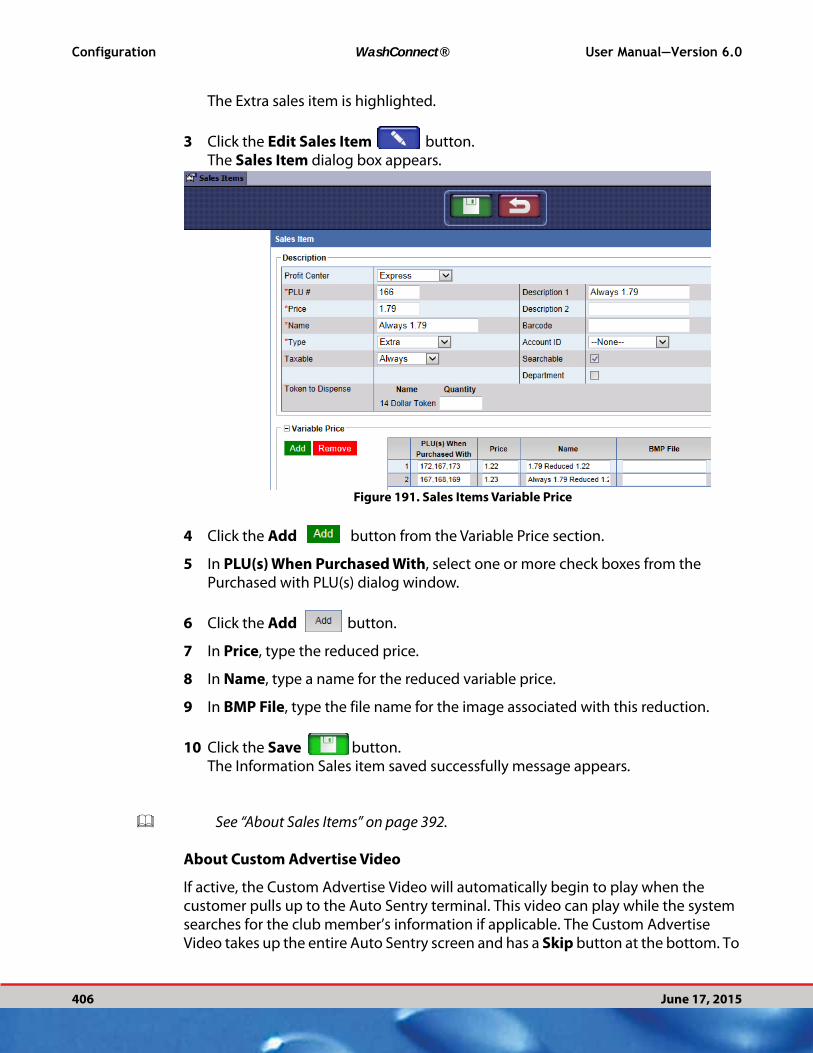
Configuration WashConnect® User Manual—Version 6.0
406 June 17, 2015
The Extra sales item is highlighted.
3 Click the Edit Sales Item button.The Sales Item dialog box appears.
Figure 191. Sales Items Variable Price
4 Click the Add button from the Variable Price section.
5 In PLU(s) When Purchased With, select one or more check boxes from the Purchased with PLU(s) dialog window.
6 Click the Add button.
7 In Price, type the reduced price.
8 In Name, type a name for the reduced variable price.
9 In BMP File, type the file name for the image associated with this reduction.
10 Click the Save button.The Information Sales item saved successfully message appears.
See “About Sales Items” on page 392.
About Custom Advertise Video
If active, the Custom Advertise Video will automatically begin to play when the customer pulls up to the Auto Sentry terminal. This video can play while the system searches for the club member’s information if applicable. The Custom Advertise Video takes up the entire Auto Sentry screen and has a Skip button at the bottom. To
User Manual—Version 6.0 WashConnect® Configuration
June 17, 2015 407
activate the video, the video must be an AVI formatted file of 720 by 480 pixels and placed in the following directory \ICS\AVIFilesAs soon as the Custom Advertise Video is saved in the WashConnect® directory, it is automatically enabled and will play until you remove or replace the file from the directory.
NOTE: There is no setting for the Custom Advertise Video in WashConnect®.
See “About Sales Items” on page 392.
About Extra Advertise Video
The Welcome Video (Custom Advertise Video) automatically plays as you pull up to the Auto Sentry. The Upgrade Video (Custom Extra Advertise Video) plays between the wash and upgrade screen. The video plays in pop up screen that covers 3/4 of the Auto Sentry screen. When the customer adds extra services for the wash, this video will play. The video must be an AVI formatted file of 352 by 288 pixels. The customer can minimize window by pressing Minimize, reducing the video to the small (normal) video size window.
See “About Sales Items” on page 392.
Sort Sales Item List
You can sort the Sales Item list.
Double-click to select an underlined column header in the Sales Items list. The list is sorted on that column in ascending order.
Click to select the column header again. The list is sorted in descending order.
See “About Sales Items” on page 392.
See “Edit Sales Item” on page 408.
See “Sales Item Search” on page 407.
Sales Item Search
To search for a sales item from the list, follow these steps:

Configuration WashConnect® User Manual—Version 6.0
408 June 17, 2015
1 From the Configuration menu, select Goods & Services, and then click Sales Item. The Sales Items tab appears.
2 In Profit Center, select a profit center if necessary.
3 In Search, type text to further refine your search.
4 Click the Search button.The search results appear in the Sales Item list.
See “About Sales Items” on page 392.
See “Flex / Retail Standard Screen” on page 411.
See “Sort Sales Item List” on page 407.
See “Edit Sales Item” on page 408.
See “Delete Sales Item” on page 409.
See “About Sales Item PLUs and Profiles” on page 410.
See “Sales Item Descriptions” on page 414.
Edit Sales Item
To edit a sales item, follow these steps:
1 From the Configuration menu, select Goods & Services, and then click Sales Item. The Sales Items tab appears.
2 Select a sales item, and then click the Edit button. The Sales Items dialog box appears.
3 Type your changes, and then click the Save button.The Sales Item is saved.
See “About Sales Items” on page 392.

User Manual—Version 6.0 WashConnect® Configuration
June 17, 2015 409
See “Flex / Retail Standard Screen” on page 411.
See “Sort Sales Item List” on page 407.
See “Delete Sales Item” on page 409.
See “About Sales Item PLUs and Profiles” on page 410.
See “Sales Item Descriptions” on page 414.
Delete Sales Item
To delete a sales item, follow these steps:
1 From the Configuration menu, select Goods & Services, and then click Sales Item. The Sales Item tab appears.
2 Select a sales item, and then click the Delete button. A termination warning appears.
3 Click Yes. The sales item is deleted.
See “About Sales Items” on page 392.
See “Flex / Retail Standard Screen” on page 411.
See “Sort Sales Item List” on page 407.
See “Edit Sales Item” on page 408.
See “About Sales Item PLUs and Profiles” on page 410.
See “Sales Item Descriptions” on page 414.

Configuration WashConnect® User Manual—Version 6.0
410 June 17, 2015
About Sales Item PLUs and Profiles
PLU (Product Look Up) is the unique number assigned to a service or item that can be sold to a customer.
Profile can consist of one or more PLUs applied under various conditions.
PLUs and profiles work together to give customers their wash menu choices. In most cases, you create a standard set of PLUs for your basic washes which are used during normal operations. If you have four washes to sell, then a PLUs need to be created for each wash. The time and specific upgrades for each of these washes can be setup in the Retail Profile.
Figure 192. Sales Items & Profile for Retail menu Wash Options Example
See “About Sales Items” on page 392.
See “Flex / Retail Standard Screen” on page 411.
See “Sort Sales Item List” on page 407.
See “Edit Sales Item” on page 408.
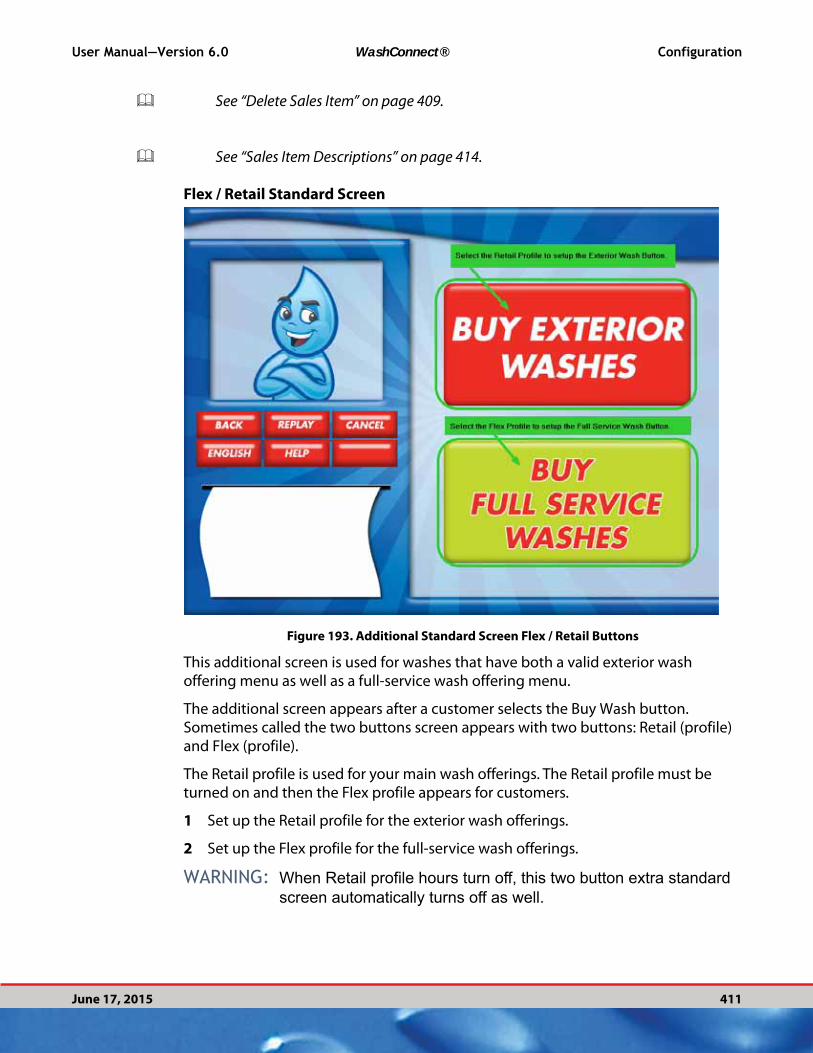
User Manual—Version 6.0 WashConnect® Configuration
June 17, 2015 411
See “Delete Sales Item” on page 409.
See “Sales Item Descriptions” on page 414.
Flex / Retail Standard Screen
Figure 193. Additional Standard Screen Flex / Retail Buttons
This additional screen is used for washes that have both a valid exterior wash offering menu as well as a full-service wash offering menu.
The additional screen appears after a customer selects the Buy Wash button. Sometimes called the two buttons screen appears with two buttons: Retail (profile) and Flex (profile).
The Retail profile is used for your main wash offerings. The Retail profile must be turned on and then the Flex profile appears for customers.
1 Set up the Retail profile for the exterior wash offerings.
2 Set up the Flex profile for the full-service wash offerings.
WARNING: When Retail profile hours turn off, this two button extra standard screen automatically turns off as well.

Configuration WashConnect® User Manual—Version 6.0
412 June 17, 2015
NOTE: Set up your wash offerings that have the longest hours as your Retail
(profile). When the Retail menu turns off, the Flex menu will not appear either.
Therefore, set up the Flex (profile) with additional offerings that offer Flexible hours during Retail hours.
See “About Sales Items” on page 392.
Activate additional Standard Screen (Flex / Retail) button
Allows site to offer two different Standard (flex/retail) profiles based on user selection.
1 From Configuration > Goods and Services > Sales Items, add a PLU for any needed base wash or extra services.
2 Select Configuration > Goods and Services > Profiles.
3 Setup a profile (Retail) for all exterior wash offerings and extra services. Setup a schedule and select Retail from Applies To drop-down.
4 Setup a profile (Flex) to include all full-service wash offerings. Setup a schedule and select Flex from Applies To drop-down.
NOTE: As long as the two profile schedules are valid for the Flex and Retail profiles,
the two button screen will be available for customers.
5 In Profile text box, type Full Service Car Wash. Full-Service Car Wash will appear on the button. You can type any name in here but it will not appear on the button.
NOTE: If you want a custom name to appear on your button, contact your ICS
support technician and discuss placing an order with ICS for custom buttons. ICS has a dedicated in-house graphic design team to fulfill your custom needs. Custom graphics are optional and additional fees apply.
6 After setting up the Profile, click the Add button under the Schedule section to set up the profile’s Schedule.
7 Select the Day or Days of Week. Note: Currently there is no way to select every other week.
8 Select the time of day to start and stop the full-service wash offerings considering your staff.
9 From the Vehicle Height, select Normal –or– High Vehicle.
NOTE: If you select HVP, the High Vehicle Sensor is required for this feature. The
High Vehicle Sensor is optional and available to purchase for an additional cost. For more information, contact ICS technical support at 800-246-3469.

User Manual—Version 6.0 WashConnect® Configuration
June 17, 2015 413
10 In Applies To, select Flex from the drop-down list.
11 To add multiple schedules, click the Add button and set up another schedule.
NOTE: Rule for overlapping time period Schedules: the most recent start date takes
priority.
12 Click OK.
Profiles are live for customers to see immediately. As soon as you complete steps 1-12, your new buttons and menu items will appear for your next customer. During full-service car wash hours, select Buy Wash. Your customers are now directed to a second menu with two buttons on it for the Retail and Flex profiles. The buttons are Exterior Car Wash (Retail) and Full-Service Car Wash (Flex). You now have the ability to separate your Exterior Wash Offerings from your Full-service Wash Offerings with two different screens. If its outside of your Full-service hours, the Buy Wash button will immediately direct your customer to the Exterior (Retail) Car Wash offerings. But now, during the Full Service hours, a screen will appear with the two buttons: Exterior Car Wash buttons or Full Service Car Wash.
If a customer selects the Full-Service Car Wash button, then the next screen will be the Full-Service Wash Offerings menu.
If a customer selects the Exterior Car Wash button, then the next screen will be the Exterior Wash Offerings that were set up in the Retail profile.
Services in different profiles are not mutually exclusive. Services can be assigned to one or more profiles. You can change your PLUs and profiles in the Sales Items and Profiles commands, if necessary. The following are just a few reasons you might need to update or change PLUs and Profiles:
If you change services based on weather conditions.
If you offer new promotions or discontinue old ones.
If you change pricing.
If you add or remove equipment in the tunnel.
The Sales Items, Packages, and Profiles commands make it easy to edit your list of PLUs. See which PLUs or Profiles are currently active for a specific site, create packages for combining PLUs, or schedule profiles for time/date related operating conditions.
See “About Sales Items” on page 392.
Sensing a High Vehicle Profile
Customers with high vehicle profiles (HVP), such as trucks, cargo and conversion vans, can receive a different wash menu at the Auto Sentry flex.
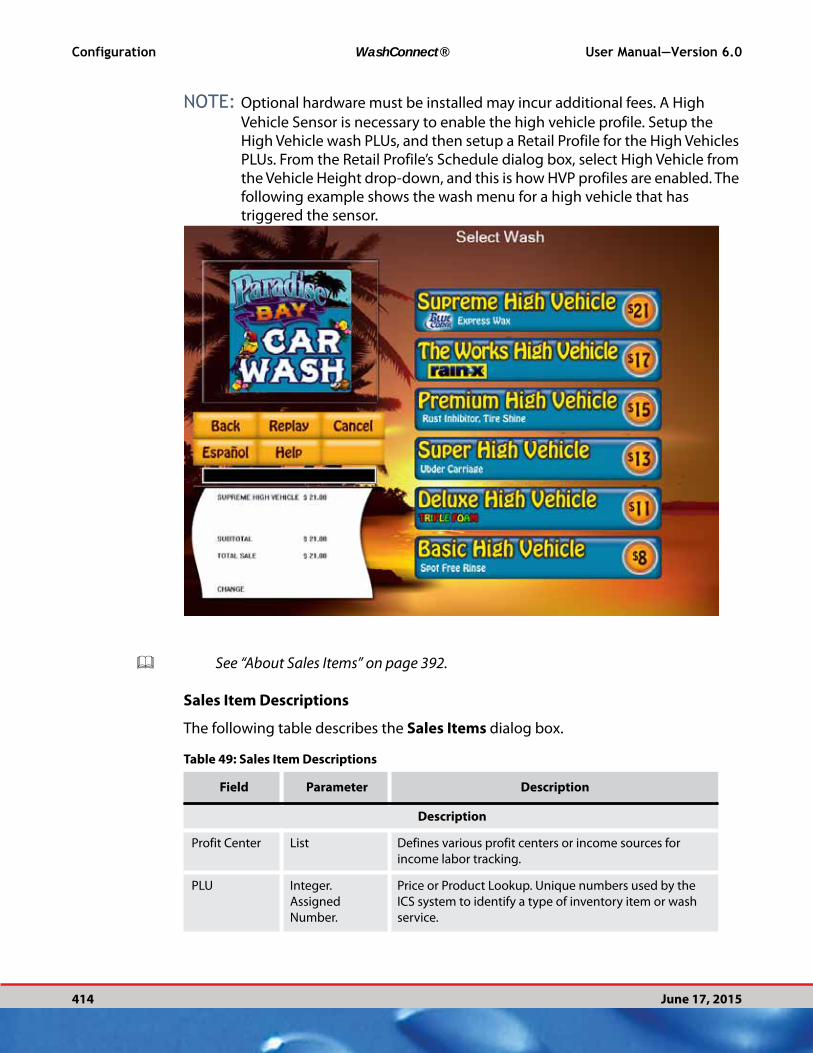
Configuration WashConnect® User Manual—Version 6.0
414 June 17, 2015
NOTE: Optional hardware must be installed may incur additional fees. A High
Vehicle Sensor is necessary to enable the high vehicle profile. Setup the High Vehicle wash PLUs, and then setup a Retail Profile for the High Vehicles PLUs. From the Retail Profile’s Schedule dialog box, select High Vehicle from the Vehicle Height drop-down, and this is how HVP profiles are enabled. The following example shows the wash menu for a high vehicle that has triggered the sensor.
See “About Sales Items” on page 392.
Sales Item Descriptions
The following table describes the Sales Items dialog box.
Table 49: Sales Item Descriptions
Field Parameter Description
Description
Profit Center List Defines various profit centers or income sources for
income labor tracking.
PLU Integer.
Assigned
Number.
Price or Product Lookup. Unique numbers used by the
ICS system to identify a type of inventory item or wash
service.

User Manual—Version 6.0 WashConnect® Configuration
June 17, 2015 415
Price Integer. Max.
length is 8.
Price of the service or item.
Name Alphanumeric.
Max. length is
52.
This is the name of the service or item. It is for your
reference, and is not displayed to customer.
Type List The type of inventory item you want to add: Base, Extra,
Discount, Other, and Miscellaneous.
Taxable List Available Sales Tax selections: Always, Never, Conditional
or Force.
Extra Service
Amount
Numeric Extra Service amount. Can be part of the base service
amount.
Description 1 Alphanumeric.
Max. length is
50.
Wash service description for reporting.
Description 2 Alphanumeric.
Max. length is
50.
Wash service description for reporting.
Barcode Alphanumeric.
Max. length is
50.
Barcode number associated with PLU. This is where you
can add a coupon barcode number. The barcode types
compatible with a pound (#) sign prefix are as follows:
Code 93, Code 128, and Code UCC/EAN 128. Barcodes are
only read by Barcode Readers that are optional and
additional at time of purchase.
Account ID List Account associated with PLU.
Searchable Checkbox Check to enable searches for item.
Department Checkbox May create an open price PLU.
Token to
Dispense
US One Dollar
token Coin
Integer. Max
length is 8.
Quantity.
Some Token Integer. Max
length is 8.
Quantity.
Secondary Language Description
Secondary
Language
Name
Text Type the correct sales item name in a secondary
language.
Description 1 Alphanumeric.
Max. length is
50.
Description 1 appears on the button’s first line on the
touch-screen. Type the correct sales item description in a
secondary language.
Table 49: Sales Item Descriptions
Field Parameter Description

Configuration WashConnect® User Manual—Version 6.0
416 June 17, 2015
See “About Sales Items” on page 392.
See “Flex / Retail Standard Screen” on page 411.
See “Sort Sales Item List” on page 407.
See “Edit Sales Item” on page 408.
Description 2 Alphanumeric.
Max. length is
50.
Description 2 appears on the button’s second line on the
touch-screen. type the correct sales item description in a
secondary language.
Media Information
Video File Alphanumeric.
Max. length is
50.
Name of video file to load for service. Video file will play
on screen. For more information on videos, See “About
Audio Visual Specifications” on page 403. Also, see the
User Manual for the TouchNClean.
BMP File Alphanumeric.
Max. length is
50.
Name of graphic bitmap (.bmp) file to load for button.
File will be used on screen.
BMP Color List Background color selection for the inventory item
button.
Fore Color List Foreground text color for the inventory item button.
Extra
Advertised
Service Video
File
Alphanumeric.
Max. length is
50.
Name of video file to load after the base wash is
purchased. Video file will automatically play on screen.
For more information on Extra Advertised Services
Videos, see the Auto Sentry user manual.
Bonus Points
Points
Awarded
Numeric The number of points credited to customer’s vehicle
when item is purchased.
Points to
Redeem
Numeric The number of points required for a customer’s vehicle to
be eligible to receive this service for free.
Assign Controller Services
Controller
Services
List Applies to Base, Retract and Extra services under Express,
Full Services and In-bay profit centers. See “About
Controller Services” on page 535.
Table 49: Sales Item Descriptions
Field Parameter Description

User Manual—Version 6.0 WashConnect® Configuration
June 17, 2015 417
See “Delete Sales Item” on page 409.
See “About Sales Item PLUs and Profiles” on page 410.
See “Sales Item Descriptions” on page 414.
About Packages
See “Packages” on page 335.
See “Create a Package” on page 336.
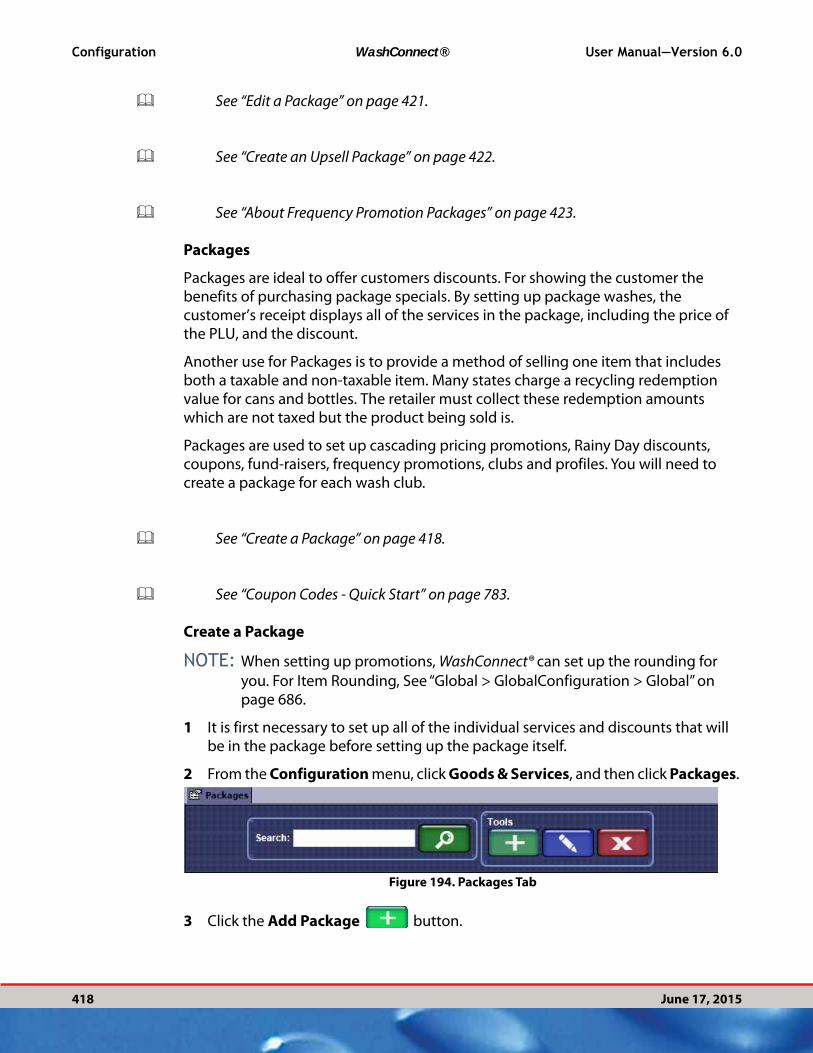
Configuration WashConnect® User Manual—Version 6.0
418 June 17, 2015
See “Edit a Package” on page 421.
See “Create an Upsell Package” on page 422.
See “About Frequency Promotion Packages” on page 423.
Packages
Packages are ideal to offer customers discounts. For showing the customer the benefits of purchasing package specials. By setting up package washes, the customer’s receipt displays all of the services in the package, including the price of the PLU, and the discount.
Another use for Packages is to provide a method of selling one item that includes both a taxable and non-taxable item. Many states charge a recycling redemption value for cans and bottles. The retailer must collect these redemption amounts which are not taxed but the product being sold is.
Packages are used to set up cascading pricing promotions, Rainy Day discounts, coupons, fund-raisers, frequency promotions, clubs and profiles. You will need to create a package for each wash club.
See “Create a Package” on page 418.
See “Coupon Codes - Quick Start” on page 783.
Create a Package
NOTE: When setting up promotions, WashConnect® can set up the rounding for
you. For Item Rounding, See “Global > GlobalConfiguration > Global” on page 686.
1 It is first necessary to set up all of the individual services and discounts that will be in the package before setting up the package itself.
2 From the Configuration menu, click Goods & Services, and then click Packages.
Figure 194. Packages Tab
3 Click the Add Package button.

User Manual—Version 6.0 WashConnect® Configuration
June 17, 2015 419
4 In Profit Center, select a profit center tab on the POS for this package to appear.
5 In PLU, type a PLU number for the new package.
NOTE: If a warning icon appears, hover over the warning symbol. If the warning
message Another PLU exists appears, then select another PLU number.
6 In Name, type a name for the new package.
7 Fill in the other optional fields, if necessary.
See “Sales Item Descriptions” on page 332.
8 In Sales Items in Package section, click to select the Add Sales Item button.The Add Sales Item dialog box appears.
9 In Profit Center drop-down box, select a profit center.The profit center sales items appear.
10 Click to select the sales item(s) to add to the Package.
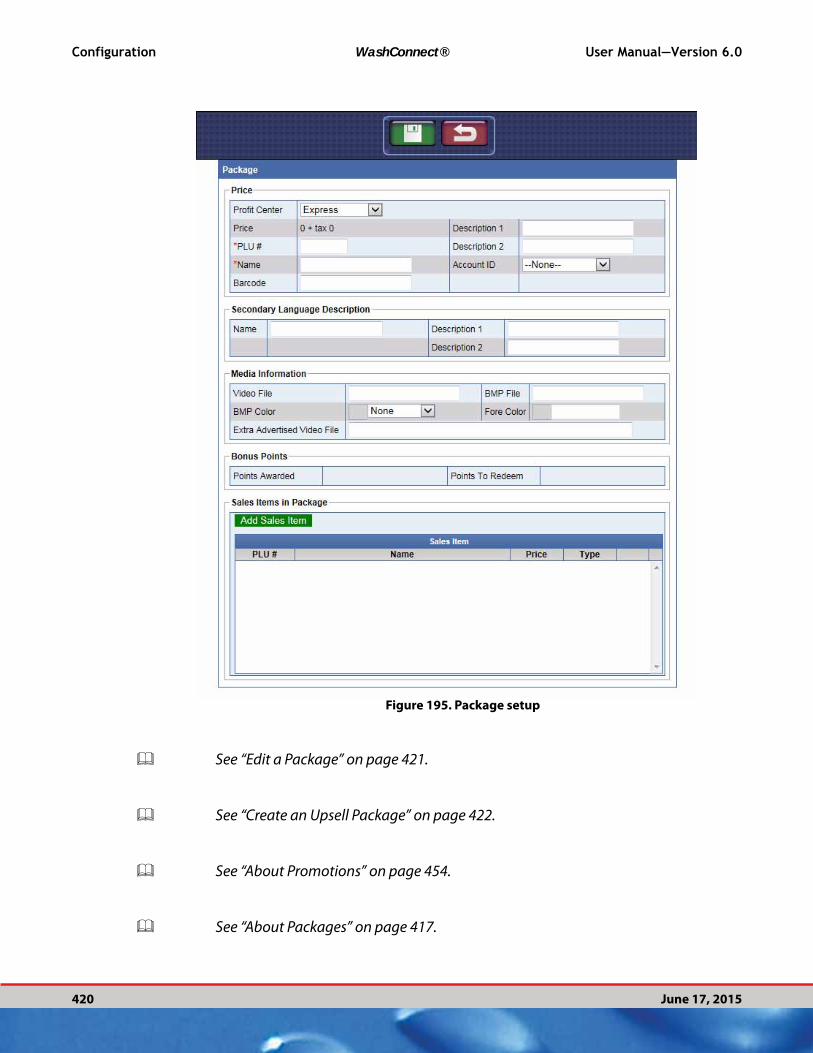
Configuration WashConnect® User Manual—Version 6.0
420 June 17, 2015
Figure 195. Package setup
See “Edit a Package” on page 421.
See “Create an Upsell Package” on page 422.
See “About Promotions” on page 454.
See “About Packages” on page 417.

User Manual—Version 6.0 WashConnect® Configuration
June 17, 2015 421
Delete a Package
You can delete a package.
1 From the Configuration menu, click Goods & Services, and then click Packages.
2 Click to select the package.
3 To delete the package, click the Delete button.The Package no longer appears in the list and is permanently deleted.
See “Create a Package” on page 418.
See “Edit a Package” on page 421.
See “About Packages” on page 417.
Edit a Package
You can edit a package.
1 From the Configuration menu, click Goods & Services, and then click Packages.
2 Click to select the package you would like to edit.
3 To delete a sales item in the sales package, select
the Edit Package button.The Package dialog box appears.
4 Make any necessary edits.
5 From the Sales Items in Package section, click the delete X button for the Sales Item PLU to remove from the sales package.This will delete the sales item from the package, but the sales item itself will remain available to use again and the Package remains.
6 Click the Save button.
See “Delete Sales Item” on page 409.
See “Create an Upsell Package” on page 422.
See “About Promotions” on page 454.

Configuration WashConnect® User Manual—Version 6.0
422 June 17, 2015
See “About Packages” on page 417.
Create an Upsell Package
DeleteIf you want to upsell your club customer to a different wash at the payment terminal, you can for the current visit, this does not change the club membership. Follow these instructions:
NOTE: To allow upsell, Clubs_Express setting must be set to False, from System
Setup > Devices > Settings.
See “Auto Sentry > Clubs” on page 658.
Offer a club customer the opportunity to upgrade their club wash to another wash to increase revenue. The customer would still remain in their original club but they can try out the more expensive wash by purchasing an upsell wash just for this one time visit. Upsells can also be confusing for the customer. The customer could understand the upsell to be a permanent move to the more expensive wash club for the upsell price, and then they could become frustrated to learn that it’s just for that one wash.
You can offer extra services as a another way to earn extra income.
See “Flex / Retail Standard Screen” on page 411.
After you have set up your club service, setup the upsell package and add it to the wash club Profile. The upsell will have a button that appears with the Extra Services buttons. For example: The Flush Club is the basic or first level wash club and has a Package including the Flush base wash PLU for $7 and then a Flush wash discount PLU for -$7. This package is in your Flush Club Profile. Next, you will create a new package for the upsell:
1 From the Configuration > Goods and Services menu, select the Packages command.
User Manual—Version 6.0 WashConnect® Configuration
June 17, 2015 423
2 Click the Add button to create a new Package.
3 In Profit Center, click to select a profit center from the drop-down list.
4 Type a new PLU.
5 Type a new name for the Upsell.
6 Add the Sales Items: The Base Wash PLU for the Royal Flush Club and the Base discount wash for the Flush Club.
7 The WashConnect® system rounds up the numbers and totals the package for you.
8 Click the Save button.
9 From the Flush Club Profile, add the Package along with any other extra services to sell for the Flush Club.
See “Edit a Package” on page 421.
See “About Frequency Promotion Packages” on page 423.
See “About Packages” on page 417.
About Frequency Promotion Packages
Set up a promotion package to offer your customers special promotional pricing on various services and products. While setting up the PLU, be certain to select the correct Profit Center for each promotional service, product or discount. The system automatically applies discounts for promotions sold in the wash Profit Center.
Promotions include: Frequent Customer and Car, Anniversary, Birthday, and Cascading Prices, as well as from the sale of services to customers who are members of Promotion PLUs.
There are two submenu items from Frequency Promotion:
Promo Setup
Promo Receipt Text
See “About Promo Setup” on page 379.
See “About Promo Receipt Text” on page 389.

Configuration WashConnect® User Manual—Version 6.0
424 June 17, 2015
About Wash Books
NOTE: An Auto Sentry can dispense only one type of card: either Gift Cards or
Customer Cards (Wash Book).
See “Add Base Wash Sales Item for Wash Book offering” on page 425.
See “Add Wash Book as a Sales Item” on page 426.
See “Purchase Wash Books at the Auto Sentry” on page 428.
See “Redeem Wash Book at Auto Sentry” on page 430.
See “View Wash Books in Shift Detail Report” on page 431.
User Manual—Version 6.0 WashConnect® Configuration
June 17, 2015 425
See “Email Wash Book Receipt” on page 432.
Add Base Wash Sales Item for Wash Book offering
1 After receiving the custom customer magnetic-stripe cards with eleven digits preceded with a % percentage sign, contact technical support to have them set up Wash Book Cards in WashConnect®.
2 Login to WashConnect Corporate.
3 From the Configuration menu, select Goods and Services and then select Sales Item.
4 If your base washes were set up at Corporate, you may skip this section and go to Add Wash Book.
5 In Profit Center, select the Profit Center for the base wash. i.e., Express.
6 In PLU, type a base wash PLU number.
7 In Price, type a price of the base wash.
8 Click the Save button.
NOTE: You cannot add a controller service from Corporate, so you will have to go to
the Site level in WashConnect and add the controller service to the PLU.
9 Login to WashConnect at the site level.
10 From the Configuration menu, select Goods and Services and then select Sales Items.
11 Search for base wash PLU that you created at the corporate level in steps 1-8.
12 In Assign Controller Services section, from the drop-down click to select the base wash services.
13 Click the Save button.The Sales Item is now ready to configure in a Wash Book.
See “Add Wash Book as a Sales Item” on page 342.
See “About Sales Items” on page 392.See “Add Base Wash Sales Item for Wash Book offering” on page 425.
See “Purchase Wash Books at the Auto Sentry” on page 428.
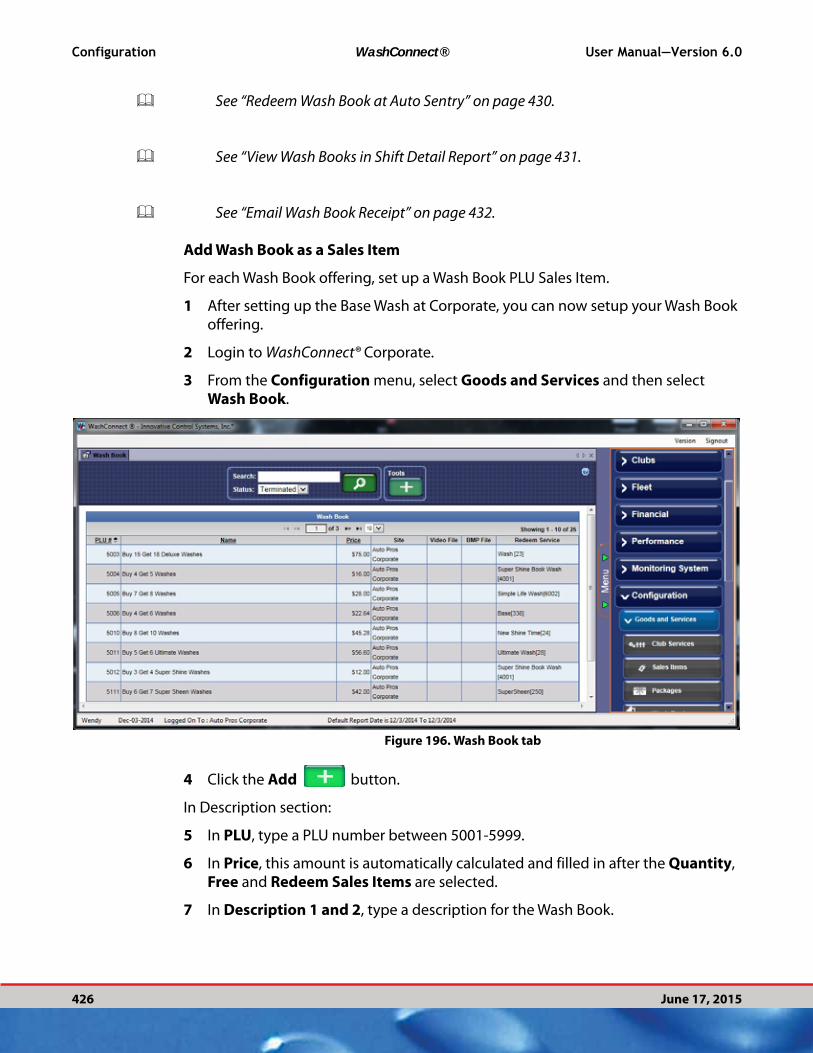
Configuration WashConnect® User Manual—Version 6.0
426 June 17, 2015
See “Redeem Wash Book at Auto Sentry” on page 430.
See “View Wash Books in Shift Detail Report” on page 431.
See “Email Wash Book Receipt” on page 432.
Add Wash Book as a Sales Item
For each Wash Book offering, set up a Wash Book PLU Sales Item.
1 After setting up the Base Wash at Corporate, you can now setup your Wash Book offering.
2 Login to WashConnect® Corporate.
3 From the Configuration menu, select Goods and Services and then select Wash Book.
Figure 196. Wash Book tab
4 Click the Add button.
In Description section:
5 In PLU, type a PLU number between 5001-5999.
6 In Price, this amount is automatically calculated and filled in after the Quantity, Free and Redeem Sales Items are selected.
7 In Description 1 and 2, type a description for the Wash Book.

User Manual—Version 6.0 WashConnect® Configuration
June 17, 2015 427
8 In Quantity, type the amount of base washes that customer will purchase with this Wash Book.
9 In Free, type amount of base washes to customer will redeem at no cost with this Wash Book.Total automatically adds the Quantity of washes purchased as well as the Free washes for the Wash Book.
10 In Alert, type the amount of washes when the system will alert customer with a message to inform them that their wash balance is getting low, and ask if they want to recharge Wash Book Card.
11 In Name, type a name for the Wash Book PLU offer. For example, Buy 8 Get 10.
12 In Barcode, type a barcode number for Wash Book.
13 In Account ID, click the Select Account button to select a general ledger account number for this PLU.
Figure 197. Add new Wash Book
In Redeem Sales Item section:
14 In Redeem Sales Item, select a Sales Item PLU from the drop-down that will be used to redeem wash from wash book.
Configuration WashConnect® User Manual—Version 6.0
428 June 17, 2015
See “Add Base Wash Sales Item for Wash Book offering” on page 425.
15 Click the Save button.If you already have set up your Base Wash at Corporate, then your Wash Book is ready to sell on the Touch POS. If selling on Auto Sentry, you still need to build a Profile for Wash Books.
See “About Sales Items” on page 392.
See “Add Base Wash Sales Item for Wash Book offering” on page 425.
See “Add Wash Book as a Sales Item” on page 426.
See “Purchase Wash Books at the Auto Sentry” on page 428.
See “Redeem Wash Book at Auto Sentry” on page 430.
See “View Wash Books in Shift Detail Report” on page 431.
See “Email Wash Book Receipt” on page 432.
Purchase Wash Books at the Auto Sentry
NOTE: Only one type of card can be dispensed from the Auto Sentry: Wash Books
or Gift Cards.
Wash Books are purchased like a prepaid card of specific washes. At the POS or Auto Sentry, the washes are purchased and loaded to a Wash Book Card by the use of a magnetic-stripe card number in the traditional format (%xxx) with 11 digits maximum due to barcode limitation on receipt. If more than one book is attached to the Wash Book Card, the book of washes will be redeemed in the order they were purchased. There is never a physical book, it’s all tracked in the system and on the magnetic-stripe cards and / or the printed receipt.
1 When a customer pulls up to the Auto Sentry, the Wash Book can be presented in Active or Passive selling style.

User Manual—Version 6.0 WashConnect® Configuration
June 17, 2015 429
2 Select the Purchase Wash Book button.
3 From the Wash Book package options, select a wash book package.The magnetic-stripe card is dispensed for the Wash Book.
4 At time of Wash Book purchase, Customer is instructed to swipe the Wash Book Card to load and activate.At this time, the amount of PLU base services purchased is now attached to the Wash Book Card. Card is now available at all sites.
5 Transaction receipt will print with the remaining balance of base services available on the Wash Book.Depending on your settings, the receipt can print with the wash book barcode number. Also, you can email receipt to customer based on settings. Customer can return with either the bar coded receipt or magnetic-stripe card to redeem a wash. When Book Card get to configurable amount of washes remaining, Auto Sentry offers to recharge the card.
See “About Sales Items” on page 392.
See “Add Base Wash Sales Item for Wash Book offering” on page 425.
See “Add Wash Book as a Sales Item” on page 426.
See “Purchase Wash Books at the Auto Sentry” on page 428.
See “Redeem Wash Book at Auto Sentry” on page 430.
See “View Wash Books in Shift Detail Report” on page 431.
See “Email Wash Book Receipt” on page 432.
Recharge Wash Book at Auto Sentry
Customer can be prompted to recharge or reload when balance of washes remaining is low (configurable amount).
1 At Auto Sentry or POS, swipe Wash Book (card) or scan receipt to redeem wash. If configured, customer can select the Redeem Book button from the main options.
Configuration WashConnect® User Manual—Version 6.0
430 June 17, 2015
See “Auto Sentry > Main Options” on page 673.
2 Auto Sentry prompts customer with a list of wash book package options to purchase.
3 Customer makes selection.
4 The Wash Book selection gets added to the end of the previous washes on the Wash Book.
5 The transaction receipts prints with the new total remaining and the Wash Book barcode if set up as well as email receipt.
See “Auto Sentry > Receipt” on page 677.
See “Add Base Wash Sales Item for Wash Book offering” on page 425.
See “Add Wash Book as a Sales Item” on page 426.
See “Purchase Wash Books at the Auto Sentry” on page 428.
See “Redeem Wash Book at Auto Sentry” on page 430.
See “View Wash Books in Shift Detail Report” on page 431.
See “Email Wash Book Receipt” on page 432.
Redeem Wash Book at Auto Sentry
Customer can redeem wash book at the Auto Sentry with a barcode or customer magnetic-stripe card.
1 Customer can scan barcode or swipe the magnetic-stripe card.
2 Depending on your setup, customer can purchase extra services.Receipt prints with the barcode for the Wash Book Card number.
3 If WashConnect® is using low wash alert setting, when the balance is low, customer will be alerted and can recharge the wash book at the Auto Sentry.If WashConnect was setup to use barcoded receipts, every time customer uses a wash, a new receipt will print with the barcode on it.

User Manual—Version 6.0 WashConnect® Configuration
June 17, 2015 431
See “About Sales Items” on page 392.
See “Add Base Wash Sales Item for Wash Book offering” on page 425.
See “Add Wash Book as a Sales Item” on page 426.
See “Purchase Wash Books at the Auto Sentry” on page 428.
See “Redeem Wash Book at Auto Sentry” on page 430.
See “View Wash Books in Shift Detail Report” on page 431.
See “Email Wash Book Receipt” on page 432.
View Wash Books in Shift Detail Report
You may run a Shift Detail report to retrieve detailed Wash Book information for each use at each site.
NOTE: If a fleet customer purchased a wash book, the rule is the wash will be
charged to the fleet account and the wash book will not be used.
See “About Sales Items” on page 392.
See “Add Base Wash Sales Item for Wash Book offering” on page 425.
See “Add Wash Book as a Sales Item” on page 426.
See “Purchase Wash Books at the Auto Sentry” on page 428.
See “Redeem Wash Book at Auto Sentry” on page 430.
See “View Wash Books in Shift Detail Report” on page 431.

Configuration WashConnect® User Manual—Version 6.0
432 June 17, 2015
See “Email Wash Book Receipt” on page 432.
Email Wash Book Receipt
You can configure POS or Auto Sentry Wash Book sale transactions to automatically email book receipt when it is purchased.
NOTE: To Email an automatic receipt to customer, it is required to have previously
established an email address on file in WashConnect®.
1 From the Customer menu, select Manage.
2 Search for a customer.
3 In Primary Email, type Customer email address.
4 Optional, in Secondary Email, type second email address for customer.
5 Click to mark the Receive email receipts check box.
To enable and set up the email receipt, the following System Setup Device Settings must be set to True. Settings > CoreGatewayConfiguration >Email Server Settings > EnableEmailReceipt. (Default is True)
See “About Sales Items” on page 392.
See “Add Base Wash Sales Item for Wash Book offering” on page 425.
See “Add Wash Book as a Sales Item” on page 426.
See “Purchase Wash Books at the Auto Sentry” on page 428.
See “Redeem Wash Book at Auto Sentry” on page 430.
See “View Wash Books in Shift Detail Report” on page 431.
See “Email Wash Book Receipt” on page 432.

User Manual—Version 6.0 WashConnect® Configuration
June 17, 2015 433
Sell Wash Books at Convenience Stores
At WashConnect® Corporate, create Wash Book Cards that are pre-assigned to specific Wash Books and can be sold at all your locations, convenience stores or other businesses.
Book is purchased at C-Store and when the first time customer redeems the Wash Book on the Auto Sentry, the customer is replicated down to other sites.
See “About Sales Items” on page 392.
See “Add Base Wash Sales Item for Wash Book offering” on page 425.
See “Add Wash Book as a Sales Item” on page 426.
See “Purchase Wash Books at the Auto Sentry” on page 428.
See “Redeem Wash Book at Auto Sentry” on page 430.
See “View Wash Books in Shift Detail Report” on page 431.
See “Email Wash Book Receipt” on page 432.

Configuration WashConnect® User Manual—Version 6.0
434 June 17, 2015
About Profiles
A profile is a collection of wash choices and extra services. When you add a profile, you can assign base washes and extra services to that profile, and then schedule the profile to activate with certain day and time restrictions.
See “Add a Profile with a Base Wash and Extra Service” on page 435.
See “Edit a Profile” on page 440.
See “About Schedules” on page 441.
See “Edit Schedule” on page 445.
User Manual—Version 6.0 WashConnect® Configuration
June 17, 2015 435
See “Delete Schedule” on page 446.
See “Profile and Schedule Descriptions” on page 442.
See “Add Wash Book as a Sales Item” on page 426.
See “About Sales Items” on page 392.
Add a Profile with a Base Wash and Extra Service
You can use Profiles to enable or disable wash selections at your unattended terminals. After you add all the Sales Items for the Base Washes and Extra Service items, you can set up a retail profile for the main Wash menu. Profiles are also used to set up club services.
See “About Sales Items” on page 392.
1 Login to WashConnect® at Corporate.
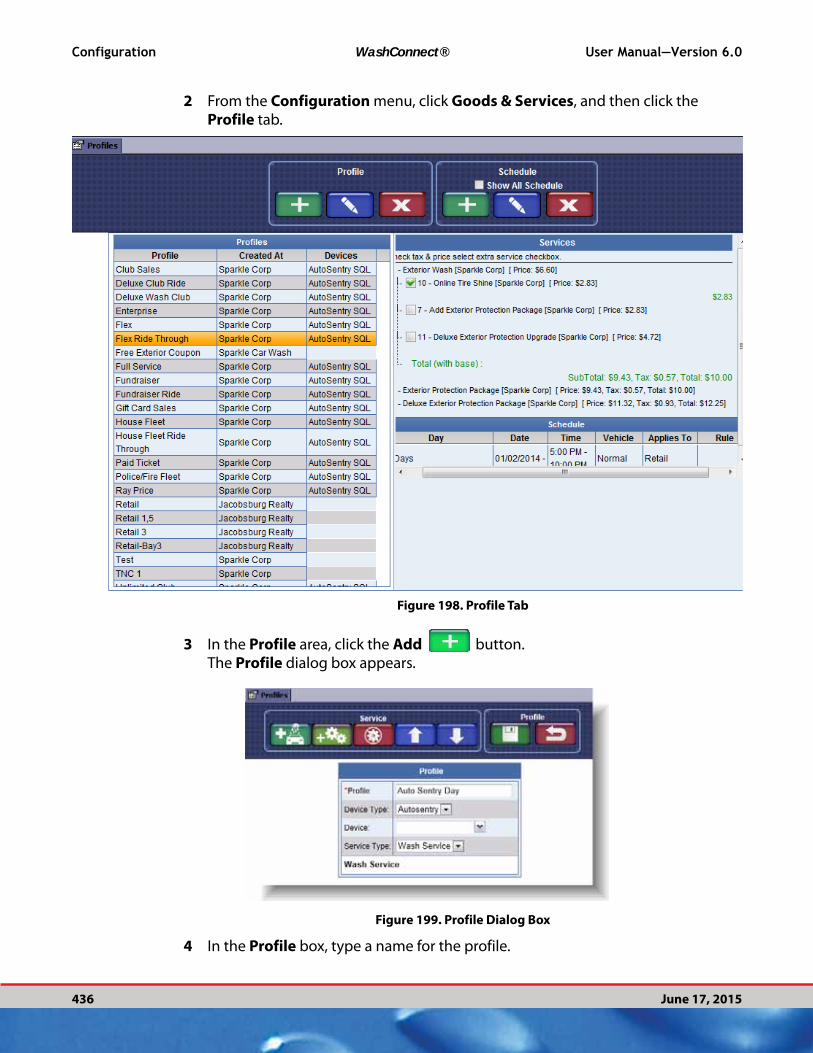
Configuration WashConnect® User Manual—Version 6.0
436 June 17, 2015
2 From the Configuration menu, click Goods & Services, and then click the Profile tab.
Figure 198. Profile Tab
3 In the Profile area, click the Add button.The Profile dialog box appears.
Figure 199. Profile Dialog Box
4 In the Profile box, type a name for the profile.

User Manual—Version 6.0 WashConnect® Configuration
June 17, 2015 437
5 In the Device Type box, select a device type.
6 In the Device box, select one or more devices.
7 In Service type, select Wash Service.
8 Click the Add Base Service button. The Base dialog box appears.
Figure 200. Base Dialog Box
9 In the Base dialog box, select between one and six base washes, and then click OK. The base washes are assigned to the new profile.
NOTE: Six base washes is the maximum for an Auto Sentry Profile.
See “Add Extra Services to a Profile” on page 438.
See “Edit a Profile” on page 440.
See “About Schedules” on page 441.
See “Edit Schedule” on page 445.
See “Delete Schedule” on page 446.
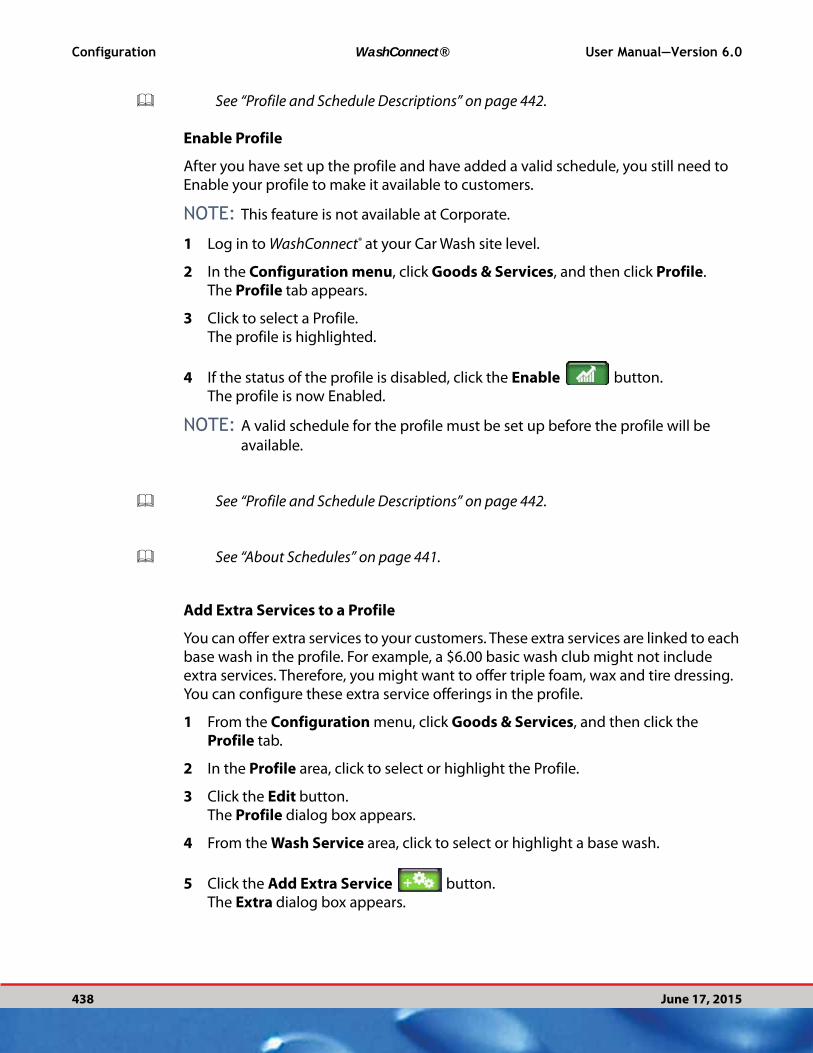
Configuration WashConnect® User Manual—Version 6.0
438 June 17, 2015
See “Profile and Schedule Descriptions” on page 442.
Enable Profile
After you have set up the profile and have added a valid schedule, you still need to Enable your profile to make it available to customers.
NOTE: This feature is not available at Corporate.
1 Log in to WashConnect® at your Car Wash site level.
2 In the Configuration menu, click Goods & Services, and then click Profile. The Profile tab appears.
3 Click to select a Profile.The profile is highlighted.
4 If the status of the profile is disabled, click the Enable button.The profile is now Enabled.
NOTE: A valid schedule for the profile must be set up before the profile will be
available.
See “Profile and Schedule Descriptions” on page 442.
See “About Schedules” on page 441.
Add Extra Services to a Profile
You can offer extra services to your customers. These extra services are linked to each base wash in the profile. For example, a $6.00 basic wash club might not include extra services. Therefore, you might want to offer triple foam, wax and tire dressing. You can configure these extra service offerings in the profile.
1 From the Configuration menu, click Goods & Services, and then click the Profile tab.
2 In the Profile area, click to select or highlight the Profile.
3 Click the Edit button.The Profile dialog box appears.
4 From the Wash Service area, click to select or highlight a base wash.
5 Click the Add Extra Service button. The Extra dialog box appears.

User Manual—Version 6.0 WashConnect® Configuration
June 17, 2015 439
Figure 201. Extra Dialog Box
6 From the Extra list, select between one and six extra services in the list, and then click OK. The extra services are assigned to the base wash. The customer will be able to view these options from the Extra Services screen that appears immediately after the customer selects the respective base wash.
7 From Wash Service section, you can reorder the Wash Services list.
▪ Click to select the wash service or extra service, and then click to select the
Move Up button or Move Down buttons to reorder the list.
Figure 202. Profile with Base Washes and Extra Services

Configuration WashConnect® User Manual—Version 6.0
440 June 17, 2015
8 In the Profile area, click the Save button when you are finished. The profile, base washes and extra services are added to the list.
See “Add a Profile with a Base Wash and Extra Service” on page 435.
See “Add Extra Services to a Profile” on page 438.
See “Edit a Profile” on page 440.
See “About Schedules” on page 441.
See “Edit Schedule” on page 445.
See “Delete Schedule” on page 446.
See “Profile and Schedule Descriptions” on page 442.
Edit a Profile
You can edit the profile name, base washes and extra services assigned to a profile.
To edit a profile, follow these steps:
1 In the Configuration menu, and click Goods & Services, and then click Profile. The Profile tab appears.
2 Select a profile in the list, and then click the Edit button. The Profile dialog box appears.
3 Click the Enable button to enable the profile. Click again to disable, and the profile will immediately be disabled. The Status column displays if the profile is enabled or disabled.
NOTE: Along with selecting the Enable button, the Profile must also have a valid
schedule to be completely enabled.
4 You can edit the profile in the following ways:
▪ Type a new name in the Profile box.
▪ You cannot select a different Device Type.

User Manual—Version 6.0 WashConnect® Configuration
June 17, 2015 441
▪ In the Device box, select or remove devices.
▪ You cannot select a different Service Type.
▪ Add and remove base washes and extra services.
▪ Re-order the Wash Service list.
5 Click the Save button.
See “Add Extra Services to a Profile” on page 438.
See “Edit a Profile” on page 440.
See “About Schedules” on page 441.
See “Edit Schedule” on page 445.
See “Delete Schedule” on page 446.
See “Profile and Schedule Descriptions” on page 442.
About Schedules
Profile time Schedules determine when the profile is available for customers at the Auto Sentry. You can add one or more schedules to a profile. For example, you might create a Standard profile with three wash choices. For that Standard profile, you can create a schedule that enables it on all days from 6 a.m. to 10 p.m.
NOTE: Along with a valid schedule, the profile needs to be Enabled.
See “About Profiles” on page 434.
See “Profile and Schedule Descriptions” on page 442.

Configuration WashConnect® User Manual—Version 6.0
442 June 17, 2015
Profile and Schedule Descriptions
The following table describes each of the fields in the Schedule dialog box.
Table 50: Profiles and Schedule Descriptions
Report Type Description
Profiles
Profile Profile name that has already been added.
Created At This is the Site at which the profile was created.
Devices This describes the Devices that the profile will be available.
Services
Services Services selected for the Profile.
Extra Service
Check Box
Extra Services selected for the Profile.
Schedule
Day List One or more of the following describes the days that the profile is valid
and available. All Days, Monday, Tuesday, Wednesday, Thursday, Friday,
Saturday, Sunday. Example: If your Exterior Club Member profile is
available seven day a week, select All Days in the Day field.
Start Date Date format This is the date selected that the valid profile begins.
End Date Date format This is the date selected that the valid profile will end.
Start Time Time format This is the earliest time the valid profile is available on the selected days.
Example: If your Exterior Club Member profile is available during
operating hours of the car wash, from 8:00am to 8:00pm, type 8:00:00 AM
in the Start Time field.
End Time Time format This is the latest time the valid profile is available on the selected days.

User Manual—Version 6.0 WashConnect® Configuration
June 17, 2015 443
See “Add Extra Services to a Profile” on page 438.
See “Edit a Profile” on page 440.
See “About Schedules” on page 441.
See “Edit Schedule” on page 445.
See “Delete Schedule” on page 446.
Vehicle List Normal or High Vehicle.
Normal—Standard size vehicles or All Vehicles if there is no HIgh Vehicle
Sensor.
High Vehicle—(i.e., the optional high vehicle sensor must be activated).
You might use the high vehicle setting for a schedule that includes
increased pricing for tall vehicles or for services that include retracts. You
can create alternate high vehicle schedules for each of your Normal
schedules.
Applies To List Select one of the following that applies to the profile:
▪ Retail Default transaction type. This is used to list the regular wash offerings.
▪ Club is used for the club redemptions.▪ Paid Ticket that are already paid, like a fuel wash code.▪ Open Ticket still needs to be paid, like a frequency
promotion. Open tickets are unpaid like tickets generated from a Presell.
▪ Coupon is used for the coupon codes.▪ Club Sales is used for club purchases. The list can include
up to 6 clubs for customers to purchase.▪ Gift Sales is used to sell Gift Cards.▪ Flex is the second screen if you need an additional retail
wash offering list.▪ Fleet is used for the Fleet Profiles.▪ BookSales is used for Wash Books.▪ Customer Group is used to offer certain customers special
prices based on their group association
Rule List These are the restrictions that pertains the to the Club or Fleet.
Table 50: Profiles and Schedule Descriptions
Report Type Description

Configuration WashConnect® User Manual—Version 6.0
444 June 17, 2015
See “Profile and Schedule Descriptions” on page 442.
Add Profile Schedule
To add a schedule to a profile, follow these steps:
1 In the Configuration menu, click Goods & Services, and then click the Profile tab.
2 Select a profile in the list. This is the profile to which you will assign the schedule.
3 In the Schedule area, click the Add button. The Schedule dialog box appears.
4 Select an item for each of the fields relating to time.
Figure 203. Schedule Dialog Box
5 In Vehicle Height, select Normal or High Vehicle.
6 In Applies To, select a category this Profile applies to:
▪ Retail
▪ Club
▪ Paid Ticket
▪ Open Ticket
▪ Coupon
▪ Club Sales
▪ Gift Sales
▪ Flex
▪ Fleet
▪ BookSales
▪ Customer Group
7 In Rule, if available, select a rule from the drop-down box that has been set up prior to setting the schedule.
NOTE: Rules apply to clubs and fleets accounts.
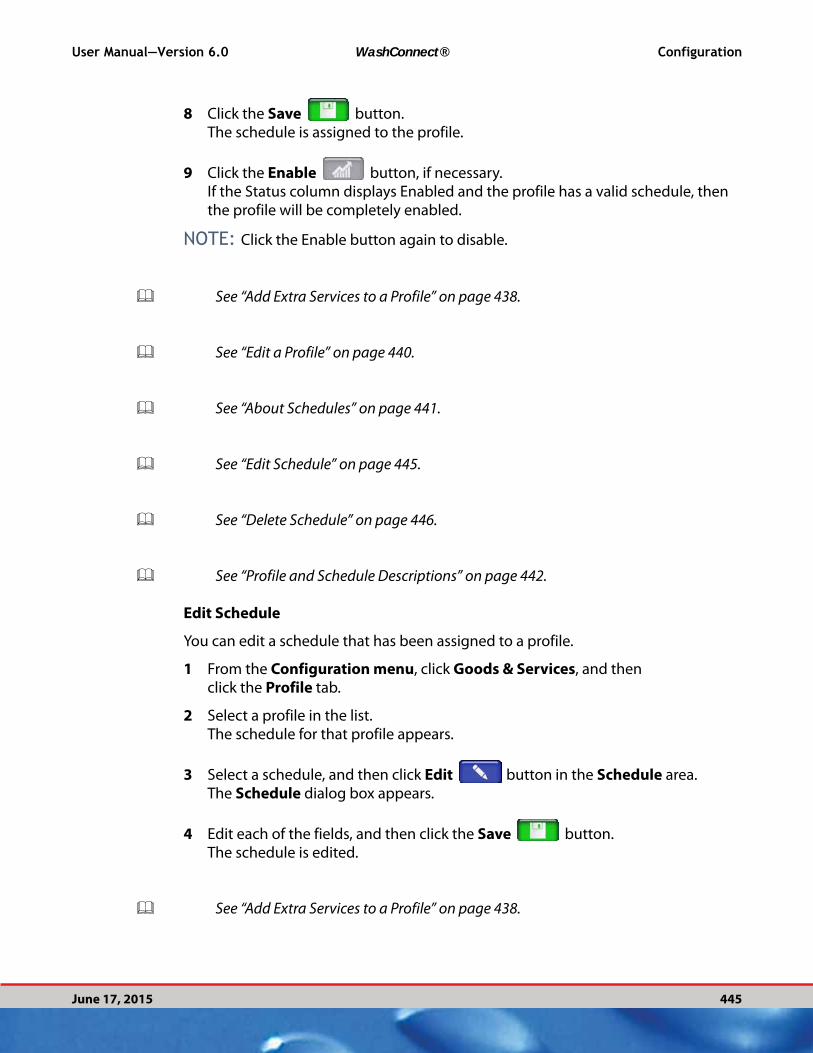
User Manual—Version 6.0 WashConnect® Configuration
June 17, 2015 445
8 Click the Save button.The schedule is assigned to the profile.
9 Click the Enable button, if necessary.If the Status column displays Enabled and the profile has a valid schedule, then the profile will be completely enabled.
NOTE: Click the Enable button again to disable.
See “Add Extra Services to a Profile” on page 438.
See “Edit a Profile” on page 440.
See “About Schedules” on page 441.
See “Edit Schedule” on page 445.
See “Delete Schedule” on page 446.
See “Profile and Schedule Descriptions” on page 442.
Edit Schedule
You can edit a schedule that has been assigned to a profile.
1 From the Configuration menu, click Goods & Services, and then click the Profile tab.
2 Select a profile in the list. The schedule for that profile appears.
3 Select a schedule, and then click Edit button in the Schedule area.The Schedule dialog box appears.
4 Edit each of the fields, and then click the Save button. The schedule is edited.
See “Add Extra Services to a Profile” on page 438.
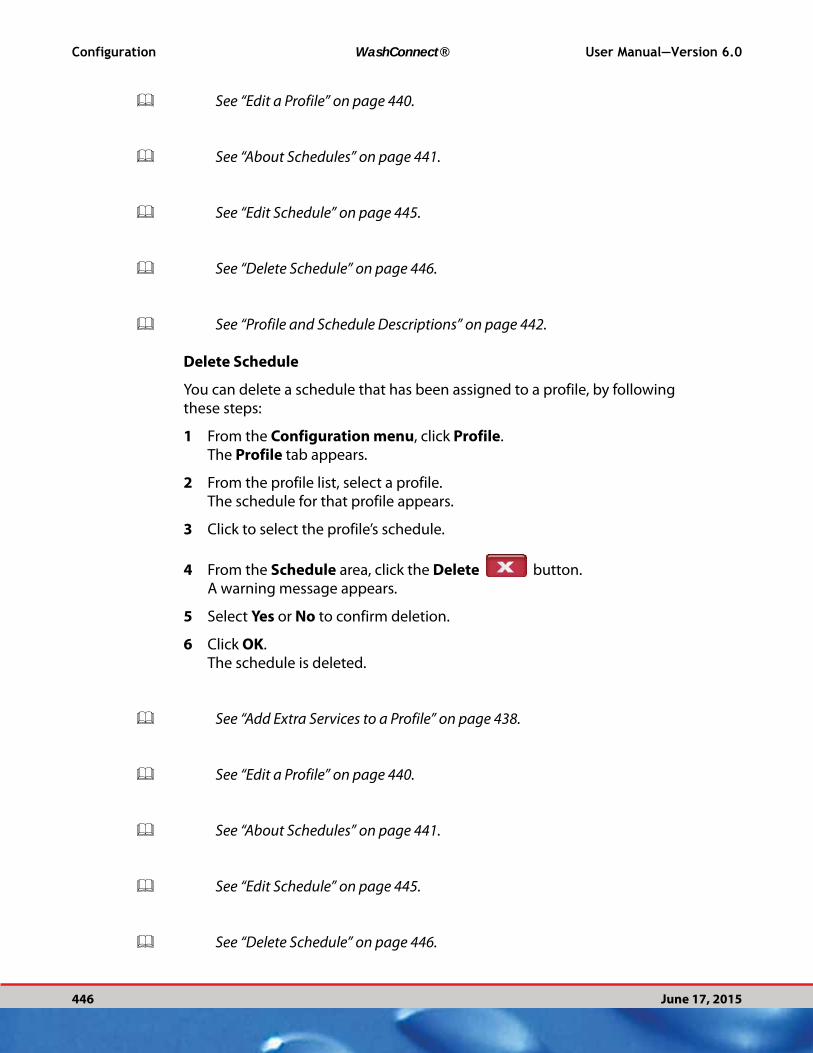
Configuration WashConnect® User Manual—Version 6.0
446 June 17, 2015
See “Edit a Profile” on page 440.
See “About Schedules” on page 441.
See “Edit Schedule” on page 445.
See “Delete Schedule” on page 446.
See “Profile and Schedule Descriptions” on page 442.
Delete Schedule
You can delete a schedule that has been assigned to a profile, by following these steps:
1 From the Configuration menu, click Profile. The Profile tab appears.
2 From the profile list, select a profile.The schedule for that profile appears.
3 Click to select the profile’s schedule.
4 From the Schedule area, click the Delete button. A warning message appears.
5 Select Yes or No to confirm deletion.
6 Click OK. The schedule is deleted.
See “Add Extra Services to a Profile” on page 438.
See “Edit a Profile” on page 440.
See “About Schedules” on page 441.
See “Edit Schedule” on page 445.
See “Delete Schedule” on page 446.

User Manual—Version 6.0 WashConnect® Configuration
June 17, 2015 447
See “Profile and Schedule Descriptions” on page 442.
See “Add a Profile with a Base Wash and Extra Service” on page 435.
Add a Wash Book Profile with Base Washes and Extra Services
See “About Wash Books” on page 340.
After you added your Base Washes, Extra Services if necessary, and Wash Book Sales Items at Corporate, you can setup a Profile to sell Wash Books at your Auto Sentry. After you setup a valid schedule for the Wash Book profile, the Buy Wash Book button will appear on the Main Options wash menu.
1 At your Car Wash site level, Log in to WashConnect®.
2 From the Configuration menu, click Goods & Services, and then click Profiles. The Profiles tab appears.
Figure 204. Profile Tab
3 From the Profiles section, click the Add button.The Profile dialog box appears.
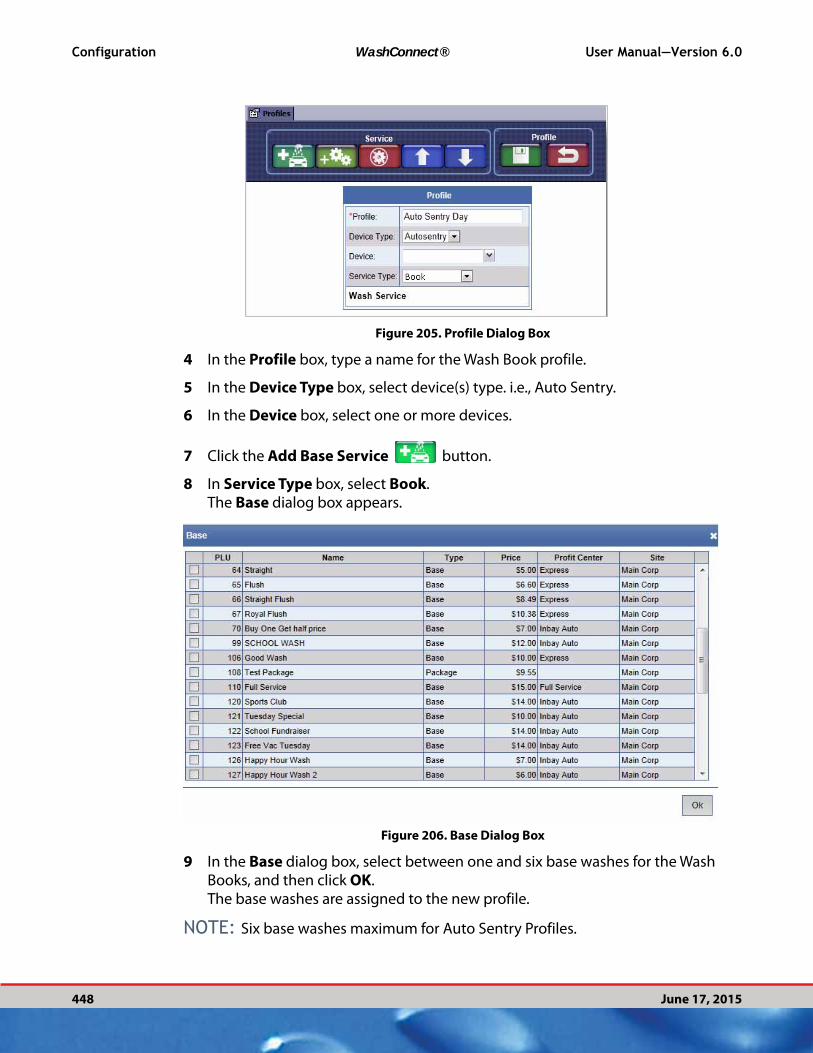
Configuration WashConnect® User Manual—Version 6.0
448 June 17, 2015
Figure 205. Profile Dialog Box
4 In the Profile box, type a name for the Wash Book profile.
5 In the Device Type box, select device(s) type. i.e., Auto Sentry.
6 In the Device box, select one or more devices.
7 Click the Add Base Service button.
8 In Service Type box, select Book.The Base dialog box appears.
Figure 206. Base Dialog Box
9 In the Base dialog box, select between one and six base washes for the Wash Books, and then click OK. The base washes are assigned to the new profile.
NOTE: Six base washes maximum for Auto Sentry Profiles.

User Manual—Version 6.0 WashConnect® Configuration
June 17, 2015 449
Reorder Wash Book Selection:
10 You can change the order of the Wash Book Offerings as they appear on the Auto
Sentry by selecting the wash, and then click Move Down button
or Move Up button.
Add Extra Services for Wash Book Base Wash:
11 From Wash Service, select the base Wash, and then, if necessary, click the Add Extra Service button to set up an extra service selection screen for the Wash Book’s base wash. You can add up to six extra services.
Remove Service from Wash Book’s Profile:
12 If necessary, you can remove services from the Wash Service list by selecting the
Wash Service and then clicking the Remove Service button.
13 Click OK.
14 Click the Save button.The message Profile saved successfully appears.
15 Click OK.
See “About Wash Books” on page 340.
See “Schedule a Wash Book Profile” on page 359.
See “Profile and Schedule Descriptions” on page 442.
Schedule a Wash Book Profile
To add a schedule to a Wash Book profile, follow these steps:
1 At your Car Wash site level, Log in to WashConnect®.
2 In the Configuration menu, click Goods & Services, and then click Profile. The Profile tab appears.
3 Click to select a profile in the list. The profile is highlighted.
4 In the Schedule area, click the Add button. The Schedule dialog box appears.

Configuration WashConnect® User Manual—Version 6.0
450 June 17, 2015
Figure 207. Schedule Dialog Box
5 In Day of Week drop-down box, select All Days or the individual day(s).
6 In Start Date, select a start date.
7 In End Date, select an end date if necessary.
8 In Start Time and End Time, select a specific time, if necessary.
9 In Vehicle Height, select Normal or High Vehicle.
10 In Applies To, select Book Sales.
11 Click OK.
12 Click OK.
13 Click the Save button.The schedule is assigned to the wash book profile.
NOTE: Upon the valid schedule, the Buy Wash Book button is available on the
Auto Sentry’s main menu. If customer is redeeming a wash book wash, a Welcome Video can present the instructions for the Wash Book customer to swipe the Wash Book Card (Customer Card).
See “About Wash Books” on page 340.
See “Add a Wash Book Profile with Base Washes and Extra Services” on page 356.
See “Profile and Schedule Descriptions” on page 442.
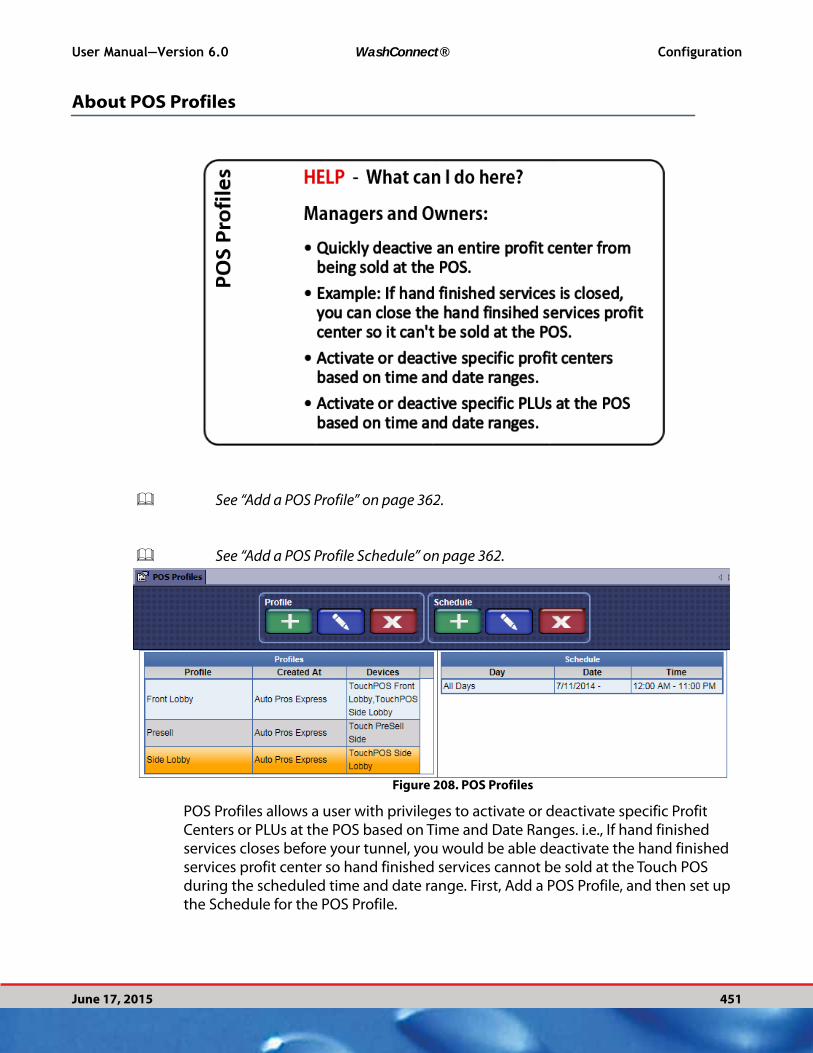
User Manual—Version 6.0 WashConnect® Configuration
June 17, 2015 451
About POS Profiles
See “Add a POS Profile” on page 362.
See “Add a POS Profile Schedule” on page 362.
Figure 208. POS Profiles
POS Profiles allows a user with privileges to activate or deactivate specific Profit Centers or PLUs at the POS based on Time and Date Ranges. i.e., If hand finished services closes before your tunnel, you would be able deactivate the hand finished services profit center so hand finished services cannot be sold at the Touch POS during the scheduled time and date range. First, Add a POS Profile, and then set up the Schedule for the POS Profile.

Configuration WashConnect® User Manual—Version 6.0
452 June 17, 2015
Add a POS Profile
The POS Profile is used to turn off any sales items to be sold during a specific time or to turn off a specific Profit Center such as Hand Finished Services. This will adjust the sales items that can be sold at the Touch POS or Presell terminals.
1 From Configuration menu, select Goods and Services, and then select POS Profiles.The list of all existing POS Profiles appears.
2 Click the Add button.
3 In Profile, type the name of the new POS Profile.
4 In Device Type, select either POS or Presell.
5 In Device, click the drop-down button and then select one or more devices that apply.
6 Expand the Assign Sales Item node. All Sales Items are selected by default, and you can deselect the entire Profit Center or specific PLU Sales Items by their PLU number.
7 Click OK.
8 Click the Save button.The message Profile saved successfully appears.However, the Profile needs a valid schedule before it will take effect.
See “Add a POS Profile” on page 452.
See “Add a POS Profile Schedule” on page 452.
Add a POS Profile Schedule
After adding a POS Profile, you need to add a schedule to activate it.
1 From Configuration menu, select Goods and Services, and then select POS Profiles.The list of all existing POS Profiles appears.
2 Click to select a POS Profile.The selected POS Profile is highlighted.
3 From Schedule, click the Add button.
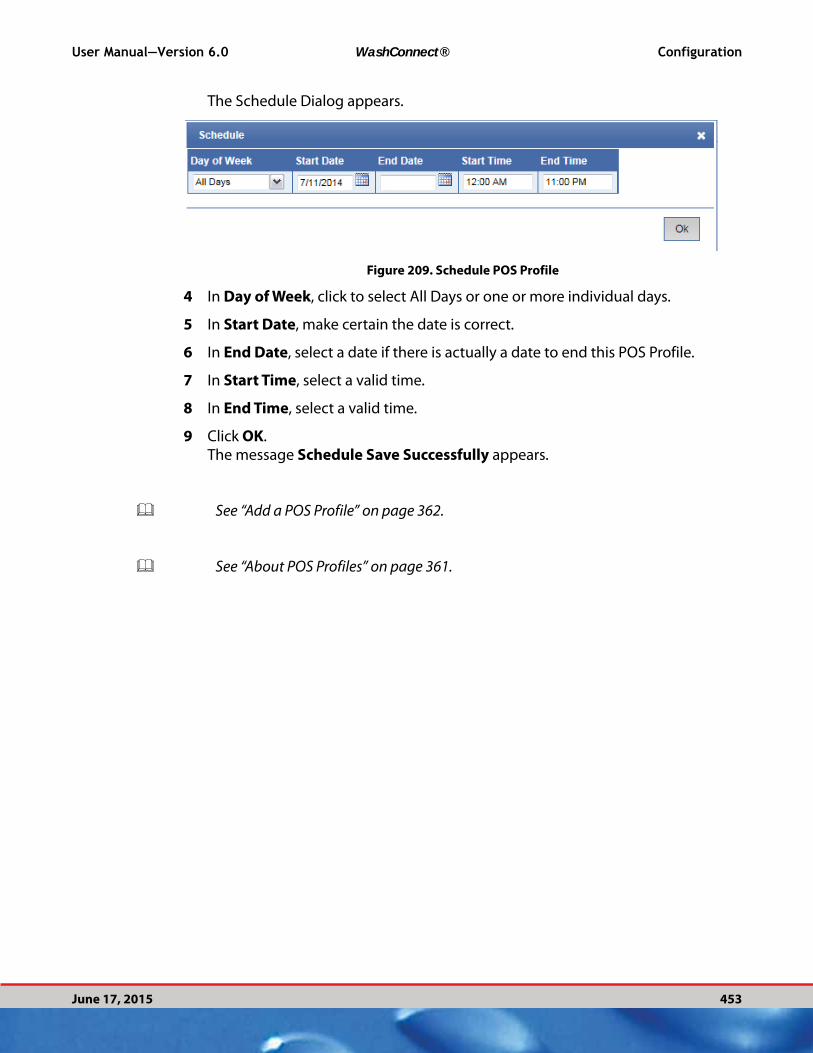
User Manual—Version 6.0 WashConnect® Configuration
June 17, 2015 453
The Schedule Dialog appears.
Figure 209. Schedule POS Profile
4 In Day of Week, click to select All Days or one or more individual days.
5 In Start Date, make certain the date is correct.
6 In End Date, select a date if there is actually a date to end this POS Profile.
7 In Start Time, select a valid time.
8 In End Time, select a valid time.
9 Click OK.The message Schedule Save Successfully appears.
See “Add a POS Profile” on page 362.
See “About POS Profiles” on page 361.
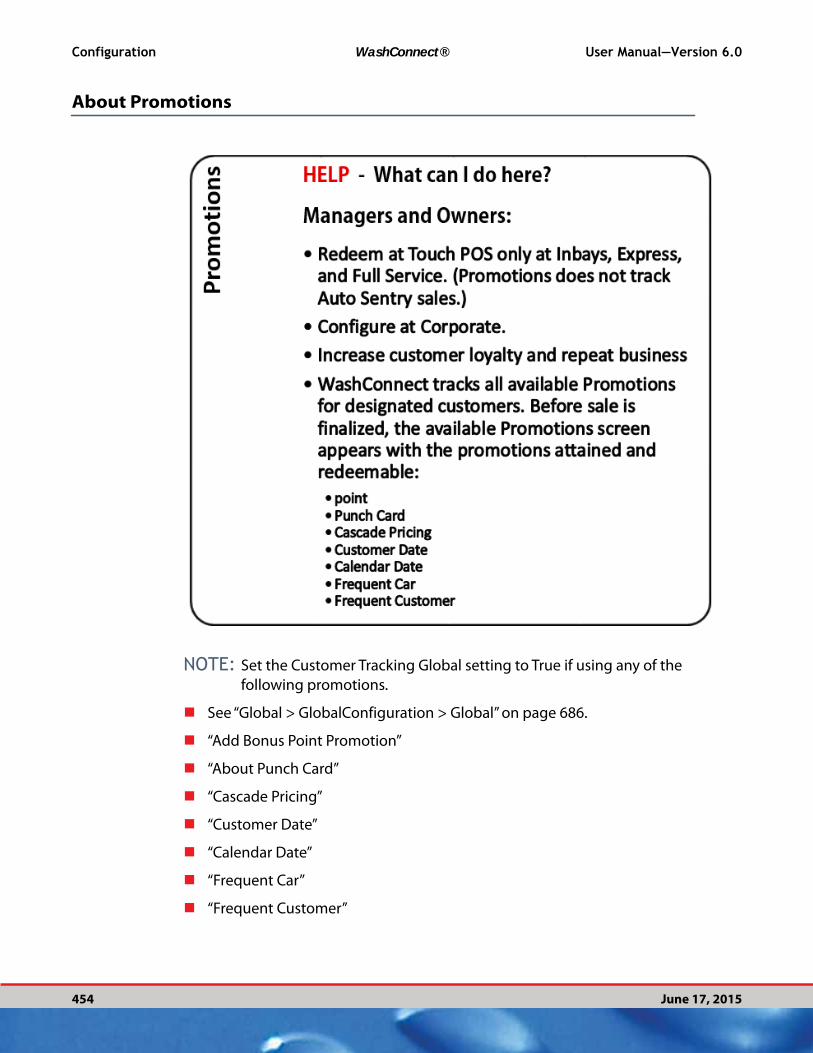
Configuration WashConnect® User Manual—Version 6.0
454 June 17, 2015
About Promotions
NOTE: Set the Customer Tracking Global setting to True if using any of the
following promotions.
See “Global > GlobalConfiguration > Global” on page 686.
“Add Bonus Point Promotion”
“About Punch Card”
“Cascade Pricing”
“Customer Date”
“Calendar Date”
“Frequent Car”
“Frequent Customer”
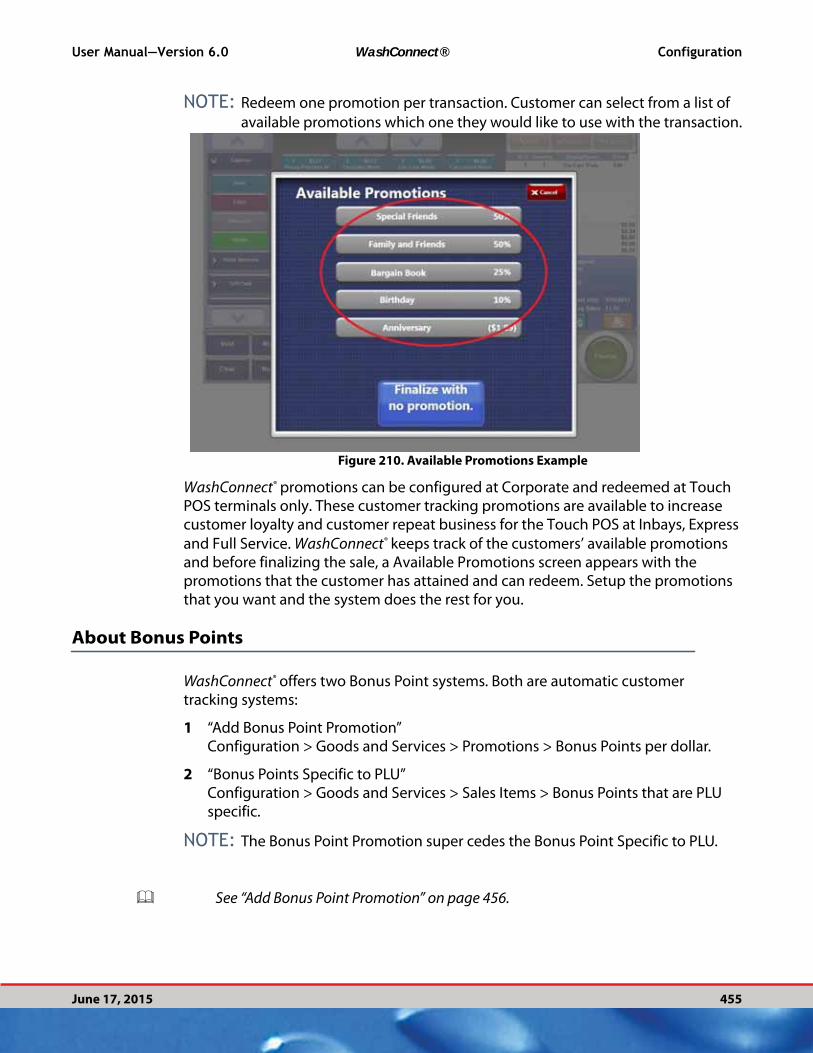
User Manual—Version 6.0 WashConnect® Configuration
June 17, 2015 455
NOTE: Redeem one promotion per transaction. Customer can select from a list of
available promotions which one they would like to use with the transaction.
Figure 210. Available Promotions Example
WashConnect® promotions can be configured at Corporate and redeemed at Touch POS terminals only. These customer tracking promotions are available to increase customer loyalty and customer repeat business for the Touch POS at Inbays, Express
and Full Service. WashConnect® keeps track of the customers’ available promotions and before finalizing the sale, a Available Promotions screen appears with the promotions that the customer has attained and can redeem. Setup the promotions that you want and the system does the rest for you.
About Bonus Points
WashConnect® offers two Bonus Point systems. Both are automatic customer tracking systems:
1 “Add Bonus Point Promotion”Configuration > Goods and Services > Promotions > Bonus Points per dollar.
2 “Bonus Points Specific to PLU”Configuration > Goods and Services > Sales Items > Bonus Points that are PLU specific.
NOTE: The Bonus Point Promotion super cedes the Bonus Point Specific to PLU.
See “Add Bonus Point Promotion” on page 456.
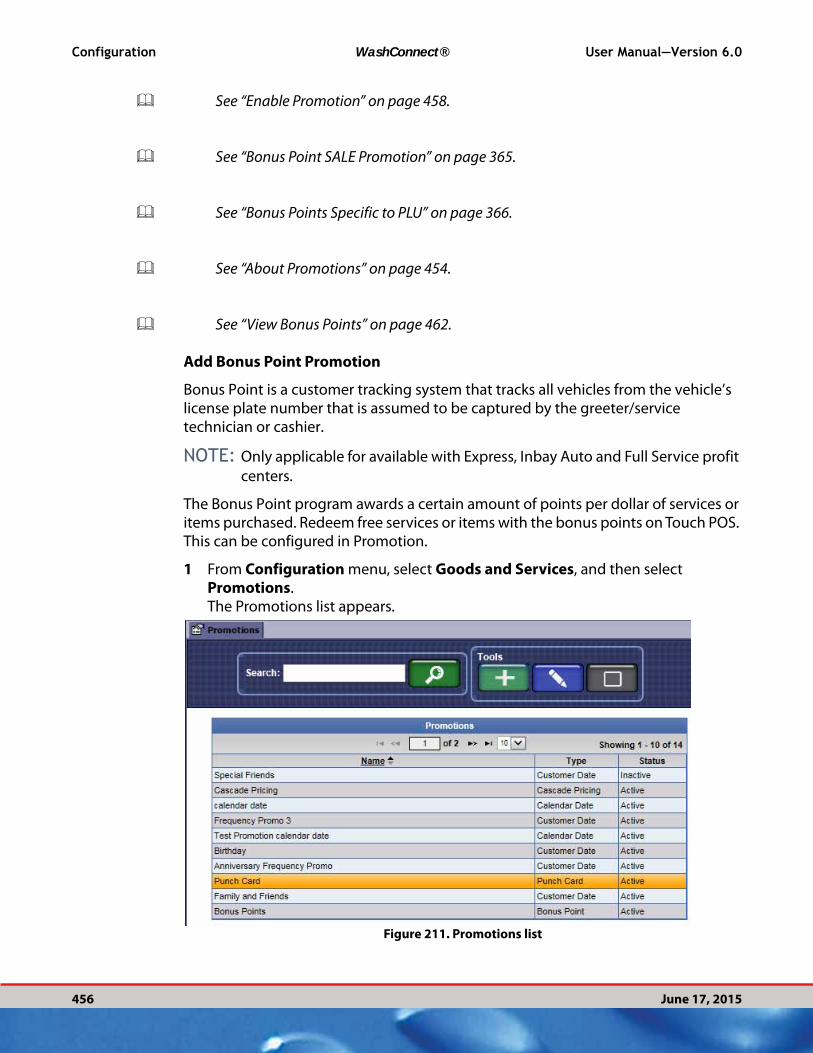
Configuration WashConnect® User Manual—Version 6.0
456 June 17, 2015
See “Enable Promotion” on page 458.
See “Bonus Point SALE Promotion” on page 365.
See “Bonus Points Specific to PLU” on page 366.
See “About Promotions” on page 454.
See “View Bonus Points” on page 462.
Add Bonus Point Promotion
Bonus Point is a customer tracking system that tracks all vehicles from the vehicle’s license plate number that is assumed to be captured by the greeter/service technician or cashier.
NOTE: Only applicable for available with Express, Inbay Auto and Full Service profit
centers.
The Bonus Point program awards a certain amount of points per dollar of services or items purchased. Redeem free services or items with the bonus points on Touch POS. This can be configured in Promotion.
1 From Configuration menu, select Goods and Services, and then select Promotions.The Promotions list appears.
Figure 211. Promotions list
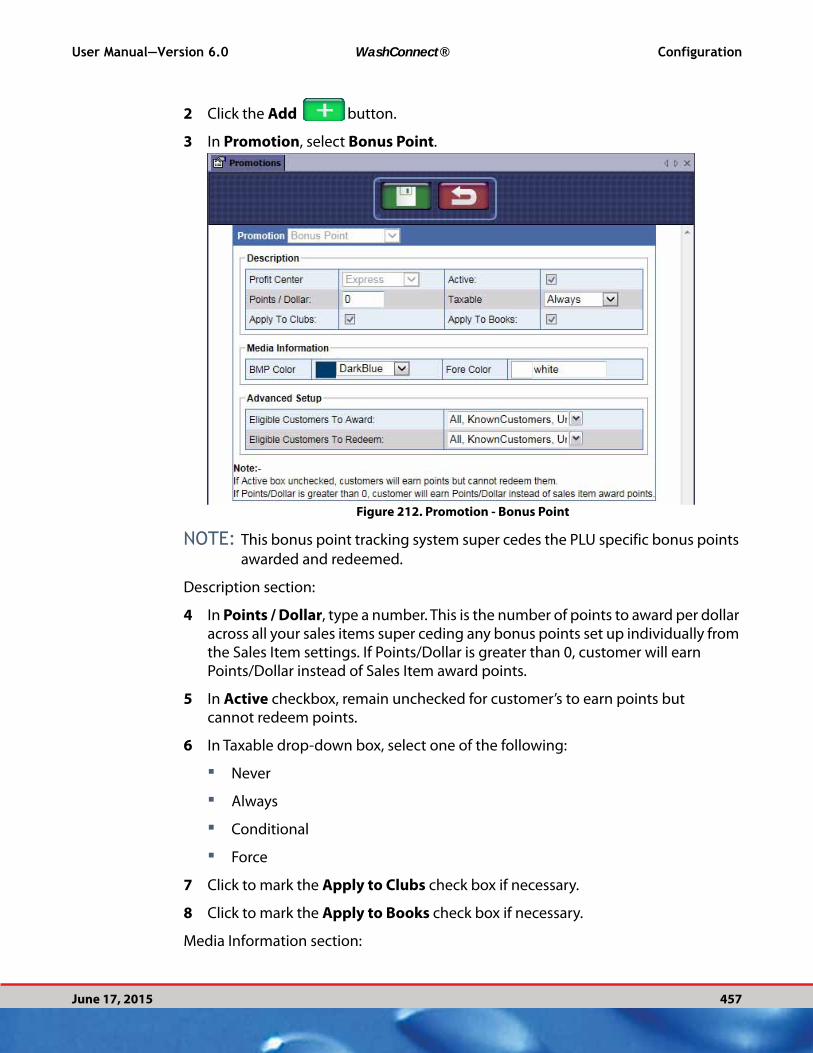
User Manual—Version 6.0 WashConnect® Configuration
June 17, 2015 457
2 Click the Add button.
3 In Promotion, select Bonus Point.
Figure 212. Promotion - Bonus Point
NOTE: This bonus point tracking system super cedes the PLU specific bonus points
awarded and redeemed.
Description section:
4 In Points / Dollar, type a number. This is the number of points to award per dollar across all your sales items super ceding any bonus points set up individually from the Sales Item settings. If Points/Dollar is greater than 0, customer will earn Points/Dollar instead of Sales Item award points.
5 In Active checkbox, remain unchecked for customer’s to earn points but cannot redeem points.
6 In Taxable drop-down box, select one of the following:
▪ Never
▪ Always
▪ Conditional
▪ Force
7 Click to mark the Apply to Clubs check box if necessary.
8 Click to mark the Apply to Books check box if necessary.
Media Information section:

Configuration WashConnect® User Manual—Version 6.0
458 June 17, 2015
9 From the Media Information section, select a BMP Color and Fore Color, if necessary.
Advanced Setup section:
10 From the Advanced Setup section, select all the Eligible Customers from the drop-down list of customers. Select both Eligible Customers to Award and Eligible Customers to Redeem.
11 Click the Save button.The promotion is set up to award points per dollar.
See “Add Bonus Point Promotion” on page 456.
See “Enable Promotion” on page 458.
See “Bonus Point SALE Promotion” on page 365.
See “Bonus Points Specific to PLU” on page 366.
See “About Promotions” on page 454.
See “View Bonus Points” on page 462.
Enable Promotion
After you have set up the promotion, you can quickly enable the promotion to make it available to the eligible customers.
See “About Promotions” on page 454.
NOTE: This feature is only available at Corporate.
1 Log in to WashConnect® at Corporate.
2 In the Configuration menu, click Goods & Services, and then click Promotions. The Promotions tab appears.
3 Click to select a Promotion.The promotion is highlighted.

User Manual—Version 6.0 WashConnect® Configuration
June 17, 2015 459
4 If the status of the promotion is Inactive, click the Enable button.The promotion status is now Active.A Confirm Are you sure you want to enable this promotion? message appears.
5 Click Yes.
See “Profile and Schedule Descriptions” on page 442.
See “About Schedules” on page 441.3
See “View Bonus Points” on page 462.
Disable Promotion
After you have set up the promotion, you can quickly disable or make the promotion inactive for the eligible customers.
NOTE: This feature is only available at Corporate.
1 Log in to WashConnect® at Corporate.
2 In the Configuration menu, click Goods & Services, and then click Promotions. The Promotions tab appears.
3 Click to select a Promotion.The promotion is highlighted.
4 If the status of the promotion is Active, click the Disable button.The promotion status is now Inactive.A Confirm Are you sure you want to disable this promotion? message appears.
5 Click Yes.
See “Profile and Schedule Descriptions” on page 442.
See “About Schedules” on page 441.
Terminate Promotion
After a promotion has been added, you can easily terminate the promotion permanently.
NOTE: This feature is only available at Corporate.
1 Log in to WashConnect® at Corporate.
Configuration WashConnect® User Manual—Version 6.0
460 June 17, 2015
2 In the Configuration menu, click Goods & Services, and then click Promotions. The Promotions tab appears.
3 Click to select a Promotion.The promotion is highlighted.
4 If the status of the promotion is Inactive or Active, click the Delete button.The promotion is deleted.A Confirm Are you sure you want to delete this promotion? message appears.
5 Click Yes.
See “Add Bonus Point Promotion” on page 456.
See “Enable Promotion” on page 458.
See “Bonus Point SALE Promotion” on page 365.
See “Bonus Points Specific to PLU” on page 366.
See “About Promotions” on page 454.
See “View Bonus Points” on page 462.
Bonus Points Specific to PLU
NOTE: Bonus Points Specific to PLU customer tracking system is only applicable for
available with Express, Inbay Auto and Full Service profit centers.
The Bonus Point program awards points for the purchase of items as well as allows you to redeem free services or items with the bonus points. This can be configured in Promotion.
1 From WashConnect®, Login at Corporate (must be Corporate level).
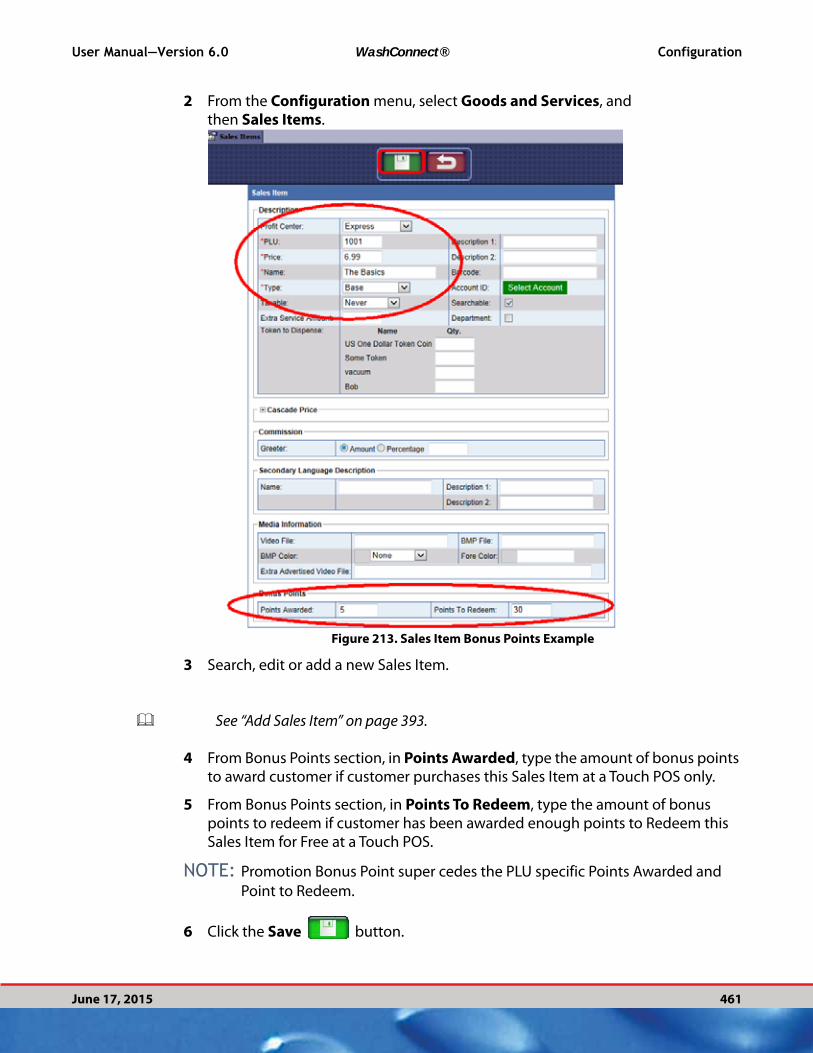
User Manual—Version 6.0 WashConnect® Configuration
June 17, 2015 461
2 From the Configuration menu, select Goods and Services, and then Sales Items.
Figure 213. Sales Item Bonus Points Example
3 Search, edit or add a new Sales Item.
See “Add Sales Item” on page 393.
4 From Bonus Points section, in Points Awarded, type the amount of bonus points to award customer if customer purchases this Sales Item at a Touch POS only.
5 From Bonus Points section, in Points To Redeem, type the amount of bonus points to redeem if customer has been awarded enough points to Redeem this Sales Item for Free at a Touch POS.
NOTE: Promotion Bonus Point super cedes the PLU specific Points Awarded and
Point to Redeem.
6 Click the Save button.

Configuration WashConnect® User Manual—Version 6.0
462 June 17, 2015
7 The bonus points will now be awarded every time customers purchase the service as well as they can redeem them if they have enough points. The Available Promotions screen will appear for the cashier to view the eligible points.
See “Bonus Point SALE Promotion” on page 365.
See “About Promotions” on page 454.
View Bonus Points
The system tracks the bonus points for each customer in the Touch POS. Follow these steps to view a customers’ bonus points:
1 From the Customer menu, select Manage.
2 Search for a customer.
3 Edit the customer.
4 From the Customer Information tab, you can view Bonus Points Total from the Statistics section.
Edit Bonus Point Counts
You can edit Bonus Points Counts with permission in POS during an Open Shift.
NOTE: Every edit to bonus points and/or punch cards will be tracked on Shift Detail
Report.
1 Open a Touch POS shift in WashConnect®.

User Manual—Version 6.0 WashConnect® Configuration
June 17, 2015 463
2 Sign in as a greeter. Greeter must have permission to edit the Bonus Points counts.
3 Click to select Vehicle History button.
4 Search and select a customer.
5 Click to select Vehicle History button again.The Vehicle History screen appears.
Figure 214. Vehicle History
6 Click to select the Edit Customer button.The Update Customer Information dialog appears.
NOTE: The Login screen appears if greeter does not have permission.
Figure 215. Update Customer Information Bonus Points
7 You can change the customers Bonus Points amount, you can type a new number in the box next to the amount to be changed.
8 Type in a reason for the change.

Configuration WashConnect® User Manual—Version 6.0
464 June 17, 2015
9 Click the Save button.The Changes are saved immediately.
See “View History of Punch Card Edits” on page 474.
See “About Bonus Points” on page 455.
View History of Bonus Points Edits
To view the edit history of Bonus Points amounts from the Customers Manage menu, follow these steps:
1 From the Customers menu, select Manage.
2 Search for customer.
3 Click to highlight customer.
4 From the Search buttons, select the Customer Notes button.
NOTE: Customer notes are not editable: cannot change or delete any line item.
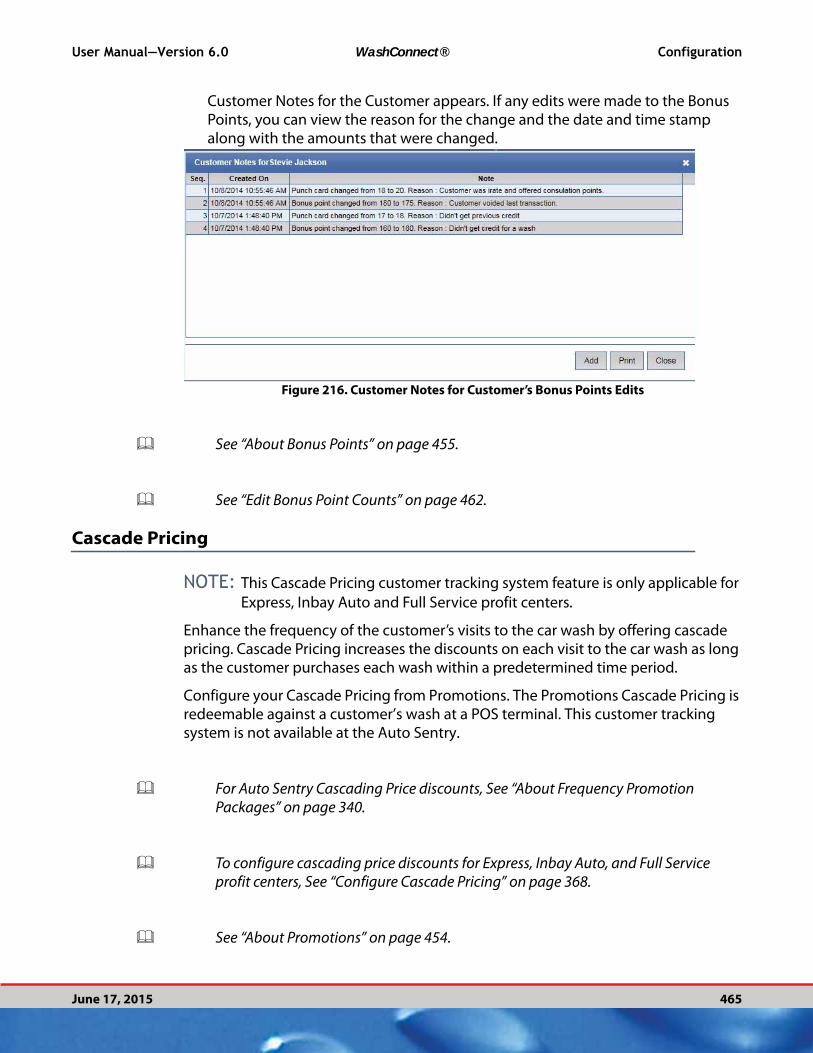
User Manual—Version 6.0 WashConnect® Configuration
June 17, 2015 465
Customer Notes for the Customer appears. If any edits were made to the Bonus Points, you can view the reason for the change and the date and time stamp along with the amounts that were changed.
Figure 216. Customer Notes for Customer’s Bonus Points Edits
See “About Bonus Points” on page 455.
See “Edit Bonus Point Counts” on page 462.
Cascade Pricing
NOTE: This Cascade Pricing customer tracking system feature is only applicable for
Express, Inbay Auto and Full Service profit centers.
Enhance the frequency of the customer’s visits to the car wash by offering cascade pricing. Cascade Pricing increases the discounts on each visit to the car wash as long as the customer purchases each wash within a predetermined time period.
Configure your Cascade Pricing from Promotions. The Promotions Cascade Pricing is redeemable against a customer’s wash at a POS terminal. This customer tracking system is not available at the Auto Sentry.
For Auto Sentry Cascading Price discounts, See “About Frequency Promotion Packages” on page 340.
To configure cascading price discounts for Express, Inbay Auto, and Full Service profit centers, See “Configure Cascade Pricing” on page 368.
See “About Promotions” on page 454.

Configuration WashConnect® User Manual—Version 6.0
466 June 17, 2015
See “Cascade Pricing Example” on page 466.
Cascade Pricing Example
The regular price of the Base Wash is $6 in this example. The customer will receive a $1 discount if they return within a 5 day period. To entice the customer to visit again within 5 days, a $2 discount will be offered. Finally, a $3 discount is offered to the customer if they want, they can return within a 5 day period. After the $3 discount wash is purchased the cycle starts again. See the following image for visual diagram.
Figure 217. Cascade Pricing Discount Visual Diagram

User Manual—Version 6.0 WashConnect® Configuration
June 17, 2015 467
Configure Cascade Pricing
The instructions will provide a step by step process to set up a Frequency Program for a car wash that wishes to offer and increasing amount of discounts for each consecutive visit returning in a set amount of days.
1 From WashConnect®, Login at Corporate (must be Corporate level).
2 From the Configuration menu, select Goods and Services, and then Promotions.
3 IIn Tools, select the Add Promotion button.
4 In Promotion, select Cascade Pricing.
5 In Profit Center, select a Profit Center.
6 In Taxable, select a setting.
7 In Media Information, select BMP Color and Fore Color if necessary.
8 In Advanced Setup, select one or more Customer Groups or All groups from the Eligible Customers to Award drop-down list.
9 Click the Save button.The system now allows Cascade Pricing settings for the Sales Item setting.
See “Apply Cascade Pricing Sales Item” on page 369.
Apply Cascade Pricing Sales Item
Cascade Pricing can be set up for one or more PLU Sales Items. Enable Cascade Pricing from Promotions.
See “Configure Cascade Pricing” on page 368.

Configuration WashConnect® User Manual—Version 6.0
468 June 17, 2015
1 From the Configuration menu, select Goods and Services, and then Sales Items.
2 Locate the Sales Item PLU or Add PLU to apply the Cascade Pricing.Figure 218. Cascade Price for Express Basic Wash example
3 In Sales Items, expand the Cascade Price section.
4 Click Add Seq. button.
5 In Visit, type visit number to receive the discount offer.
6 In Discount, type the dollar discount customer can receive in the offer.
7 In Visit within (days) box, type the amount of days customer needs to return to be awarded the discount.
8 Click the Save button.The Sales Item is now set up to offer cascade price discounts and WashConnect keeps track of it all for you.
9 When Customer returns within 5 days to POS to purchase wash, the Available Promotions screen appears.
10 Select the Cascade Pricing to receive the discount.
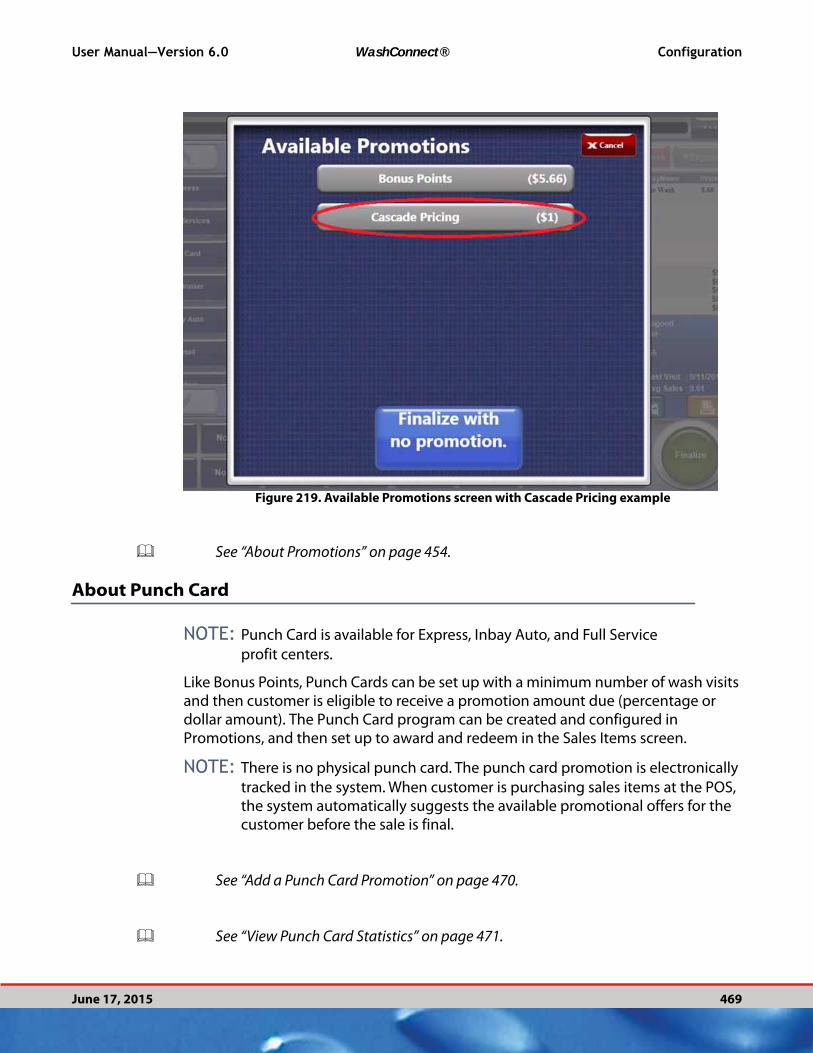
User Manual—Version 6.0 WashConnect® Configuration
June 17, 2015 469
Figure 219. Available Promotions screen with Cascade Pricing example
See “About Promotions” on page 454.
About Punch Card
NOTE: Punch Card is available for Express, Inbay Auto, and Full Service
profit centers.
Like Bonus Points, Punch Cards can be set up with a minimum number of wash visits and then customer is eligible to receive a promotion amount due (percentage or dollar amount). The Punch Card program can be created and configured in Promotions, and then set up to award and redeem in the Sales Items screen.
NOTE: There is no physical punch card. The punch card promotion is electronically
tracked in the system. When customer is purchasing sales items at the POS, the system automatically suggests the available promotional offers for the customer before the sale is final.
See “Add a Punch Card Promotion” on page 470.
See “View Punch Card Statistics” on page 471.
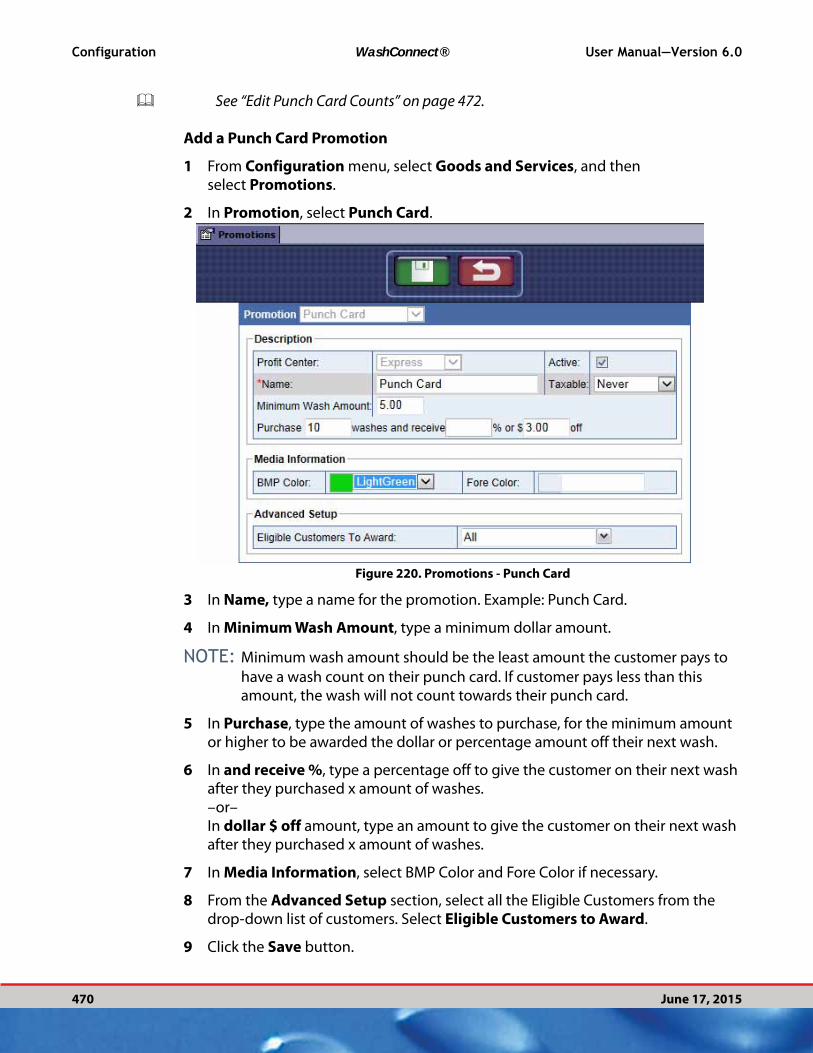
Configuration WashConnect® User Manual—Version 6.0
470 June 17, 2015
See “Edit Punch Card Counts” on page 472.
Add a Punch Card Promotion
1 From Configuration menu, select Goods and Services, and then select Promotions.
2 In Promotion, select Punch Card.
Figure 220. Promotions - Punch Card
3 In Name, type a name for the promotion. Example: Punch Card.
4 In Minimum Wash Amount, type a minimum dollar amount.
NOTE: Minimum wash amount should be the least amount the customer pays to
have a wash count on their punch card. If customer pays less than this amount, the wash will not count towards their punch card.
5 In Purchase, type the amount of washes to purchase, for the minimum amount or higher to be awarded the dollar or percentage amount off their next wash.
6 In and receive %, type a percentage off to give the customer on their next wash after they purchased x amount of washes.–or–In dollar $ off amount, type an amount to give the customer on their next wash after they purchased x amount of washes.
7 In Media Information, select BMP Color and Fore Color if necessary.
8 From the Advanced Setup section, select all the Eligible Customers from the drop-down list of customers. Select Eligible Customers to Award.
9 Click the Save button.
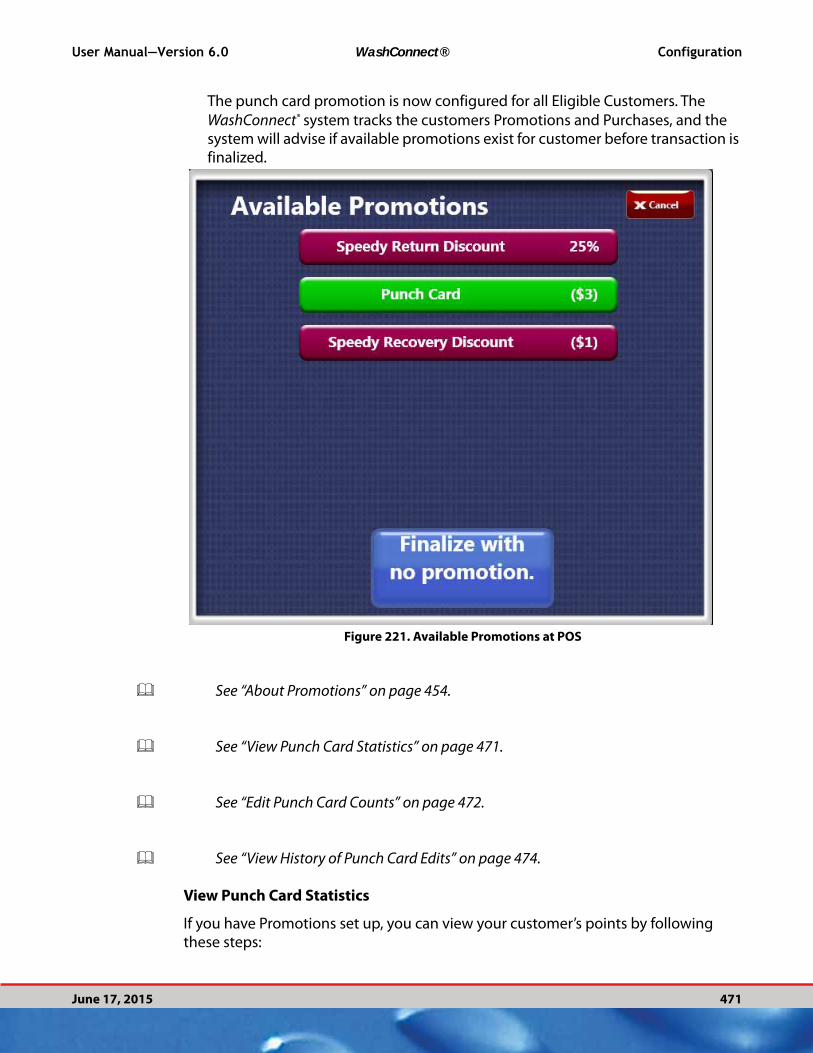
User Manual—Version 6.0 WashConnect® Configuration
June 17, 2015 471
The punch card promotion is now configured for all Eligible Customers. The
WashConnect® system tracks the customers Promotions and Purchases, and the system will advise if available promotions exist for customer before transaction is finalized.
Figure 221. Available Promotions at POS
See “About Promotions” on page 454.
See “View Punch Card Statistics” on page 471.
See “Edit Punch Card Counts” on page 472.
See “View History of Punch Card Edits” on page 474.
View Punch Card Statistics
If you have Promotions set up, you can view your customer’s points by following these steps:
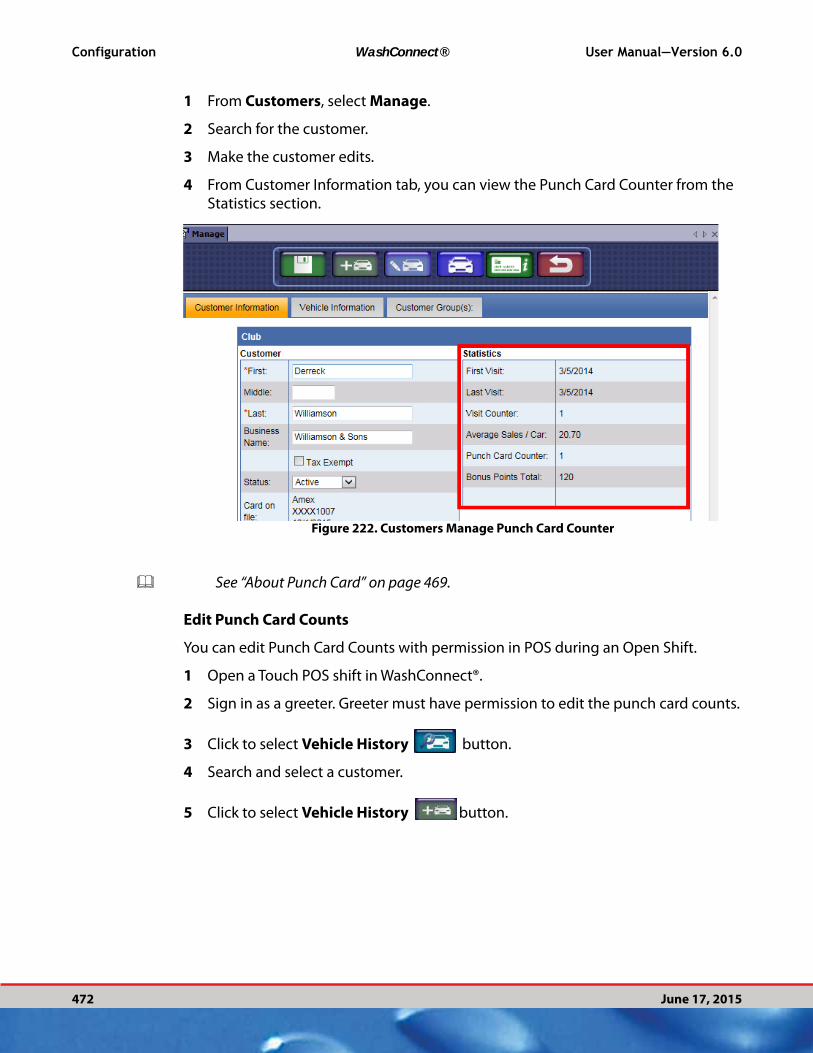
Configuration WashConnect® User Manual—Version 6.0
472 June 17, 2015
1 From Customers, select Manage.
2 Search for the customer.
3 Make the customer edits.
4 From Customer Information tab, you can view the Punch Card Counter from the Statistics section.
Figure 222. Customers Manage Punch Card Counter
See “About Punch Card” on page 469.
Edit Punch Card Counts
You can edit Punch Card Counts with permission in POS during an Open Shift.
1 Open a Touch POS shift in WashConnect®.
2 Sign in as a greeter. Greeter must have permission to edit the punch card counts.
3 Click to select Vehicle History button.
4 Search and select a customer.
5 Click to select Vehicle History button.

User Manual—Version 6.0 WashConnect® Configuration
June 17, 2015 473
The Vehicle History screen appears.
Figure 223. Vehicle History
6 Click to select the Edit Customer button.The Update Customer Information dialog appears.
NOTE: The Login screen appears if greeter does not have permission.
Figure 224. Update Customer Information Punch Card
7 You can change the customers Punch Card amount, you can type a new number in the box next to the amount to be changed.
8 Type in a reason for the change.
9 Click the Save button.

Configuration WashConnect® User Manual—Version 6.0
474 June 17, 2015
The Changes are saved immediately.
See “View History of Punch Card Edits” on page 474.
See “About Punch Card” on page 469.
View History of Punch Card Edits
To view the edit history of Punch Card amounts from the Customers Manage menu, follow these steps:
1 From the Customers menu, select Manage.
2 Search for customer.
3 Click to highlight customer.
4 From the Tools, select the Customer Notes button.
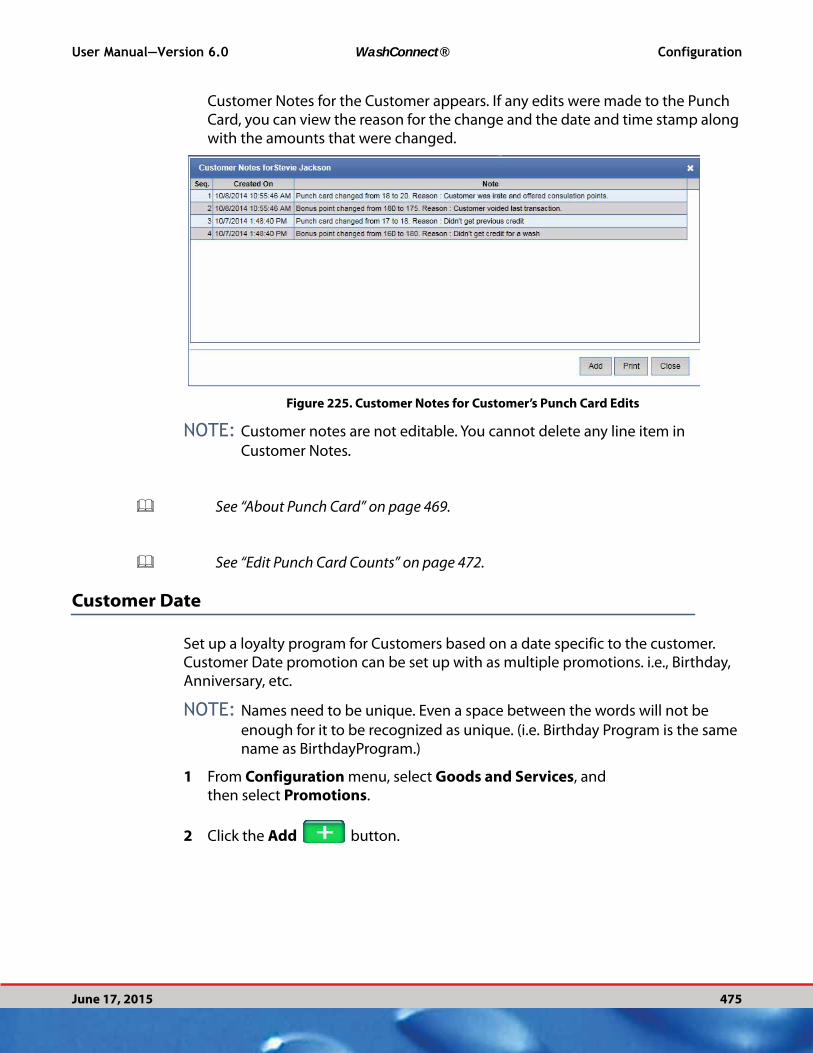
User Manual—Version 6.0 WashConnect® Configuration
June 17, 2015 475
Customer Notes for the Customer appears. If any edits were made to the Punch Card, you can view the reason for the change and the date and time stamp along with the amounts that were changed.
Figure 225. Customer Notes for Customer’s Punch Card Edits
NOTE: Customer notes are not editable. You cannot delete any line item in
Customer Notes.
See “About Punch Card” on page 469.
See “Edit Punch Card Counts” on page 472.
Customer Date
Set up a loyalty program for Customers based on a date specific to the customer. Customer Date promotion can be set up with as multiple promotions. i.e., Birthday, Anniversary, etc.
NOTE: Names need to be unique. Even a space between the words will not be
enough for it to be recognized as unique. (i.e. Birthday Program is the same name as BirthdayProgram.)
1 From Configuration menu, select Goods and Services, and then select Promotions.
2 Click the Add button.

Configuration WashConnect® User Manual—Version 6.0
476 June 17, 2015
3 In Promotion, select Customer Date..
Figure 226. Promotions Customer Date
4 In Name, type the name of the Promotion i.e., Birthday.
5 In Visit within, type a number of days (before and after the customer’s birthday or anniversary) to participate in this Promotion.
6 In and receive %, type a percentage off to give the customer if they purchase a wash within X days of their Birthday, etc.–or–
7 In dollar $ off amount, type an amount to give the customer if they purchase a wash within X days of their Birthday, etc.
8 In Media Information, select BMP Color and Fore Color if necessary.
9 From the Advanced Setup section, select all the Eligible Customers from the drop-down list of customers. Select Eligible Customers to Award.The birthday Promotion is set up in the system for the eligible customers.
NOTE: The customer’s birthday must be entered Customer Information order for
this promotion to apply.
See “Add a Customer” on page 67.

User Manual—Version 6.0 WashConnect® Configuration
June 17, 2015 477
Figure 227. Customer Information, Promotions, Birthday Example
See “About Promotions” on page 454.
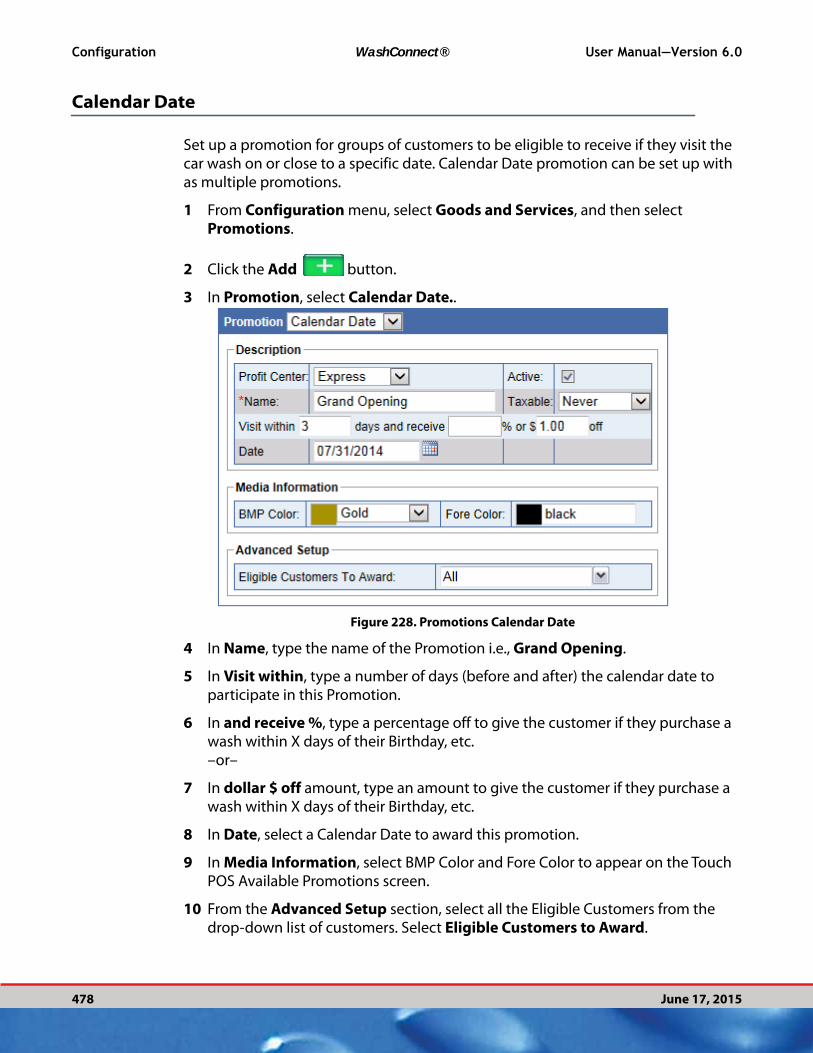
Configuration WashConnect® User Manual—Version 6.0
478 June 17, 2015
Calendar Date
Set up a promotion for groups of customers to be eligible to receive if they visit the car wash on or close to a specific date. Calendar Date promotion can be set up with as multiple promotions.
1 From Configuration menu, select Goods and Services, and then select Promotions.
2 Click the Add button.
3 In Promotion, select Calendar Date..
Figure 228. Promotions Calendar Date
4 In Name, type the name of the Promotion i.e., Grand Opening.
5 In Visit within, type a number of days (before and after) the calendar date to participate in this Promotion.
6 In and receive %, type a percentage off to give the customer if they purchase a wash within X days of their Birthday, etc.–or–
7 In dollar $ off amount, type an amount to give the customer if they purchase a wash within X days of their Birthday, etc.
8 In Date, select a Calendar Date to award this promotion.
9 In Media Information, select BMP Color and Fore Color to appear on the Touch POS Available Promotions screen.
10 From the Advanced Setup section, select all the Eligible Customers from the drop-down list of customers. Select Eligible Customers to Award.
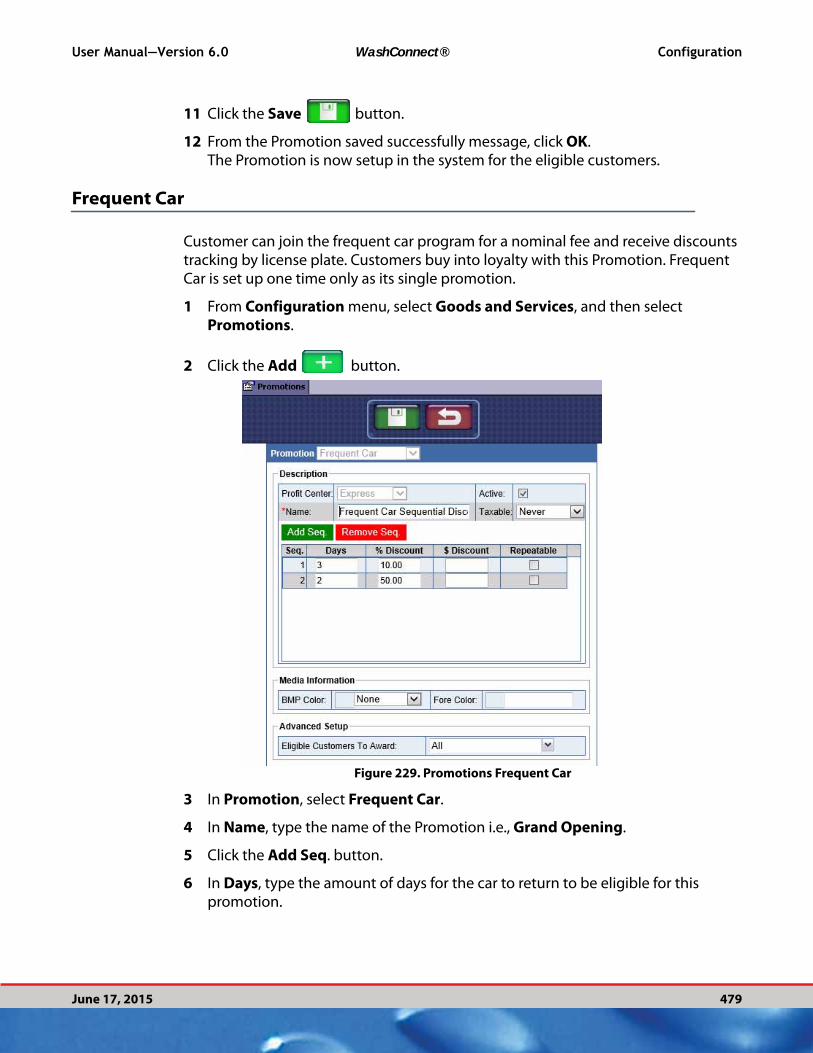
User Manual—Version 6.0 WashConnect® Configuration
June 17, 2015 479
11 Click the Save button.
12 From the Promotion saved successfully message, click OK.The Promotion is now setup in the system for the eligible customers.
Frequent Car
Customer can join the frequent car program for a nominal fee and receive discounts tracking by license plate. Customers buy into loyalty with this Promotion. Frequent Car is set up one time only as its single promotion.
1 From Configuration menu, select Goods and Services, and then select Promotions.
2 Click the Add button.
Figure 229. Promotions Frequent Car
3 In Promotion, select Frequent Car.
4 In Name, type the name of the Promotion i.e., Grand Opening.
5 Click the Add Seq. button.
6 In Days, type the amount of days for the car to return to be eligible for this promotion.
Configuration WashConnect® User Manual—Version 6.0
480 June 17, 2015
7 In and receive %, type a percentage off to give the customer if they purchase a wash within X days of their Birthday, etc.–or–
8 In dollar $ off amount, type an amount to give the customer if they purchase a wash within X days of their Birthday, etc.
9 In Repeatable, click to mark the checkbox to make this frequent car promotion available again within the X amount of days.
10 Click the Add Sequence button, if you would like to offer a second discount for the same vehicle to return within X amount of days.
11 In Media Information, select BMP Color and Fore Color to appear on the Touch POS Available Promotions screen.
12 From the Advanced Setup section, select all the Eligible Customers from the drop-down list of customers. Select Eligible Customers to Award.
13 Click the Save button.
14 From the Promotion saved successfully message, click OK.The Promotion is now setup in the POS system for the eligible customers. If customer is eligible to receive the promotion, upon finalizing sale, an Available Promotions screen appears to select which promotion customer wishes to participate.
NOTE: Only one promotion is allowed per transaction.
See “About Promotions” on page 454.
Frequent Customer
Customer can join the frequent customer program for a nominal fee and receive discounts. Customers buy into loyalty with this Promotion. Frequent Customer is set up one time only as its a single promotion.

User Manual—Version 6.0 WashConnect® Configuration
June 17, 2015 481
Figure 230. Frequent Customer Promotion
See “About Promotions” on page 454.
Discount Price List Promotion
NOTE: This promotion is for Fleet Accounts only.
This promotion must be created at Corporate and then can be assigned to selected fleet accounts through the Fleet/Accounts tab at local sites. Assign specific PLU discounts within selected Fleet Accounts.
The Promotion menu is only available at local sites to manage the Discount Price List Promotion and allow configuration of local PLUs.
Within the Discount Price List promotion, specific PLU numbers can be selected and three types of discounts can be assigned to the PLU. These include changing the actual price, granting a percentage discount, and getting a specified amount discounted off the price.
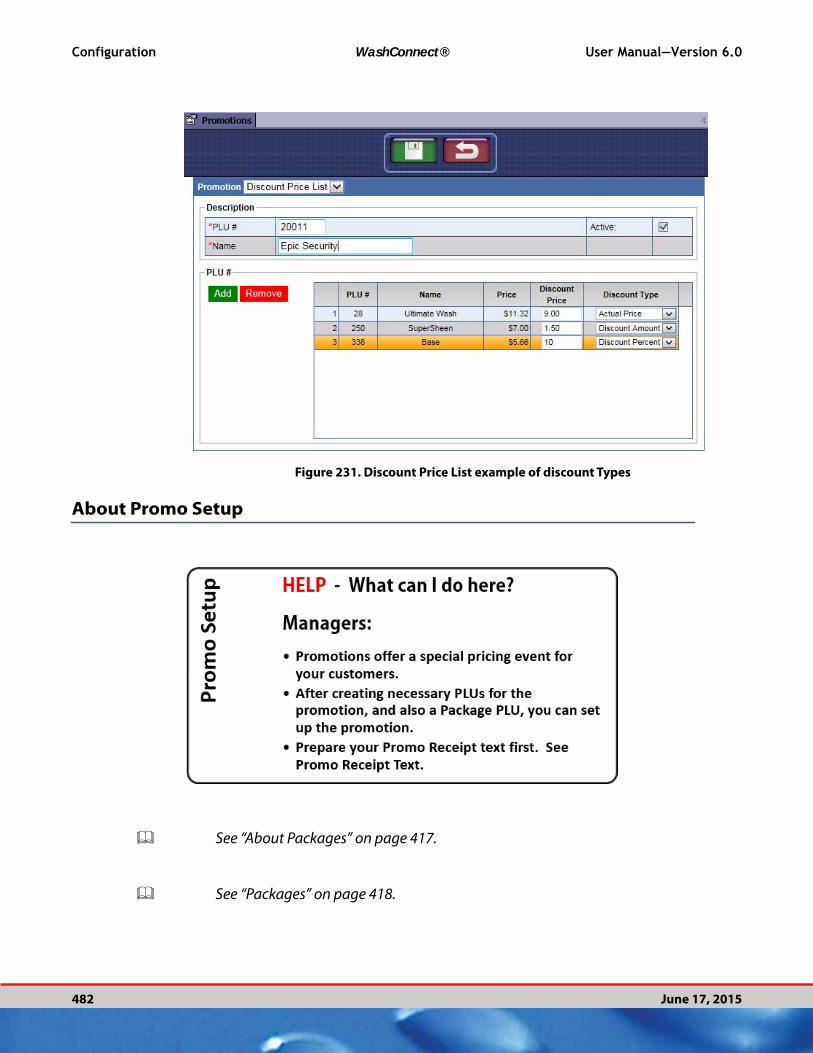
Configuration WashConnect® User Manual—Version 6.0
482 June 17, 2015
Figure 231. Discount Price List example of discount Types
About Promo Setup
See “About Packages” on page 417.
See “Packages” on page 418.
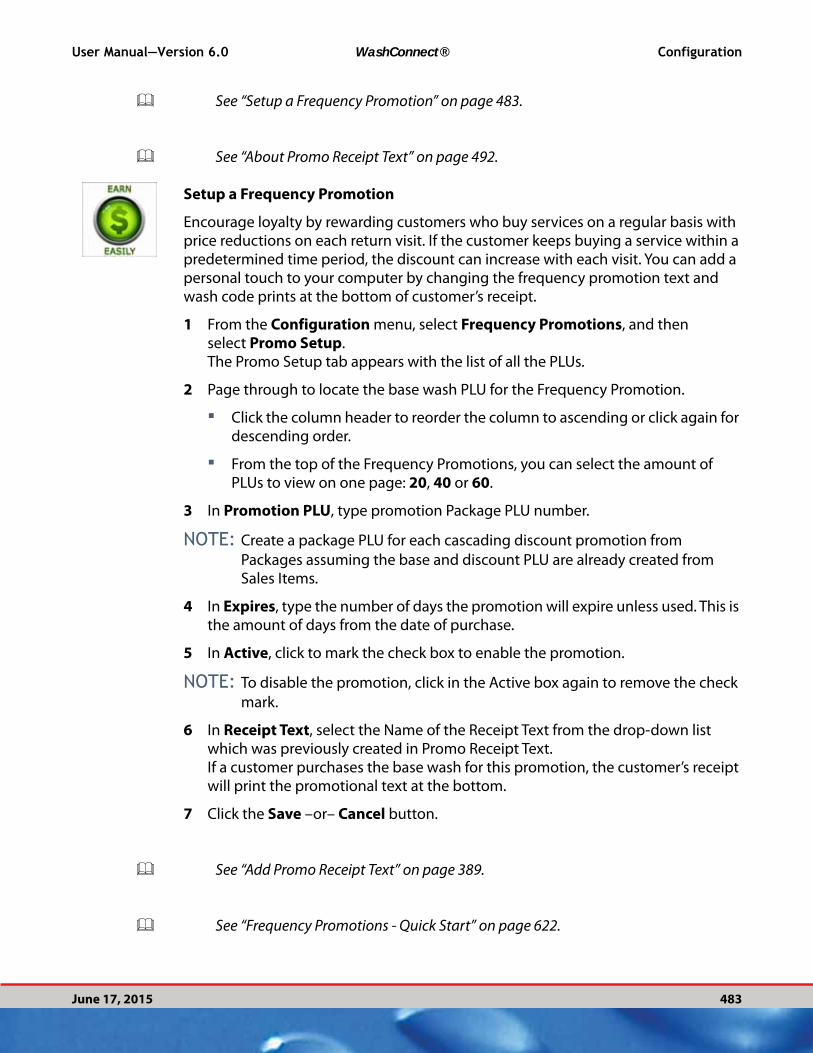
User Manual—Version 6.0 WashConnect® Configuration
June 17, 2015 483
See “Setup a Frequency Promotion” on page 483.
See “About Promo Receipt Text” on page 492.
Setup a Frequency Promotion
DeleteEncourage loyalty by rewarding customers who buy services on a regular basis with price reductions on each return visit. If the customer keeps buying a service within a predetermined time period, the discount can increase with each visit. You can add a personal touch to your computer by changing the frequency promotion text and wash code prints at the bottom of customer’s receipt.
1 From the Configuration menu, select Frequency Promotions, and then select Promo Setup.The Promo Setup tab appears with the list of all the PLUs.
2 Page through to locate the base wash PLU for the Frequency Promotion.
▪ Click the column header to reorder the column to ascending or click again for descending order.
▪ From the top of the Frequency Promotions, you can select the amount of PLUs to view on one page: 20, 40 or 60.
3 In Promotion PLU, type promotion Package PLU number.
NOTE: Create a package PLU for each cascading discount promotion from
Packages assuming the base and discount PLU are already created from Sales Items.
4 In Expires, type the number of days the promotion will expire unless used. This is the amount of days from the date of purchase.
5 In Active, click to mark the check box to enable the promotion.
NOTE: To disable the promotion, click in the Active box again to remove the check
mark.
6 In Receipt Text, select the Name of the Receipt Text from the drop-down list which was previously created in Promo Receipt Text.If a customer purchases the base wash for this promotion, the customer’s receipt will print the promotional text at the bottom.
7 Click the Save –or– Cancel button.
See “Add Promo Receipt Text” on page 389.
See “Frequency Promotions - Quick Start” on page 622.

Configuration WashConnect® User Manual—Version 6.0
484 June 17, 2015
See “About Sales Items” on page 315.
See “About Packages” on page 335.
Edit and Activate a Frequency Promotion
You can edit a Frequency Promotion from Promo Setup.
1 From the Configuration menu, select Frequency Promotions, and then select Promo Setup.
2 Locate the line with the necessary Service Name or PLU.
3 Make any necessary changes.
4 In Active, click to select the check mark.
5 Click the Save button.The edits are saved and active.
See “Disable a Frequency Promotion” on page 381.
See “Add Promo Receipt Text” on page 389.
See “Frequency Promotions - Quick Start” on page 622.
See “About Sales Items” on page 315.
See “About Packages” on page 335.
See “Setup a Frequency Promotion” on page 380.
Disable a Frequency Promotion
You can disable a Frequency Promotion.
1 From the Configuration menu, select Frequency Promotions, and then select Promo Setup.
NOTE: Click the Cancel button to undo changes and revert to saved Promo Setups.
2 Locate the line with the necessary Service Name or PLU.
3 In Active, click the check box to remove the check mark.
User Manual—Version 6.0 WashConnect® Configuration
June 17, 2015 485
4 Click the Save button.The PLU remains in the Frequency Promotion list with all the settings selected but the promotion remains disabled until you activate it.
NOTE: To remove a PLU from appearing in the Frequency Promotions list, delete
the Sales Item PLU.
See “Delete Sales Item” on page 327.
See “Disable a Frequency Promotion” on page 381.
See “Frequency Promotions - Quick Start” on page 622.
See “About Sales Items” on page 315.
See “About Packages” on page 335.
See “Add Promo Receipt Text” on page 389.
See “Setup a Frequency Promotion” on page 380.
Frequency Promotion Package
There are five menu items to complete to set up this Frequency Promotion. See the example that follows.
See “About Sales Items” on page 315.
See “Packages” on page 335.
See “Setup a Frequency Promotion” on page 380.
See “About Promo Receipt Text” on page 389.
See “Auto Sentry Main Options” on page 507.

Configuration WashConnect® User Manual—Version 6.0
486 June 17, 2015
Frequency Promotion Example
In this example, the regular price of the Base wash is $10. The customer will receive a receipt with the appropriate discount instructions printed on the bottom of their receipt along with the wash code. Receive a $1 discount if they return within a 5 day period. After the customer receives the $1 discount, encourage the customer to visit again within the next 5 days, a $2 discount will be offered. After the customer receives the $2 discount, finally offer a $3 discount to the customer if they return again within a 5 day period. After the $3 discount wash is purchased the cycle starts again.
Step #1 Sales Items
1 From the Configuration menu, select Goods & Services and then select Sales Items.
2 Add a PLU for each Discount and one for the Base Wash.
Figure 232. Sales Items Cascading Pricing Promo example
▪ PLU 106 - Base Wash. Determine which Base Wash to use for the Promotion. Royal Flush is $10.00
▪ PLU 101 - ($1 Discount) This discount is used for the first time customer returns with Wash Code receipt, discount base wash by $1.00.
▪ PLU 102 - ($2.00 Discount) This discount is used when the customer has already used the first discount and is returning for the second time, discount base wash by $2.00.
▪ PLU 103 - ($3.00 Discount) This discount is used when the customer used the 2nd discount and is returning for the third time, discount base wash by $3.00.
▪ Another Suggested Discount: You could also add a free wash. PLU 104 - ($10.00 Discount) This discount is used when the customer has already used the third discount, and is returning for the fourth and final wash, completely discount the base wash and make it free. Good Wash free discount is -$10.00.

User Manual—Version 6.0 WashConnect® Configuration
June 17, 2015 487
See “See “Flex / Retail Standard Screen” on page 329.” on page 316.
Step #2 Packages
Set up the package which includes the base wash and the discount applied.
1 For this example, the following graphic displays one of the three Packages that need to be set up for the base wash and discount.
Figure 233. Package tab for Frequency Promotion Discount
▪ It is necessary to create a package for each discount. So in this example, you would need to complete three separate package PLUs: 112, 113, and 114.

Configuration WashConnect® User Manual—Version 6.0
488 June 17, 2015
See “About Packages” on page 335.
Step #3 - Promo Receipt Text
You can add a personal touch to the Receipt for each frequency promotion.
1 Type a name for each wash receipt.
2 You can set up the ten lines of text that print at the bottom of each wash receipt.
3 Starting with your base wash, you will need to set up the promotion text to print at the bottom of each receipt. This example has 3 receipts.
Figure 234. Frequency Promotion Receipt Text example
See “About Promo Receipt Text” on page 389.

User Manual—Version 6.0 WashConnect® Configuration
June 17, 2015 489
Step #4 - Promo Setup
4 From the Frequency Promotion list, you can find all the PLUs that you created in the system. Locate the PLUs, setup the expiration of the wash code offer, activate it, select the name of the Receipt text, and click Save.
Figure 235. Promo Setup for cascading price promo example
▪ For example, in base wash PLU, select the 1st package discount PLU number, select the amount of days to Expire, select the promotional receipt text, and then Save.
After completing steps 1-4, they system is setup and now you are able to reward your repeat customers with a frequency promotion price break.
See “Setup a Frequency Promotion” on page 380.
Step #5 Allow Wash Code
After the frequency price package is set up, the last thing to confirm is that your Auto Sentry is able to accept Wash Codes.
1 From System Setup menu, select Devices and then Settings, set up the Main Options for the Auto Sentry.
2 From the Allow Code, click the drop-down list to select True.
Figure 236. Settings to allow cascading pricing discount wash codes
Configuration WashConnect® User Manual—Version 6.0
490 June 17, 2015
See “Delete Sales Item” on page 327.
See “Disable a Frequency Promotion” on page 381.
See “Frequency Promotions - Quick Start” on page 622.
See “About Sales Items” on page 315.
See “About Packages” on page 335.
See “About Promo Setup” on page 482.
See “Add Promo Receipt Text” on page 389.
See “Setup a Frequency Promotion” on page 380.
See “Auto Sentry > Main Options” on page 673.
See “About Promo Setup” on page 482.
Disable a Frequency Promotion
You can disable a Frequency Promotion.
1 From the Configuration menu, select Frequency Promotions, and then select Promo Setup.
NOTE: Click the Cancel button to undo changes and revert to saved Promo Setups.
2 Locate the line with the necessary Service Name or PLU.
3 In Active, click the check box to remove the check mark.
4 Click the Save button.The PLU remains in the Frequency Promotion list with all the settings selected but the promotion remains disabled until you activate it.
NOTE: To remove a PLU from appearing in the Frequency Promotions list, delete
the Sales Item PLU.
User Manual—Version 6.0 WashConnect® Configuration
June 17, 2015 491
See “Delete Sales Item” on page 409.
See “Disable a Frequency Promotion” on page 381.
See “Frequency Promotions - Quick Start” on page 622.
See “About Sales Items” on page 315.
See “About Packages” on page 335.
See “About Promo Setup” on page 482.
See “Add Promo Receipt Text” on page 389.
See “Setup a Frequency Promotion” on page 380.
See “Auto Sentry > Main Options” on page 673.
See “About Promo Setup” on page 482.
Frequency Promotion Package
There are five menu items to complete to set up this Frequency Promotion.
See “About Sales Items” on page 315.
See “Packages” on page 335.
See “Setup a Frequency Promotion” on page 380.
See “About Promo Receipt Text” on page 389.

Configuration WashConnect® User Manual—Version 6.0
492 June 17, 2015
See “Auto Sentry Main Options” on page 507.
About Promo Receipt Text
See “Add Promo Receipt Text” on page 492.
See “Edit Promo Receipt Text” on page 494.
See “Delete a Frequency Promotion Receipt Text” on page 495.
Add Promo Receipt Text
After setting up the promotional packages, this would be the next step. You can prepare 10 lines of text to print on the receipt for each corresponding promotional package.
1 From the Configuration menu, select Frequency Promotions menu, and then select Promo Receipt Text.The Promo Receipt Text tab appears.
2 Click the Add button.
3 In Receipt Name, type a name for the promotional receipt text.
4 In Receipt Text 1, type the first line of text up to 36 characters.
5 In Receipt Text 2, type the second line of text up to 36 characters.
6 In Receipt Text 3, type the third line of text up to 36 characters.
7 In Receipt Text 4, type the fourth line of text up to 36 characters.

User Manual—Version 6.0 WashConnect® Configuration
June 17, 2015 493
8 In Receipt Text 5, type the fifth line of text up to 36 characters.
9 In Receipt Text 6, type the sixth line of text up to 36 characters.
10 In Receipt Text 7, type the seventh line of text up to 36 characters.
11 In Receipt Text 8, type the eight line of text up to 36 characters.
12 In Receipt Text 9, type the ninth line of text up to 36 characters.
13 In Receipt Text 10, type the tenth line of text up to 36 characters.
14 Click the Save button.
Figure 237. Promo Receipt Text New Receipt Example
See “Delete Sales Item” on page 409.
See “Disable a Frequency Promotion” on page 381.
See “Frequency Promotions - Quick Start” on page 622.
See “About Sales Items” on page 315.

Configuration WashConnect® User Manual—Version 6.0
494 June 17, 2015
See “About Packages” on page 335.
See “About Promo Setup” on page 482.
See “Add Promo Receipt Text” on page 389.
See “Setup a Frequency Promotion” on page 380.
See “Auto Sentry > Main Options” on page 673.
See “About Promo Setup” on page 482.
Edit Promo Receipt Text
Search for receipt text name and edit the text.
1 From the Configuration menu, select Frequency Promotion, and then select Promo Receipt Text.The Promo Receipt Text tab appears.
2 Click the column header button to reorder the column to ascending order or click again for descending order.The arrow will appear in the column header indicating which column has been reordered and it points up for ascending and down for descending order.
3 Click to select a Promo Receipt Text name.The line is highlighted.
4 Click the Edit button.
5 Make any necessary changes.
6 Click the Save button, or the Cancel button.
See “Delete Sales Item” on page 409.
See “Disable a Frequency Promotion” on page 381.
See “Frequency Promotions - Quick Start” on page 622.
User Manual—Version 6.0 WashConnect® Configuration
June 17, 2015 495
See “About Sales Items” on page 315.
See “About Packages” on page 335.
See “About Promo Setup” on page 482.
See “Add Promo Receipt Text” on page 389.
See “Setup a Frequency Promotion” on page 380.
See “Auto Sentry > Main Options” on page 673.
See “About Promo Setup” on page 482.
Delete a Frequency Promotion Receipt Text
To delete the promo text, first you need to remove the text name from the Promo Setup.
1 From the Configuration menu, select Frequency Promotions menu, select Promo Receipt Text.The Promo Receipt Text tab appears.
2 Click to select the Frequency Promotion Receipt text.The Frequency Promotion Receipt Text is highlighted.
3 Click the Delete button.The message Receipt Text Successfully Deleted appears.–or–Message appears that the text is already in use by a frequency promotion.
▪ From the Promo Setup tab, deselect the Receipt Text name from drop-down list, and then Go back to step 2.
ee “Delete Sales Item” on page 327.
See “Disable a Frequency Promotion” on page 381.
See “Frequency Promotions - Quick Start” on page 622.

Configuration WashConnect® User Manual—Version 6.0
496 June 17, 2015
See “About Sales Items” on page 315.
See “About Packages” on page 335.
See “About Promo Setup” on page 482.
See “Add Promo Receipt Text” on page 389.
See “Setup a Frequency Promotion” on page 380.
See “Auto Sentry > Main Options” on page 673.
See “About Promo Setup” on page 482.
About Alerts
See “Subscribe to Email Alerts” on page 497.
See “Alert Configuration Example” on page 499.
See “Test Alerts” on page 498.
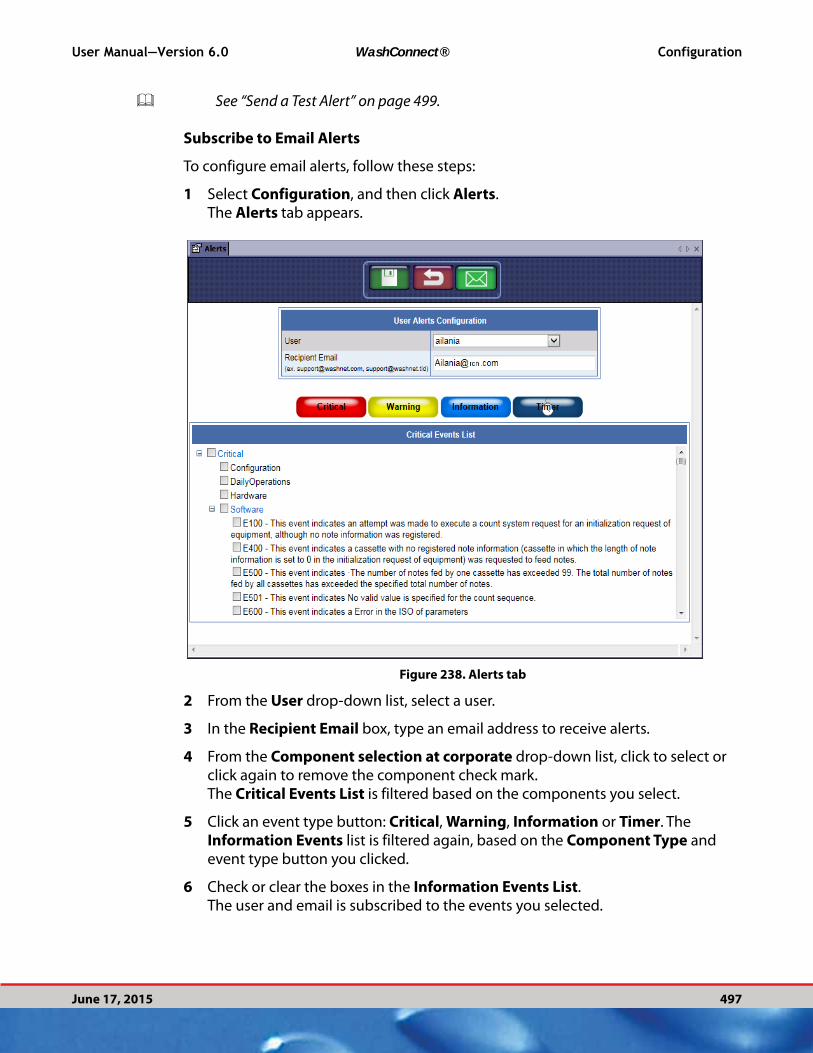
User Manual—Version 6.0 WashConnect® Configuration
June 17, 2015 497
See “Send a Test Alert” on page 499.
Subscribe to Email Alerts
To configure email alerts, follow these steps:
1 Select Configuration, and then click Alerts. The Alerts tab appears.
Figure 238. Alerts tab
2 From the User drop-down list, select a user.
3 In the Recipient Email box, type an email address to receive alerts.
4 From the Component selection at corporate drop-down list, click to select or click again to remove the component check mark. The Critical Events List is filtered based on the components you select.
5 Click an event type button: Critical, Warning, Information or Timer. The Information Events list is filtered again, based on the Component Type and event type button you clicked.
6 Check or clear the boxes in the Information Events List. The user and email is subscribed to the events you selected.
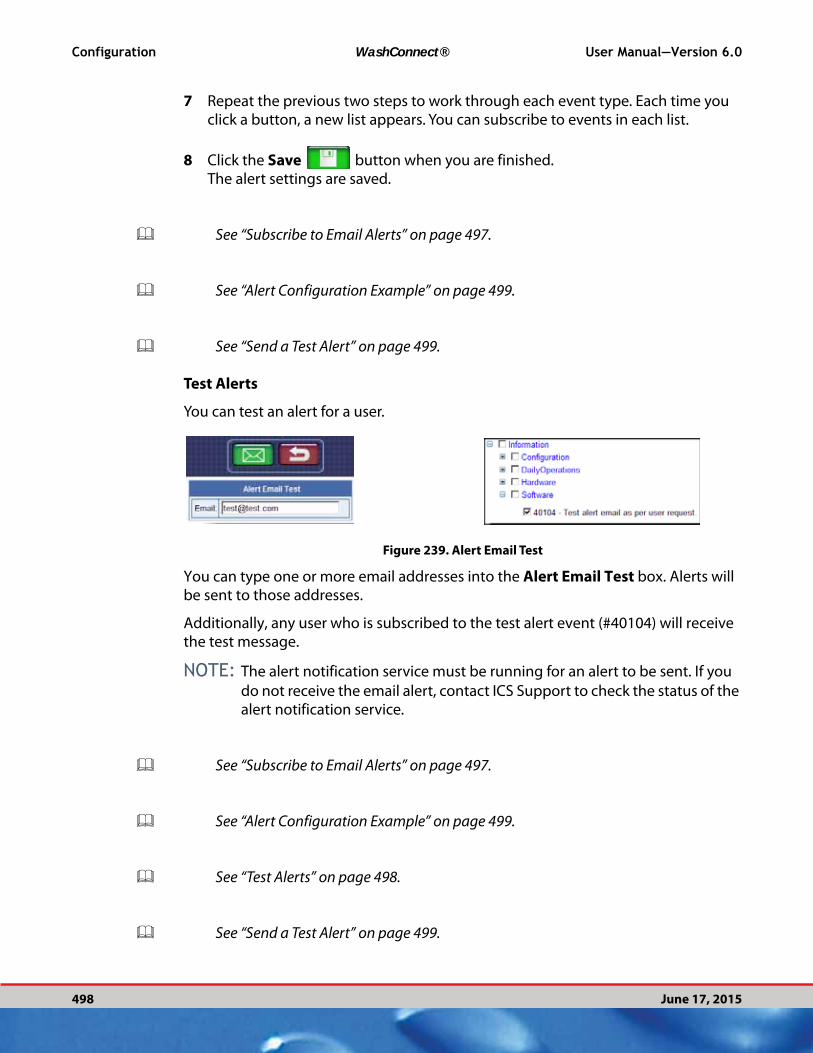
Configuration WashConnect® User Manual—Version 6.0
498 June 17, 2015
7 Repeat the previous two steps to work through each event type. Each time you click a button, a new list appears. You can subscribe to events in each list.
8 Click the Save button when you are finished. The alert settings are saved.
See “Subscribe to Email Alerts” on page 497.
See “Alert Configuration Example” on page 499.
See “Send a Test Alert” on page 499.
Test Alerts
You can test an alert for a user.
Figure 239. Alert Email Test
You can type one or more email addresses into the Alert Email Test box. Alerts will be sent to those addresses.
Additionally, any user who is subscribed to the test alert event (#40104) will receive the test message.
NOTE: The alert notification service must be running for an alert to be sent. If you
do not receive the email alert, contact ICS Support to check the status of the alert notification service.
See “Subscribe to Email Alerts” on page 497.
See “Alert Configuration Example” on page 499.
See “Test Alerts” on page 498.
See “Send a Test Alert” on page 499.
User Manual—Version 6.0 WashConnect® Configuration
June 17, 2015 499
Send a Test Alert
1 From the Configuration menu, click Alerts. The Alerts tab appears.
2 Click the Test Alert Email button. The Alert Email Test dialog box appears.
3 In the Alert Email Test box, type an email address, and then click the Send Email
button. The email is sent to the address. The email is also sent to any user who subscribes to the test alert event #40104.
Alert Configuration Example
When configuring alerts, filter the list first, and then select alerts.
For example:
To add a club service, follow these steps:
1 Open WashConnect.
2 In Region, select Corporate, and then Login.
3 From the Configuration menu, click Alerts. The Alerts tab appears.
4 In Component selection at corporate box, select Bill Acceptor.
NOTE: This command will only appear for users who logon at the Corporate level.
5 Click the Critical button.This will filter the list of available alerts to show only critical alerts pertaining to the bill acceptor.
6 Check and clear the boxes to subscribe to specific ones.
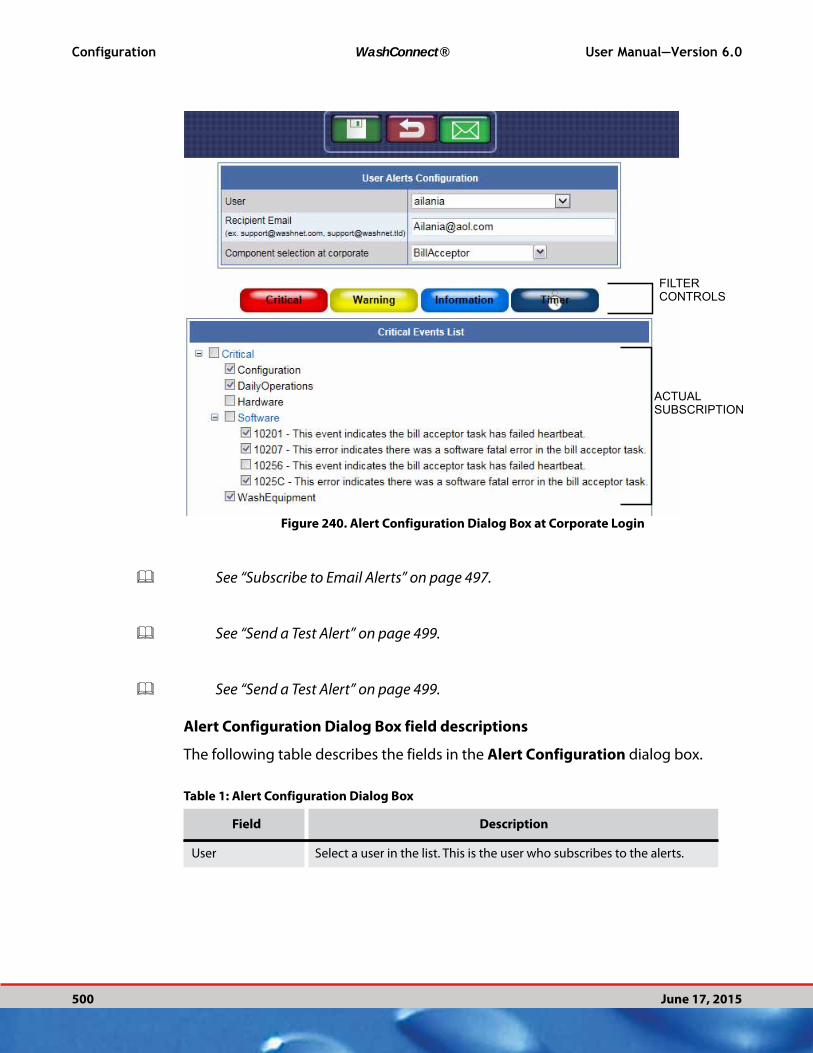
FILTERCONTROLS
ACTUALSUBSCRIPTION
Configuration WashConnect® User Manual—Version 6.0
500 June 17, 2015
Figure 240. Alert Configuration Dialog Box at Corporate Login
See “Subscribe to Email Alerts” on page 497.
See “Send a Test Alert” on page 499.
See “Send a Test Alert” on page 499.
Alert Configuration Dialog Box field descriptions
The following table describes the fields in the Alert Configuration dialog box.
Table 1: Alert Configuration Dialog Box
Field Description
User Select a user in the list. This is the user who subscribes to the alerts.
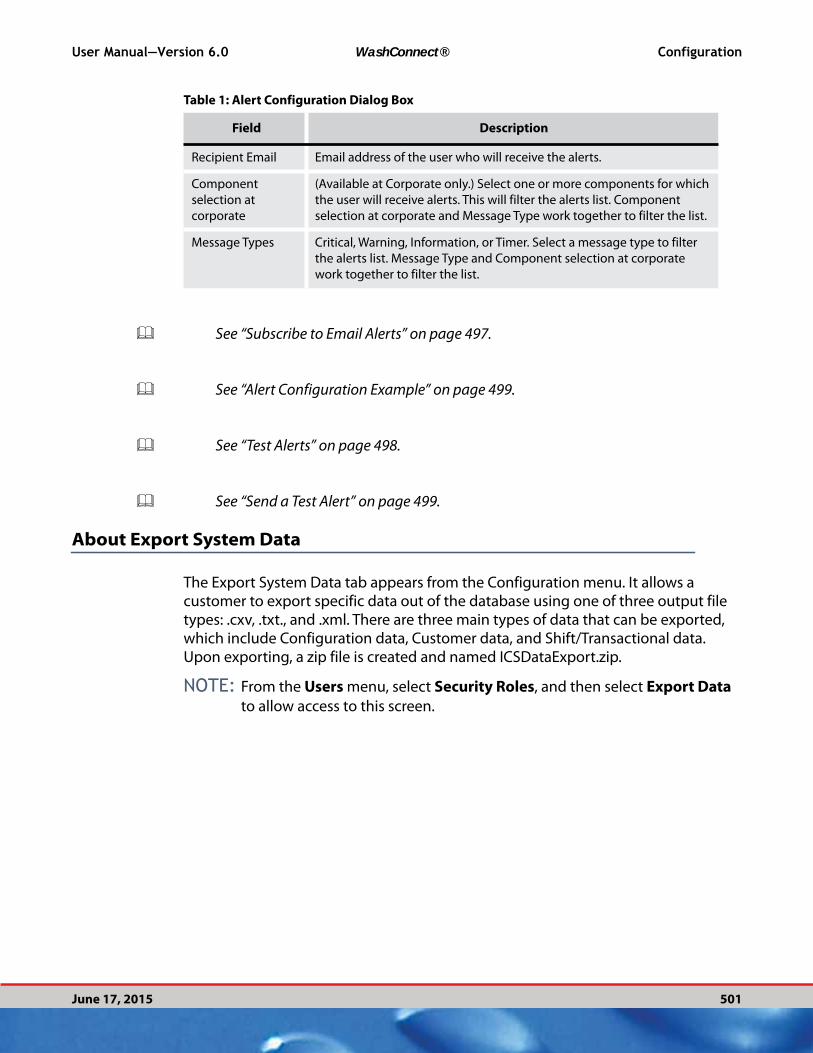
User Manual—Version 6.0 WashConnect® Configuration
June 17, 2015 501
See “Subscribe to Email Alerts” on page 497.
See “Alert Configuration Example” on page 499.
See “Test Alerts” on page 498.
See “Send a Test Alert” on page 499.
About Export System Data
The Export System Data tab appears from the Configuration menu. It allows a customer to export specific data out of the database using one of three output file types: .cxv, .txt., and .xml. There are three main types of data that can be exported, which include Configuration data, Customer data, and Shift/Transactional data. Upon exporting, a zip file is created and named ICSDataExport.zip.
NOTE: From the Users menu, select Security Roles, and then select Export Data
to allow access to this screen.
Recipient Email Email address of the user who will receive the alerts.
Component
selection at
corporate
(Available at Corporate only.) Select one or more components for which
the user will receive alerts. This will filter the alerts list. Component
selection at corporate and Message Type work together to filter the list.
Message Types Critical, Warning, Information, or Timer. Select a message type to filter
the alerts list. Message Type and Component selection at corporate
work together to filter the list.
Table 1: Alert Configuration Dialog Box
Field Description
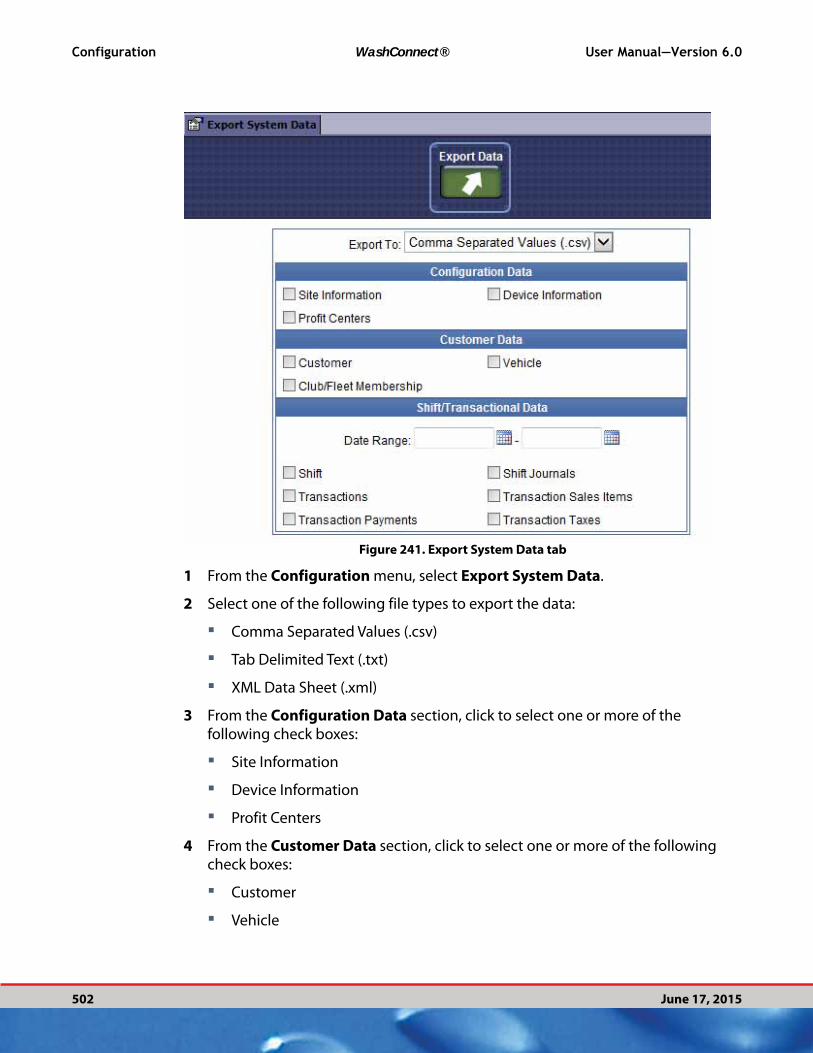
Configuration WashConnect® User Manual—Version 6.0
502 June 17, 2015
Figure 241. Export System Data tab
1 From the Configuration menu, select Export System Data.
2 Select one of the following file types to export the data:
▪ Comma Separated Values (.csv)
▪ Tab Delimited Text (.txt)
▪ XML Data Sheet (.xml)
3 From the Configuration Data section, click to select one or more of the following check boxes:
▪ Site Information
▪ Device Information
▪ Profit Centers
4 From the Customer Data section, click to select one or more of the following check boxes:
▪ Customer
▪ Vehicle
User Manual—Version 6.0 WashConnect® Configuration
June 17, 2015 503
▪ Club/Fleet Membership
5 From the Shift/Transactional Data section, select a date range.
6 From the Shift/Transactional Data section, click to select one or more of the following check boxes:
▪ Shift
▪ Shift Journals
▪ Transactions
▪ Transaction Sales Items
▪ Transaction Payments
▪ Transaction Taxes
7 Click to select the Export Data button.
8 From the File Download dialog box, click Open to view the data, Save to save the data file, or Cancel.Upon exporting, a zip file is created and named ICSDataExport.zip.
See “About Reports” on page 61.
See “Subscribe to Email Alerts” on page 392.
About the Accounting Interface
From the site level, you can manage your accounts from the Accounting Interface.
See “About Payment Account” on page 509.
Accounting Interface has four sections available at Corporate:
Manage (Site Login)
Import Accounts (Corporate Login)
Payment Account (Corporate Login)
System Items (Corporate Login)
From Import Accounts, you can import your pre-existing Chart of Accounts. Chart of Accounts is a list of expense and sales categories that are defined to calculate the profit and loss of a business.

Configuration WashConnect® User Manual—Version 6.0
504 June 17, 2015
See “About Import Accounts” on page 507.
See “About Payment Account” on page 509.
See “About System Items” on page 511.
About Manage Accounts
See “Add an Account” on page 504.
See “Terminate an Account” on page 505.
See “Reactivate an Account” on page 506.
Add an Account
To assign an account number and name, follow these steps:
1 From the Configuration menu, select Accounting Interface, and then click Manage.
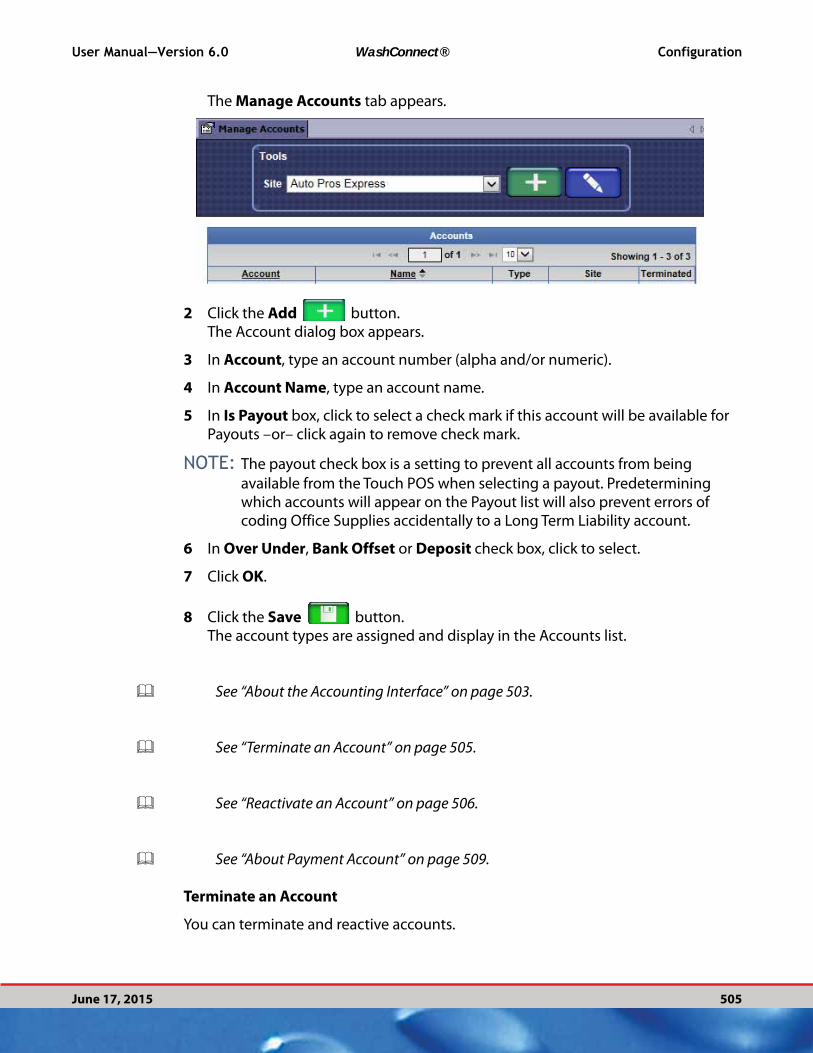
User Manual—Version 6.0 WashConnect® Configuration
June 17, 2015 505
The Manage Accounts tab appears.
2 Click the Add button.The Account dialog box appears.
3 In Account, type an account number (alpha and/or numeric).
4 In Account Name, type an account name.
5 In Is Payout box, click to select a check mark if this account will be available for Payouts –or– click again to remove check mark.
NOTE: The payout check box is a setting to prevent all accounts from being
available from the Touch POS when selecting a payout. Predetermining which accounts will appear on the Payout list will also prevent errors of coding Office Supplies accidentally to a Long Term Liability account.
6 In Over Under, Bank Offset or Deposit check box, click to select.
7 Click OK.
8 Click the Save button. The account types are assigned and display in the Accounts list.
See “About the Accounting Interface” on page 503.
See “Terminate an Account” on page 505.
See “Reactivate an Account” on page 506.
See “About Payment Account” on page 509.
Terminate an Account
You can terminate and reactive accounts.
Configuration WashConnect® User Manual—Version 6.0
506 June 17, 2015
1 From the Configuration menu, select Accounting Interface, and then click Manage. The Manage Accounts tab appears.
2 From the Accounts list, click to select an account.The selected Account is highlighted.
3 Click the Terminate button.The Confirm message Are you sure you want to terminate selected Account appears.
4 Click Yes (or No).The Information message Account is disabled successfully appears.
5 Click OK.
See “About the Accounting Interface” on page 503.
See “Add an Account” on page 504.
See “Reactivate an Account” on page 506.
See “About Payment Account” on page 509.
Reactivate an Account
If an account has been terminated, you can reactivate it.
1 From the Configuration menu, select Accounting Interface, and then select Manage. The Manage tab appears.
2 Click the Delete button.The Confirm message Are you sure you want to terminate selected Account appears.
3 Click to select the necessary Account.
4 Click the Reactivate button.The Confirm message Are you sure you want to make the Terminated account to Active appears.
5 Click Yes (or No).The Information message Account is enabled successfully appears.

User Manual—Version 6.0 WashConnect® Configuration
June 17, 2015 507
6 Click OK.
See “Terminate an Account” on page 505.
See “Add an Account” on page 504.
See “About the Accounting Interface” on page 503.
See “About Payment Account” on page 509.
About Import Accounts
You can define which account to post a particular sales or expense item. Quickbooks, Peachtree, MAS-90, Alere, and ProfData are different accounting package interfaces which allow for the importing of a pre-existing Chart of Accounts. Import the Chart
of Accounts to the WashConnect® system so that sales and expense items can be quickly posted into the accounting package.
WARNING: Your Accounting software must be installed, such as Peachtree, MAS 90, or Quickbooks. If not, the import function will fail.
See “Import Chart of Accounts” on page 507.
See “About Payment Account” on page 509.
See “About Payment Account” on page 509.
See “About System Items” on page 403.
Chart of Accounts is a list of expense and sales categories that are defined in order to calculate the profit and loss of a business.
Import Chart of Accounts
To import company’s accounts, follow these steps:
WARNING: Your Accounting software must be installed, such as Peachtree, MAS 90, or Quickbooks. If not, the import function will fail.
Configuration WashConnect® User Manual—Version 6.0
508 June 17, 2015
1 Login to WashConnect® at Corporate.
2 From the System Setup menu, select Accounting Interface, and then select Import Accounts.The Import Accounts tab appears.
3 In Accounting Type, select one of the following:
▪ MAS90
4 In Accounts File, click the browse button and select a tab separated accounts file.Example default location: c:\ProgramFiles\Sage\PeachTree\Company.The company list is loaded.The company’s accounts information is imported.Once the chart of accounts has been imported, identify which accounts the Account for the ReWash and Free Wash, Sales Tax, and even over/short dollars for the day.Example: Management may want all of the Free Washes or ReWashes to go into a discount account or they may go against a sales account. It will depend on how the Chart of Accounts is setup in the accounting package.
See “About Payment Account” on page 509.
See “About Payment Account” on page 509.
See “About System Items” on page 403.
See “About Import Accounts” on page 507.
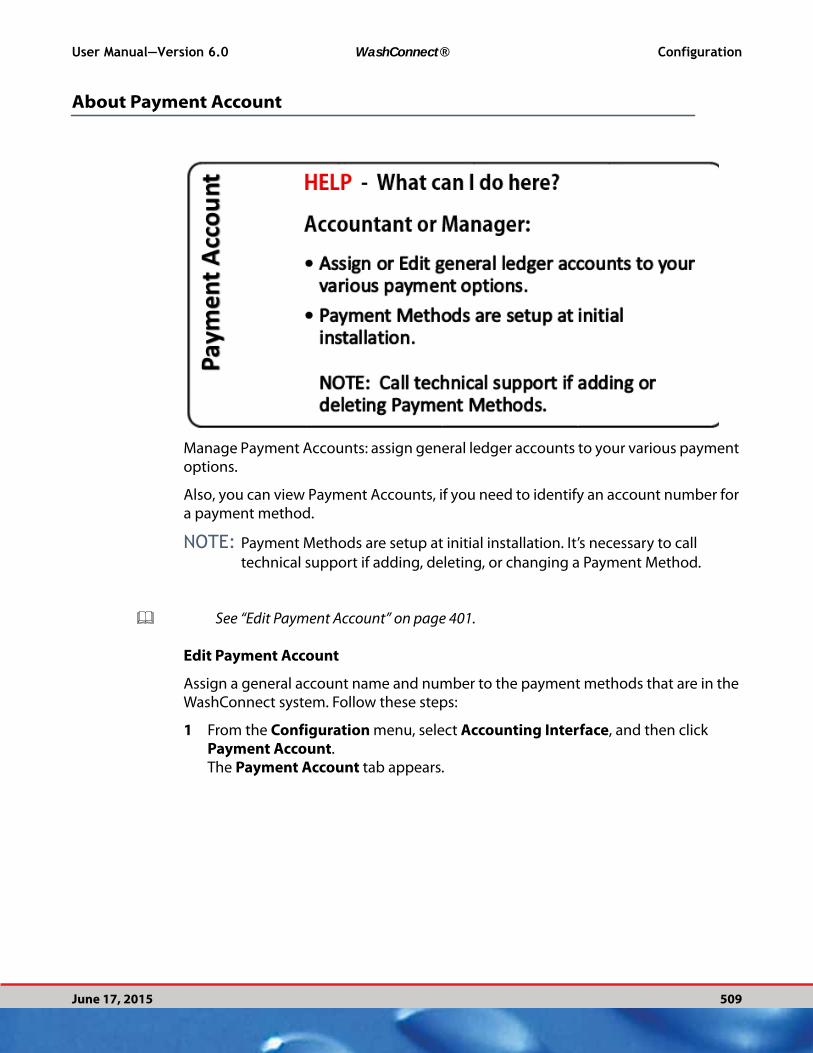
User Manual—Version 6.0 WashConnect® Configuration
June 17, 2015 509
About Payment Account
Manage Payment Accounts: assign general ledger accounts to your various payment options.
Also, you can view Payment Accounts, if you need to identify an account number for a payment method.
NOTE: Payment Methods are setup at initial installation. It’s necessary to call
technical support if adding, deleting, or changing a Payment Method.
See “Edit Payment Account” on page 401.
Edit Payment Account
Assign a general account name and number to the payment methods that are in the WashConnect system. Follow these steps:
1 From the Configuration menu, select Accounting Interface, and then click Payment Account. The Payment Account tab appears.

Configuration WashConnect® User Manual—Version 6.0
510 June 17, 2015
Figure 242. Accounting Interface Payment Account
2 In Site drop-down box, select All Sites or the individual Site.
3 From the Payment Method list, click to select a payment method.
4 Click the Edit button.The Payment Type dialog box appears.
5 In Account, click to select a general ledger account from the drop-down list.
6 Click the Save button.The message Payment Type saved successfully appears.
7 Click OK.The Payment general ledger account is now assigned.
See “About the Accounting Interface” on page 503.
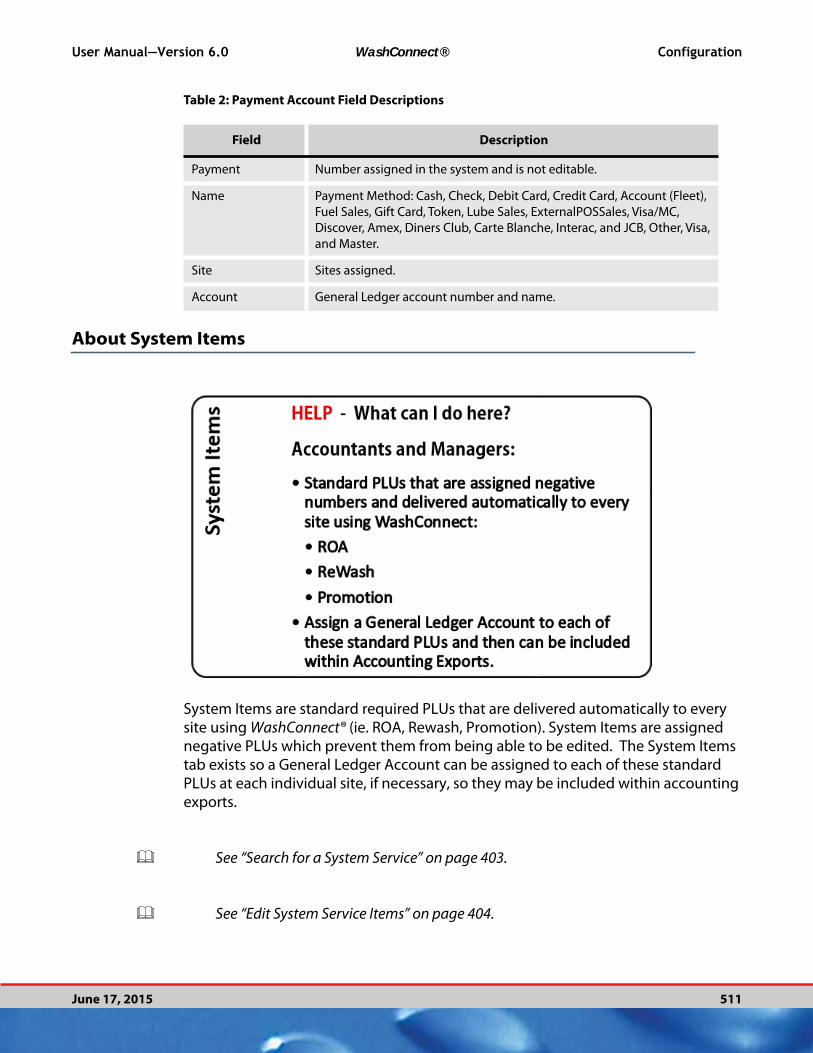
User Manual—Version 6.0 WashConnect® Configuration
June 17, 2015 511
Table 2:
Field Description
Payment Number assigned in the system and is not editable.
Name Payment Method: Cash, Check, Debit Card, Credit Card, Account (Fleet),
Fuel Sales, Gift Card, Token, Lube Sales, ExternalPOSSales, Visa/MC,
Discover, Amex, Diners Club, Carte Blanche, Interac, and JCB, Other, Visa,
and Master.
Site Sites assigned.
Account General Ledger account number and name.
Payment Account Field Descriptions
About System Items
System Items are standard required PLUs that are delivered automatically to every site using WashConnect® (ie. ROA, Rewash, Promotion). System Items are assigned negative PLUs which prevent them from being able to be edited. The System Items tab exists so a General Ledger Account can be assigned to each of these standard PLUs at each individual site, if necessary, so they may be included within accounting exports.
See “Search for a System Service” on page 403.
See “Edit System Service Items” on page 404.
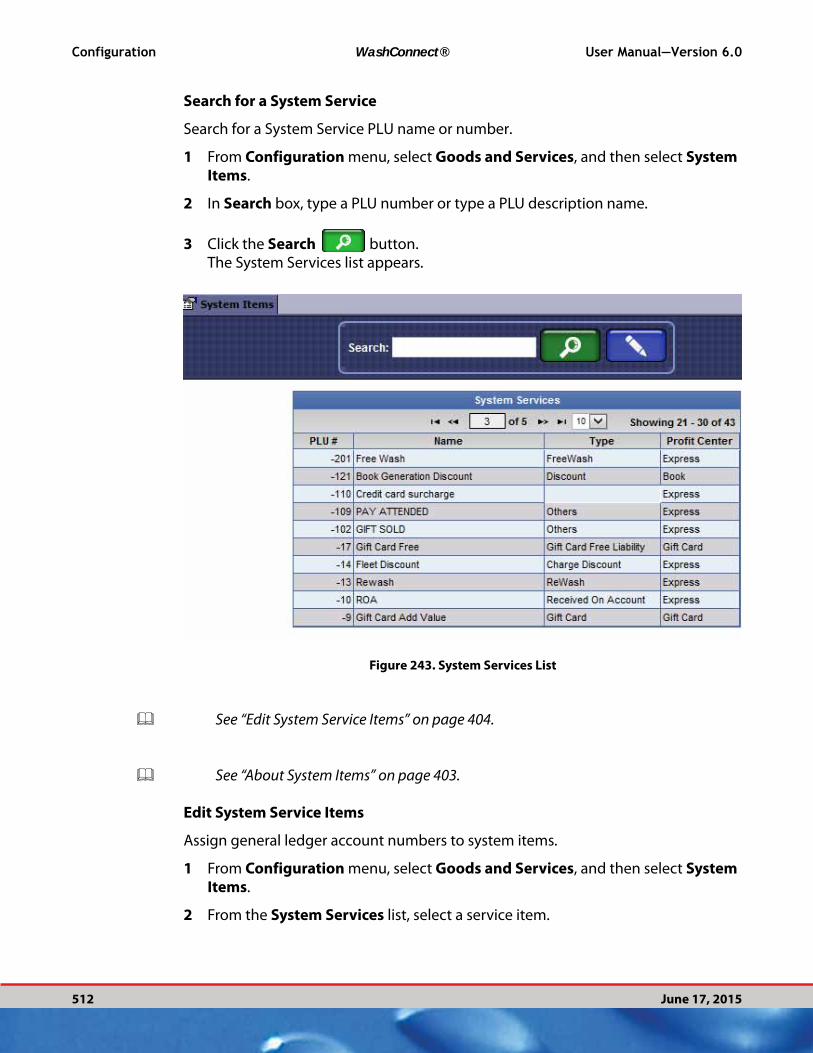
Configuration WashConnect® User Manual—Version 6.0
512 June 17, 2015
Search for a System Service
Search for a System Service PLU name or number.
1 From Configuration menu, select Goods and Services, and then select System Items.
2 In Search box, type a PLU number or type a PLU description name.
3 Click the Search button.The System Services list appears.
Figure 243. System Services List
See “Edit System Service Items” on page 404.
See “About System Items” on page 403.
Edit System Service Items
Assign general ledger account numbers to system items.
1 From Configuration menu, select Goods and Services, and then select System Items.
2 From the System Services list, select a service item.
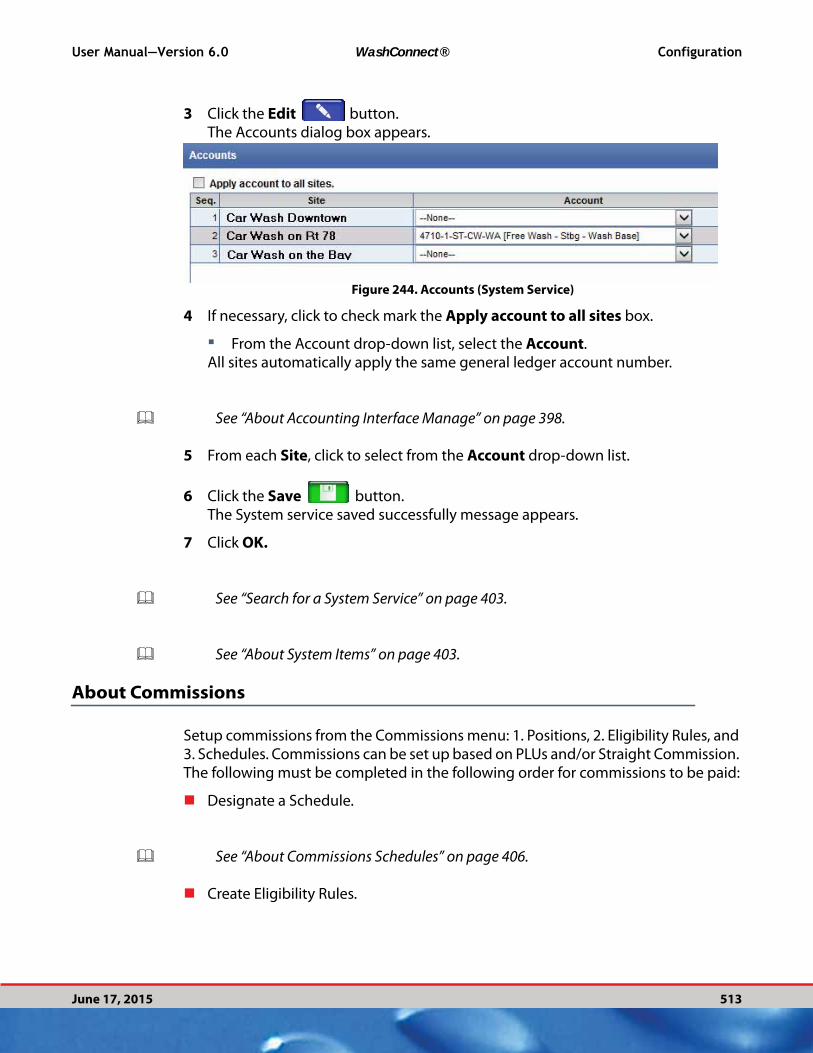
User Manual—Version 6.0 WashConnect® Configuration
June 17, 2015 513
3 Click the Edit button.The Accounts dialog box appears.
Figure 244. Accounts (System Service)
4 If necessary, click to check mark the Apply account to all sites box.
▪ From the Account drop-down list, select the Account.All sites automatically apply the same general ledger account number.
See “About Accounting Interface Manage” on page 398.
5 From each Site, click to select from the Account drop-down list.
6 Click the Save button.The System service saved successfully message appears.
7 Click OK.
See “Search for a System Service” on page 403.
See “About System Items” on page 403.
About Commissions
Setup commissions from the Commissions menu: 1. Positions, 2. Eligibility Rules, and 3. Schedules. Commissions can be set up based on PLUs and/or Straight Commission. The following must be completed in the following order for commissions to be paid:
Designate a Schedule.
See “About Commissions Schedules” on page 406.
Create Eligibility Rules.
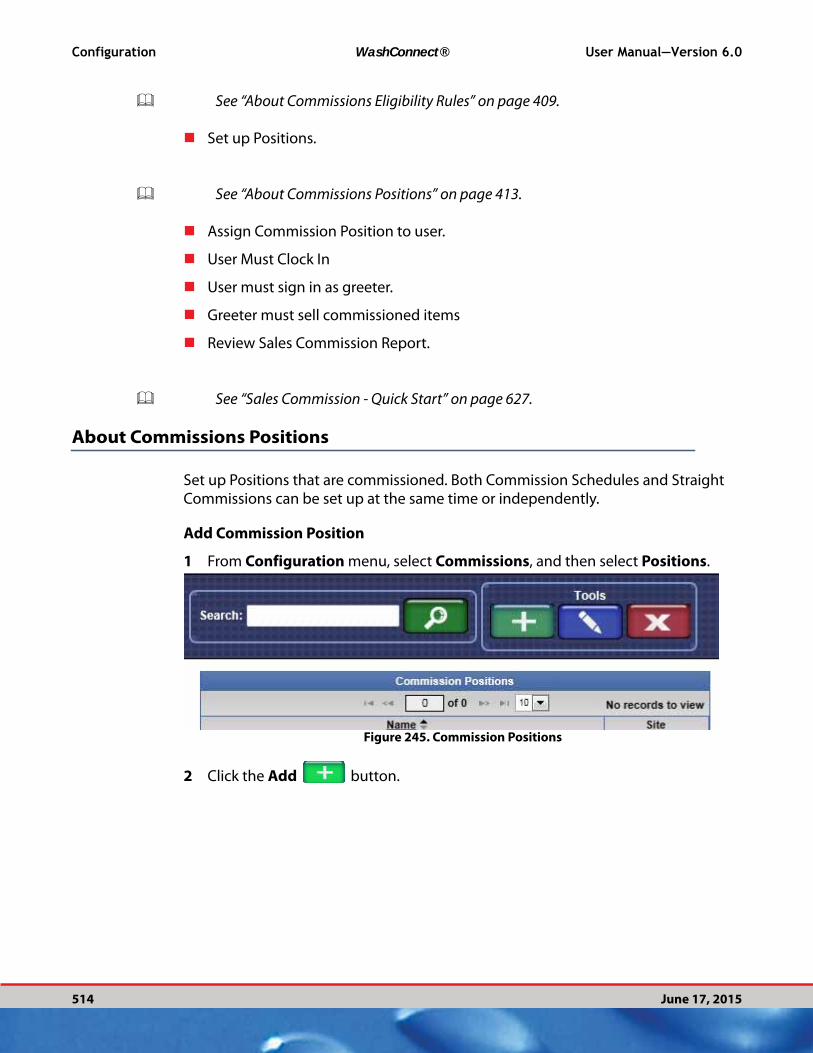
Configuration WashConnect® User Manual—Version 6.0
514 June 17, 2015
See “About Commissions Eligibility Rules” on page 409.
Set up Positions.
See “About Commissions Positions” on page 413.
Assign Commission Position to user.
User Must Clock In
User must sign in as greeter.
Greeter must sell commissioned items
Review Sales Commission Report.
See “Sales Commission - Quick Start” on page 627.
About Commissions Positions
Set up Positions that are commissioned. Both Commission Schedules and Straight Commissions can be set up at the same time or independently.
Add Commission Position
1 From Configuration menu, select Commissions, and then select Positions.
Figure 245. Commission Positions
2 Click the Add button.

User Manual—Version 6.0 WashConnect® Configuration
June 17, 2015 515
Figure 246. Commission Position
3 In Name, type a name for the Commission Position. (This can be a different name or the same Name that you used for Schedules and Eligibility Rules.)
Commission Schedule
Next, set up a Commission Schedule and Eligibility Rule for Commission Position.
4 Click the Add Entry button.A new Commission Schedule line appears.
5 In Schedule drop-down box, select a Schedule previously set up.
See “About Commissions Schedules” on page 406.
6 In Eligibility Rule drop-down box, select an Eligibility Rule previously set up.
See “About Commissions Eligibility Rules” on page 409.
7 Click the Save button.
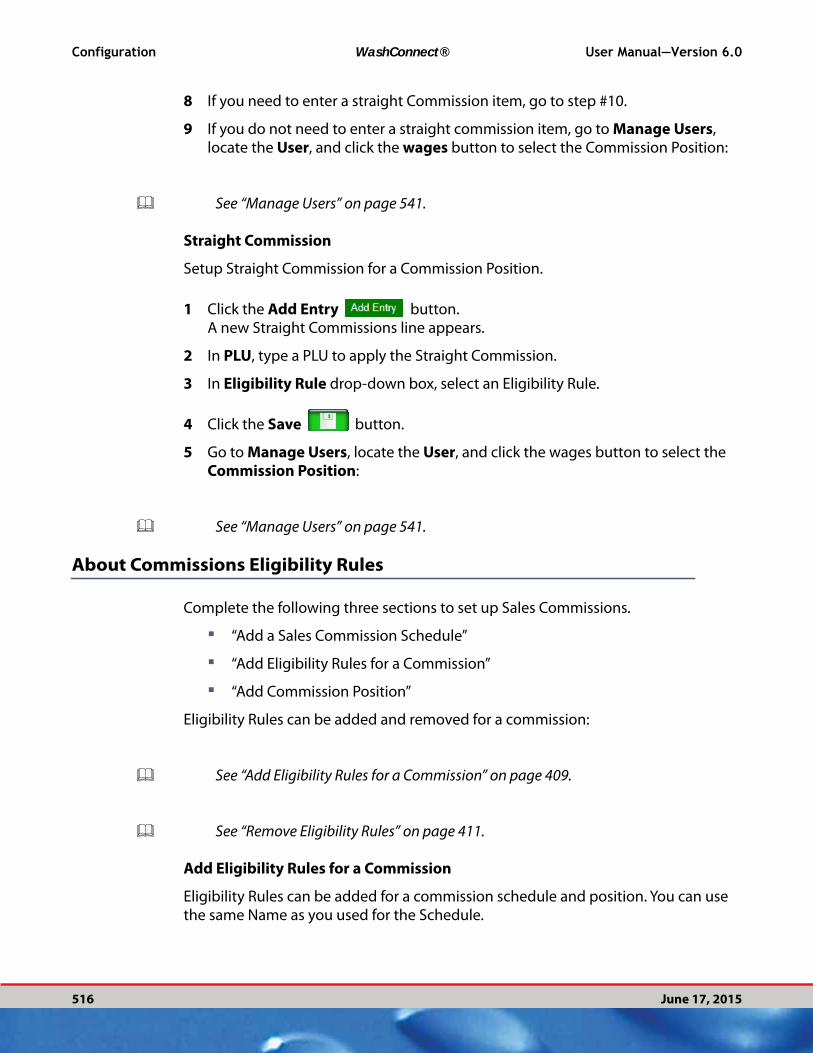
Configuration WashConnect® User Manual—Version 6.0
516 June 17, 2015
8 If you need to enter a straight Commission item, go to step #10.
9 If you do not need to enter a straight commission item, go to Manage Users, locate the User, and click the wages button to select the Commission Position:
See “Manage Users” on page 541.
Straight Commission
Setup Straight Commission for a Commission Position.
1 Click the Add Entry button.A new Straight Commissions line appears.
2 In PLU, type a PLU to apply the Straight Commission.
3 In Eligibility Rule drop-down box, select an Eligibility Rule.
4 Click the Save button.
5 Go to Manage Users, locate the User, and click the wages button to select the Commission Position:
See “Manage Users” on page 541.
About Commissions Eligibility Rules
Complete the following three sections to set up Sales Commissions.
▪ “Add a Sales Commission Schedule”
▪ “Add Eligibility Rules for a Commission”
▪ “Add Commission Position”
Eligibility Rules can be added and removed for a commission:
See “Add Eligibility Rules for a Commission” on page 409.
See “Remove Eligibility Rules” on page 411.
Add Eligibility Rules for a Commission
Eligibility Rules can be added for a commission schedule and position. You can use the same Name as you used for the Schedule.

User Manual—Version 6.0 WashConnect® Configuration
June 17, 2015 517
1 From Configuration menu, select Commissions, and then select Eligibility Rules.
Figure 247. Commission Eligibility Rules
2 Click the Add button.
3 In Name, type a name for the schedule. (This can be the same or different name that you used for Schedules and Positions.)
4 In Profit Centers drop-down box, select one or more profit centers.
5 Click the Add Entry button.
6 From Base Field drop-down box, select a field that commissions will be based on.
▪ Cars Sold - The total number of cars sold with any kind of service.
▪ Sales per Car - Total Dollars per car within the selected profit center.
▪ Cars Buying Extras - Relates to the physical number of cars, which have purchased and extra service.
▪ Extras Sales - The total amount of dollars in extra service sales.
▪ Extra Sales per Car - The total number of dollars in extra services sales divided by the total number of cars processed.
▪ % Extra Sales - The percentage of sales dollars as it is compared to total sales dollars within the selected profit center.
▪ % Buying Extras - Relates to the percentage of Cars which have purchased extra service. PLUs or services which contain an amount entered into the Extra Service field in the service table.
7 In Operator drop-down box, select one of the following:
▪ = (equals)
▪ ≠ (does not equal)
▪ < (less than)
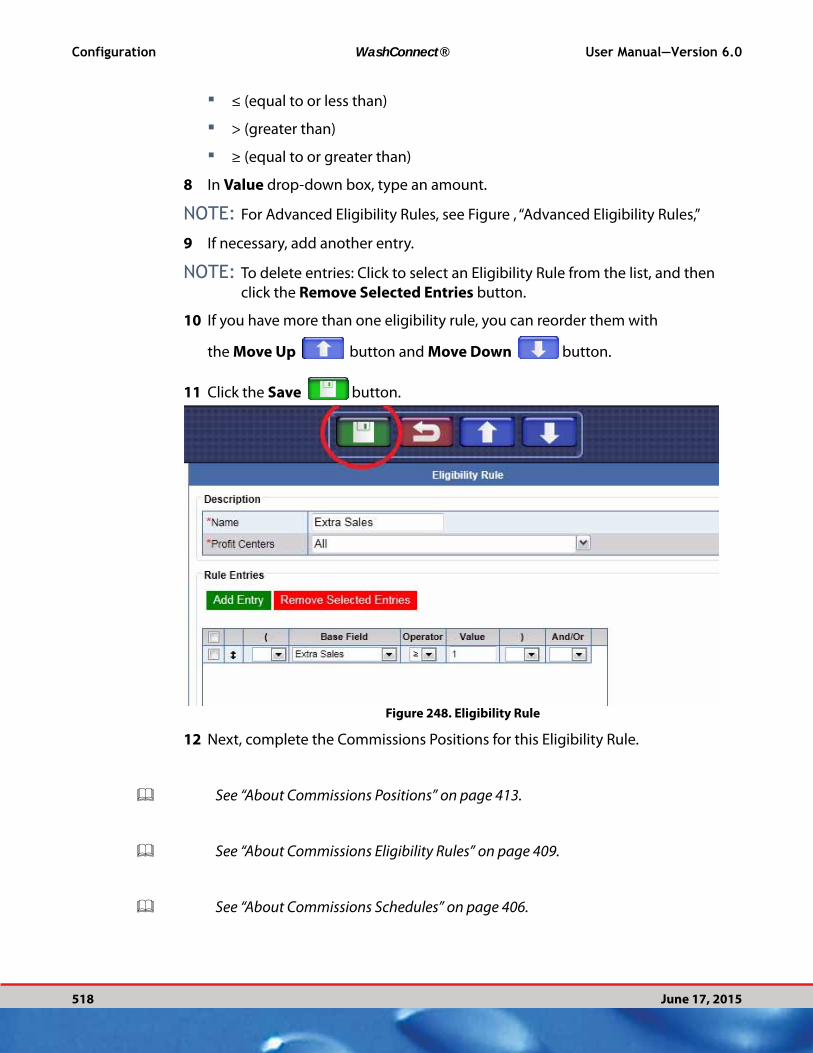
Configuration WashConnect® User Manual—Version 6.0
518 June 17, 2015
▪ ≤ (equal to or less than)
▪ > (greater than)
▪ ≥ (equal to or greater than)
8 In Value drop-down box, type an amount.
NOTE: For Advanced Eligibility Rules, see Figure , “Advanced Eligibility Rules,”
9 If necessary, add another entry.
NOTE: To delete entries: Click to select an Eligibility Rule from the list, and then
click the Remove Selected Entries button.
10 If you have more than one eligibility rule, you can reorder them with
the Move Up button and Move Down button.
11 Click the Save button.
Figure 248. Eligibility Rule
12 Next, complete the Commissions Positions for this Eligibility Rule.
See “About Commissions Positions” on page 413.
See “About Commissions Eligibility Rules” on page 409.
See “About Commissions Schedules” on page 406.
User Manual—Version 6.0 WashConnect® Configuration
June 17, 2015 519
Remove Eligibility Rules
Eligibility Rules can be removed for a commission schedule and position.
TipYou can create a new name or use the same Schedule Name for ease of use.
1 From Configuration menu, select Commissions, and then select Eligibility Rules.
2 Click to select an Eligibility Rule from the list.The Eligibility Rule is highlighted.
3 Click the Remove button.
See “Add Eligibility Rules for a Commission” on page 409.
See “About Commissions Schedules” on page 406.
See “About Commissions Eligibility Rules” on page 409.
See “About Commissions Positions” on page 413.
Advanced Eligibility Rules
On the Eligibility page, you can add another condition to be met for an Eligibility rule by using parentheses and using and/or statements.
1 From Configuration menu, select Commissions, and then select Eligibility Rules.
2 Click to select an Eligibility Rule from the list.The Eligibility Rule is highlighted.
3 Click the Edit button.
4 Click the Add button.A new Entry line appears.
5 If you are adding only two lines, click the double parenthesis to open the first line and then the single to close the first line.
6 On the second line, open the line with the single parentheses and close with the double-parentheses.
7 For the first line, you can select And or Or.
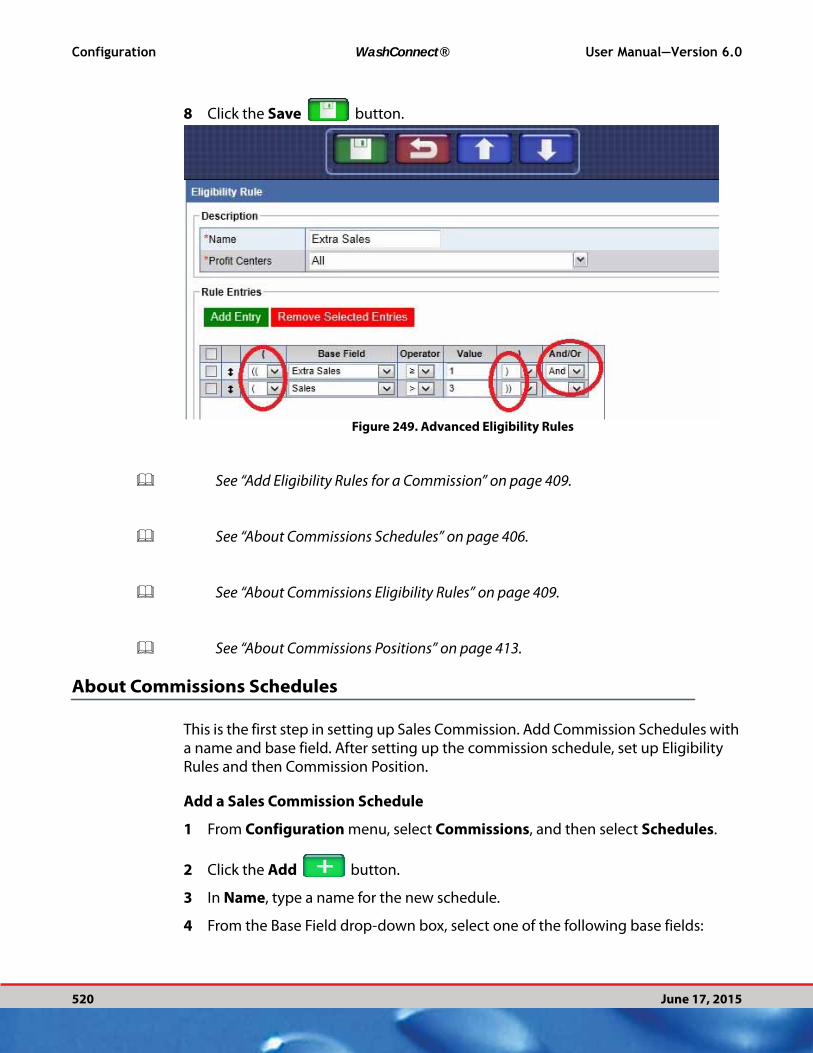
Configuration WashConnect® User Manual—Version 6.0
520 June 17, 2015
8 Click the Save button.
Figure 249. Advanced Eligibility Rules
See “Add Eligibility Rules for a Commission” on page 409.
See “About Commissions Schedules” on page 406.
See “About Commissions Eligibility Rules” on page 409.
See “About Commissions Positions” on page 413.
About Commissions Schedules
This is the first step in setting up Sales Commission. Add Commission Schedules with a name and base field. After setting up the commission schedule, set up Eligibility Rules and then Commission Position.
Add a Sales Commission Schedule
1 From Configuration menu, select Commissions, and then select Schedules.
2 Click the Add button.
3 In Name, type a name for the new schedule.
4 From the Base Field drop-down box, select one of the following base fields:

User Manual—Version 6.0 WashConnect® Configuration
June 17, 2015 521
▪ Cars Sold - The total number of cars sold with any kind of service.
▪ Sales per Car - Total Dollars per car within the selected profit center.
▪ Cars Buying Extras - Relates to the physical number of cars, which have purchased and extra service.
▪ Extras Sales - The total amount of dollars in extra service sales.
▪ Extra Sales per Car - The total number of dollars in extra services sales divided by the total number of cars processed.
▪ % Extra Sales - The percentage of sales dollars as it is compared to total sales dollars within the selected profit center.
▪ % Buying Extras - Relates to the percentage of Cars which have purchased extra service. PLUs or services which contain an amount entered into the Extra Service field in the service table.
5 If necessary, click the Add Entry button.
6 In Value and Commission boxes, type an amount.
7 From Operator Field drop-down box, select a value.
Figure 250. Commission Schedule Example
8 Click the Save button.
9 Next, setup Eligibility Rules for this schedule.

Configuration WashConnect® User Manual—Version 6.0
522 June 17, 2015
See “About Commissions Eligibility Rules” on page 409.
See “Edit a Sales Commission Schedule” on page 407.
See “Delete a Sales Commission Schedule” on page 408.
Edit a Sales Commission Schedule
You can edit an existing Sales Commission Schedule. After you save, employee must Log out and Log back in for the changes to be effective.
1 From Configuration menu, select Commissions, and then select Schedules.
2 Select the Commission Schedule.
3 Click the Edit button.
4 Make necessary edits.
5 If necessary, you can remove the schedule entry by selecting the selecting at least one schedule entry, and then select the Remove Selected Entries
button..
Figure 251. Commission Schedule Example
6 Click the Save button.
7 Next, setup Commissions Positions for this schedule.

User Manual—Version 6.0 WashConnect® Configuration
June 17, 2015 523
See “About Commissions Positions” on page 413.
See “Add a Sales Commission Schedule” on page 406.
See “Delete a Sales Commission Schedule” on page 408.
See “About Commissions” on page 405.
Delete a Sales Commission Schedule
You can delete an existing Sales Commission Schedule.
1 From Configuration menu, select Commissions, and then select Schedules.
2 Click to select a Commission Schedule from the list.
3 Click the Delete button.A message Are you sure you wish to terminate this record? Please use caution, this action cannot be reversed. appears.
Figure 252. Commission Schedule Delete Example
4 Click the Yes button.A message Commission Schedule terminated successfully appears.
5 Click OK.
See “About Commissions Positions” on page 413.
See “Add a Sales Commission Schedule” on page 406.
See “Edit a Sales Commission Schedule” on page 407.
See “About Commissions” on page 405.
Configuration WashConnect® User Manual—Version 6.0
524 June 17, 2015
Sales Commission Example
If a site would like to give their greeters 5% commission based on either sales or sales per car in a specific profit center, they should be creating an Eligibility Rule stating that 5% commission is based on either the sales or sales per car.
There are three section to complete the set up for Sales Commission.
Positions
Eligibility Rules
Schedules
1 From the Configuration menu, select Commissions and then Eligibility Rules.
2 From the tools, click the Add button.
3 In Name, type a name for the Eligibility Rule.
4 In Profit Centers, select one or more profit centers.
5 In Rule Entries, make the following entry for this sales commission example:
6
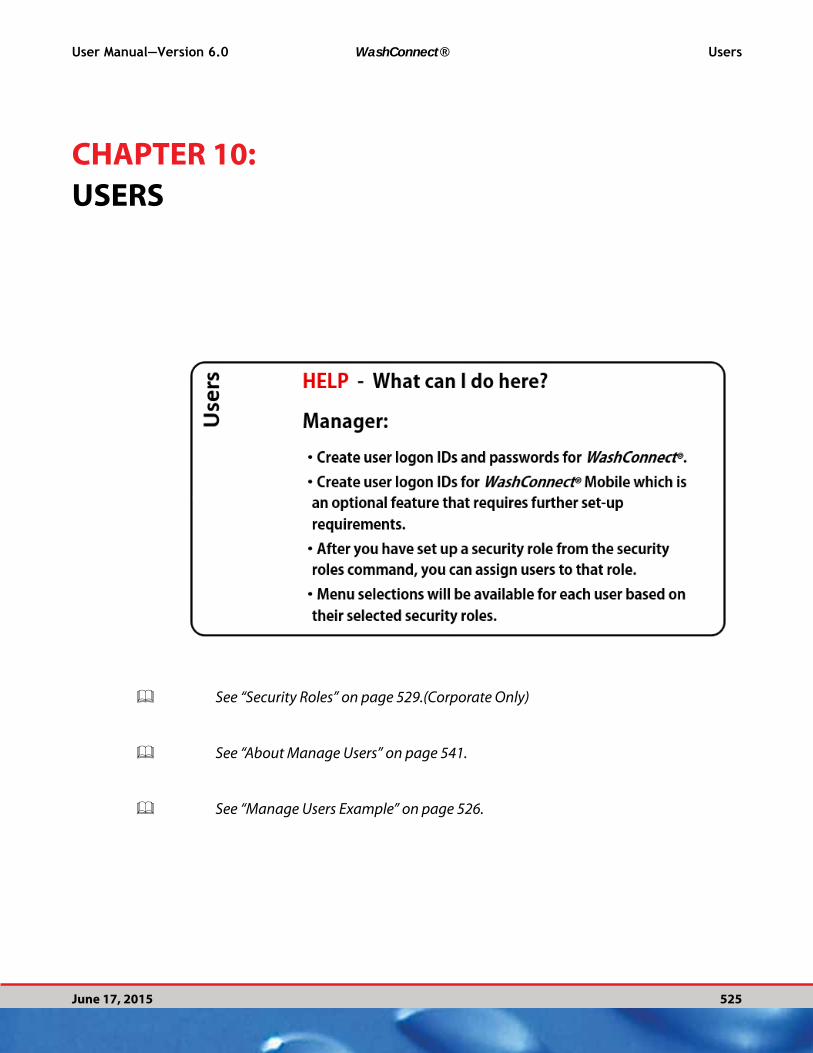
User Manual—Version 6.0 WashConnect® Users
June 17, 2015 525
CHAPTER 10:
USERS
See “Security Roles” on page 529.(Corporate Only)
See “About Manage Users” on page 541.
See “Manage Users Example” on page 526.
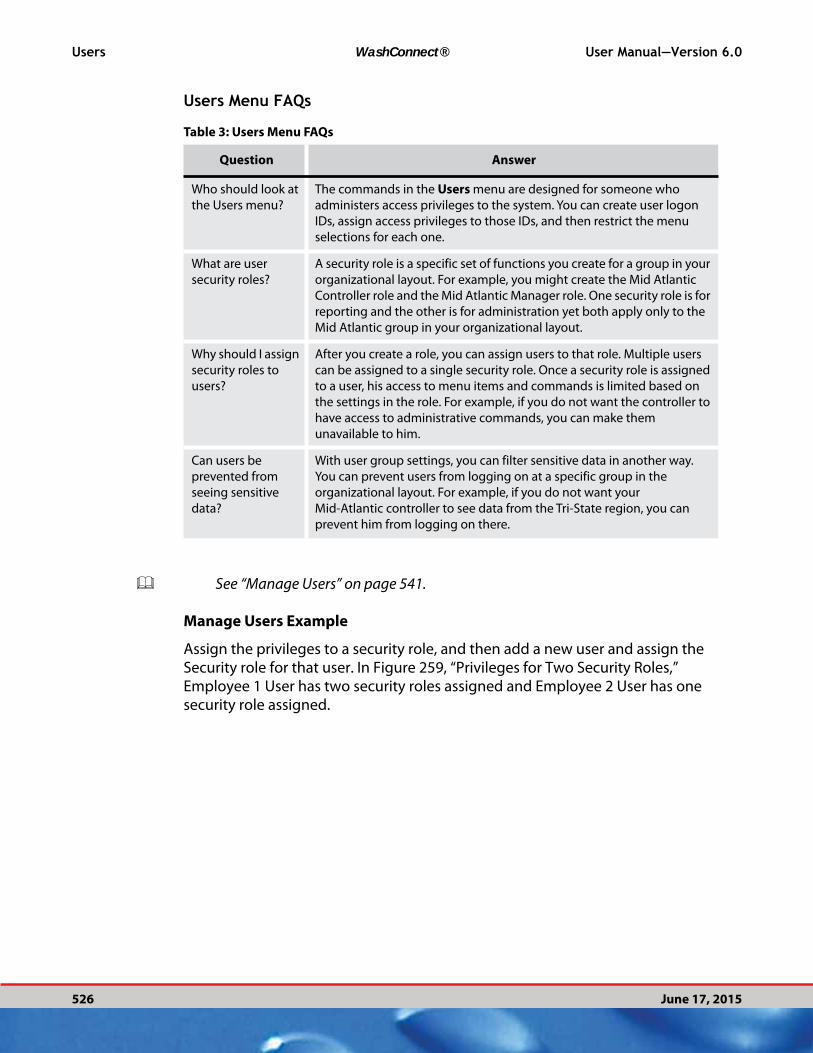
Users WashConnect® User Manual—Version 6.0
526 June 17, 2015
Users Menu FAQs
See “Manage Users” on page 541.
Manage Users Example
Assign the privileges to a security role, and then add a new user and assign the Security role for that user. In Figure 259, “Privileges for Two Security Roles,” Employee 1 User has two security roles assigned and Employee 2 User has one security role assigned.
Table 3: Users Menu FAQs
Question Answer
Who should look at
the Users menu?
The commands in the Users menu are designed for someone who
administers access privileges to the system. You can create user logon
IDs, assign access privileges to those IDs, and then restrict the menu
selections for each one.
What are user
security roles?
A security role is a specific set of functions you create for a group in your
organizational layout. For example, you might create the Mid Atlantic
Controller role and the Mid Atlantic Manager role. One security role is for
reporting and the other is for administration yet both apply only to the
Mid Atlantic group in your organizational layout.
Why should I assign
security roles to
users?
After you create a role, you can assign users to that role. Multiple users
can be assigned to a single security role. Once a security role is assigned
to a user, his access to menu items and commands is limited based on
the settings in the role. For example, if you do not want the controller to
have access to administrative commands, you can make them
unavailable to him.
Can users be
prevented from
seeing sensitive
data?
With user group settings, you can filter sensitive data in another way.
You can prevent users from logging on at a specific group in the
organizational layout. For example, if you do not want your
Mid-Atlantic controller to see data from the Tri-State region, you can
prevent him from logging on there.
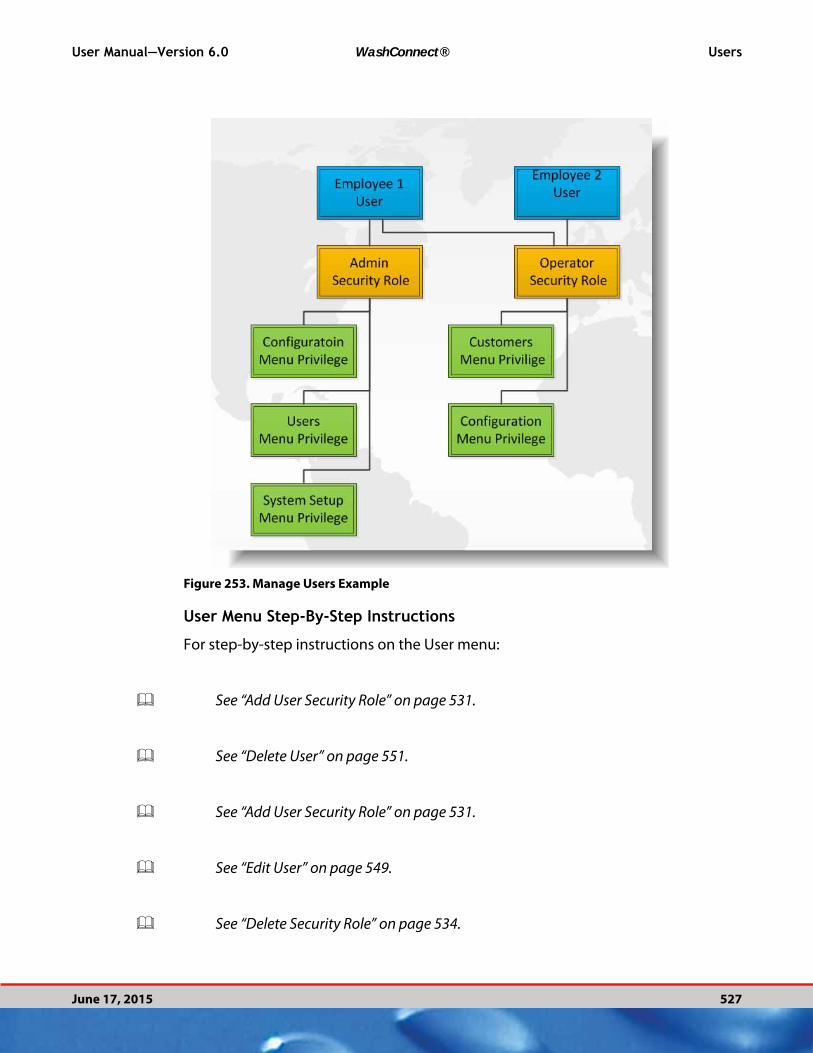
User Manual—Version 6.0 WashConnect® Users
June 17, 2015 527
Figure 253. Manage Users Example
User Menu Step-By-Step Instructions
For step-by-step instructions on the User menu:
See “Add User Security Role” on page 531.
See “Delete User” on page 551.
See “Add User Security Role” on page 531.
See “Edit User” on page 549.
See “Delete Security Role” on page 534.

Users WashConnect® User Manual—Version 6.0
528 June 17, 2015
About Security Roles
See “Add User Security Role” on page 531.
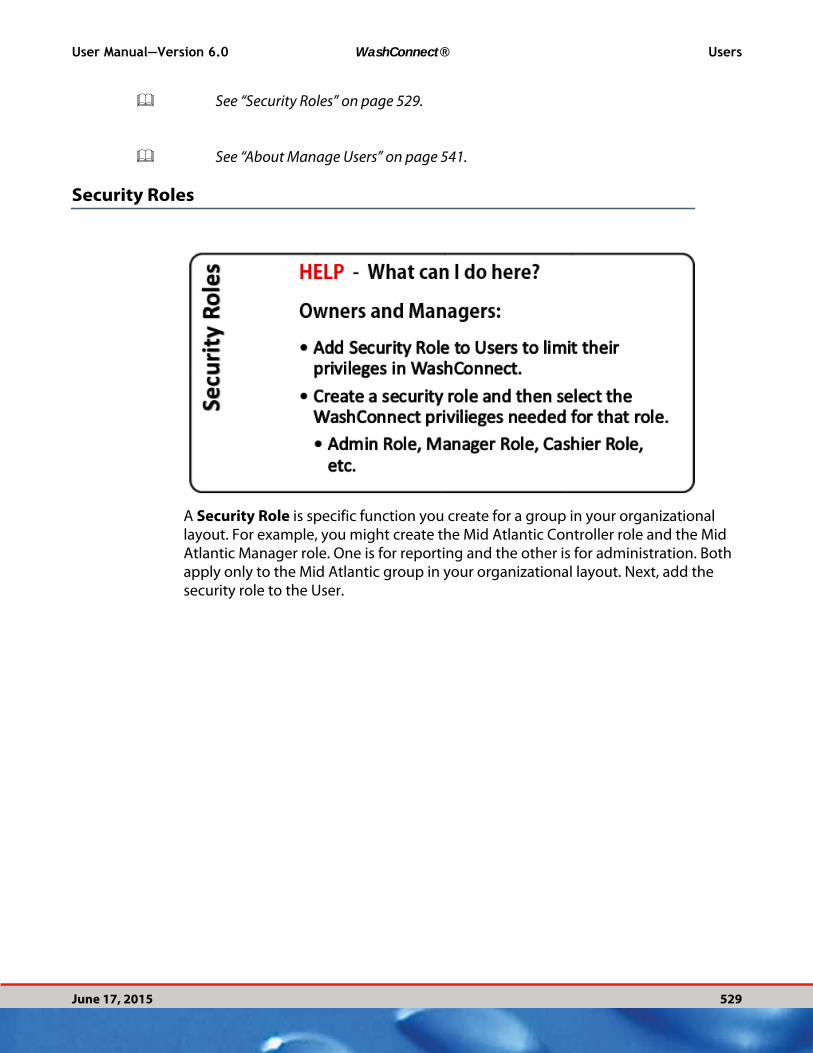
User Manual—Version 6.0 WashConnect® Users
June 17, 2015 529
See “Security Roles” on page 529.
See “About Manage Users” on page 541.
Security Roles
A Security Role is specific function you create for a group in your organizational layout. For example, you might create the Mid Atlantic Controller role and the Mid Atlantic Manager role. One is for reporting and the other is for administration. Both apply only to the Mid Atlantic group in your organizational layout. Next, add the security role to the User.

Users WashConnect® User Manual—Version 6.0
530 June 17, 2015
Figure 254. Roles Dialog Box
For detailed examples of how Roles are created for Organizational Layout Levels, along with example users, see “Example for Users and Roles” on page 534.
See “Add User Security Role” on page 531.
See “Edit Security Role” on page 532.
See “Delete Security Role” on page 534.
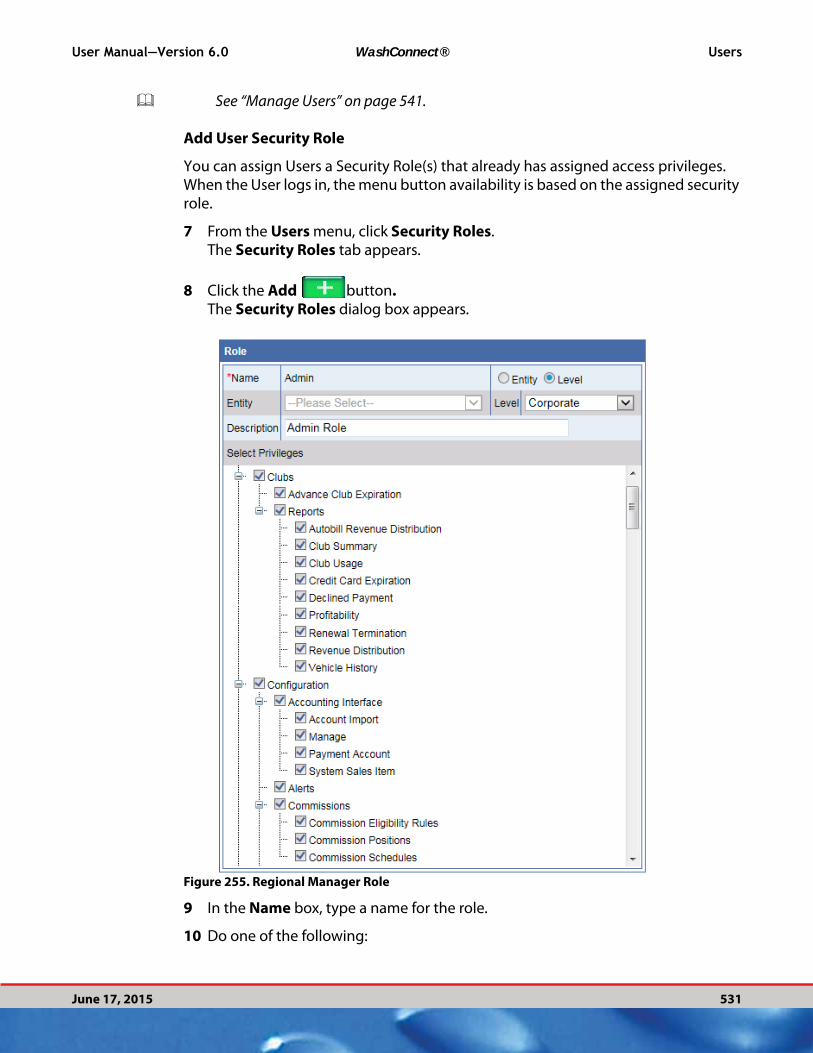
User Manual—Version 6.0 WashConnect® Users
June 17, 2015 531
See “Manage Users” on page 541.
Add User Security Role
You can assign Users a Security Role(s) that already has assigned access privileges. When the User logs in, the menu button availability is based on the assigned security role.
7 From the Users menu, click Security Roles. The Security Roles tab appears.
8 Click the Add button.The Security Roles dialog box appears.
Figure 255. Regional Manager Role
9 In the Name box, type a name for the role.
10 Do one of the following:
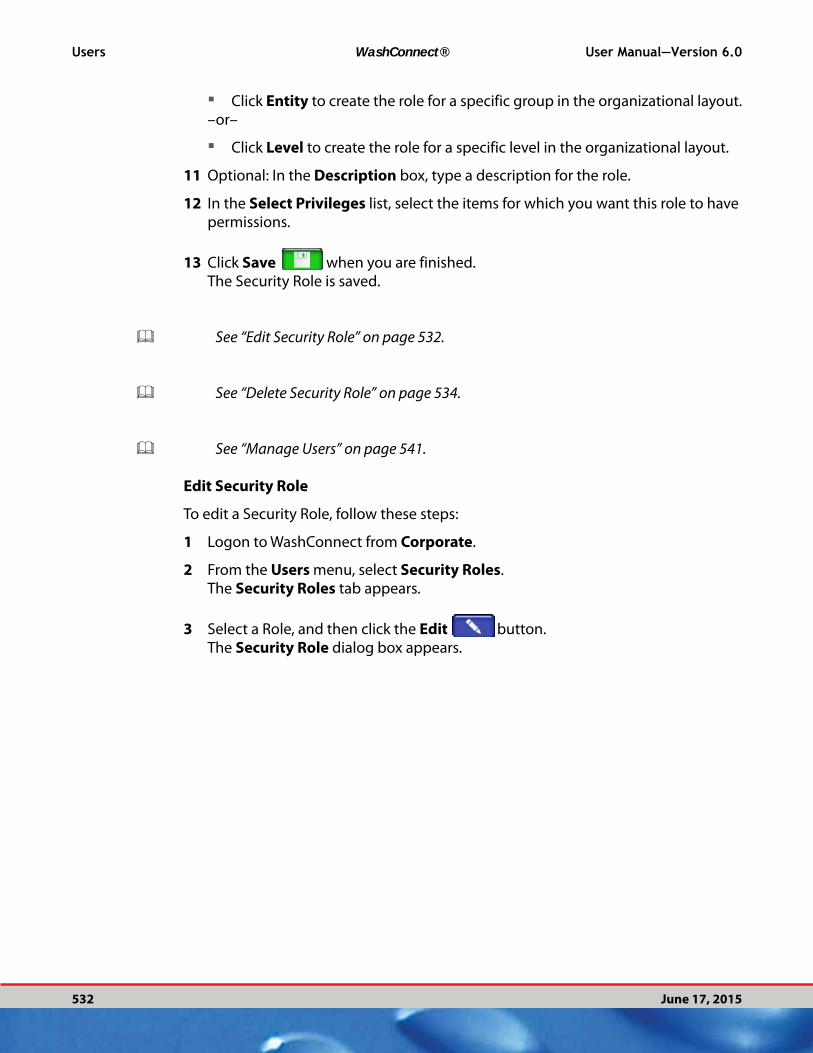
Users WashConnect® User Manual—Version 6.0
532 June 17, 2015
▪ Click Entity to create the role for a specific group in the organizational layout.–or–
▪ Click Level to create the role for a specific level in the organizational layout.
11 Optional: In the Description box, type a description for the role.
12 In the Select Privileges list, select the items for which you want this role to have permissions.
13 Click Save when you are finished. The Security Role is saved.
See “Edit Security Role” on page 532.
See “Delete Security Role” on page 534.
See “Manage Users” on page 541.
Edit Security Role
To edit a Security Role, follow these steps:
1 Logon to WashConnect from Corporate.
2 From the Users menu, select Security Roles. The Security Roles tab appears.
3 Select a Role, and then click the Edit button.The Security Role dialog box appears.

User Manual—Version 6.0 WashConnect® Users
June 17, 2015 533
Figure 256. Regional Manager Role Example
4 In the Name box, you cannot edit the name for the security role.
5 Do one of the following:
6 Click to select Entity or Level.
▪ If you have selected Entity, you can create the role for a specifically named level or site in the organizational layout.
▪ If you have selected Level, you can create the role for a certain level in the organizational layout.
7 Optional: In the Description box, type a description for the security role.
8 In the Select Privileges list, edit the items for which you want this security role to have permissions.
9 Click the Save button when you are finished. The security role is edited.
See “Add User Security Role” on page 531.

Users WashConnect® User Manual—Version 6.0
534 June 17, 2015
See “Edit Security Role” on page 532.
See “Delete Security Role” on page 534.
See “Manage Users” on page 541.
Delete Security Role
To delete a role, follow these steps:
1 From the Users menu, click Security Roles. The Security Roles tab appears.
2 Select a role, and then click Delete button. A warning appears.
3 Click OK. The role is deleted.
NOTE: You cannot delete the Admin role. It is a default role assigned to the Corpo-
rate group.
See “Add User Security Role” on page 531.
See “Edit Security Role” on page 532.
See “Delete Security Role” on page 534.
See “Manage Users” on page 541.
Example for Users and Roles
Before you create users and security roles, the Levels and Organizational Layout must be understood.

User Manual—Version 6.0 WashConnect® Users
June 17, 2015 535
Figure 257. Example Levels and Organizational Layout
In the Figure 257, “Example Levels and Organizational Layout,”:
Levels are Corporate, Region, State and City.
Organizational Layout includes Tri State Region and Mid Atlantic Region.
▪ Under Tri State Region is PA, New Jersey and New York.
▪ Under Mid Atlantic Region is Maryland, Virginia and Delaware.
Next we will consider Security Roles.
Figure 258. Security Roles
In Figure 258, “Security Roles,”six security roles have been created. The default Admin security role is listed first.
The first two roles, Mid Atlantic Controller and Mid Atlantic Manager, are for reporting and administration of the Mid Atlantic Region group.
Regional VP is for reporting and administration across both regions.
The last two roles, Tri-State Controller and Tri-State Manager, are for reporting and administration of the Tri-State Region group.
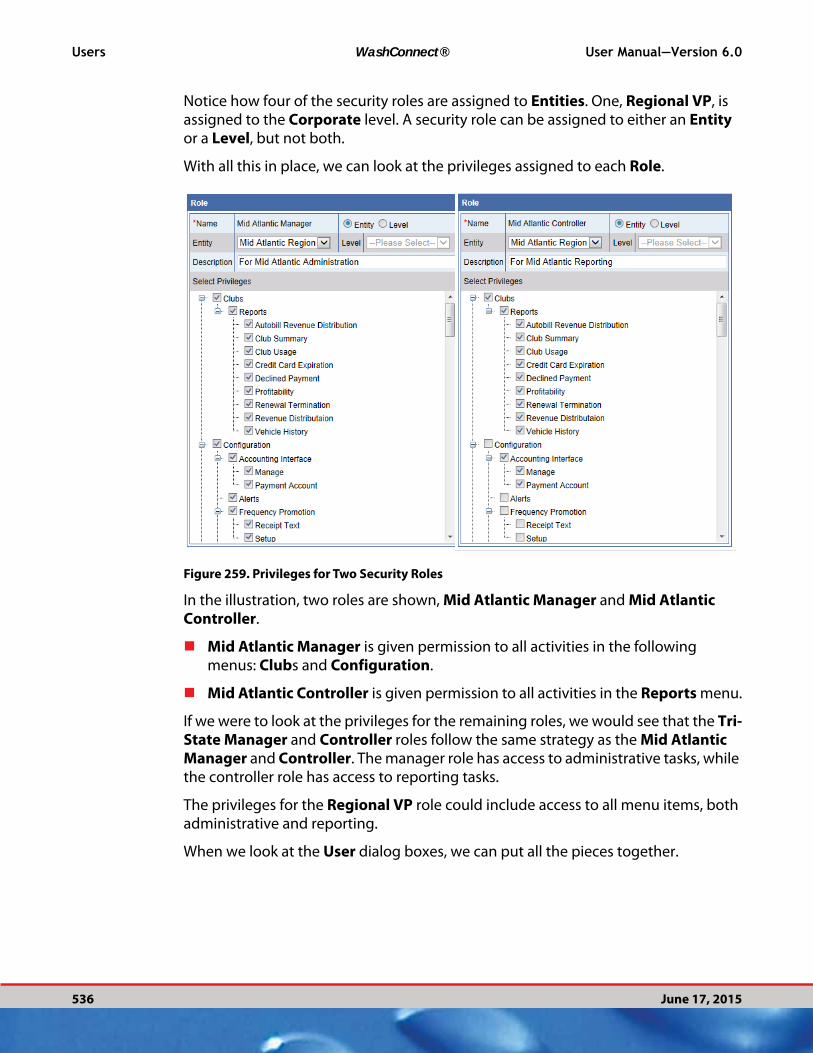
Users WashConnect® User Manual—Version 6.0
536 June 17, 2015
Notice how four of the security roles are assigned to Entities. One, Regional VP, is assigned to the Corporate level. A security role can be assigned to either an Entity or a Level, but not both.
With all this in place, we can look at the privileges assigned to each Role.
Figure 259. Privileges for Two Security Roles
In the illustration, two roles are shown, Mid Atlantic Manager and Mid Atlantic Controller.
Mid Atlantic Manager is given permission to all activities in the following menus: Clubs and Configuration.
Mid Atlantic Controller is given permission to all activities in the Reports menu.
If we were to look at the privileges for the remaining roles, we would see that the Tri-State Manager and Controller roles follow the same strategy as the Mid Atlantic Manager and Controller. The manager role has access to administrative tasks, while the controller role has access to reporting tasks.
The privileges for the Regional VP role could include access to all menu items, both administrative and reporting.
When we look at the User dialog boxes, we can put all the pieces together.
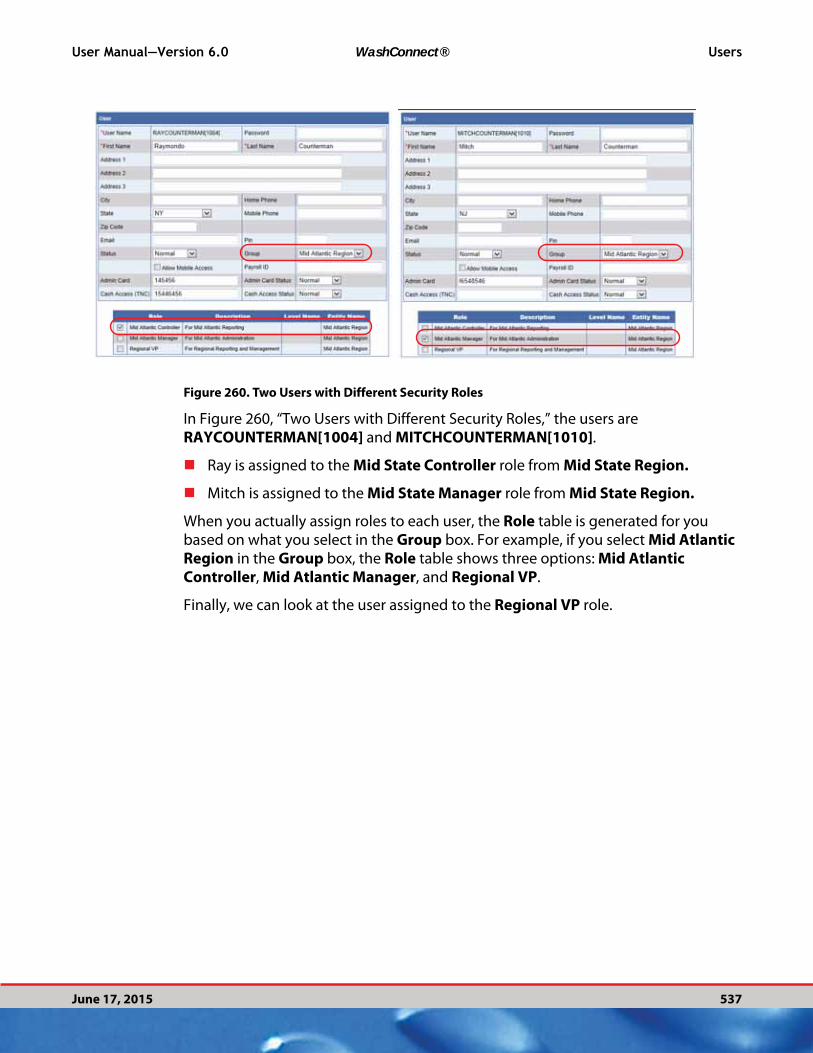
User Manual—Version 6.0 WashConnect® Users
June 17, 2015 537
Figure 260. Two Users with Different Security Roles
In Figure 260, “Two Users with Different Security Roles,” the users are RAYCOUNTERMAN[1004] and MITCHCOUNTERMAN[1010].
Ray is assigned to the Mid State Controller role from Mid State Region.
Mitch is assigned to the Mid State Manager role from Mid State Region.
When you actually assign roles to each user, the Role table is generated for you based on what you select in the Group box. For example, if you select Mid Atlantic Region in the Group box, the Role table shows three options: Mid Atlantic Controller, Mid Atlantic Manager, and Regional VP.
Finally, we can look at the user assigned to the Regional VP role.
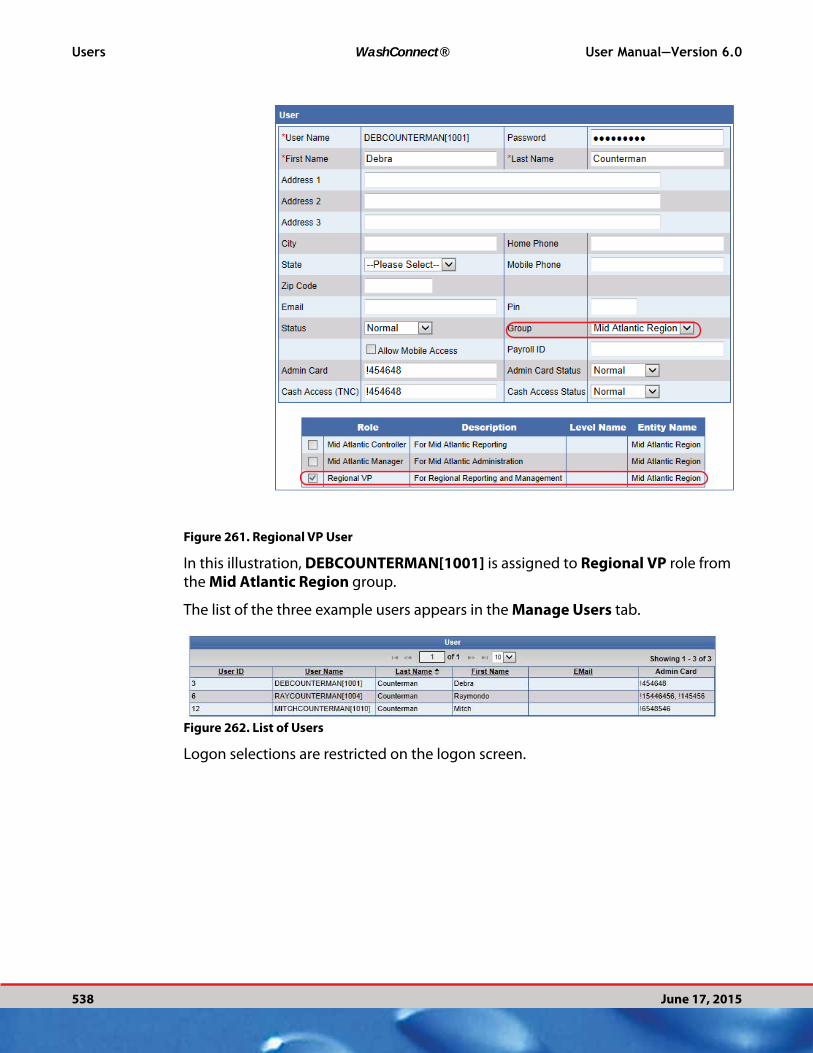
Users WashConnect® User Manual—Version 6.0
538 June 17, 2015
Figure 261. Regional VP User
In this illustration, DEBCOUNTERMAN[1001] is assigned to Regional VP role from the Mid Atlantic Region group.
The list of the three example users appears in the Manage Users tab.
Figure 262. List of Users
Logon selections are restricted on the logon screen.

VALID LOGON LOCATIONS FORRAYCOUNTERMAN[1001]
User Manual—Version 6.0 WashConnect® Users
June 17, 2015 539
Figure 263. Invalid and Valid Login Locations
In the illustration, Ray attempted to log on at the Corporate Region. The error message says Not authorized to logon to Corporate. Valid selections include Tri State Region and all child locations beneath it.
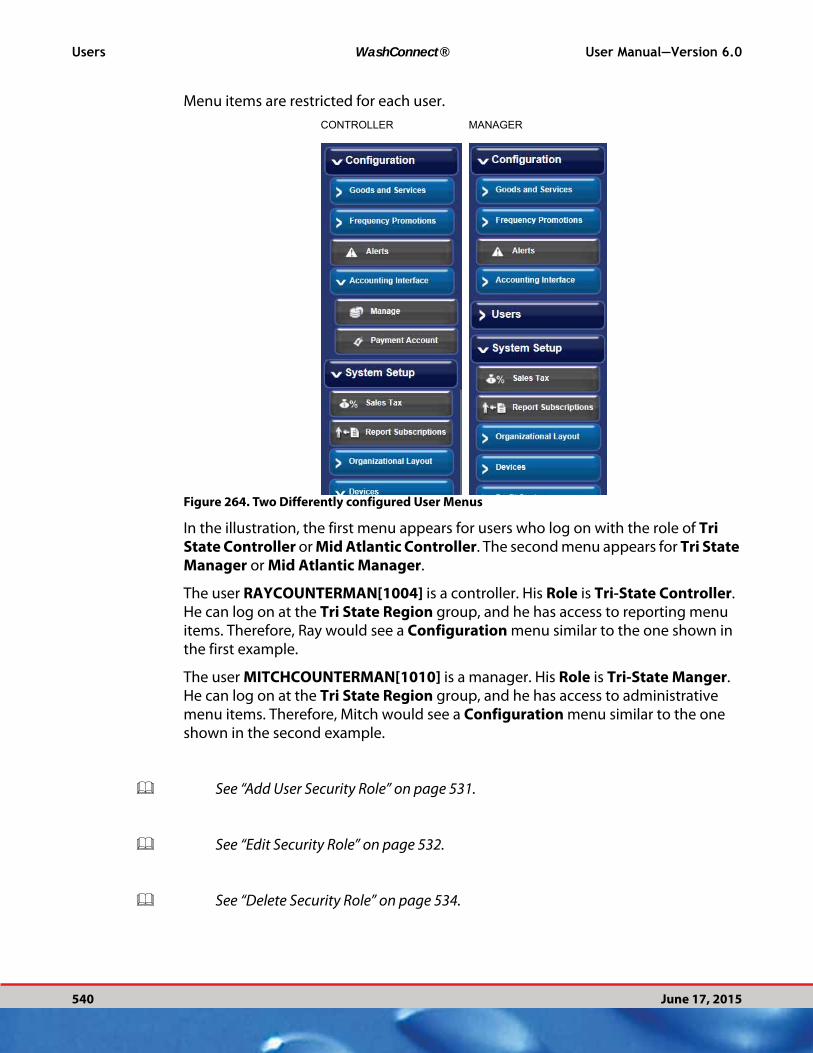
Users WashConnect® User Manual—Version 6.0
540 June 17, 2015
Menu items are restricted for each user.
CONTROLLER MANAGER
Figure 264. Two Differently configured User Menus
In the illustration, the first menu appears for users who log on with the role of Tri State Controller or Mid Atlantic Controller. The second menu appears for Tri State Manager or Mid Atlantic Manager.
The user RAYCOUNTERMAN[1004] is a controller. His Role is Tri-State Controller. He can log on at the Tri State Region group, and he has access to reporting menu items. Therefore, Ray would see a Configuration menu similar to the one shown in the first example.
The user MITCHCOUNTERMAN[1010] is a manager. His Role is Tri-State Manger. He can log on at the Tri State Region group, and he has access to administrative menu items. Therefore, Mitch would see a Configuration menu similar to the one shown in the second example.
See “Add User Security Role” on page 531.
See “Edit Security Role” on page 532.
See “Delete Security Role” on page 534.

User Manual—Version 6.0 WashConnect® Users
June 17, 2015 541
See “Manage Users” on page 541.
Back to top
About Manage Users
See “Manage Users” on page 541.
See “Add User Security Role” on page 531.
See “Delete User” on page 551.
See “Edit User” on page 549.
See “Add User Security Role” on page 531.
See “Delete Security Role” on page 534.
Manage Users
You can Manage Users and their Security Role(s). After a security role has been created, you can assign a security role to a User. Multiple users can be assigned to one security role. Once a role is assigned to a user, his access to menu items and
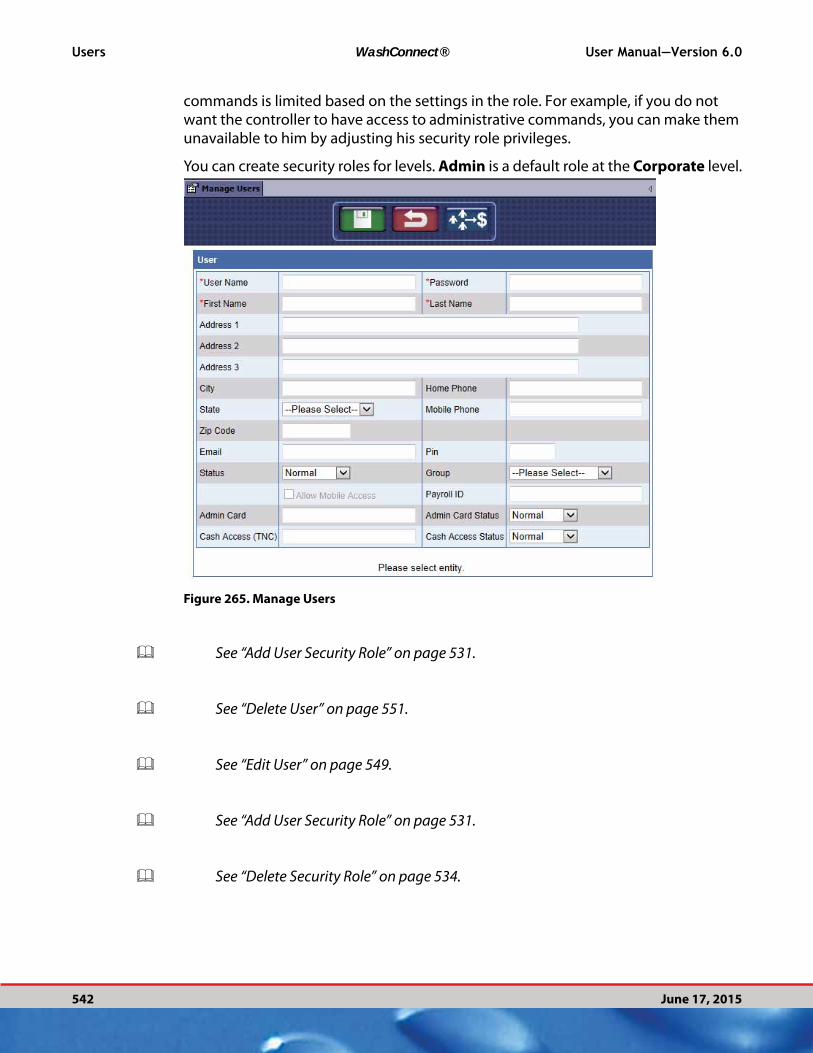
Users WashConnect® User Manual—Version 6.0
542 June 17, 2015
commands is limited based on the settings in the role. For example, if you do not want the controller to have access to administrative commands, you can make them unavailable to him by adjusting his security role privileges.
You can create security roles for levels. Admin is a default role at the Corporate level.
Figure 265. Manage Users
See “Add User Security Role” on page 531.
See “Delete User” on page 551.
See “Edit User” on page 549.
See “Add User Security Role” on page 531.
See “Delete Security Role” on page 534.

User Manual—Version 6.0 WashConnect® Users
June 17, 2015 543
Add User
A user with the administrative security role privileges (rights) can set another users’ passwords. Follow these steps to add a user:
NOTE: Setup Security Roles first, and then add a User and you will be able to select
security role(s).
1 From the Users menu, select Manage Users. The Manage Users tab appears.
2 Click the Add button.The User dialog box appears.
NOTE: The Roles table does not appear until a Group is selected.
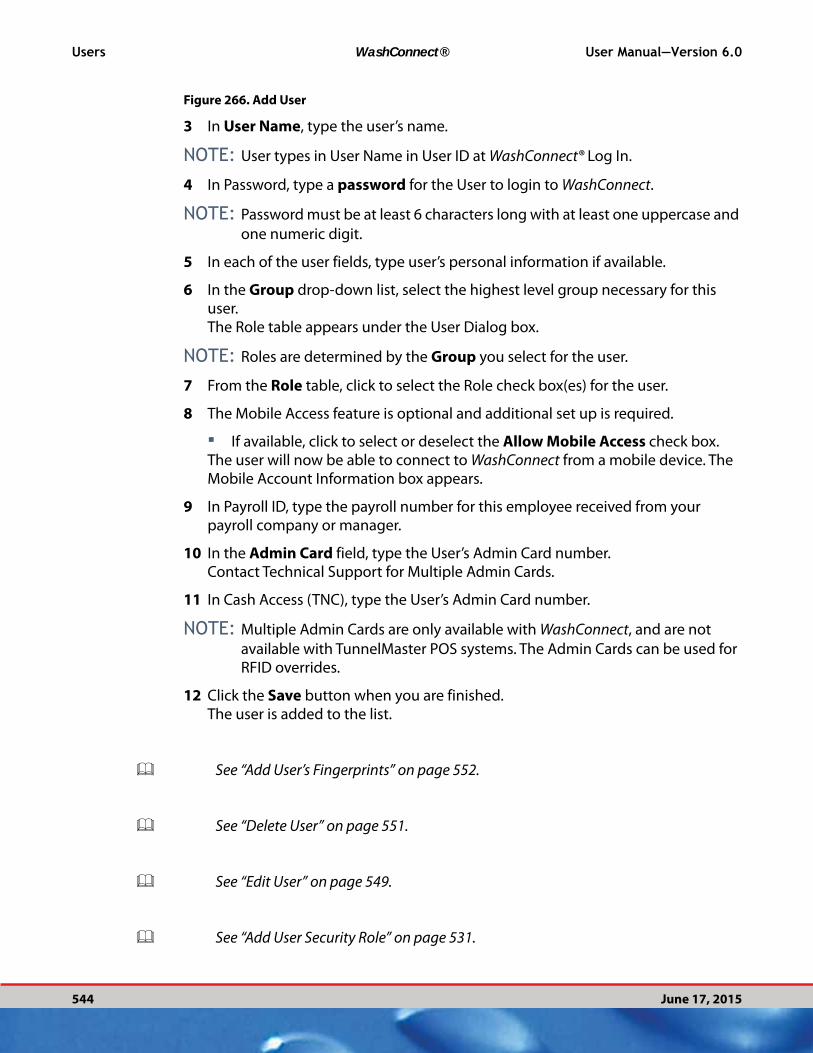
Users WashConnect® User Manual—Version 6.0
544 June 17, 2015
Figure 266. Add User
3 In User Name, type the user’s name.
NOTE: User types in User Name in User ID at WashConnect® Log In.
4 In Password, type a password for the User to login to WashConnect.
NOTE: Password must be at least 6 characters long with at least one uppercase and
one numeric digit.
5 In each of the user fields, type user’s personal information if available.
6 In the Group drop-down list, select the highest level group necessary for this user.The Role table appears under the User Dialog box.
NOTE: Roles are determined by the Group you select for the user.
7 From the Role table, click to select the Role check box(es) for the user.
8 The Mobile Access feature is optional and additional set up is required.
▪ If available, click to select or deselect the Allow Mobile Access check box.The user will now be able to connect to WashConnect from a mobile device. The Mobile Account Information box appears.
9 In Payroll ID, type the payroll number for this employee received from your payroll company or manager.
10 In the Admin Card field, type the User’s Admin Card number.Contact Technical Support for Multiple Admin Cards.
11 In Cash Access (TNC), type the User’s Admin Card number.
NOTE: Multiple Admin Cards are only available with WashConnect, and are not
available with TunnelMaster POS systems. The Admin Cards can be used for RFID overrides.
12 Click the Save button when you are finished.The user is added to the list.
See “Add User’s Fingerprints” on page 552.
See “Delete User” on page 551.
See “Edit User” on page 549.
See “Add User Security Role” on page 531.
User Manual—Version 6.0 WashConnect® Users
June 17, 2015 545
See “Delete Security Role” on page 534.
See “Manage Users” on page 541.
See “Add User Security Role” on page 531.
See “Manage User Field Descriptions” on page 546.
See “Add or Edit Wages for a User” on page 547.
Search for Users
To search for a user, follow these steps:
1 From the Users menu, select Manage Users. The Manage Users tab appears.
2 In the Search box, type a search term.
3 From Status drop-down box, select Normal to filter active users and Terminated to filter inactive users.
4 Click Search. The search results are shown.
5 To return to the full list, clear the search term in the box, and then click Search.The full user list appears.
See “Delete User” on page 551.
See “Edit User” on page 549.
See “Add User’s Fingerprints” on page 552.
See “Add User Security Role” on page 531.
See “Delete Security Role” on page 534.

Users WashConnect® User Manual—Version 6.0
546 June 17, 2015
See “Manage Users” on page 541.
See “Add User Security Role” on page 531.
See “Manage User Field Descriptions” on page 546.
Manage User Field Descriptions
When you add or edit a user, you can provide information for each of the user fields. The following table describes each of the fields in the Manage Users dialog box.
Table 4: User Field Descriptions
Field Parameter Description
User Name Alphanumeric User ID log in name used for WashConnect® login.
Password Alphanumeric User log in password. Must be 6 characters long with at
least one uppercase and one numeric digit.
First Name Alphanumeric User first name.
Last Name Alphanumeric User last name.
Address1,2,3 Alphanumeric User home address.
City Alpha User city.
State Alpha User state.
Zip Code Numeric Zip code of User.
Home Phone Numeric User home phone.
Mobile Phone Numeric User mobile phone.
Email Alphanumeric User email address.
Pin Numeric User Pin number to use Admin Card and Cash Access
card.
Status List Normal or Terminated. Normal means active.
Terminated means inactive.
Group Numeric The group or entity in the organization layout to which
the user will have logon rights and privileges.Select the
upper most level of your corporate tree structure where
your user is permitted.
Payroll ID Numeric Payroll identification for User.
Admin Card Numeric Admin card (manager card) can have more than one user.
Swipe admin card for RFID override, enter RFID number
and transaction goes through.

User Manual—Version 6.0 WashConnect® Users
June 17, 2015 547
See “Add User Security Role” on page 531.
See “Delete User” on page 551.
See “Edit User” on page 549.
See “Add User Security Role” on page 531.
See “Delete Security Role” on page 534.
See “Manage Users” on page 541.
See “Add User’s Fingerprints” on page 552.
See “Add User Security Role” on page 531.
See “Add User’s Fingerprints” on page 552.
Add or Edit Wages for a User
Users must have wages assigned or attached to use the Time Clock menu. Follow theses steps to add an hourly rate to a user from the Manage Users menu.
1 First, save the user with security role(s).
2 Login to Corporate.
3 From the Users menu, select Manage Users.
Cash Access
(TNC)
Numeric Cash access card for the TouchNClean per user.
Admin Card
Status
List Normal or Terminated. Select Normal if Admin Card is
active.
Cash Access
Status
List Normal or Terminated. Select Normal if Admin Card is
active.
Table 4: User Field Descriptions (Continued)
Field Parameter Description

Users WashConnect® User Manual—Version 6.0
548 June 17, 2015
4 Double-click to select the User or employee from the User list.
Figure 267. Manage Users employee list
The User dialog box appears.
5 Click the Wages button.The User Wages table appears for that user.
Figure 268. User Wages screen
6 In Wages, type hourly rate(s) for the User (employee) for each applicable Profit Center.
NOTE: Select an hourly wage first before you can access the Default column.
7 In Default, click to select a default Profit Center.
8 From Corporate Login, in Commission Position, click Select Position, and then select Commission Position for each site or Apply position to all sites.

User Manual—Version 6.0 WashConnect® Users
June 17, 2015 549
–or–From the Site level login, select a Commission Position from the Commission Position drop-down box.
9 Click OK, and then click the Save button.
10 Click the next Save button.The User is now eligible for the Time Clock menu.
See “Delete User” on page 551.
See “Edit User” on page 549.
See “Add User Security Role” on page 531.
See “Delete Security Role” on page 534.
See “Manage Users” on page 541.
See “Add User Security Role” on page 531.
See “Manage User Field Descriptions” on page 546.
See “Add User’s Fingerprints” on page 552.
See “Add User’s Fingerprints” on page 552.
Edit User
You can edit the information for a user. For example, to change a user’s password, you can edit the user, and then change the Pin field.
To edit a user, follow these steps:
1 Select the Users > Manage Users.The Manage Users tab appears.
2 Select a user in the list, and then click Edit button.The User dialog box appears.

Users WashConnect® User Manual—Version 6.0
550 June 17, 2015
Figure 269. Edit User
3 Edit the fields, and then click the Save button.The user’s edits are saved.
NOTE: You cannot edit the User Name field. User Name is made permanent when
the user is first created and cannot be changed. To change User Name, you can add a new user with the User Name you want.
See “Delete User” on page 551.
See “Add User Security Role” on page 531.
See “Delete Security Role” on page 534.
See “Manage Users” on page 541.
See “Add User Security Role” on page 531.
See “Manage User Field Descriptions” on page 546.

User Manual—Version 6.0 WashConnect® Users
June 17, 2015 551
See “Add or Edit Wages for a User” on page 547.
See “Add User’s Fingerprints” on page 552.
Delete User
You can delete a user in the system. Deleting a user is the same as terminating a user. The data is maintained in the database, but the user is no longer able to log on with that User Name and password. If any fingerprints are on file for that User, they will be permanently removed from the system. If user is hired again, the fingerprints will need to be registered again.
To terminate a user, follow these steps:
1 From the Users menu, click Manage Users. The Manage Users tab appears.
2 Select a user in the list, and then click the Delete button.A warning appears.
3 Click OK. The user is terminated.
See “Add User Security Role” on page 531.
See “Edit User” on page 549.
See “Add User Security Role” on page 531.
See “Delete Security Role” on page 534.
See “Manage Users” on page 541.
See “Add User Security Role” on page 531.
See “Manage User Field Descriptions” on page 546.
See “Add or Edit Wages for a User” on page 547.
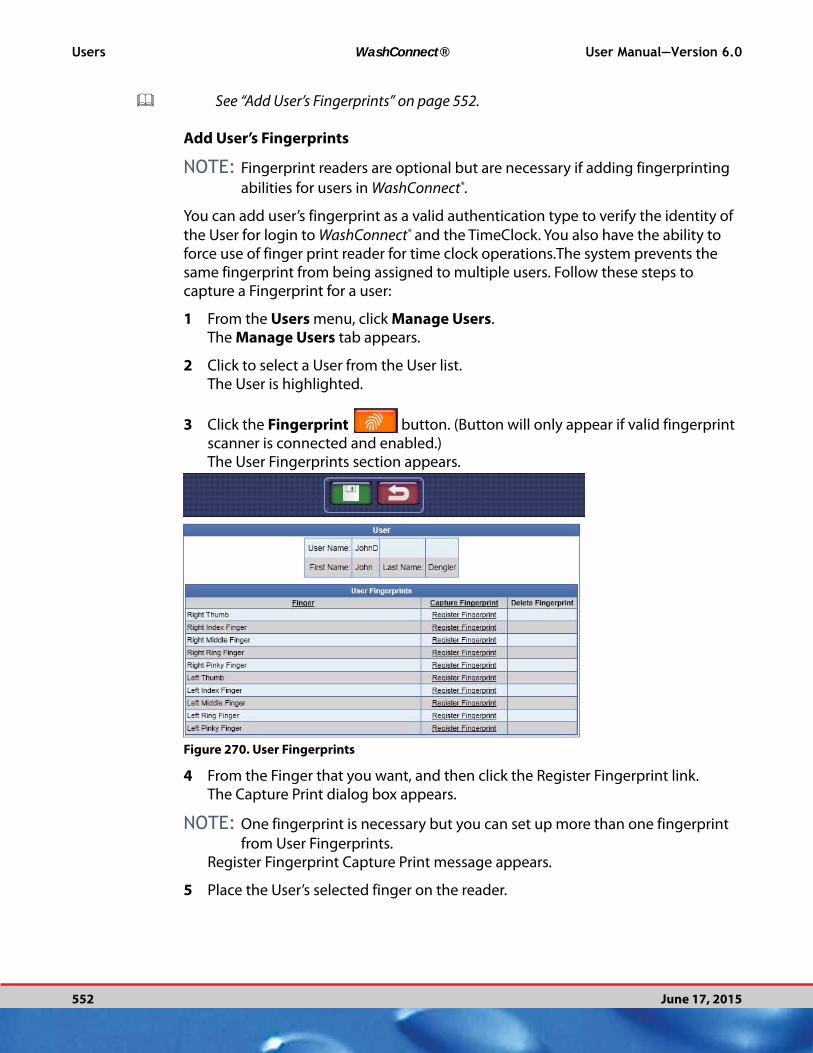
Users WashConnect® User Manual—Version 6.0
552 June 17, 2015
See “Add User’s Fingerprints” on page 552.
Add User’s Fingerprints
NOTE: Fingerprint readers are optional but are necessary if adding fingerprinting
abilities for users in WashConnect®.
You can add user’s fingerprint as a valid authentication type to verify the identity of
the User for login to WashConnect® and the TimeClock. You also have the ability to force use of finger print reader for time clock operations.The system prevents the same fingerprint from being assigned to multiple users. Follow these steps to capture a Fingerprint for a user:
1 From the Users menu, click Manage Users. The Manage Users tab appears.
2 Click to select a User from the User list.The User is highlighted.
3 Click the Fingerprint button. (Button will only appear if valid fingerprint scanner is connected and enabled.)The User Fingerprints section appears.
Figure 270. User Fingerprints
4 From the Finger that you want, and then click the Register Fingerprint link.The Capture Print dialog box appears.
NOTE: One fingerprint is necessary but you can set up more than one fingerprint
from User Fingerprints.Register Fingerprint Capture Print message appears.
5 Place the User’s selected finger on the reader.
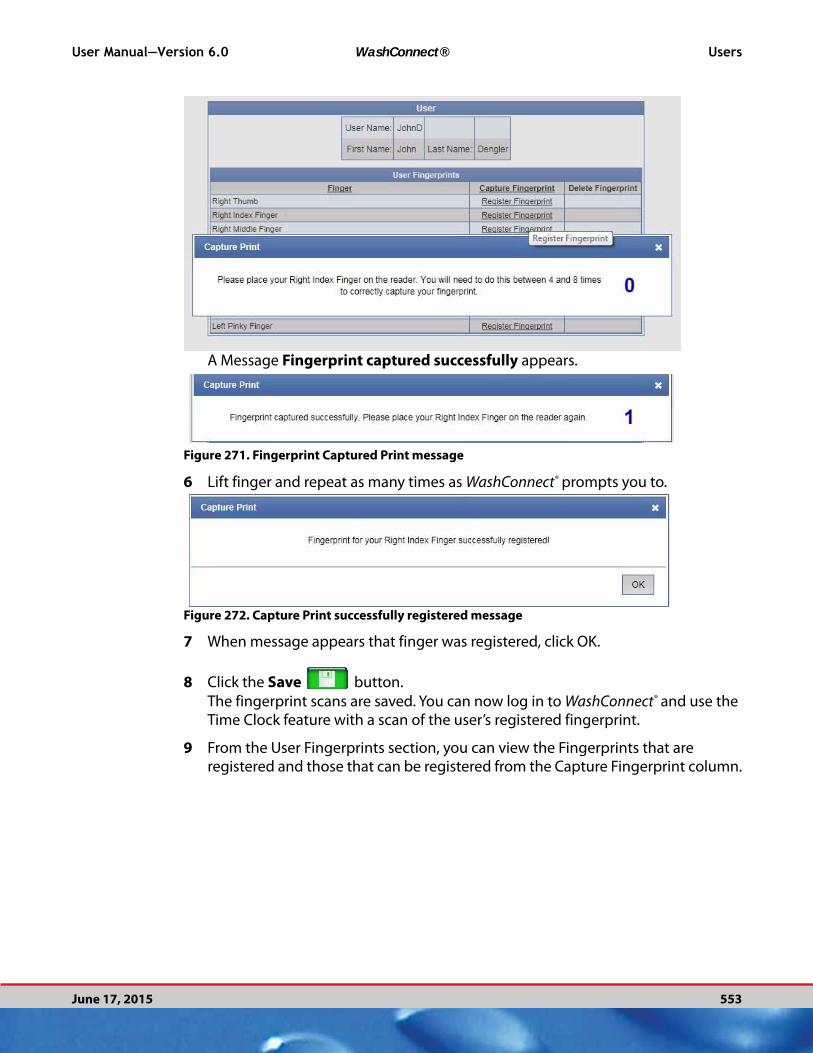
User Manual—Version 6.0 WashConnect® Users
June 17, 2015 553
A Message Fingerprint captured successfully appears.
Figure 271. Fingerprint Captured Print message
6 Lift finger and repeat as many times as WashConnect® prompts you to.
Figure 272. Capture Print successfully registered message
7 When message appears that finger was registered, click OK.
8 Click the Save button.
The fingerprint scans are saved. You can now log in to WashConnect® and use the Time Clock feature with a scan of the user’s registered fingerprint.
9 From the User Fingerprints section, you can view the Fingerprints that are registered and those that can be registered from the Capture Fingerprint column.

Users WashConnect® User Manual—Version 6.0
554 June 17, 2015
Figure 273. User - Capture Fingerprints
See “Delete a Fingerprint” on page 554.
See “Manage Users” on page 541.
Delete a Fingerprint
You can delete fingerprints from the User.
1 From the Users menu, click Manage Users. The Manage Users tab appears.
2 Click to select a User from the User list.The User is highlighted.
3 Click the Fingerprint button.

User Manual—Version 6.0 WashConnect® Users
June 17, 2015 555
The User Fingerprints section appears.
Figure 274. Delete User Fingerprints
4 In Delete Fingerprint column, click the Delete link for the respective Finger.
5 A message Are you sure you want to delete the fingerprint? Click Yes or No appears.The fingerprint is deleted.
6 Click the Save button.
See “Add User’s Fingerprints” on page 552.
See “Add User” on page 543.

Users WashConnect® User Manual—Version 6.0
556 June 17, 2015
User Manual—Version 6.0 WashConnect® TOUCH POS
557
CHAPTER 11:
TOUCH POS
The Touch POS (Point Of Sale) is an electronic cash register, allowing user who has rights to Open or Close a Touch POS device. The Touch POS menu includes the following commands:
NOTE: The Commands in the Touch POS menu are designed for a user who has
rights to Open or Close a Touch POS device.
“Open Shift”
“About Add / Remove from POS”
“Close Shift” (available after shift is opened)
“Purchase new club membership (for the first vehicle)”
“Enter a New Sales Transaction at Touch POS”
“Remove Sales Items”
“About Touch POS Sales Entry”
“About Refunds”
“About Voids”
“Free Wash or ReWash”
“ROA (Received on Account)”
“Payout”
“Ticket Generation for 6-digit Wash Codes”
“Ticket Generation for 6-digit Wash Codes”
“Add Customer Information”
After the shift is open, the menu on the left of the transaction screen is a list of the profit center items buttons, in this scenario, Express, Hand Services, Gift Card, Inbay

TOUCH POS WashConnect® User Manual—Version 6.0
558
Auto, Club, Impulse, and Packages. From the Express menu, there are four submenus: Base, Extra, Discount, Package, and Others.
Figure 275. Touch POS Screen
NOTE: The commands in the TOUCH POS menu are designed for a user who has
rights to Open or Close a Touch POS device.
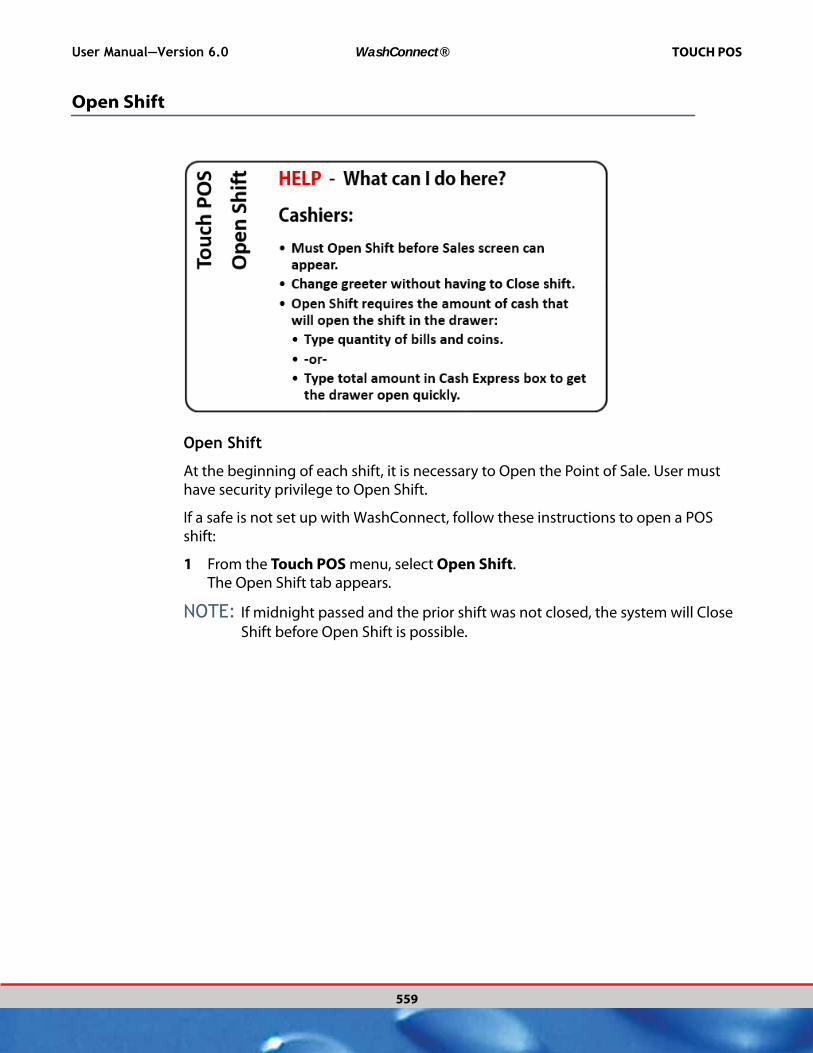
User Manual—Version 6.0 WashConnect® TOUCH POS
559
Open Shift
Open Shift
At the beginning of each shift, it is necessary to Open the Point of Sale. User must have security privilege to Open Shift.
If a safe is not set up with WashConnect, follow these instructions to open a POS shift:
1 From the Touch POS menu, select Open Shift. The Open Shift tab appears.
NOTE: If midnight passed and the prior shift was not closed, the system will Close
Shift before Open Shift is possible.
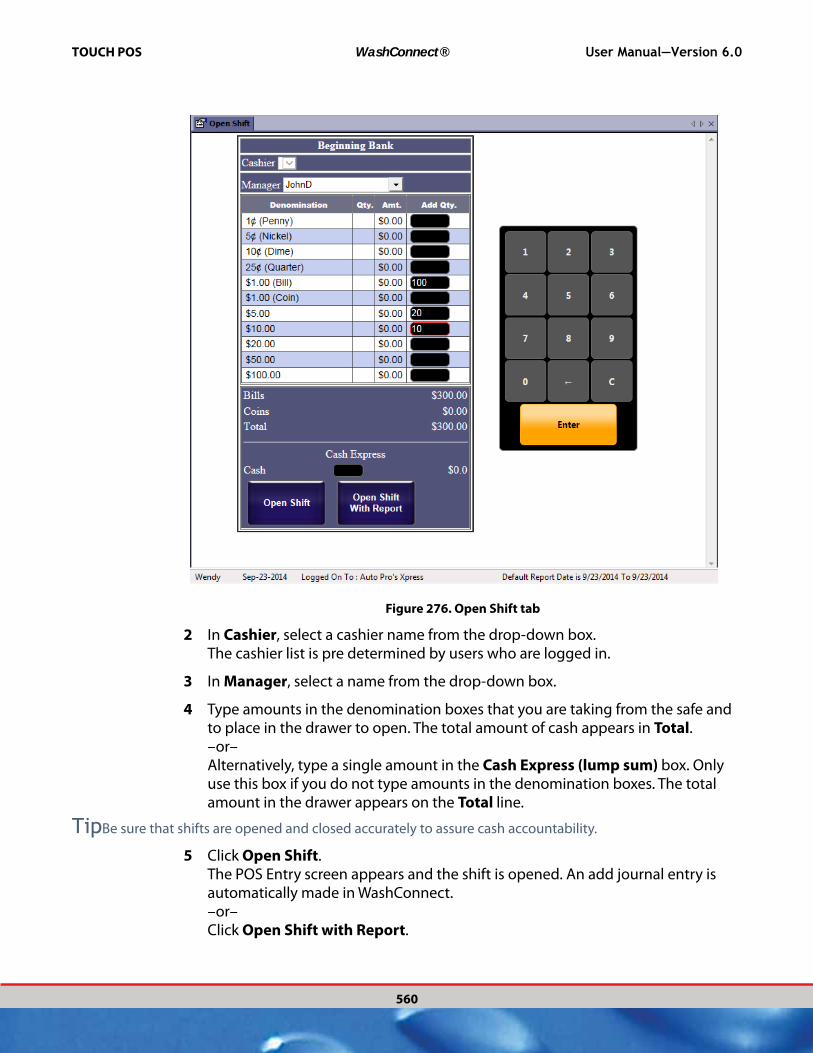
TOUCH POS WashConnect® User Manual—Version 6.0
560
Figure 276. Open Shift tab
2 In Cashier, select a cashier name from the drop-down box. The cashier list is pre determined by users who are logged in.
3 In Manager, select a name from the drop-down box.
4 Type amounts in the denomination boxes that you are taking from the safe and to place in the drawer to open. The total amount of cash appears in Total.–or–Alternatively, type a single amount in the Cash Express (lump sum) box. Only use this box if you do not type amounts in the denomination boxes. The total amount in the drawer appears on the Total line.
TipBe sure that shifts are opened and closed accurately to assure cash accountability.
5 Click Open Shift.The POS Entry screen appears and the shift is opened. An add journal entry is automatically made in WashConnect.–or–Click Open Shift with Report.

User Manual—Version 6.0 WashConnect® TOUCH POS
561
A report receipt prints, the POS Entry screen appears, and the shift is opened. An add journal entry is automatically made in WashConnect.
NOTE: This note refers to a POS that is not using the safe. When the amount you are trying
to open with does not match the amount the register was closed from the previous shift, the message If the Bank Discrepancy message appears, double check the amounts entered in the denomination or the Cash Express boxes and the actual amount in the drawer. This message appears
NO SAFE: When you chose not to use a Safe, deposit an amount to the Bank and leave so much in the drawer.
USING SAFE: When using a Safe, all money is supposed to be removed so it always closes with zero, therefore, any amount to open is OK.
TipVerify your cash movements as soon as possible. It is possible to edit most shift information after a shift has been closed. However, it is faster and easier to enter accurate information during the shift. Verify!
NOTE: There is a setting to span midnight one time. See “POS > TouchPOSConfigu-
ration > General” on page 694. If the shift is left open and a second midnight is reached, the system will force a closure of the open shift and a start of a new shift.
See “TOUCH POS” on page 557.
See “About Journals” on page 272.
See “About Touch POS Sales Entry” on page 579.

TOUCH POS WashConnect® User Manual—Version 6.0
562
About Add / Remove from POS
Electronically track the Add / Remove money in the system from the Touch POS Register Shift
After the Shift is already Open, you can add or remove money to / from the Touch POS drawer and track it in the system. The Remove feature is to prevent too many bills in the POS drawer, leaving your cash vulnerable to theft.
NOTE: The Add / Remove option will not be available on the Touch POS menu if a
shift is not Open. User must have privileges to add or remove money.
1 From the Touch POS menu, click Add/Remove.The Add/Remove tab appears.
2 From the Add/Remove section, select a Cashier.
3 Select a Manager.
4 Type the quantity of denominations that you intend to Add or Remove.–or–Type the total amount in the Cash Express to Add or Remove.
5 Click the Add button or click the Remove button.
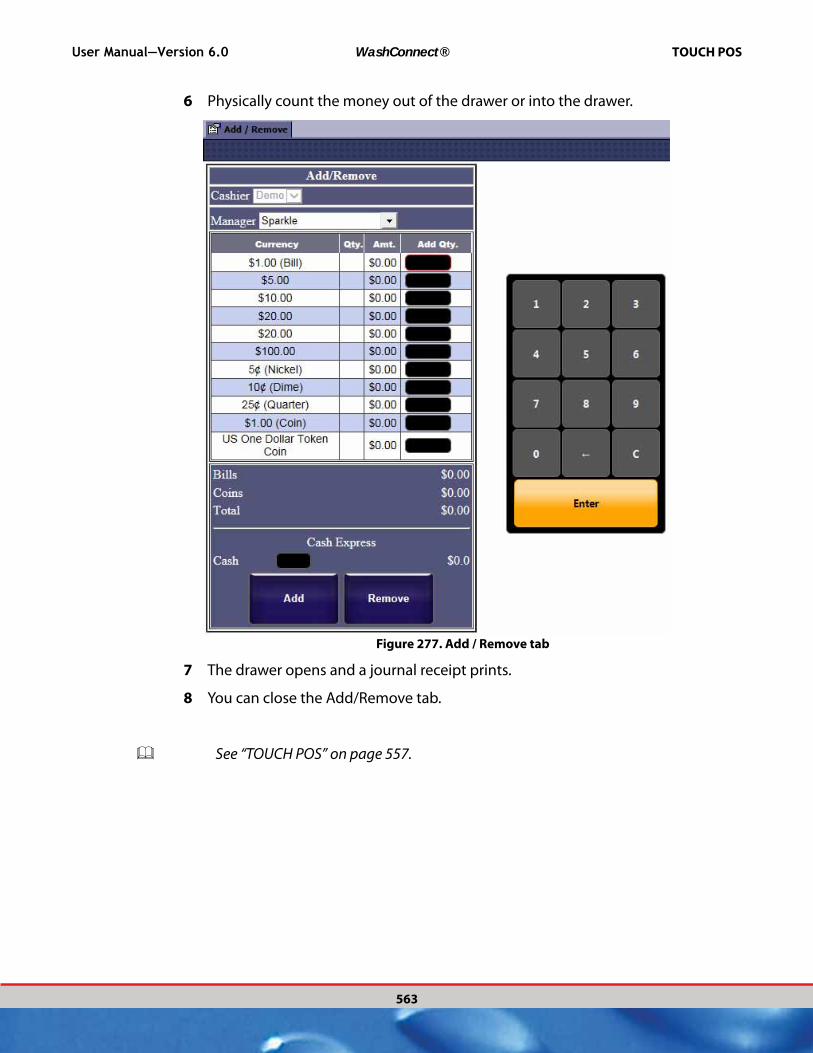
User Manual—Version 6.0 WashConnect® TOUCH POS
563
6 Physically count the money out of the drawer or into the drawer.
Figure 277. Add / Remove tab
7 The drawer opens and a journal receipt prints.
8 You can close the Add/Remove tab.
See “TOUCH POS” on page 557.
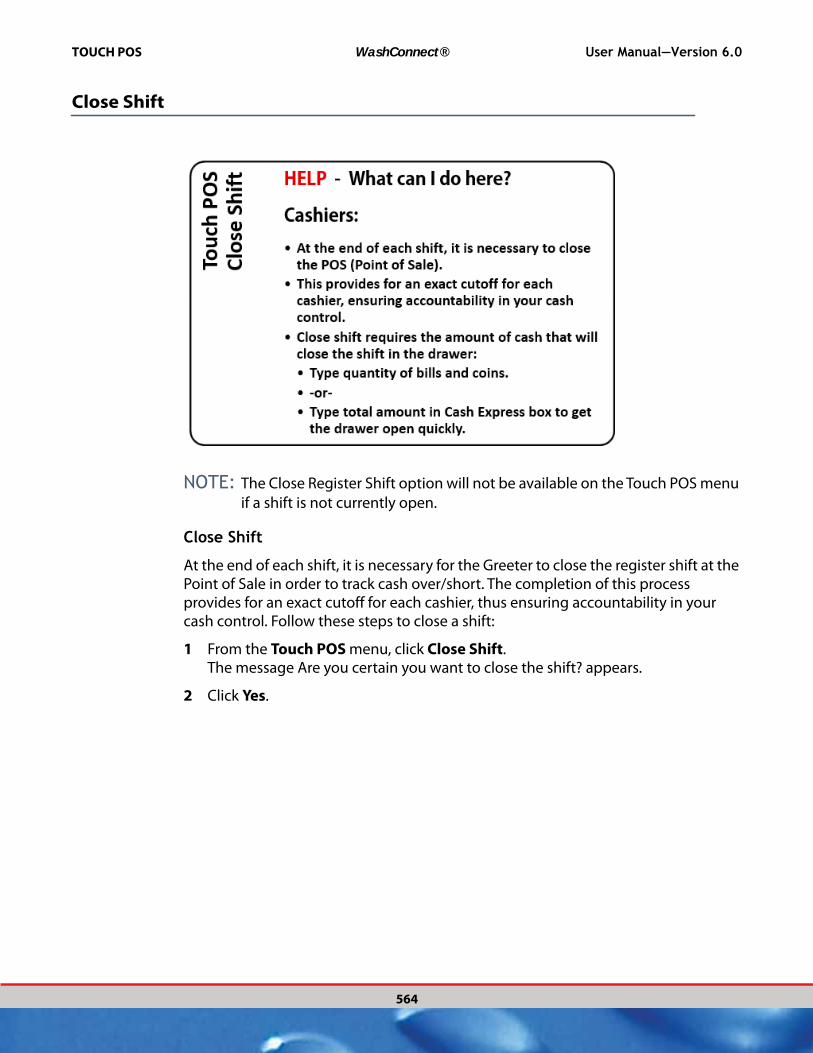
TOUCH POS WashConnect® User Manual—Version 6.0
564
Close Shift
NOTE: The Close Register Shift option will not be available on the Touch POS menu
if a shift is not currently open.
Close Shift
At the end of each shift, it is necessary for the Greeter to close the register shift at the Point of Sale in order to track cash over/short. The completion of this process provides for an exact cutoff for each cashier, thus ensuring accountability in your cash control. Follow these steps to close a shift:
1 From the Touch POS menu, click Close Shift.The message Are you certain you want to close the shift? appears.
2 Click Yes.

User Manual—Version 6.0 WashConnect® TOUCH POS
565
The Close Shift tab appears.
Figure 278. Close Shift tab
In the Deposit to Bank area, type amounts in the denomination boxes. Checks are automatically tallied from the shift and the check total appears. The Bank Total appears on the Total line. This is the amount to be deposited at the bank.
NOTE: Optional: Type an amount in the Express Deposit box. Do this only, if you
do not type amounts in the denomination boxes. Therefore, use one or the other not both Express Deposit and Express Close boxes.
3 In the Ending Bank area, type amounts in the denomination boxes. The total appears on the Total line. This is the amount to leave in the POS terminal after closing the shift.(Optional) Type an amount in the Express Close box. Do this only, if you do not type amounts in the denomination boxes.
The Ending Bank Total you enter here will become the total required to open the Beginning Bank the next time a POS Register Shift is opened. In this example, the next register shift will need to be opened with $122.50.
4 After typing all quantities, select one of the following:Click the Close Shift button to close without a printed report receipt.–or–Click the Close Shift With Report button to close shift and print a journal receipt on the POS receipt printer.
TOUCH POS WashConnect® User Manual—Version 6.0
566
–or–Click the Quick Close Shift button to close the unverified shift so that you can verify or edit using Journal Verify.
You will be returned to the Main Menu, the shift is closed and a new shift can be started right away.
It is possible to edit most shift information after a shift has been closed; however, it is much easier to have accurate information inputted during the shift. Editing closing monies is done in the Journal Editor.
See “TOUCH POS” on page 557.
See “About Journals” on page 272.
PreSell Terminal
A Presell Terminal does not have a cash drawer. The Presell Terminal is typically used at a full-service car wash. It’s designed to enter your customer’s wash selections and printout on a presell ticket. Customer walks the presell ticket to the POS Cashier when they can pay for their selections.
NOTE: If adding a 2nd vehicle club membership to be charged to the same
customer, do not enter a Presell ticket. Instead, send the customer to the cashier who must ring entire sale at the Touch POS.
Enter a new presell ticket
1 From the Presell terminal, open WashConnect®.Presell automatically opens.
NOTE: If Presell does not automatically open upon logon, see system settings for
TouchPresellConfiguration.
2 From the Touch POS menu, Open Touch POS sales screen.The Presell Terminal’s sales screen appears in the TouchPreSell tab.
3 From Greeter, type greeter’s name. By default, the system will retain the last greeter selected.
NOTE: To post a sale in POS or post a ticket in Presell, user must be clocked in from
the WashConnect Time Clock menu and a shift must be opened. The system will retain the last greeter clocked in by default. An ROA is the only excep-

User Manual—Version 6.0 WashConnect® TOUCH POS
567
tion if Greeter is not clocked in. Time Clock options are now configurable settings.
See “Time Clock” on page 753.
4 In Plate, type customer’s license plate number. If car has been there before, select the customer.The customer’s name and plate number appear next to the Customer button.–or–If customer is new, select the New Customer button. You can enter customer information here, or just click the Done button if you are busy. POS Cashier can edit vehicle information.
5 Click to select Sale Item button(s). All of the Sales Item buttons (PLU numbers) appear initially. If you don’t know the PLU number, you can search by doing one of the following:
▪ From the PLU/SKU/Coupon, type the sales item number to search by PLU number.
–or–
▪ Select a profit center button from the left-side, and then a sub menu appears with the sales item buttons available from the selected profit center.
NOTE: Profit Center names from the menu items on the left will vary based on the
names you selected when you set up your profit centers from System Setup. Submenu buttons are designated during the configuration of the Sales Items and by selecting a Type such as Base, Extra, or Discount.
The sales item(s) appears on the virtual receipt.
NOTE: If you need to remove a Sales Item:
• Click the Remove button to remove the selected item from the virtual receipt.
• Click the Clear button to clear the entire transaction screen and start over.
6 Click the Finalize button.The PreSell ticket prints with a barcode and then the customer takes to cashier to scan.

TOUCH POS WashConnect® User Manual—Version 6.0
568
Figure 279. Touch PreSell Sales Screen
Point of Sale with PreSell and without RFID
With this full-service business model, there is a PreSell terminal at the entrance of tunnel and a cashier at a Point of Sale somewhere else on site where the customer walks to while their vehicle goes through the tunnel. In this business model, if a customer purchases a club, they are identified by their license plate (not the RFID or club card number).
See “Purchase new club membership (for the first vehicle)” on page 568.
Purchase new club membership (for the first vehicle)
NOTE: The instructions assume you are using the an on-site safe with the virtual
safe setting enabled, recommended by ICS.
After Customer brings Presell ticket to the POS, follow these instructions:
1 Customer needs to fill out and sign the Wash Club Sign Up Contract.
2 At the Touch POS, scan the barcode on the Presell ticket.The club and the club wash redemption appear in the virtual receipt.
3 Click the Finalize button.
4 If necessary and available, you can select extra service(s) for the wash today.

User Manual—Version 6.0 WashConnect® TOUCH POS
569
5 Click the Finalize button.
6 In Payment, customer may select any type of payment.
NOTE: Customer must pay with credit card for automatic monthly billing.
7 From the Customers -> Manage menu, you can enter customer’s information later since all of their information is recorded on the Wash Club Sign Up Contract that they fill out at time of purchase.-OR-Add Customer Information at a later time since customer has filled out the Wash Club Sign Up Contract.
“Add Customer Information”
“Available Promotions”
See “TOUCH POS” on page 557.
Renew Club Membership
NOTE: The instructions assume you are using the an on-site safe with the virtual
safe setting enabled, recommended by ICS.
If the club membership expires, the Touch POS will recognize this and ask you to confirm.
1 Open Touch POS sales entry screen.
2 In Plate, type customer’s license plate number.
3 From the search results on the right-side, locate and then click to select customer.The customer’s information fills in the lower section of the virtual receipt. The message Your club has expired. Do you want to renew it? appears.
Figure 280. Club Expired Dialog box
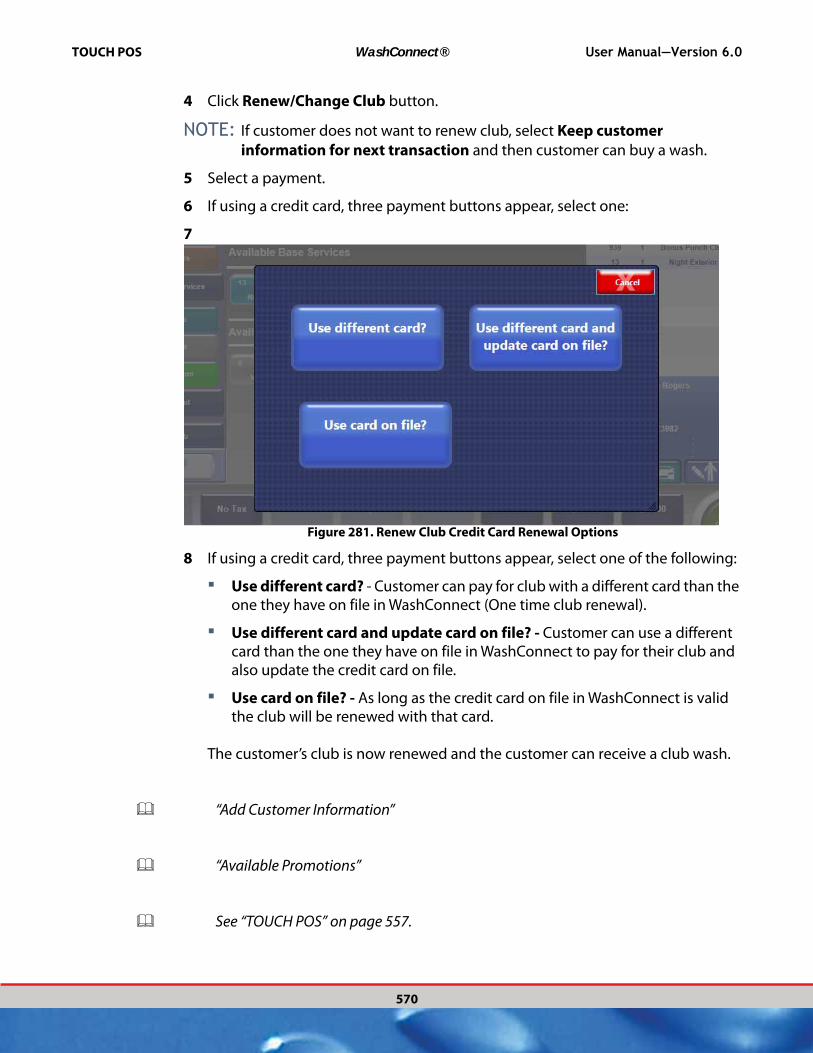
TOUCH POS WashConnect® User Manual—Version 6.0
570
4 Click Renew/Change Club button.
NOTE: If customer does not want to renew club, select Keep customer
information for next transaction and then customer can buy a wash.
5 Select a payment.
6 If using a credit card, three payment buttons appear, select one:
7
Figure 281. Renew Club Credit Card Renewal Options
8 If using a credit card, three payment buttons appear, select one of the following:
▪ Use different card? - Customer can pay for club with a different card than the one they have on file in WashConnect (One time club renewal).
▪ Use different card and update card on file? - Customer can use a different card than the one they have on file in WashConnect to pay for their club and also update the credit card on file.
▪ Use card on file? - As long as the credit card on file in WashConnect is valid the club will be renewed with that card.
The customer’s club is now renewed and the customer can receive a club wash.
“Add Customer Information”
“Available Promotions”
See “TOUCH POS” on page 557.

User Manual—Version 6.0 WashConnect® TOUCH POS
571
Add Customer Information
After the customer purchases the Club, you will need to enter the customer’s information to complete the club setup.
1 From the Customers menu, select Manage.
2 Click to select the All Customer check box.
3 In Search box, type the customer’s License Plate number.
4 From the In Field list, select License.
5 Click the View button.
NOTE: If License column is not viewable, click the Select Columns button.
6 Double-click to select the customer.-OR-
Select the vehicle, and press the Edit Customer button.
7 Required: type customer’s First Name and Last Name. All other customer information is optional.
8 Click to select the Vehicle Information tab.
9 Double-click to select the vehicle.-OR-
Select the vehicle, and press the Edit Vehicle button.
10 Add all other vehicle information that is available.
11 Click the OK button, and then click the Save button.
12 Click the OK button.
NOTE: DO NOT CHANGE THE EXPIRATION DATE.
Club setup is now complete and billing approves overnight. Customer’s credit card will be billed monthly until customer cancels membership.
See “TOUCH POS” on page 557.
Purchase Club Membership for a 2nd Vehicle (for an Existing Customer)
When a customer does NOT have a presell ticket to scan...
1 From the Customers menu, select Manage.
2 Search for the existing customer.

TOUCH POS WashConnect® User Manual—Version 6.0
572
3 From the In Field list, select Customer.
4 In Search box, type the customer’s name.
5 Click the View button.
6 Double-click to select the customer.-OR-Select a customer, and click the
Edit Customer button.
7 Click the Add Vehicle button.
8 In Plate No, type the 2nd vehicle’s plate number.
9 In Club, select a club for the 2nd vehicle.
10 In Expiration Date, type in today’s date so that customer is billed overnight.
11 In Billing Status, select Active or Bill from the list.
12 Optional: Fill in all other available Vehicle Information.
13 Click OK.
14 The message Vehicle Saved Successfully appears, click OK.
15 Click the Save button.
Club setup is now complete and billing approves overnight.No receipt will print for customer.
“Purchase new club membership (for the first vehicle)”
See “TOUCH POS” on page 557.
Terminate or Suspend Vehicles but NOT Customer
Terminate or Suspend the vehicle(s) but NOT the customer.
IMPORTANT:
▪ Terminating vehicles does not delete credit card information.
▪ Suspended vehicles can reactivate their membership without resubmitting a credit card.
1 Open WashConnect®

User Manual—Version 6.0 WashConnect® TOUCH POS
573
2 From the Customers menu, select the Manage button.
3 Search for a Customer.
See “Add Customer Information” on page 571.
4 In Search box, type in customer’s plate number.
5 From the In Field drop down list, select License.
6 Click the View button.
7 Double-click the customer.-OR-
Select an active customer and, click the Edit Customer button.
8 Click to select Vehicle Information tab.
9 Double-click to select the vehicle.
10 In Billing Status, select Terminated or Suspended.
11 Click OK.
12 Repeat steps 7-9 to terminate or suspend other vehicles.
13 Click the Save button.The message Customer Saved Successfully appears.
14 Click OK.Termination or suspension will be effective immediately.
See “TOUCH POS” on page 557.
Terminate or Suspend Customer and All Vehicles
Terminate a Club Customer or Fleet Customer and all Vehicles.
NOTE: For security, WashConnect does not store credit card data but stores a credit
card recurring ID that the credit card processor uses to access the credit card data at TransFirst® or APAY®.
IMPORTANT: If terminating customer, any related credit card information on file is permanently deleted immediately at both the current location and at corporate. Even though terminated, the club is still valid until the expiration date, unless you alter the date to today to make the change effective immediately. Upon expiration, all vehicles will automatically be terminated.

TOUCH POS WashConnect® User Manual—Version 6.0
574
-OR-
Suspend a Club Customer or Fleet Customer and all Vehicles
IMPORTANT: Suspending will deactivate customer and retain credit card on file.
1 Open WashConnect.
2 From the Customers menu, select Manage.-OR- From the Fleet menu, select Accounts.
3 Double-click the customer.-OR-
Click to select the active customer, and then click Edit Customer button.
4 In Status, select Terminated or Suspended.
5 Click the Save button.
6 Click OK.
NOTE: A fleet termination or suspension will be effective when the expiration date
is reached.
RFID is Not Working
This is the procedure to follow if the Customer’s RFID tag is not working or not being read at the Auto Sentry.
1 From Auto Sentry touch screen, press the Cancel button.The cancel button will force the RFID Reader to attempt to read the RFID tag again.
2 If the message No RFID Tags Found, then the RFID tag was not read or is defective.
3 Swipe an RFID Admin Card.The keypad appears on the touch screen.
NOTE: If you receive the message Admin Card Not in Database after you swipe
your RFID Admin Card, then in WashConnect, on the menu to the right, go to Users > Manage Users and edit the User tied to the RFID Admin Card. In Admin Card field, type the ID number located on the back of the RFID Admin Card, for example: !654321, and Save the entry.
4 From the on-screen numeric keypad, enter the RFID Tag ID located on the vehicle’s windshield, and then press Enter.
5 If the customer’s RFID tag number is valid, the transaction will process and a receipt will print.-OR-

User Manual—Version 6.0 WashConnect® TOUCH POS
575
If the customer’s RFID tag number is not a valid number,the message RFID is Not in Database appears, and they will need to purchase a wash or club membership.
6 Remove the defective RFID tag and adhere a new RFID tag to the customer’s windshield. Ensure the new RFID tag is updated in the customer’s vehicle information in WashConnect.
Available Promotions
NOTE: Promotions can only be setup from Corporate.
The WashConnect® system automatically tracks the customer information and advises cashier with an Available Promotions screen when promotions are available for the customer.
To set up the promotions from the Available Promotions screen, See “About Promotions” on page 454.
1 Open Touch POS.
2 Locate customer.
3 Add a Sales Item PLU.
4 Select the Finalize button, if the customer qualifies for one or more promotions, the Available Promotions screen appears.
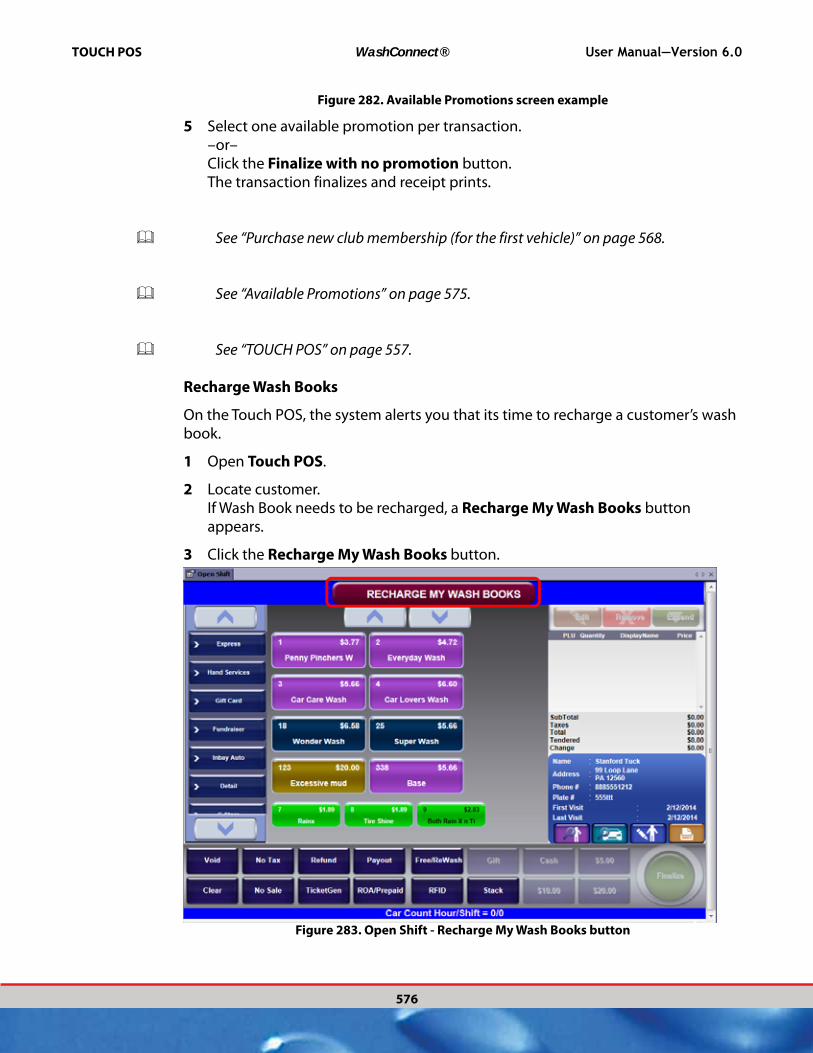
TOUCH POS WashConnect® User Manual—Version 6.0
576
Figure 282. Available Promotions screen example
5 Select one available promotion per transaction.–or–Click the Finalize with no promotion button.The transaction finalizes and receipt prints.
See “Purchase new club membership (for the first vehicle)” on page 568.
See “Available Promotions” on page 575.
See “TOUCH POS” on page 557.
Recharge Wash Books
On the Touch POS, the system alerts you that its time to recharge a customer’s wash book.
1 Open Touch POS.
2 Locate customer.If Wash Book needs to be recharged, a Recharge My Wash Books button appears.
3 Click the Recharge My Wash Books button.
Figure 283. Open Shift - Recharge My Wash Books button
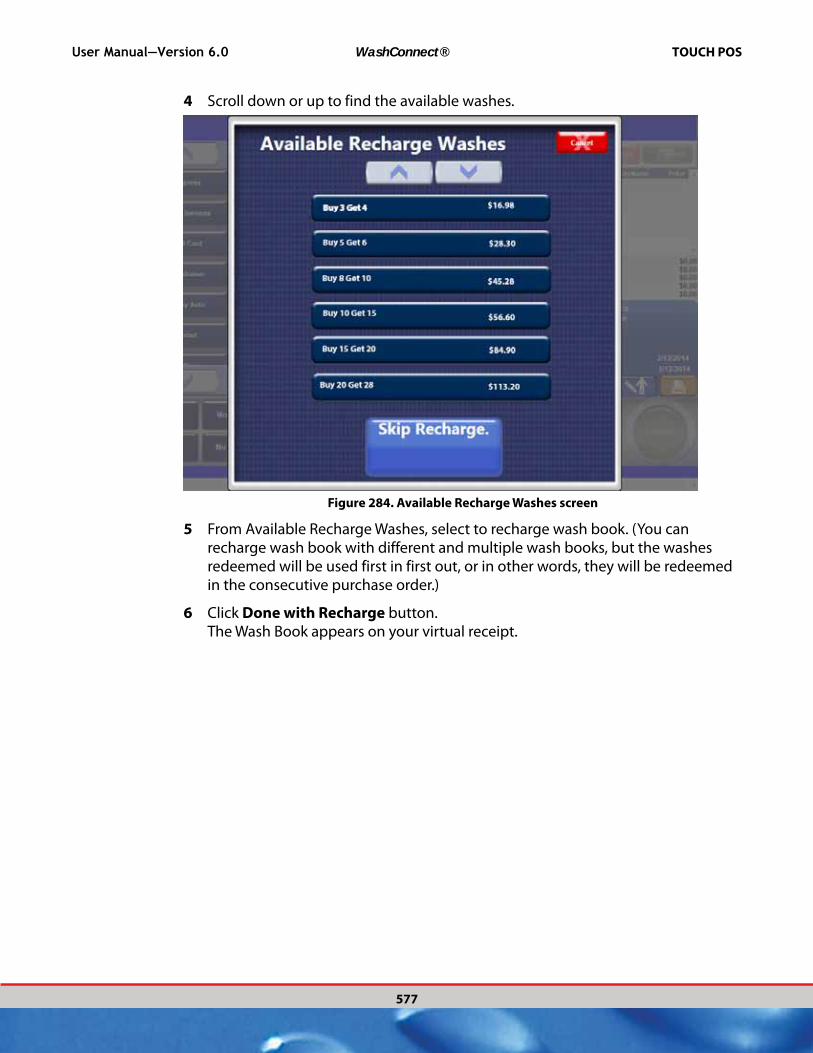
User Manual—Version 6.0 WashConnect® TOUCH POS
577
4 Scroll down or up to find the available washes.
Figure 284. Available Recharge Washes screen
5 From Available Recharge Washes, select to recharge wash book. (You can recharge wash book with different and multiple wash books, but the washes redeemed will be used first in first out, or in other words, they will be redeemed in the consecutive purchase order.)
6 Click Done with Recharge button.The Wash Book appears on your virtual receipt.
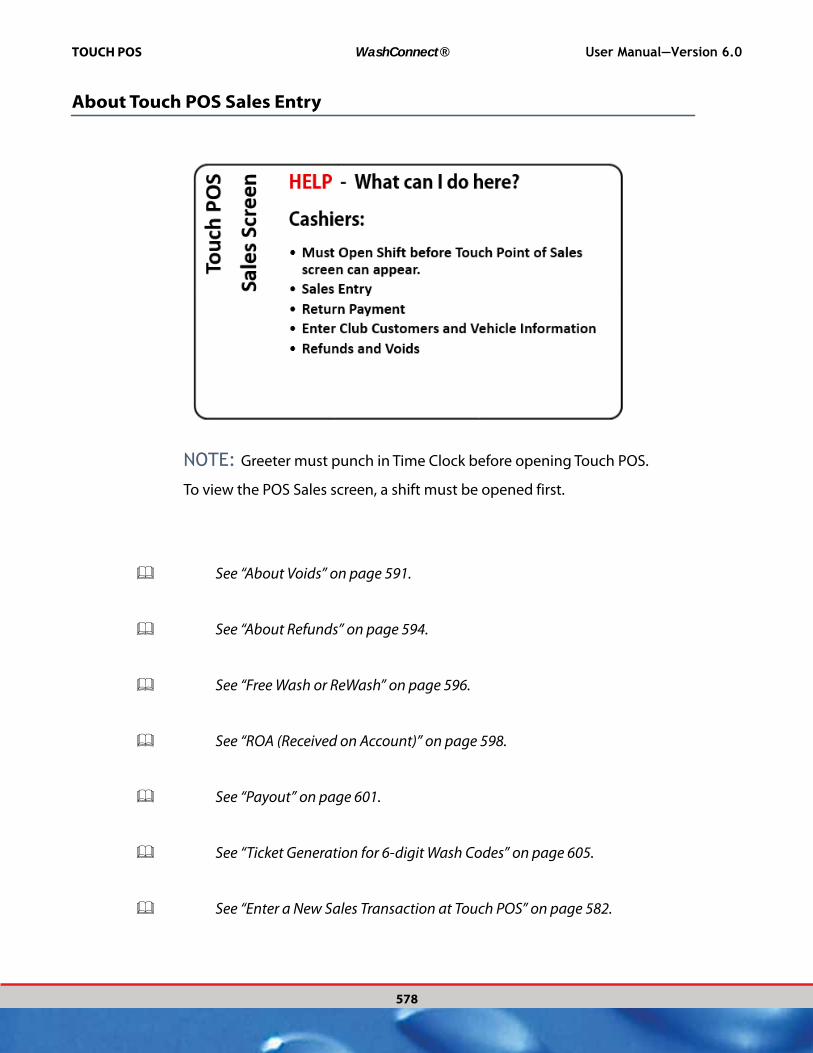
TOUCH POS WashConnect® User Manual—Version 6.0
578
About Touch POS Sales Entry
NOTE: Greeter must punch in Time Clock before opening Touch POS.
To view the POS Sales screen, a shift must be opened first.
See “About Voids” on page 591.
See “About Refunds” on page 594.
See “Free Wash or ReWash” on page 596.
See “ROA (Received on Account)” on page 598.
See “Payout” on page 601.
See “Ticket Generation for 6-digit Wash Codes” on page 605.
See “Enter a New Sales Transaction at Touch POS” on page 582.

User Manual—Version 6.0 WashConnect® TOUCH POS
579
See “Remove Sales Items” on page 586.
See “Clear Sales Items” on page 587.
See “Purchase a Club Membership at the Auto Sentry terminal” on page 588.
See “Purchase a Club Membership with a Gift Card at Touch POS” on page 589.
See “Split Payments” on page 590.
See “Search for a Sales Transaction in Touch POS” on page 590.
See “About Stack” on page 607.
About POS and Presell Service Buttons
There are two different ways to change the size of the Service buttons at the POS and Presell terminals. When sorting by PLU, you can choose all buttons to either be Regular, Medium, or Large. Or when sorting by Sales Item Category, it supports different size buttons for different types of services (base, extra, by profit center).
Just drop the correct buttons files in the Images/TouchPOS/invbuttons.

TOUCH POS WashConnect® User Manual—Version 6.0
580
Figure 285. Touch POS Service Color grouped buttons
See “POS > TouchPOSConfiguration > General” on page 694.
See “POS > TouchPOSConfiguration > ProfitCenterDescriptionColor” on page 698.
Create different size buttons according to service type example:
1 From the System Setup, select Devices, and then Settings.
2 In Device Type, select POS.
3 In Device Name, select the device name.
4 In Settings Type, select TouchPOSConfiguration.
5 In Settings, select General.
6 In the setting SortPOSServices, select SalesItemCategory.
7 In the setting FonSizeForServices, select a font size (default is 11).
8 In Tools, select the Save button.
9 In Settings, select ProfitCenterDescriptionColor.
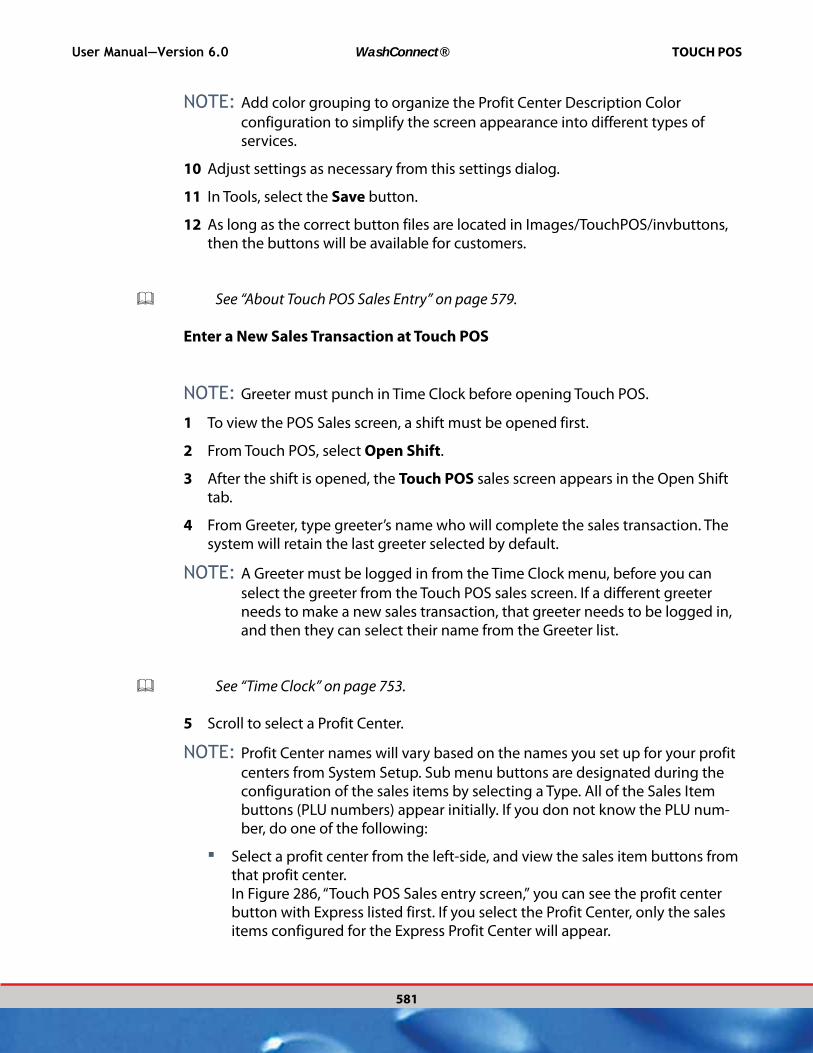
User Manual—Version 6.0 WashConnect® TOUCH POS
581
NOTE: Add color grouping to organize the Profit Center Description Color
configuration to simplify the screen appearance into different types of services.
10 Adjust settings as necessary from this settings dialog.
11 In Tools, select the Save button.
12 As long as the correct button files are located in Images/TouchPOS/invbuttons, then the buttons will be available for customers.
See “About Touch POS Sales Entry” on page 579.
Enter a New Sales Transaction at Touch POS
NOTE: Greeter must punch in Time Clock before opening Touch POS.
1 To view the POS Sales screen, a shift must be opened first.
2 From Touch POS, select Open Shift.
3 After the shift is opened, the Touch POS sales screen appears in the Open Shift tab.
4 From Greeter, type greeter’s name who will complete the sales transaction. The system will retain the last greeter selected by default.
NOTE: A Greeter must be logged in from the Time Clock menu, before you can
select the greeter from the Touch POS sales screen. If a different greeter needs to make a new sales transaction, that greeter needs to be logged in, and then they can select their name from the Greeter list.
See “Time Clock” on page 753.
5 Scroll to select a Profit Center.
NOTE: Profit Center names will vary based on the names you set up for your profit
centers from System Setup. Sub menu buttons are designated during the configuration of the sales items by selecting a Type. All of the Sales Item buttons (PLU numbers) appear initially. If you don not know the PLU num-ber, do one of the following:
▪ Select a profit center from the left-side, and view the sales item buttons from that profit center. In Figure 286, “Touch POS Sales entry screen,” you can see the profit center button with Express listed first. If you select the Profit Center, only the sales items configured for the Express Profit Center will appear.
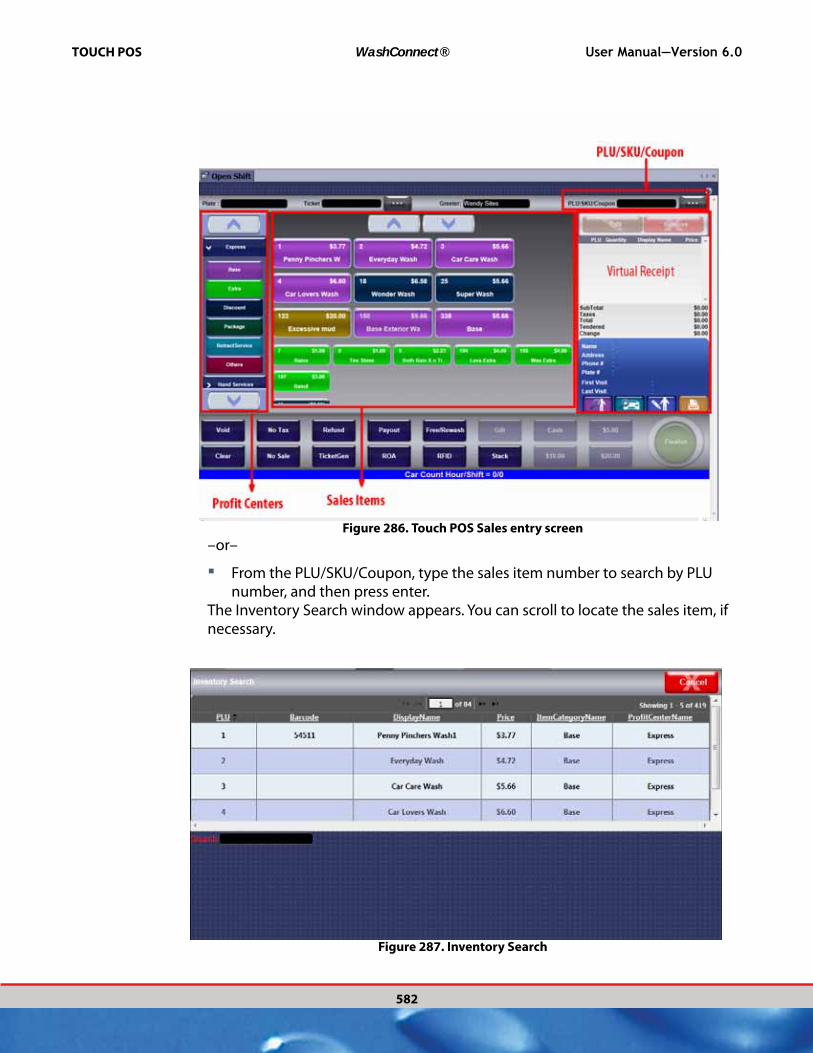
TOUCH POS WashConnect® User Manual—Version 6.0
582
Figure 286. Touch POS Sales entry screen
–or–
▪ From the PLU/SKU/Coupon, type the sales item number to search by PLU number, and then press enter.
The Inventory Search window appears. You can scroll to locate the sales item, if necessary.
Figure 287. Inventory Search
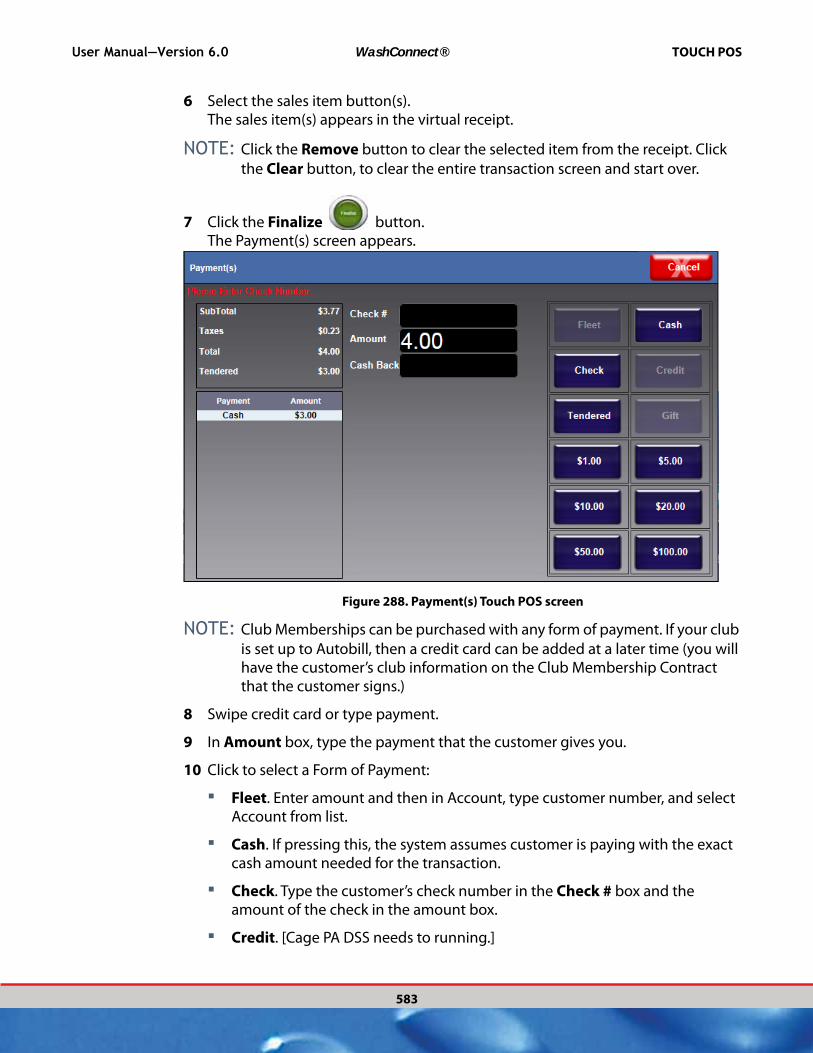
User Manual—Version 6.0 WashConnect® TOUCH POS
583
6 Select the sales item button(s).The sales item(s) appears in the virtual receipt.
NOTE: Click the Remove button to clear the selected item from the receipt. Click
the Clear button, to clear the entire transaction screen and start over.
7 Click the Finalize button.The Payment(s) screen appears.
Figure 288. Payment(s) Touch POS screen
NOTE: Club Memberships can be purchased with any form of payment. If your club
is set up to Autobill, then a credit card can be added at a later time (you will have the customer’s club information on the Club Membership Contract that the customer signs.)
8 Swipe credit card or type payment.
9 In Amount box, type the payment that the customer gives you.
10 Click to select a Form of Payment:
▪ Fleet. Enter amount and then in Account, type customer number, and select Account from list.
▪ Cash. If pressing this, the system assumes customer is paying with the exact cash amount needed for the transaction.
▪ Check. Type the customer’s check number in the Check # box and the amount of the check in the amount box.
▪ Credit. [Cage PA DSS needs to running.]

TOUCH POS WashConnect® User Manual—Version 6.0
584
▪ Tendered. Type in the amount of cash customer gives to cashier.
▪ Gift.
▪ $1.00, $5.00, $10.00, $20.00, $50.00, and $100.00 are quick entry buttons for the amount the customer may give you.
The virtual receipt calculates the sale, the amount tendered, the change if needed, and the balance due remains.
11 Swipe a different card:
▪ Cannot be the same type as the first card swiped.
▪ Cannot use two gift cards in one transaction.
▪ Cannot use two credit cards in one transaction.
▪ For Wash Club membership, credit card is only accepted.–or–
▪ Use cash or check for remaining balance due.When the amount of the sale is tendered, the drawer will open and receipt will print out. Touch POS is now ready for the next customer.
NOTE: At the bottom of the POS screen, you can find the Car Count Hour/Shift = x/
y. This line always appears with current hourly totals.x = car count for the current houry = car count for the shift
See “Reprint a Customer’s Receipt” on page 246.
See “Remove Sales Items” on page 586.
See “Clear Sales Items” on page 587.
See “Purchase a Club Membership at the Auto Sentry terminal” on page 588.
See “Purchase a Club Membership with a Gift Card at Touch POS” on page 589.
See “Split Payments” on page 590.
See “Search for a Sales Transaction in Touch POS” on page 590.
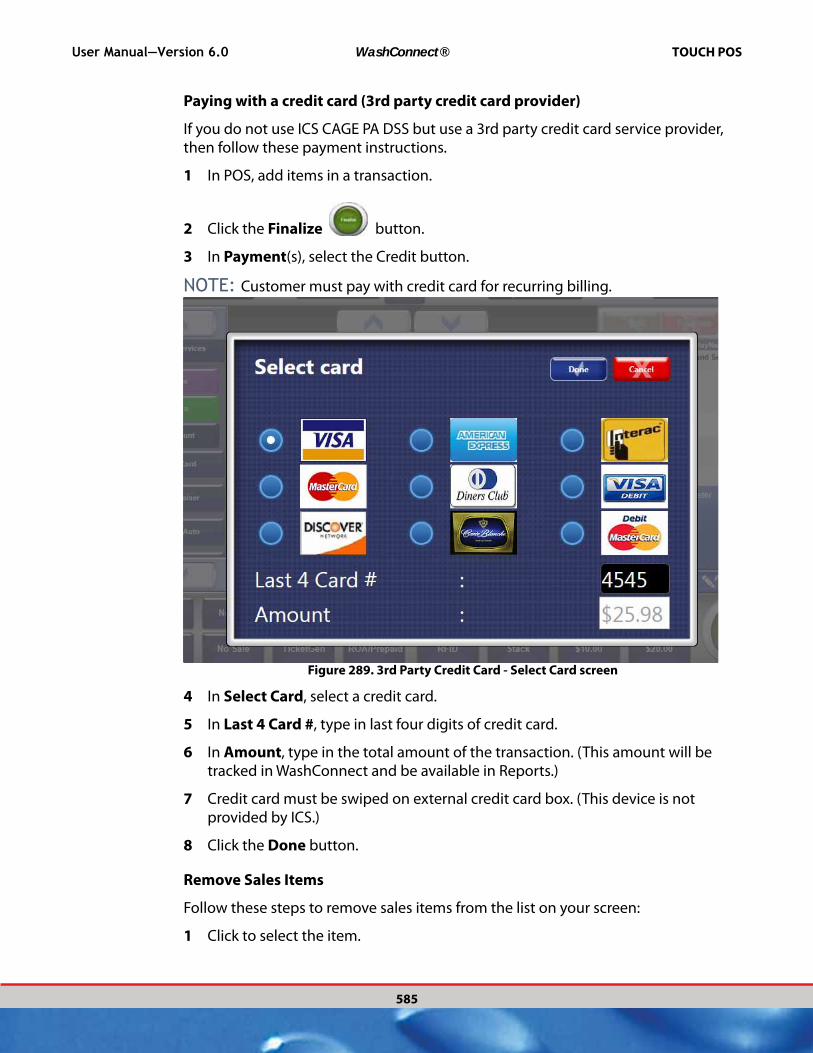
User Manual—Version 6.0 WashConnect® TOUCH POS
585
Paying with a credit card (3rd party credit card provider)
If you do not use ICS CAGE PA DSS but use a 3rd party credit card service provider, then follow these payment instructions.
1 In POS, add items in a transaction.
2 Click the Finalize button.
3 In Payment(s), select the Credit button.
NOTE: Customer must pay with credit card for recurring billing.
Figure 289. 3rd Party Credit Card - Select Card screen
4 In Select Card, select a credit card.
5 In Last 4 Card #, type in last four digits of credit card.
6 In Amount, type in the total amount of the transaction. (This amount will be tracked in WashConnect and be available in Reports.)
7 Credit card must be swiped on external credit card box. (This device is not provided by ICS.)
8 Click the Done button.
Remove Sales Items
Follow these steps to remove sales items from the list on your screen:
1 Click to select the item.
TOUCH POS WashConnect® User Manual—Version 6.0
586
2 Click the Remove button.The message Do you want to delete the selected item? appears.
3 Click OK.The item is removed from the Virtual Receipt.
See “Enter a New Sales Transaction at Touch POS” on page 582.
See “Clear Sales Items” on page 587.
See “Purchase a Club Membership at the Auto Sentry terminal” on page 588.
See “Purchase a Club Membership with a Gift Card at Touch POS” on page 589.
See “Split Payments” on page 590.
See “Search for a Sales Transaction in Touch POS” on page 590.
Clear Sales Items
To remove the all sales items from the Touch POS screen virtual receipt.
Click the Clear button.
All sales items are removed and the Touch POS is ready for a new transaction.
Add RFID tag number and customer information for a new club member who signed up at the Auto Sentry.
See “Enter a New Sales Transaction at Touch POS” on page 582.
See “Remove Sales Items” on page 586.
See “Purchase a Club Membership at the Auto Sentry terminal” on page 588.
See “Purchase a Club Membership with a Gift Card at Touch POS” on page 589.
User Manual—Version 6.0 WashConnect® TOUCH POS
587
See “Split Payments” on page 590.
See “Search for a Sales Transaction in Touch POS” on page 590.
Purchase a Club Membership at the Auto Sentry terminal
After the customer purchases a club membership at the Auto Sentry, the only information in the system is the credit card number from the sale of the club membership. The Auto Sentry alerts the customer to see a cashier/greeter to receive their RFID tag and provide customer information to complete the club membership.
1 From the Customers menu, select the Manage command.
2 At the bottom of the new club member’s receipt, find a wash code to enter.
3 From the In Field drop-down box, select RFID.
4 In Search box, type the customer’s temporary RFID number which is located at the bottom of the customer’s receipt as the Reference #, and then click
the View button –or– press the ENTER key.The customer appears in the Membership list.
5 Click to select the Customer, and then select the Edit button.From the Customer Information tab, the Club section appears.
6 Click to select the Vehicle Information tab.The Vehicle information appears.
7 Click to select the temporary RFID number, and then click the Edit Vehicle button.
NOTE: The tilde (~) symbol signifies that the RFID number is temporary and not
valid. The customer needs to receive a valid RFID tag number. Customers with a tilde (~) prefix in the RFID column have signed up and paid for a club at the Auto Sentry, but did not complete the membership process.
8 In RFID Tag, type the new RFID tag number.
9 In Plate No, type customer’s license plate number.
10 In the other fields, type as much information as possible like the customer’s name and address for the credit card billing, etc.
11 Adhere the RFID tag to your customer’s windshield.
See “Enter a New Sales Transaction at Touch POS” on page 582.
See “Remove Sales Items” on page 586.

TOUCH POS WashConnect® User Manual—Version 6.0
588
See “Clear Sales Items” on page 587.
See “Purchase a Club Membership at the Auto Sentry terminal” on page 588.
See “Purchase a Club Membership with a Gift Card at Touch POS” on page 589.
See “Split Payments” on page 590.
See “Search for a Sales Transaction in Touch POS” on page 590.
Purchase a Club Membership with a Gift Card at Touch POS
NOTE: This feature is not available at the Auto Sentry.
Customers can purchase a club membership with a gift card at the Touch POS.
▪ Customers cannot purchase an unlimited wash club with monthly recurring billing with a gift card.
▪ Customer can purchase a 6- or 12-month wash club with a gift card and also a split payment is acceptable. For example, you can use the balance of your gift card to pay for a portion of a six month club and the remaining balance with another form of payment such as cash or a credit card.
1 From the Touch POS, select a club to purchase.
2 Click the Finalize button.The Payment(s) screen appears.
3 Type the amount to be removed from the gift card to purchase the club.
4 Select the Gift button.The message Is Card Present appears.
5 Click Yes.The message Swipe Card appears.
6 Swipe the customer’s gift card.
7 If balance still remains, customer may pay cash or credit but cannot use another gift card.
NOTE: Split Payments are allowed. However, customer cannot use two of the
same card types. For example, if customer used a gift card and still has a bal-ance due, customer may not use another gift card but must select another form of payment.

User Manual—Version 6.0 WashConnect® TOUCH POS
589
See “Split Payments” on page 590.
Split Payments
Customer is able to split total of transaction with two different forms of payment.
Recurring club membership such as Unlimited Monthly Wash Club Membership is excluded from split payments and only can accept credit card for form of payment.
Customer is not allowed to use two of the same forms of payment. For example:
Acceptable
1 Gift Card and 1 Credit Card in one transaction.
2 Credit Cards in one transaction.
Unacceptable
2 Gift Cards in one transaction.
See “Enter a New Sales Transaction at Touch POS” on page 582.
See “Remove Sales Items” on page 586.
See “Clear Sales Items” on page 587.
See “Purchase a Club Membership at the Auto Sentry terminal” on page 588.
See “Purchase a Club Membership with a Gift Card at Touch POS” on page 589.
See “Split Payments” on page 590.
See “Search for a Sales Transaction in Touch POS” on page 590.
Search for a Sales Transaction in Touch POS
Voids and refunds are two reasons you would possibly need to search for a completed sales transaction. Voids can only be issued during the same shift the items were originally purchased. If you closed the shift, then you will have to issue a refund. Voids can be entered manually. Voids are never counted as actual cars washed.

TOUCH POS WashConnect® User Manual—Version 6.0
590
Follow these steps to Search for a Sales Transaction:
1 Open Touch POS.
2 In Ticket box, you can type or scan the Wash Code that is printed on the customer’s receipt. The wash code is the ticket number.
3 Click the Find Ticket button –or– press the ENTER key.
See “About Voids” on page 591.
See “Enter a New Sales Transaction at Touch POS” on page 582.
See “Remove Sales Items” on page 586.
See “Clear Sales Items” on page 587.
See “Purchase a Club Membership at the Auto Sentry terminal” on page 588.
See “Purchase a Club Membership with a Gift Card at Touch POS” on page 589.
See “Split Payments” on page 590.
See “Search for a Sales Transaction in Touch POS” on page 590.
About Voids
NOTE: Gift cards cannot be voided, but instead, need to be Refunded.
See “About Refunds” on page 594.
A sales transaction can be voided only during the same shift. If a customer changed their mind about the car wash or a particular purchase, and the sales transaction has already been finalized at the Point of Sale, it will be necessary to Void the transaction. Voids can only be performed during the same shift they were originally purchased

User Manual—Version 6.0 WashConnect® TOUCH POS
591
and before Close Shift. After a shift is closed, then that transaction will need to be a Refund.
See “Void Sales Transaction” on page 592.
See “About Touch POS Sales Entry” on page 579.
NOTE: The Void Button can be hidden if unwanted. Settings ->
TouchPosConfiguration -> Hide POS Buttons -> DisableVoid
Void Sales Transaction
Void transaction with receipt. You can only Void a sales transaction that was purchased from the current Point of Sale shift.
NOTE: Use Refund if no receipt is present, or purchased during previous shift,
different location, or different device, such as Auto Sentry® or other POS.
See “About Refunds” on page 594.
NOTE: Only Users with assigned Void For TouchPOS privileges from Security Roles,
and then from Manage Users select a role, and then Open POS can Void a Transaction.
1 From the Touch POS sales screen, select a Greeter.
2 Click the Void button.
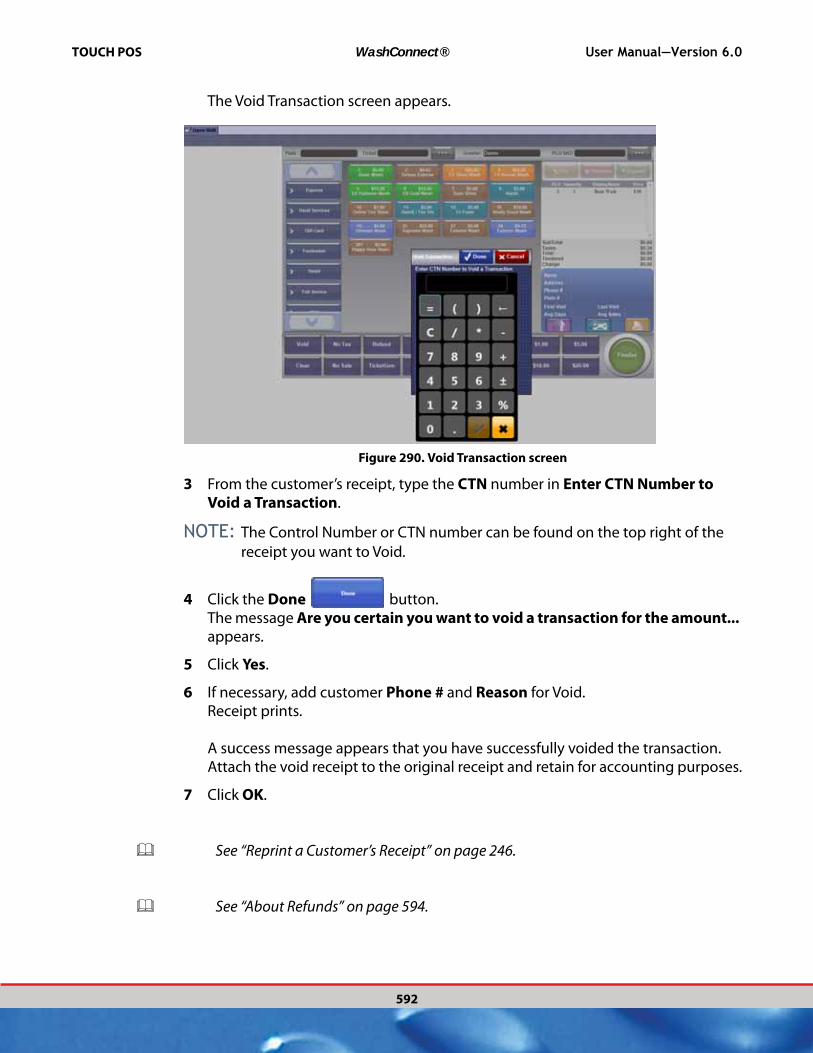
TOUCH POS WashConnect® User Manual—Version 6.0
592
The Void Transaction screen appears.
Figure 290. Void Transaction screen
3 From the customer’s receipt, type the CTN number in Enter CTN Number to Void a Transaction.
NOTE: The Control Number or CTN number can be found on the top right of the
receipt you want to Void.
4 Click the Done button.The message Are you certain you want to void a transaction for the amount... appears.
5 Click Yes.
6 If necessary, add customer Phone # and Reason for Void.Receipt prints.
A success message appears that you have successfully voided the transaction. Attach the void receipt to the original receipt and retain for accounting purposes.
7 Click OK.
See “Reprint a Customer’s Receipt” on page 246.
See “About Refunds” on page 594.

User Manual—Version 6.0 WashConnect® TOUCH POS
593
See “About Touch POS Sales Entry” on page 579.
About Refunds
You can issue a refund for a sales item or wash service with or without a customer’s receipt. You can enter the card manually for the refund.
NOTE: Voids can be performed during the same shift. If a new shift is open, you
select Refund instead of Void.
See “Refund with a Receipt” on page 594.
See “Refund without a Receipt” on page 595.
See “About Touch POS Sales Entry” on page 579.
NOTE: The Refund Button can be hidden if unwanted. Settings ->
TouchPosConfiguration -> Hide POS Buttons -> DisableRefund
Refund with a Receipt
NOTE: Use Void if purchased in the current shift.
Refund is used to give the customer back their money paid from a sales transaction during prior shifts or different locations. Use Void to refund a transaction from the current shift.
1 From the Touch POS sales screen, click the Refund button.The Warning message Do you have a receipt? Yes or No buttons appear.
2 Click Yes.The Refund Transaction dialog box appears.
NOTE: Refund privileges are setup from the Users menu, and then Manage Users
by selecting a role that has selected the TouchPOS the Refund for Touch POS privilege.
3 From the Refund Transaction dialog box, type or select a device from the Please Select a Device to Refund a Transaction from: drop-down box.
4 From the customer’s receipt, type the CTN number in Enter CTN Number to Refund a Transaction.

TOUCH POS WashConnect® User Manual—Version 6.0
594
5 From Verify these are the items to be refunded area, deselect any item(s) NOT to be refunded. (System default: All Items are selected from the transaction for refund.)
6 Click the Done button.A message Are you certain you want to refund… appears.
7 Click Yes.Item(s) are refunded in the system, drawer opens, and receipt prints.The Touch POS is ready for a new transaction.
See “Refund without a Receipt” on page 595.
See “About Refunds” on page 594.
See “About Touch POS Sales Entry” on page 579.
Refund without a Receipt
NOTE: Use Void to refund a transaction from the current shift.
Refund is used to give the customer back their money paid from a sales transaction during prior shifts or different locations. Refund privileges are setup from Users > Manage Users by selecting a role and then by allowing TouchPOS the Refund for TouchPOS privilege.
1 From the Touch POS sales screen, click the Refund button.The Warning message Do you have a receipt? appears.
2 Click No.You are directed back to POS Screen. A message Refund in Progress. Please select services for refund appears.
3 From POS Screen, select items to be refunded.
4 Click the Finalize button.If configured, Refund Customer Information dialog box appears.
5 From Customer Search, select the Search for a customer or to add a new customer if not configured, skip to #8.
6 Type in customer Phone # and Reason for the Refund.
7 Click the Done button.

User Manual—Version 6.0 WashConnect® TOUCH POS
595
8 A message Are you certain you want to refund the selected services with the Amount appears.
9 Click Yes. The message Successfully refunded the transaction appears.The item(s) are refunded in the system, the drawer opens, a receipt prints, and the Touch POS is ready for a new transaction.
See “Refund with a Receipt” on page 594.
See “About Refunds” on page 594.
See “About Voids” on page 591.
See “About Touch POS Sales Entry” on page 579.
Free Wash or ReWash
A FREE Wash or Rewash may be authorized by management for a customer in order to wash the vehicle without charging the dissatisfied customer again.
Management personnel may give a free wash or complimentary wash ticket for promotional purposes. To rewash a vehicle or send a wash through the tunnel as a free wash, the process is the same.
Be prepared to know how your management would like to handle an unhappy customer in advance. Free or Rewash buttons are available to quickly take care of the customer.
NOTE: You could also have a Package with a wash service plus a discount sales item
named specifically for dissatisfied customers.
Free Wash / ReWash
A FREE wash for dissatisfied customers.
These instructions are for a customer who has paid for a wash and received the wash but was dissatisfied with the wash, and management would like customer to come back for a FREE or REWASH.
A Free Wash could be selected for an unhappy customer that wants to come back a different day.
A ReWash would be used if the customer wanted to go through the wash again immediately. Customer may demand a refund because he so disappointed, see “About Refunds” on page 594.

TOUCH POS WashConnect® User Manual—Version 6.0
596
NOTE: Free/ReWash privileges for the User need to be selected from the Users
menu Security Roles.
1 Click the Free/ReWash button.
2 From the Choose your Option box, select:Free Wash to come back for Free wash another day.–or–ReWash to receive free wash immediately.
3 From the TouchPOS sales screen, select the base wash PLU and any extra services PLUs that the customer will receive for Free.
4 Click the Finalize button.
5 If settings are enabled, type in Free Wash/Rewash information. (Customer Name, phone number, Reason for ReWash).Approved By, and Greeter are automatically filled in based on who is logged into WashConnect as the cashier and manager. The receipt prints out. If configured, receipt will display wash code for future wash.
NOTE: If customer insists and prefers to receive a full Refund for their dissatisfac-
tion, you can refund the customer’s payment:
▪ Use Void if transaction is from current shift.
▪ Use Refund if transaction is from a prior shift or different site location.
NOTE: User must have Free privileges which are setup from Users > Security Roles.
Select a role and then select Free/ReWash from the TouchPOS privilege tree.
See “Free Wash / ReWash” on page 596.
See “Void Sales Transaction” on page 592.
See “About Refunds” on page 594.
See “Tracking Rewash or Free Washes” on page 598.
See “About Touch POS Sales Entry” on page 579.
User Manual—Version 6.0 WashConnect® TOUCH POS
597
Tracking Rewash or Free Washes
Individual sites determine if they want to keep track of rewash or free washes.
The following settings will turn off the required fields to enter customer data during a rewash, free wash, refund, or using a club customer.
1 From the System Setup menu, click Devices.
2 Click to select Settings.
3 From Device Type, select POS.
4 From Device Name, select the device.
5 From Settings Type, select TouchPOSConfiguration.
6 In Settings box, select Prompt Settings.
7 Set up the Prompt Settings as follows:
Prompt Settings:
The following settings disable the prompt to enter customer information such as phone number and reason for free wash, re-wash, refunds and clubs:
FreewashCustomerInformationPrompt = False
RewashCustomerInformationPrompt = False
RefundsCustomerInformationPrompt = False
ClubCustomerInformationPrompt = False
NOTE: True enables the setting.
See “Free Wash / ReWash” on page 596.
See “About Touch POS Sales Entry” on page 579.
ROA (Received on Account)
NOTE: The ROA Button can be hidden if unwanted. Settings ->
TouchPosConfiguration -> Hide POS Buttons -> DisableROA
If customer has a fleet account, and wants to make a payment, use the ROA button.

TOUCH POS WashConnect® User Manual—Version 6.0
598
Payment on Received on Account
1 Click the ROA button.
A message Do you have an Invoice Number? appears.
Warning: All invoice payments posted to an account will reflect in the customer balance. Any unapplied payments will be displayed in the Business name section of the Invoice tab.
(If YES):
NOTE: If using an invoice number, entire invoice must be paid. To make a partial payment, go back to step #1 and then select NO.
2 Click Yes, I have an Invoice Number.The ROA Payment(s) screen appears.
Figure 291. ROA dialog box
3 In Invoice #, type invoice number.
NOTE: Even though typing in the Invoice number, the ROA balance is applied to
the oldest invoice and any balance surplus is applied to the next oldest invoice.
4 In Amount, the open balance automatically appears.
5 Click the Done button.
6 The payment screen appears, select Payment Type button: check, cash, etc.
The payment is posted.(If NO):
1 Click No, I don’t have an Invoice Number.

User Manual—Version 6.0 WashConnect® TOUCH POS
599
The Payment(s) screen appears.
Figure 292. ROA Payment Screen without an invoice number
2 In Account, begin typing the first few letters of the fleet account name, and then select the account from the list.
Figure 293. ROA Payment(s) screen check example
3 In Amount, type amount that customer wants to pay.
4 In Check #, type a check number, if necessary.
5 In Cash Back, type an amount, if necessary.
6 Select Payment Type button: check, cash, etc.
7 Click Done.The payment is posted to the oldest open balance first.
See “TOUCH POS” on page 557.
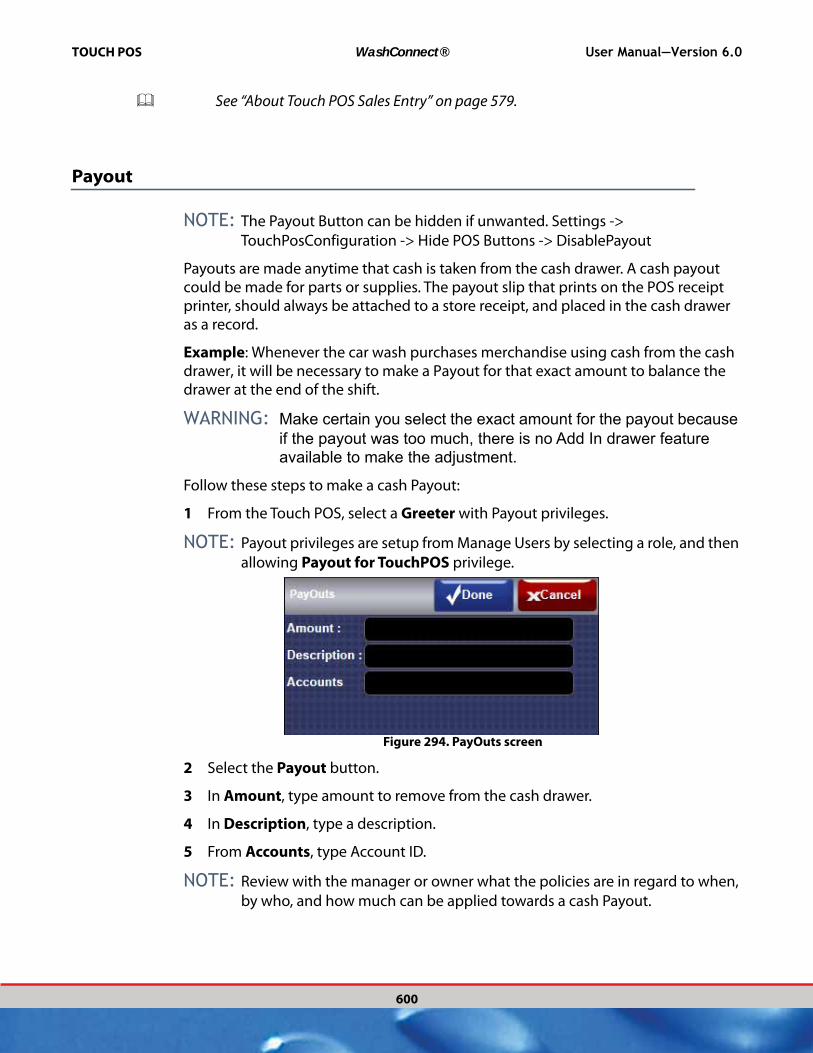
TOUCH POS WashConnect® User Manual—Version 6.0
600
See “About Touch POS Sales Entry” on page 579.
Payout
NOTE: The Payout Button can be hidden if unwanted. Settings ->
TouchPosConfiguration -> Hide POS Buttons -> DisablePayout
Payouts are made anytime that cash is taken from the cash drawer. A cash payout could be made for parts or supplies. The payout slip that prints on the POS receipt printer, should always be attached to a store receipt, and placed in the cash drawer as a record.
Example: Whenever the car wash purchases merchandise using cash from the cash drawer, it will be necessary to make a Payout for that exact amount to balance the drawer at the end of the shift.
WARNING: Make certain you select the exact amount for the payout because if the payout was too much, there is no Add In drawer feature available to make the adjustment.
Follow these steps to make a cash Payout:
1 From the Touch POS, select a Greeter with Payout privileges.
NOTE: Payout privileges are setup from Manage Users by selecting a role, and then
allowing Payout for TouchPOS privilege.
Figure 294. PayOuts screen
2 Select the Payout button.
3 In Amount, type amount to remove from the cash drawer.
4 In Description, type a description.
5 From Accounts, type Account ID.
NOTE: Review with the manager or owner what the policies are in regard to when,
by who, and how much can be applied towards a cash Payout.
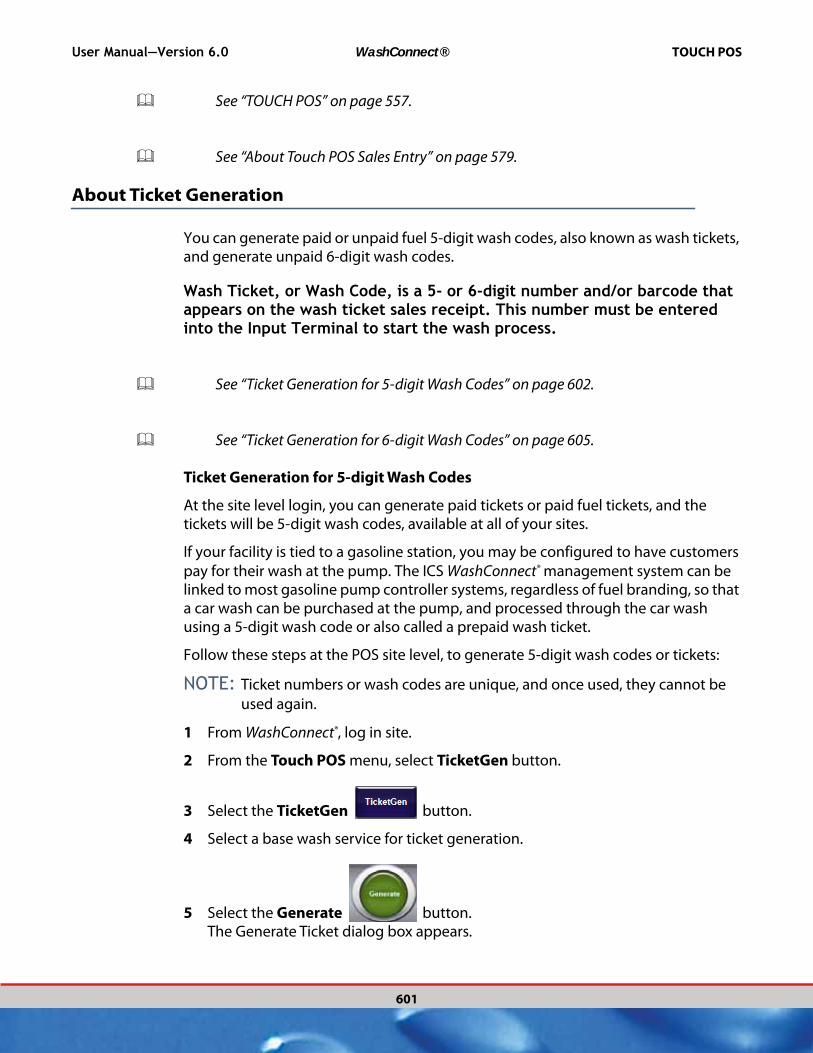
User Manual—Version 6.0 WashConnect® TOUCH POS
601
See “TOUCH POS” on page 557.
See “About Touch POS Sales Entry” on page 579.
About Ticket Generation
You can generate paid or unpaid fuel 5-digit wash codes, also known as wash tickets, and generate unpaid 6-digit wash codes.
Wash Ticket, or Wash Code, is a 5- or 6-digit number and/or barcode that appears on the wash ticket sales receipt. This number must be entered into the Input Terminal to start the wash process.
See “Ticket Generation for 5-digit Wash Codes” on page 602.
See “Ticket Generation for 6-digit Wash Codes” on page 605.
Ticket Generation for 5-digit Wash Codes
At the site level login, you can generate paid tickets or paid fuel tickets, and the tickets will be 5-digit wash codes, available at all of your sites.
If your facility is tied to a gasoline station, you may be configured to have customers
pay for their wash at the pump. The ICS WashConnect® management system can be linked to most gasoline pump controller systems, regardless of fuel branding, so that a car wash can be purchased at the pump, and processed through the car wash using a 5-digit wash code or also called a prepaid wash ticket.
Follow these steps at the POS site level, to generate 5-digit wash codes or tickets:
NOTE: Ticket numbers or wash codes are unique, and once used, they cannot be
used again.
1 From WashConnect®, log in site.
2 From the Touch POS menu, select TicketGen button.
3 Select the TicketGen button.
4 Select a base wash service for ticket generation.
5 Select the Generate button.The Generate Ticket dialog box appears.

TOUCH POS WashConnect® User Manual—Version 6.0
602
6 Select the Random Ticket check box for random wash code numbers.
NOTE: If Random Ticket is checked, the Start box will not appear. If Random Ticket
box is not selected, type the first ticket wash code number in the Start box, and then the wash codes will generate in a sequential order. Type any num-ber between (100,000 and 999,999).
7 In How Many Tickets, type amount of paid tickets necessary, and press the ENTER key.
8 In Number of Days Ticket is Valid For box, type the number of days the wash codes will remain valid from the date of ticket generation. Maximum is 999 days. The default is 3 days. Then press the ENTER key.
9 In Type of Ticket drop-down box, select Unpaid or Paid. (You can only select Unpaid at Corporate because there is no money drawer available.) Global wash codes are always paid tickets.
10 Click the Generate Tickets button.
.
Figure 295. Ticket Generation screen
WARNING: A warning message appears restating how many tickets are going to print as well as days to expiration.
11 Click OK.A message Tickets successfully generated appears.
12 If correct, click OK.
13 Do you want to open or save report? Click Open.

User Manual—Version 6.0 WashConnect® TOUCH POS
603
Microsoft® Excel opens with the generated wash codes available for use immediately.
14 In Microsoft® Excel, click the File menu, and then select the Save As button.
15 Customers cannot redeem 5-digit wash codes at the Auto Sentry until you adjust the Auto Sentry settings.
See “Setup your Auto Sentry to Redeem Wash Codes” on page 604.
See “Ticket Generation for 5-digit Wash Codes” on page 602.
See “About Touch POS Sales Entry” on page 579.
See “About Ticket Generation” on page 602.
See “Ticket Generation for 6-digit Wash Codes” on page 605.
See “About Touch POS Sales Entry” on page 579.
Setup your Auto Sentry to Redeem Wash Codes
Follow these steps to setup your Auto Sentry for 5- or 6-digit Wash Code redemption:
1 From System Setup menu, select Devices and then select Settings.
2 In Device Type, select Auto Sentry.
3 In Device Name, select the device Name.
4 In Settings Type, select TouchConfiguration.
5 In Settings, select Control.
6 In Control5DigitWashCodeTimeout, type a value for how many seconds to wait, for example, 5.While the customer types in the first five numbers, the Auto Sentry will wait an additional 5 seconds to give customer the opportunity to add a 6th digit.
7 Click the Save button.
8 In Settings, select MainOptions.
9 In Allow Code, select True.
10 Click the Save button.

TOUCH POS WashConnect® User Manual—Version 6.0
604
Now your Auto Sentry will display the Enter Wash Code button on your main options screen.
See “TOUCH POS” on page 557.
See “Ticket Generation for 6-digit Wash Code Example” on page 607.
See “About Touch POS Sales Entry” on page 579.
See “Ticket Generation for 5-digit Wash Codes” on page 602.
See “TOUCH POS” on page 557.
See “About Touch POS Sales Entry” on page 579.
Ticket Generation for 6-digit Wash Codes
NOTE: The 6-digit wash code feature is only available from Corporate login.
Ticket Generation from Corporate login, always generates unpaid 6-digit global wash codes.
NOTE: Ticket numbers or wash codes are unique, and once used, they cannot be
used again.
1 At WashConnect® Login, select Corporate.
2 From the Touch POS menu, select Ticket Generation.
3 Select the TicketGen button.
4 Select a base wash service for ticket generation.
5 Select the Generate button.The Generate Ticket dialog box appears.
6 Click to select the Random Ticket button for random wash code numbers.
NOTE: If Random Ticket is checked, the Start box will not appear. If Random Ticket
box is not selected, type the first ticket wash code number in the Start box, and then the wash codes will generate in a sequential order. Type any num-ber between (100,000 and 999,999).
7 In How Many Tickets, type amount of paid tickets necessary.
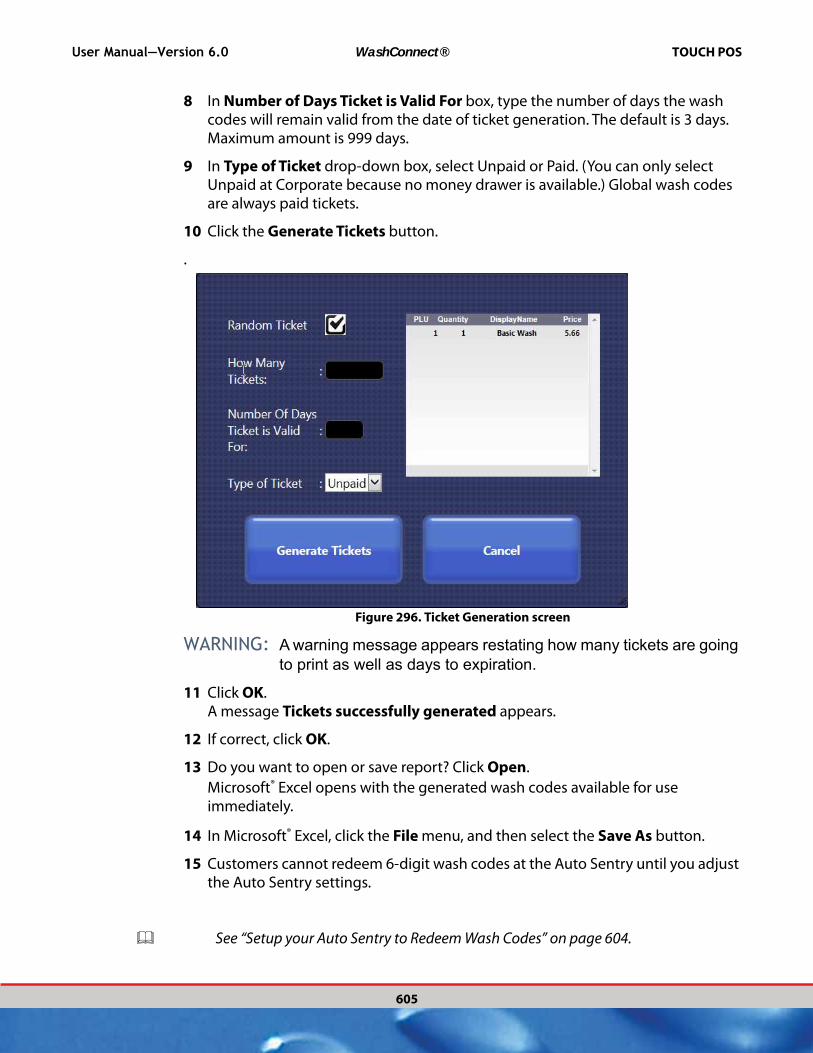
User Manual—Version 6.0 WashConnect® TOUCH POS
605
8 In Number of Days Ticket is Valid For box, type the number of days the wash codes will remain valid from the date of ticket generation. The default is 3 days. Maximum amount is 999 days.
9 In Type of Ticket drop-down box, select Unpaid or Paid. (You can only select Unpaid at Corporate because no money drawer is available.) Global wash codes are always paid tickets.
10 Click the Generate Tickets button.
.
Figure 296. Ticket Generation screen
WARNING: A warning message appears restating how many tickets are going to print as well as days to expiration.
11 Click OK.A message Tickets successfully generated appears.
12 If correct, click OK.
13 Do you want to open or save report? Click Open.
Microsoft® Excel opens with the generated wash codes available for use immediately.
14 In Microsoft® Excel, click the File menu, and then select the Save As button.
15 Customers cannot redeem 6-digit wash codes at the Auto Sentry until you adjust the Auto Sentry settings.
See “Setup your Auto Sentry to Redeem Wash Codes” on page 604.
TOUCH POS WashConnect® User Manual—Version 6.0
606
See “Ticket Generation for 5-digit Wash Codes” on page 602.
Ticket Generation for 6-digit Wash Code Example
You can give out 1,000 paid or unpaid wash codes, Groupons or postcards for your customer’s fund raiser or the customer can disburse them however they want to with their patrons. When the customer returns to the wash, at the payment terminal, they can select the Wash Code button first, and then redeem the wash by typing in the Wash Code. The wash codes can be set up with a fixed amount of days to expiration and an expiration time of 11:59:59 PM.
If the wash code was already used to wash a vehicle 30 days ago or less, the message Already washed on ‘date’ ‘time’ appears replacing Invalid Code message.
See “TOUCH POS” on page 557.
See “Setup your Auto Sentry to Redeem Wash Codes” on page 604.
See “Ticket Generation for 5-digit Wash Codes” on page 602.
About Stack
The Stack feature in Touch POS allows you to edit cars from the Touch POS. You can change a vehicle’s base wash, add or remove extra services, and add or remove retract services.
NOTE: You cannot reorder the cars on Stack from TouchPOS, but you can from the
StackNControl menu.
See “Edit the Order of the Stack” on page 736.
See “Edit Vehicle in Stack” on page 608.
Edit Vehicle in Stack
After the customer purchases a wash, you can change the base wash, add or remove extra services, and add or remove retract services as long as the vehicle has not reached the point of service in the tunnel.
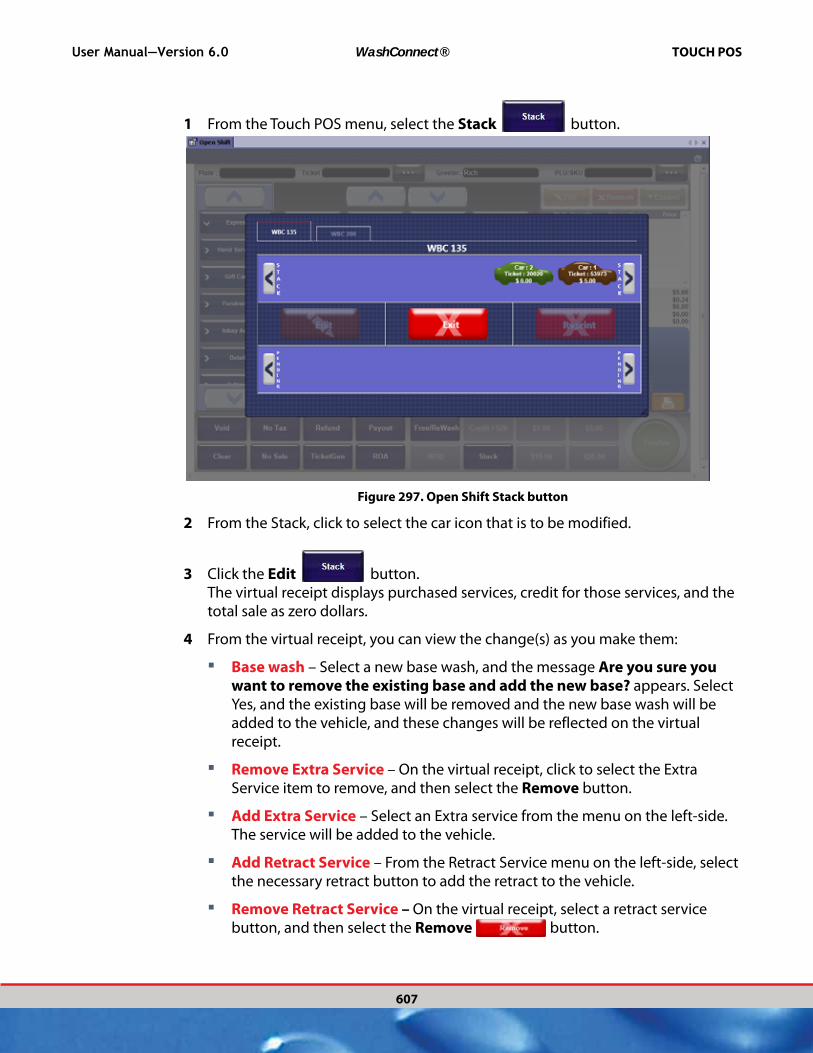
User Manual—Version 6.0 WashConnect® TOUCH POS
607
1 From the Touch POS menu, select the Stack button.
Figure 297. Open Shift Stack button
2 From the Stack, click to select the car icon that is to be modified.
3 Click the Edit button.The virtual receipt displays purchased services, credit for those services, and the total sale as zero dollars.
4 From the virtual receipt, you can view the change(s) as you make them:
▪ Base wash – Select a new base wash, and the message Are you sure you want to remove the existing base and add the new base? appears. Select Yes, and the existing base will be removed and the new base wash will be added to the vehicle, and these changes will be reflected on the virtual receipt.
▪ Remove Extra Service – On the virtual receipt, click to select the Extra Service item to remove, and then select the Remove button.
▪ Add Extra Service – Select an Extra service from the menu on the left-side. The service will be added to the vehicle.
▪ Add Retract Service – From the Retract Service menu on the left-side, select the necessary retract button to add the retract to the vehicle.
▪ Remove Retract Service – On the virtual receipt, select a retract service button, and then select the Remove button.
TOUCH POS WashConnect® User Manual—Version 6.0
608
5 When all edits to the vehicle are complete, select the Finalize button to save the edits to the vehicle.
6 If an amount is owed for the new services, the payment window appears and can be cashed out like a normal sale. If you owe the customer, the drawer will open and you can refund the customer the amount due.
NOTE: Verify the stack order is correct. To reorder the cars on stack, go to Stack
Management from the StackNControl menu on the right side of the touch screen.
See “Edit the Order of the Stack” on page 736.
See “About Stack” on page 607.
About Generated Books
You can view generated wash books from Corporate only.
1 At WashConnect® Login, select Corporate.
2 From the Touch POS menu, select Generated Books.
3 In Books Generated Between, select a begin date.
4 In And, select an end date.
5 In PLU, select a specific wash book PLU number.
6 Click the Search button.The Generated Wash Book list populates with your search results.
See “About Wash Books” on page 424.

User Manual—Version 6.0 WashConnect® System Setup
611
CHAPTER 12:
SYSTEM SETUP
The System Setup group includes commands to help you manage sales tax, the organizational layout, devices, and profit centers.
“About Sales Tax”
“About the Organizational Layout”
“About Report Subscriptions”
“Devices”
“Profit Centers”
System Setup Step-by-Step Instructions:
See “About Create Levels” on page 631.
See “About Manage Sites” on page 634.
See “Assign Sites” on page 638.
See “About Define Tokens” on page 644.
See “About Device Groups” on page 647.

System Setup WashConnect® User Manual—Version 6.0
612
See “About Settings” on page 654.
See “About Controller Services” on page 708.
See “About TouchNClean Outputs” on page 710.
See “About My Devices” on page 717.
See “Assign Denominations” on page 719.
See “About Manage Profit Centers” on page 721.
See “About Performance Indicator” on page 731.
See “Set Req. Man Hours” on page 732.
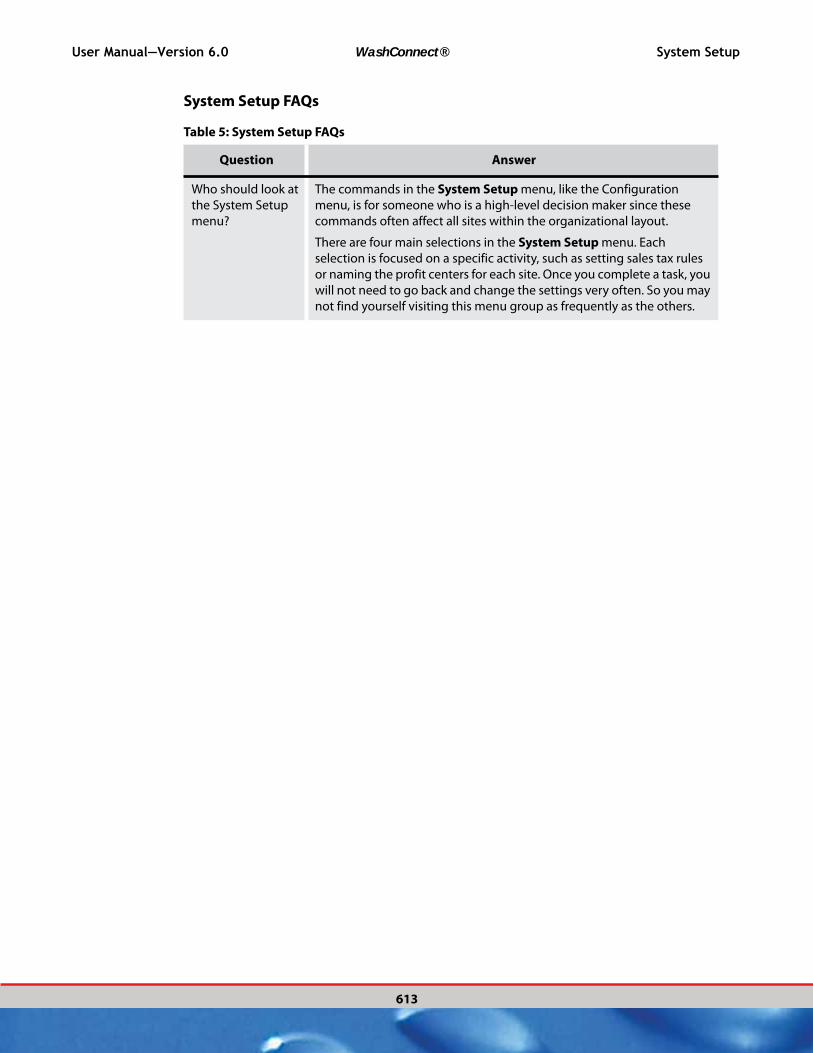
User Manual—Version 6.0 WashConnect® System Setup
613
System Setup FAQs
Table 5: System Setup FAQs
Question Answer
Who should look at
the System Setup
menu?
The commands in the System Setup menu, like the Configuration
menu, is for someone who is a high-level decision maker since these
commands often affect all sites within the organizational layout.
There are four main selections in the System Setup menu. Each
selection is focused on a specific activity, such as setting sales tax rules
or naming the profit centers for each site. Once you complete a task, you
will not need to go back and change the settings very often. So you may
not find yourself visiting this menu group as frequently as the others.
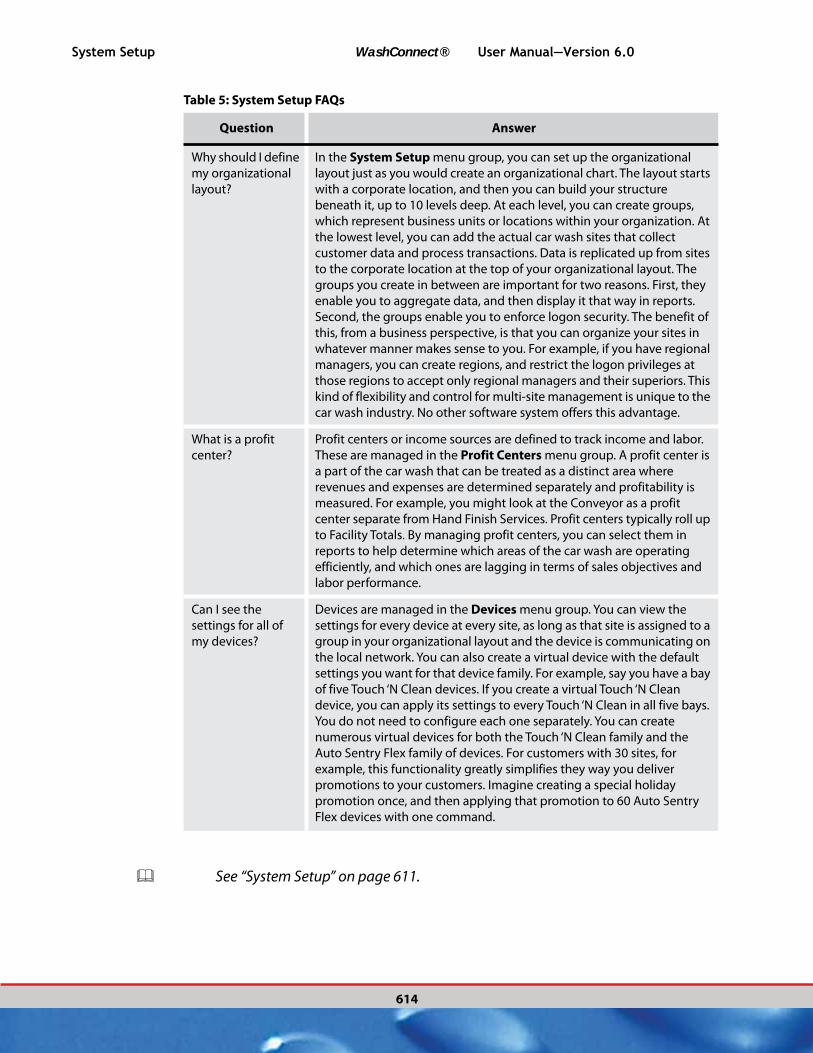
System Setup WashConnect® User Manual—Version 6.0
614
See “System Setup” on page 611.
Why should I define
my organizational
layout?
In the System Setup menu group, you can set up the organizational
layout just as you would create an organizational chart. The layout starts
with a corporate location, and then you can build your structure
beneath it, up to 10 levels deep. At each level, you can create groups,
which represent business units or locations within your organization. At
the lowest level, you can add the actual car wash sites that collect
customer data and process transactions. Data is replicated up from sites
to the corporate location at the top of your organizational layout. The
groups you create in between are important for two reasons. First, they
enable you to aggregate data, and then display it that way in reports.
Second, the groups enable you to enforce logon security. The benefit of
this, from a business perspective, is that you can organize your sites in
whatever manner makes sense to you. For example, if you have regional
managers, you can create regions, and restrict the logon privileges at
those regions to accept only regional managers and their superiors. This
kind of flexibility and control for multi-site management is unique to the
car wash industry. No other software system offers this advantage.
What is a profit
center?
Profit centers or income sources are defined to track income and labor.
These are managed in the Profit Centers menu group. A profit center is
a part of the car wash that can be treated as a distinct area where
revenues and expenses are determined separately and profitability is
measured. For example, you might look at the Conveyor as a profit
center separate from Hand Finish Services. Profit centers typically roll up
to Facility Totals. By managing profit centers, you can select them in
reports to help determine which areas of the car wash are operating
efficiently, and which ones are lagging in terms of sales objectives and
labor performance.
Can I see the
settings for all of
my devices?
Devices are managed in the Devices menu group. You can view the
settings for every device at every site, as long as that site is assigned to a
group in your organizational layout and the device is communicating on
the local network. You can also create a virtual device with the default
settings you want for that device family. For example, say you have a bay
of five Touch ‘N Clean devices. If you create a virtual Touch ‘N Clean
device, you can apply its settings to every Touch ‘N Clean in all five bays.
You do not need to configure each one separately. You can create
numerous virtual devices for both the Touch ‘N Clean family and the
Auto Sentry Flex family of devices. For customers with 30 sites, for
example, this functionality greatly simplifies they way you deliver
promotions to your customers. Imagine creating a special holiday
promotion once, and then applying that promotion to 60 Auto Sentry
Flex devices with one command.
Table 5: System Setup FAQs
Question Answer
User Manual—Version 6.0 WashConnect® System Setup
615
About the System Setup Menu
The commands in the System Setup menu, are for someone who is a high-level decision maker since these commands often affect all sites within the organizational layout.
There are four main selections in the System Setup menu. Each selection is focused on a specific activity, such as setting sales tax rules or naming the profit centers for each site. Once you complete a task, you will not need to go back and change the settings very often. So you may not find yourself visiting this menu group as frequently as the others.
System Setup Step-by-Step Instructions:
See “Add Sales Tax” on page 618. (Corporate Only)
See “About Report Subscriptions” on page 621.
Organizational Layout:
See “About the Organizational Layout” on page 625.
See “About Create Levels” on page 631.
See “About Manage Sites” on page 634.
See “Assign Sites” on page 638.
Devices:
See “About Define Tokens” on page 644.
See “About Device Groups” on page 647.
See “About Settings” on page 654.
See “About Controller Services” on page 708.
See “About TouchNClean Outputs” on page 710.
See “About My Devices” on page 717.
See “Assign Denominations” on page 719.
Profit Centers:
See “About Manage Profit Centers” on page 721.
See “Profit Center Order” on page 728.
See “Performance Indicator” on page 730.
See “Set Req. Man Hours” on page 732.
Organizational Layout
From the System Setup menu group, select Organizational Layout. You can set up the organizational layout just as you would create an organizational chart. The

System Setup WashConnect® User Manual—Version 6.0
616
layout starts with a corporate location, and then you can build your structure beneath it, up to 10 levels deep. At each level, can represent business units or locations within your organization. At the lowest level, you can add the actual car wash sites that collect customer data and process transactions. Data is replicated up from sites to the corporate location at the top of your organizational layout. The groups you create in between are important for two reasons. First, they enable you to aggregate data, and then display it that way in reports. Second, the groups enable you to enforce logon security. The benefit of this, from a business perspective, is that you can organize your sites in whatever manner makes sense to you. For example, if you have regional managers, you can create regions, and restrict the logon privileges at those regions to accept only regional managers and their superiors. This kind of flexibility and control for multi-site management is unique to the car wash industry. No other software system offers this advantage.
“About Create Levels”
“About Manage Sites”
“Assign Sites”
“About My Devices”
“About Manage Profit Centers”
Devices
Devices are managed in the Devices menu group. You can view the settings for every device at every site, as long as that site is assigned to a group in your organizational layout and the device is communicating on the local network. You can also create a virtual device with the default settings you want for that device family. For example, say you have a bay of five Touch ‘N Clean devices. If you create a virtual Touch ‘N Clean device, you can apply its settings to every Touch ‘N Clean in all five bays. You do not need to configure each one separately. You can create numerous virtual devices for both the Touch ‘N Clean family and the Auto Sentry Flex family of devices. For customers with 30 sites, for example, this functionality greatly simplifies they way you deliver promotions to your customers. Imagine creating a special holiday promotion once, and then applying that promotion to 60 Auto Sentry Flex devices with one command.
See “About the Organizational Layout” on page 625.
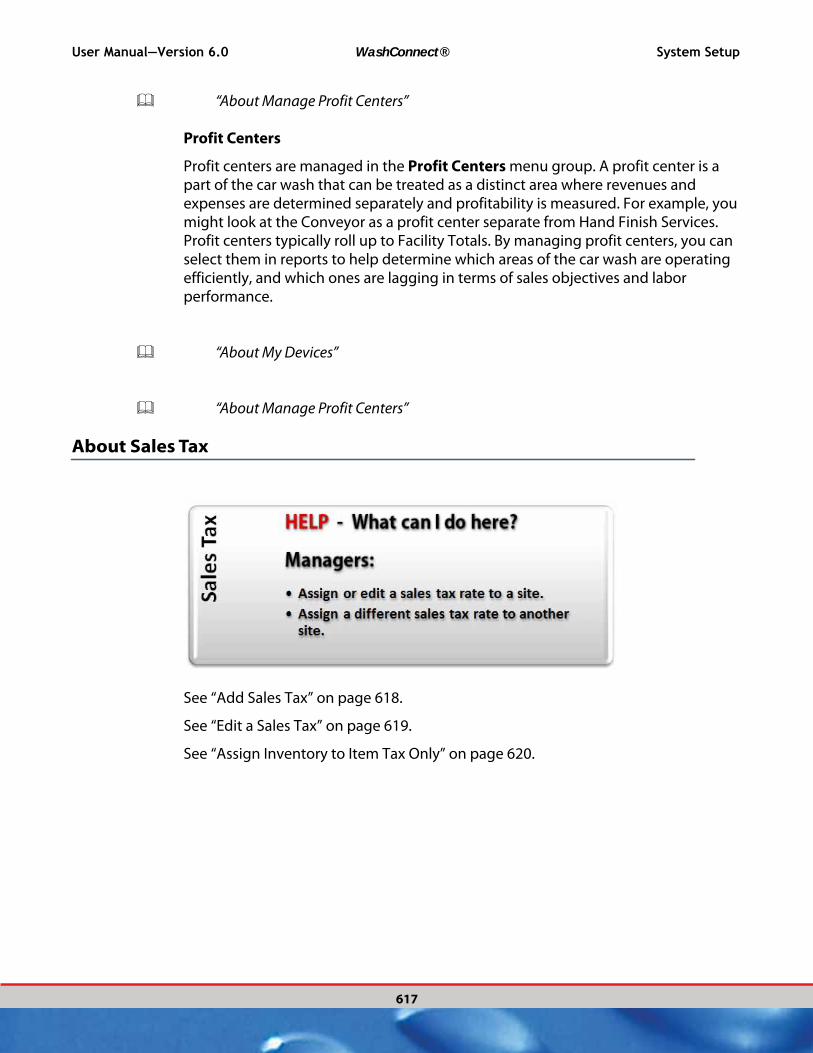
User Manual—Version 6.0 WashConnect® System Setup
617
“About Manage Profit Centers”
Profit Centers
Profit centers are managed in the Profit Centers menu group. A profit center is a part of the car wash that can be treated as a distinct area where revenues and expenses are determined separately and profitability is measured. For example, you might look at the Conveyor as a profit center separate from Hand Finish Services. Profit centers typically roll up to Facility Totals. By managing profit centers, you can select them in reports to help determine which areas of the car wash are operating efficiently, and which ones are lagging in terms of sales objectives and labor performance.
“About My Devices”
“About Manage Profit Centers”
About Sales Tax
See “Add Sales Tax” on page 618.
See “Edit a Sales Tax” on page 619.
See “Assign Inventory to Item Tax Only” on page 620.
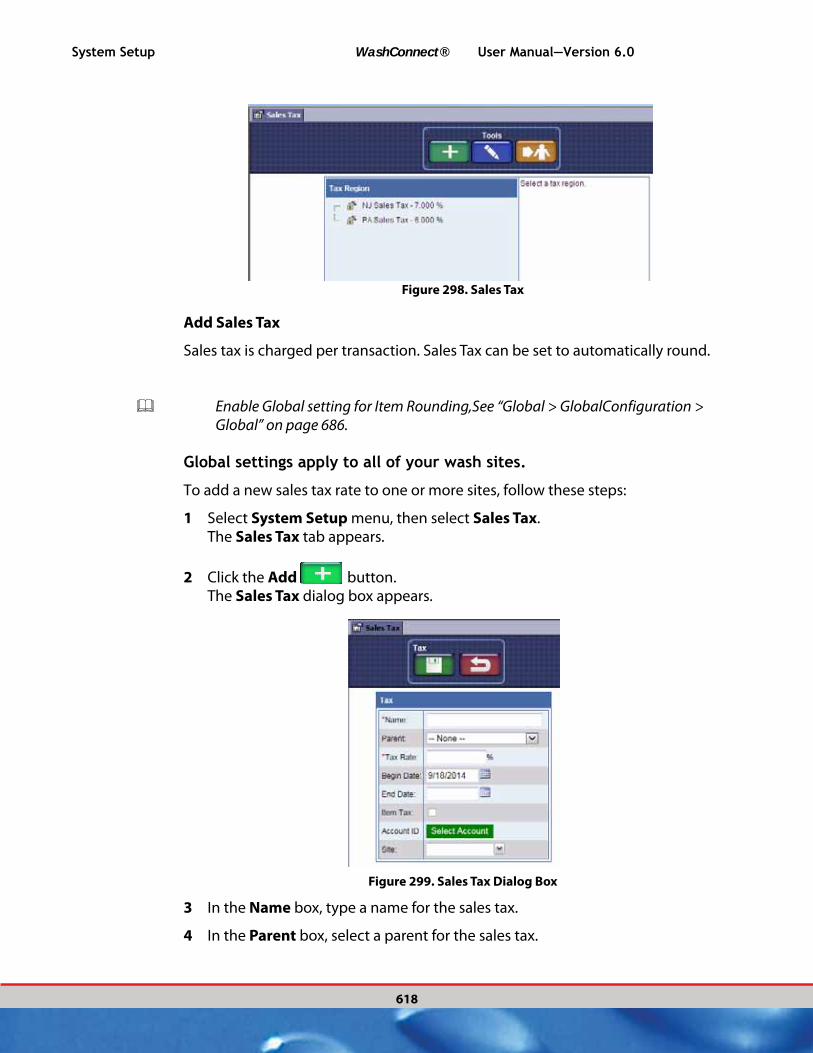
System Setup WashConnect® User Manual—Version 6.0
618
Figure 298. Sales Tax
Add Sales Tax
Sales tax is charged per transaction. Sales Tax can be set to automatically round.
Enable Global setting for Item Rounding,See “Global > GlobalConfiguration > Global” on page 686.
Global settings apply to all of your wash sites.
To add a new sales tax rate to one or more sites, follow these steps:
1 Select System Setup menu, then select Sales Tax.The Sales Tax tab appears.
2 Click the Add button. The Sales Tax dialog box appears.
Figure 299. Sales Tax Dialog Box
3 In the Name box, type a name for the sales tax.
4 In the Parent box, select a parent for the sales tax.
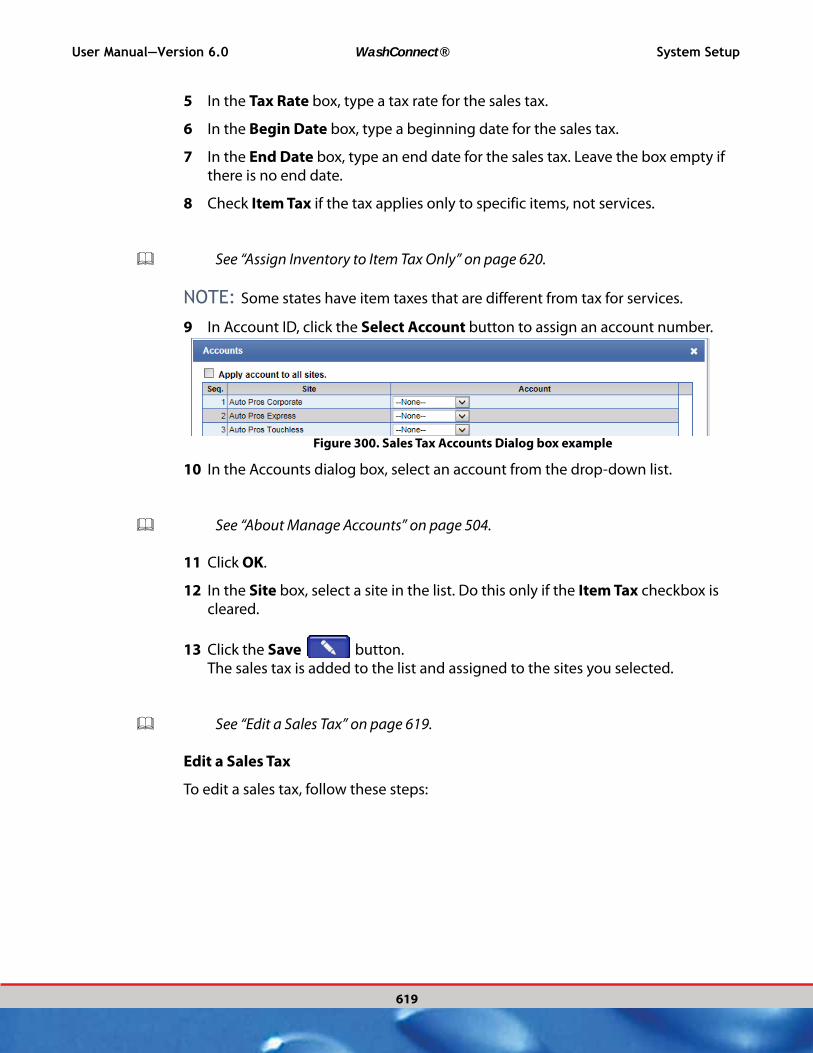
User Manual—Version 6.0 WashConnect® System Setup
619
5 In the Tax Rate box, type a tax rate for the sales tax.
6 In the Begin Date box, type a beginning date for the sales tax.
7 In the End Date box, type an end date for the sales tax. Leave the box empty if there is no end date.
8 Check Item Tax if the tax applies only to specific items, not services.
See “Assign Inventory to Item Tax Only” on page 620.
NOTE: Some states have item taxes that are different from tax for services.
9 In Account ID, click the Select Account button to assign an account number.
Figure 300. Sales Tax Accounts Dialog box example
10 In the Accounts dialog box, select an account from the drop-down list.
See “About Manage Accounts” on page 504.
11 Click OK.
12 In the Site box, select a site in the list. Do this only if the Item Tax checkbox is cleared.
13 Click the Save button. The sales tax is added to the list and assigned to the sites you selected.
See “Edit a Sales Tax” on page 619.
Edit a Sales Tax
To edit a sales tax, follow these steps:

System Setup WashConnect® User Manual—Version 6.0
620
Figure 301. Sales Tax Dialog Box
1 In the Name box, type a name for the sales tax.
2 In the Parent box, select a parent for the sales tax.
3 In the Tax Rate box, type a tax rate for the sales tax.
4 In the Begin Date box, type a beginning date for the sales tax.
5 In the End Date box, type an end date for the sales tax. Leave the box empty if there is no end date.
6 Check Item Tax if the tax applies only to items, not services.
7 In the Site box, select a site in the list. Do this only if the Item Tax checkbox is cleared.
8 Click Save. The sales tax is edited.
See “Add Sales Tax” on page 618.
Assign Inventory to Item Tax Only
This is a special tax assessed on certain items.
NOTE: The Item Type check box must be marked when setting up a Sales Tax.
1 Select System Setup menu, and then select Sales Tax. The Sales Tax tab appears.
2 Select an Item Tax in the list, and then click Assign Inventory
to item tax only button. The Assign Sales Item dialog box appears.
3 Click to assign one or more the Sales Item(s) to the Item Tax.

User Manual—Version 6.0 WashConnect® System Setup
621
4 From the Site box, select Corporate or the Site where the item tax will be applied.
5 Click the Save and Close button.
See “About Sales Tax” on page 617.
About Define Payment Types
NOTE: This is available from Corporate only.
About Report Subscriptions
Time Saver: Report Subscriptions does all the work for you.
See “Schedule Report to be sent via Email” on page 621.
See “Edit a Report Email Subscription” on page 623.
See “Delete a Report Email Subscription” on page 624.
For more information on Reporting:
See “Financial” on page 173.
See “Performance” on page 305.
Schedule Report to be sent via Email
Email a report on a regular basis to an individual or group from Report Subscriptions. Follow these steps:
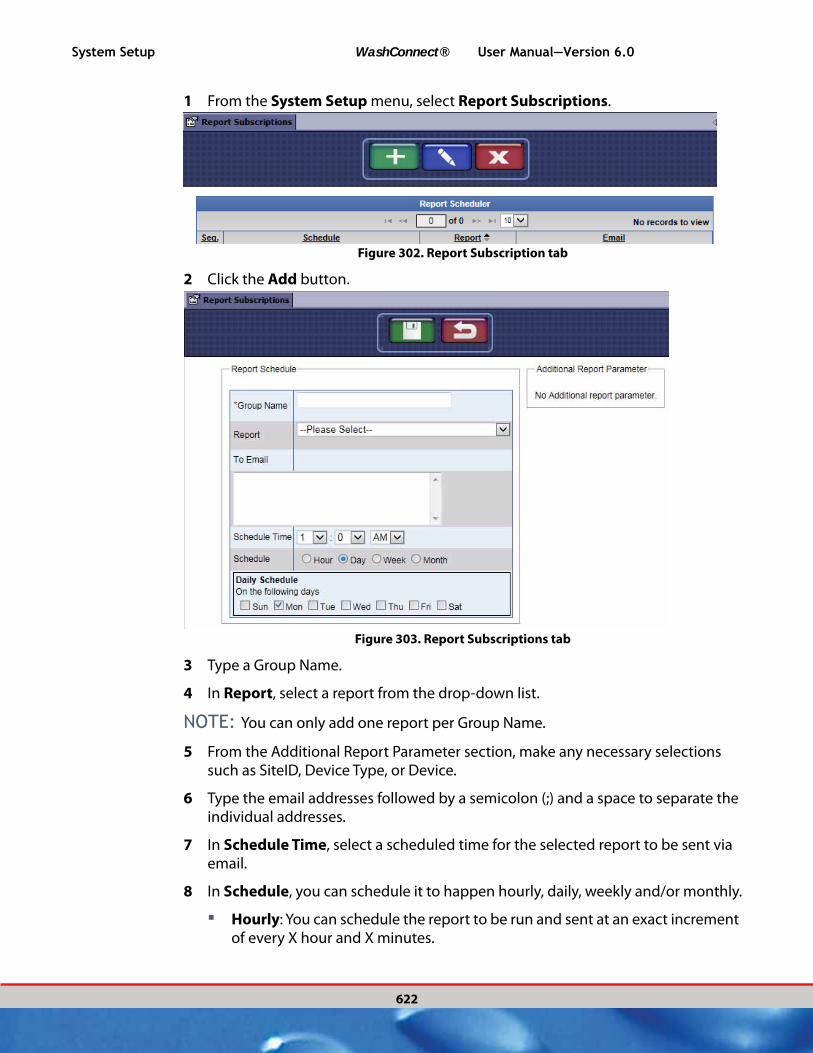
System Setup WashConnect® User Manual—Version 6.0
622
1 From the System Setup menu, select Report Subscriptions.
Figure 302. Report Subscription tab
2 Click the Add button.
Figure 303. Report Subscriptions tab
3 Type a Group Name.
4 In Report, select a report from the drop-down list.
NOTE: You can only add one report per Group Name.
5 From the Additional Report Parameter section, make any necessary selections such as SiteID, Device Type, or Device.
6 Type the email addresses followed by a semicolon (;) and a space to separate the individual addresses.
7 In Schedule Time, select a scheduled time for the selected report to be sent via email.
8 In Schedule, you can schedule it to happen hourly, daily, weekly and/or monthly.
▪ Hourly: You can schedule the report to be run and sent at an exact increment of every X hour and X minutes.
User Manual—Version 6.0 WashConnect® System Setup
623
▪ Daily: You can schedule the report to be sent on any day of the week. Click to select one or more boxes.
▪ Weekly: You can repeat the amount of weeks until the next report will be run and emailed in the Repeat after, click to select the amount of weeks to run the report and send it again with refreshed date. In ON day(s), you can also select the day of the week to receive the selected weekly report.
▪ Monthly: You can schedule report to be run and emailed on a monthly basis or select certain months. Select the months to schedule and send the report. In the On week of month, select 1st, 2nd, 3rd, 4th, or last to be the week of the month the report should be run and emailed. In On day of week, click to select day(s) of the week to run and email this report.
9 Click the Save button.The email(s) is now set up to be deliver the report on the selected schedule. When the email arrives, it comes from [email protected].
10 From your email application, add [email protected] your Address book so it is delivered to your Inbox and not your Spam folder.
11 From your Inbox, click to open the report subscription email.
12 Click double-click the attached .pdf Report document.
NOTE: If you have trouble viewing your .pdf document, go to Adobe.com and
download or update the Adobe Reader.
See “Edit a Report Email Subscription” on page 623.
See “Delete a Report Email Subscription” on page 624.
See “About Report Subscriptions” on page 621.
For more Report information:
See “Financial” on page 173.
See “Performance” on page 305.
Back to top
Edit a Report Email Subscription
You can always make changes to the email report schedule.

System Setup WashConnect® User Manual—Version 6.0
624
1 From the System Setup menu, select Report Subscriptions.
2 Click to select the schedule.The schedule is highlighted.
3 Click the Edit button.
4 Make necessary changes.
5 Click the Save button.The new changes have been saved and the emails will be sent based on the schedule saved.
See “Schedule Report to be sent via Email” on page 621.
See “Delete a Report Email Subscription” on page 624.
See “About Report Subscriptions” on page 621.
For more Report information:
See “Financial” on page 173.
See “Performance” on page 305.
Delete a Report Email Subscription
You can always delete an email report schedule.
1 From the System Setup menu, select Report Subscriptions.
2 Click to select the schedule.The schedule is highlighted.
3 Click the Edit button.
4 Make necessary changes.
5 Click the Save button.The new changes have been saved and the emails will be sent based on the schedule saved.
See “Schedule Report to be sent via Email” on page 621.
User Manual—Version 6.0 WashConnect® System Setup
625
See “Edit a Report Email Subscription” on page 623.
See “Delete a Report Email Subscription” on page 624.
See “About Report Subscriptions” on page 621.
For more Report information:
See “Financial” on page 173.
See “Performance” on page 305.
About the Organizational Layout
NOTE: Organization Layout is only available from Corporate Login.
Your Organizational Layout is a personal diagram of your car wash business. It can be as simple or as complex as you need it to be. You can easily modify your Organizational Layout as your business grows and as you add new equipment or even new sites. WashConnect® allows you to consolidate your data to view the entire organization, or to segment your data and drill down to the individual site, device or component.
For step-by-step instructions on levels:
See “About Create Levels” on page 631.
See “Edit a Level” on page 633.
See “Delete a Level” on page 633.
For step-by-step instructions on sites:
See “Edit Site” on page 636.
See “Assign Sites” on page 638.

System Setup WashConnect® User Manual—Version 6.0
626
Figure 304. Organizational Layout Concept Diagram
You can apply the Organizational Layout to your business in various ways.
Create a layout based on equipment type. For example, let's say you have six in-bay sites with equipment from one manufacturer and another three sites with equipment from a different manufacturer. You can create a layout to aggregate data based on each type of equipment manufacturer, and then analyze the failure rates to identify your most reliable equipment.
Create a layout based on demographics. Perhaps you have a few wash sites located in high-income neighborhoods and a few in low-income neighborhoods. Your layout can group the sites together based on income levels so you can evaluate success rates for pricing structures or promotional activities based on demographics.
Create a layout based on wash type or business model. Perhaps you have various car wash business models: in-bay automatic, self serve and tunnel. You can create an organizational layout to group each business model into a separate branch, and analyze data for each type.
Create a layout based on geographic location. If you have multiple car wash sites in various states, counties, cities, or townships, you can group your sites based on geographic location. Depending on the number of sites you have, you can create a tiered structure that utilizes multiple levels to aggregate data based on designated locations or management territories.
The Organizational Layout is more than just a diagram. It also gives you exact control over two important business activities: Intelligent Reporting and Roles-Based Security.
Intelligent Reporting. You typically think of an Organizational Layout based on geography. For example, say you have four sites in Pennsylvania and four sites in New Jersey. Instead of including all eight sites directly beneath the corporate headquarters, you can add a Pennsylvania branch and a New Jersey branch to the layout. Then to see reports for all four Pennsylvania sites, you simply log on to the Pennsylvania branch to view everything specific to that group.
User Manual—Version 6.0 WashConnect® System Setup
627
Roles-Based Security. Perhaps you want to prohibit your New Jersey managers from logging on to the Pennsylvania branch. Your Organizational Layout makes this possible by limiting login choices. With Roles-Based Security, you can even control what each user is allowed to do within the WashConnect® system. Site managers may be able to add and remove employees, while controllers may only be allowed to view reports.
See “Organizational Layout Advanced Concepts” on page 627.
See “Organizational Layout Setup:” on page 630.
Organizational Layout Advanced Concepts
This section includes advanced concepts for the Organizational Layout menu group.
See “About the Organizational Layout” on page 625.
See “Organizational Layout Setup:” on page 630.
Organizational Layout Details
WashConnect® provides multisite reporting and data replication services based on your organizational layout. The organizational layout is made up of levels, parents and sites.
Levels represent the depth of your organization. The highest level is named Corporate. This is a default setting. WashConnect® can provide data reporting and analysis for up to 10 levels.
▪ For example, if you want to see data for all of the car wash sites in a particular geographical region such as New Jersey, you can create the State level: NJ, PA.
▪ You can create a City level: Allentown, Stroudsburg, Clinton, Oldwick.
A Parent is a level that contains one or more levels beneath it.
Sites are the physical car wash locations. Sites link to actual database transactions and customer data, while levels are created for data reporting.
See “Organizational Layout Diagram with Four Assigned Sites” on page 628.

System Setup WashConnect® User Manual—Version 6.0
628
Organizational Layout Diagram with Four Assigned Sites
CORPORATE
UNASSIGNED SITES
CORPORATE LEVEL
STATE LEVEL
CITY LEVEL
SITE 18104-02
SITE 18360-01
SITE 08809-02
SITE 08858-02
SITE18104-01
SITE 18360-02
SITE 08809-01
SITE 08858-01
SITE LEVEL
PA NJ
ALLENTOWN STROUDSBURG CLINTON OLDWICK
18104-02 18360-01 08809-02 08858-0218104-01 18360-02 08809-01 08858-01
Figure 305. Organizational Layout with Four Assigned Sites
In the previous illustration, the organizational layout includes four levels: Corporate, State, City, and Site.
The Corporate group is the parent to PA and NJ.
Four cities have been added at the city level: Allentown and Stroudsburg (with PA as parent) and Clinton and Oldwick (with NJ as parent).
Eight sites exist at the site level, which are organized by zip code: 18104-01 and 18104-02 (with Allentown as parent); 18360-01 and 18360-02 (with Stroudsburg as parent); 08809-01 and 08809-02 (with Clinton as parent); 08858-01 and 08858-02 (with Oldwick as parent).
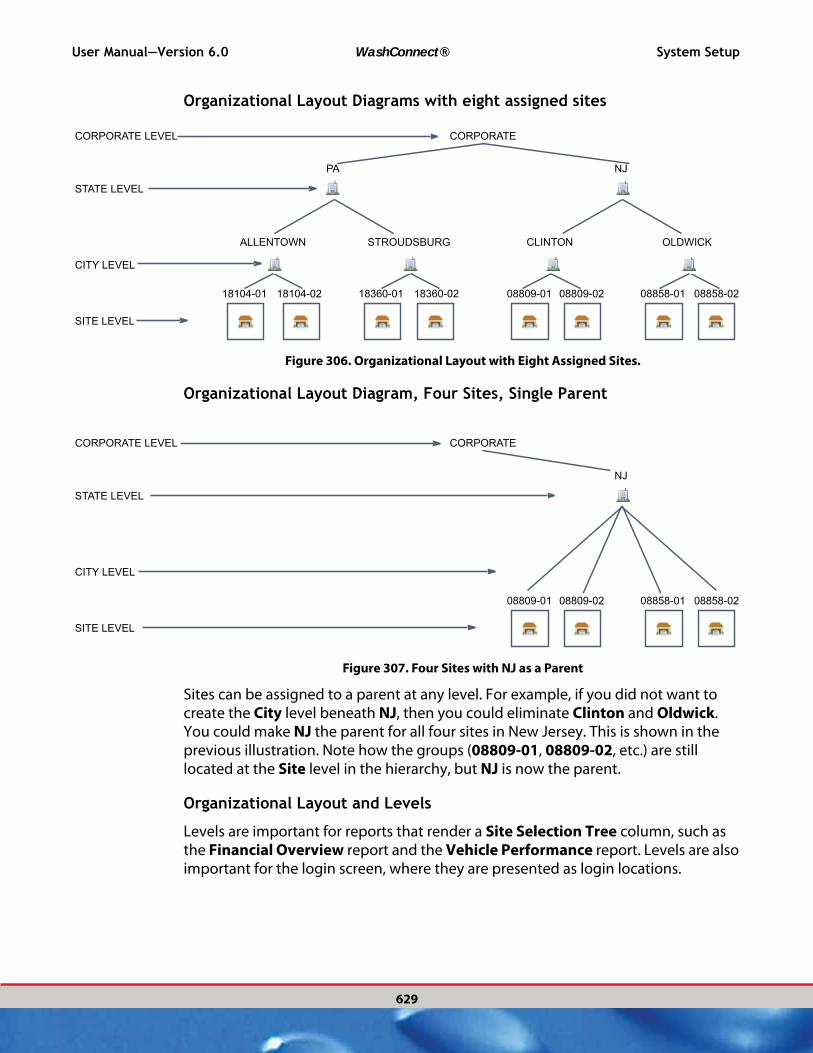
CORPORATE CORPORATE LEVEL
STATE LEVEL
CITY LEVEL
SITE LEVEL
PA NJ
ALLENTOWN STROUDSBURG CLINTON OLDWICK
18104-02 18360-01 08809-02 08858-0218104-01 18360-02 08809-01 08858-01
User Manual—Version 6.0 WashConnect® System Setup
629
Organizational Layout Diagrams with eight assigned sites
Figure 306. Organizational Layout with Eight Assigned Sites.
CORPORATE CORPORATE LEVEL
STATE LEVEL
CITY LEVEL
SITE LEVEL
NJ
08809-02 08858-0208809-01 08858-01
Organizational Layout Diagram, Four Sites, Single Parent
Figure 307. Four Sites with NJ as a Parent
Sites can be assigned to a parent at any level. For example, if you did not want to create the City level beneath NJ, then you could eliminate Clinton and Oldwick. You could make NJ the parent for all four sites in New Jersey. This is shown in the previous illustration. Note how the groups (08809-01, 08809-02, etc.) are still located at the Site level in the hierarchy, but NJ is now the parent.
Organizational Layout and Levels
Levels are important for reports that render a Site Selection Tree column, such as the Financial Overview report and the Vehicle Performance report. Levels are also important for the login screen, where they are presented as login locations.

LOGIN SCREEN
System Setup WashConnect® User Manual—Version 6.0
630
Figure 308. Login Screen and Site Selection Tree Examples
In the previous illustration, you can see an example login screen and site selection tree for the organizational layout, which includes four sites in NJ and four sites in PA.
Levels and Sites are represented by different icons in the Organizational Layout.
LEVELS ARE CREATED FOR REPORTING.
SITES ARE CREATED DURING INSTALLATION.SITES SIGNIFY PHYSICAL CAR WASH LOCATIONS.
YOU CAN CREATE LEVELS IN THE ORGANIZATIONAL LAYOUT.
Figure 309. Level and Site Icons
See “About the Organizational Layout” on page 625.
See “Organizational Layout Setup:” on page 630.
Organizational Layout Setup:
In setting up your company’s corporate structure, you will need the step-by-step instructions for the Organizational Layout menu group: Create Levels, Manage Sites, and Assign Sites.
“About Create Levels” on page 631.
“About Manage Sites” on page 634.
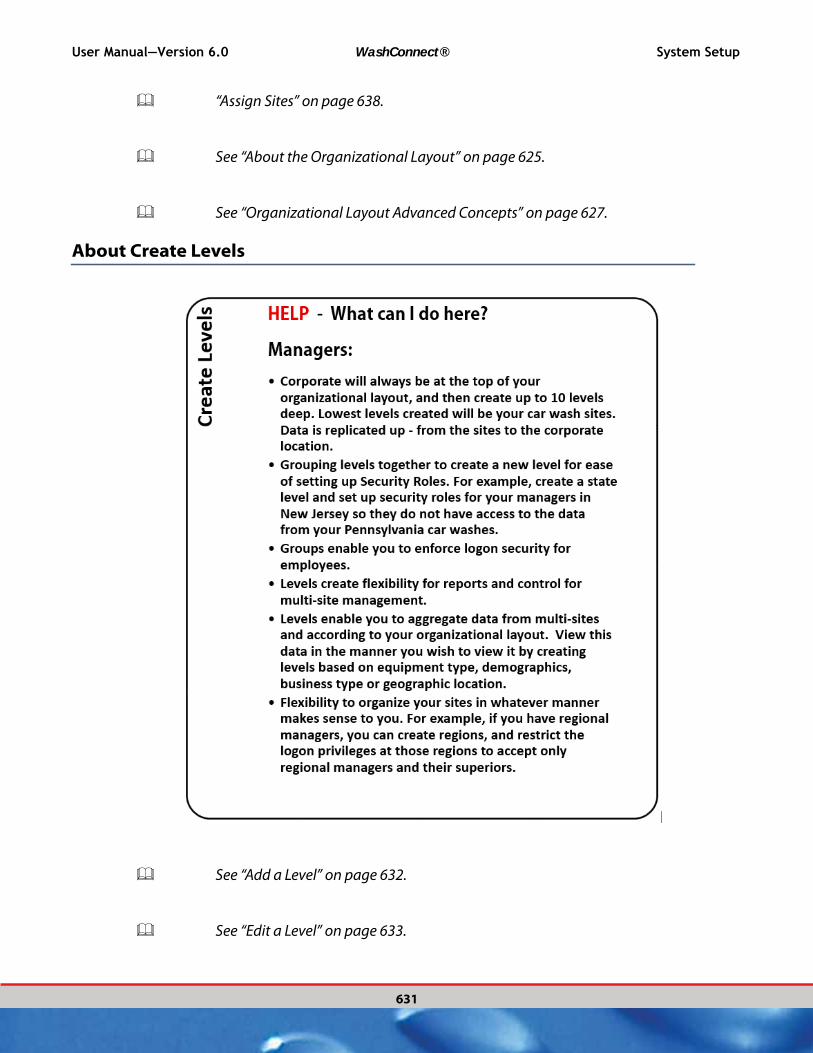
User Manual—Version 6.0 WashConnect® System Setup
631
“Assign Sites” on page 638.
See “About the Organizational Layout” on page 625.
See “Organizational Layout Advanced Concepts” on page 627.
About Create Levels
See “Add a Level” on page 632.
See “Edit a Level” on page 633.
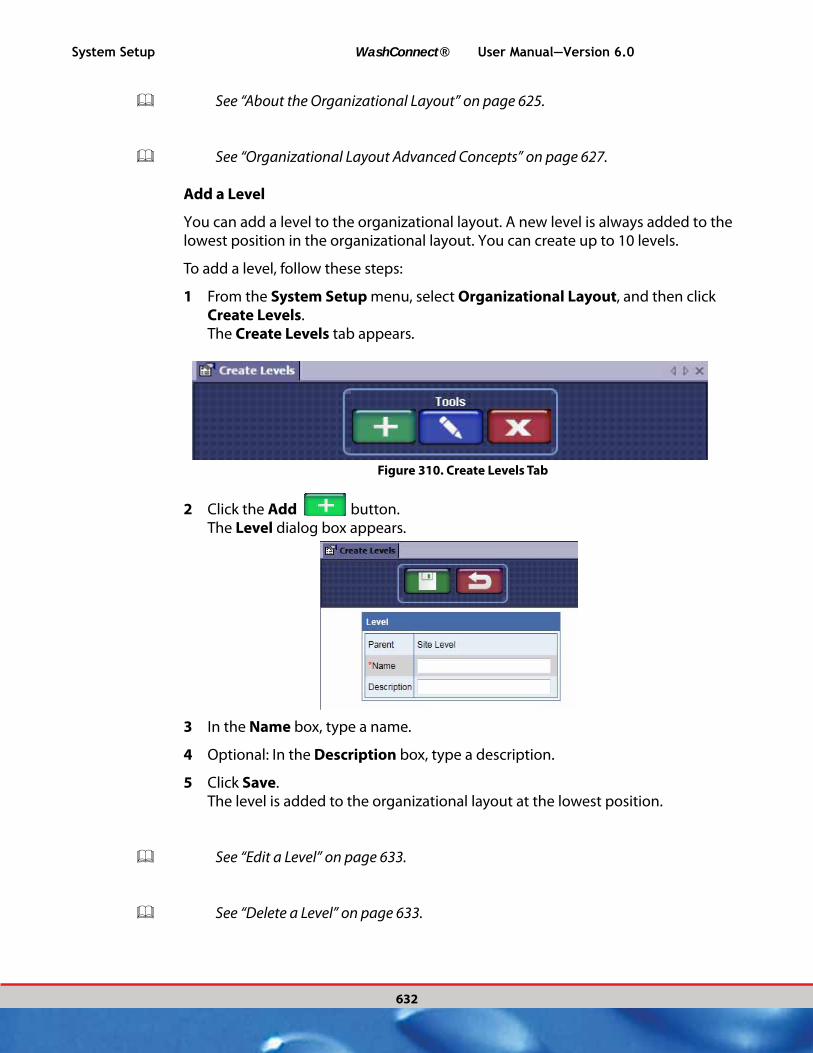
System Setup WashConnect® User Manual—Version 6.0
632
See “About the Organizational Layout” on page 625.
See “Organizational Layout Advanced Concepts” on page 627.
Add a Level
You can add a level to the organizational layout. A new level is always added to the lowest position in the organizational layout. You can create up to 10 levels.
To add a level, follow these steps:
1 From the System Setup menu, select Organizational Layout, and then click Create Levels. The Create Levels tab appears.
Figure 310. Create Levels Tab
2 Click the Add button. The Level dialog box appears.
3 In the Name box, type a name.
4 Optional: In the Description box, type a description.
5 Click Save. The level is added to the organizational layout at the lowest position.
See “Edit a Level” on page 633.
See “Delete a Level” on page 633.
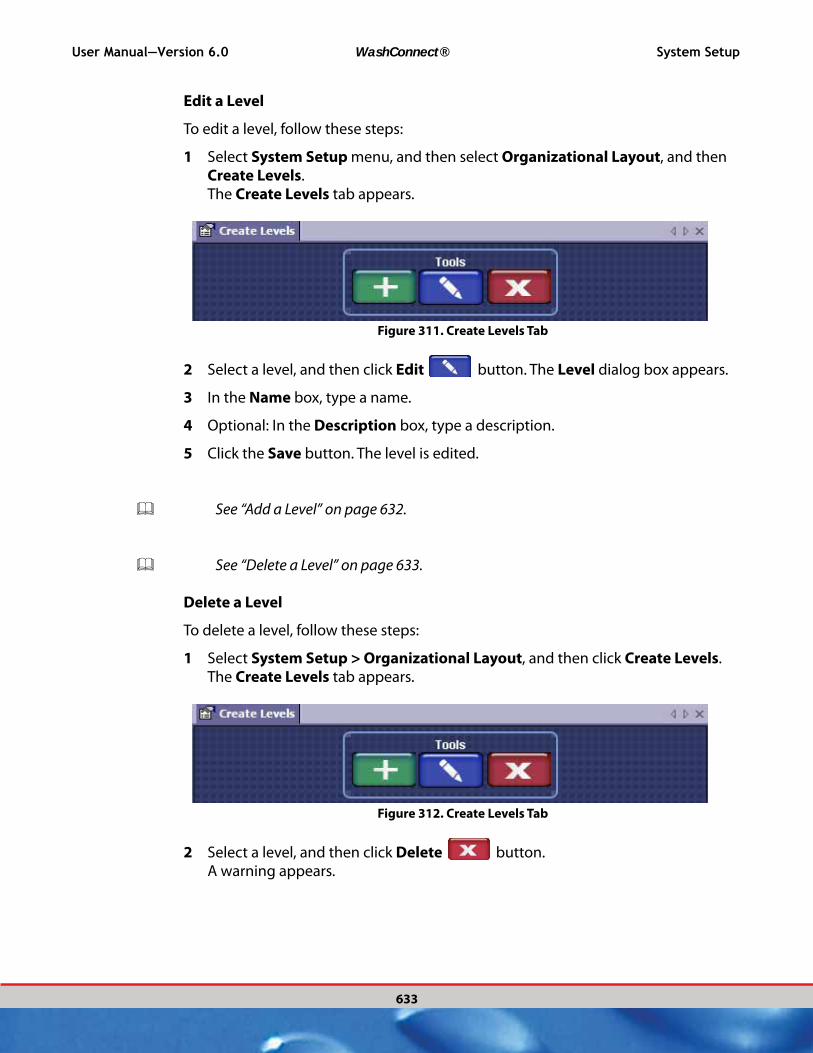
User Manual—Version 6.0 WashConnect® System Setup
633
Edit a Level
To edit a level, follow these steps:
1 Select System Setup menu, and then select Organizational Layout, and then Create Levels. The Create Levels tab appears.
Figure 311. Create Levels Tab
2 Select a level, and then click Edit button. The Level dialog box appears.
3 In the Name box, type a name.
4 Optional: In the Description box, type a description.
5 Click the Save button. The level is edited.
See “Add a Level” on page 632.
See “Delete a Level” on page 633.
Delete a Level
To delete a level, follow these steps:
1 Select System Setup > Organizational Layout, and then click Create Levels. The Create Levels tab appears.
Figure 312. Create Levels Tab
2 Select a level, and then click Delete button.A warning appears.

System Setup WashConnect® User Manual—Version 6.0
634
Figure 313. Delete Level Warning
3 Click OK. The level is deleted.
NOTE: You cannot delete a level to which sites have been assigned.
Figure 314. Cannot Delete Level Warning Message
See “Add a Level” on page 632.
See “Edit a Level” on page 633.
About Manage Sites
Formerly known as Create Site, Manage Sites is available from the System Setup menu, and then select Organizational Layout.
See “Add Site” on page 636.

User Manual—Version 6.0 WashConnect® System Setup
635
See “Edit Site” on page 636.
See “Manage Sites Field Descriptions” on page 635.
See “About Create Levels” on page 631.
Manage Sites Field Descriptions
The following table describes each column in the Manage Sites tab.
Table 6: Manage Sites Field Descriptions
Column Description
Site Name of the site.
City City where the site is located.
State State where the site is located.
See “Add Site” on page 636.
See “Edit Site” on page 636.
See “About Manage Sites” on page 634.
See “About Create Levels” on page 631.

System Setup WashConnect® User Manual—Version 6.0
636
Add Site
The list of sites was created during the installation process. You can edit contact information for your sites from WashConnect Corporate Login.
NOTE: An ICS technician can create a new site in the WashConnect® database for
you. Numerous factors are involved with the creation of a physical site, such as data replication, autobilling, customer and vehicle data, etc.
See “Edit Site” on page 636.
See “About Manage Sites” on page 634.
See “About Create Levels” on page 631.
Edit Site
To edit the contact information for a site, follow these steps:
1 Login to WashConnect Corporate.
2 From the System Setup menu, select Organizational Layout, and then click Manage Sites. The Manage Sites tab appears.
Figure 315. Site Selected to Edit
3 Select a Site, and then click the Edit button.The Site Contact dialog box appears.
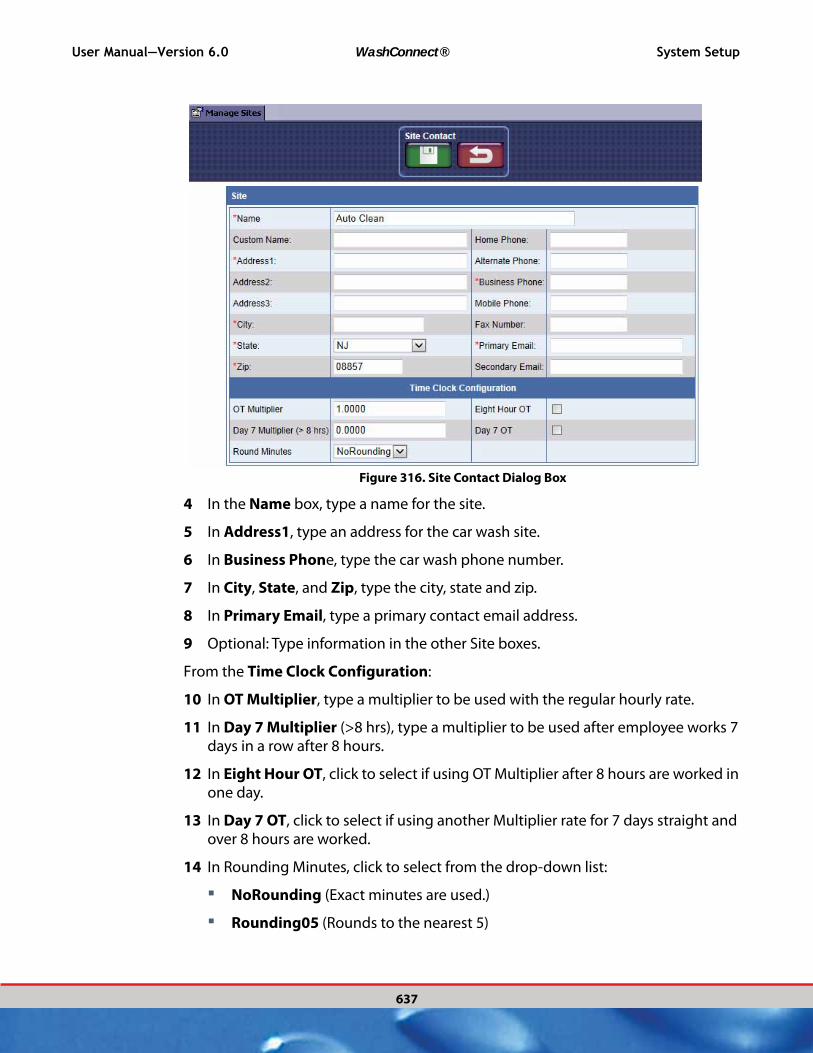
User Manual—Version 6.0 WashConnect® System Setup
637
Figure 316. Site Contact Dialog Box
4 In the Name box, type a name for the site.
5 In Address1, type an address for the car wash site.
6 In Business Phone, type the car wash phone number.
7 In City, State, and Zip, type the city, state and zip.
8 In Primary Email, type a primary contact email address.
9 Optional: Type information in the other Site boxes.
From the Time Clock Configuration:
10 In OT Multiplier, type a multiplier to be used with the regular hourly rate.
11 In Day 7 Multiplier (>8 hrs), type a multiplier to be used after employee works 7 days in a row after 8 hours.
12 In Eight Hour OT, click to select if using OT Multiplier after 8 hours are worked in one day.
13 In Day 7 OT, click to select if using another Multiplier rate for 7 days straight and over 8 hours are worked.
14 In Rounding Minutes, click to select from the drop-down list:
▪ NoRounding (Exact minutes are used.)
▪ Rounding05 (Rounds to the nearest 5)

System Setup WashConnect® User Manual—Version 6.0
638
▪ Rounding10 (Rounds to the nearest 10)
▪ Rounding15 (Rounds to the nearest 15)
15 Click the Save button.The site contact information is updated.
See “Add Site” on page 636.
See “About Manage Sites” on page 634.
See “About Create Levels” on page 631.
Assign Sites
See “About Create Levels” on page 631.
See “About Manage Sites” on page 634.
See “Assign Sites” on page 638.

BEFORE AFTERASSIGNMENT ASSIGNMENT
User Manual—Version 6.0 WashConnect® System Setup
639
Figure 317. Assign Sites
In WashConnect®, you can create levels and assign sites to levels. For example, you can assign the site Sparkle Site to the level Sparkle Car Wash.
THE NAME IS SPARKLE CAR WASH AND YOU MAY INCLUDE THE SITE NUMBER.
STROUDSBURG IS THE PARENT TO THE SPARKLE CAR WASH LEVEL.
THE SITE, SPARKLE SITE, IS ASSIGNED TO THE LEVEL, SPARKLE CAR WASH.
SPARKLE CAR WASH IS A LEVELTHAT EXISTS AT THE SITE LEVELIN THE ORGANIZATIONAL LAYOUT.
Figure 318. Assigning Sparkle Car Wash to Sparkle Site
See “About Create Levels” on page 631.
See “About Manage Sites” on page 634.
See “Assign Sites” on page 638.
Add a Level to the Organizational Layout
Add To add a level to the organizational layout, follow these steps:
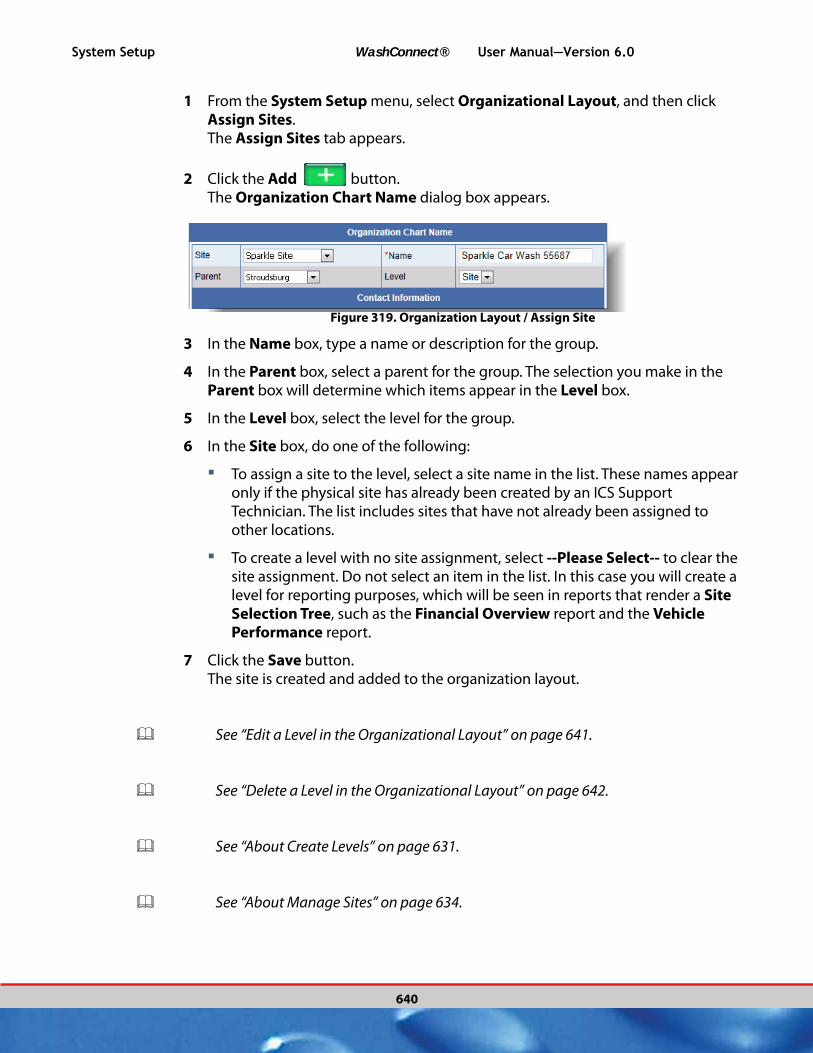
System Setup WashConnect® User Manual—Version 6.0
640
1 From the System Setup menu, select Organizational Layout, and then click Assign Sites.The Assign Sites tab appears.
2 Click the Add button.The Organization Chart Name dialog box appears.
Figure 319. Organization Layout / Assign Site
3 In the Name box, type a name or description for the group.
4 In the Parent box, select a parent for the group. The selection you make in the Parent box will determine which items appear in the Level box.
5 In the Level box, select the level for the group.
6 In the Site box, do one of the following:
▪ To assign a site to the level, select a site name in the list. These names appear only if the physical site has already been created by an ICS Support Technician. The list includes sites that have not already been assigned to other locations.
▪ To create a level with no site assignment, select --Please Select-- to clear the site assignment. Do not select an item in the list. In this case you will create a level for reporting purposes, which will be seen in reports that render a Site Selection Tree, such as the Financial Overview report and the Vehicle Performance report.
7 Click the Save button.The site is created and added to the organization layout.
See “Edit a Level in the Organizational Layout” on page 641.
See “Delete a Level in the Organizational Layout” on page 642.
See “About Create Levels” on page 631.
See “About Manage Sites” on page 634.

User Manual—Version 6.0 WashConnect® System Setup
641
See “Assign Sites” on page 638.
Edit a Level in the Organizational Layout
EditTo edit the parent, level or assignment for a level, follow these steps:
1 Select System Setup menu, select the Organizational Layout, and then click Assign Sites. The Assign Sites tab appears.
Figure 320. Site Selected to Edit
2 Select a site, and then click Edit button.The Organization Chart Name dialog box appears.
Figure 321. Organization Layout / Assign Site
3 In the Name box, type a name and/or description for the group.
4 To edit the group’s parent, select a new setting in the Parent box.
5 To edit the group’s level, select a new setting in the Level box.
6 To edit the group’s site assignment, select a new setting in the Site box or choose --Please Select-- to clear the site assignment.
7 Click the Save button.The parent, level and assignment settings are updated.
See “Add a Level to the Organizational Layout” on page 639.

System Setup WashConnect® User Manual—Version 6.0
642
See “Edit a Level in the Organizational Layout” on page 641.
See “Delete a Level in the Organizational Layout” on page 642.
See “About Create Levels” on page 631.
See “About Manage Sites” on page 634.
See “Assign Sites” on page 638.
Delete a Level in the Organizational Layout
To delete a level, follow these steps:
1 From the System Setup menu, select Organizational Layout, and then click Assign Sites. The Assign Sites tab appears.
Figure 322. Level Selected to Delete
2 Select a Level or Site, and then click Delete button.A warning appears.

User Manual—Version 6.0 WashConnect® System Setup
643
Figure 323. Delete Site Warning
3 Click OK. The group is deleted.
NOTE: You cannot delete a group to which sites, roles or users have been assigned.
Figure 324. Cannot Delete Group Warning Message
See “Add a Level to the Organizational Layout” on page 639.
See “Edit a Level in the Organizational Layout” on page 641.
See “Delete a Level in the Organizational Layout” on page 642.
See “About Create Levels” on page 631.
See “About Manage Sites” on page 634.
See “Assign Sites” on page 638.

System Setup WashConnect® User Manual—Version 6.0
644
About Define Tokens
Figure 325. Define Tokens
See “Add a Token” on page 644.
See “Edit Token” on page 645.
See “Delete Token” on page 646.
Add a Token
To add a token, follow these steps:
1 From the System Setup menu, select Devices, and then click Define Tokens.The Tokens tab appears.
2 Click Add. The Token dialog box appears.

User Manual—Version 6.0 WashConnect® System Setup
645
Figure 326. Token Dialog Box
3 In the Name box, type the token name.
4 In the Type box, select a token type:
▪ Variable
▪ Coin Token
▪ Bill Token
5 In the Value box, type a token value.
6 Click the Save button. The token is added.
See “Edit Token” on page 645.
See “Delete Token” on page 646.
Edit Token
To edit a token, follow these steps:
1 Select System Setup > Devices, and then click Define Tokens. The Tokens tab appears.
2 Click the Edit button. The Token dialog box appears.
Figure 327. Token Dialog Box
3 In the Name box, type the token name.
4 In the Type box, select a token type.
5 In the Value box, type a token value.
6 Click the Save button. The token is edited.
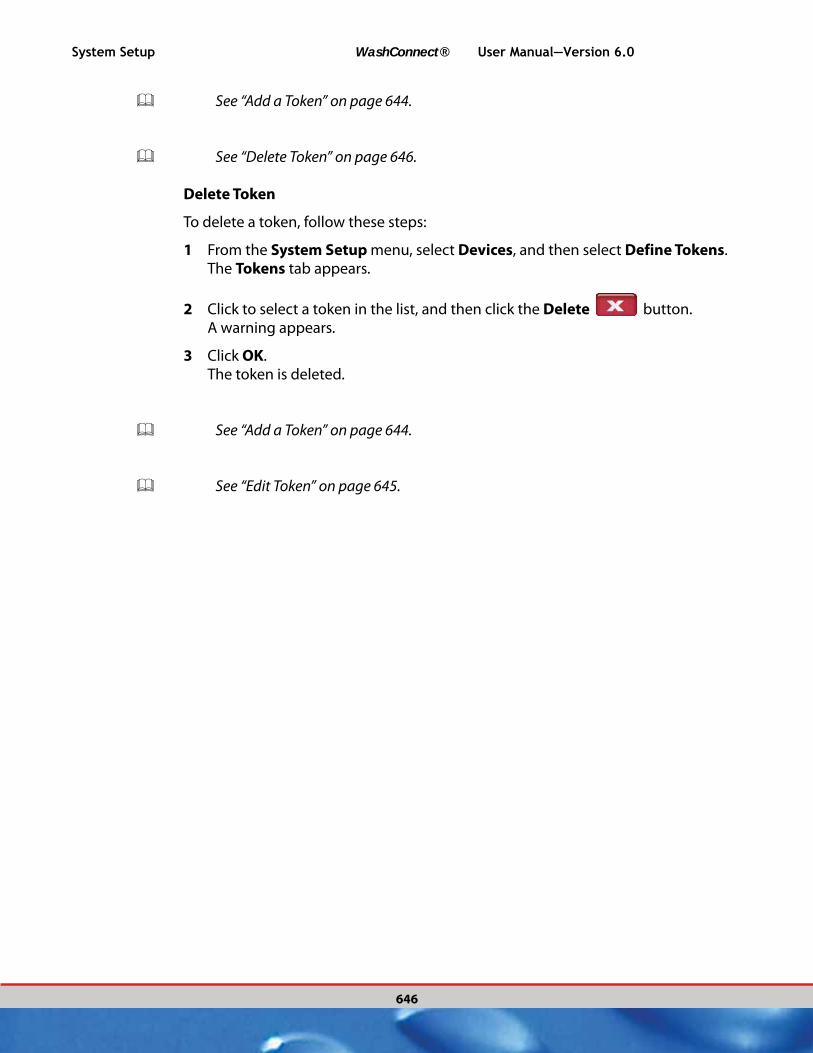
System Setup WashConnect® User Manual—Version 6.0
646
See “Add a Token” on page 644.
See “Delete Token” on page 646.
Delete Token
To delete a token, follow these steps:
1 From the System Setup menu, select Devices, and then select Define Tokens. The Tokens tab appears.
2 Click to select a token in the list, and then click the Delete button.A warning appears.
3 Click OK. The token is deleted.
See “Add a Token” on page 644.
See “Edit Token” on page 645.

User Manual—Version 6.0 WashConnect® System Setup
647
About Device Groups
You can create and assign device groups.
See “Add A Device Group” on page 648.
See “Refresh Device Group Configuration” on page 651.
See “Assign Devices to a Device Group” on page 648.
See “Delete Device Group” on page 650.
See “Assign Settings for a Device Group” on page 652.

System Setup WashConnect® User Manual—Version 6.0
648
Figure 328. Device Groups example
Add A Device Group
To add a Device Group, follow these steps:
1 From the System Setup menu, and select Devices, and then select Device Groups.The Device Groups tab appears.
2 Click the Add button. The Device Group dialog box appears.
Figure 329. Device Group
3 In the Name box, type a name for the Device Group.
4 In the Type box, select a type for the Device Group.
5 Click Save.The Device Group is saved.
See “Refresh Device Group Configuration” on page 651.
See “Assign Devices to a Device Group” on page 648.
See “Delete Device Group” on page 650.
See “Refresh Device Group Configuration” on page 651.
Assign Devices to a Device Group
To assign devices to a Device Group, follow these steps:

User Manual—Version 6.0 WashConnect® System Setup
649
1 From the System Setup menu, and select Devices, and then select Device Groups.The Device Groups tab appears.
2 Select an item in the Device Group list, and then click the Assign Devices
button. The Device Group dialog box appears.
Figure 330. Assign Devices to Device Group
3 Select one or more devices in the list, and then click Save. The devices are assigned to the Device Group.
See “Add A Device Group” on page 648.
See “Edit a Level” on page 633.
See “Delete Device Group” on page 650.
See “Refresh Device Group Configuration” on page 651.
See “Refresh Device Group Configuration” on page 651.
See “Assign Settings for a Device Group” on page 652.
Edit Device Group
To edit a Device Group, follow these steps:
1 From the System Setup menu, and select Devices, and then select Device Groups.
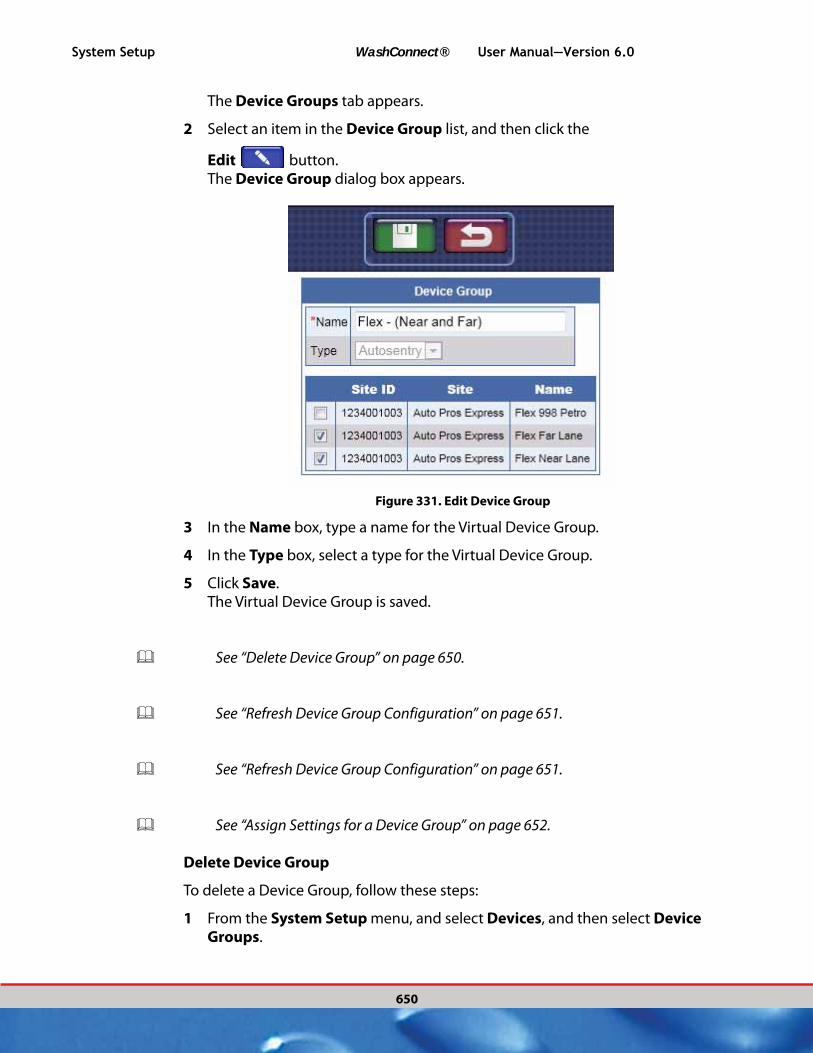
System Setup WashConnect® User Manual—Version 6.0
650
The Device Groups tab appears.
2 Select an item in the Device Group list, and then click the
Edit button. The Device Group dialog box appears.
Figure 331. Edit Device Group
3 In the Name box, type a name for the Virtual Device Group.
4 In the Type box, select a type for the Virtual Device Group.
5 Click Save. The Virtual Device Group is saved.
See “Delete Device Group” on page 650.
See “Refresh Device Group Configuration” on page 651.
See “Refresh Device Group Configuration” on page 651.
See “Assign Settings for a Device Group” on page 652.
Delete Device Group
To delete a Device Group, follow these steps:
1 From the System Setup menu, and select Devices, and then select Device Groups.

User Manual—Version 6.0 WashConnect® System Setup
651
The Device Groups tab appears.
2 Select an item in the Device Group list, and then click
the Delete button. A warning Are you sure you wish to delete this device group? Please use cau-tion, this action cannot be reversed appears.
3 Click Yes.The Device Group is deleted.
See “Add A Device Group” on page 648.
See “Assign Devices to a Device Group” on page 648.
See “Delete Device Group” on page 650.
See “Refresh Device Group Configuration” on page 651.
See “Assign Settings for a Device Group” on page 652.
Refresh Device Group Configuration
You can refresh all devices for a Device Group. For example, perhaps you have a collection of six Touch ‘N Clean devices assigned to a Device Group. On one of those devices, you made a change to accept gift cards for a week. After one week, you want that device to revert back to its Device Group settings. You can select that device in the list, and then click Refresh Device Group Configuration. The device is reset back to its default Device Group configuration.
To refresh the configuration settings for devices assigned to a Device Group, follow these steps:
1 From the System Setup menu, and select Devices, and then select Device Groups.The Device Groups tab appears.
2 Select an item in the Device Group list, and then select one or more items in the Assigned Devices list.

System Setup WashConnect® User Manual—Version 6.0
652
Figure 332. Refresh Device Configuration
3 Click the Refresh Device Configuration button.A warning Please select assigned devices to refresh its configuration. appears.
4 Click OK. The configuration settings for the selected devices are refreshed back to the default Device Group settings.
In another example, you might assign six devices to a Device Group after you have already configured the Device Group. In this case, each device could have slightly different settings. You can select the devices in the list, and then click Refresh Device Group Configuration. All devices will inherit the setting from the Device Group.
See “Add A Device Group” on page 648.
See “Assign Devices to a Device Group” on page 648.
See “Delete Device Group” on page 650.
See “Refresh Device Group Configuration” on page 651.
See “Assign Settings for a Device Group” on page 652.
Assign Settings for a Device Group
You can configure settings for a Device Group.
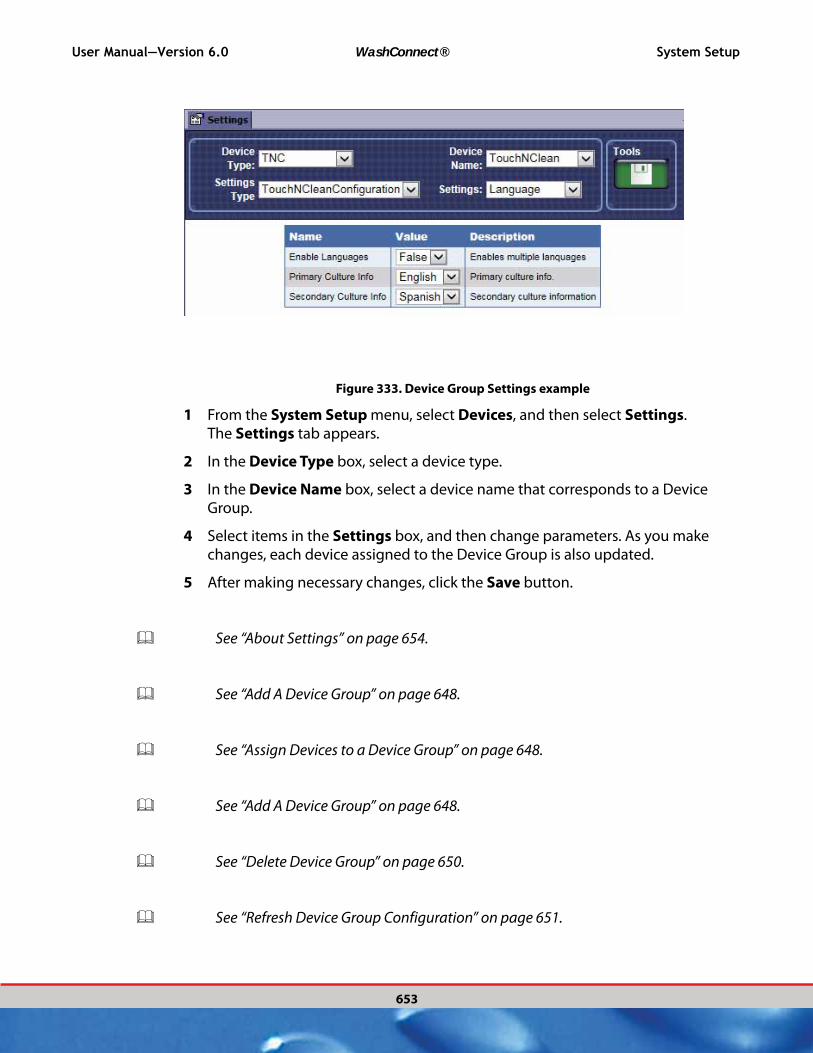
User Manual—Version 6.0 WashConnect® System Setup
653
Figure 333. Device Group Settings example
1 From the System Setup menu, select Devices, and then select Settings. The Settings tab appears.
2 In the Device Type box, select a device type.
3 In the Device Name box, select a device name that corresponds to a Device Group.
4 Select items in the Settings box, and then change parameters. As you make changes, each device assigned to the Device Group is also updated.
5 After making necessary changes, click the Save button.
See “About Settings” on page 654.
See “Add A Device Group” on page 648.
See “Assign Devices to a Device Group” on page 648.
See “Add A Device Group” on page 648.
See “Delete Device Group” on page 650.
See “Refresh Device Group Configuration” on page 651.

System Setup WashConnect® User Manual—Version 6.0
654
About Settings
See “Search for Device Settings” on page 654.
See “Settings Description Tables” on page 654.
Search for Device Settings
Configuration is filtered by device that exists at the site.
1 From the System Setup menu, select Devices.
2 Select Settings.
There are many Device Type and Settings combinations. Description tables provide more information about the settings for a particular combination.
For example, to learn more about the Accept Multiple Tokens setting, you can look at the Auto Sentry Coin Acceptor description table.
Settings Description Tables
Select one of the following to view the description table:
Auto Sentry

User Manual—Version 6.0 WashConnect® System Setup
655
“Auto Sentry > Backup”
“Auto Sentry > Books”
“Auto Sentry > Clubs”
“Auto Sentry > Coin Acceptor”
“Auto Sentry > TouchConfiguration > Control”
“Auto Sentry > TouchConfiguration > CreditCard”
“Auto Sentry > TouchConfiguration > CreditCard”
“Auto Sentry Gift Card”
“Auto Sentry > InBay Wash”
“Auto Sentry > TouchConfiguration > Language”
“Auto Sentry > Main Options”
“Auto Sentry > Receipt”
“Auto Sentry > Receipt Footer”
“Auto Sentry > Receipt Header”
“Auto Sentry > Service FontColor”
“Auto Sentry > Shift”
“Auto Sentry > StackNControl Communication”
“Auto Sentry > Tickets”
“Auto Sentry > TouchDebug”
“Auto Sentry > TouchService”
“Auto Sentry > Vandalism Deterrent”
“Auto Sentry > VideoQueue Communication”
“Auto Sentry > WBC Connection”
GLOBAL
“Global > GlobalConfiguration > CentralLogServer”
“Global > GlobalConfiguration > Global”
“Global > GlobalConfiguration > Reporting”
“Global > GlobalConfiguration > Weather”
LUBE
“Lube > LubeServiceConfiguration”

System Setup WashConnect® User Manual—Version 6.0
656
POS
“POS> TouchPOSConfiguration > Clubs”
“POS > TouchPOSConfiguration > Credit Card Settings”
“POS > TouchPOSConfiguration > General”
“POS > TouchPOSConfiguration > LayoutDirection”
“POS > TouchPOSConfiguration > ProfitCenterDescriptionColor”
“POS > TouchPOSConfiguration > Prompt Settings”
“POS > TouchPOSConfiguration > Quick Money Configuration”
“POS > TouchPOSConfiguration > ReceiptFooter”
“POS > TouchPOSConfiguration > ReceiptHeader”
“POS > TouchPOSConfiguration > ReceiptToPrint”
“POS > TouchPOSConfiguration > Refunds Using Credit Card”
“POS > TouchPOSConfiguration > Report Server”
“POS > TouchPOSConfiguration > SoundSettings”
“POS > TouchPOSConfiguration > Stack Management”
“POS > TouchPOSConfiguration > Stacking”
“POS > TouchPOSConfiguration > Tickets”
“POS > TouchPOSConfiguration > Wash Book POS > WashConnectConfiguration > Menu”
Entrance Sign
“POS > TouchESConfiguration > Configuration”
“POS > TouchESConfiguration > Display”
“POS > TouchESConfiguration > Roller”
“POS > ETLConfiguration > Logging”
TNC
“TNC > Component Port > UpCounter”
Settings includes Device Type selections. Each Device Type includes various Device Name selections. Each Device Name includes various Settings Type selections. And each Settings Type includes various Settings. For example, you can select the Device Type of Autosentry (i.e., Auto Sentry Flex); the Device Name of Auto Sentry 1, the Settings Type of Touch Configuration, and then select specific Settings for that device (e.g., Language, Coin Acceptor, etc.).

User Manual—Version 6.0 WashConnect® System Setup
657
Auto Sentry > Backup
Table 7: Auto Sentry Backup
Field Description
Backup
Destination
Type a destination directory for the backup file. This is typically a shared network
directory. Example:
\\10.0.0.16\d-drive\
Backup
Enabled
True or False. Select True to enable backups. Select False to disable.
Backup
Password
Type a backup password. This is the log-in password used to connect to the
shared network drive where the backup file is saved.
Backup
Username
Type a user name. This is the user name needed to connect to the shared network
drive where the backup file is saved.
Auto Sentry > Books
Table 8: Auto Sentry Books
Field Description
Books Sell Default setting is False. Set to False if Wash Books cannot be sold. If True, then
customer can purchase Wash Books at the Auto Sentry.
Books Use Gift
Card Dispenser
Default setting is No. Set to No if Wash Book Customer Cards cannot be
dispensed from Auto Sentry. (Set to No, if dispensing Gift Cards.) If Yes, customer
can purchase Wash Books at Auto Sentry and the Customer Card will be
dispensed.
Auto Sentry > Clubs
Purchase a Club Membership at the Auto Sentry flex.
Redeem a club wash at the Auto Sentry flex.
Renew club membership at the Auto Sentry flex.
When renewing club at Auto Sentry flex, can change assigned club.
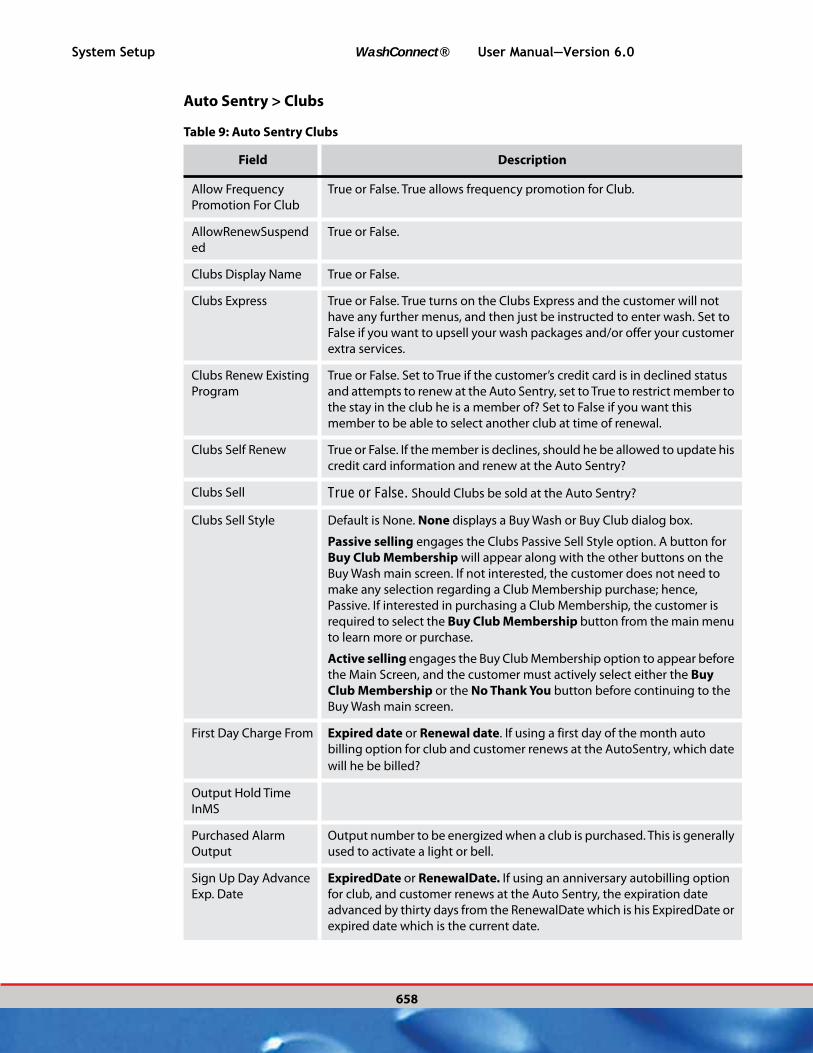
System Setup WashConnect® User Manual—Version 6.0
658
Auto Sentry > Clubs
Table 9: Auto Sentry Clubs
Field Description
Allow Frequency
Promotion For Club
True or False. True allows frequency promotion for Club.
AllowRenewSuspend
ed
True or False.
Clubs Display Name True or False.
Clubs Express True or False. True turns on the Clubs Express and the customer will not
have any further menus, and then just be instructed to enter wash. Set to
False if you want to upsell your wash packages and/or offer your customer
extra services.
Clubs Renew Existing
Program
True or False. Set to True if the customer’s credit card is in declined status
and attempts to renew at the Auto Sentry, set to True to restrict member to
the stay in the club he is a member of? Set to False if you want this
member to be able to select another club at time of renewal.
Clubs Self Renew True or False. If the member is declines, should he be allowed to update his
credit card information and renew at the Auto Sentry?
Clubs Sell True or False. Should Clubs be sold at the Auto Sentry?
Clubs Sell Style Default is None. None displays a Buy Wash or Buy Club dialog box.
Passive selling engages the Clubs Passive Sell Style option. A button for
Buy Club Membership will appear along with the other buttons on the
Buy Wash main screen. If not interested, the customer does not need to
make any selection regarding a Club Membership purchase; hence,
Passive. If interested in purchasing a Club Membership, the customer is
required to select the Buy Club Membership button from the main menu
to learn more or purchase.
Active selling engages the Buy Club Membership option to appear before
the Main Screen, and the customer must actively select either the Buy
Club Membership or the No Thank You button before continuing to the
Buy Wash main screen.
First Day Charge From Expired date or Renewal date. If using a first day of the month auto
billing option for club and customer renews at the AutoSentry, which date
will he be billed?
Output Hold Time
InMS
Purchased Alarm
Output
Output number to be energized when a club is purchased. This is generally
used to activate a light or bell.
Sign Up Day Advance
Exp. Date
ExpiredDate or RenewalDate. If using an anniversary autobilling option
for club, and customer renews at the Auto Sentry, the expiration date
advanced by thirty days from the RenewalDate which is his ExpiredDate or
expired date which is the current date.

User Manual—Version 6.0 WashConnect® System Setup
659
Sell Both Gift Cards and Clubs at Auto Sentry
Configure terminal to sell both gift cards and clubs using the following combinations:
Active Gift Cards, Passive Clubs
Active Clubs, Passive Gift Cards
Passive Gift Cards, Passive Clubs
NOTE: System cannot be configured for both active gift and active clubs. Also, only
one type of purchase can happen in a transaction, regardless of the active/passive setting. In other words, if a customer purchases a gift card, they can-not purchase a club in the same transaction and vice-versa.
Figure 334. Passive Sell Style for Clubs and Gift Cards
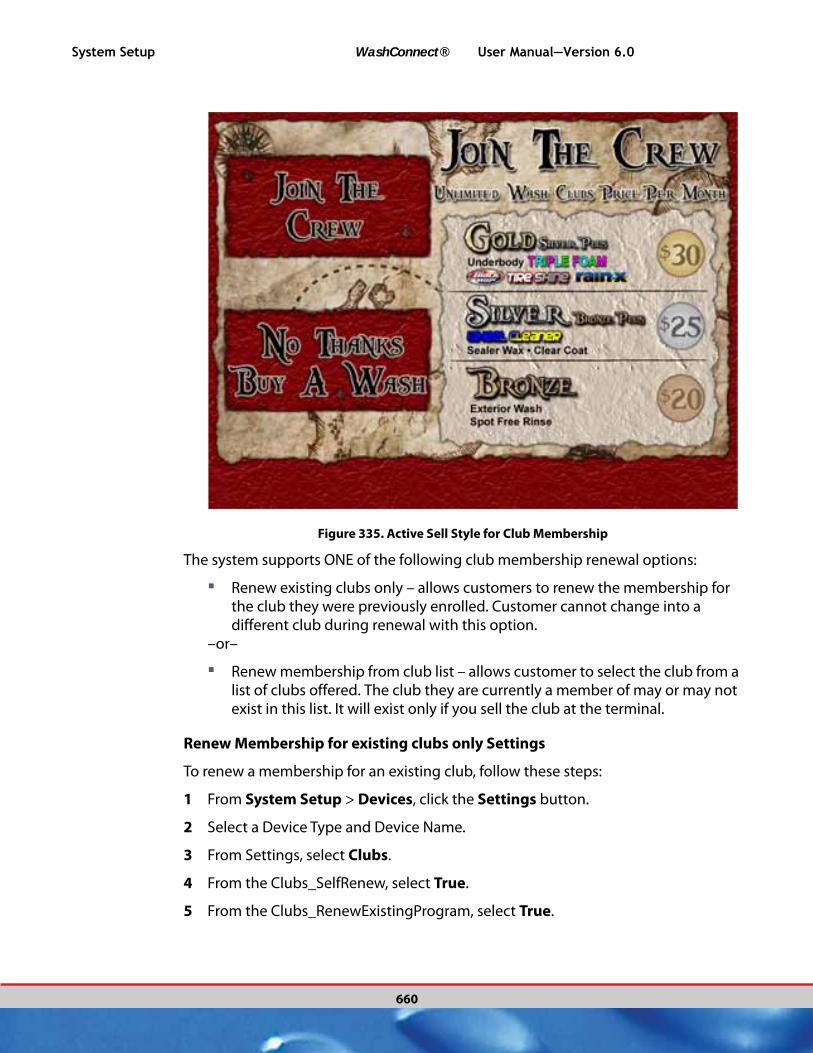
System Setup WashConnect® User Manual—Version 6.0
660
Figure 335. Active Sell Style for Club Membership
The system supports ONE of the following club membership renewal options:
▪ Renew existing clubs only – allows customers to renew the membership for the club they were previously enrolled. Customer cannot change into a different club during renewal with this option.
–or–
▪ Renew membership from club list – allows customer to select the club from a list of clubs offered. The club they are currently a member of may or may not exist in this list. It will exist only if you sell the club at the terminal.
Renew Membership for existing clubs only Settings
To renew a membership for an existing club, follow these steps:
1 From System Setup > Devices, click the Settings button.
2 Select a Device Type and Device Name.
3 From Settings, select Clubs.
4 From the Clubs_SelfRenew, select True.
5 From the Clubs_RenewExistingProgram, select True.
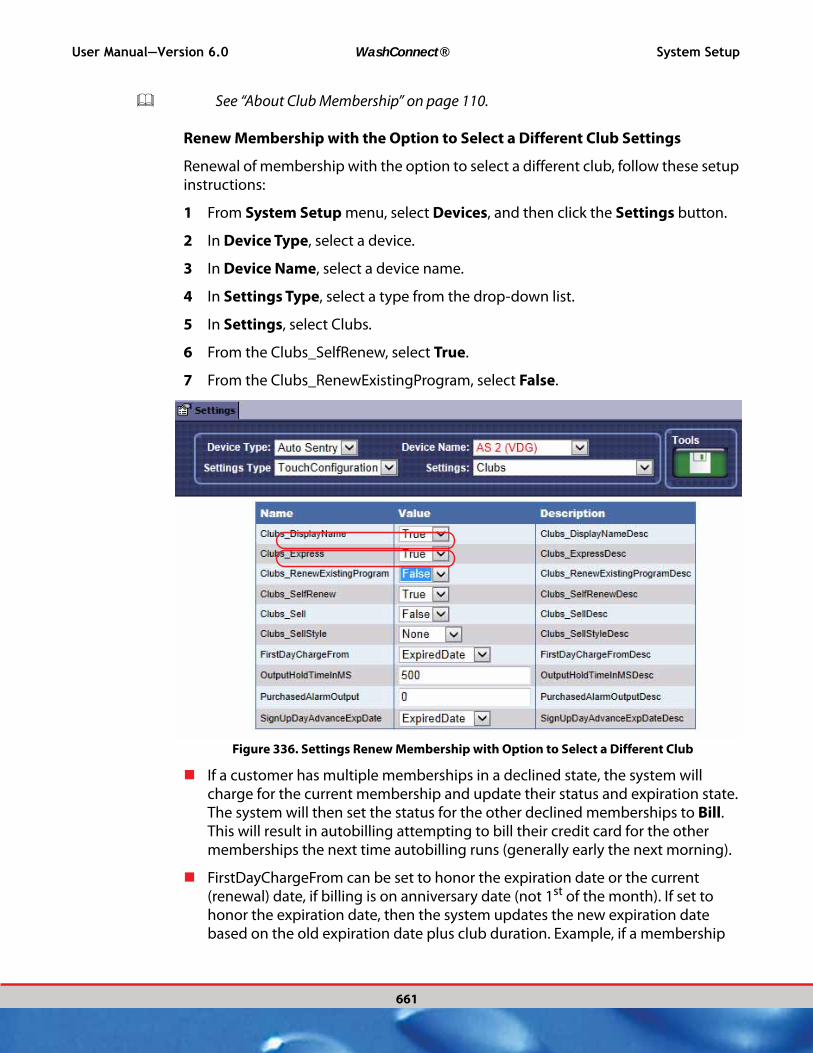
User Manual—Version 6.0 WashConnect® System Setup
661
See “About Club Membership” on page 110.
Renew Membership with the Option to Select a Different Club Settings
Renewal of membership with the option to select a different club, follow these setup instructions:
1 From System Setup menu, select Devices, and then click the Settings button.
2 In Device Type, select a device.
3 In Device Name, select a device name.
4 In Settings Type, select a type from the drop-down list.
5 In Settings, select Clubs.
6 From the Clubs_SelfRenew, select True.
7 From the Clubs_RenewExistingProgram, select False.
Figure 336. Settings Renew Membership with Option to Select a Different Club
If a customer has multiple memberships in a declined state, the system will charge for the current membership and update their status and expiration state. The system will then set the status for the other declined memberships to Bill. This will result in autobilling attempting to bill their credit card for the other memberships the next time autobilling runs (generally early the next morning).
FirstDayChargeFrom can be set to honor the expiration date or the current (renewal) date, if billing is on anniversary date (not 1st of the month). If set to honor the expiration date, then the system updates the new expiration date based on the old expiration date plus club duration. Example, if a membership
System Setup WashConnect® User Manual—Version 6.0
662
expired on the 5th of the month and a customer renews on the 10th, the new expiration date for a monthly club is the 5th of the following month. If set to honor renewal date, the new expiration date for the same example would be the 10th of the next month. Either way, the customer is billed the entire club price (no prorating).
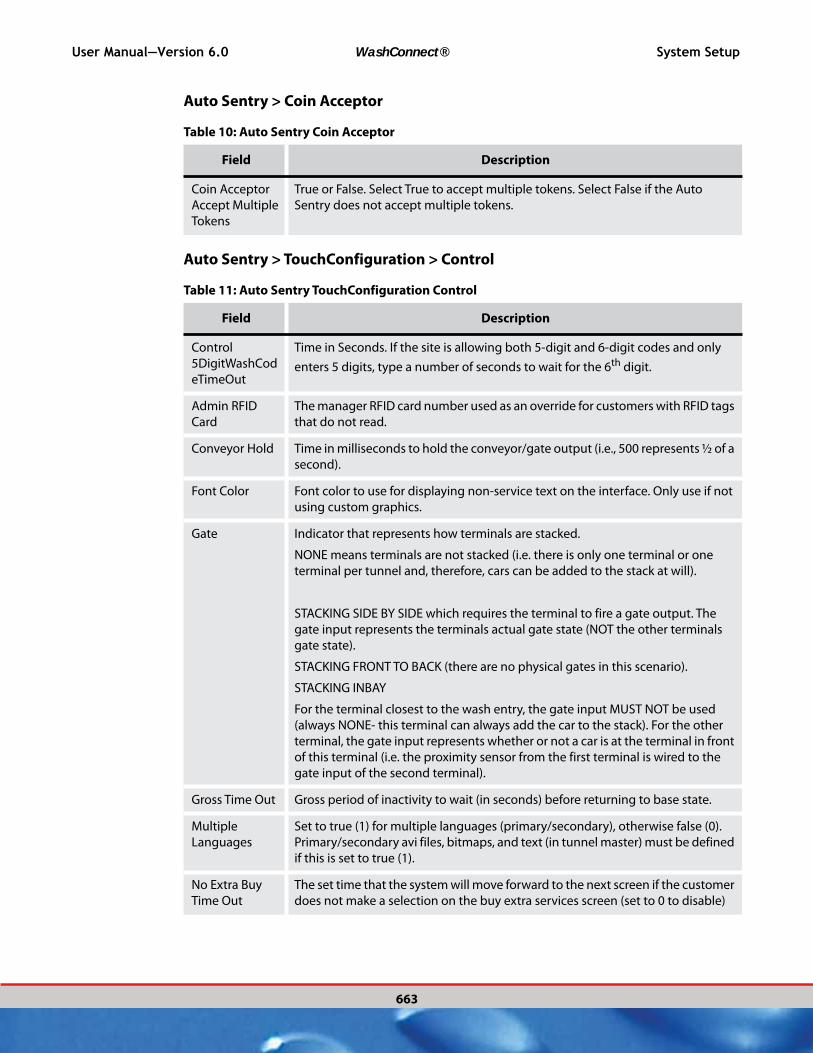
Table 10: Auto Sentry Coin Acceptor
Field Description
Coin Acceptor
Accept Multiple
Tokens
True or False. Select True to accept multiple tokens. Select False if the Auto
Sentry does not accept multiple tokens.
User Manual—Version 6.0 WashConnect® System Setup
663
Auto Sentry > Coin Acceptor
Auto Sentry > TouchConfiguration > Control
Table 11: Auto Sentry TouchConfiguration Control
Field Description
Control
5DigitWashCod
eTimeOut
Time in Seconds. If the site is allowing both 5-digit and 6-digit codes and only
enters 5 digits, type a number of seconds to wait for the 6th digit.
Admin RFID
Card
The manager RFID card number used as an override for customers with RFID tags
that do not read.
Conveyor Hold Time in milliseconds to hold the conveyor/gate output (i.e., 500 represents ½ of a
second).
Font Color Font color to use for displaying non-service text on the interface. Only use if not
using custom graphics.
Gate Indicator that represents how terminals are stacked.
NONE means terminals are not stacked (i.e. there is only one terminal or one
terminal per tunnel and, therefore, cars can be added to the stack at will).
STACKING SIDE BY SIDE which requires the terminal to fire a gate output. The
gate input represents the terminals actual gate state (NOT the other terminals
gate state).
STACKING FRONT TO BACK (there are no physical gates in this scenario).
STACKING INBAY
For the terminal closest to the wash entry, the gate input MUST NOT be used
(always NONE- this terminal can always add the car to the stack). For the other
terminal, the gate input represents whether or not a car is at the terminal in front
of this terminal (i.e. the proximity sensor from the first terminal is wired to the
gate input of the second terminal).
Gross Time Out Gross period of inactivity to wait (in seconds) before returning to base state.
Multiple
Languages
Set to true (1) for multiple languages (primary/secondary), otherwise false (0).
Primary/secondary avi files, bitmaps, and text (in tunnel master) must be defined
if this is set to true (1).
No Extra Buy
Time Out
The set time that the system will move forward to the next screen if the customer
does not make a selection on the buy extra services screen (set to 0 to disable)

System Setup WashConnect® User Manual—Version 6.0
664
Control_Print_V
acuum_BarCod
e
True or False. Default is True. If True, a forced barcode will print on a Vacuum
Ticket.
Control_Print_V
acuum_Ticket
True or False.
Restart Delay Timeout to wait when at the final screen before returning to the base state. This
gets set if a user starts the transaction by touching the screen instead of being
sensed by sensor. Also gets set if stacking and wash is busy (via gate control).
Secondary
Tunnel
Set this to true (1) if the site contains two tunnels, you are stacking and this
terminal stacks to the “secondary” (as opposed to the “primary”) tunnel.
Otherwise, set to false (0 default).
Stacking Add car to stack (1 = true, 0 = false)?
Switch Enabled Set to false (0) if the service unit switch is to be ignored, otherwise true (1). Only
for rebooting purposes.
Use Wash Detail True or False. Print wash detail “WD” ticket.
Use Wash Open True or False. Use input signal for Wash Open on SIO or PIO board, usually wired
to a switch, to determine if wash is open. When it is set to False, the CLOSE
request will be treated as Terminate and Touch will close completely, leaving the
AutoSentry on the desktop.
Use Wash Open
Label
Display text field on bitmap when wash is closed/out of service. If the owner
does not have a custom bitmap for this feature, set it to true (1), otherwise false
(0).
Control Wash
Equipment
Monitor Port
Control_WashO
penSwitchType
Table 11: Auto Sentry TouchConfiguration Control
Field Description

User Manual—Version 6.0 WashConnect® System Setup
665
Auto Sentry > TouchConfiguration > CreditCard
Table 12: Auto Sentry TouchConfiguration Credit Card
Field Description
American
Express
Set to True if site accepts American Express® cards, otherwise False. Only effects
the buy wash bitmap that is displayed.
Cage Host Location of the Cage credit card transaction handling service. For example,
localhost.Cage Port Port of the Cage credit card transaction handling service. For example, 11240.CAPS Host Machine name or IP Address of machine which is running CAPS.
CAPS Port Port number CAPS is listening on (generally 32511).
Card Path Path used to produce the file for clearing. If using PCCharge, set this to where the
program was installed (usually C:\Program Files\Active-Charge).
Discover Set to True if site accepts Discover® cards, otherwise False. Only effects the buy
wash bitmap that is displayed.
Merchant ID Merchant number. Defined by PCCharge, ICVerify or TransActive.
Processor Name of the credit card processor (i.e. “VISA”).
Store ID Store ID assigned by Lynk eCommerce.
Tax Credit Card Set to True if credit card sales are taxable, but cash sales are not. Otherwise set to
False. Currently, this is only necessary for New York locations.
Terminal ID Terminal ID assigned by Lynk eCommerce.
TimeOut Timeout (in seconds) to wait for credit card to clear.
Transactive Use TransActive credit card processor? (True= yes, False= no)
Visa Master Set to True if site accepts Visa/MC cards, otherwise False. Only effects the buy
wash bitmap that is displayed.
Table 13: Auto Sentry Credit Card
Auto Sentry Gift Card
Set up your Auto Sentry to sell, dispense Gift Cards and customer must activate the Gift Card at the Auto Sentry. Gift Card dispensers are optional and additional fees apply.
1 From the System Setup menu, select Devices, and then select Settings.
2 In Device Type, select Auto Sentry.
3 In Device Name, select device name.
4 In Settings Type, select TouchConfiguration.
5 In Settings, select GiftCard.
System Setup WashConnect® User Manual—Version 6.0
666
The Gift Card Settings dialog box appears.
6 In Sell Style setting, select Active, Passive, or None.
See “Selling Style for Gift Cards at the Auto Sentry” on page 668.
7 Type the necessary values. See the Gift Card Settings table for field descriptions.
8 Click the Save button.
See “Sell Both Gift Cards and Clubs at Auto Sentry” on page 659.
See “Selling Style for Gift Cards at the Auto Sentry” on page 668.
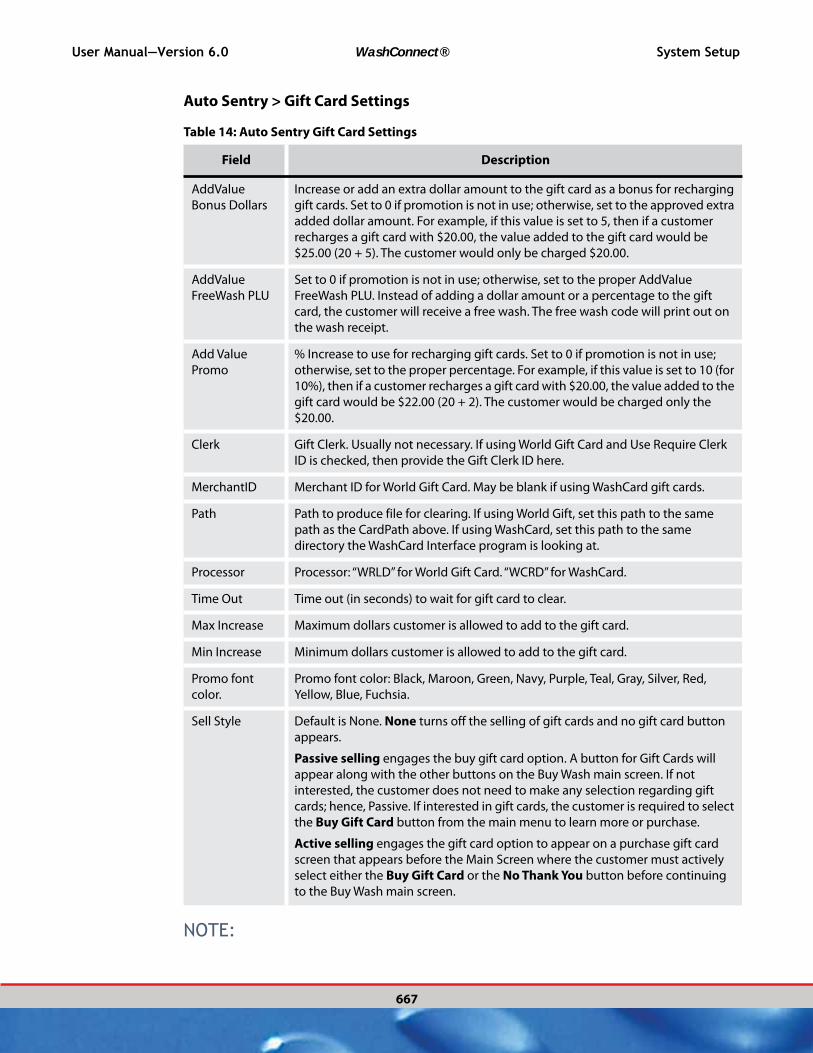
User Manual—Version 6.0 WashConnect® System Setup
667
Auto Sentry > Gift Card Settings
Table 14: Auto Sentry Gift Card Settings
Field Description
AddValue
Bonus Dollars
Increase or add an extra dollar amount to the gift card as a bonus for recharging
gift cards. Set to 0 if promotion is not in use; otherwise, set to the approved extra
added dollar amount. For example, if this value is set to 5, then if a customer
recharges a gift card with $20.00, the value added to the gift card would be
$25.00 (20 + 5). The customer would only be charged $20.00.
AddValue
FreeWash PLU
Set to 0 if promotion is not in use; otherwise, set to the proper AddValue
FreeWash PLU. Instead of adding a dollar amount or a percentage to the gift
card, the customer will receive a free wash. The free wash code will print out on
the wash receipt.
Add Value
Promo
% Increase to use for recharging gift cards. Set to 0 if promotion is not in use;
otherwise, set to the proper percentage. For example, if this value is set to 10 (for
10%), then if a customer recharges a gift card with $20.00, the value added to the
gift card would be $22.00 (20 + 2). The customer would be charged only the
$20.00.
Clerk Gift Clerk. Usually not necessary. If using World Gift Card and Use Require Clerk
ID is checked, then provide the Gift Clerk ID here.
MerchantID Merchant ID for World Gift Card. May be blank if using WashCard gift cards.
Path Path to produce file for clearing. If using World Gift, set this path to the same
path as the CardPath above. If using WashCard, set this path to the same
directory the WashCard Interface program is looking at.
Processor Processor: “WRLD” for World Gift Card. “WCRD” for WashCard.
Time Out Time out (in seconds) to wait for gift card to clear.
Max Increase Maximum dollars customer is allowed to add to the gift card.
Min Increase Minimum dollars customer is allowed to add to the gift card.
Promo font
color.
Promo font color: Black, Maroon, Green, Navy, Purple, Teal, Gray, Silver, Red,
Yellow, Blue, Fuchsia.
Sell Style Default is None. None turns off the selling of gift cards and no gift card button
appears.
Passive selling engages the buy gift card option. A button for Gift Cards will
appear along with the other buttons on the Buy Wash main screen. If not
interested, the customer does not need to make any selection regarding gift
cards; hence, Passive. If interested in gift cards, the customer is required to select
the Buy Gift Card button from the main menu to learn more or purchase.
Active selling engages the gift card option to appear on a purchase gift card
screen that appears before the Main Screen where the customer must actively
select either the Buy Gift Card or the No Thank You button before continuing
to the Buy Wash main screen.
NOTE:
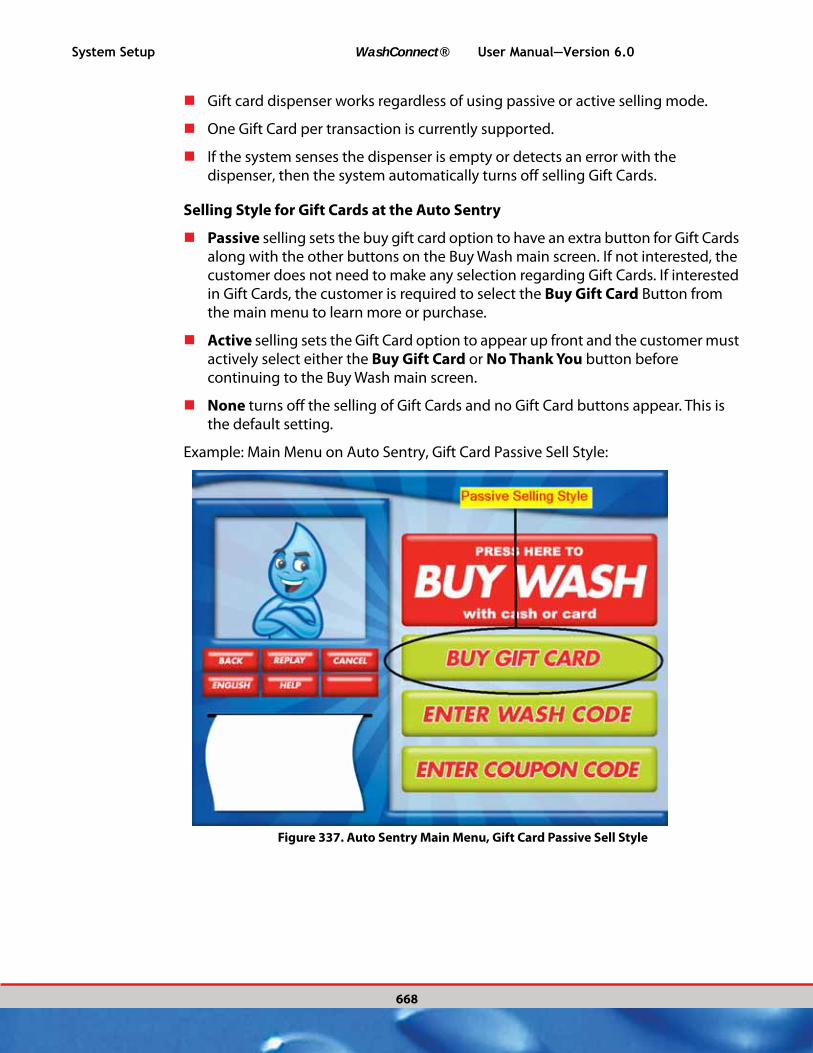
System Setup WashConnect® User Manual—Version 6.0
668
Gift card dispenser works regardless of using passive or active selling mode.
One Gift Card per transaction is currently supported.
If the system senses the dispenser is empty or detects an error with the dispenser, then the system automatically turns off selling Gift Cards.
Selling Style for Gift Cards at the Auto Sentry
Passive selling sets the buy gift card option to have an extra button for Gift Cards along with the other buttons on the Buy Wash main screen. If not interested, the customer does not need to make any selection regarding Gift Cards. If interested in Gift Cards, the customer is required to select the Buy Gift Card Button from the main menu to learn more or purchase.
Active selling sets the Gift Card option to appear up front and the customer must actively select either the Buy Gift Card or No Thank You button before continuing to the Buy Wash main screen.
None turns off the selling of Gift Cards and no Gift Card buttons appear. This is the default setting.
Example: Main Menu on Auto Sentry, Gift Card Passive Sell Style:
Figure 337. Auto Sentry Main Menu, Gift Card Passive Sell Style
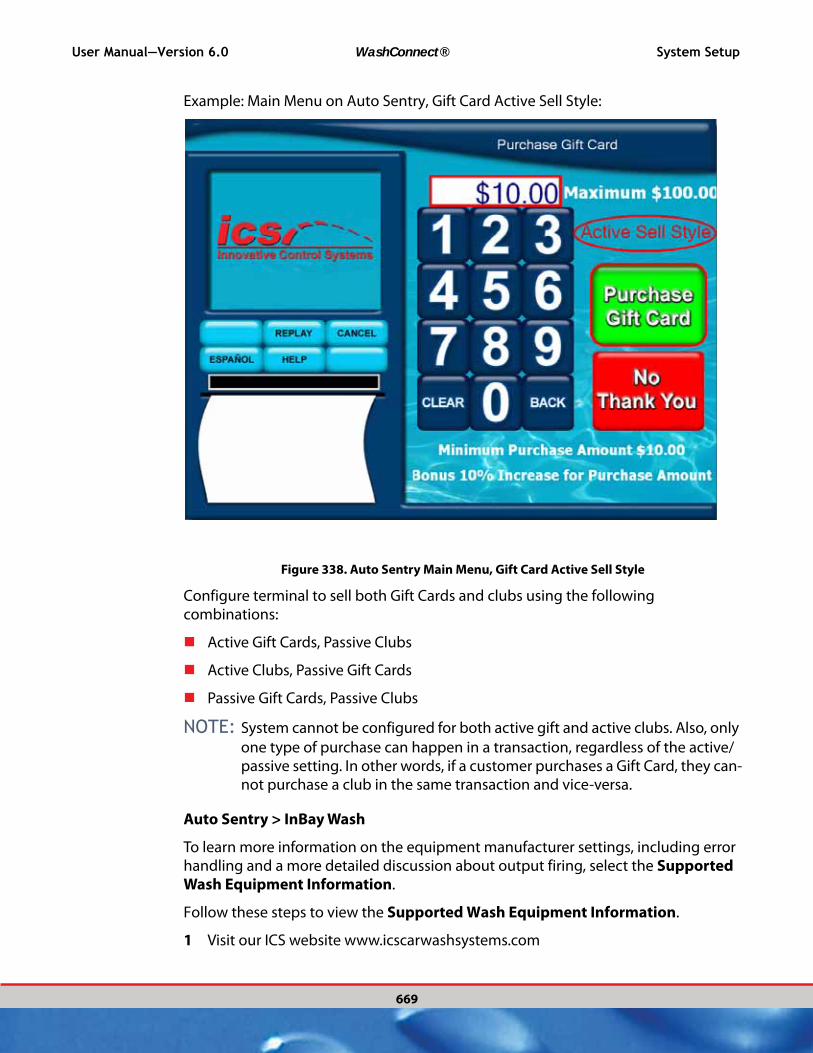
User Manual—Version 6.0 WashConnect® System Setup
669
Example: Main Menu on Auto Sentry, Gift Card Active Sell Style:
Figure 338. Auto Sentry Main Menu, Gift Card Active Sell Style
Configure terminal to sell both Gift Cards and clubs using the following combinations:
Active Gift Cards, Passive Clubs
Active Clubs, Passive Gift Cards
Passive Gift Cards, Passive Clubs
NOTE: System cannot be configured for both active gift and active clubs. Also, only
one type of purchase can happen in a transaction, regardless of the active/passive setting. In other words, if a customer purchases a Gift Card, they can-not purchase a club in the same transaction and vice-versa.
Auto Sentry > InBay Wash
To learn more information on the equipment manufacturer settings, including error handling and a more detailed discussion about output firing, select the Supported Wash Equipment Information.
Follow these steps to view the Supported Wash Equipment Information.
1 Visit our ICS website www.icscarwashsystems.com
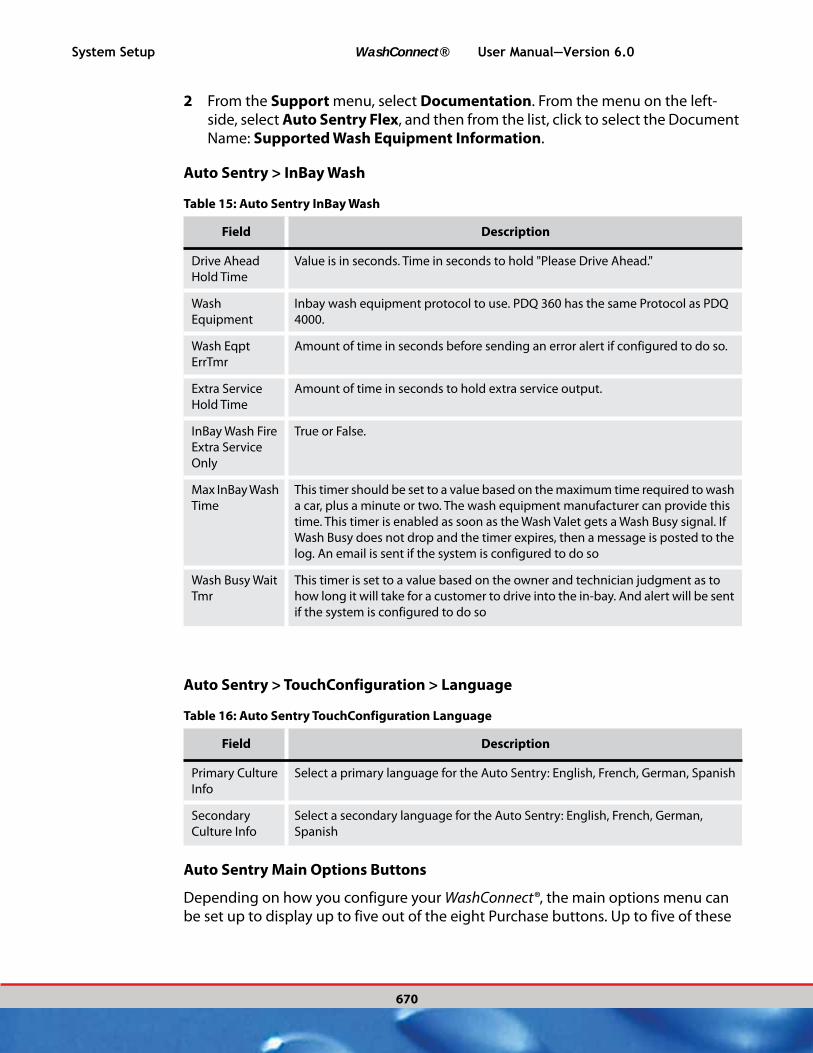
System Setup WashConnect® User Manual—Version 6.0
670
2 From the Support menu, select Documentation. From the menu on the left-side, select Auto Sentry Flex, and then from the list, click to select the Document Name: Supported Wash Equipment Information.
Auto Sentry > InBay Wash
Table 15: Auto Sentry InBay Wash
Field Description
Drive Ahead
Hold Time
Value is in seconds. Time in seconds to hold "Please Drive Ahead."
Wash
Equipment
Inbay wash equipment protocol to use. PDQ 360 has the same Protocol as PDQ
4000.
Wash Eqpt
ErrTmr
Amount of time in seconds before sending an error alert if configured to do so.
Extra Service
Hold Time
Amount of time in seconds to hold extra service output.
InBay Wash Fire
Extra Service
Only
True or False.
Max InBay Wash
Time
This timer should be set to a value based on the maximum time required to wash
a car, plus a minute or two. The wash equipment manufacturer can provide this
time. This timer is enabled as soon as the Wash Valet gets a Wash Busy signal. If
Wash Busy does not drop and the timer expires, then a message is posted to the
log. An email is sent if the system is configured to do so
Wash Busy Wait
Tmr
This timer is set to a value based on the owner and technician judgment as to
how long it will take for a customer to drive into the in-bay. And alert will be sent
if the system is configured to do so
Auto Sentry > TouchConfiguration > Language
Table 16: Auto Sentry TouchConfiguration Language
Field Description
Primary Culture
Info
Select a primary language for the Auto Sentry: English, French, German, Spanish
Secondary
Culture Info
Select a secondary language for the Auto Sentry: English, French, German,
Spanish
Auto Sentry Main Options Buttons
Depending on how you configure your WashConnect®, the main options menu can be set up to display up to five out of the eight Purchase buttons. Up to five of these
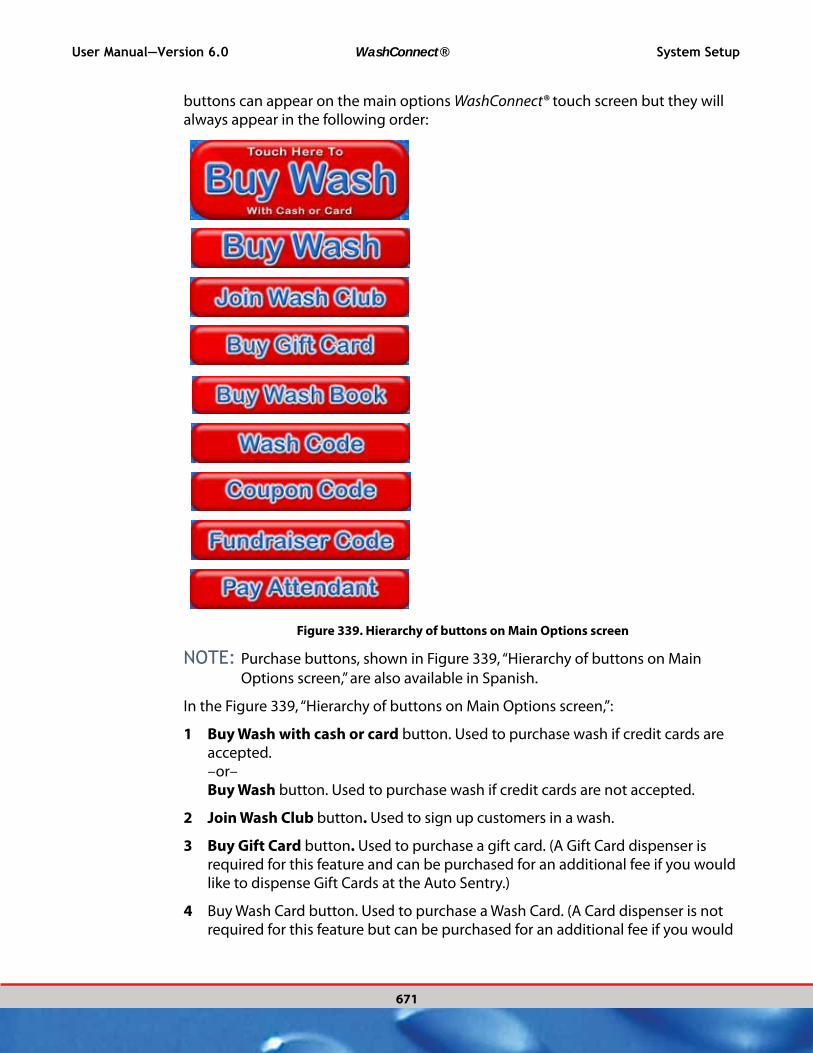
User Manual—Version 6.0 WashConnect® System Setup
671
buttons can appear on the main options WashConnect® touch screen but they will always appear in the following order:
Figure 339. Hierarchy of buttons on Main Options screen
NOTE: Purchase buttons, shown in Figure 339, “Hierarchy of buttons on Main
Options screen,” are also available in Spanish.
In the Figure 339, “Hierarchy of buttons on Main Options screen,”:
1 Buy Wash with cash or card button. Used to purchase wash if credit cards are accepted.–or–Buy Wash button. Used to purchase wash if credit cards are not accepted.
2 Join Wash Club button. Used to sign up customers in a wash.
3 Buy Gift Card button. Used to purchase a gift card. (A Gift Card dispenser is required for this feature and can be purchased for an additional fee if you would like to dispense Gift Cards at the Auto Sentry.)
4 Buy Wash Card button. Used to purchase a Wash Card. (A Card dispenser is not required for this feature but can be purchased for an additional fee if you would

System Setup WashConnect® User Manual—Version 6.0
672
like to use the Card dispenser to dispense Wash Book Customer Card at the Auto Sentry. Otherwise, the barcode and Wash Card number prints at the bottom of the customer’s receipt.)
See “About Wash Books” on page 424.
5 Wash Code button. A wash code is unique and cannot be reused. The wash code button is used to enter a five-digit paid ticket code from the fuel pump or a Global six-digit wash codes generated from Corporate. (Five-digit wash codes are generated randomly from the fuel pump interface and include an expiration date.)
6 Coupon Code button. Used to enter a three- four- or five-digit coupon code. (A PLU needs to be created for the coupon and the PLU number is the Coupon number. A Profile needs to be created for Coupons and activated with a valid schedule. Coupon numbers can be reused.)
To assign a Coupon Code, See “Auto Sentry > Shift” on page 679.
7 Fund Raiser Code button. Used to purchase a wash through a coupon code that is set up in the system so sales can be tracked and easily be able to determine the donation amount to forward to the charity or organization. Set up a valid Coupon profile.
8 Pay Attendant button. This button is used to give payment directly to car wash attendant instead of payment terminal. (Pay Attendant Button is not usually enabled for in-bay automatic sites.) This button was designed if customer has questions and needs to ask attendant before purchasing a wash. A receipt will print and customer takes it to the tunnel attendant where the attendant completes the wash purchase. After paying attendant, the vehicle will be added to the stack.) This button has mostly been replaced with an intercom system where the Attendant can answer or help customer with the use of the intercom speaker directly at the Auto Sentry.

User Manual—Version 6.0 WashConnect® System Setup
673
Auto Sentry > Main Options
Table 17: Auto Sentry Main Options
Field Description
My Listen Port This value is the My Listen Port.
MainOptions_A
LaCarteExtras
True or False. Set to True, if you want to allow variable pricing if A La Carte is
enabled.
Allow Card True or False. Set to True to accept credit cards, and False to not allow credit
cards.
Allow Cash True or False. Set to True to accept cash, and False to not accept cash.
Allow Code True or False. Set to True to allow 5-digit or 6-digit Wash Codes from the Wash
Code button at the auto Sentry. Set to False to not allow 5-digit or 6-digit Wash
Codes.
Allow Fund
raiser
True or False. Set to True to Accept 4-digit Fund raiser codes by selecting the
Fund raiser Code button at the Auto Sentry. Set to False if not allowing 4-digit
Fund raiser.
Allow Pay True or False. Default is False. Warning: This is only useful for a very specific
business model. Set to True to allow a Pay Attendant button, where the
customer can pay the attendant instead of entering payment at the Auto Sentry.
This puts a pay attendant ticket on stack that must be edited before the car can
be washed.
MainOptions_G
otoBuyIfCashOr
Card
True or False. When set to True, and customer swipes credit card, selling gift
cards or playing the RFID validations screens (and sense loop was not used).
WashConnect® assumes the customer wants to buy a wash, and the system
advances to the list of washes on the buy wash screen without pressing the Buy
Wash button. When set to False, no assumptions, customer can swipe credit card,
but will have to press Buy Wash button to advance to the Buy Wash screen to
select a wash from the list.
No Video Only
Audio
True or False. Set to True if no video should display in the small window of the
Auto Sentry. Set to False if a video should display in the small window of the
Auto Sentry.
Pay Output Output number. If the site is using the Pay Attendant button, what output is
energized to let the attendant know.
Save Logs of
Days
Number of days. The amount of days to purge Troubleshooting logs to prevent
disk space issues.
MainOptions_S
howRedeemBo
okButton
Default is False. Set to True if you want Show Redeem Book button to appear on
Main Options screen.
Save Video To
Left
True or False. Set to True to display videos on the left of the screen. Set False to
display videos to the right of the screen. Useful for countries that drive on the
left.
Wash Type Automatic, Conveyor, or Presell. This is the wash type for your wash site.

System Setup WashConnect® User Manual—Version 6.0
674
Set up purchase buttons for the Main Options menu
You can configure up to five purchase buttons to appear on the Auto Sentry Main Options menu.
1 From the System Setup menu, select Devices, and then select the Settings button.
2 In Device Type, select the Auto Sentry®.
3 In Settings Type, select TouchConfiguration.
4 In Settings, select MainOptions.
5 In My Listen Port, select a port value.
6 Select True or False for the following options:Allow Card The Buy Wash button will appear.Allow Cash The Buy Wash button will appear.Allow Code The Enter Wash Code button will appear to enter a five- or six- digit ticket wash codes.Allow Coupon Code To set up the Coupon Code button, See “Auto Sentry > Shift” on page 679.Allow Fund raiser The Fund raiser button will appear to enter a fund raiser. Fund raisers can also be entered from the Wash Code button.Allow Pay The Pay Attendant button will appear to forward customer to directly pay car wash attendant instead of pay at the Auto Sentry. (This button is not used for in-bay automatic sites.) MainOptions_ShowRedeemBookButton The Redeem Book button will appear to enter wash book number.
NOTE: Buy Gift Card and Buy Club Membership buttons will appear when repeat-
ing steps 1 and 3, and then from the Settings, select GiftCard or Club, and then select passive sell style.
7 Other fields are not pertinent to the buttons on the Main Options screen.
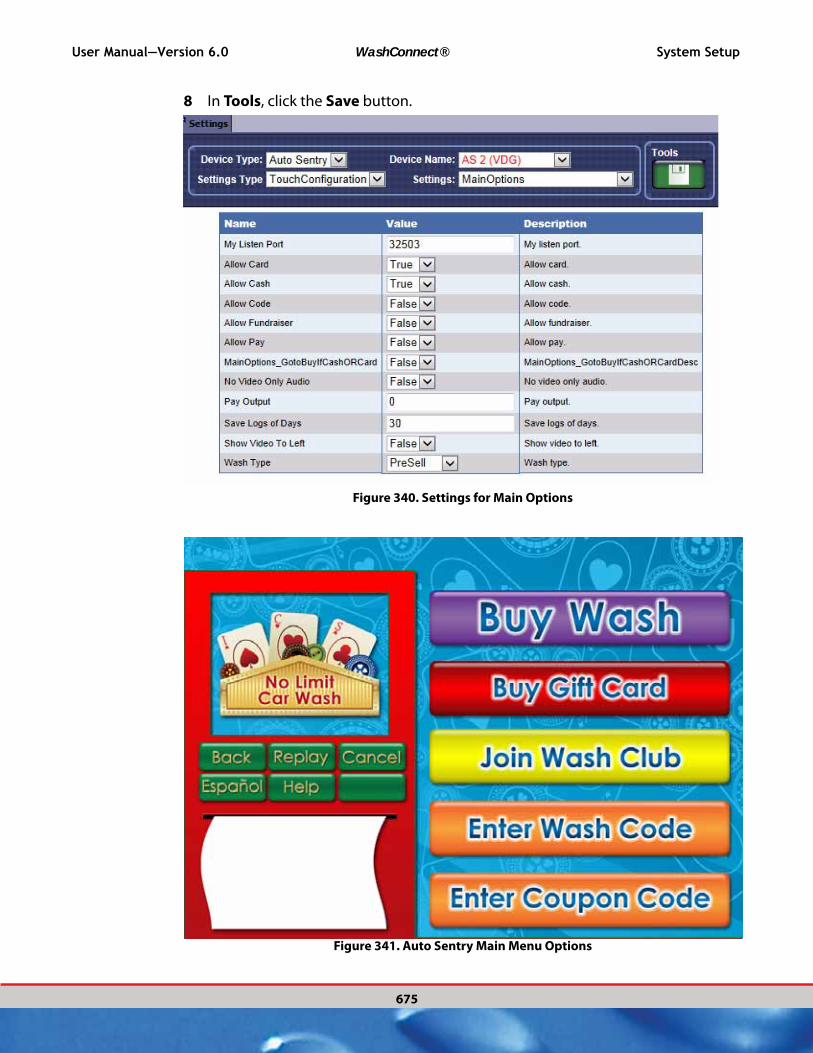
User Manual—Version 6.0 WashConnect® System Setup
675
8 In Tools, click the Save button.
Figure 340. Settings for Main Options
Figure 341. Auto Sentry Main Menu Options

System Setup WashConnect® User Manual—Version 6.0
676
Auto Sentry > TouchConfiguration Pay Cash
Table 18: Auto Sentry TouchConfiguration Pay Cash
Field Description
Cash
Change
Credit
Credit Owed
Credit Receipt 1
Credit Receipt 2
Insert Cash
Thank You
Token
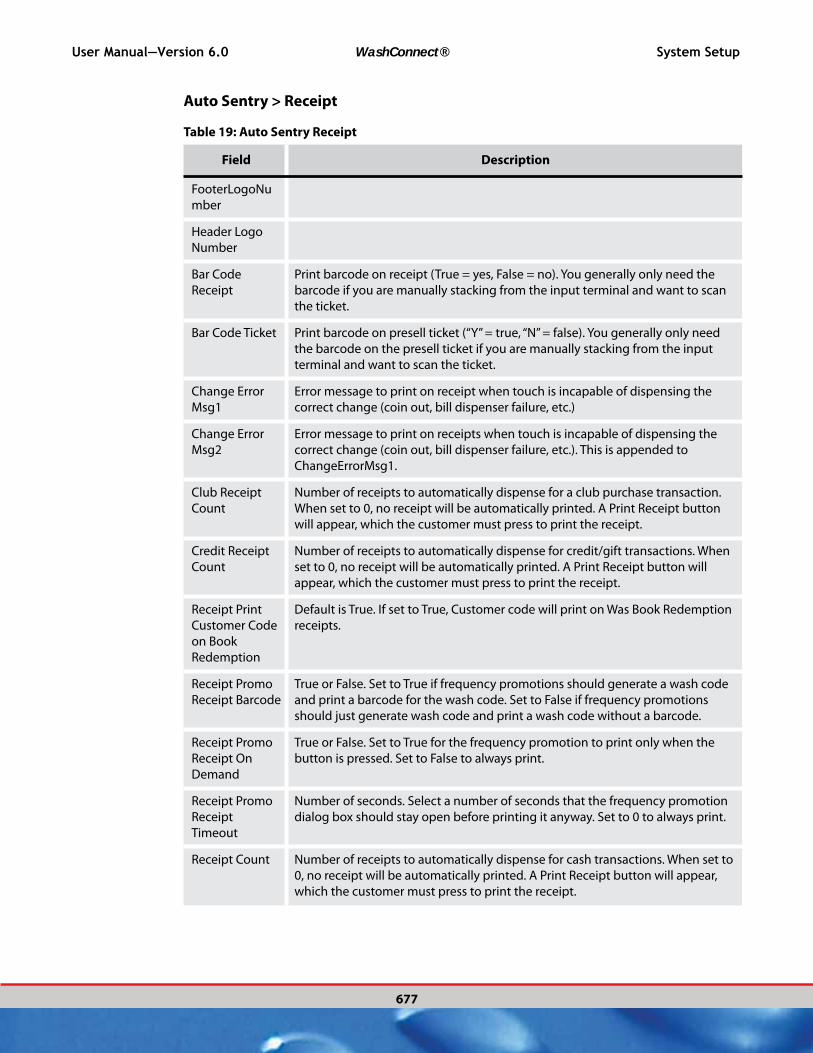
User Manual—Version 6.0 WashConnect® System Setup
677
Auto Sentry > Receipt
Table 19: Auto Sentry Receipt
Field Description
FooterLogoNu
mber
Header Logo
Number
Bar Code
Receipt
Print barcode on receipt (True = yes, False = no). You generally only need the
barcode if you are manually stacking from the input terminal and want to scan
the ticket.
Bar Code Ticket Print barcode on presell ticket (“Y” = true, “N” = false). You generally only need
the barcode on the presell ticket if you are manually stacking from the input
terminal and want to scan the ticket.
Change Error
Msg1
Error message to print on receipt when touch is incapable of dispensing the
correct change (coin out, bill dispenser failure, etc.)
Change Error
Msg2
Error message to print on receipts when touch is incapable of dispensing the
correct change (coin out, bill dispenser failure, etc.). This is appended to
ChangeErrorMsg1.
Club Receipt
Count
Number of receipts to automatically dispense for a club purchase transaction.
When set to 0, no receipt will be automatically printed. A Print Receipt button
will appear, which the customer must press to print the receipt.
Credit Receipt
Count
Number of receipts to automatically dispense for credit/gift transactions. When
set to 0, no receipt will be automatically printed. A Print Receipt button will
appear, which the customer must press to print the receipt.
Receipt Print
Customer Code
on Book
Redemption
Default is True. If set to True, Customer code will print on Was Book Redemption
receipts.
Receipt Promo
Receipt Barcode
True or False. Set to True if frequency promotions should generate a wash code
and print a barcode for the wash code. Set to False if frequency promotions
should just generate wash code and print a wash code without a barcode.
Receipt Promo
Receipt On
Demand
True or False. Set to True for the frequency promotion to print only when the
button is pressed. Set to False to always print.
Receipt Promo
Receipt
Timeout
Number of seconds. Select a number of seconds that the frequency promotion
dialog box should stay open before printing it anyway. Set to 0 to always print.
Receipt Count Number of receipts to automatically dispense for cash transactions. When set to
0, no receipt will be automatically printed. A Print Receipt button will appear,
which the customer must press to print the receipt.
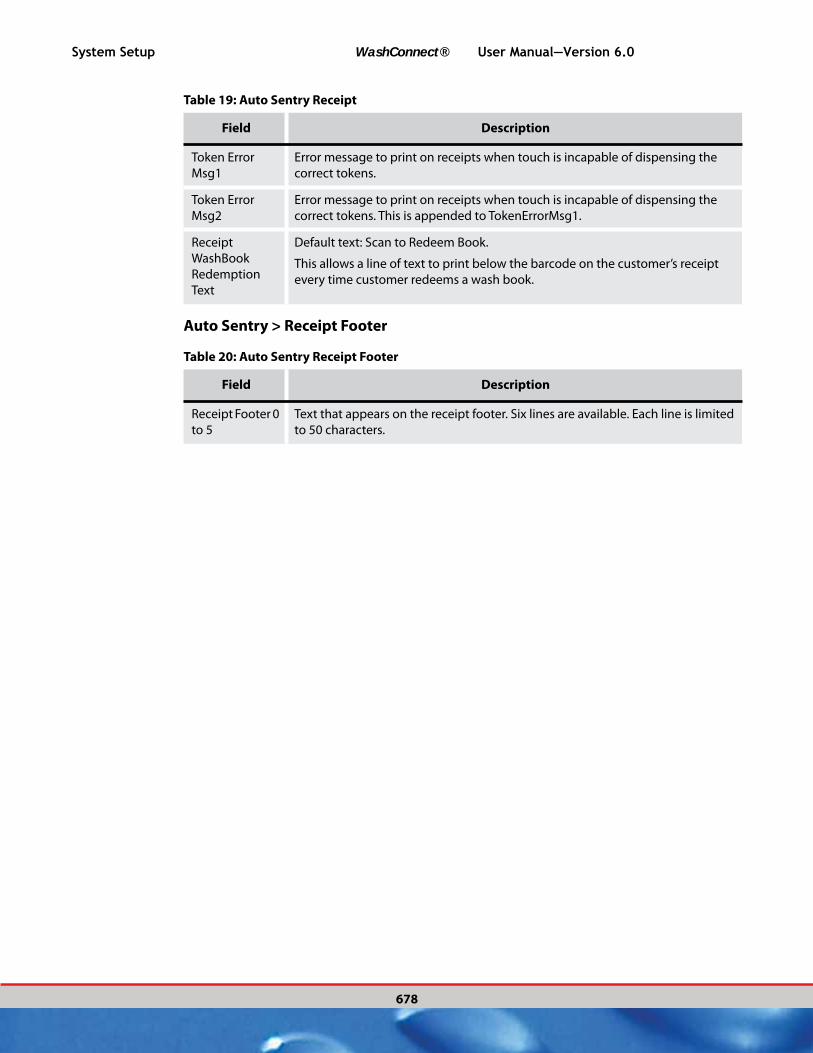
System Setup WashConnect® User Manual—Version 6.0
678
Auto Sentry > Receipt Footer
Table 20: Auto Sentry Receipt Footer
Field Description
Receipt Footer 0
to 5
Text that appears on the receipt footer. Six lines are available. Each line is limited
to 50 characters.
Token Error
Msg1
Error message to print on receipts when touch is incapable of dispensing the
correct tokens.
Token Error
Msg2
Error message to print on receipts when touch is incapable of dispensing the
correct tokens. This is appended to TokenErrorMsg1.
Receipt
WashBook
Redemption
Text
Default text: Scan to Redeem Book.
This allows a line of text to print below the barcode on the customer’s receipt
every time customer redeems a wash book.
Table 19: Auto Sentry Receipt
Field Description
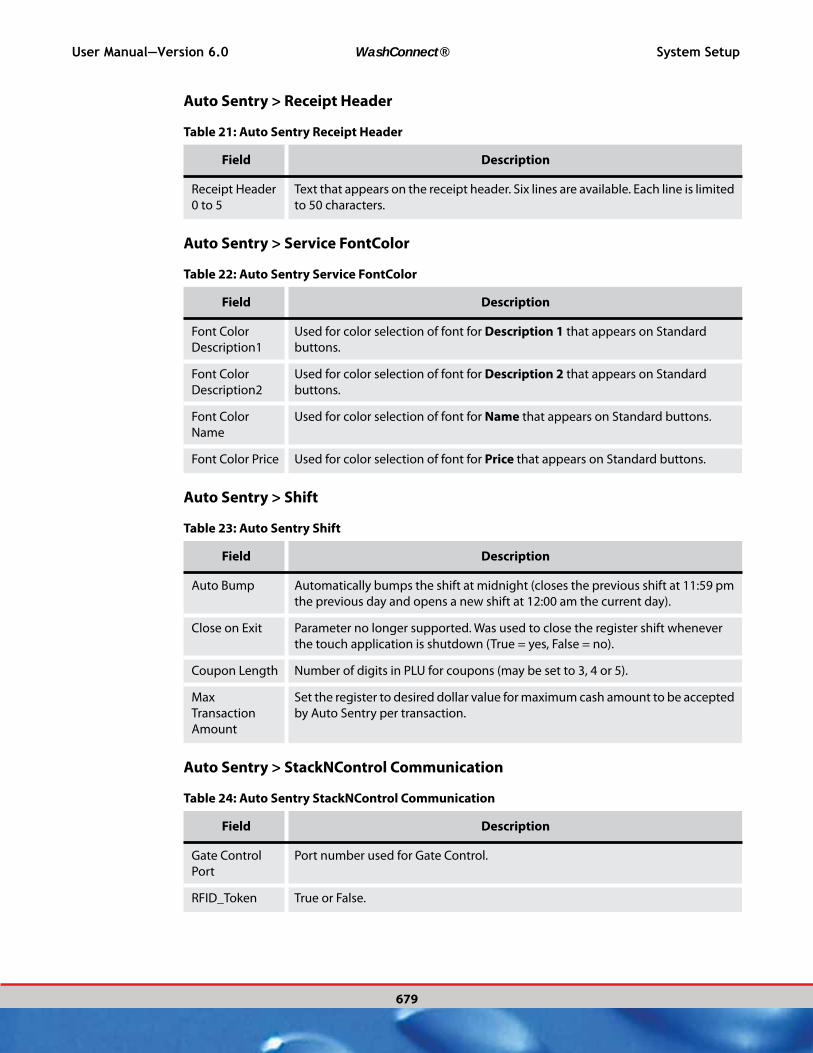
User Manual—Version 6.0 WashConnect® System Setup
679
Auto Sentry > Receipt Header
Table 21: Auto Sentry Receipt Header
Field Description
Receipt Header
0 to 5
Text that appears on the receipt header. Six lines are available. Each line is limited
to 50 characters.
Auto Sentry > Service FontColor
Table 22: Auto Sentry Service FontColor
Field Description
Font Color
Description1
Used for color selection of font for Description 1 that appears on Standard
buttons.
Font Color
Description2
Used for color selection of font for Description 2 that appears on Standard
buttons.
Font Color
Name
Used for color selection of font for Name that appears on Standard buttons.
Font Color Price Used for color selection of font for Price that appears on Standard buttons.
Auto Sentry > Shift
Table 23: Auto Sentry Shift
Field Description
Auto Bump Automatically bumps the shift at midnight (closes the previous shift at 11:59 pm
the previous day and opens a new shift at 12:00 am the current day).
Close on Exit Parameter no longer supported. Was used to close the register shift whenever
the touch application is shutdown (True = yes, False = no).
Coupon Length Number of digits in PLU for coupons (may be set to 3, 4 or 5).
Max
Transaction
Amount
Set the register to desired dollar value for maximum cash amount to be accepted
by Auto Sentry per transaction.
Auto Sentry > StackNControl Communication
Table 24: Auto Sentry StackNControl Communication
Field Description
Gate Control
Port
Port number used for Gate Control.
RFID_Token True or False.
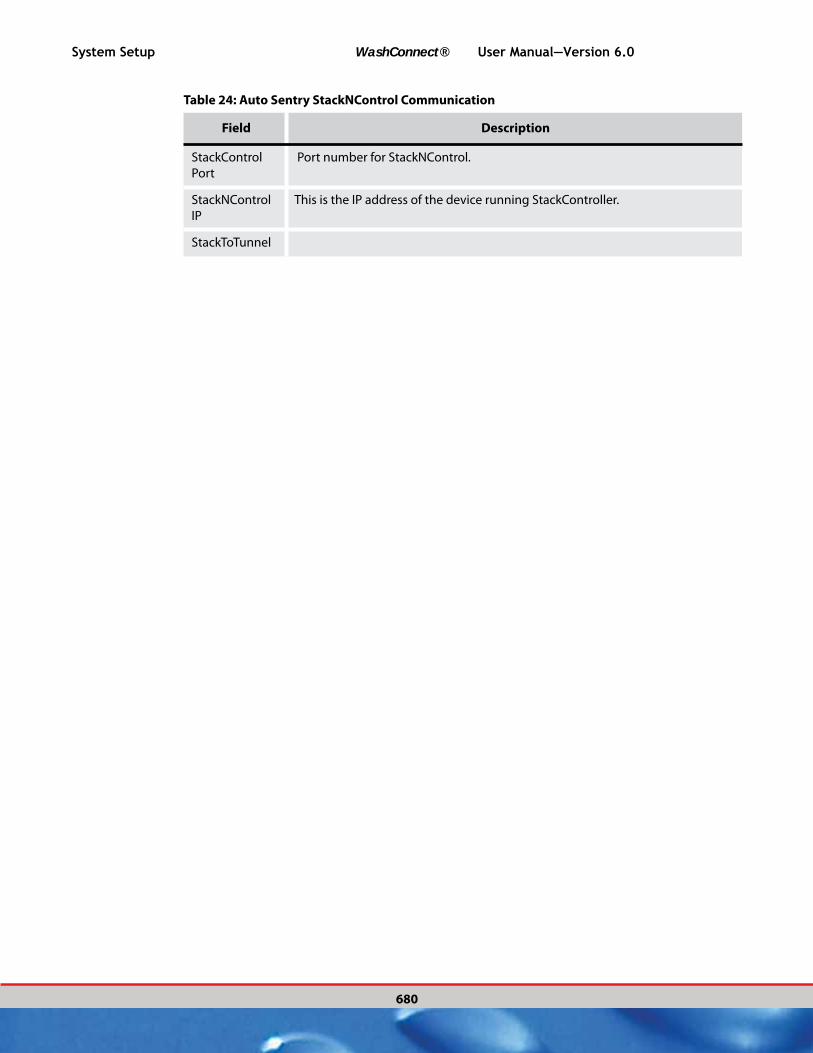
System Setup WashConnect® User Manual—Version 6.0
680
StackControl
Port
Port number for StackNControl.
StackNControl
IP
This is the IP address of the device running StackController.
StackToTunnel
Table 24: Auto Sentry StackNControl Communication
Field Description

User Manual—Version 6.0 WashConnect® System Setup
681
Auto Sentry > Tickets
Table 25: Auto Sentry Tickets
Field Description
Allow Loaded
Tickets
True or False.Configuration to allow tickets of status Loaded to scan at the Auto
Sentry.
Detail_Ticket_E
xpiration_Perio
d
Number in Minutes. Amount of time in minutes that a detail ticket generated at
the Auto Sentry will expire if not used. Most washes purchased at an Auto Sentry
are processed immediately.
Ticket_Expiratio
n_Period
Number in Minutes. Amount of time in minutes that a ticket generated at the
Auto Sentry will expire if not used. Most washes purchased at an Auto Sentry are
processed immediately.
Vacuum Ticket
Expiration
Period
Auto Sentry > TouchDebug
Table 26: Auto Sentry TouchDebug
Field Description
Enhanced Log True or False. Set to True to enable enhanced logging for troubleshooting
purposes. Set to False to turn of enhanced logging.
Monitor True or False. Set to True to enable enhanced logging for troubleshooting
purposes.Set to False to turn of enhanced logging.
Auto Sentry > TouchService
Table 27: Auto Sentry TouchService
Field Description
Car Wash Code
Coupon Wash
Code
Enter Coupon
Enter Wash
Code
Invalid Service
Selected
No Base Wash
Service

System Setup WashConnect® User Manual—Version 6.0
682
Auto Sentry > Vandalism Deterrent
Table 28: Auto Sentry Vandalism Deterrent
Field Description
Deterrent Alarm
Output
Numeric. The output that will be fired when the alarm is tripped.
Deterrent Alarm
Time Out
Numeric. Minutes. If set to zero, the alarm never resets based on this timeout.
Any number entry greater than zero represents the time to wait (in minutes)
until the alarm is automatically reset.
Deterrent
Disarm Alarm
Time Out
Numeric. Seconds. How long the alarm stays off after you press the Disable
Alarm button in the Service Unit diagnostics screen.
Deterrent
Enable
True or False. Enable or disable the vandalism alarm.
Deterrent On
Change Low
High
Type HIGH if the alarm triggers on a logic change from low to high. Else, type
LOW.
No Outputs For
Service
Purchase Wash
Select Extra
Service
Select Wash
Table 27: Auto Sentry TouchService
Field Description
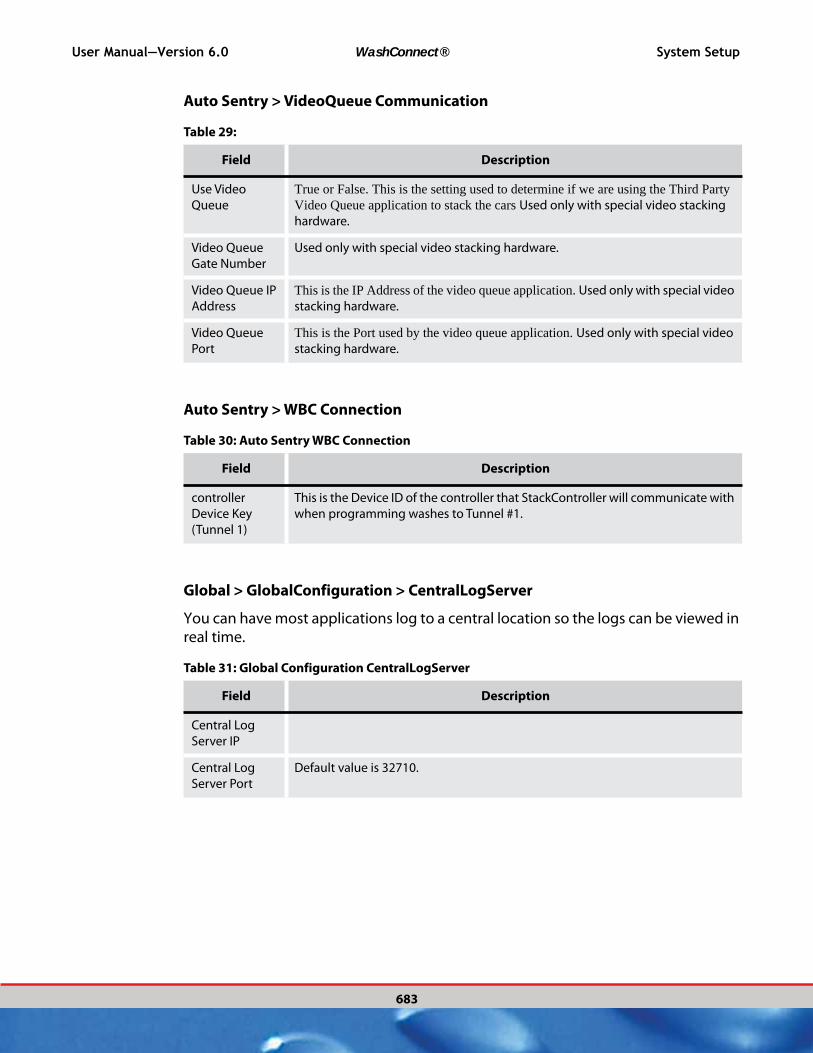
User Manual—Version 6.0 WashConnect® System Setup
683
Auto Sentry > VideoQueue Communication
Table 29:
Field Description
Use Video
Queue
True or False. This is the setting used to determine if we are using the Third Party Video Queue application to stack the cars Used only with special video stacking
hardware.
Video Queue
Gate Number
Used only with special video stacking hardware.
Video Queue IP
Address
This is the IP Address of the video queue application. Used only with special video
stacking hardware.
Video Queue
Port
This is the Port used by the video queue application. Used only with special video
stacking hardware.
Auto Sentry > WBC Connection
Table 30: Auto Sentry WBC Connection
Field Description
controller
Device Key
(Tunnel 1)
This is the Device ID of the controller that StackController will communicate with
when programming washes to Tunnel #1.
Global > GlobalConfiguration > CentralLogServer
You can have most applications log to a central location so the logs can be viewed in real time.
Table 31: Global Configuration CentralLogServer
Field Description
Central Log
Server IP
Central Log
Server Port
Default value is 32710.
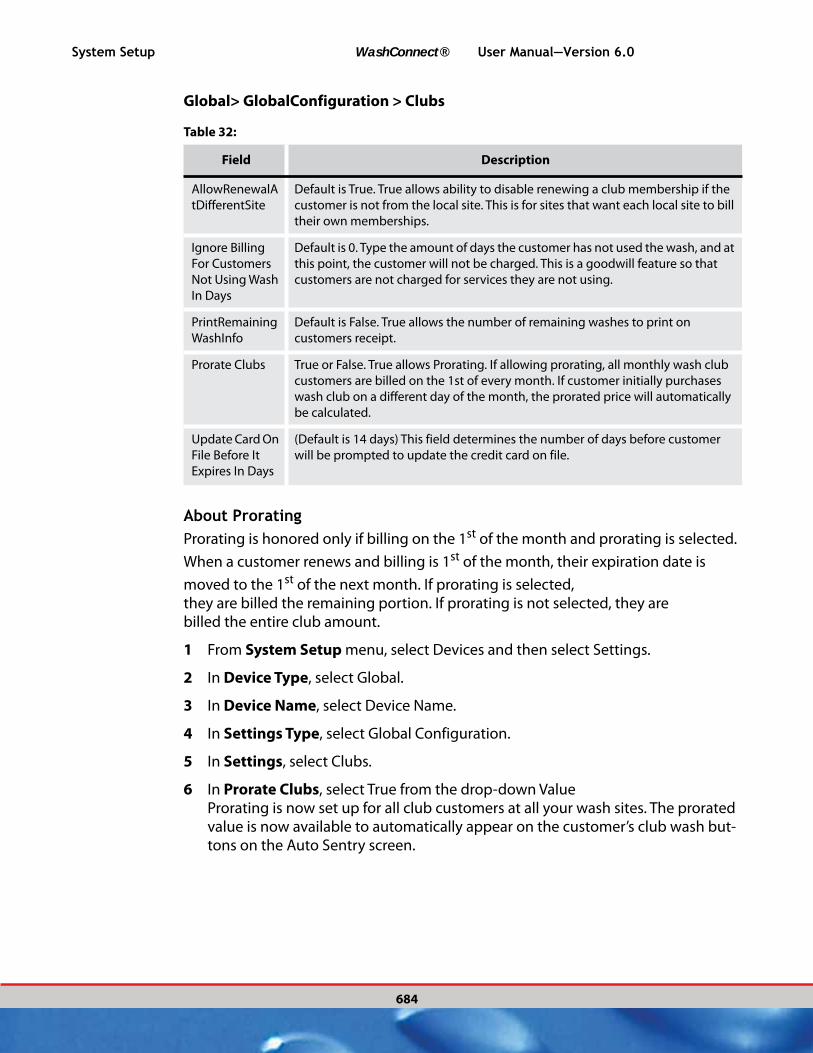
System Setup WashConnect® User Manual—Version 6.0
684
Global> GlobalConfiguration > Clubs
Table 32:
Field Description
AllowRenewalA
tDifferentSite
Default is True. True allows ability to disable renewing a club membership if the
customer is not from the local site. This is for sites that want each local site to bill
their own memberships.
Ignore Billing
For Customers
Not Using Wash
In Days
Default is 0. Type the amount of days the customer has not used the wash, and at
this point, the customer will not be charged. This is a goodwill feature so that
customers are not charged for services they are not using.
PrintRemaining
WashInfo
Default is False. True allows the number of remaining washes to print on
customers receipt.
Prorate Clubs True or False. True allows Prorating. If allowing prorating, all monthly wash club
customers are billed on the 1st of every month. If customer initially purchases
wash club on a different day of the month, the prorated price will automatically
be calculated.
Update Card On
File Before It
Expires In Days
(Default is 14 days) This field determines the number of days before customer
will be prompted to update the credit card on file.
About ProratingProrating is honored only if billing on the 1st of the month and prorating is selected.
When a customer renews and billing is 1st of the month, their expiration date is
moved to the 1st of the next month. If prorating is selected,they are billed the remaining portion. If prorating is not selected, they arebilled the entire club amount.
1 From System Setup menu, select Devices and then select Settings.
2 In Device Type, select Global.
3 In Device Name, select Device Name.
4 In Settings Type, select Global Configuration.
5 In Settings, select Clubs.
6 In Prorate Clubs, select True from the drop-down ValueProrating is now set up for all club customers at all your wash sites. The prorated value is now available to automatically appear on the customer’s club wash but-tons on the Auto Sentry screen.

User Manual—Version 6.0 WashConnect® System Setup
685
Figure 342. Global Settings for Prorate Clubs
Prorating Example
In this prorate club example, a $30 wash club is sold within a 30 day month.
If customer initially purchases the $30 wash club on the 2nd of the month, the customer would be prorated and charged $29.
If customer initially purchases the $30 wash club on the 5th of the month, the customer would be prorated and charged $26.
If customer initially purchases the $30 wash club at a later date in the month, the customer would be would prorated and charged the decremented purchase price until you reach a date where the floor price will be charged for the rest of the month.
The floor price is the minimum amount the club customer will be charged in the first prorated month. The floor price is set up from Club Services.
See “Add a Club Service” on page 376.
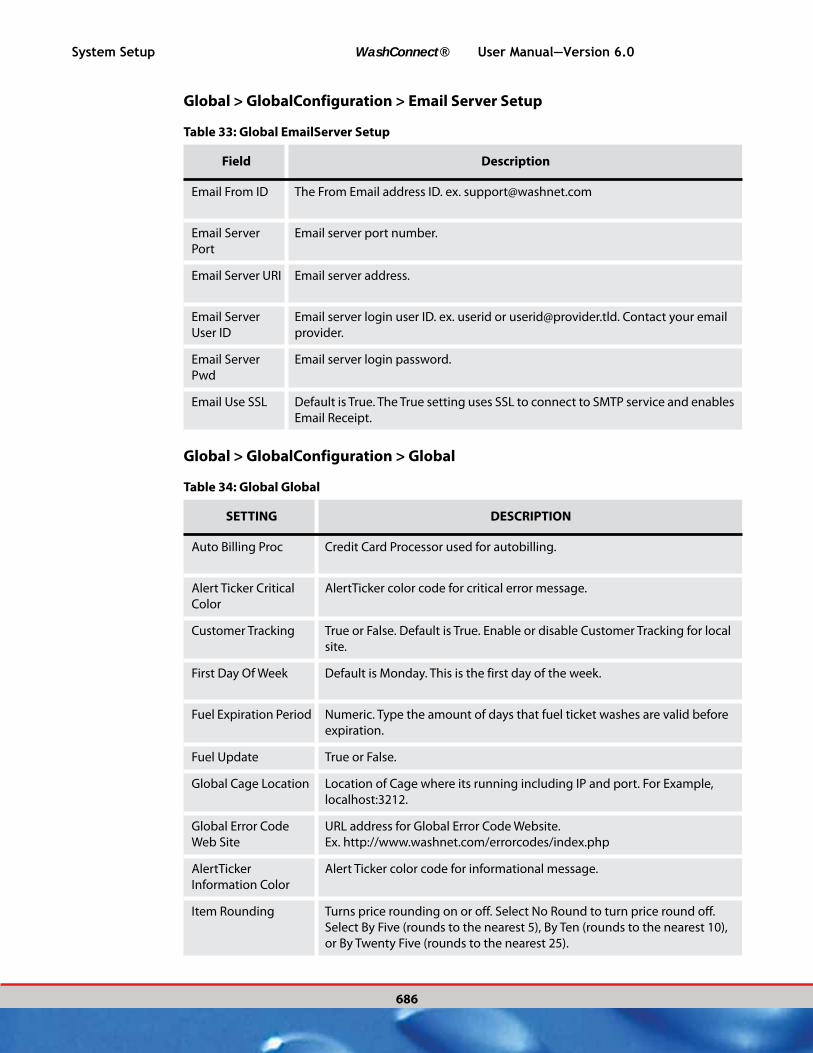
System Setup WashConnect® User Manual—Version 6.0
686
Global > GlobalConfiguration > Email Server Setup
Table 33: Global EmailServer Setup
Field Description
Email From ID The From Email address ID. ex. [email protected]
Email Server
Port
Email server port number.
Email Server URI Email server address.
Email Server
User ID
Email server login user ID. ex. userid or [email protected]. Contact your email
provider.
Email Server
Pwd
Email server login password.
Email Use SSL Default is True. The True setting uses SSL to connect to SMTP service and enables
Email Receipt.
Global > GlobalConfiguration > Global
Table 34: Global Global
SETTING DESCRIPTION
Auto Billing Proc Credit Card Processor used for autobilling.
Alert Ticker Critical
Color
AlertTicker color code for critical error message.
Customer Tracking True or False. Default is True. Enable or disable Customer Tracking for local
site.
First Day Of Week Default is Monday. This is the first day of the week.
Fuel Expiration Period Numeric. Type the amount of days that fuel ticket washes are valid before
expiration.
Fuel Update True or False.
Global Cage Location Location of Cage where its running including IP and port. For Example,
localhost:3212.
Global Error Code
Web Site
URL address for Global Error Code Website.
Ex. http://www.washnet.com/errorcodes/index.php
AlertTicker
Information Color
Alert Ticker color code for informational message.
Item Rounding Turns price rounding on or off. Select No Round to turn price round off.
Select By Five (rounds to the nearest 5), By Ten (rounds to the nearest 10),
or By Twenty Five (rounds to the nearest 25).

User Manual—Version 6.0 WashConnect® System Setup
687
Global > GlobalConfiguration > Hand Services > HandService_AutoStartCarTo-Bay
Table 35: Global Hand Services HandService_AutoStart CarToBay
PCI Scan IP PCI Scan IP address.
Show Other Devices
On Journal List
True or False. True shows other devices on journal list.
Stack Hand Services True or False. True allows stacking of Hand Services PLUs.
TimeClockUseFinger
printOnly
True or False. True only allows fingerprint to clock in and clock out. Must
have optional fingerprint reader for this setting.
AlertTicker Warning
Color
AlertTicker color code for warning message.
WashConnectDefault
Login
True or False. (Default is True.) When True, the Default user will be
automatically entered in the User ID field with its password entered in the
Password field. When set to False, the User ID and Password fields are not
populated.
WashOpen24Hours True or False. (Default is False.) Set to True when wash is a 24 hour wash.
Table 34: Global Global
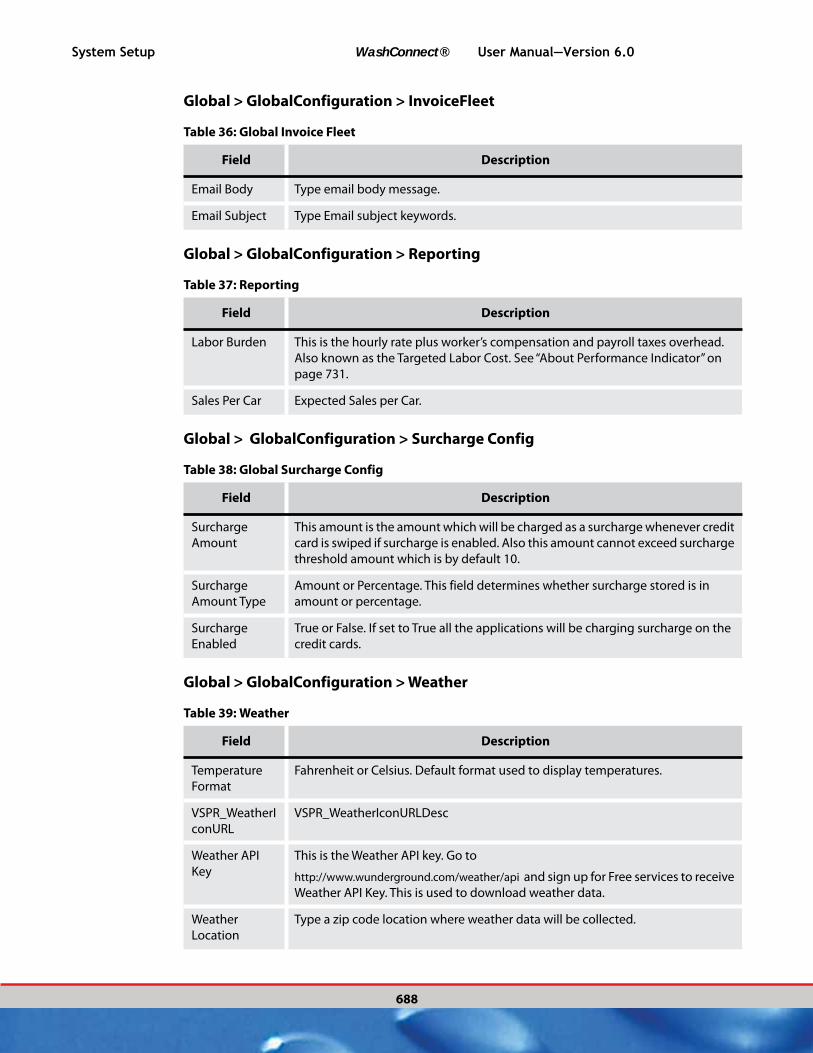
System Setup WashConnect® User Manual—Version 6.0
688
Global > GlobalConfiguration > InvoiceFleet
Table 36: Global Invoice Fleet
Field Description
Email Body Type email body message.
Email Subject Type Email subject keywords.
Global > GlobalConfiguration > Reporting
Table 37: Reporting
Field Description
Labor Burden This is the hourly rate plus worker’s compensation and payroll taxes overhead.
Also known as the Targeted Labor Cost. See “About Performance Indicator” on
page 731.
Sales Per Car Expected Sales per Car.
Global > GlobalConfiguration > Surcharge Config
Table 38: Global Surcharge Config
Field Description
Surcharge
Amount
This amount is the amount which will be charged as a surcharge whenever credit
card is swiped if surcharge is enabled. Also this amount cannot exceed surcharge
threshold amount which is by default 10.
Surcharge
Amount Type
Amount or Percentage. This field determines whether surcharge stored is in
amount or percentage.
Surcharge
Enabled
True or False. If set to True all the applications will be charging surcharge on the
credit cards.
Global > GlobalConfiguration > Weather
Table 39: Weather
Field Description
Temperature
Format
Fahrenheit or Celsius. Default format used to display temperatures.
VSPR_WeatherI
conURL
VSPR_WeatherIconURLDesc
Weather API
Key
This is the Weather API key. Go to
http://www.wunderground.com/weather/api and sign up for Free services to receive
Weather API Key. This is used to download weather data.
Weather
Location
Type a zip code location where weather data will be collected.
User Manual—Version 6.0 WashConnect® System Setup
689
See “Create a Weather API Key” on page 689.
See “Setup Weather Settings for the Vehicle Performance Report” on page 691.
Create a Weather API Key
To load weather information, a Weather API key is required. This key will be saved in the Global Configuration Weather settings. Restrictions exist on how frequently calls can be made to the Weather Underground API. As a result, each site will need its own API key. The following steps outline how to register for an API key.
1 Go to http://www.wunderground.com/weather/api
2 Click on the Sign Up for FREE button.
3 Type an email address, password, and username, and agree to the terms and conditions.
4 Click the Sign Up button
5 The email address used to sign up will receive a confirmation email with a link. Click the link in the email.
6 Enter the email address and password used to create the account, and then click the Login button.
7 Click the Explore My Options button
8 Select the Stratus Plan and the History Add-on as a Developer account then click the Purchase Key button.
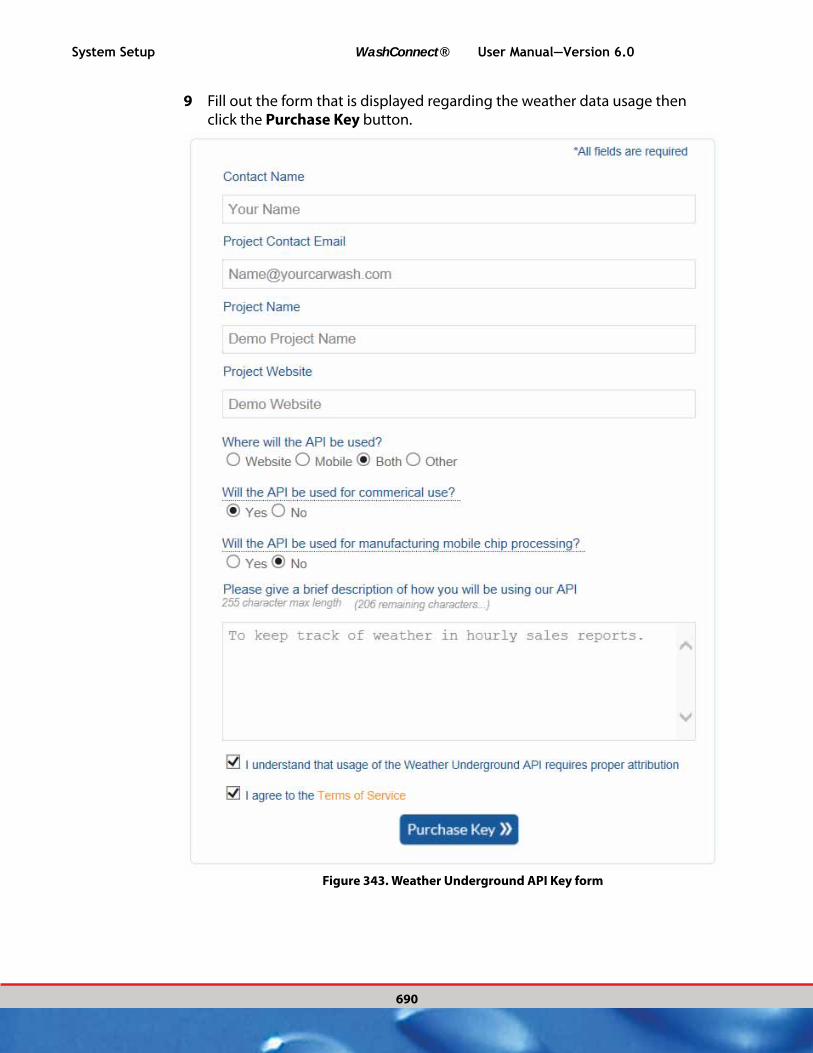
System Setup WashConnect® User Manual—Version 6.0
690
9 Fill out the form that is displayed regarding the weather data usage then click the Purchase Key button.
Figure 343. Weather Underground API Key form

User Manual—Version 6.0 WashConnect® System Setup
691
Figure 344. Weather Underground API Key example
10 From Get Your API Key, copy the value displayed in the Key ID field.
11 This is all you need from the Weather Underground. Next you will need to enter
this number in WashConnect®.
See “Setup Weather Settings for the Vehicle Performance Report” on page 691.
Setup Weather Settings for the Vehicle Performance Report
This setup is to allow the Weather Underground to provide data for the Temperature column found in the Vehicle Performance Report. Follow these steps:
1 Login to WashConnect® at site.
2 From the System Setup, select Devices, and then Settings.
3 Select Global, Device, GlobalConfiguration, and then Weather.
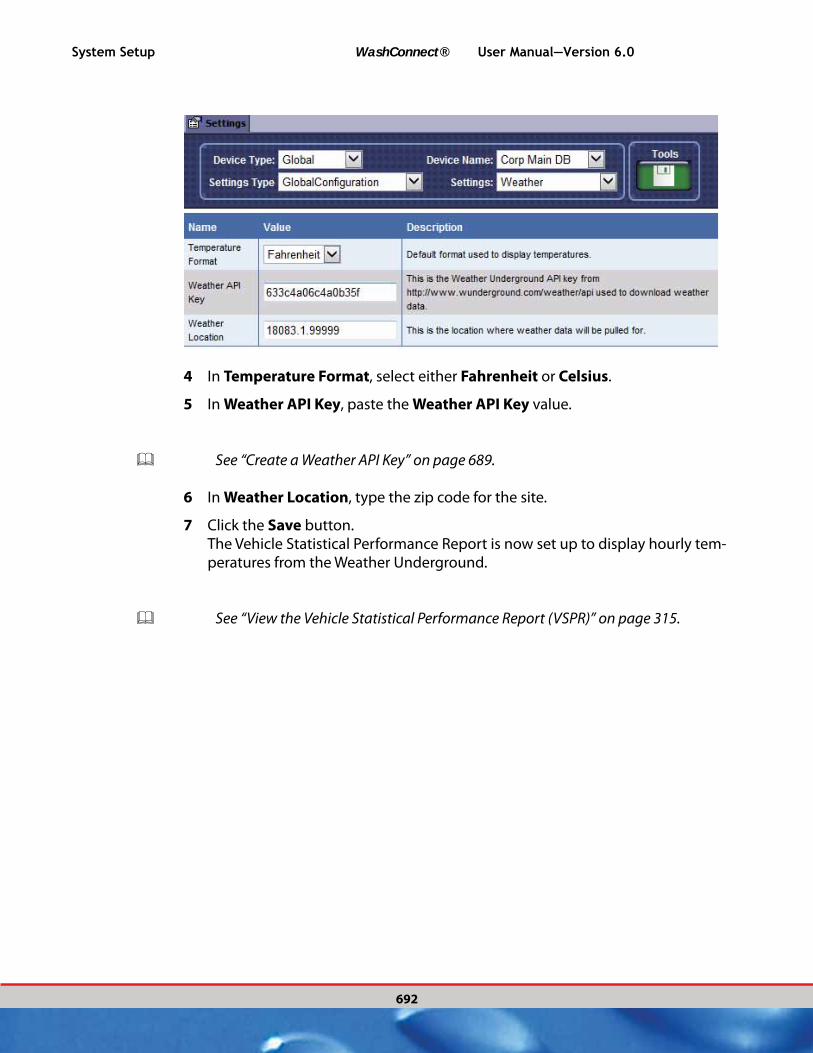
System Setup WashConnect® User Manual—Version 6.0
692
4 In Temperature Format, select either Fahrenheit or Celsius.
5 In Weather API Key, paste the Weather API Key value.
See “Create a Weather API Key” on page 689.
6 In Weather Location, type the zip code for the site.
7 Click the Save button.The Vehicle Statistical Performance Report is now set up to display hourly tem-peratures from the Weather Underground.
See “View the Vehicle Statistical Performance Report (VSPR)” on page 315.

Table 40: Lube Lube Service Configuration
Field Description
CheckControllerService
Assignment
True or False. (Default value is True)
Lube Service Password Type a password used to authenticate web service for lube ticket
generation. Must be 8 character long, must have 1 upper case, 1 lower
case letter, 1 number and 1 special character
Ticket Expiration Period Type in the amount of days until the Tickets expire.
WashCodeType LocalWashCode or GlobalWashCode. (Default value is LocalWashCode)
User Manual—Version 6.0 WashConnect® System Setup
693
Lube > LubeServiceConfiguration
POS > TouchPOSConfiguration > Cage Configuration
Table 41: POS TouchPOSConfiguration Cage Configuration
Field Description
Cage Location Location of Cage on PC i.e. D:\ICS\Cage
Cage PADSS IP IP Address of Cage where its running.
Cage PADSS Port TCP/IP port of Cage where its running.
Cage PADSS Timeout Timeout for POS/Presell to wait for response from Cage PADSS.
Touch POS Listener Port This is the port which POS uses to listen any messages from cage.
POS> TouchPOSConfiguration > Clubs
Table 42: POS TouchPOSConfiguration Clubs
Field Description
AutoRedeemAfterBuyin
gClub
True or False. Auto redeem after buying club description. If True,
Customer can buy club and redeem his wash both in the same
transaction.
AutoRedeemAfterRene
wingClub
True or False. Auto redeem after renewing club description. If True,
customer can renew club and redeem the club wash both in the same
transaction.
Clubs Express True or False.
Sign Up Day Advance
Exp. Date
Expired Date or Renewal Date. This field determines whether to advance the expiration date of program membership from the date it was renewed or from the expired date.
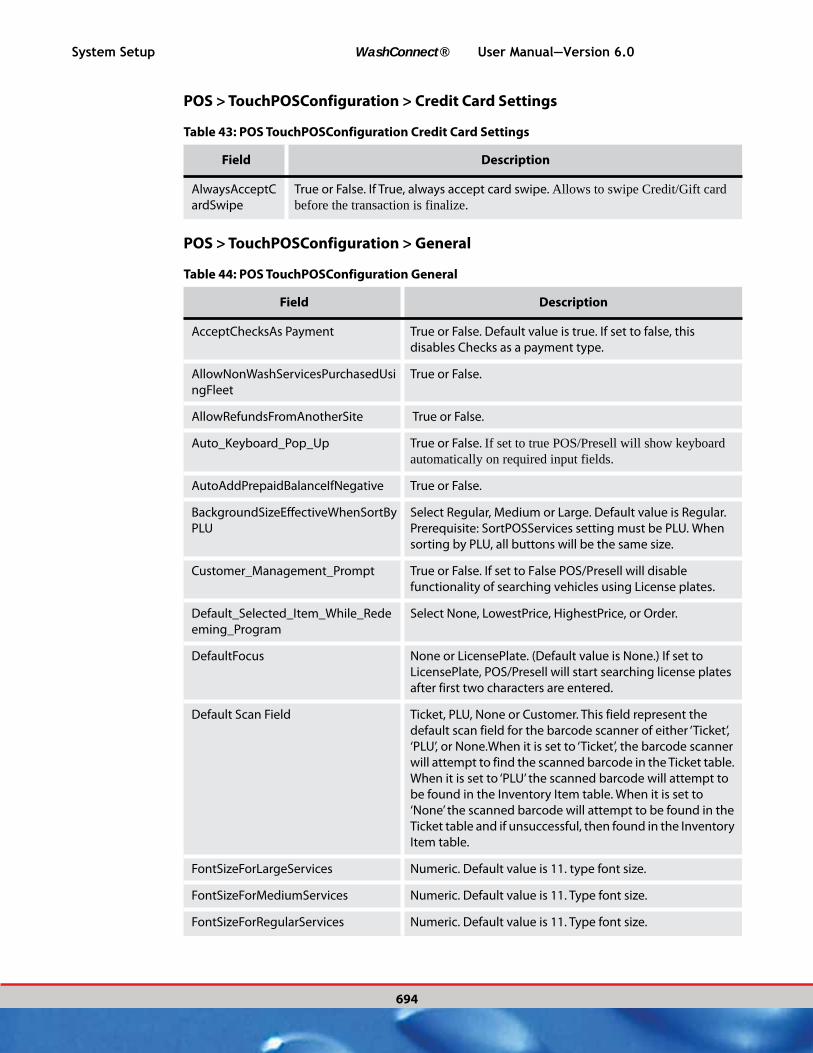
System Setup WashConnect® User Manual—Version 6.0
694
POS > TouchPOSConfiguration > Credit Card Settings
Table 43: POS TouchPOSConfiguration Credit Card Settings
Field Description
AlwaysAcceptC
ardSwipe
True or False. If True, always accept card swipe. Allows to swipe Credit/Gift card before the transaction is finalize.
POS > TouchPOSConfiguration > General
Table 44: POS TouchPOSConfiguration General
Field Description
AcceptChecksAs Payment True or False. Default value is true. If set to false, this
disables Checks as a payment type.
AllowNonWashServicesPurchasedUsi
ngFleet
True or False.
AllowRefundsFromAnotherSite True or False.
Auto_Keyboard_Pop_Up True or False. If set to true POS/Presell will show keyboard automatically on required input fields.
AutoAddPrepaidBalanceIfNegative True or False.
BackgroundSizeEffectiveWhenSortBy
PLU
Select Regular, Medium or Large. Default value is Regular.
Prerequisite: SortPOSServices setting must be PLU. When
sorting by PLU, all buttons will be the same size.
Customer_Management_Prompt True or False. If set to False POS/Presell will disable
functionality of searching vehicles using License plates.
Default_Selected_Item_While_Rede
eming_Program
Select None, LowestPrice, HighestPrice, or Order.
DefaultFocus None or LicensePlate. (Default value is None.) If set to
LicensePlate, POS/Presell will start searching license plates
after first two characters are entered.
Default Scan Field Ticket, PLU, None or Customer. This field represent the
default scan field for the barcode scanner of either ‘Ticket’,
‘PLU’, or None.When it is set to ‘Ticket’, the barcode scanner
will attempt to find the scanned barcode in the Ticket table.
When it is set to ‘PLU’ the scanned barcode will attempt to
be found in the Inventory Item table. When it is set to
‘None’ the scanned barcode will attempt to be found in the
Ticket table and if unsuccessful, then found in the Inventory
Item table.
FontSizeForLargeServices Numeric. Default value is 11. type font size.
FontSizeForMediumServices Numeric. Default value is 11. Type font size.
FontSizeForRegularServices Numeric. Default value is 11. Type font size.

User Manual—Version 6.0 WashConnect® System Setup
695
ForceBaseFromWashProfitCenterWhi
leChargingFleets
True or False. (Default is True.) If set to False, POS will not
force the purchase of an Express base while charging the
sale to a fleet account. If set to True, the POS will require a
wash base to be purchased when paid by fleet.
Greeter_Management_Prompt True or False. If set to False, POS/Presell will disable
functionality of changing the Greeter on the fly. This setting
can prevent Greet from being changed unless
WashConnect® is logged out and a new User (Greeter) logs
in.
Hide AutoSearch License Plates True or False.
Hide_Customer_Search If set to True, POS/Presell will disable functionality of
searching customers.
Hide_No_Sale True or False.
Hide_No_Tax True or False.
Honor_POS_Profiles_During_FreeRe
wash
True or False. (Default value is False.) If set to True, this
setting allows the site to determine whether the Free
Wash/Rewash options should follow the defined Touch
POS Profile or not.
SendAllServicesToPoleDisplay True or False. (Default value is False.) If set to True, POS will
show the next service selected but the total will not be
seen until you are finalizing the sale. If False, each service
appears on one line while the total appears on the bottom.
ShiftSpanMidnight Default is False. If set to True, this setting will allow shift to
span midnight once. If the shift is left open and a second
midnight is reached, it will force a closure of the open shift
and a start of a new shift.
Show_Car_Count_On_POS True or False. (Default value is False) If True, POS will display
car count information on the POS.
ShowIndividualItemsForUpgradeOn
ActualRecipt
True or False. If set to True POS will print all upgraded sales
items on actual receipt instead of one lump sum upgraded
item.
ShowIndividualItemsForUpgradeOn
VirtualReceipt
True or False. If set to True POS will display all upgraded
sales items on actual receipt instead of one lump sum
upgraded item.
ShowPackagesInProifitCenter True or False. If set to True POS/Presell will be displaying
packages to be sellable in the profit center.
ShowPriceIncludingTaxOnService True or False.
Table 44: POS TouchPOSConfiguration General
Field Description

System Setup WashConnect® User Manual—Version 6.0
696
See “About POS and Presell Service Buttons” on page 579.
POS > TouchPOSConfiguration > Hide POS Buttons
Table 45: POS TouchPOSConfiguration Hide POS Buttons
Field Description
Disable Payout True or False. Default is False. If true POS will disable the
Payout button.
DisableRefund True or False. Default is False. If true POS will disable the
Refund button.
DisableRFID True or False. Default is False. If true POS will disable the
RFID button.
DisableROA True or False. Default is False. If True POS will disable the
ROA button.
DisableStack True or False. Default is False. If true POS will disable the
Stack button.
Disable TicketGen True or False. Default is False. If true POS will disable the
TicketGen button.
DisableVoid True or False. Default is False. If true POS will disable the
Void button.
Hide_No_Sale True or False. Default is False.
Hide_No_Tax True or False. Default is False.
POS > TouchPOSConfiguration > LayoutDirection
Table 46: POS TouchConfiguration LayoutDirection
Field Description
LayoutDirection RightHand or LeftHand. Select the side of the TouchPOS, you would like to view
the virtual receipts and videos to show.
SortPOSServices PLU or SalesItemCategory. Default setting is PLU. When
sorting by Sales Item Category, it supports different Text
Size, Background Color and Size Buttons for different types
of services (base, extra, by profit center).
Ticket_Management_Prompt True or False. If set to False POS/Presell will disable
functionality of entering or searching tickets
TouchCompatible True or False. Set to True to see the scroll buttons on
TouchPOS applications where a touch screen is being used.
Table 44: POS TouchPOSConfiguration General
Field Description

User Manual—Version 6.0 WashConnect® System Setup
697

System Setup WashConnect® User Manual—Version 6.0
698
POS > TouchPOSConfiguration > ProfitCenterDescriptionColor
Table 47: ProfitCenterDescriptionColor
Field Description
BaseWashServiceBackGro
undColor
Select color for the Base Wash Service Background on Touch POS.
BaseWashServiceDisplayC
olor
Select color for the Base Wash Service Display on Touch POS.
BaseWashService
PLUColor
Select color for the Base Wash Service PLU on Touch POS.
BaseWAshServicePriceCol
or
Select color for the Base Wash Service Price on Touch POS.
ClubBackGroundColor Select color for the Club Background on Touch POS.
ClubDisplayColor Select color for the Club Display on Touch POS.
ClubPLUColor Select color for the Club PLU on Touch POS.
ClubPriceColor Select color for the Club Price on Touch POS.
DiscountBackGround
Color
Select color for the Discount Background on Touch POS.
DiscountBackGroundColor Select color for the Discount Background on Touch POS.
DiscountDisplayColor Select color for the Discount Display on Touch POS.
DiscountPLUColor Select color for the Discount PLU on Touch POS.
ExtraWashServiceBackGro
undColor
Select color for the Extra Wash Service Background on Touch POS.
ExtraWashServiceDisplayC
olor
Select color for the Extra Wash Service Display on Touch POS.
ExtraWashServicePLUColo
r
Select color for the Extra Wash Service PLU on Touch POS.
ExtraWashServicePriceCol
or
Select color for the Extra Wash Service Price on Touch POS.
GiftCardLiabilityBackGrou
ndColor
Select color for the Gift Card Liability Background on Touch POS.
GiftCardLiablityDisplayCol
or
Select color for the Gift Card Liability Display on Touch POS.
GiftCardLiabilityPLUColor Select color for the Gift Card Liability PLU on Touch POS.
GiftCardLiabilityPriceColor Select color for the Gift Card Liability Price on Touch POS.
InventoryItemBackGround
Color
Select color for the Inventory Item Background on Touch POS.

User Manual—Version 6.0 WashConnect® System Setup
699
InventoryItemDisplayColo
r
Select color for the Inventory Item Display on Touch POS.
InventoryItemPLUColor Select color for the Inventory Item PLU on Touch POS.
InventoryItemPriceColor Select color for the Inventory Item Price on Touch POS.
MiscellaneousBackGround
Color
Select color for the Miscellaneous Background on Touch POS.
MiscellaneousDisplayColo
r
Select color for the Miscellaneous Display on Touch POS.
MiscellaneousPLUColor Select color for the Miscellaneous PLU on Touch POS.
MiscellaneousPriceColor Select color for the Miscellaneous Price on Touch POS.
PackageBackGroundColor Select color for the Package Background on Touch POS.
PackageDisplayColor Select color for the Package Display on Touch POS.
PackagePLUColor Select color for the Package PLU on Touch POS.
PackagePriceColor Select color for the Package Price on Touch POS.
RetractBackGroundColor Select color for the on Touch POS.
RetractDisplayColor Select color for the Retract Display on Touch POS.
RetractPLUColor Select color for the Retract PLU on Touch POS.
RetractPriceColor Select color for the Retract Price on Touch POS.
Table 47: ProfitCenterDescriptionColor
Field Description
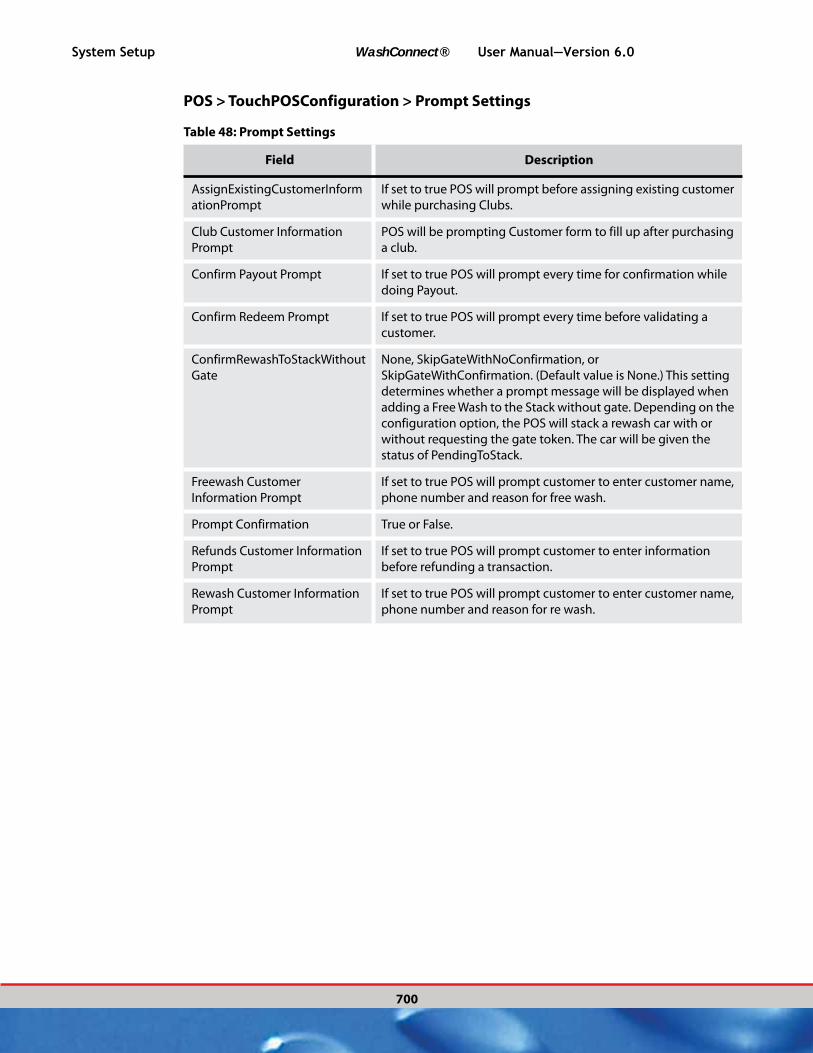
System Setup WashConnect® User Manual—Version 6.0
700
POS > TouchPOSConfiguration > Prompt Settings
Table 48: Prompt Settings
Field Description
AssignExistingCustomerInform
ationPrompt
If set to true POS will prompt before assigning existing customer
while purchasing Clubs.
Club Customer Information
Prompt
POS will be prompting Customer form to fill up after purchasing
a club.
Confirm Payout Prompt If set to true POS will prompt every time for confirmation while
doing Payout.
Confirm Redeem Prompt If set to true POS will prompt every time before validating a
customer.
ConfirmRewashToStackWithout
Gate
None, SkipGateWithNoConfirmation, or
SkipGateWithConfirmation. (Default value is None.) This setting
determines whether a prompt message will be displayed when
adding a Free Wash to the Stack without gate. Depending on the
configuration option, the POS will stack a rewash car with or
without requesting the gate token. The car will be given the
status of PendingToStack.
Freewash Customer
Information Prompt
If set to true POS will prompt customer to enter customer name,
phone number and reason for free wash.
Prompt Confirmation True or False.
Refunds Customer Information
Prompt
If set to true POS will prompt customer to enter information
before refunding a transaction.
Rewash Customer Information
Prompt
If set to true POS will prompt customer to enter customer name,
phone number and reason for re wash.

User Manual—Version 6.0 WashConnect® System Setup
701
POS > TouchPOSConfiguration > Quick Money Configuration
Table 49: Quick Money Configuration
Field Description
Quick_Money_1 Numeric. Default value is 1 for quick money button.
Quick_Money_2 Numeric. Default value is 5 for quick money button.
Quick_Money_3 Numeric. Default value is 10 for quick money button.
Quick_Money_4 Numeric. Default value is 20 for quick money button.
POS > TouchPOSConfiguration > ReceiptFooter
Table 50: ReceiptFooter
Field Description
Receipt Footer 0
to 5
Text that appears on the receipt footer. Six lines are available. Each line is limited
to 50 characters.

System Setup WashConnect® User Manual—Version 6.0
702
POS > TouchPOSConfiguration > ReceiptHeader
Table 51: ReceiptHeader
Field Description
Receipt Footer 0 to 5 Text that appears on the receipt footer. Six lines are available.
Each line is limited to 50 characters.
POS > TouchPOSConfiguration > ReceiptToPrint
Table 52: ReceiptToPrint
Field Description
EmailWash BookReceipt Default is True. If customer has a previously established email
address in WashConnect®, when the customer purchases the
wash Book, a receipt will automatically be sent to the customer.
HideChangeOnReceiptIfZero True or False. (Default value is true) If true POS will print Tax
information while closing the receipt.
HideSubTotalNTaxInfoForInvoic
edCustomers
True or False. (Default value is false) If set to True, hide subtotal
and tax information for invoiced fleet customers.
Merchant Copy For Detail Ticket If set to True, POS will print a duplicate detail receipt for
merchant.
Number Of Cash Receipt To
This determines the number of receipts POS will print while
doing a cash transaction.
Number Of Clubs Receipt To
This determines the number of receipts POS will print while
doing a club transaction.
Number Of Credit Receipt To
This determines the number of receipts POS will print while
doing a credit/gift transaction.
NumberOfPayoutReceiptToPrint
NumberOfRefundReceiptToPrin
t
NumberOfVoidReceiptToPrint
PrintTaxDetailsOnReceipt True or False. (Default value is False.) If true, POS will print tax
information while closing the receipt.
Print All Valid Wash Books on
Receipts
Default is True. If set to true POS will print all the customer valid
wash books on the receipt.
Print Barcode Receipt If set to true, POS will print barcode of the wash code on the
receipt.
Print Customer Code on Book
Redemption
True or False. If set to true POS will print barcode of the customer
card on the receipt while redeeming a wash book

User Manual—Version 6.0 WashConnect® System Setup
703
POS > TouchPOSConfiguration > Refunds Using Credit Card
Table 53: Refunds Using Credit Card
Field Description
Refund On Credit Card If set to True, POS will be doing a blind credit on credit cards while doing refunds.
POS > TouchPOSConfiguration > Report Server
Table 54: POS TouchPOSConfiguration Report Server
Field Description
Report Server
Folder
Name of the folder in reporting service from where report runs.
Report Server
URL
Reporting service URL.
Report Server
Domain
Reporting service domain name
Report Server
User Name
Reporting server login user name.
Report Server
User Pwd
Reporting server login password.
POS > TouchPOSConfiguration > SoundSettings
Table 55: POS TouchPOSConfiguration SoundSettings
Field Description
Enable Beep True or False.
Print Detail Receipt If set to true POS will print a detail receipt for detail service
bought.
Print No Sale Receipt If set to true POS will print a no sale receipt.
Print Vacuum Receipt
Print Wash Book Barcode
Receipt
Default is True. If set to True, POS will print barcode of the
customer card on the receipt while purchasing Wash book.
Table 52: ReceiptToPrint
Field Description
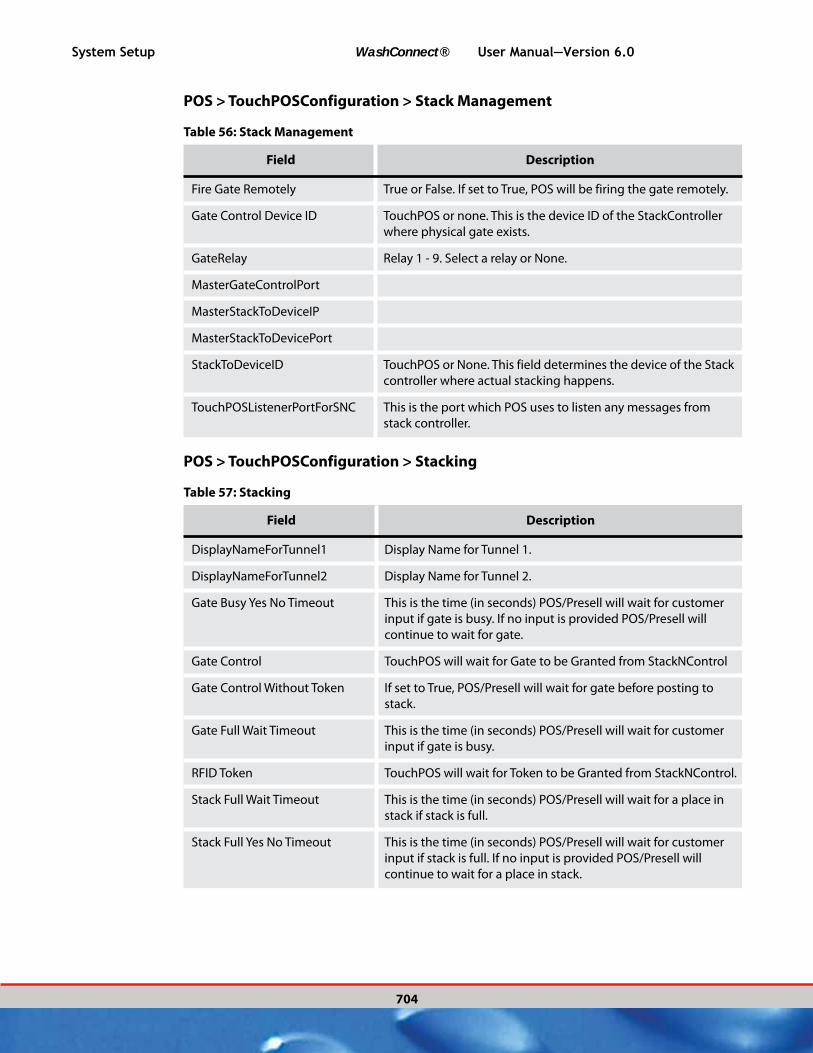
System Setup WashConnect® User Manual—Version 6.0
704
POS > TouchPOSConfiguration > Stack Management
Table 56: Stack Management
Field Description
Fire Gate Remotely True or False. If set to True, POS will be firing the gate remotely.
Gate Control Device ID TouchPOS or none. This is the device ID of the StackController
where physical gate exists.
GateRelay Relay 1 - 9. Select a relay or None.
MasterGateControlPort
MasterStackToDeviceIP
MasterStackToDevicePort
StackToDeviceID TouchPOS or None. This field determines the device of the Stack
controller where actual stacking happens.
TouchPOSListenerPortForSNC This is the port which POS uses to listen any messages from
stack controller.
POS > TouchPOSConfiguration > Stacking
Table 57: Stacking
Field Description
DisplayNameForTunnel1 Display Name for Tunnel 1.
DisplayNameForTunnel2 Display Name for Tunnel 2.
Gate Busy Yes No Timeout This is the time (in seconds) POS/Presell will wait for customer
input if gate is busy. If no input is provided POS/Presell will
continue to wait for gate.
Gate Control TouchPOS will wait for Gate to be Granted from StackNControl
Gate Control Without Token If set to True, POS/Presell will wait for gate before posting to
stack.
Gate Full Wait Timeout This is the time (in seconds) POS/Presell will wait for customer
input if gate is busy.
RFID Token TouchPOS will wait for Token to be Granted from StackNControl.
Stack Full Wait Timeout This is the time (in seconds) POS/Presell will wait for a place in
stack if stack is full.
Stack Full Yes No Timeout This is the time (in seconds) POS/Presell will wait for customer
input if stack is full. If no input is provided POS/Presell will
continue to wait for a place in stack.
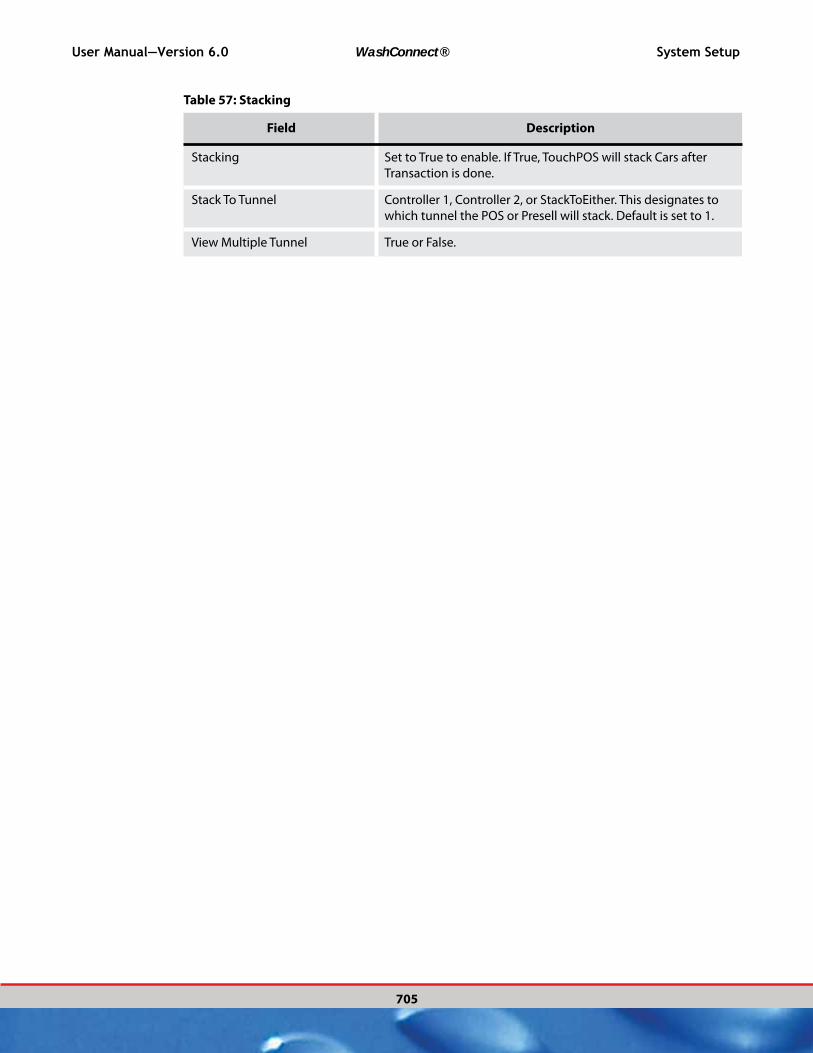
User Manual—Version 6.0 WashConnect® System Setup
705
Stacking Set to True to enable. If True, TouchPOS will stack Cars after
Transaction is done.
Stack To Tunnel Controller 1, Controller 2, or StackToEither. This designates to
which tunnel the POS or Presell will stack. Default is set to 1.
View Multiple Tunnel True or False.
Table 57: Stacking
Field Description

System Setup WashConnect® User Manual—Version 6.0
706
POS > TouchPOSConfiguration > Tickets
Table 58: Tickets
Field Description
Detail Ticket Expiration Period
Ticket Expiration Period
Vacuum_Ticket_Expiration_Peri
od
POS > TouchPOSConfiguration > Wash Book
Table 59: Wash Book
Field Description
PrintWashBookBarcodeReceipt Default True. This allows wash book barcode to print on wash
receipt.
PrintAllValidWashBooksOnRecei
pts
Default True. This allows all valid wash books to print on wash
receipt.
EmailWashBookReceipt Default True. This allows email of wash book receipt upon
purchase of wash book if customer’s email address has been
added previously.
PrintCustomerCodeOnBookRede
mption
Default True. This allows the customer card barcode to print on
wash receipts of Wash Book redemptions.
POS > WashConnectConfiguration > Menu
Table 60: Menu
Field Description
Show Menu Search True or False. Default is True. If True, allows a search within the
WashConnect main menu.
Touch ES
The Touch ES is the interactive Entrance Management Sign. This is an optional and additional piece of equipment sold by Innovative Control Systems. This sign displays at the entrance of your tunnel to display the customer’s purchased services. On the touch screen, you can also add additional services for customers, and set retracts easily. You can also adjust the stack on the touch screen as well as remove a car that exits before entering the tunnel. Contact Sales for more information.
See “POS > TouchESConfiguration > Config” on page 707.
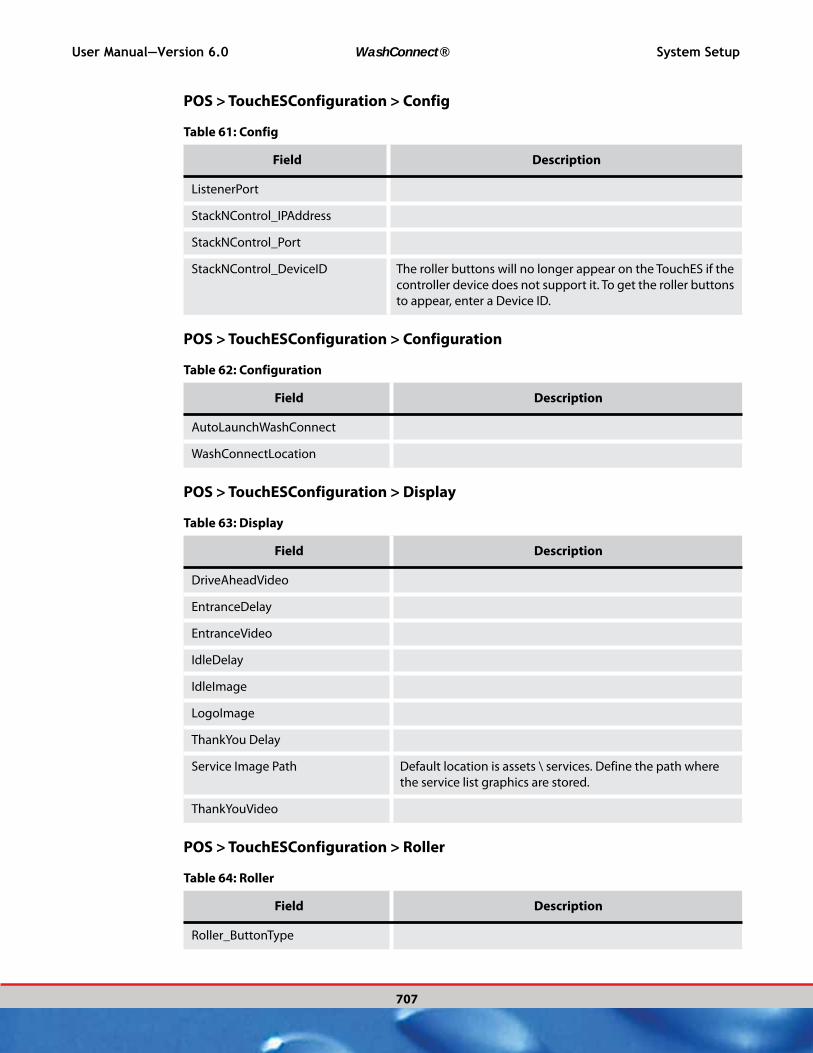
User Manual—Version 6.0 WashConnect® System Setup
707
POS > TouchESConfiguration > Config
Table 61: Config
Field Description
ListenerPort
StackNControl_IPAddress
StackNControl_Port
StackNControl_DeviceID The roller buttons will no longer appear on the TouchES if the
controller device does not support it. To get the roller buttons
to appear, enter a Device ID.
POS > TouchESConfiguration > Configuration
Table 62: Configuration
Field Description
AutoLaunchWashConnect
WashConnectLocation
POS > TouchESConfiguration > Display
Table 63: Display
Field Description
DriveAheadVideo
EntranceDelay
EntranceVideo
IdleDelay
IdleImage
LogoImage
ThankYou Delay
Service Image Path Default location is assets \ services. Define the path where
the service list graphics are stored.
ThankYouVideo
POS > TouchESConfiguration > Roller
Table 64: Roller
Field Description
Roller_ButtonType
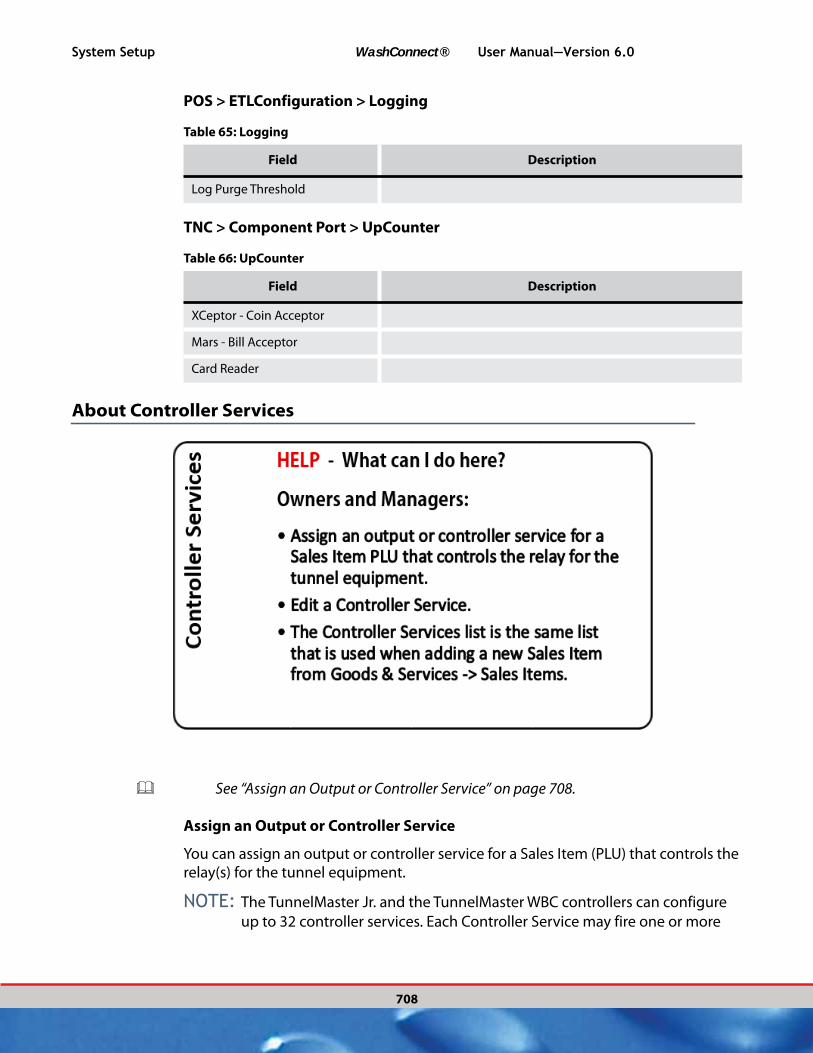
System Setup WashConnect® User Manual—Version 6.0
708
POS > ETLConfiguration > Logging
Table 65: Logging
Field Description
Log Purge Threshold
TNC > Component Port > UpCounter
Table 66: UpCounter
Field Description
XCeptor - Coin Acceptor
Mars - Bill Acceptor
Card Reader
About Controller Services
See “Assign an Output or Controller Service” on page 708.
Assign an Output or Controller Service
You can assign an output or controller service for a Sales Item (PLU) that controls the relay(s) for the tunnel equipment.
NOTE: The TunnelMaster Jr. and the TunnelMaster WBC controllers can configure
up to 32 controller services. Each Controller Service may fire one or more
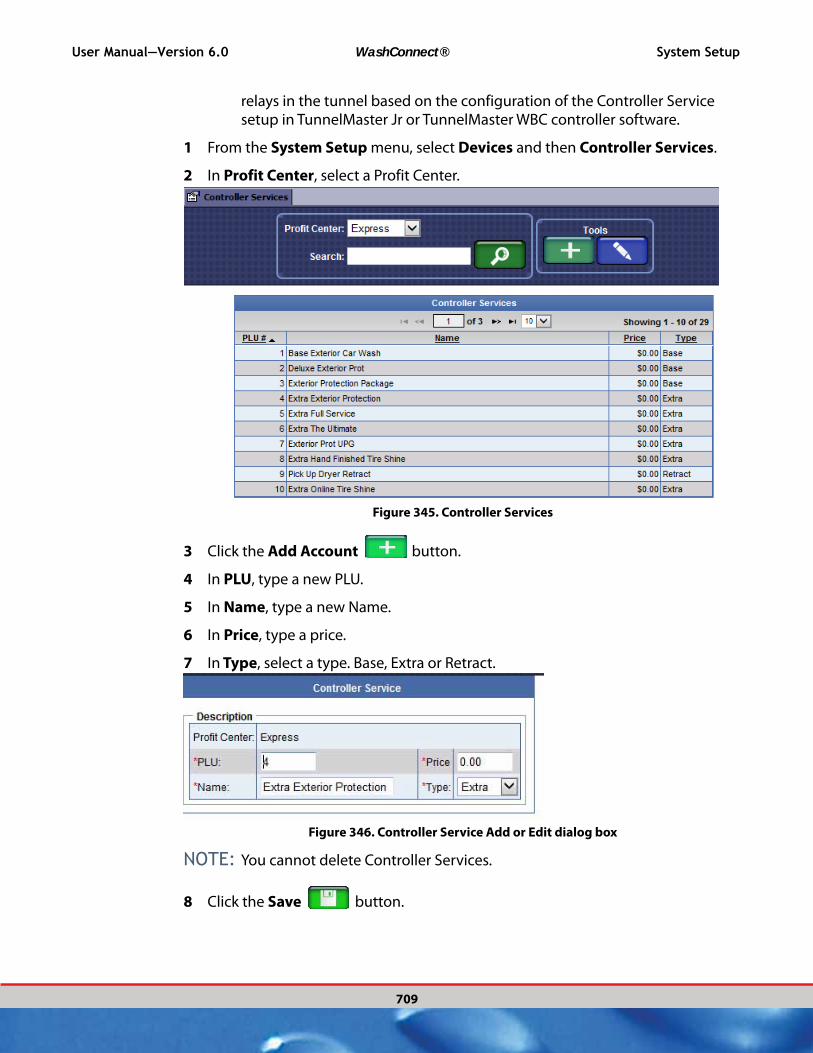
User Manual—Version 6.0 WashConnect® System Setup
709
relays in the tunnel based on the configuration of the Controller Service setup in TunnelMaster Jr or TunnelMaster WBC controller software.
1 From the System Setup menu, select Devices and then Controller Services.
2 In Profit Center, select a Profit Center.
Figure 345. Controller Services
3 Click the Add Account button.
4 In PLU, type a new PLU.
5 In Name, type a new Name.
6 In Price, type a price.
7 In Type, select a type. Base, Extra or Retract.
Figure 346. Controller Service Add or Edit dialog box
NOTE: You cannot delete Controller Services.
8 Click the Save button.

System Setup WashConnect® User Manual—Version 6.0
710
9 The new controller service will immediately be available in the Assign Controller Services for setup of a Sales Item.
NOTE: This is where you can create the list that appears when assigning controller
services to a Sales Item (PLU).
See “About Controller Services” on page 708.
About TouchNClean Outputs
“Add a TouchNClean Service with Output”
“Edit a TouchNClean Output”
“Delete a TouchNClean Output”
“Sorting TouchNClean Outputs”
“TouchNClean Dependency”

User Manual—Version 6.0 WashConnect® System Setup
711
Add a TouchNClean Service with Output
A TouchNClean Service is a time package that can be sold at the TouchNClean device. Outputs control the tunnel equipment for a TNC service.
To add a service with an output, follow these steps:
1 From the System Setup menu, select Devices, and then click TouchNClean Outputs. The TouchNClean Outputs tab appears.
Figure 347. Add TNC Service
2 Click the Add button.The TouchNClean Output dialog box appears.
Figure 348. Add TouchNClean Output Dialog Box
3 In the Profit Center box, Self Serve is automatically selected.
4 In the Name box, type a name for the service (i.e., 1 Minute Time package).
5 In the Outputs box, click the drop-down arrow.
6 Click to select the Output(s) check boxes to assign to a TouchNClean Service.
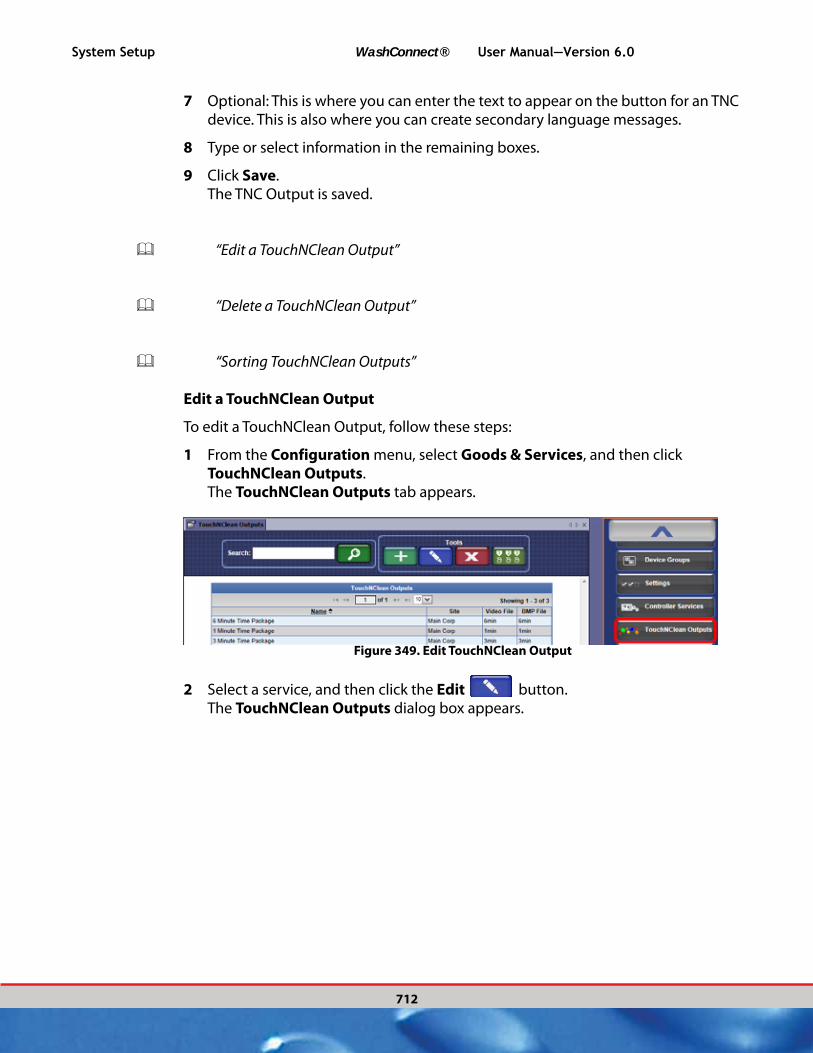
System Setup WashConnect® User Manual—Version 6.0
712
7 Optional: This is where you can enter the text to appear on the button for an TNC device. This is also where you can create secondary language messages.
8 Type or select information in the remaining boxes.
9 Click Save.The TNC Output is saved.
“Edit a TouchNClean Output”
“Delete a TouchNClean Output”
“Sorting TouchNClean Outputs”
Edit a TouchNClean Output
To edit a TouchNClean Output, follow these steps:
1 From the Configuration menu, select Goods & Services, and then click TouchNClean Outputs. The TouchNClean Outputs tab appears.
Figure 349. Edit TouchNClean Output
2 Select a service, and then click the Edit button. The TouchNClean Outputs dialog box appears.
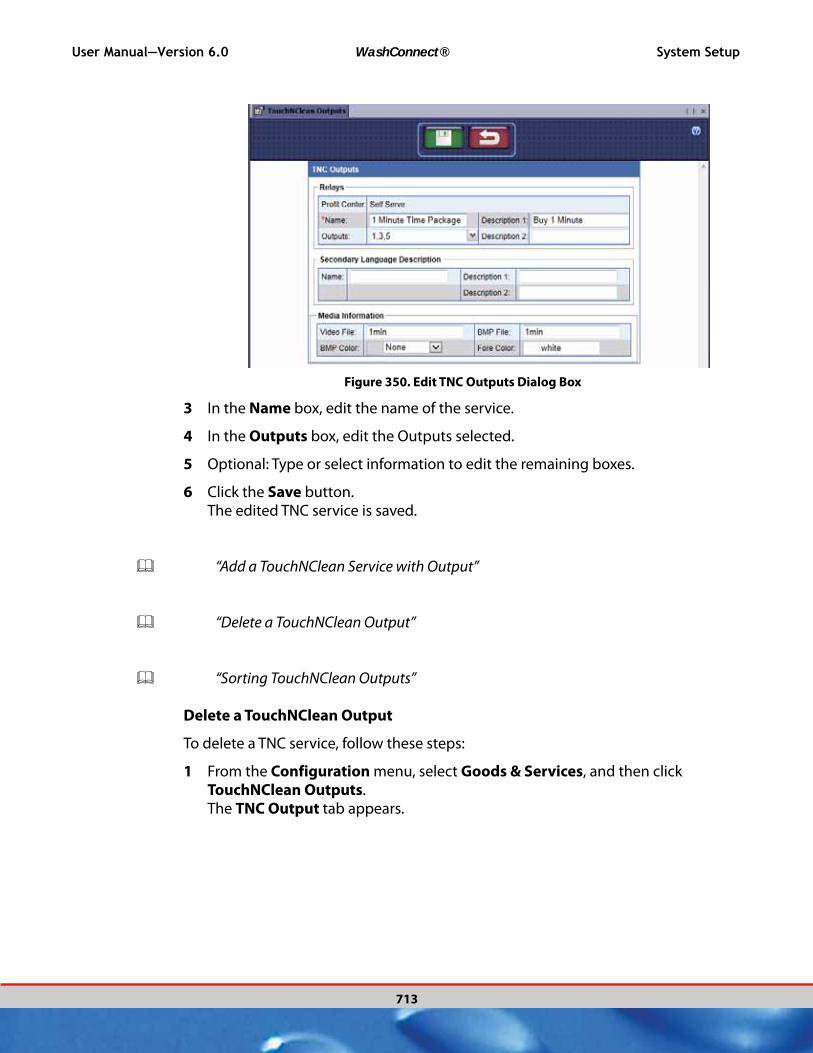
User Manual—Version 6.0 WashConnect® System Setup
713
Figure 350. Edit TNC Outputs Dialog Box
3 In the Name box, edit the name of the service.
4 In the Outputs box, edit the Outputs selected.
5 Optional: Type or select information to edit the remaining boxes.
6 Click the Save button. The edited TNC service is saved.
“Add a TouchNClean Service with Output”
“Delete a TouchNClean Output”
“Sorting TouchNClean Outputs”
Delete a TouchNClean Output
To delete a TNC service, follow these steps:
1 From the Configuration menu, select Goods & Services, and then click TouchNClean Outputs. The TNC Output tab appears.
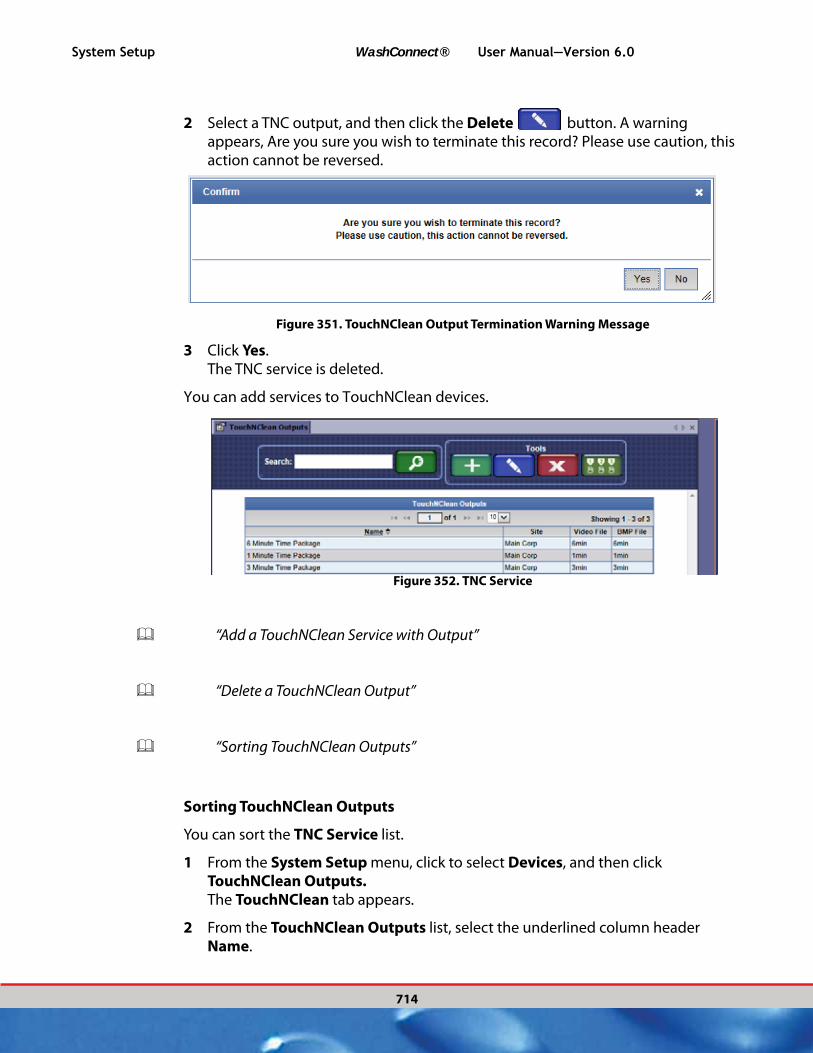
System Setup WashConnect® User Manual—Version 6.0
714
2 Select a TNC output, and then click the Delete button. A warning appears, Are you sure you wish to terminate this record? Please use caution, this action cannot be reversed.
Figure 351. TouchNClean Output Termination Warning Message
3 Click Yes. The TNC service is deleted.
You can add services to TouchNClean devices.
Figure 352. TNC Service
“Add a TouchNClean Service with Output”
“Delete a TouchNClean Output”
“Sorting TouchNClean Outputs”
Sorting TouchNClean Outputs
You can sort the TNC Service list.
1 From the System Setup menu, click to select Devices, and then click TouchNClean Outputs.The TouchNClean tab appears.
2 From the TouchNClean Outputs list, select the underlined column header Name.
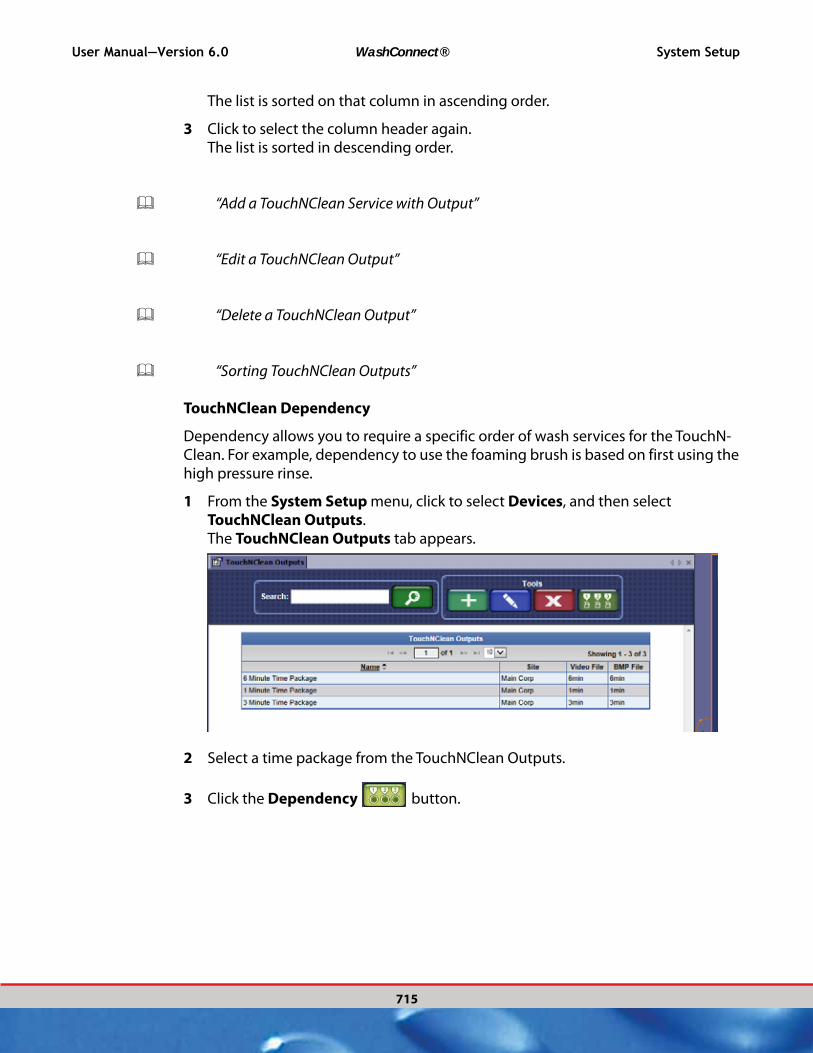
User Manual—Version 6.0 WashConnect® System Setup
715
The list is sorted on that column in ascending order.
3 Click to select the column header again.The list is sorted in descending order.
“Add a TouchNClean Service with Output”
“Edit a TouchNClean Output”
“Delete a TouchNClean Output”
“Sorting TouchNClean Outputs”
TouchNClean Dependency
Dependency allows you to require a specific order of wash services for the TouchN-Clean. For example, dependency to use the foaming brush is based on first using the high pressure rinse.
1 From the System Setup menu, click to select Devices, and then select TouchNClean Outputs. The TouchNClean Outputs tab appears.
2 Select a time package from the TouchNClean Outputs.
3 Click the Dependency button.
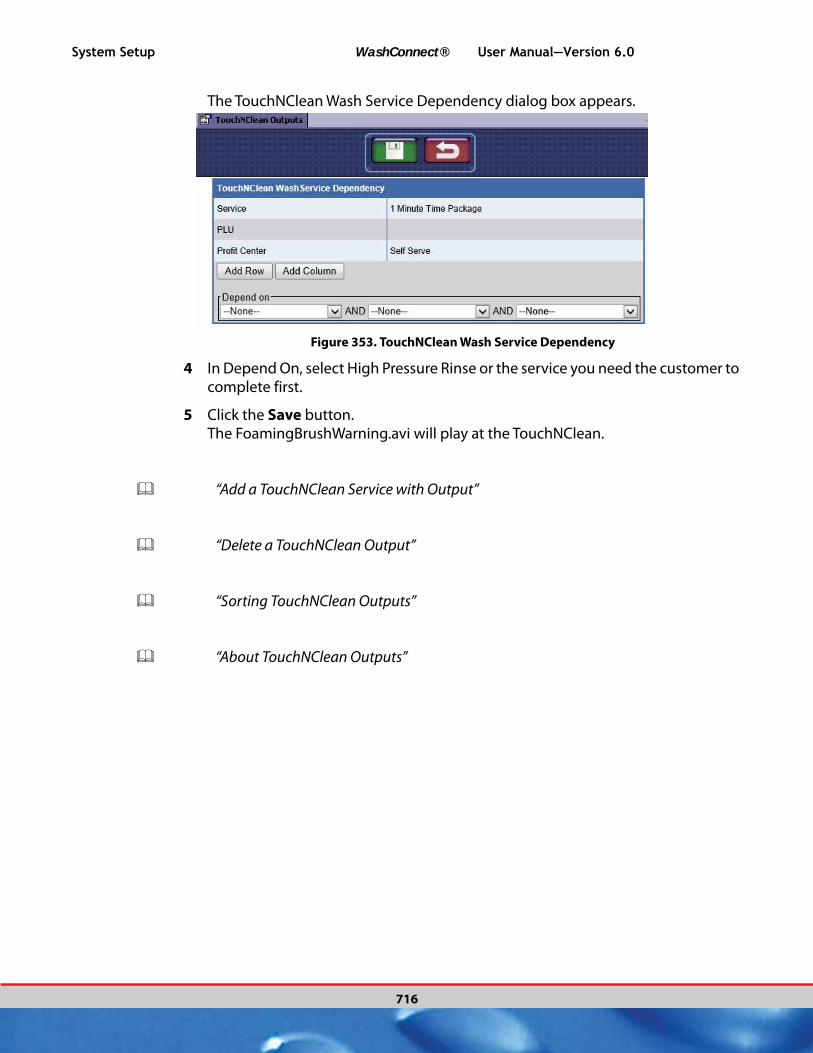
System Setup WashConnect® User Manual—Version 6.0
716
The TouchNClean Wash Service Dependency dialog box appears.
Figure 353. TouchNClean Wash Service Dependency
4 In Depend On, select High Pressure Rinse or the service you need the customer to complete first.
5 Click the Save button.The FoamingBrushWarning.avi will play at the TouchNClean.
“Add a TouchNClean Service with Output”
“Delete a TouchNClean Output”
“Sorting TouchNClean Outputs”
“About TouchNClean Outputs”
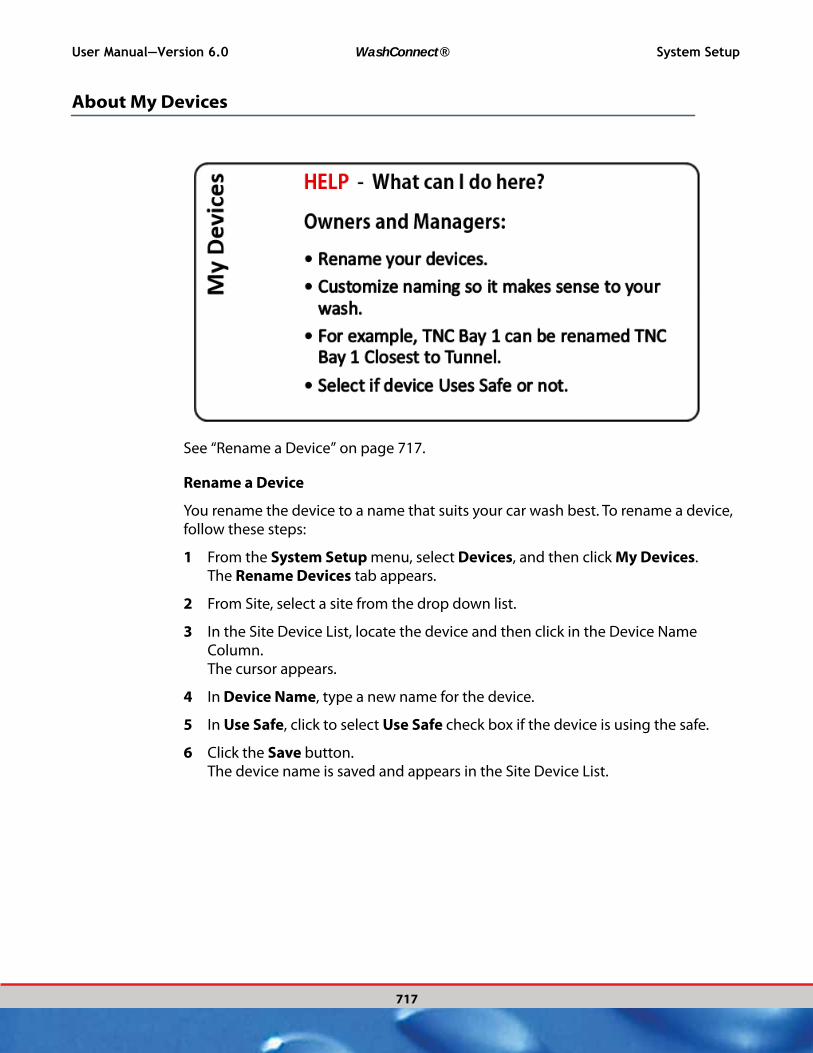
User Manual—Version 6.0 WashConnect® System Setup
717
About My Devices
See “Rename a Device” on page 717.
Rename a Device
You rename the device to a name that suits your car wash best. To rename a device, follow these steps:
1 From the System Setup menu, select Devices, and then click My Devices. The Rename Devices tab appears.
2 From Site, select a site from the drop down list.
3 In the Site Device List, locate the device and then click in the Device Name Column.The cursor appears.
4 In Device Name, type a new name for the device.
5 In Use Safe, click to select Use Safe check box if the device is using the safe.
6 Click the Save button.The device name is saved and appears in the Site Device List.

System Setup WashConnect® User Manual—Version 6.0
718
Figure 354. Site Device List
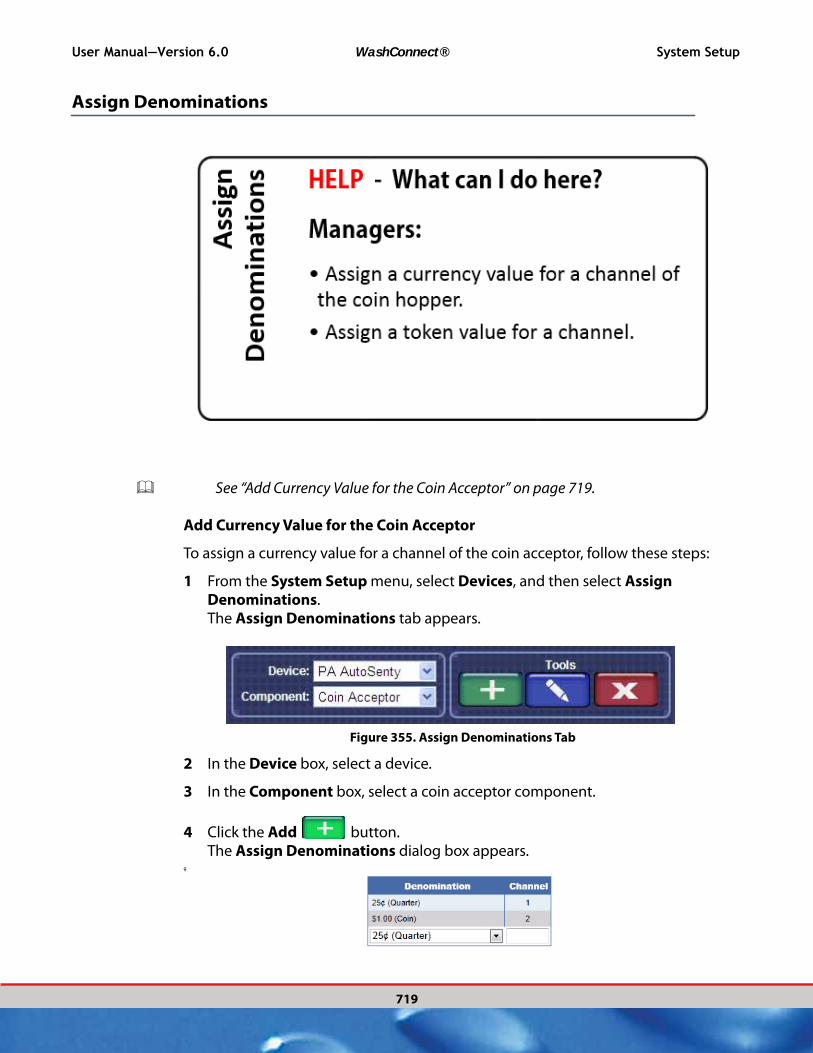
User Manual—Version 6.0 WashConnect® System Setup
719
Assign Denominations
See “Add Currency Value for the Coin Acceptor” on page 719.
Add Currency Value for the Coin Acceptor
To assign a currency value for a channel of the coin acceptor, follow these steps:
1 From the System Setup menu, select Devices, and then select Assign Denominations. The Assign Denominations tab appears.
Figure 355. Assign Denominations Tab
2 In the Device box, select a device.
3 In the Component box, select a coin acceptor component.
4 Click the Add button. The Assign Denominations dialog box appears.
g

System Setup WashConnect® User Manual—Version 6.0
720
Figure 356. Assign Denominations Dialog Box
5 The last line in the dialog box is editable. In Denomination box, from the drop-down list, select a denomination:
▪ 25¢ (Quarter)
▪ 10¢ (Dime)
▪ 5¢ (Nickel)
▪ $1.00 (Coin)
▪ 1¢ (Penny)
▪ US Once Dollar Token Coin
▪ Some Token
NOTE: Items that appear in the Denominations list are defined with separate com-
mands. Token denominations are defined with the Define Token com-mand.
6 In the Channel box, type a channel number.
NOTE: Coin acceptor channels must be programmed separately at the coin accep-
tor. Refer to the coin acceptor documentation or contact ICS Support for more information.
7 Click Save when you are finished. The denomination is assigned to a channel on the coin acceptor.
See “Assign Denominations” on page 719.
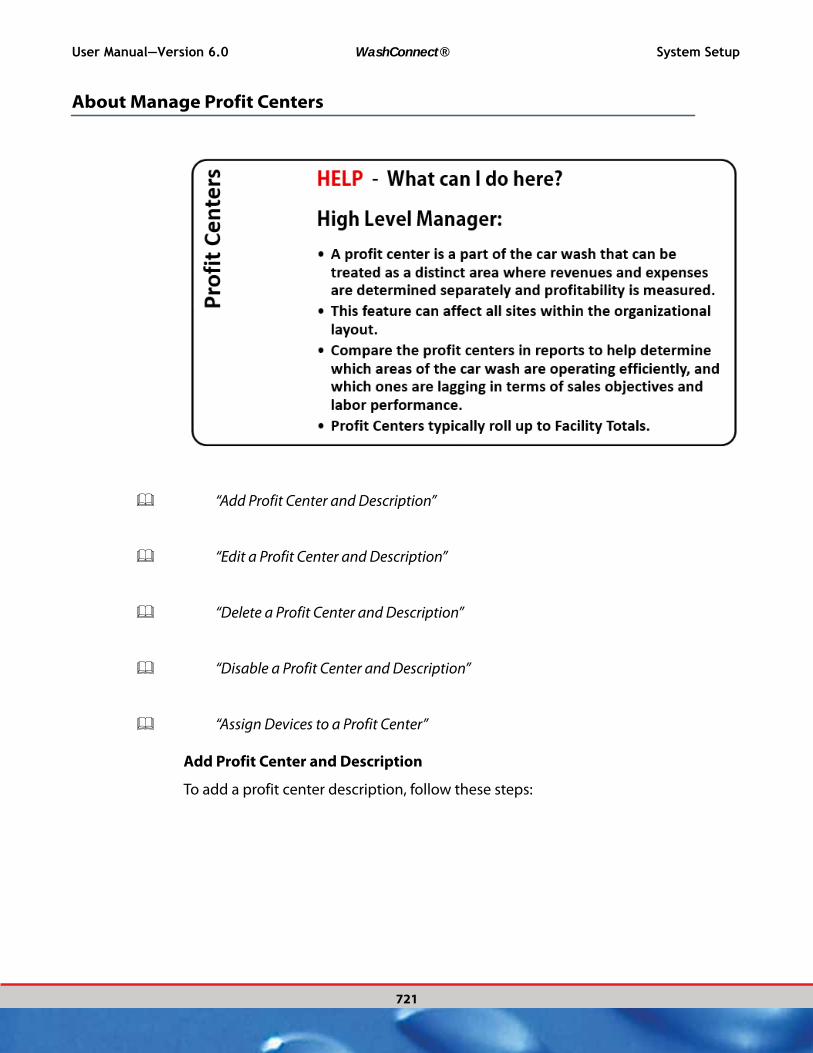
User Manual—Version 6.0 WashConnect® System Setup
721
About Manage Profit Centers
“Add Profit Center and Description”
“Edit a Profit Center and Description”
“Delete a Profit Center and Description”
“Disable a Profit Center and Description”
“Assign Devices to a Profit Center”
Add Profit Center and Description
To add a profit center description, follow these steps:

System Setup WashConnect® User Manual—Version 6.0
722
1 From the System Setup menu, select Profit Centers, and then select Manage Profit Centers.
Figure 357. Profit Center Descriptions
2 In Profit Center, click to select a Profit Center parent for the new Profit Center.
3 Click the Add button.The Profit Center Description dialog box appears.
Figure 358. Profit Center Description Dialog Box
User Manual—Version 6.0 WashConnect® System Setup
723
4 In the Name box, type a name for the profit center.
5 In the Description box, type a description for the profit center.
6 In Performance, click to select the Performance check-box if you want to collect performance statistics for the profit center.
7 In Parent, the Parent Profit Center will be displayed.
8 In Wage Eligible, click to select the Wage Eligible check box.
9 In Department, type a department name.
10 In Device, click to select the drop-down list, and then select one or more devices that report transactions and performance statistics to the profit center.
11 Click the Save button when you are finished. The profit center is saved.
“Edit a Profit Center and Description”
“Delete a Profit Center and Description”
“Disable a Profit Center and Description”
“Assign Devices to a Profit Center”
“Add Profit Center and Description”
Edit a Profit Center and Description
To edit a user defined profit center description, follow these steps:
1 From the System Setup menu, select Profit Centers, and then click Manage Profit Centers. The Profit Center dialog box appears.
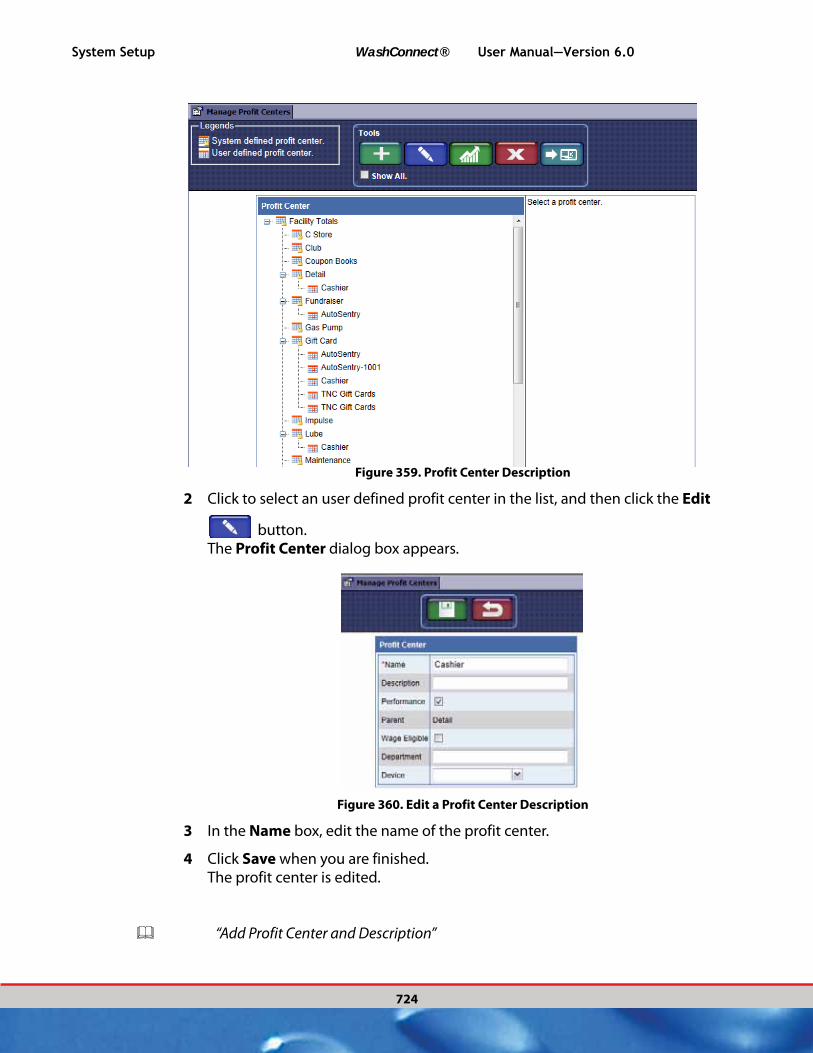
System Setup WashConnect® User Manual—Version 6.0
724
Figure 359. Profit Center Description
2 Click to select an user defined profit center in the list, and then click the Edit
button. The Profit Center dialog box appears.
Figure 360. Edit a Profit Center Description
3 In the Name box, edit the name of the profit center.
4 Click Save when you are finished. The profit center is edited.
“Add Profit Center and Description”

User Manual—Version 6.0 WashConnect® System Setup
725
“Assign Devices to a Profit Center”
“Delete a Profit Center and Description”
“Disable a Profit Center and Description”
Delete a Profit Center and Description
WARNING: When a Profit Center is terminated, WashConnect® will automatically remove the default association to avoid having two default profit centers. If a profit center is terminated, the users in which are defaulted to that profit center will have this association removed.
To delete a profit center description, follow these steps:
1 From the System Setup menu, select Profit Centers, and then click Description. The Description tab appears.
Figure 361. Profit Center Description
2 Select an item in the list, and then click the Delete button. A warning appears.
3 Click OK.The profit center description is deleted.
“Add Profit Center and Description”

System Setup WashConnect® User Manual—Version 6.0
726
“Edit a Profit Center and Description”
“Assign Devices to a Profit Center”
“Disable a Profit Center and Description”
Disable a Profit Center and Description
To disable a profit center description, follow these steps:
1 From the System Setup menu, select Profit Centers, and then click Manage Profit Center. The Manage Profit Center tab appears.
Figure 362. Manage Profit Center Description
2 Click to select the Profit Center.
3 Click the Disable button. The Are you sure you want to disable selected profit center? message appears.
4 Click Yes to disable the Profit Center. The profit center is disabled but not deleted.The profit center description disappears from the list.
5 Click to select the Show All check box to see all the Profit Centers including the disabled profit centers.
6 Click to select a Profit Center.

User Manual—Version 6.0 WashConnect® System Setup
727
7 Click the Enable button.The message Are you sure you want to enable selected profit center? appears.
8 Click the Yes button.The profit center is enabled and appears in the Profit Center list.
“Add Profit Center and Description”
“Edit a Profit Center and Description”
“Assign Devices to a Profit Center”
“Delete a Profit Center and Description”
Assign Devices to a Profit Center
To assign devices to a system defined profit center, follow these steps:
1 From the System Setup menu, select Profit Centers, and then click Manage Profit Center.The Manage Profit Center tab appears.
2 Select a profit center in the list, and then click the Assign Devices button.The Profit Center dialog box appears.
Figure 363. Profit Center Dialog Assign Device Dialog Box
3 In the Device Name list, select one or more devices.
4 Click Save. The device is assigned to the profit center.
“Add Profit Center and Description”
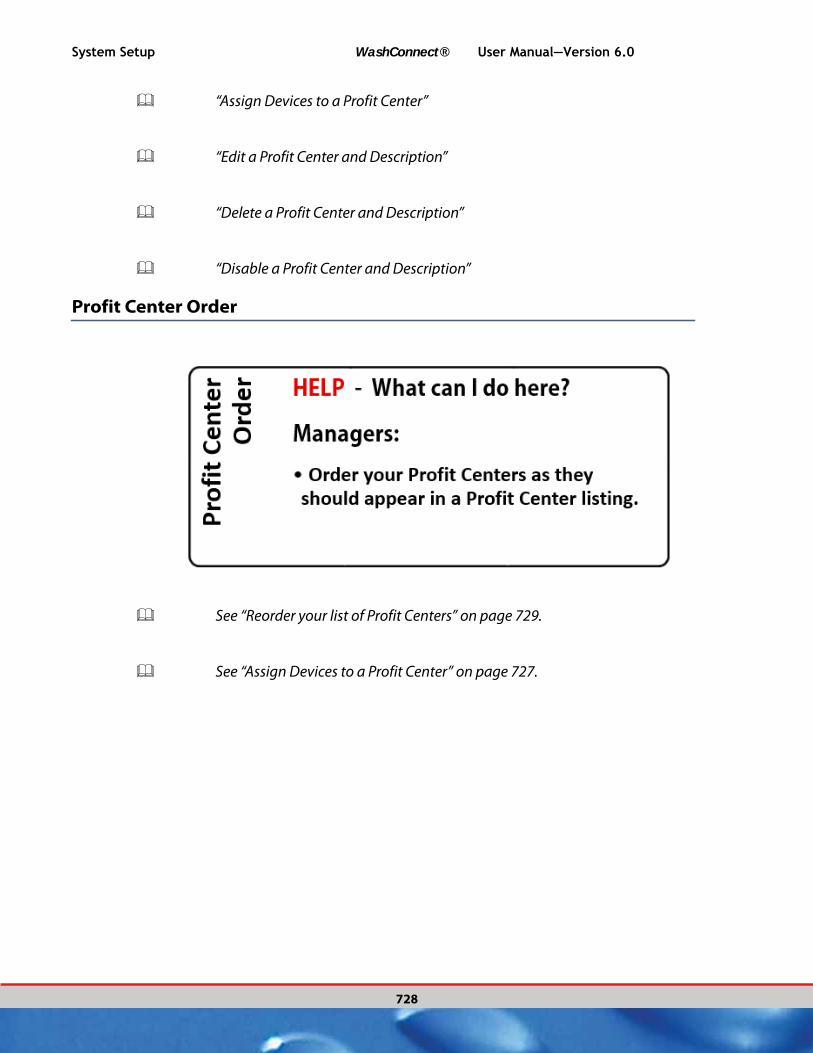
System Setup WashConnect® User Manual—Version 6.0
728
“Assign Devices to a Profit Center”
“Edit a Profit Center and Description”
“Delete a Profit Center and Description”
“Disable a Profit Center and Description”
Profit Center Order
See “Reorder your list of Profit Centers” on page 729.
See “Assign Devices to a Profit Center” on page 727.

User Manual—Version 6.0 WashConnect® System Setup
729
Reorder your list of Profit Centers
1 From the System Setup menu, select Profit Centers and then select Profit Center Order.
Figure 364. Profit Center Order tab example
2 Click to select the Profit Center.
3 Click the Reorder buttons Move Up button or Move Down button to organize the Profit Center list.
4 Click the Save button.The Profit Center list is reordered.
See “Assign Devices to a Profit Center” on page 727.
See “Profit Center Order” on page 728.
See “About Manage Profit Centers” on page 721.

System Setup WashConnect® User Manual—Version 6.0
730
Performance Indicator
See “Add a Performance Indicator” on page 730.
See “About Performance Indicator” on page 731.
See “About Manage Profit Centers” on page 721.
See “Profit Center Order” on page 728.
Add a Performance Indicator
You can define the number of employees for different levels of activity in each profit center by following these steps:
1 From the System Setup menu, select Profit Centers and then select Performance Indicator.
2 Select the Site location from the drop-down list.

User Manual—Version 6.0 WashConnect® System Setup
731
3 Click the Add button.
Figure 365. Performance Indicator Add Example
4 Select a Profit Center from the drop-down list.
5 In Sales Per Car, type targeted dollar amount.
6 In Targeted Labor Cost, type targeted dollar amount.
7 Click the Save button.View these Key Performance Indicators from the Performance Gauge and Vehicle Statistical Performance Report.
See “About the Performance Gauge Report” on page 327.
See “About Performance Indicator” on page 731.
About Performance Indicator
First, define the required number of employees for different levels of activity in each profit center.
These are established from the Performance Indicator screen. You can set them for each profit center. For example:
You can set your targeted Sales per Car at $14.25 for the wash profit center.
You can set the average labor burden or Targeted Labor Cost at $10.50 per employee, which is more than just the hourly rate. It includes worker’s compensation and payroll taxes.
View the Performance Gauge report and the variances will be based on the Sales per Car and the Labor Burden that is set up from the Performance Indicator.
See “About the Performance Gauge Report” on page 327.
NOTE: Disabled profit centers will not appear in Performance Gauge reports.
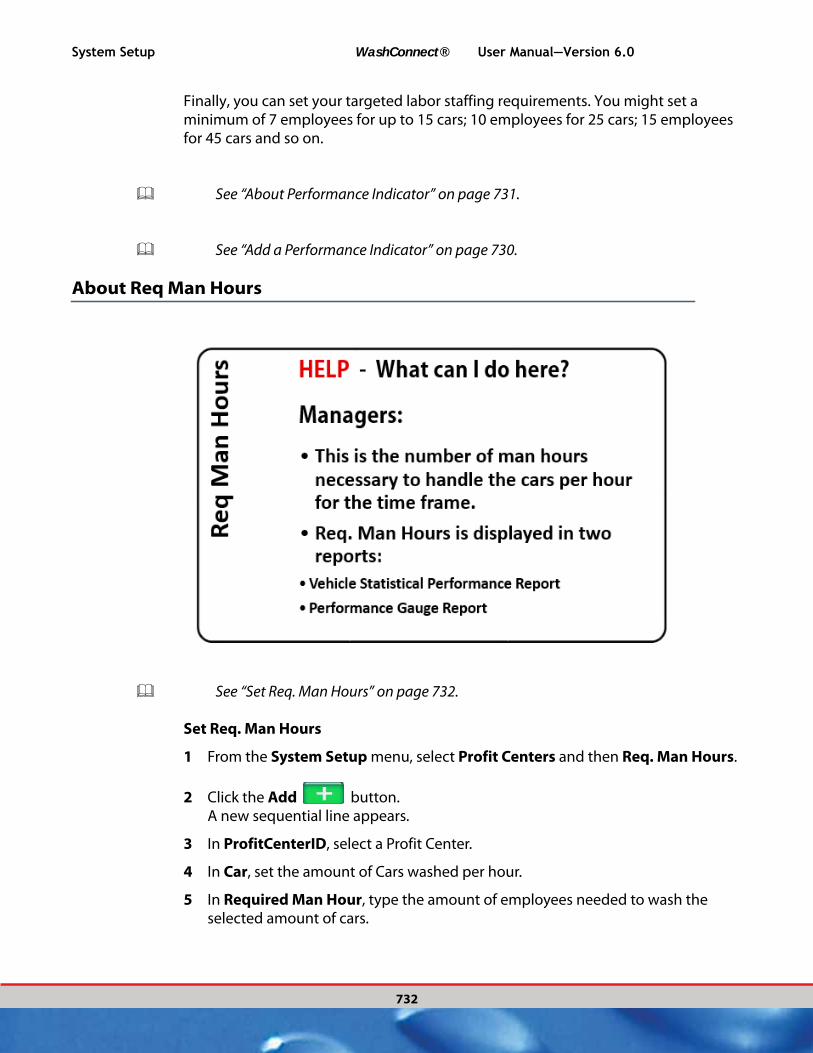
System Setup WashConnect® User Manual—Version 6.0
732
Finally, you can set your targeted labor staffing requirements. You might set a minimum of 7 employees for up to 15 cars; 10 employees for 25 cars; 15 employees for 45 cars and so on.
See “About Performance Indicator” on page 731.
See “Add a Performance Indicator” on page 730.
About Req Man Hours
See “Set Req. Man Hours” on page 732.
Set Req. Man Hours
1 From the System Setup menu, select Profit Centers and then Req. Man Hours.
2 Click the Add button.A new sequential line appears.
3 In ProfitCenterID, select a Profit Center.
4 In Car, set the amount of Cars washed per hour.
5 In Required Man Hour, type the amount of employees needed to wash the selected amount of cars.

User Manual—Version 6.0 WashConnect® System Setup
733
6 Click the Save button.
Figure 366. Req. Man Hours
The Required Man Hours table defines the specific profit center, the number of cars per hour and the required Employees to accommodate the numbers of cars. You may have multiple entries in a profit center that is highly labor intensive, such as Hand Finished Services.
The labor standards must be configured for each Profit Center as each facility is laid out differently. This information is critical in evaluating the facility’s labor performance and maintaining the level of service and quality of wash you desire to offer your customers. The ICS system is unique in its methods of assisting the operator in achieving the desired quality and speed of service standards. Be sure to take time to analyze the facility to maximize labor efficiencies in each profit center to be tracked. Once management standards are set accurately, reporting will be useful to site management in assessing manpower needs for each profit center.
Example: If your goal is to achieve 6 Cars per Man Hour and your minimum staffing is 2, then your first entry might be 12 Cars and 2 Required Man Hours.
See “Required Man Hours Descriptions” on page 733.
See “About Req Man Hours” on page 732.
Required Man Hours Descriptions
You can view the field descriptions for Req. Man Hours in the following chart.

System Setup WashConnect® User Manual—Version 6.0
734
Table 67:
Table 68: Req. Man Hours Descriptions
Field Description
Seq. Line number.
ProfitCenterID Express; Full Service; Hand Service; Inbay Auto
Car Cars to process per hour.
Required Man
Hour
Number of employees to process the amount of Cars per hour.
Req. Man Hours Descriptions
See “Required Man Hours Descriptions” on page 733.
See “About Req Man Hours” on page 732.
User Manual—Version 6.0 WashConnect® StackNControl
June 17, 2015 Copyright © Innovative Control Systems 735
CHAPTER 13:
STACKNCONTROL
The StackNControl menu consists of Stack Management and Gate Management.
See “About Stack Management” on page 735.
See “About Gate Management” on page 742.
See “Hand Service Management” on page 746.
About Stack Management
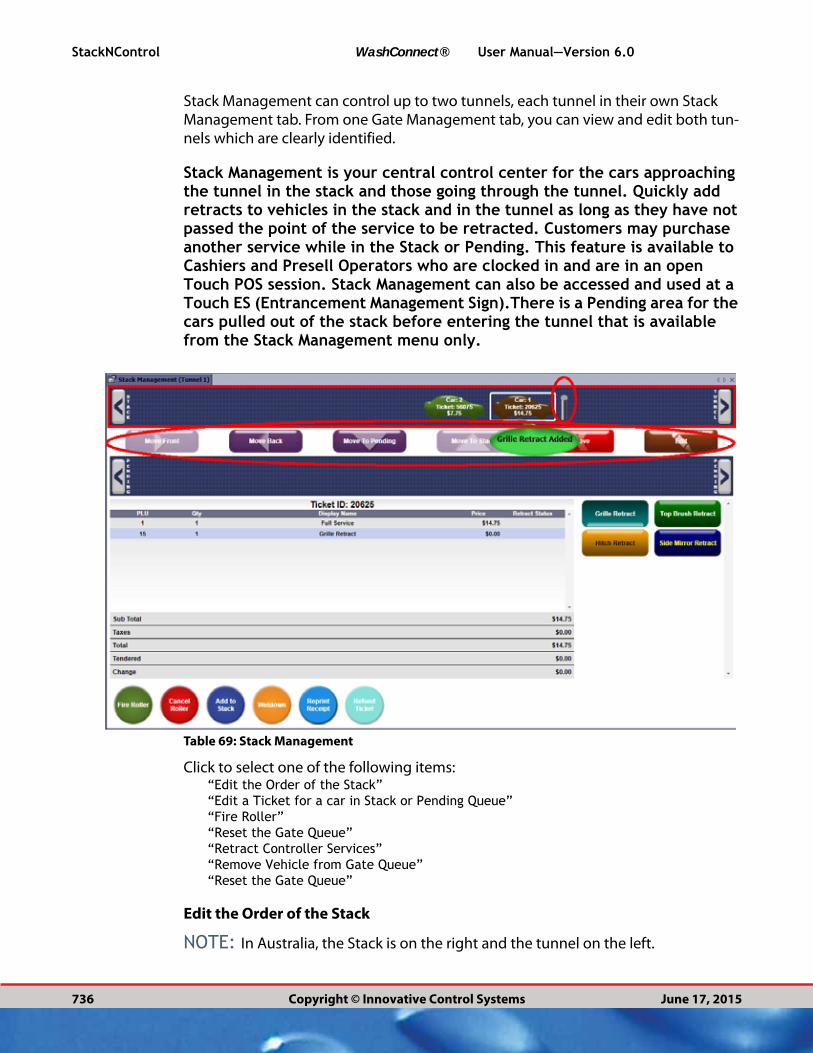
StackNControl WashConnect® User Manual—Version 6.0
736 Copyright © Innovative Control Systems June 17, 2015
Stack Management can control up to two tunnels, each tunnel in their own Stack Management tab. From one Gate Management tab, you can view and edit both tun-nels which are clearly identified.
Stack Management is your central control center for the cars approaching the tunnel in the stack and those going through the tunnel. Quickly add retracts to vehicles in the stack and in the tunnel as long as they have not passed the point of the service to be retracted. Customers may purchase another service while in the Stack or Pending. This feature is available to Cashiers and Presell Operators who are clocked in and are in an open Touch POS session. Stack Management can also be accessed and used at a Touch ES (Entrancement Management Sign).There is a Pending area for the cars pulled out of the stack before entering the tunnel that is available from the Stack Management menu only.
Table 69: Stack Management
Click to select one of the following items:“Edit the Order of the Stack”“Edit a Ticket for a car in Stack or Pending Queue”“Fire Roller”“Reset the Gate Queue”“Retract Controller Services”“Remove Vehicle from Gate Queue”“Reset the Gate Queue”
Edit the Order of the Stack
NOTE: In Australia, the Stack is on the right and the tunnel on the left.
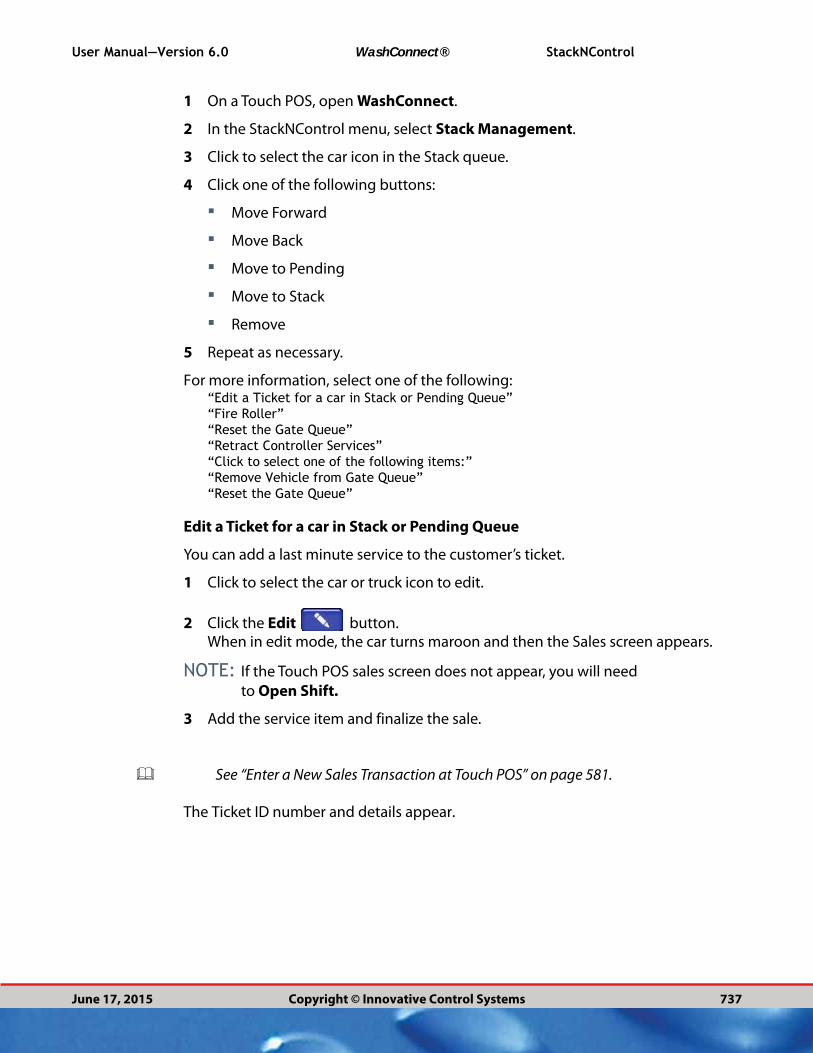
User Manual—Version 6.0 WashConnect® StackNControl
June 17, 2015 Copyright © Innovative Control Systems 737
1 On a Touch POS, open WashConnect.
2 In the StackNControl menu, select Stack Management.
3 Click to select the car icon in the Stack queue.
4 Click one of the following buttons:
▪ Move Forward
▪ Move Back
▪ Move to Pending
▪ Move to Stack
▪ Remove
5 Repeat as necessary.
For more information, select one of the following:“Edit a Ticket for a car in Stack or Pending Queue”“Fire Roller”“Reset the Gate Queue”“Retract Controller Services”“Click to select one of the following items:”“Remove Vehicle from Gate Queue”“Reset the Gate Queue”
Edit a Ticket for a car in Stack or Pending Queue
You can add a last minute service to the customer’s ticket.
1 Click to select the car or truck icon to edit.
2 Click the Edit button.When in edit mode, the car turns maroon and then the Sales screen appears.
NOTE: If the Touch POS sales screen does not appear, you will need
to Open Shift.
3 Add the service item and finalize the sale.
See “Enter a New Sales Transaction at Touch POS” on page 581.
The Ticket ID number and details appear.
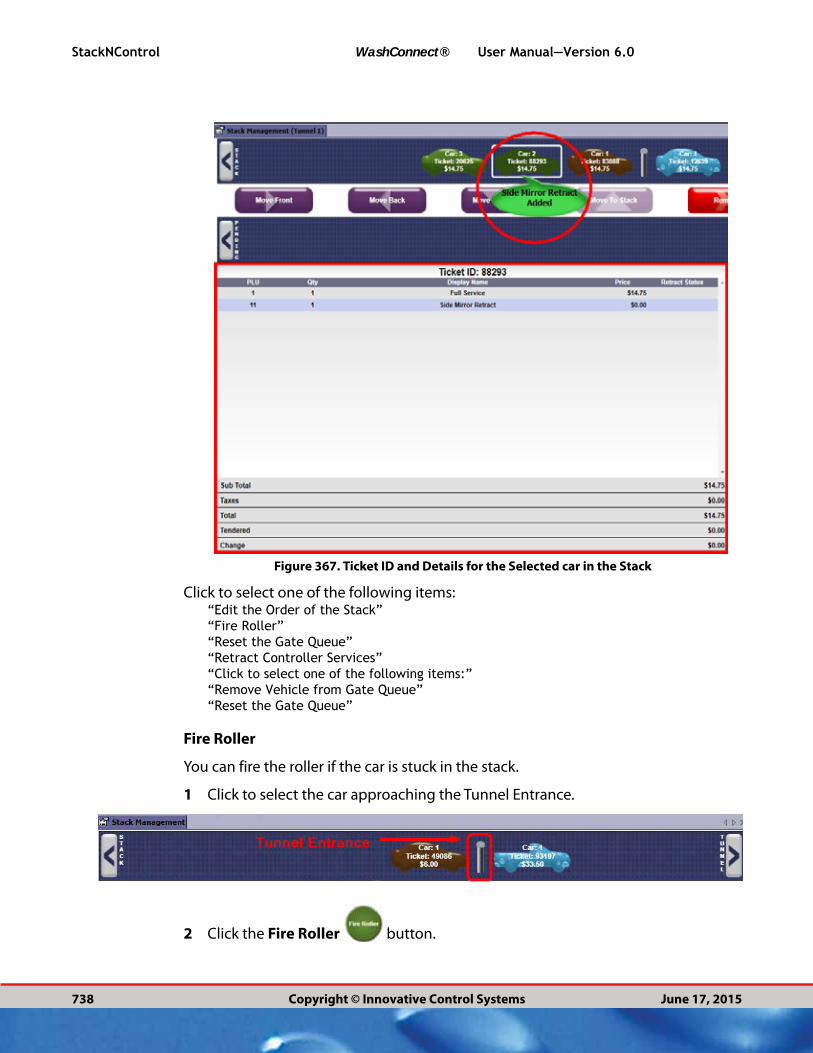
StackNControl WashConnect® User Manual—Version 6.0
738 Copyright © Innovative Control Systems June 17, 2015
Figure 367. Ticket ID and Details for the Selected car in the Stack
Click to select one of the following items:“Edit the Order of the Stack”“Fire Roller”“Reset the Gate Queue”“Retract Controller Services”“Click to select one of the following items:”“Remove Vehicle from Gate Queue”“Reset the Gate Queue”
Fire Roller
You can fire the roller if the car is stuck in the stack.
1 Click to select the car approaching the Tunnel Entrance.
2 Click the Fire Roller button.

User Manual—Version 6.0 WashConnect® StackNControl
June 17, 2015 Copyright © Innovative Control Systems 739
The Roller will fire and the vehicle will enter the tunnel. On the Stack Management screen, you can view the currently loaded vehicle shown in brown. The vehicle entering the tunnel turns orange while sensing. The car turns blue once it is in the tunnel and being washed. The vehicle turns maroon in edit mode.
Click to select one of the following items:“Edit the Order of the Stack”“Edit a Ticket for a car in Stack or Pending Queue”“Reset the Gate Queue”“Retract Controller Services”“Click to select one of the following items:”“Remove Vehicle from Gate Queue”“Reset the Gate Queue”
See “Controller Service Buttons” on page 739.
Controller Service Buttons
The controller service buttons can be configured in WashConnect® and match the Tunnel Master WBC PLUs.
Please see the Tunnel Master WBC, as the buttons can vary based on WBC configuration.
Figure 368. Controller Services example
Retract Controller Services
You can retract services in the Stack queue as well as in the tunnel queue, up until the service begins.
1 From the StackNControl menu, select Stack Management.
2 Click to select a vehicle icon.
3 Click to select a single or multiple retract controller service button(s).
▪ The green popup bubble appears if the Retract has been added.
▪ The yellow popup bubble appears if a Partial Retract has been added (some of the Retracts have been added and the other ones were missed).
▪ The red popup bubble appears if a Retract was missed.

StackNControl WashConnect® User Manual—Version 6.0
740 Copyright © Innovative Control Systems June 17, 2015
Table 70: Stack Management Example of a Popup Bubble
Click to select one of the following items:“Edit the Order of the Stack”“Edit a Ticket for a car in Stack or Pending Queue”“Fire Roller”“Reset the Gate Queue”“Click to select one of the following items:”“Remove Vehicle from Gate Queue”“Reset the Gate Queue”
Move from Stack to Pending
If there is a reason a vehicle needs to be removed from the tunnel queue, such as items in the back of a pickup bed, the vehicle can be temporarily moved into the Pending queue. This will allow other vehicles to go through the wash and when the Pending vehicle is ready to go through the wash, the vehicle can be moved back to the Stack queue.
Follow these steps to Remove Vehicle from Stack Queue and move to Pending:
1 On the right-side, locate the StackNControl menu.
2 Select the Stack Management button.
3 Select the necessary vehicle icon in the Stack queue.
4 Select the Move to Pending button.

User Manual—Version 6.0 WashConnect® StackNControl
June 17, 2015 Copyright © Innovative Control Systems 741
The vehicle will be moved from Stack to Pending.
See “Move Vehicle in Pending back to the Stack” on page 741.
See “Stack Color Key” on page 741.
See “About Stack Management” on page 735.
Move Vehicle in Pending back to the Stack
When the vehicle is ready to go through the tunnel, follow these steps:
1 Click the pending vehicle icon in the Pending section.
2 Then click the Move to Stack button.The vehicle will be moved from Pending to Stack.
See “Move from Stack to Pending” on page 740.
See “Stack Color Key” on page 741.
See “About Stack Management” on page 735.
Stack Color Key
Stack Color Code Chart Green – Sales is complete and on StackBrown – Current loaded vehicle and next to enter tunnel. Orange – Entering wash and sensing in progress.Blue – Vehicle entered tunnel and is now being washed. Maroon – Vehicle is in Edit mode.Purple – Vehicle is a Pay Attended selection that will require editing.
See “Move from Stack to Pending” on page 740.
See “Stack Color Key” on page 741.
See “About Stack Management” on page 735.

StackNControl WashConnect® User Manual—Version 6.0
742 Copyright © Innovative Control Systems June 17, 2015
About Gate Management
Click to select one of the following items:“Edit the Order of the Stack”“Edit a Ticket for a car in Stack or Pending Queue”“Fire Roller”“Reset the Gate Queue”“Retract Controller Services”“Remove Vehicle from Gate Queue”“Reset the Gate Queue”
Remove Vehicle from Gate Queue
Gate management is available in the event a car gets out of line before going through the tunnel for whatever reason. Removing a vehicle from the Gate queue may be necessary.
For instance, if the customer purchased a wash but drove out of the line before entering the tunnel, then you would remove the vehicle from the Gate queue.
The Gate queue is strictly for the cars waiting for the gate to be opened or whose gate already opened and have not yet crossed over the stack controller loop. The cars merge into one single lane before the tunnel entrance and cross over the Stack Control loop, and it’s at this point where the cars are automatically removed from the gate queue.
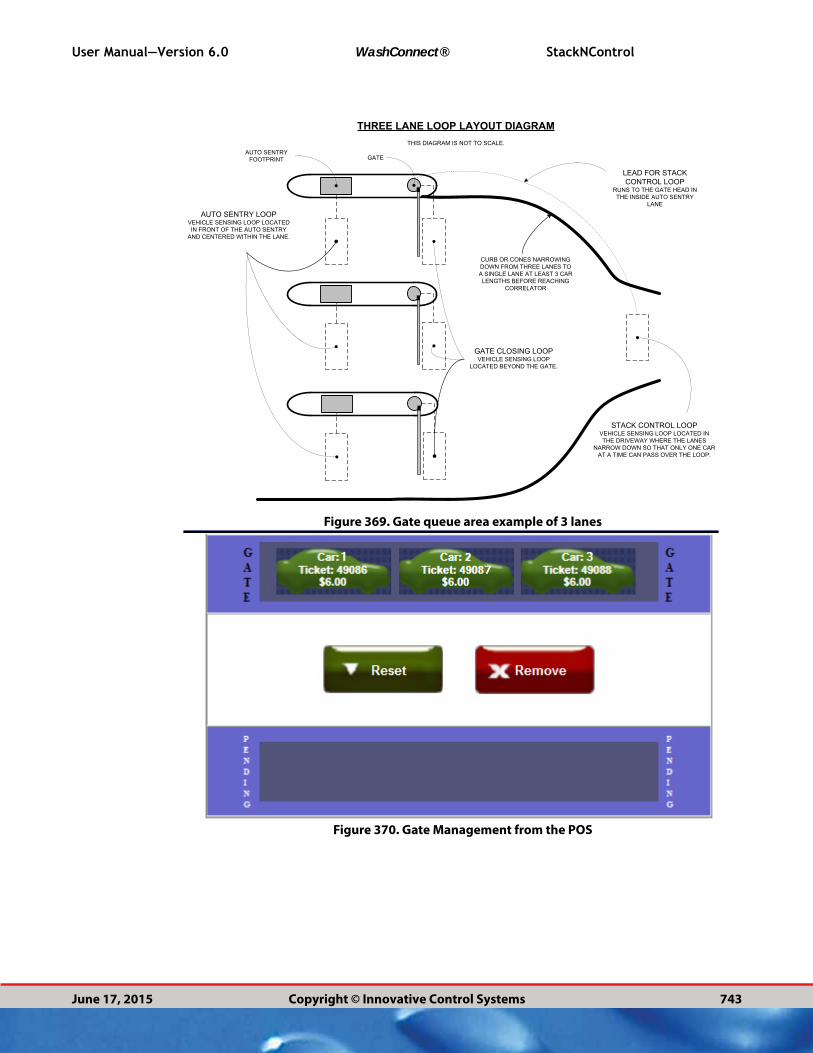
LEAD FOR STACKCONTROL LOOP
RUNS TO THE GATE HEAD INTHE INSIDE AUTO SENTRY
LANE
STACK CONTROL LOOPVEHICLE SENSING LOOP LOCATED INTHE DRIVEWAY WHERE THE LANES
NARROW DOWN SO THAT ONLY ONE CARAT A TIME CAN PASS OVER THE LOOP.
GATE CLOSING LOOPVEHICLE SENSING LOOP
LOCATED BEYOND THE GATE.
AUTO SENTRY LOOPVEHICLE SENSING LOOP LOCATEDIN FRONT OF THE AUTO SENTRY
AND CENTERED WITHIN THE LANE.
AUTO SENTRYFOOTPRINT GATE
THREE LANE LOOP LAYOUT DIAGRAMTHIS DIAGRAM IS NOT TO SCALE.
CURB OR CONES NARROWINGDOWN FROM THREE LANES TOA SINGLE LANE AT LEAST 3 CARLENGTHS BEFORE REACHING
CORRELATOR
User Manual—Version 6.0 WashConnect® StackNControl
June 17, 2015 Copyright © Innovative Control Systems 743
Figure 369. Gate queue area example of 3 lanes
Figure 370. Gate Management from the POS
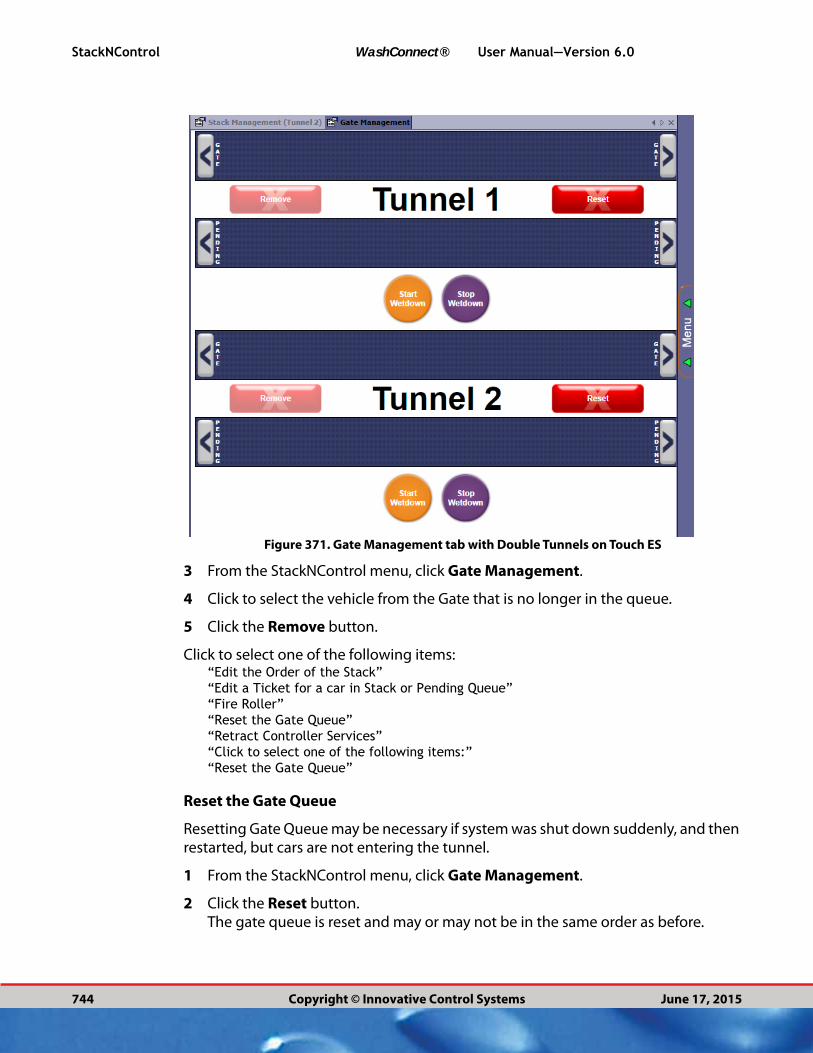
StackNControl WashConnect® User Manual—Version 6.0
744 Copyright © Innovative Control Systems June 17, 2015
Figure 371. Gate Management tab with Double Tunnels on Touch ES
3 From the StackNControl menu, click Gate Management.
4 Click to select the vehicle from the Gate that is no longer in the queue.
5 Click the Remove button.
Click to select one of the following items:“Edit the Order of the Stack”“Edit a Ticket for a car in Stack or Pending Queue”“Fire Roller”“Reset the Gate Queue”“Retract Controller Services”“Click to select one of the following items:”“Reset the Gate Queue”
Reset the Gate Queue
Resetting Gate Queue may be necessary if system was shut down suddenly, and then restarted, but cars are not entering the tunnel.
1 From the StackNControl menu, click Gate Management.
2 Click the Reset button. The gate queue is reset and may or may not be in the same order as before.

User Manual—Version 6.0 WashConnect® StackNControl
June 17, 2015 Copyright © Innovative Control Systems 745
Click to select one of the following items:“Edit the Order of the Stack”“Edit a Ticket for a car in Stack or Pending Queue”“Fire Roller”“Reset the Gate Queue”“Retract Controller Services”“Click to select one of the following items:”“Remove Vehicle from Gate Queue”
Raise Gate Manually
These are the recommended instructions for manually raising the gate. Follow the instructions if a customer purchased a wash or if no wash was purchased.
IMPORTANT: Raising a gate manually does not stack a vehicle.
No Wash Purchased
If customer does not buy a wash, and there is an area where they can pull out of line before entering the tunnel, you can manually raise the gate with the switch at the tunnel entrance: There are three positions for the Gate Switch, Up, System (Center), and Down.
1 Lift the Gate Switch to the Up position. After the gate raises, move the switch to the center or system position. -OR-
2 *Go to Wash Status menu, and click the toggle button to raise the Gate.The gate will automatically close after the vehicle passes through.IMPORTANT: If the gate switch is moved to the down position and left in the down position, the gate will remain closed, and will not open for the next customer.
3 Open Stack Management and confirm the Stack is correct.
4 Reorder, if necessary.
NOTE: If a customer is getting a Rewash, there are a few ways to set up a Rewash
that are recommended. See the WashConnect User Manual to determine the best Rewash option for your wash such as using a wash code, fleet card, gift card, etc.
Wash Purchased but Gate Doesn’t Open
If customer purchased a wash, and the Auto Sentry has a Wash Busy screen, and the gate is not opening to let customer proceed, follow these instructions:
1 In WashConnect, go to Gate Management under the StackNControl menu on right-side, and click the Reset button.
2 If the gate does not raise, you may need to press the Reset button a few times.
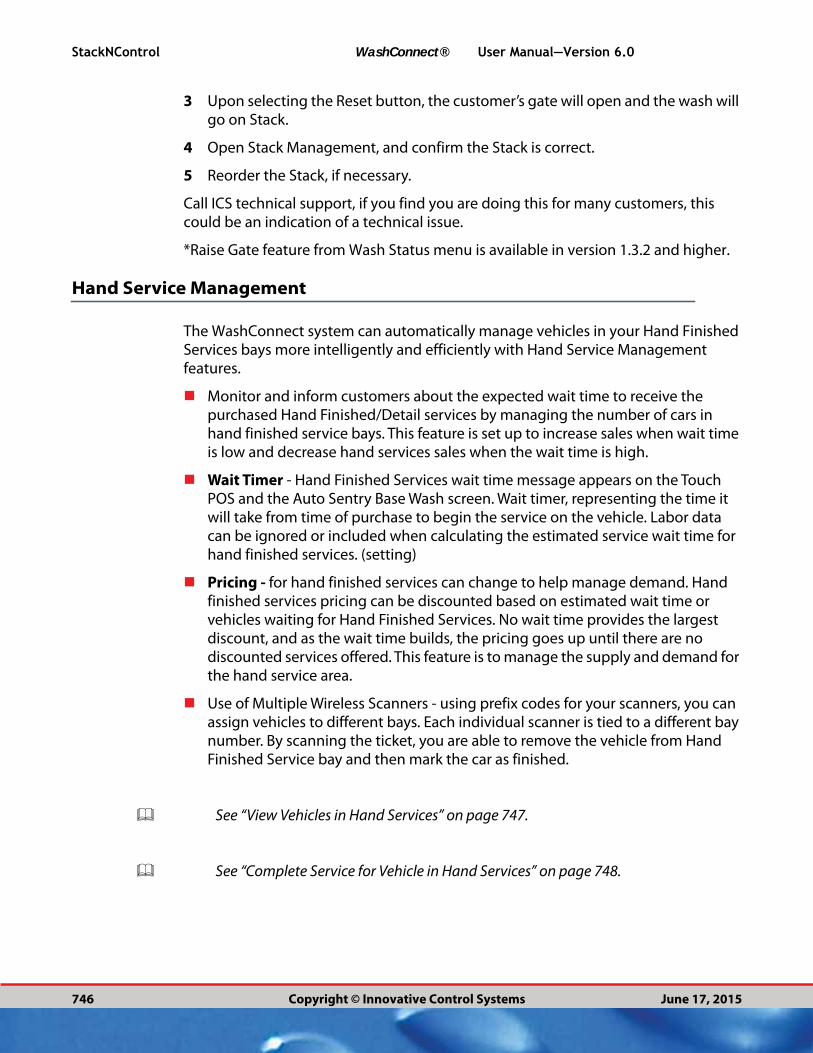
StackNControl WashConnect® User Manual—Version 6.0
746 Copyright © Innovative Control Systems June 17, 2015
3 Upon selecting the Reset button, the customer’s gate will open and the wash will go on Stack.
4 Open Stack Management, and confirm the Stack is correct.
5 Reorder the Stack, if necessary.
Call ICS technical support, if you find you are doing this for many customers, this could be an indication of a technical issue.
*Raise Gate feature from Wash Status menu is available in version 1.3.2 and higher.
Hand Service Management
The WashConnect system can automatically manage vehicles in your Hand Finished Services bays more intelligently and efficiently with Hand Service Management features.
Monitor and inform customers about the expected wait time to receive the purchased Hand Finished/Detail services by managing the number of cars in hand finished service bays. This feature is set up to increase sales when wait time is low and decrease hand services sales when the wait time is high.
Wait Timer - Hand Finished Services wait time message appears on the Touch POS and the Auto Sentry Base Wash screen. Wait timer, representing the time it will take from time of purchase to begin the service on the vehicle. Labor data can be ignored or included when calculating the estimated service wait time for hand finished services. (setting)
Pricing - for hand finished services can change to help manage demand. Hand finished services pricing can be discounted based on estimated wait time or vehicles waiting for Hand Finished Services. No wait time provides the largest discount, and as the wait time builds, the pricing goes up until there are no discounted services offered. This feature is to manage the supply and demand for the hand service area.
Use of Multiple Wireless Scanners - using prefix codes for your scanners, you can assign vehicles to different bays. Each individual scanner is tied to a different bay number. By scanning the ticket, you are able to remove the vehicle from Hand Finished Service bay and then mark the car as finished.
See “View Vehicles in Hand Services” on page 747.
See “Complete Service for Vehicle in Hand Services” on page 748.

User Manual—Version 6.0 WashConnect® StackNControl
June 17, 2015 Copyright © Innovative Control Systems 747
View Vehicles in Hand Services
NOTE: Honeywell Barcode Scanner is an additional advice that is available as a
global component.
You can use wireless scanners in the Hand Finished Services bays as well as the queue.
1 From the StackNControl menu, select Hand Service Mgmt.The Hand Service Mgmt tab appears. The following figure displays an example of one vehicle in the queue and one vehicle in Bay 1.
Figure 372. Hand Service Mgmt tab
NOTE: Timers can be set to count up or down for hand service queues and bays.
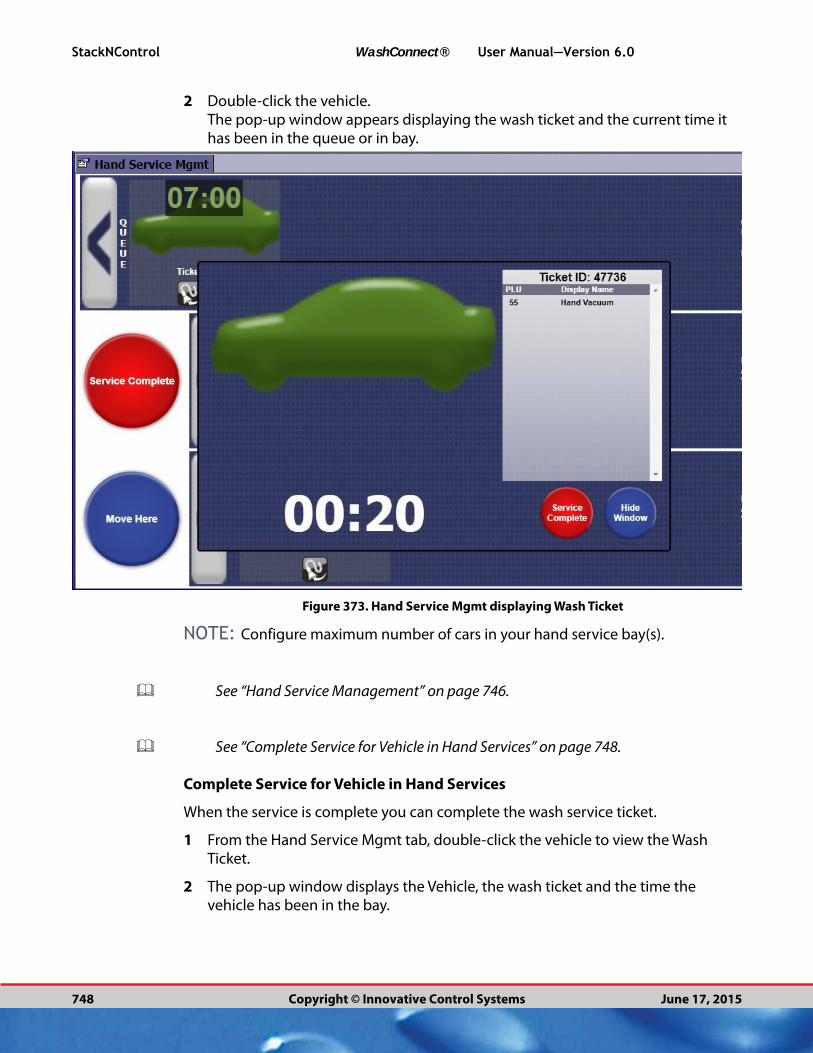
StackNControl WashConnect® User Manual—Version 6.0
748 Copyright © Innovative Control Systems June 17, 2015
2 Double-click the vehicle.The pop-up window appears displaying the wash ticket and the current time it has been in the queue or in bay.
Figure 373. Hand Service Mgmt displaying Wash Ticket
NOTE: Configure maximum number of cars in your hand service bay(s).
See “Hand Service Management” on page 746.
See “Complete Service for Vehicle in Hand Services” on page 748.
Complete Service for Vehicle in Hand Services
When the service is complete you can complete the wash service ticket.
1 From the Hand Service Mgmt tab, double-click the vehicle to view the Wash Ticket.
2 The pop-up window displays the Vehicle, the wash ticket and the time the vehicle has been in the bay.
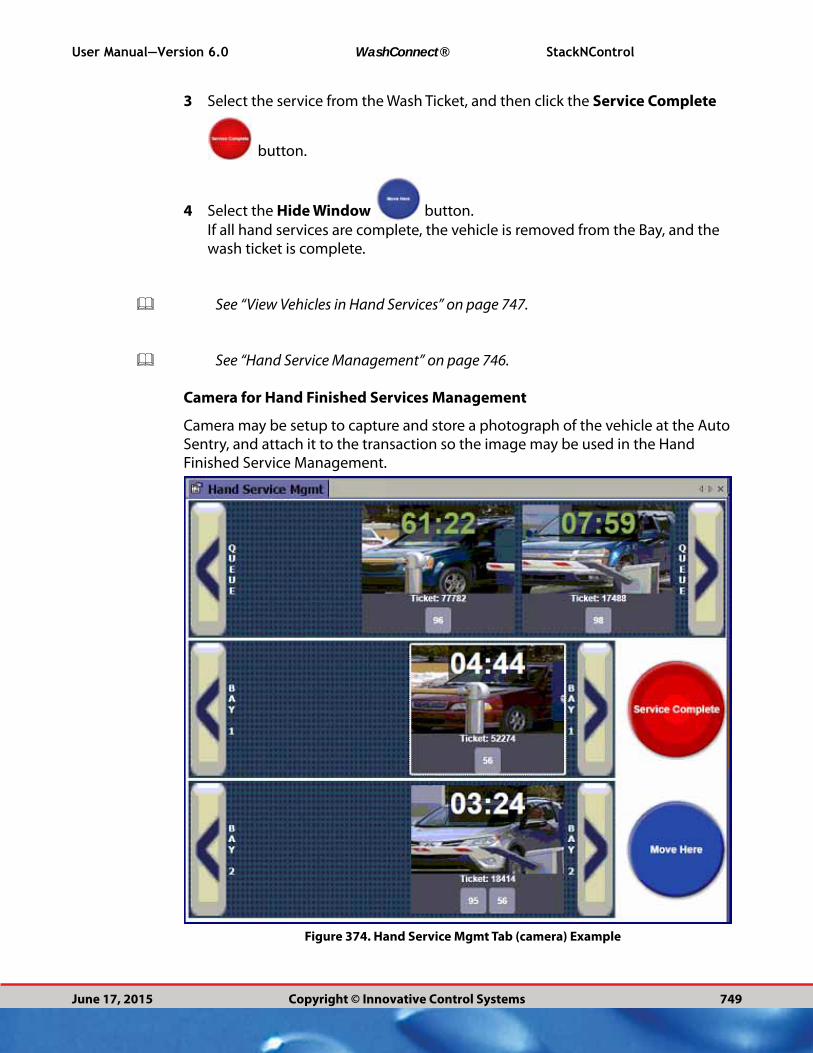
User Manual—Version 6.0 WashConnect® StackNControl
June 17, 2015 Copyright © Innovative Control Systems 749
3 Select the service from the Wash Ticket, and then click the Service Complete
button.
4 Select the Hide Window button.
If all hand services are complete, the vehicle is removed from the Bay, and the wash ticket is complete.
See “View Vehicles in Hand Services” on page 747.
See “Hand Service Management” on page 746.
Camera for Hand Finished Services Management
Camera may be setup to capture and store a photograph of the vehicle at the Auto Sentry, and attach it to the transaction so the image may be used in the Hand Finished Service Management.
Figure 374. Hand Service Mgmt Tab (camera) Example

StackNControl WashConnect® User Manual—Version 6.0
750 Copyright © Innovative Control Systems June 17, 2015
Figure 375. Hand Service Mgmt with close up and wash Ticket example
Standard Hand Services Management Graphics
Standard icons and display names are configured from the Sales Items menu. If not using custom graphics, a standard default icon will be used with the PLU:
Hand Wax
Interior Clean
Carpet Shampoo

User Manual—Version 6.0 WashConnect® StackNControl
June 17, 2015 Copyright © Innovative Control Systems 751
Full Service
Seat Cleaning
Tire Shine
Towel Dry
Vacuum
TipRequest an ICS professional graphic designer to create your custom Hand Finished Services graphics.
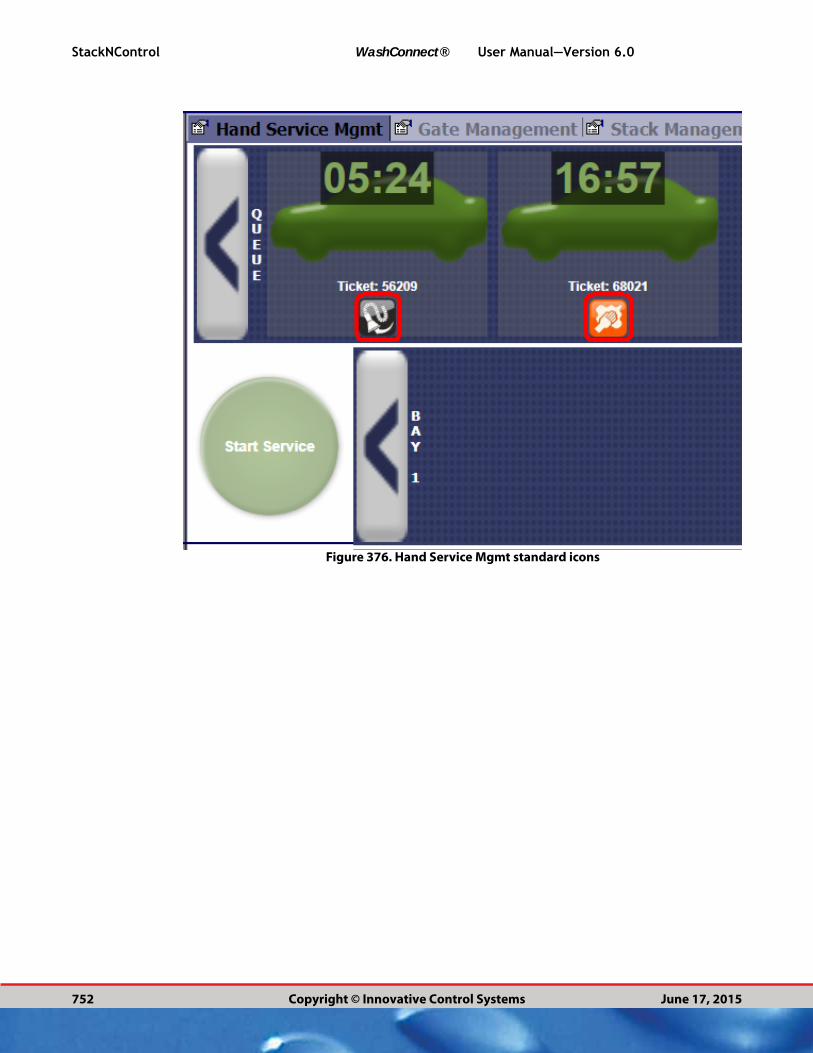
StackNControl WashConnect® User Manual—Version 6.0
752 Copyright © Innovative Control Systems June 17, 2015
Figure 376. Hand Service Mgmt standard icons

User Manual—Version 6.0 WashConnect® Time Clock
June 17, 2015 Copyright © Innovative Control Systems 753
CHAPTER 14:
TIME CLOCK
Time Clock has the following menus and commands:
Time Clock
▪ “Log In and Log Out”
▪ “Edit Time Clock”
Time Clock Reports
▪ “Employee Time Clock Summary”
▪ “Employee Time Clock Detail”
▪ “Employees Working Today”
▪ “Employees Not Working Today”
Log In and Log Out

Time Clock WashConnect® User Manual—Version 6.0
754 Copyright © Innovative Control Systems June 17, 2015
See “Log In and Log Out” on page 753.
See “Edit Time Clock” on page 758.
See “Change Labor” on page 755.
See “Time Clock Report” on page 756.
Log In / Log Out
Employees or users can Log In and Log Out from the Time Clock menu (User must be set up completely in WashConnect® from Manage > Users).
NOTE: The Time Clock menu can be enabled or disabled from appearing in the
main menu. Set this up at Corporate only, See “Edit Security Role” on page 532.
See “About Manage Users” on page 541.
NOTE: At any time, click Change User button to cancel and reset to enter another
User Name or Employee ID.
1 From the Time Clock menu, click the Log In/Log Out.
2 In the Time Clock menu, click to select Log In/Log out.The Log In/Log Out tab appears.
3 In User Name, type your User Name.
NOTE: If using a fingerprint reader, depending on how reader is set up, then the
user will have to swipe their finger on the finger print reader to log in or log out.
4 Click the Search button.
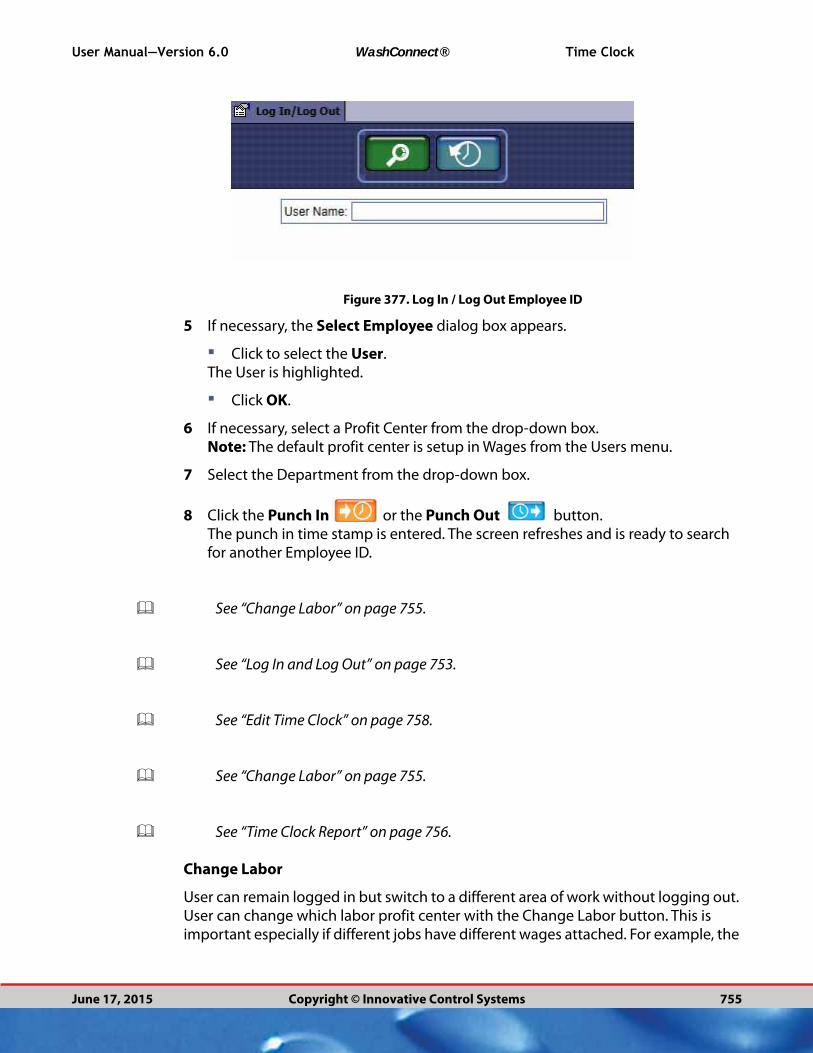
User Manual—Version 6.0 WashConnect® Time Clock
June 17, 2015 Copyright © Innovative Control Systems 755
Figure 377. Log In / Log Out Employee ID
5 If necessary, the Select Employee dialog box appears.
▪ Click to select the User.The User is highlighted.
▪ Click OK.
6 If necessary, select a Profit Center from the drop-down box.Note: The default profit center is setup in Wages from the Users menu.
7 Select the Department from the drop-down box.
8 Click the Punch In or the Punch Out button.The punch in time stamp is entered. The screen refreshes and is ready to search for another Employee ID.
See “Change Labor” on page 755.
See “Log In and Log Out” on page 753.
See “Edit Time Clock” on page 758.
See “Change Labor” on page 755.
See “Time Clock Report” on page 756.
Change Labor
User can remain logged in but switch to a different area of work without logging out. User can change which labor profit center with the Change Labor button. This is important especially if different jobs have different wages attached. For example, the
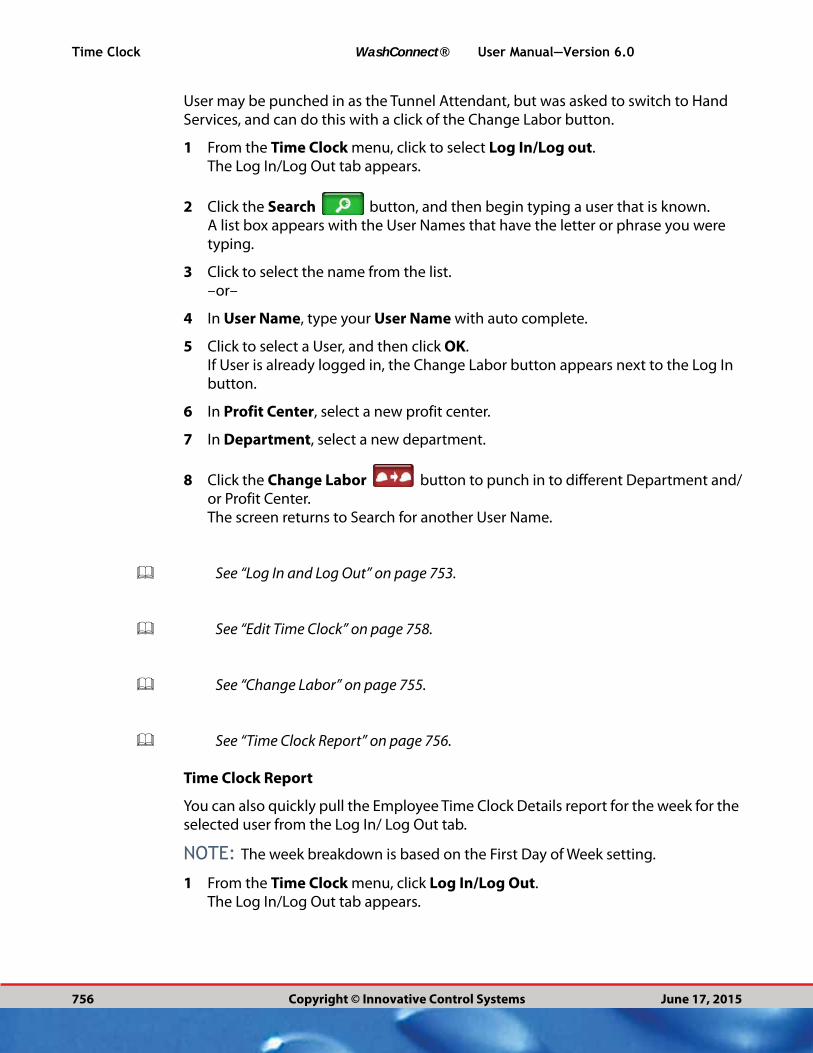
Time Clock WashConnect® User Manual—Version 6.0
756 Copyright © Innovative Control Systems June 17, 2015
User may be punched in as the Tunnel Attendant, but was asked to switch to Hand Services, and can do this with a click of the Change Labor button.
1 From the Time Clock menu, click to select Log In/Log out.The Log In/Log Out tab appears.
2 Click the Search button, and then begin typing a user that is known.A list box appears with the User Names that have the letter or phrase you were typing.
3 Click to select the name from the list.–or–
4 In User Name, type your User Name with auto complete.
5 Click to select a User, and then click OK.If User is already logged in, the Change Labor button appears next to the Log In button.
6 In Profit Center, select a new profit center.
7 In Department, select a new department.
8 Click the Change Labor button to punch in to different Department and/or Profit Center.The screen returns to Search for another User Name.
See “Log In and Log Out” on page 753.
See “Edit Time Clock” on page 758.
See “Change Labor” on page 755.
See “Time Clock Report” on page 756.
Time Clock Report
You can also quickly pull the Employee Time Clock Details report for the week for the selected user from the Log In/ Log Out tab.
NOTE: The week breakdown is based on the First Day of Week setting.
1 From the Time Clock menu, click Log In/Log Out.The Log In/Log Out tab appears.

User Manual—Version 6.0 WashConnect® Time Clock
June 17, 2015 Copyright © Innovative Control Systems 757
2 After selecting the employee or User Name, click the Time Clock Report button.
3 Click to select the calendar, and then select the Start Date or type a date in the following format: MM/DD/YYYY.
4 Click to select the calendar, and then select the End Date or type a date in the following format: MM/DD/YYYY.
5 In Employee box, select a specific employee or select All.
6 In Site box, select a specific site or select All.
7 Click the View Report button.The Employee Time Clock Details report appears. You can print or export this report.
8 Click the Printer button to print the report.–or–Select a format, and then click the Export text link for the Employee Time Clock Detail.
For more information, see “View the Employee Time Clock Summary” on page 760.
See “Log In and Log Out” on page 753.
See “Edit Time Clock” on page 758.
See “Change Labor” on page 755.
See “Time Clock Report” on page 756.

Time Clock WashConnect® User Manual—Version 6.0
758 Copyright © Innovative Control Systems June 17, 2015
Edit Time Clock
Edit Time Clock
Setup a Security Role to edit Time Clock entries. You can edit or add an entry. The Start Date, End Date, Start Time, End Time, Profit Center and Department can all be edited for individual punch in or punch out entries.
Managers can edit Time Clock stamps from Edit Time Clock command.
1 From the Search Records section, you can search with the following parameters: Start Date, End Date, Site and Employee.
Figure 378. Edit Time Clock Employee Search Results List
2 In the Search Records section, click the View button.
3 Click to select a Time Clock entry to edit, and then click the Edit button. The Edit Time Clock tab appears with the selected Time Clock entry.
4 Make necessary changes for the following editable fields:
▪ Start Date
▪ Start Time
User Manual—Version 6.0 WashConnect® Time Clock
June 17, 2015 Copyright © Innovative Control Systems 759
▪ End Date
▪ End Time
▪ Profit Center
▪ Department
5 Click the Save button –or– Cancel button and exit without saving your changes.
“About the Time Clock Reports”
See “Log In and Log Out” on page 753.
See “Edit Time Clock” on page 758.
See “Change Labor” on page 755.
About the Time Clock Reports
Review employees’ hours documented in the four Time Clock Reports:
▪ “Employee Time Clock Summary”
▪ “Employee Time Clock Detail”
▪ “Employees Working Today”
▪ “Employees Not Working Today”
SEE “TIME CLOCK” ON PAGE 753.
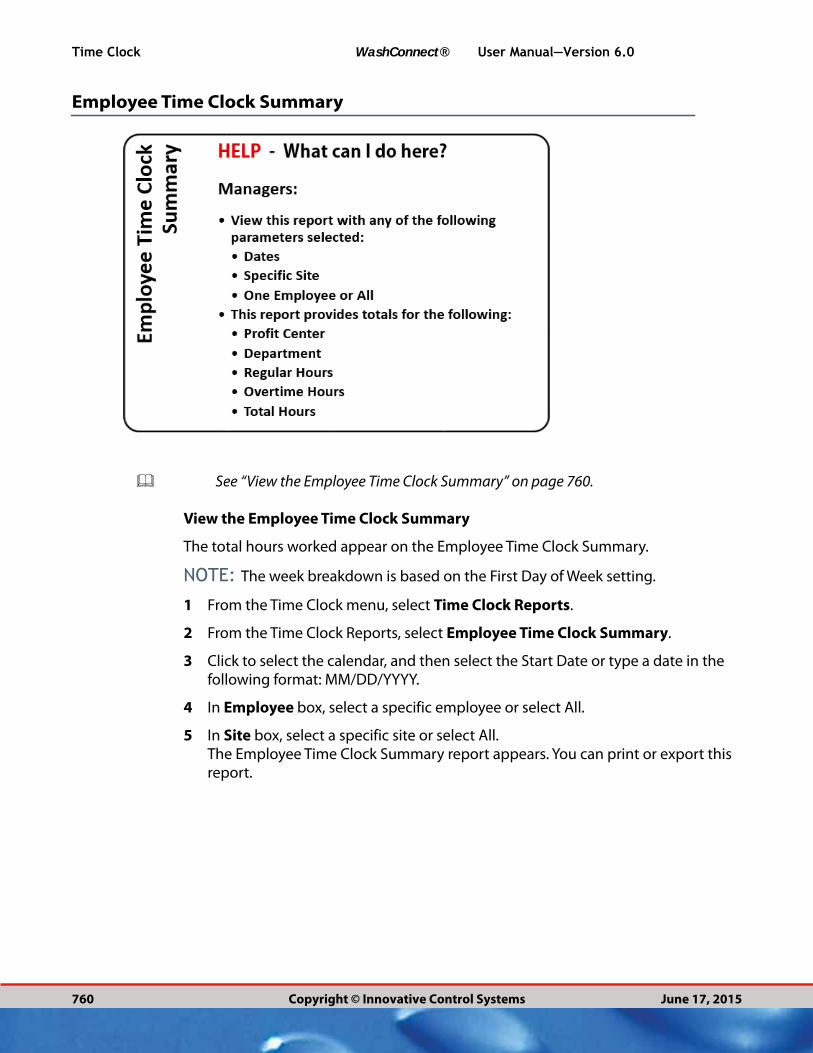
Time Clock WashConnect® User Manual—Version 6.0
760 Copyright © Innovative Control Systems June 17, 2015
Employee Time Clock Summary
See “View the Employee Time Clock Summary” on page 760.
View the Employee Time Clock Summary
The total hours worked appear on the Employee Time Clock Summary.
NOTE: The week breakdown is based on the First Day of Week setting.
1 From the Time Clock menu, select Time Clock Reports.
2 From the Time Clock Reports, select Employee Time Clock Summary.
3 Click to select the calendar, and then select the Start Date or type a date in the following format: MM/DD/YYYY.
4 In Employee box, select a specific employee or select All.
5 In Site box, select a specific site or select All.The Employee Time Clock Summary report appears. You can print or export this report.

User Manual—Version 6.0 WashConnect® Time Clock
June 17, 2015 Copyright © Innovative Control Systems 761
Figure 379. Employee Time Clock Summary Report sample
See “Printing a Report” on page 66.
See “Export a Report” on page 67.
▪ “Employee Time Clock Detail”
▪ “Employees Working Today”
▪ “Employees Not Working Today”
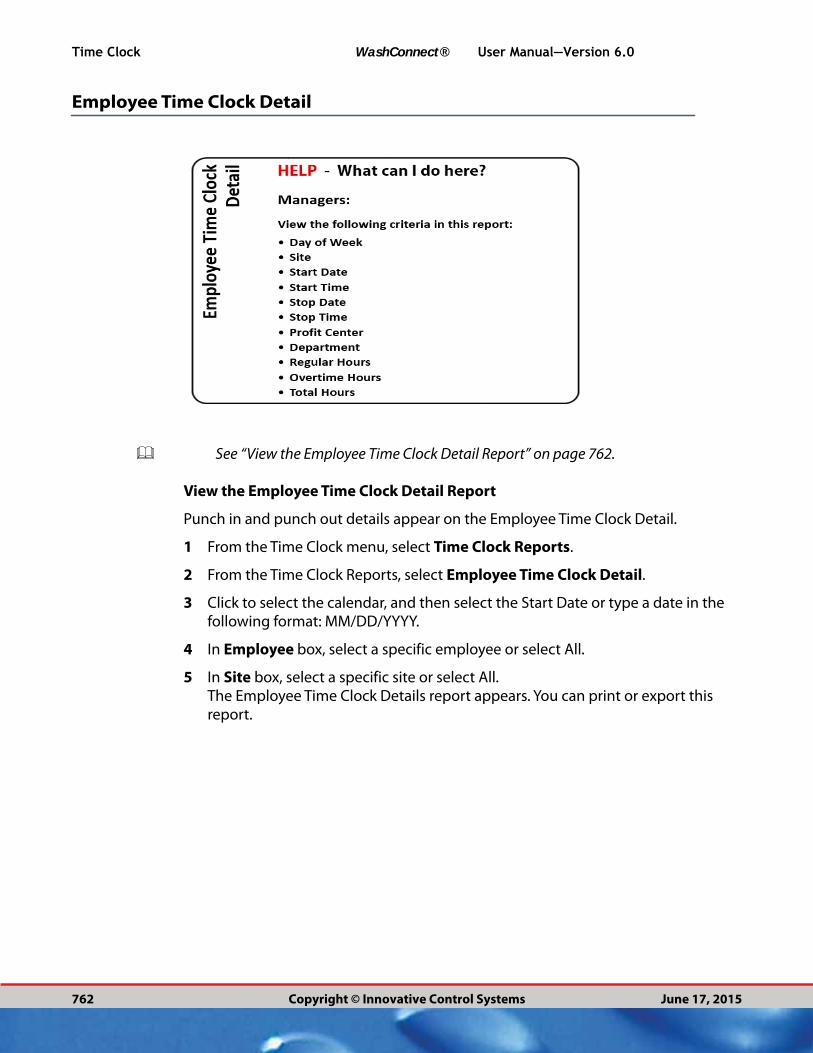
Time Clock WashConnect® User Manual—Version 6.0
762 Copyright © Innovative Control Systems June 17, 2015
Employee Time Clock Detail
See “View the Employee Time Clock Detail Report” on page 762.
View the Employee Time Clock Detail Report
Punch in and punch out details appear on the Employee Time Clock Detail.
1 From the Time Clock menu, select Time Clock Reports.
2 From the Time Clock Reports, select Employee Time Clock Detail.
3 Click to select the calendar, and then select the Start Date or type a date in the following format: MM/DD/YYYY.
4 In Employee box, select a specific employee or select All.
5 In Site box, select a specific site or select All.The Employee Time Clock Details report appears. You can print or export this report.

User Manual—Version 6.0 WashConnect® Time Clock
June 17, 2015 Copyright © Innovative Control Systems 763
Figure 380. Employee Time Clock Details Report sample
See “Printing a Report” on page 66.
See “Export a Report” on page 67.
▪ “Employee Time Clock Summary”
▪ “Employees Working Today”
▪ “Employees Not Working Today”

Time Clock WashConnect® User Manual—Version 6.0
764 Copyright © Innovative Control Systems June 17, 2015
Employees Working Today
See “Employees Working Today” on page 764.
View the Employee Working Today Report
Employees Working Today report can be pulled by individual sites or all sites. At a glance, determine which employee would be best to call in based on their hours already worked.
NOTE: You cannot change the date for this report.
1 From the Time Clock menu, select Time Clock Reports.
2 From the Time Clock Reports, select Employees Working Today.
3 In Site box, click to select specific site(s) or select All.The Employee Working Today report appears. This report can be printed or exported.

User Manual—Version 6.0 WashConnect® Time Clock
June 17, 2015 Copyright © Innovative Control Systems 765
Figure 381. Employees Working Today sample report
See “Printing a Report” on page 66.
See “Export a Report” on page 67.
▪ “Employee Time Clock Summary”
▪ “Employee Time Clock Detail”
▪ “Employees Not Working Today”
Employees Not Working Today

Time Clock WashConnect® User Manual—Version 6.0
766 Copyright © Innovative Control Systems June 17, 2015
See “View the Employees Not Working Today Report” on page 766.
See “Printing a Report” on page 66.
See “Export a Report” on page 67.
View the Employees Not Working Today Report
NOTE: This report is in real-time.
1 From the Time Clock menu, select Time Clock Reports.
2 From the Time Clock Reports, select Employees Not Working Today.
3 In Site box, click to select specific site(s) or select All.The Employee Working Today report appears and can be printed or exported.
Figure 382. Employees Not Working Today Report sample
See “Printing a Report” on page 66.
See “Export a Report” on page 67.
▪ “Employee Time Clock Summary”
▪ “Employee Time Clock Detail”
▪ “Employees Working Today”

User Manual—Version 6.0 WashConnect® What’s New Archive
June 17, 2015 Copyright © Innovative Control Systems 767
CHAPTER 15:
WHAT’S NEW ARCHIVE
The What’s New Archive is a collection of What’s New documents. The benefits, features, and enhancements are listed with a hyperlink to go to the respective help instructions, if available.
“VERSION 1.3.2.213”
“VERSION 1.3.0”
“VERSION 1.2.3”
VERSION 1.3.2.213
September 18, 2015
New Benefits, Features, and Enhancements
New! Hand Finished Service Management —
The WashConnect system can automatically manage your Hand Finished Services more intelligently and efficiently with the following Hand Finished Service Management features:
Monitor and inform customers about the expected wait time to receive the purchased Hand Finished/Detail services by managing the number of cars in hand finished service bays.
Hand Finished Services management system calculates an estimated wait time on both the Touch POS and Auto Sentry.
Wait time message appears on the Touch POS and the Auto Sentry Base Wash screen for hand finished services. Labor data can be ignored or included when calculating the estimated service wait time for hand finished services.
Pricing for hand finished services can change to help manage demand. Hand finished services pricing can be discounted based on estimated wait time or vehicles waiting for Hand Finished Services. No wait time provides the largest discount, and as the wait time builds, the pricing goes up until there are no discounted services offered.

What’s New Archive WashConnect® User Manual—Version 6.0
768 Copyright © Innovative Control Systems June 17, 2015
Configure maximum number of cars in the hand service bay to customize WashConnect to your wash.
Wait timer, representing the time it takes to begin the service on the car, displays cars in the hand service queue.
Timers can be set to count up or down for hand service queues and bays.
With the use of multiple wireless scanners (with prefix codes), you can assign vehicles to different bays. Each individual scanner is tied to a different bay number. By scanning the ticket, you are able to remove the vehicle from Hand Finished Service bay and then mark the car as finished.
Custom icons and display names are configured from Sales Items menu. If not using custom graphics, a default icon will be used with the PLU. Request an ICS professional graphic designer to create your custom Hand Finished Services graphics.
Cameras may be setup to take a photograph of the car at the Auto Sentry, and attach it to the transaction so the image may be used in the Hand Finished Service Management.
See “Hand Service Management” on page 746.
New! Discount All Washes —
Discount ALL of your washes at one time with a single global coupon code (PLU). Simply create wash packages as before and add the packages to one profile with the new Discount Coupon service type.
New! at the Auto Sentry —
Cash Club - It’s here by popular demand. The Auto Sentry can now accept cash for club purchases.
Help Button - When your customers need help, they can simply touch the Help button on the Auto Sentry touch screen to flag down an attendant. The touch screen Help button can fire a relay to activate a horn or light.
Renew Terminated or Suspended Club Customers at the Auto Sentry. Terminated club customers need to swipe a new credit card and get a new RFID Tag adhered to their windshield. Suspended customers may simply reactivate their credit card on file, and all their club information needed is reactivated.
Management Reports —
New! Dashboard Reports —
The new Dashboard Reporting for WashConnect® allows you to select the reports you care about and view them ALL on ONE screen at the same time. No more clicking back and forth, or refreshing information to see how your wash is doing. Simply

User Manual—Version 6.0 WashConnect® What’s New Archive
June 17, 2015 Copyright © Innovative Control Systems 769
Logon and view all the Dashboard reports. The Dashboard is the only reporting available directly through the use of a Web Browser.
See “About the Dashboard Report” on page 310.
New! Introducing four corporate reports—
Audit Trail Logs – Protect against fraud. Track whenever out of the normal activities happen at your wash. In this report, you can view the activity logs of who performed the activity type including a date and time stamp in chronological order. For example, a log is created for any time clock edit, when a cash drawer is opened with no sale, if a user is terminated, and a few more.
See “About the Audit Trail Log” on page 270.
Book Report – Wash Book information can be viewed from the Book Report. This report displays customers wash book information such as where and when wash book was pur-chased, how many books were purchased, number of washes redeemed, etc.
See “About Book Report” on page 249.
Credit Cards Summary –The Credit Cards Summary can only be viewed at Corporate. This summary dis-plays a break down of the credit card totals per credit card company and the amount of transaction and total amount charged. You can view this in your wash’s corporate structure. You can view the quantity of transactions and total amount per credit card.
See “About Credit Cards Reconciliation” on page 205.
Shift Not Verified Report –The Shifts Unverified Report is accessed by clicking the hyperlink on the Shift Detail Report. This link will only be available if there are unverified shifts detected within the requested date range of the Shift report. This report identifies the shift(s) that are unverified and provides technical support with information to resolve the issue.
See “Unverified Shifts” on page 194.

What’s New Archive WashConnect® User Manual—Version 6.0
770 Copyright © Innovative Control Systems June 17, 2015
Report Enhancements —
When closing the Shift, an End of Day feature can be enabled to automatically log out employees who are already clocked in and print selected End of Day Reports.
Create and save user preferences for most of the management reports.
Shift and Vehicle Statistical Performance (VSPR) Reports provide additional recalculation information.
Select multiple levels, instead of strictly using site level, with a tree structure for the following reports: Shift Detail, VSPR, Payouts, Received On Account, Free Wash, Rewash, Checks, Voids, Fleet Accounts, Refunds, Unverified Journals, Credit Cards, Gift Card, Shifts Unverified, Controller Services, Services Washed, and Statistical Comparison.
Fleet Activity Report displays with references to Prepaid Accounts, showing the beginning and ending balances for the selected period as well as the transactions for redemption or additions to the balance.
Added Site column to Vehicle History Report.
Marketing —
Wash Busy Videos for InBay –Wash Busy videos can now be a source of income. You can sell advertising space on your Auto Sentry to local businesses with an InBay Wash Busy video. The Auto Sentry can play more than one video in a consecutive loop for customers who are waiting while your wash is busy.
Sales Programs —
New! Customer Tracking and Punch Card Redemption — Track customer purchases and offer punch card promotions through the Auto Sentry increasing sales and promoting customer loyalty.
Frequency Promos —
▪ Frequency Promotions can be generated at Corporate. You can view, but not edit, the Frequency Promotions at the site level. Assign corporate sales items (PLUs) to site level sales items (PLUs).
▪ Frequency Promotions can be deactivated or terminated.
Clubs —
Determine if club customer is signed up with auto-billing by checking the barcode field as well as the RFID field.
When searching for an RFID tag number from the Customer Manage tab, type in the beginning of RFID tag number and you will notice an auto complete feature drops down a menu with the possible numbers for the RFID field, making it faster to locate customers and eliminating typing errors.
You can override rounding for club price during auto-billing or club purchase.

User Manual—Version 6.0 WashConnect® What’s New Archive
June 17, 2015 Copyright © Innovative Control Systems 771
Stack Management —
Show or hide Fire Roller and Cancel Roller buttons on the TouchES (Entrance System).
Enable/disable Hand Service Mgmt tab from the StackNControl menu. This tab tracks the vehicle’s progress of hand finished services (In Tunnel Stack, In Tunnel, In Hand Service Stack) providing an indication of the car’s location within the process.
Actual number of cars in the stack and the number of cars in the tunnel display on the Stack Management tab.
You can arrange Retracts in a desired sort order on the Touch POS.
Enhance your Stack Management experience on the POS with the ability to disable the Stack Management animation if the Stack Management tab is not currently selected.
Fire roller from Stack management, if using a third party controller, and have a relay output defined.
WashConnect and Touch POS Tools —
Added menu item search field to find specific WashConnect menu items or tabs easily.
POS touch screen is easier to use with the increased size of all WashConnect tabs.
From WashConnect login screen, you can disable the Default User from automatically populating the User ID and password.
Inactivity Timer Log off feature can be enabled to lock the Touch POS if no activity is going on.
Hide buttons not in use on your Touch POS, such as Void, Stack, Refund, RFID, ROA, Payout, and TicketGen.
Ability to print Wash Code and Barcode on duplicate receipts at POS.
Ticket Generation transactions can be tracked when using the transaction type Ticket Gen.
When an originating transaction is voided, all of the created Paid Tick Gen tickets from this transaction will be rendered invalid and changed to a Delete status.
Create custom profiles to assign PLUs to the profit centers.
Quickly search for vehicles by bar code.
See “Edit Vehicle Information” on page 91.
What’s New Archive WashConnect® User Manual—Version 6.0
772 Copyright © Innovative Control Systems June 17, 2015
You can now merge two gift cards.
Balance check can be performed by swiping or typing gift card number to check balance from the gift card balance screen. Swiping gift card engages pop up keyboard without having to touch the screen.
Fleets —
New! Prepaid Fleet Accounts –
In addition to setting up fleets as ROA (Received on Account), fleet accounts can now be set up as a prepaid account. Instead of charging washes to be invoiced at a later date as an ROA, the fleet can prepay the account and carry a balance of funds and so that each wash reduces that balance. Funds are available for use by any member of that fleet.
New! Prepaid Fleet Bonus - Progressive Fleet —
NOTE: This feature is only available when you contact ICS to set up the use of Pre-
paid Fleets.
Reward customers for committing large amounts to the balance they carry on their prepaid cards by giving larger bonus amounts or percentages to those customers purchasing larger amounts to their account.
The Progressive Bonus system was designed as an incentive to dedicate a larger amount of funds during the Prepaid Fleet recharge phase. For example, an increase to the fleet of $50 may reward a bonus of 3% = $51.50 total increase; an increase to the fleet of $100 may reward a bonus of 7% = $107.00 total increase; or an increase to the fleet of $200 may reward a bonus of 15% = $230 total increase.
The site may set up different progressive scales and assign specific fleets to each, rewarding larger fleet usage with larger bonuses. The bonus may be a flat dollar amount reward or a percentage of the purchase.
Configure number of fleet receipts to be printed at the Touch POS.
Ability to print a signature line for Fleet transactions at Touch POS.
Fleet rules apply to the individual vehicles of a fleet while keeping the option to manage the fleet account with rules.
Merge corporate fleet account and individual fleet customers through Customer/Manage and Fleet/Accounts tabs.
When a customer’s card is used to access a corporate fleet member’s account, rules applied to the individual vehicle will be honored over any rules set up for the fleet which it is assigned to. This will allow fleet managers to vary the privileges of its individual members.
Accept Credit Payments Outside the POS —
Set up fuel credit cards to be cleared outside the POS using third party terminals.

User Manual—Version 6.0 WashConnect® What’s New Archive
June 17, 2015 Copyright © Innovative Control Systems 773
Time Clock —
When clocking in or out, user receives a confirmation message acknowledging a successful punch in or out.
Customize your time clock standards with new time clock configuration fields:
▪ Weekly OT Threshold: The number of hours needed before getting overtime on a weekly basis (Default: 40).
▪ Daily OT Threshold: The number of hours needed before getting overtime on a daily basis (Default:8).
▪ Daily Double Time Threshold: The number of hours need before getting double time on a daily basis. (Default:12)
Other —
Ability to export time clock information to multiple payroll processors: ADP or Paychex.
Ability to change the order of the sites as they appear at the WashConnect Login screen.
All weather requirements are setup for every site at one central corporate location for all sites in your car wash organization with ICS Support.
System PLU -185 and -186 are the only system PLUs that can be changed. You can edit the Item Description. They are the PrepaidFleetPayment and PrepaidFleetBonus items and the description will display on the POS under the ROA button.
New Wash Status page with ability to open and close Auto Sentry terminals and view status of TNC terminals. Control wash open signal through WashConnect or toggle switches.
Create Global Discount Coupons and redeem at both the Auto Sentry and Touch POS.
Send Hand Finished Service alert to indicate a purchase has been made.
Wash Book counts tied to an RFID tag can be redeemed. Tag cannot be tied to a club or a fleet.
Limited Club Members exceeding their wash limit are eligible for discounted pricing set up from a profile using the Customer Group feature.
To provide better traceability instead of deleting data, you no longer can hard Delete Profiles but will Terminate Profiles instead.
Other Profile enhancements have been made to speed up profile schedule saving.
Vehicle make and model entries are set up to auto-complete, formerly were drop-down lists.

What’s New Archive WashConnect® User Manual—Version 6.0
774 Copyright © Innovative Control Systems June 17, 2015
The POS displays to the 1/1000s of a $1.00 for Gas Pump profit center. (i.e. $3.786)
Virtual receipt and printed receipt will show the number of gallons purchased and the price per gallon.
Users, from other sites, can log into the Auto Sentry’s Service Unit Screen.
VERSION 1.3.1
January 20, 2015
New Benefits, Features, and Enhancements
Fleet Promotion
Discount Price List Promotion is a new Promotion category. This promotion can be created at Corporate and then can be assigned to selected fleet accounts through the Fleet/Accounts tab at local sites. Within the Discount Price List promotion, specific PLU numbers can be selected and three types of discounts can be assigned to the PLU. These include changing the actual price, granting a percentage discount, and getting a specified amount discounted off the price.
See “” on page 774.
Reports
New! Statistical Comparison Report compares the sales performance of one period versus another period. (Available at Corporate only.)
See “About Statistical Comparison Report” on page 344.
Vehicle Statistical Performance Report (VSPR) enhancements:
• VSPR reporting interval options available: Hour, Day, Week, Month or Annual.
• When displaying the VSPR by week, the weeks match the First day of week setting from the Global Configuration.
See “View the Vehicle Statistical Performance Report (VSPR)” on page 315.
View Register Report is available to reprint duplicate receipts from a POS for days other than today. Once the View Previous Days permission is granted for the user from Users > Security Roles menu, they have the ability to select previous days within the View Register report.

User Manual—Version 6.0 WashConnect® What’s New Archive
June 17, 2015 Copyright © Innovative Control Systems 775
See “Set previous days privilege on View Register Report” on page 245.
Credit Card and Shift Detail Reports - From the Credit Card and Shift Detail Reports, the Payment Type column by default combines Visa and Master Card. Contact support to separate Visa and Master Card totals into two separate columns if necessary.
See “About Payment Account” on page 509.
Formerly, Transactional Detail Report, has been renamed Transaction Detail Report.
Controller Services Report - The Controller Services Report displays controller transactions accurately showing which controller services have been used against the services sold.
Site IDs
Within Customer > Manage menu, you can find a field called Site in both Customer and Vehicle. The Site column shown there represents where the customer and vehicle were signed up. This becomes significant if you run Autobilling at each individual site because then you can setup to only bill those memberships that belong to the Site. Memberships can also be billed from where the individual vehicles were signed up versus where the customer was signed up. When doing these things, changing the Site would assign the membership to that Site, meaning it would receive the Autobilling revenue. This functionality is permission-based.
See “Add a Customer” on page 81.
Wash Code Enhancement
This enhancement is to keep customers moving quickly through the Auto Sentry, if a customer enters a wash code that was already used within the last 30 days, a popup message informs customers the wash code was already redeemed with a message stating, Already Washed on date and time.
See “About Ticket Generation” on page 601.
POS
Setting to show/hide car count information on the POS screen.
When renewing a club, customer can change club at POS.
Added ability to perform club renewals at the Presell terminal.
What’s New Archive WashConnect® User Manual—Version 6.0
776 Copyright © Innovative Control Systems June 17, 2015
Direct Plate Search: POS/Presell will start searching license plates after 2 characters are entered.
Pole Display viewing options:1. On the first line of the pole display, you can view the current service being rung up. On the second line, the running total appears. (Default setting)2. New! Both lines on the pole display show the last two item(s) or service(s) being rung up, until the Finalize button is selected, and then the total appears on the second line of pole display. This option was requested to mimic the pole dis-play setting in the Tunnel Master management system.
Automatically open Presell page in WashConnect for Presell terminal.
Touch POS implements paging on sales items for faster response time.
Other Features
At the Auto Sentry, customer can go directly to Buy Wash when selling Gift Cards or playing the RFID validation screens by selecting the Go Directly to Buy Wash setting.
Now the Card number field can be edited from Customers > Manage menu so fleet customers and general customers can be edited through the same screen as club customers. The number entered here is the number that needs to be encoded on a Customer Card for accessing Fleet memberships at the Auto Sentry/POS or for identifying a General customer at the POS. This number will not be able to access a club membership at an Auto Sentry.
Barcodes can now be assigned to club vehicles offering another means of tracking club vehicles besides the use of RFID tags.
Privilege added to show/hide the Report Default Date menu.
See “Default Date Range” on page 74.
Enhanced Password Security
To prevent administrative vulnerability, WashConnect User Passwords must meet the following minimum requirements:
• Be at least six characters in length.
• Contain at least 1 uppercase letter.
• Contain at least 1 lowercase letter.
• Contain at least 1 number.
See “About Manage Users” on page 541.
User Manual—Version 6.0 WashConnect® What’s New Archive
June 17, 2015 Copyright © Innovative Control Systems 777
Canada Only
New! CAGE Support for LoyalMark Gift.
VERSION 1.3.0
September 18, 2014
New Features and Enhancements
Customer Groups
Customer Group(s) can be created to include individually specified customers. Customer groups can then be used in the profile system to offer special prices based on their Customer Group(s) association. For example: You can offer your best customers a discount for their loyalty by including them in a Customer Group that is associated with a wash profile set up with special pricing.
See “About the Group menu” on page 102.
Fleet
Fleet invoicing has been streamlined to make it more intuitive and user friendly. In addition to streamlining the overall function, fleet invoices can be generated and attached as a PDF to an email and sent to primary fleet email address.
Ability to assign fleet discounts at time of sale (not time of invoice) to individual fleets.
Ability to void an ROA payment and remove it from the fleet invoice.
Ability to add a line of text and up to three footers to all fleet invoices; this message must be the same across ALL fleet accounts.
See “About Fleet Manage” on page 171.
Club and Fleet Profiles
Club and Fleet profiles now allow up to 40 base services and 40 extra service(s) for both POS and Presell devices.
See “About Profiles” on page 434.
Memberships and Autobilling
Each individual site in a corporate structure has the option to independently bill their own club memberships instead of billing all club memberships from one site.
What’s New Archive WashConnect® User Manual—Version 6.0
778 Copyright © Innovative Control Systems June 17, 2015
See “About Club Membership” on page 110.
See “Add a Club Customer” on page 85.
Enhanced Report
Added a Bill check box to Declined Payment Report to allow for individual selection(s) or ALL club memberships to be marked as Bill.
See “Mark Bill in Declined Payment Club Report” on page 133.
Vacuum
Added ability to create and update various types of sales items within the Vacuum profit center. This feature allows you to create wash packages with the vacuum portion allocated to the vacuum profit center.
Generate and Redeem Vacuum Tickets.
See “About Sales Items” on page 392.
See “About Manage Profit Centers” on page 721.
Touch POS
First Name and now Last Name Greeter Identification for both POS and Presell devices.
Ability to configure the Quick Money buttons: default values are $1, $5, $10, and $20.
Checks can be disabled and excluded as a payment type.
Option to hide No Tax or No Sale buttons.
Ability to force greeters to be clocked-in before posting sales on POS.
Two ways to change the size of POS services buttons:
▪ All buttons can be either Regular, Medium or Large size.
▪ Regular, Medium or Large buttons can be applied to each type of service category: base, club, extra, etc.
Added ability to print general reports on POS with a receipt printer.
Added hourly car count per shift to the bottom of the POS screen.
User Manual—Version 6.0 WashConnect® What’s New Archive
June 17, 2015 Copyright © Innovative Control Systems 779
Ability to hide all denominations or just zero denominations on receipt when closing a POS shift.
See “About Touch POS Sales Entry” on page 578.
Enhanced Reporting
Vehicle Statistical Performance Report (VSPR) added minimum and maximum temperature column for specified date ranges.
Promotions added ability for WashConnect® to track Bonus Points or Card Punch totals.
See “Add Bonus Point Promotion” on page 456.
See “Add a Punch Card Promotion” on page 470.
Define which site a customer belongs to by assigning a Site ID to a specific vehicle within the Customer menu Manage form.
Vehicle History is now available for non-club vehicles as well as club vehicles.
See “About the Vehicle Statistical Performance Report (VSPR)” on page 315.
Canada Only
Non-autobilling sites can advance club membership expiration dates from Advance Expiration screen.
See “About Advance Expiration” on page 146.
VERSION 1.2.3
April 28, 2014
New Features and Enhancements:
Wash Book
This feature allows any customer to purchase a group of washes at a discounted price, typically paying for X number of washes while getting Y number of free washes. Both X and Y are fully configurable. Customers can purchase and redeem Wash Books at an Auto Sentry or TouchPOS.

What’s New Archive WashConnect® User Manual—Version 6.0
780 Copyright © Innovative Control Systems June 17, 2015
See “About Wash Books” on page 424.
Biometric FingerPrint Reader
Simply log in to WashConnect® with a quick scan of your fingerprint. The FingerPrint reader is a valid authentication Login method for WashConnect® and Time clock.
See “Add User’s Fingerprints” on page 552.
A la Carte Feature
Customers can now select up to six Extra Service selections in one transaction.
NOTE: When Auto Sentry A La Carte setting is enabled, the No Upgrade button
appears until an upgrade or extra service is selected, then the button changes to Done with Extra Services while up to all six upgrades or extra services can be selected.
Variable Pricing
PLU items in the Extra Services Menu can now have Selection Dependent Pricing assigned to them. The price displayed will be dependent on other Extra Services that have already been selected. This will allow you to lower prices on selected Extra Services under specific conditions that you pre-configure. (i.e., Customer has selected Tire Shine for $3.00 which will lower the price of the Wheel Brite from $3 to $2.)
See “About Variable Pricing” on page 405.
Sales Tax Rounding
With the Variable Pricing of the Extra Services, taxes could make the total amount uneven (i.e., $3.01). The Sales Tax rounding feature will allow the system to automatically adjust your services advertised price so the final amount will be even ($3.00).
For Item Rounding, See “Global > GlobalConfiguration > Global” on page 686.
Centralized logging
From one server, centralized logging allows real-time viewing of the logs. It saves time as we can view the log up until the point of equipment failure even when equipment is still down.
Multiple Tunnel Management

User Manual—Version 6.0 WashConnect® What’s New Archive
June 17, 2015 Copyright © Innovative Control Systems 781
Save on the cost of purchasing and maintaining two servers to operate two tunnels. Now you can view and manage two separate tunnels from one server.
One Centralized Logging Server gives the ability to operate both Gates. Gate Management tab allows easy removal of cars from the Gate to Pending with clear identification of the two separate tunnels. You can easily add or remove cars before they reach the 5th loop. Once the car passes the 5th loop, they will no longer appear in Gate Management but can be edited in the Stack Management tab.
One Stack Management tab appears for each individual tunnel for ease of firing roller, canceling fire, adding services and retracts, pull car out of stack to pending, reload car to stack, move car position, reprint receipt and refund tickets. At a glance, you can view the ticket for each car in the stack.
See “About Stack Management” on page 735.
Touch Entrance Sign
This 42” touch screen Entrance Management Sign (Touch ES) allows your tunnel entrance employee more control to fire and stop rollers without moving focus from loading car. The Touch ES will also display tunnel entrance instructions, and tunnel services purchased in a graphical confirmation.
See “About Touch POS Sales Entry” on page 578.
Weather Index on Vehicle Performance Report
Temperature and Weather Icons display on the Vehicle Performance Report.
See “Setup Weather Settings for the Vehicle Performance Report” on page 691.
Export Data
Export System Data is a new tab which allows you to export specific data out of the database using one of three output file types: .csv, .txt, and .xml. There are three main types of data that can be exported which include Configuration data, Customer data, and Shift/Transactional data. Upon exporting, a zip file is created and named ICSDataExport.zip.
See “About Export System Data” on page 501.
Autobilling
Sell non-renewing Club Memberships paid for by Cash or Credit at the POS terminal.

What’s New Archive WashConnect® User Manual—Version 6.0
782 Copyright © Innovative Control Systems June 17, 2015
Disable Autobill for club customers who have not used the wash in X months so they are not charged.
POS and Auto Sentry can proactively ask Club Customers to update credit card on file for Club Autobilling if card is expiring within X (configurable) days.
See “Add a Club Service” on page 376.
Journals
The Cash Management feature has been streamlined making it faster and easier to manage the flow of cash in and out of your system. You can now View Journal History, Verify Entries, and perform Safe Journal entries on the same screen without having to navigate to another menu.
See “Search for a Journal Entry” on page 273.
User Manual—Version 6.0 WashConnect® Marketing - Quick Starts
June 17, 2015 Copyright © Innovative Control Systems 783
CHAPTER 16:
MARKETING - QUICK STARTS
Quick Starts provide brief, concise information about commands or features to setup popular marketing tasks for the Auto Sentry without all the details. See the individual help instructions for the individual task.
FAQ
“Coupon Codes - Quick Start” (Coupon Codes)
“Create a Barcode - QuickStart”
“Wash Club Offerings - Quick Start”
“Frequency Promotions - Quick Start”
“Gift Cards Promotional Selling - Quick Start”
“Fund Raiser - Quick Start”
Coupon Codes - Quick Start
Coupon Code is the tool used for mass distribution since the same code can be used multiple times. On your advertisement coupon, use a 3-, 4-, or 5-digit number with an expiration. Customers can enter a valid coupon code directly at the Auto Sentry.
I. Set up Auto Sentry Coupon Code Length
Set the coupon code length.
1 System Setup > Devices > Settings.
2 Select Auto Sentry, Device Name, TouchConfiguration, and Shift settings.
3 Set the Coupon Length which adjusts the amount of digits the Auto Sentry accepts on the keypad (3-, 4-, or 5-digit number).
Marketing - Quick Starts WashConnect® User Manual—Version 6.0
784 Copyright © Innovative Control Systems June 17, 2015
NOTE: The coupon length can be changed; however, be certain your previous pro-
motion of a different coupon length has expired before adjusting length of coupon code.
4 If the Coupon Length setting is changed, the Auto Sentry must be restarted for this change to take effect.
See “Auto Sentry > Shift” on page 679.
II. Add the Coupon PLU
Add Sales Item PLU for a coupon.
1 Select Configuration > Goods and Services > Sales Items.
2 Add a new Sales Item PLU. If you use the same coupon number as the PLU number, it will be easy to locate on the Shift Detail Report.
3 In Barcode, type the 3-, 4- or 5- digit Barcode number.
See “Create a Barcode - QuickStart” on page 785.
4 You can use Advertised Extra Service Video files for extra services.
See “About Sales Items” on page 392.
III. Set up the Profile for the Coupon
Create a new profile for the coupon. This coupon profile allows the Auto Sentry to accept the coupon code during a time period. Set up this time period in the profile’s schedule. A valid coupon profile schedule must be set up.
1 Select Configuration > Goods and Services > Profiles.
2 Add and name a new Profile for the Coupon.
3 Add Wash Service and select the Wash PLU and the Coupon PLU.
4 Save.
5 Select the previously saved Coupon Profile.
6 Add a schedule to the Coupon Profile.
7 Click the Applies to drop-down arrow, and select Coupon.
8 Set Coupon Profile schedule parameters.
9 Save.
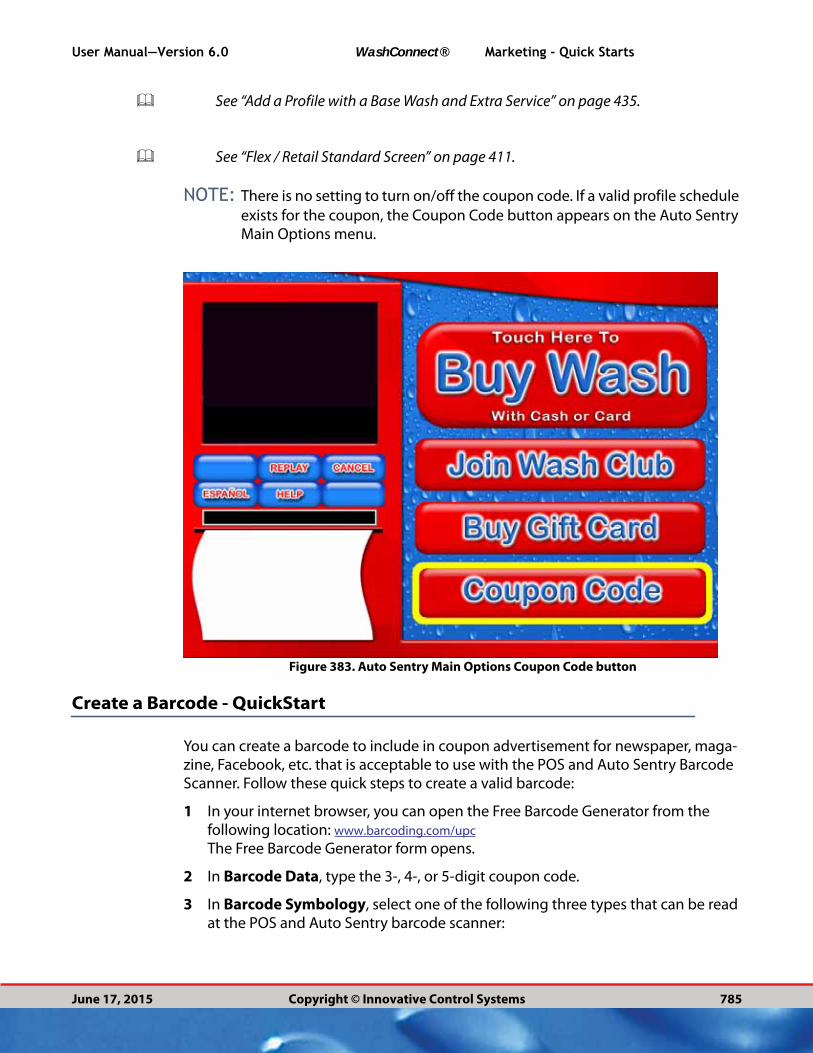
User Manual—Version 6.0 WashConnect® Marketing - Quick Starts
June 17, 2015 Copyright © Innovative Control Systems 785
See “Add a Profile with a Base Wash and Extra Service” on page 435.
See “Flex / Retail Standard Screen” on page 411.
NOTE: There is no setting to turn on/off the coupon code. If a valid profile schedule
exists for the coupon, the Coupon Code button appears on the Auto Sentry Main Options menu.
Figure 383. Auto Sentry Main Options Coupon Code button
Create a Barcode - QuickStart
You can create a barcode to include in coupon advertisement for newspaper, maga-zine, Facebook, etc. that is acceptable to use with the POS and Auto Sentry Barcode Scanner. Follow these quick steps to create a valid barcode:
1 In your internet browser, you can open the Free Barcode Generator from the following location: www.barcoding.com/upc
The Free Barcode Generator form opens.
2 In Barcode Data, type the 3-, 4-, or 5-digit coupon code.
3 In Barcode Symbology, select one of the following three types that can be read at the POS and Auto Sentry barcode scanner:
Marketing - Quick Starts WashConnect® User Manual—Version 6.0
786 Copyright © Innovative Control Systems June 17, 2015
▪ Code 93
▪ Code 128
▪ UCC/EAN 128
4 In Output Format, select one of the following formats requested by your graphics designer who is creating the coupon advertisement.
▪ .bmp
▪ .gif
▪ .jpg
▪ .png
5 Click the Generate Barcode button.The barcode thumbnail graphic preview appears.
6 To save a full size version of your barcode, right-click the thumbnail graphic, and select Save Image.
NOTE: Write down the barcode file location where you saved the full-size version of
your barcode. You will need to forward this file to your graphic designer. You can now print the coupon with this graphic image. As long as the print qual-ity of the ad is high, your customer will find it easy to scan the coupon at the Auto Sentry.
See “Coupon Codes - Quick Start” on page 783.
Wash Club Offerings - Quick Start
NOTE: Club members are less likely to visit a competitor.
Customers who join an unlimited wash club provide a credit card that will automati-cally be charged a flat fee every month, and in return receive as many washes as they wish for that particular vehicle.
Assuming your sales items are set up for your wash menu services and extra service items, follow all three sections for the Quick Start steps below to setup your Wash Club.
I. Setup up to 6 Wash Clubs (and Rules)
1 Login to WashConnect® at Corporate.
2 Select Configuration > Goods and Services > Club Services.
3 Type the name of your first Wash Club offer and the price for this Club. Keep in mind, wash clubs are based on your existing wash menu.

User Manual—Version 6.0 WashConnect® Marketing - Quick Starts
June 17, 2015 Copyright © Innovative Control Systems 787
4 In Club Rule, set the parameters: Duration, Limited/Unlimited, Billing, and Grace. Save. Repeat for other wash club(s).
NOTE: Wash Club PLU is automatically assigned a number between 900 and 999.
See “About Club Services” on page 375.
II. Setup Discounts for each Wash Club
Per base wash, a discounted (free) wash is needed for the Wash Club Package. Since the Club Membership redeems a base wash, you will need to set up a discount for the base wash as a Discount PLU (not to be confused with the club services PLU). In the next step, you will select this discounted free wash PLU to offset the charges against the base wash in a package. This is because the customer already paid for his wash club in the club membership, and does not get charged again but allows you to track the washes redeemed.
1 Login to WashConnect® at local site.
2 Select Configuration > Goods and Services > Sales Items.
3 In Profit Center, select Club.
4 Add a Sales Item.Type a PLU number and PLU name. Ex: Basic Wash Discount
5 Type a negative amount for the Base Wash of the club.
6 Select Discount for Type.
7 Click the Save button.
See “About Sales Items” on page 392.
III. Create a Package for each Wash Club level
Create a separate Package for each wash club level or offering. Packages combine the base wash service PLU for the club and a discount free wash PLU. The customer has already paid for the wash in the membership fee, and will not be charged when redeeming a wash. This package balances out to zero. Base Wash $7.00 + Base Wash Discount -$7.00 = $0
1 If necessary, login in to WashConnect® at local site.
2 Select Configuration > Goods and Services > Packages.
3 Click Add Package button.
4 Type a name and a new PLU number for the wash club package.
5 Click Add Sales Item

Marketing - Quick Starts WashConnect® User Manual—Version 6.0
788 Copyright © Innovative Control Systems June 17, 2015
6 From the Profit Center list, select two PLUs:
▪ Select the Base Wash Service (ex: $7.00) for the Club.
▪ Select the Base Wash Service Discount (ex: -$7.00) for the Club.This will return $0 because the customer has already paid for the wash in his club membership fee but we still need to select the base wash to turn on the services in the tunnel.
IV. Create a new Profile for each Wash Club
Create a profile for each wash club that includes the base wash, extras and upsells for that wash club.
1 If necessary, login to WashConnect® at local site.
2 Select Configuration > Goods and Services > Profiles.
3 Type a name for the wash club Profile.
4 In service type, select Club Service.
5 Select a PLU for your one of your Wash Club offerings.
6 Add a Schedule, and In Applies To, select Club.
7 In Rule, select the Club Rules (or Program) from the drop-down list.
8 Click OK, and the click OK again.
9 Repeat steps 1 through 7 for each wash club level.
V. Create a Profile for the entire Wash Club Offerings
This profile is used to include all your valid Wash Club profiles so the profile can be scheduled to appear on the Purchase Club Membership screen.
1 If necessary, login to WashConnect® at local site.
2 Select Configuration > Goods and Services > Profiles.
3 Type a name for the wash club Profile.
4 In service type, select Club Service.
5 Select all of the PLUs for your Wash Club offerings menu.
6 Add a Schedule, and In Applies To, select Club Sales.Immediately after setting up a valid Club Sales schedule, your wash club menu will appear for customers after they select the Join Wash Club button.

User Manual—Version 6.0 WashConnect® Marketing - Quick Starts
June 17, 2015 Copyright © Innovative Control Systems 789
Frequency Promotions - Quick Start
Reward customers who buy services on a regular basis with price reductions on each return visit. If the customer keeps buying a service within a preset time period the cost keeps dropping with each visit. The wash code prints at the bottom of their receipt as well as the promotion for their next wash.
The following are the four major menu items to complete to create a Frequency Promotion for one of your base washes:
1 Sales Items from Configuration > Goods & Services menu: Add a PLU for each Discount and one for the free Base Wash.
2 Packages - Setup a Package PLU for each discounted wash as well as the free wash.
3 Promo Receipt Text - Type a name for each wash receipt and then type the message to appear on bottom of each discounted wash receipt.
Marketing - Quick Starts WashConnect® User Manual—Version 6.0
790 Copyright © Innovative Control Systems June 17, 2015
4 Promo Setup - Locate the PLUs, setup the expiration of the wash code offer, activate it and select the name of the Receipt text.
See “About Frequency Promotion Packages” on page 423.
Gift Cards Promotional Selling - Quick Start
Gift Cards make great gifts but sometimes customers need encouragement to purchase them.
NOTE: Gift Card Sales are non-taxable always. When the customer returns with the
gift card to purchase items, he/she will then be charged applicable tax on the purchased items.
You can set up these options for your Auto Sentry at any time. There are three selling promotions for Gift Card Sales:
1 System Setup > Devices > Settings, select Auto Sentry, TouchConfiguration and GiftCard.
Increase Gift Card value by a set Dollar Amount:
▪ AddValue Bonus Dollars, set to 0 if promotion is not in use –or– set to the dollar amount to be added to the amount of the gift card purchase. For example, a customer purchases $25 gift card, and Add Value Bonus Dollars is 5, then $5.00 is added to the $25 gift card amount, and the amount on the gift card will be $30.
–or–
Offer a Free Wash with the purchase of a gift card:
▪ AddValue FreeWash PLU, set to 0 if promotion is not in use –or– set to the wash PLU of the free wash that customer’s will receive at time of gift card purchase.
–or–
Increase Gift Card value by a Percentage of the Sale:
▪ Add Value Promo, set to 0 if promotion is not in use –or– set to the dollar amount to be added to the amount the customer purchases.
2 Click Save.
3 Restart the Auto Sentry.Changes will take effect immediately after Auto Sentry restarts.
NOTE: After gift value is entered and purchase gift button is pressed, if customer
needs to change the amount, he or she will need to press the cancel button and reenter the correct amount.
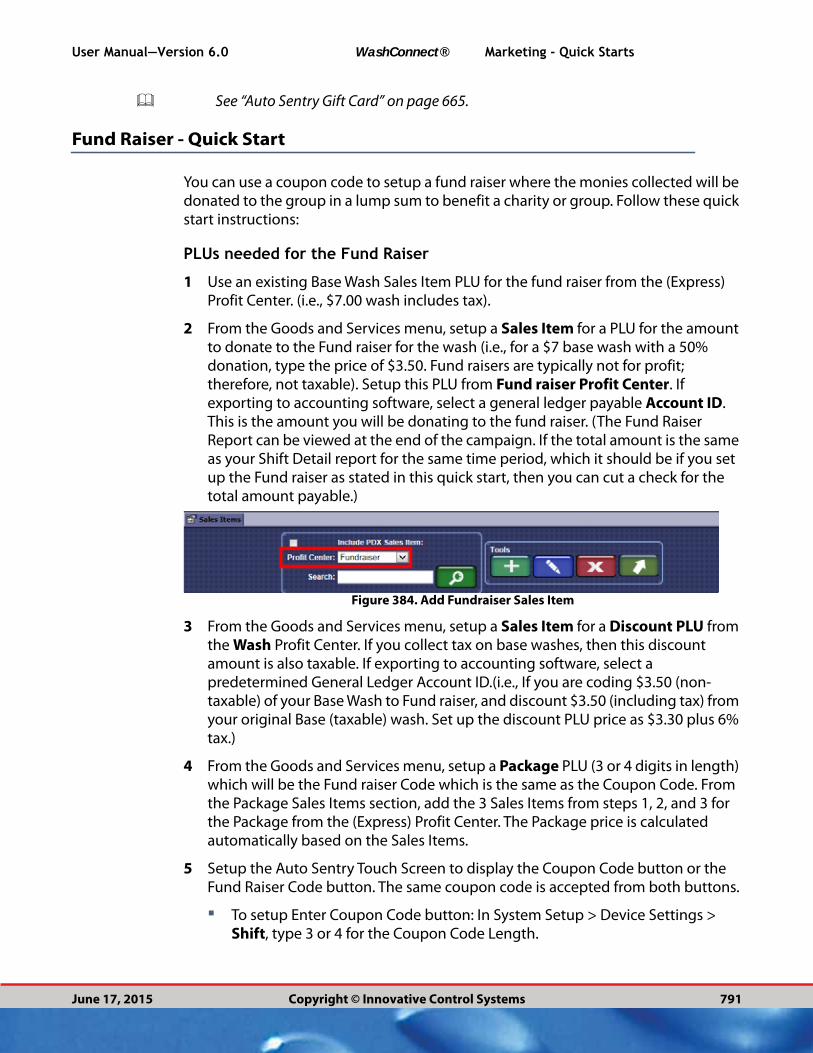
User Manual—Version 6.0 WashConnect® Marketing - Quick Starts
June 17, 2015 Copyright © Innovative Control Systems 791
See “Auto Sentry Gift Card” on page 665.
Fund Raiser - Quick Start
You can use a coupon code to setup a fund raiser where the monies collected will be donated to the group in a lump sum to benefit a charity or group. Follow these quick start instructions:
PLUs needed for the Fund Raiser
1 Use an existing Base Wash Sales Item PLU for the fund raiser from the (Express) Profit Center. (i.e., $7.00 wash includes tax).
2 From the Goods and Services menu, setup a Sales Item for a PLU for the amount to donate to the Fund raiser for the wash (i.e., for a $7 base wash with a 50% donation, type the price of $3.50. Fund raisers are typically not for profit; therefore, not taxable). Setup this PLU from Fund raiser Profit Center. If exporting to accounting software, select a general ledger payable Account ID. This is the amount you will be donating to the fund raiser. (The Fund Raiser Report can be viewed at the end of the campaign. If the total amount is the same as your Shift Detail report for the same time period, which it should be if you set up the Fund raiser as stated in this quick start, then you can cut a check for the total amount payable.)
Figure 384. Add Fundraiser Sales Item
3 From the Goods and Services menu, setup a Sales Item for a Discount PLU from the Wash Profit Center. If you collect tax on base washes, then this discount amount is also taxable. If exporting to accounting software, select a predetermined General Ledger Account ID.(i.e., If you are coding $3.50 (non-taxable) of your Base Wash to Fund raiser, and discount $3.50 (including tax) from your original Base (taxable) wash. Set up the discount PLU price as $3.30 plus 6% tax.)
4 From the Goods and Services menu, setup a Package PLU (3 or 4 digits in length) which will be the Fund raiser Code which is the same as the Coupon Code. From the Package Sales Items section, add the 3 Sales Items from steps 1, 2, and 3 for the Package from the (Express) Profit Center. The Package price is calculated automatically based on the Sales Items.
5 Setup the Auto Sentry Touch Screen to display the Coupon Code button or the Fund Raiser Code button. The same coupon code is accepted from both buttons.
▪ To setup Enter Coupon Code button: In System Setup > Device Settings > Shift, type 3 or 4 for the Coupon Code Length.

Marketing - Quick Starts WashConnect® User Manual—Version 6.0
792 Copyright © Innovative Control Systems June 17, 2015
▪ To setup Enter Fund Raiser Code button: In System Setup > Device > Settings > Main Options, select True to allow Fund raiser.
NOTE: Only five main option buttons can appear on your Touch Screen. If you
already have five buttons, you will have to determine which buttons are most important.
6 Setup a Profile for the Fund raiser Coupon Code(s):
▪ Add base Package PLU(s).
▪ Add any extra services PLU(s).
▪ Add any PLUs that you can set up for additional donation amounts (when setting up Sales Item PLU, in Type, select Extra).
▪ Schedule the valid time and dates
▪ In Applies To, select Coupon.
After all this has been set up and the schedule is valid, the Auto Sentry touch screen will have an Enter Coupon button and/or Fund raiser Code button on the main options screen.
See “Main Options Screen on Auto Sentry Touch Screen” on page 793.
User Manual—Version 6.0 WashConnect® Marketing - Quick Starts
June 17, 2015 Copyright © Innovative Control Systems 793
Figure 385. Main Options Screen on Auto Sentry Touch Screen
Sell a discounted Gift Card at Touch POS - Quick Start
You can set up your Touch POS to sell Gift Cards at a discounted price. Customer can select the desired amount of the gift card, and the Touch POS can automatically dis-count it for X percentage.
1 From the Configuration > Goods and Services > Sales Items.
2 In Profit Center, select Gift Card.
3 Click Add.
4 Add PLU number and Name
5 In Type, select Discount.
6 Click to select Discount, and then in the Price % (percentage) box, type a number for the percentage discount.
7 Click to mark the Department check box to enable multiple price option.
8 In Account ID, select an account number.
If setting up selling Gift Card at Auto Sentry, See “Auto Sentry Gift Card” on page 665.
Sales Commission - Quick Start
Set up Sales Commissions for employees. Follow these steps from beginning to end in setting up Sales Commission to reviewing the sales commissions.
1 Designate a Commission Schedule from Configuration > Commissions > Schedules.
2 Create Eligibility Rules from Configuration > Commissions > Positions.
3 Assign Commission Position from Manage > User > Wages.
4 User Must Clock In.
5 User must sign in as Greeter.
6 Greeter must sell commissioned items.
7 Review Sales Commission Report from Financial > Audit Controls.
See “About Commissions” on page 513.
See “About Sales Commission” on page 263.
Marketing - Quick Starts WashConnect® User Manual—Version 6.0
794 Copyright © Innovative Control Systems June 17, 2015
Fundraiser - If tracking Individual Volunteer Sales - Quick Start
This is an option for running a fund raiser that requires the individual tracking of funds. For instance, a marching band offers the members to operate a fund raiser but track how much money each individual sells. The volunteers individually receive the portion of their individual sales, you can set up the fund raiser as follows:
1 Setup or use the existing Base Wash Sales Item PLU for the fund raiser. (i.e., $6.60 always taxable for a $7 wash)
2 From Sales Items, set up a PLU as a discount for the base wash. Use the negative amount (base wash less tax). i.e., -$3.30 if you are donating half of the $7.00 wash including 6% tax. If exporting to accounting software, select a general ledger payable Account ID.
3 Setup up a Fundraiser Discount PLU in WashConnect®. i.e., $3.30 if you donate half the $7.00 including tax. This amount is the proceeds for the Fund raiser. If exporting to accounting software, select a predetermined General Ledger Account ID
4 Set up a package from the fund raiser Profit Center for the wash you are selling in the fund raiser. The package includes the base PLU, the base wash discount PLU, and the fund raiser PLU. Make certain the price calculated is your actual retained earnings on wash.
5 Set up a Fleet fund raiser account so that you can generate tickets and have some time to create the wash code cards for the fund raiser, and customer can return at a later date to purchase these marketing wash code cards.
6 Paid Ticket Generation at POS Site Level, generate 5-digit wash codes. Set up a Fleet Account for this fund raiser, so the codes can be paid for after the marketing pieces are printed. These codes can be entered by customers at Auto Sentry or POS to redeem their pre-paid fund raiser wash.
7 Random and unique wash codes can be printed on card stock. Protect these numbers from theft by placing scratch off stickers on top of the numbers.
NOTE: Call Technical Support if you would like ICS Marketing to print 5-digit wash
codes (barcodes - barcode reader is required) printed on labels or card stock (additional fees apply).
8 Fund raiser Leader can come in to car wash and purchase the wash code cards at the Touch POS. Leader will need to pay $2.66 per wash code for this example. Leader brings Tax Exempt form to keep on file at car wash. In Touch POS, select ROA, search for the Fleet fund raiser account, and enter amount to pay for wash codes and Finalize sale.

User Manual—Version 6.0 WashConnect® Marketing - Quick Starts
June 17, 2015 Copyright © Innovative Control Systems 795
FAQs
Frequently asked questions that you can resolve without having to call technical support.
Stack Controller does not auto delete cars in hand service queue at midnight for a 24 hour wash.
▪ Enable wash open 24 hours in global settings:In WashOpen24Hours, set to True.
Figure 34, “Global Global,” on page 686

Marketing - Quick Starts WashConnect® User Manual—Version 6.0
796 Copyright © Innovative Control Systems June 17, 2015

User Manual—Version 6.0 WashConnect®
797
INDEX
AAbout Fleet Invoice, 162About the Voids Report, 239Acceptor edits
shift detail report, 199Account ID
club services, 386sales item, 415
Accountsshift detail report, 197
Add value promoauto sentry gift card, 667, 790
Addressdeclined payment report, 135vehicle history report, 124
Adds (+)shift detail report, 198
Admin RFID cardauto sentry control, 663
Alertsabout, 492configuring, 500
American expressauto sentry credit card, 665
Amountdeclined payment report, 135vehicle history report, 125
Amount tenderedfleet activity report, 220
Auto billing, 683Auto bump
auto sentry shift, 679Auto sentry coin acceptor, 679Auto sentry credit card, 679Auto sentry DeviceIntDebug, 683Auto sentry ETL heartbeat, 683Auto sentry gift card, 679Auto sentry logging, 670Auto sentry main options, 683Auto sentry receipt, 683Auto sentry receipt footer, 670Auto sentry receipt header, 679Auto sentry RFID, 683Auto sentry service font color, 683Auto sentry shift, 683Auto sentry touch debug, 679Auto sentry vandalism deterrent, 679Auto sentry WBC connection, 683Average monthly usage
sales item, 416

WashConnect® User Manual—Version 6.0
798
Average wash per vehicleprofitability report, 115
Avg. days between visitsclub usage report, 120vehicle history report, 124
Avg. visits/month/vehicleclub usage report, 120
BBackup destination
TNC backup, 657Backup enabled
TNC backup, 657Backup password
TNC backup, 657Backup username
TNC backup, 657Bar code
sales item, 415Bar code receipt
auto sentry receipt, 677Bar code ticket
auto sentry receipt, 677Base wash
adding, 435Beginning bank
shift detail report, 198Billing day
club dialog box, 387BMP color
club services, 387sales item, 416
BMP fileclub services, 387sales item, 416
CCage location
safe credit options, 665CAPS host
auto sentry credit card, 665CAPS port
auto sentry credit card, 665Card path
auto sentry credit card, 665Card#
credit card report, 204, 212Cars
text messaging dialog box, 320Cash advances
shift detail report, 199Category
sales item, 415Change error msg1
User Manual—Version 6.0 WashConnect®
799
auto sentry receipt, 677Change error msg2
auto sentry receipt, 677Charged
fleet activity report, 220Check #
checks report, 216Check amount
checks report, 216Checks
shift detail report, 198Checks report
viewing, 217Clerk
auto sentry gift card, 667Close on exit
auto sentry shift, 679Club (customer and vehicle)
club summary report, 128Club reports
club summary, 125club usage, 115declined payment, 129revenue distribution, 136vehicle history, 121
Club revenueclub usage report, 120profitability report, 114
Club rulesexamples, 388
Club servicesabout, 375adding, 388editing, 382filtering, 385terminating, 383
Club summary reportabout, 125viewing, 129
Club types, 388Club usage report
about, 115viewing, 116, 122
Clubsabout, 60adding, 492editing, 492menu, 388
Component typealert configuration, 501
Configurationclub, 388club services, 375
Configuration menu, 371, 783

WashConnect® User Manual—Version 6.0
800
Configure menu, 109, 147Contact
declined payment report, 135vehicle history report, 124
Conveyor holdauto sentry control, 663
Coupon lengthauto sentry shift, 679
Credit carddeclined payment report, 135shift detail report, 197
Credit cards reportabout, 202viewing, 209
Credit receipt countauto sentry receipt, 677
DDate
checks report, 216credit card report, 204, 212fleet activity report, 220
Date declineddeclined payment report, 135
Debit cardshift detail report, 197
Declinedclub summary report, 128
Declined payment reportabout, 129editing a customer, 133notes, 131printing, 133search, 134viewing, 135
Deposits reportabout, 221
Descriptionclub services, 386, 387sales item, 415
Deterrent alarm outputauto sentryvandalism deterrent, 682
Deterrent alarm time outauto sentry vandalism deterrent, 682
Deterrent disarm alarm time outauto sentry vandalism deterrent, 682
Deterrent enabledauto sentry vandalism deterrent, 682
Deterrent on change low highauto sentry vandalism deterrent, 682
Device IDauto sentry RFID, 681
Discoverauto sentry credit card, 665
User Manual—Version 6.0 WashConnect®
801
Dispenser editsshift detail report, 198
Display namesales item, 414
Durationclub dialog box, 387
EEdited transactions
shift detail report, 199Ending Bank
shift detail report, 199Enhanced log
auto sentry touch debug, 679Even
shift detail report, 199Extra service
adding, 435Extra service amount
sales item, 416
FFinancial reports
brief descriptions, 176First name
declined payment report, 135vehicle history report, 124
Fleet activity reportabout, 217viewing, 221
Font colorauto sentry control, 663
Fore colorclub services, 387sales item, 416
Free wash reportabout, 224viewing, 228
Fuel salesshift detail report, 197
GGate
auto sentry control, 663Gift free
shift detail report, 197Gift redeemed
shift detail report, 197Gift sold
shift detail report, 197Grace period
club dialog box, 388Gross time out
auto sentry control, 663

WashConnect® User Manual—Version 6.0
802
IInstallation
options, 40Item price
fleet activity report, 220
LLanguage
about, 414editing, sales items, 375
Last namedeclined payment report, 135vehicle history report, 124
Licensedeclined payment report, 135fleet activity report, 220vehicle history report, 124
License plateclub usage report, 120
Logging in, 71corporate server, 72default users, 59
MMan hours
text messaging dialog box, 320Max increase
auto sentry gift card, 667Max transaction amount
auto sentry shift, 679Menu bar
illustrated, 44Menu tab, 55Merchant ID
auto sentry credit card, 665MerchantID
auto sentry gift card, 667Message types
alert configuration, 501Min increase
auto sentry gift card, 667Most visited vehicle
club usage report, 120Multiple languages
auto sentry control, 663Multi-site, 41
NName
club services, 386, 387club usage report, 120revenue distribution report, 138, 143, 145sales item, 415
User Manual—Version 6.0 WashConnect®
803
Newclub summary report, 128
No extra buy time outauto sentry control, 663
No sale countshift detail report, 199
Non taxable salesshift detail report, 197
OOpen price
sales item, 415Other details
sales item, 416Over
shift detail report, 199
PPassword
changing for a user, 549Path
auto sentry gift card, 667Payouts
shift detail report, 198Payouts report
about, 232viewing, 235
Performance menu, 305, 735, 753, 767, 783Performance reports
brief descriptions, 307PLU
club services, 386sales item, 414
Posted datevehicle history report, 125
Pricechecks report, 216club services, 386credit card report, 204, 212revenue distribution report, 138, 141, 143, 145sales item, 415
Primary culture infosafe language, 658, 673
Processorauto sentry credit card, 665auto sentry gift card, 667
Profileabout, 417adding, 435editing, 440
Profit centerclub services, 386sales item, 414
Profit centers, 721
WashConnect® User Manual—Version 6.0
804
Profitabilityabout, 112
QQty redeemed
revenue distribution report, 138Qty.
revenue distribution report, 138, 141, 143
RReason
declined payment report, 135Rec’d on account
shift detail report, 197Receipt count
auto sentry receipt, 677Receipt footer 0 to 5
auto sentry receipt footer, 678, 701, 702Receipt header 0 to 5
auto sentry receipt header, 679Received on account report
about, 235viewing, 239
Recipient emailalert configuration, 501
Recurring IDdeclined payment report, 135vehicle history report, 124
Refund dueshift detail report, 198
Register reportscredit cards report, 202deposits report, 221fleet activity report, 217free wash report, 224payouts report, 232received on account report, 235rewash report, 228shift report, 186
Removes (-)shift detail report, 198
Rename devices, 710Renewed
club summary report, 128Replication, 58Report date range, 77Reports
about, 61exporting, 67printing, 66searching, 69zooming, 68
Restart delayauto sentry control, 664
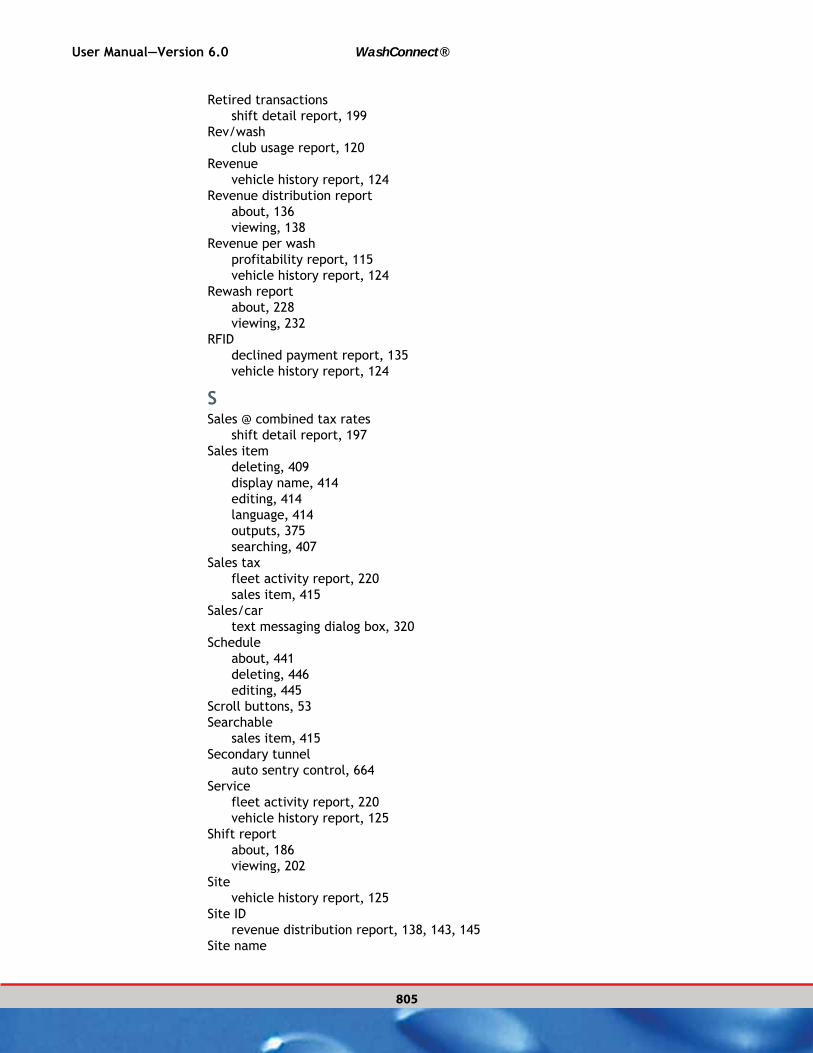
User Manual—Version 6.0 WashConnect®
805
Retired transactionsshift detail report, 199
Rev/washclub usage report, 120
Revenuevehicle history report, 124
Revenue distribution reportabout, 136viewing, 138
Revenue per washprofitability report, 115vehicle history report, 124
Rewash reportabout, 228viewing, 232
RFIDdeclined payment report, 135vehicle history report, 124
SSales @ combined tax rates
shift detail report, 197Sales item
deleting, 409display name, 414editing, 414language, 414outputs, 375searching, 407
Sales taxfleet activity report, 220sales item, 415
Sales/cartext messaging dialog box, 320
Scheduleabout, 441deleting, 446editing, 445
Scroll buttons, 53Searchable
sales item, 415Secondary tunnel
auto sentry control, 664Service
fleet activity report, 220vehicle history report, 125
Shift reportabout, 186viewing, 202
Sitevehicle history report, 125
Site IDrevenue distribution report, 138, 143, 145
Site name
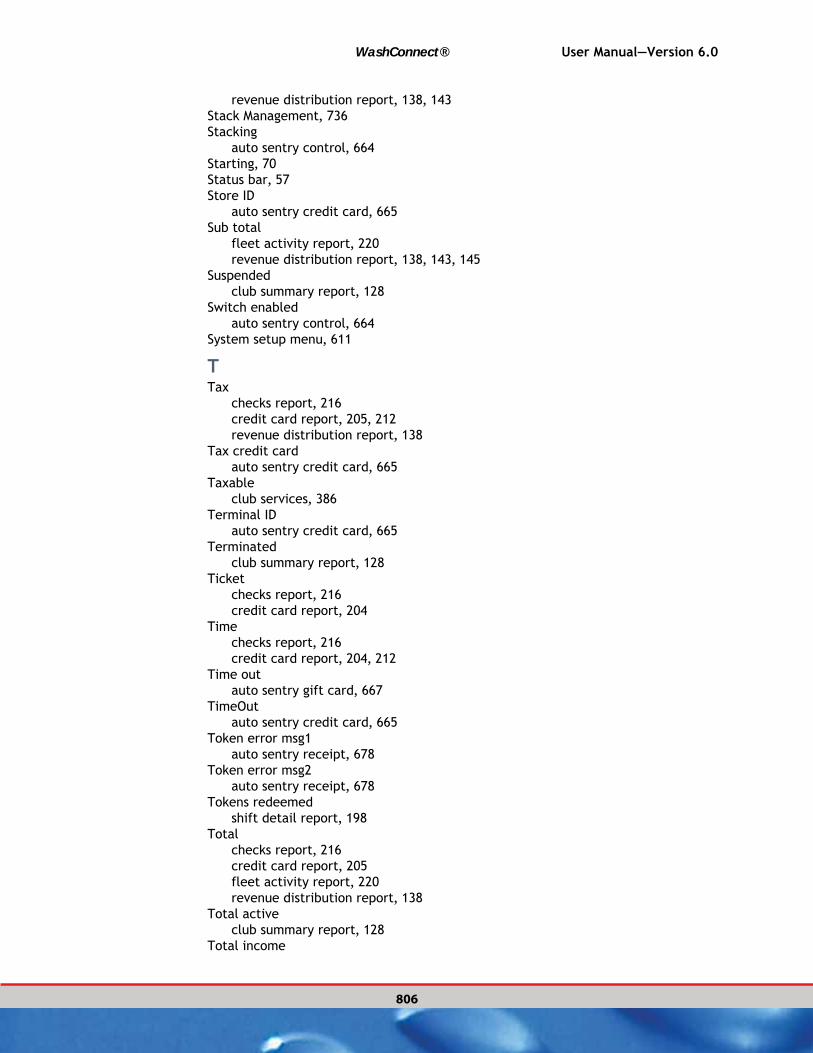
WashConnect® User Manual—Version 6.0
806
revenue distribution report, 138, 143Stack Management, 736Stacking
auto sentry control, 664Starting, 70Status bar, 57Store ID
auto sentry credit card, 665Sub total
fleet activity report, 220revenue distribution report, 138, 143, 145
Suspendedclub summary report, 128
Switch enabledauto sentry control, 664
System setup menu, 611
TTax
checks report, 216credit card report, 205, 212revenue distribution report, 138
Tax credit cardauto sentry credit card, 665
Taxableclub services, 386
Terminal IDauto sentry credit card, 665
Terminatedclub summary report, 128
Ticketchecks report, 216credit card report, 204
Timechecks report, 216credit card report, 204, 212
Time outauto sentry gift card, 667
TimeOutauto sentry credit card, 665
Token error msg1auto sentry receipt, 678
Token error msg2auto sentry receipt, 678
Tokens redeemedshift detail report, 198
Totalchecks report, 216credit card report, 205fleet activity report, 220revenue distribution report, 138
Total activeclub summary report, 128
Total income

User Manual—Version 6.0 WashConnect®
807
shift detail report, 197Total non-cash
shift detail report, 198Total rev/wash
club usage report, 120Total revenue
club usage report, 120profitability report, 114vehicle history report, 124
Total revenue per washprofitability report, 115vehicle history report, 124
Total salesshift detail report, 197
Total washprofitability report, 114vehicle history report, 124
Trans IDfleet activity report, 220
Transactionchecks report, 216credit card report, 204, 212declined payment report, 135
Transaction IDvehicle history report, 125
Transactiveauto sentry credit card, 665
UUnder
shift detail report, 199Upgrade qty
club usage report, 120vehicle history report, 124
Upgrade quantityprofitability report, 115
Upgrade rev/washclub usage report, 120
Upgrade revenueclub usage report, 120profitability report, 114vehicle history report, 124
Upgrade revenue %club usage report, 120
Upgrade revenue per washprofitability report, 115vehicle history report, 124
Upgrade revenue percentprofitability report, 115
Upgrade revenue percentagevehicle history report, 124
Upgrade vehicle percentprofitability report, 115
Upgrade vehicle percentage
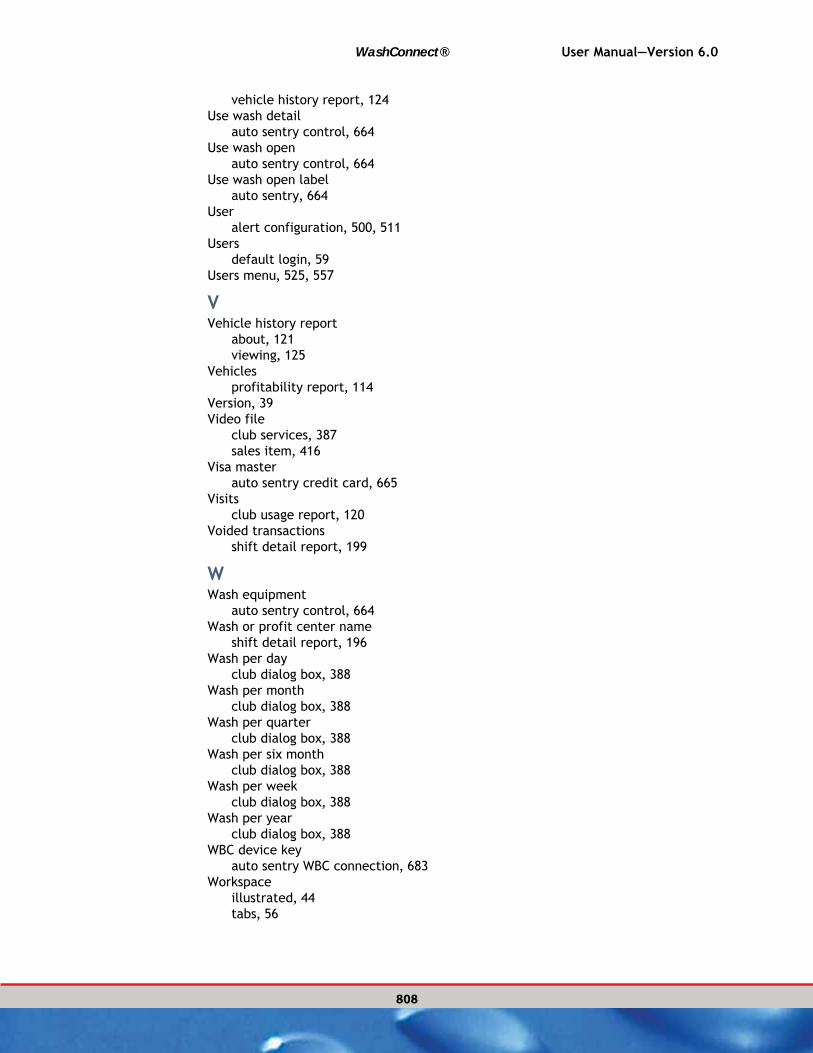
WashConnect® User Manual—Version 6.0
808
vehicle history report, 124Use wash detail
auto sentry control, 664Use wash open
auto sentry control, 664Use wash open label
auto sentry, 664User
alert configuration, 500, 511Users
default login, 59Users menu, 525, 557
VVehicle history report
about, 121viewing, 125
Vehiclesprofitability report, 114
Version, 39Video file
club services, 387sales item, 416
Visa masterauto sentry credit card, 665
Visitsclub usage report, 120
Voided transactionsshift detail report, 199
WWash equipment
auto sentry control, 664Wash or profit center name
shift detail report, 196Wash per day
club dialog box, 388Wash per month
club dialog box, 388Wash per quarter
club dialog box, 388Wash per six month
club dialog box, 388Wash per week
club dialog box, 388Wash per year
club dialog box, 388WBC device key
auto sentry WBC connection, 683Workspace
illustrated, 44tabs, 56
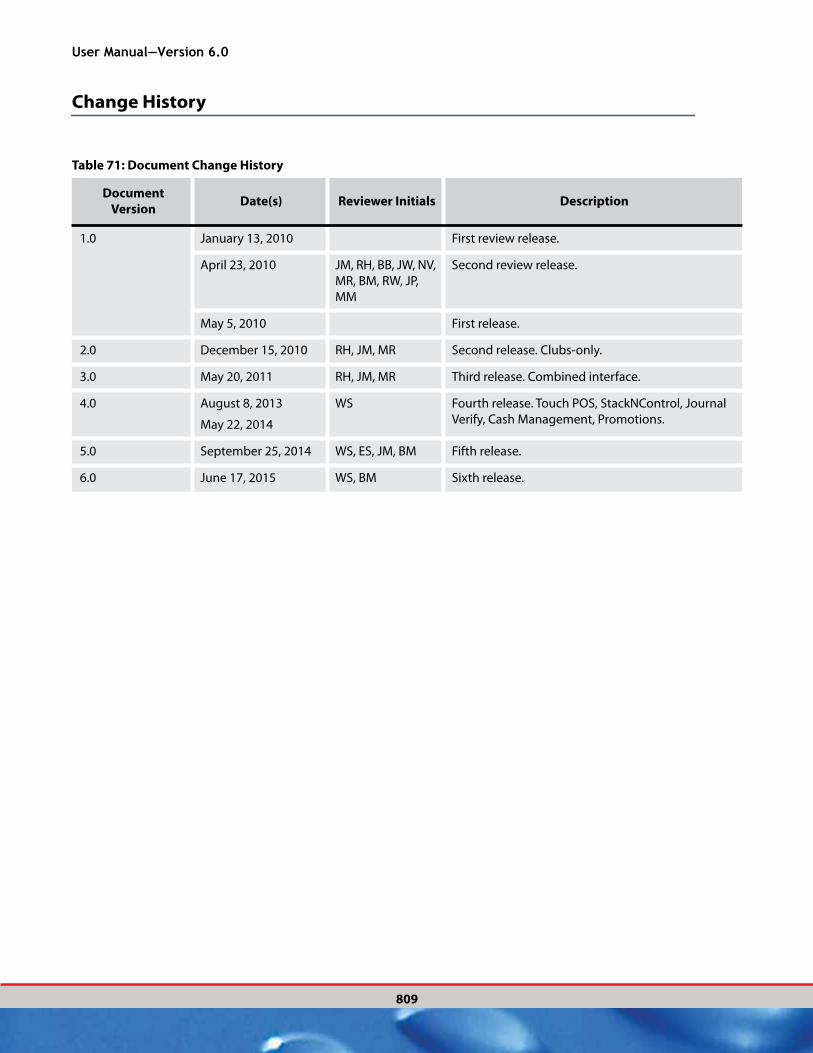
User Manual—Version 6.0
809
Change History
Table 71: Document Change History
Document
VersionDate(s) Reviewer Initials Description
1.0 January 13, 2010 First review release.
April 23, 2010 JM, RH, BB, JW, NV,
MR, BM, RW, JP,
MM
Second review release.
May 5, 2010 First release.
2.0 December 15, 2010 RH, JM, MR Second release. Clubs-only.
3.0 May 20, 2011 RH, JM, MR Third release. Combined interface.
4.0 August 8, 2013
May 22, 2014
WS Fourth release. Touch POS, StackNControl, Journal
Verify, Cash Management, Promotions.
5.0 September 25, 2014 WS, ES, JM, BM Fifth release.
6.0 June 17, 2015 WS, BM Sixth release.

User Manual—Version 6.0
810
WashConnect, Auto Sentry, Touch ‘N Clean, Lube Master and Tunnel Master are registered trademarks of Innovative Control Systems, Inc.
American Express is a registered trademark of American Express Company.Discover is a registered trademark of Discover Financial Services Corporation.Intuit Quickbooks is a registered trademark of Intuit, Inc.Mastercard is a registered trademark of MasterCard International Incorporated.Sage Peachtree and MAS 90 is a registered trademark of The Sage Group plc.SQL Server is a registered trademark of Microsoft Corporation.TransFirst is a registered trademark of TransFirst LLC.Visa is a registered trademark of Visa International Service Association.Windows and Explorer are registered trademarks of Microsoft Corporation.
All other company or product names are referenced for identification and may be trademarks of their respective owners.
No part of this document may be reproduced in any form or by any means, including but not exclusive to electronic, mechanical, photocopying, etc., without the prior written permission of Innovative Control Systems.This document and the information contained within subject to change without notice.
UM 012108 WashConnect® User Manual Version 6.0 June 17, 2015
Innovative Control Systems, Inc.
®
1349 Jacobsburg RoadWind Gap, PA 18091http://www.icscarwashsystems.com/610-881-8000610-881-8100 - [email protected]