Untitled - IS MUNI
353
-
Upload
khangminh22 -
Category
Documents
-
view
5 -
download
0
Transcript of Untitled - IS MUNI


Printed in the United States of America
1 2 3 4 5 6 7 12 11 10
© 2011 Course Technology, a part of Cengage Learning.
ALL RIGHTS RESERVED. No part of this work covered by the copyright
herein may be reproduced, transmitted, stored, or used in any form or by
any means graphic, electronic, or mechanical, including but not limited to
photocopying, recording, scanning, digitizing, taping, Web distribution,
information networks, or information storage and retrieval systems, except
as permitted under Section 107 or 108 of the 1976 United States Copyright
Act, without the prior written permission of the publisher.
All trademarks are the property of their respective owners.
Cover image from Coraline courtesy of and © Focus Features/The Kobal
Collection. Additional cover images courtesy of and © Lucas Wareing,
Ron Cole, and Justin and Shel Rasch.
Back cover images © Brett Foxwell, Ryan McCulloch, and Ken Priebe.
Author photo by Jeff Bell.
All images © Cengage Learning unless otherwise noted.
Library of Congress Control Number: 2010922093
ISBN-13: 978-1-4354-5613-6
ISBN-10: 1-4354-5613-0
Course Technology, a part of Cengage Learning
20 Channel Center Street
Boston, MA 02210
USA
Cengage Learning is a leading provider of customized learning solutions
with office locations around the globe, including Singapore, the United
Kingdom, Australia, Mexico, Brazil, and Japan. Locate your local office at:
international.cengage.com/region.
Cengage Learning products are represented in Canada by
Nelson Education, Ltd.
For your lifelong learning solutions, visit courseptr.com.
Visit our corporate Web site at cengage.com.
The Advanced Art of
Stop-Motion Animation
Ken A. Priebe
Publisher and General Manager,
Course Technology PTR:
Stacy L. Hiquet
Associate Director of Marketing:
Sarah Panella
Manager of Editorial Services:
Heather Talbot
Marketing Manager:
Jordan Castellani
Acquisitions Editor: Heather Hurley
Project Editor: Dan Foster,
Scribe Tribe
Technical Reviewer:
Lionel I. Orozco
Copy Editor: Chris Small
Interior Layout Tech:
Judy Littlefield
Cover Designer: Mike Tanamachi
CD-ROM Producer:
Brandon Penticuff
Indexer: Sharon Shock
Proofreader: Gene Redding
For product information and technology assistance, contact us at
Cengage Learning Customer & Sales Support, 1-800-354-9706.
For permission to use material from this text or product, submit all
requests online at cengage.com/permissions.
Further permissions questions can be e-mailed to
eISBN-10: 1-4354-5704-8

This book is dedicated, with much love,
to my amazing wife Janet and my children Ariel and Xander.
The adventure continues…
The Advanced Art of Stop-Motion Animationiv
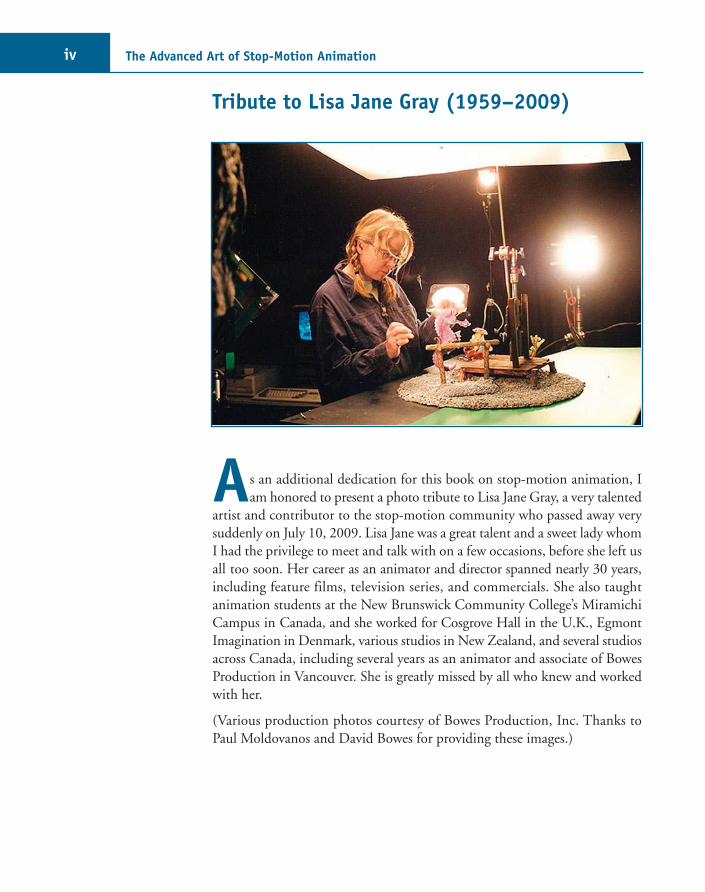
Tribute to Lisa Jane Gray (1959–2009)
As an additional dedication for this book on stop-motion animation, Iam honored to present a photo tribute to Lisa Jane Gray, a very talented
artist and contributor to the stop-motion community who passed away verysuddenly on July 10, 2009. Lisa Jane was a great talent and a sweet lady whomI had the privilege to meet and talk with on a few occasions, before she left usall too soon. Her career as an animator and director spanned nearly 30 years,including feature films, television series, and commercials. She also taught animation students at the New Brunswick Community College’s MiramichiCampus in Canada, and she worked for Cosgrove Hall in the U.K., EgmontImagination in Denmark, various studios in New Zealand, and several studiosacross Canada, including several years as an animator and associate of BowesProduction in Vancouver. She is greatly missed by all who knew and workedwith her.
(Various production photos courtesy of Bowes Production, Inc. Thanks toPaul Moldovanos and David Bowes for providing these images.)

Tribute to Lisa Jane Gray (1959–2009) v

This page intentionally left blank

Foreword ................................................................................ix
Acknowledgments.................................................................xiii
Introduction ........................................................................xvii
Chapter 1 History of Stop-Motion Feature Films.................1
Chapter 2 An Interview with Screen Novelties..................61
Chapter 3 Building Puppets............................................75Plug-In Wire and Sockets ......................................................77
Hands and Feet .....................................................................88
Puppet Anatomy....................................................................96
Silicone................................................................................106
Casting a Silicone Puppet................................................108
Making a Silicone Mold..................................................114
Plastic Casting .....................................................................121
Face Armatures ....................................................................124
Replacement Faces and Rapid Prototyping ..........................138
Replacement Animation Puppets.........................................145
Chapter 4 Digital Cinematography.................................151Digital Camera Basics..........................................................157
ISO.................................................................................159
Aperture and Shutter Speed ............................................159
Depth of Field ................................................................160
White Balance.................................................................163
Camera Effects ...................................................................165
Rack Focus......................................................................165
Blurring Effects ...............................................................168
Camera Moves ................................................................171
Stereoscopic Photography ...............................................179
Chapter 5 An Interview with Pete Kozachik, ASC ............187
Table of Contents
vii

The Advanced Art of Stop-Motion Animationviii
Chapter 6 An Interview with Trey Thomas ......................195
Chapter 7 Character Animation .....................................204Animation Technique ..........................................................204
Timing............................................................................205
Arcs.................................................................................208
Overlapping Action.........................................................211
Anticipation....................................................................215
Performance ........................................................................216
Two-Character Dialogue .................................................218
Lip Sync..........................................................................224
Chapter 8 An Interview with Bronwen Kyffin .................229
Chapter 9 Visual Effects...............................................237Film Compositing ...............................................................238
Digital Compositing............................................................244
Split-Screen and Masks ...................................................244
Blue/Green Screen ..........................................................249
Front Light/Back Light ...................................................255
Advanced Compositing for Ava.......................................258
Effects .............................................................................263
Rig and Shadow Removal ....................................................266
Motion Blur ........................................................................269
Eye Compositing Effects for Madame Tutli-Putli .................272
Chapter 10 An Interview with Larry Bafia and Webster Colcord ...........................................277
Chapter 11 An Interview with Marc Spess ........................289
Chapter 12 An Interview with Ryan McCulloch .................297
Chapter 13 An Interview with Justin and Shel Rasch ........305
Bibliography and Further Reading.....................................319Books, Articles, and Publications on Stop-Motion Animation ......................................................319
Other Useful Books about Animation and Puppetry............320
Online Resources Cited for the History of Stop-Motion Animation ......................................................322
Index ......................................................................323

By Henry Selick, director of Coraline, The Nightmare Before Christmas,James and the Giant Peach, and Slow Bob in the Lower Dimensions
There are many ways to make movies a frame at a time: drawing them byhand like Walt Disney’s Pinocchio and Hayao Miyazaki’s Spirited Away,computer graphics like Pixar’s Toy Story and The Incredibles, 2D cut-outs
like the cult feature Twice Upon a Time, animating sand or paint on glass,scratching film emulsion, moving pins on a screen, slicing wax and clay, andno doubt other techniques I’ve never witnessed. But I happen to love stop-motion best.
So much of animation’s history has been about the pursuit of making thingsmove smoothly, to hide the artist’s hand. When CG animation hit the bigtime, first as special effects and then with the Pixar features, it delivered onthis goal in spades. The animation was perfectly smooth, without a single,unintended bump or jerk. It was sexy and shiny, and audiences ate it up . . .and they still are.
CG can do anything, but it can’t do easily what is inherent in stop-motion:give proof of the artist’s hand through the inescapable mistakes made and com-municate to the audience that what they are watching really, truly exists. Itwas this part that grabbed and haunted me when I first saw Ray Harryhausen’swork at age 5—I knew his Cyclops actually existed!
Why does even crude stop-motion animation have an effect on us? Ken Priebe,the author of this great book, and I share a similar theory: stop-motion connectsus to the time when our toys came to life through the power of our imaginations.
My Journey
I didn’t plan on becoming a stop-motion director; it just happened. I was goingto art school when I was first bitten. I’d made a life-sized figure for a sculptingclass and couldn’t decide on just one pose. It had simple joints, so I started to
Foreword
ix

The Advanced Art of Stop-Motion Animationx
change the pose, looking for something better. In photography class, I beganto shoot little series of pictures, changing things in the frame. I desperatelyneeded my artwork to move. So, I made the journey west to study animationat CalArts, where I saw a Jan Svankmajer short called Jabberwocky. It was alife-changer for me, with powerful images inspired by Lewis Carroll and stop-motion that grabbed hold of you.
While working at Disney, I made a short film called Seepage, which featuredboth hand-drawn animation and stop-motion figures sitting around a realswimming pool. I was hooked and left Disney to work on a cut-out feature,the next-best thing to stop-mo. Having made several short films on my own,they made me a sequence director, and I storyboarded several sequences andpitched in doing some animation.
As my life-without-a-plan unfolded, I did feature storyboard drawings anddesigns for the claymation sequences on Walter Murch’s feature Return to Oz.I next did more storyboard work for director Carol Ballard, who had me shootsome second-unit miniatures where I realized I barely knew anything aboutlighting real stuff. More lessons learned.
I eventually got going with a bunch of stop-motion MTV spots I wrote anddirected, which I’m still proud of to this day. I built stuff, lit and shot some,and animated a few, but it was here that I started to put together a small crew—people who were better than I was at a given task. I hired better animators thanme, like Eric Leighton, Anthony Scott, and Tim Hittle from the revived Gumbyseries. And when I landed nine Pillsbury Doughboy commercials, the teamgrew again. I got the go-ahead for my animated pilot, Slow Bob in the LowerDimensions, hired Pete Kozachik to light and shoot it, and the team grew oncemore. And when Tim Burton, an old friend from my Disney days, called to askif I wanted to direct The Nightmare Before Christmas, we were all ready to stepup and make that movie.
We worked for three and a half years on Nightmare in some old warehouse spacein San Francisco, and when the film was released in 1993, my extraordinaryteam of artists and I felt we’d done Tim’s tale proud. That same year, though,CG beat out Phil Tippett’s stop-mo dinosaurs for Jurassic Park. And in 1995,a year before our second film, James and the Giant Peach, came out, Toy Storywas released, and stop-motion features were over. Except, they weren’t.

Foreword xi
Your Journey and This Book
Here it is, 2010, and stop-motion, the most ancient and magical form of animation, is more popular than it’s ever been. There are TV series like RobotChicken, three or four feature films are going into production at once, morestudents at art and film schools are taking up stop-motion, and, from theamount of new stop-motion bits on YouTube, more kids of all ages arewrestling toys, clay, dolls, and puppets to life than at any time in history. Andthere are now multiple books on stop-motion where none existed before,including the one in your hands. Ken Priebe’s The Advanced Art of Stop-MotionAnimation is the best book on the subject available. Ken has incredible knowledge of stop-motion history (I thought George Pal invented replace-ment animation, and I was certain Mad Monster Party was the first U.S. stop-motion feature . . . Ken knows better). He shares great how-to info for all thesteps and many of the choices in making your own stop-motion film, frommaking puppets to rack-focusing your camera lens to types of lip sync. Heincludes wonderful interviews (including one each with my friends and comrades-in-arms, Pete Kozachik and Trey Thomas, who both worked withme on all my features). He covers stop-motion education, stop-motion blogs,and festivals. Ken seems to cover it all, and he covers it well. I’m both hurt anda little angry that Ken didn’t have the decency to have been born 20 years earlier so that we could have copies of his book when we first started TheNightmare Before Christmas.
I stand on the shoulders of Willis O’Brien, Ray Harryhausen, George Pal, andJan Svankmajer, and I owe my name in stop-motion to my brilliant crew members like Anthony Scott, Eric Leighton, Paul Berry, Trey Thomas, PeteKozachik, and Joe Ranft. Let The Advanced Art of Stop-Motion Animation beyour leg up, and good luck with the great films you’re going to make.
Henry Selick, April 2010

This page intentionally left blank

Once again, going through another several months of late nights and caffeinated beverages working on another book, I could not possiblyhave conceived it without the generous help and support of so many
people, who deserve all the thanks in the world. First and foremost, thanks tomy Lord and God Jesus Christ for “animating” the whole process, sustainingme, and making all the connections to bring it together in one piece. Extra-special thanks to my amazing wife, Janet, for her assistance, patience, andencouragement, and to our little ones, Ariel and Xander, who rock my worldand keep making me smile. Special thanks to my extended family in the U.S.and Canada and my church family at Cedar Park for their encouragement,prayer, and support. Thanks also to the students and staff of VanArts andAcademy of Art University, to my friends from the Vancouver chapter of theAssociation for Computing Machinery’s Special Interest Group on Graphicsand Interactive Techniques (ACM SIGGRAPH), and to my friend SteveStanchfield for his continued support after initially getting me started andhooked on animation many years ago.
Extra thanks to my special interview subjects—Seamus Walsh, Mark Caballero,and Chris Finnegan at Screen Novelties, Pete Kozachik, Trey Thomas,Bronwen Kyffin, Larry Bafia, Webster Colcord, Marc Spess, Ryan McCulloch,and Justin and Shel Rasch—for the gift of their time and wisdom, and theimages they shared to complement their words. Also, a second helping ofthanks to Justin, Shel, and Bronwen for the extensive contributions they madein other parts of this book, in particular the sections on puppets and stereo-scopic photography. This book is that much richer with your contributions,and I definitely could not have written these sections without your generousassistance!
The first chapter on the history of stop-motion features alone has a huge listof people to thank for providing permission and access to images, research,and detailed information about the films: L.B. Martin-Starewitch, DanGoodsell, Jerry Beck, Rick Catizone, Michael Sporn, Rick Goldschmidt, Markand Seamus at Screen Novelties, Yoram Gross and Mimi Intal at Yoram Gross
Acknowledgments
xiii

The Advanced Art of Stop-Motion Animationxiv
Films, Mario Caprino at Caprino Studios, Will Vinton and Gillian Frances atFreewill Entertainment, Barry Purves, Jurgen Kling, Mike Belzer, DerekHayes, Naomi Jones, Christiane Cegavske, Brian Demoskoff, MarjolaineParot, Dean English, Marc Stephenson, Tatia Rosenthal, Jason Vanderhill,Adam Elliot and Samantha Fitzgerald at Adam Elliot Pictures, Adriana Piasek-Wanski at La Parti Productions, Carrie Filler and Chris Woolston atPremavision Studios, Mark Shapiro and Maggie Begley with Laika, HowardCohen at Animaking Studios, and Emily Harris, Heidi Leigh, and WhitneyMorris at the Animazing Gallery. Extra special thanks to Stephen Chiodo,Richard Kent Burton, and John Ellis for the extensive information and photoarchives from I Go Pogo, and to the extensive chain of e-mail connections thatunraveled the obscure history behind Bino Fabule, which began with JasonVanderhill and led me to the kind assistance of Tamu Townsend, Erik Goulet,Denis Roy, Andre A. Belanger, Louis-Philippe Rondeau, and Elaine Bigras atCinéGroupe. Thank you all for this unique documentation of stop-motionhistory!
For their contributions, assistance, advice, support, and sharing of images forchapters and sections on puppets, digital cinematography, visual effects, edu-cation, and animation festivals, I would also like to extend special thanks toMelanie Vachon, Don Carlson, Dave Hettmer, Ron Cole, Frida Ramirez, EmiGonzalez, Lucas Wareing, Chayse Irvin, Henrique Moser, Gary Welch, ShawnTilling, Brett Foxwell, Anthony Scott and K Ishibashi, Patrick Boivin, SteveStanchfield, Nick Hilligoss, Rich Johnson, Richard Svensson, Carlo Vogele,Gautam Modkar, Jason Walker, Pete and Sue Tait, Talon Toth at ProtodemonStudios, Roni Lubliner at Universal, Patricia Dillon and Sophie Quevillon atthe National Film Board of Canada, Chris Walsh at Sheridan College, StephenChiodo and Max Winston at CalArts, Beth Sousa and Matt Ellsworth atAcademy of Art University, Jurgen Kling of Weirdoughmationfilms, ElizabethSeavey at Bendle High School, Lee Skinner of Little Scholar Productions, PeterLord and Amy Wood at Aardman, Galen Fott of Bigfott Studios, Erik Gouletof the Montreal Stop-Motion Film Festival, and Jeff Bell, James Emler, andChrista LeCraw from the VanArts Digital Photography Department. Thankyou all!
And to all who contributed to the appendix on the stop-motion community,(on the companion CD), this book is a gift to all of you for the way youencourage and support all of us in pursuing this mysterious craft: Marc Spess,Mike Brent, Shelley Noble, Yasemin Sayibas Akyez, Ron Cole, Santino Vitale,Season Mustful, Jeffrey Roche, Sven Bonnichsen, Don Carlson, Jeremy Spake,

Acknowledgments xv
Jesse Broadkey, Chuck Duke, John Ikuma, Ethan Marak, John Hankins,Emily Baxter, Rich Johnson, Chris Walsh, Paul McConnochie, Ceri Watling,Ben Whitehouse, Guillaume Lenel, Richard Svensson, Adrian EncinasSalamanca, Julie Pitts, Miles Blow, and Nick Hilligoss.
If this was like a verbal acceptance speech, I’m sure the band leader would bestarting the music and rushing me off the stage by now, so last but not least,I have to say an extra-special thanks to Colin Gray, David Bowes, and PaulMoldovanos for helping me honor the memory of Lisa Jane Gray in this book,Anthony Scott for his kind assistance, Henry Selick for the gift of his amaz-ing foreword, the entire staff of Course Technology, editors Dan Foster andLionel I. Orozco, and especially Heather Hurley for initially asking me to writeanother book!
Thank you all…and to Ray Harryhausen, Happy 90th Birthday!
See you in the movies!

This page intentionally left blank

Stop-motion animation is in the hands of the people. I say this as a pun.As a craft, the act of animating in stop-motion requires a person to literally place a puppet in their hands and bring it to life, frame by frame.
The other meaning is that in the past few years, the art of stop-motion hasexperienced a renaissance that has not only brought it more prominently intothe big film studios, but also brought it into the hands of regular people worldwide. It is happening in cramped suburban garages and spacious studiosoundstages. It is also making its way to more homes, schools, websites, andmobile devices in a manner that is unprecedented in our time.
When stop-motion first started as an art form, it seemed to be kept as a mysterious and closely guarded magic trick. The publicity of the time behindfilms like King Kong (1933) and the feature film Hansel and Gretel: An OperaFantasy (1954) revealed false information to the masses about just how stop-motion was really done. For decades following, fans of stop-motion films hadto rely on stamp-sized photographs in science-fiction magazines to try andguess how they were made, and then take a stab at it with a Super 8 camera.Once they had completed their films, there were very limited venues for show-ing them to anyone other than themselves. It’s a different world now, and thesecret is out, so today’s filmmakers are gladly faced more with questions abouthow to tell a captivating story than about with the technique itself. In additionto the tools becoming more accessible, the Internet now provides a free platformfor everything from simple experiments to full-fledged films. In the onlineuniverse, artists not only can share their films, but also can connect with otherartists who can offer advice and support to make them even better.
What is also amazing about this growth for stop-motion animation is how fastit has recently happened. In 2006, I wrote my first book, The Art of Stop-Motion Animation (Figure I.1), as a practical guide for how stop-motion filmswere made.
xvii
Introduction

The Advanced Art of Stop-Motion Animationxviii
At that time, we were just starting to see the advent of digital SLR camerasand their use for stop-motion photography, both in feature films and inde-pendent projects. Blogs and online journals for documenting productions hadbeen around for a few years, but they were really just beginning to becomemore popular. Facebook, Twitter, and Livestream did not exist, and YouTubewas brand new—no one was really sure how long it would last. And now, lookat what has happened. Just a few years later, and stop-motion is everywhere—online, on television, and in theaters. People still love it as much today as theydid when Kong first emerged from behind the trees on Skull Island. At itsheart, the basic techniques behind stop-motion have not changed, but we nowhave the capacity to present it in the sharpest resolution possible, combine itseamlessly with computer graphics, and even shoot it in 3D. Just imagine whatthe next 4 years could bring!
My own experiences with stop-motion animation and other life adventureshave also evolved since I last published my first book. A month after the bookwas released, my daughter Ariel was born, so the summer of 2006 kind of feltlike having two babies at once. That fall, my friend Leslie Bishko, who wasinvolved with the Vancouver chapter for the Association for ComputingMachinery’s Special Interest Group on Graphics and Interactive Techniques(ACM SIGGRAPH), asked if I would be interested in being part of a stop-
Figure I.1
The Art of Stop-MotionAnimation (2006) by Ken A. Priebe.

Introduction xix
motion event to help promote my book. I was delighted for the opportunityand was able to participate in an evening of presentations and panel discus-sion with none other than Anthony Scott (animation supervisor, Corpse Bride),Peter Muyzers (visual effects artist, Corpse Bride), and Larry Bafia (animatorfrom Will Vinton Studios and PDI). I was asked back to speak for variousVancouver SIGGRAPH events related to stop-motion, and became an activemember and volunteer with the chapter, helping to organize their annualSpark FX and Spark Animation festivals and bring inspiration and innovationto the community (http://www.siggraph.ca).
Another opportunity that came my way was being asked to develop an onlinestop-motion course for the Academy of Art University’s Cyber Campus, anonline version of the degree programs offered through their school in SanFrancisco. Using my book as a required text, I got the chance to expand on theinstructional sections through two online courses, ANM 380 (Stop MotionAnimation 1) and ANM 382 (Stop Motion Animation 2). Subsequently, I havetaught these courses online and helped more students improve their skills in thestop-motion craft. The process of building these courses also involved flyingdown to San Francisco to shoot animation and puppet-building demos in theirproduction studio, which was hard work but a great deal of fun. On one of thesevisits, I had the opportunity to meet in person the technical editor for my firstbook (and this one), Lionel I. Orozco of Stop Motion Works (Figure I.2).
Figure I.2
Author Ken Priebe (left)and technical editor LionelI. Orozco (right) at theAcademy of Art University’sCyber Campus studio,proud to welcome you toanother book!

The Advanced Art of Stop-Motion Animationxx
As 2009 dawned, I continued my work as a mild-mannered admissions advisorfor VanArts (Vancouver Institute of Media Arts) by day and a crime-fightingstop-motion instructor by night, both for students at VanArts and online forthe Academy of Art University. Another addition to my family was also prepar-ing for his debut; my son Xander was born that summer. Meanwhile, the stop-motion universe was generating a lot of buzz from the release of the featurefilm Coraline, which had advanced the art form into new territories of inno-vative storytelling, and many other independent films were being noticed aswell. Riding the crest of this wave, I was approached by Course Technologywith the idea of writing another book that would go into more up-to-datedetail on the art form. Several months later, you are holding that book in yourhands.
My first book, The Art of Stop-Motion Animation, was written as a practicalguide to the basic principles of stop-motion filmmaking, providing a solidintroduction for anyone new to the medium. The focus of this new volume isto take a closer look at the techniques of stop-motion that were touched ononly briefly in the first book and to cover some advances in the art form thathave only come into fruition since 2006. You will find new techniques forbuilding puppets, including the technology behind rapid prototyping of com-puter models for stop-motion production. You will read more detailed infor-mation on camera rigs, effects, and shooting stop-motion with a digital SLRcamera, including stereoscopic photography (to make your films in eye-popping3D). The basic principles of animation covered in the first volume are expandedinto specific applications for character performance, and there is more materialcovered on visual effect compositing techniques. The history of the medium,this time around, puts more focus on stop-motion films made in feature-lengthformat, including several obscure films that have never been documented tothis extent. Also, whereas the first volume featured six interviews with otherstop-motion artists, this new book presents eight new interviews with someof the best and brightest in the field, spanning everything from big studio productions to low-budget indie filmmaking.
If you are a fan of stop-motion or any other kind of animation, I trust you willfind plenty of good reading material in this book. However, because it’s anadvanced volume, if you are new to learning animation and want a book forguidance on how stop-motion is done, I would recommend my first book.The basic principles covered in The Art of Stop-Motion Animation are impor-tant to grasp before moving on to the more advanced techniques covered in

Introduction xxi
this book. All things considered, there is only so much a book can accomplishin covering the vast array of skills required for stop-motion, but my hope isthat both volumes together will provide you with a good launching pad foryour own creations. The vast resources for stop-motion available online andthe help of other enthusiasts should also be continually tapped so that we canall continue to find new ways for telling stories in this medium.
Tools and technology will always continue to change and become moreadvanced. However, in his essay “What Is Cinema?” the noted French filmcritic Andre Bazin reminds us, “The dream of creating a living human beingby means other than natural reproduction has been a preoccupation of manfrom time immemorial: hence such myths as Pygmalion and Galatea.” We maybe able to digitally remove the strings and rigs from our modern-day puppets,but deep inside ourselves we are simply fulfilling the dreams of those whograced the Greek amphitheaters and medieval marionette stages with that simple vision: to create the illusion of life.
Welcome, read on, and enjoy this magic between the frames.
On the CD
The companion CD for this book contains QuickTime videos of various animation exercises and clips that are referenced within the text for your ownenjoyment, study, and analysis. The CD also contains two special appendicesin pdf format, which represent the growth of stop-motion education and theonline stop-motion community, celebrating the work of several artists whoshare their work through their websites and production blogs.
CD-ROM Downloads
If you purchased an ebook version of this book, and the book had a com -panion CD-ROM, we will mail you a copy of the disc. Please send [email protected] the title of the book, the ISBN, your name,address, and phone number.
Thank you.

This page intentionally left blank

Most of the stop-motion animation produced in the past century, of whichmost audiences are aware, has been done for either short formats or specialeffects. The earliest stop-motion films were merely experiments in moving
objects before the camera, like Bewitched Matches (1913) and The AutomaticMoving Company (1912). The former was actually a stop-motion sequence for a live-action short. American puppet films lasting only 7 to 12 minutes were producedby Kinex Studios for home viewing and by George Pal for theatrical distribution,while the Czech movement of puppet film shorts began overseas in EasternEurope. At the same time, stop-motion effects for creature sequences in live-actionfantasy films began with the innovations of Willis O’Brien and Ray Harryhausen,moving onto Star Wars and countless other films of the 1980s. Independent shortfilms such as Will Vinton’s Closed Mondays and Co Hoedeman’s Sandcastle wouldalso gain recognition in festivals and win Best Animated Short Film at theAcademy Awards. Another vessel for stop-motion in short format worldwide wastelevision, which brought us Gumby, Morph, Colargol, the California Raisins,and many other characters, series, parodies, and commercials.
Whether it was for a short film or a brief fantasy sequence in a feature, these stop-motion efforts were designed to hold the audience’s attention only for a briefmoment, a mere bridge getting them from one feature of entertainment toanother. The short format for stop-motion is a double-edged sword in the oppor-tunity it has lavished on the medium. For the most well-executed stop-motionsequences, such as Harryhausen’s 5-minute skeleton fight in 1963’s Jason and theArgonauts, the shorter format provided a solid frame to place as much quality as
1History of Stop-MotionFeature Films
1

possible into them. Often there was not enough time or budget to create thesame amount of animation for more than what any feature film required, so allavailable resources were applied to creating these short moments of beautifulentertainment.
At the same time, the jerky quality inherent in many of the early examples ofstop-motion photography made it difficult for audiences to sit through morethan a few minutes. If the technique distracted the audience from the story orcharacter development, stop-motion could not be utilized as much more thana novelty.
Combining quality stop-motion animation with a format long enough totruly involve an audience on an emotional level, through a longer story arc ofabout 70 to 120 minutes, proved to be a very difficult task to pull off in itsearly development. The number of stop-motion features produced wouldoften have several years of dormancy between them, depending on the coun-try. The time-consuming nature of stop-motion in general, combined withthe extra effort needed to produce more than one hour of it, has partly con-tributed to this sporadic output. The commercial success or failure of thesefilms would also have an impact on how often they would arrive, since it wasalso difficult to finance projects of this magnitude.
Feature-length projects, which are simultaneously the most expensive andprofitable form of filmmaking, often set the bar for success of any medium inthe animation field, regardless of their popularity in shorter formats. In 1937,Walt Disney took the world by storm with the phenomenal success of SnowWhite and the Seven Dwarfs. It was not the first animated feature ever made(chronologically), but it was the first to set the standard for what the anima-tion medium could achieve in a feature-length format. For decades afterward,the Disney studio was far ahead of what others tried to achieve in producinganimated features, in terms of artistic innovation and commercial success. Fora time, there were other features such as Yellow Submarine (1968), RalphBakshi’s Fritz the Cat (1972), and Don Bluth’s The Secret of NIMH (1982),which went into artistic directions that Disney was failing to delve into at thetime. However, few of these films, as fun as they are, reached the same levelof mass commercial appeal as the timeless classics of Disney animation’sgolden age.
It would be company branches owned by Disney that would help to bring theanimated feature back in vogue, through landmarks like Who Framed RogerRabbit (1988), Pixar’s Toy Story (1995), and even Tim Burton’s The NightmareBefore Christmas (1993). Nightmare, of course, was a major turning point for
The Advanced Art of Stop-Motion Animation2
stop-motion as the medium’s first feature-length project to receive worldwidedistribution and a huge following for years after its initial release. Meanwhile,in the years following, CG features by Disney/Pixar (Finding Nemo, WALL-E ),DreamWorks SKG (Shrek, Madagascar), Blue Sky (Ice Age, Horton Hears aWho!), and others grew to dominate and saturate the feature market. The CGboom of the past decade expanded to the point of prompting rumors of theextinction of more traditional techniques of hand-drawn and stop-motion,partly fueled by Disney’s misguided decision to abandon the hand-drawnmedium for features. Yet this rumored extinction was not necessarily the case;these traditional features were simply coming from different places. HayaoMiyazaki’s Studio Ghibli kept hand-drawn features alive in Japan, and the critically acclaimed Persepolis took the medium into a much more personalrealm of expression. In 2005, two stop-motion features, Wallace & Gromit:The Curse of the Were-Rabbit and Tim Burton’s Corpse Bride, were brought tothe screen within two weeks of each other.
The year 2009 provided a unique renaissance for all media of feature anima-tion, including successful CG releases like Up and Ice Age: Dawn of theDinosaurs, Disney’s return to hand-drawn animation with The Princess and theFrog, and a fresh approach to the medium by the brilliant The Secret of Kellsfrom Ireland. Also having an equally strong voice in 2009 was an unprece-dented run of five stop-motion features to be released, each differing greatlyin style, technique, and distribution. The two mainstream releases were HenrySelick’s Coraline and Wes Anderson’s Fantastic Mr. Fox, both appealing to family audiences. The festival circuit welcomed the more adult sensibilities ofAdam Elliott’s Mary and Max, Tatia Rosenthal’s $9.99, and A Town CalledPanic by Stéphane Aubier and Vincent Patar. The variety in personal styleswithin these films and the timing of their releases within the same year areunprecedented for the medium of stop-motion. The fact that more featuresusing stop-motion are already following in their wake indicates an excitingtrend that the stop-motion feature film has truly come of age. It could be thatthe art form finally has an opportunity for the presence it deserves, amidst thevast canon of cinema that is brought to audiences worldwide each year.
Features made with two-dimensional cut-outs or that use stop-motion as aspecial effect within live action have a history of their own, and their influ-ence is still felt by today’s filmmakers. King Kong alone inspired an entire genreof fantasy filmmaking and has rightly had several books and articles writtenabout its influence. The history of the feature-length stop-motion puppet filmis also an interesting story to unravel, and it is worth investigating to see exactlywhy it has taken nearly a full century for this format to reach the potential it
Chapter 1 n History of Stop-Motion Feature Films 3

is now enjoying. To clarify the focus of the films I am referring to, this is specif-ically a look at films that fit into the following categories:
n A running time of anywhere from approximately 61 to 120 minutes
n A theatrical release (actual or intended) into festivals or cinemas
n The exclusive use of three-dimensional puppets, models, or clay figuresthroughout the entire film
A few films are also included that combine puppets and live action but focuson a whole cast of puppets through most of the film’s running time. For thesake of beginning to document this history in the limited space of a singlechapter, here is a look at how these puppet features have evolved.
The history of the puppet feature begins with the pioneering puppet animatorfrom Russia, Ladislas Starewitch. Starewitch was a filmmaker and entomologistwho got started in animation making short stop-motion films with embalmedinsects rigged with wires. He is credited with producing the first known narrative shorts using the medium, most notably The Cameraman’s Revenge in1912. After moving to Paris he continued making short puppet films through-out the 1920s. From 1929 to 1930, he produced his first feature-length stop-motion puppet film, Le Roman de Renard (The Tale of the Fox). The storyfor the film was based on the 11th-century tales of Reynard the Fox, an anthro-pomorphic fox famous for his cruel trickery. The French version of the storyfrom this time period was derived from even older stories about Reynard datingback to medieval times. Variations of the tale spanned several countries; aroundthis time, in the 1930s, even Walt Disney in America was exploring the ideaof adapting it into animation. The idea was dropped because of the inherentnastiness of the title character, but many decades later Disney would resurrectsome of the story ideas for its 1973 animated version of Robin Hood. WhileDisney’s Robin Hood was also portrayed as a fox, Starewitch’s version of theoriginal Reynard tale was truer to form in capturing the cruelty and craftinessof the main character. After outsmarting a wolf and several other characters,Reynard the Fox is summoned to appear before the Lion King to answer forhis crimes. The conflict escalates into an epic battle sequence as the finale ofthe film.
The level of detail and subtlety in The Tale of the Fox (Figures 1.1 and 1.2) isoutstanding, especially for the time it was made, and the story is filled withhumor, action, and a great deal of well-crafted entertainment. The puppets,which Starewitch called “ciné marionettes,” were capable of fantastic facialexpressions and varied greatly in size. The smallest puppets were a little more
The Advanced Art of Stop-Motion Animation4

than 1 inch tall, and the Lion King was the tallest puppet in the film, stand-ing nearly 3.5 feet. As many as 75 individual puppet characters were featuredin the film, and in many scenes they shared the screen in very elaborate battlescenes, reported to have involved 273,000 different movements. This is evenmore impressive when considered that it took Starewitch only 18 months tocomplete the film (from script and scenery to shooting) and that his crew wassimply his family. He worked alone with his daughter Irene, who was his life-long collaborator, and his wife Anna and younger daughter Nina helped whennecessary. This is unique considering most features take more time and peopleto create, even with more technology than what was available at the time. Interms of chronology, The Tale of the Fox was indeed the first fully animatedpuppet feature to be produced, and technically the first to be released as well,although it was delayed by several years because of technical problems withthe soundtrack. Although the animation was complete by 1930, it would not
Chapter 1 n History of Stop-Motion Feature Films 5
Figure 1.1
A scene from LadislasStarewitch’s The Tale of the Fox. (© Collection Martin-
Starewitch.)

be shown to audiences until 1937 in Germany and 1941 in France. In themeantime, during these delays, Starewitch continued making shorter puppetfilms.
Another puppet feature would be produced in Russia during this time,although this one included a live actor interacting with a large cast of puppets.It was likely the first film to be directly inspired by King Kong, which directorAlexsandr Ptushko saw in 1934 and decided to apply the same pioneeringeffects to his own film. The film was The New Gulliver, released in 1935, basedon Jonathan Swift’s Gulliver’s Travels, but with a decidedly more Communistbent to the plot. A reported 1,500 puppets were constructed for the film andfeatured extensive use of clay replacement heads for dialogue and facial expres-sions. The faces of the puppets were extremely exaggerated, and they spokeand sang in squeaky voices created by changing the pitch of the soundtrack.Most of the matte shots combining the live actor with the puppets were donein camera, as opposed to optically in post-production. All of these techniquesfor the puppets, sound mixing, and matting effects with live action were break-throughs for Russia, and Ptushko was hailed for it. The film was a big successfor its time, even catching the attention of Hollywood legends like CharlieChaplin, and it had an influence on many other filmmakers in the decades tocome. Ptushko followed up his success with a series of short films and a fewother features combining live action with stop-motion and live puppetry, suchas The Golden Key in 1939.
The Advanced Art of Stop-Motion Animation6
Figure 1.2
The Lion King and Reynardthe Fox from The Tale of theFox. (© Collection Martin-
Starewitch.)

Starewitch’s The Tale of the Fox finally premiered in Berlin in April 1937, nowwith a fully funded German soundtrack, and it was a big success. Months later,on December 2, 1937, Germany would see another stop-motion featurereleased called Die Sieben Raben (The Seven Ravens), made by brothersFerdinand and Hermann Diehl. Based on a Brothers Grimm fairy tale, it toldthe story of a young maiden whose brothers have been turned into ravens bya curse. The girl tries to break the spell and ends up being sentenced to burn-ing at the stake for witchcraft. The film mostly featured human puppets, andlots of dialogue (in German, of course) was used to tell the story. The crafts-manship of the extremely realistic replacement mouths, which appear to bedone in clay blended into the faces, is stunning for the time it was made. Theanimation and lip sync are brilliantly done and complement the acting of thepuppets for a very naturalistic effect. Aside from a few minor fantasysequences, the film is mostly simple dialogue scenes with human puppets andhas a live-action feeling to the staging, even to the point of matte shots thatcombine live-action flames next to the puppets. However, an interesting prelude to the film shows a live actor taking a jester puppet out of a box andassembling it, before the jester comes to life through stop-motion and beginsnarrating the story. It was a common theme of the Diehl brothers to show theprocess of stop-motion in this manner, as if signaling to the audience rightaway that they were watching a puppet film. They also used the technique intheir short films featuring Mecki the Hedgehog, who would come to life afterbeing sculpted right on his workshop table. Because most films exist onlywithin themselves and would not show the actual process, this was a uniqueapproach to the puppet film. It seemed to suggest to the audience right awaywhat they were actually watching, while at the same time creating a very real-istic and believable world in miniature.
The 1940s brought very little to the screen in the format of full-length puppetfeatures, possibly because of World War II dominating at least half the decadein many countries. Ironically the war did play a part in the first stop-motionTechnicolor feature to be made in Britain, which was a training film for theAdmiralty called Handling Ships in 1945. The film was made by the newlyfounded Halas and Batchelor studio, which was primarily making propagandaand training films at that time. Handling Ships used stop-motion animationof model ships to demonstrate their proper piloting and navigation. Althoughnever released to theaters and not exactly a “puppet feature,” the film was alandmark for introducing a technique to a country that would become one ofthe leaders in stop-motion animation.
Chapter 1 n History of Stop-Motion Feature Films 7

Another stop-motion feature made in the 1940s that barely had a screen releasewas a Belgian puppet version of The Crab with the Golden Claws, based on acomic book of the same name, featuring a young reporter named Tintin andproduced by Wilfried Bouchery. The film faithfully follows the story of Tintin’srun-in with a group of drug cartels, the introduction of Captain Haddock,and a crime-fighting adventure through the Sahara Desert. The comic char-acters were realized as very simple puppets that appear to be made of wood orplastic with real fabric clothing; tiny paper mouth shapes appear to have beenused for their dialogue. The low production values for the film are obvious—several shots are barely animated at all, with characters simply frozen into posesor sitting still in boats that were shot floating in live-action water. The editingand screen direction were equally crude, with camera angles changing andrarely cut together properly. All the same, the film was screened to a specialgroup of guests at Brussels’ ABC Cinema on January 11, 1947. Another publicscreening followed in December 1947, but then Bouchery declared bankruptcyand fled the country. The Cinematheque Royale de Belgique archived a copyof the film, and it was recently released on DVD in France.
The story behind producing the first stop-motion feature in America is par-ticularly unique. It began in the late 1930s with a Broadway producer namedMichael Myerberg, who had gained a reputation for lavish showmanship toget his projects off the ground. He had become business manager for con-ductor Leopold Stokowski and was responsible for getting him involved withHollywood films, including Disney’s Fantasia (1940). Excited by the creativepotential for combining music with animation, he approached puppet ani-mator Lou Bunin to develop an incredibly ambitious animated feature.Starting in 1942, Stokowski, Myerberg, and Bunin would spend three yearsplanning a feature film that would adapt Richard Wagner’s 14-hour opera TheRing of the Nibelungen into four hours of puppet animation. The project calledfor extremely elaborate puppets of gnomes, trolls, dragons, Valhalla warriors,mermaid-like creatures called “Rhinemaidens,” and several epic battle scenes.They got as far as a full operatic voice cast, storyboards, sets, several puppetsbuilt by Bunin, and a completed animation sequence. Universal was preparedto produce the project until one of its executives raised concerns over the asso-ciation to Adolf Hitler’s admiration for Wagner’s music. With the country everdeeper in the war effort, the ambitious project was abandoned, and Myerbergand Bunin parted ways.
Myerberg began plans for another stop-motion feature called Aladdin and theWonderful Lamp, based on the classic Aladdin tales. With his associates PeterLanucci and Herb Schaeffer designing the armatures, Myerberg developedintricate puppets that employed magnetic feet that would adhere them to
The Advanced Art of Stop-Motion Animation8

metal sets. The armatures also had a unique switch built into the limbs to helpthe animator lock them into position after moving them. Clay sculpting andcharacter design by James Summers and foam latex casting by George Butlercompleted the puppets, which Myerberg called “Kinemans.” Myerberg, in trueshowman fashion, began embellishing false information for potential film dis-tributors about how the Kinemans were manipulated by a mysterious elec-tronic process that cost thousands of dollars, used secret formulas, and couldachieve more than 800,000 human expressions.
After six months of work on Aladdin and signing a British actor named JohnPaul as director, Myerberg abandoned the project and decided to move for-ward with adapting the story of the Brothers Grimm fairy tale Hansel andGretel, which he felt was more marketable. Rather than being based solely onthe original tale, it would be an English translation of the 1892 opera versionwritten by Engelbert Humperdink. His crew set up a studio in a synagogue inNew York’s Lower East Side, partly because it had a balcony that allowed thedirectors to oversee all the sets from high above. Hansel and Gretel: An OperaFantasy (Figure 1.3) would become not only the first American stop-motionfeature film, but also the first animated feature produced in New York and thefirst to be based on an opera. Professional Broadway and opera singers wouldcontribute their voice talents, including Anna Russell as the evil witch RosinaRubylips.
Chapter 1 n History of Stop-Motion Feature Films 9
Figure 1.3
Production still fromHansel and Gretel: AnOpera Fantasy. (© 1954,
Michael Myerberg Productions.)

Production of the film was unusual in that nobody on the crew had any expe-rience in animation. Since animation was essentially a series of still imagesstrung together, Myerberg hired noted fashion still photographer MartinMunkasci as director of photography. Munkasci had never used a movie camerabefore, and he found the lighting style required for animation to be a severedeparture from what he was accustomed to. Sets were built by Latvian immigrantEvalds Dajevskis, who was likely hired for his experience as a scenographer forthe Liepaja Opera and Ballet Theater and his knowledge of the European land-scape. The sets were constructed from papier-mâché and were so large theyrequired trap doors built in for the animators to access the puppets. The animators themselves had never done stop-motion before, but some of themhad experience working with puppets. Don Sahlin and Teddy Shepard hadapprenticed on The Howdy Doody Show, and Kermit Love had experience inpuppetry, ballet, and costume design. The other animators were actors JoeHorstman and his wife Inez Anderson (who was the key animator on Gretel),ballet dancer Danny Diamond, sculptor Sky Highchief, and Roger Caras. Outof these mentioned, only Horstman, Anderson, Diamond, and Shepardreceived a credit on the film, along with other animators Ralph Emory, HobartRosen, and Nathalie Schulz. The crew of new animators was given a three-weektraining period and then went straight into production, often being inter-rupted by knocks on the studio door from people wanting to book the syna-gogue for weddings and other events. The magnetic puppet feet and electrifiedsets caused another faux pas when a crew member shut the power down onenight, and the puppets fell over while in poses for the middle of a shot.Another unusual facet of Hansel and Gretel’s production was that the entirefilm was shot in sequence. As the release date grew closer and money was run-ning out, the animation in the final scenes became rushed and jerkier thanearlier sequences. There were two major group scenes: one involving a choirof angel children in a dream sequence, and another with a group of childrenreleased from the witch’s spell at the end of the film. The crew ran out of timeand money to create original sculpts for these puppets, so they simply re-castcopies of the character designs for Hansel and Gretel. The completed film isa strange but entertaining piece of stop-motion history, and an interestingexperiment in trying to adapt classical opera into an animated film. There issomething inherently creepy about the puppets and their facial expressionsand some jarring cuts in the screen direction, but the film is a good showcasefor the lovely detail of the sets, and the witch’s performance is a delight towatch.
The Advanced Art of Stop-Motion Animation10

Myerberg’s showmanship continued into thepublicity behind the film’s release (Figure 1.4).He continued the myths about his mysteriousKinemans, even creating a promotional filmsuggesting the puppets were controlled entirelyby an electronic box with a series of turningdials. (In reality, a similar device was designedonly for manual cable-controlled facial anima-tion in some close-ups.) Myerberg premieredHansel and Gretel himself in October 1954 atNew York’s Broadway Theatre, and RKO, soonto be ending its contract with Disney, enthu-siastically picked it up for distribution. Theofficial release was accompanied by an exten-sive marketing campaign that included suchitems as figurines, toys, candy, and Nabiscocookies (Figure 1.5). Despite modest successand fond nostalgic memories for those who saw it, Hansel and Gretel: An OperaFantasy did not exactly start a hot trend for stop-motion in America, but itdoes have a unique place in thegrand history of many art formsat once, combining opera, tech-nology, and puppet animation.Production of the Kinemanpuppets continued into televi-sion commercials, includingthe original Jolly Green Giant,which was apparently bannedfrom the airwaves for frighten-ing too many children. (It hassince surfaced on YouTube andtruly is quite disturbing.) Later,a studio break-in by vandalscaused all the Kinemans to be destroyed, and Myerbergreturned to Broadway, passingaway in 1974.
Chapter 1 n History of Stop-Motion Feature Films 11
Figure 1.4
Newspaper ad for Hanseland Gretel: An Opera Fantasy.
Figure 1.5
A sample of the Hansel andGretel marketing campaignwith Nabisco.

Some who had worked on various stages of Hansel and Gretel continued intoother stop-motion ventures. Don Sahlin and Kermit Love tried getting a live-action/puppet feature version of Beatrix Potter’s The Tailor of Gloucesterproduced in London, with animated mice puppets. It was never realized, butSahlin continued into more stop-motion on George Pal’s tom thumb (1958)and The Wonderful World of the Brothers Grimm (1963) and would laterbecome a puppet designer for Jim Henson’s Muppets. Lou Bunin, after part-ing ways with Myerberg, ended up producing his own stop-motion/live-actionversion of Alice in Wonderland in France in 1949 (Figure 1.6). Althoughframed by completely live-action bookend scenes, most of the film taking placein Wonderland was made in puppet animation, with actress Carol Marsh asAlice matted or cut into the scenery. The film was funded by the J. ArthurRank Organization, directed by British radio/TV pioneer Dallas Bower, andshot by noted French cinematographer Claude Renoir. Bunin animated manyof the puppet scenes himself and also had the help of former Disney anima-tor Art Babbitt, who designed several walk cycles for the puppet animators touse for reference.
Ironically, a cartoon version of Alice was simultaneouslybeing made by Disney. Amuch-publicized conflictensued over the release of bothversions throughout its pro-duction. Disney was favoredfor exclusive right to the use ofTechnicolor, which Bunin’sfilm was originally being shotin, so Bunin was forced toprocess the original negativeusing the Ansco color process.Ansco used a blue dye thatchanged the colors and mud-
died up the soundtrack so that it could not be heard properly without a blue-tinted exciter bulb when projected. Disney tried to delay the release of Bunin’sfilm in 1951, but Bunin released it anyway, two weeks before the release ofDisney’s version. Disney went after him in court but lost the case because ofthe conclusion that Alice in Wonderland was public-domain material and hadbeen adapted to film previously.
The Advanced Art of Stop-Motion Animation12
Figure 1.6
Newspaper ad for Lou Bunin’s Alice inWonderland. (Lou Bunin,
1951.)

Neither film fared very well at the box office originally, although Disney’s version has become the more popular version over time. However, many,including Bunin himself, felt that the stop-motion version was truer to LewisCarroll’s original book, capturing the famous illustrations by John Tenniel andshowing a clear contrast between the real world and Wonderland. The setswere wonderfully surreal and abstract, with curved shapes and open compo-sitions similar to the cartoons of Warner Bros., likely because they weredesigned by Gene Fleury and Bernice Polifka, who had worked for ChuckJones at Warner Bros. One particularly clever special effect involved a row ofmirrors to re-create the Lobster Quadrille dance sequence, which made twolobster puppets reflected in the mirrors appear like a whole crowd of them onscreen. Overall, the film has a strange, dreamlike quality and is certainly oneof the most visually inventive film versions of the classic book. Bunin laterbegan developing an ambitious stop-motion feature based on the book HighWater at Catfish Bend that would never be realized. Despite these setbacks tohis feature-length projects, Bunin made a big name for himself in New Yorkproducing stop-motion commercials and shorts, and he is still remembered asa unique contributor to the medium.
Around this same time that puppet animation was trying to find its voice inAmerica, on the other side of the globe it was on its way to being much morestrongly established. Czechoslovakia and other parts of Eastern Europe had along history of traditional puppet theater; it naturally found its way into stop-motion filmmaking while retaining its same lyrical essence. The master of theCzech puppet movement would undoubtedly be Jiri Trnka, who producedsome feature-length films along with his many influential shorts. After start-ing his studio in 1946, he ended up embarking on what would become hisfirst feature, Spalicek (The Czech Year), released in 1947. The film is dividedinto six segments that illustrate a full year of seasonal Czech customs:Shrovetide, Spring, the Legend of St. Prokop, the Fair, the Feast, andBethlehem. Traditional Czech folk songs enliven the animation. The final filmwas a huge success that put Trnka on the map as the country’s leading puppetanimator. This success led to the possibility for another feature, Cisaruv Slavik(The Emperor’s Nightingale), in 1949. This film was based on the HansChristian Andersen tale of a Chinese emperor with a toy nightingale who forgets about the real nightingale who would comfort him with his song. Thesignificance of this film was that it introduced Trnka to America through theatrical distribution there, with an English narration by Boris Karloff (Figure 1.7). In both versions, a beautiful musical score by Vaclav Trojanblended perfectly with the puppets and scenery. Critics worldwide hailed thefilm as a masterpiece of the medium.
Chapter 1 n History of Stop-Motion Feature Films 13

The Advanced Art of Stop-Motion Animation14
Another feature, Bajaja (PrinceBayaya), followed in 1950. Thiswas a medieval tale of a youngpeasant who overcomes many oddsto win the heart of a princess.Trnka used Bajaja as a platform topush the envelope in terms of therich detail and complexity thatcould be achieved with puppet ani-mation, creating a scope of effectsmuch more epic than his earlierworks. What is most interestingabout Trnka’s work is the tensionbetween what the Czech govern-ment agreed to fund and preferredhe create, and what Trnka himselfwanted to create. Some of his filmsdirectly reflect Czech culture andideals, into which he put just as
much pride and care, but he also wanted to explore stories from other cultures.His other features were Staré pov sti eské (Old Czech Legends) in 1953, whichis a collection of Czech hero epics, and Sen Noci Svatojanske (A MidsummerNight’s Dream) in 1959, based on William Shakespeare’s play. A MidsummerNight’s Dream was shot in widescreen and was certainly Trnka’s most exquisiteand ambitious production to date. It expressed Trnka’s style and personal viewsof puppet animation, which did not rely on any lip sync or facial expressionto tell the story. He was more concerned with the music and picture workingtogether to achieve a lyrical effect that brought the essence of traditional puppet theater to the screen. As beautiful and artistic as his epic film was,many common audiences did not connect with it on the same emotional level,which can be said of many “art films” done in feature length. (Ironically, thesame year, Disney released Sleeping Beauty, which had many similarities to A Midsummer Night’s Dream in its ambition, scope, and focus on beautiful artdirection over direct emotional engagement for the audience, as many criticsfelt.) All the same, when it comes to treating the art of stop-motion puppetanimation to a high level of grace, beauty, and respect, Trnka set the bar andinspired a whole legion of animators in his wake.
Figure 1.7
Newspaper ad for the U.S.release of The Emperor’sNightingale. (Trnka Studios,
1949.)

The 1960s and 1970s were an interesting time for cross-cultural pollinationbetween different countries producing stop-motion features, particularlyCzechoslovakia and Japan with North America. Japanese animator KihachiroKawamoto, after working briefly with one of Japan’s leading puppet animators,Tad Mochinaga, went to Czechoslovakia to work with Trnka at his studio in1963. Trnka encouraged him to respect the puppet film as an art form andembrace the lyrical style of his culture, so Kawamoto brought this influenceback to Japan and inspired the puppet movement there. Meanwhile, the filmsof Mochinaga inspired an entirely new partnership that would bring theJapanese animation style to America. Back in America, through commercials,series, and specials, stop-motion animation began to find a voice on televisionas early as the 1950s. In the 1960s, the medium found a new leader throughthe studio of Rankin/Bass. Originally under the name Videocraft International,founders Arthur Rankin, Jr., and Jules Bass joined forces with Mochinaga’sstudio in Japan in 1958 and made a name for themselves through theirAnimagic TV specials. They also created some features for the big screen.Throughout the production of these features, Rankin was very hands on atthe Japanese studio, while Bass oversaw much of the music and script writingfrom his head office in New York. Rankin took up residence in Japan formonths at a time, working alongside the animators, costume builders, and storyboard and fabrication departments.
Their first feature, Willy McBean and His Magic Machine, was producedaround the same time as their famous Rudolph the Red-Nosed Reindeer TV special and was released in 1965 (Figure 1.8). The origins of the film cameabout through a time-traveling character named Willy Nilly, who was featuredin a few episodes of their The New Adventures of Pinocchio series for television.Ideas for a spin-off series grew into a feature-length script about WillyMcBean, his monkey sidekick Pablo, and their adventures traveling throughtime to stop the mad Professor Von Rotten from altering the course of history.The original story and characters were designed by Rudolph’s designer TonyPeters, who was rooted in the style of the UPA studio that was popular in the’50s. The following year, 1966, brought a musical feature, The Daydreamer(Figure 1.9), to the screen, which was part of a three-picture deal with producerJoseph E. Levine that combined the Animagic puppets with an all-star cast oflive actors. Noted illustrator Al Hirschfeld designed the poster and creditsequence for the film, in which Paul O’Keefe plays a young Hans ChristianAndersen who dreams about four of his well-known stories, told in stop-motion.
Chapter 1 n History of Stop-Motion Feature Films 15

The Advanced Art of Stop-Motion Animation16
While these early features had minimal impact with most audiences,Rankin/Bass hit its stride with one of its best productions, the feature MadMonster Party (Figure 1.10), released in 1967. Baron Von Frankenstein, voicedby Boris Karloff, creates a destructive formula and invites a full cast of classicmonsters to share in his discovery. Frankenstein, Dracula, the Wolfman, the
Figure 1.8
Tad Mochinaga animates ascene from Willy McBean and His Magic Machine. (© 1965, Rankin/Bass
Productions/Rick Goldschmidt
Archives.)
Figure 1.9
Hiroshi Tabata works onthe Thumbelina sequenceof The Daydreamer. (© 1966,
Rankin/Bass Productions/
Rick Goldschmidt Archives.)

Mummy, the Creature, the Invisible Man, and Dr. Jekyll/Mr. Hyde are allthere, including a Peter Lorre–inspired lackey named Yetch and the Monster’sMate, modeled after and voiced by Phyllis Diller. The plot unfolds as the mon-sters conspire against the baron’s nephew and successor Felix, who also becomesromantically entangled with his sexy assistant Francesca. The film was co-writtenby Harvey Kurtzman, creator of Mad magazine, and the characters weredesigned by another Mad contributor, Jack Davis. The work of these artistsgave the film a fresh look that differentiated it from the designs of earliershows, but it still maintained the classic Rankin/Bass feel. The film, full ofwitty puns, sight gags, and a jazzy ’60s score, became a cult classic, a regularstaple for Halloween screenings, and an inspiration for many stop-motionartists, including Henry Selick and Tim Burton.
Chapter 1 n History of Stop-Motion Feature Films 17
Figure 1.10
Boris and Monster’s Mate puppets from Mad Monster Party. (© 1967, Rankin/Bass Productions/Rick Goldschmidt Archives.)

The Advanced Art of Stop-Motion Animation18
Rankin/Bass continued producing both cel and puppet animation well intothe 1980s, but it would be several years until the studio attempted one morestop-motion feature: Rudolph and Frosty’s Christmas in July, released in the summer of 1979. The film brought some of its classic characters together fora story with many plot twists, surrounding an evil king named Winterbolt.Despite an impressive voice cast, songs by Johnny Marks, and strong produc-tion design (Figure 1.11), the film was not very successful; it is likely that aChristmas film in the middle of summer was a hard sell for audiences.
Figure 1.11
Kyoko Kita works onAnimagic puppets forRudolph and Frosty’sChristmas in July. (© 1979
Rankin/Bass Productions/
Rick Goldschmidt Archives.)
Nevertheless, Rankin/Bass had plenty of other successes that would inspiredozens of other stop-motion feature projects for decades to come. MarkCaballero and Seamus Walsh of the stop-motion film collective ScreenNovelties are very inspired by the work of Rankin/Bass. They both feel (andI quite agree) that the history and traditions of Japanese kabuki theater andbunraku puppetry come through quite strongly in the animation itself.Looking at the timing and posing of the puppets of Japanese stop-motion(such as Kawamoto’s The Demon or even earlier works), a similarity can benoticed. Rankin/Bass’ background in theater also meshed well with the styleof their Japanese production team to produce a unique playfulness to the lookof these films. It is important to look for the connections between traditionalart forms and modern stop-motion, especially in a feature-length formatwhere it can be easy for an audience to get lost in the technique itself.

Elsewhere in the world, stop-motion features continued to make appearancesand impacts on the medium. The first full-length puppet feature to come outof Israel was Joseph the Dreamer (Figure 1.12) in 1961, based on the biblicalstory from Genesis about Joseph and his brothers. The film was directed byYoram Gross, who began making experimental films based on Joseph’s dreamsequences, and the results inspired him to make a feature version. He issueda press release announcing his intentions for the project, which drew the attention of puppet-maker John Byle and illustrator John Burningham. Theyagreed to collaborate and fashioned stylized puppets out of rubber with wirearmatures. Actors from Israel’s Habima National Theatre provided the voices,and the film was primarily photographed and animated by Gross and his wifeAlina, working mostly during the cooler nighttime hours over a period of two years. Joseph the Dreamer was scored by Eddie Halperin and the Kol RadioOrchestra, and its premiere was opened by Israeli President Yitzhak Ben-Zvi.It went on to screen at Cannes and won several international film prizes.Today, Yoram Gross still produces animated entertainment and has releasedJoseph the Dreamer on DVD for new generations to enjoy (http://www.yoramgrossfilms.com.au).
Chapter 1 n History of Stop-Motion Feature Films 19
Figure 1.12
Production still from Josephthe Dreamer. (© 1961, Yoram
Gross Films.)

The Magic Roundabout was a French TV series by Serge Danot that gainedgreat popularity in the late ’60s, even more so in the U.K. In 1970 a featurebased on the series was released in France called Pollux et le Chat Bleu (withthe English version, Dougal and the Blue Cat, released in the U.K. in 1972).Written and directed by Eric Johnson, the film tells about an evil blue catnamed Buxton, who enters the ruins of an old treacle factory, crowns himselfking, and unleashes an epidemic of blueness upon the land. It becomes up toDougal and his friends from the Magic Garden to defeat Buxton’s plans andrestore color to their world. The Magic Roundabout and its subsequent featureversion had long since gained a reputation for its rumored underlying subtextsrelated to political, societal, and drug-related references. The epidemic of blue-ness was read as a metaphor for conservatism by some, and many people havemulled over the meaning behind scenes involving magic mushrooms and otherhallucinatory images. Whether or not this was all intentional, Dougal and theBlue Cat is certainly a product of its time and is still enjoyable for its strange-ness, surrealism, quirky animation, and appealing designs.
The 1970s also brought a very significant original stop-motion feature toNorway called Flaklypa Grand Prix (known as Pinchcliffe Grand Prix in itsU.K. release version), which has become a national treasure with a huge cultfollowing. Director Ivo Caprino had begun making short films and commer-cials with both live-action and stop-motion puppets in 1948. He had muchsupport from his artistic parents; his mother would end up helping him buildpuppets and sets. Caprino continued making films into the ’50s and ’60s thatcaptured elements of European folk tales and short stories with delightful puppet characters. His first feature film, produced in 1959, Ugler i Mosen(Owls in the Marsh), was mostly live action, with some stop-motion sequences.His second feature project, about the Norwegian writer Peter ChristenAsbjornsen, was never realized because of a lack of funds. Instead, it wasadapted into a series of short films through the 1960s. Caprino began work-ing on a half-hour television special in 1970 that was based on the books ofcartoonist Kjell Aukrust. The special was ultimately abandoned because of dif-ficulties in adapting the material into a short format, but many of the sets andpuppets were used for what became a full-length feature. The feature tookmore than three years to make and had a very small crew of set builders andcameramen, with Caprino directing and animating (Figures 1.13 and 1.14).
The Advanced Art of Stop-Motion Animation20

Chapter 1 n History of Stop-Motion Feature Films 21
Figure 1.13
Ivo Caprino (center) andcrew on the set of FlaklypaGrand Prix. (© 1975, Caprino
Studios.)
Figure 1.14
Ivo Caprino and crew onthe exterior set of FlaklypaGrand Prix. (©1975, Caprino
Studios.)

Flaklypa Grand Prix tells the story of an inventor named Reodor Felgen (U.K.version: Theodore Rimspoke), who lives quietly on a hilltop with his assistants:a bird named Solan Gundersen (U.K. version: Sonny Duckworth) and ahedgehog named Ludvig (U.K. version: Lambert). The trio (Figure 1.15)teams up with an Arab sheik to build an amazing race car named “Il TempoGigante” to compete in a Grand Prix race against their rival, the villainousRudolf Blodstrupmoen. Highlights of the film include the complex RubeGoldberg–type contraptions in Felgen’s house, a delightful ragtime band number at the race’s opening ceremony, and the Grand Prix race itself. Therace is incredibly exciting and beautifully edited, as the camera speeds alongbehind the cars through the elaborate miniature sets of the winding country-side race track (Figure 1.16). On many levels, the film is fun to watch andworks brilliantly in terms of the set design and characterizations of the puppets.
The Advanced Art of Stop-Motion Animation22
Figure 1.15
Reodor Felgen, SolanGundersen, and Ludvig of Flaklypa Grand Prix.(©1975, Caprino Studios.)
Flaklypa Grand Prix was released on August 28, 1975, and became the mostsuccessful Norwegian film ever made, selling more than 5.5 million tickets ina country with a population of only 4.5 million. It has enjoyed similar suc-cess in Denmark, Russia, Japan, the U.K., and elsewhere. It has been trans-lated into 14 languages and traditionally runs on Norwegian television everyChristmas Eve. The feature continues to inspire a devoted fan base, and afterIvo Caprino’s death in 2001, a PC video game based on the film was produced

by Caprino’s son Remo and grandson Mario. The family maintains a websitefor Caprino Studios (http://www.caprino.no) and has released these wonder-ful puppet films on DVD.
The late ’70s was a tumultuous time for the animation industry in general—many of the old studios had shut down, and most of the work being done wascheap Saturday morning fare for television. The most significant film to comeout during this time was unquestionably Star Wars in 1977, which inspired anew revolution in using stop-motion for special effects into the next decade.Amidst the science-fiction spectacle of the time, cartoony puppet features didnot have much chance to stand out and were faced with limited commercialsuccess. As a precursor to a trend that became very popular throughout the1980s, in some cases TV series were adapted into big-screen feature versions.A popular European stop-motion TV star from the late ’60s and early ’70swho appeared on the big screen was Colargol, a little bear who wants to singand travel around the world. The Adventures of Colargol was a Polish/Frenchseries animated by Tadeusz Wilkosz at the Se-Ma-For Studio; it became knownas Barnaby in the U.K. and Jeremy the Bear in Canada. Unlike Dougal and theBlue Cat, which was an original feature based on a series, the Colargol featureswere simply episodes from the TV series strung together as one story. Threeof these adapted features were released in Poland: Colargol na Dzikim
Chapter 1 n History of Stop-Motion Feature Films 23
Figure 1.16
Shooting the race scenesfrom Flaklypa Grand Prix.(©1975, Caprino Studios.)

Zachodzie (Colargol in the Wild West, 1976), Colargol Zdobywc Kosmosu(Colargol, Conqueror of Space, 1978; Figure 1.17), and Colargol i CudownaWalizka (Colargol and the Magic Suitcase, 1979).
The Advanced Art of Stop-Motion Animation24
Figure 1.17
Polish movie poster forColargol, Conqueror ofSpace, Se-Ma-For Studio,1978.

In 1979, there was also a very limited theatrical run of another extremelybizarre puppet feature from Japan. Takeo Nakamura, an animator onRankin/Bass’ TV special Santa Claus Is Coming to Town (1970) afterward part-nered with the Sanrio Studio (creators of Hello Kitty) in 1975. He spent thenext four years directing a feature called Nutcracker Fantasy, which was looselybased on the famous Peter Tchaikovsky ballet and a story by E.T.A. Hoffmann.The influence from working with Rankin/Bass was certainly not lost onNakamura; the puppet designs were similar enough to make many people mistake it for a Rankin/Bass production, although it certainly was not. Thefilm opens with a terrifying sequence telling the bedside story of the“Ragman,” who creeps into children’s beds at night and turns them into mice.This leads into the story of a young girl named Clara (voiced by MelissaGilbert in the English dub), who is given a nutcracker doll by her strangeUncle Drosselmeyer (voiced by Christopher Lee). She then slips into a fever-induced dream state where she goes into battle against the evil QueenMorphia, a giant two-headed mouse, and the queen’s entire mouse army. Thevarious plot twists involving a king, a spooky fortune teller, and a heroic warrior named Franz are mixed with live-action ballet scenes, more incrediblydisturbing mice sequences, and an extremely trippy “land of happy times”sequence that defies all description. After its very brief run in theaters,Nutcracker Fantasy was released to video and a few cable television airings,which was enough to traumatize plenty of children throughout the early ’80s.The opening “Ragman” sequence surfaced on YouTube and prompted a fewnostalgic viewer comments about how it had scarred them for life.
The puppets in all of these early feature films were typically crafted out of foamlatex, plastic, wood, fabric, or other rubber materials. The use of modelingclay as a material for creating puppets and sets began in several experimentalstop-motion films in the 1910s and 1920s then faded into obscurity for severaldecades. It would not be explored again until Art Clokey brought his iconicGumby character to television in the 1950s, and it was further brought intopopularity by Aardman Animations and Will Vinton in the 1970s. Nobodyhad attempted to use clay animation in a feature-length format until a company named Stowmar Enterprises embarked on an animated version ofWalt Kelly’s popular comic strip Pogo. The production rights for Pogo werearranged in partnership with Walt Kelly’s widow, Selby, by executive producerKerry Stowell and screenwriter/director Marc Paul Chinoy. Armed with a $2million budget, they went into production on a clay-animation feature calledI Go Pogo from 1979 to 1980. Also involved in the early stages of the com-pany were Charlie and Stephen Chiodo, a team of brothers from New York
Chapter 1 n History of Stop-Motion Feature Films 25

who had grown up making their own animated films. I Go Pogo was producedin Arlington, Virginia, right outside Washington, D.C., and production wasset up in an office space in the Crystal City’s Crystal Underground shoppingmall. At one point, they had a storefront area where the character-fabricationdepartment was situated; although the windows were covered in paper for thesake of privacy, one face-sized hole was cut into the door. Crew members calledthis storefront area “the fish tank,” and mall shoppers would discover on theirown that an animated feature was secretly being made inside.
The Pogo production was a starting point for many animators still working inthe industry today, including Steve Oakes, who would become head ofCurious Pictures in New York, and Justin Kohn, Kim Blanchette, and KentBurton (Figure 1.18), who all worked most recently on Coraline. Blanchettewas a university student at the time, and the rest of the crew was largely madeup of other local artists, students, and amateur animators. Stephen Chiodoserved as director of animation, designed the clay puppets, and supervised themany aspects of production. All of the scenery was made of Polyform Sculpey,and the puppets were a sophisticated combination of malleable plasticine clayfor flexibility and painted ridged Sculpey parts for non-moving accessories.Press molds were made for creating the basic shape of the clay character, whichwould then be finessed with smoothing tools and texture stamps. Albert theAlligator, for instance, had a stomach plate pressed from a rubber mold thatmaintained the fine detail while the clay body was flexed. A genuine attemptwas made to keep the surfaces of the characters smooth and hide the lumpytexture and fingerprints made by the animator; the sets were kept severely airconditioned to help keep the clay from softening too much. An attempt wasmade to market the film’s technique as “Flexiform,” but it was actually nothingmore than clay combined with other standard sculpting materials. For the sets,trees were made of plaster casts from rubber molds, foliage from plastic craft-store arrangements, and reeds made of sheet copper. The sky backdrops weremade of giant milked Plexiglas sheets covered with blue gels that were illumi-nated from behind and had shapes cut out of them for clouds. The characters’plain white eyeballs were cast in resin and steel wool, and the pupils were separate pieces of rubber strip magnets. These magnetized pupils would stickto the steel wool in the eyes just forcefully enough that they could be lightlypushed around the surface of the eyes for movement. Another innovative tech-nique used in the film was wax replacement cycles built for walking sequences,some of which were shot as silhouettes against the back-lit sky backgrounds.
The Advanced Art of Stop-Motion Animation26

Chapter 1 n History of Stop-Motion Feature Films 27
The film’s story consisted of the comic strip’s regular cast of characters prepar-ing for the Okefenokee Swamp’s election and conspiring to nominate thereluctant Pogo Possum as a presidential candidate. The voice cast was animpressive line-up of popular comedic talent, including Jonathan Winters,Ruth Buzzi, Vincent Price, and Stan Freberg. The film itself was very heavyon dialogue, but the animation team tried to enliven the screenplay with somevisual gags. Stephen Chiodo recalls:
In an opening sequence featuring Mr. Mole and the Deacon chatting in a cave,I animated a great scene of the Deacon leaping off a table onto a stalactite(Figure 1.19), which then crashed down onto the table. I also did a 20-secondshot of Albert the Alligator (Figure 1.20), who gets his finger stuck in a knothole,and then his entire head, with his head squishing and popping through. Butthe director, Marc Chinoy, cut out those visual gags and left in all the heavy dialogue scenes.
After Pogo wrapped in 1980, the Chiodo brothers packed up and moved toCalifornia, eventually working on Tim Burton’s early films and starting theirown studio. The rest of the crew scattered as well to further make their markon the filmmaking world.
Figure 1.18
Animator Kent Burtonworking on a scene fromI Go Pogo. (© Possum
Productions/Walt Kelly Estate.)

The Advanced Art of Stop-Motion Animation28
Despite a modest marketing campaign in the papers and on television, I GoPogo did not get the proper theatrical release that was intended through 21stCentury Distribution. It was instead quietly released directly to VHS andBetamax videotape as an exclusive title for Fotomat (Figure 1.21), and thetapes were sold through their photo pick-up shacks in parking lots. It waspicked up for another video release as Pogo for President by Walt Disney HomeVideo in the early ’80s and aired a few times on HBO. (A few edits were madeto different video and television releases—for example, Chiodo’s knotholesequence was added back into the Disney version.) Despite these brief appear-ances, the film has since faded into obscurity. Although it was well animatedand had some very funny sequences, many fans of the original Pogo strip feelthat the film did not capture the essence of the characters or the political satireto its full potential and that it was largely bogged down by too much dialogue.The Stowmar producers did not continue into other animation ventures, buttheir Pogo feature did at least provide a launching pad for many in the creativedepartment and provided an interesting footnote in the canon of Kelly’sbeloved creations.
Figure 1.19
Deacon Mushrat in a cutscene from I Go Pogo. (© Possum Productions/
Walt Kelly Estate.)

Chapter 1 n History of Stop-Motion Feature Films 29
Figure 1.20
A production still ofpuppets from I Go Pogo.(© Possum Productions/
Walt Kelly Estate.)
Figure 1.21
Promotional material forthe Fotomat video release of I Go Pogo. (©Possum
Productions/Walt Kelly Estate.)

Clay animation finally made its way to movie screens a few years later, in 1985,when Oscar-winning animator (and founder of the term “Claymation”) WillVinton created his first Claymation feature film, The Adventures of MarkTwain (entitled Comet Quest in the U.K.). Vinton’s studio in Portland,Oregon, had already made a big name for itself producing award-winningshort films that pushed clay animation to a level of filmmaking. The Vintonstyle was that everything on screen was made of clay, from puppets to propsand sets. Animator Barry Bruce had refined Vinton’s signature style for fluidlip sync and clay morphing, and techniques for clay painting on glass weredeveloped by Joan Gratz. These animated methods were all brought to fruitionand further development in their first feature, which told the story of MarkTwain himself (Figure 1.22) traveling in a magical zeppelin to meet his destinywith the arrival of Halley’s Comet in 1910. Tagging along with him on hisjourney were his own characters Tom Sawyer, Huck Finn, and Becky Thatcher,who explore the many secret passages of his flying machine and encountermany surreal adventures. Most surreal of these is a terrifying sequence basedon Twain’s The Mysterious Stranger, where Satan appears to the children in amorphing Noh theater mask. As Twain recounts some of his other works like“The Diaries of Adam & Eve” and “The Celebrated Jumping Frog of CalaverasCounty,” the film switches gears to illustrate these particular tales with moreinspired Claymation. Many of the techniques used on previous short filmsneeded to be streamlined to be more efficient because of the feature-lengthformat. Multiple copies of characters were cast out of molds, stronger arma-tures were developed, and replacement systems were developed for lip sync,including the mustache of Twain himself. The Adventures of Mark Twain waspraised by many animation enthusiasts for its inventive visuals and was animportant step toward bringing the clay medium from its familiar short formats into a more epic scope for the big screen.
Elsewhere in the world, other stop-motion features were released to small audi-ences and festivals for limited releases throughout the 1980s. Rennyo and HisMother was the first feature-length film by Kihachiro Kawamoto in Japan,released in October 1981. It captured in puppet animation an ancient legendof the figure of Rennyo, who restored Shin Buddhism to Japan as a promiseto his mother, who had disappeared when he was a child. In 1982, Otto Fotkyin Hungary produced a stop-motion feature called The Adventures of Sam theSquirrel, and the same year saw a Czech puppet feature of Robinson Crusoe anda stop-motion mixed-media feature from France called Chronopolis, a surrealscience-fiction epic.
The Advanced Art of Stop-Motion Animation30

Chapter 1 n History of Stop-Motion Feature Films 31
In the U.K., Cosgrove Hall Studios was making a strong name for itself in creating animated content, mostly for television. Amidst the many shows thestudio produced, it scored one of its biggest hits with the stop-motion featureadaptation of The Wind in the Willows in 1983, based on Kenneth Grahame’sclassic book. The film followed the book’s adventures of the characters Mole,Rat, and Badger in their attempts to rein in the wild antics of Mr. Toad. Ahighlight of the feature was the incredible amount of detail that was craftedinto the miniature sets and puppets. Patterns for kitchen crockery and maga-zines were created in miniscule scale to create the atmosphere described in theoriginal book. Each puppet was constructed in latex over delicately constructedball-and-socket armatures, including mechanisms for very subtle facial expres-sions. Part of the team behind The Wind in the Willows would be the first collaboration between Peter Saunders and Ian MacKinnon, who teamed upto eventually form the world’s premier puppet-fabrication studio for count-less other productions. Also part of the small animation team was Barry Purves(Figure 1.23), who would later go on to be an award-winning key player inBritish animation himself. The Wind in the Willows was a huge critical successand went on to win a BAFTA, an Emmy, and many other awards. A stop-motion TV series based on the film continued from 1984 to 1987, as well asa spin-off series and TV feature centered more on the adventures of Mr. Toad.
Figure 1.22
A scene from TheAdventures of Mark Twain.(© Will Vinton Productions.)

The Advanced Art of Stop-Motion Animation32
Although the original Willows film was the only feature production meant fortheaters, Cosgrove Hall also created a stop-motion movie for television calledThe Fool of the World and the Flying Ship in 1990. This exquisite film wonanother Emmy and many other awards for the studio. Another stop-motionproduction from the same time period was Truckers, which originated as anepisodic TV serial but was later re-edited and packaged as a feature version.Truckers was based on a popular novel by fantasy writer Terry Pratchett, abouta race of tiny people called Nomes and their journey of survival through stow-ing away on humans’ trucks. One of the lead animators for the series was PaulBerry, who later directed the short film The Sandman and would go on to workon The Nightmare Before Christmas.
In the former East Germany, a couple of stop-motion features (and many moreshorts) were produced in the 1980s by a studio named DEFA, with directionby Gunter Ratz. A feature called Die Fliegende Windmühle (The FlyingWindmill), based on a book by Guenther Feustel, was released in 1982. Thiscolorful film is about a little girl named Olli who receives a bad grade in schooland runs away from home, ending up going on an adventure in a flying wind-mill with a dog, a horse, and a mad scientist. The film was interpreted by someas socialist propaganda disguised as a children’s film. Whether this is valid ornot, the film has a cult following among those who remembered it from child-hood. Ratz directed another feature to East German theaters called Die SpurFührt Zum Silbersee (The Trace Leads to the Silver Lake). It was essentially inthe style of an American western and based on a book by Karl May, who was
Figure 1.23
Animator Barry Purves on the set of The Wind in the Willows series.(© Cosgrove Hall Films.)

famous for western stories written in the 1890s. This animated version wascloser to the original book than a live-action version that had been producedin the 1960s. Like typical Hollywood western films, the historical elements ofthe stop-motion Silbersee feature were not completely accurate, given that Mayhad never visited the U.S., and East Germany did not receive exposure to thesewesterns for several decades. Following a limited East German theatrical runin 1989, the film was aired on public television to all of Germany followingthe Berlin Wall collapse in 1990. It was first aired as five episodes over theChristmas season and would be shown a year later in one piece. The poor box office for its initial release scrapped Ratz’s plans for another feature calledThe Ghost of Llano Estacado.
Czechoslovakia brought one of its most notorious feature films to the screenin 1988, directed by another one of the country’s most famous directors, Jan Svankmajer. It was a stop-motion/live-action adaptation of Alice inWonderland, simply titled Alice. While still based on the classic Lewis Carrollstory, it is decidedly more surreal even than Lou Bunin’s version and the polaropposite of Disney’s. Svankmajer’s vision was to adapt the tale with night-marish imagery, including puppets made of socks, living animal skulls, taxi-dermy specimens, and animated meat. One of the most disturbing and iconicimages from the film is the introduction of the White Rabbit, made from areal stuffed rabbit, who pulls his pocketwatch out of his chest cavity and leakssawdust. Alice became a cult classic and inspired a whole genre of surrealiststop-motion with dark themes and found object animation.
Also in 1988, there was a bizarre stop-motion/live-action science-fiction feature that came out of Montreal. It was called Bino Fabule, named after thetitle character (played by Italian actor Pietro Pizzuti), who was the only liveactor within a cast of stop-motion puppets. Bino is a scientist from the planetKarmagor who lives with his astrophysicist turtle sidekick, Torticoli. Hedreams of being able to fly and discovers a magical crescent-shaped characternamed Claire de Lune (Figure 1.24) who flies in a crystal spaceship. Claire deLune escapes from Bino when he tries to steal her flying powers, and she crashlands on another planet inhabited by a cast of living pots, pans, and weird aliencreatures (Figures 1.25 and 1.26). One of the alien leaders, Potassium, becomesjealous of Claire de Lune’s powers and attempts to destroy her. Meanwhile,Bino and Torticoli follow the activities on the planet with their video radarsystem, and through a series of other adventures ultimately end up savingClaire de Lune and the alien planet from destruction.
Chapter 1 n History of Stop-Motion Feature Films 33

The Advanced Art of Stop-Motion Animation34
Figure 1.24
Claire de Lune, a maincharacter from Bino Fabule.(© CineGroupe.)
Figure 1.25
One of the large stop-motion sets for Bino Fabule.(© CineGroupe.)
Bino Fabule was originally conceived as a possible television series by directorRejeanne Tailon, but the project eventually landed enough funding to developit into a feature film. It took nearly two years of persuasion by producer JacquePettigrew to finance the project, which was finally made through theCineGroupe production house in Montreal, with co-production by studiosin Belgium and France. The live-action sequences were all shot in Belgium,along with a live-action Torticoli puppet that came from the French studio.

Chapter 1 n History of Stop-Motion Feature Films 35
The crude live-action puppet was used in the background or edges of the framewhenever he shared the screen with Bino, but when Torticoli was on screenby himself, he was a stop-motion puppet. Line producer Andre A. Belanger(now head of Spectra Animation Studios) organized the flow of studio pro-duction in Montreal, where all of the stop-motion sequences were shot. BillMaylone was in charge of making lead wire armatures and molding the pup-pets, which were made of silicone rubber with replacement eyes and mouths.Most of the fabricators and animators had very little experience with stop-motion, but a unique feature of the production was the camera they used toshoot it. Technician Andre de Tonnancour created a custom-made movie camera out of a Nikon 35mm still camera with a film magazine attachmentthat could hold 100 feet of film. This camera was small enough to be placedon a large boom dolly for sweeping camera moves through the miniature sets,very much like today’s frequent use of digital SLR cameras to achieve the sameeffect. Ironically, with this technical innovation, the production of this futur-istic science-fiction film provided a glimpse into the future of using small stillcameras for stop-motion. Unfortunately, it did not do much for the film itself,which did not perform well in its theatrical release. The film was later broad-cast on television in its full length and also broken up into three episodic half-hours, but it has since faded into obscurity. It is definitely a strange film in thevein of many other science-fiction cult movies of the ’80s era, and the designsand effects have a very interesting quality to them.
Figure 1.26
A cast of characters fromBino Fabule. (© CineGroupe.)

Up to this point, original full-length puppet features were a mixed bag of limited commercial successes, failures, and experiments that did not makemuch impact outside of a few enthusiasts and were otherwise virtuallyunknown or unreleased outside their countries of origin. But the 1980s toearly 1990s was an interesting time for stop-motion, where many elementswere coming together to set the stage for a major breakthrough in the puppetfeature. The generation who grew up as kids in the 1950s and 1960s, beinghooked on Rudolph, Gumby, re-issues of King Kong, and the Harryhausen filmreleases, began making their mark well into the 1970s and 1980s. Of the stop-motion enthusiasts who blazed trails in the 1980s, Phil Tippett wouldrevolutionize the art of stop-motion creature effects, particularly through perfecting techniques for motion blur on The Empire Strikes Back (1980) andDragonslayer (1981).
It was during this same time period that Tim Burton and Henry Selick wereboth working at Disney, clearly disillusioned about the idea of “drawing cutefoxes” for the 1981 feature The Fox and the Hound. The atmosphere at the studio was one of trying to move forward into new territories, but lacking thechemistry and confidence to push them far enough. After Selick left to pur-sue stop-motion films in the San Francisco Bay Area, Burton managed to makehis stop-motion short Vincent (1982) at Disney and created concept art for astory titled The Nightmare Before Christmas, which remained owned by thestudio and tucked away in its archives. As ground-breaking as Vincent was, circumstances caused Burton to leave the studio and go forth to change theface of filmmaking elsewhere (through Batman and other early features).
Meanwhile, Will Vinton’s Claymation specials and commercials helped createa boom of popularity in stop-motion clay animation in the late ’80s, and manyclay animators honed their talent on the Saturday-morning show Pee-Wee’sPlayhouse. These popular shows helped set the stage for the original clay super-star Gumby to make his comeback in a new TV series. Art Clokey broughttogether a unique cross section of talent for his new show, and for many it wastheir first big break in the stop-motion world. The team of animators whocame together on this show included Mike Belzer, Stephen Buckley, AngieGlocka, Tim Hittle, Eric Leighton, Lionel I. Orozco, Anthony Scott, TreyThomas, and Richard Zimmerman.
This band of new talent would ultimately join forces with others on TheNightmare Before Christmas (Figure 1.27), which was given the green light byDisney’s Touchstone Pictures in 1990. Tim Burton chose his former Disneycomrade Henry Selick to direct the film, based on his experience in stop-motion and brilliant attention to detail. It was a deeply personal project forBurton—a culmination of his love for the stop-motion specials he loved as a
The Advanced Art of Stop-Motion Animation36

Chapter 1 n History of Stop-Motion Feature Films 37
Figure 1.27
Concept sketch of charactersfrom The Nightmare BeforeChristmas. (Courtesy of the
Animazing Gallery/Touchstone
Pictures.)
child and his story about Jack Skellington (Figure 1.28), the king ofHalloween Town who decides to replace Santa Claus on Christmas Eve. Atthe heart of all the creepiness and nostalgic vibe to the film was a poignantlove story between Jack and his admirer, Sally.
Nightmare was produced in 40,000 square feet of warehouse space in the SanFrancisco Bay Area over a span of three years. This was the first time a stop-motion feature was produced with a high-level budget and a wide range ofexperienced talent in the medium. Disney was back on top, animation wascool again, and stop-motion had been riding the wave of its first major goldenage in all of its facets: clay, puppets, and creature effects. Nightmare combinednearly every puppet and filmmaking technique that had ever been used forstop-motion, including front/rear projection, double exposure effects, castingin foam latex, ball-and-socket armatures, replacement animation, and strongcharacter performance. The production design was incredibly strong, andanother unique feature was the extensive use of modern motion control tomake the camera a moving part of the story. Topping it all off perfectly wasan unforgettable score and songs by Danny Elfman, a regular collaborator onTim Burton’s films.

The Advanced Art of Stop-Motion Animation38
Figure 1.28
Concept sketch of JackSkellington from TheNightmare Before Christmas.(Courtesy of the Animazing
Gallery/Touchstone Pictures.)

At the same time as production was occurring on Nightmare, the film JurassicPark was being produced with the intention of including the highest level of stop-motion dinosaur effects ever used. Tests in new breakthrough computer anima-tion technology would ultimately nullify the use of stop-motion for the film andput the nail in the coffin for the creature-effects technique when released in thesummer of 1993. However, The Nightmare Before Christmas, released later thatyear, proved that the idea of moving puppets frame by frame could finally workfor a feature and that it would still have a bright future ahead of it. Director ofphotography Pete Kozachik (see full interview with Pete in Chapter 5, “Interviewwith Pete Kozachik, ASC”) describes the significance of the film:
Nightmare came along at just the right time, and it was the show that managedto keep stop-motion from completely going away. There was a popular wisdomamong the stop-motion effects geek community that we all wanted to do a fullstop-motion feature, but nobody would take out a loan to finance it. The inter-est would mount up too much in this slow-moving process, whereas you can justdo it much faster in live action and not go broke paying back the loan. But in thiscase, Disney put out enough money to produce what was initially supposed to bea low-budget stop-motion feature. A bunch of us got together and threw every-thing we had at it, figuring it would never happen again, so let’s make it some-thing special. We spent six weeks just on the first shot (which was of Jack skiingdown the snowy hills and onto a train in Christmas Town) and didn’t know howwe were going to produce hundreds more shots to finish it, but we got there.
The success of Nightmare was strong in its initial release and only continuedto grow in the coming years on DVD and beyond. It was unique for the timeit was made and remains unique by today’s standards. Based on the uniquevision and great pool of talent that were displayed in the film, Disney hadinstilled confidence in Henry Selick to direct a follow-up feature in stop-motion, James and the Giant Peach, based on the famous book by Roald Dahl.Many of the same crew members from Nightmare regrouped to work on thenew feature, including British animator Paul Berry as animation supervisor.Tim Burton was also involved as a producer, but James was a film that broughtthe design and personal style of Selick more to the forefront. Much like Selick’searlier work for MTV, James combined elements of puppet animation withcut-outs, computer animation, and live action. From the outset, it seemedintended to be an experimental mix of media; the original idea was to combinea live actor as James throughout the whole film. This led to consideration ofa completely stop-motion film, and it ended up being stop-motion framed byopening and closing live-action segments.
James and the Giant Peach is a delightful film with some outstanding visualsand inspired animation (including a cameo appearance by Jack Skellington),
Chapter 1 n History of Stop-Motion Feature Films 39

although it did not match the same level of success as Nightmare. Also, by the time of its release in 1996, audiences were still reeling from the new CGinnovations by Pixar’s Toy Story and the wave of films inspired by Jurassic Park’sground-breaking effects. Even Disney’s other traditional features of the time,Pocahontas (1995) and The Hunchback of Notre Dame (1996), were comingoff as formulaic to most, and audiences were beginning to drift into new areasof interest. The relationship between Disney’s company Miramax and HenrySelick also became strained, as plans for another feature called Toots and theUpside Down House were abandoned. Selick moved forward on a new stop-motion project based on a graphic novel called Dark Town, which was even-tually renamed Monkeybone. Although that film contained some amazingstop-motion character sequences, the end result released in 2001 became moreof a strange live-action film that did not fare well at the box office.
Amid this renaissance of computer-generated visuals and new ways to makemovies, the stop-motion puppet feature continued its mixed bag of popularhits and other limited release obscurities. The Secret Adventures of Tom Thumbwas a 1993 release from the U.K. directed by Dave Borthwick of bolexbrothersthat mixed puppet animation with pixilation of live actors. Tom Thumb him-self is a sickly little puppet figure who escapes from an experimental sciencelab and embarks on a journey to return to his parents. The style of the film isgritty, surreal, and reminiscent of Svankmajer, the Brothers Quay, and thedarkest Czech films.
Back in America, 1995 saw a limited theatrical run of Gumby: The Movie, thefirst feature film starring Art Clokey’s clay icon (Figure 1.29). The story featured Gumby and his pals in a rock band planning a benefit concert, whichis threatened by the Blockheads’ attempt to replace them with robots. The feature was actually produced during the wake of the New Adventures of Gumbyseries, riding the coattails of the show’s newfound success and the fledglingtalent who started on the show. Art Clokey financed the $3 million featurehimself and stuck with the same level of simplistic charm that had existed inthe series. In fact, he simplified it so much that he narrowed his animationteam to a third of its original size and took about 30 months to shoot it. Theanimators who stayed to work on the feature ended up moving on to work onThe Nightmare Before Christmas shortly afterward. Production on Gumby: TheMovie had wrapped up around 1992, with intention of a fall 1993 release.However, there were significant delays in distribution, and even when the filmwas distributed, nobody heard about it because there was virtually no adver-tising or marketing. It was relegated to a director’s cut on video not long afterits lackluster release, but it managed to find an audience among die-hard fansof the show.
The Advanced Art of Stop-Motion Animation40

Chapter 1 n History of Stop-Motion Feature Films 41
Clay animation in a feature-length film would finally have its shot at world-wide commercial success by 2000. The 1990s had seen the rise of another stop-motion superstar with the genius of animator/director Nick Park. Park hadput the British Aardman Animation, founded by Peter Lord and DavidSproxton in the 1970s, on the map with his Oscar-winning short CreatureComforts. This was followed by further Oscar wins for The Wrong Trousers andA Close Shave, starring Wallace and Gromit. Expansion of the latter film tofeature-length was pondered at one point, but certain restrictions kept it atthe half-hour length of its prequels.
A feature film was the logical next step for Aardman, and several Hollywoodstudios were knocking on their door. The bridge between the two studioswould be found in producer Jake Eberts and his affiliation with Pathe Films,
Figure 1.29
Gumby and Pokey, stars of Gumby: The Movie.(Courtesy of Premavision
Studios.)

The Advanced Art of Stop-Motion Animation42
which agreed to finance development for a feature. Several ideas based on pop-ular stories were considered, but Aardman felt that an original idea was best.Some drawings of chickens in Nick Park’s sketchbook led to the idea of anescape movie with chickens. Upon pitching this idea to Eberts, the Aardmanteam found itself in front of Steven Spielberg, Jeffrey Katzenberg, and DavidGeffen, founders of the new DreamWorks Animation SKG.
Before long, a co-financing and distribution agreement between DreamWorksand Pathe proclaimed that Aardman’s first feature would be Chicken Run(Figure 1.30), directed by Nick Park and Peter Lord. American screenwriterKarey Kirkpatrick was brought on board to help Park and Lord crystallize theirstory, which told of a group of British chickens on a farm ruled by the evil Mr.and Mrs. Tweedy. A chicken named Ginger (voiced by Julia Sawalha) dreamsof flying to freedom with her friends, who come to believe an American roosternamed Rocky (Mel Gibson) is the answer to their prayers. Scenes of mystery,suspense, and adventure ensue as the chickens develop their master plan toescape their fate of being turned into pies by their captors.
Figure 1.30
Promotional still forChicken Run. (DreamWorks/
Pathe/Aardman/The Kobal
Collection.)

The film drew much of its inspiration from the 1963 film The Great Escapeand other POW films from the same era and mixed it with great design, funnycharacters, and (of course) outstanding animation. Chicken Run was shot instandard 35mm film, but it was the first feature film in Europe to use framegrabbers for digitally storing frames to register the animation. Computer ani-mation was also used for shooting rough animatics of their storyboards to geta better sense of the cutting and motion between scenes. Very little computeranimation was used in the film itself, except for a huge gravy explosion nearthe end. Five years in the making, Chicken Run was a big success for theAardman/DreamWorks partnership; it became one of the most entertainingfilms of the year and was loved by audiences and critics alike.
The year 2000 also brought to the screen a stop-motion feature called TheMiracle Maker, based on the life of Jesus Christ, a significant story to tell at thedawn of the new millennium. Directed by Derek Hayes, it was a co-productionbetween Wales and Russia, and took five years to produce. While the Welsh studio produced some cel animation sequences and overall production, all thepuppet animation was developed and shot by Russian animators at ChristmasFilms, which had a long tradition of adapting Biblical stories to stop-motionthrough their Testament film series.
With Russian animation director Stanislav Sokolov leading the stop-motionproduction, great attention to detail was paid to capturing the customs, attire,architecture, and landscape of first-century Israel with perfect historical accu-racy. Puppet animation, which in its very essence is created from scratch witha great sense of purity, lent itself perfectly to taking on this momentous task,and it was taken very seriously by the entire crew. The image of Jesus himself(Figure 1.31) was a culmination of many different representations of himthrough the ages and was ultimately inspired by photos of people from theregion where he had lived. The puppets’ heads were cast in dental acrylic withsculpted replacement mouths and their bodies in a rubber material calledFastflex. The results were stunning in their realism and were made even morepowerful by a moving musical score and unique script that told the storythrough the eyes of a young girl named Tamar, based on the Biblical Jairus’daughter, whom Jesus raised from the dead in the New Testament (Figure 1.32).Although the story of Jesus had been told across centuries through classical artand also on film, it had never been done quite like this. The film receivedpraise from audiences in theater and television screenings worldwide.
Chapter 1 n History of Stop-Motion Feature Films 43

The Advanced Art of Stop-Motion Animation44
The years surrounding the new millennium saw more stop-motion featuresthat were largely unknown and obscure to most of the world, including TheMagic Pipe (1998) from Russia and Prop and Berta (2000) from Denmark. InCzechoslovakia, two feature-length anthologies called Jan Werich’s Fimfarum(2002) and Fimfarum 2 (2006) delighted audiences with a menagerie of shortstories directed by noted stop-motion filmmakers Aurel Klimt, VlastaPosposilova, Jan Balej, and Bretislav Pojar. South Africa also produced its firstanimated stop-motion feature film in 2003, called Legend of the Sky Kingdom.
Figure 1.31
Puppet of Jesus Christ fromThe Miracle Maker. (© 1999
SAF and Christmas Films.)

Chapter 1 n History of Stop-Motion Feature Films 45
It was based on a children’s book by producer Phil Cunningham and employedpuppets and sets built from found objects of junk (therefore, the film wasreferred to as “junkmation” by the filmmakers). This was not only a budget-ary restriction, but also an homage to the folk art of Africa, which is oftenmade from discarded objects. In 2005, Colargol animator Tadeusz Wilkoszbrought a new puppet feature to Polish cinemas called Tajemnica KwiatuPaproci (The Secret of the Fern Flower), and Kihachiro Kawamoto completeda new feature called Shisha No Sho (The Book of the Dead).
The year 2006 saw completion of the 13-year production of an independentstop-motion feature called Blood Tea and Red String (Figure 1.33), directed byAmerican filmmaker Christiane Cegavske. Cegavske was an art student whowas inspired upon seeing Jan Svankmajer’s Alice, and she began animatingshort films while studying at the San Francisco Art Institute. Her short-filmprojects began to grow into what would become her feature, which wasfinanced mostly by working as a lead animator and sculptor for various studiosin Los Angeles. Blood Tea and Red String, described as “a handmade fairy talefor adults,” tells the story of two groups of creatures, the White Mice and theCreatures Who Dwell Under the Oak, and their conflict over gaining posses-sion of a beautiful doll. The story is filled with surreal, dream-like imagery, istold entirely without dialogue, and features a haunting musical score by MarkGrowden. The award-winning film played in several film festivals and was the
Figure 1.32
A scene from The MiracleMaker. (© 1999 SAF and
Christmas Films.)

first of an eventual trilogy by Cegavske, who is now working on her secondfeature, Seed in the Sand. (Cegavske’s production stills and other artwork canbe found at http://www.christianecegavske.com.)
The Advanced Art of Stop-Motion Animation46
Figure 1.33
A scene from Blood Tea andRed String. (© 2006 Christiane
Cegavske.)
Meanwhile, as independent rarities of puppet features spawned across theglobe, Aardman was busy moving forward on its multi-picture deal withDreamWorks. As Chicken Run wrapped, pre-production moved forward on are-telling of the Aesop fable The Tortoise and the Hare, but story problems prevented the feature from going any further. There had been talk of makinga feature-length film with Wallace and Gromit, so it was finally decided topursue it as the next project, entitled Curse of the Were-Rabbit (Figure 1.34).This time, Nick Park would co-direct with Steve Box, who he had also workedwith on the last two Wallace and Gromit short films. The story told of theclassic man-and-dog duo and their adventures rescuing their local village froma giant mutant rabbit that threatens to ruin the annual Giant VegetableCompetition.
The filmmaking techniques used for the new film were mostly the same as hadbeen used before, although there were some new uses for computer animationemployed for certain effects. CG was used to animate the bunnies floatingaround in the Bun-Vac 6000 machine used by Wallace and Gromit to capturean entire brood of bunnies; it would have been difficult to animate this in
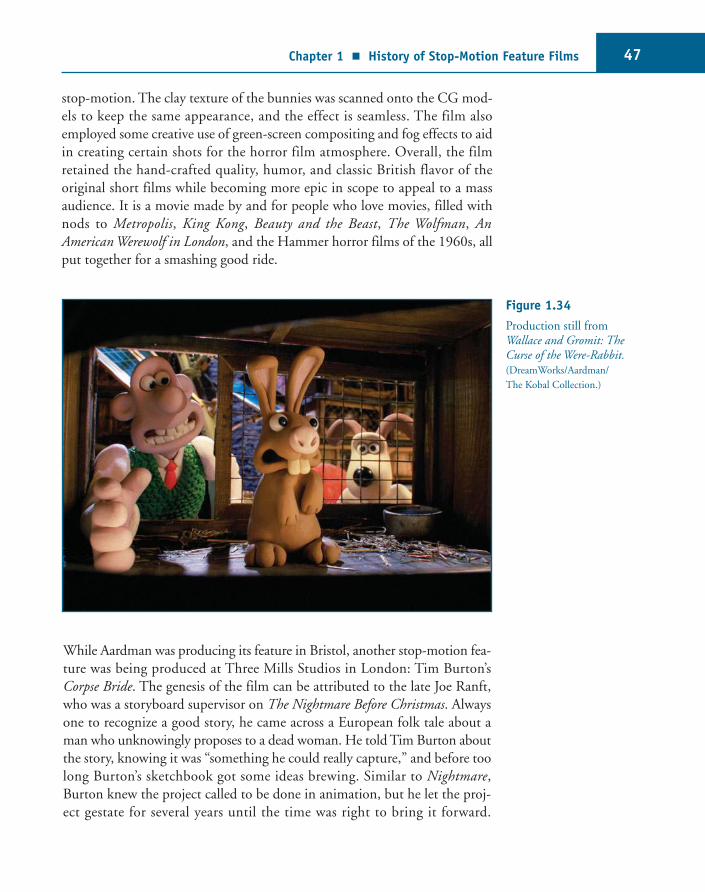
stop-motion. The clay texture of the bunnies was scanned onto the CG mod-els to keep the same appearance, and the effect is seamless. The film alsoemployed some creative use of green-screen compositing and fog effects to aidin creating certain shots for the horror film atmosphere. Overall, the filmretained the hand-crafted quality, humor, and classic British flavor of the original short films while becoming more epic in scope to appeal to a massaudience. It is a movie made by and for people who love movies, filled withnods to Metropolis, King Kong, Beauty and the Beast, The Wolfman, AnAmerican Werewolf in London, and the Hammer horror films of the 1960s, allput together for a smashing good ride.
Chapter 1 n History of Stop-Motion Feature Films 47
Figure 1.34
Production still fromWallace and Gromit: TheCurse of the Were-Rabbit.(DreamWorks/Aardman/
The Kobal Collection.)
While Aardman was producing its feature in Bristol, another stop-motion fea-ture was being produced at Three Mills Studios in London: Tim Burton’sCorpse Bride. The genesis of the film can be attributed to the late Joe Ranft,who was a storyboard supervisor on The Nightmare Before Christmas. Alwaysone to recognize a good story, he came across a European folk tale about aman who unknowingly proposes to a dead woman. He told Tim Burton aboutthe story, knowing it was “something he could really capture,” and before toolong Burton’s sketchbook got some ideas brewing. Similar to Nightmare,Burton knew the project called to be done in animation, but he let the proj-ect gestate for several years until the time was right to bring it forward.

The Advanced Art of Stop-Motion Animation48
Following Nightmare, of course, there was a glut of CG films straddling thelate 1990s and 2000s, including Burton’s own Mars Attacks! (which was CGafter being originally meant to feature stop-motion). When Corpse Bride figuratively rose from the grave of his sketchbooks, some thought was givento using CG. A few tests were done, but Burton knew that the project wouldhave much more resonance if it was done in stop-motion.
At first, the film was considered to be produced at the former Will VintonStudios in Portland, but the partnership was not meant to last. When the project was officially given the green light by Warner Bros., a crew of regularBurton collaborators combined with new talent was assembled in the U.K.Mike Johnson was chosen as co-director. Johnson had been an assistant ani-mator on Nightmare and went on to direct a short film called The Devil WentDown to Georgia and several episodes of The PJs at Will Vinton Studios. Thepuppets (Figure 1.35) were designed by premier fabricators MacKinnon &Saunders and were the first to employ a new technique for facial animation.Rather than extensive use of replacement heads, as had been done in otherfilms, the Corpse Bride puppet faces were manipulated by complex mechanismsof paddles and gears underneath a silicone skin. Animators would insert a tinyAllen key into holes positioned in the puppet’s ear or the back of the head to make the jaw drop, the corners of the mouth twitch, and other kinds ofsubtle movements.
The other breakthrough for Corpse Bride was the first use of digital still camerasfor shooting all the animation. This decision was made two weeks before production was to start, despite the fact that they had 30 classic Mitchell filmcameras and piles of film stock on the shelves ready to be used. The entire filmwas shot with Canon EOS-1D Mark IIs and provided instant feedback of eachscene, which made dailies easy to view and approve on the spot. All of the digital scenes were cut together using Apple’s Final Cut Pro, which was anotherfirst for a stop-motion feature.
Corpse Bride opened just two weeks after Curse of the Were-Rabbit in October2005, and both were nominated for Best Animated Feature at the AcademyAwards (against Howl’s Moving Castle). The simultaneous mainstream releasesand nominations were unprecedented for stop-motion in general. On Oscarnight 2006, Wallace and Gromit took home the prize, which was the thirdtime for Nick Park’s beloved dog and his owner, but a historical first for a stop-motion feature film. Despite this success, Aardman parted ways withDreamWorks after completing its third feature, Flushed Away, which was donein computer animation.

Chapter 1 n History of Stop-Motion Feature Films 49
Figure 1.35
Puppets from Tim Burton’sCorpse Bride. (Courtesy of
the Animazing Gallery/Warner
Bros.)

The Advanced Art of Stop-Motion Animation50
Riding on the popular success of these films, Switzerland’s first major forayinto stop-motion feature production (with co-production from France,Belgium, and the U.K.) came about with Max & Co. It was the first featureby directors Frederic and Samuel Guillaume, two brothers who had previouslymade a few short films. The story, incorporating detailed animalistic puppetsdesigned by MacKinnon & Saunders, told of a teenager named Max on asearch for his father. He is taken in to work at a fly-swatter factory called Bzzz& Co. and gets involved in a mission to save the local village from the plot ofan evil scientist. With a budget of nearly $30 million, Max & Co. was the mostexpensive film project ever produced in Switzerland. Production set up in anold Tetra Pak factory in the small Swiss town of Romont, with a diverse international crew of stop-motion and live-action filmmakers. The animationdirector was Guionne Leroy from Belgium, who had experience working onToy Story, James and the Giant Peach, and Chicken Run. Many of the otherexperienced stop-motion artists came from England, working with others fromCanada and all across Europe (Figures 1.36 and 1.37). The director of photography, Renato Berta from Switzerland, had nearly 30 years of live-actioncredits to his name and was shooting his first stop-motion feature. Manyunique techniques contributed to the dark urban atmosphere the directorswere aiming for, including photography of real local skies and landscapes com-posited into the backgrounds.
Figure 1.36
Marjolaine Parot animateson Max & Co. (Photo
courtesy Brian Demoskoff/
characters © Max-LeFilm.)

Despite critical raves and winning the Audience Award at the 2007 AnnecyAnimation Festival, the official European release of Max & Co. in February2008 did not live up to expectations. It only sold 16,000 of the 110,000 tick-ets anticipated, and the production company formed to create the filmdeclared bankruptcy. This turn of events obviously limited the potential for awider release, and so far the DVD release has apparently been limited toFrance. The extremely high production values, fluid animation, sophisticatedpuppetry, and beautiful design that went into the film make Max & Co. anunfortunately lost gem that may simply slip into cult status.
A similar fate befell the final release of Canada’s first stop-motion featureEdison and Leo (Figure 1.38), which had a smaller production budget of $10million, funded by Vancouver’s Perfect Circle Productions, Telefilm, andInfinity Features. Written by George Toles, the film was set in the late 19th-century Canadian prairies and centered on the exploits of shady inventorGeorge T. Edison. When a failed experiment injures his wife, Edison’s plea forhelp to a native tribe results in a series of murderous plot twists, including theelectrification of his son, Leo.
Chapter 1 n History of Stop-Motion Feature Films 51
Figure 1.37
Brian Demoskoff animateson Max & Co. (Photo courtesy
Brian Demoskoff/characters
© Max-LeFilm.)

The Advanced Art of Stop-Motion Animation52
The “steampunk” tone of the film was decidedly not geared toward a familyaudience, and it featured scenes of graphic violence and sexual innuendo. Theoriginal director ended up leaving the production midway and was replacedby Neil Burns, who had stop-motion experience from working at CuppaCoffee Studios in Toronto. Many of the animators also relocated from Cuppato work on the feature, which was shot in the gymnasium of a former FirstNations school in Mission, British Columbia. The location was also home tomost of the puppet fabrication, set workshops, and post-production. Sceneswere shot with digital still cameras, and the images traveled through a fiber-optic cable network straight to the editing suites in house. (I had the oppor-tunity to visit the set during production and was pleased to find one of myformer stop-motion students working in the puppet department.) For a rela-tively low-budget project, they attempted to put a good level of detail into thelook of the film, in particular the beautiful set design. Unfortunately, the darkstory and mean spirits of the characters were not enough to endear most audi-ences to the final product. The film played in the Vancouver InternationalFilm Festival in 2008 and the Ottawa Animation Festival in 2009, but it didnot secure a standard theatrical release and went straight to DVD. Historicallyspeaking, it is great that Canada has finally produced a fully animated stop-motion feature with a unique visual style, and hopefully it will happen again.
In production at the same time as Edison and Leo was another stop-motionfeature with a very adult sensibility, an Israeli/Australian production called$9.99 (Figure 1.39), directed by Tatia Rosenthal. Rosenthal was born in Israel
Figure 1.38
A scene from Edison andLeo. (© Perfect Circle
Productions.)

Chapter 1 n History of Stop-Motion Feature Films 53
and is now based in New York, where she studied animation at NYU’s TischSchool for the Arts. (The influence of her studies definitely made its way into$9.99; she based the design of one of her puppet characters after the TischSchool’s head of animation, Oscar-winning animator/historian JohnCanemaker.) Prior to her feature, Rosenthal had made two stop-motionshorts—Crazy Glue and A Buck’s Worth—in collaboration with Israeli writerEtgar Keret. The latter film consisted of a tense dialogue scene between a busi-nessman and a homeless man, which served as the basis for what wouldbecome $9.99.
Figure 1.39
A scene from TatiaRosenthal’s $9.99. (Courtesy
Here Media/Regent Releasing.)
Armed with a low budget, five months of pre-production began in Australiain August 2006. Production began in 2007, shooting with digital still camerasand a small crew of animators for 40 weeks, and post-production was completed afterward in Israel. Using naturalistic puppets of humans madefrom silicone, the feature consists of several interweaving stories surroundingseveral tenants in a Sydney apartment complex. The thematic elements of thevarious characters’ encounters are tied through the common thread of 28-year-old David Peck, who is reading through a book claiming to explain “themeaning of life, yours for only $9.99.” The existential script walks a fine linebetween fantasy and reality, and although it has the feeling of a live-actionfilm, it is presented in a fashion that has much more resonance through beinganimated.

Rosenthal referred to the style dictated by Keret’s stories as “magical realism,”which lent itself well to the stop-motion medium. Certain elements of thefilm, like a young boy dreaming up intricate shadow puppets on his bedroomwall and another character portrayed as a winged angel, would have stuck outas effects gimmicks in a live-action film, but through an entirely stop-motionuniverse, they fit much better, with a style all their own. The puppet charac-ters are realistic in their movements but stylized enough to present themselvesas more impressionistic and symbolic to the philosophical musings of thescreenplay. Overall, the film is very unique, bringing a fresh, mature approachto stop-motion among the more caricatured mainstream offerings geared moretoward kids. Several noted Australian actors, such as Geoffrey Rush, also lenttheir voice talents to the film. $9.99 premiered at the Toronto InternationalFilm Festival in 2008, and the following year began to find its way into theatersand festivals, picking up positive reviews and awards along the way.
Australia was not only home to the production of $9.99, but also Adam Elliot’sfeature Mary and Max (Figure 1.40). Elliot was already established as a suc-cessful figure in the independent animation scene, with several short films andan Oscar to his credit. While studying animation at the Victoria College ofthe Arts in 1996, he made a strange six-minute biographical clay animationshort called Uncle, which was a surprise hit at several festivals. Elliot’s signa-ture style brought forth in his film consisted of very limited animation of claycharacters, who often stared blankly at the camera, and shooting in black andwhite. A low, deadpan narration told the story behind the tragic lives of theseplasticine characters in a matter that is unsettling yet very touching. The powerof Elliot’s films lies in the brilliant writing, combined with funny characterdesign and a blend of humor and melancholy. Uncle was followed by a seriesof short films executed in the same style of dark, dry wit: one called Cousin,another called Brother, and finally the 22-minute epic Harvie Krumpet, whichwould take home the Academy Award for Best Animated Short Film in 2003.
Riding the wave of this success, Elliot would spend the next five years craftinghis first feature-length film. Mary and Max is recognizable as the same signa-ture style of his previous films, but it is brought to a whole new level of beauty,storytelling, art, and technique. The story tells of a pen-pal relationshipbetween Mary (voiced by Toni Collette), a young girl living in Australia, andMax (voiced by Philip Seymour Hoffman), an obese Jewish man withAsperger’s syndrome living in New York. They continue writing letters backand forth as Mary grows into adulthood and Max goes through a series of per-sonal trials, ultimately moving toward a beautiful, touching conclusion. Likehis earlier shorts, the film is dark, sad, poignant, and hilarious, all at the sametime. Elliot drew from many personal experiences writing and directing the
The Advanced Art of Stop-Motion Animation54

Chapter 1 n History of Stop-Motion Feature Films 55
film, basing it on a real pen-pal relationship he had and his thematic explo-ration of people who are different. The film was shot with Stop Motion Prosoftware interfacing with digital SLR cameras by a talented production crewthat included six animators and about 120 other artists and technicians.Hundreds of tiny props, puppets, and sets were handcrafted for the film, andaccording to production facts from the U.S. press kit, more than 7,800muffins were consumed (5,236 by the director). Mary and Max opened theSundance Film Festival in 2009, which was a first for both Australia and fea-ture animation, and really helped to push the animation medium to a higherlevel of acceptance by the film industry.
Panique au Village (A Town Called Panic) is yet another stop-motion featurethat has recently toured festivals and theaters, premiering at the Cannes FilmFestival. Based on the TV series of the same name by Stephane Auber andVincent Patar in Belgium, the aesthetic of A Town Called Panic (Figure 1.41)deliberately resembles tiny, old-fashioned plastic toys moving crudely anderratically through miniature clay sets and typically features fast-paced gagsand hilarious slapstick. The main characters of the series and the feature arehousemates Cowboy, Indian, and Horse. In the feature, Horse falls in lovewith his music teacher, Madame Longray, and Cowboy and Indian wake upremembering that it is Horse’s birthday. They frantically decide to make hima barbecue as a present, which results in the destruction of their house and aseries of adventures involving a giant robotic penguin and a family of under-water sea creatures. The crude nature of A Town Called Panic, developed bythe directors when they were art students, is completely at odds with the morecarefully crafted films it shares the screen with, but that is half the point. Thewacky French dialogue, jittery animation, and lightning-fast pacing of the filmand its bizarre story make it a fun ride (and incredibly funny).
Figure 1.40
A scene from Mary andMax. (© 2009, Adam Elliot
Pictures.)

The Advanced Art of Stop-Motion Animation56
While these independent features were hitting the festival circuit in 2009, thefirst big stop-motion feature event for mainstream theaters that year wasCoraline (Figures 1.42), released in early February. The evolution behind thefilm began when famed horror/fantasy writer Neil Gaiman fell in love with The Nightmare Before Christmas and was inspired to work someday withdirector Henry Selick. He wrote Coraline as a novel, inspired by his owndaughters, and sent the manuscript to Selick, who also fell in love with thestory and wanted to make it into a film. The story was about a young girlnamed Coraline who discovers an alternate world through a door in her newhouse. Everything in this “other” world seems to be much more enticing thanher life in the real world, but it soon unravels into a nightmare that Coralinemust find a way to defeat.
The project went through many years of finding the right studio, distributor,and medium to bring it to the screen. Choices to make it live action, com-puter animation, stop-motion, or a combination of these finally came to ahead in 2006, when production as a fully stop-motion feature finally began atLaika Studios in Portland, Oregon. Phil Knight had acquired Vinton Studiosin 2003 and renamed the company Laika in 2005, and Coraline would be thefirst feature produced under this new regime. The crew was a unique com -bination of talent, combining many who had worked consistently with Selicksince his MTV days with local Portland artists and others from around theglobe.
Figure 1.41
A scene from A TownCalled Panic. (© 2009,
La Parti Productions.)

Chapter 1 n History of Stop-Motion Feature Films 57
Figure 1.42
A scene from Coraline.(Courtesy Focus Features/
The Kobal Collection.)
The film was the first to use two new technologies for stop-motion filmmaking:rapid prototyping and stereoscopic photography. Rapid prototyping was amethod for printing out 3D computer models of replacement animation andprops into physical resin materials in order to combine the technical smooth-ness of CG into a stylized stop-motion set. Stereoscopic photography was amethod for actually shooting the stop-motion sets in 3D by taking left- andright-eye images of each frame and aligning them for stereo 3D projection.(Both of these techniques are described in more detail in Chapter 3, “BuildingProjects” and Chapter 4, “Digital Cinematography,” respectively.)
Even with this new technology and state-of-the-art compositing effects, everyeffort was made to keep Coraline as handcrafted as possible. Amazing minia-ture work was done in the puppet fabrication department, in the realms ofposable hair, tiny knit sweaters, and innovative animated plants for a fantas-tic garden sequence. Along with Laika, Focus Features did an incredible jobmarketing the film through a creative website and effective advertising, andthe anticipation paid off upon the film’s release. Audiences and critics alikegave it glowing reviews, making it a great success. As a whole, the awesomevision of Gaiman and Selick made Coraline a masterpiece that set the bar muchhigher for what the art of stop-motion could accomplish, in its design, story,animation, and technical innovation.
It is fascinating to note that the nearly 80 years of history behind the theatri-cal puppet feature began with Starewitch’s Tale of the Fox and has come fullcircle with Wes Anderson’s Fantastic Mr. Fox (Figure 1.43). Anderson didadmit that the Starewitch film inspired the look he wanted for his film. Based

The Advanced Art of Stop-Motion Animation58
on the classic children’s book by Roald Dahl, the film tells the story of Mr.Fox and his attempts to save his family from being captured by his human archenemies. Anderson took great liberties with expanding the content of the bookinto enough story material for a feature in his own signature style of deadpanhumor, flat compositions, and eccentric characters. The puppets were fabri-cated by MacKinnon & Saunders, with elaborate facial paddles for verydetailed but subtle animation. Also, aesthetically, Anderson wanted to main-tain the crawling fur that would occur when the animators touched them.
Several unique approaches were taken to the production itself, done at ThreeMills Studios in London. The voices, done by George Clooney, Bill Murray,and other well-known talent, were recorded on location rather than in a studio.This made the characters feel more like they were living in their respectivescenes, whether they were in a field or inside a cave. The animation directorwas former Will Vinton Studios animator/director Mark Gustafson, who coor-dinated production on the actual sets. Wes Anderson directed the film mostlyby e-mail from his office in Paris, viewing and commenting on still picturesand motion tests for his crew members remotely on a regular basis. He wantedas much of the film’s effects as possible to be done in front of the camera, utilizing cotton for smoke and large strips of cellophane for an iconic water-fall scene. The results were a very creative, hilarious film that caught audiencesand critics by surprise with rave reviews in late 2009. It has a very adult sensibility in the vein of Anderson’s other films but is still intelligent and enter-taining enough for kids to enjoy. Both Fantastic Mr. Fox and Coraline werenominated for Best Animated Feature at the Academy Awards, a fitting trib-ute to the long-overdue recognition of the stop-motion feature film and itshistory.
Figure 1.43
A scene from Fantastic Mr. Fox. (20th Century Fox
Film/The Kobal Collection.)

As 2010 is upon us (at the time of this initial book printing), the future looksbright for feature films made in stop-motion animation. What is also fascinat-ing is just how international the spectrum is for these films. Animaking Studios,the largest animation studio in Brazil, has been working for the past severalyears on its first stop-motion feature, Worms (Figure 1.44), based on its award-winning short film of the same name. The new feature film is made for all ages,with a focus on children, following the adventures of a pre-teen worm namedJunior. The film is slated for release in Brazil and Latin America very soon, andit appears to be receiving much support from distributors, media, and follow-ers of their production blog (http://www.minhocasofilme.com.br).
Chapter 1 n History of Stop-Motion Feature Films 59
Figure 1.44
Production still fromWorms. (Courtesy of
Animaking Studios.)
Elsewhere, a stop-motion feature called O Apostolo is being produced in Spain,a feature version of the TV series Sandmunchenn in Germany, and in Polanda stereoscopic stop-motion feature is being produced called The Flying Piano.Back in the U.S., Screen Novelties is moving forward with the Jim HensonCompany on a feature version of their short film Monster Safari (which youcan read more about in Chapter 2, “An Interview with Screen Novelties”).There is also an independent feature by Julie Pitts and Miles Blow in Australiacalled Wombok Forest still in production, and indie stop-motion filmmakersJustin and Shel Rasch (see Chapter 13, “An Interview with Justin and ShelRasch”) have dreams and plans for a feature project in the years to come.

In addition to independent features, the larger studios are moving forward onmore stop-motion feature productions. Aardman Animation is producingPirates under its new partnership with Sony Imageworks, and Tim Burton hasofficially joined forces again with Disney to create a feature-length stop-motion version of Frankenweenie, the live-action short he made for Disneyback in 1984. Meanwhile, stop-motion fans are waiting with anticipation asplans come together for future projects at Laika Studios and the next venturefor Henry Selick. As the future unfolds, we can certainly look forward to theadvanced art of stop-motion animation continuing its history on the bigscreen, with infinite possibilities and new stories to enchant us.
Author’s Note: This history chapter is dedicated to the memory of Art Clokey(Figure 1.45), whose work was the inspiration behind many of these stop-motion features.
The Advanced Art of Stop-Motion Animation60
Figure 1.45
Art Clokey (1921–2010).(Courtesy of Premavision
Studios.)

Screen Novelties is a special stop-motion film collective in Los Angeles, formed in 2003
by Seamus Walsh, Mark Caballero, and Chris Finnegan (Figure 2.1). Their style of
filmmaking, which combines puppetry and stop-motion with a classic cartoon feel,
can be seen in numerous short films, commercials, and sequences for TV specials shown on
Cartoon Network, on Nickelodeon, and at several festivals. They are also well known for
helping stop-motion master Ray Harryhausen in 2002 to complete his short puppet film
The Tortoise and the Hare, which had been left unfinished 50 years earlier. I first enjoyed
their film Mysterious Mose at the Spike and Mike’s Festival of Animation several years ago;
I have since enjoyed their unique approach to animation and puppetry and greatly appre-
ciate their passion for preserving stop-motion’s history. Naturally I wanted to acknowledge
their work and invited them to have their thoughts contributed to this book.
Website: www.screen-novelties.com
2An Interview withScreen Novelties
61
Figure 2.1
(Left to right) Chris Finnegan, Mark Caballero, Seamus Walsh.

The Advanced Art of Stop-Motion Animation62
KEN: How did you all meet each other and get started with stop-motion?
SEAMUS WALSH: Mark and I were in a class together at UCLA Extension, a series
of night classes they offered for hands-on camera instruction, and we were paired up
together on a project by chance. We started talking about stop-motion films like
Rankin/Bass’ Mad Monster Party and other stuff that we liked, and we were both saying,
“Wow, you’re the only other person I’ve met who has even heard of that movie!” So
we just started helping each other out on our projects for a few years.
MARK CABALLERO: Then we figured that rather than spend more money on our
own education through the school system, we’d take whatever little money we had
left and use it to buy a Bolex and make films on our own. We made two short films.
The first one we did, Old Man and the Goblins, got us into MTV Animation to work
on Celebrity Deathmatch out in New York. That’s where we met Chris.
CHRIS FINNEGAN: I had gone to college in Chicago and was doing some freelance
work there before getting the call to move to New York. Mark and Seamus also created
their short film Mysterious Mose right before coming out to work on Deathmatch and
completed the post-production there. At that time, around 1998, The PJs from Will
Vinton Studios was also gearing up on the west coast, but on the east coast, anyone
who was into stop-motion animation was getting hired to work for Deathmatch. We
saw it as a great opportunity to be able to animate every day, sort of like a stop-motion
boot camp, and we still work with many of the animators and fabricators who we
worked with on that show.
MARK: The other great thing about that show was that there wasn’t a whole lot of
direction, so we were able to pretty much direct ourselves. That led to a lot of unique
animation styles, so rather than stick with the standard Vinton style or what have you,
we were able to find voices for ourselves in doing the animation.
SEAMUS: It was really grueling, but a lot of really nice people worked on it and
banded together in the face of all the pressure. You had to get the shows done really
fast, but we kind of liked the looseness and anarchy of it, which was fun.
KEN: After that, what led to Screen Novelties being set up back in Los Angeles?
SEAMUS: Afterwards, Mark and I ended up coming back to L.A. because we had a
cheap living situation here, and we started making films again, including helping Ray
Harryhausen restore his film The Tortoise and the Hare (Figure 2.2). We also started
the Web shows that eventually became Robot Chicken. Back then it was called SweetJ Presents; it was a webseries of 13 episodes done for Sony’s website.

Chapter 2 n An Interview with Screen Novelties 63
CHRIS: I stayed in New York a while longer doing freelance work then came out to
L.A. to work on Sweet J with Mark and Seamus, which went on for about four or five
months. After that project wrapped, we all started talking about starting a studio. Part
of it was fulfilling a dream of ours, but part of it was also trying to generate work for
ourselves since freelance work was dying down a bit.
Figure 2.2
Mark Caballero animates thetortoise for Ray Harryhausen’sshort film. (Courtesy of Screen
Novelties.)

The Advanced Art of Stop-Motion Animation64
MARK: We never really thought of Screen Novelties as a stop-motion studio for hire,
but more like a production company for our own films. Of course, it’s rare that you
get to sell your own projects, so we like to take on bigger freelance projects, and
it does end up being like a small business. It’s really just the three of us, plus a few
assistants and a small stable of people we can bring in whenever there is a big budget
on a project.
CHRIS: After Mark and Seamus worked on The Tortoise and the Hare, it got some
attention and led to our first major work-for-hire job. Nike wanted to do a
Harryhausen-inspired spot with a minotaur and a hydra, based on the association we
had with Ray. That was our first commercial, and the first big project like that is always
the hardest one for directors to land. Once we got that, it really helped get the ball
rolling with the company.
MARK: Around that time we also got the call from Seth Green to help them start RobotChicken for Adult Swim, so we worked with them on that for the first couple seasons.
We also felt that we wanted to branch off and do our own thing so that we didn’t lose
what we really wanted to do. Between commercials or spots for Cartoon Network,
we’re still developing our own projects. We have a Monster Safari feature in develop-
ment and another short featuring our witch doctor character, which has been in our
heads for a long time.
SEAMUS: It’s a constant struggle because we’re always getting caught up in the free-
lance work, and we left Robot Chicken so we could do our own shorts but started
running out of money. So right now our work on Chowder and The MarvelousMisadventures of Flapjack for Cartoon Network (Figures 2.3) has replaced what we
were doing before. It’s still a lot of work, but it doesn’t require as much of a commit-
ment. Robot Chicken had 16 stages producing an episode a week, so it was very much
all consuming.
MARK: Plus on both of those shows, they still give us a bit of artistic freedom, but
more so with Chowder and Flapjack, we’re able to experiment more. That helps us
because any experimental stuff we do we can work into our archives and hopefully
work into bigger projects.
KEN: What specific roles do each of you normally play when working on these projects?
SEAMUS: For the most part, we try our best to trade off projects, so that each of us is
the creative head of whatever new project comes in, whether it’s a commercial or any
kind of freelance work.
MARK: Chris does a lot of the producer-type work, and Seamus leans more towards
design, but we all have creative input and will look towards whoever is the head of
any particular project.

CHRIS: A typical arrangement for a studio would be that one person does all the
business and another person does the creative, but we’re all animators who have made
our own films. We will bring in other producers or coordinators at times to help with
the bigger projects so that we can focus on the creative side, but we all pitch in and
do whatever is possible to make it work.
MARK: It’s more like a collective, where sometimes all three of us will take credit for
directing, or if somebody has more of a say in something, then they will do it.
KEN: What is your studio facility like?
SEAMUS: We have a 1,800-square-foot studio space in a warehouse behind some stores
on Melrose Avenue and Fairfax, kind of in a back-alley area. It’s just enough space to
keep the rent paid, with one larger stage and a few smaller stages.
CHRIS: When we do need more space, there are a few extra garages across the way
where we can store our power tools, saws, spraying booths, and chemicals.
KEN: What kind of camera equipment and software do you typically use, and have theychanged at all over the years?
SEAMUS: There haven’t been too many changes. It’s only been in the past 10 years or
so that we started shooting everything digitally. Back on Celebrity Deathmatch, we
used digital cameras and Adobe Premiere 4.2, which had a stop-motion capture func-
tion. Then when we did the Robot Chicken pilots for the Web, it was our first time
using digital SLR cameras and patching the frames together in After Effects or Final
Cut Pro. Since then we’ve just been using After Effects to put everything together.
Chapter 2 n An Interview with Screen Novelties 65
Figure 2.3
Seamus Walsh animating (left) and Chris Finnegan dressing a set (right) for production. (© Screen Novelties and Cartoon Network.)

The Advanced Art of Stop-Motion Animation66
MARK: As far as cameras go, we’ve just evolved with the times, so every couple of years
we’ll invest in new ones, like the Sony R1 we’re still using currently.
CHRIS: There are also so many more digital camera options now for stop-motion
compared to even five or six years ago. SLR cameras now have a live video feed option,
so we got a couple of those, and we still enjoy using the Video LunchBox tools since
they’re simple to use. We’ve also started using Dragon Stop Motion on a few projects,
but for post-production on our own projects seen all the way through, it’s still After
Effects that we will typically use for digital rig or flicker removal. Or sometimes the
post, editing, and color correction will be done elsewhere by the commercial client
we’re providing the animation for.
SEAMUS: The camera that’s used also depends on the project. If it’s a fast-paced proj-
ect, it’s nice to not have to deal with an SLR and the interchangeable lenses. On RobotChicken we just had fixed-lens cameras because you could go quickly and never had
to clean the sensors or other things like that. But on other projects, like our recent
SpongeBob SquarePants project (Figures 2.4), we used a higher-end Nikon D300. For
Nickelodeon, we just re-did the opening sequence of SpongeBob in stop-motion for
the 10th anniversary of the show, which was a lot of fun.
Figure 2.4
Puppets and set for Spongebob SquarePants 10th anniversary. (© Screen Novelties and Nickelodeon.)
KEN: What materials do you commonly use for your puppets?
SEAMUS: The methods we use are mostly like how Rankin/Bass made their puppets
back in the day; that part hasn’t changed very much. We’re usually more drawn to
fabric and fur textures than clay or silicone puppets. We try to use build-up as much
as possible and usually just use wire armatures because they are more loose and flexible.

Unless you’re going to spend lots of money making your ball-and-socket armature
really nice, they end up having many limitations and being rather clunky. Plus our
style is much more on the cartoony side, and wire allows you to do rubber-hose limbs
and animation easily.
MARK: If we knew that we were going to do animation with more repetitive actions,
or if the puppets have to last a long time, then we’ll go with ball and socket, but we’ve
rarely needed to go there. For that matter, even with foam latex puppets, we don’t go
there if we don’t need to. We like the look of build-up puppets, and there’s a lot to
play with—for instance, using found objects and stuff like that. One of these days
we’d like to try a replacement walk cycle, like the old George Pal Puppetoon style.
CHRIS: One thing technically that’s been an innovation over the last few years that
we’ve used in building props, sets, and puppets is the availability of laser cutting. If a
character has stick-on replacement mouth shapes, we can set those up as vectors in
Illustrator and get them laser cut on card stock or vinyl. This saves a lot of time cutting
things out with X-Acto knives. Especially on a project like Robot Chicken or similar
series where you need so many of those mouths, laser cutting is a great tool to have
access to.
KEN: Have you been looking into the rapid prototyping technology as well?
CHRIS: We haven’t done it yet, but we’re kind of itching to try it out because it’s a very
intriguing technique.
MARK: Yeah, we’re looking for a juicy-enough project to try it out on since it can get
a little pricey.
KEN: Do you guys have a collective or personal favorite project, or any that you are mostproud of?
SEAMUS: Well, everything you do, you like something about it. To do it in stop-
motion, you have to really throw everything you have behind it.
CHRIS: Before we officially started the company, Mark and Seamus did a stop-motion
dream sequence for a Cartoon Network Flintstones 2D feature called Flintstones on theRocks (Figure 2.5), and that’s one of the things that people keep mentioning over the
years.
SEAMUS: Yeah, that was really fun because they wanted that real Ed Benedict style to
everything. We sculpted everything with that in mind, keeping that real 1960s feel.
The puppets turned out really nice on that one, mimicking the Hanna-Barbera style,
but in stop-motion. It was strange because we had to find a nice balance between
moving it or not moving it and having it look dead but just alive enough to make it
feel like limited animation. We were pretty proud of how that one came out.
Chapter 2 n An Interview with Screen Novelties 67

The Advanced Art of Stop-Motion Animation68
MARK: I guess the bias would be definitely with our own stuff as well because we have
a lot more fun with the freedom it provides. We get excited about it since we don’t
have to match another style or run it through someone else. Also, working with Ray
Harryhausen was really exciting.
SEAMUS: Yeah, I don’t know how we could ever top working with Ray. The fun of
getting to rework all that footage was a great challenge. It was just one of those labor-
of-love projects that didn’t have any money involved and was done in our garage off
hours. It took forever, but it was so much fun.
CHRIS: The Monster Safari short we did for Nickelodeon (Figures 2.6) had a lot of
blood, sweat, and tears put into it. Unfortunately, it didn’t go forward with the network,
but it did get the Jim Henson Company interested, so we’re going forward on a feature
with them.
MARK: The feature is in the very early stages at this moment; we’re working with the
writers on a second draft of the script. Our plan at this point is to go with Henson to
get some financing together. It’s going to be one of those things where we are push-
ing the idea of an independent animated feature with a low budget so that we can try
to have as much freedom on it as we can.
SEAMUS: You want a project like this to have a high enough budget that you can pay
people well, but low enough that you can still not have every decision being made or
questioned by the big people. Henson seems confident they can find the money to
get it made, so we’re keeping a positive outlook on it, and the script is coming together
really well.
Figure 2.5
Puppets from Flintstones on the Rocks. (© Screen Novelties
and Cartoon Network.)

Chapter 2 n An Interview with Screen Novelties 69
CHRIS: The movie business is funny that way; we could be working on it in either
six months or six years.
MARK: Yeah, I’d say we’re hoping the current popularity of stop-motion will justify
our cause.
SEAMUS: And the Monster Safari short we did is something we’re particularly proud
of because it is the current best example of where we are headed, both visually and
story-wise.
KEN: Has making a feature always been a dream or major goal of Screen Novelties?
CHRIS: Doing work for television in stop-motion is always fun and has been for a
while, but it’s also exhausting because there is never the budget or time really to do
exactly what you want to do with it. You’re always making compromises; doing features
gives you more opportunity. You can spend days just lighting a shot and finessing more
details to get exactly what you want.
MARK: Plus with TV work, of course we would never turn down any offers to do a
series, but after a while, when you’ve inundated a few episodes with one character, it
doesn’t feel as special anymore. That’s the thing about stop-motion—there’s still not
enough of it out there to make it not special, so we want to make sure we don’t
contribute to that. Instead of creating a series of multiple episodes with the same
characters each time, we’d rather tell one good story with those characters and then
perhaps move on to the next story.
Figure 2.6
Seamus Walsh (left) and Mark Caballero (right) animating on Monster Safari. (© Screen Novelties.)

The Advanced Art of Stop-Motion Animation70
KEN: What advice do you guys have for someone doing stop-motion production in a creativestudio team environment?
CHRIS: One thing for us, since we’re a small studio, is that we tend to hire people who
are jacks of all trades. We can’t always afford to hire people who only animate, com-
posite, or build puppets. People who can do more of those things at once are a good
fit for us because that’s our background, and we all like to animate, build, produce,
and direct. That may not fit at a bigger studio, where things are more specialized, but
even beyond that, we’ve found that some students and others who can do everything
tend to shine in every part. Some animators who can also build puppets can end up
being better animators for it.
MARK: It’s always attractive for us to bring somebody in who knows multiple parts of
the process. For any freelance animator who goes in, whether it’s for a feature or a TV
series, it’s still valuable if you know everything because when you’re animating you
understand where the lights are and how to treat a puppet. The more knowledge you
have about what you do, it makes it better and easier for you, so we do encourage that.
For us as a studio, it works to keep things small, set a goal and stick to it, and not get
too big too fast. Also it’s vital to bring in people who know business and don’t want
to work in the creative side of things so that the artists can focus on that completely.
SEAMUS: When we were on Robot Chicken, people would send in reels; since we were
the animation directors, we’d have to evaluate them. When you meet people, you can
tell who can roll with the punches and not get too focused on the technical details.
With stop-motion you do have to pay attention to things like that, but there would
sometimes be animators who got so wrapped up in the technical side that they couldn’t
produce the daily animation quota. If you’re talking about students who want to
become animators, there are not many stop-motion jobs out there, and you’ll be
competing with others who have lots of experience. You have to compare your work
to the best stuff out there and push yourself to achieve that. It’s much more compet-
itive to get on a show like Robot Chicken now than when the show was just starting
out. You have to find your unique style and know as many different aspects of the
craft as possible so that you have other skills to fall back on. If animation jobs are not
open, you can find work building sets or something like that.
KEN: You guys seem to be very interested in preserving the history of stop-motion anima-tion, whether it’s finishing Ray Harryhausen’s short film or restoring the originalRankin/Bass puppets from their Rudolph special (Figure 2.7). What comments do youhave on your motivation behind this?
SEAMUS: We got into this because of a love for the art form itself. We never took that
many actual animation classes, so a lot of it has to do with an attempt to see as much
stop-motion that’s been produced as possible. There was a video store called Eddie
Brandt’s, where the owners took a bunch of their 16-millimeter films and transferred
them to video, which gave you the chance to see tons of stuff that’s never been released.

Mark and I used to go there on the weekends and rent five or six videos at a time;
that’s where we discovered Ladislas Starewitch, George Pal’s Puppetoons, Fleischer,
and stuff like that. We had an appetite for seeing as much stuff as possible that has
been produced out there, and that just kind of snowballed.
MARK: It’s important to know your history, and stop-motion is such a small facet of
filmmaking that it’s really not that difficult to know a little bit about your predeces-
sors and what they accomplished. I always get attracted to the people who know that
kind of stuff because that means they are drawing their knowledge from that and
applying it to what they’re doing right now.
SEAMUS: You know someone is passionate about the art form when they’ve taken the
trouble to seek out things like Karel Zeman films. We’re often surprised to meet stop-
motion people who don’t seem to know or care much about Zeman’s Adventures ofBaron Munchausen, for example. We know it’s obscure, so we would enjoy having
people over to our apartment and showing them this esoteric stuff, and they would
always appreciate it.
CHRIS: It’s getting easier to find these films now with many of them being released
to DVD, like the Japanese market, for instance, putting out more obscure stuff. It’s
still striking how much stop-motion has been produced over the years that nobody
has ever seen, like Bretislav Pojar, Zeman, and so on. When you actually see it, a lot
of the design and animation is better than anything that’s been done, even in recent
years.
Chapter 2 n An Interview with Screen Novelties 71
Figure 2.7
Restoring the originalRankin/Bass Rudolph puppets.(Courtesy of Screen Novelties.)

The Advanced Art of Stop-Motion Animation72
SEAMUS: The Internet is definitely helping that. Even back in the mid to late ’90s, it
was impossible to see anything. I remember as a kid looking in Ray Harryhausen’s
Film Fantasy Scrapbook, seeing images from the fairy tale films, and feeling frustrated
that there was no possible way to see the actual films. Now, luckily, these have been
released, and you can also go onto YouTube and find things like Joop Geesink.
Especially with stop-motion, I think you have to know the history of it in order to
find out what your little contribution to the art form is going to be. We were just
watching some of the Puppetoons recently, and we saw a double-bounce horse walk
done with replacement cycles! This was done about 70 years ago, and even as good as
modern films like The Nightmare Before Christmas and Coraline are, nobody has ever
topped this double-bounce horse walk. You need these things to set your bar high.
MARK: It’s just like if you study 2D animation; you have to know your predecessors
like Disney, Warner Bros., and Fleischer, so why not make that apply to stop-motion
as well? For that matter, when we were renting all of these videos and going through
everything frame by frame, both with 2D and puppet films, we found that you can
learn something from all of it.
SEAMUS: I would still count Rod Scribner and Ward Kimball as much of an inspiration
as Jiri Trnka because all the principles of 2D animation apply directly to stop-motion
as well.
CHRIS: It’s definitely something we try to keep in the front of our minds with every-
thing we do; a lot of stop-motion tends to default to realism or very dark, heavy
themes. We like to apply more of these elastic 2D principles to the medium because
you don’t see as much of it. Aardman Animations has done some of that as well, so
they are a big inspiration.
MARK: We don’t have anything against the darker material, like Jan Svankmeyer and
stuff. But we get a lot of reels from people who use imagery inspired by that genre but
don’t bother to take it a step further and learn more about those films. They could do
more research and find other filmmakers, like Kihachiro Kawamoto in Japan, who
did stuff like that, too.
CHRIS: So much of the student work seems to default to that Brothers Quay/Jan
Svankmeyer look for some reason. I’m not sure why that is; perhaps it’s what people
see more of.
SEAMUS: It could be because with that material, you don’t have to adhere directly to
character animation. A film like The Nightmare Before Christmas has a very high level
of character animation going on, and that’s something that people take years to
achieve, whereas on the surface of the Svankmeyer stuff, it’s more about atmosphere
and tone, not so much about a tangible walk cycle.
MARK: We have been seeing a slight change in that because we’ve hired a couple of
guys out of CalArts who do work outside of the dark, drippy stuff, which is nice to

Chapter 2 n An Interview with Screen Novelties 73
see. I think they’re trying to change that in the schools as well; some of our peers are
teaching there, applying what they’ve learned in the outside world to teaching the
students. I know that at CalArts and USC, they like to have a fine line between
character animation and experimental; stop-motion was always just experimental
before, which is a shame. We would go there to give presentations and often see such
a line dividing the two. We feel that even if you’re doing experimental animation, you
need a character in order to convey what you’re trying to express. Now that our friends
are in there, we’re starting to see a change in that, which is great.
SEAMUS: It could have something to do with the technology, too. In the past 10 years
or so, as LunchBox systems and software like Dragon have become more available,
they allow you to take risks that you couldn’t have taken before, when you were shoot-
ing on film and couldn’t snip frames out of the negative. I think back then, people
would just play it safe, whereas now, being able to flip and roll your stop-motion
frames like you would for 2D animation, you can push stuff and take chances, know-
ing you can always cut back. That wasn’t possible before, so I think that has a lot to
do with the increase of 2D-style stop-motion happening now.
CHRIS: Plus with digital rig removal tools, if you want to make a character jump in
the air, in the past that was a real challenge. Now it’s easier.
KEN: Do you think these tools are helping stop-motion find more of a place in the industryas a whole?
MARK: Yeah, stop-motion is carving more of a niche out there now, whereas in the
early ’90s we would see an animated puppet film only about as often as you used to
see it as a special effect in the old days. Now that CG has trumped that for dinosaurs
and effects, stop-motion has become more of a preference, based on what the director
wants to do. If a director like Wes Anderson decides to do his next movie in stop-
motion, then he can, and nobody is objecting, saying it’s too expensive or whatever,
because it’s not anymore. It can cost just as much as any other film, so I think it’s
becoming more accepted as just another way to make a movie that people will want
to see.
CHRIS: Also, in the past 10 years or so, we’ve seen a massive advance in CG with the
rendering becoming slicker and smoother, and the general audience ate it up and
followed it. But it has gotten to the point where CG has saturated, where it’s not an
attraction in itself just to see a computer film. We’d love to see stop-motion in the mix
with CG and also with 2D because there’s no reason 2D should be dead. If it suits
your story, it should be a viable option.
SEAMUS: All the techniques have a different look, so why not have them all on the
table, unless one of them is extremely cost prohibitive compared to the others? At
feature-level work, they are all now pretty much the same; it just depends on which
medium you like to work in. I think people tend to gravitate towards the low-fi
stop-motion work because it doesn’t look like CG. Many average people who saw

The Advanced Art of Stop-Motion Animation74
Corpse Bride probably thought it was done with computers. It’s weird because the
audience probably doesn’t care whether something is done in stop-motion. We’re not
kidding ourselves that there are tons of average people thinking, “I wish there was
more stop-motion being done”; I think people just want to see something that looks
fun or is interesting to them at that time.
CHRIS: I think it’s important to stress that there is CG animation out there that delib-
erately tries to look like stop-motion and is very convincing in the way it’s rendered
out to look that way. You have to ask whether it’s worth it to do CG and create a stop-
motion look, but I think the process of actually building physical objects and having
animators move things in real space affects the way the animation comes out. A bunch
of people sitting at computers are never going to produce the same kind of vibe as
people creating real miniature environments.
SEAMUS: From anyone I’ve talked to who has tried to mimic the stop-motion process
in CG, they all say it takes so much time to put the imperfections in that you could
almost do it faster in stop-motion to begin with.
CHRIS: We often speculate about how people feel about stop-motion in the industry—
that perhaps if the films flop, people will stop making them. Fortunately, Coralinefound an audience, and we hope that trend continues.
MARK: It will be interesting to see what Aardman’s next feature is like, since some
people speculate that The Curse of the Were-Rabbit didn’t make as much money as they
thought it would, perhaps due to some strife with DreamWorks. The general assump-
tion is that the big moneymakers are CG, but Chicken Run also did really well, so if
their next film with Sony does well, it’s good for those of us in stop-motion.
CHRIS: It’s tough going month to month in the business sometimes, but you really
can’t ask for more. There are quite a few pockets of stop-motion going on in L.A. right
now between the crew at Shadow, Chiodo Bros., and so on. And up in Portland, there’s
a network of people who do it, plus a handful in New York.
MARK: It’s nice having that network because if you do stop-motion, chances are you
know about 80% of the others who do it as well. We adapt our crew to each job we
get, so if we need more people, we just tap into that. We feel really fortunate to be
doing stop-motion. There are not many people in the world who actually get to do
what they want for a living and get paid for it.
SEAMUS: Yeah, it’s weird that we’ve managed to survive this long! As a kid I never
thought I’d be able to make a living doing stop-motion. There are only a few studios
that do it, and many more do it as a hobby. It’s just fun.

At the 2006 Ottawa Animation Festival, I had the rare privilege to meet stop-motion filmmaker Kihachiro Kawamoto and hear him speak on a panel.Knowing that he had studied the craft under the legendary Jiri Trnka,
I asked him which lessons were the most important he had learned from Trnka.His reply was that Trnka had told him, “A puppet is not a miniature human. Hehas his own world.” In my first book, The Art of Stop-Motion Animation, Chapter 7,“Building Puppets,” there was a basic overview of character design, doll armatures,ball-and-socket armatures, wire armatures, foam latex molding, latex build-up,and clay puppets. This volume’s chapter will go into a bit more detail about someof these methods and introduce some new ones, from plug-in wire armatures, facearmatures, and silicone molding/casting to cable controls, rapid prototyping, andreplacement puppets. The end goal of these methods is the same when the camerasstart clicking: to bring these carefully crafted figures to life in that other world onthe screen.
Let me reiterate one of the most important principles to follow: design your puppetbased on what is required of it, in terms of its character and movement. Which partsare hard, flexible, replaceable, heavy, or light will have a direct impact on the ani-mation of your puppet, so design everything with this in mind. Also rememberthat your puppet will be touched continually throughout the animation processand will need to be strong enough to hold each position between frames. The deci-sions you make regarding which methods or materials you use will also dependon your budget, skill level, available space, and time allotted. Often, the simplestsolutions work best. Other times, things can get more complicated, but if youbuild with the end goal in mind, things will fall into place with a little practice.
3Building Puppets
75

You may find that whatever related art forms you have experience with willinfluence which puppet-building techniques you prefer to use. If you have asculpting or painting background, you may find latex build-up a satisfyingtechnique to work in. If you are very technical and like building things out ofmetal, wood, or hardware materials, you may gravitate toward wanting tomachine ball-and-socket armatures. The possibilities for making puppets areas infinite as everything else in the universe; there is really no wrong way tosculpt a face, build an armature, or design a way to combine different mate-rials together (although some materials don’t tend to mix well). You just findwhatever works for you and go crazy with it!
When building puppets, a universal rule is to have a table-top space to workwith that can be dedicated to the process for a considerable length of time. Ifall you have is your dining room table, go with that, but it helps to cover itwith cardboard, sheets of brown paper, or wax paper to help materials fromsliding around, getting lost, or damaging any of your furniture. Be aware ofthe mess that can and will be created and which items close to your work-space, including your clothes, can be permanently soiled by the materialsyou’re using. Take this from someone who has spilled latex everywhere andruined his clothes on a few occasions. But hey, it’s all in the name of art, right?
If you build your own puppets, some of the methods described in this chapterare written in a tutorial fashion that allows you to treat the text and picturesas a guide. You should feel free to deviate from the text once you become moreconfident and come up with your own ideas based on the foundations providedhere. In other cases, some of these methods are merely an overview of the processand can be complemented by other sources of guidance. One additional disclaimer: When dealing with chemicals like epoxy glue or putty, silicone,plastic, or other toxic substances, this chapter will describe the process for you,but always read the safety instructions that come with these materials. Theseadvanced puppet-building methods should be done in a controlled environ-ment with plenty of ventilation and kept isolated from situations where petsor small children could get into them. Good art often involves pain, but it’snice to avoid trips to the hospital if you can. Materials never behave the sameway twice, and you will always be fighting with them, but this is all part ofthe process. Above all, do your research, ask for help, let yourself make mistakes,and enjoy it!
The Advanced Art of Stop-Motion Animation76

Plug-In Wire and Sockets
Wire armatures are great for producing simple characters at relatively smallsizes and provide a good range of movement at a relatively low cost. A simplewire armature is typically built of 1/16-inch aluminum wire that has beentwisted into double strands and is held together with epoxy putty for any rigidparts. The biggest disadvantage to wire armatures, of course, is that they willsnap and break eventually, even if they are built really well. If your wire arma-ture is covered with detailed latex build-up or has a casted foam latex body, itdoesn’t have much of a future once it breaks. This can be frustrating, especiallyif it happens in the middle of a long stop-motion scene that takes you severaldays to shoot. By whatever methods are in your means, it is in your best inter-est as both a puppet-builder and an animator to prolong the life of your puppet as long as you possibly can. As you plan everything else, plan for even-tual breakage of your puppet and balance this with how much animation youneed to shoot.
One way to create a wire armature that hopefully will last longer is to designit with sockets that allow you to remove and replace certain body parts if andwhen they do break. Being able to remove an arm or leg and replace it with anew one can save you from scrapping an entire puppet or hours of animation.The following pages will show some very simple and more advanced methodsfor building your own armature from scratch, implementing wire and sock-ets. Some people refer to these types of armature designs as “plug-in” arma-tures, meaning the replaceable parts are plugged into their correspondingsockets.
As always, you should start your puppet’s design and its corresponding arma-ture on paper. On a regular sheet of 8½ by 11 paper, draw a diagram of yourpuppet standing in a generic standing pose. You can use larger paper, depend-ing on the size of your puppet, but keep in mind that the larger the puppet,the more important the issue of top-heaviness becomes. Depending on thedesign and materials used, the size of your puppet can easily move it beyondthe point where a wire armature will support it, and you may need to considerother methods. For a simple wire-and-socket armature, a small to medium sizeis best and will typically work for any puppet ranging from 6 to 10 inches inheight. Draw your character diagram in a generic pose with arms slightlyfanned out from its sides to give you plenty of space to work around. In theexample shown in Figure 3.1, I’ve designed a basic human figure. The diagram
Chapter 3 n Building Puppets 77
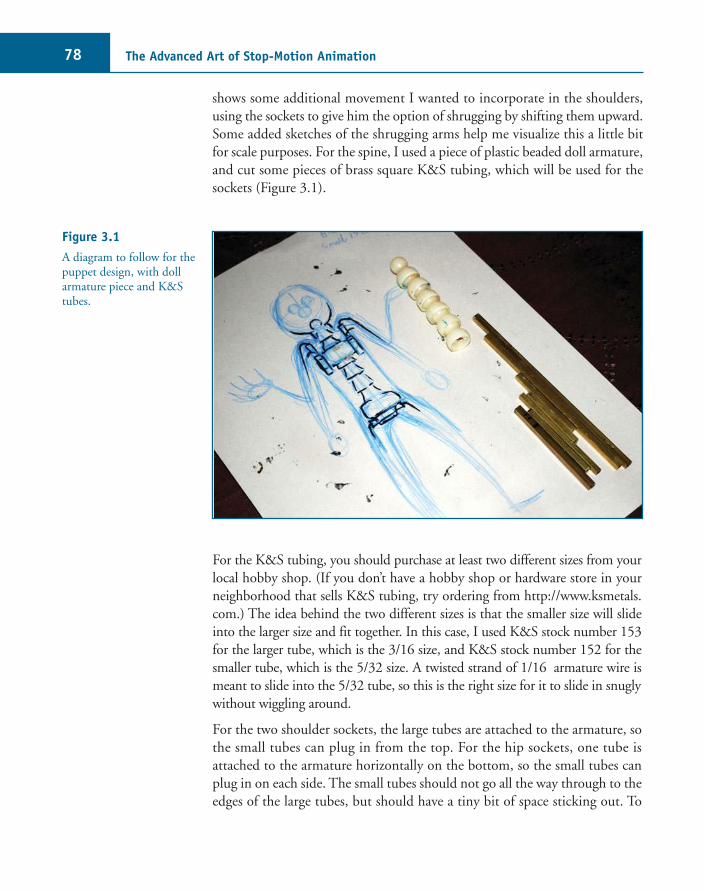
shows some additional movement I wanted to incorporate in the shoulders,using the sockets to give him the option of shrugging by shifting them upward.Some added sketches of the shrugging arms help me visualize this a little bitfor scale purposes. For the spine, I used a piece of plastic beaded doll armature,and cut some pieces of brass square K&S tubing, which will be used for thesockets (Figure 3.1).
The Advanced Art of Stop-Motion Animation78
Figure 3.1
A diagram to follow for thepuppet design, with dollarmature piece and K&Stubes.
For the K&S tubing, you should purchase at least two different sizes from yourlocal hobby shop. (If you don’t have a hobby shop or hardware store in yourneighborhood that sells K&S tubing, try ordering from http://www.ksmetals.com.) The idea behind the two different sizes is that the smaller size will slideinto the larger size and fit together. In this case, I used K&S stock number 153for the larger tube, which is the 3/16 size, and K&S stock number 152 for thesmaller tube, which is the 5/32 size. A twisted strand of 1/16 armature wire ismeant to slide into the 5/32 tube, so this is the right size for it to slide in snuglywithout wiggling around.
For the two shoulder sockets, the large tubes are attached to the armature, sothe small tubes can plug in from the top. For the hip sockets, one tube isattached to the armature horizontally on the bottom, so the small tubes canplug in on each side. The small tubes should not go all the way through to theedges of the large tubes, but should have a tiny bit of space sticking out. To

help keep the tubes in place, not pushing too far in, you can plan for punch-ing a dent in the large tube at the point you want the small tube to stop andessentially lock into position. With this configuration in mind, lay the K&Stubes over the diagram and make marks with a felt-tip marker to determinethe sizes to which they should be cut (see Figure 3.2 for a closer look at themeasured marks).
Chapter 3 n Building Puppets 79
Figure 3.2
K&S tubes lined up with the diagram formeasurement purposes.

The Advanced Art of Stop-Motion Animation80
To make the dents in the tubes, simply line them up in a mitre box, place asmall Phillips screwdriver, a nail, or a center punch on the exact spot, and givea few small taps with a hammer (Figure 3.3). Then, cut the large tube piecesand slide the small tubes in to make sure they lock into position properly. Analternate step to this process is to slide the tubes into each other and thenpunch a small dent into both of them. This will provide a notch for the smallertube to fit into and lock strongly into position. The double dents will keep theplug from slipping out, but it also might make it harder to pull out if needed,so experiment to see what works best for your design.
Next, you can cut the small pieces. As you progress, keep lining things up withyour diagram to make sure you are staying on track with things in terms ofsize (Figure 3.4). To get the small pieces out of the larger sockets, simply usea small Allen key to push them out from the other side (Figure 3.5).
Figure 3.3
Hammering a dent into the K&S tubes.
Figure 3.4
Lining up the tubes with the diagram.

Chapter 3 n Building Puppets 81
Figure 3.5
Pushing the tubes out with a small Allen key.
Figure 3.6
Hot gluing the socket tubes to the armature.
Once all of your pieces are cut, attach the large socket tubes to the armaturein the proper place with hot glue (Figure 3.6). This will not be the ultimatesolution for keeping them affixed because it’s not strong enough for all thepressure you’ll eventually put on the puppet. It’s just a temporary measure forkeeping the pieces in the right place. Next, for the arms and legs, cut and twistsome aluminum wire pieces and slot them into the small tubes. Continuemeasuring against your diagram, and put the whole figure together to makesure it’s working for you in terms of proportions (Figure 3.7).
Figure 3.7
The various pieces andlimbs slotting together.

The Advanced Art of Stop-Motion Animation82
Figure 3.8
Mixing the two-part epoxy glue.
Figure 3.9
Dipping wires into the epoxy glue.
Figure 3.10
Gluing wires into the K&S tubes.
Figure 3.11
Affixing the socket tubes to the armature with epoxy putty.
The next step is to permanently glue the wires into the small tube pieces. Usea tube of two-part steel epoxy glue, squeezing out equal amounts and mixingthem together on a piece of cardboard with a Popsicle stick until they are aneven color (Figure 3.8). You only have a few minutes to work with the epoxyuntil it sets, so dip the wires into it right away (Figure 3.9) and then slot theminto the tubes (Figure 3.10). Let them sit for at least 45 minutes to an hour toensure that they are firmly set inside. While that’s going on, you can affix thelarge socket tubes to the doll armature with some epoxy putty (Figure 3.11).When everything is dry, you have the essential elements in place for a simpleplug-in armature with removable arms and legs (Figure 3.12).

Chapter 3 n Building Puppets 83
Figure 3.12
Completed armature withplug-in arms and legs.

The Advanced Art of Stop-Motion Animation84
At this point, you can add a removable head if you wish, using more K&Sattachments, or just permanently attach a Styrofoam-ball head to the top beadof the doll armature with hot glue. You can also begin working on buildingthe arms and legs, with corresponding hands and feet (removable or not) asseparate pieces. An armature like this can be covered with clay, latex build-up,fabric clothing, or a combination of these materials. With all of these particularmaterials and more, a wire-and-socket armature is especially handy. A claypuppet, for instance, needs to be resculpted constantly while being animated.The nice thing about being able to take the puppet apart is that it allows forresculpting or replacement of different limbs without the need to put pressureon the entire puppet on set. It is particularly useful if you create a puppet, forexample, with clay or latex limbs and short-sleeved clothes made of fabric.Fabric clothing is a relatively forgiving covering in terms of working aroundit, and if the limbs are skinned with a different material, there is no need tohide any seams where the plug-in sockets are.
Another advanced method for building a plug-in wire armature is presentedhere thanks to professional stop-motion puppet builder Bronwen Kyffin. Thismethod combines wire limbs with chest and hip plates made of aluminumblocks (Figure 3.13). The blocks have been cut to shape and drilled with holesfor the limbs to plug into on the sides. Everything on this puppet can be takenapart, including the arms, legs, chest, waist, and feet (Figure 3.14). In additionto holes for the plug-ins on the sides, the front of the block has additionalholes that have been tapped with threads to accept tiny set screws that holdthe limbs in place. The end of each aluminum wire limb is covered with a smallbrass tube and inserted into the plug-in hole behind the threaded holes. Brassis used because the aluminum wire is too soft to have screws embedded intoit and would likely snap inside rather quickly. Set screws are put into thesethreaded holes to fit snugly into notches in the brass to lock the limb into place(Figure 3.15). In the event that the limbs break, the set screws are removed,and a fresh limb can be inserted back in its place.
To help prolong the life of the wire limbs, they are covered partially in elec-trical shrink-wrap tubing. The tubes are slid over the twisted wire and blownwith a hot-air dryer to shrink their form around the wire and make themstronger. The wires used for the torso/waist area are a bit thicker at 1/8 inch,while twisted 1/16-inch wire is used for the arms and the wrists. The fingersare made of threaded 24-gauge floral wire, which is even thinner. The logicbehind using different gauges of wire is simply to work out the tension of thepuppet from the inside out.

Chapter 3 n Building Puppets 85
Figure 3.13
Plug-in armature for “LittleBronwen” puppet. (Courtesy
of Bronwen Kyffin.)

The Advanced Art of Stop-Motion Animation86
A similar principle is applied to the other puppet, which uses the doll armaturefor the body and wires for the limbs. When animating either of these puppets,it is likely that most of the pressure from the animator will be placed on thetorso. One hand will grip the body tightly, while the other hand moves an armor a leg, for instance. Ideally, you want to have less tension on the limbs sothat they can be moved without putting too much pressure on them. At thesame time, the waist should be stronger so that it can take more abuse fromthe animator and not risk being moved while the limbs are animated. Evenwith a very strong armature, any of these wire puppets might last only longenough for about one to three minutes of screen time before needing replace-ment, repair, or retirement. Think and plan ahead for just how much anima-tion needs to be performed and whether those movements are broad or subtlein order to get the most mileage out of the building methods you use.
Figure 3.14
Plug-in armature with alllimbs taken apart. (Courtesy
of Bronwen Kyffin.)
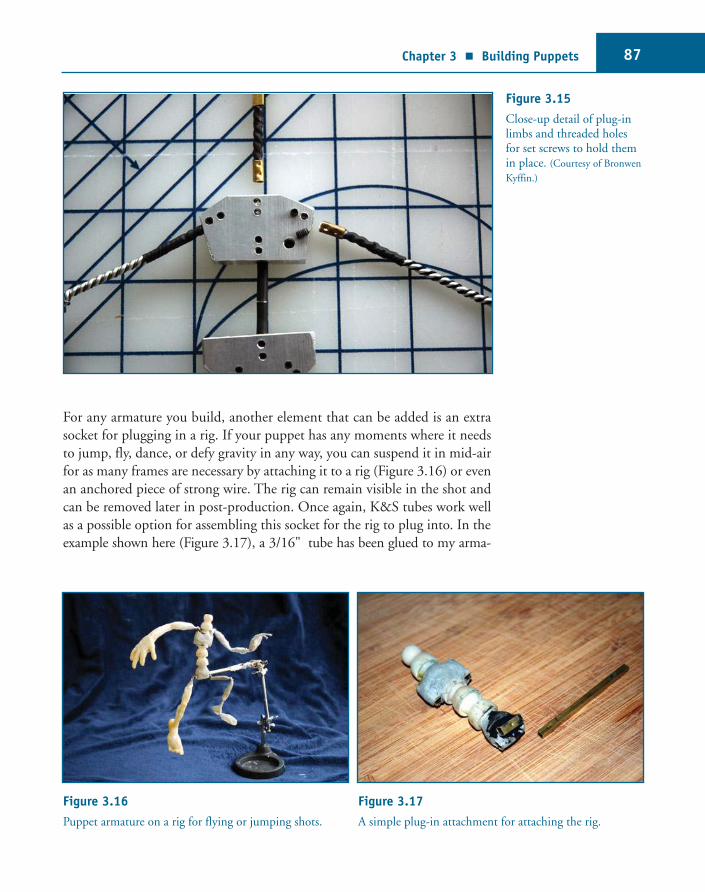
Chapter 3 n Building Puppets 87
For any armature you build, another element that can be added is an extrasocket for plugging in a rig. If your puppet has any moments where it needsto jump, fly, dance, or defy gravity in any way, you can suspend it in mid-airfor as many frames are necessary by attaching it to a rig (Figure 3.16) or evenan anchored piece of strong wire. The rig can remain visible in the shot andcan be removed later in post-production. Once again, K&S tubes work wellas a possible option for assembling this socket for the rig to plug into. In theexample shown here (Figure 3.17), a 3/16" tube has been glued to my arma-
Figure 3.15
Close-up detail of plug-inlimbs and threaded holesfor set screws to hold themin place. (Courtesy of Bronwen
Kyffin.)
Figure 3.16
Puppet armature on a rig for flying or jumping shots.
Figure 3.17
A simple plug-in attachment for attaching the rig.

The Advanced Art of Stop-Motion Animation88
ture on his backside, so a 5/32" tube can slide into it and be held in place bya helping hand rig. Dents have also been punched into these tubes to helplock them into place. The helping hand rig, found at most hobby shops, is agreat tool for holding puppet parts when building and works great for jump-ing rigs. The joints on the rig are the made of the same pieces as a ball-and-socket armature, so it can essentially be animated itself. (You can even buyseveral of them and cannibalize their parts to make your own ball-and-socketpuppet armature, if you want.)
Hands and Feet
Once you have your arms and legs built, the next step is to build some handsand feet. If you are covering your wire arms with clay, it is best to avoid anarmature for the hands and extending wires into the fingers. In most cases,the wires will constantly poke through the clay, which can usually be posedto hold its shape for tiny fingers without the need for wire inside. If you planon creating hands in a mold or using the latex build-up process, it will beimportant to create an armature for the fingers with some form of posablewire.
To create some hands, I used single strands of 1/16" aluminum wire and laidthem out in the proper position at the edge of the arm, which had its end loopfolded over (Figure 3.18). It’s best to cut them a bit longer than necessarybecause this ensures that they will be long enough (they can always betrimmed down later). A little masking tape helps to keep them in place. Epoxyputty is applied to the arm to create rigid bone shapes in proportion to therest of the body, and more is applied around the fingers to create the base ofthe hand. Using needle-nose pliers helps to pinch the epoxy tightly aroundthe fingers, and rolling their shape between them helps to ensure that theywill harden with the right shape around the wire (Figure 3.19). If the epoxyis sculpted too loosely over the wire, the fingers can come loose and will needreinforcement with more thin layers of epoxy in the space between the fingers.This shape of the hand should be finessed as much as possible before the epoxyhardens completely.
For the feet, the ends of the legs are cut and twisted to fit snugly around a nutfor creating a tie-down (Figure 3.20). A little dab of hot glue may help keepit in place initially and can be trimmed away once it dries. From this shape,epoxy putty can be placed in one slab over the tie-down to cover it and anotherpiece sculpted behind it as a heel piece (Figure 3.21). Leaving some wirebetween these two epoxy shapes creates a bend in the foot that will help in

Chapter 3 n Building Puppets 89
Figure 3.18
The beginning of constructing hands for a wire armature.
Figure 3.19
Sculpting the base of the hands with epoxy putty.
creating a realistic foot posing in any walking animation. The important thingwith these shapes is to keep the bottom of the foot flat the whole time. Thisis a tricky shape to sculpt using epoxy putty because it must be done quicklybefore it sets and can get rather messy, but once the battle is won, it works.One thing to watch for amid all the scrambling to get the shape right is mak-ing sure the tie-down hole doesn’t get filled in with putty (Figure 3.22). Onceit hardens, you won’t be able to get the bolt into it. This will inevitably hap-pen when applying the epoxy from the top of the nut, so while it’s starting toset, I typically push the eraser end of a pencil into the nut to push the epoxy
Figure 3.20
Placing nuts for tie-downs into the foot pieces.
Figure 3.21
Sculpting epoxy putty around the tie-down to make abasic foot shape.

The Advanced Art of Stop-Motion Animation90
back in and screw the bolt into the tie-down to help ensure that it will screwinto it (Figure 3.23). When it’s all finished, the epoxy should be flat on thebottom, with the tie-down empty and flush to the sole of the foot (Figure 3.24).As this process unfolds to include both legs and arms, compare the proportionsback to the armature to ensure that they are level, not crooked. The last thingyou want is to have one leg much longer than the other one. If they are partof a plug-in armature, all of these limbs are still removable and can be workedon independent of the torso (Figure 3.25).
Figure 3.22
Epoxy can get into the tie-down hole, which is not good.
Figure 3.23
The epoxy can be pushed into the hole using the bolt thatwill go into it.
Figure 3.24
The completed foot with a flat bottom flush to the tie-down.
Figure 3.25
All four limbs finished and laid out.

Chapter 3 n Building Puppets 91
As an alternative to tie-downs, you can use earth magnets embedded into thefeet for the purpose of attaching to a metal platform on an animation set.Magnets are common on TV stop-motion productions, where animationscenes must be churned out quickly and the time-consuming practice ofdrilling holes into the set and covering them up would be inconvenient.Having a magnet in the foot can restrict the design choices because thosestrong enough to hold up a puppet are usually a bit large. Television charac-ters in stop-motion (like Bob the Builder or David Pilkey’s Dragon) often aredesigned with large feet as a result. A character with medium-sized to tiny feetcannot likely be held up by a magnet alone, so tie-downs are a better choicein this situation.
To apply latex build-up to the hands, start by dipping the hand in a thin layerof liquid latex (Figure 3.26) and then applying tiny wisps of cotton to the baseof the hand and around the fingers. The fingers are covered by applying a wispof cotton to the bottom, allowing the latex to create some tack to it, and justrolling it around the wire with your finger (Figure 3.27). Applying more latexwith a brush, the wrapped cotton will adhere to itself a bit more. To createadditional layers and a smooth shape to the fingertips, dipping them into thelatex also helps (Figure 3.28), but not so much as to create clumps and fat fin-gers. Working over the hand and fingers with a small brush and continuallybuilding it up with tiny pieces of cotton will eventually create the desiredthickness and shape of the hand (Figure 3.29). It is important to continuesmoothing it out as much as possible with a brush or fingertip and keep plentyof space between the cracks of the fingers. This area in particular can easilycollect clumps of cotton and latex, which can result in a stubby look to thefingers if not kept separated. Eventually, the latex may become too wet to workwith without falling apart and getting clumpy. It is best to know when to stopand let the latex dry a bit because it can still be easily tweaked, sculpted, andfinessed when it is semiwet but not yet dry (Figure 3.30). With hand designsas well, keep in mind the aesthetic quality of varying the lengths of the fingers.Whether or not you create a realistic hand (four fingers and a thumb) or a stylized hand (three fingers and a thumb), keep in mind that the middle fin-ger is longer than the others, and the pinky is smaller. Creating all fingers thesame length tends to make hands look more like rakes or forks.

The Advanced Art of Stop-Motion Animation92
Figure 3.26
Start the latex build-upprocess by dipping the wirehand into liquid latex.

Chapter 3 n Building Puppets 93
Figure 3.27
Wrap cotton around the fingers.
Figure 3.28
More tiny dips into the latex smooths and shapes thefingers a bit.
The same technique of building up small pieces of cotton and latex can beapplied to the feet and any other parts of the puppet. Even little details liketoes, the ball of the foot, warts, bones, and knuckles can be created with littlerolls and wisps of cotton applied carefully to blend in (Figures 3.31 and 3.32).It is best to start with thin layers and build up places where the body needsmore bulk, keeping it a bit thinner around the joints, where the puppet shouldbend. One of the hard things about latex is that it dries very tough andgummy, with a rubber surface that is hard to penetrate. Layers applied toothick can cause the wires to spring back while trying to hold animation poses.
Figure 3.29
Continue to shape the cotton and latex around the handwith a brush.
Figure 3.30
Completed latex hand before it dries completely.

The Advanced Art of Stop-Motion Animation94
Therefore, it’s important to use latex sparingly and avoid adding too many layers. For any parts of a puppet that require more bulk, try to use more cottonunder a thin layer of latex applied with a brush for the outer skin. Wash yourbrushes often with soap and water; in most cases, the latex will simply peel offthe brush. Sometimes, the latex can be difficult to clean off, so it’s best to usecheap brushes that are easily disposed of after they are used.
The latex build-up technique is a fun way to create skin for your puppets(Figure 3.33), and it is relatively simple to get used to. The way the skin bulgesand stretches over the armature is really fun to play with and offers a qualityand texture that can work for many different design styles. Like any method,latex build-up does have its drawbacks. In particular, it generally works betterfor one-off puppets and can be challenging when trying to create duplicatecopies of the same character. Having replaceable limbs does help with thisbecause you can create a bunch of back-up arms and legs to replace when theybreak. They won’t be exact replicas like what you would get by creating moldsand casting them, but they can be pretty close if you try hard enough to repli-cate the proportions as closely as possible.
When painting the latex skin in whatever color your puppet is, you can useregular acrylic paint or any other special acrylic paints you can find that workspecifically with latex. A good tip is to mix the paint with a very small amountof Pros-Aide, a special adhesive used by special effects make-up artists.Depending on where you live, you can likely find it at any stores that sell theseproducts or at http://www.pros-aide.com. Pros-Aide helps thin the paint andallows it to stretch over any bends and bulges in the puppet’s movement as youanimate it. Be sure to use a tiny amount; if you use too much, your puppet
Figure 3.31
Applying latex build-up for a puppet foot.
Figure 3.32
Dried latex foot and hand parts.

Chapter 3 n Building Puppets 95
Figure 3.33
The entire puppetarmature, half-covered in latex build-up.

The Advanced Art of Stop-Motion Animation96
will be tacky and sticky to the touch, picking up dirt from your fingers prettyeasily. For a smoother matte finish to your puppet and to reduce any tacki-ness or shiny appearance, you can apply a layer of baby powder or corn starchto the skin by brushing it on or mixing it into the latex as it dries. Overall,play safe and have fun with it—the possibilities are endless. In fact, going backto what I said earlier about clay arms and hands, if you do want to use clay for the skin of your puppet, you can cover your wire armature with latex build-up first, and then apply a thin layer of clay over it once it dries. The latexbuild-up provides a solid shape over the wire, including over fingers, and canalleviate some of the resculpting needed when using solid clay.
Puppet Anatomy
For this section of the book, I’m pleased to present a look behind the scenesof some puppets created by Bronwen Kyffin and Melanie Vachon for a studentfilm directed by Lucas Wareing at Emily Carr University of Art + Design inVancouver. Lucas took my stop-motion course at VanArts several years ago andmore recently directed his own stop-motion short at Emily Carr called Ava,which was about the relationship between a little girl named Ava and her mon-ster friend, Charlie. These characters (Figure 3.34) were designed by PatrickO’Keefe, sculpted by Lucas, and commissioned to Bronwen and Melanie forfabrication, with the assistance of Ian Douglas in machining the armatures.Certain elements of their construction in relation to silicone molding and plastic casting will be detailed further a few pages later, but for now here is a lookat how the general fabrication was done. (Except where noted, all photos inthis section are courtesy of Bronwen Kyffin and Melanie Vachon.)
Both puppets were built out of metal ball-and-socket armatures (Figure 3.35),which are the strongest type of armatures for stop-motion and provide a greatdeal of precision and control over the animation. These types of armatureswere certainly necessary, considering that Charlie himself was about 16 inchestall (next to the 9-inch-tall Ava), and wire definitely would not have supportedhis bulk and weight. Charlie’s armature (Figure 3.36) was also equipped withchest and waist blocks that were cast in plastic. These blocks were designed tocreate more leverage with his eventual bulk, cut down on his weight, and givehis skin something to hold onto. The blocks were screwed onto the armaturewith long threaded rods attached to the aluminum chest and waist plates,which had additional holes drilled into them (like Swiss cheese) to cut downfurther on the puppet’s weight.

Chapter 3 n Building Puppets 97
Figure 3.34
Puppets for Ava, a film by Lucas Wareing.
Figure 3.35
Ball-and-socket armatures for Ava and Charlie.
Ball-and-socket armatures consist of many different kinds of joints that can becreated. The joints most commonly revolve around a sandwich plate. The plateconsists of two long, oval-shaped metal plates with holes drilled into them thatwrap snugly around a ball bearing but are loose enough to move in increments.The sandwich plate can also be a U-shaped joint that is about half the size andshape of a full joint. The ball bearing serves as the joint and has a hole drilledinto it, into which a metal rod for the limb is inserted and brazed together witha blowtorch. It is possible to buy threaded rods and ball bearings that arealready drilled and tapped with threaded holes for this purpose.

The Advanced Art of Stop-Motion Animation98
Figure 3.36
Armature for Charlie, the monster.

Chapter 3 n Building Puppets 99
When designing joints like these, it is important to think ahead to the actualanimation and motion that are required, in terms of which joints need to moveforward and backward, up and down, or any range of diagonal movement.Ball joints typically provide a great range of circular movement compared tohinge joints, which typically only have lateral movement up and down, likea knee or elbow. In the close-up detail of Charlie’s torso (Figure 3.37), thereare three U-shaped joints: one for each shoulder and a middle one for theneck. These joints are the anatomical equivalent of the clavicle and the pointwhere the neck joins the spine. The range of movement for these ball jointsis mostly left/right or up/down, which allows for tilts of the head and shrugsof the shoulders. The location of the plates in relation to the rod means a smallamount of forward/backward motion is possible. However, there is more freedom of movement allowed for in the joints on the other end of the rod,which provides additional mobility for his neck and shoulders. The same principles of motion are applied to the leg joints, based on how they shouldbe able to move (Figure 3.38). When the parameters of movement are specifiedin terms of the amount of freedom needed in the animation, these parameterscan be applied directly to how the armature is constructed. The more youknow about real human anatomy and how real joints are capable of moving,the more informed the armature can be in terms of mimicking this motionfor animation. If you have any experience in rigging 3D computer models,you may find some similarities to the necessary constraints of movementinvolved, but the biggest difference is dealing with real physical materials.
Figure 3.37
Close-up detail of Charlie’s chest armature.
Figure 3.38
Close-up detail of Charlie’s feet armature.

The Advanced Art of Stop-Motion Animation100
Both puppets’ armatures are covered in foam that is carved into shape to provide the bulk of their bodies. First, two blocks of foam are spray glued toeach other around the front and back of the armature (Figures 3.39 and 3.40).
Figure 3.39
Ava and Charlie’s armatures laid over blocks of foam.
Figure 3.40
Two foam blocks glued over the armature on the front and back.
The excess foam is simply carved and snipped away until the foam takes onthe desired shape. Large pieces are carved out to start, and then smaller piecesare snipped away with scissors (Figure 3.41). For Charlie, the same method isapplied to his arms (Figure 3.42). In addition to his foam body, his hands arecast in silicone and his head in plastic. (More detail on these techniques willbe explored later in this chapter.) The outer layer of Charlie is then skinnedin fabric by cutting out patterns according to his shape and stitching themtogether (Figure 3.43). For the striped pattern on his skin, masking tape is

Chapter 3 n Building Puppets 101
applied to his body in a specifically designed pattern (Figure 3.44), and theexposed parts are airbrushed lightly with white paint. When the tape isremoved, the original darker color of the fabric remains in these areas to createstripes (Figure 3.45). With all of these steps completed, Charlie’s body is essen-tially complete. Topping him off are replacement pieces for his eye and lipsync movements, which are made of Sculpey. His eyes are coated with Vaselineon the back to allow them to stick to his plain white eyeballs, and his lips areattached to his head with double-sided tape (Figure 3.46).
Figure 3.41
Ava’s carved foam body on the left, and Charlie in progress on the right.
Figure 3.42
Continuing to carve and cut away the foam for Charlie’sarms.
Figure 3.43
Charlie being skinned in fabric.
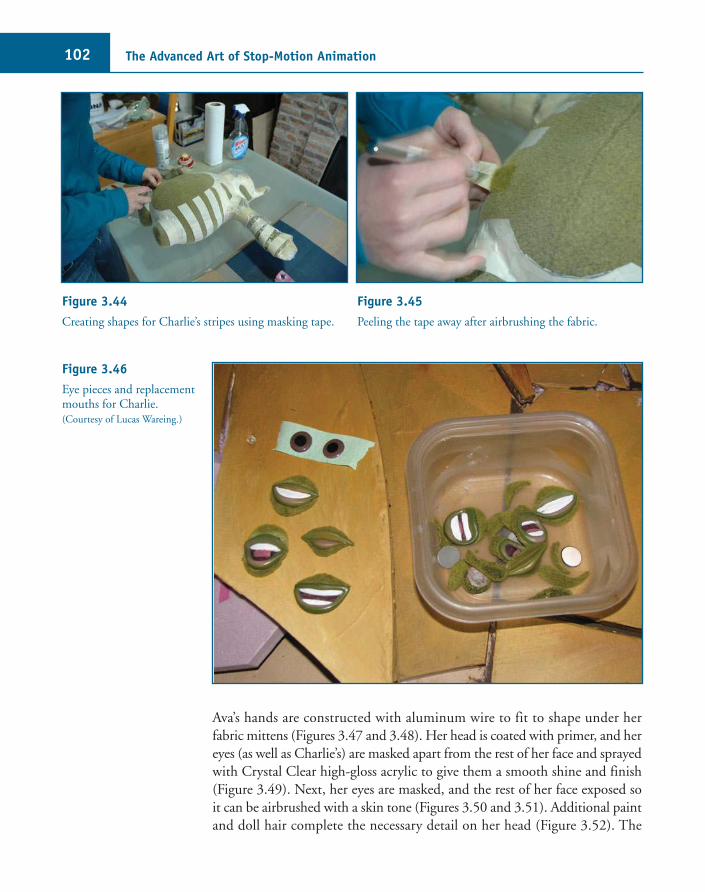
The Advanced Art of Stop-Motion Animation102
Ava’s hands are constructed with aluminum wire to fit to shape under her fabric mittens (Figures 3.47 and 3.48). Her head is coated with primer, and hereyes (as well as Charlie’s) are masked apart from the rest of her face and sprayedwith Crystal Clear high-gloss acrylic to give them a smooth shine and finish(Figure 3.49). Next, her eyes are masked, and the rest of her face exposed soit can be airbrushed with a skin tone (Figures 3.50 and 3.51). Additional paintand doll hair complete the necessary detail on her head (Figure 3.52). The
Figure 3.44
Creating shapes for Charlie’s stripes using masking tape.
Figure 3.45
Peeling the tape away after airbrushing the fabric.
Figure 3.46
Eye pieces and replacementmouths for Charlie.(Courtesy of Lucas Wareing.)

Chapter 3 n Building Puppets 103
Figure 3.47
Wire hand for Ava laid over the character design diagram.
Figure 3.48
Wire hand inside real hand, for comparison of scale.
Figure 3.49
Masking the head and exposing the eyes for coating.
Figure 3.50
Beginning to mask the eyes so that the rest of the headcan be painted.
Figure 3.51
The head after being airbrushed.
Figure 3.52
The head with hair and painted details added.

The Advanced Art of Stop-Motion Animation104
Figure 3.53
Sewing clothes over the armature.
Figure 3.54
Additional clothing and boots are added on.
Figure 3.55
Ava’s little backpack.
final steps are to sew together tiny clothes in fabric over her body (Figure 3.53)and cast silicone boots to fit over her feet (Figure 3.54). She also has a tiny back-pack made of canvas, with a tiny snap rivet holding in a roll of fun foam(Figure 3.55). Her pupils and replacement mouths, which can be attached,moved around, and removed from the plastic head with Vaseline, complete herfacial expressions (Figure 3.56), and she is ready for animation (Figure 3.57)!

Chapter 3 n Building Puppets 105
Figure 3.56
Completed Ava puppet,with eye pieces andreplacement mouths.(Courtesy of Lucas Wareing.)

The Advanced Art of Stop-Motion Animation106
Silicone
Foam latex has long been a popular material for creating the outer skin orentire body of a stop-motion puppet over its armature. The basic elementsthat are needed for a foam latex puppet are the sculpt (the official term for theoriginal clay sculpture of the puppet) and a plaster mold formed around thesculpt. The foam latex goes inside the mold along with the armature andbecomes a cast replica of the sculpt. Foam latex comes as a series of about fivedifferent liquid agents that are mixed together to gel into a soft, spongy material.Once it is cured by baking it in a convection oven, it basically behaves likeupholstery foam, which springs back into shape even after touching it. Althoughfoam latex is stinky and tricky to mix properly, it is relatively easy to repairand very lightweight, which are both important qualities for a stop-motionpuppet.
Figure 3.57
Charlie and Ava together in a scene from the film. (Courtesy of Lucas Wareing.)

Chapter 3 n Building Puppets 107
Another material that has become very popular in recent years for puppet fabricators is silicone. Silicone is easier to mix than foam latex (only two agentsare needed, instead of five) and can be used to create both puppets and molds.The appearance of silicone skin for a puppet has a different quality than foamlatex; it can potentially be smoother and more translucent. Although foamlatex can be cast and painted to appear very smooth, it will often have a certaindegree of texture to it. The smoothness and attention to detail from the original sculpt that silicone provides give a great deal of creative freedom fordifferent character designs. The other advantage that silicone has is that it willonly stick to itself, so it can be worked with alongside a variety of other materials.At the same time, there are some materials that do not react well with silicone,including latex and any sulfur-based modeling clays.
When working with silicone or any other chemicals, it’s important to under-stand what you are dealing with. By law, safety sheets must be provided andsent along with any chemicals you purchase or order, and it’s important to readthem carefully before cracking the chemicals open. Safety precautions andguidelines will typically tell you to protect your skin, lungs, and eyes from thematerial, so rubber/latex gloves, masks, and safety glasses are very importantto have on hand. The instructions will also tell you how long you can workwith the product before it starts changing. The time span for working withsilicone before it sets (and is no longer in a pourable liquid form) is referredto as its pot life; its cure time is how long it takes to cure fully. Pot life is usuallyonly a few minutes, and cure time is typically 24 to 48 hours. Silicone comesin at least two liquid parts that need to be mixed together: the inert siliconebase and an additional 10% of an activating agent that causes it to solidify.There are also softening or retarding agents you can buy that can be mixed into change the silicone’s consistency or slow down its pot life, but these are onlynecessary if you want additional control over it. Once these different agentsare one uniform color after mixing (in a cup or bucket, with any kind of stirringtool), you know it’s ready to start using before it sets.
Another important thing to understand about silicone is there are some typesthat are better for molding (creating a negative impression of a sculpt) and others better for casting (creating the replica of the sculpt that comes out ofthe mold). Within these two categories, there will be different brands and varieties, each with its own characteristics. Molding silicone is generally muchdenser and harder, so if you use it for puppet skin over the armature, you won’tbe able to bend it easily. It also typically comes in specific colors like pink, pur-ple, orange, blue, or green, which are not very convenient base colors for apuppet. Certain brands of molding silicone include Mold Max, RTV, andmany others. Most types of silicone that work well for molding are of the tin-cure variety, but others that are platinum-cure can be used as well.
The Advanced Art of Stop-Motion Animation108
For casting a silicone puppet, the best silicone products are of the special effectsvariety. These are mostly platinum-cure, much softer, and will easily bend andflex over an armature like real skin. Casting silicone typically becomes trans-parent or milky translucent when it cures, and you want to make sure the activator that mixes with the base says it’s translucent on the bottle. For thisreason, if you want a specific color for your puppet, an acrylic tint must beadded to the base while mixing. This step has traditionally been importantbecause silicone does not respond well to being painted afterward. In morerecent years, however, there have been new developments made in certain silicone products that enable them to be painted. In those cases, tinting maynot be necessary. All the same, tinting in the actual mixing process creates oneless step later and ensures a smooth surface in the color you want, and you donot need to worry about hiding brush strokes in applying paint. For skin tones,you can alternatively use just a few drops of oil-based foundation from yourlocal drug store’s make-up department. Some popular brands of casting silicones include DragonSkin, Plastil, and EcoFlex. There is also a product bySmooth-On called Soma-Foma, a silicone foam that bonds well with otherbrands and can help to create extremely lightweight puppets. (It also has anextremely fast pot life, about 30 seconds, so it must be worked with veryquickly before concealing it into a mold for curing.)
Many different kinds of silicone, both for molding and casting, can be browsedand acquired through Smooth-On (http://www.smooth-on.com), the CompleatSculptor (http://www.sculpt.com), Sculpture Supply Canada (http://www.sculpturesupply.com), and other special effects/sculpture service companies thatsell these kinds of products, depending on your country of residence.
Casting a Silicone Puppet
The general rule for molding and casting, because the mold needs to comeapart, is that if your cast is meant to be soft and flexible (like foam latex or silicone), its mold should be created in a hard material (like plaster). If yourcast is meant to be a hard material that does not bend (like plastic or resin),its mold should be created in a soft material (like silicone). There are somemethods for using silicone in both molding and casting simultaneously, whichare mentioned later in this chapter, but for the time being, let’s say you needto cast flexible silicone around the armature of your puppet using a plastermold. A basic overview of this process, using pictures from the creation ofCharlie’s hands from Ava, is provided below. (All photos in these molding/casting sections are courtesy of Bronwen Kyffin and Melanie Vachon.)
The first step is to create the sculpt, which can be of the entire puppet or justpart of it (Figure 3.58). When creating a sculpt for eventual casting in silicone,

Chapter 3 n Building Puppets 109
Figure 3.58
Clay sculpts of hands forAva and Charlie.
it is important to use a modeling clay that is not sulfur based. Silicone is generally sensitive to sulfur materials, which can cause it not to cure properly.Some brands of clay that can be used include Chavant NSP and Prima Plastalina.Before creating a mold for the sculpt, it should be lacquered with KrylonCrystal Clear spray to create a barrier that keeps it from getting damaged orreacting with any other substances to which you’ll be subjecting it.
The sculpt is surrounded completely by a bed of a different kind of clay, commonly a brand called Klean Klay (http://www.kleanklay.com), which isnot sulfur based and is ideal for the mold-making process (Figure 3.59). KleanKlay is not recommended for creating the actual sculpt, but it works well formaking molds. The clay bed is continually smoothed out and wrapped aroundthe sculpt with a palette sculpting tool so that it is airtight and lines up exactlythrough the midpoint in a perfectly straight line around its perimeter. Thepoint where the clay bed touches the sculpt is where the seam will be locatedwhen both halves of the mold are put together and pulled apart. In manycases, this is at the exact equator of the sculpt, but depending on the designof what you are molding, it is useful to find a point on the sculpt where theseam will not be very visible to the camera. In the clay bed, registration pointscalled keys are created using marbles or any other round or square objects,which will help both halves of the eventual mold to fit together (Figure 3.60).It’s best to plan ahead when figuring out how you plan to get the siliconeinside the mold. It’s possible to just pour it into the open molds, but youmight prefer to have a hole for pouring it in while the mold is clamped shut.

The Advanced Art of Stop-Motion Animation110
In this case, it’s a good idea to sculpt in a pry point for sticking in a tool tohelp pull it apart later. You also may want some exit channels built in so youknow that the silicone is flowing through the entire cavity all the way to thehighest point (like the fingertips for a full body cast). The idea behind themold itself is to make it as perfectly smooth and functional as possible, thinkahead to how you will fill it and get it apart, and think of it as two puzzlepieces that fit together around your sculpt.
Next, the sculpt in its clay bed needs a wall built around it in order to holdthe shape of the first half of the plaster mold (Figure 3.61). The wall can bebuilt from almost anything, such as slabs of clay or, in this case, large-sizedDuplo or Lego blocks. The smooth, square shape created by the blocks providesa nice surface for the mold to be built against. To avoid leakage and air pockets,the corners of the Lego fortress can be patched with more Klean Klay.
Once the wall is complete, plaster (Ultracal or Hydrocal 30, not art-store plaster of Paris varieties) is mixed and poured in to create the first half of themold (Figure 3.62). After this hardens, the Lego wall is taken away, the claybed removed, and all clay remnants washed away with water. The sculptremains inside the plaster mold, which is coated with Vaseline to aid in even-tually prying it apart from the next mold half. The process with the Lego wallcan now be repeated as another layer of plaster is poured on top of the firstmold half inside. When this is complete, there will be a two-part hard plastermold for the original sculpt (Figure 3.63), which can now be removed. As analternative to plaster, you can also create molds for a silicone puppet from atwo-part plastic or resin. This would involve mixing and pouring it over thesculpt in a manner similar to this method.
Figure 3.59
Klean Klay starting to be built around the sculpt.
Figure 3.60
The clay bed is complete with keys sculpted in.

Chapter 3 n Building Puppets 111
Figure 3.61
A wall made of Lego blocks is built around the clay bedand sculpt.
Figure 3.62
Preparing the plaster to be poured in for the mold.
Now, it’s time to get the mold ready to cast some silicone! First, the armatureis laid inside the mold, and it needs a way to stay suspended right in the middlebecause everything around it will be eventually filled in with sticky, gooey liquidsilicone. There are a few ways to do this, which may vary, depending on the designof what you are casting. It also depends on how you plan to get the silicone intothe mold. For Charlie’s hands, the armature was held in place by a lump ofKlean Klay placed within the entrance hole where the silicone was poured in.Both halves of the mold should be clamped shut as tightly as possible to avoidleakage and to ensure that the mold will be filled up properly (Figure 3.64).As the mixed silicone batch is poured into the entrance hole, the mold cavitysurrounding the armature, which is being suspended upside-down, fills up.
Figure 3.63
Complete two-part mold before the sculpt is removed.
Figure 3.64
Tying the molds together very tightly.

The Advanced Art of Stop-Motion Animation112
When pouring the silicone into or onto any space, it’s important to avoid thecreation of air bubbles as it collects and starts to cure. Bubbles can createunwanted warping in the surface of your puppet. To alleviate bubbles, it helpsto first tap the container (with the silicone inside it) firmly onto a flat surfaceafter mixing it; this forces the bubbles out. When applying it or pouring itout, you can also drizzle the silicone in a thin, high pour, raising it slowly aboutone foot above the mold (Figure 3.65). These methods will work well if you’re
Figure 3.65
Silicone is drizzled into the space around the clayholding the armature inplace.

Chapter 3 n Building Puppets 113
doing this on your own at home, and if you have the means or space, follow-ing this process in a specially built vacuum chamber will help to suck any airbubbles out of the silicone as you work with it.
Another method for getting the silicone into the mold is to leave both halvesof the mold open, mix a batch of silicone, and start by pouring a thin layerdirectly into the mold cavity. This is essentially skinning the impression of thesculpt in the mold and creating the outer layer of the cast, so it’s importantto get into every nook and cranny of the mold and avoid trapping any air bubbles inside. After skinning the mold, more silicone is poured into the moldto fill it up, and the armature is rested on top of the setting silicone in exactlythe right suspended position. Within a few minutes, depending on the potlife of the silicone, the first half will begin to cure. Meanwhile, the second halfof the mold is skin coated and filled in with more silicone. Then, the first halfof the mold with the armature in it can be flipped over, pressed onto the second mold, clamped shut, and left to cure completely. All of the siliconewill bond with itself inside to create the bulk of whatever you are casting.
Once the silicone is cured, the mold is pried open to reveal the cast of theoriginal sculpt, with its armature living inside and totally flexible for anima-tion (Figure 3.66)! The next step is to trim off any extra flash of thin siliconethat may have spilled over the mold cavity. This can be done with fine scissorsto trim it right up to the edge of the seam. To help conceal the seam a bit more,it may help to cut a groove into the edge and patch it up with a thin layer of
Figure 3.66
Silicone cast hands sittingin their molds.

The Advanced Art of Stop-Motion Animation114
silicone. During this setting time before it completely cures, continual patch-ing, smoothing, or texture stamping can still be worked into the surface,depending on the design and look you are after.
In another example, for Ava’s neck, an additional piece of silicone is cast toform a shape similar to a shirt dickie to go under her clothes. The shape itselfis sculpted in clay, and the first part is molded upside-down so that the secondhalf can be molded around it right-side-up. The result is a thin, flexible neckpiece that has been shaped to fit around the armature over her shoulders.
Figure 3.67
Mold created for Ava’s neck piece, cast in silicone.
Making a Silicone Mold
As I mentioned before, in most cases, a hard mold is required to create a softcast, but it is also possible to create a silicone mold (using molding silicone)for a silicone puppet (using casting silicone). If it is a two-part mold similarto the plaster ones I just described, the steps for creating it, like using the Legowall around the clay bed and pouring over it, are basically the same. The bigdifference in using this method is that you must apply onto your mold andsculpt a universal release agent so that the silicone will not bond to itself andcan easily be pulled apart. If you miss a spot, it will bond as one piece becausesilicone only sticks to itself. If you are casting silicone within silicone, this isvery important.
The advantage to a flexible silicone mold is that it is more forgiving than aplaster mold when it comes to undercuts. An undercut is any surface on thesculpt (and resulting cast) where the mold can easily get locked in underneathand cause damage to the cast when pulling it apart. Undercuts on the sculpt

Chapter 3 n Building Puppets 115
can be avoided by always creating shapes that are angled the right way towardit, but if they do occur, a flexible silicone mold is a bit easier to twist aroundit when releasing the cast. Creating a two-part mold that fits together andcomes apart like the plaster mold can be done easily in silicone, and then itcan be filled with any material that will create a hard cast. Within a soft siliconemold, you can cast duplicate hard copies of props, toys, and any hard parts ofa puppet (Figure 3.68), such as accessories or entire heads. Silicone molds canbe filled with resins, plastics, and even melted clay for clay puppets.
Figure 3.68
Sculpt for one of Charlie’schest plates in a siliconemold.
For Ava, the heads for both puppets were cast in plastic in a silicone mold. Adifferent approach was taken in creating these molds, which were created asone piece in a bucket instead of a two-part mold created in two halves. Thesculpt for the head is first done in sulfur-free plasticine clay and then attachedto a post to hold it in place. For a head or any other object like this, it’s a goodidea to build the initial sculpt around a ball of foil attached to the post. Thiswill help cut down on the weight and help keep it from slipping off when it’ssuspended in the mold later.
The next step is to cover the sculpt in a thin skin of molding silicone to createthe detailed impression that will be inside the mold. The silicone is drizzledover the top of the sculpt and pushed around with a brush to get inside everynook and cranny, without bubbles. Rather than brushing the silicone on,which creates more bubbles, it’s more like pushing it around and into the

The Advanced Art of Stop-Motion Animation116
cracks, without worrying about washing the brush, either. As the silicone dripsand collects at the bottom, it can be lifted back onto the top and essentiallypushed around to coat it completely. The idea is to skin the entire sculpt in alayer of silicone without bubbles (Figures 3.69 to 3.71).
Figure 3.69
Pushing silicone around the head and into all the sculpteddetails.
Figure 3.70
Drizzling silicone onto the head slowly to continuecovering it.
The next step is to suspend the skinned sculpt upside-down in a bucket (orin a plastic cup for a smaller-sized head). The post to which the head isattached can be attached to a wooden plank that rests over the top of thebucket or suspended in some other way to hold it there. Another solution, toalleviate the possibility of the head falling off the post and into the bucket, isto fill the bottom of the bucket with a layer of silicone and let it cure. Thiswould act as a cushion to rest the head on while it’s suspended. Once that isall in place, the rest of the space inside the bucket is filled to the brim withmore silicone and left to cure overnight. Bubbles are not as much of an issuein this filler space for the mold itself because they will rise to the surface any-way. The post to which the head or object is attached, suspending it into thesurrounding mold, will also serve as an entrance channel for pouring the plas-tic in during the casting process. As another part of this process, it is impor-tant to note on the bucket itself (and later on the resulting mold) the positionsof the front, backs and sides of the head inside (Figure 3.72).

Chapter 3 n Building Puppets 117
Figure 3.71
Completed sculpt coveredwith a layer of silicone.

The Advanced Art of Stop-Motion Animation118
Once the silicone is cured, it will be more firm on the surface and much lesstacky. The mold can then be pulled out of the bucket or cup, and it will havetaken on the same shape of the inside, much like a Popsicle (Figure 3.73). Thenext step is to get the head out! To accomplish this, an X-Acto blade is usedto cut through the silicone as strata-cut layers in a zigzag pattern down a sideof the mold (Figure 3.74). The cut is essentially acting as the seam for the molditself. Therefore, it’s important to place this opening near the back of the objectbeing cast, or somewhere the camera won’t necessarily notice it, in the eventof cutting into the sculpt. The zigzag pattern also serves the purpose of regis-tration keys so that the mold will always go back together in the same place.Cutting a straight seam line will cause it to slide around and could createinconsistencies in the resulting cast. Once the incision is complete, the flexiblemold can be pried open to remove the sculpt, leaving a negative impressionof the sculpt inside and a spout for pouring in the casting material (Figure 3.75).All remnants of clay that stray inside must be washed away completely withrubbing alcohol and water to avoid any bits of it getting stuck in anything else.Now, it should be ready to fill with plastic for casting!
Figure 3.72
Bucket filled with curedsilicone, marked withreference points to thepositions of the front andsides of the sculpt.

Chapter 3 n Building Puppets 119
Figure 3.73
The completed cured mold,now free of the bucket inwhich it was created.

The Advanced Art of Stop-Motion Animation120
Figure 3.74
A zigzag-shaped seam is cut into the mold in orderto get the sculpt out.

Chapter 3 n Building Puppets 121
Plastic Casting
Plastic for casting starts as a two-part liquid that is essentially mixed togetherand allowed to harden inside the mold. Silicone molds are friendly for plasticcasts because of their non-porous nature. Plastic is moisture sensitive, so if itis cast in anything porous, it will not set properly, and it may take longer inhumid climates. As always, wear protective clothing like an apron, gloves, andsafety glasses when using this stuff.
When you have your plastic ready to mix together, the empty silicone moldshould also be standing by and resting back in the same kind of bucket or cupin which it was initially created. The two parts of whatever amount of plasticyou use should be mixed together equally (1:1) by volume rather than weight.Each part can simply be poured into a separate cup, with a mark drawn onwith a Sharpie to find a common point to pour into. Using patterned Dixiecups helps for finding this common point on two identical cups (Figure 3.76).
After reading all safety instructions and having everything you need ready to go, both bottles of plastic are shaken before opening. The typical pot lifefor most two-part plastics is about four minutes, with a cure time of about 30 minutes. In each cup, equal amounts of parts A and B are poured separatelyup to the designated marker (Figure 3.77). Part B is then poured into part Aand scooped out with a stirring tool to make sure all of it gets out of the cup.
Figure 3.75
A view of the impression ofthe sculpt from inside themold.

The Advanced Art of Stop-Motion Animation122
Figure 3.76
Bottles of two-part plastic, with cups marked for theamounts to mix together.
Figure 3.77
Each part of the plastic is poured into a separate cup.
Both parts are then stirred together for whatever length of time is indicatedby the instructions (Figure 3.78). The next step is to simply pour the liquidplastic into the mold’s entrance hole so that it can fill the empty cavity all theway to the top (Figure 3.79). A little bit of plastic is left inside the cup so thatit can be watched while it hardens and act as a barometer for letting you knowwhen the plastic inside the mold is ready to come out.
Figure 3.78
The two parts are combined and stirred together.
Figure 3.79
The mixed plastic is poured into the mold.

Chapter 3 n Building Puppets 123
At this point, at least two different approaches can typically be taken with theplastic inside. If the plastic is simply left to harden while the mold sits still, theplastic will harden as a solid object inside. One thing to keep in mind in thiscase is that air bubbles in the plastic will off-gas upward as it cures, so it maynot be uncommon to find a huge bubble at the top of the cast when releasingit, which would need some patching up with more plastic. The other method,referred to as slush casting, involves keeping the mold rotating constantly andslowly while the plastic is curing inside (Figure 3.80). This slushes and guidesthe plastic to the outer wall of the cast, leaving the inside hollow. A hollowhead or other such object will allow for an attachment piece to be placed insidefor affixing to a body armature, like a K&S tube, which can be attached insidethe head with a bit more plastic to root it in there. A hollow head also cutsdown on the weight, which is always important. While slushing the plasticaround, it is still a good idea to know where the front and back of the headare inside the mold and to spend more time on the front of the head, wherethe face is. If any part of the cast needs to be patched, it’s better to have this happen in the back, where it might not have as much screen time. It is best toplug the entrance hole with some Klean Klay or a cork and move the moldaround over the top of a garbage can in case any plastic leaks out. (The samplesshown in Figures 3.79 and 3.80 are for a smaller head that fits inside a largeplastic cup, whereas the same process would have been done in a larger bucketfor Charlie’s head.)
When the cure time has passed and the remaining plastic inside the cup hasturned white and hard, the mold can be taken out and pried open, and thenyou release into the world a plastic cast replica of the sculpt (Figure 3.81)!
Figure 3.80
The mold is rotated slowly over a garbage can to slush theplastic around inside.
Figure 3.81
The sculpt and final plastic cast for Charlie’s head.

The Advanced Art of Stop-Motion Animation124
Face Armatures
A rigid head made of plastic works best for stylized designs with a simpler look,but other puppet designs will call for a bit more mobility in the face. Becausehuman and animal faces are often just as flexible a piece of design as the restof the body, some puppet faces will be rigged with armature pieces to be animated. Posable paddles, wires, or other mechanisms can be built tosimulate movement of the jaw, lips, brow, and eyebrows of the puppet face.In many cases, a movable face armature will be covered with a flexible mate-rial like foam latex or silicone. This will cause the surface of the face to bulgeand stretch like real skin for the facial features that are manipulated under-neath. Pulling and pushing on a jaw or an eyebrow paddle on the surface of the face creates a unique range of possible emotions for the animator. A fewexamples are illustrated here, ranging from studio productions to independ-ent projects.
For the feature film $9.99, director Tatia Rosenthal conceived a system forachieving subtle flexibility in the faces of her puppets. Silicone faces were castover a hinged chin for jaw movements, with a tiny slot for inserting replace-ment mouths for dialogue and paddles for eyebrow movements for extraexpression. The face mechanisms for the armatures (Figure 3.82) were devel-oped by Philip Beadsmoore. The overall effect given to the puppets is that ofbeing able to combine lip sync that matches each syllable with subtle verticalmovements in the jaw. When a character’s mouth goes into a long “ah” or “oh”vowel sound, for example, the jaw can drop just as it would on a real humanface. This gives a subtle touch of flexibility that couldn’t be achieved with astatic head made of plastic. For the realistic design of these puppets and thefeel of the film, the puppet design serves the aesthetic purpose it sets out todo for this particular independent feature film (Figure 3.83).

Chapter 3 n Building Puppets 125
Figure 3.82
An armature with facialcontrols from the featurefilm $9.99. (Courtesy of Tatia
Rosenthal/Here Media/Regent
Releasing.)

The Advanced Art of Stop-Motion Animation126
Another complex face armature was designed for a puppet of the characterUncle Creepy for a recent stop-motion project for New Comic Companydirected by Stephen Chiodo. Based on a sculpt by Chiodo himself, the UncleCreepy puppet was built pri marily on a ball-and-socket armature built by John
Deall, with silicone-cast skinfor the hands and head (Figure3.84). Underneath the headwas an epoxy skull, completewith a jaw piece on a ball jointthat could pose open andclosed, as well as left to right fora crooked jaw effect. For addi-tional mouth shapes and browmovements, paddles weredesigned for the upper lip andthe eyebrows (Figure 3.85). Forthe project’s animators, KentBurton and Justin Kohn, theUncle Creepy puppet allowed astrong sense of control in theface to com plement the rest ofthe body animation. For the lipsync, movement of the jaw is
Figure 3.83
Puppets of Albert and the Angel from $9.99.(Courtesy of Here Media/
Regent Releasing.)
Figure 3.84
The armature for UncleCreepy. (Courtesy of Stephen
Chiodo/New Comic Company.)

wider or narrower, dependingon whether a syllable isaccented; it would be openedwider for long vowel soundsand accents in the phrasing(Figure 3.86). To accentuatethe fluidity of the actual pup-pet’s animation, certain mouthshapes that required a puckeror tightening of the lips wereresculpted photographicallyusing After Effects filters. Thisgives the puppet a unique senseof lip sync that is completelybelievable when combined withthe aesthetics of the entire proj-ect. The amazing Uncle CreepyReturns film can be found andstudied at http://www.youtube.com/user/creepyuniverse.
Chapter 3 n Building Puppets 127
Figure 3.85
The face armature forUncle Creepy. (Courtesy of
Stephen Chiodo/New Comic
Company.)
Figure 3.86
Some images of Uncle Creepy showing the flexibility of his jaw. (Courtesy of Stephen Chiodo/New Comic Company.)

The Advanced Art of Stop-Motion Animation128
Another example of an armature with face controls has been designed by independent animator Dave Hettmer from Michigan, who has worked onstop-motion and miniature effects for films such as Frostbiter: Wrath of theWendigo and Army of Darkness. For his personal stop-motion project RoadRage, Dave designed frog and snail puppets out of foam latex cast out of plaster molds. The frog (Figure 3.87) is built on an aluminum wire armature(Figure 3.88), and his top and bottom mouth pieces are built out of two 1/8-inch6061 plates (a typical grade found at hardware stores). Around the mouthplates are lip mechanisms built out of 24-gauge steel florist’s wire, which allowsfor pinching into certain shapes for “oo” or other syllables.
Figure 3.87
Frog puppet by DaveHettmer, posing his mouthinto an “oo” shape for lipsync. (© Dave Hettmer.)

Chapter 3 n Building Puppets 129
Figure 3.88
The frog’s wire armaturewith aluminum mouthplates. (© Dave Hettmer.)

The Advanced Art of Stop-Motion Animation130
The snail armature (Figure 3.89) is built on a ball-and-socket neck piece, witha head made of 6061 aluminum blocks filed and ground to shape using agrinding wheel. The snail’s dialogue movement is achieved with looped piecesof steel florist’s wire, which fits inside the bottom jaw and is bent into various
Figure 3.89
Armature for the snail from Road Rage by DaveHettmer. (© Dave Hettmer.)

Chapter 3 n Building Puppets 131
mouth shapes (Figures 3.90 to 3.93). The range of movement in the snail’smouth is similar to the open-and-close motion of a hand puppet, but withsome additional mouth shapes made possible by the multiple wires. To furtheraccentuate accents in the dialogue, the eyes are attached to bendable wiresclamped into the head with set screws. Being able to extend the eye-stalks upand down to the rhythm of the dialogue uses the snail’s design to furtheraccentuate the character of his movement (Figure 3.94). The eyes themselvesare plastic beads fixed in place, and the pupils are made of thin latex paintedwith black acrylic paint and Pros-Aide. To make the pupils for both puppets,Dave dipped eye-sized balls in latex for a thin skin that would fit perfectly over the curvature of the ball. Then he cut out several copies of each pupil,which measured only 4 millimeters in diameter. These tiny pupils are stuckto the eyeballs with petroleum jelly on the back for easy sliding around, andthe eyelids are added using clay replacement pieces. In addition to the eye andmouth movement, the ball-and-socket joints in the snail’s neck allow forsmooth animation of the rest of his body to match extreme accents in the dialogue where they are needed. By combining different materials togetherfor the neck, eyes, and controllable mouth shapes, the end results allow for puppets that are designed specifically for great animation and range of expres-sion. Examples of Dave’s animation and other work can be found at his web-site (http://www.hettmerfx.com) and on YouTube (http://www.youtube.com/user/hefflesniggener).
Figure 3.90
The snail’s neutral mouth position. (© Dave Hettmer.)
Figure 3.91
The snail’s curled lip position. (© Dave Hettmer.)

The Advanced Art of Stop-Motion Animation132
Another example of someone who has used an advanced method for achievingeffective face movements is independent animator Ron Cole from New York,who burst onto the stop-motion scene with an innovative, award-winningshort film called In the Fall of Gravity (Figure 3.95). The puppets for his filmmove with a unique sense of realism and fluidity that is spell binding in its
Figure 3.92
The snail’s wide open mouth position. (© Dave Hettmer.)
Figure 3.93
The snail’s “F” or “V” mouth position. (© Dave Hettmer.)
Figure 3.94
The snail’s up and downeye movements in twosuperimposed images. (© Dave Hettmer.)

Chapter 3 n Building Puppets 133
execution, design, and aesthetic beauty. His work amazed many people in the stop-motion community upon seeing the film’s trailer on Ron’s blog site and the StopMotionAnimation.com message board. In the Fall of Gravityis a philosophical dialogue between the wizard Isomer (Figure 3.96) and hisapprentice Trevor Verity. Each puppet’s facial expressions and lip sync areachieved through a unique blend of traditional stop-motion puppet animationand a cable control system attached to the puppet’s face and connected to anexternal control box (Figure 3.97). By turning dials on the box, cables attachedto the dials run up through the puppet’s body into points inside the face(Figures 3.98 and 3.99). The faces are cast in flexible urethane rubber thatstretches and bulges into subtle changes created by the cables, and these changescan be manipulated incrementally frame by frame for a certain naturalisticeffect.
Figure 3.95
Ron Cole animating on his short film In the Fall of Gravity. (© Ron Cole.)

The Advanced Art of Stop-Motion Animation134
Figure 3.96
Isomer, the wizard character from In the Fall of Gravity,by Ron Cole. (© Ron Cole.)
Figure 3.97
The inner controls for Trevor, a character from In the Fallof Gravity, by Ron Cole. (© Ron Cole.)
I asked Ron to share some thoughts about the evolution of his puppet designs,how they work, and the challenges involved in creating them:
I had a previous background of 20 years in stop-motion, live-action puppets,and cable controls. Part of my inspiration for getting into cable controls camefrom a shot Rick Baker did for the 1976 remake of King Kong, where Kongdrew a breath and blew on the actress after she fell in the waterfall. The cablecontrol technology had been well established further on films like AmericanWerewolf in London and E.T. This other work for live-action monster effects
Figure 3.98
Isomer’s skin is peeled back to reveal his skull armatureunderneath. (© Ron Cole.)
Figure 3.99
Isomer’s skull comes apart to reveal the cable systeminside. (© Ron Cole.)

Chapter 3 n Building Puppets 135
had been done with different heads that each did one part of the facial move-ment. E.T. was one of the only characters made to fully speak, and he wouldspeak in slow motion. My challenge was to miniaturize it and do it frame byframe. With this kind of cable system, there are always tension problems to over-come, and the cables need to be delicate but strong. The skin is paper thin attimes, and so many things occur about what nature actually does. For example,not only do lips stretch open, but often there are moments where you need openjaws with the lips closed in order to get many different shapes which happenrather frequently. It’s easy to have cables pulling the lips apart, but not pushing,so I needed to have metal pieces inside the lips to push them closed. I alsoneeded to make the world’s smallest hinge for a metal piece that had to bendoutwards.
A big challenge with this system, which I learned with my first puppet, Trevor,is that the cables would tend to break in the control box end. Because they hadtension on them, they would get sucked inside the tube and would not beretrievable, unless I opened up the puppet to get the cable out. So, for Isomer,I built a junction box (Figure 3.100) between the control box and the puppetand split the cables into two halves. Inside the box, the wires were bundled veryclose together, so I created a map under the lid to indicate which hole and whichwire goes where.
On the control box side, there are two types of controls: ones that only pull thecable and others that have a dual function. The dual function controls are onlythe eyebrows; turning the knob left brings the brow down, and right bringsthem up. I managed to do that by finding a way to attach two cables to the samecontroller, which both pull, but in opposite directions. The cables for the faceare controlled by 16 dials (Figure 3.101), which achieve the following functions:
1) Outside left eyebrow up and down2) Inside left eyebrow up and down3) Inside right eyebrow up and down4) Outside right eyebrow up and down5) Left crow’s feet up6) Right crow’s feet up7) Bridge of nose up8) Top lip up9) Bottom lip down
10) Lips form “O” toward top teeth11) Lips form “O” toward bottom teeth12) Left side smile13) Right side smile14) Left side frown15) Right side frown16) Jaw open

The Advanced Art of Stop-Motion Animation136
Figure 3.100
The junction box forIsomer’s cable controlsystem. (© Ron Cole.)
Figure 3.101
Isomer’s cable control box,labeled with functions of the different dials. (© Ron Cole)

Chapter 3 n Building Puppets 137
When animating realistic dialog, the face moves as a whole in order to portrayboth the words and expressions that give them further meaning (Figures 3.102to 3.107, showing various expressions for Isomer). That’s also true even when the character isn’t speaking at all. The human face is obviously the mostexpressive part of our bodies and is virtually always in motion, expressingmoods, thoughts, ideas, comfort, and concerns. A personal rule of mine aboutanimating is the idea that “stillness equals death.” Even if only in the tiniestincrements possible, I made my best effort to keep every part of a puppet moving at all times.
Outside of the facial controls, the animation for everything else on the body,eyes, and eyelids is done by touching the puppet. I also have a clay tongue thatslips into the mouth when I need it, as there is no point in mechanizing that.Isomer has replacement plastic eyelids, and Trevor’s eyelids are just clay. Mycable technique will continue to be refined, and my dream is to eventually fitthe control box inside the puppet.
A detailed tutorial for the inner workings of Ron’s cable control system can be found on his blog (http://wobblytripod.blogspot.com), as well as otherbehind-the-scenes looks at his work and how to order a copy of In the Fall of Gravity.
Figure 3.102
(© Ron Cole.)
Figure 3.103
(© Ron Cole.)

Replacement Faces and Rapid Prototyping
Another emerging technology being implemented into various aspects of stop-motion puppet and set construction is rapid prototyping, or 3D printing. Thebasic concept behind this technique is to create a 3D computer model andhave it printed out as a physical replica. The technology behind rapid proto-typing has many other uses and implications in itself, but the film Coraline
The Advanced Art of Stop-Motion Animation138
Figure 3.104
(© Ron Cole.)
Figure 3.105
(© Ron Cole.)
Figure 3.106
(© Ron Cole.)
Figure 3.107
(© Ron Cole.)

Chapter 3 n Building Puppets 139
helped put it on the map for use as an animation technique. The area of thefilm where it was used the most was the facial animation on certain main char-acters. The faces on characters like Wybie, Coraline’s Mother, Other Mother,and Coraline herself consisted of thin replacement masks that were removedand replaced for each frame of the animation.
Replacement animation for facial expressions is a technique that has beenaround since the very beginning of the stop-motion medium. It likely grewout of the logic behind hand-drawn animation, where every frame consistedof a separate drawing that was different than the one before it, and each draw-ing was replaced under the rostrum camera for shooting. Adapting this ideato stop-motion meant that every frame would consist of a separate face thatwas replaced for each frame. The earliest known use of replacement facesappears to be from the MoToy Comedies by American filmmaker Howard S.Moss in 1917. Most of these films are lost, but the few that exist feature adopey character with exaggerated facial expressions (Figure 3.108). A smallnumber of in-between faces would help to transition from one key expressionto another for a caricatured effect. Later evidence of replacement faces is foundin the Kinex Studio short films from 1928 to 1930, in the characters of Snapthe Gingerbread Man and a recurring witch character (Figure 3.109). It is notentirely clear what materials were used to create the faces for the characters inthese early films, but they appear to be sculpted in clay and then either bakedor molded. To keep the consistency between faces, it is likely that a clay sculptwas made and cast out in a mold, and then a tiny transitional change was madein the sculpt for each sequential cast. These puppets usually had only one ortwo in-between faces between each expression. The New Gulliver in 1935 alsoused the technique, with a decidedly more crude clay appearance.
Figure 3.108
A series of replacement faces from the MoToy Comedy Cracked Ice by Howard S. Moss (1917).
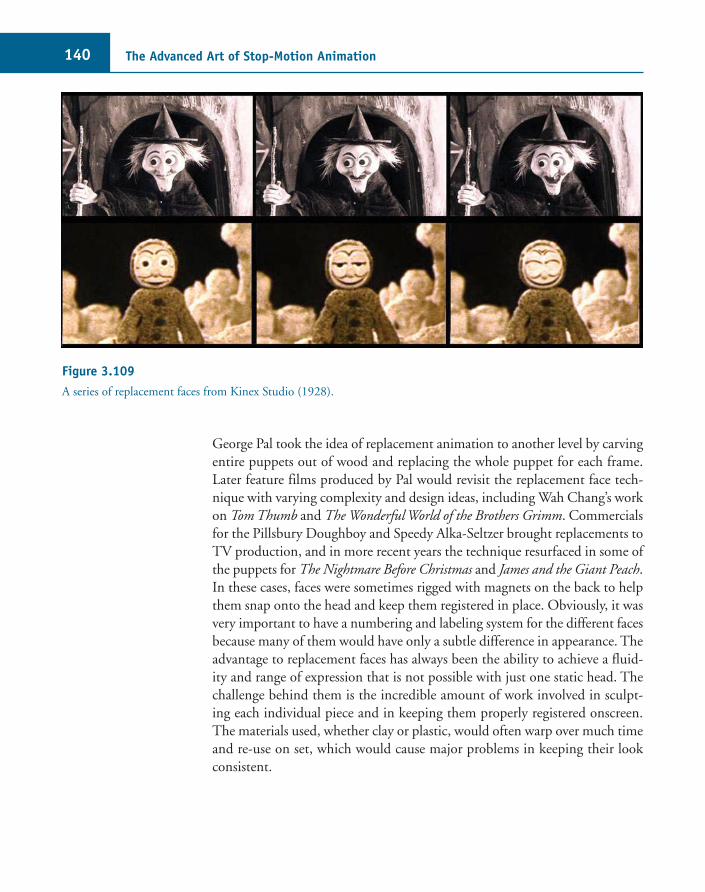
The Advanced Art of Stop-Motion Animation140
George Pal took the idea of replacement animation to another level by carvingentire puppets out of wood and replacing the whole puppet for each frame.Later feature films produced by Pal would revisit the replacement face tech-nique with varying complexity and design ideas, including Wah Chang’s workon Tom Thumb and The Wonderful World of the Brothers Grimm. Commercialsfor the Pillsbury Doughboy and Speedy Alka-Seltzer brought replacements toTV production, and in more recent years the technique resurfaced in some ofthe puppets for The Nightmare Before Christmas and James and the Giant Peach.In these cases, faces were sometimes rigged with magnets on the back to helpthem snap onto the head and keep them registered in place. Obviously, it wasvery important to have a numbering and labeling system for the different facesbecause many of them would have only a subtle difference in appearance. Theadvantage to replacement faces has always been the ability to achieve a fluid-ity and range of expression that is not possible with just one static head. Thechallenge behind them is the incredible amount of work involved in sculpt-ing each individual piece and in keeping them properly registered onscreen.The materials used, whether clay or plastic, would often warp over much timeand re-use on set, which would cause major problems in keeping their lookconsistent.
Figure 3.109
A series of replacement faces from Kinex Studio (1928).

The advancement in technology using replacement faces for Coraline bridgedthe gap between modern computer animation and bringing the precision itoffered into a physical stop-motion universe. Animator and sculptor MartinMeunier, who had worked with director Henry Selick on previous stop-motion films, served as the facial animation designer and coordinated an entirerapid prototyping department for Coraline. The process started with traditionalmeans before going digital. Facial expression changes and lip sync were designedand animated in 2D, and then key poses were sculpted as clay maquettes andscanned into the computer. The computer animated in-between positions, andentire animated face sequences were animated in CG. Each individual frameof the computer animation was exported as an STL (stereolithography) fileand printed out on an Objet 3D printer (any one of three printers installedfor the production). A 3D printer is basically like a photocopy machine thatprints liquid resin on a flatbed in layers. Starting from the bottom of the modelit is printing, an ultraviolet light cures each layer of resin as it prints until ahard replica of the model is completed.
Once printed, each modeled piece needs to have any extra support materialremoved, washed, scrubbed, sanded, and then sent to the fabrication depart-ment for painting. Each character could have as many as 15,000 faces and upto 250,000 facial expressions available, all in perfect registration to each other.The variety in expressions was created by dividing the face into upper andlower halves (Figure 3.110), so that mouth movements and lip sync could be combined with eyebrow movements in many different combinations.
Chapter 3 n Building Puppets 141
Figure 3.110
Photo of the Coralinepuppet, showing the face divided into halves. (© Focus Features.)
The Advanced Art of Stop-Motion Animation142
The seam between the two halves of the face was removed in post-productionby digital effects artists. In addition to the outer appearance of each face piece,inside were details like teeth, tongues, and uvulas, as well as a complex regis-tration system to help the pieces fit together like a puzzle. The amount ofsculpting and modeling work that went into the film was estimated to be theequivalent of nearly 30 years of traditional sculpting; rapid prototypingallowed this amount to be completed in about 18 months. It allowed them toexperiment with using CGI against itself by printing it out into the real worldand getting artists involved in the CG process. Overall, amid all the new technical precision and subtlety offered through this technology on Coraline,the end goal was for the audience to have an emotional connection with thecharacters.
The Objets used on Coraline are designed to operate like a printer or photo-copier, with a head that moves back and forth to print out each layer of themodel. There are similar machines under different brands that employ a similarprocess and print a plaster-like material that also have the ability to print in color.Other machines such as EnvisionTEC printers are operated by a 250-wattbulb inside the hub of the printer (Figure 3.111), which projects the computerdata from each layer onto a metal plate on the outside. The metal plate restsin a bed of liquid resin, cures each projected layer, and raises up incrementallyfor each layer until the model is complete and suspended upside-down (Figure3.112). Any negative space within the model can be supported by a mesh-likesupport material, which is generated within the actual computer modelingsoftware. The plate and model are removed from the printer, and supportmaterial must be cut away from the model with a hot knife (Figure 3.113)and placed in a bath for cleaning.
The future implications for this technology to continue stop-motion produc-tions have yet to be seen, but there could be a great deal of potential forbridging the gap between stop-motion and the capabilities of CGI. For artistswho specialize in modeling or sculpting in CG using tools like Maya, ZBrushor Mudbox, printing their work in 3D can be a valuable way to transition intostop-motion if they want the experience of seeing their art in actual space. Theprocess also has implications for easing the duplication of objects that wouldotherwise be cast out of molds, likewise eliminating the issue of undercuts andinconsistencies that can occur. In addition to creative applications for anima-tion, architectural models can be realized with a great amount of detail for

Chapter 3 n Building Puppets 143
possible aid in creating elaborate stop-motion sets (Figure 3.114). A world ofideas and options is opened up by CG modeling’s ability to create intricatedetails that would be very difficult to sculpt by hand or to physically cast in a mold. In addition, these details can be duplicated in different scales. Theeffect of any 3D object growing, shrinking, or morphing is possible simply byscaling or modifying the CG model and saving each change as a separate objectto be printed. Entire replacement puppets can also be animated in the com-puter and printed out for each frame.
Figure 3.111
Interior bulb for 3D printerat Protodemon CreativeStudio in North Vancouver,Canada. (Photo by Ken Priebe.
Courtesy of Protodemon.)

The Advanced Art of Stop-Motion Animation144
Figure 3.112
A finished model suspended from the resin bed. (Photo by Ken Priebe. Courtesy of Protodemon.)
Figure 3.113
Cutting away meshed support material from the model.(Photo by Ken Priebe. Courtesy of Protodemon.)
Figure 3.114
Different scaled buildingmodels printed by a 3Dprinter. (Photo by Ken Priebe.
Courtesy of Protodemon.)

Chapter 3 n Building Puppets 145
There is much that can still be explored, although for the average independ-ent filmmaker, there is not only the issue of using it creatively, but also the issueof cost. The printers themselves have various ranges in cost and quality andrequire a certain amount of space and material to support the maintenancebehind them. The most convenient method for utilizing rapid prototypingtechnology is to enlist the services of a company that specializes in servicingprototypes based on your own 3D models. Companies like Shapeways(http://www.shapeways.com), Protodemon (http://www.protodemon.com),and others can provide this service if you upload your files to their websitesand place orders for 3D printing production. They all typically have their ownguidelines for submitting files and parameters for what they are able to produce.If you feel inclined to explore this technology and bring it further into the realmof stop-motion production, it can certainly achieve some effects that wouldbe much more difficult to get otherwise. When used creatively and combinedwith a good dose of hand-crafted elements, there is a good realm of opportunityfor bridging media and enhancing the art of stop-motion storytelling.
Replacement Animation Puppets
Scaling back to puppets of the simpler variety, the idea of replacement ani-mation can also be achieved with materials much less costly than a 3D printer.I recently created a series of replacement figures for an animated logo sequencedone in stop-motion. My friend and colleague Steve Stanchfield created a hand-drawn animation logo for his company, Thunderbean Animation (Figure 3.115),which provides animation services and produces DVDs of rare lost films fromanimation history. The logo starts with a lightning flash and the word“Thunder,” and then a happy animated bean comes in and places the word“Bean” into the title. Steve and I had been collaborating on a DVD full of rarestop-motion films called Stop-Motion Marvels, so I thought it would be coolif the logo was also done in stop-motion. Steve’s animation style is very rubbery,
Figure 3.115
Logo for ThunderbeanAnimation by SteveStanchfield. (© Thunderbean
Animation.)

The Advanced Art of Stop-Motion Animation146
with lots of squash and stretch to the drawings, so I knew that replicating thesame look in stop-motion would involve replacement puppets, much like theGeorge Pal Puppetoons of the 1940s.
To create an understructure for the beans, I simply used tiny Styrofoam ballpieces for the top and bottom, glued them together with aluminum wire(Figure 3.116), and covered them in clay. Using the Styrofoam balls helpedme keep the shapes relatively consistent from one puppet to the next and cutdown on the weight. Studying Steve’s original animation told me I needed apose where the bean’s eyes and mouth were closed, a slightly squashed versionof the same expression (Figure 3.117), and at least one in-between position. I also needed a severely squashed pose for the anticipation (Figure 3.118)before he stretches up to place the words into the title (Figure 3.119), whichalso required separate puppets. Coming from the stretch was another in-between pose and a final pose to end him on as he stops to look upward andsmile. I was able to streamline the original animation and simply re-use thesebasic shapes to get the effect I needed, without necessarily adhering to theneed for that many replacement figures (Figure 3.120). For the arms and legs,I used small pieces of aluminum wire wrapped in black masking tape, and his hands and feet were made of sticky tack and white plasticine clay. I knewI would need a rig in the shot holding him up the whole time because thespindly legs would not be strong enough to hold him up on his own, and therewould be several frames where he was in mid-air. A helping hand rig workedjust fine for this, with the pincher on the end either holding a wire to stickinto the puppet or sticking into the puppet itself. The rig was visible in everyframe and later erased digitally in post-production.
Figure 3.116
Styrofoam armature structures for the clay replacementbeans.
Figure 3.117
Basic shape for the bean as he enters the frame.

Chapter 3 n Building Puppets 147
For the animation of these puppets, I set up a white poster board curved intoa cove to create a plain white limbo space for the action to take place. Thiswas lit with some ambient lighting to help soften the overall effect but stillcreate a shadow under the puppets, emphasizing the fact this would be a 3D stop-motion version of the logo. I imported an image of the logo into myframe-grabbing software and used it as an onion-skinned image to line up the framing of the shot and size of the puppet in the frame (Figure 3.121).
Figure 3.118
Squashed anticipation pose.
Figure 3.119
Big stretched pose.
Figure 3.120
The final resting puppet,along with some of theother replacement puppets.

The Advanced Art of Stop-Motion Animation148
Figure 3.121
Author Ken Priebe framinghis Thunderbean Animationshot. (Photo by Shawn Tilling.)
The logo would be composited into the shot later, and I wanted to match theexact framing as closely as I could. Once I got the framing right, I traced theedges of the logo with a dry-erase marker on the monitor to give me a refer-ence point for when the puppet would actually make contact with the logoand where he should step and land. Using all of this as a framework, I startedanimating (Figure 3.122).
Because of the different positions caused by the extreme squash-stretch move-ment and the fragility of the various puppets, in most cases I took the entirepuppet apart between each frame. If the arms or legs needed to dramaticallychange position, I would take the wires out, bend them into shape, and stickthem back in their new pose. The onion-skin feature was very useful for reg-istering the extreme movements after removing the puppet from the set, andtoggling the frames gave me an idea of how the arcs and movement were work-ing. The whole sequence took me about four hours to shoot once it was all setup, and the end results were a happy stop-motion jumping bean!
Check out the accompanying CD for the final animation, as well as the Stop-Motion Marvels DVD, available from http://www.thunderbeananimation.com.

Chapter 3 n Building Puppets 149
Figure 3.122
The Thunderbeananimation in progress, withreference markers on themonitor and onion skin forpositioning.
As some final notes for this chapter, let me point out just a few other excel-lent resources for a few specific things related to advanced puppet-building:
Online tutorials for making your own ball-and-socket armatures:
n Lionel I. Orozco:
www.stopmotionworks.com/ohspics.htm
www.stopmotionworks.com/drlballs.htm
www.stopmotionworks.com/ballbrz.htm
(Above tutorials also available with more written details in Marc Spess’s book, Secrets of Clay Animation Revealed.)
n Sven Bonnichsen:
www.scarletstarstudios.com/blog/archives/2006/06/how_to_make_a_b.html
n John Hankins (Castlegardener):
http://castlegardener.wordpress.com/2008/06/29/beginners-guide-to-ball-and-socket-armatures

The Advanced Art of Stop-Motion Animation150
n For additional tutorials and tips on creating silicone molds and casts, check out some of the issues and videos provided at http://www.stopmotionmagazine.com and http://www.marklagana.com/siliconemould.html, and consult the message board at http://www.stopmotionanimation.com.
n Armature kits and other services/supplies:
Stop-Mo-Tec: http://www.stop-mo-tec.de
Animation Supplies: http://www.animationsupplies.net
The Clay & Stop Motion Animated Store:http://www.animateclay.com/shop

Stop-motion photography is not just one image, but rather a series of imagesthat create motion when strung together. Shooting stop-motion relies onhaving the following things: a story to tell, puppets to tell that story with,
and a camera to be the eyepiece for that story. If you have the first two naileddown, reading this chapter will help you focus (no pun intended) on what youshould know about your camera, some details on how to shoot with it, and somepractical effects you can try.
When stop-motion was shot on film, each frame would exist as its own separateimage, strung together on a strip of 8mm, 16mm, or 35mm film (Figure 4.1). Thefilm would be registered with a series of sprockets that pushed the strip of filmthrough a gate in front of a square window blocked by a shutter. Exposing oneframe of film with the touch of a button would open the shutter and expose lightthrough the lens onto the film. Then, the sprockets inside would advance the film-strip to the next unexposed space for the next image to be captured. Each imagewas essentially a separate photograph with its own established focus, exposure,color, and lighting. These elements would essentially be a continuous tone, andthe features on a film camera could be set manually, although fluctuations couldhappen because of uneven shutter speed, changes in temperature, or the film mov-ing around in the gate. There was no way to make sure each frame was consistentwith the next one. The result of the whole process was basically a series of stillimages on the strip of film that would exist only in negative form until it was sentto a lab to create the positive print. Looking at the strip of film itself, all of theseparate images are visible, so an editor can see exactly where scenes begin andend, and the images can be rearranged and spliced together.
4Digital Cinematography
151

The Advanced Art of Stop-Motion Animation152
Figure 4.1
A series of 35mm framesfrom Meet the Raisins.(© Will Vinton Studios.)

As film use declined over the years and was replaced by video, the most popularmethod for stop-motion became using a MiniDV camcorder with an IEEE-1394 Firewire connection (Figure 4.2) that provided a live feed to a computerwith frame-grabbing software. The video camera basically acts as an “eye” andfeeds a constant live image into the software, so if one moves a hand into theframe, this should all appear in real time on the computer monitor as well.The software then grabs separate still images from the live feed each time theanimator hits the capture button. The flexibility of this method providesinstant access to the images for preview purposes and playback. However, evenwith an HD camera and frame averaging provided to improve the quality ofeach frame, the image being fed into the computer is essentially a compressedimage, and there may be limits to how much resolution can be attained forhigh-quality broadcast. Watching the animation play back on a computermonitor might look fine, but if it is meant to be blown up on a huge screenat a film festival, the image quality might not be as strong as it should be. Ofcourse, some software does have frame averaging and HD capabilities to helpwith this.
Despite these challenges to work around, using a live Firewire feed is still aperfectly valid way to shoot stop-motion. However, even though Firewire cardsand converters are still on the market for installing into computers, most videocameras no longer come with the Firewire output or cable included. Videocamcorders at average consumer prices (or higher) now typically shoot moviesonto a hard drive, and a USB connection is used to transfer the video off thecamera. Flip Video cameras operate on the same principle, allowing you toshoot video easily in the palm of your hand and upload movies as AVI filesdirectly to your computer. From there, you can burn your videos to DVD orupload them straight to YouTube. More and more standard hard-drive camcorders also shoot in HD, which is quickly becoming standard for allbroadcast media. This is all fine if you are shooting home videos of yourfriends, your kids, or your cat playing the piano for YouTube. However, forstop-motion it presents a problem because a USB connection from these cameras (Figure 4.3) will not provide you with a live feed for your frame grabber. Without a live feed, you cannot use the onion skin or frame-togglingfeatures that frame-grabbing software allows you to take advantage of to helpkeep your animation registered.
Chapter 4 n Digital Cinematography 153

Meanwhile, as Firewire outputs on computers and camcorders have becomeharder to find, there has been an explosion of popularity of digital SLR stillcameras in the past few years. Gone are the days of taking pictures with a filmcamera, dropping off the tube of film at the drug store, and waiting an hourfor your photos and negatives to be ready. Tiny digital cameras that allow youto point, shoot, and get your pictures instantly for uploading to your com-puter, printing, or posting online have taken the world by storm. (I don’t evenremember the last time I took a picture using film.) Then came the digital SLRcamera (Figure 4.4), which had the appearance and image quality of the moreprofessional film cameras but allowed for manual controls and creative freedomin a digital universe. Now it seems like everyone has a digital SLR camerabecause they have quickly become more affordable for the average consumer.
Along with this trend has been the realization that one can shoot stop-motionwith a digital SLR camera. Part of the appeal of shooting stop-motion this wayis that it essentially takes the process back to its roots of shooting a string ofstill images on film. After taking a series of high-quality still images, the nextstep is to download them straight to the timeline of an editing software pro-gram and play them in sequence. The manual controls for image quality makethe stop-motion frames look as sharp and clear as a film print, or potentiallyeven better.
The Advanced Art of Stop-Motion Animation154
Figure 4.2
A MiniDV camera with Firewire cable output. (Photo by Jeff Bell.)
Figure 4.3
An HD camcorder and Flip Video camera with USBoutputs. (Photo by Jeff Bell.)

However, this has presented another problem: By itself, a digital still camerawill not provide a live feed for your frame grabber. The solution in this case isto mount a camcorder next to the SLR or attach a tiny spycam or webcam tothe viewfinder and use that image for the live video feed. The animator canthen use the live feed image to utilize the frame-grabber’s functions of onion-skinning and toggling, while at the same time capturing their actual frames inhigh-resolution with the SLR camera. As long as you remember to take a picture with each camera, this gives you the best of both worlds. This methodis still a common way to shoot stop-motion, but even better is the fact thatdigital SLR cameras now are available with an HDMI or USB live video feed(Figure 4.5). They are more expensive than the lower consumer brands with-out live preview, but as they rise in popularity, the price continues to comedown and become more affordable. Before too long, digital SLR still cameraswith a live video preview function could likely become the standard for personal video use (including filming your cat for YouTube). The more afford-able these options become, the better it will be for everybody. The other con-venient factor to the digital SLR camera’s popularity has been the developmentof several stop-motion software programs to communicate directly with thefunctions of certain Canon or Nikon SLR cameras. At this time, the latest ver-sions of Stop Motion Pro and the newly popular software Dragon Stop Motionhave this functionality, and many more could easily come onto the marketbefore too long. Software programs now have the capability to work with themanual controls of the camera from within the computer, capture the HDimages directly into the timeline, and provide a multitude of other conven-ient functions for digital workflow.
Chapter 4 n Digital Cinematography 155
Figure 4.4
A Canon EOS Digital Rebel XT digital SLR camera.(Photo by Jeff Bell.)
Figure 4.5
A Canon EOS 5D Mark II digital SLR camera. (Photo by Jeff Bell.)

This book is not intended to focus on any particular software program(although a few specific ones are mentioned throughout) because this infor-mation will always change as new versions come out. Whichever software youuse is up to your own preference, operating system, budget, and reasons forshooting stop-motion in the first place. Indie stop-motion filmmakers all havedifferent financial situations, living conditions, and responsibilities outside ourpuppet-pushing; not everyone may be able to afford a fancy digital SLR camerawith live video. They also may not necessarily need a super-high-quality imageif they are simply doing stop-motion tests or learning basic student-level animation. A webcam can still provide a live feed for a simple image througha USB, but most of them won’t allow for manual control or a suitable imagefor a semiprofessional production. A MiniDV camcorder with a live Firewireoutput had always been a good compromise, but being without this optionputs stop-motion filmmakers on a budget in a difficult transitional stage.Hopefully this will pass, and another simple method will come onto the marketthat allows all filmmakers to make their films look the best they can at any budget.The software you are able to use may also be determined by your camera. Ifyour version of the software does not support the live-feed option for your digital SLR camera, you are limited to using a webcam or an SLR with a spycam,or trying to find a used DV camera with Firewire (perhaps on eBay). Anotheroption may be to use a special video adapter or a video capture converter likea Canopus, which coverts an analog video signal to digital for a live feed. Witha bit more simple technology and a little creativity, you can find other solutionsthat work to achieve your purposes, according to your budget constraints orshooting needs.
Independent animator Ron Cole describes his method for connecting his stop-motion set-up as follows:
I have a Lumix SLR camera, which has manual controls and a good image. Mycamera is not compatible with the Dragon software I’m using, but for the endproduct I use the following method: I have a live feed coming from the camerato an analog-to-digital converter into my software. The live feed is a bit grainy,but hi-res images are coming in through my camera’s Eye-Fi card, which is amemory card that can upload images wirelessly to my computer. Dragon has afeature called “folder watch,” which takes an image from the Eye-Fi card andreplaces the live feed image in the timeline. This gives me the ability to back upafter taking my picture to check the hi-res image. This is very useful when I’mshooting stop-motion to match up with a live-action shot and need the puppet’sfoot to be in the right place, for example, after taking the exposure. Since thegrainy image coming from the viewfinder is harder to see, it helps to be able todouble check the alignment of my puppet after capturing my hi-res images intothe timeline.
The Advanced Art of Stop-Motion Animation156

As a stop-motion filmmaker, you can also decide for yourself whether a livefeed is necessary at all, especially if you have a bit more experience with animation. If you are shooting frames with an SLR or any other type of stillcamera, you can simply load the still images into a timeline on your computeras you shoot. The only computer function that may be available to you is theability to advance through your frames to check the registration of your animation, but only after you capture each frame. As far as the positioning ofyour puppet is concerned, you are shooting blind, as you would be if you wereshooting on film. Without the ability to toggle between your last stored frameand your live frame in your computer, the exact reliability of your puppetbeing properly registered is essentially done by observing the puppet on setand seeing the movement in your head. The difference is that after you captureyour frame, you can look at your timeline and advance your frames to seewhether the animation is doing what you want. If there is a problem with the registration, lighting fluctuation, or otherwise, you simply delete the frameyou just took, fix the problem, and reshoot. This is a different method of frametoggling with an extra step, but it still does the job. The only other conveniencenot offered without the live feed is the onion skin, but you can work aroundthis by using the old-school method of drawing on the computer monitor witha dry-erase marker. Overall, it’s up to you and how spoiled you have becomeby the luxury of the live feed. If you are experienced enough in stop-motionto know instinctively where your puppet should be without using these tools,you can likely get by without them. With your camera, simply shoot blind,take your pictures, load them up, and watch the magic happen. (While you’reat it, you might as well break out those rusty surface gauges, too!)
Whatever method you decide to use, it does look like the digital SLR still cam-era is continuing its popularity, so this chapter will mainly focus on shootingin this method for creating an advanced, high-quality stop-motion film.
Digital Camera Basics
With a digital SLR camera, the images are not captured onto a strip of film,but rather onto an image sensor. The sensor is made up of millions of pixels,which are like tiny buckets that gather light. The light is essentially convertedfrom analog into electric photons in digital format, and this will typically giveincreased quality through a full-frame sensor. The resolution of the capturedimage is measured in megapixels; the resolution increases based on themegapixel number. Most digital cameras range from 8 to 21 megapixels. Whena picture is taken, a mirror (which reflects the image seen through theviewfinder) flips up, and light enters through the lens and hits the sensor,
Chapter 4 n Digital Cinematography 157

creating an exposure that is sent through a processing engine to create a digitalfile on the camera’s memory card.
When taking these individual images, you have the option of saving themeither as JPEGs or in RAW format. JPEGs are a relatively standard format,even for compact digital cameras, and can be captured in high quality, althoughthey are compressed images. They are only 8-bit, but perfectly suitable forloading into a video timeline for editing and giving you this flexibility. RAWfiles are unprocessed and essentially serve as a digital negative, going up to 14-bitand giving you an expanded range for editing in post-production. RAW filesimported as a sequence into your editing timeline or Adobe Photoshop willgive you more flexibility for changing brightness, correcting color, or addingdigital effects. The main thing to realize is that it also means each individualframe will have a significantly larger file size and will require more hard-drivespace to back them up. Shooting in RAW format is probably best for a pro-fessional film that is commissioned or intended for HD screening or a filmfestival. Depending on your intentions for shooting, you can either shoot inboth formats (RAW for high-quality edit, JPEG for back-up and simple play-back) or just stick with whatever suits your needs.
The lens you use can vary greatly, but its quality will have a great impact onthe quality of your image. Shooting at a small scale for stop-motion does notrequire a telephoto lens, because you are typically much closer to your subject.Most stop-motion filmmakers typically use any lens in the range of 24mm to85mm (or higher) and follow the recommended practice of interchanging lensbrands with camera brands. One of the biggest challenges in shooting stop-motion with still cameras is the flicker caused by fluctuations between expo-sures. Often this will be caused by outside elements, such as uneven wattageor gradual dimming of the lighting set-up, but it can also be caused by fact thatmost digital SLR camera lenses have an iris that defaults to being open andonly moves into the setting you want when you take a picture. Using a trulymanual lens from an older camera is one way to help keep all your images atthe same exposure.
The settings for the basic exposure elements of your camera should all be setto manual controls when shooting stop-motion to alleviate the fluctuationsbetween separate frames that can result from using automatic settings. Theessential elements to keep on manual settings include focus, aperture, shutterspeed, white balance, and ISO.
The Advanced Art of Stop-Motion Animation158

Chapter 4 n Digital Cinematography 159
ISO
The ISO determines how sensitive your image sensor is to light. On film, theISO would be predetermined by the type of film stock being used, but digitalISO can be adjusted for each frame and shooting situation. If you are shoot-ing a dark scene for your stop-motion project, increasing the ISO will increasethe sensitivity to light and allow for a slower shutter speed. However, it will alsocreate more digital noise, which is one of the shortfalls of digital photography.Heightened sensitivity on the sensor causes heat build-up and will createchunky blotches in low-light areas and shadows, unlike film grain, which issmoother and moodier. This was one of the challenges faced on Tim Burton’sCorpse Bride, which had many scenes with low light, so dark sets were oftenover-lit and adjusted in post-production. A lower ISO setting combined witha shorter shutter speed will typically create less digital noise, but ultimately therelationship between noise and your manual settings depends on your camera.In most cases it’s best to keep the ISO setting lower; most stop-motion film-makers keep it around 100 to 200.
Aperture and Shutter Speed
Controlling the aperture affects the amount of light coming into the camerathrough an iris-shaped mechanism inside the lens. Capturing light throughexposures in photography is measured by f-stops (Figure 4.6), which are eitherhalf or double the amount of light in the previous stop. To increase apertureby one f-stop, for instance, means doubling the amount of light hitting thesensor.
The shutter speed consists of how long the shutter is open and exposes thesensor to light. Therefore:
Wide aperture (lower f-stop number) = more light = faster shutter speed.
Small aperture (higher f-stop number) = less light = slower shutter speed.
Placing a digital light meter directly in front of your central focus (like yourstop-motion puppet) and pressing its meter button will help you determinewhich f-stop and shutter speed to use for getting the right exposure for thelighting situation you are using. This is pretty straightforward if you just haveone puppet in a long or medium shot on stage for a simple scene. For a com-position that requires a bit more depth to the puppet’s surroundings, there area few other things to consider. Whatever is closest to your light source mayhave a lower stop than anything that is farther away in the background, so youmay want to take a reading for both your foreground and background andstop your camera at a point in between.

The Advanced Art of Stop-Motion Animation160
Figure 4.6
Chart for some of the f-stopsprovided by a camera lens.(Image provided by James Emler.)
Depth of Field
These camera settings will also be affected by the depth of field you want foryour shot. Depth of field refers to how much of the distance of your com -position is in focus. For stop-motion, as opposed to live action, everything isscaled down to miniature size, including the distance between your cameraand your subjects. In most cases you don’t want the audience to feel like theyare watching a miniature set, but rather a world they will recognize as havinga natural sense of distance. This natural feeling of distance will be accom-plished mostly by having a wider depth of field where more elements are infocus. A shallow depth of field will mean that if you focus on the central partof your composition, the background and surrounding elements will be blurry.Shallow depth of field is typically caused by a lower f-stop and faster shutterspeed and a wider depth of field by a higher f-stop and slower shutter speed.For a happy medium in a basic animation scene, most stop-motion filmmakersset their camera in the area of f11 with a shutter speed of 1/2 to 1 second.Stopping at f16 or f22 will create a more extreme depth of field, and stoppingat f8 or lower will soften the background. It all depends on the mood you aregoing for when telling your story.
The illustrated examples shown here show how different moods and effectsare created through camera settings and also through composition of the shot

itself. For a happy, light, or comedic scene (Figures 4.7 and 4.8), the compo-sition is usually flat, with the camera centered and perpendicular to the set.Figure 4.7 is shot with a shallower depth of field, which blurs the character inthe background. Figure 4.8 is shot with a wider depth of field, so the wholescene is in focus, and the faces of both characters are much clearer. This c larityis important for a playful scene like this and communicates the relationshipbetween the two characters.
Chapter 4 n Digital Cinematography 161
Figure 4.7
Shallow depth of field, shotat f2.8 and a 1/8-secondshutter speed.
Figure 4.8
Wider depth of field, shotat f11 and a 2-secondshutter speed.

The Advanced Art of Stop-Motion Animation162
For a creepy, dark, or dramatic scene (Figures 4.9 and 4.10), the compositionis usually shot at more of an angle to give a more unsettling effect. Figure 4.9is shot with a shallower depth of field, blurring the background character andheightening the mysterious mood. Figure 4.10 is shot with a wider depth offield, bringing both characters into focus.
Depending on what your story calls for, there will be times when you maywant a shallower depth of field and times when you won’t. It helps to knowhow to use your camera as a story-telling tool to get the effect you want.
Figure 4.9
Shallow depth of field, shotat f2.8 and a 1/8-secondshutter speed.
Figure 4.10
Wider depth of field, shotat f20 and a 6-secondshutter speed.

Chapter 4 n Digital Cinematography 163
White Balance
White balance is a function that removes certain kinds of color casts createdby different light temperature situations. Color temperature of light is measuredby the Kelvin scale, which is based on the color that would be cast by an objectas it is heated. Higher temperatures will appear cooler; this seems backward,but it’s based on the fact that although we think of objects as being red ororange when they get hot, they actually will go blue to white the hotter theyget. Therefore, warm-feeling lighting situations, such as candlelight, have thelowest light temperature (1,000 to 2,000 K), and cool-feeling lighting, suchas an overcast day, have the highest light temperature (9,000 to 10,000 K). Inany lighting situation, our eyes can always recognize whether an object iswhite, but digital cameras do not have this interpretation, so improper whitebalance setting will create unwanted blue or orange casts to an image. Simplyput, you need to tell your camera what is white so it has a reference point for it.For any photographic situation, including stop-motion photography, customwhite balance is typically set by placing a white card in front of your entireframe and allowing the camera to set the white balance to the color temperatureof your lighting situation. Most cameras will also have preset white balancesettings for certain lighting scenarios, such as tungsten, daylight, overcast, andfluorescent.
In terms of how this relates to stop-motion, in most situations you would notbe shooting outdoors, so higher color temperatures would rarely be taken intoaccount. In most cases you are shooting indoors on a miniature set using artificial light. Most lights used for stop-motion have a quartz or tungsten filament, which has a color temperature of up to 3,500 K. To achieve a particular mood for your scene, you can play with the white balance to makeyour shots appear warmer or cooler, if you feel this adds some atmosphere toyour film. A standard set shot in tungsten can be made to look warmer by setting the white balance to daylight (about 5,000 K) and giving it a moreorange cast (Figure 4.11). For a sad or creepy mood, letting in more light andbalancing to a lower tungsten setting can add a darker blue mood to your scene(Figure 4.12). In many cases this may seem like extraneous tweaking to yourimagery, but mostly it helps to know how to set the balance properly so thatyou also know how to control the way your film should not look. Adjustingthe white balance should ideally be done on set if you are shooting JPEGs only,but if you are shooting in RAW format, you also have the option of changingthe white balance in post-production.

The Advanced Art of Stop-Motion Animation164
Figure 4.11
White balance set for awarm feeling.
All things considered, there are endless combinations of settings and scenariosfor making your stop-motion films look a certain way, and they will alwayschange, depending on an equally endless range of factors. Within whatevermeans you have, set things up until they look good enough to serve your story.
(Photos for this section shot by James Emler. Monster puppet by EmiGonzalez, and hamster puppet by Frida Ramirez.)
Figure 4.12
White balance set for acooler feeling.

Camera Effects
Once you have set up your sets, puppets, lights, and camera, the shootingprocess is relatively straightforward. You take a frame, move the puppet orobject, take another frame, and move the puppet or object again. That is essen-tially what it’s all about, but at the same time there are plenty of options forembellishing your shots for a richer cinematic experience. Certain effects canbe achieved by your camera right on your stop-motion set, with little to noadditional work done in post-production. Post-production refers to the processof adding certain elements to your scenes after they have been shot and is typically referred to in the business as simply post. When a filmmaker talksabout doing something “in post,” including “fixing in post,” it means thateffect or fix will be done later. Fixes in post can include attempts to line upframes where the camera was accidentally bumped, for instance, or where therewere fluctuations in the lighting. Today’s digital tools give us more options forfixing and adding effects in post, but all the same, it’s a good idea to avoid usingthis as a crutch too much. Ideally, you want to shoot your stop-motion properlyenough that very little post-production work is needed to fix mistakes. Effectsare another story; there is a great deal of artistic and technical freedom allowedtoday that not only enhances the film itself, but also creates ease in production.(More detail on post-production effects is provided in Chapter 9, “VisualEffects.”) The decision of whether to create an effect in post or in camera duringproduction will often depend on several factors—anything from artistic reasonsto technical or budgetary restrictions. Most importantly, how you shoot yourfilm and what kinds of effects you create are all determined by your story.Changes in focus, lighting, composition, or movement by the camera shouldhappen because the story dictates them, not because of the technical “wow”factor behind it. The filmmaking, in essence, should become transparent sothat your audience becomes involved in the story and the characters.
Rack Focus
A particular composition often seen in live-action films or still photographyis when there is a foreground subject close to the camera and another subjectin the background or middle ground of a shot. This composition is often usedfor over-the-shoulder shots between two characters having a conversation, forexample. If there is a considerable distance between these foreground andbackground subjects, and the camera is focused on the subject in the back-ground, the subject in the foreground will be out of focus. Alternatively, if the foreground subject is close enough to the camera lens to be focused on, if the focus is on that subject, the background will be out of focus. If the focus
Chapter 4 n Digital Cinematography 165

between these two subjects shifts visibly in the middle of a shot, this is referredto as a rack focus shot. Aesthetically, a rack focus is used purposely to draw theaudience’s attention from one subject to another within the same shot. In alive-action film, the rack focus is typically done by a camera assistant called afocus puller, who physically moves the focus dial on the lens while the cine-matographer looks through the viewfinder. Since the focus puller cannot seewhat the final shot looks like, the start and end points of the rack focus mustbe determined in advance so that he can simply move it based on the num-bers on the focus dial.
In stop-motion, a rack focus must obviously be done frame by frame, so oftenit will be the animators themselves who do this, along with animating theirsubjects. The same principle applies of knowing where the start and end pointsare on the focus dial and moving them incrementally between frames. Forstop-motion, of course, it is important to avoid touching the camera itselfbecause this can create unwanted bumps and jitters in the shot when playedback at speed. On big-budget stop-motion productions, shifts in focus areoften programmed by a motion-control system, where a computer programsthe start-end points of the focus and moves them infinitesimally between eachframe, along with all other camera moves. Before motion control was anoption, or even today for those who cannot afford a motion-control system,a rack focus can only be achieved by touching the lens. This is still possiblewithout touching the camera, but it must be done very carefully. Accordingto stop-motion director of photography Pete Kozachik (full interview inChapter 5, “Interview with Pete Kozachik, ASC”):
[A] solution that many people employ is to attach a stick (such as a chop stick)to the lens with hot glue. This provides a more accurate lever arm with morecontrol and doubles as a pointer to line up with calibrated marks on cardboardor tape around the lens. Another thing that helps is to include a slight preloadfrom a rubber band so the lens can’t flop around, and it helps to move in onedirection only.
This functionality of hand-animating a rack focus has been taken a step furtherby Brett Foxwell, a mechanical engineer, machinist, and stop-motion animatororiginally from Chicago. Brett devised a special focus-pulling mechanism(Figures 4.13 and 4.14) that he describes here:
For the rack focus, I attach a stiff metal strip sticking radially out from the cam-era’s focus ring. Then a lead screw or a micrometer is mounted in a positionsuch that its travel pushes the metal strip and turns the focus ring. The leadscrew has a ball attached to the tip, and a spring pulls the strip onto the ball.
The Advanced Art of Stop-Motion Animation166

Chapter 4 n Digital Cinematography 167
The lead screw typically has an inch of travel for the typical rack focus shot. Therig is attached to the camera base, so a firm mounting and a very light touch onthe lead screw helps. The focus ring is still a problematic aspect and is likely tobe bumped during the animation, so I have had to restart some shots or justlive with a slight shift midway through the shot. Higher-quality lenses have sturdier focus rings, and the tension spring helps with this problem.
Figure 4.13
Focus puller designed by Brett Foxwell. (© Brett Foxwell.)
Figure 4.14
Focus puller on set with adifferent arrangement forthe short film Fabricated.(© Brett Foxwell.)

Figure 4.15 shows a series of frames that display the stages of a rack focus shotfrom Brett’s independent stop-motion short film Fabricated, a creation mythof the life-forms present on Earth after the age of man. His film is still inprogress and has been in production for about six years.
The Advanced Art of Stop-Motion Animation168
Figure 4.15
A rack focus shot from Fabricated. (© Brett Foxwell. Website: http://sites.google.com/site/bfophoto)
Blurring Effects
If a subject you are shooting with a stationary camera moves while the shutteropens to take the picture, the result will be a blurred image of that subject.You may have seen this happen when taking pictures at a party or any othersituation. For instance, your friend was talking when you took the picture orspun around quickly without realizing you were snapping the frame, and the
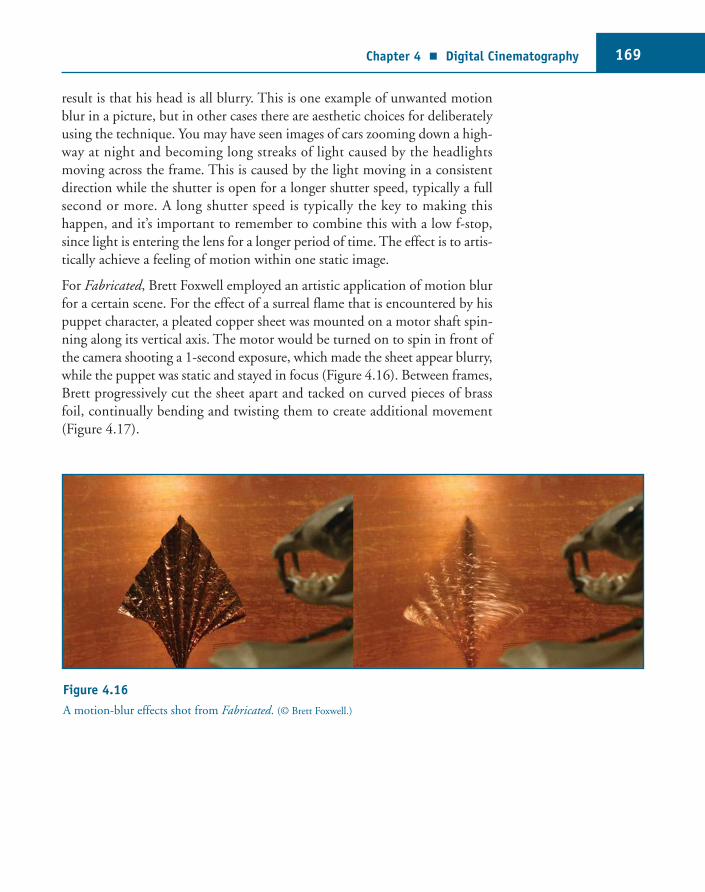
result is that his head is all blurry. This is one example of unwanted motionblur in a picture, but in other cases there are aesthetic choices for deliberatelyusing the technique. You may have seen images of cars zooming down a high-way at night and becoming long streaks of light caused by the headlights moving across the frame. This is caused by the light moving in a consistentdirection while the shutter is open for a longer shutter speed, typically a fullsecond or more. A long shutter speed is typically the key to making this happen, and it’s important to remember to combine this with a low f-stop,since light is entering the lens for a longer period of time. The effect is to artis-tically achieve a feeling of motion within one static image.
For Fabricated, Brett Foxwell employed an artistic application of motion blurfor a certain scene. For the effect of a surreal flame that is encountered by hispuppet character, a pleated copper sheet was mounted on a motor shaft spin-ning along its vertical axis. The motor would be turned on to spin in front ofthe camera shooting a 1-second exposure, which made the sheet appear blurry,while the puppet was static and stayed in focus (Figure 4.16). Between frames,Brett progressively cut the sheet apart and tacked on curved pieces of brassfoil, continually bending and twisting them to create additional movement(Figure 4.17).
Chapter 4 n Digital Cinematography 169
Figure 4.16
A motion-blur effects shot from Fabricated. (© Brett Foxwell.)

Motion blur can also be added to a puppet character or object that is meantto be moving very quickly across the screen or as a method of making the animation appear smoother. If the individual frames from the animation areblurred, the shot has the potential for a closer resemblance to live-action photography, which will typically have blurred action if any motion beingfilmed is faster than the camera’s shutter. One simple method for achieving ablur effect on set is to place a sheet of glass onto the camera lens or directly infront of it and then use Vaseline to smudge the place where the puppet is. K-Y can also be used since it is water based and easier to wipe off the glass.The smudging would need to be removed and re-applied for each frame as itfollows the motion of the object. Using this method means your puppet orobject still needs to be static, but the illusion of an unfocused blur is createdby the glass effect. The alternative is to find a way to actually move the puppetwhile each frame is being taken. People have achieved this in various ways.Attaching invisible strings to the puppet and yanking on them while capturingis one method. Finding a way to vibrate the set is another. Whichever methodis used, the trick to effective motion blur is finding a way for the blurringaction itself to follow the path of action in which the puppet or object is moving. If an object is moving diagonally from left to right, for instance, thedirection of the blur should appear to be trailing behind in that particulardirection. Applying motion blur to a puppet can also be done through variouspost-production methods, which are covered in Chapter 9, “Visual Effects.”
The Advanced Art of Stop-Motion Animation170
Figure 4.17
Another motion-blur effects shot from Fabricated. (© Brett Foxwell.)

Camera Moves
Depending on the film project you are creating and the kinds of shots required,you may want to create shots with camera moves like trucking/tracking shots,pans, tilts, and any other variety of motion. For subtle camera moves acrossone shot, digital pans or zooms can also be created in post-production throughAfter Effects or other programs. Pans done in post will change the framing ofyour shot, but the perspective of the shot will not change. You are simplyshooting a wider composition of your shot and moving the dimensions of yourscreen around within that composition. With a zoom, you are doing the samething. For this effect, be aware that there may be a change in resolution qualitywhen you zoom into your frame. When planning ahead for camera moves inpost, this might give you reason to shoot your images in RAW format so thatyou reduce the amount of image quality loss.
In a shot where the actual camera is moved around the set, the perspective willchange throughout the shot, which gives a different cinematic effect. Toaccomplish this effect, your camera needs to be mounted on some kind of rigthat can also be moved frame by frame, along with whatever you are animating.Usually the camera itself will be mounted on a base that can be moved forwardand backward or left to right. If you want the option of tilting the camera upor down, the base itself can be a geared tripod head with incremental-motiondials on it. As usual, you generally don’t want to touch the camera itself butrather only move the track it’s attached to. It also helps to have a ruler or somekind of marking system for registering each tiny move you make to the track.Even a long strip of tape with marks drawn on it will work just fine; thereshould be a point on the base where the camera is attached to line up witheach mark. Your camera move can be planned beforehand, especially if youare using an exposure sheet and know exactly how many frames long your shotis. You can plan where the camera move starts and when it ends and also planout a slow-out and slow-in. Some software programs now have a special cal-culator that will help you plan out how much to move your camera over anynumber of frames.
Camera rigs can be very simple or more complex, depending on your skilllevel, building tools available, and what kind of shots you ultimately want tocreate. You want to think about the camera moves that are needed to tell yourstory or achieve a certain effect, not just move the camera for the sake of moving it. One instance where you might want the option for a camera movewould be a scene where a puppet character is walking through a tunnel or hallway, and you want the camera to follow him. This action was called for in
Chapter 4 n Digital Cinematography 171

the script for Brett Foxwell’s Fabricated, so he set up his camera rig to do this,with the camera suspended from above (Figure 4.18). Having the camerarigged from above allowed for it to move through instances where the floor isvisible through most of the scene. The rig can also be interchangeably assembledto have the camera supported from below.
The Advanced Art of Stop-Motion Animation172
Figure 4.18
Camera motion rigdesigned by Brett Foxwell.(© Brett Foxwell.)
Brett describes the construction of his rig here:
The camera support bracket is constructed out of 1-inch by 0.5-inch aluminumbar stock. I machined several different lengths and drilled many through holesand threaded holes at 0.5-inch intervals. The camera sits on a 0.25-inch aluminum plate Swiss-cheesed with holes. The result is a somewhat modularsystem that can accommodate many different arrangements and setups. Thecamera rig is in turn attached to the overall set structure, which is a commer-cially available aluminum extrusion system called 80/20. This extrusion systemis the backbone of the whole setup. The visible set and the camera setup areboth attached to the extrusion framework, so everything is integral and quiteresistant to jostling. Another important factor with all of the mechanical move-ments (the focus puller setup, the geared heads, and the dolly track) is to haveall of the components biased in the direction they will be moving before youstart animating them. When you are returning to the start point, go well pastthe start point, and then go forward in the intended direction, stopping at thestart point.

On a larger set, your camera track can be built to move through the set itself tocreate a trucking shot that is level with the ground. (Although in terms of scalethis would be equivalent to a camera on a tripod trucking through a real set.)This was the approach taken by a former student of mine named Lucas Wareingon his student film AVA, made at Emily Carr University of Art + Design inVancouver. For one particular long trucking shot in the film, the script calledfor an establishing shot moving through a large set, with a puppet sleeping atthe far end and the sun moving across the sky (Figure 4.19).
Chapter 4 n Digital Cinematography 173
Figure 4.19
A set from Lucas Wareing’sfilm AVA. (Courtesy of Lucas
Wareing.)
The camera track itself was relatively simple, just consisting of long, flat piecesof wood (Figure 4.20). Two long, rectangular pieces are glued to a flat base,and the tripod head is affixed to a smaller piece of wood that fits snugly insideand can be slid back and forth. The track was designed with additional piecesthat slot together like a puzzle so that as the camera moves forward and reachesthe end of the track, more pieces can be added so that the move can continue(Figure 4.21). This also helps conceal the track at the beginning of the shotand is created in steps outside the camera frame. This solution was also usedbecause the shot included the camera tilting upward, which may have beeneasier to achieve with the camera mounted from below rather than above. Thecamera was moved forward by hand on the sliding track, and about midwaythrough the shot the camera also began to tilt downward while still movingforward.

To figure out exactly when the camera tilt should start and get the desiredeffect, a virtual camera move was programmed beforehand using Final CutPro, as explained by director of photography Chayse Irvin:
Final Cut Pro 7 has the ability to create logarithmic curves over a timeline.Basically what I did was create a sequence that was the same time as the shot.Since we were working on one’s and not two’s, a 23.98 timeline is perfect. I tooka video-generated filter called “color,” and I could manipulate the motion settings of that, using the scale function to animate the dolly and rotation function to animate the tilt. I found the beginning and end marks by physicallymoving and setting the camera where I wanted it to begin and end. That wouldgive me a measurement in distance, as well as a degree in tilt. I made those valuesmy beginning and end in FCP over the 23.98 timeline and duration of thewhole shot, then guessed where I wanted it to accelerate or decelerate andapplied those “curves” in the FCP motion tab. During animation I would justpress the forward key, moving to the next frame. Then I would click on eachtext slug, and it would give me FCP’s calculation of what the next frame’s move-ment was. Then I applied that to what we were working with physically. Themovement in the shot was 15 seconds, which equaled 360 frames of animation.
For another animated element in the shot, in the background there was a largeplank of wood with a light attached to the end, which was meant to representthe sun moving across the sky (Figure 4.22). A large chart was drawn on asheet of wood to which the plank was attached and could be moved frame byframe according to the timing marks drawn on the chart. The light itself,although visible to the camera, was not intended to be the actual sun in the
The Advanced Art of Stop-Motion Animation174
Figure 4.20
A wooden camera track. (Courtesy of Lucas Wareing.)
Figure 4.21
Taking the camera track apart. (Courtesy of Lucas Wareing.)

film. An illustrated sun would be composited over it in post, so the animationof the sun light was only there as a guide for tracking it. On the set, betweenthe background and the camera, a circular disk on a wire was positioned to lineup with the sun in each frame, thereby covering it. The end goal of animatingthe sun light throughout the shot was simply to give the proper light andshadows moving across the set.
Animator Anthony Scott, animation supervisor for Corpse Bride and Coraline,designed and built a camera rig of his own (Figure 4.23) for a recent stop-motion music video he worked on, a collaborative project with artist KIshibashi of the band Jupiter One. Anthony named his rig “the LumberFlex”(which started as a joke, but the name stuck) and designed it for shots thatneed to get close to the set and move through it. The wooden camera basemoves along a track made of two pipes on a long wooden platform, which ishinged in the middle and essentially works like a teeter-totter. It’s weighted onthe opposite end with about 20 pounds of weights to counter-balance theheavy geared head for the camera as it slides forward, and a bungee cord keepsthings from going flying if the camera is removed. Another device, a ModelMover (Figure 4.24), which incrementally pushes the platform upward byturning a wheel at the bottom, was added to the front for boom shots. Forsome tilt shots, Anthony would move the geared head and also attach a stickand a sheet of foam core to the back of the camera, marking the increments
Chapter 4 n Digital Cinematography 175
Figure 4.22
Adjustable rig for a movingsun light. (Courtesy of Lucas
Wareing.)

for the tilt motion on the foam core (Figure 4.25). All of the mobility for theLumberFlex, like any camera rig for stop-motion, is designed to be moved inincrements frame by frame. The animation of both the camera moves and theobjects on set was primarily shot on twos (two frames per movement) for thisproject, which is surprising because the general rule for camera moves has traditionally been to shoot them on ones (one frame per movement) to avoida strobing effect. However, on Anthony’s previous animation work for the titlesto United States of Tara (which won the stop-motion team an Emmy), they foundthat camera moves on twos actually looked better. More information on Anthonyand K’s new animated music video project is included on the companion CDin Appendix B, “The Stop-Motion Community.”
The Advanced Art of Stop-Motion Animation176
Figure 4.23
The LumberFlex camerarig. (Courtesy of Anthony Scott.)

Finally, going from these rather advanced methods and large-scale rigs back tothe very simple, filmmaker Patrick Boivin creates many of his tracking cameramoves simply by attaching his camera to a miniature train track and pushingit along (Figure 4.26). His short stop-motion films, which have become a bigsensation on YouTube (http://www.youtube.com/user/PatrickBoivin), such asBboy Joker and Iron Man vs. Bruce Lee, also use a lot of dynamic camera moves thatmimic a handheld quality. Patrick explains how he does this in stop-motion:
I do a lot on set with a classic photo camera tripod. There is a crank on the sidethat allows me to raise the head gradually. I also work with a digital camera witha much higher resolution than what I need at the final, so I can easily crop andmove inside the image in post-production.
Chapter 4 n Digital Cinematography 177
Figure 4.24
Model Mover device for the LumberFlex. (Courtesy of
Anthony Scott.)

The Advanced Art of Stop-Motion Animation178
Figure 4.25
Tilt-measuring device forthe LumberFlex. (Courtesy of
Anthony Scott.)
As these various examples show, no matter what tools or resources you have,a little creativity can go a long way when it comes to achieving the effects youwant.
Figure 4.26
Patrick Boivin’s movingcamera rig using aminiature train track.(Courtesy of Patrick Boivin.)

Stereoscopic Photography
One of the biggest emerging technologies in filmmaking today is stereoscopicphotography and projection. The term “stereoscopic” is a more technical termfor what most people simply know as “3D.” The idea of projecting movies in3D is nothing new. It had been experimented with since the beginning of film,but it first became popular in the 1950s. The way it worked was by rigging uptwo projectors, each running a duplicate print of the same film, synchronizedexactly to the same frame. The projectors’ images were shown through a polar-ized filter and lined up in such a way that both images were spaced slightlyapart on the screen, creating a small overlap between them. When viewers puton the special 3D glasses (Figure 4.27), they repolarize the overlapping imagesto create the illusion of depth and actions popping out from the flat screen.The overlapping images were an attempt to mimic the fact that when we arelooking at an image, our right and left eyes see the image from a slightly different perspective. (If you stop reading for a moment and look at any objectclose to you, first close your left eye, and then close your right eye. You willnotice that the object shifts a little bit. These are the two views seen by eachof your eyes, and your brain puts these images together to recognize the depthof what you see.)
Chapter 4 n Digital Cinematography 179
Figure 4.27
3D glasses. (Courtesy of Justin
and Shel Rasch.)

3D movies in the 1950s came about mostly as a gimmick to increase decliningmovie attendance. Once television came along, people moved towards gettingtheir entertainment and news from the comfort of home, rather than going tothe movies. Seeing movies in 3D made the theater experience more of anevent, something you couldn’t get from television. Most of the 3D movies werehorror films like House of Wax and Creature from the Black Lagoon, with cheapthrills and chills to heighten the horrific effect. Because of limited projectiontechnology and audiences complaining of headaches, the trend didn’t last verylong, so movies went back to being projected normally. 3D movies emergedagain for a while in the 1980s, when the availability of cable television andvideo rentals kept audiences at home rather than in the theaters. Once again,the trend died off until large-screen home theaters (and the practice of down-loading movies onto computers and phones) became another threat to themovie-going experience. Today, many films (animated films in particular) aremarketed and projected in 3D and 3D IMAX to bring people back to cinemasfor a unique experience. Whether this is just another passing gimmick has yetto be seen, but the phenomenal success of James Cameron’s Avatar and thedevelopment of 3D televisions could mean that 3D is here to stay.
For the latest crop of animated films, their theatrical projection may be presentedin 3D, but the films themselves are not typically made that way originally. Likethe films before them, they are made with one camera and simply reformattedfor 3D projection. In 2006, Walt Disney Pictures re-issued The NightmareBefore Christmas to theaters in 3D by creating a digital copy of each frame forthe overlapping image. The 3D formatting was done by a team of artists andtechnicians at Industrial Light & Magic, some of whom had worked on theoriginal film. The original puppets were scanned into the computer and thesets re-created in a virtual 3D environment of featureless geometries for eachscene of the film. Then each frame of the original film was digitally projectedonto the geometry, the camera moved over slightly, and the frame re-photographed. This image would be shown as the right-eye image, while theleft-eye image was the original version of the film. Viewing Nightmare in 3Din a properly equipped theater allowed for the detail of the hand-crafted setsand puppets to come forward in a way that brought more attention to theiractual third dimensions.
Around this same time, production was going forward on Coraline, whichwould take the third dimension to another level of artistry and technology.The main difference was that Coraline was actually shot in stereoscopic 3D, inaddition to being projected in 3D for certain screenings. Shooting in stereo-scopic 3D means that instead of having one camera view that takes a flat
The Advanced Art of Stop-Motion Animation180

Chapter 4 n Digital Cinematography 181
picture of a three-dimensional scene, there are two images taken from differentviews of the same scene to mimic the different perspectives of our left and righteyes (Figure 4.28).
Figure 4.28
A view of left-eye and right-eye images taken for the short film Line. (Courtesy of Justin and Shel Rasch.)
The distance between our eyes is referred to as IO (interocular distance). Thissame sense of distance is mimicked by stereo photography—the greater thedistance is, the greater the sense of three dimensions and depth that will becreated. However, having the IO too far apart will also create a ghosting effect,where the double image shows up even with the glasses on, and the focus distracts the eye towards the edges, rather than the illusion of one solid objecton screen. Also, if the IO is too great, the effect would be much too intensewhen projected in 3D, which would cause major headaches for the audience.However, once the comfortable parameters for the IO have been set, since theIO creates the depth to your shot, animating that distance (having the IOincrementally change throughout the shot) will cause your scene to visiblystretch away from the audience.
Putting this principle into context of stop-motion, in terms of how the viewerreceives the image that is projected, the distance between our eyes is veryslight, not much more than a half-inch or so. The eyes of a typical miniaturestop-motion puppet are even closer together, only a few centimeters apart.Therefore, when shooting at miniature scale for stop-motion, taking the twoseparate images at this very small distance apart from each other is necessaryto achieve a stereo effect that our brains can actually handle. On a miniature

The Advanced Art of Stop-Motion Animation182
scale like a stop-motion set, two camera lenses cannot easily get as closetogether as mere millimeters or centimeters, so the solution is to use one camera on a slider that moves the camera back and forth (Figure 4.29). Theanimator positions the puppet, the camera takes a left-eye view of it, and the camera slides over slightly to take a right-eye view of the same puppet. Thecamera then slides back to the left-eye view in preparation for the next image,the animator moves the puppet, and the process repeats, with the camera taking two separate images for each frame of the animation. Stereoscopic filmsshot on a larger scale may possibly combine two lenses in one camera, but withstop-motion being on a miniature scale, if you want to shoot in stereo, it isbetter with the slider option.
Figure 4.29
Camera-sliding tripodattachment for stereoscopicphotography. (Courtesy of
Justin and Shel Rasch.)
Once you set your IO, the other step in figuring out how deep your scene willgo in or pop out of the screen has to do with alignment of your shot. If youtreat the screen as the middle ground of your shot, the trick is to have yourleft- and right-eye images line up with each other wherever you want the middle ground (also called a zero plane or zero parallax). In many cases, youmay want to focus this middle ground on your puppet character or anotherobject on screen. This way the background will appear to be deep behind thecharacter, and if it stretches out its arm or throws something forward, forinstance, this will seem to pop out at the audience.
One way to focus on the photo subject is to shoot your scene with convergenceon the point where you want the middle ground. This simply means that inaddition to the camera sliding back and forth, the camera is angled slightlyinward in each side. It would be like two eyes crossing towards each other

slightly to focus on one point. The mechanics involved to shoot with conver-gence are more costly because the slider not only needs to move the cameraback and forth, but also turn the camera inward towards the subject. In additionto the technical end of figuring this out, the end results are pretty much con-figured there on set, with little room for adjusting in post. The other option,favored by most for stop-motion production (including on Coraline), is toshoot parallel, meaning the camera is simply pointing straight ahead at the setwhile capturing the left- and right-eye images. Shooting parallel allows you toplay around with the alignment in post, creating more freedom of choices forhow much stereo you want to create. As far as your camera settings, you cando things however you would on any other set, although keeping a wide depthof field, with everything in focus, will tend to enhance the stereo effect.
When you have left- and right-eye images shot and want to view them in 3Don your computer to test the 3D effect, the simplest method is to create ananaglyph image that can be viewed with a pair of red-blue 3D glasses. The twoimages can be layered over each other in Photoshop, each on its own separatelayer. Hide the left-eye layer; then for the right-eye image layer, double-clickon the layer in the Layers window to bring up the “Layer Style” window.Under Advanced Blending are three checkboxes for the red, green, and bluechannels of your image. Check off the Red box, and you will notice a colorshift in the image to a bluish tone (Figures 4.30 and 4.31). Click OK, andwhen both layers are still visible, you will see a double image and can move
Chapter 4 n Digital Cinematography 183
Figure 4.30
Checking off the redchannel for preparing ananaglyph image. (Courtesy
of Justin and Shel Rasch.)

The Advanced Art of Stop-Motion Animation184
the right-eye layer around to find the alignment you want. Viewing thisanaglyph image with your red-blue 3D glasses will show it in eye-popping 3D(Figure 4.32)! The same principle of creating an anaglyph image by turningoff the red channel can be applied to an entire image sequence in After Effects,along with other options for adjusting the channels for the desired effect.
Figure 4.31
A view of the left- and right-eye images in anaglyph format. (Courtesy of Justin and Shel Rasch.)
Figure 4.32
Anaglyph 3D image, which can be viewed through a pair of red-blue 3D glasses. (Courtesy of Justin and Shel Rasch.)

When shooting in stereo, this obviously complicates the workflow of your digital images, since you will have two different versions of each frame of animation you capture. For this reason, it’s a good idea to have some kind ofa system for storing these images in two separate folders, ideally while you areshooting. It’s possible to shoot all your images in a row and sort through themlater, selecting every other frame and copying them en masse to separate fold-ers. However, if your software allows for automatically separating the left- andright-eye images, that might make things easier.
Independent stop-motion filmmakers Justin and Shel Rasch (Figures 4.33 and4.34) have recently been working on a stereoscopic short film called Line in astudio they have set up in their garage, with the help of some consultants in thestereoscopic field. Here they reiterate the principles of stereoscopic productionby describing their shooting process in detail:
Basically we have a tripod with a little motion-control device, with incremen-tal numbers we can type in for how far to move the camera left or right. Thenthere is a little button where we press positive or press negative, for the right eyeor the left eye. In the Dragon software we’re using, we take a shot and then thesoftware has an Exposure 2 layer for a second set of exposures into a differentdirectory. We hit the button for the right eye, and the camera moves over, takesa shot, and moves back to the left. We have to remember we’ve done this forevery frame.
It’s all a distance thing, based on how far your character is from the camera, andhow 3D you want it to look off the screen is the distance of how far you putyour camera movement, either left or right. We’ve been experimenting with itin After Effects to see what it looks like. You can also choose where you wantthe middle ground to be, so basically you decide which part of your scene youwant to be screen depth, and everything in front of that will come off the screen.Also, in terms of what you want to be behind the background and what youwant in the middle, you can choose that for each shot.
When you have the two images and you put them on top of each other in AfterEffects, you can find the point in your animation (where, for example, the char-acter is coming forward) where everything lines up perfectly with your charac-ter so there’s no double image. That’s called the zero plane, and you’ll see adouble image in the background and foreground, which are the parts poppingoff the screen. You can choose how close to the camera you want that zero planeto be, and all the 3D is based off that.
(For more about Justin and Shel’s lives and work, see the full interview withthem in Chapter 13, “An Interview with Justin and Shel Rasch.” Also checkout the files Justin Rasch_3D.mov and Justin Rasch_3D_2.mov on theaccompanying CD with a pair of red-blue 3D glasses on!)
Chapter 4 n Digital Cinematography 185

Whether shooting in stereo or not, I hope this chapter has helped you under-stand some basic things about how to set up for shooting stop-motion effec-tively. All things considered, once you know the basic fundamentals for yourcamera functions, you are free to be creative and play. When applying this creativity to a short film, though, make sure the effects and settings you experiment with serve your story first and foremost. Knowing how to use thetechnology to enhance the art and become part of the storytelling processshould be your ultimate goal so that you can bring your audience through thestory along with you.
The Advanced Art of Stop-Motion Animation186
Figure 4.33
Justin Rasch animating on set. (Courtesy of Justin and
Shel Rasch.)
Figure 4.34
Shel Rasch views their work in 3D. (Courtesy of Justin and
Shel Rasch.)

Pete Kozachik (Figure 5.1) has worked in the film industry for over 30 years as an
animator, visual effects artist, and cinematographer. He was the director of photog-
raphy and visual effects supervisor on The Nightmare Before Christmas, James and theGiant Peach, Corpse Bride, and Coraline. On the latter two films, he was instrumental
in adapting the technology behind the first uses of digital SLR cameras and stereoscopic
photography for stop-motion. He also grew up in Michigan, like me, so for this reason
and so much more, I’m glad to have his contribution to this book.
5An Interview with Pete Kozachik, ASC
187
Figure 5.1
Pete Kozachik poses on the Land of the Dead set from Corpse Bride. (Photo by Simon
Jacobs/ © Warner Brothers Pictures.)

The Advanced Art of Stop-Motion Animation188
KEN: Can you tell me about your background and how you got started in stop-motion?
PETE: As a kid I had seen both King Kong and Seventh Voyage of Sinbad within a few
weeks of each other, and they got completely seared into my cerebrum (or wherever
those things get seared). It wasn’t clear to me at the time what I was looking at, but
it affected me so much. I remember sitting with my mom in the theater at age 7,
watching Sinbad, and out of concern that it might have been too scary for me, she
leaned over and suggested the creatures on screen might have been giant robots. So
for the next few years I had it in my mind that the U.S. government had a secret fleet
of giant robots with rubber suits on and let Hollywood use them.
Then at some point I saw a photograph of Ray Harryhausen posing next to his
Cyclops and Dragon puppets, and it all became clear. I realized those figures weren’t
as big as I thought they were, so it was something I felt I could do. There wasn’t any
information out there about how Ray’s films were made, but I managed to experi-
ment enough to start making my own stop-motion films. By the time I was in high
school, we had moved to Tucson, Arizona, and I showed some of my films around
town. This got me some jobs working at various TV stations, mostly shooting and
working with some industrial filmmakers. After graduation from University of
Arizona, I put my name out as an animator, picked up a few years of work on
commercials and industrial films, made a reel, and then headed to Hollywood in the
late ’70s.
I got lucky enough to start working for Gene Warren and later with Phil Kellison,
both having backgrounds in stop-motion. Phil was a director at Coast Special Effects
and became one of my early mentors in the craft. I ended up working there for several
years, and it was such a valuable learning experience. I had it in mind to watch the
animators work, but stop-motion animators are actually not that interesting to watch,
because they move very slowly, and it’s all just going on in their heads. But I remember
one of my first nights there, cleaning up after someone’s shoot, and opening up a
drawer with a row of Pillsbury Dough Boy heads. I was so totally transfixed by that,
because these heads seemed too precious to even look at, and I’ve never really lost that
fascination.
KEN: What kinds of projects did you work on there?
PETE: Coast Effects made most of their money on commercials, but they would also
bring in low-budget features to keep Phil Kellison happy, since he liked to work on
those. We would use stop-motion whenever we could, even if it was just a spaceship,
or whatever. It was a small part of a larger company, consisting of only a dozen or so
of us, so we all did a little bit of everything. If a star animator like Laine Liska was
too busy, sometimes I would animate something, and they would just tell the client
that Laine did it. At one point I had brought a motorized spaceship prop I built to
the set, and the cinematographer suggested that since I had built it, I should shoot it.
This led to me transitioning from animation to more work in camera, motion control,

and photography. After a few years at Coast, I answered an ad for a cameraman at
Industrial Light & Magic (ILM) and moved up to the Bay Area to work on feature
films.
KEN: How did you end up getting involved with The Nightmare Before Christmas?
PETE: I had worked with Phil Tippett on Willow while at ILM and ended up work-
ing for him exclusively at his own studio for the last two Robocop films. I essentially
brought motion control to Tippett Studio and spent some serious time there, at a
point when they were starting to gain more momentum. Phil Tippet’s studio worked
organically, a lot like Coast. That’s not too surprising, as he was an earlier alum from
Coast. Henry Selick had been renting space there for his short film Slow Bob in theLower Dimensions, which we shot as a pilot for MTV. Around that time, Tim Burton
asked Henry to direct Nightmare and, based on the strength of Slow Bob, approved
the idea of bringing me on as director of photography.
At exactly the same time across the studio, Phil Tippett was gearing up to shoot
stop-mo dinosaurs on Jurassic Park. He made a tempting case for me to work on JP,
doing this really cool stuff with dinosaurs, and I said “yeah I know, but Henry’s got
this thing going where it’s not just effects, it’s a whole movie.” So we went back and
forth on it, but I ended up going with Nightmare because I felt it was a great oppor-
tunity to tell an entire story with stop-motion, which I had never done before. It is a
major commitment to jump onto a show like that, because you are basically throw-
ing about 3% of your life into it, so it had better be good. It becomes a much bigger
part of your life than making shots for a single sequence.
KEN: On a stop-motion film, how is the decision typically made whether to do effects prac-tically on set or in camera, versus doing it later in post-production?
PETE: I’d like to say it comes down to personal taste. When Henry Selick and I work
together, the personal taste would usually be to do as many effects in camera as
possible, but there are practicalities to consider, too. Back when we were shooting on
film, there was no such thing as digital compositing; you got better quality if you did
everything in camera, but that doesn’t really hold water anymore. Composites used
to be hugely expensive, and now they’re not. It used to be worth risking a reshoot as
opposed to having a grainy film composite, or an “optical,” as it was called then. On
a film like Stanley Kubrick’s 2001: A Space Odyssey, shots would be done in camera
and spending months of laying images onto the same negative.
These days there is a lot more green-screen shooting going on, which I think is good,
because then the animators can focus exclusively on their performance, rather than all
the steps of multiple passes through the camera. Directors have a lot more freedom
now, too, so rather than being told that elements have to be shot with all sorts of
restrictions, they can call for more ambitious shot designs, and darn near anything can
be lined up digitally into a seamless composite.
Chapter 5 n An Interview with Pete Kozachik, ASC 189

The Advanced Art of Stop-Motion Animation190
On Nightmare, we did our best to get a lot of effects in camera, so we used a lot of
front and rear projection directly on set, in order to add real flames to the torches and
things like that. My personal take is that stop-motion should have some degree of real-
world physics in it. Elements like water splashes, smoke, and fire are from the same
world that the puppets are, and I feel it can be a richer experience for the audience
using elements that are shot in real life. I also still respect films that go with the cute
approach of using cotton or stylized cartoon animation for smoke, and we’ve done a
few things like that in our films, too. I remember enjoying that kind of approach as
a kid, watching things like Gumby.
KEN: Is there any particular shot you’ve worked on that stands out, in terms of capturingthe magic of stop-motion with brilliant effects work?
PETE: There is a sequence with the Corpse Bride, starting with her coming out of the
ground, all the way to when she and Victor are on the bridge surrounded by a flock
of crows. There are a lot of shots in that sequence with complex composites (comps)
in them, and some of the most painstaking animation ever done, in particular on her
clothing. There were a couple of shots where we had to throw in the towel and use
computer animation on her veil. It was still supposed to look like stop-motion, and
luckily the animators pulled it off (Figure 5.2). Some of the shots don’t even look like
they needed post work to begin with, but in some instances we had to add extra back-
ground just because we couldn’t practically fit it into the stage. Overall I love every-
thing about that sequence, and when I signed on to the movie, that scene was the one
I was thinking about. I was envisioning an image that might have been in old horror
comics, part spooky, part sexy, pretty much everything that parents didn’t want us to
spend our allowance on.
Figure 5.2
Brian Demoskoff animates on Corpse Bride. (Photo by
Gary Welch/© Warner Bros.
Pictures.)

KEN: What were the challenges you faced using digital SLR cameras for the first time onCorpse Bride?
PETE: I think the biggest challenge was taking this new technology that wasn’t really
designed for that purpose and very quickly adapting it to professional work. We had
challenges with everything, even including stringing the images together and looking
at them.
There are all kinds of agreed-on standards to the century-old film technology, including
how sensitive it is, in terms of its ISO rating. We got into a pickle early on in CorpseBride, shooting test images with these cameras. When we viewed the images on stage
in Photoshop, it would show us a better image than what we were capturing. So unbe-
knownst to us, for several shots in the movie, we were drastically underexposing them
and had to ask the visual effects crew to tweak them into usable shots. To establish a
safe standard, we had to pretend we were shooting on relatively slow film and not plan
on enhancing it in post. This made it feel like we were going backwards, but ultimately
it made life a whole lot sweeter in the color grade, since the shots did cut together
without much tweaking.
Another problem was dust falling on the unprotected image sensor, which wouldn’t
be there when we started, but each time the mirror flipped, chances were that some
dust mote would get in there to drift down on the sensor.
So there were minor issues like that, but on the other hand, the SLRs allowed for
things that were unheard of back when we used those 30-pound Mitchell cameras.
With those, you really had to consider how much the camera weighed, how you were
going to support it, and how the animator would get his head around it. Suddenly,
when the cameras were tiny, we were more on par with what live-action could do
(Figure 5.3). If live-action film had to mimic how stop-motion used to be shot, the
camera would be the size of a Volkswagen.
KEN: So what kinds of things should a stop-motion filmmaker shooting with his own SLRcamera keep in mind or watch out for?
PETE: There are a few things which now seem rather obvious. First of all, turn off
everything that is automatic: iris, exposure, focus, ISO, white balance, everything, and
dumb the camera down to the point where you are manually in control. But much
more important than the technical stuff, is that people seem to be losing time waiting
for the ultimate perfect camera to show up, and it hasn’t happened yet. The closest
thing right now is probably the Canon 5D, which will be valuable for a few years until
something better comes along. There is a lot of hot air wasted on the minutia of how
much better photography can get, or how much more resolution you need. As
filmmakers, we should help the audience focus on the story, the drama, and the
characters. That’s what they buy tickets for. If you’re only sitting there admiring the
image sharpness, then somebody didn’t do their job. So my most heartfelt advice is
simply to get off the Internet and start shooting with what you’ve got.
Chapter 5 n An Interview with Pete Kozachik, ASC 191

The Advanced Art of Stop-Motion Animation192
KEN: What would you say are the differences and similarities between shooting for live-action and shooting for stop-motion?
PETE: The thing we have been trying to do, with all of the crews I have worked with,
is to emulate the same film language and techniques as are used in live-action. Most
of the time it can be done, in terms of lighting, composition, lens choices, color,
contrast, camera movement, and things like that.
On Nightmare we were first experimenting with camera techniques that were fairly
well accepted in the live-action world. As we experimented, we often wondered if it
was going to end up being a bad fit. As an example, the character of Sally (with no
disrespect to the puppet builders) is essentially a crude representation of a woman.
There are visible signs like seams, brushstrokes, or other imperfections that make it
obvious to the audience she is only a few inches tall. So the question became, can we
take this puppet and give it the 1930s/40s glamour treatment with the lighting and
camera, or will it just look ridiculous and ghoulish? Well, to our surprise, it worked!
Through using diffusion filters and other techniques, there were many shots in the
film where we treated Sally the same way we would have treated the romantic leads
in Hollywood’s golden age.
The differences between live-action and stop-motion lie in the disciplines you have
to apply to setting up a shot. In live-action it can be OK to rig setups somewhat
precariously, with the understanding that they only need to last as long as the take,
so there is a certain amount of serendipity involved. In stop-motion, you need to
consider the long haul when setting up a shot. The demands are greater these days,
and nobody finishes a shot in one day anymore. A shot may take several days or even
Figure 5.3
Pete Kozachik goes over amotion-control shot withCaroline Wilson on CorpseBride. (Photo by Graham Pettit/
© Warner Bros. Pictures.)

weeks, so there can’t be any opportunity for things to slowly change over the passage
of time, like a light bulb slowly getting dimmer, a set warping from the humidity, or
a camera slowly losing its position. It’s the same with light leaks. Back when we shot
on film, even if we had a good camera (and usually we didn’t), it was wise to bag the
whole camera so that some little unseen crack didn’t slowly leak in light and fog each
frame.
The other thing to think about is access for the animator. They will be walking back
and forth several hundred times during a shot, so you don’t want to have too many
c-stands or cables getting in their way. Chances are, if there’s an obstacle, they will step
on it or bump it, and it’s really hard to get things back to where they were. A lot of
visual effects work in stop-motion has to deal with getting elements into a shot that
couldn’t be there while the animator was at work. When possible, devices like trap
doors or walls that can be pulled apart and back together between frames can be
designed into the set instead.
Another unique element of stop-motion is that in order to get shots out in a timely
manner, we need multiple crews. On Coraline I had about 30 people who were broken
down into about eight or nine different units. They were primarily cameramen,
electricians, and assistants, plus some tech support people, so there is a lot of parallel
processing going on. We had about 40 sets all going at the same time, simply because
we had to. You couldn’t live long enough to finish that show with just one crew.
So it’s also really important that every single crew person goes to dailies, not just the
lead crew members. Everyone needs to see what others are doing, so the shots cut
together properly. Part of my job as DP was to make sure communication was indeed
happening between sets, because it takes effort to walk 200 feet through a maze of sets
to check out a set on the other side of the building. There were some electronic aids
there, used for sending still frames to other people’s computers, but direct communi-
cation is still vital.
KEN: What are your thoughts on the future potential for this new stereoscopic technologythat was used on Coraline, and 3D movies in general?
PETE: I’d like to see 3D used in the same way that music, color, and sound have always
been used in film. It needs to get to the point (and I think we are getting close now)
where it is no longer the main reason for going to the show. I can remember back to
the point where almost half of the movies I went to as a kid were black-and-white,
and we would sometimes choose which movie to see based on whether or not it was
in color. That’s ridiculous, of course, and I would say the same for 3D. But there is
room for everybody, and hopefully we will also start to see films where everyone agrees
that 3D won’t add much to it. Then we can spend our resources on more time on set,
better filmmaking, and things like that. 3D is a great technique, and I’m glad that
Coraline was made that way, as it makes it more fun to watch. But I’ve talked to people
who didn’t see it in 3D, and they liked it, too.
Chapter 5 n An Interview with Pete Kozachik, ASC 193

KEN: What are your thoughts on the future potential of stop-motion as an art form?
PETE: Stop-motion has done a lot in the near century it’s been in use, mostly on the
fringe. It started as a visual effect technique, and then it got blown away in 1993 with
Jurassic Park. All the same, I would still love to see or work on a classic Harryhausen-
style monster movie in stop-motion, so we’ll see what happens. Stop-motion’s best
future is most likely in the niche it’s forming into now, which is stylized imagery that
has something different going on than CG animation. Luckily, most people know
what they’re looking at now, thanks to MTV and the glut of media and information
we now have. Because of that, stop motion can be appreciated for itself.
The Advanced Art of Stop-Motion Animation194

Trey Thomas (Figure 6.1) is one of the current generation of professional animators
who got their start during the animation boom of the late 1980s and early 1990s.
Since then, he has been a stop-motion animator on The Nightmare Before Christmas,James and the Giant Peach, Monkeybone, and Corpse Bride; the lead animator on Coraline;and a CG supervising animator on Walt Disney Feature Animation’s Dinosaur and
DreamWorks SKG’ Shrek 2 and Madagascar. I’m very glad to have Trey’s thoughts on the
process of feature animation as part of this book.
6An Interview with Trey Thomas
195
Figure 6.1
Trey Thomas animates on Corpse Bride. (Photo by Brian Demoskoff/Characters © Warner Bros. Pictures.)

The Advanced Art of Stop-Motion Animation196
KEN: Can you tell us about your background and how you got started in stop-motion animation?
TREY: It was always an interest of mine, sort of the classic story of being a Ray
Harryhausen fan when I was a kid. I always liked animation and special effects in
general, but when I was a youngster, I wanted to get into gore effects and make-up,
like Tom Savini–type stuff. When I was in high school, I was focused on making
zombie movies. I grew up in Washington, D.C./northern Virginia and went to art
school in Richmond, Virginia, for a couple years. I took film courses, which intro-
duced me to animation. I applied to film schools in California and ended up attend-
ing the film program at Brooks Institute of Photography. Unfortunately, it didn’t have
any animation instruction, so I just did my live-action assignments in stop-motion. I
didn’t really know how stop-motion was done, so what I ended up producing was
pretty crummy looking. But after I graduated, it was enough to get me a job on TheNew Adventures of Gumby, and that’s where I learned the basics of animation. So I
never really took an animation class in my life, but I picked it up by not taking “no”
for an answer, begging for jobs, and stuff like that.
KEN: Then how did your early work on Gumby lead into working in features?
TREY: There was a period of about three or four years in-between there where I worked
on several seasons of Pillsbury Doughboy commercials. I also worked on a couple of
pilots for series by Dave Bleiman and Ken Pontac, who were producer/directors on
Gumby and had some other projects they were trying to start. There were a few bits
and pieces of work I was picking up from Colossal Pictures in San Francisco, where
I eked out a living until Henry Selick brought me onto his film Slow Bob in the LowerDimensions. Shortly after that, Henry got the green light for The Nightmare BeforeChristmas, and all my dreams came true right there. It was such an honor and privilege
to work on Nightmare since I loved Tim Burton’s work and really enjoyed working
with Henry. When I started in stop-motion, there was no such thing as a stop-motion
feature, so I never thought I’d be able to make a living at it. I thought it would just
be more of a hobby in my garage or something. But to be on a film like Nightmarewas just mind blowing. It was being in the right place at the right time.
KEN: I can imagine that working on Nightmare would have been a major high point.
TREY: It was an absolute high point because it was the first feature I had worked on
and because it was what it was—a dark Tim Burton movie with Danny Elfman music
and directed by Henry. It was more than I could have asked for. I haven’t felt that
kind of pride in my work (again) until Coraline. After Nightmare and James, stop-
motion just kind of dried up, so I went to Disney to learn the computer and ended
up being in CG for the next eight years. When I heard Tim was doing Corpse Bride,I started making plans to try and get on it. As soon as my contract with DreamWorks

ended, the very next day I was on a plane to London to work on the last six months
of production. After that, I hung out in London until I was ready to head out to
Portland for Coraline.
KEN: Was that your first time in London?
TREY: I had been to Manchester once before, to visit Paul Berry, shortly before he
passed away.
KEN: I know there are many people, including myself, who admire the work of Paul Berry(The Sandman, Nightmare, James and the Giant Peach). What can you tell me abouthim?
TREY: He first came onto the Nightmare crew about halfway through production.
Before that, it was mainly the small group of us who had started on Gumby and gone
through the commercial jobs at Colossal, etc. It seemed like we had reached a bit
of a plateau in the quality of the animation, and then Paul Berry showed up with
The Sandman and an Academy Award nomination. I think we, as a group, loved
The Sandman and found Paul’s passion and expertise maybe a little intimidating. He
came in and raised the bar, and I think the crew responded. I think everyone took the
challenge and ended up doing the best animation of our careers. He was very unique,
with his weird, bright red hairdo and his pillbox cap that he wore every day. He was
a brilliant, crazy, and truly inspired animator. We were good friends, and I really miss
him.
KEN: Since most animators typically have a personal style of approaching their work, howare scenes assigned to specific animators throughout the production?
TREY: Animator casting is really important in stop-motion feature animation. You get
the most out of your crew if you play to their strengths. You find where people excel,
and you keep them there. But the reality of production doesn’t always allow for casting
to take priority. I mean, Coraline was pretty crazy, with 50 stages and 30-something
animators, but Nightmare was about half that, more like 20 stages and 15 animators.
So it was quite easy to give everybody a chunk of the movie, and that has a much better
flow. Of course, it depends on the sequence, too. If you have a montage sequence,
there can be a montage of animators. But when it’s two characters interacting, it’s nice
to keep those people in that one moment so they can keep the speed, rhythm, and
emotional place of the sequence. As soon as you switch sequences, it switches the pace,
mood, and rhythm. So, in my opinion, smaller productions are generally more successful
stylistically. But then again, Coraline came out pretty great, so what the hell do I know?
Chapter 6 n An Interview with Trey Thomas 197

The Advanced Art of Stop-Motion Animation198
Figure 6.2
Concept art for Sally from TheNightmare Before Christmas.(Courtesy of the Animazing
Gallery/Touchstone Pictures.)
Figure 6.3
Concept art for The Nightmare Before Christmas. (Courtesy of the Animazing Gallery/Touchstone Pictures.)

KEN: What kinds of scenes do you like to animate or typically get assigned to animate ona production?
TREY: In the past, I’ve typically landed scenes with female lead characters. I kind of
fell into it; it wasn’t by design at all. On Nightmare, I had been given a bunch of Sally
shots and did well at it, so they said, “OK, he’s a Sally guy.” So I got locked into lots
of the Sally animation and loved it (Figure 6.2). I had a few of the girls on the stage
doing video reference for me, and it was great. On James, I focused on animating the
centipede, who was more of a tough New Yorker type, but then got back into the
female lead characters on Dinosaur and then the Other Mother scenes on Coraline.I did some Corpse Bride shots, including a lot of Bonejangles, but I came in late on
Corpse Bride, so I don’t claim ownership of any of those characters. I was there to just
help them wrap up the production.
KEN: Another scene in Nightmare (Figure 6.3) I was told that you had animated is one of my favorites—when the Harlequin Demon sings “Won’t they be impressed? I am a genius!” and makes a hat out of a dead rat.
TREY: That was my very last shot on the film, and it was a nice 30-second epic to go
out on. My cameraman Brian Van’t Hul (who was also visual effects supervisor on
Coraline and worked at WETA for many years—very brilliant guy) cracked open
a bottle of champagne at eight in the morning after it was completed. It was such a
beautiful way to end such an amazing experience which I felt had gotten me into peak
form. I lucked out on that shot because I was totally flying on adrenalin at that point.
KEN: It’s amazing hearing you say that, when you consider what’s happening in the shotitself acting-wise. It seems you really put a lot of yourself and how you felt about the showinto that shot.
TREY: Absolutely! Plus I was really flying blind at that point. I mean, after a year and
a half of production, you’re pretty much running on vapors, but my confidence level
was high. It was an incredibly cool shot, and they gave it to me because they believed
I could pull it off. When I finished it, I was really proud of it, although I look back at
it now and all I see are the flaws. But several people have singled out that shot as being
particularly good. It’s weird—it seems like five lifetimes ago.
KEN: From the angle of an actor breathing a performance into a puppet, how do you pre-pare yourself for a shot, in terms of the posing, timing, and overall acting decisions?
TREY: Well, first I listen to what the director is looking for and to the quality of the
voice recording. Second, I make a plan. Although sometimes you just have to wing it,
that’s not ideal. It’s always best to know what you’re going to do and how/when you’re
going to do it. You can act out the shot, or you can use a stopwatch to refine your
timings. Some animators like to videotape themselves or others acting out the shot,
and often some unexpected stuff happens that can enhance the believability of the
Chapter 6 n An Interview with Trey Thomas 199

performance. In feature production, we have the luxury of being able to rehearse shots,
and generally that allows you to anticipate problems, gives you the opportunity to
work out the performance, and gives the director a clear idea of what you plan to do.
Then, do it with confidence, since you only get one shot at it—be bold and sell it.
KEN: Were there any major differences in production among the various films you’veworked on, particularly with Corpse Bride being done in the U.K.?
TREY: The puppet style for Corpse Bride was different because MacKinnon & Saunders
went out on a limb to make those really impressive mechanical heads, so it had a very
different look compared to the others. In the U.K., there is a long tradition of stop-
motion that we don’t have here in the U.S., where it’s a little bit harder to sell. But
there were no significant differences in production style—it was an American pro-
duction in London. Several of the same key people who were on Nightmare and Jameswere on Corpse. I love London, and I love Tim Burton’s aesthetic. I do tend do gravitate
towards the dark stuff since I grew up loving horror movies. Each film I’ve worked on
was cut from a different cloth, particularly when you consider the CG films at Disney
and DreamWorks compared to Tim’s and Henry’s more left-field art films. I first got
into CG when the producer on Nightmare had offered many of us the chance to go
down to Disney and work on Dinosaur. It was a weird thing, becoming a supervising
animator in CG without ever having touched a computer in my life. I was given
six months of training, which doesn’t happen these days, but I hated the process. The
levels of directors, the politics, the constant polishing, and on Dinosaur in particular,
watching the spirit of the film being destroyed over three years…I found it demoral-
izing, but the money was great. So it’s hard to compare the two since the peak point
of my career financially was the low point of my career artistically. Stop-motion is
more of an art form, and CG is more of a technical thing. In stop-motion, you only
get one chance—you animate from beginning to end, and if it’s not good enough, you
do it again. If not, we’re moving on. I like that simplicity.
KEN: Any advice for aspiring stop-motion animators or thoughts on the current stop-motionscene?
TREY: Just grab a puppet, some clay, or whatever you can, start experimenting with
it, and build up a body of work that you can start showing to people. I didn’t learn
animation in school; I just started doing it. Gumby was the key to the kingdom for
me. It was an incredibly naive-style show, and it allowed you to experiment and make
mistakes and hone your craft, which is a great way to do it. When you’re forced to
bang out two or three shots a day, you learn so much so fast. So I would say get a couple
of bits together, show it to a preschool television show, and get in there. It’s a boot
camp, and you want to do as much work as possible and learn as quickly as possible.
The Advanced Art of Stop-Motion Animation200

There is definitely a resurgence of stop-motion at the moment, which is probably a
backlash against the saturation of CG. Of course, if it keeps up like it is now, it will
just become another thing that people will get sick of. Everything goes in cycles, and
we happen to be hitting a peak, much like we did in the early/mid-’90s before it
dipped again. There could be as many as five stop-motion features getting produced
next year. I feel lucky to be around at this time of the industry. But as it will come, so
it will go, and in a few years we could hit a lull again. I hope not, though; as long as
there are entertaining stories to tell, stop-motion is the coolest way to tell them.
Chapter 6 n An Interview with Trey Thomas 201

This page intentionally left blank

Animation is an amazing thing. This can be hard to remember when you areimmersed in it day in and day out—talking with other animators, watch-ing animated films, teaching it to students, creating it, or even writing about
it. But every now and then, that initial spark just hits you, and you realize what amind-boggling concept is behind the whole idea. In stop-motion, whenever yousee a puppet on a set, suspended in absolute stillness between frames, there is anotion of the stillness that is only visible on that set. In our dimension of time,under those hot lights and in that stuffy air, the puppet is merely a figure that sitsthere until an animator touches it. Once touched, and when the playback buttonis pressed, a whole new life is created in that other dimension of time on the monitor. All of a sudden, this tiny being of earthbound materials appears to haveits own thoughts, fears, and speech . . . a complete life of its own, living in its ownworld.
It would seem as if that life comes only from the mind of the animator. However,anyone who has sat back and watched his puppet come to life after sweating overit for hours will know that there is something cosmic about these worlds we create.The puppets do seem to take on lives of their own, as if they are discovering italong with us. It’s like the scene in Walt Disney’s Pinocchio where the woodenpuppet, crafted by Geppetto and given life by the Blue Fairy, finds out, “I canmove! I can talk!” and then goes out to explore his new world. The adventure ofPinocchio is a loving metaphor for the art of animation itself, created by animatorswho lived and breathed in our own world. Other animators have explored the
7Character Animation
203

relationship between puppets and their creators using stop-motion, such asPeter Lord’s Adam and Nick Hilligoss’s L’Animateur (The Animator; Figure 7.1).I love films, like these, that play with the notion of a puppet’s creator withinthe very medium in which they are made, as if to remind the audience of thesheer magic behind what they are actually watching. I could go on exploringthese philosophical implications, but I will digress for the time being and leaveyou to ponder that on your own. All things considered, the privilege and chal-lenge of an animator is to bring things to life, and that is serious business, allthe while being serious play. This chapter will give you some things to thinkabout as you seriously get down to breathing life into your puppets.
The Advanced Art of Stop-Motion Animation204
Figure 7.1
A scene from L’Animateurby Nick Hilligoss. (© Nick Hilligoss.)
Animation Technique
You need a certain discipline to create believable animation. Much like learninga musical instrument—if you want to play improvisational jazz, you first haveto learn your notes and scales, and then apply those foundations to everythingelse you do. All animation is based on certain principles and foundations basedon how things move and how this movement is broken up into frames. Disneywent so far as to break many of these principles down into specifics, whichare explained in detail in the famous animation textbook Disney Animation:The Illusion of Life, by Frank Thomas and Ollie Johnston. These principlesinclude squash and stretch, anticipation, overlapping action, follow through,secondary action, basic elements of timing, holds, and many others. Differentauthors and animators often have different ways of defining these principles

and have developed them in further detail for various mediums of animation.In my first book, I introduced many of these principles in Chapter 5, “BasicAnimation,” in a way that they could be applied specifically to straight-aheadstop-motion. In this more advanced volume, I will elaborate on a few otherways to apply solid animation principles in your own work.
Timing
When regular folks hear about how stop-motion is done, a questions that oftencomes up is, “How do you know how far to move the puppet or object?” Thisis a very good question, but it doesn’t always have a simple answer! The simplestanswer lies in the essential principle of slowing in and slowing out and the factthat movements closer together will slow down the action, and movements fartherapart will speed up the action. So, how does one know what’s too fast or tooslow?
The concept of timing is one of the hardest things to grasp as an animator.Even once you learn it, it is easy to forget. At 24 frames per second (12 move-ments per second if shooting entirely on twos, with each movement capturedfor two frames), each movement is a tiny part of a much bigger picture. Attimes, I still catch myself falling into the trap of getting excited about howeffective just four drawings on a light-table or four poses on the frame grabberlook when flipping through them. That spark of getting excited about the concept of animation comes back in that moment, as I constantly flip throughthe images that I worked on so hard to get right. It gets to be very obsessive inthose moments when everything clicks because they can be rare. (Plus, it’s fun!)But when the whole completed animation sequence plays back, those fourgreat images go by way too fast. It’s frustrating because you wish the audiencecould share that same revelry you felt when you created those four perfectdrawings or poses and watched them move. In the blink of an eye, they aregone, and it’s kind of depressing.
Of course, provided you continue to do your job well, those four poses are followed by four more poses, then another four, and so on, all coming togetherinto a full performance in motion. Like the individual notes in a piece ofmusic, the individual drawings or positions of a puppet are not that signifi-cant by themselves but are immensely significant in context of entire work.What matters is where those notes are and how they are played. Timing foranimation is no different; the discipline is in knowing how each frame is placedto bring it all together. For example, master animator and director RichardWilliams (The Animator’s Survival Kit) has worked with Warner Bros. animatorKen Harris and has often observed in interviews that Harris’ unique talent was
Chapter 7 n Character Animation 205

that he knew exactly where to place each drawing in every frame for the timingthat was needed. In the same manner for stop-motion, one should strive toknow exactly where to place each position of the puppet in every frame.
Of course, in hand-drawn animation (and similarly in CG animation), thereis the advantage of creating key poses first to create the right timing and thenfilling in the in-betweens later to smooth it out. Stop-motion does not havethis luxury because it is all done straight ahead, with no chance to go back andfinesse the timing once it has been shot. Some contend that the terms keys andin-betweens are useless for stop-motion animators for this reason—because itis straight ahead, and every pose simply leads to the next one. Although thisis true, I think it’s still useful to sometimes think in terms of keys and in-betweens when approaching stop-motion, especially if one crosses over intoother mediums on occasion. At the end of the day, it’s all animation, and thebasic principles still need to be relevant no matter how it’s done. Hand-drawnanimation can also be executed completely straight ahead, and it is often necessary to get the right motion (such as the follow-through motions of a tailon a character).
A general rule when it comes to timing straight ahead is to decide which posesthe audience really needs to see. The keys do not refer only to the main partsof an action; they can also refer to the main parts of the story being commu-nicated to the audience. Which parts of any particular action or performanceare the important parts that the audience should not miss? When you are moving straight ahead with the various poses of your puppet, and you findyourself getting to these important parts, slow down the positioning into a fewtiny increments that “favor” those key poses. Those are the poses you want tohang out with for a while so the eye has a chance to see it. Better yet, you mayneed to cushion your positions into a hold so the pose is really noticeable. Mygeneral rule, which I picked up learning animation and often reiterate to mystudents, is that at 24 frames per second, it takes six frames to feel something,eight frames to see it, and 12 frames for it to really soak into the brain. If you are shooting on twos, this principle translates into three, four, and six moves,respectively.
Animating straight ahead in stop-motion contains a deadly trap—how easilyan animator can get locked into a repetitive, trance-like act of move puppet,take picture, move puppet, take picture, move puppet, and so on. True, thisis basically what happens, but it becomes very easy to get sucked into this somuch that the timing of the animation becomes too even, floaty, and aimless.There should be some planning and rhythm to these movements—some closetogether, some far apart, and, when appropriate, grinding to a halt, not moving
The Advanced Art of Stop-Motion Animation206

at all, and settling into a hold. It is perfectly fine to have your puppet stopmoving; I find myself reminding my students of this at times. I will admit thisconcept is hard to grasp because if the puppet is not moving, it’s not animated!What matters is that when it’s not moving, it still feels alive. This can be controlled by knowing how long to hold an expression or pose to make it real,and when it begins holding too long.
If a character moves into a hold, it can probably only do so for a maximum of2 or 3 seconds before it loses its breath of life. At the very least, a hold thislong or longer should be broken up by a blink or subtle secondary movementto keep it alive. For instance, if a character turns its head to look at somethingand holds before reacting to what it sees, holding for six or eight frames wouldbe a very quick glance, and holding for 16 to 24 frames would be a more intentlook. A longer hold would indicate a slower reaction and denser character,whereas a shorter hold would indicate an immediate reaction from a characterwho is more alert. Breaking up a puppet’s actions with an eight-frame holdhere and a 12-frame hold there, and so on, is vital to good timing and ultimatelya good performance. It is more natural and lets the audience soak in themoments that are most important to the scene as a whole.
It is also important to remember that starting any animation exercise with aminimum eight-frame hold at the beginning is vital to let the audience’s eyeacknowledge the character before he starts moving. If the character starts moving on frame 2 or 3 of a scene, you are starting the action much too earlyfor your audience, and their brains may explode trying to catch up. Start moving your character on frame 9, 13, or even 24. Holds are a good thing, sodo not be afraid to hit the capture button a few extra times. The nice thingabout shooting a long hold is that you can always cut frames if it does end upbeing too long for the timing you want. Putting frames back in is a bit harder.Holds are also your friend when you are animating a long sequence that has alot of complicated movements, and you can gladly welcome any momentwhen your puppet can slow down and pause for a few seconds.
The other general rule to remember regarding holds is that they should alwaysbe a minimum of six frames. A six-frame hold is still very short and is oftenused only for very quick glances or pauses in a character’s thought process onscreen. At two frames, there is only enough time for an image to appear onscreen before being replaced by another image, where the brain does not register the images as being separate. At four frames, the eye just starts to noticethe separation between sequential images, so a four-frame hold in the middleof an action will always look more like a camera mistake and cause a jerk inthe flow of the animation. An entire character should never hold for only four
Chapter 7 n Character Animation 207

frames, and the same principle applies to any individual part of a character asit overlaps with the rest of the figure. For example, if a character is being animated and several parts of him are moving perpetually at the same time(head, arms, eyes, etc.), if any individual part stays in the same spot for fourframes, it will cause a little “stick” in the animation and will look choppy. Itis important to keep track of all these different parts of a character and makesure that every little gesture, as they overlap with each other, takes at least sixor eight frames to happen on screen.
If any part of your puppet is moved accidentally for only two to four frames,it is best to try covering it up by just adding three or four more moves in thedirection the part is moving (unless you go back, delete the frames, and re-dothem). For example, let’s say you are focusing on animating the head and leftarm of your character without paying attention to the right arm. A few framesinto the animation, you realize that the right arm has shifted to the left forfour frames, and your intention was that it should not move at all. From thispoint, it is better to cushion it farther to the left for at least four more framesand write it off as a subtle secondary action. Any tiny move or hold on a puppet that lasts only four frames will not look right, but if it lasts at least sixto eight frames, it will at least appear more natural.
Overall, timing is a discipline that you can continue to experiment with untilyou get a sense of how long it takes to achieve a certain action. In many cases,it will be through timing things too fast, slow, or even that you will learn yourown sense of timing. Try to apply what you’ve learned to each subsequent pieceof animation you do.
Arcs
Nearly all patterns of movement occur along a curved path of action called an arc, rather than a straight line. Arcs are an important principle to pay attention to, and they are especially effective when applied to stop-motion animation. One of the biggest challenges in stop-motion is keeping each frameproperly registered to the next one so that the movement is smooth. Becauseyou are manipulating a puppet in three-dimensional space, it is very difficultto gauge exactly where the path of action is for any motion on the actual set.Making reference to what is on the monitor helps, and being able to placemarkers and use onion-skin features in frame-grabbing software makes a hugedifference. But a frame grabber doesn’t understand how to animate, and neither does a computer—only an animator can understand this!
The Advanced Art of Stop-Motion Animation208

When planning out any movement, look for every opportunity to register yourpuppet so that the path of action it follows is an arc. You can draw this arc onyour monitor or use markers in the software to establish where the points alongthe arc should be. Then, find a common point on your puppet that you canline up with this arc and keep it moving along that path as you animate. If thepath of action does not travel along a steady arc and is not registered properly,the end result will be jittery. Even if one frame moves outside the path ofaction, it will be noticeable to the audience and create a small jerk in the animation. Having a path of action of any sort in mind during the animationprocess, whether you actually mark it on your screen or just picture it in yourhead, is vital to alleviating that “jerky” quality that often occurs in stop-motion. Basically, think hard about the direction things are moving. If a handor head is moving to the right, keep it moving to the right until it’s supposedto change direction, perhaps up or down along an arc. A few frames (say sixor more) later, it may even start moving to the left, depending on what’s actually being animated. Simply put, if you forget which direction your puppetis supposed to be moving, it will be all over the place, and you will inevitablyget that jittery effect of a puppet on way too much caffeine.
Arcs can be applied to nearly any movement to give it more life and a naturalflow. Moving a puppet’s head along an arc is effective when snapping into ananticipation pose, in any direction, and using the eye as a guide to move italong this path can be a useful point of reference (Figure 7.2). The same principle can be applied to a hand moving in space, using the finger or anypart of the hand as a point to guide along its arched path (Figure 7.3).
Chapter 7 n Character Animation 209
Figure 7.2
The head moves down andup on an arc, using the eyeas a point of reference.

The Advanced Art of Stop-Motion Animation210
For a character jumping, running, or walking forward, moving the entire puppet along an arc is very important to make the action smooth. An extrememotion like a jump will be even more noticeable if the frames are not registeredalong a steady path (Figure 7.4).
Figure 7.3
A hand with pointed fingermoving along an arc up tothe head.
Figure 7.4
The Thunderbean, jumpingalong an arc path of action.

In a walk, there are even more elements to pay attention to in keeping the arcsconsistent. The head and torso should be continually moving forward in eachframe as well as up and down on an arc (Figure 7.5), and the arms should beswaying back and forth along an arc of their own.
Chapter 7 n Character Animation 211
Figure 7.5
The head and torso movingforward in an arc for a walksequence.
Overlapping Action
Another very important principle that brings an animated character to life ina very big way is overlapping action, which means that not every part of a character will start or stop on the same frame. Movements should be staggeredby a few frames so that all elements of the character overlap with each otherfor a much more natural appearance. To demonstrate some examples of thedifference overlapping action can make in stop-motion animation, let me intro-duce you to my character, Goth Mime (Figure 7.6). On the accompanyingCD, there is a series of short animation movies where Goth Mime goesthrough various movements both with and without overlap to the action. I havedeliberately animated some of these exercises in a very basic, rushed mannerfor the purpose of comparing them to other variations that are animated withmore attention to detail. The versions that are not animated well do not havenearly as much life and natural movement as those that are animated with theprinciples applied.

The Advanced Art of Stop-Motion Animation212
The first example is through a simple head turn, from left to right, as if GothMime hears something off screen that causes him to turn around. Looking atthe movie called Head Turn 1.mov on the CD, you will notice that it feelsvery stiff. The eyes don’t move at all, and it’s simply the head being turnedfrom left to right, without much of an arc and only a certain degree of easingin and out (Figure 7.7). This was simply done by turning the head frame byframe without putting much thought into it. The end results are functionalin achieving the simple motion of a head turning, but there is not much lifein it.
Figure 7.6
Goth Mime puppet by Ken Priebe.
Figure 7.7
Frames from a head turn with no overlapping action. (Head Turn 1.mov on the CD.)

Chapter 7 n Character Animation 213
Compare this movie to the next one, Head Turn 2.mov, and you will noticethat some overlapping action has been added. In this version, the eyes movefirst, a few frames before the head is moved (Figure 7.8). The results are muchmore natural and have a better sense of realism. The eyes essentially lead thehead into its movement, preparing the audience for the action that takes place.There is also a stronger arc that the eyes and nose move along, which was actually planned out on the monitor to help provide a smooth path of actionand ensure a better result to the animation (Figure 7.9).
Figure 7.8
Frames from a head turn with overlapping action in the eyes. (Head Turn 2.mov on the CD.)
Figure 7.9
The arc for the head tofollow drawn on themonitor.

In another version, Head Turn 3.mov, an added element of overlapping actionis employed by animating a blink before the basic eye movement and thenleading into the head movement (Figure 7.10). Blinks often add more life tothe movement of a character, especially on a head turn. When the head moves,it is very common for the brain to send a signal for the eyes to blink as it happensto help control the sensory overload that can occur when shifting the eyes’whole perspective.
The Advanced Art of Stop-Motion Animation214
Figure 7.10
Frames from a head turn with a blink and overlapping action. (Head Turn 3.mov on the CD.)
Figure 7.11
Frames from a full body turn with no overlapping action. (Body Turn 1.mov on the CD.)
The same principles of overlapping action are demonstrated in some otherexercises, which extend the simple motion of a head movement into the entirebody of the puppet. Take a look first at Body Turn 1.mov, where the wholebody turns from left to right without any overlapping action (Figure 7.11).Everything moves at the same rate, from the eyes to the head and through thearms and hips, starting and stopping on the same frame. The end results arenot very believable and feel very stiff and robotic.
Now, compare this first body turn to the next one, Body Turn 2.mov, and youwill notice what a difference the overlapping action makes. In this example,the eyes move first, followed by the head; the arms and hips follow afterward(Figure 7.12). The arms themselves overlap in their timing and spacing, with

the right arm settling into a hold a few frames after the left arm. There is a scientific and anatomical logic to overlapping action that occurs in the wholebody as it turns from left to right. The idea to turn in the first place is simplya signal triggered by the brain that shoots very quickly down the spinal cord,sending that signal to the rest of the body. The eyes are the closest thing to thebrain, so they are the first parts of the body to receive that message from the brain that says, “Turn!” The next part to receive it is the neck, followed bythe shoulders, arms, and hips. In the blink of an eye, the simple act of turn-ing around is like a memo being sent from management to all the floors belowit. Animation needs to break this up, slow it down, and overlap the body partsgetting this signal frame after frame.
Chapter 7 n Character Animation 215
Figure 7.12
Frames from a full body turn with overlapping action. (Body Turn 2.mov on the CD.)
Anticipation
Another set of movie files on the CD shows the difference anticipation canmake to an action, combined with proper timing for the eye to read the various poses in the animation. These animated exercises show Goth Mimeperforming the simple act of picking up a ball from a table. The first example,Pick Up Ball 1.mov, is deliberately animated much too fast, with very littlethought put into animation principles (Figure 7.13). The hand does grip theball for at least six frames before picking it up, which is important to read ashim actually gripping it. Otherwise, there is very little life or proper stagingin the way it is posed and timed. The biggest problem is that there is no antic-ipation for him grabbing the ball, and it goes by much too quickly for theaudience to fully appreciate and be prepared for it.

The next version, Pick Up Ball 2.mov (Figure 7.14), is an improvement inthat there is easing in and out, overlapping action in both arms, and mostimportantly, the left arm comes up for a short anticipation before comingdown to grip the ball. There are drag and overlap in the elbows and wrists ofthe puppet, making it feel much more flexible and believable.
The Advanced Art of Stop-Motion Animation216
Figure 7.13
Frames from an action of picking up a ball with no anticipation. (Pick Up Ball 1.mov on the CD.)
Figure 7.14
Frames of an action of picking up a ball with anticipation. (Pick Up Ball 2.mov on the CD.)
Performance
All the technical animation principles should be thought about, planned for,and injected into any animation sequence for it to move properly and readwell for the audience. But even more important are the performance and acting choices made for the character. These choices should have a directimpact on how the animation principles are used, because the way a charac-ter moves depends very much on who that character is. Its inner thoughts,attitude, and mood will affect how long you shoot your holds, how much easing in and out is needed, and the overall tempo of the animation. If thecharacter is nervous, stressed, happy, or alert, its movements should be faster

and farther apart, which will require fewer frames to move the characteraround. If the character is sleepy, depressed, or dimwitted, its movementsshould be slower and closer together, which will require more frames.Whatever goes on inside your character will affect how it moves and performson the outside.
All animators have different methods for planning out their scenes and mak-ing their acting choices. Often, they will use a combination of different waysto plan. Stop-motion animators who also like to draw (or at least have somedrawing skill) may prefer to make tiny thumbnail sketches of a sequence.Drawing out the key poses and nuances of a scene helps an animator visualizewhat each frame should look like and explore many different options forapproaching the posing. The poses explored through drawing can be appliedto the puppet to make sure the armature is able to mimic those same ideas.Other animators may use live-action reference by recording themselves witha webcam or video camera so that they can make a QuickTime movie to analyze frame by frame. This also helps to visualize difficult movements, likethe rotation of a wrist, arc of a limb movement, or overlap in the timing ofdifferent body parts. Whatever is learned from this analysis can be applied tothe animation, but with an extra dose of exaggeration to the timing. Animationis stylized motion based on real-live movement, not necessarily a replica of it.
To practice acting for animation, it is a good idea to think of some scenariosto place your puppet into that allow for it to go through some kind of thoughtprocess. They could be opening a gift, talking on the phone, waiting for a bus,looking for something, or any other situation you can think of. Act out thescenario based on who your character is and how it reacts to things. Ask your-self things like:
n Who is the character?
n What kind of mood is he in?
n What is he doing in this scene, and why is he doing it?
n What happened right before this scene takes place?
n How does the character feel about what is going on?
You don’t need to have a fully detailed answer for all these questions, but ithelps to have a sense of the basic “who, what, when, where, why, and how” ofthe scene so that your audience will understand what you are trying to communicate. The most basic question to ask yourself throughout the wholeprocess should be how you would behave if you were that character in thatparticular situation.
Chapter 7 n Character Animation 217

You can learn a lot by studying other animation as well, in terms of analyzingframe by frame the techniques used in animated films across all media. Studystop-motion films, but also look closely at the acting choices made in hand-drawn and computer animation films. When you notice a good performancein animation, figure out what makes it good by studying it. Think about thebeats, timing, posing, and overall feeling you get by watching it. The onlymajor trap to watch out for is an exclusive reliance on other animation toinform your own work and personal style of acting. One of the most usefulresources to study to become a better animator in terms of performance is realactors. The best animators will often use live-action films as their inspirationmore than other animated films to avoid the possibility of recycling posingand acting choices that are commonly used or overused. Watch all kinds ofmovies and take note of the acting styles inherent in them. If you start a libraryof movie clips for different scenarios and analyze them frame by frame, youwill see all the animation principles there as well. A real-life actor’s perform-ance will have overlap, anticipation, and even go into holds. If he is holdingstill, his performance will mostly come through his eyes and very subtle move-ments. If he is performing broad actions, there will be strong posing and stag-ing with arcs in the movement, cushions into poses, and dynamic facialexpressions. It is all there and fascinating to watch. In the courses I teach, Ialways use live-action clips alongside animation examples to show this con-nection. All acting and movement comes from the same source. The only dif-ference is that you are creating it all from scratch in animation and havecontrol over every single frame. So make it count!
Two-Character Dialogue
The only thing more challenging than animating one character alone on a setis to animate two characters engaging with each other at the same time. Thebasic principles are the same, but there is the additional need to keep track oftwo puppets. On most hand-drawn feature productions, a dialogue sceneinvolving two characters will typically be done by two different key animatorswho guide each character’s individual performance. Communication betweenthese animators is vital because their drawings need to line up, mesh, and interact seamlessly within the same sequence. On a stop-motion film (and similarly in CG), the animated performance of both characters is typicallydone by a single animator, who needs to keep track of what both charactersare doing at the same time. This is a very advanced test of an animator’s abilityas an actor and a very important skill to learn. If you aspire to work in studioproduction, you will likely be expected to pull off scenes with several puppetsat once and do it well.
The Advanced Art of Stop-Motion Animation218

The most important factor when animating two characters at once is to keepboth characters alive. In most cases, dialogue between two characters meansthat while one speaks, the other listens and then responds. When one charac-ter is listening to the other, it may be still, but not so much that it seems dead.It still needs to have subtle movements that are a reaction to what the othercharacter is saying. The trick is to guide the eyes of your audience back andforth between the two characters, overlapping actions between them and mak-ing it feel natural. Depending on the context of the scene, their lines may inter-rupt each other or overlap at times, and the performance element will vary,depending on who these characters are. Are they having a civil conver sationor a heated argument? Are they really listening to each other, or is one dis-tracted? Do these characters like each other, or are they enemies? It is usuallymost effective to have some contrast between the two characters—age, voice,appearance, scale, personality, or attitude. One may be skinny and the otherfat, or one may be uptight and the other easygoing. If you think about manyof the great on-screen duos from film and television, such as the comediansLaurel and Hardy or Sesame Street’s Bert and Ernie, there is usually some contrast like this between them that creates much opportunity for drama, conflict, and comedy.
For this section of the book, I did a short piece of animation to demonstratea few different things: animated performance with two characters, lip sync,and some basic compositing that is covered later in Chapter 9, “Visual Effects.” I also made it to amuse my young daughter, Ariel, who provided one of thevoices. I made a recording of her one day when she was getting a kick out ofplaying with a little toy dragon that shoots a plastic fireball out of its mouth.I edited together some of the things she said, including her laughing, and putit in context for an animation scene. The monster puppet breathes a fireball(because that’s what monsters do) while her hamster friend is reading, and the two characters share a little moment of dialogue together. The completeanimation is on the accompanying CD for study (Two Character Dialogue.mov),and some of the steps and techniques involved are referenced in this section.Both puppets were designed and built by former students from my VanArtsstop-motion course—the monster by Emi Gonzalez, and the hamster by FridaRamirez (Figure 7.15). I still had these puppets in my “puppet vault” at theschool and thought they looked great when I put them together. (Maybe ithas something to do with the fact they were both built by students fromMexico who I had in two different courses, which is only a mere coincidence.)
Chapter 7 n Character Animation 219

The Advanced Art of Stop-Motion Animation220
In Chapter 9, “Puppet Animation,” of my first book, The Art of Stop-MotionAnimation, I briefly covered how to break down a dialogue track and prepareit for animating to. Once I had my soundtrack edited for this new dialoguescene, the track was broken down in the same basic manner onto an exposuresheet (or dope sheet). The opening line was simply a very emphatic “Wow!”followed by a laugh, which is a rather unique sound to break down and actu-ally a lot of fun to animate to. Because the whole point of breaking down adialogue track is to break it up phonetically rather than using the actualspelling of the words, if the sound is not necessarily words, it can be brokenup the same way, as it is (Figure 7.16). Listening closely to the sounds thatmake up the laugh, there are several little exhales, inhales, and a series of tiny“Heh” sounds. Some of the “Heh” sounds are shorter and some accented morethan others. It’s just a matter of listening to the pattern and finding the exactframe that each sound lands on. When recording a laugh onto the dope sheet,I find it best to mark the sounds down to look like the actual sound waves andmake notes next to them about what kind of sounds they are. The blankframes between them break up the various sounds and can be referred to inthe actual animation. The rest of the scene was relatively straight-forward dialogue, where the hamster (which has my voice) asks, “What are you doing?”and the monster replies, “I’m shooting fire!” Then, the hamster replies, “You’recrazy” (Figure 7.17). I will explain some of the particulars of the actual lip syncin a moment, but first I’ll go over some of the other steps applied to the animation as a whole.
Figure 7.15
The monster and hamsterpuppets for a two-characterdialogue scene.

I set up the composition of theshot based on the fact that I knewI wanted a fireball compositedinto the top-right part of theframe, coming out of the mon-ster’s mouth over the hamster’shead. It is always important tothink about the movements thatmay occur and to make sure thereis enough negative space aroundthe characters to make this hap-pen. It’s also useful to position thetwo puppets in such a way that itis easy to reach around them andtouch them for the animation.You want to avoid bumping onecharacter while animating theother. I also wanted them to be ina position where they were angledto each other enough to be ableto turn and look at each other.Any shot should be composed insuch a manner that the characterscan interact based on what thescene requires. In momentswhere they actually make eyecontact, they might not actuallybe doing so on the actual set.They may actually be lookingslightly past each other, but theidea is to match their eye lines sothat on screen, they appear to bemaking eye contact. If the charac-ter’s head moves, the eyes willoften need to be adjusted in theactual animation between framesto keep that eye contact consis-tent. For example, if a character’shead moves to the left, away fromthe other character on the right,but the characters are supposed to
Chapter 7 n Character Animation 221
Figure 7.16
Broken-down dope sheetfor a laugh.

The Advanced Art of Stop-Motion Animation222
Figure 7.17
The rest of the dialoguetrack broken down on adope sheet.

maintain eye contact, the first character’s eyes must be moved to the rightincrementally as the head moves to the left. Otherwise, the character’s eyes willsimply stay rooted to the head and will not appear to be making eye contactwith the other character anymore.
The personality, design, and construction of these two characters had a directimpact on how they moved. The monster is built on a plastic doll armature,with very long arms and lots of mobility in the neck joint. The head is sculptedin clay over a Styrofoam skull, and the hands are sculpted entirely in clay. Thisflexibility in the puppet design allowed for some very broad, flamboyant move-ments. The dialogue itself also gave me clues about how the characters shouldmove. The monster needed a really big accented movement when shouting,“Wow!” and some sweeping gestural poses on the line, “I’m shooting fire!”These kinds of movements perfectly suited the personality I wanted to give themonster—a wild, theatrical personality (very much inspired by my daughter).The hamster, by contrast, does not really have an armature, other than twoStyrofoam balls for his round body, a removable round head covered in clay,and solid clay arms and feet. He is much more subdued and mellow than themonster, so he didn’t need to move much, other than his head and facialexpressions. All he says is, “What are you doing?” and “You’re crazy” in a rel-atively monotone voice, so he didn’t need to move as erratically as his co-star.
Using the dope sheet as a guide for where the phrases and accents were in thedialogue, I first did a pose test of the animation, which can also be viewed onthe CD (Two Character Pose Test.mov). The purpose of a pose test, alsoreferred to as a pop-through, is to block out the poses and acting decisions forthe two characters. The results of a pose test are always going to be a choppyversion of a smoother animation sequence because there are no in-betweens.All you are seeing are the key poses, in accordance with the approximate framesthey should land on, in sync with the accents in the dialogue. The lip syncitself is really the icing on the cake in a dialogue scene because the actual animation of the body language and movement is what really sells the acting.The idea is to block out a practice run of what the animation might look likein the final version. Shooting a pose test is also very useful for planning theoverlapping action between the two characters. They should not change position on the same frame, but rather have some delay between them. If onecharacter snaps into an emphatic pose, the other character can react to thepose, but it should happen a few frames afterward, not on the same frame.
This pose test allowed me to explore the initial approach I wanted for the performance and figure out what did and didn’t work. I found that a few toomany poses were blocked out for the laugh, for example, making the anima-tion a bit jittery, so that prompted a mental note to soften this action a bit in
Chapter 7 n Character Animation 223

the final version. There were essentially three different laugh phrases, so I found a different key position to move the monster around in for each ofthem. When doing the final animation, I would often refer back to my posetest as a reminder of what I wanted the key poses to look like, so I had a reference point for what kind of pose the puppet should be progressing toward.If I didn’t like a particular key pose, I could make a mental note of how I wanted to change it or simply take another stab at it. Since there are notmany frames or changes to the puppet positions in a pose test, it is much lessrisky to make changes to the timing or posing until it’s working right. Once I had gone through this test and studied it a few times, I was ready to line upmy puppets into their zero poses for the final hero shot.
In animating the actual frames straight ahead, including the extra preamblesequence of the monster looking around before she blows the fireball, I paidattention to the overlap between characters and when they should move. Tofeel natural, the starting and stopping points of these movements should over-lap between the two characters, and they should not both stop moving on thesame frame. When one character spoke, the other character would be stuck ina hold for the most part, so I could just let them sit there in many instanceswhile I focused on the other puppet who was speaking. Then, when I felt itwas needed, the holding character would occasionally blink or move his headin a very subtle six- to eight-frame motion, as if he were following the actionsof the other character. This kept each character alive while they were waitingfor their “cue” to speak. It is important to avoid overdoing this, which can bean easy trap to fall into. Because the actual animation takes so long, it maytake one hour to animate just one or two seconds of screen time. You may findyourself saying, “This character hasn’t moved in a while; I’d better move him.”But if you forget that you are in another time dimension, it really hasn’t beenthat long for the puppet, only for you. Think in terms of the timing insidethat other time zone, because that’s where the puppets live and what your audi-ence will be watching.
Lip Sync
The lip sync itself for both characters was done with a set of replacementmouths for the main syllables in the dialogue. Being made out of plasticineclay that is still malleable, a good level of control is possible to manipulate themouths for some fluid animation. The trick to making the sync look right isto choose mouths that take on the character and appearance of how the syllables sound. The largest mouth, which is a wide open shape for long “ah”syllables, can be placed onto the face on the accent and then squished togetherslightly for the frames that come after it until the need comes to replace it with
The Advanced Art of Stop-Motion Animation224

a different mouth. This effect was used on the word “wow,” which is brokenup on the dope sheet over about 19 frames, half of which are the “wah” andthen going into “w.” For the “ah” frames, the wide open mouth is animatedon twos, then replaced with a transitional “eh” shape, and finally kept on a transitional “w” mouth that suits the character of how the word is said(Figure 7.18).
Chapter 7 n Character Animation 225
Figure 7.18
Frames from the monster saying, “Wow!” in full lip sync. (Two Character Dialogue.mov on the CD.)
Another important aspect of the lip sync, when breaking it down, is to breakdown phrases based on how they are said phonetically. In many cases, notevery single syllable needs to be accentuated verbatim, especially if any linesare mumbled or spoken very quickly so the words kind of blend together. Forexample, when the hamster says the line, “What are you doing?” the way itsounds is more like, “What-ee-yuh-doo-ing?” The word “are” is not reallyaccentuated as such, so it’s not broken down that way. The mouths used tomatch the dope sheet reflect the quick, slurred way the line is said, so itappears natural.
The other lip sync technique applied to this line is ending it on a mouth shapethat reflects the character of what is being said and holding it there for a fewextra frames. The very end of the line stops on a mouth shape that is indica-tive of the “ing” of the word “doing,” hanging slightly open with the teethshowing. This mouth position holds for about 24 frames after the line finishes(Figure 7.19) before transitioning to a neutral mouth after the monster startsspeaking. In many cases, this technique of holding on the final mouth positionof a frame is best suited for when the character asks a question or says a linewhere he is thinking of something or its not entirely confident.
When a character says a line with more finality and confidence, it looks betterto just snap right into a closed neutral mouth right at the end of the phrase.This is the case with the monster at the end of her line, “I’m shooting fire!”After the “r” mouth on the last word, the animation segues right into herclosed mouth because she is proud of her little trick. That particular mouthreflects the character of what she is saying and how she says it (Figure 7.20).

The Advanced Art of Stop-Motion Animation226
Figure 7.19
Mouth shape on which the hamster ends for his line,“What are you doing?” (Two Character Dialogue.mov on the CD.)
Figure 7.20
Mouth shape on which the monster ends for her line,“I’m shooting fire!” (Two Character Dialogue.mov on the CD.)
The closed neutral mouth shape is also typically used for the syllables of “b,”“m,” and ”p,” which are sounds made by the lips being pressed together. Thisshape needs a minimum of two frames in order to register on screen. Even ifa line is said very quickly and that syllable is only audible on one frame, itshould be cheated to be photographed for two frames, or it won’t be seen andmight look sloppy in the overall sync. Another trick that can be applied withthis mouth shape, if it is recorded on the dope sheet for more than two frames,is to nudge it up slightly before replacing it with the next mouth. The nextmouth is usually going to be a vowel shape, like in the word “my” (broken upas “mm-ah-ee” on a dope sheet). Simply put, if an “m” is there for four frames,shoot it in its initial position on the face for two frames, push it up a tiny bitfor the other two, and then replace it with the “ah” mouth. The effect will adda nice punchy anticipation to the lip sync (Figure 7.21).
Figure 7.21
Frames of the hamster demonstrating lip sync.

Chapter 7 n Character Animation 227
Animation is difficult and very hard work, but it’s also fun and fascinating.This is particularly true with stop-motion. Because it deals with tiny figuresthat are touched between frames, I’ve always felt it has a strange connectionto childhood fantasies about toys or robots coming to life. But it’s not onlythe imagined movement of them that fascinates me; it’s also the stillness. WhenI was a kid, I would play with puppets and make stuffed animals move aroundlike they were living, but I was also obsessed with arranging them next to eachother in the toy chest and just looking at them. I had the same obsession withthe animatronic robot characters at pizza restaurants that existed in those days,like Chuck E. Cheese’s, ShowBiz Pizza Place, and another place in Michigancalled Major Magic’s (Figure 7.22). When the lights went down, my friendsand I would put down our pizza and rush over to the stage. The curtains wouldopen, and these clunky cartoon animals would come to life and sing theBeatles or some popular ’80s song. Then, the curtains would close until thenext show. Between shows, my friends and I would often sneak up and peekbehind the curtain, and these amazing creatures were frightening and fasci-nating as they sat there in the darkness. In that stillness of the dark stage andthe toy chest, these puppets were still living and breathing in their own world,as if they were in a meditative state, waiting for their next cue. As I was focusingintently on the animated dialogue sequence for this book for about 10 hours,I sometimes would be struck by particular poses of the puppets that broughtsome ethereal feeling of these memories back. It was in the life behind thatstillness of the puppets on set (Figure 7.23) that I found myself taken back tothis same sense of fascination that I can’t really explain.
Figure 7.22
The animatronic rock bandfrom Major Magic’s All StarPizza Revue, Detroit, MI,circa 1982.

The Advanced Art of Stop-Motion Animation228
Figure 7.23
Stop-motion puppets onset, waiting to be broughtto life.

Bronwen Kyffin (Figure 8.1) is a stop-motion animator and director originally from
Quebec, whose career has literally taken her across Canada. She has worked on
several shows for Cuppa Coffee Animation, including Henry’s World, JoJo’s Circus,and A Miser Brothers’ Christmas, and many other award-winning productions, such as the
Leo Award–winning CG series Jibber Jabber (as a co-director.) She now lives and works in
Vancouver, BC, and we first met at the Vancouver SIGGRAPH Spark Animation Festival
in 2008. I’m glad to present her experience, sense of humor, and passion for the art of stop-
motion as a contribution to this book.
Website: http://bronwenkyffin.com
8An Interview withBronwen Kyffin
229
Figure 8.1
Bronwen Kyffin.

The Advanced Art of Stop-Motion Animation230
KEN: So how did you get started with stop-motion animation?
BRONWEN: Well, it was actually totally by accident. I went to Dalhousie University
in Halifax to study costume design and theatre, and while there I started getting really
interested in live-action puppetry. Near the end of university I made my first short
film, which was a combination of live puppets and actors. After graduating I stayed
in Halifax and started working in the film industry doing wardrobe, props, set dress-
ing, and directing the odd music video. One winter through the film co-op there, a
fantastic woman named Helen Hill offered an experimental animation program.
Helen was someone who loved animation and was passionate about sharing her
enthusiasm for it. Through that program, we each got 100 feet of film to create any
style of animation we wanted. I figured that stop-motion had to be just like live-action
puppets, right? I would just move the puppets really, really slowly (laughs). I had no
idea what I was getting myself into. That was my first venture into stop-motion, a
short film called Cecil’s Insomnia, about a sock puppet who gets separated from his
mate and can’t sleep anymore (Figure 8.2). It was really fun, but I still wanted to be
a puppeteer and make children’s films, so I moved to Toronto and started looking for
work. Then in that funny way that things just happen sometimes, after about a year
of being in Toronto I got offered a job at Cuppa Coffee Animation Studios, working
on their series Henry’s World. I applied to be an animator, but got offered a job build-
ing puppets, due to my previous experience. This was great in itself, and then about
half way through production I got the chance to join the animation team and ended
up staying at Cuppa Coffee for four years. I was hooked. This stop-motion thing was
quite frankly the best thing since sliced bread.
Figure 8.2
Still from Cecil’s Insomnia.(Courtesy of Bronwen Kyffin.)

KEN: Did you have a favorite project or series at Cuppa Coffee?
BRONWEN: It’s hard to say, since each one was so different and had its own little
charm, and I got to work with some really great people throughout my time there,
which is more important that anything. But if I really had to choose, I’d say Henry’sWorld was really fantastic because it was the first stop-motion series I worked on, so
it will always have special place in my heart. The crew was a very tiny, close-knit group
of people, and everything was so new to me; I was learning like a sponge every single
day (Figure 8.3).
Chapter 8 n An Interview with Bronwen Kyffin 231
Figure 8.3
Cuppa Coffee director DaveThomas (left), electricianDennis Murphy, and animatorBronwen Kyffin hanging out on the Henry’s World set.(Courtesy of Bronwen Kyffin.)
KEN: What were some of the challenges that you would face working in a studio?
BRONWEN: The hardest thing about working at a studio animating for television, I
think, is the volume of footage and the pace at which it needs to get animated. Like
live-action TV, you’re always on a very tight schedule, and with every show you’re
trying to do so much more than you did last time. Then add in the fact that the whole
thing is being done in such a painstaking medium as stop-motion animation. The
fast pace is hard on animators. You have to be able to deliver high-quality straight-
ahead animation day in and day out. And you have to learn to sometimes say “that’s
good enough,” which is hard for any animator. Sometimes the animation may only
be 85% of what you wanted to accomplish, but you can’t sacrifice four hours of work
to go back and do it again to fix one little hand movement you didn’t like. You have

The Advanced Art of Stop-Motion Animation232
to do your best and just make a note to do it better the next time. But that’s also the
fun of it. You’re always animating a little bit by the seat of your pants and you have to
embrace that. When a puppet breaks in the middle of a shot and you have to keep
going, some really creative ideas can come out of that situation.
KEN: How did your transition from being an animator to an animation director comeabout?
BRONWEN: Well, I had Henry’s World under my belt, and I was animating on Jojo’sCircus. I knew The Wrong Coast was coming up, and that they still needed an anima-
tion director. It was certainly always my goal to direct, and being animation director
would be a great opportunity to move towards that. But I also knew that I wasn’t one
of the senior animators who would more naturally be in line for that position. It was
one of those times where I had to let someone know I had the experience to do it.
I went to the producer of the show and asked her if I could book five minutes of her
time. I prepared a whole little pitch outlining how my previous experience as an inde-
pendent filmmaker, live action film tech, and music video director actually made me
the perfect candidate. Unbelievably enough, it worked. So that brought me out of
animating for a couple years, but I loved animation directing! You get to spend a lot
of time working directly with the series director, discussing what they see for the
episode and the shots and animation they need to make that happen, and then you get
to say, “OK, I’m going to get that for you!” There are guidelines for what the director
wants, but you still have lots of creativity within those guidelines. It’s not easy by any
means, because you’re also trying to keep everybody motivated all the time, and often
you’re the one who needs to tell animators to reshoot. That’s the worst part of it.
KEN: Is there any comparison to the way you moved from animating to directing (havinghad prior independent filmmaking/directing experience) to the path of someone movingup the ranks for simply being a great animator?
BRONWEN: Sure, I’d say they are actually two ways of doing the same thing. Basically
it’s just two different ways of getting yourself noticed in the hopes of opening the door
to other opportunities. What you need to do is find a way to make yourself stand out
in the crowd; play up your strengths, as it were. Some people do that by being really
great animators. Other people get noticed for initiative they’ve taken directing their
own personal projects. By the way, these two things are not mutually exclusive.
KEN: So after four years at Cuppa Coffee, you came out to Vancouver?
BRONWEN: Yes, I had a really fabulous time at Cuppa Coffee, but it was time for a
change of scenery and a new adventure. I wasn’t entirely sure what opportunities would
be here for me. All kinds of opportunities opened up that I never would have thought
I would be doing, like working in compositing and getting back into my own projects
again. And of course, there was also the fantastic opportunity of co-directing the CG
television series Jibber Jabber with David Bowes.

KEN: How was the experience directing a CG series, compared to stop-motion?
BRONWEN: It was a pretty steep learning curve for me in some ways. It was impor-
tant to figure out very quickly what we could and could not do in the medium, so
that we didn’t write scripts that were a complete nightmare to shoot. I was actually
pretty amazed at how similar the technical problems were to the issues we often faced
in stop-motion. After reading the scripts for the first time, the CG supervisors would
come back with comments like, “blankets are very difficult” or “can we not pour water
over that character?” I thought to myself, “It’s exactly the same!” Really it’s just like
stop-motion, but the “puppets” weigh less, and no one on the crew is running around
covered in plaster.
KEN: Did you miss stop-motion while you were on that show, or were you too busy withdirecting to notice?
BRONWEN: Stop-motion will always be my favorite animation medium, but honestly,
once we started production, there wasn’t much time to really think about that. Besides,
when someone says, “it’s not going to be stop-motion, but we’d still like to hire you
as the co-director,” you say, “OK that sounds great!” and you just embrace it. We were
still making a cartoon, and it was still really fun.
KEN: Was it after Jibber Jabber that you worked on Edison and Leo for a while too?
BRONWEN: Yes, the production times of Jibber Jabber and Edison and Leo overlapped
quite a bit. So I just came on to Edison and Leo at the very end, when they needed
some extra people. I think it was during reshoots, and there was really just a skeleton
crew left. Many of the other animators had gone back to Toronto or elsewhere. If you
ask other crew members, they probably wouldn’t know that I worked on it (laughs).
It was nice to get to do the bit of work on it that I did.
KEN: What advice would you have for others working through the rigors of studio production?
BRONWEN: Studio production is the most awesome job in the world, but it’s still a
job. It’s important to do your best, but you must also not get too emotionally attached
to it. Reshoots happen, and often the reason for it has nothing to do with the quality
of your work. They just happen, whether it’s because of a technical problem, or the
client really hates purple, or a fly flew into your frame and is popping all over the shot.
It’s part of the job, and you need to be able to handle that. That said, everybody
struggles with this, all the time. It helps to have your own personal projects on the
side, something you love, that is completely creatively your own. It will save your
soul. Also, because studio work is a job and not your own personal work, there are
limitations to the kind of creative input you get, so find ways to enjoy what creative
freedom you are given. The main structure of your shot—that is, what needs to
happen to progress the story—will already be laid out for you, and you have to work
Chapter 8 n An Interview with Bronwen Kyffin 233

The Advanced Art of Stop-Motion Animation234
with the framework you are given. But if you work hard and take directions well, you
will earn the trust of your animation director, and in return you will get more creative
input, and you will have more fun.
KEN: So what can you tell me about your more recent and upcoming projects, now thatyou’ve put down some roots in Vancouver?
BRONWEN: Well, I’ve kind of come full circle a little bit, in that I’m moving back
towards puppet building. More specifically, I’m really getting into the building of
ball-and-socket armatures. There are only a couple of places in Canada where you can
get custom ball-and-socket armatures made. So I’ve teamed up with fellow animator
Melanie Vachon and award-winning motorcycle designer Ian Douglas to set up that
kind of service here in Vancouver. It’s great because we don’t need huge space to do it
in and we can ship to just about anywhere. The process of puppet building can be
really daunting. Let’s face it, not everyone is comfortable building things, especially
something as particular as an armature, and stop-motion is a medium where your
animation can be really limited by how you build your puppet. So we want to be able
to take the worry out of that portion of production for people and provide solid
ball-and-socket armatures built by animators, for animators. We’re doing that right
now for a film student at Emily Carr University, Lucas Wareing. We’re building two
puppets for him. In this case, for Lucas, we also skinned and dressed the puppets in
addition to building the armatures (Figures 8.4). I have always been a bit of a jack-of-
all-trades, so it’s kind of refreshing to focus in on one particular thing.
Figure 8.4
Bronwen getting Charlie readyfor shooting on Ava.

Also earlier this year, Melanie and I ran an animation workshop for kids aged 7 to 11
during their Spring Break. This was very different from anything I had done before,
trying to keep the kids engaged in animation for an entire day. Sure, kids love ani-
mation, but it’s very different to try and keep them going when they realize how much
work it is. We had one kid tell us she was going to take basketball next year because
animation is cool, but it’s really boring (laughs). This first time around we had eight
kids doing plasticine, paper cut-outs, sand on glass, etc. for the whole week. It was
great. Except for the girl who’s going to take basketball, the kids had a really good
time, and so did we. At least one kid even asked their mom for an animation setup at
home. So I’m calling it a success. Even if they don’t grow up to be animators, it’s still
a great experience for them to use their brains and be creative and see how animation
happens. Even though we’re in the TV business, I think it’s important to gets the kids
doing something instead of just passively watching TV all the time.
KEN: Then when they do watch TV, they probably appreciate it more once they know howmuch work goes into it.
BRONWEN: Yes, definitely.
KEN: Now, I already know that one of your other passions is dance, and when I inter-viewed Cuppa Coffee director Dave Thomas for my last book, we talked about how someof the animators there had a knowledge of dance that influenced their animation. Whatwould you have to say about that?
BRONWEN: It’s true; many of the animators had dance or martial arts backgrounds.
Now I’m not saying that we were all ballerinas and black belts, but a lot of us seemed
to gravitate towards pastimes that required a certain amount of body awareness. Stop-
motion is not something that, until more recently, was taught at many animation
schools, so most of the people coming into stop-motion had only done it through
small workshops or figured it out on their own. I think because of that, you tend to
get individuals who have a natural sense of how the body moves, whether it be from
martial arts or dance. It could be that we’re actually the most athletic animators out
there and just don’t know it (laughs).
KEN: What connections do you see between both dance and animation as art forms?
BRONWEN: To me, animation is essentially dancing—very slowly. I think figuring out
your animation timing is very similar to choreographing dance moves and the counts
that they fall on. In stop-motion you are just choreographing on a microscopic level.
Where a dancer may break down a piece of choreography into individual steps, an
animator needs to break down those individual steps into individual frames. There is
also the additional fact that stop-motion is all done with straight-ahead animation,
which is also similar to dance. You can figure out, or rehearse, a scene in smaller
chunks, but when it comes time to animate, or perform it, you just have to start at
the beginning and do it. It’s a matter of knowing where the puppet is at one instance
Chapter 8 n An Interview with Bronwen Kyffin 235

The Advanced Art of Stop-Motion Animation236
and where it needs to go and how to adjust it accordingly as you go to keep it on track.
Of course, sometimes animation is really similar to dance because you’re animating a
dance scene (laughs). I’ve gotten to do this on a couple of shows. The most recent time
was animating the famous Miser Brothers’ song in the new special A Miser Brothers’Christmas (Figure 8.5). Animating dance is fun, but it has its own set of challenges.
One of the funniest challenges is trying to resist the urge to want to make the puppets
look like professional dancers. It’s one of those times when a little bit of dance knowl-
edge can sometimes work against you. You can find yourself getting caught up in the
minutia of how a perfect pirouette should be done and forget that the character
performing it is a fat guy with bright orange hair.
Figure 8.5
Bronwen animating on AMiser Brothers’ Christmas.(Courtesy of Bronwen Kyffin/
Cuppa Coffee Studios.)
KEN: What are your thoughts on the current stop-motion scene and its future potential?
BRONWEN: What’s really fantastic right now is that through platforms like YouTube,
etc., filmmakers are able to connect to audiences and each other so much quicker and
easier than ever before. You don’t have to enter or attend film festivals and fly all over
the country to be able to share your work with people. Now we can share work with
each other from the comforts of home, just e-mailing each other the inspiring films
that we find. Hopefully that kind of accessibility will result in more independent work
being done. For TV series, I think the interest in it will always ebb and flow, depend-
ing on the appeal of the stop-motion look and how in fashion it is at the time. I think
it will perhaps be more interesting to see how this new online community spreads
interest in the stop-motion medium, and how that, in turn, affects the number of
stop-motion shows that we see on TV.

Stop-motion animation began as a special effect that was essentially done inthe camera. Before long, other processes were invented for creating furthervisual effects in post-production. These effects evolved to the point that
differentiation would be needed between special effects and visual effects. Today,the term “special effects” is used for practical effects that are done on set or in frontof the camera during production. “Visual effects,” on the other hand, are doneentirely in post-production, and in some cases during the film era, the elementswere simply prepared or created within the camera itself. The basic principles ofmany of these visual effects have remained the same, but the tools used to createthem have certainly changed. What used to be done with a great sense of tediumon a single strip of film can now be done with a great sense of tedium in the com-puter. Today’s digital tools still provide challenges and require just as muchpatience and skill, and they can range from very basic to much more complex.
As filmmakers become more savvy and higher-end tools become more widely avail-able for the average person making homemade stop-motion films, the creative possibilities open up a whole new world of potential. Some in the stop-motion com-munity even believe that today’s digital compositing tools can be used to bring backthe classic effects used in Ray Harryhausen’s films and are moving forward to bringthat genre back to the modern era. When looking at the level that stop-motion andvisual effects have reached by themselves, I think the potential behind this pursuit is pretty exciting. Harryhausen’s films have inspired an entire industry, so it makessense to continue that sense of inspiration for future generations. The goal of any filmshould be to create inspiration, whether for a moral message, for a good story, or simply to create more films. Ultimately, the use of visual effects should not be done
9Visual Effects
237

The Advanced Art of Stop-Motion Animation238
simply for the sake of using them, but to allow for more creative control over theperformance or look of a scene. The effects should become transparent to theaudience and should not draw attention to themselves, but they should alwaysserve the story. This chapter will show some techniques that can be used to com-bine stop-motion animation with other elements, whether live action or digital.
Film Compositing
To better understand how visual effects are done today, it helps to understand alittle bit about how they were done in the “old school,” before modern digitaltools were available. For stop-motion, a good number of these effects came tofruition in the original King Kong, which brought together several differentprocesses for marrying animation with live-action footage. One of the most basiccompositing effects that can be done on film is a split-screen matte shot. It is sobasic that I used it myself many years ago on my student film, Snot Living, atthe University of Michigan, which I shot in 16mm. For a shot where my liveactor, Brandon Moses, stared at the animated clay puppet in the same shot, Isimply framed up my shot and attached a glass plate to the camera lens withposter putty. In the area where I wanted the puppet, I masked out that part ofthe frame with black paper on the glass, creating a matte (Figure 9.1). The blackmatted area would not be exposed on the film, but the rest of the frame would.In the area surrounding the matte, I shot Brandon in live action. Next, I had to rewind the film to the same frame where I started, cover up the rest of theframe with black paper, and remove the previous matte, essentially reversing it(Figure 9.2). Then, in this area, I shot my animation through another pass on
Figure 9.1
For a split-screen matte, half of the frame is matted out,and live action is shot outside the matte.
Figure 9.2
The matte is reversed, and stop-motion animation is shotwhere the previous matte was.

the same frames in the camera. After sending the film to the lab and getting it back, both exposed elements were blended together into the same frame(Figure 9.3). The risk in using this technique was that if something went wrongwith either side of the matte, the whole shot would need to be redone.
Chapter 9 n Visual Effects 239
I used the same technique for another shot in the film, where Brandon getshit in the head and three tiny versions of the clay puppet spin around his head(like in those old cartoons where little birds or stars would spin around a character’s head after a serious injury). In this case, the matted area where theanimation happened was a tiny rectangular space near the top of the frame(Figures 9.4 to 9.6).
The extra trick with this shot was that because most of the frame was mattedout, I was able to rig a large set in the same place that Brandon had been lyingearlier. Because I wanted the puppets to look like they were spinning in mid-air, I placed them on a horizontal sheet of Plexiglas so that the backgroundwould show through. The Plexiglas was held up (precariously) by two foot-stools and a stack of phonebooks on each side to bring it up to the level of thematte window. This whole setup actually came crashing down in the middleof my animation, but luckily I was able to set it back up and place the puppetsback where I thought they had been. Surprisingly, it worked, and I didn’t haveto reshoot anything, which was a complete fluke and stroke of dumb luck.(Snot Living can now be found on YouTube by typing the title in the Searchwindow.)
Figure 9.3
Both sides of the mattedareas appear combined inthe final composite.
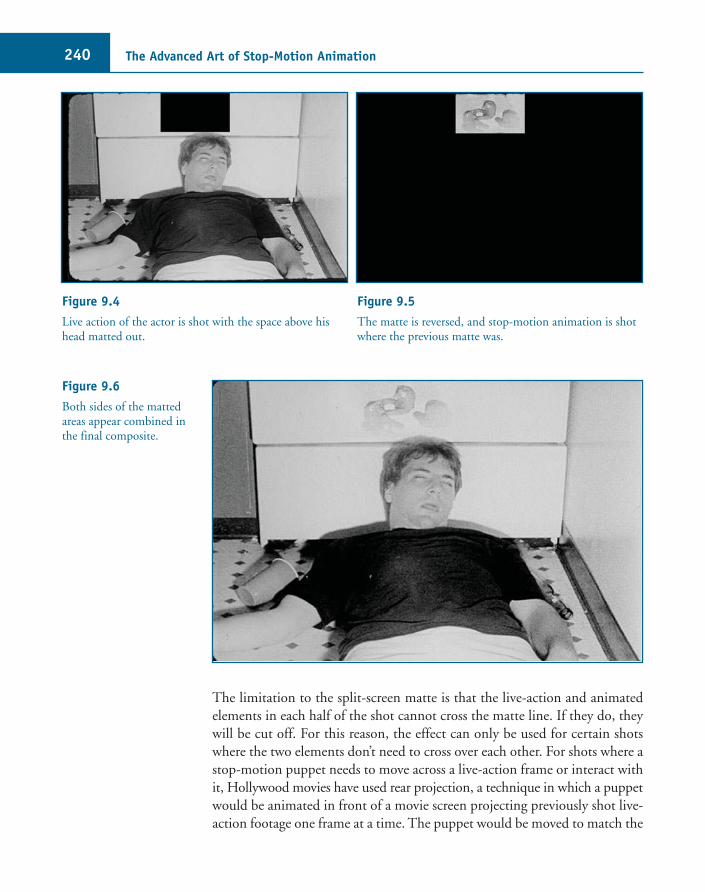
The Advanced Art of Stop-Motion Animation240
Figure 9.4
Live action of the actor is shot with the space above hishead matted out.
Figure 9.5
The matte is reversed, and stop-motion animation is shotwhere the previous matte was.
The limitation to the split-screen matte is that the live-action and animatedelements in each half of the shot cannot cross the matte line. If they do, theywill be cut off. For this reason, the effect can only be used for certain shotswhere the two elements don’t need to cross over each other. For shots where astop-motion puppet needs to move across a live-action frame or interact withit, Hollywood movies have used rear projection, a technique in which a puppetwould be animated in front of a movie screen projecting previously shot live-action footage one frame at a time. The puppet would be moved to match the
Figure 9.6
Both sides of the mattedareas appear combined inthe final composite.

background, the camera took a frame, the rear projector advanced to the nextframe, and the process repeated. For any moments of interaction, the puppetwas simply positioned to match up to the live-action footage behind it. Thiswas the basic premise of Ray Harryhausen’s Dynamation process, which wouldalso be combined with matting out any foreground elements in front of thepuppet and matting them back in through another camera pass. When youunderstand how they did this, it makes watching those old Harryhausen filmsthat much more awesome.
In other situations, a traveling matte can be created. This technique requiresmore steps and passes of the film through the camera, often done through bi-packing two strips of film together to create the various composites. One ofthese methods, the Williams process (named after its inventor, FrankWilliams), was used for some shots on King Kong and other films. To illustratethis process for black-and-white film, I put together a digital re-creation of afilm matte using a miniature dinosaur and a photo of Vancouver. First, thestop-motion puppet could be shot against a neutral or black background(Figure 9.7). The actual film in the camera, however, would capture a negativeimage of what was on set, creating a negative puppet against a white background(Figure 9.8). This strip of negative film was printed against another strip ofhigh-contrast film stock, which created a silhouette of the puppet and left thebackground transparent (Figure 9.9). A live-action background would be shotseparately and developed into a positive print. This positive print was reprintedbehind the high-contrast silhouetted image of the puppet (Figure 9.10) andshowing through the transparent negative space around it. The result was a
Chapter 9 n Visual Effects 241
Figure 9.7
This is what the camera sees: a miniature puppet in frontof a neutral dark background.
Figure 9.8
This negative image is what is actually captured on filminside the camera.

The Advanced Art of Stop-Motion Animation242
new negative of the live-action background with a transparent shape of thepuppet cut out of it (Figure 9.11). This negative was then combined with theoriginal negative of the puppet, which would fit exactly into the transparentshape (Figure 9.12) and then be developed into a new positive image of bothelements (Figure 9.13).
Figure 9.9
The negative is reprinted onto a new strip of high-contrast film, leaving the background transparent around a silhouette of the puppet.
Figure 9.10
A positive print of the live-action background is printedbehind the film with the transparent background andsilhouette.
Figure 9.11
Now, there is a new negative with a transparent shape ofthe puppet cut out of it.
Figure 9.12
The original negative of the puppet is inserted into thetransparent matte.

With color film, this process gets much more complicated because it essentiallydeals with using a blue screen as the neutral background, filtering the lens withthe same color blue, and running more strips of film with alternating negativeand positive images repeatedly through an optical printer. An optical printeris a combined movie projector and camera that can create composites in a similar manner to the in-camera processes, which is how special effects weredone up to the digital revolution of the past 15 to 20 years. The tricky thingabout these methods, other than having to think about alternating positiveand negative images that are backwards, is the reliance on exact alignment ofevery element. If one thing goes wrong, an entire composite needs to bescrapped and repeated. Although these exact methods mostly have been phasedout in today’s digital filmmaking era, it is fascinating to look back at how thesecinema wizards brought classic images to the screen with what they had. Theseguys were true technical magicians, and their innovations can help us betterunderstand and appreciate the tools available to us now. Everything we can donow comes from the logic behind these techniques.
Chapter 9 n Visual Effects 243
Figure 9.13
The negative is developed into a positive print of bothelements together, and nowVancouver is under attackby dinosaurs.

Digital Compositing
Today, we have a lot more freedom allotted by digital tools that can createseamless composites and work around many of the errors and setbacks thatwould occur from using film. They are essentially a combination of the foundations laid by the old-school film techniques and other developments invideo technology that bridged the gap to computers. One common tool usedin digital imaging today is the alpha channel, which essentially makes any partof an image transparent and allows another image layered behind it to showthrough. This is very much a digital extension of the transparent negativeimage from a strip of film, and it can be created for the entire backgroundaround a subject or as any shape within an image where a transparent area iswanted. Many compositing software programs used today also have the capability of creating masks that will cut or matte out any part of an image tocombine it with another. Also popular is the option of chroma keying out ablue- or green-screen background and replacing it with a live-action or digitalbackground. This has been used for matte work on films and is also used invideo production for weather reports, talk shows, and special effects.
Split-Screen and Masks
The split-screen and traveling matte processes have transitioned into the digitalera using the same principles from film, but obviously with more flexibilityand creative options for the filmmaker. To demonstrate some very simple techniques that can be done for compositing stop-motion with live action, I’mglad to present some contributions by Vancouver-based independent film-maker Rich Johnson. I discovered Rich’s films online and became a big fan ofhis hilarious Web series My Friend Barry (http://www.myfriendbarry.com),which is about a character named Frank (played by Rich) and his little bluestop-motion friend Barry. Part of the charm of the series is its simplicity,including the subtle compositing effects that bring Barry into the live-actionworld. Frank’s dialogue is scripted but sometimes improvised, which allowsfor many possibilities for having the silent animated character Barry react tothe action.
Many shots are done in a simple split-screen technique, where live action andstop-motion are shot as separate scenes and brought together into one shot.This can be done very easily in any nonlinear editing program by applying amask with an alpha channel into one of the scenes and then layering themtogether in Premiere or After Effects. In this situation, the split-screen matteline still acts as a division where the two elements should not cross over eachother (Figures 9.14 and 9.15).
The Advanced Art of Stop-Motion Animation244

Chapter 9 n Visual Effects 245
Figure 9.14
Split-screen animation shotfrom My Friend Barry withhalf of the frame mattedout. (Courtesy of Rich
Johnson.)
Other shots require a little more work and planning in the compositing andlayering to bring Barry into interaction with the live-action world. Here, Richhimself describes the steps he takes to accomplish this:
I start by locking the camera down and shoot the live-action video with markersso the actors know where Barry is going to be when looking at him or followinghim as he moves. I also make a rough note about how long things take and whatnew improv comes out of the shoot so that I know where I need Barry to move,react, and look. After the live-action video is done, I use a remote to captureframes of Barry moving around with a clean background behind him. I also takeone or two frames of the clean backplate with no Barry or actors, in case I needit for any holes and to mask bad reflections or unwanted shadows.
Figure 9.15
Final composite with live-action footage matted in.(Courtesy of Rich Johnson.)

The Advanced Art of Stop-Motion Animation246
For a shot in Episode 1 where Barry comes out from under the bed and rolls infront of Frank, three layers are needed to make this comp work:
1. Stop-motion layer with Barry animated and saved out as a high-res MOVfile the same frame rate as my live-action plate. In this case, it was NTSC29.97 (Figure 9.16).
2. Live-action video layer with Frank, shot using NTSC 29.97 frames per second, in standard definition (Figure 9.17).
3. Clean background plate in case it’s needed (Figure 9.18).
Figure 9.16
Stop-motion layer of Barry. (Courtesy of Rich Johnson.)
Figure 9.17
Live-action video layer of Frank. (Courtesy of Rich Johnson.)
Figure 9.18
Clean background plate. (Courtesy of Rich Johnson.)

I import and/or capture the stop-motion and video layers into my editing program in this same order, with stop-motion on top. I use a temporary“garbage matte” (drawing a rough matte around the general area where Barryis) on my stop-motion layer so that I can see the video layer underneath. If youcan’t make a temp matte, another method is to reduce the transparency. Thekey is to be able to see both layers so that you can match them up for your finaledit before compositing them together. This is the most important step, andyou need to lock down the edit in this stage because the last thing you want todo is go back and make changes. It’s too much work to do that. Each layer isedited and timed out, the temp matte is removed, and stop-motion and videolayers are exported as uncompressed files to my compositing software.
Then, I import the uncompressed files into compositing software the same way,with layers arranged top to bottom. I add a 2-pop* one second before and aftereach clip to help ensure that they are lined up.
[*Author’s note: A 2-pop is a sound tone one frame in duration that is typicallyplaced two seconds before the exact start of a program for cueing purposes.]
Next, I mask out the stop-motion layer frame by frame as needed to reveal Frankin the video layer (Figures 9.19 and 9.20). For the mask, I only concentrate onthe areas where Barry’s layer passes in front of Frank’s. The rest of the pictureon both layers does not change from one to the other, so I don’t worry aboutperfecting the mask in those areas. I finesse the mask by feathering the edges bytwo pixels or so. That softens up the edges of the mask and blends nicely withthe video layer, making for a seamless composite. Now Barry passes in front ofFrank (Figure 9.21). It’s like magic!
Chapter 9 n Visual Effects 247
Figure 9.19
Stop-motion layer being masked out. (Courtesy of Rich Johnson.)
Figure 9.20
Masked out stop-motion layer with live-action layerbehind it. (Courtesy of Rich Johnson.)

For another scene in Episode 2, where a live-action hand comes in to wipeBarry’s face, the same technique is used. The only difference is that it’s not Barrywho is masked—it’s just his eyes. One mask for each eye means all reflectionand shadows are real on the rest of his body, even in his eye sockets. I put onthe actor’s coat and sweater and wiped Barry’s face with my own hand. I madesure that Barry’s eyes were closed when I did this, so in the video layer, Barry’seyes are closed (Figure 9.22), and the only animation going on is his eyeballs(Figure 9.23). Sometimes Barry’s eyeballs were crooked, so I would grab the lefteye, make a mask, duplicate it, flip it 180 degrees, and add it over the right eye.Now, I had two fixed eyes animating in sync. When done correctly, masks arevery powerful for this type of work, and I use them for everything.
Sometimes, in production, I would choose to pose Barry in many different ways,animating his basic moves: looks right, looks left, looks up, looks down, blinkswhile turning, and blinks at camera. From that, I could make him do anythingI wanted in the editing, and it also meant that I could improvise with Frank,which gave me tons of freedom in crafting the jokes and pacing of the show. Inthis case, I would only plan for his entrance or exit for the shot. Barry is madeof Play Doh, which makes him tougher to animate and makes him look kindof lumpy and cracked, which is part of his charm. Sometimes, obstacles are goodto have, and little mistakes can help shape the work into something new andoriginal. As long as I stay true to that and don’t get too hung up on the details,the show’s overall character stays pretty consistent. Barry is an easy shape andhas no mouth, so basic stop-motion with him worked perfectly for what I wastrying to achieve and convey in my storytelling.
The Advanced Art of Stop-Motion Animation248
Figure 9.21
Final composite of Barry in front of Frank. (Courtesy of Rich Johnson.)

Blue/Green Screen
The technique of shooting stop-motion puppets against a neutral blue or greenscreen is pretty straightforward. If your intention is to combine stop-motionwith a live-action shot, first shoot your live action separately (Figure 9.24),and then animate your stop-motion puppet on a miniature set with the screenbehind it (Figure 9.25). In the computer, you can place the live action intoanother layer under the stop-motion sequence and remove (or key out) theblue or green background to reveal the live action underneath. The result willbe both images composited together in the same frame (Figure 9.26).
Chapter 9 n Visual Effects 249
Figure 9.22
Live-action video layer with Barry’s eyes closed. (Courtesy of Rich Johnson.)
Figure 9.23
Masks added in for the animation of Barry’s eyes. (Courtesy of Rich Johnson.)
Figure 9.24
Live-action video plate. (Courtesy of Richard Svensson.)
Figure 9.25
Puppet animation shot against a blue screen. (Courtesy of Richard Svensson.)

The Advanced Art of Stop-Motion Animation250
Whether you use a green or blue screen depends on several different factors.Traditionally, blue was the best color for optical matte shots on film, and greenbecame the preferred choice for video because of the nature of the media them-selves. Today, with most films being shot with video or digital cameras, thereare subjective and artistic in addition to the technical considerations. One factor is the colors present in the stop-motion puppet you are shooting. If yourcharacter is designed with many shades of green, a blue screen may be a betterchoice (and vice versa—using a green screen for a blue character). This sepa-ration of colors helps in the compositing process and avoids any color fromthe actual puppet being keyed out along with the background. The lightingmay also have an impact on which screen to use; a blue screen may separatefrom the puppet better in warm light situations, and cold lighting may be better for a green screen. The screen itself can be purchased as a precoloredposterboard (Figure 9.27), a fabric sheet, or a flat screen material. You can alsobuy paint (Rosco or a similar brand) in the specific key color and apply it toa flat sheet of board or foam core. With either method, the background shouldbe lit evenly or illuminated from behind to allow for a clean wash of color andno shadows, which makes it easier to key out the color later.
One of the challenges of shooting with a blue or green screen is the completeremoval of the screen’s color from around the animated subject. Often, theremay be issues with the green reflecting onto the puppet or remaining as a thinlayer around the edges. With today’s digital tools, though, there are ways todeal with this. Removing the color from most of the frame around the subject
Figure 9.26
Final composite ofanimation and live actiontogether. (Courtesy of Richard
Svensson.)

is the easiest part. Depending on the software, this is usually done by select-ing the color (typically with an eye-dropper tool) and hitting a button oradjusting a tolerance slider to wipe it out of the frame. In After Effects, a plug-in called Keylight is commonly used, and Combustion uses a functioncalled the Diamond Keyer for the general removal of the green (Figures 9.28and 9.29). Once most of the green is keyed out, there will often still be a thin
Chapter 9 n Visual Effects 251
Figure 9.27
Set-up for stop-motionagainst a green screen.
Figure 9.28
Selecting the Diamond Keyer in Combustion.
Figure 9.29
Keying out all the green color in the shot with theDiamond Keyer.

The Advanced Art of Stop-Motion Animation252
Figure 9.30
A slight green rim is left around the edge of the puppet.
Figure 9.31
The green color is suppressed (or slid down) on the colormap to further erase the green.
rim of green around the edges of the subject (Figure 9.30). Some additionalkeying tools can be used for fine tuning the keying out of this remaining color.In Combustion, for example, these tools include the Discreet Keyer and suppressing the green color on the color map (Figure 9.31). To create furtheratmosphere once the background is comped in behind the puppet, a blur canbe added to help create the illusion of a shallow depth of field (Figures 9.32and 9.33). (Compositing and screen captures for Figures 9.28 to 9.33 courtesyof Shawn Tilling.)
Figure 9.32
Selecting a Gaussian blur for the comped-in background.
Figure 9.33
Final composite.

Shooting any object or stop-motion puppet with a color behind it for keyingalso allows for simple resizing and moving of that object into any part of thescreen for compositing with other elements. The background that is compositedbehind the keyed-out animation frames can be a still photograph, a painting,or any type of imagery. A particularly unique use of green-screen compositingwas used on a short student film called For Sock’s Sake, made by animator CarloVogele at CalArts. The film uses real clothing, like pants, socks, and shirts, asa cast of characters who go on a journey to save a runaway sock. Carlo shotreal clothes on a flat green screen with a digital still camera pointing downfrom above (Figure 9.34). To move the clothes, he placed magnets inside themand moved matching magnets underneath the green panel, which allowed
Chapter 9 n Visual Effects 253
Figure 9.34
Animation shot against agreen screen for the filmFor Sock’s Sake. (Courtesy
of Carlo Vogele.)

them to be moved without breaking the continuity of the fabric’s folds andwrinkles. The backgrounds were drawn in Photoshop with photo collage anddigital drawing, and the animated clothes were composited into them withAfter Effects (Figure 9.35). The film can be seen on Carlo’s blog (http://carlovogele.blogspot.com).
The Advanced Art of Stop-Motion Animation254
Figure 9.35
Compositing effectsdemonstrated for the filmFor Sock’s Sake. (Courtesy of
Carlo Vogele.)

Front Light/Back Light
Another compositing method for stop-motion that harkens back to an oldfilm technique is a checkerboard matte (or front light/back light compositing).The general idea behind it is to take a frame of the puppet against a black or neutral gray background, referred to as a “beauty shot.” In this frame, thepuppet is lit from the front only, with the light shielded from reflecting ontothe background (Figure 9.36). Using a black card or curtain may help shieldor absorb the lighting, or using “barn doors” on the light fixture. Next, thesame frame is shot with a wash of light reflected onto a white card behind thepuppet to create a silhouette image of it (Figure 9.37). The puppet can thenbe moved into the next position and the process repeated. This creates an extrastep of taking each frame twice—once as a front-lit beauty shot and once as aback-lit silhouette, which serves as a transparent matte for compositing witha background. In the compositing process of layering these images togetherfor each frame of the animation, the background is on the bottom layer. Ontop of the background is the back-lit silhouette matte, which provides anopaque silhouette image of the puppet over the background, and the negativespace around it is transparent, so the background shows through. On top ofthis matte, the beauty shot image is placed over the exact silhouette, which itsnegative space also made transparent, resulting in a clean composite of all elements (Figure 9.38).
Chapter 9 n Visual Effects 255
Figure 9.36
A beauty shot, lit from the front, for the short film TheSeventh Skol by Nick Hilligoss. (Courtesy of Nick Hilligoss.)
Figure 9.37
Back-lit silhouette shot of the same frame. (Courtesy of Nick
Hilligoss.)
Although it needs twice as many frames and an extra repetitive step to exe-cute during shooting, this method is essentially an alternative to a greenscreen. It avoids the issues of the green color reflecting onto the puppet orappearing as a rim around it, and in many cases it provides a cleaner, softer

The Advanced Art of Stop-Motion Animation256
edge around the puppet for compositing. Obviously, during the animation,the lighting setup for both sets of frames, as well as the camera, must be lockeddown tightly so that all of the images line up exactly. It is common for theback-lit silhouette images of the puppet to still have some highlights spillinginto the edges and to have visible features within the silhouette. In many cases,these frames will need to have the brightness and contrast cranked up to cre-ate a crisper matte that is completely black and white. In some cases, theremay also need to be the option of rig removal in the frames if your puppet isdefying gravity in some way.
When this method is used on film, the single strip of film consists of alternatingblack-and-white images—hence, the term “checkerboard matte.” It also meansthat the animation, when played back at speed, is twice as slow and flashesquickly with black-and-white frames. The alternate frames are separated andput back together in the optical printer. Shooting digitally with frame-grabbingsoftware, the alternate silhouette frames can be hidden during the animationprocess and exported separately into another folder. Some software programs,like Dragon, can also separate the alternate frames into subfolders while youshoot the animation. Either way, at the end of the shoot, you want your beautyshot and silhouette frames separated and organized into different directories.
Many different software programs, such as Photoshop or TVPaint, can be usedto composite the different layers together in each frame as long as you can create transparencies for the negative space around the puppet and adjust thecontrast and brightness. Independent animator Nick Hilligoss has his ownmethod for compositing front-lit/back-lit images together using LightWave3D. His foreground animation elements are captured as their beauty shots
Figure 9.38
The final composite with a background. (Courtesy of
Nick Hilligoss.)

Chapter 9 n Visual Effects 257
(Figure 9.39) and back-lit silhouettes (Figure 9.40). Each image sequence isseparated, with the beauty shots applied to a rectangular flat object’s surfacein LightWave as a color image map and the back-lit sequence as a transparencymap. In this environment, black is solid, white is fully transparent, and shadesof gray are partly transparent, so if there are any see-through objects or motionblur in the animation, they will also show up. Directly behind this rectangularobject, with the beauty shots and mattes, is another flat object with the back-ground applied to it (Figure 9.40). Both the background and puppet screenobjects are exported together from the same camera view to create the finalcomposite (Figure 9.41).
Figure 9.39
Beauty shot from the Ray Harryhausen Tribute promoshort for Stop Motion Magazine by Nick Hilligoss.(Courtesy of Nick Hilligoss.)
Figure 9.40
Back-lit shot of the same frame. (Courtesy of Nick Hilligoss.)
Figure 9.41
Composite in LightWavewith Surface Editor andTransparency windowsopen, angled to show bothbackground and foregroundelements. (Courtesy of Nick
Hilligoss.)

The Advanced Art of Stop-Motion Animation258
Further tutorial details for front light and back light compositing can be foundon the YouTube channels for Nick Hilligoss (http://www.youtube.com/user/StopmoNick) and Ron Cole (http://www.youtube.com/user/animatorIsomer),as well as further tips searchable through Stop Motion Animation (http://www.stopmotionanimation.com).
Advanced Compositing for Ava
In Chapter 4, “Digital Cinematography,” I included some information thatwas shared with me about a moving camera shot from Lucas Wareing’s studentfilm Ava, made at Emily Carr University of Art + Design. The camera moveitself starts by pointing up at the ceiling of the film set and then begins tiltingdown and moving forward through the set. The camera moves through abunch of real foliage and eventually ends in front of the monster, Charlie, whois sleeping between two cliff facades built as part of the stop-motion set.Meanwhile, there is the effect of a moving sun being animated behind to createa real lighting change throughout the whole set. The background behind theset was a plain white backdrop instead of a green or blue screen. This was donedeliberately to better match the lighting throughout the scene and to avoidworrying about blue or green reflections spilling into the set. The originalfootage from this particular shot in the film (Figure 9.43) went through a com-plex process of compositing afterward in post-production. The visual effectsfor this shot would involve a digitally created matte painting of a night sky from
Figure 9.42
The final composite.(Courtesy of Nick Hilligoss.)

which the camera would tilt down, eventually revealing a sunrise in the farbackground behind the stop-motion set, including an animated sun that followedthe path of the lighting change created physically on set (Figure 9.44). Lucasand his compositor, Henrique Moser, shared with me some of the stepsinvolved to complete this shot.
Chapter 9 n Visual Effects 259
Figure 9.43
Still of original footagefrom Ava, directed by Lucas Wareing. (Courtesy of
Lucas Wareing.)
Figure 9.44
Still of final compositedfootage from Ava. (Courtesy
of Lucas Wareing and Henrique
Moser.)

The Advanced Art of Stop-Motion Animation260
The first step was to use a steadiness plug-in to minimize some of the camerashakes that resulted from the physical stop-motion camera move. Next, the camera move was tracked to create a virtual 3D version of the movement of thecamera on the physical set. This was done using PFTrack, a software programused for match-moving 3D elements to live-action plates with exact precision.The shot starts with the camera’s position extended past the beginning of thestop-motion camera move, pointing up at the matte painting. The virtual camera tilts downward across the sky portion of the painting and eventuallymerges with the tracked version of the physical camera moving through the set.
The matte painting itself, originally done in Photoshop, had its various middle-ground and background elements of mountains and clouds separated onto dif-ferent layers (Figure 9.45). These split-up layers of the painting were projectedonto separate cards in the 3D environment to create a parallax effect as the cameramoved through the set. This basically means that there is a change of perspectivein the background elements that creates more depth and simulates how it wouldlook in a 3D space, as opposed to just one static background element that staysthe same through the whole shot. In the 3D environment, there was one camerathat tilted upward and moved down to match the physical camera move andanother camera that was locked down and acted as a projector for the various fore-ground and background elements in the virtual set (Figure 9.46).
Figure 9.45
3D environment with somebackground elements forthe sky. (Courtesy of Lucas
Wareing and Henrique Moser.)
The plants and various bits of foliage were keyed out through a combinationof various keying techniques to extract mattes from them. Also, in front of the virtual 3D version of the camera move, certain elements that existed in physi-cal space on the stop-motion set were projected onto 3D cards in the exactplaces they appeared within the set. Certain things like the branches, plants,and cliffs would go through various stages of movement and overlap with each

other as the camera moved past them, so on certain frames, sections of these setpieces had to be matted out and projected to all match together. Many thingsin the set needed to be painted out, including the black disc that was animatedthroughout the set to line up with the moving sunlight and cover it up. Theprojection of mattes onto the 3D cards helped in the particular frames wherethe disc passed in front of the cliff, for example. To cover up the disc, a sectionof the cliff from another frame could be matted out and placed in the space itneeded to be (Figure 9.47). The color grading would also need to be manipu-lated to blend in with the rest of the shot since the light changes throughoutthe whole scene.
Chapter 9 n Visual Effects 261
Figure 9.46
Illustration by HenriqueMoser of the backgroundand foreground elementsand cameras in the 3Denvironment. (Courtesy of
Lucas Wareing and Henrique
Moser.)
Figure 9.47
Example of a matte createdto mask out the passingforeground disc from thecliff, before color-correcting.(Courtesy of Lucas Wareing and
Henrique Moser.)

The Advanced Art of Stop-Motion Animation262
In addition to the basic process of compositing and removing the various elements from the original footage so that the composited background couldshow through, other subtle effects were added to enhance the atmosphere. Oneexample was to enhance and exaggerate the highlights created by the sunlightat the end of the shot. This was done by keying out the bright highlights in theframe itself (Figure 9.48) and then separating the foreground and backgroundinto an alpha channel matte (Figure 9.49). The highlight shapes were blurredand given a warmer color tone, which could then be layered over the original shotto exaggerate the highlights, making them brighter and softer in the rim of lightalong Charlie’s body and next to his shadow on the ground (Figure 9.50).
Figure 9.48
Highlights created by the lighting in the frame are keyedout. (Courtesy of Lucas Wareing and Henrique Moser.)
Figure 9.49
The background is separated from the foreground.(Courtesy of Lucas Wareing and Henrique Moser.)
Figure 9.50
The keyed highlights aremanipulated and thenlayered over the originalfootage. (Courtesy of Lucas
Wareing and Henrique Moser.)

Many other effects and subtle details were executed within the advanced production method of completing this shot, all coming together to bring tothe audience a beautiful and unique approach to the art of stop-motion filmmaking. Check out the movie called Ava Footage.mov on the CD to seethe original footage from the stop-motion set and breakdowns created byHenrique Moser of a few steps taken to create the final shot.
Effects
Computer software and tools allow for all kinds of live-action or CG effectsto be composited into stop-motion to embellish shots or add any elementsneeded to tell the story. Effects such as smoke, water, fire, explosions, or gun-muzzle flashes can be downloaded or purchased as QuickTime files throughvarious websites or service companies. These effects will typically be shotagainst a black background that is prekeyed with an alpha channel. This way,if you simply drag them into a timeline in Premiere or After Effects, they caneasily be laid on top of any other movie file, with the background being auto-matically transparent. In many cases, they will then need to be repositionedand modified to line up and match with your scene.
This effect was used for my two-character dialogue scene that is featured inChapter 7, “Character Animation,” and watchable on the accompanying CD.Searching through various movie files of fireballs, I found one that was suit-able to use for the effect of the monster shooting fire out of her mouth. Themovie file itself had the fireball shooting upward in the middle of the frame,so it would obviously need to be rotated and repositioned to shoot diagonallyoff the right of the screen. This was all done in After Effects and lined up tomatch the monster’s mouth at the proper frame in the animation. Initially, theedge of the fireball was a flat line based on the bottom frame of the movie(Figure 9.51), so the shape was modified using a mask (Figure 9.52). The maskcould change shape and essentially be animated in every frame to get theproper shape for the overall effect (Figure 9.53). Two copies of the same fire-ball movie were ultimately mapped over each other, rotated, and blended togive all edges of the fireball some variety and texture. (Compositing and screengrabs for the fireball effect in Figures 9.51 to 9.53 courtesy of Gautam Modkar.)
Chapter 9 n Visual Effects 263

The Advanced Art of Stop-Motion Animation264
Figure 9.51
The first few frames of the fireball movie file,composited and rotated toposition with the puppet’smouth.
Figure 9.52
A rough mask drawn in forwhere the fireball will be inthe frame.

Online resources where you can find effects to composite into your own stop-motion films include:
n www.stopmotionmagazine.com (under Free Stuff )
n www.videocopilot.net
n www.detonationfilms.com
In addition to compositing in live-action or CG elements that are pre-photographed, it is possible to simply draw stylized effects right over your animation frames, such as lightning bolts, laser blasts, or anything that fitsyour scene. This can be done easily in newer versions of stop-motion softwareprograms or externally in Photoshop. It can also be done using TVPaint, whichis a software program used primarily for drawing 2D digital animation withinthe program itself. It can also be used for shooting stop-motion very effec-tively, and all of the drawing tools that come with it can be executed right ontop of the stop-motion images. You can easily add hand-drawn effects, smearyour stop-motion images, paint over them, blend the edges of seams on yourpuppet, and do a variety of other creative tricks.
Chapter 9 n Visual Effects 265
Figure 9.53
Animating andmanipulating the mask in the frame to shape thefireball.

The Advanced Art of Stop-Motion Animation266
Rig and Shadow Removal
Making a puppet fly is a trick that has employed several different methods overthe years. Often, the puppets would be flown on invisible strings, stuck to aplate of glass, or suspended by a rod holding them up from behind where thecamera would not see it. These methods can still be used today, but in mostcases, a rig is simply placed visibly into the frame to hold up the puppet andis digitally erased out of each frame of the animation afterward. This makesthe animation process go much more quickly because you don’t have to worryabout concealing any tools that are suspending the puppet. In post-production,it can become tedious and time consuming, but this also depends on thelength of the shot and how many frames need the rig removed.
One of the most straightforward ways to remove a rig from your stop-motionframes is simply to have a clean background plate prepared in addition to youranimation frames. If you are shooting on any kind of set, shoot some framesof an empty set without the puppets in it and set those frames aside to use asa clean background plate in post. In the animation I did for the ThunderbeanStop-Motion Marvels! DVD, there were several frames of an empty stage at thebeginning, and the entire scene was shot with a white limbo background. Thismade it pretty easy to select a background plate, and I would open this inPhotoshop along with each of my animation frames (Figure 9.54). The next
Figure 9.54
Clean background plateand animation frame areboth opened in Photoshop.
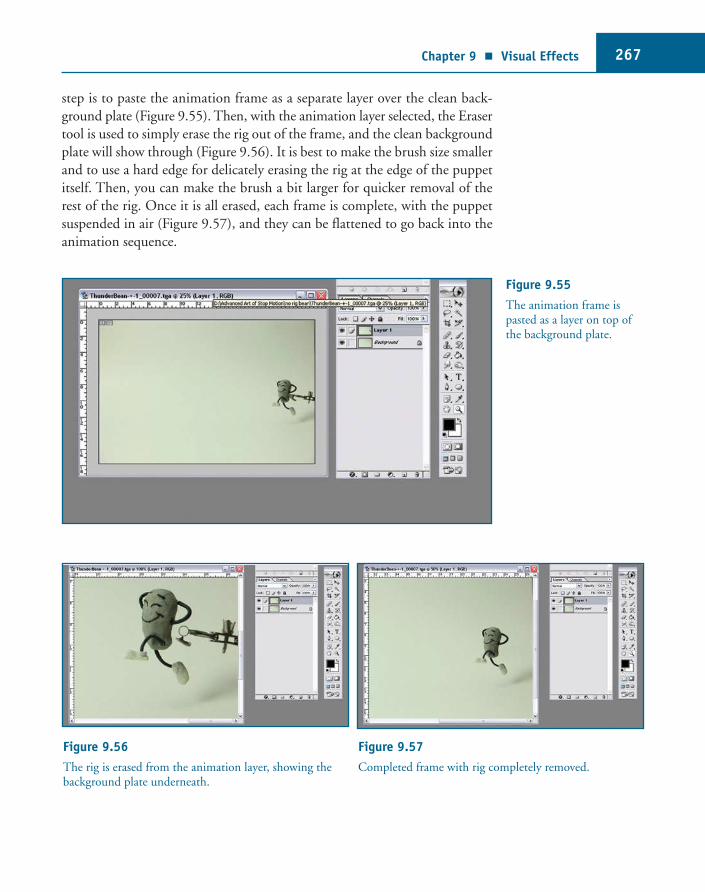
step is to paste the animation frame as a separate layer over the clean back-ground plate (Figure 9.55). Then, with the animation layer selected, the Erasertool is used to simply erase the rig out of the frame, and the clean backgroundplate will show through (Figure 9.56). It is best to make the brush size smallerand to use a hard edge for delicately erasing the rig at the edge of the puppetitself. Then, you can make the brush a bit larger for quicker removal of therest of the rig. Once it is all erased, each frame is complete, with the puppetsuspended in air (Figure 9.57), and they can be flattened to go back into theanimation sequence.
Chapter 9 n Visual Effects 267
Figure 9.56
The rig is erased from the animation layer, showing thebackground plate underneath.
Figure 9.57
Completed frame with rig completely removed.
Figure 9.55
The animation frame ispasted as a layer on top ofthe background plate.

The Advanced Art of Stop-Motion Animation268
Some of the trickier frames to work with on the Thunderbean project werethose where the shadow of the rig needed to be removed but the shadow ofthe bean remained in the frame. Because the shadow was a little fuzzy, it wasdifficult to tell exactly where the edge of the bean’s shadow was. In the last fewslow-in frames, it was also difficult to keep the shadow from jittering. To helpsoften the effect of the shadow’s edge, I used a feathered Eraser tool instead ofa hard-edged one and played around with the edge in the various frames untilI got it to look right (Figure 9.58).
Figure 9.58
A larger feathered eraserbrush is used to erase therig’s shadow.
Removing a rig from a stop-motion scene is now a built-in tool in some newerversions of certain frame-grabbing software programs, which helps avoid doingit in another program like Photoshop. Alternatively, a rig can also be removedusing masks and alpha channels in After Effects. Another alternative to usingone still frame as a background plate for rig removal is to shoot a series offrames of the clean background plate and place them into another layer underthe animation with the rig in it. The rig can be masked out, and underneathwill be an actual movie sequence of the clean background plate. The advantageto this approach is that if there are any lighting changes or pixel fluctuationsin the scene, there won’t be any noticeable difference between the animationframes and the frozen background image under them. The background platehas a danger of standing out as a still image because of the lack of noise thatwould be present in the sequential animation frames.
Being able to erase or mask out parts of an image in stop-motion also comesin handy for fixing mistakes that occur on set while shooting. One mistakethat can occur in the middle of a stop-motion shoot is the animator’s shadow

flashing into the frame. Ideally, you should be standing in exactly the samespot each time you capture a frame, with your shadow completely free of thecamera frame. In the heat of the moment while animating, though, it is common to forget this and have certain frames where your shadow creeps intothe shot. Unfortunately, this happened to me a few times while shooting mytwo-character dialogue scene. However, using After Effects, these problemframes were identified and noted as to how much of the frame had a shadowflash into it. A mask was created from some held frames that didn’t have ashadow flashing into them (Figure 9.59), and this mask could be compositedover the problem frames (Figure 9.60). The edges of the mask were featheredslightly to help blend them into the scene, and then all of the shadow flasheswere gone. (Compositing and screen grabs for the masks in Figures 9.59 and9.60 courtesy of Gautam Modkar.)
Chapter 9 n Visual Effects 269
Figure 9.59
A mask is created from a clean frame with no shadowsintruding into it.
Figure 9.60
The mask is composited over any frames that had a shadowintruding into them.
Motion Blur
Motion blur is a favored technique of stop-motion animators for replicatingthe smooth movement of live action in their work. Part of the reason thatolder stop-motion films always had a jerky quality to the movement was thatevery frame was always in focus. An even bigger part of the jerkiness, how-ever, was the distance between frames and poor registration of the positions

in relation to the speed of the movement. If the distance between two posi-tions on a fast movement (a sword swooping through the air, for example) wastoo far apart, a strobing effect would occur because the eye was not able to fillin the gap between those two very clear images. If that same fast motion occurredover just a few frames captured in live action, it is likely that some of the frames would be blurred if studied frame by frame. In Chapter 4, “DigitalCinematography,” I went over a few techniques for achieving motion blur onthe actual stop-motion set. In this chapter, I will present a few examples ofways to get motion blur into your animation in post-production.
One really interesting method for creating an illusion of motion blur wasrelayed to me by Ron Cole. I noticed his work on In the Fall of Gravity had avery smooth, ethereal quality to it, so I asked him if he used any particularmotion blur technique. He told me about a relatively simple method he usedthat was actually borrowed from an old film technique. The effect is one ofblending the frames to suggest a kind of look that isn’t really there as a blurbut makes the animation feel much smoother. Ron created at least three copiesof each animation scene; he then removed the first frame from the first copy,the first two frames from the second copy, and left the third as-is. These copieswere layered together in QuickTime Pro, and the opacity was altered in eachof the layers. That way, each frame showed three images overlapped, with theone in the center the most visible and the before-and-after frames very trans-parent (Figure 9.61). This gives the illusion that one frame at a time is fadingin and out, and the various degrees of opacity could be adjusted, depending
The Advanced Art of Stop-Motion Animation270
Figure 9.61
Illustration of a frame-blending motion blur effect applied to a scenefrom In the Fall of Gravity.(Courtesy of Ron Cole.)

Chapter 9 n Visual Effects 271
on the speed and quality of the animation. The multiple exposures of imagestypically shows up more on a fast movement, but for slow movements, it cancreate a much more subtle motion blur effect. This same effect can be doneeasily in After Effects, TVPaint, or any other package that allows you to layercopies of the same sequence over each other and adjust the opacity.
For a more realistic motion blur applied to certain frames or every frame ofan animation sequence, there are tools and plug-ins like ReelSmart MotionBlur for After Effects, which will do the job nicely if you have the budget forit. Other simple techniques can involve using Photoshop to add an overall blurto an entire still image, using a blur effect like Gaussian blur and adjustinghow extreme you want it. Another Photoshop tool that I have used for creat-ing blurred frames is the Smudge tool, which can just be dragged by hand overany part of the puppet where you want to the motion to blur, like in a fastsnappy action, for example (Figure 9.62) Whatever technique you use, theimportant thing to realize is that an effective blur should follow the object’spath of action. If you are blurring an arm moving upward in a sharp move-ment, try to smear that arm so that the blur is trailing downward in the oppo-site direction, with a smaller amount of smearing in the direction the arm isgoing.
Figure 9.62
Three frames from theThunderbean Animationlogo sequence, with themiddle frame blurred usingPhotoshop’s Smudge tool.
Many of these effects for green screen, rig removal, masking, and motion blur,as well as other innovative techniques for stop-motion, are demonstrated beautifully together by Patrick Boivin in some of his YouTube videos thatbreak down the process of his entertaining short films. Visit his YouTube page(http://www.youtube.com/user/PatrickBoivin) and, within the Stop-MotionAnimation playlist, check out the “Making of ” videos for Bboy Joker, Jazzwith a General Problem, and Black Ox Skateboard. The process is described ina very entertaining way, and the shorts themselves are fantastic to watch.

Eye Compositing Effects for Madame Tutli-Putli
Madame Tutli-Putli (Figure 9.63) is an Academy Award–nominated short filmfrom 2007 that was directed by Chris Lavis and Maciek Szczerbowski for theNational Film Board of Canada. The film told the story of a young woman whotakes a suspenseful journey aboard a train at night, using atmospheric lightingand intensely detailed puppet animation. The film amazed audiences world-wide, not only because of its cinematic resonance and story, but also because ofa particular effect in the eyes of the puppets. The eyes were actually made up ofvideo footage of real human eyes, which were painstakingly composited ontothe faces of the puppets. The effect and technique for compositing the real eyesinto the stop-motion frames were conceived and executed by artist Jason Walkerover a period of four years from concept to the final result. The innovationbehind this technique has certainly advanced the art of stop-motion animationto a whole new level in terms of performance and technical mastery.
The Advanced Art of Stop-Motion Animation272
Figure 9.63
A scene from MadameTutli-Putli. Directed byChris Lavis and MaciekSzczerbowski. Produced by Marcy Page. (© 2007
National Film Board of Canada.
All rights reserved.)
I asked Jason Walker himself to share the process of his technique for MadameTutli-Putli and how the project got started:
Around the year 2000, I had started playing around with computer animationand been able to get to know the film’s directors, Chris and Maciek, who wereprimarily doing illustration and animation at that time. I became their post-production artist on various projects, including a commercial we did for theDrive-Inn Channel in Toronto, where they had animated a stop-motion mouse.I ended up tracking and positioning a singing mouth onto the puppet, whichdid have eyes, but only a tracking dot where his mouth was. I tried a techniqueof having the puppet move only in two major positions and tracking a 2D shapeonto a 3D shape, but looking like it was turning along with it. It was all set tothe beat of music, and it worked really well.

Later, we found ourselves having a meeting to discuss a project for the NationalFilm Board and what we could do. This was around the time that Peter Jackson’sLord of the Rings had come out, and everyone was amazed by the effects forGollum, so we joked that we needed to create a “poor man’s Gollum” for ourfilm. I had an idea that had been in my head for a long time, since I was about14 years old. When I was a school kid, we had a project where we had to makea papier-mâché head around a balloon and then pop the balloon to create amask. I had the idea that instead of painting flesh tones and eyes on it, I wouldpaste a collage of magazine clippings on it for skin and the facial features. Whenit came to the eyes, I found a Vogue magazine cover and glued the eyes onto themask. Then, I had a thought that if I were to create an animation of this maskwith these photographs stuck onto it, every time I moved the head, I wouldneed to find a different set of eyes that were set at a different angle. This ideafrom my childhood came back to me at that meeting with Chris and Maciek—to shoot live-action eyes and composite them onto a puppet.
I asked Chris and Maciek to shoot some simple moves of a test puppet with blankeyes and did a test with filmed footage of actress Laurie Maher. Three basic stepswere required to try to make it work: film the actress, track the puppet, and sta-bilize the footage of the eyes to stick onto the puppet face. Luckily, after abouta month of working on it in my spare time, the test worked (Figure 9.64).
Chapter 9 n Visual Effects 273
Figure 9.64
Still from an early test donefor Madame Tutli-Putli.(Courtesy of Jason Walker.)
The directors were blown away by it, but I told them if they take this farther,they needed to make sure the puppet didn’t move around very much. I wentaway, and they got approval from the National Film Board to make the film.Coming back a month later, I saw their footage of all this puppet movement,with flashing lights and shadows from the moving train scenes. I started think-ing, “I hope my method will work for this!”
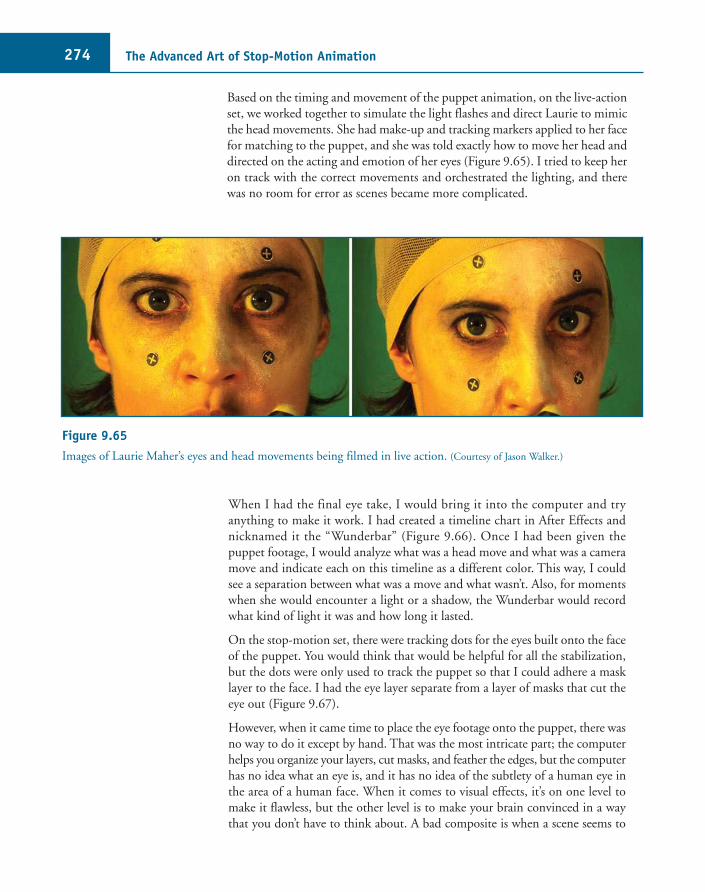
The Advanced Art of Stop-Motion Animation274
Based on the timing and movement of the puppet animation, on the live-actionset, we worked together to simulate the light flashes and direct Laurie to mimicthe head movements. She had make-up and tracking markers applied to her facefor matching to the puppet, and she was told exactly how to move her head anddirected on the acting and emotion of her eyes (Figure 9.65). I tried to keep heron track with the correct movements and orchestrated the lighting, and therewas no room for error as scenes became more complicated.
Figure 9.65
Images of Laurie Maher’s eyes and head movements being filmed in live action. (Courtesy of Jason Walker.)
When I had the final eye take, I would bring it into the computer and try anything to make it work. I had created a timeline chart in After Effects andnicknamed it the “Wunderbar” (Figure 9.66). Once I had been given the puppet footage, I would analyze what was a head move and what was a cameramove and indicate each on this timeline as a different color. This way, I couldsee a separation between what was a move and what wasn’t. Also, for momentswhen she would encounter a light or a shadow, the Wunderbar would recordwhat kind of light it was and how long it lasted.
On the stop-motion set, there were tracking dots for the eyes built onto the faceof the puppet. You would think that would be helpful for all the stabilization,but the dots were only used to track the puppet so that I could adhere a masklayer to the face. I had the eye layer separate from a layer of masks that cut theeye out (Figure 9.67).
However, when it came time to place the eye footage onto the puppet, there wasno way to do it except by hand. That was the most intricate part; the computerhelps you organize your layers, cut masks, and feather the edges, but the computerhas no idea what an eye is, and it has no idea of the subtlety of a human eye inthe area of a human face. When it comes to visual effects, it’s on one level tomake it flawless, but the other level is to make your brain convinced in a waythat you don’t have to think about. A bad composite is when a scene seems to

Chapter 9 n Visual Effects 275
Figure 9.66
Still images of Madame Tutli-Putli’s puppet animation, with the Wunderbar timeline. (Courtesy of Jason Walker.)
Figure 9.67
A progression of steps showing the puppet’s tracking markers, masks, and composited eyes. (Courtesy of Jason Walker.)
look right, but the brain tells you it doesn’t. When it comes to human eyes, thereis absolutely no room for error. When placing the eye onto the puppet in AfterEffects, if the eye was off by even a fraction of a pixel, it wouldn’t work.
So I developed a system where for every frame, I would need to zoom all theway in, use the arrow keys to move the eye up and down, and then zoom outand see if there was any independent movement. This also had to be done forscale and rotation of every frame. Often, I would zoom in, move it over onepixel, and then zoom out, and it would be too far over. Then I wondered, “Howcan that be, if it’s only a pixel? How can I move it less than a pixel?” It startedto become insanity at this point, but my solution was this: Let’s say my eye wasin the right place on frame 10, and I move it over one pixel for frame 11, but itwas too far. What I would do is put a point there, but then drag that point overto frame 12 so that frame 11 was right in the middle. To explain this further,let’s say you were on one side of a fence and you could only jump to the otherside of the fence, but you wanted to be on the fence. You would build a wall sothat when you jump over the fence, you would hit the wall before you could

land on the other side, but at least you would land on the fence. That was theonly way to make the eyes convincing, and the toughest part was this method ofsub-pixel positioning so that it always looked like it was on the puppet.
Another point to make is that this technique has sometimes been described assimply adding live-action eyes to puppets, so people think it’s not animation. Thisis partly correct, in that they are real eyes, but it’s not merely live action. When I paint portraits of children, they don’t sit still very long, so I shoot video of them,and afterward I can search until I get that one instance of the child’s face that isright for the painting. The same technique applied here, where I would film theeyes and the actress going slower than the puppet, matching accuracy of the move-ments, but not timing of the movement. Often, I would film the actress movingat least six times, take these separate takes, and join the eyes together. I wouldbring in these sequences, which would add up to many hundreds of frames, butinside the scene of the puppet there might be only 100 frames.
Then, it was a matter of selectively going through each frame of the eyes, usingthe time-remapping feature of After Effects, and sliding through the frames oneat a time until you find the one frame that works for that frame of puppet.Essentially, it’s a reanimation of video stills—people may think it’s not anima-tion, but it is! I have to animate the character that’s coming out of the eyes, andpart of that is measuring how much she reacts to things by how many extraframes you have her looking there. You have the body language of the puppetand great performance of the actress, but there is also a third level where youcan change the acting. Going back to Lord of the Rings again, it was noted thatif the actor playing Gandalf didn’t look concerned enough, for example, theywould use a subtle computer mesh to change his expression that much more.
I have ideas for some similar animation techniques I want to try with the entireface, but I will only do that with the right team of people. I often get approachedto help other people with these kinds of techniques, and many people ask meif there is any new technology developed in the last three years that will help,like 3D scanning. None of that really helps because you still have to manuallyposition a human eye one frame at a time onto the head, and only your brainwill know if it looks right. Your computer is not going to understand humanemotion—only your brain can do that. Seeing human eyes on a stop-motionpuppet in Madame Tutli-Putli is something we’ve never seen before, and theeffect of the film comes down to the fact that it looks like the eyes are there.Anything beyond that is a failure because it’s the eyes, and everyone in the worldis an expert on this. If there is something wrong with the eyes, you know it rightaway. There is a quote where someone said, “If you don’t believe eyes hold thehuman soul, then take a picture of someone you love and stab it in the eyes witha pair of scissors. I bet you can’t do it.” That’s the power of eyes.
For more information on the film Madame Tutli-Putli itself, visit:Jason Walker's website: http://www.madametutliputli.comOfficial NFB site for the film: http://films.nfb.ca/madame-tutli-putli/
The Advanced Art of Stop-Motion Animation276

Larry Bafia (Figure 10.1) and Webster Colcord (Figure 10.2) worked together as
animation partners at Will Vinton Studios in the late 1980s, when the Claymation
technique had peaked in popularity. Since that time, they have both branched into
other aspects of stop-motion, CG animation, visual effects, and education. I have enjoyed
Webster’s work online and in films for many years and recently have had the privilege to
work with Larry at VanArts and our local Vancouver SIGGRAPH (Special Interest Group
on Graphics and Interactive Techniques) chapter. I’m glad to present their thoughts in this
chapter as they talk about their respective careers and views on animation.
Larry’s website: http://whoscreative.com/larry_bafia
Webster’s website: http://webstercolcord.blogspot.com
10An Interview with Larry Bafiaand Webster Colcord
277
Figure 10.1
Larry Bafia.
Figure 10.2
Webster Colcord.

The Advanced Art of Stop-Motion Animation278
KEN: How did each of your animation careers get started?
LARRY: The first studio I worked at straight out of school in Chicago was Crocus
Productions in Evanston, Illinois, where we did some clay animation industrial videos.
One was for dental hygiene, and another was about spaying your pets for the ASPCA.
I also worked at Excelsior Studios, run by Gene Warren, which involved some time
on Land of the Lost. I built some props and repaired any set damage that occurred
during a shot. We also did a lot of practical effects, and that’s where I learned a lot of
in-camera processes. The vortex for the opening sequence of Land of the Lost, for
example, was shot in a fish tank with a high-speed Mitchell camera whirring away
like crazy, and we injected milk into swirling water to create the cloudiness. Also, at
Colossal Pictures, I assisted Gary Gutierrez with commercials for San Francisco radio
stations, scenes for the Grateful Dead movie, and things like that. For the most part,
I was just assisting rather than animating at Colossal, but overall I had several seconds
of stop-motion experience under my belt before starting at Will Vinton Studios.
WEBSTER: I was interested in animation at an early age and had done some quasi-
professional work on a science-fiction film that was being shot in my hometown of
Eugene, Oregon, with a USC film school graduate. I started at Will Vinton’s right
after high school, so that was like college for me. I like to joke that I moved straight
from Super 8 to 35mm, which I really didn’t because we shot on 16mm at Vinton’s.
They had a little Bolex mounted on these huge classic Hollywood cranes that could
have held a tank! The first shot that Larry and I worked on together at Vinton’s was
the opening wrap-around scene for A Claymation Christmas Celebration in 1987.
LARRY: I had built a good portion of the main set, which was the Christmas Square
(Figures 10.3 and 10.4). A few others and I had come in as apprentices on the show
because Vinton had just received the contract from CBS to do three half-hour specials.
Since we had been involved in building the set, we got involved in the wrap-around
scenes with Herb and Rex, the dinosaur hosts. In the first shot, I got to animate Herb
and Rex welcoming the audience, which was a pretty wide shot before it cut to a close-
up. The only other characters on the stage at the time were a little frog band on the
corner, who were supposed to be playing the opening theme music.
WEBSTER: I ended up doing armatures and sculpting the actual instruments for the
frogs, along with model sculptor Kyle Bell, and then actually animating them for the
shot (Figure 10.5). The way the studio operated was that everybody was a generalist,
so some of us had worked on sets, we all did some of the lighting, and we loaded our
own cameras most of the time. If you had the skills to do something, you ended up
doing it. It was a great place to learn because we all did a little bit of everything, but
Larry was a lead animator because he was one of the few who actually had lots of clay
animation experience before coming to Vinton’s. Claymation was a really big deal at
that time since it was pre-CG, and if you wanted to do character effects that weren’t cel
animation, you really couldn’t go any route other than stop-motion or clay animation.

LARRY: Then somehow, as a bunch of apprentices, we ended up winning an Emmy
for the first show we worked on! We were all part of a hiring wave at that time because
the studio had just finished The Adventures of Mark Twain, commercials for Kentucky
Fried Chicken, Domino’s Pizza, and the first few California Raisin commercials, which
quickly became very popular. That’s when they were playing with the notion of start-
ing a short-film division, and these half-hour specials were supposed to be a breeding
ground for that. After the Christmas special, we continued working together on Meetthe Raisins and lots of commercials for Tang and other clients (Figures 10.6 and 10.7).
Chapter 10 n An Interview with Larry Bafia and Webster Colcord 279
Figure 10.3
Larry Bafia (left) with writer Ralph Liddle on A ClaymationChristmas Celebration. (Courtesy of Larry Bafia/Will Vinton Productions.)
Figure 10.4
Larry Bafia working on A Claymation Christmas Celebration.(Courtesy of Larry Bafia/Will Vinton Productions.)
Figure 10.5
Webster Colcord working on A Claymation ChristmasCelebration. (Courtesy of Webster
Colcord/Will Vinton Productions.)

The Advanced Art of Stop-Motion Animation280
WEBSTER: There was also the “Speed Demon” sequence for Michael Jackson’s feature
film Moonwalker, plus the “Michael Raisin” commercial.
KEN: How were animators assigned to shots on a detailed commercial like “MichaelRaisin,” with all of the crowd shots and multiple characters?
WEBSTER: There were at least eight animators on the crew for that commercial,
including three key animators. Jeff Mulcaster and Tony Merrithew did most of the
dancing shots, and Mark Gustafson did the final shot of Michael Jackson waking up.
LARRY: I worked on one of the shots where the characters were holding their lighters
up. Usually, they were carefully crafted compositions that made it feel like there were
lots of characters on screen, but you may have only 15 characters to deal with at once.
Most of the crowd shots didn’t take more than one or two people.
WEBSTER: One exception was on the ending shot of Claymation Christmas Celebration,
where we had four animators at once: Kyle Bell, Tom Gurney, Larry, and me. That
was kind of a nightmare, actually! (Laughs.) We almost had some fights break out on
set there.
LARRY: (Laughs.) Not me.
WEBSTER: No, but we found out somebody had leaned against the camera crane
halfway through the shot.
LARRY: Right—that was on the second day of a shot that was supposed to take about
four days.
Figure 10.6
Larry Bafia shoots a scene from Meet the Raisins.(Courtesy of Larry Bafia/Will Vinton Productions.)
Figure 10.7
Webster Colcord animating on a Tang commercial. (Courtesy of Webster Colcord/Will Vinton Productions.)

KEN: Did they start using CG at Vinton’s while you were still there?
LARRY: Yes. How that happened was David Daniels came into the studio and started
directing, and he had a setup for a motion-control rig that he had used on a Pop-Tarts
commercial. He started training some of us on it, and when he saw that I didn’t mind
stepping onto the computer, he brought in the video toaster with Lightwave on it,
and I started trying it out. Then, when David was in New York showing tests to an
agency, they showed him storyboards for a Chips Ahoy! commercial, and he began
brainstorming with them on it. Upon walking out of the agency with the boards, his
producer Paul Deiner told him he had just pitched a CG spot that couldn’t be done
in stop-motion. They called me at the studio, and I told them I had been trying to
create models with the video toaster. They told me to start modeling an exclamation
point for a CG test, and that’s when we started combining CG with miniature sets.
Then, on a sales trip to Chicago, Mark Gustafson and I gave a studio presentation of
our stop-motion work along with the Chips Ahoy! commercial and another one we
had done for Fanta. That’s when we got asked to do a Raid commercial, which was
the first one done entirely in CG, and that led to the M&M’s campaign. It got to the
point that there was such an influx of artists and techniques coming into the studio
that if we looked at a storyboard, we had to decide which methods would suit it best.
KEN: How did you each part ways from Vinton’s into the next stage of your careers?
LARRY: I had received an offer from Warner Bros. to work with Barry Purves on doing
tests with foam latex puppets for Mars Attacks! When I arrived there, they only had
one puppet built because the entire crew had come over from Manchester, England,
and needed to build an entire stop-motion studio from scratch, including sets for the
film. We also worked with a miniature company in L.A. called Brazil that built the
flying saucers. I did spin tests on the saucers, designed a rig that would hold them up
for motion-control shots, and continued doing tests with the Martian puppets. We
actually spent lots of time developing personalities for some of the Martians, rather
than just “shoot-’em-up” characters. At one point, Barry had the idea of having them
use hand gestures while they made the “ack ack” sound that had been designed, as if
they were pulling the sounds out of their mouths. One of my favorite tests that Barry
and I animated together was of one Martian suiting up another Martian for battle. It
was entirely improvised, so each of us had to keep an eye on what the other puppet
was doing—it was a lot of fun. We had the advantage of being involved early enough
in pre-production that we could experiment with how the characters would interact.
I was also responsible for breaking down the script to determine how many stop-
motion shots would be needed and how many animators we would need to build up
a crew. Then, some producers from ILM (Industrial Light & Magic) came in. Since
their effects for films like Jurassic Park and Jumanji had finally come of age, MarsAttacks! shifted there and became a CG project. I had talked with ILM about moving
onto the project as well, but decided to take up another offer from PDI/DreamWorks
directing CG commercials and animating on their feature film Antz.
Chapter 10 n An Interview with Larry Bafia and Webster Colcord 281

The Advanced Art of Stop-Motion Animation282
WEBSTER: After my initial three years on staff at Vinton’s, I continued to work for
them as a freelancer, but I also travelled around and did some freelance work for David
Daniels and a CBC Christmas show in Canada, as well as my own commercials. Then,
I got a contract to do some work for Converse Shoes (Figure 10.8), based on some
short films I made for Spike & Mike’s Sick and Twisted Festival of Animation. I had
my own operation going on in Portland for a while, doing stints for clients like CBS,
Warner Bros. Televison, and Nickelodeon, and working on projects with animator
Chel White. I also went down to San Francisco for a while and animated on Jamesand the Giant Peach, along with animator Chuck Duke, but I left that production
early to resume some commercial work in Portland. In 1997, I got called down to
PDI/DreamWorks and started working there with Larry again. I also took a short
break from PDI to work with Henry Selick again on Monkeybone, which was a fun
but tumultuous production.
Figure 10.8
Webster Colcord working on aspot for Converse. (Courtesy of
Webster Colcord.)
LARRY: I always remember you talking about how tricky the shoulder rig was on that
show since the stop-motion monkey was usually on Brendan Fraser’s shoulder, and
you had to mimic the live-action along with the character animation.
WEBSTER: The pre-composited shots on Monkeybone were really interesting. They
actually built a Brendan Fraser motion-control robot and match-moved the live-action
movement of his body. On top of that, we animated the monkey, which was at a 1:1
scale. It was pretty awesome to see the monkey moving on this clunky robot that was
rotoscoped to the live action. It was a unique technical challenge, and I don’t think
anyone else has done it since.

KEN: Were there any challenges in adjusting from the animation style of television workto working on Henry Selick’s feature films?
WEBSTER: When I was doing my own commercials, I would wear several different
hats and try to do the best animation I could in the end. That was a challenge, when
I had my own company. Working for Henry, it was a challenge being a smaller fish in
a big pond and having to learn the protocol of that kind of production. On my first
day there, I was scolded in the hallway by Bonita DeCarlo in the puppet department
for bringing one of the puppets up for repair. She thought I was too young to be on
the animation team! (Laughs.) Later, she apologized, of course, but it was against
the rules for anyone other than a fabricator or an animator to hold a puppet. It was
very different from working on smaller projects, where you handled every aspect of
production.
In terms of animation style, I had initially learned to animate in a rather intuitive way.
There is a famous quote from a Good Morning America interview with Chuck Duke,
when he was working on Vinton’s Chips Ahoy! commercial. He was being asked about
animating a chunk of chocolate and said, “You just keep a rhythm in your head, and
that should get you there.” There have been similar statements made by Ray
Harryhausen and even by Richard Williams to the effect of finding a rhythm and
thinking about where you’re going as you animate straight ahead, and Tom St. Amand
would always say, “A good armature should sort of animate itself.” With stop-motion,
whether you plan it or not, you just get your hands on the puppet and work it out as
you go along. But there were animators on James and the Giant Peach who planned
their movements more like cel animation, so that was something I had to adapt to.
Even at PDI, with their early CG software, we used a spreadsheet and had to type in
numbers to plan out our animation. It was the only way to do it, but it was counter-
intuitive to have to analyze what you were going to animate before you even started.
But I think I became a better animator between James and Monkeybone because my
experience animating CG at PDI forced me to be more disciplined.
LARRY: Even if you look back at some of our old exposure sheets from Vinton’s, some-
times on a commercial I would only have one track that maybe had some notes about
the beats and accents in the soundtrack. But on other projects, sometimes the direc-
tor would want the live-action reference analyzed on the sheet to the point where you
would even plan out where you needed to animate a blink. So, it varied based on style,
but also on the animator. In the beginning, we wanted to have all those notes because
we had to be so precise on every frame, but after a while you learn how to get into a
rhythm, especially if you have a feel for the character.
WEBSTER: Yeah, it depends on the shot, the animator, and the director. Henry Selick
would block out the whole shot in editorial sessions with the animator, so you often
end up doing what Henry would do if he was the one animating it. But at the same
time, I had been talking recently with Richard Zimmerman and Justin Kohn about
Chapter 10 n An Interview with Larry Bafia and Webster Colcord 283

the animation from The Nightmare Before Christmas, and they said the animation on
certain things, like Sally’s hair as it blew through the wind (in the opening sequence),
would typically be done straight ahead, with no surface gauges at all. Sometimes, when
you’re in the moment on an organic follow-through motion like that, you can just do
it very quickly, and you get a better result. It’s just you, the puppet, and the rhythm.
LARRY: I think that’s one of the hardest things if you were trying to teach someone
stop-motion—to be able to see where something is going to be three or four frames
ahead of that particular pose.
KEN: It’s neat to hear you both mention how the different methods of working complementeach other. Much has been said by animators about how their stop-motion experiencehelped them transition into CG, but it’s also interesting to note how CG helps to create better stop-motion.
LARRY: Even when we started in CG, we were arm wrestling with the tools. We didn’t
know to set key frames and then look at the interpolation between them since we only
knew how to animate straight ahead.
WEBSTER: Plus, sometimes the only way to animate something in CG is to just
animate every frame without any interpolation. That’s something I learned from Harry
Walton at Sony Imageworks, who animated some shots in CG that way, and Ryan
Roberts at PDI told me the same thing. We were wrestling with some CG spiders for
Minority Report, and he figured out the only way to animate it properly was on single
frames—and this was coming from someone with a completely CG background. With
the spiders, it was mostly because of their curvy legs. Curvy shapes are the hardest
thing to animate in any medium. The snake character in Monkeybone, which was
mostly done by Justin Kohn, had lots of labor involved to keep those curves because
everything down the chain is affected. The worm in James was also very difficult for
the same reason. I recently did some work on a commercial for Genndy Tartakovsky,
and he had a CG character with snake-like rubber-hose arms. He wanted it to stretch
out and snap back like cel animation, so once again the only way to do it was single
frame with no interpolation, just like stop-motion but using the computer to do it.
In the end, it’s all animation, but I guess the main advantage stop-motion has over
CG is something that Henry Selick had said—that in stop-motion, you have every-
thing in one place. You get your lighting interacting with the puppet when you look
through the camera lens, so you know right away what the shot will look like. In CG,
you don’t know what the emotional resonance of that glint in the puppet’s eye will be
until it’s lit and rendered, which is sometimes months later.
The Advanced Art of Stop-Motion Animation284

Chapter 10 n An Interview with Larry Bafia and Webster Colcord 285
KEN: Webster, I understand you have a strong interest in the work of stop-motion artistWah Chang. What is your inspiration behind that?
WEBSTER: I always knew who he was, mostly through little hints in magazine articles
by people like Jim Danforth over the years. Finally, around 2000 or 2001, it was Peter
Kleinow who had called me up one day asking if I’d like to help him with a short-film
project he was doing with Wah Chang (Figure 10.9). So, we went down together to
meet him, and I helped out by getting them equipped with a frame-grabber system.
Later, the Chinese Historical Society in San Francisco had an exhibit of work by Wah
and Tyrus Wong, who had both worked at Disney together on Bambi, Pinocchio, and
Fantasia. I helped to curate the exhibit, but unfortunately Wah never made it up to
see it—he had passed away around that time. For his memorial service, I wrote up a
mini-biography documentary about him, and since then I’ve been trying between
projects to get his short films together in a proper format for release. Wah’s sister gave
me a collection of his still photographs, so I’ve been passing them along to people
doing articles on his work, including Jim Danforth, who is writing a memoir of his
own career and had worked with Wah on a few projects. What was amazing about
Wah is the range of work he did over so many years. He had worked with nearly every
major figure in stop-motion, including Ray Harryhausen, George Pal, Willis O’Brien,
Marcel Delgado, Gene Warren, and Gene Warren, Jr. His personal story is also amaz-
ing. He had polio in his 20s and had to wear leg braces most of his life, but despite
his physical limitations he was able to produce an incredible body of work. Not
enough people know about that, so I’m hoping to get more of his story out there.
Figure 10.9
Two stop-motion masters: Wah Chang (left) and PeterKleinow (right). (Courtesy of
Webster Colcord.)

KEN: Do either of you have any other ideas for future stop-motion projects?
LARRY: I’ve been knocking around an idea for a short film for quite a while and hop-
ing to do some animation tests when I can find the time. It’s also a matter of fund-
ing, if it turns out I need some extra support.
WEBSTER: For me, too, it’s a matter of finding the time, money, and space. Stop-
motion takes up much more physical space than just a computer station. In addition
to my regular job at ImageMovers, I’ve been doing cel animation. I just recently ani-
mated a music video for a Portland band—the Dandy Warhols. Stop-motion is my
first joy, and I’d really like to do clay animation again. Very few people do clay the way
we used to. I think it’s the most pure animation medium; it doesn’t get any more tac-
tile or versatile than just pure clay.
LARRY: I really used to love doing morph shots because once you started moving the
clay, it took on a life of its own. It wasn’t just replacement pieces used to morph into
something else.
WEBSTER: I got really into liquid animation in clay when I was doing work for
Converse, and I got a system down for achieving the effect. I’d like to do another short
film with that technique; I still have many of the models, sets, and equipment I would
need. I also have some fans online who want me to create more of my Mad Doctorsof Borneo shorts. I have a whole storyline for that posted on my website, so someday
I’d like to find the time to do that.
KEN: What do you both think about the current and future potential of stop-motion inthe animation world these days?
LARRY: Well, to Webster’s point about the purity of the clay medium, I think a lot of
people are starting to see in all genres of animation that sometimes simplifying and
going back to roots can really feel much more personal. Sometimes when you get more
sophisticated, things can get really antiseptic. Even in CG—for example, the film
Cloudy with a Chance of Meatballs went for that Muppet-type character design, and
that helped push the animation, to make it feel very unique. Another example of
unique cel animation technique is to color in the drawings with colored pencils or
makers, like Bill Plympton or even Webster’s 2D films. Now, it’s more common to
just use a program like Toon Boom to paint digitally. Things are constantly changing,
and that’s not necessarily a bad thing, but as long as you can be expressive with it,
that’s more important than where the tools are headed. You could still animate a char-
acter like Gumby and have it be more expressive than a photorealistic image. We’ve
been through just about every style of animation out there, and at a certain point it’s
more about taking on a challenge rather than which medium you’re working in.
The Advanced Art of Stop-Motion Animation286

WEBSTER: I think the future of stop-motion is very bright, even more than it used to
be. Another thing that Ray Harryhausen said is that he knew his kind of films would
never be able to compete with cel animation, but stop-motion will never die. I remem-
ber when I was in Vancouver doing motion-capture work for Electronic Arts a few
years ago, they were showing the Corpse Bride trailer in the screening room, and some-
body said those exact words—“Stop-motion will never die.” I remember feeling jeal-
ous that I didn’t get to work on that film, but at the same time being happy it was
there. And I think Coraline proved that statement even further. Audiences are more
sophisticated now. They used to complain about stop-motion looking jerky, but now
they’ve seen the flawless, smooth CG alternative, so they want that handmade qual-
ity more. Their eyes have accepted it. Coraline has opened the door to more potential
feature projects in a way that hasn’t happened before. At the same time, we have a
tremendous cottage industry of young people who want to learn the craft, and peo-
ple like Marc Spess are feeding it with resources like his Animate Clay website. More
prolific schools such as Sheridan College and Academy of Art University now have
stop-motion departments and are eagerly looking for instructors. Stop-motion has
always been cool, but who ever knew it would be both cool and popular?
Chapter 10 n An Interview with Larry Bafia and Webster Colcord 287

This page intentionally left blank

Marc Spess (Figure 11.1), from Missouri, is an animator, sculptor, author, and edu-
cator on stop-motion. He is the author of the book Secrets of Clay AnimationRevealed and creator of the popular website AnimateClay.com, a vast online
resource for stop-motion supplies, tutorials, galleries, and much more. Marc has helped
millions of people worldwide stay inspired and educated on stop-motion (and he’s always
been there for me when I needed armature wire), so I’m glad to present his thoughts and
experience here.
Websites: www.animateclay.com; www.myspace.com/animateclay;
www.youtube.com/group/animateclay; www.stopmotionmagic.com;
www.zombie-pirates.com
11An Interview with Marc Spess
289
Figure 11.1
Marc Spess.

The Advanced Art of Stop-Motion Animation290
KEN: How did you get started with stop-motion?
MARC: I used to sculpt a lot as a kid, and in my school art classes I would often sculpt
little figures with a friend of mine. Later on I discovered the California Raisins TV
commercials and specials, which really inspired me, because as a kid I was never really
exposed to real sculpture. Since I liked to sculpt and realized those characters were
made of clay, I would try sculpting them myself—took pictures of them and started
a small portfolio (Figure 11.2). My big break came when I was introduced to Mike
McKinney, an animator who had worked for Will Vinton Studios. He was going on
a U.S. tour talking about Claymation, and he came to a family center in St. Louis,
Missouri, called The Magic House. I was about 18 at the time, and several people had
told me Mike was coming, so my sister’s boyfriend drove me out there to meet him.
The presentation he was doing was more geared towards little kids, but I talked to
him afterwards and showed him my portfolio. He had some actual puppets from the
Vinton studio with him, and answered all my questions about how they were built.
From that point, I took all of this information and expanded on it. I kept in touch
with Mike, and he invited me to come out and visit Will Vinton Studios in Portland.
Luckily my dad worked for the airlines, so I got to fly out there for free. Mike found
me a place to stay, toured me around the studio, and introduced me to another artist
there named John Ashlee. John showed me around his apartment studio as well, and
I got to learn all about the Claymation process. Although I never got to officially work
at Vinton’s, I ended up touring there at least four more times before getting to work
alongside Webster Colcord at his studio (Figure 11.3). While there, I did some
animation, sculpted, built puppets and sets, and got to work with other artists like
John Ashlee and Mark Kendrick. So in the end I owe my big break into the world of
stop-motion through that meeting with Mike McKinney.
Figure 11.2
Early sculpts by Marc Spess. (Image provided by and © Marc Spess.)
Figure 11.3
Webster Colcord (left) and Marc Spess (right). (Image courtesy of
Marc Spess.)

KEN: Then how did AnimateClay.com get started?
MARC: AnimateClay.com started soon after I had finished working at John Lemmon
Films, an animation studio in North Carolina. The Internet was still a relatively new
thing, and I was part of a clay animation e-mail group on Yahoo, where someone men-
tioned they had created a free website through AOL. At that time, you couldn’t eas-
ily create a website unless you were a huge company, but AOL had up to 2MB of free
space for posting whatever you wanted. What excited me was that there were no tuto-
rials for clay animation on the Internet, so I thought it would be great if people could
visit a website to get this information rather than doing it the hard way like
I did. So I started my first site through AOL around 1999 or 2000, and the business
became official in August of 2001 (Figures 11.4–11.7).
Chapter 11 n An Interview with Marc Spess 291
Figure 11.4
AnimateClay.com home page, December 2001. (Image provided
by and © Marc Spess.)
Figure 11.5
AnimateClay.com home page, March 2003. (Image provided by
and © Marc Spess.)

The Advanced Art of Stop-Motion Animation292
Figure 11.6
AnimateClay.com home page, July 2004. (Image provided by
and © Marc Spess.)
Figure 11.7
AnimateClay.com home page, December 2009. (Image provided
by and © Marc Spess.)
KEN: How did the site develop over the years?
MARC: Basically I kept adding to it, since I like the technology, and one of my sister’s
friends got me into using the old Web building program called Front Page Express. I
started using it to make the page more complex, adding in a news section, and when
I added a counter, I realized that lots of people were visiting it. When I realized there
was a growing audience on both the site and an e-mail list I had generated, I took a
chance and created my first book, Secrets of Clay Animation Revealed, and decided to
sell it. Once I had published it and the word got out, I made $600 in the first day on
the site! At that time it was really hard to find steady work in animation, so at that
point I decided to create my own full-time career, creating DVD tutorials and instruc-
tion on stop-motion through AnimateClay.com. My DVDs are duplicated in-house,
my books plus DVDs are sold through CreateSpace.com, Amazon.com, and Lulu.com.
I get puppet supplies through various warehouses. At one point I had some contacts
in Pakistan for sculpting supplies, but the political climate out there is making it hard
to get stuff from there now.
KEN: Do you have any other collaborators working with you on the site?
MARC: Independent animator Don Carlson from donmation.blogspot.com has been
occasionally helping me find news items to post, although more recently he has been
more focused on making his own clay animation film. I’ve also been getting some

help from my friend Leroy Binks on another site called StopMotionMagic.com (Figure
11.8), where he is in charge of the monthly animation challenges.
Chapter 11 n An Interview with Marc Spess 293
Figure 11.8
The original Stop MotionMagic home page, December2009. (Image provided by
and © Marc Spess.)
KEN: Can you tell me more about StopMotionMagic.com?
MARC: It was started as an experimental site, to see if it would take off. If you study
history of the Internet, first there were the Yahoo! e-mail groups and then message
boards and forums. Now there is this new emerging technology where companies will
sell you software to create a complete social network with videos, pictures, blogs, and
profiles. This way, the site is essentially run by the users. Over the years, I would have
a weekly picture or video posted on AnimateClay.com based on material my site visitors
would send me, and it gets to be a lot of work to post material like that regularly.
So when I heard about the social networking stuff, I thought I would add it to
the server and see what happens. Up to this point, both AnimateClay.com and
StopMotionMagic.com have served their purposes in giving stop-motion animators
a way to express themselves and share what they’ve learned and created. The next step
has been to merge features of AnimateClay.com and StopMotionMagic.com together.
There are many improvements, not only to the forums where you can now post videos
more easily with unique topics, but improvements where we merge social aspects with
tutorials and news. One thing I’m particularly excited about is that adding embedded

videos in news posts is now possible, as well as galleries. This makes the news way more
fun for visitors to read and for me to write. Posting comments on news articles by
members will hopefully enrich the content when others share their own stories too. So
instead of going to AnimateClay.com for the updated news, and StopMotionMagic.com
to upload videos or post images, AnimateClay.com will have those things combined.
We are also making the live shows more visible to visitors, as well as the monthly
challenges.
KEN: That is interesting. What do you hope that will accomplish, in terms of how stop-motion is done through social networking, or perhaps video streaming?
MARC: I think it will condense it, since right now you have YouTube, Vimeo, Flickr,
StopMotionAnimation.com, AnimateClay.com, and so forth. If you have a social
network where you can upload your videos and pictures, along with a message board,
it will make things easier for the user to simply post all of your material in one
place and just have fun instead of searching. I’ve had a weekly live show on
StopMotionMagic.com for chatting about stop-motion in general, and there is also
an emerging technology using an Adobe behind-the-scenes suite called Flash Media
Server. It allows you to stream live video similar to Skype or Yahoo Messenger through
any social networking website. I’ve been watching some of these new live streaming
websites that are popular nowadays and looking for ways this could be incorporated
into sharing stop-motion. I don’t see a lot of use out of it yet, in terms of allowing
people to collaborate easily, but I think recorded video tutorials and movies are still
really useful for online sharing.
KEN: What other ways have you seen the Internet have an impact on stop-motion animation?
MARC: There does seem to be a larger volume of it now, and still some misunder-
standings of the proper terms, like pixilation, stop-motion, or “Claymation” being
applied to all kinds of different techniques. One of the things I’ve noticed on YouTube
is, for example, a band might make a stop-motion music video that becomes viral,
and then people will try to imitate it. This happened with a video called In HerMorning Elegance, which was a pixilation of a woman on a bed and animated elements
around her to make her appear to walk, run, and fly. So people will see those things
and try to understand how they work, because it piques their curiosity. More people
are trying it, and it’s become more accessible, so I think that will continue into the
future. Twitter has especially had a big impact on helping unique stop-motion films
become viral, because people keep re-tweeting them until they just take off. HD video
has also blown my mind recently, and the capability of YouTube and Vimeo now to
stream it. The quality is the best it’s ever been, and that is something that’s really
impacted my belief that the Web is more important now than ever for stop-motion.
The poor quality of YouTube videos used to make people afraid to post their work, so
I think the HD quality changes that mentality. I think we will start to see more of a
professional place for posting work online and sharing it in higher quality. Sharing
The Advanced Art of Stop-Motion Animation294

your work online is also very important, because it can open doors to people who may
offer you a job or collaborate with you, such as matte painters, sculptors, or other parts
of your production. If I meet a great artist who doesn’t have a website, I often encour-
age them to start one.
KEN: What other goals or future projects do you have in mind?
MARC: Right now my goal is to try and network with other companies that sell motion
control. Some people have agreed to start working with me on that, although I’m not
sure there is a big market for motion control on the Internet, as it’s more suited for
studio productions. I do have other ideas on ways I’d like to expand—for instance,
if a stop-motion product is being sold online and I think it has some quality, I will
usually approach them about marketing through the popularity of my website.
Sometimes there is interest, and sometimes not, but there is only so much content or
knowledge I can produce on my own. So I’m always looking for other deals I can
create for myself and stop-motion partners, which is true of any business. Otherwise
I am always trying to expand the site’s overall content.
KEN: Is Zombie Pirates still in production?
MARC: Zombie Pirates (Figure 11.9) is a side project I started about five or six years
ago with a friend of mine, but unfortunately there were some problems with funding
and other things that occurred. I do plan on returning to it and finishing it at some
point once I have more free time.
Chapter 11 n An Interview with Marc Spess 295
Figure 11.9
Ruble from Zombie Pirates.(Image provided by and © Marc
Spess.)

KEN: What do you feel has been your biggest accomplishment in providing these resourcesfor people who want to learn stop-motion?
MARC: I think it’s been keeping stop-motion in the spotlight and helping people look
at it differently than they did before. Most people think it’s just for kids, and in some
ways it is, because of all the family films created with it. But in my news section, for
instance, I often try to mix it up by posting caricatured clay animation along with
more serious genres. I see the old Harryhausen films as a more mature form of stop-
motion seen in a different way by the people who grew up with them, as compared
to modern films like Coraline. I like being able to promote all kinds of different styles
of stop-motion that are done really well. Often there will be people who post their
own stop-motion on YouTube that is really just junk. It’s great that they’re trying it,
but too much of that can create an image of the medium looking only that way. With
CG, many people see computers as the only viable way to make films, because every-
body’s doing it. But at the same time, these films are starting to make less at the box
office, because the character designs and styles are beginning to blend into each other.
It’s hard to tell which film is which, and there is less individuality to it. Stop-motion,
however, is so diverse, and every artist is so unique. I hope that is what I get across
through my website, and to be able to play a part in that is a great accomplishment.
Being able to connect with people online is also a great thing. We are now in a great phase
where CG is no longer seen as the cheapest, most efficient, and most entertaining
form of animation. So people and studios are using them instead as a tool to create
better stop-motion and connect to others in the field.
My main philosophy in starting your own stop-motion blog or site is that you should
be humble and not brag about yourself, but to still put yourself out there online. This
is a rather extreme example, but there was a guy who e-mailed me from Mexico on
the old clay animation Yahoo! group who had seen the work I posted on my website.
This was a long time ago when my site was new, and everything I learned from Mike
McKinney was posted on the pages, in terms of how he taught me to make eyeballs,
armatures—stuff like that. But this guy from Mexico visited my site, and he e-mailed
me saying “I was going to kill myself because I felt I had nothing to live for, but seeing
your work inspired me, and that’s what I want to now do with my life.” So you never
really know who is watching or how what you put out there will impact someone.
The Advanced Art of Stop-Motion Animation296

Ryan McCulloch (Figure 12.1) grew up in the San Francisco Bay area and now resides
in Florida. He has been an independent animator for over 10 years, writing and ani-
mating his own films. We started connecting through visiting each other’s blogs,
and I found the sheer volume and quality of his clay animation work online to be very
inspiring. Ryan’s films are touching, silly, and oftentimes downright hilarious, so I thought
he should be included in this volume as an artist to watch for.
Website: www.ryanmcculloch.com
Blog: http://poorclaymator.blogspot.com
12An Interview with Ryan McCulloch
297
Figure 12.1
Ryan McCulloch.

The Advanced Art of Stop-Motion Animation298
KEN: So Ryan, how did you get started with stop-motion?
RYAN: When I was five or six, my dad showed me how to do magic tricks with our
home video camera—stuff like making people disappear by stopping the camera and
taking them out of the shot and restarting it. Slowly as I got older, I started learning
that was basically how animation was done, so I started doing more advanced stuff.
Then when I was in fifth or sixth grade, I started playing around with clay, action
figures, and dolls, having fun moving them in front of the camera. Around this time
I saw Nick Park’s Wallace & Gromit for the first time, and that really opened up a whole
world to me for what I could do. That’s when I started making my own characters
out of clay, animating stories, and really embracing the process. I had been drawing
my whole life, so this was the next step for me, bringing my characters to life.
KEN: Would you say Wallace & Gromit was the turning point?
RYAN: Yeah, I think before that it was more like, ‘What can I really do with this?’
I was young and I had learned a little camera trick for moving characters around, but
there wasn’t really anywhere else to go with that except just being silly. But when
I saw The Wrong Trousers, it just hit me that the whole world was out there for me to
animate, and it was really inspiring and exciting. My dad had seen it while on a
business trip and bought me the VHS, thinking it would interest me. Later I saw the
“making of” special (Inside the Wrong Trousers) on PBS and recorded it. I’d watch the
tapes over and over again.
KEN: That’s interesting, it was the exact same film and special that made me more serious about trying stop-motion, too. Had you seen much “behind the scenes” footage ofprofessional productions before that?
RYAN: I had a pretty good idea of how it was done. I had been to Disney World and
seen animators at work there and seen the fake Hollywood versions of how animation
was done, frame by frame. But I don’t know that I had actually seen much behind-
the-scenes for stop-motion specifically. Most of my life I was figuring it out the hard
way, by myself. It wasn’t until I was in high school and college that I actually had
access to more documentary specials and got to meet other people who were doing
the same thing. I had a few books growing up, but most of the early ones out there
were mostly text with a few black-and-white images. Trying to decipher a lot of that
information was really difficult for me at a young age, but the first book to come out
that really helped me was Aardman’s Creating 3D Animation. That one had big color
photos and showed so much more of the process.
KEN: So when did your animation career really take off?
RYAN: When I was 14, I made an animated short called Without You, which my dad
started entering into film festivals. It played in about 50 festivals worldwide and then
HBO picked it up, bought it, and aired it between programs. I still get e-mails and
letters from people who remember it, and that was over 10 years ago. After that I

Chapter 12 n An Interview with Ryan McCulloch 299
made a few more animated films that HBO Family bought, and I made some
animated commercials for local companies and environmental groups. All of this work
I did before I even went to college. Luckily I was getting some money for it, so I didn’t
need to get a real job during high school, and I had lots of people encouraging me to
explore the medium. This pushed me to keep doing more and get better at it.
KEN: It sounds like your dad was a big influence on your early work.
RYAN: My dad is a musician and a writer and is extremely creative. For me and my
sister growing up, if there was ever anything creative that we were passionate about,
he and my mom were 100% behind it. During high school and college, Dad collab-
orated with me on many of the animations I was doing. He decided he would learn
editing on the computer, which I didn’t want to do, so he did all the editing. On many
of the films he would write, compose music, do voices, and even build sets while I was
sculpting and animating. We had a lot of fun being creative together those years. When
I started making films on my own after college (Figure 12.2), it was hard for me to
have to learn how to make sets and edit myself.
Figure 12.2
Ryan animating on set ofCritter Song. (2007, Courtesy
of Ryan McCulloch.)
KEN: So how did your animation career pan out after high school?
RYAN: When I graduated high school, I wouldn’t say I was burned out, but I wasn’t
entirely sure if I wanted to continue animating. I entered the Academy of Art
University to study illustration, and they did have two stop-motion courses, which I
happily took. It wasn’t a really solid education for stop-motion alone, but I also took
film history and wanted to learn more about storytelling. As I kept going through

The Advanced Art of Stop-Motion Animation300
college, the more I put off animating, the more I realized just how much I liked it.
At the same time, I didn’t think there was much money in it, in the long term, and
I heavily considered being a character designer for an animation studio.
Then after graduating from the Academy of Art in 2007, I was hired to work with
Tertiary Productions, a small Web entertainment company in Florida. They were
doing Web series and documentaries and thought it would be great to have an ani-
mation department, and that was basically me. So having also just gotten married, my
wife and I moved across the country, and I worked for Tertiary doing commercials
and five episodes of an animated series called Fox & Calf (Figure 12.3). I also created
five episodes for a new series we were going to debut, but the company didn’t survive
the economic recession. After that, the same people from Tertiary decided to start
producing a children’s book company based on some characters I had created while
working there, and so I started illustrating. Hopefully we’ll pick up Fox & Calf or some
other animation projects again when the time is right, but more recently I’m having
a blast illustrating, building the company website (Mutasia.com), and overseeing some
computer animation as well. Stop-motion has always been just one aspect of the cre-
ative world that I love. Telling stories and designing characters is what I’m passionate
about, as well as working with people who I love and respect. I’m sure I’ll come back
to stop-motion again in the very near future and that everything I’m learning right
now will be brought into it.
Figure 12.3
Fox and Calf puppets by Ryan McCulloch. (Courtesy of Ryan McCulloch/Tertiary Productions.)
KEN: Have you ever seen yourself working for a major Hollywood film studio or just focusing on smaller studio/independent work?
RYAN: Right now I like being a big fish in a little pond. Especially at this stage of my
life, I feel like if I worked at a big studio I would just disappear. I’m enjoying this time
to just develop my own personal style, and I’ve been really blessed to have the oppor-
tunity to do that. On the other hand, I’ve learned all my lessons the hard way on my

own, and learning from other brilliant animators and directors is what a studio has to
offer, so that would be great for me down the road. Right now, though, I’m happy
doing independent work for startup studios and having my own creative voice.
KEN: Your stop-motion work has primarily been done in clay, as opposed to other materials.Do you have a special preference for it?
RYAN: I definitely prefer clay. I love its workability; I love all the little imperfections
like fingerprints moving on a character’s face. Sometimes I feel that stop-motion
puppetry with latex figures and replacement faces gets so close to computer anima-
tion in its perfection that there almost doesn’t seem to be a point. What I love about
clay is that it’s gritty, always a little bit dirty, and always moving. When you’re on a
small budget, you can get more out of clay, in terms of expression, than you can with
other puppets. You can move their faces and mouths much more than you could with
a silicone puppet, unless you’re working with a higher budget, of course. At the same
time, clay puppets can be hard to work with. They can melt under the lights, they are
fragile and can dent easily, but all of that adds to the charm of the look.
KEN: I saw your film Happiness was just recently posted on your blog. What can you tellme about it?
RYAN: Happiness (Figure 12.4) was a film I made in college as a side project for about
two years. It was an interesting project because I was growing during the entire pro-
duction, so I kept redesigning the main character’s look throughout the film. You can
see his evolution as the film progresses. It was about 15 minutes long, had lots of
characters and huge sets, and I feel that making it at age 20 or so, I had bitten off way
more than I could chew. When I watch it now, there are things I’m not happy with.
Chapter 12 n An Interview with Ryan McCulloch 301
Figure 12.4
A scene from Happiness.(Courtesy of Ryan McCulloch.)

The Advanced Art of Stop-Motion Animation302
It’s easy to start hating a big project like that because it becomes a burden, and you
can’t start anything else until you finish it. I had another film that was supposed to be
30 minutes long, and I animated five minutes that I’m very proud of, but I ended up
just using those five minutes for my reel. When I finished that, I decided to keep every-
thing short, under three minutes, so I could make each piece perfect and be proud of
it. So I stuck to that. Besides, the audience gets bored after a while unless you’re a
master storyteller, so keep them happy at the two-minute mark and leave them want-
ing more.
KEN: Another thing that’s interesting about your work is the orchestral scores you’ve haddone for them. How did that come about?
RYAN: I happened to know a really amazing film composer who had studied at USC,
named Robert Litton (Figure 12.5). We were both alumni of a scholarship group, and
I had seen him conduct a score at Skywalker Ranch. I was blown away by his talent
and thought he would be great to collaborate with. I showed him my rough edit of
Happiness, and he had never scored an animated film before, but he was excited to try
something new. The film would never have been half as good as it was without that
score, so next I had him score the Fox & Calf series. The music brought so much class
to the shorts, because the series itself is so silly and weird, so to have this beautiful
music there legitimizes it for the audience. I’m a huge music fan and feel very strongly
about music. I think every filmmaker should get out there and get to know musicians.
It’s a real trap to just use copyrighted material for a film or a show reel, and I have so
many films I can’t sell or post online for that reason. So it’s best to avoid being lazy
and just using a copyrighted piece of music as a soundtrack, because you never know
Figure 12.5
Ryan McCulloch and RobertLitton on set for recording theHappiness score. (Courtesy of
Ryan McCulloch.)

Chapter 12 n An Interview with Ryan McCulloch 303
when you’ll want to show off your work, even if it’s at a different time of your life.
KEN: Did being around music and appreciating it your whole life have an impact on youranimation, in terms of learning about timing or rhythm?
RYAN: I think if you have rhythm, then that does make it much easier. Someone who
is an actual musician would likely have an easy time with that. But it also comes down
to just doing it, making mistakes, learning through trial and error, moving things too
fast or too slow, until you eventually figure out how timing works.
KEN: How does your knowledge of illustration impact your stop-motion work?
RYAN: Having a good sense of design and being able to draw definitely help when
sculpting those characters. Being able to sketch out a shot in a storyboard and having
a good sense of composition are also really important. I think composition is one thing
from my illustration studies I’ve been able to carry over into my films. When setting
up my shots, I would think a lot about where my characters were and where every-
thing in the set was, making each shot look better than just putting the camera on
them (Figure 12.6). I like to add art to my scenes, so I may have portraits of the
characters on the walls or even paint mural background so it looks like trees behind
them. You may not necessarily need to be an illustrative artist to be a good animator,
but if you’re going to be an overall creative independent artist, then having a good
sense of design and composition is very important. I actually cheat a lot by moving
the props in the background sets around. I don’t consider the background to be stuck
down. If I feel like moving a fern or piano in the background, the audience isn’t going
to notice if it’s shifted a little bit. So I’ll move everything around in the frame to make
Figure 12.6
Fox & Calf set by RyanMcCulloch. (Courtesy of Ryan
McCulloch/Tertiary Productions.)

The Advanced Art of Stop-Motion Animation304
every shot look its best. The set is moving all over the place, all done slightly and just
to help the composition, so the audience doesn’t notice.
I also try to do as many effects in camera as I can, because I feel like stop-motion
should look old school. If I want smoke, I’ll use cotton balls, and the audience knows
it’s cotton balls, but they still think, “Oooh, that’s cool!” you know? To an animator
it may seem like the obvious thing to do, but to 99% of your audience, they will think
it’s the coolest thing they’ve ever seen. It seems that many amateur animators just try
to impress other animators instead of your average viewer. To a young animator, the
walk cycle is the hardest thing to do, so logically it must be the most interesting to
watch, right? Your average viewer won’t think so; they take that for granted and will
assume it’s easy. They’re looking at the face—what’s the expression and emotion?
So while a lot of new animators are trying to impress people with their characters
walking, they’re neglecting the face. That’s why I have a philosophy of animating one
“establishing walk shot” for the audience to see and then shoot the rest above the waist.
The audience fills in the blanks without noticing. It saves a lot of time, and helps me
focus on the face.
I also sometimes feel like a lot of animators only study “animation,” and nothing else,
and with that world view, they don’t have anything new to bring to their films.
Someone who has traveled, seen other cultures, studied art history, experienced things
out of their comfort zone, will be influenced heavily by these things when creating a
new project’s story, characters, and look.
KEN: Are there any new techniques, materials, or advanced methods you want to start trying when you return to your next stop-motion project?
RYAN: I’d probably consider shooting with digital SLR cameras for the picture quality
they provide. I’ve been shooting with Framethief for the past 10 years, and I’ve heard
lots of good things about Dragon, so I might look into that as well. I still like using
clay, but I might start building latex bodies, because I feel like that might give me
more options for body movement.
Basically I want to keep making fun movies and telling silly stories with quirky
characters. In many of the film festivals I’ve been to, I’ve noticed that people who
screen work at festivals love to make dark, artsy movies, but as a whole, people like to
watch upbeat funny films. If you have something that’s really fun, and you get it
screened at a festival, you’ll have the one fun movie that’s surrounded by all the dark,
gross art films. It will stand out so much, and everyone’s going to love it, because you
didn’t need to go down that road. Most other independent filmmakers seem to go
anti-Hollywood and say, “I’m going to make a movie that makes everybody sad, or
sick.” They think they’re breaking the mold, but really they’re just falling into their
own “indie” mold. So if you make something that makes people smile, or that can
touch people, you’re going to always stand out.

Justin and Shel Rasch are a husband-and-wife filmmaking team in the Los Angeles
area (Figure 13.1). They have recently taken the stop-motion community by storm
with their animated short Gerald’s Last Day, the story of a dog in a pound trying to
seduce someone into adopting him before he is scheduled to be terminated at 5 p.m. The
entire process of making the film, over a span of three years, was documented on their blog
“Stop Motion Mission” (http://justinrasch.blogspot.com), which has developed a massive
following of animators and stop-motion enthusiasts, including me. Their story continues
to unfold online as they move forward on another film. Gerald’s Last Day itself is a triumph,
a beautiful example of exquisite character animation where the moments of silence and
stillness say just as much as the moments of expression and movement. Justin and Shel
have set the bar high for what a creative family can achieve through hard work and pursuing
their dreams to make entertaining films, so I’m proud to have them included in this book.
13An Interview with Justin and Shel Rasch
305
Figure 13.1
Justin and Shel Rasch.

The Advanced Art of Stop-Motion Animation306
KEN: How did this artistic journey between the two of you get started?
JUSTIN: I attended the Art Institute of Pittsburgh back in 1993–94 and started out
in industrial design because I wanted to do monsters, movie effects, and stuff like that.
When Jurassic Park came out around that time, I was totally blown away by it and how
the dinosaurs moved, so I switched to CG animation right then and there. A friend
of mine who went to school with me stayed in industrial design and has been hurting
job-wise ever since. But I ended up getting hired by various video-game companies,
and it’s been awesome, steady work the whole time.
SHEL: My background is dancing, choreographing, and performing. Justin and I met
in a rock-climbing gym; we both love to move, and it was pretty much love at first
sight. I hadn’t done much in visual arts until Justin asked me to build some bricks for
the set when we started Gerald’s Last Day. Right away, I got sucked in, making more
and more bricks, then buildings, and then cars, trucks, roads, curbs, and all the little
props for the film. Then, together, we learned how to make foam latex puppets
(Figure 13.2) by watching Kathi Zung’s Do-It-Yourself! Foam Latex Puppetmaking 101DVD. By then, I was hopelessly hooked.
Figure 13.2
(Left) Little girl puppet sculpt in mold. (Right) Latex puppets drying after painting. (© Justin and Shel Rasch.)
JUSTIN: We knew nothing at all about the stop-motion process when we started. It
was a big decision, whether to make the film in CG or try stop-motion. At the time,
I was getting really frustrated with the CG films I was making since I always needed
a computer in order to show my artwork. So much of the animation I had done did-
n’t exist anymore because it was done in some outdated software or codec that could
no longer be read. I decided I didn’t want that situation anymore, so when I tried
stop-motion, it was amazing for me. I now had something real I could put my ani-
mation knowledge into. Soon Shel and our kids got involved in making films along
with me, and our whole house was just full of artwork.

SHEL: It was really seductive to be able to work together like that. It changed our
whole life focus. With Justin being an animator and me being a choreographer, we
have a common interest in storytelling, so we were delighted to find a medium that
lets us tell stories together.
KEN: Shel, have you tried animating as well?
SHEL: A couple years ago, I started animating. I like it, but I got much more taken
up with building sets and puppets (Figure 13.3). I’d love to pick up animation again
at some point because, as a mover, the concepts are so exciting to me. I just need timeto practice it, to get it into my body and into my experience.
Chapter 13 n An Interview with Justin and Shel Rasch 307
Figure 13.3
Shel Rasch works on puppetsfor their new film Line.(© Justin and Shel Rasch.)
JUSTIN: We have two full-time jobs and three kids who we spend a lot of energy on,
so it is a hard thing to come home after your work day and go into the second day
with your family before heading into a third day’s worth of filmmaking. I learned the
craft of animation from the very beginning at school, and since Shel ended up doing
all of the background elements, plus editing and producing, her learning animation
wasn’t something we could balance.

The Advanced Art of Stop-Motion Animation308
KEN: It’s rare to find animators who do CG for many years and then transition into stop-motion. Usually, it’s the other way around. Do you find that the familiarity with thevirtual 3D environment helped you grasp stop-motion more easily?
JUSTIN: Absolutely! I was educated in 2D first and then applied that to CG, which
is a very different thing. I’ve seen a lot of 2D animators who can’t grasp the third
dimension. The CG experience definitely helped me because I could practice that
craft for years in CG very quickly without the hassle of tie-downs and wires to hold
my characters up. My actual animation knowledge was well practiced, and once I got
past the limitations of gravity and physical posturing in stop-motion, it was all there
and completely transferable.
SHEL: There are many ways to make a living in CG but not many ways to make a
living in stop-motion. Justin was making a living at a great job, getting to do what he
wants, but he got to a point where he wanted to feel his art because he’s a very tactile
person. So, it was a natural progression for him.
JUSTIN: I went back to where I started, in a way. Industrial design is all sculpture,
construction, and making…monsters! That’s what I wanted to do—make monsters
and animate them—so coming back to that was very natural. We’re 100% into it and
totally in love with the art form.
KEN: What was the inspiration behind the idea for Gerald’s Last Day?
JUSTIN: The character at the end of the film who adopts Gerald the dog is actually
named Gerald in real life. He’s a good friend of mine who I’ve worked with for years,
and he was looking for a mate. He would always come into work with these books
and tapes on how to pick up women, and even took tango lessons—anything he could
do to guess what women would want. And I thought, “That’s a great cartoon!” It
reminded me of a dog trying to get adopted. Shel and I talked about it and decided
that would be our cartoon, about a dog trying to be something he’s not.
SHEL: Justin has this thing where he likes to assign animals to people. Our three kids
are all so different from each other. We have a bird, a bear, and a little tiger cub, and
we always tell them, “Be your animal. Be who you are. Be yourself.”
JUSTIN: Yeah, “Bears don’t fly, so don’t worry about it and don’t compare yourself to
a bird.” We just want them to be OK with who they are.
KEN: What did the real Gerald think of the film?
JUSTIN: He loved it! He’s got an action figure of himself now (Figure 13.4). We took
pictures of him with it at our film premiere. He happened to be wearing the same
shirt as the puppet that day, so it’s a great shot!
SHEL: Yeah, he wanted to show the film to his church group. He loved it.

Chapter 13 n An Interview with Justin and Shel Rasch 309
KEN: How did your home studio setup evolve, in terms of the equipment and tools youused?
JUSTIN: I started by shooting my very first stop-motion tests with a webcam—just
got some clay puppets together with some wire and moved them around. From there
we both just taught ourselves how to make molds, armatures, and foam latex, learn-
ing a lot of things through StopMotionAnimation.com and other resources. Then, we
invested in a digital SLR Nikon D70 and used a spycam looking through the
viewfinder for the live feed into MonkeyJam, which was the first capture program I
had downloaded. And it worked great—we shot the whole film just like that, all in
our garage with the sets that Shel had built (Figures 13.5).
SHEL: One thing we didn’t know was that people could drill their tie-down holes as
they go, so we drilled about 5,000 holes into the set floor so the dog could step any-
where.
JUSTIN: Yeah, we really didn’t know what else to do, so we just made it a perforated floor
and dirtied the hell out of it so it would look natural. Other than those materials, we
just used Photoshop for removing wire rigs and After Effects for importing the image
sequences and exporting the movie files. Then, Shel edited the film in Premiere.
Figure 13.4
The real Gerald and his puppetcounterpart. (© Justin and Shel
Rasch.)

KEN: How was Gerald’s Last Day ultimately financed?
SHEL: Credit cards! (laughs).
JUSTIN: Yes, over three years, it didn’t cost as much for things like clay, wood, supplies,
and a couple of cameras. That was a minor cost, but what really cost a lot was the
music. We had no idea at the beginning how much it would be, but we wanted real
quality music, and that cost about $8,000. That’s where the credit cards came in, but
it was worth every penny.
SHEL: It was two-thirds of our budget.
JUSTIN: Yes, about $5,000 for the film and another $8,000 for the music.
KEN: How did that decision come about, to record a full orchestral score for the film?
JUSTIN: The big dream for any filmmaker is to see your film on a big screen with live
music playing along with your cartoon, just like in all the special features you see. That
was all I wanted—that was the fantasy.
SHEL: Justin listens to film scores for fun or when he’s animating and finds it very
inspiring.
The Advanced Art of Stop-Motion Animation310
Figure 13.5
Justin Rasch animates on anexterior set built by Shel Rasch.(© Justin and Shel Rasch.)

JUSTIN: Yeah, I get ideas for stories all the time from the music I listen to, so we really
knew we wanted quality. We had some temp tracks we had put in along with the film
as we were putting it together, so the composer and we would get a taste of what we
wanted out of the film emotionally. The person who introduced us to our composer
(Robert Litton) was Ryan McCulloch, who we just connected with online through
our blogs. I believe he just forwarded me the link to Robert’s website, and right away
we thought his stuff was great. At that time, we had just started thinking about look-
ing for a composer, so I sent him the basic idea of what the film was about, and he
said, “Great—love the story! When do we meet?” We just brought some puppets and
showed him what the film was going to be like, and he did the score.
SHEL: What was funny was that Ryan lives out in Florida, and for some reason we
thought he was from Australia! Here was this guy who we think is halfway around the
world sending us a link for a composer, who we find out lives just down the street
from us, 10 minutes away. The next day, we find ourselves sitting down with Robert
Litton, and we just hit it off immediately. He was awesome.
JUSTIN: Robert’s like part of the family now, and we’d like to have him score all of
our films from now on. It was such a great experience.
KEN: I was talking to Ryan about that, too. It reminds me of when George Lucas was look-ing for a specific kind of score for Star Wars, Steven Spielberg introduced him to JohnWilliams because of his work on Jaws, and the rest is history.
SHEL: Yes, Robert is our John Williams.
KEN: Through your production blog, you have developed quite a following online. Howelse did that affect the film before it was finally completed?
SHEL: It definitely helped with the actual making of the film. In the beginning, a lot
of the people we were meeting online were invaluable in terms of helping us and
answering questions. At one point, someone had visited the blog and sent us an e-mail
saying, “You know, your puppets look like they’re cracking. Are you putting enough
Pros-Aide in the paint?” and we were like, “What’s Pros-Aide?” We just didn’t know,
but we learned so much through those connections online. In the end credits of our
film, we thanked the online stop-motion community because we learned so much
from them about how to make the film as we were going. The blog was our bridge to
those people.
JUSTIN: Anybody can do it because it’s all out there now, through the
StopMotionAnimation.com message boards, too. Somebody in Ohio or wherever
learning stop-motion on their own is not alone anymore because of all the informa-
tion and people sharing online.
Chapter 13 n An Interview with Justin and Shel Rasch 311

SHEL: We actually just went to a local screening of Mary and Max the other night,
and a random CG animator in the audience recognized us from our blog.
JUSTIN: Yes, for the stop-motion community, our film became a known piece of work
that was going to come out, and I think it was exciting for people. We think it’s so
cool that all the followers on our blog feed are spread out worldwide—from Africa,
Australia, South America, India, all over Russia—and are seeing our site about stop-
motion, this thing that we all love.
KEN: When the film was completed, how did you organize getting it into so many festivals?
(Justin laughs and points to Shel, who starts to blush.)
SHEL: I went a little overboard. There are a few sites online, in particular
Withoutabox.com, which is used by most film festivals in America for their submis-
sions. It’s dangerously convenient because you click on a festival and it goes into your
shopping cart, you collect a bunch of them, click “Buy,” and it sends your submission
to all those festivals in one shot. Next time around, I won’t submit to quite as many
because it got really expensive pretty quickly. But by going to so many of those festi-
vals, we learned a ton. Next time around, we’ll know more about which ones to enter
and which ones not to bother with. We’ve gotten into almost 50% of the ones we’ve
entered, but some of the festivals we got into, even if we won awards there, didn’t really
matter if it was a really disorganized. Another thing we learned is that if you start
winning awards, then other festivals approach you, which means not having to pay
entry fees.
JUSTIN: Basically, Shel said, “Hey, we spent three years making this film, it’s our
dream to see it on the big screen, and we’re making another short and a feature some-
day, so we want exposure. Let’s get it out there and put it into festivals.”
SHEL: Plus, my sister lives in New York, Justin’s sister is in Denver, and our family’s
in Washington, so we thought, “Let’s get into the festivals there so we can see them
and show them our film,” and we’ve been able to do that with everyone.
JUSTIN: Another great thing that came out of this film in the festival circuit is that
we got full financing for our next short film project, which is huge! The person who
contacted us about the financing saw Gerald’s Last Day on Delta Airlines. The Tribeca
Film Festival had a contest where they played our film on the little airplane-seat mon-
itors for four months. About 90,000 people got to see it, so we were getting contacted
every other day by total strangers saying, “Wow, I loved it! Where can I buy it?” And
one of them wanted to help us with the next film, so it was an incredible series of
events that happened, and it was so exciting.
SHEL: So far, we’ve won our musical score budget on the film back just through con-
test wins, and we haven’t even put it into distribution or sold a single copy yet.
The Advanced Art of Stop-Motion Animation312

JUSTIN: At the film festivals, we go to a lot of the seminars and speaker panels, and
they often mention how if you want to get financing, you need to show that your film
makes money, even if it’s $1.
SHEL: It gave us a goal—that we have to make $13,001.
JUSTIN: Yes, just one extra dollar to show them our work is profitable. (Laughs.) It’s
done incredibly well. Just this past weekend, we won our 18th “best animated short”
award, and it’s so nice hearing from people about how much they enjoyed the film.
SHEL: Especially when we’re in the middle of making another one. I’ve just been
kicking butt making these spaceships and sets and putting in so many hours, it gets
kind of desperate feeling after a while. It’s like, “When is this ever going to end?” When
you have a list with 5,000 things on it, it’s hard to get excited about getting 50 of
them done, you know? So, it’s awesome to take these little film festival breaks in the
middle of the deluge and get such positive feedback.
JUSTIN: Yeah, if we had known how hard Gerald’s Last Day was going to be when we
started it, we never would have done it. It was an incredibly complicated bowl of soup
we were jumping into.
KEN: Were there any mishaps or tough moments where the process of making the filmcaused disagreements or obstacles that were hard to get through?
SHEL: The biggest challenge was, first of all, that Justin didn’t sleep.
JUSTIN: Yeah, we have priorities in our lives towards time with each other and with
our kids, so all the filming would start at midnight, which was the only way to do it.
It didn’t affect me physically because I was so thrilled by the magic of it. I’d be
exhausted by the end of the night, but when I pressed Play, it was so rewarding that
I could get a couple hours of sleep and then be OK about going to my real job. It’s all
in preparation for taking two years off from the industry to make our feature film.
That’s the goal, so it was a means to an end. I want to get more sleep on this next
project, though.
SHEL: The other big challenge was that it was all new to us, and neither of us is big
on reading instructions—we just dive in—so we often had to redo stuff, which was
frustrating. Once, I made three full puppets with the wrong kind of wire, so they all
snapped really quickly. That kind of thing is heartbreaking. Another funny thing that
happened was when Justin had a scene in the film where the dog is throwing his dish
around and food was flying everywhere (Figure 13.6). He used about 18 pieces of cat
food, each one held up by a wire, and he got halfway through the shot, but it was
6 a.m., and he had to get some sleep.
Chapter 13 n An Interview with Justin and Shel Rasch 313

The Advanced Art of Stop-Motion Animation314
JUSTIN: Shots like that usually have to be done all in one go, but unfortunately I had
to leave it. A couple nights later I went back to the set, and all the pieces were gone.
Our cat had gotten in there and eaten all the food! I had to use the frame grabber to
look at the action in my last few frames and pick up where I left off as best I could.
Nobody noticed, so it was OK.
SHEL: Sure, we would disagree on things because we’re both strong minded and a bit
obsessed. But we also know each other really well and trust each other’s instincts,
which lets us each back off when we know we need to.
JUSTIN: One of Shel’s jobs was producing the whole film, so she was there to help
me get the film done and make me efficient in how I approached my work.
SHEL: Justin wanted to shoot linear—shooting the dog and then the people’s reac-
tions in the proper order—but that meant we had to keep moving the whole set
around for each shot . . . major hassle. So, I told him he should do all of the dog and
people shots separately and intercut them later. Most of the time, reluctantly, he
would, but sometimes he really felt he needed to see the reactions together from an
acting point of view.
Figure 13.6
Still image of Gerald throwingfood suspended on wires. (© Justin and Shel Rasch.)

Chapter 13 n An Interview with Justin and Shel Rasch 315
JUSTIN: Yeah, for me, sometimes I just needed to feel the flow of it, see those three
shots cut together, and feel the reward of that. If I couldn’t see the shots cut together
for a long time, it was disheartening.
SHEL: And Justin was living on those rewards instead of sleep. So, at those times, I
would just say, “OK babe, we’ll turn the set around.”
JUSTIN: Many times, as well, I would work, and then Shel would critique my shot
the next morning. Sometimes the shots were really hard, and I would feel like they
practically killed me, but Shel would honestly feel like it should be reshot and didn’t
work. I’d feel deflated, but I didn’t take it personally because she was right—it wasn’t
good enough. Other times, she would think a shot was OK, and I wouldn’t think it
was good enough. So, it was actually really easy working together.
SHEL: That’s why we’re doing it again!
JUSTIN: Gerald’s Last Day was our first-ever experience with stop-motion, and our
goal was to learn the craft, get exposure, and seek out financing for future projects
through getting our work in the festival circuit. Now, our next short film is fully paid
for, which is incredible for our future in this medium, so there are all kinds of things
in place now going into this project that we didn’t have the possibility or the knowl-
edge of doing before. We just got back from another festival, and on the plane we were
just tripping out over how professional things are getting, compared to how it used to
be. We’re still doing the same stuff, in our garage making a cartoon, but now we have
access to equipment like better lights and cameras (Figures 13.7).
Figure 13.7
Shel Rasch touches up a spaceship for Line.

SHEL: A big difference is we know what that equipment is now and why we need it,
whereas before, we went into it knowing very little. We decided to simplify our new
film by having only two characters instead of nine, and one set, but then we totally
complicated it by deciding to shoot it in stereoscopic 3D.
JUSTIN: Yeah, we finally feel like we know what we’re doing, so we can take it to the
next level, and then we were thinking about 3D and wondering, “Do we really want
to do this?” But we decided to tackle it since 3D is a big marketable thing now, even
for short films. Also, as directors, it makes us more appealing for investors that we
know how to do it since we ultimately want to create a feature film next, and all new
animated films seem to be in 3D.
SHEL: The 3D filming was another thing that came from the Delta Airlines screen-
ings, where someone called us up and asked if we were considering doing our next
project that way. They said they would be willing to help us and get us all set up to
do it.
JUSTIN: Jason Goodman is based in Burbank at a 3D company and offered to come
over and be our 3D director of photography, since he was really impressed that Shel
and I basically made our entire film on our own. He hadn’t seen that before.
SHEL: Yeah, he was more used to live-action films where you typically see about 500
people in the credits, and our credits were pretty much “Justin and Shel” all the way
through. (Laughs.)
JUSTIN: With the 3D shooting, what I’m incredibly blown away by is that it really
works! The first couple of tests we did, I was amazed seeing the results in After Effects,
and that we can actually do 3D…at home! Who would have thought? I had this fan-
tasy that Laika and these Magical Technicians of Justice were everywhere with the only
capability for this, and here we are able to do it ourselves. It’s mind blowing, although
it is a bit more complicated in that there are more things to remember, you have twice
as many images, and you need more storage space for files.
SHEL: And for setting up our shots, we’re not just thinking about composition and
lighting. Now, we’re also thinking about depth, what should be in the foreground,
what should be in the background, and what should stay right on the screen. And how
intense do we want the 3D effect to be?
JUSTIN: Yeah, what you want in your face, and what you want less so. We have some
moments in our new film that really pop out, but mostly we want to be tasteful about
it, more like a View-Master look, which was more about 3D depth rather than being
goofy in your face.
The Advanced Art of Stop-Motion Animation316

KEN: I assume you’re hoping to project it in 3D for certain screenings, too?
JUSTIN: We have access to three different output formats in the shooting itself, all the
way from IMAX to regular DVD or 3D, and the extra frames can be hidden or not
on different tracks. There are about three or four 3D festivals out there right now in
the world, but in a few years, most of them will have 3D showcases, so it’s really great
timing since we’ll have this new piece to enter.
SHEL: All the TV manufacturers are also making in-home 3D TVs as well, so people
are going to be looking for material. But for regular screens, it’s still possible to proj-
ect only the left- or right-eye view and show it as a regular film.
KEN: I noticed on the blog that you have several interns helping you out this time.
JUSTIN: We started getting contacted by people everywhere, through Facebook and
our blog, asking if they could come by and see our studio and help us out. After about
the fourth person who asked if they could intern with us, I asked Shel what she
thought, and she said, “Bring them on!” Basically, she runs the shop and is going to
run it on our feature as well.
SHEL: There are certainly things for them to do, but unless you have all the materi-
als organized and designs ready, it’s hard to give out tasks, so that’s caused us to come
up with a whole different style of working. Instead of hitting jobs here and there at a
whim, I have to have up to four people’s tasks prepared. It’s hard to let go at times,
since we’re proud that Gerald’s Last Day was only made by the two of us. This film
will have so many more names on it. But we also have a lot of new, good friends now,
and it helps us get things done so much faster. Of course, when we do our feature, we
can’t do everything ourselves, so this is good practice.
KEN: Do your kids have any aspirations to get into animation as well?
SHEL: Yes. Aedon, our 7-year-old, wants to be a farmer, a train driver, and a film-
maker. We figure that train driving will pay for the farm, and she can make her films
in the barn. Our oldest son, Nicky, is a gifted sculptor and artist, so he wants to make
films, video games, and comic books.
JUSTIN: Yes, he will definitely go into art professionally, and our other son, Shamus,
grew up with video games. He wants to be a game designer and has tons of ideas.
SHEL: The ideas he comes up with are very much influenced by the games we’ve
played at home, the physical challenges we’ve given to all our kids, and the problem
solving we go through every day with our stop-motion antics. So, their minds are all
being steeped in this art, and it’s going to come out for them in different ways.
Chapter 13 n An Interview with Justin and Shel Rasch 317
KEN: What advice do you both have for anyone who wants to get into stop-motion professionally?
SHEL: Pick up a camera, make a puppet, think of a story, and start shooting it. Just
start, see how it comes out, and then make another one.
JUSTIN: Yeah, just do it. If you have a digital camera, just tape it down and start learn-
ing how to make things move, even before you have a story. One of our interns is a
young guy who has been through art school already and now is in grad school because
he wants to be a stop-motion animator. He’s frustrated because he feels like he’s start-
ing from scratch learning about basic drawing and anatomy all over again, and he’s
anxious to get to be making films. The craft of animation is very important, in terms
of getting educated in it, because otherwise you’re just moving things without the prin-
ciples. But you still don’t have to spend thousands of dollars a year to be a stop-motion
animator. You just have to have the will and discipline to dive in and make it happen.
All the support you need is online these days. As an industry alone, stop-motion is
tough and very difficult to keep steady work, finances, or a family—that’s unaccept-
able to me as a husband and a parent. So, I would suggest making your animation
knowledge well rounded enough that you can also find work in 2D or CG and keep
going with stop-motion whenever the opportunity arises. The way we’re doing it,
working in CG and pursuing stop-motion as our hobby, is the best way for us.
SHEL: And that way, when it gets tough, we can look at each other and say,
“Remember, we’re doing this for fun.”
The Advanced Art of Stop-Motion Animation318

Books, Articles, and Publications on Stop-Motion Animation
Anderson, Wes. 1999. The Making of Fantastic Mr. Fox: A Film by Wes Anderson Basedon the Book by Roald Dahl. Rizzoli.
Brierton, Tom. 2002. Stop-Motion Armature Machining: A Construction Manual.McFarland & Company.
Brierton, Tom. 2004. Stop-Motion Puppet Sculpting: A Manual of Foam Injection, Build-Up and Finishing Techniques. McFarland & Company.
Brierton, Tom. 2006. Stop-Motion Filming and Performance: A Guide to Cameras,Lighting and Dramatic Techniques. McFarland & Company.
Burton, Tim. 2006. Burton on Burton: Revised Edition. Faber & Faber.
Cotte, Oliver. 2007. Secrets of Oscar-Winning Animation: Behind the Scenes of 13 ClassicShort Animations. Focal Press.
Culhane, Shamus. 1998. Talking Animals and Other People. Da Capo Press. [Includes a
section on Lou Bunin.]
Fordham, Joe. 2009. “Coraline: A Handmade World,” Cinefex 117.
Frierson, Michael. 1994. Clay Animation: American Highlights 1908 to the Present.Twayne Publishers.
Goldschmidt, Rick. 2001. The Enchanted World of Rankin/Bass: A Portfolio. Miser Bros.
Press.
Goldschmidt, Rick. 2001. Rudolph the Red-Nosed Reindeer: The Making of theRankin/Bass Holiday Classic. Miser Bros. Press.
Harryhausen, Ray, and Tony Dalton. 2004. Ray Harryhausen: An Animated Life.Billboard Books.
Harryhausen, Ray, and Tony Dalton. 2006. The Art of Ray Harryhausen. Billboard
Books.
Harryhausen, Ray, and Tony Dalton. 2008. A Century of Stop-Motion Animation: FromMelies to Aardman. Watson-Guptill.
Bibliography andFurther Reading
319

Holman, Bruce L. 1975. Puppet Animation in the Cinema: History and Technique. A.S. Barnes.
Jones, Stephen. 2009. Coraline: A Visual Companion. It Books.
Lane, Andy. 2003. Creating Creature Comforts: The Award-Winning Animation Broughtto Life from the Creators of Chicken Run and Wallace and Gromit. Boxtree Ltd.
Lane, Andy, and Paul Simpson. 2005. The Art of Wallace & Gromit: The Curse of the Were-Rabbit. Titan Books.
Lord, Peter, and Brian Sibley. 2004. Creating 3D Animation: The Aardman Book ofFilmmaking, Harry N Abrams.
Mandell, Paul. 1984. “Hansel and Gretel.” Cinemagic 28.
Purves, Barry. 2007. Stop Motion: Passion, Process and Performance. Focal Press.
Purves, Barry. 2010. Basics Animation: Stop-Motion. Ava Publishing.
Salisbury, Mark. 2005. Tim Burton’s Corpse Bride: An Invitation to the Wedding.
Newmarket.
Schechter, Harold, and David Everitt. 1980. Film Tricks: Special Effects in the Movies.H. Quist.
Shaw, Susannah. 2008. Stop Motion: Craft Skills for Model Animation. Focal Press.
Sibley, Brian. 2000. Chicken Run: Hatching the Movie. Harry N. Abrams.
Spess, Marc. 2000. Secrets of Clay Animation Revealed 3! Animate Clay.
Thompson, Frank. 1994/2002. Tim Burton’s The Nightmare Before Christmas: The Film,The Art, The Vision. Disney Editions.
Turner, George E. and Dr. Orville Goldner 2005. Spawn of Skull Island: The Making ofKing Kong. Luminary Press.
Webber, Roy P. 2004. The Dinosaur Films of Ray Harryhausen: Features, Early 16mmExperiments and Unrealized Projects, McFarland & Company.
Authors. 1999. “Celebrating 100 Years of Stop-Motion Pioneers.” Cinefantastique 31
(Nos. 1 and 2).
Other Useful Books about Animation andPuppetry
Beck, Jerry, and Todd McFarlane. 2003. Outlaw Animation: Cutting-Edge Cartoons fromthe Spike and Mike Festivals. Harry N. Abrams.
Beck, Jerry. 2005. The Animated Movie Guide. Chicago Review Press.
Beiman, Nancy. 2007. Prepare to Board! Creating Story and Characters for AnimatedFeatures and Shorts. Focal Press.
The Advanced Art of Stop-Motion Animation320

Beiman, Nancy. 2010. Animated Performance. Ava Publishing.
Blair, Preston. 1994. Cartoon Animation. Walter Foster.
Curell, David. 1975. The Complete Book of Puppetry. Plays.
Finch, Christopher. 1993. Jim Henson: The Works—The Art, The Magic, TheImagination. Random House.
Goldberg, Eric. 2008. Character Animation Crash Course! Silman-James Press.
Hahn, Don. 2008. The Alchemy of Animation: Making an Animated Film in theModern Age. Disney Editions.
Hahn, Don. 2009. Drawn to Life: 20 Golden Years of Disney Master Classes. Volumes
1 and 2: The Walt Stanchfield Lectures. Focal Press.
Johnston, Ollie, and Frank Thomas. 1995. The Illusion of Life: Disney Animation.
Disney Editions.
Laybourne, Kit. 1998. The Animation Book. Three Rivers Press. [Includes chapters
on cut-out, object, and puppet animation.]
Levy, David. 2006. Your Career in Animation: How to Survive and Thrive. Allworth
Press.
Levy, David. 2009. Animation Development: From Pitch to Production. Allworth
Press.
Mazurkewich, Karen. 1999. Cartoon Capers: The History of Canadian Animators.McArthur & Company Publishing.
Simon, Mark. 2003. Producing Independent 2D Character Animation: Making andSelling a Short Film. Focal Press.
Solomon, Charles. 1994. Enchanted Drawings: The History of Animation. Random
House Value Publishing.
Taylor, Richard. 2004. The Encyclopedia of Animation Techniques. Booksales.
[Includes chapters on stop-motion puppets and sets.]
Whitaker, Harold, and John Halas. 2009. Timing for Animation. Focal Press.
White, Tony. 1988. The Animator’s Workbook: Step-by-Step Techniques of DrawnAnimation. Watson-Guptill.
White, Tony. 2006. Animation from Pencils to Pixels: Classical Techniques for theDigital Animator. Focal Press.
White, Tony. 2009. How to Make Animated Films: Tony White’s Complete Masterclasson the Traditional Principles of Animation. Focal Press.
Williams, Richard. 2009. The Animator’s Survival Kit: A Manual of Methods,Principles and Formulas for Classical, Computer, Games, Stop Motion andInternet Animators. Faber & Faber.
Bibliography and Further Reading 321

Online Resources Cited for the History of Stop-Motion Animation
Anthony Scott’s StopMotionAnimation.com: http://www.stopmotionanimation.com
Caprino’s World of Adventure: http://www.caprino.no
Cartoon Brew: http://www.cartoonbrew.com
The Crab with the Golden Claws: http://www.tintinologist.org/guides/screen/
crab1947.html
Gumby: The Movie: http://www.premavision.com/studio/1990.htm
Internet Movie Database: http://www.imdb.com
Michael Sporn’s Splog: Puppet Animation Category:
http://www.michaelspornanimation.com/splog/?cat=20
Resource for British animation and comics: http://www.toonhound.com
Rick Goldschmidt’s Enchanted World of Rankin/Bass: http://www.rankinbass.com
Website for Ladislas Starewitch by his own granddaughter, L.B. Martin-Starewitch:
http://perso.wanadoo.fr/ls/tsommair
Wikipedia list of stop-motion films: http://en.wikipedia.org/wiki/
List_of_stop_motion_films
Will Vinton’s studio history and current projects: http://www.willvinton.net
The Advanced Art of Stop-Motion Animation322

Numerics
3D glasses, 179, 1833D projection, 179–184$9.99, 53–54, 12421st Century Distribution, 282001: A Space Odyssey, 189
A
Aardman Animation, 25, 60advanced compositing, 258–263Adventures of Baron Munchausen, 71Adventures of Colargol, The, 23Adventures of Mark Twain, The, 30–31Adventures of Sam and Squirrel, The, 30After Effects, 127, 251, 254, 271airbrush, 101–102Aladdin and the Wonderful Lamp, 8–9Alice in Wonderland, 12, 33alpha channel tool, 244aluminum blocks, 84American Werewolf in London, An, 47, 134anaglyph image, 183–184Anderson, Hans Christian, 15, 58Anderson, Wes, 3, 57, 73Animaking Studios, 59AnimateClay Web site, 289, 291, 293animation. See character animationAnimators Survival Kit, The, 205Annecy Animation Festival, 51anticipation animation, 215–216aperture, 159arcs, 208–211armature
ball-and-socket, 97doll, 78, 81, 86face, 124–125, 127–137, 1265kits, 150snail, 130wire, 77–84, 87
arms and legs, puppet, 77–87Army of Darkness, 128Art of Stop-Motion Animation, The, 75,
220Asbjornsen, Peter Christen, 20Ashlee, John, 290Aubier, Stephane, 3Automatic Moving Company, The, 1Ava, 96, 173, 258–263Avatar, 180AVI file, 153
B
back light/front light, 255–258background plate, 246Bafia, Larry, 277–286Bajaja (Prince Bayaya), 14Baker, Rick, 134Bakshi, Ralph, 2Balej, Jan, 44ball bearing, 97ball joints, 99ball-and-socket armature, 97, 149–150“barn door,” 255Barnaby, 23Bass, Jules, 15, 18Bboy Joker, 177, 271Beadsmoore, Philip, 124Beauty and the Beast, 47Belanger, Andre A., 35Belzer, Mike, 36Benedict, Ed, 67Ben-Zvi, Yitzhak, 19Berry, Paul, 39Bewitched Matches, 1Binks, Leroy, 293Bino Fabule, 33–35Black Ox Skateboard, 271Blanchette, Kim, 26Blood Tea and Red String, 45–46
Blow, Miles, 59Blue Sky, 3blue/green screen, 249–254blur, 165–168, 269–272Bluth, Don, 2body turn animation, 214Boivin, Patrick, 177, 271bone shapes, 88Bonnichsen, Sven, 149Borthwick, Dave, 40Bouchery, Wilfried, 8Bower, Dallas, 12Box, Steve, 46British Aardman Animation, 41Brother, 54Brothers Grimm fairy tale, 7, 9Bruce, Barry, 30Buckley, Stephen, 36Buck’s Worth, A, 53Bulter, George, 9Bunin, Lou, 8, 12–13, 33Burningham, John, 19Burns, Neil, 52Burton, Kent, 26–27, 126Burton, Tim, 2–3, 17, 36, 39, 47–49, 60,
159Buzzi, Ruth, 27Byle, John, 19
C
Caballero, Mark, 18, 61–62, 64–74cable system, 135–137CalArts, 72–73California Raisins, 290camera
aperture, 159blind shooting, 157blurring effects, 168–170camera moves, 171–178Canon, 155
Index
323

camera (continued)composition, 161–162, 165depth of field, 160–162digital noise, 159digital SLR, 153–154effects, 165–179Eye-Fi card, 156film, 151, 153Firewire connection, 153, 156flicker, 158flip video, 153frame toggling, 157frame-grabber function, 155f-stop, 159HDMI live video feed, 155ISO, 159JPEG format, 158lens, 158–159lighting conditions, 163live feed, 156–157LumberFlux rig, 176Lumix SLR, 156manual controls, 158megapixel, 157MiniDV, 153, 156Nikon SLR, 155onion skin feature, 157RAW format, 158rigs, 171–172sensor, 157shutter speed, 159spycam, 155as story telling tool, 161–162strobing effect, 176tilt shots, 175–176tripod attachment for stereoscopic
photography, 182trucking shot, 173–174USB live video feed, 155video adapter, 156video capture converter, 156webcam, 155–156white balance, 163–164
Cameraman’s Revenge, The, 4Cameron, James, 180Canemaker, John, 53Cannes Film Festival, 55Canon camera, 155Canopus video capture converter, 156Caprino, Ivo, 20–21Caprino Studios Web site, 21Carlson, Don, 292Caroline, 26, 57, 138, 180, 183Carr, Emily, 96Carroll, Lewis, 13, 33
Cartoon Network, 61cast
plastic, 121–123silicone, 107–114slush casting, 123
Cecil’s Insomnia, 230Cegavske, Christiane, 45Celebrity Deathmatch, 62, 65Chang, Wah, 140Chaplin, Charlie, 6character animation
anticipation, 215–216arcs, 208–211body turn, 214dialogue, 218–224eight-frame hold, 207frames per second, 205hand-drawn animation, 206head turn, 212–214in-betweens, 206“jerky” quality, 209keys, 206lip sync, 224–227live-action reference, 217overlapping action, 211–215performance, 216–218point of reference, 209practice for, 217senses, 216–217six-frame hold, 207thumbnail sketches, 217timing, 205–208walking animation, 210–211
checkerboard matte, 255–256chemical use, 76chest and hip plates, 84Chicken Run, 42–43, 46, 50Chinoy, Marc Paul, 25Chiodo, Charlie, 25–26Chiodo, Stephen, 25–27, 126Chowder, 64chroma keying, 244Chronopolis, 30cinematic effect, 171Cisaruv Slavik (The Emperor’s
Nightingale), 13clavicle and neck, 99clay animation, 30, 41Clay & Stop Motion Animated Store,
The, 150Clokey, Art, 25, 40, 60Close Shave, A, 41Closed Mondays, 1clothing, 104Colargol, 1
Colargol i Cudowna Walizka (Colargol andthe Magic Suitcase), 24
Colargol na Dzikim Zachodzie (Colargol inthe Wild West), 24
Colargol Zdobywc Kosmosu (Colargol,Conqueror of Space), 24
Colcord, Webster, 277–287Cole, Ron, 132–133, 156, 258, 270collage, 254color temperature, 163Combustion, 251–252composition, 165convergence, 182–183Coraline, 3, 56, 74, 141–142, 175, 187,
193, 195–197Corpse Bride, 3, 47–49, 74, 159, 175,
187, 191, 195Cosgrove Hall Studios, 31–32cotton, 93Cousin, 54Crab with the Golden Claw, The, 8Crazy Glue, 53Creating 3D Animation, 298Creature Comforts, 41Creature for the Black Lagoon, 180cross-cultural production, 15Cunningham, Phil, 45Cuppa Coffee Studios, 52, 229Curious Pictures, 26Curse of the Were-Rabbit, The, 46, 48Czech movement of puppet films, 1
D
Dahl, Roald, 39, 58Dajevskis, Evalds, 10Dark Town, 40Daydreamer, The, 15–16de Tonnancour, Andre, 35Deall, John, 126DEFA studio, 32Demon, The, 18Demoskoff, Brian, 51, 190depth of field, 160–162Devil Went Down to Georgia, The, 48dialogue
accents, 223body language and movement, 223character animation, 218–224“cue” to speak, 224dope sheet, 221–222exhales/inhales, 220eye contact through, 221head movement and, 221
The Advanced Art of Stop-Motion Animation324

“hey” sounds, 220lip sync technique, 224–227overlapped lines, 219pose test, 223puppet-building techniques, 137two-character, 218–224
Diamond Keyer function, 251Die Fliegende Windmuhle (The Flying
Windmill), 32Die Sieben Raben (The Seven Ravens), 7Die Spur Fuhrt Zum Silbersee (The Traces
Leads to the Silver Lake), 32Diehl, Ferdinand, 7Diehl, Hermann, 7digital camera. See cameradigital compositing
advanced compositing, 258–263blue/green screen, 249–254effects, 263–265front light/back light, 255–258split-screen and masks, 244–246, 248
digital noise, 159Diller, Phyllis, 17Discreet Keyer tool, 252Disney Animation: The Illusion of Life, 204Do-It-Yourself! Foam Latex Puppetmaking
101 DVD, 306doll armature, 78, 81, 86dope sheet, 221–222Dougal and the Blue Cat, 23Douglas, Ian, 96Dragon Stop Motion, 65, 155Dragonslayer, 36drawn diagram, 77–78Dream Works SKG, 3, 42Duplo blocks, 110–111
E
Eberts, Jake, 41Edison and Leo, 51–52, 232effect. See also visual effects
blur, 165–168camera, 165–179digital compositing, 263–265rack focus shot, 165–168strobing, 176sunlight, 174–175
Elliott, Adam, 3, 54Emler, James, 164Emory, Ralph, 10Empire Strikes Back, The, 36epoxy putty, 81, 88E.T., 134–135
eye compositing effects, 272–276Eye-Fi card, 156eyes, puppet, 101, 104, 131
F
fabric sheet, 250Fabricated, 168–170, 172face armature, 124–125, 127–137, 1265face, replacement, 138–145facial expression, 135Fantastia, 8Fantastic Mr. Fox, 3, 57–58feet and hands, puppet, 88–96Feustel, Guenther, 32film camera, 151, 153film compositing, 238–243Film Fantasy Scrapbook, 72Fimfarum 2, 44Final Cut Pro software, 174Finding Nemo, 3fingers, puppet, 84Finnegan, Chris, 61–74Firewire connection, 153, 156Flaklypa Grand Prix (Pinchcliffe Grand
Prix), 20–23Fleury, Gene, 13Flexiform, 26flicker, 158Flinstones on the Rocks, 67flip video camera, 153floral wire, 84Flushed Away, 48Flying Piano, The, 59foam, 100foam latex, 106focus, 165–168Fool of the World and the Flying Ship, The,
32For Sock’s Sake, 253Fotky, Otto, 30Fox & Calf, 300, 302Fox and the Hound, The, 36Foxwell, Brett, 166–169, 172frame toggling, 157frame-grabber function, 155frames per second, 205Frankenstein, Baron Von, 16Frankenweenie, 60Freberg, Stan, 27Fritz the Cat, 2Frostbiter: Wrath of the Wendigo, 128f-stop, 159future filming, 59–60
G
Gainman, Neil, 56“garbage matte,” 247Gaussian blur, 271Geffen, David, 42Gerald’s Last Day, 305–306, 308, 310,
312–317Ghost of Llano Estacado, The, 33Glocka, Angie, 36Golden Key, The, 6Gonzalez, Emi, 164Grahame, Kenneth, 31Gratz, Joan, 30Gray, Lisa Jane, ivGreat Escape, The, 43Green, Seth, 64Gross, Yoram, 19Growden, Mark, 45Gulliver’s Travels, 6Gumby, 1, 25, 190, 196Gumby: The Movie, 40–41Gustafson, Mark, 58
H
hair, puppet, 102Halas and Batchelor studio, 7Halperin, Eddie, 19hand-drawn animation, 206hand-drawn medium, 3Handling Ships, 7hands and feet, puppet, 88–96Hankins, John, 149Hans Christian tale, 13Hansel and Gretel, 9–12Happiness, 301–302Harris, Ken, 205Harryhausen, Ray, 1, 61, 70, 72, 241Harvie Krumpet, 54Hayes, Derek, 43HDMI live video feed, 155head, puppet, 84head turn animation, 212–214Hello Kitty, 25Henry’s World, 229–230, 232Henson, Jim, 12, 59, 68Hettmer, Dave, 128High Water of Catfish Bend, 13highlight, 262Hilligoss, Nick, 204, 258hip and chest plates, 84hip socket, 78Hirschfeld, Al, 15
Index 325

history of stop-motion film1920s films, 41930s films, 41940s films, 7–9, 131950s films, 9–12, 14–151960s films, 15–17, 19–201970s, 20, 231980s films, 18, 27–28, 30–31, 33,
35–361990s films, 36, 39–422000s films, 43–44, 46, 48, 50–51,
53, 55–57beginnings of, 4clay animation, 30Czech movement, 1, 13–14first produced film, 5future filming, 59–60Japanese animation, 15live action and puppet combination, 4Russia produced film, 6
Hittle, Tim, 36Hoffman, E.T.A., 25horror films, 47Horstman, Joe, 10Horton Hears a Who!, 3hot-gluing, 81House of Wax, 180Howdy Doody Show, The, 10Howl’s Moving Castle, 48Humperdink, Engelbert, 9Hunchback of Notre Dame, The, 40
I
I Go Pogo, 25–26, 28–29Ice Age, 3Ice Age: Dawn of the Dinosaurs, 3In Her Morning Elegance, 294In the Fall of Gravity, 132–134, 137, 270in-betweens, 206Industrial Light & Magic, 180interocular distance (IO), 181interview
Bafia, 277–286Cabellero, 61–62, 64–74Finnegan, 61–74Kozachik, 187–194Kyffin, 229–236McCulloch, 297–304Rasch, 305–318Spess, 289–296Thomas, 195–201Walsh, 61–62, 64–74Webster, 277–287
IO (interocular distance), 181Iron Man versus Bruce Lee, 177Irvin, Chayse, 174ISO, 159
J
Jackson, Peter, 273James and the Giant Peach, 39, 50, 140,
187, 195Jan Werich’s Fimfarum, 44Japanese animation, 15Jason and the Argonauts, 1jawline, puppet, 126Jazz with a General Problem, 271Jeremy the Bear, 23“jerky” animation quality, 209Jibber Jabber, 229, 232Johnson, Eric, 20Johnson, Mike, 48Johnson, Rich, 244Johnston, Ollie, 204JoJo’s Circus, 229Jones, Chuck, 13Joseph the Dreamer, 19JPEG format, 158“junkmation,” 45Jurassic Park, 39–40, 189, 194, 306
K
Karloff, Boris, 13Katzenberg, Jeffrey, 42Kawamoto, Kihachiro, 15, 18, 30, 72, 75Kellison, Phil, 188Kendrick, Mark, 290Keret, Etgar, 53keying techniques, 260Keylight plug-in, 251keys, character animation, 206Kimball, Ward, 72Kinemans, 9Kinex Studios, 1King Kong, 3, 6, 47, 134, 238Kirkpatrick, Karey, 42Klean Klay, 109–110Klimt, Aurel, 44Knight, Phil, 56Kohn, Justin, 26, 126Kozachik, Pete, 39, 166, 187–194K&S tubing, 78–81, 87–88Kubrick, Stanley, 189Kurtzman, Harvey, 17Kyffin, Bronwen, 84, 96, 108, 229–236
L
Laika Studios, 56L’Animateur, 204Lanucci, Peter, 8latex build-up process, 88, 91–95Lavis, Chris, 272Le Roman de Renard, 4Legend of the Sky Kingdom, 44Lego blocks, 110–111legs and arms, puppet, 77–87Leighton, Eric, 36lens, camera, 158–159Leroy, Guionne, 50Levine, Joseph E., 15lighting
front light/back light, 255–258highlight, 262sun light animation shot, 174–175
Line, 185lip sync, 101, 126, 224–227live feed, 156–157live-action reference animation, 217Live-action video layer, 246Lord of the Rings, 273, 276Lord, Peter, 41–42, 204Love, Kermit, 10, 12LumberFlux camera rig, 176Lumix SLR camera, 156
M
MacKinnon, Ian, 31Mad magazine, 17Mad Monster Party, 16, 62Madagascar, 3, 195Madame Tutli-Putli, 272–273, 275Magic Pipe, The, 44Magic Roundabout, The, 20magnet, 91manual controls, camera, 158Marks, Johnny, 18Mars Attacks!, 48Marsch, Carol, 12Marvelous Misadventures of Flapjack, The,
64Mary and Max, 3, 54–55masks and split-screen, 244–248Max & Co., 50–51May, Karl, 32Maya tools, 142Maylone, Bill, 35McKinney, Mike, 290Mecki and Hedgehog, 7
The Advanced Art of Stop-Motion Animation326

Meet the Raisins, 152megapixel, 157Metropolis, 47Meunier, Martin, 141Midsummer Night’s Dream, A (Sen Noci
Svatoganske), 14MiniDV camera, 153, 156Miracle Maker, The, 43–45Miser Brothers’ Christmas, A, 229, 236Mochinaga, Tad, 15–16Model Mover device, 175Monkeybone, 40, 195Monster Safari, 59, 64, 67, 69Morph, 1Moser, Henrique, 259, 261Moss, Howard S., 139motion, 99motion blur, 269–272mouth, puppet, 104, 127–132Mr. Toad, 31MTV Animation, 62Muculloch, Ryan, 297–304Munkasci, Martin, 10Muppets, 12Mushrat, Deacon, 28Mutasia Web site, 300My Friend Barry web series, 244–248Myerberg, Michael, 8–11Mysterious Mose, 61–62Mysterious Stranger, The, 30
N
Nakamura, Takeo, 25neck and clavicle, puppet, 99New Adventures of Gumby, The, 40, 196New Adventures of Pinocchio, The, 15, 180New Gulliver, The, 6, 139Nickelodeon, 61Nightmare Before Christmas, The, 2–3, 32,
36–38, 40, 47, 56, 72, 140, 187,195–196
Nikon SLR camera, 155noise reduction, 159Nutcracker Fantasy, 25
O
O Aposotolo, 59O’ Keefe, Patrick, 96Oakes, Steve, 26O’Brien, Willis, 1O’Keefe, Paul, 15Old Man and the Goblins, 62
onion skin feature, 157Orozco, Lionel I., 36, 149Ottawa Animation Festival, 52, 75overlapping action, 211–215Owls in the Marsh (Ugler i Mosen), 20
P
Pal, George, 1, 12, 140, 146Panique au Village (A Town Called Panic),
55parallax effect, 260Park, Nick, 41–42, 46, 48Patar, Vincent, 3Paul, John, 9Pee-Wee’s Playhouse, 36performance animation, 216–218Pesepolis, 3Peters, Tony, 15Pettigrew, Jacque, 34PFTrack software, 260photo collage, 254photography. See also camera
cinematic effect, 171cool feeling shot, 163–164creepy, dark, or dramatic scene shot,
162happy, light, or comedic scene shot,
161Model Mover device, 175rack focus shot, 165–168stereoscopic, 18, 179–180, 182–186strobing effect, 176sun light animation shot, 174–175tilt shots, 175–176trucking shot, 173–174warm feeling shot, 163–164
Pinocchio, 203Pirates, 60Pitts, Julie, 59Pizzuti, Pietro, 33PJs, The, 48, 62plastic casting, 121–123Pocahontas, 40Pogo, 25–26Pogo for President, 28Pojar, Bretislav, 44Polifka, Bernice, 13Pollux et le Chat Bleu (Dougal and the
Blue Cat English version), 20Posposilova, Vlasta, 44post test, for dialogue, 223Potter, Beatrix, 12Pratchett, Terry, 32Price, Vincent, 27
Princess and the Frog, The, 3Prop and Berta, 44Pros-Aide adhesive, 94Ptushko, Alexsander, 6puppet films
1910s film, 251920s films, 4, 251930s films, 41940s films, 7–9, 131950s films, 9–12, 14, 25beginnings of, 4Czech movement, 1, 13–14first produced film, 5Japanese animation, 15live action and puppet combination, 4replacement faces, 138–145Russia produced film, 6socket, 87
puppet-building techniquesairbrushing, 101–102aluminum blocks, 84arms and legs, 77–87ball bearing, 97ball joints, 99ball-and-socket armature, 97bone shape, 88cable system, 135–137chemical use, 76chest and hip plates, 84clavicle and neck, 99clothing, 104cotton use, 93design principles, 75–76doll armature, 78, 81, 86drawn diagram, 77–78Duplo blocks, 110–111epoxy putty, 81, 88eye, 101, 104, 131face armature, 124–125, 127–137,
1265facial expression, 133–135finger, 84floral wire, 84foam, 100foam latex, 106hair, 102hands and feet, 88–96head, 84hot-gluing, 81jawline, 126joints, 97, 99K&S tubing, 78–81, 87–88latex build-up process, 88, 91–95Lego blocks, 110–111lip sync movement, 126
Index 327

puppet-building techniques (continued)magnets, 91motion techniques, 99mouth, 104, 127–132plastic casting, 121–123Pros-Aide adhesive, 94rapid phototyping, 138–145registration points, 109replacement animation puppet,
145–149replacement faces, 138–143resources, 149–150rig, 87sandwich plate, 97shoulder sockets, 78–79silicone cast, 107–114silicone mold, 107, 114–120silicone skin, 107skin, 94, 96, 102slush casting, 123snail armature, 130sockets, 78–80styrofoam-ball head, 84tie downs, 91torso/waist area, 84undercuts, 114–115U-shaped joints, 99Vaseline, 104walking animation, 89wire armature, 77–84, 87workspace, 76
Purves, Barry, 31–32
Q–R
quartz lighting, 163QuickTime, 263
rack focus shot, 165–168Ramirez, Frida, 164Rankin, Arthur Jr., 15, 18rapid prototyping, 138–145Rasch, Justin and Shel, 59, 185–186,
305–318Ratz, Gunter, 32RAW format, 158rear projection, 240–241reflection, 258registration points, 109Rennyo and His Mother, 30Renoir, Claude, 12replacement animation puppet, 145–149replacement faces, 138–143
resourceball-and-socket armatures, 149–150compositing, 265puppet-building techniques, 149–150silicone, 150
rig, 87rig and shadow removal, 266–269Ring of the Nibelungen, The, 8Road Rage, 128Robin Hood, 4Robinson Crusoe, 30Robocop, 189Robot Chicken, 62, 64–65, 67, 69Rosen, Hobart, 10Rosenthal, Tatia, 3, 52–54, 124Rudolph and Frosty’s Christmas in July, 18Rudolph the Red-Nosed Reindeer, 15Rush, Geoffrey, 54
S
safety, 76Sahlin, Don, 10, 12Sandcastle, 1Sandman, The, 32Sandmunchenn, 59sandwich plate, 97Sanrio Studio, 25Santa Claus is Coming to Town, 25Saunders, Peter, 31Schaeffer, Herb, 8Schulz, Nathalie, 10Scott, Anthony, 36, 175Screen Novelties, 59, 61Scribner, Rod, 72Secret Adventures of Tom Thumb, The, 40Secret of Kells, The, 3Secret of NIMH, The, 2Secrets of Clay Animation Revealed, 149,
289, 292Seed in the Sand, 46Selick, Henry, 3, 17, 36, 39–40, 56, 60,
141, 189Sen Noci Svatojanske (A Midsummer
Night’s Dream), 14senses, character animation, 216–217sensor, camera, 157Seven Ravens, The (Die Sieben Raben), 7shadow removal, 266–269Shakespeare, William, 14Shepard, Teddy, 10Shisha No Sho (The Book of the Dead), 45shoulder socket, 78–79
Shrek, 3Shrek 2, 195shutter speed, 159Silbersee, 33silhouette, 255–258silicone
cast, 107–114, 150combined with other chemicals, 107cure time, 107mold, 107, 114–120, 150pot life, 107resources, 150safety precautions for using, 107smoothness and attention to detail
from, 107softening and retarding agents for, 107time span for working with, 107
skin, 94, 96, 102, 107Sleeping Beauty, 14Slow Bob in the Lower Dimensions, 189,
196slush casting, 123snail armature, 130Snot Living, 238–239Snow White and the Seven Dwarfs, 2socket, 78Sokolov, Stanislav, 43Sony Imageworks, 60Spalicek (The Czech Year), 13Spectra Animation Studios, 35Speilberg, Steven, 42Spess, Marc, 149, 289–296Spike and Mike’s Festival of Animation,
61split-screen matte shot, 238–240split-screens and masks, 244–248SpongeBob SquarePants, 65Sproxton, David, 41spycam, 155Stanchfield, Steve, 145Star Wars, 1, 23Starewitch, Ladislas, 4–7, 57stereolithography, 141stereoscopic photography, 57, 80,
179–186Stokowsit, Leopold, 8Stop Motion Pro software, 55, 155Stop-Motion layer, 246–247Stop-Motion Marvels, 145, 148, 266StopMotionMagic Web site, 293Stowell, Kerry, 25strobing effect, 176Styrofoam, 84, 146Summers, James, 9
The Advanced Art of Stop-Motion Animation328

sun light animation shot, 174–175Sundance Film Festival, 55sunrise effect, 259Svankmajer, Jan, 33Sweet J Presents, 62–63Swift, Jonathon, 6Szczerbowski, Maciek, 272
T
Tabata, Hiroshi, 16Tailor of Gloucester, The, 12Tailon, Rejeanne, 34Tajemnica Kwiatu Paproci (The Secret of
the Fern Flower), 45Tale of the Fox, The, 4–7, 57Tcgaikovsky, Peter, 25Tenniel, John, 13Testament series, 43Thomas, Frank, 204Thomas, Trey, 36, 195–201Three Mills Studio, 47, 58thumbnail sketches, 217Thunderbean Animation, 145tie downs, 91tilt shots, 175–176timing, animation, 205–208Tippett, Phil, 36, 189Tisch School for the Arts, 53Toles, George, 51Tom Thumb, 12, 140Toots and the Upside Down House, 40Toronto International Film Festival, 54torso/waist, puppet, 84Tortoise and the Hare, The, 46, 61–62, 64Town Called Panic, A, 3, 56Toy Story, 2, 40, 50transparency, 247traveling matte technique, 241–243Trnka, Jiri, 13, 75Truckers, 32trucking shot, 173–174tubing, 78–81, 87–88tungsten lighting, 163TVPaint, 271Twain, Mark, 30two-dimensional cut-out, 3
U–V
Ugler i Mosen (Owls in the March), 20Uncle, 54Uncle Creepy Returns, 127undercuts, 114–115United States of Tara, 176Up, 3USB connection, 153USB live video feed, 155U-shaped joint, 99
Vachon, Melanie, 96, 108Vancouver International Film Festival, 52Vaseline, 104, 170video adapter, 156video camera/camcorder. See cameravideo capture converter, 156Video LunchBox tool, 65Videocraft International, 15Vincent, 36Vinton Studios, 56, 58Vinton, Will, 1, 25, 30, 48visual effects
advanced compositing, 258–263alpha channel tool, 244blue/green screen, 249–254checkerboard matte, 255–256chroma keying, 244digital compositing, 244eye compositing effects, 272–276film compositing, 238–243front light/back light, 255–258keying techniques, 260motion blur, 269–272parallax effect, 260rear projection, 240–241reflection, 258rig and shadow removal, 266–269silhouette, 255–258special effects versus, 237split-screen and masks, 244–248split-screen matte shot, 238–240sunrise effect, 259transparency, 247traveling matte technique, 241–243
Vogele, Carlo, 253
W
Wagner, Richard, 8waist/torso, puppet, 84Walker, Jason, 272walking animation, 89, 210–211Wallas & Gromit: The Curse of the
Were-Rabbit, 3, 298WALL-E, 3Walsh, Seamus, 18, 61–62, 64–74Wareing, Lucas, 96, 173, 258–259Warner Bros., 48Warren, Gene, 188webcam, 155–156Welcsh studio, 43white balance, 163–164Who Framed Roger Rabbit, 2Wilkosz, Tadeusz, 23, 45Williams, Frank, 241Williams, Richard, 205Willy McBean and His Magic Machine,
15–16Wind in the Willows, The, 31–32Winters, John, 27wire armature, 77–82, 84, 87Wolfman, The, 47Wonderful World of the Brothers Grimm,
The, 12, 140workspace, 76Worms, 59Wrong Coast, The, 232Wrong Trousers, The, 41
Y–Z
Yellow Submarine, 2
ZBrush tools, 142Zeman, Karel, 70zero plane/zero parallax, 182Zimmerman, Richard, 36Zombie Pirates, 295Zung, Kathi, 306
Index 329

License Agreement/Notice of Limited Warranty
By opening the sealed disc container in this book, you agree to the following terms and conditions. If,
upon reading the following license agreement and notice of limited warranty, you cannot agree to the
terms and conditions set forth, return the unused book with unopened disc to the place where you
purchased it for a refund.
License:
The enclosed software is copyrighted by the copyright holder(s) indicated on the software disc. You are
licensed to copy the software onto a single computer for use by a single user and to a backup disc. You may
not reproduce, make copies, or distribute copies or rent or lease the software in whole or in part, except with
written permission of the copyright holder(s). You may transfer the enclosed disc only together with this
license, and only if you destroy all other copies of the software and the transferee agrees to the terms of the
license. You may not decompile, reverse assemble, or reverse engineer the software.
Notice of Limited Warranty:
The enclosed disc is warranted by Course Technology to be free of physical defects in materials and workmanship
for a period of sixty (60) days from end user’s purchase of the book/disc combination. During the sixty-day
term of the limited warranty, Course Technology will provide a replacement disc upon the return of a defective
disc.
Limited Liability:
THE SOLE REMEDY FOR BREACH OF THIS LIMITED WARRANTY SHALL CONSIST ENTIRELY
OF REPLACEMENT OF THE DEFECTIVE DISC. IN NO EVENT SHALL COURSE TECHNOLOGY
OR THE AUTHOR BE LIABLE FOR ANY OTHER DAMAGES, INCLUDING LOSS OR CORRUPTION
OF DATA, CHANGES IN THE FUNCTIONAL CHARACTERISTICS OF THE HARDWARE OR
OPERATING SYSTEM, DELETERIOUS INTERACTION WITH OTHER SOFTWARE, OR ANY
OTHER SPECIAL, INCIDENTAL, OR CONSEQUENTIAL DAMAGES THAT MAY ARISE, EVEN IF
COURSE TECHNOLOGY AND/OR THE AUTHOR HAS PREVIOUSLY BEEN NOTIFIED THAT
THE POSSIBILITY OF SUCH DAMAGES EXISTS.
Disclaimer of Warranties:
COURSE TECHNOLOGY AND THE AUTHOR SPECIFICALLY DISCLAIM ANY AND ALL OTHER
WARRANTIES, EITHER EXPRESS OR IMPLIED, INCLUDING WARRANTIES OF MERCHANT -
ABILITY, SUITABILITY TO A PARTICULAR TASK OR PURPOSE, OR FREEDOM FROM ERRORS.
SOME STATES DO NOT ALLOW FOR EXCLUSION OF IMPLIED WARRANTIES OR LIMITATION
OF INCIDENTAL OR CONSEQUENTIAL DAMAGES, SO THESE LIMITATIONS MIGHT NOT
APPLY TO YOU.
Other:
This Agreement is governed by the laws of the State of Massachusetts without regard to choice of law principles.
The United Convention of Contracts for the International Sale of Goods is specifically disclaimed. This
Agreement constitutes the entire agreement between you and Course Technology regarding use of the software.