
Unified Functional Testing Add-ins Guide - Support
519
HP Unified Functional Testing Software Version: 12.50 Windows ® operating systems Add-ins Guide Document Release Date: July 2015 Software Release Date: June 2015
-
Upload
khangminh22 -
Category
Documents
-
view
0 -
download
0
Transcript of Unified Functional Testing Add-ins Guide - Support
HP Unified Functional TestingSoftware Version: 12.50Windows ® operating systems
Add-ins Guide
Document Release Date: July 2015Software Release Date: June 2015
Legal Notices
WarrantyThe only warranties for HP products and services are set forth in the express warranty statements accompanying suchproducts and services. Nothing herein should be construed as constituting an additional warranty. HP shall not be liablefor technical or editorial errors or omissions contained herein.
The information contained herein is subject to change without notice.
Restricted Rights LegendConfidential computer software. Valid license from HP required for possession, use or copying. Consistent with FAR12.211 and 12.212, Commercial Computer Software, Computer Software Documentation, and Technical Data forCommercial Items are licensed to the U.S. Government under vendor's standard commercial license.
Copyright Notice© Copyright 1992 - 2015 Hewlett-Packard Development Company, L.P.
Trademark NoticesAdobe® and Acrobat® are trademarks of Adobe Systems Incorporated.
Google™ and Google Maps™ are trademarks of Google Inc
Intel® and Pentium® are trademarks of Intel Corporation in the U.S. and other countries.
Microsoft®, Windows®, Windows® XP, and Windows Vista ® are U.S. registered trademarks of Microsoft Corporation.
Oracle and Java are registered trademarks of Oracle and/or its affiliates.
Documentation UpdatesThe title page of this document contains the following identifying information:
l Software Version number, which indicates the software version.l Document Release Date, which changes each time the document is updated.l Software Release Date, which indicates the release date of this version of the software.
To check for recent updates or to verify that you are using the most recent edition of a document, go to:https://softwaresupport.hp.com.
This site requires that you register for an HP Passport and sign in. To register for an HP Passport ID, go tohttps://softwaresupport.hp.com and click Register.
SupportVisit the HP Software Support Online web site at: https://softwaresupport.hp.com
This web site provides contact information and details about the products, services, and support that HP Softwareoffers.
Add-ins Guide
HP Unified Functional Testing (12.50) Page 2
HP Software online support provides customer self-solve capabilities. It provides a fast and efficient way to accessinteractive technical support tools needed to manage your business. As a valued support customer, you can benefit byusing the support web site to:
l Search for knowledge documents of interestl Submit and track support cases and enhancement requestsl Download software patchesl Manage support contractsl Look up HP support contactsl Review information about available servicesl Enter into discussions with other software customersl Research and register for software training
Most of the support areas require that you register as an HP Passport user and sign in. Many also require a supportcontract. To register for an HP Passport ID, go to: https://softwaresupport.hp.com and click Register.
To find more information about access levels, go to: https://softwaresupport.hp.com/web/softwaresupport/access-levels.
HP Software Solutions & Integrations and Best PracticesVisit HP Software Solutions Now at https://h20230.www2.hp.com/sc/solutions/index.jsp to explore how the productsin the HP Software catalog work together, exchange information, and solve business needs.
Visit the Cross Portfolio Best Practices Library at https://hpln.hp.com/group/best-practices-hpsw to access a widevariety of best practice documents and materials.
Add-ins Guide
HP Unified Functional Testing (12.50) Page 3
Contents
Welcome to the Add-ins Guide 14UFT Guides and References 15Additional Online Resources 17
Part 1: Working with UFT Add-ins 19UFT Add-ins Overview 20
UFT Add-in Support - Overview 21Loading UFT Add-ins 22Add-in Licenses 23Considerations for Working with UFT Add-ins 23
Record and Run Settings for Add-ins - Overview 24Considerations for Defining Record and Run Settings 25Environment Variables in Record and Run Settings 26
UFT Add-in Extensibility 27How to Manage UFT Add-ins 28How to Define Record and Run Settings for UFT Add-ins 29Add-in Manager Dialog Box 31
Chapter 2: Web-Based Application Support 34Web-Based Application Support - Overview 35
Considerations - Web-Based Application Support 35Registering Browser Controls 37Accessing Password-Protected Resources in the Active Screen 37Checkpoints for Web Pages 38Event Recording Configuration for Web-Based Applications 39
Web Event Recording Configuration XML File Structure 40Advanced Operations on Web-Based Applications 41
Activating methods associated with a Web-based object using the Object property 41Using programmatic descriptions for the WebElement object 42
Web Object Identifiers 42Web Object Identifier Types 43
CSS Web Object Identification 43User-Defined XPath Web Object Identification 44Automatic X-Path Web Object Identification 44Attribute/* Notation Web Object Identification 44Style/* Notation Web Object Identification 45
Considerations - Web Object Identifiers 48How to Use Web Object Identifiers - Exercise 49
Add-ins Guide
HP Unified Functional Testing (12.50) Page 4
How to Modify Event Recording Configuration for Web-Based Applications 51How to Configure UFT to Record Mouse Clicks 52Active Screen Dialog Box 54Environment Variables for a Web-Based Environment 55Register Browser Control Utility 56Web > General Pane (Options Dialog Box) 58
Browser Details Dialog Box 60Web > Page/Frame Options Pane (Options Dialog Box) 61Web > Advanced Pane (Options Dialog Box) 63
Web Pane (Test/Business Component Settings Dialog Box / Application Area - AdditionalSettings Pane) 68
Advanced Authentication Dialog Box 70Web Tab (Record and Run Settings Dialog Box) 71Troubleshooting and Limitations - Web-Based Application Support 77
Chapter 2: Windows-Based Application Support 81Windows-Based Application Support - Overview 82UFT Configuration for Windows-Based Applications 82Record and Run Settings for Windows-Based Applications 83Environment Variables for Windows-based Applications 84Windows Applications > General Pane (Options Dialog Box > GUI Testing Tab) 85Windows Applications > Advanced Pane (Options Dialog Box > GUI Testing Tab) 87
Considerations for Advanced Windows-based Application Testing 91Windows Applications Tab (Record and Run Settings Dialog Box) 93
Application Details Dialog Box 96Record and Run Setting Guidelines for Windows-Based Add-ins 98
Part 2: .NET Add-in 100.NET Add-in - Overview 101.NET Silverlight Add-in 102
.NET Silverlight Add-in - Quick Reference 103Silverlight Add-in Extensibility 105Troubleshooting and Limitations - Silverlight Add-in 106
.NET Web Forms Add-in 108.NET Web Forms Add-in - Quick Reference 109Considerations for Testing .NET Web Forms 110.NET Windows Forms Objects - Checkpoints and Output Values 110Accessing Internal Properties and Methods of Run-Time .NET Web Forms Objects 112Troubleshooting and Limitations - .NET Web Forms 112
.NET Windows Forms Add-in 115.NET Windows Forms Support - Quick Reference 116.NET Windows Forms Support - Testing and Configuration 118
Add-ins Guide
HP Unified Functional Testing (12.50) Page 5
Considerations for Testing .NET Windows Forms Applications 119.NET Windows Forms Objects - Checkpoints and Output Values 119.NET Add-in Extensibility 120.NET Windows Forms Spy 121
How to Use the .NET Windows Forms Spy 122.NET Windows Forms Spy Dialog Box 126
Troubleshooting and Limitations - .NET Windows Forms 129.NET Windows Presentation Foundation (WPF) Add-in 131
.NET Windows Presentation Foundation (WPF) Add-in - Quick Reference 132
.NET Windows Presentation Foundation (WPF) Add-in - Testing and Configuration 134Considerations for Working with the WPF Add-in 135WPF Objects, Methods, and Properties to Enhance Your Test or Component 135About WPF User Interface Automation 136
Automation Elements 136Control Patterns 136
WPF Add-in Extensibility 137Troubleshooting and Limitations - .NET WPF 137
Part 3: ActiveX Add-in 139ActiveX Add-in - Quick Reference 140Considerations for Working with the ActiveX Add-in 141Troubleshooting and Limitations - ActiveX Add-in 142
Part 4: Delphi Add-in 145Delphi Add-in - Quick Reference 146Delphi Add-in Extensibility 147How to Enable Communications Between UFT and Your Delphi Application 148Troubleshooting and Limitations - Delphi Add-in 149
Part 5: Flex Add-in 150Flex Add-in - Quick Reference 151Flex Add-in - Testing and Configuration 152
Enabling UFT to Identify Objects in your Flex Application 152Considerations for Working with the Flex Add-in 155How to Set Up the Adobe Flash Player Debugger to Enable UFT GUI Testing 156How to Open Flex Applications Using the Runtime Loader 158How to Embed a Flex Application in a Web Page with the Runtime Loader 160How to Compile Flex Applications for UFT Testing 162How to Work With Embedded Objects in Flex Lists, Tables, or Tree-Views 164Flex Tab (Record and Run Settings Dialog Box) 166
Add-ins Guide
HP Unified Functional Testing (12.50) Page 6
Add/Edit Flex Application Dialog Box 168Troubleshooting and Limitations - Flex Add-in 171
Part 6: Java Add-in 173Java Add-in - Quick Reference 174Java Add-in - Testing and Configuration 176
Java Add-in - Overview 177Java Add-in Environments 177
Considerations - Java Add-in 178Java Add-in Extensibility 179How to Disable Dynamic Transformation Support (Advanced) 180Java Pane (Options Dialog Box > GUI Testing Tab) 182
Advanced Java Options Dialog Box 184Java Tab (Record and Run Settings Dialog Box) 187Java Pane (Test/Business Component Settings Dialog Box / Application Area - AdditionalSettings Pane) 189Java Environment Variables Settings 192
Record and Run Environment Variables for Java Objects 193Troubleshooting and Limitations - Java Add-in 193
Running Another Java Application or Applet with the Same Settings 193Identifying and Solving Common Problems 194General Notes and Limitations 195
Java Add-in - Test Objects 201Recording Steps on Java Objects 202
Recording Steps on Jtable Cell Editors 203Text Checkpoint and Text Output Value Steps for Java Objects 203Full Object Hierarchy Views 204
Advanced Java Test Object Methods 204CreateObject Method 205GetStatics Method 205FireEvent / FireEventEx Methods 206
How to Modify Options for Recording on Java Tables 207
Part 7: Mobile Add-in 210Mobile Add-in - Quick Reference 211Mobile Tab (Record and Run Settings) 212Mobile Pane (Options Dialog Box > GUI Testing Tab) 212Open Application in HP Mobile Center 212
Part 8: Oracle Add-in 213
Add-ins Guide
HP Unified Functional Testing (12.50) Page 7
Oracle Add-in - Quick Reference 214Oracle Add-in - Testing and Configuration 217
Considerations for Working with the Oracle Add-in 218Recording Tests on Oracle Applications 219Dynamic Transformation Support 220How to Verify or Enable the Oracle Server Unique Name Attributes 221How to Enable the Oracle Name Attribute 221How to Set Oracle Environment Variables 222How to Disable Dynamic Transformation Support 223Oracle Tab (Record and Run Settings Dialog Box) 225Oracle Record and Run Environment Variables 227Troubleshooting and Limitations - Oracle Add-in 228
Part 9: PeopleSoft Add-in 230PeopleSoft Add-in - Quick Reference 231Considerations for Working with the PeopleSoft Add-in 232Troubleshooting and Limitations - PeopleSoft Add-in 233
Part 10: PowerBuilder Add-in 234PowerBuilder Add-in - Quick Reference 235Considerations for Working with the PowerBuilder Add-in 236Troubleshooting and Limitations - PowerBuilder Add-in 237
Part 11: Qt Add-in 238Qt Add-in - Quick Reference 239Considerations - Qt Add-in 241
Part 12: Add-in for SAP Solutions 242Add-in for SAP Solutions - Overview 243Web-based SAP Support 244
Web-Based SAP Support - Quick Reference 245Considerations for Working with SAP GUI for HTML 247Web > Page/Frame Options Pane (Options Dialog Box > GUI Testing Tab) 249Web > Advanced Pane (Options Dialog Box > GUI Testing Tab) 251Troubleshooting and Limitations - Web-based SAP 253
Windows-based SAP Support 257Windows-based SAP Support - Quick Reference 259Windows-based SAP Support - Testing and Configuration 261
SAP GUI Scripting API and UFT 262How to Enable Support for SAP GUI for Windows 264
Add-ins Guide
HP Unified Functional Testing (12.50) Page 8
How to Enable Scripting on the SAP Application (Server-Side) 266Considerations - Windows-based SAP Add-in for SAP Solutions 269Environment Variables for Windows-based SAP Applications 270Package and Patch Versions Requirements - SAP Application Server and SAP GUI forWindows 270SAP Tab (Record and Run Settings Dialog Box) 271SAP > General Pane (Options Dialog Box > GUI Testing Tab) 274Troubleshooting and Limitations - Windows-based SAP 276
Windows-Based SAP Support - Test Objects 281Checkpoints and Output Values in SAP GUI for Windows 282Using the Auto-Parameterize Option to Parameterize Table and Grid Cell Values 282
How UFT Records in Auto-Parameterize Mode 283Parameterized Cell Values in the Input Data Sheet 285Considerations for Auto-Parameterization 286Data in Rows that Require Scrolling 287
Low-Level or Analog Mode Recording on SAP GUI for Windows 288Spooling Data from a Table 288How to Record on Standard Windows Controls During an SAP GUI for WindowsRecording Session 289
UFT-SAP Solution Manager Integration 290UFT-SAP Solution Manager Integration - Overview 291
Test Management in SAP Solution Manager 291Resource Files in Solution Manager 292
Solution Manager Testing Modes: Standalone or Integrated 292Standalone Mode 293Integrated Mode 294
SAP Structured Parameters 294How to Configure Solution Manager to Work with UFT 295How to Work with Tests in Solution Manager in Standalone Mode 297How to Run a Test Stored in Solution Manager 301How to Display or Edit a GUI Test from Solution Manager in Integrated Mode 303How to Transfer Data To and From GUI Tests in Integrated Mode Using TestParameters 304How to Work with SAP Structured Parameters 305Solution Manager Connection Dialog Box 309Save GUI Test to Solution Manager Dialog Box 310Open GUI Test from Solution Manager Dialog Box 311Upload File to Solution Manager Dialog Box 312Save External File to Solution Manager Dialog Box 313Download File from Solution Manager 314SAP > SAP Solution Manager Pane (Options Dialog Box > GUI Testing Tab) 315
Solution Manager Trace Options Dialog Box 316
Add-ins Guide
HP Unified Functional Testing (12.50) Page 9

Value Map Dialog Box 317
Part 13: Siebel Add-in 319Siebel Add-in - Quick Reference 320Siebel Add-in - Testing and Configuration 323
Siebel Add-in - Overview 324Considerations - Siebel Add-in 324Siebel Test Object Model - Overview 325
Recording Steps on Siebel Objects 326Native Operations and Properties in Siebel 7.0.x and 7.5.x Applications 327
Siebel Add-in - Checkpoints and Output Values 327Spooling Data from a Siebel Table 329
Siebel 7.7.x or Later - Test Automation Module Configuration 330How to Define Environment Variables for Siebel Applications 331Siebel Tab (Record and Run Settings Dialog Box) 333Troubleshooting and Limitations - Siebel Add-in 335
Siebel 7.7.x or Later 336Siebel 7.0.x and 7.5.x 337
Siebel Test Express 339Using Siebel Test Express to Generate or Update Shared Object Repositories 340How to Use Siebel Test Express to Generate or Update a Shared Object Repository 340Create Object Repository Wizard 342
Connection Information Page (Create Object Repository Wizard) 342Screen Selection Page (Create / Update Object Repository Wizard) 343Importing Test Objects Page (Create Object Repository Wizard) 344Object Repository Created / Updated Page (Create / Update Object Repository Wizard) 345
Part 14: Standard Windows Testing Support 346Standard Windows Support -Quick Reference 347Troubleshooting and Limitations - Standard Windows 349
Part 15: Stingray Add-in 350Stingray Add-in - Quick Reference 351Stingray Add-in - Testing and Configuration 353
Setting Up Stingray Object Support 354Considerations for Working with the Stingray Add-in 354Stingray Run-time Agent (Agent DLL) 354Stingray Precompiled Agent Mode 355How to Set Up Your Stingray Project Using the Precompiled Agent Mode 356Stingray Support Configuration Wizard 358
Add-ins Guide
HP Unified Functional Testing (12.50) Page 10
Support Mode Selection Page (Stingray Support Configuration Wizard) 359Add Support Code Page (Stingray Support Configuration Wizard) 360Select Configuration Mode Page (Stingray Support Configuration Wizard) 362Manual Configuration Mode Page (Stingray Support Configuration Wizard) 364Automatic Configuration Mode Page (Stingray Support Configuration Wizard) 365Detected Stingray Components Page (Stingray Support Configuration Wizard) 367Finish Page (Stingray Support Configuration Wizard) 369Detection Failure Page (Stingray Support Configuration Wizard) 370
Stingray Pane (Options Dialog Box > GUI Testing Tab) 371Record Cell Editing Options - Example 374
Troubleshooting and Limitations - Stingray Add-in 374
Part 16: Terminal Emulator Add-in 377Terminal Emulator Add-in - Quick Reference 378Terminal Emulator Add-in - Testing and Configuration 380
Terminal Emulator Add-in - Overview 381Recording Tests and Components on Terminal Emulator Applications 382
Considerations for Recording and Running Tests and Components on TerminalEmulators 383
Run Session Synchronization 384Terminal Emulator Recovery Scenarios 384How to Configure an Emulator to Work with the Terminal Emulator Add-in 385How to Set Your HLLAPI Terminal Emulator to Work with UFT 389How to Manage Terminal Emulator Configuration Settings 389How to Copy Existing Terminal Emulator Configurations 390How to Check the Validity of a Terminal Emulator Configuration 392
Validating a Terminal Emulator - Possible Error Responses 392Invalid HLLAPI DLL 392Cannot detect an open session 393Cannot locate the main window class 393Cannot detect the emulator screen 393Cannot connect to the open session 393Cannot retrieve session text 394Cannot detect open session, or Cannot locate the main window class 394HLLAPI DLL not found 394More than one session open 394Unknown error 394
How to Synchronize Steps on Terminal Emulators 395Terminal Emulator Pane (Options Dialog Box > GUI Testing Tab) 397Terminal Emulator Configuration Adjustments Dialog Box 399Checkpoints and Output Values - Terminal Emulators 404
Add-ins Guide
HP Unified Functional Testing (12.50) Page 11
Terminal Emulator Configuration Wizard Overview 405Terminal Emulator Configuration Wizard Welcome Page 406Specify Wizard Operation Page 407Emulator Setup Page 408Configure HLLAPI Properties Page 409HLLAPI Configuration Test Page 410Configure Emulator Classes Page 413Configure Emulator Screen Settings Page 414Completing the Terminal Emulator Configuration Wizard Page 417
Troubleshooting and Limitations - Terminal Emulator 419
Part 17: VisualAge Smalltalk Add-in 424VisualAge Smalltalk Add-in - Quick Reference 425How to Configure the VisualAge Smalltalk Add-in 427
Part 18: Visual Basic Add-in 428Visual Basic Add-in - Quick Reference 429Troubleshooting and Limitations - Visual Basic Add-in 431
Part 19: Web Add-in 432Web Add-in - Quick Reference 433Web Add-in - Testing and Configuration 436
Event Recording Configuration for Web Objects - Overview 437Event Listening and Recording for Web Objects 438Considerations - Event Listening and Recording 439Event Listening and Recording - Use-case Scenario 440
Web Add-in Extensibility 440Extensibility Accelerator for HP Functional Testing 441
How to Manage Custom Web Event Recording Configurations 442How to Manage Listening and Recording Events for Web Objects 443Web Event Recording Configuration Dialog Box 445Custom Web Event Recording Configuration Dialog Box 447Troubleshooting and Limitations - Web Add-in 449
Web Add-in - Multiple Browser Support 451Testing Applications on Multiple Browsers 452
Working with Multiple Browsers - Object Identification Issues 452Testing Applications on Multiple Browsers - Creating a Single Test for All BrowserTesting 457Testing Applications on Multiple Browsers - Running the Test on Multiple Browsers 458Using Descriptive Programming for Multiple Browser Testing - Use-case Scenario 459
Add-ins Guide
HP Unified Functional Testing (12.50) Page 12

Working With Mozilla Firefox 467Working With Apple Safari on a Remote Mac Computer 469
The UFT Connection Agent for Mac Computers 471Securing the Communication With the Remote Mac Computer 473
How to Set Up Multiple Browser Testing 474How to Enable the HP Functional Testing Agent Chrome Extension 479How to Enable UFT to Test Local HTML Pages in Google Chrome 480How to Connect to a Remote Mac Computer 480How to Install and Configure UFT Connection Agent on Your Mac 483Troubleshooting and Limitations - Internet Explorer 487Troubleshooting and Limitations - Mozilla Firefox 488Troubleshooting and Limitations - Google Chrome and Apple Safari 491
Part 19: Web 2.0 Add-ins 495Web 2.0 Add-ins - Quick Reference 496Web 2.0 Toolkit Support 498Troubleshooting and Limitations - Web 2.0 Add-ins 501
Part 19: Windows Runtime Add-in 504Chapter 35: Windows Runtime Add-in - Quick Reference 505Using the Windows Runtime Add-in in UFT - Overview 507How to Use UFT in a Windows Runtime Environment 507Troubleshooting and Limitations - Windows Runtime 509
Part 20: Appendix 511Appendix A: GUI Checkpoints and Output Values Per Add-in 512
Supported Checkpoints 513Supported Output Values 515
Send Us Feedback 518
Add-ins Guide
HP Unified Functional Testing (12.50) Page 13
Welcome to the Add-ins GuideThe HP Unified Functional Testing Add-ins Guide explains how to set up support for, and work with, theUFT add-ins and standard Windows testing support, enabling you to test any supported environmentusing GUI tests and business components. This guide begins with an introductory section that describesworking with GUI testing add-ins, and specific aspects of working with Windows-based and Web-basedadd-ins. After this overview section, the add-ins are presented alphabetically.
The information, examples, and screen captures in this guide often focus specifically on working withGUI tests. However, much of the information applies equally to keyword components and scriptedcomponents. Information that is unique to using a specific add-in with BPT is indicated as such.
Note: Keyword components and scripted components are part of HP BPT, which utilizes a keyword-driven methodology for testing applications. For more information, see the section on working withBPT in the HP Unified Functional Testing User Guide.
For users that work with UFT add-in extensibility, UFT also provides developer guides that describe howto extend UFT support for third-party and custom controls for supported environments, such as Delphi,Java, .NET, or Web. For more information, see the relevant Add-in Extensibility Guide, available from theUFT Extensibility Documentation program group (Start > All Programs > HP Software > HP UnifiedFunctional Testing > Extensibility > Documentation or the <UFT installationfolder>\help\Extensibility folder.
Note: For details on accessing UFT and UFT tools and files in Windows 8 and Windows Server 2012,see "Accessing UFT in Windows 8.X or Higher Operating Systems" on page 517.
Prerequisite Background
This guide is intended for UFT users at all levels. You should already have some understanding offunctional testing concepts and processes, and know which aspects of their application you want totest.
In addition, because each UFT add-in takes advantage of commonly used UFT features such as theobject repository, Keyword View, and checkpoints and output value steps, you should also have at leasta basic understanding of these concepts before you begin working with a UFT add-in.
This guide assumes that you are familiar with UFT features and options. It describes the functionalitythat is added or changed in UFT when you work with specific GUI testing add-ins, as well as other add-in-specific considerations and best practices.
This guide should be used in conjunction with the HP Unified Functional Testing User Guide and theHP UFT Object Model Reference for GUI Testing.
HP Unified Functional Testing (12.50) Page 14
UFT Guides and ReferencesThe following tables provide a list of the UFT guides, online help and references:
Note: To check for recent updates of any of the guides below, visit the HP Software ProductManuals Web site (https://softwaresupport.hp.com/group/softwaresupport/search-result?keyword=).
Getting started
Reference Description
What's New? Describes the newest features in the latest version of UnifiedFunctional Testing.
You can also access theWhat’s New from theUnified FunctionalTestingHelpmenu.
Product Movies Click the link or select Help > Product Feature Movies to viewshort movies that demonstrate themain product features.
Readme Provides last-minute news and information about Unified FunctionalTesting.
For the latest readme file, go to theHP SoftwareManuals Web site(requires an HP Passport) athttps://softwaresupport.hp.com/group/softwaresupport/search-result?keyword=.
UFT PAM TheProduct Availability Matrix (PAM) provides current informationabout technologies and integrations supported for this version ofUFT.
UFT Tutorial TheUFT Tutorial is a self-paced printable guide, designed to lead youthrough the process of creating GUI, API, and full UFT tests of yourcomposite applications.
GUI Testing Tutorial for WebApplications
TheGUI Testing Tutorial for Web Applications is a self-pacedprintable guide, designed to lead you through the process of creatingGUI tests of your Web applications and familiarize you with thetesting environment.
PDF guides
Guide Description
UFT UserGuide
TheHP Unified Functional Testing User Guide describes how to useUFT to test your applications. It provides step-by-step instructions to help you create, debug, and run tests, and report defects detected during the testingprocess.
RunResults
TheHP Run Results Viewer User Guide explains how to use theRun Results Viewer to interpret and use the testresults from your GUI or API tests.
Add-ins GuideWelcome to the Add-ins Guide
HP Unified Functional Testing (12.50) Page 15
Guide Description
Viewer
UFTInstallationGuide
TheHP Unified Functional Testing Installation Guide provides complete, step-by-step instructions on how toinstall and set up UFT on a standalone computer.
UFTQuickStart
TheUFT Installation QuickStart Sheet explains the steps to perform abasic installation of UFT.
UFT Add-ins Guide
TheHP Unified Functional Testing Add-ins Guide explains how to set up support for UFT add-ins and standardWindows testing support. Add-ins enable you to test any supported environment using GUI tests and businesscomponents.
What'sNew
Describes the newest features in the latest version of Unified Functional Testing.
SecurityReference
Contains security relevant information for using UFT and references for further information.
RuntimeEngineGuide
Contains information on how to run tests using theRuntimeEngine installation (without theUFT IDE).
References
Links to the references are available from the UFT online help home page.
Reference Description
Object ModelReference
TheObject Model Reference for GUI Testing includes adescription, a list of methods and properties,syntax, examples, and identification properties for each UFT test object.
VBScript Reference Microsoft's Visual Basic Scripting documentation that describes objects, methods, properties,functions, and other elements that can beused when writing VBScript scripts.
Automation ObjectModel Reference
List the objects, methods, and properties that enable you to control UFT from within anotherapplication.
Object RepositoryAutomation Reference
Describes the objects that enable you to manipulateUFT shared object repositories and their contentsfrom outside of UFT.
Run Results SchemaReference
Provides details about the structure of theRun Results XML schema, and describes the elements andattributes used in the its XML reports.
Test Object SchemaReference
A reference describing the elements and attributes available for creating test object configuration XMLcontent, for usewhen creating UFT extensibility projects.
Object RepositorySchemaReference
Describes the elements and complex types defined for the object repository schema.
For additional online references, see the Welcome section of a PDF guide.
Add-ins GuideWelcome to the Add-ins Guide
HP Unified Functional Testing (12.50) Page 16
Additional Online ResourcesThe following additional online resources are available:
Resource Description
HP SoftwareSupport Online
TheHP Software Support Web site (www.hp.com/go/hpsoftwaresupport). To access, chooseHelp > HPSoftware Support.
Note: Most of the support areas require that you register as an HP Passport user and sign in. Manyalso require a support contract. To register for an HP Passport user ID, go to:http://h20229.www2.hp.com/passport-registration.html
Testing Forums l GUI Testing: http://h30499.www3.hp.com/t5/Unified-Functional-Testing/bd-p/sws-Fun_TEST_SF
l API Testing: http://h30499.www3.hp.com/t5/Service-Test-Support-and-News/bd-p/sws-Serv_TEST_SF
l BPT: http://h30499.www3.hp.com/t5/Business-Process-Validation/bd-p/sws-BPT_SF
UFT ProductPage
TheHP Unified Functional Testing product page (http://www8.hp.com/us/en/software-solutions/unified-functional-testing-automated-testing/index.html), with information and relatedlinks about UFT. To access, select Help > Useful Links > Product Page.
Troubleshooting& KnowledgeBase
TheTroubleshooting page (http://h20230.www2.hp.com/troubleshooting.jsp) on theHP SoftwareSupport Web sitewhere you can search theHP Software Self-solve knowledgebase. To access, selectHelp > Knowledge Base orHelp > Troubleshooting.
HP SoftwareCommunity
TheHP IT Experts Community site (http://h10124.www1.hp.com/campaigns/IT_Experts/pages/home.html), where you can interact with other HP software users, read articles and blogson HP software and access downloads of other software products.
HP Manuals Site TheHP SoftwareProduct Manuals Web site (http://support.openview.hp.com/selfsolve/manuals), tosearch for themost up-to-date documentation for a selected HP Software product. To access, selectHelp > Useful Links > HP Manuals Site.
What's New TheUFT What's New Help, describing the new features and enhancements in this version of UFT.
Product Movies TheUFT HPLN (HP LiveNetworks) page (https://hpln.hp.com/page/uft-120-videos) with a list of allproduct movies.
HP SoftwareWeb site
TheHP SoftwareWeb site (www.hp.com/go/software). This site provides you with themost up-to-dateinformation on HP Software products. This includes new software releases, seminars and trade shows,customer support, and more.
You can access the following sample applications from the Startmenu. These applications are the basisfor many examples in this guide:
l Mercury Tours sample Web site. The URL for this Web site is http://newtours.demoaut.com.
l Flight reservation application. To access from the Start menu, select All Programs > HP Software >HP Unified Functional Testing > Sample Applications > Flight API / Flight GUI.
Add-ins GuideWelcome to the Add-ins Guide
HP Unified Functional Testing (12.50) Page 17

These applications are also available from the file system at: <UFT installationfolder\samples\Flights Appilcation\FlightsGUI.exe (for the Flight GUI application) or <UFTinstallation folder>\samples\Flight_Application\FlightsAPI.exe (for the Flight APIapplication)
Add-ins GuideWelcome to the Add-ins Guide
HP Unified Functional Testing (12.50) Page 18

HP Unified Functional Testing (12.50) Page 19
Part 1: Working with UFT Add-insThis section includes:
"UFT Add-ins Overview" on page 20
"Web-Based Application Support" on page 34
"Windows-Based Application Support" on page 81
UFT Add-ins OverviewThis chapter includes:
• UFT Add-in Support - Overview 21
• Loading UFT Add-ins 22
• Add-in Licenses 23
• Considerations for Working with UFT Add-ins 23
• Record and Run Settings for Add-ins - Overview 24
• Considerations for Defining Record and Run Settings 25
• Environment Variables in Record and Run Settings 26
• UFT Add-in Extensibility 27
• How to Manage UFT Add-ins 28
• How to Define Record and Run Settings for UFT Add-ins 29
• Add-in Manager Dialog Box 31
HP Unified Functional Testing (12.50) Page 20
UFT Add-in Support - OverviewUFT add-ins help you to create and run tests and business components on applications in a variety ofdevelopment environments. After you load an add-in, you can record and run tests or businesscomponents on applications in the corresponding development environment, similar to the way you dowith any other application. When you work with UFT add-ins, you can use special methods, properties,and various special options to create the best possible test or business component for your application.
You can install UFT add-ins when you install UFT, or you can install the add-ins at a later time by runningthe installation again in Modifymode. For details about installing and loading add-ins, see "How toManage UFT Add-ins" on page 28.
When UFT opens, you can choose which of the installed add-ins you want to load using the UnifiedFunctional Testing "Add-in Manager Dialog Box" (described on page 31), but to maximize performance,you should load only the add-ins you need for that testing session.
UFT includes built-in support for testing standard Windows applications. Standard Windows testingsupport is automatically loaded when UFT opens.
Your UFT license enables all UFT features, including the use of all UFT add-ins. You can use the latestreleased version of all add-ins with UFT. If you upgrade from a version earlier than 9.5, only licensedadd-ins are available. Additional non-licensed add-ins that you install are disabled in the "Add-inManager Dialog Box". For details on installing add-ins and licenses, see the HP Unified Functional TestingInstallation Guide. For details, see "Add-in Licenses" on page 23.
Using Add-ins in Your Test or Component
l You can use the Keyword View, the Step Generator, and the Editor to activate environment-specifictest object and native (run-time object) operations, retrieve and set the values of properties, andcheck that objects exist.
l You can enhance your tests and business components using environment-specific checkpoints andoutput values. See the sections describing checkpoints and output values in the HP Unified FunctionalTesting User Guide.
l You can customize the Active Screen capture settings for some of the UFT add-ins. When you applycustom Active Screen settings, you override your previous capture-level settings with all of thesettings in the Custom Active Screen Capture Settings dialog box. If you want to customize onlyspecific settings, use the Reset to option to ensure that all other settings are using the capture-levelsetting you prefer and then modify the specific settings you need. For details, see the sectiondescribing Active Screen capture setting options in the HP Unified Functional Testing User Guide.
Available Add-ins Environments
l Several UFT Add-ins are designed to support special objects that are generally available in Webapplications, such as standard Web (HTML), Siebel, .NET Web Forms, and Web-based SAP objects.
HP Unified Functional Testing (12.50) Page 21
These add-ins are known as Web-based Add-ins. The interface options, capabilities, and otherfunctionality that is available for the Web-based add-ins are often identical or similar. These Web-specific features are described in "Web-Based Application Support" on page 34
l UFT provides a set of add-ins designed to support special objects that are generally part of Windowsapplications, such as .NET Windows Forms, Windows Presentation Foundation, PowerBuilder, SAP GUIfor Windows, VisualAge Smalltalk, Stingray, and others. These add-ins are known as Windows-basedAdd-ins. The interface options, capabilities, and other functionality that is available for the Windows-based add-ins are often identical or similar. These Windows-specific features are described in"Windows-Based Application Support" on page 81
This section also includes:
• Loading UFT Add-ins 22
• Add-in Licenses 23
• Considerations for Working with UFT Add-ins 23
Loading UFT Add-insTo test applications developed in various environments, you must ensure that the relevant UFT add-in isinstalled and loaded on the computer on which you create and run your tests and business components.Loading the relevant add-in enables UFT to work with the corresponding environment.
When you start UFT, the "Add-in Manager Dialog Box" (described on page 31) opens. It displays a list ofall installed add-ins.
If you have UFT add-ins installed, you can specify which add-ins to load at the beginning of each UFTsession. You can also load UFT without add-in support if you want to test only standard Windows-basedobjects.
While UFT is open, you can check whether a specific add-in is installed by choosing Help > About UnifiedFunctional Testing. Loaded add-ins are indicated by a check mark in the add-ins list.
Tip: The Web Services Add-in is supported for backwards compatibility only and is not enabled bydefault. New tests and components can use UFT's API testing solution for web service testingpurposes. To enable the Web Services Add-in for previously created tests, contact HP Softwaresupport.
When you load an add-in, UFT recognizes the objects you work with on the corresponding environment.In many cases, loading the add-in also adds new user interface options and capabilities to UFT, as wellas adding support for the add-in's object model—the set of test objects, methods, and propertiesspecially designed for working with the objects in your development environment. Details of theseobjects, methods, and properties can be found in the relevant section of the HP UFT Object ModelReference for GUI Testing (select Help > HP Unified Functional Testing Help).
Add-ins GuideUFT Add-ins Overview
HP Unified Functional Testing (12.50) Page 22

Add-in LicensesWhen you open UFT, if an add-in license has not yet been installed for a specific add-in, the add-in isdisplayed as Not Licensed in the License column of the "Add-in Manager Dialog Box" (described on page31). An add-in may also be displayed as Not Licensed if no concurrent license server within your subnethas a registered license for the specific add-in, or if all concurrent licenses are in use (and are,therefore, unavailable). In this case, you can use the LSFORCEHOST or LSHOST variable to connect to aconcurrent license server outside of the subnet that has the relevant add-in license installed on it, ifone is available. For details on connecting to concurrent license servers, see the HP Unified FunctionalTesting Installation Guide.
You can also view license details for all currently loaded licensed add-ins in the About Unified FunctionalTestingDialog Box (Help > About Unified Functional Testing).
l For seat licenses, the category for each license is displayed. The license category may be Demo,Permanent, Commuter, or Time-Limited. For Demo, Commuter (used with concurrent licenses), andTime-Limited UFT seat licenses, the number of days and hours remaining until the license expires isalso displayed.
l For concurrent licenses, the URL or host name of the concurrent license server used for each licenseis displayed.
l To switch between a seat and a concurrent license, click Modify License. Note that you can use onlyone license type per session for UFT and all loaded add-ins—either seat or concurrent. For moreinformation on license types, installing licenses, and modifying licenses, see the HP Unified FunctionalTesting Installation Guide.
Considerations for Working with UFT Add-insConsider the following when loading and using UFT add-ins:
Installing and Loading Add-ins
l You must install and load an add-in to enable UFT to recognize objects from the correspondingenvironment. To load an add-in, select the add-in from the "Add-in Manager Dialog Box" (describedon page 31) that opens when you start UFT.
l For optimal performance when testing your applications, it is strongly recommended that you loadonly the required add-in or add-ins. For example, if you want to test a process that spans a Webapplication and a .NET application, load only the Web and .NET Add-ins. Do not load all add-ins unlessyou need to work with all of them. As a reminder, the tip at the bottom of the Add-in Managerchanges to red text if more than three add-ins are selected.
l Some UFT add-ins require additional configuration after the installation is complete. Similarly, someenvironments may require configuration to enable UFT to interact with them. Configurationrequirements, if any, are described in the introductory section of each relevant environment.
Add-ins GuideUFT Add-ins Overview
HP Unified Functional Testing (12.50) Page 23
l Some applications must be opened prior to opening UFT, while some must be opened after UFT isopened. These requirements are described in the introductory section for each relevantenvironment.
l When testing applications that do not contain .NET objects, it is strongly recommended that you donot load the .NET Add-in.
l When you open a test or business component, UFT compares the add-ins that are currently loadedwith the add-ins associated with your test or with your business component's application area. If theydo not match, UFT issues a warning message. For details on matching loaded add-ins with installedadd-ins, see "Match loaded add-ins with associated add-ins" on page 28.
Running UFT from ALM with Add-ins
l When you run a UFT test from ALM, ALM instructs UFT to load the add-ins that are associated withthe test.
If you created the test in ALM (and not in UFT), the test contains the settings specified in thetemplate test you chose when creating the test. If you need to modify the associated add-ins, youcan do so by opening the test in UFT. For details, see the section on template tests in the HP UnifiedFunctional Testing User Guide.
l Before you run a UFT test from ALM, make sure that the required UFT add-ins are installed on thecomputer on which you want to run the UFT test.
Record and Run Settings for Add-ins - OverviewBefore you record or run a test on an application, you can use the Record and Run Settings Dialog Box toinstruct UFT which applications to open when you begin to record or run your test.
For some Windows-based applications, you also use the dialog box to specify the specific applicationsyou want UFT to recognize during record, run, and Object Spy sessions. For example, you can choose tohave UFT open a specific application when you start a record or run session.
You can set your record and run options in the Record and Run Settings dialog box, or you can set theoptions using environment variables.
The Record and Run Settings dialog box opens automatically each time you begin recording a new testand saves your settings with that test. Subsequently, when you perform additional record or runsessions on existing tests, the Record and Run Settings dialog box does not open. This is because UFTautomatically applies the saved record and run settings.
You can modify the record or run settings prior to any session using the Record and Run Settings dialogbox (Record > Record and Run Settings).
The Record and Run Settings dialog box always contains the Windows Applications tab. It may containother tabs corresponding to add-ins that are loaded. For details on which tab of the Record and RunSettings dialog box you should use with an add-in, see the relevant add-in chapter.
Add-ins GuideUFT Add-ins Overview
HP Unified Functional Testing (12.50) Page 24
For details on defining record and run settings, see the relevant add-in environment section, forexample, "Windows Applications Tab (Record and Run Settings Dialog Box)" on page 93 if you are testinga standard Windows-based application.
This section also includes:
• Considerations for Defining Record and Run Settings 25
• Environment Variables in Record and Run Settings 26
Considerations for Defining Record and Run Settingsl The setting of the Active Screen capture level (Tools > Options > GUI Testing tab > Active Screen
pane) can significantly affect the recording time for your test and the functionality of the ActiveScreen while editing your test. Confirm that the level selected answers your testing needs. Fordetails, see the section on setting active screen options in the HP Unified Functional Testing UserGuide.
l You can set the record and run settings for some add-in environments using the corresponding tab inthe Record and Run Settings dialog box (displayed only when the add-in is installed and loaded). Fordetails on record and run settings for:
l Windows-based applications, see "Record and Run Settings for Windows-Based Applications" onpage 83.
l Web-based environments, see "Web Tab (Record and Run Settings Dialog Box)" on page 71.
l other environments, see the relevant add-in chapter.
In addition to setting the appropriate settings in the specific application tabs, you should confirmthat the other tabs in the dialog box have the appropriate settings.
The following settings are recommended:
l Windows Applications tab.When not running Windows-based applications, select Record and runonly on: and confirm that all three check boxes are cleared.
l Other tabs. (If displayed.) Select the option to record and run on any open application (upper radiobutton of each tab).
While these settings do not directly affect your record or run sessions, they prevent you frominadvertently recording operations performed on Windows applications (such as e-mail) during yourrecording session. These settings also prevent UFT from opening unnecessary applications when yourecord or run tests on Windows-based applications.
l You can set record and run options such that no applications open at the beginning of record and runsessions. In this case, you may need to open the application after you open UFT to ensure that UFTrecognizes the application. For details, see the relevant add-in chapter.
l After you set the record and run settings for a test, the Record and Run settings dialog box will notopen the next time you record operations in that test. If needed, you open the Record and RunSettings dialog box by choosing Record > Record and Run Settings.
Add-ins GuideUFT Add-ins Overview
HP Unified Functional Testing (12.50) Page 25
If you change the record and run settings for additional recording sessions, confirm that you returnthe settings to match the needs of the first step in your test before you run it.
You should set or modify your record and run preferences in the following scenarios:
l You have already recorded one or more steps in the test and you want to modify the settingsbefore you continue recording.
l You want to run the test on a different application than the one you previously set in the Recordand Run Settings dialog box.
l If you define environment variables to specify the record and run details, those values override thevalues in the Record and Run Settings dialog box. For details, see "Environment Variables in Recordand Run Settings" below.
l After defining the connection information for HP Mobile Center in the Mobile pane of the Optionsdialog box (Tools > Options > GUI Testing tab > Mobile node), a remote access window opens everytime a record or run session begins. To prevent this window from opening when you are not testingmobile applications, select Do not record and run tests on mobile in the Mobile pane of the Recordand Run settings dialog box.
Environment Variables in Record and Run SettingsYou can use special, predefined environment variables to specify the applications or browsers you wantto use for your test. This can be useful if you want to test how your application works in differentenvironments. For example, you may want to test that your Web application works properly on identicalor similar Web sites with different Web addresses.
When you define an environment variable for one (or more) of the application details, the environmentvariable values override any values that were added using these areas of the Record and Run Settingsdialog box.
Note: If you select the option to Record and Run on any application (the upper radio button in eachtab of the Record and Run Settings dialog box), UFT ignores any defined Record and Runenvironment variables.
You can define the environment variables as internal user-defined variables, or you can add them to anexternal environment variable file and set your test to load environment variables from that file.
You can set your Record and Run settings manually while recording your test and then define theenvironment variables or load the environment variable file only when you are ready to run the test (asdescribed in the procedure below).
Alternatively, you can define environment variables before you record your test. In this case, UFT usesthese values to determine which applications or browsers to open when you begin recording—assumingthat the option to open an application when starting record and run sessions for the particularenvironment is selected. (This option corresponds to the lower radio button in each tab of the Recordand Run Settings dialog box, and the third check box in the Windows Applications tab.)
Add-ins GuideUFT Add-ins Overview
HP Unified Functional Testing (12.50) Page 26
For details on setting and modifying environment variables, see "How to Define Record and Run Settingsfor UFT Add-ins" on page 29.
UFT Add-in ExtensibilityUFT add-in extensibility, available for some environments, enables you to extend the relevant UFT add-in to support third-party and custom controls that are not supported out-of-the-box.
When UFT learns an object in an application, it recognizes the object as belonging to a specific testobject class. This type of test object might not have certain characteristics that are specific to thecontrol you are testing. Therefore, when you try to create test steps with this test object, the availableidentification properties and test object operations might not be sufficient.
By developing support for a control using Add-in Extensibility, you can direct UFT to recognize thecontrol as belonging to a specific test object class, and you can specify the behavior of the test object.
You can also teach UFT to treat a control that contains a set of lower-level controls as a singlefunctional control, instead of relating to each lower-level control separately. For example, a calendarcontrol may consist of buttons and text boxes. If you teach UFT to recognize the control as a calendar,ignoring the individual buttons and text boxes, you can create more meaningful tests on the calendarcontrol.
In most environments, you can also extend the list of available test object classes that UFT is able torecognize. This enables you to create tests that fully support the specific behavior of your controls.
UFT add-in extensibility is currently supported for the Delphi, Java, .NET, Silverlight, Web, and WPF add-ins.
If you cannot develop support for your controls using the extensibility options provided for theseenvironments, you might be able to take advantage of the Testing Extensibility for UFT program.Testing Extensibility is intended for customers who want to extend UFT testing capabilities fortechnologies or applications not supported by existing UFT add-ins. Participation in the programrequires a separate license agreement with HP.
For details on Testing Extensibility, contact HP Software support.
For details on UFT Add-in Extensibility, see:
l "Delphi Add-in Extensibility" on page 147
l "Java Add-in Extensibility" on page 179
l ".NET Add-in Extensibility" on page 120
l "Silverlight Add-in Extensibility " on page 105
l "Web Add-in Extensibility" on page 440
l "WPF Add-in Extensibility" on page 137
Add-ins GuideUFT Add-ins Overview
HP Unified Functional Testing (12.50) Page 27
How to Manage UFT Add-insThis task contains the following steps:
l "Load or remove add-ins from UFT" below
l "Match loaded add-ins with associated add-ins" below
Load or remove add-ins from UFT
1. Start UFT.
The Unified Functional Testing "Add-in Manager Dialog Box" (described on page 31) opens.
2. In the add-in list, select or clear the check box for the relevant add-in and click OK.
Match loaded add-ins with associated add-ins
If there are add-ins associated with your test or with your business component's application area thatare not currently loaded, you can:
l Close and reopen UFT, and select the required add-ins in the "Add-in Manager Dialog Box" (describedon page 31).
l Remove the add-ins from the list of associated add-ins for your test or business component. Tochange the list of add-ins associated with your test or business component, select File > Settingsand click Modify in the Properties pane.
If add-ins are loaded but are not associated with your test or with your business component'sapplication area, you can:
l Close and reopen UFT, and clear the check boxes for the add-ins in the "Add-in Manager Dialog Box",if they are not required.
l Add the add-ins to the list of associated add-ins for your test or for your business component'sapplication area.
l To change the list of add-ins associated with your test, select File > Settings and click Modify inthe Properties pane.
l To change the list of add-ins associated with your business component, open the application areaassociated with your business component, and modify the list in the Properties pane.
For details on associating add-ins with your test or business component, see the HP Unified FunctionalTesting User Guide.
Add-ins GuideUFT Add-ins Overview
HP Unified Functional Testing (12.50) Page 28
How to Define Record and Run Settings for UFT Add-insThis task contains the following steps:
l "Define record and run settings for specific add-ins" below
l "Set record and run environment variables for add-ins" below
Define record and run settings for specific add-ins
1. Review "Considerations for Defining Record and Run Settings" on page 25.
2. Use one of the following to open the Record and Run Settings dialog box:
l Select Record > Record and Run Settings.
l Click the Record button or select Record > Record. If you are recording for the first time in atest and have not yet set your recording preferences (by opening the dialog box manually), theRecord and Run Settings dialog box opens.
The Record and Run Settings dialog box is divided by environment into several tabbed pages.
3. Select the relevant environment by clicking a tab.
4. Set the required options, as described in the relevant add-in chapter.
5. To apply your changes and keep the Record and Run Settings dialog box open, click Apply.
6. Close the Record and Run Settings dialog box to begin your record or run session, click OK.
Set record and run environment variables for add-ins
1. Review "Environment Variables in Record and Run Settings" on page 26.
2. Use one of the following to open the Record and Run Settings dialog box:
l Select Record > Record and Run Settings.
l Click the Record button or select Record > Record. If you are recording for the first time in atest and have not yet set your recording preferences (by opening the dialog box manually), theRecord and Run Settings dialog box opens.
The Record and Run Settings dialog box is divided by environment into several tabbed pages.
3. Set your record and run preferences normally before recording your test.
Note: If you already have environment variables set for one or more application details, andyou select the option to open an application when the record session begins (the lower radiobutton in each tab of the Record and Run Settings dialog box), UFT ignores the record settingsyou enter in the dialog box.
4. Record and edit your test normally.
Add-ins GuideUFT Add-ins Overview
HP Unified Functional Testing (12.50) Page 29

5. If you did not define environment variables prior to recording your test, define an environmentvariable for each application detail you want to set using the appropriate variable name. For detailson the variable names required, see:
l For Web browsers and URLs to open, see "Environment Variables for a Web-Based Environment"on page 55.
l For Windows applications on which you want to record and run tests, see "Record and RunSettings for Windows-Based Applications" on page 83.
l For other tabs in the Record and Run Settings dialog box, see the relevant add-in chapter in thisguide.
For details on how to define a user-defined environment variable and how to create environmentvariable files, see the section on using environment variable parameters in the HP UnifiedFunctional Testing User Guide.
6. Run the test. UFT uses the environment values to determine which applications to open at thebeginning of the run session, and on which processes to record.
Add-ins GuideUFT Add-ins Overview
HP Unified Functional Testing (12.50) Page 30
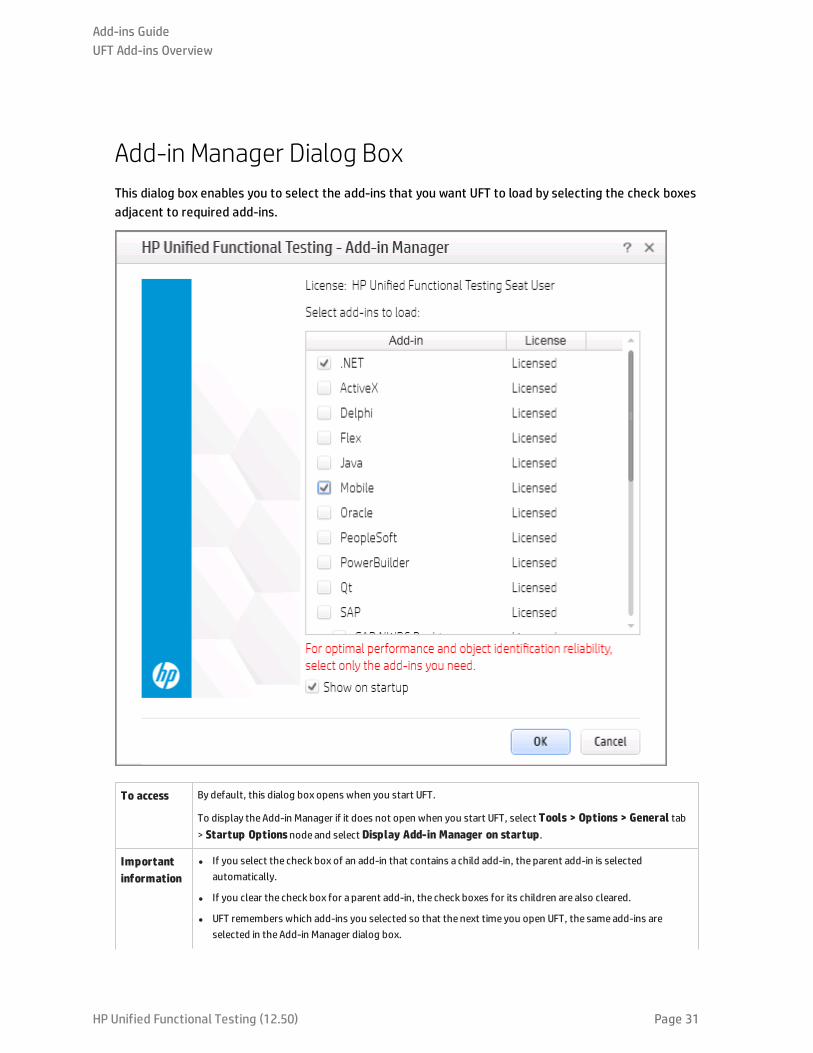
Add-in Manager Dialog BoxThis dialog box enables you to select the add-ins that you want UFT to load by selecting the check boxesadjacent to required add-ins.
To access By default, this dialog box opens when you start UFT.
To display theAdd-in Manager if it does not open when you start UFT, select Tools > Options > General tab> Startup Optionsnode and select Display Add-in Manager on startup.
Importantinformation
l If you select the check box of an add-in that contains a child add-in, the parent add-in is selectedautomatically.
l If you clear the check box for a parent add-in, the check boxes for its children are also cleared.
l UFT remembers which add-ins you selected so that the next time you open UFT, the sameadd-ins areselected in theAdd-in Manager dialog box.
Add-ins GuideUFT Add-ins Overview
HP Unified Functional Testing (12.50) Page 31
l If you load or unload an add-in that is displayed as a child of the Java add-in in theAdd-in Manager, onlyapplications that are opened after loading or unloading the add-in are affected.
Relevanttasks
l How to Start UFT in theHPUnified Functional Testing User Guide
l "How to Manage UFT Add-ins" on page 28
See also l About Unified Functional Testing Detailed Information Window in theHPUnified Functional Testing UserGuide
l "UFT Add-in Support - Overview" on page 21
l "Considerations for Working with UFT Add-ins" on page 23
User interface elements are described below:
UI Element Description
License The currently active license used by UFT.
Add-in Thenames of the installed add-ins.
The list of Add-ins might also include child nodes representing add-ins that you or a third party developed tosupport additional environments or controls using add-in extensibility. For details, see the relevant Add-inExtensibility Developer Guide, available from theUFT Extensibility Documentation program group (Start >All Programs > HP Software > HP Unified Functional Testing > Extensibility > Documentationorthe<UFT installation folder>\help\Extensibility folder).
Note:
l If you plan to test your application in aWeb browser, selectWebas well as your required add-in.
l If you want to test .NET Windows Forms, select .NET and clickOK. A message is displayed statingthat for full operation of the .NET Add-in you must also load theWeb Add-in. If you want to testonly .NET Windows Forms (and not .NET Web Forms), you can clickYes.
l For details on accessing UFT and UFT tools and files in Windows 8 and Windows Server 2012, see"Accessing UFT in Windows 8.X or Higher Operating Systems" on page 517.
Licensecolumn (foradd-ins only)
The license used by the add-in, if any, and the time remaining until a time-limited license expires:
l Licensed.Applies to the add-ins that are provided with UFT. Add-ins use the same license as UFT.Therefore, if UFT uses aPermanent license, the add-ins use the samePermanent license; if UFT uses aTime-Limited license, the add-ins use the sameTime-Limited license.
l Not Licensed.Applies to an add-in that does not have an installed seat license or access to a concurrentlicense (for example, if all concurrent licenses are currently in use, or if the required add-in license is notinstalled on the concurrent license server on your subnet). To load the add-in, you first need to install oraccess a license.
l Time Remaining.Specifies the number of days and hours remaining until a time-limited add-in licenseexpires. (Displayed onlywhen using aUFT seat license—not a concurrent license.)
For more details, see theHPUnified Functional Testing Installation Guide.
Show onstartup
Instructs UFT to display theAdd-in Manager dialog box each time you open UFT. When this check box iscleared, UFT opens and loads the sameadd-ins it loaded in the previous session, without displaying theAdd-in Manager.
Note: (for concurrent license users) If this check boxwas cleared in the previous session, and the
Add-ins GuideUFT Add-ins Overview
HP Unified Functional Testing (12.50) Page 32
UI Element Description
license type selected from the concurrent license server in that session is not currently available, UFTtries to load an available license that matches the selected add-ins.
To display the Add-in Manager again:
Select Tools > Options > General tab > Startup Optionsnode and select Display Add-in Manager onstartup.
Add-ins GuideUFT Add-ins Overview
HP Unified Functional Testing (12.50) Page 33
Chapter 2: Web-Based Application SupportThis chapter includes:
• Web-Based Application Support - Overview 35
• Considerations - Web-Based Application Support 35
• Registering Browser Controls 37
• Accessing Password-Protected Resources in the Active Screen 37
• Checkpoints for Web Pages 38
• Event Recording Configuration for Web-Based Applications 39
• Web Event Recording Configuration XML File Structure 40
• Advanced Operations on Web-Based Applications 41
• Activating methods associated with a Web-based object using the Object property 41
• Using programmatic descriptions for the WebElement object 42
• Web Object Identifiers 42
• Web Object Identifier Types 43
• Considerations - Web Object Identifiers 48
• How to Use Web Object Identifiers - Exercise 49
• How to Modify Event Recording Configuration for Web-Based Applications 51
• How to Configure UFT to Record Mouse Clicks 52
• Active Screen Dialog Box 54
• Environment Variables for a Web-Based Environment 55
• Register Browser Control Utility 56
• Web > General Pane (Options Dialog Box) 58
• Browser Details Dialog Box 60
• Web > Page/Frame Options Pane (Options Dialog Box) 61
• Web > Advanced Pane (Options Dialog Box) 63
• Web Pane (Test/Business Component Settings Dialog Box / Application Area - Additional SettingsPane) 68
• Advanced Authentication Dialog Box 70
• Web Tab (Record and Run Settings Dialog Box) 71
• Troubleshooting and Limitations - Web-Based Application Support 77
HP Unified Functional Testing (12.50) Page 34
Web-Based Application Support - OverviewUFT provides a number of add-ins for testing Web-based applications. The way you configure many ofyour UFT settings is the same or similar for most UFT Web-based add-ins. These common configurationoptions are described in the remainder of this chapter.
For additional details on how to work with Web-based add-ins, see the following sections:
l ".NET Web Forms Add-in - Quick Reference" on page 109
l "PeopleSoft Add-in - Quick Reference" on page 231
l "Siebel Add-in - Quick Reference" on page 320
l ".NET Silverlight Add-in - Quick Reference" on page 103
l "Web Add-in - Quick Reference" on page 433
l "Web 2.0 Add-ins" on page 495
l "Web-Based SAP Support - Quick Reference" on page 245
In addition to using the add-ins described above, you can also use the Extensibility Accelerator todevelop your own Web-based add-in support for third-party and custom Web controls that are notsupported by any of the above UFT Web-based add-ins. For details, see "Extensibility Accelerator for HPFunctional Testing" on page 441.
Considerations - Web-Based Application SupportThis section contains the following items to consider when testing Web-based applications:
l "Recording and Running Steps on Web Controls" below
l "Working with Web Browsers" on the next page
l "Testing Applications with Embedded Web Browser Controls" on the next page
Recording and Running Steps on Web Controls
l If UFT does not record Web events in a way that matches your needs, you can also configure theevents you want to record for each type of Web object. For example, if you want to record events,such as moving the pointer over an object to open a sub-menu, you may need to modify the Webevent configuration to recognize such events. For details, see "Event Recording Configuration forWeb-Based Applications" on page 39.
l If you are recording on a list in an application, you must highlight the list, scroll to an entry that wasnot originally showing, and select it. If you want to select the item in the list that is already displayed,you must first select another item in the list (click it), then return to the originally displayed item andselect it (click it). This is because UFT records a step only if the value in the list changes.
l If a Web element in an HTML page is set to be disabled or invisible, for example if a <DIV> elementabove it controls its appearance, but the elements on the page are available in the DOM, then UFT
HP Unified Functional Testing (12.50) Page 35
can perform operations on those objects even though a human user of the application could not.
Working with Web Browsers
l You select your browser in the "Web Tab (Record and Run Settings Dialog Box)" (described on page71).
l UFT does not support the option to zoom in and out of a Web page. If you use this option, some UFTfunctionality may not work as expected. For example, the Object Spy may be unable to correctlyhighlight objects or display object details. (These problems do not occur if the Zoom Text OnlyFirefox menu item is selected.)
Additionally, bitmap checkpoints will fail if a different zoom level is used when capturing theexpected bitmap than the zoom level used when running the checkpoint step.
l By default, the name assigned to the Browser test object in the object repository is always the nameassigned to the first Page object that is learned or recorded for the Browser object. The sameBrowser test object is used each time you learn an object or record in a browser with the sameordinal ID. Therefore, the name used for the Browser test object in the steps you record may notreflect the actual browser name.
l UFT Web support behaves as a browser extension in Microsoft Internet Explorer. Therefore, youcannot use the Web Add-in on Microsoft Internet Explorer without selecting the Enable third-partybrowser extensions option. To set the option, in Microsoft Internet Explorer select Tools > InternetOptions > Advanced and select the Enable third-party browser extensions option.
l For UFT to run JavaScript methods, the security settings in your browser must be set to allow activescripting. (In Internet Explorer, for example, you can find these security settings under: Tools >Internet Options > Security > Custom Level > Scripting > Active scripting.)
This is relevant if your test steps include RunScript or EmbedScriptmethods, or if you are workingwith test objects supported using Web Add-in Extensibility, such as Web 2.0 test objects.
l Creating and running steps that start an InPrivate Browsing session is supported only by using Tools> InPrivate Browsing. Using toolbars or extensions for this operation may cause Microsoft InternetExplorer to behave unexpectedly.
l Creating and running steps that are related to tabs, such as selecting a tab or creating a new tab isnot supported when Microsoft Internet Explorer is in Full Screen mode.
Workaround: Add a <Browser>.FullScreen step before and after the desired step to toggle FullScreen mode.
Testing Applications with Embedded Web Browser Controls
Working with applications that contain embedded Web browser controls is similar to working with Webobjects in a Web browser.
Note: Embedded browser controls are supported only for Microsoft Internet Explorer.
Add-ins GuideChapter 2: Web-Based Application Support
HP Unified Functional Testing (12.50) Page 36
To test objects in embedded browser controls, ensure that:
l The Web Add-in is loaded.
l The application opens only after UFT is open.
l (For tests) In the "Web Tab (Record and Run Settings Dialog Box)" (described on page 71), the Recordand run test on any open browser option is selected. (This option is not relevant for businesscomponents.)
After these conditions are met, you can start adding steps or running your test or business component.
Registering Browser ControlsA browser control adds navigation, document viewing, data download, and other browser functionalityto a non-Web application. This enables the user to browse the Internet as well as local and networkfolders from within the application.
UFT cannot automatically recognize the objects that provide browser functionality in your non-Webapplication as Web objects. For UFT to record or run on these objects, the application hosting thebrowser control must be registered.
Note: You can register applications developed in different environments, such as those written inJava, .NET, and so on.
For user interface details, see "Register Browser Control Utility" on page 56.
Accessing Password-Protected Resources in theActive ScreenWhen UFT creates an Active Screen page for a Web-based application, it stores the path to images andother resources on the page, rather than downloading and storing the images with your test.
Note: The Active Screen pane is not available when working with keyword components (although itis available for scripted components).
Storing the path to images and other resources ensures that the disk space used by the Active Screenpages captured with your test is not affected by the file size of the resources displayed on the page.
For this reason, a page in the Active Screen (or in your run results) may require a user name andpassword to access certain images or other resources within the page. If this is the case, a pop-up loginwindowmay open when you select a step corresponding to the page (see "Active Screen Dialog Box" onpage 54), or you may note that images or other resources are missing from the page.
Add-ins GuideChapter 2: Web-Based Application Support
HP Unified Functional Testing (12.50) Page 37
For example, the formatting of your page may look very different from the actual page on your Website if the cascading style sheet (CSS) referenced in the page is password-protected, and thereforecould not be downloaded to the Active Screen.
You may need to use one or both of the following methods to access your password-protectedresources, depending on the password-protection mechanism used by your Web server:
l Standard Authentication. If your server uses a standard authentication mechanism, you can enterthe login information in the "Web Pane (Test/Business Component Settings Dialog Box /Application Area - Additional Settings Pane)" (described on page 68). UFT saves this information withyour test and automatically enters the login information each time you select to display an ActiveScreen page that requires the information.
If you do not enter this information in the Web pane of the Test Settings dialog box and attempt toaccess the password-protected resources, the "Active Screen Dialog Box" (described on page 54)opens.
l Advanced Authentication. If your server uses a more complex authentication mechanism, you mayneed to log in to the Web site manually using the "Advanced Authentication Dialog Box" (described onpage 70). This gives the Active Screen access to password-protected resources in your Active Screenpages for the duration of your UFT session. When using this method, you must log in to your Web sitein the Advanced Authentication dialog box each time you open the test in a new UFT session.
In most cases, the automatic login is sufficient. In some cases, you must use the manual login method.In rare cases, you may need to use both login mechanisms to enable access to all resources in yourActive Screen pages.
Note: If your Web site is not password-protected, but you are still unable to view images or otherresources on your Active Screen, you may not be connected to the Internet, the Web server may bedown, or the source path that was captured with the Active Screen page may no longer beaccurate.
Checkpoints for Web PagesThis section describes the checkpoint types that are supported only for Web-based add-ins. For a list ofall supported checkpoints per add-in, see "Supported Checkpoints " on page 513
Accessibility Checkpoints
Accessibility checkpoints are designed to help you easily locate the areas of your Web site that requirespecial attention according to the W3C Web Content Accessibility Guidelines. They do not necessarilyindicate whether or not your Web site conforms to the guidelines.
Accessibility checkpoints are not supported for keyword components.
For details, see the section on accessibility checkpoints in the HP Unified Functional Testing User Guide.
Add-ins GuideChapter 2: Web-Based Application Support
HP Unified Functional Testing (12.50) Page 38
Page Checkpoints
When working with tests, you can check statistical information about your Web pages by adding pagecheckpoints to your test. These checkpoints check the links and the sources of the images on a Webpage. You can also instruct page checkpoints to include a check for broken links.
Page checkpoints are not supported for keyword components.
For details, see the section on page checkpoints in the HP Unified Functional Testing User Guide.
Tip: You can instruct UFT to create automatic page checkpoints for every page in all tests byselecting the Create a checkpoint for each Web page while recording check box in the Web >Advanced pane of the Options dialog box (Tools > Options > GUI Testing tab > Web > Advancednode). For details, see "Web > Advanced Pane (Options Dialog Box)" on page 63.
Event Recording Configuration for Web-BasedApplicationsWhen you record on a Web application, UFT generates steps by recording the events you perform on theWeb objects in your application. An event is a notification that occurs in response to an operation, suchas a change in state, or as a result of the user clicking the mouse or pressing a key while viewing thedocument.
UFT includes event recording configurations that have been optimized for each Web-based add-in, sothat in most cases UFT records steps for relevant events on each object and avoids recording steps forevents that usually do not impact the application. For example, by default, UFT records a step when aclick event occurs on a link object, but does not record a step when a mouseover event occurs on a link.
Each Web-based add-in has its own .xml file that defines the Web-event recording configuration forobjects in that environment.
When you perform an operation on a Web-based object during a recording session (and the appropriateadd-in is installed and loaded), UFT uses the recording configuration defined for that environment.
If your application contains several types of Web-based controls, the appropriate Web event recordingconfiguration is used for each object and the configuration for one environment does not overrideanother.
Customizing Event Recording Configurations for Web-Based Applications
You can view and customize the configuration settings for the Web Add-in in the "Web Event RecordingConfiguration Dialog Box" on page 445. The settings in that dialog box affect the recording behavior onlyfor objects that UFT recognizes as Web test objects.
Note: For the purposes of Web event recording, UFT treats Web test objects that are child objects
Add-ins GuideChapter 2: Web-Based Application Support
HP Unified Functional Testing (12.50) Page 39
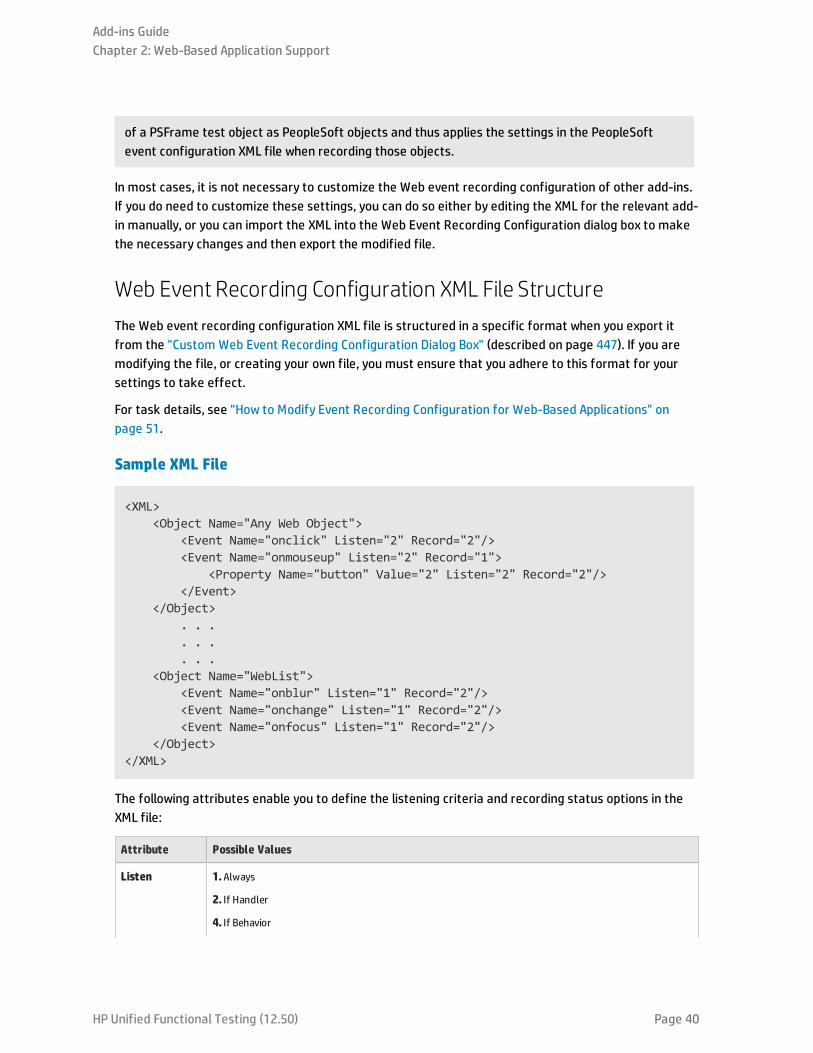
of a PSFrame test object as PeopleSoft objects and thus applies the settings in the PeopleSoftevent configuration XML file when recording those objects.
In most cases, it is not necessary to customize the Web event recording configuration of other add-ins.If you do need to customize these settings, you can do so either by editing the XML for the relevant add-in manually, or you can import the XML into the Web Event Recording Configuration dialog box to makethe necessary changes and then export the modified file.
Web Event Recording Configuration XML File StructureThe Web event recording configuration XML file is structured in a specific format when you export itfrom the "Custom Web Event Recording Configuration Dialog Box" (described on page 447). If you aremodifying the file, or creating your own file, you must ensure that you adhere to this format for yoursettings to take effect.
For task details, see "How to Modify Event Recording Configuration for Web-Based Applications" onpage 51.
Sample XML File
<XML> <Object Name="Any Web Object"> <Event Name="onclick" Listen="2" Record="2"/> <Event Name="onmouseup" Listen="2" Record="1"> <Property Name="button" Value="2" Listen="2" Record="2"/> </Event> </Object> . . . . . . . . . <Object Name="WebList"> <Event Name="onblur" Listen="1" Record="2"/> <Event Name="onchange" Listen="1" Record="2"/> <Event Name="onfocus" Listen="1" Record="2"/> </Object></XML>
The following attributes enable you to define the listening criteria and recording status options in theXML file:
Attribute Possible Values
Listen 1.Always
2. If Handler
4. If Behavior
Add-ins GuideChapter 2: Web-Based Application Support
HP Unified Functional Testing (12.50) Page 40
Attribute Possible Values
6. If Handler or Behavior
0.Never
Record 1.Disabled
2.Enabled
6.Enabled on Next Event
Advanced Operations on Web-Based ApplicationsThis section describes various advanced operations you can perform on Web-based objects, andincludes the following:
• Activating methods associated with a Web-based object using the Object property 41
• Using programmatic descriptions for the WebElement object 42
Activating methods associated with aWeb-based object usingthe Object propertyIn the Editor, you can use the Object property to activate the method for a Web object. Activating themethod for a Web object has the following syntax:
WebObjectName.Object.Method_to_activate( )
For example, suppose you have the following statement in your script:
document.MyForm.MyHiddenField.value = "My New Text"
The following example achieves the same thing by using the Object property, where MyDoc is the DOM'sdocument:
Dim MyDocSet MyDoc = Browser(browser_name).page(page_name).ObjectMyDoc.MyForm.MyHiddenField.value = "My New Text"
In the following example, LinksCollecton is assigned to the link collection of the page through theObject property. Then, a message box opens for each of the links, with its innerHTML text.
Dim LinksCollection, linkSet LinksCollection = Browser(browser_name).Page(page_name).Object.links
Add-ins GuideChapter 2: Web-Based Application Support
HP Unified Functional Testing (12.50) Page 41
For Each link in LinksCollectionMsgBox link.innerHTML
Next
For details on the Object property (.Object), see the section on retrieving and setting identificationproperty values in the HP Unified Functional Testing User Guide.
For a list of a Web object's internal properties and methods, see: http://msdn2.microsoft.com/en-us/library/ms531073.aspx
Using programmatic descriptions for theWebElement objectWhen UFT recognizes an object as a Web-based object that does not fit into any other UFT test objectclass, it learns the object as a WebElement object. You can also use a programmatic description with aWebElement test object to perform methods on any Web object in your Web site.
For example, when you run either of the examples below, UFT clicks the first Web object in the MercuryTours page with the name UserName.
Browser("Mercury Tours").Page("Mercury Tours").WebElement("Name:=UserName","Index:=0").Click
or
set WebObjDesc = Description.Create()WebObjDesc("Name").Value = "UserName"WebObjDesc("Index").Value = "0"Browser("Mercury Tours").Page("Mercury Tours").WebElement(WebObjDesc).Click
For details on the WebElement object, see the HP UFT Object Model Reference for GUI Testing. For detailson programmatic descriptions, see the section on programmatic descriptions in the HP UnifiedFunctional Testing User Guide.
Web Object IdentifiersDuring a run session, UFT attempts to identify each object in your application by matching thedescription properties stored for the corresponding test object with the properties of the DOM elementin the application. For complex Web applications that contain many objects, using only the standardidentification methods may have unreliable results. For details on the standard methods UFT uses toidentify objects, see the section on how UFT identifies objects in the HP Unified Functional Testing UserGuide.
You can instruct UFT to use Web object identifiers before the regular object identification process tohelp limit the number of candidate objects to identify. UFT accesses the application's DOM and returns
Add-ins GuideChapter 2: Web-Based Application Support
HP Unified Functional Testing (12.50) Page 42
objects that match the object identifier property values. UFT then continues to identify this smaller setof returned objects using the normal object identification process. Therefore, using Web objectidentifiers can lead to a more reliable and accurate object identification, and a quicker objectidentification process.
To follow an exercise describing the identification process using Web object identifiers, see " How to UseWeb Object Identifiers - Exercise" on page 49.
For details about the general workflow of the object identification process, see the section on objectidentification in the HP Unified Functional Testing User Guide.
This section includes:
• Web Object Identifier Types 43
• CSS Web Object Identification 43
• User-Defined XPath Web Object Identification 44
• Automatic X-Path Web Object Identification 44
• Attribute/* Notation Web Object Identification 44
• Style/* Notation Web Object Identification 45
• Considerations - Web Object Identifiers 48
• How to Use Web Object Identifiers - Exercise 49
Web Object Identifier TypesThe following Web object identifiers are available:
• CSS Web Object Identification 43
• User-Defined XPath Web Object Identification 44
• Automatic X-Path Web Object Identification 44
• Attribute/* Notation Web Object Identification 44
• Style/* Notation Web Object Identification 45
For general considerations on working with Web object identifiers, see "Considerations - Web ObjectIdentifiers" on page 48.
CSSWeb Object Identification
CSS (Cascading Style Sheet) is a language used to define formatting of elements in HTML pages. Youcan define a CSS identification property value for a test object to help identify a Web object in yourapplication based on its CSS definition.
UFT uses CSS identifiers only when identifying objects and not when learning objects. Therefore, theyare not available from the Object Spy dialog box or the Object Identification dialog box.
Add-ins GuideChapter 2: Web-Based Application Support
HP Unified Functional Testing (12.50) Page 43
For usage examples, see " How to Use Web Object Identifiers - Exercise" on page 49.
For more details on the Object Identification dialog box and on programmatic descriptions, see thesections on the Object Identification dialog box and Programmatic Descriptions in the HP UnifiedFunctional Testing User Guide.
User-Defined XPath Web Object Identification
XPath (XML Path) is a language used to define the structure of elements in XML documents. You candefine an XPath identification property to help identify a Web object in your application based on itslocation in the hierarchy of elements in the Web page. Because of the flexible nature of the language,you can define the XPath according to the unique way your Web page is structured.
UFT uses XPath identifiers only when identifying objects and not when learning objects. Therefore, theyare not available from the Object Spy dialog box or the Object Identification dialog box.
For usage examples, see " How to Use Web Object Identifiers - Exercise" on page 49.
Automatic X-Path Web Object Identification
You can instruct UFT to automatically generate and store an XPath value when learning Web testobjects. During the run session, if the automatically learned XPath for a particular object results inmultiple matches or no matches, the learned XPath is ignored. Additionally, if you have added a user-defined XPath or CSS identification property to a test object description, then the automatically learnedXPath is ignored.
Automatic XPath is a UFT-generated property, and therefore it is not available from the Object Spydialog box , the Add/Remove Properties dialog box, or the Object Identification dialog box.
You enable this option in the Web > Advanced pane of the Options dialog box. For details, see "Web >Advanced Pane (Options Dialog Box)" on page 63.
Attribute/* Notation Web Object Identification
You can use the attribute/* notation to access custom native properties of Web-based objects orevents associated with Web-based objects. You can then use these properties or events to identify suchobjects by adding the notation to the object's description properties using the Object Identificationdialog box, or by using programmatic descriptions.
The following examples describe how you can use the attribute/* notation to identify Web objects:
l "Example of using attribute/<property> to identify a Web object" on the next page
l "Example of using attribute/<event> to identify a Web object" on the next page
Add-ins GuideChapter 2: Web-Based Application Support
HP Unified Functional Testing (12.50) Page 44
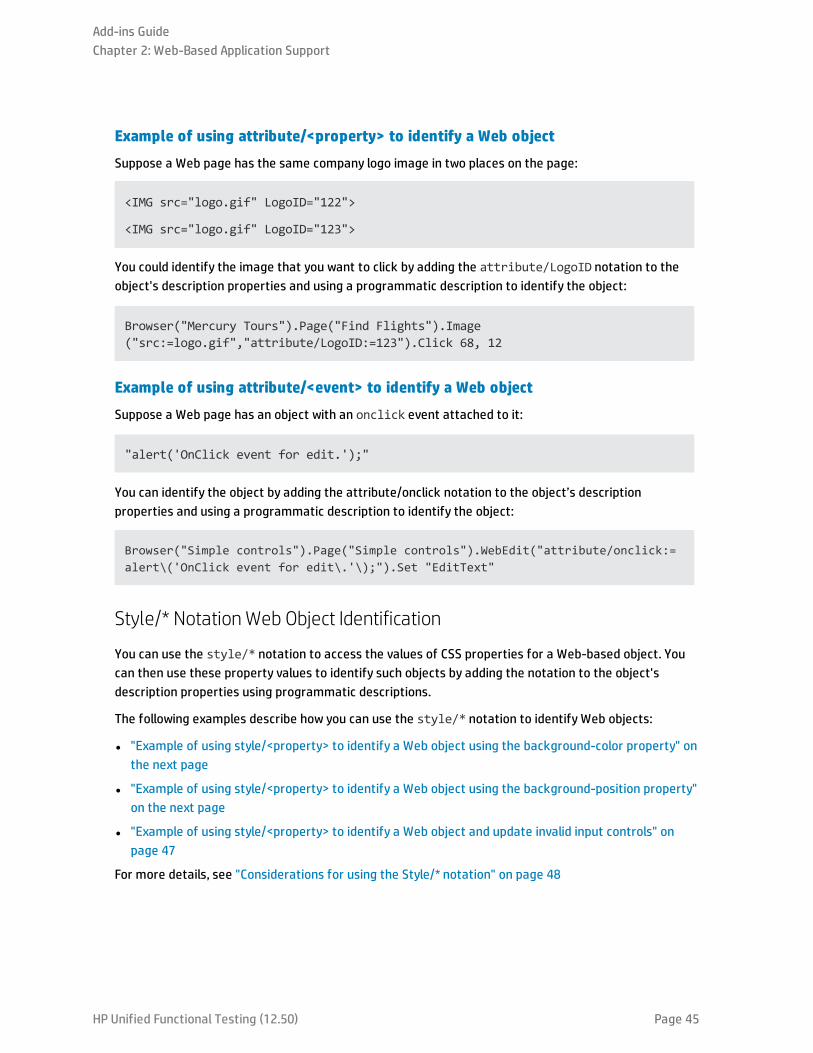
Example of using attribute/<property> to identify a Web object
Suppose a Web page has the same company logo image in two places on the page:
<IMG src="logo.gif" LogoID="122">
<IMG src="logo.gif" LogoID="123">
You could identify the image that you want to click by adding the attribute/LogoID notation to theobject's description properties and using a programmatic description to identify the object:
Browser("Mercury Tours").Page("Find Flights").Image("src:=logo.gif","attribute/LogoID:=123").Click 68, 12
Example of using attribute/<event> to identify a Web object
Suppose a Web page has an object with an onclick event attached to it:
"alert('OnClick event for edit.');"
You can identify the object by adding the attribute/onclick notation to the object’s descriptionproperties and using a programmatic description to identify the object:
Browser("Simple controls").Page("Simple controls").WebEdit("attribute/onclick:=alert\('OnClick event for edit\.'\);").Set "EditText"
Style/* Notation Web Object Identification
You can use the style/* notation to access the values of CSS properties for a Web-based object. Youcan then use these property values to identify such objects by adding the notation to the object'sdescription properties using programmatic descriptions.
The following examples describe how you can use the style/* notation to identify Web objects:
l "Example of using style/<property> to identify a Web object using the background-color property" onthe next page
l "Example of using style/<property> to identify a Web object using the background-position property"on the next page
l "Example of using style/<property> to identify a Web object and update invalid input controls" onpage 47
For more details, see "Considerations for using the Style/* notation" on page 48
Add-ins GuideChapter 2: Web-Based Application Support
HP Unified Functional Testing (12.50) Page 45
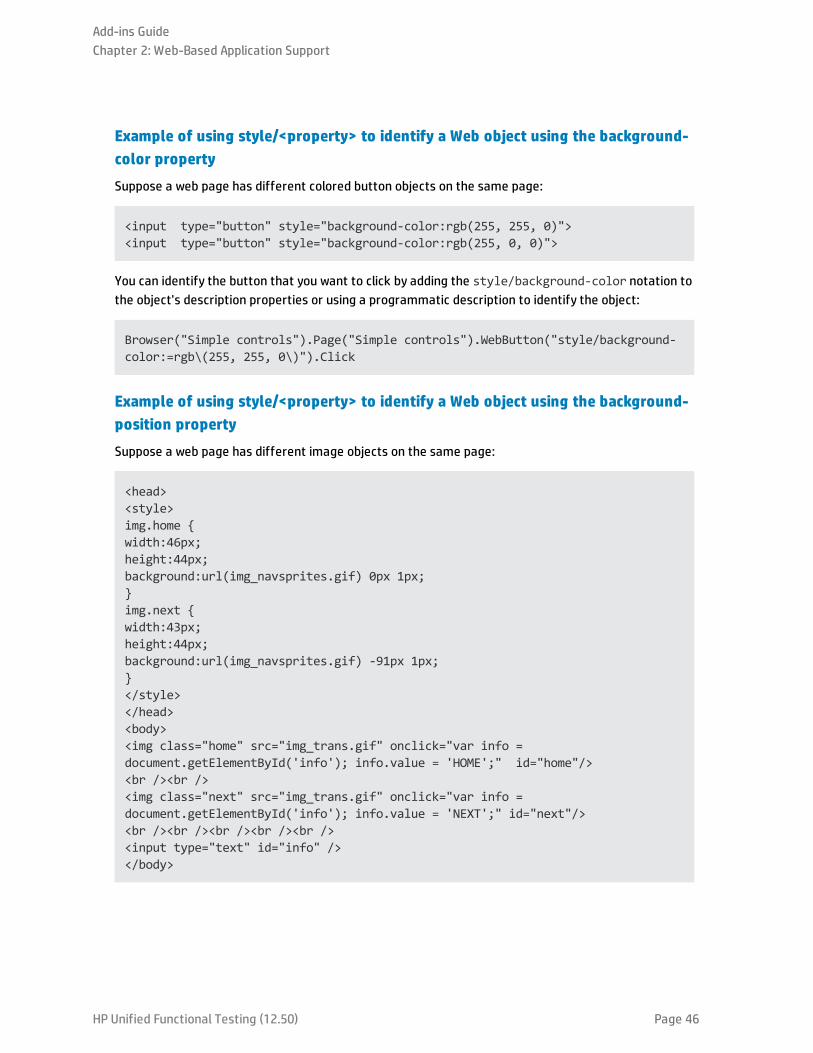
Example of using style/<property> to identify a Web object using the background-color property
Suppose a web page has different colored button objects on the same page:
<input type="button" style="background-color:rgb(255, 255, 0)"><input type="button" style="background-color:rgb(255, 0, 0)">
You can identify the button that you want to click by adding the style/background-color notation tothe object's description properties or using a programmatic description to identify the object:
Browser("Simple controls").Page("Simple controls").WebButton("style/background-color:=rgb\(255, 255, 0\)").Click
Example of using style/<property> to identify a Web object using the background-position property
Suppose a web page has different image objects on the same page:
<head><style>img.home {width:46px;height:44px;background:url(img_navsprites.gif) 0px 1px;}img.next {width:43px;height:44px;background:url(img_navsprites.gif) -91px 1px;}</style></head><body><img class="home" src="img_trans.gif" onclick="var info =document.getElementById('info'); info.value = 'HOME';" id="home"/><br /><br /><img class="next" src="img_trans.gif" onclick="var info =document.getElementById('info'); info.value = 'NEXT';" id="next"/><br /><br /><br /><br /><br /><input type="text" id="info" /></body>
Add-ins GuideChapter 2: Web-Based Application Support
HP Unified Functional Testing (12.50) Page 46
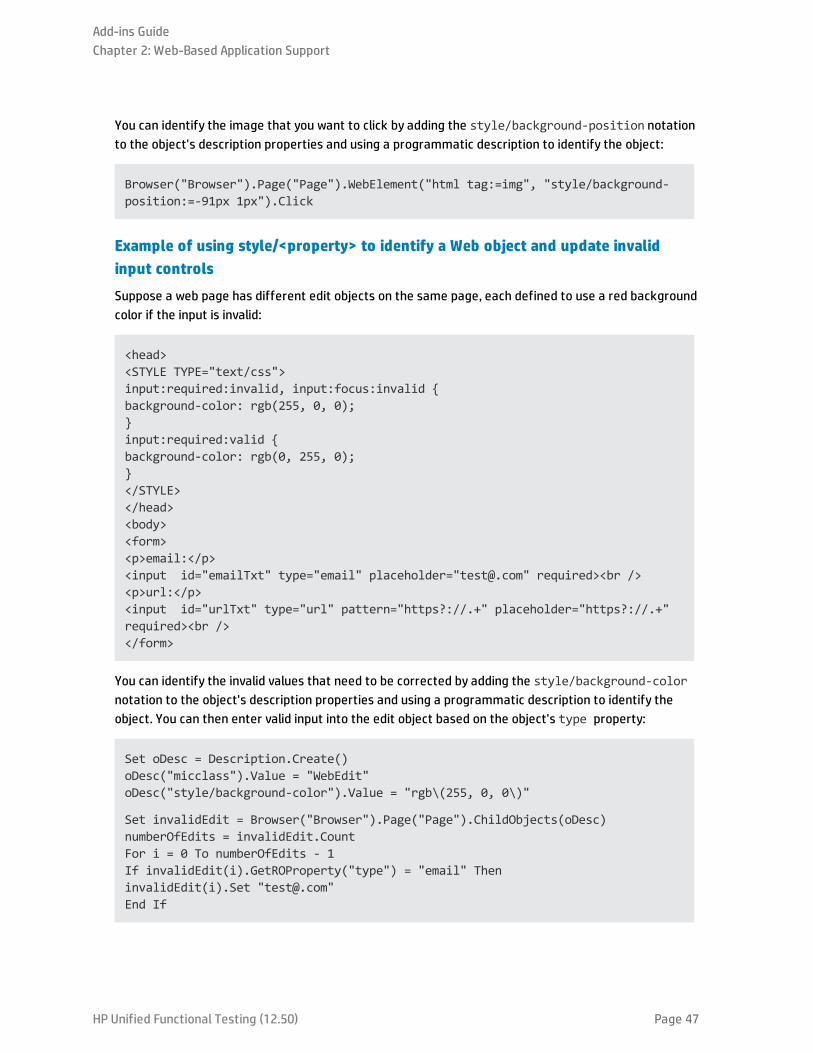
You can identify the image that you want to click by adding the style/background-position notationto the object's description properties and using a programmatic description to identify the object:
Browser("Browser").Page("Page").WebElement("html tag:=img", "style/background-position:=-91px 1px").Click
Example of using style/<property> to identify a Web object and update invalidinput controls
Suppose a web page has different edit objects on the same page, each defined to use a red backgroundcolor if the input is invalid:
<head><STYLE TYPE="text/css">input:required:invalid, input:focus:invalid {background-color: rgb(255, 0, 0);}input:required:valid {background-color: rgb(0, 255, 0);}</STYLE></head><body><form><p>email:</p><input id="emailTxt" type="email" placeholder="[email protected]" required><br /><p>url:</p><input id="urlTxt" type="url" pattern="https?://.+" placeholder="https?://.+"required><br /></form>
You can identify the invalid values that need to be corrected by adding the style/background-colornotation to the object's description properties and using a programmatic description to identify theobject. You can then enter valid input into the edit object based on the object's type property:
Set oDesc = Description.Create()oDesc("micclass").Value = "WebEdit"oDesc("style/background-color").Value = "rgb\(255, 0, 0\)"
Set invalidEdit = Browser("Browser").Page("Page").ChildObjects(oDesc)numberOfEdits = invalidEdit.CountFor i = 0 To numberOfEdits - 1If invalidEdit(i).GetROProperty("type") = "email" TheninvalidEdit(i).Set "[email protected]"End If
Add-ins GuideChapter 2: Web-Based Application Support
HP Unified Functional Testing (12.50) Page 47
invalidEdit(i).GetROProperty("type") = "url" TheninvalidEdit(i).Set "http://www.test."End If
Considerations for using the Style/* notation
l The CSS property values are returned using the browser's functions, and values may differ dependingon the browser you are using.
l UFT retrieves the CSS property values from the browser. When designing tests or components thatwill run on different browsers, keep in mind that different browsers may have different CSSfunctionality and return different property values for the same object.
l CSS shorthand properties, such as animation, font, background, and outline are not supported.Instead, use a concrete CSS property in your descriptions, such as background-image, font-family,border-width, and so on.
Considerations - Web Object IdentifiersConsider the following when using Web object identifiers:
General
l Defining xpath and css properties using Frame HTML tags is not supported. This may cause incorrectidentification when identifying Frame objects or retrieving Frame objects using the ChildObjectsmethod.
l xpath and css properties are not supported for .NET Web Forms test objects or for other Web-basedtest objects that have .NET Web Forms parent test objects.
l When running in Maintenance Mode, UFT may replace test objects with XPath or css identifierproperty values with new objects from your application.
Workaround: Use the Update from Application option in the Object Repository Manager to updatespecific test objects with XPath or css identifier property values.
Differences Between User-Defined XPath and Automatic XPath Behavior During RunSessions
Behavior in case of... User-defined XPath Automatic XPath
Multiple objectsmatch the XPathvalue
UFT continues to identify thematching objects. UFT ignores the learned XPath and continueswith the regular object identification process.
No objects match theXPath value
Object identification fails, and UFT continues toidentify the object using Smart Identification
UFT ignores the learned XPath and continueswith the regular object identification process.
Add-ins GuideChapter 2: Web-Based Application Support
HP Unified Functional Testing (12.50) Page 48
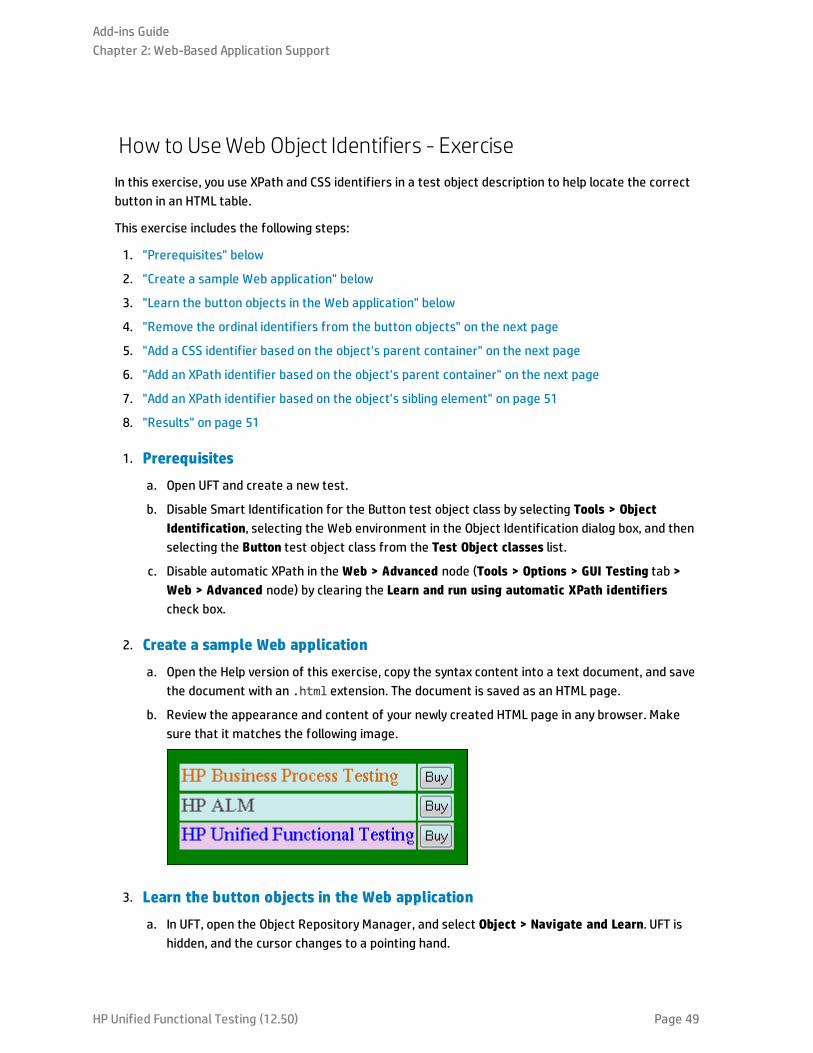
How to UseWeb Object Identifiers - ExerciseIn this exercise, you use XPath and CSS identifiers in a test object description to help locate the correctbutton in an HTML table.
This exercise includes the following steps:
1. "Prerequisites" below
2. "Create a sample Web application" below
3. "Learn the button objects in the Web application" below
4. "Remove the ordinal identifiers from the button objects" on the next page
5. "Add a CSS identifier based on the object's parent container" on the next page
6. "Add an XPath identifier based on the object's parent container" on the next page
7. "Add an XPath identifier based on the object's sibling element" on page 51
8. "Results" on page 51
1. Prerequisites
a. Open UFT and create a new test.
b. Disable Smart Identification for the Button test object class by selecting Tools > ObjectIdentification, selecting the Web environment in the Object Identification dialog box, and thenselecting the Button test object class from the Test Object classes list.
c. Disable automatic XPath in the Web > Advanced node (Tools > Options > GUI Testing tab >Web > Advanced node) by clearing the Learn and run using automatic XPath identifierscheck box.
2. Create a sample Web application
a. Open the Help version of this exercise, copy the syntax content into a text document, and savethe document with an .html extension. The document is saved as an HTML page.
b. Review the appearance and content of your newly created HTML page in any browser. Makesure that it matches the following image.
3. Learn the button objects in the Web application
a. In UFT, open the Object Repository Manager, and select Object > Navigate and Learn. UFT ishidden, and the cursor changes to a pointing hand.
Add-ins GuideChapter 2: Web-Based Application Support
HP Unified Functional Testing (12.50) Page 49
b. To verify that UFT learned the objects correctly, in the object repository, select each Buttonobject and select View > Highlight in Application. UFT highlights each button object in theHTML page.
c. Rename the Button objects to make them more clear:
o Rename Buy to Buy_BPT.
o Rename Buy_2 to Buy_ALM.
o Rename Buy_3 to Buy_UFT.
4. Remove the ordinal identifiers from the button objects
Because all of the Button objects have identical property values, when UFT learned the objects itassigned an ordinal identifier to each test object based on the location of each object in theapplication. This may cause UFT to identify the objects incorrectly if the sorting order of thebuttons in the application changes.
a. In the Object Repository Window, select the first button object to display its object propertieson the right side of the object repository window.
b. In the Ordinal Identifier section, select the Browse button. The Ordinal Identifier Dialog Boxopens.
c. In the Identifier type drop-down list, select None and close the dialog box. The ordinalidentifier is removed from the test object's identification properties.
d. Repeat the previous steps for each of the buttons.
e. Verify that the test object descriptions are no longer unique by selecting each test object andselecting View > Highlight in Application. UFT cannot identify the objects.
5. Add a CSS identifier based on the object's parent container
a. Select the Buy_BPT button. The test object details are displayed on the right side of the objectrepository window.
b. In the Object Description section, click the Add button, and add the css property to the testobject description.
c. Copy and paste the following syntax into the Value edit box:
tr.BPTRow input
6. Add an XPath identifier based on the object's parent container
a. Select the Buy_UFT button. The test object details are displayed on the right side of the objectrepository window.
b. In the Object Description section, click the Add button, and add the xpath property to the testobject description.
Add-ins GuideChapter 2: Web-Based Application Support
HP Unified Functional Testing (12.50) Page 50
c. Copy and paste the following syntax into the Value edit box:
//TR[@id='UFT']/*/INPUT
7. Add an XPath identifier based on the object's sibling element
a. Select the Buy_ALM button. The test object details are displayed on the right side of the objectrepository window.
b. In the Object Description section, click the Add button, and add the xpath property to the testobject description.
c. Copy and paste the following syntax into the Value edit box:
//td[contains(text(),'ALM')]/../*/INPUT
8. Results
Select each object and select View > Highlight in Application. UFT can now identify each buttonbased on the Web object identifiers you added.
How to Modify Event Recording Configuration for Web-Based ApplicationsThis task includes the following steps:
l "Modify the event recording configuration XML file manually" below
l "Modify the event recording configuration in the Web Event Recording Configuration dialog box" onthe next page
Modify the event recording configuration XML file manually
1. In a text or XML editor, open the appropriate MyEnvEventConfiguration.xml file from the <UFTinstallation folder>\dat folder, according to the following table:
Object Type: XML File Name
.NET Web Forms WebFormsEventConfiguration.xml
Siebel 7.5 or earlier SiebelEventConfiguration.xml
Siebel 7.7 or later CASEventConfiguration.xml
PeopleSoft Frameobjects and all Web objects that are children of aPeopleSoft frameobject
PSEventConfiguration.xml
2. Edit the file as necessary.
Add-ins GuideChapter 2: Web-Based Application Support
HP Unified Functional Testing (12.50) Page 51
3. Save the file.
Modify the event recording configuration in the Web Event Recording Configurationdialog box
1. Back up the event recording configuration for the Web environment:
a. Select Record > Web Event Recording Configuration. The Web Event Recording Configurationdialog box opens.
b. Click Custom Settings.
c. Select File > Save Configuration As and specify an XML filename for the backup file.
2. Back up the event recording configuration for the environment you want to modify:
Create a copy of the relevant <MyEnv>EventConfiguration.xml file from the <UFT installationfolder>\dat folder.
3. Modify the <MyEnv>EventConfiguration.xml file in the Web Event Recording Configuration dialogbox:
a. In the Web Event Recording Configuration dialog box, select File > Load Configuration andbrowse to the relevant <UFT installation folder>\dat\<MyEnv>EventConfiguration.xml file.The event configuration for the selected environment is displayed in the dialog box.
b. Modify the configuration using the Web Event Recording Configuration dialog box options, asdescribed in "Event Recording Configuration for Web Objects - Overview" on page 437.
c. Select File > Save Configuration As and overwrite the previous <UFT installationfolder>\dat\<MyEnv>EventConfiguration.xml file.
4. Restore the configuration file for the Web environment:
Select File > Load Configuration and browse to the backup copy of the Web configuration XML filethat you saved earlier.
Caution: UFT always applies the configuration that is loaded in the "Web Event RecordingConfiguration Dialog Box" on page 445 to all Web objects. If you do not restore the Webconfiguration file, then UFT will apply the configuration for the<MyEnv>EventConfiguration.xml file you last loaded, and as a result, UFT may not record Webevents properly.
How to Configure UFT to Record Mouse ClicksThis task describes how to instruct UFT to record right mouse clicks by modifying the configuration filemanually.
1. (Web Add-in only) Prerequisite - Export the configuration file from the CustomWeb Event Recording Configuration dialog box
a. Select Record > Web Event Recording Configuration, and then click Custom Settings. For user
Add-ins GuideChapter 2: Web-Based Application Support
HP Unified Functional Testing (12.50) Page 52
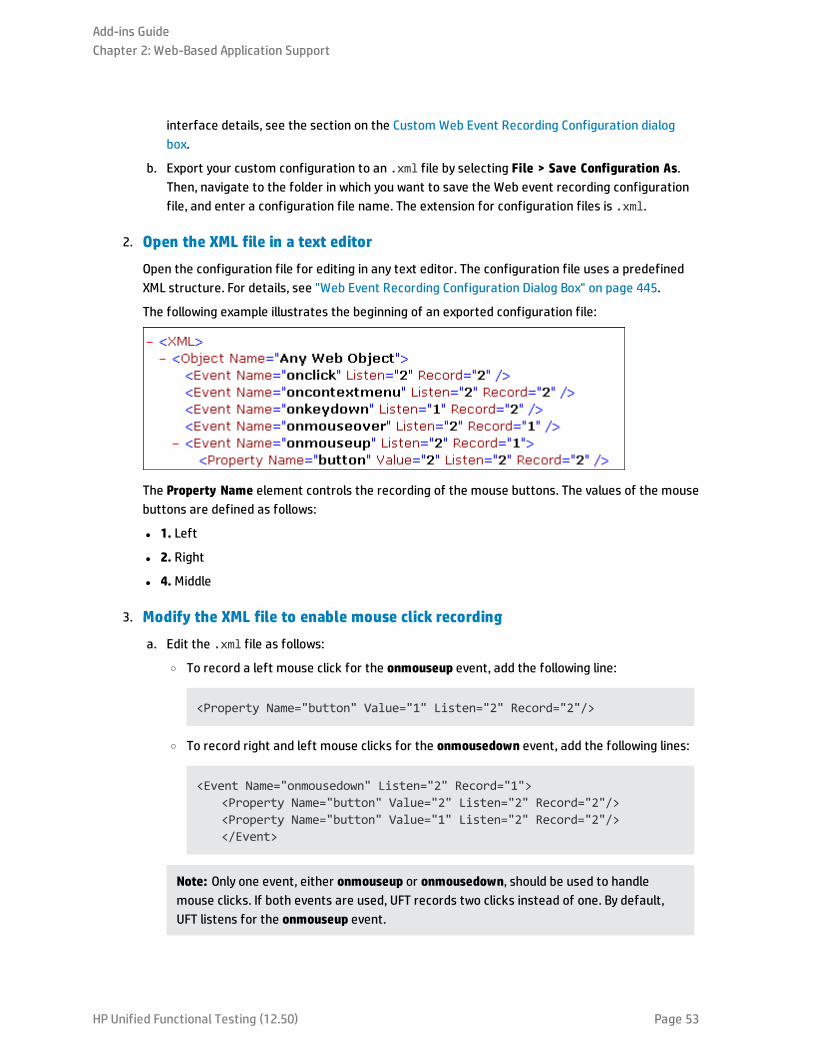
interface details, see the section on the Custom Web Event Recording Configuration dialogbox.
b. Export your custom configuration to an .xml file by selecting File > Save Configuration As.Then, navigate to the folder in which you want to save the Web event recording configurationfile, and enter a configuration file name. The extension for configuration files is .xml.
2. Open the XML file in a text editor
Open the configuration file for editing in any text editor. The configuration file uses a predefinedXML structure. For details, see "Web Event Recording Configuration Dialog Box" on page 445.
The following example illustrates the beginning of an exported configuration file:
The Property Name element controls the recording of the mouse buttons. The values of the mousebuttons are defined as follows:
l 1. Left
l 2. Right
l 4. Middle
3. Modify the XML file to enable mouse click recording
a. Edit the .xml file as follows:
o To record a left mouse click for the onmouseup event, add the following line:
<Property Name="button" Value="1" Listen="2" Record="2"/>
o To record right and left mouse clicks for the onmousedown event, add the following lines:
<Event Name="onmousedown" Listen="2" Record="1"><Property Name="button" Value="2" Listen="2" Record="2"/><Property Name="button" Value="1" Listen="2" Record="2"/></Event>
Note: Only one event, either onmouseup or onmousedown, should be used to handlemouse clicks. If both events are used, UFT records two clicks instead of one. By default,UFT listens for the onmouseup event.
Add-ins GuideChapter 2: Web-Based Application Support
HP Unified Functional Testing (12.50) Page 53
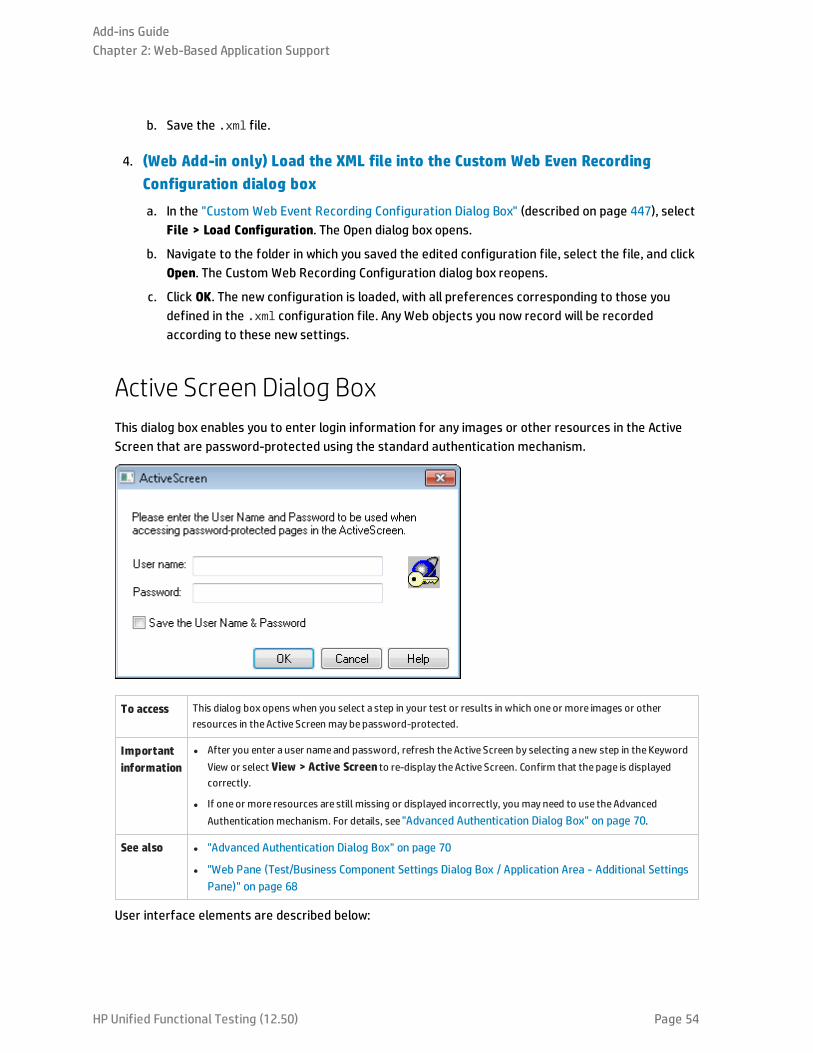
b. Save the .xml file.
4. (Web Add-in only) Load the XML file into the Custom Web Even RecordingConfiguration dialog box
a. In the "Custom Web Event Recording Configuration Dialog Box" (described on page 447), selectFile > Load Configuration. The Open dialog box opens.
b. Navigate to the folder in which you saved the edited configuration file, select the file, and clickOpen. The Custom Web Recording Configuration dialog box reopens.
c. Click OK. The new configuration is loaded, with all preferences corresponding to those youdefined in the .xml configuration file. Any Web objects you now record will be recordedaccording to these new settings.
Active Screen Dialog BoxThis dialog box enables you to enter login information for any images or other resources in the ActiveScreen that are password-protected using the standard authentication mechanism.
To access This dialog box opens when you select a step in your test or results in which oneor more images or otherresources in theActive Screen may bepassword-protected.
Importantinformation
l After you enter a user nameand password, refresh theActive Screen by selecting anew step in theKeywordView or select View > Active Screen to re-display theActive Screen. Confirm that the page is displayedcorrectly.
l If one or more resources are still missing or displayed incorrectly, you may need to use theAdvancedAuthentication mechanism. For details, see "Advanced Authentication Dialog Box" on page 70.
See also l "Advanced Authentication Dialog Box" on page 70
l "Web Pane (Test/Business Component Settings Dialog Box / Application Area - Additional SettingsPane)" on page 68
User interface elements are described below:
Add-ins GuideChapter 2: Web-Based Application Support
HP Unified Functional Testing (12.50) Page 54
UIElement
Description
Username
Theuser nameused to log into your application.
Password Thepassword used to log into your application.
Save theUserNameandPassword
Enables the automatic Active Screen login mechanism, by adding the login information to theActive Screenaccess area in theWeb paneof the Test Settings dialog box. This prevents theActive Screen dialog box fromopening, and ensures that all images and resources are displayed in theActive Screen and results each time youopen the test, you can use the automatic Active Screen login mechanism.
Note: You can also add the login information manually in theWeb paneof the Test Settings dialog box. Fordetails, see "Web Pane (Test/Business Component Settings Dialog Box / Application Area -Additional Settings Pane)" on page 68.
Environment Variables for a Web-Based EnvironmentYou can use predefined environment variables to specify the applications or browsers you want to usefor your test. This can be useful if you want to test how your application works in differentenvironments.
Note: For details on environment variables and how to use them in tests, see "EnvironmentVariables in Record and Run Settings" on page 26.
To use environment variables to define the Web browser and URL to open, set the appropriate variablenames as specified below:
Option VariableName
Description
Type BROWSER_ENV
Thebrowser program to open. For example, Microsoft Internet Explorer, Google Chrome, or MozillaFirefox.
Possible values:
IE.Opens Internet Explorer.
IE64.Opens a64-bit version of Internet Explorer.
CHROME.Opens Google Chrome.
FIREFOX.Opens the latest version of Mozilla Firefox that is both installed on the computer andsupported by UFT.
FIREFOX64.Opens the latest version of 64-bit Mozilla Firefox that is both installed on the computerand supported by UFT.
FF<VersionNumber>.Opens the specified version of Mozilla Firefox. For example: FF36 (version3.6), FF40 (version 4.0), FF140 (version 14.0).
SAFARI.Opens Safari on the remoteMac computer connected to UFT (defined in theWeb tab of the
Add-ins GuideChapter 2: Web-Based Application Support
HP Unified Functional Testing (12.50) Page 55

Option VariableName
Description
Record and Run Settings dialog box or in theREMOTE_HOST environment variable).
Note:
l If the specified browser program is not installed, the default browser is used.
l Mozilla Firefox is supported only for theWeb Add-in.
l When specifying a Firefox version number, make sure to specify a supported version. For alist of all supported browser versions, see theHPUnified Functional Testing ProductAvailability Matrix, available from theHP Support Matrix page.
Address URL_ENV TheWeb address to display in the browser.
RemoteHost
REMOTE_HOST
Thehost nameor IP address of theMac computer to which UFT connects.
By default, UFT connects to theMac using port 8822. To use adifferent port, append the portnumber to the host name: <hostname>:<port number>.
Make sure to configure the sameport number on theMac, in theUFT port option in theUFT Connection Agent preferences.
For more details, see "How to Connect to a Remote Mac Computer" on page 480.
Note: Relevant only for running tests and components on theApple Safari browser.
use SSLflag
USE_SSL Specifies whether to secure the connection to theMac computer by using SSL for the connection.
Possible values:
l TRUE
l FALSE (Default)
Note: Relevant only for running tests and components on theApple Safari browser.
Register Browser Control UtilityThis utility enables you to define the path of your Web application hosting the browser control. Afterregistration, UFT will recognize Web objects in your application when recording or running tests.
To access Select oneof the following:
Add-ins GuideChapter 2: Web-Based Application Support
HP Unified Functional Testing (12.50) Page 56
l Start > All Programs > HP Software > HP Unified Functional Testing > Tools > Register NewBrowser Control
l <UFT installationfolder>\bin\SettingNewBrowserControlApplication.exe
Note: For details on accessing UFT and UFT tools and files in Windows 8 and Windows Server 2012, see"Accessing UFT in Windows 8.X or Higher Operating Systems" on page 517.
Importantinformation
l After you register an application hosting abrowser control using this utility, you must restart UFT beforeyou test your application.
l This tool must be run with UAC disabled. For details about disabling UAC,see theHPUnified FunctionalTesting User Guide.
See also "Registering Browser Controls" on page 37
User interface elements are described below (unlabeled elements are shown in angle brackets):
UI Element Description
<host application path> The absolute path to the.exe file of the application hosting the browser control.
Register / Unregister Registers or removes a registered application.
Add-ins GuideChapter 2: Web-Based Application Support
HP Unified Functional Testing (12.50) Page 57
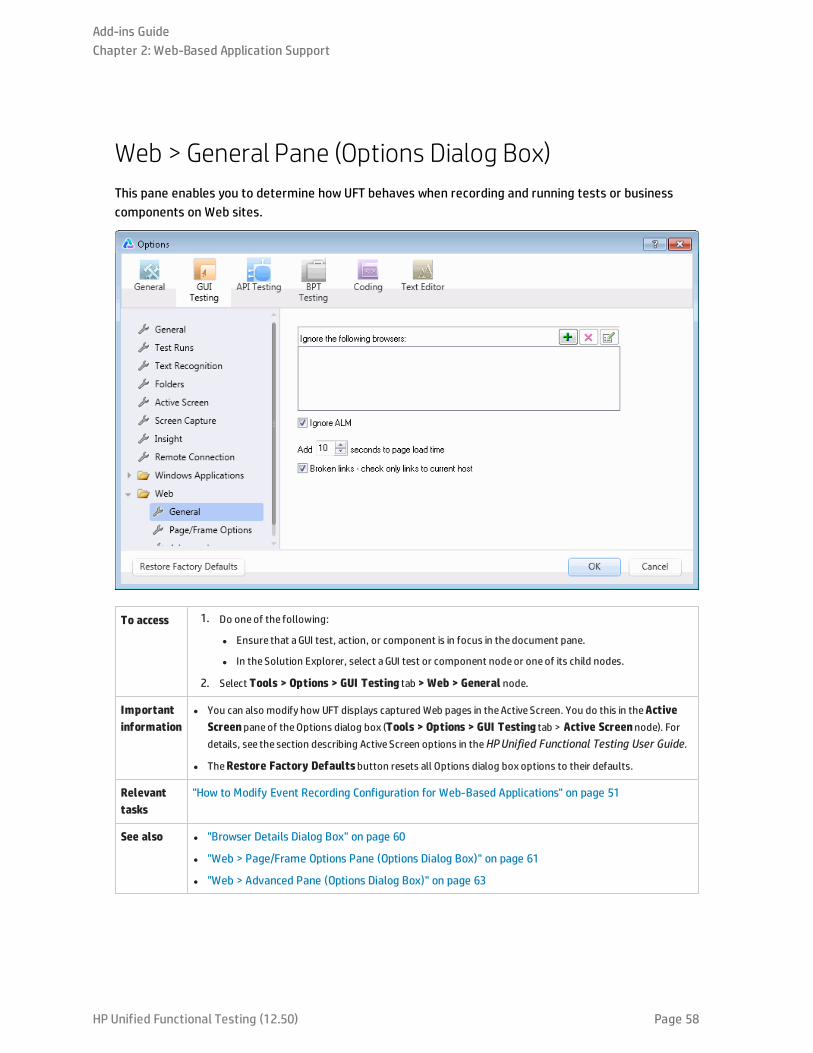
Web > General Pane (Options Dialog Box)This pane enables you to determine how UFT behaves when recording and running tests or businesscomponents on Web sites.
To access 1. Do oneof the following:
l Ensure that aGUI test, action, or component is in focus in the document pane.
l In the Solution Explorer, select aGUI test or component nodeor oneof its child nodes.
2. Select Tools > Options > GUI Testing tab > Web > General node.
Importantinformation
l You can also modify how UFT displays captured Web pages in theActive Screen. You do this in theActiveScreenpaneof theOptions dialog box (Tools > Options > GUI Testing tab > Active Screennode). Fordetails, see the section describing Active Screen options in theHPUnified Functional Testing User Guide.
l TheRestore Factory Defaultsbutton resets all Options dialog box options to their defaults.
Relevanttasks
"How to Modify Event Recording Configuration for Web-Based Applications" on page 51
See also l "Browser Details Dialog Box" on page 60
l "Web > Page/Frame Options Pane (Options Dialog Box)" on page 61
l "Web > Advanced Pane (Options Dialog Box)" on page 63
Add-ins GuideChapter 2: Web-Based Application Support
HP Unified Functional Testing (12.50) Page 58
User interface elements are described below:
UI Element Description
Ignore thefollowingbrowsers
Instructs UFT to ignore any specified browsers that may beopen while UFT is recording or running a testor business component. This enables you to keep browsers that are not related to your testingenvironment open, without having them affect the record or run session.
For example, you maywant to check your company's share price or the news headlines during a recordand run session. If you instruct UFT to ignore these specific browsers, they do not affect the session.
Note:
l UFT ignores browsers that match the defined criteria at the start of a record or run session.However, browsers that do not match the defined criteria at the start of a record or run session,but do match them during the session, are not ignored.
l Changes made to these settings apply to new tests or business components and new steps inexisting tests or business components only, but not to any other existing steps.
l When working with tests, UFT ignores browsers only if you selected Record and run test onany open Web browser in theWeb tab of theRecord and Run Settings dialog box. For details,see "Web Tab (Record and Run Settings Dialog Box)" on page 71.
For details, see "Browser Details Dialog Box" on the next page.
Add Browser.Opens the "Browser Details Dialog Box" (described on page60, which enables you toadd browsers to the Ignore the following browsers list.
Modify Browser Details. If you selected abrowser from the Ignore the following browsers list, thisoption opens the "Browser Details Dialog Box" (described on page60, which enables you to edit thedetails of the selected browser.
Remove Browser.Removes the selected browser from the list if you no longer want UFT to ignore itduring a record or run session.
Note: If a browser in the list is required for running a specific test, you can temporarily remove itfrom the list by clearing the checkmark next to its name in the list of browsers.
Ignore ALM Instructs UFT to ignore all instances of ALM that are opened while recording or running a test or businesscomponent. By default, this option is selected.
Add __ secondsto page loadtime
Instructs UFT to add a specified number of seconds to the page load timeproperty specified in each Pagecheckpoint. (Page checkpoints are not relevant for keyword components.)
Note: This option is a safeguard that prevents page checkpoints from failing in the event that theamount of time it takes for a page to load during the run is longer than the amount of time it tookduring the record session.
Broken links -check only linksto current host
Instructs UFT to check only for broken links that are targeted to your current host.
Add-ins GuideChapter 2: Web-Based Application Support
HP Unified Functional Testing (12.50) Page 59
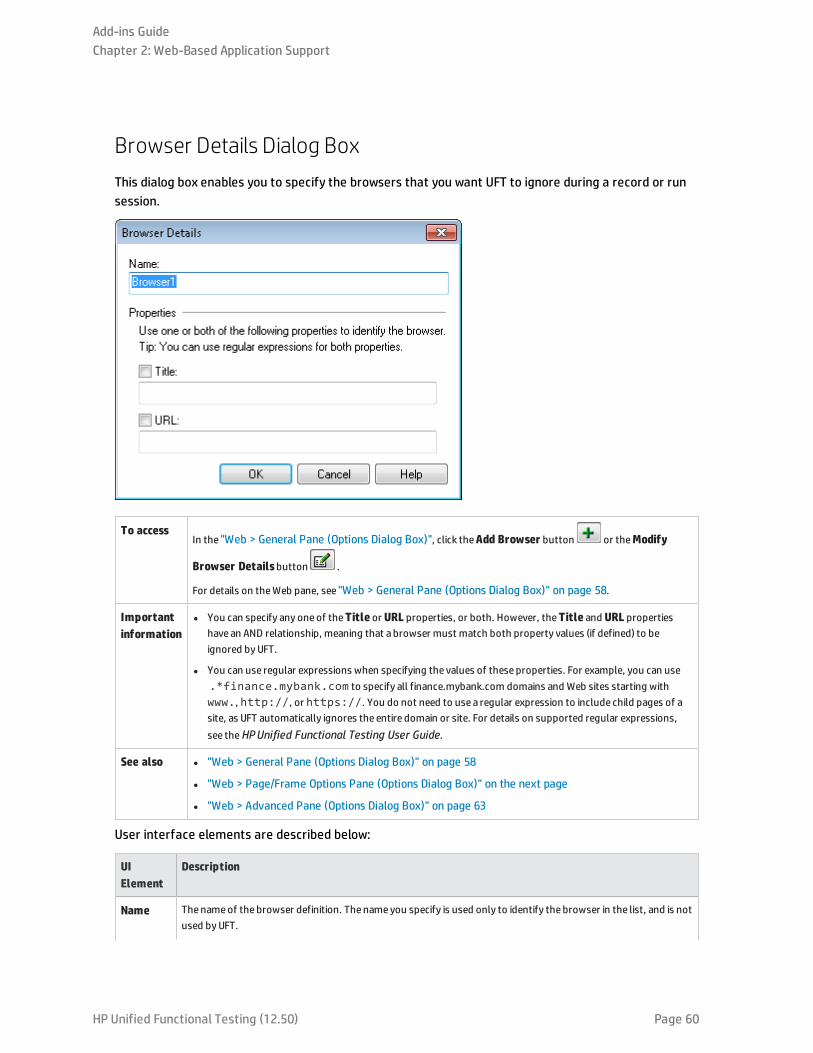
Browser Details Dialog BoxThis dialog box enables you to specify the browsers that you want UFT to ignore during a record or runsession.
To accessIn the "Web > General Pane (Options Dialog Box)", click theAdd Browser button or theModify
Browser Detailsbutton .
For details on theWeb pane, see "Web > General Pane (Options Dialog Box)" on page 58.
Importantinformation
l You can specify any oneof theTitle or URL properties, or both. However, theTitle and URL propertieshave an AND relationship, meaning that a browser must match both property values (if defined) to beignored by UFT.
l You can use regular expressions when specifying the values of these properties. For example, you can use.*finance.mybank.com to specify all finance.mybank.com domains and Web sites starting withwww., http://, or https://. You do not need to use a regular expression to include child pages of asite, as UFT automatically ignores the entire domain or site. For details on supported regular expressions,see theHPUnified Functional Testing User Guide.
See also l "Web > General Pane (Options Dialog Box)" on page 58
l "Web > Page/Frame Options Pane (Options Dialog Box)" on the next page
l "Web > Advanced Pane (Options Dialog Box)" on page 63
User interface elements are described below:
UIElement
Description
Name Thenameof the browser definition. The nameyou specify is used only to identify the browser in the list, and is notused by UFT.
Add-ins GuideChapter 2: Web-Based Application Support
HP Unified Functional Testing (12.50) Page 60
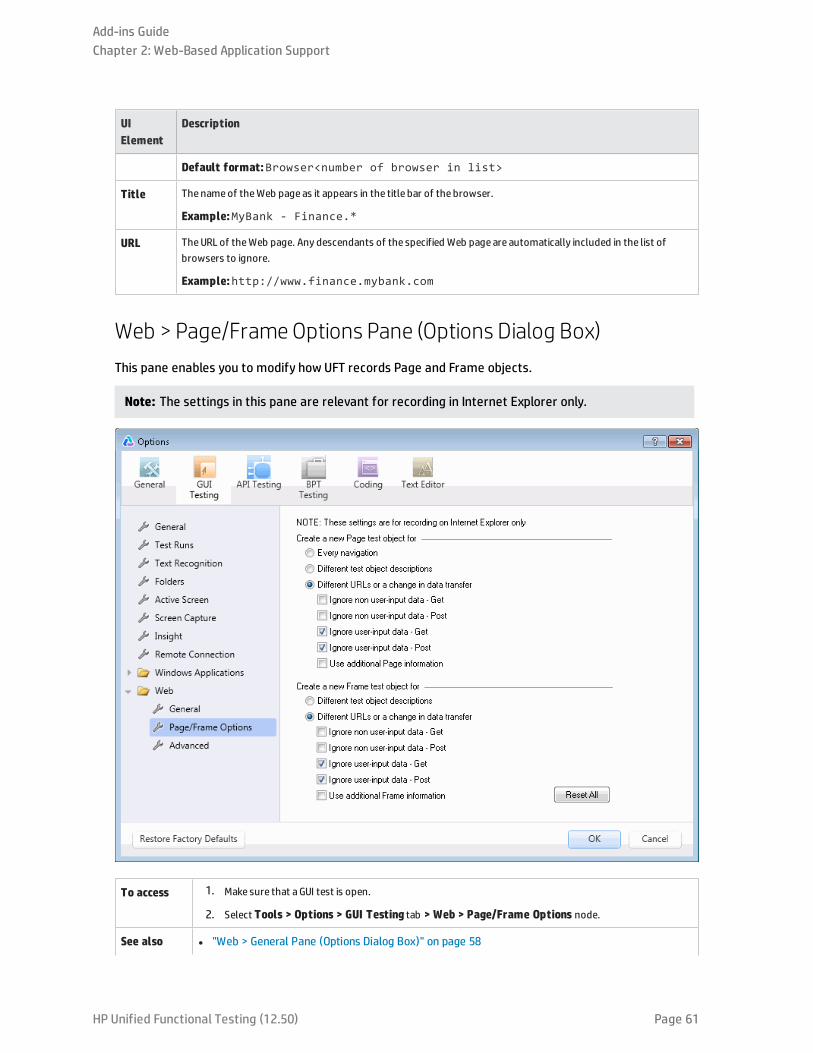
UIElement
Description
Default format:Browser<number of browser in list>
Title Thenameof theWeb page as it appears in the title bar of the browser.
Example:MyBank - Finance.*
URL TheURL of theWeb page. Any descendants of the specified Web page are automatically included in the list ofbrowsers to ignore.
Example:http://www.finance.mybank.com
Web > Page/FrameOptions Pane (Options Dialog Box)This pane enables you to modify how UFT records Page and Frame objects.
Note: The settings in this pane are relevant for recording in Internet Explorer only.
To access 1. Make sure that aGUI test is open.
2. Select Tools > Options > GUI Testing tab > Web > Page/Frame Options node.
See also l "Web > General Pane (Options Dialog Box)" on page 58
Add-ins GuideChapter 2: Web-Based Application Support
HP Unified Functional Testing (12.50) Page 61
l "Web > Advanced Pane (Options Dialog Box)" on the next page
User interface elements are described below:
UI Element Description
Create a new Page test object forThese options instruct UFT when to create a new Pageobject in the object repositorywhile recording.
Create a new Frame test object forThese options instruct UFT when to create a new Frameobject in the object repositorywhile recording. The Frameoptions aresimilar to thePageoptions (except that theEvery navigationoption is not available).
Every navigation Instructs UFT to create a new Pageobject every timeanavigation is performed in aWeb page.
(Relevant only for Create a new Page test object for.)
Different test objectdescriptions
Instructs UFT to create a new Page test object for pages with different test object descriptions,according to the properties defined for thePage test object.
Note: Thedefault test object description for Pageobjects includes only the test objectclass. If you select this option, it is highly recommended that you define objectidentification properties that uniquely identify different Page objects. You should alsoensure that the properties you define remain constant over time, otherwise future runs mayfail.
Different URLs or achange in data transfer
Instructs UFT to create a new Pageobject onlywhen the pageURL changes, or if theURL stays thesameand data that is transferred to the server changes, according to the data types and transfermethods you select:
l Ignore non user-input data - Get. Instructs UFT to ignore non user-input data if theGetmethod is used to transfer data to the server.
For example, suppose auser enters data on aWeb page, and the data is then inserted as ahidden field using theGetmethod. Theuser clicks Submit (to send the data to the server).The new Web page is different, according to the hidden field data. However, UFT does notcreate a new Page test object.
l Ignore non user-input data - Post. Instructs UFT to ignore non-user-input data if thePostmethod is used to transfer data to the server.
For example, suppose auser enters data on aWeb page, and the data is then inserted as ahidden field using thePostmethod. Theuser clicks Submit (to send the data to the server).The new Web page is different, according to the hidden field data. However, UFT does notcreate a new Page test object.
l Ignore user-input data - Get. Instructs UFT to ignore user-input data if theGetmethod isused to transfer data to the server.
For example, suppose auser enters data in a form on aWeb page and clicks Submit (to sendthe data to the server) using theGetmethod. Thenew Web page is different according to thedata filled in by the user. However, UFT does not create a new Page test object.
l Ignore user-input data - Post. Instructs UFT to ignore user-input data if thePostmethodis used to transfer data to the server.
For example, suppose auser enters data in a form on aWeb page and clicks Submit (to sendthe data to the server) using thePostmethod. Thenew Web page is different according to thedata filled in by the user. However, UFT does not create a new Page test object.
Add-ins GuideChapter 2: Web-Based Application Support
HP Unified Functional Testing (12.50) Page 62
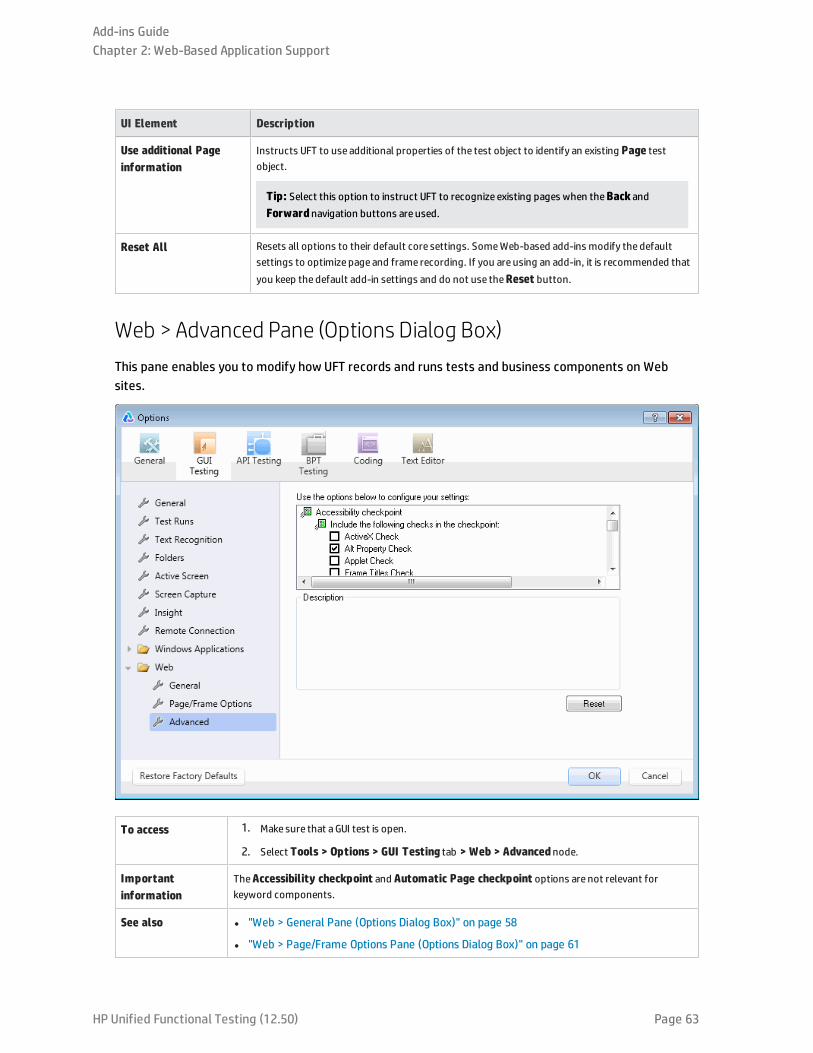
UI Element Description
Use additional Pageinformation
Instructs UFT to use additional properties of the test object to identify an existing Page testobject.
Tip: Select this option to instruct UFT to recognize existing pages when theBack andForwardnavigation buttons are used.
Reset All Resets all options to their default core settings. SomeWeb-based add-ins modify the defaultsettings to optimize page and frame recording. If you are using an add-in, it is recommended thatyou keep the default add-in settings and do not use theReset button.
Web > Advanced Pane (Options Dialog Box)This pane enables you to modify how UFT records and runs tests and business components on Websites.
To access 1. Make sure that aGUI test is open.
2. Select Tools > Options > GUI Testing tab > Web > Advancednode.
Importantinformation
TheAccessibility checkpoint and Automatic Page checkpoint options are not relevant forkeyword components.
See also l "Web > General Pane (Options Dialog Box)" on page 58
l "Web > Page/Frame Options Pane (Options Dialog Box)" on page 61
Add-ins GuideChapter 2: Web-Based Application Support
HP Unified Functional Testing (12.50) Page 63
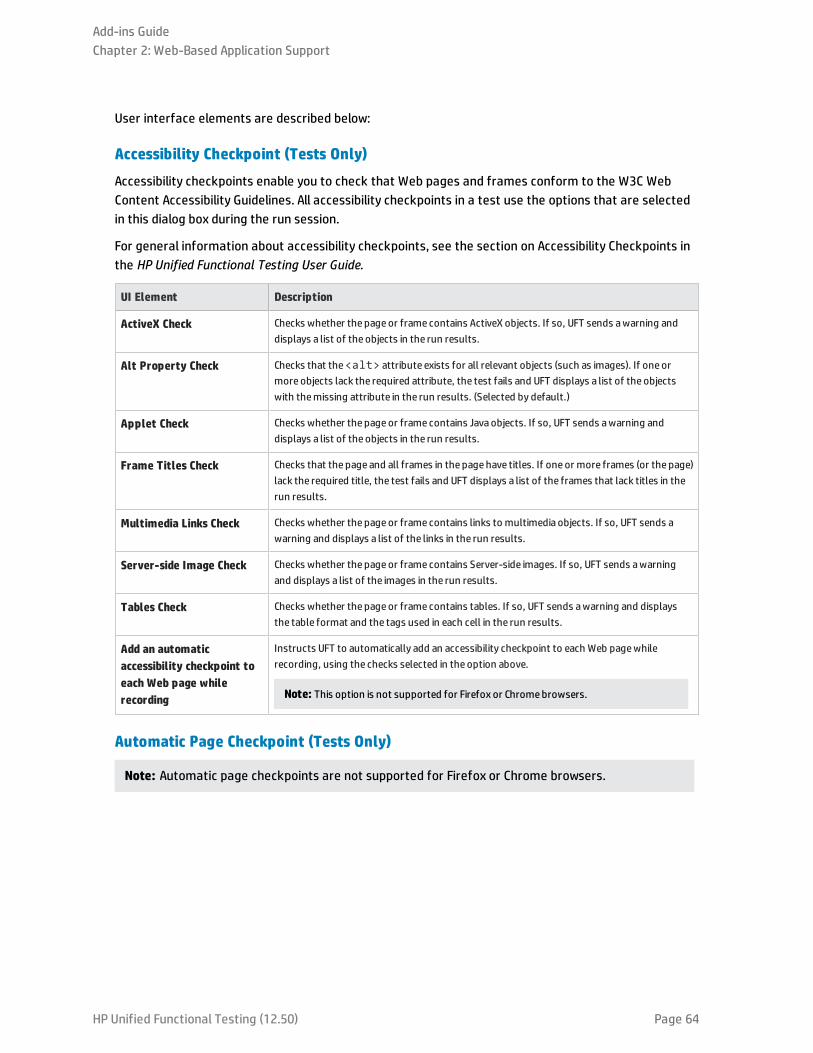
User interface elements are described below:
Accessibility Checkpoint (Tests Only)
Accessibility checkpoints enable you to check that Web pages and frames conform to the W3C WebContent Accessibility Guidelines. All accessibility checkpoints in a test use the options that are selectedin this dialog box during the run session.
For general information about accessibility checkpoints, see the section on Accessibility Checkpoints inthe HP Unified Functional Testing User Guide.
UI Element Description
ActiveX Check Checks whether the pageor frame contains ActiveX objects. If so, UFT sends awarning anddisplays a list of the objects in the run results.
Alt Property Check Checks that the<alt> attribute exists for all relevant objects (such as images). If one ormore objects lack the required attribute, the test fails and UFT displays a list of the objectswith themissing attribute in the run results. (Selected by default.)
Applet Check Checks whether the pageor frame contains Javaobjects. If so, UFT sends awarning anddisplays a list of the objects in the run results.
Frame Titles Check Checks that the page and all frames in the pagehave titles. If one or more frames (or the page)lack the required title, the test fails and UFT displays a list of the frames that lack titles in therun results.
Multimedia Links Check Checks whether the pageor frame contains links to multimedia objects. If so, UFT sends awarning and displays a list of the links in the run results.
Server-side Image Check Checks whether the pageor frame contains Server-side images. If so, UFT sends awarningand displays a list of the images in the run results.
Tables Check Checks whether the pageor frame contains tables. If so, UFT sends awarning and displaysthe table format and the tags used in each cell in the run results.
Add an automaticaccessibility checkpoint toeach Web page whilerecording
Instructs UFT to automatically add an accessibility checkpoint to each Web pagewhilerecording, using the checks selected in the option above.
Note: This option is not supported for Firefox or Chromebrowsers.
Automatic Page Checkpoint (Tests Only)
Note: Automatic page checkpoints are not supported for Firefox or Chrome browsers.
Add-ins GuideChapter 2: Web-Based Application Support
HP Unified Functional Testing (12.50) Page 64

These options enable you to check that expected and actual page properties are identical, byinstructing UFT to automatically add a Page checkpoint for each Web page navigated during therecording process.
Note: If you are testing a Web page with dynamic content, using automatic Page checkpoints maycause the test to fail as these checkpoints assume that the page content is static between recordand run sessions.
UI Element Description
Broken links Displays the number of broken links contained in the pageduring the run session.
Note: If theBroken links - check only links to current host option is selected in theWeb paneof theOptions dialog box (see "Web > General Pane (Options Dialog Box)" on page 58, thisnumber includes only those broken links that are targeted to the current host.
HTML source Checks that the expected source code is identical to the source codeduring the run session.
HTML tags Checks that the expected HTML tags in the source code are identical to those in the run session.
Image source Checks that the expected source paths of the images are identical to the sources in the run session.
Links URL Checks that the expected URL addresses for the links are identical to theURL addresses in the source codeduring the run session.
Load time Checks that the expected time it takes for the page to load during the run session is less than or equal tothe amount of time it took during the record session PLUS the amount of time specified in theAddseconds to page load time option (see "Web > General Pane (Options Dialog Box)" on page 58).
Number ofimages
Checks that the expected number of images is identical to the number displayed in the run session.
Number of links Checks that the expected number of links is identical to the number displayed in the run session.
Create acheckpoint foreach Web pagewhile recording
Instructs UFT to automatically add aPage checkpoint for each Web pagenavigated during the recordingprocess.
Ignore automaticcheckpoints whilerunning tests
Instructs UFT to ignore the automatically added Page checkpoints while running your test.
Record Settings
These options enable you to set preferences for recording Web objects.
Note: If UFT does not record Web events in a way that matches your needs, you can also configurethe events you want to record for each type of Web object. For example, if you want to recordevents, such as a mouseover that opens a sub-menu, you may need to modify your Web eventconfiguration to recognize such events. For details, see "Event Recording Configuration for Web-
Add-ins GuideChapter 2: Web-Based Application Support
HP Unified Functional Testing (12.50) Page 65
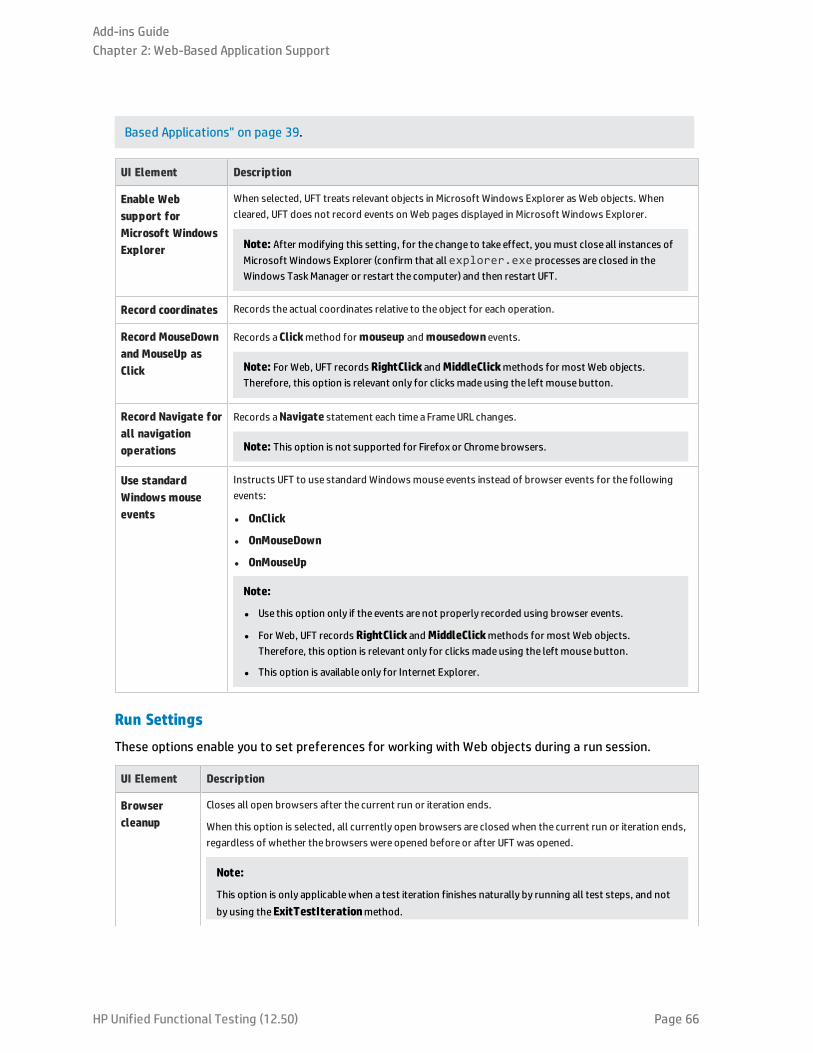
Based Applications" on page 39.
UI Element Description
Enable Websupport forMicrosoft WindowsExplorer
When selected, UFT treats relevant objects in Microsoft Windows Explorer as Web objects. Whencleared, UFT does not record events on Web pages displayed in Microsoft Windows Explorer.
Note: After modifying this setting, for the change to take effect, you must close all instances ofMicrosoft Windows Explorer (confirm that all explorer.exe processes are closed in theWindows TaskManager or restart the computer) and then restart UFT.
Record coordinates Records the actual coordinates relative to the object for each operation.
Record MouseDownand MouseUp asClick
Records aClickmethod formouseup andmousedownevents.
Note: For Web, UFT records RightClick andMiddleClickmethods for most Web objects.Therefore, this option is relevant only for clicks madeusing the left mousebutton.
Record Navigate forall navigationoperations
Records aNavigate statement each timea FrameURL changes.
Note: This option is not supported for Firefox or Chromebrowsers.
Use standardWindows mouseevents
Instructs UFT to use standard Windows mouse events instead of browser events for the followingevents:
l OnClick
l OnMouseDown
l OnMouseUp
Note:
l Use this option only if the events are not properly recorded using browser events.
l For Web, UFT records RightClick andMiddleClickmethods for most Web objects.Therefore, this option is relevant only for clicks madeusing the left mousebutton.
l This option is available only for Internet Explorer.
Run Settings
These options enable you to set preferences for working with Web objects during a run session.
UI Element Description
Browsercleanup
Closes all open browsers after the current run or iteration ends.
When this option is selected, all currently open browsers are closed when the current run or iteration ends,regardless of whether the browsers were opened before or after UFT was opened.
Note:
This option is only applicablewhen a test iteration finishes naturally by running all test steps, and notby using theExitTestIterationmethod.
Add-ins GuideChapter 2: Web-Based Application Support
HP Unified Functional Testing (12.50) Page 66
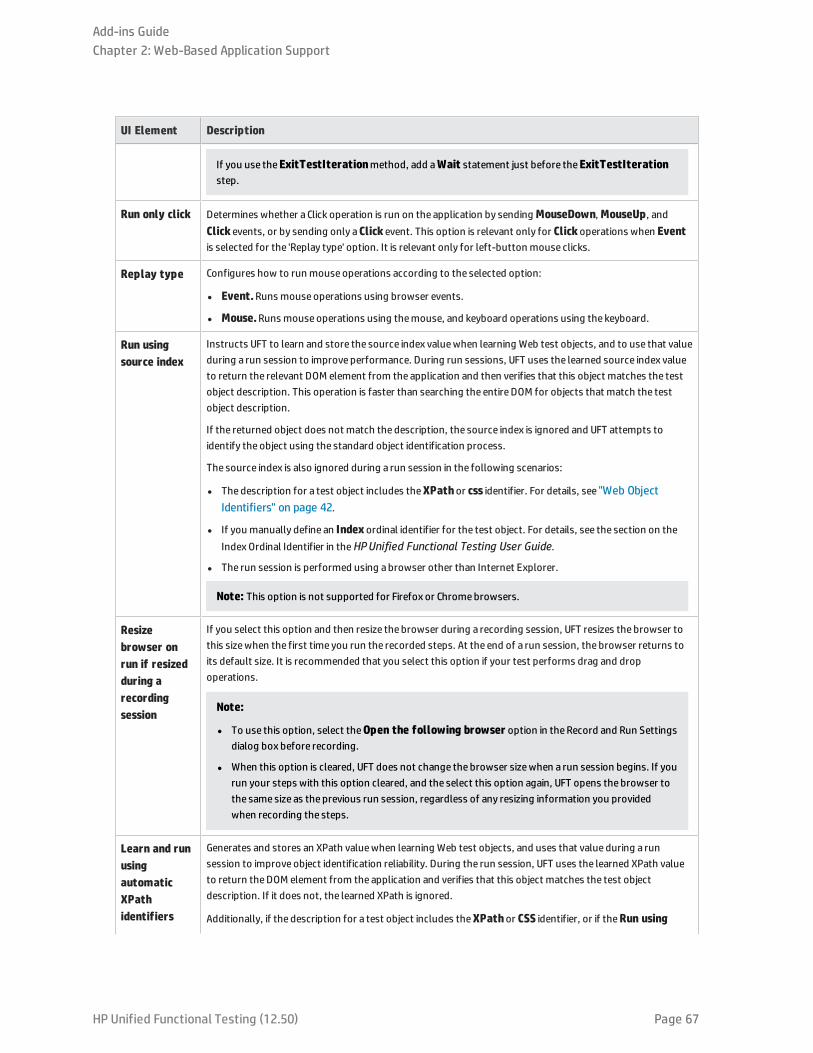
UI Element Description
If you use theExitTestIterationmethod, add aWait statement just before theExitTestIterationstep.
Run only click Determines whether a Click operation is run on the application by sendingMouseDown,MouseUp, andClick events, or by sending only aClick event. This option is relevant only for Clickoperations when Eventis selected for the 'Replay type' option. It is relevant only for left-button mouse clicks.
Replay type Configures how to run mouseoperations according to the selected option:
l Event.Runs mouseoperations using browser events.
l Mouse.Runs mouseoperations using themouse, and keyboard operations using the keyboard.
Run usingsource index
Instructs UFT to learn and store the source index valuewhen learning Web test objects, and to use that valueduring a run session to improve performance. During run sessions, UFT uses the learned source index valueto return the relevant DOM element from the application and then verifies that this object matches the testobject description. This operation is faster than searching the entireDOM for objects that match the testobject description.
If the returned object does not match the description, the source index is ignored and UFT attempts toidentify the object using the standard object identification process.
The source index is also ignored during a run session in the following scenarios:
l Thedescription for a test object includes theXPathor css identifier. For details, see "Web ObjectIdentifiers" on page 42.
l If you manually define an Index ordinal identifier for the test object. For details, see the section on theIndex Ordinal Identifier in theHPUnified Functional Testing User Guide.
l The run session is performed using abrowser other than Internet Explorer.
Note: This option is not supported for Firefox or Chromebrowsers.
Resizebrowser onrun if resizedduring arecordingsession
If you select this option and then resize the browser during a recording session, UFT resizes the browser tothis sizewhen the first time you run the recorded steps. At the end of a run session, the browser returns toits default size. It is recommended that you select this option if your test performs drag and dropoperations.
Note:
l To use this option, select theOpen the following browser option in theRecord and Run Settingsdialog box before recording.
l When this option is cleared, UFT does not change the browser sizewhen a run session begins. If yourun your steps with this option cleared, and the select this option again, UFT opens the browser tothe same size as the previous run session, regardless of any resizing information you providedwhen recording the steps.
Learn and runusingautomaticXPathidentifiers
Generates and stores an XPath valuewhen learning Web test objects, and uses that value during a runsession to improveobject identification reliability. During the run session, UFT uses the learned XPath valueto return theDOM element from the application and verifies that this object matches the test objectdescription. If it does not, the learned XPath is ignored.
Additionally, if the description for a test object includes theXPathor CSS identifier, or if theRun using
Add-ins GuideChapter 2: Web-Based Application Support
HP Unified Functional Testing (12.50) Page 67
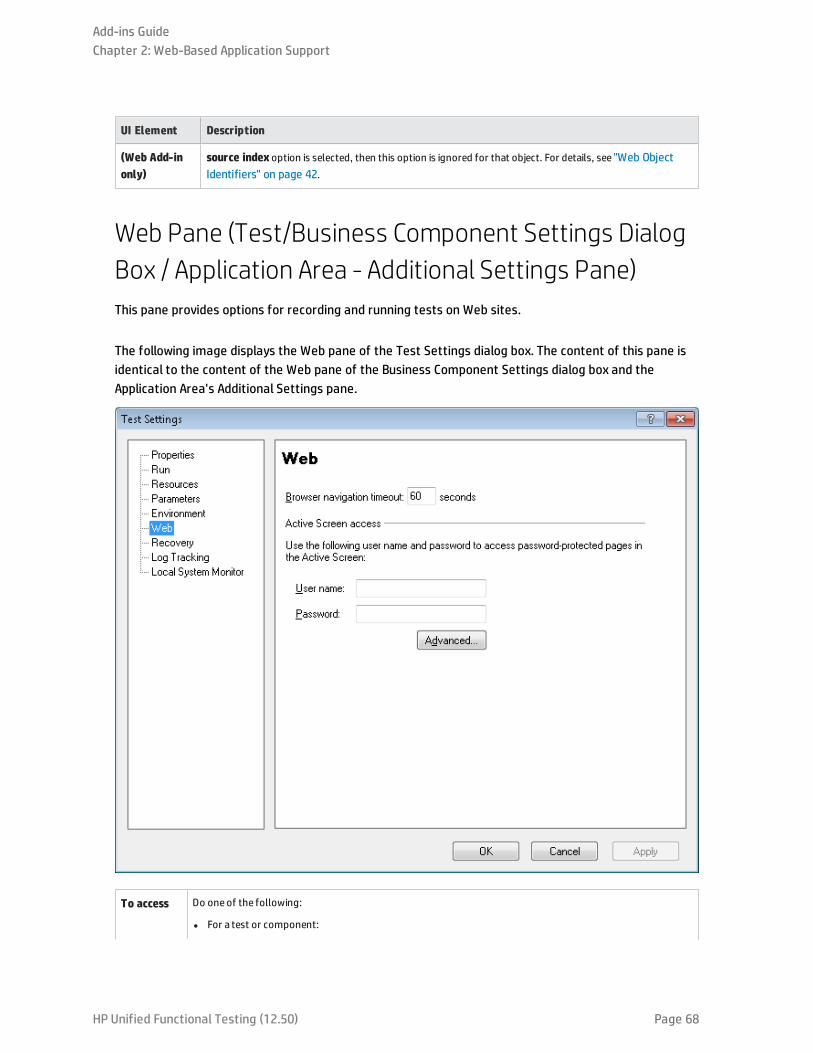
UI Element Description
(Web Add-inonly)
source index option is selected, then this option is ignored for that object. For details, see "Web ObjectIdentifiers" on page 42.
Web Pane (Test/Business Component Settings DialogBox / Application Area - Additional Settings Pane)This pane provides options for recording and running tests on Web sites.
The following image displays the Web pane of the Test Settings dialog box. The content of this pane isidentical to the content of the Web pane of the Business Component Settings dialog box and theApplication Area's Additional Settings pane.
To access Do oneof the following:
l For a test or component:
Add-ins GuideChapter 2: Web-Based Application Support
HP Unified Functional Testing (12.50) Page 68
Select File > Settings > Webnode.
l For an application area:
Open the application area and select Additional Settings> Web in the sidebar.
Importantinformation
l TheWeb pane is available only if theWeb Add-in is installed and loaded.
l Recording events. In addition to the options in this pane, you can also configure the events you want torecord for each typeof Web object. For example, if you want to record events, such as moving the pointerover an object to open a sub-menu, you may need to modify your Web event configuration to recognize suchevents. For details, see "Event Recording Configuration for Web-Based Applications" on page 39.
l Business components.For business components, the settings displayed in this pane are read-only. Tochange theWeb pane settings for a business component, open its associated application area and use theapplication area's Additional Settings > Web pane.
User interface elements are described below:
UI Element Description
Browsernavigationtimeout
Sets themaximum time (in seconds) that UFT waits for aWeb page to load before running a step in the test.
User name(tests only)
Theuser name for password-protected resources that use a standard authentication mechanism.
For details, see "Advanced Authentication Dialog Box" on the next page.
Password(tests only)
Thepassword for password-protected resources that use a standard authentication mechanism.
For details, see "Advanced Authentication Dialog Box" on the next page.
Advanced(tests only)
Opens the "Advanced Authentication Dialog Box" (described on page70, which enables you to manually login to your Web site to enable access to password-protected resources that use an advanced authenticationmechanism.
Add-ins GuideChapter 2: Web-Based Application Support
HP Unified Functional Testing (12.50) Page 69
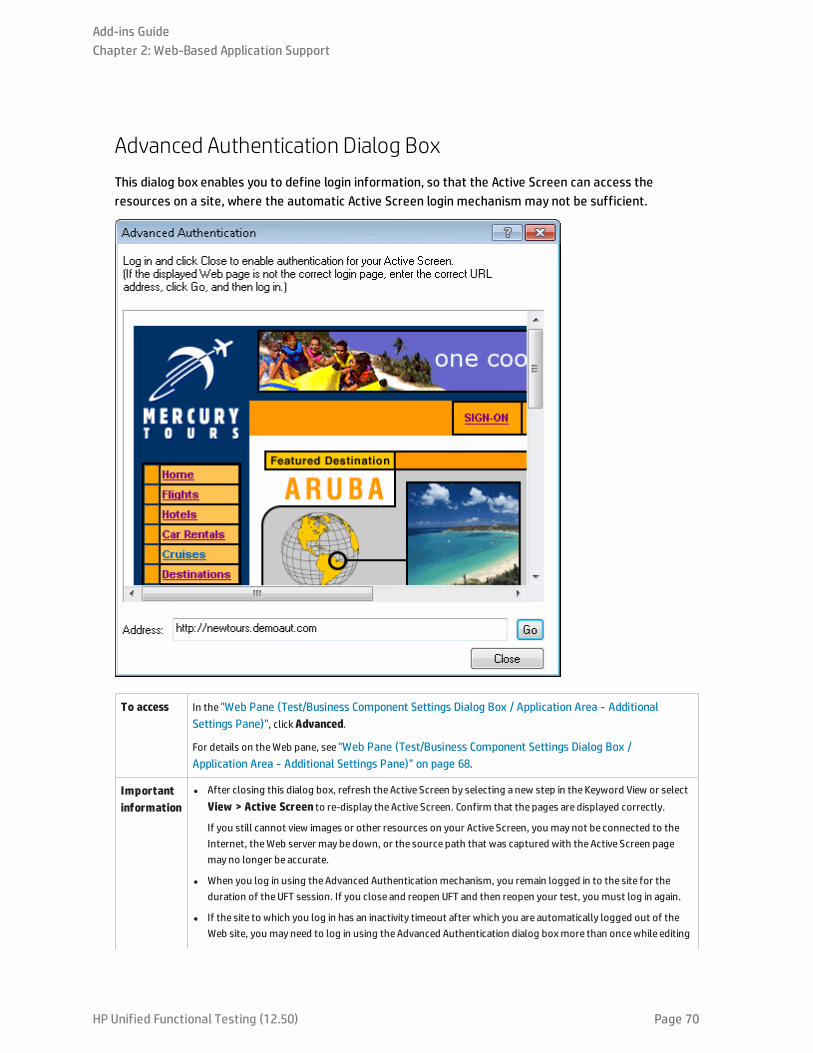
Advanced Authentication Dialog BoxThis dialog box enables you to define login information, so that the Active Screen can access theresources on a site, where the automatic Active Screen login mechanism may not be sufficient.
To access In the "Web Pane (Test/Business Component Settings Dialog Box / Application Area - AdditionalSettings Pane)", clickAdvanced.
For details on theWeb pane, see "Web Pane (Test/Business Component Settings Dialog Box /Application Area - Additional Settings Pane)" on page 68.
Importantinformation
l After closing this dialog box, refresh theActive Screen by selecting anew step in theKeyword View or selectView > Active Screen to re-display theActive Screen. Confirm that the pages are displayed correctly.
If you still cannot view images or other resources on your Active Screen, you may not be connected to theInternet, theWeb server may bedown, or the source path that was captured with theActive Screen pagemay no longer be accurate.
l When you log in using theAdvanced Authentication mechanism, you remain logged in to the site for theduration of theUFT session. If you close and reopen UFT and then reopen your test, you must log in again.
l If the site to which you log in has an inactivity timeout after which you are automatically logged out of theWeb site, you may need to log in using theAdvanced Authentication dialog boxmore than oncewhile editing
Add-ins GuideChapter 2: Web-Based Application Support
HP Unified Functional Testing (12.50) Page 70
your test to re-enable access to your Active Screen pages.
See also l "Web Pane (Test/Business Component Settings Dialog Box / Application Area - Additional SettingsPane)" on page 68
l "Active Screen Dialog Box" on page 54
l "Accessing Password-Protected Resources in the Active Screen" on page 37
User interface elements are described below (unlabeled elements are shown in angle brackets):
UIElement
Description
<browserwindow>
Thedefault Web page for the test, displayed according to the following guidelines:
l The first time you open this dialog box for a given test, the browser window displays theURL address set forthe test in theWeb tab of theRecord and Run Settings dialog box.
l If you navigate to anew URL address using this dialog box, that address becomes the default AdvancedAuthentication page for this test.
Use this window to enter your login information, and after logging into your application, clickClose. The loginsession remains open for the remainder of your UFT session (or until theWeb site's inactivity timeout is exceeded).
Address TheURL address of theWeb page. If the displayed Web page is not the correct page for logging in to your site,enter the correct URL address in theAddressbox and clickGo.
Web Tab (Record and Run Settings Dialog Box)This tab enables you to set options that instruct UFT which applications to open when you begin torecord or run your test.
Add-ins GuideChapter 2: Web-Based Application Support
HP Unified Functional Testing (12.50) Page 71
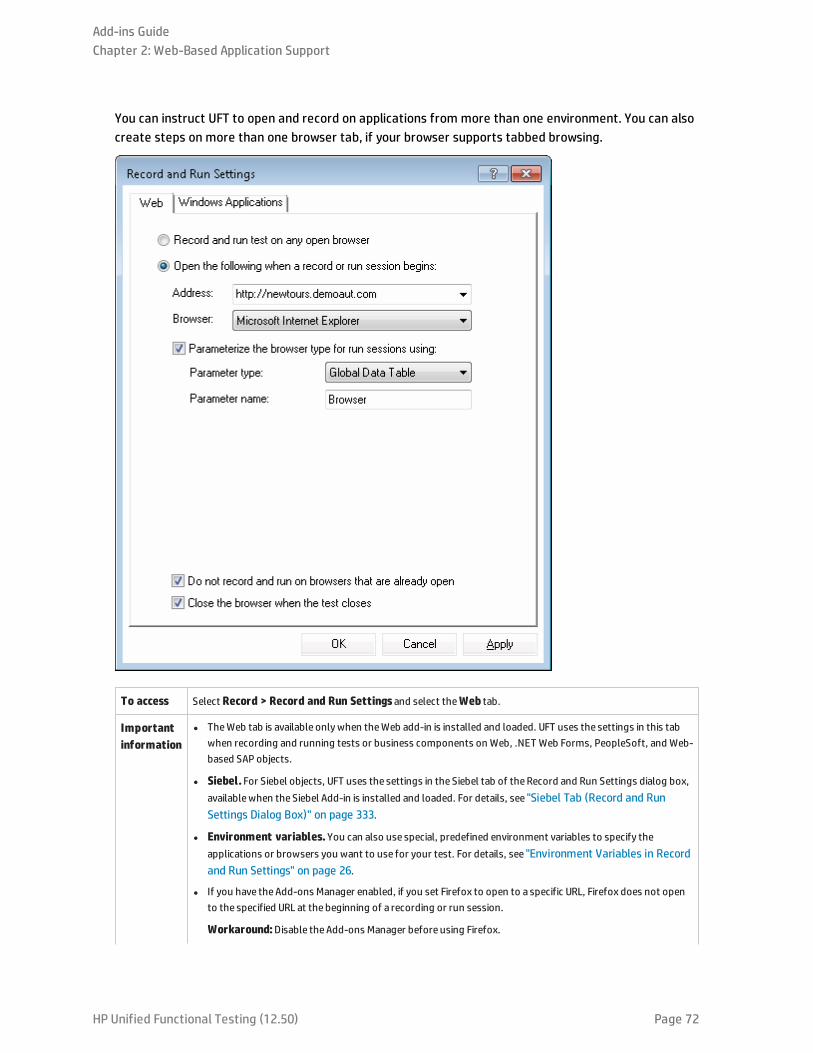
You can instruct UFT to open and record on applications from more than one environment. You can alsocreate steps on more than one browser tab, if your browser supports tabbed browsing.
To access Select Record > Record and Run Settingsand select theWeb tab.
Importantinformation
l TheWeb tab is available onlywhen theWeb add-in is installed and loaded. UFT uses the settings in this tabwhen recording and running tests or business components on Web, .NET Web Forms, PeopleSoft, and Web-based SAP objects.
l Siebel.For Siebel objects, UFT uses the settings in the Siebel tab of theRecord and Run Settings dialog box,availablewhen the Siebel Add-in is installed and loaded. For details, see "Siebel Tab (Record and RunSettings Dialog Box)" on page 333.
l Environment variables.You can also use special, predefined environment variables to specify theapplications or browsers you want to use for your test. For details, see "Environment Variables in Recordand Run Settings" on page 26.
l If you have theAdd-ons Manager enabled, if you set Firefox to open to a specific URL, Firefox does not opento the specified URL at the beginning of a recording or run session.
Workaround: Disable theAdd-ons Manager before using Firefox.
Add-ins GuideChapter 2: Web-Based Application Support
HP Unified Functional Testing (12.50) Page 72

Relevanttasks
l "How to Modify Event Recording Configuration for Web-Based Applications" on page 51
l "Environment Variables for a Web-Based Environment" on page 55
l "How to Define Record and Run Settings for UFT Add-ins" on page 29
See also l "Considerations for Testing Applications with Embedded Web Browser Controls" on page 75
User interface elements are described below:
UI Element Description
Record and runtest on any openbrowser
Instructs UFT to record and run on any open (supported)Web browser installed locally on yourcomputer. (For details on supported browsers, see theHPUnified Functional Testing ProductAvailability Matrix, available from theHP Support Matrix page (requires an HP passport)..
Note: You must open theWeb browser after you open UFT.
Tip: You can instruct UFT to ignoreALM browsers or other browsers that are open to a specifiedURL or have a specific title. For details, see "Web > General Pane (Options Dialog Box)" onpage 58.
Open thefollowing addresswhen a record orrun session begins
Instructs UFT to open anew browser session to record and run the test using the specified URL address.
Note: If you define a value for theURL_ENV environment variable, that value overrides the valuespecified here during a run session. For details, see "Environment Variables in Record and RunSettings" on page 26.
Open thefollowing browserwhen a record orrun session begins
Instructs UFT to open the specified browser typewhen recording or running a test:
Note:
l This list shows only browsers currently installed on your computer and theApple Safaribrowser, which UFT can access on a remoteMac computer.
l If you define a value for theBROWSER_ENV environment variable, that value overrides thevalue specified here during a run session. For details, see "Environment Variables for a Web-Based Environment" on page 55and "Environment Variables in Record and RunSettings" on page 26.
l If you selectMozilla Firefox, UFT opens the latest version of Mozilla Firefox that is bothinstalled on your computer and supported by UFT.
l If you want to open a specific version of Firefox that is not available in this list, you can usetheBROWSER_ENV environment variable as described in "Environment Variables for aWeb-Based Environment" on page 55.
l For a list of all supported browser versions, see theHPUnified Functional TestingProduct Availability Matrix, available from theHP Support Matrix page (requires anHP passport).
Parameterize thebrowser type forrun sessions using:
Enables you to set a parameter for the browser on which to run the test. You must specify thefollowing:
l Parameter type:Global Data Table parameter or Test Parameter
Note:
Add-ins GuideChapter 2: Web-Based Application Support
HP Unified Functional Testing (12.50) Page 73
UI Element Description
When you select the typeof parameter, UFT automatically adds a column to theGlobal tab oftheData paneor a test parameter.
The value you enter for this parameter is the sameas the environmental variables for thebrowser types. For details, see "Environment Variables for a Web-Based Environment" onpage 55.
l Parameter Name: The nameof the column in theGlobal tab of theData paneor the nameof thetest parameter
Host Name or IP(Remote ConnectionDetails)
The host nameor IP address of theMac computer to which UFT connects.
By default, UFT connects to theMac using port 8822. To use adifferent port, append the port numberto the host name: <hostname>:<port number>.
Make sure to configure the sameport number on theMac, in theUFT port option in theUFT ConnectionAgent preferences.
For more details, see "How to Connect to a Remote Mac Computer" on page 480.
Note:
l UFT uses this address whenever the test runs, whether you run it manually in UFT or as part ofan ALM test set, or any other way.
l If you want to test the connection to the host you specify, click theRemote Connection button
in theUFT toolbar, enter the host nameor IP in the dialog box that opens, and click
Connect.
l If you define a value for theREMOTE_HOST environment variable, that value overrides thevalue specified here during a run session.
Available only if you select Apple Safari (on remote Mac computer) from the list of browsers.
Use SSL (RemoteConnection Details)
Instructs UFT to use SSL when initiating the connection to the remoteMac computer.
If theUFT Connection Agent on theMac is configured to expect an SSL connection,you must select theUse SSL option.
To use an SSL connection to secure the communication between UFT and theMac, make sure that therelevant certificates and key are defined in theOptions dialog box in UFT (Tools > Options >GUITesting > Remote Connection) and in theUFT Connection Agent preferences on theMac. For details,see the "Securing the Communication With the Remote Mac Computer" on page 473.
Note: If you define a value for theUSE_SSL environment variable, that value overrides the valuespecified here during a run session. For details, see "Environment Variables in Record and RunSettings" on page 26.
Available only if you select Apple Safari (on remote Mac computer) from the list of browsers.
When run sessionends(RemoteConnection Details)
Specifies the procedures for UFT to perform at the end of a run session.
l Disconnect.Specifies whether to closeUFT's connection to the remoteMac.
For example:
Add-ins GuideChapter 2: Web-Based Application Support
HP Unified Functional Testing (12.50) Page 74

UI Element Description
Available only if youselect theAppleSafari browser
l Select this option if a subsequent run session needs to connect to a different Mac, or if youwant to release the port so another UFT instance can use it.
l Clear this option if you are running multiple tests but only the first one sets up the remoteconnection.
While editing tests in UFT, you can see the connection status in theRemote Connection dialog box
(opened from theRemote Connection button in theUFT toolbar). You can also use this dialogbox to manually close the connection to theMac.
l Close the browser.Specifies whether to close theApple Safari browser.
For example:
l Select this option if the test is independent from all other tests.
l Clear this option during the design stages of your test. The browser remains open after yourun the test, and you can continueworking with the browser while you edit the test.
l Clear this option if you are running multiple tests but only the first test contains a step thatruns the Safari browser.
These options are available only if you select Apple Safari (on remote Mac computer) from the listof browsers.
Do not record andrun on browsersthat are alreadyopen
Instructs UFT not to record or run tests on any browsers that are already open prior to the start of therecord or run session (and prior to opening UFT).
Selecting this option also prevents you from viewing the properties of these browsers using theObjectSpy.
Close the browserwhen the testcloses
Instructs UFT to close the browser window specified in theAddressboxwhen the test closes.
Examples of when to select or clear this option:
l Select this option if you are finished designing your test, and it runs independently from allother tests.
l Clear this option during the design stages of your test. The browser remains open after you runthe test, and you can continueworking with the browser while you edit the test.
l Clear this option if you plan to run multiple tests on the samebrowser, but only the first testincludes a step to open the browser.
Not available if you select Apple Safari (on remote Mac computer) from the list of browsers.
Considerations for Testing Applications with Embedded Web Browser Controls
l To record and run tests on an application with embedded Web browser controls, select Record andrun tests on any open Web browser in the Record and Run Settings dialog box.
l Register your browser control application (using the Register Browser Control Utility) so that UFTrecognizes your Web object when recording or running tests. For details, see "Register Browser
Add-ins GuideChapter 2: Web-Based Application Support
HP Unified Functional Testing (12.50) Page 75

Control Utility" on page 56.
l Make sure that the application is opened after UFT, and start recording.
Add-ins GuideChapter 2: Web-Based Application Support
HP Unified Functional Testing (12.50) Page 76
Troubleshooting and Limitations - Web-BasedApplication SupportThis section contains general troubleshooting and limitation information about the Web add-in, andincludes the following sections:
l "Test Objects, Methods, and Properties" below
l "Creating and Running Testing Documents" below
l "Recognition of WebTable Test Objects" on the next page
l "Registering Browsers" on page 79
l "Checkpoints, Output Values, and the Active Screen" on page 79
l "Working with Multiple Web Browsers" on page 79
Test Objects, Methods, and Properties
l Web test objects do not support the Class Name identification property. If you try to run aChildObjects(<Descr>) step on a Web object, and the Descr argument includes the Class Nameproperty, a General Run Errormessage is displayed.
Workaround: Use the micclass property in the Descr argument.
l If you record drag and drop steps on a Web element within the same frame, the test steps may failduring the run session if the screen resolution is not identical to the screen resolution during therecording session. This is because the target location coordinates may be different for differentscreen resolutions.
Workaround: If this problem occurs, adjust the Drop coordinates according to the new location.
l UFT records changes in the edit field only on <input type="file"> tags. Browsing operations arenot recorded.
l Clicks on form tags of type POST may not run correctly.
Workaround: If this problem occurs, change the replay type before the click to Run by mouseoperations using: Setting.WebPackage("ReplayType") = 2. It is recommended to return thereplay type to the default (Run by Events) setting after the click step: Setting.WebPackage("ReplayType") = 1.
Creating and Running Testing Documents
l If you use the Tab key when recording password fields in the AutoComplete dialog box, UFT mayrecord incorrectly.
Workaround: Press ENTER after entering the user name or click the button for logging in.
HP Unified Functional Testing (12.50) Page 77
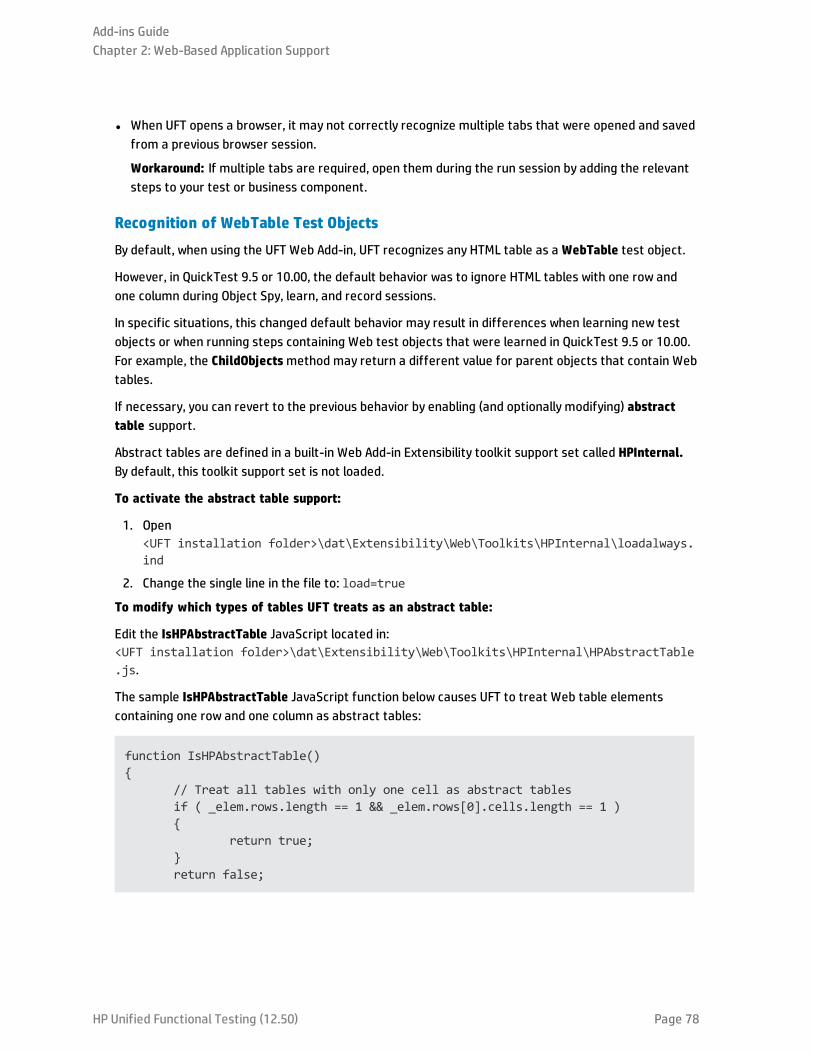
l When UFT opens a browser, it may not correctly recognize multiple tabs that were opened and savedfrom a previous browser session.
Workaround: If multiple tabs are required, open them during the run session by adding the relevantsteps to your test or business component.
Recognition of WebTable Test Objects
By default, when using the UFT Web Add-in, UFT recognizes any HTML table as a WebTable test object.
However, in QuickTest 9.5 or 10.00, the default behavior was to ignore HTML tables with one row andone column during Object Spy, learn, and record sessions.
In specific situations, this changed default behavior may result in differences when learning new testobjects or when running steps containing Web test objects that were learned in QuickTest 9.5 or 10.00.For example, the ChildObjectsmethod may return a different value for parent objects that contain Webtables.
If necessary, you can revert to the previous behavior by enabling (and optionally modifying) abstracttable support.
Abstract tables are defined in a built-in Web Add-in Extensibility toolkit support set called HPInternal.By default, this toolkit support set is not loaded.
To activate the abstract table support:
1. Open<UFT installation folder>\dat\Extensibility\Web\Toolkits\HPInternal\loadalways.ind
2. Change the single line in the file to: load=true
To modify which types of tables UFT treats as an abstract table:
Edit the IsHPAbstractTable JavaScript located in:<UFT installation folder>\dat\Extensibility\Web\Toolkits\HPInternal\HPAbstractTable.js.
The sample IsHPAbstractTable JavaScript function below causes UFT to treat Web table elementscontaining one row and one column as abstract tables:
function IsHPAbstractTable(){
// Treat all tables with only one cell as abstract tablesif ( _elem.rows.length == 1 && _elem.rows[0].cells.length == 1 ){
return true;}return false;
Add-ins GuideChapter 2: Web-Based Application Support
HP Unified Functional Testing (12.50) Page 78
To instruct UFT to ignore additional types of Web table elements, modify the IsHPAbstractTableJavaScript function to return true for those types based on their HTML properties or other information.(Use the token _elem to represent the Web element UFT is currently handling.)
Caution: HPAbstractTable.js affects the way UFT identifies Web objects and can cause problemsif modified incorrectly. Edit this file only if you are an experienced JavaScript programmer and arefamiliar with the implementation of your Web controls. Make sure to create a backup copy of thefile before making changes.
Registering Browsers
UFT supports applications with embedded browsers only for applications that embed Internet Explorer.
Checkpoints, Output Values, and the Active Screen
l Checkpoints on page source/HTML tags cannot be inserted from the Active Screen and must beinserted while recording. These checkpoints may fail during the first run session.
Workaround: Perform an update run (Run > Update Run Mode) of your test or business componentbefore you run a test or business component that includes a page source/HTML tag checkpoint.
l If you insert checkpoints from the Active Screen when you are working with an application containinga browser control instead of a Web browser, your checkpoints may fail.
Workaround: Insert checkpoints while recording.
Working with Multiple Web Browsers
UFT retrieves the CSS property values from the browser. When designing tests or components that willrun on different browsers, keep in mind that different browsers may have different CSS functionalityand return different property values for the same object.
Problem
When running steps that are intended to be performed on different browsers, and UFT tries to performthe step intended for the second browser before the second browser has finished loading, UFT willperform the step on the first browser, and the step may fail.
Solution
Insert a Wait() statement before the first step on the second browser to enable the second browser tofinish loading.
Reason
By default, a Browser test object does not have any identification properties in its description. Whenonly one browser is open, the open browser matches the (empty) description for any Browser testobjects. When multiple browsers are open, UFT uses smart identification or the ordinal identifierproperty value stored with the relevant Browser test object to distinguish between the browsers and toselect the correct browser.
Add-ins GuideChapter 2: Web-Based Application Support
HP Unified Functional Testing (12.50) Page 79

However, if a second browser has not fully loaded when UFT tries to perform a step intended for thatbrowser, UFT will assume that only one browser is open and it will try to perform the step on the firstbrowser without reverting to smart identification or ordinal identifiers.
Add-ins GuideChapter 2: Web-Based Application Support
HP Unified Functional Testing (12.50) Page 80
Chapter 2: Windows-Based Application SupportThis chapter includes:
• Windows-Based Application Support - Overview 82
• UFT Configuration for Windows-Based Applications 82
• Record and Run Settings for Windows-Based Applications 83
• Environment Variables for Windows-based Applications 84
• Windows Applications > General Pane (Options Dialog Box > GUI Testing Tab) 85
• Windows Applications > Advanced Pane (Options Dialog Box > GUI Testing Tab) 87
• Considerations for Advanced Windows-based Application Testing 91
• Windows Applications Tab (Record and Run Settings Dialog Box) 93
• Application Details Dialog Box 96
• Record and Run Setting Guidelines for Windows-Based Add-ins 98
HP Unified Functional Testing (12.50) Page 81
Windows-Based Application Support - OverviewUFT provides a number of add-ins for testing Windows-based applications.
The way you configure many of your UFT options is the same or similar for most UFT Windows-basedadd-ins (as well as for the built-in standard Windows testing support). For details, see "UFTConfiguration for Windows-Based Applications" below.
Many UFT add-ins rely on the settings in the "Windows Applications Tab (Record and Run Settings DialogBox)" (described on page 93) to determine on which applications UFT records and runs. For some add-ins, these settings may also affect the applications that UFT recognizes for certain operations while inedit mode, such as using the Object Spy or other pointing hand operations.
You can also use predefined environment variables to specify the applications or browsers you want touse for your test. This can be useful if you want to test how your application works in differentenvironments.
There may also be additional issues that you need to address to ensure that UFT recognizes yourobjects properly during record, run, and/or pointing hand operations. For details, see "Record and RunSetting Guidelines for Windows-Based Add-ins" on page 98.
For details about standard Windows testing support, see "Standard Windows Support -Quick Reference"on page 347
For details on how to work with Windows-based add-ins, see the specific sections describing these add-ins in the guide:
l "ActiveX Add-in - Quick Reference" on page 140
l "Delphi Add-in - Quick Reference" on page 146
l ".NET Windows Forms Support - Quick Reference" on page 116
l "PowerBuilder Add-in" on page 234
l "Qt Add-in" on page 238
l "Windows-based SAP Support - Quick Reference" on page 259
l "Stingray Add-in" on page 350
l "Terminal Emulator Add-in" on page 377
l "VisualAge Smalltalk Add-in" on page 424
l "Visual Basic Add-in" on page 428
l "Windows Runtime Add-in" on page 504
UFT Configuration for Windows-Based ApplicationsUse the Windows Applications pane of the Options dialog box (Tools > Options > GUI Testing tab >Windows Applications node) to configure general and advanced Windows-based application options, as
HP Unified Functional Testing (12.50) Page 82
follows:
l General options. Configure how UFT records and runs tests and business components for Windows-based applications, such as Standard Windows, ActiveX, .NET Windows Forms, WPF, SAP GUI forWindows, Visual Basic applications, and Windows Runtime. For details, see "Windows Applications >General Pane (Options Dialog Box > GUI Testing Tab)" on page 85.
Tip: When recording tests or scripted components on Windows-based applications, you canchoose to save all Active Screen information in every step, save information only in certainsteps, or disable Active Screen captures entirely. You set this preference in the Active Screenpane of the Options dialog box (Tools > Options > GUI Testing tab > Active Screen node). Theless information saved, the faster your recording times will be.
This option is not relevant for keyword components.
For details, see the section describing the Active Screen pane in the HP Unified Functional TestingUser Guide.
l Advanced options. Modify how UFT records and runs tests or business components on Windows-based applications, such as ActiveX or Visual Basic. For details, see "Windows Applications > AdvancedPane (Options Dialog Box > GUI Testing Tab)" on page 87.
Record and Run Settings for Windows-BasedApplicationsYou can set options that affect how you start creating and running tests for Windows-basedapplications in the "Windows Applications Tab (Record and Run Settings Dialog Box)" (described on page93). These options instruct UFT which applications to open when you begin to record or run your test.
Additionally, you can specify the applications on which you want to record in the "Application DetailsDialog Box" (described on page 96). You can use environment variables to define the details for theWindows-based applications on which you want to record and run tests. If you do this, use theappropriate variable names as specified in "Environment Variables for Windows-based Applications" onthe next page.
Note: The Record and Run Settings dialog box applies only to tests. Record settings for businesscomponents are specified in the Applications pane or Applications dialog box of the relevantapplication area. However, specific record and run settings do not need to be defined for businesscomponents. For details on the Applications pane in the Additional Settings pane of an applicationarea, see the HP Unified Functional Testing User Guide.
Add-ins GuideChapter 2: Windows-Based Application Support
HP Unified Functional Testing (12.50) Page 83
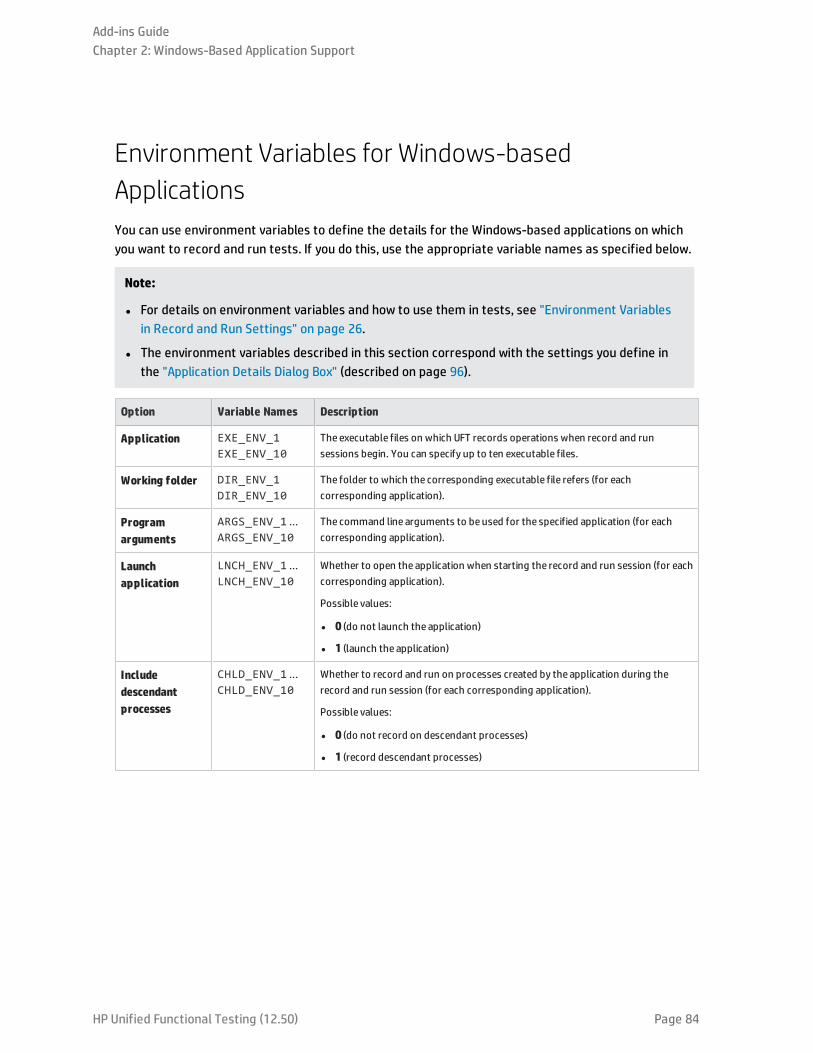
Environment Variables for Windows-basedApplicationsYou can use environment variables to define the details for the Windows-based applications on whichyou want to record and run tests. If you do this, use the appropriate variable names as specified below.
Note:
l For details on environment variables and how to use them in tests, see "Environment Variablesin Record and Run Settings" on page 26.
l The environment variables described in this section correspond with the settings you define inthe "Application Details Dialog Box" (described on page 96).
Option Variable Names Description
Application EXE_ENV_1EXE_ENV_10
The executable files on which UFT records operations when record and runsessions begin. You can specify up to ten executable files.
Working folder DIR_ENV_1DIR_ENV_10
The folder to which the corresponding executable file refers (for eachcorresponding application).
Programarguments
ARGS_ENV_1 ...ARGS_ENV_10
The command line arguments to beused for the specified application (for eachcorresponding application).
Launchapplication
LNCH_ENV_1 ...LNCH_ENV_10
Whether to open the application when starting the record and run session (for eachcorresponding application).
Possible values:
l 0 (do not launch the application)
l 1 (launch the application)
Includedescendantprocesses
CHLD_ENV_1 ...CHLD_ENV_10
Whether to record and run on processes created by the application during therecord and run session (for each corresponding application).
Possible values:
l 0 (do not record on descendant processes)
l 1 (record descendant processes)
Add-ins GuideChapter 2: Windows-Based Application Support
HP Unified Functional Testing (12.50) Page 84
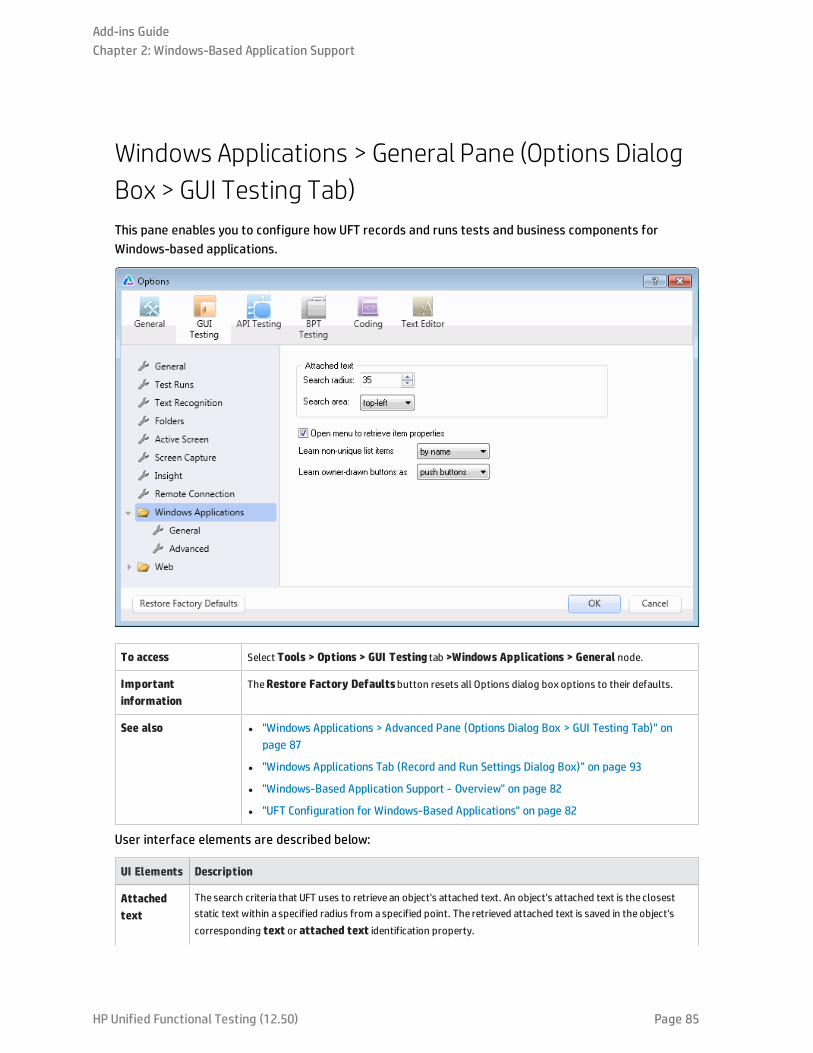
Windows Applications > General Pane (Options DialogBox > GUI Testing Tab)This pane enables you to configure how UFT records and runs tests and business components forWindows-based applications.
To access Select Tools > Options > GUI Testing tab >Windows Applications > General node.
Importantinformation
TheRestore Factory Defaultsbutton resets all Options dialog box options to their defaults.
See also l "Windows Applications > Advanced Pane (Options Dialog Box > GUI Testing Tab)" onpage 87
l "Windows Applications Tab (Record and Run Settings Dialog Box)" on page 93
l "Windows-Based Application Support - Overview" on page 82
l "UFT Configuration for Windows-Based Applications" on page 82
User interface elements are described below:
UI Elements Description
Attachedtext
The search criteria that UFT uses to retrieve an object's attached text. An object's attached text is the closeststatic text within a specified radius from aspecified point. The retrieved attached text is saved in the object'scorresponding text or attached text identification property.
Add-ins GuideChapter 2: Windows-Based Application Support
HP Unified Functional Testing (12.50) Page 85
UI Elements Description
Note: Sometimes the static text that you believe to be closest to an object is not actually the closeststatic text. You may need to use trial and error to make sure that the attached text is the static text objectof your choice.
Search radius.Themaximum distance, in pixels, that UFT searches for attached text.
Search area.Thepoint on an object from which UFT searches for the object's attached text.
Select an option from theSearch area list:
l Top-Left.Top-left corner
l Top.Midpoint between the two top corners
l Top-Right.Top-right corner
l Right.Midpoint between the two right corners
l Bottom-Right.Bottom-right corner
l Bottom.Midpoint between the two bottom corners
l Bottom-Left.Bottom-left corner
l Left.Midpoint between the two left corners
Open menuto retrieveitemproperties
Instructs UFT to open Standard Windows menu objects before retrieving menu item properties during a runsession.
Note:
l Selecting this option may slow the run, but it can beuseful if menu item properties changeuponopening themenu.
l This option, which is selected by default, sets the default behavior for all menu objects. You can usetheExpandMenuproperty in a test or function library to set this behavior for a specified menu object.For details, see the specific test object methods and properties in theHPUFT Object ModelReference for GUI Testing.
Learnnon-uniquelist items
Determines what UFT learns when more than one item (in a Standard Windows list or tree) has an identicalname.
l by name.Learns the item's name.
During a run session, UFT finds and selects the first instance of the name, regardless of the item chosenwhen learning. Select this option if the all items with the samenamehave the identical behavior.
l by index.Learns the item's index number.
Select this option if items with the samenamedo not necessarily have the identical behavior.
Learnowner-drawnbuttons as
Instructs UFT how to identify and learn Standard Windows custom-madebuttons in the application.
Select an option from the list:
l push buttons
l check boxes
l radio buttons
l objects
Add-ins GuideChapter 2: Windows-Based Application Support
HP Unified Functional Testing (12.50) Page 86
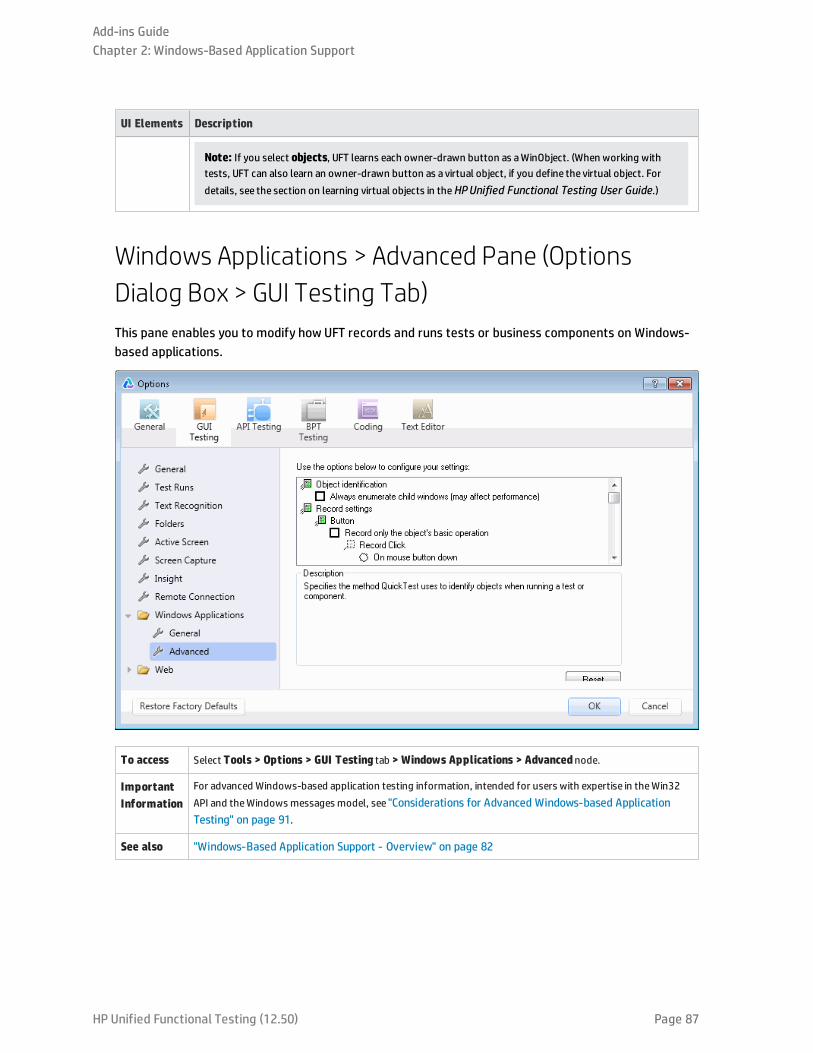
UI Elements Description
Note: If you select objects, UFT learns each owner-drawn button as aWinObject. (When working withtests, UFT can also learn an owner-drawn button as a virtual object, if you define the virtual object. Fordetails, see the section on learning virtual objects in theHPUnified Functional Testing User Guide.)
Windows Applications > Advanced Pane (OptionsDialog Box > GUI Testing Tab)This pane enables you to modify how UFT records and runs tests or business components on Windows-based applications.
To access Select Tools > Options > GUI Testing tab > Windows Applications > Advancednode.
ImportantInformation
For advanced Windows-based application testing information, intended for users with expertise in theWin32API and theWindows messages model, see "Considerations for Advanced Windows-based ApplicationTesting" on page 91.
See also "Windows-Based Application Support - Overview" on page 82
Add-ins GuideChapter 2: Windows-Based Application Support
HP Unified Functional Testing (12.50) Page 87
User interface elements are described below:
UI Elements Description
Object Identification node
Always enumeratechild windows (mayaffect performance)
Instructs UFT to enumerate all child windows when recording a running a test or businesscomponent.
Caution: This option is cleared by default and should beused onlywhen an object cannototherwise be identified, because it may significantly affect performance. For details, see"Considerations for Advanced Windows-based Application Testing" on page 91.
Record Settings node
Button Defines record settings for button objects:
l Record only the object's basic operation.Enables simplified recording on the button. Usingthis modemay improve recognition of user operations in non-standard cases.
Note: This option is cleared by default and should beused onlywhen the default recordingmethod does not meet your needs. For details, see "Considerations for AdvancedWindows-based Application Testing" on page 91.
l Record Click.Specifies whether theClickoperation should be recorded when themousebuttonis pressed (On mouse button down) or when themousebutton is released (On mouse buttonup).
Note: This option is enabled onlywhen Record only the object's basic operation isselected.
Default =On mouse button up.
List Defines record settings for Windows-based list objects (for example, WinList, WinListView, andVbList):
l Record only the object's basic operation.Enables simplified recording on the list. Using thismodemay improve recognition of user operations in non-standard cases.
Note: This option is cleared by default and should beused onlywhen the default recordingmethod does not meet your needs. For details, see "Considerations for AdvancedWindows-based Application Testing" on page 91.
l Record Select.Specifies whether theSelect operation should be recorded when themousebutton is pressed (On mouse button down) or when themousebutton is released (On mousebutton up).
Default =On mouse button up.
Menu Defines record settings for menu objects:
l Enable recording. Specifies whether UFT records operations on menu controls. For example,you maywant UFT to ignore the actual process of selecting amenu to open another window.
This option is selected by default.
l Menu recording mode.Specifies whether UFT verifies or ignores menu initialization eventsbefore recording operations on menu controls.
Add-ins GuideChapter 2: Windows-Based Application Support
HP Unified Functional Testing (12.50) Page 88
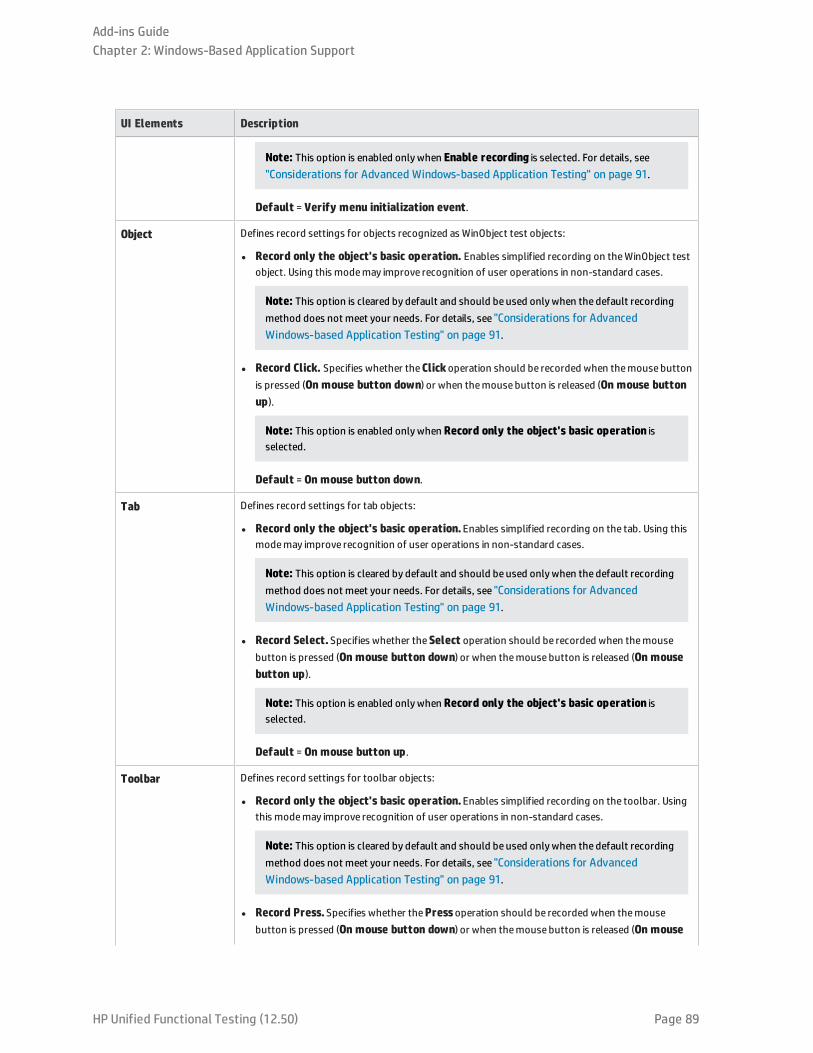
UI Elements Description
Note: This option is enabled onlywhen Enable recording is selected. For details, see"Considerations for Advanced Windows-based Application Testing" on page 91.
Default = Verify menu initialization event.
Object Defines record settings for objects recognized as WinObject test objects:
l Record only the object's basic operation. Enables simplified recording on theWinObject testobject. Using this modemay improve recognition of user operations in non-standard cases.
Note: This option is cleared by default and should beused onlywhen the default recordingmethod does not meet your needs. For details, see "Considerations for AdvancedWindows-based Application Testing" on page 91.
l Record Click. Specifies whether theClickoperation should be recorded when themousebuttonis pressed (On mouse button down) or when themousebutton is released (On mouse buttonup).
Note: This option is enabled onlywhen Record only the object's basic operation isselected.
Default =On mouse button down.
Tab Defines record settings for tab objects:
l Record only the object's basic operation.Enables simplified recording on the tab. Using thismodemay improve recognition of user operations in non-standard cases.
Note: This option is cleared by default and should beused onlywhen the default recordingmethod does not meet your needs. For details, see "Considerations for AdvancedWindows-based Application Testing" on page 91.
l Record Select.Specifies whether theSelect operation should be recorded when themousebutton is pressed (On mouse button down) or when themousebutton is released (On mousebutton up).
Note: This option is enabled onlywhen Record only the object's basic operation isselected.
Default =On mouse button up.
Toolbar Defines record settings for toolbar objects:
l Record only the object's basic operation.Enables simplified recording on the toolbar. Usingthis modemay improve recognition of user operations in non-standard cases.
Note: This option is cleared by default and should beused onlywhen the default recordingmethod does not meet your needs. For details, see "Considerations for AdvancedWindows-based Application Testing" on page 91.
l Record Press.Specifies whether thePressoperation should be recorded when themousebutton is pressed (On mouse button down) or when themousebutton is released (On mouse
Add-ins GuideChapter 2: Windows-Based Application Support
HP Unified Functional Testing (12.50) Page 89
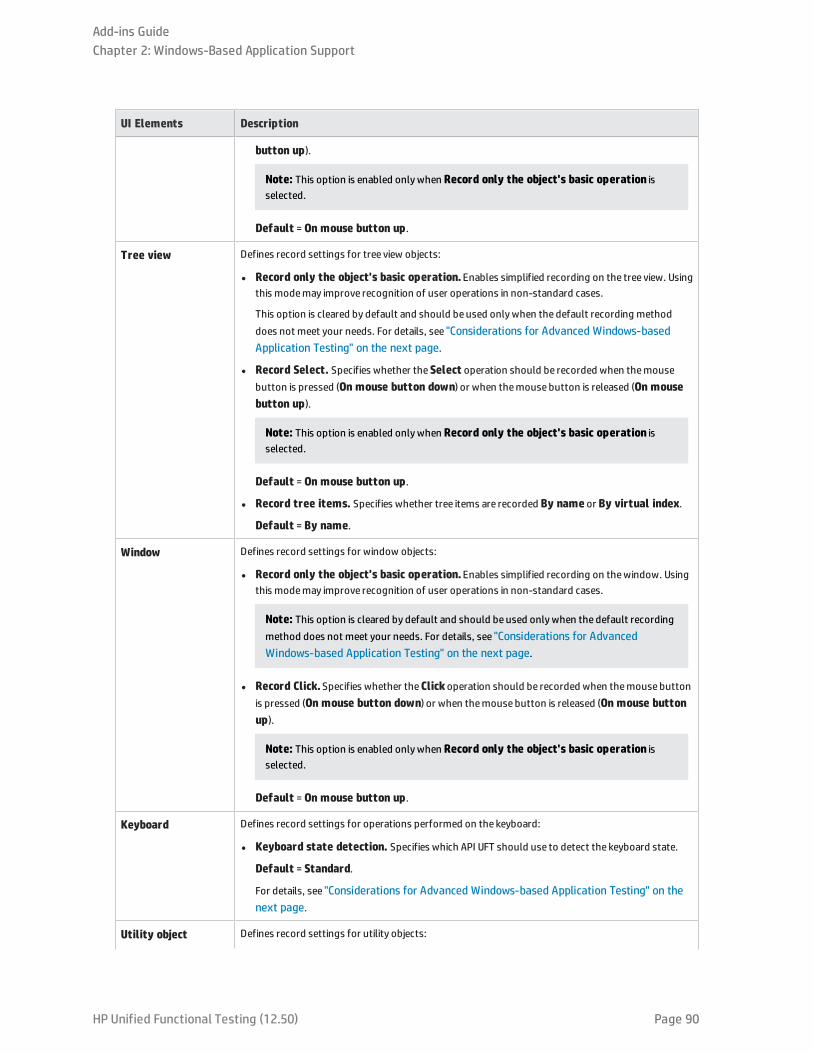
UI Elements Description
button up).
Note: This option is enabled onlywhen Record only the object's basic operation isselected.
Default =On mouse button up.
Tree view Defines record settings for tree view objects:
l Record only the object's basic operation.Enables simplified recording on the tree view. Usingthis modemay improve recognition of user operations in non-standard cases.
This option is cleared by default and should beused onlywhen the default recording methoddoes not meet your needs. For details, see "Considerations for Advanced Windows-basedApplication Testing" on the next page.
l Record Select. Specifies whether theSelect operation should be recorded when themousebutton is pressed (On mouse button down) or when themousebutton is released (On mousebutton up).
Note: This option is enabled onlywhen Record only the object's basic operation isselected.
Default =On mouse button up.
l Record tree items. Specifies whether tree items are recorded By name or By virtual index.
Default = By name.
Window Defines record settings for window objects:
l Record only the object's basic operation.Enables simplified recording on thewindow. Usingthis modemay improve recognition of user operations in non-standard cases.
Note: This option is cleared by default and should beused onlywhen the default recordingmethod does not meet your needs. For details, see "Considerations for AdvancedWindows-based Application Testing" on the next page.
l Record Click.Specifies whether theClickoperation should be recorded when themousebuttonis pressed (On mouse button down) or when themousebutton is released (On mouse buttonup).
Note: This option is enabled onlywhen Record only the object's basic operation isselected.
Default =On mouse button up.
Keyboard Defines record settings for operations performed on the keyboard:
l Keyboard state detection. Specifies which API UFT should use to detect the keyboard state.
Default = Standard.
For details, see "Considerations for Advanced Windows-based Application Testing" on thenext page.
Utility object Defines record settings for utility objects:
Add-ins GuideChapter 2: Windows-Based Application Support
HP Unified Functional Testing (12.50) Page 90
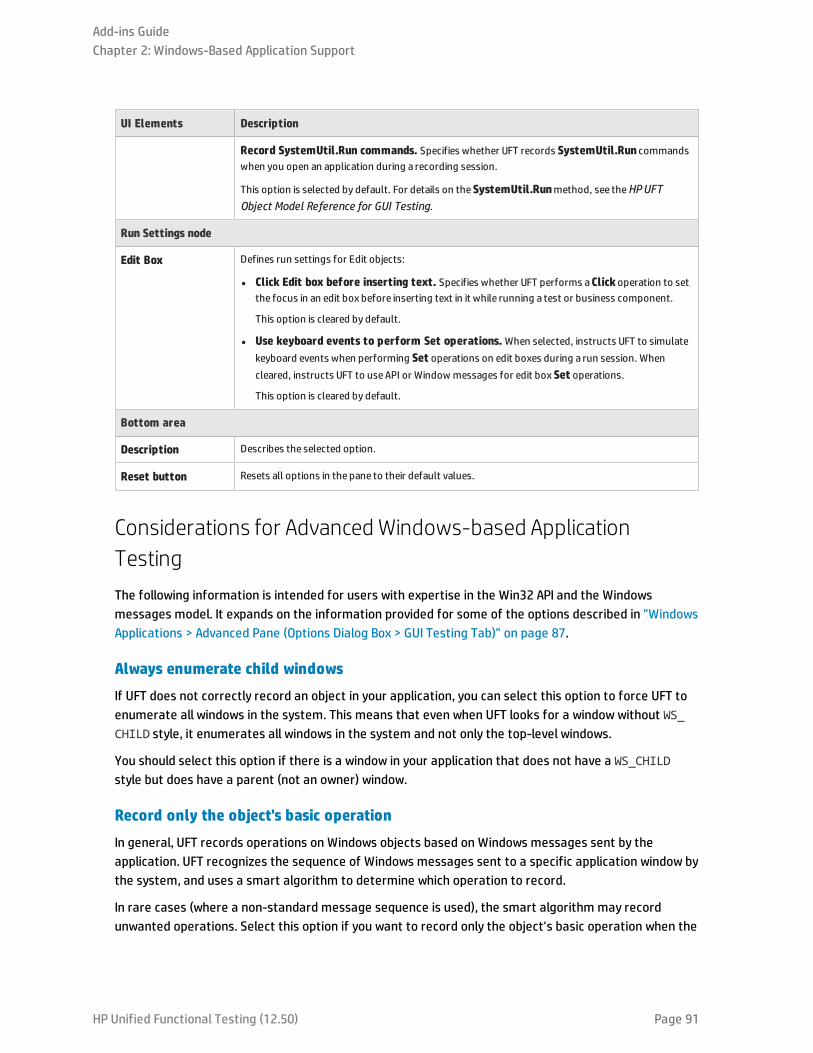
UI Elements Description
Record SystemUtil.Run commands. Specifies whether UFT records SystemUtil.Run commandswhen you open an application during a recording session.
This option is selected by default. For details on theSystemUtil.Runmethod, see theHPUFTObject Model Reference for GUI Testing.
Run Settings node
Edit Box Defines run settings for Edit objects:
l Click Edit box before inserting text. Specifies whether UFT performs aClickoperation to setthe focus in an edit box before inserting text in it while running a test or business component.
This option is cleared by default.
l Use keyboard events to perform Set operations.When selected, instructs UFT to simulatekeyboard events when performing Set operations on edit boxes during a run session. Whencleared, instructs UFT to useAPI or Window messages for edit boxSet operations.
This option is cleared by default.
Bottom area
Description Describes the selected option.
Reset button Resets all options in the pane to their default values.
Considerations for Advanced Windows-based ApplicationTestingThe following information is intended for users with expertise in the Win32 API and the Windowsmessages model. It expands on the information provided for some of the options described in "WindowsApplications > Advanced Pane (Options Dialog Box > GUI Testing Tab)" on page 87.
Always enumerate child windows
If UFT does not correctly record an object in your application, you can select this option to force UFT toenumerate all windows in the system. This means that even when UFT looks for a window without WS_CHILD style, it enumerates all windows in the system and not only the top-level windows.
You should select this option if there is a window in your application that does not have a WS_CHILDstyle but does have a parent (not an owner) window.
Record only the object's basic operation
In general, UFT records operations on Windows objects based on Windows messages sent by theapplication. UFT recognizes the sequence of Windows messages sent to a specific application window bythe system, and uses a smart algorithm to determine which operation to record.
In rare cases (where a non-standard message sequence is used), the smart algorithm may recordunwanted operations. Select this option if you want to record only the object's basic operation when the
Add-ins GuideChapter 2: Windows-Based Application Support
HP Unified Functional Testing (12.50) Page 91
selected event occurs. When you select this option, you can also select when to record the operation. Ifyou select On mouse button down, UFT records the operation performed when a WM_LBUTTONDOWNmessage is detected; if you select On mouse button up, UFT records the operation performed when aWM_LBUTTONUPmessage is detected.
Keyboard state detection
If UFT does not correctly record keyboard key combinations (for example, CTRL+Y, or ALT+CTRL+HOME),you can try changing the default setting for this option. Following is a brief explanation of each of theoptions:
l Standard. Uses the GetKeyboardState API to detect the keyboard state. For details, seehttp://msdn2.microsoft.com/en-us/library/ms646299.aspx.
l Alternate synchronous. Uses the GetKeyState API to detect the keyboard state. For details, seehttp://msdn2.microsoft.com/en-us/library/ms646301.aspx.
l Alternate asynchronous. Uses the GetAsyncKeyState API to detect the keyboard state. For details,see http://msdn2.microsoft.com/en-us/library/ms646293.aspx.
Menu recording mode
In most applications, Windows sends a WM_CONTEXTMENUmessage, WM_ENTERMENULOOPmessage, WM_INITMENUmessage, WM_INITMENUPOPUPmessage, or other initialization message when a user opens amenu. Windows then sends a WM_MENUSELECTmessage when a user selects a menu item.
The Verify menu initialization event option instructs UFT to record menu operations only afterdetecting a menu initialization message. If UFT does not correctly record menu operations, or if yourapplication does not send initialization messages before sending WM_MENUSELECTmessages, try usingthe Ignore menu initialization event option. This instructs UFT to always record menu operations.
Add-ins GuideChapter 2: Windows-Based Application Support
HP Unified Functional Testing (12.50) Page 92
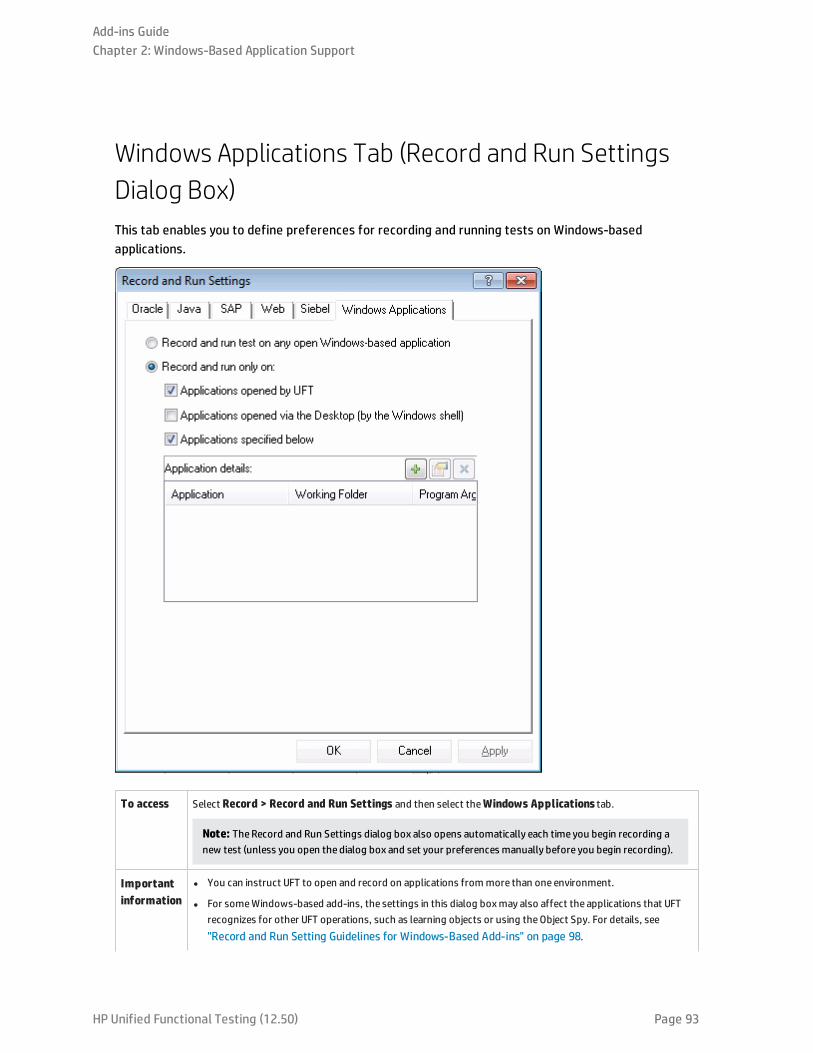
Windows Applications Tab (Record and Run SettingsDialog Box)This tab enables you to define preferences for recording and running tests on Windows-basedapplications.
To access Select Record > Record and Run Settings and then select theWindows Applications tab.
Note: TheRecord and Run Settings dialog box also opens automatically each time you begin recording anew test (unless you open the dialog box and set your preferences manually before you begin recording).
Importantinformation
l You can instruct UFT to open and record on applications frommore than one environment.
l For someWindows-based add-ins, the settings in this dialog boxmay also affect the applications that UFTrecognizes for other UFT operations, such as learning objects or using theObject Spy. For details, see"Record and Run Setting Guidelines for Windows-Based Add-ins" on page 98.
Add-ins GuideChapter 2: Windows-Based Application Support
HP Unified Functional Testing (12.50) Page 93
l For performance reasons, the default setting in theWindows Applications tab is set to record and run onlyon the applications you specify (and not on any open application). If you do not specify an application orchange this option, UFT will not record or run on anyWindows-based application.
l If you loaded other add-ins when you opened UFT, theremay be additional tabs in theRecord and RunSettings dialog box. If this is the case, confirm that in each additional tab, the option to record and run onany open application (upper radio button of each tab) is selected.
While this setting does not directly affect your record or run sessions, it prevents UFT from openingunnecessary applications when you begin record or run sessions.
See also l "Record and Run Settings for Windows-Based Applications" on page 83
l "Record and Run Setting Guidelines for Windows-Based Add-ins" on page 98
l "Environment Variables for Windows-based Applications" on page 84
l "Environment Variables in Record and Run Settings" on page 26
l "Application Details Dialog Box" on page 96
l "Record and Run Settings for Add-ins - Overview" on page 24
l "Windows-Based Application Support - Overview" on page 82
User interface elements are described below:
UI Elements Description
Record andrun test onany openWindows-basedapplication
Instructs UFT to record all operations performed on anyWindows-based application that is opened whilerecording your test (including e-mail applications, filemanagement applications, and so on). UFT records andruns only on applications that have auser interface, and it does not matter how the applications are opened(as child processes of Windows Explorer, child processes of UFT, and so on).
When selecting this option, make sure that all the applications on which you want to record are currentlyclosed. For someenvironments, UFT can recognize and/or record on the applications that you open manuallyonly after you select this option and clickOK. Instances of these applications that are already open when theRecord and Run Settings dialog box opens may be ignored or may not be recognized or recorded correctly.
Add-ins GuideChapter 2: Windows-Based Application Support
HP Unified Functional Testing (12.50) Page 94
UI Elements Description
Record andrun only on
Restricts record and run (and in some cases pointing hand) operations to selected applications. Additionally,you can configurewhether UFT should open these applications for you at the beginning of a record or runsession. The following options are available:
l Applications opened by UFT.This option records, recognizes, and runs only on applications invoked byUFT (as child processes of UFT). For example, applications opened during a record or run session using aSystemUtil.Run statement, or using a statement such as:
Set shell = createobject("wscript.shell")shell.run "notepad".
l Applications opened via the Desktop (by the Windows shell).This option records, recognizes, andruns only on applications that are opened via theWindows Desktop. For example, applications openedfrom theWindows Startmenu, by double-clicking executable files in theWindows Explorer, by double-clicking a shortcut on theWindows Desktop, or by clicking icons on theQuick Launch bar.
l Applications specified below. This option records, recognizes, and runs only on applications listed intheApplication details area.
Tip:
l If you do not want to record on anyWindows-based applications, select only theApplicationsspecified below check box, and ensure that there are no applications listed in theApplicationdetailsarea.
l Make sure that all the applications listed in theApplication detailsarea are currently closed. Forsomeenvironments, UFT can record only on the instances of the specified applications that areopened after you select this option and clickOK. Instances of these applications that are alreadyopen when theRecord and Run Settings dialog box opens may be ignored or may not be recognizedor recorded correctly.
Applicationdetails
Thedetails of the applications on which to record and run the test. For details on the details displayed, see"Application Details Dialog Box" on the next page.
Note: If you define values for oneor more environment variables, those values override the values intheWindows Applications tab during a test run. For details, see "Environment Variables in Recordand Run Settings" on page 26.
Add.Opens the "Application Details Dialog Box" (described on page96 to enable you to add an applicationto the application list. You can add up to ten applications.
Edit.Opens the "Application Details Dialog Box" (described on page96) to enable you to edit theapplication details for the selected application.
Delete. Removes the selected application from the application list.
Add-ins GuideChapter 2: Windows-Based Application Support
HP Unified Functional Testing (12.50) Page 95
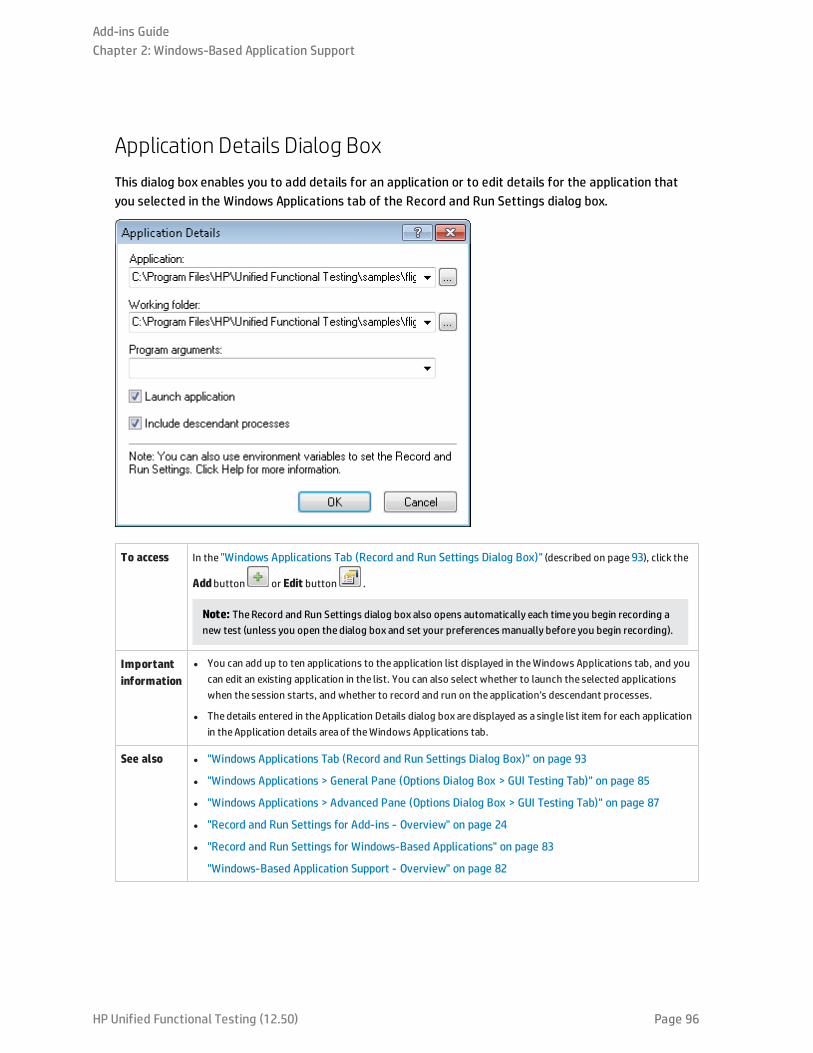
Application Details Dialog BoxThis dialog box enables you to add details for an application or to edit details for the application thatyou selected in the Windows Applications tab of the Record and Run Settings dialog box.
To access In the "Windows Applications Tab (Record and Run Settings Dialog Box)" (described on page93), click the
Addbutton or Edit button .
Note: TheRecord and Run Settings dialog box also opens automatically each time you begin recording anew test (unless you open the dialog box and set your preferences manually before you begin recording).
Importantinformation
l You can add up to ten applications to the application list displayed in theWindows Applications tab, and youcan edit an existing application in the list. You can also select whether to launch the selected applicationswhen the session starts, and whether to record and run on the application's descendant processes.
l Thedetails entered in theApplication Details dialog box are displayed as a single list item for each applicationin theApplication details area of theWindows Applications tab.
See also l "Windows Applications Tab (Record and Run Settings Dialog Box)" on page 93
l "Windows Applications > General Pane (Options Dialog Box > GUI Testing Tab)" on page 85
l "Windows Applications > Advanced Pane (Options Dialog Box > GUI Testing Tab)" on page 87
l "Record and Run Settings for Add-ins - Overview" on page 24
l "Record and Run Settings for Windows-Based Applications" on page 83
"Windows-Based Application Support - Overview" on page 82
Add-ins GuideChapter 2: Windows-Based Application Support
HP Unified Functional Testing (12.50) Page 96
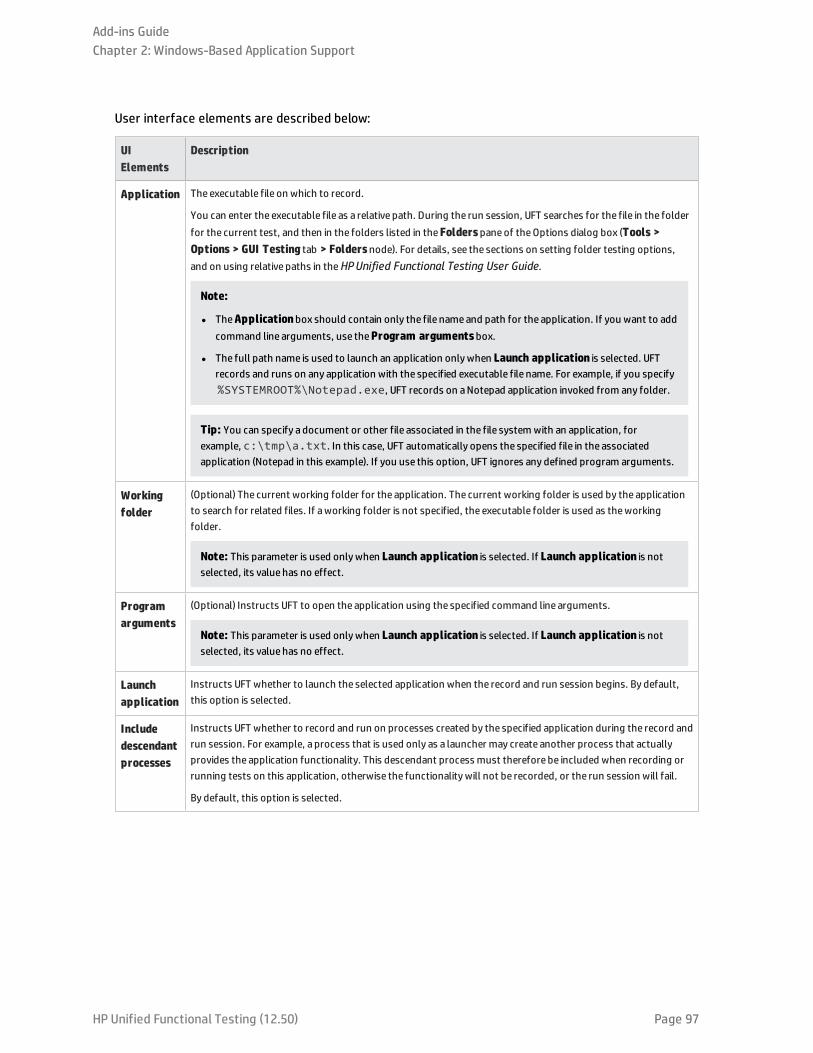
User interface elements are described below:
UIElements
Description
Application The executable file on which to record.
You can enter the executable file as a relative path. During the run session, UFT searches for the file in the folderfor the current test, and then in the folders listed in theFolderspaneof theOptions dialog box (Tools >Options > GUI Testing tab > Foldersnode). For details, see the sections on setting folder testing options,and on using relative paths in theHPUnified Functional Testing User Guide.
Note:
l TheApplicationbox should contain only the file nameand path for the application. If you want to addcommand line arguments, use theProgram argumentsbox.
l The full path name is used to launch an application onlywhen Launch application is selected. UFTrecords and runs on any application with the specified executable file name. For example, if you specify%SYSTEMROOT%\Notepad.exe, UFT records on aNotepad application invoked from any folder.
Tip: You can specify a document or other file associated in the file system with an application, forexample, c:\tmp\a.txt. In this case, UFT automatically opens the specified file in the associatedapplication (Notepad in this example). If you use this option, UFT ignores any defined program arguments.
Workingfolder
(Optional) The current working folder for the application. The current working folder is used by the applicationto search for related files. If aworking folder is not specified, the executable folder is used as theworkingfolder.
Note: This parameter is used onlywhen Launch application is selected. If Launch application is notselected, its value has no effect.
Programarguments
(Optional) Instructs UFT to open the application using the specified command line arguments.
Note: This parameter is used onlywhen Launch application is selected. If Launch application is notselected, its value has no effect.
Launchapplication
Instructs UFT whether to launch the selected application when the record and run session begins. By default,this option is selected.
Includedescendantprocesses
Instructs UFT whether to record and run on processes created by the specified application during the record andrun session. For example, a process that is used only as a launcher may create another process that actuallyprovides the application functionality. This descendant process must therefore be included when recording orrunning tests on this application, otherwise the functionality will not be recorded, or the run session will fail.
By default, this option is selected.
Add-ins GuideChapter 2: Windows-Based Application Support
HP Unified Functional Testing (12.50) Page 97
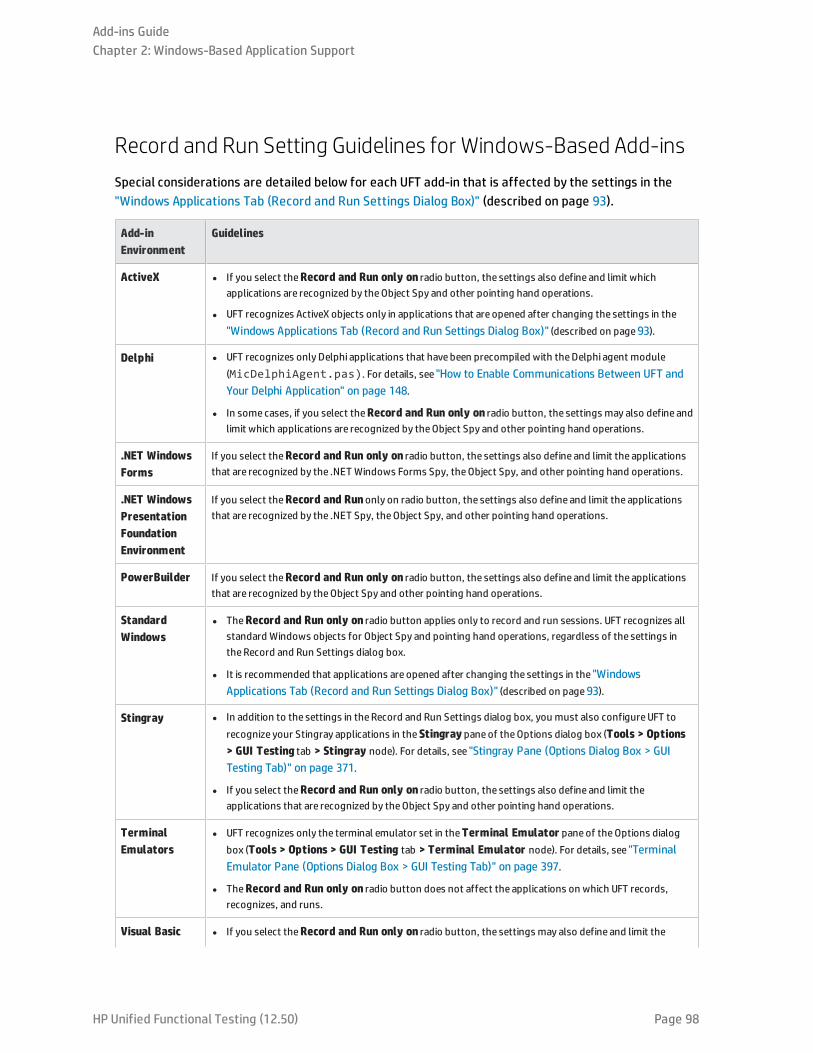
Record and Run Setting Guidelines for Windows-Based Add-insSpecial considerations are detailed below for each UFT add-in that is affected by the settings in the"Windows Applications Tab (Record and Run Settings Dialog Box)" (described on page 93).
Add-inEnvironment
Guidelines
ActiveX l If you select theRecord and Run only on radio button, the settings also define and limit whichapplications are recognized by theObject Spy and other pointing hand operations.
l UFT recognizes ActiveX objects only in applications that are opened after changing the settings in the"Windows Applications Tab (Record and Run Settings Dialog Box)" (described on page93).
Delphi l UFT recognizes only Delphi applications that have been precompiled with theDelphi agent module(MicDelphiAgent.pas). For details, see "How to Enable Communications Between UFT andYour Delphi Application" on page 148.
l In some cases, if you select theRecord and Run only on radio button, the settings may also define andlimit which applications are recognized by theObject Spy and other pointing hand operations.
.NET WindowsForms
If you select theRecord and Run only on radio button, the settings also define and limit the applicationsthat are recognized by the .NET Windows Forms Spy, theObject Spy, and other pointing hand operations.
.NET WindowsPresentationFoundationEnvironment
If you select theRecord and Runonly on radio button, the settings also define and limit the applicationsthat are recognized by the .NET Spy, theObject Spy, and other pointing hand operations.
PowerBuilder If you select theRecord and Run only on radio button, the settings also define and limit the applicationsthat are recognized by theObject Spy and other pointing hand operations.
StandardWindows
l TheRecord and Run only on radio button applies only to record and run sessions. UFT recognizes allstandard Windows objects for Object Spy and pointing hand operations, regardless of the settings intheRecord and Run Settings dialog box.
l It is recommended that applications are opened after changing the settings in the "WindowsApplications Tab (Record and Run Settings Dialog Box)" (described on page93).
Stingray l In addition to the settings in theRecord and Run Settings dialog box, you must also configureUFT torecognize your Stingray applications in theStingray paneof theOptions dialog box (Tools > Options> GUI Testing tab > Stingray node). For details, see "Stingray Pane (Options Dialog Box > GUITesting Tab)" on page 371.
l If you select theRecord and Run only on radio button, the settings also define and limit theapplications that are recognized by theObject Spy and other pointing hand operations.
TerminalEmulators
l UFT recognizes only the terminal emulator set in theTerminal Emulator paneof theOptions dialogbox (Tools > Options > GUI Testing tab > Terminal Emulator node). For details, see "TerminalEmulator Pane (Options Dialog Box > GUI Testing Tab)" on page 397.
l TheRecord and Run only on radio button does not affect the applications on which UFT records,recognizes, and runs.
Visual Basic l If you select theRecord and Run only on radio button, the settings may also define and limit the
Add-ins GuideChapter 2: Windows-Based Application Support
HP Unified Functional Testing (12.50) Page 98
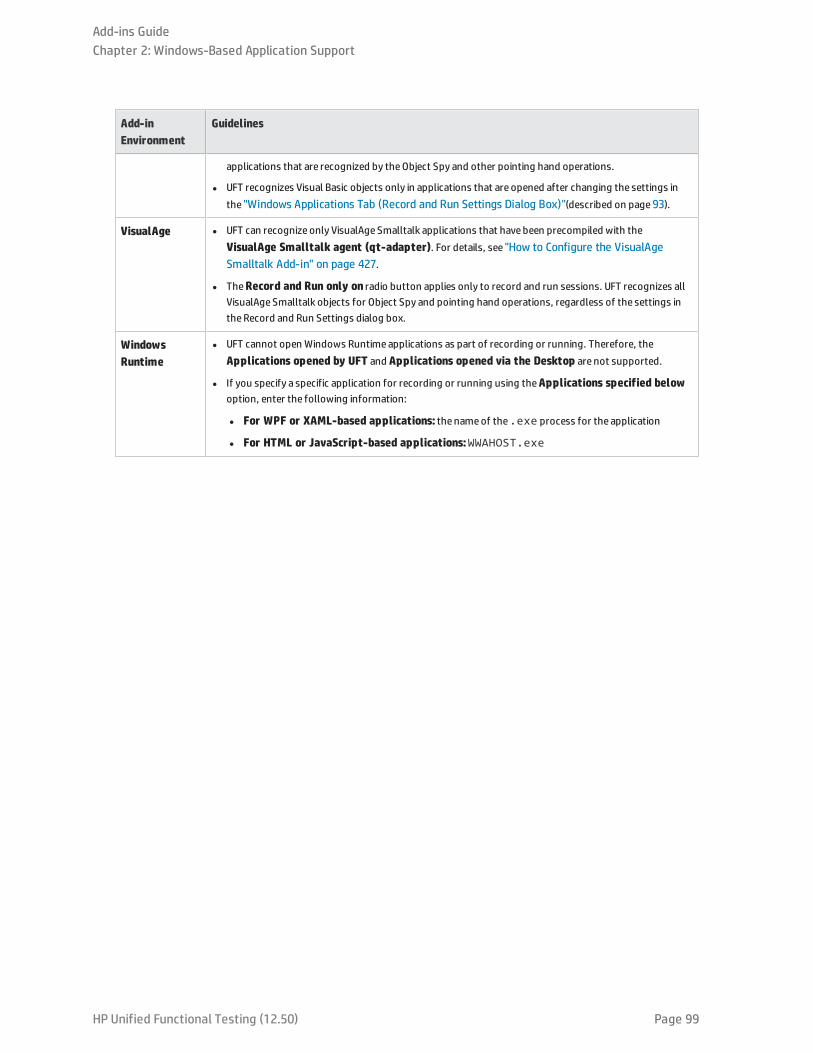
Add-inEnvironment
Guidelines
applications that are recognized by theObject Spy and other pointing hand operations.
l UFT recognizes Visual Basic objects only in applications that are opened after changing the settings inthe "Windows Applications Tab (Record and Run Settings Dialog Box)"(described on page93).
VisualAge l UFT can recognize only VisualAge Smalltalk applications that have been precompiled with theVisualAge Smalltalk agent (qt-adapter). For details, see "How to Configure the VisualAgeSmalltalk Add-in" on page 427.
l TheRecord and Run only on radio button applies only to record and run sessions. UFT recognizes allVisualAge Smalltalk objects for Object Spy and pointing hand operations, regardless of the settings intheRecord and Run Settings dialog box.
WindowsRuntime
l UFT cannot open Windows Runtimeapplications as part of recording or running. Therefore, theApplications opened by UFT and Applications opened via the Desktop are not supported.
l If you specify a specific application for recording or running using theApplications specified belowoption, enter the following information:
l For WPF or XAML-based applications: the nameof the.exe process for the application
l For HTML or JavaScript-based applications:WWAHOST.exe
Add-ins GuideChapter 2: Windows-Based Application Support
HP Unified Functional Testing (12.50) Page 99
HP Unified Functional Testing (12.50) Page 100
Part 2: .NET Add-inThis section includes:
".NET Silverlight Add-in" on page 102
".NET Web Forms Add-in" on page 108
".NET Windows Forms Add-in" on page 115
".NET Windows Presentation Foundation (WPF) Add-in" on page 131
.NET Add-in - OverviewYou can use the UFT .NET Add-in to test user interface objects (controls) in Silverlight, .NET Web Forms,.NET Windows Forms, and Windows Presentation Foundation applications. You can create and run testsand business components on these objects, and check their properties.
This section contains:
l ".NET Silverlight Add-in" on page 102
l ".NET Web Forms Add-in" on page 108
l ".NET Windows Forms Add-in" on page 115
l ".NET Windows Presentation Foundation (WPF) Add-in" on page 131
HP Unified Functional Testing (12.50) Page 101
.NET Silverlight Add-inThis chapter includes:
• .NET Silverlight Add-in - Quick Reference 103
• Silverlight Add-in Extensibility 105
• Troubleshooting and Limitations - Silverlight Add-in 106
HP Unified Functional Testing (12.50) Page 102
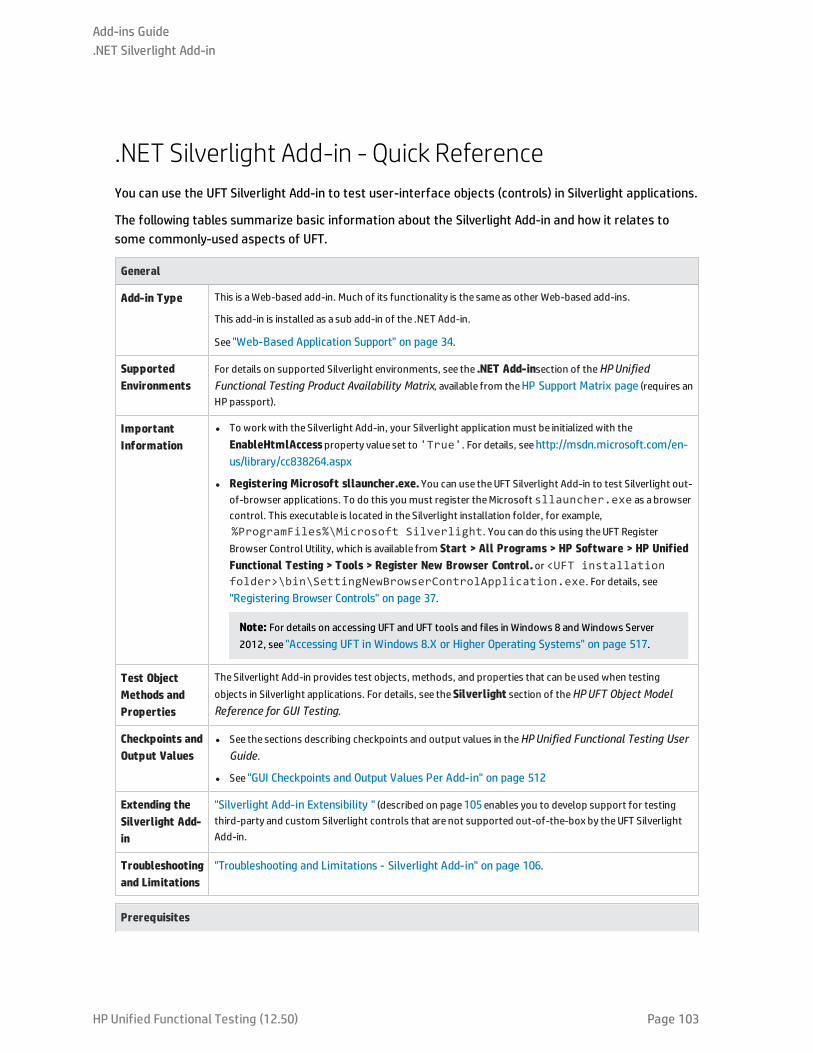
.NET Silverlight Add-in - Quick ReferenceYou can use the UFT Silverlight Add-in to test user-interface objects (controls) in Silverlight applications.
The following tables summarize basic information about the Silverlight Add-in and how it relates tosome commonly-used aspects of UFT.
General
Add-in Type This is aWeb-based add-in. Much of its functionality is the sameas other Web-based add-ins.
This add-in is installed as a sub add-in of the .NET Add-in.
See "Web-Based Application Support" on page 34.
SupportedEnvironments
For details on supported Silverlight environments, see the .NET Add-insection of theHPUnifiedFunctional Testing Product Availability Matrix, available from theHP Support Matrix page (requires anHP passport).
ImportantInformation
l To workwith the Silverlight Add-in, your Silverlight application must be initialized with theEnableHtmlAccessproperty value set to 'True'. For details, seehttp://msdn.microsoft.com/en-us/library/cc838264.aspx
l Registering Microsoft sllauncher.exe.You can use theUFT Silverlight Add-in to test Silverlight out-of-browser applications. To do this you must register theMicrosoft sllauncher.exe as abrowsercontrol. This executable is located in the Silverlight installation folder, for example,%ProgramFiles%\Microsoft Silverlight. You can do this using theUFT RegisterBrowser Control Utility, which is available from Start > All Programs > HP Software > HP UnifiedFunctional Testing > Tools > Register New Browser Control.or <UFT installationfolder>\bin\SettingNewBrowserControlApplication.exe. For details, see"Registering Browser Controls" on page 37.
Note: For details on accessing UFT and UFT tools and files in Windows 8 and Windows Server2012, see "Accessing UFT in Windows 8.X or Higher Operating Systems" on page 517.
Test ObjectMethods andProperties
TheSilverlight Add-in provides test objects, methods, and properties that can beused when testingobjects in Silverlight applications. For details, see theSilverlight section of theHPUFT Object ModelReference for GUI Testing.
Checkpoints andOutput Values
l See the sections describing checkpoints and output values in theHPUnified Functional Testing UserGuide.
l See "GUI Checkpoints and Output Values Per Add-in" on page 512
Extending theSilverlight Add-in
"Silverlight Add-in Extensibility " (described on page105enables you to develop support for testingthird-party and custom Silverlight controls that are not supported out-of-the-box by theUFT SilverlightAdd-in.
Troubleshootingand Limitations
"Troubleshooting and Limitations - Silverlight Add-in" on page 106.
Prerequisites
Add-ins Guide.NET Silverlight Add-in
HP Unified Functional Testing (12.50) Page 103
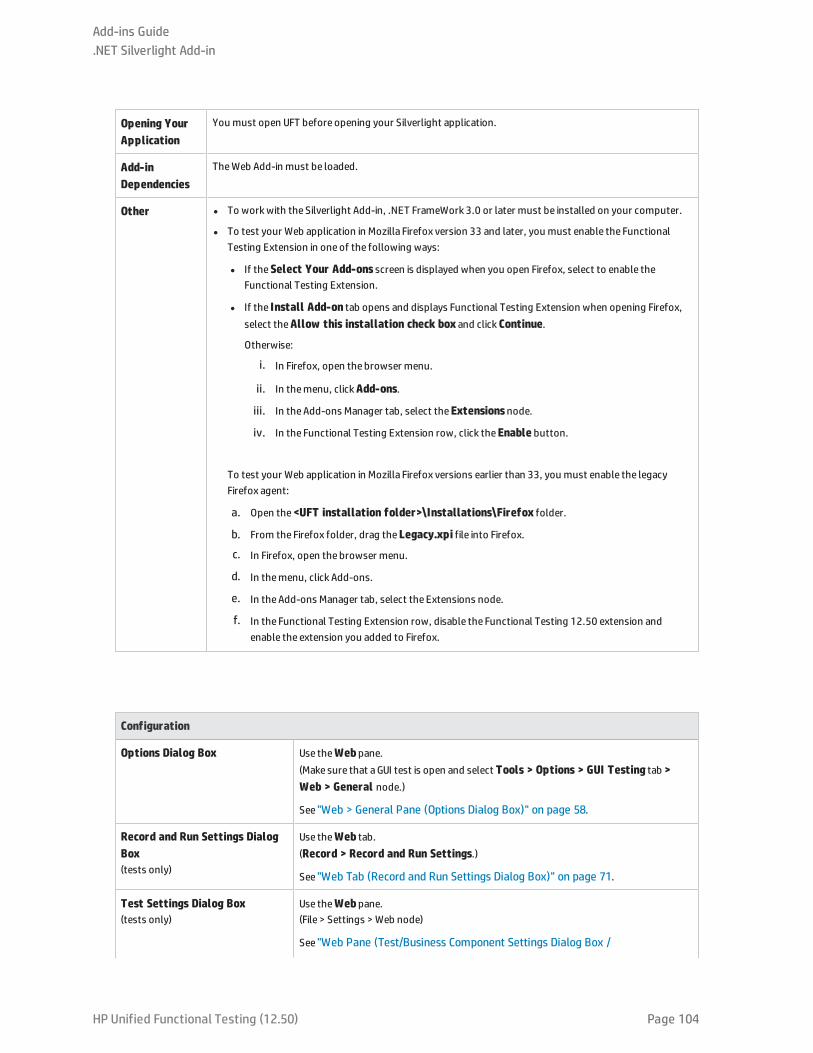
Opening YourApplication
You must open UFT before opening your Silverlight application.
Add-inDependencies
TheWeb Add-in must be loaded.
Other l To workwith the Silverlight Add-in, .NET FrameWork 3.0 or later must be installed on your computer.
l To test your Web application in Mozilla Firefox version 33 and later, you must enable the FunctionalTesting Extension in oneof the following ways:
l If theSelect Your Add-ons screen is displayed when you open Firefox, select to enable theFunctional Testing Extension.
l If the Install Add-on tab opens and displays Functional Testing Extension when opening Firefox,select theAllow this installation check box and clickContinue.
Otherwise:
i. In Firefox, open the browser menu.
ii. In themenu, clickAdd-ons.
iii. In theAdd-ons Manager tab, select theExtensionsnode.
iv. In the Functional Testing Extension row, click theEnable button.
To test your Web application in Mozilla Firefox versions earlier than 33, you must enable the legacyFirefox agent:
a. Open the<UFT installation folder>\Installations\Firefox folder.
b. From the Firefox folder, drag theLegacy.xpi file into Firefox.
c. In Firefox, open the browser menu.
d. In themenu, click Add-ons.
e. In theAdd-ons Manager tab, select the Extensions node.
f. In the Functional Testing Extension row, disable the Functional Testing 12.50 extension andenable the extension you added to Firefox.
Configuration
Options Dialog Box Use theWebpane.(Make sure that aGUI test is open and select Tools > Options > GUI Testing tab >Web > General node.)
See "Web > General Pane (Options Dialog Box)" on page 58.
Record and Run Settings DialogBox(tests only)
Use theWeb tab.(Record > Record and Run Settings.)
See "Web Tab (Record and Run Settings Dialog Box)" on page 71.
Test Settings Dialog Box(tests only)
Use theWebpane.(File > Settings > Web node)
See "Web Pane (Test/Business Component Settings Dialog Box /
Add-ins Guide.NET Silverlight Add-in
HP Unified Functional Testing (12.50) Page 104

Application Area - Additional Settings Pane)" on page 68.
Custom Active Screen CaptureSettings Dialog Box(tests only)
Use theWeb section.(Tools > Options > GUI Testing tab > Active Screennode> Custom Level)
See the section on the Custom Active Screen Capture Settings dialog box in theHPUnified Functional Testing User Guide.
Application Area AdditionalSettings pane(business components only)
Use theWebpane.In the application area, select Additional Settings > Web in the sidebar.
See "Web Pane (Test/Business Component Settings Dialog Box /Application Area - Additional Settings Pane)" on page 68.
Silverlight Add-in ExtensibilityUFT Silverlight Add-in Extensibility enables you to develop support for testing third-party and customSilverlight controls that are not supported out-of-the-box by the UFT Silverlight Add-in.
If the test object class that UFT uses to represent a control does not provide the operations andproperties necessary to operate on your control, you can use Silverlight Add-in Extensibility to create anew test object class.
You can then map the control to the new test object class, and design the test object class behaviorusing .NET programming. You can program how operations are performed on the control, howproperties are retrieved, and more.
You can also teach UFT to treat a control that contains a set of lower-level controls as a singlefunctional control, instead of relating to each lower-level control separately.
To implement Silverlight Add-in Extensibility, you need to be familiar with:
l UFT and its Object Model Reference
l The behavior of the custom control (operations, properties, events)
l .NET programming in C#
l XML (basic knowledge)
You can install the WPF and Silverlight Add-in Extensibility SDK from the Add-in Extensibility and Web2.0 Toolkits option in the UFT setup program.
The SDK also includes project templates and a wizard for Microsoft Visual Studio, that simplify settingup of your Silverlight Add-in Extensibility project.
For details on implementing Silverlight Add-in Extensibility, see the WPF and Silverlight Add-inExtensibility Help, available from the UFT Extensibility Documentation program group (Start > AllPrograms > HP Software > HP Unified Functional Testing > Extensibility > Documentation or the<UFT installation folder>\help\Extensibility folder).
Note: For details on accessing UFT and UFT tools and files in Windows 8 and Windows Server 2012,see "Accessing UFT in Windows 8.X or Higher Operating Systems" on page 517.
Add-ins Guide.NET Silverlight Add-in
HP Unified Functional Testing (12.50) Page 105
A printer-friendly (PDF) version of the HP Unified Functional Testing WPF and Silverlight Add-inExtensibility Developer Guide is available in the <Unified Functional Testing installationfolder>\help\Extensibility folder.
Troubleshooting and Limitations - Silverlight Add-inThis section describes troubleshooting and limitations for the Silverlight Add-in, and contains thefollowing sections:
l "General" below
l "Checkpoints" below
l "Creating and editing testing documents" below
l "Running steps on Silverlight applications" on the next page
General
l UFT retrieves incorrect values for the all items and selection properties for ListBox and ComboBoxcontrols that are bound to data via a template.
l If a recovery scenario uses the Object State trigger, the following may occur:
l The recovery scenario may detect redundant test objects when checking a SlvWindow state.
l The run results may not include all nodes related to the recovery scenario.
l The Silverlight Add-in is not supported on Internet Explorer 11 when the Enhanced Protected Mode isturned on.
l You cannot create a virtual object for an area in a Silverlight application.
l The Silverlight Add-in does not support 64-bit Firefox browsers.
Checkpoints
l If you insert a text area checkpoint or a text area output value using the Windows API textrecognition mechanism (as opposed to the OCR mechanism), all of the text on the Silverlight controlis captured (instead of only the text from the selected area).
l For some test objects, if you try to insert a text checkpoint from the Active Screen, the textcheckpoint cannot be inserted and an error message is displayed.
Creating and editing testing documents
l Recording on windowless Silverlight applications is not supported on Mozilla Firefox.
l If you open a Silverlight context menu when creating or editing a test, you must close the contextmenu control (for example, by pressing ESC) before you close the browser. Otherwise, during a runsession, the browser window will remain open.
Add-ins Guide.NET Silverlight Add-in
HP Unified Functional Testing (12.50) Page 106
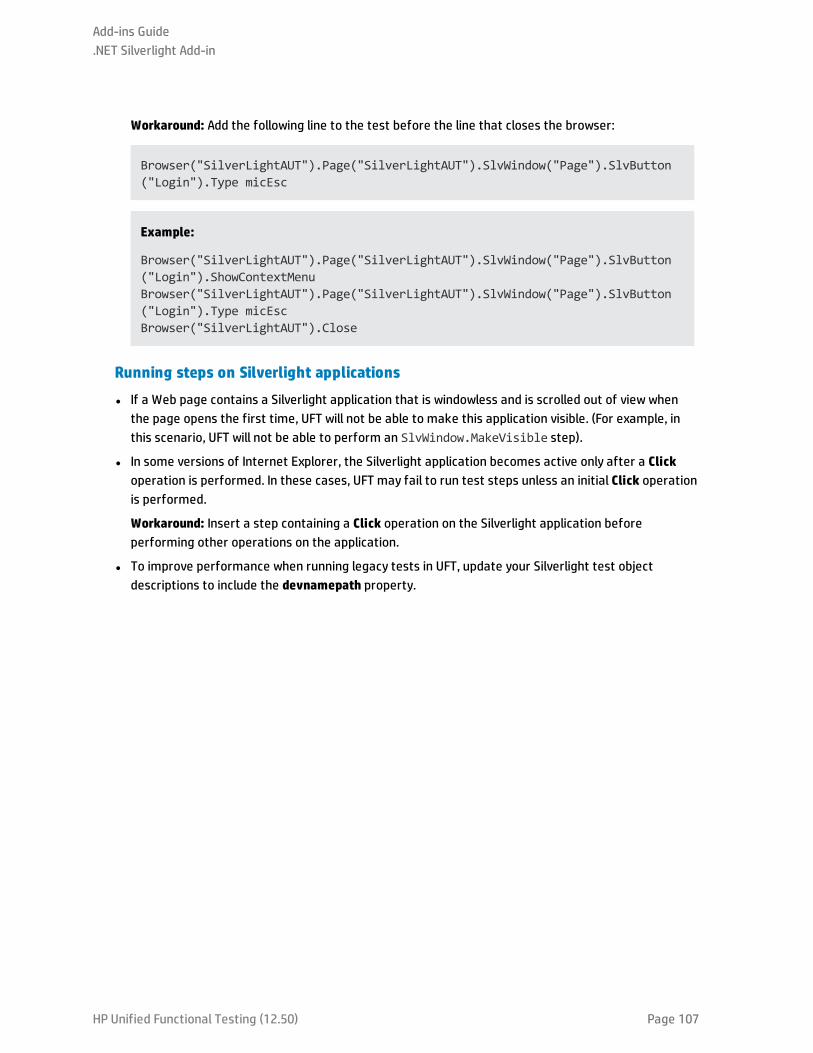
Workaround: Add the following line to the test before the line that closes the browser:
Browser("SilverLightAUT").Page("SilverLightAUT").SlvWindow("Page").SlvButton("Login").Type micEsc
Example:
Browser("SilverLightAUT").Page("SilverLightAUT").SlvWindow("Page").SlvButton("Login").ShowContextMenuBrowser("SilverLightAUT").Page("SilverLightAUT").SlvWindow("Page").SlvButton("Login").Type micEscBrowser("SilverLightAUT").Close
Running steps on Silverlight applications
l If a Web page contains a Silverlight application that is windowless and is scrolled out of view whenthe page opens the first time, UFT will not be able to make this application visible. (For example, inthis scenario, UFT will not be able to perform an SlvWindow.MakeVisible step).
l In some versions of Internet Explorer, the Silverlight application becomes active only after a Clickoperation is performed. In these cases, UFT may fail to run test steps unless an initial Click operationis performed.
Workaround: Insert a step containing a Click operation on the Silverlight application beforeperforming other operations on the application.
l To improve performance when running legacy tests in UFT, update your Silverlight test objectdescriptions to include the devnamepath property.
Add-ins Guide.NET Silverlight Add-in
HP Unified Functional Testing (12.50) Page 107
.NET Web Forms Add-inThis chapter includes:
• .NET Web Forms Add-in - Quick Reference 109
• Considerations for Testing .NET Web Forms 110
• .NET Windows Forms Objects - Checkpoints and Output Values 110
• Accessing Internal Properties and Methods of Run-Time .NET Web Forms Objects 112
• Troubleshooting and Limitations - .NET Web Forms 112
HP Unified Functional Testing (12.50) Page 108
.NET Web Forms Add-in - Quick ReferenceYou can use the .NET Add-in to test .NET Web Forms user-interface objects (controls).
The following tables summarize basic information about the .NET Web Forms application support andhow it relates to some commonly-used aspects of UFT.
General Information
Add-in Type The .NET Add-in functions like aWeb-based add-in when testing .NET Web Forms controls. Much of itsfunctionality is the sameas other Web-based add-ins.
See "Web-Based Application Support" on page 34.
SupportedEnvironments
For details on supported .NET Web Forms environments, see the .NET Add-in section of theHPUnifiedFunctional Testing Product Availability Matrix, available from theHP Support Matrix page (requires anHP passport).
Test ObjectMethods andProperties
The .NET Add-in provides test objects, methods, and properties that can beused when testing objects in.NET Web Forms applications. For details, see the .NET Web Forms section of theHPUFT Object ModelReference for GUI Testing.
Checkpoints andOutput Values
l See the sections describing checkpoints and output values in theHPUnified Functional Testing UserGuide.
l See "GUI Checkpoints and Output Values Per Add-in" on page 512
l See "Accessing Internal Properties and Methods of Run-Time .NET Web Forms Objects" onpage 112.
Troubleshootingand Limitations
See "Troubleshooting and Limitations - .NET Web Forms" on page 112.
Prerequisites
Opening YourApplication
You must open UFT and set theRecord and Run options before opening your .NET Web Forms application.Open your application only after you begin the recording session.
Add-inDependencies
TheWeb Add-in must be loaded.
Configuration
Options Dialog Box Use theWebpane.(Make sure that aGUI test is open and select Tools> Options > GUI Testing tab > Web> General node.)
See "Web > General Pane (Options Dialog Box)" on page 58.
Record and Run Settings DialogBox(tests only)
Use theWeb tab.(Record > Record and Run Settings)
See "Web Tab (Record and Run Settings Dialog Box)" on page 71
Test Settings Dialog Box Use theWebpane.
Add-ins Guide.NET Web Forms Add-in
HP Unified Functional Testing (12.50) Page 109
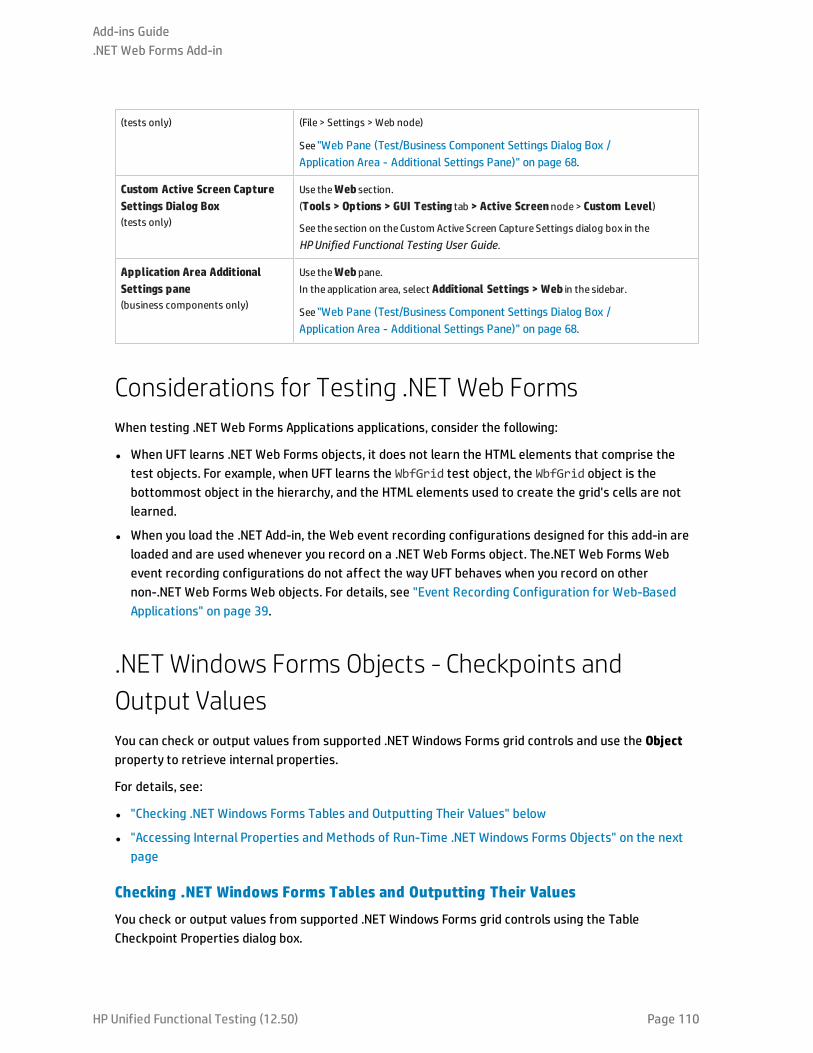
(tests only) (File > Settings > Web node)
See "Web Pane (Test/Business Component Settings Dialog Box /Application Area - Additional Settings Pane)" on page 68.
Custom Active Screen CaptureSettings Dialog Box(tests only)
Use theWeb section.(Tools > Options > GUI Testing tab > Active Screennode> Custom Level)
See the section on the Custom Active Screen Capture Settings dialog box in theHPUnified Functional Testing User Guide.
Application Area AdditionalSettings pane(business components only)
Use theWebpane.In the application area, select Additional Settings > Web in the sidebar.
See "Web Pane (Test/Business Component Settings Dialog Box /Application Area - Additional Settings Pane)" on page 68.
Considerations for Testing .NET Web FormsWhen testing .NET Web Forms Applications applications, consider the following:
l When UFT learns .NET Web Forms objects, it does not learn the HTML elements that comprise thetest objects. For example, when UFT learns the WbfGrid test object, the WbfGrid object is thebottommost object in the hierarchy, and the HTML elements used to create the grid's cells are notlearned.
l When you load the .NET Add-in, the Web event recording configurations designed for this add-in areloaded and are used whenever you record on a .NET Web Forms object. The.NET Web Forms Webevent recording configurations do not affect the way UFT behaves when you record on othernon-.NET Web Forms Web objects. For details, see "Event Recording Configuration for Web-BasedApplications" on page 39.
.NET Windows Forms Objects - Checkpoints andOutput ValuesYou can check or output values from supported .NET Windows Forms grid controls and use the Objectproperty to retrieve internal properties.
For details, see:
l "Checking .NET Windows Forms Tables and Outputting Their Values" below
l "Accessing Internal Properties and Methods of Run-Time .NET Windows Forms Objects" on the nextpage
Checking .NET Windows Forms Tables and Outputting Their Values
You check or output values from supported .NET Windows Forms grid controls using the TableCheckpoint Properties dialog box.
Add-ins Guide.NET Web Forms Add-in
HP Unified Functional Testing (12.50) Page 110
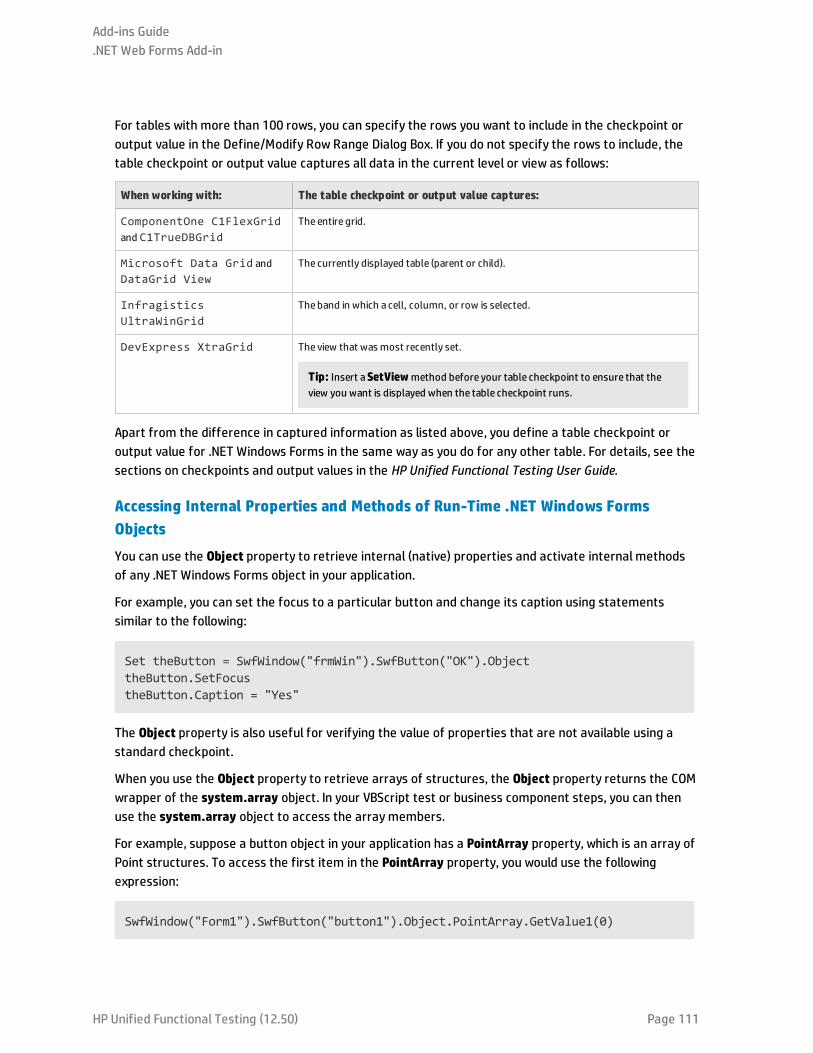
For tables with more than 100 rows, you can specify the rows you want to include in the checkpoint oroutput value in the Define/Modify Row Range Dialog Box. If you do not specify the rows to include, thetable checkpoint or output value captures all data in the current level or view as follows:
When working with: The table checkpoint or output value captures:
ComponentOne C1FlexGridand C1TrueDBGrid
The entire grid.
Microsoft Data Grid andDataGrid View
The currently displayed table (parent or child).
InfragisticsUltraWinGrid
Theband in which a cell, column, or row is selected.
DevExpress XtraGrid The view that was most recently set.
Tip: Insert aSetViewmethod before your table checkpoint to ensure that theview you want is displayed when the table checkpoint runs.
Apart from the difference in captured information as listed above, you define a table checkpoint oroutput value for .NET Windows Forms in the same way as you do for any other table. For details, see thesections on checkpoints and output values in the HP Unified Functional Testing User Guide.
Accessing Internal Properties and Methods of Run-Time .NET Windows FormsObjects
You can use the Object property to retrieve internal (native) properties and activate internal methodsof any .NET Windows Forms object in your application.
For example, you can set the focus to a particular button and change its caption using statementssimilar to the following:
Set theButton = SwfWindow("frmWin").SwfButton("OK").ObjecttheButton.SetFocustheButton.Caption = "Yes"
The Object property is also useful for verifying the value of properties that are not available using astandard checkpoint.
When you use the Object property to retrieve arrays of structures, the Object property returns the COMwrapper of the system.array object. In your VBScript test or business component steps, you can thenuse the system.array object to access the array members.
For example, suppose a button object in your application has a PointArray property, which is an array ofPoint structures. To access the first item in the PointArray property, you would use the followingexpression:
SwfWindow("Form1").SwfButton("button1").Object.PointArray.GetValue1(0)
Add-ins Guide.NET Web Forms Add-in
HP Unified Functional Testing (12.50) Page 111
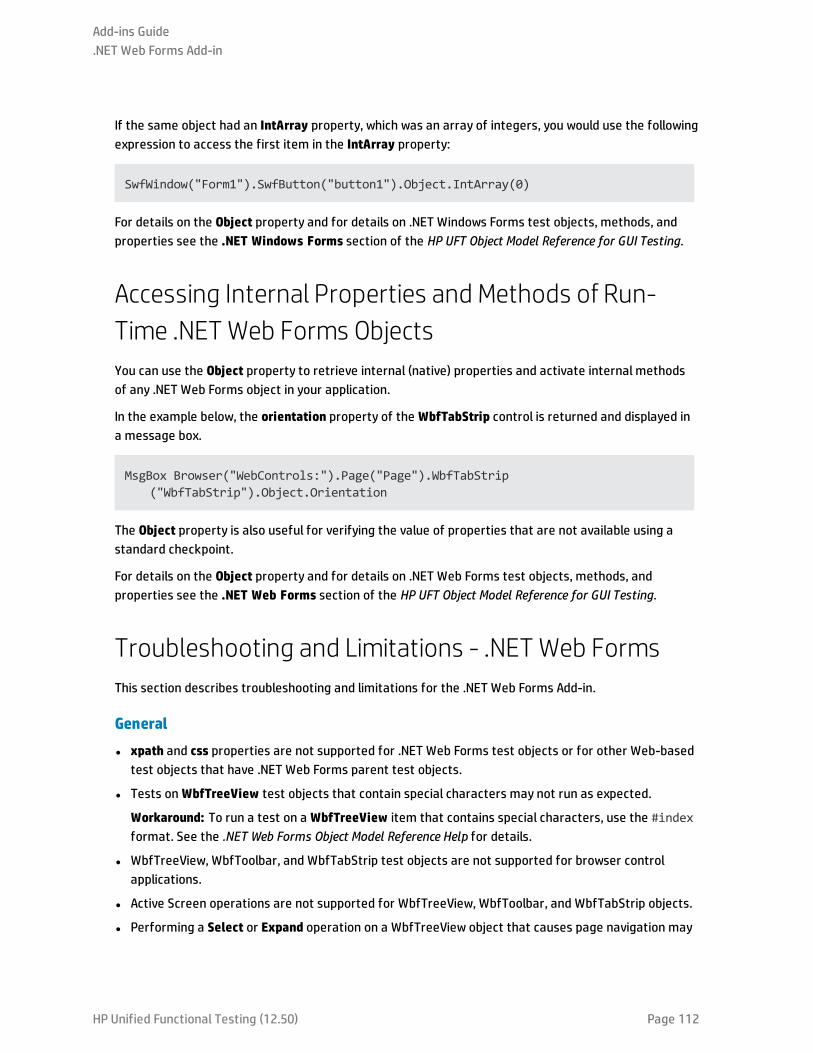
If the same object had an IntArray property, which was an array of integers, you would use the followingexpression to access the first item in the IntArray property:
SwfWindow("Form1").SwfButton("button1").Object.IntArray(0)
For details on the Object property and for details on .NET Windows Forms test objects, methods, andproperties see the .NET Windows Forms section of the HP UFT Object Model Reference for GUI Testing.
Accessing Internal Properties and Methods of Run-Time .NET Web Forms ObjectsYou can use the Object property to retrieve internal (native) properties and activate internal methodsof any .NET Web Forms object in your application.
In the example below, the orientation property of the WbfTabStrip control is returned and displayed ina message box.
MsgBox Browser("WebControls:").Page("Page").WbfTabStrip("WbfTabStrip").Object.Orientation
The Object property is also useful for verifying the value of properties that are not available using astandard checkpoint.
For details on the Object property and for details on .NET Web Forms test objects, methods, andproperties see the .NET Web Forms section of the HP UFT Object Model Reference for GUI Testing.
Troubleshooting and Limitations - .NET Web FormsThis section describes troubleshooting and limitations for the .NET Web Forms Add-in.
General
l xpath and css properties are not supported for .NET Web Forms test objects or for other Web-basedtest objects that have .NET Web Forms parent test objects.
l Tests onWbfTreeView test objects that contain special characters may not run as expected.
Workaround: To run a test on a WbfTreeView item that contains special characters, use the #indexformat. See the .NET Web Forms Object Model Reference Help for details.
l WbfTreeView, WbfToolbar, and WbfTabStrip test objects are not supported for browser controlapplications.
l Active Screen operations are not supported for WbfTreeView, WbfToolbar, and WbfTabStrip objects.
l Performing a Select or Expand operation on a WbfTreeView object that causes page navigation may
Add-ins Guide.NET Web Forms Add-in
HP Unified Functional Testing (12.50) Page 112
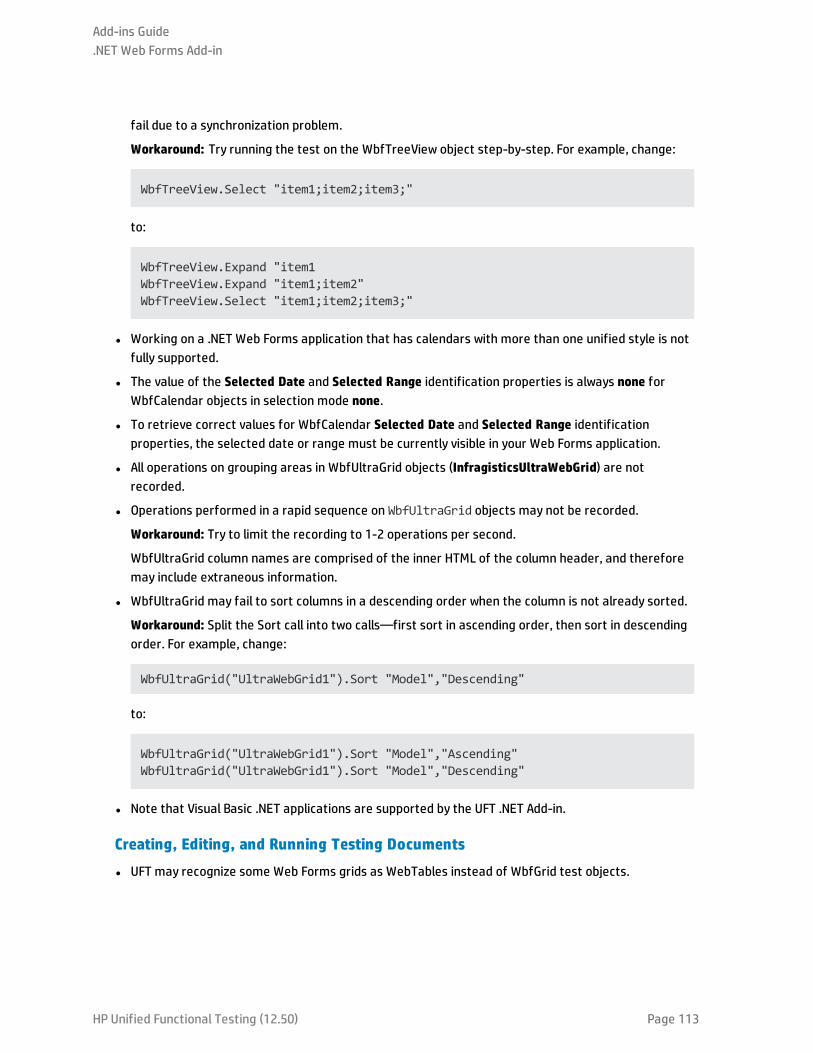
fail due to a synchronization problem.
Workaround: Try running the test on the WbfTreeView object step-by-step. For example, change:
WbfTreeView.Select "item1;item2;item3;"
to:
WbfTreeView.Expand "item1WbfTreeView.Expand "item1;item2"WbfTreeView.Select "item1;item2;item3;"
l Working on a .NET Web Forms application that has calendars with more than one unified style is notfully supported.
l The value of the Selected Date and Selected Range identification properties is always none forWbfCalendar objects in selection mode none.
l To retrieve correct values for WbfCalendar Selected Date and Selected Range identificationproperties, the selected date or range must be currently visible in your Web Forms application.
l All operations on grouping areas in WbfUltraGrid objects (InfragisticsUltraWebGrid) are notrecorded.
l Operations performed in a rapid sequence on WbfUltraGrid objects may not be recorded.
Workaround: Try to limit the recording to 1-2 operations per second.
WbfUltraGrid column names are comprised of the inner HTML of the column header, and thereforemay include extraneous information.
l WbfUltraGrid may fail to sort columns in a descending order when the column is not already sorted.
Workaround: Split the Sort call into two calls—first sort in ascending order, then sort in descendingorder. For example, change:
WbfUltraGrid("UltraWebGrid1").Sort "Model","Descending"
to:
WbfUltraGrid("UltraWebGrid1").Sort "Model","Ascending"WbfUltraGrid("UltraWebGrid1").Sort "Model","Descending"
l Note that Visual Basic .NET applications are supported by the UFT .NET Add-in.
Creating, Editing, and Running Testing Documents
l UFT may recognize some Web Forms grids as WebTables instead of WbfGrid test objects.
Add-ins Guide.NET Web Forms Add-in
HP Unified Functional Testing (12.50) Page 113
Workaround: Do one of the following:
l Modify the Web forms control so that it meets one of the following conditions:
o The class attribute contains the string DataGrid.
o The id attribute contains at least one of the strings DataGrid or GridView.
l Modify the rules that UFT uses to determine when to identify a Web Forms table control as aDataGrid or GridView (and learn it as a WbfGrid test object).
These rules are defined in:<UFT installation folder>\dat\WebFormsConfiguration.xml.
The file contains comments that describe its format and explain how to use it.
l .NET Web Forms objects are supported only on Microsoft Internet Explorer.
l When recording, you must open UFT and define record options before opening your .NET Web Formsapplication.
Checkpoint and Output Values
l WbfTreeView, WbfToolbar, and WbfTabStrip objects are not properly recognized in the Active Screen.Therefore:
l You cannot insert checkpoint or output value steps for these objects from the Active Screen.
l If you select to insert checkpoints for these objects from the Keyword View or Editor while in editmode, the expected values of these objects may be incorrect.
Workaround: Insert checkpoint or output value steps on these objects during a recording session orremove the Active Screen for the relevant step and then insert a checkpoint from the Keyword Viewor Editor with your application open to the proper location, so that the values will be retrieved fromthe application.
l Text checkpoints are not supported for WbfTreeView, WbfToolbar, and WbfTabStrip objects.
l The Active Screen image for a WbfCalendar object is always saved before navigation. For example, ifyou click a NextMonth link, the Active Screen displays the current month. Therefore, if you create acheckpoint from the Active Screen and insert it after the Calendar.ShowNextMonth line, thecheckpoint will fail.
Workaround: Do one of the following:
l Insert checkpoints on calendar objects while recording.
l While editing your test, edit the expected value for the checkpoint or insert the checkpoint beforethe current step.
l Table checkpoints are supported for WbfUltraGrid objects only while recording.
l When using the WbfUltraGrid.RowCount andWbfUltraGrid.ColumnCountmethods or performing atable checkpoint on a grid that also contains additional grid controls inside it, UFT retrieves the rowsor columns only for the outermost table. Note that the rows property and RowCountmethod countonly the non-grouping rows.
Add-ins Guide.NET Web Forms Add-in
HP Unified Functional Testing (12.50) Page 114
.NET Windows Forms Add-inThis section includes:
• .NET Windows Forms Support - Quick Reference 116
• .NET Windows Forms Support - Testing and Configuration 118
• Considerations for Testing .NET Windows Forms Applications 119
• .NET Windows Forms Objects - Checkpoints and Output Values 119
• .NET Add-in Extensibility 120
• .NET Windows Forms Spy 121
• Troubleshooting and Limitations - .NET Windows Forms 129
HP Unified Functional Testing (12.50) Page 115

.NET Windows Forms Support - Quick ReferenceYou can use the UFT .NET Add-in to test .NET Windows Forms user-interface objects (controls).
The following tables summarize basic information about .NET Windows Forms application support andhow it relates to some commonly-used aspects of UFT.
General Information
Add-in Type The .NET Windows Forms testing support functions like aWindows-based add-in. Much of its functionalityis the sameas other Windows-based add-ins.
See "Windows-Based Application Support" on page 81.
SupportedEnvironments
For details on supported .NET Windows Forms environments, see the .NET Add-in section of theHPUnified Functional Testing Product Availability Matrix, available from theHP Support Matrix page(requires an HP passport).
ImportantInformation
l You can also test most custom .NET controls inherited from theSystem.Windows.Forms.Controlregardless of which languagewas used to create the application (for example, Visual Basic .NET, C#,and so on)
l See " Considerations for Testing .NET Windows Forms Applications"
Test ObjectMethods andProperties
The .NET Add-in provides test objects, methods, and properties that can beused when testing objects in.NET Windows Forms applications. For details, see the .NET Windows Forms section of theHPUFTObject Model Reference for GUI Testing.
Checkpoints andOutput Values
l See the sections describing checkpoints and output values in theHPUnified Functional Testing UserGuide.
l See " Considerations for Testing .NET Windows Forms Applications" on page 119.
l See "GUI Checkpoints and Output Values Per Add-in" on page 512
Extending the.NET Add-in
".NET Add-in Extensibility" (described on page120enables you to develop support for testing third-party and custom .NET Windows Forms controls that are not supported out-of-the-box by theUFT .NETAdd-in.
Troubleshootingand Limitations
See "Troubleshooting and Limitations - .NET Windows Forms" on page 129.
Prerequisites
Opening Your Application You must open UFT before opening your .NET Windows Forms application
Add-in Dependencies The .NET Add-in must be installed.
Configuration
Options Dialog Box Use theWindows Applicationspane.(Select Tools> Options > GUI Testing tab > Windows Applications node).
See "Windows Applications > General Pane (Options Dialog Box > GUI Testing Tab)" on page 85.
Add-ins Guide.NET Windows Forms Add-in
HP Unified Functional Testing (12.50) Page 116

Record and Run Settings DialogBox(tests only)
Use theWindows Applications tab.(Record > Record and Run Settings)
See "Windows Applications Tab (Record and Run Settings Dialog Box)" on page 93.
Note: If you select theRecord and Run only on radio button in theRecord andRun Settings dialog box, the settings also apply to (limit) the applications that arerecognized for the .NET Windows Spy, theObject Spy, and other pointing handoperations.
Custom Active Screen CaptureSettings Dialog Box(tests only)
Use theWindows applications section.(Tools > Options > GUI Testing tab > Active Screen node > Custom Level)
See the section on the Custom Active Screen Capture Settings dialog box in theHPUnified Functional Testing User Guide.
Application Area AdditionalSettings pane(business components only)
Use theApplicationspane.In the application area, select Additional Settings> Applications in the sidebar.
See the section on theApplications pane in theHPUnified Functional Testing UserGuide.
Add-ins Guide.NET Windows Forms Add-in
HP Unified Functional Testing (12.50) Page 117
.NET Windows Forms Support - Testing andConfigurationThis section includes
• Considerations for Testing .NET Windows Forms Applications 119
• .NET Windows Forms Objects - Checkpoints and Output Values 119
• .NET Add-in Extensibility 120
• .NET Windows Forms Spy 121
• How to Use the .NET Windows Forms Spy 122
• .NET Windows Forms Spy Dialog Box 126
• Troubleshooting and Limitations - .NET Windows Forms 129
Add-ins Guide.NET Windows Forms Add-in
HP Unified Functional Testing (12.50) Page 118
Considerations for Testing .NET Windows Forms Applicationsl You can use the Keyword View and Editor to activate .NET Windows Forms test object operations and
native (run-time object) operations, retrieve and set the values of properties, and check that objectsin your application exist and function as expected.
l When you create a checkpoint on a .NET Windows Forms object, UFT stores the selected propertyvalues of the object. If your application changes, you can modify the captured values to match thenew expected values.
.NET Windows Forms Objects - Checkpoints and Output ValuesYou can check or output values from supported .NET Windows Forms grid controls and use the Objectproperty to retrieve internal properties.
For details, see:
l "Checking .NET Windows Forms Tables and Outputting Their Values" below
l "Accessing Internal Properties and Methods of Run-Time .NET Windows Forms Objects" on the nextpage
Checking .NET Windows Forms Tables and Outputting Their Values
You check or output values from supported .NET Windows Forms grid controls using the TableCheckpoint Properties dialog box.
For tables with more than 100 rows, you can specify the rows you want to include in the checkpoint oroutput value in the Define/Modify Row Range Dialog Box. If you do not specify the rows to include, thetable checkpoint or output value captures all data in the current level or view as follows:
When working with: The table checkpoint or output value captures:
ComponentOne C1FlexGridand C1TrueDBGrid
The entire grid.
Microsoft Data Grid andDataGrid View
The currently displayed table (parent or child).
InfragisticsUltraWinGrid
Theband in which a cell, column, or row is selected.
DevExpress XtraGrid The view that was most recently set.
Tip: Insert aSetViewmethod before your table checkpoint to ensure that theview you want is displayed when the table checkpoint runs.
Apart from the difference in captured information as listed above, you define a table checkpoint oroutput value for .NET Windows Forms in the same way as you do for any other table. For details, see thesections on checkpoints and output values in the HP Unified Functional Testing User Guide.
Add-ins Guide.NET Windows Forms Add-in
HP Unified Functional Testing (12.50) Page 119
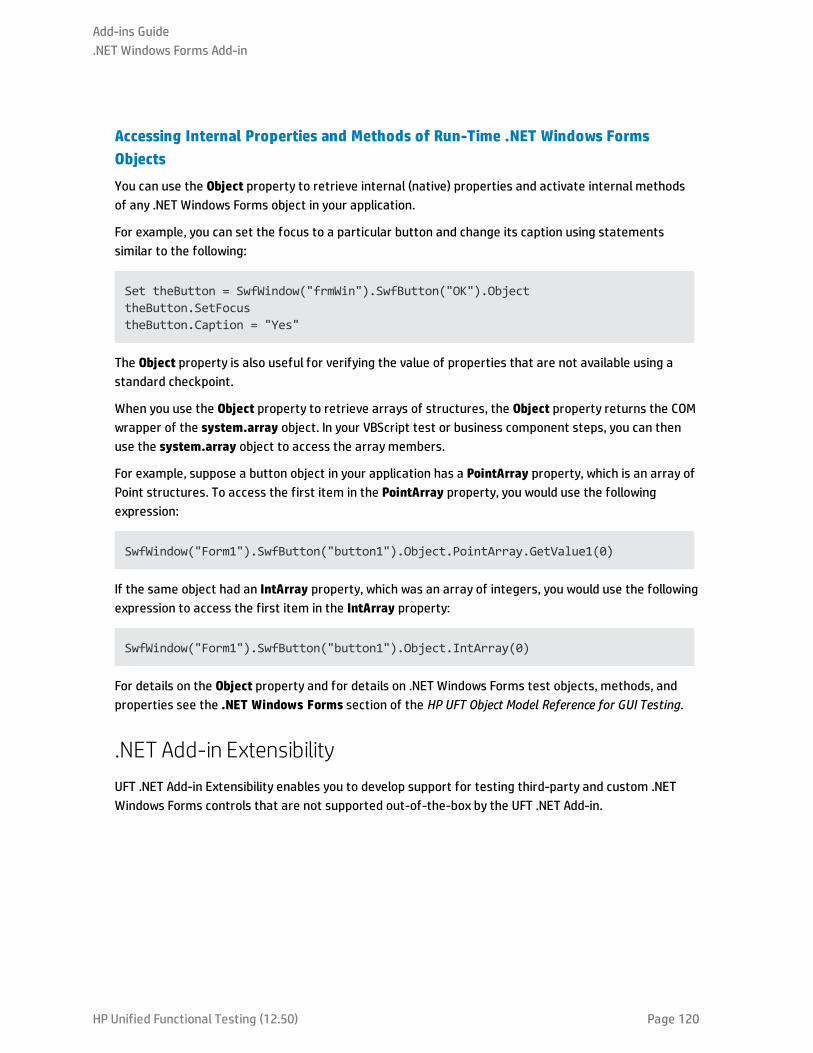
Accessing Internal Properties and Methods of Run-Time .NET Windows FormsObjects
You can use the Object property to retrieve internal (native) properties and activate internal methodsof any .NET Windows Forms object in your application.
For example, you can set the focus to a particular button and change its caption using statementssimilar to the following:
Set theButton = SwfWindow("frmWin").SwfButton("OK").ObjecttheButton.SetFocustheButton.Caption = "Yes"
The Object property is also useful for verifying the value of properties that are not available using astandard checkpoint.
When you use the Object property to retrieve arrays of structures, the Object property returns the COMwrapper of the system.array object. In your VBScript test or business component steps, you can thenuse the system.array object to access the array members.
For example, suppose a button object in your application has a PointArray property, which is an array ofPoint structures. To access the first item in the PointArray property, you would use the followingexpression:
SwfWindow("Form1").SwfButton("button1").Object.PointArray.GetValue1(0)
If the same object had an IntArray property, which was an array of integers, you would use the followingexpression to access the first item in the IntArray property:
SwfWindow("Form1").SwfButton("button1").Object.IntArray(0)
For details on the Object property and for details on .NET Windows Forms test objects, methods, andproperties see the .NET Windows Forms section of the HP UFT Object Model Reference for GUI Testing.
.NET Add-in ExtensibilityUFT .NET Add-in Extensibility enables you to develop support for testing third-party and custom .NETWindows Forms controls that are not supported out-of-the-box by the UFT .NET Add-in.
Add-ins Guide.NET Windows Forms Add-in
HP Unified Functional Testing (12.50) Page 120
If the test object class that UFT uses to represent a control does not provide the operations andproperties necessary to operate on your control, you can use .NET Add-in Extensibility to customize thisbehavior.
l You can instruct UFT to use a different test object class to represent the control.
l You can add operations or override existing ones, using .NET programming, to operate as necessaryon the control.
l You can also teach UFT to treat a control that contains a set of lower-level controls as a singlefunctional control, instead of relating to each lower-level control separately.
To implement .NET Add-in Extensibility, you need to be familiar with:
l UFT and its Object Model Reference
l The behavior of the custom control (operations, properties, events)
l .NET programming in C# or Visual Basic
l XML (basic knowledge)
You can install the .NET Add-in Extensibility SDK from the Add-in Extensibility and Web 2.0 Toolkitsoption in the UFT setup program.
The SDK also includes:
l Project templates and a wizard for Microsoft Visual Studio, that simplify setting up of your .NET Add-in Extensibility project.
l Samples of support developed using .NET Add-in Extensibility, which you can use to gain a betterunderstanding of how to create your own support.
For installation and implementation details, see the .NET Add-in Windows Forms Extensibility Help,available from the UFT Extensibility Documentation program group (Start > All Programs >HP Software > HP Unified Functional Testing > Extensibility > Documentation or the <UFTinstallation folder>\help\Extensibility folder).
Note: For details on accessing UFT and UFT tools and files in Windows 8 and Windows Server 2012,see "Accessing UFT in Windows 8.X or Higher Operating Systems" on page 517.
A printer-friendly (PDF) version of the HP UFT .NET Add-in Extensibility Developer Guide is available in the<Unified Functional Testing installation folder>\help\Extensibility folder.
.NET Windows Forms SpyThe .NET Windows Forms Spy (described in ".NET Windows Forms Spy Dialog Box" on page 126) enablesyou to select a specific control in your .NET application, view its run-time object properties and values,change property values in the application in run-time, listen to events on a specific control, view theevent arguments, and fire events back at the application.
You can use the .NET Windows Forms Spy to help you develop extensibility for .NET Windows Formscontrols.
Add-ins Guide.NET Windows Forms Add-in
HP Unified Functional Testing (12.50) Page 121

To spy on a .NET Windows Forms application, make sure that the application is specified in the "WindowsApplications Tab (Record and Run Settings Dialog Box)" (described on page 93) and that the applicationis running with Full Trust. If the application is not defined to run with Full Trust, you cannot spy on the.NET application's Windows Forms controls with the .NET Windows Forms Spy. For details on definingtrust levels for .NET applications, see Microsoft documentation.
The .NET Windows Forms Spy is intended for advanced UFT users, especially those who are using .NETAdd-in Extensibility to create support for custom .NET Windows Forms controls. The .NET WindowsForms Spy can assist you in examining .NET Windows Forms controls within your application and seeingwhich events cause it to change (to facilitate recording and running) and how the changes manifestthemselves in the control's state.
Note: The .NET Windows Forms Spy runs in the context of your .NET application, not in the UFTcontext. The objects and run-time object properties on which you are spying are the raw .NETobjects in your application, and not the .NET test objects used in UFT. Since the .NET Windows FormsSpy runs in the context of your .NET application, you can close UFT while you use the .NET WindowsForms Spy. However, UFT must be open if you want to use the pointing hand mechanism to spy onadditional objects. If you close the .NET application on which you are spying, the UFT .NET WindowsForms Spy window is closed automatically.
How to Use the .NETWindows Forms Spy
This task describes elements of the .NET Windows Forms Spy including how to:
Spy on an object
1. Make sure that the application on which you want to spy is specified in the "Windows ApplicationsTab (Record and Run Settings Dialog Box)" (described on page 93), and that the application isrunning with Full Trust.
2. Open the .NET Windows Forms application to the window containing the object on which you wantto spy.
3. Select Tools > .NET Windows Forms Spy. The UFT".NET Windows Forms Spy Dialog Box" (describedon page 126) opens.
4. In the UFT .NET Windows Forms Spy window, click the pointing hand . Both UFT and the.NET Windows Forms Spy are minimized so that you can point to, and click on, any object in theopen application.
For details on using the pointing hand, see the section describing the pointing hand in theHP Unified Functional Testing User Guide.
5. Click the object whose properties you want to view. If the location you clicked in your application isassociated with more than one object, the Object Selection dialog box opens. The objectsassociated with the location you clicked are displayed in hierarchical order.
6. Select the .NET Windows Forms object on which you want to spy and click OK. The UFT .NET
Add-ins Guide.NET Windows Forms Add-in
HP Unified Functional Testing (12.50) Page 122
Windows Forms Spy window opens showing the properties and values for the selected object.
7. You can repeat these steps to spy on additional objects and add them to the Objects pane in theUFT .NET Windows Forms Spy window.
Remove objects from the Objects pane
1. Select the object that you want to remove.
2. Perform one of the following:
l Right-click the object and select Remove Object.
l Press DELETE.
View values of run-time object properties
In the Objects pane, select the object whose run-time object properties you want to view. The propertiesfor the selected object are displayed in the Properties tab, with the property names on the left, and theproperty values on the right. A description of the selected property is displayed below the propertiesgrid.
Note: Any changes you make to the values of run-time object properties in the .NET applicationremain in effect only for the current instance of the .NET application. The next time you run the.NET application, the properties will return to their original run-time values.
View properties of embedded objects
1. In the Properties tab, select the property whose embedded object properties you want to view. Fordetails on locating a property by value, see "Locate a property by its value" below.
2. Click the Add selected property to the Objects tree button . The property is added to theObjects pane, and its run-time object properties and property values (if any) are shown in theProperties tab. Each time you add an embedded object to the Objects pane, it is added below itsparent object, in a hierarchical format.
Note: The Add selected property to the Objects tree button is disabled if the property's valueis null, or the property is an object with no properties of its own.
Locate a property by its value
1. Click the Search a property by value button . The Find Property by Value dialog box opens.
2. In the Find what box, specify the value for which you want to search.
3. To find only those occurrences in which the capitalization matches the text you entered, selectMatch case.
4. Specify the direction from the current cursor location in which you want to search: Up or Down.
5. Click Find Next. The .NET Windows Forms Spy locates the property whose value you specified.
Add-ins Guide.NET Windows Forms Add-in
HP Unified Functional Testing (12.50) Page 123
Sort the properties grid
Click one of the following buttons to sort the properties grid in the Properties tab:
l Categorized. Lists all properties and property values for the selected object, by category.Categories are listed alphabetically. You can collapse a category to reduce the number of visibleproperties. When you expand or collapse a category, a plus (+) or minus (-) is displayed to the left ofthe category name.
l Alphabetical. Alphabetically sorts all run-time object properties for the selected object.
Note: The Property Pages button is not currently supported.
Modify values of run-time object properties
1. In the Properties tab, click the property value you want to modify. Properties shown in gray aredefined as read-only in the .NET application and cannot be modified.
2. Edit the property value as required. The property value displays different types of edit fields,depending on the needs of a particular property. These edit fields include edit boxes, drop-downlists, and links to custom editor dialog boxes.
After you modify a property value, the new value is applied to the run-time instance of the .NETapplication. For example, you can change the text of an edit box label, change the background colorof a dialog box from gray to red, and so on.
View event arguments on an object
1. In the Objects pane, select the object whose event arguments you want to view.
2. Select the event in the Fired Events list whose arguments you want to view. The selected eventsarguments and argument values are shown directly below the event, in the Event Arguments list.
Listen to specified events of an object
1. In the Objects pane, select the object to whose events you want to listen.
2. In the Events list, select the check boxes for the event types to which you want to listen.
Note: The events that you select affect only the events that are listened to and logged by UFT.If you select or clear a check box for an event type after listening to events for an object, theevents in the Fired Events list are not changed.
Tip: You can click the Select All Events or Clear All Events buttons to select orclear all the event check boxes. You can also right-click the Events list and select Select All orClear All.
Add-ins Guide.NET Windows Forms Add-in
HP Unified Functional Testing (12.50) Page 124
3. Click the Listen to Selected Events button . UFT starts listening to the specified events on theselected object, and Listening is displayed in the status bar.
4. In your .NET application, perform the operations on the object to whose events you want to listen.The specified events are logged as they occur and are shown in the Fired Events list.
5. When you want to stop listening to events, click the Stop Listening to Events button . UFTstops listening to and logging the specified events.
Fire selected events on an object
1. In the Objects pane, select the object whose events you want to fire.
2. In the Fired Events list, select one or more events that you want to fire on your .NET application.You can select multiple events using standard Windows selection techniques (CTRL and SHIFTkeys).
Tip: The selected events are fired in the order in which they appear in the Fired Events list. Ifthe events do not appear in the Fired Events list in the order in which you want to fire them,listen to more events on the object until the events you want are added to the Fired Events listin the required order.
3. If the events you selected have editable arguments, you can change their argument values in theEvent Arguments list if needed before firing the events. When the events are fired, they will befired with the modified argument values.
4. Click the Fire Selected Events button . The selected events are fired in the order in which theyappear in the Fired Events list. You can view the effect that firing these events has on the relevantobject in your .NET application. The status bar displays that the event firing is in progress, andwhen it ends.
Remove specific events from the Fired Events list
1. In the Objects pane, select the object whose events you want to remove from the Fired Events list.
2. Select the events in the Fired Events list that you want to remove. You can select multiple eventsusing standard Windows selection techniques (CTRL and SHIFT keys).
3. Click the Clear Selected Events button . The selected events are removed from the FiredEvents list.
Clear all events from the Fired Events list
1. In the Objects pane, select the object whose events you want to remove from the Fired Events list.
2. Click the Clear Event List button . All the logged events are removed from the Fired Events list.
Add-ins Guide.NET Windows Forms Add-in
HP Unified Functional Testing (12.50) Page 125
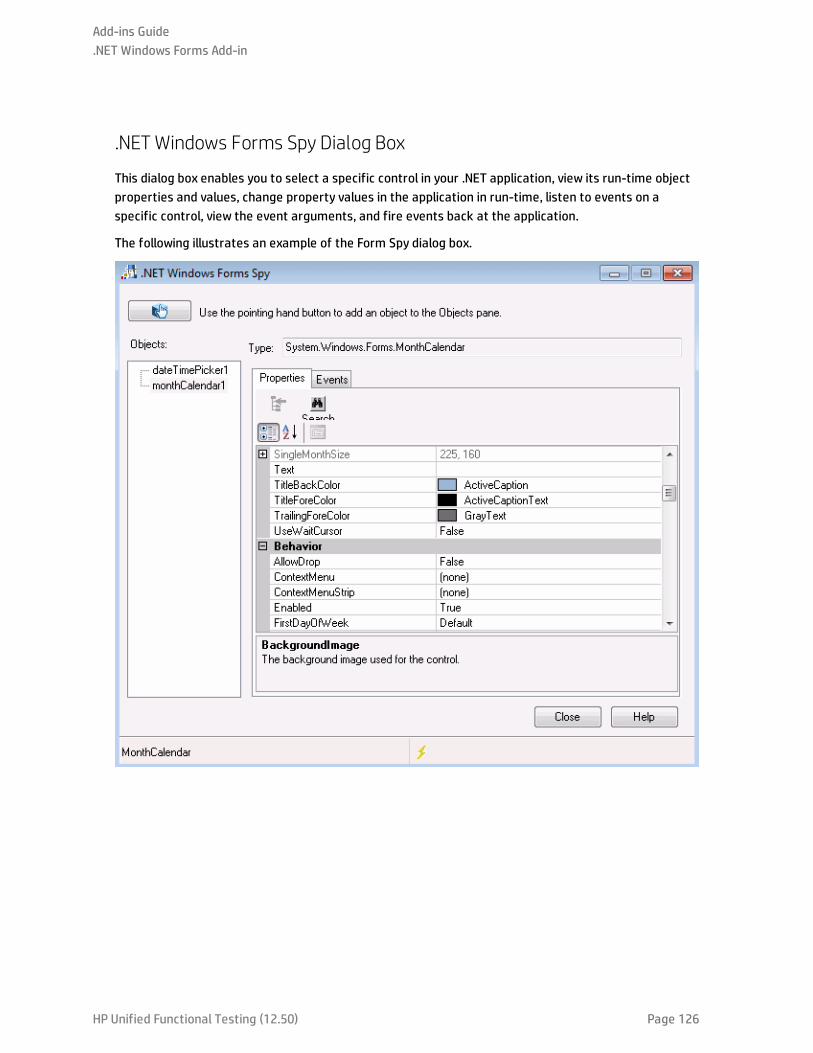
.NET Windows Forms Spy Dialog Box
This dialog box enables you to select a specific control in your .NET application, view its run-time objectproperties and values, change property values in the application in run-time, listen to events on aspecific control, view the event arguments, and fire events back at the application.
The following illustrates an example of the Form Spy dialog box.
Add-ins Guide.NET Windows Forms Add-in
HP Unified Functional Testing (12.50) Page 126
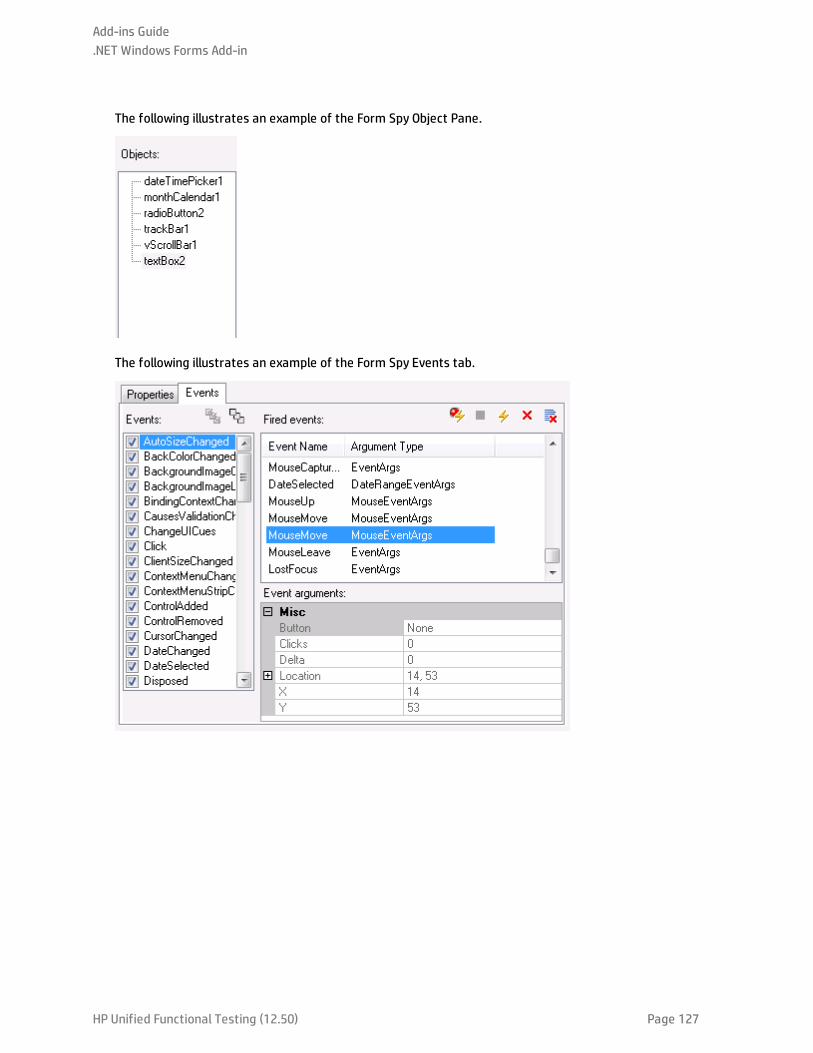
The following illustrates an example of the Form Spy Object Pane.
The following illustrates an example of the Form Spy Events tab.
Add-ins Guide.NET Windows Forms Add-in
HP Unified Functional Testing (12.50) Page 127
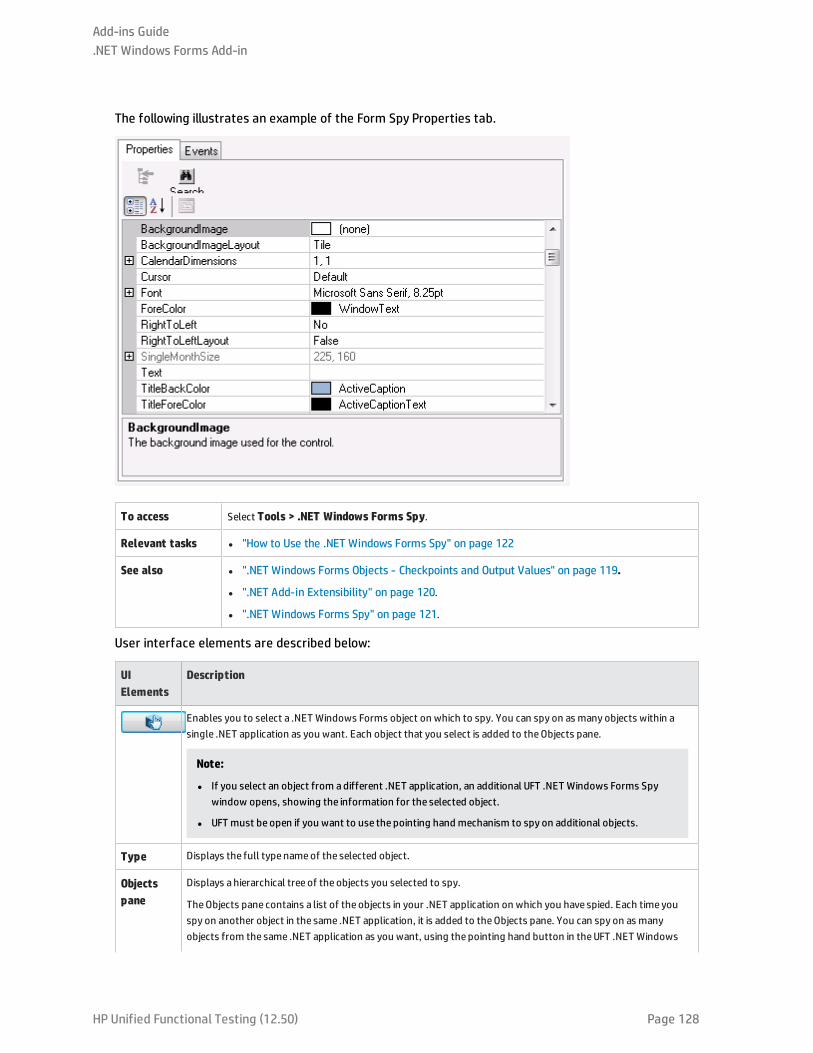
The following illustrates an example of the Form Spy Properties tab.
To access Select Tools > .NET Windows Forms Spy.
Relevant tasks l "How to Use the .NET Windows Forms Spy" on page 122
See also l ".NET Windows Forms Objects - Checkpoints and Output Values" on page 119.
l ".NET Add-in Extensibility" on page 120.
l ".NET Windows Forms Spy" on page 121.
User interface elements are described below:
UIElements
Description
Enables you to select a .NET Windows Forms object on which to spy. You can spy on as many objects within asingle .NET application as you want. Each object that you select is added to theObjects pane.
Note:
l If you select an object from adifferent .NET application, an additional UFT .NET Windows Forms Spywindow opens, showing the information for the selected object.
l UFT must be open if you want to use the pointing hand mechanism to spy on additional objects.
Type Displays the full type nameof the selected object.
Objectspane
Displays a hierarchical tree of the objects you selected to spy.
TheObjects pane contains a list of the objects in your .NET application on which you have spied. Each time youspy on another object in the same .NET application, it is added to theObjects pane. You can spy on as manyobjects from the same .NET application as you want, using the pointing hand button in theUFT .NET Windows
Add-ins Guide.NET Windows Forms Add-in
HP Unified Functional Testing (12.50) Page 128
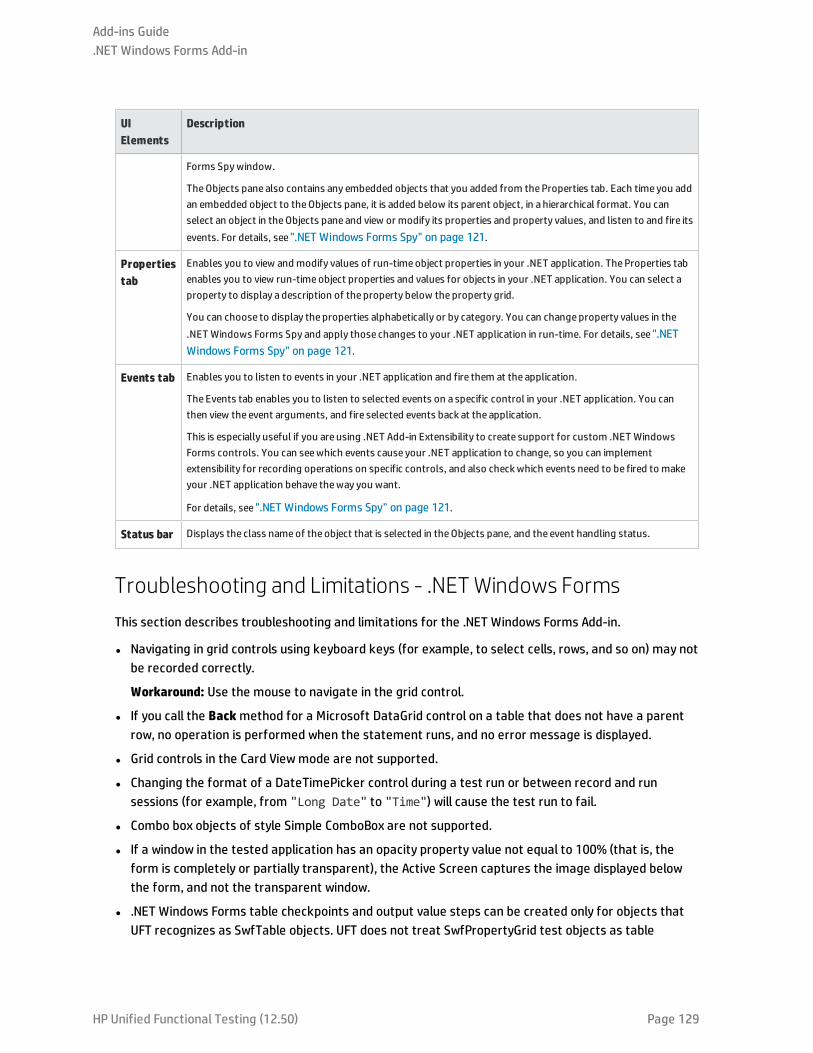
UIElements
Description
Forms Spywindow.
TheObjects pane also contains any embedded objects that you added from theProperties tab. Each time you addan embedded object to theObjects pane, it is added below its parent object, in a hierarchical format. You canselect an object in theObjects pane and view or modify its properties and property values, and listen to and fire itsevents. For details, see ".NET Windows Forms Spy" on page 121.
Propertiestab
Enables you to view and modify values of run-timeobject properties in your .NET application. TheProperties tabenables you to view run-timeobject properties and values for objects in your .NET application. You can select aproperty to display a description of the property below theproperty grid.
You can choose to display the properties alphabetically or by category. You can changeproperty values in the.NET Windows Forms Spy and apply those changes to your .NET application in run-time. For details, see ".NETWindows Forms Spy" on page 121.
Events tab Enables you to listen to events in your .NET application and fire them at the application.
The Events tab enables you to listen to selected events on a specific control in your .NET application. You canthen view the event arguments, and fire selected events back at the application.
This is especially useful if you are using .NET Add-in Extensibility to create support for custom .NET WindowsForms controls. You can seewhich events cause your .NET application to change, so you can implementextensibility for recording operations on specific controls, and also checkwhich events need to be fired to makeyour .NET application behave theway you want.
For details, see ".NET Windows Forms Spy" on page 121.
Status bar Displays the class nameof the object that is selected in theObjects pane, and the event handling status.
Troubleshooting and Limitations - .NET Windows FormsThis section describes troubleshooting and limitations for the .NET Windows Forms Add-in.
l Navigating in grid controls using keyboard keys (for example, to select cells, rows, and so on) may notbe recorded correctly.
Workaround: Use the mouse to navigate in the grid control.
l If you call the Backmethod for a Microsoft DataGrid control on a table that does not have a parentrow, no operation is performed when the statement runs, and no error message is displayed.
l Grid controls in the Card Viewmode are not supported.
l Changing the format of a DateTimePicker control during a test run or between record and runsessions (for example, from "Long Date" to "Time") will cause the test run to fail.
l Combo box objects of style Simple ComboBox are not supported.
l If a window in the tested application has an opacity property value not equal to 100% (that is, theform is completely or partially transparent), the Active Screen captures the image displayed belowthe form, and not the transparent window.
l .NET Windows Forms table checkpoints and output value steps can be created only for objects thatUFT recognizes as SwfTable objects. UFT does not treat SwfPropertyGrid test objects as table
Add-ins Guide.NET Windows Forms Add-in
HP Unified Functional Testing (12.50) Page 129
objects.
l Operations on a grid cell that was selected before you started recording on the grid control may berecorded incorrectly. For example, a child cell element operation may be recorded instead of theparent grid operation (for example, SetCellData).
Workaround: Before performing operations on a cell that is already selected, begin recording, movethe focus to another cell, select the required cell, and then perform the required operation.
l When recording steps using low-level recording, default description properties for WinObject andWindow objects do not have constant values. This may lead to different description property valuesduring a run session, which causes steps on these objects to fail.
Workaround:
l Window test objects. Before recording, remove the regexpwndclass property from the list ofmandatory, assistive, and Smart Identification properties using the Object identification dialogbox.
l WinObject test objects. Do the following:
o Before recording, remove the window id property from the list of mandatory, assistive, andSmart Identification properties using the Object identification dialog box.
o After recording, change the regexpwndclass property value to a regular expression for eachWinObject test object in the object repository, and edit the property value to removeeverything except for the control type,
For example, change WindowsForms10.BUTTON.app3 to .*BUTTON.*
l Note that Visual Basic .NET applications are supported by the UFT .NET Add-in.
Add-ins Guide.NET Windows Forms Add-in
HP Unified Functional Testing (12.50) Page 130
.NET Windows Presentation Foundation (WPF)Add-inThis section includes:
• .NET Windows Presentation Foundation (WPF) Add-in - Quick Reference 132
• .NET Windows Presentation Foundation (WPF) Add-in - Testing and Configuration 134
• Considerations for Working with the WPF Add-in 135
• WPF Objects, Methods, and Properties to Enhance Your Test or Component 135
• About WPF User Interface Automation 136
• WPF Add-in Extensibility 137
• Troubleshooting and Limitations - .NET WPF 137
HP Unified Functional Testing (12.50) Page 131
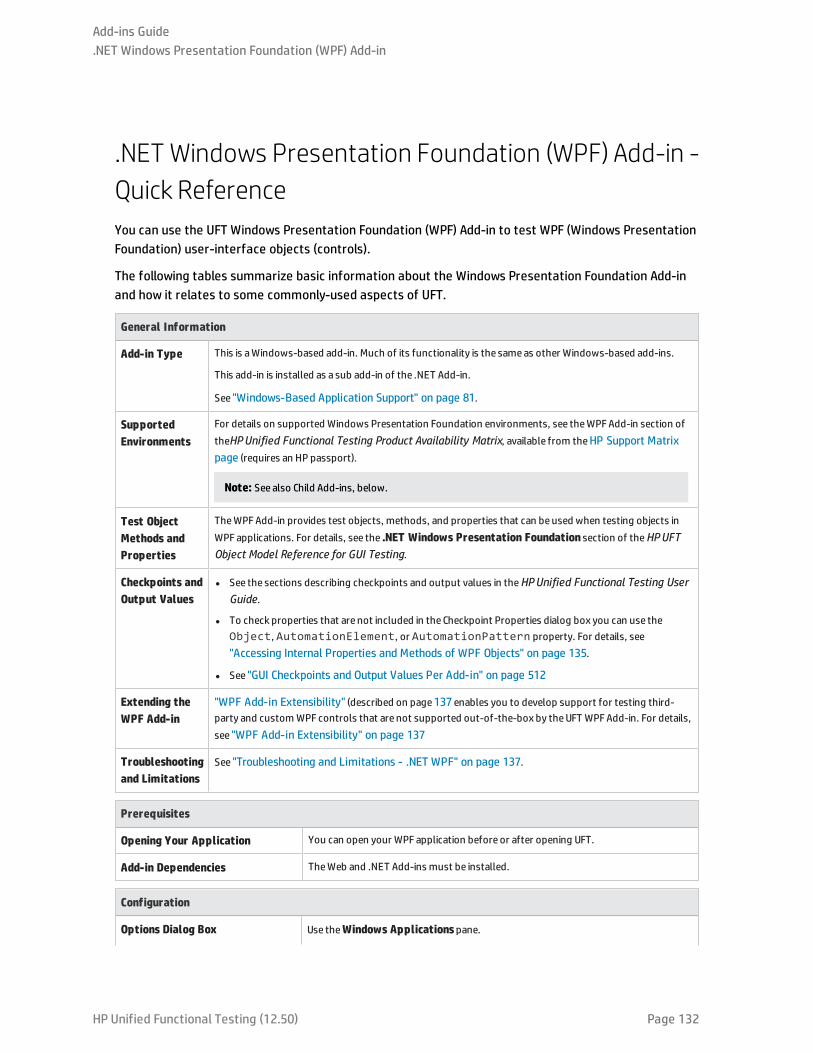
.NET Windows Presentation Foundation (WPF) Add-in -Quick ReferenceYou can use the UFT Windows Presentation Foundation (WPF) Add-in to test WPF (Windows PresentationFoundation) user-interface objects (controls).
The following tables summarize basic information about the Windows Presentation Foundation Add-inand how it relates to some commonly-used aspects of UFT.
General Information
Add-in Type This is aWindows-based add-in. Much of its functionality is the sameas other Windows-based add-ins.
This add-in is installed as a sub add-in of the .NET Add-in.
See "Windows-Based Application Support" on page 81.
SupportedEnvironments
For details on supported Windows Presentation Foundation environments, see theWPF Add-in section oftheHPUnified Functional Testing Product Availability Matrix, available from theHP Support Matrixpage (requires an HP passport).
Note: See also Child Add-ins, below.
Test ObjectMethods andProperties
TheWPFAdd-in provides test objects, methods, and properties that can beused when testing objects inWPF applications. For details, see the .NET Windows Presentation Foundation section of theHPUFTObject Model Reference for GUI Testing.
Checkpoints andOutput Values
l See the sections describing checkpoints and output values in theHPUnified Functional Testing UserGuide.
l To check properties that are not included in the Checkpoint Properties dialog box you can use theObject, AutomationElement, or AutomationPattern property. For details, see"Accessing Internal Properties and Methods of WPF Objects" on page 135.
l See "GUI Checkpoints and Output Values Per Add-in" on page 512
Extending theWPF Add-in
"WPF Add-in Extensibility" (described on page137enables you to develop support for testing third-party and customWPF controls that are not supported out-of-the-box by theUFT WPFAdd-in. For details,see "WPF Add-in Extensibility" on page 137
Troubleshootingand Limitations
See "Troubleshooting and Limitations - .NET WPF" on page 137.
Prerequisites
Opening Your Application You can open your WPF application before or after opening UFT.
Add-in Dependencies TheWeb and .NET Add-ins must be installed.
Configuration
Options Dialog Box Use theWindows Applicationspane.
Add-ins Guide.NET Windows Presentation Foundation (WPF) Add-in
HP Unified Functional Testing (12.50) Page 132
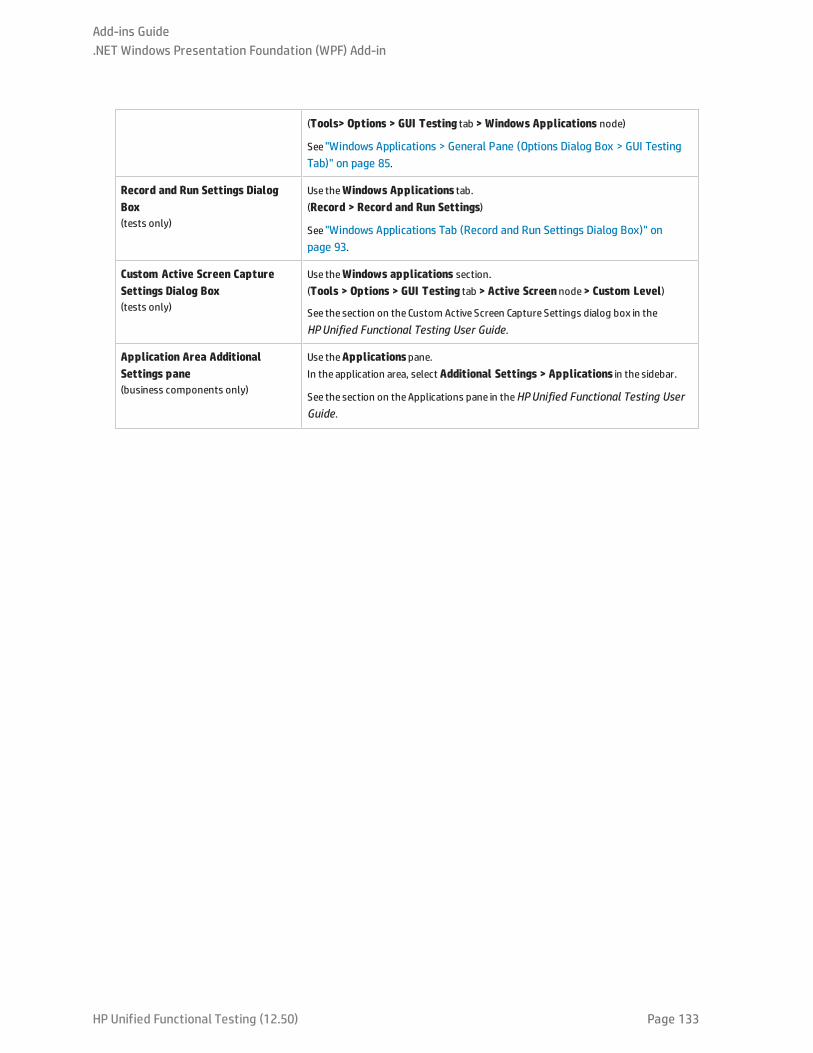
(Tools> Options > GUI Testing tab > Windows Applications node)
See "Windows Applications > General Pane (Options Dialog Box > GUI TestingTab)" on page 85.
Record and Run Settings DialogBox(tests only)
Use theWindows Applications tab.(Record > Record and Run Settings)
See "Windows Applications Tab (Record and Run Settings Dialog Box)" onpage 93.
Custom Active Screen CaptureSettings Dialog Box(tests only)
Use theWindows applications section.(Tools > Options > GUI Testing tab > Active Screennode> Custom Level)
See the section on the Custom Active Screen Capture Settings dialog box in theHPUnified Functional Testing User Guide.
Application Area AdditionalSettings pane(business components only)
Use theApplicationspane.In the application area, select Additional Settings > Applications in the sidebar.
See the section on theApplications pane in theHPUnified Functional Testing UserGuide.
Add-ins Guide.NET Windows Presentation Foundation (WPF) Add-in
HP Unified Functional Testing (12.50) Page 133
.NET Windows Presentation Foundation (WPF) Add-in -Testing and ConfigurationThis section includes
• Considerations for Working with the WPF Add-in 135
• WPF Objects, Methods, and Properties to Enhance Your Test or Component 135
• About WPF User Interface Automation 136
• Automation Elements 136
• Control Patterns 136
• WPF Add-in Extensibility 137
• Troubleshooting and Limitations - .NET WPF 137
Add-ins Guide.NET Windows Presentation Foundation (WPF) Add-in
HP Unified Functional Testing (12.50) Page 134
Considerations for Working with theWPF Add-inl You can test most custom WPF controls inherited directly or indirectly from the
System.Windows.Controls.Control class regardless of which language was used to create theapplication (for example, Visual Basic, .NET, C#, and so on), as well as third-party WPF controls thatare inherited from the System.Windows.Controls.Control class and implement automationinterfaces.
l You can use the Keyword View and Editor to activate WPF test objects, Automation objects and run-time object methods, retrieve and set the values of properties, and check that objects exist.
WPF Objects, Methods, and Properties to Enhance Your Test orComponentA test or business component consists of statements coded in Microsoft VBScript. These statementsare composed of objects, methods, and/or properties that instruct UFT to perform operations orretrieve information. You add these statements using objects from your object repositories, andmethods and properties that are available for each object type. In addition, when you record, thesestatements are generated automatically in response to input to the application. You can also programstatements manually, or mix recorded and programmed statements in the same test or businesscomponent. You create, view, and edit these statements in the Keyword View and/or Editor.
Accessing Internal Properties and Methods of WPF Objects
When accessing the internal properties and methods of WPF objects, it is important to know whichproperty to use to access the object that contains the information you want to set or retrieve.
l AutomationElement property. Returns the object that gives access to the set of standardproperties that expose information about the Automation Element.
l AutomationPattern property. Returns the object that gives access to the specific instance of aControl Pattern. For details on the methods and properties that are accessible through theAutomationPattern property, see the .NET Framework Developer Center of the Microsoft DeveloperNetwork library at http://msdn2.microsoft.com/en-us/library/system.windows.automation.aspx.
l Object property. Returns the object that gives access to properties specific to the actual run-time UIobject, as defined by the developer.
Many of the properties and methods accessible through the AutomationElement andAutomationPattern properties contain the same information as the properties and methods accessiblethrough the Object property. However, information available through UI Automation that is accessedthrough the Object property lacks the standardization provided by UI Automation.
Custom properties designed by the developer are accessible only through the Object property.
Add-ins Guide.NET Windows Presentation Foundation (WPF) Add-in
HP Unified Functional Testing (12.50) Page 135
AboutWPF User Interface AutomationUI Automation provides a single, consistent, reference object for UI elements in multiple frameworks(For example, Win32, WPF, and Trident). With UI Automation, the functionality of objects in the UI isdefined by a set of standard control patterns and properties that are common to all objects of thattype.
WPF uses UI (User Interface) Automation to define UI objects. UI Automation provides standardization ofcontrols and properties for the functionality of objects. The .NET Add-in supports UI Automation throughthe AutomationElement and AutomationPattern properties.
To learn more about UI Automation, see the UI Automation Fundamentals page of the MicrosoftDeveloper Network library at http://msdn2.microsoft.com/en-us/library/ms753107.aspx.
This section also includes:
• Automation Elements 136
• Control Patterns 136
Automation Elements
UI Automation exposes every element in the UI as an Automation Element. Automation Elementsexpose common properties of the UI elements they represent.
For example, a button control has the Automation Element property NameProperty, which referencesthe name or text associated with a button control. That same property is called caption or alt in Win32and HTML, respectively. With UI Automation, all button controls have a NameProperty, which is mappedto the corresponding property in each framework.
The Automation Element also exposes control patterns that provide properties and expose methodsspecific to their control types.
Control Patterns
Control patterns represent discrete pieces of functionality that a control in the UI can perform. Thetotal set of control patterns for a control type define the functionality of that control type.
Control patterns expose methods that provide the ability to programmatically manipulate the control.
Control patterns expose properties that provide information on the control's functionality and currentstate.
The set of supported control patterns for a particular control can be dynamically defined. Therefore, aparticular control type may not always support the same set of control patterns. For example, amultiline edit box supports scrolling (scrollpattern pattern) only if its text exceeds the viewable area.
Some controls types, such as Image controls do not support any control patterns.
Add-ins Guide.NET Windows Presentation Foundation (WPF) Add-in
HP Unified Functional Testing (12.50) Page 136
UFT enables you to access the methods and properties of automation elements and control patternsusing special properties in the UFT object model for WPF.
For details on how to work with UI Automation in your test or business component, see "AccessingInternal Properties and Methods of WPF Objects" on page 135.
WPF Add-in ExtensibilityUFT WPF Add-in Extensibility enables you to develop support for testing third-party and custom WPFcontrols that are not supported out-of-the-box by the UFT WPF Add-in.
If the test object class that UFT uses to represent a control does not provide the operations andproperties necessary to operate on your control, you can use WPF Add-in Extensibility to create a newtest object class.
You can then map the control to the new test object class, and design the test object class behaviorusing .NET programming. You can program how operations are performed on the control, howproperties are retrieved, and more.
You can also teach UFT to treat a control that contains a set of lower-level controls as a singlefunctional control, instead of relating to each lower-level control separately.
To implement WPF Add-in Extensibility, you need to be familiar with:
l UFT and its Object Model Reference
l The behavior of the custom control (operations, properties, events)
l .NET programming in C#
l XML (basic knowledge)
You can install the WPF Add-in Extensibility SDK from the Add-in Extensibility and Web 2.0 Toolkitsoption in the UFT setup program.
Troubleshooting and Limitations - .NET WPFl The UFT .NET Add-in supports:
l Testing standard .NET Windows Forms controls from the System.Windows.Forms library.
l Testing third-party .NET Windows Forms controls that are inherited fromSystem.Windows.Forms.Control class.
l The UFT .NET Add-in supports testing WPF controls inherited directly or indirectly from theSystem.Windows.Controls.Control class regardless of which language was used to create theapplication (for example, VisualBasic, .NET, C#, and so forth), as well as third-party WPF controls thatare inherited from the System.Windows.Controls.Control class and implement automationinterfaces when the WPF Add-in is loaded.
l In addition to the controls listed in the HP Unified Functional Testing Product Availability Matrix,custom-built UFT support for a variety of Infragistics .NET Windows Forms controls is provided out-of-the-box by Infragistics TestAdvantage. For more information, refer to:
Add-ins Guide.NET Windows Presentation Foundation (WPF) Add-in
HP Unified Functional Testing (12.50) Page 137
http://www.infragistics.com/dotnet/testadvantageoverview.aspx#Overview
l UFT does not treat text block elements as children of WPF objects, such as lists, treeviews, andtables. Therefore, they will not be returned in a ChildObjects statement, nor will they be learned astest objects when you select to learn a WPF object and its children.
If you want to work with the text block elements of a WPF object, use a GetItem() orGetItemProperty() statement.
l When you spy on a WPF object using the Object Spy (or the .NET Windows Forms Spy when the .NETAdd-in is loaded), and the Record and Run Settings dialog box is not configured to record on the WPFapplication on which you are spying, UFT recognizes the object as a standard Windows object.
Workaround: Close your WPF application. In UFT, open the Record and Run Settings dialog box(Record > Record and Run Settings) and in the Windows Application tab, select the Record and runtest on any Windows application option. Reopen your WPF application and then spy on it again.
l When you spy on a WpfComboBox control on a Microsoft Windows 7 operating system, to enabledisplaying the correct all items property value, you must first manually expand and collapse thecombo box.
l To view the full type name of a .NET Windows Forms object in your application, view theSwfTypeName identification property in the Object Spy.
You can also view a list of the base types of a selected object by running a statement using thefollowing syntax:
MsgBox <SwfTestObj>(<descr>).GetROProperty("SwfTypeNames")
where SwfTestObj(<descr>) is the test object you want to check. Running this statement causes amessage box to open displaying the actual class at the top of the list and the base classes below it.
l When recording steps using low-level recording, default description properties for WindowsPresentation Foundation test objects do not have constant values. This may lead to differentdescription property values during a run session, which causes steps on these objects to fail.
l When recording dynamically changing objects in your application, UFT records the object propertiesof the object after the change instead of on the original object before the change. This causes runsessions using this object to fail.
Workaround: Manually change the object description in the editor.
l UFT does not treat text block elements as child objects of WPF objects, such as lists, treeviews, andtables. Therefore, they will not be returned in a ChildObjects statement, nor will they be learned astest objects when you select to learn a WPF object and its children.
If you want to work with the text block elements of a WPF object, use a GetItem() orGetItemProperty() statement.
Note: The above behavior was implemented after QTP 11.00. Therefore, if you have ChildObjectsteps in existing tests that previously returned these text block elements, those tests may failor produce unexpected results. In this case, update such steps as recommended above.
Add-ins Guide.NET Windows Presentation Foundation (WPF) Add-in
HP Unified Functional Testing (12.50) Page 138
HP Unified Functional Testing (12.50) Page 139
Part 3: ActiveX Add-inThis section includes:
"ActiveX Add-in - Quick Reference" on page 140
"Considerations for Working with the ActiveX Add-in" on page 141
"Troubleshooting and Limitations - ActiveX Add-in" on page 142
ActiveX Add-in - Quick ReferenceYou can use the UFT ActiveX Add-in to test ActiveX user-interface objects (controls).
The following tables summarize basic information about the ActiveX Add-in and how it relates to somecommonly-used aspects of UFT.
General Information
Add-in Type This is aWindows-based add-in. Much of its functionality is the sameas other Windows-based add-ins.
See "Windows-Based Application Support" on page 81.
SupportedEnvironments
For details on supported ActiveX environments, see theActiveX Add-in section of theHPUnifiedFunctional Testing Product Availability Matrix, available from theHP Support Matrix page (requires anHP passport).
ImportantInformation
See "Considerations for Working with the ActiveX Add-in" on the next page.
Test ObjectMethods andProperties
TheActiveX Add-in provides test objects, methods, and properties that can beused when testing ActiveXobjects in applications. For details, see theActiveX section of theHPUFT Object Model Reference forGUI Testing.
Checkpoints andOutput Values
l See the sections describing checkpoints and output values in theHPUnified Functional Testing UserGuide.
l See "GUI Checkpoints and Output Values Per Add-in" on page 512
Troubleshootingand Limitations
See "Troubleshooting and Limitations - ActiveX Add-in" on page 142.
Prerequisites
Opening YourApplication
The application containing theActiveX controls on which you want to record must be closed before you beginaUFT recording session and set theRecord and Run options. Open the application only after you begin therecording session.
Add-inDependencies
Loading theActiveX and Siebel add-ins together may cause problems when recording on someActiveXmethods.
Configuration
Options Dialog Box Use theWindows Applicationspane.(Tools > Options > GUI Testing tab > Windows Applications node)
See "Windows Applications > General Pane (Options Dialog Box > GUI Testing Tab)" onpage 85.
Record and RunSettings Dialog Box(tests only)
Use theWindows Applications tab.(Run > Run Settingsor Record > Record Settings)
HP Unified Functional Testing (12.50) Page 140
See "Windows Applications Tab (Record and Run Settings Dialog Box)" on page 93.
Note:
l If you select theRecord and Run only on radio button in theRecord and Run Settingsdialog box, the settings also apply to (limit) the applications that are recognized for ObjectSpy and other pointing hand operations.
l UFT recognizes ActiveX objects only in applications that are opened after changing therecord and replay settings in theWindows Applications tab of theRecord and Run Settingsdialog box.
Custom Active ScreenCapture SettingsDialog Box(tests only)
Use theWindows applications section.(Tools > Options > GUI Testing tab > Active Screennode> Custom Level)
See the section on the Custom Active Screen Capture Settings dialog box in theHPUnifiedFunctional Testing User Guide.
Application AreaAdditional Settingspane(business componentsonly)
Use theApplicationspane.In the application area, select Additional Settings > Applications in the sidebar.
See the section on theApplications pane in theHPUnified Functional Testing User Guide.
Considerations for Working with the ActiveXAdd-inl When you create a checkpoint on an ActiveX control, UFT captures all the properties for an ActiveX
control, but it does not select any properties to check.
l When testing ActiveX objects in a browser, the top-level ActiveX object is inserted within the standardWeb object hierarchy, for example, Browser.Page.ActiveX.
l UFT can record on standard controls within an ActiveX control and if an ActiveX control containsanother ActiveX control, then UFT can record and run on this internal control as well. For example,suppose your ActiveX control is a calendar that contains a drop-down list from which you can choosethe month. If you record a click in the list to select the month of May, UFT records this step in theEditor as:
Dialog("ActiveX Calendars").ActiveX("SMonth Control").WinComboBox("ComboBox").Select "May"
l Loading the ActiveX and Siebel add-ins together may cause problems when recording on someActiveXmethods.
Add-ins GuideConsiderations for Working with the ActiveX Add-in
HP Unified Functional Testing (12.50) Page 141
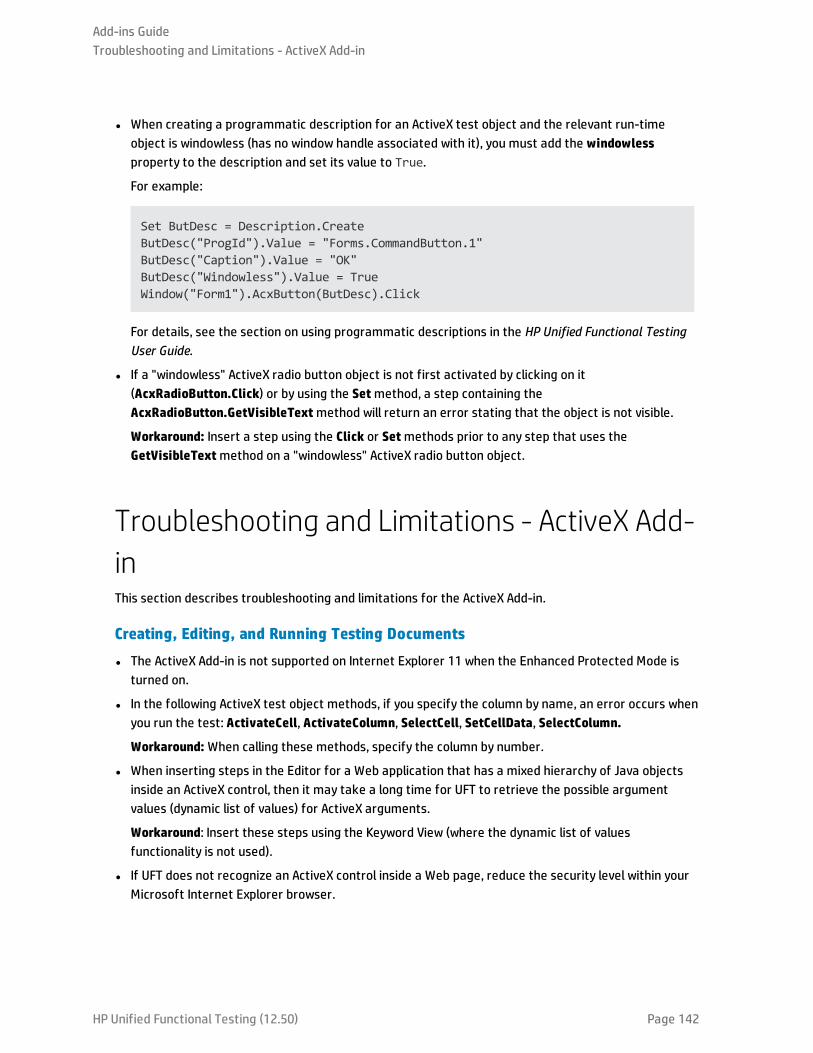
l When creating a programmatic description for an ActiveX test object and the relevant run-timeobject is windowless (has no window handle associated with it), you must add the windowlessproperty to the description and set its value to True.
For example:
Set ButDesc = Description.CreateButDesc("ProgId").Value = "Forms.CommandButton.1"ButDesc("Caption").Value = "OK"ButDesc("Windowless").Value = TrueWindow("Form1").AcxButton(ButDesc).Click
For details, see the section on using programmatic descriptions in the HP Unified Functional TestingUser Guide.
l If a "windowless" ActiveX radio button object is not first activated by clicking on it(AcxRadioButton.Click) or by using the Setmethod, a step containing theAcxRadioButton.GetVisibleTextmethod will return an error stating that the object is not visible.
Workaround: Insert a step using the Click or Setmethods prior to any step that uses theGetVisibleTextmethod on a "windowless" ActiveX radio button object.
Troubleshooting and Limitations - ActiveX Add-inThis section describes troubleshooting and limitations for the ActiveX Add-in.
Creating, Editing, and Running Testing Documents
l The ActiveX Add-in is not supported on Internet Explorer 11 when the Enhanced Protected Mode isturned on.
l In the following ActiveX test object methods, if you specify the column by name, an error occurs whenyou run the test: ActivateCell, ActivateColumn, SelectCell, SetCellData, SelectColumn.
Workaround:When calling these methods, specify the column by number.
l When inserting steps in the Editor for a Web application that has a mixed hierarchy of Java objectsinside an ActiveX control, then it may take a long time for UFT to retrieve the possible argumentvalues (dynamic list of values) for ActiveX arguments.
Workaround: Insert these steps using the Keyword View (where the dynamic list of valuesfunctionality is not used).
l If UFT does not recognize an ActiveX control inside a Web page, reduce the security level within yourMicrosoft Internet Explorer browser.
Add-ins GuideTroubleshooting and Limitations - ActiveX Add-in
HP Unified Functional Testing (12.50) Page 142
l If an ActiveX control's internal properties have the same name as the ActiveX properties created byUFT, retrieval and verification of such properties may be problematic.
Workaround: You can access the internal properties of an ActiveX control using the Object property.
l Methods performed on row and column positions for Apex, DataBound, and Sheridan grids return thevalues of the visible positions and not the absolute positions within the tables.
Workaround: Use the scroll bar while recording in order to display the required cells.
l If an ActiveX control is registered after UFT was started, UFT may not recognize the controlscorrectly. For example, UFT may recognize an AcxCalendar as a ActiveX object.
Workaround: Install the application running the ActiveX controls and register all ActiveX objectsbefore starting UFT.
Checkpoints and Output Values
l ActiveX table checkpoints capture only visible rows in data bound grids.
l When you insert a checkpoint on an ActiveX table from the Active Screen, the browser (or application)must be open to the same page (or screen). Otherwise, some data from the ActiveX table will bemissing.
Workaround: Create ActiveX table checkpoints while recording.
l Checkpoints and output values for ActiveX properties of type VT_DISPATCH are not supported.
l Checkpoints and output values for write-only ActiveX properties are not supported.
l If you perform an update run (Run > Update Run Mode) on a test that contains checkpoints oroutput values for windowless ActiveX controls, and then you rerun the test, the run session may fail.This is because a hidden property called "windowless" is missing from the test object description.
Workaround: You can either relearn the problematic ActiveX controls, or you can add the"windowless" property with a value of 1 to all problematic, windowless ActiveX controls.
Unsupported Controls
UFT does not support certain ActiveX controls or controls with certain prefixes. These controls are listedin the table below.
Unsupported Control Prefixes Unsupported Controls
Msawt AMOVIE.ActiveMovieControl.2
SpectrumHR.GrabBag MediaPlayer.MediaPlayer.1
SpectrumHR.EDataControl Trident.HTMLEditor.1
SpectrumHR.SSDBGridEventHandler htmlfile
ShockwaveFlash xmlfile
Spider90 htmlfile_FullWindowEmbed
Add-ins GuideTroubleshooting and Limitations - ActiveX Add-in
HP Unified Functional Testing (12.50) Page 143
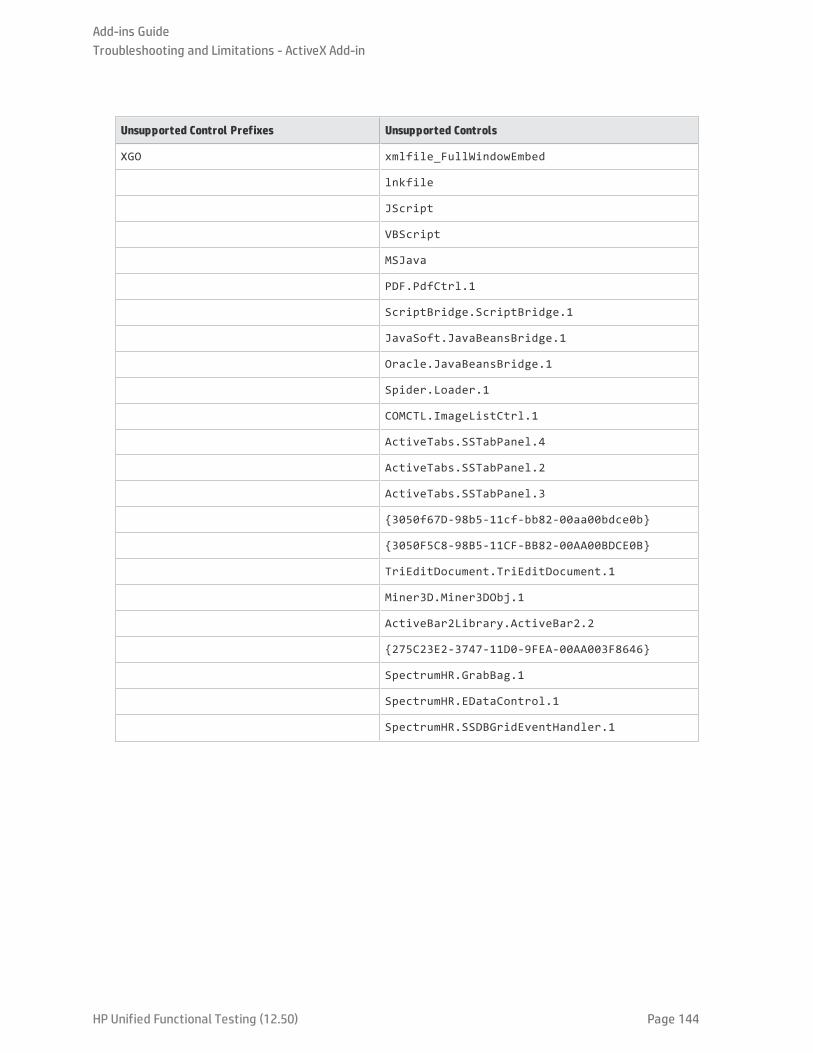
Unsupported Control Prefixes Unsupported Controls
XGO xmlfile_FullWindowEmbed
lnkfile
JScript
VBScript
MSJava
PDF.PdfCtrl.1
ScriptBridge.ScriptBridge.1
JavaSoft.JavaBeansBridge.1
Oracle.JavaBeansBridge.1
Spider.Loader.1
COMCTL.ImageListCtrl.1
ActiveTabs.SSTabPanel.4
ActiveTabs.SSTabPanel.2
ActiveTabs.SSTabPanel.3
{3050f67D-98b5-11cf-bb82-00aa00bdce0b}
{3050F5C8-98B5-11CF-BB82-00AA00BDCE0B}
TriEditDocument.TriEditDocument.1
Miner3D.Miner3DObj.1
ActiveBar2Library.ActiveBar2.2
{275C23E2-3747-11D0-9FEA-00AA003F8646}
SpectrumHR.GrabBag.1
SpectrumHR.EDataControl.1
SpectrumHR.SSDBGridEventHandler.1
Add-ins GuideTroubleshooting and Limitations - ActiveX Add-in
HP Unified Functional Testing (12.50) Page 144
HP Unified Functional Testing (12.50) Page 145
Part 4: Delphi Add-inThis section includes:
"Delphi Add-in - Quick Reference" on page 146
"Delphi Add-in Extensibility" on page 147
"How to Enable Communications Between UFT and Your Delphi Application" on page 148
"Troubleshooting and Limitations - Delphi Add-in" on page 149
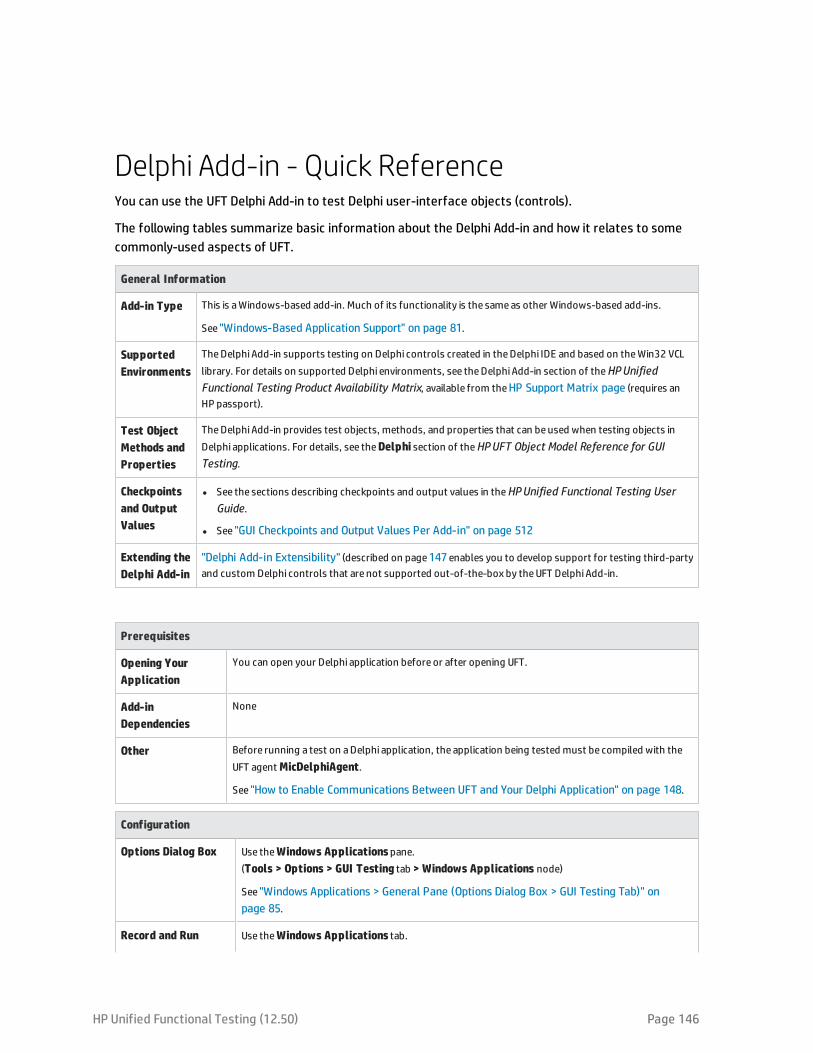
Delphi Add-in - Quick ReferenceYou can use the UFT Delphi Add-in to test Delphi user-interface objects (controls).
The following tables summarize basic information about the Delphi Add-in and how it relates to somecommonly-used aspects of UFT.
General Information
Add-in Type This is aWindows-based add-in. Much of its functionality is the sameas other Windows-based add-ins.
See "Windows-Based Application Support" on page 81.
SupportedEnvironments
TheDelphi Add-in supports testing on Delphi controls created in theDelphi IDE and based on theWin32 VCLlibrary. For details on supported Delphi environments, see theDelphi Add-in section of theHPUnifiedFunctional Testing Product Availability Matrix, available from theHP Support Matrix page (requires anHP passport).
Test ObjectMethods andProperties
TheDelphi Add-in provides test objects, methods, and properties that can beused when testing objects inDelphi applications. For details, see theDelphi section of theHPUFT Object Model Reference for GUITesting.
Checkpointsand OutputValues
l See the sections describing checkpoints and output values in theHPUnified Functional Testing UserGuide.
l See "GUI Checkpoints and Output Values Per Add-in" on page 512
Extending theDelphi Add-in
"Delphi Add-in Extensibility" (described on page147enables you to develop support for testing third-partyand custom Delphi controls that are not supported out-of-the-box by theUFT Delphi Add-in.
Prerequisites
Opening YourApplication
You can open your Delphi application before or after opening UFT.
Add-inDependencies
None
Other Before running a test on aDelphi application, the application being tested must be compiled with theUFT agentMicDelphiAgent.
See "How to Enable Communications Between UFT and Your Delphi Application" on page 148.
Configuration
Options Dialog Box Use theWindows Applicationspane.(Tools > Options > GUI Testing tab > Windows Applications node)
See "Windows Applications > General Pane (Options Dialog Box > GUI Testing Tab)" onpage 85.
Record and Run Use theWindows Applications tab.
HP Unified Functional Testing (12.50) Page 146
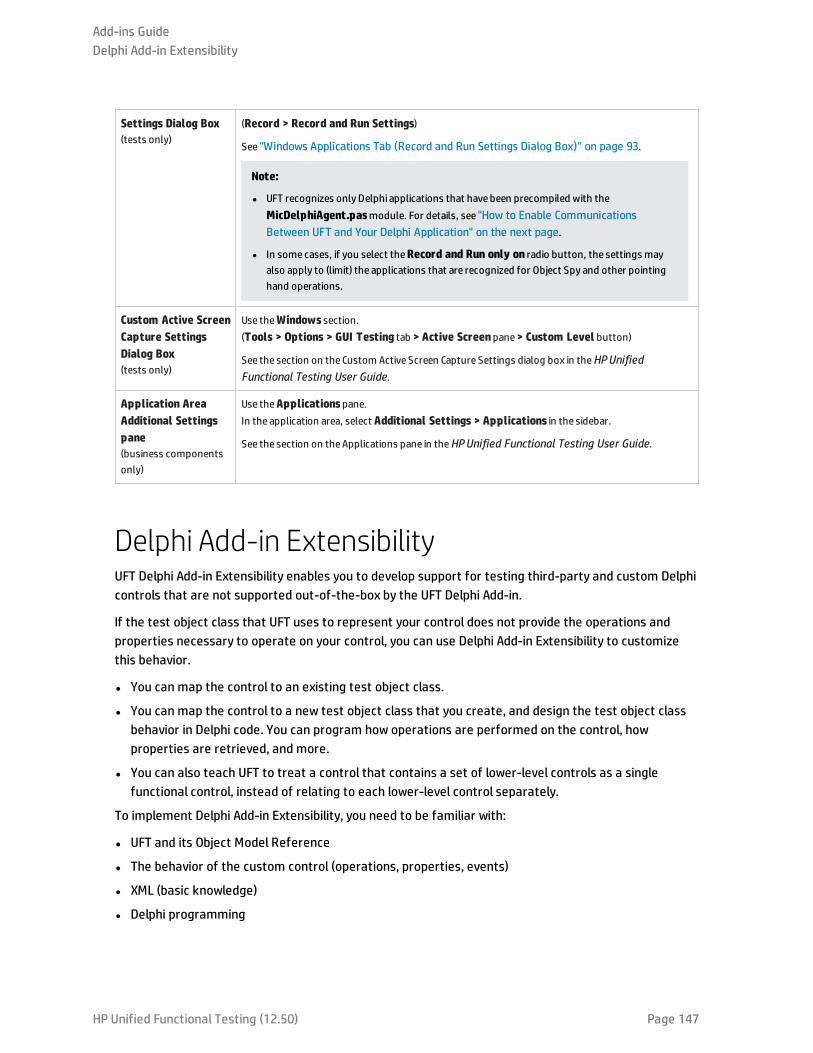
Settings Dialog Box(tests only)
(Record > Record and Run Settings)
See "Windows Applications Tab (Record and Run Settings Dialog Box)" on page 93.
Note:
l UFT recognizes only Delphi applications that have been precompiled with theMicDelphiAgent.pasmodule. For details, see "How to Enable CommunicationsBetween UFT and Your Delphi Application" on the next page.
l In some cases, if you select theRecord and Run only on radio button, the settings mayalso apply to (limit) the applications that are recognized for Object Spy and other pointinghand operations.
Custom Active ScreenCapture SettingsDialog Box(tests only)
Use theWindows section.(Tools > Options > GUI Testing tab > Active Screenpane> Custom Level button)
See the section on the Custom Active Screen Capture Settings dialog box in theHPUnifiedFunctional Testing User Guide.
Application AreaAdditional Settingspane(business componentsonly)
Use theApplicationspane.In the application area, select Additional Settings > Applications in the sidebar.
See the section on theApplications pane in theHPUnified Functional Testing User Guide.
Delphi Add-in ExtensibilityUFT Delphi Add-in Extensibility enables you to develop support for testing third-party and custom Delphicontrols that are not supported out-of-the-box by the UFT Delphi Add-in.
If the test object class that UFT uses to represent your control does not provide the operations andproperties necessary to operate on your control, you can use Delphi Add-in Extensibility to customizethis behavior.
l You can map the control to an existing test object class.
l You can map the control to a new test object class that you create, and design the test object classbehavior in Delphi code. You can program how operations are performed on the control, howproperties are retrieved, and more.
l You can also teach UFT to treat a control that contains a set of lower-level controls as a singlefunctional control, instead of relating to each lower-level control separately.
To implement Delphi Add-in Extensibility, you need to be familiar with:
l UFT and its Object Model Reference
l The behavior of the custom control (operations, properties, events)
l XML (basic knowledge)
l Delphi programming
Add-ins GuideDelphi Add-in Extensibility
HP Unified Functional Testing (12.50) Page 147
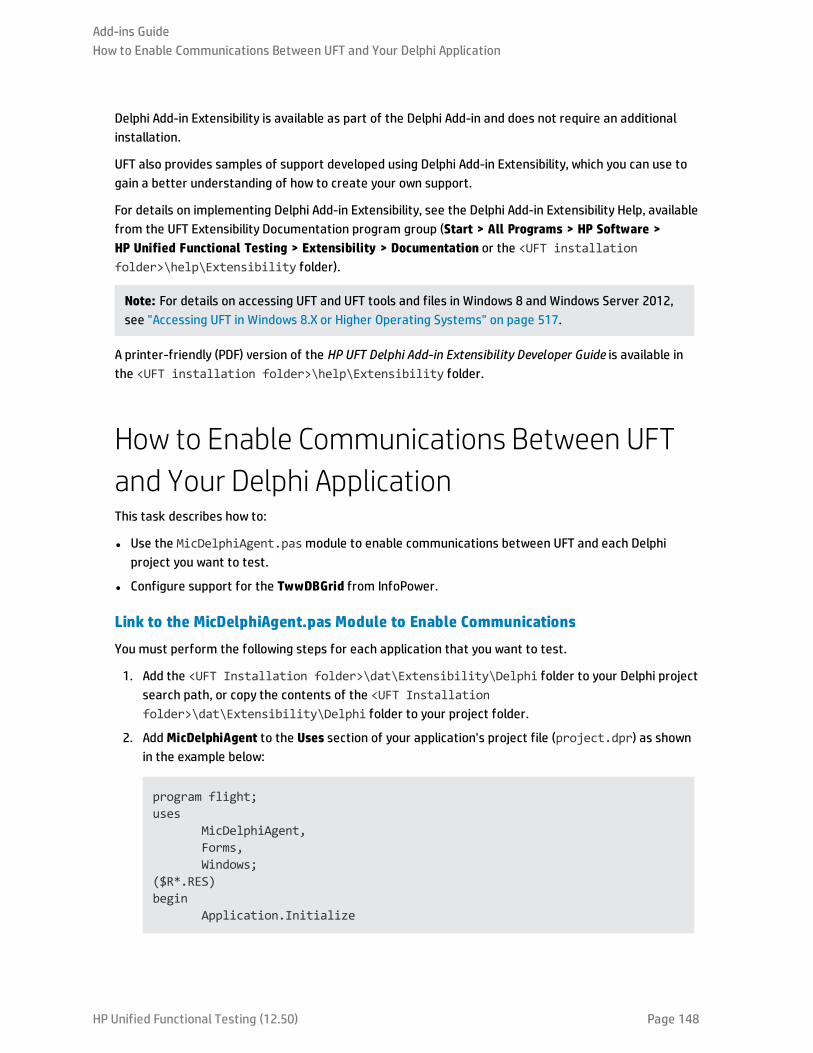
Delphi Add-in Extensibility is available as part of the Delphi Add-in and does not require an additionalinstallation.
UFT also provides samples of support developed using Delphi Add-in Extensibility, which you can use togain a better understanding of how to create your own support.
For details on implementing Delphi Add-in Extensibility, see the Delphi Add-in Extensibility Help, availablefrom the UFT Extensibility Documentation program group (Start > All Programs > HP Software >HP Unified Functional Testing > Extensibility > Documentation or the <UFT installationfolder>\help\Extensibility folder).
Note: For details on accessing UFT and UFT tools and files in Windows 8 and Windows Server 2012,see "Accessing UFT in Windows 8.X or Higher Operating Systems" on page 517.
A printer-friendly (PDF) version of the HP UFT Delphi Add-in Extensibility Developer Guide is available inthe <UFT installation folder>\help\Extensibility folder.
How to Enable Communications Between UFTand Your Delphi ApplicationThis task describes how to:
l Use the MicDelphiAgent.pasmodule to enable communications between UFT and each Delphiproject you want to test.
l Configure support for the TwwDBGrid from InfoPower.
Link to the MicDelphiAgent.pas Module to Enable Communications
You must perform the following steps for each application that you want to test.
1. Add the <UFT Installation folder>\dat\Extensibility\Delphi folder to your Delphi projectsearch path, or copy the contents of the <UFT Installationfolder>\dat\Extensibility\Delphi folder to your project folder.
2. Add MicDelphiAgent to the Uses section of your application's project file (project.dpr) as shownin the example below:
program flight;uses
MicDelphiAgent,Forms,Windows;
($R*.RES)begin
Application.Initialize
Add-ins GuideHow to Enable Communications Between UFT and Your Delphi Application
HP Unified Functional Testing (12.50) Page 148
Application.Title :='Flight Reservation';Application.Run;
end.
3. Compile your Delphi project.
Note: If your application includes the TwwDBGrid from InfoPower, you must add support forthis grid as described below..
Configure Support for TwwDBGrid
If your application includes the TwwDBGrid from InfoPower, do the following to enable support for thisgrid:
1. Add MicWWSupport to the Uses section of your application's project file (project.dpr) afterMicDelphiAgent, as shown in the example below:
program flight;uses
MicDelphiAgent,MicWWSupport,Forms,Windows;
($R*.RES)begin
Application.InitializeApplication.Title :='Flight Reservation';Application.Run;
end.
2. Recompile your application.
You are now ready to create and run tests on Delphi applications.
Troubleshooting and Limitations - Delphi Add-inButton controls in message boxes are identified asWinButton objects instead of DelphiButton objects.
Workaround: Replace the button control test objects in the object repository with DelphiButton objects.
Add-ins GuideTroubleshooting and Limitations - Delphi Add-in
HP Unified Functional Testing (12.50) Page 149

HP Unified Functional Testing (12.50) Page 150
Part 5: Flex Add-inThis section includes:
"Flex Add-in - Quick Reference" on page 151
"Flex Add-in - Testing and Configuration" on page 152
Flex Add-in - Quick ReferenceYou can use the UFT Flex Add-in to test Flex user-interface objects (controls).
The following tables summarize basic information about the Flex Add-in and how it relates to somecommonly-used aspects of UFT.
General Information
SupportedEnvironments
Tested applications must be built with Flex SDK versions that are supported by theUFT Flex Add-in.
For details on supported Flex SDK versions, see theFlex section of theHPUnified Functional TestingProduct Availability Matrix, available from theHP Support Matrix page (requires an HP passport).
ImportantInformation
l You can useUFT with Flex applications that satisfy oneof the following conditions:
l Applications opened with Adobe Flash Player Debugger
l Application s opened using theUFT Runtime Loader
l Applications prepared manually for testing.
Preparing the application consists of embedding the application in aWeb page together with theRuntime Loader, or recompiling the application with the relevant Adobeor Apache Flex automationlibraries and aUFT Flex pre-compiled agent.
For details, see:
l "Considerations for Working with the Flex Add-in" on page 155
l "How to Set Up the Adobe Flash Player Debugger to Enable UFT GUI Testing" on page 156
l "How to Open Flex Applications Using the Runtime Loader" on page 158
l "How to Compile Flex Applications for UFT Testing" on page 162
Test ObjectMethods andProperties
The Flex Add-in provides Flex test objects, methods, and properties that can beused when testing Flexobjects in Flex applications. For details, see theFlex section of theHPUFT Object Model Reference forGUI Testing.
Checkpoints andOutput Values
l See the sections describing checkpoints and output values in theHPUnified Functional Testing UserGuide
l See "GUI Checkpoints and Output Values Per Add-in" on page 512
Troubleshootingand Limitations
"Troubleshooting and Limitations - Flex Add-in " on page 171
Prerequisites
Opening YourApplication
You can open your Flex application before or after opening UFT.
Add-inDependencies
l Different versions of the Flex SDK require different versions of Adobe Flash Player, Adobe Flash PlayerDebugger, or AdobeAir.
The Flex Add-in requires the versions of Adobe Flash Player / Debugger or AdobeAir that are required bythe version of the Flex SDK used to build the application being tested. For more details, see theAdobe FlexSDK or Apache Flex SDK documentation.
HP Unified Functional Testing (12.50) Page 151
l For Flex applications that you recompilewith UFT's pre-compiled agent:
If the Flex applications were compiled using Adobe Flex SDK versions 4.5.x or 4.6.x, verify that you havelicensed versions of the relevant AdobeAutomation libraries before running full UFT GUI tests andcomponents.
If you do not have licensed versions of the libraries, consider upgrading to Apache Flex SDK version 4.9.xor 4.12.x.
l UFT interacts with the Flex application it is testing via a local TCP socket object, selecting an availablecommunication port in the range24654 - 24663.
Make sure that at least oneof these ports is available on theUFT computer. If no ports in this range areavailable, the add-in fails to load properly.
On aWindows server, multiple users can run multiple instances of UFT. To test Flex applications, you musthaveoneport in this range available for each UFT instance.
Configuration
Record and Run Settings Dialog Box(tests only)
Use theFlex tab.(Record > Record and Run Settings)
See "Flex Tab (Record and Run Settings Dialog Box)" on page 166.
Flex Add-in - Testing and ConfigurationThis chapter includes:
• Enabling UFT to Identify Objects in your Flex Application 152
• Considerations for Working with the Flex Add-in 155
• How to Set Up the Adobe Flash Player Debugger to Enable UFT GUI Testing 156
• How to Open Flex Applications Using the Runtime Loader 158
• How to Embed a Flex Application in a Web Page with the Runtime Loader 160
• How to Compile Flex Applications for UFT Testing 162
• How to Work With Embedded Objects in Flex Lists, Tables, or Tree-Views 164
• Flex Tab (Record and Run Settings Dialog Box) 166
• Add/Edit Flex Application Dialog Box 168
• Troubleshooting and Limitations - Flex Add-in 171
Enabling UFT to Identify Objects in your FlexApplicationSome preparation is required to enable UFT to communicate with and identify objects in your Flexapplication. Specifically, you must do one of the following:
Add-ins GuideFlex Add-in - Testing and Configuration
HP Unified Functional Testing (12.50) Page 152
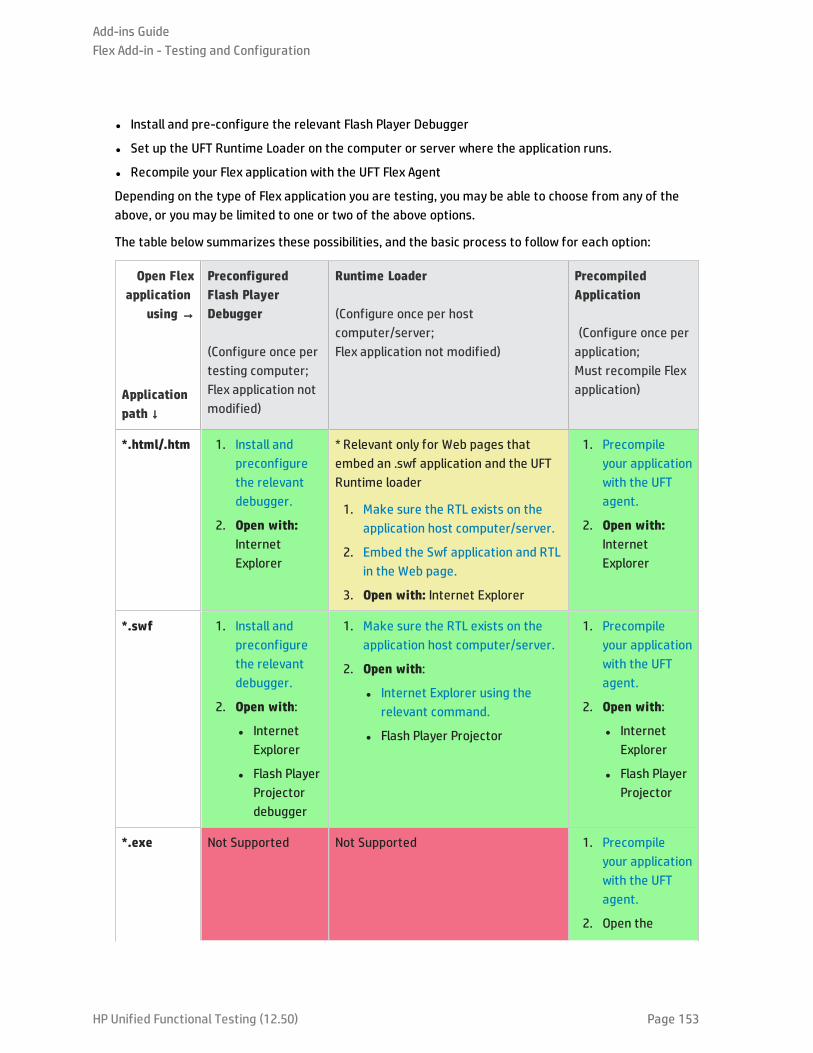
l Install and pre-configure the relevant Flash Player Debugger
l Set up the UFT Runtime Loader on the computer or server where the application runs.
l Recompile your Flex application with the UFT Flex Agent
Depending on the type of Flex application you are testing, you may be able to choose from any of theabove, or you may be limited to one or two of the above options.
The table below summarizes these possibilities, and the basic process to follow for each option:
Open Flexapplication
using →
Applicationpath ↓
PreconfiguredFlash PlayerDebugger
(Configure once pertesting computer;Flex application notmodified)
Runtime Loader
(Configure once per hostcomputer/server;Flex application not modified)
PrecompiledApplication
(Configure once perapplication;Must recompile Flexapplication)
*.html/.htm 1. Install andpreconfigurethe relevantdebugger.
2. Open with:InternetExplorer
* Relevant only for Web pages thatembed an .swf application and the UFTRuntime loader
1. Make sure the RTL exists on theapplication host computer/server.
2. Embed the Swf application and RTLin the Web page.
3. Open with: Internet Explorer
1. Precompileyour applicationwith the UFTagent.
2. Open with:InternetExplorer
*.swf 1. Install andpreconfigurethe relevantdebugger.
2. Open with:
l InternetExplorer
l Flash PlayerProjectordebugger
1. Make sure the RTL exists on theapplication host computer/server.
2. Open with:
l Internet Explorer using therelevant command.
l Flash Player Projector
1. Precompileyour applicationwith the UFTagent.
2. Open with:
l InternetExplorer
l Flash PlayerProjector
*.exe Not Supported Not Supported 1. Precompileyour applicationwith the UFTagent.
2. Open the
Add-ins GuideFlex Add-in - Testing and Configuration
HP Unified Functional Testing (12.50) Page 153
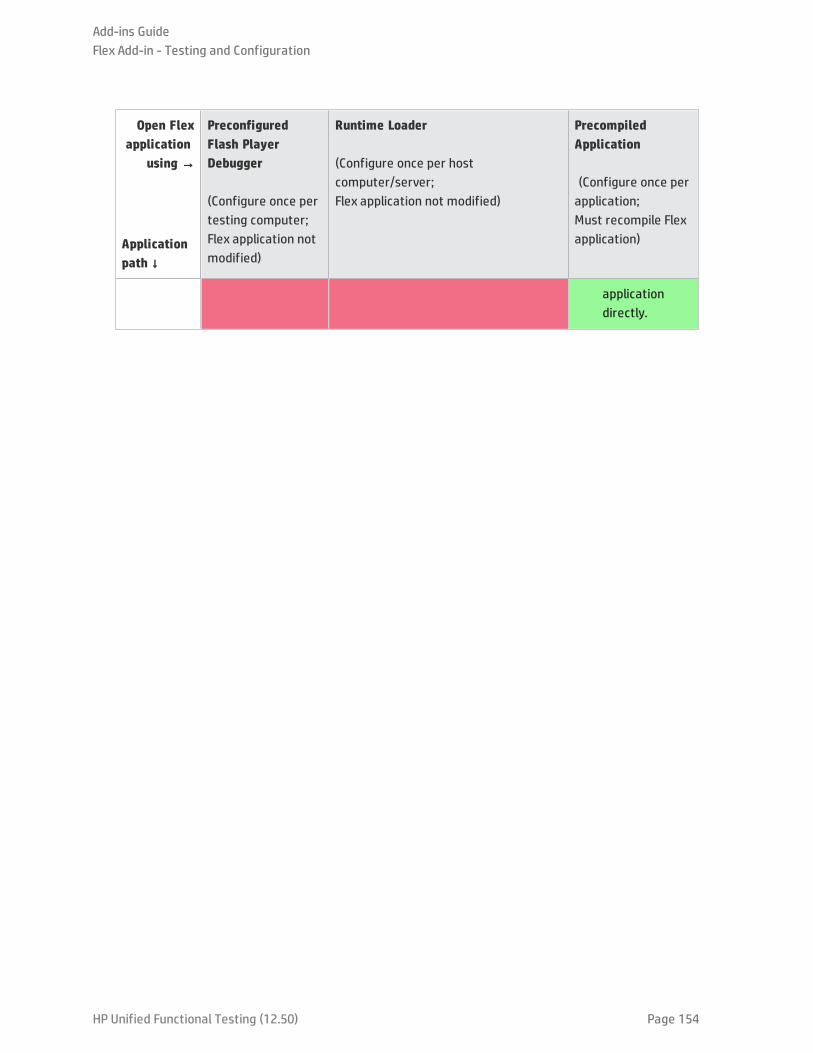
Open Flexapplication
using →
Applicationpath ↓
PreconfiguredFlash PlayerDebugger
(Configure once pertesting computer;Flex application notmodified)
Runtime Loader
(Configure once per hostcomputer/server;Flex application not modified)
PrecompiledApplication
(Configure once perapplication;Must recompile Flexapplication)
applicationdirectly.
Add-ins GuideFlex Add-in - Testing and Configuration
HP Unified Functional Testing (12.50) Page 154
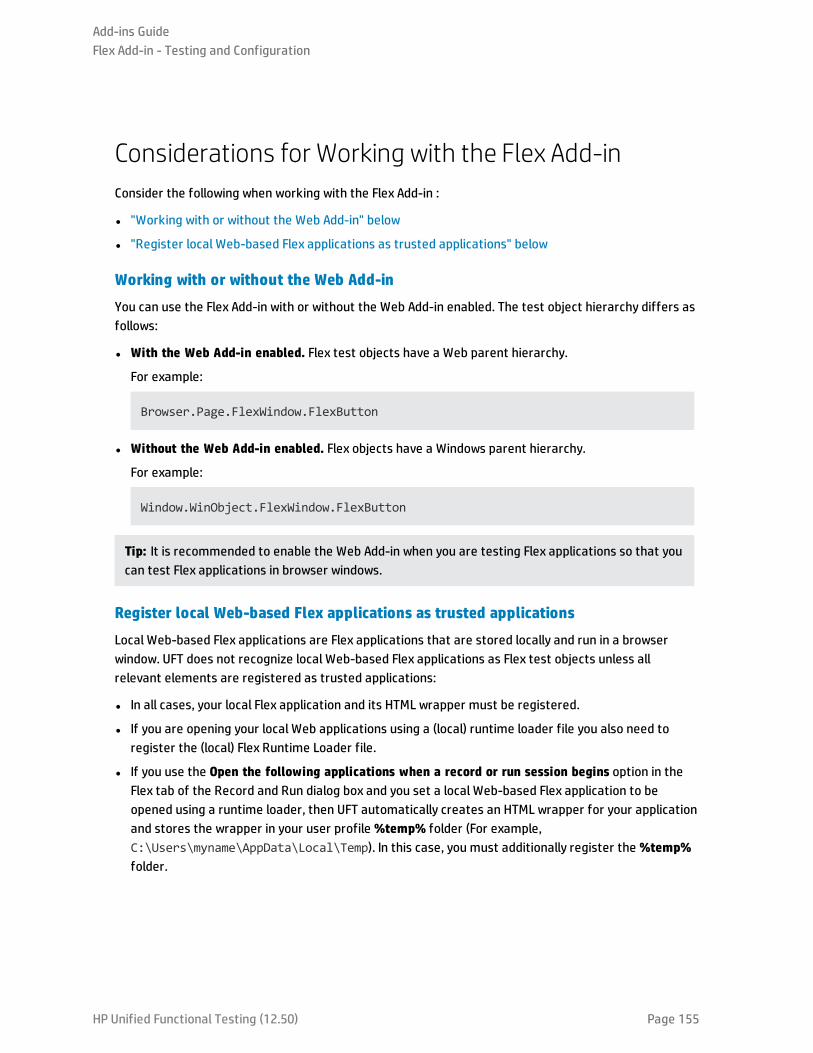
Considerations for Working with the Flex Add-inConsider the following when working with the Flex Add-in :
l "Working with or without the Web Add-in" below
l "Register local Web-based Flex applications as trusted applications" below
Working with or without the Web Add-in
You can use the Flex Add-in with or without the Web Add-in enabled. The test object hierarchy differs asfollows:
l With the Web Add-in enabled. Flex test objects have a Web parent hierarchy.
For example:
Browser.Page.FlexWindow.FlexButton
l Without the Web Add-in enabled. Flex objects have a Windows parent hierarchy.
For example:
Window.WinObject.FlexWindow.FlexButton
Tip: It is recommended to enable the Web Add-in when you are testing Flex applications so that youcan test Flex applications in browser windows.
Register local Web-based Flex applications as trusted applications
Local Web-based Flex applications are Flex applications that are stored locally and run in a browserwindow. UFT does not recognize local Web-based Flex applications as Flex test objects unless allrelevant elements are registered as trusted applications:
l In all cases, your local Flex application and its HTML wrapper must be registered.
l If you are opening your local Web applications using a (local) runtime loader file you also need toregister the (local) Flex Runtime Loader file.
l If you use the Open the following applications when a record or run session begins option in theFlex tab of the Record and Run dialog box and you set a local Web-based Flex application to beopened using a runtime loader, then UFT automatically creates an HTML wrapper for your applicationand stores the wrapper in your user profile %temp% folder (For example,C:\Users\myname\AppData\Local\Temp). In this case, you must additionally register the %temp%folder.
Add-ins GuideFlex Add-in - Testing and Configuration
HP Unified Functional Testing (12.50) Page 155
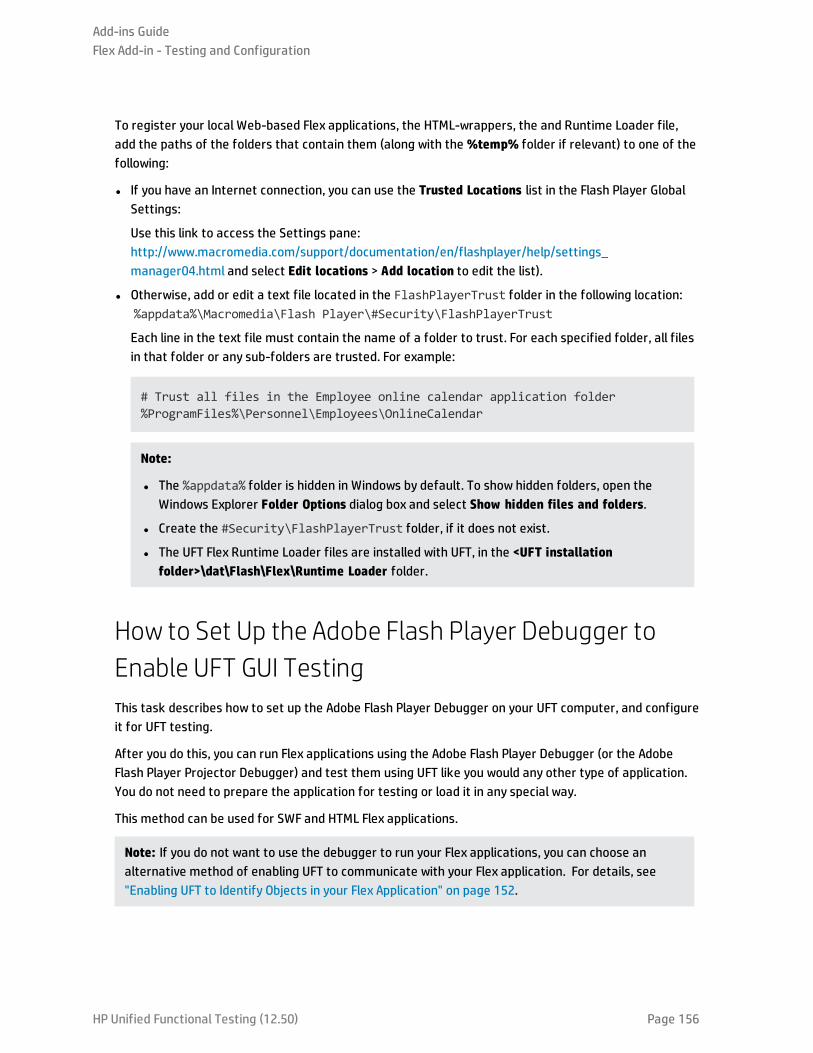
To register your local Web-based Flex applications, the HTML-wrappers, the and Runtime Loader file,add the paths of the folders that contain them (along with the %temp% folder if relevant) to one of thefollowing:
l If you have an Internet connection, you can use the Trusted Locations list in the Flash Player GlobalSettings:
Use this link to access the Settings pane:http://www.macromedia.com/support/documentation/en/flashplayer/help/settings_manager04.html and select Edit locations > Add location to edit the list).
l Otherwise, add or edit a text file located in the FlashPlayerTrust folder in the following location:%appdata%\Macromedia\Flash Player\#Security\FlashPlayerTrust
Each line in the text file must contain the name of a folder to trust. For each specified folder, all filesin that folder or any sub-folders are trusted. For example:
# Trust all files in the Employee online calendar application folder%ProgramFiles%\Personnel\Employees\OnlineCalendar
Note:
l The %appdata% folder is hidden in Windows by default. To show hidden folders, open theWindows Explorer Folder Options dialog box and select Show hidden files and folders.
l Create the #Security\FlashPlayerTrust folder, if it does not exist.
l The UFT Flex Runtime Loader files are installed with UFT, in the <UFT installationfolder>\dat\Flash\Flex\Runtime Loader folder.
How to Set Up the Adobe Flash Player Debugger toEnable UFT GUI TestingThis task describes how to set up the Adobe Flash Player Debugger on your UFT computer, and configureit for UFT testing.
After you do this, you can run Flex applications using the Adobe Flash Player Debugger (or the AdobeFlash Player Projector Debugger) and test them using UFT like you would any other type of application.You do not need to prepare the application for testing or load it in any special way.
This method can be used for SWF and HTML Flex applications.
Note: If you do not want to use the debugger to run your Flex applications, you can choose analternative method of enabling UFT to communicate with your Flex application. For details, see"Enabling UFT to Identify Objects in your Flex Application" on page 152.
Add-ins GuideFlex Add-in - Testing and Configuration
HP Unified Functional Testing (12.50) Page 156
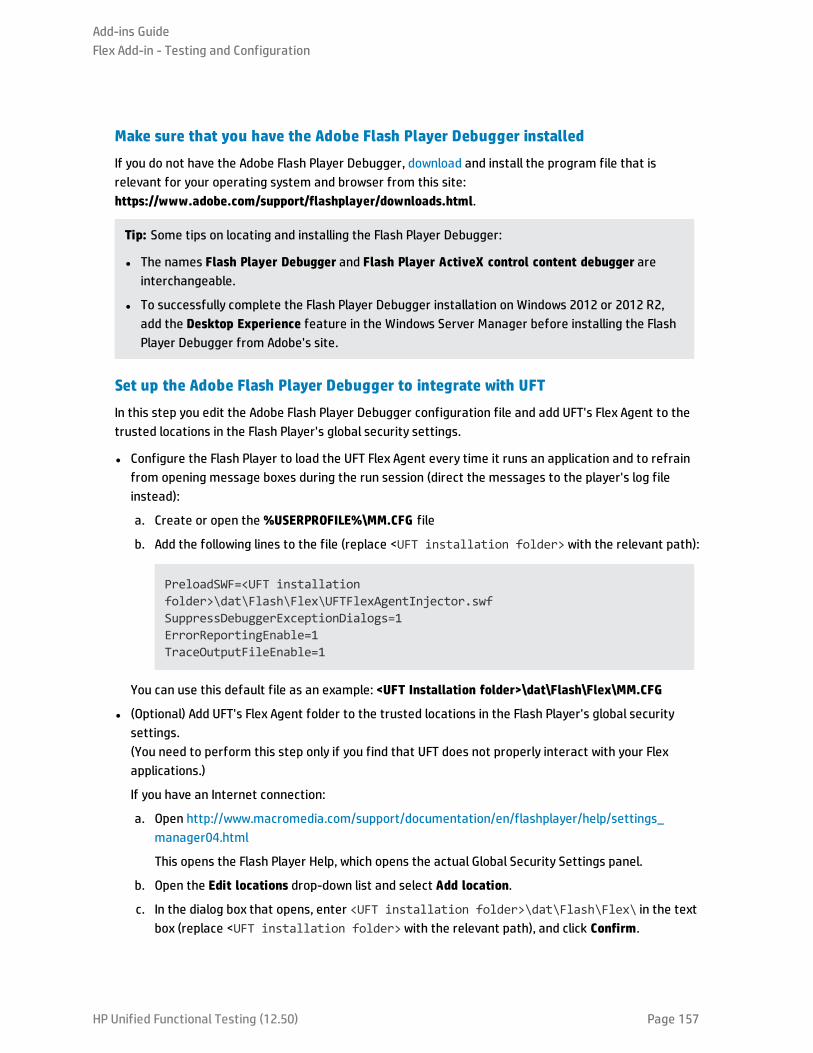
Make sure that you have the Adobe Flash Player Debugger installed
If you do not have the Adobe Flash Player Debugger, download and install the program file that isrelevant for your operating system and browser from this site:https://www.adobe.com/support/flashplayer/downloads.html.
Tip: Some tips on locating and installing the Flash Player Debugger:
l The names Flash Player Debugger and Flash Player ActiveX control content debugger areinterchangeable.
l To successfully complete the Flash Player Debugger installation on Windows 2012 or 2012 R2,add the Desktop Experience feature in the Windows Server Manager before installing the FlashPlayer Debugger from Adobe's site.
Set up the Adobe Flash Player Debugger to integrate with UFT
In this step you edit the Adobe Flash Player Debugger configuration file and add UFT's Flex Agent to thetrusted locations in the Flash Player's global security settings.
l Configure the Flash Player to load the UFT Flex Agent every time it runs an application and to refrainfrom opening message boxes during the run session (direct the messages to the player's log fileinstead):
a. Create or open the %USERPROFILE%\MM.CFG file
b. Add the following lines to the file (replace <UFT installation folder>with the relevant path):
PreloadSWF=<UFT installationfolder>\dat\Flash\Flex\UFTFlexAgentInjector.swfSuppressDebuggerExceptionDialogs=1ErrorReportingEnable=1TraceOutputFileEnable=1
You can use this default file as an example: <UFT Installation folder>\dat\Flash\Flex\MM.CFG
l (Optional) Add UFT's Flex Agent folder to the trusted locations in the Flash Player's global securitysettings.(You need to perform this step only if you find that UFT does not properly interact with your Flexapplications.)
If you have an Internet connection:
a. Open http://www.macromedia.com/support/documentation/en/flashplayer/help/settings_manager04.html
This opens the Flash Player Help, which opens the actual Global Security Settings panel.
b. Open the Edit locations drop-down list and select Add location.
c. In the dialog box that opens, enter <UFT installation folder>\dat\Flash\Flex\ in the textbox (replace <UFT installation folder>with the relevant path), and click Confirm.
Add-ins GuideFlex Add-in - Testing and Configuration
HP Unified Functional Testing (12.50) Page 157
Otherwise:
a. Create or open a text file located in the FlashPlayerTrust folder in the following location:%appdata%\Macromedia\Flash Player\#Security\FlashPlayerTrust
Note:
o The %appdata% folder is hidden in Windows by default. You may need to show hiddenfolders to see it.
o Create the #Security\FlashPlayerTrust folder, if it does not exist.
b. Each line in the text file contains the name of a file or folder to trust.
Add the following line (replace <UFT installation folder>with the relevant path):
<UFT installation folder>\dat\Flash\Flex\
How to Open Flex Applications Using the RuntimeLoaderThis task describes how to open Flex applications for UFT testing in Internet Explorer, using the UFT FlexRuntime Loader.
The UFT Flex Runtime Loader enables you to test Flex applications (.swf files) directly without having toprepare the application manually for testing.
This method is supported only when testing .swf files directly.
Note:
l If you are testing an .swf application that must remain embedded in an HTML file, or other typesof Flex applications, you can choose an alternative method of enabling UFT to communicate withyour Flex application. For details, see "Enabling UFT to Identify Objects in your Flex Application"on page 152.
l Do not use the Runtime Loader to load applications that you already compiled with the UFT Flexpre-compiled agent.
Prerequisites
The UFT Flex Runtime Loader files are installed with UFT, in the <UFT installationfolder>\dat\Flash\Flex\Runtime Loader folder.
l Use one of the following Flex Runtime Loaders:
l UFTFlexAUTLoader_4_9_1.swf - for testing Flex applications developed using the Flex SDK 4.9.1or earlier
l UFTFlexAUTLoader_4_12_1.swf - for testing Flex applications developed using the Flex SDK 4.12.x
Add-ins GuideFlex Add-in - Testing and Configuration
HP Unified Functional Testing (12.50) Page 158
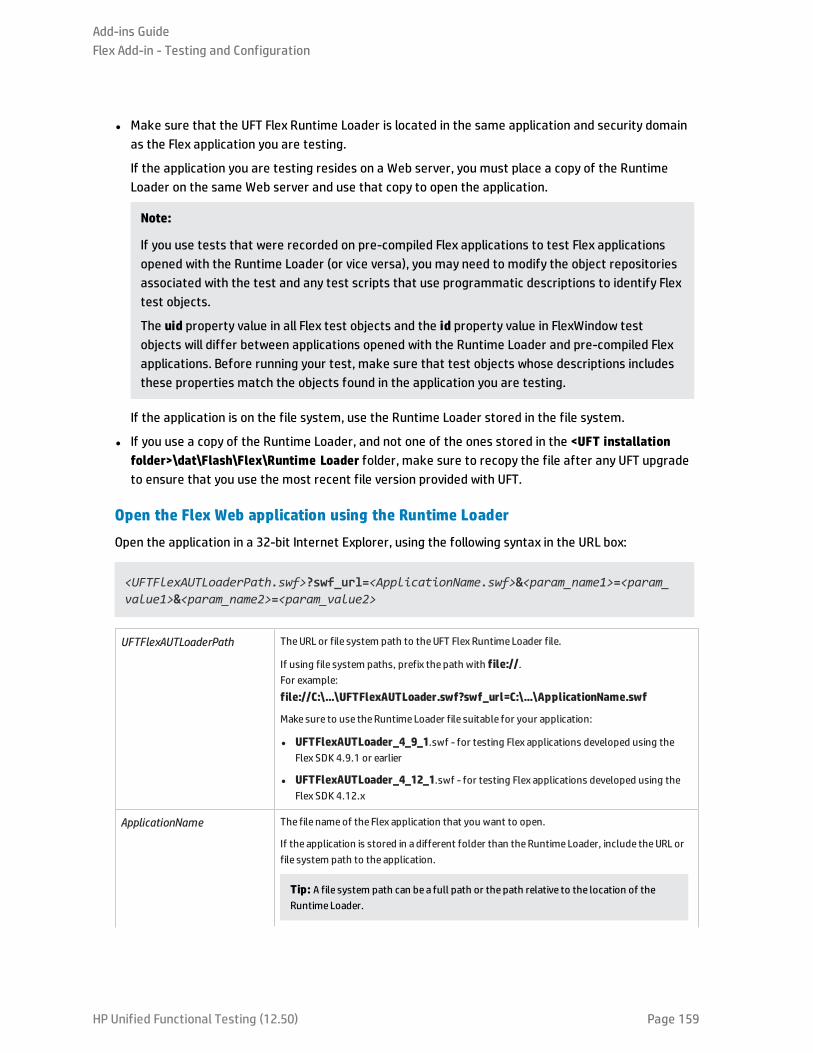
l Make sure that the UFT Flex Runtime Loader is located in the same application and security domainas the Flex application you are testing.
If the application you are testing resides on a Web server, you must place a copy of the RuntimeLoader on the same Web server and use that copy to open the application.
Note:
If you use tests that were recorded on pre-compiled Flex applications to test Flex applicationsopened with the Runtime Loader (or vice versa), you may need to modify the object repositoriesassociated with the test and any test scripts that use programmatic descriptions to identify Flextest objects.
The uid property value in all Flex test objects and the id property value in FlexWindow testobjects will differ between applications opened with the Runtime Loader and pre-compiled Flexapplications. Before running your test, make sure that test objects whose descriptions includesthese properties match the objects found in the application you are testing.
If the application is on the file system, use the Runtime Loader stored in the file system.
l If you use a copy of the Runtime Loader, and not one of the ones stored in the <UFT installationfolder>\dat\Flash\Flex\Runtime Loader folder, make sure to recopy the file after any UFT upgradeto ensure that you use the most recent file version provided with UFT.
Open the Flex Web application using the Runtime Loader
Open the application in a 32-bit Internet Explorer, using the following syntax in the URL box:
<UFTFlexAUTLoaderPath.swf>?swf_url=<ApplicationName.swf>&<param_name1>=<param_value1>&<param_name2>=<param_value2>
UFTFlexAUTLoaderPath TheURL or file system path to theUFT Flex Runtime Loader file.
If using file system paths, prefix the path with file://.For example: file://C:\...\UFTFlexAUTLoader.swf?swf_url=C:\...\ApplicationName.swf
Make sure to use theRuntime Loader file suitable for your application:
l UFTFlexAUTLoader_4_9_1.swf - for testing Flex applications developed using theFlex SDK 4.9.1 or earlier
l UFTFlexAUTLoader_4_12_1.swf - for testing Flex applications developed using theFlex SDK 4.12.x
ApplicationName The file nameof the Flex application that you want to open.
If the application is stored in a different folder than theRuntime Loader, include theURL orfile system path to the application.
Tip: A file system path can be a full path or the path relative to the location of theRuntime Loader.
Add-ins GuideFlex Add-in - Testing and Configuration
HP Unified Functional Testing (12.50) Page 159
param_names=param_values (Optional) A list of parameters and their values to pass to the application being opened.Parameters are separated by the ampersand (&) character.
How to Embed a Flex Application in a Web Page withthe Runtime LoaderThis task describes how to embed a Flex application in a Web page together with the UFT Flex RuntimeLoader. UFT can then test the application when this Web page is opened in Internet Explorer.
This method is useful if you are testing a Flex Web (.swf) application that is not already embedded in anHTML file.
Note: If this method does not fit your needs, you can choose an alternative method of enablingUFT to communicate with your Flex application. For details, see "Enabling UFT to Identify Objects inyour Flex Application" on page 152.
1. Prerequisites
The UFT Flex Runtime Loader files are installed with UFT, in the <UFT installationfolder>\dat\Flash\Flex\Runtime Loader folder.
l Use one of the following Flex Runtime Loaders:
o UFTFlexAUTLoader_4_9_1.swf - for testing Flex applications developed using the FlexSDK 4.9.1 or earlier
o UFTFlexAUTLoader_4_12_1.swf - for testing Flex applications developed using the FlexSDK 4.12.x
l Make sure that the UFT Flex Runtime Loader is located in the same application and securitydomain as the Flex application you are testing.
If the application you are testing resides on a Web server, you must place a copy of the RuntimeLoader on the same Web server and use that copy to open the application.
Note:
If you use tests that were recorded on pre-compiled Flex applications to test Flexapplications opened with the Runtime Loader (or vice versa), you may need to modify theobject repositories associated with the test and any test scripts that use programmaticdescriptions to identify Flex test objects.
The uid property value in all Flex test objects and the id property value in FlexWindow testobjects will differ between applications opened with the Runtime Loader and pre-compiledFlex applications. Before running your test, make sure that test objects whose descriptionsincludes these properties match the objects found in the application you are testing.
If the application is on the file system, use the Runtime Loader stored in the file system.
Add-ins GuideFlex Add-in - Testing and Configuration
HP Unified Functional Testing (12.50) Page 160
l If you use a copy of the Runtime Loader, and not one of the ones stored in the <UFTinstallation folder>\dat\Flash\Flex\Runtime Loader folder, make sure to recopy the file afterany UFT upgrade to ensure that you use the most recent file version provided with UFT.
2. Create the Web page
Make a copy of the UFT sample Web page located in <UFT installationfolder>\dat\Flash\Flex\Runtime Loader\UFTFlexAUTLoader_Sample.html. Store this file in thesame application and security domain as the UFT Flex Runtime Loader and the Flex application youare testing.
When you test your application using UFT, run the application by opening this file in InternetExplorer.
3. Update the Runtime Loader location specified in the Web page
a. (Optional) If the Runtime Loader is located in a different folder than the html file you created,modify the Runtime Loader file name to include a path.
The path can be a URL (if the Runtime Loader is located on a Web server), a full file systempath, or a path relative to the location of the html file.
Locate this line to make the change:
<param name="movie" value="UFTFlexAUTLoader.swf" />
For example:
<param name="movie" value="C:\MyApps\FlexRT\UFTFlexAUTLoader.swf" />
b. In both places that the Runtime Loader file name appears in the file asUFTFlexAUTLoader.swf, change it to UFTFlexAUTLoader_4_9_1.swf or UFTFlexAUTLoader_4_12_1.swf according to the version of the Flex SDK used to develop the application you aretesting.
4. Embed the Flex application in the Web page
Enter your application file name and, optionally, parameters, in the swf_url parameter, in thefollowing lines (2 places):
<param name="FlashVars" value="swf_url=YourApplication.swf" /><embed id="loader" width="100%" height="100%" align="middle" src="UFTFlexAUTLoader<version number>.swf" flashvars="swf_url=YourApplication.swf"/>
Add-ins GuideFlex Add-in - Testing and Configuration
HP Unified Functional Testing (12.50) Page 161

Use the following syntax:
swf_url=<ApplicationName.swf>&<param_name1>=<param_value1>&<param_name2>=<param_value2>
ApplicationName
The file nameof the Flex application that you want to open.
If the application is stored in a different folder than theRuntime Loader, provide theURL or file systempath to the application.
For example:
swf_url=http://some_server/MyApp.swf
swf_url=C:\\Flex\\AUTs\\MyApp45.swf
Tip: A file system path can be a full path or the path relative to the location of theRuntimeLoader.
param_names=param_values
(Optional) A list of parameters and their values to pass to the application being opened. Parameters areseparated by the ampersand (&) character.
For example:
swf_url=MyApplication.swf¶m_name=param_value¶m2_name=param2_value
How to Compile Flex Applications for UFT TestingThis task describes how to compile your Flex applications for UFT testing.
This method can be used for all supported Flex application types.
Note:
l For all Flex applications except Adobe Air:When you compile your Flex application with a UFTFlex pre-compiled agent, you must set the Flash Player target version to 10.0 or later.
l If you do not want to recompile your Flex application, and you are testing an HTML orSWF application, you can choose an alternative method of enabling UFT to communicate withyour Flex application. For details, see "Enabling UFT to Identify Objects in your Flex Application"on page 152.
This section includes:
l "Prepare a Flex application for Web, when the Flex application is embedded in an HTML file" on thenext page
l "Prepare a Flex application for Adobe AIR for testing" on the next page
Add-ins GuideFlex Add-in - Testing and Configuration
HP Unified Functional Testing (12.50) Page 162
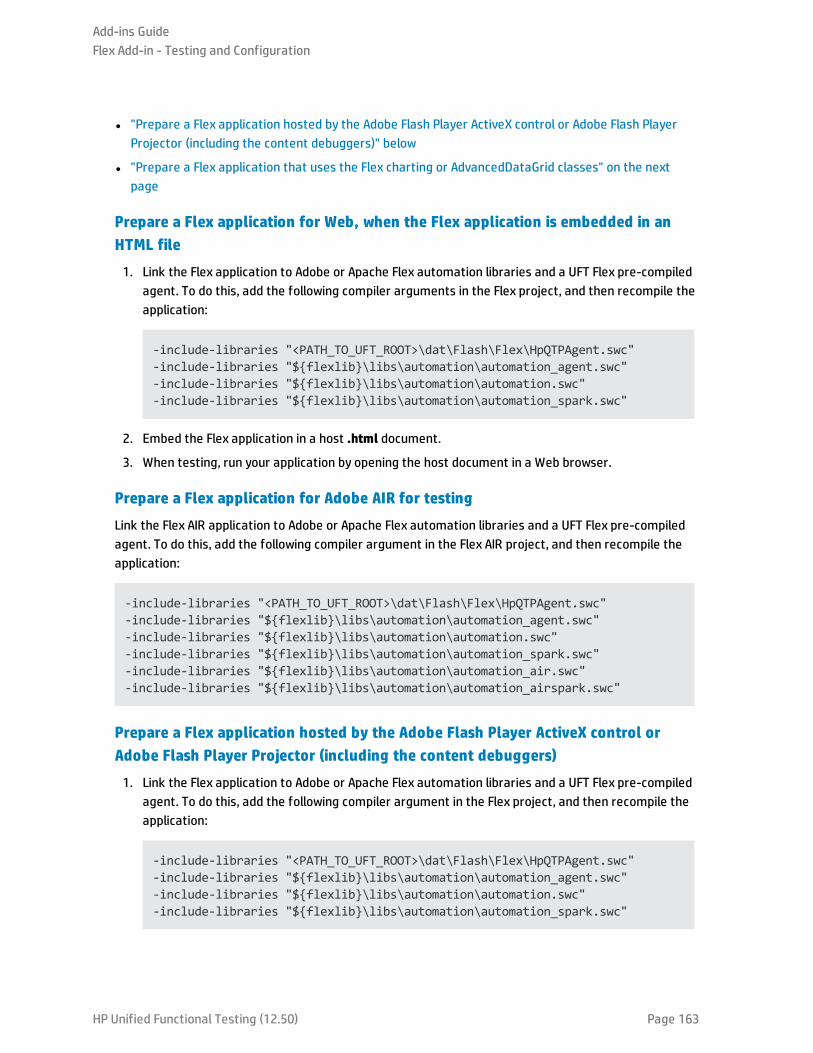
l "Prepare a Flex application hosted by the Adobe Flash Player ActiveX control or Adobe Flash PlayerProjector (including the content debuggers)" below
l "Prepare a Flex application that uses the Flex charting or AdvancedDataGrid classes" on the nextpage
Prepare a Flex application for Web, when the Flex application is embedded in anHTML file
1. Link the Flex application to Adobe or Apache Flex automation libraries and a UFT Flex pre-compiledagent. To do this, add the following compiler arguments in the Flex project, and then recompile theapplication:
-include-libraries "<PATH_TO_UFT_ROOT>\dat\Flash\Flex\HpQTPAgent.swc"-include-libraries "${flexlib}\libs\automation\automation_agent.swc"-include-libraries "${flexlib}\libs\automation\automation.swc"-include-libraries "${flexlib}\libs\automation\automation_spark.swc"
2. Embed the Flex application in a host .html document.
3. When testing, run your application by opening the host document in a Web browser.
Prepare a Flex application for Adobe AIR for testing
Link the Flex AIR application to Adobe or Apache Flex automation libraries and a UFT Flex pre-compiledagent. To do this, add the following compiler argument in the Flex AIR project, and then recompile theapplication:
-include-libraries "<PATH_TO_UFT_ROOT>\dat\Flash\Flex\HpQTPAgent.swc"-include-libraries "${flexlib}\libs\automation\automation_agent.swc"-include-libraries "${flexlib}\libs\automation\automation.swc"-include-libraries "${flexlib}\libs\automation\automation_spark.swc"-include-libraries "${flexlib}\libs\automation\automation_air.swc"-include-libraries "${flexlib}\libs\automation\automation_airspark.swc"
Prepare a Flex application hosted by the Adobe Flash Player ActiveX control orAdobe Flash Player Projector (including the content debuggers)
1. Link the Flex application to Adobe or Apache Flex automation libraries and a UFT Flex pre-compiledagent. To do this, add the following compiler argument in the Flex project, and then recompile theapplication:
-include-libraries "<PATH_TO_UFT_ROOT>\dat\Flash\Flex\HpQTPAgent.swc"-include-libraries "${flexlib}\libs\automation\automation_agent.swc"-include-libraries "${flexlib}\libs\automation\automation.swc"-include-libraries "${flexlib}\libs\automation\automation_spark.swc"
Add-ins GuideFlex Add-in - Testing and Configuration
HP Unified Functional Testing (12.50) Page 163
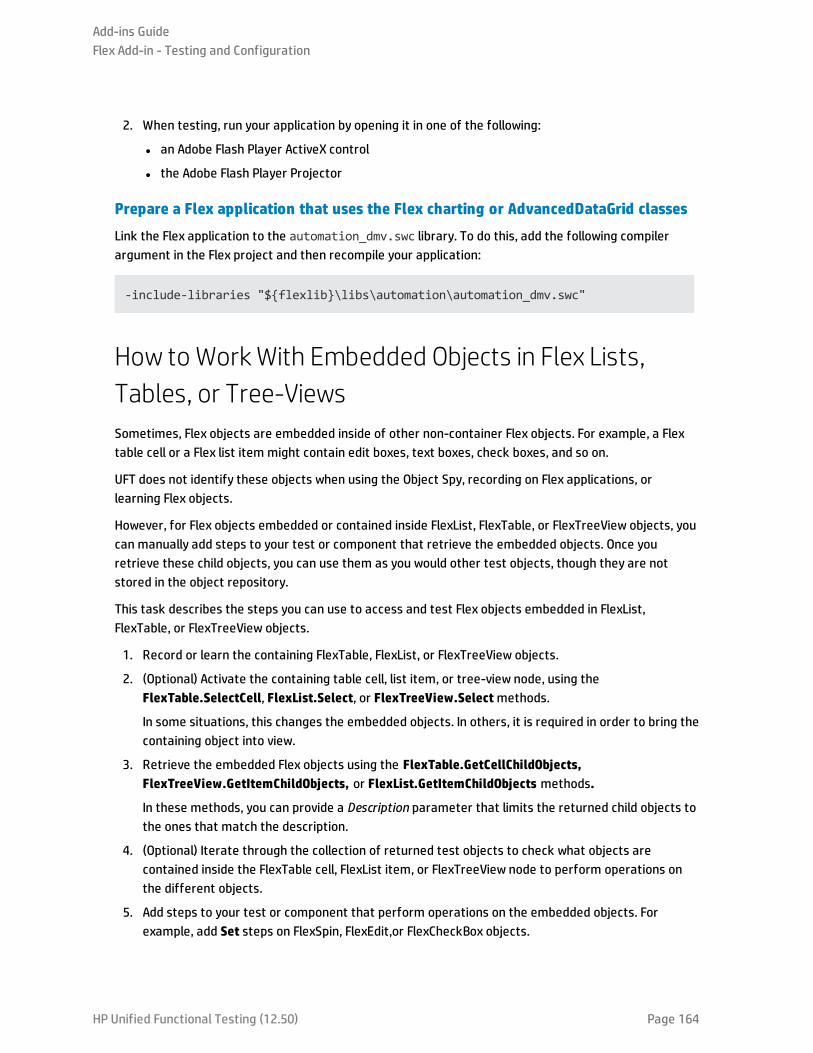
2. When testing, run your application by opening it in one of the following:
l an Adobe Flash Player ActiveX control
l the Adobe Flash Player Projector
Prepare a Flex application that uses the Flex charting or AdvancedDataGrid classes
Link the Flex application to the automation_dmv.swc library. To do this, add the following compilerargument in the Flex project and then recompile your application:
-include-libraries "${flexlib}\libs\automation\automation_dmv.swc"
How to WorkWith Embedded Objects in Flex Lists,Tables, or Tree-ViewsSometimes, Flex objects are embedded inside of other non-container Flex objects. For example, a Flextable cell or a Flex list item might contain edit boxes, text boxes, check boxes, and so on.
UFT does not identify these objects when using the Object Spy, recording on Flex applications, orlearning Flex objects.
However, for Flex objects embedded or contained inside FlexList, FlexTable, or FlexTreeView objects, youcan manually add steps to your test or component that retrieve the embedded objects. Once youretrieve these child objects, you can use them as you would other test objects, though they are notstored in the object repository.
This task describes the steps you can use to access and test Flex objects embedded in FlexList,FlexTable, or FlexTreeView objects.
1. Record or learn the containing FlexTable, FlexList, or FlexTreeView objects.
2. (Optional) Activate the containing table cell, list item, or tree-view node, using theFlexTable.SelectCell, FlexList.Select, or FlexTreeView.Selectmethods.
In some situations, this changes the embedded objects. In others, it is required in order to bring thecontaining object into view.
3. Retrieve the embedded Flex objects using the FlexTable.GetCellChildObjects,FlexTreeView.GetItemChildObjects, or FlexList.GetItemChildObjects methods.
In these methods, you can provide a Description parameter that limits the returned child objects tothe ones that match the description.
4. (Optional) Iterate through the collection of returned test objects to check what objects arecontained inside the FlexTable cell, FlexList item, or FlexTreeView node to perform operations onthe different objects.
5. Add steps to your test or component that perform operations on the embedded objects. Forexample, add Set steps on FlexSpin, FlexEdit,or FlexCheckBox objects.
Add-ins GuideFlex Add-in - Testing and Configuration
HP Unified Functional Testing (12.50) Page 164
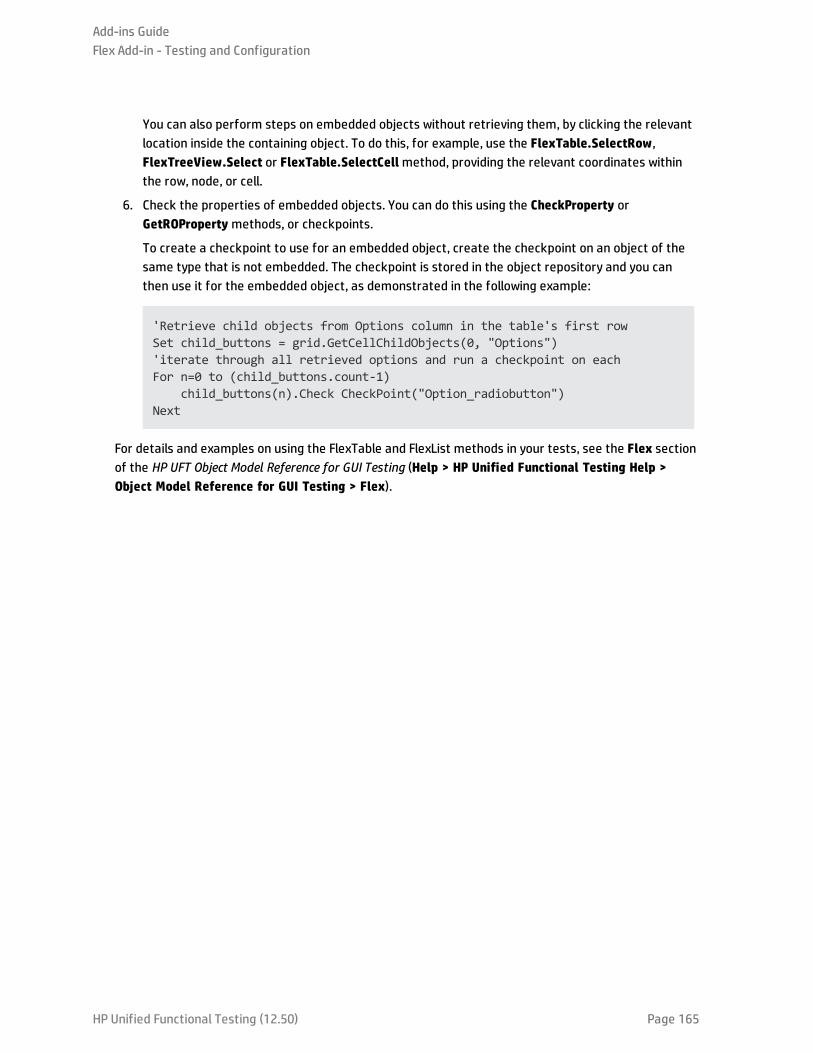
You can also perform steps on embedded objects without retrieving them, by clicking the relevantlocation inside the containing object. To do this, for example, use the FlexTable.SelectRow,FlexTreeView.Select or FlexTable.SelectCellmethod, providing the relevant coordinates withinthe row, node, or cell.
6. Check the properties of embedded objects. You can do this using the CheckProperty orGetROPropertymethods, or checkpoints.
To create a checkpoint to use for an embedded object, create the checkpoint on an object of thesame type that is not embedded. The checkpoint is stored in the object repository and you canthen use it for the embedded object, as demonstrated in the following example:
'Retrieve child objects from Options column in the table's first rowSet child_buttons = grid.GetCellChildObjects(0, "Options")'iterate through all retrieved options and run a checkpoint on eachFor n=0 to (child_buttons.count-1) child_buttons(n).Check CheckPoint("Option_radiobutton")Next
For details and examples on using the FlexTable and FlexList methods in your tests, see the Flex sectionof the HP UFT Object Model Reference for GUI Testing (Help > HP Unified Functional Testing Help >Object Model Reference for GUI Testing > Flex).
Add-ins GuideFlex Add-in - Testing and Configuration
HP Unified Functional Testing (12.50) Page 165

Flex Tab (Record and Run Settings Dialog Box)This tab enables you to define preferences for recording and running tests on Flex applications.
To access Select Record > Record and Run Settings and then select theFlex tab.
Note: TheRecord and Run Settings dialog box also opens automatically each time you begin recording anew test (unless you open the dialog box and set your preferences manually before you begin recording).
Importantinformation
l If you load only theUFT Flex Add-in, then only the Flex and Windows Applications tabs are displayed in theRecord and Run Settings dialog box. If other add-ins are loaded, the corresponding tabs (if any) are alsodisplayed.
Relevanttasks
l "How to Set Up the Adobe Flash Player Debugger to Enable UFT GUI Testing" on page 156
l "How to Compile Flex Applications for UFT Testing" on page 162
l "How to Open Flex Applications Using the Runtime Loader" on page 158
See also "Enabling UFT to Identify Objects in your Flex Application" on page 152
"Considerations for Working with the Flex Add-in" on page 155
Add-ins GuideFlex Add-in - Testing and Configuration
HP Unified Functional Testing (12.50) Page 166
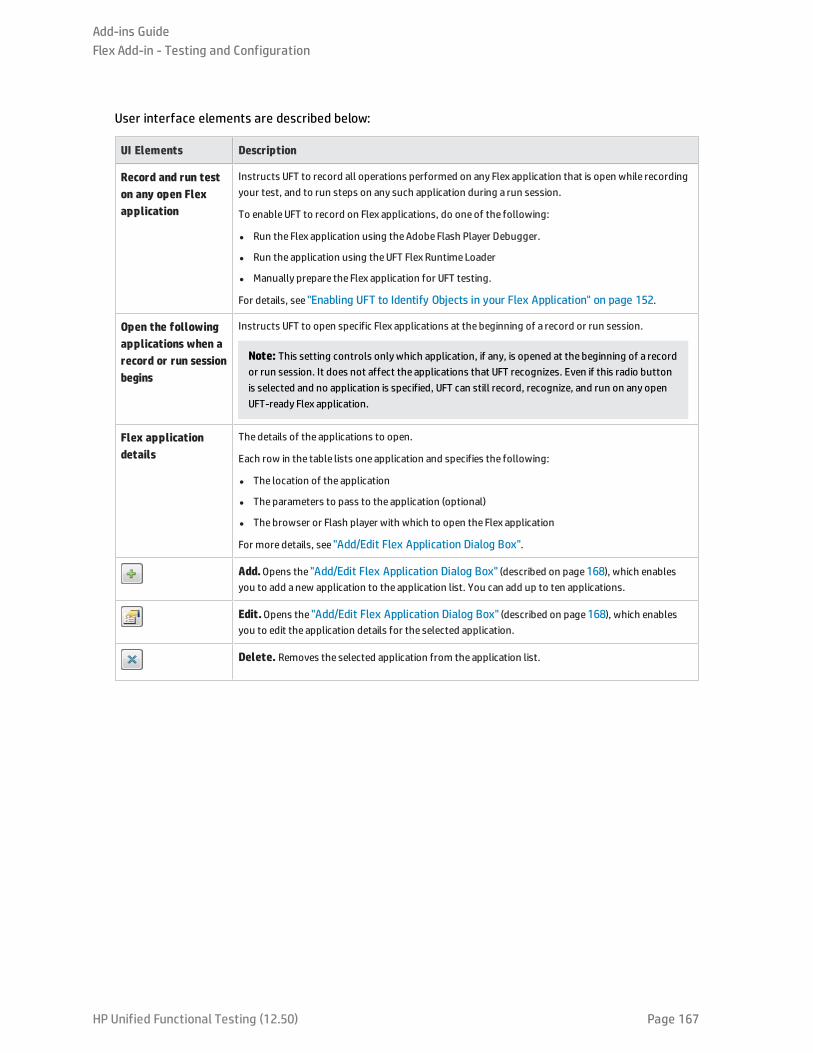
User interface elements are described below:
UI Elements Description
Record and run teston any open Flexapplication
Instructs UFT to record all operations performed on any Flex application that is open while recordingyour test, and to run steps on any such application during a run session.
To enableUFT to record on Flex applications, do oneof the following:
l Run the Flex application using theAdobe Flash Player Debugger.
l Run the application using theUFT Flex Runtime Loader
l Manually prepare the Flex application for UFT testing.
For details, see "Enabling UFT to Identify Objects in your Flex Application" on page 152.
Open the followingapplications when arecord or run sessionbegins
Instructs UFT to open specific Flex applications at the beginning of a record or run session.
Note: This setting controls onlywhich application, if any, is opened at the beginning of a recordor run session. It does not affect the applications that UFT recognizes. Even if this radio buttonis selected and no application is specified, UFT can still record, recognize, and run on any openUFT-ready Flex application.
Flex applicationdetails
Thedetails of the applications to open.
Each row in the table lists one application and specifies the following:
l The location of the application
l Theparameters to pass to the application (optional)
l Thebrowser or Flash player with which to open the Flex application
For more details, see "Add/Edit Flex Application Dialog Box".
Add.Opens the "Add/Edit Flex Application Dialog Box" (described on page168), which enablesyou to add anew application to the application list. You can add up to ten applications.
Edit.Opens the "Add/Edit Flex Application Dialog Box" (described on page168), which enablesyou to edit the application details for the selected application.
Delete. Removes the selected application from the application list.
Add-ins GuideFlex Add-in - Testing and Configuration
HP Unified Functional Testing (12.50) Page 167
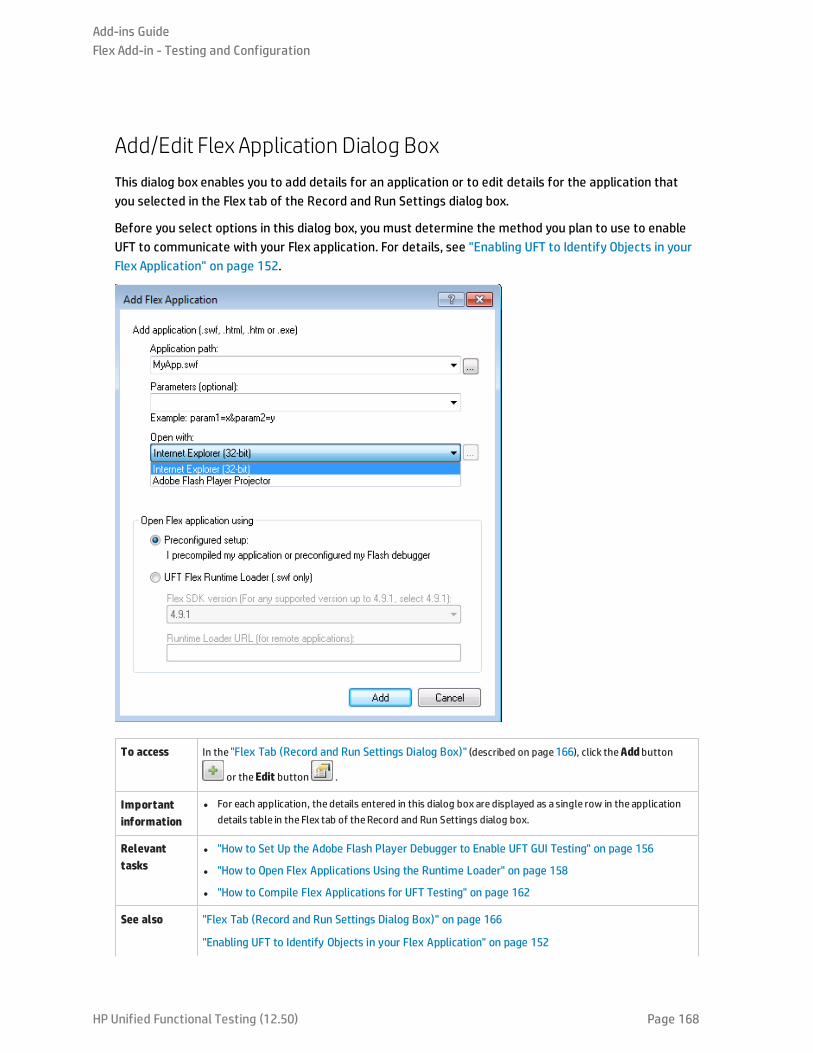
Add/Edit Flex Application Dialog BoxThis dialog box enables you to add details for an application or to edit details for the application thatyou selected in the Flex tab of the Record and Run Settings dialog box.
Before you select options in this dialog box, you must determine the method you plan to use to enableUFT to communicate with your Flex application. For details, see "Enabling UFT to Identify Objects in yourFlex Application" on page 152.
To access In the "Flex Tab (Record and Run Settings Dialog Box)" (described on page166), click theAddbutton
or theEdit button .
Importantinformation
l For each application, the details entered in this dialog box are displayed as a single row in the applicationdetails table in the Flex tab of theRecord and Run Settings dialog box.
Relevanttasks
l "How to Set Up the Adobe Flash Player Debugger to Enable UFT GUI Testing" on page 156
l "How to Open Flex Applications Using the Runtime Loader" on page 158
l "How to Compile Flex Applications for UFT Testing" on page 162
See also "Flex Tab (Record and Run Settings Dialog Box)" on page 166
"Enabling UFT to Identify Objects in your Flex Application" on page 152
Add-ins GuideFlex Add-in - Testing and Configuration
HP Unified Functional Testing (12.50) Page 168
"Considerations for Working with the Flex Add-in" on page 155
User interface elements are described below:
UI Elements Description
Applicationpath
The file system path or URL to the Flex application to open.
Note:
l TheApplicationbox should contain only the file nameand path for the application. If you want toadd command line arguments, use theParametersbox.
l If your application is the default pageon theWeb server host, theURL that you enter does not haveto include the file name. For example, if http://mysite/home and http://mysite/myApp.htmlopen the sameapplication, you can enter http://mysite/home.
l Unicode character support:TheFlex Runtime Loader fails to open the application if the filesystem path includes certain Unicode fullwidth characters. For example, make sure not to includeEnglish fullwidth letters or Japanese fullwidth number characters.
Parameters (Optional) Parameters to pass to the application when UFT opens it.
For Flex applications, enter the parameter names and values, separated by the ampersand (&) symbol, usingthe following syntax:
<parameter name>=<parameter value>&<parameter name>=<parametervalue>
For AdobeAir applications (.exe), enter the parameter values, separated by spaces:
<value1> <value2>
Open with Theprogram with which to open the Flex application (not relevant for standalone (.exe) applications).
Possible values:
l <Empty> (for .exe applications)
l Internet Explorer (32bit)
l Adobe Flash Player Projector (for .swf applications only)
If you select Adobe Flash Player Projector, you can use the browsebutton to select a specific FlashPlayer program to use for this application. The path to the selected program is then displayed under thedrop down list.
Open Flexapplicationusingpreconfiguredsetup
Select this option to indicate that you have already either:
l recompiled your Flex application as described in "How to Compile Flex Applications for UFT Testing"on page 162
or
l you have set up the relevant Flash Player Debugger as described in "How to Set Up the Adobe FlashPlayer Debugger to Enable UFT GUI Testing" on page 156.(not relevant for *.exe applications).
Open Flex Instructs UFT to open the specified Flex application using theUFT Flex Runtime Loader.
Add-ins GuideFlex Add-in - Testing and Configuration
HP Unified Functional Testing (12.50) Page 169
UI Elements Description
applicationusing UFT FlexRuntimeLoader (.swfonly)
This option is relevant onlywhen testing .swf files directly, and if you arenot using the Flash PlayerDebugger to run the application.
For more details, see "How to Open Flex Applications Using the Runtime Loader" on page 158.
Flex SDKversion
The version of Runtime Loader for UFT to use.
l 4.9.1 - (default) For testing Flex applications developed using Flex SDK version 4.9.1 and earliersupported versions.
l 4.12.1 - For testing Flex applications developed using Flex SDK version 4.12.x.
This field is not relevant if you specify aRuntime Loader URL.
RuntimeLoader URL
Only for applications hosted on aWeb server:
TheURL to theRuntime Loader you want to use to open the Flex application.
Note:
l You must place a copy of theRuntime Loader on the same server as the Flex application, andprovide theURL to this file.
When you place theRuntime Loader file on theWeb Server, select the one that matches the versionused to develop your application, as described in "How to Open Flex Applications Using theRuntime Loader" on page 158.
l If your Flex application is located on the file system, do not specify aRuntime Loader. UFT uses oneof theRuntime Loaders installed with UFT (according to the specified SDK version).
Add-ins GuideFlex Add-in - Testing and Configuration
HP Unified Functional Testing (12.50) Page 170
Troubleshooting and Limitations - Flex Add-inThis section describes troubleshooting and limitations for the Flex Add-in.
General Functionality
l The Flex Add-in does not provide backward compatibility with the Adobe Flex Add-in for QuickTest,and uses a different set of test objects, methods, and properties. Legacy QuickTest tests recordedusing the Adobe Flex Add-in cannot be used, and they cannot be upgraded to be used with the UFTFlex Add-in.
l The Flex Add-in does not support cross-domain or cross-host Flex applications. These types ofapplications are Flex applications where the HTML and SWF files are served from different domains,or from different hostnames within the same domain. For example, if an HTML page onwww.mysite.com references an SWF file located on www.anothersite.com, or incontent.mysite.com.
l The Flex Add-in is not supported on Internet Explorer 11 when the Enhanced Protected Mode isturned on.
l Testing Flex applications in UFT is only supported in Internet Explorer 32-bit browser versions.
l The UFT Flex Runtime Loader does not support applications that containmx::AreaChart controls.
l To communicate with the Flex application, UFT selects an available port within the range 24654 -24663. Make sure that at least one of these ports is available on the UFT computer.
l On a Windows server, multiple users can run multiple instances of UFT. To test Flex applications,you must have one port in this range available for each UFT instance.
l If you are testing a Flex application, you may experience a delay (up to one minute) from themoment you open UFT and your Flex application, until UFT can recognize objects in the application.This is due to the time it may take for UFT to locate an available port, as it cycles through theports in this range, waiting for the socket connection timeout for each.
l If you are using Flex SDK version 3.6.0, you must set the Flash Player target version to 10.2 or higherwhen compiling your Flex application.
Active Screen
l The Active Screen pane is not fully supported for Flex test objects, and may not display the recordedsteps correctly.
Object Identification and Functionality
l When identifying objects in a Flex application opened in a Web browser, the FlexWindow top-level testobject is contained in a Page object.
l The UFT Flex add-in recognizes Advanced Data Grid controls as FlexTable test objects, and supportsbasic table functionality for these controls. In addition, UFT supports ExpandRow, CollapseRow, and
Add-ins GuideFlex Add-in - Testing and Configuration
HP Unified Functional Testing (12.50) Page 171

SortByColumn operations for tables of this type. Other abilities of Advanced Data Grid controls arenot supported.
l The Flex Add-in does not support the mx.controls::OLAPDataGrid Flex control.
l The Navigate and Learn option is not supported in the following cases:
l Windowless Flex applications.
l Flex applications opened on Windows 8 or Windows 2012 (or later). (Such applications are openedas windowless Flex applications)
l Flex applications opened in Internet Explorer using a URL with an .swf file extension.
Workaround: To simultaneously add all or specific child objects from a windowless Flex application toan object repository, do the following:
a. Start by adding one of the Flex child objects to the repository. In the Object Selection - Add toRepository dialog box, select the parent FlexWindow object instead of the original object you hadselected.
b. In the Define Object Filter dialog box, select either All object types to learn all child objects, orclick Select to select the specific types of child objects you want to add.
For more details about adding objects to object repositories, see the chapter on test objects in theHP Unified Functional Testing User Guide.
Add-ins GuideFlex Add-in - Testing and Configuration
HP Unified Functional Testing (12.50) Page 172

HP Unified Functional Testing (12.50) Page 173
Part 6: Java Add-inThis section includes:
"Java Add-in - Quick Reference" on page 174
"Java Add-in - Testing and Configuration" on page 176
"Java Add-in - Test Objects" on page 201
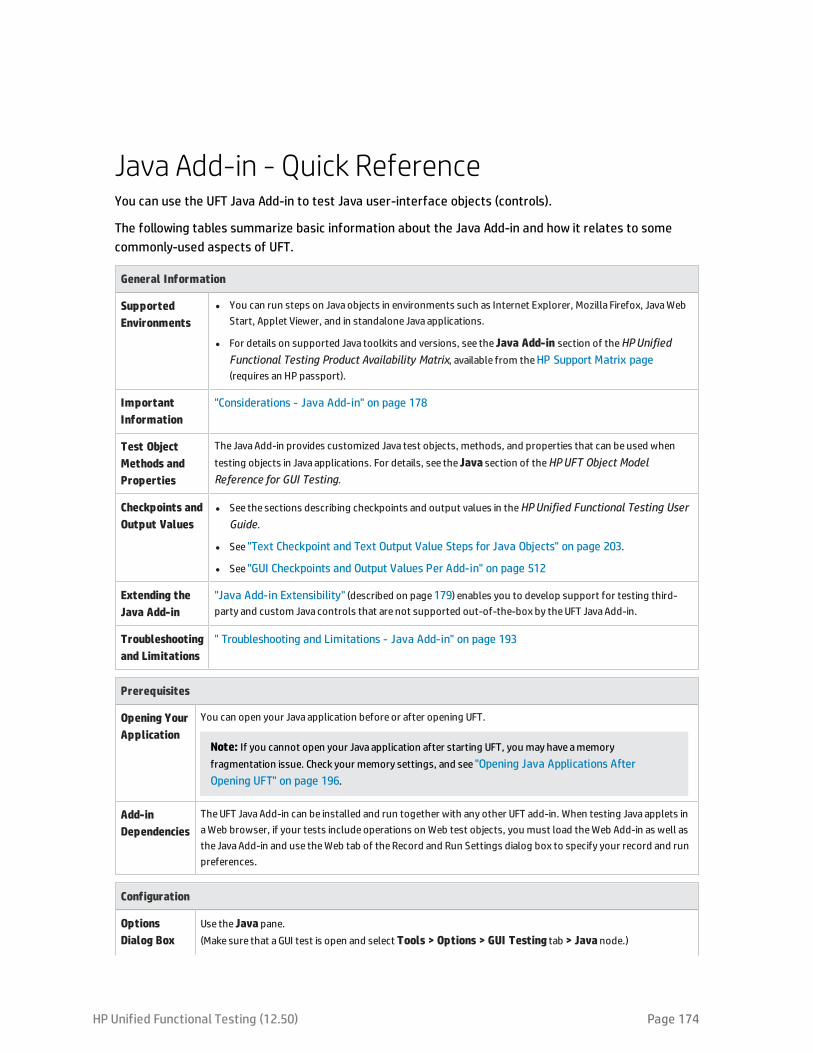
Java Add-in - Quick ReferenceYou can use the UFT Java Add-in to test Java user-interface objects (controls).
The following tables summarize basic information about the Java Add-in and how it relates to somecommonly-used aspects of UFT.
General Information
SupportedEnvironments
l You can run steps on Javaobjects in environments such as Internet Explorer, Mozilla Firefox, JavaWebStart, Applet Viewer, and in standalone Java applications.
l For details on supported Java toolkits and versions, see the Java Add-in section of theHPUnifiedFunctional Testing Product Availability Matrix, available from theHP Support Matrix page(requires an HP passport).
ImportantInformation
"Considerations - Java Add-in" on page 178
Test ObjectMethods andProperties
The JavaAdd-in provides customized Java test objects, methods, and properties that can beused whentesting objects in Java applications. For details, see the Java section of theHPUFT Object ModelReference for GUI Testing.
Checkpoints andOutput Values
l See the sections describing checkpoints and output values in theHPUnified Functional Testing UserGuide.
l See "Text Checkpoint and Text Output Value Steps for Java Objects" on page 203.
l See "GUI Checkpoints and Output Values Per Add-in" on page 512
Extending theJava Add-in
"Java Add-in Extensibility" (described on page179) enables you to develop support for testing third-party and custom Java controls that are not supported out-of-the-box by theUFT JavaAdd-in.
Troubleshootingand Limitations
" Troubleshooting and Limitations - Java Add-in" on page 193
Prerequisites
Opening YourApplication
You can open your Java application before or after opening UFT.
Note: If you cannot open your Java application after starting UFT, you may have amemoryfragmentation issue. Check your memory settings, and see "Opening Java Applications AfterOpening UFT" on page 196.
Add-inDependencies
TheUFT JavaAdd-in can be installed and run together with any other UFT add-in. When testing Java applets inaWeb browser, if your tests include operations on Web test objects, you must load theWeb Add-in as well asthe JavaAdd-in and use theWeb tab of theRecord and Run Settings dialog box to specify your record and runpreferences.
Configuration
OptionsDialog Box
Use the Java pane.(Make sure that aGUI test is open and select Tools > Options > GUI Testing tab > Java node.)
HP Unified Functional Testing (12.50) Page 174
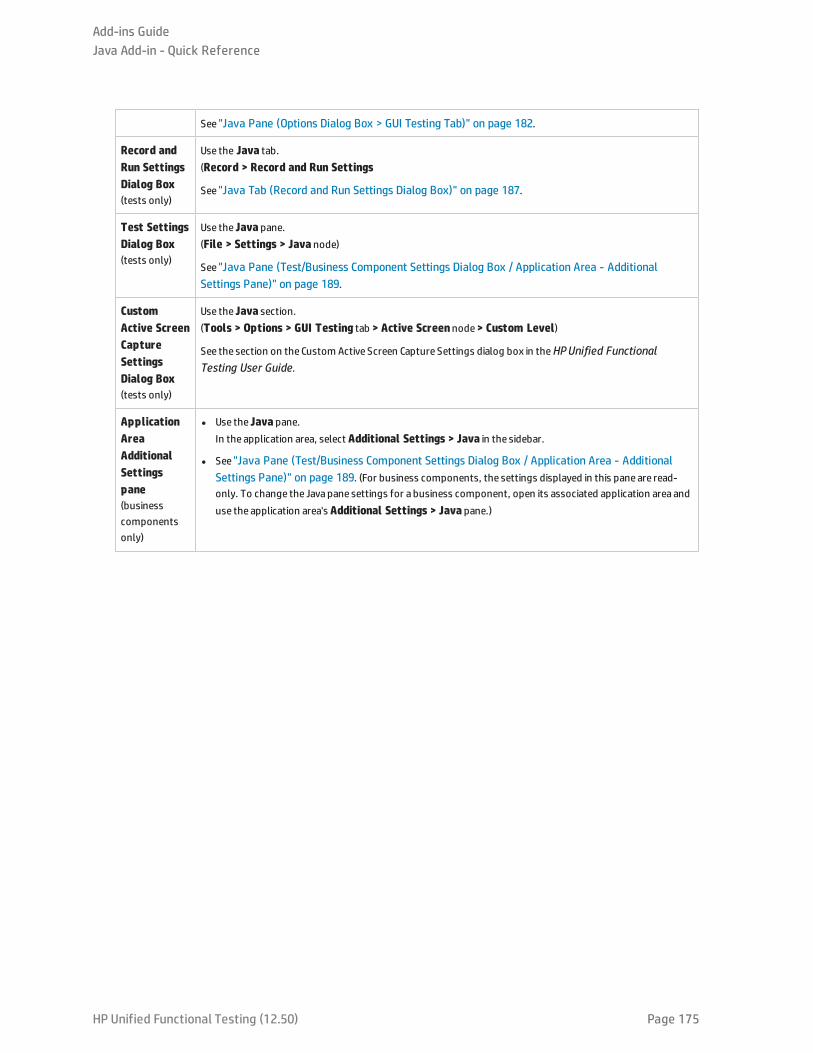
See "Java Pane (Options Dialog Box > GUI Testing Tab)" on page 182.
Record andRun SettingsDialog Box(tests only)
Use the Java tab.(Record > Record and Run Settings
See "Java Tab (Record and Run Settings Dialog Box)" on page 187.
Test SettingsDialog Box(tests only)
Use the Java pane.(File > Settings > Java node)
See "Java Pane (Test/Business Component Settings Dialog Box / Application Area - AdditionalSettings Pane)" on page 189.
CustomActive ScreenCaptureSettingsDialog Box(tests only)
Use the Java section.(Tools > Options > GUI Testing tab > Active Screennode> Custom Level)
See the section on the Custom Active Screen Capture Settings dialog box in theHPUnified FunctionalTesting User Guide.
ApplicationAreaAdditionalSettingspane(businesscomponentsonly)
l Use the Java pane.In the application area, select Additional Settings > Java in the sidebar.
l See "Java Pane (Test/Business Component Settings Dialog Box / Application Area - AdditionalSettings Pane)" on page 189. (For business components, the settings displayed in this pane are read-only. To change the Javapane settings for a business component, open its associated application area anduse the application area's Additional Settings > Java pane.)
Add-ins GuideJava Add-in - Quick Reference
HP Unified Functional Testing (12.50) Page 175
Java Add-in - Testing and ConfigurationThis chapter includes:
• Java Add-in - Overview 177
• Java Add-in Environments 177
• Considerations - Java Add-in 178
• Java Add-in Extensibility 179
• How to Disable Dynamic Transformation Support (Advanced) 180
• Java Pane (Options Dialog Box > GUI Testing Tab) 182
• Advanced Java Options Dialog Box 184
• Java Tab (Record and Run Settings Dialog Box) 187
• Java Pane (Test/Business Component Settings Dialog Box / Application Area - Additional SettingsPane) 189
• Java Environment Variables Settings 192
• Record and Run Environment Variables for Java Objects 193
• Troubleshooting and Limitations - Java Add-in 193
• Running Another Java Application or Applet with the Same Settings 193
• Identifying and Solving Common Problems 194
• General Notes and Limitations 195
HP Unified Functional Testing (12.50) Page 176
Java Add-in - OverviewThis chapter explains how to use UFT to set testing preferences and to record and run steps on Javaapplets and applications. The chapter assumes basic knowledge of UFT features and capabilities. Fordetails on working with UFT, see the HP Unified Functional Testing User Guide.
Note: Some of the features described in this chapter are relevant only for tests and scriptedcomponents. For details on the features that are available when working with keywordcomponents, see the HP Unified Functional Testing User Guide.
Java Testing Options
You can use the Java pane of the Options dialog box (Tools > Options > GUI Testing tab > Java node) toset UFT record and run options on Java applets or applications. You can also open the Advanced JavaOptions dialog box that enables you to set table record mode preferences, enable text retrieval forcheckpoints and output values, and specify lists of controls.
For details, see:
l "Java Pane (Options Dialog Box > GUI Testing Tab)" on page 182
l "Advanced Java Options Dialog Box" on page 184
Java Settings - Tests and Components
You define and view Java test or business component settings using one of the following:
l The Java pane of the Test Settings dialog box.
l The Java pane of the Business Component Settings dialog box (view only).
l The Java pane of the application area's Additional Settings pane.
For details, see "Java Pane (Test/Business Component Settings Dialog Box / Application Area - AdditionalSettings Pane)" on page 189.
Java Add-in EnvironmentsThe Java Add-in uses a mechanism that supports multiple Java environments (such as IBM JRE, OracleJRE, and Oracle JInitiator) and multiple Java versions (such as, JDK 1.5.x, 1.6.x and so on) withoutrequiring any configuration changes. (For a list of supported environments and versions, see theHP Unified Functional Testing Product Availability Matrix, available from the HP Support Matrix page(requires an HP passport).
This mechanism, known as the dynamic transformation support mechanism, adjusts the Java Add-insupport classes according to the Java environment and version used. The dynamic transformationsupport mechanism uses the Tool Interface of the Java Virtual Machine (JVMTI) (or the Profiler Interface(JVMPI) when working with JDK 1.5 and earlier).
HP Unified Functional Testing (12.50) Page 177
The dynamic transformation support mechanism is invoked by the -Xrunjvmhook option, which issupplied to the JVM. If the -Xrunjvmhook option is specified, the JVM hook profiler (part of the Java Add-in support) is loaded with every Java application or applet that loads. The JVM hook profiler dynamicallytransforms the necessary classes to enable context-sensitive Java support.
When you run the Java Add-in on Java 6 or Java 7 environments, the dynamic transformation supportmechanism is invoked by the -agentlib:jvmhook, which is defined in the JAVA_TOOL_OPTIONSenvironment variable.
Note: When working with Oracle Java 6 or Java 7 there is no conflict between -agentlib:jvmhook(defined in the JAVA_TOOL_OPTIONS environment variable) and -Xrunjvmhook (defined in the _JAVA_OPTIONS environment variable) because Java 6 and Java 7 ignore -Xrunjvmhook.
When working with IBM Java 6 or Java 7, these environment variables may conflict. For workarounddetails, see "Running Java applications on the IBM Java Runtime Environment (JRE) 1.6 " onpage 200.
The Java agent searches for the jvmhook.dll according to the java.library.path system property.You can identify any override of this system property using the Java command line: -djava.library.path = <path> However, although you can override the java.library.path systemproperty, it is recommended to extend the java.library.path and not to overwrite it.
By default, the value of the java.library.path system property is the system path. If your application isloaded with a different library path, you must either add the jvmhook.dll to a location within thejava.library.path, or change the java.library.path to contain <Windows installationfolder>/system32.
The <JRE root folder>/bin folder is always located in the java.library.path. If needed, you canmanually copy the jvmhook.dll to this folder. However, if you need to modify more than one computer,it is recommended to modify the batch file that alters the java.library.path.
For task details, see "How to Disable Dynamic Transformation Support (Advanced)" on page 180.
Considerations - Java Add-inWhen learning objects and running steps on Java applications, consider the following:
l After installing the Java Add-in, Java applets and applications will always open with Java supportactive. You can confirm that your Java environment has opened properly by checking the Javaconsole for a message similar to the following confirmation message: "Loading UnifiedFunctional Testing Java Support (version x.x.x.x) (<App> version x.x.x.x)." (where<App> is IE, IBM, or Oracle).
l The Object property can access only publicmethods and properties. A recommended alternative tousing the Object property is to extend UFT support for the required Java object using UFT Java Add-inExtensibility. For details, see the HP UFT Java Add-in Extensibility Developer Guide.
l You cannot add SWT-based JavaMenu objects directly to an object repository using the Add Objectsto Local button in the Object Repository window or the Add Objects button in the Object Repository
Add-ins GuideJava Add-in - Testing and Configuration
HP Unified Functional Testing (12.50) Page 178
Manager. If you want to add an SWT-based JavaMenu objects to the object repository, you can usethe Add Objects or Add Objects to Local button to add its parent object and then select to add theparent object together with its descendants. Alternatively, you can add a JavaMenu object using theNavigate and Learn option in the Object Repository Manager. For details, see the section on addingtest objects using the Navigate and Learn toolbar in the HP Unified Functional Testing User Guide.
l If you want to use a control's native property for object identification, you can add the property to aJava test object as an identification property in the Add/Remove Properties Dialog Box dialog box. Ifyou do this, consider the following:
l You can add only native properties for which the control has a public get or ismethod that returnsthe property value.
l If the native property name includes upper-case letters, then in the corresponding identificationproperty name that you create, you must replace each of the upper-case letters except the firstone with _<lower-case letter>. For example, to use the native property OneSmallProp, add anidentification property named One_small_prop.
For more details on adding identification properties, see the section on the Object Identificationdialog box in the HP Unified Functional Testing User Guide.
l In early releases of QuickTest, Java identification properties were not case-sensitive. If you learned atest object in a QuickTest version earlier than 11.00, you need to re-learn the object with propertiesthat are case-sensitive by performing an Update Run (using the Update test object descriptionsoption). For details, see the section on Updating Test Object Descriptions in the HP Unified FunctionalTesting User Guide.
l In UFT, table data is always loaded from the application itself, even if the Active Screen contains animage of the table. For this reason, you must first open the table in the application before creating atable checkpoint in a test.
l In some cases you may have to scroll to the last row of the table to make sure that all the data isloaded.
l It is not necessary to open the table in your application to edit an existing table checkpoint.
l If you load or unload an add-in that is displayed as a child of the Java add-in in the Add-in Manager,only applications that are opened after loading or unloading the add-in are affected.
l When working with tests, if you create a checkpoint on an SWT-based Java tree with columns, a tablecheckpoint is created.
l For details on UFT functionality, see the HP Unified Functional Testing User Guide.
Java Add-in ExtensibilityUFT Java Add-in Extensibility enables you to develop support for testing third-party and custom Javacontrols that are not supported out-of-the-box by the UFT Java Add-in.
Add-ins GuideJava Add-in - Testing and Configuration
HP Unified Functional Testing (12.50) Page 179
If the test object class that UFT uses to represent a control does not provide the operations andproperties necessary to operate on your control, you can use Java Add-in Extensibility to customize thisbehavior.
l You can map a custom control to an existing test object class, or to a new test object class that youdefine
l You can design and customize the behavior of the test object classes by developing custom Javasupport classes. You can program how operations are performed on the control, how properties areretrieved, and more.
l You can also teach UFT to treat a control that contains a set of lower-level controls as a singlefunctional control, instead of relating to each lower-level control separately.
To implement Java Add-in Extensibility, you need to be familiar with:
l UFT and its Object Model Reference
l The behavior of the custom control (operations, properties, events)
l XML (basic knowledge)
l Java programming
You can install the Java Add-in Extensibility SDK from the Add-in Extensibility and Web 2.0 Toolkitsoption in the UFT setup program.
The SDK also includes:
l A plug-in for the Eclipse Java development environment, which provides wizards and commands thathelp you create and edit the support that you develop.
l Samples of support developed using Java Add-in Extensibility, which you can use to gain a betterunderstanding of how to create your own support.
For details on installing and implementing Java Add-in Extensibility, see the Java Add-in ExtensibilityHelp, available from the UFT Extensibility Documentation program group (Start > All Programs >HP Software > HP Unified Functional Testing > Extensibility > Documentation or the <UFTinstallation folder>\help\Extensibility folder).
Note: For details on accessing UFT and UFT tools and files in Windows 8 and Windows Server 2012,see "Accessing UFT in Windows 8.X or Higher Operating Systems" on page 517.
A printer-friendly (PDF) version of the HP UFT Java Add-in Extensibility Developer Guide is available in the<UFT installation folder>\help\Extensibility folder.
How to Disable Dynamic Transformation Support(Advanced)This task describes how to disable the dynamic transformation support mechanism if it does not workproperly, and how to manually configure the Java environment to use the Java Add-in without dynamic
Add-ins GuideJava Add-in - Testing and Configuration
HP Unified Functional Testing (12.50) Page 180
transformation support. For general details about using the Java Add-in with multiple environments, see"Java Add-in Environments" on page 177.
Note: The dynamic transformation support mechanism is not supported when using theincremental garbage collector (-Xincgc option). Therefore, if you absolutely must use the -Xincgcoption, you need to disable dynamic transformation support.
This task includes the following steps:
l "Save the dynamically transformed classes" below
l "Disable dynamic transformation support" below
l "Results" on the next page
1. Save the dynamically transformed classes
a. Specify the folder in which to save the dynamically transformed classes that will be generatedduring the preliminary launching of your java applet or application.
To do this, open the registry editor (select Start > Run, type regedit in the Open box and clickOK) and navigate to the JavaAgentmain key, located in: HKEY_LOCAL_MACHINE\SOFTWARE\Mercury Interactive\JavaAgent. Define a new string value namedClassesDumpFolder, and set its value data to an existing folder (preferably empty) on yourcomputer, for example, C:\JavaSupportClasses.
Note: If the ClassesDumpFolder string value already exists, you can modify its value datato an existing folder on your computer.
b. If you are using the -Xincgc option, temporarily remove it from the command line to enablethe JVM hook profiler to transform and save the necessary classes.
c. Launch your applet or application and perform some basic operations on it. This ensures thatall of the necessary classes are transformed and saved. Close your applet or application. All ofthe dynamically transformed classes are now saved in the folder you specified in the previousstep (for example, C:\JavaSupportClasses).
d. If you temporarily removed the -Xincgc option from the command line, you can restore itnow.
Now that you saved the transformed classes, you are ready to disable dynamic transformationsupport.
2. Disable dynamic transformation support
a. Remove the -Xrunjvmhook option from the _JAVA_OPTIONS (or IBM_JAVA_OPTIONS for IBMVM-based applications, and JAVA_TOOL_OPTIONS if you are working with Java 6) environmentvariable.
Add-ins GuideJava Add-in - Testing and Configuration
HP Unified Functional Testing (12.50) Page 181
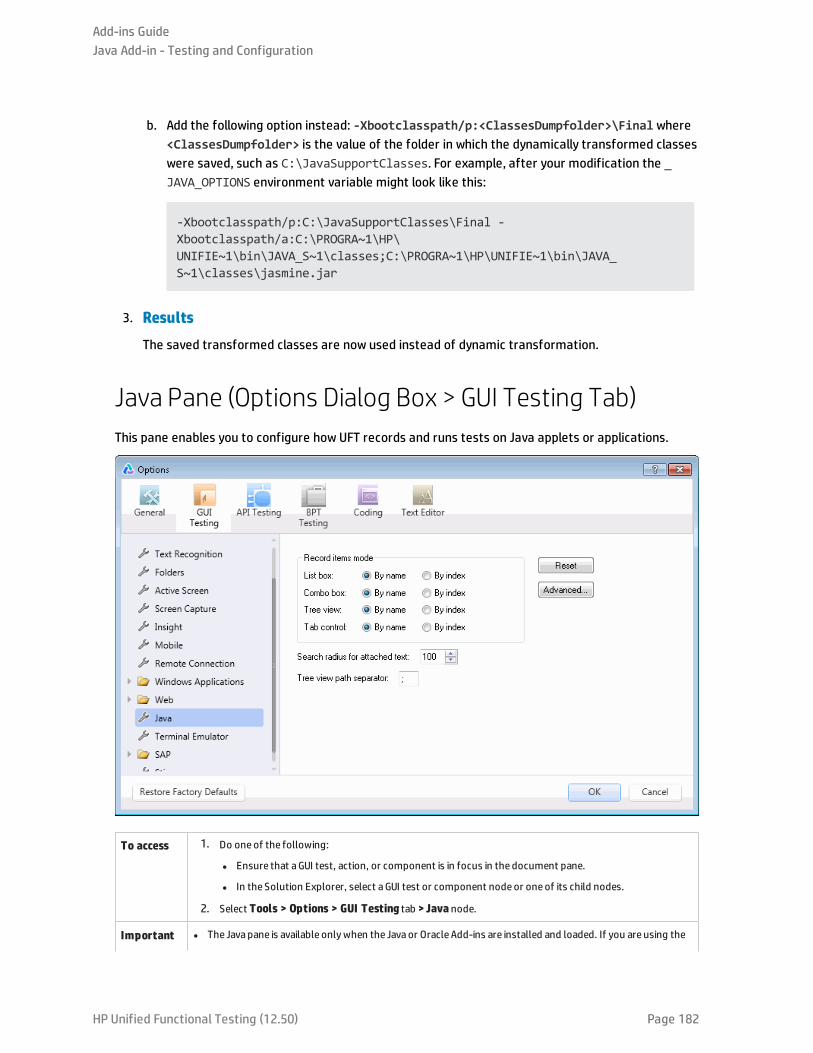
b. Add the following option instead: -Xbootclasspath/p:<ClassesDumpfolder>\Finalwhere<ClassesDumpfolder> is the value of the folder in which the dynamically transformed classeswere saved, such as C:\JavaSupportClasses. For example, after your modification the _JAVA_OPTIONS environment variable might look like this:
-Xbootclasspath/p:C:\JavaSupportClasses\Final -Xbootclasspath/a:C:\PROGRA~1\HP\UNIFIE~1\bin\JAVA_S~1\classes;C:\PROGRA~1\HP\UNIFIE~1\bin\JAVA_S~1\classes\jasmine.jar
3. Results
The saved transformed classes are now used instead of dynamic transformation.
Java Pane (Options Dialog Box > GUI Testing Tab)This pane enables you to configure how UFT records and runs tests on Java applets or applications.
To access 1. Do oneof the following:
l Ensure that aGUI test, action, or component is in focus in the document pane.
l In the Solution Explorer, select aGUI test or component nodeor oneof its child nodes.
2. Select Tools > Options > GUI Testing tab >Java node.
Important l The Javapane is available onlywhen the Javaor Oracle Add-ins are installed and loaded. If you are using the
Add-ins GuideJava Add-in - Testing and Configuration
HP Unified Functional Testing (12.50) Page 182
information Oracle Add-in, and you add steps to your test for Javaobjects within your Oracle application, the options inthis pane are relevant for the Java steps in your test.
l TheRestore Factory Defaultsbutton resets all Options dialog box options to their defaults.
Relatedtasks
l "How to Modify Options for Recording on Java Tables" on page 207
l "Record and Run Environment Variables for Java Objects" on page 193
See also l "Advanced Java Options Dialog Box" on the next page.
l "Java Pane (Test/Business Component Settings Dialog Box / Application Area - Additional SettingsPane)" on page 189
l "Java Tab (Record and Run Settings Dialog Box)" on page 187
l "Recording Steps on Java Objects" on page 202
User interface elements are described below:
UIElement
Description
Recorditemsmode
Determines how UFT records operations on items in List box, Combo box, Tree view, and Tab control objects.The following options are available for each object:
l By name. (Default) Records operations on an item within the object (for example, selected list item or tab)according to the item's name.
l By index.Records operations on an item within the object (for example, selected list item or tab) according tothe item's position within the Javaobject.
Note:
l If you select theBy index option for Tree view, do not specify "#" as the default separator in theTreeview path separator option below.
l This option corresponds to theSetting.Java("record_by_num") variable.
Searchradius forattachedtext
Themaximum distance in pixels to search for attached text.
Default value:100
Note:
l This option is relevant onlywhen thelabel identification property is unavailable.
l This option corresponds to theSetting.Java("max_text_distance") variable.
Tree viewpathseparator
Thedefault separator used to separate entries in a path to anodeof a Tree view control.
l Default value: ;
l Possible value:Oneor more single-character separators
Note:
l If you enter more than one character, UFT treats each of the characters as a separator (but not both ofthem in sequence). If a path contains two consecutive separators, UFT interprets the path as if it containsa nodewith no namebetween the two separators. For example, if you specify%$ for this option and aparticular path contains MyNode%$MySubNode, then UFT treats the%character as a separator for anodewith no name, and the$ character as the separator for an additional nodenamed MySubNode.
Add-ins GuideJava Add-in - Testing and Configuration
HP Unified Functional Testing (12.50) Page 183
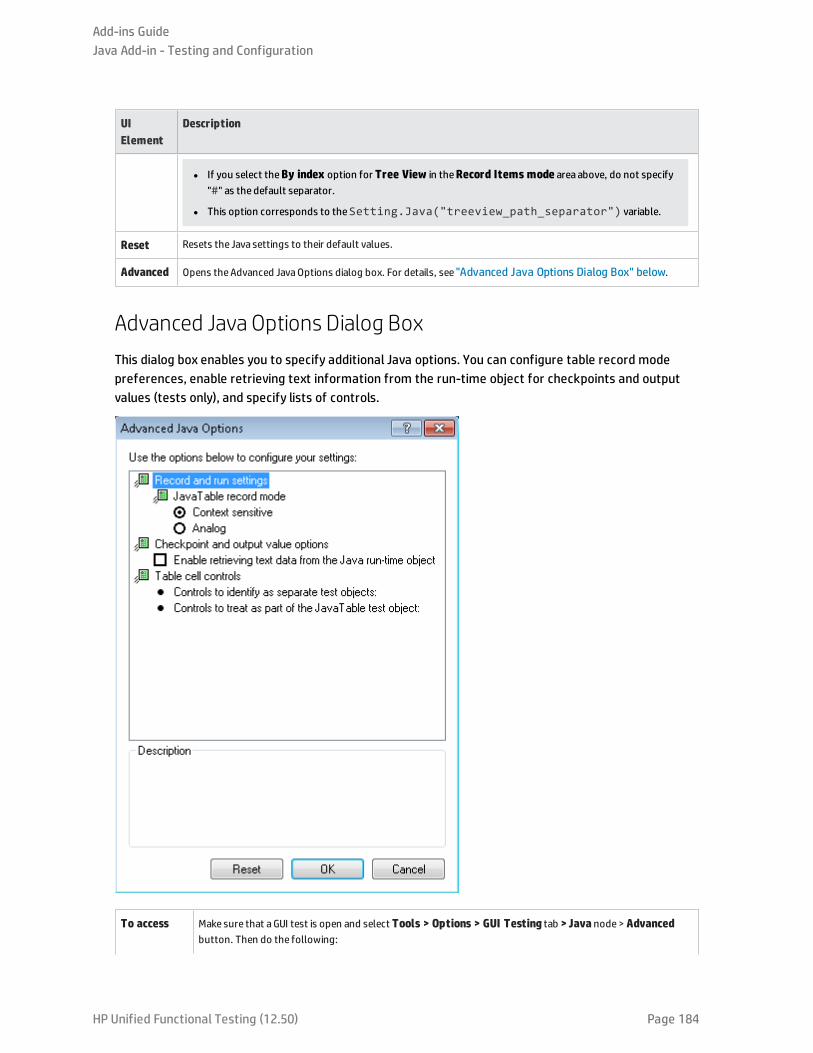
UIElement
Description
l If you select theBy index option for Tree View in theRecord Items mode area above, do not specify"#" as the default separator.
l This option corresponds to theSetting.Java("treeview_path_separator") variable.
Reset Resets the Java settings to their default values.
Advanced Opens theAdvanced JavaOptions dialog box. For details, see "Advanced Java Options Dialog Box" below.
Advanced Java Options Dialog BoxThis dialog box enables you to specify additional Java options. You can configure table record modepreferences, enable retrieving text information from the run-time object for checkpoints and outputvalues (tests only), and specify lists of controls.
To access Make sure that aGUI test is open and select Tools > Options > GUI Testing tab >Java node> Advancedbutton. Then do the following:
Add-ins GuideJava Add-in - Testing and Configuration
HP Unified Functional Testing (12.50) Page 184
1. Click the relevant option once to highlight it.
2. Click the option again or press F2 to open an edit box in which you can add or modify a list of controls.
3. Change the value as necessary.
Note: Specify editor class names separated by a space, tab, newline, or return character. Valuesare case sensitive.
4. When you finish editing the value, click another location in the dialog box to set the value.
Importantinformation
l If you are using theOracle Add-in, and you add steps to your test for Javaobjects within your Oracleapplication, the options in this dialog box are relevant for the Java steps in your test.
l Any changes you make are not applied to the currently open test or business component. To apply yourchanges, close your test or business component and reopen it.
l You can restore the default settings in theAdvanced JavaOptions dialog box by clicking theReset button.
Relatedtasks
"How to Modify Options for Recording on Java Tables" on page 207
See also l "Java Pane (Options Dialog Box > GUI Testing Tab)" on page 182
l "Java Pane (Test/Business Component Settings Dialog Box / Application Area - AdditionalSettings Pane)" on page 189
l "Java Tab (Record and Run Settings Dialog Box)" on page 187
l "Recording Steps on Java Objects" on page 202
l "Text Checkpoint and Text Output Value Steps for Java Objects" on page 203
User interface elements are described below:
UIElement
Description
JavaTablerecordmode
The record mode for table objects. The following modes are available:
l Context sensitive. (Default) Records operations on table objects in context-sensitivemode: SetCellData,SelectRow, and so on.
l Analog.Records only low-level (analog) tablemethods: ClickCell, DoubleClickCell, and Drag.
Note: This option corresponds to theSetting.Java("table_record_mode") variable.
Checkpointand outputvalueoptions
Thepreferences for checkpoint and output value steps on Javaobjects. The following option is available:
Enable retrieving text data from the Java run-time object:Enables UFT to retrieve text information fromthe Javaobjects in the application for checkpoints and output value steps. This option is not relevant if UFT isconfigured to use theOCRmechanism for text recognition (Tools > Options > GUI Testing tab > TextRecognitionnode)
Note:
l Retrieving text information from the run-timeobject is supported only for Javaobjects that meet veryspecific criteria. Therefore, this option is disabled by default.
l For a list of supported checkpoints and output values for the JavaAdd-in, see "Java Add-in - QuickReference" on page 174.
Add-ins GuideJava Add-in - Testing and Configuration
HP Unified Functional Testing (12.50) Page 185
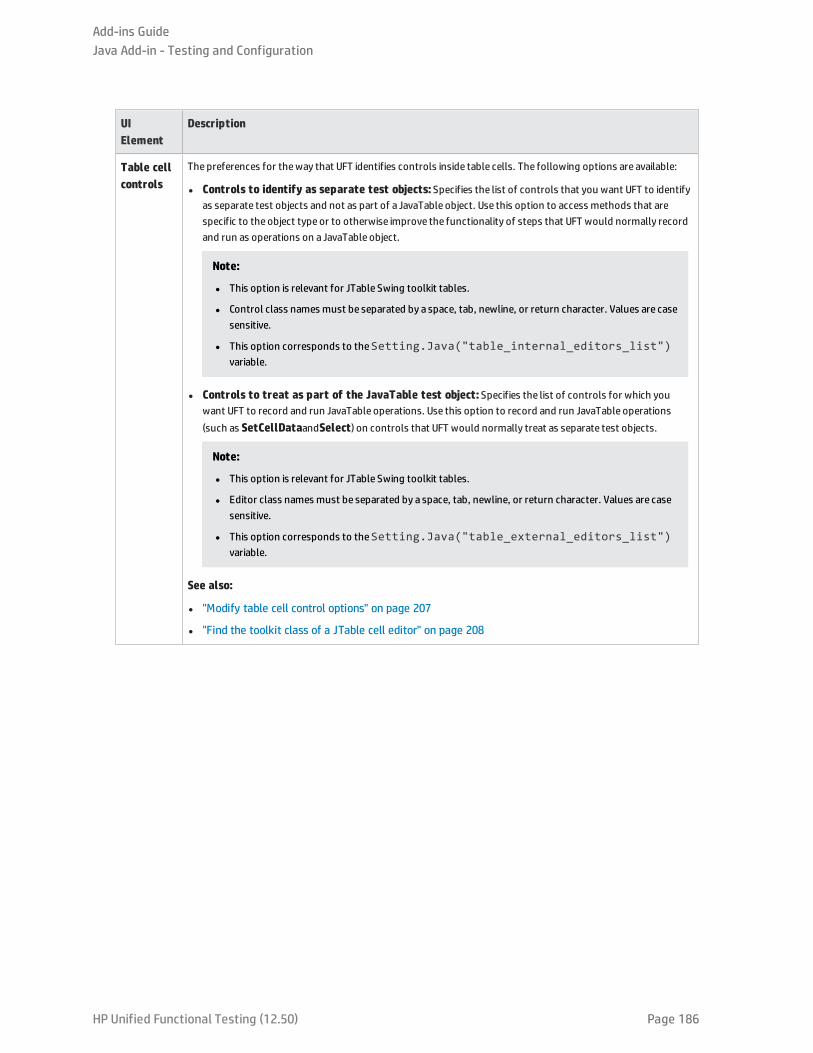
UIElement
Description
Table cellcontrols
Thepreferences for theway that UFT identifies controls inside table cells. The following options are available:
l Controls to identify as separate test objects:Specifies the list of controls that you want UFT to identifyas separate test objects and not as part of a JavaTable object. Use this option to access methods that arespecific to the object type or to otherwise improve the functionality of steps that UFT would normally recordand run as operations on a JavaTable object.
Note:
l This option is relevant for JTable Swing toolkit tables.
l Control class names must be separated by a space, tab, newline, or return character. Values are casesensitive.
l This option corresponds to theSetting.Java("table_internal_editors_list")variable.
l Controls to treat as part of the JavaTable test object:Specifies the list of controls for which youwant UFT to record and run JavaTable operations. Use this option to record and run JavaTable operations(such as SetCellDataandSelect) on controls that UFT would normally treat as separate test objects.
Note:
l This option is relevant for JTable Swing toolkit tables.
l Editor class names must be separated by a space, tab, newline, or return character. Values are casesensitive.
l This option corresponds to theSetting.Java("table_external_editors_list")variable.
See also:
l "Modify table cell control options" on page 207
l "Find the toolkit class of a JTable cell editor" on page 208
Add-ins GuideJava Add-in - Testing and Configuration
HP Unified Functional Testing (12.50) Page 186
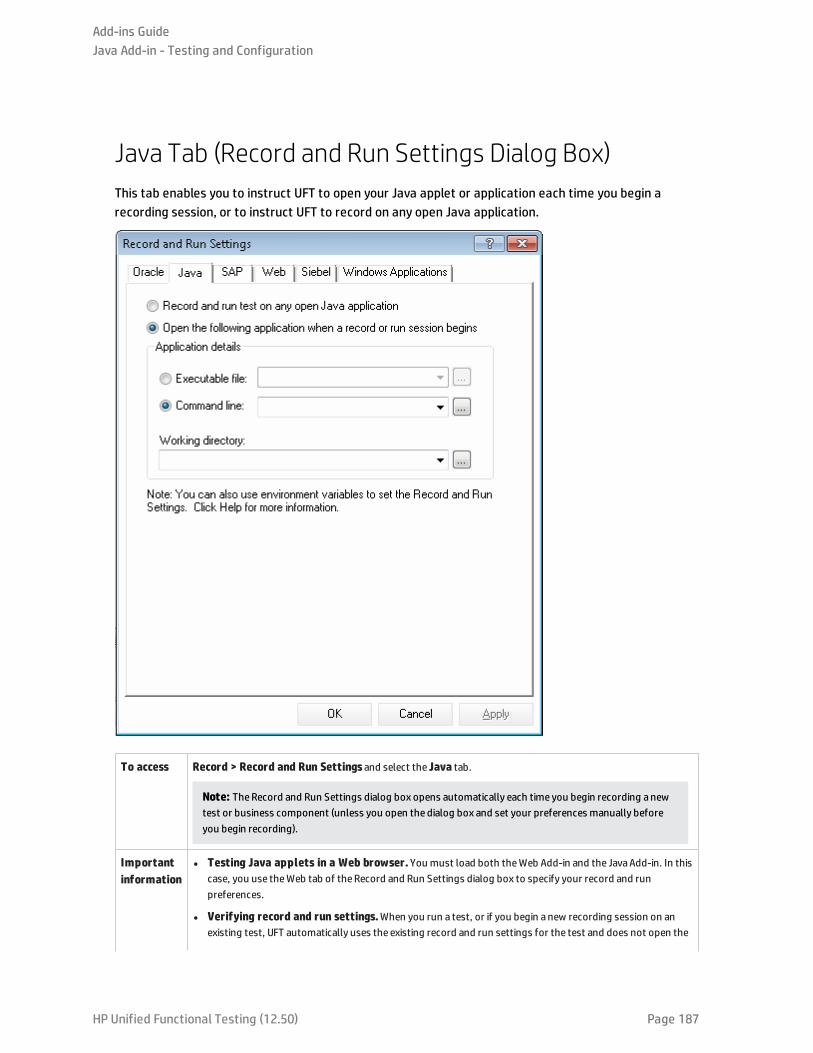
Java Tab (Record and Run Settings Dialog Box)This tab enables you to instruct UFT to open your Java applet or application each time you begin arecording session, or to instruct UFT to record on any open Java application.
To access Record > Record and Run Settingsand select the Java tab.
Note: TheRecord and Run Settings dialog box opens automatically each time you begin recording anewtest or business component (unless you open the dialog box and set your preferences manually beforeyou begin recording).
Importantinformation
l Testing Java applets in a Web browser.You must load both theWeb Add-in and the JavaAdd-in. In thiscase, you use theWeb tab of theRecord and Run Settings dialog box to specify your record and runpreferences.
l Verifying record and run settings.When you run a test, or if you begin a new recording session on anexisting test, UFT automatically uses the existing record and run settings for the test and does not open the
Add-ins GuideJava Add-in - Testing and Configuration
HP Unified Functional Testing (12.50) Page 187
Record and Run Settings dialog box. However, it is important to confirm that the options in the JavaTab oftheRecord and Run Settings Dialog Box are appropriate for the first step of your test before running itbecause you (or someone else)may havemodified theRecord and Run Settings dialog boxmanually in aprior recording session.
l Testing business components. Components do not require specific record and run settings to workwithJava applets and applications. To record abusiness component, you need to first open the Java applet orapplication manually. Alternatively, you can include steps in your business component that connect to theJava applet or application, for example, you can include a step that contains theOpenApp operation.
When you begin recording anew business component, theApplications dialog box opens (unless youpreviously specified aWindows environment in theBusiness Component Settings dialog box or theapplication area's Additional Settings pane). ClickOK in the dialog boxwithout making modifications to beginrecording. For details on theApplications pane and Applications dialog box, see "Record and run test onany open Windows-based application" on page 94.
Relatedtasks
"How to Define Record and Run Settings for UFT Add-ins"
See also l "Java Pane (Options Dialog Box > GUI Testing Tab)" on page 182
l "Advanced Java Options Dialog Box" on page 184
l "Recording Steps on Java Objects" on page 202
l "Record and Run Environment Variables for Java Objects" on page 193
l For details on theWeb tab of theRecord and Run Settings dialog box, see "Web-Based ApplicationSupport" on page 34.
l For general details on theRecord and Run Settings dialog box, see theHPUnified Functional Testing UserGuide.
User interface elements are described below:
UI Element Description
Record and runtest on any openJava application
Instructs UFT to record and run the test on any open Java application or applet.
Open thefollowingapplication whena record or runsession begins
Instructs UFT to open anew Java application or applet using the specified application details.
Note:
l This setting controls onlywhich Java application, if any, is opened at the beginning of a recordor run session. It does not affect the applications that UFT recognizes. Even if this radio buttonis selected and no application is specified, UFT can still record, recognize, and run on any openJava application.
l When working with a Java applet inside a browser, use theWeb Tab of theRecord and RunSettings Dialog Box to open theURL containing the applet.
Applicationdetails
Thedetails of the Java application on which to run the test:
l Executable file. Instructs UFT to open the specified executable or batch file.
l Command line. Instructs UFT to open the application from the specified command line.
l Working directory. Instructs UFT to run the specified executable file or command line from thespecified directory. Make sure you specify the full directory path, for example,
Add-ins GuideJava Add-in - Testing and Configuration
HP Unified Functional Testing (12.50) Page 188
UI Element Description
%ProgramFiles%\Java\jre1.6.0\bin.
Note:
l If you define values for theEXEPATH_ENV, CMDLINE_ENV, and/or WORKDIR_ENV testenvironment variables, these values override the values in theExecutable file, Commandline, andWorking Directory boxes of the Java tab during a run session. For details, see"Record and Run Environment Variables for Java Objects" on page 193.
l Always enter a value in theWorking directory field, otherwiseUFT cannot open your Javaapplication.
Java Pane (Test/Business Component Settings DialogBox / Application Area - Additional Settings Pane)This pane enables you to define Java test or business component settings. For business components,you use the application area's Additional Settings pane to define the settings, and the BusinessComponent Settings dialog box to view the settings in read-only mode.
The following image displays the Java pane of the Test Settings dialog box. The content of this pane isidentical to the content of the Java pane of the Business Component Settings dialog box and theapplication area's Additional Settings pane.
Add-ins GuideJava Add-in - Testing and Configuration
HP Unified Functional Testing (12.50) Page 189
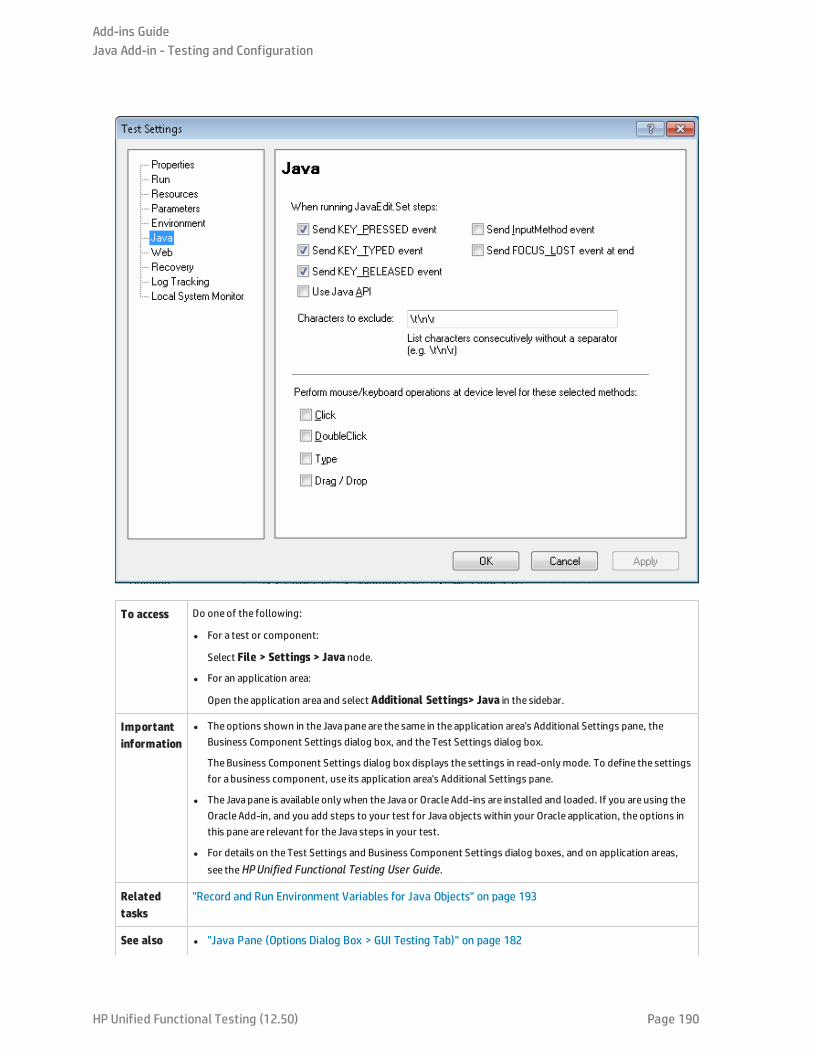
To access Do oneof the following:
l For a test or component:
Select File > Settings > Java node.
l For an application area:
Open the application area and select Additional Settings> Java in the sidebar.
Importantinformation
l Theoptions shown in the Javapane are the same in the application area's Additional Settings pane, theBusiness Component Settings dialog box, and the Test Settings dialog box.
TheBusiness Component Settings dialog box displays the settings in read-onlymode. To define the settingsfor a business component, use its application area's Additional Settings pane.
l The Javapane is available onlywhen the Javaor Oracle Add-ins are installed and loaded. If you are using theOracle Add-in, and you add steps to your test for Javaobjects within your Oracle application, the options inthis pane are relevant for the Java steps in your test.
l For details on the Test Settings and Business Component Settings dialog boxes, and on application areas,see theHPUnified Functional Testing User Guide.
Relatedtasks
"Record and Run Environment Variables for Java Objects" on page 193
See also l "Java Pane (Options Dialog Box > GUI Testing Tab)" on page 182
Add-ins GuideJava Add-in - Testing and Configuration
HP Unified Functional Testing (12.50) Page 190
l "Java Tab (Record and Run Settings Dialog Box)" on page 187
l "Recording Steps on Java Objects" on page 202
Externalresources
l For details on JFCor AWT-based Java key events and input methods, see Javadocumentation athttp://www.oracle.com/technetwork/java/index.html.
l For details on SWT-based Java key events, see Javadocumentation at http://www.eclipse.org.
User interface elements are described below:
UI Element Description
When runningJavaEdit.Setsteps
Specifies how operations are performed on edit boxes during a test run. It is recommended not to modifythese settings unless you fully understand Java key events and input methods, as well as the implicationsof sending or not sending these events. Note that JavaEdit.Set steps may fail during a run session ifan incorrect value is used for these settings. You can set oneor more of the following options:
l Send KEY_PRESSED event.Sends aKEY_PRESSED event to the object for every character fromthe input string. (Selected by default.) This setting corresponds to theP value of theSetting.Java("edit_replay_mode") variable.
l Send KEY_TYPED event.Sends aKEY_TYPED event to the object for every character from theinput string. (Selected by default.) This setting corresponds to theT value of theSetting.Java("edit_replay_mode") variable.
l Send KEY_RELEASED event.Sends aKEY_RELEASED event to the object for every character fromthe input string. (Selected by default.) This setting corresponds to theR value of theSetting.Java("edit_replay_mode") variable.
l Use Java API.Calls thesetValue()method to set a value of the edit object. This settingcorresponds to theS value of theSetting.Java("edit_replay_mode") variable.
l Send InputMethod event.Sends an InputMethod event to the object for every character fromthe input string. This event is used with Unicode applications (for example, for somenon-Englishapplications). This setting corresponds to the I value of theSetting.Java("edit_replay_mode") variable.
l Send FOCUS_LOST event at end.Generates aFOCUS_LOST event after running the step. Thissetting corresponds to theF value of theSetting.Java("edit_replay_mode") variable.
Characters toexclude
Instructs UFT to ignore the specified characters during a run session. List characters consecutively,without a separator.
Default value: \t\n\r
Note:
l This option is relevant only if theUse Java API check box is selected in the upper section of thisdialog box, or if the value of theSetting.Java("edit_replay_mode") variable is setto S.
l This setting corresponds to theSetting.Java("exclude_control_chars")variable.
Performmouse/keyboardoperations atdevice level for
By default, UFT performs mouseoperations at the context-sensitive level. You can use this option toselect specific operations to perform using device-level replay. Device-level replay simulates mouseor keyoperations exactly as if they occur on themouseor keyboard drivers. When amouse action is simulated ondevice replay, themousepointer moves on the screen to the point where the action is to beperformedduring the run session. You can select from the following mouse and keyboard methods:
Add-ins GuideJava Add-in - Testing and Configuration
HP Unified Functional Testing (12.50) Page 191
UI Element Description
these selectedmethods
l Click
l DoubleClick
l Type
l Drag / Drop
Default value:All check boxes are cleared.
This option corresponds to theSetting.Java("device_replay_mode") variable.
Java Environment Variables SettingsThis section describes the environment variables that need to be set when you load your Javaapplication with UFT Java Add-in support. You need to set one or more environment variables to thepath name of the Java Add-in support classes folder.
Set the _JAVA_OPTIONS environment variable (Oracle) or the IBM_JAVA_OPTIONS environment variable(IBM) as follows:
-Xrunjvmhook-Xbootclasspath/a:"<UFT installation folder>\bin\java_shared\classes";"<UFT installation folder>\bin\java_shared\classes\jasmine.jar"
The above settings should appear on one line (no newline separators).
If you are working with Oracle Java 6 or 7 (versions 1.6 or 1.7), you must set an additional environmentvariable, JAVA_TOOL_OPTIONS, with the value -agentlib:jvmhook
Tip: If needed, you can temporarily remove Java support by renaming the _JAVA_OPTIONS or IBM_JAVA_OPTIONS environment variable. (If you are working with Java 5 or 6, you need to rename theJAVA_TOOL_OPTIONS environment variable as well.) For example, you must remove Java support ifyou want to test ActiveX controls that are embedded in SWT- or Eclipse-based applications.
Note:
You can also use short paths in these commands. For example:
-Xrunjvmhook -Xbootclasspath/a:C:\PROGRA~2\HP\UNIFIE~1\bin\ JAVA_S~1\classes;C:\PROGRA~2\HP\UNIFIE~1\bin\JAVA_S~1\classes\jasmine.jar
In this example, UFT is installed in the default installation folder (C drive, Program Files) on aWindows 7 computer. PROGRA~2 denotes the Program Files (x86) folder, which is the ProgramFiles folder on 64-bit operating systems.
Add-ins GuideJava Add-in - Testing and Configuration
HP Unified Functional Testing (12.50) Page 192
Record and Run Environment Variables for Java ObjectsYou can override the values in the Executable file, Command line, andWorking directory boxes in the"Java Tab (Record and Run Settings Dialog Box)" (described on page 187) by defining the Javaapplication details using the following variables:
Option Variable Name Description
Executable file EXEPATH_ENV The executable file or a batch file to open.
Command line CMDLINE_ENV The command line to use to open the file.
Working directory WORKDIR_ENV The folder to which the specified command line or executable file refers.
For details on defining and working with environment variables, see the HP Unified Functional TestingUser Guide.
Troubleshooting and Limitations - Java Add-inThis section is intended to help pinpoint and resolve some common problems that may occur whentesting Java applets and applications.
In some cases, running another Java application or applet with the exact same settings helps determinewhether you are encountering a general problem with the Java Add-in or an application-specificproblem. For details, see
This section includes:
l "Running Another Java Application or Applet with the Same Settings" below
l "Identifying and Solving Common Problems" on the next page
l "General Notes and Limitations" on page 195
Running Another Java Application or Applet with the SameSettingsYou can run another Java application or applet with the same settings as the one you are currentlyrunning to help determine whether you are encountering a general problem with the Java Add-in or anapplication-specific problem.
Add-ins GuideJava Add-in - Testing and Configuration
HP Unified Functional Testing (12.50) Page 193
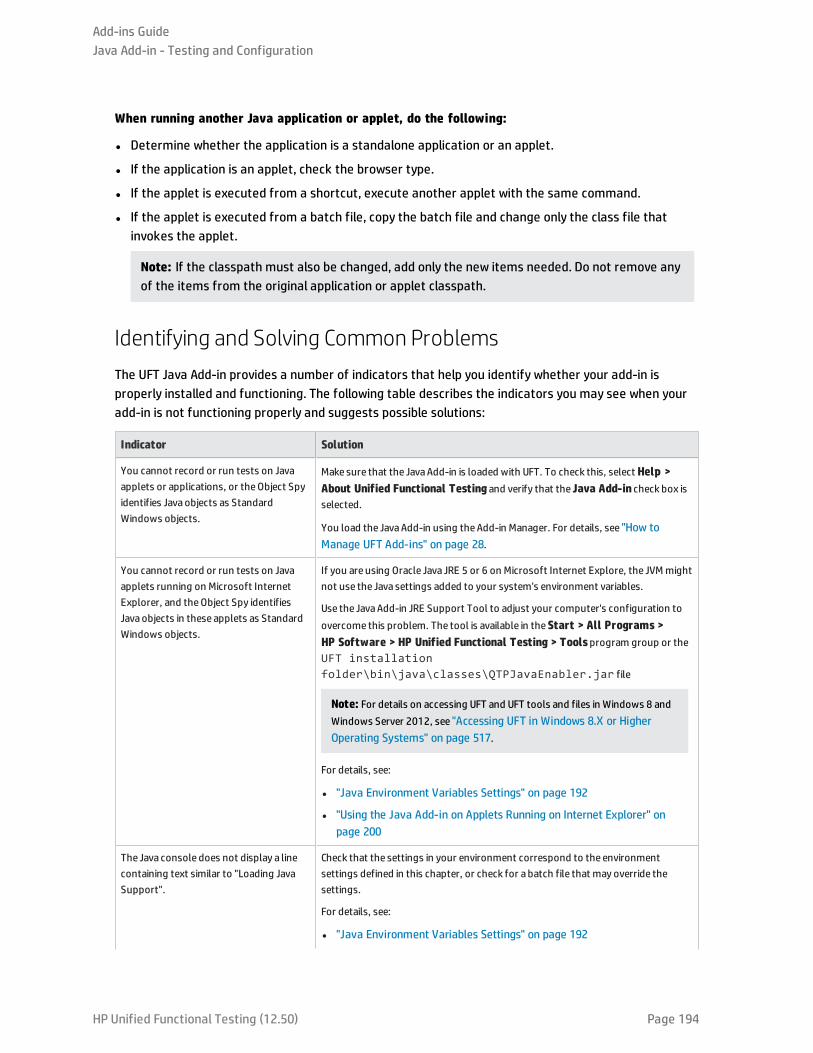
When running another Java application or applet, do the following:
l Determine whether the application is a standalone application or an applet.
l If the application is an applet, check the browser type.
l If the applet is executed from a shortcut, execute another applet with the same command.
l If the applet is executed from a batch file, copy the batch file and change only the class file thatinvokes the applet.
Note: If the classpath must also be changed, add only the new items needed. Do not remove anyof the items from the original application or applet classpath.
Identifying and Solving Common ProblemsThe UFT Java Add-in provides a number of indicators that help you identify whether your add-in isproperly installed and functioning. The following table describes the indicators you may see when youradd-in is not functioning properly and suggests possible solutions:
Indicator Solution
You cannot record or run tests on Javaapplets or applications, or theObject Spyidentifies Javaobjects as StandardWindows objects.
Make sure that the JavaAdd-in is loaded with UFT. To check this, select Help >About Unified Functional Testingand verify that the Java Add-in check box isselected.
You load the JavaAdd-in using theAdd-in Manager. For details, see "How toManage UFT Add-ins" on page 28.
You cannot record or run tests on Javaapplets running on Microsoft InternetExplorer, and theObject Spy identifiesJavaobjects in these applets as StandardWindows objects.
If you are using Oracle Java JRE 5 or 6 on Microsoft Internet Explore, the JVM mightnot use the Java settings added to your system's environment variables.
Use the JavaAdd-in JRE Support Tool to adjust your computer's configuration toovercome this problem. The tool is available in theStart > All Programs >HP Software > HP Unified Functional Testing > Toolsprogram group or theUFT installationfolder\bin\java\classes\QTPJavaEnabler.jar file
Note: For details on accessing UFT and UFT tools and files in Windows 8 andWindows Server 2012, see "Accessing UFT in Windows 8.X or HigherOperating Systems" on page 517.
For details, see:
l "Java Environment Variables Settings" on page 192
l "Using the Java Add-in on Applets Running on Internet Explorer" onpage 200
The Java console does not display a linecontaining text similar to "Loading JavaSupport".
Check that the settings in your environment correspond to the environmentsettings defined in this chapter, or check for a batch file that may override thesettings.
For details, see:
l "Java Environment Variables Settings" on page 192
Add-ins GuideJava Add-in - Testing and Configuration
HP Unified Functional Testing (12.50) Page 194
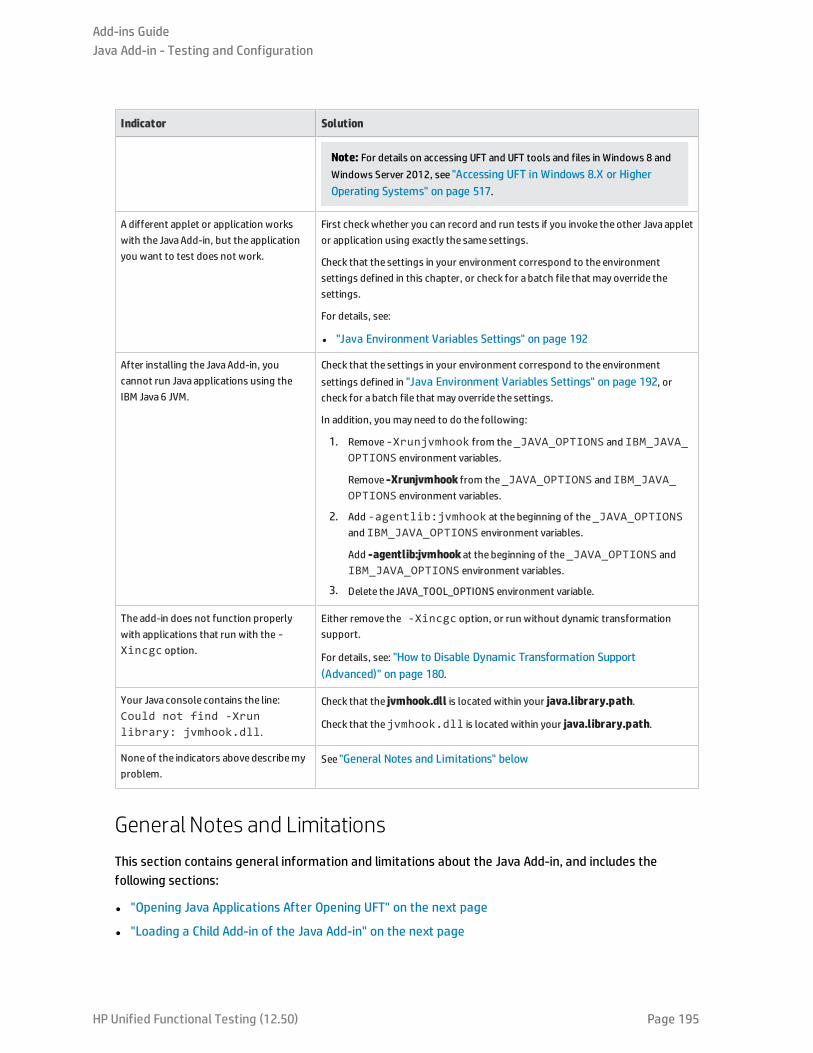
Indicator Solution
Note: For details on accessing UFT and UFT tools and files in Windows 8 andWindows Server 2012, see "Accessing UFT in Windows 8.X or HigherOperating Systems" on page 517.
A different applet or application workswith the JavaAdd-in, but the applicationyou want to test does not work.
First checkwhether you can record and run tests if you invoke the other Java appletor application using exactly the same settings.
Check that the settings in your environment correspond to the environmentsettings defined in this chapter, or check for a batch file that may override thesettings.
For details, see:
l "Java Environment Variables Settings" on page 192
After installing the JavaAdd-in, youcannot run Java applications using theIBM Java 6 JVM.
Check that the settings in your environment correspond to the environmentsettings defined in "Java Environment Variables Settings" on page 192, orcheck for a batch file that may override the settings.
In addition, you may need to do the following:
1. Remove-Xrunjvmhook from the_JAVA_OPTIONS and IBM_JAVA_OPTIONS environment variables.
Remove -Xrunjvmhook from the_JAVA_OPTIONS and IBM_JAVA_OPTIONS environment variables.
2. Add -agentlib:jvmhook at the beginning of the_JAVA_OPTIONSand IBM_JAVA_OPTIONS environment variables.
Add -agentlib:jvmhook at the beginning of the_JAVA_OPTIONS andIBM_JAVA_OPTIONS environment variables.
3. Delete the JAVA_TOOL_OPTIONS environment variable.
The add-in does not function properlywith applications that run with the-Xincgc option.
Either remove the -Xincgc option, or run without dynamic transformationsupport.
For details, see: "How to Disable Dynamic Transformation Support(Advanced)" on page 180.
Your Java console contains the line:Could not find -Xrunlibrary: jvmhook.dll.
Check that the jvmhook.dll is located within your java.library.path.
Check that thejvmhook.dll is located within your java.library.path.
Noneof the indicators abovedescribemyproblem.
See "General Notes and Limitations" below
General Notes and LimitationsThis section contains general information and limitations about the Java Add-in, and includes thefollowing sections:
l "Opening Java Applications After Opening UFT" on the next page
l "Loading a Child Add-in of the Java Add-in" on the next page
Add-ins GuideJava Add-in - Testing and Configuration
HP Unified Functional Testing (12.50) Page 195
l "Creating and Running Testing Documents" on the next page
l "Record and Run Options" on the next page
l "Working with Java Controls" on page 198
l "Test Objects and Methods" on page 199
l "Checkpoints and Output Values " on page 199
l "Running Java applications on the IBM Java Runtime Environment (JRE) 1.6 " on page 200
l "Using the Java Add-in on Applets Running on Internet Explorer" on page 200
Opening Java Applications After Opening UFT
l If you are not able to open your Java application after you've opened UFT, you may have a memoryspace fragmentation issue, caused by loading a Windows .dll file. If Eclipse fails to start with highermemory settings, do one of the following:
l Use a 64-bit Windows operating system and 64-bit JVM, with 64-bit Eclipse. Have a 64-bit virtualmemory space can prevent you from encountering memory fragmentation issues.
l Force Eclipse to start using the java.exe or javaw.exe file instead of the default jvm.dllstartup file. To do this edit the eclipse.ini file by adding the following text, on two separatelines:
-vm<full path to the java.exe or javaw.exe file>
l Modify the Eclipse memory setting in the eclipse.ini file. For example, if the application fails tostart with a parameter setting of -Xmx512m, use a parameter setting of -Xmx256m or -Xmx384minstead.
l In some cases, Java applications that run successfully when UFT is closed, fail to run if you open themwhile UFT is open. An error message is displayed: Could not create the Java Virtual Machine.
Workaround: Activate UFT's memory defragmenting by adding a line to the mercury.ini file:
Locate the mercury.ini file in your Windows folder (%windir%) and add a line to the Memory_Defragsection, as follows:
[Memory_Defrag]<process_name>.exe=1
process_name: The name of the Java engine or application that you are using.1: Turns on defragmenting (use 0 to turn off, if necessary).
Loading a Child Add-in of the Java Add-in
When you select a child add-in under Java in the Add-in Manager, you load Java Add-in extensibilitysupport for the selected environment.
Add-ins GuideJava Add-in - Testing and Configuration
HP Unified Functional Testing (12.50) Page 196

If you load support that was developed using a Java Add-in Extensibility SDK version earlier than version10.00, then when you open one of the UFT dialog boxes that display test object classes for a selectedenvironment (such as the Object Identification dialog box), the extensibility test object classes aredisplayed in the wrong list. If you select the child add-in in the Environment list, the list of test objectclasses is empty. Instead, the extensibility test object classes are displayed directly under the Javaenvironment instead of being displayed under the child add-in in the Environment list.
Additionally, in some cases, the Generate Script button in the Object Identification Dialog Box does notfunction properly.
Workaround:
1. Locate the test object configuration file associated with the child add-in. This file is located in thefollowing locations:
l <UFT Installation Folder>\dat\Extensibility\Java\<add-inname>TestObjects.xml.
l If working with ALM: <UFT Add-in for ALM InstallationFolder>\dat\Extensibility\Java\<add-in name>TestObjects.xml.
2. In the XML file, locate the PackageName attribute in the TypeInformation element, and change itsvalue from JavaPackage to the name of the child add-in.
3. Save the file and reopen UFT.
4. If this extensibility support (child add-in) was developed by a third party, you may want to contactthem for assistance.
Creating and Running Testing Documents
l If, while recording keyboard operations in a JFC single-line edit box in an IME composition window, youpress the ENTER key to select the composition string, the key press may be recorded as the Activatemethod, thereby generating an extra step. For example:
JavaWindow("Application").JavaEdit("User Name").Activate
This extra step generally does not affect the run session adversely.
Workaround: Before running your test or business component, remove the extra step that wasrecorded.
l The ALT+F4 keyboard shortcut (used for closing a Java applet or Java application) is not supportedfor recording or running.
Workaround: Use a Close menu command or button to close a Java applet or Java application duringa recording session. Alternatively, manually add a JavaWindow(...).Close step.
Record and Run Options
l Adding a -Xincgc flag to the java.exe command line (in the Record and Run Settings dialog box orin a batch file) prevents the Java support from working properly.
Add-ins GuideJava Add-in - Testing and Configuration
HP Unified Functional Testing (12.50) Page 197
Workaround: When testing with UFT Java support, do not use -Xincgc in your command line, or,alternatively, do not use the dynamic transformation support mechanism. For details, see theHP Unified Functional Testing Add-ins Guide.
l When selecting a JAR file from the command line in the Record and Run Settings dialog box, youshould manually add -jar to the Command line box before you invoke the Java application.
l If you intend to launch your Java application using the Record and Run Settings dialog box withoutusing a batch file (or another executable file), and without the -jar command line option (afterselecting a JAR file), you should include the fully qualified name of the Java class in the Command linebox.
Working with Java Controls
l By default, moving and resizing of Java windows are not recorded. This is because it may causeredundant recordings in some cases.
Workaround: To instruct the Java Add-in record these actions, use the Setting.Javamethod to setthe record_win_ops variable to 1. For example:
Setting.Java("RECORD_WIN_OPS") = 1
l AWT popup menus are recorded by the Standard Window control support WinMenu test object (whileother Java menus are recorded using the JavaMenu test object). You cannot perform checkpoints orActive Screen operations on such menus.
Workaround: Use other verification methods (such as using GetTOProperty). For more details onverification methods, see the HP Unified Functional Testing User Guide.
l A call to .Object.startModal of a JavaInternalFrame or JavaDialog object may cause UFT to behaveunexpectedly until the dialog box is closed.
l The use of multi-byte characters in a multiline edit field object is not supported.
l The Java Add-in does not record or run steps for hovering over identifiers in an Eclipse window.
l When you record a step that closes a Java dialog box, UFT records an additional Close statement.
Workaround: Manually delete the extraneous Close statement.
l For button objects (either JavaButton or a button in a JavaToolbar) whose label is determined by thename of the image file they display, the process of naming the test object when running in JDK 1.6 isdifferent than the one used when running in JDK 1.5.
Therefore, if you have a test or business component containing button objects that were learned onJDK 1.5 and labeled according to their image file, when you run it on JDK 1.6, the test or businesscomponent may fail.
Workaround:
l For a JavaButton object—relearn the object on JDK 1.6. Then modify the test to use the new testobject, or delete the old object from the object repository and rename the new test object tomatch the object name used in the step. Make sure the Automatically update test and business
Add-ins GuideJava Add-in - Testing and Configuration
HP Unified Functional Testing (12.50) Page 198
components steps when you rename test objects option is selected in the General pane of theGUI Testing tab in the Options dialog box (Tools > Options > GUI Testing tab > General node).
l For a button in a JavaToolbar object—modify the Item argument in the JavaToolbar statement torefer to the relevant button. You can specify the button's index, or you can use the Object Spy tospy on the toolbar button, and then provide the label identification property as the Itemargument.
l When the Active Screen displays a Java applet or ActiveX control within a Web page, the applet orcontrol is for viewing purposes only and you cannot perform operations (for example, createcheckpoints, add methods, and so forth) on the object.
Workaround: Record an operation on the Java applet/ActiveX control to create a step on the objectwith the ActiveX Add-in and/or Java Add-in loaded. Then you can create a checkpoint, parameterize astep, or add a method from the individual Java applet/ActiveX control in the Active Screen.
Test Objects and Methods
The PropertyValue argument (second argument) of the WaitPropertymethod for any Java test objectcan be only of type string.
Workaround: Use a string instead of the original type. For example, instead of 1, use "1". For example:
y = JavaCheckBox("Active").WaitProperty ("enabled", "1", 1000)
Checkpoints and Output Values
l You can create text checkpoints and text output values only for Java objects that meet specificcriteria. For details, see "Text Checkpoint and Text Output Value Steps for Java Objects" on page 203.
l To create a new table checkpoint on a Java table while editing a test or business component, youmust first open the application containing the table you want to check and display the table in theapplication.
l If you add a checkpoints on a JavaList or JavaTree object while editing a test or business component,the list_content or tree_content property is not available in the checkpoint.
Workaround: Create checkpoints on Java lists and Java trees while recording.
l Performing a checkpoint on an object that is not always visible (such as a list opening from a combobox selection or a menu item) is not fully supported.
Workaround: If a checkpoint on a transient object is required, make sure the object is visible prior toexecuting the checkpoint. For example, in the case of combo box list, you should insert a statementthat clicks the combo box button before executing the checkpoint.
Add-ins GuideJava Add-in - Testing and Configuration
HP Unified Functional Testing (12.50) Page 199

Running Java applications on the IBM Java Runtime Environment (JRE) 1.6
In some cases, after installing the Java Add-in, Java applications running on the IBM Java 6 JVM cannotbe started. The error message displayed may indicate that Mercury Interactive support could not beloaded and the Java Virtual Machine could not be created.
Workaround:
1. Remove -Xrunjvmhook from the _JAVA_OPTIONS and IBM_JAVA_OPTIONS environment variables.
2. Add -agentlib:jvmhook at the beginning of the _JAVA_OPTIONS and IBM_JAVA_OPTIONSenvironment variables.
3. Delete the JAVA_TOOL_OPTIONS environment variable.
Using the Java Add-in on Applets Running on Internet Explorer
In some cases, when running Java applets using Oracle Java JRE 5 or 6 on Microsoft Internet Explorer,the Java Add-in does not recognize the applet as belonging to the Java environment. It does notrecognize objects in the applet as Java objects, and cannot record or run steps on them.
This happens when the JVM does not use the Java Add-in's settings from the environment variables. Inthis case, you need to set -agentlib:jvmhook -Xbootclasspath/ a:"<UFT installationfolder>\bin\java_shared\classes";"<UFT installation folder>\bin\java_shared\classes\jasmine.jar" in the JVM Runtime Parameters.
Use the Java Add-in JRE Support Tool to set this string in the Runtime Parameters for the relevant JVM.The tool is available from: Start > All Programs > HP Software > HP Unified Functional Testing >Tools > Java Add-in JRE Support Tool or UFT installationfolder\bin\java\classes\QTPJavaEnabler.jar file
Note: For details on accessing UFT and UFT tools and files in Windows 8 and Windows Server 2012,see "Accessing UFT in Windows 8.X or Higher Operating Systems" on page 517.
Add-ins GuideJava Add-in - Testing and Configuration
HP Unified Functional Testing (12.50) Page 200
Java Add-in - Test ObjectsThis chapter includes:
• Recording Steps on Java Objects 202
• Recording Steps on Jtable Cell Editors 203
• Text Checkpoint and Text Output Value Steps for Java Objects 203
• Full Object Hierarchy Views 204
• Advanced Java Test Object Methods 204
• CreateObject Method 205
• GetStatics Method 205
• FireEvent / FireEventEx Methods 206
• How to Modify Options for Recording on Java Tables 207
HP Unified Functional Testing (12.50) Page 201
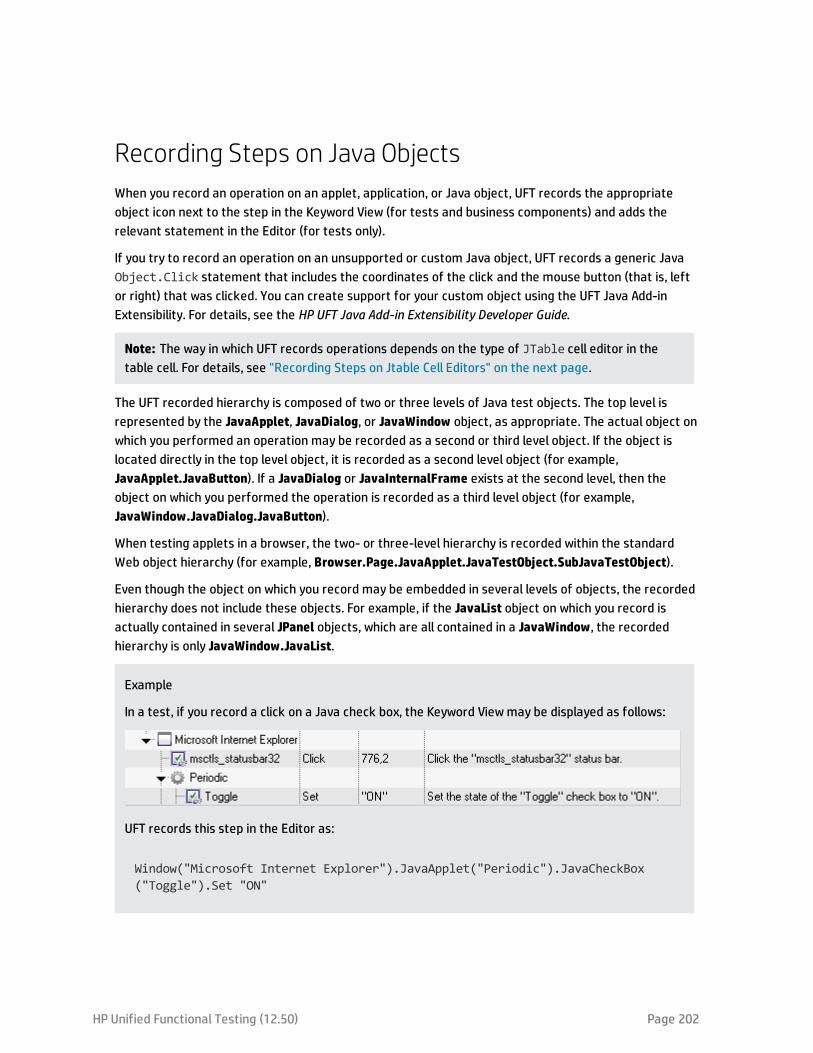
Recording Steps on Java ObjectsWhen you record an operation on an applet, application, or Java object, UFT records the appropriateobject icon next to the step in the Keyword View (for tests and business components) and adds therelevant statement in the Editor (for tests only).
If you try to record an operation on an unsupported or custom Java object, UFT records a generic JavaObject.Click statement that includes the coordinates of the click and the mouse button (that is, leftor right) that was clicked. You can create support for your custom object using the UFT Java Add-inExtensibility. For details, see the HP UFT Java Add-in Extensibility Developer Guide.
Note: The way in which UFT records operations depends on the type of JTable cell editor in thetable cell. For details, see "Recording Steps on Jtable Cell Editors" on the next page.
The UFT recorded hierarchy is composed of two or three levels of Java test objects. The top level isrepresented by the JavaApplet, JavaDialog, or JavaWindow object, as appropriate. The actual object onwhich you performed an operation may be recorded as a second or third level object. If the object islocated directly in the top level object, it is recorded as a second level object (for example,JavaApplet.JavaButton). If a JavaDialog or JavaInternalFrame exists at the second level, then theobject on which you performed the operation is recorded as a third level object (for example,JavaWindow.JavaDialog.JavaButton).
When testing applets in a browser, the two- or three-level hierarchy is recorded within the standardWeb object hierarchy (for example, Browser.Page.JavaApplet.JavaTestObject.SubJavaTestObject).
Even though the object on which you record may be embedded in several levels of objects, the recordedhierarchy does not include these objects. For example, if the JavaList object on which you record isactually contained in several JPanel objects, which are all contained in a JavaWindow, the recordedhierarchy is only JavaWindow.JavaList.
Example
In a test, if you record a click on a Java check box, the Keyword Viewmay be displayed as follows:
UFT records this step in the Editor as:
Window("Microsoft Internet Explorer").JavaApplet("Periodic").JavaCheckBox("Toggle").Set "ON"
HP Unified Functional Testing (12.50) Page 202
In a keyword component, if you record a click on this same Java check box, the Keyword View woulddisplayed as follows:
You can view the recorded hierarchy of a test object in the object repository. You can also access thefull hierarchy of an object when using the pointing hand mechanism in the Step Generator (tests only),when inserting a checkpoint or output value step while recording, or when using the Object Spy.
For a related task, see "How to Modify Options for Recording on Java Tables" on page 207.
This section also includes:
• Recording Steps on Jtable Cell Editors 203
• Text Checkpoint and Text Output Value Steps for Java Objects 203
• Full Object Hierarchy Views 204
Recording Steps on Jtable Cell EditorsUFT records operations differently, depending on the type of JTable cell editor in the table cell.
If you are recording on standard cell editors in Swing Jtable tables, UFT records operations by default inthe same way it records other table objects, using SetCellData statements.
However, when a JTable contains a custom (non-standard) cell editor, the default SetCellDatastatement cannot be recorded. For example, if a cell contains both a check box and a button that opensa dialog box, then a SetCellData statement may not always provide an accurate description of theoperations performed inside the cell.
If you record an operation on a custom cell editor, UFT records a statement that reflects the operationyou performed on the object inside of the cell. For example, if the cell editor contains a custom checkbox, UFT might record the following statement:
Browser("Periodic").Page("Periodic").JavaWindow("CoolJava").JavaDialog("SetOptions").JavaCheckBox("MyCheckBox").Set "ON"
instead of:
Browser("Periodic").Page("Periodic").JavaWindow("CoolJava").JavaDialog("SetOptions").JavaTable("MyTable").SetCellData "ON"
Text Checkpoint and Text Output Value Steps for Java ObjectsWhen working with tests, you can use checkpoints or output values to check that text in your Javaapplication or applet displays correctly. Similar to many other supported environments, it isrecommended to retrieve and check text from your Java applet or application by inserting a standard
Add-ins GuideJava Add-in - Test Objects
HP Unified Functional Testing (12.50) Page 203
checkpoint or output value for the object containing the desired text, and selecting to check or outputits text (or similar) identification property (for example, text, attached text, or label).
If the object you want to work with does not have an appropriate identification property, or, if for anyother reason, the above recommendation does not answer your needs (for example, the text before orafter the selected text is important), you can consider inserting a UFT text checkpoint or text outputvalue step for a Java object if it meets the following criteria:
l The object must draw the text itself (and not delegate the drawing task to the underlying operatingsystem, as is the case with most AWT business components).
l The object must draw text by overriding the paint()method and calling the standardgraphics.drawString()method to draw text. For example, the object cannot use special drawingmethods for writing text, such as using a method that can draw oval circles to draw the letter O.
l The object cannot use the double (image) buffering drawing technique.
Note: Because many Java objects do not answer these criteria, the text checkpoint and textoutput mechanism for Java objects is disabled by default. You can enable it in the "AdvancedJava Options Dialog Box" (described on page 184).
Full Object Hierarchy ViewsThe Java Add-in enables you to view the full object hierarchy of each of the objects in your application inthe Object Spy and Object Selection dialog boxes. In contrast to the recorded object hierarchy, the fullobject hierarchy shows you all of the parent objects associated with the clicked locations and, in somecases, the child objects of the clicked object.
The full object hierarchy enables you to view associated operations and properties of non-recordedobjects in the Object Spy. You can also access non-recorded objects from the Object Selection dialog boxthat opens when using the Step Generator dialog box (tests only) or when inserting a checkpoint oroutput value step during a recording session.
The Object Spy and Object Selection dialog boxes enable you to view details, insert statements, orperform operations even for elements of an object (class business components) that are not recorded,such as java.awt.Component. For example, you can access the edit box, drop-down list, and buttonelements of a combo box.
For details on the Object Spy and Object Selection dialog box, see the HP Unified Functional Testing UserGuide.
Advanced Java Test Object MethodsJava test object classes include test object methods that you can use in your tests to enhance theinteraction between UFT and the application being tested.
Add-ins GuideJava Add-in - Test Objects
HP Unified Functional Testing (12.50) Page 204
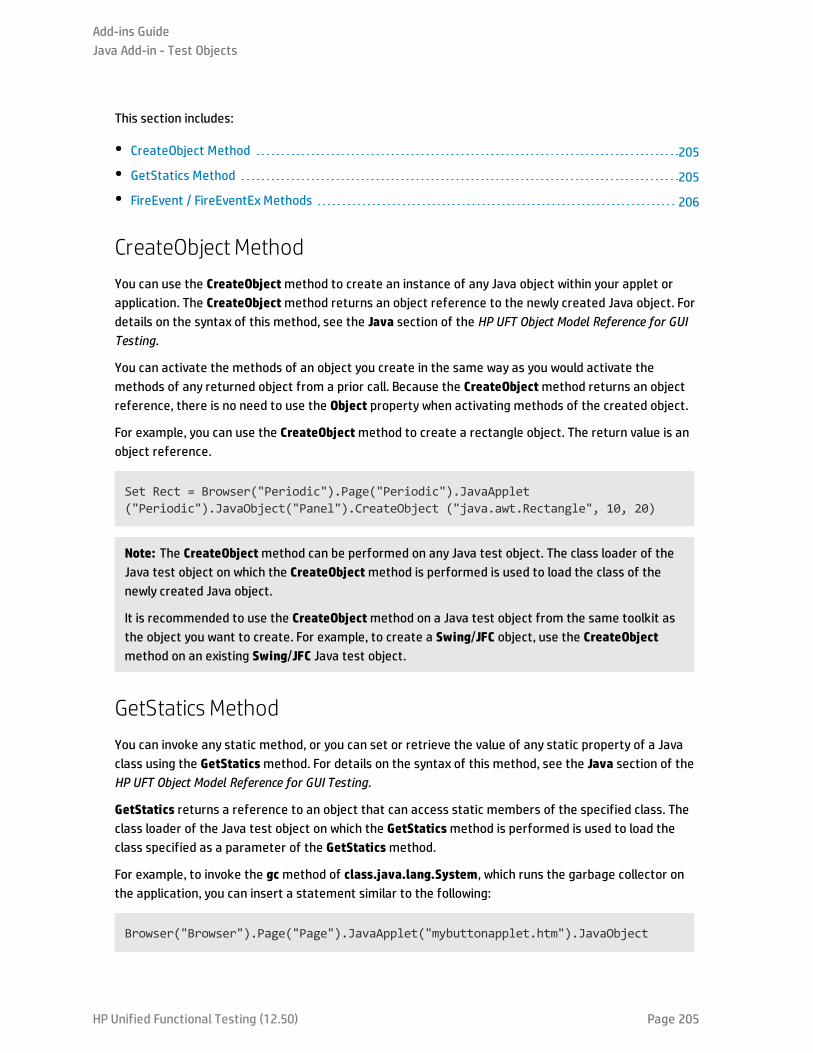
This section includes:
• CreateObject Method 205
• GetStatics Method 205
• FireEvent / FireEventEx Methods 206
CreateObject MethodYou can use the CreateObjectmethod to create an instance of any Java object within your applet orapplication. The CreateObjectmethod returns an object reference to the newly created Java object. Fordetails on the syntax of this method, see the Java section of the HP UFT Object Model Reference for GUITesting.
You can activate the methods of an object you create in the same way as you would activate themethods of any returned object from a prior call. Because the CreateObjectmethod returns an objectreference, there is no need to use the Object property when activating methods of the created object.
For example, you can use the CreateObjectmethod to create a rectangle object. The return value is anobject reference.
Set Rect = Browser("Periodic").Page("Periodic").JavaApplet("Periodic").JavaObject("Panel").CreateObject ("java.awt.Rectangle", 10, 20)
Note: The CreateObjectmethod can be performed on any Java test object. The class loader of theJava test object on which the CreateObjectmethod is performed is used to load the class of thenewly created Java object.
It is recommended to use the CreateObjectmethod on a Java test object from the same toolkit asthe object you want to create. For example, to create a Swing/JFC object, use the CreateObjectmethod on an existing Swing/JFC Java test object.
GetStatics MethodYou can invoke any static method, or you can set or retrieve the value of any static property of a Javaclass using the GetStaticsmethod. For details on the syntax of this method, see the Java section of theHP UFT Object Model Reference for GUI Testing.
GetStatics returns a reference to an object that can access static members of the specified class. Theclass loader of the Java test object on which the GetStaticsmethod is performed is used to load theclass specified as a parameter of the GetStaticsmethod.
For example, to invoke the gcmethod of class.java.lang.System, which runs the garbage collector onthe application, you can insert a statement similar to the following:
Browser("Browser").Page("Page").JavaApplet("mybuttonapplet.htm").JavaObject
Add-ins GuideJava Add-in - Test Objects
HP Unified Functional Testing (12.50) Page 205
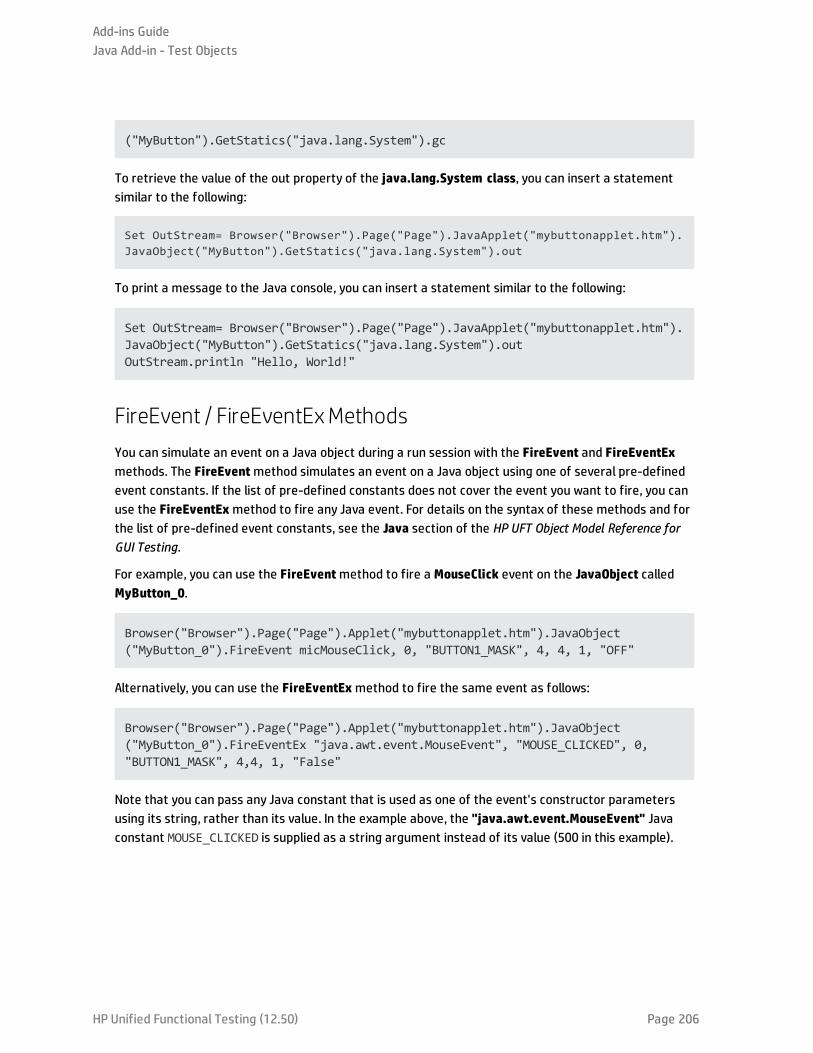
("MyButton").GetStatics("java.lang.System").gc
To retrieve the value of the out property of the java.lang.System class, you can insert a statementsimilar to the following:
Set OutStream= Browser("Browser").Page("Page").JavaApplet("mybuttonapplet.htm").JavaObject("MyButton").GetStatics("java.lang.System").out
To print a message to the Java console, you can insert a statement similar to the following:
Set OutStream= Browser("Browser").Page("Page").JavaApplet("mybuttonapplet.htm").JavaObject("MyButton").GetStatics("java.lang.System").outOutStream.println "Hello, World!"
FireEvent / FireEventExMethodsYou can simulate an event on a Java object during a run session with the FireEvent and FireEventExmethods. The FireEventmethod simulates an event on a Java object using one of several pre-definedevent constants. If the list of pre-defined constants does not cover the event you want to fire, you canuse the FireEventExmethod to fire any Java event. For details on the syntax of these methods and forthe list of pre-defined event constants, see the Java section of the HP UFT Object Model Reference forGUI Testing.
For example, you can use the FireEventmethod to fire a MouseClick event on the JavaObject calledMyButton_0.
Browser("Browser").Page("Page").Applet("mybuttonapplet.htm").JavaObject("MyButton_0").FireEvent micMouseClick, 0, "BUTTON1_MASK", 4, 4, 1, "OFF"
Alternatively, you can use the FireEventExmethod to fire the same event as follows:
Browser("Browser").Page("Page").Applet("mybuttonapplet.htm").JavaObject("MyButton_0").FireEventEx "java.awt.event.MouseEvent", "MOUSE_CLICKED", 0,"BUTTON1_MASK", 4,4, 1, "False"
Note that you can pass any Java constant that is used as one of the event's constructor parametersusing its string, rather than its value. In the example above, the "java.awt.event.MouseEvent" Javaconstant MOUSE_CLICKED is supplied as a string argument instead of its value (500 in this example).
Add-ins GuideJava Add-in - Test Objects
HP Unified Functional Testing (12.50) Page 206
How to Modify Options for Recording on Java TablesThis task describes how to modify some recording options for recording on Java table, as well asidentify the toolkit class for an editor for use with the table_external_editors_list
This task includes the following steps:
l "Modify the default JTable recording behavior for SetCellData statements (advanced)" below
l "Modify table cell control options" below
l "Find the toolkit class of a JTable cell editor" on the next page
Modify the default JTable recording behavior for SetCellData statements(advanced)
If the default recording behavior for JTables does not provide the desired value for the SetCellDatastatement of a particular editor, set that editor to be recorded, like a custom cell editor, in terms of theoperation performed on the object inside the cell.
Do one of the following:
l In the "Advanced Java Options Dialog Box" (described on page 184), select Table cell controls >Controls to identify as separate test objects, and then specify specific cell editor types that shouldalways be treated as separate objects, and not as part of a JavaTable object.
l Create a Setting.Java ("table_internal_editors_list") statement. For details, see"Advanced Java Options Dialog Box" on page 184, and the HP UFT Object Model Reference for GUITesting.
Modify table cell control options
You can specify a list of table cell controls that you want UFT to identify as separate test object, or forwhich you want UFT to record and run JavaTable operations.
Note:
l Any changes you make are not applied to the currently open test or business component.
l You can restore the default settings in the "Advanced Java Options Dialog Box" (described onpage 184) by clicking the Reset button.
1. In the "Advanced Java Options Dialog Box" (described on page 184), click the relevant option onceto highlight it.
2. Click the option again or press F2 to open an edit box in which you can add or modify a list ofcontrols.
Add-ins GuideJava Add-in - Test Objects
HP Unified Functional Testing (12.50) Page 207
3. Change the value as necessary.
Note: Specify editor class names separated by a space, tab, newline, or return character.Values are case sensitive.
4. When you finish editing the value, click another location in the dialog box to set the value.
5. To apply your changes to the currently open test or business component, close the document andthen reopen it.
Find the toolkit class of a JTable cell editor
If you do not know the value of the toolkit class for an editor for use with the table_external_editors_list variable, you can find it by doing one of the following:
l Use the Object Spy to retrieve the value.
l Run a short test in UFT to retrieve the value. You may want to do this when working with a cell thatdoes not stay activated for long enough to capture the cell with the Object Spy. For example, a cellthat is no longer active after a check box is selected or cleared.
l Create a user-defined function and insert it as a step in your test. You may want to do this whenworking with business components.
You can insert steps similar to the following example:
' Sample test to retrieve the toolkit class of a table cell editor' that cannot be made continuously activeSet table = JavaWindow("TableDemo").JavaTable("Left table").ObjectSet JTableCS = table.mic_get_supp_class()Set comp = JTableCS.getComponentAt(table, 0, 6) ‘row 0, col 6MsgBox comp.getClass().getName()' Set the value of TABLE_EXTERNAL_EDITORS_LISTSetting.Java("TABLE_EXTERNAL_EDITORS_LIST") = comp.getClass().getName()
To find the toolkit class of a JTable cell editor using the Object Spy:
1. Open the table and activate a cell in the cell editor column. For example, make sure the cursor isblinking inside an edit field or display the drop-down list of a combo box.
2. With the appropriate cell activated, use the Object Spy to point to the active cell. For details onusing the Object Spy dialog box , see the HP Unified Functional Testing User Guide.
3. Make sure the Properties tab of the Object Spy is displayed and select the Identification radiobutton.
4. In the Properties column, scroll to toolkit class.
Add-ins GuideJava Add-in - Test Objects
HP Unified Functional Testing (12.50) Page 208
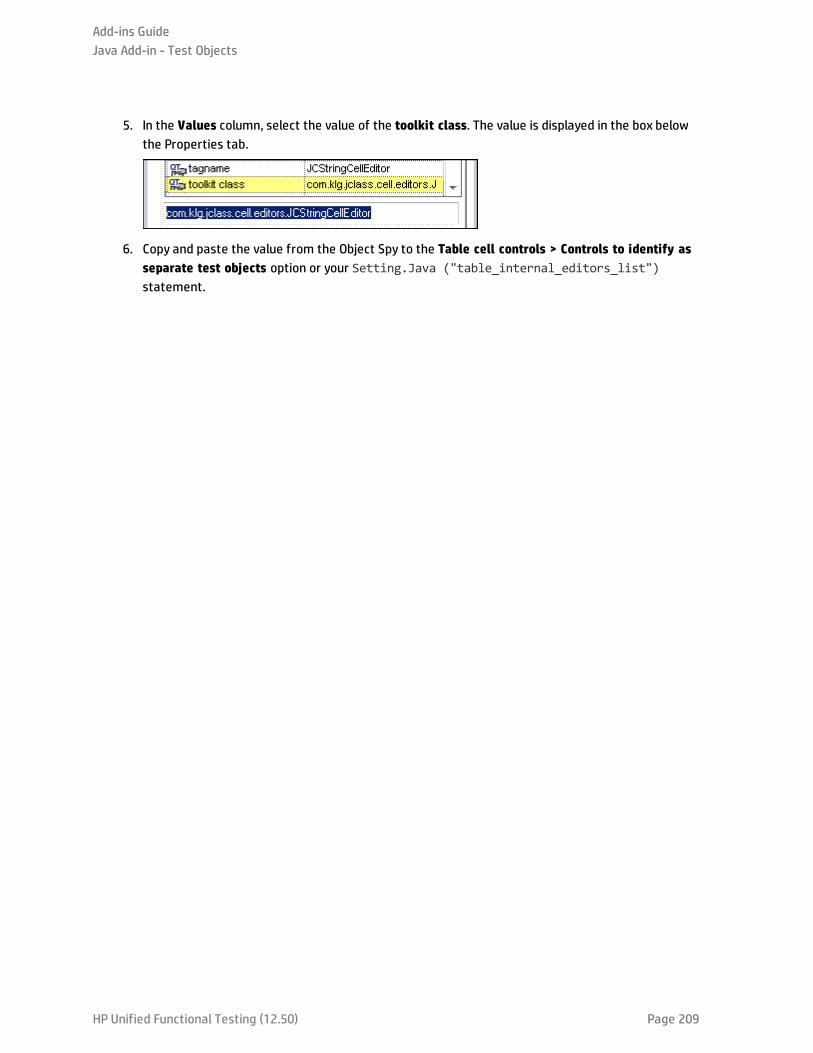
5. In the Values column, select the value of the toolkit class. The value is displayed in the box belowthe Properties tab.
6. Copy and paste the value from the Object Spy to the Table cell controls > Controls to identify asseparate test objects option or your Setting.Java ("table_internal_editors_list")statement.
Add-ins GuideJava Add-in - Test Objects
HP Unified Functional Testing (12.50) Page 209

HP Unified Functional Testing (12.50) Page 210
Part 7: Mobile Add-inThis section includes:
"Mobile Add-in - Quick Reference" on page 211
"Mobile Tab (Record and Run Settings)" on page 212
"Mobile Pane (Options Dialog Box > GUI Testing Tab) " on page 212
Mobile Add-in - Quick ReferenceBuilt on native HP technology, HP Mobile Center integrates mobile testing with Sprinter, UnifiedFunctional Testing, LoadRunner, and Performance Center.
You can use UFT to record and run GUI tests and components on mobile applications that are running onreal mobile devices hosted on HP Mobile Center. After you connect your devices to HP Mobile Center, youcan immediately start testing them using the Mobile Add-in.
The following tables summarize basic information about the Mobile Add-in and how it relates to somecommonly-used aspects of UFT.
Note: For additional information on using UFT with HP Mobile Center, see the UFT section in the HPMobile Center Help at http://mobilecenter.hp.com/docs/en/1.10/.
General Information
SupportedEnvironments
l For details on supported versions of HP Mobile Center, see:http://mobilecenter.hp.com/docs/en/1.10/Content/My_Product_Matrix.htm
l For supported mobile devices, see: http://mobilecenter.hp.com/docs/en/1.10/Content/Configuring_and_connecting_devices.htm
Test ObjectMethods andProperties
TheMobile Add-in provides test objects, methods, and properties that can beused when testing objects inmobile applications. For details, see theMobile section of theHPUFT Object Model Reference for GUITesting.
Checkpointsand OutputValues
l See the sections describing checkpoints and output values in theHPUnified Functional Testing UserGuide.
l See "GUI Checkpoints and Output Values Per Add-in" on page 512
Other You must have theHP Mobile Center installed and configured on a server in order to use theMobile Add-in.Once theHP Mobile Center is set up, you can connect real mobile devices to theMobile Center. Then, UFTcommunicates with themobile devices to create tests of themobile applications.
ConsiderationsandLimitations
See: http://mobilecenter.hp.com/docs/en/1.10/Content/mobile_on_UFT_Lims.htm.
Prerequisites
Opening Your Application The application is accessed through the remote access window that opens whenyou start recording or running a test, or that you open manually.
Add-in Dependencies None
Configuration
Options Dialog Box Make sure that aGUI test is open and select Tools > Options > GUI Testing tab > Mobile
HP Unified Functional Testing (12.50) Page 211
node.
For details, see: http://mobilecenter.hp.com/docs/en/1.10/Content/mobile_on_UFT_define_cnx.htm#Options
Record and Run SettingsDialog Box(tests only)
Make sure that aGUI test is open and select Record > Record and Run Settings.
For details, see: http://mobilecenter.hp.com/docs/en/1.10/Content/mobile_on_UFT_define_cnx.htm#TestSettings
Mobile Tab (Record and Run Settings)For details on defining record and run settings for mobile devices, see:http://mobilecenter.hp.com/docs/en/1.10/Content/mobile_on_UFT_define_cnx.htm#TestSettings
Mobile Pane (Options Dialog Box > GUI TestingTab)For details on defining the UFT connection to HP Mobile Center, see:http://mobilecenter.hp.com/docs/en/1.10/Content/mobile_on_UFT_define_cnx.htm#Options
Open Application in HP Mobile CenterFor details on manually opening HP Mobile Center with an application pre-loaded on a device, see:http://mobilecenter.hp.com/docs/en/1.10/Content/mobile_on_UFT_OpenRAWindow_Rec.htm
Add-ins GuideMobile Tab (Record and Run Settings)
HP Unified Functional Testing (12.50) Page 212

HP Unified Functional Testing (12.50) Page 213
Part 8: Oracle Add-inThis section includes:
"Oracle Add-in - Quick Reference" on page 214
"Oracle Add-in - Testing and Configuration" on page 217
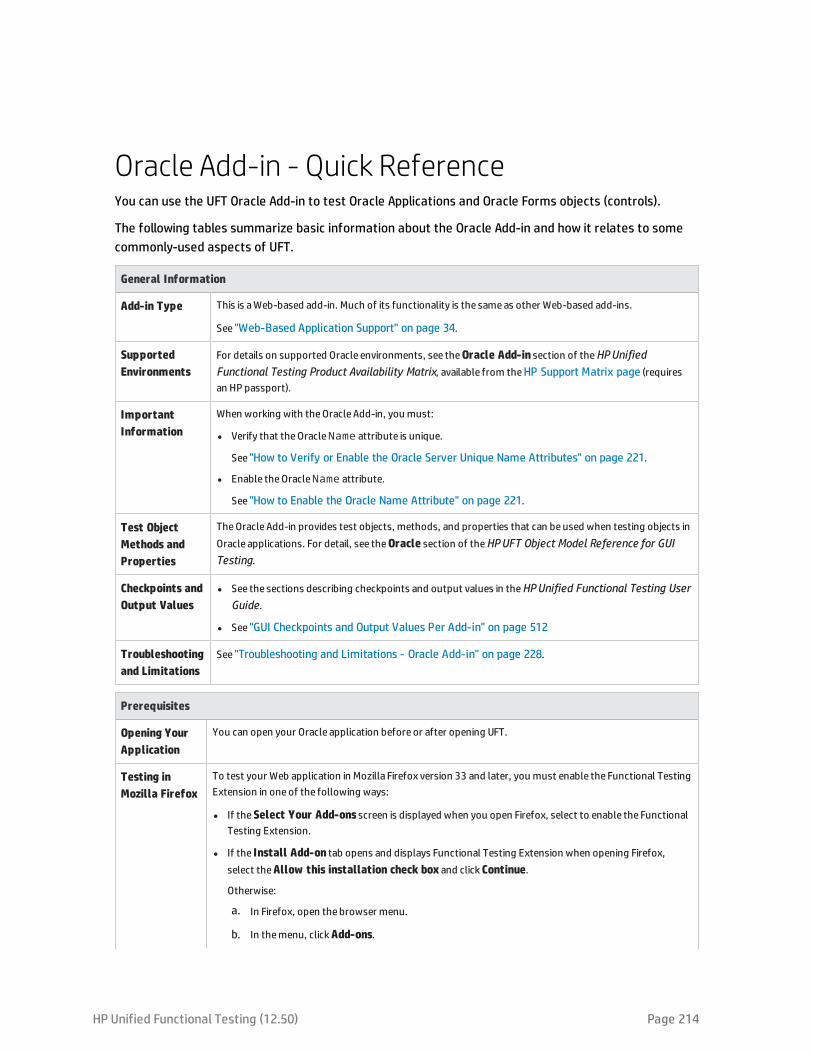
Oracle Add-in - Quick ReferenceYou can use the UFT Oracle Add-in to test Oracle Applications and Oracle Forms objects (controls).
The following tables summarize basic information about the Oracle Add-in and how it relates to somecommonly-used aspects of UFT.
General Information
Add-in Type This is aWeb-based add-in. Much of its functionality is the sameas other Web-based add-ins.
See "Web-Based Application Support" on page 34.
SupportedEnvironments
For details on supported Oracle environments, see theOracle Add-in section of theHPUnifiedFunctional Testing Product Availability Matrix, available from theHP Support Matrix page (requiresan HP passport).
ImportantInformation
When working with theOracle Add-in, you must:
l Verify that theOracleName attribute is unique.
See "How to Verify or Enable the Oracle Server Unique Name Attributes" on page 221.
l Enable theOracleName attribute.
See "How to Enable the Oracle Name Attribute" on page 221.
Test ObjectMethods andProperties
TheOracle Add-in provides test objects, methods, and properties that can beused when testing objects inOracle applications. For detail, see theOracle section of theHPUFT Object Model Reference for GUITesting.
Checkpoints andOutput Values
l See the sections describing checkpoints and output values in theHPUnified Functional Testing UserGuide.
l See "GUI Checkpoints and Output Values Per Add-in" on page 512
Troubleshootingand Limitations
See "Troubleshooting and Limitations - Oracle Add-in" on page 228.
Prerequisites
Opening YourApplication
You can open your Oracle application before or after opening UFT.
Testing inMozilla Firefox
To test your Web application in Mozilla Firefox version 33 and later, you must enable the Functional TestingExtension in oneof the following ways:
l If theSelect Your Add-ons screen is displayed when you open Firefox, select to enable the FunctionalTesting Extension.
l If the Install Add-on tab opens and displays Functional Testing Extension when opening Firefox,select theAllow this installation check box and clickContinue.
Otherwise:
a. In Firefox, open the browser menu.
b. In themenu, clickAdd-ons.
HP Unified Functional Testing (12.50) Page 214
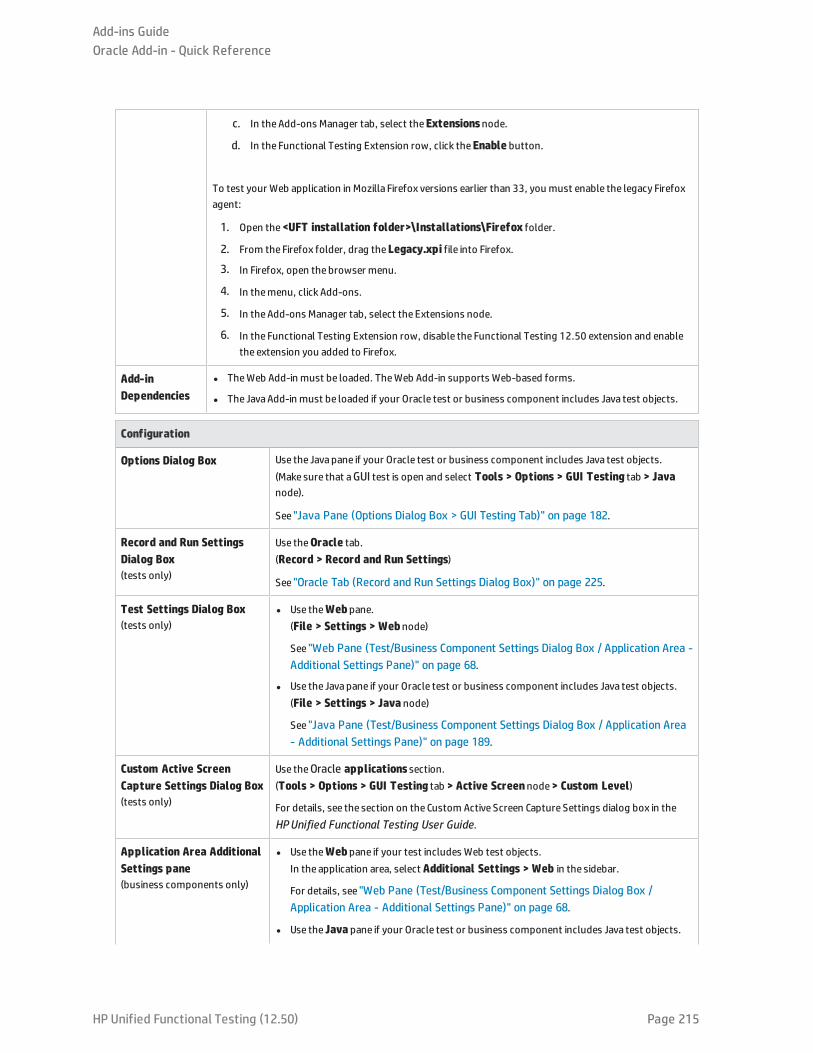
c. In theAdd-ons Manager tab, select theExtensionsnode.
d. In the Functional Testing Extension row, click theEnable button.
To test your Web application in Mozilla Firefox versions earlier than 33, you must enable the legacy Firefoxagent:
1. Open the<UFT installation folder>\Installations\Firefox folder.
2. From the Firefox folder, drag theLegacy.xpi file into Firefox.
3. In Firefox, open the browser menu.
4. In themenu, click Add-ons.
5. In theAdd-ons Manager tab, select the Extensions node.
6. In the Functional Testing Extension row, disable the Functional Testing 12.50 extension and enablethe extension you added to Firefox.
Add-inDependencies
l TheWeb Add-in must be loaded. TheWeb Add-in supports Web-based forms.
l The JavaAdd-in must be loaded if your Oracle test or business component includes Java test objects.
Configuration
Options Dialog Box Use the Javapane if your Oracle test or business component includes Java test objects.(Make sure that aGUI test is open and select Tools > Options > GUI Testing tab > Javanode).
See "Java Pane (Options Dialog Box > GUI Testing Tab)" on page 182.
Record and Run SettingsDialog Box(tests only)
Use theOracle tab.(Record > Record and Run Settings)
See "Oracle Tab (Record and Run Settings Dialog Box)" on page 225.
Test Settings Dialog Box(tests only)
l Use theWebpane.(File > Settings > Webnode)
See "Web Pane (Test/Business Component Settings Dialog Box / Application Area -Additional Settings Pane)" on page 68.
l Use the Javapane if your Oracle test or business component includes Java test objects.(File > Settings > Java node)
See "Java Pane (Test/Business Component Settings Dialog Box / Application Area- Additional Settings Pane)" on page 189.
Custom Active ScreenCapture Settings Dialog Box(tests only)
Use theOracle applications section.(Tools > Options > GUI Testing tab > Active Screennode> Custom Level)
For details, see the section on the Custom Active Screen Capture Settings dialog box in theHPUnified Functional Testing User Guide.
Application Area AdditionalSettings pane(business components only)
l Use theWebpane if your test includes Web test objects.In the application area, select Additional Settings > Web in the sidebar.
For details, see "Web Pane (Test/Business Component Settings Dialog Box /Application Area - Additional Settings Pane)" on page 68.
l Use the Java pane if your Oracle test or business component includes Java test objects.
Add-ins GuideOracle Add-in - Quick Reference
HP Unified Functional Testing (12.50) Page 215

In the application area, select Additional Settings > Java in the sidebar.
See "Java Pane (Test/Business Component Settings Dialog Box / Application Area- Additional Settings Pane)" on page 189.
(The options shown in the Javapaneof the Test Settings dialog box are the sameas theoptions that are available in theAdditional Settings in the application area.)
Add-ins GuideOracle Add-in - Quick Reference
HP Unified Functional Testing (12.50) Page 216
Oracle Add-in - Testing and ConfigurationThis chapter includes:
• Considerations for Working with the Oracle Add-in 218
• Recording Tests on Oracle Applications 219
• Dynamic Transformation Support 220
• How to Verify or Enable the Oracle Server Unique Name Attributes 221
• How to Enable the Oracle Name Attribute 221
• How to Set Oracle Environment Variables 222
• How to Disable Dynamic Transformation Support 223
• Oracle Tab (Record and Run Settings Dialog Box) 225
• Oracle Record and Run Environment Variables 227
• Troubleshooting and Limitations - Oracle Add-in 228
HP Unified Functional Testing (12.50) Page 217
Considerations for Working with the Oracle Add-inl If you installed a version of JInitiator 1.1.x after installing the Oracle Add-in, a warning is displayed
when you start recording your test or business component. Versions of JInitiator 1.1.x installed afteryou install the Oracle Add-in are not supported by UFT. In this case, you can repair the Oracle Add-into enable full support of all currently installed versions of JInitiator 1.1.x. For details, see the sectionon repairing your UFT installation in the HP Unified Functional Testing Installation Guide.
If you try to record an action on an Oracle object with an unsupported version of JInitiator 1.1.x, UFTrecords a generic WinObject.Click statement that includes the coordinates of the click and themouse button that was clicked.
l After installing the Oracle Add-in, your applications will always open with Java support active. You canconfirm that your Oracle environment has opened properly by checking the Java console for theconfirmation message similar to:
Loading Oracle Support (version x.x build xxx) (Oracle Corporation x.x.x.xx).
For details, see " Dynamic Transformation Support " on page 220.
Note: The UFT Oracle Add-in supports only Oracle clients that are Java-based. OracleDeveloper/2000 is not supported.
l Before using the Oracle Add-in to test Oracle Applications, you must first enable the Name attributesupplied by the Oracle Applications server. details, see "How to Enable the Oracle Name Attribute" onpage 221.
l The Oracle Applications server supplies a unique Name attribute for many application objects. Youcan also find the Oracle Applications server Name attribute in the Oracle Add-in developer nameidentification property. The developer name identification property is used by UFT in most testobject descriptions to identify Oracle objects. For details, see "How to Enable the Oracle NameAttribute" on page 221.
l In UFT, table data is always loaded from the application itself, even if the Active Screen contains animage of the table. For this reason, you must first open the table in the application before creating atable checkpoint in a test.
l In some cases you may need to scroll to the last row of the table to make sure that all the data isloaded.
l If the table object is not open in your application when you create the checkpoint, the TableCheckpoint Properties dialog box contains only the Properties tab, and the option to select whichtype of information to check (content or properties) is disabled.
l It is not necessary to open the table in your application to edit an existing table checkpoint.
l For details on UFT functionality, see the HP Unified Functional Testing User Guide.
HP Unified Functional Testing (12.50) Page 218

Recording Tests on Oracle ApplicationsAs you record on an Oracle Applications session, UFT inserts statements into your test or businesscomponent that represent the operations you perform. The UFT Oracle Add-in recognizes specificOracle objects such as button, form, navigator, list, and tree. It records these objects in relation to thedata selected or entered and to the object within its parent object.
Note: UFT does not record the selection of Oracle tabs. Each object in an Oracle tab is included inthe object repository within the tab hierarchy. UFT then uses this hierarchy when the test orbusiness component is run, switching to the appropriate tab if needed.
The UFT learned object hierarchy is composed of one, two, or three levels of Oracle test objects.Depending on the actual object on which you performed an operation, that object may be recorded as afirst level object (for example, OracleLogon), as a second level object (for example,OracleFormWindow.OracleList), or as a third level object (for example,OracleFormWindow.OracleTabbedRegion.OracleTable).
Even though the object on which you record may be embedded in several levels of objects, the recordedhierarchy does not include these objects. For example, even if the OracleListOfValues object in whichyou select an item is actually within an Oracle form, which is contained within an Oracle Applicationssession window, the recorded hierarchy is only OracleListOfValues.
Example of a Step on an Oracle Object
If you record the selection of an item in an Oracle List of Values window, the Keyword Viewmay bedisplayed as follows:
UFT records this step in the Editor as:
OracleListOfValues("Responsibilities").Select "Assets, Vision Operations (USA)"
Working with Tests
Each time you begin recording a test, you can use the "Oracle Tab (Record and Run Settings Dialog Box)"(described on page 225) to instruct UFT to connect to a specified Oracle Applications server.Alternatively, you can instruct UFT to record on any open browser. For details, see "Recording Tests onOracle Applications" above.
Working with Components
The Record and Run Settings dialog box is used for tests only. When you record a business componenton an Oracle Applications session, you cannot instruct UFT to open or connect to a specified Oracle
Add-ins GuideOracle Add-in - Testing and Configuration
HP Unified Functional Testing (12.50) Page 219
Applications server. You can open and connect to it manually or include statements in your businesscomponent (using the OpenApp operation or the SystemUtil utility object and the OracleLogon testobject) that open and connect to the Oracle Applications server. For details on the Applications pane andApplications dialog box, see the HP Unified Functional Testing User Guide.
Working with Java Test Objects
You may have a combination of Oracle and Java test objects in your Oracle test or business component.This occurs when UFT encounters a Java applet within your Oracle Applications session and records itusing the Java test object hierarchy.
You can edit steps that use Java test objects, methods, and properties in the same way as you editother standard steps. You can add new steps to existing tests or business components using the newOracle test object model. For details on Java objects, methods, and properties, see the Java section ofthe HP UFT Object Model Reference for GUI Testing, installed together with the Oracle Add-in. For detailson Oracle objects, methods, and properties, see the Oracle section of the HP UFT Object Model Referencefor GUI Testing.
There are specific options and settings you can use in your test or business component that apply onlyto steps that use Java test objects. These options and settings are located in the Java pane of the TestSettings dialog box (File > Settings > Java node) and the Java pane of the Options dialog box (Tools >Options > GUI Testing tab > Java node). For more information, click the Help button in the relevantJava pane. Note that the options in the Java panes do not have any effect on Oracle object steps in yourtest or business component.
Dynamic Transformation SupportThe Oracle Add-in uses a mechanism for supporting multiple Java environments (Oracle Plug-in,JInitiator) and their versions (JInitiator 1.1.8, 1.3.1, and so on) without requiring any configurationchanges. This mechanism is known as dynamic transformation support.
Dynamic transformation support uses the profiler interface of the Java Virtual Machine (JVM) to adjustthe Oracle Add-in support classes according to the Java environment and version in use.
The dynamic transformation support mechanism is invoked by the -Xrunjvmhook option (for JInitiator1.3.1.x and Sun Plug-in 1.4.1) or the _classload_hook=jvmhook option (for JInitiator 1.1.x) supplied tothe JVM. If this option is specified, the JVM hook profiler, which is part of the Oracle Add-in support, isloaded with every application or applet and dynamically transforms the necessary classes to enablecontext-sensitive Oracle support.
l If the dynamic transformation support mechanism does not work properly, you can disable it andmanually configure the Oracle environment to use the Oracle Add-in without dynamic transformationsupport. For details, see "How to Disable Dynamic Transformation Support" on page 223.
l The dynamic transformation support mechanism is not supported when using the incrementalgarbage collector (-Xincgc option). Therefore, if you absolutely must use the -Xincgc option, you
Add-ins GuideOracle Add-in - Testing and Configuration
HP Unified Functional Testing (12.50) Page 220

need to disable dynamic transformation support. For details, see "How to Disable DynamicTransformation Support" on page 223
How to Verify or Enable the Oracle Server UniqueName AttributesThis task includes the following steps:
l "Prerequisite" below
l "Enable the Oracle server to supply unique Name attributes" below
1. Prerequisite
Use the Object Spy to point to a few edit boxes inside the Oracle application and view thedeveloper name attribute. If the developer name is displayed in all capital letters in the formatFORM:BLOCK:FIELD or FORM_BLOCK_FIELD, then the developer name attribute is suppliedcorrectly.
If the developer name value is empty, then the server does not supply unique Name attributes. Touse the Oracle Add-in to test Oracle Applications, your Oracle server must supply unique Nameattributes.
Your Oracle server administrator can assist you in enabling unique Name attributes.
2. Enable the Oracle server to supply unique Name attributes
a. Add the following line to the server configuration file (for example, $OA_HTML/bin/appsweb_UKTRN_hwu00001.cfg):
otherparams=record=names
b. Restart the Oracle server.
How to Enable the Oracle Name AttributeThis task describes the different ways in which you can enable the Name attribute supplied by theOracle Applications server before using the Oracle Add-in to test Oracle Applications.
This task includes:
l "Enable the Name attribute when accessing the application directly" on the next page
l "Enable the Name attribute when using HTML to launch the Oracle application" on the next page
l "Enable the Name attribute when using the Personal Home Page to launch your Forms 6 application"on the next page
Add-ins GuideOracle Add-in - Testing and Configuration
HP Unified Functional Testing (12.50) Page 221
Enable the Name attribute when accessing the application directly
Add record=names to the URL parameters.
Example:
http://oracleapps.mydomain.com:8002/dev60cgi/f60cgi?record=names
Enable the Name attribute when using HTML to launch the Oracle application
1. In the startup HTML file that is used to launch the application, locate the line: <PARAMname="serverArgs ............ fndnam= APPS">
2. Add the Oracle key: record=names
Example:
<PARAM name="serverArgs" value="module=f:\FNDSCSGN userid=XYZ fndnam=appsrecord=names">
Enable the Name attribute when using the Personal Home Page to launch yourForms 6 application
Set up the following system profile option at (your) user level to enable the Name attribute:
1. Sign on to your Oracle application and select System Administrator responsibility.
2. Select Nav > Profile > System.
3. In the Find System Profile Values form:
l Confirm that Display: Site and Users contains your user logon.
l Enter %ICX%Launch% in the Profile box.
l Click the Find button.
4. Copy the value from the Site box of the ICX: Forms Launcher profile and paste it in the User box.Add &play=&record=names to the end of the URL in the User box.
5. Save your transaction.
6. Sign on again using your user name.
Note: If the ICX: Forms Launcher profile option is not updatable at the user level, accessApplication Developer and select the Updatable check box for the ICX_FORMS_LAUNCHER profile.
How to Set Oracle Environment VariablesThis task describes how to set the environment variables you need for loading your Oracle applicationwith UFT Oracle Add-in support. For all the environments, you need to set one or more environmentvariables with the path name of the Oracle Add-in support classes folder.
Add-ins GuideOracle Add-in - Testing and Configuration
HP Unified Functional Testing (12.50) Page 222
This task includes the following steps:
l "Sun Plug-in 1.4.1 and Oracle JInitiator 1.3.1.x" below
l "Oracle JInitiator 1.1.x" below
Sun Plug-in 1.4.1 and Oracle JInitiator 1.3.1.x
Set the _JAVA_OPTIONS environment variable as follows:
-Xrunjvmhook-Xbootclasspath/a:"<UFT installation folder>\bin\javashared\classes";"<UFT installation folder>\bin\java_sharedclasses\jasmine.jar"
The above variables should appear on one line (no newline separators).
Note:
You can also use short paths in this command. For example:
-Xrunjvmhook -Xbootclasspath/a:C:\PROGRA~2\HP\UNIFIE~1\bin\JAVA_S~1\classes;C:\PROGRA~2\HP\UNIFIE~1\bin\JAVA_S~1\classes\jasmine.jar
In this example, UFT is installed in the default installation folder (C drive, Program Files) on aWindows 7 computer. PROGRA~2 denotes the Program Files (x86) folder, which is the ProgramFiles folder on 64-bit operating systems.
Oracle JInitiator 1.1.x
Set the _classload_hook environment variable to jvmhook.
How to Disable Dynamic Transformation SupportThis task includes the following steps:
l "Save the dynamically transformed classes" below
l "Disable dynamic transformation support " on the next page
This task describes how to disable dynamic transformation support if the dynamic transformationsupport mechanism does not work properly.
Save the dynamically transformed classes
1. Specify the folder in which to save the dynamically transformed classes that will be generatedduring the preliminary launching of your Oracle application.
To do this:
a. Open the registry editor (select Start > Run, type regedit in the Open box and click OK)
b. Navigate to the JavaAgentmain key, located in: HKEY_LOCAL_MACHINE\SOFTWARE\Mercury
Add-ins GuideOracle Add-in - Testing and Configuration
HP Unified Functional Testing (12.50) Page 223
Interactive\JavaAgent.
c. Define a new string value named ClassesDumpFolder, and set its value data to an existingfolder (preferably empty) on your computer, for example, C:\JavaSupportClasses.
d. If the ClassesDumpFolder string value already exists, you can modify its value data to anexisting folder on your computer.
2. If you are using the -Xincgc option, temporarily remove it from the command line to enable theJVM hook profiler to transform and save the necessary classes. You can add it back to thecommand line after performing the following step.
3. Launch your applet or application and perform some basic operations on it. This ensures that all ofthe necessary classes are transformed and saved. Close your application. All of the dynamicallytransformed classes are now saved in the folder you specified in the previous step (for example,C:\JavaSupportClasses).
Disable dynamic transformation support
For Sun Plug-in 1.4.1 or JInitiator 1.3.1.x:
1. Remove the -Xrunjvmhook option from the _JAVA_OPTIONS environment variable.
2. Add the following option instead: -Xbootclasspath/p:<ClassesDumpFolder>\Final, where<ClassesDumpFolder> is the value of the folder in which the dynamically transformed classeswere saved, such as C:\JavaSupportClasses, appended by the Final subfolder. For example,after your modification the _JAVA_OPTIONS environment variable might look like this:
-Xbootclasspath/p:C:\JavaSupportClasses\Final -Xbootclasspath/a:"%ProgramFiles%\HP Software\Unified FunctionalTesting\bin\java_shared\classes";
For Initiator 1.1.x:
1. Remove the _classload_hook option from the JDK settings by deleting the environment variable.
2. Manually copy the classes from the <ClassesDumpFolder>, where <ClassesDumpFolder> is thevalue of the folder in which the dynamically transformed classes were saved, such asC:\JavaSupportClasses, appended by the Final subfolder, to the JInitiator 1.1.x classes folder.You can find the JInitiator 1.1.x classes folder under %ProgramFiles%\Oracle\JInitiator1.1.x\classes.
Add-ins GuideOracle Add-in - Testing and Configuration
HP Unified Functional Testing (12.50) Page 224

Oracle Tab (Record and Run Settings Dialog Box)This tab enables you to specify whether or not to connect to an Oracle Applications server and open aspecified Oracle Applications session when a record or run session begins. If you select to connect to aspecific server, you can specify details that will enable UFT to automatically log on to the server eachtime a record or run session begins (instead of recording the log-in steps).
To access Select Record > Record and Run Settingsand select theOracle tab
Note: If you do not modify theRecord and Run settings before you begin recording, theRecord and RunSettings dialog box opens automatically when you begin recording anew test (by clicking Record (orchoosing Record > Record).
Importantinformation
If you load only theUFT Oracle Add-in and theWeb add-in, then only theOracle, Web, and WindowsApplications tabs are displayed in theRecord and Run Settings dialog box. If other add-ins are loaded, thecorresponding tabs (if any) are also displayed.
Add-ins GuideOracle Add-in - Testing and Configuration
HP Unified Functional Testing (12.50) Page 225
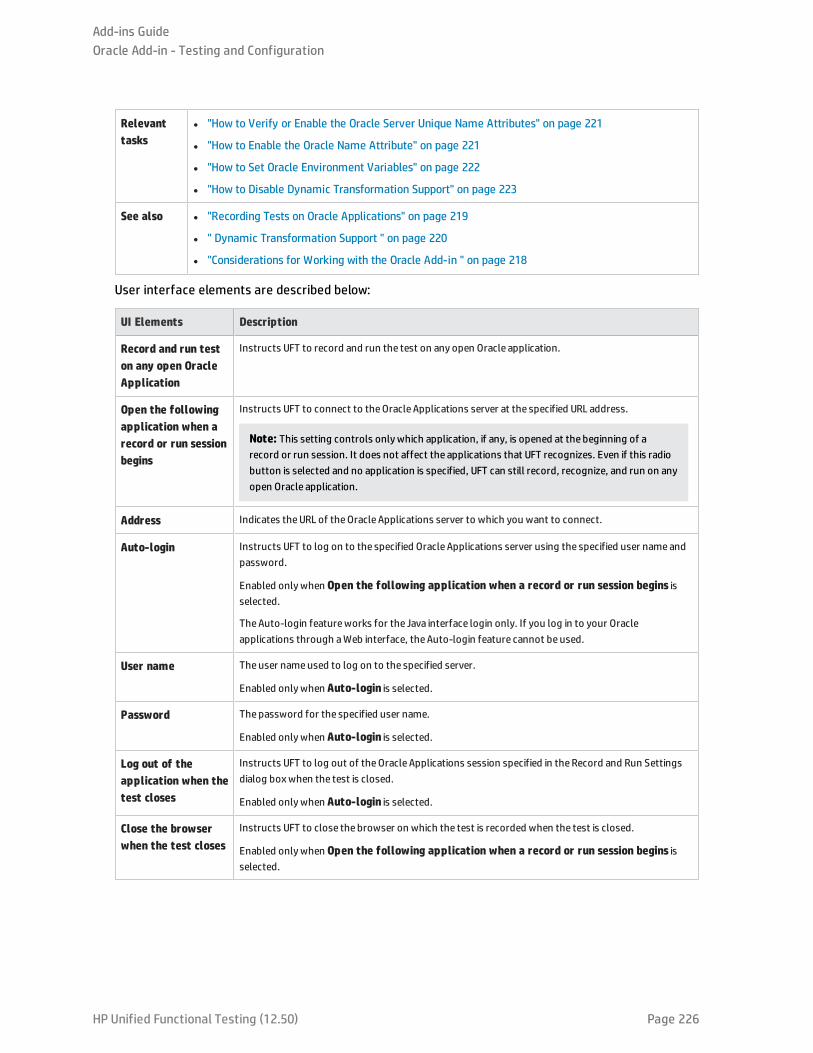
Relevanttasks
l "How to Verify or Enable the Oracle Server Unique Name Attributes" on page 221
l "How to Enable the Oracle Name Attribute" on page 221
l "How to Set Oracle Environment Variables" on page 222
l "How to Disable Dynamic Transformation Support" on page 223
See also l "Recording Tests on Oracle Applications" on page 219
l " Dynamic Transformation Support " on page 220
l "Considerations for Working with the Oracle Add-in " on page 218
User interface elements are described below:
UI Elements Description
Record and run teston any open OracleApplication
Instructs UFT to record and run the test on any open Oracle application.
Open the followingapplication when arecord or run sessionbegins
Instructs UFT to connect to theOracle Applications server at the specified URL address.
Note: This setting controls onlywhich application, if any, is opened at the beginning of arecord or run session. It does not affect the applications that UFT recognizes. Even if this radiobutton is selected and no application is specified, UFT can still record, recognize, and run on anyopen Oracle application.
Address Indicates theURL of theOracle Applications server to which you want to connect.
Auto-login Instructs UFT to log on to the specified Oracle Applications server using the specified user nameandpassword.
Enabled onlywhen Open the following application when a record or run session begins isselected.
TheAuto-login featureworks for the Java interface login only. If you log in to your Oracleapplications through aWeb interface, theAuto-login feature cannot be used.
User name Theuser nameused to log on to the specified server.
Enabled onlywhen Auto-login is selected.
Password Thepassword for the specified user name.
Enabled onlywhen Auto-login is selected.
Log out of theapplication when thetest closes
Instructs UFT to log out of theOracle Applications session specified in theRecord and Run Settingsdialog boxwhen the test is closed.
Enabled onlywhen Auto-login is selected.
Close the browserwhen the test closes
Instructs UFT to close the browser on which the test is recorded when the test is closed.
Enabled onlywhen Open the following application when a record or run session begins isselected.
Add-ins GuideOracle Add-in - Testing and Configuration
HP Unified Functional Testing (12.50) Page 226
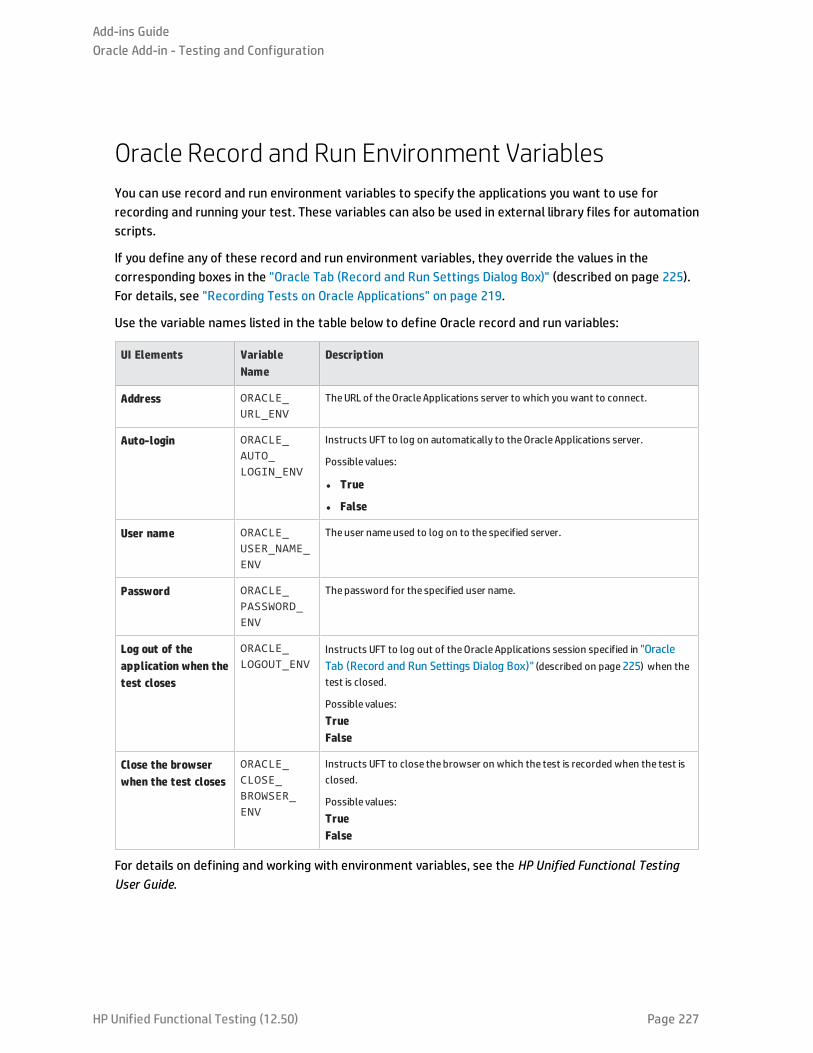
Oracle Record and Run Environment VariablesYou can use record and run environment variables to specify the applications you want to use forrecording and running your test. These variables can also be used in external library files for automationscripts.
If you define any of these record and run environment variables, they override the values in thecorresponding boxes in the "Oracle Tab (Record and Run Settings Dialog Box)" (described on page 225).For details, see "Recording Tests on Oracle Applications" on page 219.
Use the variable names listed in the table below to define Oracle record and run variables:
UI Elements VariableName
Description
Address ORACLE_URL_ENV
TheURL of theOracle Applications server to which you want to connect.
Auto-login ORACLE_AUTO_LOGIN_ENV
Instructs UFT to log on automatically to theOracle Applications server.
Possible values:
l True
l False
User name ORACLE_USER_NAME_ENV
Theuser nameused to log on to the specified server.
Password ORACLE_PASSWORD_ENV
Thepassword for the specified user name.
Log out of theapplication when thetest closes
ORACLE_LOGOUT_ENV
Instructs UFT to log out of theOracle Applications session specified in "OracleTab (Record and Run Settings Dialog Box)" (described on page225) when thetest is closed.
Possible values:TrueFalse
Close the browserwhen the test closes
ORACLE_CLOSE_BROWSER_ENV
Instructs UFT to close the browser on which the test is recorded when the test isclosed.
Possible values:TrueFalse
For details on defining and working with environment variables, see the HP Unified Functional TestingUser Guide.
Add-ins GuideOracle Add-in - Testing and Configuration
HP Unified Functional Testing (12.50) Page 227
Troubleshooting and Limitations - Oracle Add-inThis section contains general information and limitations about the Oracle add-in, and includes thefollowing sections:
l "Installing the Oracle Add-in " below
l "Creating and Running Testing Documents" on the next page
l "Record and Run Options" on the next page
l "Checkpoints" on the next page
For limitations relevant to specific test objects and methods, see the Oracle section of the HP UFTObject Model Reference for GUI Testing.
Installing the Oracle Add-in
l If you install an Oracle JInitiator 1.1.x version after you install the UFT Oracle Add-in, you must repairUFT to test applications running in the newly installed JInitiator version. For details, see the HP UnifiedFunctional Testing Add-ins Guide.
Note: It is not necessary to re-install or otherwise configure the UFT Oracle Add-in if youinstalled a new Oracle environment other than JInitiator 1.1.x.
l The UFT Oracle Add-in provides a number of indicators that help you identify whether your add-in isproperly installed and functioning. The following table describes the indicators you may see whenyour add-in is not functioning properly, and suggests possible solutions:
Indicator Solution
You cannot record or run testson Oracle Applications.
Ensure that theOracle Add-in is loaded. For details, see "How to Manage UFT Add-ins"on page 28.
The Java console does notdisplay a line containing the textsimilar to: Loading OracleSupport.
Check that the settings in your environment correspond to the environment settingsdefined in this chapter, or check for a batch file that may override the settings.
For details, see:
l "Recording Tests on Oracle Applications" on page 219.
l " Dynamic Transformation Support " on page 220.
Your Java console contains thelineCould not find –Xrun library:jvmhook.dll.
Check that you havejvmhook.dll in your system folder (WINNT\system32,Windows\System32, or Windows\SysWOW64, depending on your operatingsystem).
You cannot useUFT to recordon Oracle Applications runningon Oracle JInitiator versions1.1.X.
The version of Oracle JInitiator 1.1.X on which your Oracle Application runs must beinstalled before you install theUFT Oracle Add-in.
If you installed Oracle JInitiator versions 1.1.X on your computer after you installed theOracle Add-in, you should repair theOracle Add-in installation. For details, see the section
Add-ins GuideOracle Add-in - Testing and Configuration
HP Unified Functional Testing (12.50) Page 228
Indicator Solution
on repairing your UFT installation in theHPUnified Functional Testing InstallationGuide.
If, after reviewing the above indicators and solutions, you are still unable to record and run tests onyour Oracle application, contact HP Software Support.
Creating and Running Testing Documents
l Test objects that require the index property for their description (for example, range flexfieldobjects) cannot be created from the Active Screen.
Workaround: Use the Add Objects button in the Object Repository window to add these test objectsdirectly from your Oracle Applications instead.
l Active Screen captures are not supported for OracleListOfValues and OracleNotification test objects.
l The recovery scenario pop-up window trigger event is not supported when testing OracleApplications.
l Simultaneous testing of multiple Oracle Applications sessions is not supported.
Record and Run Options
The Log out of the application when the test closes option in the Record and Run Settings dialog boxdoes not work if the Responsibilities List of Values window is displayed in the Oracle Applicationssession.
Checkpoints
l Performing a checkpoint on an object that is not always visible (such as a list opening from a combobox selection or a menu item) is not fully supported.
Workaround: If a checkpoint on a transient object is required, make sure the object is visible prior toexecuting the checkpoint. For example, in the case of combo box list, you should insert a statementthat clicks the combo box button before executing the checkpoint.
l When testing Oracle applications, a table checkpoint may not capture the values of columns that arenot visible.
Workaround: Before creating a table checkpoint, scroll in the table so that the last column is visible.
Add-ins GuideOracle Add-in - Testing and Configuration
HP Unified Functional Testing (12.50) Page 229
HP Unified Functional Testing (12.50) Page 230
Part 9: PeopleSoft Add-inThis section includes:
"PeopleSoft Add-in - Quick Reference" on page 231
"Considerations for Working with the PeopleSoft Add-in" on page 232
"Troubleshooting and Limitations - PeopleSoft Add-in" on page 233
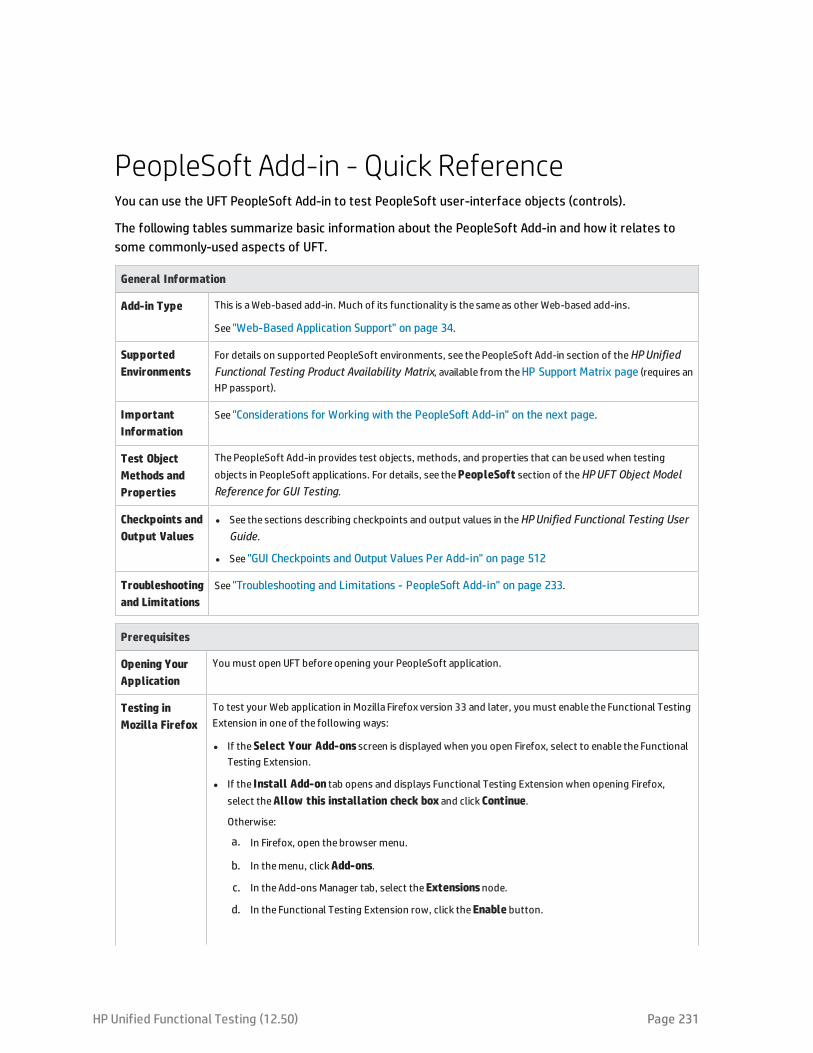
PeopleSoft Add-in - Quick ReferenceYou can use the UFT PeopleSoft Add-in to test PeopleSoft user-interface objects (controls).
The following tables summarize basic information about the PeopleSoft Add-in and how it relates tosome commonly-used aspects of UFT.
General Information
Add-in Type This is aWeb-based add-in. Much of its functionality is the sameas other Web-based add-ins.
See "Web-Based Application Support" on page 34.
SupportedEnvironments
For details on supported PeopleSoft environments, see thePeopleSoft Add-in section of theHPUnifiedFunctional Testing Product Availability Matrix, available from theHP Support Matrix page (requires anHP passport).
ImportantInformation
See "Considerations for Working with the PeopleSoft Add-in" on the next page.
Test ObjectMethods andProperties
ThePeopleSoft Add-in provides test objects, methods, and properties that can beused when testingobjects in PeopleSoft applications. For details, see thePeopleSoft section of theHPUFT Object ModelReference for GUI Testing.
Checkpoints andOutput Values
l See the sections describing checkpoints and output values in theHPUnified Functional Testing UserGuide.
l See "GUI Checkpoints and Output Values Per Add-in" on page 512
Troubleshootingand Limitations
See "Troubleshooting and Limitations - PeopleSoft Add-in" on page 233.
Prerequisites
Opening YourApplication
You must open UFT before opening your PeopleSoft application.
Testing inMozilla Firefox
To test your Web application in Mozilla Firefox version 33 and later, you must enable the Functional TestingExtension in oneof the following ways:
l If theSelect Your Add-ons screen is displayed when you open Firefox, select to enable the FunctionalTesting Extension.
l If the Install Add-on tab opens and displays Functional Testing Extension when opening Firefox,select theAllow this installation check box and clickContinue.
Otherwise:
a. In Firefox, open the browser menu.
b. In themenu, clickAdd-ons.
c. In theAdd-ons Manager tab, select theExtensionsnode.
d. In the Functional Testing Extension row, click theEnable button.
HP Unified Functional Testing (12.50) Page 231
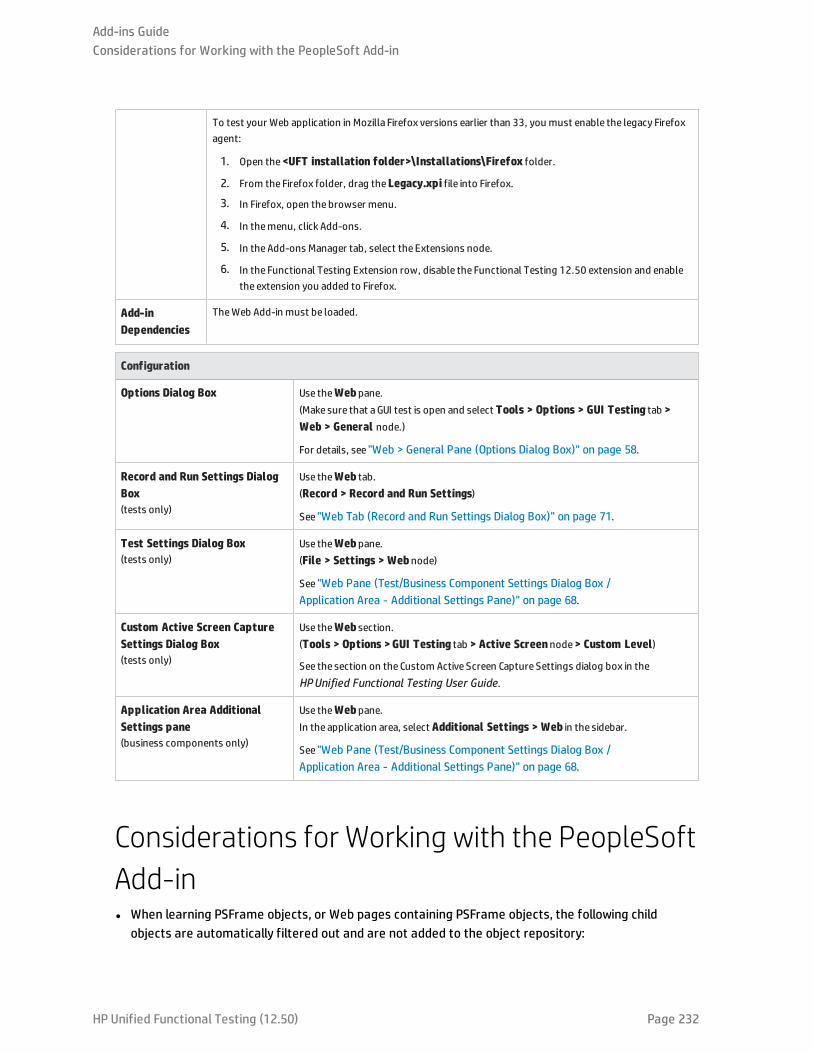
To test your Web application in Mozilla Firefox versions earlier than 33, you must enable the legacy Firefoxagent:
1. Open the<UFT installation folder>\Installations\Firefox folder.
2. From the Firefox folder, drag theLegacy.xpi file into Firefox.
3. In Firefox, open the browser menu.
4. In themenu, click Add-ons.
5. In theAdd-ons Manager tab, select the Extensions node.
6. In the Functional Testing Extension row, disable the Functional Testing 12.50 extension and enablethe extension you added to Firefox.
Add-inDependencies
TheWeb Add-in must be loaded.
Configuration
Options Dialog Box Use theWebpane.(Make sure that aGUI test is open and select Tools > Options > GUI Testing tab >Web > General node.)
For details, see "Web > General Pane (Options Dialog Box)" on page 58.
Record and Run Settings DialogBox(tests only)
Use theWeb tab.(Record > Record and Run Settings)
See "Web Tab (Record and Run Settings Dialog Box)" on page 71.
Test Settings Dialog Box(tests only)
Use theWebpane.(File > Settings > Webnode)
See "Web Pane (Test/Business Component Settings Dialog Box /Application Area - Additional Settings Pane)" on page 68.
Custom Active Screen CaptureSettings Dialog Box(tests only)
Use theWeb section.(Tools > Options >GUI Testing tab > Active Screennode> Custom Level)
See the section on the Custom Active Screen Capture Settings dialog box in theHPUnified Functional Testing User Guide.
Application Area AdditionalSettings pane(business components only)
Use theWebpane.In the application area, select Additional Settings > Web in the sidebar.
See "Web Pane (Test/Business Component Settings Dialog Box /Application Area - Additional Settings Pane)" on page 68.
Considerations for Working with the PeopleSoftAdd-inl When learning PSFrame objects, or Web pages containing PSFrame objects, the following child
objects are automatically filtered out and are not added to the object repository:
Add-ins GuideConsiderations for Working with the PeopleSoft Add-in
HP Unified Functional Testing (12.50) Page 232
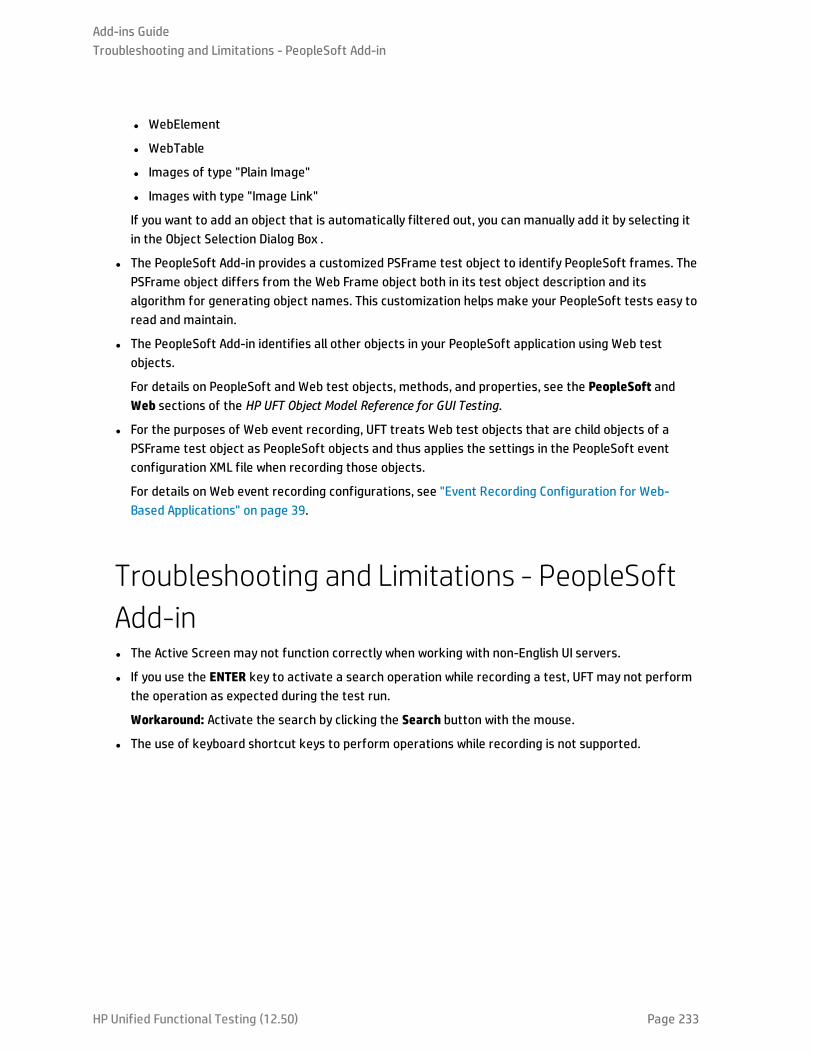
l WebElement
l WebTable
l Images of type "Plain Image"
l Images with type "Image Link"
If you want to add an object that is automatically filtered out, you can manually add it by selecting itin the Object Selection Dialog Box .
l The PeopleSoft Add-in provides a customized PSFrame test object to identify PeopleSoft frames. ThePSFrame object differs from the Web Frame object both in its test object description and itsalgorithm for generating object names. This customization helps make your PeopleSoft tests easy toread and maintain.
l The PeopleSoft Add-in identifies all other objects in your PeopleSoft application using Web testobjects.
For details on PeopleSoft and Web test objects, methods, and properties, see the PeopleSoft andWeb sections of the HP UFT Object Model Reference for GUI Testing.
l For the purposes of Web event recording, UFT treats Web test objects that are child objects of aPSFrame test object as PeopleSoft objects and thus applies the settings in the PeopleSoft eventconfiguration XML file when recording those objects.
For details on Web event recording configurations, see "Event Recording Configuration for Web-Based Applications" on page 39.
Troubleshooting and Limitations - PeopleSoftAdd-inl The Active Screen may not function correctly when working with non-English UI servers.
l If you use the ENTER key to activate a search operation while recording a test, UFT may not performthe operation as expected during the test run.
Workaround: Activate the search by clicking the Search button with the mouse.
l The use of keyboard shortcut keys to perform operations while recording is not supported.
Add-ins GuideTroubleshooting and Limitations - PeopleSoft Add-in
HP Unified Functional Testing (12.50) Page 233

HP Unified Functional Testing (12.50) Page 234
Part 10: PowerBuilder Add-inThis section includes:
"PowerBuilder Add-in - Quick Reference " on page 235
"Considerations for Working with the PowerBuilder Add-in " on page 236
"Troubleshooting and Limitations - PowerBuilder Add-in" on page 237
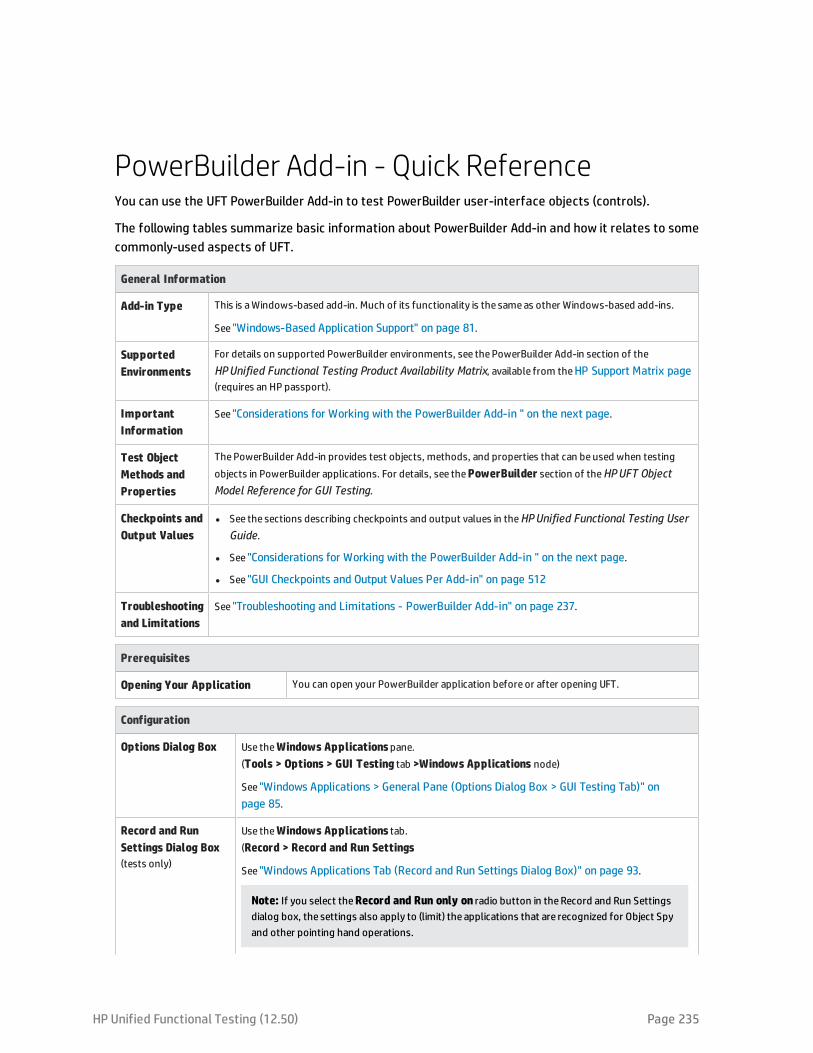
PowerBuilder Add-in - Quick ReferenceYou can use the UFT PowerBuilder Add-in to test PowerBuilder user-interface objects (controls).
The following tables summarize basic information about PowerBuilder Add-in and how it relates to somecommonly-used aspects of UFT.
General Information
Add-in Type This is aWindows-based add-in. Much of its functionality is the sameas other Windows-based add-ins.
See "Windows-Based Application Support" on page 81.
SupportedEnvironments
For details on supported PowerBuilder environments, see thePowerBuilder Add-in section of theHPUnified Functional Testing Product Availability Matrix, available from theHP Support Matrix page(requires an HP passport).
ImportantInformation
See "Considerations for Working with the PowerBuilder Add-in " on the next page.
Test ObjectMethods andProperties
ThePowerBuilder Add-in provides test objects, methods, and properties that can beused when testingobjects in PowerBuilder applications. For details, see thePowerBuilder section of theHPUFT ObjectModel Reference for GUI Testing.
Checkpoints andOutput Values
l See the sections describing checkpoints and output values in theHPUnified Functional Testing UserGuide.
l See "Considerations for Working with the PowerBuilder Add-in " on the next page.
l See "GUI Checkpoints and Output Values Per Add-in" on page 512
Troubleshootingand Limitations
See "Troubleshooting and Limitations - PowerBuilder Add-in" on page 237.
Prerequisites
Opening Your Application You can open your PowerBuilder application before or after opening UFT.
Configuration
Options Dialog Box Use theWindows Applicationspane.(Tools > Options > GUI Testing tab >Windows Applications node)
See "Windows Applications > General Pane (Options Dialog Box > GUI Testing Tab)" onpage 85.
Record and RunSettings Dialog Box(tests only)
Use theWindows Applications tab.(Record > Record and Run Settings
See "Windows Applications Tab (Record and Run Settings Dialog Box)" on page 93.
Note: If you select theRecord and Run only on radio button in theRecord and Run Settingsdialog box, the settings also apply to (limit) the applications that are recognized for Object Spyand other pointing hand operations.
HP Unified Functional Testing (12.50) Page 235
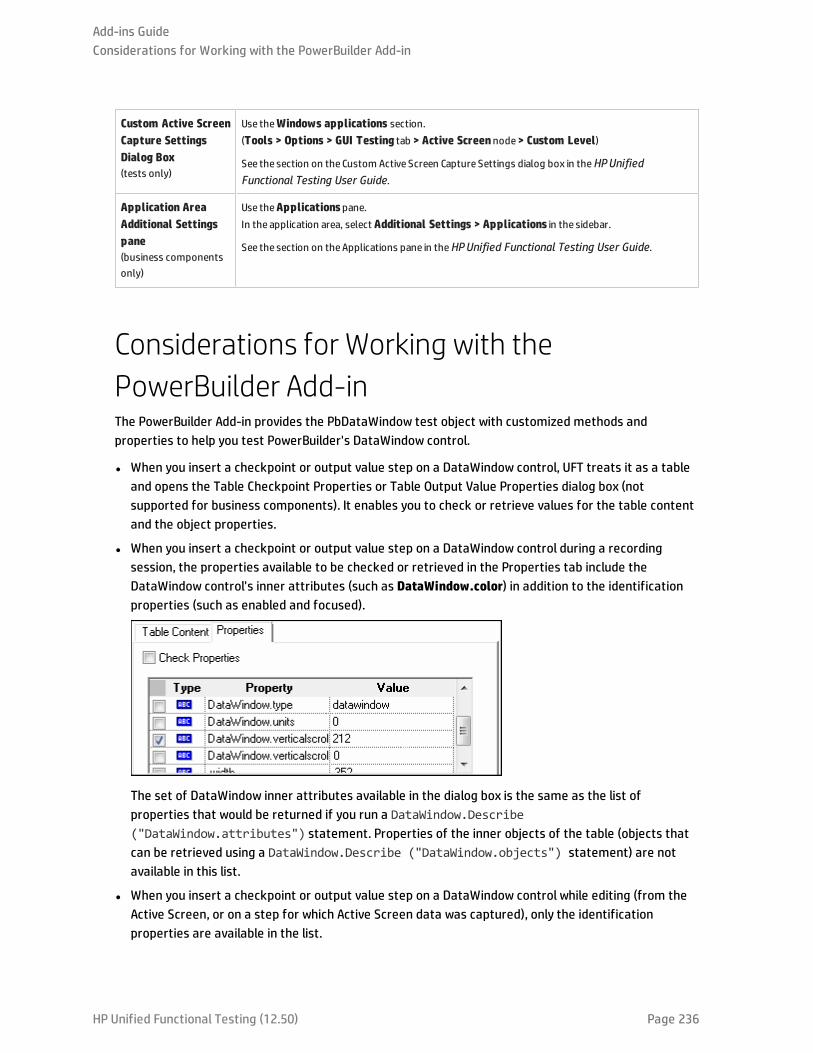
Custom Active ScreenCapture SettingsDialog Box(tests only)
Use theWindows applications section.(Tools > Options > GUI Testing tab > Active Screennode> Custom Level)
See the section on the Custom Active Screen Capture Settings dialog box in theHPUnifiedFunctional Testing User Guide.
Application AreaAdditional Settingspane(business componentsonly)
Use theApplicationspane.In the application area, select Additional Settings > Applications in the sidebar.
See the section on theApplications pane in theHPUnified Functional Testing User Guide.
Considerations for Working with thePowerBuilder Add-inThe PowerBuilder Add-in provides the PbDataWindow test object with customized methods andproperties to help you test PowerBuilder's DataWindow control.
l When you insert a checkpoint or output value step on a DataWindow control, UFT treats it as a tableand opens the Table Checkpoint Properties or Table Output Value Properties dialog box (notsupported for business components). It enables you to check or retrieve values for the table contentand the object properties.
l When you insert a checkpoint or output value step on a DataWindow control during a recordingsession, the properties available to be checked or retrieved in the Properties tab include theDataWindow control's inner attributes (such as DataWindow.color) in addition to the identificationproperties (such as enabled and focused).
The set of DataWindow inner attributes available in the dialog box is the same as the list ofproperties that would be returned if you run a DataWindow.Describe("DataWindow.attributes") statement. Properties of the inner objects of the table (objects thatcan be retrieved using a DataWindow.Describe ("DataWindow.objects") statement) are notavailable in this list.
l When you insert a checkpoint or output value step on a DataWindow control while editing (from theActive Screen, or on a step for which Active Screen data was captured), only the identificationproperties are available in the list.
Add-ins GuideConsiderations for Working with the PowerBuilder Add-in
HP Unified Functional Testing (12.50) Page 236
For details on the DataWindow test object, see the PowerBuilder section of the HP UFT Object ModelReference for GUI Testing.
Troubleshooting and Limitations - PowerBuilder Add-inl When learning or recording on toolbars in PowerBuilder applications, UFT no longer records the
PbToolbar test object. Instead, it records a PbObject.Click step. The PbToolbar test object is nolonger available in UFT dialog boxes or in the documentation.
l If a PbToolbar test object exists in an old object repository, it will be recognized and supported, buttoolbar-specific methods such as CheckItem, GetContent, GetItem, GetItemProperty, GetItemCount,GetSelection, Press, ShowDropDown, andWaitItemProperty are not supported for this object. To fixthis, update object repositories and tests to use the PbObject test object for toolbar steps.
l By default, UFT recgonizes objects in your application as PowerBuilder objects only if the applicationwas built with a supported version of PowerBuilder.
If you want to try to use UFT with an unsupported PowerBuilder version, you can make the followingchange:
a. Open C:\Windows\wrun.ini in a text editor. If this file does not exist, create it.
b. Under the [WrCfg] section, add a line in the format: PBRuntimeDllName=<YourPB_Dll>. Forexample:
[WrCfg]
PBRuntimeDllName=pbvm126.dll
Caution: This is an ‘As-Is’, unsupported option.
For details on supported versions of PowerBuilder, see the UFT Product Availability Matrix, availablefrom the HP Support Matrix page site.
Add-ins GuideTroubleshooting and Limitations - PowerBuilder Add-in
HP Unified Functional Testing (12.50) Page 237

HP Unified Functional Testing (12.50) Page 238
Part 11: Qt Add-inThis section includes:
"Qt Add-in - Quick Reference" on page 239
"Considerations - Qt Add-in" on page 241
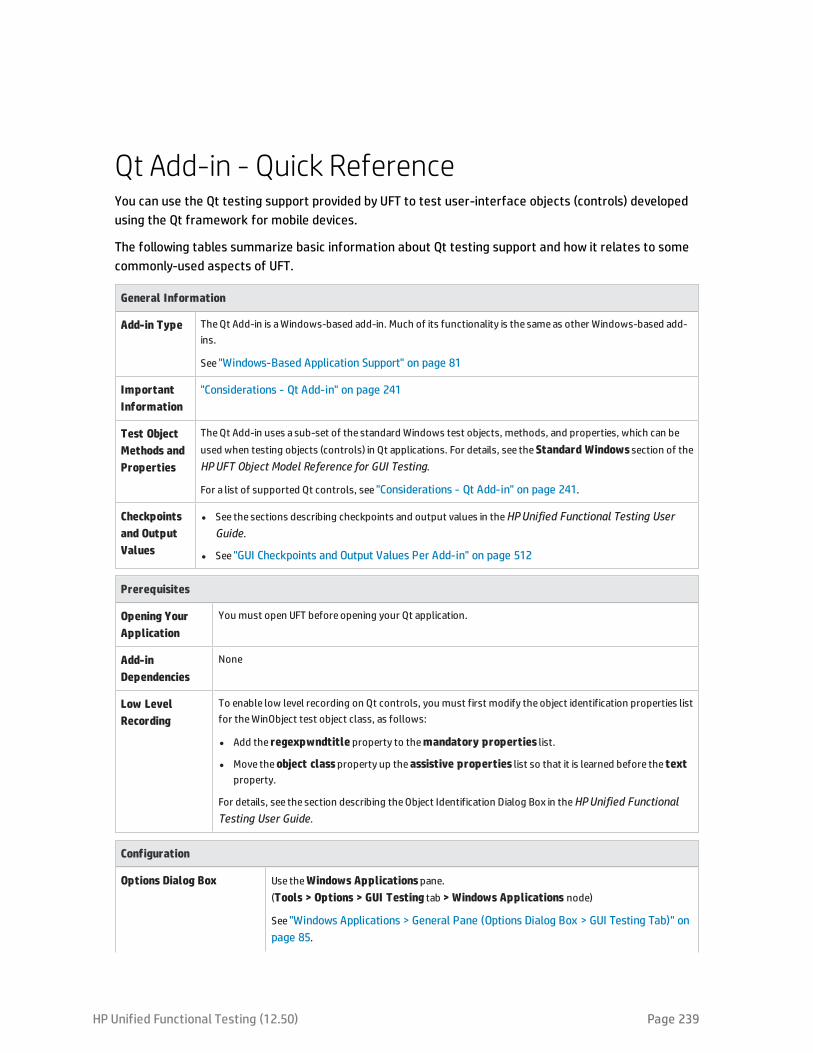
Qt Add-in - Quick ReferenceYou can use the Qt testing support provided by UFT to test user-interface objects (controls) developedusing the Qt framework for mobile devices.
The following tables summarize basic information about Qt testing support and how it relates to somecommonly-used aspects of UFT.
General Information
Add-in Type TheQt Add-in is aWindows-based add-in. Much of its functionality is the sameas other Windows-based add-ins.
See "Windows-Based Application Support" on page 81
ImportantInformation
"Considerations - Qt Add-in" on page 241
Test ObjectMethods andProperties
TheQt Add-in uses a sub-set of the standard Windows test objects, methods, and properties, which can beused when testing objects (controls) in Qt applications. For details, see theStandard Windows section of theHPUFT Object Model Reference for GUI Testing.
For a list of supported Qt controls, see "Considerations - Qt Add-in" on page 241.
Checkpointsand OutputValues
l See the sections describing checkpoints and output values in theHPUnified Functional Testing UserGuide.
l See "GUI Checkpoints and Output Values Per Add-in" on page 512
Prerequisites
Opening YourApplication
You must open UFT before opening your Qt application.
Add-inDependencies
None
Low LevelRecording
To enable low level recording on Qt controls, you must first modify the object identification properties listfor theWinObject test object class, as follows:
l Add the regexpwndtitle property to themandatory properties list.
l Move theobject classproperty up theassistive properties list so that it is learned before the textproperty.
For details, see the section describing theObject Identification Dialog Box in theHPUnified FunctionalTesting User Guide.
Configuration
Options Dialog Box Use theWindows Applicationspane.(Tools > Options > GUI Testing tab > Windows Applications node)
See "Windows Applications > General Pane (Options Dialog Box > GUI Testing Tab)" onpage 85.
HP Unified Functional Testing (12.50) Page 239
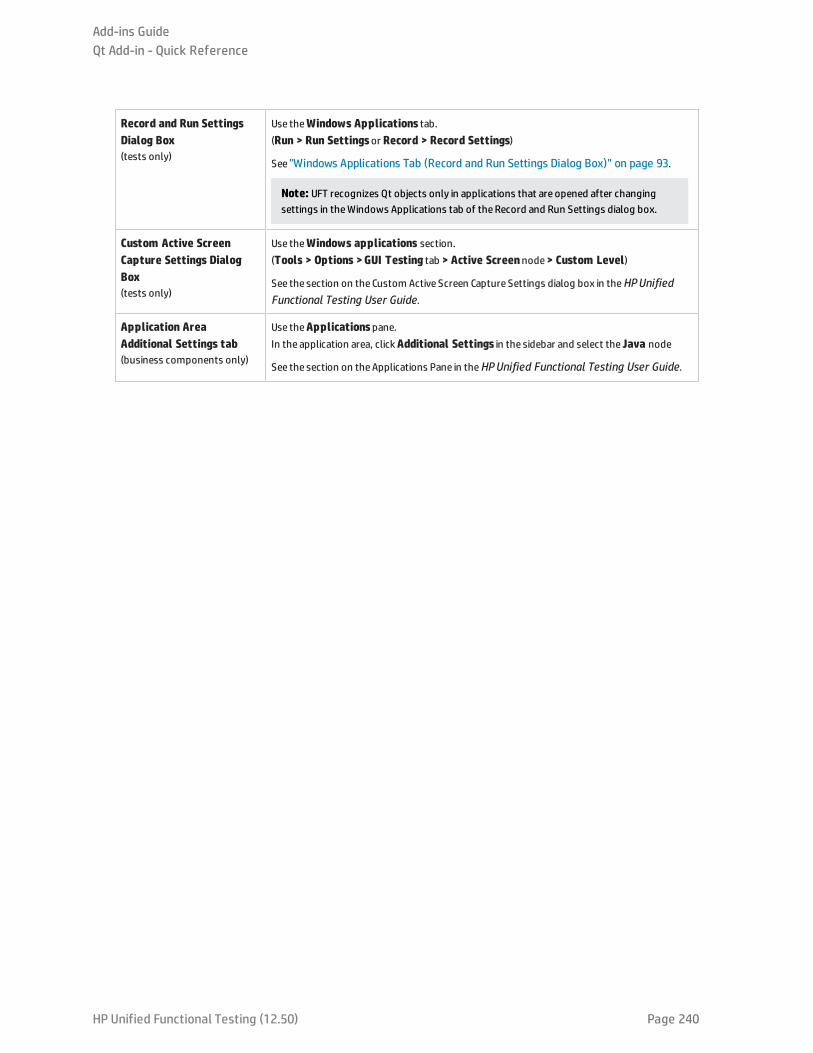
Record and Run SettingsDialog Box(tests only)
Use theWindows Applications tab.(Run > Run Settingsor Record > Record Settings)
See "Windows Applications Tab (Record and Run Settings Dialog Box)" on page 93.
Note: UFT recognizes Qt objects only in applications that are opened after changingsettings in theWindows Applications tab of theRecord and Run Settings dialog box.
Custom Active ScreenCapture Settings DialogBox(tests only)
Use theWindows applications section.(Tools > Options >GUI Testing tab > Active Screennode> Custom Level)
See the section on the Custom Active Screen Capture Settings dialog box in theHPUnifiedFunctional Testing User Guide.
Application AreaAdditional Settings tab(business components only)
Use theApplicationspane.In the application area, clickAdditional Settings in the sidebar and select the Java node
See the section on theApplications Pane in theHPUnified Functional Testing User Guide.
Add-ins GuideQt Add-in - Quick Reference
HP Unified Functional Testing (12.50) Page 240
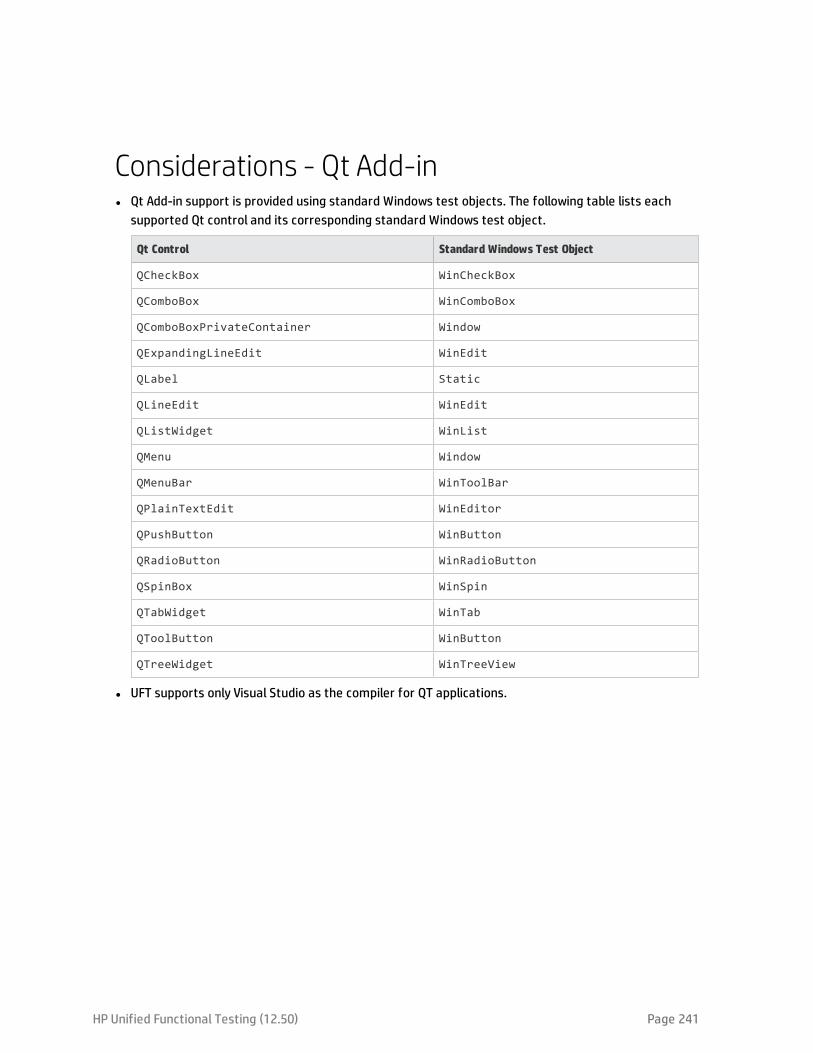
Considerations - Qt Add-inl Qt Add-in support is provided using standard Windows test objects. The following table lists each
supported Qt control and its corresponding standard Windows test object.
Qt Control Standard Windows Test Object
QCheckBox WinCheckBox
QComboBox WinComboBox
QComboBoxPrivateContainer Window
QExpandingLineEdit WinEdit
QLabel Static
QLineEdit WinEdit
QListWidget WinList
QMenu Window
QMenuBar WinToolBar
QPlainTextEdit WinEditor
QPushButton WinButton
QRadioButton WinRadioButton
QSpinBox WinSpin
QTabWidget WinTab
QToolButton WinButton
QTreeWidget WinTreeView
l UFT supports only Visual Studio as the compiler for QT applications.
HP Unified Functional Testing (12.50) Page 241

HP Unified Functional Testing (12.50) Page 242
Part 12: Add-in for SAP SolutionsThis section includes:
"Web-based SAP Support" on page 244
"Windows-based SAP Support" on page 257

Add-in for SAP Solutions - OverviewYou can use the UFT Add-in for SAP Solutions to test user-interface objects (controls) in SAP GUI forWindows applications and in Web-based SAP applications. You can create and run tests and businesscomponents on these objects, and check their properties.
After you create your test or business component, you can enhance it by adding checkpoints, retrievingoutput values, and parameterizing values. Where relevant, you can also add SAP GUI for Windows orSAP Web objects, methods and properties to it.
This section contains:
l "Web-based SAP Support" on page 244
l "Windows-based SAP Support" on page 257
HP Unified Functional Testing (12.50) Page 243
Web-based SAP SupportThis chapter includes:
• Web-Based SAP Support - Quick Reference 245
• Considerations for Working with SAP GUI for HTML 247
• Web > Page/Frame Options Pane (Options Dialog Box > GUI Testing Tab) 249
• Web > Advanced Pane (Options Dialog Box > GUI Testing Tab) 251
• Troubleshooting and Limitations - Web-based SAP 253
HP Unified Functional Testing (12.50) Page 244
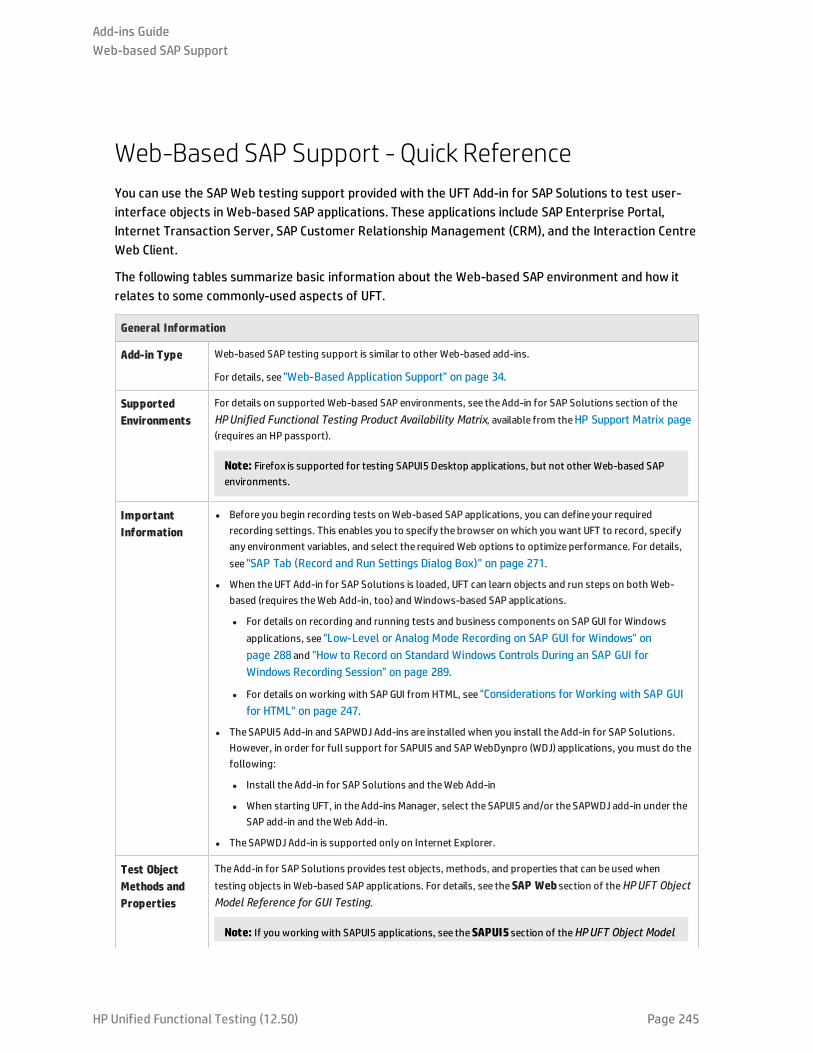
Web-Based SAP Support - Quick ReferenceYou can use the SAP Web testing support provided with the UFT Add-in for SAP Solutions to test user-interface objects in Web-based SAP applications. These applications include SAP Enterprise Portal,Internet Transaction Server, SAP Customer Relationship Management (CRM), and the Interaction CentreWeb Client.
The following tables summarize basic information about the Web-based SAP environment and how itrelates to some commonly-used aspects of UFT.
General Information
Add-in Type Web-based SAP testing support is similar to other Web-based add-ins.
For details, see "Web-Based Application Support" on page 34.
SupportedEnvironments
For details on supported Web-based SAP environments, see theAdd-in for SAP Solutions section of theHPUnified Functional Testing Product Availability Matrix, available from theHP Support Matrix page(requires an HP passport).
Note: Firefox is supported for testing SAPUI5 Desktop applications, but not other Web-based SAPenvironments.
ImportantInformation
l Before you begin recording tests on Web-based SAP applications, you can define your requiredrecording settings. This enables you to specify the browser on which you want UFT to record, specifyany environment variables, and select the required Web options to optimize performance. For details,see "SAP Tab (Record and Run Settings Dialog Box)" on page 271.
l When theUFT Add-in for SAP Solutions is loaded, UFT can learn objects and run steps on both Web-based (requires theWeb Add-in, too) and Windows-based SAP applications.
l For details on recording and running tests and business components on SAP GUI for Windowsapplications, see "Low-Level or Analog Mode Recording on SAP GUI for Windows" onpage 288and "How to Record on Standard Windows Controls During an SAP GUI forWindows Recording Session" on page 289.
l For details on working with SAP GUI from HTML, see "Considerations for Working with SAP GUIfor HTML" on page 247.
l TheSAPUI5 Add-in and SAPWDJ Add-ins are installed when you install the Add-in for SAP Solutions.However, in order for full support for SAPUI5 and SAPWebDynpro (WDJ) applications, you must do thefollowing:
l Install the Add-in for SAP Solutions and theWeb Add-in
l When starting UFT, in theAdd-ins Manager, select the SAPUI5 and/or the SAPWDJ add-in under theSAP add-in and theWeb Add-in.
l TheSAPWDJ Add-in is supported only on Internet Explorer.
Test ObjectMethods andProperties
TheAdd-in for SAP Solutions provides test objects, methods, and properties that can beused whentesting objects in Web-based SAP applications. For details, see theSAP Web section of theHPUFT ObjectModel Reference for GUI Testing.
Note: If you working with SAPUI5 applications, see theSAPUI5 section of theHPUFT Object Model
Add-ins GuideWeb-based SAP Support
HP Unified Functional Testing (12.50) Page 245
Reference for GUI Testing, in theWeb Child Add-ins section.
Checkpoints andOutput Values
l See the sections describing checkpoints and output values in theHPUnified Functional Testing UserGuide.
l See "Considerations for Working with SAP GUI for HTML" on the next page.
l See "GUI Checkpoints and Output Values Per Add-in" on page 512
Troubleshootingand Limitations
See "Troubleshooting and Limitations - Web-based SAP" on page 253.
Prerequisites
Opening YourApplication
l Open UFT before you open your Web-based SAP application.
l If you areworking in an SAP GUI application that contains HTML objects, you can log on to yourapplication before opening UFT, but you must open UFT before navigating to the transaction containingany HTML objects.
l For SAP GUI for HTML, Interaction CentreWeb Client (ICWC) applications, and Customer RelationshipManagement (CRM) applications, confirm that your SAP server and client are configured properly.
See "How to Enable Support for SAP GUI for Windows" on page 264.
Testing inMozilla Firefox
To test your Web application in Mozilla Firefox version 33 and later, you must enable the Functional TestingExtension in oneof the following ways:
l If theSelect Your Add-ons screen is displayed when you open Firefox, select to enable the FunctionalTesting Extension.
l If the Install Add-on tab opens and displays Functional Testing Extension when opening Firefox,select theAllow this installation check box and clickContinue.
Otherwise:
a. In Firefox, open the browser menu.
b. In themenu, clickAdd-ons.
c. In theAdd-ons Manager tab, select theExtensionsnode.
d. In the Functional Testing Extension row, click theEnable button.
To test your Web application in Mozilla Firefox versions earlier than 33, you must enable the legacy Firefoxagent:
1. Open the<UFT installation folder>\Installations\Firefox folder.
2. From the Firefox folder, drag theLegacy.xpi file into Firefox.
3. In Firefox, open the browser menu.
4. In themenu, click Add-ons.
5. In theAdd-ons Manager tab, select the Extensions node.
6. In the Functional Testing Extension row, disable the Functional Testing 12.50 extension and enablethe extension you added to Firefox.
Add-inDependencies
TheWeb Add-in must be loaded.
Add-ins GuideWeb-based SAP Support
HP Unified Functional Testing (12.50) Page 246
Configuration
Options DialogBox
Use theWebpane.(Make sure that aGUI test is open and select Tools > Options> GUI Testing tab > Web > Generalnode.)
Record and RunSettings DialogBox(tests only)
l Use the SAP tab (Record > Record and Run Settings) to connect to the SAP GUI Client for SAP GUIfor HTML or Interaction CentreWeb Client (ICWC) applications. This is because ICWCopens from insidethe SAP GUI Client.
See "How to Enable Support for SAP GUI for Windows" on page 264.
l Use theWeb tab (Record > Record Settings) to instruct UFT to use a specific URL and browser toopen aWeb-based SAP application, or the SAP Enterprise Portal, at the beginning of each record andrun session. Alternatively, you can instruct UFT to record and run on any open browser.
See "Web Tab (Record and Run Settings Dialog Box)" on page 71.
Test SettingsDialog Box(tests only)
Use theWebpane.(File > Settings > Web node)
See "Web Pane (Test/Business Component Settings Dialog Box / Application Area - AdditionalSettings Pane)" on page 68.
Custom ActiveScreen CaptureSettings DialogBox(tests only)
Use theWeb section.(Tools > Options > GUI Testing tab > Active Screennode> Custom Level button)
See the section on the Custom Active Screen Capture Settings dialog box in theHPUnified FunctionalTesting User Guide.
Application AreaAdditionalSettings pane(businesscomponents only)
Use theWebpane.In the application area, select Additional Settings > Web in the sidebar.
See "Web Pane (Test/Business Component Settings Dialog Box / Application Area - AdditionalSettings Pane)" on page 68.
Web EventRecordingConfigurationDialog Box
When you load theAdd-in for SAP Solutions, the settings in the "Web Event Recording ConfigurationDialog Box" on page 445 (Record > Web Event Recording Configuration) are automaticallycustomized. You do not need to make anyWeb event configuration changes.
Considerations for Working with SAP GUI for HTMLl You can add a table checkpoint while recording or editing your test.
l If a table has a column header row, it is counted as the first row in the table.
l If you have not recorded a step on the table object you want to check, but you have an Active Screencapture that displays the table object, you can add a table checkpoint if the Active Screen Capturelevel was set to Complete when the object was captured, and the Active Screen is currently selected(View > Active Screen).
(You set the Capture level in the Active Screen pane of the Options dialog box (Tools > Options >GUI Testing tab > Active Screen node). For details, see the section on Active Screen options in the
Add-ins GuideWeb-based SAP Support
HP Unified Functional Testing (12.50) Page 247
HP Unified Functional Testing User Guide.)
l You can spool all of the available data from an SAP GUI for HTML application table into an external fileusing the GetCellDatamethod, which loops through each cell in the table. You can then save theinformation to an external file.
The following example uses the GetCellDatamethod to list the data of each cell in a table of 10 rowsand 10 columns:
For i=1 to 10For j=1 to 10
Dat=Browser("ITS System Informati").Page("Table control").SAPTable("MySAPTable").GetCellData (i, j)
‘Enter lines of code that use the value of the returned Dat variableNext
Next
For details on the GetCellDatamethod, see the SAP Web section of the HP UFT Object Model Referencefor GUI Testing.
Add-ins GuideWeb-based SAP Support
HP Unified Functional Testing (12.50) Page 248
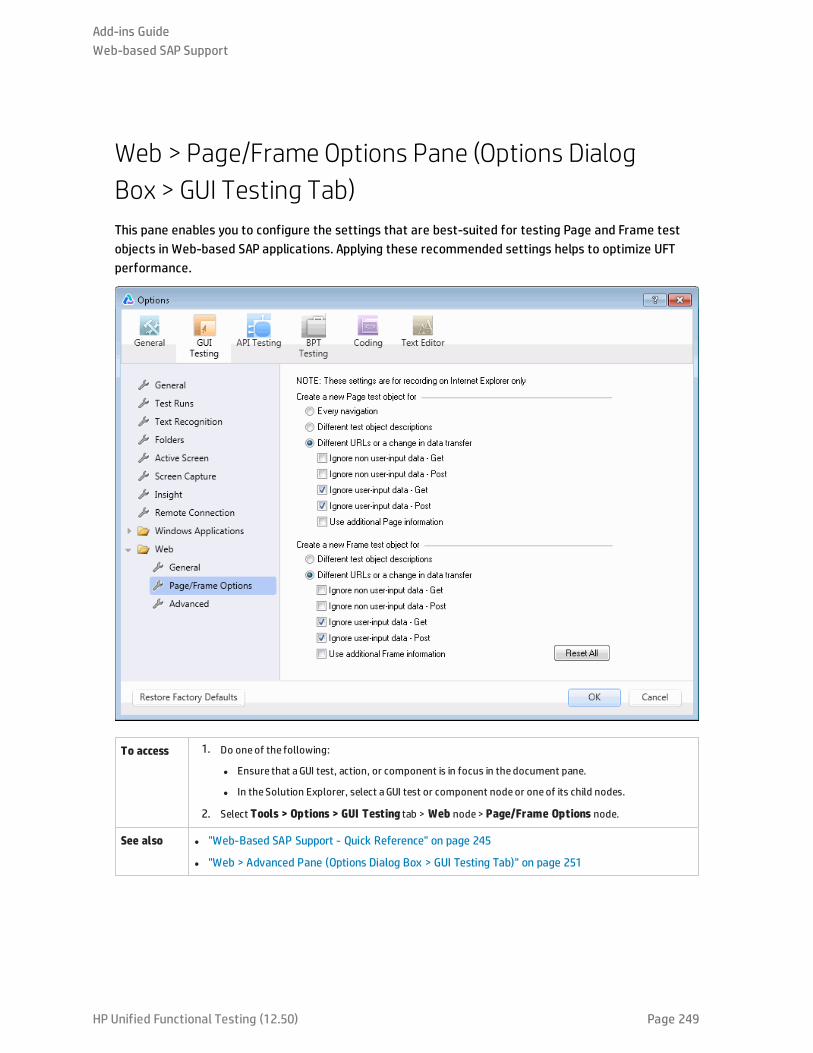
Web > Page/Frame Options Pane (Options DialogBox > GUI Testing Tab)This pane enables you to configure the settings that are best-suited for testing Page and Frame testobjects in Web-based SAP applications. Applying these recommended settings helps to optimize UFTperformance.
To access 1. Do oneof the following:
l Ensure that aGUI test, action, or component is in focus in the document pane.
l In the Solution Explorer, select aGUI test or component nodeor oneof its child nodes.
2. Select Tools > Options > GUI Testing tab > Web node> Page/Frame Options node.
See also l "Web-Based SAP Support - Quick Reference" on page 245
l "Web > Advanced Pane (Options Dialog Box > GUI Testing Tab)" on page 251
Add-ins GuideWeb-based SAP Support
HP Unified Functional Testing (12.50) Page 249
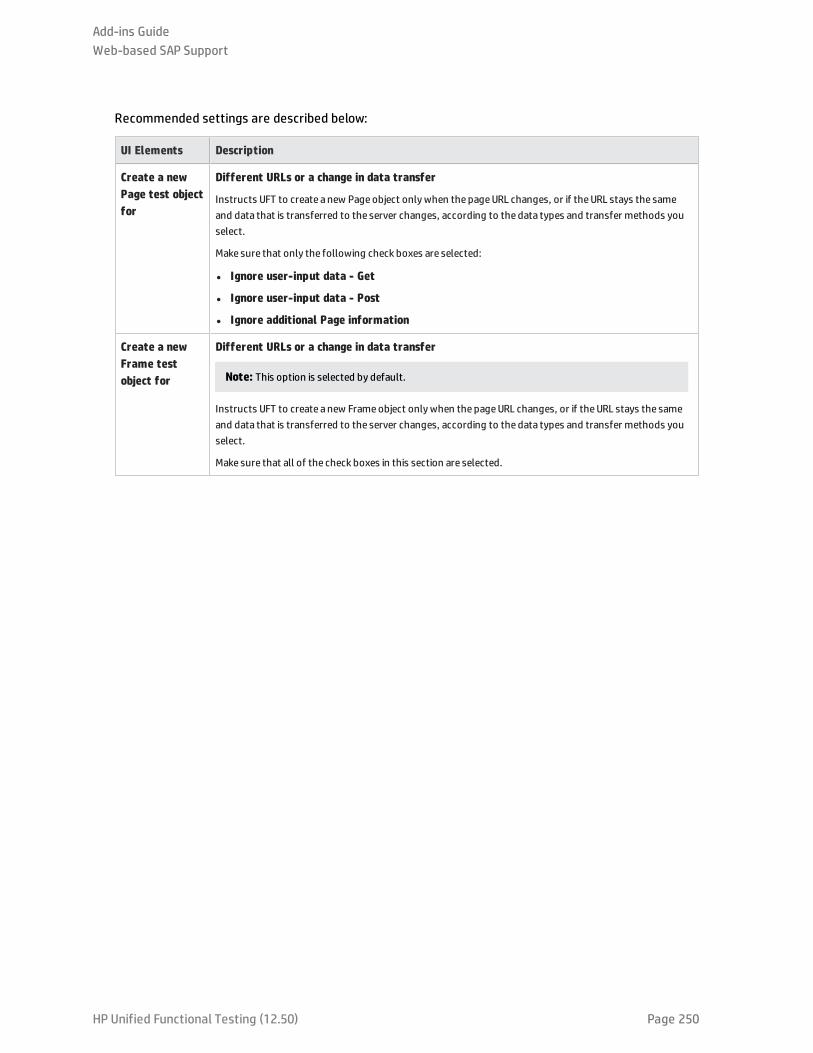
Recommended settings are described below:
UI Elements Description
Create a newPage test objectfor
Different URLs or a change in data transfer
Instructs UFT to create a new Pageobject onlywhen the pageURL changes, or if theURL stays the sameand data that is transferred to the server changes, according to the data types and transfer methods youselect.
Make sure that only the following check boxes are selected:
l Ignore user-input data - Get
l Ignore user-input data - Post
l Ignore additional Page information
Create a newFrame testobject for
Different URLs or a change in data transfer
Note: This option is selected by default.
Instructs UFT to create a new Frameobject onlywhen the pageURL changes, or if theURL stays the sameand data that is transferred to the server changes, according to the data types and transfer methods youselect.
Make sure that all of the check boxes in this section are selected.
Add-ins GuideWeb-based SAP Support
HP Unified Functional Testing (12.50) Page 250
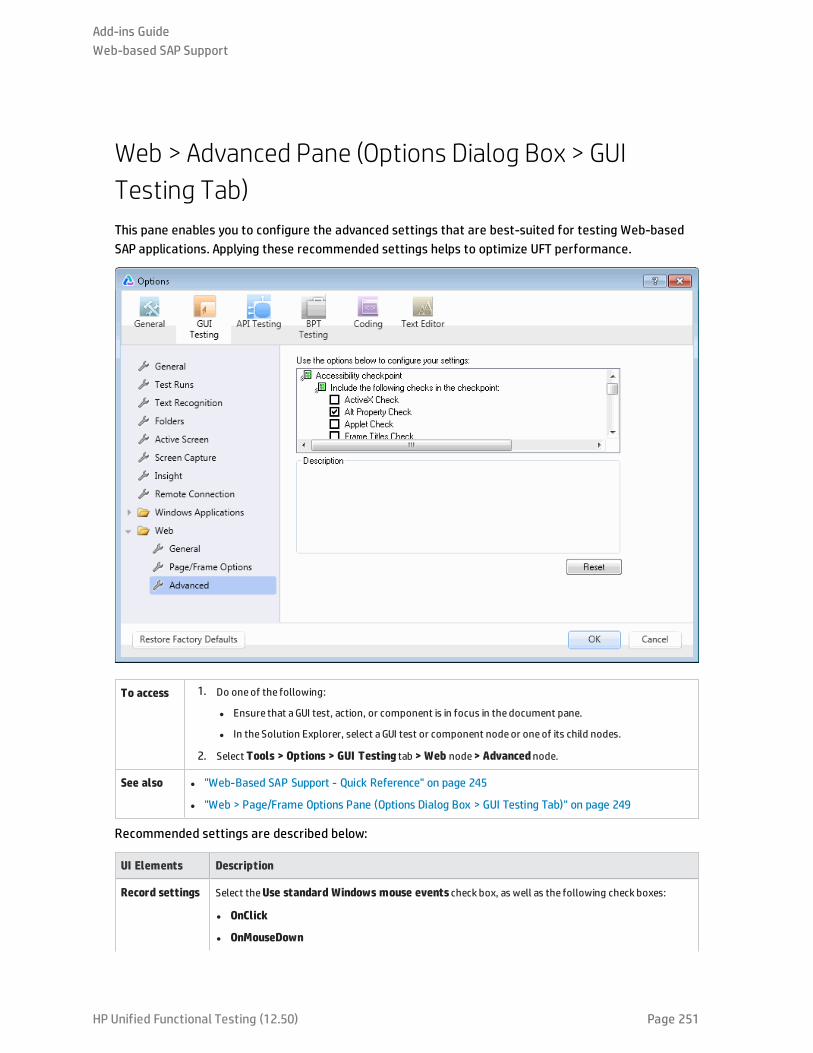
Web > Advanced Pane (Options Dialog Box > GUITesting Tab)This pane enables you to configure the advanced settings that are best-suited for testing Web-basedSAP applications. Applying these recommended settings helps to optimize UFT performance.
To access 1. Do oneof the following:
l Ensure that aGUI test, action, or component is in focus in the document pane.
l In the Solution Explorer, select aGUI test or component nodeor oneof its child nodes.
2. Select Tools > Options > GUI Testing tab > Web node> Advancednode.
See also l "Web-Based SAP Support - Quick Reference" on page 245
l "Web > Page/Frame Options Pane (Options Dialog Box > GUI Testing Tab)" on page 249
Recommended settings are described below:
UI Elements Description
Record settings Select theUse standard Windows mouse events check box, as well as the following check boxes:
l OnClick
l OnMouseDown
Add-ins GuideWeb-based SAP Support
HP Unified Functional Testing (12.50) Page 251

UI Elements Description
l OnMouseUp
This instructs UFT to use these standard Windows mouse events instead of browser events.
Add-ins GuideWeb-based SAP Support
HP Unified Functional Testing (12.50) Page 252
Troubleshooting and Limitations - Web-based SAPThis section contains general troubleshooting and limitation information about the Web-based SAP add-in, and includes the following sections:
l "General" below
l "SAPUI5 Objects" below
l "SAP WDJ Objects" on the next page
l "SAP Enterprise Portal" on the next page
l "SAP GUI for HTML—Internet Transaction Server (ITS) " on page 255
l "Using the Active Screen " on page 255
l "Web-based CRM Systems" on page 256
General
l It is not recommended to work with other Web-based add-ins when the UFT Add-in for SAP Solutionsis loaded. The Add-in for SAP Solutions modifies certain Web configuration settings that may affectother add-ins or applications.
l When recording and running steps on a table control, only the table content that is visible on theclient is actually available.
l During a run session, the SAP platform response time may be slower than the time it takes for UFT torun the corresponding step.
Workaround: Add a Wait statement prior to the relevant step.
l In some cases, when running tests on SAPEdit, SAPNavigationBar, or SAPPortal, you may receive aCannot find object error.
Workaround: Do one of the following:
l Ensure that the object properties are unique and correct.
l Modify the registry as specified below:
For 32 bit computers: In the HKEY_LOCAL_MACHINE\Software\MercuryInteractive\QuickTestProfessional\MicTest\AbortIfHangInSendData key, set the value ofDWORD to 0.
For 64-bit computers: In the HKEY_LOCAL_MACHINE\Software\Wow6432Node\MercuryInteractive\QuickTestProfessional\MicTest\AbortIfHangInSendData key, set the value ofDWORD to 0.
SAPUI5 Objects
l Because the SAPUI5 add-in supports both desktop and mobile applications, not all methods for allobjects are supported for both desktop and mobile applications.
HP Unified Functional Testing (12.50) Page 253
l When running a test or component on SAPUI5 test objects, application Alert messages for someobjects are not displayed.
Workaround: Do one of the following:
l Make sure your test does not contain steps that need to be performed on the Alert message.
l Add an If statement to your test for the object that triggers the alert to check if the Alert exists.
l If your SAPUI5 application contains nested table objects, inserting a checkpoint on the nested tableobject shows only the parent SAPUITable object.
Workaround: Select the nested WebTable objects and create checkpoints for the WebTable objectinstead of the parent SAPUITable object.
l When using the Object Spy to view an SAPUIMenu object in Firefox, you cannot add the menu object to
the repository with the Add Object to Repository button .
l When working with mobile SAPUI5 applications, UFT cannot use the Object Spy on some disabledcontrols (like the SAPUIButton and SAPUITextEdit) due to the application object properties.
SAP WDJ Objects
l If you try to record objects in a SAP WDJ application without the SAPWDJ add-in loaded, UFT recordsonly some of the objects correctly.
Workaround: Restart UFT and load the SAP WDJ Add-in.
l During a run session, the response time of the SAP platform running a SAPWeb Dynpro Java (WDJ)application may be slower than the time it takes for UFT to run the corresponding step.
Workaround: Add a Wait statement prior to the relevant step or set the Delay each step executionoption in the Test Runs pane of the Options dialog box (Tools > Options > GUI Testing tab > TestRuns node) to the necessary wait period (in milliseconds)
l The following functionalities are not supported for SAP WDJ applications:
l Selection of non-visible table rows
l Interaction with the application scroll bar
l Menus inside table cells
l Date navigator windows inside the application
l When running tests of your SAPWDJ application, the SAPWDJTable.SelectItemmInCellmethod doesnot click a link (for a pop-up window) in a table cell.
Workaround: Add a Link.Click step to click the link inside the table cell.
l When recording steps on an SAPWDJTable object, the SelectCell method is not always recorded if youare selecting non-editable cells.
SAP Enterprise Portal
l Operations on the iView option menu and on objects within the page title bar of SAP EnterprisePortal are recorded as Web operations on the Frame object and not as SAP operations on the iView
Add-ins GuideWeb-based SAP Support
HP Unified Functional Testing (12.50) Page 254
object.
l Minimized or collapsed iViews may not be recognized correctly.
l In some cases, when more than one browser is open during the test run, UFT is unable to correctlyidentify certain objects.
Workaround: Clear the Enable Smart Identification check box for the Browser test objects in theObject Repository window. You may also want to disable the Enable Smart Identification option forBrowser test objects in the Object Identification dialog box for future test recording.
l In some cases, a frame in SAP Enterprise Portal may be recognized as a Web Frame object instead ofan iView object. In some of these, the frame name is generated dynamically. Because the Web Frameobject uses the name property to identify the object, you must modify the recorded name value touse an appropriate regular expression so that UFT will be able to recognize it during the test run.
SAP GUI for HTML—Internet Transaction Server (ITS)
l When using the Object Spy or creating a checkpoint on an object inside an SAPWeb table cell, UFTmay recognize the object as a WebElement (and not as the appropriate SAP Web object), if a click hasnot yet been performed on the object.
Workaround: Click on the object inside the SAPWeb table cell before using the Object Spy or creatinga checkpoint on it.
l Dragging the SAP GUI for HTML table scroll bar is not recorded.
Workaround: You can record scrolling in SAP GUI for HTML tables by clicking the scroll button.Alternatively, use the Step Generator or Editor to insert a SAPTable.Object.DoScroll("up") orSAPTable.Object.DoScroll("down") statement in your test.
l The appearance of toolbar buttons may differ, and toolbar buttons may or may not be displayed,depending on the size of your browser window.
Workaround: Try to maintain the same browser window size and the resulting menu appearancewhen recording and running your test.
l When running a test on an ITS frame in an SAP Enterprise Portal iView, the ITS menu sometimes failsto operate properly.
Workaround: Enlarge the iView size and/or increase the Object Synchronization Timeout and thenrun the test again.
l When recording a SAPList object, you need to click the input part of the list, not its button part inorder to enable UFT to recognize the object.
Using the Active Screen
l The Active Screen may not display the entire HTML page captured while recording your test.
Workaround: Resize the Active Screen so that it best fits the HTML page size.
l When testing an SAP Enterprise Portal application, it is recommended to set advanced authenticationfor Active Screen access (File > Settings > Web).
Add-ins GuideWeb-based SAP Support
HP Unified Functional Testing (12.50) Page 255

l Avoid using an Active Screen that was captured when a pop-up dialog was open to add an object fromthe main window to the object repository. Doing this results in an incorrect object hierarchy in theobject repository.
Web-based CRM Systems
l When using UFT to test Web-based CRM systems, make sure that the CRM system is in test mode.You can do this by adding "?sap-testmode=X" to the URL.
Add-ins GuideWeb-based SAP Support
HP Unified Functional Testing (12.50) Page 256
Windows-based SAP SupportThis chapter includes:
• Windows-based SAP Support - Quick Reference 259
• Windows-based SAP Support - Testing and Configuration 261
• SAP GUI Scripting API and UFT 262
• How to Enable Support for SAP GUI for Windows 264
• Considerations - Windows-based SAP Add-in for SAP Solutions 269
• Environment Variables for Windows-based SAP Applications 270
• Package and Patch Versions Requirements - SAP Application Server and SAP GUI for Windows 270
• SAP Tab (Record and Run Settings Dialog Box) 271
• SAP > General Pane (Options Dialog Box > GUI Testing Tab) 274
• Troubleshooting and Limitations - Windows-based SAP 276
• Windows-Based SAP Support - Test Objects 281
• Checkpoints and Output Values in SAP GUI for Windows 282
• Using the Auto-Parameterize Option to Parameterize Table and Grid Cell Values 282
• Low-Level or Analog Mode Recording on SAP GUI for Windows 288
• Spooling Data from a Table 288
• How to Record on Standard Windows Controls During an SAP GUI for Windows RecordingSession 289
• UFT-SAP Solution Manager Integration 290
• UFT-SAP Solution Manager Integration - Overview 291
• Solution Manager Testing Modes: Standalone or Integrated 292
• SAP Structured Parameters 294
• How to Configure Solution Manager to Work with UFT 295
• How to Work with Tests in Solution Manager in Standalone Mode 297
• How to Run a Test Stored in Solution Manager 301
• How to Display or Edit a GUI Test from Solution Manager in Integrated Mode 303
• How to Transfer Data To and From GUI Tests in Integrated Mode Using Test Parameters 304
• How to Work with SAP Structured Parameters 305
• Solution Manager Connection Dialog Box 309
• Save GUI Test to Solution Manager Dialog Box 310
HP Unified Functional Testing (12.50) Page 257
• Open GUI Test from Solution Manager Dialog Box 311
• Upload File to Solution Manager Dialog Box 312
• Save External File to Solution Manager Dialog Box 313
• Download File from Solution Manager 314
• SAP > SAP Solution Manager Pane (Options Dialog Box > GUI Testing Tab) 315
• Value Map Dialog Box 317
Add-ins GuideWindows-based SAP Support
HP Unified Functional Testing (12.50) Page 258
Windows-based SAP Support - Quick ReferenceYou can use the Windows-based SAP testing support provided with the UFT Add-in for SAP Solutions totest user-interface objects in SAP GUI for Windows user-interface objects.
The following tables summarize basic information about the Windows-based SAP environment and howit relates to some commonly-used aspects of UFT.
General Information
Add-in Type When testing SAP GUI for Windows applications, much of the functionality is the sameas other Windows-based add-ins.
See "Windows-Based Application Support" on page 81.
SupportedEnvironments
For details on supported Windows-based SAP environments, see theAdd-in for SAP Solutions section oftheHPUnified Functional Testing Product Availability Matrix, available from theHP Support Matrixpage (requires an HP passport)..
ImportantInformation
l When theAdd-in for SAP Solutions is loaded, UFT can learn objects and run steps on both Web-basedand Windows-based SAP applications. For details on recording and running tests and businesscomponents on Web-based SAP applications, see "Web-based SAP Support" on page 244.
l TheSAPNWBC Desktop Add-in is installed with theAdd-in for SAP solutions. However, in order for fullsupport for NWBCDesktop applications, you must do the following:
l Install both theAdd-in for SAP Solutions and theWPF Add-in
l When opening UFT, in theAdd-in Manager, select the SAPNWBCDesktop Add-in under the SAP Add-in and theWPF Add-in.
Test ObjectMethods andProperties
TheAdd-in for SAP Solutions provides test objects, methods, and properties that can beused whentesting objects in SAP GUI for Windows applications. For details, see theSAP GUI for Windows section oftheHPUFT Object Model Reference for GUI Testing.
Checkpoints andOutput Values
l See the sections describing checkpoints and output values in theHPUnified Functional Testing UserGuide.
l See "Checkpoints and Output Values in SAP GUI for Windows" on page 282.
l See "Supported Checkpoints " on page 513and "Supported Output Values " on page 515Per Add-In.
l See "GUI Checkpoints and Output Values Per Add-in" on page 512
Troubleshootingand Limitations
See "Troubleshooting and Limitations - Windows-based SAP" on page 276
Prerequisites
Before Usingthis Add-in
For details on the following prerequisites, see "How to Enable Support for SAP GUI for Windows" onpage 264.
l TheSAP GUI Scripting option must be installed.
Add-ins GuideWindows-based SAP Support
HP Unified Functional Testing (12.50) Page 259
l Your server and client must have the proper package and patch versions installed. For details, see"Package and Patch Versions Requirements - SAP Application Server and SAP GUI for Windows"on page 270.See also: SAP OSS note# 480149
l TheScripting API must be enabled on both the server and client. For details, see "Enable scripting on theSAP application (server-side)" on page 264.
l Your client must be configured to use theDialogdisplaymode for F4Help screens.
l Make sure that the server is not set to use aLow speed connection.
l TheF1and F4Help display setting must be configured correctly to support testing the use of theF1andF4Help screens in your SAP GUI for Windows application.
l If you plan to use theUFT-Solution Manager integration features, you must also install the appropriatesupport package and configure the Solution Manager server to workwith UFT. For details, see "How toConfigure Solution Manager to Work with UFT" on page 295.
Add-inDependencies
None
Configuration
Options Dialog Box Use theSAP> General pane.(Tools > Options > GUI Testing tab > SAP > General node)
See "SAP > General Pane (Options Dialog Box > GUI Testing Tab) " on page 274.
Record and Run Settings DialogBox(tests only)
Use theSAP tab.(Record > Record and Run Settings)
See "SAP Tab (Record and Run Settings Dialog Box)" on page 271.
Custom Active Screen CaptureSettings Dialog Box(tests only)
Use the SAP GUI for Windows section.(Tools > Options > GUI Testing tab > Active Screennode> Custom Levelbutton)
See the section on the Custom Active Screen Capture Settings dialog box in theHPUnified Functional Testing User Guide.
Application Area AdditionalSettings pane(business components only)
Use theApplicationspane.In the application area, select Additional Settings > Applications in the sidebar.
See the section on theApplications pane in theHPUnified Functional Testing UserGuide.
Add-ins GuideWindows-based SAP Support
HP Unified Functional Testing (12.50) Page 260
Windows-based SAP Support -Testing and ConfigurationThis section includes
• SAP GUI Scripting API and UFT 262
• How to Enable Support for SAP GUI for Windows 264
• How to Enable Scripting on the SAP Application (Server-Side) 266
• Considerations - Windows-based SAP Add-in for SAP Solutions 269
• Environment Variables for Windows-based SAP Applications 270
• Package and Patch Versions Requirements - SAP Application Server and SAP GUI for Windows 270
• SAP Tab (Record and Run Settings Dialog Box) 271
• SAP > General Pane (Options Dialog Box > GUI Testing Tab) 274
• Troubleshooting and Limitations - Windows-based SAP 276
Add-ins GuideWindows-based SAP Support
HP Unified Functional Testing (12.50) Page 261
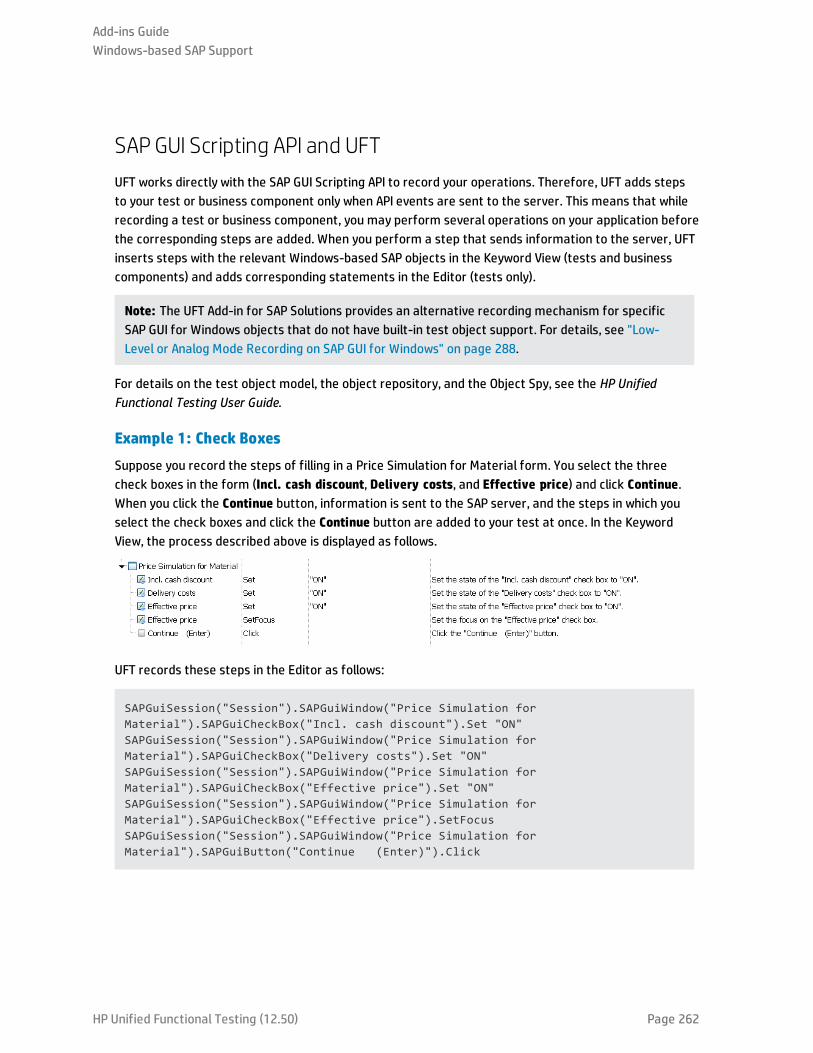
SAPGUI Scripting API and UFTUFT works directly with the SAP GUI Scripting API to record your operations. Therefore, UFT adds stepsto your test or business component only when API events are sent to the server. This means that whilerecording a test or business component, you may perform several operations on your application beforethe corresponding steps are added. When you perform a step that sends information to the server, UFTinserts steps with the relevant Windows-based SAP objects in the Keyword View (tests and businesscomponents) and adds corresponding statements in the Editor (tests only).
Note: The UFT Add-in for SAP Solutions provides an alternative recording mechanism for specificSAP GUI for Windows objects that do not have built-in test object support. For details, see "Low-Level or Analog Mode Recording on SAP GUI for Windows" on page 288.
For details on the test object model, the object repository, and the Object Spy, see the HP UnifiedFunctional Testing User Guide.
Example 1: Check Boxes
Suppose you record the steps of filling in a Price Simulation for Material form. You select the threecheck boxes in the form (Incl. cash discount, Delivery costs, and Effective price) and click Continue.When you click the Continue button, information is sent to the SAP server, and the steps in which youselect the check boxes and click the Continue button are added to your test at once. In the KeywordView, the process described above is displayed as follows.
UFT records these steps in the Editor as follows:
SAPGuiSession("Session").SAPGuiWindow("Price Simulation forMaterial").SAPGuiCheckBox("Incl. cash discount").Set "ON"SAPGuiSession("Session").SAPGuiWindow("Price Simulation forMaterial").SAPGuiCheckBox("Delivery costs").Set "ON"SAPGuiSession("Session").SAPGuiWindow("Price Simulation forMaterial").SAPGuiCheckBox("Effective price").Set "ON"SAPGuiSession("Session").SAPGuiWindow("Price Simulation forMaterial").SAPGuiCheckBox("Effective price").SetFocusSAPGuiSession("Session").SAPGuiWindow("Price Simulation forMaterial").SAPGuiButton("Continue (Enter)").Click
Add-ins GuideWindows-based SAP Support
HP Unified Functional Testing (12.50) Page 262
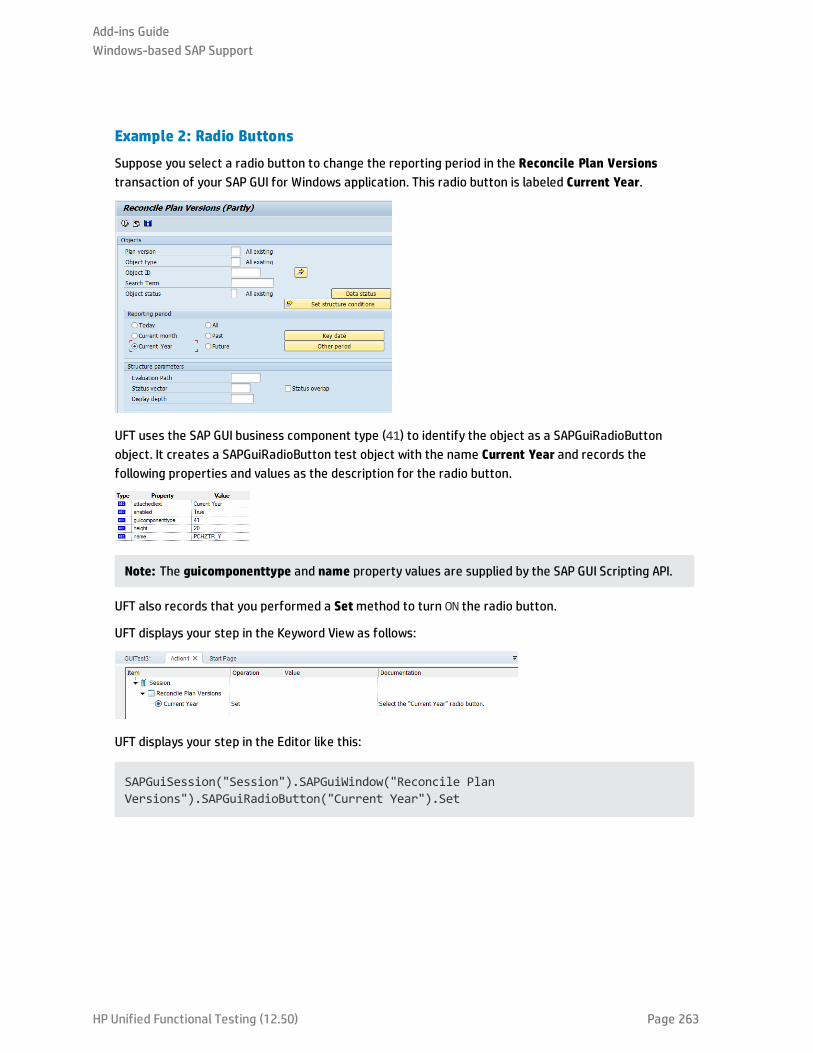
Example 2: Radio Buttons
Suppose you select a radio button to change the reporting period in the Reconcile Plan Versionstransaction of your SAP GUI for Windows application. This radio button is labeled Current Year.
UFT uses the SAP GUI business component type (41) to identify the object as a SAPGuiRadioButtonobject. It creates a SAPGuiRadioButton test object with the name Current Year and records thefollowing properties and values as the description for the radio button.
Note: The guicomponenttype and name property values are supplied by the SAP GUI Scripting API.
UFT also records that you performed a Setmethod to turn ON the radio button.
UFT displays your step in the Keyword View as follows:
UFT displays your step in the Editor like this:
SAPGuiSession("Session").SAPGuiWindow("Reconcile PlanVersions").SAPGuiRadioButton("Current Year").Set
Add-ins GuideWindows-based SAP Support
HP Unified Functional Testing (12.50) Page 263
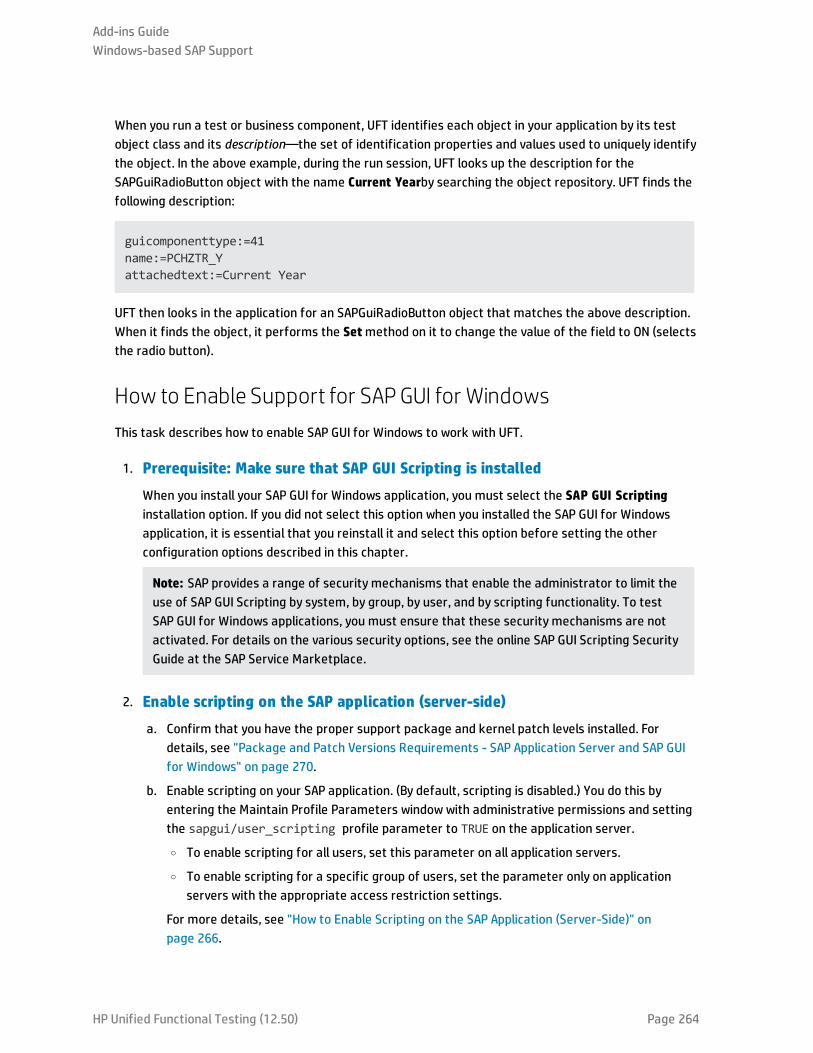
When you run a test or business component, UFT identifies each object in your application by its testobject class and its description—the set of identification properties and values used to uniquely identifythe object. In the above example, during the run session, UFT looks up the description for theSAPGuiRadioButton object with the name Current Yearby searching the object repository. UFT finds thefollowing description:
guicomponenttype:=41name:=PCHZTR_Yattachedtext:=Current Year
UFT then looks in the application for an SAPGuiRadioButton object that matches the above description.When it finds the object, it performs the Setmethod on it to change the value of the field to ON (selectsthe radio button).
How to Enable Support for SAPGUI for WindowsThis task describes how to enable SAP GUI for Windows to work with UFT.
1. Prerequisite: Make sure that SAP GUI Scripting is installed
When you install your SAP GUI for Windows application, you must select the SAP GUI Scriptinginstallation option. If you did not select this option when you installed the SAP GUI for Windowsapplication, it is essential that you reinstall it and select this option before setting the otherconfiguration options described in this chapter.
Note: SAP provides a range of security mechanisms that enable the administrator to limit theuse of SAP GUI Scripting by system, by group, by user, and by scripting functionality. To testSAP GUI for Windows applications, you must ensure that these security mechanisms are notactivated. For details on the various security options, see the online SAP GUI Scripting SecurityGuide at the SAP Service Marketplace.
2. Enable scripting on the SAP application (server-side)
a. Confirm that you have the proper support package and kernel patch levels installed. Fordetails, see "Package and Patch Versions Requirements - SAP Application Server and SAP GUIfor Windows" on page 270.
b. Enable scripting on your SAP application. (By default, scripting is disabled.) You do this byentering the Maintain Profile Parameters window with administrative permissions and settingthe sapgui/user_scripting profile parameter to TRUE on the application server.
o To enable scripting for all users, set this parameter on all application servers.
o To enable scripting for a specific group of users, set the parameter only on applicationservers with the appropriate access restriction settings.
For more details, see "How to Enable Scripting on the SAP Application (Server-Side)" onpage 266.
Add-ins GuideWindows-based SAP Support
HP Unified Functional Testing (12.50) Page 264
Note: If you connect to a server on which scripting is disabled, an error message displayswhen you try to record on your SAP GUI for Windows application.
3. Enable scripting on the SAP application (client-side)
You can do this on your SAP client only if the SAP GUI Scripting option is installed. If this option isnot installed, reinstall your SAP GUI for Windows application and be sure to select the SAP GUIScripting check box. For details, see your SAP GUI for Windows documentation.
4. Eliminate warning messages
By default, you regularly receive two warning messages when using UFT with an SAP GUI forWindows application:
l When UFT connects to the Scripting API, the following warning message is displayed: A scriptis trying to attach to the GUI.
l When UFT opens a new connection using the Scripting API, the following warning message isdisplayed: A script is opening a connection to system <system_name>.
It is recommended to disable these warning messages in the SAP GUI for Windows application whenworking with UFT.
5. Check the connection speed on the SAP server
Confirm that the Low speed connection option is NOT selected for the server to which you areconnecting before recording and running GUI tests.
This is because when you log on to SAP using the Low speed connection option to communicatewith the server, the SAP server does not send sufficient information for UFT to properly record andrun tests. (UFT displays an error message if the Low speed connection option is selected.)
For details, see SAP OSS note #587202.
6. Set F1 Help to use the modal dialog box mode
Confirm that the modal dialog box option is selected. This enables UFT to record the display of F1Help in your tests. (The F1 Help in your SAP GUI for Windows application can be displayed usingeither the Performance Assistant or as a modal dialog box.)
7. Set F4 Help to use the dialog display mode
Confirm that your client is set to load F4 Help screens in Dialog mode. (The SAP GUI for Windowsapplication cannot load F4 Help screens in Control mode when using the SAP GUI Scripting API(Enable Scripting option.)
Note: This is a per-user setting. You must set this option on each client that you want to testusing the UFT Add-in for SAP Solutions. Alternatively, the SAP system administrator can changethe system default for you.
Add-ins GuideWindows-based SAP Support
HP Unified Functional Testing (12.50) Page 265
How to Enable Scripting on the SAP Application (Server-Side)
UFT records and runs steps based directly on the API events that are sent from the client to the SAPserver because UFT communicates directly with the SAP GUI Scripting API. Therefore, to record and runtests and business components on your SAP GUI for Windows application, you must enable scripting onboth the server and client computers.
After you confirm that you have the proper support package and kernel patch levels installed, you mustenable scripting on your SAP application. By default, scripting is disabled.
You enable scripting by entering the Maintain Profile Parameters window with administrativepermissions and setting the sapgui/user_scripting profile parameter to TRUE on the applicationserver.
To enable scripting for all users, set this parameter on all application servers. To enable scripting for aspecific group of users, set the parameter only on application servers with the appropriate accessrestriction settings.
Note: If you connect to a server on which scripting is disabled, an error message displays when youtry to record on your SAP GUI for Windows application.
Add-ins GuideWindows-based SAP Support
HP Unified Functional Testing (12.50) Page 266
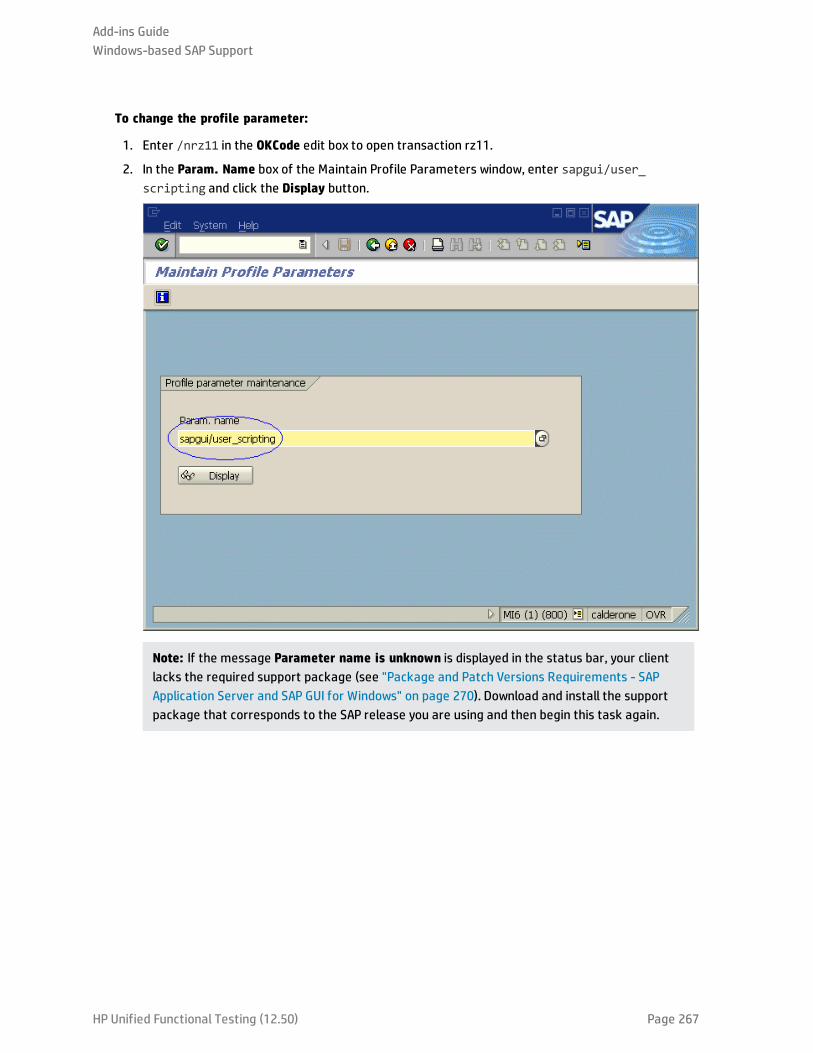
To change the profile parameter:
1. Enter /nrz11 in the OKCode edit box to open transaction rz11.
2. In the Param. Name box of the Maintain Profile Parameters window, enter sapgui/user_scripting and click the Display button.
Note: If the message Parameter name is unknown is displayed in the status bar, your clientlacks the required support package (see "Package and Patch Versions Requirements - SAPApplication Server and SAP GUI for Windows" on page 270). Download and install the supportpackage that corresponds to the SAP release you are using and then begin this task again.
Add-ins GuideWindows-based SAP Support
HP Unified Functional Testing (12.50) Page 267
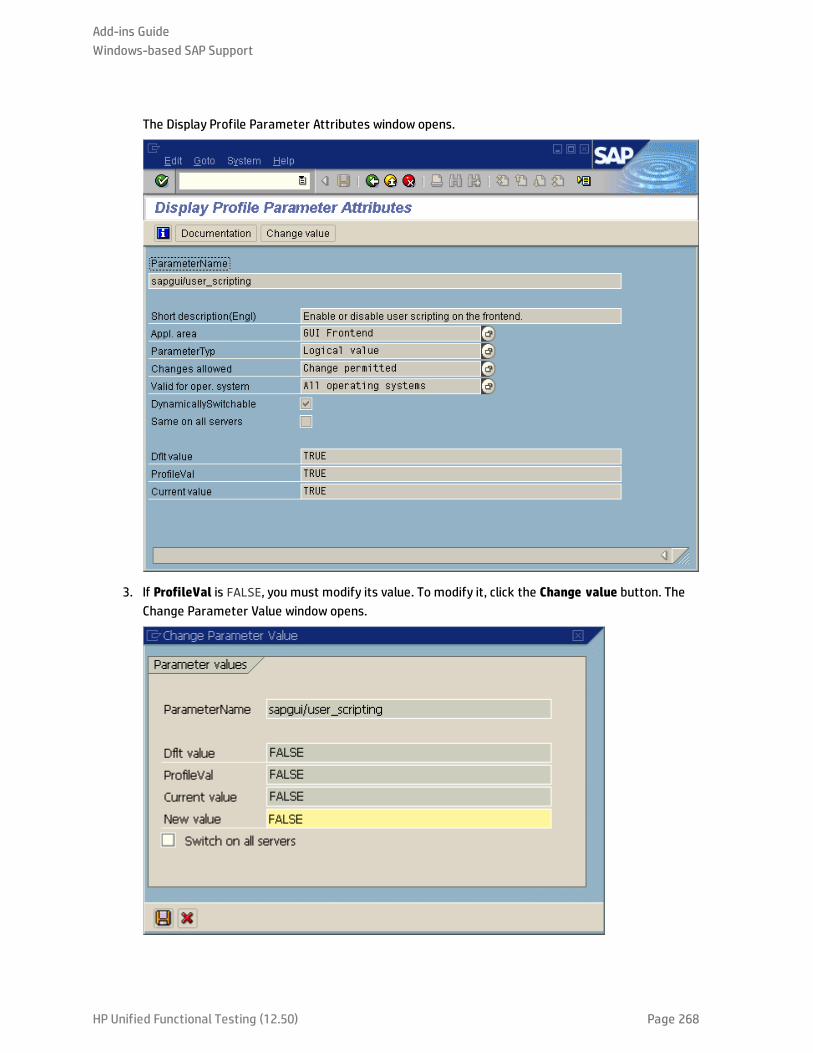
The Display Profile Parameter Attributes window opens.
3. If ProfileVal is FALSE, you must modify its value. To modify it, click the Change value button. TheChange Parameter Value window opens.
Add-ins GuideWindows-based SAP Support
HP Unified Functional Testing (12.50) Page 268
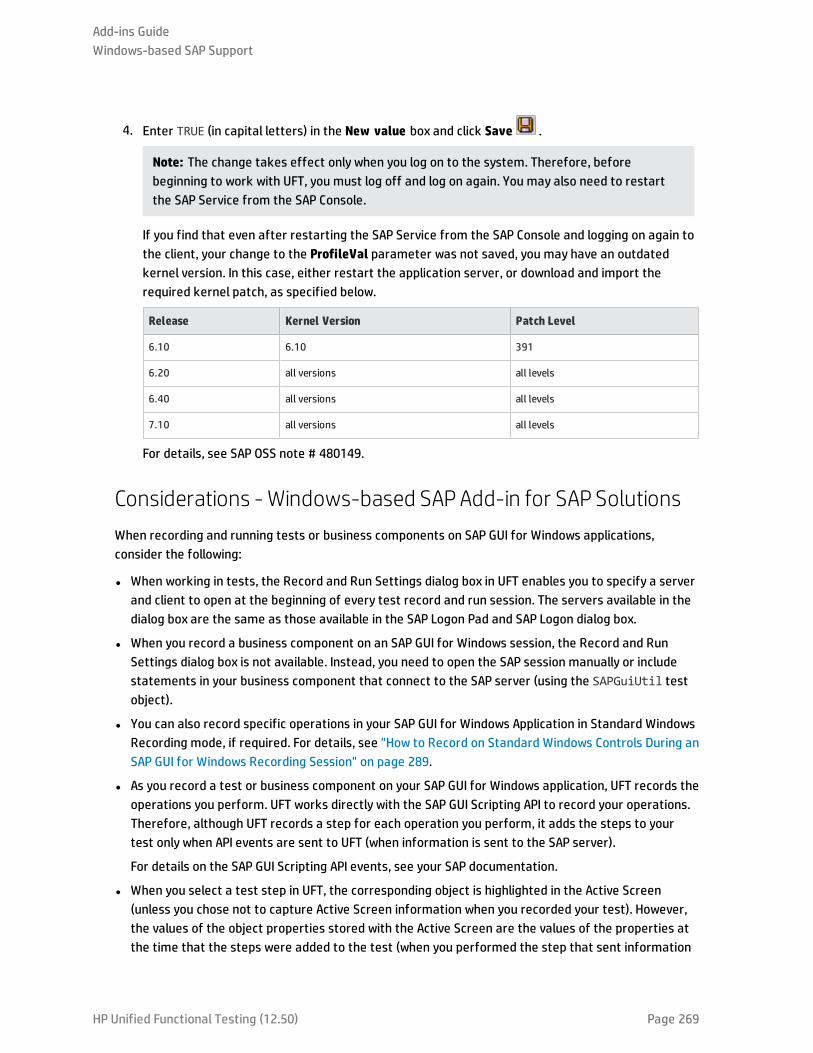
4. Enter TRUE (in capital letters) in the New value box and click Save .
Note: The change takes effect only when you log on to the system. Therefore, beforebeginning to work with UFT, you must log off and log on again. You may also need to restartthe SAP Service from the SAP Console.
If you find that even after restarting the SAP Service from the SAP Console and logging on again tothe client, your change to the ProfileVal parameter was not saved, you may have an outdatedkernel version. In this case, either restart the application server, or download and import therequired kernel patch, as specified below.
Release Kernel Version Patch Level
6.10 6.10 391
6.20 all versions all levels
6.40 all versions all levels
7.10 all versions all levels
For details, see SAP OSS note # 480149.
Considerations - Windows-based SAPAdd-in for SAP SolutionsWhen recording and running tests or business components on SAP GUI for Windows applications,consider the following:
l When working in tests, the Record and Run Settings dialog box in UFT enables you to specify a serverand client to open at the beginning of every test record and run session. The servers available in thedialog box are the same as those available in the SAP Logon Pad and SAP Logon dialog box.
l When you record a business component on an SAP GUI for Windows session, the Record and RunSettings dialog box is not available. Instead, you need to open the SAP session manually or includestatements in your business component that connect to the SAP server (using the SAPGuiUtil testobject).
l You can also record specific operations in your SAP GUI for Windows Application in Standard WindowsRecording mode, if required. For details, see "How to Record on Standard Windows Controls During anSAP GUI for Windows Recording Session" on page 289.
l As you record a test or business component on your SAP GUI for Windows application, UFT records theoperations you perform. UFT works directly with the SAP GUI Scripting API to record your operations.Therefore, although UFT records a step for each operation you perform, it adds the steps to yourtest only when API events are sent to UFT (when information is sent to the SAP server).
For details on the SAP GUI Scripting API events, see your SAP documentation.
l When you select a test step in UFT, the corresponding object is highlighted in the Active Screen(unless you chose not to capture Active Screen information when you recorded your test). However,the values of the object properties stored with the Active Screen are the values of the properties atthe time that the steps were added to the test (when you performed the step that sent information
Add-ins GuideWindows-based SAP Support
HP Unified Functional Testing (12.50) Page 269
to the SAP server). These values may potentially be different from the values of the properties at thetime that the selected step was actually performed. For details on Active Screen capture levels, seethe section on the Custom Active Screen Capture Settings Dialog Box in the HP Unified FunctionalTesting User Guide.
Environment Variables for Windows-based SAPApplicationsYou can use environment variables to specify details for the applications you want to use during arecording or run session. These variables can also be used in external library files for automationscripts.
If you define any of these environment variables, they override the values in the Server description,User, Password, Client, and Language boxes in the "SAP Tab (Record and Run Settings Dialog Box)"(described on page 271).
Use the variable names listed in the table below to define SAP application details:
Option Variable Name Description
Serverdescription
SAP_SERVER_ENV Thedescription of the server to which you want to connect.
User SAP_USERNAME_ENV
Theuser nameused to log on to the specified client number.
Password SAP_PASSWORD_ENV
The encrypted password for the specified user name.
Client SAP_CLIENT_ENV The client number.
Language SAP_LANGUAGE_ENV
The language that you want the specified SAP GUI for Windows application todisplay.
For details on defining and working with environment variables, see the HP Unified Functional TestingUser Guide.
Package and Patch Versions Requirements - SAP ApplicationServer and SAPGUI for WindowsTo test your application using UFT, you must confirm that you have the correct support package andkernel patch levels for your software component release. The following tables show the minimumrequired versions and levels. You must have these versions and levels or higher:
Software Component Release Support Package Kernel Patch Level
SAP_APPL 31I SAPKH31I96 Kernel 3.1I level 650
SAP_APPL 40B SAPKH40B71 Kernel 4.0B level 903
SAP_APPL 45B SAPKH45B49 Kernel 4.5B level 753
Add-ins GuideWindows-based SAP Support
HP Unified Functional Testing (12.50) Page 270
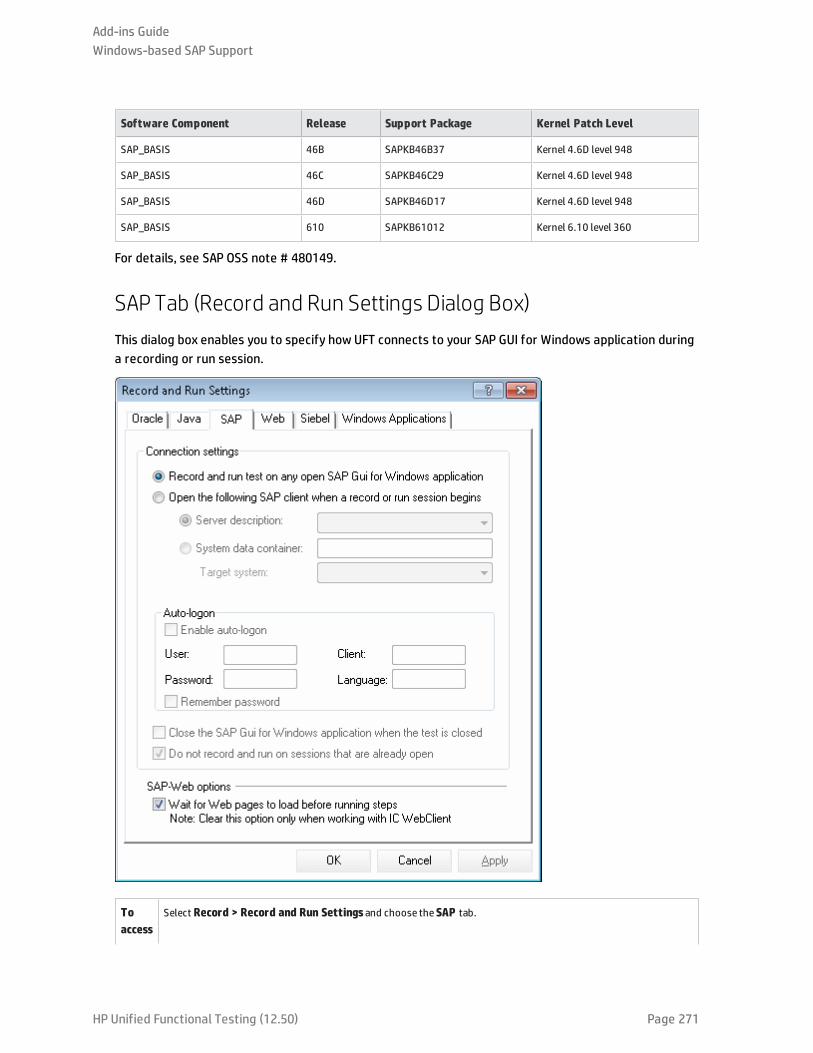
Software Component Release Support Package Kernel Patch Level
SAP_BASIS 46B SAPKB46B37 Kernel 4.6D level 948
SAP_BASIS 46C SAPKB46C29 Kernel 4.6D level 948
SAP_BASIS 46D SAPKB46D17 Kernel 4.6D level 948
SAP_BASIS 610 SAPKB61012 Kernel 6.10 level 360
For details, see SAP OSS note # 480149.
SAP Tab (Record and Run Settings Dialog Box)This dialog box enables you to specify how UFT connects to your SAP GUI for Windows application duringa recording or run session.
Toaccess
Select Record > Record and Run Settingsand choose theSAP tab.
Add-ins GuideWindows-based SAP Support
HP Unified Functional Testing (12.50) Page 271
Note: TheRecord and Run Settings dialog box also opens automatically each time you begin recording anewtest (unless you open the dialog box and set your preferences manually before you begin recording).
Seealso
l You can also use application details environment variables to specify these parameters. For details, see"Environment Variables for Windows-based SAP Applications" on page 270.
l "SAP GUI Scripting API and UFT" on page 262.
l "Using the Auto-Parameterize Option to Parameterize Table and Grid Cell Values" on page 282.
l "Low-Level or Analog Mode Recording on SAP GUI for Windows" on page 288.
l "How to Record on Standard Windows Controls During an SAP GUI for Windows Recording Session" onpage 289.
l "SAP > General Pane (Options Dialog Box > GUI Testing Tab) " on page 274.
User interface elements are described below:
UI Elements Description
Record and runtests on any openSAP GUI forWindowsapplication
Instructs UFT to use any open SAP GUI for Windows application to record and run the test.
This option supports sessions opened using the SAP Logon dialog box or the SAP Logon Pad.
Open the followingSAP client when arecord or runsession begins
Instructs UFT to connect to the specified SAP server and open your SAP GUI for Windows applicationusing specified user settings.
Note: If you select to connect to a specific server, you can specify details that will enableUFT toautomatically log on to the server each timea record or run session begins (instead of recordingthe logon steps).
Server description Indicates the server to which you want to connect. TheServer descriptionbox lists the serversavailable in the SAP Logon Pad or the SAP Logon dialog box.
To add a server to the list in theRecord and Run Settings dialog box, close theRecord and RunSettings dialog box, define an appropriate entry using your SAP Logon dialog box, and then reopentheRecord and Run Settings dialog box.
Note: The values you enter for theUser, Client, Password, and Language in theAuto-logonareaof the dialog box are saved with the selected server (in addition to being saved with thetest). Therefore, the saved values are automatically displayed in the auto-logon areawhen youspecify a previously selected server.
System datacontainer
Specifies the system data container that contains the available target systems for the current test.
Enabled only if you open aGUI test from Solution Manager in integrated mode.
Target system A drop-down list of available SAP environments that can be tested.
Enabled only if theSystem data container option is selected.
Enable auto-logon Instructs UFT to open the specified SAP GUI for Windows application using the specified logon details.
Enabled onlywhen Open the following SAP Gui client when a record or run session begins isselected.
Add-ins GuideWindows-based SAP Support
HP Unified Functional Testing (12.50) Page 272
UI Elements Description
User Theuser nameused to log on to the specified server.
Enabled onlywhen Enable auto-logon is selected.
Password Thepassword for the specified user name.
Enabled onlywhen Enable auto-logon is selected.
Client The client number.
Enabled onlywhen Enable auto-logon is selected.
Language The language that you want the specified SAP GUI for Windows application to display.
Enabled onlywhen Enable auto-logon is selected.
Rememberpassword
Saves the password information in this dialog box so that you do not have to enter it each time youbegin to record or run the test.
Enabled onlywhen Enable auto-logon is selected.
Close the SAP GUIfor Windowsapplication whenthe test is closed
Instructs UFT to close the SAP GUI for Windows session specified in theRecord and Run Settingsdialog boxwhen the test is closed.
Any other SAP GUI for Windows session that was opened before, during, or after the run session is notaffected.
TheSession cleanup option in the SAP paneof theOptions dialog box (Tools > Options > GUITesting tab > SAP node) overrides this option. For details, see "SAP > General Pane (OptionsDialog Box > GUI Testing Tab) " on the next page.
Do not record andrun on sessions thatare already open
Instructs UFT not to record or run tests on any SAP GUI for Windows sessions that were already openprior to the start of the record or run session. This is to ensure that steps are not inadvertentlyrecorded on other SAP GUI for Windows sessions that may also be running on the same computer.
Wait for Web pagesto load beforerunning steps
Instructs UFT to wait for Web-based SAP pages to synchronize completely before starting the testrun.
Note: This option is selected by default. Clear this option onlywhen working with ICWebClient.
Add-ins GuideWindows-based SAP Support
HP Unified Functional Testing (12.50) Page 273
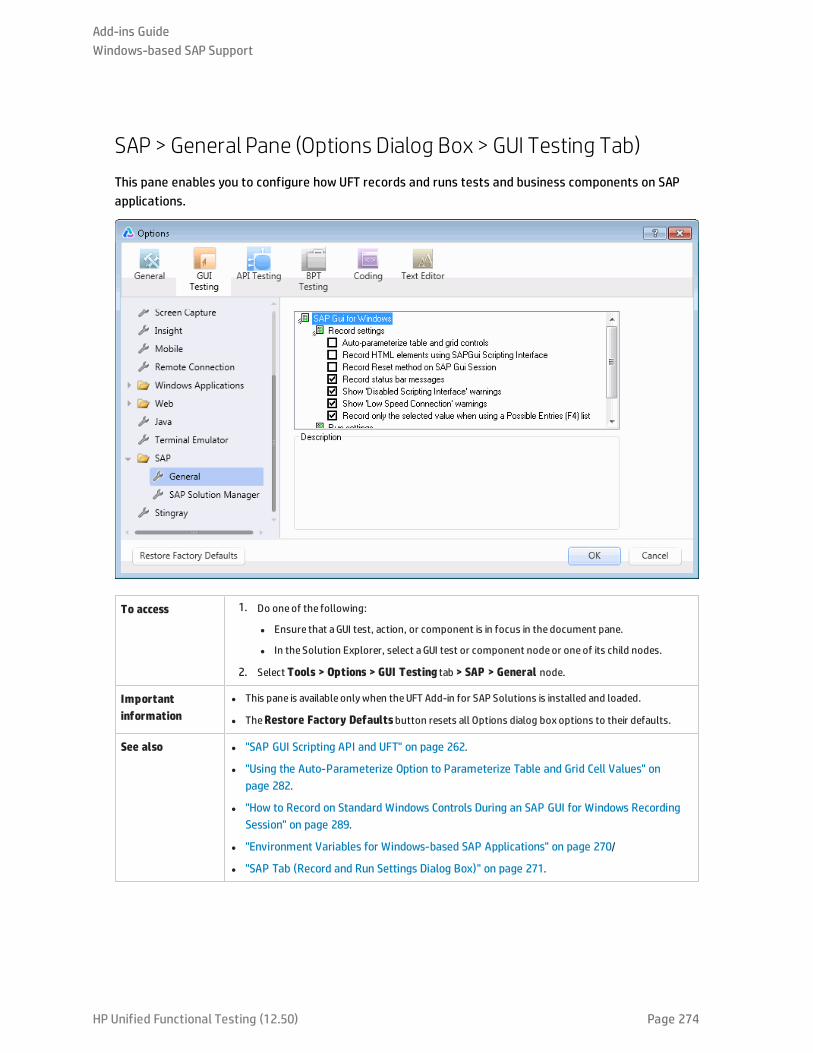
SAP > General Pane (Options Dialog Box > GUI Testing Tab)This pane enables you to configure how UFT records and runs tests and business components on SAPapplications.
To access 1. Do oneof the following:
l Ensure that aGUI test, action, or component is in focus in the document pane.
l In the Solution Explorer, select aGUI test or component nodeor oneof its child nodes.
2. Select Tools > Options > GUI Testing tab > SAP > General node.
Importantinformation
l This pane is available onlywhen theUFT Add-in for SAP Solutions is installed and loaded.
l TheRestore Factory Defaultsbutton resets all Options dialog box options to their defaults.
See also l "SAP GUI Scripting API and UFT" on page 262.
l "Using the Auto-Parameterize Option to Parameterize Table and Grid Cell Values" onpage 282.
l "How to Record on Standard Windows Controls During an SAP GUI for Windows RecordingSession" on page 289.
l "Environment Variables for Windows-based SAP Applications" on page 270/
l "SAP Tab (Record and Run Settings Dialog Box)" on page 271.
Add-ins GuideWindows-based SAP Support
HP Unified Functional Testing (12.50) Page 274
User interface elements are described below:
UI Elements Description
Auto-parameterizetable and gridcontrols
While recording tests, automatically captures the data you set in table and grid cells and stores it in a newdata sheet in theData pane. UFT inserts an Input statement into your test, which refers to the new datasheet. Using this option enables you to set values of multiple cells in a single test step and easilyparameterize the cell values. For details, see "Using the Auto-Parameterize Option to ParameterizeTable and Grid Cell Values" on page 282.
Record HTMLelements usingSAPGuiScriptinginterface
Specifies whether UFT should use the SAP GUI Scripting API when recording HTML elements within SAPapplications, or use the built-in Web support to record theseHTML elements. You can use this option tohandle synchronization issues that may arise from recording on Web elements inside an SAP GUI forWindows session.
Changes to this option take effect only after you start recording anew test or business component.
Record ResetMethod on SAPGui Session
Records aResetmethod as the first step when recording a test or business component. When the test orbusiness component is run, the first step resets the application session so that it starts at the initial SAPscreen. This ensures that the test or business component starts with the sameapplication state each time itis run.
This option is applicable only if theOpen the following SAP Gui client when a record or run sessionbegins and theAuto-logonoptions are both selected in the "SAP Tab (Record and Run Settings DialogBox)" (described on page271.
Record statusbar messages
Records aSAPGuiStatusbar.Sync step each timea status bar message is displayed in the SAPapplication.
Note: This option is selected by default.
Show 'DisabledScriptingInterface'warnings
Instructs UFT to displaywarnings if the SAP GUI Scripting API is disabled on the SAP application. If this is thecase, you cannot record or run steps until you enable the SAP GUI Scripting API. For details on enabling theSAP GUI Scripting API, see "How to Enable Support for SAP GUI for Windows" on page 264.
Note: This option is selected by default.
Show 'LowSpeedConnection'Warnings
Instructs UFT to displaywarnings if the connection speed to the server is set to Low speed connection.
If this option is selected, oneof the following occurs if the connection speed is low:
l If the session was opened by UFT when recording started (as defined in theRecord and Run Settingsdialog box), the error message appears and the recording stops.
l If the session was opened by the user before recording started, the error message appears and recordingcontinues in Standard Windows recording mode. For details on Standard Windows recording mode, see"How to Record on Standard Windows Controls During an SAP GUI for Windows RecordingSession" on page 289.
If this option is not selected, oneof the following occurs if the connection speed is low:
l If the session was opened by UFT when recording started (as defined in theRecord and Run Settingsdialog box), the error messagedoes not appear and the recording stops.
l If the session was opened by the user before recording was begun, the error messagedoes not appearand recording continues in Standard Windows recording mode. For details on Standard Windowsrecording mode, see "How to Record on Standard Windows Controls During an SAP GUI forWindows Recording Session" on page 289.
Add-ins GuideWindows-based SAP Support
HP Unified Functional Testing (12.50) Page 275
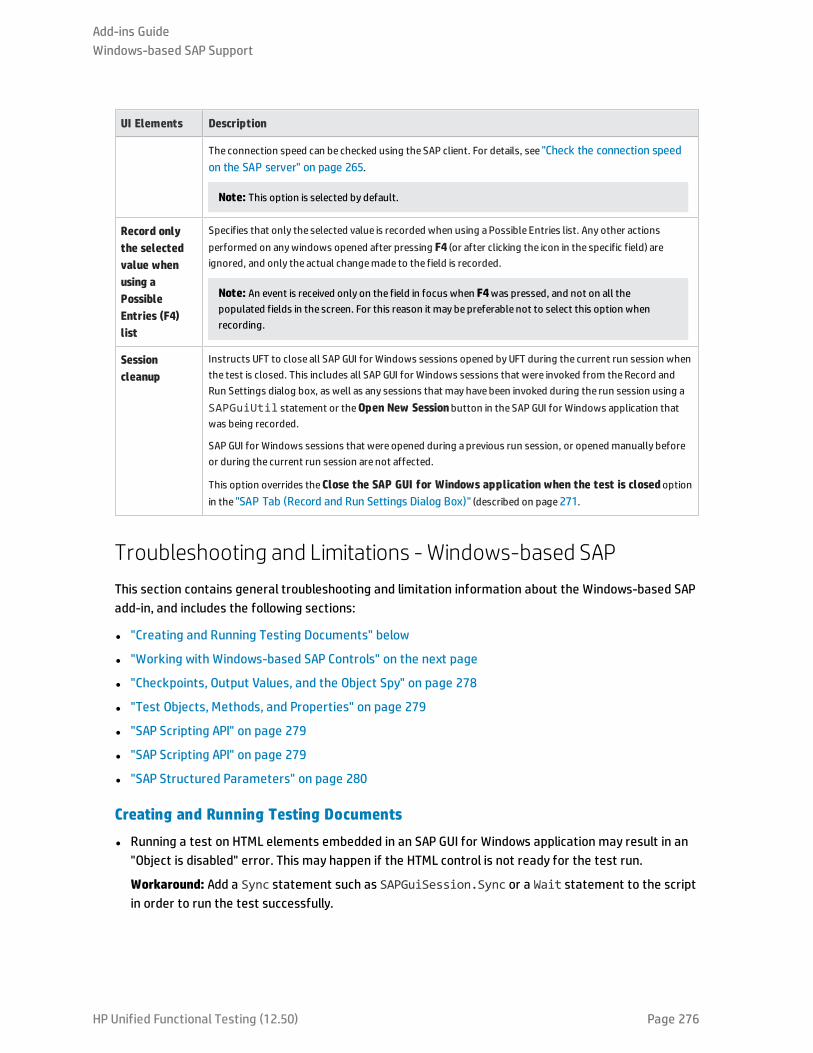
UI Elements Description
The connection speed can be checked using the SAP client. For details, see "Check the connection speedon the SAP server" on page 265.
Note: This option is selected by default.
Record onlythe selectedvalue whenusing aPossibleEntries (F4)list
Specifies that only the selected value is recorded when using aPossible Entries list. Any other actionsperformed on anywindows opened after pressing F4 (or after clicking the icon in the specific field) areignored, and only the actual changemade to the field is recorded.
Note: An event is received only on the field in focus when F4was pressed, and not on all thepopulated fields in the screen. For this reason it may bepreferable not to select this option whenrecording.
Sessioncleanup
Instructs UFT to close all SAP GUI for Windows sessions opened by UFT during the current run session whenthe test is closed. This includes all SAP GUI for Windows sessions that were invoked from theRecord andRun Settings dialog box, as well as any sessions that may havebeen invoked during the run session using aSAPGuiUtil statement or theOpen New Sessionbutton in the SAP GUI for Windows application thatwas being recorded.
SAP GUI for Windows sessions that were opened during aprevious run session, or opened manually beforeor during the current run session are not affected.
This option overrides theClose the SAP GUI for Windows application when the test is closedoptionin the "SAP Tab (Record and Run Settings Dialog Box)" (described on page271.
Troubleshooting and Limitations - Windows-based SAPThis section contains general troubleshooting and limitation information about the Windows-based SAPadd-in, and includes the following sections:
l "Creating and Running Testing Documents" below
l "Working with Windows-based SAP Controls" on the next page
l "Checkpoints, Output Values, and the Object Spy" on page 278
l "Test Objects, Methods, and Properties" on page 279
l "SAP Scripting API" on page 279
l "SAP Scripting API" on page 279
l "SAP Structured Parameters" on page 280
Creating and Running Testing Documents
l Running a test on HTML elements embedded in an SAP GUI for Windows application may result in an"Object is disabled" error. This may happen if the HTML control is not ready for the test run.
Workaround: Add a Sync statement such as SAPGuiSession.Sync or a Wait statement to the scriptin order to run the test successfully.
Add-ins GuideWindows-based SAP Support
HP Unified Functional Testing (12.50) Page 276
l By default, the recording and running of steps on HTML elements embedded in an SAP GUI forWindows application is performed using the UFT Web Add-in. In some cases, steps recorded using theWeb Add-in are inserted into the script before SAP Add-in steps that use the SAP Scripting API.
Workaround: Use the option of recording HTML elements embedded in SAP GUI application using theSAP Scripting Interface. To do so, stop recording, select the Record HTML elements using SAPGuiScripting interface check box in the SAP pane of the Options dialog box (Tools > Options > GUITesting tab > SAP > General node). Then close and reopen the test and then begin recording again.
l The SAP Gantt chart (SAP Bar Chart) and Image/Picture controls are supported by the SAP GUIfor Windows alternative recording mechanism. The current support for these controls is limited. Youcan override the default recording behavior for SAP Windows test objects, or add limited recordingsupport for other SAP GUI for Windows objects.
l If you insert a call to an external action or a copy of an action, and that action includes anSAPGuiTable.Input, SAPGuiGrid.Input, or SAPGuiAPOGrid.Input statement, the correspondinginput data sheet is not copied to the Data pane with the action.
Workaround: Insert and run Datatable.AddSheet and Datatable.ImportSheet statements toimport the sheet referenced by the action's Inputmethod. Ensure that the name of the data sheetexactly matches the name specified in the corresponding Input statement.
l In the SAP Enterprise Portal environment, occasional synchronization problems may occur during thetest run when alternating between SAPWeb and SAPWindows environments.
Workaround: Add a WaitProperty or Wait statement between the Web steps and the Windowssteps.
l UFT can connect to your SAP Logon or SAP Logon Pad application for recording and running tests onSAP GUI for Windows sessions. If you use both SAP Logon and SAP Logon Pad processes on yourcomputer, UFT connects to the latest process that was launched.
l Use the SAP Tab of the Record and Run Settings Dialog Box to instruct UFT to open your SAP GUI forWindows application. Do not use the Windows Applications tab of the dialog box for this purpose.
Working with Windows-based SAP Controls
l Separate toolbar controls (ones that are not part of a grid or other object) are supported by theSapGuiToolbar test object (GuiComponentType is 202), and the Object Spy recognizes thembecause they are separate objects.
Note that tree controls do not have associated toolbars. Toolbars displayed on top of tree controlsare recognized as separate toolbars, and are therefore supported as described above.
l Toolbars inside grid controls are supported by the SapGuiToolbar test object (GuiComponentType is204). However, the Object Spy does not recognize these toolbars because they are part of the grid.You cannot add these toolbars to the object repository using the Add to repository option from theActive Screen or the Add Objects option in the Object Repository window. To add these toolbars tothe object repository, record on them.
l Toolbars inside other controls (such as a toolbar within a text area control) are not supported.
Add-ins GuideWindows-based SAP Support
HP Unified Functional Testing (12.50) Page 277
l Microsoft Office controls within the SAP window are not supported.
l If you record the step of pressing an F4 key, and that key press results in setting new values formultiple fields, a step is recorded only for the field from which the F4 key was pressed, andtherefore, only that field will be populated during the run.
l The SAP Editor control is not supported.
l UFT fails to run steps on SAP tree nodes that contain the ";" character.
l UFT does not automatically record standard Windows dialog boxes used by your SAP GUI for Windowsapplication (such as the Open File and Save As dialog boxes). This is because the SAP scripting APIdoes not support these dialog boxes. This may also occur when using SAP GUI for Windows with GuiXT.
Workaround: Do one of the following:
l Change to Standard Windows Recording mode (select Standard Windows Recording from theRecording Modes drop-down in the Record toolbar) to record on these objects. (Make sure thatyou switch to Standard Windows Recordingmode before you perform the operation that opensthe standard Windows control in your SAP application.)
l Use low-level recording to record on these objects.
l Use programmatic descriptions to run steps on these objects.
Checkpoints, Output Values, and the Object Spy
l To ensure that the correct object properties are captured with your checkpoint, always record a stepthat results in communication with the server (such as pressing ENTER) before inserting a checkpointor output value.
l You cannot use the Object Spy or create checkpoints for the controls listed below. However, you cansuccessfully record and run steps on them.
l Toolbar buttons in grid controls.
l Internal controls in tree or table objects.(For example, a radio button in a table cell or a check box in a tree.)
l Creating checkpoints or using the Object Spy on an object that is located in a currently inactive SAPscreen (for example, if the screen is behind an invoked dialog box) is not supported. However, you cancreate checkpoints on status bar messages (displayed in an inactive window) using the Record statusbar messages option (Tools > Options > GUI Testing tab > SAP node > Record status barmessages).
l When running old 6.20 tests on a 6.40 client, checkpoints on radio buttons, check boxes, edit boxes,or regular buttons may fail due to changes to tooltip property values for these objects in the 6.40client.
l UFT can estimate the number of rows in a table control, but it cannot retrieve the exact numberbecause only the table content that is visible on the client is actually available. Data from non-visiblerows are stored only on the back-end server. Therefore, when inserting or modifying checkpoints fora table control object, the number of rows specified in the Define/Modify Row Range dialog box maynot be accurate.
Add-ins GuideWindows-based SAP Support
HP Unified Functional Testing (12.50) Page 278
l Do not perform any operations on the SAP GUI window (such as changing the transaction state ornavigating to another window) while UFT retrieves the data for a table checkpoint even if it seems totake a long time, as this may cause severe problems.
l When inserting a checkpoint on a table or grid from the Active Screen, the actual table must be openin your SAP GUI for Windows application to extract the correct information from the table or grid.
Test Objects, Methods, and Properties
l When using the SAPGuiTableInputmethod, check the scrolling mode of the current table. If youparameterize a table with a Data pane sheet that contains more rows in the sheet than are displayedin the table's current view, UFT tries to scroll down the table while running the test, to insert morerows from the data sheet. UFT supports two ways of scrolling rows in tables—by pressing the ENTERkey, or by pressing the PAGEDOWN key. By default, the Add-in for SAP Solutions tries PAGEDOWN ifneeded. You can configure the required mode using the second argument of the Inputmethod.
For details, see the HP Unified Functional Testing Add-ins Guide.
l Right-click operations are not supported for the SAPGuiTextArea object.
l Drag-and-drop operations in the SAP Gui for Windows application are disabled when UFT is open.
Using the Active Screen
l Active Screen images are based on captured screen bitmaps. Therefore, objects that are not visiblein the SAP GUI for Windows view are not part of the Active Screen image. You cannot add objects tothe script from the Active Screen if they were not in the captured view.
l Drop-down menus are not captured in the Active Screen. Active Screen technology captures the dataafter the menu is closed and the menu item is selected.
l While recording, UFT captures one Active Screen image for several steps. UFT records steps onlywhen the SAP GUI for Windows client sends information to the SAP back-end server. When thisoccurs, all steps that were performed between the previous communication and the current one areadded to the script. The last screen that was sent to the server is captured by the Active Screen forall steps recorded during that communication.
l When recording on Web elements inside SAP GUI for Windows applications, HTML images are notcaptured.
l Adding objects to the object repository (using the View/Add Object option, or creating checkpoint oroutput value steps) from an Active Screen created from a step recorded on a Web element inside aSAP GUI for Windows application generates an incorrect object hierarchy in the object repository.
SAP Scripting API
l For security reasons, the SAP scripting API prevents the recording of passwords. When you record theoperation of inserting a password in a password box, UFT records a Set statement using asterisks(****) as the method argument value.
Workaround: Do one of the following:
Add-ins GuideWindows-based SAP Support
HP Unified Functional Testing (12.50) Page 279
l Configure and enable the Auto-logon settings in the SAP Tab of the Record and Run SettingsDialog Box.
l Insert a step using one of the SAPGuiUtil object's AutoLogonmethods.
l Record the password normally during the recording session. After the recording session, modifythe password step to use the SetSecuremethod, and enter the encrypted password value orparameterize the value.
For details, see the SAP Windows section of the HP UFT Object Model Reference for GUI Testing(Help> HP Unified Functional Testing Help > Object Model Reference for GUI Testing > SAP Windows).
SAP Structured Parameters
When you launch UFT by clicking the Edit Test Script button directly in the SAP Solution Manager TestAutomation:Initial Screen transaction(Transaction Code: stce) or in the SAP Solution ManagerConfiguration transaction (Transaction Code :Solar02), clicking the Maintain SAP Parameter button inUFT might not return you to the correct page in SAP Solution Manager.
Workaround: Use the External Test button in the Change Test Configuration transaction to launch UFT.
When you create a test in the Change Test Script transaction of SAP Solution Manager and then clickthe Back button, UFT may not show the test.
Workaround: Save and close UFT and click the External Test button to call UFT.
When you click the Maintain SAP Parameter button or the Back/External Test button to switch fromUFT to SAP, you may receive an error in SAP Solution Manager: OBJECT_OBJREF_NOT_ASSIGNED.
Add-ins GuideWindows-based SAP Support
HP Unified Functional Testing (12.50) Page 280

Windows-Based SAP Support - Test ObjectsThis chapter includes:
• Checkpoints and Output Values in SAP GUI for Windows 282
• Using the Auto-Parameterize Option to Parameterize Table and Grid Cell Values 282
• Low-Level or Analog Mode Recording on SAP GUI for Windows 288
• Spooling Data from a Table 288
• How to Record on Standard Windows Controls During an SAP GUI for Windows Recording Session 289
Add-ins GuideWindows-based SAP Support
HP Unified Functional Testing (12.50) Page 281

Checkpoints and Output Values in SAPGUI for Windowsl When inserting a table checkpoint (tests only), consider how other steps performed on the table may
affect the checkpoint.
Example 1: If you have a step in your test that clicks the Total toolbar button on a grid control, thatclick refreshes all data in the table. The refresh could potentially cause a table checkpoint on a cell inthe table to fail.
Example 2: If you click a toolbar button in a grid control that adds rows to your table before creatinga table checkpoint, the extra rows are captured as part of the grid checkpoint (if you capture allrows). Therefore, confirm that the same rows are displayed during the run session.
l To insert a new table checkpoint while editing your test or business component, the actual table orgrid must be open to the appropriate level or view. This is true even if your Active Screen (tests only)contains a capture of the table or grid.
l In general, it is not necessary to open the table or grid in the application to edit an existingcheckpoint. However, if you want to modify the row range for the checkpoint, the actual table or gridmust be open to the appropriate level or view.
l When creating a checkpoint on ActiveX grid controls (these generally have toolbars), UFT capturesthe data from all columns and all rows in the grid in the table checkpoint. If you do not need to checkdata from all rows in your grid, you can specify the rows you want to include in the checkpoint in theDefine Row Range dialog box. You can also increase or decrease the number of rows included in thecheckpoint at a later time.
l The Visible Rows option in the Define/Modify Row Range Dialog Box is not available for checkpointscreated on grid controls.
Using the Auto-Parameterize Option to Parameterize Table andGrid Cell ValuesWhen working with tests, UFT records a SetCellData statement, by default, each time you modify thevalue of a cell in a table or grid. If you want to modify the values of several cells in a single table or grid,and then parameterize your test so that different values are entered into the cells each time your testaction runs, you can do this by parameterizing each statement individually, or by enabling the Auto-parameterize table and grid controls option.
When this option is selected, UFT automatically captures all values you set for a particular table or gridduring a recording session and stores them in a special data sheet in the Data pane. UFT inserts a singleSAPGuiTable.Input, SAPGuiGrid.Input, or SAPGuiAPOGrid.Input statement into your test, whichrefers to this new data sheet. Before running the test, you can easily modify the values or addadditional sets of data to the data sheet for each action iteration.
Add-ins GuideWindows-based SAP Support
HP Unified Functional Testing (12.50) Page 282
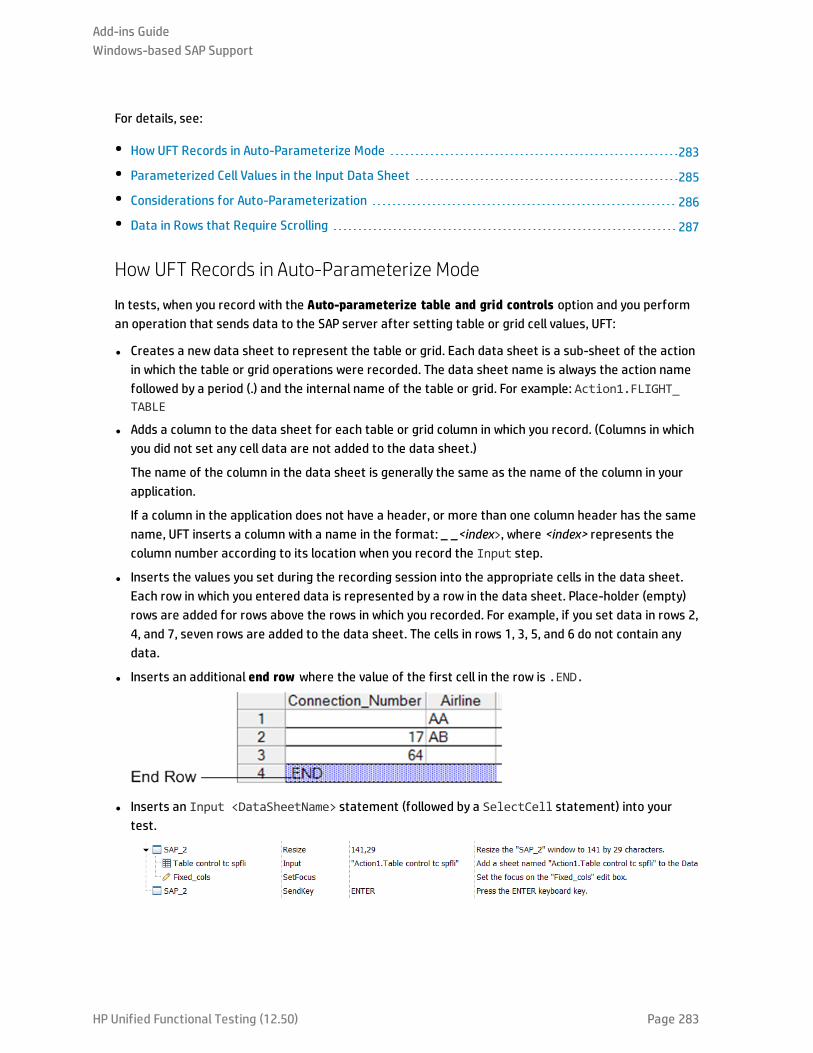
For details, see:
• How UFT Records in Auto-Parameterize Mode 283
• Parameterized Cell Values in the Input Data Sheet 285
• Considerations for Auto-Parameterization 286
• Data in Rows that Require Scrolling 287
How UFT Records in Auto-Parameterize Mode
In tests, when you record with the Auto-parameterize table and grid controls option and you performan operation that sends data to the SAP server after setting table or grid cell values, UFT:
l Creates a new data sheet to represent the table or grid. Each data sheet is a sub-sheet of the actionin which the table or grid operations were recorded. The data sheet name is always the action namefollowed by a period (.) and the internal name of the table or grid. For example: Action1.FLIGHT_TABLE
l Adds a column to the data sheet for each table or grid column in which you record. (Columns in whichyou did not set any cell data are not added to the data sheet.)
The name of the column in the data sheet is generally the same as the name of the column in yourapplication.
If a column in the application does not have a header, or more than one column header has the samename, UFT inserts a column with a name in the format: _ _<index>, where <index> represents thecolumn number according to its location when you record the Input step.
l Inserts the values you set during the recording session into the appropriate cells in the data sheet.Each row in which you entered data is represented by a row in the data sheet. Place-holder (empty)rows are added for rows above the rows in which you recorded. For example, if you set data in rows 2,4, and 7, seven rows are added to the data sheet. The cells in rows 1, 3, 5, and 6 do not contain anydata.
l Inserts an additional end row where the value of the first cell in the row is .END.
l Inserts an Input <DataSheetName> statement (followed by a SelectCell statement) into yourtest.
Add-ins GuideWindows-based SAP Support
HP Unified Functional Testing (12.50) Page 283
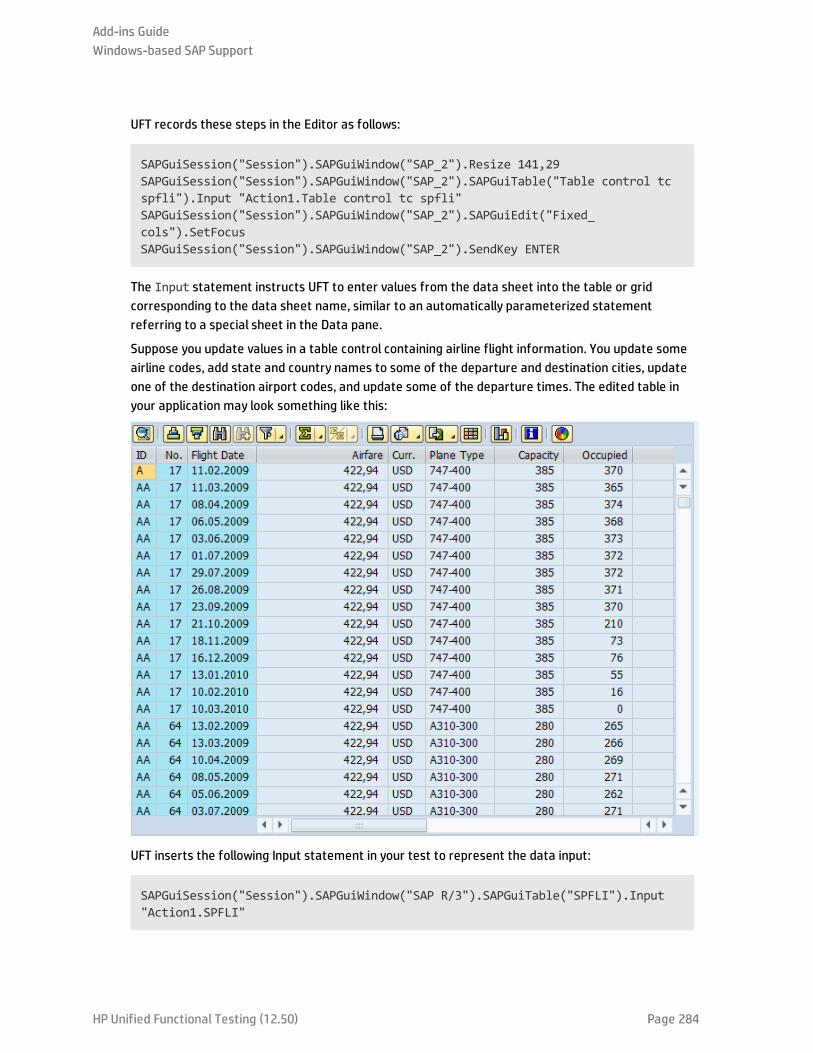
UFT records these steps in the Editor as follows:
SAPGuiSession("Session").SAPGuiWindow("SAP_2").Resize 141,29SAPGuiSession("Session").SAPGuiWindow("SAP_2").SAPGuiTable("Table control tcspfli").Input "Action1.Table control tc spfli"SAPGuiSession("Session").SAPGuiWindow("SAP_2").SAPGuiEdit("Fixed_cols").SetFocusSAPGuiSession("Session").SAPGuiWindow("SAP_2").SendKey ENTER
The Input statement instructs UFT to enter values from the data sheet into the table or gridcorresponding to the data sheet name, similar to an automatically parameterized statementreferring to a special sheet in the Data pane.
Suppose you update values in a table control containing airline flight information. You update someairline codes, add state and country names to some of the departure and destination cities, updateone of the destination airport codes, and update some of the departure times. The edited table inyour application may look something like this:
UFT inserts the following Input statement in your test to represent the data input:
SAPGuiSession("Session").SAPGuiWindow("SAP R/3").SAPGuiTable("SPFLI").Input"Action1.SPFLI"
Add-ins GuideWindows-based SAP Support
HP Unified Functional Testing (12.50) Page 284
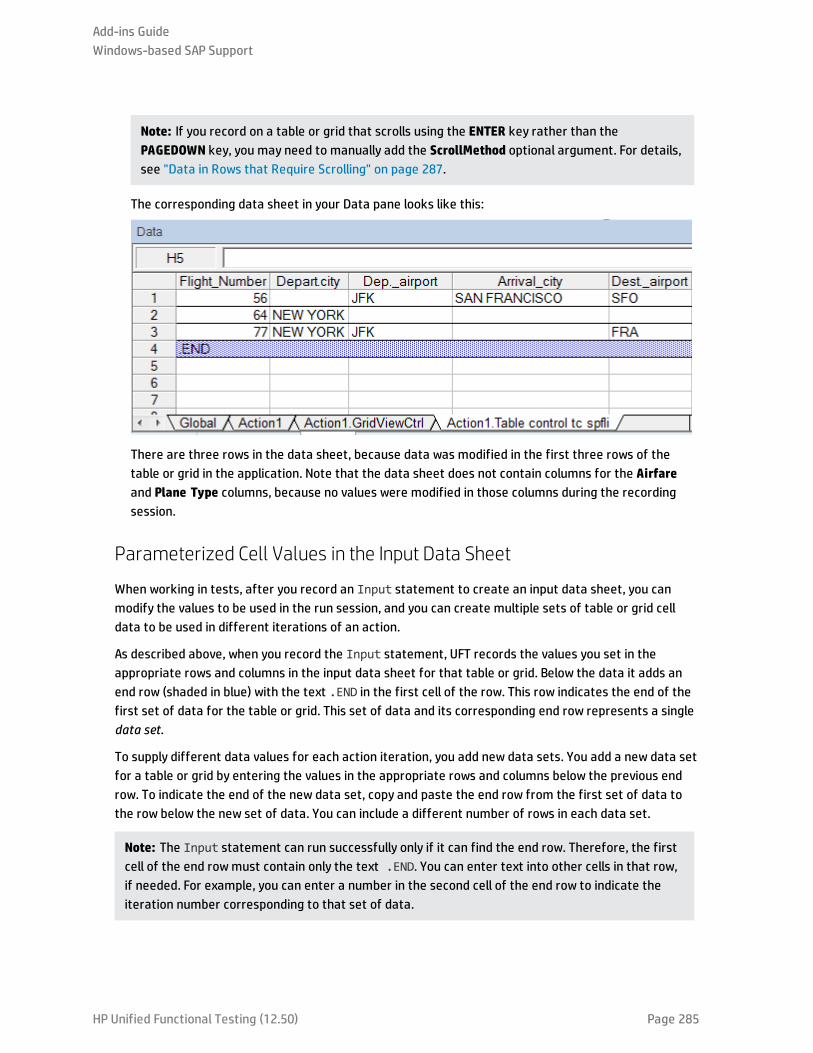
Note: If you record on a table or grid that scrolls using the ENTER key rather than thePAGEDOWN key, you may need to manually add the ScrollMethod optional argument. For details,see "Data in Rows that Require Scrolling" on page 287.
The corresponding data sheet in your Data pane looks like this:
There are three rows in the data sheet, because data was modified in the first three rows of thetable or grid in the application. Note that the data sheet does not contain columns for the Airfareand Plane Type columns, because no values were modified in those columns during the recordingsession.
Parameterized Cell Values in the Input Data Sheet
When working in tests, after you record an Input statement to create an input data sheet, you canmodify the values to be used in the run session, and you can create multiple sets of table or grid celldata to be used in different iterations of an action.
As described above, when you record the Input statement, UFT records the values you set in theappropriate rows and columns in the input data sheet for that table or grid. Below the data it adds anend row (shaded in blue) with the text .END in the first cell of the row. This row indicates the end of thefirst set of data for the table or grid. This set of data and its corresponding end row represents a singledata set.
To supply different data values for each action iteration, you add new data sets. You add a new data setfor a table or grid by entering the values in the appropriate rows and columns below the previous endrow. To indicate the end of the new data set, copy and paste the end row from the first set of data tothe row below the new set of data. You can include a different number of rows in each data set.
Note: The Input statement can run successfully only if it can find the end row. Therefore, the firstcell of the end rowmust contain only the text .END. You can enter text into other cells in that row,if needed. For example, you can enter a number in the second cell of the end row to indicate theiteration number corresponding to that set of data.
Add-ins GuideWindows-based SAP Support
HP Unified Functional Testing (12.50) Page 285
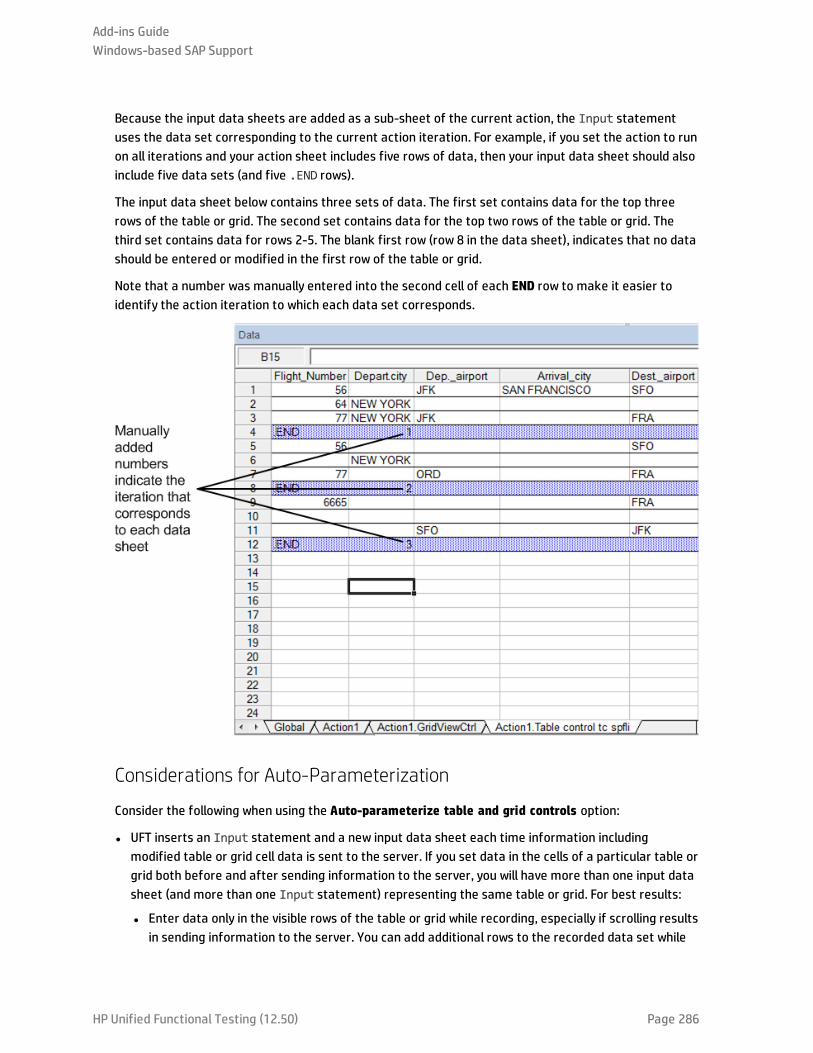
Because the input data sheets are added as a sub-sheet of the current action, the Input statementuses the data set corresponding to the current action iteration. For example, if you set the action to runon all iterations and your action sheet includes five rows of data, then your input data sheet should alsoinclude five data sets (and five .END rows).
The input data sheet below contains three sets of data. The first set contains data for the top threerows of the table or grid. The second set contains data for the top two rows of the table or grid. Thethird set contains data for rows 2-5. The blank first row (row 8 in the data sheet), indicates that no datashould be entered or modified in the first row of the table or grid.
Note that a number was manually entered into the second cell of each END row to make it easier toidentify the action iteration to which each data set corresponds.
Considerations for Auto-Parameterization
Consider the following when using the Auto-parameterize table and grid controls option:
l UFT inserts an Input statement and a new input data sheet each time information includingmodified table or grid cell data is sent to the server. If you set data in the cells of a particular table orgrid both before and after sending information to the server, you will have more than one input datasheet (and more than one Input statement) representing the same table or grid. For best results:
l Enter data only in the visible rows of the table or grid while recording, especially if scrolling resultsin sending information to the server. You can add additional rows to the recorded data set while
Add-ins GuideWindows-based SAP Support
HP Unified Functional Testing (12.50) Page 286
editing your test.
l Perform sorting, calculations, and other such operations either before beginning or after youfinish entering data in a table or grid.
l The end of each data set in the input table or grid must be indicated by an end row with only the text.END in the first cell of the row.
l You can enter additional text, such as comments or an iteration number, in other cells of the .ENDrow.
l You can include a different number of rows in each data set.
If you enter data for rows that require scrolling to display them in your application, you may need tomodify your Input statement. For details, see "Data in Rows that Require Scrolling" below.
l When recording, UFT adds a column to the input data sheet only for table or grid columns in whichyou set data. You can add additional columns from your table or grid to the data sheet while editingyour test. Double-click the column header in the data sheet to rename it. Enter the name of yourtable or grid column. If the table or grid column name has spaces, replace the spaces withunderscores.
l In general, the columns in your data sheet can be in any order, as long as the column names matchthe column names in your table or grid. However, if you record data in a column without a columnheader name or if more than one column in the table or grid has the same header name, UFT adds acolumn to the data sheet in the format: __<index>, where <index> indicates the number of thecolumn in the table or grid when you record the Input statement, for example, __1 or __2. You canalso use this format for columns in the data sheet if the column header names in your table or gridmay change from iteration to iteration.
l To use multiple sets of data from an input data sheet, you must have at least one other Data paneparameter in your action that is set to use Current action sheet (local). Also, confirm that the actionis set to run multiple iterations in the Run Tab of the Action Call Properties Dialog Box.
l The number of data sets in your input data sheet should match the number of rows in thecorresponding action data sheet.
If your input data sheet contains fewer data sets than the number of rows in the action sheet, nodata will be inserted in the table or grid during those action iterations. For example, if the action runsfive iterations, and your input data sheet contains only four data sets, during the fifth iteration nodata will be entered into the table or grid when the Input statement runs.
If your data sheet contains more data sets than the number of rows in the action sheet, those datasets will not be used.
Data in Rows that Require Scrolling
When working in tests, UFT inserts a new Input statement and creates a new input data sheet eachtime you send information to the server that includes table or grid cell data. Therefore, if scrollingresults in sending data to the server, it is recommended to add data only to visible cells during therecording session. If you want to enter data into additional rows during the run session, you can addthose rows to the data sheet manually while editing your test.
Add-ins GuideWindows-based SAP Support
HP Unified Functional Testing (12.50) Page 287
If you create an input data set for rows that are not visible on the table or grid in your application, thenUFT must scroll the table or grid during the run session to insert the data for those rows. If you createan input data set for a row that needs to be added to the table or grid, UFT must send a command toadd the row. By default, UFT sends a PageDown command if the rows in the data sheet exceed thosecurrently displayed in the application. If UFT needs to use the ENTER key to add additional rows to thetable or grid, then you need to manually add the optional ScrollMethod argument (with the valueENTER) to your Input statement before running your test.
For example:
SAPGuiSession("Session").SAPGuiWindow("Create Standard").SAPGuiTable("SAPMV45ATCRTL_V_ERF_").Input "Action1.All items", ENTER
Low-Level or Analog Mode Recording on SAPGUI for WindowsWhen working in tests, if you are unable to record steps on an object in the normal recording mode, or ifyou want to record mouse clicks and keyboard input with the exact x- and y-coordinates, you can recordsteps on those objects using low-level or analog recording (select Low-Level Recording or AnalogRecording from the Recording Mode drop-down in the Record toolbar during a recording session).
When recording in one of these modes, your steps are added to your test (or to the analog file) as yourecord them rather than when information is sent to the server. If you begin recording in low-level oranalog mode, do not switch back to the normal recording mode until you perform a step that results incommunication with the SAP server. Switching between one of these modes and the normal recordingmode before the server communication, may result in your steps being recorded twice (once in low-level/analog mode and once in normal mode).
For details on low-level and analog recording, see the HP Unified Functional Testing User Guide.
Spooling Data froma TableIf you want to spool all the data from an SAP GUI for Windows table into an external file, use theGetCellDatamethod to loop through each cell in the table. You can then save the information to anexternal file.
The following example uses the GetCellDatamethod to list the data of each cell in a table of 10 rowsand 10 columns:
For i=1 to 10for j=1 to 10
col="#" & jDat=SAPGuiSession("Session").SAPGuiWindow("Create Standard").SAPGuiTable
("SAPMV45ATCTRL_U_ERF_").GetCellData (i, col)'Enter lines of code that use the value of the returned Dat variable
next
Add-ins GuideWindows-based SAP Support
HP Unified Functional Testing (12.50) Page 288
next
For details on the GetCellDatamethod, see the SAP GUI for Windows section of the HP UFT ObjectModel Reference for GUI Testing.
How to Record on Standard Windows Controls During an SAPGUI for Windows Recording SessionTo enable UFT to record steps on standard Windows controls during an SAP GUI for Windows recordingsession, you must switch to Standard Windows Recordingmode prior to performing steps on thesecontrols. (If you switch to Standard Windows Recording mode after performing an operation on astandard Windows control, both UFT and the SAP application may sometimes become unresponsive.)
This task describes how to toggle between the relevant recording options.
To switch to Standard Windows recording mode while recording a test in an SAP GUI for Windowsapplication:
On the Record toolbar, select Standard Windows Recording from the Recording Modes drop-down, orpress ALT+SHIFT+F3.
To record steps as SAP GUI for Windows objects again:
Do one of the following:
l On the Record toolbar, select Default from the Recording Modes drop-down.
l Stop the recording session.
This restores the normal recording mode for SAP GUI for Windows.
Add-ins GuideWindows-based SAP Support
HP Unified Functional Testing (12.50) Page 289
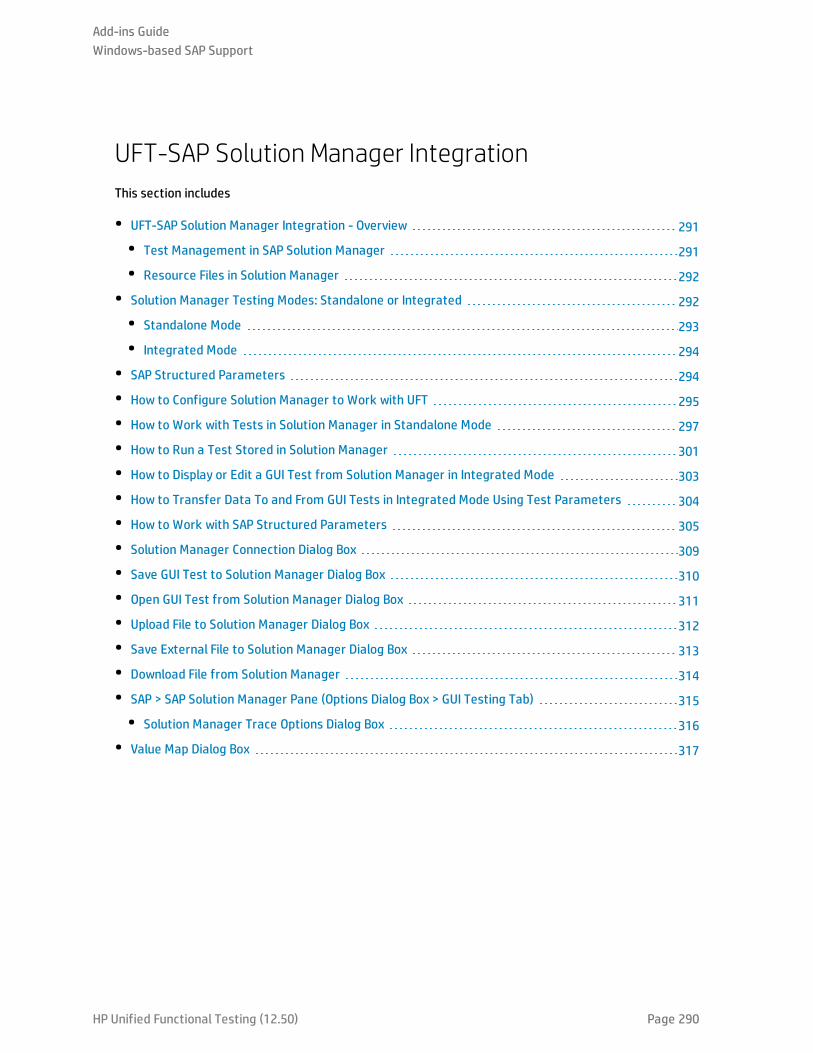
UFT-SAP Solution Manager IntegrationThis section includes
• UFT-SAP Solution Manager Integration - Overview 291
• Test Management in SAP Solution Manager 291
• Resource Files in Solution Manager 292
• Solution Manager Testing Modes: Standalone or Integrated 292
• Standalone Mode 293
• Integrated Mode 294
• SAP Structured Parameters 294
• How to Configure Solution Manager to Work with UFT 295
• How to Work with Tests in Solution Manager in Standalone Mode 297
• How to Run a Test Stored in Solution Manager 301
• How to Display or Edit a GUI Test from Solution Manager in Integrated Mode 303
• How to Transfer Data To and From GUI Tests in Integrated Mode Using Test Parameters 304
• How to Work with SAP Structured Parameters 305
• Solution Manager Connection Dialog Box 309
• Save GUI Test to Solution Manager Dialog Box 310
• Open GUI Test from Solution Manager Dialog Box 311
• Upload File to Solution Manager Dialog Box 312
• Save External File to Solution Manager Dialog Box 313
• Download File from Solution Manager 314
• SAP > SAP Solution Manager Pane (Options Dialog Box > GUI Testing Tab) 315
• Solution Manager Trace Options Dialog Box 316
• Value Map Dialog Box 317
Add-ins GuideWindows-based SAP Support
HP Unified Functional Testing (12.50) Page 290
UFT-SAP Solution Manager Integration - Overview
Note: Unless otherwise specified, references to Solution Manager in this Help file apply to allcurrently supported versions of SAP eCATT (SAP Extended Computer Aided Test Tool) and SAPSolution Manager. Note that some features and options may not be supported in the specificedition of Solution Manager or eCATT that you are using.
For a list of the supported versions of Solution Manager or eCATT, see the HP Unified FunctionalTesting Product Availability Matrix, available from the HP Support Matrix page (requires anHP passport).
In addition to ALM, HP's Web-based test management tool, you can also store and manage GUI tests inSAP Solution Manager.
UFT Add-in for SAP Solutions integrates with SAP Solution Manager. This means that you can useSolution Manager with UFT to run quality tests in environments that span beyond Windows and SAPenvironments including complex, multi-platform, highly-integrated composite, legacy, and proprietaryenterprise applications.
Note: UFT cannot connect to both Solution Manager and ALM in the same session. Therefore, youcannot use Solution Manager to manage business components and application areas.
You can work with GUI tests stored in Solution Manager in standalone or integrated mode. The currentmode is indicated in the UFT title bar.
l "Standalone Mode" (described on page 293). The test is opened from UFT.
l "Integrated Mode" (described on page294). The test is opened from Solution Manager.
Solution Manager support is available only when:
l SAP Frontend software is installed on your computer (including support for Unicode).
l SAP GUI for Windows software installed on your computer, including support for RFC libraries. Youadd support for RFC libraries by selecting the Unicode RFC Libraries check box (under DevelopmentTools) during the SAP installation.
l The UFT Add-in for SAP Solutions is installed and loaded. For details, see "How to Manage UFT Add-ins" on page 28.
l Solution Manager integration components are installed.
Test Management in SAP Solution Manager
You can store and manage GUI tests for your SAP application in the file system or in a test managementtool, such as HP ALM or SAP Solution Manager, depending on your testing needs.
To work with SAP Solution Manager, you must configure your Solution Manager server to work with UFT.After the server is configured, you can connect to Solution Manager from UFT in standalone mode, or
Add-ins GuideWindows-based SAP Support
HP Unified Functional Testing (12.50) Page 291
you can connect to UFT from Solution Manager in integrated mode. For details, see "How to ConfigureSolution Manager to Work with UFT" on page 295.
You can create tests from UFT or from Solution Manager, store tests and associated resource files inthe Solution Manager database, edit tests, run tests, and review run results. For details see, "How toWork with Tests in Solution Manager in Standalone Mode" on page 297.
You can also call and pass values from a Solution Manager test script to a GUI test. For details, see "Howto Transfer Data To and From GUI Tests in Integrated Mode Using Test Parameters" on page 304.
For details on performing basic Solution Manager test management operations, see:
l "How to Configure Solution Manager to Work with UFT" on page 295
l "How to Work with Tests in Solution Manager in Standalone Mode" on page 297
l "How to Run a Test Stored in Solution Manager" on page 301
l "How to Display or Edit a GUI Test from Solution Manager in Integrated Mode" on page 303
l "How to Transfer Data To and From GUI Tests in Integrated Mode Using Test Parameters" onpage 304
Resource Files in Solution Manager
When you save a GUI test in Solution Manager, make sure you store all associated resource files inSolution Manager so that any user who opens the test from Solution Manager will have access to all ofthe test's resource files.
Like test names, all test resource files stored in Solution Manager must begin with a valid prefixaccording to the server settings. For example, if your Solution Manager server requires all file names tobegin with z, you would use the following naming convention: z<filename> (for example: zSOR_dwdm).You can set the default prefix for files in the Solution Manager pane of the Options dialog box. Fordetails, see "SAP > SAP Solution Manager Pane (Options Dialog Box > GUI Testing Tab)" on page 315.
When you create a file in UFT, such as a new shared object repository or recovery file, you can createthe file as you normally would in UFT and then save the file directly to Solution Manager.
You can also upload existing files that are stored in the file system (such as external data table files,function library files, shared object repository files, recovery files, and environment variable files).
For details on uploading resource files to Solution Manager, see "How to Work with Tests in SolutionManager in Standalone Mode" on page 297.
Solution Manager Testing Modes: Standalone or IntegratedThe table below describes the basic differences between the standalone and integrated testing modes.
Standalone Mode Integrated Mode
Open testfrom
UFT Solution Manager
Add-ins GuideWindows-based SAP Support
HP Unified Functional Testing (12.50) Page 292
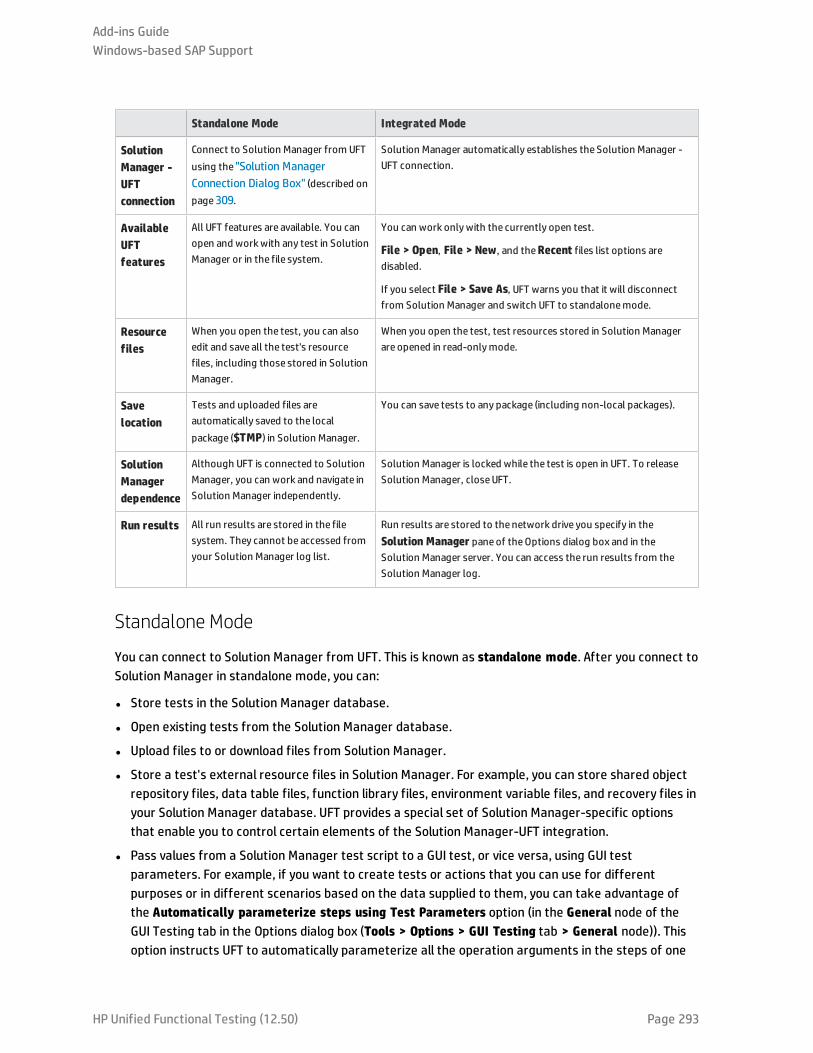
Standalone Mode Integrated Mode
SolutionManager -UFTconnection
Connect to Solution Manager from UFTusing the "Solution ManagerConnection Dialog Box" (described onpage309.
Solution Manager automatically establishes the Solution Manager -UFT connection.
AvailableUFTfeatures
All UFT features are available. You canopen and workwith any test in SolutionManager or in the file system.
You can work onlywith the currently open test.
File > Open, File > New, and theRecent files list options aredisabled.
If you select File > Save As, UFT warns you that it will disconnectfrom Solution Manager and switch UFT to standalonemode.
Resourcefiles
When you open the test, you can alsoedit and save all the test's resourcefiles, including those stored in SolutionManager.
When you open the test, test resources stored in Solution Managerare opened in read-onlymode.
Savelocation
Tests and uploaded files areautomatically saved to the localpackage ($TMP) in Solution Manager.
You can save tests to any package (including non-local packages).
SolutionManagerdependence
Although UFT is connected to SolutionManager, you can work and navigate inSolution Manager independently.
Solution Manager is locked while the test is open in UFT. To releaseSolution Manager, closeUFT.
Run results All run results are stored in the filesystem. They cannot be accessed fromyour Solution Manager log list.
Run results are stored to the network drive you specify in theSolution Manager paneof theOptions dialog box and in theSolution Manager server. You can access the run results from theSolution Manager log.
Standalone Mode
You can connect to Solution Manager from UFT. This is known as standalone mode. After you connect toSolution Manager in standalone mode, you can:
l Store tests in the Solution Manager database.
l Open existing tests from the Solution Manager database.
l Upload files to or download files from Solution Manager.
l Store a test's external resource files in Solution Manager. For example, you can store shared objectrepository files, data table files, function library files, environment variable files, and recovery files inyour Solution Manager database. UFT provides a special set of Solution Manager-specific optionsthat enable you to control certain elements of the Solution Manager-UFT integration.
l Pass values from a Solution Manager test script to a GUI test, or vice versa, using GUI testparameters. For example, if you want to create tests or actions that you can use for differentpurposes or in different scenarios based on the data supplied to them, you can take advantage ofthe Automatically parameterize steps using Test Parameters option (in the General node of theGUI Testing tab in the Options dialog box (Tools > Options > GUI Testing tab > General node)). Thisoption instructs UFT to automatically parameterize all the operation arguments in the steps of one
Add-ins GuideWindows-based SAP Support
HP Unified Functional Testing (12.50) Page 293
or more actions in your test, at the end of a UFT recording session. You can then supply the values forthese test parameters from Solution Manager. For more details on parameters, see the HP UnifiedFunctional Testing User Guide.
Note:
You can also perform many of these operations from Solution Manager in integrated mode. Fordetails, see "Integrated Mode" below. For a comparison of Solution Manager testing modes, see"Solution Manager Testing Modes: Standalone or Integrated" on page 292.
You can also download resource files already stored in Solution Manager and save them in the filesystem.
Integrated Mode
You can connect to UFT from Solution Manager. This is called integrated mode. When you work inintegrated mode, only UFT features related to the Solution Manager test are available in UFT. When yourun tests in integrated mode, your run session results are accessible in the Solution Manager log.
When you log on to a Solution Manager server that is configured to integrate with UFT, you can view,edit, and run GUI tests that are stored in Solution Manager. You can also use the standard SolutionManager commands to copy, rename, and delete GUI tests, just as you would with any other file storedin Solution Manager.
When you open a GUI test from Solution Manager, UFT opens in integrated mode. In this mode, you canuse all UFT features that are associated with the open test. However, you cannot save the open testwith another name.
You can run a test in integrated mode by using the Run option in UFT or using the Execute Test Script(F8) option for a selected GUI test in Solution Manager. You can also execute a Solution Manager testscript (or blob—Binary Large Object) that calls a GUI test. Creating Solution Manager scripts that call GUItests is useful if you want to pass or retrieve values to or from a GUI test.
For details on configuring Solution Manager to work with UFT, see "How to Configure Solution Managerto Work with UFT" on the next page.
Note: You can also work with tests stored in Solution Manager from the UFT interface instandalone mode. For details, see "Standalone Mode" on the previous page. For a comparison ofSolution Manager testing modes, see "Solution Manager Testing Modes: Standalone or Integrated"on page 292.
SAP Structured ParametersWhen you work in integrated mode with SAP Solution Manager, you can use structure-type testparameters to pass complex values such as XML values or arrays from a Solution Manager test script toa GUI test, or vice versa,
Add-ins GuideWindows-based SAP Support
HP Unified Functional Testing (12.50) Page 294
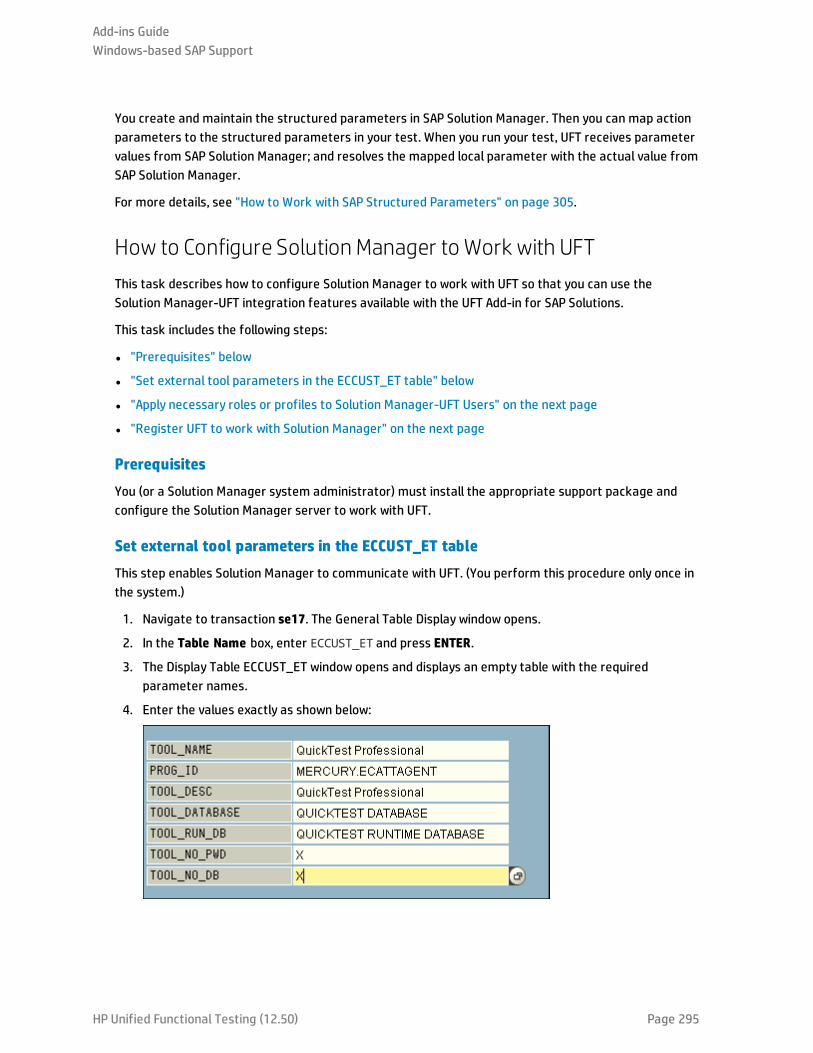
You create and maintain the structured parameters in SAP Solution Manager. Then you can map actionparameters to the structured parameters in your test. When you run your test, UFT receives parametervalues from SAP Solution Manager; and resolves the mapped local parameter with the actual value fromSAP Solution Manager.
For more details, see "How to Work with SAP Structured Parameters" on page 305.
How to Configure Solution Manager to Work with UFTThis task describes how to configure Solution Manager to work with UFT so that you can use theSolution Manager-UFT integration features available with the UFT Add-in for SAP Solutions.
This task includes the following steps:
l "Prerequisites" below
l "Set external tool parameters in the ECCUST_ET table" below
l "Apply necessary roles or profiles to Solution Manager-UFT Users" on the next page
l "Register UFT to work with Solution Manager" on the next page
Prerequisites
You (or a Solution Manager system administrator) must install the appropriate support package andconfigure the Solution Manager server to work with UFT.
Set external tool parameters in the ECCUST_ET table
This step enables Solution Manager to communicate with UFT. (You perform this procedure only once inthe system.)
1. Navigate to transaction se17. The General Table Display window opens.
2. In the Table Name box, enter ECCUST_ET and press ENTER.
3. The Display Table ECCUST_ET window opens and displays an empty table with the requiredparameter names.
4. Enter the values exactly as shown below:
Add-ins GuideWindows-based SAP Support
HP Unified Functional Testing (12.50) Page 295

Note: You can also use the function module SET_EXTERNAL_TOOL to create entries in thecustomizing table. For details, see your Solution Manager documentation.
Apply necessary roles or profiles to Solution Manager-UFT Users
1. Make sure you have permission to:
l Run Solution Manager scripts
l Edit Solution Manager scripts
l Work with an external tool (UFT) in integrated mode
l Connect to Solution Manager from an external tool (UFT) in standalone mode
2. Confirm with your system administrator that the user name you use is assigned the necessaryroles or profiles to perform the above tasks before you begin working with the UFT-SolutionManager integration. For example, to work with UFT in standalone mode, you must be assigned therole S_ECET or the profile SAP_ECET in the Solution Manager system. This is because each of thesetasks requires special roles or profiles.
For details, contact your system administrator or see your SAP and Solution Managerdocumentation.
Register UFT to work with Solution Manager
To enable UFT to communicate with Solution Manager, you must register UFT and then verify theregistration. You perform this procedure only once in the system.
1. Navigate to transaction SPRO, click SAP Reference IMG, and browse to SAP Solution Manager >Capabilities (Optional) > Test Management > External Integration > External Test Tool witheCATT > Register Test Tool.
2. Click New Entries.
3. Enter the values exactly as shown below:
Add-ins GuideWindows-based SAP Support
HP Unified Functional Testing (12.50) Page 296
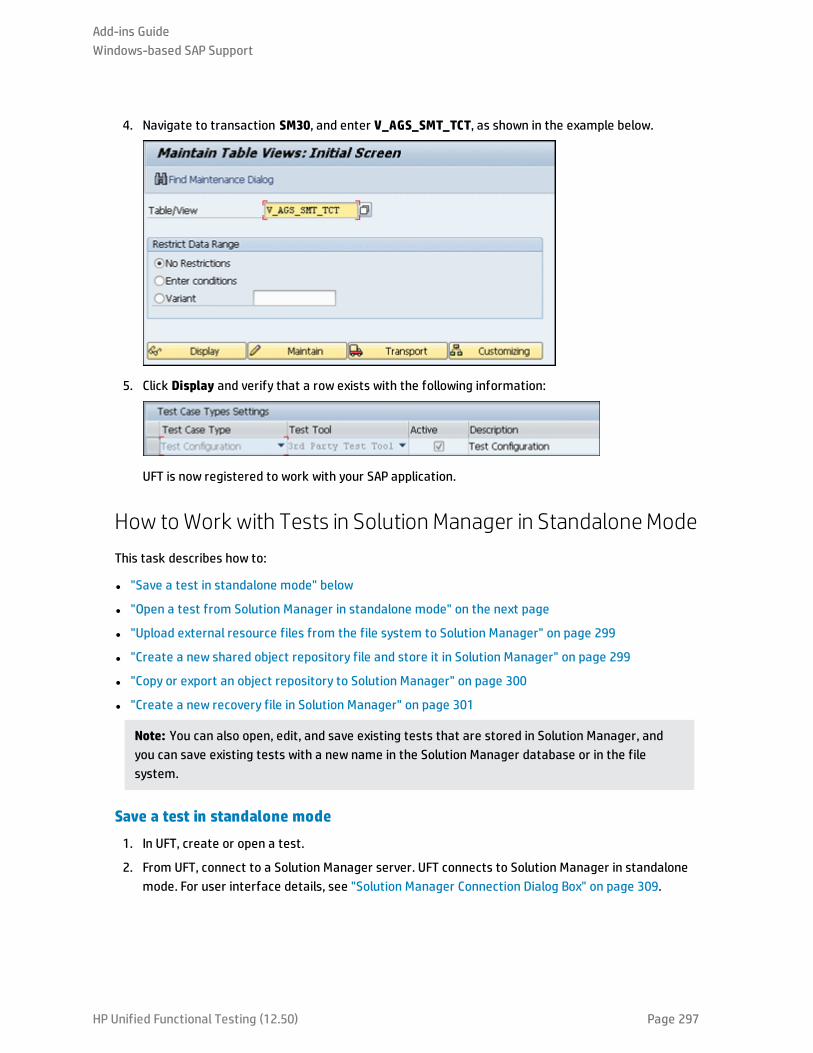
4. Navigate to transaction SM30, and enter V_AGS_SMT_TCT, as shown in the example below.
5. Click Display and verify that a row exists with the following information:
UFT is now registered to work with your SAP application.
How toWork with Tests in Solution Manager in StandaloneModeThis task describes how to:
l "Save a test in standalone mode" below
l "Open a test from Solution Manager in standalone mode" on the next page
l "Upload external resource files from the file system to Solution Manager" on page 299
l "Create a new shared object repository file and store it in Solution Manager" on page 299
l "Copy or export an object repository to Solution Manager" on page 300
l "Create a new recovery file in Solution Manager" on page 301
Note: You can also open, edit, and save existing tests that are stored in Solution Manager, andyou can save existing tests with a new name in the Solution Manager database or in the filesystem.
Save a test in standalone mode
1. In UFT, create or open a test.
2. From UFT, connect to a Solution Manager server. UFT connects to Solution Manager in standalonemode. For user interface details, see "Solution Manager Connection Dialog Box" on page 309.
Add-ins GuideWindows-based SAP Support
HP Unified Functional Testing (12.50) Page 297
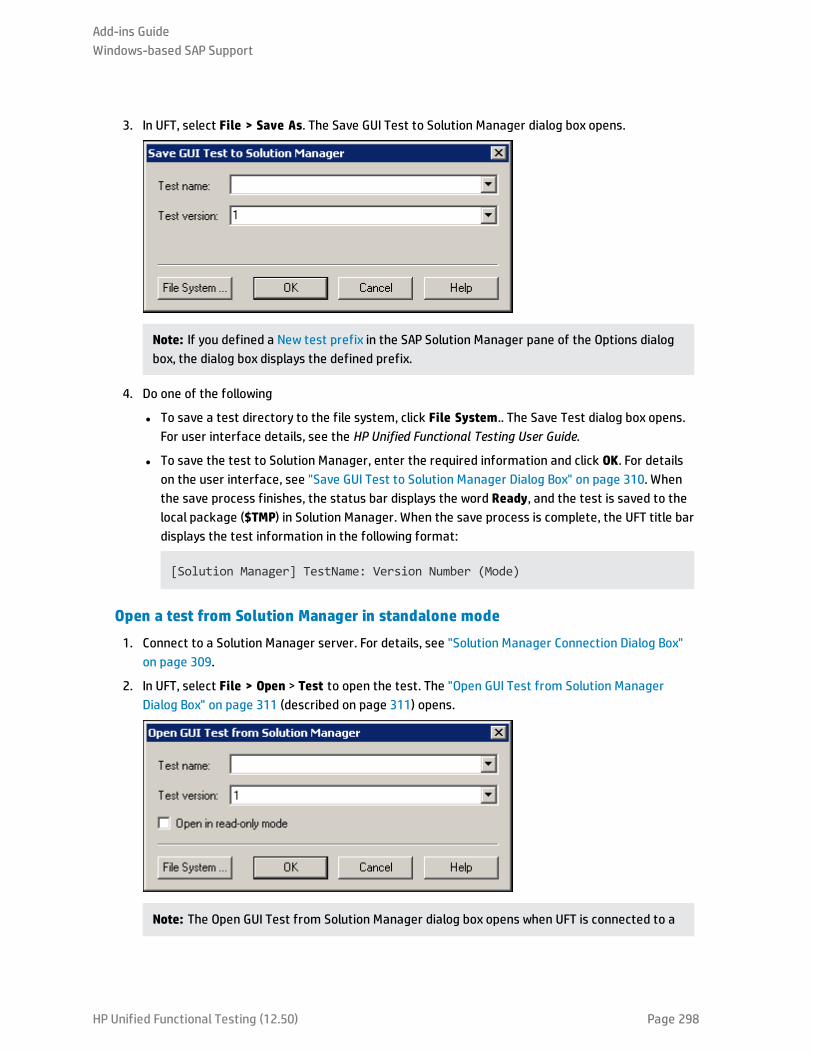
3. In UFT, select File > Save As. The Save GUI Test to Solution Manager dialog box opens.
Note: If you defined a New test prefix in the SAP Solution Manager pane of the Options dialogbox, the dialog box displays the defined prefix.
4. Do one of the following
l To save a test directory to the file system, click File System.. The Save Test dialog box opens.For user interface details, see the HP Unified Functional Testing User Guide.
l To save the test to Solution Manager, enter the required information and click OK. For detailson the user interface, see "Save GUI Test to Solution Manager Dialog Box" on page 310. Whenthe save process finishes, the status bar displays the word Ready, and the test is saved to thelocal package ($TMP) in Solution Manager. When the save process is complete, the UFT title bardisplays the test information in the following format:
[Solution Manager] TestName: Version Number (Mode)
Open a test from Solution Manager in standalone mode
1. Connect to a Solution Manager server. For details, see "Solution Manager Connection Dialog Box"on page 309.
2. In UFT, select File > Open > Test to open the test. The "Open GUI Test from Solution ManagerDialog Box" on page 311 (described on page 311) opens.
Note: The Open GUI Test from Solution Manager dialog box opens when UFT is connected to a
Add-ins GuideWindows-based SAP Support
HP Unified Functional Testing (12.50) Page 298
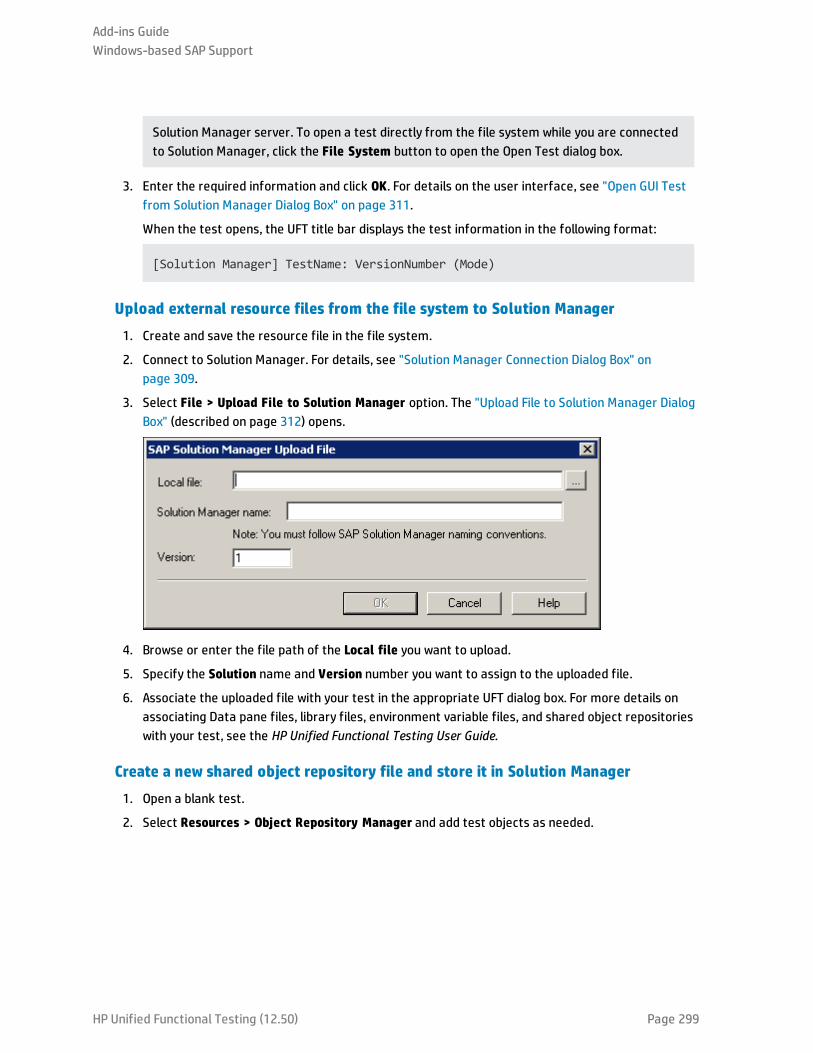
Solution Manager server. To open a test directly from the file system while you are connectedto Solution Manager, click the File System button to open the Open Test dialog box.
3. Enter the required information and click OK. For details on the user interface, see "Open GUI Testfrom Solution Manager Dialog Box" on page 311.
When the test opens, the UFT title bar displays the test information in the following format:
[Solution Manager] TestName: VersionNumber (Mode)
Upload external resource files from the file system to Solution Manager
1. Create and save the resource file in the file system.
2. Connect to Solution Manager. For details, see "Solution Manager Connection Dialog Box" onpage 309.
3. Select File > Upload File to Solution Manager option. The "Upload File to Solution Manager DialogBox" (described on page 312) opens.
4. Browse or enter the file path of the Local file you want to upload.
5. Specify the Solution name and Version number you want to assign to the uploaded file.
6. Associate the uploaded file with your test in the appropriate UFT dialog box. For more details onassociating Data pane files, library files, environment variable files, and shared object repositorieswith your test, see the HP Unified Functional Testing User Guide.
Create a new shared object repository file and store it in Solution Manager
1. Open a blank test.
2. Select Resources > Object Repository Manager and add test objects as needed.
Add-ins GuideWindows-based SAP Support
HP Unified Functional Testing (12.50) Page 299
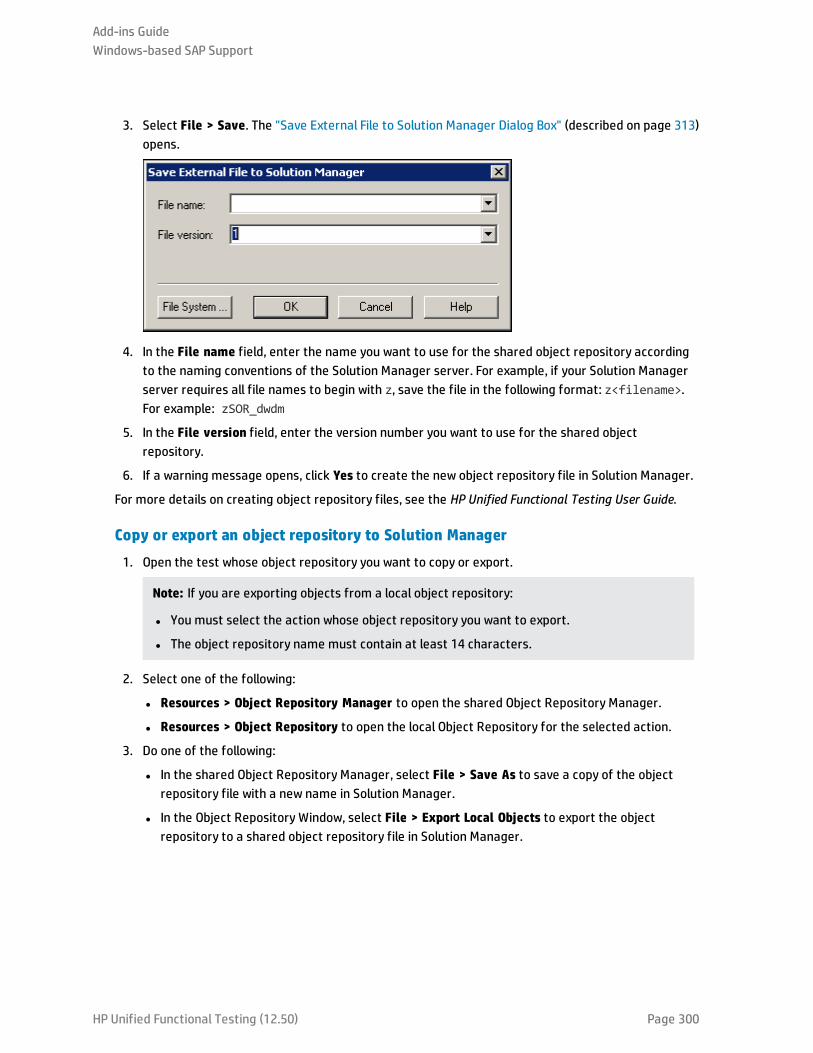
3. Select File > Save. The "Save External File to Solution Manager Dialog Box" (described on page 313)opens.
4. In the File name field, enter the name you want to use for the shared object repository accordingto the naming conventions of the Solution Manager server. For example, if your Solution Managerserver requires all file names to begin with z, save the file in the following format: z<filename>.For example: zSOR_dwdm
5. In the File version field, enter the version number you want to use for the shared objectrepository.
6. If a warning message opens, click Yes to create the new object repository file in Solution Manager.
For more details on creating object repository files, see the HP Unified Functional Testing User Guide.
Copy or export an object repository to Solution Manager
1. Open the test whose object repository you want to copy or export.
Note: If you are exporting objects from a local object repository:
l You must select the action whose object repository you want to export.
l The object repository name must contain at least 14 characters.
2. Select one of the following:
l Resources > Object Repository Manager to open the shared Object Repository Manager.
l Resources > Object Repository to open the local Object Repository for the selected action.
3. Do one of the following:
l In the shared Object Repository Manager, select File > Save As to save a copy of the objectrepository file with a new name in Solution Manager.
l In the Object Repository Window, select File > Export Local Objects to export the objectrepository to a shared object repository file in Solution Manager.
Add-ins GuideWindows-based SAP Support
HP Unified Functional Testing (12.50) Page 300
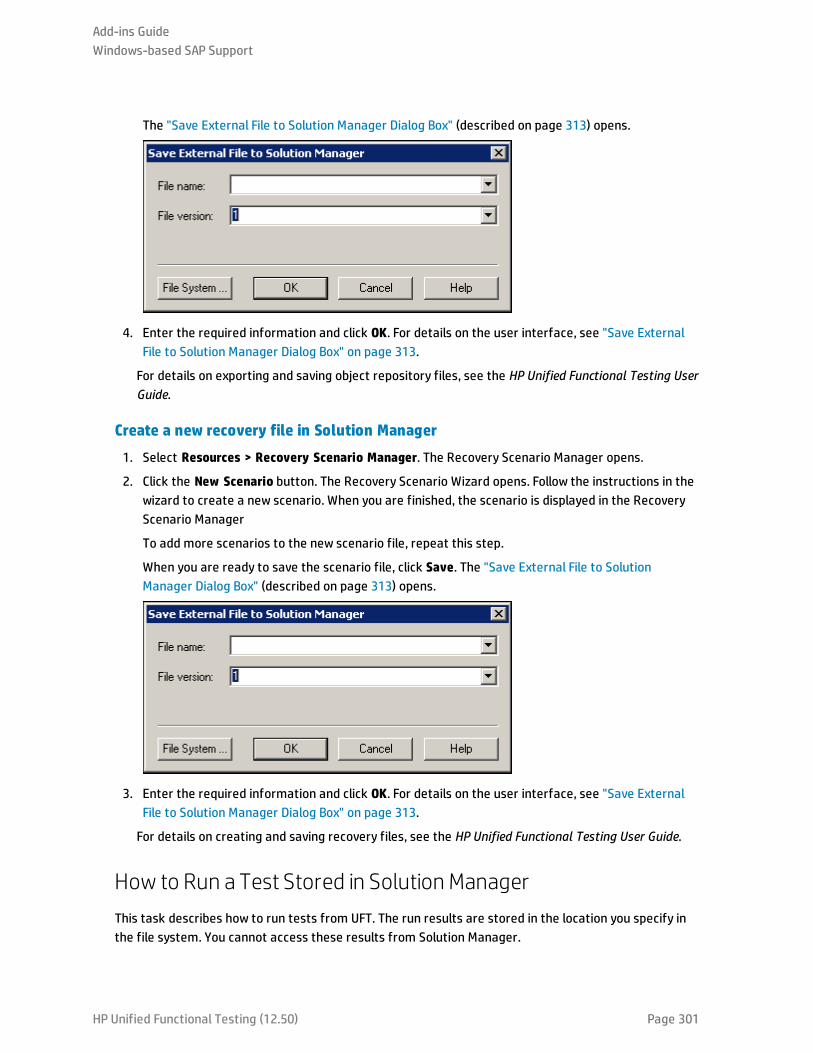
The "Save External File to Solution Manager Dialog Box" (described on page 313) opens.
4. Enter the required information and click OK. For details on the user interface, see "Save ExternalFile to Solution Manager Dialog Box" on page 313.
For details on exporting and saving object repository files, see the HP Unified Functional Testing UserGuide.
Create a new recovery file in Solution Manager
1. Select Resources > Recovery Scenario Manager. The Recovery Scenario Manager opens.
2. Click the New Scenario button. The Recovery Scenario Wizard opens. Follow the instructions in thewizard to create a new scenario. When you are finished, the scenario is displayed in the RecoveryScenario Manager
To add more scenarios to the new scenario file, repeat this step.
When you are ready to save the scenario file, click Save. The "Save External File to SolutionManager Dialog Box" (described on page 313) opens.
3. Enter the required information and click OK. For details on the user interface, see "Save ExternalFile to Solution Manager Dialog Box" on page 313.
For details on creating and saving recovery files, see the HP Unified Functional Testing User Guide.
How to Run a Test Stored in Solution ManagerThis task describes how to run tests from UFT. The run results are stored in the location you specify inthe file system. You cannot access these results from Solution Manager.
Add-ins GuideWindows-based SAP Support
HP Unified Functional Testing (12.50) Page 301
When working with UFT in standalone mode, you run a test stored in a Solution Manager database justlike any other UFT test.
This task describes how to:
l "Run a test in standalone" below
l "Run a UFT test from Solution Manager in Integrated Mode using the Execute Test Script option"below
l "View results of a GUI test run in integrated mode" on the next page
Run a test in standalone
1. Open UFT in standalone mode. For details, see "Solution Manager Connection Dialog Box" onpage 309.
2. In UFT, open the test you want to run. For user interface details, see "Open GUI Test from SolutionManager Dialog Box" on page 311.
3. Click the Run button or select Run > Run. The Run Dialog Box opens.
4. Accept the default results folder or browse to select another one.
Note:
l The default results folder is created under the folder where the cache (local) copy of yourtest is stored. You set the location of your Solution Manager test cache folder in theSolution Manager pane of the Options dialog box.
l When running tests in standalone mode, no Solution Manager log is created.
l To run the test and overwrite the previous run session results, select the Temporary runresults folder (overwriting older temporary results) option.
l UFT stores temporary run session results for all tests in <SystemDrive>:\%Temp%\TempResults. The path in the text box of the Temporary run resultsfolder (overwriting older temporary results) option is read-only and cannot be changed.
5. Click OK. The Run dialog box closes and UFT begins running the test.
When the run session ends, the run results open (unless the View results when run session endscheck box is cleared in the Run Sessions pane of the Options dialog box (Tools > Options > GUITesting tab > General tab > Run Sessions node).
Run a UFT test from Solution Manager in Integrated Mode using the Execute TestScript option
For details, see your SAP documentation.
Add-ins GuideWindows-based SAP Support
HP Unified Functional Testing (12.50) Page 302

View results of a GUI test run in integrated mode
You can view the results of a GUI test that was run from Solution Manager in the following ways:
l In the Solution Manager Log Display. You can view the results of the test or the results of a specificevent, such as a checkpoint, in the Solution Manager log. You can view the folder in which the resultsare saved in the UNCPathToLocalLog line of the Solution Manager log.
l In UFT. You can view the run results in the run results, which you can either access from UFT (asseparate tab in the document pane) or open directly from your browser.
If a test includes steps that log on to Solution Manager using the "SAP Tab (Record and Run SettingsDialog Box)" (described on page 271), the logon steps are displayed in the run results tree.
You can set the Run Results Viewer to open automatically after a test runs from Solution Manager.To do this, in Solution Manager, select the Log Display check box in the Shared tab in Start Optionswindow.
l Via the generated XML Report. Each time you run a GUI test from Solution Manager, an .xml file isgenerated. This file contains all details of the run session. To view the file, click the line containingthe text: XML-DATA in the Solution Manager log.
How to Display or Edit a GUI Test fromSolution Manager inIntegrated ModeThis task describes how to display or edit any existing GUI test that is stored in Solution Manager. Whenyou open the test, UFT opens in integrated and read-only mode. When you display or open a GUI test inintegrated mode, you can work only with the open test. You cannot open another test or save the opentest with another name.
Despite this, resource files that are saved with the test (for example, a local repository or the test'slocal data table) are editable. To edit external resource files, open the test in standalone mode.
Note: If you select the UFT File > Save As menu command when working in integrated mode, UFTdisplays a warning message indicating that you can save a test with a new name in the file system,but doing so disconnects UFT from Solution Manager and switches UFT to standalone mode.
For more details on integrated and standalone modes, see "Standalone Mode" on page 293 and"Integrated Mode" on page 294.
This task describes how to:
l "Display or open a GUI test from Solution Manager" below
l "Create a new GUI test from Solution Manager" on the next page
Display or open a GUI test from Solution Manager
1. Log on to Solution Manager and open a test script. Make sure to specify Unified Functional Testing
Add-ins GuideWindows-based SAP Support
HP Unified Functional Testing (12.50) Page 303
as the external tool. For details on how to open test scripts in Solution Manager, see your SAPdocumentation.
You can open the test in:
l Read-only (Display) mode. (If the test uses external resource files, the test and its resourcesopen in read-only mode by default.)
l Edit mode. This enables you to use most UFT options. For details, see the HP Unified FunctionalTesting User Guide.
2. To return to Solution Manager, close UFT.
Create a new GUI test from Solution Manager
1. Log on to Solution Manager. Then create and save a test script. Make sure to specify UnifiedFunctional Testing as the external tool. For details on how to open test scripts in Solution Manager,see your SAP documentation.
When you create the script, UFT opens with a blank test.
2. Create the test in UFT. For details on creating GUI tests in UFT, see the other chapters in this guideand the HP Unified Functional Testing User Guide.
3. In UFT, select File > Save As. A dialog box opens in Solution Manager.
4. In Solution Manager, specify the package in which you want to store the test. Confirm that theother edit boxes contain correct values.
If the test has external resource files, they are stored by default in the $TMP (local) package. Ifyou select another package for the test, you must manually move any external resource filesto the same package.
5. In Solution Manager, save the test. UFT is restored in integrated mode and displays the saved testfor additional editing.
6. To return to Solution Manager, close UFT.
How to Transfer Data To and FromGUI Tests in Integrated ModeUsing Test ParametersYou can pass values from a Solution Manager test script to a GUI test, or vice versa, using GUI testparameters.
To send values to your input arguments, you must run your test via a call from a Solution Manager testscript. After you define input and output arguments for your GUI test, you can insert a call to that testfrom a Solution Manager test script and specify argument values for the input arguments.
Prerequisites
Define test parameters and use them in your GUI test. For details, see the section on the "Parameters
Add-ins GuideWindows-based SAP Support
HP Unified Functional Testing (12.50) Page 304
Tab (Properties Pane - Testing)" in the HP Unified Functional Testing User Guide.
If you are working with SAP structured parameters, see also "How to Work with SAP StructuredParameters" below.
Call a GUI test and specify arguments from Solution Manager
To send values to your input arguments from Solution Manager, you must run your test via a call from aSolution Manager test script.
Tip: You can enter the name of a Solution Manager parameter from the Solution Manager script asthe value of a GUI input parameter.
After you define input and output arguments for your GUI test, you can insert a call to that testfrom a Solution Manager script and specify argument values for the input arguments.
How toWork with SAP Structured ParametersWhen you work in integrated mode with SAP Solution manager, you can pass values from a SolutionManager test script to a GUI test, or vice versa, using the structure value type for your test parameters.
You create and maintain the structured parameters in SAP Solution Manager. After you have definedyour test parameters via SAP Solution Manager you can map action parameters to the structuredparameters in the test. When you run a test, UFT receives the defined structure from SAP SolutionManager, and resolves the mapped local parameter with the actual structured parameter value fromSAP Solution Manager.
Create or modify the structured parameters of a test
1. From SAP Solution Manager, Launch your test as an external test.
UFT opens with your test displayed.
2. In the Parameters tab of the Properties pane, click the Maintain SAP Parameters icon . If theProperties Pane is not already open, select View > Properties to open it.
SAP Solutions Manager opens and UFT is hidden.
Note: SAP Structured Parameters can be maintained only in SAP Solution Manager.
3. In SAP Solutions Manager, create or modify the structure parameters you want to use for yourtest, save your changes and click Back.
UFT re-opens with the changes you made now available.
Assign or modify the structured parameters for an action
To use the SAP structured parameter to run the test, you must define parameters of type structure,associate the test and action parameters, and then map the action’s structured parameter to the test’sstructured parameter. You can also map a simple type action parameter to a single element in a
Add-ins GuideWindows-based SAP Support
HP Unified Functional Testing (12.50) Page 305
structured parameter defined for the test.
1. Select the relevant action.
2. In the Parameters tab of the Properties pane, you can add or remove parameters, as described inAdd/Edit Input/Output Parameter Dialog Box (Properties Pane - GUI Testing) in the HP UnifiedFunctional Testing User Guide. If the Properties Pane is not already open, select View > Propertiesto open it.
Note: If the test contains structured parameters, you can add parameters with the structuretype to the action.
3. Map action parameters to the test structured parameters
a. Right-click the relevant actions.
b. In the context menu, select Action Call Properties.
c. In the Action Call Properties Dialog Box > Parameter Values tab, in the Value cell/column of aninput parameter or the Store In cell/column of an output parameter, click the Configure Valuebutton.
d. In either the Value Configuration Options Dialog Box (for input parameters) or the StorageLocation Options Dialog Box (for output parameters), select the Parameter radio button andclick Browse.
The Value Map dialog box opens.
e. Define the mapping, as described in "Value Map Dialog Box" on page 317.
You can select the root node to map the entire structure, or a sub tree node to map to anembedded structure, or you can select a leaf node to map to a specific value in the structure.
f. Click OK.
The parameters are mapped
Note: If an action is called inside another action, you can map a parameter to an inputparameter of the parent action. If the action is called after another action, you can map aparameter to an output parameter of any previous action.
For more details on test and action parameters, see the HP Unified Functional Testing UserGuide.
Use structured parameters in a script
The examples below show how you can use structured parameters directly from a script.
<?xml version="1.0" encoding="utf-16"?><ZMOVIE><TITLE>Avatar</TITLE><DIRECTOR>
Add-ins GuideWindows-based SAP Support
HP Unified Functional Testing (12.50) Page 306
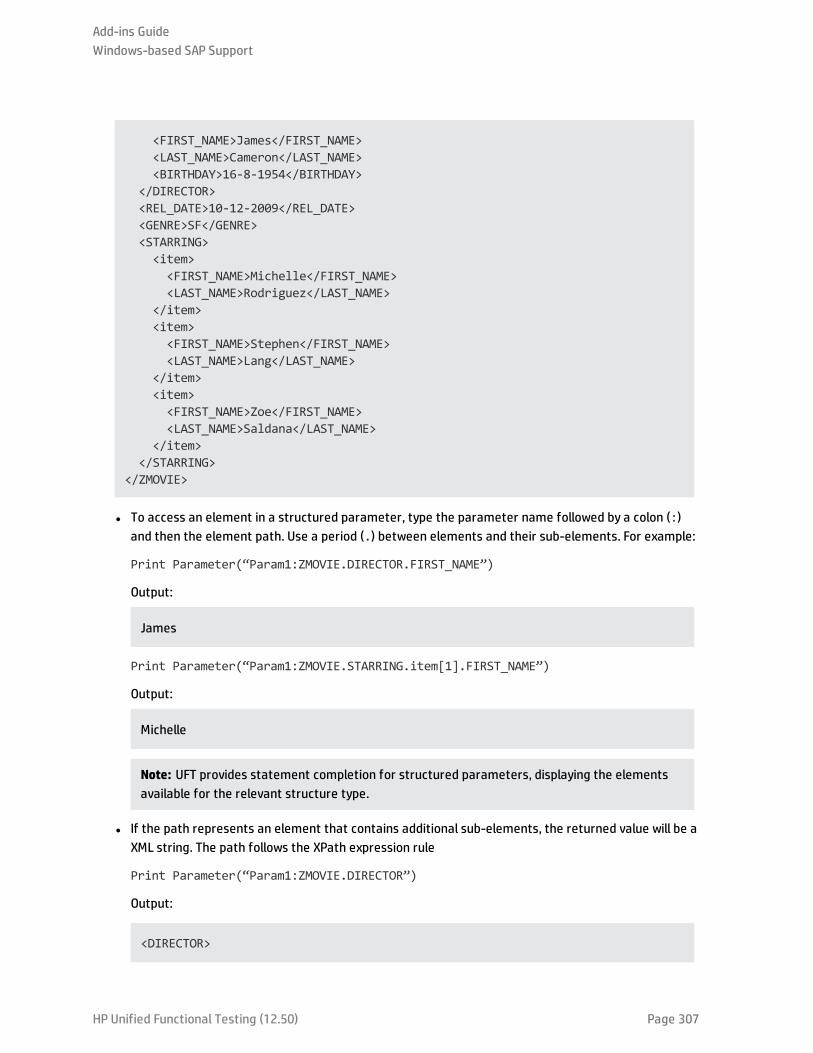
<FIRST_NAME>James</FIRST_NAME><LAST_NAME>Cameron</LAST_NAME><BIRTHDAY>16-8-1954</BIRTHDAY>
</DIRECTOR><REL_DATE>10-12-2009</REL_DATE><GENRE>SF</GENRE><STARRING><item><FIRST_NAME>Michelle</FIRST_NAME><LAST_NAME>Rodriguez</LAST_NAME>
</item><item><FIRST_NAME>Stephen</FIRST_NAME><LAST_NAME>Lang</LAST_NAME>
</item><item><FIRST_NAME>Zoe</FIRST_NAME><LAST_NAME>Saldana</LAST_NAME>
</item></STARRING>
</ZMOVIE>
l To access an element in a structured parameter, type the parameter name followed by a colon (:)and then the element path. Use a period (.) between elements and their sub-elements. For example:
Print Parameter(“Param1:ZMOVIE.DIRECTOR.FIRST_NAME”)
Output:
James
Print Parameter(“Param1:ZMOVIE.STARRING.item[1].FIRST_NAME”)
Output:
Michelle
Note: UFT provides statement completion for structured parameters, displaying the elementsavailable for the relevant structure type.
l If the path represents an element that contains additional sub-elements, the returned value will be aXML string. The path follows the XPath expression rule
Print Parameter(“Param1:ZMOVIE.DIRECTOR”)
Output:
<DIRECTOR>
Add-ins GuideWindows-based SAP Support
HP Unified Functional Testing (12.50) Page 307
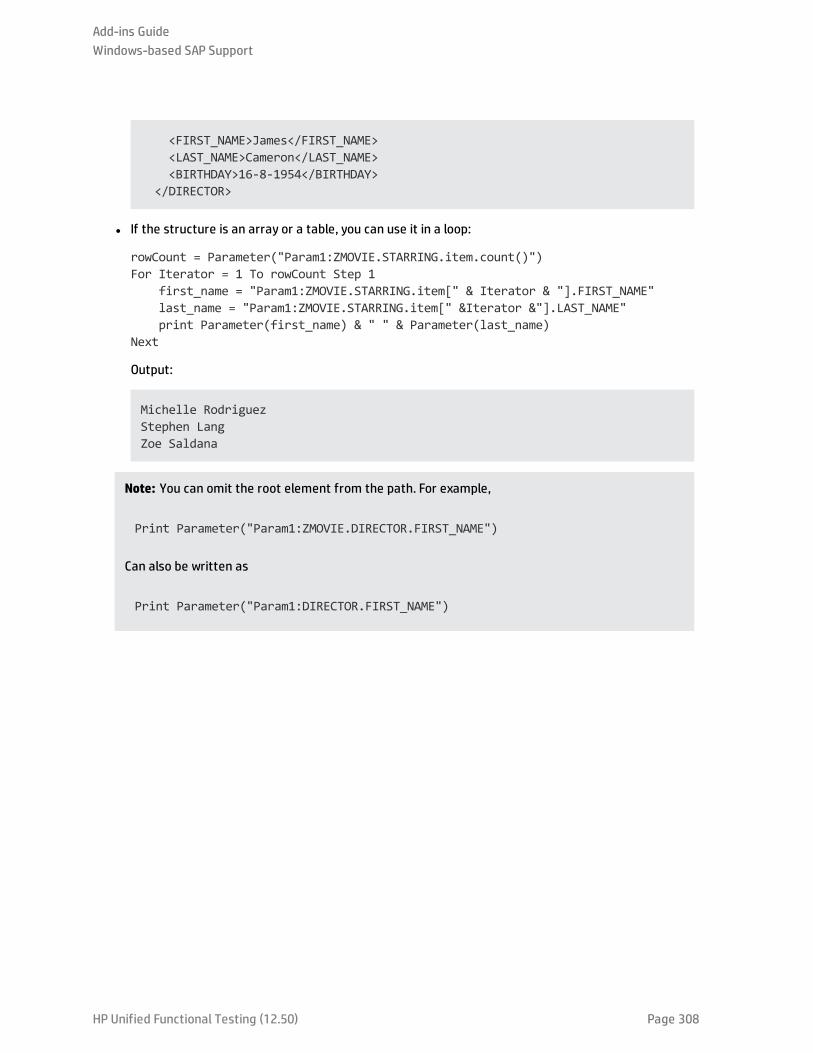
<FIRST_NAME>James</FIRST_NAME><LAST_NAME>Cameron</LAST_NAME><BIRTHDAY>16-8-1954</BIRTHDAY>
</DIRECTOR>
l If the structure is an array or a table, you can use it in a loop:
rowCount = Parameter("Param1:ZMOVIE.STARRING.item.count()")For Iterator = 1 To rowCount Step 1
first_name = "Param1:ZMOVIE.STARRING.item[" & Iterator & "].FIRST_NAME"last_name = "Param1:ZMOVIE.STARRING.item[" &Iterator &"].LAST_NAME"print Parameter(first_name) & " " & Parameter(last_name)
Next
Output:
Michelle RodriguezStephen LangZoe Saldana
Note: You can omit the root element from the path. For example,
Print Parameter("Param1:ZMOVIE.DIRECTOR.FIRST_NAME")
Can also be written as
Print Parameter("Param1:DIRECTOR.FIRST_NAME")
Add-ins GuideWindows-based SAP Support
HP Unified Functional Testing (12.50) Page 308
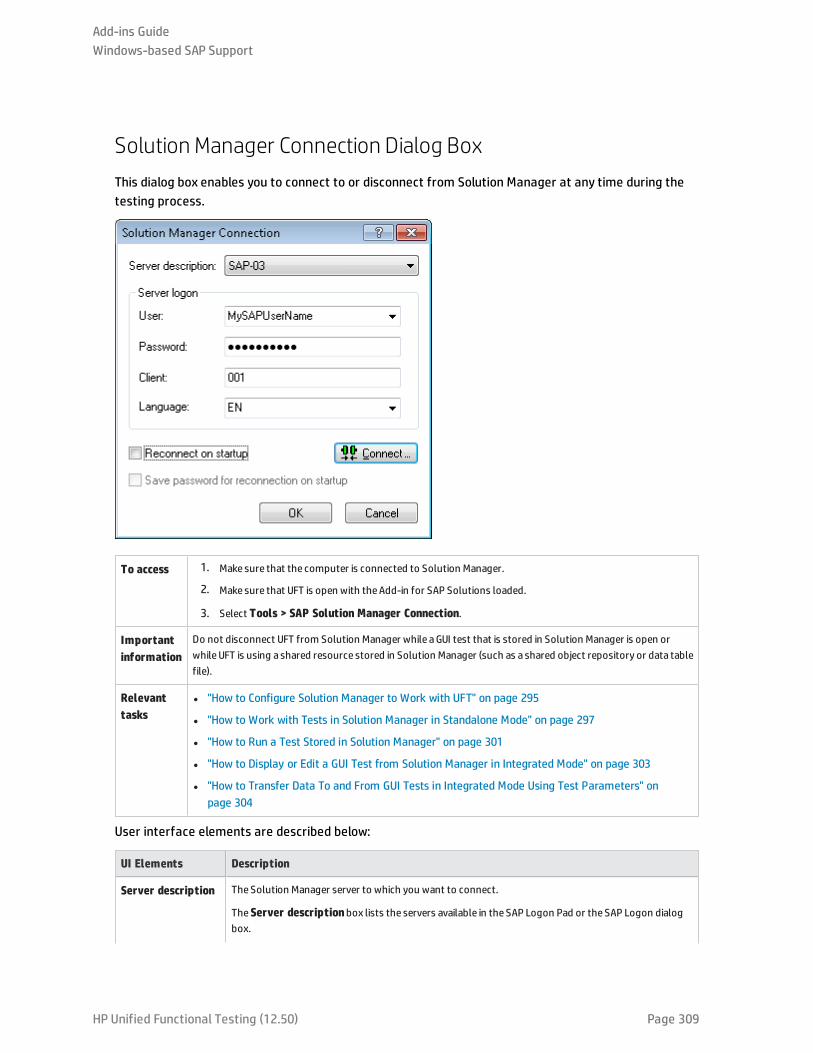
Solution Manager Connection Dialog BoxThis dialog box enables you to connect to or disconnect from Solution Manager at any time during thetesting process.
To access 1. Make sure that the computer is connected to Solution Manager.
2. Make sure that UFT is open with theAdd-in for SAP Solutions loaded.
3. Select Tools > SAP Solution Manager Connection.
Importantinformation
Do not disconnect UFT from Solution Manager while aGUI test that is stored in Solution Manager is open orwhile UFT is using a shared resource stored in Solution Manager (such as a shared object repository or data tablefile).
Relevanttasks
l "How to Configure Solution Manager to Work with UFT" on page 295
l "How to Work with Tests in Solution Manager in Standalone Mode" on page 297
l "How to Run a Test Stored in Solution Manager" on page 301
l "How to Display or Edit a GUI Test from Solution Manager in Integrated Mode" on page 303
l "How to Transfer Data To and From GUI Tests in Integrated Mode Using Test Parameters" onpage 304
User interface elements are described below:
UI Elements Description
Server description TheSolution Manager server to which you want to connect.
TheServer descriptionbox lists the servers available in the SAP Logon Pad or the SAP Logon dialogbox.
Add-ins GuideWindows-based SAP Support
HP Unified Functional Testing (12.50) Page 309
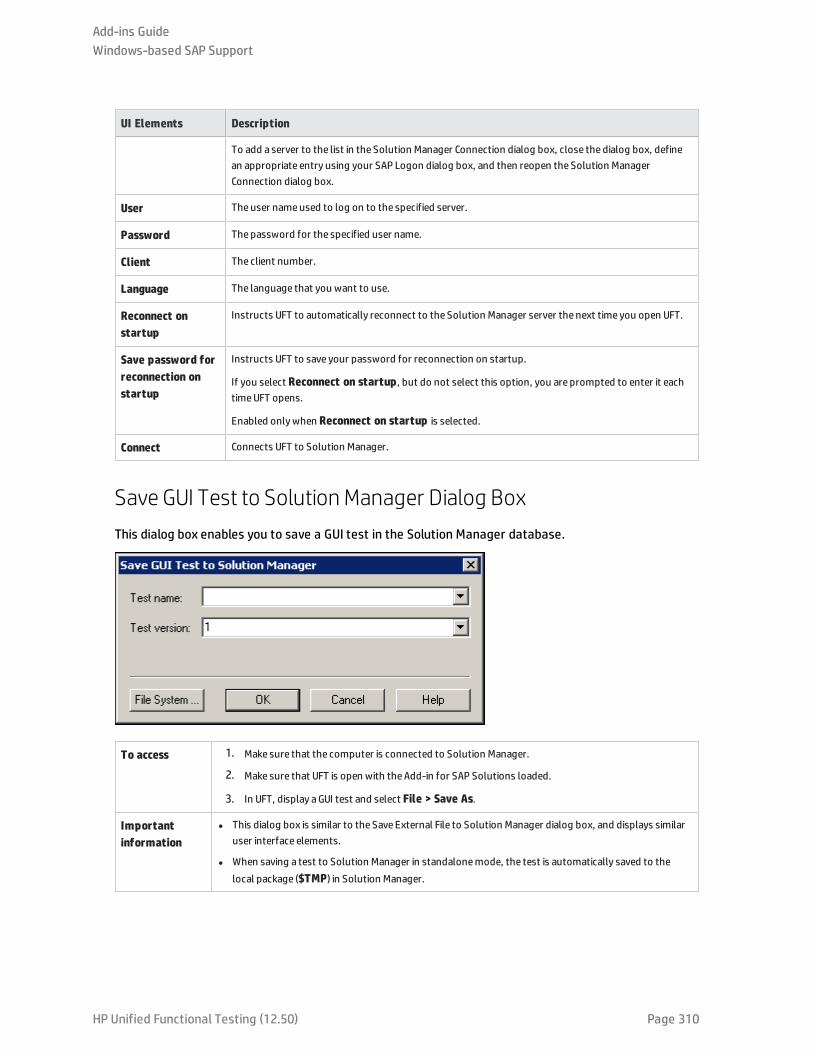
UI Elements Description
To add a server to the list in the Solution Manager Connection dialog box, close the dialog box, definean appropriate entry using your SAP Logon dialog box, and then reopen the Solution ManagerConnection dialog box.
User Theuser nameused to log on to the specified server.
Password Thepassword for the specified user name.
Client The client number.
Language The language that you want to use.
Reconnect onstartup
Instructs UFT to automatically reconnect to the Solution Manager server the next time you open UFT.
Save password forreconnection onstartup
Instructs UFT to save your password for reconnection on startup.
If you select Reconnect on startup, but do not select this option, you are prompted to enter it eachtimeUFT opens.
Enabled onlywhen Reconnect on startup is selected.
Connect Connects UFT to Solution Manager.
Save GUI Test to Solution Manager Dialog BoxThis dialog box enables you to save a GUI test in the Solution Manager database.
To access 1. Make sure that the computer is connected to Solution Manager.
2. Make sure that UFT is open with theAdd-in for SAP Solutions loaded.
3. In UFT, display aGUI test and select File > Save As.
Importantinformation
l This dialog box is similar to the Save External File to Solution Manager dialog box, and displays similaruser interface elements.
l When saving a test to Solution Manager in standalonemode, the test is automatically saved to thelocal package ($TMP) in Solution Manager.
Add-ins GuideWindows-based SAP Support
HP Unified Functional Testing (12.50) Page 310
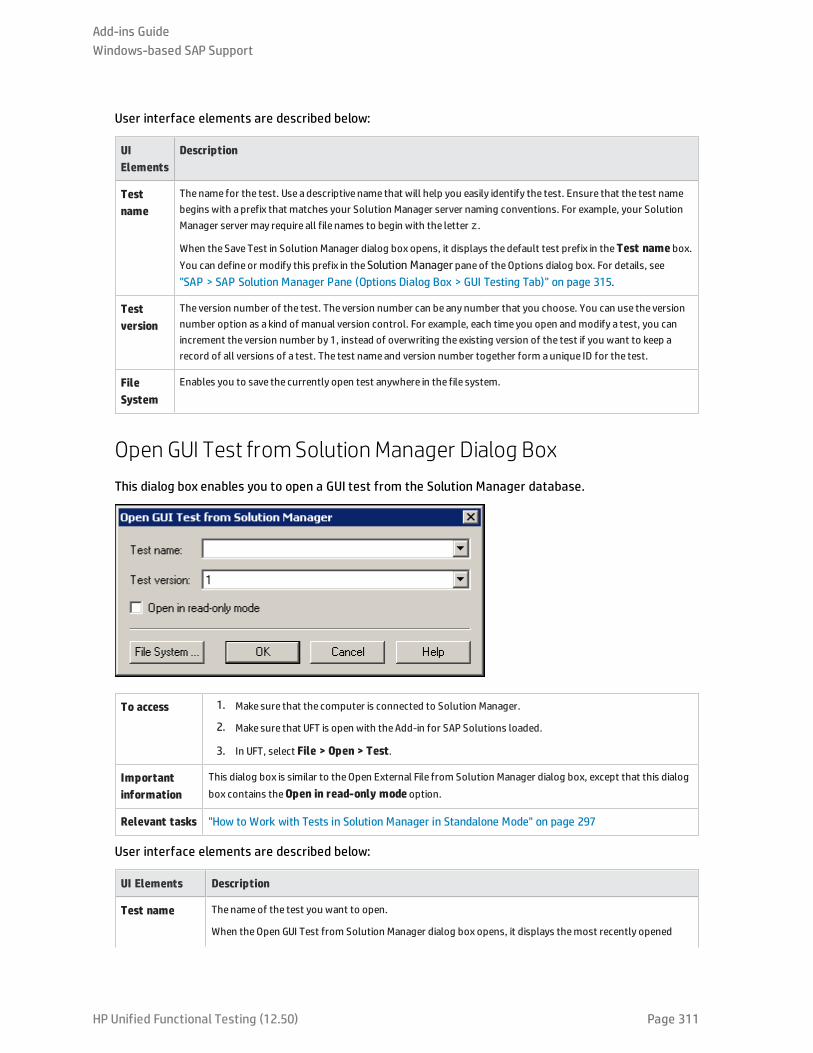
User interface elements are described below:
UIElements
Description
Testname
Thename for the test. Use adescriptive name that will help you easily identify the test. Ensure that the test namebegins with a prefix that matches your Solution Manager server naming conventions. For example, your SolutionManager server may require all file names to begin with the letter z.
When the SaveTest in Solution Manager dialog box opens, it displays the default test prefix in theTest name box.You can define or modify this prefix in theSolution Manager paneof theOptions dialog box. For details, see"SAP > SAP Solution Manager Pane (Options Dialog Box > GUI Testing Tab)" on page 315.
Testversion
The version number of the test. The version number can be any number that you choose. You can use the versionnumber option as a kind of manual version control. For example, each time you open and modify a test, you canincrement the version number by 1, instead of overwriting the existing version of the test if you want to keep arecord of all versions of a test. The test nameand version number together form aunique ID for the test.
FileSystem
Enables you to save the currently open test anywhere in the file system.
Open GUI Test fromSolution Manager Dialog BoxThis dialog box enables you to open a GUI test from the Solution Manager database.
To access 1. Make sure that the computer is connected to Solution Manager.
2. Make sure that UFT is open with theAdd-in for SAP Solutions loaded.
3. In UFT, select File > Open > Test.
Importantinformation
This dialog box is similar to theOpen External File from Solution Manager dialog box, except that this dialogbox contains theOpen in read-only mode option.
Relevant tasks "How to Work with Tests in Solution Manager in Standalone Mode" on page 297
User interface elements are described below:
UI Elements Description
Test name Thenameof the test you want to open.
When theOpen GUI Test from Solution Manager dialog box opens, it displays themost recently opened
Add-ins GuideWindows-based SAP Support
HP Unified Functional Testing (12.50) Page 311
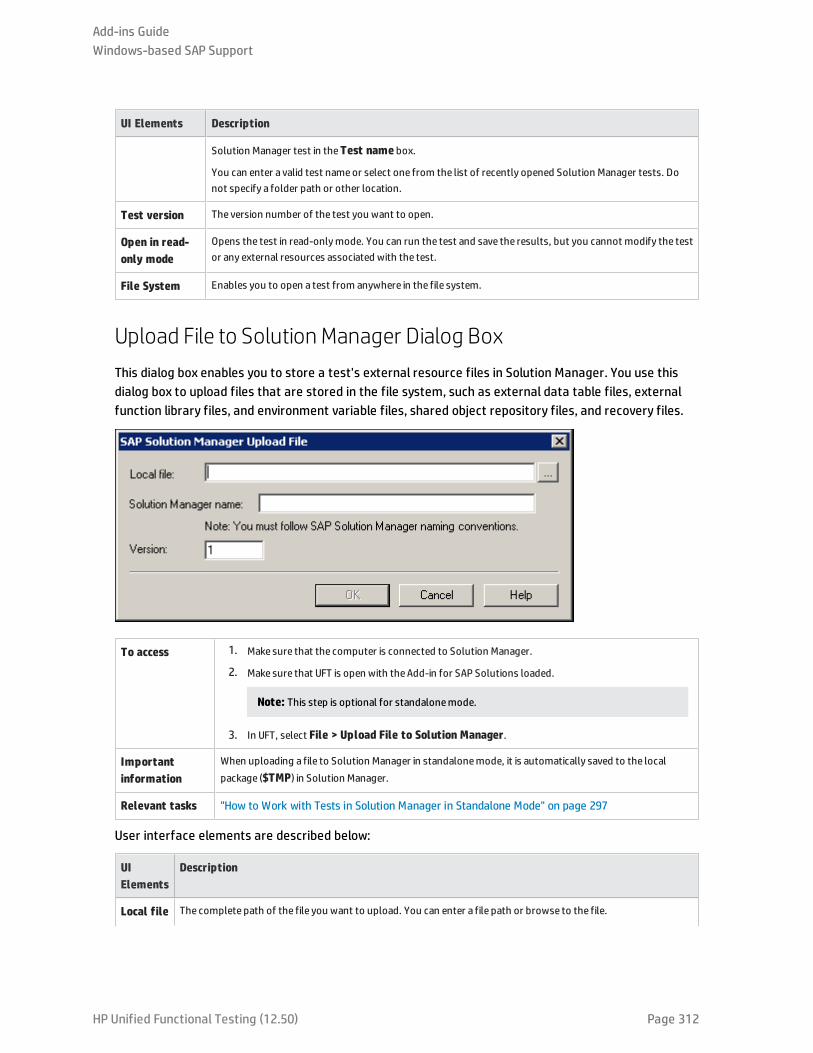
UI Elements Description
Solution Manager test in theTest name box.
You can enter a valid test nameor select one from the list of recently opened Solution Manager tests. Donot specify a folder path or other location.
Test version The version number of the test you want to open.
Open in read-only mode
Opens the test in read-onlymode. You can run the test and save the results, but you cannot modify the testor any external resources associated with the test.
File System Enables you to open a test from anywhere in the file system.
Upload File to Solution Manager Dialog BoxThis dialog box enables you to store a test's external resource files in Solution Manager. You use thisdialog box to upload files that are stored in the file system, such as external data table files, externalfunction library files, and environment variable files, shared object repository files, and recovery files.
To access 1. Make sure that the computer is connected to Solution Manager.
2. Make sure that UFT is open with theAdd-in for SAP Solutions loaded.
Note: This step is optional for standalonemode.
3. In UFT, select File > Upload File to Solution Manager.
Importantinformation
When uploading a file to Solution Manager in standalonemode, it is automatically saved to the localpackage ($TMP) in Solution Manager.
Relevant tasks "How to Work with Tests in Solution Manager in Standalone Mode" on page 297
User interface elements are described below:
UIElements
Description
Local file The complete path of the file you want to upload. You can enter a file path or browse to the file.
Add-ins GuideWindows-based SAP Support
HP Unified Functional Testing (12.50) Page 312
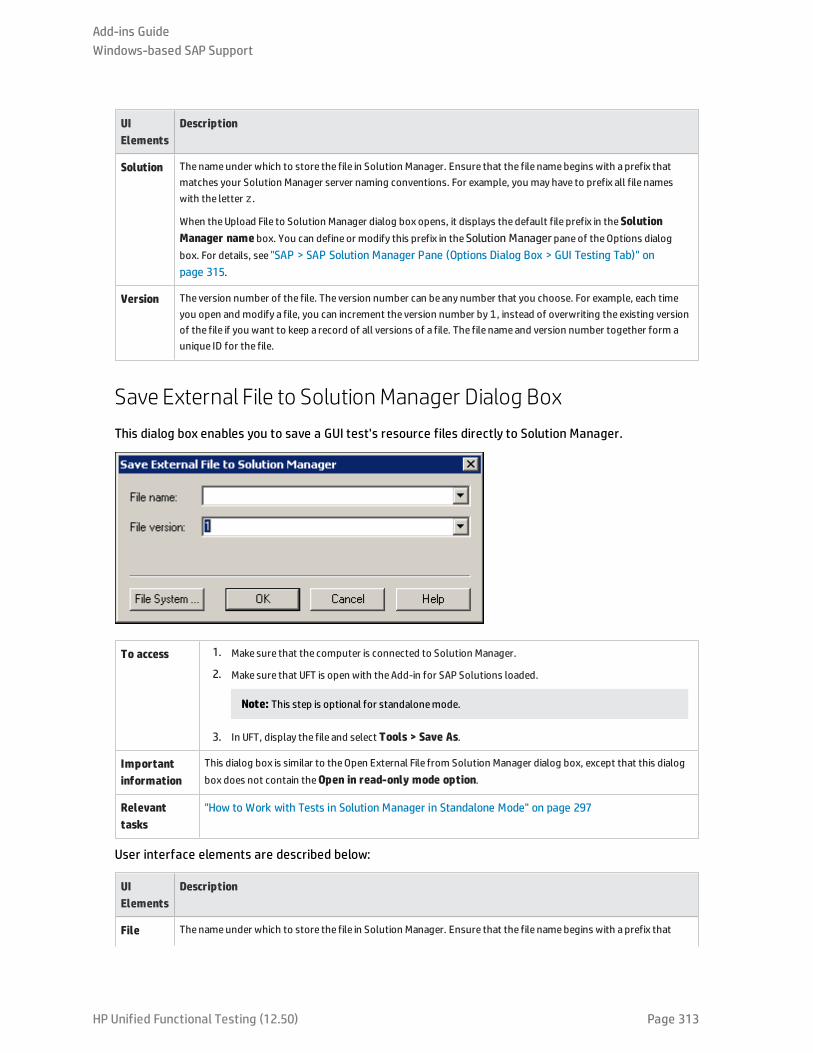
UIElements
Description
Solution Thenameunder which to store the file in Solution Manager. Ensure that the file namebegins with a prefix thatmatches your Solution Manager server naming conventions. For example, you may have to prefix all file nameswith the letter z.
When theUpload File to Solution Manager dialog box opens, it displays the default file prefix in theSolutionManager name box. You can define or modify this prefix in theSolution Manager paneof theOptions dialogbox. For details, see "SAP > SAP Solution Manager Pane (Options Dialog Box > GUI Testing Tab)" onpage 315.
Version The version number of the file. The version number can be any number that you choose. For example, each timeyou open and modify a file, you can increment the version number by1, instead of overwriting the existing versionof the file if you want to keep a record of all versions of a file. The file nameand version number together form aunique ID for the file.
Save External File to Solution Manager Dialog BoxThis dialog box enables you to save a GUI test's resource files directly to Solution Manager.
To access 1. Make sure that the computer is connected to Solution Manager.
2. Make sure that UFT is open with theAdd-in for SAP Solutions loaded.
Note: This step is optional for standalonemode.
3. In UFT, display the file and select Tools > Save As.
Importantinformation
This dialog box is similar to theOpen External File from Solution Manager dialog box, except that this dialogbox does not contain theOpen in read-only mode option.
Relevanttasks
"How to Work with Tests in Solution Manager in Standalone Mode" on page 297
User interface elements are described below:
UIElements
Description
File Thenameunder which to store the file in Solution Manager. Ensure that the file namebegins with a prefix that
Add-ins GuideWindows-based SAP Support
HP Unified Functional Testing (12.50) Page 313

UIElements
Description
name matches your Solution Manager server naming conventions. For example, you may have to prefix all file nameswith the letter z.
When the Save External File to Solution Manager dialog box opens, it displays the default file prefix in theSolutionManager name box. You can define or modify this prefix in theSAP Solution Manager paneof theOptionsdialog box. For details, see "SAP > SAP Solution Manager Pane (Options Dialog Box > GUI Testing Tab)" onthe next page.
Fileversion
The version number of the file. The version number can be any number that you choose. For example, each timeyou open and modify a file, you can increment the version number by 1, instead of overwriting the existing versionof the file if you want to keep a record of all versions of a file. The file nameand version number together form aunique ID for the file.
Download File fromSolution ManagerThis dialog box enables you to download files stored in Solution Manager and save them in the filesystem.
To access 1. Make sure that the computer is connected to Solution Manager.
2. Make sure that UFT is open with theAdd-in for SAP Solutions loaded.
3. In UFT, select File > Download File from Solution Manager.
Importantinformation
If you upload a file to Solution Manager and then associate that filewith a test as a resource file, the resourcefile is automatically downloaded each time you open the test, and you do not need to use this dialog box.
User interface elements are described below:
UIElements
Description
Solution Thenameof the file stored in Solution Manager.
When theDownload File from Solution Manager dialog box opens, it displays the default file prefix in theSolutionManager name box. You can define or modify this prefix in theSolution Manager paneof theOptions dialogbox. For details, see "SAP > SAP Solution Manager Pane (Options Dialog Box > GUI Testing Tab)" on thenext page.
Add-ins GuideWindows-based SAP Support
HP Unified Functional Testing (12.50) Page 314
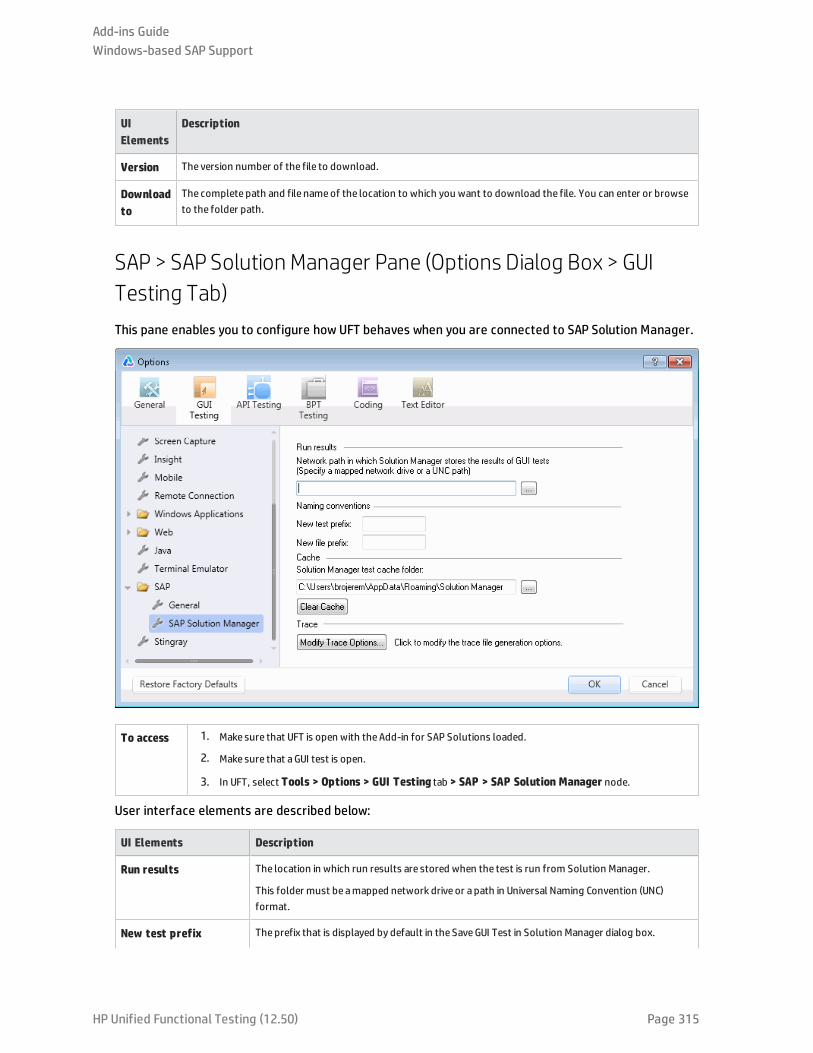
UIElements
Description
Version The version number of the file to download.
Downloadto
The complete path and file nameof the location to which you want to download the file. You can enter or browseto the folder path.
SAP > SAP Solution Manager Pane (Options Dialog Box > GUITesting Tab)This pane enables you to configure how UFT behaves when you are connected to SAP Solution Manager.
To access 1. Make sure that UFT is open with theAdd-in for SAP Solutions loaded.
2. Make sure that aGUI test is open.
3. In UFT, select Tools > Options > GUI Testing tab > SAP > SAP Solution Manager node.
User interface elements are described below:
UI Elements Description
Run results The location in which run results are stored when the test is run from Solution Manager.
This folder must be amapped network drive or a path in Universal Naming Convention (UNC)format.
New test prefix Theprefix that is displayed by default in the SaveGUI Test in Solution Manager dialog box.
Add-ins GuideWindows-based SAP Support
HP Unified Functional Testing (12.50) Page 315
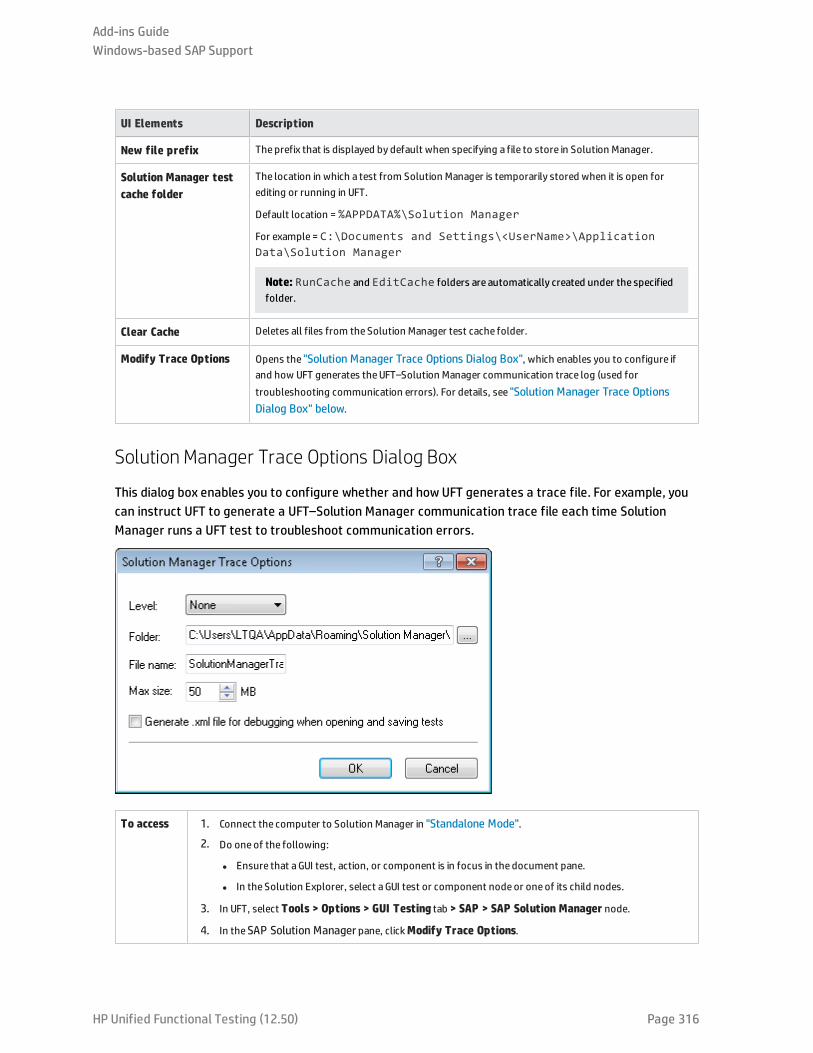
UI Elements Description
New file prefix Theprefix that is displayed by default when specifying a file to store in Solution Manager.
Solution Manager testcache folder
The location in which a test from Solution Manager is temporarily stored when it is open forediting or running in UFT.
Default location = %APPDATA%\Solution Manager
For example = C:\Documents and Settings\<UserName>\ApplicationData\Solution Manager
Note: RunCache and EditCache folders are automatically created under the specifiedfolder.
Clear Cache Deletes all files from theSolution Manager test cache folder.
Modify Trace Options Opens the "Solution Manager Trace Options Dialog Box", which enables you to configure ifand how UFT generates theUFT–Solution Manager communication trace log (used fortroubleshooting communication errors). For details, see "Solution Manager Trace OptionsDialog Box" below.
Solution Manager Trace Options Dialog Box
This dialog box enables you to configure whether and how UFT generates a trace file. For example, youcan instruct UFT to generate a UFT–Solution Manager communication trace file each time SolutionManager runs a UFT test to troubleshoot communication errors.
To access 1. Connect the computer to Solution Manager in "Standalone Mode".
2. Do oneof the following:
l Ensure that aGUI test, action, or component is in focus in the document pane.
l In the Solution Explorer, select aGUI test or component nodeor oneof its child nodes.
3. In UFT, select Tools > Options > GUI Testing tab > SAP > SAP Solution Manager node.
4. In theSAP Solution Manager pane, clickModify Trace Options.
Add-ins GuideWindows-based SAP Support
HP Unified Functional Testing (12.50) Page 316
User interface elements are described below:
UI Elements Description
Level The level of detail to include in the trace file that is created when Solution Manager runs aGUItest.
l None. (default) No trace file is created.
l Low.The trace file lists any Solution Manager–UFT communication errors.
l Medium.The trace file includes Solution Manager–UFT communication errors andinformation on other major operations that result in Solution Manager–UFTcommunication.
l High.The trace file includes all available information related to Solution Manager–UFTcommunications.
Folder The folder path for storing the trace file. Required if a trace file level other than None isspecified in theLevel option.
Default location = %APPDATA%\Solution Manager\Trace
For example = C:\Documents and Settings\<UserName>\ApplicationData\Solution Manager\Trace
File name The file name for the trace file.
Default = SolutionManagerTrace.html
Max size Themaximum file size you want to allow for the trace file.
Generate .xml file fordebugging when openingand saving tests
Generates an .xml file each time you open or save a test that is stored in Solution Manager.The files are saved in Open and Save folders under the trace folder.
Note: Selecting this option results in slower response times for editing and saving testsin UFT. In general, you should select this option onlywhen instructed to do so to debugSolution Manager connectivity issues.
ValueMap Dialog BoxRelevant for: GUI tests and components
This dialog box enables you to map a structured parameter to an action parameter.
The image below shows the dialog to map parameters.
Add-ins GuideWindows-based SAP Support
HP Unified Functional Testing (12.50) Page 317
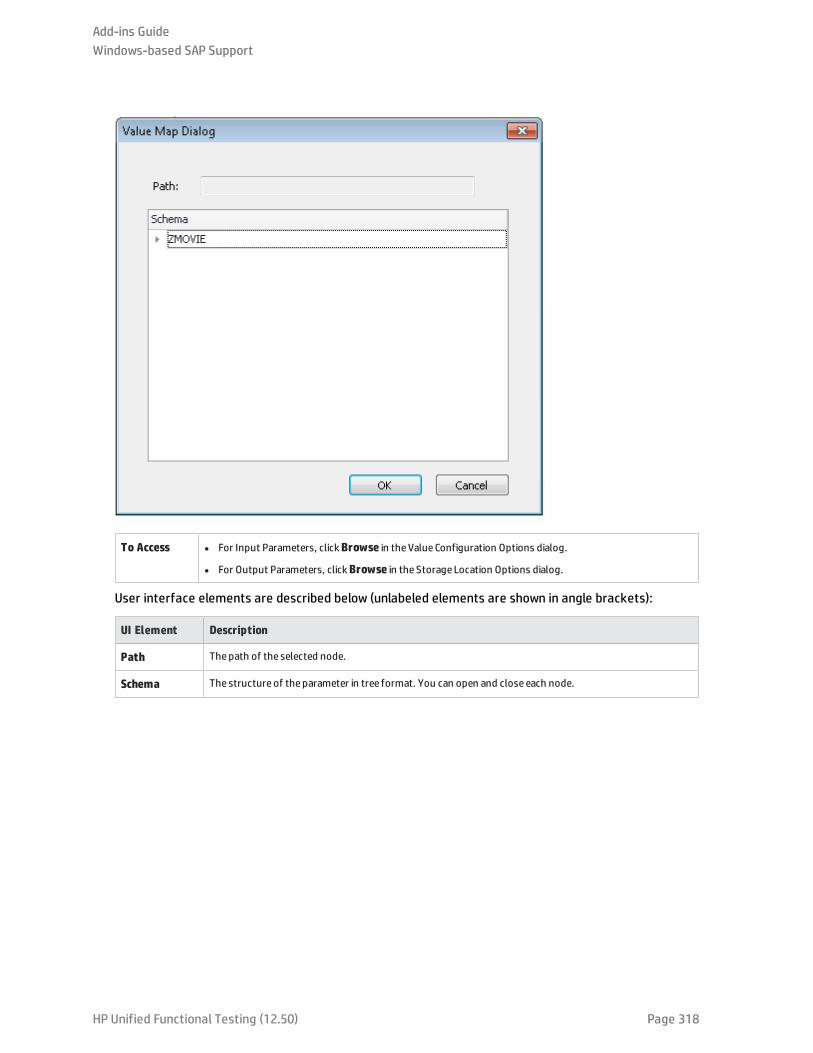
To Access l For Input Parameters, clickBrowse in theValue Configuration Options dialog.
l For Output Parameters, clickBrowse in the Storage Location Options dialog.
User interface elements are described below (unlabeled elements are shown in angle brackets):
UI Element Description
Path Thepath of the selected node.
Schema The structure of the parameter in tree format. You can open and close each node.
Add-ins GuideWindows-based SAP Support
HP Unified Functional Testing (12.50) Page 318

HP Unified Functional Testing (12.50) Page 319
Part 13: Siebel Add-inThis section includes:
"Siebel Add-in - Quick Reference" on page 320
"Siebel Add-in - Testing and Configuration" on page 323
"Siebel Test Express" on page 339
Siebel Add-in - Quick ReferenceYou can use the UFT Siebel Add-in to test Siebel user-interface objects (controls).
The following tables summarize basic information about the Siebel Add-in and how it relates to somecommonly-used aspects of UFT.
General Information
Add-in Type This is aWeb-based add-in. Much of its functionality is the sameas other Web-based add-ins.
See "Web-Based Application Support" on page 34.
SupportedEnvironments
For details on supported Siebel environments, see theSiebel Add-in section of theHPUnifiedFunctional Testing Product Availability Matrix, available from theHP Support Matrix page (requires anHP passport).
If you are testing SiebelOpenUI applications, the SiebelOpenUI Add-in is supported as a child add-in of theWeb Add-in and appears in theAdd-in Manager as a child add-in of theWeb Add-in. The SiebelOpenUI Add-in must be installed as oneof theWeb 2.0 toolkits. You should load theWeb Add-in and the SiebelOpenUIAdd-in, but do not load the Siebel Add-in. If you load both the Siebel and the SiebelOpenUI add-ins, theadd-ins sometimes conflict with each other, and prevent successful object recognition.
ImportantInformation
l You can use Siebel Test Express to automatically generate a new object repository, or update anexisting object repository. For details, see "Siebel Test Express" on page 339.
l For general considerations, see "Considerations - Siebel Add-in" on page 324.
Test ObjectMethods andProperties
TheSiebel Add-in provides test objects, methods, and properties that can beused when testing objects inSiebel applications. For details, see theSiebel section of theHPUFT Object Model Reference for GUITesting.
Checkpoints andOutput Values
l See the sections describing checkpoints and output values in theHPUnified Functional Testing UserGuide.
l See "Considerations - Siebel Add-in" on page 324.
l See "GUI Checkpoints and Output Values Per Add-in" on page 512
Troubleshootingand Limitations
"Troubleshooting and Limitations - Siebel Add-in" on page 335
Prerequisites
Opening YourApplication
You must open UFT and set Record and Run options before opening your Siebel application. Open theapplication only after you begin the recording session.
Add-inDependencies
None
Other l To test a Siebel 7.7.x or later application, you must:
l Modify the Siebel Test Automation module configuration.
l Instruct your Siebel application to generate test automation information.
See "Siebel 7.7.x or Later - Test Automation Module Configuration" on page 330.
HP Unified Functional Testing (12.50) Page 320

l To test your Web application in Mozilla Firefox version 33 and later, you must enable the FunctionalTesting Extension in oneof the following ways:
l If theSelect Your Add-ons screen is displayed when you open Firefox, select to enable theFunctional Testing Extension.
l If the Install Add-on tab opens and displays Functional Testing Extension when opening Firefox,select theAllow this installation check box and clickContinue.
Otherwise:
i. In Firefox, open the browser menu.
ii. In themenu, clickAdd-ons.
iii. In theAdd-ons Manager tab, select theExtensionsnode.
iv. In the Functional Testing Extension row, click theEnable button.
To test your Web application in Mozilla Firefox versions earlier than 33, you must enable the legacyFirefox agent:
a. Open the<UFT installation folder>\Installations\Firefox folder.
b. From the Firefox folder, drag theLegacy.xpi file into Firefox.
c. In Firefox, open the browser menu.
d. In themenu, click Add-ons.
e. In theAdd-ons Manager tab, select the Extensions node.
f. In the Functional Testing Extension row, disable the Functional Testing 12.50 extension andenable the extension you added to Firefox.
Configuration
Options Dialog Box Use theWebpane.(Make sure that aGUI test is open and select Tools > Options > GUI Testing tab > Web > Generalnode.)
See "Web > General Pane (Options Dialog Box)" on page 58.
Record and RunSettings Dialog Box(tests only)
Use theSiebel tab.(Record > Record and Run Settings)
See "Siebel Tab (Record and Run Settings Dialog Box)" on page 333.
Test Settings DialogBox(tests only)
Use theWebpane.(File > Settings > Web node)
See "Web Pane (Test/Business Component Settings Dialog Box / Application Area -Additional Settings Pane)" on page 68.
Custom Active ScreenCapture SettingsDialog Box(tests only)
Use theWeb section.(Tools > Options > GUI Testing tab >Active Screen node> Custom Level)
See the section on the Custom Active Screen Capture Settings dialog box in theHPUnifiedFunctional Testing User Guide.
Application AreaAdditional Settingspane
l Use theWebpane.In the application area, clickAdditional Settings>Web in the sidebar.
Add-ins GuideSiebel Add-in - Quick Reference
HP Unified Functional Testing (12.50) Page 321

(business componentsonly)
See "Web Pane (Test/Business Component Settings Dialog Box / Application Area -Additional Settings Pane)" on page 68.
l Use theApplicationspane.In the application area, select Additional Settings > Applications in the sidebar.
In theSiebel versionbox, specify the Siebel version for the applications on which you want torecord your business component. The version that you choose remains selected for allsubsequent business components.
Add-ins GuideSiebel Add-in - Quick Reference
HP Unified Functional Testing (12.50) Page 322
Siebel Add-in - Testing and ConfigurationThis chapter includes:
• Siebel Add-in - Overview 324
• Considerations - Siebel Add-in 324
• Siebel Test Object Model - Overview 325
• Recording Steps on Siebel Objects 326
• Native Operations and Properties in Siebel 7.0.x and 7.5.x Applications 327
• Siebel Add-in - Checkpoints and Output Values 327
• Spooling Data from a Siebel Table 329
• Siebel 7.7.x or Later - Test Automation Module Configuration 330
• How to Define Environment Variables for Siebel Applications 331
• Siebel Tab (Record and Run Settings Dialog Box) 333
• Troubleshooting and Limitations - Siebel Add-in 335
• Siebel 7.7.x or Later 336
• Siebel 7.0.x and 7.5.x 337
HP Unified Functional Testing (12.50) Page 323
Siebel Add-in - OverviewThe Siebel eBusiness platform is widely used in many organizations for their business processapplications. UFT can create and run tests and business components on these applications using specialtest objects and operations (methods and properties) that are customized for Siebel.
The customized Siebel test objects, methods, and properties make scripts simpler to read, maintain,enhance, and parameterize, enabling both advanced and novice users to create sophisticated tests andbusiness components on Siebel applications.
UFT supports testing on both standard-interactivity and high-interactivity Siebel applications:
l Standard-interactivity applications download data as it becomes necessary. This interface isdesigned for users accessing the application from outside the corporate network.
l High-interactivity applications download the majority of the required data at one time, requiringfewer navigations. This interface is designed for heavy use, for example, by call centers.
Considerations - Siebel Add-inGeneral Considerations
l UFT learns objects in Siebel 7.7.x or later applications in a different way than in Siebel 7.0.x and 7.5.xapplications. The Siebel Add-in has two different groups of test objects. The test object used torepresent an object in your application depends on the Siebel version of your application and theimplementation of the object. For details, see "Siebel Test Object Model - Overview" on the next page.
l When you load the Siebel Add-in, the Web event recording configurations designed for this add-in areloaded and are used whenever you record on a Siebel object. The Siebel Web event recordingconfigurations do not affect the way UFT behaves when you record on other non-Siebel Web objects.For details, see "Event Recording Configuration for Web-Based Applications" on page 39.
l When you load the Siebel Add-in, the object identification settings are also automatically customizedfor Siebel. You do not need to make any changes to them. Therefore, the Siebel and Web options inthe Object Identification dialog box are unavailable.
l Loading the ActiveX and Siebel add-ins together may cause problems when recording on someActiveXmethods.
Siebel 7.7.x or Later
l As you record a test or business component on your Siebel 7.7.x or later application, UFT records theoperations you perform. UFT works directly with the Siebel Test Automation API (SiebelAx_Test_Automation_18306.exe) to record your operations. Therefore, although UFT records a step for eachoperation you perform, it adds the steps to your test or business component only when API eventsare sent to UFT (when information is sent to the Siebel server).
HP Unified Functional Testing (12.50) Page 324
l When test automation is activated on a Siebel 7.7.x or later server and requested in the URL, theSiebel Web Engine (SWE) generates additional information about each object in the Siebel applicationwhen constructing the Web page. Each object has a specific set of properties, events, and methodsthat provide functionality for the Siebel application. The Siebel Test Automation API maps to theseobjects to enable you to manipulate your Siebel application from UFT when recording and runningtests or business components on the Siebel application.
Siebel 7.0.x/7.5.x
The Siebel Add-in can also identify Siebel objects by the siebel attached text property (the static textdisplayed with a Siebel object), rather than by the HTML name of the object. This enables you tomaintain the test or business component with dynamically created pages.
Siebel Test Object Model - OverviewThe Siebel test object model is comprised of two different groups of test objects: test objects with theprefix Sbl and test objects with the prefix Sieb. If you are recording on a Siebel 7.0.x or 7.5.x application,UFT learns only Sbl test objects. If you are learning objects on a Siebel 7.7.x or later application, UFT maylearn only Sieb test objects or a combination of Sbl and Sieb test objects, depending on the way in whichyour Siebel application was implemented.
For details on each of the Siebel test objects, see the Siebel section of the HP UFT Object ModelReference for GUI Testing.
When you perform an operation on your Siebel application while recording a test or businesscomponent, UFT:
l identifies the object on which you performed the operation and creates the appropriate test objectin the test or business component.
l reads the current value of the object's properties in your application and stores them in the objectrepository as the test object's property values.
l chooses a unique name for the test object, generally using the value of one of its prominentproperties.
l records the operation (method) that you performed on the object and displays the operation as astep in the Keyword View and as a statement in the Editor.
For example, suppose you select a check box for a specific account on a page of your Siebel application.This check box has the label Competitor.
UFT identifies the check box as a SiebCheckbox object. It creates a SiebCheckbox test object with thename Competitor and records the following properties and values as the description for the CompetitorSiebCheckbox.
Add-ins GuideSiebel Add-in - Testing and Configuration
HP Unified Functional Testing (12.50) Page 325

It also records that you performed a SetOnmethod to select the SiebCheckbox object.
UFT displays your step in the Keyword View like this:
UFT displays your step in the Editor like this:
SiebApplication("Siebel Call Center").SiebScreen("Accounts").SiebView("AccountDetails").SiebApplet("Account").SiebCheckbox("Competitor").SetOn
When you run a test or business component, UFT identifies each object in your application by its testobject class and its description: the set of identification properties and values used to uniquely identifythe object. In the above example, during the run session, UFT searches the object repository for theSiebCheckbox object named Competitor to look up its description. Based on the description it finds(repositoryname = Competitor and classname = SiebCheckbox), UFT searches the application for aSiebCheckbox object named Competitor. When it finds the object, UFT performs the SetOnmethod onthe object to select the check box.
This section also includes:
• Recording Steps on Siebel Objects 326
• Native Operations and Properties in Siebel 7.0.x and 7.5.x Applications 327
Recording Steps on Siebel ObjectsWhen you record an operation on a Siebel object, UFT inserts a step with the relevant Siebel object inthe Keyword View and adds the corresponding statement in the Editor.
For example, if you select an item from a list, the Keyword Viewmay be displayed as follows:
Add-ins GuideSiebel Add-in - Testing and Configuration
HP Unified Functional Testing (12.50) Page 326

UFT records this step in the Editor as:
SiebApplication("Siebel Call Center").SiebScreen("Accounts").SiebView("AccountDetails").SiebApplet("Account").SiebPicklist("Account Type").Select "Consultant"
Tip: It is recommended to log out of your Siebel application at the end of the recording sessionbefore closing the browser.
If you have the Siebel Add-in installed, you can use UFT to generate an object repository for yourapplication. For details, see "Siebel Test Express" on page 339
Native Operations and Properties in Siebel 7.0.x and 7.5.xApplicationsIn addition to the Siebel-specific test objects and operations, you can also use the Object property toaccess native (internal) operations and properties of the HTML or ActiveX elements that wrap Siebelobjects. The Object property is available for all Siebel 7.0.x and 7.5.x objects.
Tip: You can use the Object Spy to view the native operations and properties of an object in yourapplication.
The Object property is also useful for checking the value of properties that are not available using astandard Siebel checkpoint.
The following example uses the Object property to access the raw HTML element that represents theSblTabStrip object, retrieve its HTML tag name and size, and display this information in message boxes
set obj = Browser("Siebel Call").Page("Siebel Call").Frame("SiebelCall").SblTabStrip("ScreenTabStrip").Objectmsgbox obj.tagNamemsgbox obj.heightmsgbox obj.width
Note: Relying on native properties may be problematic if you are upgrading your Siebel applicationto a newer version, in which objects may have a different structure. For example, the conversion ofHTML objects to ActiveX objects in the Internet Explorer Option Pack.
For details on using the Object property, see the HP Unified Functional Testing User Guide.
Siebel Add-in - Checkpoints and Output ValuesAfter you create your test or business component, you can enhance it by adding checkpoints, retrievingoutput values, parameterizing values, and inserting Siebel objects, methods and properties.
Add-ins GuideSiebel Add-in - Testing and Configuration
HP Unified Functional Testing (12.50) Page 327
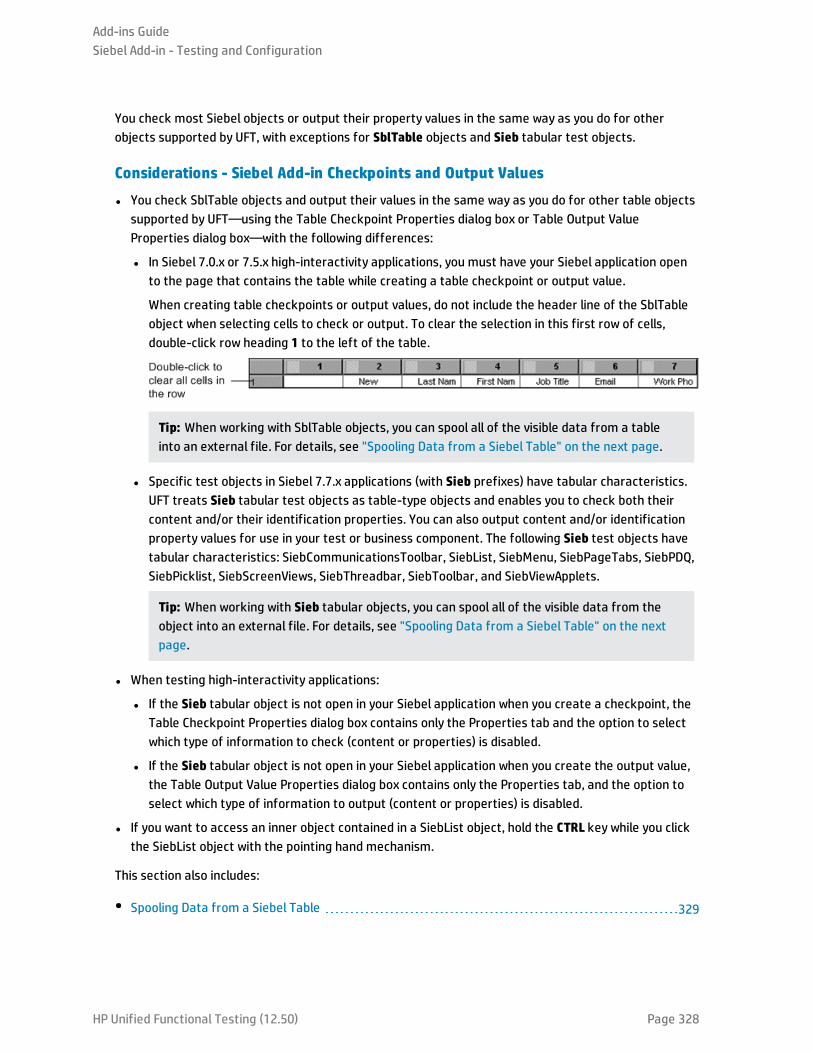
You check most Siebel objects or output their property values in the same way as you do for otherobjects supported by UFT, with exceptions for SblTable objects and Sieb tabular test objects.
Considerations - Siebel Add-in Checkpoints and Output Values
l You check SblTable objects and output their values in the same way as you do for other table objectssupported by UFT—using the Table Checkpoint Properties dialog box or Table Output ValueProperties dialog box—with the following differences:
l In Siebel 7.0.x or 7.5.x high-interactivity applications, you must have your Siebel application opento the page that contains the table while creating a table checkpoint or output value.
When creating table checkpoints or output values, do not include the header line of the SblTableobject when selecting cells to check or output. To clear the selection in this first row of cells,double-click row heading 1 to the left of the table.
Tip: When working with SblTable objects, you can spool all of the visible data from a tableinto an external file. For details, see "Spooling Data from a Siebel Table" on the next page.
l Specific test objects in Siebel 7.7.x applications (with Sieb prefixes) have tabular characteristics.UFT treats Sieb tabular test objects as table-type objects and enables you to check both theircontent and/or their identification properties. You can also output content and/or identificationproperty values for use in your test or business component. The following Sieb test objects havetabular characteristics: SiebCommunicationsToolbar, SiebList, SiebMenu, SiebPageTabs, SiebPDQ,SiebPicklist, SiebScreenViews, SiebThreadbar, SiebToolbar, and SiebViewApplets.
Tip: When working with Sieb tabular objects, you can spool all of the visible data from theobject into an external file. For details, see "Spooling Data from a Siebel Table" on the nextpage.
l When testing high-interactivity applications:
l If the Sieb tabular object is not open in your Siebel application when you create a checkpoint, theTable Checkpoint Properties dialog box contains only the Properties tab and the option to selectwhich type of information to check (content or properties) is disabled.
l If the Sieb tabular object is not open in your Siebel application when you create the output value,the Table Output Value Properties dialog box contains only the Properties tab, and the option toselect which type of information to output (content or properties) is disabled.
l If you want to access an inner object contained in a SiebList object, hold the CTRL key while you clickthe SiebList object with the pointing hand mechanism.
This section also includes:
• Spooling Data from a Siebel Table 329
Add-ins GuideSiebel Add-in - Testing and Configuration
HP Unified Functional Testing (12.50) Page 328
Spooling Data froma Siebel TableIf you want to spool all the visible data from a SblTable or a Sieb tabular object (such as a SiebListobject) into an external file, you can loop through each cell in the table and then save the information toan external file.
The following example uses the GetCellDatamethod to list the data of each cell in a SblTable objectwith 10 rows and 10 columns:
For i=0 to 10For j=0 to 10
Dat=Browser("Siebel eChannel").Page("Siebel eChannel_8").Frame("Campaign Explorer").SblTable("Campaign").GetCellData (i, j)SaveToExternalFile (Dat)
NextNext
The following example uses the RowsCount and ColumnsCountmethods to list the data of each cell in aSiebList object:
RowsCount = SiebApplication("Siebel Call Center").SiebScreen("Accounts").SiebView("My Accounts").SiebApplet("Accounts").SiebList("List").RowsCountColsCount = SiebApplication("Siebel Call Center").SiebScreen("Accounts").SiebView("My Accounts").SiebApplet("Accounts").SiebList("List").ColumnsCountFor i=0 to RowsCount-1
For j=0 to ColsCount-1ColumnName = SiebApplication("Siebel Call Center").SiebScreen
("Accounts").SiebView("My Accounts").SiebApplet("Accounts").SiebList("List").GetColumnRepositoryNameByIndex(j)
Dat=SiebApplication("Siebel Call Center").SiebScreen("Accounts").SiebView("MyAccounts").SiebApplet("Accounts").SiebList("List").GetCellText(ColumnName,i)
SaveToExternalFile (Dat)Next
Next
For details on the GetCellData, RowsCount, and ColumnsCountmethods, see the Siebel section of theHP UFT Object Model Reference for GUI Testing.
Add-ins GuideSiebel Add-in - Testing and Configuration
HP Unified Functional Testing (12.50) Page 329
Siebel 7.7.x or Later - Test Automation ModuleConfigurationUFT support for Siebel 7.7.x or later applications is based on the Siebel Test Automation API (SiebelAx_Test_Automation_18306.exe). Before you can create or run tests or business components on yourSiebel 7.7.x or later application, you must modify the Siebel Test Automation module configuration andinstruct your Siebel application to generate test automation information.
You do not need to make any configuration changes in Siebel 7.0.x and 7.5.x applications to create andrun tests or business components on these Siebel application versions.
To test your Siebel 7.7.x or later application using the Siebel Add-in, you must confirm that your Siebelserver has the Siebel Test Automation module installed and correctly configured to perform testautomation. For detailed information, see the section that describes how to set up your functionaltesting environment in Testing Siebel eBusiness Applications Version 7.7, provided with your Siebelinstallation.
Generating Test Automation Information - Siebel Application
To create and run tests or business components on your Siebel 7.7.x or later application, you mustinstruct the Siebel Web Engine (SWE) to generate test automation information for the Siebelapplication, using a SWE command. To do so, append the SWECmd=AutoOn token to the URL of yourSiebel server. For example: http://hostname/callcenter/start.swe?SWECmd=AutoOn. If you do not append this token, the SWE does not generate testautomation information.
If you select the Open the following application when a record or run session begins option in the"Siebel Tab (Record and Run Settings Dialog Box)" (described on page 333), UFT automatically appendsthe Siebel Test Automation information to the URL (you do not need to specify it manually in the URL).For details on the Record and Run Settings dialog box options, see "How to Define EnvironmentVariables for Siebel Applications" on the next page.
If you select the Open the following application when a record or run session begins option in the"Siebel Tab (Record and Run Settings Dialog Box)" (described on page 333), UFT automatically appendsthe Siebel Test Automation information to the URL (you do not need to specify it manually in the URL).For details on the Record and Run Settings dialog box options, see "How to Define EnvironmentVariables for Siebel Applications" on the next page.
Note: If a session timeout error occurs in your Siebel 7.7.x or later application, the Siebel TestAutomation URL parameter values are not saved. After you log out and log in again, you mustnavigate to the correct URL that contains the required Siebel Test Automation parameter values(including password parameter values, if any—see below).
Add-ins GuideSiebel Add-in - Testing and Configuration
HP Unified Functional Testing (12.50) Page 330
Generating Test Automation Information - Secured Siebel Application
If a password for generating test automation information is defined on your Siebel Server, you mustalso indicate that password in the URL (in addition to the SWECommand=AutoOn token described above).The URL token is in the format AutoToken=password. For example:http://hostname/callcenter/start.swe?SWECmd=AutoOn&AutoToken=mYPass. This enables UFT torun the Siebel Test Automation API SiebelAx_Test_Automation_18306.exe even in secure mode.
If a password is defined for the Siebel Server and you do not append this token to the URL, the SWEdoes not generate test automation information.
For details on whether your Siebel Server is secured for test automation, contact your Siebel systemadministrator.
If you select the Open the following application when a record or run session begins option in the"Siebel Tab (Record and Run Settings Dialog Box)" (described on page 333), click the Advanced button,and specify the password in the Siebel automation access code box in the Advanced Siebel Record andRun Settings dialog box, UFT automatically appends the password information to the URL (you do notneed to specify it manually in the URL). For details on the Record and Run Settings dialog box options,see "How to Define Environment Variables for Siebel Applications" below.
How to Define Environment Variables for SiebelApplications
Note:
l If you define any of these environment variables, it overrides the corresponding values in the"Siebel Tab (Record and Run Settings Dialog Box)" (described on page 333) (for components), orthe Applications pane in the application area's Additional Settings pane (for application areas).
l For details on defining and working with environment variables, see "Environment Variables inRecord and Run Settings" on page 26.
Use the variable names listed in the following table to define Siebel application details:
Option Variable Name Description
Siebel version APPLICATION_ENV
TheSiebel version for the applications on which you want to recordyour test or business component.
Possible values:
l 77
l 7075
This option is available for tests and business components.
Address URL_ENV TheURL of the application you want to open. This option is availableonly for tests.
Add-ins GuideSiebel Add-in - Testing and Configuration
HP Unified Functional Testing (12.50) Page 331
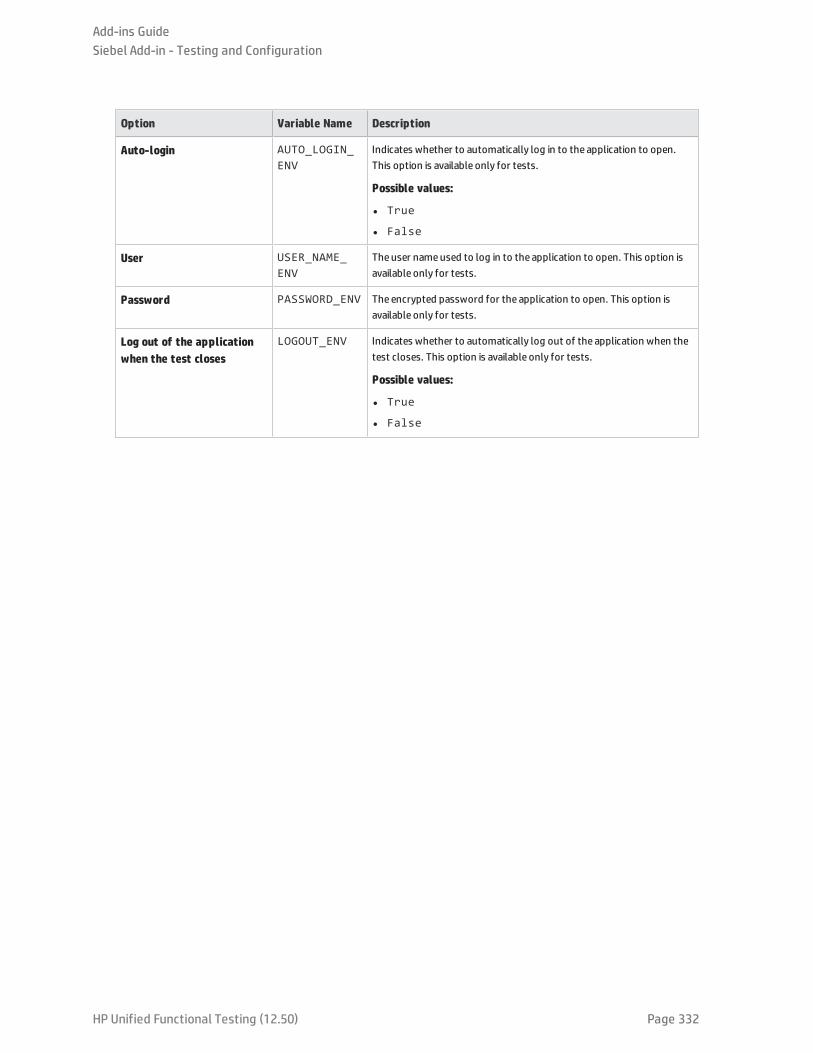
Option Variable Name Description
Auto-login AUTO_LOGIN_ENV
Indicates whether to automatically log in to the application to open.This option is available only for tests.
Possible values:
l True
l False
User USER_NAME_ENV
Theuser nameused to log in to the application to open. This option isavailable only for tests.
Password PASSWORD_ENV The encrypted password for the application to open. This option isavailable only for tests.
Log out of the applicationwhen the test closes
LOGOUT_ENV Indicates whether to automatically log out of the application when thetest closes. This option is available only for tests.
Possible values:
l True
l False
Add-ins GuideSiebel Add-in - Testing and Configuration
HP Unified Functional Testing (12.50) Page 332
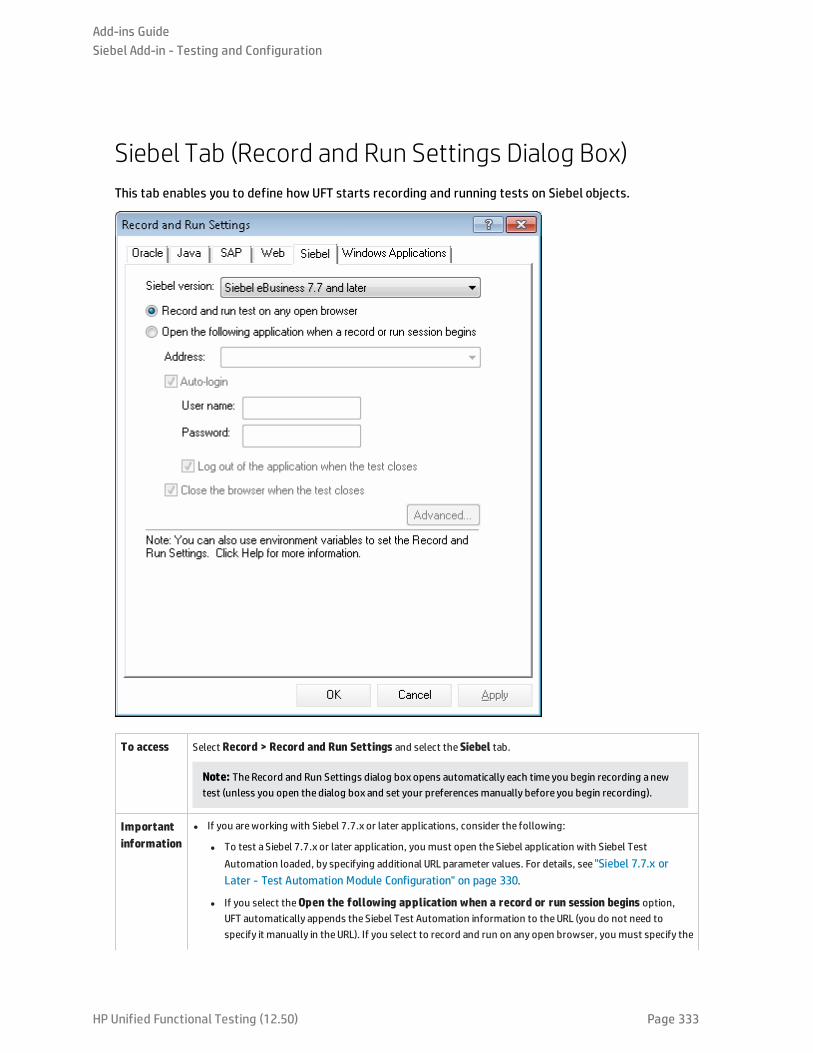
Siebel Tab (Record and Run Settings Dialog Box)This tab enables you to define how UFT starts recording and running tests on Siebel objects.
To access Select Record > Record and Run Settings and select theSiebel tab.
Note: TheRecord and Run Settings dialog box opens automatically each time you begin recording anewtest (unless you open the dialog box and set your preferences manually before you begin recording).
Importantinformation
l If you areworking with Siebel 7.7.x or later applications, consider the following:
l To test a Siebel 7.7.x or later application, you must open the Siebel application with Siebel TestAutomation loaded, by specifying additional URL parameter values. For details, see "Siebel 7.7.x orLater - Test Automation Module Configuration" on page 330.
l If you select theOpen the following application when a record or run session begins option,UFT automatically appends the Siebel Test Automation information to theURL (you do not need tospecify it manually in theURL). If you select to record and run on any open browser, you must specify the
Add-ins GuideSiebel Add-in - Testing and Configuration
HP Unified Functional Testing (12.50) Page 333
required parameter values as part of the application URLwhen you open the application.
l If you select theOpen the following application when a record or run session beginsoption, andspecify the password in theSiebel automation access code box in theAdvanced Siebel Record andRun Settings dialog box, UFT automatically appends the password information to theURL. You do notneed to specify it manually in theURL. If you select to record and run on any open browser, or do notspecify the password in theAdvanced Siebel Record and Run Settings dialog box, you must specify therequired password values as part of the application URLwhen you open the application.
l If a session timeout error occurs in your Siebel 7.7.x or later application, the Siebel Test Automation URLparameter values are not saved. After you log out and log in again, you must navigate to the correct URLthat contains the required Siebel Test Automation parameter values.
Relevanttasks
"How to Define Environment Variables for Siebel Applications" on page 331
See also l "Considerations - Siebel Add-in" on page 324
l "How to Define Record and Run Settings for UFT Add-ins" on page 29
User interface elements are described below:
UI Elements Description
Siebel version Specifies the Siebel version for the applications on which you want to recordyour test. The version that you choose remains selected for all subsequenttests.
You can use an environment variable to specify the Siebel version. For details,see "How to Define Environment Variables for Siebel Applications" onpage 331.
Record and run tests on any openbrowser
Instructs UFT to use any Internet Explorer browser to record and run the test.
UFT can record and run only browsers that are opened after UFT is opened. Ifyou are using Siebel 7.7.x or later, make sure you specify the required testautomation parameters, as described in "Siebel 7.7.x or Later - TestAutomation Module Configuration" on page 330.
Open the following application when arecord or run session begins
Instructs UFT to open the specified application when record or run sessionsbegin.
Address(Enabled only when "Open thefollowing application when a record orrun session begins" is selected)
Instructs UFT to open Internet Explorer to the specified URL. Recommendedformat: <host>/<application name>/start.swe
Example: siebapp/callcenter_enu/start.swe
You can use an environment variable to specify theURL. For details, see "How toDefine Environment Variables for Siebel Applications" on page 331.
Auto-login(Enabled only when "Open thefollowing application when a record orrun session begins" is selected)
Instructs UFT to open the specified Siebel application using the specified logindetails.
You can use an environment variable to specify theAuto-login setting. Fordetails, see "How to Define Environment Variables for Siebel Applications"on page 331.
Add-ins GuideSiebel Add-in - Testing and Configuration
HP Unified Functional Testing (12.50) Page 334
UI Elements Description
User(Enabled only when Auto-loginis selected)
Theuser nameused to log in to the specified application.
You can use an environment variable to specify the user name. For details, see"How to Define Environment Variables for Siebel Applications" onpage 331.
Password(Enabled only when Auto-loginis selected)
Thepassword for the specified user name.
You can use an environment variable to specify the password. For details, see"How to Define Environment Variables for Siebel Applications" onpage 331.
Log out of the application when thetest closes(Enabled only when Auto-loginis selected)
Instructs UFT to log out of the specified application automatically when the testcloses. Any other Siebel sessions that were opened before, during, or after thetest run are not affected.
You can use an environment variable to specify theLog out setting. For details,see "How to Define Environment Variables for Siebel Applications" onpage 331.
Close the browser when the test closes(Enabled only when "Open thefollowing application when a record orrun session begins" is selected)
Instructs UFT to close the opened browser when the test closes. Any otherbrowsers that were opened before, during, or after the test run are not affected.
Advanced(Enabled only when "Siebel version 7.7and later" and "Open the followingapplication when a record or runsession begins" are selected)
Opens theAdvanced Siebel Record and Run Settings dialog box, where you canspecify the following options:
l Siebel automation request timeout.The timeout period (in seconds) foreach attempt to connect to Siebel Test Automation when running the test.
Default: 120 seconds.
l Siebel automation access code.Thepredefined security code required toenable access to Siebel Test Automation, if specified by your organization'saccess security policy.
Troubleshooting and Limitations - Siebel Add-inThis section contains general troubleshooting and limitation information about the Siebel Add-in.
General
Recording on multiple Siebel application versions in the same computer may cause steps not to berecorded.
Checkpoints and the Object Spy
l To create a table content checkpoint or output value for the appropriate object type (for example,SiebList, SiebPicklist, or SiebPageTabs) when editing your test or business component, you must openthe application to the exact screen in which the object appears. Otherwise, only the Properties tab is
Add-ins GuideSiebel Add-in - Testing and Configuration
HP Unified Functional Testing (12.50) Page 335
displayed in the Table Checkpoint dialog box or Table Output Value dialog box.
l Checkpoints created for SiebList objects that contain a Total rowmay fail during a run session if theaction that led to the update of the Total row was not recorded.
l The Object Spy and checkpoints identify expanded calculator and calendar popup objects as Window("Siebel control popup").
This section also includes troubleshooting and limitation information about the following Siebelversions:
l "Siebel 7.7.x or Later" below
l "Siebel 7.0.x and 7.5.x " on the next page
Siebel 7.7.x or Laterl Certain objects, methods, or properties may be available from within UFT even though they are not
described in the documentation. This is because UFT retrieves the latest SiebelObject.xml filewhen loading the Siebel add-in and opening a Siebel application, and because the documentation isupdated according to version of the .xml file that is available at the time of the UFT product release.
l Certain objects, for example, in the SmartScript module, do not have a value for the repository nameproperty and are therefore not recorded and are not recognized by the Object Spy.
Workaround: Use low-level recording.
l Gantt chart operations and RichText editor toolbar operations are not recorded.
Workaround: Use low-level recording.
l The appointment calendar object can be recorded only if the ActiveX Add-in is enabled.
l If you record the creation of a new appointment in an appointment calendar, the test or businesscomponent may fail when you run it.
Workaround: Manually add an onkeypress FireEvent to the WebElement before the Set step.
l The Active Screen is empty for steps recorded on pop-up tables.
l Inner objects that are placed in cells of a SiebList object cannot be accessed in the standard way,even if they are recorded. This may cause the following limitations:
l The entire SiebList object is highlighted if the test or business component script line contains anoperation on a SiebList inner object.
l The ChildObjectsmethod for SiebList objects returns 0.
l The Add Objects option in the Object Repository window cannot be used to add SiebList innerobjects to the object repository.
l If a warning message opens while recording your test or business component, for example, if youinsert invalid data, UFT may record these operations in the incorrect order.
Workaround: Manually change the order of the steps in your test after recording.
l Context-sensitive help (F1 Help) may not be available for Siebel 7.7.x or later objects and/or methodsthat were added by Siebel after the UFT 11.50 release. In addition, auto-documentation (in the
Add-ins GuideSiebel Add-in - Testing and Configuration
HP Unified Functional Testing (12.50) Page 336
Keyword View Documentation column) and step documentation (in the Step Generator) may not beavailable for these objects and/or methods.
l When using Siebel version 8.1.1.11, the SiebCalculator.ClickKeysmethod may not work whenrunning the test of the application calculator
Workaround: Enter the value of the calculator directly into the edit field instead of using theClickKey/ClickKeysmethod to enter the value.
Siebel 7.0.x and 7.5.x
Creating and Running Testing Documents
l UFT does not support recording on Siebel applications using keyboard shortcuts.
Workaround: Use the mouse to record on Siebel applications.
l UFT does not record the scrolling of a set of records in an SblTable.
Workaround:While recording, scroll the table row by row.
Tip: You can use the Editor to manually edit the statement to scroll multiple rows.
l By default, UFT does not record Editor control operations (used mainly in long Description fields).
Workaround: Use low-level recording, making sure you record the scrolling to the control if needed.
Working with Siebel Controls
l When you click the Search icon for the first time during a browser session, a frame opens that isdifferent from all other search frames. When running test iterations, the correct frame may not beidentified.
Workaround: Close the browser at the end of every iteration.
l Each Siebel version includes changes/modifications to the user interface. As a result, steps lastmodified in previous Siebel versions on elements that no longer exist in the interface will probablyfail and should be replaced.
For example, the button arrow used to view the next set of records on the top line of the Siebel tablethat appears in earlier versions of Siebel was replaced in Siebel version 7.5.2 with a scroll bar at theside of the table. In this case, replace Image("Next Record").Clickwith an operation on the scrollbar.
l The name of the first column in an SblTable object cannot be retrieved.
Workaround: Use the column index to perform the operation on the cells in the first column.
Standard-Interactivity (SI) Applications
l In some SI application dialog boxes, in cases where selecting a check box causes a navigation to occur(for example, in a check box table column, such as the New column), UFT may not record thesubsequent steps or may record them inaccurately.
Add-ins GuideSiebel Add-in - Testing and Configuration
HP Unified Functional Testing (12.50) Page 337
Workaround: To continue recording accurately, click anywhere in the page before the next operation.
l When recording on a Currency Calculator pop-up control, clicking OK immediately after entering acurrency value may result in a recording error.
Workaround: Before clicking OK in a Currency Calculator pop-up control within a SblAdvancedEditobject, select another control within the pop-up and click OK.
High-Interactivity (HI) Applications
l Depending on your browser's security settings and the Siebel patches that are installed, severaldialog boxes may open when logging in to your Siebel application. It is recommended to run tests orbusiness components when all required Siebel patches are downloaded and installed. If for somereason, you cannot do this, manually delete the Sync steps added between the steps recorded on thesecurity alerts.
l UFT cannot record a SblTable.Sort operation if it is the first operation inside an MVG (Multi-ValueGroup) applet.
Workaround: Click anywhere in the MVG applet and then sort it.
l When recording on a SblAdvancedEdit object that opens a pop-up object, UFT records only the Setmethod and does not record the operations within the pop-up object. However, if you open a tablefrom the pop-up object, UFT does record the operations performed within this secondary table.These statements are not required in the test or business component, since the operation ofinserting the Pickup table selected item into the main table is also recorded. In some cases, theseredundant statements interfere with the run session.
Workaround: If the test or business component does not run as expected, delete the statementsrecorded on secondary tables opened from a pop-up object.
l When adding an attachment to a Siebel table, UFT records additional statements that may interferewith the run session.
Workaround: After recording, delete the OpenCellElement and Add statements that were recordedwhen you added an attachment.
l When inserting a value into a Siebel table cell using the Currency Calculator control, UFT may record anew SelectCell step before the SetCellData if you move the cursor to another cell before clickingin the cell in which you entered a value.
Workaround:While recording, always close the Currency Calculator by pressing the ENTER key. If, forsome reason, the Currency Calculator was not closed using the ENTER key, you can manually changethe order between the SetCellData and SelectCell steps.
Add-ins GuideSiebel Add-in - Testing and Configuration
HP Unified Functional Testing (12.50) Page 338
Siebel Test ExpressThis chapter includes:
• Using Siebel Test Express to Generate or Update Shared Object Repositories 340
• How to Use Siebel Test Express to Generate or Update a Shared Object Repository 340
• Create Object Repository Wizard 342
• Connection Information Page (Create Object Repository Wizard) 342
• Screen Selection Page (Create / Update Object Repository Wizard) 343
• Importing Test Objects Page (Create Object Repository Wizard) 344
• Object Repository Created / Updated Page (Create / Update Object Repository Wizard) 345
HP Unified Functional Testing (12.50) Page 339

Using Siebel Test Express to Generate or UpdateShared Object RepositoriesIf the Siebel Add-in is installed on UFT, you can use Siebel Test Express to automatically generate a newshared object repository, or to update an existing object repository.
You can create new shared object repositories using the Create Object Repository Wizard. Using thewizard you can select the applications or top-level application objects for which to create an objectrepository. Siebel Test Express scans the Siebel application and creates test objects for every childobject contained in the applications or top-level objects that you specify. After you have created theshared object repository, you can save it to the file system or to an ALM project using the ObjectRepository Manager.
You can also use Siebel Test Express to update an existing object repository. The Update ObjectRepository Wizard enables you to select the applications or top-level objects to include in the update, aswell as the date from which to search for and include new or modified objects. The date refers to whenthe objects were last added or modified in the object repository.
After you update an object repository, the Object Repository Merge Tool merges the new and modifiedobjects with objects from your existing object repository.
This chapter explains how to create or update an object repository using Siebel Test Express. For detailson working with object repositories in general, see the HP Unified Functional Testing User Guide.
For details on creating and updating object repositories using Siebel Test Express, see "How to UseSiebel Test Express to Generate or Update a Shared Object Repository" below.
For details on the Create / Update Object Repository wizard, see "Create Object Repository Wizard" onpage 342.
How to Use Siebel Test Express to Generate or Updatea Shared Object RepositoryThis task describes how to use Siebel Test Express to generate a new shared object repository for aSiebel application or to update an existing shared object repository.
This task includes the following steps:
l "Prerequisites" on the next page
l "Create or update a shared object repository" on the next page
l "(Optional) Use the Object Repository Merge Tool to merge the updated Siebel object repository" onthe next page
l "Save the shared object repository" on the next page
HP Unified Functional Testing (12.50) Page 340
1. Prerequisites
l To successfully run Siebel Test Express, the Siebel Add-in must be installed and loaded.
l Siebel Test Express supports Siebel 7.7 or later high-interactivity applications that are based onthe Siebel Test Automation API.
l To work with Siebel Test Express in UFT, ensure that the Siebel Test Automation API versioninstalled on your server is one that supports Siebel Test Express.
2. Create or update a shared object repository
a. Select Resources > Object Repository Manager. The Object Repository Manager opens.
b. (Optional) To update an existing object repository, open the object repository file you want toupdate in editable format.
Note: By default, the object repository file opens in read-only mode. To open it in editableformat, either clear the Open in read-only mode check box in the Open Shared ObjectRepository window, or enable editing by selecting File > Enable Editing after you openthe repository.
c. Open the Create Object Repository Wizard, as described in "Create Object Repository Wizard"on the next page.
d. Follow the steps of the wizard to create the new shared object repository. The wizard containsthe following pages:
o "Connection Information Page (Create Object Repository Wizard)" on the next page
o "Screen Selection Page (Create / Update Object Repository Wizard)" on page 343
o "Importing Test Objects Page (Create Object Repository Wizard)" on page 344
o "Object Repository Created / Updated Page (Create / Update Object Repository Wizard)" onpage 345
After the import process ends, the Object Repository Merge Tool opens. This may take a fewminutes.
3. (Optional) Use the Object Repository Merge Tool to merge the updated Siebelobject repository
Conflicts between objects in the primary and secondary repository files are resolved automaticallyby the Merge Tool according to the default resolution settings. After the merge, the Merge Tooldisplays the Statistics dialog box, which lists the files that were merged, and the number and typeof any conflicts that were resolved during the merge. You can accept or modify these resolutionsto match your needs.
For details on working with the Object Repository Merge Tool, see the HP Unified Functional TestingUser Guide.
4. Save the shared object repository
Save the shared object repository to the file system or to an ALM project. For details on working
Add-ins GuideSiebel Test Express
HP Unified Functional Testing (12.50) Page 341
with or saving shared object repositories, see the section on the Object Repository Manager in theHP Unified Functional Testing User Guide.
Create Object Repository WizardThis wizard enables you to create or update a shared object repository using Siebel Test Express.
To access In theObject RepositoryManager (Resources > Object Repository Manager), do oneof the following:
To create a new object repository:
l Click theCreate Object Repository button on theObject RepositoryManager toolbar.
l Select Tools > Siebel Test Express > Create Object Repository.
To update an existing object repository:
l Click theUpdate Object Repository button on theObject RepositoryManager toolbar.
l Select Tools > Siebel Test Express > Update Object Repository.
Importantinformation
You can run only one instance of the Create / UpdateObject RepositoryWizard on a computer at any given time.
Relevanttasks
"How to Use Siebel Test Express to Generate or Update a Shared Object Repository" on page 340
Wizard map This wizard contains:
"Connection Information Page (Create Object Repository Wizard)" (page342> "Screen Selection Page(Create / Update Object Repository Wizard)" (page 343> "Importing Test Objects Page (Create ObjectRepository Wizard)" (page344> "Object Repository Created / Updated Page (Create / Update ObjectRepository Wizard)" (page345
See also "Using Siebel Test Express to Generate or Update Shared Object Repositories" on page 340
Connection Information Page (Create Object RepositoryWizard)This wizard page enables you to enter the connection information for logging in to the Siebel server.
Importantinformation
l General information about thewizard is available here: "Create Object Repository Wizard" above
l The information you enter on this page is saved as metadata in the generated object repository file.
l If you are creating anew repository, the information that was entered in this page the last time you used thewizard is automatically entered in this page.
l If you are updating the repository, the information that was saved as metadatawith the repository file isautomatically entered in this page.
l Thedata required in this page is not necessarily the sameas the data you use to log into the Siebelapplication as auser. Contact your Siebel server administrator for details.
l While the Connection Information page is open, you cannot make theObject RepositoryManager or UFTwindow active.
Add-ins GuideSiebel Test Express
HP Unified Functional Testing (12.50) Page 342
Wizard map The "Create Object Repository Wizard" contains:
Connection Information Page (Create Object Repository Wizard) > Screen Selection Page (page343>"Importing Test Objects Page (Create Object Repository Wizard)" (page344) > "Object RepositoryCreated / Updated Page (Create / Update Object Repository Wizard)" (page345)
See also l "How to Use Siebel Test Express to Generate or Update a Shared Object Repository" on page 340
l "Using Siebel Test Express to Generate or Update Shared Object Repositories" on page 340
User interface elements are described belows:
UI Element Description
Server URL TheURL of the Siebel server (including http://).
User name Your user name.
Password Your password.
Database name Thenameof the Siebel database.
Table owner The table owner you want to use for the specified Siebel database.
Siebel repository (optional) Thenameof the Siebel repository. If you do not enter a name, Siebel will use a default name.
Screen Selection Page (Create / Update Object RepositoryWizard)This wizard page enables you to select the test objects whose children you want to import. You canselect the applications for which to create the object repository, or you can expand the application nodeand then select one or more top-level objects. It is recommended to select only the top-level objectsthat you need. Importing an entire application may take a very long time.
Importantinformation
l General information about thewizard is available here: "Create Object Repository Wizard" on theprevious page.
l While the Screen Selection page is open, you cannot make theObject RepositoryManager or UFT windowactive.
l When Siebel Test Express creates the object repository, it imports themetadata and creates test objects forall children (descendants) of the applications or top-level objects you select in this page. Therefore, it isrecommended to select only the top-level objects that you need. Importing an entire application may take avery long time.
Wizard map The "Create Object Repository Wizard" contains:
"Connection Information Page (Create Object Repository Wizard)" (page342) > Screen Selection Page(Create / Update Object Repository Wizard) > Importing Test Objects Page (page344) > "ObjectRepository Created / Updated Page (Create / Update Object Repository Wizard)" (page345)
See also l "How to Use Siebel Test Express to Generate or Update a Shared Object Repository" on page 340
l "Using Siebel Test Express to Generate or Update Shared Object Repositories" on page 340
Add-ins GuideSiebel Test Express
HP Unified Functional Testing (12.50) Page 343
User interfaces elements are described below (unlabeled elements are shown in angle brackets):
UI Elements Description
<test object tree> The list of all the available applications and their objects, according to the connection informationentered in the "Connection Information Page (Create Object Repository Wizard)", displayed asnodes in a tree.
Note: (for updating an object repository)
l If the last used profile from aprevious import operation was saved, the profile is loaded,and you can edit the selected options, as required. The new selections are saved in theprofile to beused for future import operations on the sameobject repository.
l If you select objects other than the ones that were imported in the previous wizard session,then only objects modified since the selected date are imported.
Import only objectsmodified since(Update ObjectRepository Wizardonly)
Thedate in which the last import was performed. You can keep the displayed date or select a newdate by clicking the drop-down arrow, and select the date from thedisplayed calendar. All objectsmodified before the selected date are ignored during the import process. Using this option canspeed up the importing process.
Importing Test Objects Page (Create Object RepositoryWizard)This wizard page shows the progress of the import process. The number imported indicates the numberof applet objects that have already been imported, including all child objects of that applet.
Importantinformation
l General information about thewizard is available here: "Create Object Repository Wizard" on page 342.
l Importing into the object repository can take up to several hours, depending on the size of the repository.
l At the same time that thewizard imports the objects, it is also retrieving information about the total numberof applets it needs to import. While thewizard is retrieving this information, the total number changes andthewords at least show that thewizard is still retrieving information. When the total number is known,thewords at least are no longer displayed.
l You can work in either theObject RepositoryManager or UFT while thewizard is generating the objectrepository. However, do not close either window. If you do try to close either window, amessage isdisplayed, warning that the object repository generation process will be stopped and all datawill be lost.
l If you are using thewizard to update an object repository, that object repository file is locked and youcannot modify it in theObject RepositoryManager.
l During the import process, you can cancel the operation if required. If you cancel the operation, amessage isdisplayed notifying you that stopping the import process will result in an incomplete object repository. Youcan then select whether to keep, discard, or continue importing test objects into the partial objectrepository.
Wizard map The "Create Object Repository Wizard" contains:
"Connection Information Page (Create Object Repository Wizard)" (342) > Screen SelectionPage"Screen Selection Page (Create / Update Object Repository Wizard)" (343) > Importing TestObjects Page (Create Object Repository Wizard> Object Repository Created / Updated Page"ObjectRepository Created / Updated Page (Create / Update Object Repository Wizard)" (page345)
Add-ins GuideSiebel Test Express
HP Unified Functional Testing (12.50) Page 344
See also l "How to Use Siebel Test Express to Generate or Update a Shared Object Repository" on page 340
l "Using Siebel Test Express to Generate or Update Shared Object Repositories" on page 340
Object Repository Created / Updated Page (Create / UpdateObject RepositoryWizard)This wizard page opens after all the objects have been imported, displaying the total number of objectsadded or modified in the object repository.
Importantinformation
l General information about thewizard is available here: "Create Object Repository Wizard" on page 342.
l Displaying the new or updated object repository in theObject RepositoryManager may take a few minutes.
l If any errors occur during the import process, this pagedisplays awarning and an Error Logbutton. Thelog contains error and exception data from theSiebel server, listing the failed calls and the object thatcaused the error. You can click theError Logbutton to save the error log. By default, the error log is calledTestExpressErrorLog.xml, and it is saved in the<Unified FunctionalTesting>\Tests folder.
Wizard map The "Create Object Repository Wizard" contains:
"Connection Information Page (Create Object Repository Wizard)" (342) > "Screen Selection Page(Create / Update Object Repository Wizard)" (page343) > Importing Test Objects Page"Importing TestObjects Page (Create Object Repository Wizard)" (page344>Object Repository Created / UpdatedPage (Create / Update Object Repository Wizard)
See also l "How to Use Siebel Test Express to Generate or Update a Shared Object Repository" on page 340
l "Using Siebel Test Express to Generate or Update Shared Object Repositories" on page 340
Add-ins GuideSiebel Test Express
HP Unified Functional Testing (12.50) Page 345

HP Unified Functional Testing (12.50) Page 346
Part 14: Standard Windows TestingSupportThis section includes:
"Standard Windows Support -Quick Reference" on page 347
"Troubleshooting and Limitations - Standard Windows" on page 349
Standard Windows Support -Quick ReferenceYou can use the standard Windows testing support provided by UFT to test user-interface objects(controls) developed using the Win32 API or MFC platforms. UFT standard Windows testing support isbuilt-in and does not require you to load any UFT add-in.
The following tables summarize basic information about standard Windows testing support and how itrelates to some commonly-used aspects of UFT.
General Information
Add-in Type The standard Windows testing support functions like aWindows-based add-in. Much of its functionality isthe sameas other Windows-based add-ins.
See "Windows-Based Application Support" on page 81
ImportantInformation
UFT uses built-in standard Windows testing support and standard Windows test objects to identify thefollowing:
l Objects from other environments if the relevant add-in is not installed and loaded.
l Stingray, VisualAge Smalltalk, and Qt (widget toolkit) controls when the relevant add-in is installed andloaded. For details, see the relevant add-in documentation.
l Manywindowless objects, if theywere developed using theMSAA (Microsoft Active Accessibility) API.For example, the controls within theMicrosoft Office ribbons are identified as independent objects.
Test ObjectMethods andProperties
Standard Windows testing support provides test objects, methods, and properties that can beused whentesting objects in standard Windows applications. For more information, see theStandard Windowssection of theHPUFT Object Model Reference for GUI Testing.
Checkpoints andOutput Values
l See the sections describing checkpoints and output values in theHPUnified Functional Testing UserGuide.
l See "Supported Checkpoints " on page 513and "Supported Output Values " on page 515Per Add-In.
l See "GUI Checkpoints and Output Values Per Add-in" on page 512
Troubleshootingand Limitations
"Troubleshooting and Limitations - Standard Windows" on page 349
Prerequisites
Opening YourApplication
You can open your standard Windows application before or after opening UFT.
Standard Windows testing support is always loaded in UFT. It is therefore not an available option intheAdd-in Manager.
Add-in Dependencies None
Configuration
Options Dialog Box Use theWindows Applicationspane.(Tools > Options > GUI Testing tab > Windows Applications node)
HP Unified Functional Testing (12.50) Page 347
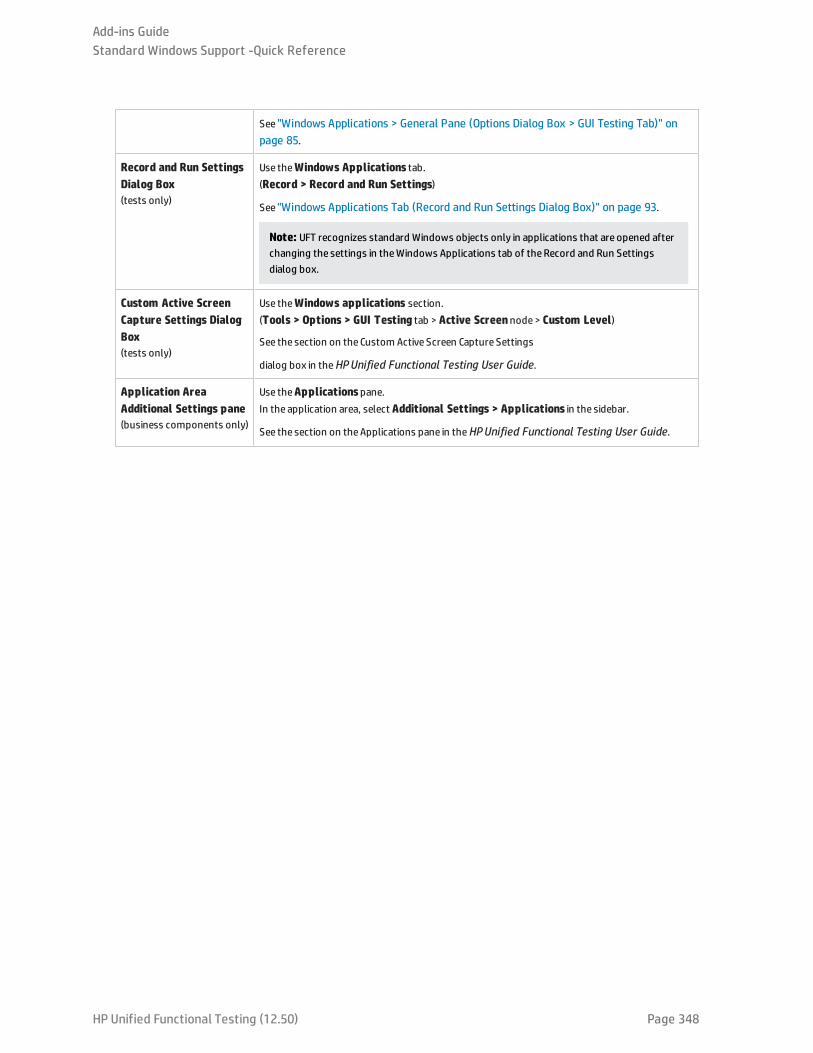
See "Windows Applications > General Pane (Options Dialog Box > GUI Testing Tab)" onpage 85.
Record and Run SettingsDialog Box(tests only)
Use theWindows Applications tab.(Record > Record and Run Settings)
See "Windows Applications Tab (Record and Run Settings Dialog Box)" on page 93.
Note: UFT recognizes standard Windows objects only in applications that are opened afterchanging the settings in theWindows Applications tab of theRecord and Run Settingsdialog box.
Custom Active ScreenCapture Settings DialogBox(tests only)
Use theWindows applications section.(Tools > Options > GUI Testing tab > Active Screennode> Custom Level)
See the section on the Custom Active Screen Capture Settings
dialog box in theHPUnified Functional Testing User Guide.
Application AreaAdditional Settings pane(business components only)
Use theApplicationspane.In the application area, select Additional Settings > Applications in the sidebar.
See the section on theApplications pane in theHPUnified Functional Testing User Guide.
Add-ins GuideStandard Windows Support -Quick Reference
HP Unified Functional Testing (12.50) Page 348
Troubleshooting and Limitations - StandardWindowsThis section describes troubleshooting and limitations for working with Standard Windows test objects.
l When recording on WinMenu objects, the Active Screen is not captured.
l You cannot insert a checkpoint on a WinMenu object.
Workaround: Use the CheckProperty and CheckItemPropertymethods to check specific propertyand item property values.
l If you record using Windows logo key shortcuts, the recording may be inaccurate.
Workaround: Use the Startmenu instead of the Windows logo key when recording.
l Changing the style of a WinCalendar (from single selection to multi-selection, for example) will causethe run session to fail.
l When using the pointing hand mechanism from the Object Spy to point to MFC static text or tabcontrols, UFT may fail to return the correct object.
Workaround: Add the object to the object repository. To do this, point to the object's parent window,select the parent window object in the Object Selection dialog box, click OK, and perform one of thefollowing in the Define Object Filter dialog box:
l Select the All object types option to add all of the objects in the parent window to the objectrepository.
l Select the Selected object types option, click the Select button, and then select the specificobject type(s) you want to add to the object repository.
After you add the object to the object repository, you can use the GetROPropertymethod to retrievethe run-time values of its properties. For example:
width = Dialog("Login").Static("Agent Name:").GetROProperty("width")MsgBox width
l Checkpoints are not supported for WinComboBox objects of style Simple ComboBox.
l Windowless objects developed using an API other than the MSAA API are not identified.
l The description properties of a windowless control must include the acc_name property. By default,this property is not available in the list properties when you add a new test object.
Workaround: Add the acc_name property to the list of properties. To do this from the Define NewTest Object Dialog Box, in the Test object details area, click the Add description properties button
. In the Add Properties dialog box, click the Define new property button and add the acc_name property.
HP Unified Functional Testing (12.50) Page 349

HP Unified Functional Testing (12.50) Page 350
Part 15: Stingray Add-inThis section includes:
"Stingray Add-in - Quick Reference" on page 351
"Stingray Add-in - Testing and Configuration" on page 353
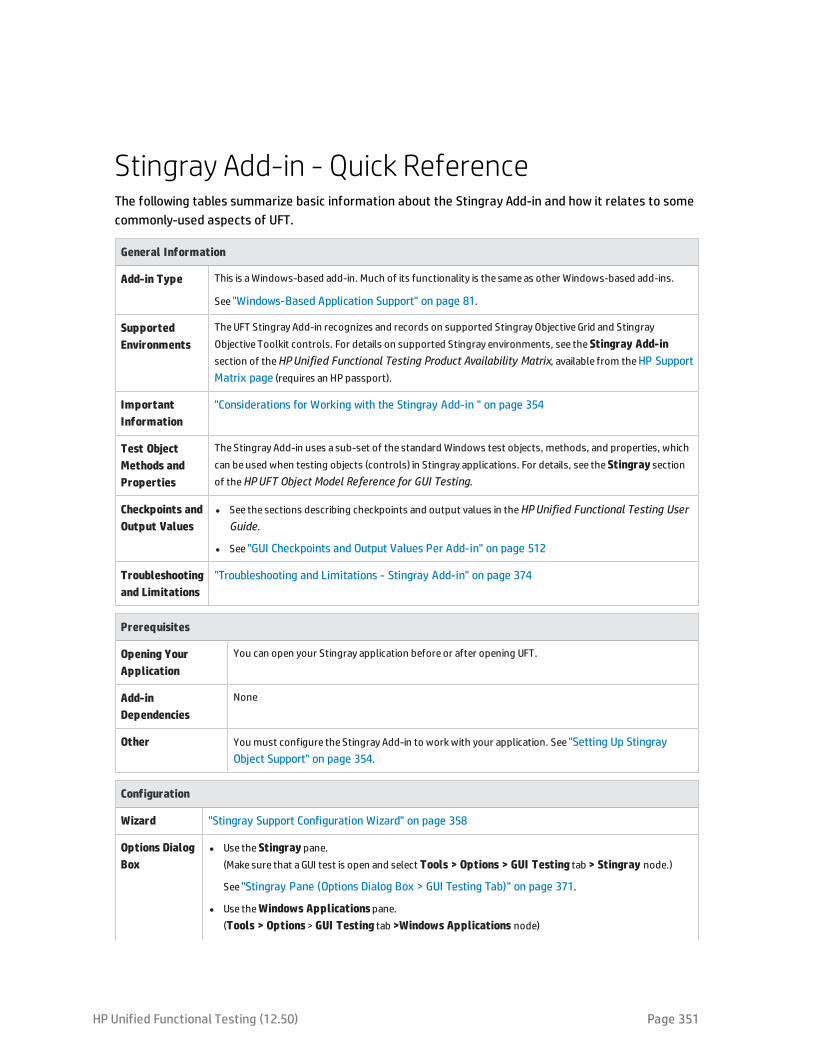
Stingray Add-in - Quick ReferenceThe following tables summarize basic information about the Stingray Add-in and how it relates to somecommonly-used aspects of UFT.
General Information
Add-in Type This is aWindows-based add-in. Much of its functionality is the sameas other Windows-based add-ins.
See "Windows-Based Application Support" on page 81.
SupportedEnvironments
TheUFT Stingray Add-in recognizes and records on supported Stingray ObjectiveGrid and StingrayObjective Toolkit controls. For details on supported Stingray environments, see theStingray Add-insection of theHPUnified Functional Testing Product Availability Matrix, available from theHP SupportMatrix page (requires an HP passport).
ImportantInformation
"Considerations for Working with the Stingray Add-in " on page 354
Test ObjectMethods andProperties
TheStingray Add-in uses a sub-set of the standard Windows test objects, methods, and properties, whichcan beused when testing objects (controls) in Stingray applications. For details, see theStingray sectionof theHPUFT Object Model Reference for GUI Testing.
Checkpoints andOutput Values
l See the sections describing checkpoints and output values in theHPUnified Functional Testing UserGuide.
l See "GUI Checkpoints and Output Values Per Add-in" on page 512
Troubleshootingand Limitations
"Troubleshooting and Limitations - Stingray Add-in" on page 374
Prerequisites
Opening YourApplication
You can open your Stingray application before or after opening UFT.
Add-inDependencies
None
Other You must configure the Stingray Add-in to workwith your application. See "Setting Up StingrayObject Support" on page 354.
Configuration
Wizard "Stingray Support Configuration Wizard" on page 358
Options DialogBox
l Use theStingray pane.(Make sure that aGUI test is open and select Tools > Options > GUI Testing tab > Stingray node.)
See "Stingray Pane (Options Dialog Box > GUI Testing Tab)" on page 371.
l Use theWindows Applicationspane.(Tools > Options> GUI Testing tab >Windows Applications node)
HP Unified Functional Testing (12.50) Page 351
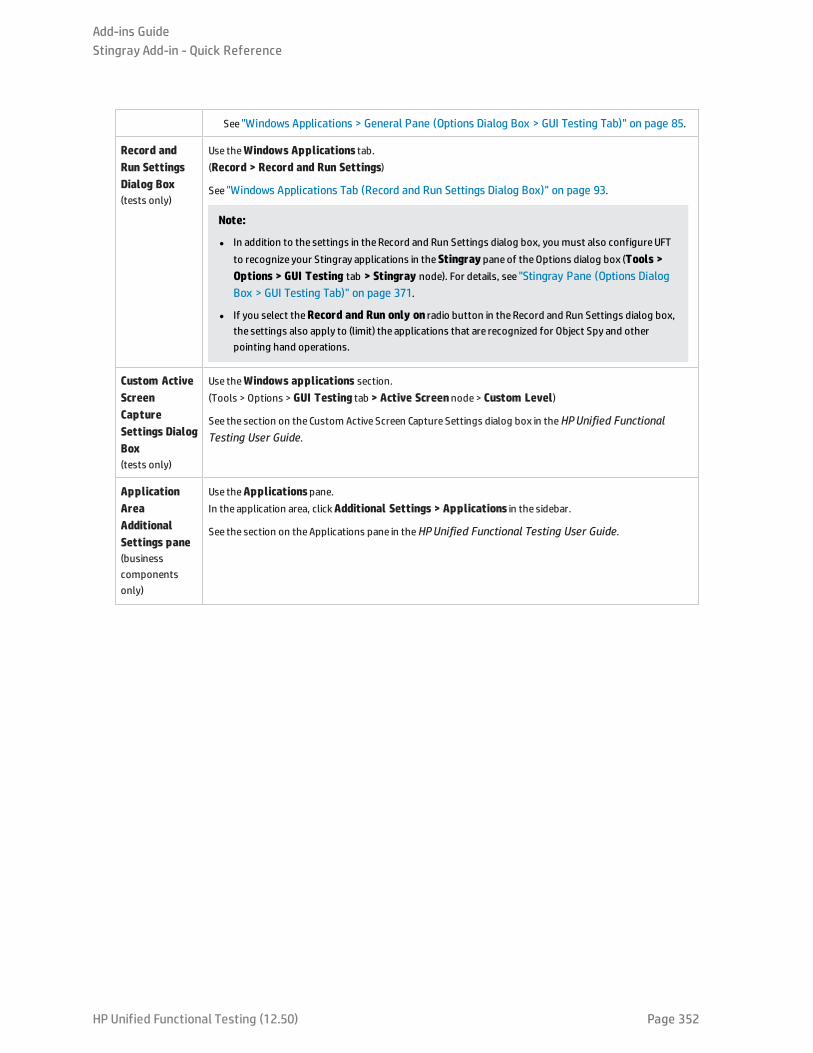
See "Windows Applications > General Pane (Options Dialog Box > GUI Testing Tab)" on page 85.
Record andRun SettingsDialog Box(tests only)
Use theWindows Applications tab.(Record > Record and Run Settings)
See "Windows Applications Tab (Record and Run Settings Dialog Box)" on page 93.
Note:
l In addition to the settings in theRecord and Run Settings dialog box, you must also configureUFTto recognize your Stingray applications in theStingray paneof theOptions dialog box (Tools >Options > GUI Testing tab > Stingray node). For details, see "Stingray Pane (Options DialogBox > GUI Testing Tab)" on page 371.
l If you select theRecord and Run only on radio button in theRecord and Run Settings dialog box,the settings also apply to (limit) the applications that are recognized for Object Spy and otherpointing hand operations.
Custom ActiveScreenCaptureSettings DialogBox(tests only)
Use theWindows applications section.(Tools > Options > GUI Testing tab > Active Screennode> Custom Level)
See the section on the Custom Active Screen Capture Settings dialog box in theHPUnified FunctionalTesting User Guide.
ApplicationAreaAdditionalSettings pane(businesscomponentsonly)
Use theApplicationspane.In the application area, clickAdditional Settings > Applications in the sidebar.
See the section on theApplications pane in theHPUnified Functional Testing User Guide.
Add-ins GuideStingray Add-in - Quick Reference
HP Unified Functional Testing (12.50) Page 352

Stingray Add-in - Testing and ConfigurationThis chapter includes:
• Setting Up Stingray Object Support 354
• Considerations for Working with the Stingray Add-in 354
• Stingray Run-time Agent (Agent DLL) 354
• Stingray Precompiled Agent Mode 355
• How to Set Up Your Stingray Project Using the Precompiled Agent Mode 356
• Stingray Support Configuration Wizard 358
• Support Mode Selection Page (Stingray Support Configuration Wizard) 359
• Add Support Code Page (Stingray Support Configuration Wizard) 360
• Select Configuration Mode Page (Stingray Support Configuration Wizard) 362
• Manual Configuration Mode Page (Stingray Support Configuration Wizard) 364
• Automatic Configuration Mode Page (Stingray Support Configuration Wizard) 365
• Detected Stingray Components Page (Stingray Support Configuration Wizard) 367
• Finish Page (Stingray Support Configuration Wizard) 369
• Detection Failure Page (Stingray Support Configuration Wizard) 370
• Stingray Pane (Options Dialog Box > GUI Testing Tab) 371
• Record Cell Editing Options - Example 374
• Troubleshooting and Limitations - Stingray Add-in 374
HP Unified Functional Testing (12.50) Page 353
Setting Up Stingray Object SupportBefore you begin working, you need to configure the Stingray Add-in to work with your application. UFTsupport for Stingray objects is based on an agent entity that exists in the Stingray application. Thisagent interacts with UFT to enable record and run operations. There are two different modes forestablishing the agent entity:
l Run-time Agent Mode UFT injects an agent .dll into the application's process during run-time. Thisis the recommended mode. For details, see "Stingray Run-time Agent (Agent DLL)" below.
l Precompiled Agent Mode. You make slight modifications to your Visual C++ project in addition toconfiguring the Stingray Add-in. Use this mode only if the run-time agent mode is unsuitable orcannot be used. For details, see "Stingray Precompiled Agent Mode" on the next page.
You choose your preferred mode and configure support for the Stingray Add-in using the StingraySupport Configuration Wizard. For details, see "Stingray Support Configuration Wizard" on page 358.
After you configure support for the Stingray Add-in, you can fine-tune the configuration options, ifneeded. For details, see "Stingray Pane (Options Dialog Box > GUI Testing Tab)" on page 371.
Considerations for Working with the Stingray Add-inUFT stores Stingray support configuration for each configured Stingray application separately. Bydefault, UFT uses the latest configured Stingray agent version for all Stingray applications except thoseapplications that are already configured.
For example, suppose you have two Stingray applications; application grid1.exe that uses Stingray Gridcontrol version 9.03, and application tree1.exe that uses Stingray TreeView control version 11.00.
You can configure UFT to support both applications as follows:
1. Run the Stingray Support Configuration Wizard and configure support for the grid1.exeapplication. UFT saves the configuration for this application.
2. Run the Stingray Support Configuration Wizard again and configure support for the tree1.exeapplication. UFT saves the configuration for this application.
After performing these steps, UFT will support the grid1.exe application and support all Stingrayapplications that have Stingray TreeView controls version 11.00, including the tree1.exe application.
Stingray Run-time Agent (Agent DLL)When you choose the run-time agent mode, UFT injects an agent DLL into the application's processduring run-time. This recommended mode is non-intrusive and does not require any modifications tothe source code of the application being tested.
HP Unified Functional Testing (12.50) Page 354
You can use the run-time agent mode only with Stingray applications that are created with dynamically-linked MFC libraries. You can verify if your MFC libraries are linked dynamically or statically by launchingthe Stingray Support Configuration Wizard. If the wizard identifies that your Stingray application usesstatically-linked MFC libraries, it issues a warning.
The run-time agent mode supports the most commonly used major Stingray versions, as well as some—but not all—minor versions. For a list of supported version combinations, see the HP Unified FunctionalTesting Product Availability Matrix, available from the HP Support Matrix page (requires an HP passport).You can also verify if your Stingray application version is supported by launching the Stingray SupportConfiguration Wizard. If the wizard identifies that your Stingray application version is not supported, itissues a warning.
Note: The Stingray Add-in is designed to support only applications that are compiled in Releasemode.
If you cannot use the run-time agent mode for any reason, you can still work with your Stingrayapplication using the precompiled agent mode, instead. For details, see "Stingray Precompiled AgentMode" below, or contact HP Software Support.
Stingray Precompiled Agent ModeIf your application is statically linked with the MFC libraries, you can use the precompiled agent mode toenable Stingray object support. The precompiled agent mode requires you to make slight modificationsto your Visual C++ project to enable UFT to support your Stingray application. If you select theprecompiled agent mode in the Stingray Support Configuration Wizard, you can compile your projectusing the Stingray Add-in agent files.
Note: If your Stingray application project was compiled with an earlier version of the Stingray Add-in agent, your project already contains the required support code. To take advantage of the latestfunctionality provided with this add-in, it is recommended to remove the existing Stingray Add-inagent files from your project and recompile using the latest agent files.
Setting up Stingray support using the precompiled agent mode requires adding one support header fileto your application's Visual C++ project and copying one library file to your Visual C++ project directory.After you complete these steps, you can compile your application, as usual.
Note: Use the precompiled agent mode only if the run-time agent mode is unsuitable or cannot beused.
Add-ins GuideStingray Add-in - Testing and Configuration
HP Unified Functional Testing (12.50) Page 355
How to Set Up Your Stingray Project Using thePrecompiled Agent Mode
Note:
l Use the precompiled agent mode only if the run-time agent mode is unsuitable or cannot beused.
l For a conceptual overview, see "Stingray Precompiled Agent Mode" on the previous page.
This task includes the following steps:
l "Prerequisites" below
l "Copy StgAgentLib.h and StgAgentLib.lib files" below
l "Add #include "StgAgentLib.h" to a .cpp file" on the next page
l "Add the ReleaseWRVC(); function call" on the next page
l "Make sure that the Precompiled Agent option is selected in the Stingray Support ConfigurationWizard" on the next page
l "Results" on the next page
1. Prerequisites
l Both Stingray Objective Grid and Stingray Objective Toolkit must be installed on your computer,even if your application contains only one type of Stingray control, such as a grid control or atab control.
l The installed versions must match the version combinations supported for this add-in. For a listof supported version combinations, see the HP Unified Functional Testing Product AvailabilityMatrix, available from the HP Support Matrix page (requires an HP passport).
Note: If you do not have the required Stingray Objective Grid and Stingray Objective Toolkitversion combination, contact HP Software Support for assistance.
l If your Stingray application was previously compiled with agent files from an earlier version ofthe Stingray Add-in, remove the existing agent files from your project.
Caution: If you choose not to replace your existing Stingray Add-in agent files with thelatest agent files, do not continue with this procedure. Although you will be able to workwith the UFT Stingray Add-in, you will not be able to take advantage of the latestfunctionality.
2. Copy StgAgentLib.h and StgAgentLib.lib files
a. Copy the StgAgentLib.h header file from <UFT Installation
Add-ins GuideStingray Add-in - Testing and Configuration
HP Unified Functional Testing (12.50) Page 356
Folder>\bin\StingrayAgent\AgentLib\src\StgAgentLib.h to your Visual C++ project directory. (You can optionally addthe header file to the list of header files in your workspace.)
b. Check the version of the Stingray Objective Grid or Stingray Objective Toolkit used by yourapplication and search for the corresponding support library file, StgAgentLib.lib.
For example, if your application is not compiled in Unicode and uses Objective Grid version 9.03and Objective Toolkit version 8.03 linked with MFC version 7.1, search for the library file in:<UFT Installation Folder>\bin\StingrayAgent\AgentLib\bin\MFC71\OG903_OT803
If the application is linked with MFC80, is compiled in Unicode and uses Objective Grid version10.0 and Objective Toolkit version 9.0, search for the library file in: <UFTInstallationFolder>\bin\StingrayAgent\AgentLib\bin\MFC80\OG1000U_OT900U
Note: Each support library file specifies a combination of Objective Grid and ObjectiveToolkit versions. You must choose a combination of Objective Grid or Objective Toolkitversions, even if your application uses only one of these Stingray tools. For a list ofsupported Stingray version combinations, see the HP Unified Functional Testing ProductAvailability Matrix, available from the HP Support Matrix page (requires an HP passport).
c. Copy the StgAgentLib.lib support library file to your Visual C++ project directory.
3. Add #include "StgAgentLib.h" to a .cpp file
Add the #include "StgAgentLib.h" statement to one of your cpp files, such as, MainFrm.cpp.
4. Add the ReleaseWRVC(); function call
Insert the ReleaseWRVC(); function call in one of the functions called when your applicationterminates, for example, CMainFrame::OnDestroy().
Note: Inserting this function call instructs the agent to perform required clean up operationsrelated to the support library code.
5. Make sure that the Precompiled Agent option is selected in the StingraySupport Configuration Wizard
For details, see "Stingray Support Configuration Wizard" on the next page.
6. Results
When you build your application executable, the added header file automatically links theStgAgentLib.lib support library to your application statically, enabling the library code to beactivated automatically during the run session.
Add-ins GuideStingray Add-in - Testing and Configuration
HP Unified Functional Testing (12.50) Page 357
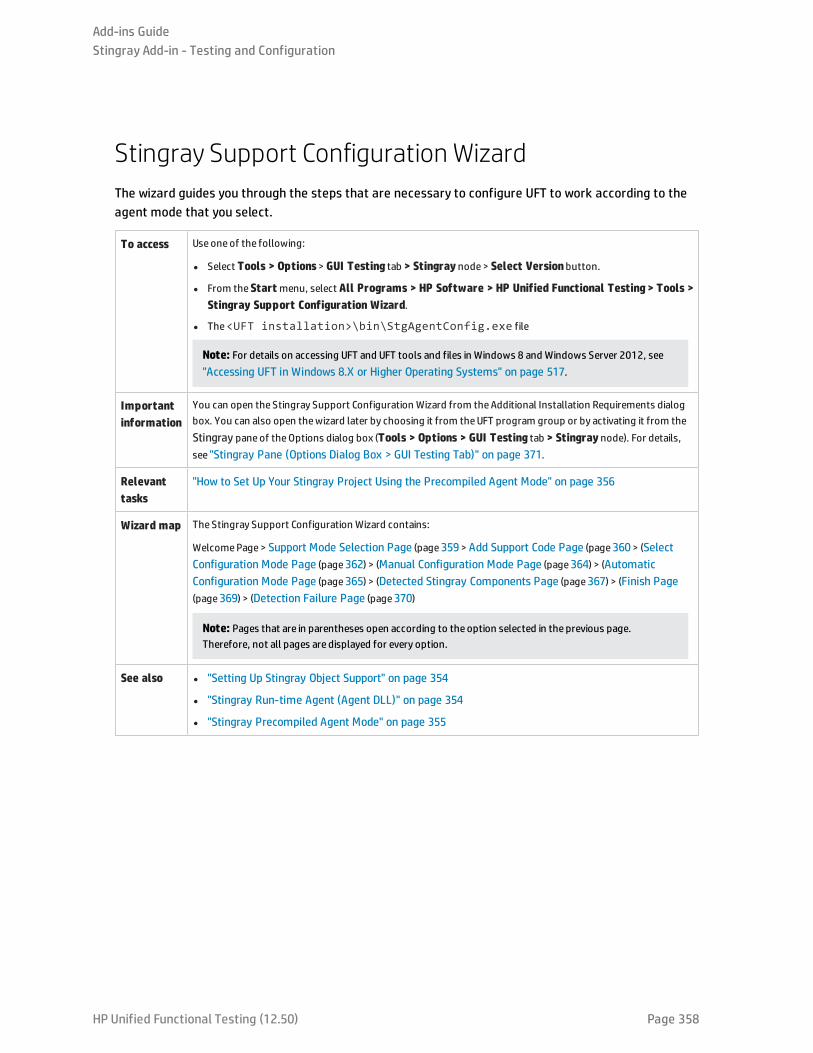
Stingray Support Configuration WizardThe wizard guides you through the steps that are necessary to configure UFT to work according to theagent mode that you select.
To access Useoneof the following:
l Select Tools > Options> GUI Testing tab > Stingray node> Select Versionbutton.
l From theStartmenu, select All Programs > HP Software > HP Unified Functional Testing> Tools >Stingray Support Configuration Wizard.
l The<UFT installation>\bin\StgAgentConfig.exe file
Note: For details on accessing UFT and UFT tools and files in Windows 8 and Windows Server 2012, see"Accessing UFT in Windows 8.X or Higher Operating Systems" on page 517.
Importantinformation
You can open the Stingray Support Configuration Wizard from theAdditional Installation Requirements dialogbox. You can also open thewizard later by choosing it from theUFT program group or by activating it from theStingray paneof theOptions dialog box (Tools > Options > GUI Testing tab > Stingray node). For details,see "Stingray Pane (Options Dialog Box > GUI Testing Tab)" on page 371.
Relevanttasks
"How to Set Up Your Stingray Project Using the Precompiled Agent Mode" on page 356
Wizard map TheStingray Support Configuration Wizard contains:
WelcomePage> Support Mode Selection Page (page359> Add Support Code Page (page360> (SelectConfiguration Mode Page (page362) > (Manual Configuration Mode Page (page364) > (AutomaticConfiguration Mode Page (page365) > (Detected Stingray Components Page (page367) > (Finish Page(page369) > (Detection Failure Page (page370)
Note: Pages that are in parentheses open according to the option selected in the previous page.Therefore, not all pages are displayed for every option.
See also l "Setting Up Stingray Object Support" on page 354
l "Stingray Run-time Agent (Agent DLL)" on page 354
l "Stingray Precompiled Agent Mode" on page 355
Add-ins GuideStingray Add-in - Testing and Configuration
HP Unified Functional Testing (12.50) Page 358
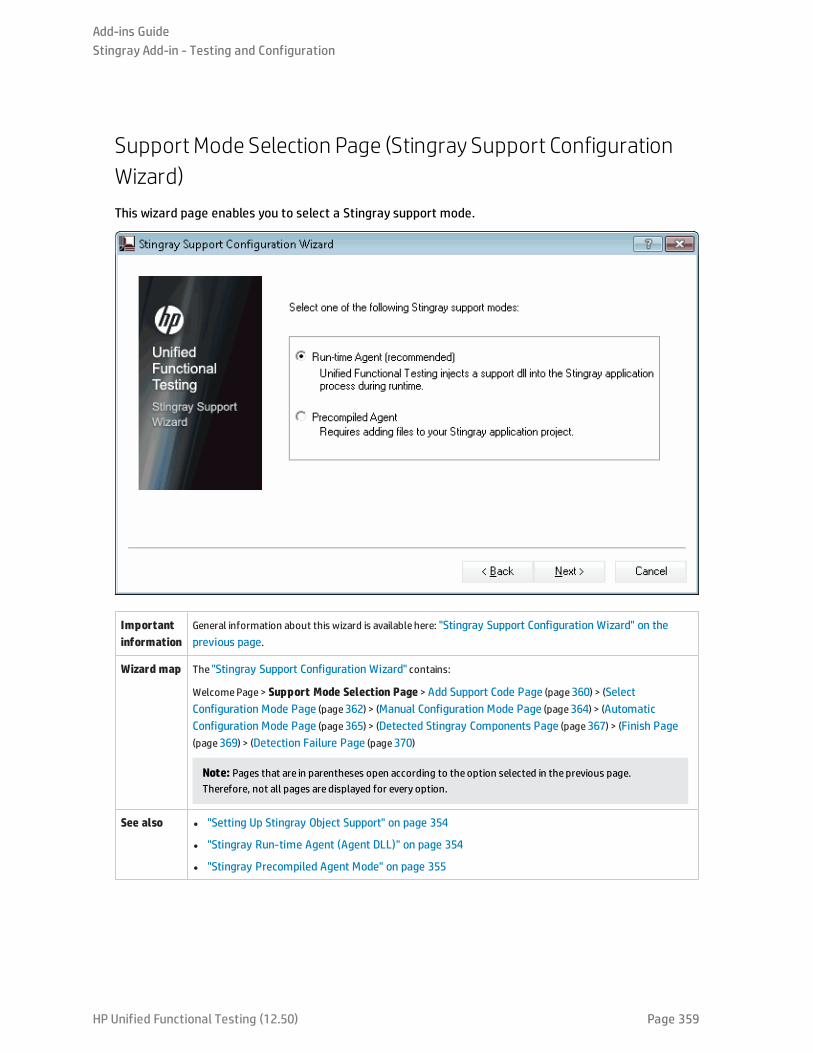
Support Mode Selection Page (Stingray Support ConfigurationWizard)This wizard page enables you to select a Stingray support mode.
Importantinformation
General information about this wizard is available here: "Stingray Support Configuration Wizard" on theprevious page.
Wizard map The "Stingray Support Configuration Wizard" contains:
WelcomePage> Support Mode Selection Page > Add Support Code Page (page360) > (SelectConfiguration Mode Page (page362) > (Manual Configuration Mode Page (page364) > (AutomaticConfiguration Mode Page (page365) > (Detected Stingray Components Page (page367) > (Finish Page(page369) > (Detection Failure Page (page370)
Note: Pages that are in parentheses open according to the option selected in the previous page.Therefore, not all pages are displayed for every option.
See also l "Setting Up Stingray Object Support" on page 354
l "Stingray Run-time Agent (Agent DLL)" on page 354
l "Stingray Precompiled Agent Mode" on page 355
Add-ins GuideStingray Add-in - Testing and Configuration
HP Unified Functional Testing (12.50) Page 359
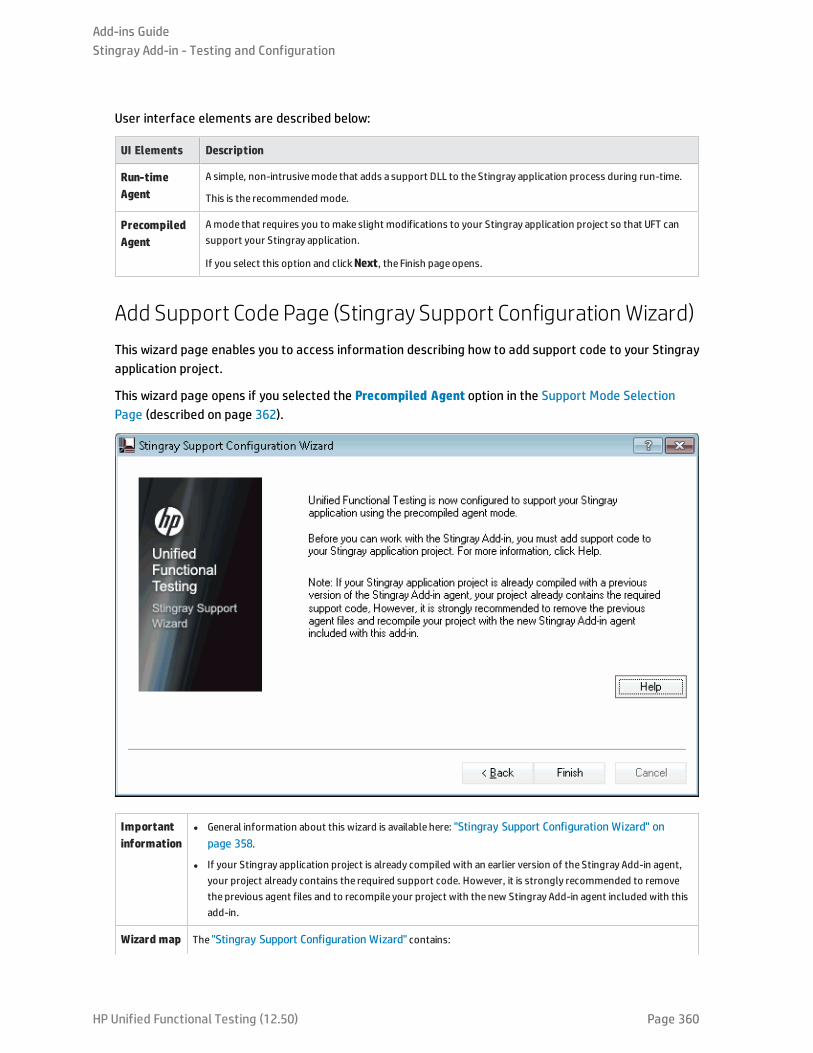
User interface elements are described below:
UI Elements Description
Run-timeAgent
A simple, non-intrusivemode that adds a support DLL to the Stingray application process during run-time.
This is the recommended mode.
PrecompiledAgent
Amode that requires you to make slight modifications to your Stingray application project so that UFT cansupport your Stingray application.
If you select this option and clickNext, the Finish pageopens.
Add Support Code Page (Stingray Support Configuration Wizard)This wizard page enables you to access information describing how to add support code to your Stingrayapplication project.
This wizard page opens if you selected the Precompiled Agent option in the Support Mode SelectionPage (described on page 362).
Importantinformation
l General information about this wizard is available here: "Stingray Support Configuration Wizard" onpage 358.
l If your Stingray application project is already compiled with an earlier version of the Stingray Add-in agent,your project already contains the required support code. However, it is strongly recommended to removethe previous agent files and to recompile your project with the new Stingray Add-in agent included with thisadd-in.
Wizard map The "Stingray Support Configuration Wizard" contains:
Add-ins GuideStingray Add-in - Testing and Configuration
HP Unified Functional Testing (12.50) Page 360
WelcomePage> Support Mode Selection Page (page359> Add Support Code Page > (SelectConfiguration Mode Page (page362)) > (Manual Configuration Mode Page (364) > (AutomaticConfiguration Mode Page (365)) > (Detected Stingray Components Page (page367) > (Finish Page (page369) > (Detection Failure Page (page370))
Note: Pages that are in parentheses open according to the option selected in the previous page.Therefore, not all pages are displayed for every option.
See also "Stingray Precompiled Agent Mode" on page 355
User interface elements are described below:
UIElements
Description
Help Displays information describing how to add support code to your Stingray application project.
Finish Closes thewizard. If you havenot already compiled your application with the Stingray Add-in agent files, you mustdo so before you begin to workwith theUFT Stingray Add-in.
Add-ins GuideStingray Add-in - Testing and Configuration
HP Unified Functional Testing (12.50) Page 361
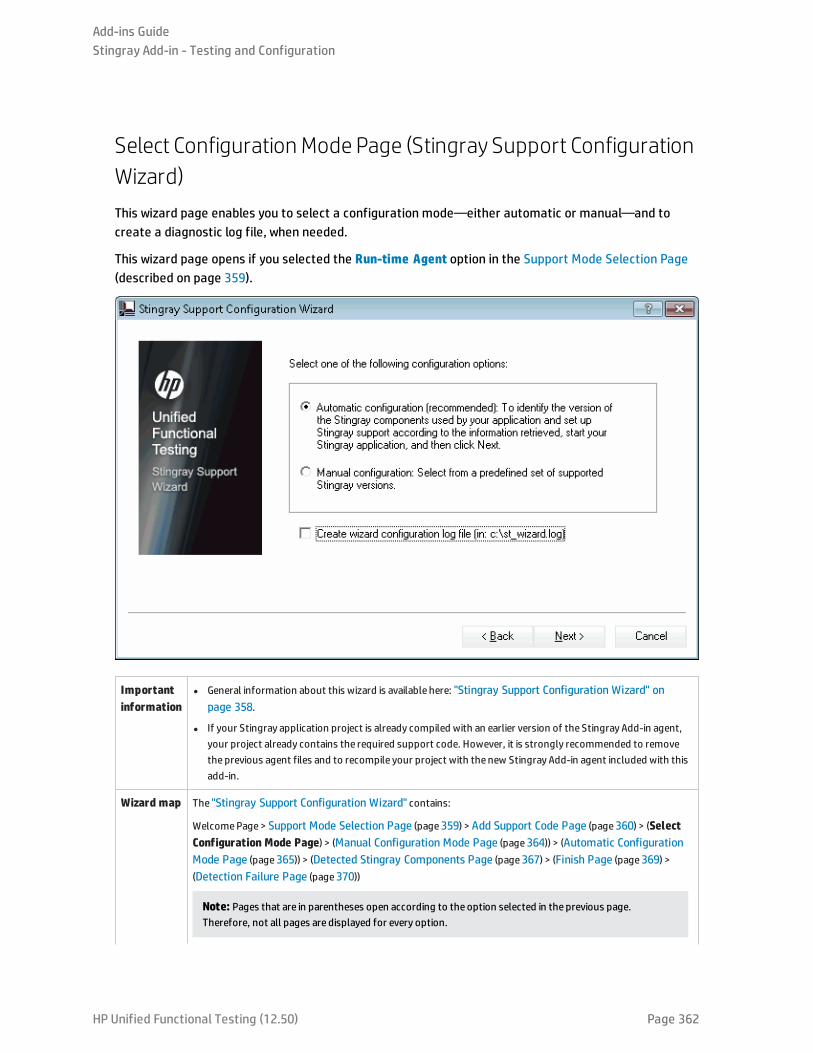
Select Configuration Mode Page (Stingray Support ConfigurationWizard)This wizard page enables you to select a configuration mode—either automatic or manual—and tocreate a diagnostic log file, when needed.
This wizard page opens if you selected the Run-time Agent option in the Support Mode Selection Page(described on page 359).
Importantinformation
l General information about this wizard is available here: "Stingray Support Configuration Wizard" onpage 358.
l If your Stingray application project is already compiled with an earlier version of the Stingray Add-in agent,your project already contains the required support code. However, it is strongly recommended to removethe previous agent files and to recompile your project with the new Stingray Add-in agent included with thisadd-in.
Wizard map The "Stingray Support Configuration Wizard" contains:
WelcomePage> Support Mode Selection Page (page359) > Add Support Code Page (page360) > (SelectConfiguration Mode Page) > (Manual Configuration Mode Page (page364)) > (Automatic ConfigurationMode Page (page365)) > (Detected Stingray Components Page (page367) > (Finish Page (page369) >(Detection Failure Page (page370))
Note: Pages that are in parentheses open according to the option selected in the previous page.Therefore, not all pages are displayed for every option.
Add-ins GuideStingray Add-in - Testing and Configuration
HP Unified Functional Testing (12.50) Page 362
See also "Setting Up Stingray Object Support" on page 354
User interface elements are described below:
UI Elements Description
Automaticconfiguration
Instructs thewizard to configure Stingray support automatically according to the detected MFCDLL andthe version of Stingray business components used in your application.
Manualconfiguration
Enables you to configure Stingray support manually by specifying theMFCDLL and Stingray businesscomponent version used in your application. This is useful, for example, if your application is staticallylinked to the Stingray libraries.
Create wizardconfigurationlog file
Creates a diagnostic log file.
Select this check box if, at any time, you encounter problems with the Stingray Add-in.
Note: If you contact HP Software Support for assistance, you may be asked to provide this log file fordiagnostic purposes.
Add-ins GuideStingray Add-in - Testing and Configuration
HP Unified Functional Testing (12.50) Page 363
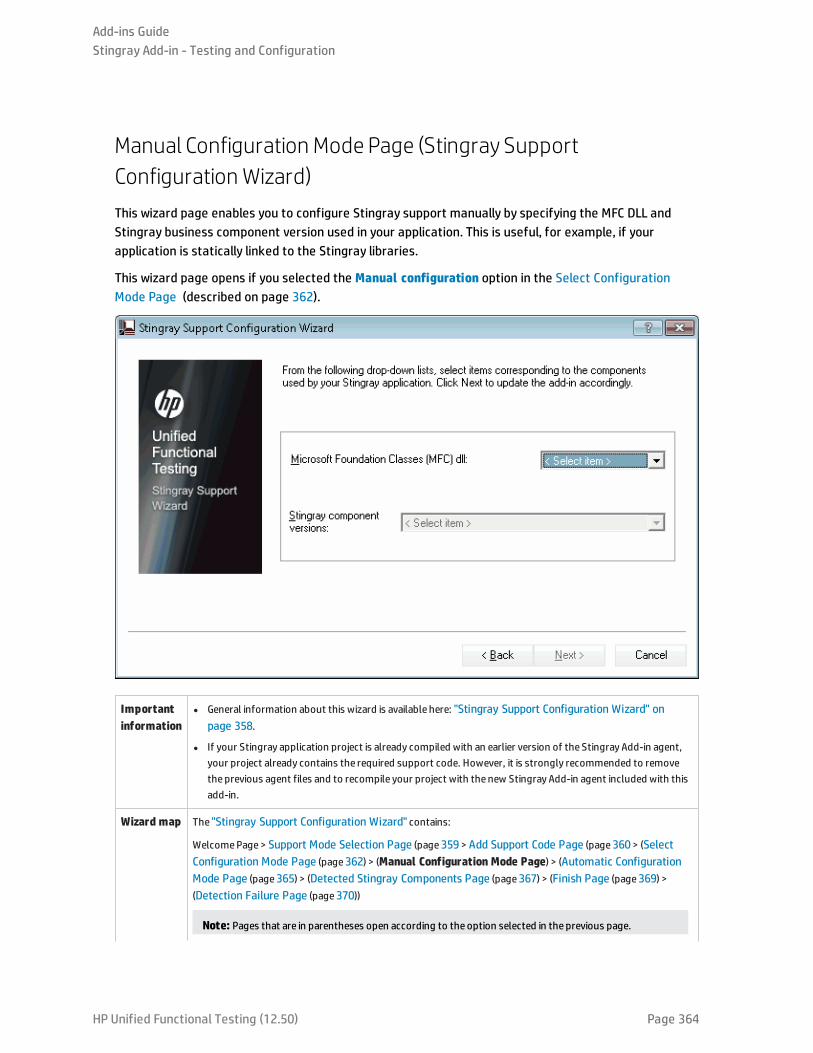
Manual Configuration Mode Page (Stingray SupportConfiguration Wizard)This wizard page enables you to configure Stingray support manually by specifying the MFC DLL andStingray business component version used in your application. This is useful, for example, if yourapplication is statically linked to the Stingray libraries.
This wizard page opens if you selected the Manual configuration option in the Select ConfigurationMode Page (described on page 362).
Importantinformation
l General information about this wizard is available here: "Stingray Support Configuration Wizard" onpage 358.
l If your Stingray application project is already compiled with an earlier version of the Stingray Add-in agent,your project already contains the required support code. However, it is strongly recommended to removethe previous agent files and to recompile your project with the new Stingray Add-in agent included with thisadd-in.
Wizard map The "Stingray Support Configuration Wizard" contains:
WelcomePage> Support Mode Selection Page (page359> Add Support Code Page (page360> (SelectConfiguration Mode Page (page362) > (Manual Configuration Mode Page) > (Automatic ConfigurationMode Page (page365) > (Detected Stingray Components Page (page367) > (Finish Page (page369) >(Detection Failure Page (page370))
Note: Pages that are in parentheses open according to the option selected in the previous page.
Add-ins GuideStingray Add-in - Testing and Configuration
HP Unified Functional Testing (12.50) Page 364
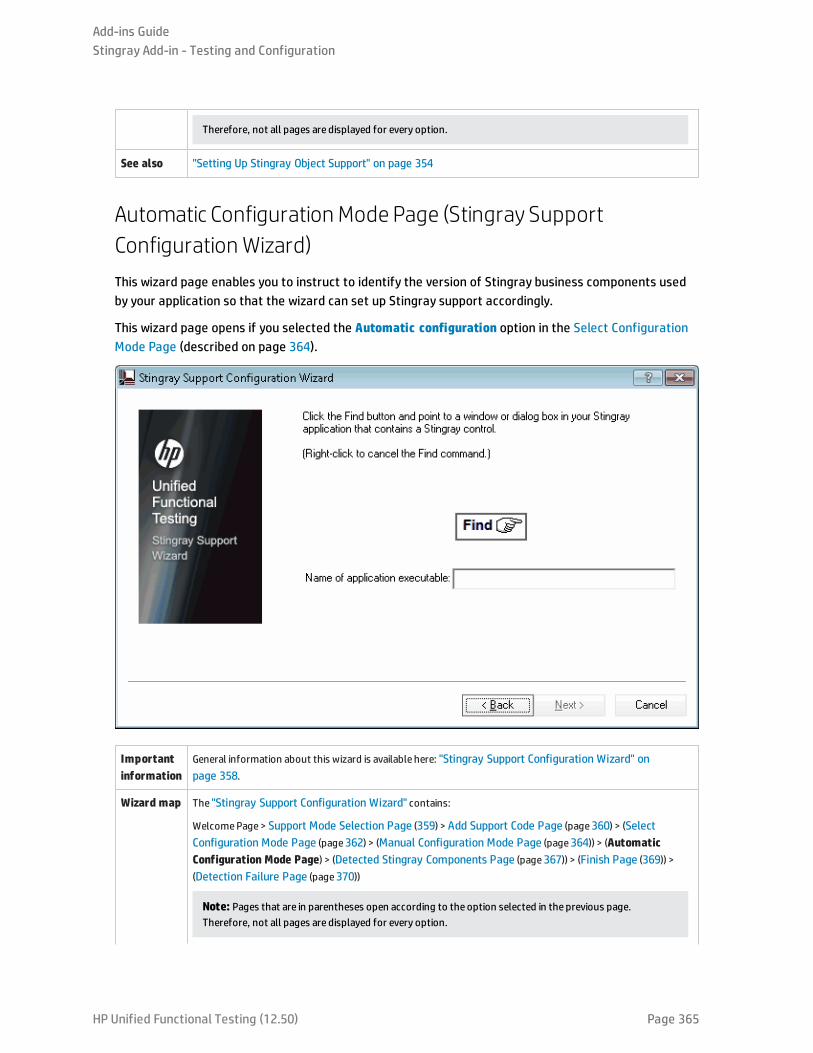
Therefore, not all pages are displayed for every option.
See also "Setting Up Stingray Object Support" on page 354
Automatic Configuration Mode Page (Stingray SupportConfiguration Wizard)This wizard page enables you to instruct to identify the version of Stingray business components usedby your application so that the wizard can set up Stingray support accordingly.
This wizard page opens if you selected the Automatic configuration option in the Select ConfigurationMode Page (described on page 364).
Importantinformation
General information about this wizard is available here: "Stingray Support Configuration Wizard" onpage 358.
Wizard map The "Stingray Support Configuration Wizard" contains:
WelcomePage> Support Mode Selection Page (359) > Add Support Code Page (page360) > (SelectConfiguration Mode Page (page362) > (Manual Configuration Mode Page (page364)) > (AutomaticConfiguration Mode Page) > (Detected Stingray Components Page (page367)) > (Finish Page (369)) >(Detection Failure Page (page370))
Note: Pages that are in parentheses open according to the option selected in the previous page.Therefore, not all pages are displayed for every option.
Add-ins GuideStingray Add-in - Testing and Configuration
HP Unified Functional Testing (12.50) Page 365
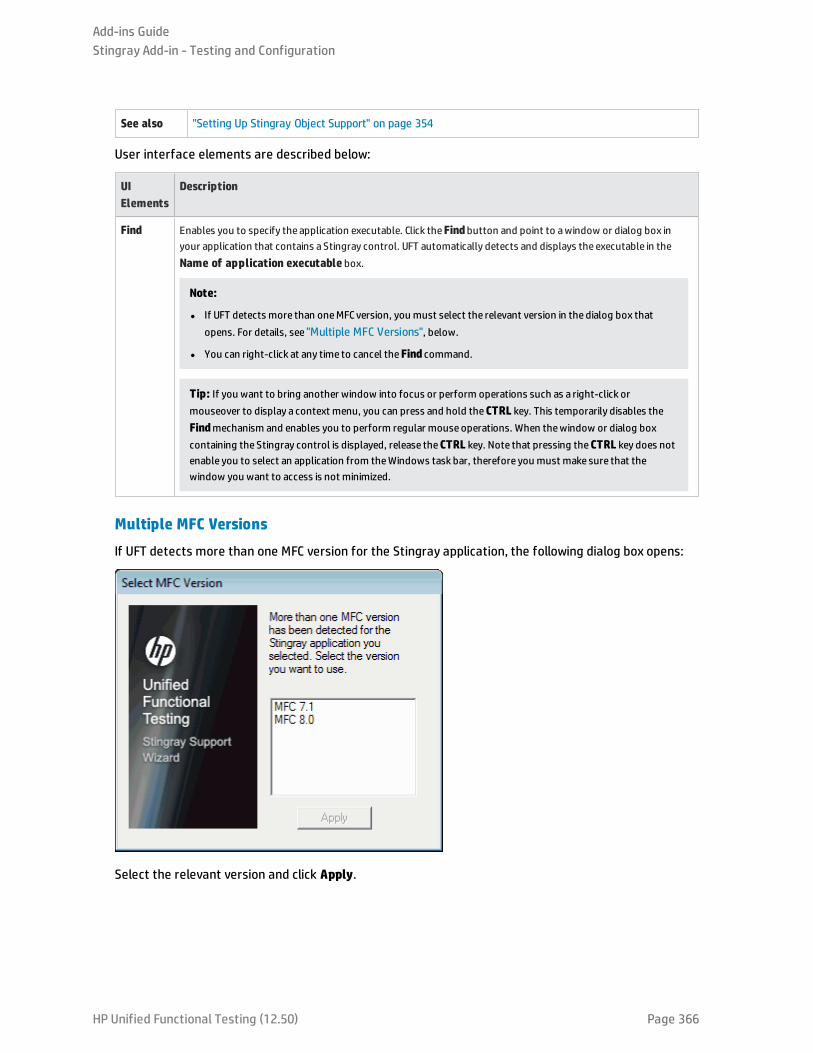
See also "Setting Up Stingray Object Support" on page 354
User interface elements are described below:
UIElements
Description
Find Enables you to specify the application executable. Click theFindbutton and point to awindow or dialog box inyour application that contains a Stingray control. UFT automatically detects and displays the executable in theName of application executable box.
Note:
l If UFT detects more than oneMFCversion, you must select the relevant version in the dialog box thatopens. For details, see "Multiple MFC Versions", below.
l You can right-click at any time to cancel theFind command.
Tip: If you want to bring another window into focus or perform operations such as a right-click ormouseover to display a context menu, you can press and hold theCTRL key. This temporarily disables theFindmechanism and enables you to perform regular mouseoperations. When thewindow or dialog boxcontaining the Stingray control is displayed, release theCTRL key. Note that pressing theCTRL key does notenable you to select an application from theWindows task bar, therefore you must make sure that thewindow you want to access is not minimized.
Multiple MFC Versions
If UFT detects more than one MFC version for the Stingray application, the following dialog box opens:
Select the relevant version and click Apply.
Add-ins GuideStingray Add-in - Testing and Configuration
HP Unified Functional Testing (12.50) Page 366
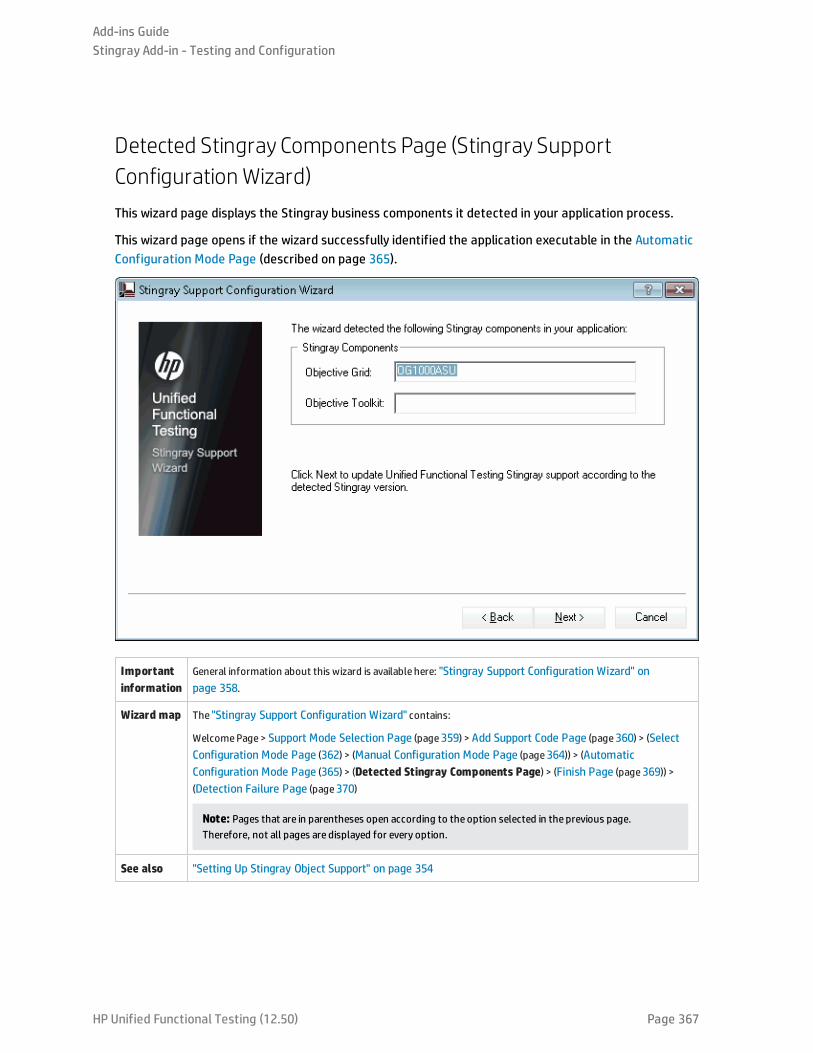
Detected Stingray Components Page (Stingray SupportConfiguration Wizard)This wizard page displays the Stingray business components it detected in your application process.
This wizard page opens if the wizard successfully identified the application executable in the AutomaticConfiguration Mode Page (described on page 365).
Importantinformation
General information about this wizard is available here: "Stingray Support Configuration Wizard" onpage 358.
Wizard map The "Stingray Support Configuration Wizard" contains:
WelcomePage> Support Mode Selection Page (page359) > Add Support Code Page (page360) > (SelectConfiguration Mode Page (362) > (Manual Configuration Mode Page (page364)) > (AutomaticConfiguration Mode Page (365) > (Detected Stingray Components Page) > (Finish Page (page369)) >(Detection Failure Page (page370)
Note: Pages that are in parentheses open according to the option selected in the previous page.Therefore, not all pages are displayed for every option.
See also "Setting Up Stingray Object Support" on page 354
Add-ins GuideStingray Add-in - Testing and Configuration
HP Unified Functional Testing (12.50) Page 367
User interface elements are described below:
UI Elements Description
<Stingraybusinesscomponents>
TheObjectiveGrid and Objective Toolkit that thewizard detected in your application.
Note: If, in the previous screen, you pointed to anon-Stingray application, or to a Stingray applicationwhosebusiness components UFT could not detect, awarning messagedisplays stating that UFT failedto detect the Stingray business components in your application.
UFT may fail to detect business components of a Stingray application for several reasons, for example:
l The application may be statically linked to Stingray libraries, preventing thewizard from identifying theversion of the Stingray libraries. In this case, clickBack twice and selectManual configuration toconfigure Stingray support manually. For details, see "Manual Configuration Mode Page (StingraySupport Configuration Wizard) " on page 364.
l The application may be statically linked to theMicrosoft Foundation Class (MFC) libraries. In this case, clickBack three times and select Precompiled Agent. For details, see "Add Support Code Page (StingraySupport Configuration Wizard) " on page 360.
l The selected Stingray version may not be supported by the Stingray Add-in, or may be slightly differentfrom theofficially supported versions.
If you need to workwith a Stingray version that is not supported, contact HP Software Support, who maybe able to provide you with a support agent for your specific version.
Add-ins GuideStingray Add-in - Testing and Configuration
HP Unified Functional Testing (12.50) Page 368
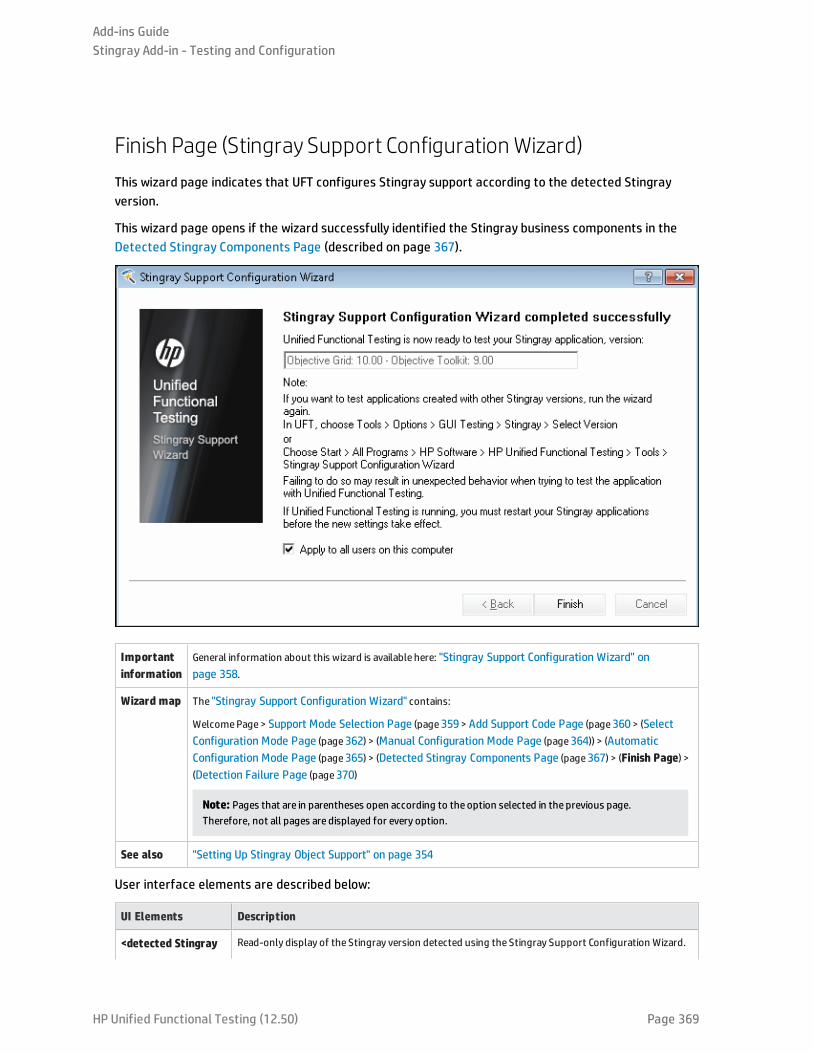
Finish Page (Stingray Support Configuration Wizard)This wizard page indicates that UFT configures Stingray support according to the detected Stingrayversion.
This wizard page opens if the wizard successfully identified the Stingray business components in theDetected Stingray Components Page (described on page 367).
Importantinformation
General information about this wizard is available here: "Stingray Support Configuration Wizard" onpage 358.
Wizard map The "Stingray Support Configuration Wizard" contains:
WelcomePage> Support Mode Selection Page (page359> Add Support Code Page (page360> (SelectConfiguration Mode Page (page362) > (Manual Configuration Mode Page (page364)) > (AutomaticConfiguration Mode Page (page365) > (Detected Stingray Components Page (page367) > (Finish Page) >(Detection Failure Page (page370)
Note: Pages that are in parentheses open according to the option selected in the previous page.Therefore, not all pages are displayed for every option.
See also "Setting Up Stingray Object Support" on page 354
User interface elements are described below:
UI Elements Description
<detected Stingray Read-only display of the Stingray version detected using the Stingray Support Configuration Wizard.
Add-ins GuideStingray Add-in - Testing and Configuration
HP Unified Functional Testing (12.50) Page 369
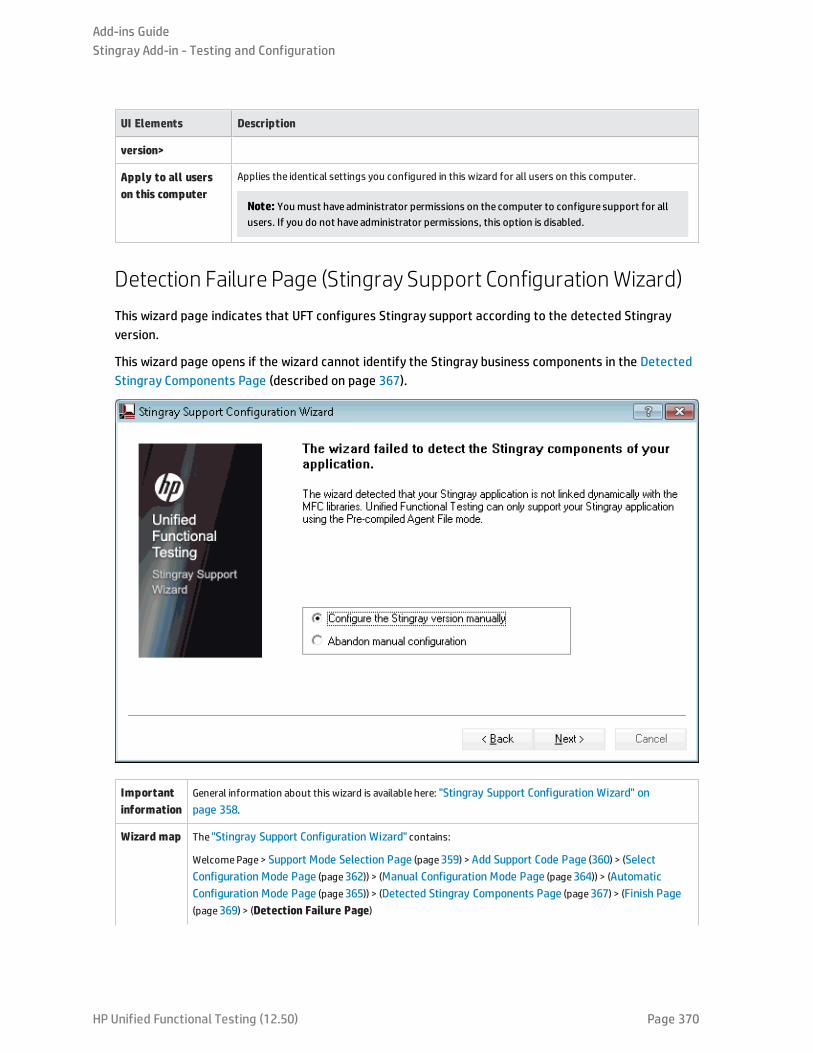
UI Elements Description
version>
Apply to all userson this computer
Applies the identical settings you configured in this wizard for all users on this computer.
Note: You must have administrator permissions on the computer to configure support for allusers. If you do not have administrator permissions, this option is disabled.
Detection Failure Page (Stingray Support Configuration Wizard)This wizard page indicates that UFT configures Stingray support according to the detected Stingrayversion.
This wizard page opens if the wizard cannot identify the Stingray business components in the DetectedStingray Components Page (described on page 367).
Importantinformation
General information about this wizard is available here: "Stingray Support Configuration Wizard" onpage 358.
Wizard map The "Stingray Support Configuration Wizard" contains:
WelcomePage> Support Mode Selection Page (page359) > Add Support Code Page (360) > (SelectConfiguration Mode Page (page362)) > (Manual Configuration Mode Page (page364)) > (AutomaticConfiguration Mode Page (page365)) > (Detected Stingray Components Page (page367) > (Finish Page(page369) > (Detection Failure Page)
Add-ins GuideStingray Add-in - Testing and Configuration
HP Unified Functional Testing (12.50) Page 370
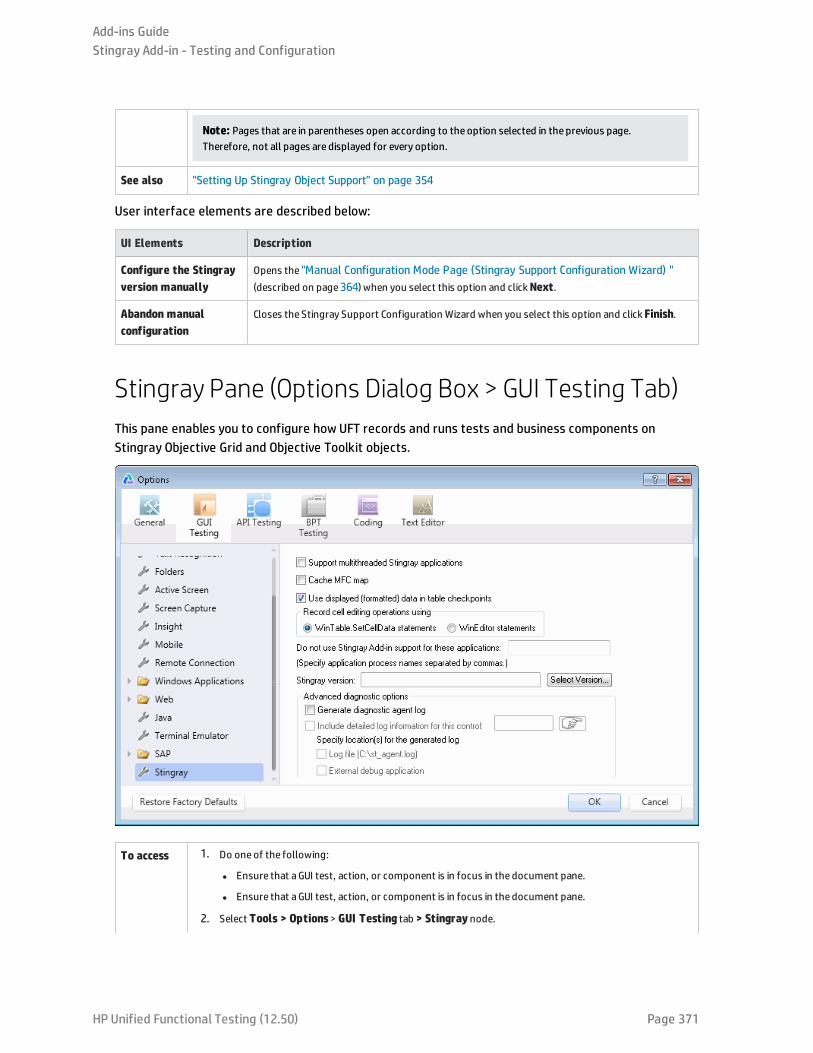
Note: Pages that are in parentheses open according to the option selected in the previous page.Therefore, not all pages are displayed for every option.
See also "Setting Up Stingray Object Support" on page 354
User interface elements are described below:
UI Elements Description
Configure the Stingrayversion manually
Opens the "Manual Configuration Mode Page (Stingray Support Configuration Wizard) "(described on page364) when you select this option and clickNext.
Abandon manualconfiguration
Closes the Stingray Support Configuration Wizard when you select this option and clickFinish.
Stingray Pane (Options Dialog Box > GUI Testing Tab)This pane enables you to configure how UFT records and runs tests and business components onStingray Objective Grid and Objective Toolkit objects.
To access 1. Do oneof the following:
l Ensure that aGUI test, action, or component is in focus in the document pane.
l Ensure that aGUI test, action, or component is in focus in the document pane.
2. Select Tools > Options> GUI Testing tab > Stingray node.
Add-ins GuideStingray Add-in - Testing and Configuration
HP Unified Functional Testing (12.50) Page 371
Importantinformation
l If the Stingray Add-in is configured correctly, you may not need to make anymodifications using this pane.However, if you did not run the Stingray Support Configuration Wizard after installing the Stingray Add-in,or if you encounter difficulties when recording and running tests and business components on Stingrayapplications, you can use the options in this pane to fine-tune the configuration. For example, you canenable support for multithreaded applications by selecting the relevant option in this pane.
After modifying this pane, you must restart UFT before you continueworking with this add-in.
l TheRestore Factory Defaultsbutton resets all Options dialog box options to their defaults.
Relevanttasks
"How to Set Up Your Stingray Project Using the Precompiled Agent Mode" on page 356
See also "Stingray Support Configuration Wizard" on page 358
User interface elements are described below:
UI Elements Description
SupportmultithreadedStingrayapplications
Instructs UFT to support multithreaded Stingray applications. If you are not surewhether you areworkingwith amultithreaded Stingray application, first try to record and run on your Stingray application withoutselecting this check box. If you experience difficulties, you can select this check box and try again.
Select this check box only if you areworking with amultithreaded application.
By default, this check box is cleared.
Cache MFCmap
Instructs UFT to use auxiliary caching as abackup for MFC's internal mapping of window handles toVisual C++ objects. If UFT cannot identify oneor more Stingray controls while recording or running a test orbusiness component, you can select this check box to instruct UFT to use a cached map instead of using theStingray application for identification.
By default, this check box is cleared.
Use displayed(formatted)data in tablecheckpoints
Instructs UFT to use the formatted data value in the Stingray grid control. You can use this option whenworking with table checkpoints (not supported for business components). For example, if the actual value ofa cell in a Stingray application is formatted to display two digits to the right of the decimal point, UFT will usethat rounded number instead of the actual number when checking the value during the run session.
By default, this check box is selected.
Record celleditingoptions using
Instructs UFT to record typing operations in a Stingray grid (edit) cell using oneof the following options:
l WinTable.SetCellData statements. (Default) Uses theSetCellDatamethod to record the final valuethat you enter in a grid cell. This option results in a single step in your test or business component. Inmost cases, this option makes the step more readable and easier to modifymanually
l WinEditor statements.UFT records each operation that you perform in a Stingray grid edit cell as aseparateWinEditor step. For example, operations such as placing the cursor in a specific place in theedit box, typing a single character, or deleting a character may be recorded as individual steps. This canmake your test or business component less readable and more difficult to modifymanually, but this maybeuseful if you want to test the behavior of specific editing operations.
For a use-case example, see "Record Cell Editing Options - Example" on page 374
Do not useStingray Add-in support forthese
Instructs UFT to treat the applications you specify as non-Stingray applications.
Someopen, non-Stingray processes (such as explorer.exe) can cause unexpected behavior whenrecording and running tests and business components on Stingray applications. By adding the processnames to this edit box, you can help prevent this unexpected behavior.
Add-ins GuideStingray Add-in - Testing and Configuration
HP Unified Functional Testing (12.50) Page 372
UI Elements Description
applications:(Specifyapplicationprocessnamesseparated bycommas)
Note:
l In some cases, the executable file you use to open an application is only a launching process, whichthen opens the actual application process. In these cases, make sure that you specify the nameofthe actual application process and not the launching process.
l When working with tests, this option is relevant only if you selected theRecord and run test onany open Windows-based application in theRecord and Run Settings dialog box (Record >Record and Run Settings). For details on the options available, see "Windows Applications Tab(Record and Run Settings Dialog Box)" on page 93.
Stingrayversion
Indicates the versions of the Stingray ObjectiveGrid and Stingray Objective Toolkit libraries used foridentifying Stingray objects in your application (read-only).
Select Version Opens the Stingray Support Configuration Wizard, which enables you to select the combination of ObjectiveGrid and Objective Toolkit versions with which you want to work.
For details, see "Stingray Support Configuration Wizard" on page 358.
Generatediagnosticagent log
Instructs UFT to generate a diagnostic agent log file. You can use this option if you encounter problems withthe Stingray Add-in, for example, if UFT does not recognize a Stingray grid control while recording.HP Software Support may ask you to generate this log and send it together with your service request.
When you select this check box, the following options are enabled:
l Include detailed log information for this control
l Log file (C:\st_agent.log)
l External debug application
Note: If you select this check box, you must specify the location for the generated log. For details, see"Specify location(s) for the generated log" below.
Includedetailed loginformationfor thiscontrol
Instructs UFT to include detailed information in the generated log for a specific Stingray control, in additionto the general UFT/agent communication log information. For example, you maywant to generate additionallog details for a specific Stingray grid.
To select the object for which you want to generate detailed log information:
Click the pointing hand and then click the relevant Stingray control. The selected object's window handle isdisplayed in the edit box.
Note: This option is available onlywhen theGenerate diagnostic agent log check box is selected.
Specifylocation(s) forthe generatedlog
Instructs UFT to generate the log to the selected locations. You can select oneor both of the followingoptions:
l Log file (C:\st_agent.log).Saves the diagnostic log to thest_agent.log text file on your C:drive.
l External debug application.Exports the diagnostic log data to an external debug application, such asthe freeware application, DebugView, or Microsoft VisualStudio.
Note: These options are available onlywhen theGenerate diagnostic agent log check box isselected.
Add-ins GuideStingray Add-in - Testing and Configuration
HP Unified Functional Testing (12.50) Page 373
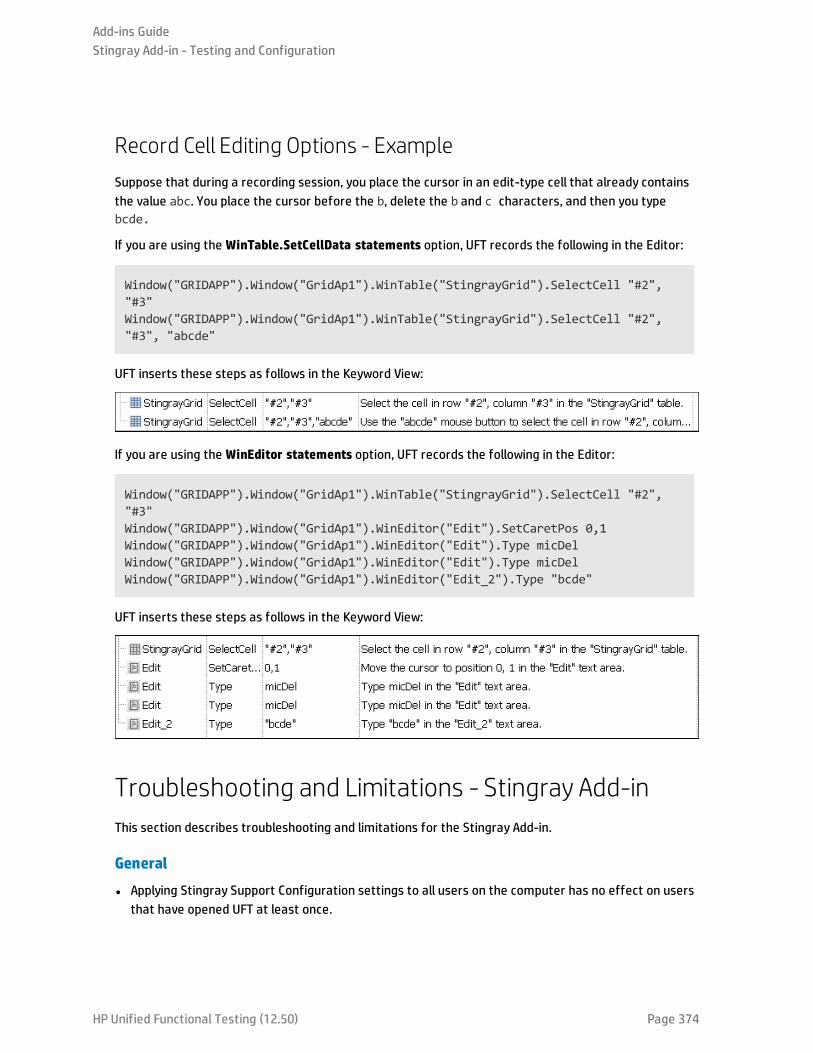
Record Cell Editing Options - ExampleSuppose that during a recording session, you place the cursor in an edit-type cell that already containsthe value abc. You place the cursor before the b, delete the b and c characters, and then you typebcde.
If you are using the WinTable.SetCellData statements option, UFT records the following in the Editor:
Window("GRIDAPP").Window("GridAp1").WinTable("StingrayGrid").SelectCell "#2","#3"Window("GRIDAPP").Window("GridAp1").WinTable("StingrayGrid").SelectCell "#2","#3", "abcde"
UFT inserts these steps as follows in the Keyword View:
If you are using the WinEditor statements option, UFT records the following in the Editor:
Window("GRIDAPP").Window("GridAp1").WinTable("StingrayGrid").SelectCell "#2","#3"Window("GRIDAPP").Window("GridAp1").WinEditor("Edit").SetCaretPos 0,1Window("GRIDAPP").Window("GridAp1").WinEditor("Edit").Type micDelWindow("GRIDAPP").Window("GridAp1").WinEditor("Edit").Type micDelWindow("GRIDAPP").Window("GridAp1").WinEditor("Edit_2").Type "bcde"
UFT inserts these steps as follows in the Keyword View:
Troubleshooting and Limitations - Stingray Add-inThis section describes troubleshooting and limitations for the Stingray Add-in.
General
l Applying Stingray Support Configuration settings to all users on the computer has no effect on usersthat have opened UFT at least once.
Add-ins GuideStingray Add-in - Testing and Configuration
HP Unified Functional Testing (12.50) Page 374
Workaround: Apply Stingray Support Configuration settings separately for each user that has openedUFT at least once.
l UFT does not support both Unicode and non-Unicode in the same application when the Stingray Add-in is loaded.
Creating and Running Tests and Components
l If your Stingray application was built using the precompiled agent mode and you have used theStingray Support Configuration Wizard at least once to set a Stingray run-time agent, then recording,learning, or running steps on the application may fail.
l By default, only single-threaded Stingray applications are supported.
To provide support for multithreaded applications, in UFT, select Tools > Options > GUI Testing tab >Stingray node. Select the Support multithreaded Stingray applications check box and click OK.Close and restart UFT.
For details, see "Stingray Pane (Options Dialog Box > GUI Testing Tab)" on page 371.
l The Stingray Add-in does not support Objective Edit or Objective Chart controls.
l The ExpandAllmethod is not supported for Stingray tree controls.
l When working with nested tab controls, you may need to manually modify the corresponding entriesin the object repository to enable unique identification. For example, you may need to add an ordinalidentifier to the existing description.
l Sometimes, the MFC internal map that correlates a window handle of a control with the Visual C++object may not contain an entry for all Stingray controls. In such cases, the Stingray Add-in may failto recognize certain Stingray controls because it relies on this map when retrieving information fromthe application.
Workaround: The Stingray Add-in contains an auxiliary mechanism that serves as a fallback for thelack of MFC map entries in the situation described above. To activate this mechanism, in UFT, selectTools > Options > GUI Testing tab > Stingray node. Select the Cache MFC map check box and clickOK. Close and restart UFT.
Note: This mechanism is not activated by default because it imposes some performanceoverhead.
l By default, edit boxes, check boxes, and drop-down (combo) lists are supported when recording on aStingray grid. Other types of controls embedded in Stingray grids may be supported partially or maynot be supported at all.
Note: The CGXTabbedComboBox control and the CGXCheckBoxEx control type are not supportedduring recording.
Workaround: To work with controls other than the supported ones, manually add SetCellDatastatements to your test or business component (instead of recording user actions inside cells).
l GetCellData and SetCellDatamethods are limited to 3000 characters.
Add-ins GuideStingray Add-in - Testing and Configuration
HP Unified Functional Testing (12.50) Page 375

l By default, only the following grid classes are supported:
l CGXBrowserView
l CGXBrowserWnd
l CGXGridWnd
l CGXGridView
l CGXGridHandleView
l When Stingray tree control items have tooltips, recording the selection of an item by clicking its labelmay fail.
Workaround: Select the requested item by performing a click on the item's icon.
Add-ins GuideStingray Add-in - Testing and Configuration
HP Unified Functional Testing (12.50) Page 376

HP Unified Functional Testing (12.50) Page 377
Part 16: Terminal Emulator Add-inThis section includes:
"Terminal Emulator Add-in - Quick Reference" on page 378
"Terminal Emulator Add-in - Testing and Configuration" on page 380
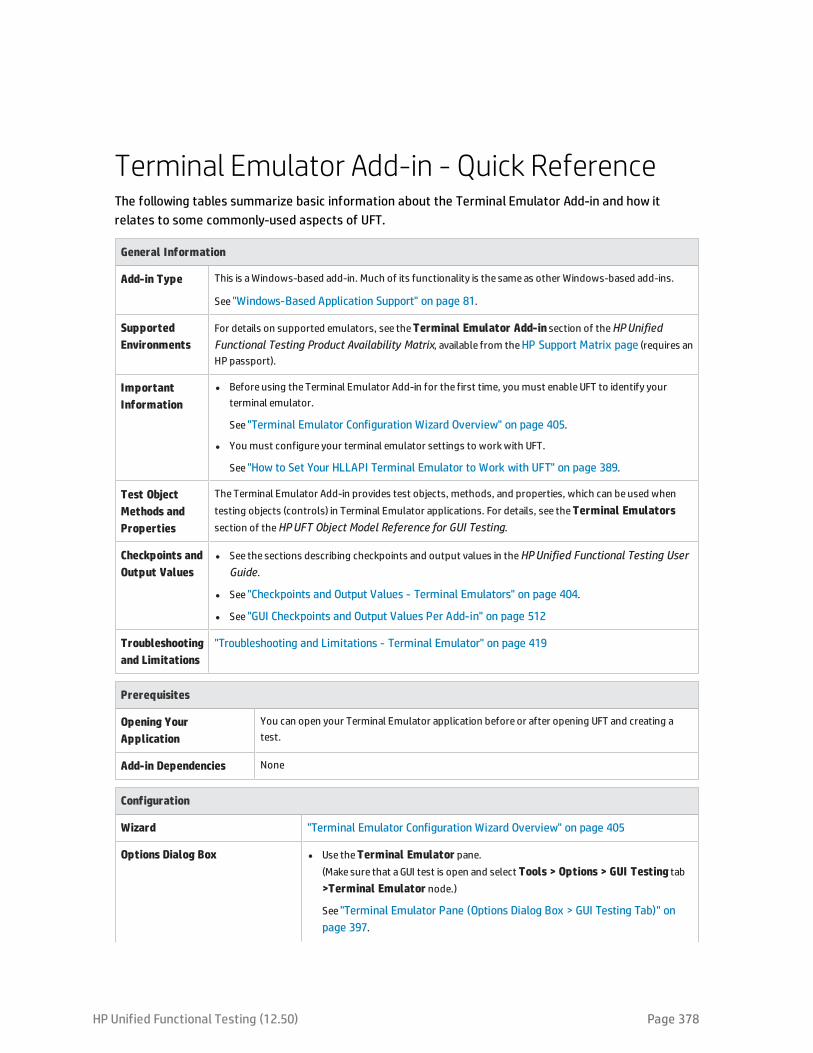
Terminal Emulator Add-in - Quick ReferenceThe following tables summarize basic information about the Terminal Emulator Add-in and how itrelates to some commonly-used aspects of UFT.
General Information
Add-in Type This is aWindows-based add-in. Much of its functionality is the sameas other Windows-based add-ins.
See "Windows-Based Application Support" on page 81.
SupportedEnvironments
For details on supported emulators, see theTerminal Emulator Add-in section of theHPUnifiedFunctional Testing Product Availability Matrix, available from theHP Support Matrix page (requires anHP passport).
ImportantInformation
l Before using the Terminal Emulator Add-in for the first time, you must enableUFT to identify yourterminal emulator.
See "Terminal Emulator Configuration Wizard Overview" on page 405.
l You must configure your terminal emulator settings to workwith UFT.
See "How to Set Your HLLAPI Terminal Emulator to Work with UFT" on page 389.
Test ObjectMethods andProperties
TheTerminal Emulator Add-in provides test objects, methods, and properties, which can beused whentesting objects (controls) in Terminal Emulator applications. For details, see theTerminal Emulatorssection of theHPUFT Object Model Reference for GUI Testing.
Checkpoints andOutput Values
l See the sections describing checkpoints and output values in theHPUnified Functional Testing UserGuide.
l See "Checkpoints and Output Values - Terminal Emulators" on page 404.
l See "GUI Checkpoints and Output Values Per Add-in" on page 512
Troubleshootingand Limitations
"Troubleshooting and Limitations - Terminal Emulator" on page 419
Prerequisites
Opening YourApplication
You can open your Terminal Emulator application before or after opening UFT and creating atest.
Add-in Dependencies None
Configuration
Wizard "Terminal Emulator Configuration Wizard Overview" on page 405
Options Dialog Box l Use theTerminal Emulator pane.(Make sure that aGUI test is open and select Tools > Options > GUI Testing tab>Terminal Emulator node.)
See "Terminal Emulator Pane (Options Dialog Box > GUI Testing Tab)" onpage 397.
HP Unified Functional Testing (12.50) Page 378
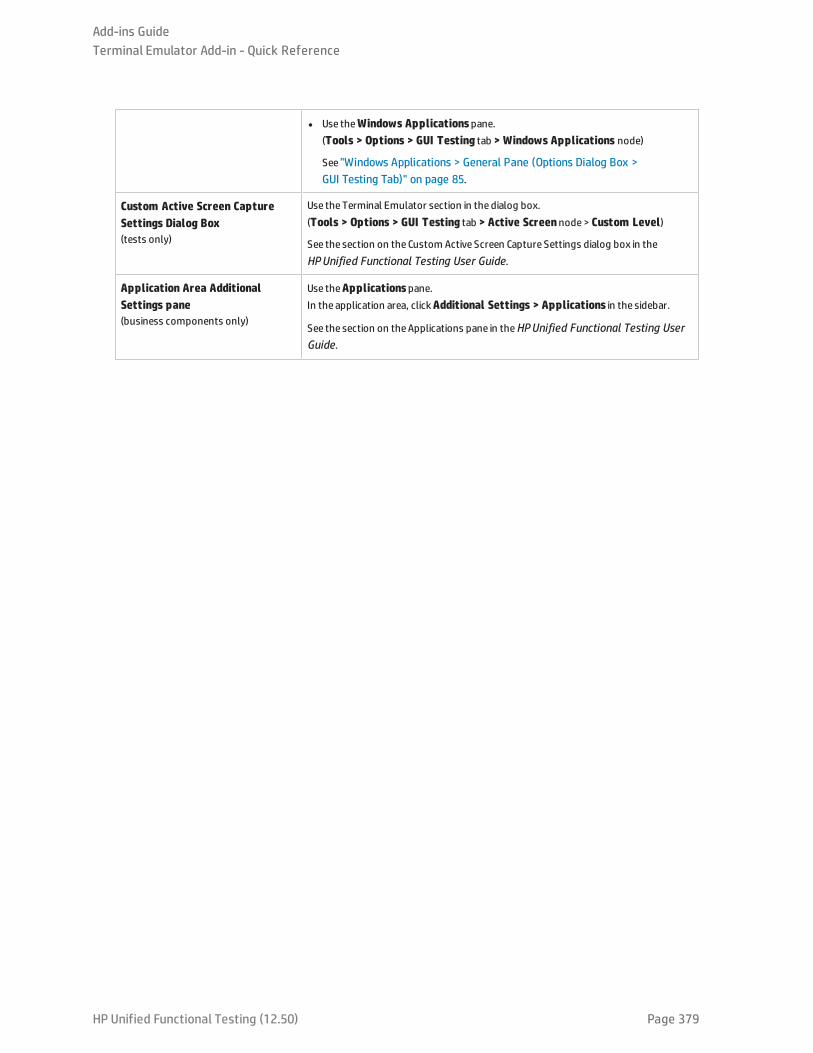
l Use theWindows Applicationspane.(Tools > Options > GUI Testing tab > Windows Applications node)
See "Windows Applications > General Pane (Options Dialog Box >GUI Testing Tab)" on page 85.
Custom Active Screen CaptureSettings Dialog Box(tests only)
Use the Terminal Emulator section in the dialog box.(Tools > Options > GUI Testing tab > Active Screennode> Custom Level)
See the section on the Custom Active Screen Capture Settings dialog box in theHPUnified Functional Testing User Guide.
Application Area AdditionalSettings pane(business components only)
Use theApplicationspane.In the application area, clickAdditional Settings > Applications in the sidebar.
See the section on theApplications pane in theHPUnified Functional Testing UserGuide.
Add-ins GuideTerminal Emulator Add-in - Quick Reference
HP Unified Functional Testing (12.50) Page 379
Terminal Emulator Add-in - Testing andConfigurationThis chapter includes:
• Terminal Emulator Add-in - Overview 381
• Recording Tests and Components on Terminal Emulator Applications 382
• Considerations for Recording and Running Tests and Components on Terminal Emulators 383
• Run Session Synchronization 384
• Terminal Emulator Recovery Scenarios 384
• How to Configure an Emulator to Work with the Terminal Emulator Add-in 385
• How to Set Your HLLAPI Terminal Emulator to Work with UFT 389
• How to Manage Terminal Emulator Configuration Settings 389
• How to Copy Existing Terminal Emulator Configurations 390
• How to Check the Validity of a Terminal Emulator Configuration 392
• Validating a Terminal Emulator - Possible Error Responses 392
• How to Synchronize Steps on Terminal Emulators 395
• Terminal Emulator Pane (Options Dialog Box > GUI Testing Tab) 397
• Terminal Emulator Configuration Adjustments Dialog Box 399
• Checkpoints and Output Values - Terminal Emulators 404
• Terminal Emulator Configuration Wizard Overview 405
• Terminal Emulator Configuration Wizard Welcome Page 406
• Specify Wizard Operation Page 407
• Emulator Setup Page 408
• Configure HLLAPI Properties Page 409
• HLLAPI Configuration Test Page 410
• Configure Emulator Classes Page 413
• Configure Emulator Screen Settings Page 414
• Completing the Terminal Emulator Configuration Wizard Page 417
• Troubleshooting and Limitations - Terminal Emulator 419
HP Unified Functional Testing (12.50) Page 380
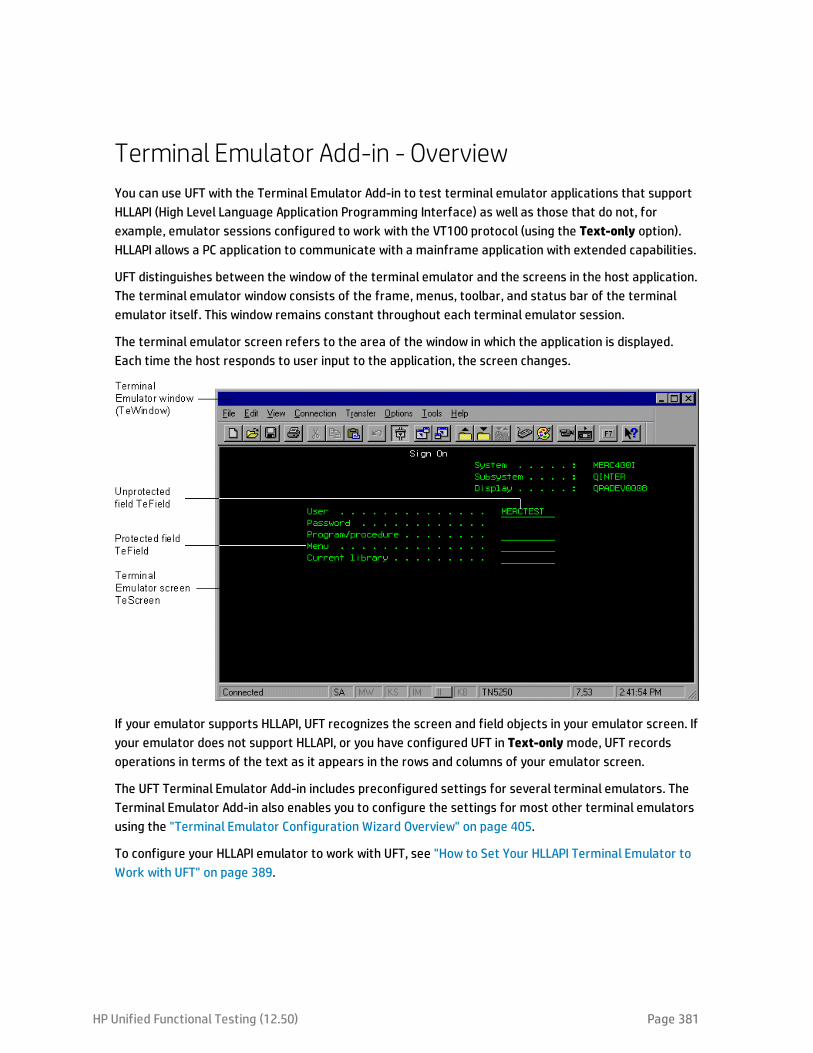
Terminal Emulator Add-in - OverviewYou can use UFT with the Terminal Emulator Add-in to test terminal emulator applications that supportHLLAPI (High Level Language Application Programming Interface) as well as those that do not, forexample, emulator sessions configured to work with the VT100 protocol (using the Text-only option).HLLAPI allows a PC application to communicate with a mainframe application with extended capabilities.
UFT distinguishes between the window of the terminal emulator and the screens in the host application.The terminal emulator window consists of the frame, menus, toolbar, and status bar of the terminalemulator itself. This window remains constant throughout each terminal emulator session.
The terminal emulator screen refers to the area of the window in which the application is displayed.Each time the host responds to user input to the application, the screen changes.
If your emulator supports HLLAPI, UFT recognizes the screen and field objects in your emulator screen. Ifyour emulator does not support HLLAPI, or you have configured UFT in Text-onlymode, UFT recordsoperations in terms of the text as it appears in the rows and columns of your emulator screen.
The UFT Terminal Emulator Add-in includes preconfigured settings for several terminal emulators. TheTerminal Emulator Add-in also enables you to configure the settings for most other terminal emulatorsusing the "Terminal Emulator Configuration Wizard Overview" on page 405.
To configure your HLLAPI emulator to work with UFT, see "How to Set Your HLLAPI Terminal Emulator toWork with UFT" on page 389.
HP Unified Functional Testing (12.50) Page 381
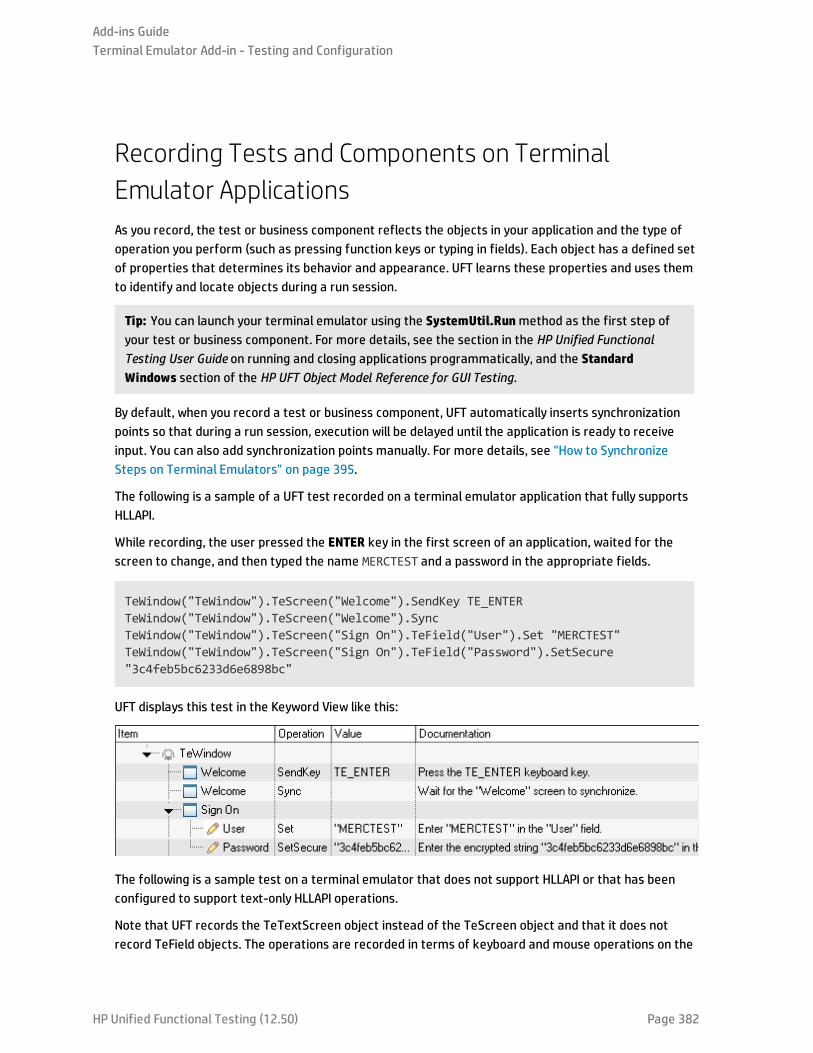
Recording Tests and Components on TerminalEmulator ApplicationsAs you record, the test or business component reflects the objects in your application and the type ofoperation you perform (such as pressing function keys or typing in fields). Each object has a defined setof properties that determines its behavior and appearance. UFT learns these properties and uses themto identify and locate objects during a run session.
Tip: You can launch your terminal emulator using the SystemUtil.Runmethod as the first step ofyour test or business component. For more details, see the section in the HP Unified FunctionalTesting User Guide on running and closing applications programmatically, and the StandardWindows section of the HP UFT Object Model Reference for GUI Testing.
By default, when you record a test or business component, UFT automatically inserts synchronizationpoints so that during a run session, execution will be delayed until the application is ready to receiveinput. You can also add synchronization points manually. For more details, see "How to SynchronizeSteps on Terminal Emulators" on page 395.
The following is a sample of a UFT test recorded on a terminal emulator application that fully supportsHLLAPI.
While recording, the user pressed the ENTER key in the first screen of an application, waited for thescreen to change, and then typed the name MERCTEST and a password in the appropriate fields.
TeWindow("TeWindow").TeScreen("Welcome").SendKey TE_ENTERTeWindow("TeWindow").TeScreen("Welcome").SyncTeWindow("TeWindow").TeScreen("Sign On").TeField("User").Set "MERCTEST"TeWindow("TeWindow").TeScreen("Sign On").TeField("Password").SetSecure"3c4feb5bc6233d6e6898bc"
UFT displays this test in the Keyword View like this:
The following is a sample test on a terminal emulator that does not support HLLAPI or that has beenconfigured to support text-only HLLAPI operations.
Note that UFT records the TeTextScreen object instead of the TeScreen object and that it does notrecord TeField objects. The operations are recorded in terms of keyboard and mouse operations on the
Add-ins GuideTerminal Emulator Add-in - Testing and Configuration
HP Unified Functional Testing (12.50) Page 382
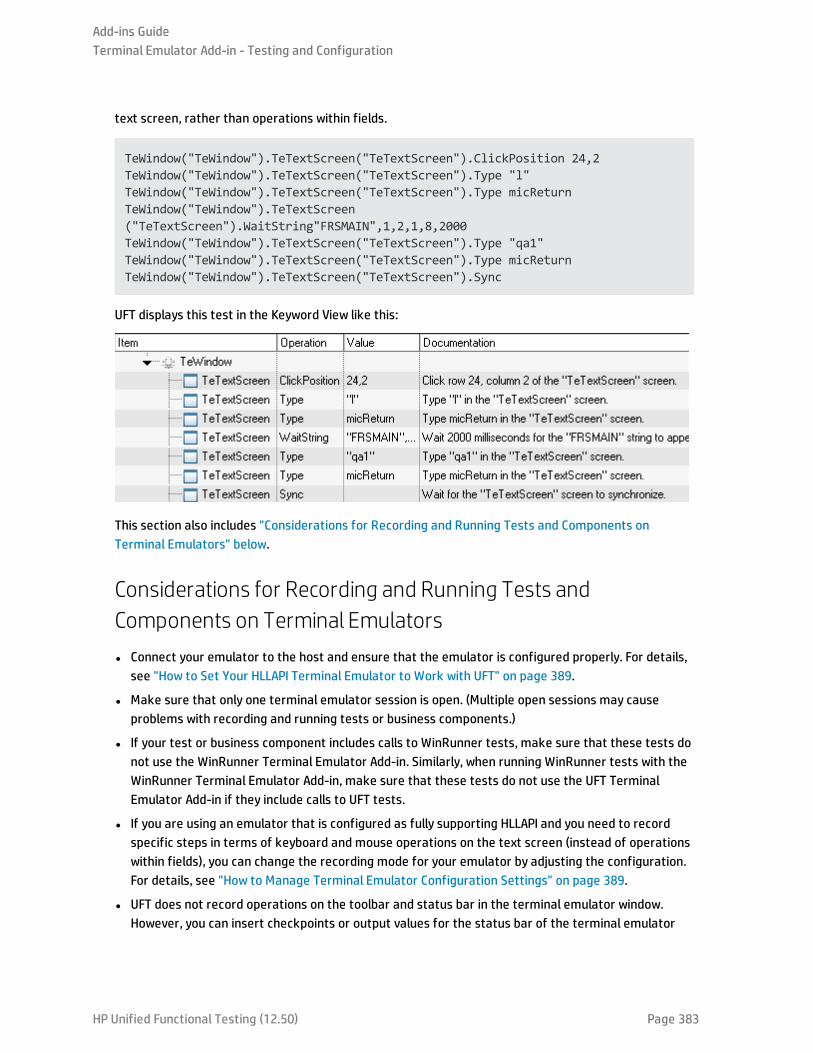
text screen, rather than operations within fields.
TeWindow("TeWindow").TeTextScreen("TeTextScreen").ClickPosition 24,2TeWindow("TeWindow").TeTextScreen("TeTextScreen").Type "l"TeWindow("TeWindow").TeTextScreen("TeTextScreen").Type micReturnTeWindow("TeWindow").TeTextScreen("TeTextScreen").WaitString"FRSMAIN",1,2,1,8,2000TeWindow("TeWindow").TeTextScreen("TeTextScreen").Type "qa1"TeWindow("TeWindow").TeTextScreen("TeTextScreen").Type micReturnTeWindow("TeWindow").TeTextScreen("TeTextScreen").Sync
UFT displays this test in the Keyword View like this:
This section also includes "Considerations for Recording and Running Tests and Components onTerminal Emulators" below.
Considerations for Recording and Running Tests andComponents on Terminal Emulatorsl Connect your emulator to the host and ensure that the emulator is configured properly. For details,
see "How to Set Your HLLAPI Terminal Emulator to Work with UFT" on page 389.
l Make sure that only one terminal emulator session is open. (Multiple open sessions may causeproblems with recording and running tests or business components.)
l If your test or business component includes calls to WinRunner tests, make sure that these tests donot use the WinRunner Terminal Emulator Add-in. Similarly, when running WinRunner tests with theWinRunner Terminal Emulator Add-in, make sure that these tests do not use the UFT TerminalEmulator Add-in if they include calls to UFT tests.
l If you are using an emulator that is configured as fully supporting HLLAPI and you need to recordspecific steps in terms of keyboard and mouse operations on the text screen (instead of operationswithin fields), you can change the recording mode for your emulator by adjusting the configuration.For details, see "How to Manage Terminal Emulator Configuration Settings" on page 389.
l UFT does not record operations on the toolbar and status bar in the terminal emulator window.However, you can insert checkpoints or output values for the status bar of the terminal emulator
Add-ins GuideTerminal Emulator Add-in - Testing and Configuration
HP Unified Functional Testing (12.50) Page 383
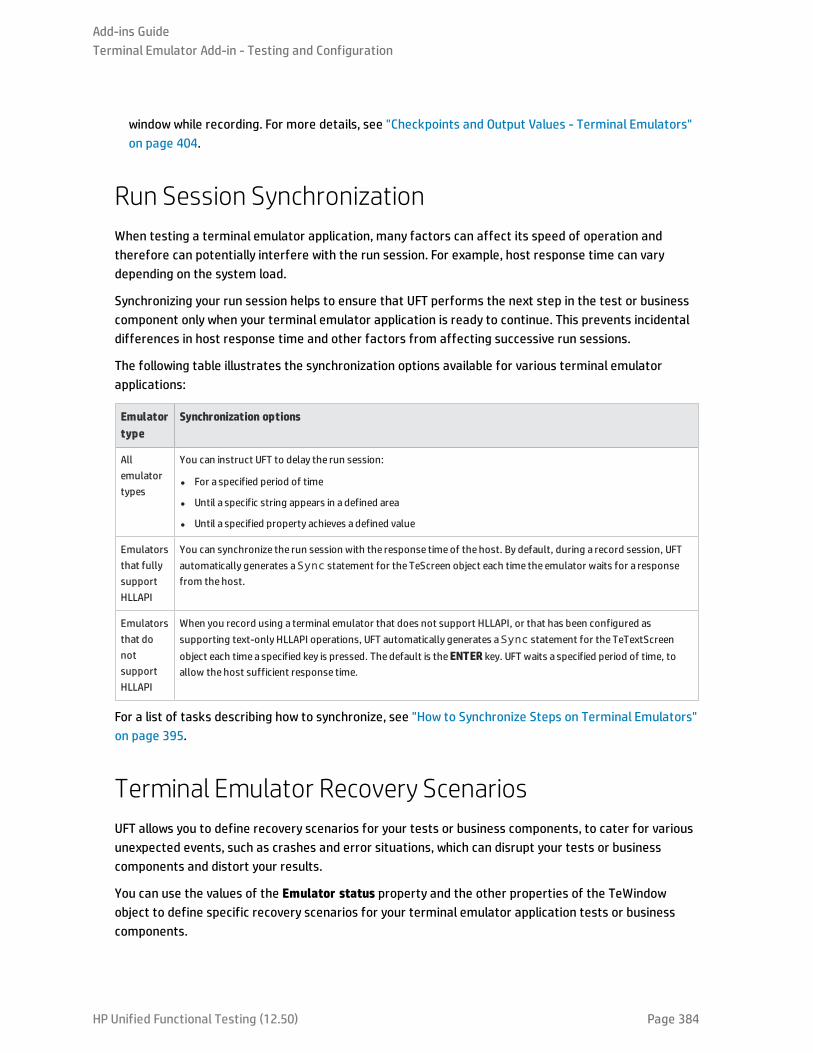
window while recording. For more details, see "Checkpoints and Output Values - Terminal Emulators"on page 404.
Run Session SynchronizationWhen testing a terminal emulator application, many factors can affect its speed of operation andtherefore can potentially interfere with the run session. For example, host response time can varydepending on the system load.
Synchronizing your run session helps to ensure that UFT performs the next step in the test or businesscomponent only when your terminal emulator application is ready to continue. This prevents incidentaldifferences in host response time and other factors from affecting successive run sessions.
The following table illustrates the synchronization options available for various terminal emulatorapplications:
Emulatortype
Synchronization options
Allemulatortypes
You can instruct UFT to delay the run session:
l For a specified period of time
l Until a specific string appears in a defined area
l Until a specified property achieves a defined value
Emulatorsthat fullysupportHLLAPI
You can synchronize the run session with the response timeof the host. By default, during a record session, UFTautomatically generates aSync statement for the TeScreen object each time the emulator waits for a responsefrom thehost.
Emulatorsthat donotsupportHLLAPI
When you record using a terminal emulator that does not support HLLAPI, or that has been configured assupporting text-only HLLAPI operations, UFT automatically generates aSync statement for the TeTextScreenobject each timea specified key is pressed. The default is theENTER key. UFT waits a specified period of time, toallow thehost sufficient response time.
For a list of tasks describing how to synchronize, see "How to Synchronize Steps on Terminal Emulators"on page 395.
Terminal Emulator Recovery ScenariosUFT allows you to define recovery scenarios for your tests or business components, to cater for variousunexpected events, such as crashes and error situations, which can disrupt your tests or businesscomponents and distort your results.
You can use the values of the Emulator status property and the other properties of the TeWindowobject to define specific recovery scenarios for your terminal emulator application tests or businesscomponents.
Add-ins GuideTerminal Emulator Add-in - Testing and Configuration
HP Unified Functional Testing (12.50) Page 384
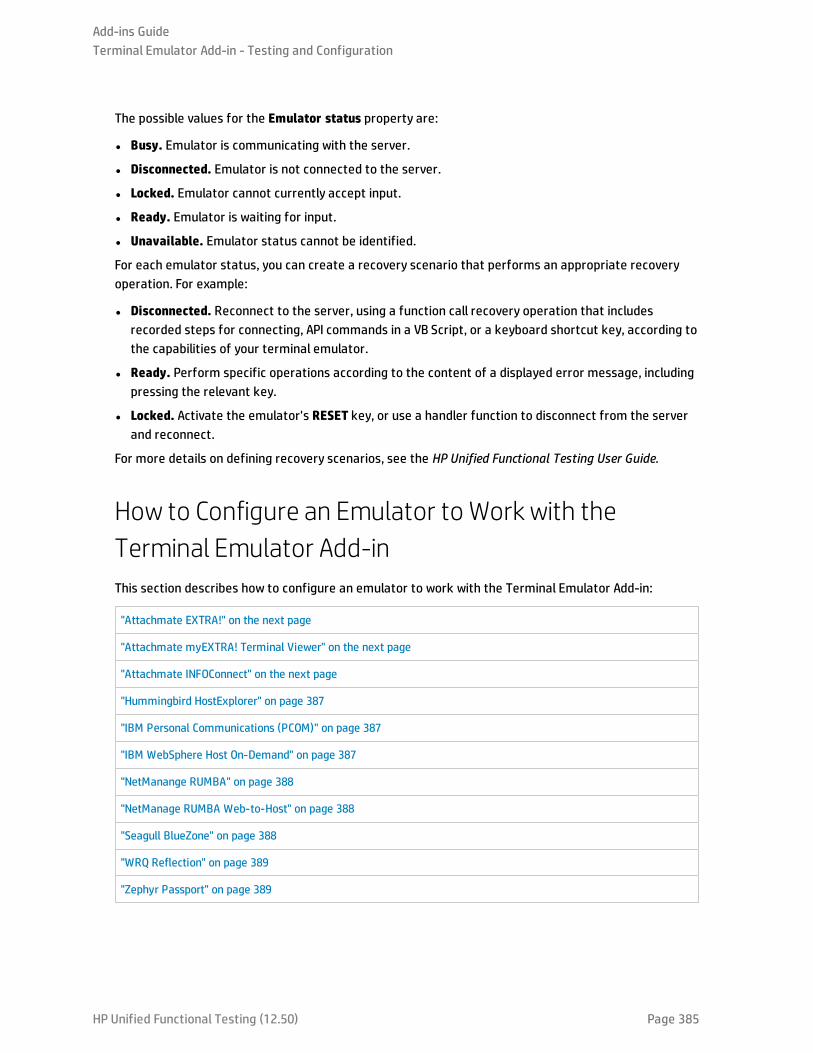
The possible values for the Emulator status property are:
l Busy. Emulator is communicating with the server.
l Disconnected. Emulator is not connected to the server.
l Locked. Emulator cannot currently accept input.
l Ready. Emulator is waiting for input.
l Unavailable. Emulator status cannot be identified.
For each emulator status, you can create a recovery scenario that performs an appropriate recoveryoperation. For example:
l Disconnected. Reconnect to the server, using a function call recovery operation that includesrecorded steps for connecting, API commands in a VB Script, or a keyboard shortcut key, according tothe capabilities of your terminal emulator.
l Ready. Perform specific operations according to the content of a displayed error message, includingpressing the relevant key.
l Locked. Activate the emulator's RESET key, or use a handler function to disconnect from the serverand reconnect.
For more details on defining recovery scenarios, see the HP Unified Functional Testing User Guide.
How to Configure an Emulator to Work with theTerminal Emulator Add-inThis section describes how to configure an emulator to work with the Terminal Emulator Add-in:
"Attachmate EXTRA!" on the next page
"Attachmate myEXTRA! Terminal Viewer" on the next page
"Attachmate INFOConnect" on the next page
"Hummingbird HostExplorer" on page 387
"IBM Personal Communications (PCOM)" on page 387
"IBM WebSphere Host On-Demand" on page 387
"NetManange RUMBA" on page 388
"NetManage RUMBA Web-to-Host" on page 388
"Seagull BlueZone" on page 388
"WRQ Reflection" on page 389
"Zephyr Passport" on page 389
Add-ins GuideTerminal Emulator Add-in - Testing and Configuration
HP Unified Functional Testing (12.50) Page 385
Attachmate EXTRA!
To connect your EXTRA! terminal emulator to UFT:
1. Open EXTRA!.
2. In EXTRA!, select Options > Global Preferences. The Global Preferences dialog box opens.
3. Click the Advanced tab.
4. In the HLLAPI shortname list, select the uppercase letter A as the Short Name.
5. Click the browse button, browse to and select your session profile, and click OK.
6. Save the profile before you start testing with UFT. This enables you to configure the terminalemulator once and then reuse the saved settings.
Attachmate myEXTRA! Terminal Viewer
To connect your myEXTRA! terminal viewer to UFT:
1. Open the myEXTRA! Management and Control Services window.
2. In the Management and Control Services window, select Products > Terminal Viewers. TheTerminal Viewers tree is displayed in the left pane.
3. In the Terminal Viewers tree, select the required terminal.
4. In the right pane, select the required session and click Properties.
5. In the Properties pane, click Configure to configure the connection.
6. In the General tab of the Configure pane, select the Support HLLAPI check box and set the sessionname to A.
7. Save the session.
8. If this is the first time that you are connecting to a myEXTRA! terminal viewer, install the HLLAPIDLL, as follows:
a. Click Preferences.
b. Click the Install HLLAPI Client Components link.
Attachmate INFOConnect
To connect your INFOConnect terminal emulator to UFT:
1. Open Attachmate INFOConnect.
2. Select Options > Global Preferences from the main menu.
3. Select the Advanced tab.
4. Select A as the session short name.
5. To associate the session short name (A), with your session, click Browse and locate your sessionprofile in the file system.
6. Click OK.
Add-ins GuideTerminal Emulator Add-in - Testing and Configuration
HP Unified Functional Testing (12.50) Page 386
Hummingbird HostExplorer
To connect your HostExplorer terminal emulator to UFT:
1. Open HostExplorer.
2. From the HostExplorer main menu, select File > Save Session Profile.
3. In the Save Profile dialog box, set the HLLAPI Short Name to the uppercase letter A.
4. From the main menu, select Options > API Settings.
5. In the API Global Settings dialog box, select the Update screen after PS update and Auto syncoptions.
6. Click OK.
Alternatively:
1. Open HostExplorer.
2. Open a saved session.
3. Select Options > Edit Session Profile.
4. Select Terminal > API in the categories tree.
5. Select A as the session short name and click OK.
6. Save the session profile.
IBM Personal Communications (PCOM)
The preconfigured settings enable UFT to work with IBM PCOM terminal emulators.
IBM WebSphere Host On-Demand
To connect your WebSphere Host On-Demand terminal emulator to UFT:
1. Open the WebSphere Host On-Demand EHLLAPI Enablement Tool. (If you do not have this tool,contact IBM for details on how to acquire and install it.)
2. To enable UFT to record on the IBM WebSphere Host On-Demand terminal emulator, define thesession options as follows:
a. Click Configure and select Properties from the list. Then select Preferences > Start Optionsand set Auto-Start HLLAPI Enabler to Yes.
b. Set the Start In Separate Window option to Yes.
c. Set the Alternate Terminal option to Disable.
Make sure that the server and client are not installed on a computer on which another terminalemulator is installed.
Add-ins GuideTerminal Emulator Add-in - Testing and Configuration
HP Unified Functional Testing (12.50) Page 387
NetManange RUMBA
To connect your RUMBA terminal emulator to UFT:
1. Open RUMBA.
2. In RUMBA, select Options > API. The API Options dialog box opens.
3. Click the Identification tab.
4. In the Session Short Name field, type the uppercase letter A.
5. Click OK.
6. Save the profile.
Tip: It is recommended to save the profile before you start testing with UFT. This enables youto configure the terminal emulator once and then reuse the saved settings.
NetManage RUMBA Web-to-Host
To connect your RUMBA Web-to-Host terminal emulator to UFT:
1. Open the RUMBAWeb-to-Host Session Configuration Manager and open a session.
2. In addition to your standard configuration steps in the Configuration Manager:
a. Select Pro client from the Implementation drop-down list.
b. Click HLLAPI Configuration and select A from the Session Short Name drop-down list.
3. Save the profile.
Note:
l For versions 5.x: Only Mainframe Display is supported for the Java client Only Replay issupported for both Java client and Pro client.
l For version 6.x: Java Client is not supported. Only Replay is supported for Pro client.
For more details on supported versions RUMBAWeb-to-Host, see the HP Unified Functional TestingProduct Availability Matrix, available from the HP Support Matrix page (requires an HP passport).
Seagull BlueZone
To connect your BlueZone terminal emulator to UFT:
1. Open BlueZone.
2. In BlueZone, select Options > API. The API Properties dialog box opens.
3. Click the Options tab.
4. In the Short NameSession Identifier field, type the uppercase letter A.
5. Click OK.
6. Save the session.
Add-ins GuideTerminal Emulator Add-in - Testing and Configuration
HP Unified Functional Testing (12.50) Page 388
WRQ Reflection
To connect your Reflection terminal emulator to UFT:
1. Open a new or existing session.
2. Select Setup > Terminal.
3. In the Short Name field, type the uppercase letter A.
4. Click OK.
Zephyr Passport
To connect your Zephyr Passport terminal emulator to UFT:
1. Open a new or existing session.
2. Check that the session shortname (A) Passport.zws appears in the window title bar.
How to Set Your HLLAPI Terminal Emulator to Workwith UFTThe steps below provide a general overview of how to enable testing on your terminal emulatorapplication when working with an emulator that supports HLLAPI. For details on how to configure aspecific emulator, see "How to Configure an Emulator to Work with the Terminal Emulator Add-in" onpage 385.
1. Connect your emulator to the host before running the Terminal Emulator Configuration Wizard andbefore recording each test or business component.
2. Assign the uppercase letter A as the short name for the current emulator session.
3. (Optional) Restart the emulator after changing these settings.
Note: For details on supported emulator versions and protocols, see the HP Unified FunctionalTesting Product Availability Matrix, available from the HP Support Matrix page (requires anHP passport)..
How to Manage Terminal Emulator ConfigurationSettingsThe following steps describe how to manage your terminal emulator configuration settings.
l "Change configuration settings" on the next page
l "Restore default settings for the selected preconfigured emulator" on the next page
l "Restore settings for a user-defined configuration" on the next page
Add-ins GuideTerminal Emulator Add-in - Testing and Configuration
HP Unified Functional Testing (12.50) Page 389
Change configuration settings
The Terminal Emulator Configuration Adjustments dialog box contains check boxes, radio buttons, andoptions that require a numeric or text value.
1. Open the "Terminal Emulator Configuration Adjustments Dialog Box", as described on page 397.
2. Enter a numeric or text value for an option:
a. Click the option once to highlight it.
b. Click the option again or press F2 to access the value to be changed.
c. Change the value as necessary.
d. Click another location in the dialog box to set the value.
3. Click OK to update the current terminal emulator configuration and close the dialog box.
Restore default settings for the selected preconfigured emulator
1. Open the "Terminal Emulator Configuration Adjustments Dialog Box", as described on page 397.
2. Click the Reset button. (This button is enabled only if a preconfigured emulator is selected.)
Restore settings for a user-defined configuration
1. Locate the saved registry file that contains the configuration settings in the <UFT installationfolder>\dat folder on your computer. The file has a .reg extension. (The path for the dat folderin a typical installation is: %ProgramFiles%\HP\Unified Functional Testing\dat.)
2. Double-click the registry file to activate the registry file. A confirmation message opens.
3. Click Yes. A message opens confirming that the information was copied into the registry.
4. Click OK. The settings in the saved file are restored.
Tip: You can also restore the settings for a user-defined terminal emulator, if these settingswere saved previously using the wizard. For details, see "Completing the Terminal EmulatorConfiguration Wizard Page " on page 417.
How to Copy Existing Terminal EmulatorConfigurationsThis task describes how to copy a terminal emulator configuration from another user who has alreadyconfigured the UFT settings for a specific emulator using the Terminal Emulator Configuration Wizard.
For example, if the settings for your terminal emulator were configured and saved to a file on anothercomputer (or on a network drive), you can copy this file to your computer, instead of running the wizardand configuring the settings yourself.
Add-ins GuideTerminal Emulator Add-in - Testing and Configuration
HP Unified Functional Testing (12.50) Page 390
This task includes the following steps:
l "Prerequisites" below
l "Copy the registry file to your computer" below
l "Register the file" below
l "Set the new emulator as the default emulator - Optional" below
l "Modify the emulator settings - Optional" below
l "Results" on the next page
1. Prerequisites
l The existing configuration file must be saved to a registry file, using the Save terminalemulator settings to file option in the wizard's final page. For details, see "Completing theTerminal Emulator Configuration Wizard Page " on page 417.
l Before you copy the saved configuration, make sure you know the vendor name and theemulator name assigned to the configuration, and the exact name and location of the file. Thefile has a .reg extension.
2. Copy the registry file to your computer
a. Locate the registry file containing the configuration settings for your emulator. The file has a.reg extension.
b. Copy the file to the <UFT installation folder>\dat folder on your computer.
The path for the dat folder in a typical installation is: %ProgramFiles%\HP\UnifiedFunctional Testing\dat
3. Register the file
a. Double-click the registry file to open the Registry Editor message box.
b. Click Yes to add the information into the registry. A message opens confirming that theinformation has been copied into the registry.
c. Click OK. The emulator name assigned to this configuration is added to the list of availableterminal emulators for your UFT installation.
4. Set the new emulator as the default emulator - Optional
a. Open UFT with the Terminal Emulator Add-in loaded.
b. Select the new emulator name from the list in the Tools > Options > GUI Testing tab >Terminal Emulator pane, and set it as your default emulator.
5. Modify the emulator settings - Optional
a. Open UFT with the Terminal Emulator Add-in loaded.
b. Open the Terminal Emulator Configuration Wizard. For details, see "Terminal EmulatorConfiguration Wizard Overview" on page 405.
Add-ins GuideTerminal Emulator Add-in - Testing and Configuration
HP Unified Functional Testing (12.50) Page 391
6. Results
After you copy a configuration file from another location, the emulator name assigned to thisconfiguration is added to the list of available terminal emulators for your UFT installation.
Note: If you copy a configuration file after starting UFT, you need to close and reopen UFT tosee the updated list of available emulators.
How to Check the Validity of a Terminal EmulatorConfiguration1. Make sure that a GUI test is open.
2. Open the Terminal Emulator pane of the Options dialog box (Tools > Options > GUI Testing tab >Terminal Emulator node) (described on page 397).
3. Click Validate.
If a problem is detected, a brief description (error response) is displayed in the pane. For details onhandling the error, click Troubleshoot to open a Help page that displays error-specific information.
Validating a Terminal Emulator - Possible Error ResponsesThe following possible error responses may be displayed in the Terminal Emulator pane of the Optionsdialog box (Tools > Options > GUI Testing tab > Terminal Emulator node) when you click the Validatebutton:
l "Invalid HLLAPI DLL" below
l "Cannot detect an open session" on the next page
l "Cannot locate the main window class " on the next page
l "Cannot detect the emulator screen" on the next page
l "Cannot connect to the open session" on the next page
l "Cannot retrieve session text" on page 394
l "Cannot detect open session, or Cannot locate the main window class" on page 394
l "HLLAPI DLL not found" on page 394
l "More than one session open" on page 394
l "Unknown error" on page 394
Invalid HLLAPI DLL
The required HLLAPI or EHLLAPI function cannot be found, because the configured DLL is invalid.
Add-ins GuideTerminal Emulator Add-in - Testing and Configuration
HP Unified Functional Testing (12.50) Page 392
Ensure that you have configured the correct DLL path and name in the Terminal Emulator ConfigurationWizard (Tools > Options > GUI Testing tab > Terminal Emulator node > Open Wizard).
For more details, see the table listing the DLL names used by supported terminal emulators in"Configure HLLAPI Properties Page" on page 409, or the documentation provided by your emulatorprovider.
Cannot detect an open session
UFT cannot detect an open terminal emulator session.
l Ensure that you have opened a current session in your terminal emulator.
l For HLLAPI emulators, ensure that the emulator short session name is set to the uppercase letter A.You may need to restart the emulator after changing this setting.
Cannot locate the main window class
UFT cannot find the terminal emulator main window class name.
l Ensure that the terminal emulator main window class name is configured correctly in the TerminalEmulator Configuration Wizard (Tools > Options > GUI Testing tab > Terminal Emulator node >Open Wizard).
l If the main window class name has a postfix that changes each time you launch the emulator, enteronly the non-changing portion of the name in the Terminal Emulator Configuration Wizard.
Cannot detect the emulator screen
UFT cannot find the terminal emulator main window class name.
l Ensure that the terminal emulator main window class name is configured correctly in the TerminalEmulator Configuration Wizard (Tools > Options > GUI Testing tab > Terminal Emulator node >Open Wizard).
l If the main window class name has a postfix that changes each time you launch the emulator, enteronly the non-changing portion of the name in the Terminal Emulator Configuration Wizard.
Cannot connect to the open session
Although a current session is open, invoking an HLLAPI function resulted in an error.
Restart UFT and then restart the emulator. If this does not resolve the problem, contact your emulatorprovider.
Add-ins GuideTerminal Emulator Add-in - Testing and Configuration
HP Unified Functional Testing (12.50) Page 393
Cannot retrieve session text
UFT cannot display text captured in the current session.
l HLLAPI Emulators—Restart UFT and then restart the emulator. If this does not resolve the problem,contact your emulator provider.
l Non-HLLAPI Emulators—Click Validate again. If the error message is repeated, check that theemulator screen is brought to the front during the validate process (even when using remoteaccess). If this is the case, contact HP Customer Support.
Cannot detect open session, or Cannot locate the main window class
UFT cannot detect an open terminal emulator session, or find the terminal emulator main window classname.
l Ensure that you have opened a current session in your terminal emulator.
l Ensure that the terminal emulator main window class name is configured correctly in the TerminalEmulator Configuration Wizard (Tools > Options > GUI Testing tab > Terminal Emulator node >Open Wizard).
l If the main window class name has a postfix that changes each time you launch the emulator, enteronly the non-changing portion of the name in the Terminal Emulator Configuration Wizard.
HLLAPI DLL not found
UFT cannot find the HLLAPI DLL specified for the selected emulator.
Ensure that you have configured the correct DLL path and name in the Terminal Emulator ConfigurationWizard (Tools > Options > GUI Testing tab > Terminal Emulator node > Open Wizard).
For more details, see the table listing the DLL names used by supported terminal emulators in"Configure HLLAPI Properties Page" on page 409, or the documentation provided by your emulatorprovider.
More than one session open
More than one terminal emulator session is currently open.
Close additional sessions.
Unknown error
The validation process failed due to an unknown error.
Restart UFT and then restart the emulator.
Add-ins GuideTerminal Emulator Add-in - Testing and Configuration
HP Unified Functional Testing (12.50) Page 394
How to Synchronize Steps on Terminal EmulatorsThe following steps describe how to perform various types of synchronization operations. Forconceptual details, see "Run Session Synchronization " on page 384.
l "Insert a synchronization step while recording" below
l "Set synchronization timeout" below
l "Insert a synchronization point for an object" below
l "Wait for a specified text string" on the next page
Insert a synchronization step while recording
1. Select Design > Emulator Synchronization.
2. (Optional) Specify a timeout in milliseconds for the Sync statement, after which the run sessioncontinues regardless of the status of the emulator. If you do not specify a timeout value, UFT usesthe default timeout interval, as described in "Set synchronization timeout" below.
Note:
l You can adjust your emulator configuration to prevent UFT from automatically insertingSync steps for TeScreen objects in your test or business component.
l You can specify the keys that generate Sync steps for TeTextScreen objects.
For details, see "How to Manage Terminal Emulator Configuration Settings" on page 389
Set synchronization timeout
In the Run Pane of the Test Settings Dialog Box (File > Settings > Run node), set the ObjectSynchronization Timeout. For details, see the HP Unified Functional Testing User Guide.
This enables you to specify the maximum interval (in milliseconds) that UFT waits before running eachtest step.
Note:
l This option is not available for business components.
l This setting is also used as the default timeout for the Sync andWaitStringmethods for boththe TeScreen and the TeTextScreen objects if a timeout argument is not specified.
Insert a synchronization point for an object
Select Design > Synchronization Point. For details, see the HP Unified Functional Testing User Guide.
Add-ins GuideTerminal Emulator Add-in - Testing and Configuration
HP Unified Functional Testing (12.50) Page 395
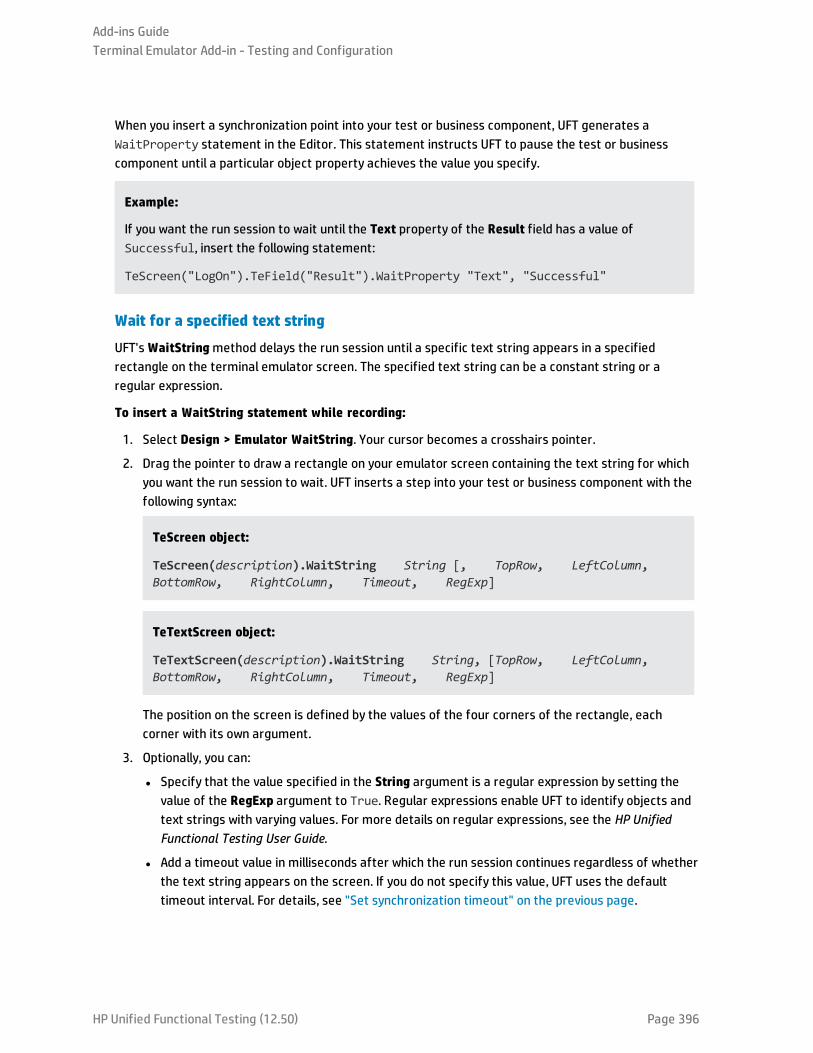
When you insert a synchronization point into your test or business component, UFT generates aWaitProperty statement in the Editor. This statement instructs UFT to pause the test or businesscomponent until a particular object property achieves the value you specify.
Example:
If you want the run session to wait until the Text property of the Result field has a value ofSuccessful, insert the following statement:
TeScreen("LogOn").TeField("Result").WaitProperty "Text", "Successful"
Wait for a specified text string
UFT'sWaitStringmethod delays the run session until a specific text string appears in a specifiedrectangle on the terminal emulator screen. The specified text string can be a constant string or aregular expression.
To insert a WaitString statement while recording:
1. Select Design > Emulator WaitString. Your cursor becomes a crosshairs pointer.
2. Drag the pointer to draw a rectangle on your emulator screen containing the text string for whichyou want the run session to wait. UFT inserts a step into your test or business component with thefollowing syntax:
TeScreen object:
TeScreen(description).WaitString String [, TopRow, LeftColumn,BottomRow, RightColumn, Timeout, RegExp]
TeTextScreen object:
TeTextScreen(description).WaitString String, [TopRow, LeftColumn,BottomRow, RightColumn, Timeout, RegExp]
The position on the screen is defined by the values of the four corners of the rectangle, eachcorner with its own argument.
3. Optionally, you can:
l Specify that the value specified in the String argument is a regular expression by setting thevalue of the RegExp argument to True. Regular expressions enable UFT to identify objects andtext strings with varying values. For more details on regular expressions, see the HP UnifiedFunctional Testing User Guide.
l Add a timeout value in milliseconds after which the run session continues regardless of whetherthe text string appears on the screen. If you do not specify this value, UFT uses the defaulttimeout interval. For details, see "Set synchronization timeout" on the previous page.
Add-ins GuideTerminal Emulator Add-in - Testing and Configuration
HP Unified Functional Testing (12.50) Page 396
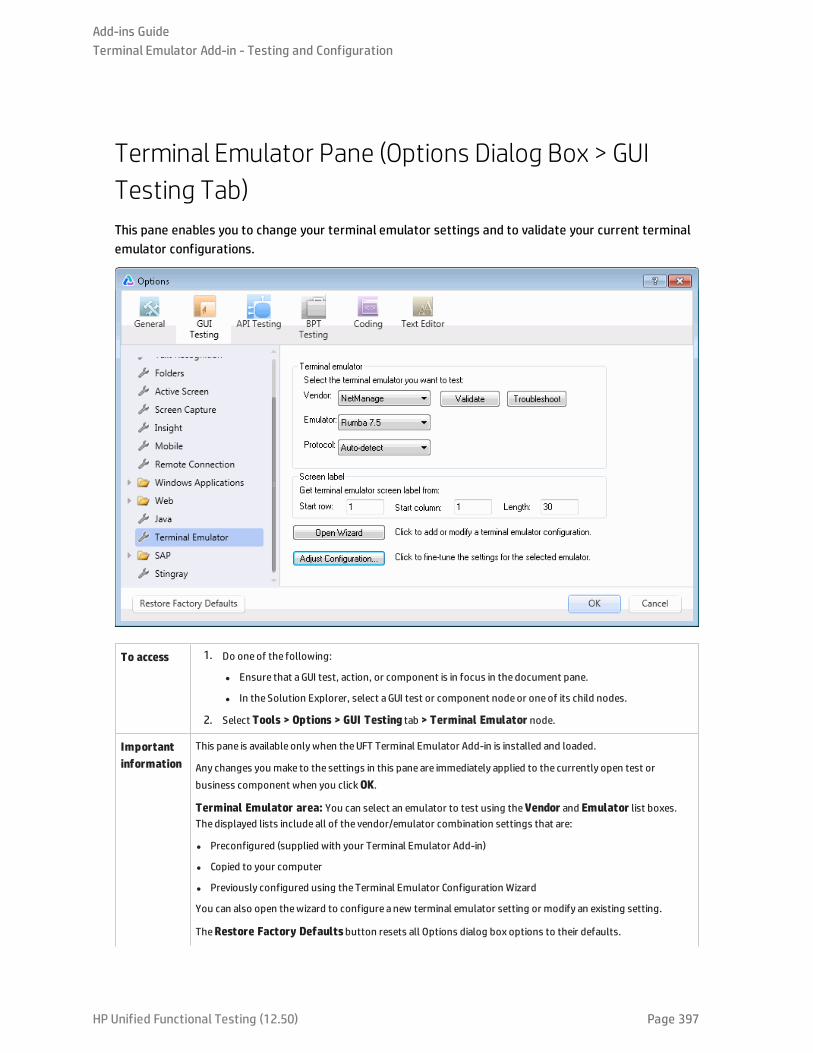
Terminal Emulator Pane (Options Dialog Box > GUITesting Tab)This pane enables you to change your terminal emulator settings and to validate your current terminalemulator configurations.
To access 1. Do oneof the following:
l Ensure that aGUI test, action, or component is in focus in the document pane.
l In the Solution Explorer, select aGUI test or component nodeor oneof its child nodes.
2. Select Tools > Options > GUI Testing tab > Terminal Emulator node.
Importantinformation
This pane is available onlywhen theUFT Terminal Emulator Add-in is installed and loaded.
Any changes you make to the settings in this pane are immediately applied to the currently open test orbusiness component when you clickOK.
Terminal Emulator area: You can select an emulator to test using theVendor and Emulator list boxes.The displayed lists include all of the vendor/emulator combination settings that are:
l Preconfigured (supplied with your Terminal Emulator Add-in)
l Copied to your computer
l Previously configured using the Terminal Emulator Configuration Wizard
You can also open thewizard to configure a new terminal emulator setting or modify an existing setting.
TheRestore Factory Defaultsbutton resets all Options dialog box options to their defaults.
Add-ins GuideTerminal Emulator Add-in - Testing and Configuration
HP Unified Functional Testing (12.50) Page 397
Relevanttasks
"How to Check the Validity of a Terminal Emulator Configuration" on page 392
User interface elements are described below:
UI Elements Description
Vendor The list of available terminal emulator vendors. Select the vendor for your emulator.
Emulator The list of terminal emulators available for the selected vendor. Select the emulator application you want totest.
Protocol Theprotocol that your emulator uses.
Recommended: Auto-detect
Validate Validates the current configurations of the selected emulator, and, if an error is detected, displays a briefdescription that error.
Errors may result from:
l invalid terminal emulator configurations in the Terminal Emulator pane (Tools > Options > GUI Testingtab > Terminal Emulator node).
l invalid configurations madewhen configuring the terminal emulator using the Terminal EmulatorConfiguration Wizard (Tools > Options > GUI Testing tab > Terminal Emulator node > OpenWizard).
l errors in the terminal emulator itself.
For a list of possible error responses, see "Validating a Terminal Emulator - Possible Error Responses"on page 392.
Troubleshoot Opens a specific Help page that provides a troubleshooting solution where available.
Available only if an error response is displayed after you clickValidate.
Example: If you clickValidate and Invalid HLLAPI DLL is displayed, you can clickTroubleshoot to open aHelp topic displaying information on handling this error.
For details, see "Validating a Terminal Emulator - Possible Error Responses" on page 392.
Screen Label The area from which UFT reads the label property of the emulator screen while recording a test or businesscomponent. If the location and length of the label are correctly defined, UFT uses this value as the nameofthe TeScreen object. TheScreen label area is enabled only for emulators that support HLLAPI.
To set the screen label:
Enter theStart row and Start column coordinates that mark the beginning of the emulator label. Definethe size of the label by entering theLength (in characters).
Note: You can change theway that UFT reads the label property of the emulator screen, by adjustingthe configuration settings. For details, see "How to Manage Terminal Emulator ConfigurationSettings" on page 389.
Open Wizard Opens the Terminal Emulator Configuration Wizard. Thewizard enables you to define new settings for aterminal emulator or to modify existing user-defined settings. For details, see "Terminal EmulatorConfiguration Wizard Overview" on page 405.
Add-ins GuideTerminal Emulator Add-in - Testing and Configuration
HP Unified Functional Testing (12.50) Page 398
UI Elements Description
AdjustConfiguration
Opens the "Terminal Emulator Configuration Adjustments Dialog Box""Terminal EmulatorConfiguration Adjustments Dialog Box" (described on page399) to allow changes to existing configurationsettings in exceptional circumstances.
Note: In general, it is recommended to use the Terminal Emulator Configuration Wizard to configureyour emulator screen settings. For details, see "Configure Emulator Screen Settings Page" onpage 414. You should use theAdjust Configurationoption only if you have agood understanding ofyour terminal emulator settings and of the impact that such changes may haveon your tests orbusiness components. For more details, see "How to Manage Terminal Emulator ConfigurationSettings" on page 389.
Terminal Emulator Configuration Adjustments DialogBoxThis dialog box enables you to make adjustments to existing terminal emulator configuration settings.This is required only in exceptional circumstances. In the majority of cases, UFT works successfully withterminal emulators using the supplied preconfigured settings and with the configuration settingsdefined using the Terminal Emulator Configuration Wizard.
Caution: Do not change the configuration settings using the options in this dialog box unless youhave a good understanding of your terminal emulator and of the impact that such changes mayhave on your tests or business components.
The following is an example of the options displayed in the dialog box for an emulator that supportsHLLAPI.
Add-ins GuideTerminal Emulator Add-in - Testing and Configuration
HP Unified Functional Testing (12.50) Page 399
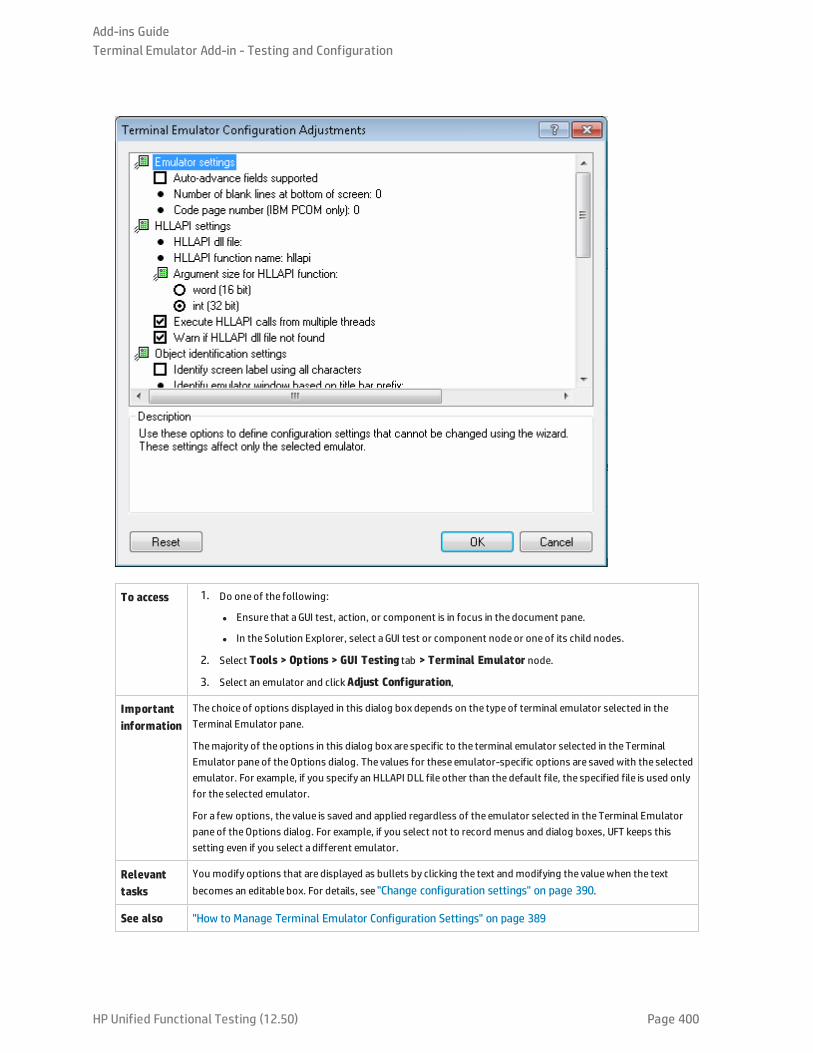
To access 1. Do oneof the following:
l Ensure that aGUI test, action, or component is in focus in the document pane.
l In the Solution Explorer, select aGUI test or component nodeor oneof its child nodes.
2. Select Tools > Options > GUI Testing tab > Terminal Emulator node.
3. Select an emulator and clickAdjust Configuration,
Importantinformation
The choice of options displayed in this dialog box depends on the typeof terminal emulator selected in theTerminal Emulator pane.
Themajority of the options in this dialog box are specific to the terminal emulator selected in the TerminalEmulator paneof theOptions dialog. The values for these emulator-specific options are saved with the selectedemulator. For example, if you specify an HLLAPI DLL file other than the default file, the specified file is used onlyfor the selected emulator.
For a few options, the value is saved and applied regardless of the emulator selected in the Terminal Emulatorpaneof theOptions dialog. For example, if you select not to record menus and dialog boxes, UFT keeps thissetting even if you select a different emulator.
Relevanttasks
You modify options that are displayed as bullets by clicking the text and modifying the valuewhen the textbecomes an editable box. For details, see "Change configuration settings" on page 390.
See also "How to Manage Terminal Emulator Configuration Settings" on page 389
Add-ins GuideTerminal Emulator Add-in - Testing and Configuration
HP Unified Functional Testing (12.50) Page 400
User interface elements are described below:
UI Elements Description
EmulatorSettings
The following options enable you to define configuration settings that cannot be changed using thewizard:
l Auto-advance fields supported. Auto-advance fields allow an application to proceed automatically tothe next screen or field after input of a predefined number of characters without pressing ENTER oranother key.
If your emulator supports auto-advance fields, select this check box to enableUFT to record Setstatements on these fields.
Displayed for: Emulators that support HLLAPI.
l Number of blank lines at bottom of screen. Someemulators reserve blank lines at the bottom of thescreen. If the screen size changes, these lines may distort UFT's calculation of field locations. This optionenables you to specify the number of blank lines at the bottom of the emulator screen. It is recommendedto use the Terminal Emulator Configuration Wizard to configure this setting, but you can also modify thesetting using this option.
Enter the number of lines that your emulator reserves at the bottom of the screen. UFT includes this valuein its algorithm for identifying field locations.
l Code page number (IBM PCOM only). If you are using an IBM PCOM emulator with a languageotherthan English, enter the codepagenumber for this language. For example, for theGerman languagekeyboard, enter the value1252. To use the default codepage conversion, specify0. To view a list oflanguages and their codepagenumbers, select Regional Options in theWindows Control Panel andselect theAdvancedbutton in theGeneral tab.
UFT uses this codepage to correctly identify the keys you record.
HLLAPISettings
The following options enable you to define configuration settings for the selected emulator. They aredisplayed only for emulators that support HLLAPI.
l HLLAPI .dll file.UFT uses theHLLAPI DLL file specified for this emulator to connect to the emulator andto retrieve data concerning its current status.
If you are using a customized version of a preconfigured emulator, you may need to specify a different DLLfile name.
l HLLAPI function name.TheHLLAPI DLL for this emulator uses this function as the entry point for allHLLAPI calls.
If you are using a customized version of a preconfigured emulator, you may need to specify a differentfunction name.
l Argument size for HLLAPI function.For most emulators, theHLLAPI function receives 16-bit (word)arguments. For someemulators, such as IBM PCOM, theHLLAPI function receives 32-bit (integer)arguments.
Select the correct argument size for the selected emulator:word (16 bits) or integer (32 bits).
l Execute HLLAPI calls from multiple threads. Someemulators allow HLLAPI calls frommultiplethreads, while others require all HLLAPI calls to be executed from the same thread. (Selected by default fora preconfigured emulator configuration.)
Clear this check box to instruct UFT to open a separate process for HLLAPI calls and to execute all HLLAPIcalls from this single thread.
l Warn if HLLAPI dll file not found. Instructs UFT to display awarning messagewhen theHLLAPI DLLfile for the current configuration cannot be found. For example, UFT warns you if you try to use theTerminal Emulator Add-in before you have installed the emulator itself.
Add-ins GuideTerminal Emulator Add-in - Testing and Configuration
HP Unified Functional Testing (12.50) Page 401
UI Elements Description
If you clear this check box and UFT cannot find the required DLL file, it may bedifficult to determinewhyUFT is not recording successfully. It is therefore recommended that you leave this option selected.
Applies to: All terminal emulator configurations, regardless of the currently selected emulator.
ObjectIdentificationSettings
The following options enable you to configure theway UFT identifies objects for the selected terminalemulator:
l Identify screen label using all characters. The label property value is used to identify the TeScreentest object. The location and length of the label are defined for the selected emulator in the TerminalEmulator pane. For more details, see "Terminal Emulator Pane (Options Dialog Box > GUI TestingTab)" on page 397.
By default, only the protected characters in the defined label area are captured for the label propertyvalue.
Select this option if you want UFT to capture all the characters in the label area for the label property,including any unprotected or hidden characters that may form part of the label.
l Identify emulator window based on title bar prefix.UFT normally identifies the emulator windowby its object class. With a user-defined configuration, the class namemay not be unique. For example, anemulator may use ageneric class name, such as Afx. In such cases, you can instruct UFT to identify thewindow based on a static prefix in thewindow title bar.
To instruct UFT to use aprefix to identify the correct window, specify the text string for the prefix.
When no value is specified, UFT uses the object class to identify the emulator window.
RecordSettings
The following options enable you to configure theway UFT records operations:
l Communicate with server using these keys.When recording without HLLAPI support, UFT insertsSync steps after specified keys are pressed, to synchronize the communication between the emulatorand the server. The keys are identified by their virtual key codes.
Default:ENTER key—virtual key code value: 13 (0D Hex). You can specify different or additional keys. Forexample, you can add theCTRL key—virtual key code value: 17 (11 Hex).
Specify thedecimal value of the virtual key code for each key, separated by a semicolon (;). UFT inserts aSync step whenever oneof these keys is pressed. For more details on synchronization, see "How toSynchronize Steps on Terminal Emulators" on page 395.
For a list of virtual key codes, seehttp://msdn.microsoft.com/en-us/library/dd375731(VS.85).aspx.The list on theMSDN pagedisplays theHex values for each key code. You must convert the value todecimal and specify the decimal value of the key codes when you add them to the list for this option.
Applies to: All terminal emulator configurations, regardless of the currently selected emulator.
l Record operations on menus and dialog boxes. By default, UFT records operations on themenus ofthe terminal emulator window and the dialog boxes that open as a result of thesemenu option selections.
Clear this check box if you do not want UFT to record thesemenu and dialog box operations. For example,you may not want emulator-specific menu and dialog box steps in your test or business component ifcross-emulator compatibility is important, or if these steps are not relevant to your test or businesscomponent.
Applies to: All terminal emulator configurations, regardless of the currently selected emulator.
Add-ins GuideTerminal Emulator Add-in - Testing and Configuration
HP Unified Functional Testing (12.50) Page 402
UI Elements Description
RecordSettings(continued)
l Record mode. In Text screenmode, UFT records operations as TeTextScreen steps, based on the screencoordinates. In Context-sensitivemode, UFT records field operations as TeField steps.
By default, all preconfigured terminal emulators and user-defined emulators configured as fullysupporting HLLAPI are set to context-sensitivemode. Select Text screen mode if you are using anemulator that supports HLLAPI and you want to test in terms of coordinates instead of TeField objects.
You can use thewizard to change themode for a user-defined terminal emulator. For more details, see"Terminal Emulator Configuration Wizard Overview" on page 405.
Note: For emulators that do not support HLLAPI and those configured as supporting text-onlyHLLAPI operations, UFT always uses Text screenmodeand this option is not available.
l Record steps without synchronizing. By default, when UFT recognizes a user operation in the terminalemulator application, such as keyboard input or amouse click, UFT suspends the processing of the userinput in the application. After the recorded statement is added to the test or business component scriptand theActive Screen information has been saved, UFT releases the emulator and allows it to process theuser input.
Someemulators, such as IBM PCOM, do not support running HLLAPI while user input processing issuspended, and requireUFT to release the emulator process before executing HLLAPI calls.
If you experience unexpected behavior while trying to record, you may need to select this option. Forexample, theremay beno response from UFT or the emulator (or both). If you do select this option, makesure that you allow sufficient time for UFT to record each step before performing another operation.
RecordSettings(continued)
l Record cursor position.When recording in a text screen or field, UFT usesTeTextScreen.ClickPosition or TeField.SetCursorPos to record the cursor position.
Clear this check box if you do not want to record the cursor position in your test or business component.
Applies to:All terminal emulator configurations.
l Trim trailing spaces in fields.When recording in Context-sensitivemode, fields may contain trailingspaces or other "white characters", such as tab symbols.
Select this check box to instruct UFT to trim these characters. If you select this option, specify theminimum length of fields to be trimmed. Fields containing fewer than the specified number of charactersremain unchanged. The default is 5 characters.
Clear the check box to leave the field content unchanged.
Displayed for:Emulators that support HLLAPI.
l Use property patterns.Select this check box to use property patterns to record regular expressions inidentification properties, such as for date and time values in a screen label.
For more details on property patterns, seeUsing Property Patterns to Identify Objects (Advanced) inPropPattern.htm. This file is located in thehelp subfolder of theUFT installation folder.
You can accept the default property pattern configuration file, change its contents, or specify a differentproperty pattern configuration file. The default file is designed for applications where the current timeforms part of the screen label. It defines regular expressions that replace the current time in the screenlabel, creating a reliable description and readable name for the screen.
Applies to:All terminal emulator configurations, regardless of the currently selected emulator.
Run Settings The following options enable you to configure theway UFT runs tests or business components for theselected terminal emulator, if the emulator supports HLLAPI:
l Beep when Sync operations are performed. Indicates whether UFT beeps after performing each Sync
Add-ins GuideTerminal Emulator Add-in - Testing and Configuration
HP Unified Functional Testing (12.50) Page 403

UI Elements Description
operation during a run session.
Applies to:All terminal emulator configurations, regardless of the currently selected emulator.
l Run steps containing special emulator keys using keyboard events. Instructs UFT to performSendKey commands using keyboard events. If you do not use this option to specify key codes, UFTperforms SendKey commands using the corresponding HLLAPI function.
Someemulators, for example, Attachmate Extra!, recognize theRESET command while the emulator isbusy onlywhen it is sent using keyboard events. In theKeys for RESET functionoption, specify thekeyboard combination of the virtual key codeby specifying the decimal value of each key in the code,separated by semicolons (;).
l Time between emulator status checks (in milliseconds). During aSync step, UFT waits thespecified period of timebefore checking the emulator status. UFT repeats these checks at the specifiedinterval until the emulator status changes to Ready (or until theSync timeout is reached), and thencontinues with the run session. For more details on synchronization, see "How to Synchronize Steps onTerminal Emulators" on page 395.
Specify the interval (in milliseconds) between emulator status checks.
Default:200
Note: Specifying a very long interval could significantly increase the time your tests or businesscomponents take to run.
Checkpoints and Output Values - Terminal EmulatorsWhile recording your test, you can add text checkpoints for the following:
l TeScreen and TeTextScreen objects
l status bar of the terminal emulator window
l dialog boxes that open after menu options are selected
While editing your test or business component, you can:
l add text checkpoints for TeScreen objects.
l add text checkpoints for TeTextScreen objects if the test was recorded using an emulator with fullHLLAPI support that was configured to record in Text screenmode. For details on changing theemulator mode, see "How to Manage Terminal Emulator Configuration Settings" on page 389.
l output property or text values from the objects in your terminal emulator application to use in yourtest or business component.
Guidelines for Using Checkpoints and Output Values
l You can create bitmap checkpoints for TeWindow, TeScreen and TeTextScreen objects, but not forTeField objects.
l You can create text output values (tests only) only for TeScreen and TeTextScreen objects.
Add-ins GuideTerminal Emulator Add-in - Testing and Configuration
HP Unified Functional Testing (12.50) Page 404

l In the terminal emulator window you can add text checkpoints or output values (tests only) andstandard checkpoints and output values for the status bar and the dialog boxes that open from themenu options. UFT recognizes these as standard Windows objects. For more details on the propertiesof standard Windows objects, see the Standard Windows section of the HP UFT Object ModelReference for GUI Testing.
For details on standard, text, and bitmap checkpoints, and on standard and text output values, see theHP Unified Functional Testing User Guide.
Terminal Emulator Configuration Wizard OverviewThis wizard guides you through the process of configuring the settings UFT needs to identify yourterminal emulator. If your emulator is not in the list of preconfigured settings to select, you can definethe way UFT identifies your emulator.
To access 1. Open UFT with the Terminal Emulator Add-in loaded.
2. In UFT, select Tools > Options > GUI Testing tab > Terminal Emulator node.
3. In the Terminal Emulator pane, clickOpen Wizard.
Note: After you install UFT, the Terminal Emulator Configuration Wizard opens automatically if youselected Run the Terminal Emulator wizard in theAdditional Installation Requirements dialog box.
Importantinformation
l To configure a terminal emulator that supports HLLAPI, make sure that you close any application that iscurrently using theHLLAPI .dll file before you begin using thewizard. Otherwise, thewizard cannotconnect to your terminal emulator.
l If terminal emulator settings for UFT are already configured on another computer, you can copy an existingconfiguration file onto your computer, instead of running thewizard. For details, see "How to CopyExisting Terminal Emulator Configurations" on page 390.
l After you run thewizard, the terminal emulator you selected is set as the default emulator when you openUFT with the Terminal Emulator Add-in loaded.
Wizard map TheTerminal Emulator Configuration Wizard contains:
"Terminal Emulator Configuration Wizard Welcome Page" (page406> "Specify Wizard Operation Page" (page407) > "Emulator Setup Page" (page408) > "Configure HLLAPI Properties Page" (page409>"HLLAPI Configuration Test Page" (page410> "Configure Emulator Classes Page" (page413> "ConfigureEmulator Screen Settings Page" (page414> "Completing the Terminal Emulator Configuration WizardPage " (page417
Note: Pages that are in parentheses open according to the option selected in the previous page.Therefore, not all pages are displayed for every option.
See also l You can check your configurations by clicking theValidate button in theTerminal Emulator paneof theOptions dialog box. A description of any detected problem is displayed in the pane, as well as a link to aspecific troubleshooting Help page. For details, see "How to Check the Validity of a Terminal EmulatorConfiguration" on page 392.
l You can use thewizard to select a different emulator for usewith your tests or business components. Formore details, see "Terminal Emulator Configuration Wizard Overview" above.
Add-ins GuideTerminal Emulator Add-in - Testing and Configuration
HP Unified Functional Testing (12.50) Page 405
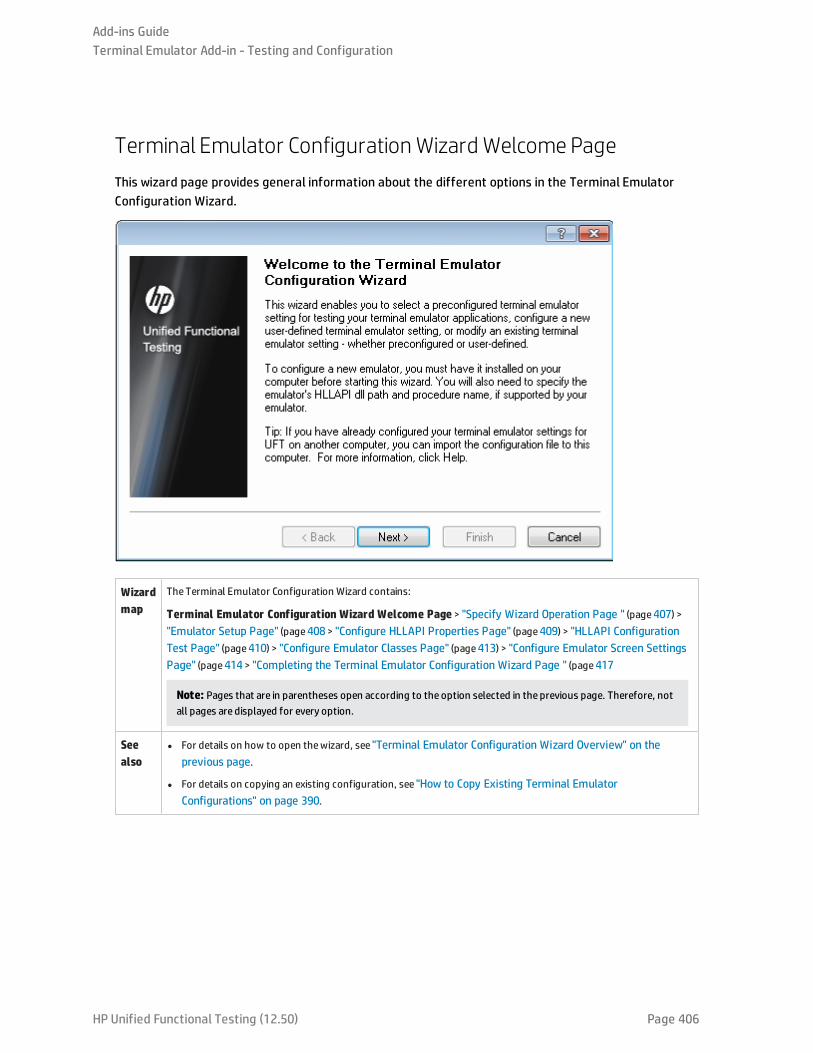
Terminal Emulator Configuration Wizard Welcome PageThis wizard page provides general information about the different options in the Terminal EmulatorConfiguration Wizard.
Wizardmap
TheTerminal Emulator Configuration Wizard contains:
Terminal Emulator Configuration Wizard Welcome Page > "Specify Wizard Operation Page " (page407) >"Emulator Setup Page" (page408> "Configure HLLAPI Properties Page" (page409) > "HLLAPI ConfigurationTest Page" (page410) > "Configure Emulator Classes Page" (page413) > "Configure Emulator Screen SettingsPage" (page414> "Completing the Terminal Emulator Configuration Wizard Page " (page417
Note: Pages that are in parentheses open according to the option selected in the previous page. Therefore, notall pages are displayed for every option.
Seealso
l For details on how to open thewizard, see "Terminal Emulator Configuration Wizard Overview" on theprevious page.
l For details on copying an existing configuration, see "How to Copy Existing Terminal EmulatorConfigurations" on page 390.
Add-ins GuideTerminal Emulator Add-in - Testing and Configuration
HP Unified Functional Testing (12.50) Page 406
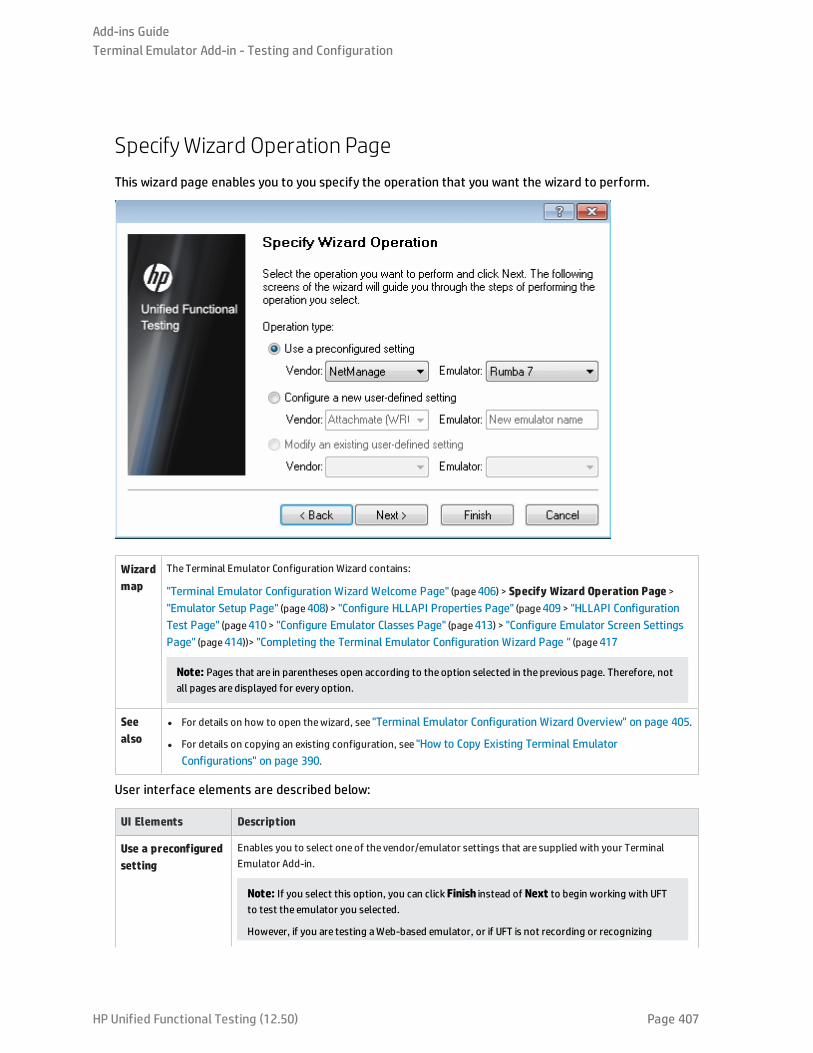
SpecifyWizard Operation PageThis wizard page enables you to you specify the operation that you want the wizard to perform.
Wizardmap
TheTerminal Emulator Configuration Wizard contains:
"Terminal Emulator Configuration Wizard Welcome Page" (page406) > Specify Wizard Operation Page >"Emulator Setup Page" (page408) > "Configure HLLAPI Properties Page" (page409> "HLLAPI ConfigurationTest Page" (page410> "Configure Emulator Classes Page" (page413) > "Configure Emulator Screen SettingsPage" (page414))> "Completing the Terminal Emulator Configuration Wizard Page " (page417
Note: Pages that are in parentheses open according to the option selected in the previous page. Therefore, notall pages are displayed for every option.
Seealso
l For details on how to open thewizard, see "Terminal Emulator Configuration Wizard Overview" on page 405.
l For details on copying an existing configuration, see "How to Copy Existing Terminal EmulatorConfigurations" on page 390.
User interface elements are described below:
UI Elements Description
Use a preconfiguredsetting
Enables you to select oneof the vendor/emulator settings that are supplied with your TerminalEmulator Add-in.
Note: If you select this option, you can clickFinish instead of Next to begin working with UFTto test the emulator you selected.
However, if you are testing aWeb-based emulator, or if UFT is not recording or recognizing
Add-ins GuideTerminal Emulator Add-in - Testing and Configuration
HP Unified Functional Testing (12.50) Page 407
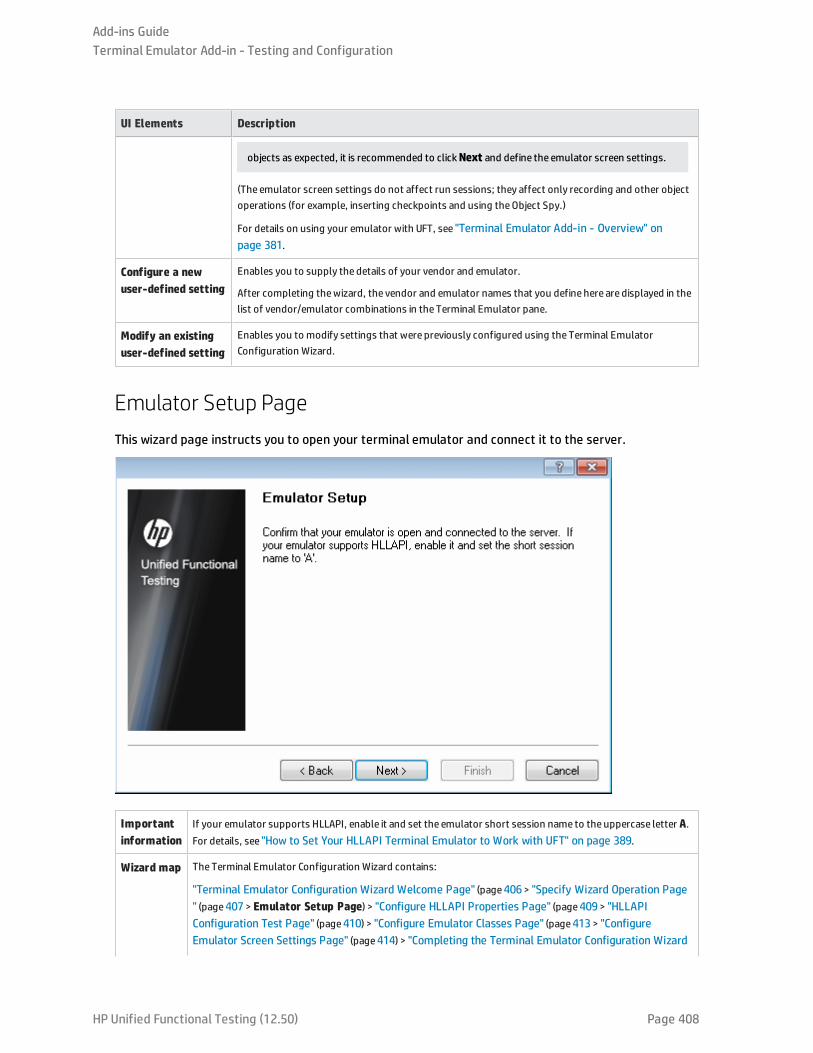
UI Elements Description
objects as expected, it is recommended to clickNext and define the emulator screen settings.
(The emulator screen settings do not affect run sessions; they affect only recording and other objectoperations (for example, inserting checkpoints and using theObject Spy.)
For details on using your emulator with UFT, see "Terminal Emulator Add-in - Overview" onpage 381.
Configure a newuser-defined setting
Enables you to supply the details of your vendor and emulator.
After completing thewizard, the vendor and emulator names that you define here are displayed in thelist of vendor/emulator combinations in the Terminal Emulator pane.
Modify an existinguser-defined setting
Enables you to modify settings that were previously configured using the Terminal EmulatorConfiguration Wizard.
Emulator Setup PageThis wizard page instructs you to open your terminal emulator and connect it to the server.
Importantinformation
If your emulator supports HLLAPI, enable it and set the emulator short session name to the uppercase letter A.For details, see "How to Set Your HLLAPI Terminal Emulator to Work with UFT" on page 389.
Wizard map TheTerminal Emulator Configuration Wizard contains:
"Terminal Emulator Configuration Wizard Welcome Page" (page406> "Specify Wizard Operation Page" (page407> Emulator Setup Page) > "Configure HLLAPI Properties Page" (page409> "HLLAPIConfiguration Test Page" (page410) > "Configure Emulator Classes Page" (page413> "ConfigureEmulator Screen Settings Page" (page414) > "Completing the Terminal Emulator Configuration Wizard
Add-ins GuideTerminal Emulator Add-in - Testing and Configuration
HP Unified Functional Testing (12.50) Page 408
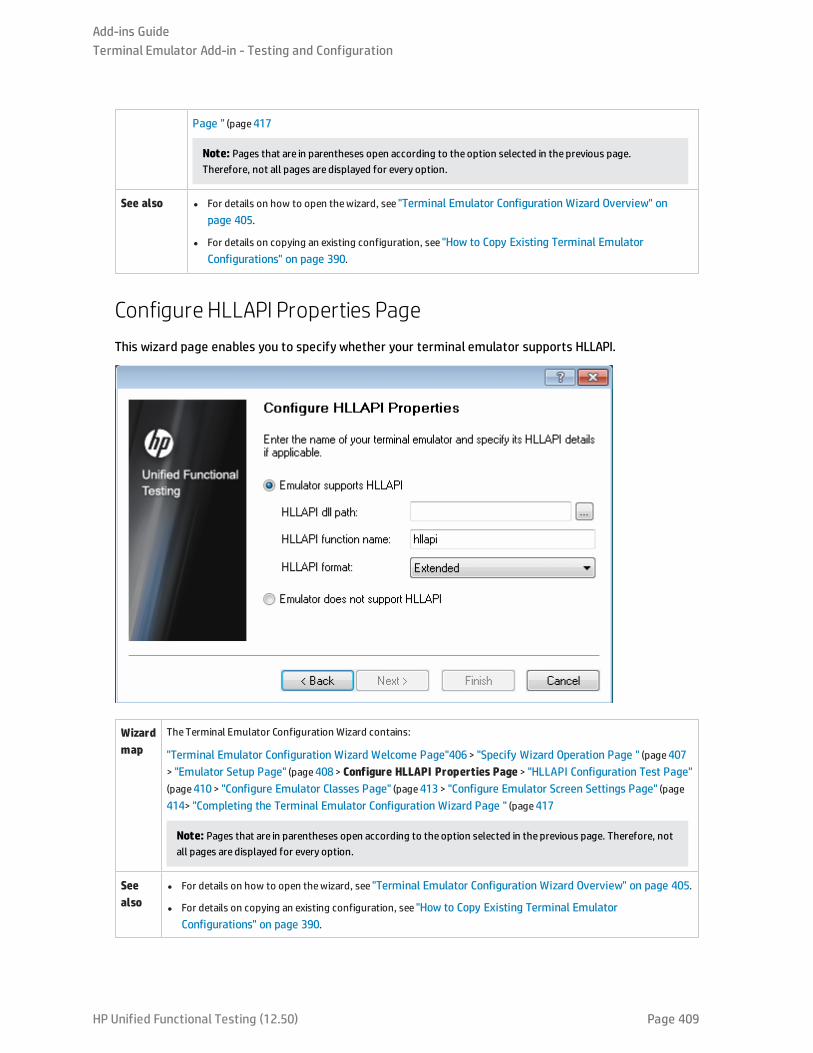
Page " (page417
Note: Pages that are in parentheses open according to the option selected in the previous page.Therefore, not all pages are displayed for every option.
See also l For details on how to open thewizard, see "Terminal Emulator Configuration Wizard Overview" onpage 405.
l For details on copying an existing configuration, see "How to Copy Existing Terminal EmulatorConfigurations" on page 390.
Configure HLLAPI Properties PageThis wizard page enables you to specify whether your terminal emulator supports HLLAPI.
Wizardmap
TheTerminal Emulator Configuration Wizard contains:
"Terminal Emulator Configuration Wizard Welcome Page"406> "Specify Wizard Operation Page " (page407> "Emulator Setup Page" (page408> Configure HLLAPI Properties Page > "HLLAPI Configuration Test Page"(page410> "Configure Emulator Classes Page" (page413> "Configure Emulator Screen Settings Page" (page414> "Completing the Terminal Emulator Configuration Wizard Page " (page417
Note: Pages that are in parentheses open according to the option selected in the previous page. Therefore, notall pages are displayed for every option.
Seealso
l For details on how to open thewizard, see "Terminal Emulator Configuration Wizard Overview" on page 405.
l For details on copying an existing configuration, see "How to Copy Existing Terminal EmulatorConfigurations" on page 390.
Add-ins GuideTerminal Emulator Add-in - Testing and Configuration
HP Unified Functional Testing (12.50) Page 409
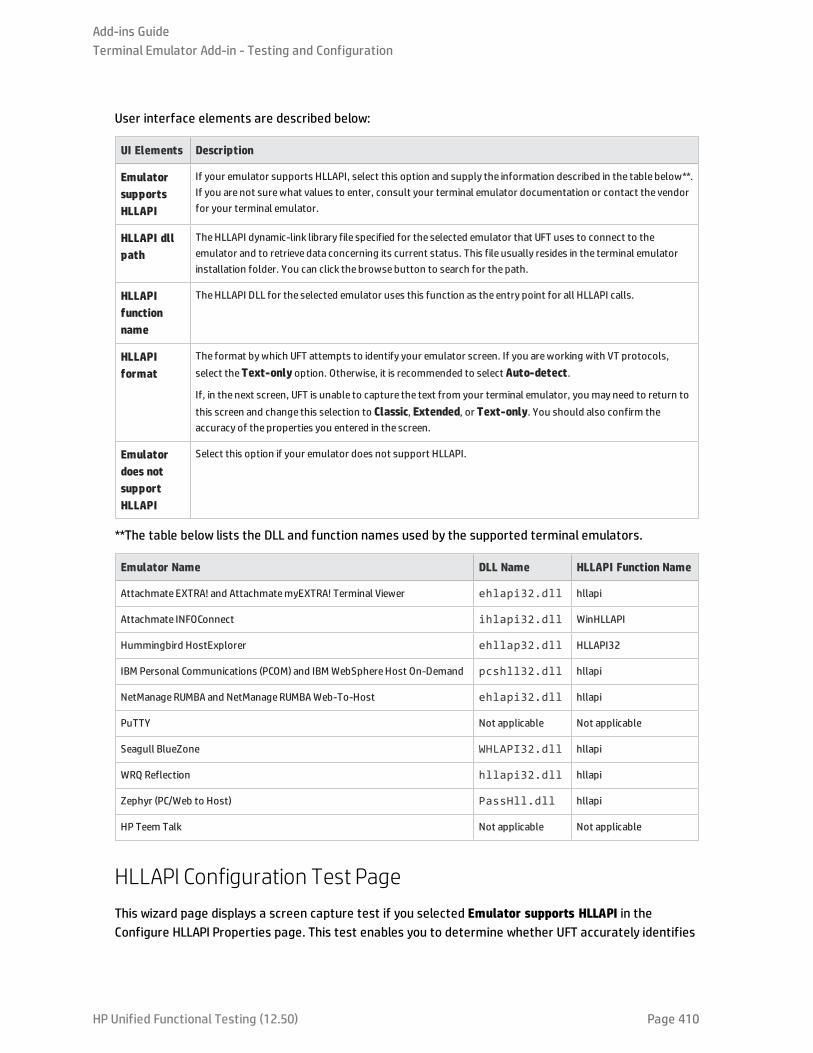
User interface elements are described below:
UI Elements Description
EmulatorsupportsHLLAPI
If your emulator supports HLLAPI, select this option and supply the information described in the table below**.If you are not surewhat values to enter, consult your terminal emulator documentation or contact the vendorfor your terminal emulator.
HLLAPI dllpath
TheHLLAPI dynamic-link library file specified for the selected emulator that UFT uses to connect to theemulator and to retrieve data concerning its current status. This file usually resides in the terminal emulatorinstallation folder. You can click the browsebutton to search for the path.
HLLAPIfunctionname
TheHLLAPI DLL for the selected emulator uses this function as the entry point for all HLLAPI calls.
HLLAPIformat
The format bywhich UFT attempts to identify your emulator screen. If you areworking with VT protocols,select theText-only option. Otherwise, it is recommended to select Auto-detect.
If, in the next screen, UFT is unable to capture the text from your terminal emulator, you may need to return tothis screen and change this selection to Classic, Extended, or Text-only. You should also confirm theaccuracy of the properties you entered in the screen.
Emulatordoes notsupportHLLAPI
Select this option if your emulator does not support HLLAPI.
**The table below lists the DLL and function names used by the supported terminal emulators.
Emulator Name DLL Name HLLAPI Function Name
Attachmate EXTRA! and AttachmatemyEXTRA! Terminal Viewer ehlapi32.dll hllapi
Attachmate INFOConnect ihlapi32.dll WinHLLAPI
Hummingbird HostExplorer ehllap32.dll HLLAPI32
IBM Personal Communications (PCOM) and IBM WebSphereHost On-Demand pcshll32.dll hllapi
NetManageRUMBA and NetManageRUMBAWeb-To-Host ehlapi32.dll hllapi
PuTTY Not applicable Not applicable
Seagull BlueZone WHLAPI32.dll hllapi
WRQ Reflection hllapi32.dll hllapi
Zephyr (PC/Web to Host) PassHll.dll hllapi
HP Teem Talk Not applicable Not applicable
HLLAPI Configuration Test PageThis wizard page displays a screen capture test if you selected Emulator supports HLLAPI in theConfigure HLLAPI Properties page. This test enables you to determine whether UFT accurately identifies
Add-ins GuideTerminal Emulator Add-in - Testing and Configuration
HP Unified Functional Testing (12.50) Page 410
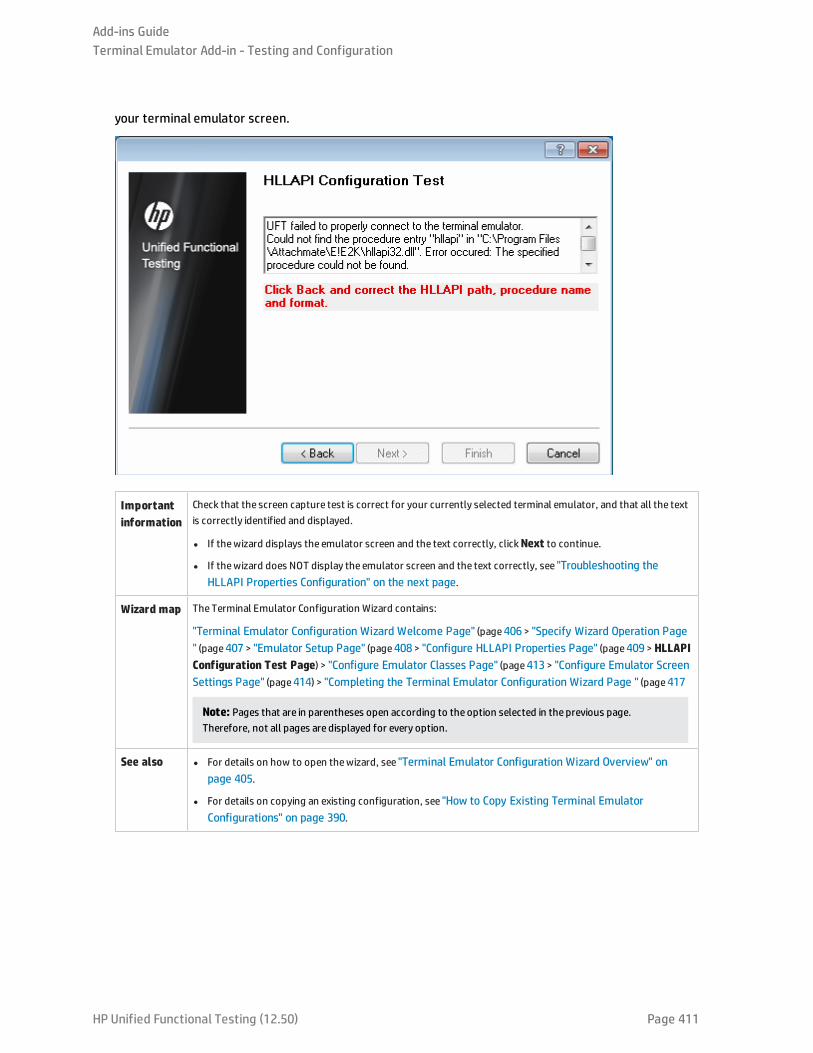
your terminal emulator screen.
Importantinformation
Check that the screen capture test is correct for your currently selected terminal emulator, and that all the textis correctly identified and displayed.
l If thewizard displays the emulator screen and the text correctly, clickNext to continue.
l If thewizard does NOT display the emulator screen and the text correctly, see "Troubleshooting theHLLAPI Properties Configuration" on the next page.
Wizard map TheTerminal Emulator Configuration Wizard contains:
"Terminal Emulator Configuration Wizard Welcome Page" (page406> "Specify Wizard Operation Page" (page407> "Emulator Setup Page" (page408> "Configure HLLAPI Properties Page" (page409>HLLAPIConfiguration Test Page) > "Configure Emulator Classes Page" (page413> "Configure Emulator ScreenSettings Page" (page414) > "Completing the Terminal Emulator Configuration Wizard Page " (page417
Note: Pages that are in parentheses open according to the option selected in the previous page.Therefore, not all pages are displayed for every option.
See also l For details on how to open thewizard, see "Terminal Emulator Configuration Wizard Overview" onpage 405.
l For details on copying an existing configuration, see "How to Copy Existing Terminal EmulatorConfigurations" on page 390.
Add-ins GuideTerminal Emulator Add-in - Testing and Configuration
HP Unified Functional Testing (12.50) Page 411

Troubleshooting the HLLAPI Properties Configuration
If the wizard does not display the text correctly, or if the HLLAPI configuration test fails, do thefollowing:
1. Click Back. Before repeating the test:
l Make sure your emulator is connected to the host and the short name for the session is set tothe uppercase letter A. For details, see "How to Set Your HLLAPI Terminal Emulator to Work withUFT" on page 389.
l Check that the settings you entered in the "Configure HLLAPI Properties Page" are accurate(DLL path, procedure, format). For details, see "Configure HLLAPI Properties Page" on page 409.
l Make sure that the HLLAPI .dll file you specified in the DLL path is not in use by UFT oranother application.
If the .dll file is currently in use by another application, click Cancel to close the wizard, closethe application using the DLL, and restart the wizard.
If the .dll file is currently in use by UFT, select a different emulator and create a new test.Then reopen the wizard and modify the original configuration as required.
2. If the display is still not correct, click Back and, in the Configure HLLAPI Properties page, change theHLLAPI format to Text-only. Use the Text-only option if you are working with a VT protocol, or ifyou have begun working in UFT and encountered problems with recording and running tests orbusiness components. For details, see "Configure HLLAPI Properties Page" on page 409.
3. If the above tips do not solve the problem, click Back and, in the Configure HLLAPI Properties page,select Emulator does not support HLLAPI. For details, see "Configure HLLAPI Properties Page" onpage 409.
Tip: If you have a good understanding of your emulator, you may be able to solve anyproblems you experience by adjusting the configuration settings. For details, see "How toManage Terminal Emulator Configuration Settings" on page 389.
Add-ins GuideTerminal Emulator Add-in - Testing and Configuration
HP Unified Functional Testing (12.50) Page 412
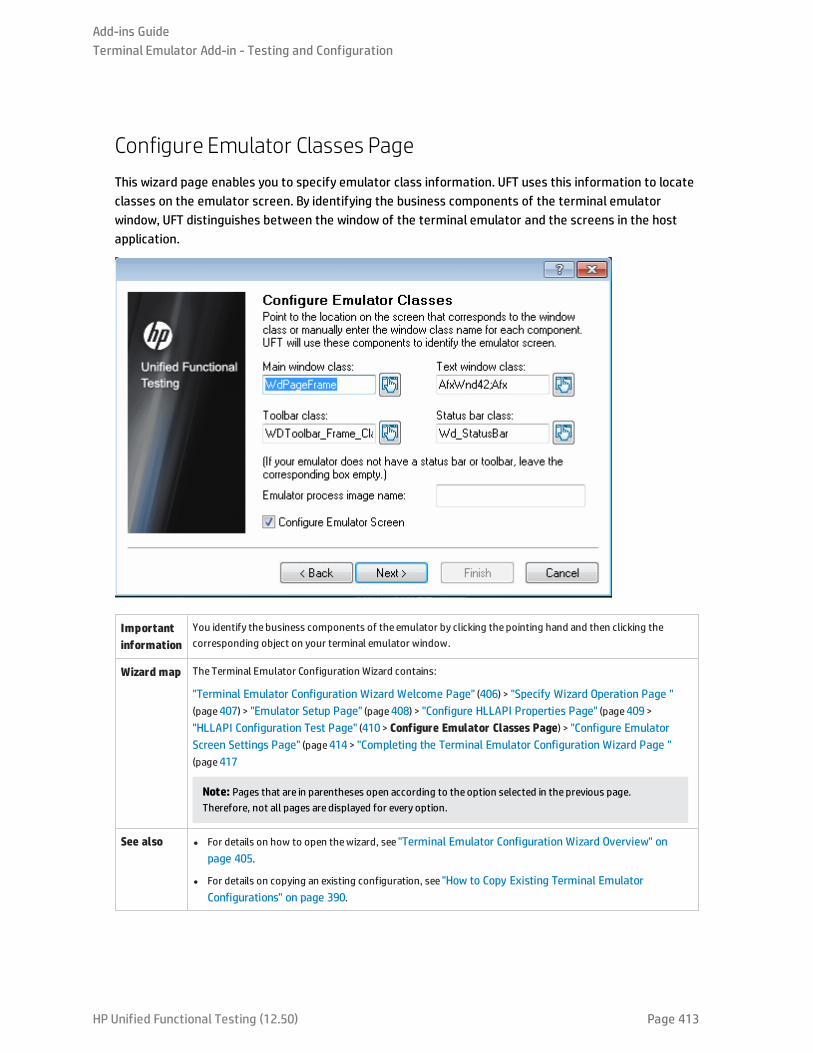
Configure Emulator Classes PageThis wizard page enables you to specify emulator class information. UFT uses this information to locateclasses on the emulator screen. By identifying the business components of the terminal emulatorwindow, UFT distinguishes between the window of the terminal emulator and the screens in the hostapplication.
Importantinformation
You identify the business components of the emulator by clicking the pointing hand and then clicking thecorresponding object on your terminal emulator window.
Wizard map TheTerminal Emulator Configuration Wizard contains:
"Terminal Emulator Configuration Wizard Welcome Page" (406) > "Specify Wizard Operation Page "(page407) > "Emulator Setup Page" (page408) > "Configure HLLAPI Properties Page" (page409>"HLLAPI Configuration Test Page" (410> Configure Emulator Classes Page) > "Configure EmulatorScreen Settings Page" (page414> "Completing the Terminal Emulator Configuration Wizard Page "(page417
Note: Pages that are in parentheses open according to the option selected in the previous page.Therefore, not all pages are displayed for every option.
See also l For details on how to open thewizard, see "Terminal Emulator Configuration Wizard Overview" onpage 405.
l For details on copying an existing configuration, see "How to Copy Existing Terminal EmulatorConfigurations" on page 390.
Add-ins GuideTerminal Emulator Add-in - Testing and Configuration
HP Unified Functional Testing (12.50) Page 413
User interface elements are described below (unlabeled elements are shown in angle brackets):
UI Elements Description
<emulator classoptions>
You identify the business components of the emulator by clicking the pointing hand and then clicking thecorresponding object on your terminal emulator window.
l Main window class.Theuppermost title bar of themain emulator window.
l Text window class.The text within the emulator screen.
l Toolbar class.The terminal emulator's toolbar (if applicable).
l Status bar class.The lowest status bar of themain emulator window (if applicable).
EmulatorProcess ImageName
Theprocess name for the emulator. (Thewizard detects the process name for the emulator and displays itin this box after identifying the emulator main window class.)
UFT uses this process name to identify the correct process for this terminal emulator when recording andrunning tests or business components.
Make sure that the displayed process name is correct for this emulator.
Tip: You can view the imagenames of the currently loaded processes in the Image Name column oftheWindows TaskManager Processes tab.
ConfigureEmulatorScreen
Select this check box to configure your emulator screen correctly for usewith UFT if:
l Your emulator does not support HLLAPI.
l Your emulator supports HLLAPI, but you want to review or change the configuration settings for theemulator screen.
Note: If you do not select this check box, the Terminal Emulator Add-in automatically:
1. Retrieves the configuration settings for the emulator screen.
2. Adjusts the screen size and alignment using aproprietary algorithm with the settings retrievedfor the emulator. These settings are normally correct, so you may not need to select this checkbox.
Configure Emulator Screen Settings PageThis wizard page enables you to specify the settings of the terminal emulator text screen.
Add-ins GuideTerminal Emulator Add-in - Testing and Configuration
HP Unified Functional Testing (12.50) Page 414
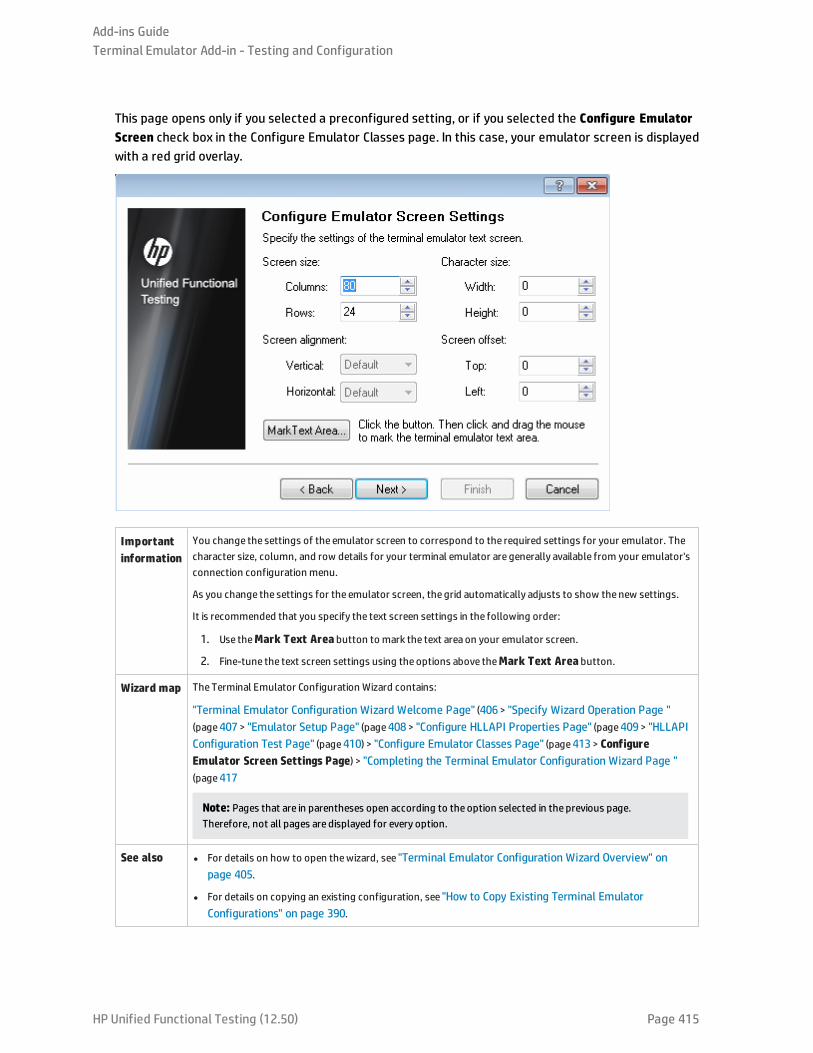
This page opens only if you selected a preconfigured setting, or if you selected the Configure EmulatorScreen check box in the Configure Emulator Classes page. In this case, your emulator screen is displayedwith a red grid overlay.
Importantinformation
You change the settings of the emulator screen to correspond to the required settings for your emulator. Thecharacter size, column, and row details for your terminal emulator are generally available from your emulator'sconnection configuration menu.
As you change the settings for the emulator screen, the grid automatically adjusts to show thenew settings.
It is recommended that you specify the text screen settings in the following order:
1. Use theMark Text Area button to mark the text area on your emulator screen.
2. Fine-tune the text screen settings using the options above theMark Text Area button.
Wizard map TheTerminal Emulator Configuration Wizard contains:
"Terminal Emulator Configuration Wizard Welcome Page" (406> "Specify Wizard Operation Page "(page407> "Emulator Setup Page" (page408> "Configure HLLAPI Properties Page" (page409> "HLLAPIConfiguration Test Page" (page410) > "Configure Emulator Classes Page" (page413> ConfigureEmulator Screen Settings Page) > "Completing the Terminal Emulator Configuration Wizard Page "(page417
Note: Pages that are in parentheses open according to the option selected in the previous page.Therefore, not all pages are displayed for every option.
See also l For details on how to open thewizard, see "Terminal Emulator Configuration Wizard Overview" onpage 405.
l For details on copying an existing configuration, see "How to Copy Existing Terminal EmulatorConfigurations" on page 390.
Add-ins GuideTerminal Emulator Add-in - Testing and Configuration
HP Unified Functional Testing (12.50) Page 415
User interface elements are described below (unlabeled elements are shown in angle brackets):
UIElements
Description
MarkTextArea
Enables you to define the dimensions of the terminal emulator text area on your emulator screen. When you clickthis button, thewizard is minimized and the cursor becomes a crosshairs pointer. Drag the pointer on youremulator screen to define the text area.
After you mark the text area on your emulator screen you can fine-tune your settings by adjusting the text screensettings.
<textscreensettings>
Screen and Character Sizes
You can specify your emulator's screen size in terms of:
l Number of columns and rows.Specify the number of columns and rows in your emulator screen.
l Character size.Select thewidth and height of your emulator's characters to fit correctly in the definedemulator screen.
Alignment and Offset
You can specify how the text on your emulator's screen should be aligned in relation to the emulator windowwhen thewindow size changes. The effect of these settings depends on the behavior of your emulator:
l Screen alignment.Select the vertical alignment (Top or Center) and the horizontal alignment (Left orCenter) of the emulator screen inside thewindow. These options are already optimized for preconfiguredemulator settings, and cannot bemodified.
Tip: The screen alignment settings determine how UFT identifies the information on your emulatorscreen. If you are having trouble recording and running tests or business components (for example, theClickPositionmethod is not accurately determining the coordinates), try changing theScreenalignment settings.
l Screen offset.Select the top and left offset for the text on your emulator screen in relation to the emulatorwindow. For example, if you know that your emulator always reserves oneblank row at the top of the screen,set the offset to 1.
Add-ins GuideTerminal Emulator Add-in - Testing and Configuration
HP Unified Functional Testing (12.50) Page 416
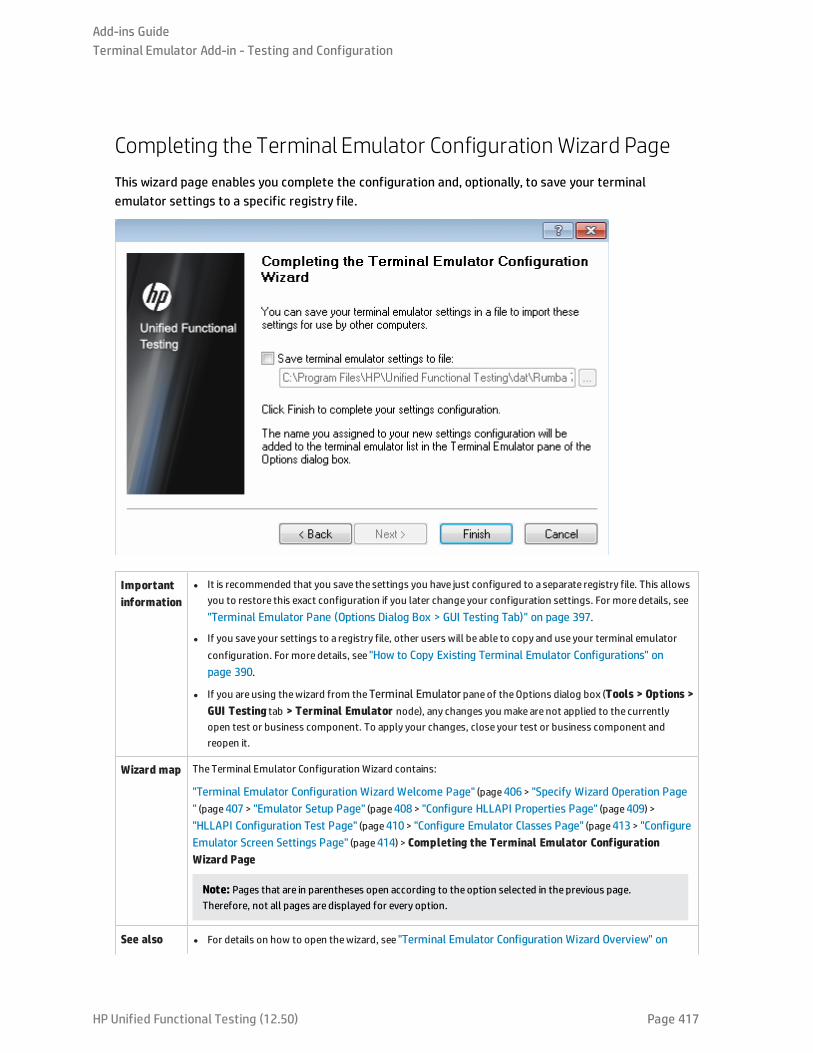
Completing the Terminal Emulator Configuration Wizard PageThis wizard page enables you complete the configuration and, optionally, to save your terminalemulator settings to a specific registry file.
Importantinformation
l It is recommended that you save the settings you have just configured to a separate registry file. This allowsyou to restore this exact configuration if you later change your configuration settings. For more details, see"Terminal Emulator Pane (Options Dialog Box > GUI Testing Tab)" on page 397.
l If you save your settings to a registry file, other users will be able to copy and use your terminal emulatorconfiguration. For more details, see "How to Copy Existing Terminal Emulator Configurations" onpage 390.
l If you are using thewizard from theTerminal Emulator paneof theOptions dialog box (Tools > Options >GUI Testing tab > Terminal Emulator node), any changes you make are not applied to the currentlyopen test or business component. To apply your changes, close your test or business component andreopen it.
Wizard map TheTerminal Emulator Configuration Wizard contains:
"Terminal Emulator Configuration Wizard Welcome Page" (page406> "Specify Wizard Operation Page" (page407> "Emulator Setup Page" (page408> "Configure HLLAPI Properties Page" (page409) >"HLLAPI Configuration Test Page" (page410> "Configure Emulator Classes Page" (page413> "ConfigureEmulator Screen Settings Page" (page414) > Completing the Terminal Emulator ConfigurationWizard Page
Note: Pages that are in parentheses open according to the option selected in the previous page.Therefore, not all pages are displayed for every option.
See also l For details on how to open thewizard, see "Terminal Emulator Configuration Wizard Overview" on
Add-ins GuideTerminal Emulator Add-in - Testing and Configuration
HP Unified Functional Testing (12.50) Page 417
page 405.
l For details on copying an existing configuration, see "How to Copy Existing Terminal EmulatorConfigurations" on page 390.
User interface elements are described below (unlabeled elements are shown in angle brackets):
UI Elements Description
Save terminalemulatorsettings to file
Saves your settings to a registry filewhen you specify a location. This enables others to import thesesettings as needed.
<file location> The location in which to save the terminal emulator settings registry file.
Finish Adds the nameyou assigned to your new configuration settings to the list of available terminal emulators intheTerminal Emulator paneof theOptions dialog box as described in "Terminal Emulator Pane(Options Dialog Box > GUI Testing Tab)" on page 397.
Add-ins GuideTerminal Emulator Add-in - Testing and Configuration
HP Unified Functional Testing (12.50) Page 418
Troubleshooting and Limitations - Terminal EmulatorThis section contains general troubleshooting and limitation information about the Web add-in, andincludes the following sections:
l "Installing and Loading the Terminal Emulator Add-in" below
l "Connecting and Disconnecting from the Terminal Emulator Add-in" below
l "Configuration and Settings" on the next page
l "Creating and Running Tests and Components" on the next page
l "Working with Terminal Emulator Controls" on page 422
l "Test Objects, Methods, and Properties" on page 422
l "Checkpoints and Output Values " on page 423
l "Multilingual Support" on page 423
Installing and Loading the Terminal Emulator Add-in
l When installing a Hummingbird HostExplorer terminal emulator or patches, make sure that UFT isclosed.
l If the UFT Terminal Emulator Add-in is installed and loaded, but there is no terminal emulatorinstalled on your computer, the following error message is displayed: UFT Terminal Emulatorsupport is not configured correctly. Either the terminal emulator is notinstalled on your computer or the HLLAPI DLL was not found.
Workaround:When you open UFT, clear the Terminal Emulators check box in the Add-in Manager.
Note: You can prevent this message from appearing by adjusting your emulator's configurationsettings. For more details, see "How to Manage Terminal Emulator Configuration Settings" onpage 389.
l You may experience unexpected behavior after you install an EXTRA! emulator. You may not be ableto run UFT or various features may stop working. This happens because the EXTRA! installation mayhave copied and registered an outdated version of the atl.dll file on your computer.
Workaround: Locate the atl.dll in your system folder (WINNT\system32). Its version should be 3.0or higher. Register it with the regsvr32 utility.
Connecting and Disconnecting from the Terminal Emulator Add-in
l If you have more than one terminal emulator session open, UFT does not recognize either session.
Workaround:While recording or running your test or business component, make sure that only oneterminal emulator session is connected at a time.
HP Unified Functional Testing (12.50) Page 419
l If your test or business component contains steps that disconnect the current emulator sessionduring the run session, followed immediately by a TeScreen.Sync command, the test or businesscomponent run might stop responding or take a long time to respond.
Workaround: Remove the Sync command from the test or business component, or replace it with aWait statement. For more details, see the Utility Objects section of the HP UFT Object ModelReference for GUI Testing.
l Inserting a checkpoint, creating a new test or business component, or opening an existing test orbusiness component when the emulator session is busy may cause unexpected problems.
Workaround: Check the connection status of your emulator on the status line of the emulator screenbefore performing any of these operations.
l Unexpected behavior may occur after disconnecting from a Host On-Demand session while recording.
Workaround: Stop recording before disconnecting from the session. Then, manually add a step thatdisconnects from the session.
l You may experience unexpected behavior if the terminal emulator is closed while UFT is recording.
Configuration and Settings
l When working with an emulator that does not support HLLAPI, or with an emulator that has beenconfigured as supporting text-only HLLAPI operations, do not change the size of the terminalemulator window after configuring the emulator settings.
l To enable support for a NetManage Web-To-Host Java Client session that is configured to open in aseparate window, specify the title of your session window using the Tools > Options > GUI Testingtab > Terminal Emulator > Adjust Configuration > Object identification settings > Identifyemulator window based on title bar prefix option.
Tip: You may need to clear this value when switching to another configuration.
l When using the Terminal Emulator Configuration Wizard to configure the screen sizes of NetManageRUMBAWeb-to-Host, you cannot use the Mark Text Area option to draw on top of the emulatorwindow.
Workaround: Configure the text area position of the screen manually.
Creating and Running Tests and Components
l When using the OCR mechanism in order to perform steps requiring text recognition on non-HLLAPIemulators, the steps run slowly due to the required processing power of the OCR mechanism.Therefore, when testing non-HLLAPI emulators, it is recommended to select the default textrecognition option: First Windows API then OCR in the Text Recognition pane of the Options dialogbox. (For details on this option, see the HP Unified Functional Testing User Guide.)
l The UFT Terminal Emulator Add-in can identify emulator window objects only when the emulator isconnected. For example, you cannot use the following statement to connect to an emulator session:
Add-ins GuideTerminal Emulator Add-in - Testing and Configuration
HP Unified Functional Testing (12.50) Page 420
TeWindow("TeWindow").WinMenu("Menu").Select "Communication;Connect"
Workaround: You can record any steps that need to be performed prior to connection with theemulator. These steps are recorded as if the Terminal Emulator Add-in is not loaded. After theemulator is connected, stop the recording session and begin a new recording session to recordterminal emulator objects.
l When using an emulator that supports HLLAPI, if your emulator session disconnects from the hostwhile recording, UFT no longer recognizes the emulator, even after reconnecting.
Workaround: Stop recording, reconnect the session, and continue recording.
l When recording on a Hummingbird HostExplorer emulator, menu and toolbar operations in theemulator window are disabled.
Workaround: Stop recording, select the required menu item or click the required toolbar button, andcontinue recording.
l When using an emulator that supports HLLAPI, closing the emulator window while recording maycause unexpected results.
Workaround: Stop recording before closing the emulator window.
l The UFT Terminal Emulator Add-in does not support recording operations on toolbar objects interminal emulator applications.
Workaround: Record on the corresponding menu command for the toolbar button. Alternatively, youcan use low-level recording to record operations on toolbars. For more details about low-levelrecording, see the HP Unified Functional Testing User Guide.
l If you record a test or business component using one terminal emulator, it may not run correctly onanother terminal emulator. For example, tests recorded on RUMBAmay not run on IBM PCOM.
l HostExplorer has a bug in the HLLAPI GetKey function. As a result, UFT will stop recording terminalemulator keyboard events after recording for a while, and the emulator might stop responding tokeyboard events.
Workaround: Contact Hummingbird customer support to get the patch that fixes the problem withthe HLLAPI GetKey function (where it stops responding after several calls).
l Clicking, typing, or moving objects in the terminal emulator window while UFT is running a test orbusiness component may cause unexpected results.
Workaround:Wait until the end of the test or business component, or pause the test or businesscomponent execution before using the emulator.n
l To record and run tests or business components on Hummingbird 9.0 5250 sessions, you need toinstall a patch for Hummingbird.
Workaround: Contact Hummingbird customer support to get the patch that fixes the problem withHLLAPI where all 5250 fields appear protected.
l You might encounter unexpected results when you run the Reflection HLL API in multiple threadsmode.
Add-ins GuideTerminal Emulator Add-in - Testing and Configuration
HP Unified Functional Testing (12.50) Page 421
Working with Terminal Emulator Controls
l When working with Attachmate Terminal Viewer 3.1 5250 session, all of the fields that appear on thescreen before the first unprotected field are recognized as a single field.
l UFT may not recognize a TeField object in a NetManage RUMBA session immediately after installingthe emulator.
Workaround: Restart your computer after installing RUMBA, even if the installation does not requesta restart.
Test Objects, Methods, and Properties
l When using the SendKeymethod to unlock a terminal emulator, for example, TeWindow("TeWindow").TeScreen("screen5296"). SendKey TE_RESET, some emulators (such as Host On-Demand) may not be unlocked.
Workaround: Specify the keyboard event to send for the RESET command, using the Tools > Options> GUI Testing tab > Terminal Emulator pane > Adjust Configuration > Run Settings > Run stepscontaining special emulator keys using keyboard events > Keys for RESET function option.
l By default, UFT uses the attached text and protected properties in TeField test object descriptions. Ifthe attached text for a field changes from session to session, UFT cannot find the field during the runsession.
Workaround: Open the Object Repository Window or the Object Repository Window for the object.Remove the attached text property from the field's description and add another property (orproperties) such as start row, start column, or index to uniquely identify the object.
Tip: You can also create a smart identification definition for TeField objects so that yourrecorded test or business component can run successfully even if the attached text propertyvalue for a particular TeField object changes. (Select Tools > Object Identification > EnableSmart Identification and click Configure.) For more details on Smart Identification, see theHP Unified Functional Testing User Guide.
l You cannot use the label property in a programmatic description of the TeScreen object. However,since only one screen can exist in the given TeWindow at any one time, you can use TeScreen("MicClass:=TeScreen").
For example:
TeWindow("short name:=A").TeScreen("MicClass:=TeScreen").TeField("attachedtext:=User", "Protected:=False").Set "33333"
l The TeTextScreen properties current column and current row are available only for emulators thatsupport HLLAPI.
l The location property is not recorded for TeField objects.
Workaround: Use the index property instead.
Add-ins GuideTerminal Emulator Add-in - Testing and Configuration
HP Unified Functional Testing (12.50) Page 422

Checkpoints and Output Values
In some cases, a bitmap checkpoint on a TeScreen may fail because the cursor shows in the expectedbitmap, and not in the actual bitmap (or the other way around).
Workaround: Set the emulator cursor to a slow blink rate, or not to blink at all. This enhances theprobability that the cursor is not captured in the bitmap.
Multilingual Support
When working with the IBM PCOM emulator, UFT may ignore special European language characters whilerecording or running a test or business component.
Workaround: Set the code page for your IBM PCOM emulator in UFT, using the Tools > Options > GUITesting tab > Terminal Emulator > Adjust Configuration > Emulator settings > Code page number(IBM PCOM only) option.
Tip: Try setting the Code page number (IBM PCOM only) option to 1252.
Add-ins GuideTerminal Emulator Add-in - Testing and Configuration
HP Unified Functional Testing (12.50) Page 423

HP Unified Functional Testing (12.50) Page 424
Part 17: VisualAge Smalltalk Add-inThis section includes:
"VisualAge Smalltalk Add-in - Quick Reference" on page 425
"How to Configure the VisualAge Smalltalk Add-in" on page 427

VisualAge Smalltalk Add-in - Quick ReferenceYou can use the UFT VisualAge Smalltalk Add-in to test VisualAge Smalltalk user-interface objects(controls).
The following tables summarize basic information about the VisualAge Smalltalk Add-in and how itrelates to some commonly-used aspects of UFT.
General Information
Add-in Type This is aWindows-based add-in. Much of its functionality is the sameas other Windows-based add-ins.
See "Windows-Based Application Support" on page 81.
SupportedEnvironments
For details on supported VisualAge Smalltalk environments, see theVisualAge Smalltalk Add-in section of theHPUnified Functional Testing Product Availability Matrix, available from theHP Support Matrix page(requires an HP passport).
ImportantInformation
You must configure your VisualAge Smalltalk environment by importing theqt-adapter.dat file andthen recompiling your application.
See "How to Configure the VisualAge Smalltalk Add-in" on page 427.
Test ObjectMethods andProperties
TheVisualAge Smalltalk Add-in uses a sub-set of the standard Windows test objects, methods, andproperties, which can beused when testing objects in VisualAge Smalltalk applications. For details, see theVisual Age Small Talk section of theHPUFT Object Model Reference for GUI Testing.
Checkpointsand OutputValues
l See the sections describing checkpoints and output values in theHPUnified Functional Testing UserGuide.
l See "GUI Checkpoints and Output Values Per Add-in" on page 512
Prerequisites
Opening Your Application You can open your VisualAge Smalltalk application before or after opening UFT.
Add-in Dependencies None
Configuration
Configuring YourApplication
You configure your VisualAge Smalltalk environment by importing theqt-adapter.dat file andthen recompiling your application.
See "How to Configure the VisualAge Smalltalk Add-in" on page 427.
Record and RunSettings Dialog Box(tests only)
Use theWindows Applications tab.(Record > Record and Run Settings)
See "Windows Applications Tab (Record and Run Settings Dialog Box)" on page 93.
Note:
l UFT can recognize only VisualAge Smalltalk applications that have been precompiled with theqt-adapter agent. For details, see "How to Configure the VisualAge Smalltalk Add-in" on page 427.
HP Unified Functional Testing (12.50) Page 425
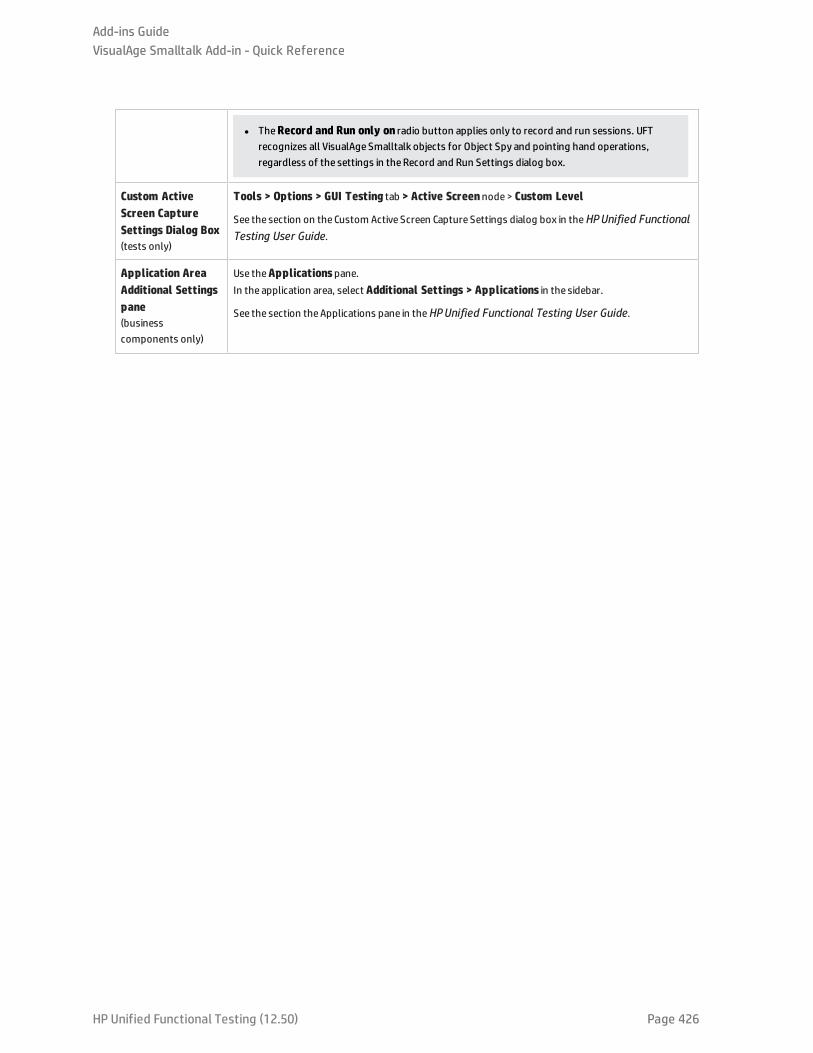
l TheRecord and Run only on radio button applies only to record and run sessions. UFTrecognizes all VisualAge Smalltalk objects for Object Spy and pointing hand operations,regardless of the settings in theRecord and Run Settings dialog box.
Custom ActiveScreen CaptureSettings Dialog Box(tests only)
Tools > Options > GUI Testing tab > Active Screennode> Custom Level
See the section on the Custom Active Screen Capture Settings dialog box in theHPUnified FunctionalTesting User Guide.
Application AreaAdditional Settingspane(businesscomponents only)
Use theApplicationspane.In the application area, select Additional Settings > Applications in the sidebar.
See the section theApplications pane in theHPUnified Functional Testing User Guide.
Add-ins GuideVisualAge Smalltalk Add-in - Quick Reference
HP Unified Functional Testing (12.50) Page 426
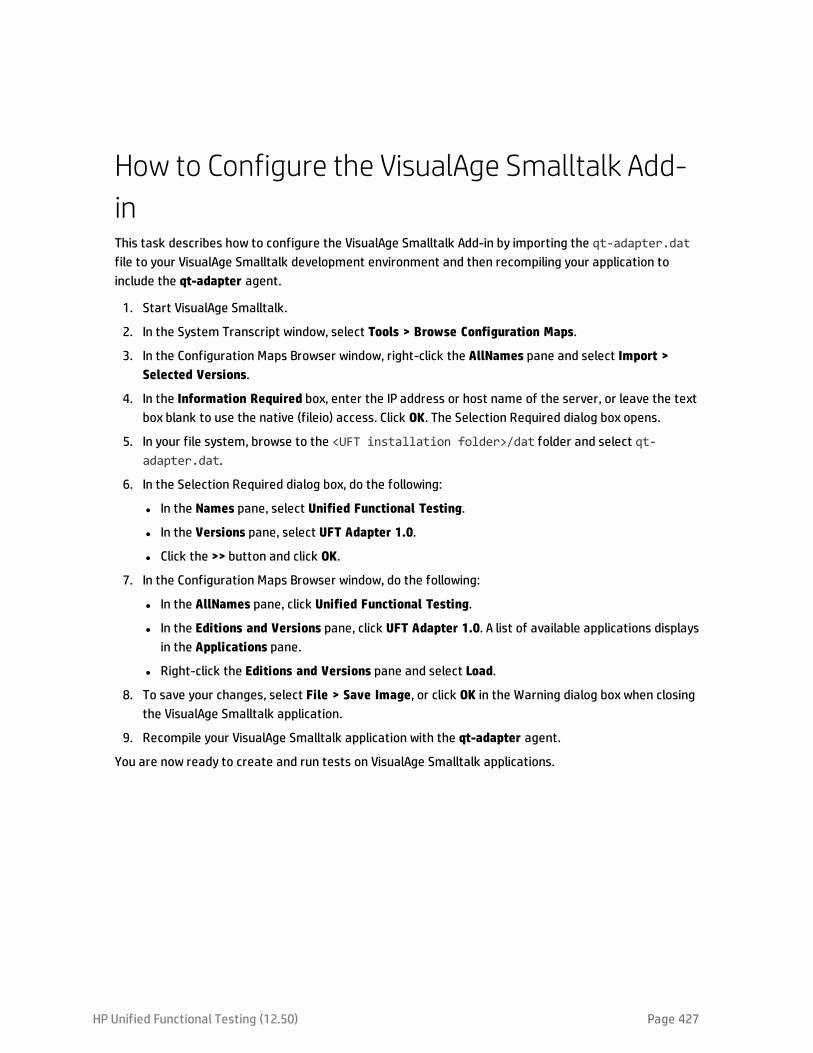
How to Configure the VisualAge Smalltalk Add-inThis task describes how to configure the VisualAge Smalltalk Add-in by importing the qt-adapter.datfile to your VisualAge Smalltalk development environment and then recompiling your application toinclude the qt-adapter agent.
1. Start VisualAge Smalltalk.
2. In the System Transcript window, select Tools > Browse Configuration Maps.
3. In the Configuration Maps Browser window, right-click the AllNames pane and select Import >Selected Versions.
4. In the Information Required box, enter the IP address or host name of the server, or leave the textbox blank to use the native (fileio) access. Click OK. The Selection Required dialog box opens.
5. In your file system, browse to the <UFT installation folder>/dat folder and select qt-adapter.dat.
6. In the Selection Required dialog box, do the following:
l In the Names pane, select Unified Functional Testing.
l In the Versions pane, select UFT Adapter 1.0.
l Click the >> button and click OK.
7. In the Configuration Maps Browser window, do the following:
l In the AllNames pane, click Unified Functional Testing.
l In the Editions and Versions pane, click UFT Adapter 1.0. A list of available applications displaysin the Applications pane.
l Right-click the Editions and Versions pane and select Load.
8. To save your changes, select File > Save Image, or click OK in the Warning dialog box when closingthe VisualAge Smalltalk application.
9. Recompile your VisualAge Smalltalk application with the qt-adapter agent.
You are now ready to create and run tests on VisualAge Smalltalk applications.
HP Unified Functional Testing (12.50) Page 427

HP Unified Functional Testing (12.50) Page 428
Part 18: Visual Basic Add-inThis section includes:
"Visual Basic Add-in - Quick Reference" on page 429
"Troubleshooting and Limitations - Visual Basic Add-in" on page 431
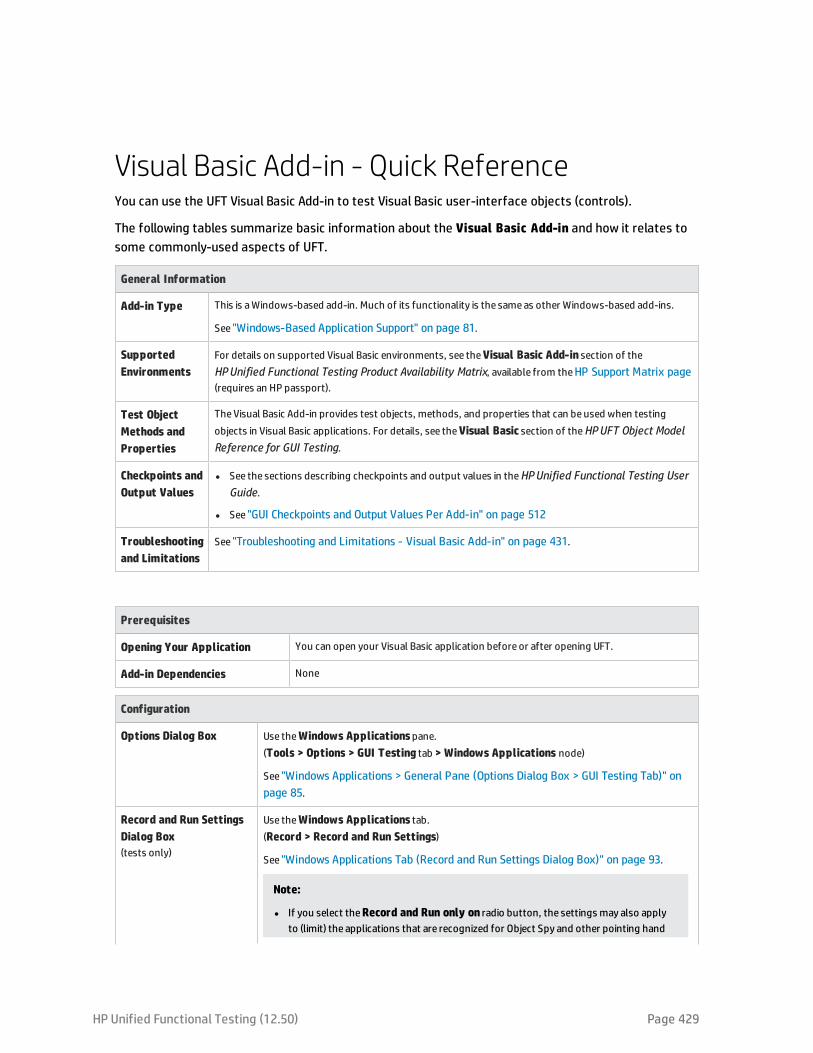
Visual Basic Add-in - Quick ReferenceYou can use the UFT Visual Basic Add-in to test Visual Basic user-interface objects (controls).
The following tables summarize basic information about the Visual Basic Add-in and how it relates tosome commonly-used aspects of UFT.
General Information
Add-in Type This is aWindows-based add-in. Much of its functionality is the sameas other Windows-based add-ins.
See "Windows-Based Application Support" on page 81.
SupportedEnvironments
For details on supported Visual Basic environments, see theVisual Basic Add-in section of theHPUnified Functional Testing Product Availability Matrix, available from theHP Support Matrix page(requires an HP passport).
Test ObjectMethods andProperties
TheVisual Basic Add-in provides test objects, methods, and properties that can beused when testingobjects in Visual Basic applications. For details, see theVisual Basic section of theHPUFT Object ModelReference for GUI Testing.
Checkpoints andOutput Values
l See the sections describing checkpoints and output values in theHPUnified Functional Testing UserGuide.
l See "GUI Checkpoints and Output Values Per Add-in" on page 512
Troubleshootingand Limitations
See "Troubleshooting and Limitations - Visual Basic Add-in" on page 431.
Prerequisites
Opening Your Application You can open your Visual Basic application before or after opening UFT.
Add-in Dependencies None
Configuration
Options Dialog Box Use theWindows Applicationspane.(Tools > Options > GUI Testing tab > Windows Applications node)
See "Windows Applications > General Pane (Options Dialog Box > GUI Testing Tab)" onpage 85.
Record and Run SettingsDialog Box(tests only)
Use theWindows Applications tab.(Record > Record and Run Settings)
See "Windows Applications Tab (Record and Run Settings Dialog Box)" on page 93.
Note:
l If you select theRecord and Run only on radio button, the settings may also applyto (limit) the applications that are recognized for Object Spy and other pointing hand
HP Unified Functional Testing (12.50) Page 429
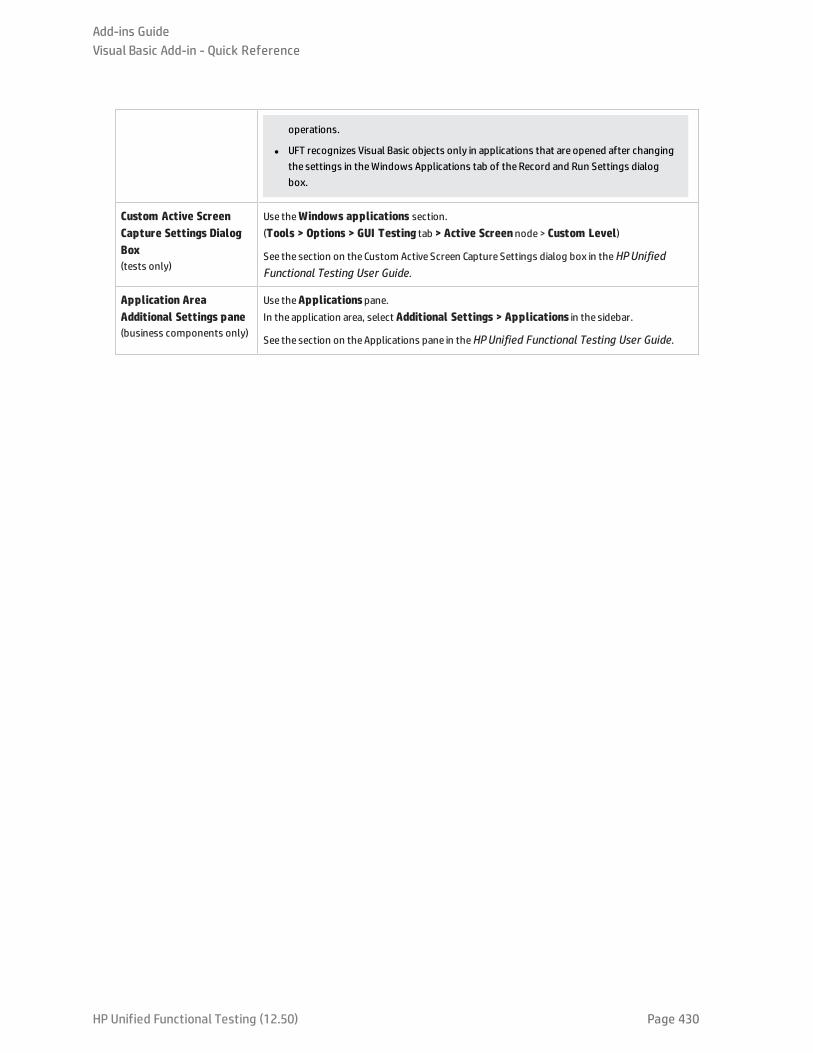
operations.
l UFT recognizes Visual Basic objects only in applications that are opened after changingthe settings in theWindows Applications tab of theRecord and Run Settings dialogbox.
Custom Active ScreenCapture Settings DialogBox(tests only)
Use theWindows applications section.(Tools > Options > GUI Testing tab > Active Screennode> Custom Level)
See the section on the Custom Active Screen Capture Settings dialog box in theHPUnifiedFunctional Testing User Guide.
Application AreaAdditional Settings pane(business components only)
Use theApplicationspane.In the application area, select Additional Settings > Applications in the sidebar.
See the section on theApplications pane in theHPUnified Functional Testing User Guide.
Add-ins GuideVisual Basic Add-in - Quick Reference
HP Unified Functional Testing (12.50) Page 430
Troubleshooting and Limitations - Visual BasicAdd-inThis section describes troubleshooting and limitations for the Visual Basic Add-in.
l When working with the Visual Basic Add-in, it is recommended to select the Record and run on theseapplications (opened on session start) option and then to specify the application name in theWindows Applications Tab of the Record and Run Settings dialog box.
If you select the Record and run test on any open Windows-based application option, you shouldopen the Visual Basic application after the first time you start recording.
l Combo box objects of style Simple ComboBox are not supported.
l Visual Basic .NET applications are supported by the UFT .NET Add-in.
HP Unified Functional Testing (12.50) Page 431
HP Unified Functional Testing (12.50) Page 432
Part 19: Web Add-inThis section includes:
"Web Add-in - Quick Reference" on page 433
"Web Add-in - Testing and Configuration" on page 436
"Web Add-in - Multiple Browser Support" on page 451
Web Add-in - Quick ReferenceYou can use the Web Add-in to test HTML user-interface objects (controls).
The following tables summarize basic information about the Web Add-in and how it relates to somecommonly-used aspects of UFT. This information is also relevant for all child add-ins that extend theWeb Add-in.
General Information
Add-in Type Much of the functionality of this add-in is the sameas other Web-based add-ins.
l See "Web-Based Application Support" on page 34.
SupportedEnvironments
l For details on supported Web browsers and versions, see theHPUnified Functional Testing ProductAvailability Matrix, available from theHP Support Matrix page (requires an HP passport).
l See also Child Add-ins, below.
Child Add-ins l UFT also provides a set of add-ins that support testing specialized controls from anumber of Web 2.0toolkits using test object classes that were developed by HP using "Web Add-in Extensibility" (describedon page440). These add-ins are displayed as child nodes of theWeb Add-in in theAdd-in Manager. Fordetails, see "Web 2.0 Toolkit Support " on page 498.
Test ObjectMethods andProperties
TheWeb Add-in provides test objects, methods, and properties that can beused when testing objects in Webapplications. For details, see theWeb section of theHPUFT Object Model Reference for GUI Testing.
Checkpointsand OutputValues
l See the sections describing checkpoints and output values in theHPUnified Functional Testing UserGuide.
l See "Checkpoints for Web Pages" on page 38.
l See "GUI Checkpoints and Output Values Per Add-in" on page 512
Extending theWeb Add-in
"Web Add-in Extensibility" (described on page440) enables you to develop support for testing third-partyand customWeb controls that are not supported out-of-the-box by theUFT Web Add-in.
Other l When you load the Siebel Add-in in addition to theWeb Add-in, the object identification settings areautomatically customized. For this reason, theWeb Add-in is not available in theEnvironment list in theObject Identification dialog box (Tools > Object Identification), even though theWeb Add-in is loaded.
For details, see "Siebel Add-in - Overview" on page 324.
l You can create steps on more than onebrowser tab, if your browser supports tabbed browsing.
Prerequisites
Opening Your Application You must open UFT before opening your Web application.
Testing in Mozilla Firefox The Functional Testing Extension for Firefox is supported from Firefox versions 33 andhigher. If you need to test versions of Firefox earlier than 33, you need to enableUFT supportfor these Firefox versions.
To test your Web application in Mozilla Firefox version 33 and later, you must enable theFunctional Testing Extension in oneof the following ways:
HP Unified Functional Testing (12.50) Page 433
l If theSelect Your Add-ons screen is displayed when you open Firefox, select to enablethe Functional Testing Extension.
l If the Install Add-on tab opens and displays Functional Testing Extension when openingFirefox, select theAllow this installation check box and clickContinue.
Otherwise:
a. In Firefox, open the browser menu.
b. In themenu, clickAdd-ons.
c. In theAdd-ons Manager tab, select theExtensionsnode.
d. In the Functional Testing Extension row, click theEnable button.
To test your Web application in Mozilla Firefox versions earlier than 33, you must enable thelegacy Firefox agent:
1. Open the<UFT installation folder>\Installations\Firefox folder.
2. From the Firefox folder, drag theLegacy.xpi file into Firefox.
3. In Firefox, open the browser menu.
4. In themenu, click Add-ons.
5. In theAdd-ons Manager tab, select the Extensions node.
6. In the Functional Testing Extension row, disable the Functional Testing 12.50extension and enable the extension you added to Firefox.
Note: Only one version of theUnified Functional Testing Extension can be enabled inFirefox at a time.
For more details, see "Working With Mozilla Firefox" on page 467.
Testing in Google Chrome l UFT communicates with the Functional Testing Agent ChromeExtension to test Webapplications running in Google Chrome.
The extension is available on the Chromeweb store and downloads automatically whenpossible, for Chromeversions 31 or later. If the extension does not download, go tohttps://chrome.google.com/webstore/detail/kgpdpdnaoephdehalonapacdgjhamnbc and download it manually. If you do not have an Internet connection or areworking withChromeversion 30 or earlier, see "How to Enable the HP Functional Testing AgentChrome Extension" on page 479.
IMPORTANT: If you have aprevious version of the Functional Testing Agent forGoogle Chrome installed, you must manually remove this extension before enablingthe new version.
l If you need to test local HTML pages in Google Chrome, you must make additionalconfiguration changes. For details, see "How to Enable UFT to Test Local HTML Pagesin Google Chrome" on page 480.
Testing in Apple Safari on aRemote Mac
See "Working With Apple Safari on a Remote Mac Computer" on page 469.
Add-in Dependencies None
Add-ins GuideWeb Add-in - Quick Reference
HP Unified Functional Testing (12.50) Page 434
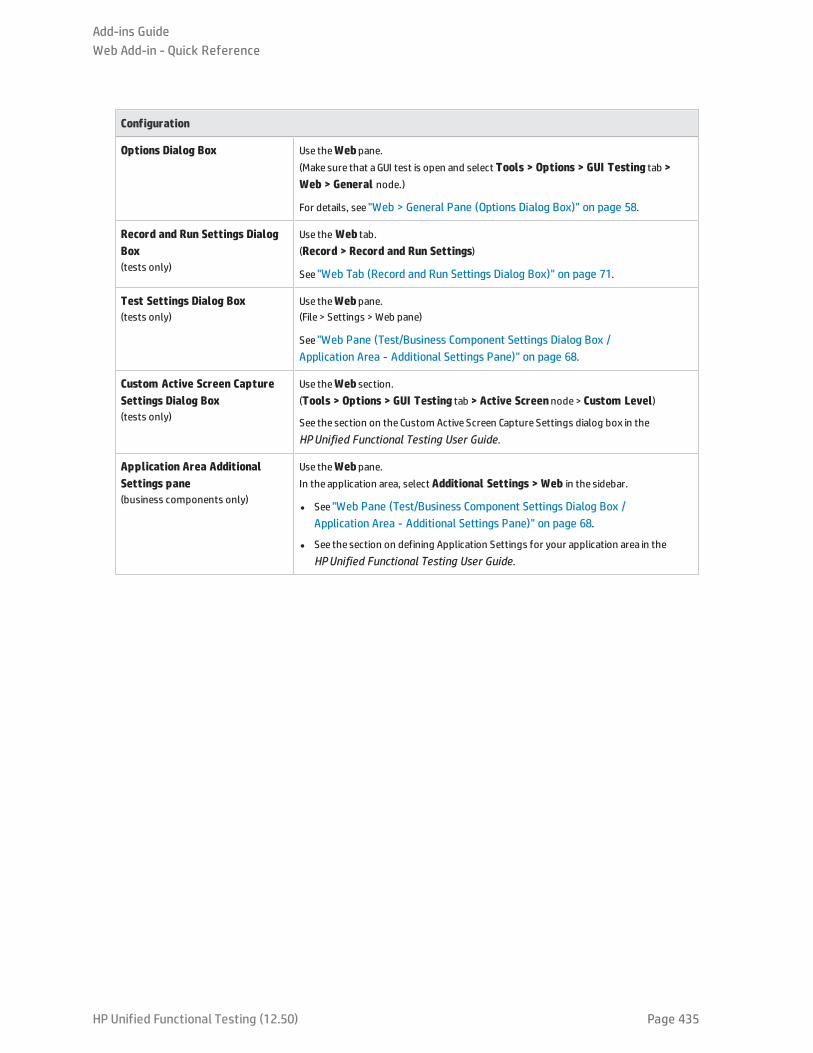
Configuration
Options Dialog Box Use theWebpane.(Make sure that aGUI test is open and select Tools > Options > GUI Testing tab >Web > General node.)
For details, see "Web > General Pane (Options Dialog Box)" on page 58.
Record and Run Settings DialogBox(tests only)
Use theWeb tab.(Record > Record and Run Settings)
See "Web Tab (Record and Run Settings Dialog Box)" on page 71.
Test Settings Dialog Box(tests only)
Use theWebpane.(File > Settings > Web pane)
See "Web Pane (Test/Business Component Settings Dialog Box /Application Area - Additional Settings Pane)" on page 68.
Custom Active Screen CaptureSettings Dialog Box(tests only)
Use theWeb section.(Tools > Options > GUI Testing tab > Active Screennode> Custom Level)
See the section on the Custom Active Screen Capture Settings dialog box in theHPUnified Functional Testing User Guide.
Application Area AdditionalSettings pane(business components only)
Use theWebpane.In the application area, select Additional Settings > Web in the sidebar.
l See "Web Pane (Test/Business Component Settings Dialog Box /Application Area - Additional Settings Pane)" on page 68.
l See the section on defining Application Settings for your application area in theHPUnified Functional Testing User Guide.
Add-ins GuideWeb Add-in - Quick Reference
HP Unified Functional Testing (12.50) Page 435

Web Add-in - Testing and ConfigurationThis chapter includes:
• Event Recording Configuration for Web Objects - Overview 437
• Event Listening and Recording for Web Objects 438
• Considerations - Event Listening and Recording 439
• Event Listening and Recording - Use-case Scenario 440
• Web Add-in Extensibility 440
• Extensibility Accelerator for HP Functional Testing 441
• How to Manage Custom Web Event Recording Configurations 442
• How to Manage Listening and Recording Events for Web Objects 443
• Web Event Recording Configuration Dialog Box 445
• Custom Web Event Recording Configuration Dialog Box 447
• Troubleshooting and Limitations - Web Add-in 449
HP Unified Functional Testing (12.50) Page 436
Event Recording Configuration for Web Objects - OverviewWhen you record on a Web application, UFT generates steps by recording the events you perform on theWeb objects in your application. An event is a notification that occurs in response to an operation, suchas a change in state, or as a result of the user clicking the mouse or pressing a key while working in aWeb application.
You may need to record more or fewer events than UFT automatically records by default. If so, you canmodify the default event recording settings for Web objects using the "Web Event RecordingConfiguration Dialog Box" (described on page 445) to use one of three predefined configurations, or youcan customize the individual event recording configuration settings to meet your specific needs.
For example, UFT does not generally record mouseover events on link objects. If, however, you havemouseover behavior connected to a link, it may be important for you to record the mouseover event. Inthis case, you could customize the configuration to record mouseover events on link objects wheneverthey are connected to a behavior.
Considerations for Configuring Web Event Recording for Web Objects
l Event configuration is a global setting and therefore affects all steps that are recorded after youchange the settings.
l Changing the event configuration settings does not affect steps that have already been recorded. Ifyou find that UFT recorded more or less than you need, change the event recording configuration andthen re-record the steps that are affected by the change.
l Changes to the custom Web event recording configuration settings do not affect open browsers. Toapply your changes, make the changes you need in the Web Event Recording Configuration dialogbox, refresh any open browsers, and then start a new recording session.
l The settings in the "Web Event Recording Configuration Dialog Box" (described on page 445) affectrecording only for objects that UFT recognizes as Web test objects. The recording configuration forother Web-based objects (such as Siebel, PeopleSoft, .NET Web Forms, and SAPWeb controls) isdefined by environment-specific XML configuration files.
Note: For the purposes of Web event recording, UFT treats Web test objects that are childobjects of a PSFrame test object as PeopleSoft objects and thus applies the settings in thePeopleSoft event configuration XML file when recording those objects.
l You can restore predefined settings after you set custom settings by resetting the event recordingconfiguration settings to the basic level from the "Web Event Recording Configuration Dialog Box".You can also restore the default custom level settings from the "Custom Web Event RecordingConfiguration Dialog Box" (described on page 447).
HP Unified Functional Testing (12.50) Page 437
This section also includes:
l "Event Listening and Recording for Web Objects" below
l "Considerations - Event Listening and Recording" on the next page
Event Listening and Recording for Web ObjectsFor each event, you can instruct UFT to:
l listen every time the event occurs on the object.
l listen only if an event handler is attached to the event.
l listen only if a DHTML behavior is attached to the event.
l listen if either an event handler or DHTML behavior are attached to the event.
l never listen to the event.
An event handler is code in a Web page, typically a function or routine written in a scripting language,that receives control when the corresponding event occurs.
Note: UFT supports event handlers that are attached using an on* attribute (such as onclick oronmouseover). It does not support other event handlers, such as those attached using anaddEventListener or attachEvent command.
A DHTML behavior encapsulates specific functionality or behavior on a page. When applied to astandard HTML element on a page, a behavior enhances that element's default behavior.
For each event, you can enable recording, disable recording, or enable recording only if the next event isdependent on the selected event.
For example, suppose a mouseover behavior modifies an image link. You may not want to record themouseover event each time you happen to move the pointer over this image. It is essential, though, thatthe mouseover event be recorded before a click event on the same object because only the image thatis displayed after the mouseover event enables the link event. This option applies only to the Image andWebArea objects.
For task details, see "How to Manage Listening and Recording Events for Web Objects" on page 443.
Recording Right Mouse Button Clicks
UFT enables you to record click events made using left, center, and right mouse buttons. By default, onlyleft clicks are recorded, but you can modify the configuration to record clicks from the right and centerbuttons, as well.
Add-ins GuideWeb Add-in - Testing and Configuration
HP Unified Functional Testing (12.50) Page 438
UFT records the Click statement when the OnClick event is triggered. UFT differentiates between themouse buttons by listening for events configured for each of the mouse buttons. By default, it listensfor the OnMouseUp event, but you can also configure it to listen for the OnMouseDown event using the"Web Event Recording Configuration Dialog Box" (described on page 445).
Note:
l UFT does not record the simultaneous clicking of more than one mouse button.
l UFT does not record the right-click that opens the browser context menu, or the selection of anitem from the context menu. For details on modifying the script manually to enable theseoptions, visit the HP Software Self-solve knowledge base and search for document ID KM185231.
For details, see "How to Configure UFT to Record Mouse Clicks" on page 52.
Considerations - Event Listening and RecordingIt can sometimes be difficult to find the ideal listen and recording settings. When defining thesesettings, keep in mind the following guidelines:
l If settings for different objects in the Objects pane conflict, UFT gives first priority to settings forspecific HTML Tag Objects and second priority to Web Objects settings. UFT applies the settingsfor Any Web Object only to Web objects that do not belong to any other loaded Web-basedenvironment and were not defined in the HTML Tag Object or Web Objects areas.
l To record an event on an object, you must instruct UFT to listen for the event, and to record theevent when it occurs. You can listen for an event on a child object, even if a parent object containsthe handler or behavior, or you can listen for an event on a parent object, even if the child objectcontains the handler or behavior.
However, you must enable recording for the event on the source object (the object on which theevent actually occurs, regardless of which parent object contains the handler or behavior). For anexample of this, see "Event Listening and Recording - Use-case Scenario" on the next page.
l Instructing UFT to listen for many events on many objects may lower performance, so it isrecommended to limit Listen settings to the required objects.
l In Internet Explorer, listening to the object on which the event occurs (the source object) can, in raresituations, interfere with the event.
If you find that your application works properly until you begin recording on the application using UFT,your Listen settings may be interfering.
l If this problem occurs with a mouse event, try selecting the appropriate Use standard Windowsmouse events options in the Web > Advanced pane of the Options dialog box (Tools > Options > GUITesting tab > Web > Advanced node). For details, see "Web > Advanced Pane (Options Dialog Box)" onpage 63.
l If this problem occurs with a keyboard or internal event, or the Use standard Windows mouseevents option does not solve your problem, set the Listen settings for the event to Never on the
Add-ins GuideWeb Add-in - Testing and Configuration
HP Unified Functional Testing (12.50) Page 439
source object (but keep the record setting enabled on the source object), and set the Listen settingsto Always for a parent object.
Event Listening and Recording - Use-case ScenarioWhen you are creating your test, you may want UFT to record a specific event on an object. As a result,you must instruct UFT to listen for the event and to record the event when it occurs.
In this use-case scenario, you are trying to record an onmouseoverevent for a table cell containing twoimages. When the mouse moves over either of the images contained in the table cell, the event bubblesup to the cell, and the bubbling action includes information on the image that the mouse moved over.You want to record the steps performed on the images.
In order to enable UFT to record the image mouseover event, you can do a number of things:
l In the "Custom Web Event Recording Configuration Dialog Box" (described on page 447), youconfigure the mouseover event for the <TD> tag (table cell) to If Handler. You also disable theRecord for the cell to Never, thereby disabling the recording option. This enables UFT to "hear" themouseover event on the table cell when it happens in the application but not record the event as partof the test flow. (This is important because the actual "work" of the application is done with theimages contained in the table cells.)
l Also in the "Custom Web Event Recording Configuration Dialog Box" (described on page 447), youdisable listening on the <IMG> tag (the image) by setting the Listen option to Never. In addition, youset the Record option on the image(s) to Enable. This enables UFT to record the actual action on theimages.
By setting the recording to be done on the images, but listening to be done on the table cells, youhave taught UFT that while something happens (the images appear) when you mouseover the tablecell, the important part and the objects to include in the test flow are the images that appear whenperforming a mouseover on the table cell.
You can also record the actions on the images by setting the Listen option on the <IMG> tag to Always(which enables UFT to listen for the mouseover event even though the image does not contain abehavior or event handler). You then set Record option on the image to Enable.
For task details on setting event listening and recording options, see "How to Manage Custom WebEvent Recording Configurations" on page 442. For details on the available options for listening andrecording events, see the "Custom Web Event Recording Configuration Dialog Box".
Web Add-in ExtensibilityUFT Web Add-in Extensibility enables you to develop support for testing third-party and custom Webcontrols that are not supported out-of-the-box by the UFT Web Add-in.
If the test object class that UFT uses to represent a control does not provide the operations andproperties necessary to operate on your control, you can use Web Add-in Extensibility to create a newtest object class.
Add-ins GuideWeb Add-in - Testing and Configuration
HP Unified Functional Testing (12.50) Page 440

You can then map the control to the new test object class, and design the test object class behavior inJavaScript. You can program how operations are performed on the control, how properties areretrieved, and more.
You can also teach UFT to treat a control that contains a set of lower-level controls as a singlefunctional control, instead of relating to each lower-level control separately.
To implement Web Add-in Extensibility, you need to be familiar with:
l UFT and its Object Model Reference
l The behavior of the custom control (operations, properties, events)
l Web programming (HTML and JavaScript)
l XML (basic knowledge)
"Extensibility Accelerator for HP Functional Testing" (described on page 441) is an IDE that facilitatesthe design, development, and deployment of Web Add-in Extensibility support. You can install it fromthe Add-in Extensibility and Web 2.0 Toolkits option in the UFT setup program.
Extensibility Accelerator also provides samples of support developed using Web Add-in Extensibility,which you can use to gain a better understanding of how to create your own support.
For details on implementing Web Add-in Extensibility, see the Web Add-in Extensibility Help, availablefrom the UFT Extensibility Documentation program group (Start > All Programs > HP Software >Unified Functional Testing > Extensibility > Documentation or the <UFT installationfolder>\help\Extensibility folder).
Note: For details on accessing UFT and UFT tools and files in Windows 8 and Windows Server 2012,see "Accessing UFT in Windows 8.X or Higher Operating Systems" on page 517.
A printer-friendly (PDF) version of the HP UFT Web Add-in Extensibility Developer Guide is available in the<UFT installation folder>\help\Extensibility folder.
Extensibility Accelerator for HP Functional TestingAn increasing number of Web applications are making use of Web 2.0-based toolkits, such as ASP.NETAJAX, Dojo, YahooUI, GWT, and JQueryUI to add dynamic and interactive content to their sites. Thecontrols in these toolkits are complex and require sophisticated and flexible testing capabilities.
UFT Web Add-in Extensibility enables you to extend the Web Add-in to customize how UFT recognizesand interacts with different types of controls. Until now, using Web Add-in Extensibility consisted ofmanually developing and maintaining toolkit support sets.
Extensibility Accelerator for HP Functional Testing is an IDE that facilitates the design, development, anddeployment of these support sets. It makes it faster and easier to create the required extensibility XMLfiles so that you can invest your main efforts in the development of the JavaScript functions that willenable UFT to work with your custom Web controls.
The Extensibility Accelerator user interface helps you define new test object classes, operations, andproperties. It also provides a point-and-click mechanism you can use to map the test object classes you
Add-ins GuideWeb Add-in - Testing and Configuration
HP Unified Functional Testing (12.50) Page 441
defined to controls in your application. Extensibility Accelerator deployment capabilities enable you toautomatically deploy your new toolkit support set to UFT or to package it so that you can share it withother UFT users.
The Extensibility Accelerator for HP Functional Testing installation is available from the Add-inExtensibility and Web 2.0 Toolkits option in the Unified Functional Testing setup program.
Note: As part of the installation process, an html page opens in your browser. To complete theinstallation successfully, this page must be opened in Internet Explorer.
How to Manage CustomWeb Event RecordingConfigurationsThis task describes the different ways you can define, modify, export, and reset custom Web eventrecording configurations.
This task includes the following steps:
l "Prerequisite - Open the Custom Web Event Recording Configuration dialog box" below
l "Add objects to the HTML Tag Objects list" below
l "Delete objects from the HTML Tag Objects list" below
l "Save a custom configuration in an XML file" on the next page
l "Load a custom configuration from an XML file" on the next page
l "Modify a custom configuration file manually - Optional" on the next page
l "Reset configuration settings to a pre-configured basic level" on the next page
Prerequisite - Open the Custom Web Event Recording Configuration dialog box
Select Record > Web Event Recording Configuration, and then click Custom Settings. For userinterface details, see "Custom Web Event Recording Configuration Dialog Box" on page 447.
Add objects to the HTML Tag Objects list
1. Select Object > Add. A New Object object is displayed in the HTML Tag Objects list.
2. Click New Object to rename it. Enter the exact HTML Tag name.
By default the new object is set to listen and record onclick events with handlers attached.
Delete objects from the HTML Tag Objects list
1. Select the object in the HTML Tag Objects category that you want to delete.
2. Select Object > Delete. The object is deleted from the list.
Add-ins GuideWeb Add-in - Testing and Configuration
HP Unified Functional Testing (12.50) Page 442
Save a custom configuration in an XML file
1. Select File > Save Configuration As. The Save As dialog box opens.
2. Navigate to the folder in which you want to save your event configuration file and enter aconfiguration file name. The extension for configuration files is .xml.
3. Click Save to save the file and close the dialog box.
Load a custom configuration from an XML file
1. Select File > Load Configuration. The Open dialog box opens.
2. Locate the event configuration file (.xml) that you want to load and click Open. The dialog boxcloses and the selected configuration is loaded.
Modify a custom configuration file manually - Optional
Open the .xml file that you saved in any text editor, and modify the file according to your needs. Toenable UFT to recognize the modifications that you made, the .xml file must keep its original structure.For details on the XML file structure, see "Web Event Recording Configuration XML File Structure" onpage 40.
For example, you can modify the file to enable right mouse click recording, as described in "How toConfigure UFT to Record Mouse Clicks" on page 52.
Reset configuration settings to a pre-configured basic level
l From the Custom Web Event Recording Configuration dialog box. In the Reset to box, select thepredefined event recording level you want, and click Reset. All event settings are restored to thedefaults for the level you selected.
l From the Web Event Recording Configuration dialog box. Reset basic level configuration settingsby selecting Default Settings. The configuration slider is displayed again, and all event settings arerestored to the Basic event recording configuration level.
Note: When you choose to reset predefined settings, your custom settings are cleared completely.If you do not want to lose your changes, make sure to save your settings in an event configurationfile. For details, see "Custom Web Event Recording Configuration Dialog Box" on page 447.
How to Manage Listening and Recording Events forWeb ObjectsThis task describes the different ways you can manage listening and recording events for Web objects.
Note: The listen and record settings are mutually independent. This means that you can choose tolisten to an event for a particular object, but not record it, or you can choose not to listen to an
Add-ins GuideWeb Add-in - Testing and Configuration
HP Unified Functional Testing (12.50) Page 443
event for an object, but still record the event. For details, see "Considerations - Event Listening andRecording" on page 439.
This task contains the following steps:
l "Prerequisite - Open the Custom Web Event Recording Configuration dialog box" below
l "Add listening events for an object" below
l "Delete listening events for an object" below
l "Specify the listening criterion for an event" below
l "Set the recording status for an event" below
l "Configure UFT to record mouse click events" on the next page
Prerequisite - Open the Custom Web Event Recording Configuration dialog box
Select Record > Web Event Recording Configuration, and then click Custom Settings. For userinterface details, see "Custom Web Event Recording Configuration Dialog Box" on page 447.
Add listening events for an object
1. Select the object to which you want to add an event, or select Any Web Object.
2. Select Event > Add. A list of available events opens. For details, see "Custom Web Event RecordingConfiguration Dialog Box" on page 447.
3. Select the event you want to add. The event is displayed in the Event Name column in alphabeticalorder. By default, UFT listens to the event when a handler is attached and always records the event(as long as it is listened to at some level).
Delete listening events for an object
1. Select the object from which you want delete an event, or select Any Web Object.
2. Select the event you want to delete from the Event Name column.
3. Select Event > Delete. The event is deleted from the Event Name column.
Specify the listening criterion for an event
1. Select the object for which you want to modify the listening criterion or select Any Web Object.
2. In the row of the event you want to modify, select the listening criterion you want from the Listencolumn. You can select Always, If Handler, If Behavior, If Handler or Behavior, or Never. Fordetails, see "Custom Web Event Recording Configuration Dialog Box" on page 447.
Set the recording status for an event
1. Select the object for which you want to modify the recording status or select Any Web Object.
2. In the row of the event you want to modify, select a recording status from the Record column. Fordetails, see "Custom Web Event Recording Configuration Dialog Box" on page 447.
Add-ins GuideWeb Add-in - Testing and Configuration
HP Unified Functional Testing (12.50) Page 444
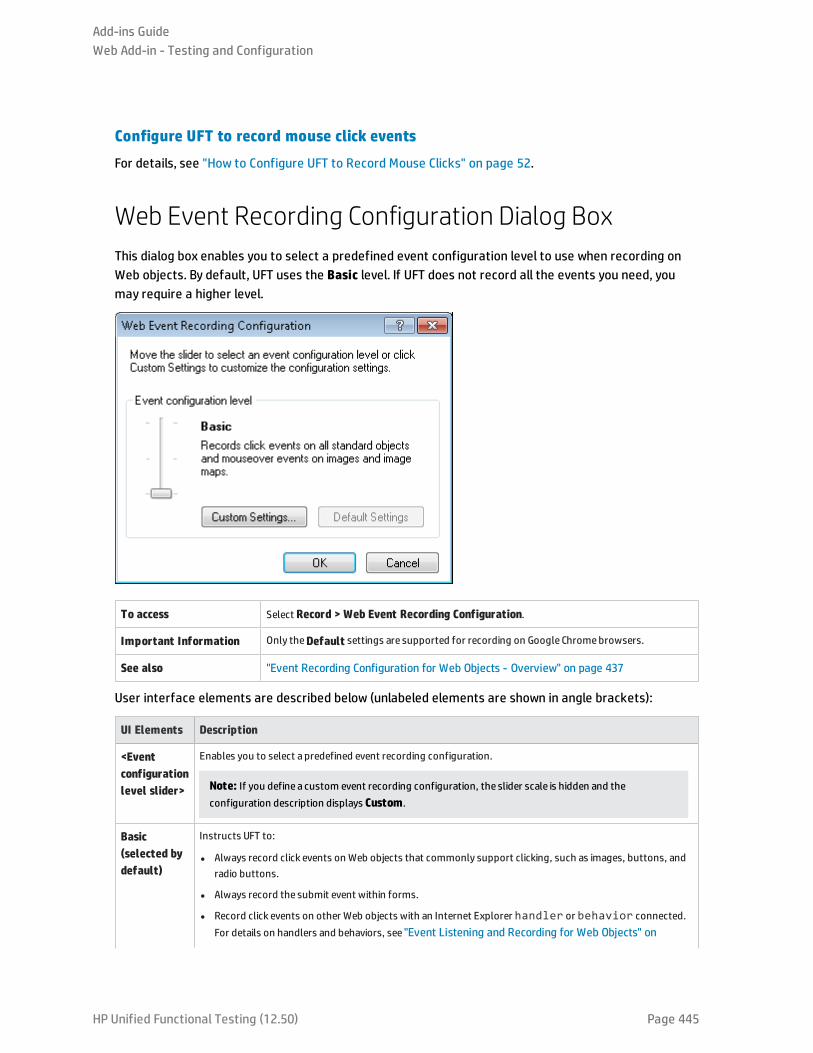
Configure UFT to record mouse click events
For details, see "How to Configure UFT to Record Mouse Clicks" on page 52.
Web Event Recording Configuration Dialog BoxThis dialog box enables you to select a predefined event configuration level to use when recording onWeb objects. By default, UFT uses the Basic level. If UFT does not record all the events you need, youmay require a higher level.
To access Select Record > Web Event Recording Configuration.
Important Information Only theDefault settings are supported for recording on Google Chromebrowsers.
See also "Event Recording Configuration for Web Objects - Overview" on page 437
User interface elements are described below (unlabeled elements are shown in angle brackets):
UI Elements Description
<Eventconfigurationlevel slider>
Enables you to select a predefined event recording configuration.
Note: If you define a custom event recording configuration, the slider scale is hidden and theconfiguration description displays Custom.
Basic(selected bydefault)
Instructs UFT to:
l Always record click events on Web objects that commonly support clicking, such as images, buttons, andradio buttons.
l Always record the submit event within forms.
l Record click events on other Web objects with an Internet Explorer handler or behavior connected.For details on handlers and behaviors, see "Event Listening and Recording for Web Objects" on
Add-ins GuideWeb Add-in - Testing and Configuration
HP Unified Functional Testing (12.50) Page 445
UI Elements Description
page 438.
l Record themouseover event on images and imagemaps only if the event following themouseover isperformed on the sameobject.
Medium Instructs UFT to record click events on the<DIV>, <SPAN>, and <TD> HTML tag objects, in addition to theevents recorded in the basic level.
High Instructs UFT to record mouseover, mousedown, and double-click events on Web objects withhandlers or behaviors attached, in addition to the events recorded in the basic level.
CustomSettings
Opens the "Custom Web Event Recording Configuration Dialog Box" (described on page447), whichenables you to customize the event recording configuration.
DefaultSettings
Restores the settings to theBasic level.
Note:When you choose to reset predefined settings, your custom settings are cleared completely. Ifyou customized the event recording configuration and do not want to lose these settings, make sure tosave your settings in an event configuration file. For details, see "How to Manage Custom Web EventRecording Configurations" on page 442.
Add-ins GuideWeb Add-in - Testing and Configuration
HP Unified Functional Testing (12.50) Page 446
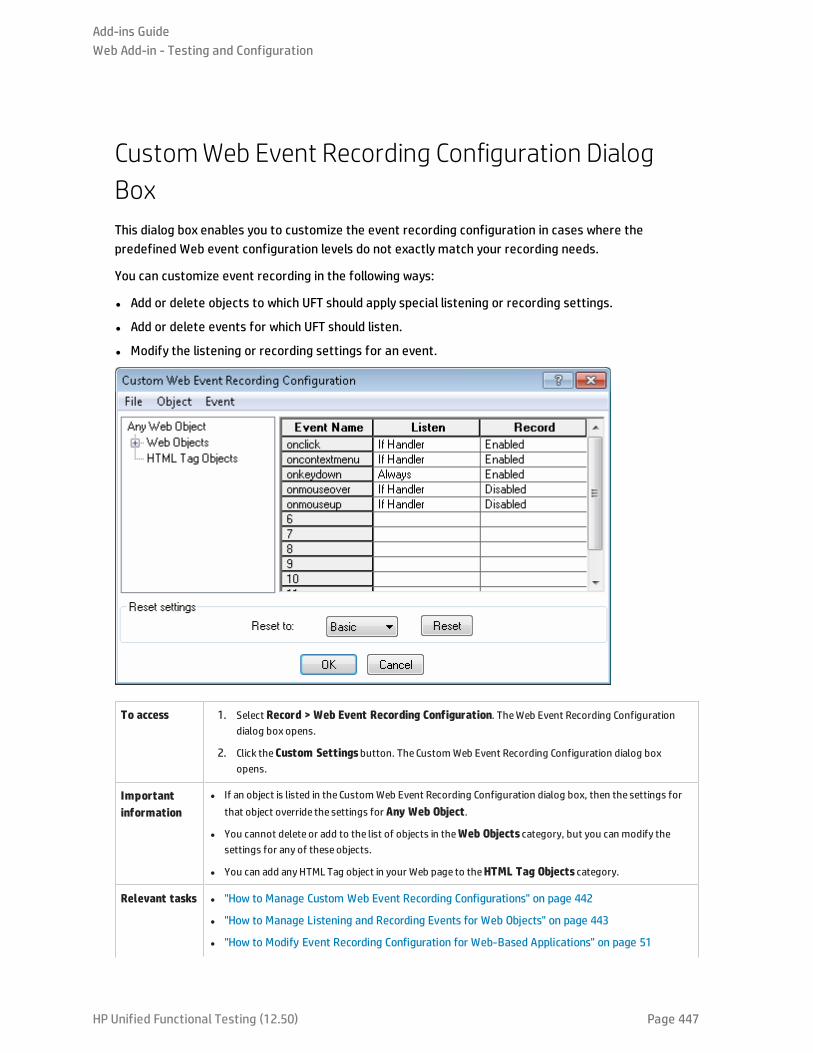
CustomWeb Event Recording Configuration DialogBoxThis dialog box enables you to customize the event recording configuration in cases where thepredefined Web event configuration levels do not exactly match your recording needs.
You can customize event recording in the following ways:
l Add or delete objects to which UFT should apply special listening or recording settings.
l Add or delete events for which UFT should listen.
l Modify the listening or recording settings for an event.
To access 1. Select Record > Web Event Recording Configuration. TheWeb Event Recording Configurationdialog box opens.
2. Click theCustom Settingsbutton. The CustomWeb Event Recording Configuration dialog boxopens.
Importantinformation
l If an object is listed in the CustomWeb Event Recording Configuration dialog box, then the settings forthat object override the settings for Any Web Object.
l You cannot delete or add to the list of objects in theWeb Objects category, but you can modify thesettings for any of these objects.
l You can add any HTML Tag object in your Web page to theHTML Tag Objects category.
Relevant tasks l "How to Manage Custom Web Event Recording Configurations" on page 442
l "How to Manage Listening and Recording Events for Web Objects" on page 443
l "How to Modify Event Recording Configuration for Web-Based Applications" on page 51
Add-ins GuideWeb Add-in - Testing and Configuration
HP Unified Functional Testing (12.50) Page 447
l "How to Configure UFT to Record Mouse Clicks" on page 52
See also l "Event Recording Configuration for Web Objects - Overview" on page 437
l "Event Listening and Recording for Web Objects" on page 438
User interface elements are described below (unlabeled elements are shown in angle brackets):
UIElements
Description
<menuoptions>
FileMenu
l Load Configuration.Enables you to load a custom configuration XML file.
l Save Configuration As.Enables you to save your custom configuration in an XML file.
Object Menu
l Add. Enables you to add an HTML tag object to theObjects pane.
l Delete. Enables you to delete an HTML tag object from theObjects pane.
Event Menu
l Add.Enables you to add the following events to the Events pane: onchange, ondblclick, onblur,onfocus, onmousedown, onmouseup, onmouseover, onmouseout, onsubmit, onreset,onpropertychange.
Depending on the selected object, not every event type is available.
l Delete. Delete the selected events from the Events pane.
<Objectspane>
The list of Web test object classes and HTML tag objects. The top of the hierarchy is Any Web Object.
Note:
l The settings for Any Web Object apply to any object on theWeb page, for which there is no specificevent recording configuration set. Below this are theWeb Objectsand HTML Tag Objects categories,each of which contains a list of objects.
l OnlyHTML tag objects can be added or deleted to this list.
<Eventspane>
The list of events associated with the object.
EventName
Thenameof the event to which UFT listens and/or records, depending on the settings you specify.
Listen The criteria that instructs UFT when to listen to the event. The following criteria are available:
l Always.Always listens to the event.
l If Handler.Listens to the event if a handler is attached to it. A handler is code in aWeb page, typically afunction or routinewritten in a scripting language, that receives control when the corresponding event occurs.
l If Behavior.Listens to the event if aDHTML behavior is attached to it. A DHTMLbehavior encapsulatesspecific functionality or behavior on apage. When applied to a standard HTML element on apage, a behaviorenhances that element's default behavior.
l If Handler or Behavior.Listens to the event if a handler or behavior is attached to it.
l Never.Never listens to the event.
Add-ins GuideWeb Add-in - Testing and Configuration
HP Unified Functional Testing (12.50) Page 448
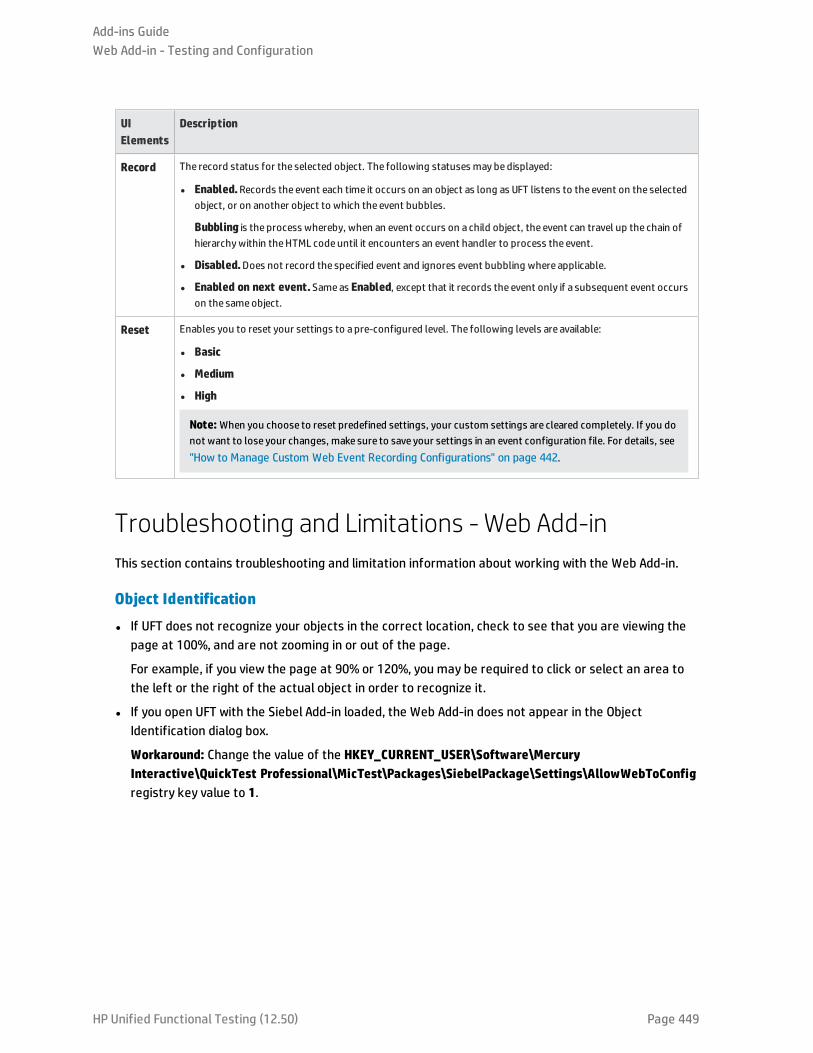
UIElements
Description
Record The record status for the selected object. The following statuses may bedisplayed:
l Enabled.Records the event each time it occurs on an object as long as UFT listens to the event on the selectedobject, or on another object to which the event bubbles.
Bubbling is the process whereby, when an event occurs on a child object, the event can travel up the chain ofhierarchywithin theHTML codeuntil it encounters an event handler to process the event.
l Disabled.Does not record the specified event and ignores event bubbling where applicable.
l Enabled on next event.Sameas Enabled, except that it records the event only if a subsequent event occurson the sameobject.
Reset Enables you to reset your settings to apre-configured level. The following levels are available:
l Basic
l Medium
l High
Note:When you choose to reset predefined settings, your custom settings are cleared completely. If you donot want to lose your changes, make sure to save your settings in an event configuration file. For details, see"How to Manage Custom Web Event Recording Configurations" on page 442.
Troubleshooting and Limitations - Web Add-inThis section contains troubleshooting and limitation information about working with the Web Add-in.
Object Identification
l If UFT does not recognize your objects in the correct location, check to see that you are viewing thepage at 100%, and are not zooming in or out of the page.
For example, if you view the page at 90% or 120%, you may be required to click or select an area tothe left or the right of the actual object in order to recognize it.
l If you open UFT with the Siebel Add-in loaded, the Web Add-in does not appear in the ObjectIdentification dialog box.
Workaround: Change the value of the HKEY_CURRENT_USER\Software\MercuryInteractive\QuickTest Professional\MicTest\Packages\SiebelPackage\Settings\AllowWebToConfigregistry key value to 1.
Add-ins GuideWeb Add-in - Testing and Configuration
HP Unified Functional Testing (12.50) Page 449
Recording
Autocomplete is not supported during recording sessions. When recording on an autocomplete control,enter the full string instead of selecting the suggestion provided by the control. The step is recorded inthe same way as other (non-autocomplete) controls.
Workaround: You can disable the AutoComplete feature in Microsoft Internet Explorer by selectingTools > Internet Options > Advanced and deselecting the Use inline AutoComplete under the Browsingoptions.
Troubleshooting and Limitations - Browser Specific
l "Troubleshooting and Limitations - Internet Explorer" on page 487
l "Troubleshooting and Limitations - Mozilla Firefox" on page 488
l "Troubleshooting and Limitations - Google Chrome and Apple Safari" on page 491
Add-ins GuideWeb Add-in - Testing and Configuration
HP Unified Functional Testing (12.50) Page 450
Web Add-in - Multiple Browser SupportThis chapter includes:
• Testing Applications on Multiple Browsers 452
• Working with Multiple Browsers - Object Identification Issues 452
• Testing Applications on Multiple Browsers - Creating a Single Test for All Browser Testing 457
• Testing Applications on Multiple Browsers - Running the Test on Multiple Browsers 458
• Using Descriptive Programming for Multiple Browser Testing - Use-case Scenario 459
• Working With Mozilla Firefox 467
• Working With Apple Safari on a Remote Mac Computer 469
• The UFT Connection Agent for Mac Computers 471
• Securing the Communication With the Remote Mac Computer 473
• How to Set Up Multiple Browser Testing 474
• How to Enable the HP Functional Testing Agent Chrome Extension 479
• How to Enable UFT to Test Local HTML Pages in Google Chrome 480
• How to Connect to a Remote Mac Computer 480
• How to Install and Configure UFT Connection Agent on Your Mac 483
• Troubleshooting and Limitations - Internet Explorer 487
• Troubleshooting and Limitations - Mozilla Firefox 488
• Troubleshooting and Limitations - Google Chrome and Apple Safari 491
HP Unified Functional Testing (12.50) Page 451

Testing Applications on Multiple BrowsersWeb applications and Web controls may be implemented or displayed differently on different browsers.This may affect the behavior of your tests and components, especially if you design them on onebrowser, and then run them on another. The run results may also differ when running the same test orcomponent on different browsers. For example, if properties are implemented or stored differently ondifferent browsers, UFT may use different properties for object identification or checkpoints dependingon the browser you use to open the application.
If you are aware of differences in your application's behavior on different browsers, you may be able todesign your tests and components to be browser-independent by anticipating these differences.
There are a number of areas where potential issues can exist:
l Object Identification
l Creating a Single Test for Cross-Browser Testing
l Running Cross Browser Tests
For details on steps to assist you with cross browser testing, see "How to Set Up Multiple BrowserTesting" on page 474.
For a use-case scenario, see "Using Descriptive Programming for Multiple Browser Testing - Use-caseScenario" on page 459.
Working with Multiple Browsers - Object Identification IssuesWhen testing web applications and web pages in multiple browsers, one of the foremost challenges isidentification of the application/page controls or objects. Due to differences in browser architecture,each of the browsers recognizes and displays the controls and/or objects differently. This can be avisual difference or a property difference that is invisible to the eye. However, because UFT uses theseproperties (both the visual and hidden ones) as described in the HTML tags, object identification canpresent issues between browser types.
This can be due to something as basic as different browser layout settings. For example, each browsertype structures their toolbar, bookmark, and tab layout differently. However, because of this, theamount of available space for the browser content differs, and likewise the display of the contentdiffers. If you are using location-based identification properties to identify different objects in anapplication, the layout of the browser can change these properties.
Object property differences also provide a point of potential issue. Within each browser, the propertiesfor a given object can be different (even when your application or Web page uses a CSS to standardizethe appearance of application or page elements). For example:
l Link controls are displayed differently on Firefox and Chrome than in Internet Explorer. A link fromthe Mercury Tours website is identified differently between each of the browsers (with the font,color, and background color properties highlighted):
HP Unified Functional Testing (12.50) Page 452

Add-ins GuideWeb Add-in - Multiple Browser Support
HP Unified Functional Testing (12.50) Page 453
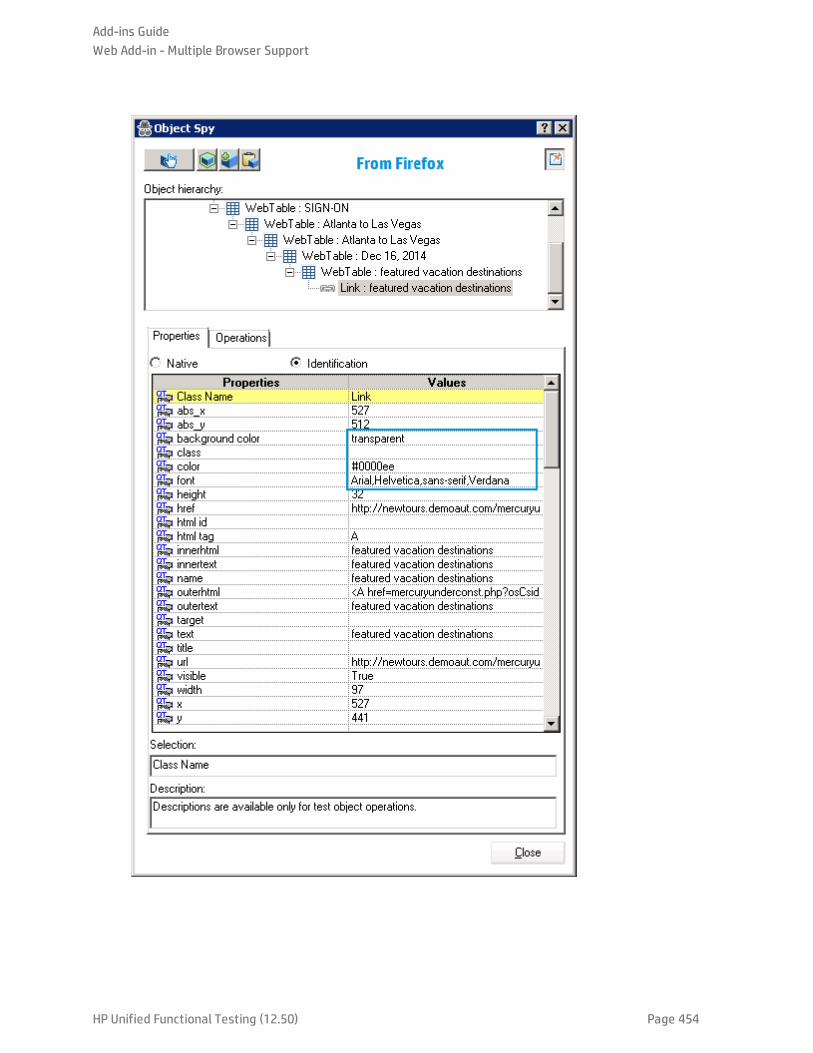
Add-ins GuideWeb Add-in - Multiple Browser Support
HP Unified Functional Testing (12.50) Page 454
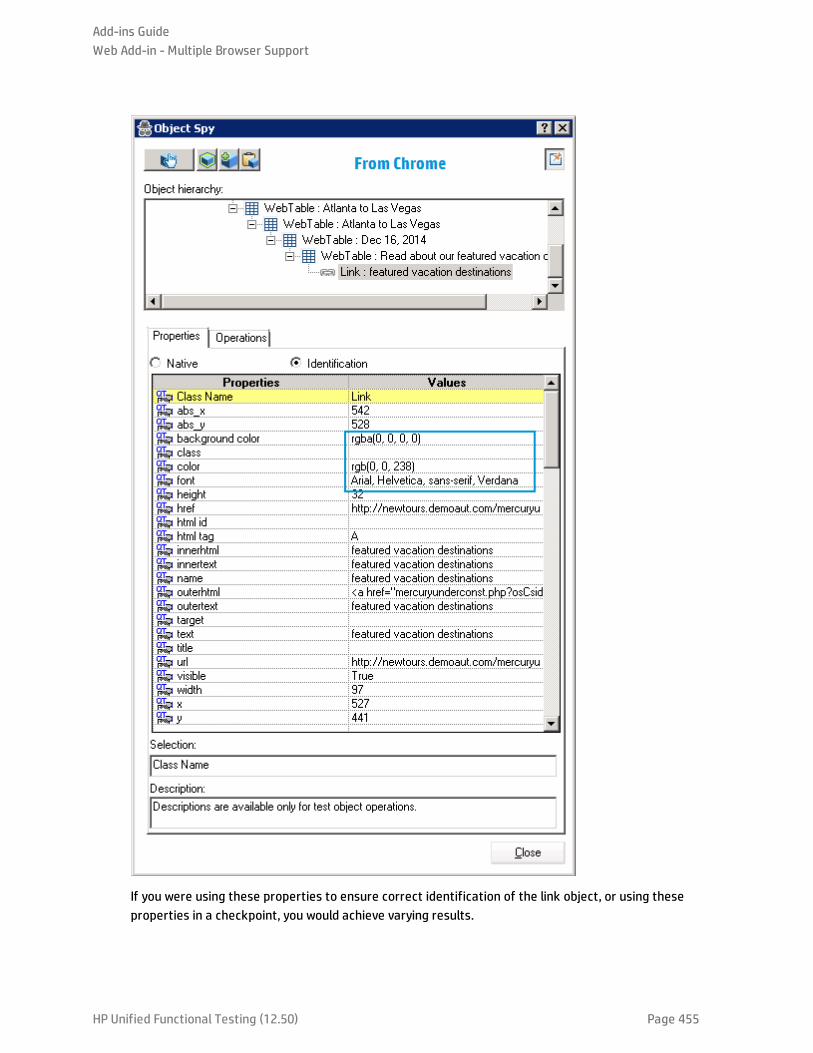
If you were using these properties to ensure correct identification of the link object, or using theseproperties in a checkpoint, you would achieve varying results.
Add-ins GuideWeb Add-in - Multiple Browser Support
HP Unified Functional Testing (12.50) Page 455
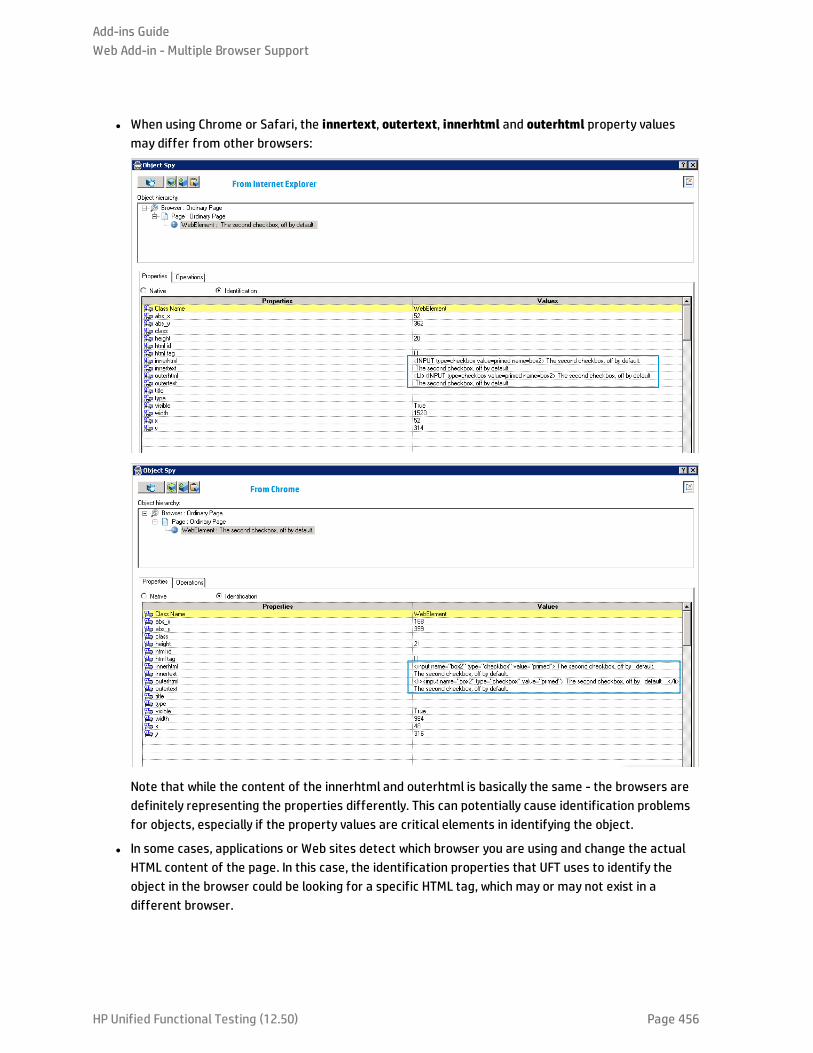
l When using Chrome or Safari, the innertext, outertext, innerhtml and outerhtml property valuesmay differ from other browsers:
Note that while the content of the innerhtml and outerhtml is basically the same - the browsers aredefinitely representing the properties differently. This can potentially cause identification problemsfor objects, especially if the property values are critical elements in identifying the object.
l In some cases, applications or Web sites detect which browser you are using and change the actualHTML content of the page. In this case, the identification properties that UFT uses to identify theobject in the browser could be looking for a specific HTML tag, which may or may not exist in adifferent browser.
Add-ins GuideWeb Add-in - Multiple Browser Support
HP Unified Functional Testing (12.50) Page 456
l Some HTML5 input types are not supported in older browsers or browser versions. This means that acontrol might have different properties, depending on the browser you use. If you record a test on abrowser that supports HTML5 but run it on a browser that does not support HTML5, or vice versa, UFTmight not be able to match the object description in your test to an object in the Web page beingtested.
Testing Applications on Multiple Browsers - Creating a SingleTest for All Browser TestingWhen you are testing your application or Web page on multiple browsers, you are trying to see that theapplication or Web page performs the same between browser types (unless designed otherwise). Whenyou set up your test, you would also expect that the same test can be used for each browser type, withminimal maintenance and updating to account for browser differences. However, creating a single testfor cross browser testing provides a set of challenges:
Having thecorrectobjects withthe correctpropertiesfor eachbrowser
In UFT, a test of your application accesses the object repository or repositories for your test, which contains thenecessary objects to test the application's objects. Ideally, you would create a single object repository or objectrepositories (per application section or Web page). Then, you would run the test in all the browser versionsusing that single object repository or set of object repositories, and UFT could identify the objects in theapplication or Web pagewithout issue.
In reality, providing the correct objects in the correct object repository is not always simple. Firstly, there arethe object identification issues. If UFT identifies a certain object very differently between browser types orversions, you may need to create separate repositories for each browser type to enableUFT to find the rightobject. However, when the test runs on a specific browser, you need the correct object repository for that testrun.
When you have a scenario such as this, you can enableUFT to dynamically add an object repository at thebeginning of the test run. For details, see "Dynamically load an object repository during the test run" onpage 477.
Dynamicallycreatedobjects thatare notincluded inan objectrepository
In some cases, you may also have dynamically created objects that are displayed on apage as a result ofprevious operations performed in the application. However, in the process of creating the test and the objectrepositories, these objects are not identified (as they do not exist when UFT is learning the application initially).Likemany other objects, these objects can be created and identified very different between browsers, making iteven more difficult for UFT to identify them.
To help UFT identify these objects, you can use descriptive programming. For details, see the section onProgrammatic Descriptions in theHPUnified Functional Testing User Guide.
Dynamicpageupdates
Each browser version can also have dynamic updates to the browser or page as part of its normal workflow.For example, alert dialogs are different between each of the browser versions, making it difficult to UFT toknow how to recognize, handle or ignore the dialogs. As a result, if you create test steps to close the alertdialog using onebrowser type, the other browser types may have trouble recognizing or performing steps onthe dialog. In other cases, these dialogs do not exist in the other browsers. In some cases, the browser may noteven enable you to continue the test if the alert dialog is not closed, thereby causing the test to fail, simplybecause it did not recognize the dialog and perform the correct steps on it.
In the case of the browser dialog boxes, there are special methods that can ensure you handle the pop-updialogs appropriately, including theBrowser.HandleDialog, Browser.GetDialogText, and theBrowser.DialogExistsmethods. (Note that even thesemethods do not work exactly the samebetween
Add-ins GuideWeb Add-in - Multiple Browser Support
HP Unified Functional Testing (12.50) Page 457
browsers also.)
In other cases, you can add steps to your test to account for browser-specific behavior. For details, see "Addsteps for browser specific behavior" on page 478.
Browser-specific orapplication-specificbehavior foruser actions
There are scenarios where the sameapplication operation - such as pressing theBackbutton -may result invery different behavior between browsers. For example, in an appointment booking application, pressing theBackbutton for Internet Explorer returns you to the previously viewed page, while pressing Back in Firefox orChrome logs you out of the application.
However, because of such problems, your test must be prepared to address the different behaviors. There aresomepotential solutions to help:
l Navigate to a specific URL/location in the application instead of a previous/next page (such as in the exampleabove)
l InsertWait steps that pause the test until an application or an application object achieves a certain state(which can be checked using theExist property for an object)
For details, see "Add steps for browser specific behavior" on page 478
Testing Applications on Multiple Browsers - Running the Test onMultiple BrowsersAfter you create a single test of your application or Web page to use in different browsers, you stillmust run it to actually test the application or Web page. You have a number of options on how to runthe test across different browser types:
Manually configurethe browser typefor each test run
UFT provides you the opportunity to select the browser type before each test run. You can do this inoneof the following places:
l The Web tab of the Record and Run Settings dialog box.
In theWeb tab, you can select the browser type from thedrop-down list. Then, when you run thetest, UFT opens the appropriate browser and runs the test.
l A user-defined environment variable specified in the Environment pane of the TestSettings dialog box.
UFT uses theBROWSER_ENV environment variable, and the requisite values for each browser typeto enable you to set this variable before each test run. When you enter a value for theBROWSER_ENV variable, UFT automatically opens up the necessary browser (ignoring any other browserlaunch settings).
However, this requires manual intervention by the person running the test, and does not enable youto run subsequent tests of the application or Web pageon the different browser types in sequence.
For details, see "Configure the Record and Run settings to launch a browser" on page 474or"Set the value of the BROWSER_ENV environment variable to launch a specific browser" onpage 475
Instruct UFT to opena browser typedefined by aparameter in thetest step
Instead of manually setting the browser before each test run (which thereby defeats the purpose ofautomated testing), you can insert a parameter into a test step that defines the browser to open. (Youcan also define a single reusable action that opens the browser, which can be reused in all the tests ofyour application or Web page.)
The values for this parameter (which are the.exe programs for each browser) are then defined in
Add-ins GuideWeb Add-in - Multiple Browser Support
HP Unified Functional Testing (12.50) Page 458
theData pane. When UFT reaches this test step, it reads the data pane and decides which browserneeds to open based on the selected data.
This removes the need for you or another person to manually configure settings or variables in a testbefore running the test, enabling you automatically test your application or Web pageon all browsertypes and/or versions. If you create a reusable action with the step that opens the browser, theparameter and datamust be added to every test that calls this external action.
For task details on how to set up automatic opening of browser types from UFT, see "Configure UFTto automatically launch a browser using a data parameter" on page 476.
Use a testparameter or datatable parameter tolaunch theappropriatebrowser
In theRecord and Run Settings dialog box (Web tab), you can instruct UFT to use either a testparameter or data table parameter to launch the browser. You set the parameter at the beginning ofthe test run (for a test parameter) or insert theBROWSER_ENV value in theData table in theDatapane.
Then, when UFT runs the test, it launches the correct browser according to the values you inserted.
For details, see "Configure UFT to automatically launch a browser with a parameter using theRecord and Run Settings" on page 476.
Using Descriptive Programming for Multiple Browser Testing -Use-case ScenarioOne of the challenging parts of cross-browser testing of your applications or Web pages is the objectidentification of objects in different browser types. Since each browser type can read the HTML code ofyour application and translate this differently, UFT may have trouble identifying the same objects indifferent browsers.
One technique that you can use when UFT is not identifying objects correctly is descriptiveprogramming. When you insert a programmatic description into your test instead of the actual testobject name, UFT searches for the object in your application matching the description.
In this use-case scenario, you can see how UFT can find a problematic object using description insteadof the test object name for the object (as stored in the object repository.).
Add-ins GuideWeb Add-in - Multiple Browser Support
HP Unified Functional Testing (12.50) Page 459
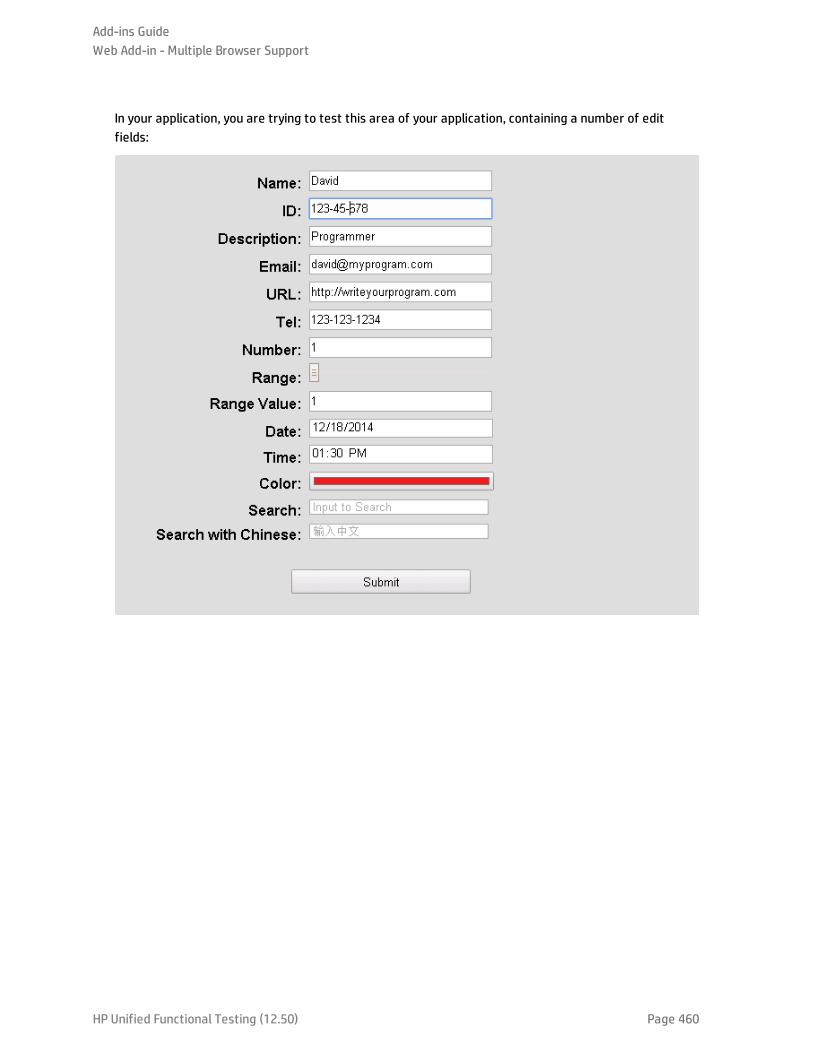
In your application, you are trying to test this area of your application, containing a number of editfields:
Add-ins GuideWeb Add-in - Multiple Browser Support
HP Unified Functional Testing (12.50) Page 460

In Chrome and Firefox, the application area displays as seen above. However, in Internet Explorer, thewindow has a different appearance, particularly the Color field:
Add-ins GuideWeb Add-in - Multiple Browser Support
HP Unified Functional Testing (12.50) Page 461
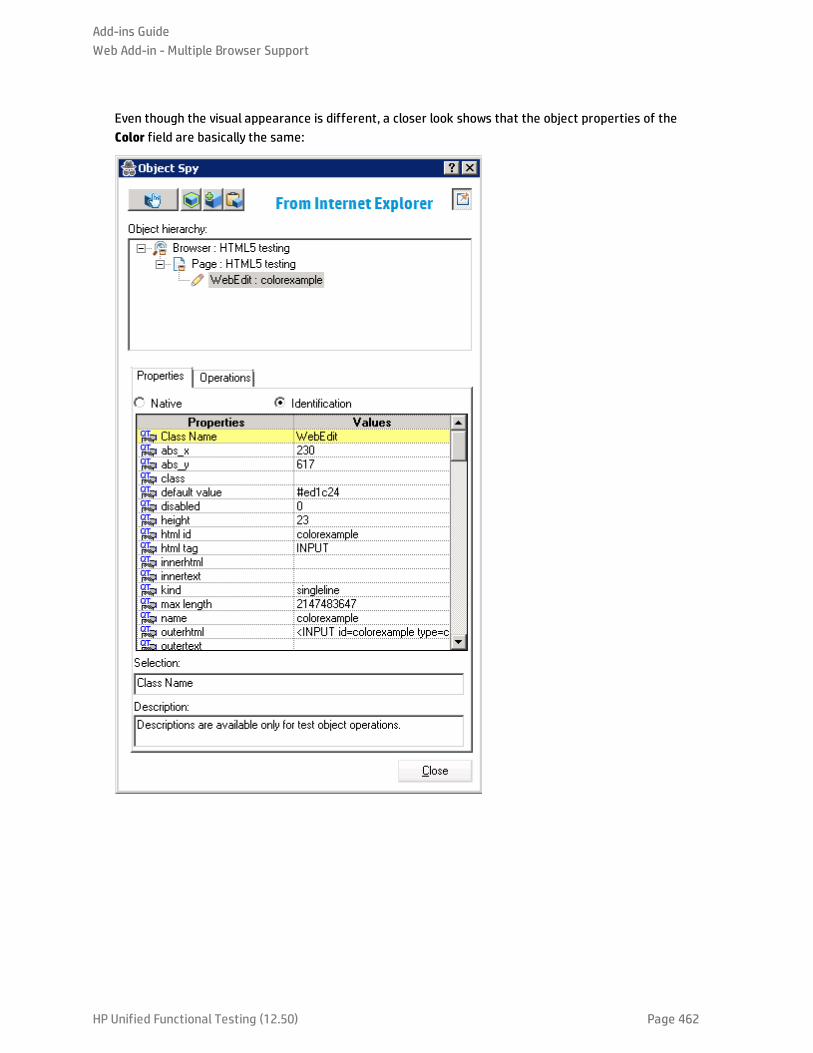
Even though the visual appearance is different, a closer look shows that the object properties of theColor field are basically the same:
Add-ins GuideWeb Add-in - Multiple Browser Support
HP Unified Functional Testing (12.50) Page 462

Add-ins GuideWeb Add-in - Multiple Browser Support
HP Unified Functional Testing (12.50) Page 463
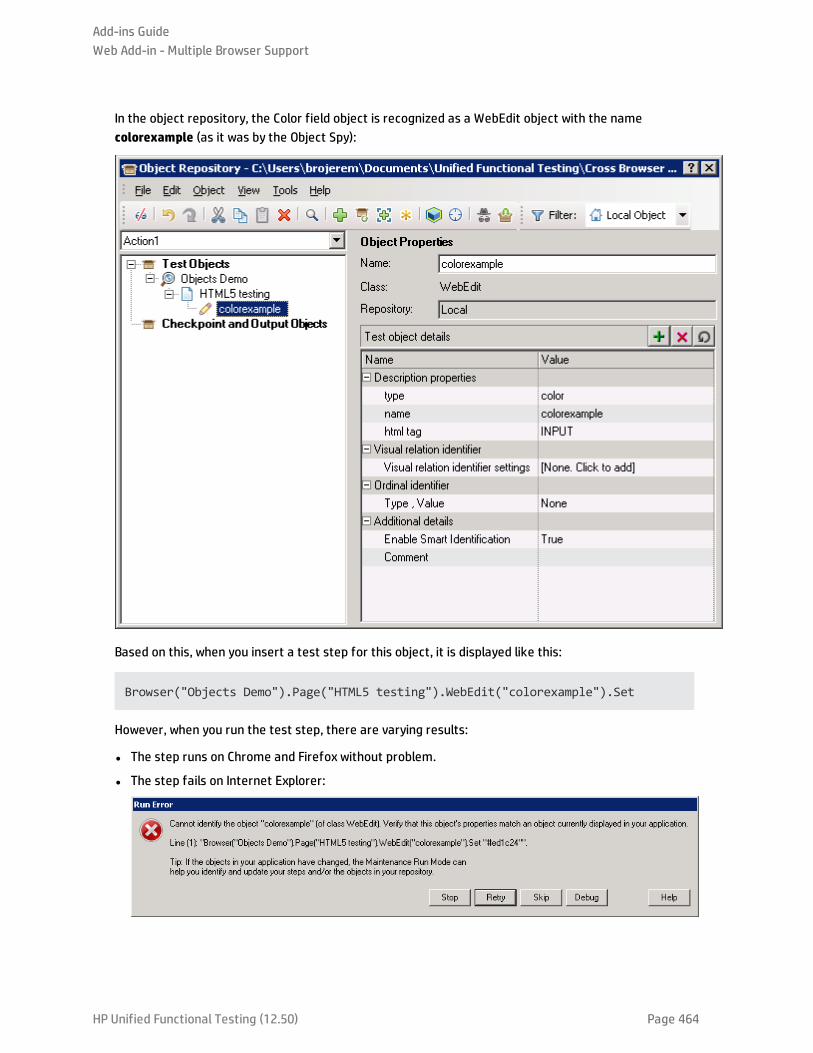
In the object repository, the Color field object is recognized as a WebEdit object with the namecolorexample (as it was by the Object Spy):
Based on this, when you insert a test step for this object, it is displayed like this:
Browser("Objects Demo").Page("HTML5 testing").WebEdit("colorexample").Set
However, when you run the test step, there are varying results:
l The step runs on Chrome and Firefox without problem.
l The step fails on Internet Explorer:
Add-ins GuideWeb Add-in - Multiple Browser Support
HP Unified Functional Testing (12.50) Page 464
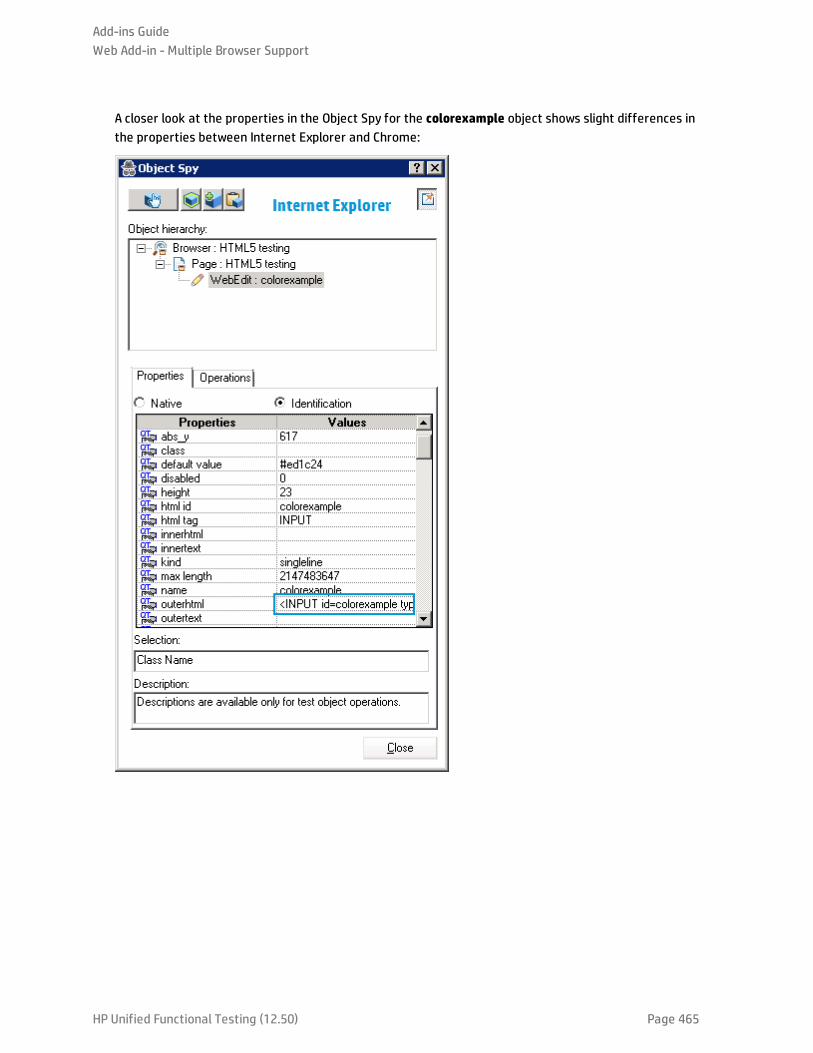
A closer look at the properties in the Object Spy for the colorexample object shows slight differences inthe properties between Internet Explorer and Chrome:
Add-ins GuideWeb Add-in - Multiple Browser Support
HP Unified Functional Testing (12.50) Page 465
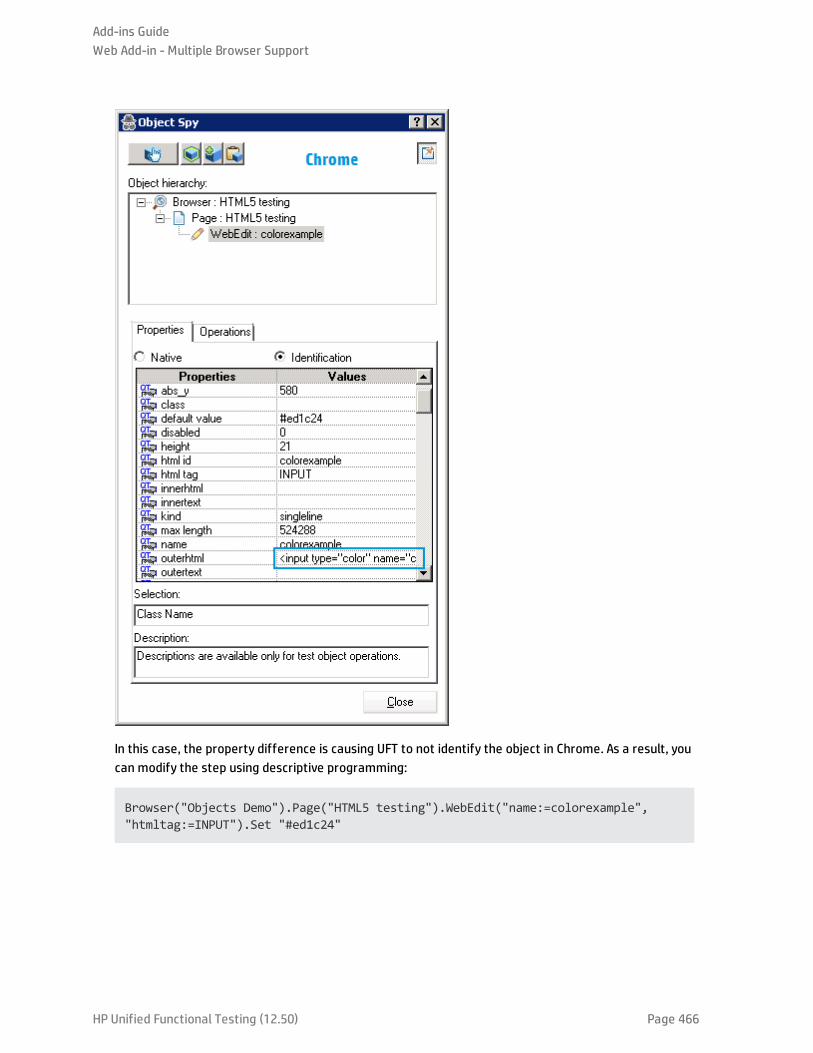
In this case, the property difference is causing UFT to not identify the object in Chrome. As a result, youcan modify the step using descriptive programming:
Browser("Objects Demo").Page("HTML5 testing").WebEdit("name:=colorexample","htmltag:=INPUT").Set "#ed1c24"
Add-ins GuideWeb Add-in - Multiple Browser Support
HP Unified Functional Testing (12.50) Page 466

Using this statement, when the test runs, the step runs without a problem:
Thus, by changing the test step to use descriptive programming, UFT is able to identify the object andrun the test step across all browsers.
Working With Mozilla FirefoxUFT tests and business components are generally cross-browser—you can record Web steps onMicrosoft Internet Explorer or Mozilla Firefox, or you can create steps with the keyword-drivenmethodology using any supported browser. You can run Web steps in any supported browser.
For general considerations on working with Web browsers, see "Considerations - Web-Based ApplicationSupport" on page 35.
The following sections describe specific items to consider when working with Mozilla Firefox:
l "Running Steps on Mozilla Firefox Browser Controls" below
l "Running Steps on Mozilla Firefox Dialog Boxes" on the next page
l "Checkpoints and Output Values" on the next page
Running Steps on Mozilla Firefox Browser Controls
Generally, steps that were recorded on Microsoft Internet Explorer will run on Mozilla Firefox withoutrequiring any modification. However, there are several differences to consider:
l UFT does not support Mozilla Firefox menus or sidebars.
l UFT supports specific Browser menu operations that are represented by the following toolbarbuttons:
l Back
l Forward
l Home
l Refresh
l Stop
All other toolbars and toolbar buttons are not supported. If you record steps on any unsupportedmenu or toolbar objects when working with Microsoft Internet Explorer, you may need to remove orreplace the steps before running the test or business component on Mozilla Firefox.
Add-ins GuideWeb Add-in - Multiple Browser Support
HP Unified Functional Testing (12.50) Page 467
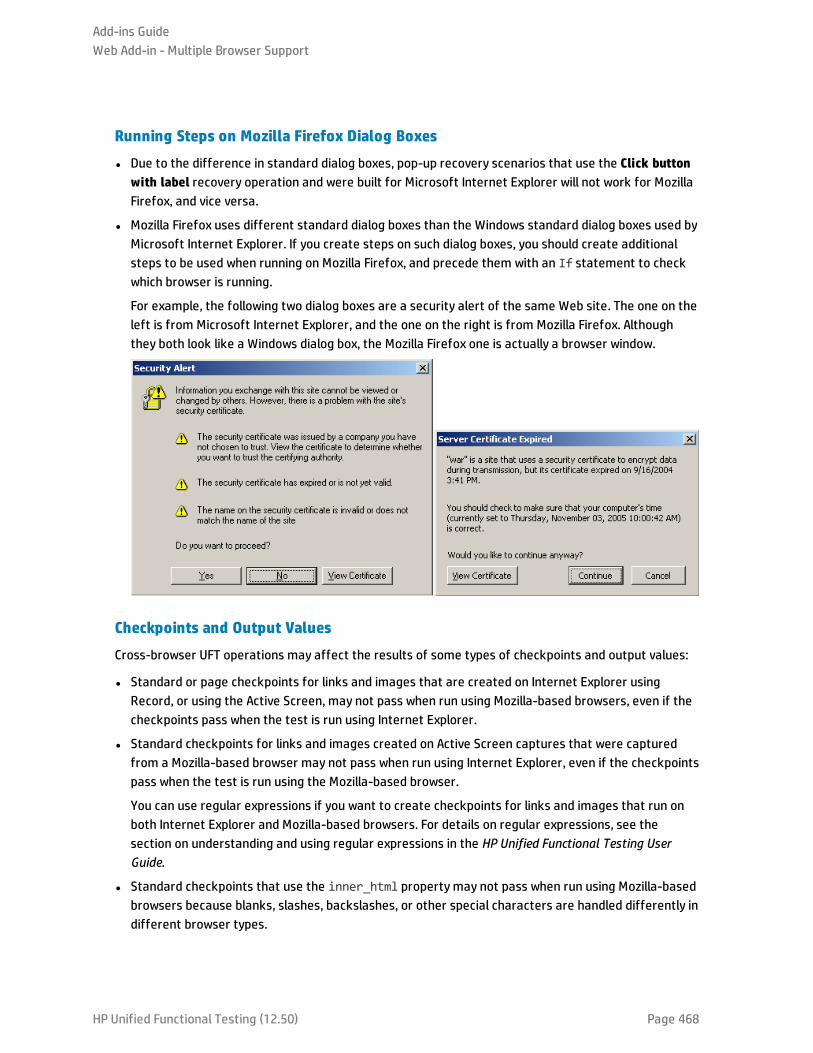
Running Steps on Mozilla Firefox Dialog Boxes
l Due to the difference in standard dialog boxes, pop-up recovery scenarios that use the Click buttonwith label recovery operation and were built for Microsoft Internet Explorer will not work for MozillaFirefox, and vice versa.
l Mozilla Firefox uses different standard dialog boxes than the Windows standard dialog boxes used byMicrosoft Internet Explorer. If you create steps on such dialog boxes, you should create additionalsteps to be used when running on Mozilla Firefox, and precede them with an If statement to checkwhich browser is running.
For example, the following two dialog boxes are a security alert of the same Web site. The one on theleft is from Microsoft Internet Explorer, and the one on the right is from Mozilla Firefox. Althoughthey both look like a Windows dialog box, the Mozilla Firefox one is actually a browser window.
Checkpoints and Output Values
Cross-browser UFT operations may affect the results of some types of checkpoints and output values:
l Standard or page checkpoints for links and images that are created on Internet Explorer usingRecord, or using the Active Screen, may not pass when run using Mozilla-based browsers, even if thecheckpoints pass when the test is run using Internet Explorer.
l Standard checkpoints for links and images created on Active Screen captures that were capturedfrom a Mozilla-based browser may not pass when run using Internet Explorer, even if the checkpointspass when the test is run using the Mozilla-based browser.
You can use regular expressions if you want to create checkpoints for links and images that run onboth Internet Explorer and Mozilla-based browsers. For details on regular expressions, see thesection on understanding and using regular expressions in the HP Unified Functional Testing UserGuide.
l Standard checkpoints that use the inner_html property may not pass when run using Mozilla-basedbrowsers because blanks, slashes, backslashes, or other special characters are handled differently indifferent browser types.
Add-ins GuideWeb Add-in - Multiple Browser Support
HP Unified Functional Testing (12.50) Page 468

l Before running text/text area checkpoint or output value steps, you must set the text recognitionoptions to use only OCR, by selecting the Use Only OCR option in the Text Recognition pane of theOptions dialog box (Tools > Options > GUI Testing tab > Text Recognition node).
Working With Apple Safari on a Remote Mac ComputerYou can use UFT to test Web applications on an Apple Safari browser that is running on a remote Maccomputer. UFT uses the WebSockets protocol to connect to the Mac computer that you specify. Notethat only Web test object steps can run on Safari. All other steps, including Utility object steps, such asSystemUtil.Run, run locally on the UFT computer.
To test Web applications on the Safari browser, you must install the UFT Connection Agent and theUnified Functional Testing Agent Safari browser extension on your Mac computer. For details on how todo this, see "The UFT Connection Agent for Mac Computers" on page 471.
Recording steps and learning objects (in the Object Repository Window or Manager) are not supportedon the Safari browser. However, you can use the Remote Object Spy on a Safari browser to view theproperties and operations of Web controls, and optionally, add the corresponding test objects to yourobject repository.
Creating and Editing Tests and Components that Run on Safari
It may be more convenient to create and edit your object repositories, tests and components workingwith a supported browser installed locally on the UFT computer,and then connect to a remote Maccomputer, fine-tune your tests, and run them on Safari.
Tip: Use Google Chrome to create, edit, and debug your tests and components, as Chrome andSafari render Web pages similarly.
Once your basic test is designed, you can connect UFT to a remote Mac computer running Safari, andfine-tune or debug your test based on the object properties available on Safari:
l Use the Remote Object Spy to see how UFT recognizes the objects in your application.
l View object properties using statement completion for the Objectmethod.
Note: Statement completion for the Object method is only available if the connection to theremote Mac is fast enough.
l Create standard checkpoints and output value steps on objects displayed in the Safari browser
Use the Design > Checkpoint and Design > Output Value > Standard Output Value commands.
Multiple UFT-Mac Connections
l Multiple users from different UFT instances can connect to the same Mac simultaneously usingdifferent ports.
Add-ins GuideWeb Add-in - Multiple Browser Support
HP Unified Functional Testing (12.50) Page 469
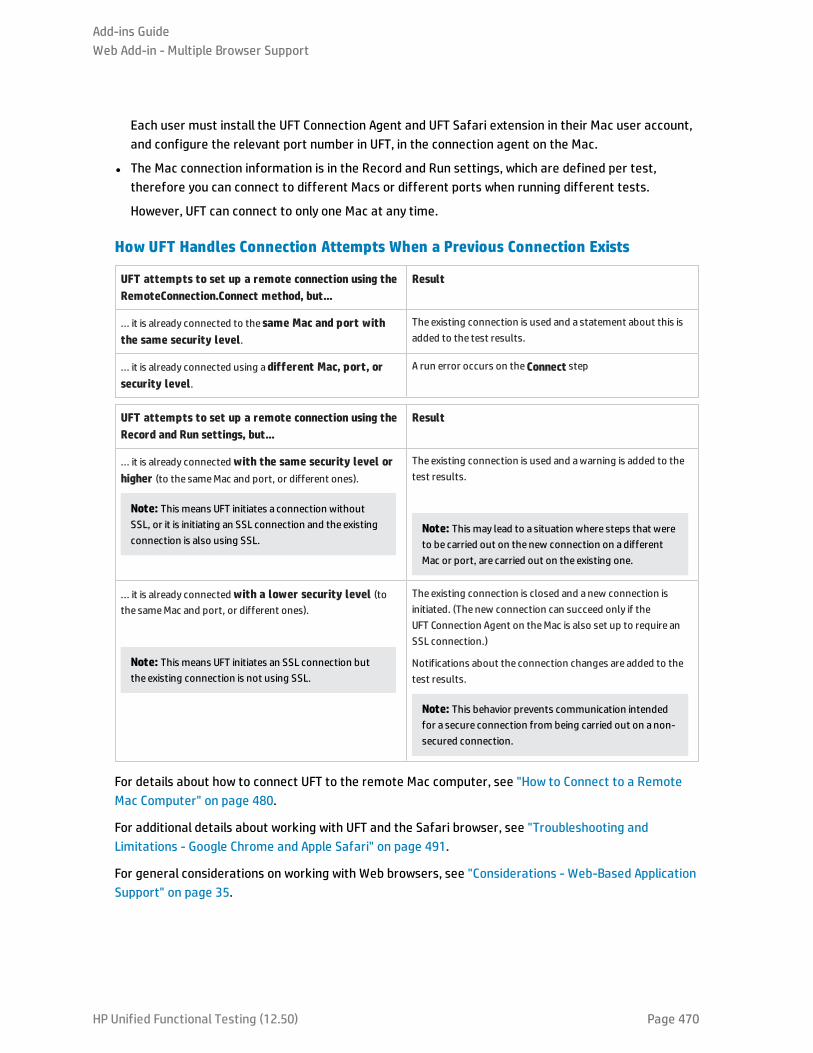
Each user must install the UFT Connection Agent and UFT Safari extension in their Mac user account,and configure the relevant port number in UFT, in the connection agent on the Mac.
l The Mac connection information is in the Record and Run settings, which are defined per test,therefore you can connect to different Macs or different ports when running different tests.
However, UFT can connect to only one Mac at any time.
How UFT Handles Connection Attempts When a Previous Connection Exists
UFT attempts to set up a remote connection using theRemoteConnection.Connect method, but...
Result
... it is already connected to the same Mac and port withthe same security level.
The existing connection is used and a statement about this isadded to the test results.
... it is already connected using adifferent Mac, port, orsecurity level.
A run error occurs on theConnect step
UFT attempts to set up a remote connection using theRecord and Run settings, but...
Result
... it is already connectedwith the same security level orhigher (to the sameMac and port, or different ones).
Note: This means UFT initiates a connection withoutSSL, or it is initiating an SSL connection and the existingconnection is also using SSL.
The existing connection is used and awarning is added to thetest results.
Note: This may lead to a situation where steps that wereto be carried out on the new connection on adifferentMac or port, are carried out on the existing one.
... it is already connectedwith a lower security level (tothe sameMac and port, or different ones).
Note: This means UFT initiates an SSL connection butthe existing connection is not using SSL.
The existing connection is closed and anew connection isinitiated. (The new connection can succeed only if theUFT Connection Agent on theMac is also set up to require anSSL connection.)
Notifications about the connection changes are added to thetest results.
Note: This behavior prevents communication intendedfor a secure connection from being carried out on anon-secured connection.
For details about how to connect UFT to the remote Mac computer, see "How to Connect to a RemoteMac Computer" on page 480.
For additional details about working with UFT and the Safari browser, see "Troubleshooting andLimitations - Google Chrome and Apple Safari" on page 491.
For general considerations on working with Web browsers, see "Considerations - Web-Based ApplicationSupport" on page 35.
Add-ins GuideWeb Add-in - Multiple Browser Support
HP Unified Functional Testing (12.50) Page 470
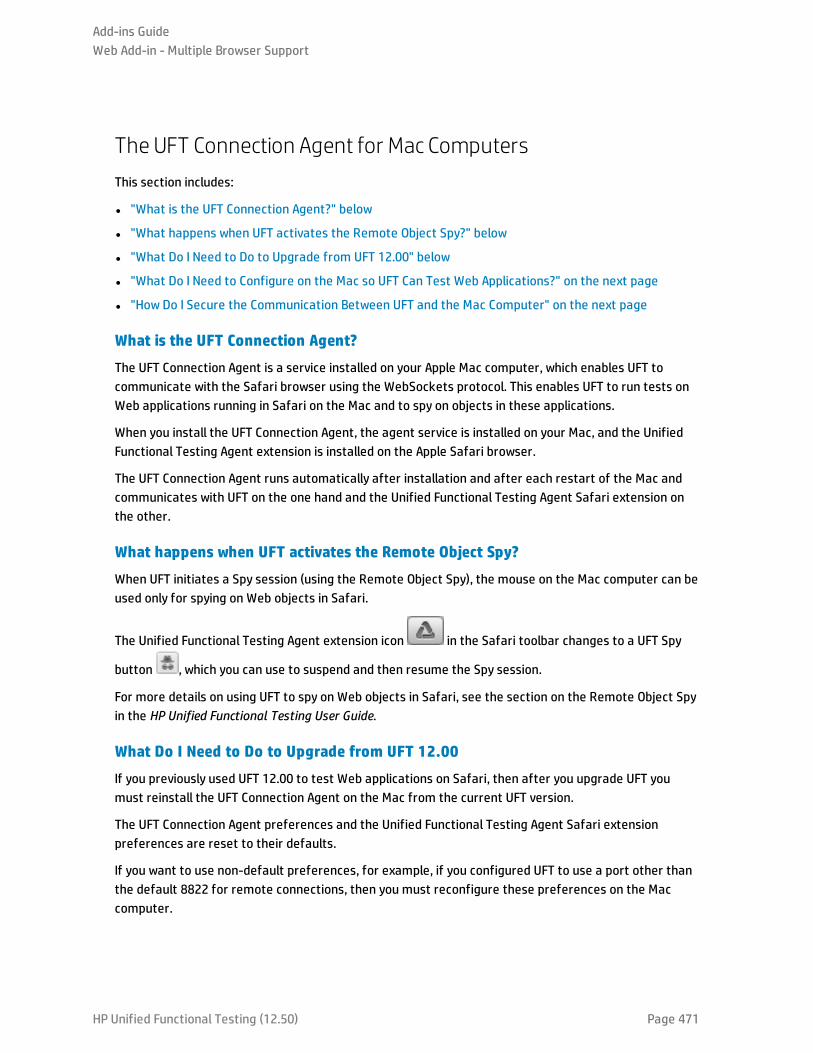
The UFT Connection Agent for Mac ComputersThis section includes:
l "What is the UFT Connection Agent?" below
l "What happens when UFT activates the Remote Object Spy?" below
l "What Do I Need to Do to Upgrade from UFT 12.00" below
l "What Do I Need to Configure on the Mac so UFT Can Test Web Applications?" on the next page
l "How Do I Secure the Communication Between UFT and the Mac Computer" on the next page
What is the UFT Connection Agent?
The UFT Connection Agent is a service installed on your Apple Mac computer, which enables UFT tocommunicate with the Safari browser using the WebSockets protocol. This enables UFT to run tests onWeb applications running in Safari on the Mac and to spy on objects in these applications.
When you install the UFT Connection Agent, the agent service is installed on your Mac, and the UnifiedFunctional Testing Agent extension is installed on the Apple Safari browser.
The UFT Connection Agent runs automatically after installation and after each restart of the Mac andcommunicates with UFT on the one hand and the Unified Functional Testing Agent Safari extension onthe other.
What happens when UFT activates the Remote Object Spy?
When UFT initiates a Spy session (using the Remote Object Spy), the mouse on the Mac computer can beused only for spying on Web objects in Safari.
The Unified Functional Testing Agent extension icon in the Safari toolbar changes to a UFT Spy
button , which you can use to suspend and then resume the Spy session.
For more details on using UFT to spy on Web objects in Safari, see the section on the Remote Object Spyin the HP Unified Functional Testing User Guide.
What Do I Need to Do to Upgrade from UFT 12.00
If you previously used UFT 12.00 to test Web applications on Safari, then after you upgrade UFT youmust reinstall the UFT Connection Agent on the Mac from the current UFT version.
The UFT Connection Agent preferences and the Unified Functional Testing Agent Safari extensionpreferences are reset to their defaults.
If you want to use non-default preferences, for example, if you configured UFT to use a port other thanthe default 8822 for remote connections, then you must reconfigure these preferences on the Maccomputer.
Add-ins GuideWeb Add-in - Multiple Browser Support
HP Unified Functional Testing (12.50) Page 471
This is required because of significant changes in the UFT Connection Agent's preferences. For example,the UFT Connection Agent now uses different ports to communicate with UFT and the Safari extension.In UFT 12.00, the same port was used for both communications.
What Do I Need to Configure on the Mac so UFT Can Test Web Applications?
By default, you do not need to modify the preferences set for the UFT Connection Agent and the UnifiedFunctional Testing Agent extension.
l UFT and the connection agent communicate using port 8822
l The connection agent and the UFT Safari extension communicate using port 8823.
However, in some situations, you might want to specify different ports. For example:
l If another application on the Mac uses these ports.
l If multiple UFT users need to connect to the same Mac computer. Each UFT user can use a connectionagent installed under a different Mac user account, with a different port number configured.
Caution: If you modify the port numbers, make sure that:
l The UFT port defined in the UFT Connection Agent preferences matches the one defined in UFT.
For details on setting this in UFT, see "How to Connect to a Remote Mac Computer" on page 480.
l The Safari port defined in the UFT Connection Agent preferences matches the one defined inthe Unified Functional Testing Agent extension in Safari.
In addition to the port numbers, you can configure the level of log messages to collect. By default, logmessages are collected from the connection agent, but not the Safari extension.
How Do I Secure the Communication Between UFT and the Mac Computer
When UFT communicates with the Mac, UFT acts as a client and the UFT Connection Agent acts as aserver.
You can secure this communication on different levels:
1. You can set up client authentication by defining a passphrase for UFT to use when contacting theMac.
2. You can secure the communication between UFT and the UFT Connection Agent by requiring thatthey use an SSL connection.
For more details, see "Securing the Communication With the Remote Mac Computer" on the next page
For task details on configuring the UFT Connection Agent preferences, the Unified Functional TestingAgent Safari extension preferences, and the security settings, see "Configure the UFT Connection AgentPreferences (Optional)" on page 483.
Add-ins GuideWeb Add-in - Multiple Browser Support
HP Unified Functional Testing (12.50) Page 472
Securing the Communication With the RemoteMac ComputerWhen UFT connects to a remote Mac computer, it can access the Safari application and perform stepson Web applications running in Safari. Therefore, it is important to secure this connection, to preventinappropriate access to your Mac and Web pages that the Mac can access.
When UFT communicates with the Mac, UFT acts as a client and the UFT Connection Agent acts as aserver.
You can secure this communication on different levels. You can:
Set up client authentication by defining a passphrase for UFT to use whenconnecting to the Mac.
Define the same passphrase in UFT's Remote Connection pane in the Options dialog box (Tools> Options > GUI Testing > Remote Connection) and in the UFT Connection Agent's preferences.
By default, the passphrase is empty. To provide better security, provide a passphrase that is long,complicated, and difficult to guess.
UFT uses this passphrase whenever it initiates a connection with any Mac computer.
The UFT Connection Agent accepts a connection request only if the passphrase included in the requestmatches the passphrase defined in the agent's preferences.
You can define the same passphrase on multiple UFT instances (on different computers, or in differentuser accounts on the same computer), and multiple instances of the UFT Connection Agent, (ondifferent Mac computers or in different Mac user accounts). This way, you can set up a group ofcomputers that all share the same passphrase and are used for similar testing purposes (like a virtuallab).
Secure the communication between UFT (the client) and the UFT Connection Agent(the server) by requiring that they use an SSL connection.
In the UFT Connection Agent preferences, set the following:
l Specify whether communications with this agent must take place over SSL connections (use SSL)
l If they must, then:
l Specify the path to an SSL certificate file for the server to use for the communication. (Chaincertificate files are also supported)
l Specify the path to the SSL private key that matches the certificate.
In UFT:
l In the Remote Connection pane in the Options dialog box (Tools > Options > GUI Testing > RemoteConnection), specify the path to an SSL CA certificate file that UFT can use to validate theSSL certificate provided by the server. (Certificate bundles are also supported.)
Add-ins GuideWeb Add-in - Multiple Browser Support
HP Unified Functional Testing (12.50) Page 473
l When defining the details for a specific remote connection, you specify whether the connectionshould use SSL. This can be done in the Remote Connection dialog box, in the Record and Runsettings (on a per-test basis), or using the RemoteConnection utility method in a test step. Fordetails, see "How to Connect to a Remote Mac Computer" on page 480.
l For a connection to succeed, the use SSL option must have the same value in UFT and theUFT Connection Agent.
At different times, UFT can connect to different UFT Connection Agents, by using different Mac orport numbers. You can instruct UFT to initiate non-SSL connections with agents that you know do notrequire SSL, and SSL connections with agents that you know require it. UFT uses the CA certificate filefor certificate validation only on connections initiated using SSL.
How to Set Up Multiple Browser TestingThis task describes some of the techniques you can use to enable effective cross-browser testing foryour application or Web page.
Tip: For a use-case scenario related to this task, see "Using Descriptive Programming for MultipleBrowser Testing - Use-case Scenario" on page 459.
This task includes the following steps:
l "Prerequisite- turn off auto updates for the browsers" below
l "Configure the Record and Run settings to launch a browser" below
l "Set the value of the BROWSER_ENV environment variable to launch a specific browser" on the nextpage
l "Configure UFT to automatically launch a browser with a parameter using the Record and RunSettings" on page 476
l "Configure UFT to automatically launch a browser using a data parameter" on page 476
l "Dynamically load an object repository during the test run" on page 477
l "Add steps for browser specific behavior" on page 478
Prerequisite- turn off auto updates for the browsers
To ensure that you are testing on the specific browser version you want, turn off the automatic updatefeature for your browser.
Configure the Record and Run settings to launch a browser
Using the Record and Run settings, you can change the browser on which you run the test for each testrun.
1. Select Record > Record and Run Settings.
2. In the Record and Run Settings dialog box, select the Web tab.
Add-ins GuideWeb Add-in - Multiple Browser Support
HP Unified Functional Testing (12.50) Page 474
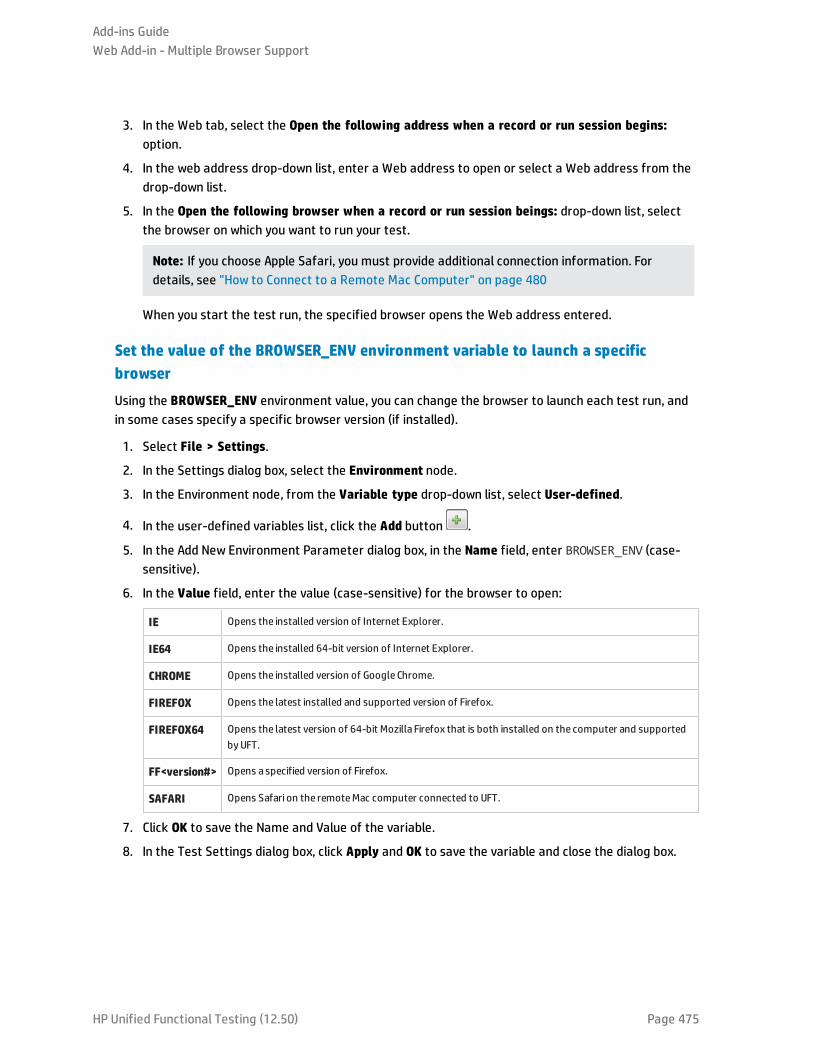
3. In the Web tab, select the Open the following address when a record or run session begins:option.
4. In the web address drop-down list, enter a Web address to open or select a Web address from thedrop-down list.
5. In the Open the following browser when a record or run session beings: drop-down list, selectthe browser on which you want to run your test.
Note: If you choose Apple Safari, you must provide additional connection information. Fordetails, see "How to Connect to a Remote Mac Computer" on page 480
When you start the test run, the specified browser opens the Web address entered.
Set the value of the BROWSER_ENV environment variable to launch a specificbrowser
Using the BROWSER_ENV environment value, you can change the browser to launch each test run, andin some cases specify a specific browser version (if installed).
1. Select File > Settings.
2. In the Settings dialog box, select the Environment node.
3. In the Environment node, from the Variable type drop-down list, select User-defined.
4. In the user-defined variables list, click the Add button .
5. In the Add New Environment Parameter dialog box, in the Name field, enter BROWSER_ENV (case-sensitive).
6. In the Value field, enter the value (case-sensitive) for the browser to open:
IE Opens the installed version of Internet Explorer.
IE64 Opens the installed 64-bit version of Internet Explorer.
CHROME Opens the installed version of Google Chrome.
FIREFOX Opens the latest installed and supported version of Firefox.
FIREFOX64 Opens the latest version of 64-bit Mozilla Firefox that is both installed on the computer and supportedby UFT.
FF<version#> Opens a specified version of Firefox.
SAFARI Opens Safari on the remoteMac computer connected to UFT.
7. Click OK to save the Name and Value of the variable.
8. In the Test Settings dialog box, click Apply and OK to save the variable and close the dialog box.
Add-ins GuideWeb Add-in - Multiple Browser Support
HP Unified Functional Testing (12.50) Page 475
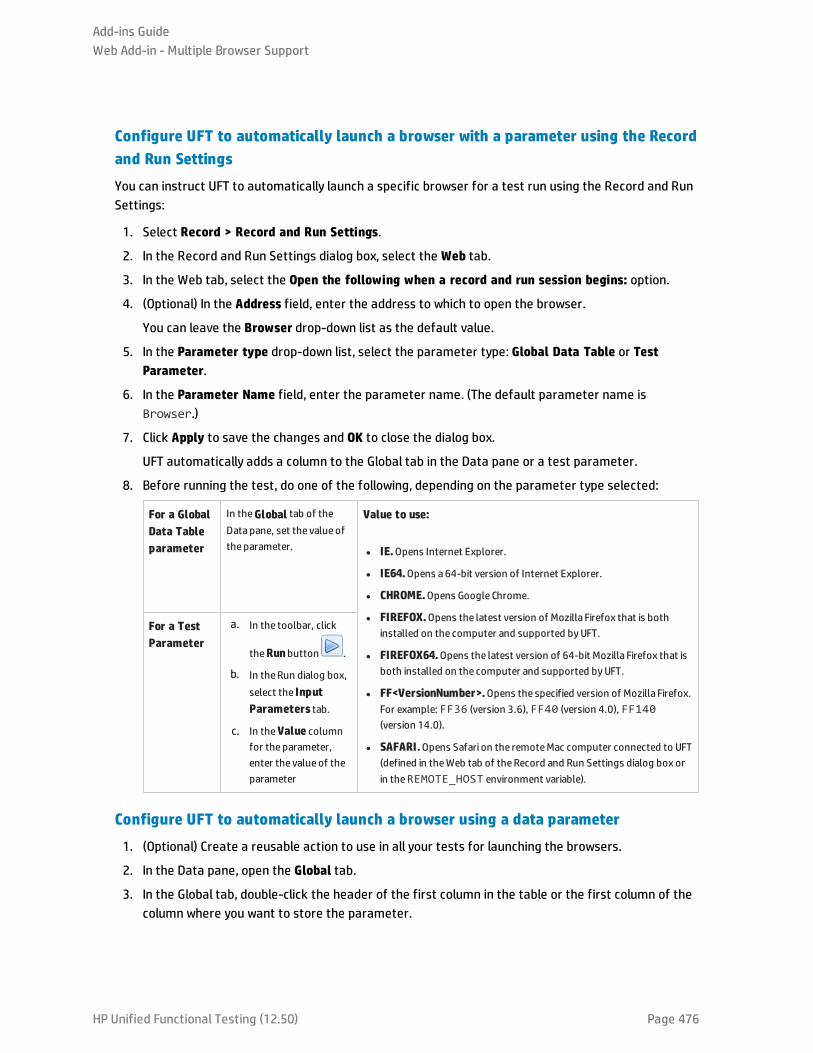
Configure UFT to automatically launch a browser with a parameter using the Recordand Run Settings
You can instruct UFT to automatically launch a specific browser for a test run using the Record and RunSettings:
1. Select Record > Record and Run Settings.
2. In the Record and Run Settings dialog box, select the Web tab.
3. In the Web tab, select the Open the following when a record and run session begins: option.
4. (Optional) In the Address field, enter the address to which to open the browser.
You can leave the Browser drop-down list as the default value.
5. In the Parameter type drop-down list, select the parameter type: Global Data Table or TestParameter.
6. In the Parameter Name field, enter the parameter name. (The default parameter name isBrowser.)
7. Click Apply to save the changes and OK to close the dialog box.
UFT automatically adds a column to the Global tab in the Data pane or a test parameter.
8. Before running the test, do one of the following, depending on the parameter type selected:
For a GlobalData Tableparameter
In theGlobal tab of theData pane, set the value ofthe parameter.
Value to use:
l IE.Opens Internet Explorer.
l IE64.Opens a64-bit version of Internet Explorer.
l CHROME.Opens Google Chrome.
l FIREFOX.Opens the latest version of Mozilla Firefox that is bothinstalled on the computer and supported by UFT.
l FIREFOX64.Opens the latest version of 64-bit Mozilla Firefox that isboth installed on the computer and supported by UFT.
l FF<VersionNumber>.Opens the specified version of Mozilla Firefox.For example: FF36 (version 3.6), FF40 (version 4.0), FF140(version 14.0).
l SAFARI.Opens Safari on the remoteMac computer connected to UFT(defined in theWeb tab of theRecord and Run Settings dialog box orin theREMOTE_HOST environment variable).
For a TestParameter
a. In the toolbar, click
theRunbutton .
b. In theRun dialog box,select the InputParameters tab.
c. In theValue columnfor the parameter,enter the value of theparameter
Configure UFT to automatically launch a browser using a data parameter
1. (Optional) Create a reusable action to use in all your tests for launching the browsers.
2. In the Data pane, open the Global tab.
3. In the Global tab, double-click the header of the first column in the table or the first column of thecolumn where you want to store the parameter.
Add-ins GuideWeb Add-in - Multiple Browser Support
HP Unified Functional Testing (12.50) Page 476
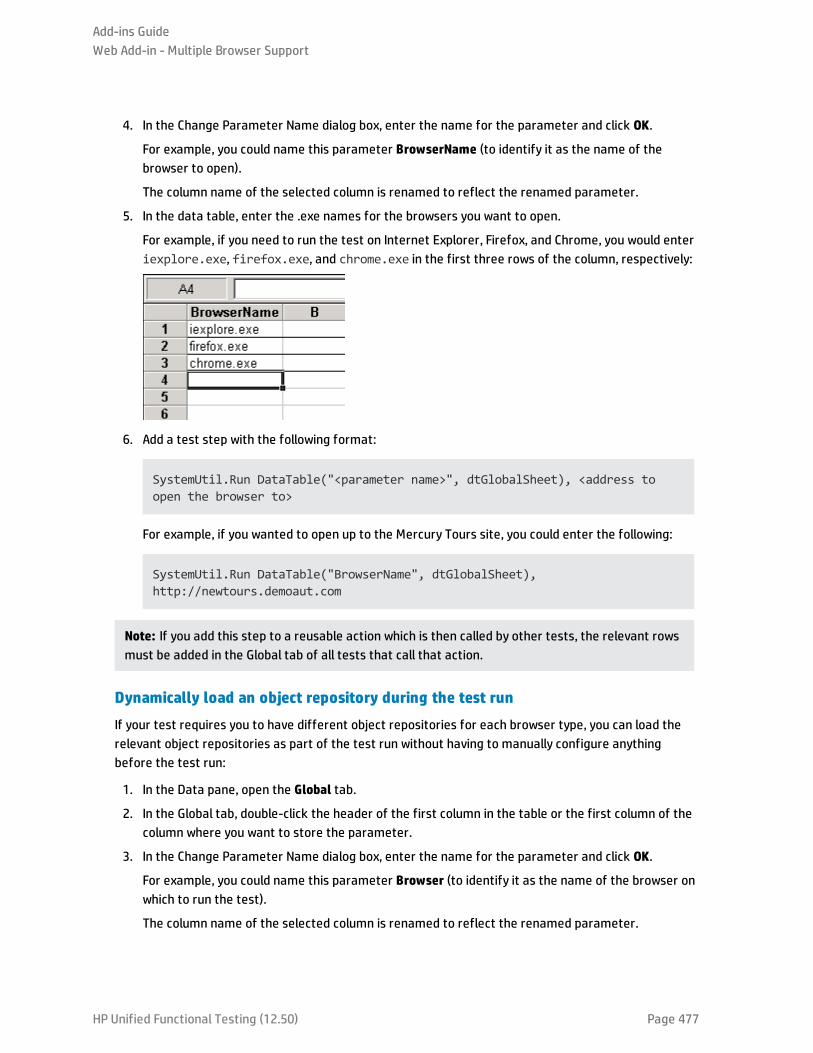
4. In the Change Parameter Name dialog box, enter the name for the parameter and click OK.
For example, you could name this parameter BrowserName (to identify it as the name of thebrowser to open).
The column name of the selected column is renamed to reflect the renamed parameter.
5. In the data table, enter the .exe names for the browsers you want to open.
For example, if you need to run the test on Internet Explorer, Firefox, and Chrome, you would enteriexplore.exe, firefox.exe, and chrome.exe in the first three rows of the column, respectively:
6. Add a test step with the following format:
SystemUtil.Run DataTable("<parameter name>", dtGlobalSheet), <address toopen the browser to>
For example, if you wanted to open up to the Mercury Tours site, you could enter the following:
SystemUtil.Run DataTable("BrowserName", dtGlobalSheet),http://newtours.demoaut.com
Note: If you add this step to a reusable action which is then called by other tests, the relevant rowsmust be added in the Global tab of all tests that call that action.
Dynamically load an object repository during the test run
If your test requires you to have different object repositories for each browser type, you can load therelevant object repositories as part of the test run without having to manually configure anythingbefore the test run:
1. In the Data pane, open the Global tab.
2. In the Global tab, double-click the header of the first column in the table or the first column of thecolumn where you want to store the parameter.
3. In the Change Parameter Name dialog box, enter the name for the parameter and click OK.
For example, you could name this parameter Browser (to identify it as the name of the browser onwhich to run the test).
The column name of the selected column is renamed to reflect the renamed parameter.
Add-ins GuideWeb Add-in - Multiple Browser Support
HP Unified Functional Testing (12.50) Page 477
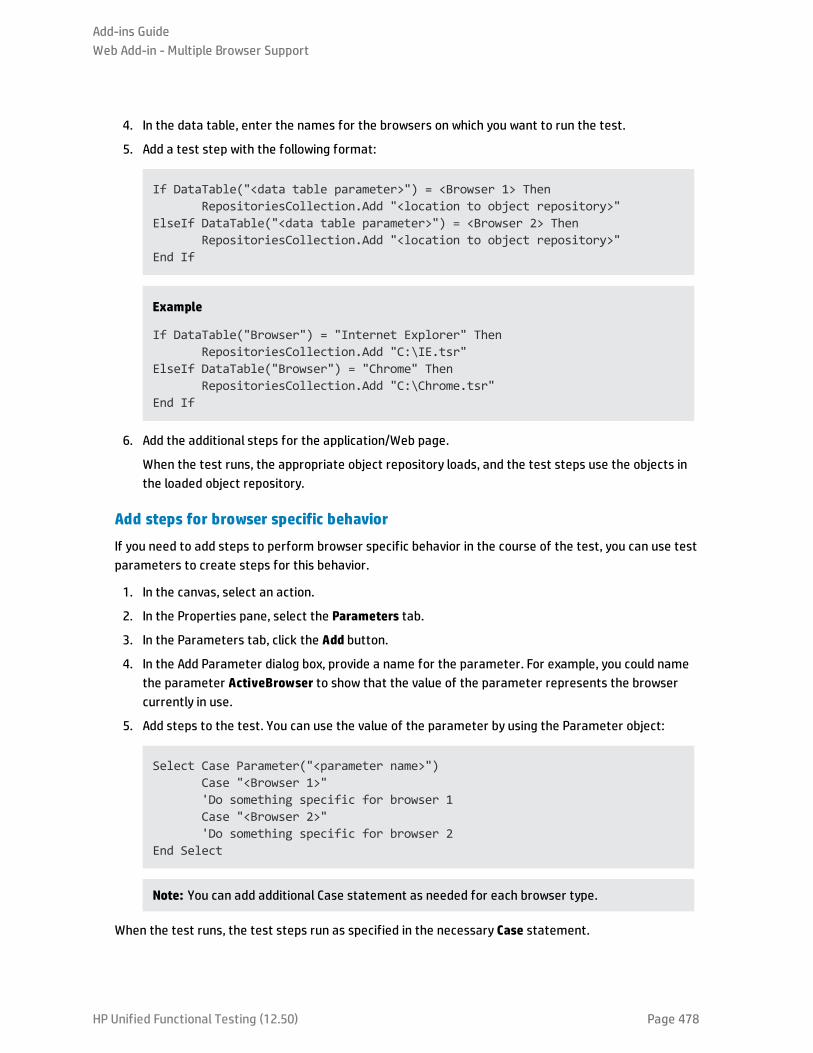
4. In the data table, enter the names for the browsers on which you want to run the test.
5. Add a test step with the following format:
If DataTable("<data table parameter>") = <Browser 1> ThenRepositoriesCollection.Add "<location to object repository>"
ElseIf DataTable("<data table parameter>") = <Browser 2> ThenRepositoriesCollection.Add "<location to object repository>"
End If
Example
If DataTable("Browser") = "Internet Explorer" ThenRepositoriesCollection.Add "C:\IE.tsr"
ElseIf DataTable("Browser") = "Chrome" ThenRepositoriesCollection.Add "C:\Chrome.tsr"
End If
6. Add the additional steps for the application/Web page.
When the test runs, the appropriate object repository loads, and the test steps use the objects inthe loaded object repository.
Add steps for browser specific behavior
If you need to add steps to perform browser specific behavior in the course of the test, you can use testparameters to create steps for this behavior.
1. In the canvas, select an action.
2. In the Properties pane, select the Parameters tab.
3. In the Parameters tab, click the Add button.
4. In the Add Parameter dialog box, provide a name for the parameter. For example, you could namethe parameter ActiveBrowser to show that the value of the parameter represents the browsercurrently in use.
5. Add steps to the test. You can use the value of the parameter by using the Parameter object:
Select Case Parameter("<parameter name>")Case "<Browser 1>"'Do something specific for browser 1Case "<Browser 2>"'Do something specific for browser 2
End Select
Note: You can add additional Case statement as needed for each browser type.
When the test runs, the test steps run as specified in the necessary Case statement.
Add-ins GuideWeb Add-in - Multiple Browser Support
HP Unified Functional Testing (12.50) Page 478
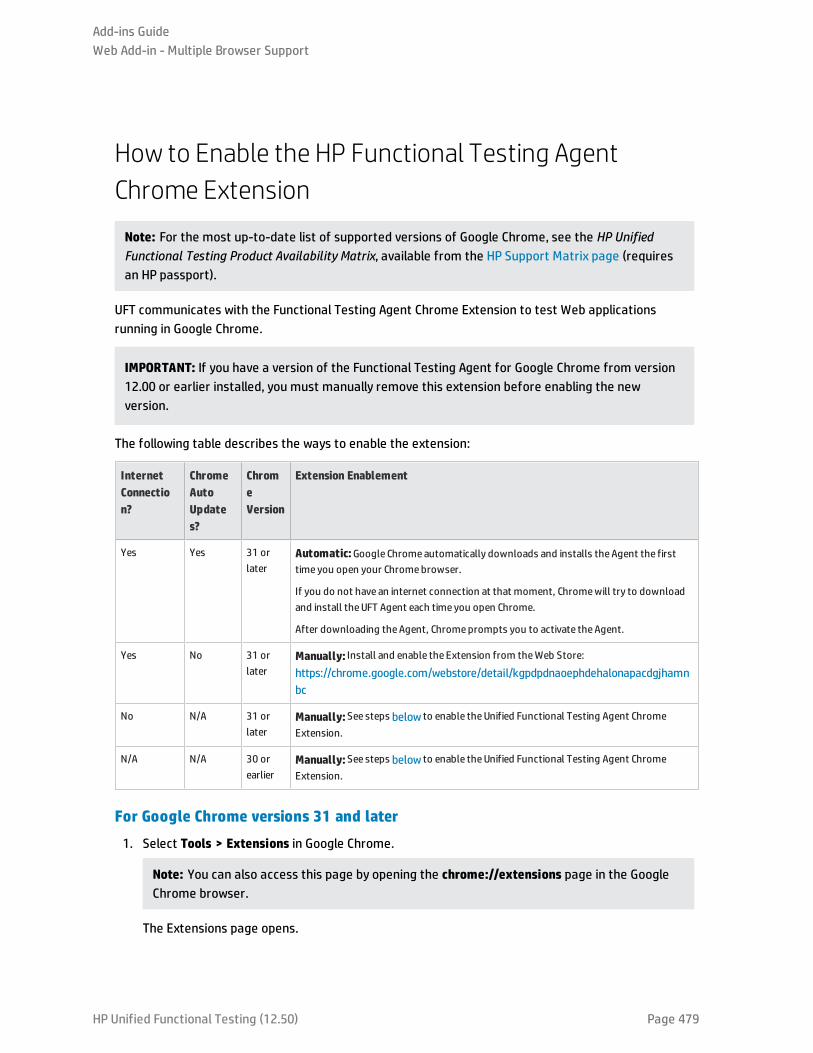
How to Enable the HP Functional Testing AgentChrome Extension
Note: For the most up-to-date list of supported versions of Google Chrome, see the HP UnifiedFunctional Testing Product Availability Matrix, available from the HP Support Matrix page (requiresan HP passport).
UFT communicates with the Functional Testing Agent Chrome Extension to test Web applicationsrunning in Google Chrome.
IMPORTANT: If you have a version of the Functional Testing Agent for Google Chrome from version12.00 or earlier installed, you must manually remove this extension before enabling the newversion.
The following table describes the ways to enable the extension:
InternetConnection?
ChromeAutoUpdates?
ChromeVersion
Extension Enablement
Yes Yes 31 orlater
Automatic: Google Chromeautomatically downloads and installs theAgent the firsttime you open your Chromebrowser.
If you do not have an internet connection at that moment, Chromewill try to downloadand install theUFT Agent each time you open Chrome.
After downloading theAgent, Chromeprompts you to activate theAgent.
Yes No 31 orlater
Manually: Install and enable the Extension from theWeb Store:
https://chrome.google.com/webstore/detail/kgpdpdnaoephdehalonapacdgjhamnbc
No N/A 31 orlater
Manually: See steps below to enable theUnified Functional Testing Agent ChromeExtension.
N/A N/A 30 orearlier
Manually: See steps below to enable theUnified Functional Testing Agent ChromeExtension.
For Google Chrome versions 31 and later
1. Select Tools > Extensions in Google Chrome.
Note: You can also access this page by opening the chrome://extensions page in the GoogleChrome browser.
The Extensions page opens.
Add-ins GuideWeb Add-in - Multiple Browser Support
HP Unified Functional Testing (12.50) Page 479
2. In the Extensions page, select the Developer mode option. Additional options are displayed afteryou select this option.
3. Click on the Load unpacked extension button.
4. In the Browse for Folder dialog, navigate to the <UFT installation folder>\Installations\Chromefolder and select the AgentLegacy.crx file.
5. In the Confirm New Extension dialog, click Add when prompted,
The Functional Testing Agent is now displayed in the Chrome extensions list.
For Google Chrome versions 30 and earlier
1. If you have a previous version of the UFT Agent for Google Chrome installed, manually remove thisextension.
2. Open the Chrome folder included with the UFT installation, found at <UFT installationfolder>\Installations\Chrome.
3. Select Tools > Extensions in Google Chrome.
Note: You can also access this page by opening the chrome://extensions page in GoogleChrome. The Extensions page opens.
4. From the <UFT installation folder>\Installations\Chrome folder, drag the AgentLegacy.crx file tothe chrome://extension page.
5. In the Confirm New Extension dialog, click Add to install the extension.
The Functional Testing Agent for Google Chrome is now displayed in the Chrome extensions list.
How to Enable UFT to Test Local HTML Pages inGoogle ChromeBy default, the ability to run extensions on local HTML files is disabled in Google Chrome. Do thefollowing to allow the UFT Google Chrome extension to run on local HTML files:
1. In Google Chrome, browse to the following URL: chrome://extensions
2. Locate the UFT extension, named Unified Functional Testing Agent.
3. Click the arrow located to the left of the icon to expand details about the extension.
Select Allow access to file URLs. Your selection is automatically saved.
How to Connect to a Remote Mac ComputerThis task describes how to control the UFT connection to a remote Mac computer, to enable testingWeb applications on the Safari browser.
Add-ins GuideWeb Add-in - Multiple Browser Support
HP Unified Functional Testing (12.50) Page 480
For details on how to work with a connected remote computer and how UFT handles connectionattempts when a previous connection exists, see "Working With Apple Safari on a Remote MacComputer" on page 469.
This task includes the following steps:
l "Prerequisite" below
l "Use the Remote Connection dialog box to control the connection to the Mac while designing yourtest" below
l "In the Record and Run Settings dialog box, specify the remote Mac computer to use when runningthe test or component" on the next page
l "Alternatively, you can add steps to your test or component to control the remote connection to theMac during the run session" on the next page
l "Configuring the Port Number to Use for the UFT-Mac Connection" on the next page
Prerequisite
To test Web applications on the Safari browser, you must install the UFT Connection Agent and theUnified Functional Testing Agent Safari browser extension on your Mac computer. For details on how todo this, see "The UFT Connection Agent for Mac Computers" on page 471.
Use the Remote Connection dialog box to control the connection to the Mac whiledesigning your test
l Click the Remote Connection button in UFT's toolbar.
In the dialog that opens, enter the host name or IP Address to use for the Mac.
Optionally, append a port number to the host name. For details, see "Configuring the Port Number toUse for the UFT-Mac Connection" on the next page.
l If the UFT Connection Agent on the Mac is configured to expect an SSL connection,you must selectthe Use SSL option.
To use an SSL connection to secure the communication between UFT and the Mac, make sure thatthe relevant certificates and key are defined in the Options dialog box in UFT (Tools > Options >GUITesting > Remote Connection) and in the UFT Connection Agent preferences on the Mac. For details,see the "Securing the Communication With the Remote Mac Computer" on page 473.
l Use the Connect/Disconnect button on this dialog to control the connection status while you edit thetest.
l This dialog also displays the current status of the connection.
l Before you run the test, make sure that you use one of the methods below to set up the UFT-Macconnection for the run session.
Add-ins GuideWeb Add-in - Multiple Browser Support
HP Unified Functional Testing (12.50) Page 481
In the Record and Run Settings dialog box, specify the remote Mac computer to usewhen running the test or component
Do one of the following:
l Select Record > Record and Run Settings to open the Record and Run Settings dialog box.a. In the Web tab, select Open the following browser when a record or run session begins.
b. Select Apple Safari (on remote Mac computer) from the list of browsers.
c. Set the host (and port) information.
d. Select whether to initiate an SSL connection.
e. Select whether to disconnect from the Mac at the end of the run session, and whether to closethe browser.
For details, see "Web Tab (Record and Run Settings Dialog Box)" on page 71.
l Set the environment variables REMOTE_HOST, BROWSER_ENV, URL_ENV, and USE_SSL (the last twobeing optional).
In these environment variables, you specify the Mac connection details, the SAFARI browser, and,optionally, the URL to open in the browser.
If you need an SSL-secured connection, set the USE_SSL variable to TRUE. For details, see"Environment Variables for a Web-Based Environment" on page 55.
UFT sets up the connection with the specified Mac and runs the Safari browser at the beginning of therun session, whether the test runs it from UFT’s UI, or from an ALM test set.
Alternatively, you can add steps to your test or component to control the remoteconnection to the Mac during the run session
Use the RemoteConnection utility object and its methods: Connect (hostname, [useSSL]), Disconnect,IsConnected to set up and disconnect the connection with the Mac.
Use RemoteConnection.Run (Safari, <URL>), to run the Safari browser on the remote Mac afteryou establish the connection.
For details, see the Utility Objects section of the HP UFT Object Model Reference for GUI Testing.
Configuring the Port Number to Use for the UFT-Mac Connection
By default, UFT connects to the Mac using port 8822. However, in some situations, you might want touse a different port. For example:
l If another application on the Mac uses this port.
l If multiple UFT users need to connect to the same Mac computer. Each UFT user can use a connectionagent installed under a different Mac user account, with a different port number configured.
To use a different port, append the port number to the host name: <hostname>:<port number>.
Add-ins GuideWeb Add-in - Multiple Browser Support
HP Unified Functional Testing (12.50) Page 482
Make sure to configure the same port number on the Mac, in the UFT port option in the UFT ConnectionAgent preferences.
How to Install and Configure UFT Connection Agent onYour MacThe UFT Connection Agent is a service installed on your Apple Mac computer, which enables UFT tocommunicate with the Safari browser using the WebSockets protocol. This enables UFT to run tests onWeb applications running in Safari on the Mac and to spy on objects in these applications. For details,see "The UFT Connection Agent for Mac Computers" on page 471.
This task describes installing and configuring the UFT Connection Agent, and includes the followingsteps:
l "Install or Uninstall the UFT Connection Agent" below
l "Configure the UFT Connection Agent Preferences (Optional)" below
l "Configure the Unified Functional Testing Agent Extension in Safari (Optional)" on page 485
l "Troubleshooting the UFT Connection Agent" on page 486
Install or Uninstall the UFT Connection Agent
l You must have administrator permissions to install the UFT Connection Agent.
l All Mac users that use the UFT Connection Agent must have the agent installed in their Mac useraccount.
1. Copy the installer image file (UFTConnectionAgent.dmg) from the <UFT installationfolder>/Installations/Safari folder to the Mac.
2. Open the UFTConnectionAgent.dmg image file.
3. Double-click (HP UFT Connection Agent.pkg) to start the installation wizard, or Uninstall toremove the agent from your Mac.
This installs or removes both the UFT Connection Agent and the Unified Functional Testing AgentSafari extension.
Note: If Safari or the System Preferences pane are open when you uninstall the agent, reopenthem for the uninstallation to take effect.
Configure the UFT Connection Agent Preferences (Optional)
1. To check or modify the status of the UFT Connection Agent, or to update its preferences, openSystem Preferences and double-click HP UFT Connection Agent.
Add-ins GuideWeb Add-in - Multiple Browser Support
HP Unified Functional Testing (12.50) Page 483
2. You can modify any of the following preferences (separately for each Mac user):
l Connection Port Numbers
o Safari port. The port on which the UFT Connection Agent communicates with the UnifiedFunctional Testing Agent Safari extension. (Default: 8823)
This number must match the Remote Agent Port number defined in the Unified FunctionalTesting Agent extension in Safari.
o UFT port. The port on which UFT communicates with the UFT Connection Agent.(Default: 8822)
This number must match the number defined in UFT for initiating the remote connection tothe Mac.
l Security Configuration
o Passphrase. The passphrase that UFT must use for authentication when initiating a remoteconnection to the Mac computer.
This string must match the passphrase defined in UFT's Remote Connection pane in theOptions dialog box (Tools > Options > GUI Testing > Remote Connection).
The passphrase can be empty, but a long and complicated passphrase that is difficult toguess provides better security.
o Use SSL. Indicates that UFT must use SSL when initiating the connection to the Maccomputer.
If you select this option, then:
l The Use SSL option, available in UFT when initiating a remote connection, must also beselected.
l You must specify the paths to the SSL certificate file to use for the communication andits SSL private key.
These files must be accessible to the UFT Connection Agent when it sets up theconnection. (Chain certificate files are also supported)
l In UFT (Tools > Options > GUI Testing > Remote Connection), specify the CA certificatethat UFT can use to validate the SSL certificate file when received from theUFT Connection Agent.
For more details, see "Securing the Communication With the Remote Mac Computer" onpage 473.
l Log Messages Configuration
o Log folder. The folder in which to save activity log messages.
Make sure you have write permissions for this folder.
o Agent log level. The level of information to save in the agent log (Fatal, Error, Warning,Debug).
The log is saved in the UFTAgent.log file in the specified folder.
o UFT Safari extension logs. Specifies whether to maintain a log of the Unified Functional
Add-ins GuideWeb Add-in - Multiple Browser Support
HP Unified Functional Testing (12.50) Page 484
Testing Agent Safari extension activity in addition to the UFT Connection Agent log. (Default:OFF).There is no need to turn these logs on, unless HP Support personnel request it.
This log is saved in the SafariLog.log file in the same folder.
Note: To activate the Unified Functional Testing Agent Safari extension log, you mustalso select Enable Remote Logging in the extension's preferences in Safari.
3. Make sure the Safari browser is closed and then click Apply & Save to save your changes andrestart the agent with the new preferences.
l The agent's status is displayed in the HP UFT Connection Agent preference pane.
Check the status to make sure the agent runs successfully with the new preferences. If it doesnot, check the UFTAgent.log file for problem details.
l If you set the UFT Safari extension logs option to ON and the remote logger service that logsthe Safari extension activity fails to run, this option is automatically set back to OFF. Check theSafariLog.log file for problem details.
Configure the Unified Functional Testing Agent Extension in Safari (Optional)
1. Open the Unified Functional Testing Agent extension in Safari.
a. Select Safari > Preferences
b. In the Preferences dialog box, select the Extensions tab.
c. In the Extensions list in the left pane of the dialog box, select the Unified Functional TestingAgent extension.
2. In the right pane, you can modify any of the following preferences:
l Remote Agent Port: The port number on which the UFT Connection Agent communicates withthe Safari browser. (Default: 8823)
Caution: This number must match the Safari port number defined in the UFT ConnectionAgent preferences.
l Show Object Spy popover when Spy starts: If you turned off the notification displayed onSafari when UFT initiates a Spy session, you can turn it back on using this option.
l Options related to maintaining a log of the Unified Functional Testing Agent Safari extensionactivity.There is no need to modify these options, unless HP Support personnel request it.
o Default Logging Level. The level of information to save in the Unified Functional TestingAgent Safari extension log file. (All, Trace, Debug, Info, Warn, Error, Fatal, Off )
o Enable Remote Logging. Specifies whether to maintain a log of the Unified FunctionalTesting Agent Safari extension activity in addition to the UFT Connection Agent log. (Bydefault, this option is cleared.)
Add-ins GuideWeb Add-in - Multiple Browser Support
HP Unified Functional Testing (12.50) Page 485

This log is saved in the SafariLog.log file in the same folder as the UFT Connection Agentlogs.
Note: To activate the Unified Functional Testing Agent Safari extension log, you mustalso select UFT Safari Extension logs in the UFT Connection Agent preferences.
o Leave the Logging Exceptions box empty. This is intended for use by HP Support only.
Troubleshooting the UFT Connection Agent
l If the agent remains in not running status after you update its preferences, check the UFTAgent.logfile for problem details.
For example, the ports you specified might be busy. They may be used by another application, or theymay be in use by a UFT Connection Agent installed on the Mac under another user's account.
Alternatively, you might have entered a port number that is restricted by Apple. Consult the Applesupport site regarding restricted or blocked ports.
l If UFT fails to connect to the Mac, make sure that the security settings defined in UFT match thosedefined in the UFT Connection Agent. For more details, see "Securing the Communication With theRemote Mac Computer" on page 473.
l If UFT fails to run tests on Safari or to recognize that it is installed on the Mac:
l Make sure that Safari port number defined in the UFT Connection Agent preferences, matchesthe Remote Agent Port number defined in the Unified Functional Testing Agent extension.
Make sure that the UFT port number defined in the UFT Connection Agent preferences, matchesthe number defined in UFT for initiating the remote connection to the Mac.
l Make sure that you are not using a port number that is blocked by Safari. Consult the Applesupport site regarding restricted or blocked ports.
l If you manually remove the Unified Functional Testing Agent extension from Safari, or the HPUFT Connection Agent preferences pane from the System Preferences, you can reinstall them byreinstalling the UFT Connection Agent on the Mac.
Reinstalling the UFT Connection Agent resets its preferences to their defaults. Make sure to updatethe preferences, if necessary, so that the correct port numbers are defined in the agent preferencesand in the Safari extension.
l If you turn on the UFT Safari extension logs, and when you save the preferences, the log option is setto OFF, check the SafariLog.log file for problem details.
For example, the port used for these logs is the Safari port + 1. If this port is busy, the remote loggerservice fails.
Add-ins GuideWeb Add-in - Multiple Browser Support
HP Unified Functional Testing (12.50) Page 486
Troubleshooting and Limitations - Internet ExplorerGeneral
If Internet Explorer 9 displays the message: Speeding up browsing by disabling add-ons, chooseDon't disable or select a bigger threshold value.
Test Objects, Methods, and Properties
l Recognition of test objects when using AutoXPath is very slow for web pages in Quirks Mode andAlmost Standards Mode.
Workaround: Convert the web page into Standards Mode by adding or changing the DOCTYPE of thepage into <!DOCTYPE.htlm> or <!DOCTYPE.HTML PUBLIC "-//W3C//DTD HTML 4.01//EN""http://www.w3.org/TR/html4/strict.dtd" or disabling AutoXPath capabilities in UFT byclearing the Learn and run using automatic XPath identifiers in the Web > Advanced pane (Tools >Options > GUI Testing tab > Web > Advanced node).
l When using the RunScript or RunScriptFromFile methods, Alert, Confirm, or Prompt dialogs are notdisplayed.
Workaround:When writing a RunScriptmethod, use the following method syntax:
Set wnd=Browser("<browser name>").Page("<page name>").RunScript("window")wnd.alert()
or
Browser("<browser name>").Page("<page name>").RunScript "setTimeout(function (){alert(); }, 0)"
l The WebXML test object is not supported on Internet Explorer 9 or later running in standard mode.Accordingly, features related to WebXML test objects, such as XML checkpoints and output valuesteps, are not supported on such browsers.
l In some cases, UFT does not support or recognize about:blank tabs in Internet Explorer 11.
l When using Internet Explorer 9, the innertext, outertext, innerhtml and outerhtml property valuesmay differ from earlier versions of Internet Explorer. Therefore, using these values in parameters orrunning checkpoints that use these property values may cause the steps to fail.
l Java applets running on Internet Explorer 11 (with JRE 8, update 45) are not supported.
Recording
l When recording a test on Internet Explorer 8 or earlier with the Active Screen enabled, performanceon the site may become very slow. This is due to a performance issue in the JavaScript engine used inthese browsers.
Add-ins GuideWeb Add-in - Multiple Browser Support
HP Unified Functional Testing (12.50) Page 487
Workaround: Record the test using Internet Explorer 9, or disable the Active Screen. For details, seethe HP Unified Functional Testing User Guide.
l If you are using Internet Explorer with:
l UAC enabled
l Protected mode enabled for either the Internet zone or the Intranet zone (Internet Options> Security tab)
l Protected mode disabled for the other zone (the Internet or Intranet zone)
UFT does not record steps when switching between an Internet site and an Intranet site.
Workaround: Set the integrity level (Protected mode enabled or not enabled) to be the same for theInternet and Intranet zones.
l If you record a click on an area of an image map that is not mapped to a URL in Microsoft InternetExplorer, UFT will perform a click on the first mapped area of that map during the run session.
l UFT does not record on customized toolbar buttons in Microsoft Internet Explorer. (It records only onthe toolbar buttons that are displayed by default in the browser.)
l UFT does not record on the Find window of the Microsoft Internet Explorer browser.
l UFT may respond slowly during a recording session if the drop-down boxes in a Web page contain alot of data.
Workaround: Learn the objects on a Web page that contains a lot of data (instead of recording).
l In Internet Explorer, the AutoComplete operation on edit fields is not recorded.
Workaround: You can disable the AutoComplete feature in Microsoft Internet Explorer by selectingTools > Internet Options > Advanced and deselecting the Use inline AutoComplete under theBrowsing options in Microsoft Internet Explorer.
Active Screen
When using Internet Explorer versions 10 or 11, if you use the Active Screen to view objects or add stepsto a test or component, the Active Screen does not capture the updated state of the Web page.
Workaround: Open the Developer Tools for the Web page and change the Document Mode to 8 or lower.
Troubleshooting and Limitations - Mozilla FirefoxGeneral Limitations
l If two minor versions of Mozilla Firefox are installed on the same computer, and the earlier versionwas installed after the later version, UFT may not recognize which is the latest version.
Add-ins GuideWeb Add-in - Multiple Browser Support
HP Unified Functional Testing (12.50) Page 488
l If you are working on a computer where the UAC (User Account Control) option is set to ON, UFT doesnot support testing on Mozilla Firefox browsers that were installed (or upgraded to a new version)after you installed UFT.
Workaround: After installing Mozilla Firefox on the environment described above, log in as anadministrator and open UFT. This enables UFT to install files that are required for Mozilla Firefoxsupport.
l The legacy Functional Testing Agent for Firefox (found at <UFT installationfolder>\Installations\Firefox\AgentLegacy.xpi) may experience unexpected results on a Windows 8operating system.
l UFT does not support anonymous content elements in non-XUL frames. (For example, the buttons inthe Mozilla Firefox SSL exception page.)
l It is recommended to disable other Mozilla Firefox add-ins when performing tests of your Webapplication or Web page.
l The SAPWDJ Add-in is not supported on Firefox browsers.
l If you have the Add-ons Manager enabled, in the Web tab of the Run and Record Settings dialog box,if you set Firefox to open to a specific URL, Firefox does not open to the specified URL at thebeginning of a recording or run session.
Workaround: Disable the Add-ons Manager before using Firefox.
Recording
l Recording on Mozilla Firefox pages is only possible when the page is fully loaded.
l When recording steps in Mozilla Firefox, additional steps may be recorded.
Workaround: Manually remove the extraneous steps after the recording session ends.
l The following methods are not supported for recording on Mozilla Firefox:
l Browser.Home
l Browser.FullScreen
l When recording on some Mozilla Firefox versions, if you perform a search on google.com by enteringthe search string and then pressing Enter, the Submit operation is not recorded. Subsequently, whenyou run the test, UFT enters the search string but does not perform the search.
Workaround: Do one of the following:
l When recording the search operation, click the search button instead of pressing Enter.
l Manually add the Submit (or Click) step to the test or component.
l The If Handler option in the "Web Event Recording Configuration Dialog Box" (described on page445) works on Mozilla Firefox browsers only if the handler is assigned as an attribute (for example, <Aonclick = "some code"/>) and not if it is assigned as a property (for example, aObj.onclick =function() {some code})
l The Active Screen is not supported for use with Mozilla Firefox browsers.
Add-ins GuideWeb Add-in - Multiple Browser Support
HP Unified Functional Testing (12.50) Page 489
l UFT does not record steps performed on browser dialog boxes (such as alert, confirmation, orprompt) if these dialog boxes are opened from a new browser tab.
l When recording on Mozilla Firefox, UFT does not use the location identifier identification property tolearn the object.
Test Objects, Methods, Properties, and Checkpoints
l UFT does not support accessing browser dialog boxes (such as alert, confirmation, or prompt) directlyin Mozilla Firefox.
Workarounds for Firefox only:
l Use the HandleDialog or GetDialogTextmethods described in the Web section of the HP UFTObject Model Reference for GUI Testing.
l If the Browser("xxx").Dialog("xxx").Page("xxx") object is recognized, either use a recoveryscenario with the HandleDialogmethod, or a Browser("xxx").Dialog("xxx").Page("xxx").Typestep to handle the pop-up dialog box. For example, use an Enter key to click the default buttonand close the dialog box.
l The Object Spy and Checkpoint Properties dialog boxes do not retrieve the current value of editboxes in Mozilla Firefox dialog boxes.
l The Object Spy and Navigate and Learn dialog boxes do not retrieve the current value of tabmodaldialogs in Mozilla Firefox.
l The Type property of the WebButton test object has a different default value in Microsoft InternetExplorer and Mozilla Firefox. In Microsoft Internet Explorer the default value is Button, but in MozillaFirefox the default value is Submit.
Workaround: Do not use the Type property in the description of a WebButton test object.
l When using Mozilla Firefox, the innertext, outertext, innerhtml and outerhtml property valuesmay differ from other browsers. Therefore, using these values in parameters or running checkpointsthat use these property values may cause the steps to fail.
l The following test objects, methods, and other Web-specific functionalities are not supported inFirefox:
l iFrame (with a Javascript source) and Frameset objects are not supported in Mozilla Firefoxbrowsers.
l Firefox Start Page
l about://* pages
l Modal or modaless dialog boxes
l ViewLink test object
l WebXML test object (and, accordingly, XML checkpoints and output value steps)
l Browser.Objectmethod
l Browser.Stop
l Text area checkpoints are not supported on Mozilla Firefox.
Add-ins GuideWeb Add-in - Multiple Browser Support
HP Unified Functional Testing (12.50) Page 490
l If you drag a tab to create a separate window in Firefox, UFT stops recognizing, recording, or runningany web objects in the new window.
l If you need to test Java applets in Mozilla Firefox browsers, you must use the legacy FunctionalTesting Agent for Firefox, found in the <UFT installation folder>\Installations\Firefox folder.
l If you take a snapshot of an ASPAjaxRichTextArea object on FireFox, it might not be displayedcorrectly in the Active screen.
l If a test or business component contains a step that closes a Mozilla Firefox browser, UFT maybehave unexpectedly when that step is reached during a run session.
Workaround: Do not include a step that closes a Mozilla Firefox browser.
l If you open the Search toolbar or developer toolbar in Mozilla Firefox, when you spy on an object orhighlight an object in the object repository, the highlight rectangle is displayed in the wrong locationin the browser window.
Workaround: Float the toolbar in the browser window.
Troubleshooting and Limitations - Google Chrome andApple Safari
Google Chrome and Apple SafariSee below for additional issues relevant only to Chrome or Safari.
Functionality and Settings
l Web pages that modify the browser's JavaScript functionality (for example, a Web page thatreplaces the JSON object) may cause UFT to behave unexpectedly.
l The font and color properties for link objects contain different values in different browsers.Therefore, if you create standard checkpoints in Microsoft Internet Explorer and select the font andcolor properties, running these checkpoints in Chrome or Safari may cause the checkpoints to fail.
l If you have multiple Chrome or Safari users defined, you must delete all users.
Test Objects, Methods and Properties
l When using Chrome or Safari, the innertext, outertext, innerhtml and outerhtml property valuesmay differ from other browsers. Therefore, using these values in parameters or running checkpointsthat use these property values may cause the steps to fail.
l The following test objects, methods, and other Web-specific functionalities are not supported inChrome or Safari:
l ViewLink test object
l chrome://* pages
Add-ins GuideWeb Add-in - Multiple Browser Support
HP Unified Functional Testing (12.50) Page 491
l about://* pages
l Browser.Home method
l Browser.FullScreenmethod
l Browser.Objectmethod
l Browser.Stop
l Modal or modaless dialog boxes
l Developer Tools pane. (Running steps on Chrome or Safari while the Developer Tools pane is openis supported.)
l Dialog boxes opened by the browser, such as Alert, Confirmation, or Prompt messages on versionsof Chrome earlier than 26.
l WebXML test object (and, accordingly, XML checkpoints and output value steps).
l Web-based environments, such as Web-based SAP, Siebel, Java, .NET Web Forms, and so on.
Google Chromel In the following cases, you must manually enable the Functional Testing Agent for Google Chrome
extension:
l You have no internet connection
l You have not enabled the automatic updates for Google Chrome
l You are using Google Chrome versions 31 or earlier.
For details on manually enabling the Extension, see "How to Enable the HP Functional TestingAgent Chrome Extension" on page 479.
l Recording on Google Chrome is supported only from versions 31 and higher.
l If you have the Chrome developer tools currently open, UFT cannot spy on Web objects.
l If you have a Chrome alert or warning dialog open, UFT cannot run or record tests or components onthe browser.
Workaround: Close the alert or warning dialog before trying to run or record a test or component.
l Internal Google Chrome pages, such as the about:blank page, Google Chrome sign-in page, GoogleChrome Web Store, and Google Chrome's default tabs homepage are not recognized as Web pagesbut WinObjects.
l When working with Chrome version 36 or earlier, UFT does not support Web test objects locatedinside iFrame controls with a blank or about:blank SRC identification property value.
l Page checkpoints and bitmap checkpoints may fail when running on Google Chrome because ofdifferences between Chrome and Internet Explorer. For page checkpoints this is related todifferences in the handling of casing in HTML source files.
l Text checkpoints fail when running on Google Chrome.
l When recording on Google Chrome, UFT does not use the location identification property to learn theobject.
Add-ins GuideWeb Add-in - Multiple Browser Support
HP Unified Functional Testing (12.50) Page 492
l When spying on a Web file in Google Chrome, you get a fakepath for a Webfile value property.
l If you manually uninstall the UFT Agent extension from Chrome, you must manually reinstall it if youreinstall UFT.
l The Active Screen is not supported for use with Google Chrome browsers.
l The Page/Frame options (Tools > Options > GUI Testing tab > Web > Page/Frame Options node) arenot supported for recording in Google Chrome.
l If the Record Coordinates option is selected in the Web > Advanced pane of the Options dialog box(Tools > Options > GUI Testing tab > Web > Advanced > Record Settings section), UFT does notrecord correct coordinates on images in Google Chrome browsers.
Workaround: Manually add the correct coordinates for the image after recording.
l iFrame and Frameset objects are not supported in Google Chrome browsers.
l Using the Object Spy on Alert or Confirm dialogs in Google Chrome causes unexpected behavior inUFT.
Apple Safaril Only Web test object steps can run on Safari. All other steps run locally on the UFT computer.
l Recording steps on Safari is not supported.
l Web 2.0 test objects or Web Add-in Extensibility-based test objects are not supported on SafariBrowsers
l UFT does not recognize internal Safari pages, such as the New Tab page.
l The following functionalities are not supported when working with the Safari browser:
l Learning objects in the Object Repository Window or Object Repository Manager (you can learnobjects using the Remote Object Spy)
l Maintenance Mode
l Highlighting an object from the object repository in the application
l Creating an Active Screen or using the Update Run Mode to update the Active Screen
l Checkpoints and output values that are not standard (such as File Content checkpoints andoutput values, Text checkpoints and output values, and Bitmap checkpoints).
Note that Page checkpoints are supported, with the following limitations:
o Page checkpoints and bitmap checkpoints may fail when running on Google Chrome becauseof differences between Chrome and Internet Explorer. For page checkpoints this is related todifferences in the handling of casing in HTML source files.
o The value of the load time identification property for Page and Frame test objects is always 0when running on Safari. In Page checkpoints, the load time property is selected by default,therefore Page checkpoints may fail when running on Safari.
Workaround: Deselect the load time property in Page checkpoints that need to run on Safari.
Add-ins GuideWeb Add-in - Multiple Browser Support
HP Unified Functional Testing (12.50) Page 493
l The following test objects and test object methods are not supported when running on Safari:
l WebFile.Setmethod
l Browser.ClearCache method
l Browser.DeleteCookiesmethod
l Drag & Dropmethods (on all Web test objects)
l Web test objects located inside iFrame controls with a blank or about:blank SRC identificationproperty value.
l Depending on the performance of your connection to the Mac, statement completion for the Objectproperty might not work.
l During a run session, steps that click on a Web object that is supposed to open a new browser tab failto open the new tab.
Workaround: Disable the popup blocker in Safari. (Safari > Preferences > Security, clear the Blockpop-up windows check box).
l When running tests or components on Safari, recovery scenarios are not supported.
l Running tests or components on Safari using the Mouse replay type is not supported.
Make sure that Event is selected as the Replay type in the Run settings section of the Web >Advanced options pane (Tools > Options > GUI Testing tab > Web pane > Advanced node).
l In the automation object model,WebLauncher.Browser does not support the Safari browser. Toconnect to a remote Mac during a test run and open the Safari browser, use the RemoteConnectionutility object and its methods. For details, see the Utility Objects section of the HP UFT Object ModelReference for GUI Testing.
Add-ins GuideWeb Add-in - Multiple Browser Support
HP Unified Functional Testing (12.50) Page 494
HP Unified Functional Testing (12.50) Page 495
Part 19: Web 2.0 Add-insThis section includes:
"Web 2.0 Add-ins - Quick Reference" on page 496
"Web 2.0 Toolkit Support " on page 498
"Troubleshooting and Limitations - Web 2.0 Add-ins" on page 501

Web 2.0 Add-ins - Quick ReferenceYou can use the Web 2.0 Add-ins to test HTML user-interface objects (controls) in Web 2.0environments.
The Web 2.0 Add-ins include the following:
l ASP .NET AJAX
l Dojo
l Google Web Toolkit (GWT)
l jQueryUI
l Siebel Open UI
l EXT-JS
l Yahoo User Interface (Yahoo UI)
The following tables summarize basic information about the Web 2.0 Add-ins and how they relates tosome commonly-used aspects of UFT.
General Information
Add-in Type Much of the functionality of these add-ins is the sameas other Web add-ins. These add-ins extend thecapabilities of theWeb Add-in functionalities.
l See the section on the "Web Add-in" on page 432and "Web-Based Application Support" on page 34.
SupportedEnvironments
For details on supported Web 2.0 toolkits and versions, see theHPUnified Functional Testing ProductAvailability Matrix, available from theHP Support Matrix page (requires an HP passport).
Test ObjectMethods andProperties
TheWeb 2.0 Add-ins provide test objects, methods, and properties that can beused when testing objects inWeb applications. For details, see the relevant toolkit section in theWeb 2.0 toolkits sectionof theHPUFTObject Model Reference for GUI Testing.
Checkpointsand OutputValues
l See the sections describing checkpoints and output values in theHPUnified Functional Testing UserGuide.
l See "GUI Checkpoints and Output Values Per Add-in" on page 512
Prerequisites
Opening YourApplication
You must open UFT before opening your Web application.
Add-in Dependencies You must have theWeb Add-in installed and loaded.
Other ImportantInformation forSiebelOpenUI users
l When working with SiebelOpenUI objects, load theWeb Add-in and the SiebelOpenUI Add-in,but do not load the Siebel Add-in.
If you load both the Siebel and the SiebelOpenUI add-ins, the add-ins sometimes conflict witheach other, and prevent successful object recognition.
l In order to enableUFT to run tests for SiebelOpenUI objects, you must associate a special
HP Unified Functional Testing (12.50) Page 496
function librarywith your test.
This function library is found at <UFT installationfolder>\dat\Extensibility\Web\Toolkits\SiebelOpenUI\Function Libraries\SiebelOpenUI.qfl.
You can set this function library as the default function library in theResources pane in theTest Settings dialog box. For details, see the section on the Test Settings Resources pane intheHPUnified Functional Testing User Guide.
Other ImportantInformation for EXT-JS users
In order to enableUFT to run tests for EXT-JS objects, you must associate a special functionlibrarywith your test.
This function library is found at <UFT installationfolder>\dat\Extensibility\Web\Toolkits\ExtJS\FunctionLibraries\ExtJS.qfl.
You can set this function library as the default function library in theResources pane in the TestSettings dialog box. For details, see the section on the Test Settings Resources pane in theHPUnified Functional Testing User Guide.
Configuration
Options Dialog Box Use theWebpane.
(Make sure that aGUI test is open and select Tools > Options > GUI Testing tab >Web > General node.)
For details, see "Web > General Pane (Options Dialog Box)" on page 58.
Record and Run Settings DialogBox(tests only)
Use theWeb tab. (Record > Record and Run Settings)
See "Web Tab (Record and Run Settings Dialog Box)" on page 71.
Test Settings Dialog Box(tests only)
Use theWeb pane (File > Settings > Webpane).
See "Web Pane (Test/Business Component Settings Dialog Box /Application Area - Additional Settings Pane)" on page 68.
Custom Active Screen CaptureSettings Dialog Box(tests only)
Use theWeb section (Tools > Options > GUI Testing tab > Active Screennode>Custom Level).
See the section on the Custom Active Screen Capture Settings dialog box in theHPUnified Functional Testing User Guide.
Application Area AdditionalSettings pane(business components only)
Use theWebpane.
In the application area, select Additional Settings > Web in the sidebar.
l See "Web Pane (Test/Business Component Settings Dialog Box /Application Area - Additional Settings Pane)" on page 68.
l See the section on defining Application Settings for your application area in theHPUnified Functional Testing User Guide.
Add-ins GuideWeb 2.0 Add-ins - Quick Reference
HP Unified Functional Testing (12.50) Page 497
Web 2.0 Toolkit Support
The Complexities of Testing Web 2.0 ControlsWeb 2.0 sites often include a feature-rich, user-friendly interface based on client-side interactivityframeworks. The controls in these sites are generally created using a combination of HTML and client-side JavaScript code that create complex, interactive application objects.
Many groups and organizations have published Web 2.0 toolkits. These toolkits comprise open sourceJavaScript libraries that define Web 2.0 controls. Developers can use or customize these toolkits tobuild Web 2.0 applications instead of developing Web 2.0 controls from scratch.
The UFT Web Add-in does not recognize these complex controls and, instead, relates to the HTMLelements that comprise them. This results in low-level steps on generic Web test objects. Such stepsmay be difficult to create, read, and maintain.
Testing Web 2.0 Controls with UFT Web 2.0 Add-inSupportUFT Web Add-in Extensibility makes it possible to develop Web-based add-ins that can identify thecontrols in a Web 2.0 application in a way that better matches the intended purpose and functionality ofthose controls.
UFT provides built-in Web Add-in Extensibility support for several public Web 2.0 toolkits. The supportfor each toolkit is packaged as a child add-in of the Web Add-in. If you install the Web 2.0 ToolkitSupport, you can load this support by selecting the relevant toolkit name in the Add-in Manager. TheWeb 2.0 Toolkit Support Setup is available from the Add-in Extensibility and Web 2.0 Toolkits optionin the UFT setup, or on your UFT computer:<UFT installation folder>\Installations\Web2AddinSetup\Web2AddinSetup.exe.
The operations supported for each Web 2.0 test object class are a combination of custom operationsdeveloped for that test object class and operations directly inherited from the corresponding (base)Web Add-in test object class.
You work with a Web 2.0 toolkit add-in much the same way as you work with the regular Web Add-in.When the toolkit support is loaded, you can learn, record, create checkpoints, run steps, and use allstandard UFT functionality on controls from these toolkits.
UFT provides support for the following toolkits:
l ASP .NET Ajax - http://www.asp.net/ajax/
l Dojo - http://www.dojotoolkit.org
Add-ins GuideWeb 2.0 Toolkit Support
HP Unified Functional Testing (12.50) Page 498
l Google Web Toolkit (GWT) - http://code.google.com/webtoolkit/
l jQuery UI - http://jqueryui.com/
l Siebel Open UI
l Yahoo User Interface (Yahoo UI) - http://developer.yahoo.com/yui/
l EXT-JS: http://www.sencha.com/products/extjs/S
For details on the test objects and operations supported for these toolkits, see the Web 2.0 Toolkitssection of the HP UFT Object Model Reference for GUI Testing.
Considerations for Working with Web 2.0 Add-ins
l jQuery Library Injection. The Web 2.0 Add-in support is based on the jQuery JavaScript library.Therefore, if you load any Web 2.0 add-in, UFT injects the jQuery JavaScript library into every Webpage that opens in a browser while UFT is open (unless a jQuery library is already included in thepage).
The specific jQuery UI file injected for each Web 2.0 add-in is specified in the add-in's toolkit XML file,located in: <UFT installation>\dat\Extensibility\Web\Toolkits\<ToolkitName>\<ToolkitName>.xml.
l F1 Help Support.When you press F1 on a test object operation that was inherited from the WebAdd-in, the Help displays information about that operation for the Web Add-in test object class fromwhich the operation was inherited, and not for the extensibility-based test object class used in yourstep.
Additionally, the details in the Help file reflect the behavior of the test objects and operations in theXML files provided with UFT. If these files were customized or modified in any way, the details in theHelp files supplied with UFT may no longer be accurate.
In general, when the content of the extensibility files for a Web 2.0 toolkit is modified, the Help fileshould also be changed as described in "Customization Guidelines" on page 501. In these cases, youshould contact the person or organization who customized the files as your first contact point forsupport.
l Checkpoints and Output Values. Inserting checkpoints and output values on Web 2.0 objects issupported only when recording steps.
l Container Objects. Some Web 2.0 objects that visually or behaviorally seem to contain other objectsin a Web application are not learned as container objects in terms of the test object hierarchy. Forexample, this is the case for the YUIDialogBox and GWTDialogBox test objects.
l Identification property values.When working in Mozilla Firefox, the value of the selected item orselected identification property is not available in the Object Spy for some Web 2.0 test objectclasses. The same is true when updating property values from the application in the objectrepository. This is because the value is only retrievable when the browser is in focus.
Workaround: Retrieve the property value without removing focus from the browser. For example:
Browser("Dijit Tree Test").Page("Dijit Tree Test").DojoTree("mytree").Select
Add-ins GuideWeb 2.0 Toolkit Support
HP Unified Functional Testing (12.50) Page 499

"Continents;Africa"msgbox Browser("Dijit Tree Test").Page("Dijit Tree Test").DojoTree("mytree").GetROProperty("selected item")
l Object Type Identification. In the toolkit XML file, the <HTMLTags> and <Conditions> elements inthe <Identification> section for the relevant test object class define how UFT maps Web controls tothat class.
In the example below, UFT identifies a control as a GWTToggleButton test object (when the GWT Add-in is loaded) if it has a <div> HTML tag and a className HTML property with a value that matchesthe regular expression: .*gwt-ToggleButton.*
<Control TestObjectClass="GWTToggleButton"><Settings><Variable name="default_imp_file" value="JavaScript\GWTToggleButton.js"/></Settings><Identification>
<Browser name="*"><HTMLTags><Tag name="div"/></HTMLTags><Conditions type="IdentifyIfPropMatch">
<!-- The search string in this condition is treated as a regular expressionand is therefore equivalent to .*gwt-ToggleButton.* -->
<Condition prop_name="className" expected_value="gwt-ToggleButton" is_reg_exp="true"/>
</Conditions></Browser>
In some cases (for example, when <Conditions type="CallIDFuncIfPropMatch">), a JavaScriptfunction that contains identification criteria is also used to help map controls to a test object class.
Keep in mind that the support provided in the HP-furnished Web 2.0 add-ins is dependent on theHTML and DOM structure of the controls. If developers of a Web 2.0-based application change thevalues of a control's properties, then the values defined for the <HTMLTags> and <Conditions>elements of the toolkit XML files (or JavaScript files) may not enable UFT to correctly identify thosecontrols.
If UFT is not identifying an object in your application as you expect, you can view or adjust thesevalues in the relevant toolkit support files.
The toolkit XML files are located in: <UFT installation>\dat\Extensibility\Web\Toolkits\<ToolkitName>\<ToolkitName>.xml
The JavaScript files are in a JavaScript folder under the above folder.
If you modify this (or any) HP-furnished toolkit support set file, follow the guidelines described in"Customization Guidelines" on the next page.
Add-ins GuideWeb 2.0 Toolkit Support
HP Unified Functional Testing (12.50) Page 500
For more details on the way UFT identifies supported controls and for details on the implementationof the supported operations, see the comments provided in the XML and JavaScript files for therelevant toolkit support set.
Customization Guidelines
If you are familiar with Web Add-in Extensibility, then you can customize or further extend the built-inWeb 2.0 support to match the needs of the Web 2.0 toolkit application you are testing.
Additionally, if you have installed Extensibility Accelerator, you can use this IDE to make it faster andeasier to design and develop the required extensibility XML files so that you can invest your main effortsin the development of the JavaScript functions that will enable UFT to work with your custom Webcontrols.
Extensibility Accelerator also comes with built-in projects for the UFT Web 2.0 add-ins. You can usethese projects to help you learn the Extensibility Accelerator features or to more easily add to or modifythe provided support files.
If you customize or further extend any of the HP-furnished Web Add-in Extensibility files, youshould also do the following:
l Make a copy of, or otherwise back up, the original HP-provided files.
l Change the name and description that are displayed in the Add-in Manager for the toolkit. Includethe text: "Provided by <YourOrganization>" in the Add-in Manager description (in theControls\Description element of the toolkit XML file).
l Create your own Help file to be opened for the customized test object classes or operations. Youmust use a different file name than the HP-provided Help file. (Change the file name in the HelpInfoelement of the Test Object XML file.)
Note: When installing the Web 2.0 add-ins, if a previous version of a selected add-in is installedon your computer, the setup stores the previous files in a backup folder before installing. Youmay need to merge any customizations you made to the previous version into the new version.
For details on how to make these changes and how to customize the support files, see the UFT WebAdd-in Extensibility documentation, available in the <UFT installationfolder>\help\Extensibility folder.
For details on working with Extensibility Accelerator, see the HP UFT Extensibility Accelerator forHP Functional Testing User Guide.
Troubleshooting and Limitations - Web 2.0Add-insThis section contains troubleshooting and limitation information about working with the Web 2.0 Add-ins.
Add-ins GuideTroubleshooting and Limitations - Web 2.0 Add-ins
HP Unified Functional Testing (12.50) Page 501
General Limitations
l When working with test objects that are supported using Web Add-in Extensibility, such as Web 2.0test objects, if you create a checkpoint from the Active Screen, or try to view the object's propertiesfrom the Active Screen, some property values may be empty.
Note: Using the Active Screen for Google Chrome is not supported.
l When working with Web 2.0 toolkits on Firefox browsers, it is recommended to load only one toolkitat a time.
Browser Specific Limitations
l Due to synchronization issues, if you navigate to a newWeb page in Internet Explorer or MozillaFirefox while recording, then UFT may not record certain operations on certain ASP .NET Ajax orjQuery UI objects in the page. Similarly, when running steps that navigate to a new page, UFT may failto perform certain steps on certain ASP .NET Ajax or jQuery UI objects.
Workaround: If the problem occurs while recording, refresh the Web page and record the step again.If the problem occurs while running, insert a Wait() statement before the problematic step.
l Web 2.0 test objects or Web Add-in Extensibility-based test objects are not supported on Safaribrowsers.
ASP .NET AJAX
l When working with the Web 2.0 ASPAjax Add-in, running scripts in the Active Screen is not enabled bydefault.
Workaround:
a. In the Options dialog box, enable running scripts in the Active Screen. In Tools > Options > GUITesting tab > Active Screen node, set Run scripts to Enabled.
b. Close and reopen your test or component for the setting to take effect.
Dojo
You cannot not record on objects created with Dojo 1.10 in Internet Explorer 10 or 11.
Workaround: Record the objects on Internet Explorer 9, Firefox, or Chrome.
Siebel Open UI
l In order to enable UFT to run tests for SiebelOpenUI objects, you must associate a special functionlibrary with your test.
This function library is found at <UFT installationfolder>\dat\Extensibility\Web\Toolkits\SiebelOpenUI\FunctionLibraries\SiebelOpenUI.qfl.
Add-ins GuideTroubleshooting and Limitations - Web 2.0 Add-ins
HP Unified Functional Testing (12.50) Page 502

You can set this function library as the default function library in the Resources pane in the TestSettings dialog box. For details, see the section on the Test Settings Resources pane in the HP UnifiedFunctional Testing User Guide.
l By default, all SiebelOpenUI objects appear as child objects of the same Page object, even for objectsembedded in objects that are opened from the main page.
If you need to group objects under separate Page objects, select the Every navigation option underthe Create a new page test object for section in the Page/Frame Options pane of the OptionsDialog box (Tools > Options > GUI Testing tab > Web pane > Page/Frame Options).
l When recording entering information for a SblOUIAdvancedEdit object, UFT records the Set methodfor the entered information after the opening of another object.
Workaround: Manually change the order of the steps after recording.
l When selecting a method for Siebel OpenUI objects, the autocompletion list displays some of theobject's internal methods. These methods should not be used in your test.
Add-ins GuideTroubleshooting and Limitations - Web 2.0 Add-ins
HP Unified Functional Testing (12.50) Page 503
HP Unified Functional Testing (12.50) Page 504
Part 19: Windows Runtime Add-inThis section includes:
"Windows Runtime Add-in - Quick Reference" on page 505
"Using the Windows Runtime Add-in in UFT - Overview" on page 507
"How to Use UFT in a Windows Runtime Environment" on page 507
"Troubleshooting and Limitations - Windows Runtime" on page 509
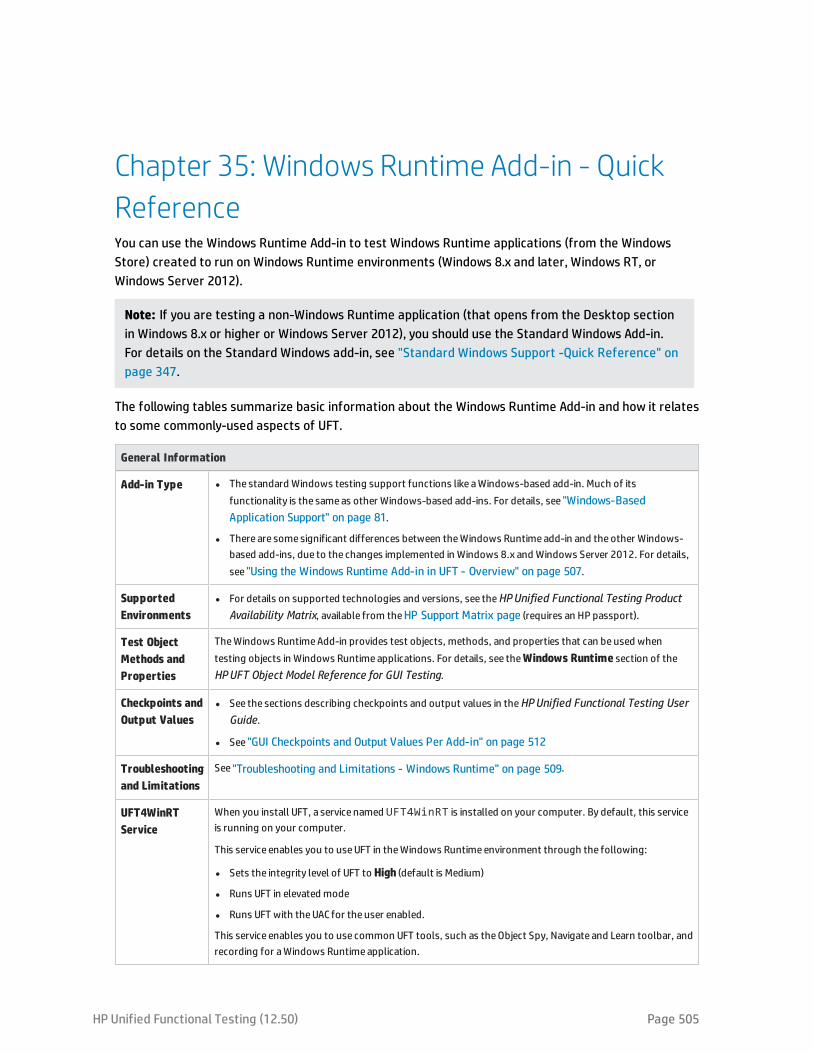
Chapter 35: Windows Runtime Add-in - QuickReferenceYou can use the Windows Runtime Add-in to test Windows Runtime applications (from the WindowsStore) created to run on Windows Runtime environments (Windows 8.x and later, Windows RT, orWindows Server 2012).
Note: If you are testing a non-Windows Runtime application (that opens from the Desktop sectionin Windows 8.x or higher or Windows Server 2012), you should use the Standard Windows Add-in.For details on the Standard Windows add-in, see "Standard Windows Support -Quick Reference" onpage 347.
The following tables summarize basic information about the Windows Runtime Add-in and how it relatesto some commonly-used aspects of UFT.
General Information
Add-in Type l The standard Windows testing support functions like aWindows-based add-in. Much of itsfunctionality is the sameas other Windows-based add-ins. For details, see "Windows-BasedApplication Support" on page 81.
l There are some significant differences between theWindows Runtimeadd-in and the other Windows-based add-ins, due to the changes implemented in Windows 8.x and Windows Server 2012. For details,see "Using the Windows Runtime Add-in in UFT - Overview" on page 507.
SupportedEnvironments
l For details on supported technologies and versions, see theHPUnified Functional Testing ProductAvailability Matrix, available from theHP Support Matrix page (requires an HP passport).
Test ObjectMethods andProperties
TheWindows RuntimeAdd-in provides test objects, methods, and properties that can beused whentesting objects in Windows Runtimeapplications. For details, see theWindows Runtime section of theHPUFT Object Model Reference for GUI Testing.
Checkpoints andOutput Values
l See the sections describing checkpoints and output values in theHPUnified Functional Testing UserGuide.
l See "GUI Checkpoints and Output Values Per Add-in" on page 512
Troubleshootingand Limitations
See "Troubleshooting and Limitations - Windows Runtime" on page 509.
UFT4WinRTService
When you install UFT, a service named UFT4WinRT is installed on your computer. By default, this serviceis running on your computer.
This service enables you to useUFT in theWindows Runtimeenvironment through the following:
l Sets the integrity level of UFT to High (default is Medium)
l Runs UFT in elevated mode
l Runs UFT with theUAC for the user enabled.
This service enables you to use common UFT tools, such as theObject Spy, Navigate and Learn toolbar, andrecording for aWindows Runtimeapplication.
HP Unified Functional Testing (12.50) Page 505
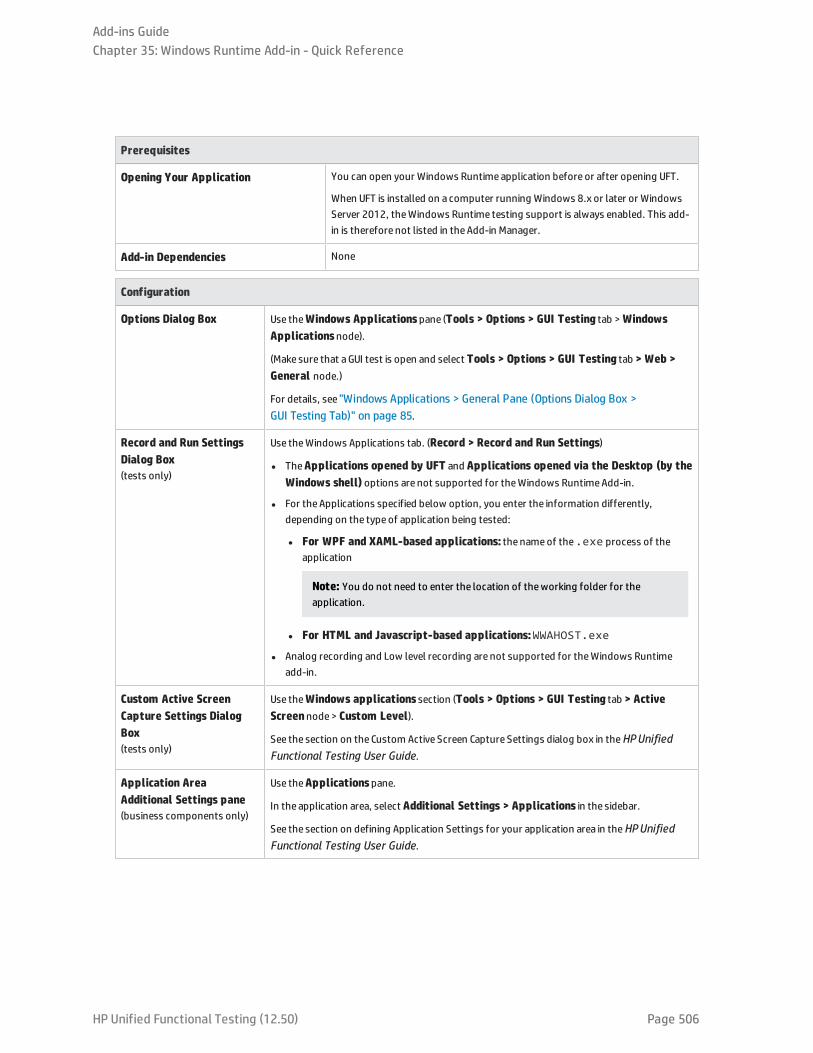
Prerequisites
Opening Your Application You can open your Windows Runtimeapplication before or after opening UFT.
When UFT is installed on a computer running Windows 8.x or later or WindowsServer 2012, theWindows Runtime testing support is always enabled. This add-in is therefore not listed in theAdd-in Manager.
Add-in Dependencies None
Configuration
Options Dialog Box Use theWindows Applicationspane (Tools > Options > GUI Testing tab > WindowsApplicationsnode).
(Make sure that aGUI test is open and select Tools > Options > GUI Testing tab > Web >General node.)
For details, see "Windows Applications > General Pane (Options Dialog Box >GUI Testing Tab)" on page 85.
Record and Run SettingsDialog Box(tests only)
Use theWindows Applications tab. (Record > Record and Run Settings)
l TheApplications opened by UFT and Applications opened via the Desktop (by theWindows shell) options are not supported for theWindows RuntimeAdd-in.
l For theApplications specified below option, you enter the information differently,depending on the typeof application being tested:
l For WPF and XAML-based applications: the nameof the.exe process of theapplication
Note: You do not need to enter the location of theworking folder for theapplication.
l For HTML and Javascript-based applications:WWAHOST.exe
l Analog recording and Low level recording are not supported for theWindows Runtimeadd-in.
Custom Active ScreenCapture Settings DialogBox(tests only)
Use theWindows applications section (Tools > Options > GUI Testing tab > ActiveScreennode> Custom Level).
See the section on the Custom Active Screen Capture Settings dialog box in theHPUnifiedFunctional Testing User Guide.
Application AreaAdditional Settings pane(business components only)
Use theApplicationspane.
In the application area, select Additional Settings > Applications in the sidebar.
See the section on defining Application Settings for your application area in theHPUnifiedFunctional Testing User Guide.
Add-ins GuideChapter 35: Windows Runtime Add-in - Quick Reference
HP Unified Functional Testing (12.50) Page 506
Using the Windows Runtime Add-in in UFT -OverviewThe Windows Runtime Add-in enables you to test applications running in a Windows Runtimeenvironment. AWindows Runtime environment describes the area in Windows 8.x or higher or WindowsServer 2012 that runs applications from the Windows Store.
Note: On Windows 8.x or higher or Windows Server 2012, UFT uses the Standard Windows Add-in totest applications that run on the desktop.
You can test different types of Windows Runtime applications using UFT:
l WPF or XAML-based Windows applications
For details on WPF or XAML-based applications, see http://msdn.microsoft.com/en-us/magazine/jj651571.aspx.
l HTML or JavaScript-based Windows applications
For details on HTML-based Windows Runtime application, see http://msdn.microsoft.com/en-us/library/windows/apps/hh770842.aspx. For details on Javascript-based Windows Runtimeapplications, see http://msdn.microsoft.com/en-us/library/hh710230(v=vs.94).aspx.
Note: If you are testing an HTML or JavaScript-based Windows application, you must also loadthe Web add-in when starting UFT.
For basic configuration details for the Windows Runtime Add-in, see "Windows Runtime Add-in - QuickReference" on page 505.
How to Use UFT in a Windows RuntimeEnvironmentThis task describes how to perform common UFT tasks in a Windows Runtime environment.
This task includes the following steps:
l "Prerequisites " below
l "Display UFT and the Windows Runtime application together" on the next page
l "Use UFT tools with a Windows Runtime application " on the next page
Prerequisites
You must meet the following requirements before using the Windows Runtime add-in:
Add-ins GuideUsing the Windows Runtime Add-in in UFT - Overview
HP Unified Functional Testing (12.50) Page 507
l UFT must be installed on a computer running Windows 8.x or higher or Windows Server 2012
l The UFT4WinRT service must be running. For details on the service, see the description of the service.
Display UFT and the Windows Runtime application together
UFT runs on the desktop in Windows 8.x or higher or Windows Server 2012. Therefore, direct interactionbetween UFT dialog boxes, panes, and windows is difficult. To enable UFT to work with Windows Runtimeapplications available on the Start screen, you can resize the open window:
l Dock the desktop window containing UFT on an edge of the screen:
a. On the Desktop window, move the mouse to the upper edge of the window. The mouse cursorchanges to a hand.
b. Drag the desktop window toward the bottom of the screen.
c. Move the dragged window to either edge of the screen.
d. Resize the window as needed.
Note: The window can be resized to use 1/3 or 2/3 of the screen.
l Use UFT in full screen view.
By default, the desktop window containing your UFT session is displayed at full screen view. Tonavigate to your Windows Runtime application, use the keyboard shortcuts described in the followingsteps.
Use UFT tools with a Windows Runtime application
Because UFT runs on the Desktop screen in Windows 8.x or higher, direct navigation between the ObjectSpy dialog box, Navigate and Learn toolbar, and the Record Toolbar is difficult. Use the following stepsto enable UFT to access your Windows Runtime application:
1. Open the relevant UFT tool.
2. Do one of the following:
Object Spy Press theWindows + SHIFT key. Windows cycles through all open Windows Runtimeapplications.
After selecting your application, theObject Spy dialog box is displayed on top of the open application.
Note: If you use this option to switch to your application, theKeep on Top option in theObjectSpy dialog box does not work.
Navigate andLearn toolbar
a. Press ALT + TAB. Windows displays awindow displaying the list of open applications:
Add-ins GuideHow to Use UFT in a Windows Runtime Environment
HP Unified Functional Testing (12.50) Page 508
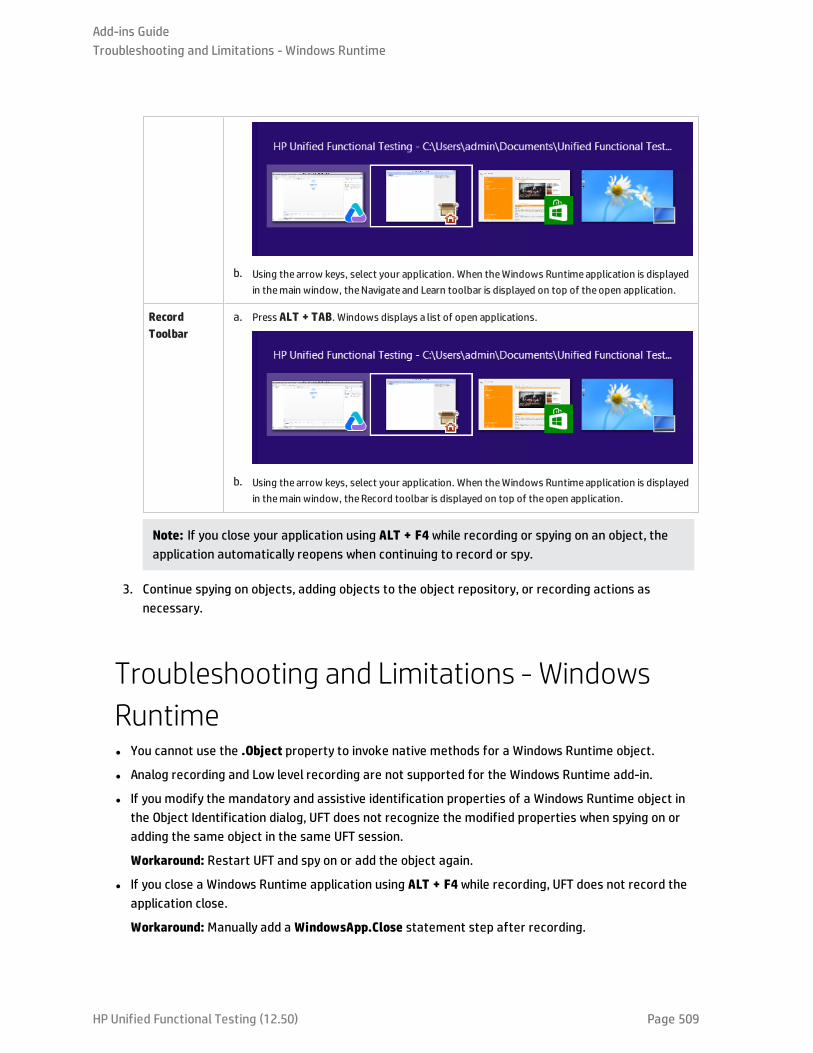
b. Using the arrow keys, select your application. When theWindows Runtimeapplication is displayedin themain window, theNavigate and Learn toolbar is displayed on top of the open application.
RecordToolbar
a. Press ALT + TAB. Windows displays a list of open applications.
b. Using the arrow keys, select your application. When theWindows Runtimeapplication is displayedin themain window, theRecord toolbar is displayed on top of the open application.
Note: If you close your application using ALT + F4 while recording or spying on an object, theapplication automatically reopens when continuing to record or spy.
3. Continue spying on objects, adding objects to the object repository, or recording actions asnecessary.
Troubleshooting and Limitations - WindowsRuntimel You cannot use the .Object property to invoke native methods for a Windows Runtime object.
l Analog recording and Low level recording are not supported for the Windows Runtime add-in.
l If you modify the mandatory and assistive identification properties of a Windows Runtime object inthe Object Identification dialog, UFT does not recognize the modified properties when spying on oradding the same object in the same UFT session.
Workaround: Restart UFT and spy on or add the object again.
l If you close a Windows Runtime application using ALT + F4 while recording, UFT does not record theapplication close.
Workaround: Manually add a WindowsApp.Close statement step after recording.
Add-ins GuideTroubleshooting and Limitations - Windows Runtime
HP Unified Functional Testing (12.50) Page 509

l UFT cannot record or spy on a Windows Runtime application that is in a suspended state.
Workaround: Restart the Windows Runtime application.
l UFT cannot record over applications that have a higher integrity level, such as setup programs orprograms that are run as administrator.
Workaround: Run UFT as administrator if you need to record over an application with a higherintegrity level.
Add-ins GuideTroubleshooting and Limitations - Windows Runtime
HP Unified Functional Testing (12.50) Page 510

HP Unified Functional Testing (12.50) Page 511
Part 20: AppendixThis section includes:
"GUI Checkpoints and Output Values Per Add-in" on page 512

Appendix A: GUI Checkpoints and Output ValuesPer Add-inThe tables in this chapter show the categories of checkpoints and output values that are supported byUFT for each add-in.
For details about using checkpoints and output values in a specific add-in, see the relevant add-insection.
This chapter includes:
l "Supported Checkpoints " on the next page
l "Supported Output Values " on page 515
HP Unified Functional Testing (12.50) Page 512
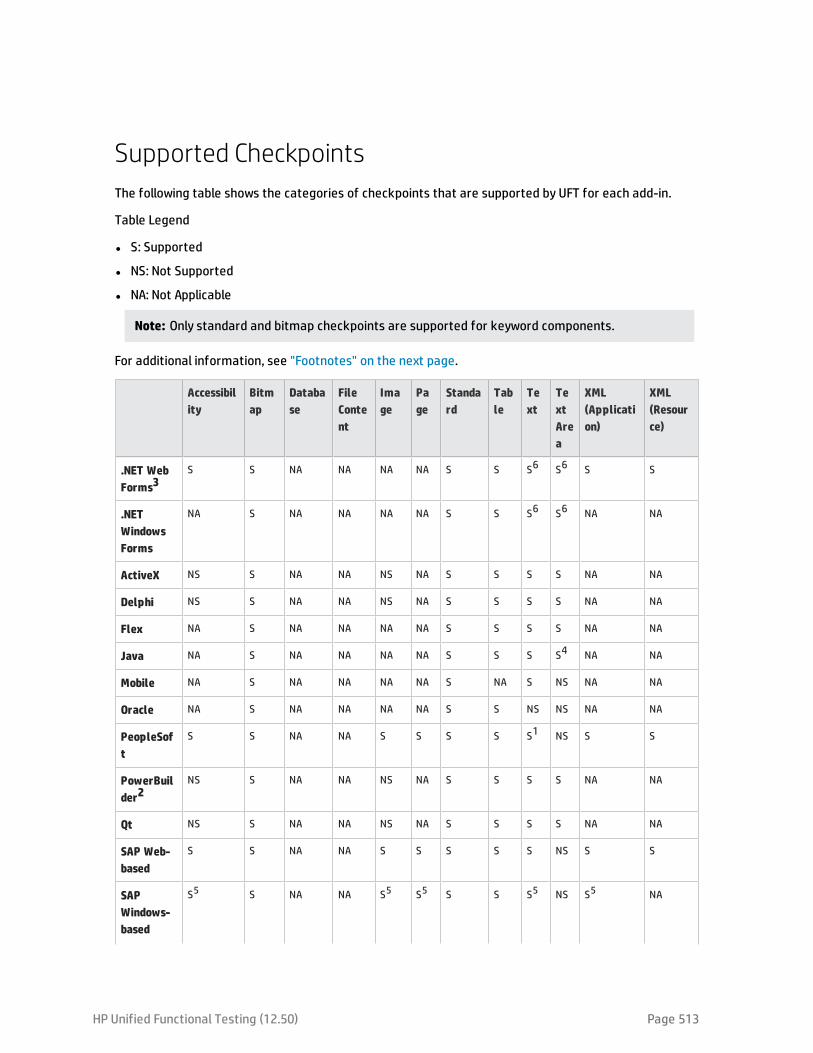
Supported CheckpointsThe following table shows the categories of checkpoints that are supported by UFT for each add-in.
Table Legend
l S: Supported
l NS: Not Supported
l NA: Not Applicable
Note: Only standard and bitmap checkpoints are supported for keyword components.
For additional information, see "Footnotes" on the next page.
Accessibility
Bitmap
Database
FileContent
Image
Page
Standard
Table
Text
TextArea
XML(Application)
XML(Resource)
.NET WebForms3
S S NA NA NA NA S S S6 S6 S S
.NETWindowsForms
NA S NA NA NA NA S S S6 S6 NA NA
ActiveX NS S NA NA NS NA S S S S NA NA
Delphi NS S NA NA NS NA S S S S NA NA
Flex NA S NA NA NA NA S S S S NA NA
Java NA S NA NA NA NA S S S S4 NA NA
Mobile NA S NA NA NA NA S NA S NS NA NA
Oracle NA S NA NA NA NA S S NS NS NA NA
PeopleSoft
S S NA NA S S S S S1 NS S S
PowerBuilder2
NS S NA NA NS NA S S S S NA NA
Qt NS S NA NA NS NA S S S S NA NA
SAP Web-based
S S NA NA S S S S S NS S S
SAPWindows-based
S5 S NA NA S5 S5 S S S5 NS S5 NA
HP Unified Functional Testing (12.50) Page 513
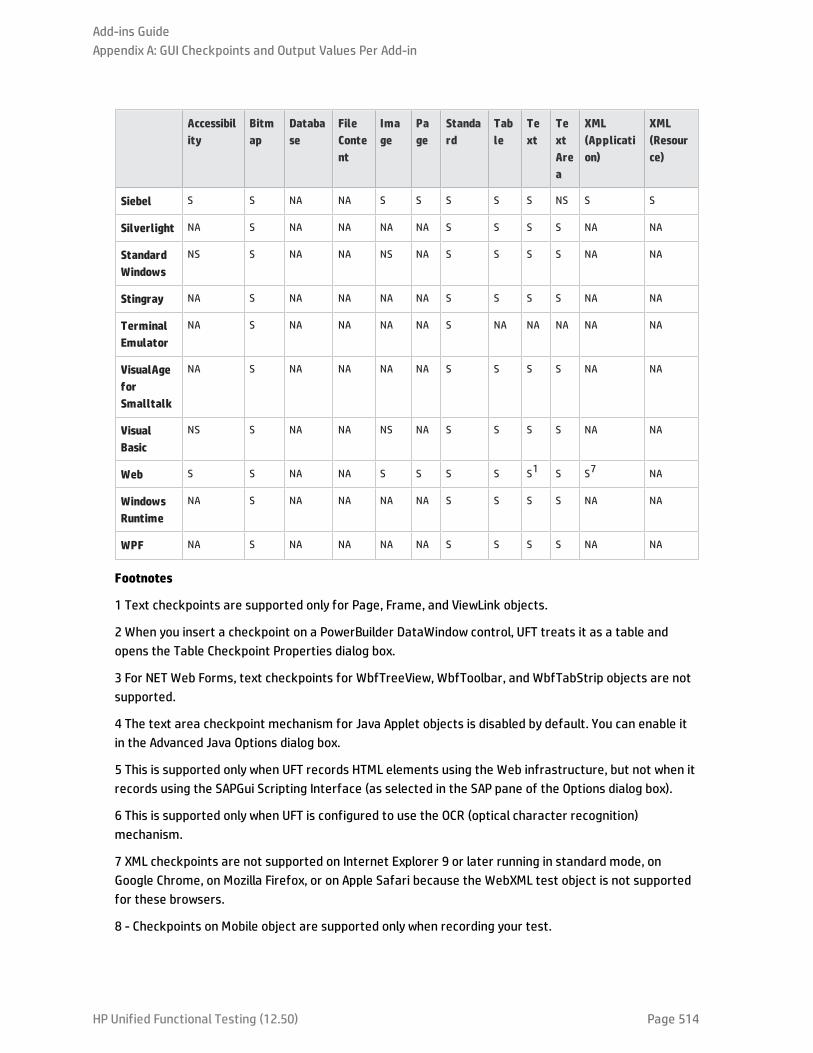
Accessibility
Bitmap
Database
FileContent
Image
Page
Standard
Table
Text
TextArea
XML(Application)
XML(Resource)
Siebel S S NA NA S S S S S NS S S
Silverlight NA S NA NA NA NA S S S S NA NA
StandardWindows
NS S NA NA NS NA S S S S NA NA
Stingray NA S NA NA NA NA S S S S NA NA
TerminalEmulator
NA S NA NA NA NA S NA NA NA NA NA
VisualAgeforSmalltalk
NA S NA NA NA NA S S S S NA NA
VisualBasic
NS S NA NA NS NA S S S S NA NA
Web S S NA NA S S S S S1 S S7 NA
WindowsRuntime
NA S NA NA NA NA S S S S NA NA
WPF NA S NA NA NA NA S S S S NA NA
Footnotes
1 Text checkpoints are supported only for Page, Frame, and ViewLink objects.
2 When you insert a checkpoint on a PowerBuilder DataWindow control, UFT treats it as a table andopens the Table Checkpoint Properties dialog box.
3 For NET Web Forms, text checkpoints for WbfTreeView, WbfToolbar, and WbfTabStrip objects are notsupported.
4 The text area checkpoint mechanism for Java Applet objects is disabled by default. You can enable itin the Advanced Java Options dialog box.
5 This is supported only when UFT records HTML elements using the Web infrastructure, but not when itrecords using the SAPGui Scripting Interface (as selected in the SAP pane of the Options dialog box).
6 This is supported only when UFT is configured to use the OCR (optical character recognition)mechanism.
7 XML checkpoints are not supported on Internet Explorer 9 or later running in standard mode, onGoogle Chrome, on Mozilla Firefox, or on Apple Safari because the WebXML test object is not supportedfor these browsers.
8 - Checkpoints on Mobile object are supported only when recording your test.
Add-ins GuideAppendix A: GUI Checkpoints and Output Values Per Add-in
HP Unified Functional Testing (12.50) Page 514
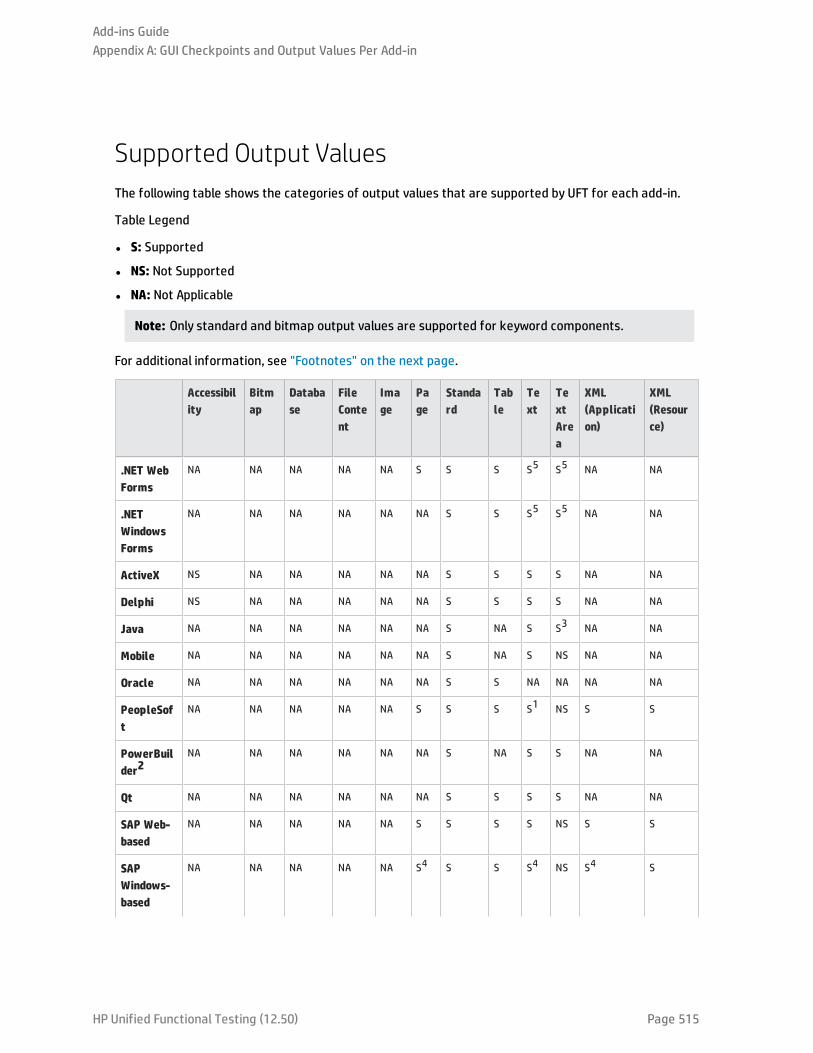
Supported Output ValuesThe following table shows the categories of output values that are supported by UFT for each add-in.
Table Legend
l S: Supported
l NS: Not Supported
l NA: Not Applicable
Note: Only standard and bitmap output values are supported for keyword components.
For additional information, see "Footnotes" on the next page.
Accessibility
Bitmap
Database
FileContent
Image
Page
Standard
Table
Text
TextArea
XML(Application)
XML(Resource)
.NET WebForms
NA NA NA NA NA S S S S5 S5 NA NA
.NETWindowsForms
NA NA NA NA NA NA S S S5 S5 NA NA
ActiveX NS NA NA NA NA NA S S S S NA NA
Delphi NS NA NA NA NA NA S S S S NA NA
Java NA NA NA NA NA NA S NA S S3 NA NA
Mobile NA NA NA NA NA NA S NA S NS NA NA
Oracle NA NA NA NA NA NA S S NA NA NA NA
PeopleSoft
NA NA NA NA NA S S S S1 NS S S
PowerBuilder2
NA NA NA NA NA NA S NA S S NA NA
Qt NA NA NA NA NA NA S S S S NA NA
SAP Web-based
NA NA NA NA NA S S S S NS S S
SAPWindows-based
NA NA NA NA NA S4 S S S4 NS S4 S
Add-ins GuideAppendix A: GUI Checkpoints and Output Values Per Add-in
HP Unified Functional Testing (12.50) Page 515
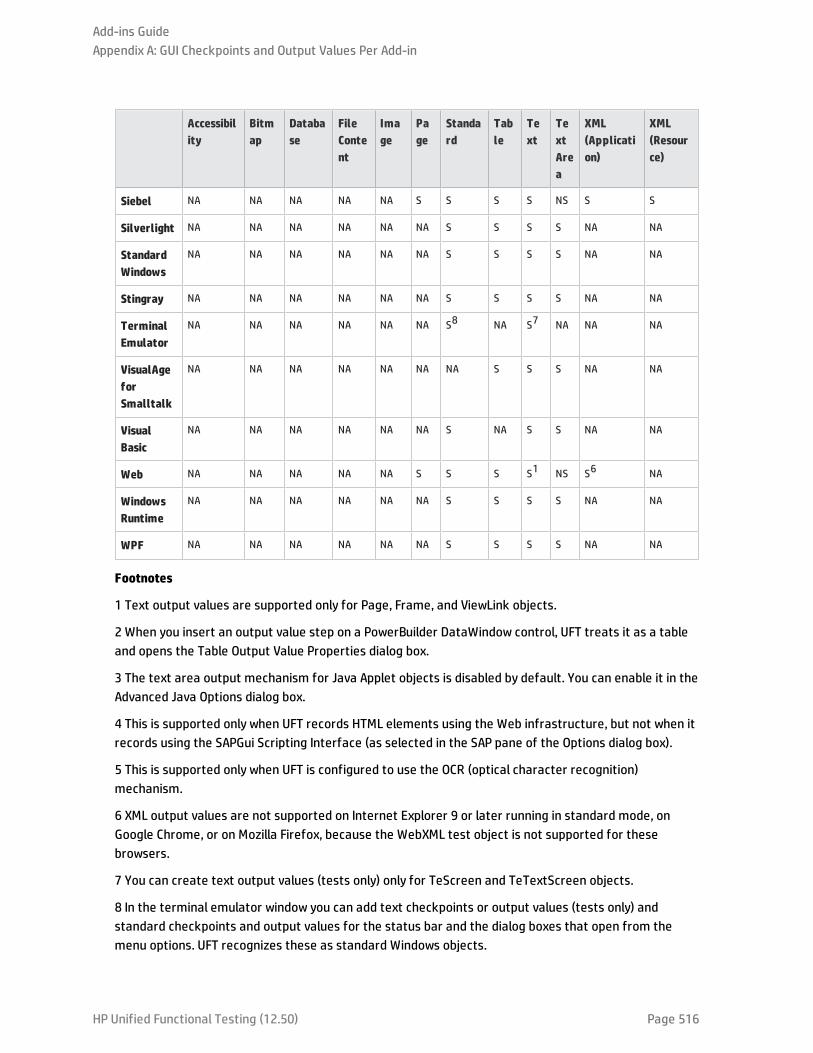
Accessibility
Bitmap
Database
FileContent
Image
Page
Standard
Table
Text
TextArea
XML(Application)
XML(Resource)
Siebel NA NA NA NA NA S S S S NS S S
Silverlight NA NA NA NA NA NA S S S S NA NA
StandardWindows
NA NA NA NA NA NA S S S S NA NA
Stingray NA NA NA NA NA NA S S S S NA NA
TerminalEmulator
NA NA NA NA NA NA S8 NA S7 NA NA NA
VisualAgeforSmalltalk
NA NA NA NA NA NA NA S S S NA NA
VisualBasic
NA NA NA NA NA NA S NA S S NA NA
Web NA NA NA NA NA S S S S1 NS S6 NA
WindowsRuntime
NA NA NA NA NA NA S S S S NA NA
WPF NA NA NA NA NA NA S S S S NA NA
Footnotes
1 Text output values are supported only for Page, Frame, and ViewLink objects.
2 When you insert an output value step on a PowerBuilder DataWindow control, UFT treats it as a tableand opens the Table Output Value Properties dialog box.
3 The text area output mechanism for Java Applet objects is disabled by default. You can enable it in theAdvanced Java Options dialog box.
4 This is supported only when UFT records HTML elements using the Web infrastructure, but not when itrecords using the SAPGui Scripting Interface (as selected in the SAP pane of the Options dialog box).
5 This is supported only when UFT is configured to use the OCR (optical character recognition)mechanism.
6 XML output values are not supported on Internet Explorer 9 or later running in standard mode, onGoogle Chrome, or on Mozilla Firefox, because the WebXML test object is not supported for thesebrowsers.
7 You can create text output values (tests only) only for TeScreen and TeTextScreen objects.
8 In the terminal emulator window you can add text checkpoints or output values (tests only) andstandard checkpoints and output values for the status bar and the dialog boxes that open from themenu options. UFT recognizes these as standard Windows objects.
Add-ins GuideAppendix A: GUI Checkpoints and Output Values Per Add-in
HP Unified Functional Testing (12.50) Page 516
Accessing UFT in Windows 8.X or HigherOperating SystemsBy default, you can access UFT directly from the Start or Apps Screen in Windows 8.x or higher.
In addition, you can add UFT tools and files that were accessible from the Startmenu in previousversions of Windows to the Start screen, including:
l Applications (.exe files). For example:
l The Run Results Viewer
l All UFT tools, such as the Password Encoder and the License Validation Utility
l The API testing sample Flight applications
l Non-program files. You can access documentation and the link to the Mercury Tours Website fromthe Apps screen.
Note: By default, the Start and Apps screens on Windows 8.x or higher are set to open InternetExplorer in Metro Mode. However, if User Account Control is turned off on your computer, Windows8 will not open Internet Explorer in Metro mode. Therefore, if you try to open an HTML shortcutfrom the Start or Apps screen, such as the UFT Help or Readme file, an error will be displayed.
To solve this, you can change the default behavior of Internet Explorer so that it never opens inMetro mode. In the Internet Properties dialog box > Programs tab, select Always in InternetExplorer on the desktop for the Choose how you open links option. For more details, seehttp://support.microsoft.com/kb/2736601 andhttp://blogs.msdn.com/b/ie/archive/2012/03/26/launch-options-for-internet-explorer-10-on-windows-8.aspx.
Add-ins Guide
HP Unified Functional Testing (12.50) Page 517

Send Us FeedbackCan we make this Add-ins Guide better?
Tell us how: [email protected]
HP Unified Functional Testing (12.50) Page 518