The in-situ calibration of barometers January 2018 - NATA
10
General Accreditation Guidance The in-situ calibration of barometers January 2018
-
Upload
khangminh22 -
Category
Documents
-
view
3 -
download
0
Transcript of The in-situ calibration of barometers January 2018 - NATA
General Accreditation Guidance The in-situ calibration of barometers
January 2018

© Copyright National Association of Testing Authorities, Australia 2013
This publication is protected by copyright under the Commonwealth of Australia Copyright Act 1968. NATA’s accredited facilities or facilities seeking accreditation may use or copy this publication or print or email this publication internally for accreditation purposes. Individuals may store a copy of this publication for private non-commercial use or copy a reasonable portion of this publication in accordance with the fair dealing provisions in Part III Division 3 of the Copyright Act 1968. You must include this copyright notice in its complete form if you make a copy of this publication. Apart from these permitted uses, you must not modify, copy, reproduce, republish, frame, upload to a third party, store in a retrieval system, post, transmit or distribute this content in any way or any form or by any means without express written authority from NATA.

General Accreditation Guidance — The in-situ calibration of barometers
January 2018 Page 3 of 10
The in-situ calibration of barometers
1. Summary
1.1 Once installed, a Fortin barometer should not be moved and should be checked at one point with a transfer instrument every five years.
1.2 Aneroid barometers (mechanical and electronic) should be checked at least six-monthly. One point is sufficient.
1.3 Telephone comparisons of barometers cannot be relied upon to provide an accuracy of better than 200 Pa (1.5 mm Hg)
1.4 The in-situ calibration of barometers may be carried out as described under Section 7.3.
2. Background
A number of organisations are concerned about the difficulty of calibrating their barometers - Fortin and aneroid. In general, barometers do not transport easily and so there is some doubt as to whether the barometer is still reading correctly after its return from calibration. Some organisations check their barometers by phoning a laboratory with a reference barometer. This is considered a most unsatisfactory procedure and so an alternative method is described. The scope is limited to barometers used for measuring ambient pressure (i.e. pressure over the range 95 to 105 kPa (950 to 1050 mb, 710 to 785 mm Hg)), and with an uncertainty of 15 Pa (0.15 mb, 0.1 mm Hg) or larger.
3. Types of barometers
3.1 Fortin barometer
This is a mercury barometer in which a flexible bag forms the mercury container in the cistern (Figure 1). An adjusting screw is used to raise the centre of the bag, and hence the level of the mercury in the cistern. The top end of the glass barometer tube is sealed and the space above the mercury evacuated. To read the barometer the mercury level is raised until it touches the pointer. The setting is correct when the pointer and its image just touch. The top of the mercury column is then determined by setting the bottom of the cursor tangential to the meniscus. This is most conveniently done by adjusting the cursor until the top of the meniscus and the front and back of the cursor are in line. When the barometer is adjusted it should be firmly tapped and the mercury level in the cistern and the cursor setting readjusted if necessary. Tapping frees the mercury from sticking to the glass walls and allows the meniscii to be properly formed. The height of the column is then read from the scale beside the tube.
3.2 Aneroid barometer
The most common instrument consists of a corrugated chamber, formed by two thin metal diaphragms, which has been evacuated. Its operation depends on the principle that a thin metal disc or membrane responds elastically to a change of pressure on its faces. This movement is magnified by mechanical linkages and translated into the rotary movement of a pointer on a dial. One sensitive instrument senses the movement of a bellows with a micrometer. There are a number of other pressure measuring devices which measure the movement of a diaphragm either capacitively, inductively or with strain gauges, and one which measures the change in frequency of an oscillating crystal. These instruments all have an electronic digital readout. Aneroid barometers are not fundamental instruments and so require calibration with a standard barometer.

General Accreditation Guidance — The in-situ calibration of barometers
January 2018 Page 4 of 10
4. Problems of transporting barometers
4.1 Fortin barometer
i) Air can enter the vacuum space. If this happens the tube must be refilled.
ii) If the barometer is tipped over quickly it is possible for the mercury to rush up the tube and knock the end out.
4.2 Aneroid barometer
These barometers are fairly sensitive to vibration and shock. In the mechanical aneroid, the linkage could be jammed by severe shock. The more usual effect is for the zero to be shifted, and this can occur for both the mechanical and electronic instruments.
5. Preparation and transportation of barometers
5.1 Fortin barometer
If the barometer is to be moved a very short distance to another position on the same level in the same building then it can be carefully carried by hand in an upright position. Care must be taken that the barometer is not tipped so that the mercury surges up the tube, or that the mercury in the cistern becomes so agitated that the bottom of the tube is exposed allowing air into the tube. For longer journeys the barometer must be carefully prepared by means of the following steps:
i) The adjusting screw (Figure 1) is screwed up until it lightly touches the end of the barometer tube. It is then backed off a half to one turn. This is to allow mercury to flow in or out of the tube should the temperature change. The barometer mounting board is then removed from the wall with the barometer attached. Leaving it mounted on the board is important for the protection of the barometer.
ii) The barometer is then very carefully and slowly tilted over until the mercury rises up and fills the tube. If there is no air in the vacuum space a sharp ‘metallic click’ may be heard as the mercury reaches the top of the tube (see Appendix). The barometer is then laid horizontal or tipped upside down. During the whole time of transport the top of the barometer tube must never be allowed to rise higher than the cistern. The barometer can be safely carried, preferably be hand, in this position. However, it can be safely transported long distances by rail or road while in this position providing it is packed as for any fragile instrument.
iii) The barometer is restored to operation by reversing the above procedures. It should be raised to a vertical position very carefully while watching the column for any signs of air bubbles. It is the tilting at the beginning and the end that is the delicate operation, as this is the time when air can enter the tube. Once the barometer is horizontal or upside down it is quite safe (unless it is dropped).
5.2 Preparing a Fortin barometer for measurement after transport
After the barometer has been brought upright and attached to the wall it is necessary to set it vertical. The barometer usually has ferrules at the points of support enabling it to be rotated. The mercury is brought into contact with the pointer, the barometer rotated 180° and the verticality adjusted until the mercury is again in contact with the pointer. This is repeated until contact between the pointer and the mercury surface is maintained for as full a rotation as possible. All adjusting screws should then be tightened so that the barometer cannot move laterally, although it should still be free to rotate. Any lack of squareness between the scale and the plate to which the pointer is attached contributes to the instrumental correction obtained at calibration.
5.3 Aneroid barometer
These should either be carried by hand or packed in a box with special protective packing so that it is not subject to excessive vibration or shock. There is no other preparation that can be done, but with reasonable care aneroid barometers can be transported safely. After transport any distance the reading needs to be checked against another barometer of known calibration.
General Accreditation Guidance — The in-situ calibration of barometers
January 2018 Page 5 of 10
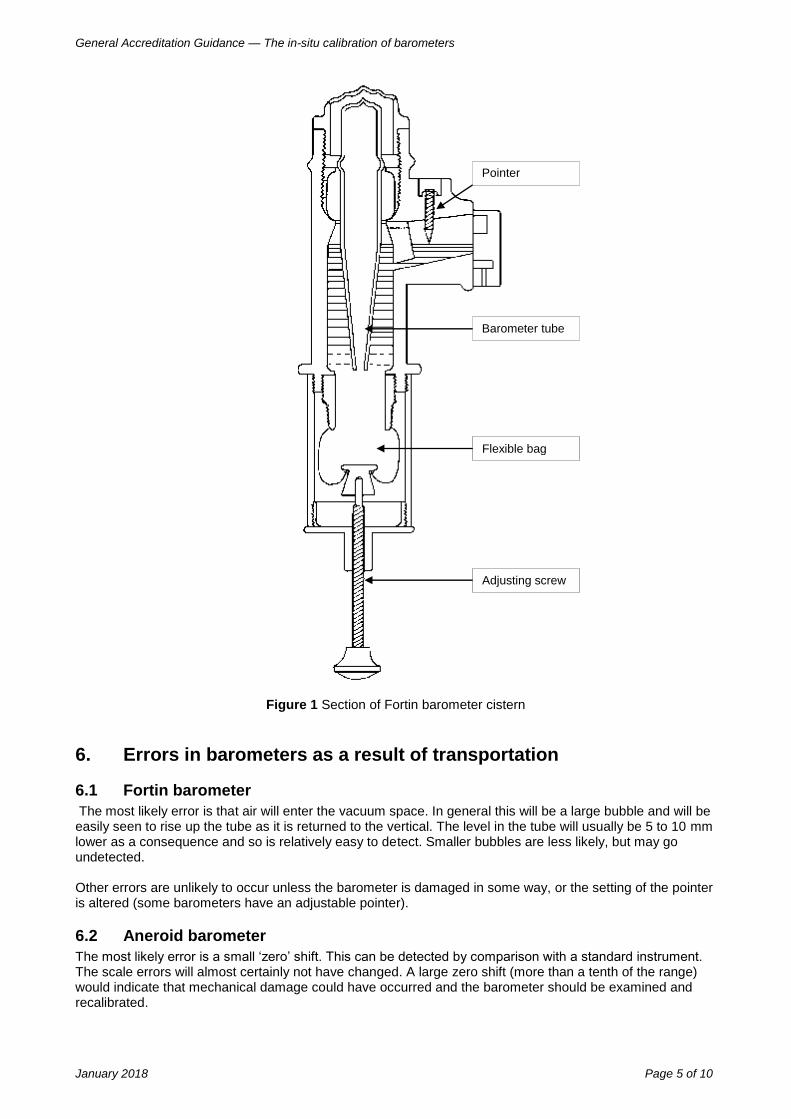
Figure 1 Section of Fortin barometer cistern
6. Errors in barometers as a result of transportation
6.1 Fortin barometer
The most likely error is that air will enter the vacuum space. In general this will be a large bubble and will be easily seen to rise up the tube as it is returned to the vertical. The level in the tube will usually be 5 to 10 mm lower as a consequence and so is relatively easy to detect. Smaller bubbles are less likely, but may go undetected. Other errors are unlikely to occur unless the barometer is damaged in some way, or the setting of the pointer is altered (some barometers have an adjustable pointer).
6.2 Aneroid barometer
The most likely error is a small ‘zero’ shift. This can be detected by comparison with a standard instrument. The scale errors will almost certainly not have changed. A large zero shift (more than a tenth of the range) would indicate that mechanical damage could have occurred and the barometer should be examined and recalibrated.
Pointer
Barometer tube
Flexible bag
Adjusting screw

General Accreditation Guidance — The in-situ calibration of barometers
January 2018 Page 6 of 10
7. Methods of checking barometers
7.1 Frequency of calibration
Once a mercury barometer has been calibrated and mounted on the wall there is little that can happen to it, except outgassing of the tube. In a well prepared barometer this should be minimal, but is virtually the only thing that can affect the calibration after it has been set up. The mercury surface in the cistern will eventually become dirty, but this does not usually affect the accuracy unless the pointer image cannot be seen. When this happens the barometer requires servicing and recalibrating. Some barometers have a trap in the cistern for trapping dirt from the surface. If dirt on the surface is troublesome then the adjusting screw should be wound out to its extremity and then back again. This usually provides a cleaner surface. The barometer can be examined for air in the vacuum space but this is akin to preparing the barometer for transport and is not recommended. However, for a laboratory that is not able to participate in the in-situ calibration procedures suggested below, this is a viable alternative which is far superior to telephone comparisons. For this reason the method is described in the Appendix. The calibration of the barometer only needs to be checked at one point after two years and then, if there is no change, every five years thereafter. Provided the barometer is not shifted and the mercury in the cistern is not too dirty there is no need for a more regular calibration.
7.2 Comparison with a remote barometer
One method of calibrating barometers in-situ has been to compare the barometer reading with that of a reference barometer situated some short distance away. This can be a difficult and not very precise operation. Some criteria for knowing the value of the pressure within the vicinity of a reference barometer are given in ASTM D3631-84 – Standard Methods for Measuring Surface Atmospheric Pressure
1. These are as
follows (numbers refer to ASTM document):
1.2 In the absence of abnormal perturbations, atmospheric pressure measured by these methods at a point is valid everywhere within a horizontal distance of 100 m and a vertical distance of 0.5 m of the point.
1.3 Atmospheric pressure decreases with increasing height and varies with horizontal distance by 1 Pa/100 m or less except in the event of catastrophic phenomena (e.g. tornadoes). Therefore, extension of a known barometric pressure to another site beyond the spatial limits stated in 1.2 above can be accomplished by correcting for height difference if the following criteria are met:
1.3.1 The new site is within 2000m laterally and 500m vertically.
1.3.2 The change of pressure during the previous 10 min has been less than 20 Pa.
10.3 If the atmospheric pressure P1, height h1 and atmospheric temperature T1 at some Site 1 and the height h2 at a Site 2 are known then the atmospheric pressure P2 at Site 2 can be calculated from the following equation:
P2 = P1 exp 0.068332(h1 – h2)
T1 + T2 where: P1 = pressure at Site 1, Pa P2 = pressure at Site 2, Pa h1 = height above mean sea level of Site 1, m h2 = height above mean sea level of Site 2, m T2 = atmospheric temperature at Site 2, K While application of the above method may seem attractive, the telephone comparison of barometers is considered to be neither necessary nor capable of better accuracy than about 200 Pa (1.5 mm Hg) for the following reasons:
i) Unless something catastrophic occurs, a Fortin barometer will almost certainly not change its calibration by 200 Pa over most of its life. Hence the comparison is not necessary.
ii) Not all laboratories know their height above sea level to sufficient accuracy.
The allowance per metre of vertical distance between the cistern of the barometer and the point at which the pressure is required is:

General Accreditation Guidance — The in-situ calibration of barometers
January 2018 Page 7 of 10
mb mm Hg Pa
Barometric pressure 1000 760 100 000
Allowance per metre 0.118 0.088 11.8
iii) Some laboratories are air-conditioned and this can produce a pressure different from ambient. A typical air-conditioned laboratory can have a pressure of 40 Pa above ambient.
iv) The formula given in section 10.3 of ASTM D 36311 (equation (1) above) requires a knowledge of the
atmospheric temperatures at the two sites. These are not the same as the temperatures measured inside the laboratories.
v) When the pressure is obtained from another laboratory it is essential to find out if it is merely an instrumental reading (which is perfectly adequate when comparing two similar instruments in the same room), or whether it has been corrected to standard conditions and allowance made for height above sea level. The Bureau of Meteorology, for example, quotes the pressure at sea level.
Aneroid barometers (mechanical and electrical) are, in general, not as stable or as accurate as mercury barometers. Since aneroid barometers are more readily transported than mercury barometers they can be taken to a reference barometer. However if a laboratory uses an aneroid barometer regularly in its work, then it should possess a mercury barometer to check the aneroid at one point every six months, or more frequently if the instrument is moved regularly.
7.3 Procedures for checking mercury barometers in-situ
Despite the general statement concerning the accuracy of aneroid barometers made above, there are some special instruments with sufficient resolution and stability for them to be used as transfer standards. The two considered to be the best at present are:
i) Precision Aneroid Barometer This consists of a digital micrometer with an electrical contact indicator to sense the movement in a sensitive bellows. These instruments have a resolution of 1.0 Pa. There are two makers of this instrument - Negretti & Zambra and Mechanism Ltd.
ii) Digiquartz Pressure Transducer In this instrument the frequency of a vibrating quartz crystal is measured as a function of pressure. The 0 psia to 15 psia transducer has a resolution of 0.1 Pa. These instruments have sufficient stability to enable them to be calibrated to an accuracy of 10 Pa, or a little better.
The other instruments with possibly just sufficient accuracy are:
iii) CEC 2500 Digital Barometer, and
iv) Setra Systems Model 361 Digital Barometer Both of these instruments have a resolution of 10 Pa and stated accuracies of 25 Pa and 15 Pa respectively.
The main disadvantage of the electronic instruments [numbers (ii), (iii) and (iv)] for this use is the warm-up time required to reach a stable reading - up to two hours. One of these instruments could be used as a transfer standard to calibrate barometers in-situ. The transfer standard would have to be taken to each laboratory by hand, an expensive procedure but one which need be repeated only every five years. The instrument would first be calibrated at the CSIRO Division of Applied Physics to establish the calibration curve. Thereafter it need only be checked at atmospheric pressure against a reference instrument in the Division. It should be checked just prior to being taken around a number of laboratories, and again immediately upon return. No more than four weeks should elapse between these two checks. If the readings before and after differ by more than 50 Pa (0.38 mm Hg) then the run should be aborted, unless the laboratories are prepared to accept an uncertainty of this magnitude. If the difference is less than 50 Pa then the mean of the two readings should be used to calculate the corrections to the barometers. The reported uncertainty of calibration of the mercury barometer should be no less than ± (25 Pa + half the difference between the check calibrations at the start and the finish, in Pa).

General Accreditation Guidance — The in-situ calibration of barometers
January 2018 Page 8 of 10
As stated above this would only need to be done every five years for Fortin barometers. Aneroid barometers are a different problem as they require checking against a standard at least every six months. If the accuracy required is no better than 200 Pa then the telephone check could be carried out, providing a reference barometer within 2 km can be located. In this case it is probably as easy to transport the aneroid barometer to the reference barometer.
8. Acknowledgement
NATA gratefully acknowledges the preparation of this guidance document by the late Dr D B Prowse of CSIRO.
9. Reference
1. Standard Methods for Measuring Surface Atmospheric Pressure. ASTM D 3631-84.
10. Further reading
Specification for Barometer Conventions and Tables.BS 2520:1983.
W G Brombacher, D P Johnson and J L Cross. Mercury Barometers and Manometers. NBS Monograph 8
1960.
Measurement of Pressure with the Mercury Barometer. NPL Notes on Applied Science No 9-1955.
Handbook of Meteorological Instruments, Part 1. Meteorological Office, M O 577, HMSO 1956.
Manual of Barometry (WBAN), Vol 1 United States Weather Bureau, Air Weather Service and Naval Weather Service. Govt Printing Office 1963.
Dictionary of Applied Physics, edited by Sir Richard Glazebrook, Vol 3 140 - 185 Peter Smith, New York 1950.
11. Appendix
Estimation of the amount of air in the vacuum space of a Fortin barometer
1) A qualitative method of estimating the amount of air in a barometer tube is the sound yielded at the top of the tube by the impact of the mercury with the glass. If the sound is sharp and metallic the vacuum is judged to be satisfactory; whereas, if the sound is characterised as soft, dull, or leaden, it is generally inferred that the vacuum is impaired in quality. The difference in sound in the latter case is considered to arise from the fact that a bubble of air would act as a buffer between the mercury and the glass at the top of the tube. The so-called ‘metallic click’ is best produced while the barometer is inclined about 45° and occurs just as the mercury moving up the tube reaches to top and completely fills it. The greatest caution should be exercised in producing the click as it is possible to damage the tube.
2) A quantitative method is to measure the size of the air bubble at the top of the tube while the instrument is lying in a horizontal position.
Following steps (i) and (ii) under preparation and transport of Fortin barometers (Section 5.1), lay the barometer in a horizontal position on a flat surface. Next the hanger ring, cover cap and any inserts should be removed from the top of the instrument. The upper portion of the tube should be inspected to see whether an air bubble is visible. If no bubble is visible, the barometer should be erected to its normal vertical position, tapped gently, and again inclined and brought to a horizontal position. The tube is again inspected for the presence of a bubble. It is emphasised that the greatest care should be exercised in carrying out this procedure. If an air bubble is present then its diameter should be measured with the aid of a scale. The effect of this air bubble on the reading of the barometer can be calculated as described below: The following dimensions must be obtained or measured:
i) internal diameter of the tube, D;
ii) length of tube between the 101325 Pa scale position and the top of the tube, h;
iii) diameter of the air bubble when the tube is horizontal, d.
General Accreditation Guidance — The in-situ calibration of barometers
January 2018 Page 9 of 10
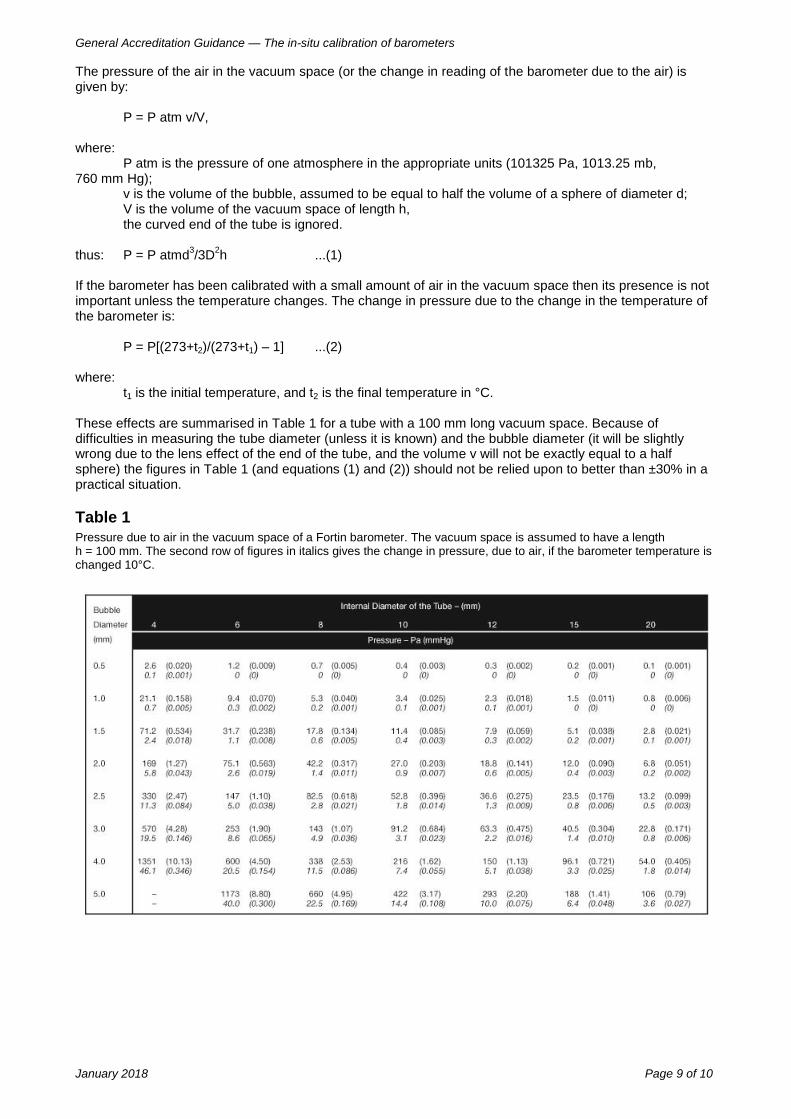
The pressure of the air in the vacuum space (or the change in reading of the barometer due to the air) is given by: P = P atm v/V, where: P atm is the pressure of one atmosphere in the appropriate units (101325 Pa, 1013.25 mb, 760 mm Hg); v is the volume of the bubble, assumed to be equal to half the volume of a sphere of diameter d; V is the volume of the vacuum space of length h, the curved end of the tube is ignored. thus: P = P atmd
3/3D
2h ...(1)
If the barometer has been calibrated with a small amount of air in the vacuum space then its presence is not important unless the temperature changes. The change in pressure due to the change in the temperature of the barometer is: P = P[(273+t2)/(273+t1) – 1] ...(2) where: t1 is the initial temperature, and t2 is the final temperature in °C. These effects are summarised in Table 1 for a tube with a 100 mm long vacuum space. Because of difficulties in measuring the tube diameter (unless it is known) and the bubble diameter (it will be slightly wrong due to the lens effect of the end of the tube, and the volume v will not be exactly equal to a half sphere) the figures in Table 1 (and equations (1) and (2)) should not be relied upon to better than ±30% in a practical situation.
Table 1
Pressure due to air in the vacuum space of a Fortin barometer. The vacuum space is assumed to have a length h = 100 mm. The second row of figures in italics gives the change in pressure, due to air, if the barometer temperature is changed 10°C.

General Accreditation Guidance — The in-situ calibration of barometers
January 2018 Page 10 of 10
AMENDMENT TABLE The table below provides a summary of changes made to the document with this issue.
Section Amendment
Entire document This document replaces the former Technical Note 8. The document has been renamed to reflect the new accreditation criteria documentation structure