STUDENT'S LABORATORY MANUAL MICROBIOLOGY
47
MICROBIOLOGY LABORATORY MANUAL 1 LIST OF EXPERIMENTS Kingdom of Saudi Arabia Ministry of Higher Education Majmaah University College of Applied Medical Sciences Department of Nursing 246 NRS code Course Nursing for Microbiology name Course STUDENT’S LABORATORY MANUAL
-
Upload
khangminh22 -
Category
Documents
-
view
4 -
download
0
Transcript of STUDENT'S LABORATORY MANUAL MICROBIOLOGY

MICROBIOLOGY LABORATORY MANUAL
1
LISTOFEXPERIMENTS
Kingdom of Saudi Arabia Ministry of Higher Education
Majmaah University
College of Applied Medical Sciences
Department of Nursing
246NRS codeCourse
NursingforMicrobiology nameCourse
STUDENT’S LABORATORY MANUAL MICROBIOLOGY

MICROBIOLOGY LABORATORY MANUAL
2

MICROBIOLOGY LABORATORY MANUAL
3
General Laboratory Precautions: • Eating, drinking, and handling contact lenses are not
permitted in the laboratory.
• Wash hands prior to entering and leaving the laboratory.
• Mouth pipetting is prohibited. Only mechanical pipetting
devices should be used.
• Minimize risk of exposure and risk of contamination of lab
surfaces.
• All procedures are to be performed carefully to minimize
the formation of aerosols.
• Animals, persons and plants not related to work being conducted are not permitted in
the laboratory.
• No material suspected or known to be contaminated with biohazardous material (e.g.
latex gloves, pipette wrappers, paper towels, etc.) is to be placed in the trash cans.
These items are to be placed in an appropriate bag for biohazardous wastes.
• Vacuum lines should be always protected with disinfectant traps and HEPA filters.
THE BASICS
Section No.: Student Name: Student ID No. :

MICROBIOLOGY LABORATORY MANUAL
4
Spills Spillages of cultures must be reported immediately to the teacher or technician to be dealt with quickly. Spilled cultures and surrounding debris (e.g. glass, cotton wool plugs), if any, must not be touched with unprotected hands. Wearing disposable gloves, disinfect the area by covering the spill with several layers of paper towel/cloth soaked in a suitable disinfectant and leave for 15-30 minutes. Spill debris should then be swept into a dustpan using paper towels. All disposable material should then be transferred to a suitable container, e.g. an autoclave/roasting bag, for autoclaving and disposal. The dustpan must be decontaminated either by autoclaving or by soaking (at least 24 hours) in Sodium Hypochlorite solution. Broken glass Pieces and residues of broken glass materials should be swept carefully into a suitable container, autoclaved and disposed of in a puncture proof container.
Splashes on clothing and the skin Contaminated clothing should be soaked in disinfectant. Splashes on the skin should be treated as soon as possible; washing with soap and hot water should be sufficient, but if necessary the skin can be disinfected. Aerosols Spillages also carry a risk of generating aerosols (an invisible “mist” of small droplets of moisture) which may contain microbes and might be inhaled. The risk of spillages occurring is lessened by using cultures grown on agar instead of in liquid media whenever possible. Care should also be taken to avoid generating aerosols during practical work. The risk is minimized by adhering to GMLP with special attention to the correct use of pipettes. I have read the above rules and understand their meaning Student Name:__________________________________ Student Signature:_______________________________ Aseptic techniques & Methods of
Sterilisation

MICROBIOLOGY LABORATORY MANUAL
5
Aseptic Techniques: I. To sterilize, or flame, a loop or needle hold the entire length of its wire in the Bunsen
burner flame for several seconds until the wire glows, incinerating any contaminating organisms. Sterilize the loop in this way before and after each use of the loop.
Flaming a loop
II. Maintain the sterility of a solution or culture in a vessel, e.g., tube, flask, bottle, by flaming the rim of the vessel before and after entering it with a sterile implement, e.g., glass pipette, plastic pipette tip, loop. Do not flame the rim of any vessel containing a flammable material such as chloroform or ethanol. Do not flame plastic tips.
III. Transferring a culture:

MICROBIOLOGY LABORATORY MANUAL
6
- To remove an aliquot of culture from a tube, flask, or bottle while holding the sterile loop, pick up the vessel with your free hand and holding the vessel at a slant, remove its lid with the little finger and palm of the hand holding the loop.
- While holding the lid and loop in one hand and the open vessel in the other, flame the rim of the vessel. Dip the sterile loop into a sterile culture, still held at a slant, to obtain the inoculum and withdraw the loop from the vessel. Try to avoid touching the sides or rim of the vessel with the loop.
Flaming the neck of bottles
- Flame the rim of the vessel again and carefully replace the lid that you are holding with your little finger. Put the vessel down. Do not flame the loop with your sample on it or you will destroy your inoculum. Examine the loop to see that you have a loopful of liquid or a dot of a colony.

MICROBIOLOGY LABORATORY MANUAL
7
- Then, with your free hand pick up the vessel holding the liquid medium you wish to inoculate, remove the lid as above, flame the rim of the vessel, dip the loop containing the inoculum in the liquid (avoid touching the sides), shake and turn the loop while it is in the medium to transfer the inoculum, remove the loop, flame the rim, replace the lid, and flame the loop.
- If you are inoculating a plate or slant draw the loop across the agar surface or pierce the agar, as desired.
- Removing an inoculum from an agar plate - When removing an inoculum from a colony on a plate, flame the loop and cool it 5 to 10 seconds (without waving it). Then lift the lid of the petri plate up enough to remove the inoculum but no farther than is necessary so that the lid protects the plate from contaminants falling on it. To get the inoculum, touch the loop to a single colony growing on an agar. It is not necessary or desirable to pick up all the colony. Try to avoid touching the agar itself. If the loop is not cooled prior to touching a colony, the hot wire may melt the agar medium and may kill many of the desired bacteria. When you are streaking a strain on a plate, the hot loop may be cooled by touching it to the sterile surface of the fresh agar plate.
- To transfer a liquid with a pipette, mix the source liquid well. If using a glass pipette, carefully remove it from the can and run its tip through the flame. If using a Pipetteman, place a plastic tip on a pipettor without contaminating the portion that will contact sterile solutions or vessels.
- Open and flame the source vessel as described above. Remove an aliquot with the pipette. Flame and close the vessel as described above. Dispense the aliquot in a similar manner. Never flame a plastic pipette tip and do not flame a glass pipette while it holds a culture. After you have dispensed a culture from a glass pipette, flame it and place it, tip up, in the dirty pipette holder.
- To spread cells on an agar plate, place a jar of ethanol toward the back of the bench, a Bunsen burner in front of it but not near it and the round Petri plate rotator table near the front of the bench. Remove the lid of the ethanol jar and place it nearby. Put the glass spreader in the ethanol and put a fresh, dry agar plate on Petri plate table.
- Lift lid of plate briefly and dispense a small liquid aliquot of your culture near the center of the plate. Remove glass cell spreader from ethanol, place spreader in flame to light ethanol, slowly remove flaming spreader from flame and hold it steady until the flame goes out and the glass cools 10 to 15 seconds. Do not shake the spreader or wave it in the air. The ethanol flame is difficult to see. Then lift the lid of the plate and spread the cells by moving the spreader back and forth across the surface of the agar while rotating the Petri plate table. Try, at the same time to protect the surface of the agar with the lid of the Petri plate. Stop spreading the cells and replace the lid when the plate becomes somewhat dry.
Sterilisation techniques Sterilization in Microbiology refers to complete destruction or removal of all living forms in/from the given object. Generally, sterilization is best achieved by physical methods such

MICROBIOLOGY LABORATORY MANUAL
8
as steam or dry heat, which are less time-consuming and more reliable than chemicals. A summary of physical agents which employ heat for control of microorganisms can be found in Table 1. Of these physical procedures, steam autoclaving is the most practical option for the majority of laboratories for both sterilization and decontamination purposes. Sterilisation vs. Disinfection • Sterilization means the complete destruction of all the micro-organisms including
spores, from an object or environment. It is usually achieved by heat or filtration but chemicals or radiation can be used.
• Disinfection is the destruction, inhibition or removal of microbes that may cause disease
or other problems e.g. spoilage. It is usually achieved by the use of chemicals.

MICROBIOLOGY LABORATORY MANUAL
9
Methods Principle/Conditions Advantages Disadvantages Uses Dry Heat Thermal inactivation:
destroys by oxidation Non-corrosive Simple design and principle
Less effective than moist heat; requires longer times and/or higher temperatures
Materials that are damaged by or are impenetrable to, moist heat
Hot Air Oven
160-180°C for 2-4 hours
Penetrates water-insoluble materials (e.g., grease and oil). less corrosive to metals and sharp instruments than steam
Slow diffusion, penetration. Loading, packing critical to performance. Not suitable for reusable plastics
Anhydrous materials, such as oils, greases and powders. Laboratory glassware, instruments Closed containers
Red-heat Flame
oxidation to ashes (burning)
rapid Initial contact with flame can produce a viable aerosol. possibility of accidental fire
Inoculating loops, needles
Incineration Oxidation to ashes (burning). 1-60 minutes: temperatures may exceed 1000°C
Reduces volume of waste by up to 95%
Improper use may lead to emission of pathogens in smoke. Requires transport of infectious waste Excess plastic (>20%) content reduces combustibility
For decontamination of waste items prior to disposal in landfill
Moist Heat Irreversible coagulation of (microbial) proteins
More rapid and more effective than dry heat
Pasteurization
heating to below boiling point (generally 77°C) for up to 30 minutes
can be used on heat sensitive liquids and medical devices and is low cost
not reliably sporicidal
For milk and dairy products. Some heat-sensitive medical equipment
Tyndallization (Fractional Sterilization)
heating to 80-100°C for 30 mins on successive days, with incubation periods in between
resistant spores germinate and are killed on the second and third days
Time consuming. Not reliably sporicidal
Heat sensitive materials such as bacteriologic media, solutions of chemicals, biological materials
Boiling Maximum temperature obtainable is approximately 100°C 10-30 mins
Minimal equipment required
Cumbersome: not practical for everyday lab use. Not reliably sporicidal.
Small instruments and equipment
Autoclaving Steam under pressure at 121°C/15 psi for 15-90 mins (gravity displacement autoclave). 132°C/27 psi for 4-20 minutes (pre-vacuum autoclave)
Minimal time required. most dependable sterilant for lab use
Loading and packing critical to performance Shielding dirt must first be removed. Maintenance and quality control essential. Damages heat-sensitive items
Penetration of sterile glassware, media and instruments. Decontamination of reusable supplies and equipment Decontamination of infectious waste

MICROBIOLOGY LABORATORY MANUAL
10
Introduction to the oil immersion compound microscope: A basic microscope consists of two lenses and the associated hardware to make viewing of specimens easier. The uppermost lens, called the ocular, is the part through which a person looks. The lower lens is the objective. Usually, several objective lenses are mounted on a turret, allowing rapid changing of objective lenses. The body tube holds the ocular and objective lenses in place. Most microbiological specimens are mounted on glass slides and placed on the stage.
MICROSCOPY
Figure 1: A typical compound microscope. Individual microscopes may vary somewhat from this illustration.

MICROBIOLOGY LABORATORY MANUAL
11
Usually, clips or clamps hold the slide firmly to the stage. A light source and a condenser lens are located beneath the stage. The condenser focuses the light through a hole in the stage. The condenser usually includes an iris that varies the amount of light passing through the specimen. After passing through the specimen, the light goes through the objective and ocular lenses, and then into the eye of the observer. As light passes through various substances (glass, air, specimens, etc.), it bends. This bending of light is called refraction. The refractive index of a substance is a measurement of the extent that the substance bends light. Excessive refraction can cause distortion of the image. At magnifications of less than 500x, the distortion is minimal. But at higher magnifications, the distortion becomes so great that image details are lost. An oil immersion lens helps to remedy this problem by eliminating the air gap between the specimen and the objective lens. A drop of special immersion oil is placed on the microscope slide, and the oil immersion objective lens is maneuvered so that it is touching the oil. Immersion oil has the same refractive index as glass so that the light passes through the slide, specimen, oil and objective lens as if they were a single piece of glass. In this lab, you will become familiar with the use of the microscope (particularly oil immersion microscopy) and will compare the relative size and shape of various microorganisms. Most bacteria range in size between 0.5-2.0 micrometers (μm). There are three common shapes of bacteria: the coccus, the bacillus, and the spiral. Figure 2 represents a typical shape of bacteria.
Figure: Basic shapes of bacteria
Some important concepts to Remember

MICROBIOLOGY LABORATORY MANUAL
12
Resolution: Resolution is the ability to distinguish between two points; The closer the two points, the higher the resolution. Magnification: Relative enlargement of the specimen, the total magnification of the image is calculated by multiplying the magnification of the ocular by the magnification of the objective. Depth of focus: thickness of a specimen that can be seen in focus at one time; as magnification increase the depth of focus decrease. Field of vision: the surface area of view; the area decrease as magnification increase. Numerical aperture (NA): the amount of light reaching the specimen;as NA increase the resolutio
n increase. Microscope Focusing method:

MICROBIOLOGY LABORATORY MANUAL
13
I. Obtain a prepared slide of mixed bacteria. Mount the slide onto the stage of the
microscope. II. Turn the revolving nosepiece so that the lowest power objective lens is "clicked" into
position. III. Place the microscope slide on the stage and fasten it with the stage clips. You can
push down on the back end of the stage clip to open it.Using the coarse adjustment, lower the objective lens down as far as it will go without touching the slide! Note: Look at the slide and lens from the side when doing this.
IV. Look through the eyepiece and adjust the illuminator and diaphragm for the greatest amount of light.Slowly turn the coarse adjustment so that the objective lens goes up (away from the slide). Continue until the image comes into focus. Use the fine adjustment, if available, for fine focusing.Move the microscope slide around so that the image is in the center of the field of view and readjust the mirror, illuminator or diaphragm for the clearest image.
V. You should be able to change to the next objective lenses with only slight focusing adjustment. Use the fine adjustment, if available. If you cannot focus on your specimen, repeat steps 4 through 7 with the higher power objective lens in place. DO
NOT ALLOW THE LENS TO TOUCH THE SLIDE! VI. Remember, everything is upside down and backwards. When you move the slide to
the right, the image goes to the left! VII. Do not touch the glass part of the lenses with your fingers. Use only special lens
paper to clean the lenses. VIII. When finished, raise the tube, click the low power lens into position and remove
the slide.

MICROBIOLOGY LABORATORY MANUAL
14
Remember, microscopes are expensive scientific instruments. When moving your microscope, always carry it with both hands. Grasp the arm with one hand and place the other hand under the base for support. Operation of compound microscope
• Clean your lenses with lens paper.
• Set your microscope on the scanning or red lens.
• Focus using the coarse adjustment.
• Change to low power, yellow. Find a portion of the cells are spread apart.
• Switch to high power. Only use the fine adjustment knob.
• When you believe that you have completed this process continue below remember to
clean your microscope when you are done and store with the scanning lens in place.
Oil Immersion
• Repeat focus for the bacteria slide.
• Make sure that your focus is perfect for high power.
• Switch the objective to half way between the high and the oil (white).
• Place a drop of oil on the slide.
• Turn oil objective lens into the oil.
• Check your image and only use fine to adjust.

MICROBIOLOGY LABORATORY MANUAL
15
Objective: To study the morphology of the given bacterial culture Principle: Basic dyes consist of positively charged charomophores. Because of the opposite charges they bind to the negatively charged cell wall components and cellular Nucleic acid to intensify the colour of the organism. This increases contrast between bacterial cell and the inert particles. Hence, the bacterial shape and its arrangement can be studied. Precaution: Do NOT make your smear suspensions too thick: The dye will not penetrate well, and there will be far too many bacterial cells to see individual shapes and arrangements. One needs to be careful about thick smears when taking the specimen from an agar medium. Materials:
Overnight broth culture of Escherichia coli, Grease free glass slide, inoculation loop
and Crystal violet stain
Procedure:
1. Prepare bacterial smear of the given organism.
2. Heat fix the smear.
3. Flood the smear with crystal violet and allow it to stand for 1 minute.
4. Wash the smear with running tap water to remove excess of stain.
5. Blot dry the slide and observe it under microscope from 10X, 45X and 100X
objectives.
Week 1. SIMPLE STAINING

MICROBIOLOGY LABORATORY MANUAL
16
Figure: Simplest staining procedure
Results & Interpretation
Shapes of organisms
MICROBIOLOGY LABORATORY MANUAL
17
Objective: To distinguish the bacteria based on their cell wall composition into Gram positive and Gram negative Principle: Christian Gram in 1884 developed this technique for classification of bacteria. Here more than one stain is used to distinguish different groups of bacteria. Hence this technique also called as differential staining. Gram positive bacteria have a thick mesh-like cell wall made of peptidoglycan (50-90% of cell wall), which stains purple while Gram-negative bacteria have a thinner layer (10% of cell wall), which stains pink. Gram-negative bacteria also have an additional outer membrane which contains lipids, and is separated from the cell wall by the periplasmic space. There are four basic steps of the Gram stain, which include applying a primary stain (crystal violet) to a heat-fixed smear of a bacterial culture, followed by the addition of a trapping agent (Gram's iodine), rapid decolorization with alcohol and counterstaining with safranin. Crystal violet (CV) dissociates in aqueous solutions into CV+ and chloride (Cl – ) ions. These ions penetrate through the cell wall and cell membrane of both Gram-positive and Gram-negative cells. The CV+ ion interacts with negatively charged components of bacterial cells and stains the cells purple. Iodine (I – or I3 –) interacts with CV+ and forms large complexes of crystal violet and iodine (CV–I) within the inner and outer layers of the cell. Iodine is often referred to as a mordant, but is a trapping agent that prevents the removal of the CV-I complex and therefore the colour of the cell. When a decolorizer such as alcohol or acetone is added, it interacts with the lipids of the cell membrane. A Gram-negative cell will lose its outer membrane and the peptidoglycan layer is left exposed. The CV–I complexes are washed from the Gram-negative cell along with the outer membrane. In contrast, a Gram-positive cell becomes dehydrated from an ethanol treatment. The large CV–I complexes become trapped within the Gram-positive cell due to the multilayered nature of its peptidoglycan. The decolorization step is critical and must be timed correctly; the crystal violet stain will be removed from both Gram-positive and negative cells if the decolorizing agent is left on too long (a matter of seconds). After decolorization, the Gram-positive cell remains purple and the Gram-negative cell loses its purple color. Counterstain, which is usually positively charged safranin, is applied last to give decolorized Gram-negative bacteria a pink or red color. Materials: Stock culture containing organism #1 (E. coli or Klebsiella) Stock culture containing organism #2 (Staphylococcus aureus or Staphylococcus epidermidis) clean microscope slides Gram’s staining reagents
Week 2. GRAM STAINING

MICROBIOLOGY LABORATORY MANUAL
18
Gram’s crystal violet [primary stain] Gram’s iodine [mordant - makes 1_ stain fix to cell wall] Decolorizer (95% ethyl alcohol) [washes stain out of cell walls with high lipid content] Gram’s safranin [counterstain] Inoculating loop and needle Bunsen burner Tissue towel Immersion oil Wash bottle Bibulous paper, Lens paper Methanol (CMS) Precautions: Two other important points should be noted while performing gram staining i.e. gram-variable gram-non-reactive Genera like Neisseria and Moraxella are gram-negative chemically but resist decolorization, therefore they are considered gram-variable. The genus Mycobacterium is often gram-non-reactive due to a waxy cell wall. Some members of this genus do accept gram stain and are normally gram-positive. Other genera, such as Mycoplasma, lack cell walls and gram staining is considered inappropriate for those (an acid-fast stain is used for these organisms, such as looking for M. tuberculosis in a sputum sample). Other factors that can affect the gram staining procedure include the following: • Using cells (from an old culture) that cannot resist decolorization. • Intrusion of stain crystals into smear or clumping of stain and bacteria. • Not allowing enough time for each stain to sit or allowing too much time for decolorizer and/or water to sit on slide. • Using old stain reagents. • Using thick vs. thin smears. Thin is normally much better. • Overheating the cells during fixation. To avoid problems from these factors, be sure not to shake reagent bottles, keep reagents fresh, do not over rinse or overdo the decolorization in the step, keep smears thin, do not overheat when heatfixing organisms, allow plenty of time for each stain to sit on the slide (about 1 minute per each is best). Procedure:

MICROBIOLOGY LABORATORY MANUAL
19
Procedure: • A heat-fixed bacterial smear is first covered completely with a few drops of a solution of
crystal violet, a purple basic dye. • After 60 sec the smear is rinsed with water by squirting the slide above the smear and
letting the water wash over it until the water runs clear. • Several drops of iodine (the mordant) are applied to cover the smear and left for 60 sec.,
then rinsed again. • A few drops of 95% alcohol added at a time until the wash is colorless, then rinse the
side again. • A red basic dye, aqueous safranin, is applied for 2 minutes followed by a rinse. • The smear is blotted (not wiped) to remove excess water, using bibulous (absorbent)
paper or a paper towel. The slide is then air dried and observed under the microscope. Result & Interpretation:
Organism #1:
Organism#2:

MICROBIOLOGY LABORATORY MANUAL
20
Objective: To understand the chemical basis of acid-fast staining and differentiation of bacteria into acid-fast and non-acid-fast groups. Principle: Many bacteria of the genera Mycobacterium and Nocardia are medically significant causes of infectious diseases, such as tuberculosis, leprosy and other lung and skin infections. It is therefore obviously important to be able to accurately identify members of these genera. Bacteria of the genera Mycobacterium and Nocardia have unusual cell walls that are waxy and nearly impermeable due to the presence of mycolic acid(a branched aliphatic with hydroxy acids – R1-CH2OH-CH2-COOH), and large amounts of fatty acids, waxes, and complex lipids. These organisms are highly resistant to disinfectants, desiccation and are difficult to stain with water-based stains such as the Gram. Because the cell wall is so resistant to most compounds, acid-fast organisms require a special staining technique involving heat to drive stain into their waxy cell wall. After this staining procedure, the Acid-fast cells will appear pink, because the primary stain, Ziel’s carbol fuschion, has been driven into the bacteria’s waxy cell wall with the heat from the water bath. Acid-fast cells also typically clump together, due to the wax in their cell wall. The Nonacid fast cells (bacteria that do not have a waxy cell wall) will appear purple in colour. Materials: Glass slide, staining rack, 72 hrs Mycobacterium smegmatis, Carbol fuchsin, (Acid alcohol (3% HCl + 95% ethanol), crystal violet and inoculation loop. • A bacterial smear is must be heat fixed onto a microscope slide. • Place the covered slide over a screened water bath and then saturate blotting paper with
primary stain Ziehl’s carbol fuschion. • Allow the slide to sit over the water bath for 3 – 5 minutes, reapplying stain if it begins to
dry out. • Remove blotting paper and rinse slide until water runs clear. • Flood slide with decolorizer, Acid Alcohol, for 10 – 15 seconds and then rinse. • Flood slide with counterstain, Crystal Violet, for one minute and then rinse. • Gently blot the slide dry. It is now ready to
be viewed under oil immersion (1000x TM) with a bright-field compound microscope.
Result & Interpretation:
Week 3. ACID-FAST STAINING Ziehl Neelsen Stain Reaction

MICROBIOLOGY LABORATORY MANUAL
21
Objective: To identify weak acid fast bacteria Principle: Certain organisms, most notably the mycobacteria, retain stain even after attempts at decolorizing with acids, acid-alcohol, or acid-acetone solutions. This property, called acid-fastness, is attributed to a cell wall containing mycolic acid (a lipid) in mycobacteria and close related organisms and to undefined impermeability factors for endospores and Cryptosporidium. Since these factors make staining the organism more difficult, heat, organic solvents or detergents are needed to facilitate stain penetration. Materials: Carbolfuchsin stain basic fuchsin 4 gm ethyl alcohol (95%) 20 ml Dissolve and add slowly while shaking. distilled water 100 ml liquefied phenol (melted crystals) 8 gm Decolorizer ethanol (95%) 97 ml concentrated hydrochloric acid 3 ml Counterstain methylene blue chloride 0.3 ml distilled water 100 ml Method: Prepare smear; fix with gentle heat. 2. Stain with Kinyoun carbolfuchsin for 3 minutes (do not heat). 3. Rinse gently with running water. 4. Decolorize with acid-alcohol until no more color appears in the washing (about 2 minutes). 5. Rinse gently with running water. 6. Counterstain with methylene blue for 30 seconds. 7. Rinse gently with running water. Air dry. Acid-fast organisms appear red, and background material appears blue. Result & Interpretation:
Week 4. MODIFIED KINOUN’S ACID FAST STAIN

MICROBIOLOGY LABORATORY MANUAL
22
Objective: To classify the bacteria based on the spore formation as spore former and non-spore former. Principle: Members of the genera Clostridium, Bacillus, Desulfotomaculum, Sporolactobacillus and Oscillospira form an exceptionally resistant structure capable of surviving for long periods in an unfavorable environment. The dormant structure is called an endospore since it develops within the cell. Endospore morphology and location vary with species and often are valuable in identification; endospore may be spherical to elliptical and either smaller or larger than the diameter of the parent bacterium. Endospores are not stained well by most dyes, but once stained, they strongly resist decolorization. This property is the basis of spore staining method. In the Schaeffer-Fulton procedure, endospores are first stained by heating the bacterial smear with malachite green, a weak basic dye. Heat makes the stain permeate through the tough spore coat components, Dipicolinic acid-Ca2+. Once spore taken up the stain it never loses the stain by decolourising with distilled water. Whereas vegetative cells lose the primary stain colour and appear to be colourless. Safranin is used as the counterstain the vegetative structure. Materials: 48 hrs old cultures of Bacillus sp., Malachite green, safranin, boiling water bath, inoculating loop, glass slides and microscope. Procedure: • Prepare the smear of the given organism and heat fix it. • Flood the smear with malachite green stain and allow it to
stand over the boiling water bath, without drying for 5 minutes.
• Remove the slide, cool and wash the slide under running tap water.
• Counterstain the slide with safranin for 2 minutes. • Again wash the slide with distilled water, air dry it and examine
under the microscope. Result & Interpretation:
Week 5. ENDOSPORE STAINING Schaeffer-Fulton method

MICROBIOLOGY LABORATORY MANUAL
23
Objective: To classify the bacteria based on the presence or absence of capsule. Principle: Capsule is the gelatinous outer layer of several genus which is used for protection, binding, and for exhibiting bacterial virulence. These capsules are made of polysaccharides or glycoproteins or polypeptides. The smear is gently heat fixed to avoid shrikage of capsule during staining process. While staining, capsule materials may be dislodged in the washing process because of their water soluble property. Crystal violet is applied to stain the cell and the capsular material and both take up the stain and appear violet. A decolourising agent, 20% copper sulfate is applied to the smear as decolouriser removes the crystal violet from the non-ionic capsule and then it stains the capsule to light blue. Materials: A 48 hrs old culture of Enterobacter aerogenes, 1% crystal violet, 20% copper sulfate solution, inoculating loop, staining tray, glass slide and microscope. Procedure: • Prepare the heavy smear of the given organism. • Flood the smear with crystal violet for 5 - 7 minutes. • Wash the smear with 20% copper sulphate solution. • Air dry the smear and observe it under the microscope. Result & Interpretation:
Week 6. CAPSULE STAINING

MICROBIOLOGY LABORATORY MANUAL
24
Objective: To study the morphology given culture by negative staining procedure. Principle: Negative staining refers to staining of background instead of the organism. Thereby the colourless bacteria are distinguished from other materials. Here an acidic black colour stain nigrosin is used to stain the bacteria. As the charges of both are negative they repels each other, so the dye remains outside the cell. The cell appears as colourless bright stars on a dark sky. Since heat fixation is not required, it gives us the clear and natural picture of shape and arrangement of bacterial cell. Materials: Overnight broth cultures of Bacillus sp., Nigrosin, glass slides and microscope. Procedure: • Place a drop of nigrosin near one end of a clean
glass slide. • Aseptically transfer a loopful of given bacterial
culture into the nigrosin and mix. • Position the second slide 45 angle over the first
slide near the edge where the bacterial inoculum has been already placed.
• Push and slide away the second slide over the first slide at a stretch at a fast rate.
• Air dry the smear and observe with in 30 minutes of slide preparation.
Results & Interpretation:
Week 6. NEGATIVE STAINING

MICROBIOLOGY LABORATORY MANUAL
25
McIntosh and Filde's anaerobic jar is an instrument used in the production of an anaerobic environment. This method of anaerorbiosis as others is used to culture bacteria which die or fail to grow in presence of oxygen (anaerobes). The jar is about 20″×12.5″ and is made up of a metal. Its parts are as follows: • The body made up of metal (air tight) • The lid, also metal can be placed in an air tight fashion • A screw going through a curved metal strip to secure and hold the lid in place • A thermometer to measure the internal temperature • A pressure gauge to measuring the internal pressure (or a side tube is attached to a
manometer • Another side tube for evacuation and introduction of gases (connecting to a gas cylinder
or a vacuum pump) • A wire cage hanging from the lid to hold a catalyst that makes hydrogen react to oxygen
without the need of any ignition source Materials: GasPak jar system using anaerobic jars (Oxoid, Basingstoke, England) and gas generating envelopes (Oxoid), which release H2 and CO2 when water is added. Palladium catalysts are placed inside both systems to catalyze the reaction between oxygen and hydrogen. A gas mixture of 80% N2, 10% H2, 10% CO2, supplied by a gas cylinder, is the replacement gas. An anaerobic indicator and a plate of Pseudomonas aeruginosa are placed inside the jars to monitor anaerobiosis. Procedure The culture: Place culture plates inside the jar in inverted position stacking up one on the other. Indicator system: Pseudomonas aeruginosa, inoculated on to a nutrient agar plate is kept inside the jar along with the other plates. This bacteria need oxygen to grow (aerobic). A growth free culture plate at the end of the process indicates a successful anaerobiosis. 6/7ths of the air inside is pumped out and replaced with either unmixed Hydrogen or a 10% CO2 + 90% H2 mixture. The catalyst (Palladium) acts and the oxygen is used up in forming water with the hydrogen. The manometer registers this as a fall in the internal pressure of the jar. Hydrogen is pumped in to fill up the jar so that the pressure inside equals atmospheric pressure. The jar is now incubated at desired temperature settings. Place the sealed jar in an incubator at 37°C for 24 to 48 hrs.
Week 7. ANAEROBIC CULTURE McIntosh and Filde's anaerobic jar

MICROBIOLOGY LABORATORY MANUAL
26
After several hours of incubation observe the indicator strip for a colour change to colourless, this is indicative of anaerobic conditions. Objective: To distinguish the bacteria based on their ability to produce the enzyme tryptophanase. Principle: The indole test is frequently employed to distinguish Klebsiella or Enterobacter bacteria (indole negative) from Escherichia coli (indole positive). Peptone broth tubes are inoculated with organisms and incubated for 24 hrs. After incubation, the culture broth is mixed with Kovács reagent (p-dimethylamino-benzaldehyde). Peptone broth is rich in the amino acid tryptophan. Tryptophanase, an enzyme, is capable of cleaving tryptophan and producing indole, pyruvic acid, and ammonia. If the organism is able to produce the enzyme tryptophanse, indole is produced. Indole can be detected by the development of a red color after adding Kovács reagent. A negative result appears yellow. Materials: Test organisms, test tubes with peptone broth, incoulating loop and Kovac’s reagent. Procedure: • Aseptically inoculate given pure bacterial culture into test tubes with 5 ml of peptone
broth and incubate at 37C for 48 hours. Following incubation, add 5 drops of Kovac's reagent to the culture broth.
• A positive result is shown by the presence of a red or red-violet color in the surface alcohol layer of the broth. A variable result can also occur, showing an orange color as a result. This is due to the presence of skatole, also known as methyl indole or methylated indole, another possible product of tryptophan degradation.
• Result &Interpretation:
Week 8. INDOLE TEST

MICROBIOLOGY LABORATORY MANUAL
27
Objective: To distinguish the bacteria based on their ability to metabolise glucose. Principle: Some bacteria perform mixed-acid fermentation. The by-products are mixtures of large amounts of stable acids. Other fermentative organisms produce smaller amounts of less stable acids. The Methyl-Red test tests for the ability to perform mixed-acid fermentation. MR-VP broth contains glucose, peptone, and a phosphate buffer. Organisms that perform mixed-acid fermentation produce enough acid to overcome the buffering capacity of the broth, so a decrease in pH results. Organisms that perform other kinds of fermentation cannot overcome the buffering capacity of the broth. After incubation, the pH indicator Methyl Red is added to the broth. Methyl Red is red at pH below 4.4 (this would be a positive result) and yellow at pH above 6.0. An orange color indicates an intermediate pH and would be considered a negative result. This test is used to differentiate among the Gram-negative bacilli in the family Enterobacteriaceae. Materials: Sterile MR-VP broth tubes, inoculating loop, test cultures, and methyl red indicator. Procedure: Prepare MR-VP broths and inoculate one broth with test culture using aseptic technique. Leave the other tube uninoculated (this will be a control). Incubate the tubes at 37C for 48 hours. Add few drops of Methyl Red to each broth. Observe the colour (which should develop within a few minutes). Result & Interpretation:
Week 9. METHYL RED TEST

MICROBIOLOGY LABORATORY MANUAL
28
Objective: To distinguish the bacteria based on their ability to metabolise glucose. Principle: Voges-Proskauer tests demonstrate an organism’s ability to convert pyruvate to acetoin an alkaline end product. Most organisms, which ferment glucose, form only one fermentation product, usually acetic acid. The acetic acid in the case of some organisms is converted to acetylmethylcarbinol, which leads to a pH of approximately 6.2. After incubation of the organism in the MRVP broth, Barritt’s Reagent A (a-napthol) and B (40% KOH) are added. The reagents will react with acetylmethylcarbinol (acetoin), and a positive reaction will show a maroon band at the top of the broth in the tube which will diffuse over time into the rest of the media. This property is a valuable tool in distinguishing Klebsiella, Enterobacter, Ewingella and Serratia from other members of Enterobacteraceae, as well as distinguishing between Proteus vulgaris (VP negative) and P. mirabilis (VP positive). Material: Sterile MR-VP broth tubes, inoculating loop, test cultures, and Baritt’s reagent A and B. Procedure: • Prepare MR-VP broths and inoculate one
broth with test culture using aseptic technique. Leave the other tube uninoculated (this will be a control).
• Incubate the tubes at 37C for 48 hours. • Add few drops of Baritt’s reagent A and B
and observe the colour. Result & Interpretation:
Week 10. VOGES-PROSKAUER TEST
MICROBIOLOGY LABORATORY MANUAL
29
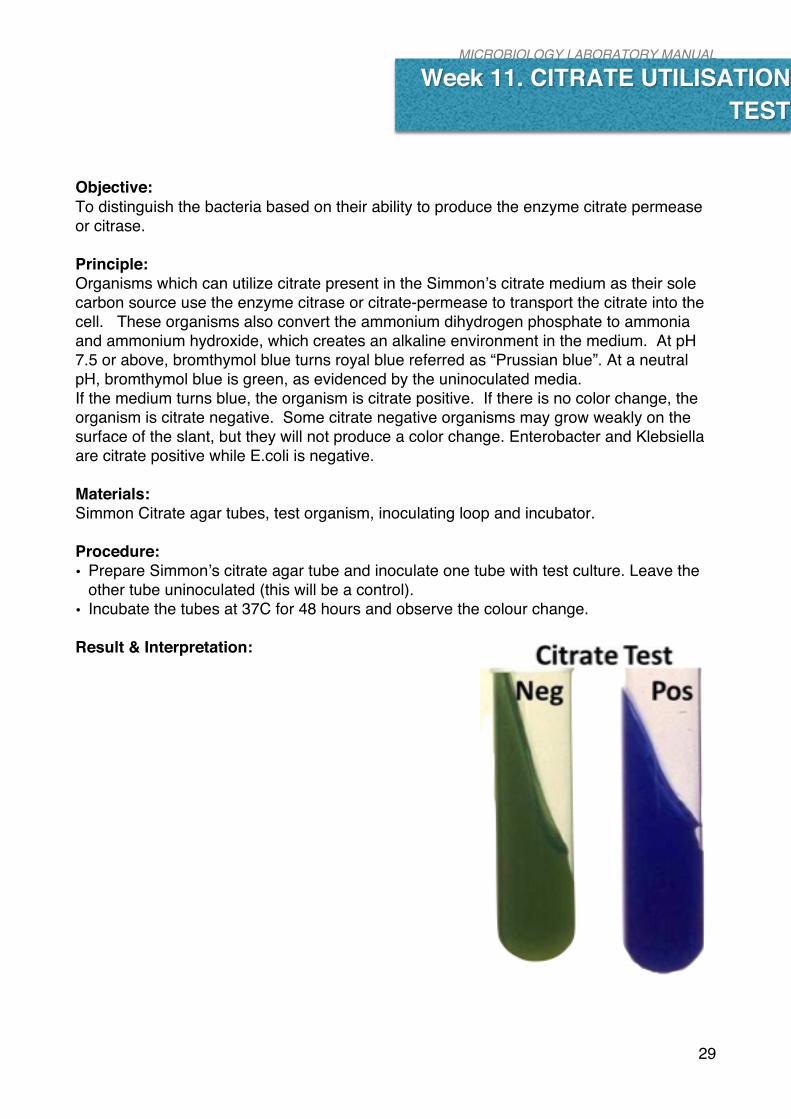
Objective: To distinguish the bacteria based on their ability to produce the enzyme citrate permease or citrase. Principle: Organisms which can utilize citrate present in the Simmon’s citrate medium as their sole carbon source use the enzyme citrase or citrate-permease to transport the citrate into the cell. These organisms also convert the ammonium dihydrogen phosphate to ammonia and ammonium hydroxide, which creates an alkaline environment in the medium. At pH 7.5 or above, bromthymol blue turns royal blue referred as “Prussian blue”. At a neutral pH, bromthymol blue is green, as evidenced by the uninoculated media. If the medium turns blue, the organism is citrate positive. If there is no color change, the organism is citrate negative. Some citrate negative organisms may grow weakly on the surface of the slant, but they will not produce a color change. Enterobacter and Klebsiella are citrate positive while E.coli is negative. Materials: Simmon Citrate agar tubes, test organism, inoculating loop and incubator. Procedure: • Prepare Simmon’s citrate agar tube and inoculate one tube with test culture. Leave the
other tube uninoculated (this will be a control). • Incubate the tubes at 37C for 48 hours and observe the colour change. Result & Interpretation:
Week 11. CITRATE UTILISATION TEST

MICROBIOLOGY LABORATORY MANUAL
30
Objective: To diagnose the bacteria based on their ability to produce urease enzyme. Principle: Urease test detects the ability of an organism (usually bacteria) to metabolise urea. Urease is the enzyme responsible for the catalysis of the hydrolysis of urea into carbon dioxide and ammonia. Two units of ammonia are formed with resulting alkalinity in the presence of the enzyme and the increased pH is detected by a pH indicator. Christensen’s medium contains the pH indicator phenol red which under acid conditions (pH 6.8) is yellow. In alkaline conditions (pH 8.4) the indicator turns the media rose pink. Many gastrointestinal or urinary tract pathogens produce urease, enabling the detection of urease to be used as a diagnostic to detect presence of pathogens. Positive control Providencia rettgeri Negative control Serratia marcescens Materials: Discrete colonies of test organisms growing on solid medium, Christensen’s medium and inoculating loop (preferably nichrome). Procedure: Inoculate slope heavily over the entire surface. Incubate inoculated slope at 35-37°C in a water bath or hot block or incubator. Examine slopes after 4h and after overnight incubation. Result & Interpretation:
Week 12. UREASE TEST

MICROBIOLOGY LABORATORY MANUAL
31
Objective: To demonstrate the formation of hydrogen sulphide gas using SIM agar medium.
Principle: Many proteins are rich in sulfur-containing amino acids such as cysteine. When
these proteins are hydrolyzed by some bacteria, the amino acids are released and
taken up as nutrients. Cysteine, in the presence of the enzyme cysteine
desulfurase, loses its sulfur atom through the addition of hydrogen from water to
form hydrogen sulfide gas.
Gaseous hydrogen sulfide may also be produced by the reduction of inorganic
sulfur-containing compounds such as thiosulfate (S2O32-), sulfate (SO42-) or sulfite
(SO32-). For example, when certain bacteria take up sodium thiosulfate, they can
reduce it to sulfite using the enzyme thiosulfate reductase with the release of
hydrogen sulfide gas. Such a reduction occurs during anaerobic respiration in which
respiring cells use something other than oxygen (such as thiosulfate) as the final
electron acceptor in the respiratory electron transport chain.
In this exercise, the SIM medium (named after J.S. Simmons in 1926) contains
peptones and sodium thiosulfate as substrates, and ferrous ammonium sulfate, Fe
(NH4) SO4, as the H2S indicator. Cysteine is a component of the peptones used in
SIM medium. Sufficient agar (about 0.4% instead of the usual 1.5%) is present to
make the medium semisolid. Once H2S is produced, it combines with the ferrous
ammonium sulfate (ferrous sulfate will also work), forming an insoluble, black
ferrous sulfide precipitate that can be seen along the line of the stab inoculation. If
the organism is also motile, the entire tube may turn black. This black line or tube
indicates a positive H2S reaction; absence of a black precipitate indicates a
negative reaction.
SIM agar may also be used to detect the presence or absence of motility in bacteria
as well as indole production. Motility is present when the growth of the culture is not
Week 13. HYDROGEN SULPHIDE PRODUCTION TEST

MICROBIOLOGY LABORATORY MANUAL
32
restricted to the stab line of the inoculation. Growth of non-motile bacteria is
confined to the line of inoculation.
Test Organisms (ATCC) H2S production
Escherichia coli (25922) -
Salmonella serotype Enteritidis (13076) +
Salmonella serotype Typhimurium (14028) +
Materials:
Test organisms, SIM agar tubes and inoculating needle.
Procedure:
1. Label each of the SIM agar deep tubes with the name of the bacterium to be
inoculated, and date.
2. With an inoculating needle, and using aseptic technique, inoculate each tube
with the appropriate bacterium by stabbing the medium ¾ of the way to the
bottom of the tube.
3. Be careful when inoculating the tubes to withdraw the needle from the agar
in a line as close as possible to the line used when entering the agar. Do not
allow the inoculating needle to touch the bottom of the tube.
4. Incubate the cultures for 24 to 48 hours at 37 oC.
5. Examine the SIM cultures for the presence or absence of a black precipitate
along the line of the stab inoculation. A black precipitate of FeS indicates the
presence of H2S. Any blackening of the medium is considered a positive test
for H2S production.
6. Based on your observations, determine and record whether or not each
bacterium was capable of H2S production and the presence (+) or absence (-
) of motility. Note: if the growth appears much wider on the two opposite
sides and narrower on the other two sides, the bacterium is not motile. If the
growth is uniform all around the stab line and the growth does not have a
“flattened appearance”, and then the organism is likely to be motile.

MICROBIOLOGY LABORATORY MANUAL
33
7. If desired, one can also test for indole production by adding 5 drops of
Kovacs reagent to the SIM tubes and looking for the development of a red
color at the top of the deeps.
Result & Discussion:

MICROBIOLOGY LABORATORY MANUAL
34
Objective:
To determine the ability of the organisms to produce the enzyme oxidase.
Principle: Oxidase positive bacteria possess cytochrome oxidase or indophenol
oxidase (an iron containing haemoprotein). Both catalyse the transport of electrons
from donor compounds (NADH) to electron acceptors (usually oxygen). The test
reagent, N, N, N’, N’-tetra-methyl-p-phenylenediamine dihydrochloride acts as an
artificial electron acceptor for the enzyme oxidase. The oxidised reagent forms the
coloured compound indophenol blue. The cytochrome system is usually only
present in aerobic organisms which are capable of utilizing oxygen as the final
hydrogen receptor. The end product of this metabolism is either water or hydrogen
peroxide (broken down by catalase). The test should not be performed on cultures
from media containing tellurite and fermentable carbohydrates as these may
prevent the reaction from occurring.
Do not use nichrome inoculating loops or wires. False positive reactions may occur
due to surface oxidation products formed during flame sterilisation. Some
Pseudomonas species are oxidase-negative.
Positive control Pseudomonas aeruginosa
Negative control Acinetobacter Iwoffii
Materials:
Discrete bacterial colonies of test organism growing on solid medium, 1% N,
N, N’, N’-tetramethyl-p-phenylenediamine dihydrochloride in distilled water or
impregnated oxidase test strips (The test solution auto-oxidises rapidly: use a fresh
solution or add 1% ascorbic acid to retard oxidation, Do not use if the solution is
blue), inoculating loop and Filter paper.
Week 14. OXIDASE TEST

MICROBIOLOGY LABORATORY MANUAL
35
Procedure
Filter paper method • Soak a piece of filter paper in the reagent solution.
• Scrape some fresh growth from the plate with a disposable loop or stick and
rub onto the filter paper or touch a colony with edge of paper.
• Examine for blue colour within 10 seconds.
Direct plate method (do not use on colonies intended for sub-culture)
• Add 2 drops of reagent to suspect colonies on an agar plate. Do not flood the
plate.
• Examine for blue colour within 10 seconds.
Swab method (do not use on colonies intended for sub-culture)
• Dip swab into reagent and then touch colony.
• Examine for blue colour within 10 seconds.
Impregnated oxidase test strip method • Scrape some fresh growth from the plate with a disposable loop or stick and
rub onto the filter paper.
• Examine for blue colour within 10 seconds.
Result & Interpreation:

MICROBIOLOGY LABORATORY MANUAL
36
Objective:
To demonstrate the production of catalase by the organisms.
Principle: The catalase test is used to detect the presence of catalase enzymes by the
decomposition of hydrogen peroxide to release oxygen and water. Hydrogen
peroxide is formed by some bacteria as an oxidative end product of the aerobic
breakdown of sugars. If allowed to accumulate it is highly toxic, to bacteria and can
result in death. Catalase either decomposes hydrogen peroxide or oxidizes
secondary substrates, but it has no effect on other peroxides.
Do not use a nichrome loop as this will give a false-positive reaction.
Because hydrogen peroxide is unstable, always check the expiration date
on the solution. Do not perform the catalase test on blood agar, because
blood cells in the agar contain the catalase enzyme. Always run positive
and negative controls from known cultures. A weak catalase or pseudocatalase
reaction may be produced by some strains of Aerococcus species. Some strains of
Enterococcus species also produce a pseudocatalase. Anaerobe cultures should be
exposed to air for 30 minutes prior to testing.
Procedure: Tube method 1. Place approximately 0.2 mL of hydrogen peroxide solution in a test tube
2. Carefully pick a colony to be tested with straight wire/loop or disposable
alternative
3. Rub the colony onto the inside wall of the tube above the surface of the
hydrogen peroxide solution.
4. Cap the tube or bottle and tilt it to allow the hydrogen peroxide solution to cover
the colony
5. Look for vigorous bubbling occurring within 10 seconds
Week 15. CATALSE TEST
MICROBIOLOGY LABORATORY MANUAL
37
Agar slant method
1. Add 3-4 drops of hydrogen peroxide to an overnight growth on an agar slant and
replace the cap.
2. Look for vigorous bubbling occurring within 10 seconds.
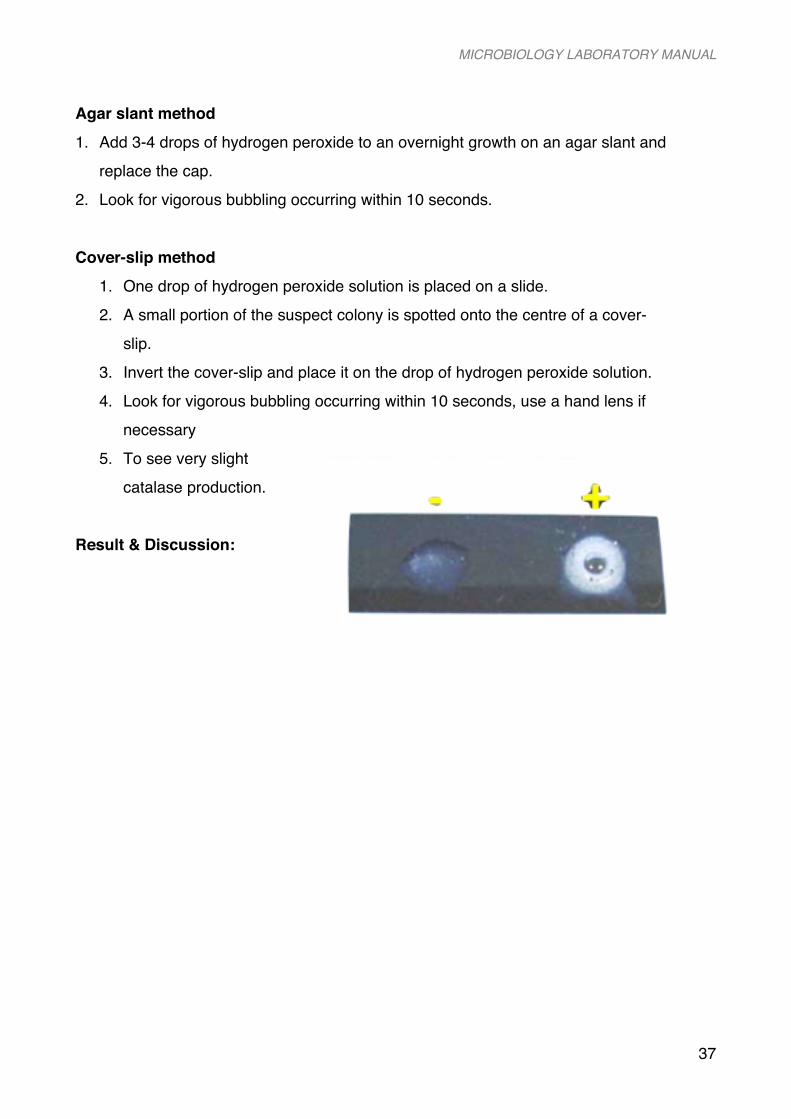
Cover-slip method
1. One drop of hydrogen peroxide solution is placed on a slide.
2. A small portion of the suspect colony is spotted onto the centre of a cover-
slip.
3. Invert the cover-slip and place it on the drop of hydrogen peroxide solution.
4. Look for vigorous bubbling occurring within 10 seconds, use a hand lens if
necessary
5. To see very slight
catalase production.
Result & Discussion:

MICROBIOLOGY LABORATORY MANUAL
38
Objective:
To isolate and identify clinically important bacteria from sputum.(Laboratory
identification of Tuberculosis)
Sputum commensals: Collected sputum sample usually contains commensals that are found in upper
respiratory tract and mouth.it includes both gram positive and gram negative
bacteria.Hence,appropriate methods are necessary to find out the pathogen.
Materials: Blood agar, Chocolate agar & Lowenstein Jensen’s media etc;
Optochin disc, Saline,4%Sodium hydroxide, Gram staining reagents, Zeihl
Neelsen’s staining reagents,10% Cyanogenbromide,40% Aniline in ethanol etc
Procedure:
Laboratory Examination of sputum
1. Appearance of Specimen:
a. Purulent b.Mucopurulent c.Mucoid d. Mucosalvary e. Bloody
2. Microscopic Examination:
a. WetMount:- Performed when specimen contains large number of epithelial
cells and few pus cells
b. Gram staining:- Observe for pus cells / bacterial cells
c . Zeihl Neelsen’s Staining:- Observe for acid fast bacilli
3. Culturing of specimen
a. Wash collected sputum with saline to reduce commensals
b. Blood agar - Incubate aerobically at 37°C for 48 hours
c. Chocolate agar – Optochin disc added to identify Streptococcus pneumoniae
Incubate anaerobically at 37ºC for 48 hours
d. Lowerstein - Jensen’s media – Decontaminate the specimen by mixing equal
volumes of sputum and NaOH (4%) inoculate 0.2ml of homogenized sputum on to
the medium.
Week 16. MICROBIOLOGICAL ANALYSIS OF SPUTUM

MICROBIOLOGY LABORATORY MANUAL
39
1. Examination and report of culture
Blood agar and chocolate agar: Observe colonies of Streptococcus pyogenes,
Staphylococcus aureus, Haemophilus influenzae, Klebsiella pneumoniae,
Pseudomonous aeruginosa.
Lowerstein – Jensen’s media: Observe for raised, dry creamy, puff coloured
colonies of Mycobacterium tuberculosis.
Additional Test for Mycobacterium tuberculosis:
1. Test for pigment production: Leave the culture in light for 2 hours & incubate
at 35°C-37ºC.Examine for non-pigment producing organism (non
schromogenic.Hence no pigment production.)
2. Niacin Test:
Reagent 10% cyanogen bromide, 40% aniline in ethanol (Freshly prepare)
added to a suspension of bacterial culture. Canary yellow colour indicates
positive reaction.
Observation For the given sputum specimen microscopic and cultural test results are studied.
Summary for the examination of sputum sample
DAY 1 Routine analysis Additional tests I.Appearance Report whether specimen is purulent, mucopurulent, mucoid, salivary, contains blood II. Microscopic examination Grams’ staining For pus cells and bacteria Acid fast staining For AFB Giemsa smear When bubonic plague or histoplasmosis is suspected KOH preparation When aspergillus infection is suspected

MICROBIOLOGY LABORATORY MANUAL
40
Toluidine blue-o giemsa smear Pneumonia is suspected Eosin preparation When allergic condition is suspected Saline preparation When Paragonimus is suspected
IV. Culturing Media used for culturing urine specimens are Blood agar and Chocolate agar (aerobic incubation). Incubate Blood agar with optochin disc and under anaerobic conditions Culture for M.tuberculosis
DAY 2 V. Examination and report of tests Blood agar and Chocolate agar are examined for the presence of:
S.pneumoniae, H.influenzae, S.aureus
and less commonly for K.pneumoniae, P.aeruginosa, M.catarrhalis, S.pyogenes Test H. influenzae for Beta lactamase production.
Antimicrobial tests are required

MICROBIOLOGY LABORATORY MANUAL
41
Objective:
To isolate and identify clinically important bacteria from urine.
Principle:
Infection of any part along the path from the kidney till the urethra is referred
to as urinary tract infection. Urinary tract infection may be natural or acquired in the
hospital following instrumentation, its usually caused by bacteria. The presence of
bacteria in urine is called bacteriuria. Significant bacteriuria is usually accompanied
by pyuria (pus cells in urine). Infection of the bladder is called cystitis and infection
of the kidney is called pyelo- nephritis which is associated with obstruction in the
urinary tract. Both gram positive and gram negative organisms and parasites cause
urinary tract infection.
Materials: Gram staining reagents, Ziehl Neelson staining reagents, NaOH, Dark field
microscope etc
Procedure:
Laboratory examination of urine 1. Appearance of the specimen
a. Colour – Red, Brown, Yellow brown, Yellow orange, Milky white etc.,
b. Cloudy/Clear
2. Examining the specimen microscopically
a. Wet mount – For observation of bacterial cells, pus cels, WBC, Red blood
cells, Yeast cells, Epithelial cells, Casts, Crystals, Parasites eggs of
Schistosoma, Trichomonas vaginalis etc.,
b. Gram staining – To observe the presence of bacteria
c. Ziehl Neelson staining – To detect acid fast bacilli
d. Dark field microscopy – If Leptospira is present
3. Biochemical tests
Carbohydrate fermentation test, Indole test, MR, VP, Citrate, SIM, TSI and
Urease test should be performed.
Week 17. LABORATORY DIAGNOSIS OF URINARY TRACT
INFECTIONS (UTI)

MICROBIOLOGY LABORATORY MANUAL
42
4. Culturing the specimen
Culturing is required when urine contains bacterial cells, pus cells, casts etc.
a. Blood agar and Macconkey agar – Observe for the presence of
haemolytic streptococci and other gram positive organisms
b. Culturing on Selenite - F – Broth – To detect the presence of Salmonella
typi carriers. 7 – 10 ml of urine is centrifuged for 5 – 10 minutes.
Sediment obtained is inoculated into selenite broth, incubated at 37C for
24 hours. After incubation transfer to xylose lysine deoxycholate agar and
incubate at 37C for 24 hours.
c. Lowstein Jenson’s slope method – when renal tuberculosis is suspected.
5. Estimation of bacterial number
Total number of bacterial colonies is calculated
Total number of bacteria / ml of urine is estimated
The bacterial count should be reported as,
Less than 10,000 to 1, 00.000 / ml
More than 1, 00,000 / ml
Interpretation of bacterial counts:
A bacterial count of 1, 00,000 (105) per ml or more indicates urinary tract
infection.
10,000 (104) to 1, 00,000 (105) / ml – Infection or contamination
10000 / ml – Contamination or antimicrobial treatment
Observation
For the given urine specimen microscopic and macroscopic, cultural and
biochemical tests are recorded.
Cells obtained in wet mounting: White cells (pus cells), red cells (enlarged normal sized, crenated), epithelial
cells etc
Casts:
Hyaline casts, Waxy casts, Cellular casts, Granular casts etc.,
Crystals: Cysteine crystals – six sided, cholesterol crystals (rectangular shaped) etc.,

MICROBIOLOGY LABORATORY MANUAL
43
Summary for the examination of urine sample
DAY 1 Routine analysis Additional tests I.Appearance Colour,clarity and cloudiness of the urine sample is observed and reported. II. Microscopic examination wet mount examination Uncentrifuged fresh sample may be suspected for bacterial cell, pus cell, tissue casts or parasites.
a) Centrifuged samples are analyzed for Histosoma hematobium. Grams’ staining b) Grams smear of uncentrifuged sample for pus cell or bacteria. Acid fast staining c) Ziel- Neelson’s staining for tuberculosis pathogen. Dark field microscopy d) Dark field examination for spirochaetes such as Leptospira.
III. Biochemical examination Urine sample is analyzed for the presence of protein and sugar.
a) Presence of bilirubin, urobilirubin for the examination of liver disease, jaundice/ hemolytic diseases.
b) Presence of ketones (acetones) in diabetic patients. c) Analysis of free/fresh heamoglobin for black water fever disease.
Presence of bacterial cells, casts, proteins, and nitrite, acidity/alkalinity or positive tests in urine requires culturing. IV. Culturing Media used for culturing urine specimens are Blood agar and Mac Conkey agar (aerobic incubation).

MICROBIOLOGY LABORATORY MANUAL
44
1) XLD/Selenite F broth may be used as enrichment culture media for culturing Salmonella typhi.
2) LJ medium is used for culturing tuberculosis causing pathogen.
DAY 2
V. Examination and report of tests Blood agar and Mac Conkey agar media are examined for the presence of: Eschericia coli, Enterococci, Pseudomonas aeruginosa, Staphylococcus saprophyticus.
1) XLD and Selenite F broth are examined for the presence of Salmonella sps. 2) LJ medium is examined for the presence of Mycobacterium tuberculosis.

MICROBIOLOGY LABORATORY MANUAL
45
Chemotherapeutic agents are antimicrobial agents of synthetic origin that are used
in the treatment of infectious diseases. These are anti microbial agents that are
produced by certain micro organisms. They interfere with microbial metabolism and
do not produce any effect on the host cells. They bring about static or cidal effect
on micro organisms. Various techniques and principles are employed to test in in-
vitro condition to test for the sensitivity of bacteria. The most commonly and widely
used technique is the Kirby – Bauer method.
Objective:
To determine the sensitivity pattern of an organism towards different antibiotics.
Principle:
This method is commonly used for determination of susceptibility using disc
diffusion test. The discs are impregnated with known concentration of antimicrobial
agents. The antimicrobial activity is expressed as spectrum of action. Some are
effective against one group of organism, called limited spectrum of activity while
some are active against a wide range of organisms, called broad spectrum.
The susceptibility of an organism to a drug is determined by the size of the
zone, which itself is dependent on variables such as:
o The ability and the rate of diffusion of the antibiotic into the medium
and its interaction with the test organism.
o The number of organisms inoculated.
o The growth of the organisms.
o The degree of susceptibility of the organism to the antibiotic.
Based on the zone of clearance the test organism is determined to be
resistant, intermediate or susceptible to the antibiotic.
Kirby-Bauer method is frequently used to determine the drug sensitivity of
micro organisms isolated. In this method the efficiency of the drug is determined by
Week 18. ANTIBIOTIC SUSCEPTIBILITY - KIRBY-BAUER
DISC DIFFUSION METHOD

MICROBIOLOGY LABORATORY MANUAL
46
measuring the diameter of the zone of inhibition that is got due to the diffusion of
the antibiotic. In this procedure, filter-paper discs of uniform size are impregnated
with specified concentration of antibiotic and placed on agar plate that has been
inoculated with the test organism, the medium generally used is Muller-Hinton
agar. The plates are inoculated using cotton swabs to ensure the confluent growth
of the organisms. The test is performed under aseptic condition.
Following incubation, the plates are examined for the presence of growth
inhibition, which is indicated by a clear zone surrounding each disc. The
susceptibility of an organism to a drug is determined by the size of this zone on
Muller-Hinton agar.
Materials used Antibiotic discs, Muller Hinton broth, Muller Hinton agar, culture, inoculation needle,
cotton swab, etc.
Procedure
¬ Take a loopful of the pure culture of
the organism from nutrient agar
plate and inoculate into Muller
Hinton broth for 3-4 hours until its
turbidity reaches Mc Farland
Standard 0.5 which is equivalent to
105 orgs/ml.
¬ Inoculate the culture on Muller
Hinton agar plate by swab
inoculation.
¬ Place different antibiotic discs on
the Muller Hinton agar plate using
sterile foreceps aseptically.
¬ Incubate the plates at 37ºC for 24
hours.
¬ Measure the diameter of zone of
inhibition in mm and compare with
standard charts.

MICROBIOLOGY LABORATORY MANUAL
47
Result & Interpretation: