
STANDARD OPERATING PROCEDURES BASIC & FIELD ...
61
Shooting Sports – American History – Civic Engagement COPYRIGHT 2017 RR, ALL RIGHTS RESERVED 1 STANDARD OPERATING PROCEDURES BASIC & FIELD RIFLE ANNEX VERSION 3.2
-
Upload
khangminh22 -
Category
Documents
-
view
1 -
download
0
Transcript of STANDARD OPERATING PROCEDURES BASIC & FIELD ...

Shooting Sports – American History – Civic Engagement
COPYRIGHT 2017 RR, ALL RIGHTS RESERVED 1
STANDARD OPERATING PROCEDURES
BASIC & FIELD RIFLE ANNEX VERSION 3.2

Shooting Sports – American History – Civic Engagement
COPYRIGHT 2017 RR, ALL RIGHTS RESERVED 2
1 OVERVIEW
This page intentionally left blank to allow for individual notes.

Shooting Sports – American History – Civic Engagement
COPYRIGHT 2017 RR, ALL RIGHTS RESERVED 3
1.1 FOREWORD
Congratulations on making the choice to study the art of American Rifle Marksmanship. This manual
includes a number of historic skill challenges as well as instructional modules to master on your path to
becoming a skilled instructor. These foundational lessons provide a solid base for future skill
development.
New instructors should jump to the training progression section and review the basic rifle endorsement
requirements. Start your self-study by focusing on the items that need to be signed off first. You will find
that each item has a corresponding instructional module in this volume. Each module is essentially a
lesson plan. You will need to study the material, observe an experienced instructor teach, practice with a
mentor, and then demonstrate the skill to be certified on the task.
Experienced instructors can use this manual as a reference guide as needed. This volume has several new
skill challenges that can be used to spice up an event.

Shooting Sports – American History – Civic Engagement
COPYRIGHT 2017 RR, ALL RIGHTS RESERVED 4
TABLE OF CONTENTS
1 Overview ............................................................................................................................................................... 2
1.1 Foreword ...................................................................................................................................................... 3
Table of Contents....................................................................................................................................................... 4
1.2 Edition Information ...................................................................................................................................... 5
1.3 SOP Approval................................................................................................................................................ 6
2 Administration ...................................................................................................................................................... 7
2.1 Event Plans ................................................................................................................................................... 8
3 Marksmanship & Shooting Sports ...................................................................................................................... 13
3.1 Rifle Skill Challenges ................................................................................................................................... 14
3.2 Basic Rifle Marksmanship Instructional Modules ...................................................................................... 31
4 Basic Rifle Instructor Training Progression ......................................................................................................... 55
4.1 RR Basic Rifle Endorsement ....................................................................................................................... 56
4.2 RR Field Rifle Endorsement ........................................................................................................................ 58
5 Resources ............................................................................................................................................................ 60
Index of Tables ......................................................................................................................................................... 61

Shooting Sports – American History – Civic Engagement
COPYRIGHT 2017 RR, ALL RIGHTS RESERVED 5
1.2 EDITION INFORMATION
1.2.1 REVISION NOTES
This annex is new for Edition 3.0. Several significant updates have occurred since Version 2.0:
“5 Steps” Lesson Plan updated with ABC technique
Standard Come-Ups for KD updated
Skill challenges updated
1.2.2 ACKNOWLEDGMENTS
Many individuals contributed to this manual, and not all can be individually named. We are especially
appreciative of the following key contributors:
Ben Edman, who drafted much of the Basic Rifle instructional tips
Any errors are those of the editor (i.e. myself).
1.2.3 REVISIONS AND CHANGES
This manual will be revised on a periodic basis. Please identify changes to this volume to the Executive
Officer for Marksmanship (Rifle).
Shooting Sports – American History – Civic Engagement
COPYRIGHT 2017 RR, ALL RIGHTS RESERVED 6
1.3 SOP APPROVAL
26 April 15
Revere's Riders
PO Box 9571
Las Vegas, NV 89191
MEMORANDUM FOR RR CLUB MEMBERS
The enclosed Standard Operating Procedures address typical activities. On 25 April 2015, the RR Board of
Directors reviewed the initial SOPs and passed the following resolution:
WHEREAS, the board of directors has reviewed the proposed Standard Operating Procedures (SOP),
WHEREAS, the SOP are based upon best practices in our field,
RESOLVED, that the proposed SOP are approved and in effect,
RESOLVED FURTHER, that the board shall review the SOP annually,
RESOLVED FURTHER, that the President or Vice President may approve additions, subtractions, or other
changes to the SOP from time to time, except that neither shall remove any safety precautions.
This revision reflects an annual update and does not affect safety procedures. Drafts were circulated
among the membership for 30 days and inputs solicited. The updated SOPs is approved / rejected. It will
go into effect immediately and be reviewed on at least an annual basis. It supersedes any previous
versions, effective 1 January 2017.
Respectfully,
Christopher M. Seidler
//SIGNED-CMS18DEC16//

Shooting Sports – American History – Civic Engagement
COPYRIGHT 2017 RR, ALL RIGHTS RESERVED 7
2 ADMINISTRATION
This page intentionally left blank to allow for individual notes.

Shooting Sports – American History – Civic Engagement
COPYRIGHT 2017 RR, ALL RIGHTS RESERVED 8
2.1 EVENT PLANS
2.1.1 OVERVIEW
This section provides outlines for a variety of Basic Rifle events. The Event Director may of course deviate
from the suggested outline so long as safety is not affected. If a particular subject will not be covered at
all then that should be noted when the event is scheduled so that participants have appropriate
expectations.
2.1.2 BASIC RIFLE – ONE DAY
Introduction
o Administration & Registration
o Setup gear line
o Welcome and Introduction
o Safety Procedures
o Review how to unload firearms
o Range Operations & Line Commands
o Retrieve rifles
Fundamentals
o Morgan’s 13 Classifier COF
o Prone Position & Sling Usage
o Five Fundamentals of Rifle Shooting
o Natural Point of Aim
o Basic MOA (Sight Adjustments at 25 Yards)
o Shot Group Analysis
Field Positions & Drills
o Sitting Position
o Transitions to Sitting and Prone
o Reloading the Rifle
o Standing Position
Skill Challenges
o RR Qualification Test(s)
o Morgan’s 13 Classifier
Weave History Throughout
Call to Action: Civic Engagement

Shooting Sports – American History – Civic Engagement
COPYRIGHT 2017 RR, ALL RIGHTS RESERVED 9
2.1.3 BASIC RIFLE – TWO DAY
Execute Day One as described above
Introduction
o Administration & Registration
o Setup gear line
o Welcome and Introduction
o Safety Procedures
o Review how to unload firearms
o Range Operations & Line Commands
Morgan’s 13 Classifier
Review Fundamentals from Day One as required
o Prone Position & Sling Usage
o Five Fundamentals of Rifle Shooting
o Natural Point of Aim
o Intermediate IMC Discussion
o Sitting Position
o Standing Position
Fundamentals of Known Distance w/ live fire as facilities allow
Skill Challenges
o RR Qualification Test(s) – 25Y, 100Y, or 400Y
o RR Battle Rattle (optional)
o Morgan’s 13 Classifier
Weave History Throughout
Call to Action: Civic Engagement
2.1.4 FIRST SHOTS CLINIC (NSSF STYLE – 2 HRS)
Modify to use NSSF materials as desired available here.
Introduction
o Administration & Registration
o Welcome and Introduction
Classroom Portion
o Introduction to Firearms Shooting and Activities
o Range Information
o Safety Procedures
o Review how to unload firearms
o Range Operations & Line Commands
o Retrieve firearms
Range Portion
o Prone Supported or Prone Position & Sling Usage
o Fundamentals of Rifle Shooting (“ABCs”)
o Morgan’s 13 Classifier
Weave History Throughout
Call to Action: Civic Engagement

Shooting Sports – American History – Civic Engagement
COPYRIGHT 2017 RR, ALL RIGHTS RESERVED 10
2.1.5 FIRST STEPS RIFLE CLINIC (NRA STYLE – ½ DAY)
Modify to use NRA materials as desired.
Introduction
o Administration & Registration
o Setup gear line
o Welcome and Introduction
Introduction to Rifle Safety, Parts, and Operation
o Safety Procedures
o Firearms Parts and Nomenclature
o Ammunition
o Review how to unload firearms
o Range Operations & Line Commands
Fundamentals
o Prone Position or Prone Supported Positions; sling usage optional
o Fundamentals of Rifle Shooting (“ABCs”)
o Natural Point of Aim
o Shot Group Analysis
Morgan’s 13 Classifier
Weave History Throughout
Call to Action: Civic Engagement
2.1.6 RAPID FIRE CLINIC
Introduction
o Administration & Registration
o Setup gear line
o Welcome and Introduction
o Safety Procedures
o Review how to unload firearms
o Range Operations & Line Commands
Very Brief Review of Fundamentals
o Fundamentals of Rifle Shooting (“ABCs”)
o Prone Position
o Natural Point of Aim
Field Positions & Drills
o Sitting Position
o Transitions to Sitting and Prone
o Reloading the Rifle
Skill Challenges
o RR Qualification Test(s)
o Battle Rattle
o Morgan’s 13 Classifier
Weave History Throughout
Call to Action: Civic Engagement

Shooting Sports – American History – Civic Engagement
COPYRIGHT 2017 RR, ALL RIGHTS RESERVED 11
2.1.7 RIFLEMAN’S QUARTER MILE CLINIC
Introduction
o Administration & Registration
o Setup gear line
o Welcome and Introduction
o Safety Procedures
o Review how to unload firearms
o Range Operations & Line Commands
Very Brief Review of Fundamentals & Confirm 25Y zeroes
o Fundamentals of Rifle Shooting (“ABCs”)
o Prone Position
o Natural Point of Aim
MOA & IMC Discussion
Obtain DOPE with Live Fire
RR Qualification Test (at KD) Range
Morgan’s 13 Classifier
Weave History Throughout
Call to Action: Civic Engagement
2.1.8 FIELD SHOOTING CLINIC
Introduction
o Administration & Registration
o Setup gear line
o Welcome and Introduction
o Safety Procedures
o Review how to unload firearms
o Range Operations & Line Commands
Very Brief Review of Fundamentals & Confirm 25Y zeroes
o Fundamentals of Rifle Shooting (“ABCs”)
o Prone Position
o Natural Point of Aim
Brief Review of IMC Fundamentals
o MOA & IMC Discussion
o Consider obtaining DOPE with Live Fire
Field Shooting Activities & Skill Challenges
Morgan’s 13 Classifier
Weave History Throughout
Call to Action: Civic Engagement
2.1.9 MATCHES
Introduction
o Administration & Registration
Shooting Sports – American History – Civic Engagement
COPYRIGHT 2017 RR, ALL RIGHTS RESERVED 12
o Setup gear line
o Welcome and Introduction
o Safety Procedures
o Review how to unload firearms
o Range Operations & Line Commands
Skill Challenges (as advertised)
o Morgan’s 13 Classifier
o RR Qualification Test
o Battle Rattle
o Field Challenge
o NRA or CMP Matches
2.1.10 OTHER PROGRAMS
Conform to NRA or CMP standards.

Shooting Sports – American History – Civic Engagement
COPYRIGHT 2017 RR, ALL RIGHTS RESERVED 13
3 MARKSMANSHIP & SHOOTING SPORTS

Shooting Sports – American History – Civic Engagement
COPYRIGHT 2017 RR, ALL RIGHTS RESERVED 14
3.1 RIFLE SKILL CHALLENGES
3.1.1 OVERVIEW
RR has several competitive shooting events called “skill challenges” that put competitors to the test in a
variety of disciplines. This section describes the parameters for each.
Our Skill Challenges resemble formal competition but are intended to provide interesting and difficult
problems which link students to marksmen heritage. Thus the parameters for targets, setup, and
variations may vary more than traditional CMP or NRA challenges. Students are competing more against
their immediate peers and themselves than against the record books. We are affiliated with the NRA and
CMP and urge students who have mastered the RR challenges to try their hand in formal competition.
RR Morgan’s 13 Classifier: See what your current maximum range is to score consistent hits!
RR Hits Count Rifle Qualification Test: This is our signature basic rifle skills test. It requires scoring
hits with both rapid and slow fire in a variety of positions against targets at varying ranges. This event
may be fired at 25 yards, 100 yards, 200 yards, or the standard 400 yard distance. Variants allow fire
out to traditional 600 yards.
RR "5V Vintage Rifle" Qualification Test: This version of our classic test uses the vintage targets used
by generations of American riflemen. Test your skills against the same target used by previous
generations! Scoring on this variant is more precise.
RR Battle Rattle: Based on the CMP's popular Team Matches, this fast-paced event pits teams of four
against targets at a variety of ranges.
RR Field Shoot Challenge: The capstone challenge for a rifleman, these creative events require
marksmen to detect, identify, range, and engage targets under field conditions at varying distances.
Most of the Skill Challenges use similar rules and are described below. The Battle Rattle and Field Shoot
Challenge differ and are presented separately.
3.1.2 ACCOMMODATIONS
Accommodations for shooters with obvious or documented disabilities, or for youth, MAY be provided at
the discretion of the Event Director. If any shooter is judged by the Event Director to not be able to
transition safely, he/she may have the shooter start in the firing position and not fire until after a
transitioning shooter fires a round first.
For shooters with disabilities who are seated in wheelchairs or shooting seated from a bench, suggested
adapted shooting positions are as follows (if possible, and at the discretion of the Event Director): To
simulate standing; arms unsupported. To simulate seated/kneeling; one elbow may be supported by a
wheelchair arm or table. To simulate prone: both elbows may be supported on wheelchair arms or a
table.

Shooting Sports – American History – Civic Engagement
COPYRIGHT 2017 RR, ALL RIGHTS RESERVED 15
3.1.3 TARGETS & DIMENSIONS
Approved targets include the following (dimensions approximate). Reduced versions scaled for 25 yard or other distances are also approved.
Event Directors should use official RR targets if available and suitable. Other targets should be used as an enrichment activity to add to the event.
Morgan’s Board Target Dimensions: 4”x7” Rectangle (6” Diameter circle)
Standard Target Dimensions (Full Scale): All of the following are equivalent for standard targets o 21” Diameter Circle o 18.5” Square o U.S. Army “FOX” prone silhouette targets o 5V Circular Targets (4” V, 12” 5 Ring, 24” 4 Ring, 36” 3 Ring) o US Army “DOG” prone silhouette targets o Revere’s Riders Hits Count scaled targets such as bells, stamps etc (all are scaled to have a
similar surface area to the 21” Diameter Circle) o Any target of approximately 345 sq in in size
Extra Large Target Dimensions (Full Scale): All of the following are equivalent for extra-large targets o 31” Diameter Circle o 27.5” Square o US Army “ECHO” Silhouette targets (19.5” W x 40” Tall) o Any target of approximately 755 sq in in size
Revere’s Riders has produced a series of scaled targets for use at different distances.
Scale Standard Circle Diameter
Notes
25% (1/4 Scale) “Mini-KD” 5.25” (21” / 4) If placed at 25/50/75/100 replicates the sight picture at 100-400 yards.
50% (1/2 Scale) “Carbine” Large Scoring Area
10.5” (21” / 2) If placed at 50/100/150/200 replicates the sight picture at 100-400 yards.
20% (1/5 Scale) “Carbine” T-Zone Scoring Area
4.2” (21 / 5) If placed at 20/40/60/80 replicates the sight picture at 100-400 yards.
25 Yard or “Thousand Inch” Scale
Varies Intended to be placed at 25 yards. Different size silhouettes represent the sight picture at 100-400 yards.
50 Foot Scale Varies Intended to be placed at 50 feet. Different size silhouettes represent the sight picture at 100-400 yards. Useful for indoor bays.
Use variant scaled targets if on a known-distance bays shorter than the full 400 yards:
100 Yard Bays. Place 25% scaled targets at 25/50/75/100 yards.
150 Yard Bays. Place 25% scaled targets at 25/50/75/100 yards. Place 25% scaled E-Silhouettes
(“Large” targets) at 125 and 150 yards and fire the Optional Stage 5.
200 Yard Bays. Place 50% scaled targets at 50/100/150/200 yards
300 Yard Bays. Place 50% scaled targets at 50/100/150/200 yards. Place 50% scaled E-
Silhouettes (“Large” targets) at 250 and 300 yards and fire the Optional Stage 5.
Shooting Sports – American History – Civic Engagement
COPYRIGHT 2017 RR, ALL RIGHTS RESERVED 16
3.1.4 RR RIFLE CLASSIFIER COURSES OF FIRE
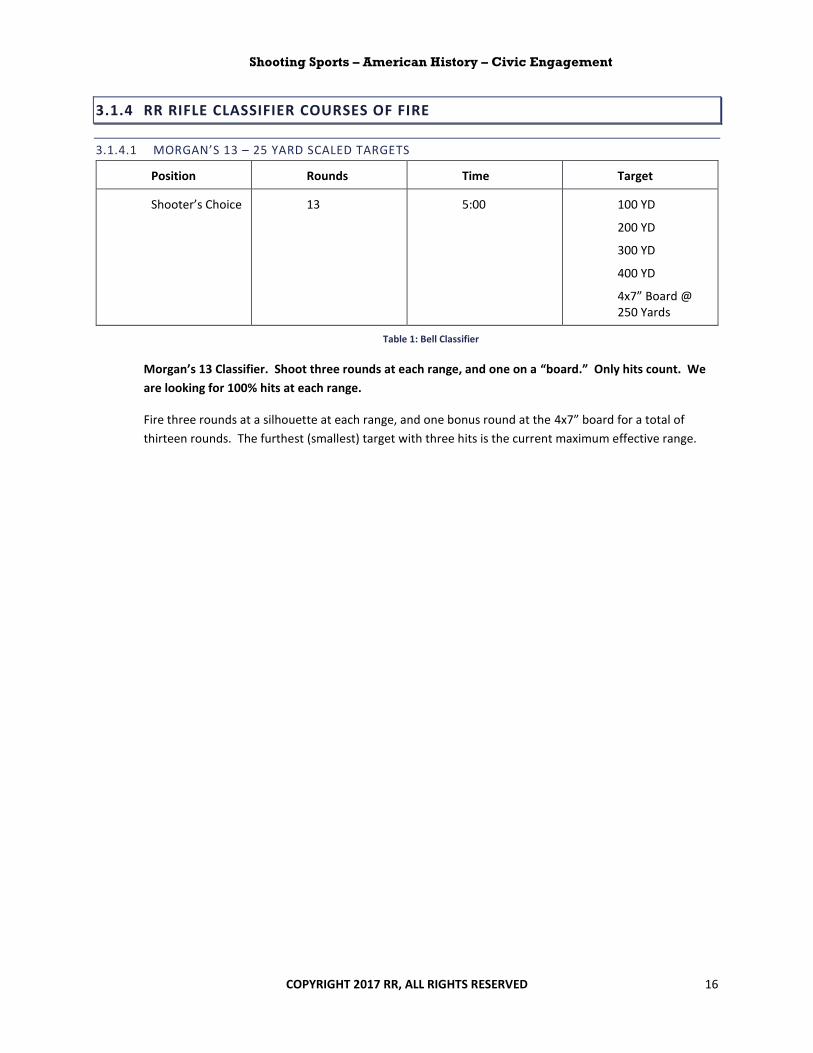
3.1.4.1 MORGAN’S 13 – 25 YARD SCALED TARGETS
Position Rounds Time Target
Shooter’s Choice 13 5:00 100 YD
200 YD
300 YD
400 YD
4x7” Board @ 250 Yards
Table 1: Bell Classifier
Morgan’s 13 Classifier. Shoot three rounds at each range, and one on a “board.” Only hits count. We
are looking for 100% hits at each range.
Fire three rounds at a silhouette at each range, and one bonus round at the 4x7” board for a total of
thirteen rounds. The furthest (smallest) target with three hits is the current maximum effective range.

Shooting Sports – American History – Civic Engagement
COPYRIGHT 2017 RR, ALL RIGHTS RESERVED 17
3.1.5 RR RIFLE QUALIFICATION TEST COURSES OF FIRE
3.1.5.1 FULL ROUND COUNT RR QUALIFICATION TEST – KNOWN DISTANCE
Position Rounds Time Target
Standing 10 2:00 100 YD
Sitting or kneeling
2+8 (Reload) 60 seconds 200 YD
Prone 2+8 (Reload) 70 seconds 300 YD
Prone 10 or 20 5:00 or 10:00 400 YD
Table 2: Full round count RR Qualification Test (40-50 rounds)
Stage One. Target Distance: 100 yards. Magazine Prep: 1 magazine with 10 rounds. Position:
standing. Time: 2:00. Note: On command, the shooter fires all 10 rounds at the target.
Stage Two. Target distance 200 yards. Magazine Prep: 2 magazines with 2 and 8 rounds (on mat).
Position: transition standing to seated or kneeling. Time: 1:00. Note: On command, the shooter
drops into the seated or kneeling position, loads, and fires 2 rounds; conduct emergency reload and
fire eight more rounds at the target.
Stage Three. Target distance 300 yards. Magazine Prep: 2 magazines with 2 and 8 rounds (on mat).
Position: transition standing to prone. Time: 1:10. Note: On command, the shooter drops into the
prone position, loads, and fires 2 rounds; conduct emergency reload and fires eight more rounds at
the target.
Stage Four. Target distance 400 yards. Magazine Prep: 1 magazine with 10 rounds. Position: prone.
Time: 5:00. Note: On command, the shooter fires all 10 rounds at the target. Double the score
attained on stage four, or, at the event director’s option, fire 20 rounds in 10:00.
Optional Stage Five: Place a Large Target (“E” type) at 500 and 600 yards. Instead of doubling stage
four, fire five shots at 500 yards and five shots at 600 yards at the “E” silhouette (2:30 at each
distance); total maximum points remains 50. Traditionally, service rifle has been fired to the full 600
yard distance.
Modifications for different size bays:
o Modification for 100 Yard Bays. Place 25% scaled targets at 25/50/75/100 yards.
o Modification for 200 Yard Bays. Place 50% scaled targets at 50/100/150/200 yards
o Modification for 300 Yard Bays. Place 50% scaled targets at 50/100/150/200 yards. Place
50% scaled E-Silhouettes (“Large” targets) at 250 and 300 yards and fire the Optional Stage
5.

Shooting Sports – American History – Civic Engagement
COPYRIGHT 2017 RR, ALL RIGHTS RESERVED 18
3.1.5.2 REDUCED ROUND COUNT RR QUALIFICATION TEST – KNOWN DISTANCE
Position Rounds Time Target
Standing 5 60 seconds 100 YD
Sitting or kneeling
2+3 (Reload) 35 seconds 200 YD
Prone 2+3 (Reload) 45 seconds 300 YD
Prone 5 or 10 2:00 or 4:00 400 YD
Table 3: Reduced round count (20 rounds)
Stage One. Target Distance: 100 yards. Magazine Prep: 1 magazine with 5 rounds. Position:
standing. Time: 1:00. Note: On command, the shooter fires all five rounds at the target.
Stage Two. Target distance 200 yards. Magazine Prep: 2 magazines with 2 and 3 rounds (on mat).
Position: transition standing to seated or kneeling. Time: 0:35. Note: On command, the shooter
drops into the seated or kneeling position, loads, and fires 2 rounds; reloads and fires three more
rounds at the target.
Stage Three. Target distance 300 yards. Magazine Prep: 2 magazines with 2 and 3 rounds (on mat).
Position: transition standing to prone. Time: 0:45. Note: On command, the shooter drops into the
prone position, loads, and fires 2 rounds; reloads and fires three more rounds at the target.
Stage Four. Target distance 400 yards. Magazine Prep: 1 magazine with 5 rounds. Position: prone.
Time: 2:00. Note: On command, the shooter fires all five rounds at the target. Double the score
attained on stage four, or, at the event director’s option, fire 10 rounds in 4:00.
Optional Stage Five: Place a Large Target (“E” type) at 500 and 600 yards. Instead of doubling stage
four, fire two shots at 500 yards and three shots at 600 yards at the “E” silhouette (1:00 at each
range). Total maximum points remains 25.

Shooting Sports – American History – Civic Engagement
COPYRIGHT 2017 RR, ALL RIGHTS RESERVED 19
3.1.5.3 FULL ROUND COUNT RR QUALIFICATION TEST – 25 YARD SCALED TARGETS
Position Rounds Time Target
Standing 10 2:00 100 YD
Sitting or kneeling
2+8 (Reload) 60 seconds 200 YD
Prone 2+8 (Reload) 70 seconds 300 YD
Prone 10 5:00 400 YD
Table 4: Full Round Count RR Qualification Test – 25 Yard Scaled Targets
Stage One. Magazine Prep: 1 magazine with 10 rounds. Position: standing. Time: 2:00. Note: On
command, the shooter fires 5 rounds at the left 100 yard scaled target, then shifts and fires 5 rounds at
the right 100 yard scaled target.
Stage Two. Magazine Prep: 2 magazines with 2 and 8 rounds (on mat). Position: transition standing to
seated or kneeling. Time: 1:00. Note: On command, the shooter drops into the seated or kneeling
position, loads, and fires 2 rounds at the left 200 yard scaled target, reloads and fires 3 more rounds at
the left 200 yard scaled target, shifts and fires the 5 remaining rounds into the right 200 yard scaled
target.
Stage Three. Magazine Prep: 2 magazines with 2 and 8 rounds (on mat). Position: transition standing to
prone. Time: 1:10. Note: On command, the shooter drops into the prone position, loads, and fires 2
rounds at the left 300 yard scaled target, reloads and fires 3 more rounds at the left 300 yard scaled
target, shifts and fires the 5 remaining rounds into the right 300 yard scaled target.
Stage Four. Magazine Prep: 1 magazine with 10 rounds. Position: prone*. Time: 5:00. Note: On
command, the shooter fires the following round count at the 400 yard scaled targets (left to right):
2,2,3,3. Double the points on this stage.

Shooting Sports – American History – Civic Engagement
COPYRIGHT 2017 RR, ALL RIGHTS RESERVED 20
3.1.5.4 20 ROUND REDUCED COUNT RR QUALIFICATION TEST – 25 YARD SCALED TARGETS
Position Rounds Time Target
Standing 5 60 seconds 100 YD
Sitting or kneeling
2+3 (Reload) 35 seconds 200 YD
Prone 2+3 (Reload) 45 seconds 300 YD
Prone 5 2:30 400 YD
Table 5: 20 ROUND REDUCED COUNT RR Qualification Test – 25 Yard Scaled Targets
Stage One. Magazine Prep: 1 magazine with 5 rounds. Position: standing*. Time: 1:00. Note: On
command, the shooter fires 5 rounds at the left 100 yard scaled target.
Stage Two. Magazine Prep: 2 magazines with 2 and 3 rounds (on mat). Position: transition standing to
seated or kneeling. Time: :35. Note: On command, the shooter drops into the seated or kneeling position,
loads, and fires 2 rounds at the left 200 yard scaled target, reloads and fires 3 more rounds at the left 200
yard scaled target.
Stage Three. Magazine Prep: 2 magazines with 2 and 3 rounds (on mat). Position: transition standing to
prone. Time: 0:45. Note: On command, the shooter drops into the prone position, loads, and fires 2
rounds at the left 300 yard scaled target, reloads and fires 3 more rounds at the left 300 yard scaled
target.
Stage Four. Magazine Prep: 1 magazine with 5 rounds. Position: prone*. Time: 2:30. Note: On command,
the shooter fires the following round count at two of the 400 yard scaled targets (left to right): 2,3.
Double the points on this stage.
3.1.5.5 FULL OR REDUCED ROUND COUNT RAPID FIRE “LIBERTY!” TEST – 25 YARD SCALED TARGETS
Position Rounds Time Target
Standing 5 or 10 2:00 or 4:00 100 YD
Sitting or kneeling
5 or 10 200 YD
Prone 5 or 10 300 YD
Prone 5 or 10 400 YD
Table 6: Rapid Fire “Liberty!” (20 or 40 rounds)
Shoot entire course of fire in one go. Transition with empty rifle to new positions. Suggested for “marksmen” and above only.
Full Round Count. Prepare four magazines with 10 rounds each. Start in the standing position and engage
each stage of the 25 yard scaled target as you normally would. Transition with an unloaded rifle between
each 10 round magazine to the seated and then prone position. Time: 4:00.
Reduced Round Count. Prepare four magazines with 5 rounds each. Start in the standing position and
engage each stage of the 25 yard scaled target as you normally would. Transition with an unloaded rifle
between each magazine to the seated and then prone position. Time: 2:00.

Shooting Sports – American History – Civic Engagement
COPYRIGHT 2017 RR, ALL RIGHTS RESERVED 21
3.1.6 RIFLE QUALIFIER SCORING
Hits Count: Hits count as one point. Misses count as zero points.
Classic “5V” Scoring: Targets which are marked with “5,” “4,” and “3” rings such as the “5V” are scored by adding up the point of value of each hit. This is referred to as Classic Scoring in the table below.
Awards: Award a “Field Rifle” qualification strip for any qualification at the full 400+ yards. Award a standard “Rifle” qualification strip for qualification at reduced ranges. As an exception, the Event Director may award “Field Rifle” strips on 300 yard bays if prevailing conditions required shooters to contend with come-ups and windage adjustments.
Reminders:
Hits inside the scoring area, or breaking the line around the scoring area, count as one point
In all courses of fire, either the score for the final prone slow fire stage is doubled or the number of shots fired on this stage must be doubled.
Score Requirements for 25 Yard reduced targets differ from full-distance “KD” targets. This is because shooters do not need to contend with bullet drop, weather, wind, or other variables.

Shooting Sports – American History – Civic Engagement
COPYRIGHT 2017 RR, ALL RIGHTS RESERVED 22
Marksman Sharpshooter Expert Master
“Hits Count” 34/50 42/50 45/50 48/50
“Classic” 170/250 210/250 225/250 240/250
Table 7: Full Round Count & 25 Yards Scoring
Marksman Sharpshooter Expert Master
“Hits Count” 32/50 40/50 43/50 46/50
“Classic” 160/250 200/250 215/250 230/250
Table 8: Full Round Count & Full Distance (KD) Scoring
Marksman Sharpshooter Expert Master
“Hits Count” 17/25 21/25 23/25 25/25*
“Classic” 85/125 105/125 113/125 120/125*
Table 9: Reduced Round Count & 25 Yards Scoring *Master must shoot two consecutive scores
Marksman Sharpshooter Expert Master
“Hits Count” 17/25 21/25 22/25 25/25*
“Classic” 80/125 100/125 108/125 115/125*
Table 10: Reduced Round Count & Full Distance (KD) Scoring *Master must shoot two consecutive scores

Shooting Sports – American History – Civic Engagement
COPYRIGHT 2017 RR, ALL RIGHTS RESERVED 23
3.1.7 RR BATTLE RATTLE
INTRODUCTION
Revere's Riders is a Civilian Marksmanship Program (CMP) affiliated non-profit. The RR Battle Rattle is an
adaptation of the popular CMP National Team Infantry Trophy (NTIT) match, commonly known as “Rattle
Battle.” Variants on this exciting team-based event put on by the CMP and NRA have been drawing
competitors since the early 20th century. This section gives a set of rules to use with the “RR Battle
Rattle,” a scaled down version appropriate for use at any RR event using readily available materials and
targets.
HISTORY AND CMP FULL DISTANCE VERSION
- Refer to CMP history online: http://www.odcmp.com/NM/InfantryTrophyMatchHistory.pdf
- Example video: https://www.youtube.com/watch?v=JDpYDKvBpG4
- Team: Eight people -- Six shooters plus coach and captain (with binoculars)
- Targets: E & F silhouettes
- Time: 50 seconds per stage
- Stages: 600 yd prone (4 points), 500 yd prone (3 points), 300 yd sitting (2 points), 200 yd standing (1 points)
- Scoring: Each hit counts for points (as above); bonus each stage equal to # of targets with six+ hits square
- Ammunition & Equipment: 384 rounds divided among team as desired, binoculars (10X) for coach & captain;
team required to move from 600 to 200 yards through match
RR BATTLE RATTLE (25 METERS VERSION FOR USE AT RR EVENTS)
- Teams: Divide participants into teams of four – three shooters, one coach
- Rifles & Ammunition: Three rifles, 100 rounds divided among team as desired
- Teams may swap out coaches and shooters between stages, but only three rifles firing at any given stage!
- Optics: The coach may use an optic of up to 10x power; shooters may use any RR-legal optic on rifle
- Targets: Post two standard 11x17 RR “Morgan’s 13” targets (or similar) at 25 meters for each team. This gives
each team a total of four silhouettes to engage at each scaled distance.
- Course of Fire
o Strategy Session: 10 minutes before course of fire begins for teams to assign coach, develop plan,
and prep magazines
o All stages: Three minute preparation period, 30 seconds to fire
o No transitions (i.e. start sitting/stay sitting, start prone/stay prone)
o Only the indicated silhouette may be engaged (i.e. you can only engage 400 meters during stage one)
STAGE POSITION SILOHOUTTE POINTS PER HIT
1 Prone 400 yards 4
2 Prone 300 yards 3
3 Sitting/Kneeling 200 yards 2
4 Standing 100 yards 1

Shooting Sports – American History – Civic Engagement
COPYRIGHT 2017 RR, ALL RIGHTS RESERVED 24
Table 11: RR Battle Rattle (25 Meters Version For Use At RR Events)
- Clearing the Line: Chief Range Officer Discretion
o Plan A: There are no transitions and nobody goes down range between stages, so simply press on
without clearing the line between each stage. “Honor system” prevents shooters from engaging
targets more than once to score extra points. This is the fastest way to proceed.
o Plan B: Clear the line. Proceed down range quickly to mark and count hits. Use this to maximize
safety with tired/new shooters or to validate scores. You must use this method if moving the line (for
example, if shooting at actual ranges).
- Scoring
o Each hit counts for 1-4 points as indicated above
o Add a bonus to each stage: Count number of targets with at least three hits and apply bonus (zero
targets-0; one+1; two+4; three+9; all four+16). Targets without at least three hits on them count for
NO bonus points.
o Ties are broken by highest stage score at 400 yards, then 300, then 200, then 100.
o Example: The team lands 20 hits on stage two (300 yards), worth 60 points (20x3). Additionally,
three of the four silhouettes have at least three hits on them, for a bonus of nine points. The team
scores 69 points on this stage.
o 25 Yards only: If a target is “shot out” and unscorable due to overlapping hits then it counts for no
more than seven hits total.
o Friendly competition: Can run if desired, consider optics/irons division
o RR “25 YARD BATTLE RATTLE” qualification awarded for team score of 210 or better
VARIANTS & EVENT DIRECTOR NOTES
- 100 (200) Yard Variant:
o Post the 25% Scale (or 50% Scale at 200 yards) Standard Silhouettes: Four silhouettes per station,
four stations per team
o Start at 100 (200) yards and shoot first set of silhouettes
o Move to 75 (150) yards and shoot second set of silhouettes
o Move to 50 (100) yards and shoot third set of silhouettes
o Conclude at 25 (50) yards and shoot final set of silhouettes
o Shooters must apply come-ups with help from their coach
o Team must carry gear from firing point to next line! No more than one min transit time! No running.
o Clear rifles before moving between lines
o Suggest teaching KD and getting sighters for 22 LR come-ups first!
o Score of 205 required to qualify for “BATTLE RATTLE.”
- KD Centerfire Variant (team score of 200 required to qualify)
o Will need to post four silhouettes per station, or go downrange and mark hits/score targets
o Proceed as with 100 yard variant, but move from 400/300/200/100 yards
o Team must carry gear from firing point to next line! No more than four min transit time! No running.
- Notes
o Instructors can and should be on teams – but don’t provide too much strategy help
o Time to run a quick Battle Rattle (not clearing line between stages) is about 30 minutes.
o Malfunctions. No alibis are accepted for misfires, disabled firearms or other failures of equipment.
o All stages must be shot like a marksman, using only a sling if desired for support (no bipods/rests).

Shooting Sports – American History – Civic Engagement
COPYRIGHT 2016 RR, ALL RIGHTS RESERVED 25
RR BATTLE RATTLE PARTICIPANT INSTRUCTIONS AND SCORE SHEET
INTRODUCTION. The RR Battle Rattle is a team shooting match. You will have to develop a plan, work together as a team, and gets hits on target to
win this challenging action shooting challenge! This match is based on the CMP “Battle Rattle” event which is popular with many civilian and service
teams.
TEAM. Your team will consist of three shooters and a coach. The coach may use an optic up to 10x power. The entire team gets 100 rounds of
ammunition for the course of fire. You may divide your team’s ammunition as you see fit, and the coach may reallocate ammunition between each
stage. It is suggested that teams start by allocating 30 rounds per shooter, with the final ten rounds to be given out by the coach as required, but this
is just one method.
SETUP. Post four RR Morgan’s 13 targets at 25 meters for your team’s use. Your team gets a 10 minute strategy session to plan and prep mags.
STAGES. Your team will shoot four stages in the Battle Rattle. You will have a three minute preparation period with thirty seconds to fire for each
stage.
STAGE POSITION SILHOUETTE POINTS PER HIT TIME
1 Prone 400m 4 30 seconds
2 Prone 300m 3 30 seconds
3 Sitting/Kneeling 200m 2 30 seconds
4 Standing 100m 1 30 seconds
SCORING. Each hit is worth points as indicated above. The team also earns a bonus in each stage based on the number of targets which have at least
three hits. 210 points are required for 25M qualification (200 pts @ 100 yd rimfire KD, 200 pts @ 400 yd KD). A “shot out” target is worth no more
than seven hits.

Shooting Sports – American History – Civic Engagement
COPYRIGHT 2016 RR, ALL RIGHTS RESERVED 26
RR BATTLE RATTLE SCORE CARD (QUALIFY: 210 @ 25 Yards, 205 @ 100, 200 @ 400)
COUNT POINTS FROM HITS
THEN ADD BONUS POINTS (# TGTS w/ 3+ HITS)…
Fill in only one square per stage
TOTAL
STAGE # HITS x POINTS PER HIT SUBTOTAL 0 TGT
+0
1 TGT
+1
2 TGTS
+4
3 TGTS
+9
4 TGTS
+16
1 (400m) x 4
2 (300m) x 3
3 (200m) x 2
4 (100m) x 1
TOTAL SUBTOTAL… PLUS BONUS POINTS…

Shooting Sports – American History – Civic Engagement
COPYRIGHT 2016, RR. ALL RIGHTS RESERVED 27
3.1.8 RR FIELD CHALLENGE
3.1.8.1 PURPOSE
RR Field Challenges are intended to test a wide variety of skills. To succeed participants should need to
apply the fundamentals of basic rifle marksmanship in a time compressed situation. Successful marksmen
will need to detect, identify, range, and engage targets under field conditions.
Field Challenges may be executed with rimfire rifles at ranges up to 100-150 yards or with centerfire rifles
at ranges not to exceed 400-600 yards. No two challenges are exactly alike.
3.1.8.2 SETUP
This event requires four steel knock-over or “shoot and see” targets where hits are easily visible as well as
a single standard target (25% scale for 100 yard version or full scale for 400-600 yard version) for each
shooter. If knockovers are not available, a spotter is needed for each shooter to call out hits on steel
gongs, or other reactive targets such as balloons or clay pigeons should be used. It is suggested to set up
three or four lanes for the class, and rotate shooters through the event in relays. Shooters may compete
as individuals, or be paired up as two or three person squads or teams who help spot for each other.
Place targets at the suggested distances per the table below. These may vary based on local conditions.
100-150 Yard Version 400-600 Yard Version
Target Types
25% Scaled
5” Steel Knockovers or similar
100% Scale
21” Steel Knockovers or similar
Paper Target Placement 50 Yards 200 Yards
Steel #1 Placement 25-50 Yards 100-200 Yards
Steel #2 Placement 50-75 Yards 200-300 Yards
Steel #3 Placement 75-100 Yards 300-400 Yards
Steel #4 Placement 100-150 Yards 400-600 Yards
Concealment: One or two of the targets (typically targets #1 and #2) may be partially obscured with
concealment such as a cardboard box that blocks line of sight to half the target, cheesecloth, a bit of camo
netting, natural concealment on the range such as berms or vegetation, etc.
Spoofers: In addition to the four designated targets, it is suggested to place at least one or two “spoofer”
targets in the lane at any distance. The “spoofer” targets should be of a different shape or color.
The left and right boundaries of each lane should be identifiable with landmarks, flagging tape, etc.
Shooting Sports – American History – Civic Engagement
COPYRIGHT 2016, RR. ALL RIGHTS RESERVED 28
3.1.8.3 EQUIPMENT
Shooters may use any item on their rifle (such as optics or irons), binoculars or monoculars up to 10x
power, any dope sheet they would normally carry, and a small pad with pencil or pen. A compact spotting
scope may be used if it is carried on the shooter’s person in a reasonable field-expedient manner.
Event directors should discourage the use of anything not normally brought into the field. In general,
laser range finders, phones, and other electronics are not permitted but event directors may permit them
so long as they are carried in a field expedient manner (for example, in a weatherproof container).
At the start of the preparation period, all equipment must be stowed in a pocket or pouch.
3.1.8.4 TARGET DETECTION, IDENTIFICATION & RANGING
Shooters are responsible for detecting and identifying their targets. Shooters are responsible for
determining the range to their targets. Event Directors should provide the size of the targets (“5 inch
diameter steel circles”) but not the distance.
The first relay receives a five minute preparation period. Subsequent relays receive a two minute
preparation period if they are on the line helping as spotters for the first relay; if sequestered away from
the target area they also receive a full five minutes.
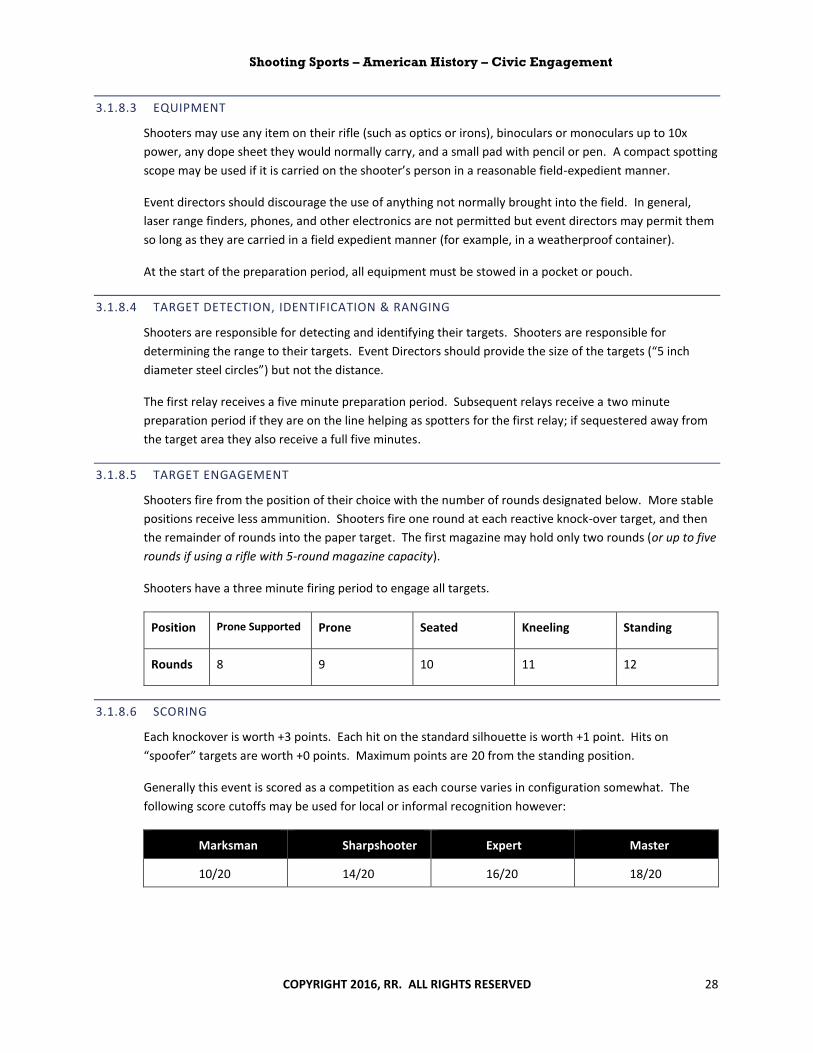
3.1.8.5 TARGET ENGAGEMENT
Shooters fire from the position of their choice with the number of rounds designated below. More stable
positions receive less ammunition. Shooters fire one round at each reactive knock-over target, and then
the remainder of rounds into the paper target. The first magazine may hold only two rounds (or up to five
rounds if using a rifle with 5-round magazine capacity).
Shooters have a three minute firing period to engage all targets.
Position Prone Supported Prone Seated Kneeling Standing
Rounds 8 9 10 11 12
3.1.8.6 SCORING
Each knockover is worth +3 points. Each hit on the standard silhouette is worth +1 point. Hits on
“spoofer” targets are worth +0 points. Maximum points are 20 from the standing position.
Generally this event is scored as a competition as each course varies in configuration somewhat. The
following score cutoffs may be used for local or informal recognition however:
Marksman Sharpshooter Expert Master
10/20 14/20 16/20 18/20

Shooting Sports – American History – Civic Engagement
COPYRIGHT 2016, RR. ALL RIGHTS RESERVED 29
3.1.9 CLASSIC M1 CARBINE CHALLENGE
This COF is borrowed from the Carbine SOP. Event directors may use it and award a “Classic Carbine”
strip at Basic Rifle events. If used, attempt to generate interest in carbine classes.
HISTORY: This COF is based on FM 23-7 dated May 20, 1942 for the M1 Carbine, supplemented by the
qualification scores from AR 775-10. It was originally fired at 100, 200, and 300 yards at partial “A” and
“B” silhouettes. This is a faithful adaptation translated to the 100 yard bay.
TARGETS: Use the 11x17 Classic M1 Challenge target to be posted at 25 yards at basic events.
SCORING: Each hit is one point.
AWARD: Award a “CLASSIC CARBINE” strip for a sharpshooter’s score.
Stage Sim Range (Yards)
Time (Sec) Target Remarks
1 100 35 Large Fire 4 rounds standing. Transition to kneeling, reload, fire 4 more rounds.
2 130 35 Large Fire 4 rounds standing. Transition to kneeling, reload, fire 4 more rounds.
3 200 20 Large Fire 2 rounds prone, reload, fire 2 more rounds.
All transitions are to be conducted from a bolt locked open on an empty chamber with safety on.
Students will load only four rounds in the magazine for the standing portion of the stage.
Marksman Sharpshooter Expert Master
15 17 19 20
For a 40-round variant, repeat stages 1 & 2 but transition to sitting; increase round count on stage 4 to 4+4 and
time to 35 seconds. Score cutoffs become 29/34/37/39.
For a 10-round variant, cut stage 1 & 2 round counts to 2+2 with 20 seconds per stage; reduce stage 3 round count
to 1+1 in 12 seconds; score cutoffs become 8/9/10/NA (if patch is awarded at all – still useful as a diagnostic tool).
Scaled 25-yard targets similar to Morgan’s 13 may also be available (coming in 2017).
SPECIAL INSTRUCTIONS: Students may not start “slung up;” if sling use is desired they must get into the
sling after time begins. Students should load only four rounds on stages 1 & 2 in their magazines to
ensure transitions occur with an empty rifle. At carbine clinics, all magazines must be kept on the body;
at basic rifle events, it is acceptable to place spare magazines on the ground for reloads.
SAFETY TIPS FOR BASIC EVENTS: Ensure that the first magazine has only four rounds so that students
transition with an empty rifle. Practice the transition dry first. Ensure adequate RSO support is
available; break the line into relays if necessary.

Shooting Sports – American History – Civic Engagement
COPYRIGHT 2016, RR. ALL RIGHTS RESERVED 30
3.1.10 CLASSIC M1 CARBINE BATTLESIGHT ZERO CHALLENGE
This COF is borrowed from the Carbine SOP. Event directors may use it and award a “Classic Carbine”
strip at Field Rifle events and test their student’s skills within the BSZ of the rifles. If used, attempt to
generate interest in carbine classes.
HISTORY: This COF is based on FM 23-7 dated May 20, 1942 for the M1 Carbine, supplemented by the
qualification scores from AR 775-10. It was originally fired at 100, 200, and 300 yards at partial “A” and
“B” silhouettes.
NOTES: This is a faithful adaptation using traditional targets on the full distance range, requiring
students to understand and use their full battlesight zero effective range.
TARGETS: Use a full size “FOX” army Silhouette and “E” Silhouette. A full-scale RR bell or 21” diameter
circle may substitute for the “FOX” Silhouette. A 31” diameter circle may substitute for the “E”
Silhouette.
SCORING: Each hit is one point.
AWARD: Award a “CLASSIC CARBINE” strip for a sharpshooter’s score.
Stage Range (Yards) Time (Sec) Target Remarks
1 100 35 F Fire 4 rounds standing. Transition to kneeling, reload, fire 4 more rounds.
2 200 35 E Fire 4 rounds standing. Transition to kneeling, reload, fire 4 more rounds.
3 300 20 E Fire 2 rounds prone, reload, fire 2 more rounds.
All transitions are to be conducted from a bolt locked open on an empty chamber with safety on.
Students will load only four rounds in the magazine for the standing portion of the stage.
COF Marksman Sharpshooter Expert Master
20 Rounds 15 17 19 20
40 Rounds 29 33 37 39
For a 40-round variant, repeat stages 1 & 2 but transition to sitting instead of kneeling; increase round count on
stage four to 4+4 and time to 35 seconds.
For a 10-round variant, cut stage 1 & 2 round counts to 2+2 with 20 seconds per stage; reduce stage 3 round count
to 1+1 in 12 seconds; score cutoffs become 8/9/10/NA (if patch is awarded at all – still useful as a diagnostic tool).
Scaled 25-yard targets similar to Morgan’s 13 are also available.
SPECIAL INSTRUCTIONS: Students may not start “slung up;” if sling use is desired they must get into the
sling after time begins. Students should load only four rounds on stages 1 & 2 in their magazines to
ensure transitions occur with an empty rifle. At carbine clinics, all magazines must be kept on the body;
at basic rifle events, it is acceptable to place spare magazines on the ground for reloads.

Shooting Sports – American History – Civic Engagement
COPYRIGHT 2016, RR. ALL RIGHTS RESERVED 31
3.2 BASIC RIFLE MARKSMANSHIP INSTRUCTIONAL MODULES
3.2.1 OVERVIEW
Basic Rifle Marksmanship consists of three broad pillars which form a foundation for all other activities.
Fundamentals of Shooting a Rifle (aka the “Five Fundamentals”)
Shooting Positions
Natural Point of Aim
After the pillars are mastered, the basic marksman must learn a few more additional skills:
How to analyze groups for errors
How to make sight adjustments and zero a rifle at 25 yards
Intermediate calculation of minutes of angle for precise sight adjustments at all ranges
Fundamentals of Known Distance Shooting, to include basic ballistics and live firing to longer distances (if
the range facility permits)
All of these subjects are covered with lesson plans in this section. Together these modules form the core
of a RR Basic Rifle class. They can also be used separately as review material or as parts of other classes.
Dry fire is a useful practice, but students should ensure it is safe in their rifles. Consider the use of dummy
rounds where indicated by the owner’s manual.
3.2.2 FUNDAMENTALS OF SHOOTING A RIFLE (AKA THE “ABCS”)
3.2.2.1 LESSON PLAN OVERVIEW
3.2.2.1.1 LEARNING OBJECTIVES
By the end of this lesson, students should be able to…
State the five fundamentals of shooting a rifle
o Explain the proper sight alignment for their sights or optic
o State whether they are using a 6:00 or center of mass hold
o Describe when in the breath cycle they should take a shot
o Explain the importance of concnetration
o Describe how to engage the trigger
o Explain what to do during the follow through after a shot is fired
Demonstrate the five fundamentals of shooting a rifle
3.2.2.1.2 LENGTH
20-30 minutes
3.2.2.1.3 FACILITY
Range

Shooting Sports – American History – Civic Engagement
COPYRIGHT 2016, RR. ALL RIGHTS RESERVED 32
3.2.2.1.4 TRAINING MATERIALS
Student handouts
3.2.2.1.5 REFERENCE
NRA The Basics of Rifle Shooting Handbook -- Part 2 Chapter 1 (pp 61)
3.2.2.2 PLAN OF INSTRUCTION
1. Provide overview of the five fundamentals
a. Lecture
1. Aiming
2. Breath Control
3. Concentration (Hold Control)
4. Squeeze Trigger (Trigger Control)
5. Follow Through
b. Review learning objectives
2. Live fire plan
a. Dry practice
b. Drill target
3.2.2.3 INSTRUCTIONAL NOTES
3.2.2.3.1 AIMING
3.2.2.3.1.1 SIGHT ALIGNMENT
Sight alignment is the relationship between the eye, the rear sight, and the front sight or tube of a scope.
Open sights: front sight centered in the rear sight notch; top of the front sight is even with the
top of the rear sight
Aperture or peep sights: top of the front sight is centered in the rear sight aperture
Telescopic sight: Head positioned so you can clearly see the entire field of view (i.e. no shadow)
3.2.2.3.1.2 SIGHT PICTURE
Sight picture is the relationship between the aligned sights or scope and the target.
6:00 hold: With this sight picture, the tip of the front sight is positioned at the base of the target.
We recommend using this hold with iron sights.
Center of mass hold: with this sight picture, the front sight or scope reticle is positioned in the
center of the target. We recommend using this hold with most scopes.
Each has advantages and disadvantages – one isn’t better than another. Pick one and stick to it.
Regardless of which sight picture you use, the front sight or reticle should be clear and crisp. The target
and rear sight will be blurry. This is because your eye can only focus on one object any time. With scopes,
adjust the optic if the picture is blurry.
3.2.2.3.2 BREATH CONTROL

Shooting Sports – American History – Civic Engagement
COPYRIGHT 2016, RR. ALL RIGHTS RESERVED 33
Breath control means pausing your breathing before you fire a shot. Breathing causes your body to move
which makes it impossible to get a steady sight picture. We want you to exhale normally; the bottom of
the breathing cycle, when your lungs are empty, is the most relaxed and repeatable. Your natural
breathing cycle is a breath every 6-8 seconds. If you hold your breath longer your muscles will start to
shake and your vision will blur. If you’re not able to fire the shot within this time, simply take a breath
and repeat.
3.2.2.3.3 CONCENTRATION (HOLD CONTROL)
Concentration – referred to as Hold Control by the NRA -- is the process of maintaining the correct
relationship between the shooter, gun, and target. Accurate rifle fire requires great focus and
concentration. Maintaining a consistent sight alignment (with a physical focus on the front sight), sight
picture (the mental discipline of holding the aligned sights on the target) and practice of layering all of the
fundamentals together as in integrated act of shooting are essential to achieving this degree of
concentration.
3.2.2.3.4 SQUEEZE (TRIGGER CONTROL)
Squeeze the trigger straight back in a smooth controlled motion until the rifle fires. This is referred to as
trigger control by the NRA.
3.2.2.3.4.1 FINGER PLACEMENT
Generally speaking, you want either the middle of the first pad of your trigger finger or the first joint of
your trigger finger to be as low as possible on the trigger without touching the trigger guard. Remember
that the trigger is a lever. The bottom of the trigger gives you the most leverage and can make a heavy
trigger feel light.
The trigger must move straight back. Not enough pad and you can push your muzzle to the support side.
Too much pad and you hook your muzzle to the firing side. Poor trigger placement can result in horizontal
stringing on your target.
3.2.2.3.4.2 WHEN TO ENGAGE THE TRIGGER
When your sights are on the target and you’ve stopped all movement.
3.2.2.3.4.3 SQUEEZE THE TRIGGER
When you are at full exhale and your sights are on the target it is time to squeeze the trigger. Keep your
eyes focused on the front sight or reticle and start applying pressure to the trigger until the shot breaks.
3.2.2.3.5 FOLLOW THROUGH
When the shot breaks it’s critical that you ride the trigger all the way to the point it stops. Any movement
of the trigger after it reaches the stop will distort the shot. Trap the trigger and ride the recoil. This is
called follow through.
3.2.2.3.5.1 TRIGGER RESET
While you are taking your next breath, in preparation for the next shot; release only enough pressure on
your trigger finger until you feel the trigger reset. You are now ready for your next shot.

Shooting Sports – American History – Civic Engagement
COPYRIGHT 2016, RR. ALL RIGHTS RESERVED 34
3.2.2.3.5.2 CALL THE SHOT
If the shooter focuses on the front sight and follows through correctly, the shooter should be able to call
their shots, that is, indicate their location on the target before looking at the bullet hole.
3.2.2.3.6 LIVE FIRE PLAN
3.2.2.3.6.1 DRY FIRE AND TRIGGER RESET DRILL
If students are unfamiliar with the concept of trigger reset, then a dry practice drill can be conducted.
Have students apply all five steps and press the trigger for a single dry shot. After the hammer drops,
have a coach or partner manually cycle the firearm's action while the student keeps the trigger trapped to
the rear. After the action has been cycled, the students can gradually release the trigger which allows
them to hear and feel the sear reset. This concept can also be demonstrated using a “clicky pen.”
3.2.2.3.6.2 LIVE FIRE
Utilize drill squares to practice these five steps. Watch closely for follow through and trigger resets. These
are common shooter (new and experienced) errors. This is an easy place for new instructors to start
working directly with shooters.

Shooting Sports – American History – Civic Engagement
COPYRIGHT 2016, RR. ALL RIGHTS RESERVED 35
3.2.3 SHOOTING POSITIONS
3.2.3.1 PRONE
3.2.3.1.1 LESSON PLAN OVERVIEW
3.2.3.1.1.1 LEARNING OBJECTIVES
By the end of this lesson, students should be able to…
State the advantages of the prone position
Demonstrate the knowledge, skills and attitude to safely assume this position with a rifle
Safely shoot a rifle using the fundamentals of rifle shooting at a target on a range from the prone position.
Explain and demonstrate how to shift natural point of aim from the prone position.
3.2.3.1.1.2 LENGTH
20-30 minutes
3.2.3.1.1.3 FACILITY
Range
3.2.3.1.1.4 TRAINING MATERIALS
Demonstration rifle
3.2.3.1.1.5 REFERENCE
NRA The Basics of Rifle Shooting Handbook -- Part 2, Chapter 3 (pp 90)
3.2.3.1.2 PLAN OF INSTRUCTION
1. Explain pros and cons of the position and when you would use it
2. Have another coach model the position and highlight:
a. Body lies facing target and angled slightly to the trigger side
b. Support hand is loose and relaxed
c. Support elbow is extended, directly under the rifle
d. Sling is taut and high on the bicep
e. Support leg is extended straight back in line with the spine
f. Firing side leg is bent slightly, drawn up high to get the diaphragm off the ground
g. Firing side hand grips rifle firmly; rifle butt low in shoulder
h. Cheek weld
3. Practice the position
a. Dry practice
b. Drill target
4. Align the position with a target
a. Dry practice
b. Drill target
3.2.3.1.3 INSTRUCTIONAL NOTES

Shooting Sports – American History – Civic Engagement
COPYRIGHT 2016, RR. ALL RIGHTS RESERVED 36
KEY CONCEPTS: Support elbow directly under the rifle, relaxed, sight alignment
3.2.3.1.3.1 CHARACTERISTICS OF THE POSITION
The prone position is the steadiest of the four positions. Both elbows and the entire body are placed in
contact with ground, thus providing a large area of support. The prone position should be used when
maximum accuracy is required. It can be somewhat slower to get into than some of the other positions,
and may not allow you to see the target in some terrain.
3.2.3.1.3.2 BUILDING THE POSITION
To build the proper prone position, start by squaring your shoulders to the target. Turn your
body 30-45 degrees to the trigger side. Adjust your mat to the proper index. Using your trigger
hand to support you, drop down to your knees.
Place the butt of the rifle on the ground in front of your knees and put the barrel in your trigger
side shoulder pocket. The rifle is now supported so you may use your hands to set up your sling.
Remember to place your support hand between the sling and the fore stock. Once you are slung
up correctly, use your trigger hand to support your body down into prone.
Relax and roll your support shoulder and plant your support elbow directly under the rifle. Still
using your trigger hand on the ground for support, kick your feet straight back.
Your support hand is relaxed letting the sling and elbow hold the rifle. If you cannot get your
support elbow directly under the rifle, try indexing your body further.
Your support leg is straight, in line with the spine.
Your trigger side leg is drawn up high, rolling you onto your rib cage and providing room for your
diaphragm to breathe.
Use your trigger hand to push the butt of the rifle away from you just enough to clear the
shoulder, then guide the butt of the rifle into your shoulder pocket. This should require some
effort – if not the sling is too loose. Pull the butt of the rifle into your shoulder pocket firmly and
plant your trigger side elbow firmly on the ground. Your shoulders should be roughly level.
Your eye must be directly over the stock and aligned with your front and rear sight. Your ears
should be level with the ground. There should be a slight roll of cheek over the top of the stock
and you must come back to this same position every time – repeatable.
If your head, eye and sights do not all align, make some adjustments to your stock so they do. A
properly fit rifle is critical to marksmanship.
3.2.3.1.3.3 ADJUSTING THE POINT OF AIM IN THE POSITION
To adjust the natural point of aim in this position, the body rotates around the support elbow. It is easiest
to think of shifting of the belt buckle forward and back (for elevation) or left and right (for windage).
3.2.3.1.3.4 LIVE FIRE PLAN & COACHING NOTES
Dry Fire
During a dryfire preparation period, coaches should assist students in assuming and fine tuning this
position. Sometimes it is easier for the shooter (women in particular) to lie fully on their support side
(think – taking a nap). This puts the elbow in the correct position and then they can roll the rest of the
body into position.
Live Fire

Shooting Sports – American History – Civic Engagement
COPYRIGHT 2016, RR. ALL RIGHTS RESERVED 37
Utilize drill squares to practice the position. Watch closely for appropriate body position. Be sure to call
out when students are doing something right; this reinforces the desirable position for all other students
within earshot.
Once the groups begin to look acceptable, you can try a drill that requires the students to shift their NPOA
in order to engage multiple targets.

Shooting Sports – American History – Civic Engagement
COPYRIGHT 2016, RR. ALL RIGHTS RESERVED 38
3.2.3.2 SEATED OR KNEELING
3.2.3.2.1 LESSON PLAN OVERVIEW
3.2.3.2.1.1 LEARNING OBJECTIVES
By the end of this lesson, students should be able to…
State the advantages of the seated or kneeling position
Demonstrate the knowledge, skills and attitude to safely assume the seated or kneeling position
with a rifle
Safely shoot a rifle using the fundamentals of rifle shooting at a target on a range from the
seated or kneeling position
Explain and demonstrate how to shift natural point of aim in the seated or kneeling position
3.2.3.2.1.2 LENGTH
20-30 minutes
3.2.3.2.1.3 FACILITY
Range
3.2.3.2.1.4 TRAINING MATERIALS
Demonstration rifle
3.2.3.2.1.5 REFERENCE
NRA The Basics of Rifle Shooting Handbook -- Part 2, Chapter 3 (pp 90)
3.2.3.2.2 PLAN OF INSTRUCTION
1. Explain pros and cons of the position and when you would use it
2. Have another coach model the position and highlight:
1. Crossed-leg Seated Position
2. Crossed-ankle Seated Position
3. Open Leg Seated Position
4. Kneeling Position
3. Practice the position
1. Dry practice
2. Drill target
4. Align the position with a target
1. Dry practice
2. Drill target
3.2.3.2.3 INSTRUCTIONAL NOTES
KEY CONCEPTS: Elbows on the target side of the knee, both elbows need support or use kneeling, find
the combination that works for you

Shooting Sports – American History – Civic Engagement
COPYRIGHT 2016, RR. ALL RIGHTS RESERVED 39
3.2.3.2.3.1 CHARACTERISTICS OF THE POSITION
The kneeling position is particularly useful in the field. It is quick to assume, steadier than standing and
provides the clearance necessary to shoot over terrain such as tall weeds or brush.
The sitting position is a stable position because it provides support for both elbows. For hunters, sitting,
like kneeling, provides more ground clearance than the prone position.
Due to different body geometries, there are a wide number of variations between individuals in this
particular position.
3.2.3.2.3.2 BUILDING THE POSITION
Just like in prone, you need to start with a proper body index. Square your shoulders to your target and
index your body about 40 degrees. Using your trigger hand for support, drop down into a crossed leg
position; drawing your trigger side leg in first.
Lay the rifle across your lap with the trigger guard facing you and put on your sling. You may need to take
1-2” of length out of the sling from the prone position.
CROSS LEGGED
Bending at the hips, keep your spine straight, lean forward and place your support elbow on the target
side of the knee.
Place the fore stock of the rifle onto the relaxed support hand; remember to trap your support hand
between the sling and the fore stock of the rifle.
Use your trigger hand to push the butt of the rifle away from you just enough to clear the shoulder, then
guide the butt of the rifle into your shoulder pocket. This should require some effort – if not the sling is
too loose. Pull the butt of the rifle into your shoulder pocket firmly and put your trigger side elbow on the
target side of your trigger side knee. Your shoulders should be roughly level.
Your eye must be directly over the stock and aligned with your front and rear sight. Your ears should be
level with the ground. There should be a slight roll of cheek over the top of the stock and you must come
back to this same position every time – repeatable.
If the rifle is not straight up and down (canted) you may use your trigger hand to correct any cant. You
may also move the fore stock of the rifle closer to the base of your relaxed fingers.
To make windage NPOA adjustments, reach behind you with your trigger side hand to take the weight off
of your bottom and pivot around your support elbow. For elevation you can move the butt of the rifle up
or down in the shoulder pocket or slide your support hand forward or back on the fore stock. In cross-
legged, legs can be moved in or out to increase/decrease elevation; using the boots as a fulcrum.
Remember to check your NPOA after you have made an adjustment.
CROSS ANKLE
If your body type doesn’t allow you to stay in the crossed leg position, you may extend your legs into the
crossed ankle position. Extend your trigger side leg as far as you can with your support leg on top. Draw
your feet closer to your body until the outside of your support foot is in contact with the ground.
Everything else about the position remains the same.
OPEN LEG

Shooting Sports – American History – Civic Engagement
COPYRIGHT 2016, RR. ALL RIGHTS RESERVED 40
If you are having a hard time getting your trigger side elbow in contact with your knee – try the open leg
position. Spread your feet to a wide base just beyond shoulder width. Draw your knees up until there is
about 10” between the ground and the back of your knee. Your feet should be flat on the ground or heels
dug into the ground.
Windage NPOA adjustments are made by shuffling your feet with your bottom as the pivot point.
Everything else about the position remains the same.
KNEELING
Sometimes you need a little more height or you need to get into position very quickly. Use the kneeling
position.
Point your support toe at your target. Use your trigger hand for support, if necessary, and sit on your
trigger side ankle. The ankle may be flat to the ground or you may sit on the heel depending on your
footwear and flexibility. Your support shin should be as vertical as possible.
Put your support elbow on the target side of the knee , directly under the rifle.
Place the forearm of the stock of the rifle onto the relaxed support hand; remember to trap your support
hand between the sling and the fore stock of the rifle.
Use your trigger hand to push the butt of the rifle away from you just enough to clear the shoulder, then
guide the butt of the rifle into your shoulder pocket. This should require some effort – if not the sling is
too loose. Pull the butt of the rifle into your shoulder pocket firmly. There is no support for your trigger
elbow. Allow your elbow to relax into a natural position.
Your eye must be directly over the stock and aligned with your front and rear sight. Your ears should be
level with the ground. There should be a slight roll of cheek over the top of the stock and you must come
back to this same position every time – repeatable.
3.2.3.2.3.3 ADJUSTING THE POINT OF AIM IN THE POSITION
Adjusting NPOA for windage is generally made by shuffling the body left or right. Elevation is adjusted by
moving the legs in or out or moving the support hand forward and back.
3.2.3.2.3.4 LIVE FIRE PLAN & COACHING NOTES
Dry Fire
During a dryfire preparation period, coaches should assist students in assuming and fine tuning this
position. These positions are tricky and may require extra preparation.
Watch the trigger elbow. If it’s not in contact with the body in some way or they are clearly using their
quad muscles, help the shooter. Experiment with body index and move the feet closer or further apart.
Sometimes getting into position without the rifle will help you spot what the correct index should be.
Elbows can also be placed into the pockets created by the back of the knees. Trigger side is what gets the
most recoil. One or both elbows can be placed into the pockets created by the back of the knee(s) to
adapt to body type or adjust gross elevation. This alteration is more vulnerable to recoil.
Live Fire
Utilize drill squares to practice the position. Watch closely for appropriate body position. Be sure to call
out when students are doing something right; this reinforces the desirable position for all other students
within earshot.

Shooting Sports – American History – Civic Engagement
COPYRIGHT 2016, RR. ALL RIGHTS RESERVED 41
Once the groups begin to look acceptable, you can try a drill that requires the students to shift their NPOA
in order to engage multiple targets.

Shooting Sports – American History – Civic Engagement
COPYRIGHT 2016, RR. ALL RIGHTS RESERVED 42
3.2.3.3 STANDING
3.2.3.3.1 LESSON PLAN OVERVIEW
3.2.3.3.1.1 LEARNING OBJECTIVES
By the end of this lesson, students should be able to…
State the advantages of the standing position
Demonstrate the knowledge, skills and attitude to safely assume the standing position with a rifle
Safely shoot a rifle using the fundamentals of rifle shooting at a target on a range from the standing
position
Explain and demonstrate how to shift natural point of aim in the standing position
3.2.3.3.1.2 LENGTH
20-30 minutes
3.2.3.3.1.3 FACILITY
Range
3.2.3.3.1.4 TRAINING MATERIALS
Demonstration rifle
3.2.3.3.1.5 REFERENCE
NRA The Basics of Rifle Shooting Handbook -- Part 2, Chapter 3 (pp 82)
3.2.3.3.2 PLAN OF INSTRUCTION
1. Explain pros and cons of the position and when you would use it
2. Have another coach model the position and highlight:
a) Feet are shoulder width apart
b) Body weight distributed equally on both feet
c) Head and body are erect
d) Support arm is free from the body (free hand), or tucked into hip (arm rest)
e) Left hand under fore end supports weight of rifle; consider hasty sling use
f) Right hand grasps rifle grip
g) Butt of stock is positioned against shoulder so rifle sight is at eye level
3. Practice the position
a) Dry practice
b) Drill target
4. Align the position with a target
a) Dry practice
b) Drill target
3.2.3.3.3 INSTRUCTIONAL NOTES
KEY CONCEPTS: Head erect, feet near perpendicular with target

Shooting Sports – American History – Civic Engagement
COPYRIGHT 2016, RR. ALL RIGHTS RESERVED 43
3.2.3.3.3.1 CHARACTERISTICS OF THE POSITION
The free arm position is used when the time available to fire a shot is very short or when the target is
moving such as in hunting shots. Once again, field conditions may dictate that you need to shoot from
the standing position. The barrel is the furthest from the ground making this the least stable position.
Your body is also subject to movement from influences like the wind.
A variant of the standing position known as the arm rest standing position provides a higher degree of
stability and accuracy and is often used in competition events. This position places the support elbow
against the support side of the body for additional bracing.
Finally, some marksmen utilize a squared up stance in which the shooter faces the target with little or no
index. This is particularly common with shooters who have a background in action rifle competition
events, the military, or law enforcement.
Because we are a practical field shooting program, our curriculum emphasizes the traditional free armed
position. If students desire to work on a variant position they are welcome to practice those skills.
3.2.3.3.3.2 BUILDING THE POSITION
Key concepts: Build the stack, chest high, head level
Square your shoulders to the target and index your body 90 degrees to the trigger side. Place your feet
hip width apart and relax your knees. Roll your hips slightly forward putting your center of gravity directly
over your heels.
We recommend the hasty sling in the standing position; be aware that some competitions do not allow
the use of a sling standing. The loop sling is acceptable but it is more difficult to use NPOA. You may need
to take another 1-2” out of your sling for the standing position compared to the prone position.
Place the fore stock of the rifle onto the relaxed support hand; remember to trap your support hand
between the sling and the fore stock of the rifle.
Keeping your chest high and your ears level, relax the shoulders and bring the butt of the rifle up to your
head. The butt of the rifle may be planted very high in your shoulder pocket.
Your eye must be directly over the stock and aligned with your front and rear sight. Your ears should be
level with the ground. There should be a slight roll of cheek over the top of the stock and you must come
back to this same position every time – repeatable.
There is no support for your trigger elbow. Allow your elbow to relax into a natural position.
Standing is generally considered a slow fire stage and you may get tired. It’s okay to take a break. In
competition you may have a 5 gallon bucket to set your rifle on or a bench. It’s critical that you don’t
move your feet. Take a couple of deep breaths and keep going.
If you have the luxury of a sling, simply remove your finger from the trigger guard, and bend slightly at the
waist. Relax, take a few breaths and come back into position. If your feet haven’t moved, your NPOA is
still on.
3.2.3.3.3.3 ADJUSTING THE POINT OF AIM IN THE POSITION
Your pivot point for NPOA is your support foot. For windage move your trigger side foot right or left. For
elevation, move your trigger side foot closer to your support foot or further away.
3.2.3.3.3.4 LIVE FIRE PLAN & COACHING NOTES

Shooting Sports – American History – Civic Engagement
COPYRIGHT 2016, RR. ALL RIGHTS RESERVED 44
Dry Fire
During a dryfire preparation period, coaches should assist students in assuming and fine tuning this
position. Pay particular attention that students bring the rifle up to them rather than bending their head
at an extreme angle.
Action shooters and law enforcement frequently bend forward at the waist and have their elbows at
extreme angles. This is correct form for big, close, rapid fire targets. Point out the difference between
action shooting and marksmanship. For LEO/military, they are also used to body armor.
Live Fire
Use a larger target to practice the position. Watch closely for appropriate body position. Be sure to call
out when students are doing something right; this reinforces the desirable position for all other students
within earshot.
Once the groups begin to look acceptable, you can try a drill that requires the students to shift their NPOA
in order to engage multiple targets.
Shooting Sports – American History – Civic Engagement
COPYRIGHT 2016, RR. ALL RIGHTS RESERVED 45
3.2.4 NATURAL POINT OF AIM (NPOA)
3.2.4.1 LESSON PLAN OVERVIEW
3.2.4.1.1 LEARNING OBJECTIVES
By the end of this lesson, students should be able to…
Understand the value of NPOA in making consistent shots
Explain how to check their NPOA
3.2.4.1.2 LENGTH
20-30 minutes
3.2.4.1.3 FACILITY
Range
3.2.4.1.4 TRAINING MATERIALS
Demonstration rifle, preferably with laser pointer
3.2.4.1.5 REFERENCE
http://www.nrafamilyinsights.org/articles/Make-Natural-Point-Aim-Work
3.2.4.2 PLAN OF INSTRUCTION
Explain the principle of NPOA
Explain how to check NPOA
Demonstrate NPOA with a dummy rifle, ideally one with a laser
Show how to shift NPOA
Practice the position
Dry practice
Drill target
3.2.4.3 INSTRUCTIONAL NOTES
“Where the relaxed body will naturally place the shot”
KEY CONCEPTS: Relaxed, repeatable, cadence
Putting multiple rounds in the same hole can be achieved by using your Natural Point Of Aim. The
definition of NPOA is where the relaxed body will naturally place the shot. The keys to marksmanship are
relaxed and repeatable.
How do you find your NPOA? Close your eyes and build your position. Mentally start with your support
hand and ensure everything is in proper position. Take a breath. Exhale fully, to the bottom of the breath
(the most repeatable). Pause your breathing, RELAX and open your eyes.
Wherever your front sight is – that is your Natural Point Of Aim. There is only one NPOA. You have it or
you do not.

Shooting Sports – American History – Civic Engagement
COPYRIGHT 2016, RR. ALL RIGHTS RESERVED 46
Chances are your front sight is not where you want it to be – you must make an adjustment. Imagine you
are aiming a canon. You can’t just move the barrel over slightly; you have to adjust the carriage of the
canon.
In the prone position, you will keep your support elbow pinned in place – this is your pivot point. Pick up
your hips and make an adjustment to your carriage. If you want to move your Point Of Aim to the left, you
must move your hips to the right. If you want to move your Point of Aim (POA) to the right, you must
move your hips to the left. If you want to move your POA up, you must move your hips back. If you want
to move your POA down, you must move your hips forward.
After making an NPOA adjustment, you must verify the change. Close your eyes, take a breath, relax, open
your eyes. If you are on target, take the shot. If not, make another NPOA adjustment. Repeat this process
until you open your eyes and your front sight is exactly where you want it to be. With proper position and
technique your front sight will return to this position naturally after every shot.
Once we have aligned our NPOA with our target, we don’t have to check it until we change targets or
break position (like when we reload). All you need to take the next shot is a fresh breath.
Breathe in, breathe out – squeeze; breathe in, breathe out – squeeze. This is shooting in cadence or rapid
fire. If you need to shoot faster, breathe faster. Relaxed and repeatable – the keys to marksmanship.
3.2.4.3.1 LIVE FIRE PLAN & COACHING NOTES
Dry Fire
During a dry fire preparation period, coaches should assist shooters in acquiring their NPOA. Coaches can
observe shooters close their eyes or even block the sights/scope with their hand. Block the sights in front
of the front sight with an index card or similar to avoid putting your hand in front of the muzzle. After
blocking the sight, ask shooters to validate that they are still on target.
If resources and time allow, it is helpful to allow students to experiment with a dummy rifle equipped with
a laser.
Live Fire
Proper NPOA drills must have more than one target. Arranging targets so vertical and horizontal NPOA
changes must be achieved is useful. You may also consider assigning shooters multiple backers to
eliminate any possibility of muscling.

Shooting Sports – American History – Civic Engagement
COPYRIGHT 2016, RR. ALL RIGHTS RESERVED 47
3.2.5 SHOT GROUP ANALYSIS
3.2.5.1 LESSON PLAN OVERVIEW
3.2.5.1.1 LEARNING OBJECTIVES
o By the end of this lesson, students should be able to…
Identify vertical stringing and state corrective action.
Identify horizontal stringing and state corrective action.
Identify diagonal stringing and state corrective action.
Identify a larger size group and state corrective action.
3.2.5.1.2 LENGTH
o 15 minutes
3.2.5.1.3 FACILITY
o Range or Classroom
3.2.5.1.4 TRAINING MATERIALS
o Targets with sample groups
3.2.5.1.5 REFERENCE
o Rifle Marksmanship Diagnostic and Training Guide, May 2011 Fort Benning Research Unit
www.dtic.mil/cgi-bin/GetTRDoc?AD=ADA544533
3.2.5.2 PLAN OF INSTRUCTION
1. Explain value of being able to diagnose your own performance
2. ID common groups and the errors associated with them
a. Vertical
b. Horizontal
c. Diagonal
d. Larger Groups
3. Use lesson as an opportunity to reinforce fundamentals from earlier lessons
3.2.5.3 INSTRUCTIONAL NOTES
o KEY CONCEPTS: Self-diagnosis
Vertical Stringing: Check breathing. Shooter is likely not firing at bottom of breath cycle.
Horizontal Stringing: Check trigger control. Shooter may be jerking trigger.
Diagonal Stringing: Many possible causes. Check sling, flinching, cant of rifle.
Large Groups: Check NPOA, position stability, sight picture and hold control (focus on front sight).
3.2.6 BASIC MINUTES OF ANGLE (MOA): 25 YARD ZEROING PROCEDURES

Shooting Sports – American History – Civic Engagement
COPYRIGHT 2016, RR. ALL RIGHTS RESERVED 48
3.2.6.1 LESSON PLAN OVERVIEW
3.2.6.1.1 LEARNING OBJECTIVES
o By the end of this lesson, students should be able to…
State the relationship between MOA and inches at 25 yards
Calculate and make sight adjustments at 25 yards
3.2.6.1.2 LENGTH
o 15 minutes
3.2.6.1.3 FACILITY
o Range or Classroom
3.2.6.1.4 TRAINING MATERIALS
o Whiteboard; 25 yard drill targets
3.2.6.1.5 REFERENCE
o http://nssf.org/video/facts/MOA.cfm
3.2.6.2 PLAN OF INSTRUCTION
1. Show how to measure how far off center a group is
2. Explain the concept of MOA
3. Convert the inches from step #1 into MOA
4. Convert MOA into clicks for sights or scopes

Shooting Sports – American History – Civic Engagement
COPYRIGHT 2016, RR. ALL RIGHTS RESERVED 49
3.2.6.3 INSTRUCTIONAL NOTES
o How to move your Point Of Impact (the holes in paper) to match your Point Of Aim or zeroing your
rifle
o KEY CONCEPTS: Minute Of Angle is ~1” per 100y, translating Inches into Minutes into Clicks, Front
Opposite, Rear the Same (FORS).
Step 1: Identify the group. Draw a box around your group (you may ignore called flyers). Draw an X from
the corners of your box to find the center of your group.
Step 2: Identify how many inches you would like your group to move up or down (elevation) and how
many inches you would like your group to move left or right (windage).
Step 3: Determine what 1 MOA is at the distance you are currently shooting.
What is a Minute Of Angle? There are 360 degrees in a circle. 1 degree is about 60 inches at 100 yards.
Since this is too big a measurement to work with we will divide that degree into minutes. Minute is French
for 1/60th. What is 1/60th of 60”? A MINUTE OF ANGLE IS 1” *PER* 100 YARDS. (It’s actually 1.047” but 1”
is good enough for our purposes).
What distance did you shoot this group at? What is 1 MOA at this distance?
Step 4: Determine how many minutes you want to move your group and in which direction – remember
to do this for both windage and elevation. Write it down.
Step 5: Determine how your sighting system works. Typical military sighting systems will be 1 click per
minute. Your scope may be 4 (1/4” @100y) or 8 (1/8” @100y) clicks per minute. Your red dot or tech
sights may be 2 clicks per minute.
Step 6: Input the correct sight adjustment into your sighting system. Be sure to write down your
adjustments. For iron sights, if you are working with your front sight – you need to move your sight in the
OPPOSITE direction of the change you want to make. If you are working with your rear sight – you need to
move the sight in the SAME direction of the change you want to make. You can use the acronym FORS
(Front Opposite, Rear the Same) to help you remember.
Remember, you must have a decent group (~6 MOA) before making a sight adjustment. You may find
that, as you start to implement some of the techniques of marksmanship, you need to make sight
adjustments throughout the day – that’s okay. Just do it smartly using Inches, Minutes and Clicks.
Instructor note: For drift adjustable sights, draw a reference line on the sight and the barrel. Have the
student use a punch and hammer (scale of 1-10 you need about a 7 to move a stock Ruger sight). You will
know you have moved the sight when the line on the barrel no longer is in alignment with the mark on
the sight. The width of a piece of paper is about 1 MOA at 25 yards.
Instructor note: Do not over-complicate this lesson. The intent is for students to be able to make sight
adjustments at 25 yards. Based on your students and instructional flow it may make sense to defer some
of the content in this lesson until the discussion of “intermediate IMC.”
Instructor note: Some scopes may be calibrated in mils. There are 3.6 MOA in a Mil (milliradian) – this is
an oversimplification but will work for our purposes.

Shooting Sports – American History – Civic Engagement
COPYRIGHT 2016, RR. ALL RIGHTS RESERVED 50
3.2.7 INTERMEDIATE MINUTES OF ANGLE DISCUSSION
3.2.7.1 LESSON PLAN OVERVIEW
3.2.7.1.1 LEARNING OBJECTIVES
o By the end of this lesson, students should be able to…
State the relationship between MOA and inches at ranges from 25 to 600 yards
Convert between inches and MOA at ranges from 25 to 600 yards
3.2.7.1.2 LENGTH
o 15 minutes
3.2.7.1.3 FACILITY
o Range or Classroom
3.2.7.1.4 TRAINING MATERIALS
o Whiteboard; 25 yard drill targets
3.2.7.1.5 REFERENCE
o http://nssf.org/video/facts/MOA.cfm
3.2.7.2 PLAN OF INSTRUCTION
1. Explain the concept of MOA
2. Establish the baseline of 1 MOA at 100 Yards = 1”
3. From that baseline, calculate various conversions at ranges from 25-400 yards
3.2.7.3 INSTRUCTIONAL NOTES
o This lesson reinforces and builds upon the previous discussion. It sets the stage for discussion of
firing out to the Rifleman’s Quarter Mile. It is ideal as a review on day two of a two-day class.
Students should now have a firm grasp of MOA at 25 yards, so applying the concept at different
ranges should be straightforward. At the instructor’s option it can be incorporated into the basic
discussion.

Shooting Sports – American History – Civic Engagement
COPYRIGHT 2016, RR. ALL RIGHTS RESERVED 51
3.2.8 FUNDAMENTALS OF KNOWN DISTANCE SHOOTING: APPLICATION OF IMC
3.2.8.1 LESSON PLAN OVERVIEW
3.2.8.1.1 LEARNING OBJECTIVES
o By the end of this lesson, students should be able to…
State typical ballistic trajectories for common rifles
Explain how to compensate for ballistic drops
Explain the concept of “battle sight zero” or “maximum point blank range”
Gather and record data for “come ups” at various ranges
3.2.8.1.2 LENGTH
o 15 to 30 minutes + 45 minute live fire exercise
3.2.8.1.3 FACILITY
o Range or Classroom
3.2.8.1.4 TRAINING MATERIALS
o Whiteboard; 25 yard drill targets
3.2.8.1.5 REFERENCE
o http://nssf.org/video/facts/MOA.cfm
3.2.8.2 PLAN OF INSTRUCTION
1. Fundamentals: Ballistic Arc of Bullet
2. Typical Drops or “Comeups”
3. Techniques to Compensate
a. Dial in Comeups
b. Battle Sight Zero
c. Kentucky Windage
4. Other Effects at Distance
5. Data on Personal Equipment (DOPE)
6. Live Fire and DOPE Collection

Shooting Sports – American History – Civic Engagement
COPYRIGHT 2016, RR. ALL RIGHTS RESERVED 52
3.2.8.3 INSTRUCTIONAL NOTES
o Why IMC is important
o KEY CONCEPTS: Near zero/far zero, standard come ups, Custom come ups (DOPE), Kentucky
Windage, Battle Sight Zero
3.2.8.3.1 FUNDAMENTALS
Why do we care about mathematical sight adjustments? Why not just ‘guess and check’? If you are only going
to shoot at static targets at a fixed distance – zero your rifle at that distance and forget everything else we
taught you about IMC. However, if you intend to shoot at varying distances or in windy conditions you need to
understand Inches, Minutes and Clicks.
Where does the angle come from anyway? Aren’t we shooting in a straight line?
Due to gravity, we must angle our barrel up and lob our projectile at the target. Think of this like throwing a
football. If you threw the ball directly at the recipient, the ball would hit their feet. We correct for this by
throwing high. The further out the recipient is, the higher we must throw the ball.
Imagine a straight line between you and your target – line of sight. Now, think about your sights; the rear sight
is higher than the front angling the barrel up. If you draw the arc that the bullet takes (just like the football)
you will see that the bullet crosses your line of sight twice. The first time is called your near zero. The second
time is called your far zero.
3.2.8.3.2 TYPICAL BALLISTIC DROPS
30 cal rifles use “2-3-3-4-4.” Gravity is very predictable. Generally speaking there is 2 MOA drop between 100
and 200 yards. There’s an additional 3 MOA drop between 200 and 300 yards. There’s an additional 3 MOA
drop between 300 and 400 yards; and there is a 4 MOA drop between 400 and 500 yards. These are what’s
known as the standard come ups.
AR-15s shooting 5.56 (M193/55 grain) use “1-2-3-4-5.” For rifles with a high sight height and flat shooting
trajectory such as the AR15 you will want to use 1-2-3-4-5 to go from 100-600 yards.
AR-15s shooting 55 grain .223 use “2-2-3-5-6.” The slower velocity of the 223 round significantly impacts
trajectory at longer ranges.
22 LR use “0-2.5-2.5-4-4.” A 22 LR zeroed at 25 yards will typically also be zeroed at 50 yards. It will be about
2.5 MOA low at 75 yards, an additional 2.5 MOA low at 100 yards, an additional 4 MOA low at 125 yards, and
an additional 4 MOA low at 150 yards. Hence: 0, 2.5, 2.5, 4, 4. There is very wide variance in .22 LR rifles and
ammunition so this rule of thumb is very approximate.
Your Rifle, Ammunition, and Sights may be different. The only way to know is to check with live fire. Online
ballistics calculators can also be of some help.
3.2.8.3.3 TECHNIQUE ONE TO COMPENSATE: DIAL IN COME UPS
If your rifle is zeroed at 100 yards, and you know your target is at 300 yards, you could simply dial in the
correct number of MOA adjustments based on the standard comeups. In this example, with our AR-15, we
would dial in 3 MOA of elevation adjustment (1+2).
The advantage of this technique is that it can be quite precise.
The disadvantage is that it is slow and can lead to errors.

Shooting Sports – American History – Civic Engagement
COPYRIGHT 2016, RR. ALL RIGHTS RESERVED 53
3.2.8.3.4 TECHNIQUE TWO TO COMPENSATE: BATTLE SIGHT ZERO OR MAX POINT BLANK RANGE
If your rifle is zeroed at, say, 36 yards, the bullet will be on target at 36 yards, arcing high to an apogee,
then cross the zero again at 300 yards for an AR-15 or other high sights type rifle (200 yards for a low iron
sights type rifles like an M1 Garand, M1A or M14).
Experience tells us that if your near zero is 36 yards then your far zero will be about 300 yards for an AR-
15 type or other high sights rifle. Assuming we have a 20” target and we hit dead center at 300 yards but
my target is only 200 yards away – using the standard come ups for an AR-15, am I going to hit high or
low? The answer is “High;” how high? About 2 MOA. What is 2 MOA at 200 yards? 4”; on my 20” target
did I hit? Yes.
My target is now 400 yards away. Without changing my 300 yard zero and using the same standard come
ups, am I going to hit high or low: Low; how low? 3 MOA. What is 3 MOA at 400 yards? 12”; on my 20”
target did I hit? Yes.
I know that anything out to about 400 yards away is within the “max point blank range.” I can simply hold
on the center of the target and fire and I should hit.
3.2.8.3.5 TECHNIQUE THREE TO COMPENSATE: KENTUCKY WINDAGE OR HOLDING OVER
On that last example we were going to hit 12” low. If you know you are going to hit 12” low, you can aim
a little high. This is called Kentucky Windage. It’s expedient, but is it the most accurate? No; the most
accurate would be to make a 3 MOA sight adjustment and aim for the center. This is why you need to
understand Inches, Minutes and Clicks.
3.2.8.3.6 COMBINED TECHNIQUES: AR-15 BSZ EXAMPLE
You can combine all three techniques. Here is an example with the AR-15 with A2 sights zeroed at 36
yards.
From 36 yards to 300 yards we know our rounds will be up to 4-5” high as they arc towards apogee. So at
these ranges we can compensate by holding low.
Outside of 300 yards, we know that the bullet will be dropping rapidly. Fortunately, the A2 sight system
has a wheel for rapid elevation adjustments. We can dial in the correct MOA to get on target out to 600
yards.
3.2.8.3.7 OTHER EFFECTS AT DISTANCE
Wind is Most Significant: A cross wind will push the bullet off course about 1 MOA per 10 MPH per 100
yards. So if you are shooting a target at 400 yards with a 10 MPH crosswind, the round will be off by 4
MOA – 16 inches!
This is a rule of thumb. Wind doping and corrections is a discussion that could take up many pages.
Shooting Uphill or Downhill: Rule of Thumb – aim low to avoid overshooting on hills.
3.2.8.3.8 LEARNING ABOUT YOUR RIFLE
We’ve given you the standard come ups and they will get you on paper, but you need to build your own
custom come up table for your rifle. To do this, you will need a data log book. Then document your 25 yard
zero and move your target out to 100 yards. Shoot a group and see where it hits. We expect it to be about 6”
high but what is reality? Measure, calculate, and write it down. When you have your 100 yard zero move your
target out to 200 yards. Shoot another group and see where it hits. Measure, calculate, and write it down.
Repeat this process out as far as you want, in whatever increments you want. This process is called getting

Shooting Sports – American History – Civic Engagement
COPYRIGHT 2016, RR. ALL RIGHTS RESERVED 54
DOPE. When you are satisfied that you have the come ups for your rifle/ammunition combination – build a
table in Excel that you can laminate onto your stock so you have that data when you are in the field.
Instructor Note: Standard come ups are not caliber specific, it really has more to do with the center line of the
sighting system to the center line of the barrel. High mounted scopes or carry handle style iron sights will have
similar come ups vs. low mounted irons on say the M1 Garand.
BSZ is a hotly debated topic 250, 275, 300 yards there’s no ‘right’ answer. 36/300, documented above, is
chosen for simplicity. Another very common option is the 50/200 yard zero, or a simple 100 yard zero.
3.2.8.3.9 LIVE FIRE
Fire groups at 25/100/200/300/400 yards. Do not have shooters make sight adjustments. The purpose is
to gather data on where each student’s rifle groups at that range.
For rimfire shooters, the same procedure can be used at 25/50/75/100 yards.
Pause during live fire to mark hits and calculate IMC. Point out when the “far zero” is reached.
Fire groups from prone in a slow fire manner. Shooters struggling to get “on paper” at these ranges can
use a rest. The purpose of this exercise is to teach the students how to get DOPE.
3.2.8.3.10 ADDITIONAL AR-15 DETAILS (SKIP IN LECTURE – FOR INSTRUCTOR REFERENCE AND
INDIVIDUAL COACHING ONLY)
The above “1-2-3-4-5” rule of thumb works well for rifles with 16”-18” barrels using 5.56 M193 55 grain ball
ammunition. Bullets leaving long barrels travel faster than those leaving short barrels. Shorter barreled ARs will
thus suffer more drop, and longer barrels will have less drop. Heavier rounds such as the MK262 77 grain round
also tend to drop faster. 223 rounds are significantly slower and thus drop faster; use 2-2-3-5-6 as the rule of
thumb (easily remember as its “223!”).
Shooters with different barrels or ammunition thus have some unique considerations:
Carbines: 14.5" carbine shooters dial in an extra +1 MOA when going from 300 to 400 yards, and one
more MOA at 600 yards as a one-time action (1-2-4-4-6).*
500 to 600 yards Precise Adjustments with 20" Rifles: The full length 20” rifles tend to be a little high at
600 due to the faster velocity of the round. Dial in one less MOA at 600 yards i.e 1-2-3-4-4.
MK262 (18" BBL): If shooting 77GR from an 18" BBL, dial in an extra +1/2 MOA as a one time action (so,
zero at 100 yards, 1/2" high). With this adjustment, expect to be 1 MOA high at 600 yards, but otherwise
within 1/4 MOA of bullseye. This is more fiddly than we normally deal with but those shooting MK262
from 18" SPRs probably want to be a little fiddly.
MK262 (16" BBL): From a 16" BBL, dial in an extra +1 MOA as a one-time action (so, zero at 100 yards, 1"
high).
MK262 (14.5" BBL): 14.5" BBLs have their own come-ups for MK262 (2-3-4-4-5).
MK262 (10.5" BBL): 10.5" SBRs have their own come-ups for MK262 (2-4-4-6-6).
3.2.8.3.11 SHOOTERS WITH BDC RETICLES
Some optics have a ballistic drop compensation reticle. These reticles are often designed to have the comeups for
a given caliber, ammunition load and barrel length preset. If the shooter is not using that specific load and barrel
length, the reticle may not match the DOPE. Gather DOPE as normal and see how far off the BDC points the
rounds print. The most common “fix” for a BDC that doesn’t work for a shooter is to zero short carbines (14.5”
barrels) or MK262 ammunition one MOA high (i.e. one inch high at 100 yards).

Shooting Sports – American History – Civic Engagement
COPYRIGHT 2016, RR. ALL RIGHTS RESERVED 55
4 BASIC RIFLE INSTRUCTOR TRAINING
PROGRESSION

Shooting Sports – American History – Civic Engagement
COPYRIGHT 2016, RR. ALL RIGHTS RESERVED 56
4.1 RR BASIC RIFLE ENDORSEMENT
4.1.1 PURPOSE
The purpose of RR Basic Rifle Endorsement is to establish a fundamental baseline of knowledge, skills, and
attitudes for RR Members to teach the RR First Steps and Basic Rifle curricula.
4.1.2 TIMELINE
The Basic Rifle endorsement is intended to be completed over at least two RR events with a “hands on”
training model. It should take at least 20 hours of on-the-job training plus some self-study.
4.1.3 CHECKLIST OF TASKS
TASK DATE LOCATION MASTER NAME MASTER INITIAL
APPRENTICE BASIC RIFLE
Complete RR-BIT (Assistant+) N/A N/A N/A
Score “Marksman+” on RR Rifle Qualifier
Demo prone position
Explain prone position
Apprentice Upgrade Complete
ASSISTANT BASIC RIFLE
Complete RR-BIT (Assistant+)
Explain Morgan’s 13 COF
Rifle Safety, Parts, & Operation
Sling Usage
Prone Supported Position
Rifle Shooting Fundies (ABCs)
Natural Point of Aim
Basic IMC (25 Yard Adjustments)
Rifle Cleaning, Storage, & Trng
Assistant Upgrade Complete
Table 12: Basic Rifle Task List

Shooting Sports – American History – Civic Engagement
COPYRIGHT 2016, RR. ALL RIGHTS RESERVED 57
CERTIFIED BASIC RIFLE
Complete RR-BIT (Certified+)
Score “Sharpshooter+” on RR Rifle Qualifier
Explain RR Qualifier COF
Sitting Position
Standing Position
Shot Group Analysis
Intermediate IMC
Fundies of KD Shooting Lecture
Familiar w/ Battle Rattle COF
Familiar w/ KD Qualifier COF
Serve as Chief Instructor for a Basic Rifle event
Certification Upgrade Complete
MASTER BASIC RIFLE
Be a Full RR Member N/A N/A N/A
Be 21+ Years of Age N/A N/A N/A
Work 8+ RR Basic Rifle Events
RR Officer Approval
Master Upgrade Complete
Table 13: Basic Rifle Task List (contd)
4.1.4 BASIC RIFLE SPECIAL INSTRUCTIONS AND CLARIFICATION
The following provides a study guide and clarification for tasks above.
Assistant: These tasks are the essential ones required to execute the first third of a 2-Day Basic Rifle
Class, or an entire First Steps class. All lesson plans can be found in the Basic Rifle section/
Certified: To complete this upgrade, the candidate must serve as the Chief Instructor for a Basic Rifle
event under the direct supervision of the certifying Master Basic Rifle Instructor. The line items above
may be accomplished simultaneously or completed prior based on the preferences of the upgrading and
certifying members.
NRA Certifications: Individuals holding the appropriate NRA Rifle Instructor certification may have all
tasks included in NRA Basic Rifle curriculum signed off. Such individuals need only demonstrate the RR
specific skills.
CMP EIC or NRA Sharpshooters: The RR Rifle Qualifier score requirement is waived for any instructor
holding CMP EIC points in Service Rifle or a NRA Sharpshooter rating or better in a rifle discipline.

Shooting Sports – American History – Civic Engagement
COPYRIGHT 2016, RR. ALL RIGHTS RESERVED 58
4.2 RR FIELD RIFLE ENDORSEMENT
4.2.1 PURPOSE
The purpose of RR Field Rifle Endorsement is to establish a fundamental baseline of knowledge, skills, and
attitudes for RR Members to teach the RR Field Rifle curricula.
4.2.2 TIMELINE
The Field Rifle endorsement is intended to be completed over at least two RR events with a “hands on”
training model. It should take at least 20 hours of on-the-job training plus some self-study. It builds on
the Basic Rifle skill set.
4.2.3 CHECKLIST OF TASKS
TASK DATE LOCATION MASTER NAME MASTER INITIAL
APPRENTICE FIELD RIFLE
Complete RR-BIT (Certified) N/A N/A N/A
Complete RR Basic Rifle (Certified) Endorsement
Score “Marksman+” on RR Rifle Qualifier at KD Ranges
Apprentice Upgrade Complete
ASSISTANT FIELD RIFLE
Attend 1+ Field Shoot Event or have NRA/CMP experience
Target Detection
Target Identification
Field-Expedient Ranging
Intermediate IMC
Basic Ballistics
Data Collection (“DOPE”)
Explain Battle Rattle COF
Explain RR Classifier COF (KD)
Assistant Upgrade Complete
Table 14: Field Rifle Task List

Shooting Sports – American History – Civic Engagement
COPYRIGHT 2016, RR. ALL RIGHTS RESERVED 59
CERTIFIED FIELD RIFLE
Score “Sharpshooter+” on RR Rifle Qualifier at KD Ranges
Serve as Chief Instructor for a Field Rifle event
Explain Field Rifle Challenge COF
Certification Upgrade Complete
MASTER FIELD RIFLE
Be a Full RR Member N/A N/A N/A
Be 21+ Years of Age N/A N/A N/A
Work 2+ RR Field Rifle Events
RR Officer Approval
Master Upgrade Complete
Table 15: Field Rifle Task List (contd)
4.2.4 FIELD RIFLE SPECIAL INSTRUCTIONS AND CLARIFICATION
The following provides a study guide and clarification for tasks above.
Apprentice: The Field Rifle upgrade builds on the skills in Basic Rifle and thus Basic Rifle endorsement is
required for entry. A “Marksman” score or better must be live-fired on a RR Classifier at Known Distance
(either 100 yard Rimfire or 400 yard Centerfire).
Certified: To complete this upgrade, the candidate must serve as the Chief Instructor for a Field Rifle
event under the direct supervision of the certifying Master Basic Rifle Instructor. The line items for
“assistant” may be accomplished simultaneously or completed prior based on the preferences of the
upgrading and certifying members. Because this is an advanced skill set, the “see one/do one”
mentorship model is most appropriate. Master instructors must ensure that Certified candidates are fully
prepared to execute Field Rifle events on their own. If there is doubt, the Candidate should spend time as
an Assistant to have more chances to practice the skills required. The RR Rifle Qualifier requirement is
waived for any instructor holding CMP EIC points in Service Rifle or a NRA Sharpshooter rating or better in
High Power Rifle.

Shooting Sports – American History – Civic Engagement
COPYRIGHT 2016, RR. ALL RIGHTS RESERVED 60
5 RESOURCES

Shooting Sports – American History – Civic Engagement
COPYRIGHT 2016, RR. ALL RIGHTS RESERVED 61
INDEX OF TABLES
Table 3: Bell Classifier .................................................................................................................................................. 16
Table 4: Full round count RR Qualification Test (40-50 rounds) .................................................................................. 17
Table 5: Reduced round count (20 rounds) ................................................................................................................. 18
Table 6: Full Round Count RR Qualification Test – 25 Yard Scaled Targets ................................................................. 19
Table 7: 20 ROUND REDUCED COUNT RR Qualification Test – 25 Yard Scaled Targets .............................................. 20
Table 8: Rapid Fire “Liberty!” (20 or 40 rounds) .......................................................................................................... 20
Table 9: Full Round Count & 25 Yards Scoring............................................................................................................. 22
Table 10: Full Round Count & Full Distance (KD) Scoring ............................................................................................ 22
Table 11: Reduced Round Count & 25 Yards Scoring *Master must shoot two consecutive scores .......................... 22
Table 12: Reduced Round Count & Full Distance (KD) Scoring *Master must shoot two consecutive scores ............ 22
Table 13: RR Battle Rattle (25 Meters Version For Use At RR Events)......................................................................... 24
Table 20: Basic Rifle Task List ....................................................................................................................................... 56
Table 21: Basic Rifle Task List (contd) .......................................................................................................................... 57
Table 22: Field Rifle Task List ....................................................................................................................................... 58
Table 23: Field Rifle Task List (contd) .......................................................................................................................... 59