Spring Boot Reference Documentation
527
Spring Boot Reference Documentation Phillip Webb, Dave Syer, Josh Long, Stéphane Nicoll, Rob Winch, Andy Wilkinson, Marcel Overdijk, Christian Dupuis, Sébastien Deleuze, Michael Simons, Vedran Pavić, Jay Bryant, Madhura Bhave, Eddú Meléndez
-
Upload
khangminh22 -
Category
Documents
-
view
1 -
download
0
Transcript of Spring Boot Reference Documentation

Spring Boot Reference DocumentationPhillip Webb, Dave Syer, Josh Long, Stéphane Nicoll, Rob Winch, Andy
Wilkinson, Marcel Overdijk, Christian Dupuis, Sébastien Deleuze, MichaelSimons, Vedran Pavić, Jay Bryant, Madhura Bhave, Eddú Meléndez

Table of ContentsLegal. . . . . . . . . . . . . . . . . . . . . . . . . . . . . . . . . . . . . . . . . . . . . . . . . . . . . . . . . . . . . . . . . . . . . . . . . . . . . . . . . . . . . . . 1
1. Spring Boot Documentation. . . . . . . . . . . . . . . . . . . . . . . . . . . . . . . . . . . . . . . . . . . . . . . . . . . . . . . . . . . . . . . . 2
1.1. About the Documentation. . . . . . . . . . . . . . . . . . . . . . . . . . . . . . . . . . . . . . . . . . . . . . . . . . . . . . . . . . . . . . 2
1.2. Getting Help . . . . . . . . . . . . . . . . . . . . . . . . . . . . . . . . . . . . . . . . . . . . . . . . . . . . . . . . . . . . . . . . . . . . . . . . . . 2
1.3. Upgrading from an Earlier Version . . . . . . . . . . . . . . . . . . . . . . . . . . . . . . . . . . . . . . . . . . . . . . . . . . . . . 2
1.4. First Steps . . . . . . . . . . . . . . . . . . . . . . . . . . . . . . . . . . . . . . . . . . . . . . . . . . . . . . . . . . . . . . . . . . . . . . . . . . . . 3
1.5. Working with Spring Boot . . . . . . . . . . . . . . . . . . . . . . . . . . . . . . . . . . . . . . . . . . . . . . . . . . . . . . . . . . . . . 3
1.6. Learning about Spring Boot Features . . . . . . . . . . . . . . . . . . . . . . . . . . . . . . . . . . . . . . . . . . . . . . . . . . . 3
1.7. Moving to Production . . . . . . . . . . . . . . . . . . . . . . . . . . . . . . . . . . . . . . . . . . . . . . . . . . . . . . . . . . . . . . . . . 3
1.8. Advanced Topics . . . . . . . . . . . . . . . . . . . . . . . . . . . . . . . . . . . . . . . . . . . . . . . . . . . . . . . . . . . . . . . . . . . . . . 3
2. Getting Started . . . . . . . . . . . . . . . . . . . . . . . . . . . . . . . . . . . . . . . . . . . . . . . . . . . . . . . . . . . . . . . . . . . . . . . . . . . 5
2.1. Introducing Spring Boot . . . . . . . . . . . . . . . . . . . . . . . . . . . . . . . . . . . . . . . . . . . . . . . . . . . . . . . . . . . . . . . 5
2.2. System Requirements . . . . . . . . . . . . . . . . . . . . . . . . . . . . . . . . . . . . . . . . . . . . . . . . . . . . . . . . . . . . . . . . . 5
2.2.1. Servlet Containers. . . . . . . . . . . . . . . . . . . . . . . . . . . . . . . . . . . . . . . . . . . . . . . . . . . . . . . . . . . . . . . . . 5
2.3. Installing Spring Boot . . . . . . . . . . . . . . . . . . . . . . . . . . . . . . . . . . . . . . . . . . . . . . . . . . . . . . . . . . . . . . . . . 6
2.3.1. Installation Instructions for the Java Developer . . . . . . . . . . . . . . . . . . . . . . . . . . . . . . . . . . . . . . 6
Maven Installation . . . . . . . . . . . . . . . . . . . . . . . . . . . . . . . . . . . . . . . . . . . . . . . . . . . . . . . . . . . . . . . . . . . 6
Gradle Installation . . . . . . . . . . . . . . . . . . . . . . . . . . . . . . . . . . . . . . . . . . . . . . . . . . . . . . . . . . . . . . . . . . . 8
2.3.2. Installing the Spring Boot CLI . . . . . . . . . . . . . . . . . . . . . . . . . . . . . . . . . . . . . . . . . . . . . . . . . . . . . . 8
Manual Installation . . . . . . . . . . . . . . . . . . . . . . . . . . . . . . . . . . . . . . . . . . . . . . . . . . . . . . . . . . . . . . . . . . 8
Installation with SDKMAN!. . . . . . . . . . . . . . . . . . . . . . . . . . . . . . . . . . . . . . . . . . . . . . . . . . . . . . . . . . . . 9
OSX Homebrew Installation . . . . . . . . . . . . . . . . . . . . . . . . . . . . . . . . . . . . . . . . . . . . . . . . . . . . . . . . . . . 9
MacPorts Installation . . . . . . . . . . . . . . . . . . . . . . . . . . . . . . . . . . . . . . . . . . . . . . . . . . . . . . . . . . . . . . . . 10
Command-line Completion. . . . . . . . . . . . . . . . . . . . . . . . . . . . . . . . . . . . . . . . . . . . . . . . . . . . . . . . . . . 10
Windows Scoop Installation. . . . . . . . . . . . . . . . . . . . . . . . . . . . . . . . . . . . . . . . . . . . . . . . . . . . . . . . . . 10
Quick-start Spring CLI Example . . . . . . . . . . . . . . . . . . . . . . . . . . . . . . . . . . . . . . . . . . . . . . . . . . . . . . 10
2.3.3. Upgrading from an Earlier Version of Spring Boot . . . . . . . . . . . . . . . . . . . . . . . . . . . . . . . . . . 11
2.4. Developing Your First Spring Boot Application . . . . . . . . . . . . . . . . . . . . . . . . . . . . . . . . . . . . . . . . . 12
2.4.1. Creating the POM . . . . . . . . . . . . . . . . . . . . . . . . . . . . . . . . . . . . . . . . . . . . . . . . . . . . . . . . . . . . . . . . 12
2.4.2. Adding Classpath Dependencies . . . . . . . . . . . . . . . . . . . . . . . . . . . . . . . . . . . . . . . . . . . . . . . . . . . 13
2.4.3. Writing the Code . . . . . . . . . . . . . . . . . . . . . . . . . . . . . . . . . . . . . . . . . . . . . . . . . . . . . . . . . . . . . . . . . 14
The @RestController and @RequestMapping Annotations . . . . . . . . . . . . . . . . . . . . . . . . . . . . . . 15
The @EnableAutoConfiguration Annotation . . . . . . . . . . . . . . . . . . . . . . . . . . . . . . . . . . . . . . . . . . . 15
The “main” Method . . . . . . . . . . . . . . . . . . . . . . . . . . . . . . . . . . . . . . . . . . . . . . . . . . . . . . . . . . . . . . . . . 16
2.4.4. Running the Example. . . . . . . . . . . . . . . . . . . . . . . . . . . . . . . . . . . . . . . . . . . . . . . . . . . . . . . . . . . . . 16
2.4.5. Creating an Executable Jar . . . . . . . . . . . . . . . . . . . . . . . . . . . . . . . . . . . . . . . . . . . . . . . . . . . . . . . . 16
2.5. What to Read Next . . . . . . . . . . . . . . . . . . . . . . . . . . . . . . . . . . . . . . . . . . . . . . . . . . . . . . . . . . . . . . . . . . . 18
3. Using Spring Boot . . . . . . . . . . . . . . . . . . . . . . . . . . . . . . . . . . . . . . . . . . . . . . . . . . . . . . . . . . . . . . . . . . . . . . . . 20

3.1. Build Systems. . . . . . . . . . . . . . . . . . . . . . . . . . . . . . . . . . . . . . . . . . . . . . . . . . . . . . . . . . . . . . . . . . . . . . . . 20
3.1.1. Dependency Management . . . . . . . . . . . . . . . . . . . . . . . . . . . . . . . . . . . . . . . . . . . . . . . . . . . . . . . . 20
3.1.2. Maven . . . . . . . . . . . . . . . . . . . . . . . . . . . . . . . . . . . . . . . . . . . . . . . . . . . . . . . . . . . . . . . . . . . . . . . . . . 20
Inheriting the Starter Parent . . . . . . . . . . . . . . . . . . . . . . . . . . . . . . . . . . . . . . . . . . . . . . . . . . . . . . . . . 21
Using Spring Boot without the Parent POM . . . . . . . . . . . . . . . . . . . . . . . . . . . . . . . . . . . . . . . . . . . . 21
Using the Spring Boot Maven Plugin . . . . . . . . . . . . . . . . . . . . . . . . . . . . . . . . . . . . . . . . . . . . . . . . . . 22
3.1.3. Gradle . . . . . . . . . . . . . . . . . . . . . . . . . . . . . . . . . . . . . . . . . . . . . . . . . . . . . . . . . . . . . . . . . . . . . . . . . . 23
3.1.4. Ant . . . . . . . . . . . . . . . . . . . . . . . . . . . . . . . . . . . . . . . . . . . . . . . . . . . . . . . . . . . . . . . . . . . . . . . . . . . . . 23
3.1.5. Starters . . . . . . . . . . . . . . . . . . . . . . . . . . . . . . . . . . . . . . . . . . . . . . . . . . . . . . . . . . . . . . . . . . . . . . . . . 24
3.2. Structuring Your Code . . . . . . . . . . . . . . . . . . . . . . . . . . . . . . . . . . . . . . . . . . . . . . . . . . . . . . . . . . . . . . . . 29
3.2.1. Using the “default” Package . . . . . . . . . . . . . . . . . . . . . . . . . . . . . . . . . . . . . . . . . . . . . . . . . . . . . . . 30
3.2.2. Locating the Main Application Class . . . . . . . . . . . . . . . . . . . . . . . . . . . . . . . . . . . . . . . . . . . . . . . 30
3.3. Configuration Classes . . . . . . . . . . . . . . . . . . . . . . . . . . . . . . . . . . . . . . . . . . . . . . . . . . . . . . . . . . . . . . . . 31
3.3.1. Importing Additional Configuration Classes . . . . . . . . . . . . . . . . . . . . . . . . . . . . . . . . . . . . . . . . 31
3.3.2. Importing XML Configuration . . . . . . . . . . . . . . . . . . . . . . . . . . . . . . . . . . . . . . . . . . . . . . . . . . . . . 31
3.4. Auto-configuration . . . . . . . . . . . . . . . . . . . . . . . . . . . . . . . . . . . . . . . . . . . . . . . . . . . . . . . . . . . . . . . . . . . 31
3.4.1. Gradually Replacing Auto-configuration . . . . . . . . . . . . . . . . . . . . . . . . . . . . . . . . . . . . . . . . . . . 32
3.4.2. Disabling Specific Auto-configuration Classes . . . . . . . . . . . . . . . . . . . . . . . . . . . . . . . . . . . . . . . 32
3.5. Spring Beans and Dependency Injection . . . . . . . . . . . . . . . . . . . . . . . . . . . . . . . . . . . . . . . . . . . . . . . 32
3.6. Using the @SpringBootApplication Annotation . . . . . . . . . . . . . . . . . . . . . . . . . . . . . . . . . . . . . . . . . 33
3.7. Running Your Application . . . . . . . . . . . . . . . . . . . . . . . . . . . . . . . . . . . . . . . . . . . . . . . . . . . . . . . . . . . . 35
3.7.1. Running from an IDE . . . . . . . . . . . . . . . . . . . . . . . . . . . . . . . . . . . . . . . . . . . . . . . . . . . . . . . . . . . . . 35
3.7.2. Running as a Packaged Application . . . . . . . . . . . . . . . . . . . . . . . . . . . . . . . . . . . . . . . . . . . . . . . . 36
3.7.3. Using the Maven Plugin. . . . . . . . . . . . . . . . . . . . . . . . . . . . . . . . . . . . . . . . . . . . . . . . . . . . . . . . . . . 36
3.7.4. Using the Gradle Plugin . . . . . . . . . . . . . . . . . . . . . . . . . . . . . . . . . . . . . . . . . . . . . . . . . . . . . . . . . . . 36
3.7.5. Hot Swapping. . . . . . . . . . . . . . . . . . . . . . . . . . . . . . . . . . . . . . . . . . . . . . . . . . . . . . . . . . . . . . . . . . . . 37
3.8. Developer Tools. . . . . . . . . . . . . . . . . . . . . . . . . . . . . . . . . . . . . . . . . . . . . . . . . . . . . . . . . . . . . . . . . . . . . . 37
3.8.1. Property Defaults . . . . . . . . . . . . . . . . . . . . . . . . . . . . . . . . . . . . . . . . . . . . . . . . . . . . . . . . . . . . . . . . 38
3.8.2. Automatic Restart . . . . . . . . . . . . . . . . . . . . . . . . . . . . . . . . . . . . . . . . . . . . . . . . . . . . . . . . . . . . . . . . 38
Logging changes in condition evaluation . . . . . . . . . . . . . . . . . . . . . . . . . . . . . . . . . . . . . . . . . . . . . . 40
Excluding Resources . . . . . . . . . . . . . . . . . . . . . . . . . . . . . . . . . . . . . . . . . . . . . . . . . . . . . . . . . . . . . . . . 40
Watching Additional Paths . . . . . . . . . . . . . . . . . . . . . . . . . . . . . . . . . . . . . . . . . . . . . . . . . . . . . . . . . . . 40
Disabling Restart . . . . . . . . . . . . . . . . . . . . . . . . . . . . . . . . . . . . . . . . . . . . . . . . . . . . . . . . . . . . . . . . . . . . 40
Using a Trigger File. . . . . . . . . . . . . . . . . . . . . . . . . . . . . . . . . . . . . . . . . . . . . . . . . . . . . . . . . . . . . . . . . . 41
Customizing the Restart Classloader . . . . . . . . . . . . . . . . . . . . . . . . . . . . . . . . . . . . . . . . . . . . . . . . . . 41
Known Limitations . . . . . . . . . . . . . . . . . . . . . . . . . . . . . . . . . . . . . . . . . . . . . . . . . . . . . . . . . . . . . . . . . . 42
3.8.3. LiveReload . . . . . . . . . . . . . . . . . . . . . . . . . . . . . . . . . . . . . . . . . . . . . . . . . . . . . . . . . . . . . . . . . . . . . . 42
3.8.4. Global Settings . . . . . . . . . . . . . . . . . . . . . . . . . . . . . . . . . . . . . . . . . . . . . . . . . . . . . . . . . . . . . . . . . . . 42
Configuring File System Watcher . . . . . . . . . . . . . . . . . . . . . . . . . . . . . . . . . . . . . . . . . . . . . . . . . . . . . 43
3.8.5. Remote Applications . . . . . . . . . . . . . . . . . . . . . . . . . . . . . . . . . . . . . . . . . . . . . . . . . . . . . . . . . . . . . 43
Running the Remote Client Application . . . . . . . . . . . . . . . . . . . . . . . . . . . . . . . . . . . . . . . . . . . . . . . 44
Remote Update. . . . . . . . . . . . . . . . . . . . . . . . . . . . . . . . . . . . . . . . . . . . . . . . . . . . . . . . . . . . . . . . . . . . . . 45
3.9. Packaging Your Application for Production. . . . . . . . . . . . . . . . . . . . . . . . . . . . . . . . . . . . . . . . . . . . . 46
3.10. What to Read Next . . . . . . . . . . . . . . . . . . . . . . . . . . . . . . . . . . . . . . . . . . . . . . . . . . . . . . . . . . . . . . . . . . 46
4. Spring Boot Features . . . . . . . . . . . . . . . . . . . . . . . . . . . . . . . . . . . . . . . . . . . . . . . . . . . . . . . . . . . . . . . . . . . . . 47
4.1. SpringApplication. . . . . . . . . . . . . . . . . . . . . . . . . . . . . . . . . . . . . . . . . . . . . . . . . . . . . . . . . . . . . . . . . . . . 47
4.1.1. Startup Failure. . . . . . . . . . . . . . . . . . . . . . . . . . . . . . . . . . . . . . . . . . . . . . . . . . . . . . . . . . . . . . . . . . . 48
4.1.2. Lazy Initialization. . . . . . . . . . . . . . . . . . . . . . . . . . . . . . . . . . . . . . . . . . . . . . . . . . . . . . . . . . . . . . . . 48
4.1.3. Customizing the Banner . . . . . . . . . . . . . . . . . . . . . . . . . . . . . . . . . . . . . . . . . . . . . . . . . . . . . . . . . . 49
4.1.4. Customizing SpringApplication. . . . . . . . . . . . . . . . . . . . . . . . . . . . . . . . . . . . . . . . . . . . . . . . . . . . 50
4.1.5. Fluent Builder API . . . . . . . . . . . . . . . . . . . . . . . . . . . . . . . . . . . . . . . . . . . . . . . . . . . . . . . . . . . . . . . 50
4.1.6. Application Events and Listeners . . . . . . . . . . . . . . . . . . . . . . . . . . . . . . . . . . . . . . . . . . . . . . . . . . 51
4.1.7. Web Environment . . . . . . . . . . . . . . . . . . . . . . . . . . . . . . . . . . . . . . . . . . . . . . . . . . . . . . . . . . . . . . . 52
4.1.8. Accessing Application Arguments . . . . . . . . . . . . . . . . . . . . . . . . . . . . . . . . . . . . . . . . . . . . . . . . . 52
4.1.9. Using the ApplicationRunner or CommandLineRunner. . . . . . . . . . . . . . . . . . . . . . . . . . . . . . 53
4.1.10. Application Exit. . . . . . . . . . . . . . . . . . . . . . . . . . . . . . . . . . . . . . . . . . . . . . . . . . . . . . . . . . . . . . . . . 54
4.1.11. Admin Features . . . . . . . . . . . . . . . . . . . . . . . . . . . . . . . . . . . . . . . . . . . . . . . . . . . . . . . . . . . . . . . . . 54
4.2. Externalized Configuration . . . . . . . . . . . . . . . . . . . . . . . . . . . . . . . . . . . . . . . . . . . . . . . . . . . . . . . . . . . 54
4.2.1. Configuring Random Values. . . . . . . . . . . . . . . . . . . . . . . . . . . . . . . . . . . . . . . . . . . . . . . . . . . . . . . 57
4.2.2. Accessing Command Line Properties. . . . . . . . . . . . . . . . . . . . . . . . . . . . . . . . . . . . . . . . . . . . . . . 57
4.2.3. Application Property Files . . . . . . . . . . . . . . . . . . . . . . . . . . . . . . . . . . . . . . . . . . . . . . . . . . . . . . . . 57
4.2.4. Profile-specific Properties. . . . . . . . . . . . . . . . . . . . . . . . . . . . . . . . . . . . . . . . . . . . . . . . . . . . . . . . . 59
4.2.5. Placeholders in Properties . . . . . . . . . . . . . . . . . . . . . . . . . . . . . . . . . . . . . . . . . . . . . . . . . . . . . . . . 59
4.2.6. Encrypting Properties . . . . . . . . . . . . . . . . . . . . . . . . . . . . . . . . . . . . . . . . . . . . . . . . . . . . . . . . . . . . 60
4.2.7. Using YAML Instead of Properties . . . . . . . . . . . . . . . . . . . . . . . . . . . . . . . . . . . . . . . . . . . . . . . . . 60
Loading YAML . . . . . . . . . . . . . . . . . . . . . . . . . . . . . . . . . . . . . . . . . . . . . . . . . . . . . . . . . . . . . . . . . . . . . . 60
Exposing YAML as Properties in the Spring Environment . . . . . . . . . . . . . . . . . . . . . . . . . . . . . . . 61
Multi-profile YAML Documents . . . . . . . . . . . . . . . . . . . . . . . . . . . . . . . . . . . . . . . . . . . . . . . . . . . . . . . 61
YAML Shortcomings . . . . . . . . . . . . . . . . . . . . . . . . . . . . . . . . . . . . . . . . . . . . . . . . . . . . . . . . . . . . . . . . . 63
4.2.8. Type-safe Configuration Properties . . . . . . . . . . . . . . . . . . . . . . . . . . . . . . . . . . . . . . . . . . . . . . . . 63
JavaBean properties binding . . . . . . . . . . . . . . . . . . . . . . . . . . . . . . . . . . . . . . . . . . . . . . . . . . . . . . . . . 63
Constructor binding . . . . . . . . . . . . . . . . . . . . . . . . . . . . . . . . . . . . . . . . . . . . . . . . . . . . . . . . . . . . . . . . . 65
Enabling @ConfigurationProperties-annotated types . . . . . . . . . . . . . . . . . . . . . . . . . . . . . . . . . . . . 68
Using @ConfigurationProperties-annotated types . . . . . . . . . . . . . . . . . . . . . . . . . . . . . . . . . . . . . . . 69
Third-party Configuration . . . . . . . . . . . . . . . . . . . . . . . . . . . . . . . . . . . . . . . . . . . . . . . . . . . . . . . . . . . 70
Relaxed Binding . . . . . . . . . . . . . . . . . . . . . . . . . . . . . . . . . . . . . . . . . . . . . . . . . . . . . . . . . . . . . . . . . . . . 70
Merging Complex Types . . . . . . . . . . . . . . . . . . . . . . . . . . . . . . . . . . . . . . . . . . . . . . . . . . . . . . . . . . . . . 72
Properties Conversion . . . . . . . . . . . . . . . . . . . . . . . . . . . . . . . . . . . . . . . . . . . . . . . . . . . . . . . . . . . . . . . 74
@ConfigurationProperties Validation . . . . . . . . . . . . . . . . . . . . . . . . . . . . . . . . . . . . . . . . . . . . . . . . . 78
@ConfigurationProperties vs. @Value . . . . . . . . . . . . . . . . . . . . . . . . . . . . . . . . . . . . . . . . . . . . . . . . . 79
4.3. Profiles . . . . . . . . . . . . . . . . . . . . . . . . . . . . . . . . . . . . . . . . . . . . . . . . . . . . . . . . . . . . . . . . . . . . . . . . . . . . . 79
4.3.1. Adding Active Profiles . . . . . . . . . . . . . . . . . . . . . . . . . . . . . . . . . . . . . . . . . . . . . . . . . . . . . . . . . . . . 80

4.3.2. Programmatically Setting Profiles . . . . . . . . . . . . . . . . . . . . . . . . . . . . . . . . . . . . . . . . . . . . . . . . . 81
4.3.3. Profile-specific Configuration Files . . . . . . . . . . . . . . . . . . . . . . . . . . . . . . . . . . . . . . . . . . . . . . . . 81
4.4. Logging . . . . . . . . . . . . . . . . . . . . . . . . . . . . . . . . . . . . . . . . . . . . . . . . . . . . . . . . . . . . . . . . . . . . . . . . . . . . . 81
4.4.1. Log Format . . . . . . . . . . . . . . . . . . . . . . . . . . . . . . . . . . . . . . . . . . . . . . . . . . . . . . . . . . . . . . . . . . . . . . 81
4.4.2. Console Output . . . . . . . . . . . . . . . . . . . . . . . . . . . . . . . . . . . . . . . . . . . . . . . . . . . . . . . . . . . . . . . . . . 82
Color-coded Output. . . . . . . . . . . . . . . . . . . . . . . . . . . . . . . . . . . . . . . . . . . . . . . . . . . . . . . . . . . . . . . . . . 83
4.4.3. File Output . . . . . . . . . . . . . . . . . . . . . . . . . . . . . . . . . . . . . . . . . . . . . . . . . . . . . . . . . . . . . . . . . . . . . . 83
4.4.4. Log Levels . . . . . . . . . . . . . . . . . . . . . . . . . . . . . . . . . . . . . . . . . . . . . . . . . . . . . . . . . . . . . . . . . . . . . . . 84
4.4.5. Log Groups . . . . . . . . . . . . . . . . . . . . . . . . . . . . . . . . . . . . . . . . . . . . . . . . . . . . . . . . . . . . . . . . . . . . . . 84
4.4.6. Custom Log Configuration . . . . . . . . . . . . . . . . . . . . . . . . . . . . . . . . . . . . . . . . . . . . . . . . . . . . . . . . 85
4.4.7. Logback Extensions . . . . . . . . . . . . . . . . . . . . . . . . . . . . . . . . . . . . . . . . . . . . . . . . . . . . . . . . . . . . . . 87
Profile-specific Configuration . . . . . . . . . . . . . . . . . . . . . . . . . . . . . . . . . . . . . . . . . . . . . . . . . . . . . . . . 88
Environment Properties . . . . . . . . . . . . . . . . . . . . . . . . . . . . . . . . . . . . . . . . . . . . . . . . . . . . . . . . . . . . . 88
4.5. Internationalization. . . . . . . . . . . . . . . . . . . . . . . . . . . . . . . . . . . . . . . . . . . . . . . . . . . . . . . . . . . . . . . . . . 89
4.6. JSON . . . . . . . . . . . . . . . . . . . . . . . . . . . . . . . . . . . . . . . . . . . . . . . . . . . . . . . . . . . . . . . . . . . . . . . . . . . . . . . . 89
4.6.1. Jackson. . . . . . . . . . . . . . . . . . . . . . . . . . . . . . . . . . . . . . . . . . . . . . . . . . . . . . . . . . . . . . . . . . . . . . . . . . 90
4.6.2. Gson . . . . . . . . . . . . . . . . . . . . . . . . . . . . . . . . . . . . . . . . . . . . . . . . . . . . . . . . . . . . . . . . . . . . . . . . . . . . 90
4.6.3. JSON-B . . . . . . . . . . . . . . . . . . . . . . . . . . . . . . . . . . . . . . . . . . . . . . . . . . . . . . . . . . . . . . . . . . . . . . . . . . 90
4.7. Developing Web Applications . . . . . . . . . . . . . . . . . . . . . . . . . . . . . . . . . . . . . . . . . . . . . . . . . . . . . . . . . 90
4.7.1. The “Spring Web MVC Framework” . . . . . . . . . . . . . . . . . . . . . . . . . . . . . . . . . . . . . . . . . . . . . . . . 90
Spring MVC Auto-configuration . . . . . . . . . . . . . . . . . . . . . . . . . . . . . . . . . . . . . . . . . . . . . . . . . . . . . . 91
HttpMessageConverters . . . . . . . . . . . . . . . . . . . . . . . . . . . . . . . . . . . . . . . . . . . . . . . . . . . . . . . . . . . . . 92
Custom JSON Serializers and Deserializers . . . . . . . . . . . . . . . . . . . . . . . . . . . . . . . . . . . . . . . . . . . . 92
MessageCodesResolver . . . . . . . . . . . . . . . . . . . . . . . . . . . . . . . . . . . . . . . . . . . . . . . . . . . . . . . . . . . . . . 93
Static Content . . . . . . . . . . . . . . . . . . . . . . . . . . . . . . . . . . . . . . . . . . . . . . . . . . . . . . . . . . . . . . . . . . . . . . . 93
Welcome Page . . . . . . . . . . . . . . . . . . . . . . . . . . . . . . . . . . . . . . . . . . . . . . . . . . . . . . . . . . . . . . . . . . . . . . 95
Custom Favicon . . . . . . . . . . . . . . . . . . . . . . . . . . . . . . . . . . . . . . . . . . . . . . . . . . . . . . . . . . . . . . . . . . . . . 95
Path Matching and Content Negotiation . . . . . . . . . . . . . . . . . . . . . . . . . . . . . . . . . . . . . . . . . . . . . . . 95
ConfigurableWebBindingInitializer . . . . . . . . . . . . . . . . . . . . . . . . . . . . . . . . . . . . . . . . . . . . . . . . . . . 96
Template Engines . . . . . . . . . . . . . . . . . . . . . . . . . . . . . . . . . . . . . . . . . . . . . . . . . . . . . . . . . . . . . . . . . . . 96
Error Handling . . . . . . . . . . . . . . . . . . . . . . . . . . . . . . . . . . . . . . . . . . . . . . . . . . . . . . . . . . . . . . . . . . . . . 97
Spring HATEOAS . . . . . . . . . . . . . . . . . . . . . . . . . . . . . . . . . . . . . . . . . . . . . . . . . . . . . . . . . . . . . . . . . . . 101
CORS Support. . . . . . . . . . . . . . . . . . . . . . . . . . . . . . . . . . . . . . . . . . . . . . . . . . . . . . . . . . . . . . . . . . . . . . 101
4.7.2. The “Spring WebFlux Framework” . . . . . . . . . . . . . . . . . . . . . . . . . . . . . . . . . . . . . . . . . . . . . . . 101
Spring WebFlux Auto-configuration . . . . . . . . . . . . . . . . . . . . . . . . . . . . . . . . . . . . . . . . . . . . . . . . . 104
HTTP Codecs with HttpMessageReaders and HttpMessageWriters . . . . . . . . . . . . . . . . . . . . . . 104
Static Content. . . . . . . . . . . . . . . . . . . . . . . . . . . . . . . . . . . . . . . . . . . . . . . . . . . . . . . . . . . . . . . . . . . . . . 105
Template Engines . . . . . . . . . . . . . . . . . . . . . . . . . . . . . . . . . . . . . . . . . . . . . . . . . . . . . . . . . . . . . . . . . . 105
Error Handling . . . . . . . . . . . . . . . . . . . . . . . . . . . . . . . . . . . . . . . . . . . . . . . . . . . . . . . . . . . . . . . . . . . . 105
Web Filters . . . . . . . . . . . . . . . . . . . . . . . . . . . . . . . . . . . . . . . . . . . . . . . . . . . . . . . . . . . . . . . . . . . . . . . . 107
4.7.3. JAX-RS and Jersey . . . . . . . . . . . . . . . . . . . . . . . . . . . . . . . . . . . . . . . . . . . . . . . . . . . . . . . . . . . . . . . 107
4.7.4. Embedded Servlet Container Support . . . . . . . . . . . . . . . . . . . . . . . . . . . . . . . . . . . . . . . . . . . . . 108
Servlets, Filters, and listeners . . . . . . . . . . . . . . . . . . . . . . . . . . . . . . . . . . . . . . . . . . . . . . . . . . . . . . . 108
Servlet Context Initialization . . . . . . . . . . . . . . . . . . . . . . . . . . . . . . . . . . . . . . . . . . . . . . . . . . . . . . . . 109
The ServletWebServerApplicationContext . . . . . . . . . . . . . . . . . . . . . . . . . . . . . . . . . . . . . . . . . . . . 110
Customizing Embedded Servlet Containers . . . . . . . . . . . . . . . . . . . . . . . . . . . . . . . . . . . . . . . . . . . 110
JSP Limitations . . . . . . . . . . . . . . . . . . . . . . . . . . . . . . . . . . . . . . . . . . . . . . . . . . . . . . . . . . . . . . . . . . . . 111
4.7.5. Embedded Reactive Server Support. . . . . . . . . . . . . . . . . . . . . . . . . . . . . . . . . . . . . . . . . . . . . . . 112
4.7.6. Reactive Server Resources Configuration. . . . . . . . . . . . . . . . . . . . . . . . . . . . . . . . . . . . . . . . . . 112
4.8. RSocket . . . . . . . . . . . . . . . . . . . . . . . . . . . . . . . . . . . . . . . . . . . . . . . . . . . . . . . . . . . . . . . . . . . . . . . . . . . . 112
4.8.1. RSocket Strategies Auto-configuration . . . . . . . . . . . . . . . . . . . . . . . . . . . . . . . . . . . . . . . . . . . . 112
4.8.2. RSocket server Auto-configuration . . . . . . . . . . . . . . . . . . . . . . . . . . . . . . . . . . . . . . . . . . . . . . . 113
4.8.3. Spring Messaging RSocket support. . . . . . . . . . . . . . . . . . . . . . . . . . . . . . . . . . . . . . . . . . . . . . . . 113
4.8.4. Calling RSocket Services with RSocketRequester . . . . . . . . . . . . . . . . . . . . . . . . . . . . . . . . . . . . 113
4.9. Security . . . . . . . . . . . . . . . . . . . . . . . . . . . . . . . . . . . . . . . . . . . . . . . . . . . . . . . . . . . . . . . . . . . . . . . . . . . . 114
4.9.1. MVC Security . . . . . . . . . . . . . . . . . . . . . . . . . . . . . . . . . . . . . . . . . . . . . . . . . . . . . . . . . . . . . . . . . . . 115
4.9.2. WebFlux Security . . . . . . . . . . . . . . . . . . . . . . . . . . . . . . . . . . . . . . . . . . . . . . . . . . . . . . . . . . . . . . . 115
4.9.3. OAuth2. . . . . . . . . . . . . . . . . . . . . . . . . . . . . . . . . . . . . . . . . . . . . . . . . . . . . . . . . . . . . . . . . . . . . . . . . 116
Client . . . . . . . . . . . . . . . . . . . . . . . . . . . . . . . . . . . . . . . . . . . . . . . . . . . . . . . . . . . . . . . . . . . . . . . . . . . . . 116
Resource Server . . . . . . . . . . . . . . . . . . . . . . . . . . . . . . . . . . . . . . . . . . . . . . . . . . . . . . . . . . . . . . . . . . . 118
Authorization Server . . . . . . . . . . . . . . . . . . . . . . . . . . . . . . . . . . . . . . . . . . . . . . . . . . . . . . . . . . . . . . . 119
4.9.4. SAML 2.0 . . . . . . . . . . . . . . . . . . . . . . . . . . . . . . . . . . . . . . . . . . . . . . . . . . . . . . . . . . . . . . . . . . . . . . . 119
Relying Party . . . . . . . . . . . . . . . . . . . . . . . . . . . . . . . . . . . . . . . . . . . . . . . . . . . . . . . . . . . . . . . . . . . . . . 119
4.9.5. Actuator Security . . . . . . . . . . . . . . . . . . . . . . . . . . . . . . . . . . . . . . . . . . . . . . . . . . . . . . . . . . . . . . . 120
Cross Site Request Forgery Protection . . . . . . . . . . . . . . . . . . . . . . . . . . . . . . . . . . . . . . . . . . . . . . . . 120
4.10. Working with SQL Databases . . . . . . . . . . . . . . . . . . . . . . . . . . . . . . . . . . . . . . . . . . . . . . . . . . . . . . . 121
4.10.1. Configure a DataSource . . . . . . . . . . . . . . . . . . . . . . . . . . . . . . . . . . . . . . . . . . . . . . . . . . . . . . . . 121
Embedded Database Support. . . . . . . . . . . . . . . . . . . . . . . . . . . . . . . . . . . . . . . . . . . . . . . . . . . . . . . . 121
Connection to a Production Database . . . . . . . . . . . . . . . . . . . . . . . . . . . . . . . . . . . . . . . . . . . . . . . . 122
Connection to a JNDI DataSource . . . . . . . . . . . . . . . . . . . . . . . . . . . . . . . . . . . . . . . . . . . . . . . . . . . . 123
4.10.2. Using JdbcTemplate . . . . . . . . . . . . . . . . . . . . . . . . . . . . . . . . . . . . . . . . . . . . . . . . . . . . . . . . . . . . 123
4.10.3. JPA and Spring Data JPA . . . . . . . . . . . . . . . . . . . . . . . . . . . . . . . . . . . . . . . . . . . . . . . . . . . . . . . . 124
Entity Classes . . . . . . . . . . . . . . . . . . . . . . . . . . . . . . . . . . . . . . . . . . . . . . . . . . . . . . . . . . . . . . . . . . . . . . 124
Spring Data JPA Repositories . . . . . . . . . . . . . . . . . . . . . . . . . . . . . . . . . . . . . . . . . . . . . . . . . . . . . . . . 126
Creating and Dropping JPA Databases. . . . . . . . . . . . . . . . . . . . . . . . . . . . . . . . . . . . . . . . . . . . . . . . 126
Open EntityManager in View. . . . . . . . . . . . . . . . . . . . . . . . . . . . . . . . . . . . . . . . . . . . . . . . . . . . . . . . 127
4.10.4. Spring Data JDBC . . . . . . . . . . . . . . . . . . . . . . . . . . . . . . . . . . . . . . . . . . . . . . . . . . . . . . . . . . . . . . 127
4.10.5. Using H2’s Web Console . . . . . . . . . . . . . . . . . . . . . . . . . . . . . . . . . . . . . . . . . . . . . . . . . . . . . . . . 127
Changing the H2 Console’s Path . . . . . . . . . . . . . . . . . . . . . . . . . . . . . . . . . . . . . . . . . . . . . . . . . . . . . 128
4.10.6. Using jOOQ . . . . . . . . . . . . . . . . . . . . . . . . . . . . . . . . . . . . . . . . . . . . . . . . . . . . . . . . . . . . . . . . . . . . 128
Code Generation . . . . . . . . . . . . . . . . . . . . . . . . . . . . . . . . . . . . . . . . . . . . . . . . . . . . . . . . . . . . . . . . . . . 128
Using DSLContext . . . . . . . . . . . . . . . . . . . . . . . . . . . . . . . . . . . . . . . . . . . . . . . . . . . . . . . . . . . . . . . . . . 129

jOOQ SQL Dialect . . . . . . . . . . . . . . . . . . . . . . . . . . . . . . . . . . . . . . . . . . . . . . . . . . . . . . . . . . . . . . . . . . 130
Customizing jOOQ. . . . . . . . . . . . . . . . . . . . . . . . . . . . . . . . . . . . . . . . . . . . . . . . . . . . . . . . . . . . . . . . . . 130
4.11. Working with NoSQL Technologies . . . . . . . . . . . . . . . . . . . . . . . . . . . . . . . . . . . . . . . . . . . . . . . . . . 130
4.11.1. Redis . . . . . . . . . . . . . . . . . . . . . . . . . . . . . . . . . . . . . . . . . . . . . . . . . . . . . . . . . . . . . . . . . . . . . . . . . 131
Connecting to Redis . . . . . . . . . . . . . . . . . . . . . . . . . . . . . . . . . . . . . . . . . . . . . . . . . . . . . . . . . . . . . . . . 131
4.11.2. MongoDB . . . . . . . . . . . . . . . . . . . . . . . . . . . . . . . . . . . . . . . . . . . . . . . . . . . . . . . . . . . . . . . . . . . . . 132
Connecting to a MongoDB Database . . . . . . . . . . . . . . . . . . . . . . . . . . . . . . . . . . . . . . . . . . . . . . . . . 132
MongoTemplate . . . . . . . . . . . . . . . . . . . . . . . . . . . . . . . . . . . . . . . . . . . . . . . . . . . . . . . . . . . . . . . . . . . 133
Spring Data MongoDB Repositories . . . . . . . . . . . . . . . . . . . . . . . . . . . . . . . . . . . . . . . . . . . . . . . . . . 134
Embedded Mongo. . . . . . . . . . . . . . . . . . . . . . . . . . . . . . . . . . . . . . . . . . . . . . . . . . . . . . . . . . . . . . . . . . 134
4.11.3. Neo4j . . . . . . . . . . . . . . . . . . . . . . . . . . . . . . . . . . . . . . . . . . . . . . . . . . . . . . . . . . . . . . . . . . . . . . . . . 135
Connecting to a Neo4j Database . . . . . . . . . . . . . . . . . . . . . . . . . . . . . . . . . . . . . . . . . . . . . . . . . . . . . 135
Using the Embedded Mode. . . . . . . . . . . . . . . . . . . . . . . . . . . . . . . . . . . . . . . . . . . . . . . . . . . . . . . . . . 135
Using Native Types . . . . . . . . . . . . . . . . . . . . . . . . . . . . . . . . . . . . . . . . . . . . . . . . . . . . . . . . . . . . . . . . . 136
Neo4jSession . . . . . . . . . . . . . . . . . . . . . . . . . . . . . . . . . . . . . . . . . . . . . . . . . . . . . . . . . . . . . . . . . . . . . . 136
Spring Data Neo4j Repositories . . . . . . . . . . . . . . . . . . . . . . . . . . . . . . . . . . . . . . . . . . . . . . . . . . . . . . 136
4.11.4. Solr . . . . . . . . . . . . . . . . . . . . . . . . . . . . . . . . . . . . . . . . . . . . . . . . . . . . . . . . . . . . . . . . . . . . . . . . . . . 137
Connecting to Solr. . . . . . . . . . . . . . . . . . . . . . . . . . . . . . . . . . . . . . . . . . . . . . . . . . . . . . . . . . . . . . . . . . 137
Spring Data Solr Repositories . . . . . . . . . . . . . . . . . . . . . . . . . . . . . . . . . . . . . . . . . . . . . . . . . . . . . . . 138
4.11.5. Elasticsearch . . . . . . . . . . . . . . . . . . . . . . . . . . . . . . . . . . . . . . . . . . . . . . . . . . . . . . . . . . . . . . . . . . 138
Connecting to Elasticsearch using REST clients. . . . . . . . . . . . . . . . . . . . . . . . . . . . . . . . . . . . . . . . 138
Connecting to Elasticsearch using Reactive REST clients . . . . . . . . . . . . . . . . . . . . . . . . . . . . . . . 139
Connecting to Elasticsearch using Jest. . . . . . . . . . . . . . . . . . . . . . . . . . . . . . . . . . . . . . . . . . . . . . . . 139
Connecting to Elasticsearch by Using Spring Data . . . . . . . . . . . . . . . . . . . . . . . . . . . . . . . . . . . . . 140
Spring Data Elasticsearch Repositories . . . . . . . . . . . . . . . . . . . . . . . . . . . . . . . . . . . . . . . . . . . . . . . 140
4.11.6. Cassandra . . . . . . . . . . . . . . . . . . . . . . . . . . . . . . . . . . . . . . . . . . . . . . . . . . . . . . . . . . . . . . . . . . . . . 141
Connecting to Cassandra. . . . . . . . . . . . . . . . . . . . . . . . . . . . . . . . . . . . . . . . . . . . . . . . . . . . . . . . . . . . 141
Spring Data Cassandra Repositories . . . . . . . . . . . . . . . . . . . . . . . . . . . . . . . . . . . . . . . . . . . . . . . . . 141
4.11.7. Couchbase. . . . . . . . . . . . . . . . . . . . . . . . . . . . . . . . . . . . . . . . . . . . . . . . . . . . . . . . . . . . . . . . . . . . . 142
Connecting to Couchbase . . . . . . . . . . . . . . . . . . . . . . . . . . . . . . . . . . . . . . . . . . . . . . . . . . . . . . . . . . . 142
Spring Data Couchbase Repositories . . . . . . . . . . . . . . . . . . . . . . . . . . . . . . . . . . . . . . . . . . . . . . . . . 142
4.11.8. LDAP . . . . . . . . . . . . . . . . . . . . . . . . . . . . . . . . . . . . . . . . . . . . . . . . . . . . . . . . . . . . . . . . . . . . . . . . . 143
Connecting to an LDAP Server. . . . . . . . . . . . . . . . . . . . . . . . . . . . . . . . . . . . . . . . . . . . . . . . . . . . . . . 144
Spring Data LDAP Repositories . . . . . . . . . . . . . . . . . . . . . . . . . . . . . . . . . . . . . . . . . . . . . . . . . . . . . . 144
Embedded In-memory LDAP Server . . . . . . . . . . . . . . . . . . . . . . . . . . . . . . . . . . . . . . . . . . . . . . . . . 144
4.11.9. InfluxDB . . . . . . . . . . . . . . . . . . . . . . . . . . . . . . . . . . . . . . . . . . . . . . . . . . . . . . . . . . . . . . . . . . . . . . 145
Connecting to InfluxDB . . . . . . . . . . . . . . . . . . . . . . . . . . . . . . . . . . . . . . . . . . . . . . . . . . . . . . . . . . . . . 145
4.12. Caching . . . . . . . . . . . . . . . . . . . . . . . . . . . . . . . . . . . . . . . . . . . . . . . . . . . . . . . . . . . . . . . . . . . . . . . . . . . 146
4.12.1. Supported Cache Providers . . . . . . . . . . . . . . . . . . . . . . . . . . . . . . . . . . . . . . . . . . . . . . . . . . . . . 147
Generic . . . . . . . . . . . . . . . . . . . . . . . . . . . . . . . . . . . . . . . . . . . . . . . . . . . . . . . . . . . . . . . . . . . . . . . . . . . 148
JCache (JSR-107). . . . . . . . . . . . . . . . . . . . . . . . . . . . . . . . . . . . . . . . . . . . . . . . . . . . . . . . . . . . . . . . . . . . 148

EhCache 2.x . . . . . . . . . . . . . . . . . . . . . . . . . . . . . . . . . . . . . . . . . . . . . . . . . . . . . . . . . . . . . . . . . . . . . . . 149
Hazelcast . . . . . . . . . . . . . . . . . . . . . . . . . . . . . . . . . . . . . . . . . . . . . . . . . . . . . . . . . . . . . . . . . . . . . . . . . . 149
Infinispan . . . . . . . . . . . . . . . . . . . . . . . . . . . . . . . . . . . . . . . . . . . . . . . . . . . . . . . . . . . . . . . . . . . . . . . . . 149
Couchbase. . . . . . . . . . . . . . . . . . . . . . . . . . . . . . . . . . . . . . . . . . . . . . . . . . . . . . . . . . . . . . . . . . . . . . . . . 149
Redis. . . . . . . . . . . . . . . . . . . . . . . . . . . . . . . . . . . . . . . . . . . . . . . . . . . . . . . . . . . . . . . . . . . . . . . . . . . . . . 150
Caffeine . . . . . . . . . . . . . . . . . . . . . . . . . . . . . . . . . . . . . . . . . . . . . . . . . . . . . . . . . . . . . . . . . . . . . . . . . . . 151
Simple . . . . . . . . . . . . . . . . . . . . . . . . . . . . . . . . . . . . . . . . . . . . . . . . . . . . . . . . . . . . . . . . . . . . . . . . . . . . 151
None. . . . . . . . . . . . . . . . . . . . . . . . . . . . . . . . . . . . . . . . . . . . . . . . . . . . . . . . . . . . . . . . . . . . . . . . . . . . . . 152
4.13. Messaging. . . . . . . . . . . . . . . . . . . . . . . . . . . . . . . . . . . . . . . . . . . . . . . . . . . . . . . . . . . . . . . . . . . . . . . . . 152
4.13.1. JMS . . . . . . . . . . . . . . . . . . . . . . . . . . . . . . . . . . . . . . . . . . . . . . . . . . . . . . . . . . . . . . . . . . . . . . . . . . . 152
ActiveMQ Support. . . . . . . . . . . . . . . . . . . . . . . . . . . . . . . . . . . . . . . . . . . . . . . . . . . . . . . . . . . . . . . . . . 152
Artemis Support . . . . . . . . . . . . . . . . . . . . . . . . . . . . . . . . . . . . . . . . . . . . . . . . . . . . . . . . . . . . . . . . . . . 153
Using a JNDI ConnectionFactory . . . . . . . . . . . . . . . . . . . . . . . . . . . . . . . . . . . . . . . . . . . . . . . . . . . . . 154
Sending a Message . . . . . . . . . . . . . . . . . . . . . . . . . . . . . . . . . . . . . . . . . . . . . . . . . . . . . . . . . . . . . . . . . 154
Receiving a Message. . . . . . . . . . . . . . . . . . . . . . . . . . . . . . . . . . . . . . . . . . . . . . . . . . . . . . . . . . . . . . . . 155
4.13.2. AMQP. . . . . . . . . . . . . . . . . . . . . . . . . . . . . . . . . . . . . . . . . . . . . . . . . . . . . . . . . . . . . . . . . . . . . . . . . 157
RabbitMQ support . . . . . . . . . . . . . . . . . . . . . . . . . . . . . . . . . . . . . . . . . . . . . . . . . . . . . . . . . . . . . . . . . 157
Sending a Message . . . . . . . . . . . . . . . . . . . . . . . . . . . . . . . . . . . . . . . . . . . . . . . . . . . . . . . . . . . . . . . . . 157
Receiving a Message. . . . . . . . . . . . . . . . . . . . . . . . . . . . . . . . . . . . . . . . . . . . . . . . . . . . . . . . . . . . . . . . 158
4.13.3. Apache Kafka Support. . . . . . . . . . . . . . . . . . . . . . . . . . . . . . . . . . . . . . . . . . . . . . . . . . . . . . . . . . 160
Sending a Message . . . . . . . . . . . . . . . . . . . . . . . . . . . . . . . . . . . . . . . . . . . . . . . . . . . . . . . . . . . . . . . . . 160
Receiving a Message. . . . . . . . . . . . . . . . . . . . . . . . . . . . . . . . . . . . . . . . . . . . . . . . . . . . . . . . . . . . . . . . 161
Kafka Streams . . . . . . . . . . . . . . . . . . . . . . . . . . . . . . . . . . . . . . . . . . . . . . . . . . . . . . . . . . . . . . . . . . . . . 162
Additional Kafka Properties. . . . . . . . . . . . . . . . . . . . . . . . . . . . . . . . . . . . . . . . . . . . . . . . . . . . . . . . . 162
Testing with Embedded Kafka. . . . . . . . . . . . . . . . . . . . . . . . . . . . . . . . . . . . . . . . . . . . . . . . . . . . . . . 163
4.14. Calling REST Services with RestTemplate . . . . . . . . . . . . . . . . . . . . . . . . . . . . . . . . . . . . . . . . . . . . . 164
4.14.1. RestTemplate Customization . . . . . . . . . . . . . . . . . . . . . . . . . . . . . . . . . . . . . . . . . . . . . . . . . . . . 165
4.15. Calling REST Services with WebClient . . . . . . . . . . . . . . . . . . . . . . . . . . . . . . . . . . . . . . . . . . . . . . . . 166
4.15.1. WebClient Runtime . . . . . . . . . . . . . . . . . . . . . . . . . . . . . . . . . . . . . . . . . . . . . . . . . . . . . . . . . . . . 166
4.15.2. WebClient Customization . . . . . . . . . . . . . . . . . . . . . . . . . . . . . . . . . . . . . . . . . . . . . . . . . . . . . . . 167
4.16. Validation . . . . . . . . . . . . . . . . . . . . . . . . . . . . . . . . . . . . . . . . . . . . . . . . . . . . . . . . . . . . . . . . . . . . . . . . . 167
4.17. Sending Email . . . . . . . . . . . . . . . . . . . . . . . . . . . . . . . . . . . . . . . . . . . . . . . . . . . . . . . . . . . . . . . . . . . . . 167
4.18. Distributed Transactions with JTA . . . . . . . . . . . . . . . . . . . . . . . . . . . . . . . . . . . . . . . . . . . . . . . . . . . 168
4.18.1. Using an Atomikos Transaction Manager. . . . . . . . . . . . . . . . . . . . . . . . . . . . . . . . . . . . . . . . . 168
4.18.2. Using a Bitronix Transaction Manager . . . . . . . . . . . . . . . . . . . . . . . . . . . . . . . . . . . . . . . . . . . 169
4.18.3. Using a Java EE Managed Transaction Manager . . . . . . . . . . . . . . . . . . . . . . . . . . . . . . . . . . 169
4.18.4. Mixing XA and Non-XA JMS Connections . . . . . . . . . . . . . . . . . . . . . . . . . . . . . . . . . . . . . . . . . 169
4.18.5. Supporting an Alternative Embedded Transaction Manager . . . . . . . . . . . . . . . . . . . . . . . 170
4.19. Hazelcast . . . . . . . . . . . . . . . . . . . . . . . . . . . . . . . . . . . . . . . . . . . . . . . . . . . . . . . . . . . . . . . . . . . . . . . . . 170
4.20. Quartz Scheduler . . . . . . . . . . . . . . . . . . . . . . . . . . . . . . . . . . . . . . . . . . . . . . . . . . . . . . . . . . . . . . . . . . 171
4.21. Task Execution and Scheduling . . . . . . . . . . . . . . . . . . . . . . . . . . . . . . . . . . . . . . . . . . . . . . . . . . . . . 172
4.22. Spring Integration . . . . . . . . . . . . . . . . . . . . . . . . . . . . . . . . . . . . . . . . . . . . . . . . . . . . . . . . . . . . . . . . . 173
4.23. Spring Session . . . . . . . . . . . . . . . . . . . . . . . . . . . . . . . . . . . . . . . . . . . . . . . . . . . . . . . . . . . . . . . . . . . . . 174
4.24. Monitoring and Management over JMX . . . . . . . . . . . . . . . . . . . . . . . . . . . . . . . . . . . . . . . . . . . . . . 174
4.25. Testing. . . . . . . . . . . . . . . . . . . . . . . . . . . . . . . . . . . . . . . . . . . . . . . . . . . . . . . . . . . . . . . . . . . . . . . . . . . . 175
4.25.1. Test Scope Dependencies . . . . . . . . . . . . . . . . . . . . . . . . . . . . . . . . . . . . . . . . . . . . . . . . . . . . . . . 175
4.25.2. Testing Spring Applications . . . . . . . . . . . . . . . . . . . . . . . . . . . . . . . . . . . . . . . . . . . . . . . . . . . . . 175
4.25.3. Testing Spring Boot Applications . . . . . . . . . . . . . . . . . . . . . . . . . . . . . . . . . . . . . . . . . . . . . . . . 176
Detecting Web Application Type. . . . . . . . . . . . . . . . . . . . . . . . . . . . . . . . . . . . . . . . . . . . . . . . . . . . . 177
Detecting Test Configuration . . . . . . . . . . . . . . . . . . . . . . . . . . . . . . . . . . . . . . . . . . . . . . . . . . . . . . . . 177
Excluding Test Configuration . . . . . . . . . . . . . . . . . . . . . . . . . . . . . . . . . . . . . . . . . . . . . . . . . . . . . . . 178
Using Application Arguments . . . . . . . . . . . . . . . . . . . . . . . . . . . . . . . . . . . . . . . . . . . . . . . . . . . . . . . 178
Testing with a mock environment . . . . . . . . . . . . . . . . . . . . . . . . . . . . . . . . . . . . . . . . . . . . . . . . . . . 179
Testing with a running server . . . . . . . . . . . . . . . . . . . . . . . . . . . . . . . . . . . . . . . . . . . . . . . . . . . . . . . 180
Customizing WebTestClient . . . . . . . . . . . . . . . . . . . . . . . . . . . . . . . . . . . . . . . . . . . . . . . . . . . . . . . . . 181
Using JMX . . . . . . . . . . . . . . . . . . . . . . . . . . . . . . . . . . . . . . . . . . . . . . . . . . . . . . . . . . . . . . . . . . . . . . . . . 182
Mocking and Spying Beans. . . . . . . . . . . . . . . . . . . . . . . . . . . . . . . . . . . . . . . . . . . . . . . . . . . . . . . . . . 182
Auto-configured Tests . . . . . . . . . . . . . . . . . . . . . . . . . . . . . . . . . . . . . . . . . . . . . . . . . . . . . . . . . . . . . . 184
Auto-configured JSON Tests . . . . . . . . . . . . . . . . . . . . . . . . . . . . . . . . . . . . . . . . . . . . . . . . . . . . . . . . . 184
Auto-configured Spring MVC Tests . . . . . . . . . . . . . . . . . . . . . . . . . . . . . . . . . . . . . . . . . . . . . . . . . . . 186
Auto-configured Spring WebFlux Tests . . . . . . . . . . . . . . . . . . . . . . . . . . . . . . . . . . . . . . . . . . . . . . . 188
Auto-configured Data JPA Tests . . . . . . . . . . . . . . . . . . . . . . . . . . . . . . . . . . . . . . . . . . . . . . . . . . . . . . 190
Auto-configured JDBC Tests . . . . . . . . . . . . . . . . . . . . . . . . . . . . . . . . . . . . . . . . . . . . . . . . . . . . . . . . . 191
Auto-configured Data JDBC Tests . . . . . . . . . . . . . . . . . . . . . . . . . . . . . . . . . . . . . . . . . . . . . . . . . . . . 192
Auto-configured jOOQ Tests . . . . . . . . . . . . . . . . . . . . . . . . . . . . . . . . . . . . . . . . . . . . . . . . . . . . . . . . . 192
Auto-configured Data MongoDB Tests . . . . . . . . . . . . . . . . . . . . . . . . . . . . . . . . . . . . . . . . . . . . . . . . 193
Auto-configured Data Neo4j Tests . . . . . . . . . . . . . . . . . . . . . . . . . . . . . . . . . . . . . . . . . . . . . . . . . . . 194
Auto-configured Data Redis Tests . . . . . . . . . . . . . . . . . . . . . . . . . . . . . . . . . . . . . . . . . . . . . . . . . . . . 195
Auto-configured Data LDAP Tests . . . . . . . . . . . . . . . . . . . . . . . . . . . . . . . . . . . . . . . . . . . . . . . . . . . . 195
Auto-configured REST Clients . . . . . . . . . . . . . . . . . . . . . . . . . . . . . . . . . . . . . . . . . . . . . . . . . . . . . . . 196
Auto-configured Spring REST Docs Tests . . . . . . . . . . . . . . . . . . . . . . . . . . . . . . . . . . . . . . . . . . . . . 197
Additional Auto-configuration and Slicing . . . . . . . . . . . . . . . . . . . . . . . . . . . . . . . . . . . . . . . . . . . . 201
User Configuration and Slicing . . . . . . . . . . . . . . . . . . . . . . . . . . . . . . . . . . . . . . . . . . . . . . . . . . . . . . 201
Using Spock to Test Spring Boot Applications . . . . . . . . . . . . . . . . . . . . . . . . . . . . . . . . . . . . . . . . . 203
4.25.4. Test Utilities . . . . . . . . . . . . . . . . . . . . . . . . . . . . . . . . . . . . . . . . . . . . . . . . . . . . . . . . . . . . . . . . . . . 203
ConfigFileApplicationContextInitializer . . . . . . . . . . . . . . . . . . . . . . . . . . . . . . . . . . . . . . . . . . . . . . 203
TestPropertyValues . . . . . . . . . . . . . . . . . . . . . . . . . . . . . . . . . . . . . . . . . . . . . . . . . . . . . . . . . . . . . . . . 203
OutputCapture. . . . . . . . . . . . . . . . . . . . . . . . . . . . . . . . . . . . . . . . . . . . . . . . . . . . . . . . . . . . . . . . . . . . . 203
TestRestTemplate . . . . . . . . . . . . . . . . . . . . . . . . . . . . . . . . . . . . . . . . . . . . . . . . . . . . . . . . . . . . . . . . . . 204
4.26. WebSockets . . . . . . . . . . . . . . . . . . . . . . . . . . . . . . . . . . . . . . . . . . . . . . . . . . . . . . . . . . . . . . . . . . . . . . . 205
4.27. Web Services . . . . . . . . . . . . . . . . . . . . . . . . . . . . . . . . . . . . . . . . . . . . . . . . . . . . . . . . . . . . . . . . . . . . . . 206
4.27.1. Calling Web Services with WebServiceTemplate . . . . . . . . . . . . . . . . . . . . . . . . . . . . . . . . . . . . 206
4.28. Creating Your Own Auto-configuration . . . . . . . . . . . . . . . . . . . . . . . . . . . . . . . . . . . . . . . . . . . . . . 207
4.28.1. Understanding Auto-configured Beans . . . . . . . . . . . . . . . . . . . . . . . . . . . . . . . . . . . . . . . . . . . 207
4.28.2. Locating Auto-configuration Candidates . . . . . . . . . . . . . . . . . . . . . . . . . . . . . . . . . . . . . . . . . 207
4.28.3. Condition Annotations . . . . . . . . . . . . . . . . . . . . . . . . . . . . . . . . . . . . . . . . . . . . . . . . . . . . . . . . . 208
Class Conditions . . . . . . . . . . . . . . . . . . . . . . . . . . . . . . . . . . . . . . . . . . . . . . . . . . . . . . . . . . . . . . . . . . . 208
Bean Conditions . . . . . . . . . . . . . . . . . . . . . . . . . . . . . . . . . . . . . . . . . . . . . . . . . . . . . . . . . . . . . . . . . . . 209
Property Conditions . . . . . . . . . . . . . . . . . . . . . . . . . . . . . . . . . . . . . . . . . . . . . . . . . . . . . . . . . . . . . . . . 210
Resource Conditions. . . . . . . . . . . . . . . . . . . . . . . . . . . . . . . . . . . . . . . . . . . . . . . . . . . . . . . . . . . . . . . . 210
Web Application Conditions . . . . . . . . . . . . . . . . . . . . . . . . . . . . . . . . . . . . . . . . . . . . . . . . . . . . . . . . 210
SpEL Expression Conditions. . . . . . . . . . . . . . . . . . . . . . . . . . . . . . . . . . . . . . . . . . . . . . . . . . . . . . . . . 210
4.28.4. Testing your Auto-configuration . . . . . . . . . . . . . . . . . . . . . . . . . . . . . . . . . . . . . . . . . . . . . . . . 210
Simulating a Web Context . . . . . . . . . . . . . . . . . . . . . . . . . . . . . . . . . . . . . . . . . . . . . . . . . . . . . . . . . . 212
Overriding the Classpath . . . . . . . . . . . . . . . . . . . . . . . . . . . . . . . . . . . . . . . . . . . . . . . . . . . . . . . . . . . 212
4.28.5. Creating Your Own Starter . . . . . . . . . . . . . . . . . . . . . . . . . . . . . . . . . . . . . . . . . . . . . . . . . . . . . . 212
Naming . . . . . . . . . . . . . . . . . . . . . . . . . . . . . . . . . . . . . . . . . . . . . . . . . . . . . . . . . . . . . . . . . . . . . . . . . . . 213
Configuration keys . . . . . . . . . . . . . . . . . . . . . . . . . . . . . . . . . . . . . . . . . . . . . . . . . . . . . . . . . . . . . . . . . 213
autoconfigure Module . . . . . . . . . . . . . . . . . . . . . . . . . . . . . . . . . . . . . . . . . . . . . . . . . . . . . . . . . . . . . . 214
Starter Module. . . . . . . . . . . . . . . . . . . . . . . . . . . . . . . . . . . . . . . . . . . . . . . . . . . . . . . . . . . . . . . . . . . . . 215
4.29. Kotlin support . . . . . . . . . . . . . . . . . . . . . . . . . . . . . . . . . . . . . . . . . . . . . . . . . . . . . . . . . . . . . . . . . . . . . 216
4.29.1. Requirements . . . . . . . . . . . . . . . . . . . . . . . . . . . . . . . . . . . . . . . . . . . . . . . . . . . . . . . . . . . . . . . . . 216
4.29.2. Null-safety . . . . . . . . . . . . . . . . . . . . . . . . . . . . . . . . . . . . . . . . . . . . . . . . . . . . . . . . . . . . . . . . . . . . 216
4.29.3. Kotlin API . . . . . . . . . . . . . . . . . . . . . . . . . . . . . . . . . . . . . . . . . . . . . . . . . . . . . . . . . . . . . . . . . . . . . 217
runApplication . . . . . . . . . . . . . . . . . . . . . . . . . . . . . . . . . . . . . . . . . . . . . . . . . . . . . . . . . . . . . . . . . . . . 217
Extensions. . . . . . . . . . . . . . . . . . . . . . . . . . . . . . . . . . . . . . . . . . . . . . . . . . . . . . . . . . . . . . . . . . . . . . . . . 217
4.29.4. Dependency management . . . . . . . . . . . . . . . . . . . . . . . . . . . . . . . . . . . . . . . . . . . . . . . . . . . . . . 217
4.29.5. @ConfigurationProperties . . . . . . . . . . . . . . . . . . . . . . . . . . . . . . . . . . . . . . . . . . . . . . . . . . . . . . . 218
4.29.6. Testing . . . . . . . . . . . . . . . . . . . . . . . . . . . . . . . . . . . . . . . . . . . . . . . . . . . . . . . . . . . . . . . . . . . . . . . . 218
4.29.7. Resources . . . . . . . . . . . . . . . . . . . . . . . . . . . . . . . . . . . . . . . . . . . . . . . . . . . . . . . . . . . . . . . . . . . . . 219
Further reading. . . . . . . . . . . . . . . . . . . . . . . . . . . . . . . . . . . . . . . . . . . . . . . . . . . . . . . . . . . . . . . . . . . . 219
Examples. . . . . . . . . . . . . . . . . . . . . . . . . . . . . . . . . . . . . . . . . . . . . . . . . . . . . . . . . . . . . . . . . . . . . . . . . . 219
4.30. What to Read Next . . . . . . . . . . . . . . . . . . . . . . . . . . . . . . . . . . . . . . . . . . . . . . . . . . . . . . . . . . . . . . . . . 219
5. Spring Boot Actuator: Production-ready Features . . . . . . . . . . . . . . . . . . . . . . . . . . . . . . . . . . . . . . . . . . 220
5.1. Enabling Production-ready Features. . . . . . . . . . . . . . . . . . . . . . . . . . . . . . . . . . . . . . . . . . . . . . . . . . 220
5.2. Endpoints . . . . . . . . . . . . . . . . . . . . . . . . . . . . . . . . . . . . . . . . . . . . . . . . . . . . . . . . . . . . . . . . . . . . . . . . . . 220
5.2.1. Enabling Endpoints . . . . . . . . . . . . . . . . . . . . . . . . . . . . . . . . . . . . . . . . . . . . . . . . . . . . . . . . . . . . . 222
5.2.2. Exposing Endpoints . . . . . . . . . . . . . . . . . . . . . . . . . . . . . . . . . . . . . . . . . . . . . . . . . . . . . . . . . . . . . 222
5.2.3. Securing HTTP Endpoints . . . . . . . . . . . . . . . . . . . . . . . . . . . . . . . . . . . . . . . . . . . . . . . . . . . . . . . . 224
5.2.4. Configuring Endpoints . . . . . . . . . . . . . . . . . . . . . . . . . . . . . . . . . . . . . . . . . . . . . . . . . . . . . . . . . . 225
5.2.5. Hypermedia for Actuator Web Endpoints . . . . . . . . . . . . . . . . . . . . . . . . . . . . . . . . . . . . . . . . . 225
5.2.6. CORS Support. . . . . . . . . . . . . . . . . . . . . . . . . . . . . . . . . . . . . . . . . . . . . . . . . . . . . . . . . . . . . . . . . . . 226
5.2.7. Implementing Custom Endpoints . . . . . . . . . . . . . . . . . . . . . . . . . . . . . . . . . . . . . . . . . . . . . . . . . 226
Receiving Input . . . . . . . . . . . . . . . . . . . . . . . . . . . . . . . . . . . . . . . . . . . . . . . . . . . . . . . . . . . . . . . . . . . . 227
Custom Web Endpoints . . . . . . . . . . . . . . . . . . . . . . . . . . . . . . . . . . . . . . . . . . . . . . . . . . . . . . . . . . . . . 227
Servlet endpoints . . . . . . . . . . . . . . . . . . . . . . . . . . . . . . . . . . . . . . . . . . . . . . . . . . . . . . . . . . . . . . . . . . 229
Controller endpoints . . . . . . . . . . . . . . . . . . . . . . . . . . . . . . . . . . . . . . . . . . . . . . . . . . . . . . . . . . . . . . . 229
5.2.8. Health Information . . . . . . . . . . . . . . . . . . . . . . . . . . . . . . . . . . . . . . . . . . . . . . . . . . . . . . . . . . . . . 229
Auto-configured HealthIndicators . . . . . . . . . . . . . . . . . . . . . . . . . . . . . . . . . . . . . . . . . . . . . . . . . . . 230
Writing Custom HealthIndicators. . . . . . . . . . . . . . . . . . . . . . . . . . . . . . . . . . . . . . . . . . . . . . . . . . . . 231
Reactive Health Indicators . . . . . . . . . . . . . . . . . . . . . . . . . . . . . . . . . . . . . . . . . . . . . . . . . . . . . . . . . . 232
Auto-configured ReactiveHealthIndicators . . . . . . . . . . . . . . . . . . . . . . . . . . . . . . . . . . . . . . . . . . . 233
Health Groups . . . . . . . . . . . . . . . . . . . . . . . . . . . . . . . . . . . . . . . . . . . . . . . . . . . . . . . . . . . . . . . . . . . . . 233
5.2.9. Application Information . . . . . . . . . . . . . . . . . . . . . . . . . . . . . . . . . . . . . . . . . . . . . . . . . . . . . . . . . 234
Auto-configured InfoContributors . . . . . . . . . . . . . . . . . . . . . . . . . . . . . . . . . . . . . . . . . . . . . . . . . . . 234
Custom Application Information . . . . . . . . . . . . . . . . . . . . . . . . . . . . . . . . . . . . . . . . . . . . . . . . . . . . 234
Git Commit Information . . . . . . . . . . . . . . . . . . . . . . . . . . . . . . . . . . . . . . . . . . . . . . . . . . . . . . . . . . . . 235
Build Information . . . . . . . . . . . . . . . . . . . . . . . . . . . . . . . . . . . . . . . . . . . . . . . . . . . . . . . . . . . . . . . . . . 235
Writing Custom InfoContributors. . . . . . . . . . . . . . . . . . . . . . . . . . . . . . . . . . . . . . . . . . . . . . . . . . . . 235
5.3. Monitoring and Management over HTTP. . . . . . . . . . . . . . . . . . . . . . . . . . . . . . . . . . . . . . . . . . . . . . 236
5.3.1. Customizing the Management Endpoint Paths . . . . . . . . . . . . . . . . . . . . . . . . . . . . . . . . . . . . . 236
5.3.2. Customizing the Management Server Port. . . . . . . . . . . . . . . . . . . . . . . . . . . . . . . . . . . . . . . . . 237
5.3.3. Configuring Management-specific SSL . . . . . . . . . . . . . . . . . . . . . . . . . . . . . . . . . . . . . . . . . . . . 237
5.3.4. Customizing the Management Server Address . . . . . . . . . . . . . . . . . . . . . . . . . . . . . . . . . . . . . 238
5.3.5. Disabling HTTP Endpoints . . . . . . . . . . . . . . . . . . . . . . . . . . . . . . . . . . . . . . . . . . . . . . . . . . . . . . . 238
5.4. Monitoring and Management over JMX . . . . . . . . . . . . . . . . . . . . . . . . . . . . . . . . . . . . . . . . . . . . . . . 239
5.4.1. Customizing MBean Names . . . . . . . . . . . . . . . . . . . . . . . . . . . . . . . . . . . . . . . . . . . . . . . . . . . . . . 239
5.4.2. Disabling JMX Endpoints . . . . . . . . . . . . . . . . . . . . . . . . . . . . . . . . . . . . . . . . . . . . . . . . . . . . . . . . 239
5.4.3. Using Jolokia for JMX over HTTP . . . . . . . . . . . . . . . . . . . . . . . . . . . . . . . . . . . . . . . . . . . . . . . . . 239
Customizing Jolokia . . . . . . . . . . . . . . . . . . . . . . . . . . . . . . . . . . . . . . . . . . . . . . . . . . . . . . . . . . . . . . . . 240
Disabling Jolokia . . . . . . . . . . . . . . . . . . . . . . . . . . . . . . . . . . . . . . . . . . . . . . . . . . . . . . . . . . . . . . . . . . . 240
5.5. Loggers . . . . . . . . . . . . . . . . . . . . . . . . . . . . . . . . . . . . . . . . . . . . . . . . . . . . . . . . . . . . . . . . . . . . . . . . . . . . 240
5.5.1. Configure a Logger . . . . . . . . . . . . . . . . . . . . . . . . . . . . . . . . . . . . . . . . . . . . . . . . . . . . . . . . . . . . . . 240
5.6. Metrics . . . . . . . . . . . . . . . . . . . . . . . . . . . . . . . . . . . . . . . . . . . . . . . . . . . . . . . . . . . . . . . . . . . . . . . . . . . . 241
5.6.1. Getting started . . . . . . . . . . . . . . . . . . . . . . . . . . . . . . . . . . . . . . . . . . . . . . . . . . . . . . . . . . . . . . . . . . 241
5.6.2. Supported monitoring systems . . . . . . . . . . . . . . . . . . . . . . . . . . . . . . . . . . . . . . . . . . . . . . . . . . . 242
AppOptics . . . . . . . . . . . . . . . . . . . . . . . . . . . . . . . . . . . . . . . . . . . . . . . . . . . . . . . . . . . . . . . . . . . . . . . . . 242
Atlas . . . . . . . . . . . . . . . . . . . . . . . . . . . . . . . . . . . . . . . . . . . . . . . . . . . . . . . . . . . . . . . . . . . . . . . . . . . . . . 242
Datadog . . . . . . . . . . . . . . . . . . . . . . . . . . . . . . . . . . . . . . . . . . . . . . . . . . . . . . . . . . . . . . . . . . . . . . . . . . . 243
Dynatrace . . . . . . . . . . . . . . . . . . . . . . . . . . . . . . . . . . . . . . . . . . . . . . . . . . . . . . . . . . . . . . . . . . . . . . . . . 243
Elastic. . . . . . . . . . . . . . . . . . . . . . . . . . . . . . . . . . . . . . . . . . . . . . . . . . . . . . . . . . . . . . . . . . . . . . . . . . . . . 243
Ganglia. . . . . . . . . . . . . . . . . . . . . . . . . . . . . . . . . . . . . . . . . . . . . . . . . . . . . . . . . . . . . . . . . . . . . . . . . . . . 243
Graphite . . . . . . . . . . . . . . . . . . . . . . . . . . . . . . . . . . . . . . . . . . . . . . . . . . . . . . . . . . . . . . . . . . . . . . . . . . 244
Humio . . . . . . . . . . . . . . . . . . . . . . . . . . . . . . . . . . . . . . . . . . . . . . . . . . . . . . . . . . . . . . . . . . . . . . . . . . . . 244
Influx . . . . . . . . . . . . . . . . . . . . . . . . . . . . . . . . . . . . . . . . . . . . . . . . . . . . . . . . . . . . . . . . . . . . . . . . . . . . . 244
JMX . . . . . . . . . . . . . . . . . . . . . . . . . . . . . . . . . . . . . . . . . . . . . . . . . . . . . . . . . . . . . . . . . . . . . . . . . . . . . . . 244
KairosDB . . . . . . . . . . . . . . . . . . . . . . . . . . . . . . . . . . . . . . . . . . . . . . . . . . . . . . . . . . . . . . . . . . . . . . . . . . 245
New Relic . . . . . . . . . . . . . . . . . . . . . . . . . . . . . . . . . . . . . . . . . . . . . . . . . . . . . . . . . . . . . . . . . . . . . . . . . 245
Prometheus . . . . . . . . . . . . . . . . . . . . . . . . . . . . . . . . . . . . . . . . . . . . . . . . . . . . . . . . . . . . . . . . . . . . . . . 245
SignalFx. . . . . . . . . . . . . . . . . . . . . . . . . . . . . . . . . . . . . . . . . . . . . . . . . . . . . . . . . . . . . . . . . . . . . . . . . . . 246
Simple . . . . . . . . . . . . . . . . . . . . . . . . . . . . . . . . . . . . . . . . . . . . . . . . . . . . . . . . . . . . . . . . . . . . . . . . . . . . 246
StatsD . . . . . . . . . . . . . . . . . . . . . . . . . . . . . . . . . . . . . . . . . . . . . . . . . . . . . . . . . . . . . . . . . . . . . . . . . . . . . 247
Wavefront. . . . . . . . . . . . . . . . . . . . . . . . . . . . . . . . . . . . . . . . . . . . . . . . . . . . . . . . . . . . . . . . . . . . . . . . . 247
5.6.3. Supported Metrics . . . . . . . . . . . . . . . . . . . . . . . . . . . . . . . . . . . . . . . . . . . . . . . . . . . . . . . . . . . . . . 247
Spring MVC Metrics . . . . . . . . . . . . . . . . . . . . . . . . . . . . . . . . . . . . . . . . . . . . . . . . . . . . . . . . . . . . . . . . 248
Spring WebFlux Metrics . . . . . . . . . . . . . . . . . . . . . . . . . . . . . . . . . . . . . . . . . . . . . . . . . . . . . . . . . . . . 249
Jersey Server Metrics . . . . . . . . . . . . . . . . . . . . . . . . . . . . . . . . . . . . . . . . . . . . . . . . . . . . . . . . . . . . . . . 250
HTTP Client Metrics . . . . . . . . . . . . . . . . . . . . . . . . . . . . . . . . . . . . . . . . . . . . . . . . . . . . . . . . . . . . . . . . 251
Cache Metrics. . . . . . . . . . . . . . . . . . . . . . . . . . . . . . . . . . . . . . . . . . . . . . . . . . . . . . . . . . . . . . . . . . . . . . 251
DataSource Metrics . . . . . . . . . . . . . . . . . . . . . . . . . . . . . . . . . . . . . . . . . . . . . . . . . . . . . . . . . . . . . . . . 252
Hibernate Metrics. . . . . . . . . . . . . . . . . . . . . . . . . . . . . . . . . . . . . . . . . . . . . . . . . . . . . . . . . . . . . . . . . . 252
RabbitMQ Metrics . . . . . . . . . . . . . . . . . . . . . . . . . . . . . . . . . . . . . . . . . . . . . . . . . . . . . . . . . . . . . . . . . . 252
5.6.4. Registering custom metrics . . . . . . . . . . . . . . . . . . . . . . . . . . . . . . . . . . . . . . . . . . . . . . . . . . . . . . 252
5.6.5. Customizing individual metrics . . . . . . . . . . . . . . . . . . . . . . . . . . . . . . . . . . . . . . . . . . . . . . . . . . 253
Common tags . . . . . . . . . . . . . . . . . . . . . . . . . . . . . . . . . . . . . . . . . . . . . . . . . . . . . . . . . . . . . . . . . . . . . . 253
Per-meter properties . . . . . . . . . . . . . . . . . . . . . . . . . . . . . . . . . . . . . . . . . . . . . . . . . . . . . . . . . . . . . . . 254
5.6.6. Metrics endpoint. . . . . . . . . . . . . . . . . . . . . . . . . . . . . . . . . . . . . . . . . . . . . . . . . . . . . . . . . . . . . . . . 254
5.7. Auditing . . . . . . . . . . . . . . . . . . . . . . . . . . . . . . . . . . . . . . . . . . . . . . . . . . . . . . . . . . . . . . . . . . . . . . . . . . . 255
5.7.1. Custom Auditing . . . . . . . . . . . . . . . . . . . . . . . . . . . . . . . . . . . . . . . . . . . . . . . . . . . . . . . . . . . . . . . . 255
5.8. HTTP Tracing. . . . . . . . . . . . . . . . . . . . . . . . . . . . . . . . . . . . . . . . . . . . . . . . . . . . . . . . . . . . . . . . . . . . . . . 255
5.8.1. Custom HTTP tracing . . . . . . . . . . . . . . . . . . . . . . . . . . . . . . . . . . . . . . . . . . . . . . . . . . . . . . . . . . . . 256
5.9. Process Monitoring . . . . . . . . . . . . . . . . . . . . . . . . . . . . . . . . . . . . . . . . . . . . . . . . . . . . . . . . . . . . . . . . . 256
5.9.1. Extending Configuration. . . . . . . . . . . . . . . . . . . . . . . . . . . . . . . . . . . . . . . . . . . . . . . . . . . . . . . . . 256
5.9.2. Programmatically . . . . . . . . . . . . . . . . . . . . . . . . . . . . . . . . . . . . . . . . . . . . . . . . . . . . . . . . . . . . . . . 256
5.10. Cloud Foundry Support . . . . . . . . . . . . . . . . . . . . . . . . . . . . . . . . . . . . . . . . . . . . . . . . . . . . . . . . . . . . 257
5.10.1. Disabling Extended Cloud Foundry Actuator Support . . . . . . . . . . . . . . . . . . . . . . . . . . . . . 257
5.10.2. Cloud Foundry Self-signed Certificates . . . . . . . . . . . . . . . . . . . . . . . . . . . . . . . . . . . . . . . . . . . 257
5.10.3. Custom context path . . . . . . . . . . . . . . . . . . . . . . . . . . . . . . . . . . . . . . . . . . . . . . . . . . . . . . . . . . . 257
5.11. What to Read Next . . . . . . . . . . . . . . . . . . . . . . . . . . . . . . . . . . . . . . . . . . . . . . . . . . . . . . . . . . . . . . . . . 258
6. Deploying Spring Boot Applications . . . . . . . . . . . . . . . . . . . . . . . . . . . . . . . . . . . . . . . . . . . . . . . . . . . . . . 259
6.1. Deploying to Containers . . . . . . . . . . . . . . . . . . . . . . . . . . . . . . . . . . . . . . . . . . . . . . . . . . . . . . . . . . . . . 259
6.2. Deploying to the Cloud . . . . . . . . . . . . . . . . . . . . . . . . . . . . . . . . . . . . . . . . . . . . . . . . . . . . . . . . . . . . . . 260
6.2.1. Cloud Foundry . . . . . . . . . . . . . . . . . . . . . . . . . . . . . . . . . . . . . . . . . . . . . . . . . . . . . . . . . . . . . . . . . . 260
Binding to Services . . . . . . . . . . . . . . . . . . . . . . . . . . . . . . . . . . . . . . . . . . . . . . . . . . . . . . . . . . . . . . . . . 263
6.2.2. Heroku. . . . . . . . . . . . . . . . . . . . . . . . . . . . . . . . . . . . . . . . . . . . . . . . . . . . . . . . . . . . . . . . . . . . . . . . . 263
6.2.3. OpenShift . . . . . . . . . . . . . . . . . . . . . . . . . . . . . . . . . . . . . . . . . . . . . . . . . . . . . . . . . . . . . . . . . . . . . . 265
6.2.4. Amazon Web Services (AWS) . . . . . . . . . . . . . . . . . . . . . . . . . . . . . . . . . . . . . . . . . . . . . . . . . . . . 265
AWS Elastic Beanstalk . . . . . . . . . . . . . . . . . . . . . . . . . . . . . . . . . . . . . . . . . . . . . . . . . . . . . . . . . . . . . . 265
Summary. . . . . . . . . . . . . . . . . . . . . . . . . . . . . . . . . . . . . . . . . . . . . . . . . . . . . . . . . . . . . . . . . . . . . . . . . . 266
6.2.5. Boxfuse and Amazon Web Services . . . . . . . . . . . . . . . . . . . . . . . . . . . . . . . . . . . . . . . . . . . . . . . 266
6.2.6. Google Cloud . . . . . . . . . . . . . . . . . . . . . . . . . . . . . . . . . . . . . . . . . . . . . . . . . . . . . . . . . . . . . . . . . . . 267
6.3. Installing Spring Boot Applications . . . . . . . . . . . . . . . . . . . . . . . . . . . . . . . . . . . . . . . . . . . . . . . . . . . 268
6.3.1. Supported Operating Systems . . . . . . . . . . . . . . . . . . . . . . . . . . . . . . . . . . . . . . . . . . . . . . . . . . . . 269
6.3.2. Unix/Linux Services . . . . . . . . . . . . . . . . . . . . . . . . . . . . . . . . . . . . . . . . . . . . . . . . . . . . . . . . . . . . . 269
Installation as an init.d Service (System V) . . . . . . . . . . . . . . . . . . . . . . . . . . . . . . . . . . . . . . . . . . 269
Installation as a systemd Service . . . . . . . . . . . . . . . . . . . . . . . . . . . . . . . . . . . . . . . . . . . . . . . . . . . . . 271
Customizing the Startup Script . . . . . . . . . . . . . . . . . . . . . . . . . . . . . . . . . . . . . . . . . . . . . . . . . . . . . . 272
6.3.3. Microsoft Windows Services . . . . . . . . . . . . . . . . . . . . . . . . . . . . . . . . . . . . . . . . . . . . . . . . . . . . . 275
6.4. What to Read Next . . . . . . . . . . . . . . . . . . . . . . . . . . . . . . . . . . . . . . . . . . . . . . . . . . . . . . . . . . . . . . . . . . 275
7. Spring Boot CLI . . . . . . . . . . . . . . . . . . . . . . . . . . . . . . . . . . . . . . . . . . . . . . . . . . . . . . . . . . . . . . . . . . . . . . . . . 276
7.1. Installing the CLI . . . . . . . . . . . . . . . . . . . . . . . . . . . . . . . . . . . . . . . . . . . . . . . . . . . . . . . . . . . . . . . . . . . 276
7.2. Using the CLI . . . . . . . . . . . . . . . . . . . . . . . . . . . . . . . . . . . . . . . . . . . . . . . . . . . . . . . . . . . . . . . . . . . . . . . 276
7.2.1. Running Applications with the CLI . . . . . . . . . . . . . . . . . . . . . . . . . . . . . . . . . . . . . . . . . . . . . . . 277
Deduced “grab” Dependencies . . . . . . . . . . . . . . . . . . . . . . . . . . . . . . . . . . . . . . . . . . . . . . . . . . . . . . 278
Deduced “grab” Coordinates . . . . . . . . . . . . . . . . . . . . . . . . . . . . . . . . . . . . . . . . . . . . . . . . . . . . . . . . 279
Default Import Statements . . . . . . . . . . . . . . . . . . . . . . . . . . . . . . . . . . . . . . . . . . . . . . . . . . . . . . . . . . 279
Automatic Main Method . . . . . . . . . . . . . . . . . . . . . . . . . . . . . . . . . . . . . . . . . . . . . . . . . . . . . . . . . . . . 279
Custom Dependency Management . . . . . . . . . . . . . . . . . . . . . . . . . . . . . . . . . . . . . . . . . . . . . . . . . . . 279
7.2.2. Applications with Multiple Source Files . . . . . . . . . . . . . . . . . . . . . . . . . . . . . . . . . . . . . . . . . . . 280
7.2.3. Packaging Your Application . . . . . . . . . . . . . . . . . . . . . . . . . . . . . . . . . . . . . . . . . . . . . . . . . . . . . . 280
7.2.4. Initialize a New Project . . . . . . . . . . . . . . . . . . . . . . . . . . . . . . . . . . . . . . . . . . . . . . . . . . . . . . . . . . 280
7.2.5. Using the Embedded Shell . . . . . . . . . . . . . . . . . . . . . . . . . . . . . . . . . . . . . . . . . . . . . . . . . . . . . . . 281
7.2.6. Adding Extensions to the CLI . . . . . . . . . . . . . . . . . . . . . . . . . . . . . . . . . . . . . . . . . . . . . . . . . . . . . 282
7.3. Developing Applications with the Groovy Beans DSL . . . . . . . . . . . . . . . . . . . . . . . . . . . . . . . . . . . 282
7.4. Configuring the CLI with settings.xml . . . . . . . . . . . . . . . . . . . . . . . . . . . . . . . . . . . . . . . . . . . . . . . . 283
7.5. What to Read Next . . . . . . . . . . . . . . . . . . . . . . . . . . . . . . . . . . . . . . . . . . . . . . . . . . . . . . . . . . . . . . . . . . 283
8. Build Tool Plugins . . . . . . . . . . . . . . . . . . . . . . . . . . . . . . . . . . . . . . . . . . . . . . . . . . . . . . . . . . . . . . . . . . . . . . 285
8.1. Spring Boot Maven Plugin . . . . . . . . . . . . . . . . . . . . . . . . . . . . . . . . . . . . . . . . . . . . . . . . . . . . . . . . . . . 285
8.1.1. Including the Plugin. . . . . . . . . . . . . . . . . . . . . . . . . . . . . . . . . . . . . . . . . . . . . . . . . . . . . . . . . . . . . 285
8.1.2. Packaging Executable Jar and War Files. . . . . . . . . . . . . . . . . . . . . . . . . . . . . . . . . . . . . . . . . . . 286
8.2. Spring Boot Gradle Plugin . . . . . . . . . . . . . . . . . . . . . . . . . . . . . . . . . . . . . . . . . . . . . . . . . . . . . . . . . . . 288
8.3. Spring Boot AntLib Module . . . . . . . . . . . . . . . . . . . . . . . . . . . . . . . . . . . . . . . . . . . . . . . . . . . . . . . . . . 288
8.3.1. Spring Boot Ant Tasks . . . . . . . . . . . . . . . . . . . . . . . . . . . . . . . . . . . . . . . . . . . . . . . . . . . . . . . . . . . 288spring-boot:exejar . . . . . . . . . . . . . . . . . . . . . . . . . . . . . . . . . . . . . . . . . . . . . . . . . . . . . . . . . . . . . . . . . 288Examples. . . . . . . . . . . . . . . . . . . . . . . . . . . . . . . . . . . . . . . . . . . . . . . . . . . . . . . . . . . . . . . . . . . . . . . . . . 289
8.3.2. spring-boot:findmainclass . . . . . . . . . . . . . . . . . . . . . . . . . . . . . . . . . . . . . . . . . . . . . . . . . . . . . . . 289

Examples. . . . . . . . . . . . . . . . . . . . . . . . . . . . . . . . . . . . . . . . . . . . . . . . . . . . . . . . . . . . . . . . . . . . . . . . . . 290
8.4. Supporting Other Build Systems. . . . . . . . . . . . . . . . . . . . . . . . . . . . . . . . . . . . . . . . . . . . . . . . . . . . . . 290
8.4.1. Repackaging Archives . . . . . . . . . . . . . . . . . . . . . . . . . . . . . . . . . . . . . . . . . . . . . . . . . . . . . . . . . . . 290
8.4.2. Nested Libraries . . . . . . . . . . . . . . . . . . . . . . . . . . . . . . . . . . . . . . . . . . . . . . . . . . . . . . . . . . . . . . . . 290
8.4.3. Finding a Main Class . . . . . . . . . . . . . . . . . . . . . . . . . . . . . . . . . . . . . . . . . . . . . . . . . . . . . . . . . . . . 291
8.4.4. Example Repackage Implementation . . . . . . . . . . . . . . . . . . . . . . . . . . . . . . . . . . . . . . . . . . . . . 291
8.5. What to Read Next . . . . . . . . . . . . . . . . . . . . . . . . . . . . . . . . . . . . . . . . . . . . . . . . . . . . . . . . . . . . . . . . . . 291
9. “How-to” Guides . . . . . . . . . . . . . . . . . . . . . . . . . . . . . . . . . . . . . . . . . . . . . . . . . . . . . . . . . . . . . . . . . . . . . . . . 292
9.1. Spring Boot Application . . . . . . . . . . . . . . . . . . . . . . . . . . . . . . . . . . . . . . . . . . . . . . . . . . . . . . . . . . . . . 292
9.1.1. Create Your Own FailureAnalyzer . . . . . . . . . . . . . . . . . . . . . . . . . . . . . . . . . . . . . . . . . . . . . . . . 292
9.1.2. Troubleshoot Auto-configuration . . . . . . . . . . . . . . . . . . . . . . . . . . . . . . . . . . . . . . . . . . . . . . . . . 292
9.1.3. Customize the Environment or ApplicationContext Before It Starts . . . . . . . . . . . . . . . . . . 293
9.1.4. Build an ApplicationContext Hierarchy (Adding a Parent or Root Context) . . . . . . . . . . . 295
9.1.5. Create a Non-web Application. . . . . . . . . . . . . . . . . . . . . . . . . . . . . . . . . . . . . . . . . . . . . . . . . . . . 295
9.2. Properties and Configuration . . . . . . . . . . . . . . . . . . . . . . . . . . . . . . . . . . . . . . . . . . . . . . . . . . . . . . . . 295
9.2.1. Automatically Expand Properties at Build Time. . . . . . . . . . . . . . . . . . . . . . . . . . . . . . . . . . . . 295
Automatic Property Expansion Using Maven . . . . . . . . . . . . . . . . . . . . . . . . . . . . . . . . . . . . . . . . . 295
Automatic Property Expansion Using Gradle . . . . . . . . . . . . . . . . . . . . . . . . . . . . . . . . . . . . . . . . . 296
9.2.2. Externalize the Configuration of SpringApplication . . . . . . . . . . . . . . . . . . . . . . . . . . . . . . . . 297
9.2.3. Change the Location of External Properties of an Application . . . . . . . . . . . . . . . . . . . . . . . 297
9.2.4. Use ‘Short’ Command Line Arguments . . . . . . . . . . . . . . . . . . . . . . . . . . . . . . . . . . . . . . . . . . . . 298
9.2.5. Use YAML for External Properties . . . . . . . . . . . . . . . . . . . . . . . . . . . . . . . . . . . . . . . . . . . . . . . . 298
9.2.6. Set the Active Spring Profiles. . . . . . . . . . . . . . . . . . . . . . . . . . . . . . . . . . . . . . . . . . . . . . . . . . . . . 299
9.2.7. Change Configuration Depending on the Environment . . . . . . . . . . . . . . . . . . . . . . . . . . . . . 300
9.2.8. Discover Built-in Options for External Properties . . . . . . . . . . . . . . . . . . . . . . . . . . . . . . . . . . 300
9.3. Embedded Web Servers . . . . . . . . . . . . . . . . . . . . . . . . . . . . . . . . . . . . . . . . . . . . . . . . . . . . . . . . . . . . . 301
9.3.1. Use Another Web Server. . . . . . . . . . . . . . . . . . . . . . . . . . . . . . . . . . . . . . . . . . . . . . . . . . . . . . . . . 301
9.3.2. Disabling the Web Server . . . . . . . . . . . . . . . . . . . . . . . . . . . . . . . . . . . . . . . . . . . . . . . . . . . . . . . . 302
9.3.3. Change the HTTP Port . . . . . . . . . . . . . . . . . . . . . . . . . . . . . . . . . . . . . . . . . . . . . . . . . . . . . . . . . . . 302
9.3.4. Use a Random Unassigned HTTP Port . . . . . . . . . . . . . . . . . . . . . . . . . . . . . . . . . . . . . . . . . . . . . 302
9.3.5. Discover the HTTP Port at Runtime . . . . . . . . . . . . . . . . . . . . . . . . . . . . . . . . . . . . . . . . . . . . . . . 302
9.3.6. Enable HTTP Response Compression. . . . . . . . . . . . . . . . . . . . . . . . . . . . . . . . . . . . . . . . . . . . . . 303
9.3.7. Configure SSL. . . . . . . . . . . . . . . . . . . . . . . . . . . . . . . . . . . . . . . . . . . . . . . . . . . . . . . . . . . . . . . . . . . 304
9.3.8. Configure HTTP/2 . . . . . . . . . . . . . . . . . . . . . . . . . . . . . . . . . . . . . . . . . . . . . . . . . . . . . . . . . . . . . . . 304
HTTP/2 with Tomcat. . . . . . . . . . . . . . . . . . . . . . . . . . . . . . . . . . . . . . . . . . . . . . . . . . . . . . . . . . . . . . . . 304
HTTP/2 with Jetty . . . . . . . . . . . . . . . . . . . . . . . . . . . . . . . . . . . . . . . . . . . . . . . . . . . . . . . . . . . . . . . . . . 305
HTTP/2 with Reactor Netty . . . . . . . . . . . . . . . . . . . . . . . . . . . . . . . . . . . . . . . . . . . . . . . . . . . . . . . . . . 305
HTTP/2 with Undertow . . . . . . . . . . . . . . . . . . . . . . . . . . . . . . . . . . . . . . . . . . . . . . . . . . . . . . . . . . . . . 305
h2c with supported servers . . . . . . . . . . . . . . . . . . . . . . . . . . . . . . . . . . . . . . . . . . . . . . . . . . . . . . . . . 305
9.3.9. Configure the Web Server . . . . . . . . . . . . . . . . . . . . . . . . . . . . . . . . . . . . . . . . . . . . . . . . . . . . . . . 306
9.3.10. Add a Servlet, Filter, or Listener to an Application . . . . . . . . . . . . . . . . . . . . . . . . . . . . . . . . 307
Add a Servlet, Filter, or Listener by Using a Spring Bean . . . . . . . . . . . . . . . . . . . . . . . . . . . . . . . 307
Add Servlets, Filters, and Listeners by Using Classpath Scanning . . . . . . . . . . . . . . . . . . . . . . . 308
9.3.11. Configure Access Logging . . . . . . . . . . . . . . . . . . . . . . . . . . . . . . . . . . . . . . . . . . . . . . . . . . . . . . . 308
9.3.12. Running Behind a Front-end Proxy Server . . . . . . . . . . . . . . . . . . . . . . . . . . . . . . . . . . . . . . . 309
Customize Tomcat’s Proxy Configuration. . . . . . . . . . . . . . . . . . . . . . . . . . . . . . . . . . . . . . . . . . . . . 309
9.3.13. Enable Multiple Connectors with Tomcat . . . . . . . . . . . . . . . . . . . . . . . . . . . . . . . . . . . . . . . . 310
9.3.14. Use Tomcat’s LegacyCookieProcessor . . . . . . . . . . . . . . . . . . . . . . . . . . . . . . . . . . . . . . . . . . . . 310
9.3.15. Enable Tomcat’s MBean Registry . . . . . . . . . . . . . . . . . . . . . . . . . . . . . . . . . . . . . . . . . . . . . . . . 311
9.3.16. Enable Multiple Listeners with Undertow . . . . . . . . . . . . . . . . . . . . . . . . . . . . . . . . . . . . . . . . 311
9.3.17. Create WebSocket Endpoints Using @ServerEndpoint . . . . . . . . . . . . . . . . . . . . . . . . . . . . . 312
9.4. Spring MVC . . . . . . . . . . . . . . . . . . . . . . . . . . . . . . . . . . . . . . . . . . . . . . . . . . . . . . . . . . . . . . . . . . . . . . . . 312
9.4.1. Write a JSON REST Service . . . . . . . . . . . . . . . . . . . . . . . . . . . . . . . . . . . . . . . . . . . . . . . . . . . . . . . 312
9.4.2. Write an XML REST Service . . . . . . . . . . . . . . . . . . . . . . . . . . . . . . . . . . . . . . . . . . . . . . . . . . . . . . 312
9.4.3. Customize the Jackson ObjectMapper . . . . . . . . . . . . . . . . . . . . . . . . . . . . . . . . . . . . . . . . . . . . . 313
9.4.4. Customize the @ResponseBody Rendering . . . . . . . . . . . . . . . . . . . . . . . . . . . . . . . . . . . . . . . . 314
9.4.5. Handling Multipart File Uploads . . . . . . . . . . . . . . . . . . . . . . . . . . . . . . . . . . . . . . . . . . . . . . . . . 315
9.4.6. Switch Off the Spring MVC DispatcherServlet . . . . . . . . . . . . . . . . . . . . . . . . . . . . . . . . . . . . . . 315
9.4.7. Switch off the Default MVC Configuration . . . . . . . . . . . . . . . . . . . . . . . . . . . . . . . . . . . . . . . . . 316
9.4.8. Customize ViewResolvers . . . . . . . . . . . . . . . . . . . . . . . . . . . . . . . . . . . . . . . . . . . . . . . . . . . . . . . . 316
9.5. Testing With Spring Security . . . . . . . . . . . . . . . . . . . . . . . . . . . . . . . . . . . . . . . . . . . . . . . . . . . . . . . . . 317
9.6. Jersey . . . . . . . . . . . . . . . . . . . . . . . . . . . . . . . . . . . . . . . . . . . . . . . . . . . . . . . . . . . . . . . . . . . . . . . . . . . . . . 317
9.6.1. Secure Jersey endpoints with Spring Security. . . . . . . . . . . . . . . . . . . . . . . . . . . . . . . . . . . . . . 317
9.6.2. Use Jersey Alongside Another Web Framework . . . . . . . . . . . . . . . . . . . . . . . . . . . . . . . . . . . . 318
9.7. HTTP Clients . . . . . . . . . . . . . . . . . . . . . . . . . . . . . . . . . . . . . . . . . . . . . . . . . . . . . . . . . . . . . . . . . . . . . . . 318
9.7.1. Configure RestTemplate to Use a Proxy . . . . . . . . . . . . . . . . . . . . . . . . . . . . . . . . . . . . . . . . . . . 318
9.7.2. Configure the TcpClient used by a Reactor Netty-based WebClient . . . . . . . . . . . . . . . . . . . 319
9.8. Logging . . . . . . . . . . . . . . . . . . . . . . . . . . . . . . . . . . . . . . . . . . . . . . . . . . . . . . . . . . . . . . . . . . . . . . . . . . . . 320
9.8.1. Configure Logback for Logging . . . . . . . . . . . . . . . . . . . . . . . . . . . . . . . . . . . . . . . . . . . . . . . . . . . 320
Configure Logback for File-only Output . . . . . . . . . . . . . . . . . . . . . . . . . . . . . . . . . . . . . . . . . . . . . . 322
9.8.2. Configure Log4j for Logging. . . . . . . . . . . . . . . . . . . . . . . . . . . . . . . . . . . . . . . . . . . . . . . . . . . . . . 322
Use YAML or JSON to Configure Log4j 2 . . . . . . . . . . . . . . . . . . . . . . . . . . . . . . . . . . . . . . . . . . . . . . 323
9.9. Data Access . . . . . . . . . . . . . . . . . . . . . . . . . . . . . . . . . . . . . . . . . . . . . . . . . . . . . . . . . . . . . . . . . . . . . . . . 324
9.9.1. Configure a Custom DataSource . . . . . . . . . . . . . . . . . . . . . . . . . . . . . . . . . . . . . . . . . . . . . . . . . . 324
9.9.2. Configure Two DataSources . . . . . . . . . . . . . . . . . . . . . . . . . . . . . . . . . . . . . . . . . . . . . . . . . . . . . . 326
9.9.3. Use Spring Data Repositories . . . . . . . . . . . . . . . . . . . . . . . . . . . . . . . . . . . . . . . . . . . . . . . . . . . . . 328
9.9.4. Separate @Entity Definitions from Spring Configuration . . . . . . . . . . . . . . . . . . . . . . . . . . . 329
9.9.5. Configure JPA Properties . . . . . . . . . . . . . . . . . . . . . . . . . . . . . . . . . . . . . . . . . . . . . . . . . . . . . . . . 329
9.9.6. Configure Hibernate Naming Strategy . . . . . . . . . . . . . . . . . . . . . . . . . . . . . . . . . . . . . . . . . . . . 330
9.9.7. Configure Hibernate Second-Level Caching. . . . . . . . . . . . . . . . . . . . . . . . . . . . . . . . . . . . . . . . 330
9.9.8. Use Dependency Injection in Hibernate Components . . . . . . . . . . . . . . . . . . . . . . . . . . . . . . . 331
9.9.9. Use a Custom EntityManagerFactory. . . . . . . . . . . . . . . . . . . . . . . . . . . . . . . . . . . . . . . . . . . . . . 331
9.9.10. Use Two EntityManagers . . . . . . . . . . . . . . . . . . . . . . . . . . . . . . . . . . . . . . . . . . . . . . . . . . . . . . . 331
9.9.11. Use a Traditional persistence.xml File . . . . . . . . . . . . . . . . . . . . . . . . . . . . . . . . . . . . . . . . . . . 333
9.9.12. Use Spring Data JPA and Mongo Repositories . . . . . . . . . . . . . . . . . . . . . . . . . . . . . . . . . . . . . 333
9.9.13. Customize Spring Data’s Web Support . . . . . . . . . . . . . . . . . . . . . . . . . . . . . . . . . . . . . . . . . . . 333
9.9.14. Expose Spring Data Repositories as REST Endpoint . . . . . . . . . . . . . . . . . . . . . . . . . . . . . . . 334
9.9.15. Configure a Component that is Used by JPA . . . . . . . . . . . . . . . . . . . . . . . . . . . . . . . . . . . . . . 334
9.9.16. Configure jOOQ with Two DataSources . . . . . . . . . . . . . . . . . . . . . . . . . . . . . . . . . . . . . . . . . . 334
9.10. Database Initialization . . . . . . . . . . . . . . . . . . . . . . . . . . . . . . . . . . . . . . . . . . . . . . . . . . . . . . . . . . . . . 335
9.10.1. Initialize a Database Using JPA . . . . . . . . . . . . . . . . . . . . . . . . . . . . . . . . . . . . . . . . . . . . . . . . . . 335
9.10.2. Initialize a Database Using Hibernate . . . . . . . . . . . . . . . . . . . . . . . . . . . . . . . . . . . . . . . . . . . . 335
9.10.3. Initialize a Database. . . . . . . . . . . . . . . . . . . . . . . . . . . . . . . . . . . . . . . . . . . . . . . . . . . . . . . . . . . . 335
9.10.4. Initialize a Spring Batch Database . . . . . . . . . . . . . . . . . . . . . . . . . . . . . . . . . . . . . . . . . . . . . . . 336
9.10.5. Use a Higher-level Database Migration Tool . . . . . . . . . . . . . . . . . . . . . . . . . . . . . . . . . . . . . . 336
Execute Flyway Database Migrations on Startup . . . . . . . . . . . . . . . . . . . . . . . . . . . . . . . . . . . . . . 336
Execute Liquibase Database Migrations on Startup. . . . . . . . . . . . . . . . . . . . . . . . . . . . . . . . . . . . 338
9.11. Messaging. . . . . . . . . . . . . . . . . . . . . . . . . . . . . . . . . . . . . . . . . . . . . . . . . . . . . . . . . . . . . . . . . . . . . . . . . 338
9.11.1. Disable Transacted JMS Session . . . . . . . . . . . . . . . . . . . . . . . . . . . . . . . . . . . . . . . . . . . . . . . . . 338
9.12. Batch Applications . . . . . . . . . . . . . . . . . . . . . . . . . . . . . . . . . . . . . . . . . . . . . . . . . . . . . . . . . . . . . . . . . 339
9.12.1. Specifying a Batch Data Source. . . . . . . . . . . . . . . . . . . . . . . . . . . . . . . . . . . . . . . . . . . . . . . . . . 339
9.12.2. Running Spring Batch Jobs on Startup . . . . . . . . . . . . . . . . . . . . . . . . . . . . . . . . . . . . . . . . . . . 339
9.12.3. Running from the Command Line . . . . . . . . . . . . . . . . . . . . . . . . . . . . . . . . . . . . . . . . . . . . . . . 339
Passing Command-line Arguments . . . . . . . . . . . . . . . . . . . . . . . . . . . . . . . . . . . . . . . . . . . . . . . . . . 340
9.12.4. Storing the Job Repository . . . . . . . . . . . . . . . . . . . . . . . . . . . . . . . . . . . . . . . . . . . . . . . . . . . . . . 340
9.13. Actuator . . . . . . . . . . . . . . . . . . . . . . . . . . . . . . . . . . . . . . . . . . . . . . . . . . . . . . . . . . . . . . . . . . . . . . . . . . 340
9.13.1. Change the HTTP Port or Address of the Actuator Endpoints . . . . . . . . . . . . . . . . . . . . . . . 340
9.13.2. Customize the ‘whitelabel’ Error Page . . . . . . . . . . . . . . . . . . . . . . . . . . . . . . . . . . . . . . . . . . . 340
9.13.3. Sanitize Sensitive Values . . . . . . . . . . . . . . . . . . . . . . . . . . . . . . . . . . . . . . . . . . . . . . . . . . . . . . . 341
9.13.4. Map Health Indicators to Micrometer Metrics . . . . . . . . . . . . . . . . . . . . . . . . . . . . . . . . . . . . 341
9.14. Security. . . . . . . . . . . . . . . . . . . . . . . . . . . . . . . . . . . . . . . . . . . . . . . . . . . . . . . . . . . . . . . . . . . . . . . . . . . 342
9.14.1. Switch off the Spring Boot Security Configuration. . . . . . . . . . . . . . . . . . . . . . . . . . . . . . . . . 342
9.14.2. Change the UserDetailsService and Add User Accounts . . . . . . . . . . . . . . . . . . . . . . . . . . . . 342
9.14.3. Enable HTTPS When Running behind a Proxy Server . . . . . . . . . . . . . . . . . . . . . . . . . . . . . 343
9.15. Hot Swapping . . . . . . . . . . . . . . . . . . . . . . . . . . . . . . . . . . . . . . . . . . . . . . . . . . . . . . . . . . . . . . . . . . . . . 343
9.15.1. Reload Static Content. . . . . . . . . . . . . . . . . . . . . . . . . . . . . . . . . . . . . . . . . . . . . . . . . . . . . . . . . . . 343
9.15.2. Reload Templates without Restarting the Container . . . . . . . . . . . . . . . . . . . . . . . . . . . . . . . 344
Thymeleaf Templates. . . . . . . . . . . . . . . . . . . . . . . . . . . . . . . . . . . . . . . . . . . . . . . . . . . . . . . . . . . . . . . 344
FreeMarker Templates . . . . . . . . . . . . . . . . . . . . . . . . . . . . . . . . . . . . . . . . . . . . . . . . . . . . . . . . . . . . . 344
Groovy Templates . . . . . . . . . . . . . . . . . . . . . . . . . . . . . . . . . . . . . . . . . . . . . . . . . . . . . . . . . . . . . . . . . . 344
9.15.3. Fast Application Restarts . . . . . . . . . . . . . . . . . . . . . . . . . . . . . . . . . . . . . . . . . . . . . . . . . . . . . . . 344
9.15.4. Reload Java Classes without Restarting the Container . . . . . . . . . . . . . . . . . . . . . . . . . . . . . 344
9.16. Build . . . . . . . . . . . . . . . . . . . . . . . . . . . . . . . . . . . . . . . . . . . . . . . . . . . . . . . . . . . . . . . . . . . . . . . . . . . . . 344
9.16.1. Generate Build Information. . . . . . . . . . . . . . . . . . . . . . . . . . . . . . . . . . . . . . . . . . . . . . . . . . . . . 345
9.16.2. Generate Git Information . . . . . . . . . . . . . . . . . . . . . . . . . . . . . . . . . . . . . . . . . . . . . . . . . . . . . . . 345
9.16.3. Customize Dependency Versions . . . . . . . . . . . . . . . . . . . . . . . . . . . . . . . . . . . . . . . . . . . . . . . . 346
9.16.4. Create an Executable JAR with Maven . . . . . . . . . . . . . . . . . . . . . . . . . . . . . . . . . . . . . . . . . . . 347
9.16.5. Use a Spring Boot Application as a Dependency. . . . . . . . . . . . . . . . . . . . . . . . . . . . . . . . . . . 347
9.16.6. Extract Specific Libraries When an Executable Jar Runs . . . . . . . . . . . . . . . . . . . . . . . . . . . 348
9.16.7. Create a Non-executable JAR with Exclusions. . . . . . . . . . . . . . . . . . . . . . . . . . . . . . . . . . . . . 349
9.16.8. Remote Debug a Spring Boot Application Started with Maven. . . . . . . . . . . . . . . . . . . . . . 350
9.16.9. Build an Executable Archive from Ant without Using spring-boot-antlib . . . . . . . . . . . 350
9.17. Traditional Deployment . . . . . . . . . . . . . . . . . . . . . . . . . . . . . . . . . . . . . . . . . . . . . . . . . . . . . . . . . . . . 351
9.17.1. Create a Deployable War File . . . . . . . . . . . . . . . . . . . . . . . . . . . . . . . . . . . . . . . . . . . . . . . . . . . 351
9.17.2. Convert an Existing Application to Spring Boot . . . . . . . . . . . . . . . . . . . . . . . . . . . . . . . . . . . 353
9.17.3. Deploying a WAR to WebLogic . . . . . . . . . . . . . . . . . . . . . . . . . . . . . . . . . . . . . . . . . . . . . . . . . . 356
9.17.4. Use Jedis Instead of Lettuce . . . . . . . . . . . . . . . . . . . . . . . . . . . . . . . . . . . . . . . . . . . . . . . . . . . . . 356
10. Appendices . . . . . . . . . . . . . . . . . . . . . . . . . . . . . . . . . . . . . . . . . . . . . . . . . . . . . . . . . . . . . . . . . . . . . . . . . . . 358
Appendix A: Common Application properties . . . . . . . . . . . . . . . . . . . . . . . . . . . . . . . . . . . . . . . . . . . . . 358
10.A.1. Core properties . . . . . . . . . . . . . . . . . . . . . . . . . . . . . . . . . . . . . . . . . . . . . . . . . . . . . . . . . . . . . . . . 358
10.A.2. Cache properties . . . . . . . . . . . . . . . . . . . . . . . . . . . . . . . . . . . . . . . . . . . . . . . . . . . . . . . . . . . . . . 363
10.A.3. Mail properties . . . . . . . . . . . . . . . . . . . . . . . . . . . . . . . . . . . . . . . . . . . . . . . . . . . . . . . . . . . . . . . . 364
10.A.4. JSON properties . . . . . . . . . . . . . . . . . . . . . . . . . . . . . . . . . . . . . . . . . . . . . . . . . . . . . . . . . . . . . . . 365
10.A.5. Data properties . . . . . . . . . . . . . . . . . . . . . . . . . . . . . . . . . . . . . . . . . . . . . . . . . . . . . . . . . . . . . . . . 366
10.A.6. Transaction properties . . . . . . . . . . . . . . . . . . . . . . . . . . . . . . . . . . . . . . . . . . . . . . . . . . . . . . . . . 380
10.A.7. Data migration properties . . . . . . . . . . . . . . . . . . . . . . . . . . . . . . . . . . . . . . . . . . . . . . . . . . . . . . 388
10.A.8. Integration properties. . . . . . . . . . . . . . . . . . . . . . . . . . . . . . . . . . . . . . . . . . . . . . . . . . . . . . . . . . 392
10.A.9. Web properties . . . . . . . . . . . . . . . . . . . . . . . . . . . . . . . . . . . . . . . . . . . . . . . . . . . . . . . . . . . . . . . . 404
10.A.10. Templating properties . . . . . . . . . . . . . . . . . . . . . . . . . . . . . . . . . . . . . . . . . . . . . . . . . . . . . . . . 408
10.A.11. Server properties . . . . . . . . . . . . . . . . . . . . . . . . . . . . . . . . . . . . . . . . . . . . . . . . . . . . . . . . . . . . . 413
10.A.12. Security properties . . . . . . . . . . . . . . . . . . . . . . . . . . . . . . . . . . . . . . . . . . . . . . . . . . . . . . . . . . . 420
10.A.13. RSocket properties. . . . . . . . . . . . . . . . . . . . . . . . . . . . . . . . . . . . . . . . . . . . . . . . . . . . . . . . . . . . 423
10.A.14. Actuator properties . . . . . . . . . . . . . . . . . . . . . . . . . . . . . . . . . . . . . . . . . . . . . . . . . . . . . . . . . . . 423
10.A.15. Devtools properties . . . . . . . . . . . . . . . . . . . . . . . . . . . . . . . . . . . . . . . . . . . . . . . . . . . . . . . . . . . 440
10.A.16. Testing properties . . . . . . . . . . . . . . . . . . . . . . . . . . . . . . . . . . . . . . . . . . . . . . . . . . . . . . . . . . . . 442
Appendix B: Configuration Metadata . . . . . . . . . . . . . . . . . . . . . . . . . . . . . . . . . . . . . . . . . . . . . . . . . . . . . 442
10.B.1. Metadata Format . . . . . . . . . . . . . . . . . . . . . . . . . . . . . . . . . . . . . . . . . . . . . . . . . . . . . . . . . . . . . . 442
Group Attributes . . . . . . . . . . . . . . . . . . . . . . . . . . . . . . . . . . . . . . . . . . . . . . . . . . . . . . . . . . . . . . . . . . . 444
Property Attributes. . . . . . . . . . . . . . . . . . . . . . . . . . . . . . . . . . . . . . . . . . . . . . . . . . . . . . . . . . . . . . . . . 444
Hint Attributes. . . . . . . . . . . . . . . . . . . . . . . . . . . . . . . . . . . . . . . . . . . . . . . . . . . . . . . . . . . . . . . . . . . . . 447
Repeated Metadata Items . . . . . . . . . . . . . . . . . . . . . . . . . . . . . . . . . . . . . . . . . . . . . . . . . . . . . . . . . . . 448
10.B.2. Providing Manual Hints . . . . . . . . . . . . . . . . . . . . . . . . . . . . . . . . . . . . . . . . . . . . . . . . . . . . . . . . 448
Value Hint . . . . . . . . . . . . . . . . . . . . . . . . . . . . . . . . . . . . . . . . . . . . . . . . . . . . . . . . . . . . . . . . . . . . . . . . . 448
Value Providers . . . . . . . . . . . . . . . . . . . . . . . . . . . . . . . . . . . . . . . . . . . . . . . . . . . . . . . . . . . . . . . . . . . . 449

10.B.3. Generating Your Own Metadata by Using the Annotation Processor . . . . . . . . . . . . . . . . 455
Configuring the Annotation Processor . . . . . . . . . . . . . . . . . . . . . . . . . . . . . . . . . . . . . . . . . . . . . . . 455
Automatic Metadata Generation. . . . . . . . . . . . . . . . . . . . . . . . . . . . . . . . . . . . . . . . . . . . . . . . . . . . . 457
Adding Additional Metadata . . . . . . . . . . . . . . . . . . . . . . . . . . . . . . . . . . . . . . . . . . . . . . . . . . . . . . . . 460
Appendix C: Auto-configuration Classes . . . . . . . . . . . . . . . . . . . . . . . . . . . . . . . . . . . . . . . . . . . . . . . . . . 460
10.C.1. spring-boot-autoconfigure . . . . . . . . . . . . . . . . . . . . . . . . . . . . . . . . . . . . . . . . . . . . . . . . . . . . . . 461
10.C.2. spring-boot-actuator-autoconfigure . . . . . . . . . . . . . . . . . . . . . . . . . . . . . . . . . . . . . . . . . . . . . 464
Appendix D: Test Auto-configuration Annotations . . . . . . . . . . . . . . . . . . . . . . . . . . . . . . . . . . . . . . . . . 467
10.D.1. Test Slices . . . . . . . . . . . . . . . . . . . . . . . . . . . . . . . . . . . . . . . . . . . . . . . . . . . . . . . . . . . . . . . . . . . . . 467
Appendix E: The Executable Jar Format . . . . . . . . . . . . . . . . . . . . . . . . . . . . . . . . . . . . . . . . . . . . . . . . . . 473
10.E.1. Nested JARs . . . . . . . . . . . . . . . . . . . . . . . . . . . . . . . . . . . . . . . . . . . . . . . . . . . . . . . . . . . . . . . . . . . 473
The Executable Jar File Structure . . . . . . . . . . . . . . . . . . . . . . . . . . . . . . . . . . . . . . . . . . . . . . . . . . . . 473
The Executable War File Structure. . . . . . . . . . . . . . . . . . . . . . . . . . . . . . . . . . . . . . . . . . . . . . . . . . . 473
10.E.2. Spring Boot’s “JarFile” Class . . . . . . . . . . . . . . . . . . . . . . . . . . . . . . . . . . . . . . . . . . . . . . . . . . . . 474
Compatibility with the Standard Java “JarFile”. . . . . . . . . . . . . . . . . . . . . . . . . . . . . . . . . . . . . . . . 475
10.E.3. Launching Executable Jars . . . . . . . . . . . . . . . . . . . . . . . . . . . . . . . . . . . . . . . . . . . . . . . . . . . . . 475
Launcher Manifest . . . . . . . . . . . . . . . . . . . . . . . . . . . . . . . . . . . . . . . . . . . . . . . . . . . . . . . . . . . . . . . . . 475
10.E.4. PropertiesLauncher Features . . . . . . . . . . . . . . . . . . . . . . . . . . . . . . . . . . . . . . . . . . . . . . . . . . . . 476
10.E.5. Executable Jar Restrictions . . . . . . . . . . . . . . . . . . . . . . . . . . . . . . . . . . . . . . . . . . . . . . . . . . . . . 477
10.E.6. Alternative Single Jar Solutions . . . . . . . . . . . . . . . . . . . . . . . . . . . . . . . . . . . . . . . . . . . . . . . . . 477
Appendix F: Dependency versions . . . . . . . . . . . . . . . . . . . . . . . . . . . . . . . . . . . . . . . . . . . . . . . . . . . . . . . 478
10.F.1. Managed Dependency Coordinates . . . . . . . . . . . . . . . . . . . . . . . . . . . . . . . . . . . . . . . . . . . . . . 478

Legal2.2.11.RELEASE
Copyright © 2012-2020
Copies of this document may be made for your own use and for distribution to others, providedthat you do not charge any fee for such copies and further provided that each copy contains thisCopyright Notice, whether distributed in print or electronically.
1

Chapter 1. Spring Boot DocumentationThis section provides a brief overview of Spring Boot reference documentation. It serves as a mapfor the rest of the document.
1.1. About the DocumentationThe Spring Boot reference guide is available as:
• Multi-page HTML
• Single page HTML
The latest copy is available at docs.spring.io/spring-boot/docs/current/reference.
Copies of this document may be made for your own use and for distribution to others, providedthat you do not charge any fee for such copies and further provided that each copy contains thisCopyright Notice, whether distributed in print or electronically.
1.2. Getting HelpIf you have trouble with Spring Boot, we would like to help.
• Try the How-to documents. They provide solutions to the most common questions.
• Learn the Spring basics. Spring Boot builds on many other Spring projects. Check the spring.ioweb-site for a wealth of reference documentation. If you are starting out with Spring, try one ofthe guides.
• Ask a question. We monitor stackoverflow.com for questions tagged with spring-boot.
• Report bugs with Spring Boot at github.com/spring-projects/spring-boot/issues.
All of Spring Boot is open source, including the documentation. If you findproblems with the docs or if you want to improve them, please get involved.
1.3. Upgrading from an Earlier VersionInstructions for how to upgrade from earlier versions of Spring Boot are provided on the projectwiki. Follow the links in the in the release notes section to find the version that you want toupgrade to.
Upgrading instructions are always the first item in the release notes. If you are more than onerelease behind, please make sure that you also review the release notes of the versions that youjumped.
You should always ensure that you are running a supported version of Spring Boot.
2

1.4. First StepsIf you are getting started with Spring Boot or 'Spring' in general, start with the following topics:
• From scratch: Overview | Requirements | Installation
• Tutorial: Part 1 | Part 2
• Running your example: Part 1 | Part 2
1.5. Working with Spring BootReady to actually start using Spring Boot? We have you covered:
• Build systems: Maven | Gradle | Ant | Starters
• Best practices: Code Structure | @Configuration | @EnableAutoConfiguration | Beans andDependency Injection
• Running your code: IDE | Packaged | Maven | Gradle
• Packaging your app: Production jars
• Spring Boot CLI: Using the CLI
1.6. Learning about Spring Boot FeaturesNeed more details about Spring Boot’s core features? The following content is for you:
• Core Features: SpringApplication | External Configuration | Profiles | Logging
• Web Applications: MVC | Embedded Containers
• Working with data: SQL | NO-SQL
• Messaging: Overview | JMS
• Testing: Overview | Boot Applications | Utils
• Extending: Auto-configuration | @Conditions
1.7. Moving to ProductionWhen you are ready to push your Spring Boot application to production, we have some tricks thatyou might like:
• Management endpoints: Overview
• Connection options: HTTP | JMX
• Monitoring: Metrics | Auditing | HTTP Tracing | Process
1.8. Advanced TopicsFinally, we have a few topics for more advanced users:
3

• Spring Boot Applications Deployment: Cloud Deployment | OS Service
• Build tool plugins: Maven | Gradle
• Appendix: Application Properties | Configuration Metadata | Auto-configuration Classes | TestAuto-configuration Annotations | Executable Jars | Dependency Versions
4

Chapter 2. Getting StartedIf you are getting started with Spring Boot, or “Spring” in general, start by reading this section. Itanswers the basic “what?”, “how?” and “why?” questions. It includes an introduction to SpringBoot, along with installation instructions. We then walk you through building your first Spring Bootapplication, discussing some core principles as we go.
2.1. Introducing Spring BootSpring Boot helps you to create stand-alone, production-grade Spring-based Applications that youcan run. We take an opinionated view of the Spring platform and third-party libraries, so that youcan get started with minimum fuss. Most Spring Boot applications need very little Springconfiguration.
You can use Spring Boot to create Java applications that can be started by using java -jar or moretraditional war deployments. We also provide a command line tool that runs “spring scripts”.
Our primary goals are:
• Provide a radically faster and widely accessible getting-started experience for all Springdevelopment.
• Be opinionated out of the box but get out of the way quickly as requirements start to divergefrom the defaults.
• Provide a range of non-functional features that are common to large classes of projects (such asembedded servers, security, metrics, health checks, and externalized configuration).
• Absolutely no code generation and no requirement for XML configuration.
2.2. System RequirementsSpring Boot 2.2.11.RELEASE requires Java 8 and is compatible up to Java 15 (included). SpringFramework 5.2.10.RELEASE or above is also required.
Explicit build support is provided for the following build tools:
Build Tool Version
Maven 3.3+
Gradle 5.x and 6.x (4.10 is also supported but in adeprecated form)
2.2.1. Servlet Containers
Spring Boot supports the following embedded servlet containers:
Name Servlet Version
Tomcat 9.0 4.0
5
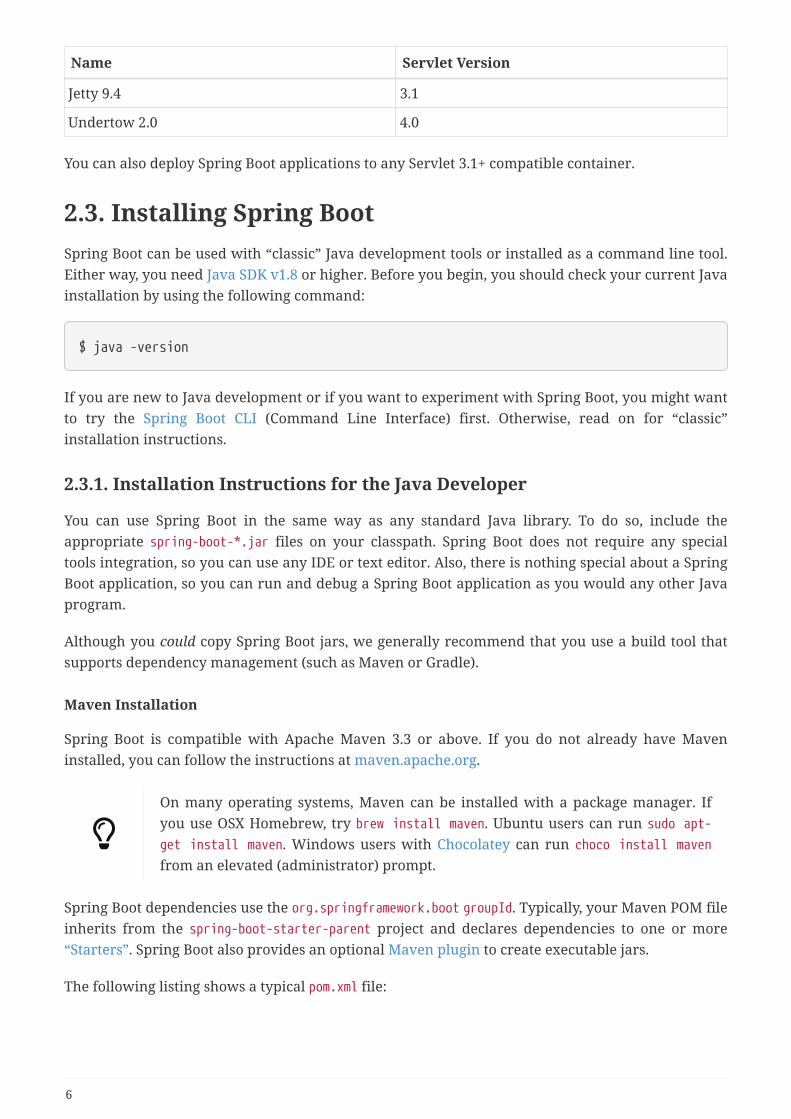
Name Servlet Version
Jetty 9.4 3.1
Undertow 2.0 4.0
You can also deploy Spring Boot applications to any Servlet 3.1+ compatible container.
2.3. Installing Spring BootSpring Boot can be used with “classic” Java development tools or installed as a command line tool.Either way, you need Java SDK v1.8 or higher. Before you begin, you should check your current Javainstallation by using the following command:
$ java -version
If you are new to Java development or if you want to experiment with Spring Boot, you might wantto try the Spring Boot CLI (Command Line Interface) first. Otherwise, read on for “classic”installation instructions.
2.3.1. Installation Instructions for the Java Developer
You can use Spring Boot in the same way as any standard Java library. To do so, include theappropriate spring-boot-*.jar files on your classpath. Spring Boot does not require any specialtools integration, so you can use any IDE or text editor. Also, there is nothing special about a SpringBoot application, so you can run and debug a Spring Boot application as you would any other Javaprogram.
Although you could copy Spring Boot jars, we generally recommend that you use a build tool thatsupports dependency management (such as Maven or Gradle).
Maven Installation
Spring Boot is compatible with Apache Maven 3.3 or above. If you do not already have Maveninstalled, you can follow the instructions at maven.apache.org.
On many operating systems, Maven can be installed with a package manager. Ifyou use OSX Homebrew, try brew install maven. Ubuntu users can run sudo apt-get install maven. Windows users with Chocolatey can run choco install mavenfrom an elevated (administrator) prompt.
Spring Boot dependencies use the org.springframework.boot groupId. Typically, your Maven POM fileinherits from the spring-boot-starter-parent project and declares dependencies to one or more“Starters”. Spring Boot also provides an optional Maven plugin to create executable jars.
The following listing shows a typical pom.xml file:
6

<?xml version="1.0" encoding="UTF-8"?><project xmlns="http://maven.apache.org/POM/4.0.0"xmlns:xsi="http://www.w3.org/2001/XMLSchema-instance" xsi:schemaLocation="http://maven.apache.org/POM/4.0.0https://maven.apache.org/xsd/maven-4.0.0.xsd"> <modelVersion>4.0.0</modelVersion>
<groupId>com.example</groupId> <artifactId>myproject</artifactId> <version>0.0.1-SNAPSHOT</version>
<!-- Inherit defaults from Spring Boot --> <parent> <groupId>org.springframework.boot</groupId> <artifactId>spring-boot-starter-parent</artifactId> <version>2.2.11.RELEASE</version> </parent>
<!-- Override inherited settings --> <description/> <developers> <developer/> </developers> <licenses> <license/> </licenses> <scm> <url/> </scm> <url/>
<!-- Add typical dependencies for a web application --> <dependencies> <dependency> <groupId>org.springframework.boot</groupId> <artifactId>spring-boot-starter-web</artifactId> </dependency> </dependencies>
<!-- Package as an executable jar --> <build> <plugins> <plugin> <groupId>org.springframework.boot</groupId> <artifactId>spring-boot-maven-plugin</artifactId> </plugin> </plugins> </build>
</project>
7

The spring-boot-starter-parent is a great way to use Spring Boot, but it might notbe suitable all of the time. Sometimes you may need to inherit from a differentparent POM, or you might not like our default settings. In those cases, see UsingSpring Boot without the Parent POM for an alternative solution that uses an importscope.
Gradle Installation
Spring Boot is compatible with 5.x and 6.x. 4.10 is also supported but this support is deprecated andwill be removed in a future release. If you do not already have Gradle installed, you can follow theinstructions at gradle.org.
Spring Boot dependencies can be declared by using the org.springframework.boot group. Typically,your project declares dependencies to one or more “Starters”. Spring Boot provides a useful Gradleplugin that can be used to simplify dependency declarations and to create executable jars.
Gradle Wrapper
The Gradle Wrapper provides a nice way of “obtaining” Gradle when you need to build aproject. It is a small script and library that you commit alongside your code to bootstrap thebuild process. See docs.gradle.org/current/userguide/gradle_wrapper.html for details.
More details on getting started with Spring Boot and Gradle can be found in the Getting Startedsection of the Gradle plugin’s reference guide.
2.3.2. Installing the Spring Boot CLI
The Spring Boot CLI (Command Line Interface) is a command line tool that you can use to quicklyprototype with Spring. It lets you run Groovy scripts, which means that you have a familiar Java-like syntax without so much boilerplate code.
You do not need to use the CLI to work with Spring Boot, but it is definitely the quickest way to get aSpring application off the ground.
Manual Installation
You can download the Spring CLI distribution from the Spring software repository:
• spring-boot-cli-2.2.11.RELEASE-bin.zip
• spring-boot-cli-2.2.11.RELEASE-bin.tar.gz
Cutting edge snapshot distributions are also available.
Once downloaded, follow the INSTALL.txt instructions from the unpacked archive. In summary,there is a spring script (spring.bat for Windows) in a bin/ directory in the .zip file. Alternatively,you can use java -jar with the .jar file (the script helps you to be sure that the classpath is setcorrectly).
8
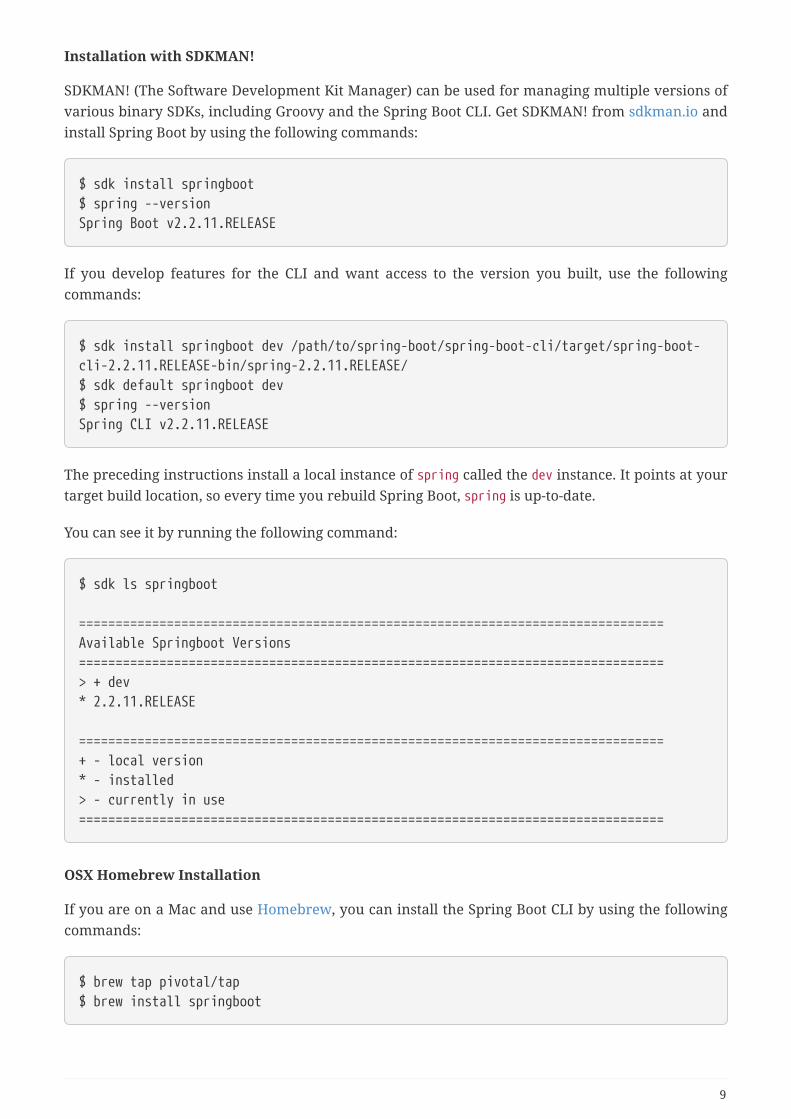
Installation with SDKMAN!
SDKMAN! (The Software Development Kit Manager) can be used for managing multiple versions ofvarious binary SDKs, including Groovy and the Spring Boot CLI. Get SDKMAN! from sdkman.io andinstall Spring Boot by using the following commands:
$ sdk install springboot$ spring --versionSpring Boot v2.2.11.RELEASE
If you develop features for the CLI and want access to the version you built, use the followingcommands:
$ sdk install springboot dev /path/to/spring-boot/spring-boot-cli/target/spring-boot-cli-2.2.11.RELEASE-bin/spring-2.2.11.RELEASE/$ sdk default springboot dev$ spring --versionSpring CLI v2.2.11.RELEASE
The preceding instructions install a local instance of spring called the dev instance. It points at yourtarget build location, so every time you rebuild Spring Boot, spring is up-to-date.
You can see it by running the following command:
$ sdk ls springboot
================================================================================Available Springboot Versions================================================================================> + dev* 2.2.11.RELEASE
================================================================================+ - local version* - installed> - currently in use================================================================================
OSX Homebrew Installation
If you are on a Mac and use Homebrew, you can install the Spring Boot CLI by using the followingcommands:
$ brew tap pivotal/tap$ brew install springboot
9

Homebrew installs spring to /usr/local/bin.
If you do not see the formula, your installation of brew might be out-of-date. Inthat case, run brew update and try again.
MacPorts Installation
If you are on a Mac and use MacPorts, you can install the Spring Boot CLI by using the followingcommand:
$ sudo port install spring-boot-cli
Command-line Completion
The Spring Boot CLI includes scripts that provide command completion for the BASH and zsh shells.You can source the script (also named spring) in any shell or put it in your personal or system-widebash completion initialization. On a Debian system, the system-wide scripts are in /shell-completion/bash and all scripts in that directory are executed when a new shell starts. For example,to run the script manually if you have installed by using SDKMAN!, use the following commands:
$ . ~/.sdkman/candidates/springboot/current/shell-completion/bash/spring$ spring <HIT TAB HERE> grab help jar run test version
If you install the Spring Boot CLI by using Homebrew or MacPorts, the command-line completion scripts are automatically registered with your shell.
Windows Scoop Installation
If you are on a Windows and use Scoop, you can install the Spring Boot CLI by using the followingcommands:
> scoop bucket add extras> scoop install springboot
Scoop installs spring to ~/scoop/apps/springboot/current/bin.
If you do not see the app manifest, your installation of scoop might be out-of-date.In that case, run scoop update and try again.
Quick-start Spring CLI Example
You can use the following web application to test your installation. To start, create a file calledapp.groovy, as follows:
10

@RestControllerclass ThisWillActuallyRun {
@RequestMapping("/") String home() { "Hello World!" }
}
Then run it from a shell, as follows:
$ spring run app.groovy
The first run of your application is slow, as dependencies are downloaded.Subsequent runs are much quicker.
Open localhost:8080 in your favorite web browser. You should see the following output:
Hello World!
2.3.3. Upgrading from an Earlier Version of Spring Boot
If you are upgrading from the 1.x release of Spring Boot, check the “migration guide” on the projectwiki that provides detailed upgrade instructions. Check also the “release notes” for a list of “newand noteworthy” features for each release.
When upgrading to a new feature release, some properties may have been renamed or removed.Spring Boot provides a way to analyze your application’s environment and print diagnostics atstartup, but also temporarily migrate properties at runtime for you. To enable that feature, add thefollowing dependency to your project:
<dependency> <groupId>org.springframework.boot</groupId> <artifactId>spring-boot-properties-migrator</artifactId> <scope>runtime</scope></dependency>
Properties that are added late to the environment, such as when using@PropertySource, will not be taken into account.
Once you’re done with the migration, please make sure to remove this modulefrom your project’s dependencies.
11

To upgrade an existing CLI installation, use the appropriate package manager command (forexample, brew upgrade). If you manually installed the CLI, follow the standard instructions,remembering to update your PATH environment variable to remove any older references.
2.4. Developing Your First Spring Boot ApplicationThis section describes how to develop a small “Hello World!” web application that highlights someof Spring Boot’s key features. We use Maven to build this project, since most IDEs support it.
The spring.io web site contains many “Getting Started” guides that use Spring Boot.If you need to solve a specific problem, check there first.
You can shortcut the steps below by going to start.spring.io and choosing the "Web"starter from the dependencies searcher. Doing so generates a new projectstructure so that you can start coding right away. Check the Spring Initializrdocumentation for more details.
Before we begin, open a terminal and run the following commands to ensure that you have validversions of Java and Maven installed:
$ java -versionjava version "1.8.0_102"Java(TM) SE Runtime Environment (build 1.8.0_102-b14)Java HotSpot(TM) 64-Bit Server VM (build 25.102-b14, mixed mode)
$ mvn -vApache Maven 3.5.4 (1edded0938998edf8bf061f1ceb3cfdeccf443fe; 2018-06-17T14:33:14-04:00)Maven home: /usr/local/Cellar/maven/3.3.9/libexecJava version: 1.8.0_102, vendor: Oracle Corporation
This sample needs to be created in its own folder. Subsequent instructions assumethat you have created a suitable folder and that it is your current directory.
2.4.1. Creating the POM
We need to start by creating a Maven pom.xml file. The pom.xml is the recipe that is used to build yourproject. Open your favorite text editor and add the following:
12

<?xml version="1.0" encoding="UTF-8"?><project xmlns="http://maven.apache.org/POM/4.0.0"xmlns:xsi="http://www.w3.org/2001/XMLSchema-instance" xsi:schemaLocation="http://maven.apache.org/POM/4.0.0https://maven.apache.org/xsd/maven-4.0.0.xsd"> <modelVersion>4.0.0</modelVersion>
<groupId>com.example</groupId> <artifactId>myproject</artifactId> <version>0.0.1-SNAPSHOT</version>
<parent> <groupId>org.springframework.boot</groupId> <artifactId>spring-boot-starter-parent</artifactId> <version>2.2.11.RELEASE</version> </parent>
<description/> <developers> <developer/> </developers> <licenses> <license/> </licenses> <scm> <url/> </scm> <url/>
<!-- Additional lines to be added here... -->
</project>
The preceding listing should give you a working build. You can test it by running mvn package (fornow, you can ignore the “jar will be empty - no content was marked for inclusion!” warning).
At this point, you could import the project into an IDE (most modern Java IDEsinclude built-in support for Maven). For simplicity, we continue to use a plain texteditor for this example.
2.4.2. Adding Classpath Dependencies
Spring Boot provides a number of “Starters” that let you add jars to your classpath. Ourapplications for smoke tests use the spring-boot-starter-parent in the parent section of the POM.The spring-boot-starter-parent is a special starter that provides useful Maven defaults. It alsoprovides a dependency-management section so that you can omit version tags for “blessed”dependencies.
Other “Starters” provide dependencies that you are likely to need when developing a specific type
13
of application. Since we are developing a web application, we add a spring-boot-starter-webdependency. Before that, we can look at what we currently have by running the followingcommand:
$ mvn dependency:tree
[INFO] com.example:myproject:jar:0.0.1-SNAPSHOT
The mvn dependency:tree command prints a tree representation of your project dependencies. Youcan see that spring-boot-starter-parent provides no dependencies by itself. To add the necessarydependencies, edit your pom.xml and add the spring-boot-starter-web dependency immediatelybelow the parent section:
<dependencies> <dependency> <groupId>org.springframework.boot</groupId> <artifactId>spring-boot-starter-web</artifactId> </dependency></dependencies>
If you run mvn dependency:tree again, you see that there are now a number of additionaldependencies, including the Tomcat web server and Spring Boot itself.
2.4.3. Writing the Code
To finish our application, we need to create a single Java file. By default, Maven compiles sourcesfrom src/main/java, so you need to create that folder structure and then add a file namedsrc/main/java/Example.java to contain the following code:
14

import org.springframework.boot.*;import org.springframework.boot.autoconfigure.*;import org.springframework.web.bind.annotation.*;
@RestController@EnableAutoConfigurationpublic class Example {
@RequestMapping("/") String home() { return "Hello World!"; }
public static void main(String[] args) { SpringApplication.run(Example.class, args); }
}
Although there is not much code here, quite a lot is going on. We step through the important partsin the next few sections.
The @RestController and @RequestMapping Annotations
The first annotation on our Example class is @RestController. This is known as a stereotypeannotation. It provides hints for people reading the code and for Spring that the class plays aspecific role. In this case, our class is a web @Controller, so Spring considers it when handlingincoming web requests.
The @RequestMapping annotation provides “routing” information. It tells Spring that any HTTPrequest with the / path should be mapped to the home method. The @RestController annotation tellsSpring to render the resulting string directly back to the caller.
The @RestController and @RequestMapping annotations are Spring MVC annotations(they are not specific to Spring Boot). See the MVC section in the Spring ReferenceDocumentation for more details.
The @EnableAutoConfiguration Annotation
The second class-level annotation is @EnableAutoConfiguration. This annotation tells Spring Boot to“guess” how you want to configure Spring, based on the jar dependencies that you have added.Since spring-boot-starter-web added Tomcat and Spring MVC, the auto-configuration assumes thatyou are developing a web application and sets up Spring accordingly.
15

Starters and Auto-configuration
Auto-configuration is designed to work well with “Starters”, but the two concepts are notdirectly tied. You are free to pick and choose jar dependencies outside of the starters. SpringBoot still does its best to auto-configure your application.
The “main” Method
The final part of our application is the main method. This is a standard method that follows the Javaconvention for an application entry point. Our main method delegates to Spring Boot’sSpringApplication class by calling run. SpringApplication bootstraps our application, starting Spring,which, in turn, starts the auto-configured Tomcat web server. We need to pass Example.class as anargument to the run method to tell SpringApplication which is the primary Spring component. Theargs array is also passed through to expose any command-line arguments.
2.4.4. Running the Example
At this point, your application should work. Since you used the spring-boot-starter-parent POM,you have a useful run goal that you can use to start the application. Type mvn spring-boot:run fromthe root project directory to start the application. You should see output similar to the following:
$ mvn spring-boot:run
. ____ _ __ _ _ /\\ / ___'_ __ _ _(_)_ __ __ _ \ \ \ \( ( )\___ | '_ | '_| | '_ \/ _` | \ \ \ \ \\/ ___)| |_)| | | | | || (_| | ) ) ) ) ' |____| .__|_| |_|_| |_\__, | / / / / =========|_|==============|___/=/_/_/_/ :: Spring Boot :: (v2.2.11.RELEASE)....... . . ........ . . . (log output here)....... . . ......... Started Example in 2.222 seconds (JVM running for 6.514)
If you open a web browser to localhost:8080, you should see the following output:
Hello World!
To gracefully exit the application, press ctrl-c.
2.4.5. Creating an Executable Jar
We finish our example by creating a completely self-contained executable jar file that we could runin production. Executable jars (sometimes called “fat jars”) are archives containing your compiledclasses along with all of the jar dependencies that your code needs to run.
16
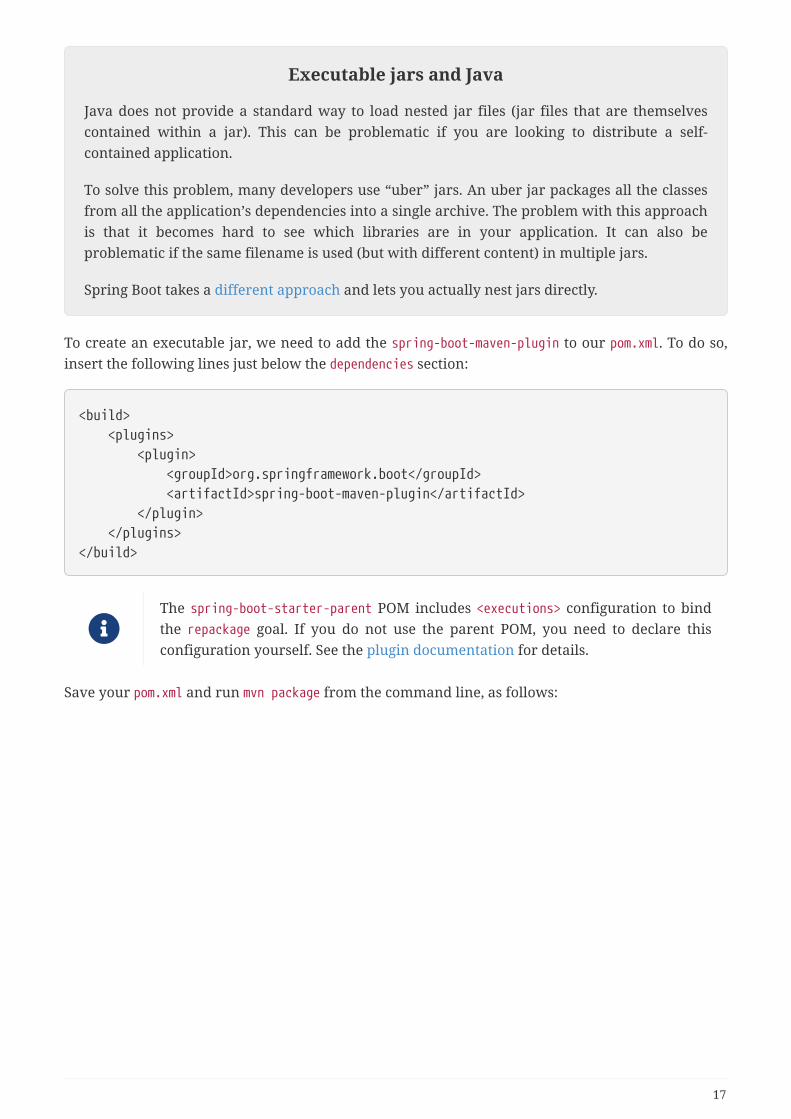
Executable jars and Java
Java does not provide a standard way to load nested jar files (jar files that are themselvescontained within a jar). This can be problematic if you are looking to distribute a self-contained application.
To solve this problem, many developers use “uber” jars. An uber jar packages all the classesfrom all the application’s dependencies into a single archive. The problem with this approachis that it becomes hard to see which libraries are in your application. It can also beproblematic if the same filename is used (but with different content) in multiple jars.
Spring Boot takes a different approach and lets you actually nest jars directly.
To create an executable jar, we need to add the spring-boot-maven-plugin to our pom.xml. To do so,insert the following lines just below the dependencies section:
<build> <plugins> <plugin> <groupId>org.springframework.boot</groupId> <artifactId>spring-boot-maven-plugin</artifactId> </plugin> </plugins></build>
The spring-boot-starter-parent POM includes <executions> configuration to bindthe repackage goal. If you do not use the parent POM, you need to declare thisconfiguration yourself. See the plugin documentation for details.
Save your pom.xml and run mvn package from the command line, as follows:
17

$ mvn package
[INFO] Scanning for projects...[INFO][INFO] ------------------------------------------------------------------------[INFO] Building myproject 0.0.1-SNAPSHOT[INFO] ------------------------------------------------------------------------[INFO] .... ..[INFO] --- maven-jar-plugin:2.4:jar (default-jar) @ myproject ---[INFO] Building jar: /Users/developer/example/spring-boot-example/target/myproject-0.0.1-SNAPSHOT.jar[INFO][INFO] --- spring-boot-maven-plugin:2.2.11.RELEASE:repackage (default) @ myproject ---[INFO] ------------------------------------------------------------------------[INFO] BUILD SUCCESS[INFO] ------------------------------------------------------------------------
If you look in the target directory, you should see myproject-0.0.1-SNAPSHOT.jar. The file should bearound 10 MB in size. If you want to peek inside, you can use jar tvf, as follows:
$ jar tvf target/myproject-0.0.1-SNAPSHOT.jar
You should also see a much smaller file named myproject-0.0.1-SNAPSHOT.jar.original in the targetdirectory. This is the original jar file that Maven created before it was repackaged by Spring Boot.
To run that application, use the java -jar command, as follows:
$ java -jar target/myproject-0.0.1-SNAPSHOT.jar
. ____ _ __ _ _ /\\ / ___'_ __ _ _(_)_ __ __ _ \ \ \ \( ( )\___ | '_ | '_| | '_ \/ _` | \ \ \ \ \\/ ___)| |_)| | | | | || (_| | ) ) ) ) ' |____| .__|_| |_|_| |_\__, | / / / / =========|_|==============|___/=/_/_/_/ :: Spring Boot :: (v2.2.11.RELEASE)....... . . ........ . . . (log output here)....... . . ......... Started Example in 2.536 seconds (JVM running for 2.864)
As before, to exit the application, press ctrl-c.
2.5. What to Read NextHopefully, this section provided some of the Spring Boot basics and got you on your way to writing
18

your own applications. If you are a task-oriented type of developer, you might want to jump over tospring.io and check out some of the getting started guides that solve specific “How do I do that withSpring?” problems. We also have Spring Boot-specific “How-to” reference documentation.
Otherwise, the next logical step is to read Using Spring Boot. If you are really impatient, you couldalso jump ahead and read about Spring Boot features.
19

Chapter 3. Using Spring BootThis section goes into more detail about how you should use Spring Boot. It covers topics such asbuild systems, auto-configuration, and how to run your applications. We also cover some SpringBoot best practices. Although there is nothing particularly special about Spring Boot (it is justanother library that you can consume), there are a few recommendations that, when followed,make your development process a little easier.
If you are starting out with Spring Boot, you should probably read the Getting Started guide beforediving into this section.
3.1. Build SystemsIt is strongly recommended that you choose a build system that supports dependency managementand that can consume artifacts published to the “Maven Central” repository. We would recommendthat you choose Maven or Gradle. It is possible to get Spring Boot to work with other build systems(Ant, for example), but they are not particularly well supported.
3.1.1. Dependency Management
Each release of Spring Boot provides a curated list of dependencies that it supports. In practice, youdo not need to provide a version for any of these dependencies in your build configuration, asSpring Boot manages that for you. When you upgrade Spring Boot itself, these dependencies areupgraded as well in a consistent way.
You can still specify a version and override Spring Boot’s recommendations if youneed to do so.
The curated list contains all the spring modules that you can use with Spring Boot as well as arefined list of third party libraries. The list is available as a standard Bills of Materials (spring-boot-dependencies) that can be used with both Maven and Gradle.
Each release of Spring Boot is associated with a base version of the SpringFramework. We highly recommend that you not specify its version.
3.1.2. Maven
Maven users can inherit from the spring-boot-starter-parent project to obtain sensible defaults.The parent project provides the following features:
• Java 1.8 as the default compiler level.
• UTF-8 source encoding.
• A Dependency Management section, inherited from the spring-boot-dependencies pom, thatmanages the versions of common dependencies. This dependency management lets you omit<version> tags for those dependencies when used in your own pom.
• An execution of the repackage goal with a repackage execution id.
20
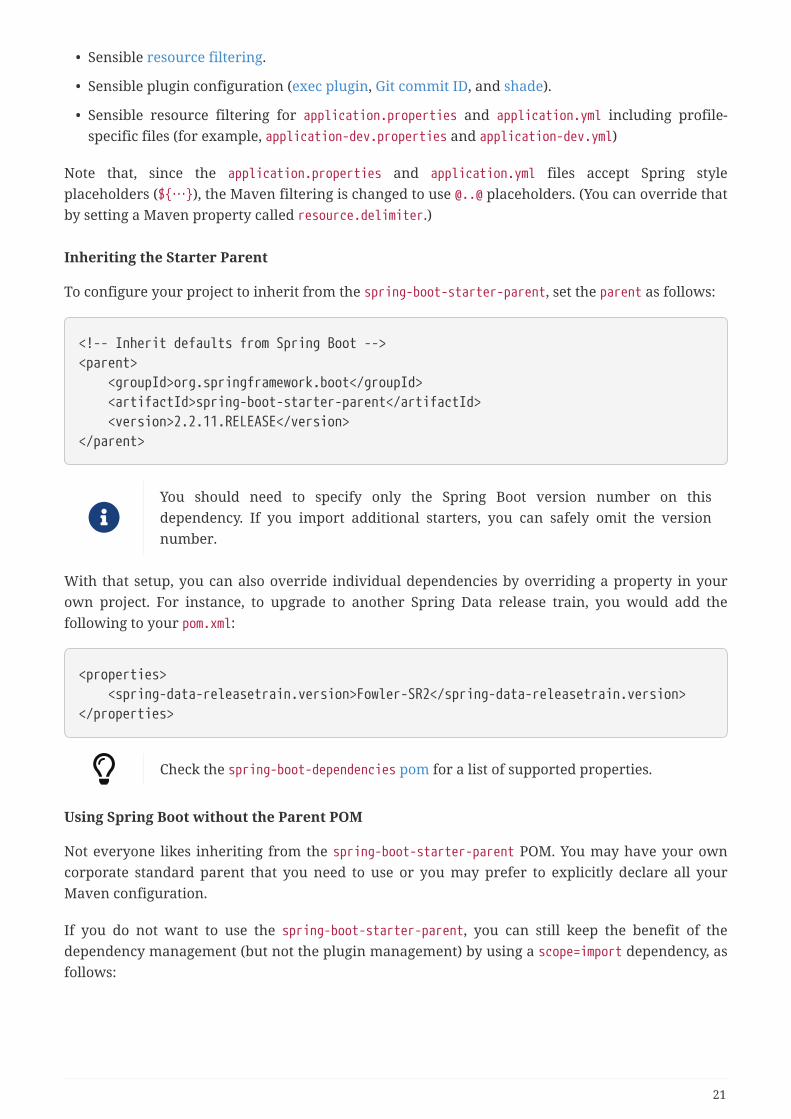
• Sensible resource filtering.
• Sensible plugin configuration (exec plugin, Git commit ID, and shade).
• Sensible resource filtering for application.properties and application.yml including profile-specific files (for example, application-dev.properties and application-dev.yml)
Note that, since the application.properties and application.yml files accept Spring styleplaceholders (${…}), the Maven filtering is changed to use @..@ placeholders. (You can override thatby setting a Maven property called resource.delimiter.)
Inheriting the Starter Parent
To configure your project to inherit from the spring-boot-starter-parent, set the parent as follows:
<!-- Inherit defaults from Spring Boot --><parent> <groupId>org.springframework.boot</groupId> <artifactId>spring-boot-starter-parent</artifactId> <version>2.2.11.RELEASE</version></parent>
You should need to specify only the Spring Boot version number on thisdependency. If you import additional starters, you can safely omit the versionnumber.
With that setup, you can also override individual dependencies by overriding a property in yourown project. For instance, to upgrade to another Spring Data release train, you would add thefollowing to your pom.xml:
<properties> <spring-data-releasetrain.version>Fowler-SR2</spring-data-releasetrain.version></properties>
Check the spring-boot-dependencies pom for a list of supported properties.
Using Spring Boot without the Parent POM
Not everyone likes inheriting from the spring-boot-starter-parent POM. You may have your owncorporate standard parent that you need to use or you may prefer to explicitly declare all yourMaven configuration.
If you do not want to use the spring-boot-starter-parent, you can still keep the benefit of thedependency management (but not the plugin management) by using a scope=import dependency, asfollows:
21

<dependencyManagement> <dependencies> <dependency> <!-- Import dependency management from Spring Boot --> <groupId>org.springframework.boot</groupId> <artifactId>spring-boot-dependencies</artifactId> <version>2.2.11.RELEASE</version> <type>pom</type> <scope>import</scope> </dependency> </dependencies></dependencyManagement>
The preceding sample setup does not let you override individual dependencies by using a property,as explained above. To achieve the same result, you need to add an entry in thedependencyManagement of your project before the spring-boot-dependencies entry. For instance, toupgrade to another Spring Data release train, you could add the following element to your pom.xml:
<dependencyManagement> <dependencies> <!-- Override Spring Data release train provided by Spring Boot --> <dependency> <groupId>org.springframework.data</groupId> <artifactId>spring-data-releasetrain</artifactId> <version>Moore-SR10</version> <type>pom</type> <scope>import</scope> </dependency> <dependency> <groupId>org.springframework.boot</groupId> <artifactId>spring-boot-dependencies</artifactId> <version>2.2.11.RELEASE</version> <type>pom</type> <scope>import</scope> </dependency> </dependencies></dependencyManagement>
In the preceding example, we specify a BOM, but any dependency type can beoverridden in the same way.
Using the Spring Boot Maven Plugin
Spring Boot includes a Maven plugin that can package the project as an executable jar. Add theplugin to your <plugins> section if you want to use it, as shown in the following example:
22

<build> <plugins> <plugin> <groupId>org.springframework.boot</groupId> <artifactId>spring-boot-maven-plugin</artifactId> </plugin> </plugins></build>
If you use the Spring Boot starter parent pom, you need to add only the plugin.There is no need to configure it unless you want to change the settings defined inthe parent.
3.1.3. Gradle
To learn about using Spring Boot with Gradle, please refer to the documentation for Spring Boot’sGradle plugin:
• Reference (HTML and PDF)
• API
3.1.4. Ant
It is possible to build a Spring Boot project using Apache Ant+Ivy. The spring-boot-antlib “AntLib”module is also available to help Ant create executable jars.
To declare dependencies, a typical ivy.xml file looks something like the following example:
<ivy-module version="2.0"> <info organisation="org.springframework.boot" module="spring-boot-sample-ant" /> <configurations> <conf name="compile" description="everything needed to compile this module" /> <conf name="runtime" extends="compile" description="everything needed to runthis module" /> </configurations> <dependencies> <dependency org="org.springframework.boot" name="spring-boot-starter" rev="${spring-boot.version}" conf="compile" /> </dependencies></ivy-module>
A typical build.xml looks like the following example:
23
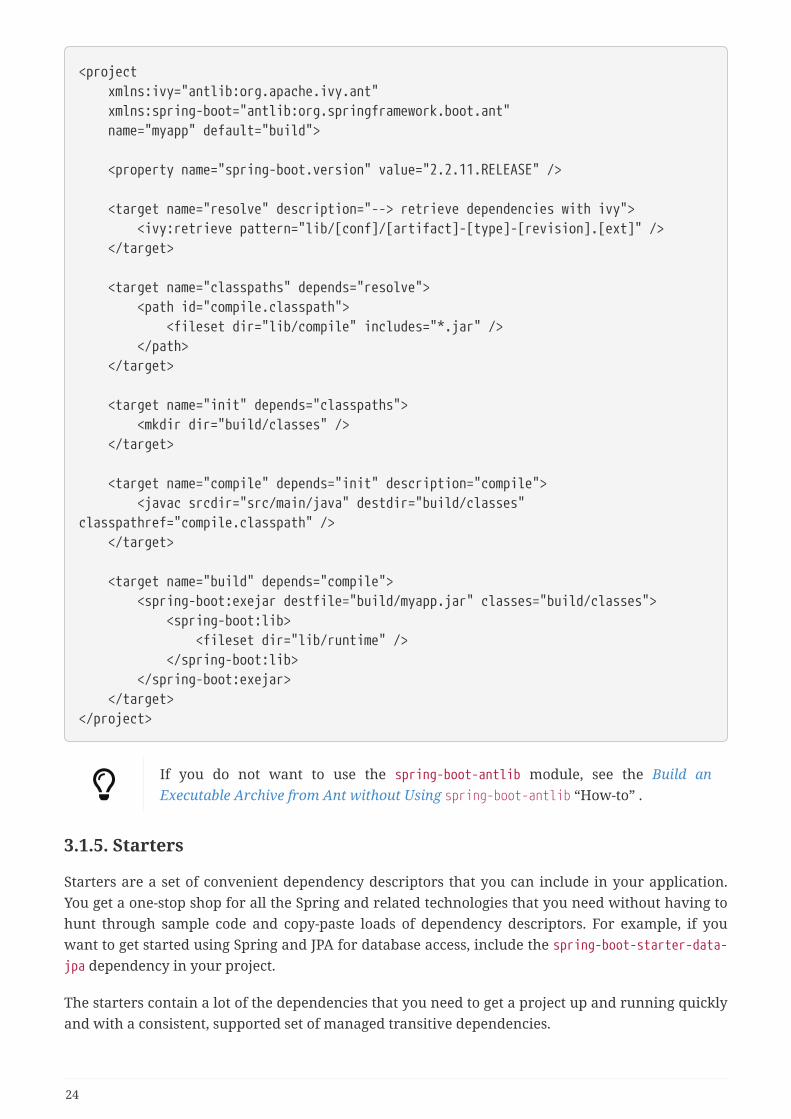
<project xmlns:ivy="antlib:org.apache.ivy.ant" xmlns:spring-boot="antlib:org.springframework.boot.ant" name="myapp" default="build">
<property name="spring-boot.version" value="2.2.11.RELEASE" />
<target name="resolve" description="--> retrieve dependencies with ivy"> <ivy:retrieve pattern="lib/[conf]/[artifact]-[type]-[revision].[ext]" /> </target>
<target name="classpaths" depends="resolve"> <path id="compile.classpath"> <fileset dir="lib/compile" includes="*.jar" /> </path> </target>
<target name="init" depends="classpaths"> <mkdir dir="build/classes" /> </target>
<target name="compile" depends="init" description="compile"> <javac srcdir="src/main/java" destdir="build/classes"classpathref="compile.classpath" /> </target>
<target name="build" depends="compile"> <spring-boot:exejar destfile="build/myapp.jar" classes="build/classes"> <spring-boot:lib> <fileset dir="lib/runtime" /> </spring-boot:lib> </spring-boot:exejar> </target></project>
If you do not want to use the spring-boot-antlib module, see the Build anExecutable Archive from Ant without Using spring-boot-antlib “How-to” .
3.1.5. Starters
Starters are a set of convenient dependency descriptors that you can include in your application.You get a one-stop shop for all the Spring and related technologies that you need without having tohunt through sample code and copy-paste loads of dependency descriptors. For example, if youwant to get started using Spring and JPA for database access, include the spring-boot-starter-data-jpa dependency in your project.
The starters contain a lot of the dependencies that you need to get a project up and running quicklyand with a consistent, supported set of managed transitive dependencies.
24

What’s in a name
All official starters follow a similar naming pattern; spring-boot-starter-*, where * is aparticular type of application. This naming structure is intended to help when you need tofind a starter. The Maven integration in many IDEs lets you search dependencies by name.For example, with the appropriate Eclipse or STS plugin installed, you can press ctrl-space inthe POM editor and type “spring-boot-starter” for a complete list.
As explained in the “Creating Your Own Starter” section, third party starters should not startwith spring-boot, as it is reserved for official Spring Boot artifacts. Rather, a third-partystarter typically starts with the name of the project. For example, a third-party starter projectcalled thirdpartyproject would typically be named thirdpartyproject-spring-boot-starter.
The following application starters are provided by Spring Boot under the org.springframework.bootgroup:
Table 1. Spring Boot application starters
Name Description Pom
spring-boot-starter Core starter, including auto-configuration support, loggingand YAML
Pom
spring-boot-starter-activemq Starter for JMS messaging usingApache ActiveMQ
Pom
spring-boot-starter-amqp Starter for using Spring AMQPand Rabbit MQ
Pom
spring-boot-starter-aop Starter for aspect-orientedprogramming with Spring AOPand AspectJ
Pom
spring-boot-starter-artemis Starter for JMS messaging usingApache Artemis
Pom
spring-boot-starter-batch Starter for using Spring Batch Pom
spring-boot-starter-cache Starter for using SpringFramework’s caching support
Pom
spring-boot-starter-cloud-connectors
Starter for using Spring CloudConnectors which simplifiesconnecting to services in cloudplatforms like Cloud Foundryand Heroku. Deprecated infavor of Java CFEnv
Pom
spring-boot-starter-data-cassandra
Starter for using Cassandradistributed database and SpringData Cassandra
Pom
25
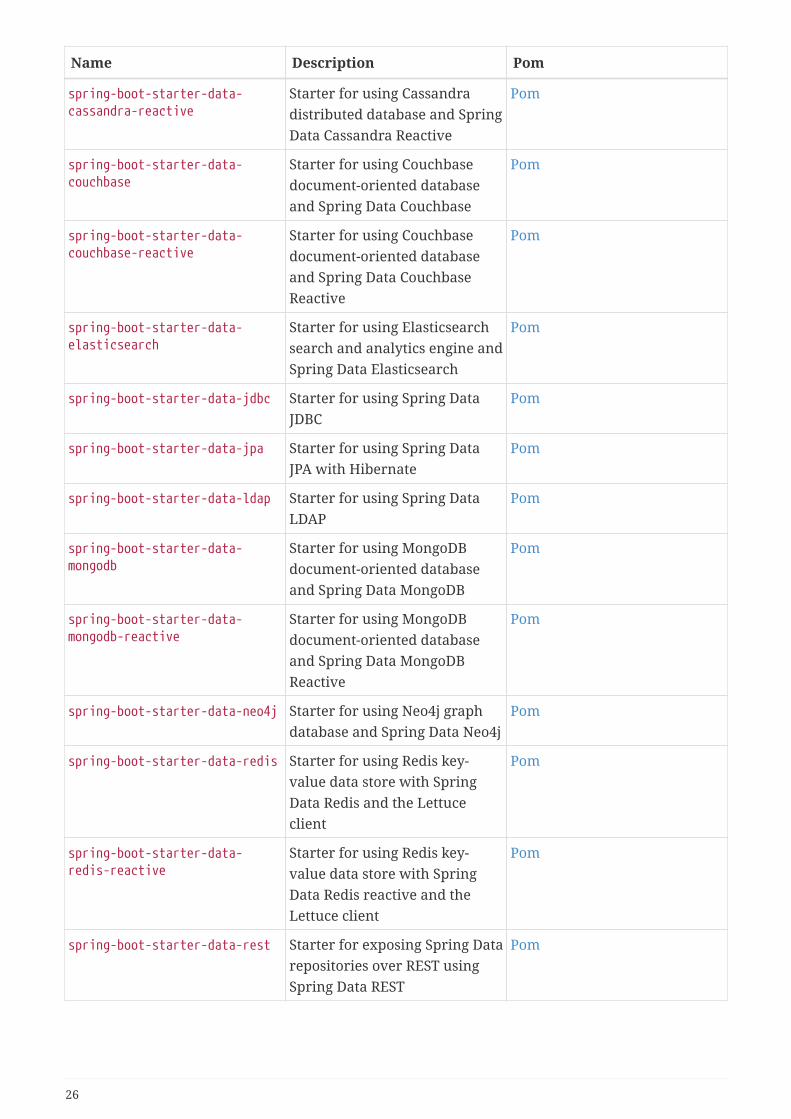
Name Description Pom
spring-boot-starter-data-cassandra-reactive
Starter for using Cassandradistributed database and SpringData Cassandra Reactive
Pom
spring-boot-starter-data-couchbase
Starter for using Couchbasedocument-oriented databaseand Spring Data Couchbase
Pom
spring-boot-starter-data-couchbase-reactive
Starter for using Couchbasedocument-oriented databaseand Spring Data CouchbaseReactive
Pom
spring-boot-starter-data-elasticsearch
Starter for using Elasticsearchsearch and analytics engine andSpring Data Elasticsearch
Pom
spring-boot-starter-data-jdbc Starter for using Spring DataJDBC
Pom
spring-boot-starter-data-jpa Starter for using Spring DataJPA with Hibernate
Pom
spring-boot-starter-data-ldap Starter for using Spring DataLDAP
Pom
spring-boot-starter-data-mongodb
Starter for using MongoDBdocument-oriented databaseand Spring Data MongoDB
Pom
spring-boot-starter-data-mongodb-reactive
Starter for using MongoDBdocument-oriented databaseand Spring Data MongoDBReactive
Pom
spring-boot-starter-data-neo4j Starter for using Neo4j graphdatabase and Spring Data Neo4j
Pom
spring-boot-starter-data-redis Starter for using Redis key-value data store with SpringData Redis and the Lettuceclient
Pom
spring-boot-starter-data-redis-reactive
Starter for using Redis key-value data store with SpringData Redis reactive and theLettuce client
Pom
spring-boot-starter-data-rest Starter for exposing Spring Datarepositories over REST usingSpring Data REST
Pom
26

Name Description Pom
spring-boot-starter-data-solr Starter for using the ApacheSolr search platform withSpring Data Solr
Pom
spring-boot-starter-freemarker Starter for building MVC webapplications using FreeMarkerviews
Pom
spring-boot-starter-groovy-templates
Starter for building MVC webapplications using GroovyTemplates views
Pom
spring-boot-starter-hateoas Starter for buildinghypermedia-based RESTful webapplication with Spring MVCand Spring HATEOAS
Pom
spring-boot-starter-integration
Starter for using SpringIntegration
Pom
spring-boot-starter-jdbc Starter for using JDBC with theHikariCP connection pool
Pom
spring-boot-starter-jersey Starter for building RESTfulweb applications using JAX-RSand Jersey. An alternative tospring-boot-starter-web
Pom
spring-boot-starter-jooq Starter for using jOOQ to accessSQL databases. An alternativeto spring-boot-starter-data-jpaor spring-boot-starter-jdbc
Pom
spring-boot-starter-json Starter for reading and writingjson
Pom
spring-boot-starter-jta-atomikos
Starter for JTA transactionsusing Atomikos
Pom
spring-boot-starter-jta-bitronix
Starter for JTA transactionsusing Bitronix
Pom
spring-boot-starter-mail Starter for using Java Mail andSpring Framework’s emailsending support
Pom
spring-boot-starter-mustache Starter for building webapplications using Mustacheviews
Pom
spring-boot-starter-oauth2-client
Starter for using SpringSecurity’s OAuth2/OpenIDConnect client features
Pom
27
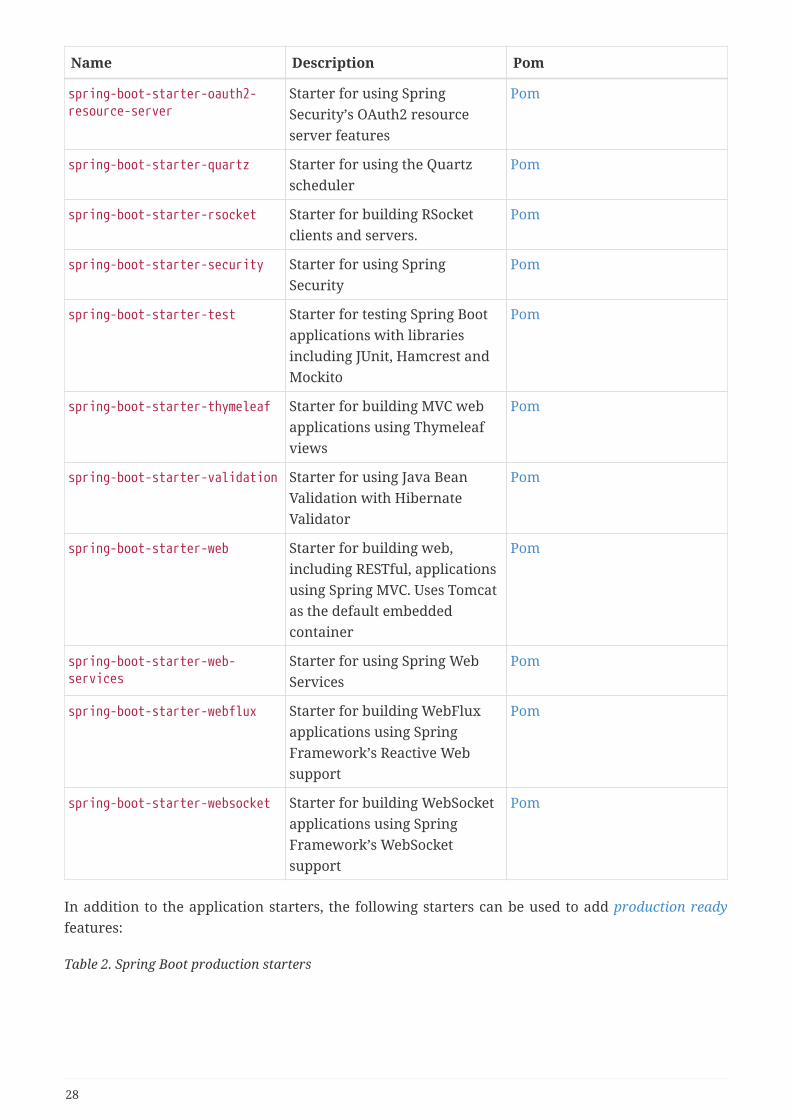
Name Description Pom
spring-boot-starter-oauth2-resource-server
Starter for using SpringSecurity’s OAuth2 resourceserver features
Pom
spring-boot-starter-quartz Starter for using the Quartzscheduler
Pom
spring-boot-starter-rsocket Starter for building RSocketclients and servers.
Pom
spring-boot-starter-security Starter for using SpringSecurity
Pom
spring-boot-starter-test Starter for testing Spring Bootapplications with librariesincluding JUnit, Hamcrest andMockito
Pom
spring-boot-starter-thymeleaf Starter for building MVC webapplications using Thymeleafviews
Pom
spring-boot-starter-validation Starter for using Java BeanValidation with HibernateValidator
Pom
spring-boot-starter-web Starter for building web,including RESTful, applicationsusing Spring MVC. Uses Tomcatas the default embeddedcontainer
Pom
spring-boot-starter-web-services
Starter for using Spring WebServices
Pom
spring-boot-starter-webflux Starter for building WebFluxapplications using SpringFramework’s Reactive Websupport
Pom
spring-boot-starter-websocket Starter for building WebSocketapplications using SpringFramework’s WebSocketsupport
Pom
In addition to the application starters, the following starters can be used to add production readyfeatures:
Table 2. Spring Boot production starters
28
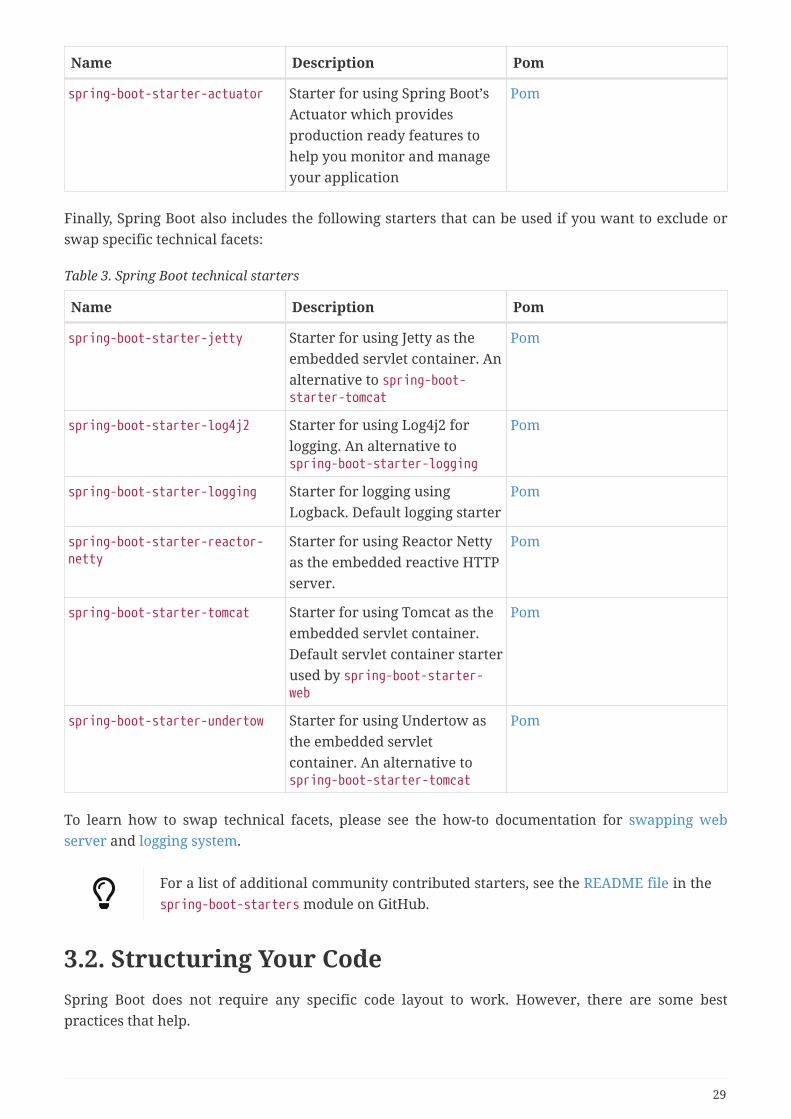
Name Description Pom
spring-boot-starter-actuator Starter for using Spring Boot’sActuator which providesproduction ready features tohelp you monitor and manageyour application
Pom
Finally, Spring Boot also includes the following starters that can be used if you want to exclude orswap specific technical facets:
Table 3. Spring Boot technical starters
Name Description Pom
spring-boot-starter-jetty Starter for using Jetty as theembedded servlet container. Analternative to spring-boot-starter-tomcat
Pom
spring-boot-starter-log4j2 Starter for using Log4j2 forlogging. An alternative tospring-boot-starter-logging
Pom
spring-boot-starter-logging Starter for logging usingLogback. Default logging starter
Pom
spring-boot-starter-reactor-netty
Starter for using Reactor Nettyas the embedded reactive HTTPserver.
Pom
spring-boot-starter-tomcat Starter for using Tomcat as theembedded servlet container.Default servlet container starterused by spring-boot-starter-web
Pom
spring-boot-starter-undertow Starter for using Undertow asthe embedded servletcontainer. An alternative tospring-boot-starter-tomcat
Pom
To learn how to swap technical facets, please see the how-to documentation for swapping webserver and logging system.
For a list of additional community contributed starters, see the README file in thespring-boot-starters module on GitHub.
3.2. Structuring Your CodeSpring Boot does not require any specific code layout to work. However, there are some bestpractices that help.
29
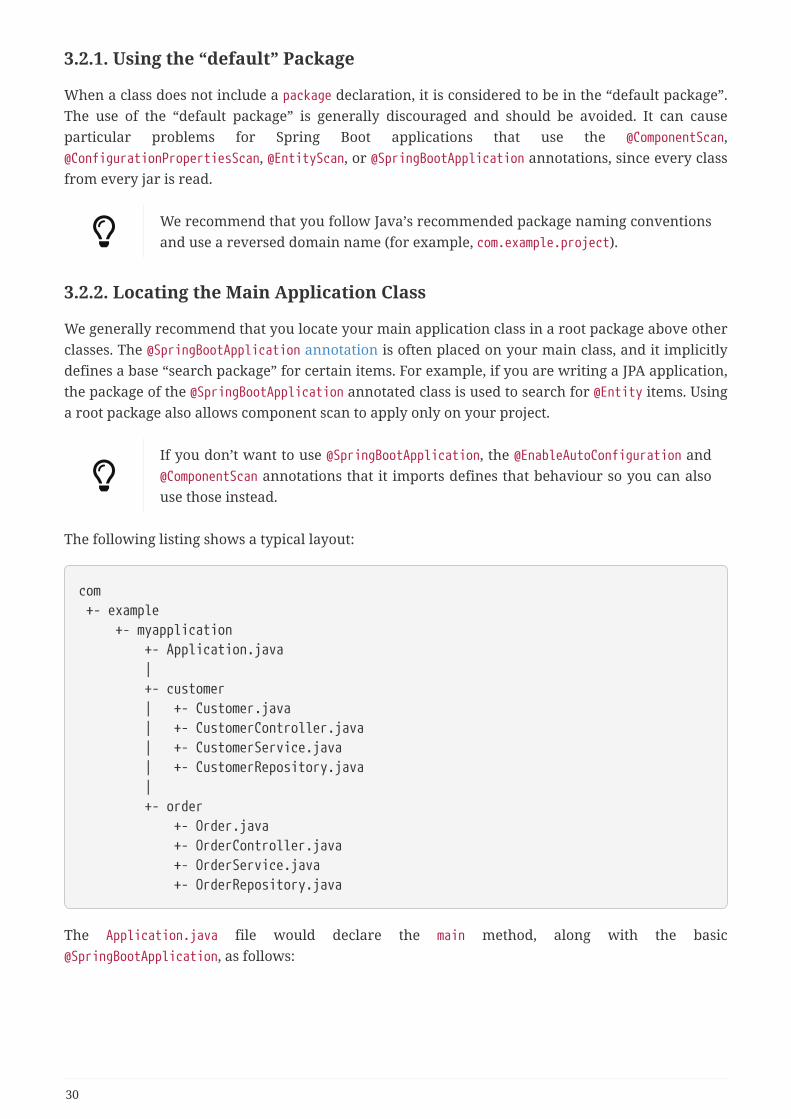
3.2.1. Using the “default” Package
When a class does not include a package declaration, it is considered to be in the “default package”.The use of the “default package” is generally discouraged and should be avoided. It can causeparticular problems for Spring Boot applications that use the @ComponentScan,@ConfigurationPropertiesScan, @EntityScan, or @SpringBootApplication annotations, since every classfrom every jar is read.
We recommend that you follow Java’s recommended package naming conventionsand use a reversed domain name (for example, com.example.project).
3.2.2. Locating the Main Application Class
We generally recommend that you locate your main application class in a root package above otherclasses. The @SpringBootApplication annotation is often placed on your main class, and it implicitlydefines a base “search package” for certain items. For example, if you are writing a JPA application,the package of the @SpringBootApplication annotated class is used to search for @Entity items. Usinga root package also allows component scan to apply only on your project.
If you don’t want to use @SpringBootApplication, the @EnableAutoConfiguration and@ComponentScan annotations that it imports defines that behaviour so you can alsouse those instead.
The following listing shows a typical layout:
com +- example +- myapplication +- Application.java | +- customer | +- Customer.java | +- CustomerController.java | +- CustomerService.java | +- CustomerRepository.java | +- order +- Order.java +- OrderController.java +- OrderService.java +- OrderRepository.java
The Application.java file would declare the main method, along with the basic@SpringBootApplication, as follows:
30

package com.example.myapplication;
import org.springframework.boot.SpringApplication;import org.springframework.boot.autoconfigure.SpringBootApplication;
@SpringBootApplicationpublic class Application {
public static void main(String[] args) { SpringApplication.run(Application.class, args); }
}
3.3. Configuration ClassesSpring Boot favors Java-based configuration. Although it is possible to use SpringApplication withXML sources, we generally recommend that your primary source be a single @Configuration class.Usually the class that defines the main method is a good candidate as the primary @Configuration.
Many Spring configuration examples have been published on the Internet that useXML configuration. If possible, always try to use the equivalent Java-basedconfiguration. Searching for Enable* annotations can be a good starting point.
3.3.1. Importing Additional Configuration Classes
You need not put all your @Configuration into a single class. The @Import annotation can be used toimport additional configuration classes. Alternatively, you can use @ComponentScan to automaticallypick up all Spring components, including @Configuration classes.
3.3.2. Importing XML Configuration
If you absolutely must use XML based configuration, we recommend that you still start with a@Configuration class. You can then use an @ImportResource annotation to load XML configurationfiles.
3.4. Auto-configurationSpring Boot auto-configuration attempts to automatically configure your Spring application basedon the jar dependencies that you have added. For example, if HSQLDB is on your classpath, and youhave not manually configured any database connection beans, then Spring Boot auto-configures anin-memory database.
You need to opt-in to auto-configuration by adding the @EnableAutoConfiguration or@SpringBootApplication annotations to one of your @Configuration classes.
31
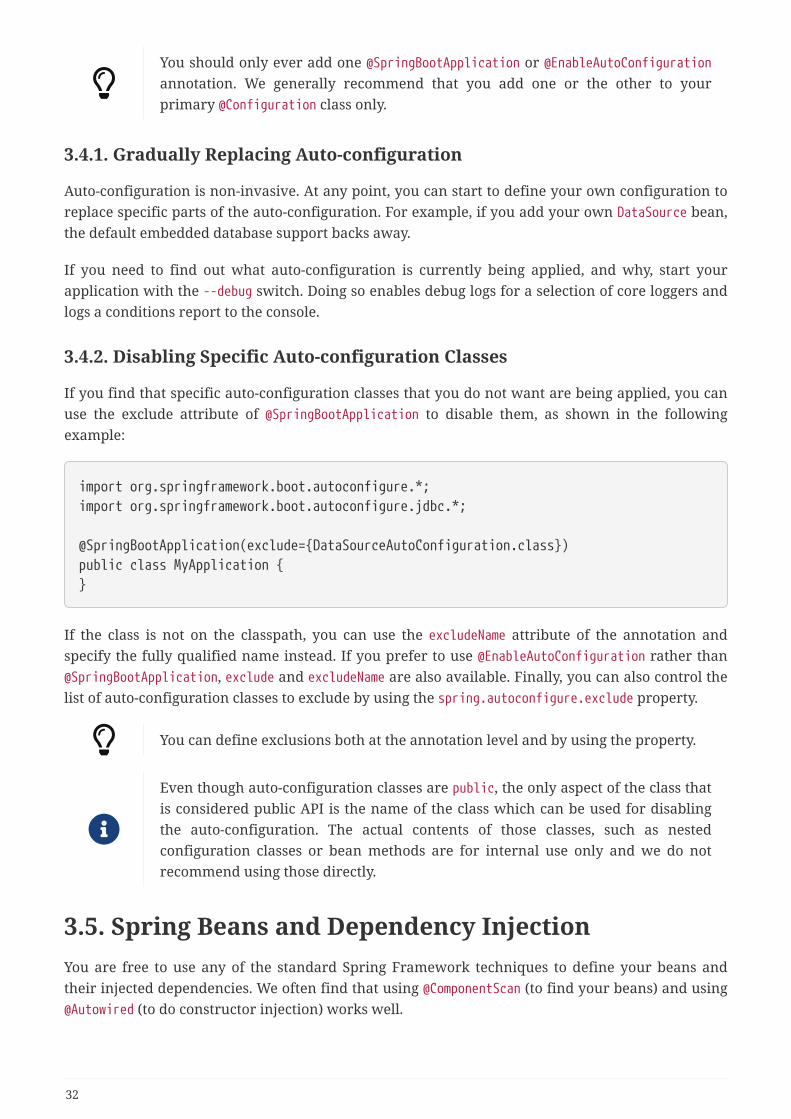
You should only ever add one @SpringBootApplication or @EnableAutoConfigurationannotation. We generally recommend that you add one or the other to yourprimary @Configuration class only.
3.4.1. Gradually Replacing Auto-configuration
Auto-configuration is non-invasive. At any point, you can start to define your own configuration toreplace specific parts of the auto-configuration. For example, if you add your own DataSource bean,the default embedded database support backs away.
If you need to find out what auto-configuration is currently being applied, and why, start yourapplication with the --debug switch. Doing so enables debug logs for a selection of core loggers andlogs a conditions report to the console.
3.4.2. Disabling Specific Auto-configuration Classes
If you find that specific auto-configuration classes that you do not want are being applied, you canuse the exclude attribute of @SpringBootApplication to disable them, as shown in the followingexample:
import org.springframework.boot.autoconfigure.*;import org.springframework.boot.autoconfigure.jdbc.*;
@SpringBootApplication(exclude={DataSourceAutoConfiguration.class})public class MyApplication {}
If the class is not on the classpath, you can use the excludeName attribute of the annotation andspecify the fully qualified name instead. If you prefer to use @EnableAutoConfiguration rather than@SpringBootApplication, exclude and excludeName are also available. Finally, you can also control thelist of auto-configuration classes to exclude by using the spring.autoconfigure.exclude property.
You can define exclusions both at the annotation level and by using the property.
Even though auto-configuration classes are public, the only aspect of the class thatis considered public API is the name of the class which can be used for disablingthe auto-configuration. The actual contents of those classes, such as nestedconfiguration classes or bean methods are for internal use only and we do notrecommend using those directly.
3.5. Spring Beans and Dependency InjectionYou are free to use any of the standard Spring Framework techniques to define your beans andtheir injected dependencies. We often find that using @ComponentScan (to find your beans) and using@Autowired (to do constructor injection) works well.
32
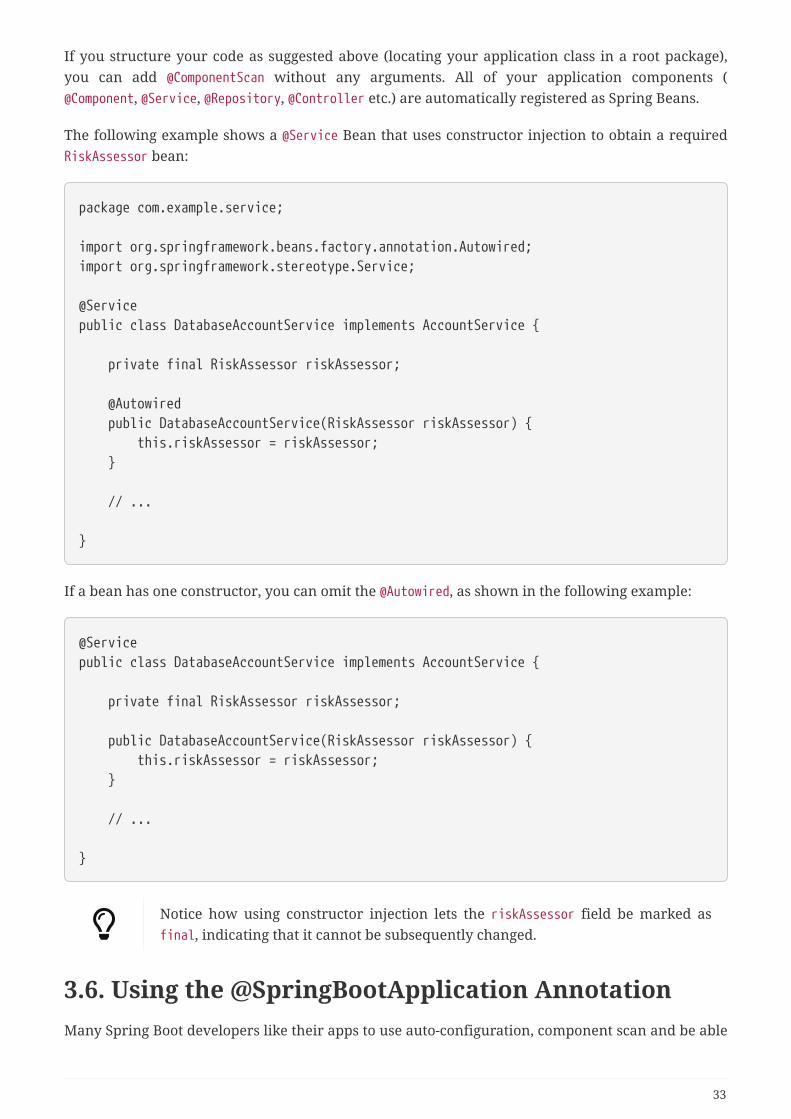
If you structure your code as suggested above (locating your application class in a root package),you can add @ComponentScan without any arguments. All of your application components (@Component, @Service, @Repository, @Controller etc.) are automatically registered as Spring Beans.
The following example shows a @Service Bean that uses constructor injection to obtain a requiredRiskAssessor bean:
package com.example.service;
import org.springframework.beans.factory.annotation.Autowired;import org.springframework.stereotype.Service;
@Servicepublic class DatabaseAccountService implements AccountService {
private final RiskAssessor riskAssessor;
@Autowired public DatabaseAccountService(RiskAssessor riskAssessor) { this.riskAssessor = riskAssessor; }
// ...
}
If a bean has one constructor, you can omit the @Autowired, as shown in the following example:
@Servicepublic class DatabaseAccountService implements AccountService {
private final RiskAssessor riskAssessor;
public DatabaseAccountService(RiskAssessor riskAssessor) { this.riskAssessor = riskAssessor; }
// ...
}
Notice how using constructor injection lets the riskAssessor field be marked asfinal, indicating that it cannot be subsequently changed.
3.6. Using the @SpringBootApplication AnnotationMany Spring Boot developers like their apps to use auto-configuration, component scan and be able
33

to define extra configuration on their "application class". A single @SpringBootApplication
annotation can be used to enable those three features, that is:
• @EnableAutoConfiguration: enable Spring Boot’s auto-configuration mechanism
• @ComponentScan: enable @Component scan on the package where the application is located (see thebest practices)
• @Configuration: allow to register extra beans in the context or import additional configurationclasses
package com.example.myapplication;
import org.springframework.boot.SpringApplication;import org.springframework.boot.autoconfigure.SpringBootApplication;
@SpringBootApplication // same as @Configuration @EnableAutoConfiguration@ComponentScanpublic class Application {
public static void main(String[] args) { SpringApplication.run(Application.class, args); }
}
@SpringBootApplication also provides aliases to customize the attributes of@EnableAutoConfiguration and @ComponentScan.
34

None of these features are mandatory and you may choose to replace this singleannotation by any of the features that it enables. For instance, you may not want touse component scan or configuration properties scan in your application:
package com.example.myapplication;
import org.springframework.boot.SpringApplication;import org.springframework.context.annotation.ComponentScanimport org.springframework.context.annotation.Configuration;import org.springframework.context.annotation.Import;
@Configuration(proxyBeanMethods = false)@EnableAutoConfiguration@Import({ MyConfig.class, MyAnotherConfig.class })public class Application {
public static void main(String[] args) { SpringApplication.run(Application.class, args); }
}
In this example, Application is just like any other Spring Boot application exceptthat @Component-annotated classes and @ConfigurationProperties-annotated classesare not detected automatically and the user-defined beans are imported explicitly(see @Import).
3.7. Running Your ApplicationOne of the biggest advantages of packaging your application as a jar and using an embedded HTTPserver is that you can run your application as you would any other. The sample applies todebugging Spring Boot applications. You do not need any special IDE plugins or extensions.
This section only covers jar based packaging. If you choose to package yourapplication as a war file, you should refer to your server and IDE documentation.
3.7.1. Running from an IDE
You can run a Spring Boot application from your IDE as a Java application. However, you first needto import your project. Import steps vary depending on your IDE and build system. Most IDEs canimport Maven projects directly. For example, Eclipse users can select Import… → Existing MavenProjects from the File menu.
If you cannot directly import your project into your IDE, you may be able to generate IDE metadataby using a build plugin. Maven includes plugins for Eclipse and IDEA. Gradle offers plugins forvarious IDEs.
35

If you accidentally run a web application twice, you see a “Port already in use”error. STS users can use the Relaunch button rather than the Run button to ensurethat any existing instance is closed.
3.7.2. Running as a Packaged Application
If you use the Spring Boot Maven or Gradle plugins to create an executable jar, you can run yourapplication using java -jar, as shown in the following example:
$ java -jar target/myapplication-0.0.1-SNAPSHOT.jar
It is also possible to run a packaged application with remote debugging support enabled. Doing solets you attach a debugger to your packaged application, as shown in the following example:
$ java -Xdebug -Xrunjdwp:server=y,transport=dt_socket,address=8000,suspend=n \ -jar target/myapplication-0.0.1-SNAPSHOT.jar
3.7.3. Using the Maven Plugin
The Spring Boot Maven plugin includes a run goal that can be used to quickly compile and run yourapplication. Applications run in an exploded form, as they do in your IDE. The following exampleshows a typical Maven command to run a Spring Boot application:
$ mvn spring-boot:run
You might also want to use the MAVEN_OPTS operating system environment variable, as shown in thefollowing example:
$ export MAVEN_OPTS=-Xmx1024m
3.7.4. Using the Gradle Plugin
The Spring Boot Gradle plugin also includes a bootRun task that can be used to run your applicationin an exploded form. The bootRun task is added whenever you apply the org.springframework.bootand java plugins and is shown in the following example:
$ gradle bootRun
You might also want to use the JAVA_OPTS operating system environment variable, as shown in thefollowing example:
$ export JAVA_OPTS=-Xmx1024m
36
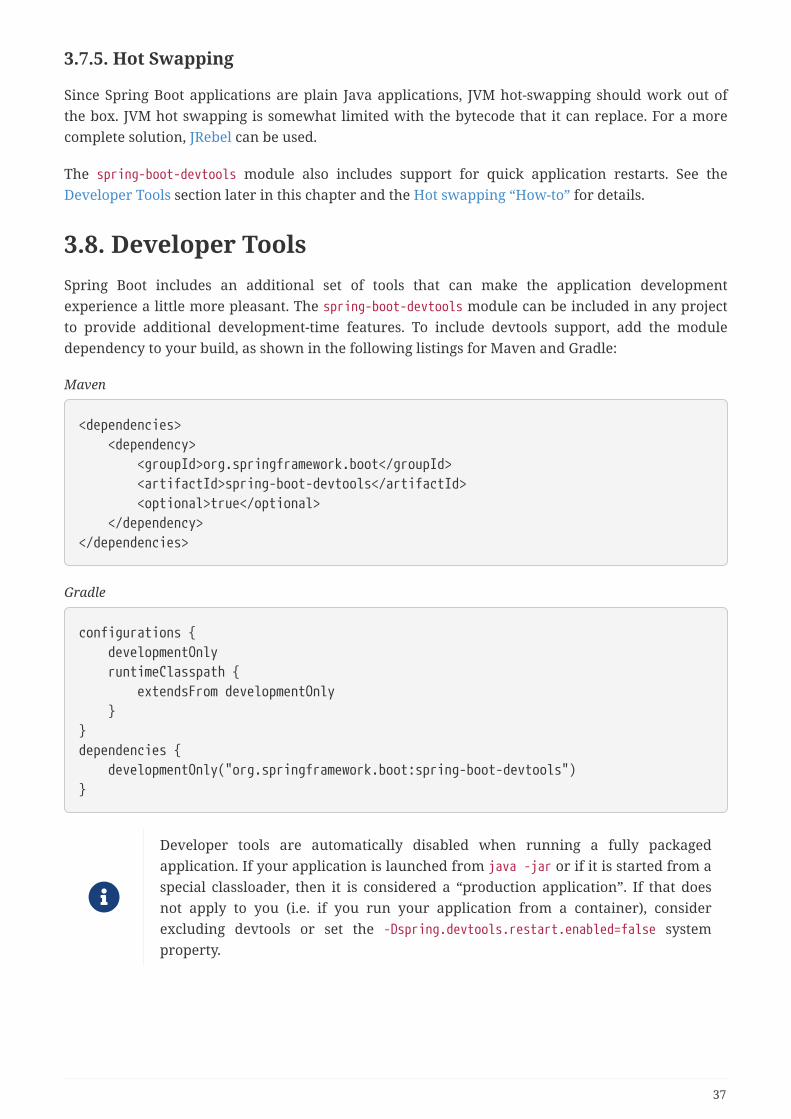
3.7.5. Hot Swapping
Since Spring Boot applications are plain Java applications, JVM hot-swapping should work out ofthe box. JVM hot swapping is somewhat limited with the bytecode that it can replace. For a morecomplete solution, JRebel can be used.
The spring-boot-devtools module also includes support for quick application restarts. See theDeveloper Tools section later in this chapter and the Hot swapping “How-to” for details.
3.8. Developer ToolsSpring Boot includes an additional set of tools that can make the application developmentexperience a little more pleasant. The spring-boot-devtools module can be included in any projectto provide additional development-time features. To include devtools support, add the moduledependency to your build, as shown in the following listings for Maven and Gradle:
Maven
<dependencies> <dependency> <groupId>org.springframework.boot</groupId> <artifactId>spring-boot-devtools</artifactId> <optional>true</optional> </dependency></dependencies>
Gradle
configurations { developmentOnly runtimeClasspath { extendsFrom developmentOnly }}dependencies { developmentOnly("org.springframework.boot:spring-boot-devtools")}
Developer tools are automatically disabled when running a fully packagedapplication. If your application is launched from java -jar or if it is started from aspecial classloader, then it is considered a “production application”. If that doesnot apply to you (i.e. if you run your application from a container), considerexcluding devtools or set the -Dspring.devtools.restart.enabled=false systemproperty.
37
Flagging the dependency as optional in Maven or using a custom developmentOnlyconfiguration in Gradle (as shown above) is a best practice that prevents devtoolsfrom being transitively applied to other modules that use your project.
Repackaged archives do not contain devtools by default. If you want to use acertain remote devtools feature, you need to disable the excludeDevtools buildproperty to include it. The property is supported with both the Maven and Gradleplugins.
3.8.1. Property Defaults
Several of the libraries supported by Spring Boot use caches to improve performance. For example,template engines cache compiled templates to avoid repeatedly parsing template files. Also, SpringMVC can add HTTP caching headers to responses when serving static resources.
While caching is very beneficial in production, it can be counter-productive during development,preventing you from seeing the changes you just made in your application. For this reason, spring-boot-devtools disables the caching options by default.
Cache options are usually configured by settings in your application.properties file. For example,Thymeleaf offers the spring.thymeleaf.cache property. Rather than needing to set these propertiesmanually, the spring-boot-devtools module automatically applies sensible development-timeconfiguration.
Because you need more information about web requests while developing Spring MVC and SpringWebFlux applications, developer tools will enable DEBUG logging for the web logging group. This willgive you information about the incoming request, which handler is processing it, the responseoutcome, etc. If you wish to log all request details (including potentially sensitive information), youcan turn on the spring.http.log-request-details configuration property.
If you don’t want property defaults to be applied you can set spring.devtools.add-properties to false in your application.properties.
For a complete list of the properties that are applied by the devtools, seeDevToolsPropertyDefaultsPostProcessor.
3.8.2. Automatic Restart
Applications that use spring-boot-devtools automatically restart whenever files on the classpathchange. This can be a useful feature when working in an IDE, as it gives a very fast feedback loopfor code changes. By default, any entry on the classpath that points to a folder is monitored forchanges. Note that certain resources, such as static assets and view templates, do not need to restartthe application.
38

Triggering a restart
As DevTools monitors classpath resources, the only way to trigger a restart is to update theclasspath. The way in which you cause the classpath to be updated depends on the IDE thatyou are using. In Eclipse, saving a modified file causes the classpath to be updated andtriggers a restart. In IntelliJ IDEA, building the project (Build +→+ Build Project) has thesame effect.
As long as forking is enabled, you can also start your application by using thesupported build plugins (Maven and Gradle), since DevTools needs an isolatedapplication classloader to operate properly. By default, the Gradle and Mavenplugins fork the application process.
Automatic restart works very well when used with LiveReload. See the LiveReloadsection for details. If you use JRebel, automatic restarts are disabled in favor ofdynamic class reloading. Other devtools features (such as LiveReload and propertyoverrides) can still be used.
DevTools relies on the application context’s shutdown hook to close it during arestart. It does not work correctly if you have disabled the shutdown hook(SpringApplication.setRegisterShutdownHook(false)).
When deciding if an entry on the classpath should trigger a restart when itchanges, DevTools automatically ignores projects named spring-boot, spring-boot-devtools, spring-boot-autoconfigure, spring-boot-actuator, and spring-boot-
starter.
DevTools needs to customize the ResourceLoader used by the ApplicationContext. Ifyour application provides one already, it is going to be wrapped. Direct override ofthe getResource method on the ApplicationContext is not supported.
Restart vs Reload
The restart technology provided by Spring Boot works by using two classloaders. Classes thatdo not change (for example, those from third-party jars) are loaded into a base classloader.Classes that you are actively developing are loaded into a restart classloader. When theapplication is restarted, the restart classloader is thrown away and a new one is created. Thisapproach means that application restarts are typically much faster than “cold starts”, sincethe base classloader is already available and populated.
If you find that restarts are not quick enough for your applications or you encounterclassloading issues, you could consider reloading technologies such as JRebel fromZeroTurnaround. These work by rewriting classes as they are loaded to make them moreamenable to reloading.
39

Logging changes in condition evaluation
By default, each time your application restarts, a report showing the condition evaluation delta islogged. The report shows the changes to your application’s auto-configuration as you make changessuch as adding or removing beans and setting configuration properties.
To disable the logging of the report, set the following property:
spring.devtools.restart.log-condition-evaluation-delta=false
Excluding Resources
Certain resources do not necessarily need to trigger a restart when they are changed. For example,Thymeleaf templates can be edited in-place. By default, changing resources in /META-INF/maven,/META-INF/resources, /resources, /static, /public, or /templates does not trigger a restart but doestrigger a live reload. If you want to customize these exclusions, you can use thespring.devtools.restart.exclude property. For example, to exclude only /static and /public youwould set the following property:
spring.devtools.restart.exclude=static/**,public/**
If you want to keep those defaults and add additional exclusions, use thespring.devtools.restart.additional-exclude property instead.
Watching Additional Paths
You may want your application to be restarted or reloaded when you make changes to files that arenot on the classpath. To do so, use the spring.devtools.restart.additional-paths property toconfigure additional paths to watch for changes. You can use the spring.devtools.restart.excludeproperty described earlier to control whether changes beneath the additional paths trigger a fullrestart or a live reload.
Disabling Restart
If you do not want to use the restart feature, you can disable it by using thespring.devtools.restart.enabled property. In most cases, you can set this property in yourapplication.properties (doing so still initializes the restart classloader, but it does not watch for filechanges).
If you need to completely disable restart support (for example, because it does not work with aspecific library), you need to set the spring.devtools.restart.enabled System property to falsebefore calling SpringApplication.run(…), as shown in the following example:
40
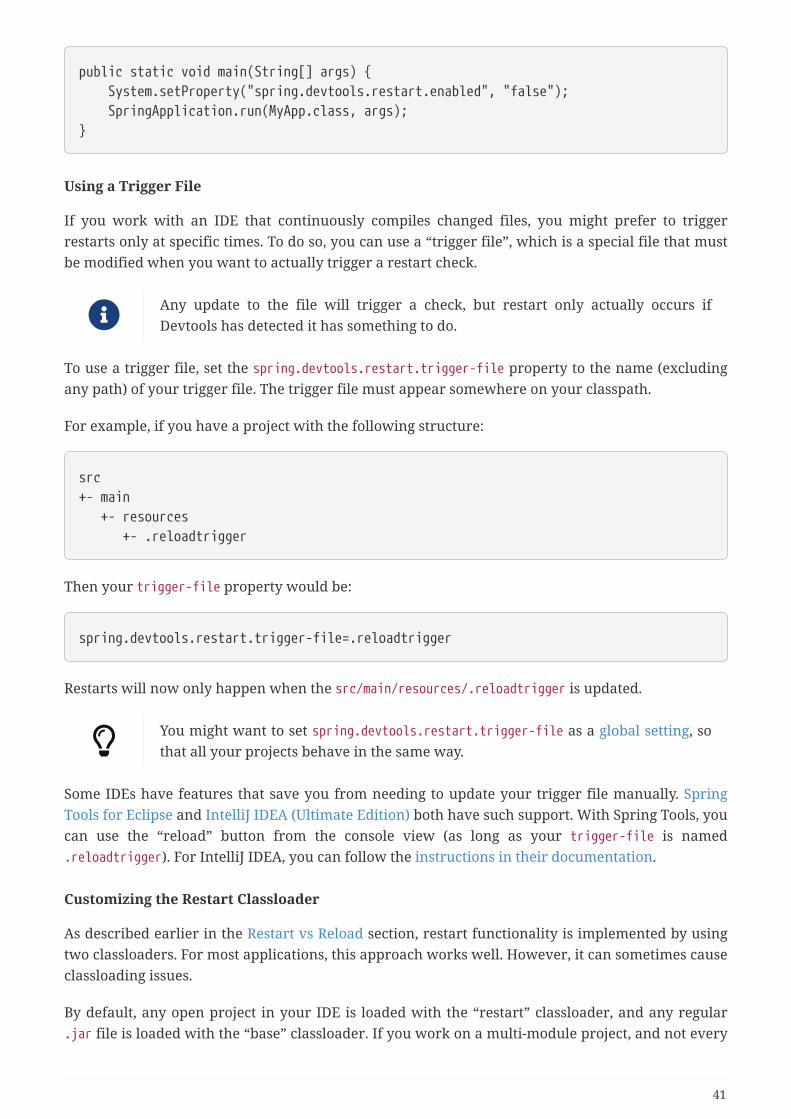
public static void main(String[] args) { System.setProperty("spring.devtools.restart.enabled", "false"); SpringApplication.run(MyApp.class, args);}
Using a Trigger File
If you work with an IDE that continuously compiles changed files, you might prefer to triggerrestarts only at specific times. To do so, you can use a “trigger file”, which is a special file that mustbe modified when you want to actually trigger a restart check.
Any update to the file will trigger a check, but restart only actually occurs ifDevtools has detected it has something to do.
To use a trigger file, set the spring.devtools.restart.trigger-file property to the name (excludingany path) of your trigger file. The trigger file must appear somewhere on your classpath.
For example, if you have a project with the following structure:
src+- main +- resources +- .reloadtrigger
Then your trigger-file property would be:
spring.devtools.restart.trigger-file=.reloadtrigger
Restarts will now only happen when the src/main/resources/.reloadtrigger is updated.
You might want to set spring.devtools.restart.trigger-file as a global setting, sothat all your projects behave in the same way.
Some IDEs have features that save you from needing to update your trigger file manually. SpringTools for Eclipse and IntelliJ IDEA (Ultimate Edition) both have such support. With Spring Tools, youcan use the “reload” button from the console view (as long as your trigger-file is named.reloadtrigger). For IntelliJ IDEA, you can follow the instructions in their documentation.
Customizing the Restart Classloader
As described earlier in the Restart vs Reload section, restart functionality is implemented by usingtwo classloaders. For most applications, this approach works well. However, it can sometimes causeclassloading issues.
By default, any open project in your IDE is loaded with the “restart” classloader, and any regular.jar file is loaded with the “base” classloader. If you work on a multi-module project, and not every
41
module is imported into your IDE, you may need to customize things. To do so, you can create aMETA-INF/spring-devtools.properties file.
The spring-devtools.properties file can contain properties prefixed with restart.exclude andrestart.include. The include elements are items that should be pulled up into the “restart”classloader, and the exclude elements are items that should be pushed down into the “base”classloader. The value of the property is a regex pattern that is applied to the classpath, as shown inthe following example:
restart.exclude.companycommonlibs=/mycorp-common-[\\w\\d-\.]+\.jarrestart.include.projectcommon=/mycorp-myproj-[\\w\\d-\.]+\.jar
All property keys must be unique. As long as a property starts withrestart.include. or restart.exclude. it is considered.
All META-INF/spring-devtools.properties from the classpath are loaded. You canpackage files inside your project, or in the libraries that the project consumes.
Known Limitations
Restart functionality does not work well with objects that are deserialized by using a standardObjectInputStream. If you need to deserialize data, you may need to use Spring’sConfigurableObjectInputStream in combination withThread.currentThread().getContextClassLoader().
Unfortunately, several third-party libraries deserialize without considering the context classloader.If you find such a problem, you need to request a fix with the original authors.
3.8.3. LiveReload
The spring-boot-devtools module includes an embedded LiveReload server that can be used totrigger a browser refresh when a resource is changed. LiveReload browser extensions are freelyavailable for Chrome, Firefox and Safari from livereload.com.
If you do not want to start the LiveReload server when your application runs, you can set thespring.devtools.livereload.enabled property to false.
You can only run one LiveReload server at a time. Before starting your application,ensure that no other LiveReload servers are running. If you start multipleapplications from your IDE, only the first has LiveReload support.
To trigger LiveReload when a file changes, Automatic Restart must be enabled.
3.8.4. Global Settings
You can configure global devtools settings by adding any of the following files to the$HOME/.config/spring-boot folder:
42

1. spring-boot-devtools.properties
2. spring-boot-devtools.yaml
3. spring-boot-devtools.yml
Any properties added to these file apply to all Spring Boot applications on your machine that usedevtools. For example, to configure restart to always use a trigger file, you would add the followingproperty:
~/.config/spring-boot/spring-boot-devtools.properties
spring.devtools.restart.trigger-file=.reloadtrigger
If devtools configuration files are not found in $HOME/.config/spring-boot, the rootof the $HOME folder is searched for the presence of a .spring-boot-
devtools.properties file. This allows you to share the devtools global configurationwith applications that are on an older version of Spring Boot that does not supportthe $HOME/.config/spring-boot location.
Profiles are not supported in devtools properties/yaml files.
Any profiles activated in .spring-boot-devtools.properties will not affect theloading of profile-specific configuration files. Profile specific filenames (of theform spring-boot-devtools-<profile>.properties) and spring.profile sub-documents in YAML files are not supported.
Configuring File System Watcher
FileSystemWatcher works by polling the class changes with a certain time interval, and thenwaiting for a predefined quiet period to make sure there are no more changes. Since Spring Bootrelies entirely on the IDE to compile and copy files into the location from where Spring Boot canread them, you might find that there are times when certain changes are not reflected whendevtools restarts the application. If you observe such problems constantly, try increasing thespring.devtools.restart.poll-interval and spring.devtools.restart.quiet-period parameters tothe values that fit your development environment:
spring.devtools.restart.poll-interval=2sspring.devtools.restart.quiet-period=1s
The monitored classpath folders are now polled every 2 seconds for changes, and a 1 second quietperiod is maintained to make sure there are no additional class changes.
3.8.5. Remote Applications
The Spring Boot developer tools are not limited to local development. You can also use severalfeatures when running applications remotely. Remote support is opt-in as enabling it can be asecurity risk. It should only be enabled when running on a trusted network or when secured withSSL. If neither of these options is available to you, you should not use DevTools' remote support.
43

You should never enable support on a production deployment.
To enable it, you need to make sure that devtools is included in the repackaged archive, as shown inthe following listing:
<build> <plugins> <plugin> <groupId>org.springframework.boot</groupId> <artifactId>spring-boot-maven-plugin</artifactId> <configuration> <excludeDevtools>false</excludeDevtools> </configuration> </plugin> </plugins></build>
Then you need to set the spring.devtools.remote.secret property. Like any important password orsecret, the value should be unique and strong such that it cannot be guessed or brute-forced.
Remote devtools support is provided in two parts: a server-side endpoint that accepts connectionsand a client application that you run in your IDE. The server component is automatically enabledwhen the spring.devtools.remote.secret property is set. The client component must be launchedmanually.
Running the Remote Client Application
The remote client application is designed to be run from within your IDE. You need to runorg.springframework.boot.devtools.RemoteSpringApplication with the same classpath as the remoteproject that you connect to. The application’s single required argument is the remote URL to whichit connects.
For example, if you are using Eclipse or STS and you have a project named my-app that you havedeployed to Cloud Foundry, you would do the following:
• Select Run Configurations… from the Run menu.
• Create a new Java Application “launch configuration”.
• Browse for the my-app project.
• Use org.springframework.boot.devtools.RemoteSpringApplication as the main class.
• Add https://myapp.cfapps.io to the Program arguments (or whatever your remote URL is).
A running remote client might resemble the following listing:
44

. ____ _ __ _ _ /\\ / ___'_ __ _ _(_)_ __ __ _ ___ _ \ \ \ \( ( )\___ | '_ | '_| | '_ \/ _` | | _ \___ _ __ ___| |_ ___ \ \ \ \ \\/ ___)| |_)| | | | | || (_| []::::::[] / -_) ' \/ _ \ _/ -_) ) ) ) ) ' |____| .__|_| |_|_| |_\__, | |_|_\___|_|_|_\___/\__\___|/ / / / =========|_|==============|___/===================================/_/_/_/ :: Spring Boot Remote :: 2.2.11.RELEASE
2015-06-10 18:25:06.632 INFO 14938 --- [ main]o.s.b.devtools.RemoteSpringApplication : Starting RemoteSpringApplication on pwmbpwith PID 14938 (/Users/pwebb/projects/spring-boot/code/spring-boot-project/spring-boot-devtools/target/classes started by pwebb in /Users/pwebb/projects/spring-boot/code)2015-06-10 18:25:06.671 INFO 14938 --- [ main]s.c.a.AnnotationConfigApplicationContext : Refreshingorg.springframework.context.annotation.AnnotationConfigApplicationContext@2a17b7b6:startup date [Wed Jun 10 18:25:06 PDT 2015]; root of context hierarchy2015-06-10 18:25:07.043 WARN 14938 --- [ main]o.s.b.d.r.c.RemoteClientConfiguration : The connection to http://localhost:8080 isinsecure. You should use a URL starting with 'https://'.2015-06-10 18:25:07.074 INFO 14938 --- [ main]o.s.b.d.a.OptionalLiveReloadServer : LiveReload server is running on port 357292015-06-10 18:25:07.130 INFO 14938 --- [ main]o.s.b.devtools.RemoteSpringApplication : Started RemoteSpringApplication in 0.74seconds (JVM running for 1.105)
Because the remote client is using the same classpath as the real application it candirectly read application properties. This is how the spring.devtools.remote.secretproperty is read and passed to the server for authentication.
It is always advisable to use https:// as the connection protocol, so that traffic isencrypted and passwords cannot be intercepted.
If you need to use a proxy to access the remote application, configure thespring.devtools.remote.proxy.host and spring.devtools.remote.proxy.port
properties.
Remote Update
The remote client monitors your application classpath for changes in the same way as the localrestart. Any updated resource is pushed to the remote application and (if required) triggers arestart. This can be helpful if you iterate on a feature that uses a cloud service that you do not havelocally. Generally, remote updates and restarts are much quicker than a full rebuild and deploycycle.
On a slower development environment, it may happen that the quiet period is not enough, and thechanges in the classes may be split into batches. The server is restarted after the first batch of classchanges is uploaded. The next batch can’t be sent to the application, since the server is restarting.
45
This is typically manifested by a warning in the RemoteSpringApplication logs about failing to uploadsome of the classes, and a consequent retry. But it may also lead to application code inconsistencyand failure to restart after the first batch of changes is uploaded. If you observe such problemsconstantly, try increasing the spring.devtools.restart.poll-interval andspring.devtools.restart.quiet-period parameters to the values that fit your developmentenvironment. See the Configuring File System Watcher section for configuring these properties.
Files are only monitored when the remote client is running. If you change a filebefore starting the remote client, it is not pushed to the remote server.
3.9. Packaging Your Application for ProductionExecutable jars can be used for production deployment. As they are self-contained, they are alsoideally suited for cloud-based deployment.
For additional “production ready” features, such as health, auditing, and metric REST or JMX end-points, consider adding spring-boot-actuator. See Spring Boot Actuator: Production-ready Featuresfor details.
3.10. What to Read NextYou should now understand how you can use Spring Boot and some best practices that you shouldfollow. You can now go on to learn about specific Spring Boot features in depth, or you could skipahead and read about the “production ready” aspects of Spring Boot.
46
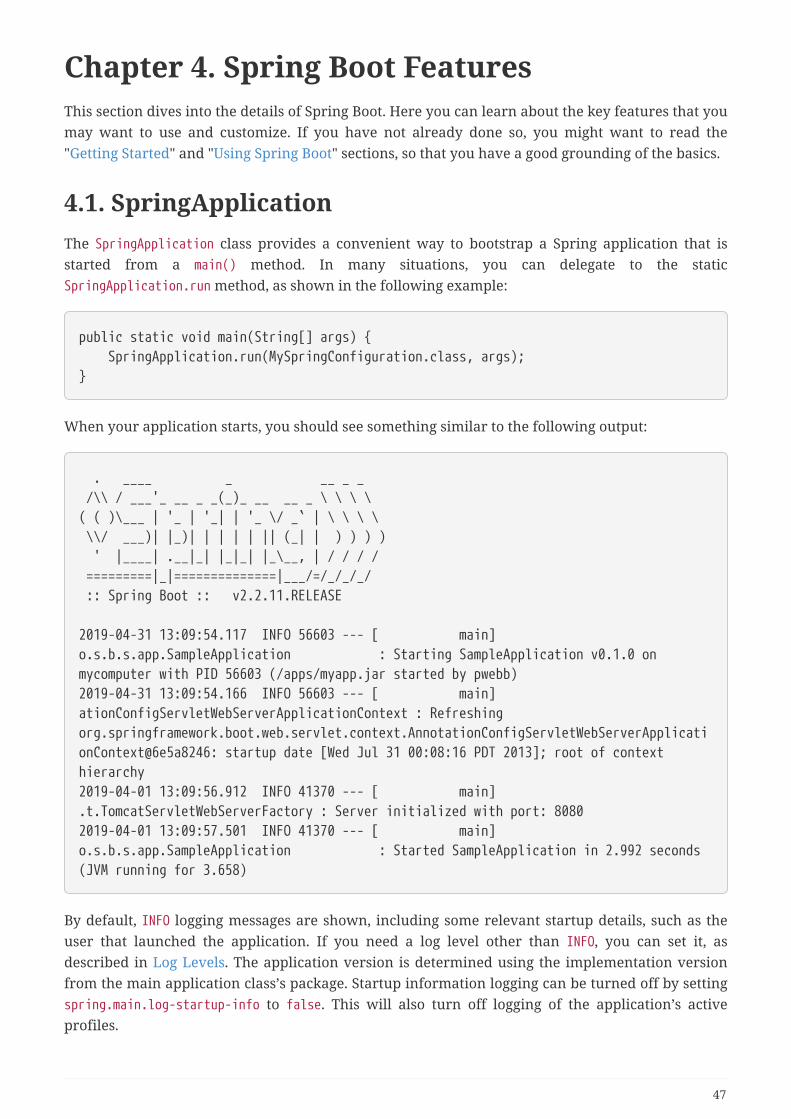
Chapter 4. Spring Boot FeaturesThis section dives into the details of Spring Boot. Here you can learn about the key features that youmay want to use and customize. If you have not already done so, you might want to read the"Getting Started" and "Using Spring Boot" sections, so that you have a good grounding of the basics.
4.1. SpringApplicationThe SpringApplication class provides a convenient way to bootstrap a Spring application that isstarted from a main() method. In many situations, you can delegate to the staticSpringApplication.run method, as shown in the following example:
public static void main(String[] args) { SpringApplication.run(MySpringConfiguration.class, args);}
When your application starts, you should see something similar to the following output:
. ____ _ __ _ _ /\\ / ___'_ __ _ _(_)_ __ __ _ \ \ \ \( ( )\___ | '_ | '_| | '_ \/ _` | \ \ \ \ \\/ ___)| |_)| | | | | || (_| | ) ) ) ) ' |____| .__|_| |_|_| |_\__, | / / / / =========|_|==============|___/=/_/_/_/ :: Spring Boot :: v2.2.11.RELEASE
2019-04-31 13:09:54.117 INFO 56603 --- [ main]o.s.b.s.app.SampleApplication : Starting SampleApplication v0.1.0 onmycomputer with PID 56603 (/apps/myapp.jar started by pwebb)2019-04-31 13:09:54.166 INFO 56603 --- [ main]ationConfigServletWebServerApplicationContext : Refreshingorg.springframework.boot.web.servlet.context.AnnotationConfigServletWebServerApplicationContext@6e5a8246: startup date [Wed Jul 31 00:08:16 PDT 2013]; root of contexthierarchy2019-04-01 13:09:56.912 INFO 41370 --- [ main].t.TomcatServletWebServerFactory : Server initialized with port: 80802019-04-01 13:09:57.501 INFO 41370 --- [ main]o.s.b.s.app.SampleApplication : Started SampleApplication in 2.992 seconds(JVM running for 3.658)
By default, INFO logging messages are shown, including some relevant startup details, such as theuser that launched the application. If you need a log level other than INFO, you can set it, asdescribed in Log Levels. The application version is determined using the implementation versionfrom the main application class’s package. Startup information logging can be turned off by settingspring.main.log-startup-info to false. This will also turn off logging of the application’s activeprofiles.
47
To add additional logging during startup, you can overridelogStartupInfo(boolean) in a subclass of SpringApplication.
4.1.1. Startup Failure
If your application fails to start, registered FailureAnalyzers get a chance to provide a dedicatederror message and a concrete action to fix the problem. For instance, if you start a web applicationon port 8080 and that port is already in use, you should see something similar to the followingmessage:
***************************APPLICATION FAILED TO START***************************
Description:
Embedded servlet container failed to start. Port 8080 was already in use.
Action:
Identify and stop the process that's listening on port 8080 or configure thisapplication to listen on another port.
Spring Boot provides numerous FailureAnalyzer implementations, and you canadd your own.
If no failure analyzers are able to handle the exception, you can still display the full conditionsreport to better understand what went wrong. To do so, you need to enable the debug property orenable DEBUG logging fororg.springframework.boot.autoconfigure.logging.ConditionEvaluationReportLoggingListener.
For instance, if you are running your application by using java -jar, you can enable the debugproperty as follows:
$ java -jar myproject-0.0.1-SNAPSHOT.jar --debug
4.1.2. Lazy Initialization
SpringApplication allows an application to be initialized lazily. When lazy initialization is enabled,beans are created as they are needed rather than during application startup. As a result, enablinglazy initialization can reduce the time that it takes your application to start. In a web application,enabling lazy initialization will result in many web-related beans not being initialized until anHTTP request is received.
A downside of lazy initialization is that it can delay the discovery of a problem with the application.If a misconfigured bean is initialized lazily, a failure will no longer occur during startup and the
48
problem will only become apparent when the bean is initialized. Care must also be taken to ensurethat the JVM has sufficient memory to accommodate all of the application’s beans and not just thosethat are initialized during startup. For these reasons, lazy initialization is not enabled by defaultand it is recommended that fine-tuning of the JVM’s heap size is done before enabling lazyinitialization.
Lazy initialization can be enabled programatically using the lazyInitialization method onSpringApplicationBuilder or the setLazyInitialization method on SpringApplication. Alternatively,it can be enabled using the spring.main.lazy-initialization property as shown in the followingexample:
spring.main.lazy-initialization=true
If you want to disable lazy initialization for certain beans while using lazyinitialization for the rest of the application, you can explicitly set their lazyattribute to false using the @Lazy(false) annotation.
4.1.3. Customizing the Banner
The banner that is printed on start up can be changed by adding a banner.txt file to your classpathor by setting the spring.banner.location property to the location of such a file. If the file has anencoding other than UTF-8, you can set spring.banner.charset. In addition to a text file, you can alsoadd a banner.gif, banner.jpg, or banner.png image file to your classpath or set thespring.banner.image.location property. Images are converted into an ASCII art representation andprinted above any text banner.
Inside your banner.txt file, you can use any of the following placeholders:
Table 4. Banner variables
Variable Description
${application.version} The version number of your application, asdeclared in MANIFEST.MF. For example,Implementation-Version: 1.0 is printed as 1.0.
${application.formatted-version} The version number of your application, asdeclared in MANIFEST.MF and formatted fordisplay (surrounded with brackets and prefixedwith v). For example (v1.0).
${spring-boot.version} The Spring Boot version that you are using. Forexample 2.2.11.RELEASE.
${spring-boot.formatted-version} The Spring Boot version that you are using,formatted for display (surrounded with bracketsand prefixed with v). For example(v2.2.11.RELEASE).
49
Variable Description
${Ansi.NAME} (or ${AnsiColor.NAME},${AnsiBackground.NAME}, ${AnsiStyle.NAME})
Where NAME is the name of an ANSI escape code.See AnsiPropertySource for details.
${application.title} The title of your application, as declared inMANIFEST.MF. For example Implementation-Title:MyApp is printed as MyApp.
The SpringApplication.setBanner(…) method can be used if you want to generate abanner programmatically. Use the org.springframework.boot.Banner interface andimplement your own printBanner() method.
You can also use the spring.main.banner-mode property to determine if the banner has to be printedon System.out (console), sent to the configured logger (log), or not produced at all (off).
The printed banner is registered as a singleton bean under the following name: springBootBanner.
4.1.4. Customizing SpringApplication
If the SpringApplication defaults are not to your taste, you can instead create a local instance andcustomize it. For example, to turn off the banner, you could write:
public static void main(String[] args) { SpringApplication app = new SpringApplication(MySpringConfiguration.class); app.setBannerMode(Banner.Mode.OFF); app.run(args);}
The constructor arguments passed to SpringApplication are configuration sourcesfor Spring beans. In most cases, these are references to @Configuration classes, butthey could also be references to XML configuration or to packages that should bescanned.
It is also possible to configure the SpringApplication by using an application.properties file. SeeExternalized Configuration for details.
For a complete list of the configuration options, see the SpringApplication Javadoc.
4.1.5. Fluent Builder API
If you need to build an ApplicationContext hierarchy (multiple contexts with a parent/childrelationship) or if you prefer using a “fluent” builder API, you can use the SpringApplicationBuilder.
The SpringApplicationBuilder lets you chain together multiple method calls and includes parent andchild methods that let you create a hierarchy, as shown in the following example:
50
new SpringApplicationBuilder() .sources(Parent.class) .child(Application.class) .bannerMode(Banner.Mode.OFF) .run(args);
There are some restrictions when creating an ApplicationContext hierarchy. Forexample, Web components must be contained within the child context, and thesame Environment is used for both parent and child contexts. See theSpringApplicationBuilder Javadoc for full details.
4.1.6. Application Events and Listeners
In addition to the usual Spring Framework events, such as ContextRefreshedEvent, aSpringApplication sends some additional application events.
Some events are actually triggered before the ApplicationContext is created, so youcannot register a listener on those as a @Bean. You can register them with theSpringApplication.addListeners(…) method or theSpringApplicationBuilder.listeners(…) method.
If you want those listeners to be registered automatically, regardless of the way theapplication is created, you can add a META-INF/spring.factories file to your projectand reference your listener(s) by using theorg.springframework.context.ApplicationListener key, as shown in the followingexample:
org.springframework.context.ApplicationListener=com.example.project.MyListener
Application events are sent in the following order, as your application runs:
1. An ApplicationStartingEvent is sent at the start of a run but before any processing, except forthe registration of listeners and initializers.
2. An ApplicationEnvironmentPreparedEvent is sent when the Environment to be used in the context isknown but before the context is created.
3. An ApplicationContextInitializedEvent is sent when the ApplicationContext is prepared andApplicationContextInitializers have been called but before any bean definitions are loaded.
4. An ApplicationPreparedEvent is sent just before the refresh is started but after bean definitionshave been loaded.
5. An ApplicationStartedEvent is sent after the context has been refreshed but before anyapplication and command-line runners have been called.
6. An ApplicationReadyEvent is sent after any application and command-line runners have beencalled. It indicates that the application is ready to service requests.
51

7. An ApplicationFailedEvent is sent if there is an exception on startup.
The above list only includes SpringApplicationEvents that are tied to a SpringApplication. Inaddition to these, the following events are also published after ApplicationPreparedEvent and beforeApplicationStartedEvent:
1. A ContextRefreshedEvent is sent when an ApplicationContext is refreshed.
2. A WebServerInitializedEvent is sent after the WebServer is ready.ServletWebServerInitializedEvent and ReactiveWebServerInitializedEvent are the servlet andreactive variants respectively.
You often need not use application events, but it can be handy to know that theyexist. Internally, Spring Boot uses events to handle a variety of tasks.
Application events are sent by using Spring Framework’s event publishing mechanism. Part of thismechanism ensures that an event published to the listeners in a child context is also published tothe listeners in any ancestor contexts. As a result of this, if your application uses a hierarchy ofSpringApplication instances, a listener may receive multiple instances of the same type ofapplication event.
To allow your listener to distinguish between an event for its context and an event for a descendantcontext, it should request that its application context is injected and then compare the injectedcontext with the context of the event. The context can be injected by implementingApplicationContextAware or, if the listener is a bean, by using @Autowired.
4.1.7. Web Environment
A SpringApplication attempts to create the right type of ApplicationContext on your behalf. Thealgorithm used to determine a WebApplicationType is the following:
• If Spring MVC is present, an AnnotationConfigServletWebServerApplicationContext is used
• If Spring MVC is not present and Spring WebFlux is present, anAnnotationConfigReactiveWebServerApplicationContext is used
• Otherwise, AnnotationConfigApplicationContext is used
This means that if you are using Spring MVC and the new WebClient from Spring WebFlux in thesame application, Spring MVC will be used by default. You can override that easily by callingsetWebApplicationType(WebApplicationType).
It is also possible to take complete control of the ApplicationContext type that is used by callingsetApplicationContextClass(…).
It is often desirable to call setWebApplicationType(WebApplicationType.NONE) whenusing SpringApplication within a JUnit test.
4.1.8. Accessing Application Arguments
If you need to access the application arguments that were passed to SpringApplication.run(…), you
52

can inject a org.springframework.boot.ApplicationArguments bean. The ApplicationArguments
interface provides access to both the raw String[] arguments as well as parsed option and non-option arguments, as shown in the following example:
import org.springframework.boot.*;import org.springframework.beans.factory.annotation.*;import org.springframework.stereotype.*;
@Componentpublic class MyBean {
@Autowired public MyBean(ApplicationArguments args) { boolean debug = args.containsOption("debug"); List<String> files = args.getNonOptionArgs(); // if run with "--debug logfile.txt" debug=true, files=["logfile.txt"] }
}
Spring Boot also registers a CommandLinePropertySource with the Spring Environment.This lets you also inject single application arguments by using the @Value
annotation.
4.1.9. Using the ApplicationRunner or CommandLineRunner
If you need to run some specific code once the SpringApplication has started, you can implementthe ApplicationRunner or CommandLineRunner interfaces. Both interfaces work in the same way andoffer a single run method, which is called just before SpringApplication.run(…) completes.
The CommandLineRunner interfaces provides access to application arguments as a string array,whereas the ApplicationRunner uses the ApplicationArguments interface discussed earlier. Thefollowing example shows a CommandLineRunner with a run method:
import org.springframework.boot.*;import org.springframework.stereotype.*;
@Componentpublic class MyBean implements CommandLineRunner {
public void run(String... args) { // Do something... }
}
If several CommandLineRunner or ApplicationRunner beans are defined that must be called in a specific
53
order, you can additionally implement the org.springframework.core.Ordered interface or use theorg.springframework.core.annotation.Order annotation.
4.1.10. Application Exit
Each SpringApplication registers a shutdown hook with the JVM to ensure that theApplicationContext closes gracefully on exit. All the standard Spring lifecycle callbacks (such as theDisposableBean interface or the @PreDestroy annotation) can be used.
In addition, beans may implement the org.springframework.boot.ExitCodeGenerator interface if theywish to return a specific exit code when SpringApplication.exit() is called. This exit code can thenbe passed to System.exit() to return it as a status code, as shown in the following example:
@SpringBootApplicationpublic class ExitCodeApplication {
@Bean public ExitCodeGenerator exitCodeGenerator() { return () -> 42; }
public static void main(String[] args) { System.exit(SpringApplication.exit(SpringApplication.run(ExitCodeApplication.class,args))); }
}
Also, the ExitCodeGenerator interface may be implemented by exceptions. When such an exceptionis encountered, Spring Boot returns the exit code provided by the implemented getExitCode()method.
4.1.11. Admin Features
It is possible to enable admin-related features for the application by specifying thespring.application.admin.enabled property. This exposes the SpringApplicationAdminMXBean on theplatform MBeanServer. You could use this feature to administer your Spring Boot applicationremotely. This feature could also be useful for any service wrapper implementation.
If you want to know on which HTTP port the application is running, get theproperty with a key of local.server.port.
4.2. Externalized ConfigurationSpring Boot lets you externalize your configuration so that you can work with the same applicationcode in different environments. You can use properties files, YAML files, environment variables,and command-line arguments to externalize configuration. Property values can be injected directly
54
into your beans by using the @Value annotation, accessed through Spring’s Environment abstraction,or be bound to structured objects through @ConfigurationProperties.
Spring Boot uses a very particular PropertySource order that is designed to allow sensibleoverriding of values. Properties are considered in the following order:
1. Devtools global settings properties in the $HOME/.config/spring-boot folder when devtools isactive.
2. @TestPropertySource annotations on your tests.
3. properties attribute on your tests. Available on @SpringBootTest and the test annotations fortesting a particular slice of your application.
4. Command line arguments.
5. Properties from SPRING_APPLICATION_JSON (inline JSON embedded in an environment variable orsystem property).
6. ServletConfig init parameters.
7. ServletContext init parameters.
8. JNDI attributes from java:comp/env.
9. Java System properties (System.getProperties()).
10. OS environment variables.
11. A RandomValuePropertySource that has properties only in random.*.
12. Profile-specific application properties outside of your packaged jar (application-{profile}.properties and YAML variants).
13. Profile-specific application properties packaged inside your jar (application-{profile}.properties and YAML variants).
14. Application properties outside of your packaged jar (application.properties and YAMLvariants).
15. Application properties packaged inside your jar (application.properties and YAML variants).
16. @PropertySource annotations on your @Configuration classes. Please note that such propertysources are not added to the Environment until the application context is being refreshed. This istoo late to configure certain properties such as logging.* and spring.main.* which are readbefore refresh begins.
17. Default properties (specified by setting SpringApplication.setDefaultProperties).
To provide a concrete example, suppose you develop a @Component that uses a name property, asshown in the following example:
55

import org.springframework.stereotype.*;import org.springframework.beans.factory.annotation.*;
@Componentpublic class MyBean {
@Value("${name}") private String name;
// ...
}
On your application classpath (for example, inside your jar) you can have anapplication.properties file that provides a sensible default property value for name. When runningin a new environment, an application.properties file can be provided outside of your jar thatoverrides the name. For one-off testing, you can launch with a specific command line switch (forexample, java -jar app.jar --name="Spring").
The SPRING_APPLICATION_JSON properties can be supplied on the command line withan environment variable. For example, you could use the following line in a UN*Xshell:
$ SPRING_APPLICATION_JSON='{"acme":{"name":"test"}}' java -jarmyapp.jar
In the preceding example, you end up with acme.name=test in the SpringEnvironment. You can also supply the JSON as spring.application.json in a Systemproperty, as shown in the following example:
$ java -Dspring.application.json='{"name":"test"}' -jar myapp.jar
You can also supply the JSON by using a command line argument, as shown in thefollowing example:
$ java -jar myapp.jar --spring.application.json='{"name":"test"}'
You can also supply the JSON as a JNDI variable, as follows:java:comp/env/spring.application.json.
Although null values from the JSON will be added to the resulting property source,the PropertySourcesPropertyResolver treats null properties as missing values. Thismeans that the JSON cannot override properties from lower order propertysources with a null value.
56
4.2.1. Configuring Random Values
The RandomValuePropertySource is useful for injecting random values (for example, into secrets ortest cases). It can produce integers, longs, uuids, or strings, as shown in the following example:
my.secret=${random.value}my.number=${random.int}my.bignumber=${random.long}my.uuid=${random.uuid}my.number.less.than.ten=${random.int(10)}my.number.in.range=${random.int[1024,65536]}
The random.int* syntax is OPEN value (,max) CLOSE where the OPEN,CLOSE are any character andvalue,max are integers. If max is provided, then value is the minimum value and max is the maximumvalue (exclusive).
4.2.2. Accessing Command Line Properties
By default, SpringApplication converts any command line option arguments (that is, argumentsstarting with --, such as --server.port=9000) to a property and adds them to the Spring Environment.As mentioned previously, command line properties always take precedence over other propertysources.
If you do not want command line properties to be added to the Environment, you can disable themby using SpringApplication.setAddCommandLineProperties(false).
4.2.3. Application Property Files
SpringApplication loads properties from application.properties files in the following locations andadds them to the Spring Environment:
1. A /config subdirectory of the current directory
2. The current directory
3. A classpath /config package
4. The classpath root
The list is ordered by precedence (properties defined in locations higher in the list override thosedefined in lower locations).
You can also use YAML ('.yml') files as an alternative to '.properties'.
If you do not like application.properties as the configuration file name, you can switch to anotherfile name by specifying a spring.config.name environment property. You can also refer to an explicitlocation by using the spring.config.location environment property (which is a comma-separatedlist of directory locations or file paths). The following example shows how to specify a different filename:
57
$ java -jar myproject.jar --spring.config.name=myproject
The following example shows how to specify two locations:
$ java -jar myproject.jar--spring.config.location=classpath:/default.properties,classpath:/override.properties
spring.config.name and spring.config.location are used very early to determinewhich files have to be loaded. They must be defined as an environment property(typically an OS environment variable, a system property, or a command-lineargument).
If spring.config.location contains directories (as opposed to files), they should end in / (and, atruntime, be appended with the names generated from spring.config.name before being loaded,including profile-specific file names). Files specified in spring.config.location are used as-is, withno support for profile-specific variants, and are overridden by any profile-specific properties.Whether specified directly or contained in a directory, configuration files must include a fileextension in their name. Typical extensions that are supported out-of-the-box are .properties,.yaml, and .yml.
Config locations are searched in reverse order. By default, the configured locations areclasspath:/,classpath:/config/,file:./,file:./config/. The resulting search order is the following:
1. file:./config/
2. file:./
3. classpath:/config/
4. classpath:/
When custom config locations are configured by using spring.config.location, they replace thedefault locations. For example, if spring.config.location is configured with the valueclasspath:/custom-config/,file:./custom-config/, the search order becomes the following:
1. file:./custom-config/
2. classpath:custom-config/
Alternatively, when custom config locations are configured by using spring.config.additional-location, they are used in addition to the default locations. Additional locations are searched beforethe default locations. For example, if additional locations of classpath:/custom-
config/,file:./custom-config/ are configured, the search order becomes the following:
1. file:./custom-config/
2. classpath:custom-config/
3. file:./config/
4. file:./
5. classpath:/config/
6. classpath:/
58
This search ordering lets you specify default values in one configuration file and then selectivelyoverride those values in another. You can provide default values for your application inapplication.properties (or whatever other basename you choose with spring.config.name) in one ofthe default locations. These default values can then be overridden at runtime with a different filelocated in one of the custom locations.
If you use environment variables rather than system properties, most operatingsystems disallow period-separated key names, but you can use underscoresinstead (for example, SPRING_CONFIG_NAME instead of spring.config.name). SeeBinding from Environment Variables for details.
If your application runs in a container, then JNDI properties (in java:comp/env) orservlet context initialization parameters can be used instead of, or as well as,environment variables or system properties.
4.2.4. Profile-specific Properties
In addition to application.properties files, profile-specific properties can also be defined by usingthe following naming convention: application-{profile}.properties. The Environment has a set ofdefault profiles (by default, [default]) that are used if no active profiles are set. In other words, ifno profiles are explicitly activated, then properties from application-default.properties areloaded.
Profile-specific properties are loaded from the same locations as standard application.properties,with profile-specific files always overriding the non-specific ones, whether or not the profile-specific files are inside or outside your packaged jar.
If several profiles are specified, a last-wins strategy applies. For example, profiles specified by thespring.profiles.active property are added after those configured through the SpringApplicationAPI and therefore take precedence.
If you have specified any files in spring.config.location, profile-specific variantsof those files are not considered. Use directories in spring.config.location if youwant to also use profile-specific properties.
4.2.5. Placeholders in Properties
The values in application.properties are filtered through the existing Environment when they areused, so you can refer back to previously defined values (for example, from System properties).
app.name=MyAppapp.description=${app.name} is a Spring Boot application
You can also use this technique to create “short” variants of existing Spring Bootproperties. See the Use ‘Short’ Command Line Arguments how-to for details.
59
4.2.6. Encrypting Properties
Spring Boot does not provide any built in support for encrypting property values, however, it doesprovide the hook points necessary to modify values contained in the Spring Environment. TheEnvironmentPostProcessor interface allows you to manipulate the Environment before the applicationstarts. See Customize the Environment or ApplicationContext Before It Starts for details.
If you’re looking for a secure way to store credentials and passwords, the Spring Cloud Vault projectprovides support for storing externalized configuration in HashiCorp Vault.
4.2.7. Using YAML Instead of Properties
YAML is a superset of JSON and, as such, is a convenient format for specifying hierarchicalconfiguration data. The SpringApplication class automatically supports YAML as an alternative toproperties whenever you have the SnakeYAML library on your classpath.
If you use “Starters”, SnakeYAML is automatically provided by spring-boot-starter.
Loading YAML
Spring Framework provides two convenient classes that can be used to load YAML documents. TheYamlPropertiesFactoryBean loads YAML as Properties and the YamlMapFactoryBean loads YAML as aMap.
For example, consider the following YAML document:
environments: dev: url: https://dev.example.com name: Developer Setup prod: url: https://another.example.com name: My Cool App
The preceding example would be transformed into the following properties:
environments.dev.url=https://dev.example.comenvironments.dev.name=Developer Setupenvironments.prod.url=https://another.example.comenvironments.prod.name=My Cool App
YAML lists are represented as property keys with [index] dereferencers. For example, consider thefollowing YAML:
60
my: servers: - dev.example.com - another.example.com
The preceding example would be transformed into these properties:
my.servers[0]=dev.example.commy.servers[1]=another.example.com
To bind to properties like that by using Spring Boot’s Binder utilities (which is what@ConfigurationProperties does), you need to have a property in the target bean of typejava.util.List (or Set) and you either need to provide a setter or initialize it with a mutable value.For example, the following example binds to the properties shown previously:
@ConfigurationProperties(prefix="my")public class Config {
private List<String> servers = new ArrayList<String>();
public List<String> getServers() { return this.servers; }}
Exposing YAML as Properties in the Spring Environment
The YamlPropertySourceLoader class can be used to expose YAML as a PropertySource in the SpringEnvironment. Doing so lets you use the @Value annotation with placeholders syntax to access YAMLproperties.
Multi-profile YAML Documents
You can specify multiple profile-specific YAML documents in a single file by using a spring.profileskey to indicate when the document applies, as shown in the following example:
61
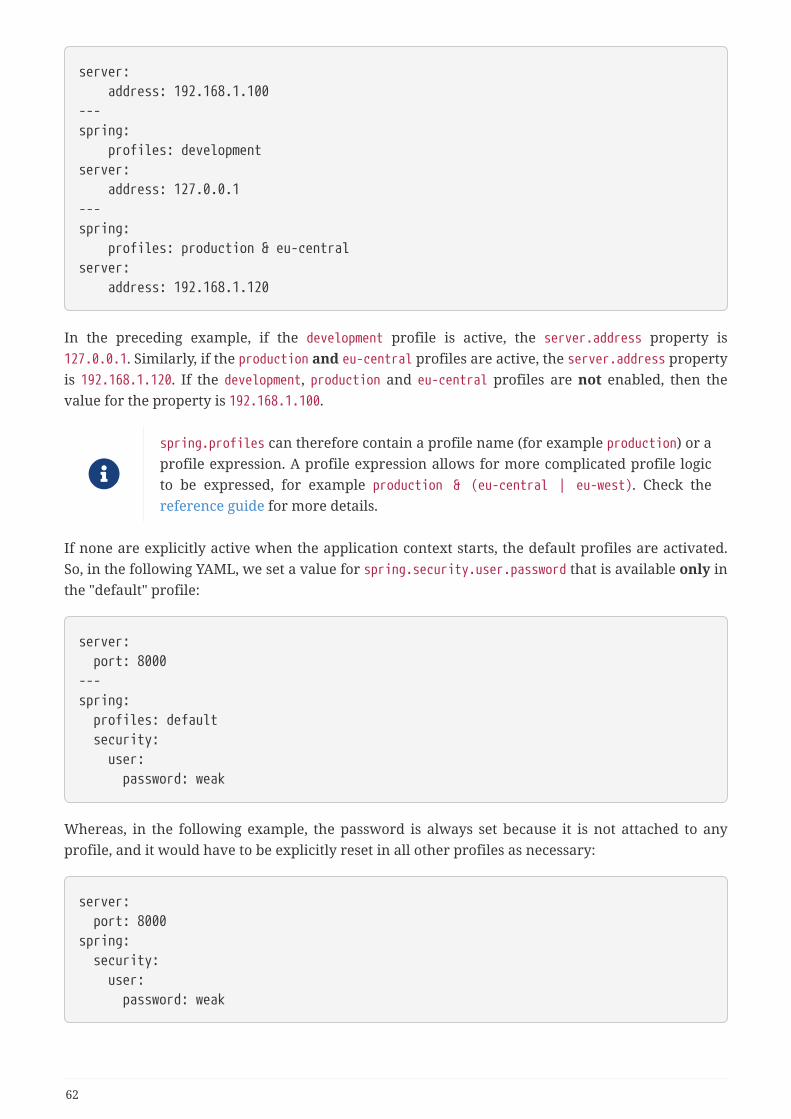
server: address: 192.168.1.100---spring: profiles: developmentserver: address: 127.0.0.1---spring: profiles: production & eu-centralserver: address: 192.168.1.120
In the preceding example, if the development profile is active, the server.address property is127.0.0.1. Similarly, if the production and eu-central profiles are active, the server.address propertyis 192.168.1.120. If the development, production and eu-central profiles are not enabled, then thevalue for the property is 192.168.1.100.
spring.profiles can therefore contain a profile name (for example production) or aprofile expression. A profile expression allows for more complicated profile logicto be expressed, for example production & (eu-central | eu-west). Check thereference guide for more details.
If none are explicitly active when the application context starts, the default profiles are activated.So, in the following YAML, we set a value for spring.security.user.password that is available only inthe "default" profile:
server: port: 8000---spring: profiles: default security: user: password: weak
Whereas, in the following example, the password is always set because it is not attached to anyprofile, and it would have to be explicitly reset in all other profiles as necessary:
server: port: 8000spring: security: user: password: weak
62
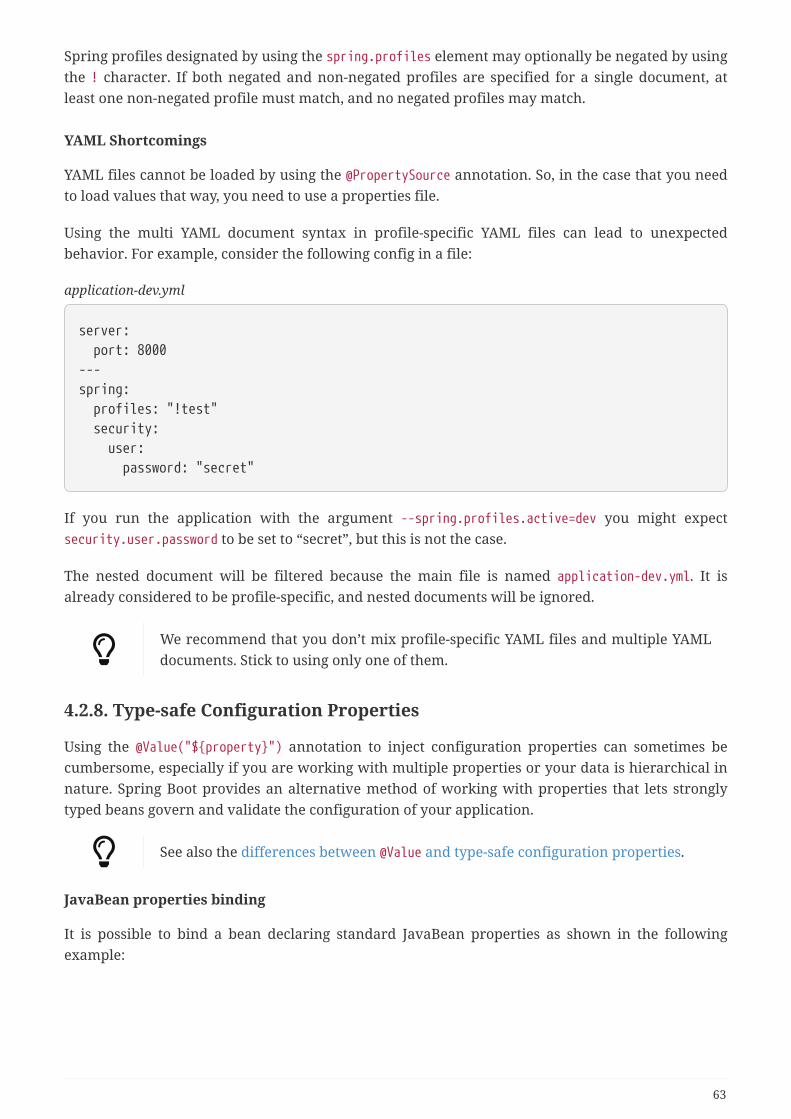
Spring profiles designated by using the spring.profiles element may optionally be negated by usingthe ! character. If both negated and non-negated profiles are specified for a single document, atleast one non-negated profile must match, and no negated profiles may match.
YAML Shortcomings
YAML files cannot be loaded by using the @PropertySource annotation. So, in the case that you needto load values that way, you need to use a properties file.
Using the multi YAML document syntax in profile-specific YAML files can lead to unexpectedbehavior. For example, consider the following config in a file:
application-dev.yml
server: port: 8000---spring: profiles: "!test" security: user: password: "secret"
If you run the application with the argument --spring.profiles.active=dev you might expectsecurity.user.password to be set to “secret”, but this is not the case.
The nested document will be filtered because the main file is named application-dev.yml. It isalready considered to be profile-specific, and nested documents will be ignored.
We recommend that you don’t mix profile-specific YAML files and multiple YAMLdocuments. Stick to using only one of them.
4.2.8. Type-safe Configuration Properties
Using the @Value("${property}") annotation to inject configuration properties can sometimes becumbersome, especially if you are working with multiple properties or your data is hierarchical innature. Spring Boot provides an alternative method of working with properties that lets stronglytyped beans govern and validate the configuration of your application.
See also the differences between @Value and type-safe configuration properties.
JavaBean properties binding
It is possible to bind a bean declaring standard JavaBean properties as shown in the followingexample:
63
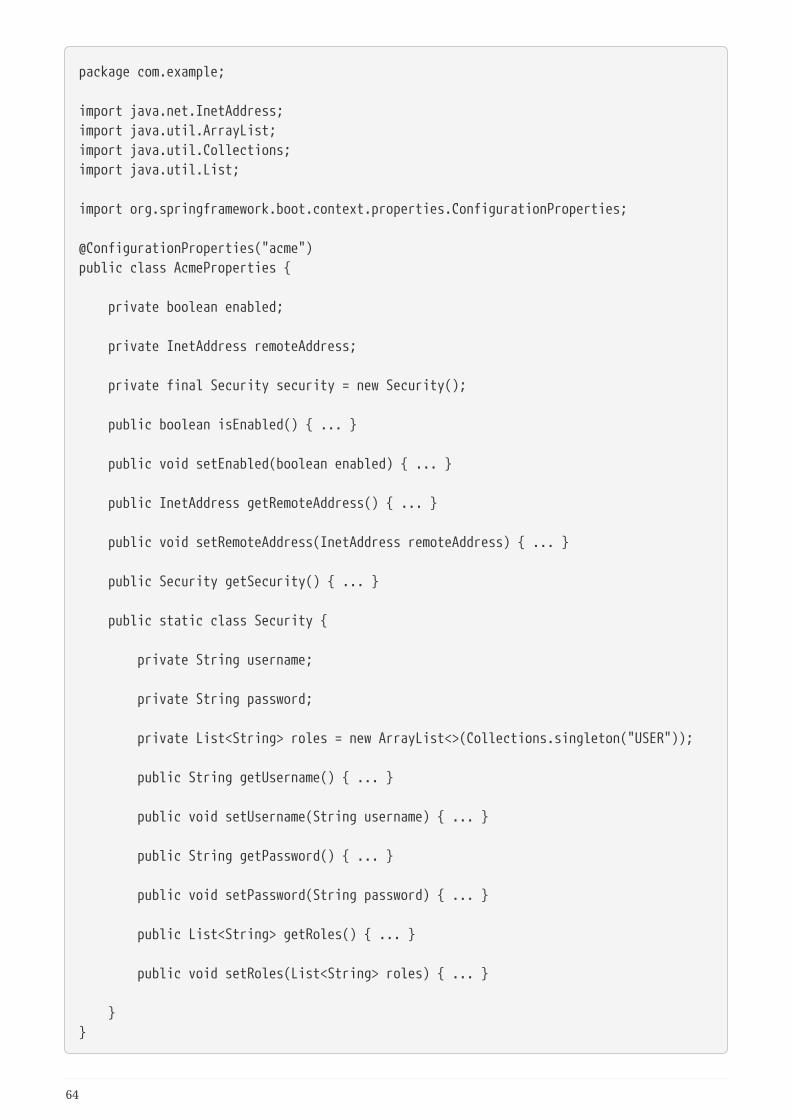
package com.example;
import java.net.InetAddress;import java.util.ArrayList;import java.util.Collections;import java.util.List;
import org.springframework.boot.context.properties.ConfigurationProperties;
@ConfigurationProperties("acme")public class AcmeProperties {
private boolean enabled;
private InetAddress remoteAddress;
private final Security security = new Security();
public boolean isEnabled() { ... }
public void setEnabled(boolean enabled) { ... }
public InetAddress getRemoteAddress() { ... }
public void setRemoteAddress(InetAddress remoteAddress) { ... }
public Security getSecurity() { ... }
public static class Security {
private String username;
private String password;
private List<String> roles = new ArrayList<>(Collections.singleton("USER"));
public String getUsername() { ... }
public void setUsername(String username) { ... }
public String getPassword() { ... }
public void setPassword(String password) { ... }
public List<String> getRoles() { ... }
public void setRoles(List<String> roles) { ... }
}}
64

The preceding POJO defines the following properties:
• acme.enabled, with a value of false by default.
• acme.remote-address, with a type that can be coerced from String.
• acme.security.username, with a nested "security" object whose name is determined by the nameof the property. In particular, the return type is not used at all there and could have beenSecurityProperties.
• acme.security.password.
• acme.security.roles, with a collection of String that defaults to USER.
The properties that map to @ConfigurationProperties classes available in SpringBoot, which are configured via properties files, YAML files, environment variablesetc., are public API but the accessors (getters/setters) of the class itself are notmeant to be used directly.
Such arrangement relies on a default empty constructor and getters and settersare usually mandatory, since binding is through standard Java Beans propertydescriptors, just like in Spring MVC. A setter may be omitted in the following cases:
• Maps, as long as they are initialized, need a getter but not necessarily a setter,since they can be mutated by the binder.
• Collections and arrays can be accessed either through an index (typically withYAML) or by using a single comma-separated value (properties). In the lattercase, a setter is mandatory. We recommend to always add a setter for suchtypes. If you initialize a collection, make sure it is not immutable (as in thepreceding example).
• If nested POJO properties are initialized (like the Security field in the precedingexample), a setter is not required. If you want the binder to create the instanceon the fly by using its default constructor, you need a setter.
Some people use Project Lombok to add getters and setters automatically. Makesure that Lombok does not generate any particular constructor for such a type, asit is used automatically by the container to instantiate the object.
Finally, only standard Java Bean properties are considered and binding on staticproperties is not supported.
Constructor binding
The example in the previous section can be rewritten in an immutable fashion as shown in thefollowing example:
package com.example;
import java.net.InetAddress;import java.util.List;
65

import org.springframework.boot.context.properties.ConfigurationProperties;import org.springframework.boot.context.properties.ConstructorBinding;import org.springframework.boot.context.properties.bind.DefaultValue;
@ConstructorBinding@ConfigurationProperties("acme")public class AcmeProperties {
private final boolean enabled;
private final InetAddress remoteAddress;
private final Security security;
public AcmeProperties(boolean enabled, InetAddress remoteAddress, Securitysecurity) { this.enabled = enabled; this.remoteAddress = remoteAddress; this.security = security; }
public boolean isEnabled() { ... }
public InetAddress getRemoteAddress() { ... }
public Security getSecurity() { ... }
public static class Security {
private final String username;
private final String password;
private final List<String> roles;
public Security(String username, String password, @DefaultValue("USER") List<String> roles) { this.username = username; this.password = password; this.roles = roles; }
public String getUsername() { ... }
public String getPassword() { ... }
public List<String> getRoles() { ... }
}
66

}
In this setup, the @ConstructorBinding annotation is used to indicate that constructor binding shouldbe used. This means that the binder will expect to find a constructor with the parameters that youwish to have bound.
Nested members of a @ConstructorBinding class (such as Security in the example above) will also bebound via their constructor.
Default values can be specified using @DefaultValue and the same conversion service will be appliedto coerce the String value to the target type of a missing property. By default, if no properties arebound to Security, the AcmeProperties instance will contain a null value for security. If you wishyou return a non-null instance of Security even when no properties are bound to it, you can use anempty @DefaultValue annotation to do so:
package com.example;import java.net.InetAddress;import java.util.List;
import org.springframework.boot.context.properties.ConfigurationProperties;import org.springframework.boot.context.properties.ConstructorBinding;import org.springframework.boot.context.properties.bind.DefaultValue;
@ConstructorBinding@ConfigurationProperties("acme")public class AcmeProperties {
private final boolean enabled;
private final InetAddress remoteAddress;
private final Security security;
public AcmeProperties(boolean enabled, InetAddress remoteAddress, @DefaultValueSecurity security) { this.enabled = enabled; this.remoteAddress = remoteAddress; this.security = security; }}
To use constructor binding the class must be enabled using@EnableConfigurationProperties or configuration property scanning. You cannotuse constructor binding with beans that are created by the regular Springmechanisms (e.g. @Component beans, beans created via @Bean methods or beansloaded using @Import)
67

If you have more than one constructor for your class you can also use@ConstructorBinding directly on the constructor that should be bound.
The use of java.util.Optional with @ConfigurationProperties is not recommendedas it is primarily intended for use as a return type. As such, it is not well-suited toconfiguration property injection. For consistency with properties of other types, ifyou do declare an Optional property and it has no value, null rather than an emptyOptional will be bound.
Enabling @ConfigurationProperties-annotated types
Spring Boot provides infrastructure to bind @ConfigurationProperties types and register them asbeans. You can either enable configuration properties on a class-by-class basis or enableconfiguration property scanning that works in a similar manner to component scanning.
Sometimes, classes annotated with @ConfigurationProperties might not be suitable for scanning, forexample, if you’re developing your own auto-configuration or you want to enable themconditionally. In these cases, specify the list of types to process using the@EnableConfigurationProperties annotation. This can be done on any @Configuration class, as shownin the following example:
@Configuration(proxyBeanMethods = false)@EnableConfigurationProperties(AcmeProperties.class)public class MyConfiguration {}
To use configuration property scanning, add the @ConfigurationPropertiesScan annotation to yourapplication. Typically, it is added to the main application class that is annotated with@SpringBootApplication but it can be added to any @Configuration class. By default, scanning willoccur from the package of the class that declares the annotation. If you want to define specificpackages to scan, you can do so as shown in the following example:
@SpringBootApplication@ConfigurationPropertiesScan({ "com.example.app", "org.acme.another" })public class MyApplication {}
When the @ConfigurationProperties bean is registered using configurationproperty scanning or via @EnableConfigurationProperties, the bean has aconventional name: <prefix>-<fqn>, where <prefix> is the environment key prefixspecified in the @ConfigurationProperties annotation and <fqn> is the fullyqualified name of the bean. If the annotation does not provide any prefix, only thefully qualified name of the bean is used.
The bean name in the example above is acme-com.example.AcmeProperties.
68
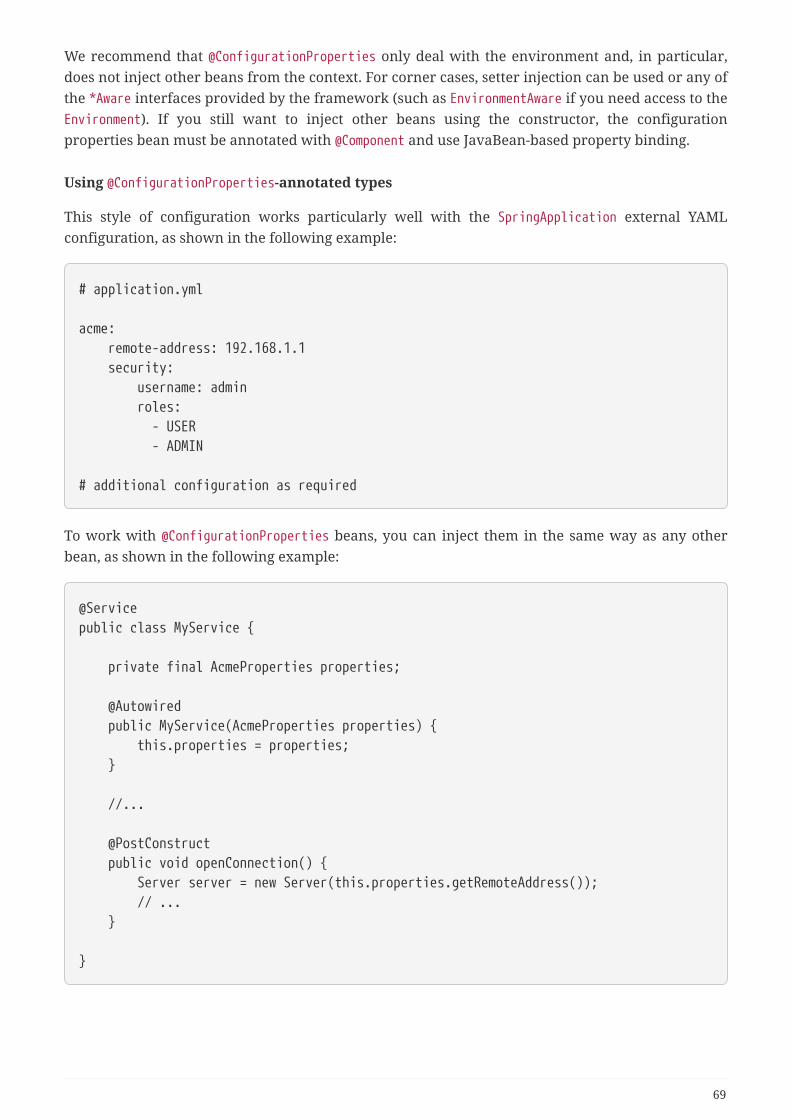
We recommend that @ConfigurationProperties only deal with the environment and, in particular,does not inject other beans from the context. For corner cases, setter injection can be used or any ofthe *Aware interfaces provided by the framework (such as EnvironmentAware if you need access to theEnvironment). If you still want to inject other beans using the constructor, the configurationproperties bean must be annotated with @Component and use JavaBean-based property binding.
Using @ConfigurationProperties-annotated types
This style of configuration works particularly well with the SpringApplication external YAMLconfiguration, as shown in the following example:
# application.yml
acme: remote-address: 192.168.1.1 security: username: admin roles: - USER - ADMIN
# additional configuration as required
To work with @ConfigurationProperties beans, you can inject them in the same way as any otherbean, as shown in the following example:
@Servicepublic class MyService {
private final AcmeProperties properties;
@Autowired public MyService(AcmeProperties properties) { this.properties = properties; }
//...
@PostConstruct public void openConnection() { Server server = new Server(this.properties.getRemoteAddress()); // ... }
}
69

Using @ConfigurationProperties also lets you generate metadata files that can beused by IDEs to offer auto-completion for your own keys. See the appendix fordetails.
Third-party Configuration
As well as using @ConfigurationProperties to annotate a class, you can also use it on public @Beanmethods. Doing so can be particularly useful when you want to bind properties to third-partycomponents that are outside of your control.
To configure a bean from the Environment properties, add @ConfigurationProperties to its beanregistration, as shown in the following example:
@ConfigurationProperties(prefix = "another")@Beanpublic AnotherComponent anotherComponent() { ...}
Any JavaBean property defined with the another prefix is mapped onto that AnotherComponent beanin manner similar to the preceding AcmeProperties example.
Relaxed Binding
Spring Boot uses some relaxed rules for binding Environment properties to @ConfigurationPropertiesbeans, so there does not need to be an exact match between the Environment property name and thebean property name. Common examples where this is useful include dash-separated environmentproperties (for example, context-path binds to contextPath), and capitalized environment properties(for example, PORT binds to port).
As an example, consider the following @ConfigurationProperties class:
@ConfigurationProperties(prefix="acme.my-project.person")public class OwnerProperties {
private String firstName;
public String getFirstName() { return this.firstName; }
public void setFirstName(String firstName) { this.firstName = firstName; }
}
With the preceding code, the following properties names can all be used:
70
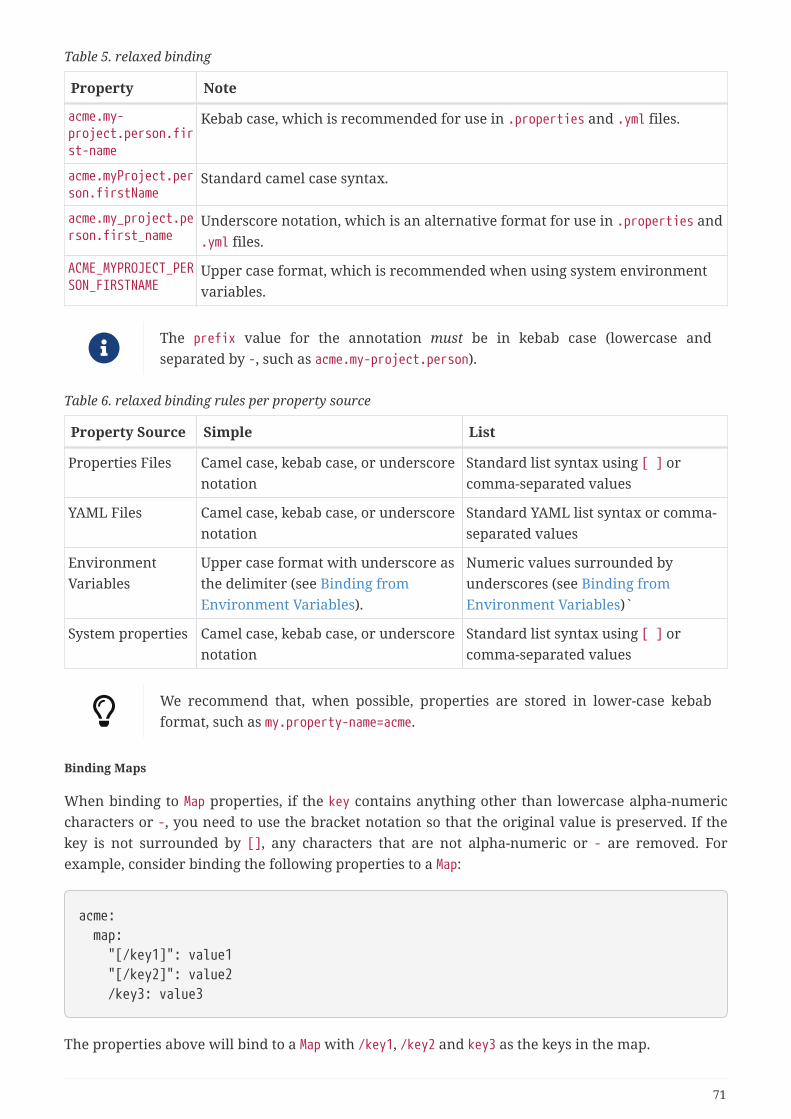
Table 5. relaxed binding
Property Note
acme.my-project.person.first-name
Kebab case, which is recommended for use in .properties and .yml files.
acme.myProject.person.firstName
Standard camel case syntax.
acme.my_project.person.first_name
Underscore notation, which is an alternative format for use in .properties and.yml files.
ACME_MYPROJECT_PERSON_FIRSTNAME
Upper case format, which is recommended when using system environmentvariables.
The prefix value for the annotation must be in kebab case (lowercase andseparated by -, such as acme.my-project.person).
Table 6. relaxed binding rules per property source
Property Source Simple List
Properties Files Camel case, kebab case, or underscorenotation
Standard list syntax using [ ] orcomma-separated values
YAML Files Camel case, kebab case, or underscorenotation
Standard YAML list syntax or comma-separated values
EnvironmentVariables
Upper case format with underscore asthe delimiter (see Binding fromEnvironment Variables).
Numeric values surrounded byunderscores (see Binding fromEnvironment Variables)`
System properties Camel case, kebab case, or underscorenotation
Standard list syntax using [ ] orcomma-separated values
We recommend that, when possible, properties are stored in lower-case kebabformat, such as my.property-name=acme.
Binding Maps
When binding to Map properties, if the key contains anything other than lowercase alpha-numericcharacters or -, you need to use the bracket notation so that the original value is preserved. If thekey is not surrounded by [], any characters that are not alpha-numeric or - are removed. Forexample, consider binding the following properties to a Map:
acme: map: "[/key1]": value1 "[/key2]": value2 /key3: value3
The properties above will bind to a Map with /key1, /key2 and key3 as the keys in the map.
71

For YAML files, the brackets need to be surrounded by quotes for the keys to beparsed properly.
Binding from Environment Variables
Most operating systems impose strict rules around the names that can be used for environmentvariables. For example, Linux shell variables can contain only letters (a to z or A to Z), numbers (0 to9) or the underscore character (_). By convention, Unix shell variables will also have their names inUPPERCASE.
Spring Boot’s relaxed binding rules are, as much as possible, designed to be compatible with thesenaming restrictions.
To convert a property name in the canonical-form to an environment variable name you can followthese rules:
• Replace dots (.) with underscores (_).
• Remove any dashes (-).
• Convert to uppercase.
For example, the configuration property spring.main.log-startup-info would be an environmentvariable named SPRING_MAIN_LOGSTARTUPINFO.
Underscores cannot be used to replace the dashes in property names. If youattempt to use SPRING_MAIN_LOG_STARTUP_INFO with the example above, no value willbe bound.
Environment variables can also be used when binding to object lists. To bind to a List, the elementnumber should be surrounded with underscores in the variable name.
For example, the configuration property my.acme[0].other would use an environment variablenamed MY_ACME_0_OTHER.
Merging Complex Types
When lists are configured in more than one place, overriding works by replacing the entire list.
For example, assume a MyPojo object with name and description attributes that are null by default.The following example exposes a list of MyPojo objects from AcmeProperties:
72
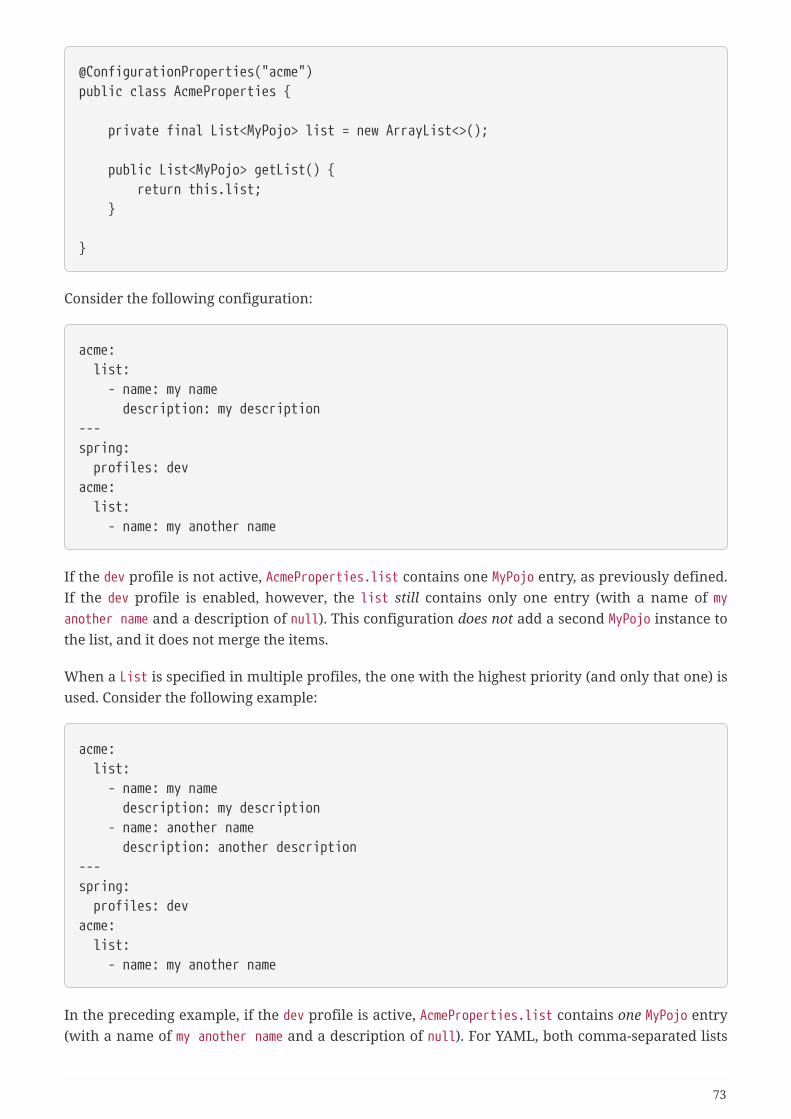
@ConfigurationProperties("acme")public class AcmeProperties {
private final List<MyPojo> list = new ArrayList<>();
public List<MyPojo> getList() { return this.list; }
}
Consider the following configuration:
acme: list: - name: my name description: my description---spring: profiles: devacme: list: - name: my another name
If the dev profile is not active, AcmeProperties.list contains one MyPojo entry, as previously defined.If the dev profile is enabled, however, the list still contains only one entry (with a name of myanother name and a description of null). This configuration does not add a second MyPojo instance tothe list, and it does not merge the items.
When a List is specified in multiple profiles, the one with the highest priority (and only that one) isused. Consider the following example:
acme: list: - name: my name description: my description - name: another name description: another description---spring: profiles: devacme: list: - name: my another name
In the preceding example, if the dev profile is active, AcmeProperties.list contains one MyPojo entry(with a name of my another name and a description of null). For YAML, both comma-separated lists
73

and YAML lists can be used for completely overriding the contents of the list.
For Map properties, you can bind with property values drawn from multiple sources. However, forthe same property in multiple sources, the one with the highest priority is used. The followingexample exposes a Map<String, MyPojo> from AcmeProperties:
@ConfigurationProperties("acme")public class AcmeProperties {
private final Map<String, MyPojo> map = new HashMap<>();
public Map<String, MyPojo> getMap() { return this.map; }
}
Consider the following configuration:
acme: map: key1: name: my name 1 description: my description 1---spring: profiles: devacme: map: key1: name: dev name 1 key2: name: dev name 2 description: dev description 2
If the dev profile is not active, AcmeProperties.map contains one entry with key key1 (with a name ofmy name 1 and a description of my description 1). If the dev profile is enabled, however, map containstwo entries with keys key1 (with a name of dev name 1 and a description of my description 1) andkey2 (with a name of dev name 2 and a description of dev description 2).
The preceding merging rules apply to properties from all property sources and notjust YAML files.
Properties Conversion
Spring Boot attempts to coerce the external application properties to the right type when it binds tothe @ConfigurationProperties beans. If you need custom type conversion, you can provide aConversionService bean (with a bean named conversionService) or custom property editors (through
74

a CustomEditorConfigurer bean) or custom Converters (with bean definitions annotated as@ConfigurationPropertiesBinding).
As this bean is requested very early during the application lifecycle, make sure tolimit the dependencies that your ConversionService is using. Typically, anydependency that you require may not be fully initialized at creation time. You maywant to rename your custom ConversionService if it is not required forconfiguration keys coercion and only rely on custom converters qualified with@ConfigurationPropertiesBinding.
Converting durations
Spring Boot has dedicated support for expressing durations. If you expose a java.time.Durationproperty, the following formats in application properties are available:
• A regular long representation (using milliseconds as the default unit unless a @DurationUnit hasbeen specified)
• The standard ISO-8601 format used by java.time.Duration
• A more readable format where the value and the unit are coupled (e.g. 10s means 10 seconds)
Consider the following example:
@ConfigurationProperties("app.system")public class AppSystemProperties {
@DurationUnit(ChronoUnit.SECONDS) private Duration sessionTimeout = Duration.ofSeconds(30);
private Duration readTimeout = Duration.ofMillis(1000);
public Duration getSessionTimeout() { return this.sessionTimeout; }
public void setSessionTimeout(Duration sessionTimeout) { this.sessionTimeout = sessionTimeout; }
public Duration getReadTimeout() { return this.readTimeout; }
public void setReadTimeout(Duration readTimeout) { this.readTimeout = readTimeout; }
}
75
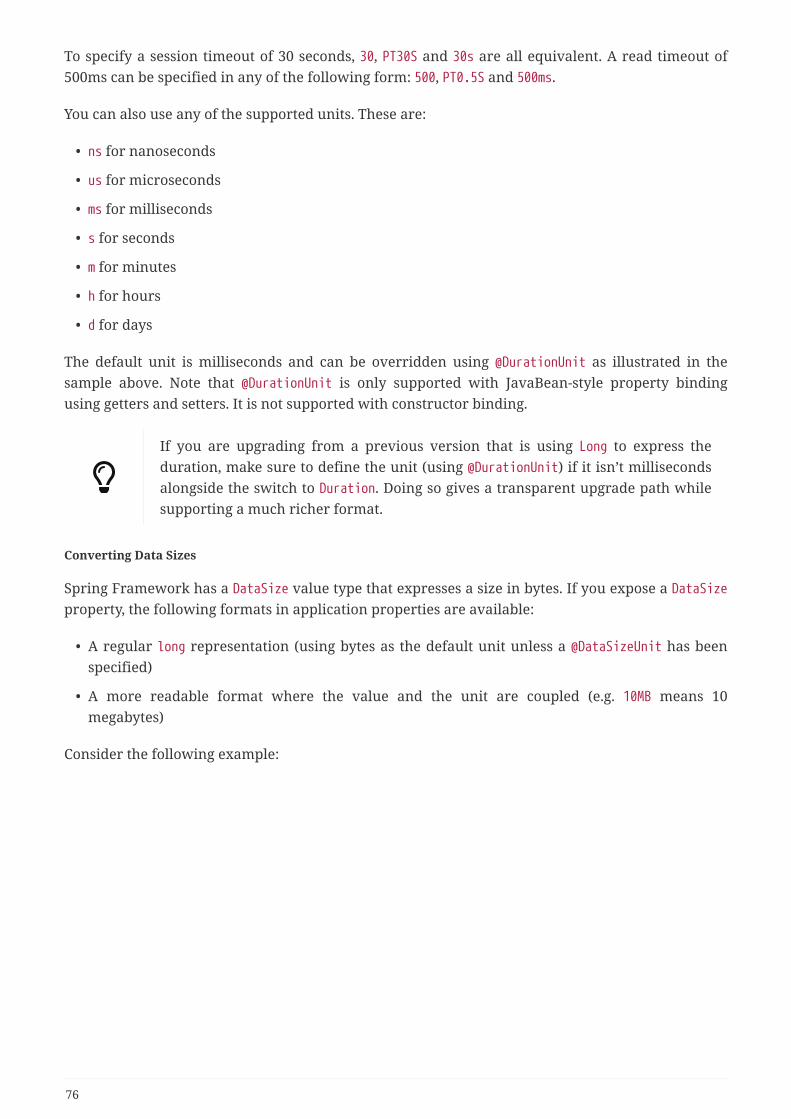
To specify a session timeout of 30 seconds, 30, PT30S and 30s are all equivalent. A read timeout of500ms can be specified in any of the following form: 500, PT0.5S and 500ms.
You can also use any of the supported units. These are:
• ns for nanoseconds
• us for microseconds
• ms for milliseconds
• s for seconds
• m for minutes
• h for hours
• d for days
The default unit is milliseconds and can be overridden using @DurationUnit as illustrated in thesample above. Note that @DurationUnit is only supported with JavaBean-style property bindingusing getters and setters. It is not supported with constructor binding.
If you are upgrading from a previous version that is using Long to express theduration, make sure to define the unit (using @DurationUnit) if it isn’t millisecondsalongside the switch to Duration. Doing so gives a transparent upgrade path whilesupporting a much richer format.
Converting Data Sizes
Spring Framework has a DataSize value type that expresses a size in bytes. If you expose a DataSizeproperty, the following formats in application properties are available:
• A regular long representation (using bytes as the default unit unless a @DataSizeUnit has beenspecified)
• A more readable format where the value and the unit are coupled (e.g. 10MB means 10megabytes)
Consider the following example:
76

@ConfigurationProperties("app.io")public class AppIoProperties {
@DataSizeUnit(DataUnit.MEGABYTES) private DataSize bufferSize = DataSize.ofMegabytes(2);
private DataSize sizeThreshold = DataSize.ofBytes(512);
public DataSize getBufferSize() { return this.bufferSize; }
public void setBufferSize(DataSize bufferSize) { this.bufferSize = bufferSize; }
public DataSize getSizeThreshold() { return this.sizeThreshold; }
public void setSizeThreshold(DataSize sizeThreshold) { this.sizeThreshold = sizeThreshold; }
}
To specify a buffer size of 10 megabytes, 10 and 10MB are equivalent. A size threshold of 256 bytescan be specified as 256 or 256B.
You can also use any of the supported units. These are:
• B for bytes
• KB for kilobytes
• MB for megabytes
• GB for gigabytes
• TB for terabytes
The default unit is bytes and can be overridden using @DataSizeUnit as illustrated in the sampleabove.
If you are upgrading from a previous version that is using Long to express the size,make sure to define the unit (using @DataSizeUnit) if it isn’t bytes alongsidetheswitch to DataSize. Doing so gives a transparent upgrade path while supporting amuch richer format.
77

@ConfigurationProperties Validation
Spring Boot attempts to validate @ConfigurationProperties classes whenever they are annotatedwith Spring’s @Validated annotation. You can use JSR-303 javax.validation constraint annotationsdirectly on your configuration class. To do so, ensure that a compliant JSR-303 implementation is onyour classpath and then add constraint annotations to your fields, as shown in the followingexample:
@ConfigurationProperties(prefix="acme")@Validatedpublic class AcmeProperties {
@NotNull private InetAddress remoteAddress;
// ... getters and setters
}
You can also trigger validation by annotating the @Bean method that creates theconfiguration properties with @Validated.
To ensure that validation is always triggered for nested properties, even when no properties arefound, the associated field must be annotated with @Valid. The following example builds on thepreceding AcmeProperties example:
@ConfigurationProperties(prefix="acme")@Validatedpublic class AcmeProperties {
@NotNull private InetAddress remoteAddress;
@Valid private final Security security = new Security();
// ... getters and setters
public static class Security {
@NotEmpty public String username;
// ... getters and setters
}
}
78
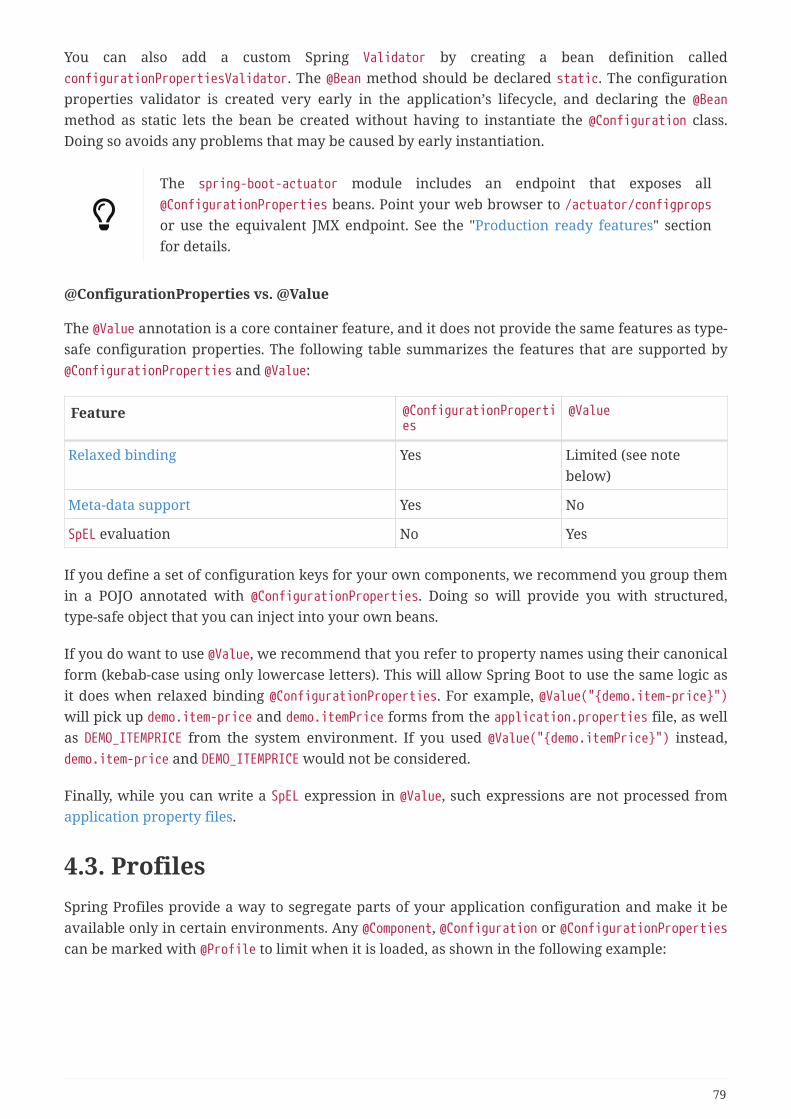
You can also add a custom Spring Validator by creating a bean definition calledconfigurationPropertiesValidator. The @Bean method should be declared static. The configurationproperties validator is created very early in the application’s lifecycle, and declaring the @Beanmethod as static lets the bean be created without having to instantiate the @Configuration class.Doing so avoids any problems that may be caused by early instantiation.
The spring-boot-actuator module includes an endpoint that exposes all@ConfigurationProperties beans. Point your web browser to /actuator/configpropsor use the equivalent JMX endpoint. See the "Production ready features" sectionfor details.
@ConfigurationProperties vs. @Value
The @Value annotation is a core container feature, and it does not provide the same features as type-safe configuration properties. The following table summarizes the features that are supported by@ConfigurationProperties and @Value:
Feature @ConfigurationProperties
@Value
Relaxed binding Yes Limited (see notebelow)
Meta-data support Yes No
SpEL evaluation No Yes
If you define a set of configuration keys for your own components, we recommend you group themin a POJO annotated with @ConfigurationProperties. Doing so will provide you with structured,type-safe object that you can inject into your own beans.
If you do want to use @Value, we recommend that you refer to property names using their canonicalform (kebab-case using only lowercase letters). This will allow Spring Boot to use the same logic asit does when relaxed binding @ConfigurationProperties. For example, @Value("{demo.item-price}")will pick up demo.item-price and demo.itemPrice forms from the application.properties file, as wellas DEMO_ITEMPRICE from the system environment. If you used @Value("{demo.itemPrice}") instead,demo.item-price and DEMO_ITEMPRICE would not be considered.
Finally, while you can write a SpEL expression in @Value, such expressions are not processed fromapplication property files.
4.3. ProfilesSpring Profiles provide a way to segregate parts of your application configuration and make it beavailable only in certain environments. Any @Component, @Configuration or @ConfigurationPropertiescan be marked with @Profile to limit when it is loaded, as shown in the following example:
79
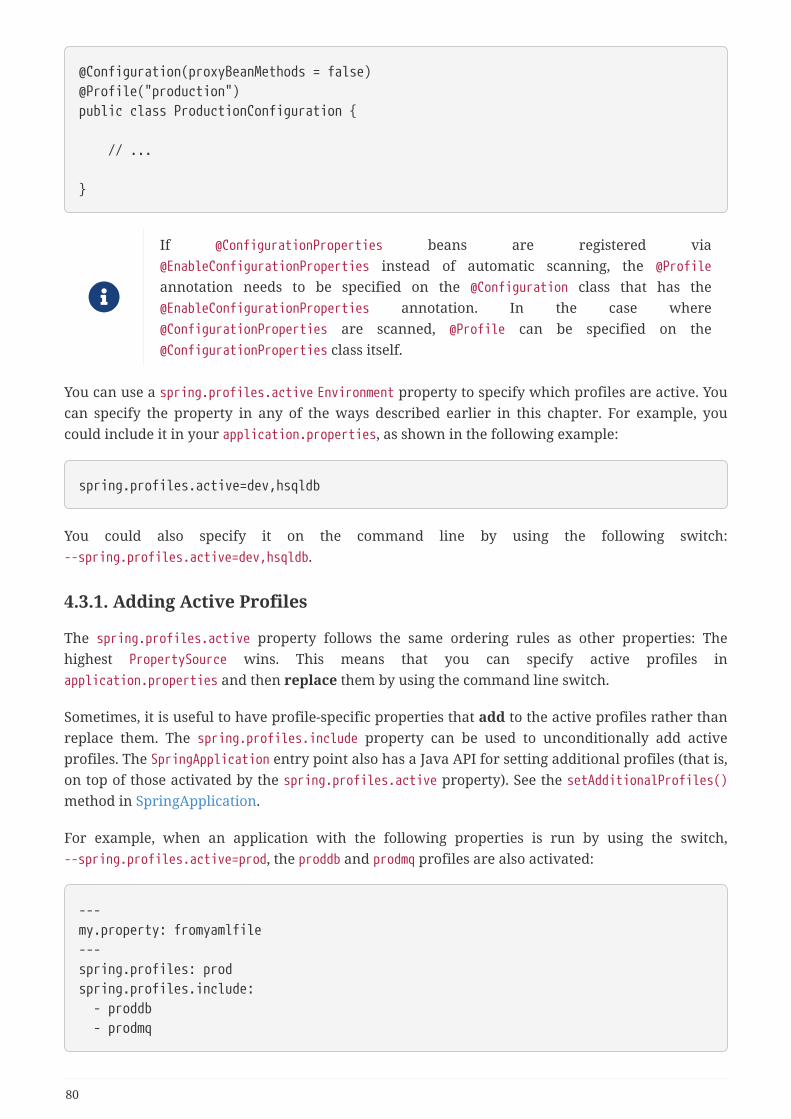
@Configuration(proxyBeanMethods = false)@Profile("production")public class ProductionConfiguration {
// ...
}
If @ConfigurationProperties beans are registered via@EnableConfigurationProperties instead of automatic scanning, the @Profile
annotation needs to be specified on the @Configuration class that has the@EnableConfigurationProperties annotation. In the case where@ConfigurationProperties are scanned, @Profile can be specified on the@ConfigurationProperties class itself.
You can use a spring.profiles.active Environment property to specify which profiles are active. Youcan specify the property in any of the ways described earlier in this chapter. For example, youcould include it in your application.properties, as shown in the following example:
spring.profiles.active=dev,hsqldb
You could also specify it on the command line by using the following switch:--spring.profiles.active=dev,hsqldb.
4.3.1. Adding Active Profiles
The spring.profiles.active property follows the same ordering rules as other properties: Thehighest PropertySource wins. This means that you can specify active profiles inapplication.properties and then replace them by using the command line switch.
Sometimes, it is useful to have profile-specific properties that add to the active profiles rather thanreplace them. The spring.profiles.include property can be used to unconditionally add activeprofiles. The SpringApplication entry point also has a Java API for setting additional profiles (that is,on top of those activated by the spring.profiles.active property). See the setAdditionalProfiles()method in SpringApplication.
For example, when an application with the following properties is run by using the switch,--spring.profiles.active=prod, the proddb and prodmq profiles are also activated:
---my.property: fromyamlfile---spring.profiles: prodspring.profiles.include: - proddb - prodmq
80
Remember that the spring.profiles property can be defined in a YAML documentto determine when this particular document is included in the configuration. SeeChange Configuration Depending on the Environment for more details.
4.3.2. Programmatically Setting Profiles
You can programmatically set active profiles by calling SpringApplication.setAdditionalProfiles(…) before your application runs. It is also possible to activate profiles by using Spring’sConfigurableEnvironment interface.
4.3.3. Profile-specific Configuration Files
Profile-specific variants of both application.properties (or application.yml) and files referencedthrough @ConfigurationProperties are considered as files and loaded. See "Profile-specificProperties" for details.
4.4. LoggingSpring Boot uses Commons Logging for all internal logging but leaves the underlying logimplementation open. Default configurations are provided for Java Util Logging, Log4J2, andLogback. In each case, loggers are pre-configured to use console output with optional file outputalso available.
By default, if you use the “Starters”, Logback is used for logging. Appropriate Logback routing isalso included to ensure that dependent libraries that use Java Util Logging, Commons Logging,Log4J, or SLF4J all work correctly.
There are a lot of logging frameworks available for Java. Do not worry if the abovelist seems confusing. Generally, you do not need to change your loggingdependencies and the Spring Boot defaults work just fine.
When you deploy your application to a servlet container or application server,logging performed via the Java Util Logging API is not routed into yourapplication’s logs. This prevents logging performed by the container or otherapplications that have been deployed to it from appearing in your application’slogs.
4.4.1. Log Format
The default log output from Spring Boot resembles the following example:
81
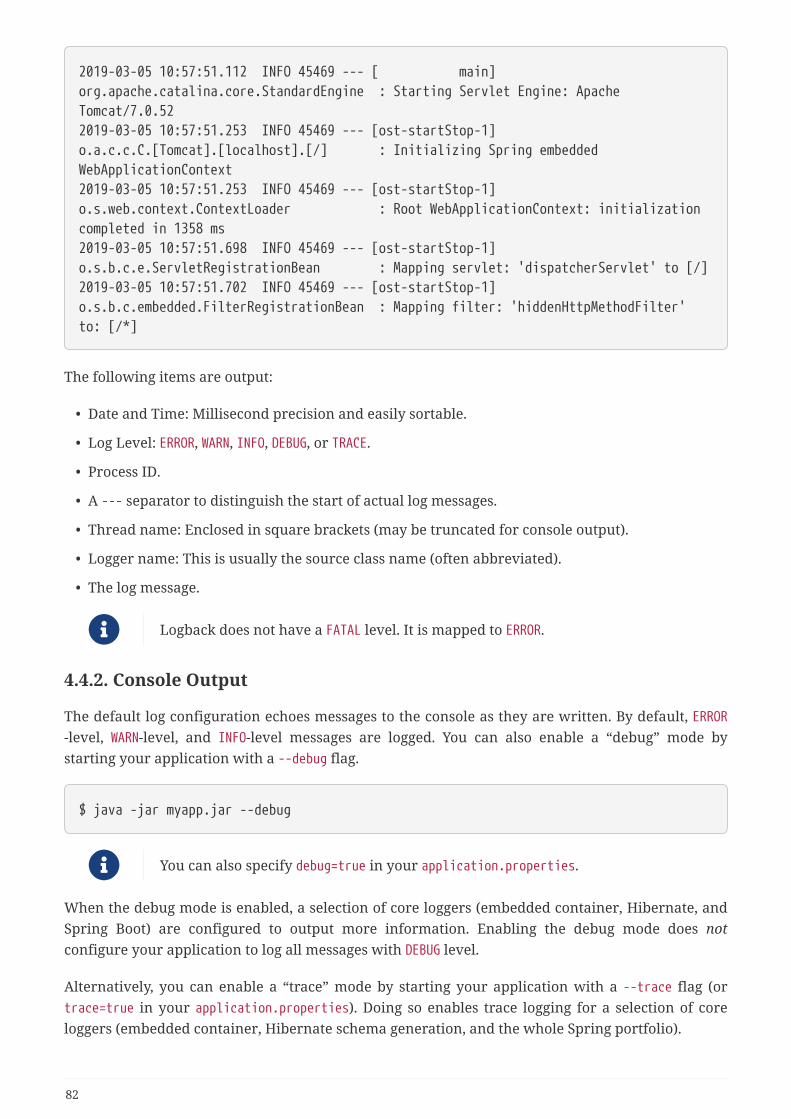
2019-03-05 10:57:51.112 INFO 45469 --- [ main]org.apache.catalina.core.StandardEngine : Starting Servlet Engine: ApacheTomcat/7.0.522019-03-05 10:57:51.253 INFO 45469 --- [ost-startStop-1]o.a.c.c.C.[Tomcat].[localhost].[/] : Initializing Spring embeddedWebApplicationContext2019-03-05 10:57:51.253 INFO 45469 --- [ost-startStop-1]o.s.web.context.ContextLoader : Root WebApplicationContext: initializationcompleted in 1358 ms2019-03-05 10:57:51.698 INFO 45469 --- [ost-startStop-1]o.s.b.c.e.ServletRegistrationBean : Mapping servlet: 'dispatcherServlet' to [/]2019-03-05 10:57:51.702 INFO 45469 --- [ost-startStop-1]o.s.b.c.embedded.FilterRegistrationBean : Mapping filter: 'hiddenHttpMethodFilter'to: [/*]
The following items are output:
• Date and Time: Millisecond precision and easily sortable.
• Log Level: ERROR, WARN, INFO, DEBUG, or TRACE.
• Process ID.
• A --- separator to distinguish the start of actual log messages.
• Thread name: Enclosed in square brackets (may be truncated for console output).
• Logger name: This is usually the source class name (often abbreviated).
• The log message.
Logback does not have a FATAL level. It is mapped to ERROR.
4.4.2. Console Output
The default log configuration echoes messages to the console as they are written. By default, ERROR-level, WARN-level, and INFO-level messages are logged. You can also enable a “debug” mode bystarting your application with a --debug flag.
$ java -jar myapp.jar --debug
You can also specify debug=true in your application.properties.
When the debug mode is enabled, a selection of core loggers (embedded container, Hibernate, andSpring Boot) are configured to output more information. Enabling the debug mode does notconfigure your application to log all messages with DEBUG level.
Alternatively, you can enable a “trace” mode by starting your application with a --trace flag (ortrace=true in your application.properties). Doing so enables trace logging for a selection of coreloggers (embedded container, Hibernate schema generation, and the whole Spring portfolio).
82

Color-coded Output
If your terminal supports ANSI, color output is used to aid readability. You can setspring.output.ansi.enabled to a supported value to override the auto-detection.
Color coding is configured by using the %clr conversion word. In its simplest form, the convertercolors the output according to the log level, as shown in the following example:
%clr(%5p)
The following table describes the mapping of log levels to colors:
Level Color
FATAL Red
ERROR Red
WARN Yellow
INFO Green
DEBUG Green
TRACE Green
Alternatively, you can specify the color or style that should be used by providing it as an option tothe conversion. For example, to make the text yellow, use the following setting:
%clr(%d{yyyy-MM-dd HH:mm:ss.SSS}){yellow}
The following colors and styles are supported:
• blue
• cyan
• faint
• green
• magenta
• red
• yellow
4.4.3. File Output
By default, Spring Boot logs only to the console and does not write log files. If you want to write logfiles in addition to the console output, you need to set a logging.file.name or logging.file.pathproperty (for example, in your application.properties).
The following table shows how the logging.* properties can be used together:
Table 7. Logging properties
83

logging.file.name
logging.file.path
Example Description
(none) (none) Console only logging.
Specific file (none) my.log Writes to the specified log file. Names can be an exactlocation or relative to the current directory.
(none) Specificdirectory
/var/log Writes spring.log to the specified directory. Names canbe an exact location or relative to the current directory.
Log files rotate when they reach 10 MB and, as with console output, ERROR-level, WARN-level, and INFO-level messages are logged by default. Size limits can be changed using the logging.file.max-sizeproperty. Rotated log files of the last 7 days are kept by default unless the logging.file.max-historyproperty has been set. The total size of log archives can be capped using logging.file.total-size-cap. When the total size of log archives exceeds that threshold, backups will be deleted. To force logarchive cleanup on application startup, use the logging.file.clean-history-on-start property.
Logging properties are independent of the actual logging infrastructure. As aresult, specific configuration keys (such as logback.configurationFile for Logback)are not managed by spring Boot.
4.4.4. Log Levels
All the supported logging systems can have the logger levels set in the Spring Environment (forexample, in application.properties) by using logging.level.<logger-name>=<level> where level isone of TRACE, DEBUG, INFO, WARN, ERROR, FATAL, or OFF. The root logger can be configured byusing logging.level.root.
The following example shows potential logging settings in application.properties:
logging.level.root=warnlogging.level.org.springframework.web=debuglogging.level.org.hibernate=error
It’s also possible to set logging levels using environment variables. For example,LOGGING_LEVEL_ORG_SPRINGFRAMEWORK_WEB=DEBUG will set org.springframework.web to DEBUG.
The above approach will only work for package level logging. Since relaxedbinding always converts environment variables to lowercase, it’s not possible toconfigure logging for an individual class in this way. If you need to configurelogging for a class, you can use the SPRING_APPLICATION_JSON variable.
4.4.5. Log Groups
It’s often useful to be able to group related loggers together so that they can all be configured at thesame time. For example, you might commonly change the logging levels for all Tomcat relatedloggers, but you can’t easily remember top level packages.
84

To help with this, Spring Boot allows you to define logging groups in your Spring Environment. Forexample, here’s how you could define a “tomcat” group by adding it to your application.properties:
logging.group.tomcat=org.apache.catalina, org.apache.coyote, org.apache.tomcat
Once defined, you can change the level for all the loggers in the group with a single line:
logging.level.tomcat=TRACE
Spring Boot includes the following pre-defined logging groups that can be used out-of-the-box:
Name Loggers
web org.springframework.core.codec, org.springframework.http,org.springframework.web, org.springframework.boot.actuate.endpoint.web,org.springframework.boot.web.servlet.ServletContextInitializerBeans
sql org.springframework.jdbc.core, org.hibernate.SQL,org.jooq.tools.LoggerListener
4.4.6. Custom Log Configuration
The various logging systems can be activated by including the appropriate libraries on theclasspath and can be further customized by providing a suitable configuration file in the root of theclasspath or in a location specified by the following Spring Environment property: logging.config.
You can force Spring Boot to use a particular logging system by using theorg.springframework.boot.logging.LoggingSystem system property. The value should be the fullyqualified class name of a LoggingSystem implementation. You can also disable Spring Boot’s loggingconfiguration entirely by using a value of none.
Since logging is initialized before the ApplicationContext is created, it is notpossible to control logging from @PropertySources in Spring @Configuration files.The only way to change the logging system or disable it entirely is via Systemproperties.
Depending on your logging system, the following files are loaded:
Logging System Customization
Logback logback-spring.xml, logback-spring.groovy,logback.xml, or logback.groovy
Log4j2 log4j2-spring.xml or log4j2.xml
JDK (Java Util Logging) logging.properties
85
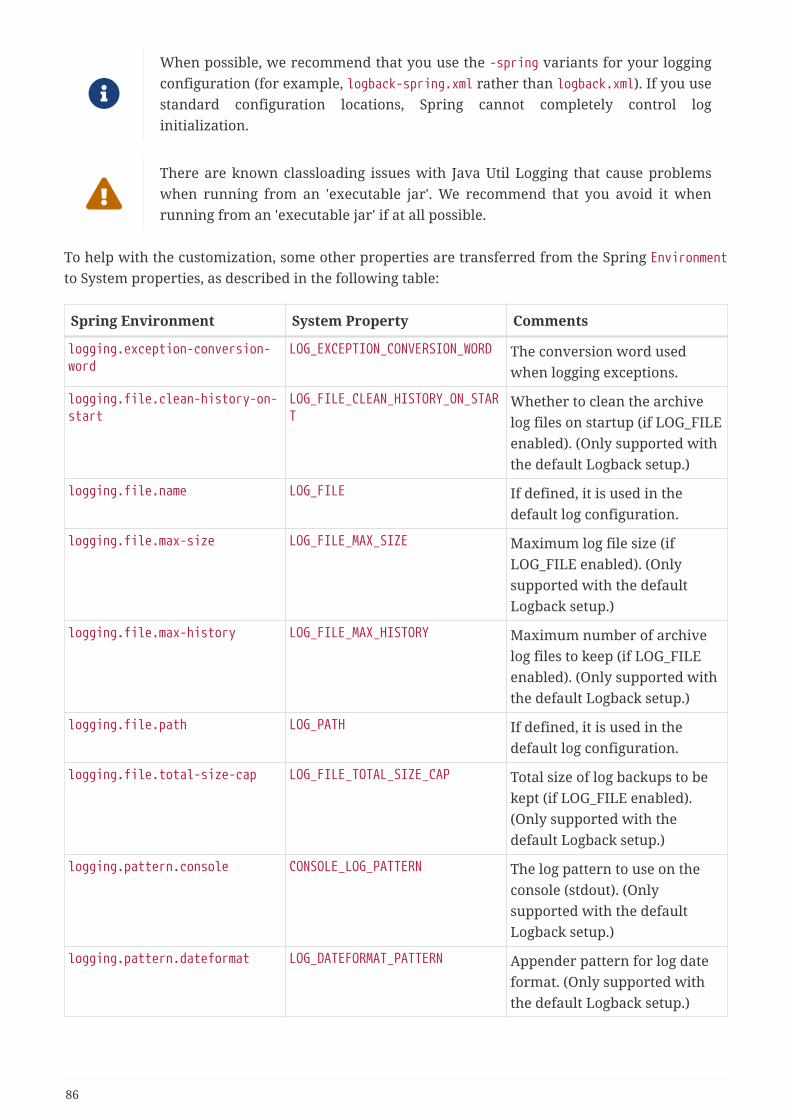
When possible, we recommend that you use the -spring variants for your loggingconfiguration (for example, logback-spring.xml rather than logback.xml). If you usestandard configuration locations, Spring cannot completely control loginitialization.
There are known classloading issues with Java Util Logging that cause problemswhen running from an 'executable jar'. We recommend that you avoid it whenrunning from an 'executable jar' if at all possible.
To help with the customization, some other properties are transferred from the Spring Environmentto System properties, as described in the following table:
Spring Environment System Property Comments
logging.exception-conversion-word
LOG_EXCEPTION_CONVERSION_WORD The conversion word usedwhen logging exceptions.
logging.file.clean-history-on-start
LOG_FILE_CLEAN_HISTORY_ON_START
Whether to clean the archivelog files on startup (if LOG_FILEenabled). (Only supported withthe default Logback setup.)
logging.file.name LOG_FILE If defined, it is used in thedefault log configuration.
logging.file.max-size LOG_FILE_MAX_SIZE Maximum log file size (ifLOG_FILE enabled). (Onlysupported with the defaultLogback setup.)
logging.file.max-history LOG_FILE_MAX_HISTORY Maximum number of archivelog files to keep (if LOG_FILEenabled). (Only supported withthe default Logback setup.)
logging.file.path LOG_PATH If defined, it is used in thedefault log configuration.
logging.file.total-size-cap LOG_FILE_TOTAL_SIZE_CAP Total size of log backups to bekept (if LOG_FILE enabled).(Only supported with thedefault Logback setup.)
logging.pattern.console CONSOLE_LOG_PATTERN The log pattern to use on theconsole (stdout). (Onlysupported with the defaultLogback setup.)
logging.pattern.dateformat LOG_DATEFORMAT_PATTERN Appender pattern for log dateformat. (Only supported withthe default Logback setup.)
86

Spring Environment System Property Comments
logging.pattern.file FILE_LOG_PATTERN The log pattern to use in a file(if LOG_FILE is enabled). (Onlysupported with the defaultLogback setup.)
logging.pattern.level LOG_LEVEL_PATTERN The format to use whenrendering the log level (default%5p). (Only supported with thedefault Logback setup.)
logging.pattern.rolling-file-name
ROLLING_FILE_NAME_PATTERN Pattern for rolled-over log filenames (default${LOG_FILE}.%d{yyyy-MM-
dd}.%i.gz). (Only supportedwith the default Logback setup.)
PID PID The current process ID(discovered if possible andwhen not already defined as anOS environment variable).
All the supported logging systems can consult System properties when parsing their configurationfiles. See the default configurations in spring-boot.jar for examples:
• Logback
• Log4j 2
• Java Util logging
If you want to use a placeholder in a logging property, you should use SpringBoot’s syntax and not the syntax of the underlying framework. Notably, if you useLogback, you should use : as the delimiter between a property name and itsdefault value and not use :-.
You can add MDC and other ad-hoc content to log lines by overriding only theLOG_LEVEL_PATTERN (or logging.pattern.level with Logback). For example, if you uselogging.pattern.level=user:%X{user} %5p, then the default log format contains anMDC entry for "user", if it exists, as shown in the following example.
2019-08-30 12:30:04.031 user:someone INFO 22174 --- [ nio-8080-exec-0]demo.ControllerHandling authenticated request
4.4.7. Logback Extensions
Spring Boot includes a number of extensions to Logback that can help with advanced configuration.You can use these extensions in your logback-spring.xml configuration file.
87
Because the standard logback.xml configuration file is loaded too early, you cannotuse extensions in it. You need to either use logback-spring.xml or define alogging.config property.
The extensions cannot be used with Logback’s configuration scanning. If youattempt to do so, making changes to the configuration file results in an errorsimilar to one of the following being logged:
ERROR in ch.qos.logback.core.joran.spi.Interpreter@4:71 - no applicable action for[springProperty], current ElementPath is [[configuration][springProperty]]ERROR in ch.qos.logback.core.joran.spi.Interpreter@4:71 - no applicable action for[springProfile], current ElementPath is [[configuration][springProfile]]
Profile-specific Configuration
The <springProfile> tag lets you optionally include or exclude sections of configuration based onthe active Spring profiles. Profile sections are supported anywhere within the <configuration>element. Use the name attribute to specify which profile accepts the configuration. The<springProfile> tag can contain a profile name (for example staging) or a profile expression. Aprofile expression allows for more complicated profile logic to be expressed, for exampleproduction & (eu-central | eu-west). Check the reference guide for more details. The followinglisting shows three sample profiles:
<springProfile name="staging"> <!-- configuration to be enabled when the "staging" profile is active --></springProfile>
<springProfile name="dev | staging"> <!-- configuration to be enabled when the "dev" or "staging" profiles are active--></springProfile>
<springProfile name="!production"> <!-- configuration to be enabled when the "production" profile is not active --></springProfile>
Environment Properties
The <springProperty> tag lets you expose properties from the Spring Environment for use withinLogback. Doing so can be useful if you want to access values from your application.properties filein your Logback configuration. The tag works in a similar way to Logback’s standard <property> tag.However, rather than specifying a direct value, you specify the source of the property (from theEnvironment). If you need to store the property somewhere other than in local scope, you can usethe scope attribute. If you need a fallback value (in case the property is not set in the Environment),you can use the defaultValue attribute. The following example shows how to expose properties foruse within Logback:
88

<springProperty scope="context" name="fluentHost" source="myapp.fluentd.host" defaultValue="localhost"/><appender name="FLUENT" class="ch.qos.logback.more.appenders.DataFluentAppender"> <remoteHost>${fluentHost}</remoteHost> ...</appender>
The source must be specified in kebab case (such as my.property-name). However,properties can be added to the Environment by using the relaxed rules.
4.5. InternationalizationSpring Boot supports localized messages so that your application can cater to users of differentlanguage preferences. By default, Spring Boot looks for the presence of a messages resource bundleat the root of the classpath.
The auto-configuration applies when the default properties file for the configuredresource bundle is available (i.e. messages.properties by default). If your resourcebundle contains only language-specific properties files, you are required to addthe default. If no properties file is found that matches any of the configured basenames, there will be no auto-configured MessageSource.
The basename of the resource bundle as well as several other attributes can be configured usingthe spring.messages namespace, as shown in the following example:
spring.messages.basename=messages,config.i18n.messagesspring.messages.fallback-to-system-locale=false
spring.messages.basename supports comma-separated list of locations, either apackage qualifier or a resource resolved from the classpath root.
See MessageSourceProperties for more supported options.
4.6. JSONSpring Boot provides integration with three JSON mapping libraries:
• Gson
• Jackson
• JSON-B
Jackson is the preferred and default library.
89

4.6.1. Jackson
Auto-configuration for Jackson is provided and Jackson is part of spring-boot-starter-json. WhenJackson is on the classpath an ObjectMapper bean is automatically configured. Several configurationproperties are provided for customizing the configuration of the ObjectMapper.
4.6.2. Gson
Auto-configuration for Gson is provided. When Gson is on the classpath a Gson bean is automaticallyconfigured. Several spring.gson.* configuration properties are provided for customizing theconfiguration. To take more control, one or more GsonBuilderCustomizer beans can be used.
4.6.3. JSON-B
Auto-configuration for JSON-B is provided. When the JSON-B API and an implementation are on theclasspath a Jsonb bean will be automatically configured. The preferred JSON-B implementation isApache Johnzon for which dependency management is provided.
4.7. Developing Web ApplicationsSpring Boot is well suited for web application development. You can create a self-contained HTTPserver by using embedded Tomcat, Jetty, Undertow, or Netty. Most web applications use the spring-boot-starter-web module to get up and running quickly. You can also choose to build reactive webapplications by using the spring-boot-starter-webflux module.
If you have not yet developed a Spring Boot web application, you can follow the "Hello World!"example in the Getting started section.
4.7.1. The “Spring Web MVC Framework”
The Spring Web MVC framework (often referred to as “Spring MVC”) is a rich “model viewcontroller” web framework. Spring MVC lets you create special @Controller or @RestControllerbeans to handle incoming HTTP requests. Methods in your controller are mapped to HTTP by using@RequestMapping annotations.
The following code shows a typical @RestController that serves JSON data:
90
@RestController@RequestMapping(value="/users")public class MyRestController {
@RequestMapping(value="/{user}", method=RequestMethod.GET) public User getUser(@PathVariable Long user) { // ... }
@RequestMapping(value="/{user}/customers", method=RequestMethod.GET) List<Customer> getUserCustomers(@PathVariable Long user) { // ... }
@RequestMapping(value="/{user}", method=RequestMethod.DELETE) public User deleteUser(@PathVariable Long user) { // ... }
}
Spring MVC is part of the core Spring Framework, and detailed information is available in thereference documentation. There are also several guides that cover Spring MVC available atspring.io/guides.
Spring MVC Auto-configuration
Spring Boot provides auto-configuration for Spring MVC that works well with most applications.
The auto-configuration adds the following features on top of Spring’s defaults:
• Inclusion of ContentNegotiatingViewResolver and BeanNameViewResolver beans.
• Support for serving static resources, including support for WebJars (covered later in thisdocument)).
• Automatic registration of Converter, GenericConverter, and Formatter beans.
• Support for HttpMessageConverters (covered later in this document).
• Automatic registration of MessageCodesResolver (covered later in this document).
• Static index.html support.
• Custom Favicon support (covered later in this document).
• Automatic use of a ConfigurableWebBindingInitializer bean (covered later in this document).
If you want to keep those Spring Boot MVC customizations and make more MVC customizations(interceptors, formatters, view controllers, and other features), you can add your own@Configuration class of type WebMvcConfigurer but without @EnableWebMvc.
If you want to provide custom instances of RequestMappingHandlerMapping,
91

RequestMappingHandlerAdapter, or ExceptionHandlerExceptionResolver, and still keep the Spring BootMVC customizations, you can declare a bean of type WebMvcRegistrations and use it to providecustom instances of those components.
If you want to take complete control of Spring MVC, you can add your own @Configurationannotated with @EnableWebMvc, or alternatively add your own @Configuration-annotatedDelegatingWebMvcConfiguration as described in the Javadoc of @EnableWebMvc.
HttpMessageConverters
Spring MVC uses the HttpMessageConverter interface to convert HTTP requests and responses.Sensible defaults are included out of the box. For example, objects can be automatically convertedto JSON (by using the Jackson library) or XML (by using the Jackson XML extension, if available, orby using JAXB if the Jackson XML extension is not available). By default, strings are encoded in UTF-8.
If you need to add or customize converters, you can use Spring Boot’s HttpMessageConverters class,as shown in the following listing:
import org.springframework.boot.autoconfigure.http.HttpMessageConverters;import org.springframework.context.annotation.*;import org.springframework.http.converter.*;
@Configuration(proxyBeanMethods = false)public class MyConfiguration {
@Bean public HttpMessageConverters customConverters() { HttpMessageConverter<?> additional = ... HttpMessageConverter<?> another = ... return new HttpMessageConverters(additional, another); }
}
Any HttpMessageConverter bean that is present in the context is added to the list of converters. Youcan also override default converters in the same way.
Custom JSON Serializers and Deserializers
If you use Jackson to serialize and deserialize JSON data, you might want to write your ownJsonSerializer and JsonDeserializer classes. Custom serializers are usually registered with Jacksonthrough a module, but Spring Boot provides an alternative @JsonComponent annotation that makes iteasier to directly register Spring Beans.
You can use the @JsonComponent annotation directly on JsonSerializer, JsonDeserializer orKeyDeserializer implementations. You can also use it on classes that containserializers/deserializers as inner classes, as shown in the following example:
92

import java.io.*;import com.fasterxml.jackson.core.*;import com.fasterxml.jackson.databind.*;import org.springframework.boot.jackson.*;
@JsonComponentpublic class Example {
public static class Serializer extends JsonSerializer<SomeObject> { // ... }
public static class Deserializer extends JsonDeserializer<SomeObject> { // ... }
}
All @JsonComponent beans in the ApplicationContext are automatically registered with Jackson.Because @JsonComponent is meta-annotated with @Component, the usual component-scanning rulesapply.
Spring Boot also provides JsonObjectSerializer and JsonObjectDeserializer base classes thatprovide useful alternatives to the standard Jackson versions when serializing objects. SeeJsonObjectSerializer and JsonObjectDeserializer in the Javadoc for details.
MessageCodesResolver
Spring MVC has a strategy for generating error codes for rendering error messages from bindingerrors: MessageCodesResolver. If you set the spring.mvc.message-codes-resolver-format propertyPREFIX_ERROR_CODE or POSTFIX_ERROR_CODE, Spring Boot creates one for you (see the enumeration inDefaultMessageCodesResolver.Format).
Static Content
By default, Spring Boot serves static content from a directory called /static (or /public or/resources or /META-INF/resources) in the classpath or from the root of the ServletContext. It usesthe ResourceHttpRequestHandler from Spring MVC so that you can modify that behavior by addingyour own WebMvcConfigurer and overriding the addResourceHandlers method.
In a stand-alone web application, the default servlet from the container is also enabled and acts asa fallback, serving content from the root of the ServletContext if Spring decides not to handle it.Most of the time, this does not happen (unless you modify the default MVC configuration), becauseSpring can always handle requests through the DispatcherServlet.
By default, resources are mapped on /**, but you can tune that with the spring.mvc.static-path-pattern property. For instance, relocating all resources to /resources/** can be achieved as follows:
93
spring.mvc.static-path-pattern=/resources/**
You can also customize the static resource locations by using the spring.resources.static-locationsproperty (replacing the default values with a list of directory locations). The root Servlet contextpath, "/", is automatically added as a location as well.
In addition to the “standard” static resource locations mentioned earlier, a special case is made forWebjars content. Any resources with a path in /webjars/** are served from jar files if they arepackaged in the Webjars format.
Do not use the src/main/webapp directory if your application is packaged as a jar.Although this directory is a common standard, it works only with war packaging,and it is silently ignored by most build tools if you generate a jar.
Spring Boot also supports the advanced resource handling features provided by Spring MVC,allowing use cases such as cache-busting static resources or using version agnostic URLs forWebjars.
To use version agnostic URLs for Webjars, add the webjars-locator-core dependency. Then declareyour Webjar. Using jQuery as an example, adding "/webjars/jquery/jquery.min.js" results in"/webjars/jquery/x.y.z/jquery.min.js" where x.y.z is the Webjar version.
If you use JBoss, you need to declare the webjars-locator-jboss-vfs dependencyinstead of the webjars-locator-core. Otherwise, all Webjars resolve as a 404.
To use cache busting, the following configuration configures a cache busting solution for all staticresources, effectively adding a content hash, such as <link href="/css/spring-
2a2d595e6ed9a0b24f027f2b63b134d6.css"/>, in URLs:
spring.resources.chain.strategy.content.enabled=truespring.resources.chain.strategy.content.paths=/**
Links to resources are rewritten in templates at runtime, thanks to aResourceUrlEncodingFilter that is auto-configured for Thymeleaf and FreeMarker.You should manually declare this filter when using JSPs. Other template enginesare currently not automatically supported but can be with custom templatemacros/helpers and the use of the ResourceUrlProvider.
When loading resources dynamically with, for example, a JavaScript module loader, renaming filesis not an option. That is why other strategies are also supported and can be combined. A "fixed"strategy adds a static version string in the URL without changing the file name, as shown in thefollowing example:
94

spring.resources.chain.strategy.content.enabled=truespring.resources.chain.strategy.content.paths=/**spring.resources.chain.strategy.fixed.enabled=truespring.resources.chain.strategy.fixed.paths=/js/lib/spring.resources.chain.strategy.fixed.version=v12
With this configuration, JavaScript modules located under "/js/lib/" use a fixed versioningstrategy ("/v12/js/lib/mymodule.js"), while other resources still use the content one (<linkhref="/css/spring-2a2d595e6ed9a0b24f027f2b63b134d6.css"/>).
See ResourceProperties for more supported options.
This feature has been thoroughly described in a dedicated blog post and in SpringFramework’s reference documentation.
Welcome Page
Spring Boot supports both static and templated welcome pages. It first looks for an index.html file inthe configured static content locations. If one is not found, it then looks for an index template. Ifeither is found, it is automatically used as the welcome page of the application.
Custom Favicon
As with other static resources, Spring Boot looks for a favicon.ico in the configured static contentlocations. If such a file is present, it is automatically used as the favicon of the application.
Path Matching and Content Negotiation
Spring MVC can map incoming HTTP requests to handlers by looking at the request path andmatching it to the mappings defined in your application (for example, @GetMapping annotations onController methods).
Spring Boot chooses to disable suffix pattern matching by default, which means that requests like"GET /projects/spring-boot.json" won’t be matched to @GetMapping("/projects/spring-boot")
mappings. This is considered as a best practice for Spring MVC applications. This feature wasmainly useful in the past for HTTP clients which did not send proper "Accept" request headers; weneeded to make sure to send the correct Content Type to the client. Nowadays, Content Negotiationis much more reliable.
There are other ways to deal with HTTP clients that don’t consistently send proper "Accept" requestheaders. Instead of using suffix matching, we can use a query parameter to ensure that requestslike "GET /projects/spring-boot?format=json" will be mapped to @GetMapping("/projects/spring-boot"):
95

spring.mvc.contentnegotiation.favor-parameter=true
# We can change the parameter name, which is "format" by default:# spring.mvc.contentnegotiation.parameter-name=myparam
# We can also register additional file extensions/media types with:spring.mvc.contentnegotiation.media-types.markdown=text/markdown
Suffix pattern matching is deprecated and will be removed in a future release. If you understandthe caveats and would still like your application to use suffix pattern matching, the followingconfiguration is required:
spring.mvc.contentnegotiation.favor-path-extension=truespring.mvc.pathmatch.use-suffix-pattern=true
Alternatively, rather than open all suffix patterns, it’s more secure to only support registered suffixpatterns:
spring.mvc.contentnegotiation.favor-path-extension=truespring.mvc.pathmatch.use-registered-suffix-pattern=true
# You can also register additional file extensions/media types with:# spring.mvc.contentnegotiation.media-types.adoc=text/asciidoc
ConfigurableWebBindingInitializer
Spring MVC uses a WebBindingInitializer to initialize a WebDataBinder for a particular request. If youcreate your own ConfigurableWebBindingInitializer @Bean, Spring Boot automatically configuresSpring MVC to use it.
Template Engines
As well as REST web services, you can also use Spring MVC to serve dynamic HTML content. SpringMVC supports a variety of templating technologies, including Thymeleaf, FreeMarker, and JSPs.Also, many other templating engines include their own Spring MVC integrations.
Spring Boot includes auto-configuration support for the following templating engines:
• FreeMarker
• Groovy
• Thymeleaf
• Mustache
If possible, JSPs should be avoided. There are several known limitations whenusing them with embedded servlet containers.
96
When you use one of these templating engines with the default configuration, your templates arepicked up automatically from src/main/resources/templates.
Depending on how you run your application, your IDE may order the classpathdifferently. Running your application in the IDE from its main method results in adifferent ordering than when you run your application by using Maven or Gradleor from its packaged jar. This can cause Spring Boot to fail to find the expectedtemplate. If you have this problem, you can reorder the classpath in the IDE toplace the module’s classes and resources first.
Error Handling
By default, Spring Boot provides an /error mapping that handles all errors in a sensible way, and itis registered as a “global” error page in the servlet container. For machine clients, it produces aJSON response with details of the error, the HTTP status, and the exception message. For browserclients, there is a “whitelabel” error view that renders the same data in HTML format (to customizeit, add a View that resolves to error). To replace the default behavior completely, you can implementErrorController and register a bean definition of that type or add a bean of type ErrorAttributes touse the existing mechanism but replace the contents.
The BasicErrorController can be used as a base class for a custom ErrorController.This is particularly useful if you want to add a handler for a new content type (thedefault is to handle text/html specifically and provide a fallback for everythingelse). To do so, extend BasicErrorController, add a public method with a@RequestMapping that has a produces attribute, and create a bean of your new type.
You can also define a class annotated with @ControllerAdvice to customize the JSON document toreturn for a particular controller and/or exception type, as shown in the following example:
97
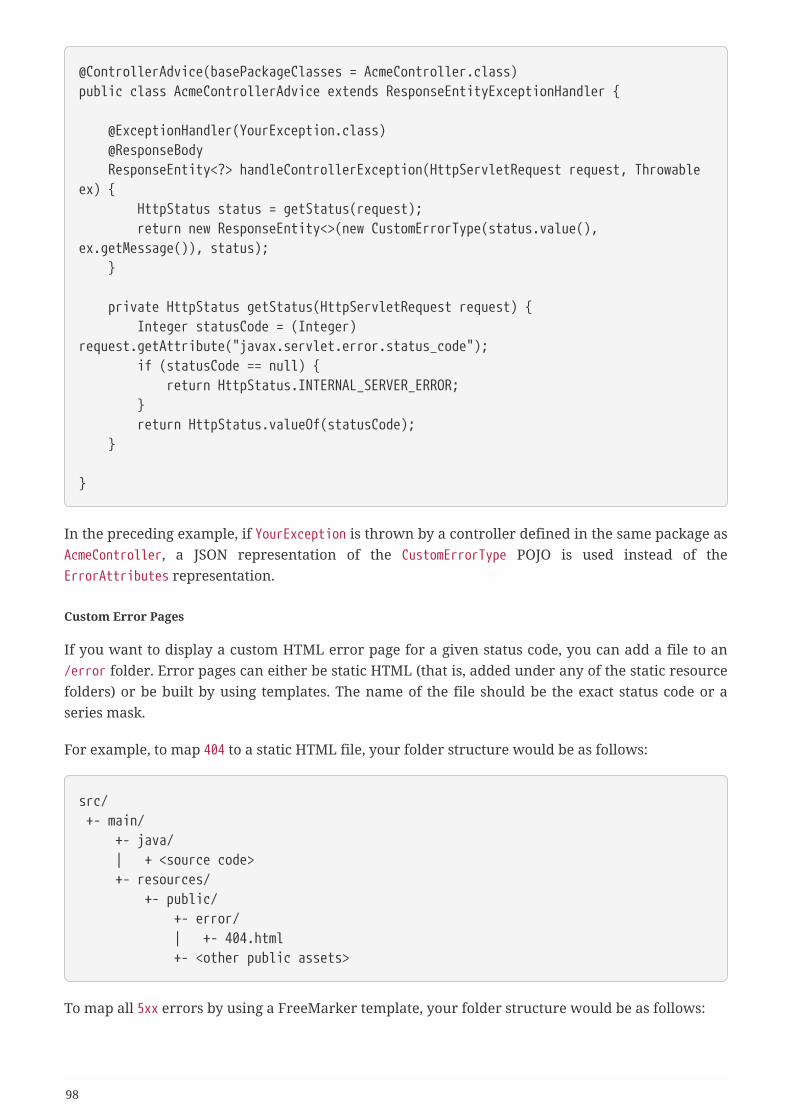
@ControllerAdvice(basePackageClasses = AcmeController.class)public class AcmeControllerAdvice extends ResponseEntityExceptionHandler {
@ExceptionHandler(YourException.class) @ResponseBody ResponseEntity<?> handleControllerException(HttpServletRequest request, Throwableex) { HttpStatus status = getStatus(request); return new ResponseEntity<>(new CustomErrorType(status.value(),ex.getMessage()), status); }
private HttpStatus getStatus(HttpServletRequest request) { Integer statusCode = (Integer)request.getAttribute("javax.servlet.error.status_code"); if (statusCode == null) { return HttpStatus.INTERNAL_SERVER_ERROR; } return HttpStatus.valueOf(statusCode); }
}
In the preceding example, if YourException is thrown by a controller defined in the same package asAcmeController, a JSON representation of the CustomErrorType POJO is used instead of theErrorAttributes representation.
Custom Error Pages
If you want to display a custom HTML error page for a given status code, you can add a file to an/error folder. Error pages can either be static HTML (that is, added under any of the static resourcefolders) or be built by using templates. The name of the file should be the exact status code or aseries mask.
For example, to map 404 to a static HTML file, your folder structure would be as follows:
src/ +- main/ +- java/ | + <source code> +- resources/ +- public/ +- error/ | +- 404.html +- <other public assets>
To map all 5xx errors by using a FreeMarker template, your folder structure would be as follows:
98

src/ +- main/ +- java/ | + <source code> +- resources/ +- templates/ +- error/ | +- 5xx.ftlh +- <other templates>
For more complex mappings, you can also add beans that implement the ErrorViewResolverinterface, as shown in the following example:
public class MyErrorViewResolver implements ErrorViewResolver {
@Override public ModelAndView resolveErrorView(HttpServletRequest request, HttpStatus status, Map<String, Object> model) { // Use the request or status to optionally return a ModelAndView return ... }
}
You can also use regular Spring MVC features such as @ExceptionHandler methods and@ControllerAdvice. The ErrorController then picks up any unhandled exceptions.
Mapping Error Pages outside of Spring MVC
For applications that do not use Spring MVC, you can use the ErrorPageRegistrar interface todirectly register ErrorPages. This abstraction works directly with the underlying embedded servletcontainer and works even if you do not have a Spring MVC DispatcherServlet.
99

@Beanpublic ErrorPageRegistrar errorPageRegistrar(){ return new MyErrorPageRegistrar();}
// ...
private static class MyErrorPageRegistrar implements ErrorPageRegistrar {
@Override public void registerErrorPages(ErrorPageRegistry registry) { registry.addErrorPages(new ErrorPage(HttpStatus.BAD_REQUEST, "/400")); }
}
If you register an ErrorPage with a path that ends up being handled by a Filter (asis common with some non-Spring web frameworks, like Jersey and Wicket), thenthe Filter has to be explicitly registered as an ERROR dispatcher, as shown in thefollowing example:
@Beanpublic FilterRegistrationBean myFilter() { FilterRegistrationBean registration = new FilterRegistrationBean(); registration.setFilter(new MyFilter()); ... registration.setDispatcherTypes(EnumSet.allOf(DispatcherType.class)); return registration;}
Note that the default FilterRegistrationBean does not include the ERROR dispatcher type.
Error handling in a war deployment
When deployed to a servlet container, Spring Boot uses its error page filter to forward a requestwith an error status to the appropriate error page. This is necessary as the Servlet specificationdoes not provide an API for registering error pages. Depending on the container that you aredeploying your war file to and the technologies that your application uses, some additionalconfiguration may be required.
The error page filter can only forward the request to the correct error page if the response has notalready been committed. By default, WebSphere Application Server 8.0 and later commits theresponse upon successful completion of a servlet’s service method. You should disable this behaviorby setting com.ibm.ws.webcontainer.invokeFlushAfterService to false.
If you are using Spring Security and want to access the principal in an error page, you mustconfigure Spring Security’s filter to be invoked on error dispatches. To do so, set the
100
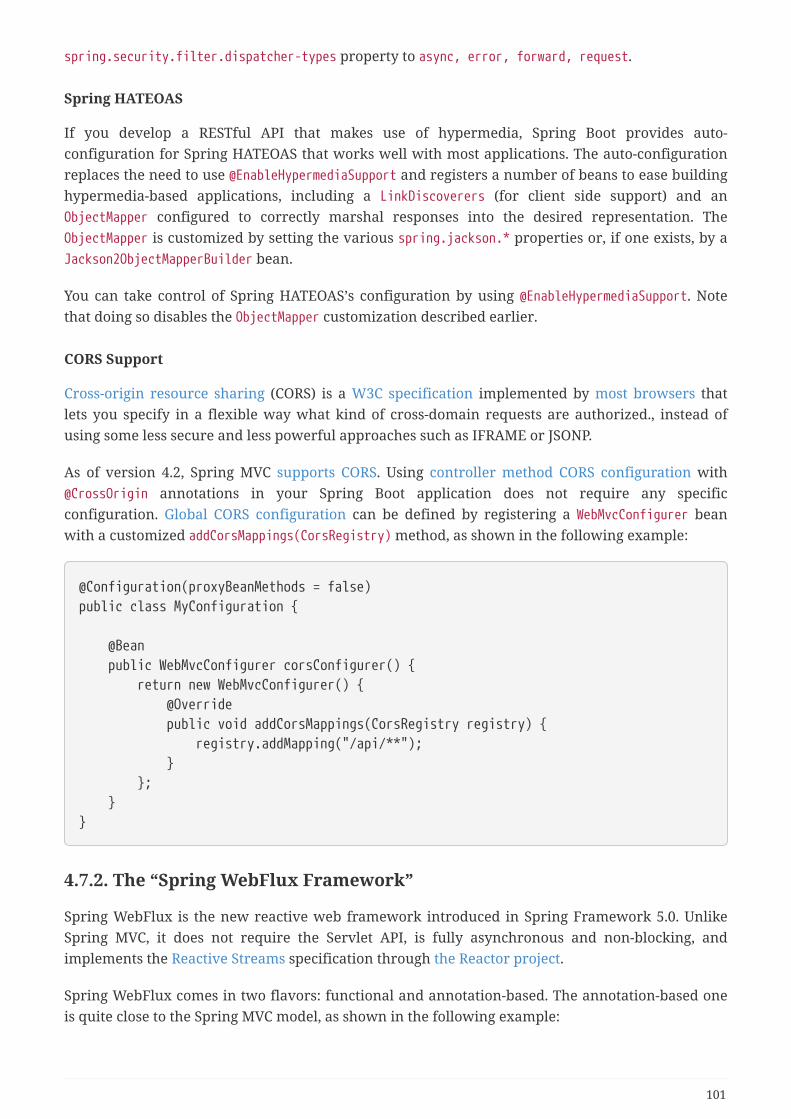
spring.security.filter.dispatcher-types property to async, error, forward, request.
Spring HATEOAS
If you develop a RESTful API that makes use of hypermedia, Spring Boot provides auto-configuration for Spring HATEOAS that works well with most applications. The auto-configurationreplaces the need to use @EnableHypermediaSupport and registers a number of beans to ease buildinghypermedia-based applications, including a LinkDiscoverers (for client side support) and anObjectMapper configured to correctly marshal responses into the desired representation. TheObjectMapper is customized by setting the various spring.jackson.* properties or, if one exists, by aJackson2ObjectMapperBuilder bean.
You can take control of Spring HATEOAS’s configuration by using @EnableHypermediaSupport. Notethat doing so disables the ObjectMapper customization described earlier.
CORS Support
Cross-origin resource sharing (CORS) is a W3C specification implemented by most browsers thatlets you specify in a flexible way what kind of cross-domain requests are authorized., instead ofusing some less secure and less powerful approaches such as IFRAME or JSONP.
As of version 4.2, Spring MVC supports CORS. Using controller method CORS configuration with@CrossOrigin annotations in your Spring Boot application does not require any specificconfiguration. Global CORS configuration can be defined by registering a WebMvcConfigurer beanwith a customized addCorsMappings(CorsRegistry) method, as shown in the following example:
@Configuration(proxyBeanMethods = false)public class MyConfiguration {
@Bean public WebMvcConfigurer corsConfigurer() { return new WebMvcConfigurer() { @Override public void addCorsMappings(CorsRegistry registry) { registry.addMapping("/api/**"); } }; }}
4.7.2. The “Spring WebFlux Framework”
Spring WebFlux is the new reactive web framework introduced in Spring Framework 5.0. UnlikeSpring MVC, it does not require the Servlet API, is fully asynchronous and non-blocking, andimplements the Reactive Streams specification through the Reactor project.
Spring WebFlux comes in two flavors: functional and annotation-based. The annotation-based oneis quite close to the Spring MVC model, as shown in the following example:
101

@RestController@RequestMapping("/users")public class MyRestController {
@GetMapping("/{user}") public Mono<User> getUser(@PathVariable Long user) { // ... }
@GetMapping("/{user}/customers") public Flux<Customer> getUserCustomers(@PathVariable Long user) { // ... }
@DeleteMapping("/{user}") public Mono<User> deleteUser(@PathVariable Long user) { // ... }
}
“WebFlux.fn”, the functional variant, separates the routing configuration from the actual handlingof the requests, as shown in the following example:
102

@Configuration(proxyBeanMethods = false)public class RoutingConfiguration {
@Bean public RouterFunction<ServerResponse> monoRouterFunction(UserHandler userHandler){ return route(GET("/{user}").and(accept(APPLICATION_JSON)),userHandler::getUser) .andRoute(GET("/{user}/customers").and(accept(APPLICATION_JSON)),userHandler::getUserCustomers) .andRoute(DELETE("/{user}").and(accept(APPLICATION_JSON)),userHandler::deleteUser); }
}
@Componentpublic class UserHandler {
public Mono<ServerResponse> getUser(ServerRequest request) { // ... }
public Mono<ServerResponse> getUserCustomers(ServerRequest request) { // ... }
public Mono<ServerResponse> deleteUser(ServerRequest request) { // ... }}
WebFlux is part of the Spring Framework and detailed information is available in its referencedocumentation.
You can define as many RouterFunction beans as you like to modularize thedefinition of the router. Beans can be ordered if you need to apply a precedence.
To get started, add the spring-boot-starter-webflux module to your application.
Adding both spring-boot-starter-web and spring-boot-starter-webflux modules inyour application results in Spring Boot auto-configuring Spring MVC, not WebFlux.This behavior has been chosen because many Spring developers add spring-boot-starter-webflux to their Spring MVC application to use the reactive WebClient. Youcan still enforce your choice by setting the chosen application type toSpringApplication.setWebApplicationType(WebApplicationType.REACTIVE).
103
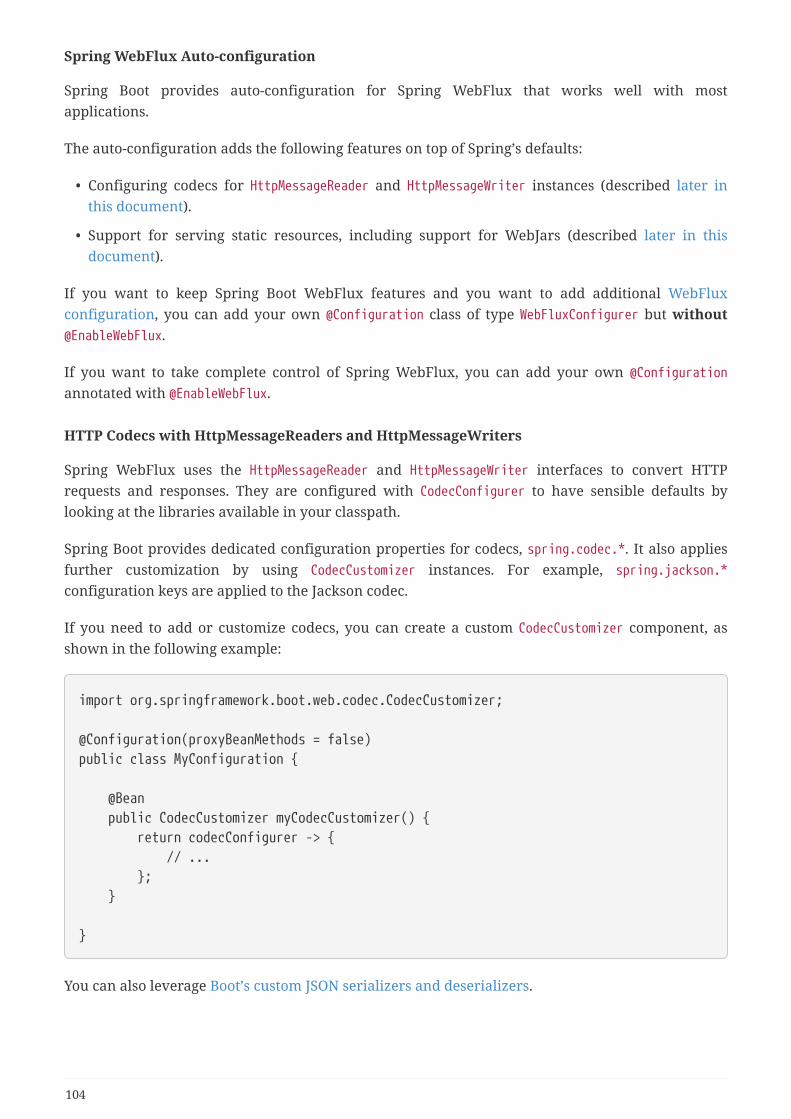
Spring WebFlux Auto-configuration
Spring Boot provides auto-configuration for Spring WebFlux that works well with mostapplications.
The auto-configuration adds the following features on top of Spring’s defaults:
• Configuring codecs for HttpMessageReader and HttpMessageWriter instances (described later inthis document).
• Support for serving static resources, including support for WebJars (described later in thisdocument).
If you want to keep Spring Boot WebFlux features and you want to add additional WebFluxconfiguration, you can add your own @Configuration class of type WebFluxConfigurer but without@EnableWebFlux.
If you want to take complete control of Spring WebFlux, you can add your own @Configurationannotated with @EnableWebFlux.
HTTP Codecs with HttpMessageReaders and HttpMessageWriters
Spring WebFlux uses the HttpMessageReader and HttpMessageWriter interfaces to convert HTTPrequests and responses. They are configured with CodecConfigurer to have sensible defaults bylooking at the libraries available in your classpath.
Spring Boot provides dedicated configuration properties for codecs, spring.codec.*. It also appliesfurther customization by using CodecCustomizer instances. For example, spring.jackson.*
configuration keys are applied to the Jackson codec.
If you need to add or customize codecs, you can create a custom CodecCustomizer component, asshown in the following example:
import org.springframework.boot.web.codec.CodecCustomizer;
@Configuration(proxyBeanMethods = false)public class MyConfiguration {
@Bean public CodecCustomizer myCodecCustomizer() { return codecConfigurer -> { // ... }; }
}
You can also leverage Boot’s custom JSON serializers and deserializers.
104
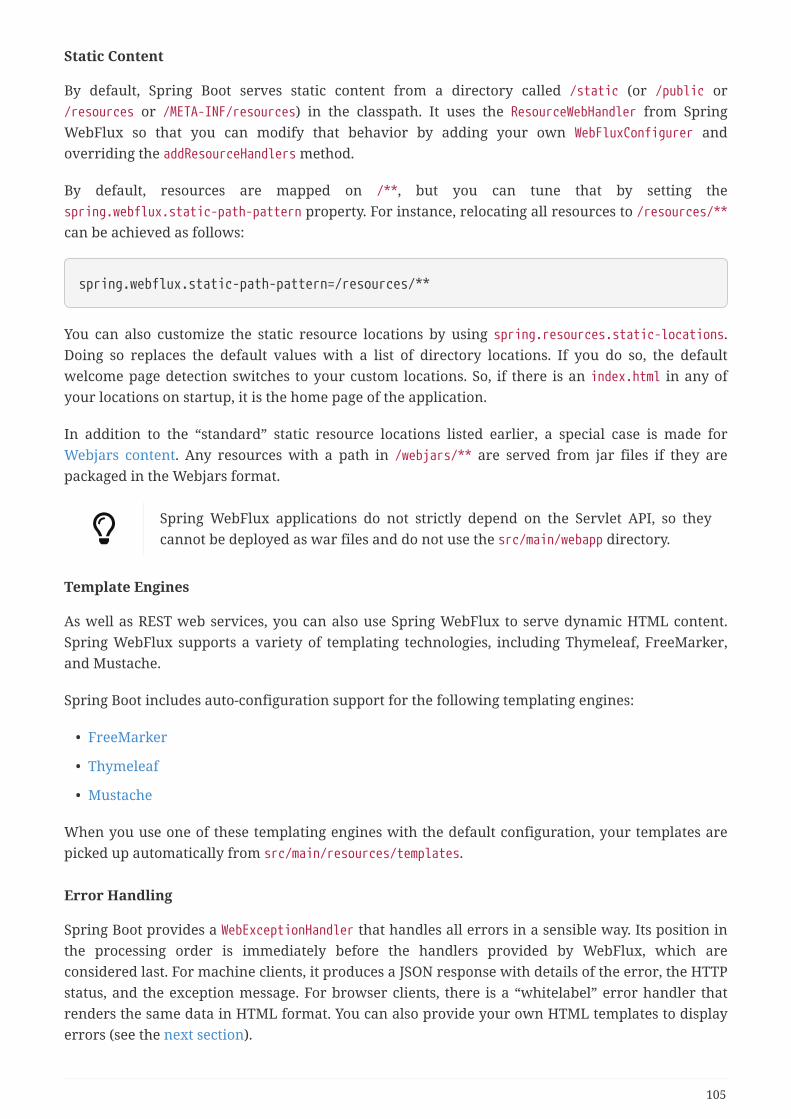
Static Content
By default, Spring Boot serves static content from a directory called /static (or /public or/resources or /META-INF/resources) in the classpath. It uses the ResourceWebHandler from SpringWebFlux so that you can modify that behavior by adding your own WebFluxConfigurer andoverriding the addResourceHandlers method.
By default, resources are mapped on /**, but you can tune that by setting thespring.webflux.static-path-pattern property. For instance, relocating all resources to /resources/**can be achieved as follows:
spring.webflux.static-path-pattern=/resources/**
You can also customize the static resource locations by using spring.resources.static-locations.Doing so replaces the default values with a list of directory locations. If you do so, the defaultwelcome page detection switches to your custom locations. So, if there is an index.html in any ofyour locations on startup, it is the home page of the application.
In addition to the “standard” static resource locations listed earlier, a special case is made forWebjars content. Any resources with a path in /webjars/** are served from jar files if they arepackaged in the Webjars format.
Spring WebFlux applications do not strictly depend on the Servlet API, so theycannot be deployed as war files and do not use the src/main/webapp directory.
Template Engines
As well as REST web services, you can also use Spring WebFlux to serve dynamic HTML content.Spring WebFlux supports a variety of templating technologies, including Thymeleaf, FreeMarker,and Mustache.
Spring Boot includes auto-configuration support for the following templating engines:
• FreeMarker
• Thymeleaf
• Mustache
When you use one of these templating engines with the default configuration, your templates arepicked up automatically from src/main/resources/templates.
Error Handling
Spring Boot provides a WebExceptionHandler that handles all errors in a sensible way. Its position inthe processing order is immediately before the handlers provided by WebFlux, which areconsidered last. For machine clients, it produces a JSON response with details of the error, the HTTPstatus, and the exception message. For browser clients, there is a “whitelabel” error handler thatrenders the same data in HTML format. You can also provide your own HTML templates to displayerrors (see the next section).
105

The first step to customizing this feature often involves using the existing mechanism but replacingor augmenting the error contents. For that, you can add a bean of type ErrorAttributes.
To change the error handling behavior, you can implement ErrorWebExceptionHandler and register abean definition of that type. Because a WebExceptionHandler is quite low-level, Spring Boot alsoprovides a convenient AbstractErrorWebExceptionHandler to let you handle errors in a WebFluxfunctional way, as shown in the following example:
public class CustomErrorWebExceptionHandler extends AbstractErrorWebExceptionHandler {
// Define constructor here
@Override protected RouterFunction<ServerResponse> getRoutingFunction(ErrorAttributeserrorAttributes) {
return RouterFunctions .route(aPredicate, aHandler) .andRoute(anotherPredicate, anotherHandler); }
}
For a more complete picture, you can also subclass DefaultErrorWebExceptionHandler directly andoverride specific methods.
Custom Error Pages
If you want to display a custom HTML error page for a given status code, you can add a file to an/error folder. Error pages can either be static HTML (that is, added under any of the static resourcefolders) or built with templates. The name of the file should be the exact status code or a seriesmask.
For example, to map 404 to a static HTML file, your folder structure would be as follows:
src/ +- main/ +- java/ | + <source code> +- resources/ +- public/ +- error/ | +- 404.html +- <other public assets>
To map all 5xx errors by using a Mustache template, your folder structure would be as follows:
106
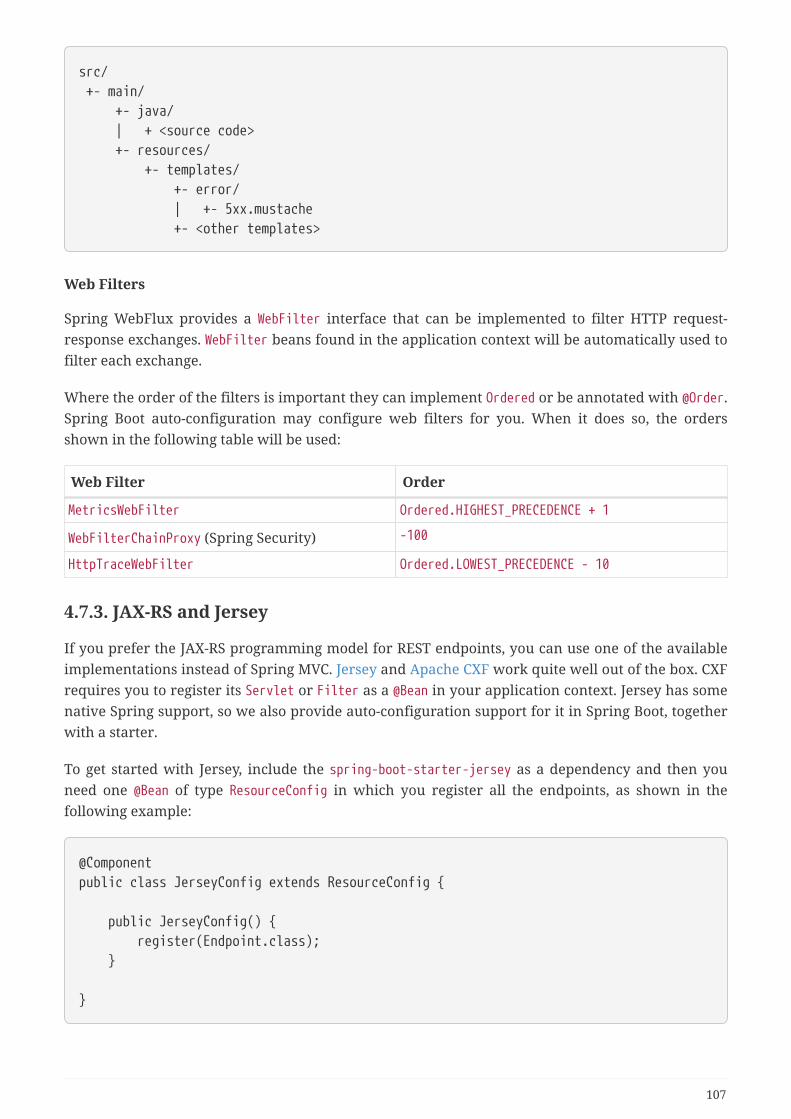
src/ +- main/ +- java/ | + <source code> +- resources/ +- templates/ +- error/ | +- 5xx.mustache +- <other templates>
Web Filters
Spring WebFlux provides a WebFilter interface that can be implemented to filter HTTP request-response exchanges. WebFilter beans found in the application context will be automatically used tofilter each exchange.
Where the order of the filters is important they can implement Ordered or be annotated with @Order.Spring Boot auto-configuration may configure web filters for you. When it does so, the ordersshown in the following table will be used:
Web Filter Order
MetricsWebFilter Ordered.HIGHEST_PRECEDENCE + 1
WebFilterChainProxy (Spring Security) -100
HttpTraceWebFilter Ordered.LOWEST_PRECEDENCE - 10
4.7.3. JAX-RS and Jersey
If you prefer the JAX-RS programming model for REST endpoints, you can use one of the availableimplementations instead of Spring MVC. Jersey and Apache CXF work quite well out of the box. CXFrequires you to register its Servlet or Filter as a @Bean in your application context. Jersey has somenative Spring support, so we also provide auto-configuration support for it in Spring Boot, togetherwith a starter.
To get started with Jersey, include the spring-boot-starter-jersey as a dependency and then youneed one @Bean of type ResourceConfig in which you register all the endpoints, as shown in thefollowing example:
@Componentpublic class JerseyConfig extends ResourceConfig {
public JerseyConfig() { register(Endpoint.class); }
}
107

Jersey’s support for scanning executable archives is rather limited. For example, itcannot scan for endpoints in a package found in a fully executable jar file or inWEB-INF/classes when running an executable war file. To avoid this limitation, thepackages method should not be used, and endpoints should be registeredindividually by using the register method, as shown in the preceding example.
For more advanced customizations, you can also register an arbitrary number of beans thatimplement ResourceConfigCustomizer.
All the registered endpoints should be @Components with HTTP resource annotations (@GET andothers), as shown in the following example:
@Component@Path("/hello")public class Endpoint {
@GET public String message() { return "Hello"; }
}
Since the Endpoint is a Spring @Component, its lifecycle is managed by Spring and you can use the@Autowired annotation to inject dependencies and use the @Value annotation to inject externalconfiguration. By default, the Jersey servlet is registered and mapped to /*. You can change themapping by adding @ApplicationPath to your ResourceConfig.
By default, Jersey is set up as a Servlet in a @Bean of type ServletRegistrationBean namedjerseyServletRegistration. By default, the servlet is initialized lazily, but you can customize thatbehavior by setting spring.jersey.servlet.load-on-startup. You can disable or override that beanby creating one of your own with the same name. You can also use a filter instead of a servlet bysetting spring.jersey.type=filter (in which case, the @Bean to replace or override isjerseyFilterRegistration). The filter has an @Order, which you can set withspring.jersey.filter.order. Both the servlet and the filter registrations can be given initparameters by using spring.jersey.init.* to specify a map of properties.
4.7.4. Embedded Servlet Container Support
Spring Boot includes support for embedded Tomcat, Jetty, and Undertow servers. Most developersuse the appropriate “Starter” to obtain a fully configured instance. By default, the embedded serverlistens for HTTP requests on port 8080.
Servlets, Filters, and listeners
When using an embedded servlet container, you can register servlets, filters, and all the listeners(such as HttpSessionListener) from the Servlet spec, either by using Spring beans or by scanning forServlet components.
108
Registering Servlets, Filters, and Listeners as Spring Beans
Any Servlet, Filter, or servlet *Listener instance that is a Spring bean is registered with theembedded container. This can be particularly convenient if you want to refer to a value from yourapplication.properties during configuration.
By default, if the context contains only a single Servlet, it is mapped to /. In the case of multipleservlet beans, the bean name is used as a path prefix. Filters map to /*.
If convention-based mapping is not flexible enough, you can use the ServletRegistrationBean,FilterRegistrationBean, and ServletListenerRegistrationBean classes for complete control.
It is usually safe to leave Filter beans unordered. If a specific order is required, you should annotatethe Filter with @Order or make it implement Ordered. You cannot configure the order of a Filter byannotating its bean method with @Order. If you cannot change the Filter class to add @Order orimplement Ordered, you must define a FilterRegistrationBean for the Filter and set the registrationbean’s order using the setOrder(int) method. Avoid configuring a Filter that reads the request bodyat Ordered.HIGHEST_PRECEDENCE, since it might go against the character encoding configuration ofyour application. If a Servlet filter wraps the request, it should be configured with an order that isless than or equal to OrderedFilter.REQUEST_WRAPPER_FILTER_MAX_ORDER.
To see the order of every Filter in your application, enable debug level logging forthe web logging group (logging.level.web=debug). Details of the registered filters,including their order and URL patterns, will then be logged at startup.
Take care when registering Filter beans since they are initialized very early in theapplication lifectyle. If you need to register a Filter that interacts with otherbeans, consider using a DelegatingFilterProxyRegistrationBean instead.
Servlet Context Initialization
Embedded servlet containers do not directly execute the Servlet 3.0+javax.servlet.ServletContainerInitializer interface or Spring’sorg.springframework.web.WebApplicationInitializer interface. This is an intentional design decisionintended to reduce the risk that third party libraries designed to run inside a war may break SpringBoot applications.
If you need to perform servlet context initialization in a Spring Boot application, you shouldregister a bean that implements theorg.springframework.boot.web.servlet.ServletContextInitializer interface. The single onStartup
method provides access to the ServletContext and, if necessary, can easily be used as an adapter toan existing WebApplicationInitializer.
Scanning for Servlets, Filters, and listeners
When using an embedded container, automatic registration of classes annotated with @WebServlet,@WebFilter, and @WebListener can be enabled by using @ServletComponentScan.
109
@ServletComponentScan has no effect in a standalone container, where thecontainer’s built-in discovery mechanisms are used instead.
The ServletWebServerApplicationContext
Under the hood, Spring Boot uses a different type of ApplicationContext for embedded servletcontainer support. The ServletWebServerApplicationContext is a special type ofWebApplicationContext that bootstraps itself by searching for a single ServletWebServerFactory bean.Usually a TomcatServletWebServerFactory, JettyServletWebServerFactory, orUndertowServletWebServerFactory has been auto-configured.
You usually do not need to be aware of these implementation classes. Mostapplications are auto-configured, and the appropriate ApplicationContext andServletWebServerFactory are created on your behalf.
Customizing Embedded Servlet Containers
Common servlet container settings can be configured by using Spring Environment properties.Usually, you would define the properties in your application.properties file.
Common server settings include:
• Network settings: Listen port for incoming HTTP requests (server.port), interface address tobind to server.address, and so on.
• Session settings: Whether the session is persistent (server.servlet.session.persistent), sessiontimeout (server.servlet.session.timeout), location of session data(server.servlet.session.store-dir), and session-cookie configuration(server.servlet.session.cookie.*).
• Error management: Location of the error page (server.error.path) and so on.
• SSL
• HTTP compression
Spring Boot tries as much as possible to expose common settings, but this is not always possible. Forthose cases, dedicated namespaces offer server-specific customizations (see server.tomcat andserver.undertow). For instance, access logs can be configured with specific features of the embeddedservlet container.
See the ServerProperties class for a complete list.
Programmatic Customization
If you need to programmatically configure your embedded servlet container, you can register aSpring bean that implements the WebServerFactoryCustomizer interface. WebServerFactoryCustomizerprovides access to the ConfigurableServletWebServerFactory, which includes numerouscustomization setter methods. The following example shows programmatically setting the port:
110
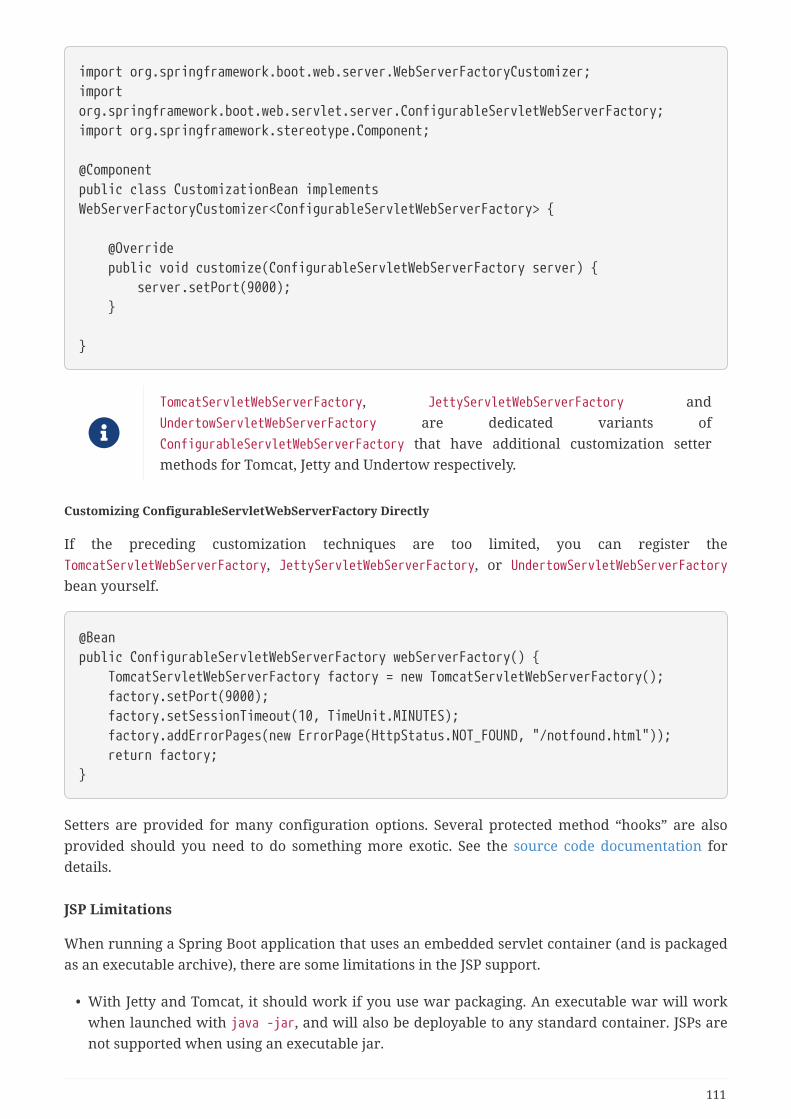
import org.springframework.boot.web.server.WebServerFactoryCustomizer;importorg.springframework.boot.web.servlet.server.ConfigurableServletWebServerFactory;import org.springframework.stereotype.Component;
@Componentpublic class CustomizationBean implementsWebServerFactoryCustomizer<ConfigurableServletWebServerFactory> {
@Override public void customize(ConfigurableServletWebServerFactory server) { server.setPort(9000); }
}
TomcatServletWebServerFactory, JettyServletWebServerFactory andUndertowServletWebServerFactory are dedicated variants ofConfigurableServletWebServerFactory that have additional customization settermethods for Tomcat, Jetty and Undertow respectively.
Customizing ConfigurableServletWebServerFactory Directly
If the preceding customization techniques are too limited, you can register theTomcatServletWebServerFactory, JettyServletWebServerFactory, or UndertowServletWebServerFactorybean yourself.
@Beanpublic ConfigurableServletWebServerFactory webServerFactory() { TomcatServletWebServerFactory factory = new TomcatServletWebServerFactory(); factory.setPort(9000); factory.setSessionTimeout(10, TimeUnit.MINUTES); factory.addErrorPages(new ErrorPage(HttpStatus.NOT_FOUND, "/notfound.html")); return factory;}
Setters are provided for many configuration options. Several protected method “hooks” are alsoprovided should you need to do something more exotic. See the source code documentation fordetails.
JSP Limitations
When running a Spring Boot application that uses an embedded servlet container (and is packagedas an executable archive), there are some limitations in the JSP support.
• With Jetty and Tomcat, it should work if you use war packaging. An executable war will workwhen launched with java -jar, and will also be deployable to any standard container. JSPs arenot supported when using an executable jar.
111

• Undertow does not support JSPs.
• Creating a custom error.jsp page does not override the default view for error handling. Customerror pages should be used instead.
4.7.5. Embedded Reactive Server Support
Spring Boot includes support for the following embedded reactive web servers: Reactor Netty,Tomcat, Jetty, and Undertow. Most developers use the appropriate “Starter” to obtain a fullyconfigured instance. By default, the embedded server listens for HTTP requests on port 8080.
4.7.6. Reactive Server Resources Configuration
When auto-configuring a Reactor Netty or Jetty server, Spring Boot will create specific beans thatwill provide HTTP resources to the server instance: ReactorResourceFactory or JettyResourceFactory.
By default, those resources will be also shared with the Reactor Netty and Jetty clients for optimalperformances, given:
• the same technology is used for server and client
• the client instance is built using the WebClient.Builder bean auto-configured by Spring Boot
Developers can override the resource configuration for Jetty and Reactor Netty by providing acustom ReactorResourceFactory or JettyResourceFactory bean - this will be applied to both clientsand servers.
You can learn more about the resource configuration on the client side in the WebClient Runtimesection.
4.8. RSocketRSocket is a binary protocol for use on byte stream transports. It enables symmetric interactionmodels via async message passing over a single connection.
The spring-messaging module of the Spring Framework provides support for RSocket requestersand responders, both on the client and on the server side. See the RSocket section of the SpringFramework reference for more details, including an overview of the RSocket protocol.
4.8.1. RSocket Strategies Auto-configuration
Spring Boot auto-configures an RSocketStrategies bean that provides all the required infrastructurefor encoding and decoding RSocket payloads. By default, the auto-configuration will try to configurethe following (in order):
1. CBOR codecs with Jackson
2. JSON codecs with Jackson
The spring-boot-starter-rsocket starter provides both dependencies. Check out the Jackson supportsection to know more about customization possibilities.
112

Developers can customize the RSocketStrategies component by creating beans that implement theRSocketStrategiesCustomizer interface. Note that their @Order is important, as it determines theorder of codecs.
4.8.2. RSocket server Auto-configuration
Spring Boot provides RSocket server auto-configuration. The required dependencies are providedby the spring-boot-starter-rsocket.
Spring Boot allows exposing RSocket over WebSocket from a WebFlux server, or standing up anindependent RSocket server. This depends on the type of application and its configuration.
For WebFlux application (i.e. of type WebApplicationType.REACTIVE), the RSocket server will beplugged into the Web Server only if the following properties match:
spring.rsocket.server.mapping-path=/rsocket # a mapping path is definedspring.rsocket.server.transport=websocket # websocket is chosen as a transport#spring.rsocket.server.port= # no port is defined
Plugging RSocket into a web server is only supported with Reactor Netty, asRSocket itself is built with that library.
Alternatively, an RSocket TCP or websocket server is started as an independent, embedded server.Besides the dependency requirements, the only required configuration is to define a port for thatserver:
spring.rsocket.server.port=9898 # the only required configurationspring.rsocket.server.transport=tcp # you're free to configure other properties
4.8.3. Spring Messaging RSocket support
Spring Boot will auto-configure the Spring Messaging infrastructure for RSocket.
This means that Spring Boot will create a RSocketMessageHandler bean that will handle RSocketrequests to your application.
4.8.4. Calling RSocket Services with RSocketRequester
Once the RSocket channel is established between server and client, any party can send or receiverequests to the other.
As a server, you can get injected with an RSocketRequester instance on any handler method of anRSocket @Controller. As a client, you need to configure and establish an RSocket connection first.Spring Boot auto-configures an RSocketRequester.Builder for such cases with the expected codecs.
The RSocketRequester.Builder instance is a prototype bean, meaning each injection point willprovide you with a new instance . This is done on purpose since this builder is stateful and you
113

shouldn’t create requesters with different setups using the same instance.
The following code shows a typical example:
@Servicepublic class MyService {
private final Mono<RSocketRequester> rsocketRequester;
public MyService(RSocketRequester.Builder rsocketRequesterBuilder) { this.rsocketRequester = rsocketRequesterBuilder .connectTcp("example.org", 9898).cache(); }
public Mono<User> someRSocketCall(String name) { return this.rsocketRequester.flatMap(req -> req.route("user").data(name).retrieveMono(User.class)); }
}
4.9. SecurityIf Spring Security is on the classpath, then web applications are secured by default. Spring Bootrelies on Spring Security’s content-negotiation strategy to determine whether to use httpBasic orformLogin. To add method-level security to a web application, you can also add@EnableGlobalMethodSecurity with your desired settings. Additional information can be found in theSpring Security Reference Guide.
The default UserDetailsService has a single user. The user name is user, and the password israndom and is printed at INFO level when the application starts, as shown in the followingexample:
Using generated security password: 78fa095d-3f4c-48b1-ad50-e24c31d5cf35
If you fine-tune your logging configuration, ensure that theorg.springframework.boot.autoconfigure.security category is set to log INFO-levelmessages. Otherwise, the default password is not printed.
You can change the username and password by providing a spring.security.user.name andspring.security.user.password.
The basic features you get by default in a web application are:
• A UserDetailsService (or ReactiveUserDetailsService in case of a WebFlux application) beanwith in-memory store and a single user with a generated password (see SecurityProperties.Userfor the properties of the user).
114

• Form-based login or HTTP Basic security (depending on the Accept header in the request) for theentire application (including actuator endpoints if actuator is on the classpath).
• A DefaultAuthenticationEventPublisher for publishing authentication events.
You can provide a different AuthenticationEventPublisher by adding a bean for it.
4.9.1. MVC Security
The default security configuration is implemented in SecurityAutoConfiguration andUserDetailsServiceAutoConfiguration. SecurityAutoConfiguration importsSpringBootWebSecurityConfiguration for web security and UserDetailsServiceAutoConfiguration
configures authentication, which is also relevant in non-web applications. To switch off the defaultweb application security configuration completely or to combine multiple Spring Securitycomponents such as OAuth 2 Client and Resource Server, add a bean of typeWebSecurityConfigurerAdapter (doing so does not disable the UserDetailsService configuration orActuator’s security).
To also switch off the UserDetailsService configuration, you can add a bean of typeUserDetailsService, AuthenticationProvider, or AuthenticationManager.
Access rules can be overridden by adding a custom WebSecurityConfigurerAdapter. Spring Bootprovides convenience methods that can be used to override access rules for actuator endpoints andstatic resources. EndpointRequest can be used to create a RequestMatcher that is based on themanagement.endpoints.web.base-path property. PathRequest can be used to create a RequestMatcher forresources in commonly used locations.
4.9.2. WebFlux Security
Similar to Spring MVC applications, you can secure your WebFlux applications by adding thespring-boot-starter-security dependency. The default security configuration is implemented inReactiveSecurityAutoConfiguration and UserDetailsServiceAutoConfiguration.ReactiveSecurityAutoConfiguration imports WebFluxSecurityConfiguration for web security andUserDetailsServiceAutoConfiguration configures authentication, which is also relevant in non-webapplications. To switch off the default web application security configuration completely, you canadd a bean of type WebFilterChainProxy (doing so does not disable the UserDetailsService
configuration or Actuator’s security).
To also switch off the UserDetailsService configuration, you can add a bean of typeReactiveUserDetailsService or ReactiveAuthenticationManager.
Access rules and the use of multiple Spring Security components such as OAuth 2 Client andResource Server can be configured by adding a custom SecurityWebFilterChain bean. Spring Bootprovides convenience methods that can be used to override access rules for actuator endpoints andstatic resources. EndpointRequest can be used to create a ServerWebExchangeMatcher that is based onthe management.endpoints.web.base-path property.
PathRequest can be used to create a ServerWebExchangeMatcher for resources in commonly usedlocations.
115
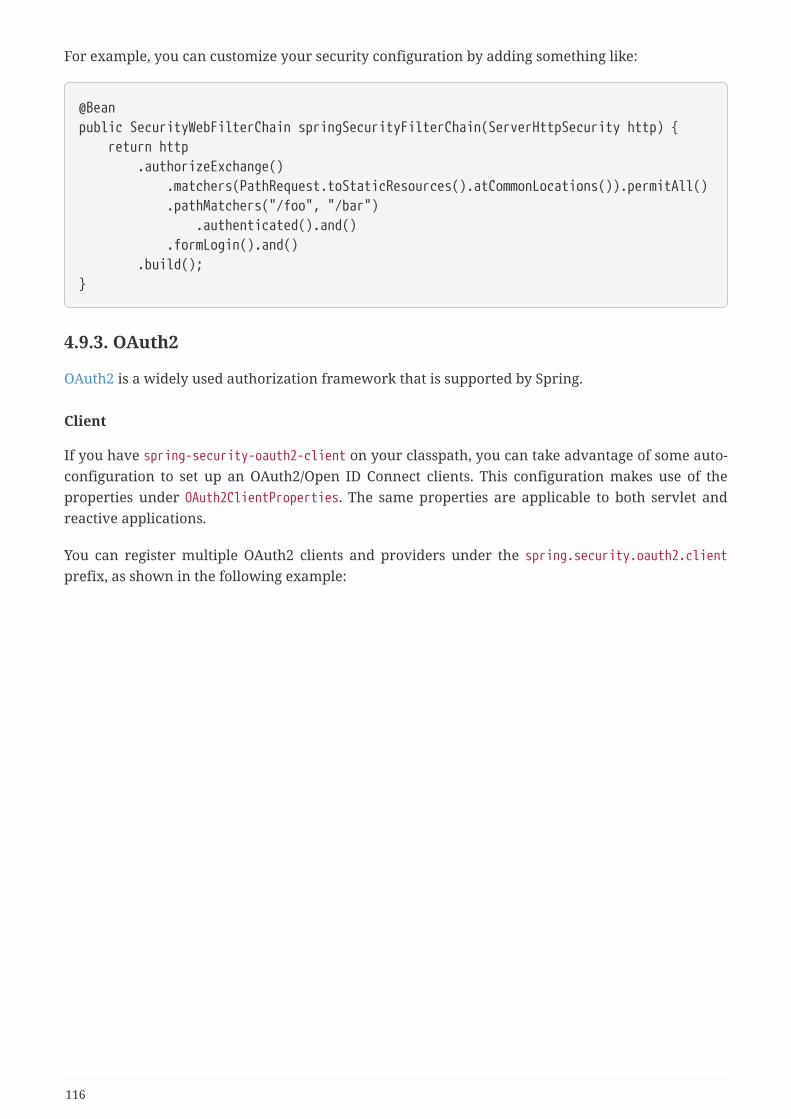
For example, you can customize your security configuration by adding something like:
@Beanpublic SecurityWebFilterChain springSecurityFilterChain(ServerHttpSecurity http) { return http .authorizeExchange() .matchers(PathRequest.toStaticResources().atCommonLocations()).permitAll() .pathMatchers("/foo", "/bar") .authenticated().and() .formLogin().and() .build();}
4.9.3. OAuth2
OAuth2 is a widely used authorization framework that is supported by Spring.
Client
If you have spring-security-oauth2-client on your classpath, you can take advantage of some auto-configuration to set up an OAuth2/Open ID Connect clients. This configuration makes use of theproperties under OAuth2ClientProperties. The same properties are applicable to both servlet andreactive applications.
You can register multiple OAuth2 clients and providers under the spring.security.oauth2.clientprefix, as shown in the following example:
116

spring.security.oauth2.client.registration.my-client-1.client-id=abcdspring.security.oauth2.client.registration.my-client-1.client-secret=passwordspring.security.oauth2.client.registration.my-client-1.client-name=Client for userscopespring.security.oauth2.client.registration.my-client-1.provider=my-oauth-providerspring.security.oauth2.client.registration.my-client-1.scope=userspring.security.oauth2.client.registration.my-client-1.redirect-uri=https://my-redirect-uri.comspring.security.oauth2.client.registration.my-client-1.client-authentication-method=basicspring.security.oauth2.client.registration.my-client-1.authorization-grant-type=authorization_code
spring.security.oauth2.client.registration.my-client-2.client-id=abcdspring.security.oauth2.client.registration.my-client-2.client-secret=passwordspring.security.oauth2.client.registration.my-client-2.client-name=Client for emailscopespring.security.oauth2.client.registration.my-client-2.provider=my-oauth-providerspring.security.oauth2.client.registration.my-client-2.scope=emailspring.security.oauth2.client.registration.my-client-2.redirect-uri=https://my-redirect-uri.comspring.security.oauth2.client.registration.my-client-2.client-authentication-method=basicspring.security.oauth2.client.registration.my-client-2.authorization-grant-type=authorization_code
spring.security.oauth2.client.provider.my-oauth-provider.authorization-uri=https://my-auth-server/oauth/authorizespring.security.oauth2.client.provider.my-oauth-provider.token-uri=https://my-auth-server/oauth/tokenspring.security.oauth2.client.provider.my-oauth-provider.user-info-uri=https://my-auth-server/userinfospring.security.oauth2.client.provider.my-oauth-provider.user-info-authentication-method=headerspring.security.oauth2.client.provider.my-oauth-provider.jwk-set-uri=https://my-auth-server/token_keysspring.security.oauth2.client.provider.my-oauth-provider.user-name-attribute=name
For OpenID Connect providers that support OpenID Connect discovery, the configuration can befurther simplified. The provider needs to be configured with an issuer-uri which is the URI that theit asserts as its Issuer Identifier. For example, if the issuer-uri provided is "https://example.com",then an OpenID Provider Configuration Request will be made to "https://example.com/.well-known/openid-configuration". The result is expected to be an OpenID Provider Configuration
Response. The following example shows how an OpenID Connect Provider can be configured withthe issuer-uri:
spring.security.oauth2.client.provider.oidc-provider.issuer-uri=https://dev-123456.oktapreview.com/oauth2/default/
117
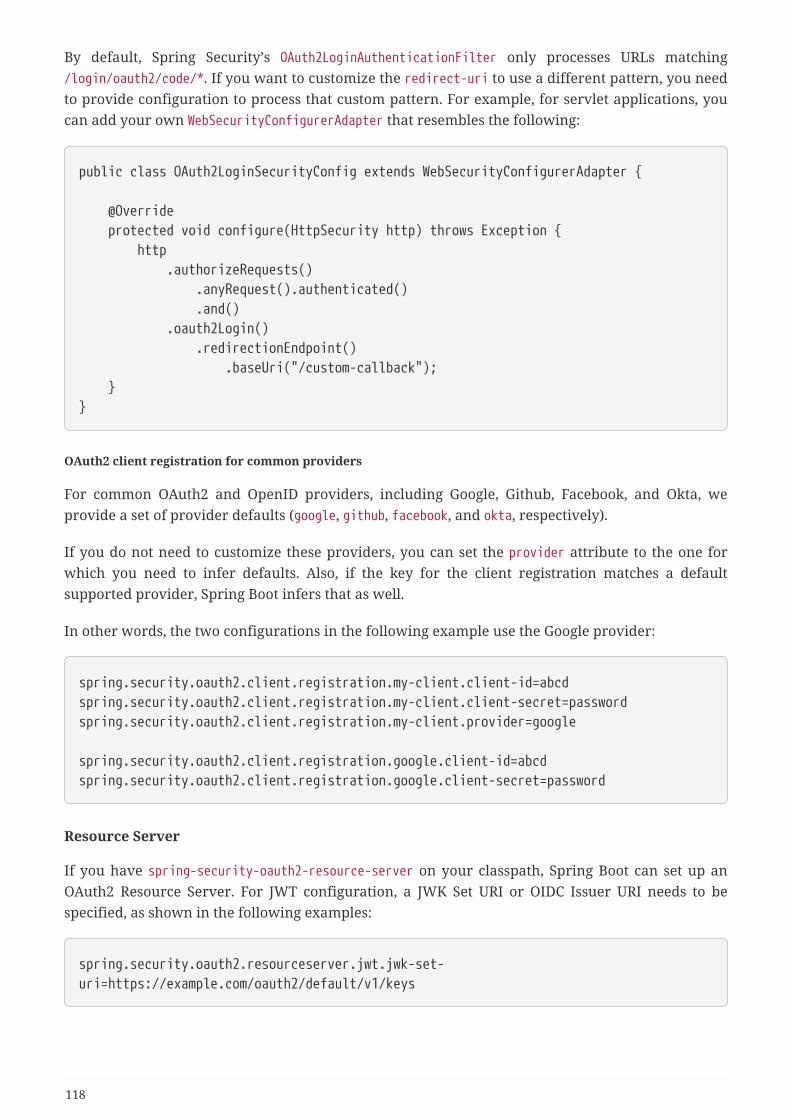
By default, Spring Security’s OAuth2LoginAuthenticationFilter only processes URLs matching/login/oauth2/code/*. If you want to customize the redirect-uri to use a different pattern, you needto provide configuration to process that custom pattern. For example, for servlet applications, youcan add your own WebSecurityConfigurerAdapter that resembles the following:
public class OAuth2LoginSecurityConfig extends WebSecurityConfigurerAdapter {
@Override protected void configure(HttpSecurity http) throws Exception { http .authorizeRequests() .anyRequest().authenticated() .and() .oauth2Login() .redirectionEndpoint() .baseUri("/custom-callback"); }}
OAuth2 client registration for common providers
For common OAuth2 and OpenID providers, including Google, Github, Facebook, and Okta, weprovide a set of provider defaults (google, github, facebook, and okta, respectively).
If you do not need to customize these providers, you can set the provider attribute to the one forwhich you need to infer defaults. Also, if the key for the client registration matches a defaultsupported provider, Spring Boot infers that as well.
In other words, the two configurations in the following example use the Google provider:
spring.security.oauth2.client.registration.my-client.client-id=abcdspring.security.oauth2.client.registration.my-client.client-secret=passwordspring.security.oauth2.client.registration.my-client.provider=google
spring.security.oauth2.client.registration.google.client-id=abcdspring.security.oauth2.client.registration.google.client-secret=password
Resource Server
If you have spring-security-oauth2-resource-server on your classpath, Spring Boot can set up anOAuth2 Resource Server. For JWT configuration, a JWK Set URI or OIDC Issuer URI needs to bespecified, as shown in the following examples:
spring.security.oauth2.resourceserver.jwt.jwk-set-uri=https://example.com/oauth2/default/v1/keys
118

spring.security.oauth2.resourceserver.jwt.issuer-uri=https://dev-123456.oktapreview.com/oauth2/default/
If the authorization server does not support a JWK Set URI, you can configure theresource server with the Public Key used for verifying the signature of the JWT.This can be done using the spring.security.oauth2.resourceserver.jwt.public-key-location property, where the value needs to point to a file containing the publickey in the PEM-encoded x509 format.
The same properties are applicable for both servlet and reactive applications.
Alternatively, you can define your own JwtDecoder bean for servlet applications or aReactiveJwtDecoder for reactive applications.
In cases where opaque tokens are used instead of JWTs, you can configure the following propertiesto validate tokens via introspection:
spring.security.oauth2.resourceserver.opaquetoken.introspection-uri=https://example.com/check-tokenspring.security.oauth2.resourceserver.opaquetoken.client-id=my-client-idspring.security.oauth2.resourceserver.opaquetoken.client-secret=my-client-secret
Again, the same properties are applicable for both servlet and reactive applications.
Alternatively, you can define your own OpaqueTokenIntrospector bean for servlet applications or aReactiveOpaqueTokenIntrospector for reactive applications.
Authorization Server
Currently, Spring Security does not provide support for implementing an OAuth 2.0 AuthorizationServer. However, this functionality is available from the Spring Security OAuth project, which willeventually be superseded by Spring Security completely. Until then, you can use the spring-security-oauth2-autoconfigure module to easily set up an OAuth 2.0 authorization server; see itsdocumentation for instructions.
4.9.4. SAML 2.0
Relying Party
If you have spring-security-saml2-service-provider on your classpath, you can take advantage ofsome auto-configuration to set up a SAML 2.0 Relying Party. This configuration makes use of theproperties under Saml2RelyingPartyProperties.
A relying party registration represents a paired configuration between an Identity Provider, IDP,and a Service Provider, SP. You can register multiple relying parties under thespring.security.saml2.relyingparty prefix, as shown in the following example:
119
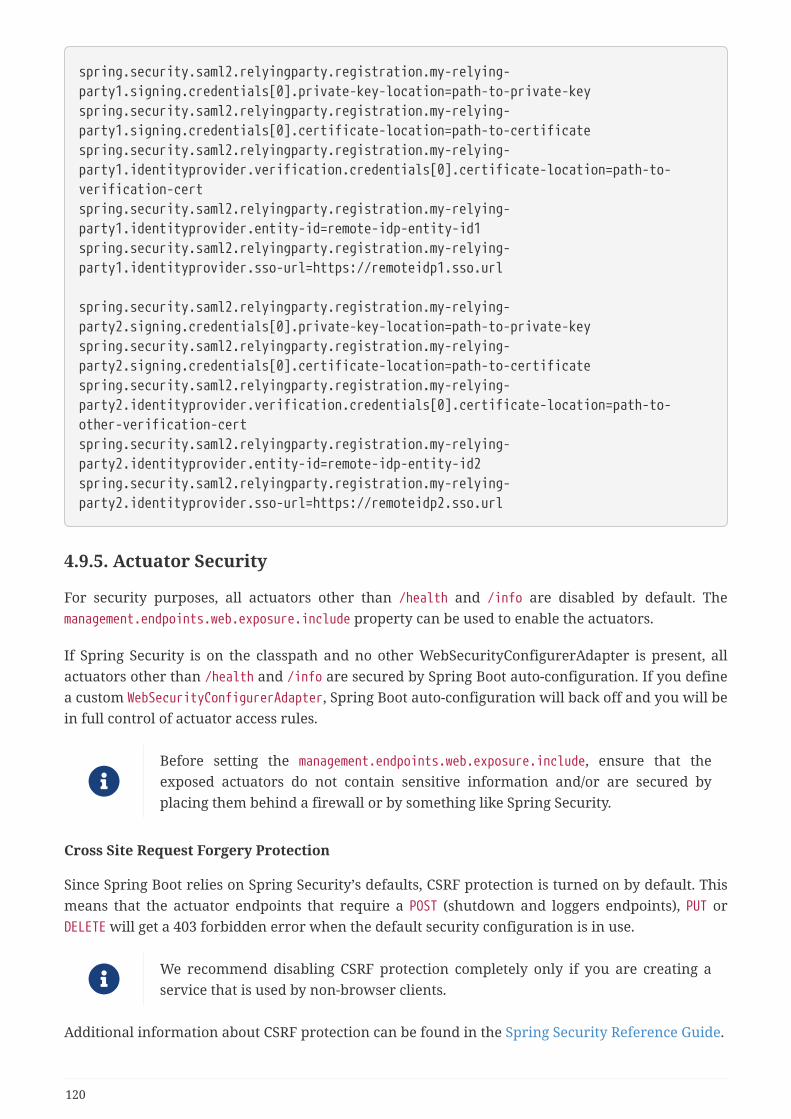
spring.security.saml2.relyingparty.registration.my-relying-party1.signing.credentials[0].private-key-location=path-to-private-keyspring.security.saml2.relyingparty.registration.my-relying-party1.signing.credentials[0].certificate-location=path-to-certificatespring.security.saml2.relyingparty.registration.my-relying-party1.identityprovider.verification.credentials[0].certificate-location=path-to-verification-certspring.security.saml2.relyingparty.registration.my-relying-party1.identityprovider.entity-id=remote-idp-entity-id1spring.security.saml2.relyingparty.registration.my-relying-party1.identityprovider.sso-url=https://remoteidp1.sso.url
spring.security.saml2.relyingparty.registration.my-relying-party2.signing.credentials[0].private-key-location=path-to-private-keyspring.security.saml2.relyingparty.registration.my-relying-party2.signing.credentials[0].certificate-location=path-to-certificatespring.security.saml2.relyingparty.registration.my-relying-party2.identityprovider.verification.credentials[0].certificate-location=path-to-other-verification-certspring.security.saml2.relyingparty.registration.my-relying-party2.identityprovider.entity-id=remote-idp-entity-id2spring.security.saml2.relyingparty.registration.my-relying-party2.identityprovider.sso-url=https://remoteidp2.sso.url
4.9.5. Actuator Security
For security purposes, all actuators other than /health and /info are disabled by default. Themanagement.endpoints.web.exposure.include property can be used to enable the actuators.
If Spring Security is on the classpath and no other WebSecurityConfigurerAdapter is present, allactuators other than /health and /info are secured by Spring Boot auto-configuration. If you definea custom WebSecurityConfigurerAdapter, Spring Boot auto-configuration will back off and you will bein full control of actuator access rules.
Before setting the management.endpoints.web.exposure.include, ensure that theexposed actuators do not contain sensitive information and/or are secured byplacing them behind a firewall or by something like Spring Security.
Cross Site Request Forgery Protection
Since Spring Boot relies on Spring Security’s defaults, CSRF protection is turned on by default. Thismeans that the actuator endpoints that require a POST (shutdown and loggers endpoints), PUT orDELETE will get a 403 forbidden error when the default security configuration is in use.
We recommend disabling CSRF protection completely only if you are creating aservice that is used by non-browser clients.
Additional information about CSRF protection can be found in the Spring Security Reference Guide.
120

4.10. Working with SQL DatabasesThe Spring Framework provides extensive support for working with SQL databases, from directJDBC access using JdbcTemplate to complete “object relational mapping” technologies such asHibernate. Spring Data provides an additional level of functionality: creating Repository
implementations directly from interfaces and using conventions to generate queries from yourmethod names.
4.10.1. Configure a DataSource
Java’s javax.sql.DataSource interface provides a standard method of working with databaseconnections. Traditionally, a 'DataSource' uses a URL along with some credentials to establish adatabase connection.
See the “How-to” section for more advanced examples, typically to take full controlover the configuration of the DataSource.
Embedded Database Support
It is often convenient to develop applications by using an in-memory embedded database.Obviously, in-memory databases do not provide persistent storage. You need to populate yourdatabase when your application starts and be prepared to throw away data when your applicationends.
The “How-to” section includes a section on how to initialize a database.
Spring Boot can auto-configure embedded H2, HSQL, and Derby databases. You need not provideany connection URLs. You need only include a build dependency to the embedded database thatyou want to use.
If you are using this feature in your tests, you may notice that the same database isreused by your whole test suite regardless of the number of application contextsthat you use. If you want to make sure that each context has a separate embeddeddatabase, you should set spring.datasource.generate-unique-name to true.
For example, the typical POM dependencies would be as follows:
<dependency> <groupId>org.springframework.boot</groupId> <artifactId>spring-boot-starter-data-jpa</artifactId></dependency><dependency> <groupId>org.hsqldb</groupId> <artifactId>hsqldb</artifactId> <scope>runtime</scope></dependency>
121
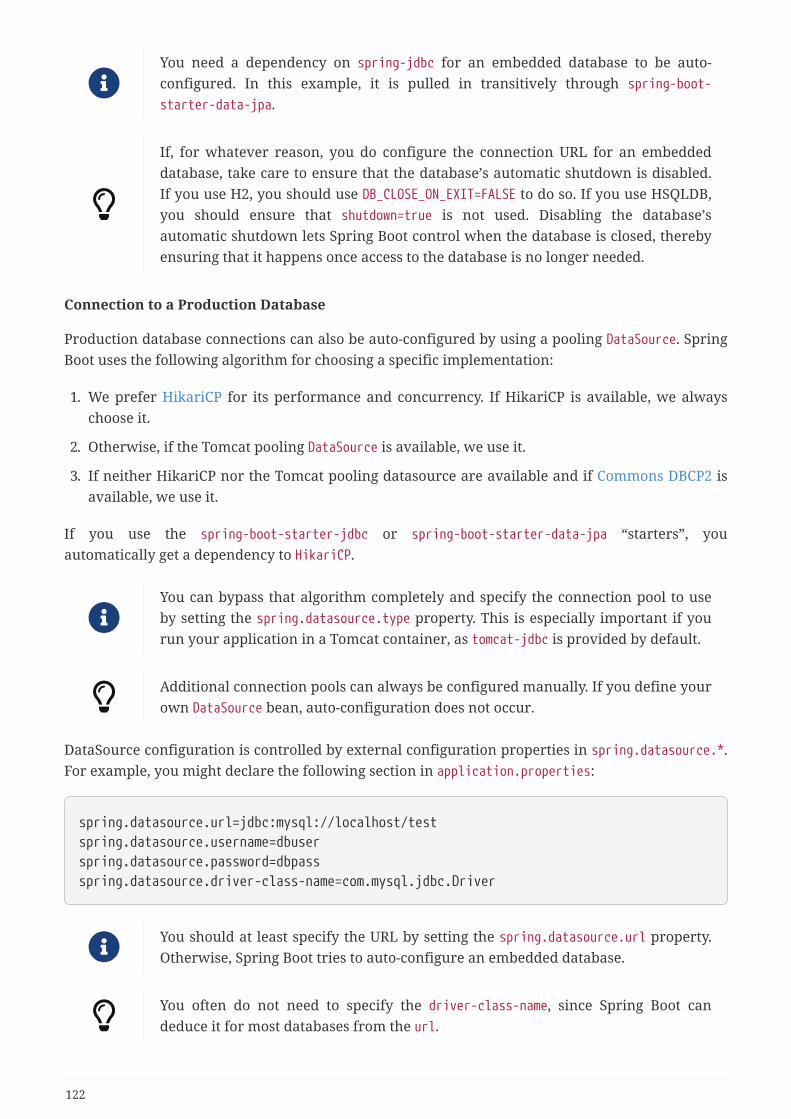
You need a dependency on spring-jdbc for an embedded database to be auto-configured. In this example, it is pulled in transitively through spring-boot-starter-data-jpa.
If, for whatever reason, you do configure the connection URL for an embeddeddatabase, take care to ensure that the database’s automatic shutdown is disabled.If you use H2, you should use DB_CLOSE_ON_EXIT=FALSE to do so. If you use HSQLDB,you should ensure that shutdown=true is not used. Disabling the database’sautomatic shutdown lets Spring Boot control when the database is closed, therebyensuring that it happens once access to the database is no longer needed.
Connection to a Production Database
Production database connections can also be auto-configured by using a pooling DataSource. SpringBoot uses the following algorithm for choosing a specific implementation:
1. We prefer HikariCP for its performance and concurrency. If HikariCP is available, we alwayschoose it.
2. Otherwise, if the Tomcat pooling DataSource is available, we use it.
3. If neither HikariCP nor the Tomcat pooling datasource are available and if Commons DBCP2 isavailable, we use it.
If you use the spring-boot-starter-jdbc or spring-boot-starter-data-jpa “starters”, youautomatically get a dependency to HikariCP.
You can bypass that algorithm completely and specify the connection pool to useby setting the spring.datasource.type property. This is especially important if yourun your application in a Tomcat container, as tomcat-jdbc is provided by default.
Additional connection pools can always be configured manually. If you define yourown DataSource bean, auto-configuration does not occur.
DataSource configuration is controlled by external configuration properties in spring.datasource.*.For example, you might declare the following section in application.properties:
spring.datasource.url=jdbc:mysql://localhost/testspring.datasource.username=dbuserspring.datasource.password=dbpassspring.datasource.driver-class-name=com.mysql.jdbc.Driver
You should at least specify the URL by setting the spring.datasource.url property.Otherwise, Spring Boot tries to auto-configure an embedded database.
You often do not need to specify the driver-class-name, since Spring Boot candeduce it for most databases from the url.
122
For a pooling DataSource to be created, we need to be able to verify that a validDriver class is available, so we check for that before doing anything. In otherwords, if you set spring.datasource.driver-class-name=com.mysql.jdbc.Driver, thenthat class has to be loadable.
See DataSourceProperties for more of the supported options. These are the standard options thatwork regardless of the actual implementation. It is also possible to fine-tune implementation-specific settings by using their respective prefix (spring.datasource.hikari.*,spring.datasource.tomcat.*, and spring.datasource.dbcp2.*). Refer to the documentation of theconnection pool implementation you are using for more details.
For instance, if you use the Tomcat connection pool, you could customize many additional settings,as shown in the following example:
# Number of ms to wait before throwing an exception if no connection is available.spring.datasource.tomcat.max-wait=10000
# Maximum number of active connections that can be allocated from this pool at thesame time.spring.datasource.tomcat.max-active=50
# Validate the connection before borrowing it from the pool.spring.datasource.tomcat.test-on-borrow=true
Connection to a JNDI DataSource
If you deploy your Spring Boot application to an Application Server, you might want to configureand manage your DataSource by using your Application Server’s built-in features and access it byusing JNDI.
The spring.datasource.jndi-name property can be used as an alternative to thespring.datasource.url, spring.datasource.username, and spring.datasource.password properties toaccess the DataSource from a specific JNDI location. For example, the following section inapplication.properties shows how you can access a JBoss AS defined DataSource:
spring.datasource.jndi-name=java:jboss/datasources/customers
4.10.2. Using JdbcTemplate
Spring’s JdbcTemplate and NamedParameterJdbcTemplate classes are auto-configured, and you can@Autowire them directly into your own beans, as shown in the following example:
123
import org.springframework.beans.factory.annotation.Autowired;import org.springframework.jdbc.core.JdbcTemplate;import org.springframework.stereotype.Component;
@Componentpublic class MyBean {
private final JdbcTemplate jdbcTemplate;
@Autowired public MyBean(JdbcTemplate jdbcTemplate) { this.jdbcTemplate = jdbcTemplate; }
// ...
}
You can customize some properties of the template by using the spring.jdbc.template.* properties,as shown in the following example:
spring.jdbc.template.max-rows=500
The NamedParameterJdbcTemplate reuses the same JdbcTemplate instance behind thescenes. If more than one JdbcTemplate is defined and no primary candidate exists,the NamedParameterJdbcTemplate is not auto-configured.
4.10.3. JPA and Spring Data JPA
The Java Persistence API is a standard technology that lets you “map” objects to relationaldatabases. The spring-boot-starter-data-jpa POM provides a quick way to get started. It providesthe following key dependencies:
• Hibernate: One of the most popular JPA implementations.
• Spring Data JPA: Helps you to implement JPA-based repositories.
• Spring ORM: Core ORM support from the Spring Framework.
We do not go into too many details of JPA or Spring Data here. You can follow the“Accessing Data with JPA” guide from spring.io and read the Spring Data JPA andHibernate reference documentation.
Entity Classes
Traditionally, JPA “Entity” classes are specified in a persistence.xml file. With Spring Boot, this file isnot necessary and “Entity Scanning” is used instead. By default, all packages below your mainconfiguration class (the one annotated with @EnableAutoConfiguration or @SpringBootApplication)
124

are searched.
Any classes annotated with @Entity, @Embeddable, or @MappedSuperclass are considered. A typicalentity class resembles the following example:
package com.example.myapp.domain;
import java.io.Serializable;import javax.persistence.*;
@Entitypublic class City implements Serializable {
@Id @GeneratedValue private Long id;
@Column(nullable = false) private String name;
@Column(nullable = false) private String state;
// ... additional members, often include @OneToMany mappings
protected City() { // no-args constructor required by JPA spec // this one is protected since it shouldn't be used directly }
public City(String name, String state) { this.name = name; this.state = state; }
public String getName() { return this.name; }
public String getState() { return this.state; }
// ... etc
}
You can customize entity scanning locations by using the @EntityScan annotation.See the “Separate @Entity Definitions from Spring Configuration” how-to.
125
Spring Data JPA Repositories
Spring Data JPA repositories are interfaces that you can define to access data. JPA queries arecreated automatically from your method names. For example, a CityRepository interface mightdeclare a findAllByState(String state) method to find all the cities in a given state.
For more complex queries, you can annotate your method with Spring Data’s Query annotation.
Spring Data repositories usually extend from the Repository or CrudRepository interfaces. If you useauto-configuration, repositories are searched from the package containing your main configurationclass (the one annotated with @EnableAutoConfiguration or @SpringBootApplication) down.
The following example shows a typical Spring Data repository interface definition:
package com.example.myapp.domain;
import org.springframework.data.domain.*;import org.springframework.data.repository.*;
public interface CityRepository extends Repository<City, Long> {
Page<City> findAll(Pageable pageable);
City findByNameAndStateAllIgnoringCase(String name, String state);
}
Spring Data JPA repositories support three different modes of bootstrapping: default, deferred, andlazy. To enable deferred or lazy bootstrapping, set the spring.data.jpa.repositories.bootstrap-modeproperty to deferred or lazy respectively. When using deferred or lazy bootstrapping, the auto-configured EntityManagerFactoryBuilder will use the context’s AsyncTaskExecutor, if any, as thebootstrap executor. If more than one exists, the one named applicationTaskExecutor will be used.
We have barely scratched the surface of Spring Data JPA. For complete details, seethe Spring Data JPA reference documentation.
Creating and Dropping JPA Databases
By default, JPA databases are automatically created only if you use an embedded database (H2,HSQL, or Derby). You can explicitly configure JPA settings by using spring.jpa.* properties. Forexample, to create and drop tables you can add the following line to your application.properties:
spring.jpa.hibernate.ddl-auto=create-drop
126
Hibernate’s own internal property name for this (if you happen to remember itbetter) is hibernate.hbm2ddl.auto. You can set it, along with other Hibernate nativeproperties, by using spring.jpa.properties.* (the prefix is stripped before addingthem to the entity manager). The following line shows an example of setting JPAproperties for Hibernate:
spring.jpa.properties.hibernate.globally_quoted_identifiers=true
The line in the preceding example passes a value of true for thehibernate.globally_quoted_identifiers property to the Hibernate entity manager.
By default, the DDL execution (or validation) is deferred until the ApplicationContext has started.There is also a spring.jpa.generate-ddl flag, but it is not used if Hibernate auto-configuration isactive, because the ddl-auto settings are more fine-grained.
Open EntityManager in View
If you are running a web application, Spring Boot by default registersOpenEntityManagerInViewInterceptor to apply the “Open EntityManager in View” pattern, to allowfor lazy loading in web views. If you do not want this behavior, you should set spring.jpa.open-in-view to false in your application.properties.
4.10.4. Spring Data JDBC
Spring Data includes repository support for JDBC and will automatically generate SQL for themethods on CrudRepository. For more advanced queries, a @Query annotation is provided.
Spring Boot will auto-configure Spring Data’s JDBC repositories when the necessary dependenciesare on the classpath. They can be added to your project with a single dependency on spring-boot-starter-data-jdbc. If necessary, you can take control of Spring Data JDBC’s configuration by addingthe @EnableJdbcRepositories annotation or a JdbcConfiguration subclass to your application.
For complete details of Spring Data JDBC, please refer to the referencedocumentation.
4.10.5. Using H2’s Web Console
The H2 database provides a browser-based console that Spring Boot can auto-configure for you. Theconsole is auto-configured when the following conditions are met:
• You are developing a servlet-based web application.
• com.h2database:h2 is on the classpath.
• You are using Spring Boot’s developer tools.
127

If you are not using Spring Boot’s developer tools but would still like to make useof H2’s console, you can configure the spring.h2.console.enabled property with avalue of true.
The H2 console is only intended for use during development, so you should takecare to ensure that spring.h2.console.enabled is not set to true in production.
Changing the H2 Console’s Path
By default, the console is available at /h2-console. You can customize the console’s path by using thespring.h2.console.path property.
4.10.6. Using jOOQ
jOOQ Object Oriented Querying (jOOQ) is a popular product from Data Geekery which generatesJava code from your database and lets you build type-safe SQL queries through its fluent API. Boththe commercial and open source editions can be used with Spring Boot.
Code Generation
In order to use jOOQ type-safe queries, you need to generate Java classes from your databaseschema. You can follow the instructions in the jOOQ user manual. If you use the jooq-codegen-mavenplugin and you also use the spring-boot-starter-parent “parent POM”, you can safely omit theplugin’s <version> tag. You can also use Spring Boot-defined version variables (such as h2.version)to declare the plugin’s database dependency. The following listing shows an example:
128

<plugin> <groupId>org.jooq</groupId> <artifactId>jooq-codegen-maven</artifactId> <executions> ... </executions> <dependencies> <dependency> <groupId>com.h2database</groupId> <artifactId>h2</artifactId> <version>${h2.version}</version> </dependency> </dependencies> <configuration> <jdbc> <driver>org.h2.Driver</driver> <url>jdbc:h2:~/yourdatabase</url> </jdbc> <generator> ... </generator> </configuration></plugin>
Using DSLContext
The fluent API offered by jOOQ is initiated through the org.jooq.DSLContext interface. Spring Bootauto-configures a DSLContext as a Spring Bean and connects it to your application DataSource. To usethe DSLContext, you can @Autowire it, as shown in the following example:
@Componentpublic class JooqExample implements CommandLineRunner {
private final DSLContext create;
@Autowired public JooqExample(DSLContext dslContext) { this.create = dslContext; }
}
The jOOQ manual tends to use a variable named create to hold the DSLContext.
You can then use the DSLContext to construct your queries, as shown in the following example:
129
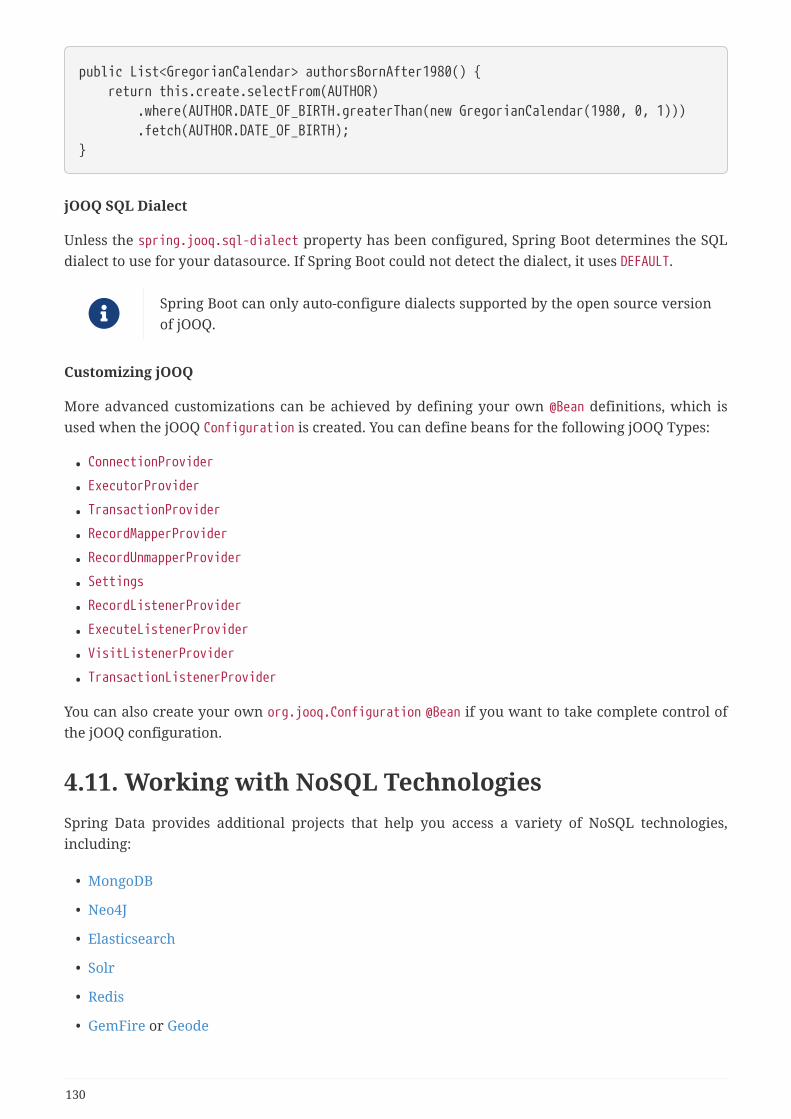
public List<GregorianCalendar> authorsBornAfter1980() { return this.create.selectFrom(AUTHOR) .where(AUTHOR.DATE_OF_BIRTH.greaterThan(new GregorianCalendar(1980, 0, 1))) .fetch(AUTHOR.DATE_OF_BIRTH);}
jOOQ SQL Dialect
Unless the spring.jooq.sql-dialect property has been configured, Spring Boot determines the SQLdialect to use for your datasource. If Spring Boot could not detect the dialect, it uses DEFAULT.
Spring Boot can only auto-configure dialects supported by the open source versionof jOOQ.
Customizing jOOQ
More advanced customizations can be achieved by defining your own @Bean definitions, which isused when the jOOQ Configuration is created. You can define beans for the following jOOQ Types:
• ConnectionProvider
• ExecutorProvider
• TransactionProvider
• RecordMapperProvider
• RecordUnmapperProvider
• Settings
• RecordListenerProvider
• ExecuteListenerProvider
• VisitListenerProvider
• TransactionListenerProvider
You can also create your own org.jooq.Configuration @Bean if you want to take complete control ofthe jOOQ configuration.
4.11. Working with NoSQL TechnologiesSpring Data provides additional projects that help you access a variety of NoSQL technologies,including:
• MongoDB
• Neo4J
• Elasticsearch
• Solr
• Redis
• GemFire or Geode
130

• Cassandra
• Couchbase
• LDAP
Spring Boot provides auto-configuration for Redis, MongoDB, Neo4j, Elasticsearch, Solr Cassandra,Couchbase, and LDAP. You can make use of the other projects, but you must configure themyourself. Refer to the appropriate reference documentation at spring.io/projects/spring-data.
4.11.1. Redis
Redis is a cache, message broker, and richly-featured key-value store. Spring Boot offers basic auto-configuration for the Lettuce and Jedis client libraries and the abstractions on top of them providedby Spring Data Redis.
There is a spring-boot-starter-data-redis “Starter” for collecting the dependencies in a convenientway. By default, it uses Lettuce. That starter handles both traditional and reactive applications.
we also provide a spring-boot-starter-data-redis-reactive “Starter” forconsistency with the other stores with reactive support.
Connecting to Redis
You can inject an auto-configured RedisConnectionFactory, StringRedisTemplate, or vanillaRedisTemplate instance as you would any other Spring Bean. By default, the instance tries to connectto a Redis server at localhost:6379. The following listing shows an example of such a bean:
@Componentpublic class MyBean {
private StringRedisTemplate template;
@Autowired public MyBean(StringRedisTemplate template) { this.template = template; }
// ...
}
You can also register an arbitrary number of beans that implementLettuceClientConfigurationBuilderCustomizer for more advanced customizations.If you use Jedis, JedisClientConfigurationBuilderCustomizer is also available.
If you add your own @Bean of any of the auto-configured types, it replaces the default (except in thecase of RedisTemplate, when the exclusion is based on the bean name, redisTemplate, not its type). Bydefault, if commons-pool2 is on the classpath, you get a pooled connection factory.
131

4.11.2. MongoDB
MongoDB is an open-source NoSQL document database that uses a JSON-like schema instead oftraditional table-based relational data. Spring Boot offers several conveniences for working withMongoDB, including the spring-boot-starter-data-mongodb and spring-boot-starter-data-mongodb-reactive “Starters”.
Connecting to a MongoDB Database
To access Mongo databases, you can inject an auto-configuredorg.springframework.data.mongodb.MongoDbFactory. By default, the instance tries to connect to aMongoDB server at mongodb://localhost/test. The following example shows how to connect to aMongoDB database:
import org.springframework.data.mongodb.MongoDbFactory;import com.mongodb.DB;
@Componentpublic class MyBean {
private final MongoDbFactory mongo;
@Autowired public MyBean(MongoDbFactory mongo) { this.mongo = mongo; }
// ...
public void example() { DB db = mongo.getDb(); // ... }
}
You can set the spring.data.mongodb.uri property to change the URL and configure additionalsettings such as the replica set, as shown in the following example:
spring.data.mongodb.uri=mongodb://user:[email protected]:12345,mongo2.example.com:23456/test
Alternatively, as long as you use Mongo 2.x, you can specify a host/port. For example, you mightdeclare the following settings in your application.properties:
spring.data.mongodb.host=mongoserverspring.data.mongodb.port=27017
132
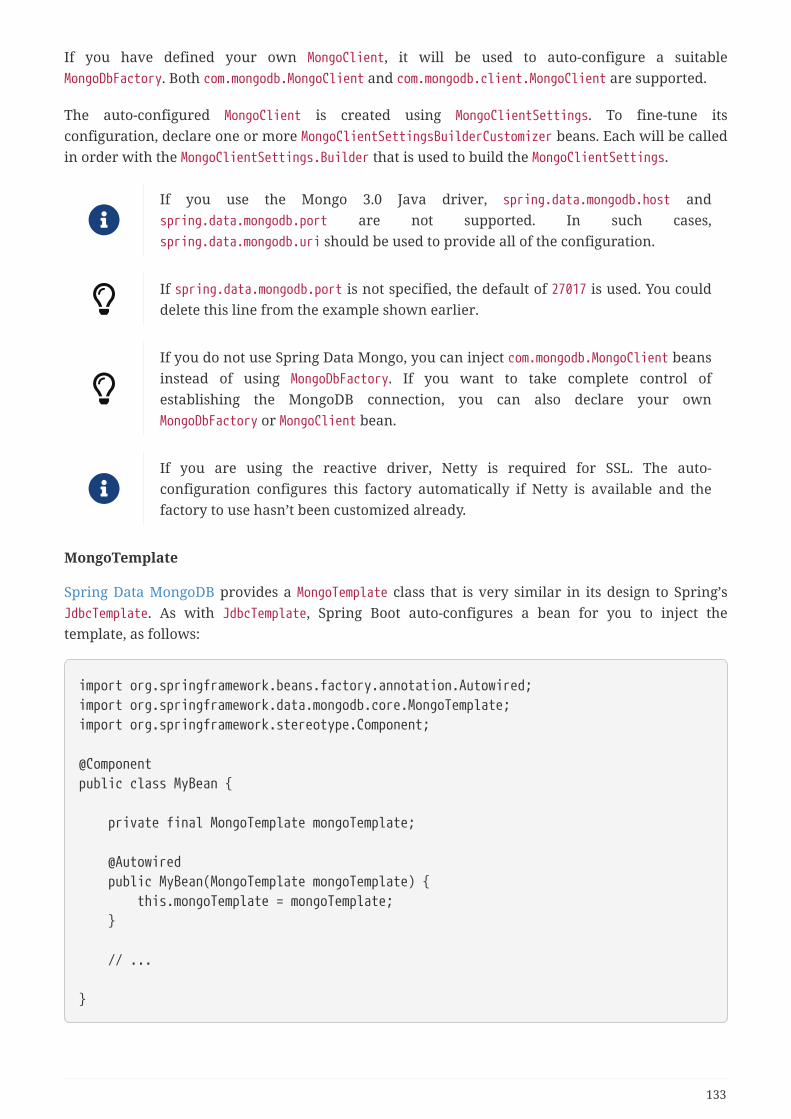
If you have defined your own MongoClient, it will be used to auto-configure a suitableMongoDbFactory. Both com.mongodb.MongoClient and com.mongodb.client.MongoClient are supported.
The auto-configured MongoClient is created using MongoClientSettings. To fine-tune itsconfiguration, declare one or more MongoClientSettingsBuilderCustomizer beans. Each will be calledin order with the MongoClientSettings.Builder that is used to build the MongoClientSettings.
If you use the Mongo 3.0 Java driver, spring.data.mongodb.host andspring.data.mongodb.port are not supported. In such cases,spring.data.mongodb.uri should be used to provide all of the configuration.
If spring.data.mongodb.port is not specified, the default of 27017 is used. You coulddelete this line from the example shown earlier.
If you do not use Spring Data Mongo, you can inject com.mongodb.MongoClient beansinstead of using MongoDbFactory. If you want to take complete control ofestablishing the MongoDB connection, you can also declare your ownMongoDbFactory or MongoClient bean.
If you are using the reactive driver, Netty is required for SSL. The auto-configuration configures this factory automatically if Netty is available and thefactory to use hasn’t been customized already.
MongoTemplate
Spring Data MongoDB provides a MongoTemplate class that is very similar in its design to Spring’sJdbcTemplate. As with JdbcTemplate, Spring Boot auto-configures a bean for you to inject thetemplate, as follows:
import org.springframework.beans.factory.annotation.Autowired;import org.springframework.data.mongodb.core.MongoTemplate;import org.springframework.stereotype.Component;
@Componentpublic class MyBean {
private final MongoTemplate mongoTemplate;
@Autowired public MyBean(MongoTemplate mongoTemplate) { this.mongoTemplate = mongoTemplate; }
// ...
}
133
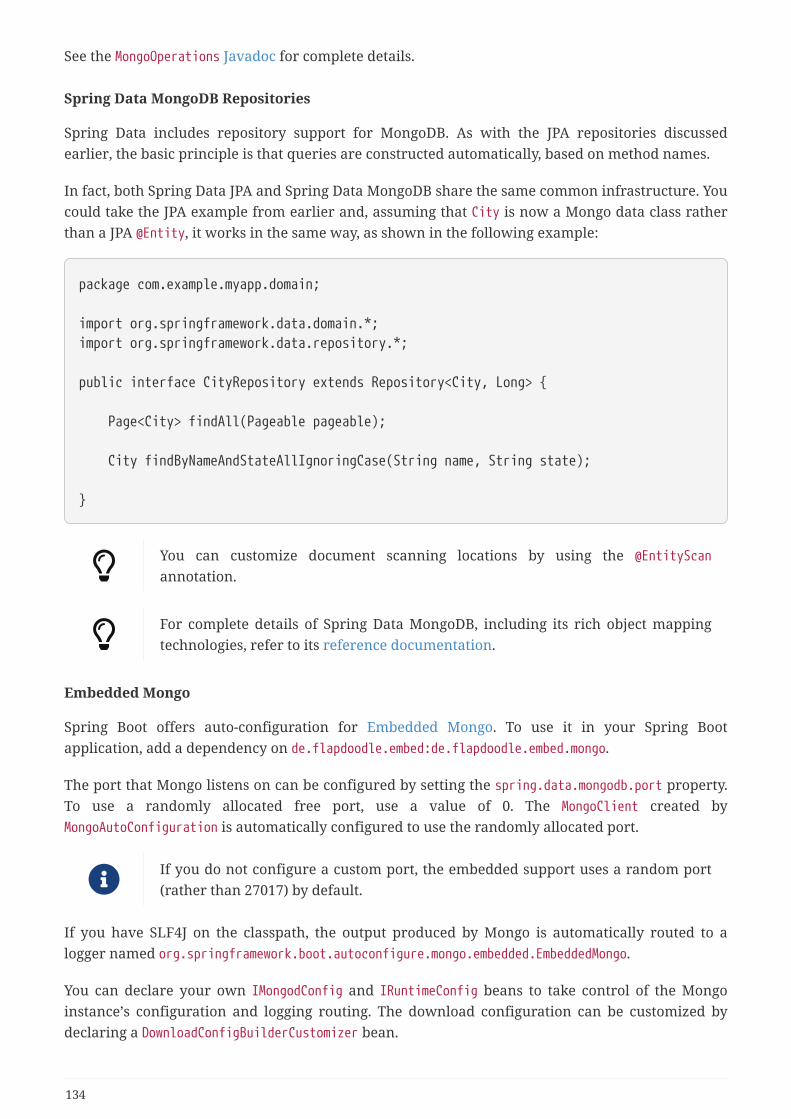
See the MongoOperations Javadoc for complete details.
Spring Data MongoDB Repositories
Spring Data includes repository support for MongoDB. As with the JPA repositories discussedearlier, the basic principle is that queries are constructed automatically, based on method names.
In fact, both Spring Data JPA and Spring Data MongoDB share the same common infrastructure. Youcould take the JPA example from earlier and, assuming that City is now a Mongo data class ratherthan a JPA @Entity, it works in the same way, as shown in the following example:
package com.example.myapp.domain;
import org.springframework.data.domain.*;import org.springframework.data.repository.*;
public interface CityRepository extends Repository<City, Long> {
Page<City> findAll(Pageable pageable);
City findByNameAndStateAllIgnoringCase(String name, String state);
}
You can customize document scanning locations by using the @EntityScan
annotation.
For complete details of Spring Data MongoDB, including its rich object mappingtechnologies, refer to its reference documentation.
Embedded Mongo
Spring Boot offers auto-configuration for Embedded Mongo. To use it in your Spring Bootapplication, add a dependency on de.flapdoodle.embed:de.flapdoodle.embed.mongo.
The port that Mongo listens on can be configured by setting the spring.data.mongodb.port property.To use a randomly allocated free port, use a value of 0. The MongoClient created byMongoAutoConfiguration is automatically configured to use the randomly allocated port.
If you do not configure a custom port, the embedded support uses a random port(rather than 27017) by default.
If you have SLF4J on the classpath, the output produced by Mongo is automatically routed to alogger named org.springframework.boot.autoconfigure.mongo.embedded.EmbeddedMongo.
You can declare your own IMongodConfig and IRuntimeConfig beans to take control of the Mongoinstance’s configuration and logging routing. The download configuration can be customized bydeclaring a DownloadConfigBuilderCustomizer bean.
134
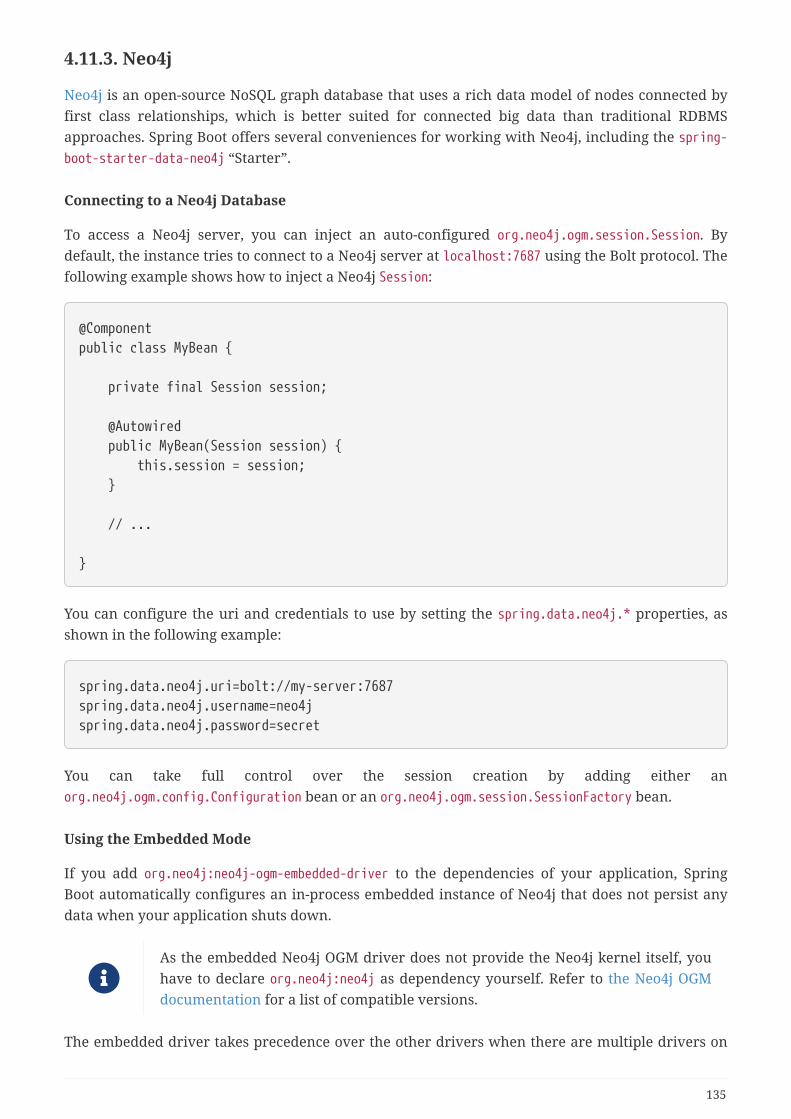
4.11.3. Neo4j
Neo4j is an open-source NoSQL graph database that uses a rich data model of nodes connected byfirst class relationships, which is better suited for connected big data than traditional RDBMSapproaches. Spring Boot offers several conveniences for working with Neo4j, including the spring-boot-starter-data-neo4j “Starter”.
Connecting to a Neo4j Database
To access a Neo4j server, you can inject an auto-configured org.neo4j.ogm.session.Session. Bydefault, the instance tries to connect to a Neo4j server at localhost:7687 using the Bolt protocol. Thefollowing example shows how to inject a Neo4j Session:
@Componentpublic class MyBean {
private final Session session;
@Autowired public MyBean(Session session) { this.session = session; }
// ...
}
You can configure the uri and credentials to use by setting the spring.data.neo4j.* properties, asshown in the following example:
spring.data.neo4j.uri=bolt://my-server:7687spring.data.neo4j.username=neo4jspring.data.neo4j.password=secret
You can take full control over the session creation by adding either anorg.neo4j.ogm.config.Configuration bean or an org.neo4j.ogm.session.SessionFactory bean.
Using the Embedded Mode
If you add org.neo4j:neo4j-ogm-embedded-driver to the dependencies of your application, SpringBoot automatically configures an in-process embedded instance of Neo4j that does not persist anydata when your application shuts down.
As the embedded Neo4j OGM driver does not provide the Neo4j kernel itself, youhave to declare org.neo4j:neo4j as dependency yourself. Refer to the Neo4j OGMdocumentation for a list of compatible versions.
The embedded driver takes precedence over the other drivers when there are multiple drivers on
135

the classpath. You can explicitly disable the embedded mode by settingspring.data.neo4j.embedded.enabled=false.
Data Neo4j Tests automatically make use of an embedded Neo4j instance if the embedded driverand Neo4j kernel are on the classpath as described above.
You can enable persistence for the embedded mode by providing a path to adatabase file in your configuration, e.g.spring.data.neo4j.uri=file://var/tmp/graph.db.
Using Native Types
Neo4j-OGM can map some types, like those in java.time.*, to String-based properties or to one ofthe native types that Neo4j provides. For backwards compatibility reasons the default for Neo4j-OGM is to use a String-based representation. To use native types, add a dependency on eitherorg.neo4j:neo4j-ogm-bolt-native-types or org.neo4j:neo4j-ogm-embedded-native-types, andconfigure the spring.data.neo4j.use-native-types property as shown in the following example:
spring.data.neo4j.use-native-types=true
Neo4jSession
By default, if you are running a web application, the session is bound to the thread for the entireprocessing of the request (that is, it uses the "Open Session in View" pattern). If you do not want thisbehavior, add the following line to your application.properties file:
spring.data.neo4j.open-in-view=false
Spring Data Neo4j Repositories
Spring Data includes repository support for Neo4j.
Spring Data Neo4j shares the common infrastructure with Spring Data JPA as many other SpringData modules do. You could take the JPA example from earlier and define City as Neo4j OGM@NodeEntity rather than JPA @Entity and the repository abstraction works in the same way, asshown in the following example:
136

package com.example.myapp.domain;
import java.util.Optional;
import org.springframework.data.neo4j.repository.*;
public interface CityRepository extends Neo4jRepository<City, Long> {
Optional<City> findOneByNameAndState(String name, String state);
}
The spring-boot-starter-data-neo4j “Starter” enables the repository support as well as transactionmanagement. You can customize the locations to look for repositories and entities by using@EnableNeo4jRepositories and @EntityScan respectively on a @Configuration-bean.
For complete details of Spring Data Neo4j, including its object mappingtechnologies, refer to the reference documentation.
4.11.4. Solr
Apache Solr is a search engine. Spring Boot offers basic auto-configuration for the Solr 5 clientlibrary and the abstractions on top of it provided by Spring Data Solr. There is a spring-boot-starter-data-solr “Starter” for collecting the dependencies in a convenient way.
Connecting to Solr
You can inject an auto-configured SolrClient instance as you would any other Spring bean. Bydefault, the instance tries to connect to a server at localhost:8983/solr. The following exampleshows how to inject a Solr bean:
@Componentpublic class MyBean {
private SolrClient solr;
@Autowired public MyBean(SolrClient solr) { this.solr = solr; }
// ...
}
If you add your own @Bean of type SolrClient, it replaces the default.
137
Spring Data Solr Repositories
Spring Data includes repository support for Apache Solr. As with the JPA repositories discussedearlier, the basic principle is that queries are automatically constructed for you based on methodnames.
In fact, both Spring Data JPA and Spring Data Solr share the same common infrastructure. Youcould take the JPA example from earlier and, assuming that City is now a @SolrDocument class ratherthan a JPA @Entity, it works in the same way.
IP: For complete details of Spring Data Solr, refer to the reference documentation.
4.11.5. Elasticsearch
Elasticsearch is an open source, distributed, RESTful search and analytics engine. Spring Boot offersbasic auto-configuration for Elasticsearch.
Spring Boot supports several clients:
• The official Java "Low Level" and "High Level" REST clients
• The ReactiveElasticsearchClient provided by Spring Data Elasticsearch
The transport client is still available but its support has been deprecated in Spring DataElasticsearch and Elasticsearch itself. It will be removed in a future release. Spring Boot provides adedicated “Starter”, spring-boot-starter-data-elasticsearch.
The Jest client has been deprecated as well, since both Elasticsearch and Spring Data Elasticsearchprovide official support for REST clients.
Connecting to Elasticsearch using REST clients
Elasticsearch ships two different REST clients that you can use to query a cluster: the "Low Level"client and the "High Level" client.
If you have the org.elasticsearch.client:elasticsearch-rest-client dependency on the classpath,Spring Boot will auto-configure and register a RestClient bean that by default targetslocalhost:9200. You can further tune how RestClient is configured, as shown in the followingexample:
spring.elasticsearch.rest.uris=https://search.example.com:9200spring.elasticsearch.rest.read-timeout=10sspring.elasticsearch.rest.username=userspring.elasticsearch.rest.password=secret
You can also register an arbitrary number of beans that implement RestClientBuilderCustomizer formore advanced customizations. To take full control over the registration, define a RestClient bean.
If you have the org.elasticsearch.client:elasticsearch-rest-high-level-client dependency on theclasspath, Spring Boot will auto-configure a RestHighLevelClient, which wraps any existing
138
RestClient bean, reusing its HTTP configuration.
Connecting to Elasticsearch using Reactive REST clients
Spring Data Elasticsearch ships ReactiveElasticsearchClient for querying Elasticsearch instances ina reactive fashion. It is built on top of WebFlux’s WebClient, so both spring-boot-starter-elasticsearch and spring-boot-starter-webflux dependencies are useful to enable this support.
By default, Spring Boot will auto-configure and register a ReactiveElasticsearchClient bean thattargets localhost:9200. You can further tune how it is configured, as shown in the followingexample:
spring.data.elasticsearch.client.reactive.endpoints=search.example.com:9200spring.data.elasticsearch.client.reactive.use-ssl=truespring.data.elasticsearch.client.reactive.socket-timeout=10sspring.data.elasticsearch.client.reactive.username=userspring.data.elasticsearch.client.reactive.password=secret
If the configuration properties are not enough and you’d like to fully control the clientconfiguration, you can register a custom ClientConfiguration bean.
Connecting to Elasticsearch using Jest
Now that Spring Boot supports the official RestHighLevelClient, Jest support is deprecated.
If you have Jest on the classpath, you can inject an auto-configured JestClient that by defaulttargets localhost:9200. You can further tune how the client is configured, as shown in the followingexample:
spring.elasticsearch.jest.uris=https://search.example.com:9200spring.elasticsearch.jest.read-timeout=10000spring.elasticsearch.jest.username=userspring.elasticsearch.jest.password=secret
You can also register an arbitrary number of beans that implementHttpClientConfigBuilderCustomizer for more advanced customizations. The following exampletunes additional HTTP settings:
static class HttpSettingsCustomizer implements HttpClientConfigBuilderCustomizer {
@Override public void customize(HttpClientConfig.Builder builder) { builder.maxTotalConnection(100).defaultMaxTotalConnectionPerRoute(5); }
}
139
To take full control over the registration, define a JestClient bean.
Connecting to Elasticsearch by Using Spring Data
To connect to Elasticsearch, a RestHighLevelClient bean must be defined, auto-configured by SpringBoot or manually provided by the application (see previous sections). With this configuration inplace, an ElasticsearchRestTemplate can be injected like any other Spring bean, as shown in thefollowing example:
@Componentpublic class MyBean {
private final ElasticsearchRestTemplate template;
public MyBean(ElasticsearchRestTemplate template) { this.template = template; }
// ...
}
In the presence of spring-data-elasticsearch and the required dependencies for using a WebClient(typically spring-boot-starter-webflux), Spring Boot can also auto-configure aReactiveElasticsearchClient and a ReactiveElasticsearchTemplate as beans. They are the reactiveequivalent of the other REST clients.
Spring Data Elasticsearch Repositories
Spring Data includes repository support for Elasticsearch. As with the JPA repositories discussedearlier, the basic principle is that queries are constructed for you automatically based on methodnames.
In fact, both Spring Data JPA and Spring Data Elasticsearch share the same common infrastructure.You could take the JPA example from earlier and, assuming that City is now an Elasticsearch@Document class rather than a JPA @Entity, it works in the same way.
For complete details of Spring Data Elasticsearch, refer to the referencedocumentation.
Spring Boot supports both classic and reactive Elasticsearch repositories, using theElasticsearchRestTemplate or ReactiveElasticsearchTemplate beans. Most likely those beans areauto-configured by Spring Boot given the required dependencies are present.
If you wish to use your own template for backing the Elasticsearch repositories, you can add yourown ElasticsearchRestTemplate or ElasticsearchOperations @Bean, as long as it is named"elasticsearchTemplate". Same applies to ReactiveElasticsearchTemplate andReactiveElasticsearchOperations, with the bean name "reactiveElasticsearchTemplate".
140

You can choose to disable the repositories support with the following property:
spring.data.elasticsearch.repositories.enabled=false
4.11.6. Cassandra
Cassandra is an open source, distributed database management system designed to handle largeamounts of data across many commodity servers. Spring Boot offers auto-configuration forCassandra and the abstractions on top of it provided by Spring Data Cassandra. There is a spring-boot-starter-data-cassandra “Starter” for collecting the dependencies in a convenient way.
Connecting to Cassandra
You can inject an auto-configured CassandraTemplate or a Cassandra Session instance as you wouldwith any other Spring Bean. The spring.data.cassandra.* properties can be used to customize theconnection. Generally, you provide keyspace-name and contact-points properties, as shown in thefollowing example:
spring.data.cassandra.keyspace-name=mykeyspacespring.data.cassandra.contact-points=cassandrahost1,cassandrahost2
You can also register an arbitrary number of beans that implement ClusterBuilderCustomizer formore advanced customizations.
The following code listing shows how to inject a Cassandra bean:
@Componentpublic class MyBean {
private CassandraTemplate template;
public MyBean(CassandraTemplate template) { this.template = template; }
// ...
}
If you add your own @Bean of type CassandraTemplate, it replaces the default.
Spring Data Cassandra Repositories
Spring Data includes basic repository support for Cassandra. Currently, this is more limited thanthe JPA repositories discussed earlier and needs to annotate finder methods with @Query.
141
For complete details of Spring Data Cassandra, refer to the referencedocumentation.
4.11.7. Couchbase
Couchbase is an open-source, distributed, multi-model NoSQL document-oriented database that isoptimized for interactive applications. Spring Boot offers auto-configuration for Couchbase and theabstractions on top of it provided by Spring Data Couchbase. There are spring-boot-starter-data-couchbase and spring-boot-starter-data-couchbase-reactive “Starters” for collecting thedependencies in a convenient way.
Connecting to Couchbase
You can get a Bucket and Cluster by adding the Couchbase SDK and some configuration. Thespring.couchbase.* properties can be used to customize the connection. Generally, you provide thebootstrap hosts, bucket name, and password, as shown in the following example:
spring.couchbase.bootstrap-hosts=my-host-1,192.168.1.123spring.couchbase.bucket.name=my-bucketspring.couchbase.bucket.password=secret
You need to provide at least the bootstrap host(s), in which case the bucket name isdefault and the password is an empty String. Alternatively, you can define yourown org.springframework.data.couchbase.config.CouchbaseConfigurer @Bean to takecontrol over the whole configuration.
It is also possible to customize some of the CouchbaseEnvironment settings. For instance, the followingconfiguration changes the timeout to use to open a new Bucket and enables SSL support:
spring.couchbase.env.timeouts.connect=3000spring.couchbase.env.ssl.key-store=/location/of/keystore.jksspring.couchbase.env.ssl.key-store-password=secret
Check the spring.couchbase.env.* properties for more details.
Spring Data Couchbase Repositories
Spring Data includes repository support for Couchbase. For complete details of Spring DataCouchbase, refer to the reference documentation.
You can inject an auto-configured CouchbaseTemplate instance as you would with any other SpringBean, provided a default CouchbaseConfigurer is available (which happens when you enableCouchbase support, as explained earlier).
The following examples shows how to inject a Couchbase bean:
142
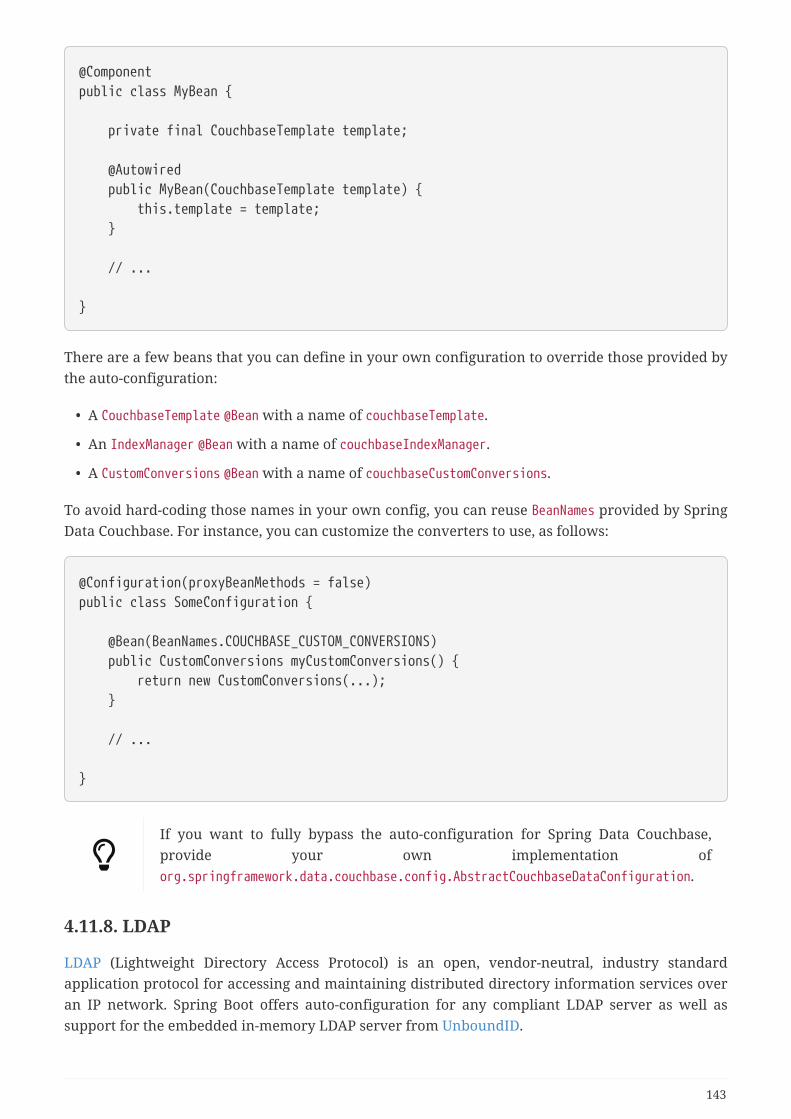
@Componentpublic class MyBean {
private final CouchbaseTemplate template;
@Autowired public MyBean(CouchbaseTemplate template) { this.template = template; }
// ...
}
There are a few beans that you can define in your own configuration to override those provided bythe auto-configuration:
• A CouchbaseTemplate @Bean with a name of couchbaseTemplate.
• An IndexManager @Bean with a name of couchbaseIndexManager.
• A CustomConversions @Bean with a name of couchbaseCustomConversions.
To avoid hard-coding those names in your own config, you can reuse BeanNames provided by SpringData Couchbase. For instance, you can customize the converters to use, as follows:
@Configuration(proxyBeanMethods = false)public class SomeConfiguration {
@Bean(BeanNames.COUCHBASE_CUSTOM_CONVERSIONS) public CustomConversions myCustomConversions() { return new CustomConversions(...); }
// ...
}
If you want to fully bypass the auto-configuration for Spring Data Couchbase,provide your own implementation oforg.springframework.data.couchbase.config.AbstractCouchbaseDataConfiguration.
4.11.8. LDAP
LDAP (Lightweight Directory Access Protocol) is an open, vendor-neutral, industry standardapplication protocol for accessing and maintaining distributed directory information services overan IP network. Spring Boot offers auto-configuration for any compliant LDAP server as well assupport for the embedded in-memory LDAP server from UnboundID.
143
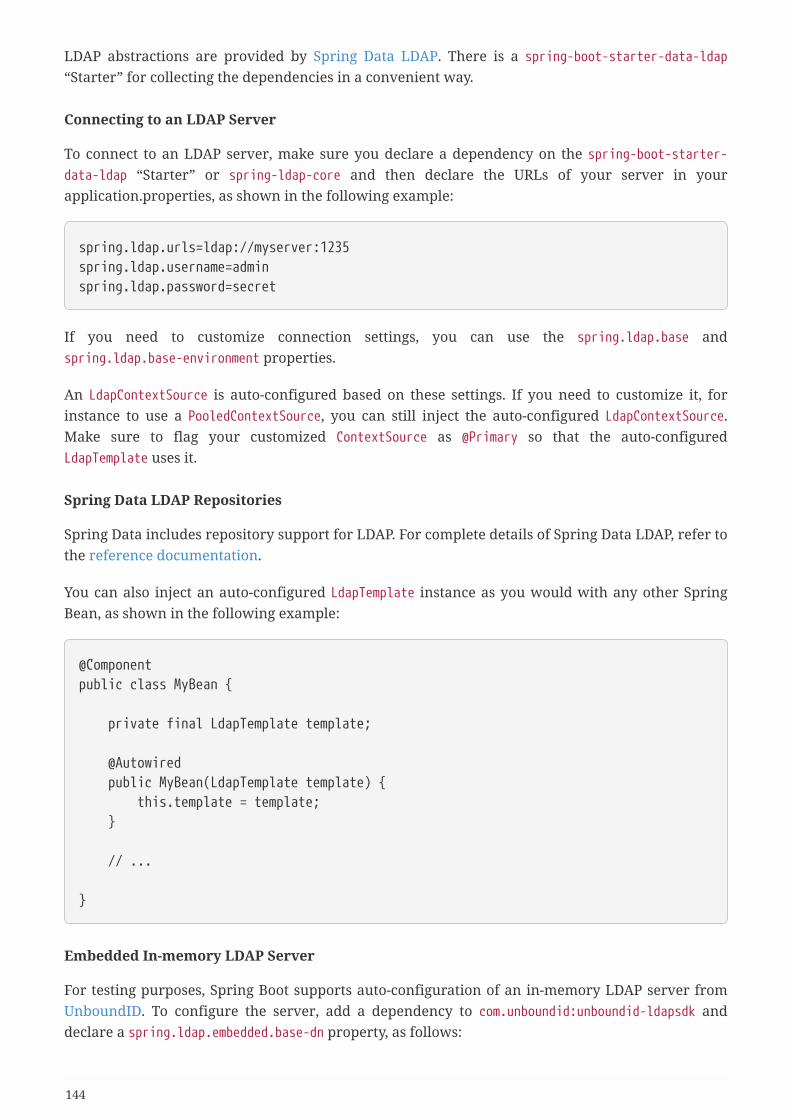
LDAP abstractions are provided by Spring Data LDAP. There is a spring-boot-starter-data-ldap“Starter” for collecting the dependencies in a convenient way.
Connecting to an LDAP Server
To connect to an LDAP server, make sure you declare a dependency on the spring-boot-starter-data-ldap “Starter” or spring-ldap-core and then declare the URLs of your server in yourapplication.properties, as shown in the following example:
spring.ldap.urls=ldap://myserver:1235spring.ldap.username=adminspring.ldap.password=secret
If you need to customize connection settings, you can use the spring.ldap.base andspring.ldap.base-environment properties.
An LdapContextSource is auto-configured based on these settings. If you need to customize it, forinstance to use a PooledContextSource, you can still inject the auto-configured LdapContextSource.Make sure to flag your customized ContextSource as @Primary so that the auto-configuredLdapTemplate uses it.
Spring Data LDAP Repositories
Spring Data includes repository support for LDAP. For complete details of Spring Data LDAP, refer tothe reference documentation.
You can also inject an auto-configured LdapTemplate instance as you would with any other SpringBean, as shown in the following example:
@Componentpublic class MyBean {
private final LdapTemplate template;
@Autowired public MyBean(LdapTemplate template) { this.template = template; }
// ...
}
Embedded In-memory LDAP Server
For testing purposes, Spring Boot supports auto-configuration of an in-memory LDAP server fromUnboundID. To configure the server, add a dependency to com.unboundid:unboundid-ldapsdk anddeclare a spring.ldap.embedded.base-dn property, as follows:
144

spring.ldap.embedded.base-dn=dc=spring,dc=io
It is possible to define multiple base-dn values, however, since distinguishednames usually contain commas, they must be defined using the correct notation.
In yaml files, you can use the yaml list notation:
spring.ldap.embedded.base-dn: - dc=spring,dc=io - dc=pivotal,dc=io
In properties files, you must include the index as part of the property name:
spring.ldap.embedded.base-dn[0]=dc=spring,dc=iospring.ldap.embedded.base-dn[1]=dc=pivotal,dc=io
By default, the server starts on a random port and triggers the regular LDAP support. There is noneed to specify a spring.ldap.urls property.
If there is a schema.ldif file on your classpath, it is used to initialize the server. If you want to loadthe initialization script from a different resource, you can also use the spring.ldap.embedded.ldifproperty.
By default, a standard schema is used to validate LDIF files. You can turn off validation altogether bysetting the spring.ldap.embedded.validation.enabled property. If you have custom attributes, youcan use spring.ldap.embedded.validation.schema to define your custom attribute types or objectclasses.
4.11.9. InfluxDB
InfluxDB is an open-source time series database optimized for fast, high-availability storage andretrieval of time series data in fields such as operations monitoring, application metrics, Internet-of-Things sensor data, and real-time analytics.
Connecting to InfluxDB
Spring Boot auto-configures an InfluxDB instance, provided the influxdb-java client is on theclasspath and the URL of the database is set, as shown in the following example:
spring.influx.url=https://172.0.0.1:8086
If the connection to InfluxDB requires a user and password, you can set the spring.influx.user andspring.influx.password properties accordingly.
InfluxDB relies on OkHttp. If you need to tune the http client InfluxDB uses behind the scenes, you
145
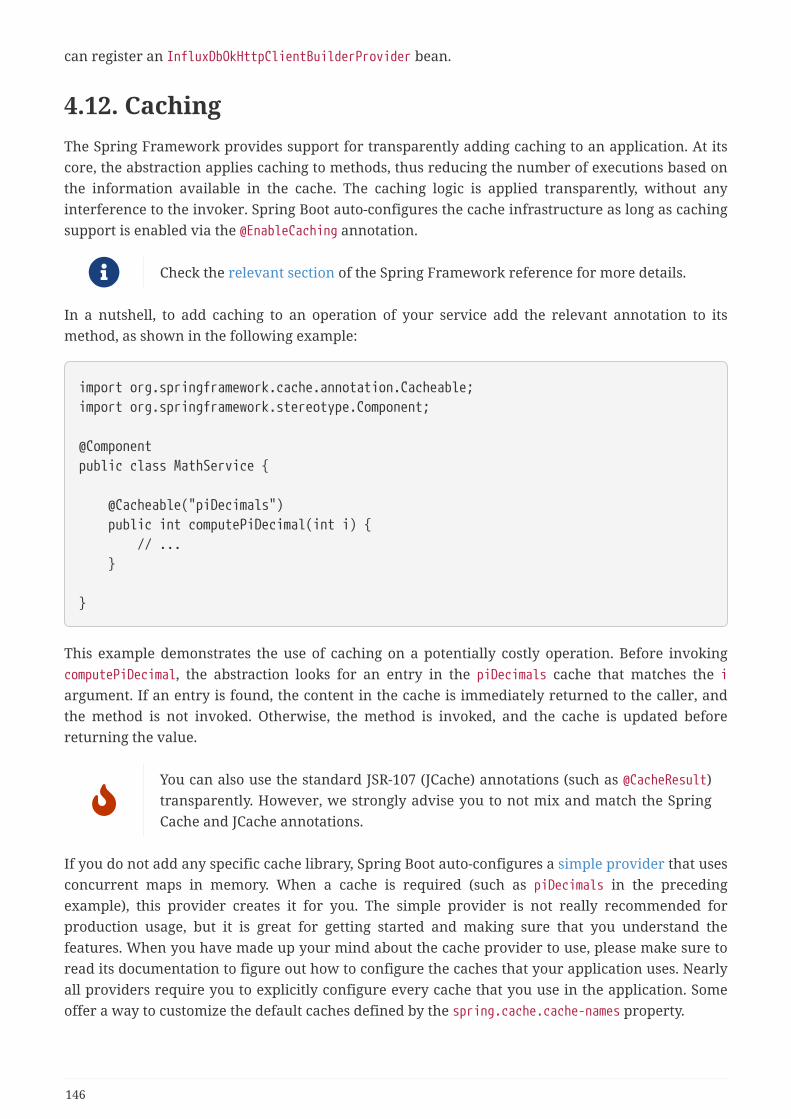
can register an InfluxDbOkHttpClientBuilderProvider bean.
4.12. CachingThe Spring Framework provides support for transparently adding caching to an application. At itscore, the abstraction applies caching to methods, thus reducing the number of executions based onthe information available in the cache. The caching logic is applied transparently, without anyinterference to the invoker. Spring Boot auto-configures the cache infrastructure as long as cachingsupport is enabled via the @EnableCaching annotation.
Check the relevant section of the Spring Framework reference for more details.
In a nutshell, to add caching to an operation of your service add the relevant annotation to itsmethod, as shown in the following example:
import org.springframework.cache.annotation.Cacheable;import org.springframework.stereotype.Component;
@Componentpublic class MathService {
@Cacheable("piDecimals") public int computePiDecimal(int i) { // ... }
}
This example demonstrates the use of caching on a potentially costly operation. Before invokingcomputePiDecimal, the abstraction looks for an entry in the piDecimals cache that matches the iargument. If an entry is found, the content in the cache is immediately returned to the caller, andthe method is not invoked. Otherwise, the method is invoked, and the cache is updated beforereturning the value.
You can also use the standard JSR-107 (JCache) annotations (such as @CacheResult)transparently. However, we strongly advise you to not mix and match the SpringCache and JCache annotations.
If you do not add any specific cache library, Spring Boot auto-configures a simple provider that usesconcurrent maps in memory. When a cache is required (such as piDecimals in the precedingexample), this provider creates it for you. The simple provider is not really recommended forproduction usage, but it is great for getting started and making sure that you understand thefeatures. When you have made up your mind about the cache provider to use, please make sure toread its documentation to figure out how to configure the caches that your application uses. Nearlyall providers require you to explicitly configure every cache that you use in the application. Someoffer a way to customize the default caches defined by the spring.cache.cache-names property.
146
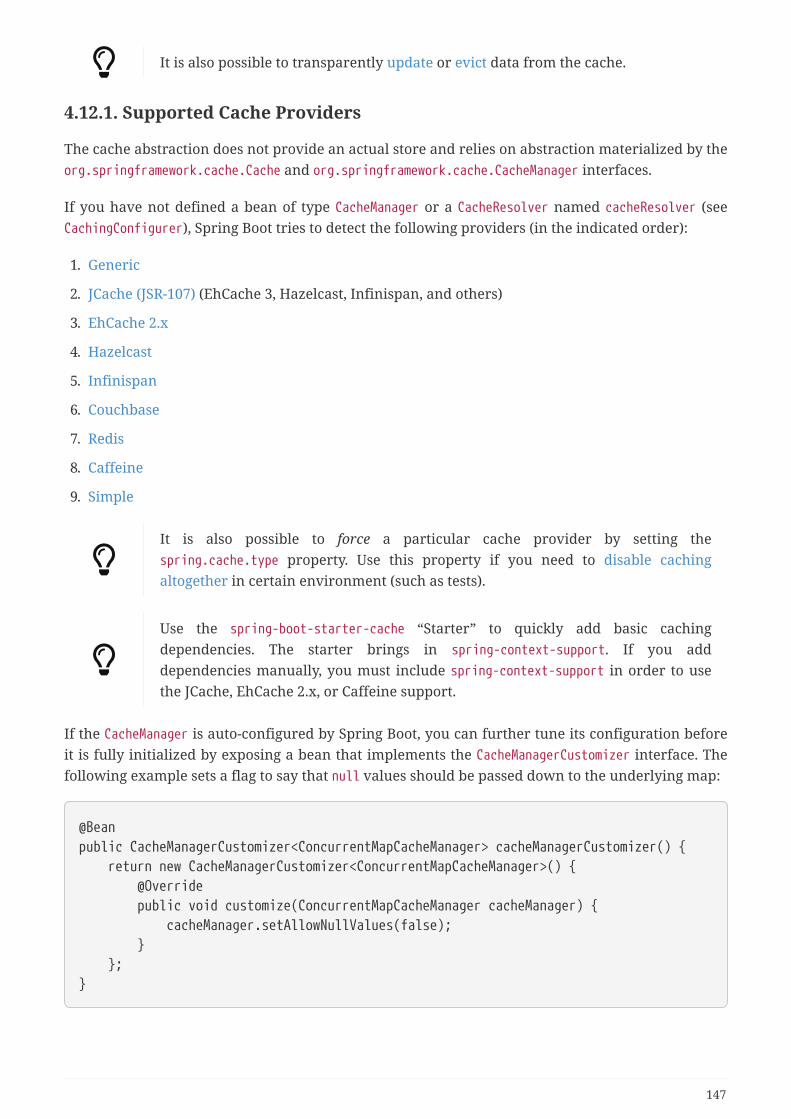
It is also possible to transparently update or evict data from the cache.
4.12.1. Supported Cache Providers
The cache abstraction does not provide an actual store and relies on abstraction materialized by theorg.springframework.cache.Cache and org.springframework.cache.CacheManager interfaces.
If you have not defined a bean of type CacheManager or a CacheResolver named cacheResolver (seeCachingConfigurer), Spring Boot tries to detect the following providers (in the indicated order):
1. Generic
2. JCache (JSR-107) (EhCache 3, Hazelcast, Infinispan, and others)
3. EhCache 2.x
4. Hazelcast
5. Infinispan
6. Couchbase
7. Redis
8. Caffeine
9. Simple
It is also possible to force a particular cache provider by setting thespring.cache.type property. Use this property if you need to disable cachingaltogether in certain environment (such as tests).
Use the spring-boot-starter-cache “Starter” to quickly add basic cachingdependencies. The starter brings in spring-context-support. If you adddependencies manually, you must include spring-context-support in order to usethe JCache, EhCache 2.x, or Caffeine support.
If the CacheManager is auto-configured by Spring Boot, you can further tune its configuration beforeit is fully initialized by exposing a bean that implements the CacheManagerCustomizer interface. Thefollowing example sets a flag to say that null values should be passed down to the underlying map:
@Beanpublic CacheManagerCustomizer<ConcurrentMapCacheManager> cacheManagerCustomizer() { return new CacheManagerCustomizer<ConcurrentMapCacheManager>() { @Override public void customize(ConcurrentMapCacheManager cacheManager) { cacheManager.setAllowNullValues(false); } };}
147
In the preceding example, an auto-configured ConcurrentMapCacheManager isexpected. If that is not the case (either you provided your own config or a differentcache provider was auto-configured), the customizer is not invoked at all. You canhave as many customizers as you want, and you can also order them by using@Order or Ordered.
Generic
Generic caching is used if the context defines at least one org.springframework.cache.Cache bean. ACacheManager wrapping all beans of that type is created.
JCache (JSR-107)
JCache is bootstrapped through the presence of a javax.cache.spi.CachingProvider on the classpath(that is, a JSR-107 compliant caching library exists on the classpath), and the JCacheCacheManager isprovided by the spring-boot-starter-cache “Starter”. Various compliant libraries are available, andSpring Boot provides dependency management for Ehcache 3, Hazelcast, and Infinispan. Any othercompliant library can be added as well.
It might happen that more than one provider is present, in which case the provider must beexplicitly specified. Even if the JSR-107 standard does not enforce a standardized way to define thelocation of the configuration file, Spring Boot does its best to accommodate setting a cache withimplementation details, as shown in the following example:
# Only necessary if more than one provider is presentspring.cache.jcache.provider=com.acme.MyCachingProviderspring.cache.jcache.config=classpath:acme.xml
When a cache library offers both a native implementation and JSR-107 support,Spring Boot prefers the JSR-107 support, so that the same features are available ifyou switch to a different JSR-107 implementation.
Spring Boot has general support for Hazelcast. If a single HazelcastInstance isavailable, it is automatically reused for the CacheManager as well, unless thespring.cache.jcache.config property is specified.
There are two ways to customize the underlying javax.cache.cacheManager:
• Caches can be created on startup by setting the spring.cache.cache-names property. If a customjavax.cache.configuration.Configuration bean is defined, it is used to customize them.
• org.springframework.boot.autoconfigure.cache.JCacheManagerCustomizer beans are invoked withthe reference of the CacheManager for full customization.
If a standard javax.cache.CacheManager bean is defined, it is wrapped automaticallyin an org.springframework.cache.CacheManager implementation that the abstractionexpects. No further customization is applied to it.
148

EhCache 2.x
EhCache 2.x is used if a file named ehcache.xml can be found at the root of the classpath. If EhCache2.x is found, the EhCacheCacheManager provided by the spring-boot-starter-cache “Starter” is used tobootstrap the cache manager. An alternate configuration file can be provided as well, as shown inthe following example:
spring.cache.ehcache.config=classpath:config/another-config.xml
Hazelcast
Spring Boot has general support for Hazelcast. If a HazelcastInstance has been auto-configured, it isautomatically wrapped in a CacheManager.
Infinispan
Infinispan has no default configuration file location, so it must be specified explicitly. Otherwise,the default bootstrap is used.
spring.cache.infinispan.config=infinispan.xml
Caches can be created on startup by setting the spring.cache.cache-names property. If a customConfigurationBuilder bean is defined, it is used to customize the caches.
The support of Infinispan in Spring Boot is restricted to the embedded mode and isquite basic. If you want more options, you should use the official Infinispan SpringBoot starter instead. See Infinispan’s documentation for more details.
Couchbase
If the Couchbase Java client and the couchbase-spring-cache implementation are available andCouchbase is configured, a CouchbaseCacheManager is auto-configured. It is also possible to createadditional caches on startup by setting the spring.cache.cache-names property. These caches operateon the Bucket that was auto-configured. You can also create additional caches on another Bucket byusing the customizer. Assume you need two caches (cache1 and cache2) on the "main" Bucket andone (cache3) cache with a custom time to live of 2 seconds on the “another” Bucket. You can createthe first two caches through configuration, as follows:
spring.cache.cache-names=cache1,cache2
Then you can define a @Configuration class to configure the extra Bucket and the cache3 cache, asfollows:
149
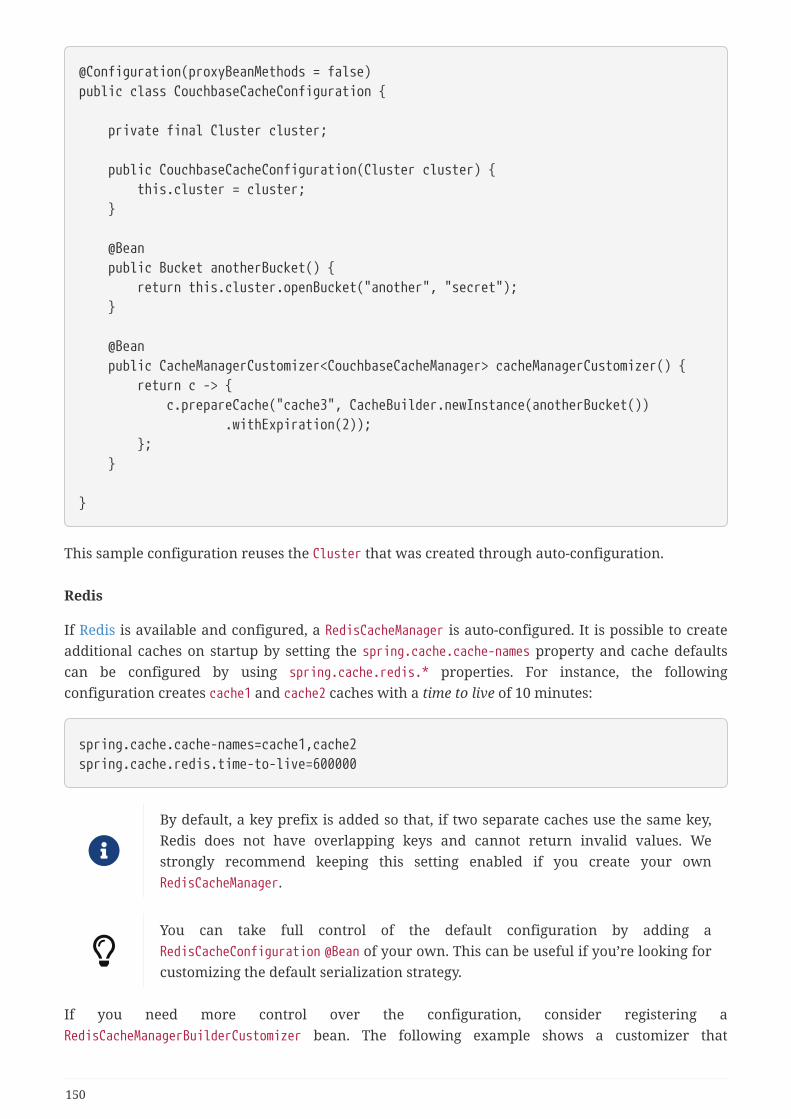
@Configuration(proxyBeanMethods = false)public class CouchbaseCacheConfiguration {
private final Cluster cluster;
public CouchbaseCacheConfiguration(Cluster cluster) { this.cluster = cluster; }
@Bean public Bucket anotherBucket() { return this.cluster.openBucket("another", "secret"); }
@Bean public CacheManagerCustomizer<CouchbaseCacheManager> cacheManagerCustomizer() { return c -> { c.prepareCache("cache3", CacheBuilder.newInstance(anotherBucket()) .withExpiration(2)); }; }
}
This sample configuration reuses the Cluster that was created through auto-configuration.
Redis
If Redis is available and configured, a RedisCacheManager is auto-configured. It is possible to createadditional caches on startup by setting the spring.cache.cache-names property and cache defaultscan be configured by using spring.cache.redis.* properties. For instance, the followingconfiguration creates cache1 and cache2 caches with a time to live of 10 minutes:
spring.cache.cache-names=cache1,cache2spring.cache.redis.time-to-live=600000
By default, a key prefix is added so that, if two separate caches use the same key,Redis does not have overlapping keys and cannot return invalid values. Westrongly recommend keeping this setting enabled if you create your ownRedisCacheManager.
You can take full control of the default configuration by adding aRedisCacheConfiguration @Bean of your own. This can be useful if you’re looking forcustomizing the default serialization strategy.
If you need more control over the configuration, consider registering aRedisCacheManagerBuilderCustomizer bean. The following example shows a customizer that
150
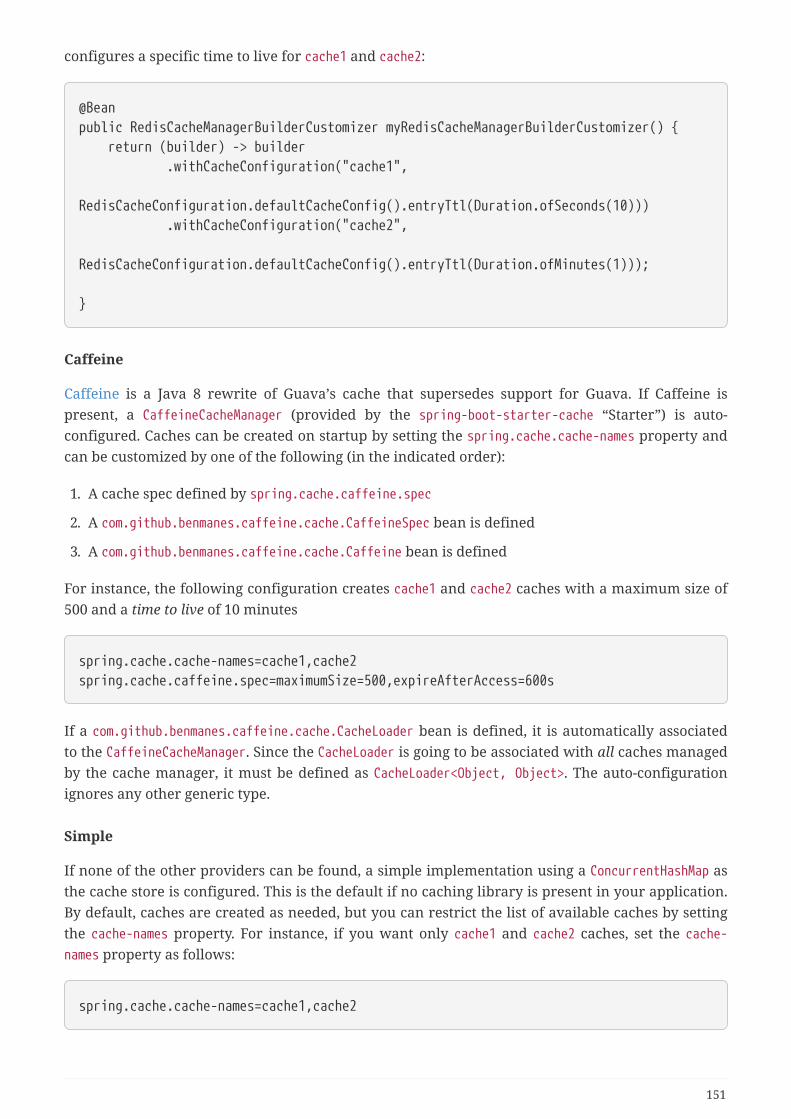
configures a specific time to live for cache1 and cache2:
@Beanpublic RedisCacheManagerBuilderCustomizer myRedisCacheManagerBuilderCustomizer() { return (builder) -> builder .withCacheConfiguration("cache1", RedisCacheConfiguration.defaultCacheConfig().entryTtl(Duration.ofSeconds(10))) .withCacheConfiguration("cache2", RedisCacheConfiguration.defaultCacheConfig().entryTtl(Duration.ofMinutes(1)));
}
Caffeine
Caffeine is a Java 8 rewrite of Guava’s cache that supersedes support for Guava. If Caffeine ispresent, a CaffeineCacheManager (provided by the spring-boot-starter-cache “Starter”) is auto-configured. Caches can be created on startup by setting the spring.cache.cache-names property andcan be customized by one of the following (in the indicated order):
1. A cache spec defined by spring.cache.caffeine.spec
2. A com.github.benmanes.caffeine.cache.CaffeineSpec bean is defined
3. A com.github.benmanes.caffeine.cache.Caffeine bean is defined
For instance, the following configuration creates cache1 and cache2 caches with a maximum size of500 and a time to live of 10 minutes
spring.cache.cache-names=cache1,cache2spring.cache.caffeine.spec=maximumSize=500,expireAfterAccess=600s
If a com.github.benmanes.caffeine.cache.CacheLoader bean is defined, it is automatically associatedto the CaffeineCacheManager. Since the CacheLoader is going to be associated with all caches managedby the cache manager, it must be defined as CacheLoader<Object, Object>. The auto-configurationignores any other generic type.
Simple
If none of the other providers can be found, a simple implementation using a ConcurrentHashMap asthe cache store is configured. This is the default if no caching library is present in your application.By default, caches are created as needed, but you can restrict the list of available caches by settingthe cache-names property. For instance, if you want only cache1 and cache2 caches, set the cache-names property as follows:
spring.cache.cache-names=cache1,cache2
151

If you do so and your application uses a cache not listed, then it fails at runtime when the cache isneeded, but not on startup. This is similar to the way the "real" cache providers behave if you usean undeclared cache.
None
When @EnableCaching is present in your configuration, a suitable cache configuration is expected aswell. If you need to disable caching altogether in certain environments, force the cache type to noneto use a no-op implementation, as shown in the following example:
spring.cache.type=none
4.13. MessagingThe Spring Framework provides extensive support for integrating with messaging systems, fromsimplified use of the JMS API using JmsTemplate to a complete infrastructure to receive messagesasynchronously. Spring AMQP provides a similar feature set for the Advanced Message QueuingProtocol. Spring Boot also provides auto-configuration options for RabbitTemplate and RabbitMQ.Spring WebSocket natively includes support for STOMP messaging, and Spring Boot has support forthat through starters and a small amount of auto-configuration. Spring Boot also has support forApache Kafka.
4.13.1. JMS
The javax.jms.ConnectionFactory interface provides a standard method of creating ajavax.jms.Connection for interacting with a JMS broker. Although Spring needs a ConnectionFactoryto work with JMS, you generally need not use it directly yourself and can instead rely on higherlevel messaging abstractions. (See the relevant section of the Spring Framework referencedocumentation for details.) Spring Boot also auto-configures the necessary infrastructure to sendand receive messages.
ActiveMQ Support
When ActiveMQ is available on the classpath, Spring Boot can also configure a ConnectionFactory. Ifthe broker is present, an embedded broker is automatically started and configured (provided nobroker URL is specified through configuration).
If you use spring-boot-starter-activemq, the necessary dependencies to connect orembed an ActiveMQ instance are provided, as is the Spring infrastructure tointegrate with JMS.
ActiveMQ configuration is controlled by external configuration properties in spring.activemq.*. Forexample, you might declare the following section in application.properties:
152
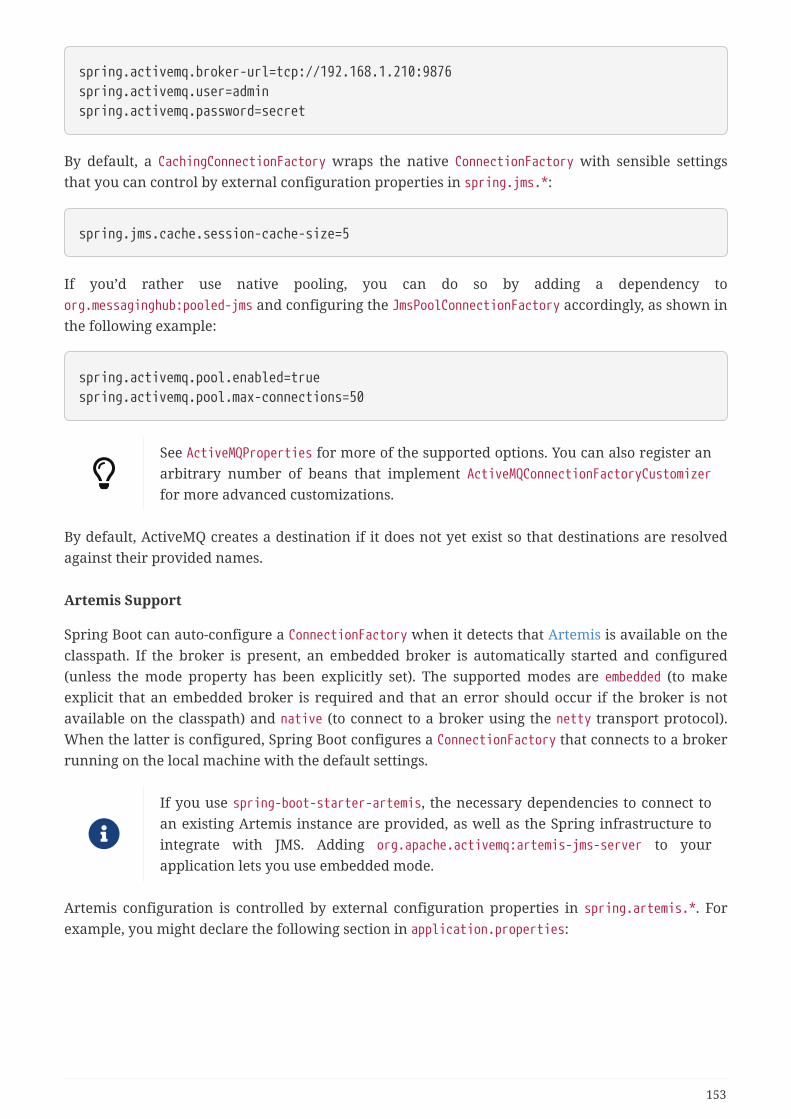
spring.activemq.broker-url=tcp://192.168.1.210:9876spring.activemq.user=adminspring.activemq.password=secret
By default, a CachingConnectionFactory wraps the native ConnectionFactory with sensible settingsthat you can control by external configuration properties in spring.jms.*:
spring.jms.cache.session-cache-size=5
If you’d rather use native pooling, you can do so by adding a dependency toorg.messaginghub:pooled-jms and configuring the JmsPoolConnectionFactory accordingly, as shown inthe following example:
spring.activemq.pool.enabled=truespring.activemq.pool.max-connections=50
See ActiveMQProperties for more of the supported options. You can also register anarbitrary number of beans that implement ActiveMQConnectionFactoryCustomizerfor more advanced customizations.
By default, ActiveMQ creates a destination if it does not yet exist so that destinations are resolvedagainst their provided names.
Artemis Support
Spring Boot can auto-configure a ConnectionFactory when it detects that Artemis is available on theclasspath. If the broker is present, an embedded broker is automatically started and configured(unless the mode property has been explicitly set). The supported modes are embedded (to makeexplicit that an embedded broker is required and that an error should occur if the broker is notavailable on the classpath) and native (to connect to a broker using the netty transport protocol).When the latter is configured, Spring Boot configures a ConnectionFactory that connects to a brokerrunning on the local machine with the default settings.
If you use spring-boot-starter-artemis, the necessary dependencies to connect toan existing Artemis instance are provided, as well as the Spring infrastructure tointegrate with JMS. Adding org.apache.activemq:artemis-jms-server to yourapplication lets you use embedded mode.
Artemis configuration is controlled by external configuration properties in spring.artemis.*. Forexample, you might declare the following section in application.properties:
153
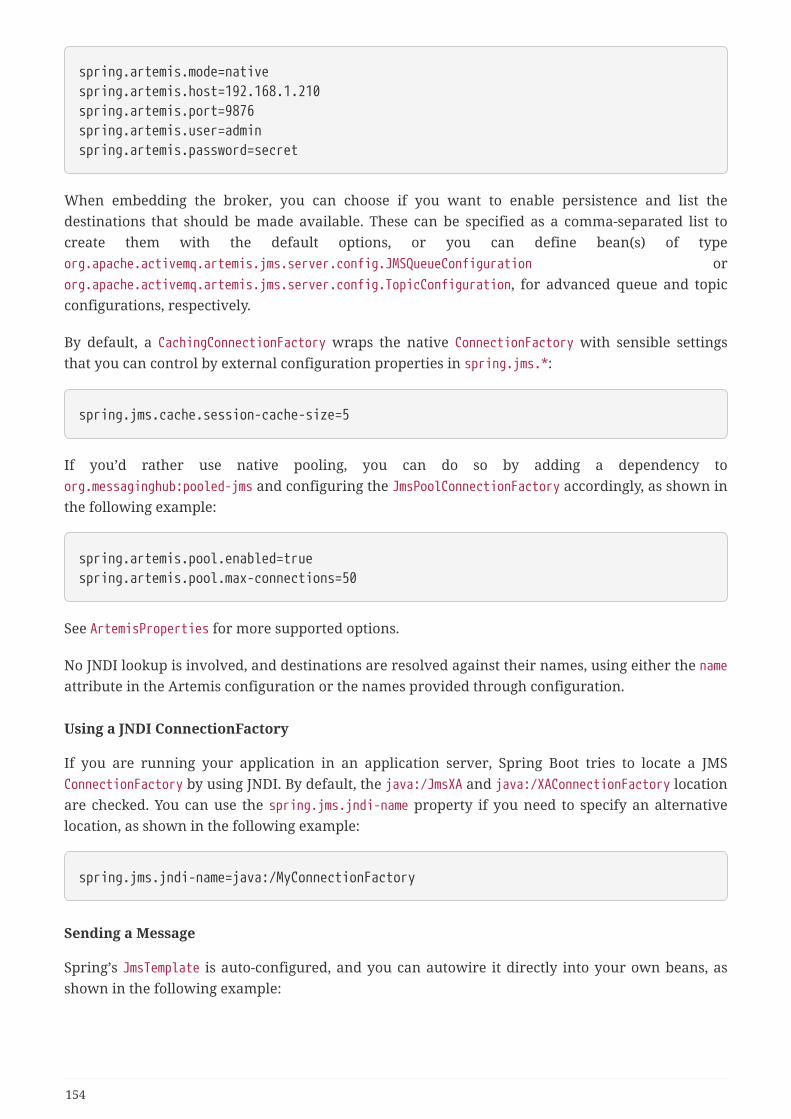
spring.artemis.mode=nativespring.artemis.host=192.168.1.210spring.artemis.port=9876spring.artemis.user=adminspring.artemis.password=secret
When embedding the broker, you can choose if you want to enable persistence and list thedestinations that should be made available. These can be specified as a comma-separated list tocreate them with the default options, or you can define bean(s) of typeorg.apache.activemq.artemis.jms.server.config.JMSQueueConfiguration ororg.apache.activemq.artemis.jms.server.config.TopicConfiguration, for advanced queue and topicconfigurations, respectively.
By default, a CachingConnectionFactory wraps the native ConnectionFactory with sensible settingsthat you can control by external configuration properties in spring.jms.*:
spring.jms.cache.session-cache-size=5
If you’d rather use native pooling, you can do so by adding a dependency toorg.messaginghub:pooled-jms and configuring the JmsPoolConnectionFactory accordingly, as shown inthe following example:
spring.artemis.pool.enabled=truespring.artemis.pool.max-connections=50
See ArtemisProperties for more supported options.
No JNDI lookup is involved, and destinations are resolved against their names, using either the nameattribute in the Artemis configuration or the names provided through configuration.
Using a JNDI ConnectionFactory
If you are running your application in an application server, Spring Boot tries to locate a JMSConnectionFactory by using JNDI. By default, the java:/JmsXA and java:/XAConnectionFactory locationare checked. You can use the spring.jms.jndi-name property if you need to specify an alternativelocation, as shown in the following example:
spring.jms.jndi-name=java:/MyConnectionFactory
Sending a Message
Spring’s JmsTemplate is auto-configured, and you can autowire it directly into your own beans, asshown in the following example:
154
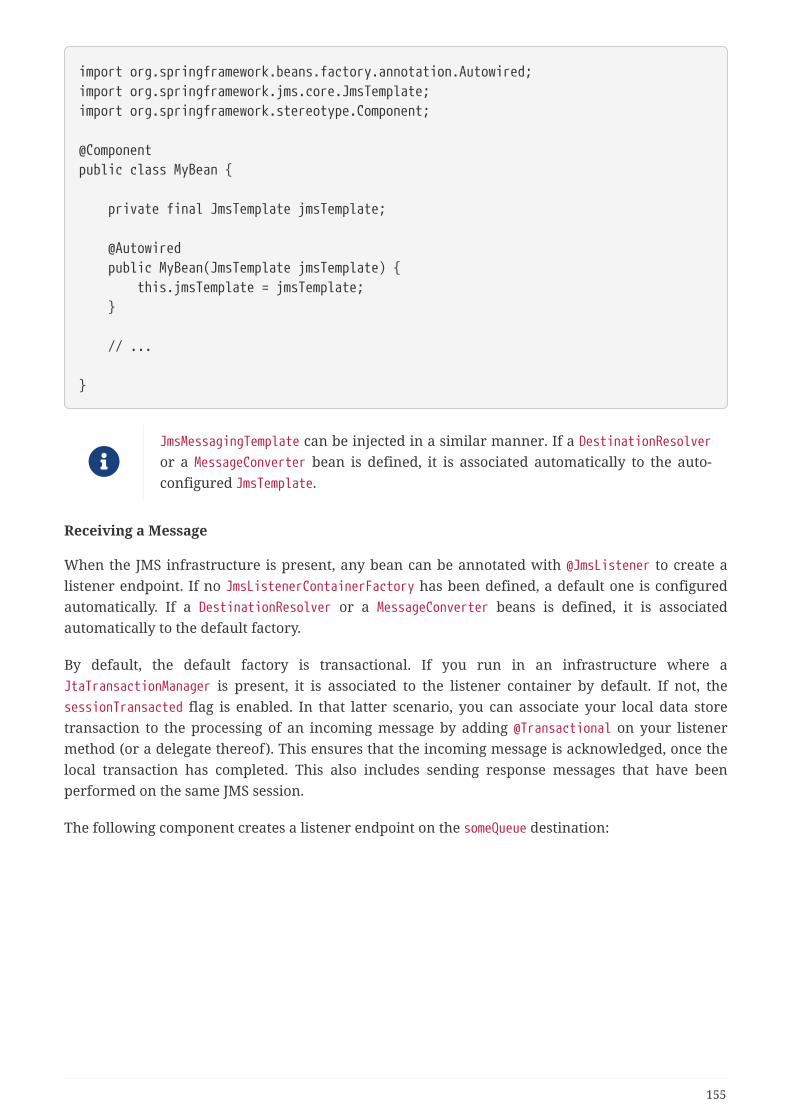
import org.springframework.beans.factory.annotation.Autowired;import org.springframework.jms.core.JmsTemplate;import org.springframework.stereotype.Component;
@Componentpublic class MyBean {
private final JmsTemplate jmsTemplate;
@Autowired public MyBean(JmsTemplate jmsTemplate) { this.jmsTemplate = jmsTemplate; }
// ...
}
JmsMessagingTemplate can be injected in a similar manner. If a DestinationResolveror a MessageConverter bean is defined, it is associated automatically to the auto-configured JmsTemplate.
Receiving a Message
When the JMS infrastructure is present, any bean can be annotated with @JmsListener to create alistener endpoint. If no JmsListenerContainerFactory has been defined, a default one is configuredautomatically. If a DestinationResolver or a MessageConverter beans is defined, it is associatedautomatically to the default factory.
By default, the default factory is transactional. If you run in an infrastructure where aJtaTransactionManager is present, it is associated to the listener container by default. If not, thesessionTransacted flag is enabled. In that latter scenario, you can associate your local data storetransaction to the processing of an incoming message by adding @Transactional on your listenermethod (or a delegate thereof). This ensures that the incoming message is acknowledged, once thelocal transaction has completed. This also includes sending response messages that have beenperformed on the same JMS session.
The following component creates a listener endpoint on the someQueue destination:
155

@Componentpublic class MyBean {
@JmsListener(destination = "someQueue") public void processMessage(String content) { // ... }
}
See the Javadoc of @EnableJms for more details.
If you need to create more JmsListenerContainerFactory instances or if you want to override thedefault, Spring Boot provides a DefaultJmsListenerContainerFactoryConfigurer that you can use toinitialize a DefaultJmsListenerContainerFactory with the same settings as the one that is auto-configured.
For instance, the following example exposes another factory that uses a specific MessageConverter:
@Configuration(proxyBeanMethods = false)static class JmsConfiguration {
@Bean public DefaultJmsListenerContainerFactory myFactory( DefaultJmsListenerContainerFactoryConfigurer configurer) { DefaultJmsListenerContainerFactory factory = new DefaultJmsListenerContainerFactory(); configurer.configure(factory, connectionFactory()); factory.setMessageConverter(myMessageConverter()); return factory; }
}
Then you can use the factory in any @JmsListener-annotated method as follows:
@Componentpublic class MyBean {
@JmsListener(destination = "someQueue", containerFactory="myFactory") public void processMessage(String content) { // ... }
}
156

4.13.2. AMQP
The Advanced Message Queuing Protocol (AMQP) is a platform-neutral, wire-level protocol formessage-oriented middleware. The Spring AMQP project applies core Spring concepts to thedevelopment of AMQP-based messaging solutions. Spring Boot offers several conveniences forworking with AMQP through RabbitMQ, including the spring-boot-starter-amqp “Starter”.
RabbitMQ support
RabbitMQ is a lightweight, reliable, scalable, and portable message broker based on the AMQPprotocol. Spring uses RabbitMQ to communicate through the AMQP protocol.
RabbitMQ configuration is controlled by external configuration properties in spring.rabbitmq.*. Forexample, you might declare the following section in application.properties:
spring.rabbitmq.host=localhostspring.rabbitmq.port=5672spring.rabbitmq.username=adminspring.rabbitmq.password=secret
Alternatively, you could configure the same connection using the addresses attribute:
spring.rabbitmq.addresses=amqp://admin:secret@localhost
If a ConnectionNameStrategy bean exists in the context, it will be automatically used to nameconnections created by the auto-configured ConnectionFactory. See RabbitProperties for more of thesupported options.
See Understanding AMQP, the protocol used by RabbitMQ for more details.
Sending a Message
Spring’s AmqpTemplate and AmqpAdmin are auto-configured, and you can autowire them directly intoyour own beans, as shown in the following example:
157

import org.springframework.amqp.core.AmqpAdmin;import org.springframework.amqp.core.AmqpTemplate;import org.springframework.beans.factory.annotation.Autowired;import org.springframework.stereotype.Component;
@Componentpublic class MyBean {
private final AmqpAdmin amqpAdmin; private final AmqpTemplate amqpTemplate;
@Autowired public MyBean(AmqpAdmin amqpAdmin, AmqpTemplate amqpTemplate) { this.amqpAdmin = amqpAdmin; this.amqpTemplate = amqpTemplate; }
// ...
}
RabbitMessagingTemplate can be injected in a similar manner. If a MessageConverterbean is defined, it is associated automatically to the auto-configured AmqpTemplate.
If necessary, any org.springframework.amqp.core.Queue that is defined as a bean is automaticallyused to declare a corresponding queue on the RabbitMQ instance.
To retry operations, you can enable retries on the AmqpTemplate (for example, in the event that thebroker connection is lost):
spring.rabbitmq.template.retry.enabled=truespring.rabbitmq.template.retry.initial-interval=2s
Retries are disabled by default. You can also customize the RetryTemplate programmatically bydeclaring a RabbitRetryTemplateCustomizer bean.
Receiving a Message
When the Rabbit infrastructure is present, any bean can be annotated with @RabbitListener tocreate a listener endpoint. If no RabbitListenerContainerFactory has been defined, a defaultSimpleRabbitListenerContainerFactory is automatically configured and you can switch to a directcontainer using the spring.rabbitmq.listener.type property. If a MessageConverter or aMessageRecoverer bean is defined, it is automatically associated with the default factory.
The following sample component creates a listener endpoint on the someQueue queue:
158
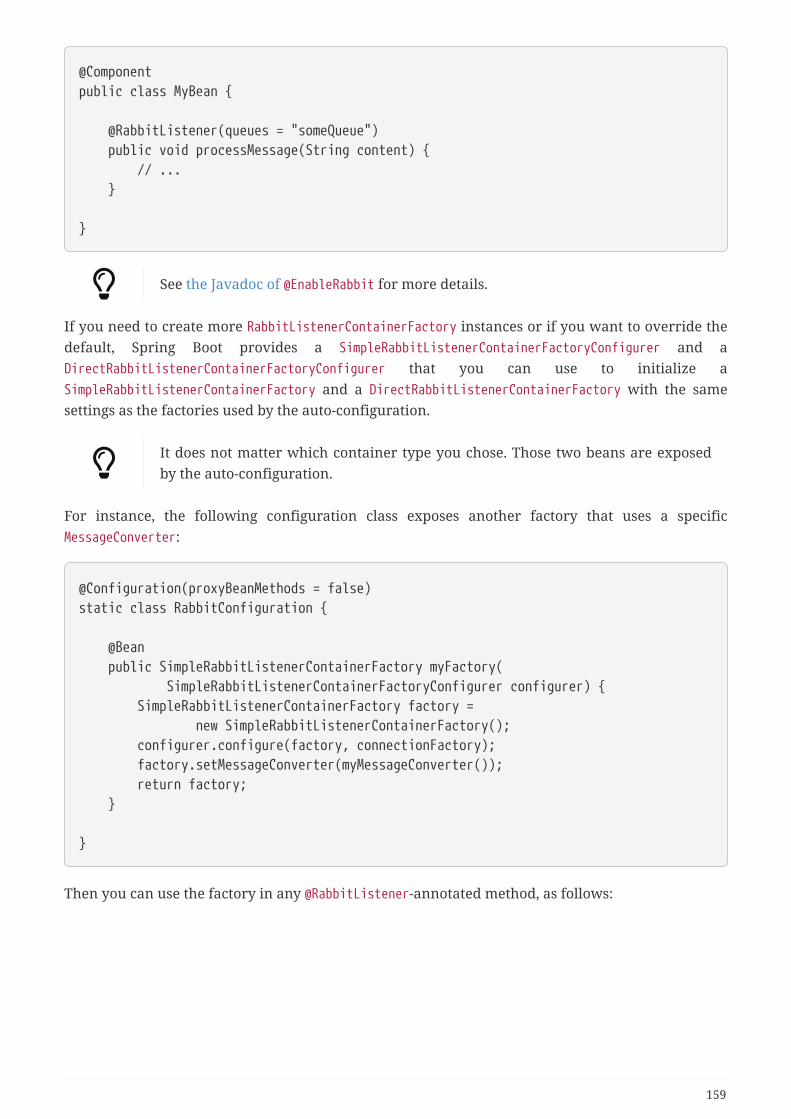
@Componentpublic class MyBean {
@RabbitListener(queues = "someQueue") public void processMessage(String content) { // ... }
}
See the Javadoc of @EnableRabbit for more details.
If you need to create more RabbitListenerContainerFactory instances or if you want to override thedefault, Spring Boot provides a SimpleRabbitListenerContainerFactoryConfigurer and aDirectRabbitListenerContainerFactoryConfigurer that you can use to initialize aSimpleRabbitListenerContainerFactory and a DirectRabbitListenerContainerFactory with the samesettings as the factories used by the auto-configuration.
It does not matter which container type you chose. Those two beans are exposedby the auto-configuration.
For instance, the following configuration class exposes another factory that uses a specificMessageConverter:
@Configuration(proxyBeanMethods = false)static class RabbitConfiguration {
@Bean public SimpleRabbitListenerContainerFactory myFactory( SimpleRabbitListenerContainerFactoryConfigurer configurer) { SimpleRabbitListenerContainerFactory factory = new SimpleRabbitListenerContainerFactory(); configurer.configure(factory, connectionFactory); factory.setMessageConverter(myMessageConverter()); return factory; }
}
Then you can use the factory in any @RabbitListener-annotated method, as follows:
159
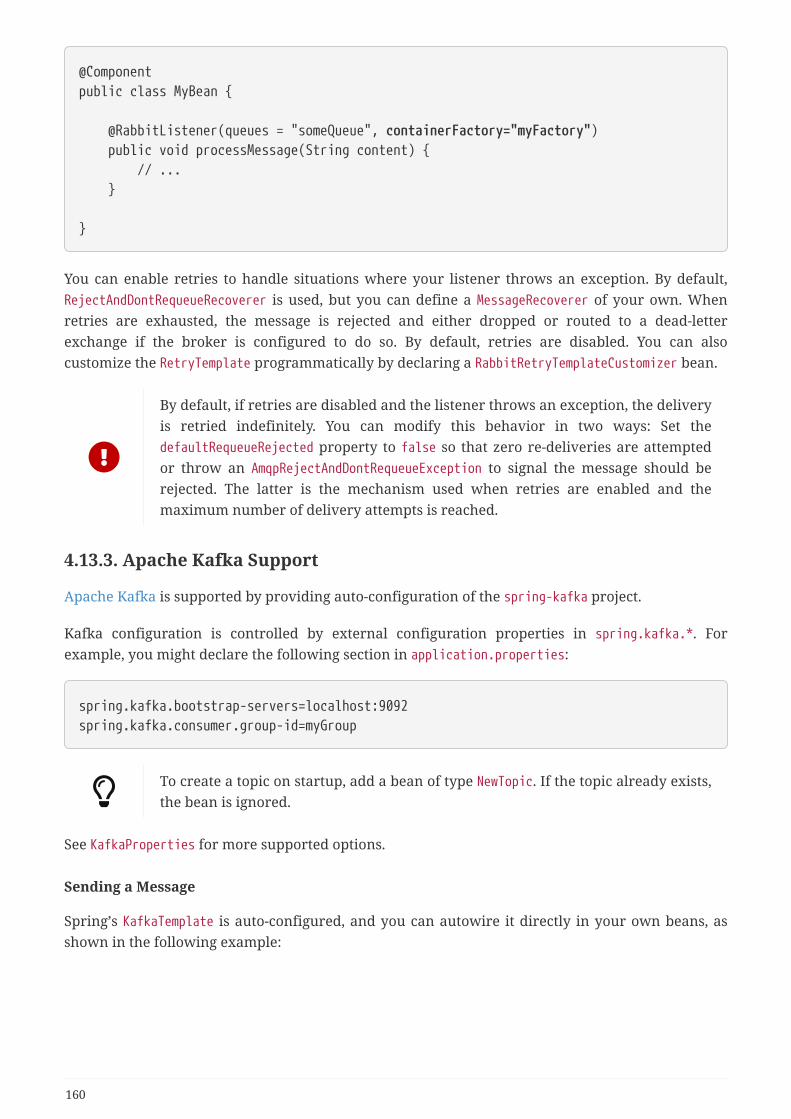
@Componentpublic class MyBean {
@RabbitListener(queues = "someQueue", containerFactory="myFactory") public void processMessage(String content) { // ... }
}
You can enable retries to handle situations where your listener throws an exception. By default,RejectAndDontRequeueRecoverer is used, but you can define a MessageRecoverer of your own. Whenretries are exhausted, the message is rejected and either dropped or routed to a dead-letterexchange if the broker is configured to do so. By default, retries are disabled. You can alsocustomize the RetryTemplate programmatically by declaring a RabbitRetryTemplateCustomizer bean.
By default, if retries are disabled and the listener throws an exception, the deliveryis retried indefinitely. You can modify this behavior in two ways: Set thedefaultRequeueRejected property to false so that zero re-deliveries are attemptedor throw an AmqpRejectAndDontRequeueException to signal the message should berejected. The latter is the mechanism used when retries are enabled and themaximum number of delivery attempts is reached.
4.13.3. Apache Kafka Support
Apache Kafka is supported by providing auto-configuration of the spring-kafka project.
Kafka configuration is controlled by external configuration properties in spring.kafka.*. Forexample, you might declare the following section in application.properties:
spring.kafka.bootstrap-servers=localhost:9092spring.kafka.consumer.group-id=myGroup
To create a topic on startup, add a bean of type NewTopic. If the topic already exists,the bean is ignored.
See KafkaProperties for more supported options.
Sending a Message
Spring’s KafkaTemplate is auto-configured, and you can autowire it directly in your own beans, asshown in the following example:
160
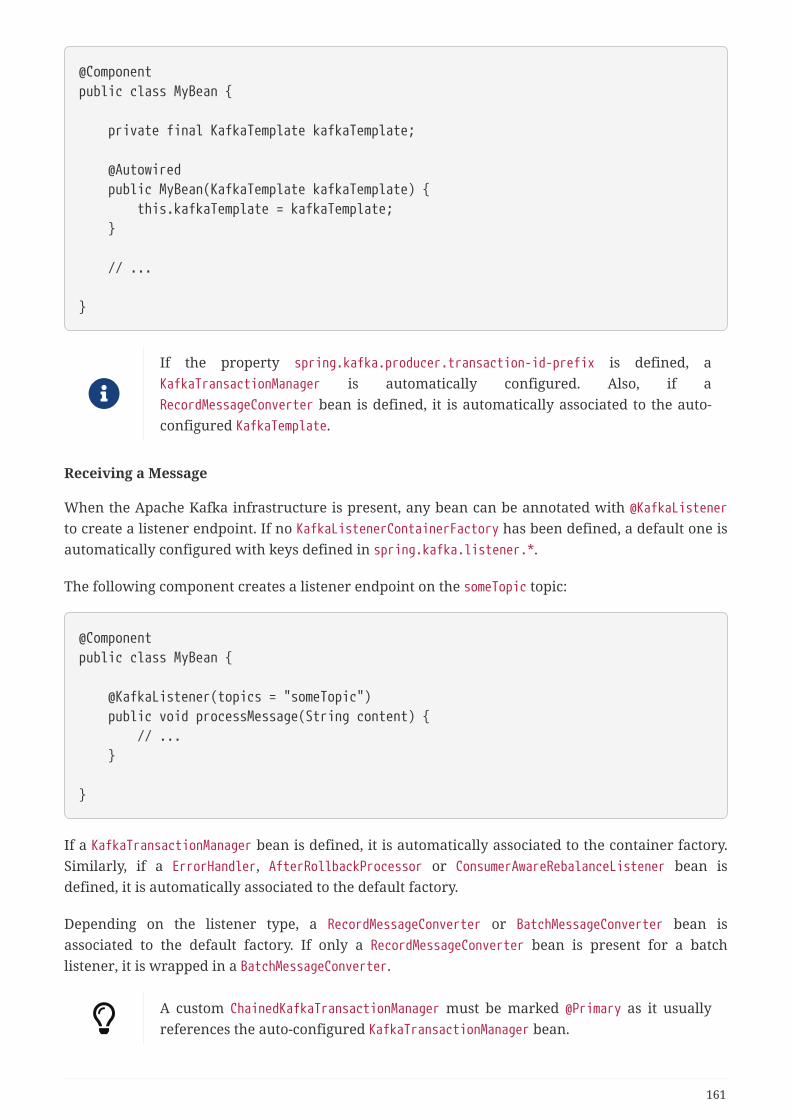
@Componentpublic class MyBean {
private final KafkaTemplate kafkaTemplate;
@Autowired public MyBean(KafkaTemplate kafkaTemplate) { this.kafkaTemplate = kafkaTemplate; }
// ...
}
If the property spring.kafka.producer.transaction-id-prefix is defined, aKafkaTransactionManager is automatically configured. Also, if aRecordMessageConverter bean is defined, it is automatically associated to the auto-configured KafkaTemplate.
Receiving a Message
When the Apache Kafka infrastructure is present, any bean can be annotated with @KafkaListenerto create a listener endpoint. If no KafkaListenerContainerFactory has been defined, a default one isautomatically configured with keys defined in spring.kafka.listener.*.
The following component creates a listener endpoint on the someTopic topic:
@Componentpublic class MyBean {
@KafkaListener(topics = "someTopic") public void processMessage(String content) { // ... }
}
If a KafkaTransactionManager bean is defined, it is automatically associated to the container factory.Similarly, if a ErrorHandler, AfterRollbackProcessor or ConsumerAwareRebalanceListener bean isdefined, it is automatically associated to the default factory.
Depending on the listener type, a RecordMessageConverter or BatchMessageConverter bean isassociated to the default factory. If only a RecordMessageConverter bean is present for a batchlistener, it is wrapped in a BatchMessageConverter.
A custom ChainedKafkaTransactionManager must be marked @Primary as it usuallyreferences the auto-configured KafkaTransactionManager bean.
161

Kafka Streams
Spring for Apache Kafka provides a factory bean to create a StreamsBuilder object and manage thelifecycle of its streams. Spring Boot auto-configures the required KafkaStreamsConfiguration bean aslong as kafka-streams is on the classpath and Kafka Streams is enabled via the @EnableKafkaStreamsannotation.
Enabling Kafka Streams means that the application id and bootstrap servers must be set. Theformer can be configured using spring.kafka.streams.application-id, defaulting tospring.application.name if not set. The latter can be set globally or specifically overridden only forstreams.
Several additional properties are available using dedicated properties; other arbitrary Kafkaproperties can be set using the spring.kafka.streams.properties namespace. See also AdditionalKafka Properties for more information.
To use the factory bean, wire StreamsBuilder into your @Bean as shown in the following example:
@Configuration(proxyBeanMethods = false)@EnableKafkaStreamspublic static class KafkaStreamsExampleConfiguration {
@Bean public KStream<Integer, String> kStream(StreamsBuilder streamsBuilder) { KStream<Integer, String> stream = streamsBuilder.stream("ks1In"); stream.map((k, v) -> new KeyValue<>(k, v.toUpperCase())).to("ks1Out", Produced.with(Serdes.Integer(), new JsonSerde<>())); return stream; }
}
By default, the streams managed by the StreamBuilder object it creates are started automatically.You can customize this behaviour using the spring.kafka.streams.auto-startup property.
Additional Kafka Properties
The properties supported by auto configuration are shown in Common Application properties. Notethat, for the most part, these properties (hyphenated or camelCase) map directly to the ApacheKafka dotted properties. Refer to the Apache Kafka documentation for details.
The first few of these properties apply to all components (producers, consumers, admins, andstreams) but can be specified at the component level if you wish to use different values. ApacheKafka designates properties with an importance of HIGH, MEDIUM, or LOW. Spring Boot auto-configuration supports all HIGH importance properties, some selected MEDIUM and LOWproperties, and any properties that do not have a default value.
Only a subset of the properties supported by Kafka are available directly through theKafkaProperties class. If you wish to configure the producer or consumer with additional properties
162

that are not directly supported, use the following properties:
spring.kafka.properties.prop.one=firstspring.kafka.admin.properties.prop.two=secondspring.kafka.consumer.properties.prop.three=thirdspring.kafka.producer.properties.prop.four=fourthspring.kafka.streams.properties.prop.five=fifth
This sets the common prop.one Kafka property to first (applies to producers, consumers andadmins), the prop.two admin property to second, the prop.three consumer property to third, theprop.four producer property to fourth and the prop.five streams property to fifth.
You can also configure the Spring Kafka JsonDeserializer as follows:
spring.kafka.consumer.value-deserializer=org.springframework.kafka.support.serializer.JsonDeserializerspring.kafka.consumer.properties.spring.json.value.default.type=com.example.Invoicespring.kafka.consumer.properties.spring.json.trusted.packages=com.example,org.acme
Similarly, you can disable the JsonSerializer default behavior of sending type information inheaders:
spring.kafka.producer.value-serializer=org.springframework.kafka.support.serializer.JsonSerializerspring.kafka.producer.properties.spring.json.add.type.headers=false
Properties set in this way override any configuration item that Spring Bootexplicitly supports.
Testing with Embedded Kafka
Spring for Apache Kafka provides a convenient way to test projects with an embedded ApacheKafka broker. To use this feature, annotate a test class with @EmbeddedKafka from the spring-kafka-test module. For more information, please see the Spring for Apache Kafka reference manual.
To make Spring Boot auto-configuration work with the aforementioned embedded Apache Kafkabroker, you need to remap a system property for embedded broker addresses (populated by theEmbeddedKafkaBroker) into the Spring Boot configuration property for Apache Kafka. There areseveral ways to do that:
• Provide a system property to map embedded broker addresses into spring.kafka.bootstrap-servers in the test class:
163

static { System.setProperty(EmbeddedKafkaBroker.BROKER_LIST_PROPERTY,"spring.kafka.bootstrap-servers");}
• Configure a property name on the @EmbeddedKafka annotation:
@EmbeddedKafka(topics = "someTopic", bootstrapServersProperty = "spring.kafka.bootstrap-servers")
• Use a placeholder in configuration properties:
spring.kafka.bootstrap-servers=${spring.embedded.kafka.brokers}
4.14. Calling REST Services with RestTemplateIf you need to call remote REST services from your application, you can use the Spring Framework’sRestTemplate class. Since RestTemplate instances often need to be customized before being used,Spring Boot does not provide any single auto-configured RestTemplate bean. It does, however, auto-configure a RestTemplateBuilder, which can be used to create RestTemplate instances when needed.The auto-configured RestTemplateBuilder ensures that sensible HttpMessageConverters are applied toRestTemplate instances.
The following code shows a typical example:
@Servicepublic class MyService {
private final RestTemplate restTemplate;
public MyService(RestTemplateBuilder restTemplateBuilder) { this.restTemplate = restTemplateBuilder.build(); }
public Details someRestCall(String name) { return this.restTemplate.getForObject("/{name}/details", Details.class, name); }
}
RestTemplateBuilder includes a number of useful methods that can be used toquickly configure a RestTemplate. For example, to add BASIC auth support, you canuse builder.basicAuthentication("user", "password").build().
164
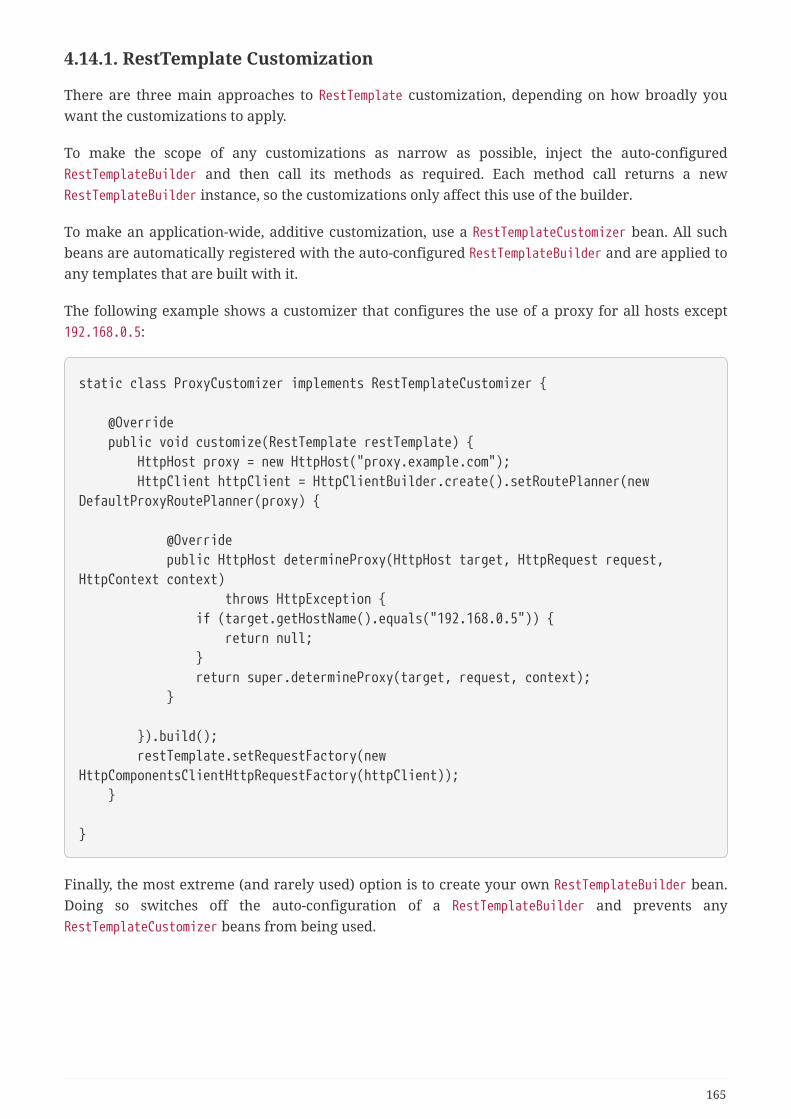
4.14.1. RestTemplate Customization
There are three main approaches to RestTemplate customization, depending on how broadly youwant the customizations to apply.
To make the scope of any customizations as narrow as possible, inject the auto-configuredRestTemplateBuilder and then call its methods as required. Each method call returns a newRestTemplateBuilder instance, so the customizations only affect this use of the builder.
To make an application-wide, additive customization, use a RestTemplateCustomizer bean. All suchbeans are automatically registered with the auto-configured RestTemplateBuilder and are applied toany templates that are built with it.
The following example shows a customizer that configures the use of a proxy for all hosts except192.168.0.5:
static class ProxyCustomizer implements RestTemplateCustomizer {
@Override public void customize(RestTemplate restTemplate) { HttpHost proxy = new HttpHost("proxy.example.com"); HttpClient httpClient = HttpClientBuilder.create().setRoutePlanner(newDefaultProxyRoutePlanner(proxy) {
@Override public HttpHost determineProxy(HttpHost target, HttpRequest request,HttpContext context) throws HttpException { if (target.getHostName().equals("192.168.0.5")) { return null; } return super.determineProxy(target, request, context); }
}).build(); restTemplate.setRequestFactory(newHttpComponentsClientHttpRequestFactory(httpClient)); }
}
Finally, the most extreme (and rarely used) option is to create your own RestTemplateBuilder bean.Doing so switches off the auto-configuration of a RestTemplateBuilder and prevents anyRestTemplateCustomizer beans from being used.
165
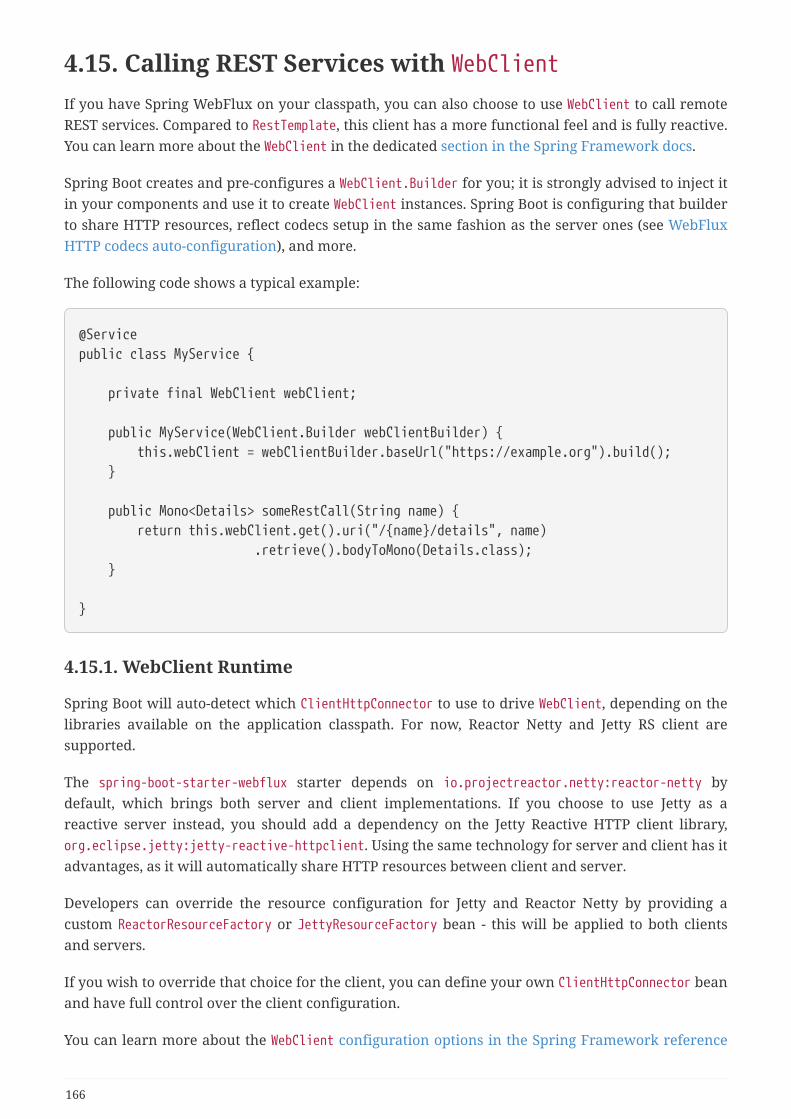
4.15. Calling REST Services with WebClientIf you have Spring WebFlux on your classpath, you can also choose to use WebClient to call remoteREST services. Compared to RestTemplate, this client has a more functional feel and is fully reactive.You can learn more about the WebClient in the dedicated section in the Spring Framework docs.
Spring Boot creates and pre-configures a WebClient.Builder for you; it is strongly advised to inject itin your components and use it to create WebClient instances. Spring Boot is configuring that builderto share HTTP resources, reflect codecs setup in the same fashion as the server ones (see WebFluxHTTP codecs auto-configuration), and more.
The following code shows a typical example:
@Servicepublic class MyService {
private final WebClient webClient;
public MyService(WebClient.Builder webClientBuilder) { this.webClient = webClientBuilder.baseUrl("https://example.org").build(); }
public Mono<Details> someRestCall(String name) { return this.webClient.get().uri("/{name}/details", name) .retrieve().bodyToMono(Details.class); }
}
4.15.1. WebClient Runtime
Spring Boot will auto-detect which ClientHttpConnector to use to drive WebClient, depending on thelibraries available on the application classpath. For now, Reactor Netty and Jetty RS client aresupported.
The spring-boot-starter-webflux starter depends on io.projectreactor.netty:reactor-netty bydefault, which brings both server and client implementations. If you choose to use Jetty as areactive server instead, you should add a dependency on the Jetty Reactive HTTP client library,org.eclipse.jetty:jetty-reactive-httpclient. Using the same technology for server and client has itadvantages, as it will automatically share HTTP resources between client and server.
Developers can override the resource configuration for Jetty and Reactor Netty by providing acustom ReactorResourceFactory or JettyResourceFactory bean - this will be applied to both clientsand servers.
If you wish to override that choice for the client, you can define your own ClientHttpConnector beanand have full control over the client configuration.
You can learn more about the WebClient configuration options in the Spring Framework reference
166
documentation.
4.15.2. WebClient Customization
There are three main approaches to WebClient customization, depending on how broadly you wantthe customizations to apply.
To make the scope of any customizations as narrow as possible, inject the auto-configuredWebClient.Builder and then call its methods as required. WebClient.Builder instances are stateful:Any change on the builder is reflected in all clients subsequently created with it. If you want tocreate several clients with the same builder, you can also consider cloning the builder withWebClient.Builder other = builder.clone();.
To make an application-wide, additive customization to all WebClient.Builder instances, you candeclare WebClientCustomizer beans and change the WebClient.Builder locally at the point ofinjection.
Finally, you can fall back to the original API and use WebClient.create(). In that case, no auto-configuration or WebClientCustomizer is applied.
4.16. ValidationThe method validation feature supported by Bean Validation 1.1 is automatically enabled as long asa JSR-303 implementation (such as Hibernate validator) is on the classpath. This lets bean methodsbe annotated with javax.validation constraints on their parameters and/or on their return value.Target classes with such annotated methods need to be annotated with the @Validated annotation atthe type level for their methods to be searched for inline constraint annotations.
For instance, the following service triggers the validation of the first argument, making sure its sizeis between 8 and 10:
@Service@Validatedpublic class MyBean {
public Archive findByCodeAndAuthor(@Size(min = 8, max = 10) String code, Author author) { ... }
}
4.17. Sending EmailThe Spring Framework provides an abstraction for sending email by using the JavaMailSenderinterface, and Spring Boot provides auto-configuration for it as well as a starter module.
167
See the reference documentation for a detailed explanation of how you can useJavaMailSender.
If spring.mail.host and the relevant libraries (as defined by spring-boot-starter-mail) areavailable, a default JavaMailSender is created if none exists. The sender can be further customizedby configuration items from the spring.mail namespace. See MailProperties for more details.
In particular, certain default timeout values are infinite, and you may want to change that to avoidhaving a thread blocked by an unresponsive mail server, as shown in the following example:
spring.mail.properties.mail.smtp.connectiontimeout=5000spring.mail.properties.mail.smtp.timeout=3000spring.mail.properties.mail.smtp.writetimeout=5000
It is also possible to configure a JavaMailSender with an existing Session from JNDI:
spring.mail.jndi-name=mail/Session
When a jndi-name is set, it takes precedence over all other Session-related settings.
4.18. Distributed Transactions with JTASpring Boot supports distributed JTA transactions across multiple XA resources by using either anAtomikos or Bitronix embedded transaction manager. JTA transactions are also supported whendeploying to a suitable Java EE Application Server.
When a JTA environment is detected, Spring’s JtaTransactionManager is used to managetransactions. Auto-configured JMS, DataSource, and JPA beans are upgraded to support XAtransactions. You can use standard Spring idioms, such as @Transactional, to participate in adistributed transaction. If you are within a JTA environment and still want to use local transactions,you can set the spring.jta.enabled property to false to disable the JTA auto-configuration.
4.18.1. Using an Atomikos Transaction Manager
Atomikos is a popular open source transaction manager which can be embedded into your SpringBoot application. You can use the spring-boot-starter-jta-atomikos starter to pull in theappropriate Atomikos libraries. Spring Boot auto-configures Atomikos and ensures that appropriatedepends-on settings are applied to your Spring beans for correct startup and shutdown ordering.
By default, Atomikos transaction logs are written to a transaction-logs directory in yourapplication’s home directory (the directory in which your application jar file resides). You cancustomize the location of this directory by setting a spring.jta.log-dir property in yourapplication.properties file. Properties starting with spring.jta.atomikos.properties can also beused to customize the Atomikos UserTransactionServiceImp. See the AtomikosProperties Javadoc forcomplete details.
168

To ensure that multiple transaction managers can safely coordinate the sameresource managers, each Atomikos instance must be configured with a unique ID.By default, this ID is the IP address of the machine on which Atomikos is running.To ensure uniqueness in production, you should configure thespring.jta.transaction-manager-id property with a different value for eachinstance of your application.
4.18.2. Using a Bitronix Transaction Manager
Bitronix is a popular open-source JTA transaction manager implementation. You can use thespring-boot-starter-jta-bitronix starter to add the appropriate Bitronix dependencies to yourproject. As with Atomikos, Spring Boot automatically configures Bitronix and post-processes yourbeans to ensure that startup and shutdown ordering is correct.
By default, Bitronix transaction log files (part1.btm and part2.btm) are written to a transaction-logsdirectory in your application home directory. You can customize the location of this directory bysetting the spring.jta.log-dir property. Properties starting with spring.jta.bitronix.properties arealso bound to the bitronix.tm.Configuration bean, allowing for complete customization. See theBitronix documentation for details.
To ensure that multiple transaction managers can safely coordinate the sameresource managers, each Bitronix instance must be configured with a unique ID.By default, this ID is the IP address of the machine on which Bitronix is running.To ensure uniqueness in production, you should configure thespring.jta.transaction-manager-id property with a different value for eachinstance of your application.
4.18.3. Using a Java EE Managed Transaction Manager
If you package your Spring Boot application as a war or ear file and deploy it to a Java EE applicationserver, you can use your application server’s built-in transaction manager. Spring Boot tries toauto-configure a transaction manager by looking at common JNDI locations(java:comp/UserTransaction, java:comp/TransactionManager, and so on). If you use a transactionservice provided by your application server, you generally also want to ensure that all resourcesare managed by the server and exposed over JNDI. Spring Boot tries to auto-configure JMS bylooking for a ConnectionFactory at the JNDI path (java:/JmsXA or java:/XAConnectionFactory), andyou can use the spring.datasource.jndi-name property to configure your DataSource.
4.18.4. Mixing XA and Non-XA JMS Connections
When using JTA, the primary JMS ConnectionFactory bean is XA-aware and participates indistributed transactions. In some situations, you might want to process certain JMS messages byusing a non-XA ConnectionFactory. For example, your JMS processing logic might take longer thanthe XA timeout.
If you want to use a non-XA ConnectionFactory, you can inject the nonXaJmsConnectionFactory beanrather than the @Primary jmsConnectionFactory bean. For consistency, the jmsConnectionFactory beanis also provided by using the bean alias xaJmsConnectionFactory.
169

The following example shows how to inject ConnectionFactory instances:
// Inject the primary (XA aware) ConnectionFactory@Autowiredprivate ConnectionFactory defaultConnectionFactory;
// Inject the XA aware ConnectionFactory (uses the alias and injects the same asabove)@Autowired@Qualifier("xaJmsConnectionFactory")private ConnectionFactory xaConnectionFactory;
// Inject the non-XA aware ConnectionFactory@Autowired@Qualifier("nonXaJmsConnectionFactory")private ConnectionFactory nonXaConnectionFactory;
4.18.5. Supporting an Alternative Embedded Transaction Manager
The XAConnectionFactoryWrapper and XADataSourceWrapper interfaces can be used to supportalternative embedded transaction managers. The interfaces are responsible for wrappingXAConnectionFactory and XADataSource beans and exposing them as regular ConnectionFactory andDataSource beans, which transparently enroll in the distributed transaction. DataSource and JMSauto-configuration use JTA variants, provided you have a JtaTransactionManager bean andappropriate XA wrapper beans registered within your ApplicationContext.
The BitronixXAConnectionFactoryWrapper and BitronixXADataSourceWrapper provide goodexamples of how to write XA wrappers.
4.19. HazelcastIf Hazelcast is on the classpath and a suitable configuration is found, Spring Boot auto-configures aHazelcastInstance that you can inject in your application.
If you define a com.hazelcast.config.Config bean, Spring Boot uses that. If your configurationdefines an instance name, Spring Boot tries to locate an existing instance rather than creating anew one.
You could also specify the Hazelcast configuration file to use through configuration, as shown in thefollowing example:
spring.hazelcast.config=classpath:config/my-hazelcast.xml
Otherwise, Spring Boot tries to find the Hazelcast configuration from the default locations:hazelcast.xml in the working directory or at the root of the classpath, or a .yaml counterpart in thesame locations. We also check if the hazelcast.config system property is set. See the Hazelcastdocumentation for more details.
170

If hazelcast-client is present on the classpath, Spring Boot first attempts to create a client bychecking the following configuration options:
• The presence of a com.hazelcast.client.config.ClientConfig bean.
• A configuration file defined by the spring.hazelcast.config property.
• The presence of the hazelcast.client.config system property.
• A hazelcast-client.xml in the working directory or at the root of the classpath.
• A hazelcast-client.yaml in the working directory or at the root of the classpath.
Spring Boot also has explicit caching support for Hazelcast. If caching is enabled,the HazelcastInstance is automatically wrapped in a CacheManager implementation.
4.20. Quartz SchedulerSpring Boot offers several conveniences for working with the Quartz scheduler, including thespring-boot-starter-quartz “Starter”. If Quartz is available, a Scheduler is auto-configured (throughthe SchedulerFactoryBean abstraction).
Beans of the following types are automatically picked up and associated with the Scheduler:
• JobDetail: defines a particular Job. JobDetail instances can be built with the JobBuilder API.
• Calendar.
• Trigger: defines when a particular job is triggered.
By default, an in-memory JobStore is used. However, it is possible to configure a JDBC-based store ifa DataSource bean is available in your application and if the spring.quartz.job-store-type propertyis configured accordingly, as shown in the following example:
spring.quartz.job-store-type=jdbc
When the JDBC store is used, the schema can be initialized on startup, as shown in the followingexample:
spring.quartz.jdbc.initialize-schema=always
By default, the database is detected and initialized by using the standard scriptsprovided with the Quartz library. These scripts drop existing tables, deleting alltriggers on every restart. It is also possible to provide a custom script by setting thespring.quartz.jdbc.schema property.
To have Quartz use a DataSource other than the application’s main DataSource, declare a DataSourcebean, annotating its @Bean method with @QuartzDataSource. Doing so ensures that the Quartz-specificDataSource is used by both the SchedulerFactoryBean and for schema initialization.
171

By default, jobs created by configuration will not overwrite already registered jobs that have beenread from a persistent job store. To enable overwriting existing job definitions set thespring.quartz.overwrite-existing-jobs property.
Quartz Scheduler configuration can be customized using spring.quartz properties andSchedulerFactoryBeanCustomizer beans, which allow programmatic SchedulerFactoryBean
customization. Advanced Quartz configuration properties can be customized usingspring.quartz.properties.*.
In particular, an Executor bean is not associated with the scheduler as Quartzoffers a way to configure the scheduler via spring.quartz.properties. If you needto customize the task executor, consider implementingSchedulerFactoryBeanCustomizer.
Jobs can define setters to inject data map properties. Regular beans can also be injected in a similarmanner, as shown in the following example:
public class SampleJob extends QuartzJobBean {
private MyService myService;
private String name;
// Inject "MyService" bean public void setMyService(MyService myService) { ... }
// Inject the "name" job data property public void setName(String name) { ... }
@Override protected void executeInternal(JobExecutionContext context) throws JobExecutionException { ... }
}
4.21. Task Execution and SchedulingIn the absence of an Executor bean in the context, Spring Boot auto-configures aThreadPoolTaskExecutor with sensible defaults that can be automatically associated to asynchronoustask execution (@EnableAsync) and Spring MVC asynchronous request processing.
172
If you have defined a custom Executor in the context, regular task execution (i.e.@EnableAsync) will use it transparently but the Spring MVC support will not beconfigured as it requires an AsyncTaskExecutor implementation (namedapplicationTaskExecutor). Depending on your target arrangement, you couldchange your Executor into a ThreadPoolTaskExecutor or define both aThreadPoolTaskExecutor and an AsyncConfigurer wrapping your custom Executor.
The auto-configured TaskExecutorBuilder allows you to easily create instances thatreproduce what the auto-configuration does by default.
The thread pool uses 8 core threads that can grow and shrink according to the load. Those defaultsettings can be fine-tuned using the spring.task.execution namespace as shown in the followingexample:
spring.task.execution.pool.max-size=16spring.task.execution.pool.queue-capacity=100spring.task.execution.pool.keep-alive=10s
This changes the thread pool to use a bounded queue so that when the queue is full (100 tasks), thethread pool increases to maximum 16 threads. Shrinking of the pool is more aggressive as threadsare reclaimed when they are idle for 10 seconds (rather than 60 seconds by default).
A ThreadPoolTaskScheduler can also be auto-configured if need to be associated to scheduled taskexecution (@EnableScheduling). The thread pool uses one thread by default and those settings can befine-tuned using the spring.task.scheduling namespace.
Both a TaskExecutorBuilder bean and a TaskSchedulerBuilder bean are made available in the contextif a custom executor or scheduler needs to be created.
4.22. Spring IntegrationSpring Boot offers several conveniences for working with Spring Integration, including the spring-boot-starter-integration “Starter”. Spring Integration provides abstractions over messaging andalso other transports such as HTTP, TCP, and others. If Spring Integration is available on yourclasspath, it is initialized through the @EnableIntegration annotation.
Spring Boot also configures some features that are triggered by the presence of additional SpringIntegration modules. If spring-integration-jmx is also on the classpath, message processingstatistics are published over JMX. If spring-integration-jdbc is available, the default databaseschema can be created on startup, as shown in the following line:
spring.integration.jdbc.initialize-schema=always
See the IntegrationAutoConfiguration and IntegrationProperties classes for more details.
By default, if a Micrometer meterRegistry bean is present, Spring Integration metrics will bemanaged by Micrometer. If you wish to use legacy Spring Integration metrics, add a
173

DefaultMetricsFactory bean to the application context.
4.23. Spring SessionSpring Boot provides Spring Session auto-configuration for a wide range of data stores. Whenbuilding a Servlet web application, the following stores can be auto-configured:
• JDBC
• Redis
• Hazelcast
• MongoDB
When building a reactive web application, the following stores can be auto-configured:
• Redis
• MongoDB
If a single Spring Session module is present on the classpath, Spring Boot uses that storeimplementation automatically. If you have more than one implementation, you must choose theStoreType that you wish to use to store the sessions. For instance, to use JDBC as the back-end store,you can configure your application as follows:
spring.session.store-type=jdbc
You can disable Spring Session by setting the store-type to none.
Each store has specific additional settings. For instance, it is possible to customize the name of thetable for the JDBC store, as shown in the following example:
spring.session.jdbc.table-name=SESSIONS
For setting the timeout of the session you can use the spring.session.timeout property. If thatproperty is not set, the auto-configuration falls back to the value of server.servlet.session.timeout.
4.24. Monitoring and Management over JMXJava Management Extensions (JMX) provide a standard mechanism to monitor and manageapplications. Spring Boot exposes the most suitable MBeanServer as a bean with an ID of mbeanServer.Any of your beans that are annotated with Spring JMX annotations (@ManagedResource,@ManagedAttribute, or @ManagedOperation) are exposed to it.
If your platform provides a standard MBeanServer, Spring Boot will use that and default to the VMMBeanServer if necessary. If all that fails, a new MBeanServer will be created.
See the JmxAutoConfiguration class for more details.
174
4.25. TestingSpring Boot provides a number of utilities and annotations to help when testing your application.Test support is provided by two modules: spring-boot-test contains core items, and spring-boot-test-autoconfigure supports auto-configuration for tests.
Most developers use the spring-boot-starter-test “Starter”, which imports both Spring Boot testmodules as well as JUnit Jupiter, AssertJ, Hamcrest, and a number of other useful libraries.
The starter also brings the vintage engine so that you can run both JUnit 4 andJUnit 5 tests. If you have migrated your tests to JUnit 5, you should exclude JUnit 4support, as shown in the following example:
<dependency> <groupId>org.springframework.boot</groupId> <artifactId>spring-boot-starter-test</artifactId> <scope>test</scope> <exclusions> <exclusion> <groupId>org.junit.vintage</groupId> <artifactId>junit-vintage-engine</artifactId> </exclusion> </exclusions></dependency>
4.25.1. Test Scope Dependencies
The spring-boot-starter-test “Starter” (in the test scope) contains the following provided libraries:
• JUnit 5 (including the vintage engine for backward compatibility with JUnit 4): The de-factostandard for unit testing Java applications.
• Spring Test & Spring Boot Test: Utilities and integration test support for Spring Bootapplications.
• AssertJ: A fluent assertion library.
• Hamcrest: A library of matcher objects (also known as constraints or predicates).
• Mockito: A Java mocking framework.
• JSONassert: An assertion library for JSON.
• JsonPath: XPath for JSON.
We generally find these common libraries to be useful when writing tests. If these libraries do notsuit your needs, you can add additional test dependencies of your own.
4.25.2. Testing Spring Applications
One of the major advantages of dependency injection is that it should make your code easier to unit
175
test. You can instantiate objects by using the new operator without even involving Spring. You canalso use mock objects instead of real dependencies.
Often, you need to move beyond unit testing and start integration testing (with a SpringApplicationContext). It is useful to be able to perform integration testing without requiringdeployment of your application or needing to connect to other infrastructure.
The Spring Framework includes a dedicated test module for such integration testing. You candeclare a dependency directly to org.springframework:spring-test or use the spring-boot-starter-test “Starter” to pull it in transitively.
If you have not used the spring-test module before, you should start by reading the relevantsection of the Spring Framework reference documentation.
4.25.3. Testing Spring Boot Applications
A Spring Boot application is a Spring ApplicationContext, so nothing very special has to be done totest it beyond what you would normally do with a vanilla Spring context.
External properties, logging, and other features of Spring Boot are installed in thecontext by default only if you use SpringApplication to create it.
Spring Boot provides a @SpringBootTest annotation, which can be used as an alternative to thestandard spring-test @ContextConfiguration annotation when you need Spring Boot features. Theannotation works by creating the ApplicationContext used in your tests through SpringApplication.In addition to @SpringBootTest a number of other annotations are also provided for testing morespecific slices of an application.
If you are using JUnit 4, don’t forget to also add @RunWith(SpringRunner.class) toyour test, otherwise the annotations will be ignored. If you are using JUnit 5,there’s no need to add the equivalent @ExtendWith(SpringExtension.class) as@SpringBootTest and the other @…Test annotations are already annotated with it.
By default, @SpringBootTest will not start a server. You can use the webEnvironment attribute of@SpringBootTest to further refine how your tests run:
• MOCK(Default) : Loads a web ApplicationContext and provides a mock web environment.Embedded servers are not started when using this annotation. If a web environment is notavailable on your classpath, this mode transparently falls back to creating a regular non-webApplicationContext. It can be used in conjunction with @AutoConfigureMockMvc or@AutoConfigureWebTestClient for mock-based testing of your web application.
• RANDOM_PORT: Loads a WebServerApplicationContext and provides a real web environment.Embedded servers are started and listen on a random port.
• DEFINED_PORT: Loads a WebServerApplicationContext and provides a real web environment.Embedded servers are started and listen on a defined port (from your application.properties)or on the default port of 8080.
• NONE: Loads an ApplicationContext by using SpringApplication but does not provide any webenvironment (mock or otherwise).
176
If your test is @Transactional, it rolls back the transaction at the end of each testmethod by default. However, as using this arrangement with either RANDOM_PORT orDEFINED_PORT implicitly provides a real servlet environment, the HTTP client andserver run in separate threads and, thus, in separate transactions. Any transactioninitiated on the server does not roll back in this case.
@SpringBootTest with webEnvironment = WebEnvironment.RANDOM_PORT will also startthe management server on a separate random port if your application uses adifferent port for the management server.
Detecting Web Application Type
If Spring MVC is available, a regular MVC-based application context is configured. If you have onlySpring WebFlux, we’ll detect that and configure a WebFlux-based application context instead.
If both are present, Spring MVC takes precedence. If you want to test a reactive web application inthis scenario, you must set the spring.main.web-application-type property:
@SpringBootTest(properties = "spring.main.web-application-type=reactive")class MyWebFluxTests { ... }
Detecting Test Configuration
If you are familiar with the Spring Test Framework, you may be used to using@ContextConfiguration(classes=…) in order to specify which Spring @Configuration to load.Alternatively, you might have often used nested @Configuration classes within your test.
When testing Spring Boot applications, this is often not required. Spring Boot’s @*Test annotationssearch for your primary configuration automatically whenever you do not explicitly define one.
The search algorithm works up from the package that contains the test until it finds a classannotated with @SpringBootApplication or @SpringBootConfiguration. As long as you structured yourcode in a sensible way, your main configuration is usually found.
If you use a test annotation to test a more specific slice of your application, youshould avoid adding configuration settings that are specific to a particular area onthe main method’s application class.
The underlying component scan configuration of @SpringBootApplication definesexclude filters that are used to make sure slicing works as expected. If you areusing an explicit @ComponentScan directive on your @SpringBootApplication
-annotated class, be aware that those filters will be disabled. If you are usingslicing, you should define them again.
If you want to customize the primary configuration, you can use a nested @TestConfiguration class.Unlike a nested @Configuration class, which would be used instead of your application’s primaryconfiguration, a nested @TestConfiguration class is used in addition to your application’s primary
177

configuration.
Spring’s test framework caches application contexts between tests. Therefore, aslong as your tests share the same configuration (no matter how it is discovered),the potentially time-consuming process of loading the context happens only once.
Excluding Test Configuration
If your application uses component scanning (for example, if you use @SpringBootApplication or@ComponentScan), you may find top-level configuration classes that you created only for specific testsaccidentally get picked up everywhere.
As we have seen earlier, @TestConfiguration can be used on an inner class of a test to customize theprimary configuration. When placed on a top-level class, @TestConfiguration indicates that classesin src/test/java should not be picked up by scanning. You can then import that class explicitlywhere it is required, as shown in the following example:
@SpringBootTest@Import(MyTestsConfiguration.class)class MyTests {
@Test void exampleTest() { ... }
}
If you directly use @ComponentScan (that is, not through @SpringBootApplication) youneed to register the TypeExcludeFilter with it. See the Javadoc for details.
Using Application Arguments
If your application expects arguments, you can have @SpringBootTest inject them using the argsattribute.
@SpringBootTest(args = "--app.test=one")class ApplicationArgumentsExampleTests {
@Test void applicationArgumentsPopulated(@Autowired ApplicationArguments args) { assertThat(args.getOptionNames()).containsOnly("app.test"); assertThat(args.getOptionValues("app.test")).containsOnly("one"); }
}
178

Testing with a mock environment
By default, @SpringBootTest does not start the server. If you have web endpoints that you want totest against this mock environment, you can additionally configure MockMvc as shown in thefollowing example:
import org.junit.jupiter.api.Test;
import org.springframework.beans.factory.annotation.Autowired;import org.springframework.boot.test.autoconfigure.web.servlet.AutoConfigureMockMvc;import org.springframework.boot.test.context.SpringBootTest;import org.springframework.test.web.servlet.MockMvc;
import static org.springframework.test.web.servlet.request.MockMvcRequestBuilders.get;import staticorg.springframework.test.web.servlet.result.MockMvcResultMatchers.content;import staticorg.springframework.test.web.servlet.result.MockMvcResultMatchers.status;
@SpringBootTest@AutoConfigureMockMvcclass MockMvcExampleTests {
@Test void exampleTest(@Autowired MockMvc mvc) throws Exception { mvc.perform(get("/")).andExpect(status().isOk()).andExpect(content().string("HelloWorld")); }
}
If you want to focus only on the web layer and not start a completeApplicationContext, consider using @WebMvcTest instead.
Alternatively, you can configure a WebTestClient as shown in the following example:
179
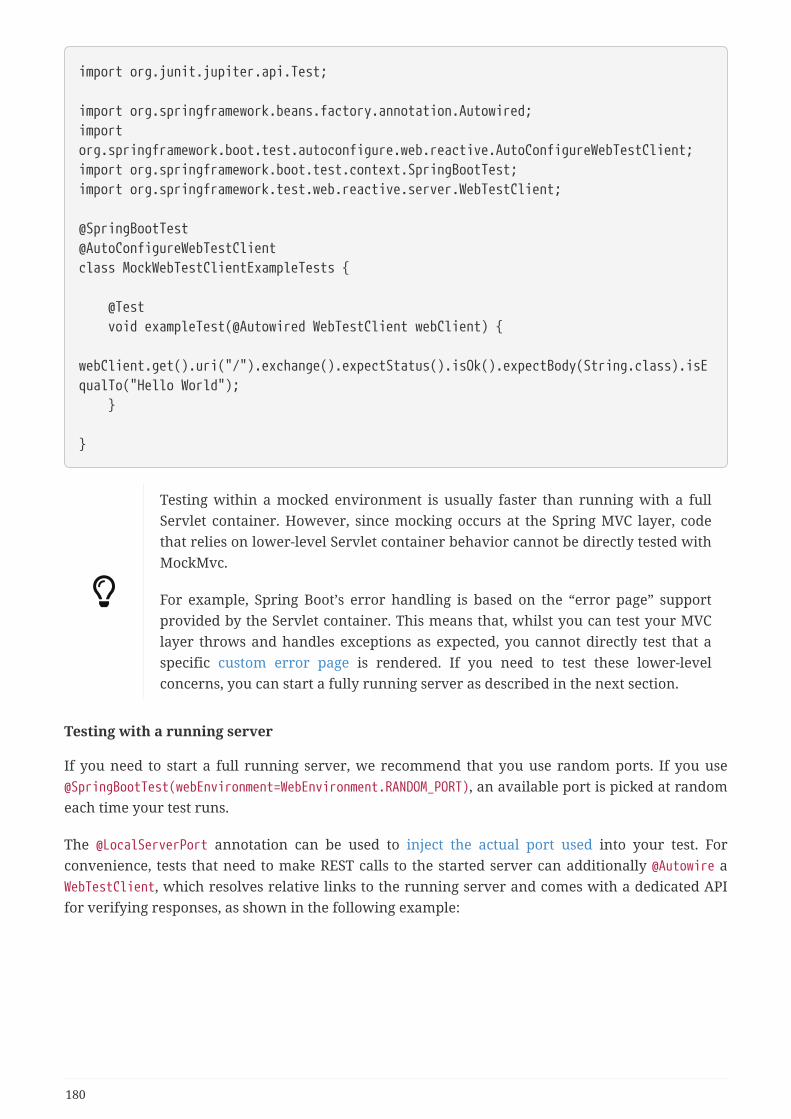
import org.junit.jupiter.api.Test;
import org.springframework.beans.factory.annotation.Autowired;importorg.springframework.boot.test.autoconfigure.web.reactive.AutoConfigureWebTestClient;import org.springframework.boot.test.context.SpringBootTest;import org.springframework.test.web.reactive.server.WebTestClient;
@SpringBootTest@AutoConfigureWebTestClientclass MockWebTestClientExampleTests {
@Test void exampleTest(@Autowired WebTestClient webClient) { webClient.get().uri("/").exchange().expectStatus().isOk().expectBody(String.class).isEqualTo("Hello World"); }
}
Testing within a mocked environment is usually faster than running with a fullServlet container. However, since mocking occurs at the Spring MVC layer, codethat relies on lower-level Servlet container behavior cannot be directly tested withMockMvc.
For example, Spring Boot’s error handling is based on the “error page” supportprovided by the Servlet container. This means that, whilst you can test your MVClayer throws and handles exceptions as expected, you cannot directly test that aspecific custom error page is rendered. If you need to test these lower-levelconcerns, you can start a fully running server as described in the next section.
Testing with a running server
If you need to start a full running server, we recommend that you use random ports. If you use@SpringBootTest(webEnvironment=WebEnvironment.RANDOM_PORT), an available port is picked at randomeach time your test runs.
The @LocalServerPort annotation can be used to inject the actual port used into your test. Forconvenience, tests that need to make REST calls to the started server can additionally @Autowire aWebTestClient, which resolves relative links to the running server and comes with a dedicated APIfor verifying responses, as shown in the following example:
180

import org.junit.jupiter.api.Test;
import org.springframework.beans.factory.annotation.Autowired;import org.springframework.boot.test.context.SpringBootTest;import org.springframework.boot.test.context.SpringBootTest.WebEnvironment;import org.springframework.test.web.reactive.server.WebTestClient;
@SpringBootTest(webEnvironment = WebEnvironment.RANDOM_PORT)class RandomPortWebTestClientExampleTests {
@Test void exampleTest(@Autowired WebTestClient webClient) { webClient.get().uri("/").exchange().expectStatus().isOk().expectBody(String.class).isEqualTo("Hello World"); }
}
This setup requires spring-webflux on the classpath. If you can’t or won’t add webflux, Spring Bootalso provides a TestRestTemplate facility:
import org.junit.jupiter.api.Test;
import org.springframework.beans.factory.annotation.Autowired;import org.springframework.boot.test.context.SpringBootTest;import org.springframework.boot.test.context.SpringBootTest.WebEnvironment;import org.springframework.boot.test.web.client.TestRestTemplate;
import static org.assertj.core.api.Assertions.assertThat;
@SpringBootTest(webEnvironment = WebEnvironment.RANDOM_PORT)class RandomPortTestRestTemplateExampleTests {
@Test void exampleTest(@Autowired TestRestTemplate restTemplate) { String body = restTemplate.getForObject("/", String.class); assertThat(body).isEqualTo("Hello World"); }
}
Customizing WebTestClient
To customize the WebTestClient bean, configure a WebTestClientBuilderCustomizer bean. Any suchbeans are called with the WebTestClient.Builder that is used to create the WebTestClient.
181

Using JMX
As the test context framework caches context, JMX is disabled by default to prevent identicalcomponents to register on the same domain. If such test needs access to an MBeanServer, considermarking it dirty as well:
@ExtendWith(SpringExtension.class)@SpringBootTest(properties = "spring.jmx.enabled=true")@DirtiesContextclass SampleJmxTests {
@Autowired private MBeanServer mBeanServer;
@Test void exampleTest() { // ... }
}
Mocking and Spying Beans
When running tests, it is sometimes necessary to mock certain components within your applicationcontext. For example, you may have a facade over some remote service that is unavailable duringdevelopment. Mocking can also be useful when you want to simulate failures that might be hard totrigger in a real environment.
Spring Boot includes a @MockBean annotation that can be used to define a Mockito mock for a beaninside your ApplicationContext. You can use the annotation to add new beans or replace a singleexisting bean definition. The annotation can be used directly on test classes, on fields within yourtest, or on @Configuration classes and fields. When used on a field, the instance of the created mockis also injected. Mock beans are automatically reset after each test method.
If your test uses one of Spring Boot’s test annotations (such as @SpringBootTest),this feature is automatically enabled. To use this feature with a differentarrangement, a listener must be explicitly added, as shown in the followingexample:
@TestExecutionListeners(MockitoTestExecutionListener.class)
The following example replaces an existing RemoteService bean with a mock implementation:
182
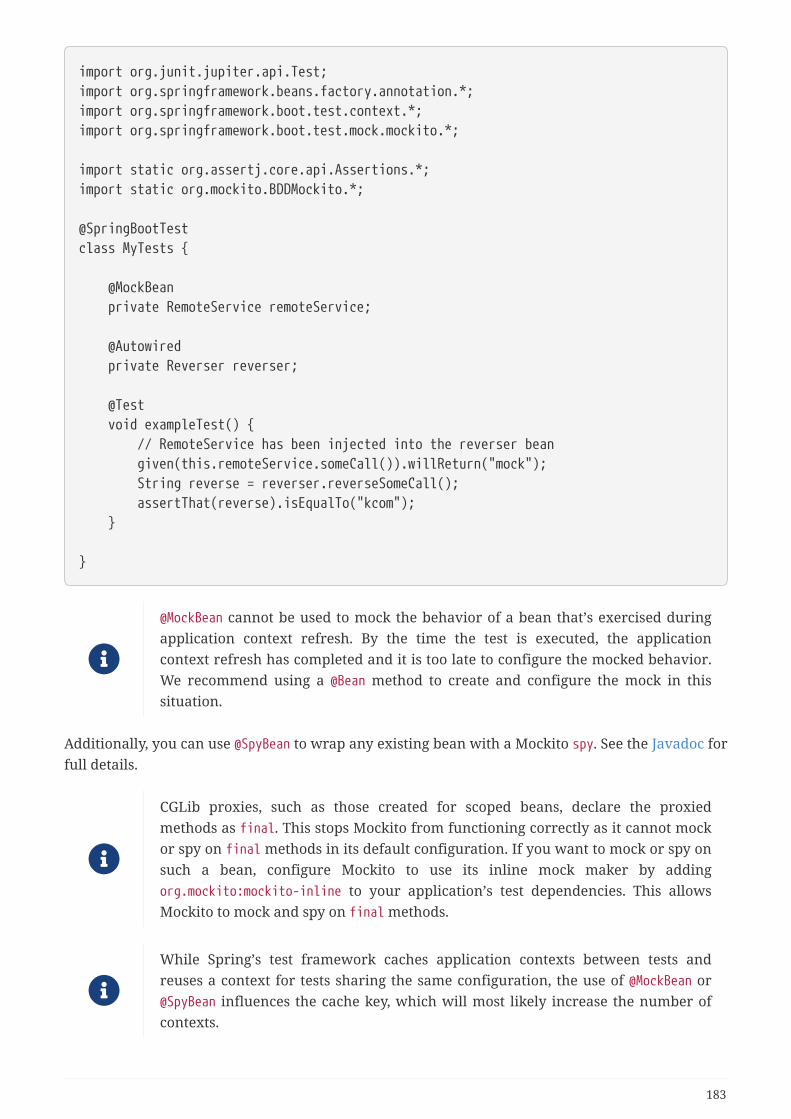
import org.junit.jupiter.api.Test;import org.springframework.beans.factory.annotation.*;import org.springframework.boot.test.context.*;import org.springframework.boot.test.mock.mockito.*;
import static org.assertj.core.api.Assertions.*;import static org.mockito.BDDMockito.*;
@SpringBootTestclass MyTests {
@MockBean private RemoteService remoteService;
@Autowired private Reverser reverser;
@Test void exampleTest() { // RemoteService has been injected into the reverser bean given(this.remoteService.someCall()).willReturn("mock"); String reverse = reverser.reverseSomeCall(); assertThat(reverse).isEqualTo("kcom"); }
}
@MockBean cannot be used to mock the behavior of a bean that’s exercised duringapplication context refresh. By the time the test is executed, the applicationcontext refresh has completed and it is too late to configure the mocked behavior.We recommend using a @Bean method to create and configure the mock in thissituation.
Additionally, you can use @SpyBean to wrap any existing bean with a Mockito spy. See the Javadoc forfull details.
CGLib proxies, such as those created for scoped beans, declare the proxiedmethods as final. This stops Mockito from functioning correctly as it cannot mockor spy on final methods in its default configuration. If you want to mock or spy onsuch a bean, configure Mockito to use its inline mock maker by addingorg.mockito:mockito-inline to your application’s test dependencies. This allowsMockito to mock and spy on final methods.
While Spring’s test framework caches application contexts between tests andreuses a context for tests sharing the same configuration, the use of @MockBean or@SpyBean influences the cache key, which will most likely increase the number ofcontexts.
183
If you are using @SpyBean to spy on a bean with @Cacheable methods that refer toparameters by name, your application must be compiled with -parameters. Thisensures that the parameter names are available to the caching infrastructure oncethe bean has been spied upon.
When you are using @SpyBean to spy on a bean that is proxied by Spring, you mayneed to remove Spring’s proxy in some situations, for example when settingexpectations using given or when. UseAopTestUtils.getTargetObject(yourProxiedSpy) to do so.
Auto-configured Tests
Spring Boot’s auto-configuration system works well for applications but can sometimes be a littletoo much for tests. It often helps to load only the parts of the configuration that are required to testa “slice” of your application. For example, you might want to test that Spring MVC controllers aremapping URLs correctly, and you do not want to involve database calls in those tests, or you mightwant to test JPA entities, and you are not interested in the web layer when those tests run.
The spring-boot-test-autoconfigure module includes a number of annotations that can be used toautomatically configure such “slices”. Each of them works in a similar way, providing a @…Test
annotation that loads the ApplicationContext and one or more @AutoConfigure… annotations thatcan be used to customize auto-configuration settings.
Each slice restricts component scan to appropriate components and loads a veryrestricted set of auto-configuration classes. If you need to exclude one of them,most @…Test annotations provide an excludeAutoConfiguration attribute.Alternatively, you can use @ImportAutoConfiguration#exclude.
Including multiple “slices” by using several @…Test annotations in one test is notsupported. If you need multiple “slices”, pick one of the @…Test annotations andinclude the @AutoConfigure… annotations of the other “slices” by hand.
It is also possible to use the @AutoConfigure… annotations with the standard@SpringBootTest annotation. You can use this combination if you are not interestedin “slicing” your application but you want some of the auto-configured test beans.
Auto-configured JSON Tests
To test that object JSON serialization and deserialization is working as expected, you can use the@JsonTest annotation. @JsonTest auto-configures the available supported JSON mapper, which canbe one of the following libraries:
• Jackson ObjectMapper, any @JsonComponent beans and any Jackson Modules
• Gson
• Jsonb
184
A list of the auto-configurations that are enabled by @JsonTest can be found in theappendix.
If you need to configure elements of the auto-configuration, you can use the@AutoConfigureJsonTesters annotation.
Spring Boot includes AssertJ-based helpers that work with the JSONAssert and JsonPath libraries tocheck that JSON appears as expected. The JacksonTester, GsonTester, JsonbTester, andBasicJsonTester classes can be used for Jackson, Gson, Jsonb, and Strings respectively. Any helperfields on the test class can be @Autowired when using @JsonTest. The following example shows a testclass for Jackson:
import org.junit.jupiter.api.Test;import org.springframework.beans.factory.annotation.*;import org.springframework.boot.test.autoconfigure.json.*;import org.springframework.boot.test.context.*;import org.springframework.boot.test.json.*;
import static org.assertj.core.api.Assertions.*;
@JsonTestclass MyJsonTests {
@Autowired private JacksonTester<VehicleDetails> json;
@Test void testSerialize() throws Exception { VehicleDetails details = new VehicleDetails("Honda", "Civic"); // Assert against a `.json` file in the same package as the test assertThat(this.json.write(details)).isEqualToJson("expected.json"); // Or use JSON path based assertions assertThat(this.json.write(details)).hasJsonPathStringValue("@.make"); assertThat(this.json.write(details)).extractingJsonPathStringValue("@.make") .isEqualTo("Honda"); }
@Test void testDeserialize() throws Exception { String content = "{\"make\":\"Ford\",\"model\":\"Focus\"}"; assertThat(this.json.parse(content)) .isEqualTo(new VehicleDetails("Ford", "Focus")); assertThat(this.json.parseObject(content).getMake()).isEqualTo("Ford"); }
}
185
JSON helper classes can also be used directly in standard unit tests. To do so, callthe initFields method of the helper in your @Before method if you do not use@JsonTest.
If you’re using Spring Boot’s AssertJ-based helpers to assert on a number value at a given JSONpath, you might not be able to use isEqualTo depending on the type. Instead, you can use AssertJ’ssatisfies to assert that the value matches the given condition. For instance, the following exampleasserts that the actual number is a float value close to 0.15 within an offset of 0.01.
assertThat(json.write(message)) .extractingJsonPathNumberValue("@.test.numberValue") .satisfies((number) -> assertThat(number.floatValue()).isCloseTo(0.15f,within(0.01f)));
Auto-configured Spring MVC Tests
To test whether Spring MVC controllers are working as expected, use the @WebMvcTest annotation.@WebMvcTest auto-configures the Spring MVC infrastructure and limits scanned beans to @Controller,@ControllerAdvice, @JsonComponent, Converter, GenericConverter, Filter, HandlerInterceptor,WebMvcConfigurer, and HandlerMethodArgumentResolver. Regular @Component and@ConfigurationProperties beans are not scanned when the @WebMvcTest annotation is used.@EnableConfigurationProperties can be used to include @ConfigurationProperties beans.
A list of the auto-configuration settings that are enabled by @WebMvcTest can befound in the appendix.
If you need to register extra components, such as the Jackson Module, you canimport additional configuration classes by using @Import on your test.
Often, @WebMvcTest is limited to a single controller and is used in combination with @MockBean toprovide mock implementations for required collaborators.
@WebMvcTest also auto-configures MockMvc. Mock MVC offers a powerful way to quickly test MVCcontrollers without needing to start a full HTTP server.
You can also auto-configure MockMvc in a non-@WebMvcTest (such as @SpringBootTest)by annotating it with @AutoConfigureMockMvc. The following example uses MockMvc:
186
import org.junit.jupiter.api.*;import org.springframework.beans.factory.annotation.*;import org.springframework.boot.test.autoconfigure.web.servlet.*;import org.springframework.boot.test.mock.mockito.*;
import static org.assertj.core.api.Assertions.*;import static org.mockito.BDDMockito.*;import static org.springframework.test.web.servlet.request.MockMvcRequestBuilders.*;import static org.springframework.test.web.servlet.result.MockMvcResultMatchers.*;
@WebMvcTest(UserVehicleController.class)class MyControllerTests {
@Autowired private MockMvc mvc;
@MockBean private UserVehicleService userVehicleService;
@Test void testExample() throws Exception { given(this.userVehicleService.getVehicleDetails("sboot")) .willReturn(new VehicleDetails("Honda", "Civic")); this.mvc.perform(get("/sboot/vehicle").accept(MediaType.TEXT_PLAIN)) .andExpect(status().isOk()).andExpect(content().string("HondaCivic")); }
}
If you need to configure elements of the auto-configuration (for example, whenservlet filters should be applied) you can use attributes in the@AutoConfigureMockMvc annotation.
If you use HtmlUnit or Selenium, auto-configuration also provides an HtmlUnit WebClient beanand/or a Selenium WebDriver bean. The following example uses HtmlUnit:
187

import com.gargoylesoftware.htmlunit.*;import org.junit.jupiter.api.*;import org.springframework.beans.factory.annotation.*;import org.springframework.boot.test.autoconfigure.web.servlet.*;import org.springframework.boot.test.mock.mockito.*;
import static org.assertj.core.api.Assertions.*;import static org.mockito.BDDMockito.*;
@WebMvcTest(UserVehicleController.class)class MyHtmlUnitTests {
@Autowired private WebClient webClient;
@MockBean private UserVehicleService userVehicleService;
@Test void testExample() throws Exception { given(this.userVehicleService.getVehicleDetails("sboot")) .willReturn(new VehicleDetails("Honda", "Civic")); HtmlPage page = this.webClient.getPage("/sboot/vehicle.html"); assertThat(page.getBody().getTextContent()).isEqualTo("Honda Civic"); }
}
By default, Spring Boot puts WebDriver beans in a special “scope” to ensure that thedriver exits after each test and that a new instance is injected. If you do not wantthis behavior, you can add @Scope("singleton") to your WebDriver @Bean definition.
The webDriver scope created by Spring Boot will replace any user defined scope ofthe same name. If you define your own webDriver scope you may find it stopsworking when you use @WebMvcTest.
If you have Spring Security on the classpath, @WebMvcTest will also scan WebSecurityConfigurerbeans. Instead of disabling security completely for such tests, you can use Spring Security’s testsupport. More details on how to use Spring Security’s MockMvc support can be found in this TestingWith Spring Security how-to section.
Sometimes writing Spring MVC tests is not enough; Spring Boot can help you runfull end-to-end tests with an actual server.
Auto-configured Spring WebFlux Tests
To test that Spring WebFlux controllers are working as expected, you can use the @WebFluxTestannotation. @WebFluxTest auto-configures the Spring WebFlux infrastructure and limits scanned
188
beans to @Controller, @ControllerAdvice, @JsonComponent, Converter, GenericConverter, WebFilter, andWebFluxConfigurer. Regular @Component and @ConfigurationProperties beans are not scanned whenthe @WebFluxTest annotation is used. @EnableConfigurationProperties can be used to include@ConfigurationProperties beans.
A list of the auto-configurations that are enabled by @WebFluxTest can be found inthe appendix.
If you need to register extra components, such as Jackson Module, you can importadditional configuration classes using @Import on your test.
Often, @WebFluxTest is limited to a single controller and used in combination with the @MockBeanannotation to provide mock implementations for required collaborators.
@WebFluxTest also auto-configures WebTestClient, which offers a powerful way to quickly testWebFlux controllers without needing to start a full HTTP server.
You can also auto-configure WebTestClient in a non-@WebFluxTest (such as@SpringBootTest) by annotating it with @AutoConfigureWebTestClient. The followingexample shows a class that uses both @WebFluxTest and a WebTestClient:
import org.junit.jupiter.api.Test;
import org.springframework.beans.factory.annotation.Autowired;import org.springframework.boot.test.autoconfigure.web.reactive.WebFluxTest;import org.springframework.http.MediaType;import org.springframework.test.web.reactive.server.WebTestClient;
@WebFluxTest(UserVehicleController.class)class MyControllerTests {
@Autowired private WebTestClient webClient;
@MockBean private UserVehicleService userVehicleService;
@Test void testExample() throws Exception { given(this.userVehicleService.getVehicleDetails("sboot")) .willReturn(new VehicleDetails("Honda", "Civic")); this.webClient.get().uri("/sboot/vehicle").accept(MediaType.TEXT_PLAIN) .exchange() .expectStatus().isOk() .expectBody(String.class).isEqualTo("Honda Civic"); }
}
189

This setup is only supported by WebFlux applications as using WebTestClient in amocked web application only works with WebFlux at the moment.
@WebFluxTest cannot detect routes registered via the functional web framework.For testing RouterFunction beans in the context, consider importing yourRouterFunction yourself via @Import or using @SpringBootTest.
@WebFluxTest cannot detect custom security configuration registered via a @Bean oftype SecurityWebFilterChain. To include that in your test, you will need to importthe configuration that registers the bean via @Import or use @SpringBootTest.
Sometimes writing Spring WebFlux tests is not enough; Spring Boot can help yourun full end-to-end tests with an actual server.
Auto-configured Data JPA Tests
You can use the @DataJpaTest annotation to test JPA applications. By default, it scans for @Entityclasses and configures Spring Data JPA repositories. If an embedded database is available on theclasspath, it configures one as well. Regular @Component and @ConfigurationProperties beans are notscanned when the @DataJpaTest annotation is used. @EnableConfigurationProperties can be used toinclude @ConfigurationProperties beans.
A list of the auto-configuration settings that are enabled by @DataJpaTest can befound in the appendix.
By default, data JPA tests are transactional and roll back at the end of each test. See the relevantsection in the Spring Framework Reference Documentation for more details. If that is not what youwant, you can disable transaction management for a test or for the whole class as follows:
import org.junit.jupiter.api.Test;import org.springframework.boot.test.autoconfigure.orm.jpa.DataJpaTest;import org.springframework.transaction.annotation.Propagation;import org.springframework.transaction.annotation.Transactional;
@DataJpaTest@Transactional(propagation = Propagation.NOT_SUPPORTED)class ExampleNonTransactionalTests {
}
Data JPA tests may also inject a TestEntityManager bean, which provides an alternative to thestandard JPA EntityManager that is specifically designed for tests. If you want to useTestEntityManager outside of @DataJpaTest instances, you can also use the@AutoConfigureTestEntityManager annotation. A JdbcTemplate is also available if you need that. Thefollowing example shows the @DataJpaTest annotation in use:
190

import org.junit.jupiter.api.Test;import org.springframework.boot.test.autoconfigure.orm.jpa.*;
import static org.assertj.core.api.Assertions.*;
@DataJpaTestclass ExampleRepositoryTests {
@Autowired private TestEntityManager entityManager;
@Autowired private UserRepository repository;
@Test void testExample() throws Exception { this.entityManager.persist(new User("sboot", "1234")); User user = this.repository.findByUsername("sboot"); assertThat(user.getUsername()).isEqualTo("sboot"); assertThat(user.getVin()).isEqualTo("1234"); }
}
In-memory embedded databases generally work well for tests, since they are fast and do notrequire any installation. If, however, you prefer to run tests against a real database you can use the@AutoConfigureTestDatabase annotation, as shown in the following example:
@DataJpaTest@AutoConfigureTestDatabase(replace=Replace.NONE)class ExampleRepositoryTests {
// ...
}
Auto-configured JDBC Tests
@JdbcTest is similar to @DataJpaTest but is for tests that only require a DataSource and do not useSpring Data JDBC. By default, it configures an in-memory embedded database and a JdbcTemplate.Regular @Component and @ConfigurationProperties beans are not scanned when the @JdbcTestannotation is used. @EnableConfigurationProperties can be used to include @ConfigurationPropertiesbeans.
A list of the auto-configurations that are enabled by @JdbcTest can be found in theappendix.
By default, JDBC tests are transactional and roll back at the end of each test. See the relevant section
191

in the Spring Framework Reference Documentation for more details. If that is not what you want,you can disable transaction management for a test or for the whole class, as follows:
import org.junit.jupiter.api.Test;import org.springframework.boot.test.autoconfigure.jdbc.JdbcTest;import org.springframework.transaction.annotation.Propagation;import org.springframework.transaction.annotation.Transactional;
@JdbcTest@Transactional(propagation = Propagation.NOT_SUPPORTED)class ExampleNonTransactionalTests {
}
If you prefer your test to run against a real database, you can use the @AutoConfigureTestDatabaseannotation in the same way as for DataJpaTest. (See "Auto-configured Data JPA Tests".)
Auto-configured Data JDBC Tests
@DataJdbcTest is similar to @JdbcTest but is for tests that use Spring Data JDBC repositories. Bydefault, it configures an in-memory embedded database, a JdbcTemplate, and Spring Data JDBCrepositories. Regular @Component and @ConfigurationProperties beans are not scanned when the@DataJdbcTest annotation is used. @EnableConfigurationProperties can be used to include@ConfigurationProperties beans.
A list of the auto-configurations that are enabled by @DataJdbcTest can be found inthe appendix.
By default, Data JDBC tests are transactional and roll back at the end of each test. See the relevantsection in the Spring Framework Reference Documentation for more details. If that is not what youwant, you can disable transaction management for a test or for the whole test class as shown in theJDBC example.
If you prefer your test to run against a real database, you can use the @AutoConfigureTestDatabaseannotation in the same way as for DataJpaTest. (See "Auto-configured Data JPA Tests".)
Auto-configured jOOQ Tests
You can use @JooqTest in a similar fashion as @JdbcTest but for jOOQ-related tests. As jOOQ reliesheavily on a Java-based schema that corresponds with the database schema, the existing DataSourceis used. If you want to replace it with an in-memory database, you can use@AutoConfigureTestDatabase to override those settings. (For more about using jOOQ with SpringBoot, see "Using jOOQ", earlier in this chapter.) Regular @Component and @ConfigurationPropertiesbeans are not scanned when the @JooqTest annotation is used. @EnableConfigurationProperties canbe used to include @ConfigurationProperties beans.
A list of the auto-configurations that are enabled by @JooqTest can be found in theappendix.
192

@JooqTest configures a DSLContext. The following example shows the @JooqTest annotation in use:
import org.jooq.DSLContext;import org.junit.jupiter.api.Test;import org.springframework.boot.test.autoconfigure.jooq.JooqTest;
@JooqTestclass ExampleJooqTests {
@Autowired private DSLContext dslContext;}
JOOQ tests are transactional and roll back at the end of each test by default. If that is not what youwant, you can disable transaction management for a test or for the whole test class as shown in theJDBC example.
Auto-configured Data MongoDB Tests
You can use @DataMongoTest to test MongoDB applications. By default, it configures an in-memoryembedded MongoDB (if available), configures a MongoTemplate, scans for @Document classes, andconfigures Spring Data MongoDB repositories. Regular @Component and @ConfigurationPropertiesbeans are not scanned when the @DataMongoTest annotation is used. @EnableConfigurationPropertiescan be used to include @ConfigurationProperties beans. (For more about using MongoDB withSpring Boot, see "MongoDB", earlier in this chapter.)
A list of the auto-configuration settings that are enabled by @DataMongoTest can befound in the appendix.
The following class shows the @DataMongoTest annotation in use:
import org.springframework.beans.factory.annotation.Autowired;import org.springframework.boot.test.autoconfigure.data.mongo.DataMongoTest;import org.springframework.data.mongodb.core.MongoTemplate;
@DataMongoTestclass ExampleDataMongoTests {
@Autowired private MongoTemplate mongoTemplate;
//}
In-memory embedded MongoDB generally works well for tests, since it is fast and does not requireany developer installation. If, however, you prefer to run tests against a real MongoDB server, youshould exclude the embedded MongoDB auto-configuration, as shown in the following example:
193

importorg.springframework.boot.autoconfigure.mongo.embedded.EmbeddedMongoAutoConfiguration;import org.springframework.boot.test.autoconfigure.data.mongo.DataMongoTest;
@DataMongoTest(excludeAutoConfiguration = EmbeddedMongoAutoConfiguration.class)class ExampleDataMongoNonEmbeddedTests {
}
Auto-configured Data Neo4j Tests
You can use @DataNeo4jTest to test Neo4j applications. By default, it uses an in-memory embeddedNeo4j (if the embedded driver is available), scans for @NodeEntity classes, and configures SpringData Neo4j repositories. Regular @Component and @ConfigurationProperties beans are not scannedwhen the @DataNeo4jTest annotation is used. @EnableConfigurationProperties can be used to include@ConfigurationProperties beans. (For more about using Neo4J with Spring Boot, see "Neo4j", earlierin this chapter.)
A list of the auto-configuration settings that are enabled by @DataNeo4jTest can befound in the appendix.
The following example shows a typical setup for using Neo4J tests in Spring Boot:
import org.springframework.beans.factory.annotation.Autowired;import org.springframework.boot.test.autoconfigure.data.neo4j.DataNeo4jTest;
@DataNeo4jTestclass ExampleDataNeo4jTests {
@Autowired private YourRepository repository;
//}
By default, Data Neo4j tests are transactional and roll back at the end of each test. See the relevantsection in the Spring Framework Reference Documentation for more details. If that is not what youwant, you can disable transaction management for a test or for the whole class, as follows:
194

import org.springframework.boot.test.autoconfigure.data.neo4j.DataNeo4jTest;import org.springframework.transaction.annotation.Propagation;import org.springframework.transaction.annotation.Transactional;
@DataNeo4jTest@Transactional(propagation = Propagation.NOT_SUPPORTED)class ExampleNonTransactionalTests {
}
Auto-configured Data Redis Tests
You can use @DataRedisTest to test Redis applications. By default, it scans for @RedisHash classes andconfigures Spring Data Redis repositories. Regular @Component and @ConfigurationProperties beansare not scanned when the @DataRedisTest annotation is used. @EnableConfigurationProperties can beused to include @ConfigurationProperties beans. (For more about using Redis with Spring Boot, see"Redis", earlier in this chapter.)
A list of the auto-configuration settings that are enabled by @DataRedisTest can befound in the appendix.
The following example shows the @DataRedisTest annotation in use:
import org.springframework.beans.factory.annotation.Autowired;import org.springframework.boot.test.autoconfigure.data.redis.DataRedisTest;
@DataRedisTestclass ExampleDataRedisTests {
@Autowired private YourRepository repository;
//}
Auto-configured Data LDAP Tests
You can use @DataLdapTest to test LDAP applications. By default, it configures an in-memoryembedded LDAP (if available), configures an LdapTemplate, scans for @Entry classes, and configuresSpring Data LDAP repositories. Regular @Component and @ConfigurationProperties beans are notscanned when the @DataLdapTest annotation is used. @EnableConfigurationProperties can be used toinclude @ConfigurationProperties beans. (For more about using LDAP with Spring Boot, see "LDAP",earlier in this chapter.)
A list of the auto-configuration settings that are enabled by @DataLdapTest can befound in the appendix.
195

The following example shows the @DataLdapTest annotation in use:
import org.springframework.beans.factory.annotation.Autowired;import org.springframework.boot.test.autoconfigure.data.ldap.DataLdapTest;import org.springframework.ldap.core.LdapTemplate;
@DataLdapTestclass ExampleDataLdapTests {
@Autowired private LdapTemplate ldapTemplate;
//}
In-memory embedded LDAP generally works well for tests, since it is fast and does not require anydeveloper installation. If, however, you prefer to run tests against a real LDAP server, you shouldexclude the embedded LDAP auto-configuration, as shown in the following example:
importorg.springframework.boot.autoconfigure.ldap.embedded.EmbeddedLdapAutoConfiguration;import org.springframework.boot.test.autoconfigure.data.ldap.DataLdapTest;
@DataLdapTest(excludeAutoConfiguration = EmbeddedLdapAutoConfiguration.class)class ExampleDataLdapNonEmbeddedTests {
}
Auto-configured REST Clients
You can use the @RestClientTest annotation to test REST clients. By default, it auto-configuresJackson, GSON, and Jsonb support, configures a RestTemplateBuilder, and adds support forMockRestServiceServer. Regular @Component and @ConfigurationProperties beans are not scannedwhen the @RestClientTest annotation is used. @EnableConfigurationProperties can be used toinclude @ConfigurationProperties beans.
A list of the auto-configuration settings that are enabled by @RestClientTest can befound in the appendix.
The specific beans that you want to test should be specified by using the value or componentsattribute of @RestClientTest, as shown in the following example:
196

@RestClientTest(RemoteVehicleDetailsService.class)class ExampleRestClientTest {
@Autowired private RemoteVehicleDetailsService service;
@Autowired private MockRestServiceServer server;
@Test void getVehicleDetailsWhenResultIsSuccessShouldReturnDetails() throws Exception { this.server.expect(requestTo("/greet/details")) .andRespond(withSuccess("hello", MediaType.TEXT_PLAIN)); String greeting = this.service.callRestService(); assertThat(greeting).isEqualTo("hello"); }
}
Auto-configured Spring REST Docs Tests
You can use the @AutoConfigureRestDocs annotation to use Spring REST Docs in your tests with MockMVC, REST Assured, or WebTestClient. It removes the need for the JUnit extension in Spring RESTDocs.
@AutoConfigureRestDocs can be used to override the default output directory (target/generated-snippets if you are using Maven or build/generated-snippets if you are using Gradle). It can also beused to configure the host, scheme, and port that appears in any documented URIs.
Auto-configured Spring REST Docs Tests with Mock MVC
@AutoConfigureRestDocs customizes the MockMvc bean to use Spring REST Docs when testing Servlet-based web applications. You can inject it by using @Autowired and use it in your tests as younormally would when using Mock MVC and Spring REST Docs, as shown in the following example:
197
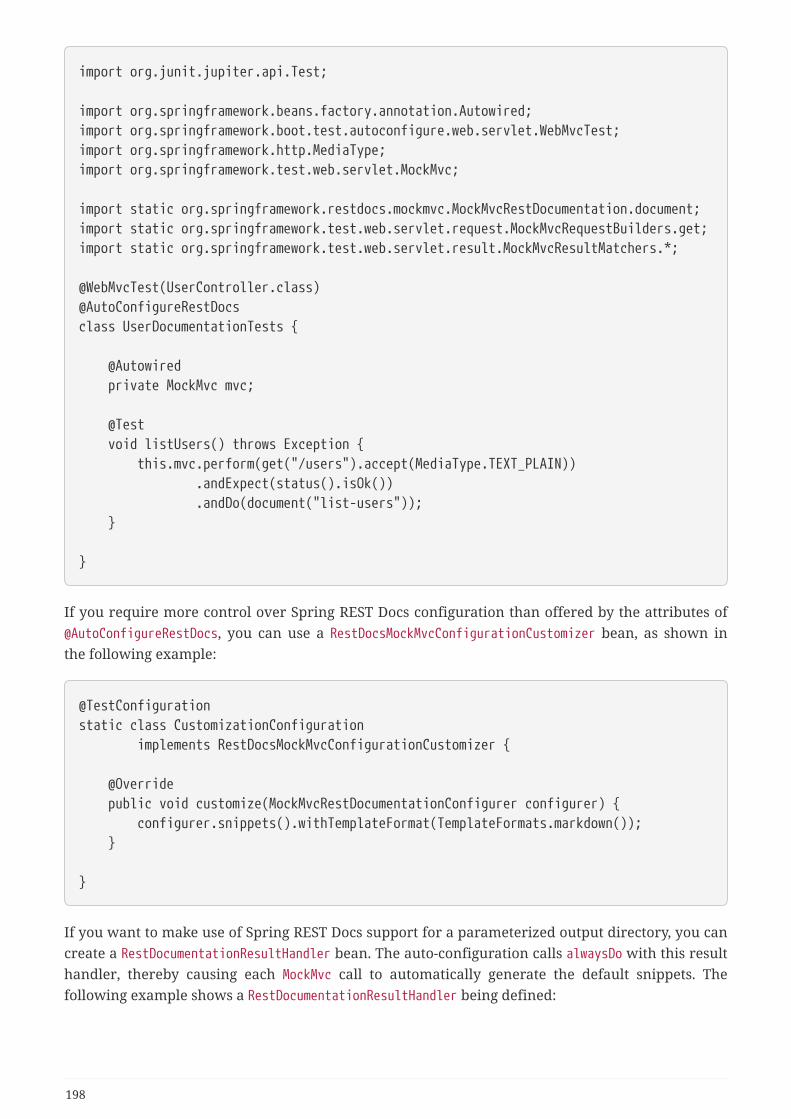
import org.junit.jupiter.api.Test;
import org.springframework.beans.factory.annotation.Autowired;import org.springframework.boot.test.autoconfigure.web.servlet.WebMvcTest;import org.springframework.http.MediaType;import org.springframework.test.web.servlet.MockMvc;
import static org.springframework.restdocs.mockmvc.MockMvcRestDocumentation.document;import static org.springframework.test.web.servlet.request.MockMvcRequestBuilders.get;import static org.springframework.test.web.servlet.result.MockMvcResultMatchers.*;
@WebMvcTest(UserController.class)@AutoConfigureRestDocsclass UserDocumentationTests {
@Autowired private MockMvc mvc;
@Test void listUsers() throws Exception { this.mvc.perform(get("/users").accept(MediaType.TEXT_PLAIN)) .andExpect(status().isOk()) .andDo(document("list-users")); }
}
If you require more control over Spring REST Docs configuration than offered by the attributes of@AutoConfigureRestDocs, you can use a RestDocsMockMvcConfigurationCustomizer bean, as shown inthe following example:
@TestConfigurationstatic class CustomizationConfiguration implements RestDocsMockMvcConfigurationCustomizer {
@Override public void customize(MockMvcRestDocumentationConfigurer configurer) { configurer.snippets().withTemplateFormat(TemplateFormats.markdown()); }
}
If you want to make use of Spring REST Docs support for a parameterized output directory, you cancreate a RestDocumentationResultHandler bean. The auto-configuration calls alwaysDo with this resulthandler, thereby causing each MockMvc call to automatically generate the default snippets. Thefollowing example shows a RestDocumentationResultHandler being defined:
198

@TestConfiguration(proxyBeanMethods = false)static class ResultHandlerConfiguration {
@Bean public RestDocumentationResultHandler restDocumentation() { return MockMvcRestDocumentation.document("{method-name}"); }
}
Auto-configured Spring REST Docs Tests with WebTestClient
@AutoConfigureRestDocs can also be used with WebTestClient when testing reactive web applications.You can inject it by using @Autowired and use it in your tests as you normally would when using@WebFluxTest and Spring REST Docs, as shown in the following example:
import org.junit.jupiter.api.Test;
import org.springframework.beans.factory.annotation.Autowired;import org.springframework.boot.test.autoconfigure.restdocs.AutoConfigureRestDocs;import org.springframework.boot.test.autoconfigure.web.reactive.WebFluxTest;import org.springframework.test.web.reactive.server.WebTestClient;
import staticorg.springframework.restdocs.webtestclient.WebTestClientRestDocumentation.document;
@WebFluxTest@AutoConfigureRestDocsclass UsersDocumentationTests {
@Autowired private WebTestClient webTestClient;
@Test void listUsers() { this.webTestClient.get().uri("/").exchange().expectStatus().isOk().expectBody() .consumeWith(document("list-users")); }
}
If you require more control over Spring REST Docs configuration than offered by the attributes of@AutoConfigureRestDocs, you can use a RestDocsWebTestClientConfigurationCustomizer bean, asshown in the following example:
199

@TestConfiguration(proxyBeanMethods = false)public static class CustomizationConfiguration implementsRestDocsWebTestClientConfigurationCustomizer {
@Override public void customize(WebTestClientRestDocumentationConfigurer configurer) { configurer.snippets().withEncoding("UTF-8"); }
}
Auto-configured Spring REST Docs Tests with REST Assured
@AutoConfigureRestDocs makes a RequestSpecification bean, preconfigured to use Spring REST Docs,available to your tests. You can inject it by using @Autowired and use it in your tests as you normallywould when using REST Assured and Spring REST Docs, as shown in the following example:
import io.restassured.specification.RequestSpecification;import org.junit.jupiter.api.Test;
import org.springframework.beans.factory.annotation.Autowired;import org.springframework.boot.test.autoconfigure.restdocs.AutoConfigureRestDocs;import org.springframework.boot.test.context.SpringBootTest;import org.springframework.boot.test.context.SpringBootTest.WebEnvironment;import org.springframework.boot.web.server.LocalServerPort;
import static io.restassured.RestAssured.given;import static org.hamcrest.Matchers.is;import staticorg.springframework.restdocs.restassured3.RestAssuredRestDocumentation.document;
@SpringBootTest(webEnvironment = WebEnvironment.RANDOM_PORT)@AutoConfigureRestDocsclass UserDocumentationTests {
@Test void listUsers(@Autowired RequestSpecification documentationSpec, @LocalServerPortint port) { given(documentationSpec).filter(document("list-users")).when().port(port).get("/").then().assertThat() .statusCode(is(200)); }
}
If you require more control over Spring REST Docs configuration than offered by the attributes of@AutoConfigureRestDocs, a RestDocsRestAssuredConfigurationCustomizer bean can be used, as shownin the following example:
200

@TestConfiguration(proxyBeanMethods = false)public static class CustomizationConfiguration implementsRestDocsRestAssuredConfigurationCustomizer {
@Override public void customize(RestAssuredRestDocumentationConfigurer configurer) { configurer.snippets().withTemplateFormat(TemplateFormats.markdown()); }
}
Additional Auto-configuration and Slicing
Each slice provides one or more @AutoConfigure… annotations that namely defines the auto-configurations that should be included as part of a slice. Additional auto-configurations can beadded by creating a custom @AutoConfigure… annotation or simply by adding@ImportAutoConfiguration to the test as shown in the following example:
@JdbcTest@ImportAutoConfiguration(IntegrationAutoConfiguration.class)class ExampleJdbcTests {
}
Make sure to not use the regular @Import annotation to import auto-configurationsas they are handled in a specific way by Spring Boot.
User Configuration and Slicing
If you structure your code in a sensible way, your @SpringBootApplication class is used by default asthe configuration of your tests.
It then becomes important not to litter the application’s main class with configuration settings thatare specific to a particular area of its functionality.
Assume that you are using Spring Batch and you rely on the auto-configuration for it. You coulddefine your @SpringBootApplication as follows:
@SpringBootApplication@EnableBatchProcessingpublic class SampleApplication { ... }
Because this class is the source configuration for the test, any slice test actually tries to start SpringBatch, which is definitely not what you want to do. A recommended approach is to move that area-specific configuration to a separate @Configuration class at the same level as your application, asshown in the following example:
201
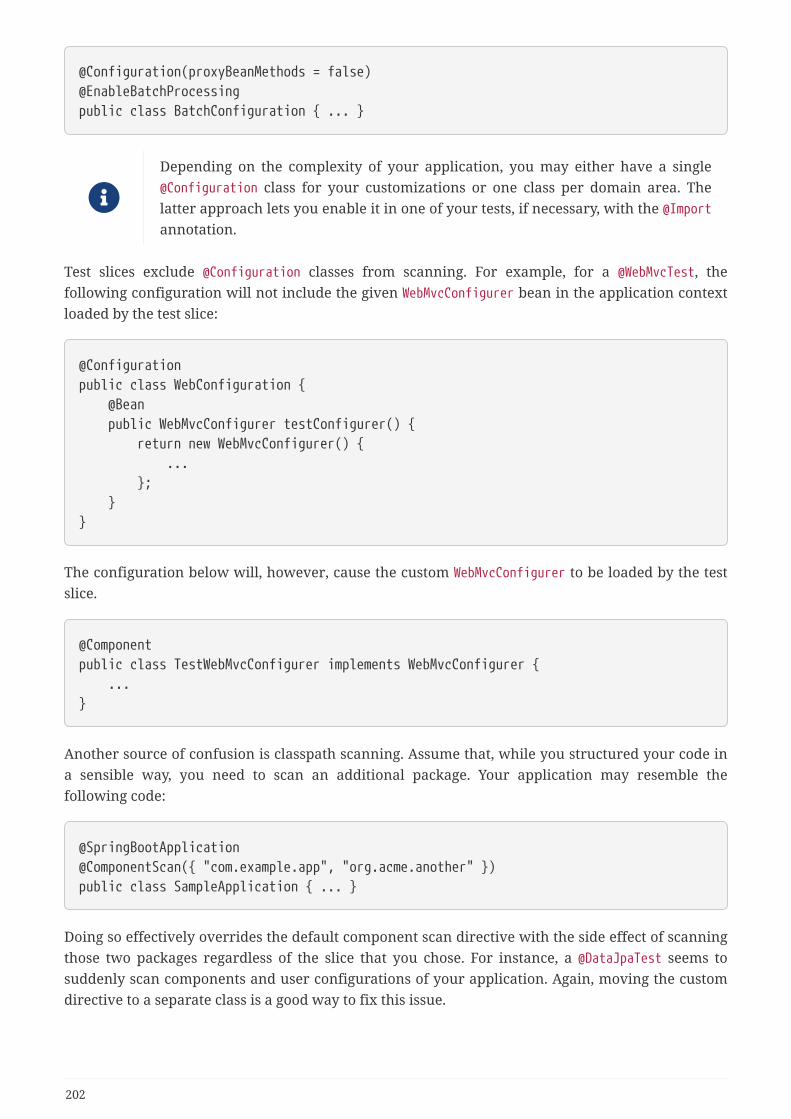
@Configuration(proxyBeanMethods = false)@EnableBatchProcessingpublic class BatchConfiguration { ... }
Depending on the complexity of your application, you may either have a single@Configuration class for your customizations or one class per domain area. Thelatter approach lets you enable it in one of your tests, if necessary, with the @Importannotation.
Test slices exclude @Configuration classes from scanning. For example, for a @WebMvcTest, thefollowing configuration will not include the given WebMvcConfigurer bean in the application contextloaded by the test slice:
@Configurationpublic class WebConfiguration { @Bean public WebMvcConfigurer testConfigurer() { return new WebMvcConfigurer() { ... }; }}
The configuration below will, however, cause the custom WebMvcConfigurer to be loaded by the testslice.
@Componentpublic class TestWebMvcConfigurer implements WebMvcConfigurer { ...}
Another source of confusion is classpath scanning. Assume that, while you structured your code ina sensible way, you need to scan an additional package. Your application may resemble thefollowing code:
@SpringBootApplication@ComponentScan({ "com.example.app", "org.acme.another" })public class SampleApplication { ... }
Doing so effectively overrides the default component scan directive with the side effect of scanningthose two packages regardless of the slice that you chose. For instance, a @DataJpaTest seems tosuddenly scan components and user configurations of your application. Again, moving the customdirective to a separate class is a good way to fix this issue.
202

If this is not an option for you, you can create a @SpringBootConfigurationsomewhere in the hierarchy of your test so that it is used instead. Alternatively,you can specify a source for your test, which disables the behavior of finding adefault one.
Using Spock to Test Spring Boot Applications
If you wish to use Spock to test a Spring Boot application, you should add a dependency on Spock’sspock-spring module to your application’s build. spock-spring integrates Spring’s test frameworkinto Spock. It is recommended that you use Spock 1.2 or later to benefit from a number ofimprovements to Spock’s Spring Framework and Spring Boot integration. See the documentationfor Spock’s Spring module for further details.
4.25.4. Test Utilities
A few test utility classes that are generally useful when testing your application are packaged aspart of spring-boot.
ConfigFileApplicationContextInitializer
ConfigFileApplicationContextInitializer is an ApplicationContextInitializer that you can apply toyour tests to load Spring Boot application.properties files. You can use it when you do not need thefull set of features provided by @SpringBootTest, as shown in the following example:
@ContextConfiguration(classes = Config.class, initializers = ConfigFileApplicationContextInitializer.class)
Using ConfigFileApplicationContextInitializer alone does not provide support for@Value("${…}") injection. Its only job is to ensure that application.properties filesare loaded into Spring’s Environment. For @Value support, you need to eitheradditionally configure a PropertySourcesPlaceholderConfigurer or use@SpringBootTest, which auto-configures one for you.
TestPropertyValues
TestPropertyValues lets you quickly add properties to a ConfigurableEnvironment orConfigurableApplicationContext. You can call it with key=value strings, as follows:
TestPropertyValues.of("org=Spring", "name=Boot").applyTo(env);
OutputCapture
OutputCapture is a JUnit Extension that you can use to capture System.out and System.err output. Touse add @ExtendWith(OutputCaptureExtension.class) and inject CapturedOutput as an argument toyour test class constructor or test method as follows:
203

@ExtendWith(OutputCaptureExtension.class)class OutputCaptureTests {
@Test void testName(CapturedOutput output) { System.out.println("Hello World!"); assertThat(output).contains("World"); }
}
TestRestTemplate
TestRestTemplate is a convenience alternative to Spring’s RestTemplate that is useful in integrationtests. You can get a vanilla template or one that sends Basic HTTP authentication (with a usernameand password). In either case, the template behaves in a test-friendly way by not throwingexceptions on server-side errors.
Spring Framework 5.0 provides a new WebTestClient that works for WebFluxintegration tests and both WebFlux and MVC end-to-end testing. It provides afluent API for assertions, unlike TestRestTemplate.
It is recommended, but not mandatory, to use the Apache HTTP Client (version 4.3.2 or better). Ifyou have that on your classpath, the TestRestTemplate responds by configuring the clientappropriately. If you do use Apache’s HTTP client, some additional test-friendly features areenabled:
• Redirects are not followed (so you can assert the response location).
• Cookies are ignored (so the template is stateless).
TestRestTemplate can be instantiated directly in your integration tests, as shown in the followingexample:
public class MyTest {
private TestRestTemplate template = new TestRestTemplate();
@Test public void testRequest() throws Exception { HttpHeaders headers = this.template.getForEntity( "https://myhost.example.com/example", String.class).getHeaders(); assertThat(headers.getLocation()).hasHost("other.example.com"); }
}
Alternatively, if you use the @SpringBootTest annotation with WebEnvironment.RANDOM_PORT or
204
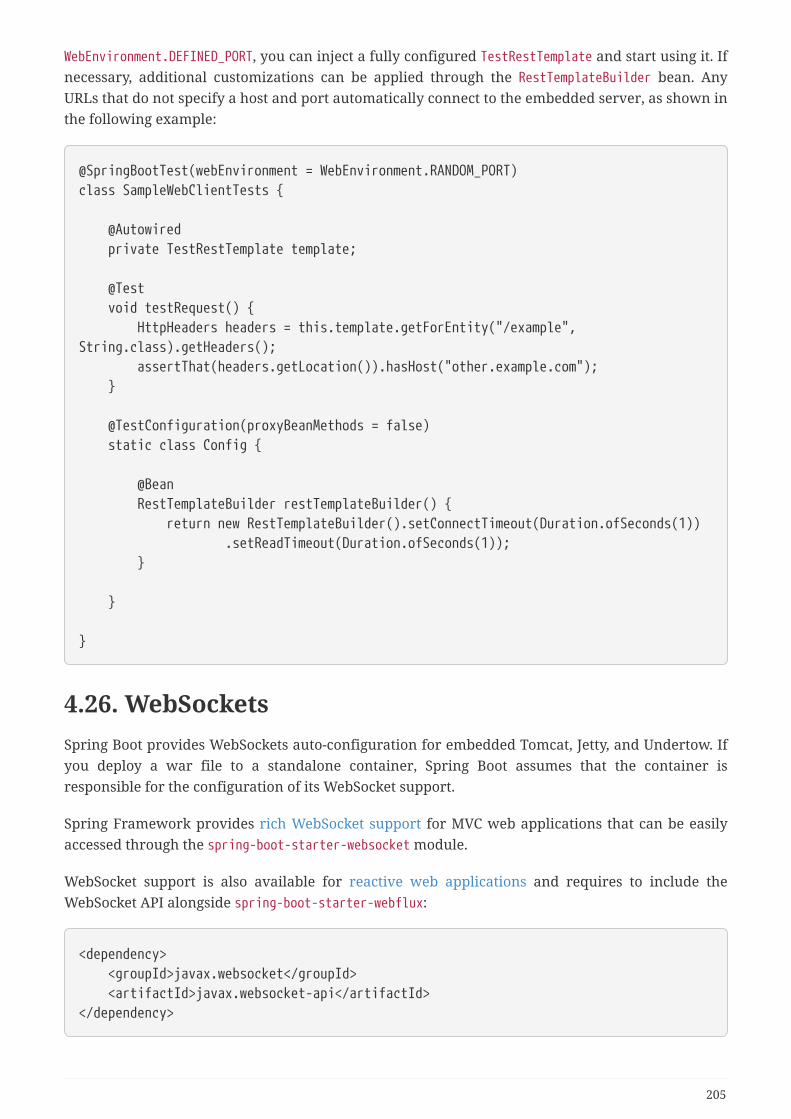
WebEnvironment.DEFINED_PORT, you can inject a fully configured TestRestTemplate and start using it. Ifnecessary, additional customizations can be applied through the RestTemplateBuilder bean. AnyURLs that do not specify a host and port automatically connect to the embedded server, as shown inthe following example:
@SpringBootTest(webEnvironment = WebEnvironment.RANDOM_PORT)class SampleWebClientTests {
@Autowired private TestRestTemplate template;
@Test void testRequest() { HttpHeaders headers = this.template.getForEntity("/example",String.class).getHeaders(); assertThat(headers.getLocation()).hasHost("other.example.com"); }
@TestConfiguration(proxyBeanMethods = false) static class Config {
@Bean RestTemplateBuilder restTemplateBuilder() { return new RestTemplateBuilder().setConnectTimeout(Duration.ofSeconds(1)) .setReadTimeout(Duration.ofSeconds(1)); }
}
}
4.26. WebSocketsSpring Boot provides WebSockets auto-configuration for embedded Tomcat, Jetty, and Undertow. Ifyou deploy a war file to a standalone container, Spring Boot assumes that the container isresponsible for the configuration of its WebSocket support.
Spring Framework provides rich WebSocket support for MVC web applications that can be easilyaccessed through the spring-boot-starter-websocket module.
WebSocket support is also available for reactive web applications and requires to include theWebSocket API alongside spring-boot-starter-webflux:
<dependency> <groupId>javax.websocket</groupId> <artifactId>javax.websocket-api</artifactId></dependency>
205
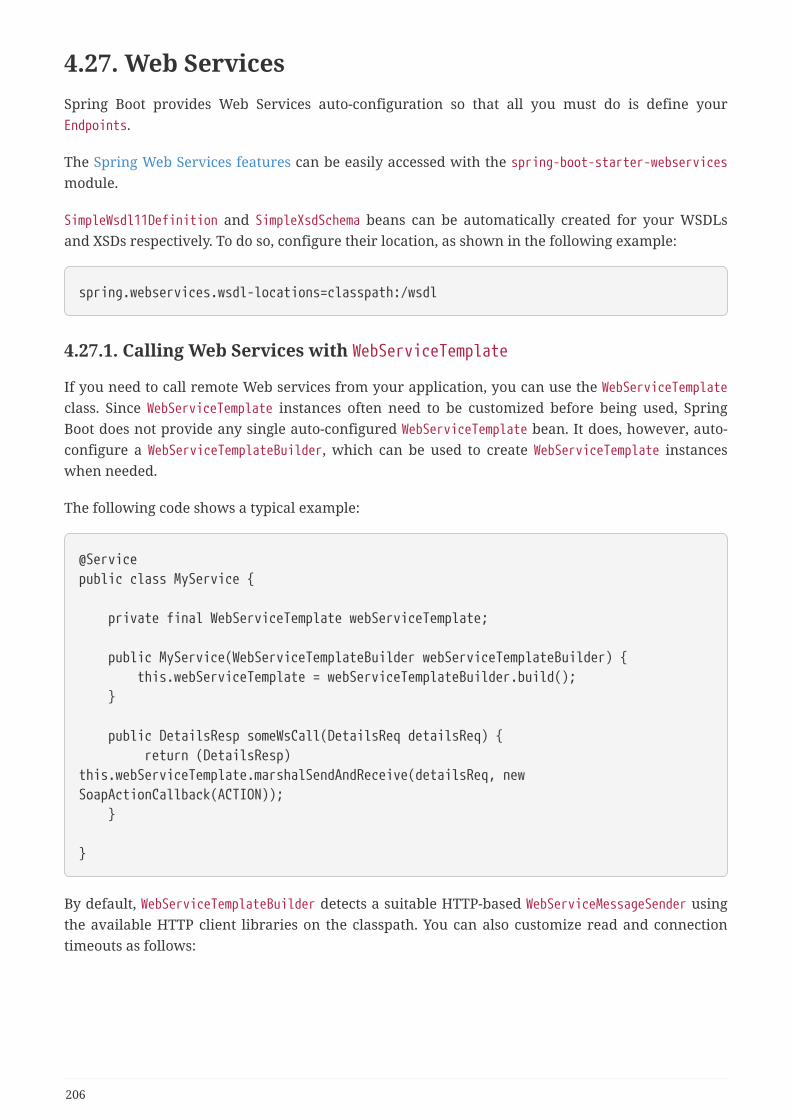
4.27. Web ServicesSpring Boot provides Web Services auto-configuration so that all you must do is define yourEndpoints.
The Spring Web Services features can be easily accessed with the spring-boot-starter-webservicesmodule.
SimpleWsdl11Definition and SimpleXsdSchema beans can be automatically created for your WSDLsand XSDs respectively. To do so, configure their location, as shown in the following example:
spring.webservices.wsdl-locations=classpath:/wsdl
4.27.1. Calling Web Services with WebServiceTemplate
If you need to call remote Web services from your application, you can use the WebServiceTemplateclass. Since WebServiceTemplate instances often need to be customized before being used, SpringBoot does not provide any single auto-configured WebServiceTemplate bean. It does, however, auto-configure a WebServiceTemplateBuilder, which can be used to create WebServiceTemplate instanceswhen needed.
The following code shows a typical example:
@Servicepublic class MyService {
private final WebServiceTemplate webServiceTemplate;
public MyService(WebServiceTemplateBuilder webServiceTemplateBuilder) { this.webServiceTemplate = webServiceTemplateBuilder.build(); }
public DetailsResp someWsCall(DetailsReq detailsReq) { return (DetailsResp)this.webServiceTemplate.marshalSendAndReceive(detailsReq, newSoapActionCallback(ACTION)); }
}
By default, WebServiceTemplateBuilder detects a suitable HTTP-based WebServiceMessageSender usingthe available HTTP client libraries on the classpath. You can also customize read and connectiontimeouts as follows:
206
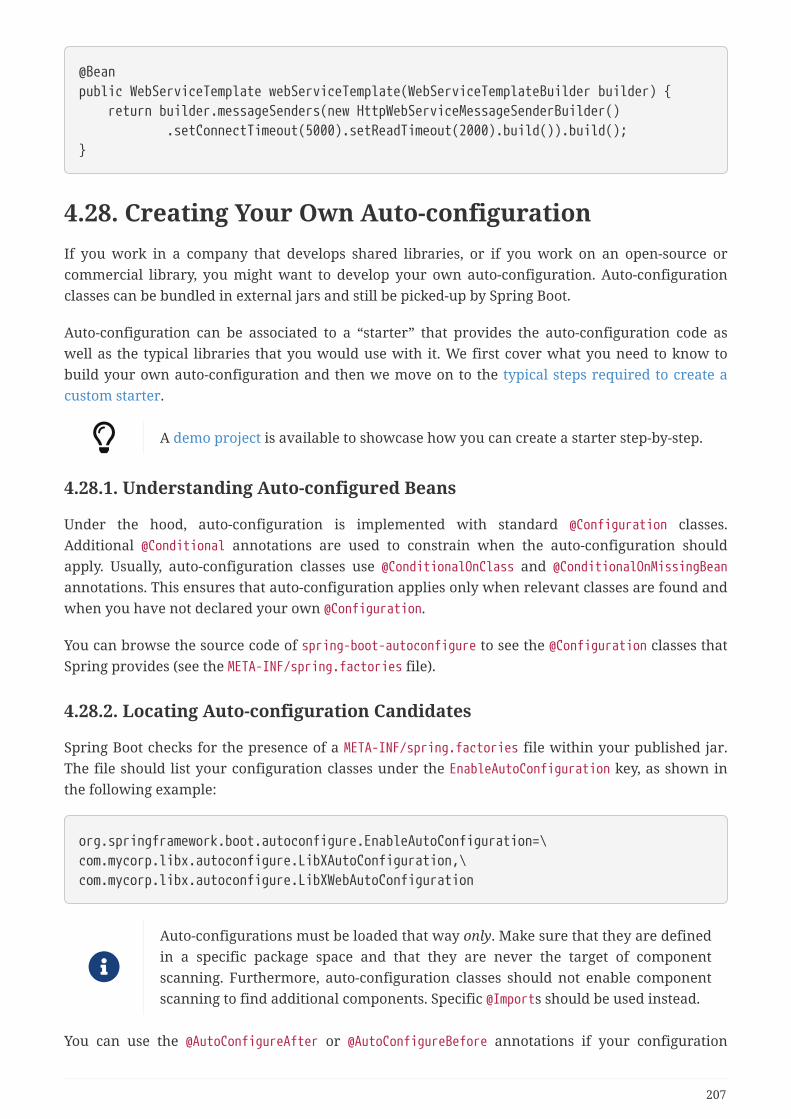
@Beanpublic WebServiceTemplate webServiceTemplate(WebServiceTemplateBuilder builder) { return builder.messageSenders(new HttpWebServiceMessageSenderBuilder() .setConnectTimeout(5000).setReadTimeout(2000).build()).build();}
4.28. Creating Your Own Auto-configurationIf you work in a company that develops shared libraries, or if you work on an open-source orcommercial library, you might want to develop your own auto-configuration. Auto-configurationclasses can be bundled in external jars and still be picked-up by Spring Boot.
Auto-configuration can be associated to a “starter” that provides the auto-configuration code aswell as the typical libraries that you would use with it. We first cover what you need to know tobuild your own auto-configuration and then we move on to the typical steps required to create acustom starter.
A demo project is available to showcase how you can create a starter step-by-step.
4.28.1. Understanding Auto-configured Beans
Under the hood, auto-configuration is implemented with standard @Configuration classes.Additional @Conditional annotations are used to constrain when the auto-configuration shouldapply. Usually, auto-configuration classes use @ConditionalOnClass and @ConditionalOnMissingBeanannotations. This ensures that auto-configuration applies only when relevant classes are found andwhen you have not declared your own @Configuration.
You can browse the source code of spring-boot-autoconfigure to see the @Configuration classes thatSpring provides (see the META-INF/spring.factories file).
4.28.2. Locating Auto-configuration Candidates
Spring Boot checks for the presence of a META-INF/spring.factories file within your published jar.The file should list your configuration classes under the EnableAutoConfiguration key, as shown inthe following example:
org.springframework.boot.autoconfigure.EnableAutoConfiguration=\com.mycorp.libx.autoconfigure.LibXAutoConfiguration,\com.mycorp.libx.autoconfigure.LibXWebAutoConfiguration
Auto-configurations must be loaded that way only. Make sure that they are definedin a specific package space and that they are never the target of componentscanning. Furthermore, auto-configuration classes should not enable componentscanning to find additional components. Specific @Imports should be used instead.
You can use the @AutoConfigureAfter or @AutoConfigureBefore annotations if your configuration
207

needs to be applied in a specific order. For example, if you provide web-specific configuration, yourclass may need to be applied after WebMvcAutoConfiguration.
If you want to order certain auto-configurations that should not have any direct knowledge of eachother, you can also use @AutoConfigureOrder. That annotation has the same semantic as the regular@Order annotation but provides a dedicated order for auto-configuration classes.
As with standard @Configuration classes, the order in which auto-configuration classes are appliedonly affects the order in which their beans are defined. The order in which those beans aresubsequently created is unaffected and is determined by each bean’s dependencies and any@DependsOn relationships.
4.28.3. Condition Annotations
You almost always want to include one or more @Conditional annotations on your auto-configuration class. The @ConditionalOnMissingBean annotation is one common example that is usedto allow developers to override auto-configuration if they are not happy with your defaults.
Spring Boot includes a number of @Conditional annotations that you can reuse in your own code byannotating @Configuration classes or individual @Bean methods. These annotations include:
• Class Conditions
• Bean Conditions
• Property Conditions
• Resource Conditions
• Web Application Conditions
• SpEL Expression Conditions
Class Conditions
The @ConditionalOnClass and @ConditionalOnMissingClass annotations let @Configuration classes beincluded based on the presence or absence of specific classes. Due to the fact that annotationmetadata is parsed by using ASM, you can use the value attribute to refer to the real class, eventhough that class might not actually appear on the running application classpath. You can also usethe name attribute if you prefer to specify the class name by using a String value.
This mechanism does not apply the same way to @Bean methods where typically the return type isthe target of the condition: before the condition on the method applies, the JVM will have loadedthe class and potentially processed method references which will fail if the class is not present.
To handle this scenario, a separate @Configuration class can be used to isolate the condition, asshown in the following example:
208
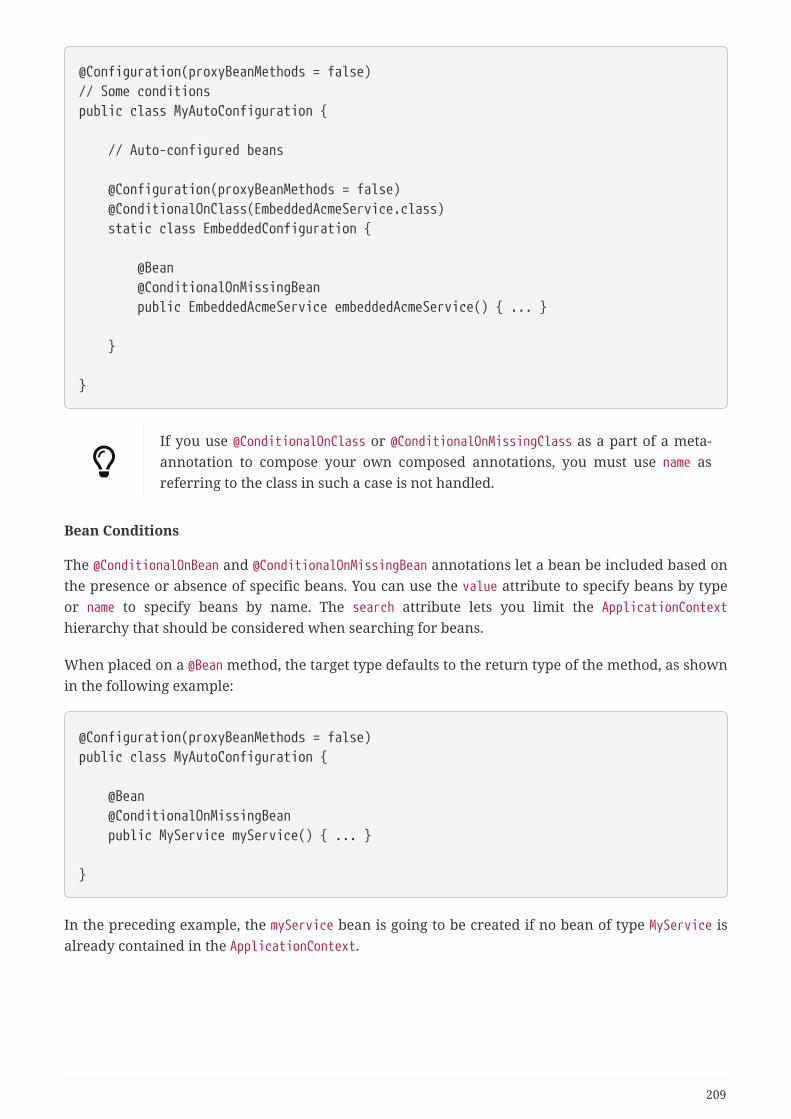
@Configuration(proxyBeanMethods = false)// Some conditionspublic class MyAutoConfiguration {
// Auto-configured beans
@Configuration(proxyBeanMethods = false) @ConditionalOnClass(EmbeddedAcmeService.class) static class EmbeddedConfiguration {
@Bean @ConditionalOnMissingBean public EmbeddedAcmeService embeddedAcmeService() { ... }
}
}
If you use @ConditionalOnClass or @ConditionalOnMissingClass as a part of a meta-annotation to compose your own composed annotations, you must use name asreferring to the class in such a case is not handled.
Bean Conditions
The @ConditionalOnBean and @ConditionalOnMissingBean annotations let a bean be included based onthe presence or absence of specific beans. You can use the value attribute to specify beans by typeor name to specify beans by name. The search attribute lets you limit the ApplicationContexthierarchy that should be considered when searching for beans.
When placed on a @Bean method, the target type defaults to the return type of the method, as shownin the following example:
@Configuration(proxyBeanMethods = false)public class MyAutoConfiguration {
@Bean @ConditionalOnMissingBean public MyService myService() { ... }
}
In the preceding example, the myService bean is going to be created if no bean of type MyService isalready contained in the ApplicationContext.
209

You need to be very careful about the order in which bean definitions are added,as these conditions are evaluated based on what has been processed so far. Forthis reason, we recommend using only @ConditionalOnBean and@ConditionalOnMissingBean annotations on auto-configuration classes (since theseare guaranteed to load after any user-defined bean definitions have been added).
@ConditionalOnBean and @ConditionalOnMissingBean do not prevent @Configurationclasses from being created. The only difference between using these conditions atthe class level and marking each contained @Bean method with the annotation isthat the former prevents registration of the @Configuration class as a bean if thecondition does not match.
Property Conditions
The @ConditionalOnProperty annotation lets configuration be included based on a SpringEnvironment property. Use the prefix and name attributes to specify the property that should bechecked. By default, any property that exists and is not equal to false is matched. You can alsocreate more advanced checks by using the havingValue and matchIfMissing attributes.
Resource Conditions
The @ConditionalOnResource annotation lets configuration be included only when a specific resourceis present. Resources can be specified by using the usual Spring conventions, as shown in thefollowing example: file:/home/user/test.dat.
Web Application Conditions
The @ConditionalOnWebApplication and @ConditionalOnNotWebApplication annotations letconfiguration be included depending on whether the application is a “web application”. A servlet-based web application is any application that uses a Spring WebApplicationContext, defines a sessionscope, or has a ConfigurableWebEnvironment. A reactive web application is any application that uses aReactiveWebApplicationContext, or has a ConfigurableReactiveWebEnvironment.
SpEL Expression Conditions
The @ConditionalOnExpression annotation lets configuration be included based on the result of aSpEL expression.
4.28.4. Testing your Auto-configuration
An auto-configuration can be affected by many factors: user configuration (@Bean definition andEnvironment customization), condition evaluation (presence of a particular library), and others.Concretely, each test should create a well defined ApplicationContext that represents a combinationof those customizations. ApplicationContextRunner provides a great way to achieve that.
ApplicationContextRunner is usually defined as a field of the test class to gather the base, commonconfiguration. The following example makes sure that UserServiceAutoConfiguration is alwaysinvoked:
210
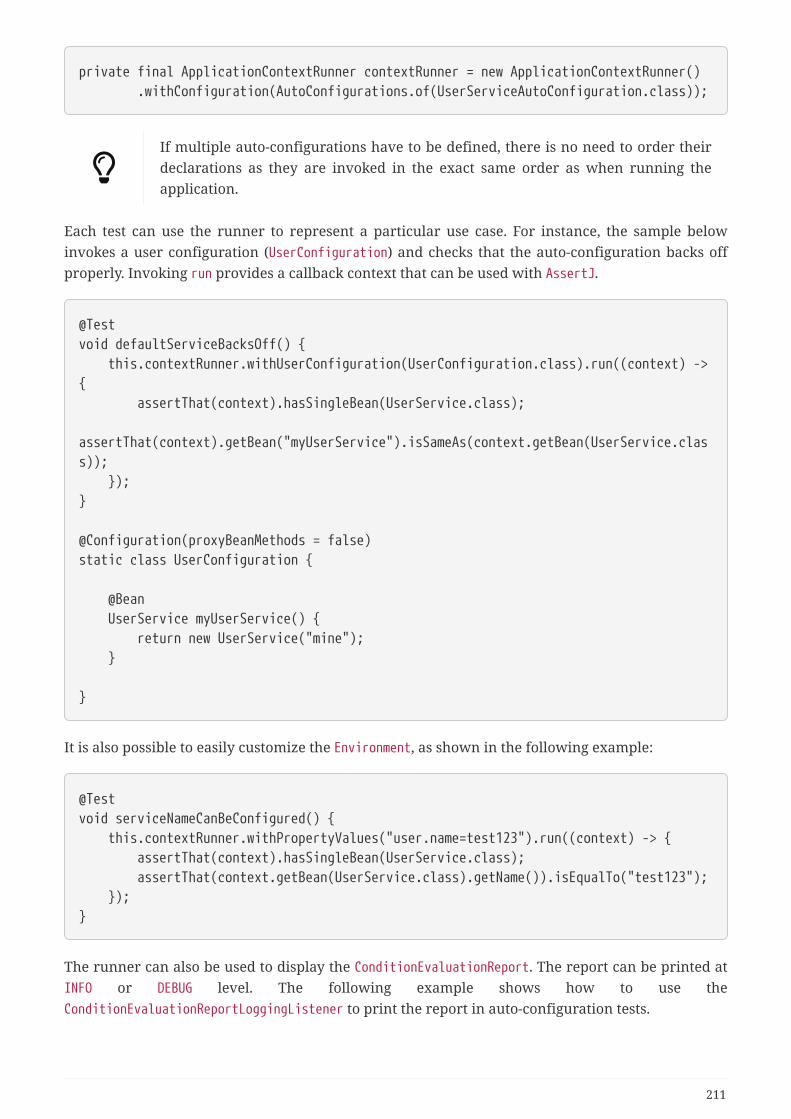
private final ApplicationContextRunner contextRunner = new ApplicationContextRunner() .withConfiguration(AutoConfigurations.of(UserServiceAutoConfiguration.class));
If multiple auto-configurations have to be defined, there is no need to order theirdeclarations as they are invoked in the exact same order as when running theapplication.
Each test can use the runner to represent a particular use case. For instance, the sample belowinvokes a user configuration (UserConfiguration) and checks that the auto-configuration backs offproperly. Invoking run provides a callback context that can be used with AssertJ.
@Testvoid defaultServiceBacksOff() { this.contextRunner.withUserConfiguration(UserConfiguration.class).run((context) ->{ assertThat(context).hasSingleBean(UserService.class); assertThat(context).getBean("myUserService").isSameAs(context.getBean(UserService.class)); });}
@Configuration(proxyBeanMethods = false)static class UserConfiguration {
@Bean UserService myUserService() { return new UserService("mine"); }
}
It is also possible to easily customize the Environment, as shown in the following example:
@Testvoid serviceNameCanBeConfigured() { this.contextRunner.withPropertyValues("user.name=test123").run((context) -> { assertThat(context).hasSingleBean(UserService.class); assertThat(context.getBean(UserService.class).getName()).isEqualTo("test123"); });}
The runner can also be used to display the ConditionEvaluationReport. The report can be printed atINFO or DEBUG level. The following example shows how to use theConditionEvaluationReportLoggingListener to print the report in auto-configuration tests.
211

@Testpublic void autoConfigTest { ConditionEvaluationReportLoggingListener initializer = newConditionEvaluationReportLoggingListener( LogLevel.INFO); ApplicationContextRunner contextRunner = new ApplicationContextRunner() .withInitializer(initializer).run((context) -> { // Do something... });}
Simulating a Web Context
If you need to test an auto-configuration that only operates in a Servlet or Reactive web applicationcontext, use the WebApplicationContextRunner or ReactiveWebApplicationContextRunner respectively.
Overriding the Classpath
It is also possible to test what happens when a particular class and/or package is not present atruntime. Spring Boot ships with a FilteredClassLoader that can easily be used by the runner. In thefollowing example, we assert that if UserService is not present, the auto-configuration is properlydisabled:
@Testvoid serviceIsIgnoredIfLibraryIsNotPresent() { this.contextRunner.withClassLoader(new FilteredClassLoader(UserService.class)) .run((context) -> assertThat(context).doesNotHaveBean("userService"));}
4.28.5. Creating Your Own Starter
A typical Spring Boot starter contains code to auto-configure and customize the infrastructure of agiven technology, let’s call that "acme". To make it easily extensible, a number of configuration keysin a dedicated namespace can be exposed to the environment. Finally, a single "starter" dependencyis provided to help users get started as easily as possible.
Concretely, a custom starter can contain the following:
• The autoconfigure module that contains the auto-configuration code for "acme".
• The starter module that provides a dependency to the autoconfigure module as well as "acme"and any additional dependencies that are typically useful. In a nutshell, adding the startershould provide everything needed to start using that library.
This separation in two modules is in no way necessary. If "acme" has several flavours, options oroptional features, then it is better to separate the auto-configuration as you can clearly express thefact some features are optional. Besides, you have the ability to craft a starter that provides anopinion about those optional dependencies. At the same time, others can rely only on the
212
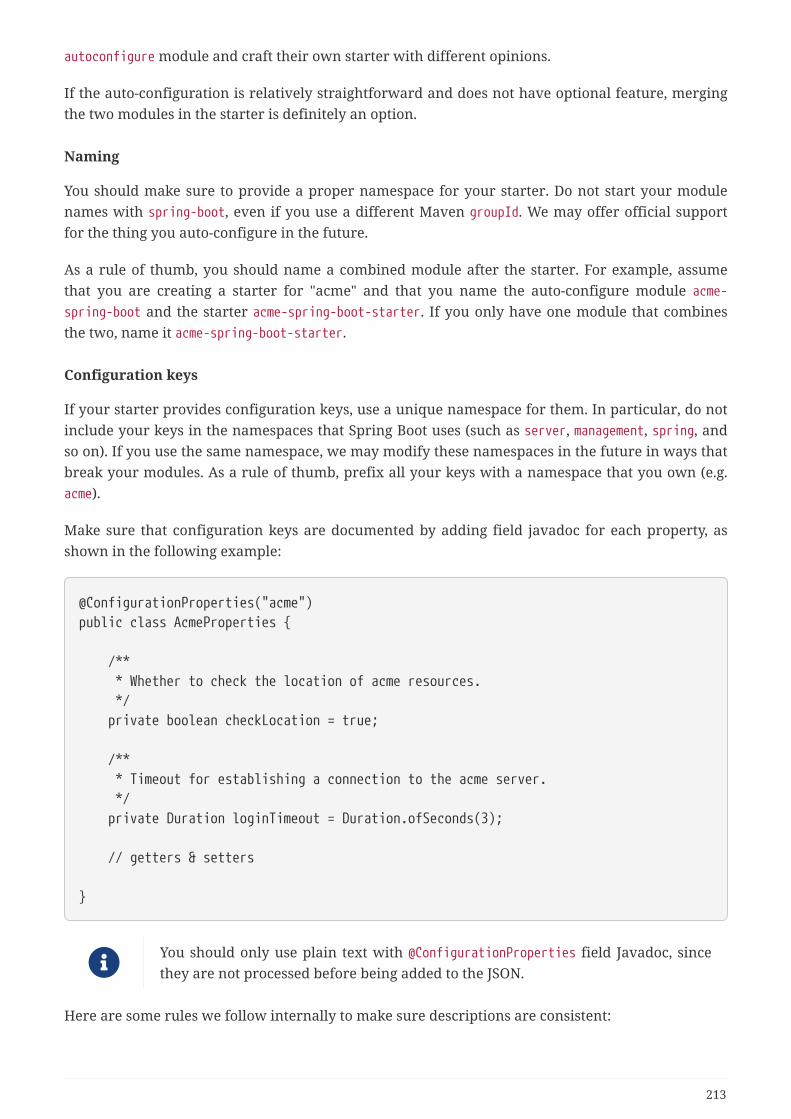
autoconfigure module and craft their own starter with different opinions.
If the auto-configuration is relatively straightforward and does not have optional feature, mergingthe two modules in the starter is definitely an option.
Naming
You should make sure to provide a proper namespace for your starter. Do not start your modulenames with spring-boot, even if you use a different Maven groupId. We may offer official supportfor the thing you auto-configure in the future.
As a rule of thumb, you should name a combined module after the starter. For example, assumethat you are creating a starter for "acme" and that you name the auto-configure module acme-spring-boot and the starter acme-spring-boot-starter. If you only have one module that combinesthe two, name it acme-spring-boot-starter.
Configuration keys
If your starter provides configuration keys, use a unique namespace for them. In particular, do notinclude your keys in the namespaces that Spring Boot uses (such as server, management, spring, andso on). If you use the same namespace, we may modify these namespaces in the future in ways thatbreak your modules. As a rule of thumb, prefix all your keys with a namespace that you own (e.g.acme).
Make sure that configuration keys are documented by adding field javadoc for each property, asshown in the following example:
@ConfigurationProperties("acme")public class AcmeProperties {
/** * Whether to check the location of acme resources. */ private boolean checkLocation = true;
/** * Timeout for establishing a connection to the acme server. */ private Duration loginTimeout = Duration.ofSeconds(3);
// getters & setters
}
You should only use plain text with @ConfigurationProperties field Javadoc, sincethey are not processed before being added to the JSON.
Here are some rules we follow internally to make sure descriptions are consistent:
213
• Do not start the description by "The" or "A".
• For boolean types, start the description with "Whether" or "Enable".
• For collection-based types, start the description with "Comma-separated list"
• Use java.time.Duration rather than long and describe the default unit if it differs frommilliseconds, e.g. "If a duration suffix is not specified, seconds will be used".
• Do not provide the default value in the description unless it has to be determined at runtime.
Make sure to trigger meta-data generation so that IDE assistance is available for your keys as well.You may want to review the generated metadata (META-INF/spring-configuration-metadata.json) tomake sure your keys are properly documented. Using your own starter in a compatible IDE is also agood idea to validate that quality of the metadata.
autoconfigure Module
The autoconfigure module contains everything that is necessary to get started with the library. Itmay also contain configuration key definitions (such as @ConfigurationProperties) and any callbackinterface that can be used to further customize how the components are initialized.
You should mark the dependencies to the library as optional so that you caninclude the autoconfigure module in your projects more easily. If you do it thatway, the library is not provided and, by default, Spring Boot backs off.
Spring Boot uses an annotation processor to collect the conditions on auto-configurations in ametadata file (META-INF/spring-autoconfigure-metadata.properties). If that file is present, it is usedto eagerly filter auto-configurations that do not match, which will improve startup time. It isrecommended to add the following dependency in a module that contains auto-configurations:
<dependency> <groupId>org.springframework.boot</groupId> <artifactId>spring-boot-autoconfigure-processor</artifactId> <optional>true</optional></dependency>
If you have defined auto-configurations directly in your application, make sure to configure thespring-boot-maven-plugin to prevent the repackage goal from adding the dependency into the fat jar:
214
<project> <build> <plugins> <plugin> <groupId>org.springframework.boot</groupId> <artifactId>spring-boot-maven-plugin</artifactId> <configuration> <excludes> <exclude> <groupId>org.springframework.boot</groupId> <artifactId>spring-boot-autoconfigure-processor</artifactId> </exclude> </excludes> </configuration> </plugin> </plugins> </build></project>
With Gradle 4.5 and earlier, the dependency should be declared in the compileOnly configuration, asshown in the following example:
dependencies { compileOnly "org.springframework.boot:spring-boot-autoconfigure-processor"}
With Gradle 4.6 and later, the dependency should be declared in the annotationProcessor
configuration, as shown in the following example:
dependencies { annotationProcessor "org.springframework.boot:spring-boot-autoconfigure-processor"}
Starter Module
The starter is really an empty jar. Its only purpose is to provide the necessary dependencies to workwith the library. You can think of it as an opinionated view of what is required to get started.
Do not make assumptions about the project in which your starter is added. If the library you areauto-configuring typically requires other starters, mention them as well. Providing a proper set ofdefault dependencies may be hard if the number of optional dependencies is high, as you shouldavoid including dependencies that are unnecessary for a typical usage of the library. In otherwords, you should not include optional dependencies.
215

Either way, your starter must reference the core Spring Boot starter (spring-boot-starter) directly or indirectly (i.e. no need to add it if your starter relies on anotherstarter). If a project is created with only your custom starter, Spring Boot’s corefeatures will be honoured by the presence of the core starter.
4.29. Kotlin supportKotlin is a statically-typed language targeting the JVM (and other platforms) which allows writingconcise and elegant code while providing interoperability with existing libraries written in Java.
Spring Boot provides Kotlin support by leveraging the support in other Spring projects such asSpring Framework, Spring Data, and Reactor. See the Spring Framework Kotlin supportdocumentation for more information.
The easiest way to start with Spring Boot and Kotlin is to follow this comprehensive tutorial. Youcan create new Kotlin projects via start.spring.io. Feel free to join the #spring channel of KotlinSlack or ask a question with the spring and kotlin tags on Stack Overflow if you need support.
4.29.1. Requirements
Spring Boot supports Kotlin 1.3.x. To use Kotlin, org.jetbrains.kotlin:kotlin-stdlib andorg.jetbrains.kotlin:kotlin-reflect must be present on the classpath. The kotlin-stdlib variantskotlin-stdlib-jdk7 and kotlin-stdlib-jdk8 can also be used.
Since Kotlin classes are final by default, you are likely to want to configure kotlin-spring plugin inorder to automatically open Spring-annotated classes so that they can be proxied.
Jackson’s Kotlin module is required for serializing / deserializing JSON data in Kotlin. It isautomatically registered when found on the classpath. A warning message is logged if Jackson andKotlin are present but the Jackson Kotlin module is not.
These dependencies and plugins are provided by default if one bootstraps a Kotlinproject on start.spring.io.
4.29.2. Null-safety
One of Kotlin’s key features is null-safety. It deals with null values at compile time rather thandeferring the problem to runtime and encountering a NullPointerException. This helps to eliminatea common source of bugs without paying the cost of wrappers like Optional. Kotlin also allows usingfunctional constructs with nullable values as described in this comprehensive guide to null-safetyin Kotlin.
Although Java does not allow one to express null-safety in its type system, Spring Framework,Spring Data, and Reactor now provide null-safety of their API via tooling-friendly annotations. Bydefault, types from Java APIs used in Kotlin are recognized as platform types for which null-checksare relaxed. Kotlin’s support for JSR 305 annotations combined with nullability annotations providenull-safety for the related Spring API in Kotlin.
216

The JSR 305 checks can be configured by adding the -Xjsr305 compiler flag with the followingoptions: -Xjsr305={strict|warn|ignore}. The default behavior is the same as -Xjsr305=warn. Thestrict value is required to have null-safety taken in account in Kotlin types inferred from SpringAPI but should be used with the knowledge that Spring API nullability declaration could evolveeven between minor releases and more checks may be added in the future).
Generic type arguments, varargs and array elements nullability are not yetsupported. See SPR-15942 for up-to-date information. Also be aware that SpringBoot’s own API is not yet annotated.
4.29.3. Kotlin API
runApplication
Spring Boot provides an idiomatic way to run an application withrunApplication<MyApplication>(*args) as shown in the following example:
import org.springframework.boot.autoconfigure.SpringBootApplicationimport org.springframework.boot.runApplication
@SpringBootApplicationclass MyApplication
fun main(args: Array<String>) { runApplication<MyApplication>(*args)}
This is a drop-in replacement for SpringApplication.run(MyApplication::class.java, *args). It alsoallows customization of the application as shown in the following example:
runApplication<MyApplication>(*args) { setBannerMode(OFF)}
Extensions
Kotlin extensions provide the ability to extend existing classes with additional functionality. TheSpring Boot Kotlin API makes use of these extensions to add new Kotlin specific conveniences toexisting APIs.
TestRestTemplate extensions, similar to those provided by Spring Framework for RestOperations inSpring Framework, are provided. Among other things, the extensions make it possible to takeadvantage of Kotlin reified type parameters.
4.29.4. Dependency management
In order to avoid mixing different versions of Kotlin dependencies on the classpath, Spring Boot
217

imports the Kotlin BOM.
With Maven, the Kotlin version can be customized via the kotlin.version property and pluginmanagement is provided for kotlin-maven-plugin. With Gradle, the Spring Boot pluginautomatically aligns the kotlin.version with the version of the Kotlin plugin.
Spring Boot also manages the version of Coroutines dependencies by importing the KotlinCoroutines BOM. The version can be customized via the kotlin-coroutines.version property.
org.jetbrains.kotlinx:kotlinx-coroutines-reactor dependency is provided bydefault if one bootstraps a Kotlin project with at least one reactive dependency onstart.spring.io.
4.29.5. @ConfigurationProperties
@ConfigurationProperties when used in combination with @ConstructorBinding supports classes withimmutable val properties as shown in the following example:
@ConstructorBinding@ConfigurationProperties("example.kotlin")data class KotlinExampleProperties( val name: String, val description: String, val myService: MyService) {
data class MyService( val apiToken: String, val uri: URI )}
To generate your own metadata using the annotation processor, kapt should beconfigured with the spring-boot-configuration-processor dependency. Note thatsome features (such as detecting the default value or deprecated items) are notworking due to limitations in the model kapt provides.
4.29.6. Testing
While it is possible to use JUnit 4 to test Kotlin code, JUnit 5 is provided by default and isrecommended. JUnit 5 enables a test class to be instantiated once and reused for all of the class’stests. This makes it possible to use @BeforeAll and @AfterAll annotations on non-static methods,which is a good fit for Kotlin.
JUnit 5 is the default and the vintage engine is provided for backward compatibility with JUnit 4. Ifyou don’t use it, exclude org.junit.vintage:junit-vintage-engine. You also need to switch testinstance lifecycle to "per-class".
To mock Kotlin classes, MockK is recommended. If you need the Mockk equivalent of the Mockito
218
specific @MockBean and @SpyBean annotations, you can use SpringMockK which provides similar@MockkBean and @SpykBean annotations.
4.29.7. Resources
Further reading
• Kotlin language reference
• Kotlin Slack (with a dedicated #spring channel)
• Stackoverflow with spring and kotlin tags
• Try Kotlin in your browser
• Kotlin blog
• Awesome Kotlin
• Tutorial: building web applications with Spring Boot and Kotlin
• Developing Spring Boot applications with Kotlin
• A Geospatial Messenger with Kotlin, Spring Boot and PostgreSQL
• Introducing Kotlin support in Spring Framework 5.0
• Spring Framework 5 Kotlin APIs, the functional way
Examples
• spring-boot-kotlin-demo: regular Spring Boot + Spring Data JPA project
• mixit: Spring Boot 2 + WebFlux + Reactive Spring Data MongoDB
• spring-kotlin-fullstack: WebFlux Kotlin fullstack example with Kotlin2js for frontend instead ofJavaScript or TypeScript
• spring-petclinic-kotlin: Kotlin version of the Spring PetClinic Sample Application
• spring-kotlin-deepdive: a step by step migration for Boot 1.0 + Java to Boot 2.0 + Kotlin
• spring-boot-coroutines-demo: Coroutines sample project
4.30. What to Read NextIf you want to learn more about any of the classes discussed in this section, you can check out theSpring Boot API documentation or you can browse the source code directly. If you have specificquestions, take a look at the how-to section.
If you are comfortable with Spring Boot’s core features, you can continue on and read aboutproduction-ready features.
219
Chapter 5. Spring Boot Actuator: Production-ready FeaturesSpring Boot includes a number of additional features to help you monitor and manage yourapplication when you push it to production. You can choose to manage and monitor yourapplication by using HTTP endpoints or with JMX. Auditing, health, and metrics gathering can alsobe automatically applied to your application.
5.1. Enabling Production-ready FeaturesThe spring-boot-actuator module provides all of Spring Boot’s production-ready features. Therecommended way to enable the features is to add a dependency on the spring-boot-starter-actuator ‘Starter’.
Definition of Actuator
An actuator is a manufacturing term that refers to a mechanical device for moving orcontrolling something. Actuators can generate a large amount of motion from a small change.
To add the actuator to a Maven based project, add the following ‘Starter’ dependency:
<dependencies> <dependency> <groupId>org.springframework.boot</groupId> <artifactId>spring-boot-starter-actuator</artifactId> </dependency></dependencies>
For Gradle, use the following declaration:
dependencies { compile("org.springframework.boot:spring-boot-starter-actuator")}
5.2. EndpointsActuator endpoints let you monitor and interact with your application. Spring Boot includes anumber of built-in endpoints and lets you add your own. For example, the health endpoint providesbasic application health information.
Each individual endpoint can be enabled or disabled and exposed (made remotely accessible) overHTTP or JMX. An endpoint is considered to be available when it is both enabled and exposed. Thebuilt-in endpoints will only be auto-configured when they are available. Most applications choose
220
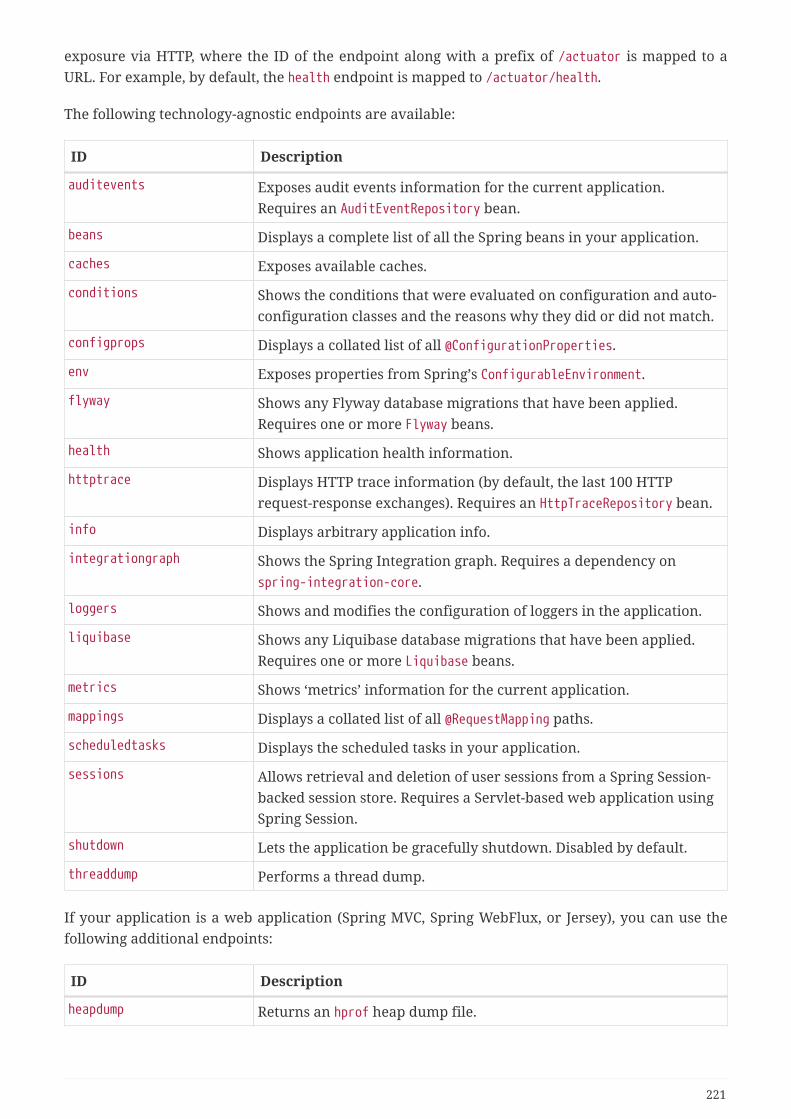
exposure via HTTP, where the ID of the endpoint along with a prefix of /actuator is mapped to aURL. For example, by default, the health endpoint is mapped to /actuator/health.
The following technology-agnostic endpoints are available:
ID Description
auditevents Exposes audit events information for the current application.Requires an AuditEventRepository bean.
beans Displays a complete list of all the Spring beans in your application.
caches Exposes available caches.
conditions Shows the conditions that were evaluated on configuration and auto-configuration classes and the reasons why they did or did not match.
configprops Displays a collated list of all @ConfigurationProperties.
env Exposes properties from Spring’s ConfigurableEnvironment.
flyway Shows any Flyway database migrations that have been applied.Requires one or more Flyway beans.
health Shows application health information.
httptrace Displays HTTP trace information (by default, the last 100 HTTPrequest-response exchanges). Requires an HttpTraceRepository bean.
info Displays arbitrary application info.
integrationgraph Shows the Spring Integration graph. Requires a dependency onspring-integration-core.
loggers Shows and modifies the configuration of loggers in the application.
liquibase Shows any Liquibase database migrations that have been applied.Requires one or more Liquibase beans.
metrics Shows ‘metrics’ information for the current application.
mappings Displays a collated list of all @RequestMapping paths.
scheduledtasks Displays the scheduled tasks in your application.
sessions Allows retrieval and deletion of user sessions from a Spring Session-backed session store. Requires a Servlet-based web application usingSpring Session.
shutdown Lets the application be gracefully shutdown. Disabled by default.
threaddump Performs a thread dump.
If your application is a web application (Spring MVC, Spring WebFlux, or Jersey), you can use thefollowing additional endpoints:
ID Description
heapdump Returns an hprof heap dump file.
221
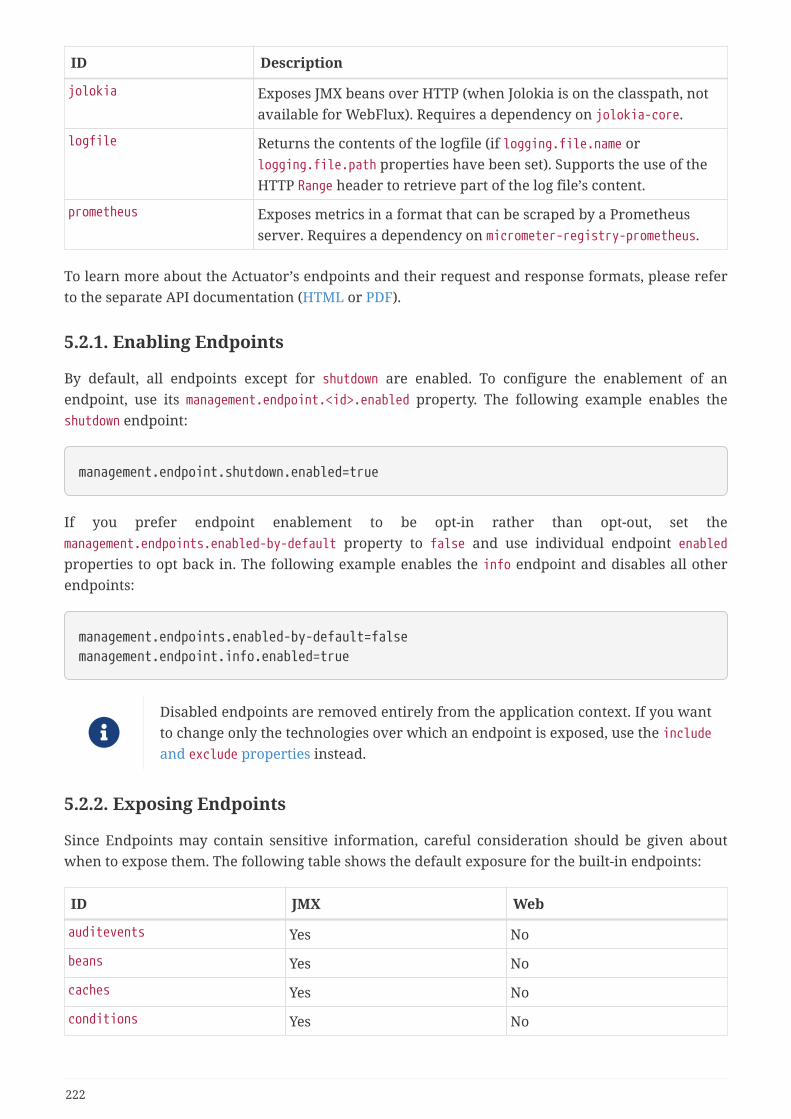
ID Description
jolokia Exposes JMX beans over HTTP (when Jolokia is on the classpath, notavailable for WebFlux). Requires a dependency on jolokia-core.
logfile Returns the contents of the logfile (if logging.file.name orlogging.file.path properties have been set). Supports the use of theHTTP Range header to retrieve part of the log file’s content.
prometheus Exposes metrics in a format that can be scraped by a Prometheusserver. Requires a dependency on micrometer-registry-prometheus.
To learn more about the Actuator’s endpoints and their request and response formats, please referto the separate API documentation (HTML or PDF).
5.2.1. Enabling Endpoints
By default, all endpoints except for shutdown are enabled. To configure the enablement of anendpoint, use its management.endpoint.<id>.enabled property. The following example enables theshutdown endpoint:
management.endpoint.shutdown.enabled=true
If you prefer endpoint enablement to be opt-in rather than opt-out, set themanagement.endpoints.enabled-by-default property to false and use individual endpoint enabledproperties to opt back in. The following example enables the info endpoint and disables all otherendpoints:
management.endpoints.enabled-by-default=falsemanagement.endpoint.info.enabled=true
Disabled endpoints are removed entirely from the application context. If you wantto change only the technologies over which an endpoint is exposed, use the includeand exclude properties instead.
5.2.2. Exposing Endpoints
Since Endpoints may contain sensitive information, careful consideration should be given aboutwhen to expose them. The following table shows the default exposure for the built-in endpoints:
ID JMX Web
auditevents Yes No
beans Yes No
caches Yes No
conditions Yes No
222
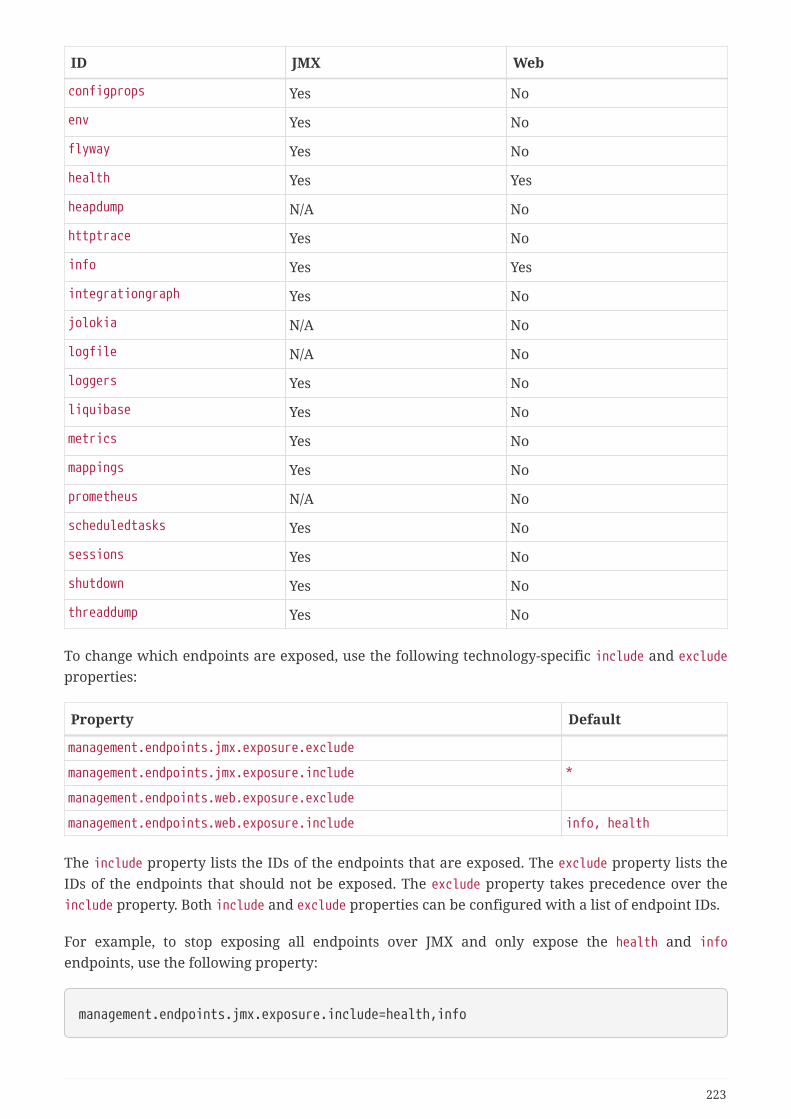
ID JMX Web
configprops Yes No
env Yes No
flyway Yes No
health Yes Yes
heapdump N/A No
httptrace Yes No
info Yes Yes
integrationgraph Yes No
jolokia N/A No
logfile N/A No
loggers Yes No
liquibase Yes No
metrics Yes No
mappings Yes No
prometheus N/A No
scheduledtasks Yes No
sessions Yes No
shutdown Yes No
threaddump Yes No
To change which endpoints are exposed, use the following technology-specific include and excludeproperties:
Property Default
management.endpoints.jmx.exposure.exclude
management.endpoints.jmx.exposure.include *
management.endpoints.web.exposure.exclude
management.endpoints.web.exposure.include info, health
The include property lists the IDs of the endpoints that are exposed. The exclude property lists theIDs of the endpoints that should not be exposed. The exclude property takes precedence over theinclude property. Both include and exclude properties can be configured with a list of endpoint IDs.
For example, to stop exposing all endpoints over JMX and only expose the health and infoendpoints, use the following property:
management.endpoints.jmx.exposure.include=health,info
223
* can be used to select all endpoints. For example, to expose everything over HTTP except the envand beans endpoints, use the following properties:
management.endpoints.web.exposure.include=*management.endpoints.web.exposure.exclude=env,beans
* has a special meaning in YAML, so be sure to add quotes if you want to include(or exclude) all endpoints, as shown in the following example:
management: endpoints: web: exposure: include: "*"
If your application is exposed publicly, we strongly recommend that you alsosecure your endpoints.
If you want to implement your own strategy for when endpoints are exposed, youcan register an EndpointFilter bean.
5.2.3. Securing HTTP Endpoints
You should take care to secure HTTP endpoints in the same way that you would any other sensitiveURL. If Spring Security is present, endpoints are secured by default using Spring Security’s content-negotiation strategy. If you wish to configure custom security for HTTP endpoints, for example, onlyallow users with a certain role to access them, Spring Boot provides some convenientRequestMatcher objects that can be used in combination with Spring Security.
A typical Spring Security configuration might look something like the following example:
@Configuration(proxyBeanMethods = false)public class ActuatorSecurity extends WebSecurityConfigurerAdapter {
@Override protected void configure(HttpSecurity http) throws Exception { http.requestMatcher(EndpointRequest.toAnyEndpoint()).authorizeRequests((requests) -> requests.anyRequest().hasRole("ENDPOINT_ADMIN")); http.httpBasic(); }
}
The preceding example uses EndpointRequest.toAnyEndpoint() to match a request to any endpoint
224
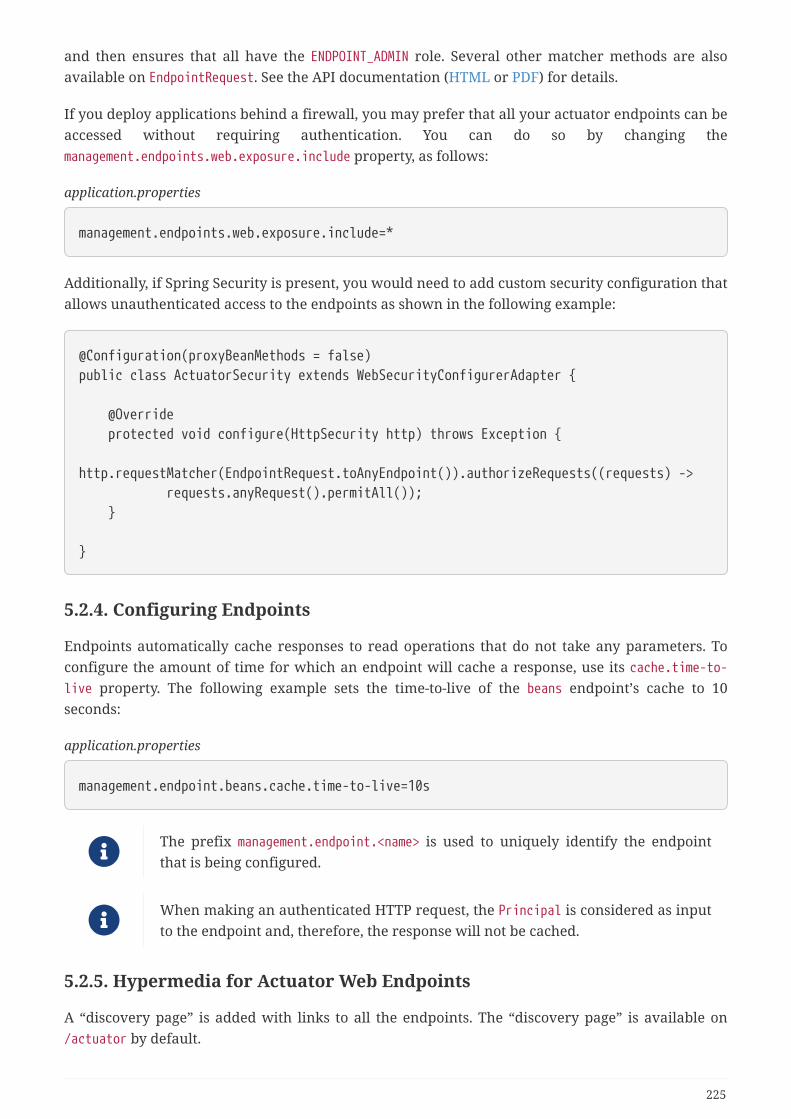
and then ensures that all have the ENDPOINT_ADMIN role. Several other matcher methods are alsoavailable on EndpointRequest. See the API documentation (HTML or PDF) for details.
If you deploy applications behind a firewall, you may prefer that all your actuator endpoints can beaccessed without requiring authentication. You can do so by changing themanagement.endpoints.web.exposure.include property, as follows:
application.properties
management.endpoints.web.exposure.include=*
Additionally, if Spring Security is present, you would need to add custom security configuration thatallows unauthenticated access to the endpoints as shown in the following example:
@Configuration(proxyBeanMethods = false)public class ActuatorSecurity extends WebSecurityConfigurerAdapter {
@Override protected void configure(HttpSecurity http) throws Exception { http.requestMatcher(EndpointRequest.toAnyEndpoint()).authorizeRequests((requests) -> requests.anyRequest().permitAll()); }
}
5.2.4. Configuring Endpoints
Endpoints automatically cache responses to read operations that do not take any parameters. Toconfigure the amount of time for which an endpoint will cache a response, use its cache.time-to-live property. The following example sets the time-to-live of the beans endpoint’s cache to 10seconds:
application.properties
management.endpoint.beans.cache.time-to-live=10s
The prefix management.endpoint.<name> is used to uniquely identify the endpointthat is being configured.
When making an authenticated HTTP request, the Principal is considered as inputto the endpoint and, therefore, the response will not be cached.
5.2.5. Hypermedia for Actuator Web Endpoints
A “discovery page” is added with links to all the endpoints. The “discovery page” is available on/actuator by default.
225

When a custom management context path is configured, the “discovery page” automatically movesfrom /actuator to the root of the management context. For example, if the management contextpath is /management, then the discovery page is available from /management. When the managementcontext path is set to /, the discovery page is disabled to prevent the possibility of a clash with othermappings.
5.2.6. CORS Support
Cross-origin resource sharing (CORS) is a W3C specification that lets you specify in a flexible waywhat kind of cross-domain requests are authorized. If you use Spring MVC or Spring WebFlux,Actuator’s web endpoints can be configured to support such scenarios.
CORS support is disabled by default and is only enabled once themanagement.endpoints.web.cors.allowed-origins property has been set. The following configurationpermits GET and POST calls from the example.com domain:
management.endpoints.web.cors.allowed-origins=https://example.commanagement.endpoints.web.cors.allowed-methods=GET,POST
See CorsEndpointProperties for a complete list of options.
5.2.7. Implementing Custom Endpoints
If you add a @Bean annotated with @Endpoint, any methods annotated with @ReadOperation,@WriteOperation, or @DeleteOperation are automatically exposed over JMX and, in a web application,over HTTP as well. Endpoints can be exposed over HTTP using Jersey, Spring MVC, or SpringWebFlux. If both Jersey and Spring MVC are available, Spring MVC will be used.
The following example exposes a read operation that returns a custom object:
@ReadOperationpublic CustomData getCustomData() { return new CustomData("test", 5);}
You can also write technology-specific endpoints by using @JmxEndpoint or @WebEndpoint. Theseendpoints are restricted to their respective technologies. For example, @WebEndpoint is exposed onlyover HTTP and not over JMX.
You can write technology-specific extensions by using @EndpointWebExtension and@EndpointJmxExtension. These annotations let you provide technology-specific operations toaugment an existing endpoint.
Finally, if you need access to web-framework-specific functionality, you can implement Servlet orSpring @Controller and @RestController endpoints at the cost of them not being available over JMXor when using a different web framework.
226

Receiving Input
Operations on an endpoint receive input via their parameters. When exposed via the web, thevalues for these parameters are taken from the URL’s query parameters and from the JSON requestbody. When exposed via JMX, the parameters are mapped to the parameters of the MBean’soperations. Parameters are required by default. They can be made optional by annotating themwith @org.springframework.lang.Nullable.
Each root property in the JSON request body can be mapped to a parameter of the endpoint.Consider the following JSON request body:
{ "name": "test", "counter": 42}
This can be used to invoke a write operation that takes String name and int counter parameters, asshown in the following example:
@WriteOperationpublic void updateCustomData(String name, int counter) { // injects "test" and 42}
Because endpoints are technology agnostic, only simple types can be specified inthe method signature. In particular declaring a single parameter with a CustomDatatype defining a name and counter properties is not supported.
To allow the input to be mapped to the operation method’s parameters, Java codeimplementing an endpoint should be compiled with -parameters, and Kotlin codeimplementing an endpoint should be compiled with -java-parameters. This willhappen automatically if you are using Spring Boot’s Gradle plugin or if you areusing Maven and spring-boot-starter-parent.
Input type conversion
The parameters passed to endpoint operation methods are, if necessary, automatically converted tothe required type. Before calling an operation method, the input received via JMX or an HTTPrequest is converted to the required types using an instance of ApplicationConversionService as wellas any Converter or GenericConverter beans qualified with @EndpointConverter.
Custom Web Endpoints
Operations on an @Endpoint, @WebEndpoint, or @EndpointWebExtension are automatically exposed overHTTP using Jersey, Spring MVC, or Spring WebFlux. If both Jersey and Spring MVC are available,Spring MVC will be used.
227

Web Endpoint Request Predicates
A request predicate is automatically generated for each operation on a web-exposed endpoint.
Path
The path of the predicate is determined by the ID of the endpoint and the base path of web-exposedendpoints. The default base path is /actuator. For example, an endpoint with the ID sessions willuse /actuator/sessions as its path in the predicate.
The path can be further customized by annotating one or more parameters of the operation methodwith @Selector. Such a parameter is added to the path predicate as a path variable. The variable’svalue is passed into the operation method when the endpoint operation is invoked. If you want tocapture all remaining path elements, you can add @Selector(Match=ALL_REMAINING) to the lastparameter and make it a type that is conversion compatible with a String[].
HTTP method
The HTTP method of the predicate is determined by the operation type, as shown in the followingtable:
Operation HTTP method
@ReadOperation GET
@WriteOperation POST
@DeleteOperation DELETE
Consumes
For a @WriteOperation (HTTP POST) that uses the request body, the consumes clause of the predicateis application/vnd.spring-boot.actuator.v2+json, application/json. For all other operations theconsumes clause is empty.
Produces
The produces clause of the predicate can be determined by the produces attribute of the@DeleteOperation, @ReadOperation, and @WriteOperation annotations. The attribute is optional. If it isnot used, the produces clause is determined automatically.
If the operation method returns void or Void the produces clause is empty. If the operation methodreturns a org.springframework.core.io.Resource, the produces clause is application/octet-stream.For all other operations the produces clause is application/vnd.spring-boot.actuator.v2+json,application/json.
Web Endpoint Response Status
The default response status for an endpoint operation depends on the operation type (read, write,or delete) and what, if anything, the operation returns.
A @ReadOperation returns a value, the response status will be 200 (OK). If it does not return a value,the response status will be 404 (Not Found).
228
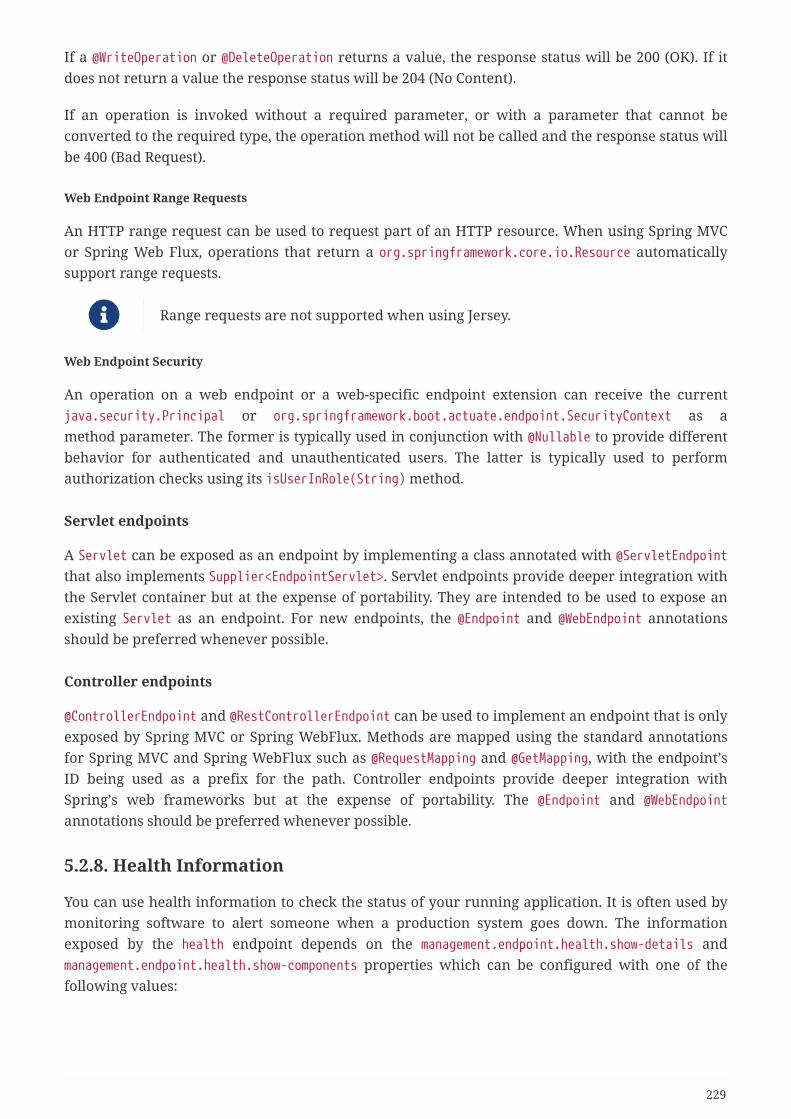
If a @WriteOperation or @DeleteOperation returns a value, the response status will be 200 (OK). If itdoes not return a value the response status will be 204 (No Content).
If an operation is invoked without a required parameter, or with a parameter that cannot beconverted to the required type, the operation method will not be called and the response status willbe 400 (Bad Request).
Web Endpoint Range Requests
An HTTP range request can be used to request part of an HTTP resource. When using Spring MVCor Spring Web Flux, operations that return a org.springframework.core.io.Resource automaticallysupport range requests.
Range requests are not supported when using Jersey.
Web Endpoint Security
An operation on a web endpoint or a web-specific endpoint extension can receive the currentjava.security.Principal or org.springframework.boot.actuate.endpoint.SecurityContext as amethod parameter. The former is typically used in conjunction with @Nullable to provide differentbehavior for authenticated and unauthenticated users. The latter is typically used to performauthorization checks using its isUserInRole(String) method.
Servlet endpoints
A Servlet can be exposed as an endpoint by implementing a class annotated with @ServletEndpointthat also implements Supplier<EndpointServlet>. Servlet endpoints provide deeper integration withthe Servlet container but at the expense of portability. They are intended to be used to expose anexisting Servlet as an endpoint. For new endpoints, the @Endpoint and @WebEndpoint annotationsshould be preferred whenever possible.
Controller endpoints
@ControllerEndpoint and @RestControllerEndpoint can be used to implement an endpoint that is onlyexposed by Spring MVC or Spring WebFlux. Methods are mapped using the standard annotationsfor Spring MVC and Spring WebFlux such as @RequestMapping and @GetMapping, with the endpoint’sID being used as a prefix for the path. Controller endpoints provide deeper integration withSpring’s web frameworks but at the expense of portability. The @Endpoint and @WebEndpointannotations should be preferred whenever possible.
5.2.8. Health Information
You can use health information to check the status of your running application. It is often used bymonitoring software to alert someone when a production system goes down. The informationexposed by the health endpoint depends on the management.endpoint.health.show-details andmanagement.endpoint.health.show-components properties which can be configured with one of thefollowing values:
229

Name Description
never Details are never shown.
when-authorized Details are only shown to authorized users. Authorized roles can beconfigured using management.endpoint.health.roles.
always Details are shown to all users.
The default value is never. A user is considered to be authorized when they are in one or more ofthe endpoint’s roles. If the endpoint has no configured roles (the default) all authenticated users areconsidered to be authorized. The roles can be configured using themanagement.endpoint.health.roles property.
If you have secured your application and wish to use always, your securityconfiguration must permit access to the health endpoint for both authenticatedand unauthenticated users.
Health information is collected from the content of a HealthContributorRegistry (by default allHealthContributor instances defined in your ApplicationContext). Spring Boot includes a number ofauto-configured HealthContributors and you can also write your own.
A HealthContributor can either be a HealthIndicator or a CompositeHealthContributor. AHealthIndicator provides actual health information, including a Status. ACompositeHealthContributor provides a composite of other HealthContributors. Taken together,contributors form a tree structure to represent the overall system health.
By default, the final system health is derived by a StatusAggregator which sorts the statuses fromeach HealthIndicator based on an ordered list of statuses. The first status in the sorted list is used asthe overall health status. If no HealthIndicator returns a status that is known to theStatusAggregator, an UNKNOWN status is used.
The HealthContributorRegistry can be used to register and unregister healthindicators at runtime.
Auto-configured HealthIndicators
The following HealthIndicators are auto-configured by Spring Boot when appropriate:
Name Description
CassandraHealthIndicator Checks that a Cassandra database is up.
CouchbaseHealthIndicator Checks that a Couchbase cluster is up.
DiskSpaceHealthIndicator Checks for low disk space.
DataSourceHealthIndicator Checks that a connection to DataSource can be obtained.
ElasticsearchRestHealthIndicator Checks that an Elasticsearch cluster is up.
HazelcastHealthIndicator Checks that a Hazelcast server is up.
InfluxDbHealthIndicator Checks that an InfluxDB server is up.
230

Name Description
JmsHealthIndicator Checks that a JMS broker is up.
LdapHealthIndicator Checks that an LDAP server is up.
MailHealthIndicator Checks that a mail server is up.
MongoHealthIndicator Checks that a Mongo database is up.
Neo4jHealthIndicator Checks that a Neo4j database is up.
PingHealthIndicator Always responds with UP.
RabbitHealthIndicator Checks that a Rabbit server is up.
RedisHealthIndicator Checks that a Redis server is up.
SolrHealthIndicator Checks that a Solr server is up.
You can disable them all by setting the management.health.defaults.enabled
property.
Writing Custom HealthIndicators
To provide custom health information, you can register Spring beans that implement theHealthIndicator interface. You need to provide an implementation of the health() method andreturn a Health response. The Health response should include a status and can optionally includeadditional details to be displayed. The following code shows a sample HealthIndicator
implementation:
import org.springframework.boot.actuate.health.Health;import org.springframework.boot.actuate.health.HealthIndicator;import org.springframework.stereotype.Component;
@Componentpublic class MyHealthIndicator implements HealthIndicator {
@Override public Health health() { int errorCode = check(); // perform some specific health check if (errorCode != 0) { return Health.down().withDetail("Error Code", errorCode).build(); } return Health.up().build(); }
}
The identifier for a given HealthIndicator is the name of the bean without theHealthIndicator suffix, if it exists. In the preceding example, the healthinformation is available in an entry named my.
231

In addition to Spring Boot’s predefined Status types, it is also possible for Health to return a customStatus that represents a new system state. In such cases, a custom implementation of theStatusAggregator interface also needs to be provided, or the default implementation has to beconfigured by using the management.endpoint.health.status.order configuration property.
For example, assume a new Status with code FATAL is being used in one of your HealthIndicatorimplementations. To configure the severity order, add the following property to your applicationproperties:
management.endpoint.health.status.order=fatal,down,out-of-service,unknown,up
The HTTP status code in the response reflects the overall health status. By default, OUT_OF_SERVICEand DOWN map to 503. Any unmapped health statuses, including UP, map to 200. You might also wantto register custom status mappings if you access the health endpoint over HTTP. Configuring acustom mapping disables the defaults mappings for DOWN and OUT_OF_SERVICE. If you want to retainthe default mappings they must be configured explicitly alongside any custom mappings. Forexample, the following property maps FATAL to 503 (service unavailable) and retains the defaultmappings for DOWN and OUT_OF_SERVICE:
management.endpoint.health.status.http-mapping.down=503management.endpoint.health.status.http-mapping.fatal=503management.endpoint.health.status.http-mapping.out-of-service=503
If you need more control, you can define your own HttpCodeStatusMapper bean.
The following table shows the default status mappings for the built-in statuses:
Status Mapping
DOWN SERVICE_UNAVAILABLE (503)
OUT_OF_SERVICE SERVICE_UNAVAILABLE (503)
UP No mapping by default, so http status is 200
UNKNOWN No mapping by default, so http status is 200
Reactive Health Indicators
For reactive applications, such as those using Spring WebFlux, ReactiveHealthContributor providesa non-blocking contract for getting application health. Similar to a traditional HealthContributor,health information is collected from the content of a ReactiveHealthContributorRegistry (by defaultall HealthContributor and ReactiveHealthContributor instances defined in your ApplicationContext).Regular HealthContributors that do not check against a reactive API are executed on the elasticscheduler.
232
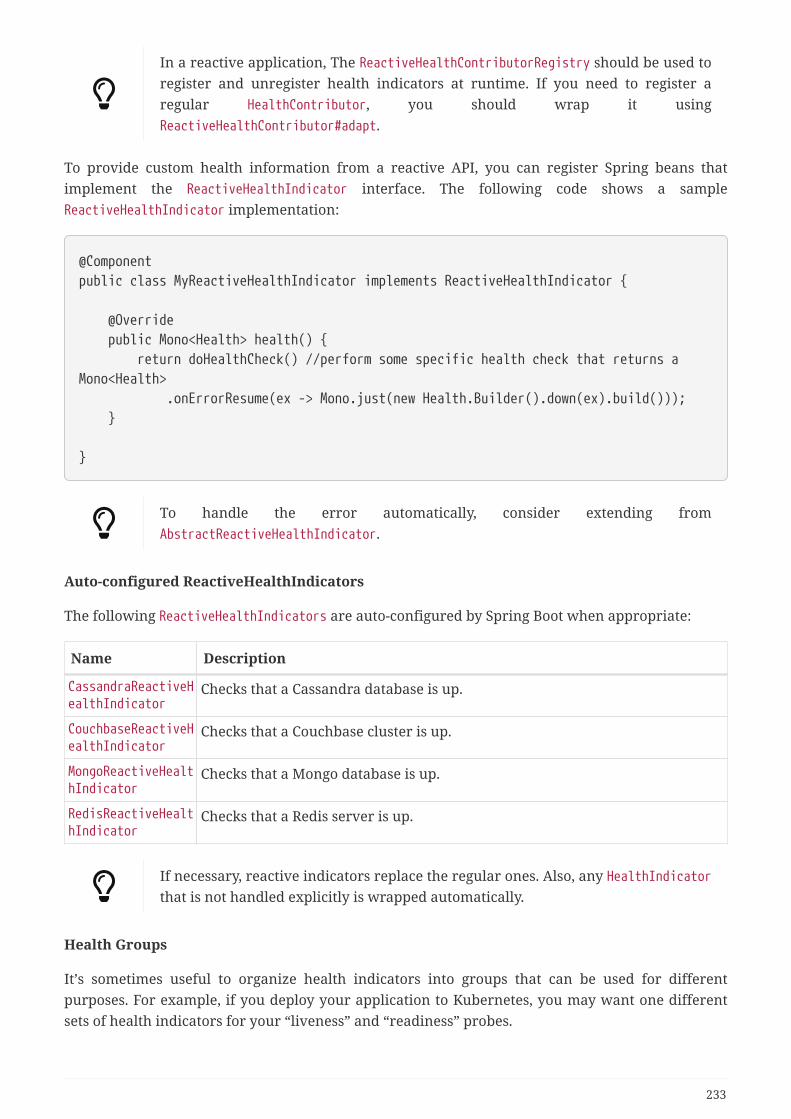
In a reactive application, The ReactiveHealthContributorRegistry should be used toregister and unregister health indicators at runtime. If you need to register aregular HealthContributor, you should wrap it usingReactiveHealthContributor#adapt.
To provide custom health information from a reactive API, you can register Spring beans thatimplement the ReactiveHealthIndicator interface. The following code shows a sampleReactiveHealthIndicator implementation:
@Componentpublic class MyReactiveHealthIndicator implements ReactiveHealthIndicator {
@Override public Mono<Health> health() { return doHealthCheck() //perform some specific health check that returns aMono<Health> .onErrorResume(ex -> Mono.just(new Health.Builder().down(ex).build())); }
}
To handle the error automatically, consider extending fromAbstractReactiveHealthIndicator.
Auto-configured ReactiveHealthIndicators
The following ReactiveHealthIndicators are auto-configured by Spring Boot when appropriate:
Name Description
CassandraReactiveHealthIndicator
Checks that a Cassandra database is up.
CouchbaseReactiveHealthIndicator
Checks that a Couchbase cluster is up.
MongoReactiveHealthIndicator
Checks that a Mongo database is up.
RedisReactiveHealthIndicator
Checks that a Redis server is up.
If necessary, reactive indicators replace the regular ones. Also, any HealthIndicatorthat is not handled explicitly is wrapped automatically.
Health Groups
It’s sometimes useful to organize health indicators into groups that can be used for differentpurposes. For example, if you deploy your application to Kubernetes, you may want one differentsets of health indicators for your “liveness” and “readiness” probes.
233

To create a health indicator group you can use the management.endpoint.health.group.<name>property and specify a list of health indicator IDs to include or exclude. For example, to create agroup that includes only database indicators you can define the following:
management.endpoint.health.group.custom.include=db
You can then check the result by hitting localhost:8080/actuator/health/custom.
By default groups will inherit the same StatusAggregator and HttpCodeStatusMapper settings as thesystem health, however, these can also be defined on a per-group basis. It’s also possible to overridethe show-details and roles properties if required:
management.endpoint.health.group.custom.show-details=when-authorizedmanagement.endpoint.health.group.custom.roles=adminmanagement.endpoint.health.group.custom.status.order=fatal,upmanagement.endpoint.health.group.custom.status.http-mapping.fatal=500management.endpoint.health.group.custom.status.http-mapping.out-of-service=500
You can use @Qualifier("groupname") if you need to register customStatusAggregator or HttpCodeStatusMapper beans for use with the group.
5.2.9. Application Information
Application information exposes various information collected from all InfoContributor beansdefined in your ApplicationContext. Spring Boot includes a number of auto-configuredInfoContributor beans, and you can write your own.
Auto-configured InfoContributors
The following InfoContributor beans are auto-configured by Spring Boot, when appropriate:
Name Description
EnvironmentInfoContributor
Exposes any key from the Environment under the info key.
GitInfoContributor Exposes git information if a git.properties file is available.
BuildInfoContributor
Exposes build information if a META-INF/build-info.properties file is available.
It is possible to disable them all by setting the management.info.defaults.enabledproperty.
Custom Application Information
You can customize the data exposed by the info endpoint by setting info.* Spring properties. AllEnvironment properties under the info key are automatically exposed. For example, you could addthe following settings to your application.properties file:
234

info.app.encoding=UTF-8info.app.java.source=1.8info.app.java.target=1.8
Rather than hardcoding those values, you could also expand info properties atbuild time.
Assuming you use Maven, you could rewrite the preceding example as follows:
[email protected]@[email protected]@[email protected]@
Git Commit Information
Another useful feature of the info endpoint is its ability to publish information about the state ofyour git source code repository when the project was built. If a GitProperties bean is available, thegit.branch, git.commit.id, and git.commit.time properties are exposed.
A GitProperties bean is auto-configured if a git.properties file is available at theroot of the classpath. See "Generate git information" for more details.
If you want to display the full git information (that is, the full content of git.properties), use themanagement.info.git.mode property, as follows:
management.info.git.mode=full
Build Information
If a BuildProperties bean is available, the info endpoint can also publish information about yourbuild. This happens if a META-INF/build-info.properties file is available in the classpath.
The Maven and Gradle plugins can both generate that file. See "Generate buildinformation" for more details.
Writing Custom InfoContributors
To provide custom application information, you can register Spring beans that implement theInfoContributor interface.
The following example contributes an example entry with a single value:
235
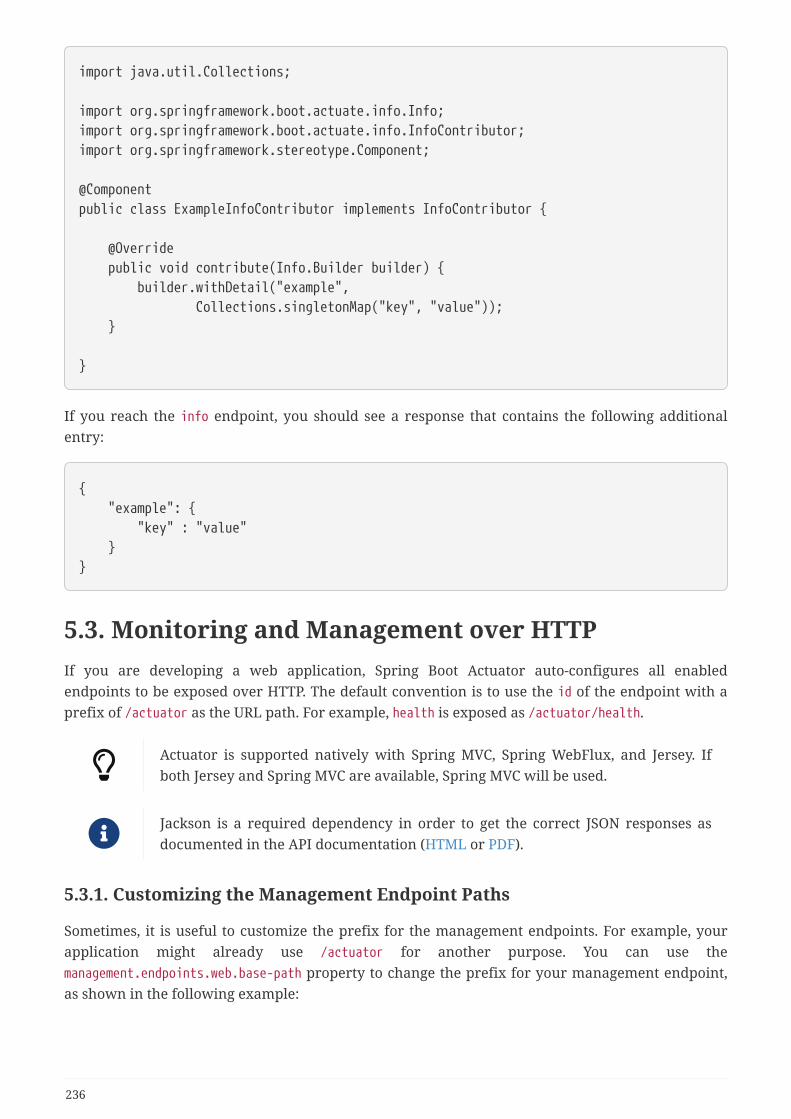
import java.util.Collections;
import org.springframework.boot.actuate.info.Info;import org.springframework.boot.actuate.info.InfoContributor;import org.springframework.stereotype.Component;
@Componentpublic class ExampleInfoContributor implements InfoContributor {
@Override public void contribute(Info.Builder builder) { builder.withDetail("example", Collections.singletonMap("key", "value")); }
}
If you reach the info endpoint, you should see a response that contains the following additionalentry:
{ "example": { "key" : "value" }}
5.3. Monitoring and Management over HTTPIf you are developing a web application, Spring Boot Actuator auto-configures all enabledendpoints to be exposed over HTTP. The default convention is to use the id of the endpoint with aprefix of /actuator as the URL path. For example, health is exposed as /actuator/health.
Actuator is supported natively with Spring MVC, Spring WebFlux, and Jersey. Ifboth Jersey and Spring MVC are available, Spring MVC will be used.
Jackson is a required dependency in order to get the correct JSON responses asdocumented in the API documentation (HTML or PDF).
5.3.1. Customizing the Management Endpoint Paths
Sometimes, it is useful to customize the prefix for the management endpoints. For example, yourapplication might already use /actuator for another purpose. You can use themanagement.endpoints.web.base-path property to change the prefix for your management endpoint,as shown in the following example:
236

management.endpoints.web.base-path=/manage
The preceding application.properties example changes the endpoint from /actuator/{id} to/manage/{id} (for example, /manage/info).
Unless the management port has been configured to expose endpoints by using adifferent HTTP port, management.endpoints.web.base-path is relative toserver.servlet.context-path. If management.server.port is configured,management.endpoints.web.base-path is relative tomanagement.server.servlet.context-path.
If you want to map endpoints to a different path, you can use the management.endpoints.web.path-mapping property.
The following example remaps /actuator/health to /healthcheck:
application.properties
management.endpoints.web.base-path=/management.endpoints.web.path-mapping.health=healthcheck
5.3.2. Customizing the Management Server Port
Exposing management endpoints by using the default HTTP port is a sensible choice for cloud-based deployments. If, however, your application runs inside your own data center, you may preferto expose endpoints by using a different HTTP port.
You can set the management.server.port property to change the HTTP port, as shown in the followingexample:
management.server.port=8081
On Cloud Foundry, applications only receive requests on port 8080 for both HTTPand TCP routing, by default. If you want to use a custom management port onCloud Foundry, you will need to explicitly set up the application’s routes toforward traffic to the custom port.
5.3.3. Configuring Management-specific SSL
When configured to use a custom port, the management server can also be configured with its ownSSL by using the various management.server.ssl.* properties. For example, doing so lets amanagement server be available over HTTP while the main application uses HTTPS, as shown inthe following property settings:
237
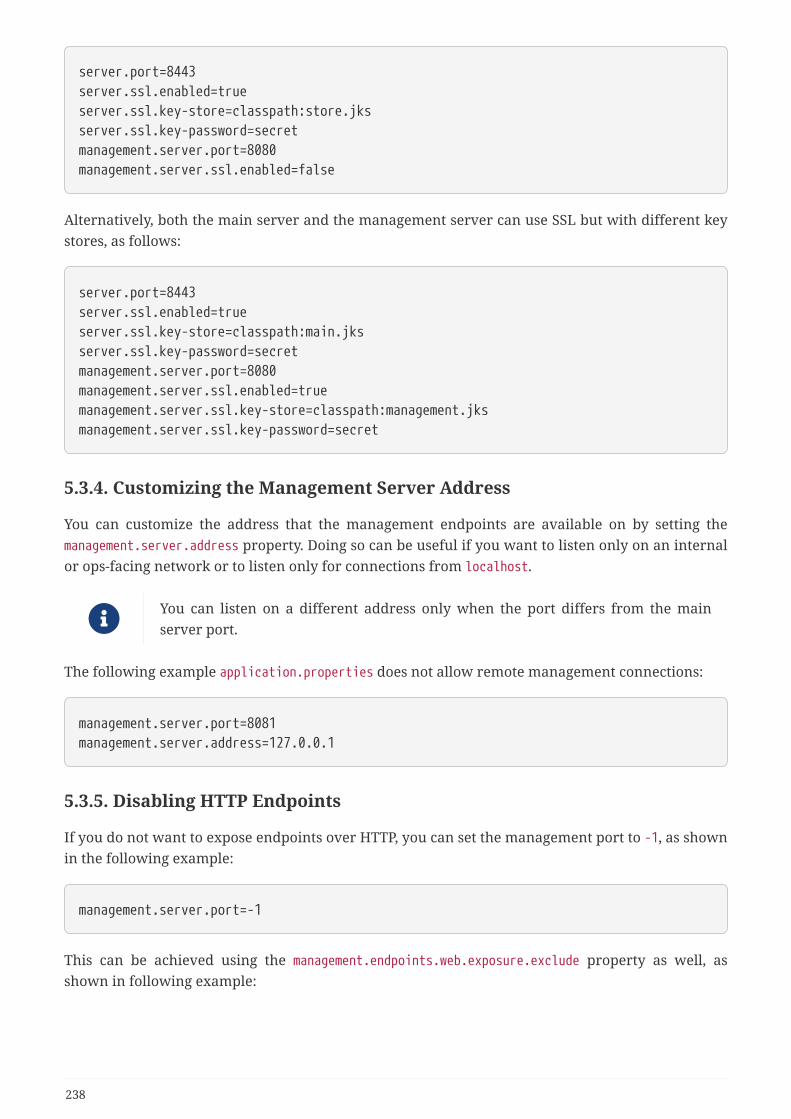
server.port=8443server.ssl.enabled=trueserver.ssl.key-store=classpath:store.jksserver.ssl.key-password=secretmanagement.server.port=8080management.server.ssl.enabled=false
Alternatively, both the main server and the management server can use SSL but with different keystores, as follows:
server.port=8443server.ssl.enabled=trueserver.ssl.key-store=classpath:main.jksserver.ssl.key-password=secretmanagement.server.port=8080management.server.ssl.enabled=truemanagement.server.ssl.key-store=classpath:management.jksmanagement.server.ssl.key-password=secret
5.3.4. Customizing the Management Server Address
You can customize the address that the management endpoints are available on by setting themanagement.server.address property. Doing so can be useful if you want to listen only on an internalor ops-facing network or to listen only for connections from localhost.
You can listen on a different address only when the port differs from the mainserver port.
The following example application.properties does not allow remote management connections:
management.server.port=8081management.server.address=127.0.0.1
5.3.5. Disabling HTTP Endpoints
If you do not want to expose endpoints over HTTP, you can set the management port to -1, as shownin the following example:
management.server.port=-1
This can be achieved using the management.endpoints.web.exposure.exclude property as well, asshown in following example:
238

management.endpoints.web.exposure.exclude=*
5.4. Monitoring and Management over JMXJava Management Extensions (JMX) provide a standard mechanism to monitor and manageapplications. By default, this feature is not enabled and can be turned on by setting theconfiguration property spring.jmx.enabled to true. Spring Boot exposes management endpoints asJMX MBeans under the org.springframework.boot domain by default.
5.4.1. Customizing MBean Names
The name of the MBean is usually generated from the id of the endpoint. For example, the healthendpoint is exposed as org.springframework.boot:type=Endpoint,name=Health.
If your application contains more than one Spring ApplicationContext, you may find that namesclash. To solve this problem, you can set the spring.jmx.unique-names property to true so that MBeannames are always unique.
You can also customize the JMX domain under which endpoints are exposed. The following settingsshow an example of doing so in application.properties:
spring.jmx.unique-names=truemanagement.endpoints.jmx.domain=com.example.myapp
5.4.2. Disabling JMX Endpoints
If you do not want to expose endpoints over JMX, you can set themanagement.endpoints.jmx.exposure.exclude property to *, as shown in the following example:
management.endpoints.jmx.exposure.exclude=*
5.4.3. Using Jolokia for JMX over HTTP
Jolokia is a JMX-HTTP bridge that provides an alternative method of accessing JMX beans. To useJolokia, include a dependency to org.jolokia:jolokia-core. For example, with Maven, you wouldadd the following dependency:
<dependency> <groupId>org.jolokia</groupId> <artifactId>jolokia-core</artifactId></dependency>
The Jolokia endpoint can then be exposed by adding jolokia or * to themanagement.endpoints.web.exposure.include property. You can then access it by using
239

/actuator/jolokia on your management HTTP server.
The Jolokia endpoint exposes Jolokia’s servlet as an actuator endpoint. As a result,it is specific to servlet environments such as Spring MVC and Jersey. The endpointwill not be available in a WebFlux application.
Customizing Jolokia
Jolokia has a number of settings that you would traditionally configure by setting servletparameters. With Spring Boot, you can use your application.properties file. To do so, prefix theparameter with management.endpoint.jolokia.config., as shown in the following example:
management.endpoint.jolokia.config.debug=true
Disabling Jolokia
If you use Jolokia but do not want Spring Boot to configure it, set themanagement.endpoint.jolokia.enabled property to false, as follows:
management.endpoint.jolokia.enabled=false
5.5. LoggersSpring Boot Actuator includes the ability to view and configure the log levels of your application atruntime. You can view either the entire list or an individual logger’s configuration, which is madeup of both the explicitly configured logging level as well as the effective logging level given to it bythe logging framework. These levels can be one of:
• TRACE
• DEBUG
• INFO
• WARN
• ERROR
• FATAL
• OFF
• null
null indicates that there is no explicit configuration.
5.5.1. Configure a Logger
To configure a given logger, POST a partial entity to the resource’s URI, as shown in the followingexample:
240
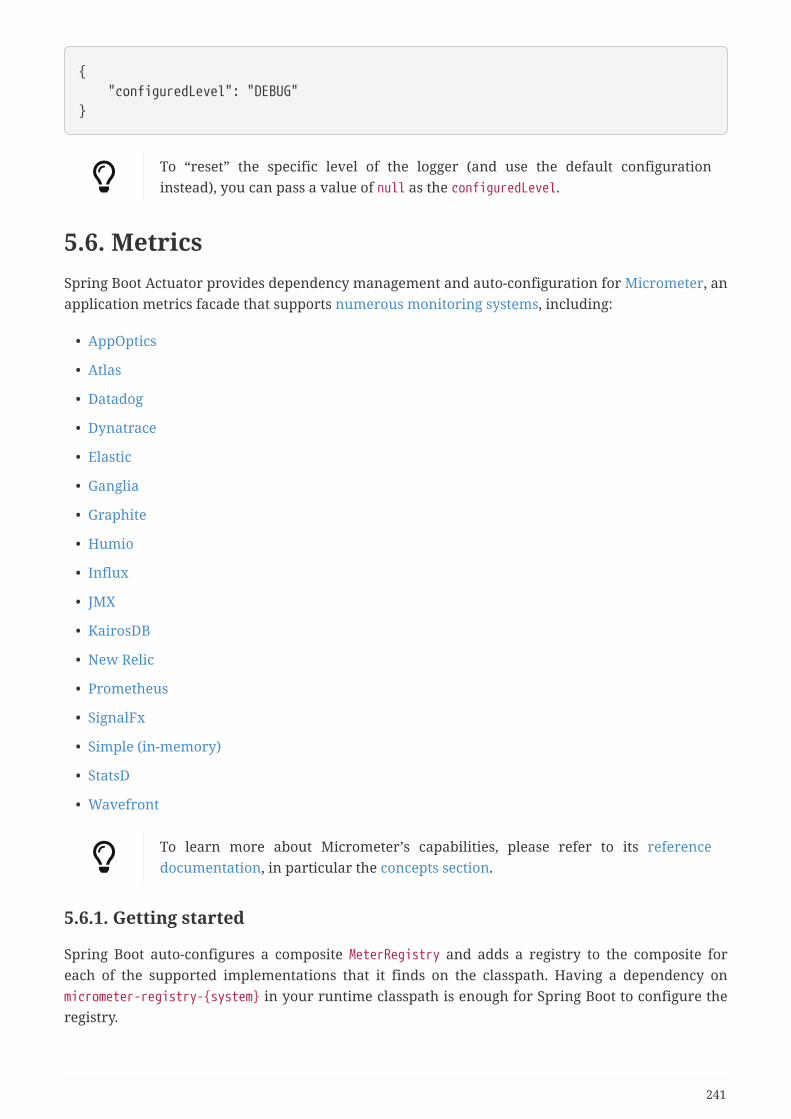
{ "configuredLevel": "DEBUG"}
To “reset” the specific level of the logger (and use the default configurationinstead), you can pass a value of null as the configuredLevel.
5.6. MetricsSpring Boot Actuator provides dependency management and auto-configuration for Micrometer, anapplication metrics facade that supports numerous monitoring systems, including:
• AppOptics
• Atlas
• Datadog
• Dynatrace
• Elastic
• Ganglia
• Graphite
• Humio
• Influx
• JMX
• KairosDB
• New Relic
• Prometheus
• SignalFx
• Simple (in-memory)
• StatsD
• Wavefront
To learn more about Micrometer’s capabilities, please refer to its referencedocumentation, in particular the concepts section.
5.6.1. Getting started
Spring Boot auto-configures a composite MeterRegistry and adds a registry to the composite foreach of the supported implementations that it finds on the classpath. Having a dependency onmicrometer-registry-{system} in your runtime classpath is enough for Spring Boot to configure theregistry.
241
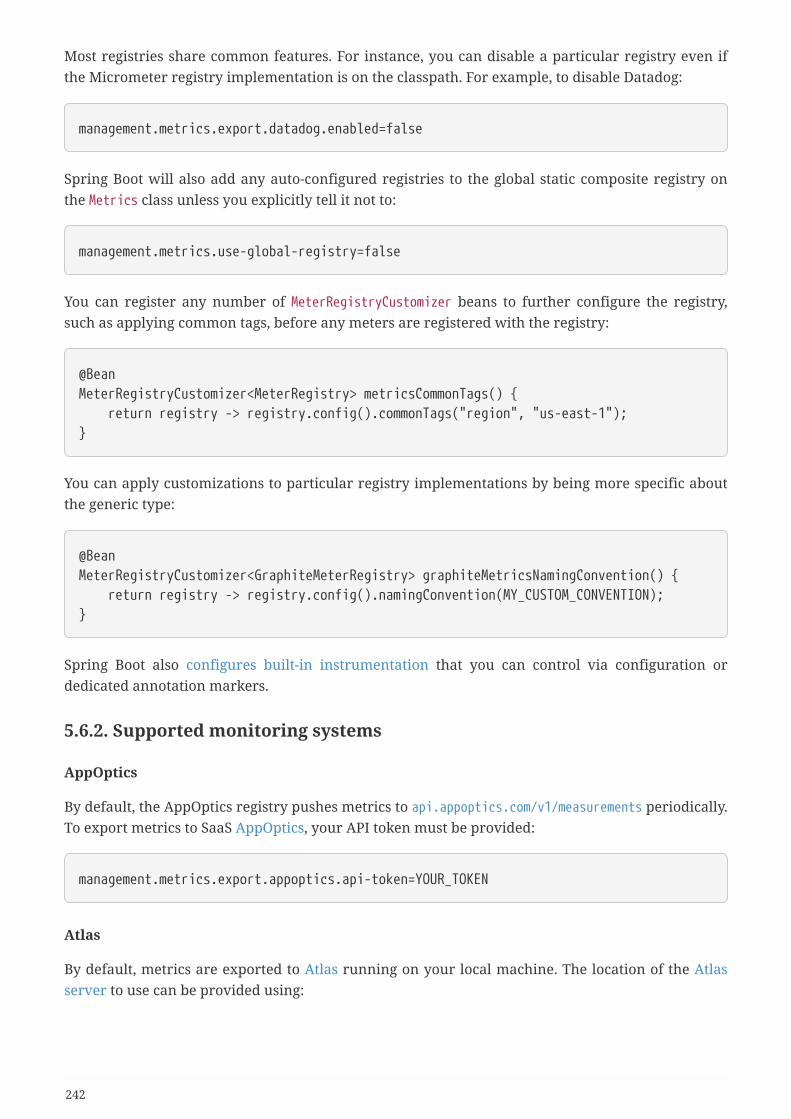
Most registries share common features. For instance, you can disable a particular registry even ifthe Micrometer registry implementation is on the classpath. For example, to disable Datadog:
management.metrics.export.datadog.enabled=false
Spring Boot will also add any auto-configured registries to the global static composite registry onthe Metrics class unless you explicitly tell it not to:
management.metrics.use-global-registry=false
You can register any number of MeterRegistryCustomizer beans to further configure the registry,such as applying common tags, before any meters are registered with the registry:
@BeanMeterRegistryCustomizer<MeterRegistry> metricsCommonTags() { return registry -> registry.config().commonTags("region", "us-east-1");}
You can apply customizations to particular registry implementations by being more specific aboutthe generic type:
@BeanMeterRegistryCustomizer<GraphiteMeterRegistry> graphiteMetricsNamingConvention() { return registry -> registry.config().namingConvention(MY_CUSTOM_CONVENTION);}
Spring Boot also configures built-in instrumentation that you can control via configuration ordedicated annotation markers.
5.6.2. Supported monitoring systems
AppOptics
By default, the AppOptics registry pushes metrics to api.appoptics.com/v1/measurements periodically.To export metrics to SaaS AppOptics, your API token must be provided:
management.metrics.export.appoptics.api-token=YOUR_TOKEN
Atlas
By default, metrics are exported to Atlas running on your local machine. The location of the Atlasserver to use can be provided using:
242
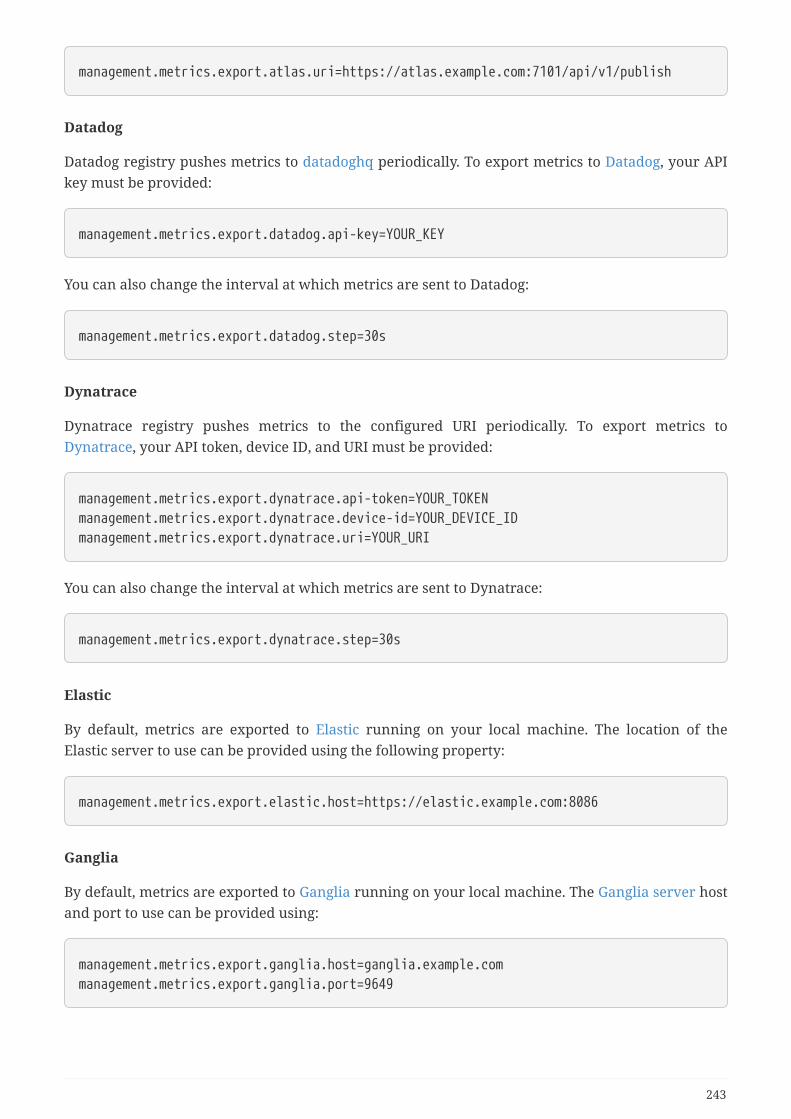
management.metrics.export.atlas.uri=https://atlas.example.com:7101/api/v1/publish
Datadog
Datadog registry pushes metrics to datadoghq periodically. To export metrics to Datadog, your APIkey must be provided:
management.metrics.export.datadog.api-key=YOUR_KEY
You can also change the interval at which metrics are sent to Datadog:
management.metrics.export.datadog.step=30s
Dynatrace
Dynatrace registry pushes metrics to the configured URI periodically. To export metrics toDynatrace, your API token, device ID, and URI must be provided:
management.metrics.export.dynatrace.api-token=YOUR_TOKENmanagement.metrics.export.dynatrace.device-id=YOUR_DEVICE_IDmanagement.metrics.export.dynatrace.uri=YOUR_URI
You can also change the interval at which metrics are sent to Dynatrace:
management.metrics.export.dynatrace.step=30s
Elastic
By default, metrics are exported to Elastic running on your local machine. The location of theElastic server to use can be provided using the following property:
management.metrics.export.elastic.host=https://elastic.example.com:8086
Ganglia
By default, metrics are exported to Ganglia running on your local machine. The Ganglia server hostand port to use can be provided using:
management.metrics.export.ganglia.host=ganglia.example.commanagement.metrics.export.ganglia.port=9649
243
Graphite
By default, metrics are exported to Graphite running on your local machine. The Graphite serverhost and port to use can be provided using:
management.metrics.export.graphite.host=graphite.example.commanagement.metrics.export.graphite.port=9004
Micrometer provides a default HierarchicalNameMapper that governs how a dimensional meter id ismapped to flat hierarchical names.
To take control over this behaviour, define your GraphiteMeterRegistry and supplyyour own HierarchicalNameMapper. An auto-configured GraphiteConfig and Clockbeans are provided unless you define your own:
@Beanpublic GraphiteMeterRegistry graphiteMeterRegistry(GraphiteConfig config, Clock clock){ return new GraphiteMeterRegistry(config, clock, MY_HIERARCHICAL_MAPPER);}
Humio
By default, the Humio registry pushes metrics to cloud.humio.com periodically. To export metrics toSaaS Humio, your API token must be provided:
management.metrics.export.humio.api-token=YOUR_TOKEN
You should also configure one or more tags to identify the data source to which metrics will bepushed:
management.metrics.export.humio.tags.alpha=amanagement.metrics.export.humio.tags.bravo=b
Influx
By default, metrics are exported to Influx running on your local machine. The location of the Influxserver to use can be provided using:
management.metrics.export.influx.uri=https://influx.example.com:8086
JMX
Micrometer provides a hierarchical mapping to JMX, primarily as a cheap and portable way to view
244
metrics locally. By default, metrics are exported to the metrics JMX domain. The domain to use canbe provided using:
management.metrics.export.jmx.domain=com.example.app.metrics
Micrometer provides a default HierarchicalNameMapper that governs how a dimensional meter id ismapped to flat hierarchical names.
To take control over this behaviour, define your JmxMeterRegistry and supply yourown HierarchicalNameMapper. An auto-configured JmxConfig and Clock beans areprovided unless you define your own:
@Beanpublic JmxMeterRegistry jmxMeterRegistry(JmxConfig config, Clock clock) { return new JmxMeterRegistry(config, clock, MY_HIERARCHICAL_MAPPER);}
KairosDB
By default, metrics are exported to KairosDB running on your local machine. The location of theKairosDB server to use can be provided using:
management.metrics.export.kairos.uri=https://kairosdb.example.com:8080/api/v1/datapoints
New Relic
New Relic registry pushes metrics to New Relic periodically. To export metrics to New Relic, yourAPI key and account id must be provided:
management.metrics.export.newrelic.api-key=YOUR_KEYmanagement.metrics.export.newrelic.account-id=YOUR_ACCOUNT_ID
You can also change the interval at which metrics are sent to New Relic:
management.metrics.export.newrelic.step=30s
Prometheus
Prometheus expects to scrape or poll individual app instances for metrics. Spring Boot provides anactuator endpoint available at /actuator/prometheus to present a Prometheus scrape with theappropriate format.
245
The endpoint is not available by default and must be exposed, see exposingendpoints for more details.
Here is an example scrape_config to add to prometheus.yml:
scrape_configs: - job_name: 'spring' metrics_path: '/actuator/prometheus' static_configs: - targets: ['HOST:PORT']
For ephemeral or batch jobs which may not exist long enough to be scraped, PrometheusPushgateway support can be used to expose their metrics to Prometheus. To enable PrometheusPushgateway support, add the following dependency to your project:
<dependency> <groupId>io.prometheus</groupId> <artifactId>simpleclient_pushgateway</artifactId></dependency>
When the Prometheus Pushgateway dependency is present on the classpath and themanagement.metrics.export.prometheus.pushgateway.enabled property is set to true, aPrometheusPushGatewayManager bean is auto-configured. This manages the pushing of metrics to aPrometheus Pushgateway.
The PrometheusPushGatewayManager can be tuned using properties undermanagement.metrics.export.prometheus.pushgateway. For advanced configuration, you can alsoprovide your own PrometheusPushGatewayManager bean.
SignalFx
SignalFx registry pushes metrics to SignalFx periodically. To export metrics to SignalFx, your accesstoken must be provided:
management.metrics.export.signalfx.access-token=YOUR_ACCESS_TOKEN
You can also change the interval at which metrics are sent to SignalFx:
management.metrics.export.signalfx.step=30s
Simple
Micrometer ships with a simple, in-memory backend that is automatically used as a fallback if noother registry is configured. This allows you to see what metrics are collected in the metricsendpoint.
246
The in-memory backend disables itself as soon as you’re using any of the other available backend.You can also disable it explicitly:
management.metrics.export.simple.enabled=false
StatsD
The StatsD registry pushes metrics over UDP to a StatsD agent eagerly. By default, metrics areexported to a StatsD agent running on your local machine. The StatsD agent host and port to usecan be provided using:
management.metrics.export.statsd.host=statsd.example.commanagement.metrics.export.statsd.port=9125
You can also change the StatsD line protocol to use (default to Datadog):
management.metrics.export.statsd.flavor=etsy
Wavefront
Wavefront registry pushes metrics to Wavefront periodically. If you are exporting metrics toWavefront directly, your API token must be provided:
management.metrics.export.wavefront.api-token=YOUR_API_TOKEN
Alternatively, you may use a Wavefront sidecar or an internal proxy set up in your environmentthat forwards metrics data to the Wavefront API host:
management.metrics.export.wavefront.uri=proxy://localhost:2878
If publishing metrics to a Wavefront proxy (as described in the documentation),the host must be in the proxy://HOST:PORT format.
You can also change the interval at which metrics are sent to Wavefront:
management.metrics.export.wavefront.step=30s
5.6.3. Supported Metrics
Spring Boot registers the following core metrics when applicable:
• JVM metrics, report utilization of:
247
◦ Various memory and buffer pools
◦ Statistics related to garbage collection
◦ Threads utilization
◦ Number of classes loaded/unloaded
• CPU metrics
• File descriptor metrics
• Kafka consumer metrics (JMX support should be enabled)
• Log4j2 metrics: record the number of events logged to Log4j2 at each level
• Logback metrics: record the number of events logged to Logback at each level
• Uptime metrics: report a gauge for uptime and a fixed gauge representing the application’sabsolute start time
• Tomcat metrics (server.tomcat.mbeanregistry.enabled must be set to true for all Tomcat metricsto be registered)
• Spring Integration metrics
Spring MVC Metrics
Auto-configuration enables the instrumentation of requests handled by Spring MVC. Whenmanagement.metrics.web.server.request.autotime.enabled is true, this instrumentation occurs for allrequests. Alternatively, when set to false, you can enable instrumentation by adding @Timed to arequest-handling method:
@RestController@Timed ①public class MyController {
@GetMapping("/api/people") @Timed(extraTags = { "region", "us-east-1" }) ② @Timed(value = "all.people", longTask = true) ③ public List<Person> listPeople() { ... }
}
① A controller class to enable timings on every request handler in the controller.
② A method to enable for an individual endpoint. This is not necessary if you have it on the class,but can be used to further customize the timer for this particular endpoint.
③ A method with longTask = true to enable a long task timer for the method. Long task timersrequire a separate metric name, and can be stacked with a short task timer.
By default, metrics are generated with the name, http.server.requests. The name can becustomized by setting the management.metrics.web.server.request.metric-name property.
By default, Spring MVC-related metrics are tagged with the following information:
248
Tag Description
exception Simple class name of any exception that wasthrown while handling the request.
method Request’s method (for example, GET or POST)
outcome Request’s outcome based on the status code ofthe response. 1xx is INFORMATIONAL, 2xx isSUCCESS, 3xx is REDIRECTION, 4xx CLIENT_ERROR,and 5xx is SERVER_ERROR
status Response’s HTTP status code (for example, 200 or500)
uri Request’s URI template prior to variablesubstitution, if possible (for example,/api/person/{id})
To customize the tags, provide a @Bean that implements WebMvcTagsProvider.
Spring WebFlux Metrics
Auto-configuration enables the instrumentation of all requests handled by WebFlux controllers andfunctional handlers.
By default, metrics are generated with the name http.server.requests. You can customize the nameby setting the management.metrics.web.server.request.metric-name property.
By default, WebFlux-related metrics are tagged with the following information:
Tag Description
exception Simple class name of any exception that wasthrown while handling the request.
method Request’s method (for example, GET or POST)
outcome Request’s outcome based on the status code ofthe response. 1xx is INFORMATIONAL, 2xx isSUCCESS, 3xx is REDIRECTION, 4xx CLIENT_ERROR,and 5xx is SERVER_ERROR
status Response’s HTTP status code (for example, 200 or500)
uri Request’s URI template prior to variablesubstitution, if possible (for example,/api/person/{id})
To customize the tags, provide a @Bean that implements WebFluxTagsProvider.
249

Jersey Server Metrics
When Micrometer’s micrometer-jersey2 module is on the classpath, auto-configuration enables theinstrumentation of requests handled by the Jersey JAX-RS implementation. Whenmanagement.metrics.web.server.request.autotime.enabled is true, this instrumentation occurs for allrequests. Alternatively, when set to false, you can enable instrumentation by adding @Timed to arequest-handling method:
@Component@Path("/api/people")@Timed ①public class Endpoint { @GET @Timed(extraTags = { "region", "us-east-1" }) ② @Timed(value = "all.people", longTask = true) ③ public List<Person> listPeople() { ... }}
① On a resource class to enable timings on every request handler in the resource.
② On a method to enable for an individual endpoint. This is not necessary if you have it on theclass, but can be used to further customize the timer for this particular endpoint.
③ On a method with longTask = true to enable a long task timer for the method. Long task timersrequire a separate metric name, and can be stacked with a short task timer.
By default, metrics are generated with the name, http.server.requests. The name can becustomized by setting the management.metrics.web.server.request.metric-name property.
By default, Jersey server metrics are tagged with the following information:
Tag Description
exception Simple class name of any exception that wasthrown while handling the request.
method Request’s method (for example, GET or POST)
outcome Request’s outcome based on the status code ofthe response. 1xx is INFORMATIONAL, 2xx isSUCCESS, 3xx is REDIRECTION, 4xx CLIENT_ERROR,and 5xx is SERVER_ERROR
status Response’s HTTP status code (for example, 200 or500)
uri Request’s URI template prior to variablesubstitution, if possible (for example,/api/person/{id})
To customize the tags, provide a @Bean that implements JerseyTagsProvider.
250

HTTP Client Metrics
Spring Boot Actuator manages the instrumentation of both RestTemplate and WebClient. For that,you have to get injected with an auto-configured builder and use it to create instances:
• RestTemplateBuilder for RestTemplate
• WebClient.Builder for WebClient
It is also possible to apply manually the customizers responsible for this instrumentation, namelyMetricsRestTemplateCustomizer and MetricsWebClientCustomizer.
By default, metrics are generated with the name, http.client.requests. The name can becustomized by setting the management.metrics.web.client.request.metric-name property.
By default, metrics generated by an instrumented client are tagged with the following information:
Tag Description
clientName Host portion of the URI
method Request’s method (for example, GET or POST)
outcome Request’s outcome based on the status code ofthe response. 1xx is INFORMATIONAL, 2xx isSUCCESS, 3xx is REDIRECTION, 4xx CLIENT_ERROR,and 5xx is SERVER_ERROR, UNKNOWN otherwise
status Response’s HTTP status code if available (forexample, 200 or 500), or IO_ERROR in case of I/Oissues, CLIENT_ERROR otherwise
uri Request’s URI template prior to variablesubstitution, if possible (for example,/api/person/{id})
To customize the tags, and depending on your choice of client, you can provide a @Bean thatimplements RestTemplateExchangeTagsProvider or WebClientExchangeTagsProvider. There areconvenience static functions in RestTemplateExchangeTags and WebClientExchangeTags.
Cache Metrics
Auto-configuration enables the instrumentation of all available Caches on startup with metricsprefixed with cache. Cache instrumentation is standardized for a basic set of metrics. Additional,cache-specific metrics are also available.
The following cache libraries are supported:
• Caffeine
• EhCache 2
• Hazelcast
• Any compliant JCache (JSR-107) implementation
251

Metrics are tagged by the name of the cache and by the name of the CacheManager that is derivedfrom the bean name.
Only caches that are configured on startup are bound to the registry. For cachesnot defined in the cache’s configuration, e.g. caches created on-the-fly orprogrammatically after the startup phase, an explicit registration is required. ACacheMetricsRegistrar bean is made available to make that process easier.
DataSource Metrics
Auto-configuration enables the instrumentation of all available DataSource objects with metricsprefixed with jdbc.connections. Data source instrumentation results in gauges representing thecurrently active, idle, maximum allowed, and minimum allowed connections in the pool.
Metrics are also tagged by the name of the DataSource computed based on the bean name.
By default, Spring Boot provides metadata for all supported data sources; you canadd additional DataSourcePoolMetadataProvider beans if your favorite data sourceisn’t supported out of the box. See DataSourcePoolMetadataProvidersConfigurationfor examples.
Also, Hikari-specific metrics are exposed with a hikaricp prefix. Each metric is tagged by the nameof the Pool (can be controlled with spring.datasource.name).
Hibernate Metrics
Auto-configuration enables the instrumentation of all available Hibernate EntityManagerFactoryinstances that have statistics enabled with a metric named hibernate.
Metrics are also tagged by the name of the EntityManagerFactory that is derived from the beanname.
To enable statistics, the standard JPA property hibernate.generate_statistics must be set to true.You can enable that on the auto-configured EntityManagerFactory as shown in the followingexample:
spring.jpa.properties.hibernate.generate_statistics=true
RabbitMQ Metrics
Auto-configuration will enable the instrumentation of all available RabbitMQ connection factorieswith a metric named rabbitmq.
5.6.4. Registering custom metrics
To register custom metrics, inject MeterRegistry into your component, as shown in the followingexample:
252

class Dictionary {
private final List<String> words = new CopyOnWriteArrayList<>();
Dictionary(MeterRegistry registry) { registry.gaugeCollectionSize("dictionary.size", Tags.empty(), this.words); }
// …
}
If you metrics depend on other beans, it is recommend that you use a MeterBinder to register them,as shown in the following example:
@BeanMeterBinder queueSize(Queue queue) { return (registry) -> Gauge.builder("queueSize", queue::size).register(registry);}
Using a MeterBinder ensures that the correct dependency relationships are set up and that the beanis available when the metric’s value is retrieved. By default, metrics from all MeterBinder beans willbe automatically bound to the Spring-managed MeterRegistry. A MeterBinder implementation canalso be useful if you find that you repeatedly instrument a suite of metrics across components orapplications..
5.6.5. Customizing individual metrics
If you need to apply customizations to specific Meter instances you can use theio.micrometer.core.instrument.config.MeterFilter interface. By default, all MeterFilter beans willbe automatically applied to the micrometer MeterRegistry.Config.
For example, if you want to rename the mytag.region tag to mytag.area for all meter IDs beginningwith com.example, you can do the following:
@Beanpublic MeterFilter renameRegionTagMeterFilter() { return MeterFilter.renameTag("com.example", "mytag.region", "mytag.area");}
Common tags
Common tags are generally used for dimensional drill-down on the operating environment likehost, instance, region, stack, etc. Commons tags are applied to all meters and can be configured asshown in the following example:
253

management.metrics.tags.region=us-east-1management.metrics.tags.stack=prod
The example above adds region and stack tags to all meters with a value of us-east-1 and prodrespectively.
The order of common tags is important if you are using Graphite. As the order ofcommon tags cannot be guaranteed using this approach, Graphite users areadvised to define a custom MeterFilter instead.
Per-meter properties
In addition to MeterFilter beans, it’s also possible to apply a limited set of customization on a per-meter basis using properties. Per-meter customizations apply to any all meter IDs that start withthe given name. For example, the following will disable any meters that have an ID starting withexample.remote
management.metrics.enable.example.remote=false
The following properties allow per-meter customization:
Table 8. Per-meter customizations
Property Description
management.metrics.enable Whether to deny meters from emitting anymetrics.
management.metrics.distribution.percentiles-histogram
Whether to publish a histogram suitable forcomputing aggregable (across dimension)percentile approximations.
management.metrics.distribution.minimum-
expected-value,management.metrics.distribution.maximum-expected-value
Publish less histogram buckets by clamping therange of expected values.
management.metrics.distribution.percentiles Publish percentile values computed in yourapplication
management.metrics.distribution.sla Publish a cumulative histogram with bucketsdefined by your SLAs.
For more details on concepts behind percentiles-histogram, percentiles and sla refer to the"Histograms and percentiles" section of the micrometer documentation.
5.6.6. Metrics endpoint
Spring Boot provides a metrics endpoint that can be used diagnostically to examine the metricscollected by an application. The endpoint is not available by default and must be exposed, seeexposing endpoints for more details.
254
Navigating to /actuator/metrics displays a list of available meter names. You can drill down to viewinformation about a particular meter by providing its name as a selector, e.g./actuator/metrics/jvm.memory.max.
The name you use here should match the name used in the code, not the nameafter it has been naming-convention normalized for a monitoring system it isshipped to. In other words, if jvm.memory.max appears as jvm_memory_max inPrometheus because of its snake case naming convention, you should still usejvm.memory.max as the selector when inspecting the meter in the metrics endpoint.
You can also add any number of tag=KEY:VALUE query parameters to the end of the URL todimensionally drill down on a meter, e.g. /actuator/metrics/jvm.memory.max?tag=area:nonheap.
The reported measurements are the sum of the statistics of all meters matching themeter name and any tags that have been applied. So in the example above, thereturned "Value" statistic is the sum of the maximum memory footprints of "CodeCache", "Compressed Class Space", and "Metaspace" areas of the heap. If you onlywanted to see the maximum size for the "Metaspace", you could add an additionaltag=id:Metaspace, i.e./actuator/metrics/jvm.memory.max?tag=area:nonheap&tag=id:Metaspace.
5.7. AuditingOnce Spring Security is in play, Spring Boot Actuator has a flexible audit framework that publishesevents (by default, “authentication success”, “failure” and “access denied” exceptions). This featurecan be very useful for reporting and for implementing a lock-out policy based on authenticationfailures.
Auditing can be enabled by providing a bean of type AuditEventRepository in your application’sconfiguration. For convenience, Spring Boot offers an InMemoryAuditEventRepository.InMemoryAuditEventRepository has limited capabilities and we recommend using it only fordevelopment environments. For production environments, consider creating your own alternativeAuditEventRepository implementation.
5.7.1. Custom Auditing
To customize published security events, you can provide your own implementations ofAbstractAuthenticationAuditListener and AbstractAuthorizationAuditListener.
You can also use the audit services for your own business events. To do so, either inject theAuditEventRepository bean into your own components and use that directly or publish anAuditApplicationEvent with the Spring ApplicationEventPublisher (by implementingApplicationEventPublisherAware).
5.8. HTTP TracingHTTP Tracing can be enabled by providing a bean of type HttpTraceRepository in your application’s
255
configuration. For convenience, Spring Boot offers an InMemoryHttpTraceRepository that storestraces for the last 100 request-response exchanges, by default. InMemoryHttpTraceRepository islimited compared to other tracing solutions and we recommend using it only for developmentenvironments. For production environments, use of a production-ready tracing or observabilitysolution, such as Zipkin or Spring Cloud Sleuth, is recommended. Alternatively, create your ownHttpTraceRepository that meets your needs.
The httptrace endpoint can be used to obtain information about the request-response exchangesthat are stored in the HttpTraceRepository.
5.8.1. Custom HTTP tracing
To customize the items that are included in each trace, use the management.trace.http.includeconfiguration property. For advanced customization, consider registering your ownHttpExchangeTracer implementation.
5.9. Process MonitoringIn the spring-boot module, you can find two classes to create files that are often useful for processmonitoring:
• ApplicationPidFileWriter creates a file containing the application PID (by default, in theapplication directory with a file name of application.pid).
• WebServerPortFileWriter creates a file (or files) containing the ports of the running web server(by default, in the application directory with a file name of application.port).
By default, these writers are not activated, but you can enable:
• By Extending Configuration
• Programmatically
5.9.1. Extending Configuration
In the META-INF/spring.factories file, you can activate the listener(s) that writes a PID file, as shownin the following example:
org.springframework.context.ApplicationListener=\org.springframework.boot.context.ApplicationPidFileWriter,\org.springframework.boot.web.context.WebServerPortFileWriter
5.9.2. Programmatically
You can also activate a listener by invoking the SpringApplication.addListeners(…) method andpassing the appropriate Writer object. This method also lets you customize the file name and pathin the Writer constructor.
256

5.10. Cloud Foundry SupportSpring Boot’s actuator module includes additional support that is activated when you deploy to acompatible Cloud Foundry instance. The /cloudfoundryapplication path provides an alternativesecured route to all @Endpoint beans.
The extended support lets Cloud Foundry management UIs (such as the web application that youcan use to view deployed applications) be augmented with Spring Boot actuator information. Forexample, an application status page may include full health information instead of the typical“running” or “stopped” status.
The /cloudfoundryapplication path is not directly accessible to regular users. Inorder to use the endpoint, a valid UAA token must be passed with the request.
5.10.1. Disabling Extended Cloud Foundry Actuator Support
If you want to fully disable the /cloudfoundryapplication endpoints, you can add the followingsetting to your application.properties file:
application.properties
management.cloudfoundry.enabled=false
5.10.2. Cloud Foundry Self-signed Certificates
By default, the security verification for /cloudfoundryapplication endpoints makes SSL calls tovarious Cloud Foundry services. If your Cloud Foundry UAA or Cloud Controller services use self-signed certificates, you need to set the following property:
application.properties
management.cloudfoundry.skip-ssl-validation=true
5.10.3. Custom context path
If the server’s context-path has been configured to anything other than /, the Cloud Foundryendpoints will not be available at the root of the application. For example, ifserver.servlet.context-path=/app, Cloud Foundry endpoints will be available at/app/cloudfoundryapplication/*.
If you expect the Cloud Foundry endpoints to always be available at /cloudfoundryapplication/*,regardless of the server’s context-path, you will need to explicitly configure that in yourapplication. The configuration will differ depending on the web server in use. For Tomcat, thefollowing configuration can be added:
257
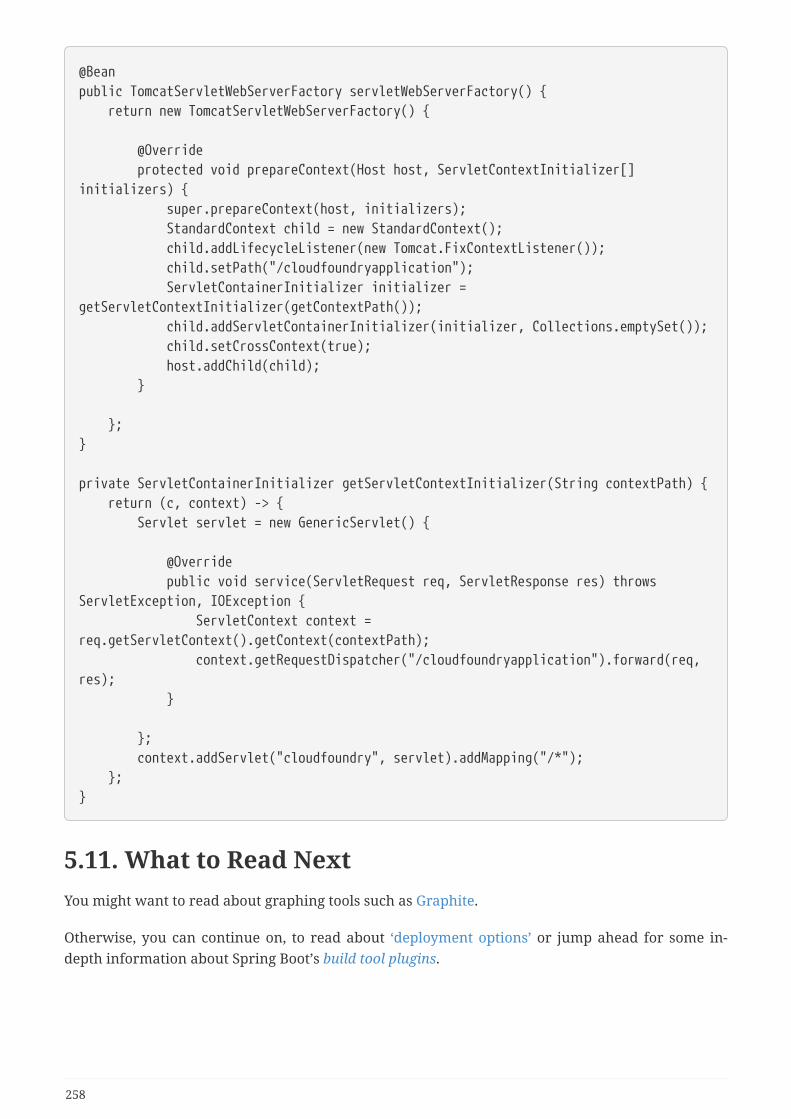
@Beanpublic TomcatServletWebServerFactory servletWebServerFactory() { return new TomcatServletWebServerFactory() {
@Override protected void prepareContext(Host host, ServletContextInitializer[]initializers) { super.prepareContext(host, initializers); StandardContext child = new StandardContext(); child.addLifecycleListener(new Tomcat.FixContextListener()); child.setPath("/cloudfoundryapplication"); ServletContainerInitializer initializer =getServletContextInitializer(getContextPath()); child.addServletContainerInitializer(initializer, Collections.emptySet()); child.setCrossContext(true); host.addChild(child); }
};}
private ServletContainerInitializer getServletContextInitializer(String contextPath) { return (c, context) -> { Servlet servlet = new GenericServlet() {
@Override public void service(ServletRequest req, ServletResponse res) throwsServletException, IOException { ServletContext context =req.getServletContext().getContext(contextPath); context.getRequestDispatcher("/cloudfoundryapplication").forward(req,res); }
}; context.addServlet("cloudfoundry", servlet).addMapping("/*"); };}
5.11. What to Read NextYou might want to read about graphing tools such as Graphite.
Otherwise, you can continue on, to read about ‘deployment options’ or jump ahead for some in-depth information about Spring Boot’s build tool plugins.
258
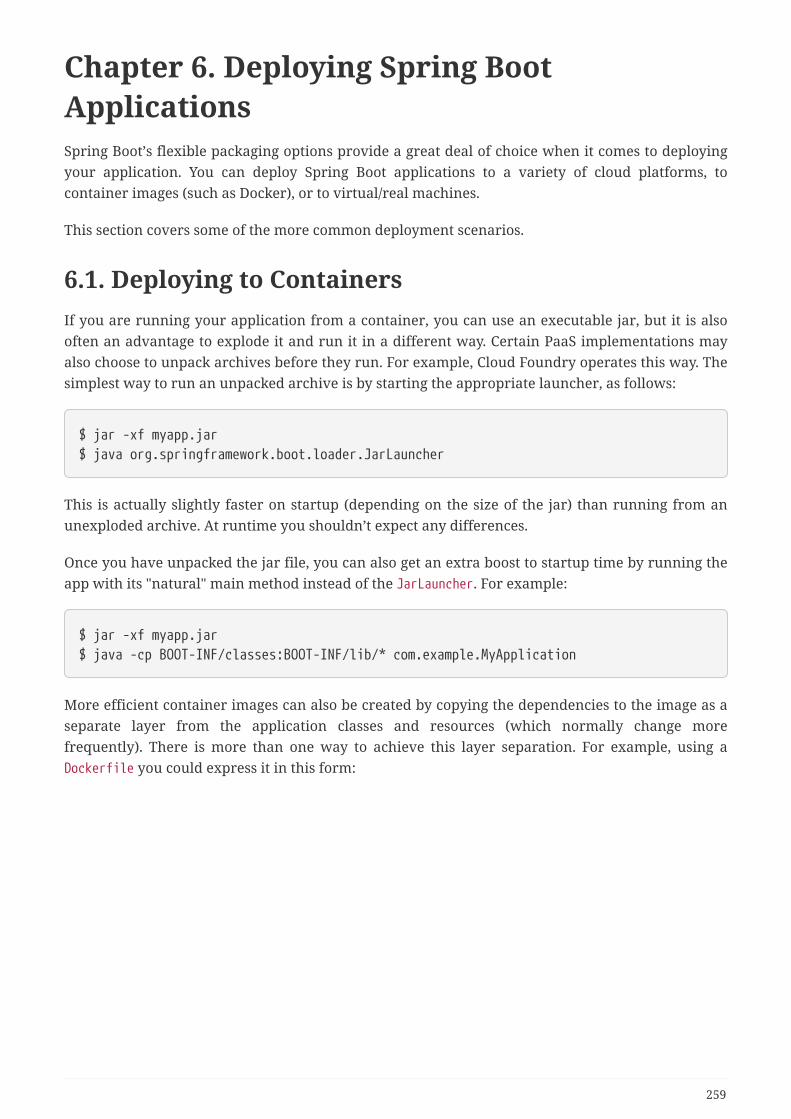
Chapter 6. Deploying Spring BootApplicationsSpring Boot’s flexible packaging options provide a great deal of choice when it comes to deployingyour application. You can deploy Spring Boot applications to a variety of cloud platforms, tocontainer images (such as Docker), or to virtual/real machines.
This section covers some of the more common deployment scenarios.
6.1. Deploying to ContainersIf you are running your application from a container, you can use an executable jar, but it is alsooften an advantage to explode it and run it in a different way. Certain PaaS implementations mayalso choose to unpack archives before they run. For example, Cloud Foundry operates this way. Thesimplest way to run an unpacked archive is by starting the appropriate launcher, as follows:
$ jar -xf myapp.jar$ java org.springframework.boot.loader.JarLauncher
This is actually slightly faster on startup (depending on the size of the jar) than running from anunexploded archive. At runtime you shouldn’t expect any differences.
Once you have unpacked the jar file, you can also get an extra boost to startup time by running theapp with its "natural" main method instead of the JarLauncher. For example:
$ jar -xf myapp.jar$ java -cp BOOT-INF/classes:BOOT-INF/lib/* com.example.MyApplication
More efficient container images can also be created by copying the dependencies to the image as aseparate layer from the application classes and resources (which normally change morefrequently). There is more than one way to achieve this layer separation. For example, using aDockerfile you could express it in this form:
259
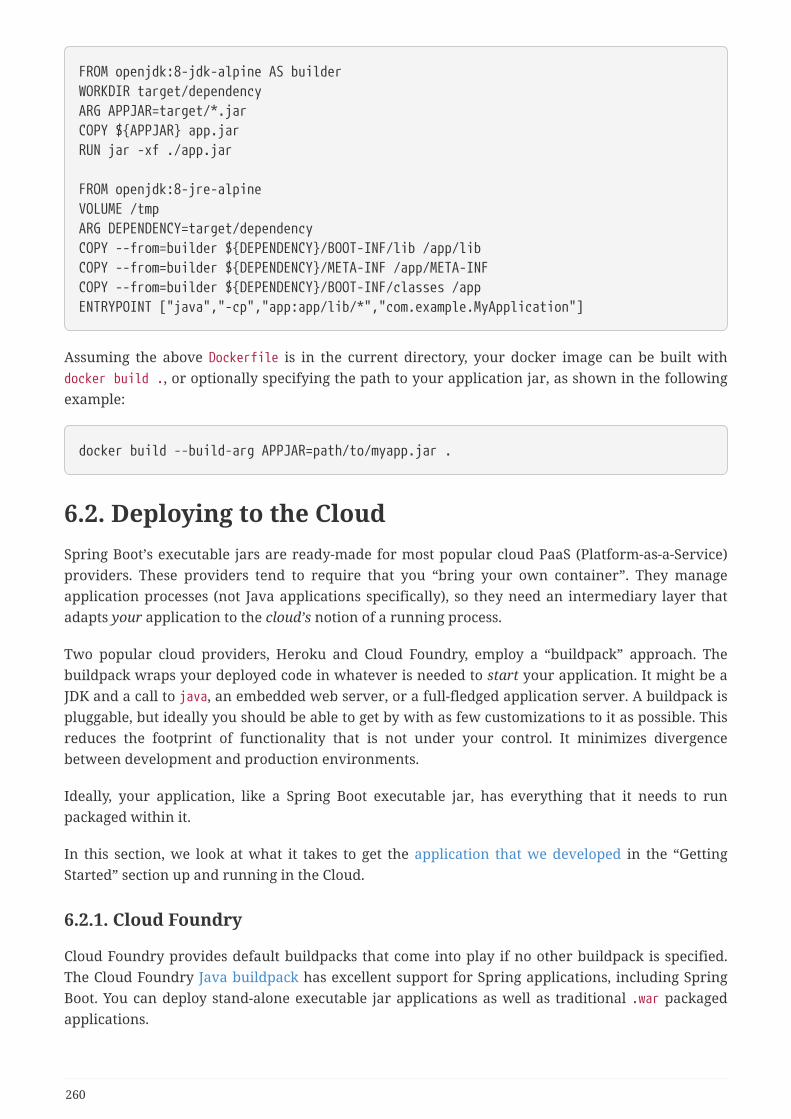
FROM openjdk:8-jdk-alpine AS builderWORKDIR target/dependencyARG APPJAR=target/*.jarCOPY ${APPJAR} app.jarRUN jar -xf ./app.jar
FROM openjdk:8-jre-alpineVOLUME /tmpARG DEPENDENCY=target/dependencyCOPY --from=builder ${DEPENDENCY}/BOOT-INF/lib /app/libCOPY --from=builder ${DEPENDENCY}/META-INF /app/META-INFCOPY --from=builder ${DEPENDENCY}/BOOT-INF/classes /appENTRYPOINT ["java","-cp","app:app/lib/*","com.example.MyApplication"]
Assuming the above Dockerfile is in the current directory, your docker image can be built withdocker build ., or optionally specifying the path to your application jar, as shown in the followingexample:
docker build --build-arg APPJAR=path/to/myapp.jar .
6.2. Deploying to the CloudSpring Boot’s executable jars are ready-made for most popular cloud PaaS (Platform-as-a-Service)providers. These providers tend to require that you “bring your own container”. They manageapplication processes (not Java applications specifically), so they need an intermediary layer thatadapts your application to the cloud’s notion of a running process.
Two popular cloud providers, Heroku and Cloud Foundry, employ a “buildpack” approach. Thebuildpack wraps your deployed code in whatever is needed to start your application. It might be aJDK and a call to java, an embedded web server, or a full-fledged application server. A buildpack ispluggable, but ideally you should be able to get by with as few customizations to it as possible. Thisreduces the footprint of functionality that is not under your control. It minimizes divergencebetween development and production environments.
Ideally, your application, like a Spring Boot executable jar, has everything that it needs to runpackaged within it.
In this section, we look at what it takes to get the application that we developed in the “GettingStarted” section up and running in the Cloud.
6.2.1. Cloud Foundry
Cloud Foundry provides default buildpacks that come into play if no other buildpack is specified.The Cloud Foundry Java buildpack has excellent support for Spring applications, including SpringBoot. You can deploy stand-alone executable jar applications as well as traditional .war packagedapplications.
260
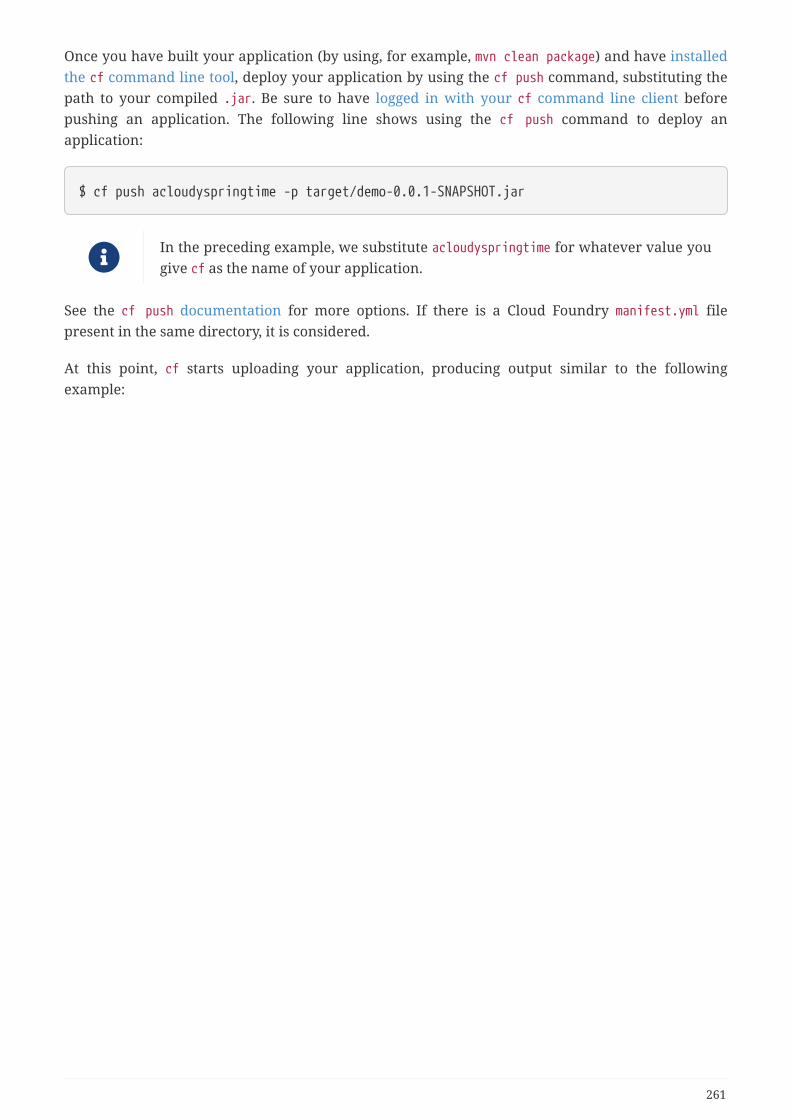
Once you have built your application (by using, for example, mvn clean package) and have installedthe cf command line tool, deploy your application by using the cf push command, substituting thepath to your compiled .jar. Be sure to have logged in with your cf command line client beforepushing an application. The following line shows using the cf push command to deploy anapplication:
$ cf push acloudyspringtime -p target/demo-0.0.1-SNAPSHOT.jar
In the preceding example, we substitute acloudyspringtime for whatever value yougive cf as the name of your application.
See the cf push documentation for more options. If there is a Cloud Foundry manifest.yml filepresent in the same directory, it is considered.
At this point, cf starts uploading your application, producing output similar to the followingexample:
261
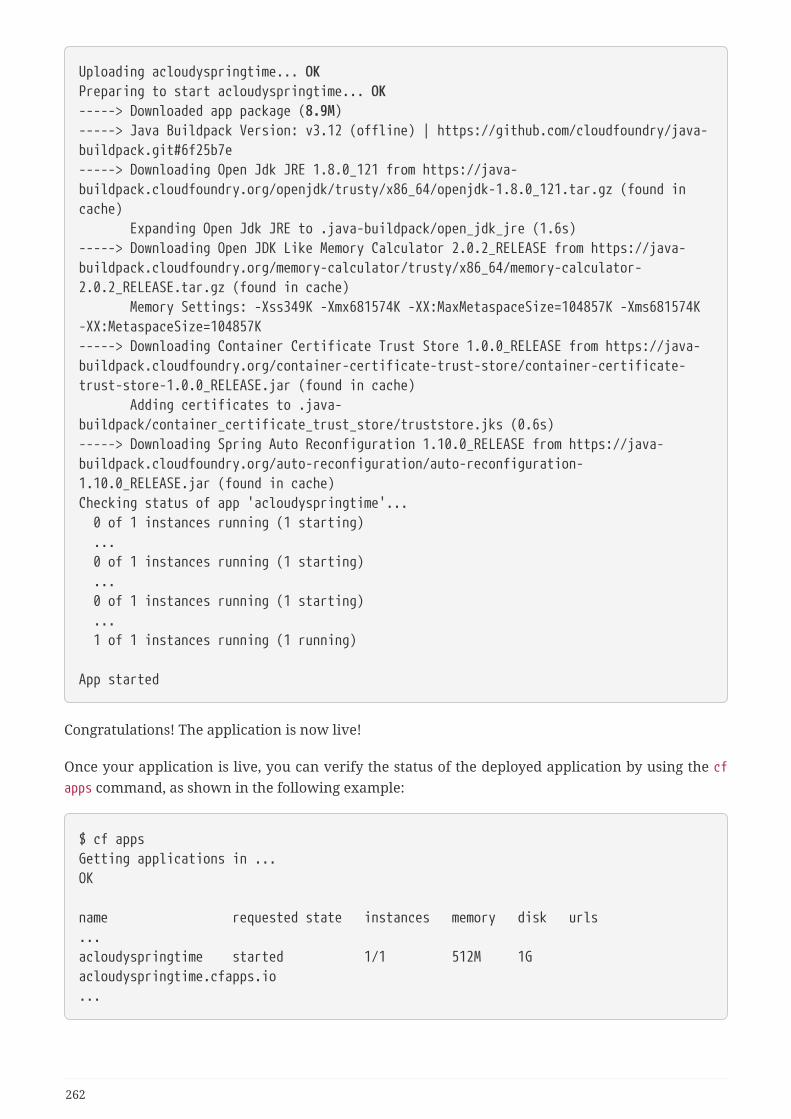
Uploading acloudyspringtime... OKPreparing to start acloudyspringtime... OK-----> Downloaded app package (8.9M)-----> Java Buildpack Version: v3.12 (offline) | https://github.com/cloudfoundry/java-buildpack.git#6f25b7e-----> Downloading Open Jdk JRE 1.8.0_121 from https://java-buildpack.cloudfoundry.org/openjdk/trusty/x86_64/openjdk-1.8.0_121.tar.gz (found incache) Expanding Open Jdk JRE to .java-buildpack/open_jdk_jre (1.6s)-----> Downloading Open JDK Like Memory Calculator 2.0.2_RELEASE from https://java-buildpack.cloudfoundry.org/memory-calculator/trusty/x86_64/memory-calculator-2.0.2_RELEASE.tar.gz (found in cache) Memory Settings: -Xss349K -Xmx681574K -XX:MaxMetaspaceSize=104857K -Xms681574K-XX:MetaspaceSize=104857K-----> Downloading Container Certificate Trust Store 1.0.0_RELEASE from https://java-buildpack.cloudfoundry.org/container-certificate-trust-store/container-certificate-trust-store-1.0.0_RELEASE.jar (found in cache) Adding certificates to .java-buildpack/container_certificate_trust_store/truststore.jks (0.6s)-----> Downloading Spring Auto Reconfiguration 1.10.0_RELEASE from https://java-buildpack.cloudfoundry.org/auto-reconfiguration/auto-reconfiguration-1.10.0_RELEASE.jar (found in cache)Checking status of app 'acloudyspringtime'... 0 of 1 instances running (1 starting) ... 0 of 1 instances running (1 starting) ... 0 of 1 instances running (1 starting) ... 1 of 1 instances running (1 running)
App started
Congratulations! The application is now live!
Once your application is live, you can verify the status of the deployed application by using the cfapps command, as shown in the following example:
$ cf appsGetting applications in ...OK
name requested state instances memory disk urls...acloudyspringtime started 1/1 512M 1Gacloudyspringtime.cfapps.io...
262
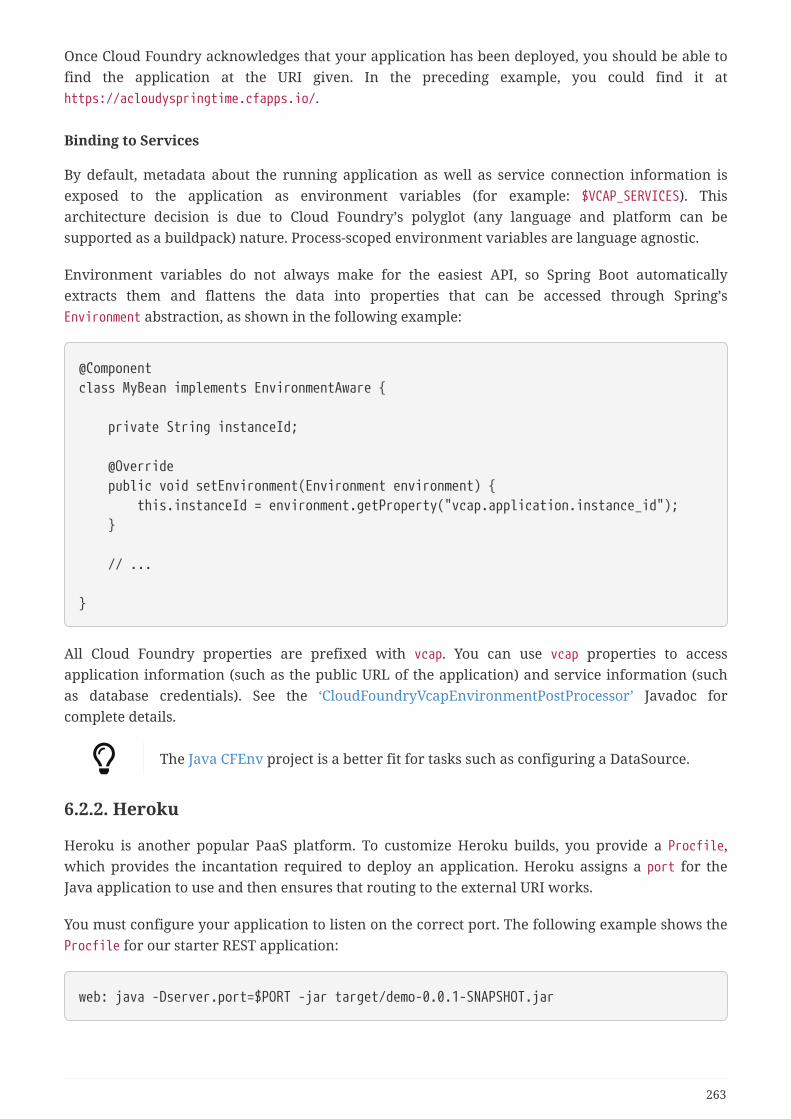
Once Cloud Foundry acknowledges that your application has been deployed, you should be able tofind the application at the URI given. In the preceding example, you could find it athttps://acloudyspringtime.cfapps.io/.
Binding to Services
By default, metadata about the running application as well as service connection information isexposed to the application as environment variables (for example: $VCAP_SERVICES). Thisarchitecture decision is due to Cloud Foundry’s polyglot (any language and platform can besupported as a buildpack) nature. Process-scoped environment variables are language agnostic.
Environment variables do not always make for the easiest API, so Spring Boot automaticallyextracts them and flattens the data into properties that can be accessed through Spring’sEnvironment abstraction, as shown in the following example:
@Componentclass MyBean implements EnvironmentAware {
private String instanceId;
@Override public void setEnvironment(Environment environment) { this.instanceId = environment.getProperty("vcap.application.instance_id"); }
// ...
}
All Cloud Foundry properties are prefixed with vcap. You can use vcap properties to accessapplication information (such as the public URL of the application) and service information (suchas database credentials). See the ‘CloudFoundryVcapEnvironmentPostProcessor’ Javadoc forcomplete details.
The Java CFEnv project is a better fit for tasks such as configuring a DataSource.
6.2.2. Heroku
Heroku is another popular PaaS platform. To customize Heroku builds, you provide a Procfile,which provides the incantation required to deploy an application. Heroku assigns a port for theJava application to use and then ensures that routing to the external URI works.
You must configure your application to listen on the correct port. The following example shows theProcfile for our starter REST application:
web: java -Dserver.port=$PORT -jar target/demo-0.0.1-SNAPSHOT.jar
263
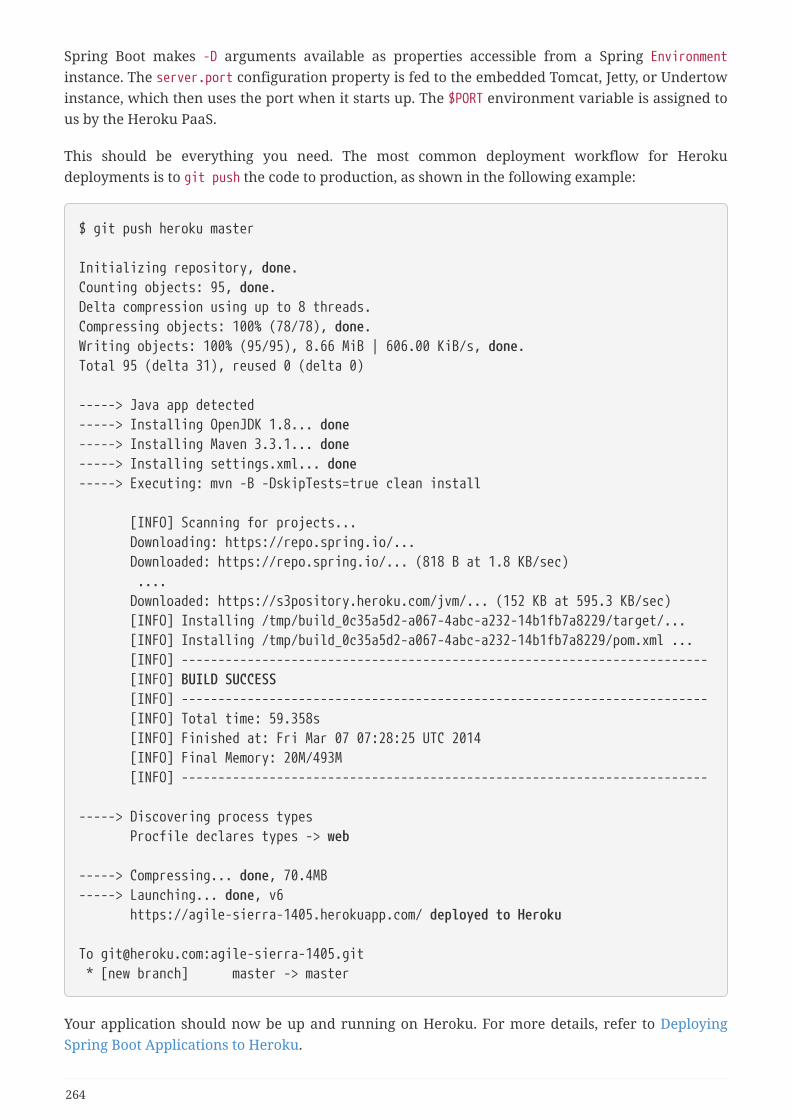
Spring Boot makes -D arguments available as properties accessible from a Spring Environmentinstance. The server.port configuration property is fed to the embedded Tomcat, Jetty, or Undertowinstance, which then uses the port when it starts up. The $PORT environment variable is assigned tous by the Heroku PaaS.
This should be everything you need. The most common deployment workflow for Herokudeployments is to git push the code to production, as shown in the following example:
$ git push heroku master
Initializing repository, done.Counting objects: 95, done.Delta compression using up to 8 threads.Compressing objects: 100% (78/78), done.Writing objects: 100% (95/95), 8.66 MiB | 606.00 KiB/s, done.Total 95 (delta 31), reused 0 (delta 0)
-----> Java app detected-----> Installing OpenJDK 1.8... done-----> Installing Maven 3.3.1... done-----> Installing settings.xml... done-----> Executing: mvn -B -DskipTests=true clean install
[INFO] Scanning for projects... Downloading: https://repo.spring.io/... Downloaded: https://repo.spring.io/... (818 B at 1.8 KB/sec) .... Downloaded: https://s3pository.heroku.com/jvm/... (152 KB at 595.3 KB/sec) [INFO] Installing /tmp/build_0c35a5d2-a067-4abc-a232-14b1fb7a8229/target/... [INFO] Installing /tmp/build_0c35a5d2-a067-4abc-a232-14b1fb7a8229/pom.xml ... [INFO] ------------------------------------------------------------------------ [INFO] BUILD SUCCESS [INFO] ------------------------------------------------------------------------ [INFO] Total time: 59.358s [INFO] Finished at: Fri Mar 07 07:28:25 UTC 2014 [INFO] Final Memory: 20M/493M [INFO] ------------------------------------------------------------------------
-----> Discovering process types Procfile declares types -> web
-----> Compressing... done, 70.4MB-----> Launching... done, v6 https://agile-sierra-1405.herokuapp.com/ deployed to Heroku
To [email protected]:agile-sierra-1405.git * [new branch] master -> master
Your application should now be up and running on Heroku. For more details, refer to DeployingSpring Boot Applications to Heroku.
264
6.2.3. OpenShift
OpenShift is the Red Hat public (and enterprise) extension of the Kubernetes containerorchestration platform. Similarly to Kubernetes, OpenShift has many options for installing SpringBoot based applications.
OpenShift has many resources describing how to deploy Spring Boot applications, including:
• Using the S2I builder
• Architecture guide
• Running as a traditional web application on Wildfly
• OpenShift Commons Briefing
6.2.4. Amazon Web Services (AWS)
Amazon Web Services offers multiple ways to install Spring Boot-based applications, either astraditional web applications (war) or as executable jar files with an embedded web server. Theoptions include:
• AWS Elastic Beanstalk
• AWS Code Deploy
• AWS OPS Works
• AWS Cloud Formation
• AWS Container Registry
Each has different features and pricing models. In this document, we describe to approach usingAWS Elastic Beanstalk.
AWS Elastic Beanstalk
As described in the official Elastic Beanstalk Java guide, there are two main options to deploy a Javaapplication. You can either use the “Tomcat Platform” or the “Java SE platform”.
Using the Tomcat Platform
This option applies to Spring Boot projects that produce a war file. No special configuration isrequired. You need only follow the official guide.
Using the Java SE Platform
This option applies to Spring Boot projects that produce a jar file and run an embedded webcontainer. Elastic Beanstalk environments run an nginx instance on port 80 to proxy the actualapplication, running on port 5000. To configure it, add the following line to yourapplication.properties file:
server.port=5000
265

Upload binaries instead of sources
By default, Elastic Beanstalk uploads sources and compiles them in AWS. However,it is best to upload the binaries instead. To do so, add lines similar to the followingto your .elasticbeanstalk/config.yml file:
deploy: artifact: target/demo-0.0.1-SNAPSHOT.jar
Reduce costs by setting the environment type
By default an Elastic Beanstalk environment is load balanced. The load balancerhas a significant cost. To avoid that cost, set the environment type to “Singleinstance”, as described in the Amazon documentation. You can also create singleinstance environments by using the CLI and the following command:
eb create -s
Summary
This is one of the easiest ways to get to AWS, but there are more things to cover, such as how tointegrate Elastic Beanstalk into any CI / CD tool, use the Elastic Beanstalk Maven plugin instead ofthe CLI, and others. There is a blog post covering these topics more in detail.
6.2.5. Boxfuse and Amazon Web Services
Boxfuse works by turning your Spring Boot executable jar or war into a minimal VM image that canbe deployed unchanged either on VirtualBox or on AWS. Boxfuse comes with deep integration forSpring Boot and uses the information from your Spring Boot configuration file to automaticallyconfigure ports and health check URLs. Boxfuse leverages this information both for the images itproduces as well as for all the resources it provisions (instances, security groups, elastic loadbalancers, and so on).
Once you have created a Boxfuse account, connected it to your AWS account, installed the latestversion of the Boxfuse Client, and ensured that the application has been built by Maven or Gradle(by using, for example, mvn clean package), you can deploy your Spring Boot application to AWSwith a command similar to the following:
$ boxfuse run myapp-1.0.jar -env=prod
See the boxfuse run documentation for more options. If there is a boxfuse.conf file present in thecurrent directory, it is considered.
By default, Boxfuse activates a Spring profile named boxfuse on startup. If yourexecutable jar or war contains an application-boxfuse.properties file, Boxfusebases its configuration on the properties it contains.
266

At this point, boxfuse creates an image for your application, uploads it, and configures and startsthe necessary resources on AWS, resulting in output similar to the following example:
Fusing Image for myapp-1.0.jar ...Image fused in 00:06.838s (53937 K) -> axelfontaine/myapp:1.0Creating axelfontaine/myapp ...Pushing axelfontaine/myapp:1.0 ...Verifying axelfontaine/myapp:1.0 ...Creating Elastic IP ...Mapping myapp-axelfontaine.boxfuse.io to 52.28.233.167 ...Waiting for AWS to create an AMI for axelfontaine/myapp:1.0 in eu-central-1 (this maytake up to 50 seconds) ...AMI created in 00:23.557s -> ami-d23f38cfCreating security group boxfuse-sg_axelfontaine/myapp:1.0 ...Launching t2.micro instance of axelfontaine/myapp:1.0 (ami-d23f38cf) in eu-central-1...Instance launched in 00:30.306s -> i-92ef9f53Waiting for AWS to boot Instance i-92ef9f53 and Payload to start athttps://52.28.235.61/ ...Payload started in 00:29.266s -> https://52.28.235.61/Remapping Elastic IP 52.28.233.167 to i-92ef9f53 ...Waiting 15s for AWS to complete Elastic IP Zero Downtime transition ...Deployment completed successfully. axelfontaine/myapp:1.0 is up and running athttps://myapp-axelfontaine.boxfuse.io/
Your application should now be up and running on AWS.
See the blog post on deploying Spring Boot apps on EC2 as well as the documentation for theBoxfuse Spring Boot integration to get started with a Maven build to run the app.
6.2.6. Google Cloud
Google Cloud has several options that can be used to launch Spring Boot applications. The easiest toget started with is probably App Engine, but you could also find ways to run Spring Boot in acontainer with Container Engine or on a virtual machine with Compute Engine.
To run in App Engine, you can create a project in the UI first, which sets up a unique identifier foryou and also sets up HTTP routes. Add a Java app to the project and leave it empty and then use theGoogle Cloud SDK to push your Spring Boot app into that slot from the command line or CI build.
App Engine Standard requires you to use WAR packaging. Follow these steps to deploy App EngineStandard application to Google Cloud.
Alternatively, App Engine Flex requires you to create an app.yaml file to describe the resources yourapp requires. Normally, you put this file in src/main/appengine, and it should resemble the followingfile:
267
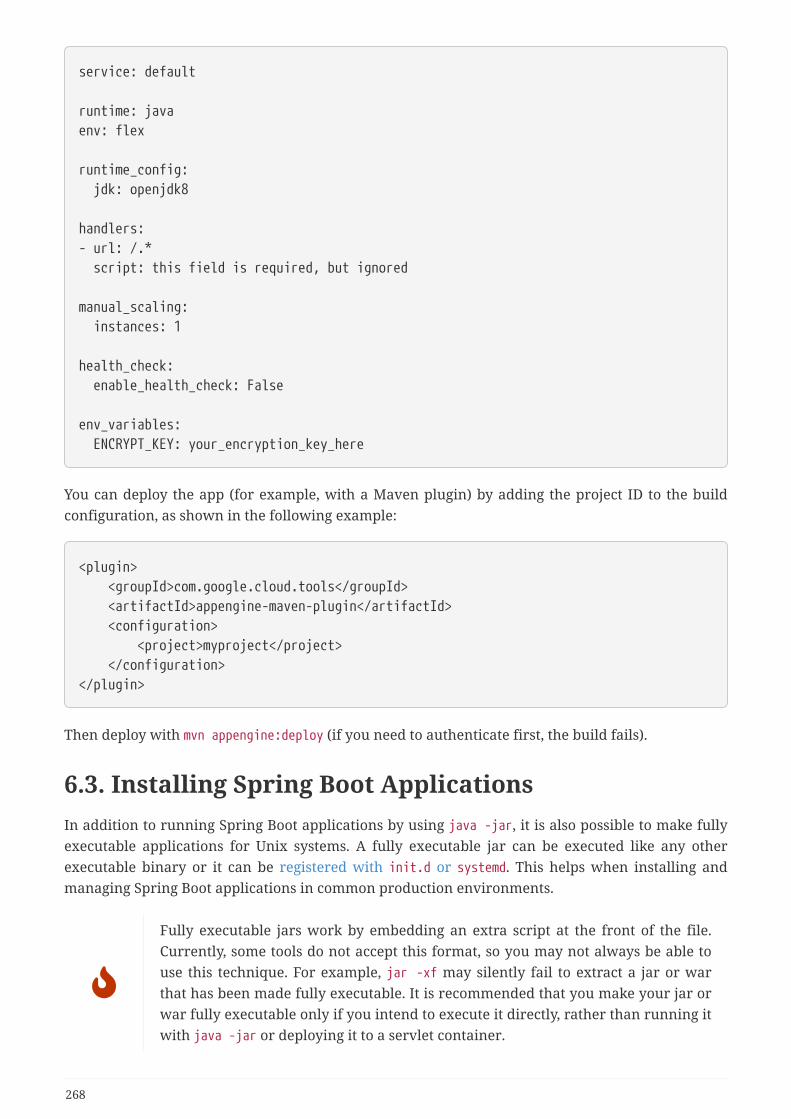
service: default
runtime: javaenv: flex
runtime_config: jdk: openjdk8
handlers:- url: /.* script: this field is required, but ignored
manual_scaling: instances: 1
health_check: enable_health_check: False
env_variables: ENCRYPT_KEY: your_encryption_key_here
You can deploy the app (for example, with a Maven plugin) by adding the project ID to the buildconfiguration, as shown in the following example:
<plugin> <groupId>com.google.cloud.tools</groupId> <artifactId>appengine-maven-plugin</artifactId> <configuration> <project>myproject</project> </configuration></plugin>
Then deploy with mvn appengine:deploy (if you need to authenticate first, the build fails).
6.3. Installing Spring Boot ApplicationsIn addition to running Spring Boot applications by using java -jar, it is also possible to make fullyexecutable applications for Unix systems. A fully executable jar can be executed like any otherexecutable binary or it can be registered with init.d or systemd. This helps when installing andmanaging Spring Boot applications in common production environments.
Fully executable jars work by embedding an extra script at the front of the file.Currently, some tools do not accept this format, so you may not always be able touse this technique. For example, jar -xf may silently fail to extract a jar or warthat has been made fully executable. It is recommended that you make your jar orwar fully executable only if you intend to execute it directly, rather than running itwith java -jar or deploying it to a servlet container.
268
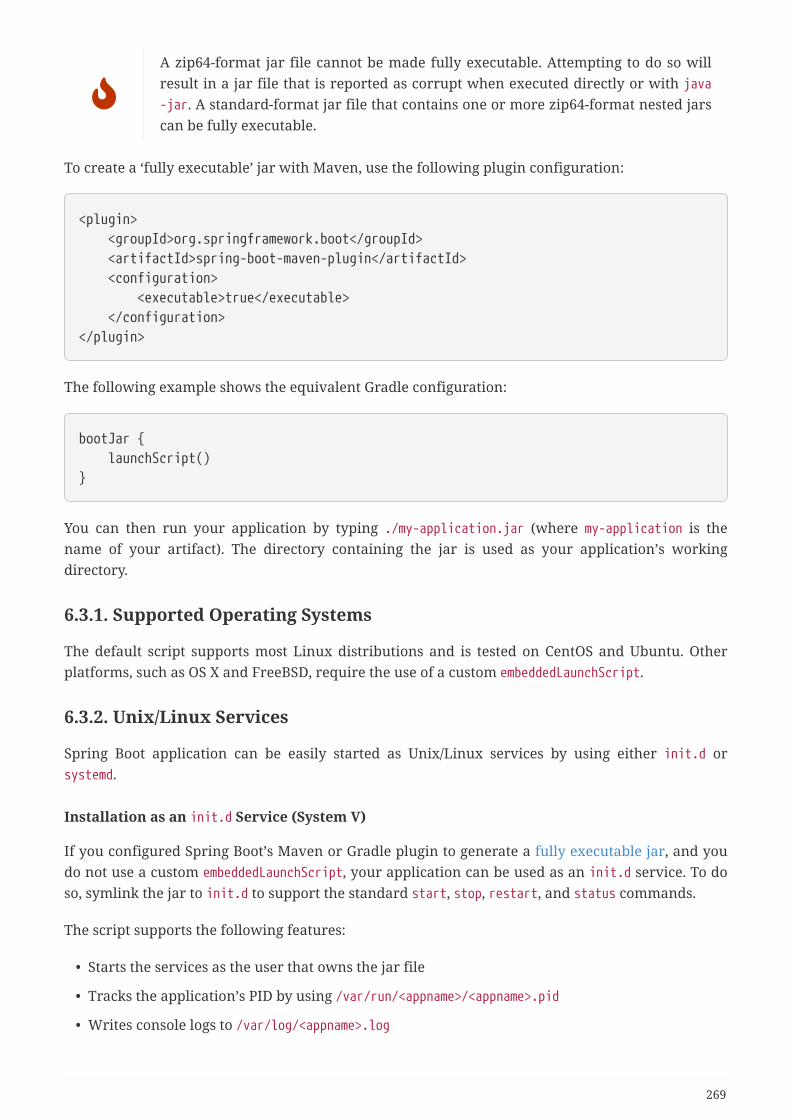
A zip64-format jar file cannot be made fully executable. Attempting to do so willresult in a jar file that is reported as corrupt when executed directly or with java-jar. A standard-format jar file that contains one or more zip64-format nested jarscan be fully executable.
To create a ‘fully executable’ jar with Maven, use the following plugin configuration:
<plugin> <groupId>org.springframework.boot</groupId> <artifactId>spring-boot-maven-plugin</artifactId> <configuration> <executable>true</executable> </configuration></plugin>
The following example shows the equivalent Gradle configuration:
bootJar { launchScript()}
You can then run your application by typing ./my-application.jar (where my-application is thename of your artifact). The directory containing the jar is used as your application’s workingdirectory.
6.3.1. Supported Operating Systems
The default script supports most Linux distributions and is tested on CentOS and Ubuntu. Otherplatforms, such as OS X and FreeBSD, require the use of a custom embeddedLaunchScript.
6.3.2. Unix/Linux Services
Spring Boot application can be easily started as Unix/Linux services by using either init.d orsystemd.
Installation as an init.d Service (System V)
If you configured Spring Boot’s Maven or Gradle plugin to generate a fully executable jar, and youdo not use a custom embeddedLaunchScript, your application can be used as an init.d service. To doso, symlink the jar to init.d to support the standard start, stop, restart, and status commands.
The script supports the following features:
• Starts the services as the user that owns the jar file
• Tracks the application’s PID by using /var/run/<appname>/<appname>.pid
• Writes console logs to /var/log/<appname>.log
269

Assuming that you have a Spring Boot application installed in /var/myapp, to install a Spring Bootapplication as an init.d service, create a symlink, as follows:
$ sudo ln -s /var/myapp/myapp.jar /etc/init.d/myapp
Once installed, you can start and stop the service in the usual way. For example, on a Debian-basedsystem, you could start it with the following command:
$ service myapp start
If your application fails to start, check the log file written to/var/log/<appname>.log for errors.
You can also flag the application to start automatically by using your standard operating systemtools. For example, on Debian, you could use the following command:
$ update-rc.d myapp defaults <priority>
Securing an init.d Service
The following is a set of guidelines on how to secure a Spring Boot application thatruns as an init.d service. It is not intended to be an exhaustive list of everythingthat should be done to harden an application and the environment in which itruns.
When executed as root, as is the case when root is being used to start an init.d service, the defaultexecutable script runs the application as the user specified in the RUN_AS_USER environmentvariable. When the environment variable is not set, the user who owns the jar file is used instead.You should never run a Spring Boot application as root, so RUN_AS_USER should never be root andyour application’s jar file should never be owned by root. Instead, create a specific user to run yourapplication and set the RUN_AS_USER environment variable or use chown to make it the owner of thejar file, as shown in the following example:
$ chown bootapp:bootapp your-app.jar
In this case, the default executable script runs the application as the bootapp user.
To reduce the chances of the application’s user account being compromised, youshould consider preventing it from using a login shell. For example, you can set theaccount’s shell to /usr/sbin/nologin.
You should also take steps to prevent the modification of your application’s jar file. Firstly,configure its permissions so that it cannot be written and can only be read or executed by itsowner, as shown in the following example:
270
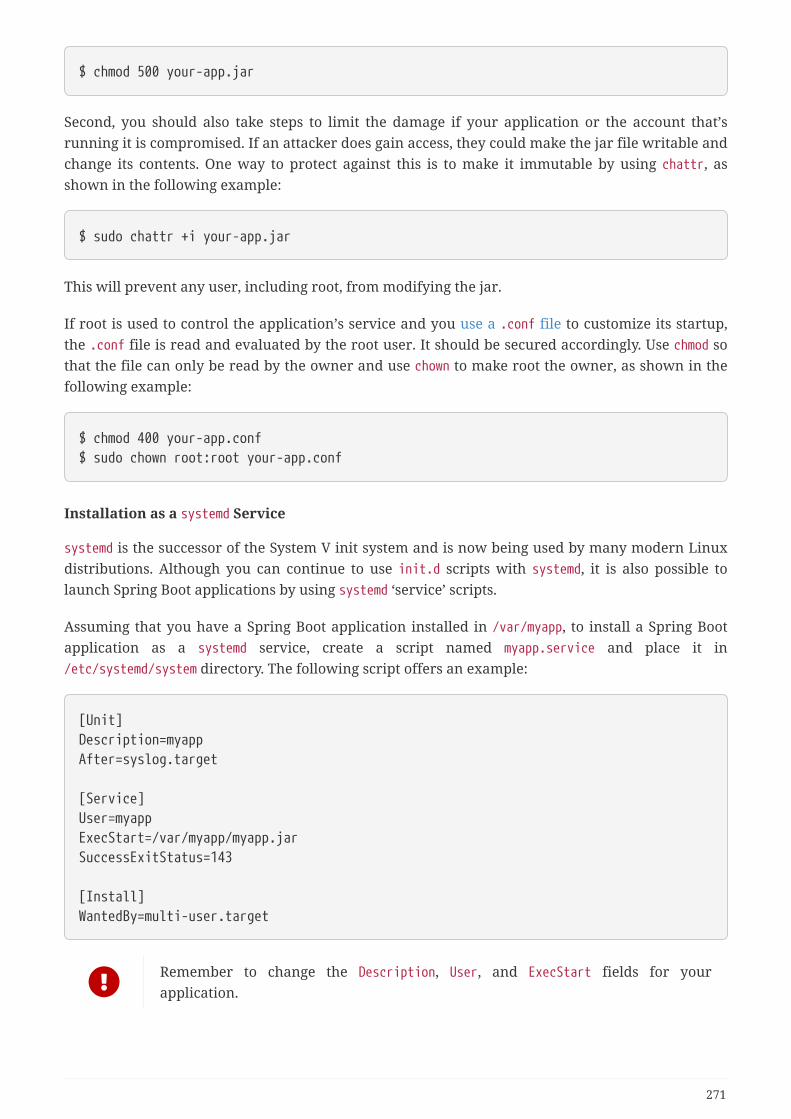
$ chmod 500 your-app.jar
Second, you should also take steps to limit the damage if your application or the account that’srunning it is compromised. If an attacker does gain access, they could make the jar file writable andchange its contents. One way to protect against this is to make it immutable by using chattr, asshown in the following example:
$ sudo chattr +i your-app.jar
This will prevent any user, including root, from modifying the jar.
If root is used to control the application’s service and you use a .conf file to customize its startup,the .conf file is read and evaluated by the root user. It should be secured accordingly. Use chmod sothat the file can only be read by the owner and use chown to make root the owner, as shown in thefollowing example:
$ chmod 400 your-app.conf$ sudo chown root:root your-app.conf
Installation as a systemd Service
systemd is the successor of the System V init system and is now being used by many modern Linuxdistributions. Although you can continue to use init.d scripts with systemd, it is also possible tolaunch Spring Boot applications by using systemd ‘service’ scripts.
Assuming that you have a Spring Boot application installed in /var/myapp, to install a Spring Bootapplication as a systemd service, create a script named myapp.service and place it in/etc/systemd/system directory. The following script offers an example:
[Unit]Description=myappAfter=syslog.target
[Service]User=myappExecStart=/var/myapp/myapp.jarSuccessExitStatus=143
[Install]WantedBy=multi-user.target
Remember to change the Description, User, and ExecStart fields for yourapplication.
271
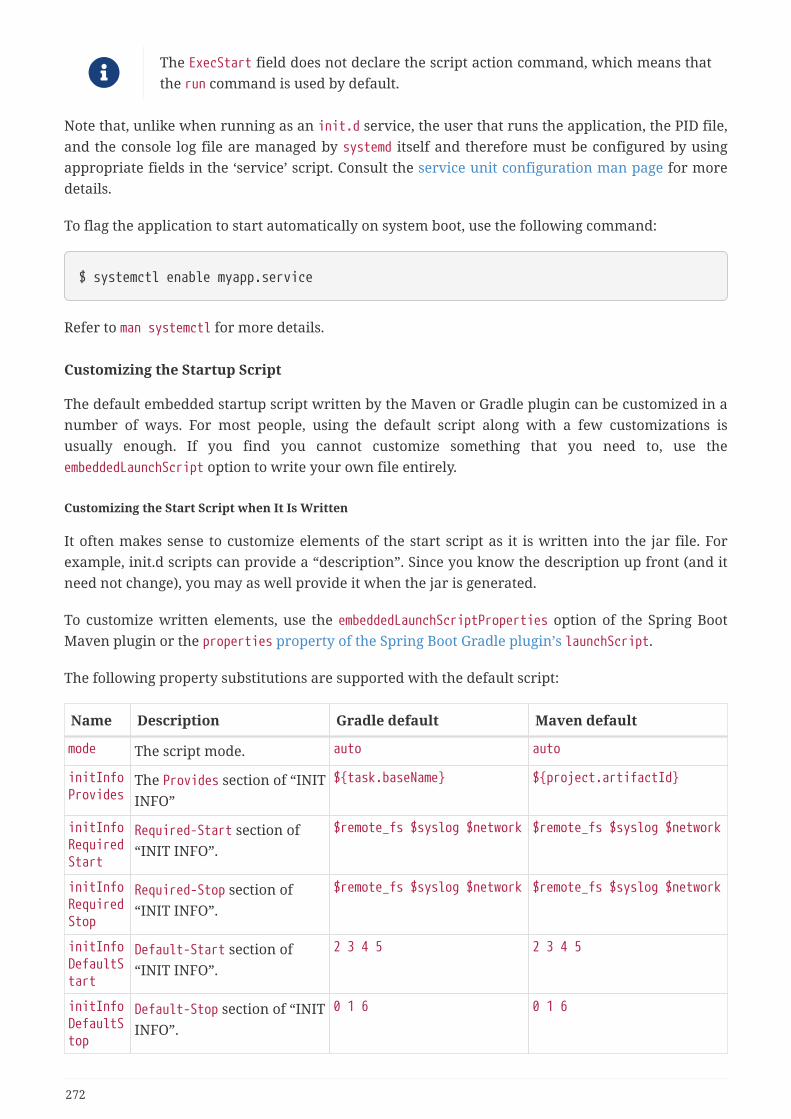
The ExecStart field does not declare the script action command, which means thatthe run command is used by default.
Note that, unlike when running as an init.d service, the user that runs the application, the PID file,and the console log file are managed by systemd itself and therefore must be configured by usingappropriate fields in the ‘service’ script. Consult the service unit configuration man page for moredetails.
To flag the application to start automatically on system boot, use the following command:
$ systemctl enable myapp.service
Refer to man systemctl for more details.
Customizing the Startup Script
The default embedded startup script written by the Maven or Gradle plugin can be customized in anumber of ways. For most people, using the default script along with a few customizations isusually enough. If you find you cannot customize something that you need to, use theembeddedLaunchScript option to write your own file entirely.
Customizing the Start Script when It Is Written
It often makes sense to customize elements of the start script as it is written into the jar file. Forexample, init.d scripts can provide a “description”. Since you know the description up front (and itneed not change), you may as well provide it when the jar is generated.
To customize written elements, use the embeddedLaunchScriptProperties option of the Spring BootMaven plugin or the properties property of the Spring Boot Gradle plugin’s launchScript.
The following property substitutions are supported with the default script:
Name Description Gradle default Maven default
mode The script mode. auto auto
initInfoProvides
The Provides section of “INITINFO”
${task.baseName} ${project.artifactId}
initInfoRequiredStart
Required-Start section of“INIT INFO”.
$remote_fs $syslog $network $remote_fs $syslog $network
initInfoRequiredStop
Required-Stop section of“INIT INFO”.
$remote_fs $syslog $network $remote_fs $syslog $network
initInfoDefaultStart
Default-Start section of“INIT INFO”.
2 3 4 5 2 3 4 5
initInfoDefaultStop
Default-Stop section of “INITINFO”.
0 1 6 0 1 6
272
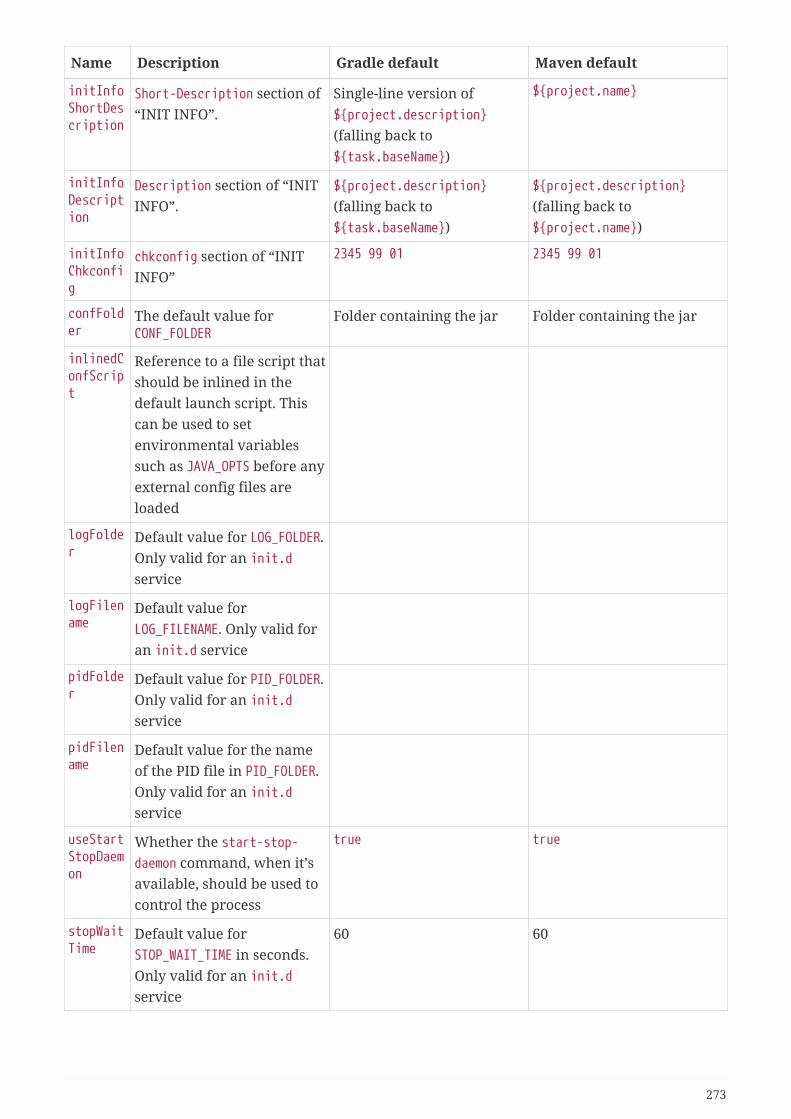
Name Description Gradle default Maven default
initInfoShortDescription
Short-Description section of“INIT INFO”.
Single-line version of${project.description}
(falling back to${task.baseName})
${project.name}
initInfoDescription
Description section of “INITINFO”.
${project.description}
(falling back to${task.baseName})
${project.description}
(falling back to${project.name})
initInfoChkconfig
chkconfig section of “INITINFO”
2345 99 01 2345 99 01
confFolder
The default value forCONF_FOLDER
Folder containing the jar Folder containing the jar
inlinedConfScript
Reference to a file script thatshould be inlined in thedefault launch script. Thiscan be used to setenvironmental variablessuch as JAVA_OPTS before anyexternal config files areloaded
logFolder
Default value for LOG_FOLDER.Only valid for an init.dservice
logFilename
Default value forLOG_FILENAME. Only valid foran init.d service
pidFolder
Default value for PID_FOLDER.Only valid for an init.dservice
pidFilename
Default value for the nameof the PID file in PID_FOLDER.Only valid for an init.dservice
useStartStopDaemon
Whether the start-stop-daemon command, when it’savailable, should be used tocontrol the process
true true
stopWaitTime
Default value forSTOP_WAIT_TIME in seconds.Only valid for an init.dservice
60 60
273
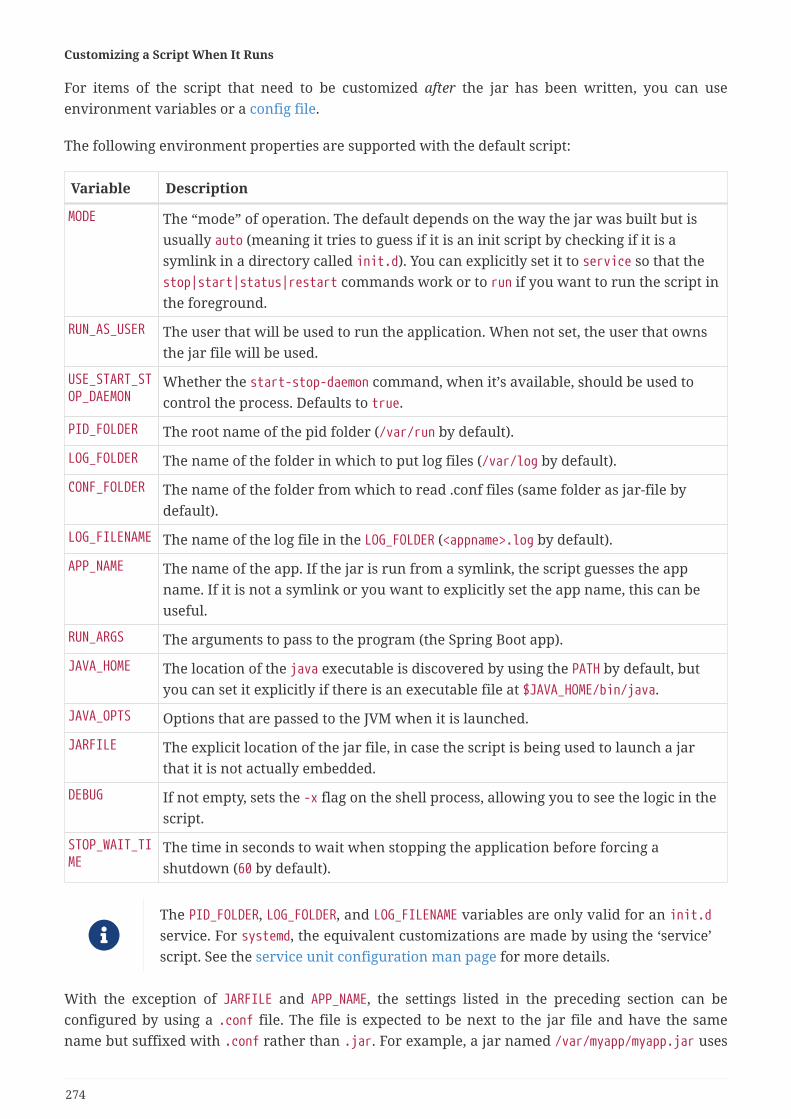
Customizing a Script When It Runs
For items of the script that need to be customized after the jar has been written, you can useenvironment variables or a config file.
The following environment properties are supported with the default script:
Variable Description
MODE The “mode” of operation. The default depends on the way the jar was built but isusually auto (meaning it tries to guess if it is an init script by checking if it is asymlink in a directory called init.d). You can explicitly set it to service so that thestop|start|status|restart commands work or to run if you want to run the script inthe foreground.
RUN_AS_USER The user that will be used to run the application. When not set, the user that ownsthe jar file will be used.
USE_START_STOP_DAEMON
Whether the start-stop-daemon command, when it’s available, should be used tocontrol the process. Defaults to true.
PID_FOLDER The root name of the pid folder (/var/run by default).
LOG_FOLDER The name of the folder in which to put log files (/var/log by default).
CONF_FOLDER The name of the folder from which to read .conf files (same folder as jar-file bydefault).
LOG_FILENAME The name of the log file in the LOG_FOLDER (<appname>.log by default).
APP_NAME The name of the app. If the jar is run from a symlink, the script guesses the appname. If it is not a symlink or you want to explicitly set the app name, this can beuseful.
RUN_ARGS The arguments to pass to the program (the Spring Boot app).
JAVA_HOME The location of the java executable is discovered by using the PATH by default, butyou can set it explicitly if there is an executable file at $JAVA_HOME/bin/java.
JAVA_OPTS Options that are passed to the JVM when it is launched.
JARFILE The explicit location of the jar file, in case the script is being used to launch a jarthat it is not actually embedded.
DEBUG If not empty, sets the -x flag on the shell process, allowing you to see the logic in thescript.
STOP_WAIT_TIME
The time in seconds to wait when stopping the application before forcing ashutdown (60 by default).
The PID_FOLDER, LOG_FOLDER, and LOG_FILENAME variables are only valid for an init.dservice. For systemd, the equivalent customizations are made by using the ‘service’script. See the service unit configuration man page for more details.
With the exception of JARFILE and APP_NAME, the settings listed in the preceding section can beconfigured by using a .conf file. The file is expected to be next to the jar file and have the samename but suffixed with .conf rather than .jar. For example, a jar named /var/myapp/myapp.jar uses
274

the configuration file named /var/myapp/myapp.conf, as shown in the following example:
myapp.conf
JAVA_OPTS=-Xmx1024MLOG_FOLDER=/custom/log/folder
If you do not like having the config file next to the jar file, you can set a CONF_FOLDERenvironment variable to customize the location of the config file.
To learn about securing this file appropriately, see the guidelines for securing an init.d service.
6.3.3. Microsoft Windows Services
A Spring Boot application can be started as a Windows service by using winsw.
A (separately maintained sample) describes step-by-step how you can create a Windows service foryour Spring Boot application.
6.4. What to Read NextCheck out the Cloud Foundry, Heroku, OpenShift, and Boxfuse web sites for more informationabout the kinds of features that a PaaS can offer. These are just four of the most popular Java PaaSproviders. Since Spring Boot is so amenable to cloud-based deployment, you can freely considerother providers as well.
The next section goes on to cover the Spring Boot CLI, or you can jump ahead to read about buildtool plugins.
275

Chapter 7. Spring Boot CLIThe Spring Boot CLI is a command line tool that you can use if you want to quickly develop a Springapplication. It lets you run Groovy scripts, which means that you have a familiar Java-like syntaxwithout so much boilerplate code. You can also bootstrap a new project or write your owncommand for it.
7.1. Installing the CLIThe Spring Boot CLI (Command-Line Interface) can be installed manually by using SDKMAN! (theSDK Manager) or by using Homebrew or MacPorts if you are an OSX user. See Installing the SpringBoot CLI in the “Getting started” section for comprehensive installation instructions.
7.2. Using the CLIOnce you have installed the CLI, you can run it by typing spring and pressing Enter at the commandline. If you run spring without any arguments, a help screen is displayed, as follows:
$ springusage: spring [--help] [--version] <command> [<args>]
Available commands are:
run [options] <files> [--] [args] Run a spring groovy script
... more command help is shown here
You can type spring help to get more details about any of the supported commands, as shown in thefollowing example:
276

$ spring help runspring run - Run a spring groovy script
usage: spring run [options] <files> [--] [args]
Option Description------ -------------autoconfigure [Boolean] Add autoconfigure compiler transformations (default: true)--classpath, -cp Additional classpath entries--no-guess-dependencies Do not attempt to guess dependencies--no-guess-imports Do not attempt to guess imports-q, --quiet Quiet logging-v, --verbose Verbose logging of dependency resolution--watch Watch the specified file for changes
The version command provides a quick way to check which version of Spring Boot you are using, asfollows:
$ spring versionSpring CLI v2.2.11.RELEASE
7.2.1. Running Applications with the CLI
You can compile and run Groovy source code by using the run command. The Spring Boot CLI iscompletely self-contained, so you do not need any external Groovy installation.
The following example shows a “hello world” web application written in Groovy:
hello.groovy
@RestControllerclass WebApplication {
@RequestMapping("/") String home() { "Hello World!" }
}
To compile and run the application, type the following command:
$ spring run hello.groovy
277
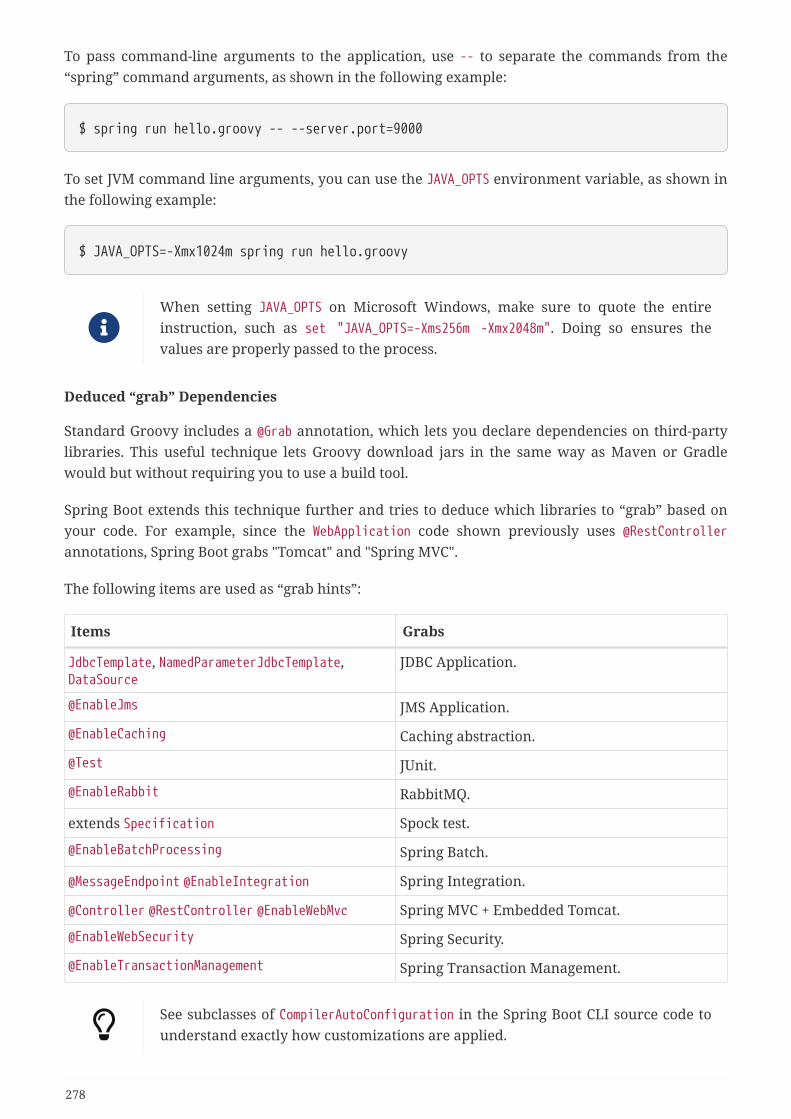
To pass command-line arguments to the application, use -- to separate the commands from the“spring” command arguments, as shown in the following example:
$ spring run hello.groovy -- --server.port=9000
To set JVM command line arguments, you can use the JAVA_OPTS environment variable, as shown inthe following example:
$ JAVA_OPTS=-Xmx1024m spring run hello.groovy
When setting JAVA_OPTS on Microsoft Windows, make sure to quote the entireinstruction, such as set "JAVA_OPTS=-Xms256m -Xmx2048m". Doing so ensures thevalues are properly passed to the process.
Deduced “grab” Dependencies
Standard Groovy includes a @Grab annotation, which lets you declare dependencies on third-partylibraries. This useful technique lets Groovy download jars in the same way as Maven or Gradlewould but without requiring you to use a build tool.
Spring Boot extends this technique further and tries to deduce which libraries to “grab” based onyour code. For example, since the WebApplication code shown previously uses @RestControllerannotations, Spring Boot grabs "Tomcat" and "Spring MVC".
The following items are used as “grab hints”:
Items Grabs
JdbcTemplate, NamedParameterJdbcTemplate,DataSource
JDBC Application.
@EnableJms JMS Application.
@EnableCaching Caching abstraction.
@Test JUnit.
@EnableRabbit RabbitMQ.
extends Specification Spock test.
@EnableBatchProcessing Spring Batch.
@MessageEndpoint @EnableIntegration Spring Integration.
@Controller @RestController @EnableWebMvc Spring MVC + Embedded Tomcat.
@EnableWebSecurity Spring Security.
@EnableTransactionManagement Spring Transaction Management.
See subclasses of CompilerAutoConfiguration in the Spring Boot CLI source code tounderstand exactly how customizations are applied.
278
Deduced “grab” Coordinates
Spring Boot extends Groovy’s standard @Grab support by letting you specify a dependency without agroup or version (for example, @Grab('freemarker')). Doing so consults Spring Boot’s defaultdependency metadata to deduce the artifact’s group and version.
The default metadata is tied to the version of the CLI that you use. It changes onlywhen you move to a new version of the CLI, putting you in control of when theversions of your dependencies may change. A table showing the dependencies andtheir versions that are included in the default metadata can be found in theappendix.
Default Import Statements
To help reduce the size of your Groovy code, several import statements are automatically included.Notice how the preceding example refers to @Component, @RestController, and @RequestMappingwithout needing to use fully-qualified names or import statements.
Many Spring annotations work without using import statements. Try running yourapplication to see what fails before adding imports.
Automatic Main Method
Unlike the equivalent Java application, you do not need to include a public static void
main(String[] args) method with your Groovy scripts. A SpringApplication is automatically created,with your compiled code acting as the source.
Custom Dependency Management
By default, the CLI uses the dependency management declared in spring-boot-dependencies whenresolving @Grab dependencies. Additional dependency management, which overrides the defaultdependency management, can be configured by using the @DependencyManagementBom annotation. Theannotation’s value should specify the coordinates (groupId:artifactId:version) of one or moreMaven BOMs.
For example, consider the following declaration:
@DependencyManagementBom("com.example.custom-bom:1.0.0")
The preceding declaration picks up custom-bom-1.0.0.pom in a Maven repository undercom/example/custom-versions/1.0.0/.
When you specify multiple BOMs, they are applied in the order in which you declare them, asshown in the following example:
@DependencyManagementBom(["com.example.custom-bom:1.0.0", "com.example.another-bom:1.0.0"])
279

The preceding example indicates that the dependency management in another-bom overrides thedependency management in custom-bom.
You can use @DependencyManagementBom anywhere that you can use @Grab. However, to ensureconsistent ordering of the dependency management, you can use @DependencyManagementBom at mostonce in your application.
7.2.2. Applications with Multiple Source Files
You can use “shell globbing” with all commands that accept file input. Doing so lets you usemultiple files from a single directory, as shown in the following example:
$ spring run *.groovy
7.2.3. Packaging Your Application
You can use the jar command to package your application into a self-contained executable jar file,as shown in the following example:
$ spring jar my-app.jar *.groovy
The resulting jar contains the classes produced by compiling the application and all of theapplication’s dependencies so that it can then be run by using java -jar. The jar file also containsentries from the application’s classpath. You can add and remove explicit paths to the jar by using--include and --exclude. Both are comma-separated, and both accept prefixes, in the form of “+”and “-”, to signify that they should be removed from the defaults. The default includes are asfollows:
public/**, resources/**, static/**, templates/**, META-INF/**, *
The default excludes are as follows:
.*, repository/**, build/**, target/**, **/*.jar, **/*.groovy
Type spring help jar on the command line for more information.
7.2.4. Initialize a New Project
The init command lets you create a new project by using start.spring.io without leaving the shell,as shown in the following example:
$ spring init --dependencies=web,data-jpa my-projectUsing service at https://start.spring.ioProject extracted to '/Users/developer/example/my-project'
280
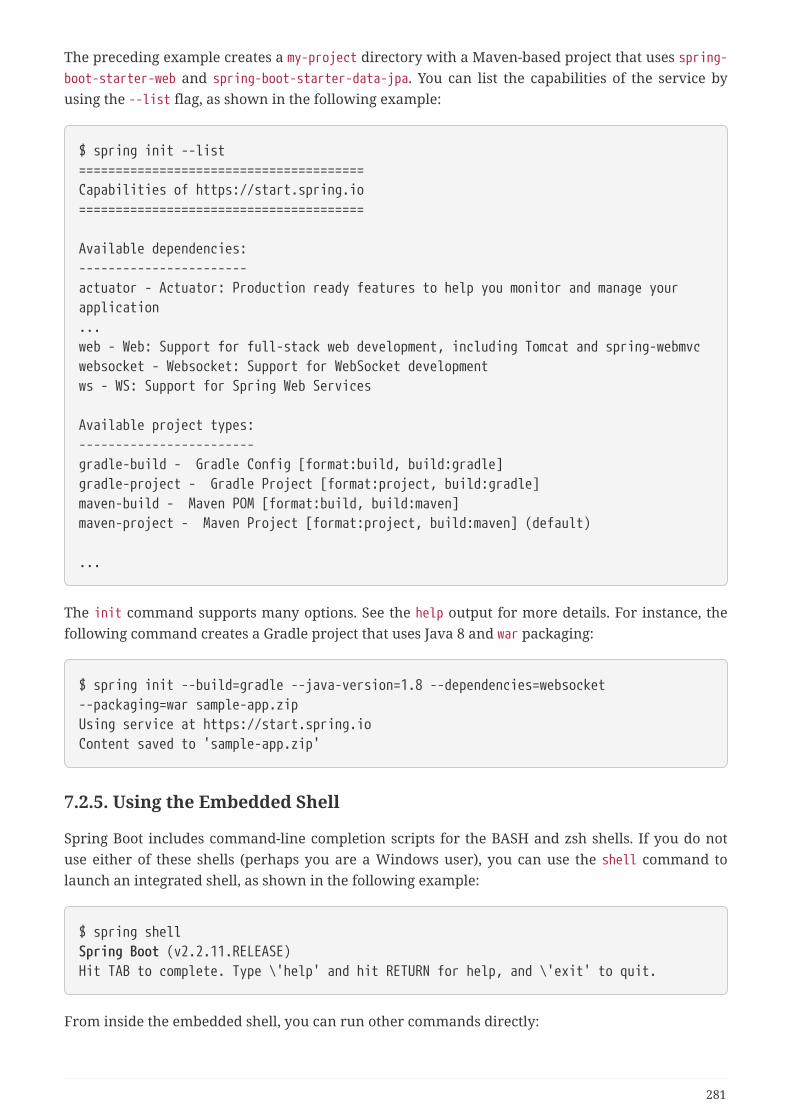
The preceding example creates a my-project directory with a Maven-based project that uses spring-boot-starter-web and spring-boot-starter-data-jpa. You can list the capabilities of the service byusing the --list flag, as shown in the following example:
$ spring init --list=======================================Capabilities of https://start.spring.io=======================================
Available dependencies:-----------------------actuator - Actuator: Production ready features to help you monitor and manage yourapplication...web - Web: Support for full-stack web development, including Tomcat and spring-webmvcwebsocket - Websocket: Support for WebSocket developmentws - WS: Support for Spring Web Services
Available project types:------------------------gradle-build - Gradle Config [format:build, build:gradle]gradle-project - Gradle Project [format:project, build:gradle]maven-build - Maven POM [format:build, build:maven]maven-project - Maven Project [format:project, build:maven] (default)
...
The init command supports many options. See the help output for more details. For instance, thefollowing command creates a Gradle project that uses Java 8 and war packaging:
$ spring init --build=gradle --java-version=1.8 --dependencies=websocket--packaging=war sample-app.zipUsing service at https://start.spring.ioContent saved to 'sample-app.zip'
7.2.5. Using the Embedded Shell
Spring Boot includes command-line completion scripts for the BASH and zsh shells. If you do notuse either of these shells (perhaps you are a Windows user), you can use the shell command tolaunch an integrated shell, as shown in the following example:
$ spring shellSpring Boot (v2.2.11.RELEASE)Hit TAB to complete. Type \'help' and hit RETURN for help, and \'exit' to quit.
From inside the embedded shell, you can run other commands directly:
281

$ versionSpring CLI v2.2.11.RELEASE
The embedded shell supports ANSI color output as well as tab completion. If you need to run anative command, you can use the ! prefix. To exit the embedded shell, press ctrl-c.
7.2.6. Adding Extensions to the CLI
You can add extensions to the CLI by using the install command. The command takes one or moresets of artifact coordinates in the format group:artifact:version, as shown in the followingexample:
$ spring install com.example:spring-boot-cli-extension:1.0.0.RELEASE
In addition to installing the artifacts identified by the coordinates you supply, all of the artifacts'dependencies are also installed.
To uninstall a dependency, use the uninstall command. As with the install command, it takes oneor more sets of artifact coordinates in the format of group:artifact:version, as shown in thefollowing example:
$ spring uninstall com.example:spring-boot-cli-extension:1.0.0.RELEASE
It uninstalls the artifacts identified by the coordinates you supply and their dependencies.
To uninstall all additional dependencies, you can use the --all option, as shown in the followingexample:
$ spring uninstall --all
7.3. Developing Applications with the Groovy BeansDSLSpring Framework 4.0 has native support for a beans{} “DSL” (borrowed from Grails), and you canembed bean definitions in your Groovy application scripts by using the same format. This issometimes a good way to include external features like middleware declarations, as shown in thefollowing example:
282
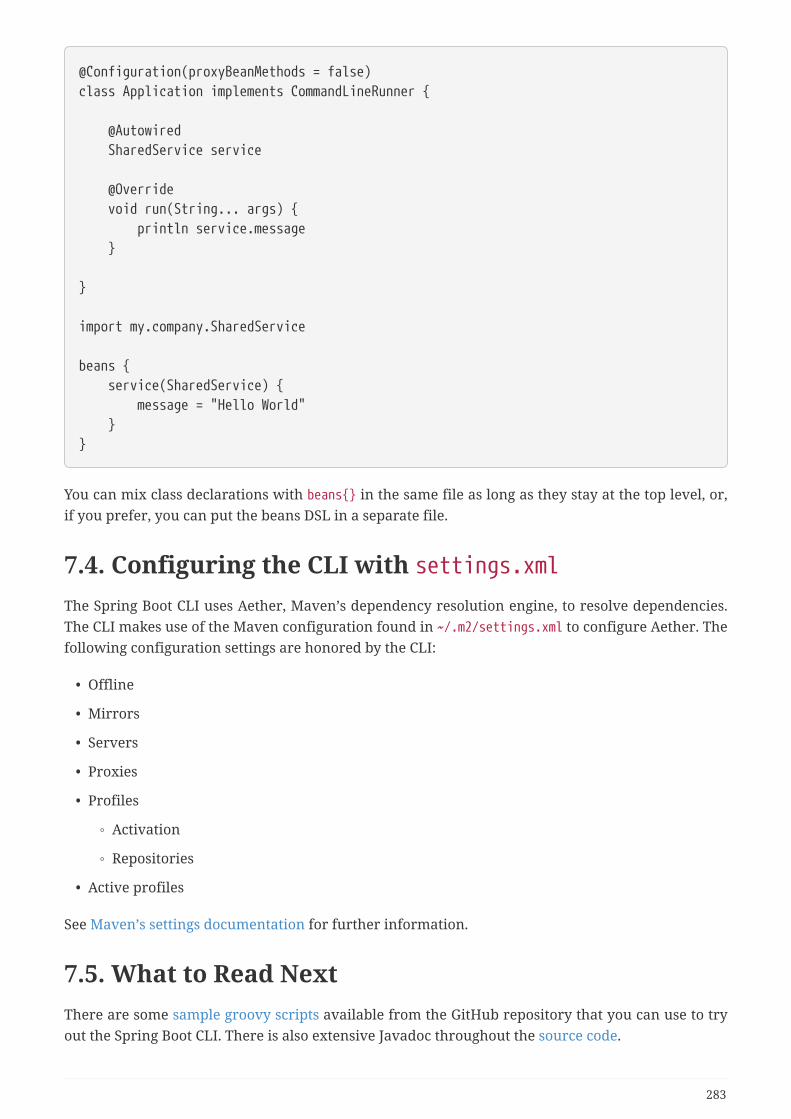
@Configuration(proxyBeanMethods = false)class Application implements CommandLineRunner {
@Autowired SharedService service
@Override void run(String... args) { println service.message }
}
import my.company.SharedService
beans { service(SharedService) { message = "Hello World" }}
You can mix class declarations with beans{} in the same file as long as they stay at the top level, or,if you prefer, you can put the beans DSL in a separate file.
7.4. Configuring the CLI with settings.xmlThe Spring Boot CLI uses Aether, Maven’s dependency resolution engine, to resolve dependencies.The CLI makes use of the Maven configuration found in ~/.m2/settings.xml to configure Aether. Thefollowing configuration settings are honored by the CLI:
• Offline
• Mirrors
• Servers
• Proxies
• Profiles
◦ Activation
◦ Repositories
• Active profiles
See Maven’s settings documentation for further information.
7.5. What to Read NextThere are some sample groovy scripts available from the GitHub repository that you can use to tryout the Spring Boot CLI. There is also extensive Javadoc throughout the source code.
283

If you find that you reach the limit of the CLI tool, you probably want to look at converting yourapplication to a full Gradle or Maven built “Groovy project”. The next section covers Spring Boot’s"Build tool plugins", which you can use with Gradle or Maven.
284
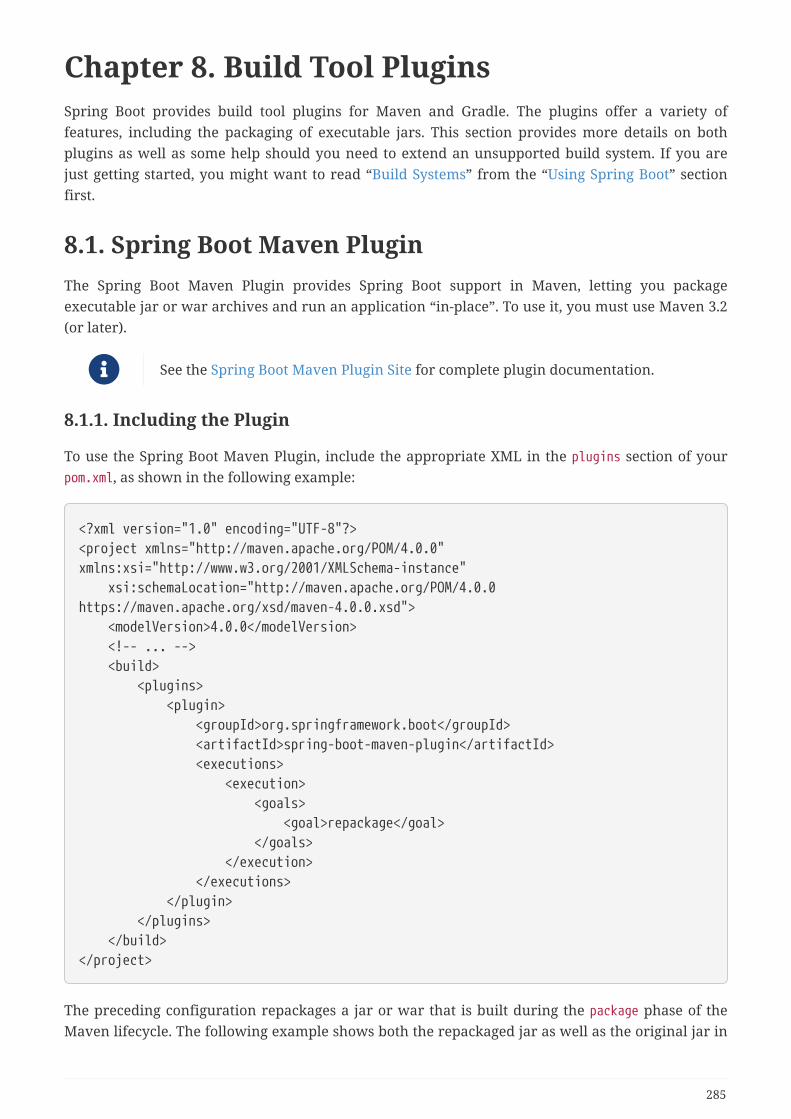
Chapter 8. Build Tool PluginsSpring Boot provides build tool plugins for Maven and Gradle. The plugins offer a variety offeatures, including the packaging of executable jars. This section provides more details on bothplugins as well as some help should you need to extend an unsupported build system. If you arejust getting started, you might want to read “Build Systems” from the “Using Spring Boot” sectionfirst.
8.1. Spring Boot Maven PluginThe Spring Boot Maven Plugin provides Spring Boot support in Maven, letting you packageexecutable jar or war archives and run an application “in-place”. To use it, you must use Maven 3.2(or later).
See the Spring Boot Maven Plugin Site for complete plugin documentation.
8.1.1. Including the Plugin
To use the Spring Boot Maven Plugin, include the appropriate XML in the plugins section of yourpom.xml, as shown in the following example:
<?xml version="1.0" encoding="UTF-8"?><project xmlns="http://maven.apache.org/POM/4.0.0"xmlns:xsi="http://www.w3.org/2001/XMLSchema-instance" xsi:schemaLocation="http://maven.apache.org/POM/4.0.0https://maven.apache.org/xsd/maven-4.0.0.xsd"> <modelVersion>4.0.0</modelVersion> <!-- ... --> <build> <plugins> <plugin> <groupId>org.springframework.boot</groupId> <artifactId>spring-boot-maven-plugin</artifactId> <executions> <execution> <goals> <goal>repackage</goal> </goals> </execution> </executions> </plugin> </plugins> </build></project>
The preceding configuration repackages a jar or war that is built during the package phase of theMaven lifecycle. The following example shows both the repackaged jar as well as the original jar in
285
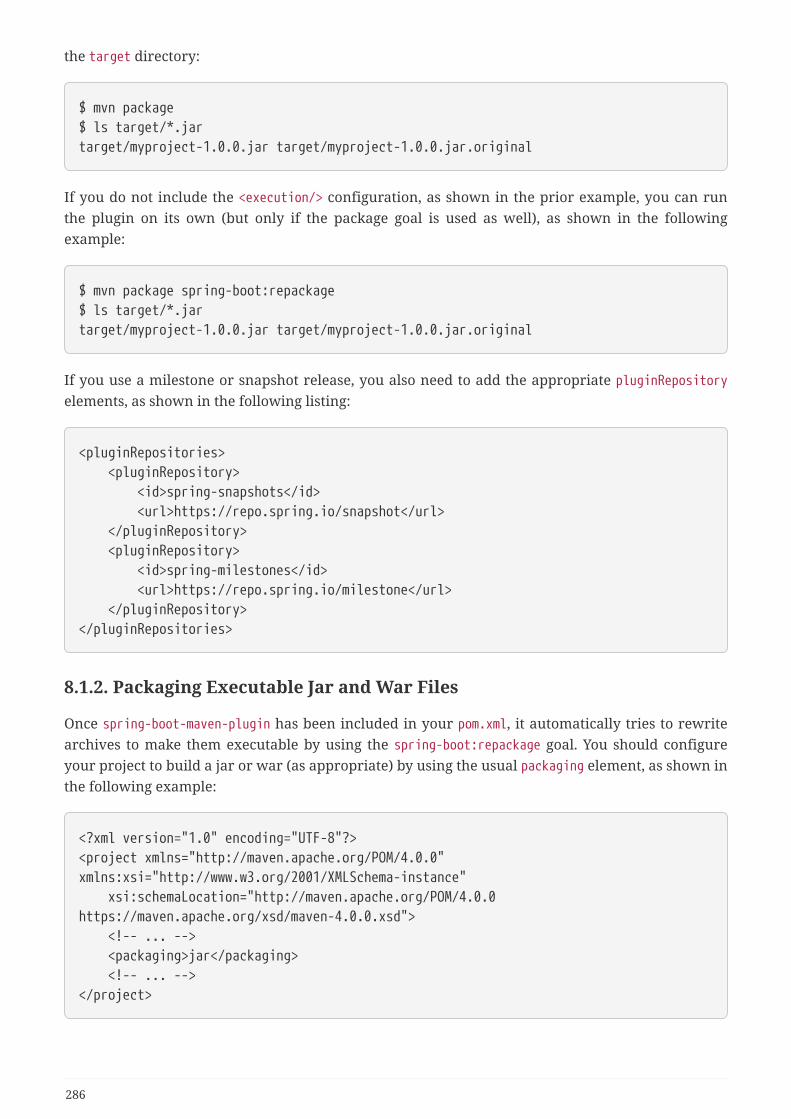
the target directory:
$ mvn package$ ls target/*.jartarget/myproject-1.0.0.jar target/myproject-1.0.0.jar.original
If you do not include the <execution/> configuration, as shown in the prior example, you can runthe plugin on its own (but only if the package goal is used as well), as shown in the followingexample:
$ mvn package spring-boot:repackage$ ls target/*.jartarget/myproject-1.0.0.jar target/myproject-1.0.0.jar.original
If you use a milestone or snapshot release, you also need to add the appropriate pluginRepositoryelements, as shown in the following listing:
<pluginRepositories> <pluginRepository> <id>spring-snapshots</id> <url>https://repo.spring.io/snapshot</url> </pluginRepository> <pluginRepository> <id>spring-milestones</id> <url>https://repo.spring.io/milestone</url> </pluginRepository></pluginRepositories>
8.1.2. Packaging Executable Jar and War Files
Once spring-boot-maven-plugin has been included in your pom.xml, it automatically tries to rewritearchives to make them executable by using the spring-boot:repackage goal. You should configureyour project to build a jar or war (as appropriate) by using the usual packaging element, as shown inthe following example:
<?xml version="1.0" encoding="UTF-8"?><project xmlns="http://maven.apache.org/POM/4.0.0"xmlns:xsi="http://www.w3.org/2001/XMLSchema-instance" xsi:schemaLocation="http://maven.apache.org/POM/4.0.0https://maven.apache.org/xsd/maven-4.0.0.xsd"> <!-- ... --> <packaging>jar</packaging> <!-- ... --></project>
286

Your existing archive is enhanced by Spring Boot during the package phase. The main class that youwant to launch can be specified either by using a configuration option, as shown below, or byadding a Main-Class attribute to the manifest. If you do not specify a main class, the plugin searchesfor a class with a public static void main(String[] args) method.
<plugin> <groupId>org.springframework.boot</groupId> <artifactId>spring-boot-maven-plugin</artifactId> <configuration> <mainClass>com.example.app.Main</mainClass> </configuration></plugin>
To build and run a project artifact, you can type the following:
$ mvn package$ java -jar target/mymodule-0.0.1-SNAPSHOT.jar
To build a war file that is both executable and deployable into an external container, you need tomark the embedded container dependencies as “provided”, as shown in the following example:
<?xml version="1.0" encoding="UTF-8"?><project xmlns="http://maven.apache.org/POM/4.0.0"xmlns:xsi="http://www.w3.org/2001/XMLSchema-instance" xsi:schemaLocation="http://maven.apache.org/POM/4.0.0https://maven.apache.org/xsd/maven-4.0.0.xsd"> <!-- ... --> <packaging>war</packaging> <!-- ... --> <dependencies> <dependency> <groupId>org.springframework.boot</groupId> <artifactId>spring-boot-starter-web</artifactId> </dependency> <dependency> <groupId>org.springframework.boot</groupId> <artifactId>spring-boot-starter-tomcat</artifactId> <scope>provided</scope> </dependency> <!-- ... --> </dependencies></project>
See the “Create a Deployable War File” section for more details on how to create adeployable war file.
Advanced configuration options and examples are available in the plugin info page.
287
8.2. Spring Boot Gradle PluginThe Spring Boot Gradle Plugin provides Spring Boot support in Gradle, letting you packageexecutable jar or war archives, run Spring Boot applications, and use the dependency managementprovided by spring-boot-dependencies. It requires Gradle 5.x (4.10 is also supported but this supportis deprecated and will be removed in a future release). Please refer to the plugin’s documentationto learn more:
• Reference (HTML and PDF)
• API
8.3. Spring Boot AntLib ModuleThe Spring Boot AntLib module provides basic Spring Boot support for Apache Ant. You can use themodule to create executable jars. To use the module, you need to declare an additional spring-bootnamespace in your build.xml, as shown in the following example:
<project xmlns:ivy="antlib:org.apache.ivy.ant" xmlns:spring-boot="antlib:org.springframework.boot.ant" name="myapp" default="build"> ...</project>
You need to remember to start Ant using the -lib option, as shown in the following example:
$ ant -lib <folder containing spring-boot-antlib-2.2.11.RELEASE.jar>
The “Using Spring Boot” section includes a more complete example of usingApache Ant with spring-boot-antlib.
8.3.1. Spring Boot Ant Tasks
Once the spring-boot-antlib namespace has been declared, the following additional tasks areavailable:
• spring-boot:exejar
• spring-boot:findmainclass
spring-boot:exejar
You can use the exejar task to create a Spring Boot executable jar. The following attributes aresupported by the task:
Attribute Description Required
destfile The destination jar file to create Yes
288
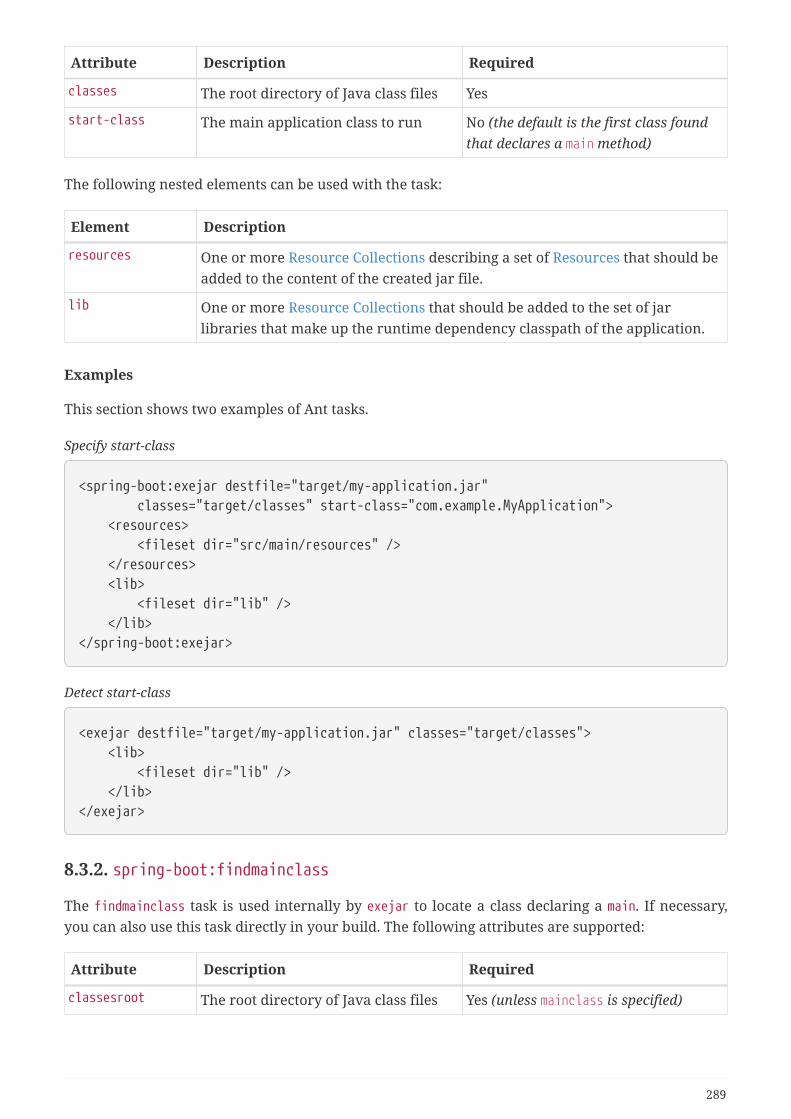
Attribute Description Required
classes The root directory of Java class files Yes
start-class The main application class to run No (the default is the first class foundthat declares a main method)
The following nested elements can be used with the task:
Element Description
resources One or more Resource Collections describing a set of Resources that should beadded to the content of the created jar file.
lib One or more Resource Collections that should be added to the set of jarlibraries that make up the runtime dependency classpath of the application.
Examples
This section shows two examples of Ant tasks.
Specify start-class
<spring-boot:exejar destfile="target/my-application.jar" classes="target/classes" start-class="com.example.MyApplication"> <resources> <fileset dir="src/main/resources" /> </resources> <lib> <fileset dir="lib" /> </lib></spring-boot:exejar>
Detect start-class
<exejar destfile="target/my-application.jar" classes="target/classes"> <lib> <fileset dir="lib" /> </lib></exejar>
8.3.2. spring-boot:findmainclass
The findmainclass task is used internally by exejar to locate a class declaring a main. If necessary,you can also use this task directly in your build. The following attributes are supported:
Attribute Description Required
classesroot The root directory of Java class files Yes (unless mainclass is specified)
289

Attribute Description Required
mainclass Can be used to short-circuit the mainclass search
No
property The Ant property that should be setwith the result
No (result will be logged if unspecified)
Examples
This section contains three examples of using findmainclass.
Find and log
<findmainclass classesroot="target/classes" />
Find and set
<findmainclass classesroot="target/classes" property="main-class" />
Override and set
<findmainclass mainclass="com.example.MainClass" property="main-class" />
8.4. Supporting Other Build SystemsIf you want to use a build tool other than Maven, Gradle, or Ant, you likely need to develop yourown plugin. Executable jars need to follow a specific format and certain entries need to be writtenin an uncompressed form (see the “executable jar format” section in the appendix for details).
The Spring Boot Maven and Gradle plugins both make use of spring-boot-loader-tools to actuallygenerate jars. If you need to, you may use this library directly.
8.4.1. Repackaging Archives
To repackage an existing archive so that it becomes a self-contained executable archive, useorg.springframework.boot.loader.tools.Repackager. The Repackager class takes a single constructorargument that refers to an existing jar or war archive. Use one of the two available repackage()methods to either replace the original file or write to a new destination. Various settings can also beconfigured on the repackager before it is run.
8.4.2. Nested Libraries
When repackaging an archive, you can include references to dependency files by using theorg.springframework.boot.loader.tools.Libraries interface. We do not provide any concreteimplementations of Libraries here as they are usually build-system-specific.
If your archive already includes libraries, you can use Libraries.NONE.
290

8.4.3. Finding a Main Class
If you do not use Repackager.setMainClass() to specify a main class, the repackager uses ASM toread class files and tries to find a suitable class with a public static void main(String[] args)method. An exception is thrown if more than one candidate is found.
8.4.4. Example Repackage Implementation
The following example shows a typical repackage implementation:
Repackager repackager = new Repackager(sourceJarFile);repackager.setBackupSource(false);repackager.repackage(new Libraries() { @Override public void doWithLibraries(LibraryCallback callback) throws IOException { // Build system specific implementation, callback for each dependency // callback.library(new Library(nestedFile, LibraryScope.COMPILE)); } });
8.5. What to Read NextIf you are interested in how the build tool plugins work, you can look at the spring-boot-toolsmodule on GitHub. More technical details of the executable jar format are covered in the appendix.
If you have specific build-related questions, you can check out the “how-to” guides.
291
Chapter 9. “How-to” GuidesThis section provides answers to some common ‘how do I do that…’ questions that often arise whenusing Spring Boot. Its coverage is not exhaustive, but it does cover quite a lot.
If you have a specific problem that we do not cover here, you might want to check outstackoverflow.com to see if someone has already provided an answer. This is also a great place toask new questions (please use the spring-boot tag).
We are also more than happy to extend this section. If you want to add a ‘how-to’, send us a pullrequest.
9.1. Spring Boot ApplicationThis section includes topics relating directly to Spring Boot applications.
9.1.1. Create Your Own FailureAnalyzer
FailureAnalyzer is a great way to intercept an exception on startup and turn it into a human-readable message, wrapped in a FailureAnalysis. Spring Boot provides such an analyzer forapplication-context-related exceptions, JSR-303 validations, and more. You can also create yourown.
AbstractFailureAnalyzer is a convenient extension of FailureAnalyzer that checks the presence of aspecified exception type in the exception to handle. You can extend from that so that yourimplementation gets a chance to handle the exception only when it is actually present. If, forwhatever reason, you cannot handle the exception, return null to give another implementation achance to handle the exception.
FailureAnalyzer implementations must be registered in META-INF/spring.factories. The followingexample registers ProjectConstraintViolationFailureAnalyzer:
org.springframework.boot.diagnostics.FailureAnalyzer=\com.example.ProjectConstraintViolationFailureAnalyzer
If you need access to the BeanFactory or the Environment, your FailureAnalyzer canimplement BeanFactoryAware or EnvironmentAware respectively.
9.1.2. Troubleshoot Auto-configuration
The Spring Boot auto-configuration tries its best to “do the right thing”, but sometimes things fail,and it can be hard to tell why.
There is a really useful ConditionEvaluationReport available in any Spring Boot ApplicationContext.You can see it if you enable DEBUG logging output. If you use the spring-boot-actuator (see theActuator chapter), there is also a conditions endpoint that renders the report in JSON. Use thatendpoint to debug the application and see what features have been added (and which have not
292

been added) by Spring Boot at runtime.
Many more questions can be answered by looking at the source code and the Javadoc. Whenreading the code, remember the following rules of thumb:
• Look for classes called *AutoConfiguration and read their sources. Pay special attention to the@Conditional* annotations to find out what features they enable and when. Add --debug to thecommand line or a System property -Ddebug to get a log on the console of all the auto-configuration decisions that were made in your app. In a running application with actuatorenabled, look at the conditions endpoint (/actuator/conditions or the JMX equivalent) for thesame information.
• Look for classes that are @ConfigurationProperties (such as ServerProperties) and read fromthere the available external configuration options. The @ConfigurationProperties annotation hasa name attribute that acts as a prefix to external properties. Thus, ServerProperties hasprefix="server" and its configuration properties are server.port, server.address, and others. Ina running application with actuator enabled, look at the configprops endpoint.
• Look for uses of the bind method on the Binder to pull configuration values explicitly out of theEnvironment in a relaxed manner. It is often used with a prefix.
• Look for @Value annotations that bind directly to the Environment.
• Look for @ConditionalOnExpression annotations that switch features on and off in response toSpEL expressions, normally evaluated with placeholders resolved from the Environment.
9.1.3. Customize the Environment or ApplicationContext Before It Starts
A SpringApplication has ApplicationListeners and ApplicationContextInitializers that are used toapply customizations to the context or environment. Spring Boot loads a number of suchcustomizations for use internally from META-INF/spring.factories. There is more than one way toregister additional customizations:
• Programmatically, per application, by calling the addListeners and addInitializers methods onSpringApplication before you run it.
• Declaratively, per application, by setting the context.initializer.classes orcontext.listener.classes properties.
• Declaratively, for all applications, by adding a META-INF/spring.factories and packaging a jarfile that the applications all use as a library.
The SpringApplication sends some special ApplicationEvents to the listeners (some even before thecontext is created) and then registers the listeners for events published by the ApplicationContext aswell. See “Application Events and Listeners” in the ‘Spring Boot features’ section for a complete list.
It is also possible to customize the Environment before the application context is refreshed by usingEnvironmentPostProcessor. Each implementation should be registered in META-INF/spring.factories,as shown in the following example:
org.springframework.boot.env.EnvironmentPostProcessor=com.example.YourEnvironmentPostProcessor
293
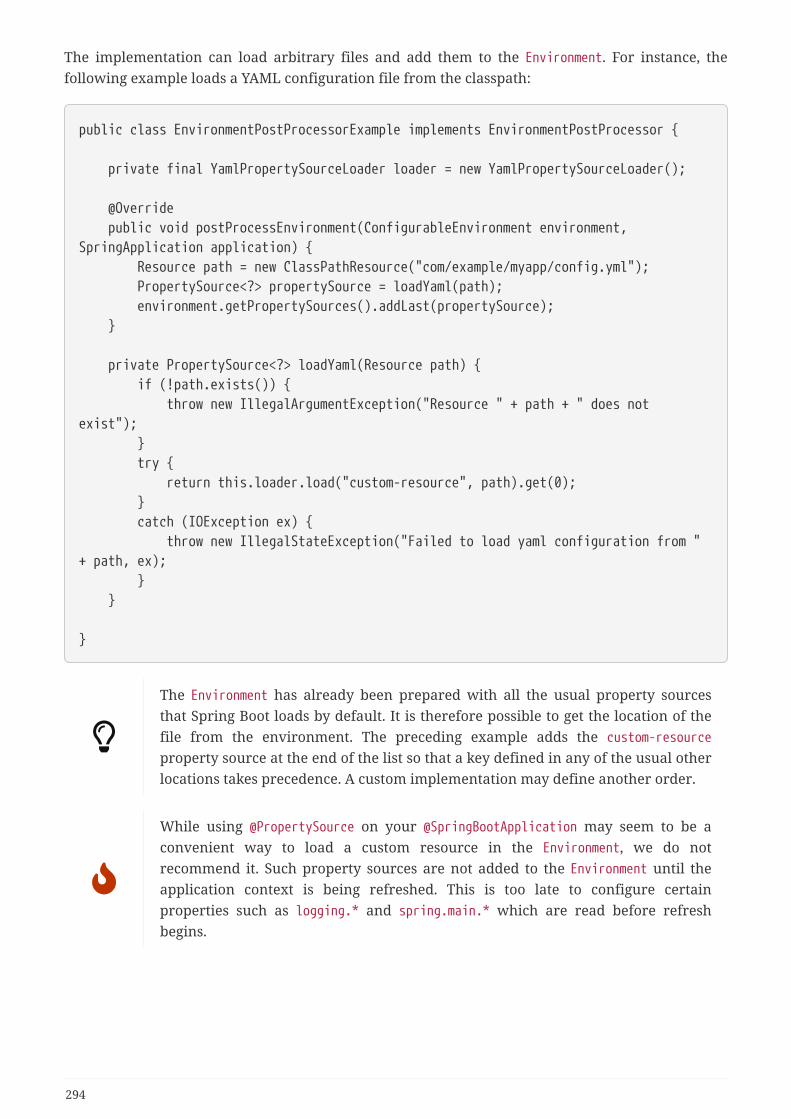
The implementation can load arbitrary files and add them to the Environment. For instance, thefollowing example loads a YAML configuration file from the classpath:
public class EnvironmentPostProcessorExample implements EnvironmentPostProcessor {
private final YamlPropertySourceLoader loader = new YamlPropertySourceLoader();
@Override public void postProcessEnvironment(ConfigurableEnvironment environment,SpringApplication application) { Resource path = new ClassPathResource("com/example/myapp/config.yml"); PropertySource<?> propertySource = loadYaml(path); environment.getPropertySources().addLast(propertySource); }
private PropertySource<?> loadYaml(Resource path) { if (!path.exists()) { throw new IllegalArgumentException("Resource " + path + " does notexist"); } try { return this.loader.load("custom-resource", path).get(0); } catch (IOException ex) { throw new IllegalStateException("Failed to load yaml configuration from "+ path, ex); } }
}
The Environment has already been prepared with all the usual property sourcesthat Spring Boot loads by default. It is therefore possible to get the location of thefile from the environment. The preceding example adds the custom-resourceproperty source at the end of the list so that a key defined in any of the usual otherlocations takes precedence. A custom implementation may define another order.
While using @PropertySource on your @SpringBootApplication may seem to be aconvenient way to load a custom resource in the Environment, we do notrecommend it. Such property sources are not added to the Environment until theapplication context is being refreshed. This is too late to configure certainproperties such as logging.* and spring.main.* which are read before refreshbegins.
294

9.1.4. Build an ApplicationContext Hierarchy (Adding a Parent or RootContext)
You can use the ApplicationBuilder class to create parent/child ApplicationContext hierarchies. See“Fluent Builder API” in the ‘Spring Boot features’ section for more information.
9.1.5. Create a Non-web Application
Not all Spring applications have to be web applications (or web services). If you want to executesome code in a main method but also bootstrap a Spring application to set up the infrastructure touse, you can use the SpringApplication features of Spring Boot. A SpringApplication changes itsApplicationContext class, depending on whether it thinks it needs a web application or not. The firstthing you can do to help it is to leave server-related dependencies (e.g. servlet API) off the classpath.If you cannot do that (for example, you run two applications from the same code base) then you canexplicitly call setWebApplicationType(WebApplicationType.NONE) on your SpringApplication instanceor set the applicationContextClass property (through the Java API or with external properties).Application code that you want to run as your business logic can be implemented as aCommandLineRunner and dropped into the context as a @Bean definition.
9.2. Properties and ConfigurationThis section includes topics about setting and reading properties and configuration settings andtheir interaction with Spring Boot applications.
9.2.1. Automatically Expand Properties at Build Time
Rather than hardcoding some properties that are also specified in your project’s buildconfiguration, you can automatically expand them by instead using the existing buildconfiguration. This is possible in both Maven and Gradle.
Automatic Property Expansion Using Maven
You can automatically expand properties from the Maven project by using resource filtering. If youuse the spring-boot-starter-parent, you can then refer to your Maven ‘project properties’ with @..@placeholders, as shown in the following example:
[email protected]@[email protected]@
Only production configuration is filtered that way (in other words, no filtering isapplied on src/test/resources).
295

If you enable the addResources flag, the spring-boot:run goal can addsrc/main/resources directly to the classpath (for hot reloading purposes). Doing socircumvents the resource filtering and this feature. Instead, you can use theexec:java goal or customize the plugin’s configuration. See the plugin usage pagefor more details.
If you do not use the starter parent, you need to include the following element inside the <build/>element of your pom.xml:
<resources> <resource> <directory>src/main/resources</directory> <filtering>true</filtering> </resource></resources>
You also need to include the following element inside <plugins/>:
<plugin> <groupId>org.apache.maven.plugins</groupId> <artifactId>maven-resources-plugin</artifactId> <configuration> <delimiters> <delimiter>@</delimiter> </delimiters> <useDefaultDelimiters>false</useDefaultDelimiters> </configuration></plugin>
The useDefaultDelimiters property is important if you use standard Springplaceholders (such as ${placeholder}) in your configuration. If that property is notset to false, these may be expanded by the build.
Automatic Property Expansion Using Gradle
You can automatically expand properties from the Gradle project by configuring the Java plugin’sprocessResources task to do so, as shown in the following example:
processResources { expand(project.properties)}
You can then refer to your Gradle project’s properties by using placeholders, as shown in thefollowing example:
296

app.name=${name}app.description=${description}
Gradle’s expand method uses Groovy’s SimpleTemplateEngine, which transforms${..} tokens. The ${..} style conflicts with Spring’s own property placeholdermechanism. To use Spring property placeholders together with automaticexpansion, escape the Spring property placeholders as follows: \${..}.
9.2.2. Externalize the Configuration of SpringApplication
A SpringApplication has bean properties (mainly setters), so you can use its Java API as you createthe application to modify its behavior. Alternatively, you can externalize the configuration bysetting properties in spring.main.*. For example, in application.properties, you might have thefollowing settings:
spring.main.web-application-type=nonespring.main.banner-mode=off
Then the Spring Boot banner is not printed on startup, and the application is not starting anembedded web server.
Properties defined in external configuration override the values specified with the Java API, withthe notable exception of the sources used to create the ApplicationContext. Consider the followingapplication:
new SpringApplicationBuilder() .bannerMode(Banner.Mode.OFF) .sources(demo.MyApp.class) .run(args);
Now consider the following configuration:
spring.main.sources=com.acme.Config,com.acme.ExtraConfigspring.main.banner-mode=console
The actual application now shows the banner (as overridden by configuration) and uses threesources for the ApplicationContext (in the following order): demo.MyApp, com.acme.Config, andcom.acme.ExtraConfig.
9.2.3. Change the Location of External Properties of an Application
By default, properties from different sources are added to the Spring Environment in a defined order(see “Externalized Configuration” in the ‘Spring Boot features’ section for the exact order).
You can also provide the following System properties (or environment variables) to change the
297

behavior:
• spring.config.name (SPRING_CONFIG_NAME): Defaults to application as the root of the file name.
• spring.config.location (SPRING_CONFIG_LOCATION): The file to load (such as a classpath resourceor a URL). A separate Environment property source is set up for this document and it can beoverridden by system properties, environment variables, or the command line.
No matter what you set in the environment, Spring Boot always loads application.properties asdescribed above. By default, if YAML is used, then files with the ‘.yml’ extension are also added tothe list.
Spring Boot logs the configuration files that are loaded at the DEBUG level and the candidates it hasnot found at TRACE level.
See ConfigFileApplicationListener for more detail.
9.2.4. Use ‘Short’ Command Line Arguments
Some people like to use (for example) --port=9000 instead of --server.port=9000 to set configurationproperties on the command line. You can enable this behavior by using placeholders inapplication.properties, as shown in the following example:
server.port=${port:8080}
If you inherit from the spring-boot-starter-parent POM, the default filter token ofthe maven-resources-plugins has been changed from ${*} to @ (that is, @maven.token@instead of ${maven.token}) to prevent conflicts with Spring-style placeholders. Ifyou have enabled Maven filtering for the application.properties directly, you maywant to also change the default filter token to use other delimiters.
In this specific case, the port binding works in a PaaS environment such as Herokuor Cloud Foundry. In those two platforms, the PORT environment variable is setautomatically and Spring can bind to capitalized synonyms for Environment
properties.
9.2.5. Use YAML for External Properties
YAML is a superset of JSON and, as such, is a convenient syntax for storing external properties in ahierarchical format, as shown in the following example:
298
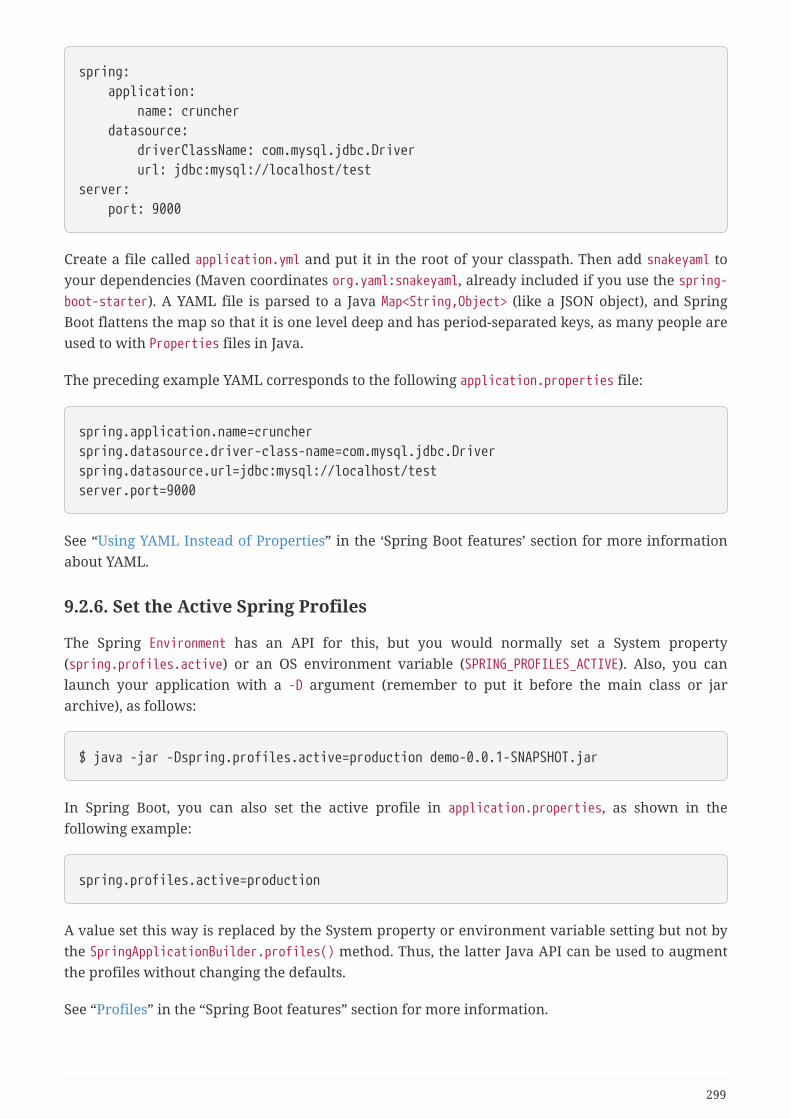
spring: application: name: cruncher datasource: driverClassName: com.mysql.jdbc.Driver url: jdbc:mysql://localhost/testserver: port: 9000
Create a file called application.yml and put it in the root of your classpath. Then add snakeyaml toyour dependencies (Maven coordinates org.yaml:snakeyaml, already included if you use the spring-boot-starter). A YAML file is parsed to a Java Map<String,Object> (like a JSON object), and SpringBoot flattens the map so that it is one level deep and has period-separated keys, as many people areused to with Properties files in Java.
The preceding example YAML corresponds to the following application.properties file:
spring.application.name=cruncherspring.datasource.driver-class-name=com.mysql.jdbc.Driverspring.datasource.url=jdbc:mysql://localhost/testserver.port=9000
See “Using YAML Instead of Properties” in the ‘Spring Boot features’ section for more informationabout YAML.
9.2.6. Set the Active Spring Profiles
The Spring Environment has an API for this, but you would normally set a System property(spring.profiles.active) or an OS environment variable (SPRING_PROFILES_ACTIVE). Also, you canlaunch your application with a -D argument (remember to put it before the main class or jararchive), as follows:
$ java -jar -Dspring.profiles.active=production demo-0.0.1-SNAPSHOT.jar
In Spring Boot, you can also set the active profile in application.properties, as shown in thefollowing example:
spring.profiles.active=production
A value set this way is replaced by the System property or environment variable setting but not bythe SpringApplicationBuilder.profiles() method. Thus, the latter Java API can be used to augmentthe profiles without changing the defaults.
See “Profiles” in the “Spring Boot features” section for more information.
299
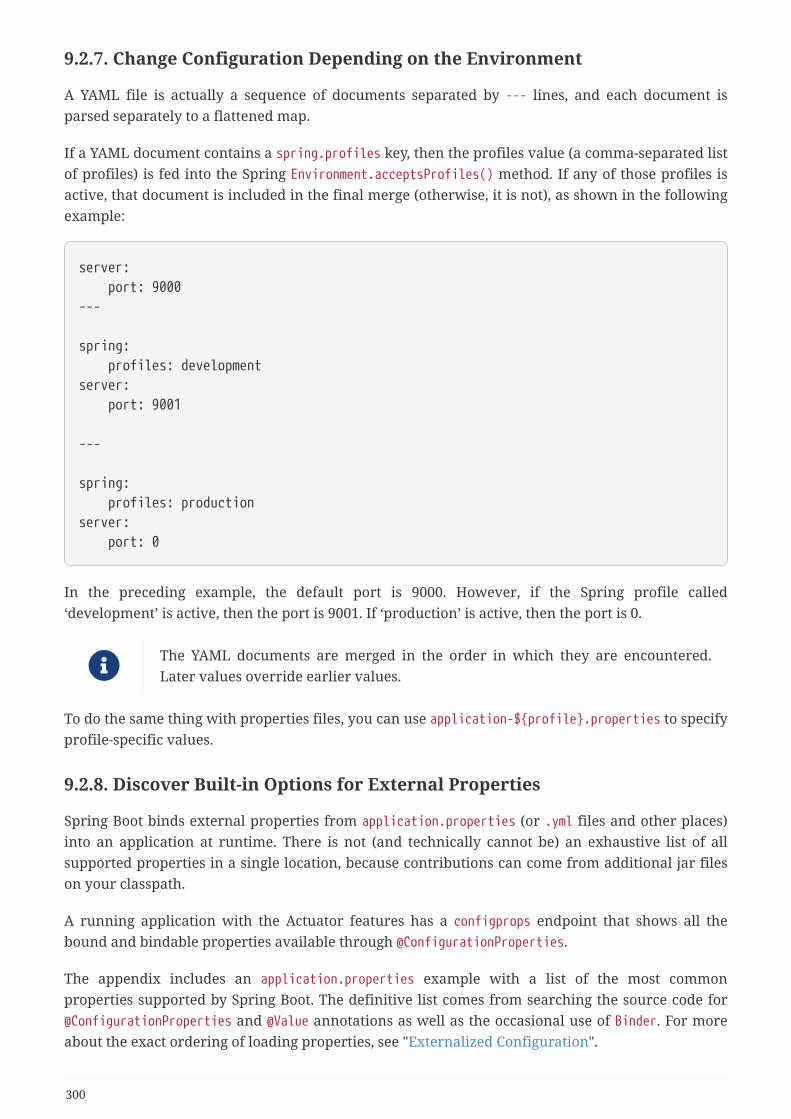
9.2.7. Change Configuration Depending on the Environment
A YAML file is actually a sequence of documents separated by --- lines, and each document isparsed separately to a flattened map.
If a YAML document contains a spring.profiles key, then the profiles value (a comma-separated listof profiles) is fed into the Spring Environment.acceptsProfiles() method. If any of those profiles isactive, that document is included in the final merge (otherwise, it is not), as shown in the followingexample:
server: port: 9000---
spring: profiles: developmentserver: port: 9001
---
spring: profiles: productionserver: port: 0
In the preceding example, the default port is 9000. However, if the Spring profile called‘development’ is active, then the port is 9001. If ‘production’ is active, then the port is 0.
The YAML documents are merged in the order in which they are encountered.Later values override earlier values.
To do the same thing with properties files, you can use application-${profile}.properties to specifyprofile-specific values.
9.2.8. Discover Built-in Options for External Properties
Spring Boot binds external properties from application.properties (or .yml files and other places)into an application at runtime. There is not (and technically cannot be) an exhaustive list of allsupported properties in a single location, because contributions can come from additional jar fileson your classpath.
A running application with the Actuator features has a configprops endpoint that shows all thebound and bindable properties available through @ConfigurationProperties.
The appendix includes an application.properties example with a list of the most commonproperties supported by Spring Boot. The definitive list comes from searching the source code for@ConfigurationProperties and @Value annotations as well as the occasional use of Binder. For moreabout the exact ordering of loading properties, see "Externalized Configuration".
300
9.3. Embedded Web ServersEach Spring Boot web application includes an embedded web server. This feature leads to anumber of how-to questions, including how to change the embedded server and how to configurethe embedded server. This section answers those questions.
9.3.1. Use Another Web Server
Many Spring Boot starters include default embedded containers.
• For servlet stack applications, the spring-boot-starter-web includes Tomcat by including spring-boot-starter-tomcat, but you can use spring-boot-starter-jetty or spring-boot-starter-
undertow instead.
• For reactive stack applications, the spring-boot-starter-webflux includes Reactor Netty byincluding spring-boot-starter-reactor-netty, but you can use spring-boot-starter-tomcat,spring-boot-starter-jetty, or spring-boot-starter-undertow instead.
When switching to a different HTTP server, you need to swap the default dependencies for thosethat you need instead. To help with this process, Spring Boot provides a separate starter for each ofthe supported HTTP servers.
The following Maven example shows how to exclude Tomcat and include Jetty for Spring MVC:
<properties> <servlet-api.version>3.1.0</servlet-api.version></properties><dependency> <groupId>org.springframework.boot</groupId> <artifactId>spring-boot-starter-web</artifactId> <exclusions> <!-- Exclude the Tomcat dependency --> <exclusion> <groupId>org.springframework.boot</groupId> <artifactId>spring-boot-starter-tomcat</artifactId> </exclusion> </exclusions></dependency><!-- Use Jetty instead --><dependency> <groupId>org.springframework.boot</groupId> <artifactId>spring-boot-starter-jetty</artifactId></dependency>
The version of the Servlet API has been overridden as, unlike Tomcat 9 andUndertow 2.0, Jetty 9.4 does not support Servlet 4.0.
The following Gradle example shows how to use Undertow in place of Reactor Netty for SpringWebFlux:
301

configurations.all { resolutionStrategy.dependencySubstitution.all { dependency -> if (dependency.requested instanceof ModuleComponentSelector &&dependency.requested.module == 'spring-boot-starter-reactor-netty') { dependency.useTarget("org.springframework.boot:spring-boot-starter-undertow:$dependency.requested.version", 'Use Undertow instead of Reactor Netty') } }}
dependencies { compile 'org.springframework.boot:spring-boot-starter-webflux' // ...}
spring-boot-starter-reactor-netty is required to use the WebClient class, so youmay need to keep a dependency on Netty even when you need to include adifferent HTTP server.
9.3.2. Disabling the Web Server
If your classpath contains the necessary bits to start a web server, Spring Boot will automaticallystart it. To disable this behavior configure the WebApplicationType in your application.properties, asshown in the following example:
spring.main.web-application-type=none
9.3.3. Change the HTTP Port
In a standalone application, the main HTTP port defaults to 8080 but can be set with server.port (forexample, in application.properties or as a System property). Thanks to relaxed binding ofEnvironment values, you can also use SERVER_PORT (for example, as an OS environment variable).
To switch off the HTTP endpoints completely but still create a WebApplicationContext, useserver.port=-1 (doing so is sometimes useful for testing).
For more details, see “Customizing Embedded Servlet Containers” in the ‘Spring Boot Features’section, or the ServerProperties source code.
9.3.4. Use a Random Unassigned HTTP Port
To scan for a free port (using OS natives to prevent clashes) use server.port=0.
9.3.5. Discover the HTTP Port at Runtime
You can access the port the server is running on from log output or from theWebServerApplicationContext through its WebServer. The best way to get that and be sure it has been
302
initialized is to add a @Bean of type ApplicationListener<WebServerInitializedEvent> and pull thecontainer out of the event when it is published.
Tests that use @SpringBootTest(webEnvironment=WebEnvironment.RANDOM_PORT) can also inject theactual port into a field by using the @LocalServerPort annotation, as shown in the followingexample:
@SpringBootTest(webEnvironment=WebEnvironment.RANDOM_PORT)public class MyWebIntegrationTests {
@LocalServerPort int port;
// ...
}
@LocalServerPort is a meta-annotation for @Value("${local.server.port}"). Do nottry to inject the port in a regular application. As we just saw, the value is set onlyafter the container has been initialized. Contrary to a test, application codecallbacks are processed early (before the value is actually available).
9.3.6. Enable HTTP Response Compression
HTTP response compression is supported by Jetty, Tomcat, and Undertow. It can be enabled inapplication.properties, as follows:
server.compression.enabled=true
By default, responses must be at least 2048 bytes in length for compression to be performed. Youcan configure this behavior by setting the server.compression.min-response-size property.
By default, responses are compressed only if their content type is one of the following:
• text/html
• text/xml
• text/plain
• text/css
• text/javascript
• application/javascript
• application/json
• application/xml
You can configure this behavior by setting the server.compression.mime-types property.
303
9.3.7. Configure SSL
SSL can be configured declaratively by setting the various server.ssl.* properties, typically inapplication.properties or application.yml. The following example shows setting SSL properties inapplication.properties:
server.port=8443server.ssl.key-store=classpath:keystore.jksserver.ssl.key-store-password=secretserver.ssl.key-password=another-secret
See Ssl for details of all of the supported properties.
Using configuration such as the preceding example means the application no longer supports aplain HTTP connector at port 8080. Spring Boot does not support the configuration of both an HTTPconnector and an HTTPS connector through application.properties. If you want to have both, youneed to configure one of them programmatically. We recommend using application.properties toconfigure HTTPS, as the HTTP connector is the easier of the two to configure programmatically.
9.3.8. Configure HTTP/2
You can enable HTTP/2 support in your Spring Boot application with the server.http2.enabledconfiguration property. This support depends on the chosen web server and the applicationenvironment, since that protocol is not supported out-of-the-box by JDK8.
Spring Boot does not advise using h2c, the cleartext version of the HTTP/2 protocol.As a result, the next sections require to configure SSL first. If you still choose to useh2c, you can check the dedicated section.
HTTP/2 with Tomcat
Spring Boot ships by default with Tomcat 9.0.x which supports HTTP/2 out of the box when usingJDK 9 or later. Alternatively, HTTP/2 can be used on JDK 8 if the libtcnative library and itsdependencies are installed on the host operating system.
The library folder must be made available, if not already, to the JVM library path. You can do sowith a JVM argument such as -Djava.library.path=/usr/local/opt/tomcat-native/lib. More on thisin the official Tomcat documentation.
Starting Tomcat 9.0.x on JDK 8 without that native support logs the following error:
ERROR 8787 --- [ main] o.a.coyote.http11.Http11NioProtocol : Theupgrade handler [org.apache.coyote.http2.Http2Protocol] for [h2] only supports upgradevia ALPN but has been configured for the ["https-jsse-nio-8443"] connector that doesnot support ALPN.
This error is not fatal, and the application still starts with HTTP/1.1 SSL support.
304

HTTP/2 with Jetty
As of Jetty 9.4.8, HTTP/2 is also supported with the Conscrypt library. To enable that support, yourapplication needs to have two additional dependencies: org.eclipse.jetty:jetty-alpn-conscrypt-server and org.eclipse.jetty.http2:http2-server.
HTTP/2 with Reactor Netty
The spring-boot-webflux-starter is using by default Reactor Netty as a server. Reactor Netty can beconfigured for HTTP/2 using the JDK support with JDK 9 or later. For JDK 8 environments, or foroptimal runtime performance, this server also supports HTTP/2 with native libraries. To enablethat, your application needs to have an additional dependency.
Spring Boot manages the version for the io.netty:netty-tcnative-boringssl-static "uber jar",containing native libraries for all platforms. Developers can choose to import only the requireddependencies using a classifier (see the Netty official documentation).
HTTP/2 with Undertow
As of Undertow 1.4.0+, HTTP/2 is supported without any additional requirement on JDK8.
h2c with supported servers
To enable h2c, you need to leave the server.http2.enabled property set to false, and instead apply acustomizer specific to your choice of server:
For Tomcat, we need to add an upgrade protocol:
@Beanpublic TomcatConnectorCustomizer connectorCustomizer() { return (connector) -> connector.addUpgradeProtocol(new Http2Protocol());}
For Jetty, we need to add a connection factory to the existing connector:
@Beanpublic JettyServerCustomizer serverCustomizer() { return (server) -> { HttpConfiguration configuration = new HttpConfiguration(); configuration.setSendServerVersion(false); Arrays.stream(server.getConnectors()) .filter(connector -> connector instanceof ServerConnector) .map(ServerConnector.class::cast) .forEach(connector -> { connector.addConnectionFactory(newHTTP2CServerConnectionFactory(configuration)); }); };}
305
For Netty, we need to add h2c as a supported protocol:
@Beanpublic NettyServerCustomizer serverCustomizer() { return (server) -> server.protocol(HttpProtocol.H2C);}
For Undertow, we need to enable the HTTP2 option:
@Beanpublic UndertowBuilderCustomizer builderCustomizer() { return (builder) -> { builder.setServerOption(ENABLE_HTTP2, true); };}
9.3.9. Configure the Web Server
Generally, you should first consider using one of the many available configuration keys andcustomize your web server by adding new entries in your application.properties (orapplication.yml, or environment, etc. see “Discover Built-in Options for External Properties”). Theserver.* namespace is quite useful here, and it includes namespaces like server.tomcat.*,server.jetty.* and others, for server-specific features. See the list of Common Applicationproperties.
The previous sections covered already many common use cases, such as compression, SSL orHTTP/2. However, if a configuration key doesn’t exist for your use case, you should then look atWebServerFactoryCustomizer. You can declare such a component and get access to the server factoryrelevant to your choice: you should select the variant for the chosen Server (Tomcat, Jetty, ReactorNetty, Undertow) and the chosen web stack (Servlet or Reactive).
The example below is for Tomcat with the spring-boot-starter-web (Servlet stack):
@Componentpublic class MyTomcatWebServerCustomizer implements WebServerFactoryCustomizer<TomcatServletWebServerFactory> {
@Override public void customize(TomcatServletWebServerFactory factory) { // customize the factory here }}
In addition Spring Boot provides:
306
Server Servlet stack Reactive stack
Tomcat TomcatServletWebServerFactory TomcatReactiveWebServerFactory
Jetty JettyServletWebServerFactory JettyReactiveWebServerFactory
Undertow UndertowServletWebServerFactory UndertowReactiveWebServerFactory
Reactor N/A NettyReactiveWebServerFactory
Once you’ve got access to a WebServerFactory, you can often add customizers to it to configurespecific parts, like connectors, server resources, or the server itself - all using server-specific APIs.
As a last resort, you can also declare your own WebServerFactory component, which will overridethe one provided by Spring Boot. In this case, you can’t rely on configuration properties in theserver namespace anymore.
9.3.10. Add a Servlet, Filter, or Listener to an Application
In a servlet stack application, i.e. with the spring-boot-starter-web, there are two ways to addServlet, Filter, ServletContextListener, and the other listeners supported by the Servlet API to yourapplication:
• Add a Servlet, Filter, or Listener by Using a Spring Bean
• Add Servlets, Filters, and Listeners by Using Classpath Scanning
Add a Servlet, Filter, or Listener by Using a Spring Bean
To add a Servlet, Filter, or Servlet *Listener by using a Spring bean, you must provide a @Beandefinition for it. Doing so can be very useful when you want to inject configuration ordependencies. However, you must be very careful that they do not cause eager initialization of toomany other beans, because they have to be installed in the container very early in the applicationlifecycle. (For example, it is not a good idea to have them depend on your DataSource or JPAconfiguration.) You can work around such restrictions by initializing the beans lazily when firstused instead of on initialization.
In the case of Filters and Servlets, you can also add mappings and init parameters by adding aFilterRegistrationBean or a ServletRegistrationBean instead of or in addition to the underlyingcomponent.
If no dispatcherType is specified on a filter registration, REQUEST is used. This alignswith the Servlet Specification’s default dispatcher type.
Like any other Spring bean, you can define the order of Servlet filter beans; please make sure tocheck the “Registering Servlets, Filters, and Listeners as Spring Beans” section.
Disable Registration of a Servlet or Filter
As described earlier, any Servlet or Filter beans are registered with the servlet containerautomatically. To disable registration of a particular Filter or Servlet bean, create a registrationbean for it and mark it as disabled, as shown in the following example:
307

@Beanpublic FilterRegistrationBean registration(MyFilter filter) { FilterRegistrationBean registration = new FilterRegistrationBean(filter); registration.setEnabled(false); return registration;}
Add Servlets, Filters, and Listeners by Using Classpath Scanning
@WebServlet, @WebFilter, and @WebListener annotated classes can be automatically registered with anembedded servlet container by annotating a @Configuration class with @ServletComponentScan andspecifying the package(s) containing the components that you want to register. By default,@ServletComponentScan scans from the package of the annotated class.
9.3.11. Configure Access Logging
Access logs can be configured for Tomcat, Undertow, and Jetty through their respectivenamespaces.
For instance, the following settings log access on Tomcat with a custom pattern.
server.tomcat.basedir=my-tomcatserver.tomcat.accesslog.enabled=trueserver.tomcat.accesslog.pattern=%t %a "%r" %s (%D ms)
The default location for logs is a logs directory relative to the Tomcat basedirectory. By default, the logs directory is a temporary directory, so you may wantto fix Tomcat’s base directory or use an absolute path for the logs. In the precedingexample, the logs are available in my-tomcat/logs relative to the working directoryof the application.
Access logging for Undertow can be configured in a similar fashion, as shown in the followingexample:
server.undertow.accesslog.enabled=trueserver.undertow.accesslog.pattern=%t %a "%r" %s (%D ms)
Logs are stored in a logs directory relative to the working directory of the application. You cancustomize this location by setting the server.undertow.accesslog.dir property.
Finally, access logging for Jetty can also be configured as follows:
server.jetty.accesslog.enabled=trueserver.jetty.accesslog.filename=/var/log/jetty-access.log
308

By default, logs are redirected to System.err. For more details, see the Jetty documentation.
9.3.12. Running Behind a Front-end Proxy Server
If your application is running behind a proxy, a load-balancer or in the cloud, the requestinformation (like the host, port, scheme…) might change along the way. Your application may berunning on 10.10.10.10:8080, but HTTP clients should only see example.org.
RFC7239 "Forwarded Headers" defines the Forwarded HTTP header; proxies can use this header toprovide information about the original request. You can configure your application to read thoseheaders and automatically use that information when creating links and sending them to clients inHTTP 302 responses, JSON documents or HTML pages. There are also non-standard headers, like X-Forwarded-Host, X-Forwarded-Port, X-Forwarded-Proto, X-Forwarded-Ssl, and X-Forwarded-Prefix.
If the proxy adds the commonly used X-Forwarded-For and X-Forwarded-Proto headers, settingserver.forward-headers-strategy to NATIVE is enough to support those. With this option, the Webservers themselves natively support this feature; you can check their specific documentation tolearn about specific behavior.
If this is not enough, Spring Framework provides a ForwardedHeaderFilter. You can register it as aServlet Filter in your application by setting server.forward-headers-strategy is set to FRAMEWORK.
If your application runs in Cloud Foundry or Heroku, the server.forward-headers-strategy property defaults to NATIVE. In all other instances, it defaults to NONE.
Customize Tomcat’s Proxy Configuration
If you use Tomcat, you can additionally configure the names of the headers used to carry“forwarded” information, as shown in the following example:
server.tomcat.remote-ip-header=x-your-remote-ip-headerserver.tomcat.protocol-header=x-your-protocol-header
Tomcat is also configured with a default regular expression that matches internal proxies that areto be trusted. By default, IP addresses in 10/8, 192.168/16, 169.254/16 and 127/8 are trusted. You cancustomize the valve’s configuration by adding an entry to application.properties, as shown in thefollowing example:
server.tomcat.internal-proxies=192\\.168\\.\\d{1,3}\\.\\d{1,3}
The double backslashes are required only when you use a properties file forconfiguration. If you use YAML, single backslashes are sufficient, and a valueequivalent to that shown in the preceding example would be192\.168\.\d{1,3}\.\d{1,3}.
309

You can trust all proxies by setting the internal-proxies to empty (but do not do soin production).
You can take complete control of the configuration of Tomcat’s RemoteIpValve by switching theautomatic one off (to do so, set server.forward-headers-strategy=NONE) and adding a new valveinstance in a TomcatServletWebServerFactory bean.
9.3.13. Enable Multiple Connectors with Tomcat
You can add an org.apache.catalina.connector.Connector to the TomcatServletWebServerFactory,which can allow multiple connectors, including HTTP and HTTPS connectors, as shown in thefollowing example:
@Beanpublic ServletWebServerFactory servletContainer() { TomcatServletWebServerFactory tomcat = new TomcatServletWebServerFactory(); tomcat.addAdditionalTomcatConnectors(createSslConnector()); return tomcat;}
private Connector createSslConnector() { Connector connector = new Connector("org.apache.coyote.http11.Http11NioProtocol"); Http11NioProtocol protocol = (Http11NioProtocol) connector.getProtocolHandler(); try { File keystore = new ClassPathResource("keystore").getFile(); File truststore = new ClassPathResource("keystore").getFile(); connector.setScheme("https"); connector.setSecure(true); connector.setPort(8443); protocol.setSSLEnabled(true); protocol.setKeystoreFile(keystore.getAbsolutePath()); protocol.setKeystorePass("changeit"); protocol.setTruststoreFile(truststore.getAbsolutePath()); protocol.setTruststorePass("changeit"); protocol.setKeyAlias("apitester"); return connector; } catch (IOException ex) { throw new IllegalStateException("can't access keystore: [" + keystore + "] or truststore: [" + truststore + "]", ex); }}
9.3.14. Use Tomcat’s LegacyCookieProcessor
By default, the embedded Tomcat used by Spring Boot does not support "Version 0" of the Cookieformat, so you may see the following error:
310

java.lang.IllegalArgumentException: An invalid character [32] was present in theCookie value
If at all possible, you should consider updating your code to only store values compliant with laterCookie specifications. If, however, you cannot change the way that cookies are written, you caninstead configure Tomcat to use a LegacyCookieProcessor. To switch to the LegacyCookieProcessor,use an WebServerFactoryCustomizer bean that adds a TomcatContextCustomizer, as shown in thefollowing example:
@Beanpublic WebServerFactoryCustomizer<TomcatServletWebServerFactory>cookieProcessorCustomizer() { return (factory) -> factory .addContextCustomizers((context) -> context.setCookieProcessor(newLegacyCookieProcessor()));}
9.3.15. Enable Tomcat’s MBean Registry
Embedded Tomcat’s MBean registry is disabled by default. This minimizes Tomcat’s memoryfootprint. If you want to use Tomcat’s MBeans, for example so that they can be used to exposemetrics via Micrometer, you must use the server.tomcat.mbeanregistry.enabled property to do so, asshown in the following example:
server.tomcat.mbeanregistry.enabled=true
9.3.16. Enable Multiple Listeners with Undertow
Add an UndertowBuilderCustomizer to the UndertowServletWebServerFactory and add a listener to theBuilder, as shown in the following example:
@Beanpublic UndertowServletWebServerFactory servletWebServerFactory() { UndertowServletWebServerFactory factory = new UndertowServletWebServerFactory(); factory.addBuilderCustomizers(new UndertowBuilderCustomizer() {
@Override public void customize(Builder builder) { builder.addHttpListener(8080, "0.0.0.0"); }
}); return factory;}
311
9.3.17. Create WebSocket Endpoints Using @ServerEndpoint
If you want to use @ServerEndpoint in a Spring Boot application that used an embedded container,you must declare a single ServerEndpointExporter @Bean, as shown in the following example:
@Beanpublic ServerEndpointExporter serverEndpointExporter() { return new ServerEndpointExporter();}
The bean shown in the preceding example registers any @ServerEndpoint annotated beans with theunderlying WebSocket container. When deployed to a standalone servlet container, this role isperformed by a servlet container initializer, and the ServerEndpointExporter bean is not required.
9.4. Spring MVCSpring Boot has a number of starters that include Spring MVC. Note that some starters include adependency on Spring MVC rather than include it directly. This section answers common questionsabout Spring MVC and Spring Boot.
9.4.1. Write a JSON REST Service
Any Spring @RestController in a Spring Boot application should render JSON response by default aslong as Jackson2 is on the classpath, as shown in the following example:
@RestControllerpublic class MyController {
@RequestMapping("/thing") public MyThing thing() { return new MyThing(); }
}
As long as MyThing can be serialized by Jackson2 (true for a normal POJO or Groovy object), thenlocalhost:8080/thing serves a JSON representation of it by default. Note that, in a browser, youmight sometimes see XML responses, because browsers tend to send accept headers that preferXML.
9.4.2. Write an XML REST Service
If you have the Jackson XML extension (jackson-dataformat-xml) on the classpath, you can use it torender XML responses. The previous example that we used for JSON would work. To use theJackson XML renderer, add the following dependency to your project:
312
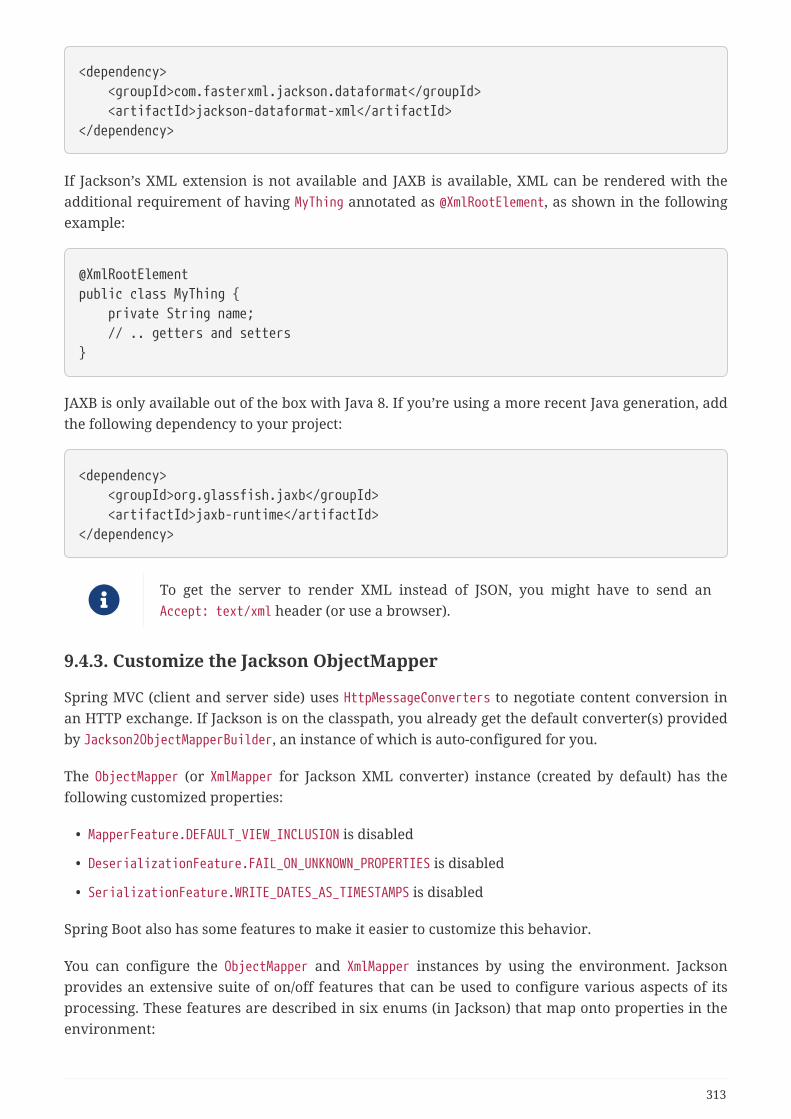
<dependency> <groupId>com.fasterxml.jackson.dataformat</groupId> <artifactId>jackson-dataformat-xml</artifactId></dependency>
If Jackson’s XML extension is not available and JAXB is available, XML can be rendered with theadditional requirement of having MyThing annotated as @XmlRootElement, as shown in the followingexample:
@XmlRootElementpublic class MyThing { private String name; // .. getters and setters}
JAXB is only available out of the box with Java 8. If you’re using a more recent Java generation, addthe following dependency to your project:
<dependency> <groupId>org.glassfish.jaxb</groupId> <artifactId>jaxb-runtime</artifactId></dependency>
To get the server to render XML instead of JSON, you might have to send anAccept: text/xml header (or use a browser).
9.4.3. Customize the Jackson ObjectMapper
Spring MVC (client and server side) uses HttpMessageConverters to negotiate content conversion inan HTTP exchange. If Jackson is on the classpath, you already get the default converter(s) providedby Jackson2ObjectMapperBuilder, an instance of which is auto-configured for you.
The ObjectMapper (or XmlMapper for Jackson XML converter) instance (created by default) has thefollowing customized properties:
• MapperFeature.DEFAULT_VIEW_INCLUSION is disabled
• DeserializationFeature.FAIL_ON_UNKNOWN_PROPERTIES is disabled
• SerializationFeature.WRITE_DATES_AS_TIMESTAMPS is disabled
Spring Boot also has some features to make it easier to customize this behavior.
You can configure the ObjectMapper and XmlMapper instances by using the environment. Jacksonprovides an extensive suite of on/off features that can be used to configure various aspects of itsprocessing. These features are described in six enums (in Jackson) that map onto properties in theenvironment:
313
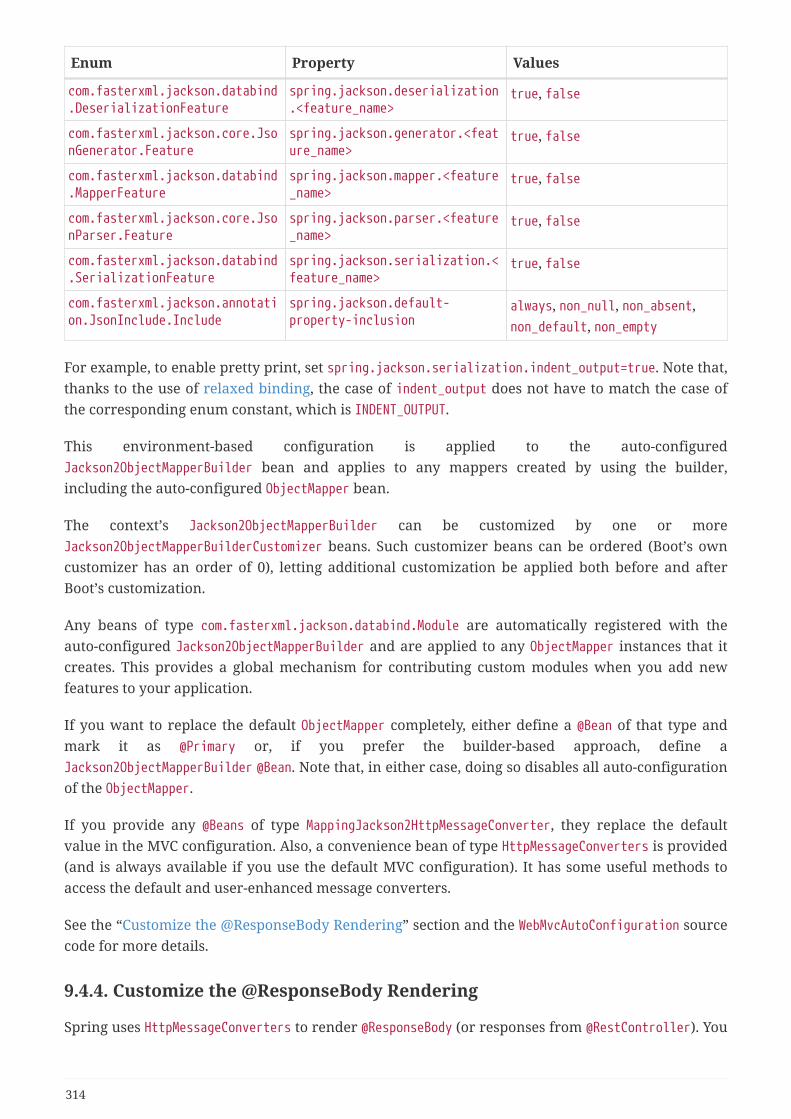
Enum Property Values
com.fasterxml.jackson.databind.DeserializationFeature
spring.jackson.deserialization.<feature_name>
true, false
com.fasterxml.jackson.core.JsonGenerator.Feature
spring.jackson.generator.<feature_name>
true, false
com.fasterxml.jackson.databind.MapperFeature
spring.jackson.mapper.<feature_name>
true, false
com.fasterxml.jackson.core.JsonParser.Feature
spring.jackson.parser.<feature_name>
true, false
com.fasterxml.jackson.databind.SerializationFeature
spring.jackson.serialization.<feature_name>
true, false
com.fasterxml.jackson.annotation.JsonInclude.Include
spring.jackson.default-property-inclusion
always, non_null, non_absent,non_default, non_empty
For example, to enable pretty print, set spring.jackson.serialization.indent_output=true. Note that,thanks to the use of relaxed binding, the case of indent_output does not have to match the case ofthe corresponding enum constant, which is INDENT_OUTPUT.
This environment-based configuration is applied to the auto-configuredJackson2ObjectMapperBuilder bean and applies to any mappers created by using the builder,including the auto-configured ObjectMapper bean.
The context’s Jackson2ObjectMapperBuilder can be customized by one or moreJackson2ObjectMapperBuilderCustomizer beans. Such customizer beans can be ordered (Boot’s owncustomizer has an order of 0), letting additional customization be applied both before and afterBoot’s customization.
Any beans of type com.fasterxml.jackson.databind.Module are automatically registered with theauto-configured Jackson2ObjectMapperBuilder and are applied to any ObjectMapper instances that itcreates. This provides a global mechanism for contributing custom modules when you add newfeatures to your application.
If you want to replace the default ObjectMapper completely, either define a @Bean of that type andmark it as @Primary or, if you prefer the builder-based approach, define aJackson2ObjectMapperBuilder @Bean. Note that, in either case, doing so disables all auto-configurationof the ObjectMapper.
If you provide any @Beans of type MappingJackson2HttpMessageConverter, they replace the defaultvalue in the MVC configuration. Also, a convenience bean of type HttpMessageConverters is provided(and is always available if you use the default MVC configuration). It has some useful methods toaccess the default and user-enhanced message converters.
See the “Customize the @ResponseBody Rendering” section and the WebMvcAutoConfiguration sourcecode for more details.
9.4.4. Customize the @ResponseBody Rendering
Spring uses HttpMessageConverters to render @ResponseBody (or responses from @RestController). You
314
can contribute additional converters by adding beans of the appropriate type in a Spring Bootcontext. If a bean you add is of a type that would have been included by default anyway (such asMappingJackson2HttpMessageConverter for JSON conversions), it replaces the default value. Aconvenience bean of type HttpMessageConverters is provided and is always available if you use thedefault MVC configuration. It has some useful methods to access the default and user-enhancedmessage converters (For example, it can be useful if you want to manually inject them into acustom RestTemplate).
As in normal MVC usage, any WebMvcConfigurer beans that you provide can also contributeconverters by overriding the configureMessageConverters method. However, unlike with normalMVC, you can supply only additional converters that you need (because Spring Boot uses the samemechanism to contribute its defaults). Finally, if you opt out of the Spring Boot default MVCconfiguration by providing your own @EnableWebMvc configuration, you can take control completelyand do everything manually by using getMessageConverters from WebMvcConfigurationSupport.
See the WebMvcAutoConfiguration source code for more details.
9.4.5. Handling Multipart File Uploads
Spring Boot embraces the Servlet 3 javax.servlet.http.Part API to support uploading files. Bydefault, Spring Boot configures Spring MVC with a maximum size of 1MB per file and a maximumof 10MB of file data in a single request. You may override these values, the location to whichintermediate data is stored (for example, to the /tmp directory), and the threshold past which data isflushed to disk by using the properties exposed in the MultipartProperties class. For example, if youwant to specify that files be unlimited, set the spring.servlet.multipart.max-file-size property to-1.
The multipart support is helpful when you want to receive multipart encoded file data as a@RequestParam-annotated parameter of type MultipartFile in a Spring MVC controller handlermethod.
See the MultipartAutoConfiguration source for more details.
It is recommended to use the container’s built-in support for multipart uploadsrather than introducing an additional dependency such as Apache Commons FileUpload.
9.4.6. Switch Off the Spring MVC DispatcherServlet
By default, all content is served from the root of your application (/). If you would rather map to adifferent path, you can configure one as follows:
spring.mvc.servlet.path=/acme
If you have additional servlets you can declare a @Bean of type Servlet or ServletRegistrationBeanfor each and Spring Boot will register them transparently to the container. Because servlets areregistered that way, they can be mapped to a sub-context of the DispatcherServlet without invokingit.
315

Configuring the DispatcherServlet yourself is unusual but if you really need to do it, a @Bean of typeDispatcherServletPath must be provided as well to provide the path of your customDispatcherServlet.
9.4.7. Switch off the Default MVC Configuration
The easiest way to take complete control over MVC configuration is to provide your own@Configuration with the @EnableWebMvc annotation. Doing so leaves all MVC configuration in yourhands.
9.4.8. Customize ViewResolvers
A ViewResolver is a core component of Spring MVC, translating view names in @Controller to actualView implementations. Note that ViewResolvers are mainly used in UI applications, rather thanREST-style services (a View is not used to render a @ResponseBody). There are many implementationsof ViewResolver to choose from, and Spring on its own is not opinionated about which ones youshould use. Spring Boot, on the other hand, installs one or two for you, depending on what it findson the classpath and in the application context. The DispatcherServlet uses all the resolvers it findsin the application context, trying each one in turn until it gets a result. If you add your own, youhave to be aware of the order and in which position your resolver is added.
WebMvcAutoConfiguration adds the following ViewResolvers to your context:
• An InternalResourceViewResolver named ‘defaultViewResolver’. This one locates physicalresources that can be rendered by using the DefaultServlet (including static resources and JSPpages, if you use those). It applies a prefix and a suffix to the view name and then looks for aphysical resource with that path in the servlet context (the defaults are both empty but areaccessible for external configuration through spring.mvc.view.prefix andspring.mvc.view.suffix). You can override it by providing a bean of the same type.
• A BeanNameViewResolver named ‘beanNameViewResolver’. This is a useful member of the viewresolver chain and picks up any beans with the same name as the View being resolved. It shouldnot be necessary to override or replace it.
• A ContentNegotiatingViewResolver named ‘viewResolver’ is added only if there are actuallybeans of type View present. This is a ‘master’ resolver, delegating to all the others andattempting to find a match to the ‘Accept’ HTTP header sent by the client. There is a useful blogabout ContentNegotiatingViewResolver that you might like to study to learn more, and you mightalso look at the source code for detail. You can switch off the auto-configuredContentNegotiatingViewResolver by defining a bean named ‘viewResolver’.
• If you use Thymeleaf, you also have a ThymeleafViewResolver named ‘thymeleafViewResolver’. Itlooks for resources by surrounding the view name with a prefix and suffix. The prefix isspring.thymeleaf.prefix, and the suffix is spring.thymeleaf.suffix. The values of the prefix andsuffix default to ‘classpath:/templates/’ and ‘.html’, respectively. You can overrideThymeleafViewResolver by providing a bean of the same name.
• If you use FreeMarker, you also have a FreeMarkerViewResolver named‘freeMarkerViewResolver’. It looks for resources in a loader path (which is externalized tospring.freemarker.templateLoaderPath and has a default value of ‘classpath:/templates/’) bysurrounding the view name with a prefix and a suffix. The prefix is externalized to
316
spring.freemarker.prefix, and the suffix is externalized to spring.freemarker.suffix. The defaultvalues of the prefix and suffix are empty and ‘.ftlh’, respectively. You can overrideFreeMarkerViewResolver by providing a bean of the same name.
• If you use Groovy templates (actually, if groovy-templates is on your classpath), you also have aGroovyMarkupViewResolver named ‘groovyMarkupViewResolver’. It looks for resources in aloader path by surrounding the view name with a prefix and suffix (externalized tospring.groovy.template.prefix and spring.groovy.template.suffix). The prefix and suffix havedefault values of ‘classpath:/templates/’ and ‘.tpl’, respectively. You can overrideGroovyMarkupViewResolver by providing a bean of the same name.
• If you use Mustache, you also have a MustacheViewResolver named ‘mustacheViewResolver’. Itlooks for resources by surrounding the view name with a prefix and suffix. The prefix isspring.mustache.prefix, and the suffix is spring.mustache.suffix. The values of the prefix andsuffix default to ‘classpath:/templates/’ and ‘.mustache’, respectively. You can overrideMustacheViewResolver by providing a bean of the same name.
For more detail, see the following sections:
• WebMvcAutoConfiguration
• ThymeleafAutoConfiguration
• FreeMarkerAutoConfiguration
• GroovyTemplateAutoConfiguration
9.5. Testing With Spring SecuritySpring Security provides support for running tests as a specific user. For example, the test in thesnippet below will run with an authenticated user that has the ADMIN role.
@Test@WithMockUser(roles="ADMIN")public void requestProtectedUrlWithUser() throws Exception { mvc .perform(get("/")) ...}
Spring Security provides comprehensive integration with Spring MVC Test and this can also be usedwhen testing controllers using the @WebMvcTest slice and MockMvc.
For additional details on Spring Security’s testing support, refer to Spring Security’s referencedocumentation).
9.6. Jersey
9.6.1. Secure Jersey endpoints with Spring Security
Spring Security can be used to secure a Jersey-based web application in much the same way as it
317
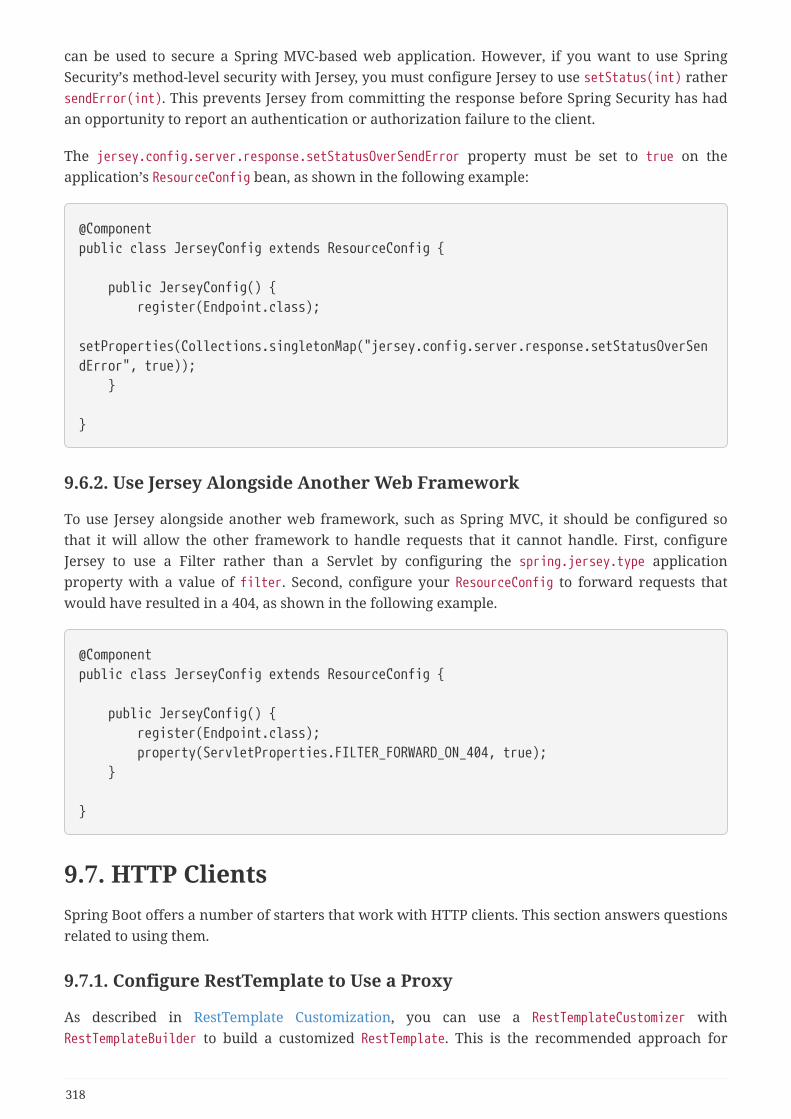
can be used to secure a Spring MVC-based web application. However, if you want to use SpringSecurity’s method-level security with Jersey, you must configure Jersey to use setStatus(int) rathersendError(int). This prevents Jersey from committing the response before Spring Security has hadan opportunity to report an authentication or authorization failure to the client.
The jersey.config.server.response.setStatusOverSendError property must be set to true on theapplication’s ResourceConfig bean, as shown in the following example:
@Componentpublic class JerseyConfig extends ResourceConfig {
public JerseyConfig() { register(Endpoint.class); setProperties(Collections.singletonMap("jersey.config.server.response.setStatusOverSendError", true)); }
}
9.6.2. Use Jersey Alongside Another Web Framework
To use Jersey alongside another web framework, such as Spring MVC, it should be configured sothat it will allow the other framework to handle requests that it cannot handle. First, configureJersey to use a Filter rather than a Servlet by configuring the spring.jersey.type applicationproperty with a value of filter. Second, configure your ResourceConfig to forward requests thatwould have resulted in a 404, as shown in the following example.
@Componentpublic class JerseyConfig extends ResourceConfig {
public JerseyConfig() { register(Endpoint.class); property(ServletProperties.FILTER_FORWARD_ON_404, true); }
}
9.7. HTTP ClientsSpring Boot offers a number of starters that work with HTTP clients. This section answers questionsrelated to using them.
9.7.1. Configure RestTemplate to Use a Proxy
As described in RestTemplate Customization, you can use a RestTemplateCustomizer withRestTemplateBuilder to build a customized RestTemplate. This is the recommended approach for
318
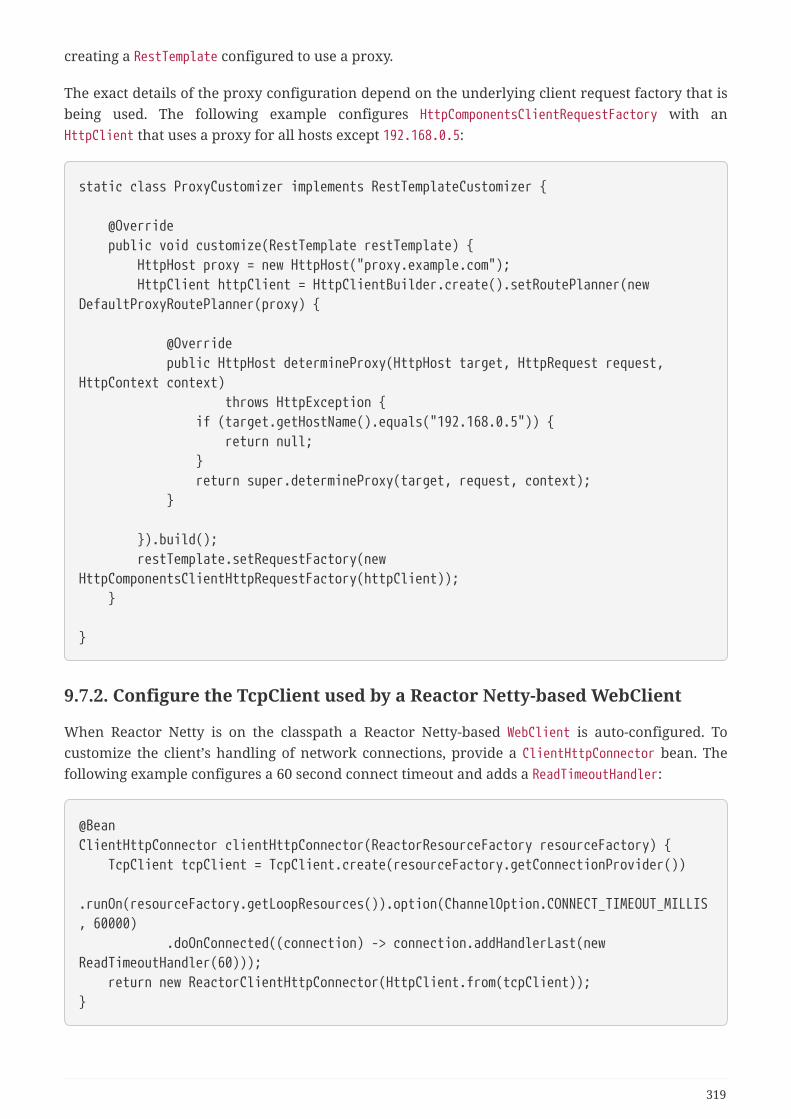
creating a RestTemplate configured to use a proxy.
The exact details of the proxy configuration depend on the underlying client request factory that isbeing used. The following example configures HttpComponentsClientRequestFactory with anHttpClient that uses a proxy for all hosts except 192.168.0.5:
static class ProxyCustomizer implements RestTemplateCustomizer {
@Override public void customize(RestTemplate restTemplate) { HttpHost proxy = new HttpHost("proxy.example.com"); HttpClient httpClient = HttpClientBuilder.create().setRoutePlanner(newDefaultProxyRoutePlanner(proxy) {
@Override public HttpHost determineProxy(HttpHost target, HttpRequest request,HttpContext context) throws HttpException { if (target.getHostName().equals("192.168.0.5")) { return null; } return super.determineProxy(target, request, context); }
}).build(); restTemplate.setRequestFactory(newHttpComponentsClientHttpRequestFactory(httpClient)); }
}
9.7.2. Configure the TcpClient used by a Reactor Netty-based WebClient
When Reactor Netty is on the classpath a Reactor Netty-based WebClient is auto-configured. Tocustomize the client’s handling of network connections, provide a ClientHttpConnector bean. Thefollowing example configures a 60 second connect timeout and adds a ReadTimeoutHandler:
@BeanClientHttpConnector clientHttpConnector(ReactorResourceFactory resourceFactory) { TcpClient tcpClient = TcpClient.create(resourceFactory.getConnectionProvider()) .runOn(resourceFactory.getLoopResources()).option(ChannelOption.CONNECT_TIMEOUT_MILLIS, 60000) .doOnConnected((connection) -> connection.addHandlerLast(newReadTimeoutHandler(60))); return new ReactorClientHttpConnector(HttpClient.from(tcpClient));}
319
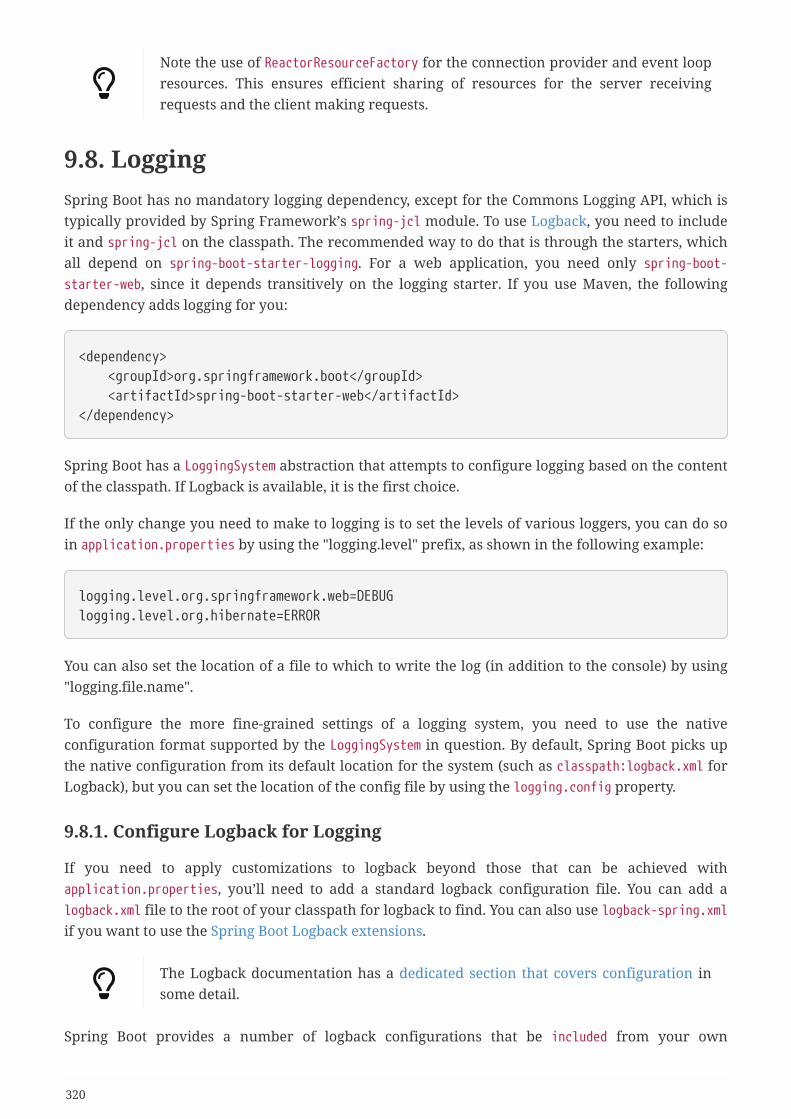
Note the use of ReactorResourceFactory for the connection provider and event loopresources. This ensures efficient sharing of resources for the server receivingrequests and the client making requests.
9.8. LoggingSpring Boot has no mandatory logging dependency, except for the Commons Logging API, which istypically provided by Spring Framework’s spring-jcl module. To use Logback, you need to includeit and spring-jcl on the classpath. The recommended way to do that is through the starters, whichall depend on spring-boot-starter-logging. For a web application, you need only spring-boot-starter-web, since it depends transitively on the logging starter. If you use Maven, the followingdependency adds logging for you:
<dependency> <groupId>org.springframework.boot</groupId> <artifactId>spring-boot-starter-web</artifactId></dependency>
Spring Boot has a LoggingSystem abstraction that attempts to configure logging based on the contentof the classpath. If Logback is available, it is the first choice.
If the only change you need to make to logging is to set the levels of various loggers, you can do soin application.properties by using the "logging.level" prefix, as shown in the following example:
logging.level.org.springframework.web=DEBUGlogging.level.org.hibernate=ERROR
You can also set the location of a file to which to write the log (in addition to the console) by using"logging.file.name".
To configure the more fine-grained settings of a logging system, you need to use the nativeconfiguration format supported by the LoggingSystem in question. By default, Spring Boot picks upthe native configuration from its default location for the system (such as classpath:logback.xml forLogback), but you can set the location of the config file by using the logging.config property.
9.8.1. Configure Logback for Logging
If you need to apply customizations to logback beyond those that can be achieved withapplication.properties, you’ll need to add a standard logback configuration file. You can add alogback.xml file to the root of your classpath for logback to find. You can also use logback-spring.xmlif you want to use the Spring Boot Logback extensions.
The Logback documentation has a dedicated section that covers configuration insome detail.
Spring Boot provides a number of logback configurations that be included from your own
320

configuration. These includes are designed to allow certain common Spring Boot conventions to bere-applied.
The following files are provided under org/springframework/boot/logging/logback/:
• defaults.xml - Provides conversion rules, pattern properties and common logger configurations.
• console-appender.xml - Adds a ConsoleAppender using the CONSOLE_LOG_PATTERN.
• file-appender.xml - Adds a RollingFileAppender using the FILE_LOG_PATTERN andROLLING_FILE_NAME_PATTERN with appropriate settings.
In addition, a legacy base.xml file is provided for compatibility with earlier versions of Spring Boot.
A typical custom logback.xml file would look something like this:
<?xml version="1.0" encoding="UTF-8"?><configuration> <include resource="org/springframework/boot/logging/logback/defaults.xml"/> <include resource="org/springframework/boot/logging/logback/console-appender.xml"/> <root level="INFO"> <appender-ref ref="CONSOLE" /> </root> <logger name="org.springframework.web" level="DEBUG"/></configuration>
Your logback configuration file can also make use of System properties that the LoggingSystem takescare of creating for you:
• ${PID}: The current process ID.
• ${LOG_FILE}: Whether logging.file.name was set in Boot’s external configuration.
• ${LOG_PATH}: Whether logging.file.path (representing a directory for log files to live in) was setin Boot’s external configuration.
• ${LOG_EXCEPTION_CONVERSION_WORD}: Whether logging.exception-conversion-word was set in Boot’sexternal configuration.
• ${ROLLING_FILE_NAME_PATTERN}: Whether logging.pattern.rolling-file-name was set in Boot’sexternal configuration.
Spring Boot also provides some nice ANSI color terminal output on a console (but not in a log file)by using a custom Logback converter. See the CONSOLE_LOG_PATTERN in the defaults.xml configurationfor an example.
If Groovy is on the classpath, you should be able to configure Logback with logback.groovy as well.If present, this setting is given preference.
Spring extensions are not supported with Groovy configuration. Any logback-spring.groovy files will not be detected.
321

Configure Logback for File-only Output
If you want to disable console logging and write output only to a file, you need a custom logback-spring.xml that imports file-appender.xml but not console-appender.xml, as shown in the followingexample:
<?xml version="1.0" encoding="UTF-8"?><configuration> <include resource="org/springframework/boot/logging/logback/defaults.xml" /> <property name="LOG_FILE" value="${LOG_FILE:-${LOG_PATH:-${LOG_TEMP:-${java.io.tmpdir:-/tmp}}/}spring.log}"/> <include resource="org/springframework/boot/logging/logback/file-appender.xml" /> <root level="INFO"> <appender-ref ref="FILE" /> </root></configuration>
You also need to add logging.file.name to your application.properties, as shown in the followingexample:
logging.file.name=myapplication.log
9.8.2. Configure Log4j for Logging
Spring Boot supports Log4j 2 for logging configuration if it is on the classpath. If you use the startersfor assembling dependencies, you have to exclude Logback and then include log4j 2 instead. If youdo not use the starters, you need to provide (at least) spring-jcl in addition to Log4j 2.
The recommended path is through the starters, even though it requires some jiggling. The followingexample shows how to set up the starters in Maven:
322

<dependency> <groupId>org.springframework.boot</groupId> <artifactId>spring-boot-starter-web</artifactId></dependency><dependency> <groupId>org.springframework.boot</groupId> <artifactId>spring-boot-starter</artifactId> <exclusions> <exclusion> <groupId>org.springframework.boot</groupId> <artifactId>spring-boot-starter-logging</artifactId> </exclusion> </exclusions></dependency><dependency> <groupId>org.springframework.boot</groupId> <artifactId>spring-boot-starter-log4j2</artifactId></dependency>
And the following example shows one way to set up the starters in Gradle:
dependencies { compile 'org.springframework.boot:spring-boot-starter-web' }
configurations.all { resolutionStrategy.dependencySubstitution.all { dependency -> if (dependency.requested instanceof ModuleComponentSelector &&dependency.requested.module == 'spring-boot-starter-logging') { dependency.useTarget("org.springframework.boot:spring-boot-starter-log4j2:$dependency.requested.version", 'Use Log4j2 instead of Logback') } } }}
The Log4j starters gather together the dependencies for common loggingrequirements (such as having Tomcat use java.util.logging but configuring theoutput using Log4j 2).
To ensure that debug logging performed using java.util.logging is routed intoLog4j 2, configure its JDK logging adapter by setting the java.util.logging.managersystem property to org.apache.logging.log4j.jul.LogManager.
Use YAML or JSON to Configure Log4j 2
In addition to its default XML configuration format, Log4j 2 also supports YAML and JSON
323

configuration files. To configure Log4j 2 to use an alternative configuration file format, add theappropriate dependencies to the classpath and name your configuration files to match your chosenfile format, as shown in the following example:
Format Dependencies File names
YAML com.fasterxml.jackson.core:jackson-databind +com.fasterxml.jackson.dataformat:jackson-dataformat-yaml
log4j2.yaml +log4j2.yml
JSON com.fasterxml.jackson.core:jackson-databind log4j2.json +log4j2.jsn
9.9. Data AccessSpring Boot includes a number of starters for working with data sources. This section answersquestions related to doing so.
9.9.1. Configure a Custom DataSource
To configure your own DataSource, define a @Bean of that type in your configuration. Spring Bootreuses your DataSource anywhere one is required, including database initialization. If you need toexternalize some settings, you can bind your DataSource to the environment (see “Third-partyConfiguration”).
The following example shows how to define a data source in a bean:
@Bean@ConfigurationProperties(prefix="app.datasource")public DataSource dataSource() { return new FancyDataSource();}
The following example shows how to define a data source by setting properties:
app.datasource.url=jdbc:h2:mem:mydbapp.datasource.username=saapp.datasource.pool-size=30
Assuming that your FancyDataSource has regular JavaBean properties for the URL, the username,and the pool size, these settings are bound automatically before the DataSource is made available toother components. The regular database initialization also happens (so the relevant sub-set ofspring.datasource.* can still be used with your custom configuration).
Spring Boot also provides a utility builder class, called DataSourceBuilder, that can be used to createone of the standard data sources (if it is on the classpath). The builder can detect the one to usebased on what’s available on the classpath. It also auto-detects the driver based on the JDBC URL.
324

The following example shows how to create a data source by using a DataSourceBuilder:
@Bean@ConfigurationProperties("app.datasource")public DataSource dataSource() { return DataSourceBuilder.create().build();}
To run an app with that DataSource, all you need is the connection information. Pool-specificsettings can also be provided. Check the implementation that is going to be used at runtime formore details.
The following example shows how to define a JDBC data source by setting properties:
app.datasource.url=jdbc:mysql://localhost/testapp.datasource.username=dbuserapp.datasource.password=dbpassapp.datasource.pool-size=30
However, there is a catch. Because the actual type of the connection pool is not exposed, no keys aregenerated in the metadata for your custom DataSource and no completion is available in your IDE(because the DataSource interface exposes no properties). Also, if you happen to have Hikari on theclasspath, this basic setup does not work, because Hikari has no url property (but does have ajdbcUrl property). In that case, you must rewrite your configuration as follows:
app.datasource.jdbc-url=jdbc:mysql://localhost/testapp.datasource.username=dbuserapp.datasource.password=dbpassapp.datasource.maximum-pool-size=30
You can fix that by forcing the connection pool to use and return a dedicated implementationrather than DataSource. You cannot change the implementation at runtime, but the list of optionswill be explicit.
The following example shows how create a HikariDataSource with DataSourceBuilder:
@Bean@ConfigurationProperties("app.datasource")public HikariDataSource dataSource() { return DataSourceBuilder.create().type(HikariDataSource.class).build();}
You can even go further by leveraging what DataSourceProperties does for you — that is, byproviding a default embedded database with a sensible username and password if no URL isprovided. You can easily initialize a DataSourceBuilder from the state of any DataSourcePropertiesobject, so you could also inject the DataSource that Spring Boot creates automatically. However, that
325

would split your configuration into two namespaces: url, username, password, type, and driver onspring.datasource and the rest on your custom namespace (app.datasource). To avoid that, you canredefine a custom DataSourceProperties on your custom namespace, as shown in the followingexample:
@Bean@Primary@ConfigurationProperties("app.datasource")public DataSourceProperties dataSourceProperties() { return new DataSourceProperties();}
@Bean@ConfigurationProperties("app.datasource.configuration")public HikariDataSource dataSource(DataSourceProperties properties) { returnproperties.initializeDataSourceBuilder().type(HikariDataSource.class).build();}
This setup puts you in sync with what Spring Boot does for you by default, except that a dedicatedconnection pool is chosen (in code) and its settings are exposed in the app.datasource.configurationsub namespace. Because DataSourceProperties is taking care of the url/jdbcUrl translation for you,you can configure it as follows:
app.datasource.url=jdbc:mysql://localhost/testapp.datasource.username=dbuserapp.datasource.password=dbpassapp.datasource.configuration.maximum-pool-size=30
Spring Boot will expose Hikari-specific settings to spring.datasource.hikari. Thisexample uses a more generic configuration sub namespace as the example doesnot support multiple datasource implementations.
Because your custom configuration chooses to go with Hikari, app.datasource.typehas no effect. In practice, the builder is initialized with whatever value you mightset there and then overridden by the call to .type().
See “Configure a DataSource” in the “Spring Boot features” section and theDataSourceAutoConfiguration class for more details.
9.9.2. Configure Two DataSources
If you need to configure multiple data sources, you can apply the same tricks that are described inthe previous section. You must, however, mark one of the DataSource instances as @Primary, becausevarious auto-configurations down the road expect to be able to get one by type.
If you create your own DataSource, the auto-configuration backs off. In the following example, we
326

provide the exact same feature set as the auto-configuration provides on the primary data source:
@Bean@Primary@ConfigurationProperties("app.datasource.first")public DataSourceProperties firstDataSourceProperties() { return new DataSourceProperties();}
@Bean@Primary@ConfigurationProperties("app.datasource.first.configuration")public HikariDataSource firstDataSource() { returnfirstDataSourceProperties().initializeDataSourceBuilder().type(HikariDataSource.class).build();}
@Bean@ConfigurationProperties("app.datasource.second")public BasicDataSource secondDataSource() { return DataSourceBuilder.create().type(BasicDataSource.class).build();}
firstDataSourceProperties has to be flagged as @Primary so that the databaseinitializer feature uses your copy (if you use the initializer).
Both data sources are also bound for advanced customizations. For instance, you could configurethem as follows:
app.datasource.first.url=jdbc:mysql://localhost/firstapp.datasource.first.username=dbuserapp.datasource.first.password=dbpassapp.datasource.first.configuration.maximum-pool-size=30
app.datasource.second.url=jdbc:mysql://localhost/secondapp.datasource.second.username=dbuserapp.datasource.second.password=dbpassapp.datasource.second.max-total=30
You can apply the same concept to the secondary DataSource as well, as shown in the followingexample:
327
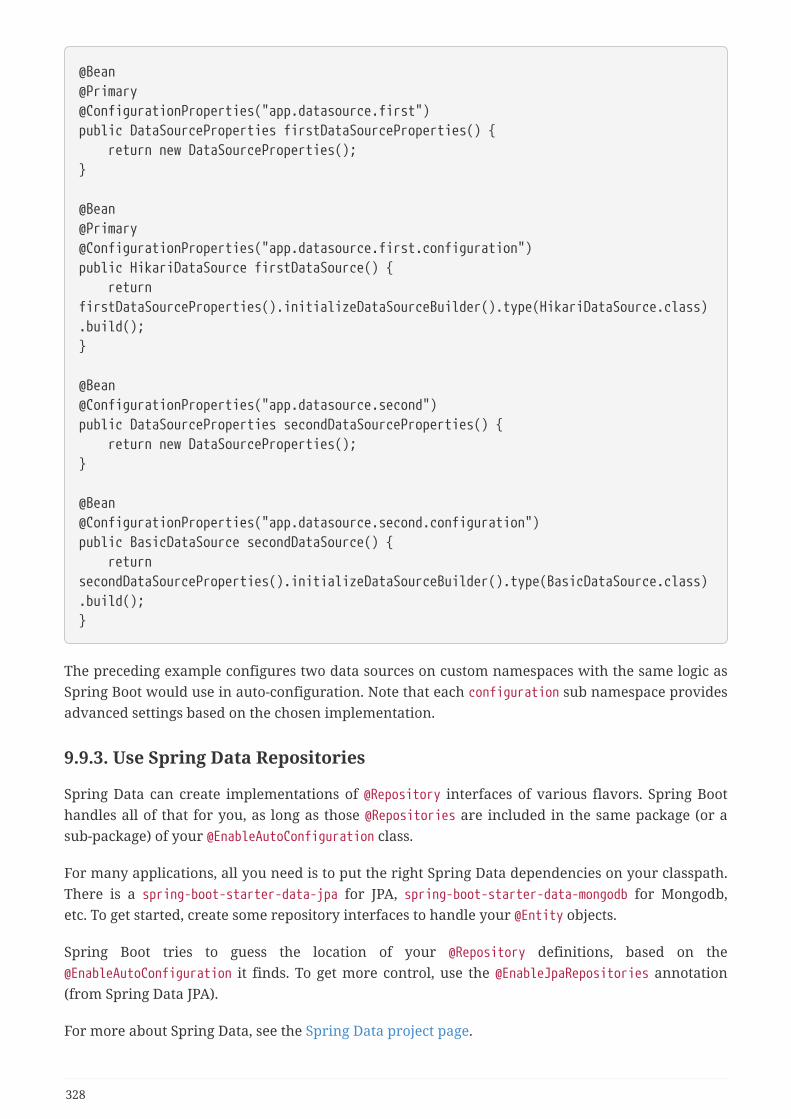
@Bean@Primary@ConfigurationProperties("app.datasource.first")public DataSourceProperties firstDataSourceProperties() { return new DataSourceProperties();}
@Bean@Primary@ConfigurationProperties("app.datasource.first.configuration")public HikariDataSource firstDataSource() { returnfirstDataSourceProperties().initializeDataSourceBuilder().type(HikariDataSource.class).build();}
@Bean@ConfigurationProperties("app.datasource.second")public DataSourceProperties secondDataSourceProperties() { return new DataSourceProperties();}
@Bean@ConfigurationProperties("app.datasource.second.configuration")public BasicDataSource secondDataSource() { returnsecondDataSourceProperties().initializeDataSourceBuilder().type(BasicDataSource.class).build();}
The preceding example configures two data sources on custom namespaces with the same logic asSpring Boot would use in auto-configuration. Note that each configuration sub namespace providesadvanced settings based on the chosen implementation.
9.9.3. Use Spring Data Repositories
Spring Data can create implementations of @Repository interfaces of various flavors. Spring Boothandles all of that for you, as long as those @Repositories are included in the same package (or asub-package) of your @EnableAutoConfiguration class.
For many applications, all you need is to put the right Spring Data dependencies on your classpath.There is a spring-boot-starter-data-jpa for JPA, spring-boot-starter-data-mongodb for Mongodb,etc. To get started, create some repository interfaces to handle your @Entity objects.
Spring Boot tries to guess the location of your @Repository definitions, based on the@EnableAutoConfiguration it finds. To get more control, use the @EnableJpaRepositories annotation(from Spring Data JPA).
For more about Spring Data, see the Spring Data project page.
328

9.9.4. Separate @Entity Definitions from Spring Configuration
Spring Boot tries to guess the location of your @Entity definitions, based on the@EnableAutoConfiguration it finds. To get more control, you can use the @EntityScan annotation, asshown in the following example:
@Configuration(proxyBeanMethods = false)@EnableAutoConfiguration@EntityScan(basePackageClasses=City.class)public class Application {
//...
}
9.9.5. Configure JPA Properties
Spring Data JPA already provides some vendor-independent configuration options (such as thosefor SQL logging), and Spring Boot exposes those options and a few more for Hibernate as externalconfiguration properties. Some of them are automatically detected according to the context so youshould not have to set them.
The spring.jpa.hibernate.ddl-auto is a special case, because, depending on runtime conditions, ithas different defaults. If an embedded database is used and no schema manager (such as Liquibaseor Flyway) is handling the DataSource, it defaults to create-drop. In all other cases, it defaults to none.
The dialect to use is detected by the JPA provider. If you prefer to set the dialect yourself, set thespring.jpa.database-platform property.
The most common options to set are shown in the following example:
spring.jpa.hibernate.naming.physical-strategy=com.example.MyPhysicalNamingStrategyspring.jpa.show-sql=true
In addition, all properties in spring.jpa.properties.* are passed through as normal JPA properties(with the prefix stripped) when the local EntityManagerFactory is created.
You need to ensure that names defined under spring.jpa.properties.* exactlymatch those expected by your JPA provider. Spring Boot will not attempt any kindof relaxed binding for these entries.
For example, if you want to configure Hibernate’s batch size you must usespring.jpa.properties.hibernate.jdbc.batch_size. If you use other forms, such asbatchSize or batch-size, Hibernate will not apply the setting.
329
If you need to apply advanced customization to Hibernate properties, considerregistering a HibernatePropertiesCustomizer bean that will be invoked prior tocreating the EntityManagerFactory. This takes precedence to anything that isapplied by the auto-configuration.
9.9.6. Configure Hibernate Naming Strategy
Hibernate uses two different naming strategies to map names from the object model to thecorresponding database names. The fully qualified class name of the physical and the implicitstrategy implementations can be configured by setting the spring.jpa.hibernate.naming.physical-strategy and spring.jpa.hibernate.naming.implicit-strategy properties, respectively. Alternatively,if ImplicitNamingStrategy or PhysicalNamingStrategy beans are available in the application context,Hibernate will be automatically configured to use them.
By default, Spring Boot configures the physical naming strategy with SpringPhysicalNamingStrategy.This implementation provides the same table structure as Hibernate 4: all dots are replaced byunderscores and camel casing is replaced by underscores as well. By default, all table names aregenerated in lower case, but it is possible to override that flag if your schema requires it.
For example, a TelephoneNumber entity is mapped to the telephone_number table.
If you prefer to use Hibernate 5’s default instead, set the following property:
spring.jpa.hibernate.naming.physical-strategy=org.hibernate.boot.model.naming.PhysicalNamingStrategyStandardImpl
Alternatively, you can configure the following bean:
@Beanpublic PhysicalNamingStrategy physicalNamingStrategy() { return new PhysicalNamingStrategyStandardImpl();}
See HibernateJpaAutoConfiguration and JpaBaseConfiguration for more details.
9.9.7. Configure Hibernate Second-Level Caching
Hibernate second-level cache can be configured for a range of cache providers. Rather thanconfiguring Hibernate to lookup the cache provider again, it is better to provide the one that isavailable in the context whenever possible.
To do this with JCache, first make sure that org.hibernate:hibernate-jcache is available on theclasspath. Then, add a HibernatePropertiesCustomizer bean as shown in the following example:
330
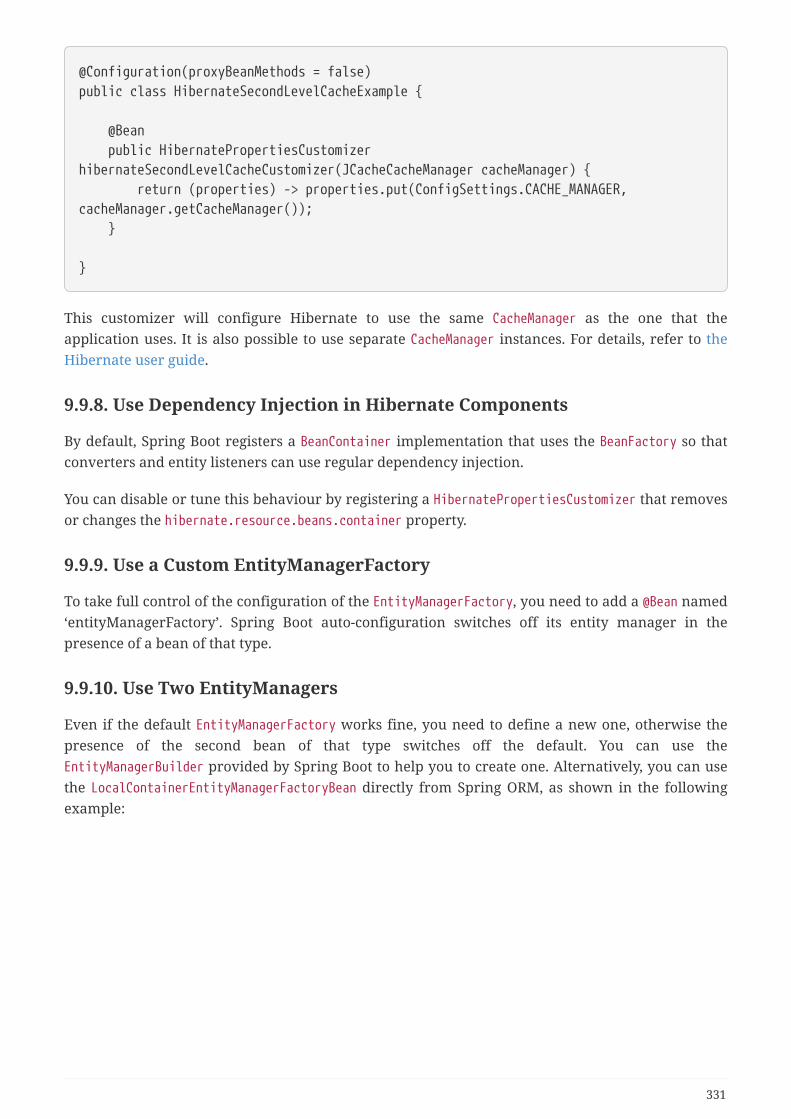
@Configuration(proxyBeanMethods = false)public class HibernateSecondLevelCacheExample {
@Bean public HibernatePropertiesCustomizerhibernateSecondLevelCacheCustomizer(JCacheCacheManager cacheManager) { return (properties) -> properties.put(ConfigSettings.CACHE_MANAGER,cacheManager.getCacheManager()); }
}
This customizer will configure Hibernate to use the same CacheManager as the one that theapplication uses. It is also possible to use separate CacheManager instances. For details, refer to theHibernate user guide.
9.9.8. Use Dependency Injection in Hibernate Components
By default, Spring Boot registers a BeanContainer implementation that uses the BeanFactory so thatconverters and entity listeners can use regular dependency injection.
You can disable or tune this behaviour by registering a HibernatePropertiesCustomizer that removesor changes the hibernate.resource.beans.container property.
9.9.9. Use a Custom EntityManagerFactory
To take full control of the configuration of the EntityManagerFactory, you need to add a @Bean named‘entityManagerFactory’. Spring Boot auto-configuration switches off its entity manager in thepresence of a bean of that type.
9.9.10. Use Two EntityManagers
Even if the default EntityManagerFactory works fine, you need to define a new one, otherwise thepresence of the second bean of that type switches off the default. You can use theEntityManagerBuilder provided by Spring Boot to help you to create one. Alternatively, you can usethe LocalContainerEntityManagerFactoryBean directly from Spring ORM, as shown in the followingexample:
331

// add two data sources configured as above
@Beanpublic LocalContainerEntityManagerFactoryBean customerEntityManagerFactory( EntityManagerFactoryBuilder builder) { return builder .dataSource(customerDataSource()) .packages(Customer.class) .persistenceUnit("customers") .build();}
@Beanpublic LocalContainerEntityManagerFactoryBean orderEntityManagerFactory( EntityManagerFactoryBuilder builder) { return builder .dataSource(orderDataSource()) .packages(Order.class) .persistenceUnit("orders") .build();}
When you create a bean for LocalContainerEntityManagerFactoryBean yourself, anycustomization that was applied during the creation of the auto-configuredLocalContainerEntityManagerFactoryBean is lost. For example, in case of Hibernate,any properties under the spring.jpa.hibernate prefix will not be automaticallyapplied to your LocalContainerEntityManagerFactoryBean. If you were relying onthese properties for configuring things like the naming strategy or the DDL mode,you will need to explicitly configure that when creating theLocalContainerEntityManagerFactoryBean bean. On the other hand, properties thatget applied to the auto-configured EntityManagerFactoryBuilder, which arespecified via spring.jpa.properties, will automatically be applied, provided youuse the auto-configured EntityManagerFactoryBuilder to build theLocalContainerEntityManagerFactoryBean bean.
The configuration above almost works on its own. To complete the picture, you need to configureTransactionManagers for the two EntityManagers as well. If you mark one of them as @Primary, it couldbe picked up by the default JpaTransactionManager in Spring Boot. The other would have to beexplicitly injected into a new instance. Alternatively, you might be able to use a JTA transactionmanager that spans both.
If you use Spring Data, you need to configure @EnableJpaRepositories accordingly, as shown in thefollowing example:
332

@Configuration(proxyBeanMethods = false)@EnableJpaRepositories(basePackageClasses = Customer.class, entityManagerFactoryRef = "customerEntityManagerFactory")public class CustomerConfiguration { ...}
@Configuration(proxyBeanMethods = false)@EnableJpaRepositories(basePackageClasses = Order.class, entityManagerFactoryRef = "orderEntityManagerFactory")public class OrderConfiguration { ...}
9.9.11. Use a Traditional persistence.xml File
Spring Boot will not search for or use a META-INF/persistence.xml by default. If you prefer to use atraditional persistence.xml, you need to define your own @Bean of typeLocalEntityManagerFactoryBean (with an ID of ‘entityManagerFactory’) and set the persistence unitname there.
See JpaBaseConfiguration for the default settings.
9.9.12. Use Spring Data JPA and Mongo Repositories
Spring Data JPA and Spring Data Mongo can both automatically create Repository implementationsfor you. If they are both present on the classpath, you might have to do some extra configuration totell Spring Boot which repositories to create. The most explicit way to do that is to use the standardSpring Data @EnableJpaRepositories and @EnableMongoRepositories annotations and provide thelocation of your Repository interfaces.
There are also flags (spring.data.*.repositories.enabled and spring.data.*.repositories.type) thatyou can use to switch the auto-configured repositories on and off in external configuration. Doingso is useful, for instance, in case you want to switch off the Mongo repositories and still use theauto-configured MongoTemplate.
The same obstacle and the same features exist for other auto-configured Spring Data repositorytypes (Elasticsearch, Solr, and others). To work with them, change the names of the annotations andflags accordingly.
9.9.13. Customize Spring Data’s Web Support
Spring Data provides web support that simplifies the use of Spring Data repositories in a webapplication. Spring Boot provides properties in the spring.data.web namespace for customizing itsconfiguration. Note that if you are using Spring Data REST, you must use the properties in thespring.data.rest namespace instead.
333

9.9.14. Expose Spring Data Repositories as REST Endpoint
Spring Data REST can expose the Repository implementations as REST endpoints for you, providedSpring MVC has been enabled for the application.
Spring Boot exposes a set of useful properties (from the spring.data.rest namespace) thatcustomize the RepositoryRestConfiguration. If you need to provide additional customization, youshould use a RepositoryRestConfigurer bean.
If you do not specify any order on your custom RepositoryRestConfigurer, it runsafter the one Spring Boot uses internally. If you need to specify an order, makesure it is higher than 0.
9.9.15. Configure a Component that is Used by JPA
If you want to configure a component that JPA uses, then you need to ensure that the component isinitialized before JPA. When the component is auto-configured, Spring Boot takes care of this foryou. For example, when Flyway is auto-configured, Hibernate is configured to depend upon Flywayso that Flyway has a chance to initialize the database before Hibernate tries to use it.
If you are configuring a component yourself, you can use anEntityManagerFactoryDependsOnPostProcessor subclass as a convenient way of setting up thenecessary dependencies. For example, if you use Hibernate Search with Elasticsearch as its indexmanager, any EntityManagerFactory beans must be configured to depend on the elasticsearchClientbean, as shown in the following example:
/** * {@link EntityManagerFactoryDependsOnPostProcessor} that ensures that * {@link EntityManagerFactory} beans depend on the {@code elasticsearchClient} bean. */@Componentstatic class ElasticsearchEntityManagerFactoryDependsOnPostProcessor extends EntityManagerFactoryDependsOnPostProcessor {
ElasticsearchEntityManagerFactoryDependsOnPostProcessor() { super("elasticsearchClient"); }
}
9.9.16. Configure jOOQ with Two DataSources
If you need to use jOOQ with multiple data sources, you should create your own DSLContext for eachone. Refer to JooqAutoConfiguration for more details.
In particular, JooqExceptionTranslator and SpringTransactionProvider can bereused to provide similar features to what the auto-configuration does with asingle DataSource.
334
9.10. Database InitializationAn SQL database can be initialized in different ways depending on what your stack is. Of course,you can also do it manually, provided the database is a separate process. It is recommended to use asingle mechanism for schema generation.
9.10.1. Initialize a Database Using JPA
JPA has features for DDL generation, and these can be set up to run on startup against the database.This is controlled through two external properties:
• spring.jpa.generate-ddl (boolean) switches the feature on and off and is vendor independent.
• spring.jpa.hibernate.ddl-auto (enum) is a Hibernate feature that controls the behavior in amore fine-grained way. This feature is described in more detail later in this guide.
9.10.2. Initialize a Database Using Hibernate
You can set spring.jpa.hibernate.ddl-auto explicitly and the standard Hibernate property valuesare none, validate, update, create, and create-drop. Spring Boot chooses a default value for youbased on whether it thinks your database is embedded. It defaults to create-drop if no schemamanager has been detected or none in all other cases. An embedded database is detected by lookingat the Connection type. hsqldb, h2, and derby are embedded, and others are not. Be careful whenswitching from in-memory to a ‘real’ database that you do not make assumptions about theexistence of the tables and data in the new platform. You either have to set ddl-auto explicitly oruse one of the other mechanisms to initialize the database.
You can output the schema creation by enabling the org.hibernate.SQL logger. Thisis done for you automatically if you enable the debug mode.
In addition, a file named import.sql in the root of the classpath is executed on startup if Hibernatecreates the schema from scratch (that is, if the ddl-auto property is set to create or create-drop).This can be useful for demos and for testing if you are careful but is probably not something youwant to be on the classpath in production. It is a Hibernate feature (and has nothing to do withSpring).
9.10.3. Initialize a Database
Spring Boot can automatically create the schema (DDL scripts) of your DataSource and initialize it(DML scripts). It loads SQL from the standard root classpath locations: schema.sql and data.sql,respectively. In addition, Spring Boot processes the schema-${platform}.sql and data-
${platform}.sql files (if present), where platform is the value of spring.datasource.platform. Thisallows you to switch to database-specific scripts if necessary. For example, you might choose to set itto the vendor name of the database (hsqldb, h2, oracle, mysql, postgresql, and so on).
335

When only basic SQL scripts are used, Spring Boot automatically creates theschema of an embedded DataSource. This behavior can be customized by using thespring.datasource.initialization-mode property. For instance, if you want toalways initialize the DataSource regardless of its type:
spring.datasource.initialization-mode=always
In a JPA-based app, you can choose to let Hibernate create the schema or useschema.sql, but you cannot do both. Make sure to disablespring.jpa.hibernate.ddl-auto if you use schema.sql.
spring.jpa.hibernate.ddl-auto=none
If you are using a Higher-level Database Migration Tool, like Flyway or Liquibase,you should use them alone to create and initialize the schema. Using the basicschema.sql and data.sql scripts alongside Flyway or Liquibase is not recommendedand support will be removed in a future release.
By default, Spring Boot enables the fail-fast feature of the Spring JDBC initializer. This means that, ifthe scripts cause exceptions, the application fails to start. You can tune that behavior by settingspring.datasource.continue-on-error.
9.10.4. Initialize a Spring Batch Database
If you use Spring Batch, it comes pre-packaged with SQL initialization scripts for most populardatabase platforms. Spring Boot can detect your database type and execute those scripts on startup.If you use an embedded database, this happens by default. You can also enable it for any databasetype, as shown in the following example:
spring.batch.initialize-schema=always
You can also switch off the initialization explicitly by setting spring.batch.initialize-schema=never.
9.10.5. Use a Higher-level Database Migration Tool
Spring Boot supports two higher-level migration tools: Flyway and Liquibase.
Execute Flyway Database Migrations on Startup
To automatically run Flyway database migrations on startup, add the org.flywaydb:flyway-core toyour classpath.
Typically, migrations are scripts in the form V<VERSION>__<NAME>.sql (with <VERSION> an underscore-separated version, such as ‘1’ or ‘2_1’). By default, they are in a folder called classpath:db/migration,but you can modify that location by setting spring.flyway.locations. This is a comma-separated listof one or more classpath: or filesystem: locations. For example, the following configuration would
336

search for scripts in both the default classpath location and the /opt/migration directory:
spring.flyway.locations=classpath:db/migration,filesystem:/opt/migration
You can also add a special {vendor} placeholder to use vendor-specific scripts. Assume thefollowing:
spring.flyway.locations=classpath:db/migration/{vendor}
Rather than using db/migration, the preceding configuration sets the folder to use according to thetype of the database (such as db/migration/mysql for MySQL). The list of supported databases isavailable in DatabaseDriver.
Migrations can also be written in Java. Flyway will be auto-configured with any beans thatimplement JavaMigration.
FlywayProperties provides most of Flyway’s settings and a small set of additional properties that canbe used to disable the migrations or switch off the location checking. If you need more control overthe configuration, consider registering a FlywayConfigurationCustomizer bean.
Spring Boot calls Flyway.migrate() to perform the database migration. If you would like morecontrol, provide a @Bean that implements FlywayMigrationStrategy.
Flyway supports SQL and Java callbacks. To use SQL-based callbacks, place the callback scripts inthe classpath:db/migration folder. To use Java-based callbacks, create one or more beans thatimplement Callback. Any such beans are automatically registered with Flyway. They can be orderedby using @Order or by implementing Ordered. Beans that implement the deprecated FlywayCallbackinterface can also be detected, however they cannot be used alongside Callback beans.
By default, Flyway autowires the (@Primary) DataSource in your context and uses that for migrations.If you like to use a different DataSource, you can create one and mark its @Bean as @FlywayDataSource.If you do so and want two data sources, remember to create another one and mark it as @Primary.Alternatively, you can use Flyway’s native DataSource by setting spring.flyway.[url,user,password]in external properties. Setting either spring.flyway.url or spring.flyway.user is sufficient to causeFlyway to use its own DataSource. If any of the three properties has not been set, the value of itsequivalent spring.datasource property will be used.
You can also use Flyway to provide data for specific scenarios. For example, you can place test-specific migrations in src/test/resources and they are run only when your application starts fortesting. Also, you can use profile-specific configuration to customize spring.flyway.locations so thatcertain migrations run only when a particular profile is active. For example, in application-dev.properties, you might specify the following setting:
spring.flyway.locations=classpath:/db/migration,classpath:/dev/db/migration
With that setup, migrations in dev/db/migration run only when the dev profile is active.
337

Execute Liquibase Database Migrations on Startup
To automatically run Liquibase database migrations on startup, add the org.liquibase:liquibase-core to your classpath.
When you add the org.liquibase:liquibase-core to your classpath, databasemigrations run by default for both during application startup and before your testsrun. This behavior can be customized by using the spring.liquibase.enabledproperty, setting different values in the main and test configurations. It is notpossible to use two different ways to initialize the database (e.g. Liquibase forapplication startup, JPA for test runs).
By default, the master change log is read from db/changelog/db.changelog-master.yaml, but you canchange the location by setting spring.liquibase.change-log. In addition to YAML, Liquibase alsosupports JSON, XML, and SQL change log formats.
By default, Liquibase autowires the (@Primary) DataSource in your context and uses that formigrations. If you need to use a different DataSource, you can create one and mark its @Bean as@LiquibaseDataSource. If you do so and you want two data sources, remember to create another oneand mark it as @Primary. Alternatively, you can use Liquibase’s native DataSource by settingspring.liquibase.[url,user,password] in external properties. Setting either spring.liquibase.url orspring.liquibase.user is sufficient to cause Liquibase to use its own DataSource. If any of the threeproperties has not been set, the value of its equivalent spring.datasource property will be used.
See LiquibaseProperties for details about available settings such as contexts, the default schema,and others.
9.11. MessagingSpring Boot offers a number of starters that include messaging. This section answers questions thatarise from using messaging with Spring Boot.
9.11.1. Disable Transacted JMS Session
If your JMS broker does not support transacted sessions, you have to disable the support oftransactions altogether. If you create your own JmsListenerContainerFactory, there is nothing to do,since, by default it cannot be transacted. If you want to use theDefaultJmsListenerContainerFactoryConfigurer to reuse Spring Boot’s default, you can disabletransacted sessions, as follows:
338
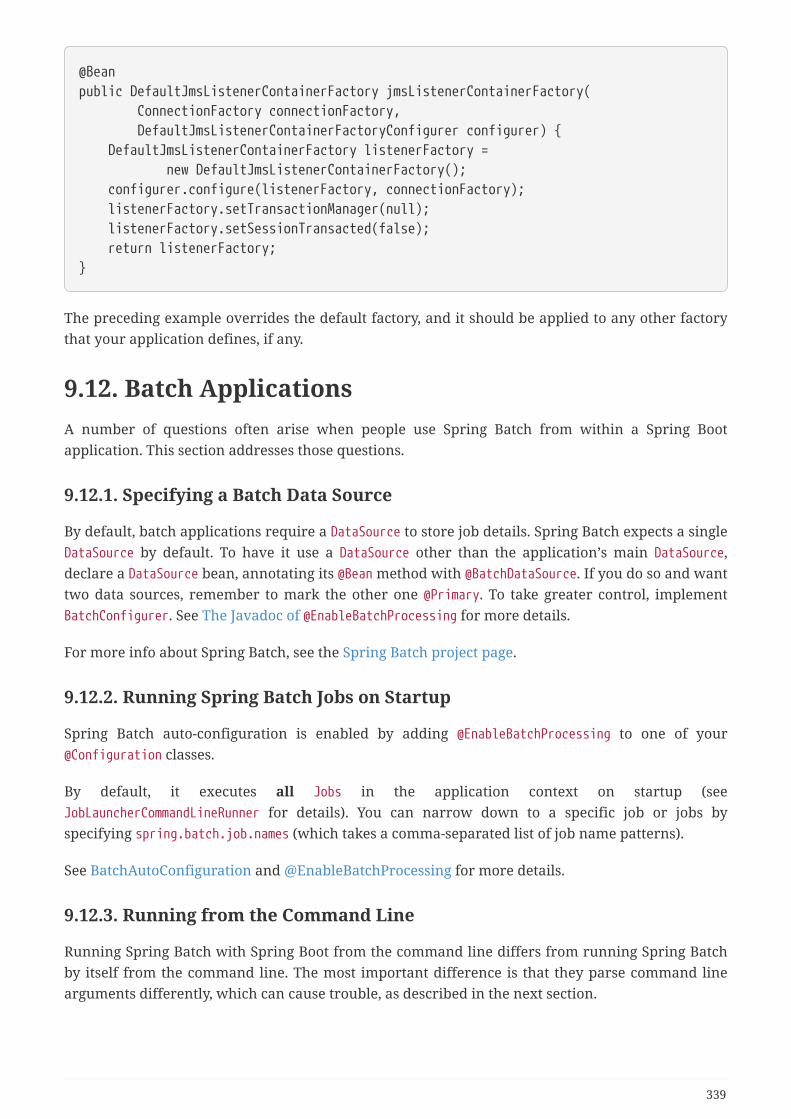
@Beanpublic DefaultJmsListenerContainerFactory jmsListenerContainerFactory( ConnectionFactory connectionFactory, DefaultJmsListenerContainerFactoryConfigurer configurer) { DefaultJmsListenerContainerFactory listenerFactory = new DefaultJmsListenerContainerFactory(); configurer.configure(listenerFactory, connectionFactory); listenerFactory.setTransactionManager(null); listenerFactory.setSessionTransacted(false); return listenerFactory;}
The preceding example overrides the default factory, and it should be applied to any other factorythat your application defines, if any.
9.12. Batch ApplicationsA number of questions often arise when people use Spring Batch from within a Spring Bootapplication. This section addresses those questions.
9.12.1. Specifying a Batch Data Source
By default, batch applications require a DataSource to store job details. Spring Batch expects a singleDataSource by default. To have it use a DataSource other than the application’s main DataSource,declare a DataSource bean, annotating its @Bean method with @BatchDataSource. If you do so and wanttwo data sources, remember to mark the other one @Primary. To take greater control, implementBatchConfigurer. See The Javadoc of @EnableBatchProcessing for more details.
For more info about Spring Batch, see the Spring Batch project page.
9.12.2. Running Spring Batch Jobs on Startup
Spring Batch auto-configuration is enabled by adding @EnableBatchProcessing to one of your@Configuration classes.
By default, it executes all Jobs in the application context on startup (seeJobLauncherCommandLineRunner for details). You can narrow down to a specific job or jobs byspecifying spring.batch.job.names (which takes a comma-separated list of job name patterns).
See BatchAutoConfiguration and @EnableBatchProcessing for more details.
9.12.3. Running from the Command Line
Running Spring Batch with Spring Boot from the command line differs from running Spring Batchby itself from the command line. The most important difference is that they parse command linearguments differently, which can cause trouble, as described in the next section.
339
Passing Command-line Arguments
Spring Boot converts any command line argument starting with -- to a property to add to theEnvironment, see accessing command line properties. This should not be used to pass arguments tobatch jobs. To specify batch arguments on the command line, use the regular format (i.e. without --), as shown in the following example:
$ java -jar myapp.jar someParameter=someValue anotherParameter=anotherValue
If you specify a property of the Environment on the command line, it impacts the arguments thatyour job uses as well. Consider the following command:
$ java -jar myapp.jar --server.port=7070 someParameter=someValue
This provides two arguments to the batch job: someParameter=someValue and -server.port=7070. Notethat the second argument is missing one hyphen as Spring Batch will remove the first - character ofa property if it is present.
9.12.4. Storing the Job Repository
Spring Batch requires a data store for the Job repository. If you use Spring Boot, you must use anactual database. Note that it can be an in-memory database, see Configuring a Job Repository.
9.13. ActuatorSpring Boot includes the Spring Boot Actuator. This section answers questions that often arise fromits use.
9.13.1. Change the HTTP Port or Address of the Actuator Endpoints
In a standalone application, the Actuator HTTP port defaults to the same as the main HTTP port. Tomake the application listen on a different port, set the external property: management.server.port. Tolisten on a completely different network address (such as when you have an internal network formanagement and an external one for user applications), you can also set management.server.addressto a valid IP address to which the server is able to bind.
For more detail, see the ManagementServerProperties source code and “Customizing the ManagementServer Port” in the “Production-ready features” section.
9.13.2. Customize the ‘whitelabel’ Error Page
Spring Boot installs a ‘whitelabel’ error page that you see in a browser client if you encounter aserver error (machine clients consuming JSON and other media types should see a sensibleresponse with the right error code).
340
Set server.error.whitelabel.enabled=false to switch the default error page off.Doing so restores the default of the servlet container that you are using. Note thatSpring Boot still tries to resolve the error view, so you should probably add yourown error page rather than disabling it completely.
Overriding the error page with your own depends on the templating technology that you use. Forexample, if you use Thymeleaf, you can add an error.html template. If you use FreeMarker, you canadd an error.ftlh template. In general, you need a View that resolves with a name of error or a@Controller that handles the /error path. Unless you replaced some of the default configuration,you should find a BeanNameViewResolver in your ApplicationContext, so a @Bean named error wouldbe one way of doing that. See ErrorMvcAutoConfiguration for more options.
See also the section on “Error Handling” for details of how to register handlers in the servletcontainer.
9.13.3. Sanitize Sensitive Values
Information returned by the env and configprops endpoints can be somewhat sensitive so keysmatching a certain pattern are sanitized by default (i.e. their values are replaced by ******).
The patterns to use can be customized using the management.endpoint.env.keys-to-sanitize andmanagement.endpoint.configprops.keys-to-sanitize respectively.
Spring Boot uses sensible defaults for such keys: any key ending with the word "password", "secret","key", "token", "vcap_services", "sun.java.command" is entirely sanitized. Additionally, any key thatholds the word credentials as part of the key is sanitized (configured as a regular expression, i.e.*credentials.*).
Furthermore, Spring Boot only sanitizes the sensitive portion of URIs for keys which end with "uri","uris", "address", or "addresses". The sensitive portion of the URI is identified using the format<scheme>://<username>:<password>@<host>:<port>/. For example, for the propertymyclient.uri=http://user1:password1@localhost:8081, the resulting sanitized value ishttp://user1:******@localhost:8081.
9.13.4. Map Health Indicators to Micrometer Metrics
Spring Boot health indicators return a Status type to indicate the overall system health. If you wantto monitor or alert on levels of health for a particular application, you can export these statuses asmetrics via Micrometer. By default, the status codes “up”, “down”, “out of service” and “unknown”are used by Spring Boot. To export these, you’ll need to convert these states to some set of numbersso that they can be used with a Micrometer Gauge.
The follow example shows one way to write such an exporter:
341

@Configurationpublic class HealthMetricsConfiguration {
public HealthMetricsConfiguration(MeterRegistry registry, HealthEndpointhealthEndpoint) { // This example presumes common tags (such as the app) are applied elsewhere Gauge.builder("health", healthEndpoint,this::getStatusCode).strongReference(true).register(registry); }
private int getStatusCode(HealthEndpoint health) { Status status = health.health().getStatus(); if (Status.UP.equals(status)) { return 3; } if (Status.OUT_OF_SERVICE.equals(status)) { return 2; } if (Status.DOWN.equals(status)) { return 1; } return 0; }
}
9.14. SecurityThis section addresses questions about security when working with Spring Boot, includingquestions that arise from using Spring Security with Spring Boot.
For more about Spring Security, see the Spring Security project page.
9.14.1. Switch off the Spring Boot Security Configuration
If you define a @Configuration with a WebSecurityConfigurerAdapter in your application, it switchesoff the default webapp security settings in Spring Boot.
9.14.2. Change the UserDetailsService and Add User Accounts
If you provide a @Bean of type AuthenticationManager, AuthenticationProvider, or UserDetailsService,the default @Bean for InMemoryUserDetailsManager is not created. This means you have the full featureset of Spring Security available (such as various authentication options).
The easiest way to add user accounts is to provide your own UserDetailsService bean.
342

9.14.3. Enable HTTPS When Running behind a Proxy Server
Ensuring that all your main endpoints are only available over HTTPS is an important chore for anyapplication. If you use Tomcat as a servlet container, then Spring Boot adds Tomcat’s ownRemoteIpValve automatically if it detects some environment settings, and you should be able to relyon the HttpServletRequest to report whether it is secure or not (even downstream of a proxy serverthat handles the real SSL termination). The standard behavior is determined by the presence orabsence of certain request headers (x-forwarded-for and x-forwarded-proto), whose names areconventional, so it should work with most front-end proxies. You can switch on the valve by addingsome entries to application.properties, as shown in the following example:
server.tomcat.remote-ip-header=x-forwarded-forserver.tomcat.protocol-header=x-forwarded-proto
(The presence of either of those properties switches on the valve. Alternatively, you can add theRemoteIpValve by adding a TomcatServletWebServerFactory bean.)
To configure Spring Security to require a secure channel for all (or some) requests, consider addingyour own WebSecurityConfigurerAdapter that adds the following HttpSecurity configuration:
@Configuration(proxyBeanMethods = false)public class SslWebSecurityConfigurerAdapter extends WebSecurityConfigurerAdapter {
@Override protected void configure(HttpSecurity http) throws Exception { // Customize the application security http.requiresChannel().anyRequest().requiresSecure(); }
}
9.15. Hot SwappingSpring Boot supports hot swapping. This section answers questions about how it works.
9.15.1. Reload Static Content
There are several options for hot reloading. The recommended approach is to use spring-boot-devtools, as it provides additional development-time features, such as support for fast applicationrestarts and LiveReload as well as sensible development-time configuration (such as templatecaching). Devtools works by monitoring the classpath for changes. This means that static resourcechanges must be "built" for the change to take effect. By default, this happens automatically inEclipse when you save your changes. In IntelliJ IDEA, the Make Project command triggers thenecessary build. Due to the default restart exclusions, changes to static resources do not trigger arestart of your application. They do, however, trigger a live reload.
Alternatively, running in an IDE (especially with debugging on) is a good way to do development
343
(all modern IDEs allow reloading of static resources and usually also allow hot-swapping of Javaclass changes).
Finally, the Maven and Gradle plugins can be configured (see the addResources property) to supportrunning from the command line with reloading of static files directly from source. You can use thatwith an external css/js compiler process if you are writing that code with higher-level tools.
9.15.2. Reload Templates without Restarting the Container
Most of the templating technologies supported by Spring Boot include a configuration option todisable caching (described later in this document). If you use the spring-boot-devtools module,these properties are automatically configured for you at development time.
Thymeleaf Templates
If you use Thymeleaf, set spring.thymeleaf.cache to false. See ThymeleafAutoConfiguration for otherThymeleaf customization options.
FreeMarker Templates
If you use FreeMarker, set spring.freemarker.cache to false. See FreeMarkerAutoConfiguration forother FreeMarker customization options.
Groovy Templates
If you use Groovy templates, set spring.groovy.template.cache to false. SeeGroovyTemplateAutoConfiguration for other Groovy customization options.
9.15.3. Fast Application Restarts
The spring-boot-devtools module includes support for automatic application restarts. While not asfast as technologies such as JRebel it is usually significantly faster than a “cold start”. You shouldprobably give it a try before investigating some of the more complex reload options discussed laterin this document.
For more details, see the Developer Tools section.
9.15.4. Reload Java Classes without Restarting the Container
Many modern IDEs (Eclipse, IDEA, and others) support hot swapping of bytecode. Consequently, ifyou make a change that does not affect class or method signatures, it should reload cleanly with noside effects.
9.16. BuildSpring Boot includes build plugins for Maven and Gradle. This section answers common questionsabout these plugins.
344
9.16.1. Generate Build Information
Both the Maven plugin and the Gradle plugin allow generating build information containing thecoordinates, name, and version of the project. The plugins can also be configured to add additionalproperties through configuration. When such a file is present, Spring Boot auto-configures aBuildProperties bean.
To generate build information with Maven, add an execution for the build-info goal, as shown inthe following example:
<build> <plugins> <plugin> <groupId>org.springframework.boot</groupId> <artifactId>spring-boot-maven-plugin</artifactId> <executions> <execution> <goals> <goal>build-info</goal> </goals> </execution> </executions> </plugin> </plugins></build>
See the Spring Boot Maven Plugin documentation for more details.
The following example does the same with Gradle:
springBoot { buildInfo()}
See the Spring Boot Gradle Plugin documentation for more details.
9.16.2. Generate Git Information
Both Maven and Gradle allow generating a git.properties file containing information about thestate of your git source code repository when the project was built.
For Maven users, the spring-boot-starter-parent POM includes a pre-configured plugin to generatea git.properties file. To use it, add the following declaration to your POM:
345

<build> <plugins> <plugin> <groupId>pl.project13.maven</groupId> <artifactId>git-commit-id-plugin</artifactId> </plugin> </plugins></build>
Gradle users can achieve the same result by using the gradle-git-properties plugin, as shown in thefollowing example:
plugins { id "com.gorylenko.gradle-git-properties" version "2.2.2"}
The commit time in git.properties is expected to match the following format:yyyy-MM-dd’T’HH:mm:ssZ. This is the default format for both plugins listed above.Using this format lets the time be parsed into a Date and its format, whenserialized to JSON, to be controlled by Jackson’s date serialization configurationsettings.
9.16.3. Customize Dependency Versions
If you use a Maven build that inherits directly or indirectly from spring-boot-dependencies (forinstance, spring-boot-starter-parent) but you want to override a specific third-party dependency,you can add appropriate <properties> elements. Browse the spring-boot-dependencies POM for acomplete list of properties. For example, to pick a different slf4j version, you would add thefollowing property:
<properties> <slf4j.version>1.7.5<slf4j.version></properties>
Doing so only works if your Maven project inherits (directly or indirectly) fromspring-boot-dependencies. If you have added spring-boot-dependencies in your owndependencyManagement section with <scope>import</scope>, you have to redefine theartifact yourself instead of overriding the property.
Each Spring Boot release is designed and tested against this specific set of third-party dependencies. Overriding versions may cause compatibility issues.
To override dependency versions in Gradle, see this section of the Gradle plugin’s documentation.
346
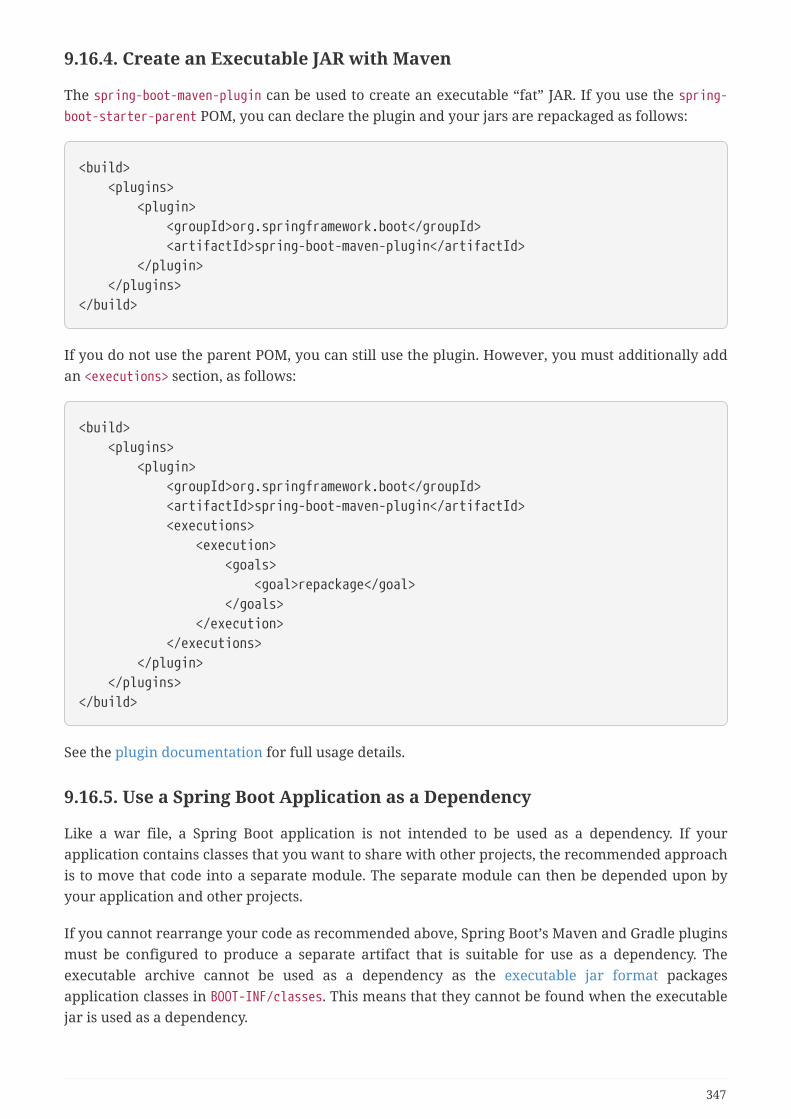
9.16.4. Create an Executable JAR with Maven
The spring-boot-maven-plugin can be used to create an executable “fat” JAR. If you use the spring-boot-starter-parent POM, you can declare the plugin and your jars are repackaged as follows:
<build> <plugins> <plugin> <groupId>org.springframework.boot</groupId> <artifactId>spring-boot-maven-plugin</artifactId> </plugin> </plugins></build>
If you do not use the parent POM, you can still use the plugin. However, you must additionally addan <executions> section, as follows:
<build> <plugins> <plugin> <groupId>org.springframework.boot</groupId> <artifactId>spring-boot-maven-plugin</artifactId> <executions> <execution> <goals> <goal>repackage</goal> </goals> </execution> </executions> </plugin> </plugins></build>
See the plugin documentation for full usage details.
9.16.5. Use a Spring Boot Application as a Dependency
Like a war file, a Spring Boot application is not intended to be used as a dependency. If yourapplication contains classes that you want to share with other projects, the recommended approachis to move that code into a separate module. The separate module can then be depended upon byyour application and other projects.
If you cannot rearrange your code as recommended above, Spring Boot’s Maven and Gradle pluginsmust be configured to produce a separate artifact that is suitable for use as a dependency. Theexecutable archive cannot be used as a dependency as the executable jar format packagesapplication classes in BOOT-INF/classes. This means that they cannot be found when the executablejar is used as a dependency.
347
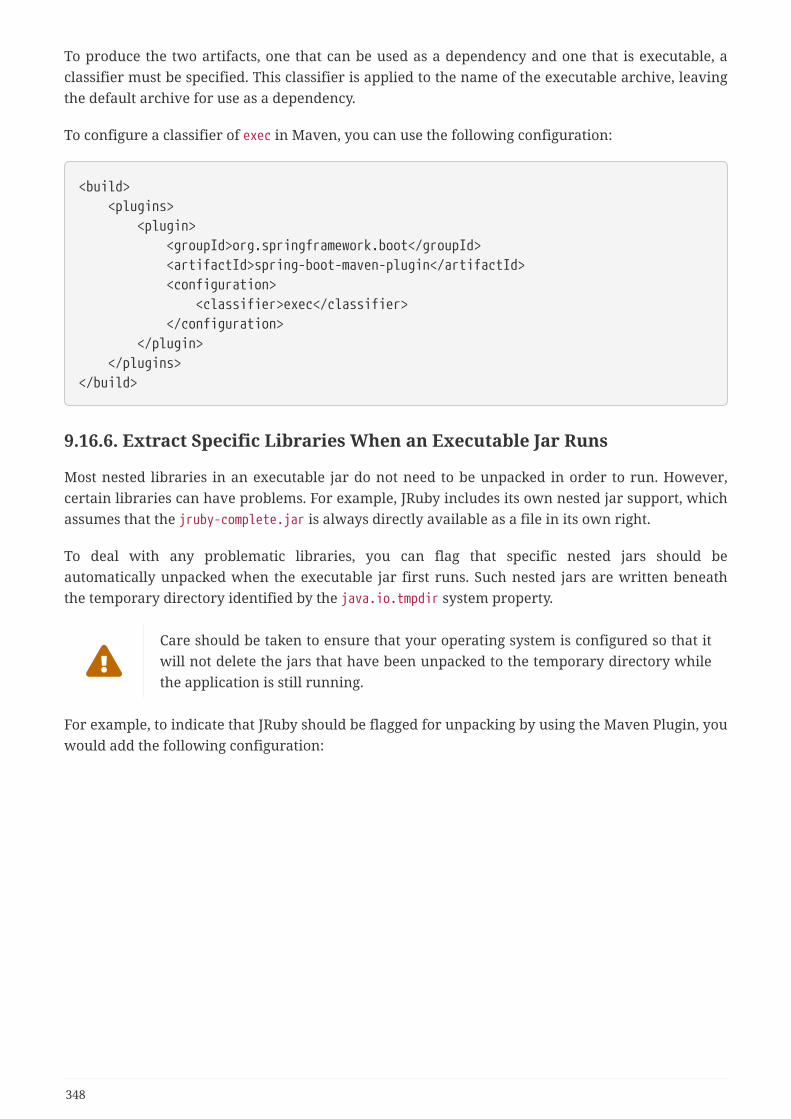
To produce the two artifacts, one that can be used as a dependency and one that is executable, aclassifier must be specified. This classifier is applied to the name of the executable archive, leavingthe default archive for use as a dependency.
To configure a classifier of exec in Maven, you can use the following configuration:
<build> <plugins> <plugin> <groupId>org.springframework.boot</groupId> <artifactId>spring-boot-maven-plugin</artifactId> <configuration> <classifier>exec</classifier> </configuration> </plugin> </plugins></build>
9.16.6. Extract Specific Libraries When an Executable Jar Runs
Most nested libraries in an executable jar do not need to be unpacked in order to run. However,certain libraries can have problems. For example, JRuby includes its own nested jar support, whichassumes that the jruby-complete.jar is always directly available as a file in its own right.
To deal with any problematic libraries, you can flag that specific nested jars should beautomatically unpacked when the executable jar first runs. Such nested jars are written beneaththe temporary directory identified by the java.io.tmpdir system property.
Care should be taken to ensure that your operating system is configured so that itwill not delete the jars that have been unpacked to the temporary directory whilethe application is still running.
For example, to indicate that JRuby should be flagged for unpacking by using the Maven Plugin, youwould add the following configuration:
348
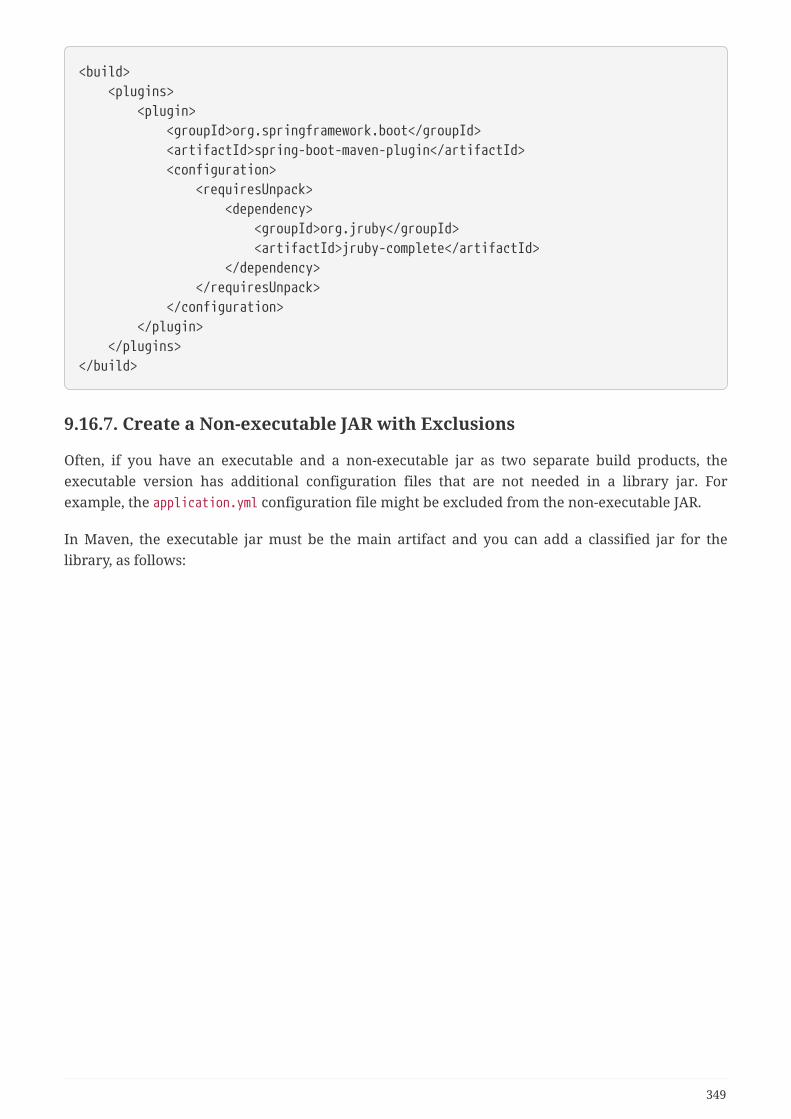
<build> <plugins> <plugin> <groupId>org.springframework.boot</groupId> <artifactId>spring-boot-maven-plugin</artifactId> <configuration> <requiresUnpack> <dependency> <groupId>org.jruby</groupId> <artifactId>jruby-complete</artifactId> </dependency> </requiresUnpack> </configuration> </plugin> </plugins></build>
9.16.7. Create a Non-executable JAR with Exclusions
Often, if you have an executable and a non-executable jar as two separate build products, theexecutable version has additional configuration files that are not needed in a library jar. Forexample, the application.yml configuration file might be excluded from the non-executable JAR.
In Maven, the executable jar must be the main artifact and you can add a classified jar for thelibrary, as follows:
349
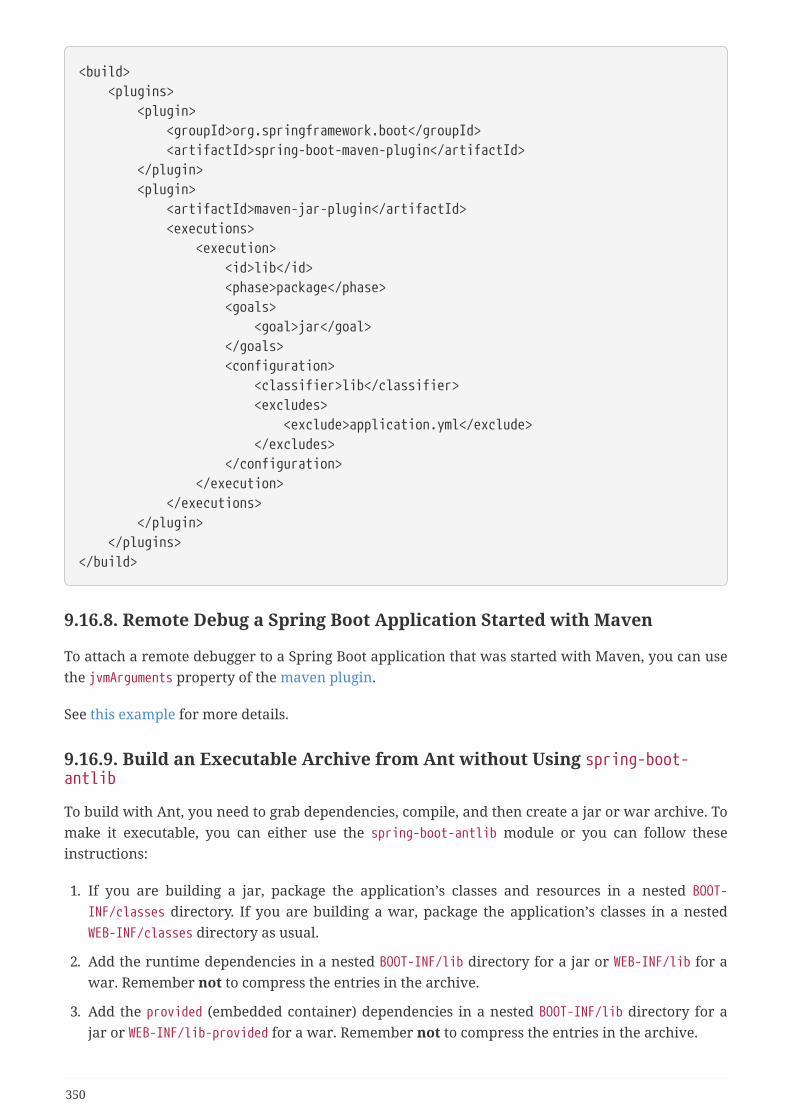
<build> <plugins> <plugin> <groupId>org.springframework.boot</groupId> <artifactId>spring-boot-maven-plugin</artifactId> </plugin> <plugin> <artifactId>maven-jar-plugin</artifactId> <executions> <execution> <id>lib</id> <phase>package</phase> <goals> <goal>jar</goal> </goals> <configuration> <classifier>lib</classifier> <excludes> <exclude>application.yml</exclude> </excludes> </configuration> </execution> </executions> </plugin> </plugins></build>
9.16.8. Remote Debug a Spring Boot Application Started with Maven
To attach a remote debugger to a Spring Boot application that was started with Maven, you can usethe jvmArguments property of the maven plugin.
See this example for more details.
9.16.9. Build an Executable Archive from Ant without Using spring-boot-antlib
To build with Ant, you need to grab dependencies, compile, and then create a jar or war archive. Tomake it executable, you can either use the spring-boot-antlib module or you can follow theseinstructions:
1. If you are building a jar, package the application’s classes and resources in a nested BOOT-INF/classes directory. If you are building a war, package the application’s classes in a nestedWEB-INF/classes directory as usual.
2. Add the runtime dependencies in a nested BOOT-INF/lib directory for a jar or WEB-INF/lib for awar. Remember not to compress the entries in the archive.
3. Add the provided (embedded container) dependencies in a nested BOOT-INF/lib directory for ajar or WEB-INF/lib-provided for a war. Remember not to compress the entries in the archive.
350
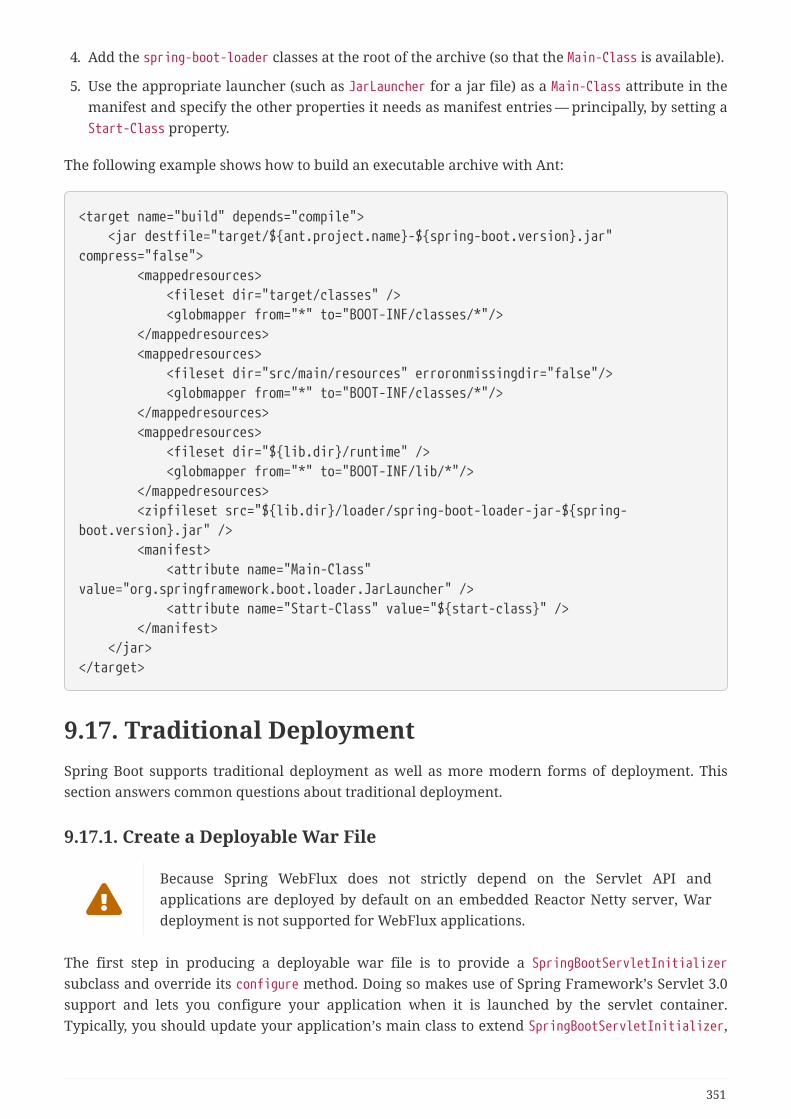
4. Add the spring-boot-loader classes at the root of the archive (so that the Main-Class is available).
5. Use the appropriate launcher (such as JarLauncher for a jar file) as a Main-Class attribute in themanifest and specify the other properties it needs as manifest entries — principally, by setting aStart-Class property.
The following example shows how to build an executable archive with Ant:
<target name="build" depends="compile"> <jar destfile="target/${ant.project.name}-${spring-boot.version}.jar"compress="false"> <mappedresources> <fileset dir="target/classes" /> <globmapper from="*" to="BOOT-INF/classes/*"/> </mappedresources> <mappedresources> <fileset dir="src/main/resources" erroronmissingdir="false"/> <globmapper from="*" to="BOOT-INF/classes/*"/> </mappedresources> <mappedresources> <fileset dir="${lib.dir}/runtime" /> <globmapper from="*" to="BOOT-INF/lib/*"/> </mappedresources> <zipfileset src="${lib.dir}/loader/spring-boot-loader-jar-${spring-boot.version}.jar" /> <manifest> <attribute name="Main-Class"value="org.springframework.boot.loader.JarLauncher" /> <attribute name="Start-Class" value="${start-class}" /> </manifest> </jar></target>
9.17. Traditional DeploymentSpring Boot supports traditional deployment as well as more modern forms of deployment. Thissection answers common questions about traditional deployment.
9.17.1. Create a Deployable War File
Because Spring WebFlux does not strictly depend on the Servlet API andapplications are deployed by default on an embedded Reactor Netty server, Wardeployment is not supported for WebFlux applications.
The first step in producing a deployable war file is to provide a SpringBootServletInitializersubclass and override its configure method. Doing so makes use of Spring Framework’s Servlet 3.0support and lets you configure your application when it is launched by the servlet container.Typically, you should update your application’s main class to extend SpringBootServletInitializer,
351

as shown in the following example:
@SpringBootApplicationpublic class Application extends SpringBootServletInitializer {
@Override protected SpringApplicationBuilder configure(SpringApplicationBuilder application){ return application.sources(Application.class); }
public static void main(String[] args) { SpringApplication.run(Application.class, args); }
}
The next step is to update your build configuration such that your project produces a war filerather than a jar file. If you use Maven and spring-boot-starter-parent (which configures Maven’swar plugin for you), all you need to do is to modify pom.xml to change the packaging to war, asfollows:
<packaging>war</packaging>
If you use Gradle, you need to modify build.gradle to apply the war plugin to the project, as follows:
apply plugin: 'war'
The final step in the process is to ensure that the embedded servlet container does not interferewith the servlet container to which the war file is deployed. To do so, you need to mark theembedded servlet container dependency as being provided.
If you use Maven, the following example marks the servlet container (Tomcat, in this case) as beingprovided:
<dependencies> <!-- … --> <dependency> <groupId>org.springframework.boot</groupId> <artifactId>spring-boot-starter-tomcat</artifactId> <scope>provided</scope> </dependency> <!-- … --></dependencies>
If you use Gradle, the following example marks the servlet container (Tomcat, in this case) as being
352

provided:
dependencies { // … providedRuntime 'org.springframework.boot:spring-boot-starter-tomcat' // …}
providedRuntime is preferred to Gradle’s compileOnly configuration. Among otherlimitations, compileOnly dependencies are not on the test classpath, so any web-based integration tests fail.
If you use the Spring Boot build tools, marking the embedded servlet container dependency asprovided produces an executable war file with the provided dependencies packaged in a lib-provided directory. This means that, in addition to being deployable to a servlet container, you canalso run your application by using java -jar on the command line.
9.17.2. Convert an Existing Application to Spring Boot
To convert an existing non-web Spring application to a Spring Boot application, replace the codethat creates your ApplicationContext and replace it with calls to SpringApplication orSpringApplicationBuilder. Spring MVC web applications are generally amenable to first creating adeployable war application and then migrating it later to an executable war or jar. See the GettingStarted Guide on Converting a jar to a war.
To create a deployable war by extending SpringBootServletInitializer (for example, in a classcalled Application) and adding the Spring Boot @SpringBootApplication annotation, use code similarto that shown in the following example:
@SpringBootApplicationpublic class Application extends SpringBootServletInitializer {
@Override protected SpringApplicationBuilder configure(SpringApplicationBuilder application){ // Customize the application or call application.sources(...) to add sources // Since our example is itself a @Configuration class (via@SpringBootApplication) // we actually don't need to override this method. return application; }
}
Remember that, whatever you put in the sources is merely a Spring ApplicationContext. Normally,anything that already works should work here. There might be some beans you can remove laterand let Spring Boot provide its own defaults for them, but it should be possible to get something
353
working before you need to do that.
Static resources can be moved to /public (or /static or /resources or /META-INF/resources) in theclasspath root. The same applies to messages.properties (which Spring Boot automatically detects inthe root of the classpath).
Vanilla usage of Spring DispatcherServlet and Spring Security should require no further changes. Ifyou have other features in your application (for instance, using other servlets or filters), you mayneed to add some configuration to your Application context, by replacing those elements from theweb.xml, as follows:
• A @Bean of type Servlet or ServletRegistrationBean installs that bean in the container as if itwere a <servlet/> and <servlet-mapping/> in web.xml.
• A @Bean of type Filter or FilterRegistrationBean behaves similarly (as a <filter/> and <filter-mapping/>).
• An ApplicationContext in an XML file can be added through an @ImportResource in yourApplication. Alternatively, cases where annotation configuration is heavily used already can berecreated in a few lines as @Bean definitions.
Once the war file is working, you can make it executable by adding a main method to yourApplication, as shown in the following example:
public static void main(String[] args) { SpringApplication.run(Application.class, args);}
354

If you intend to start your application as a war or as an executable application, youneed to share the customizations of the builder in a method that is both availableto the SpringBootServletInitializer callback and in the main method in a classsimilar to the following:
@SpringBootApplicationpublic class Application extends SpringBootServletInitializer {
@Override protected SpringApplicationBuilderconfigure(SpringApplicationBuilder builder) { return configureApplication(builder); }
public static void main(String[] args) { configureApplication(new SpringApplicationBuilder()).run(args); }
private static SpringApplicationBuilderconfigureApplication(SpringApplicationBuilder builder) { returnbuilder.sources(Application.class).bannerMode(Banner.Mode.OFF); }
}
Applications can fall into more than one category:
• Servlet 3.0+ applications with no web.xml.
• Applications with a web.xml.
• Applications with a context hierarchy.
• Applications without a context hierarchy.
All of these should be amenable to translation, but each might require slightly different techniques.
Servlet 3.0+ applications might translate pretty easily if they already use the Spring Servlet 3.0+initializer support classes. Normally, all the code from an existing WebApplicationInitializer can bemoved into a SpringBootServletInitializer. If your existing application has more than oneApplicationContext (for example, if it uses AbstractDispatcherServletInitializer) then you might beable to combine all your context sources into a single SpringApplication. The main complication youmight encounter is if combining does not work and you need to maintain the context hierarchy. Seethe entry on building a hierarchy for examples. An existing parent context that contains web-specific features usually needs to be broken up so that all the ServletContextAware components arein the child context.
Applications that are not already Spring applications might be convertible to Spring Bootapplications, and the previously mentioned guidance may help. However, you may yet encounter
355

problems. In that case, we suggest asking questions on Stack Overflow with a tag of spring-boot.
9.17.3. Deploying a WAR to WebLogic
To deploy a Spring Boot application to WebLogic, you must ensure that your servlet initializerdirectly implements WebApplicationInitializer (even if you extend from a base class that alreadyimplements it).
A typical initializer for WebLogic should resemble the following example:
import org.springframework.boot.autoconfigure.SpringBootApplication;import org.springframework.boot.web.servlet.support.SpringBootServletInitializer;import org.springframework.web.WebApplicationInitializer;
@SpringBootApplicationpublic class MyApplication extends SpringBootServletInitializer implementsWebApplicationInitializer {
}
If you use Logback, you also need to tell WebLogic to prefer the packaged version rather than theversion that was pre-installed with the server. You can do so by adding a WEB-INF/weblogic.xml filewith the following contents:
<?xml version="1.0" encoding="UTF-8"?><wls:weblogic-web-app xmlns:wls="http://xmlns.oracle.com/weblogic/weblogic-web-app" xmlns:xsi="http://www.w3.org/2001/XMLSchema-instance" xsi:schemaLocation="http://java.sun.com/xml/ns/javaee https://java.sun.com/xml/ns/javaee/ejb-jar_3_0.xsd http://xmlns.oracle.com/weblogic/weblogic-web-app https://xmlns.oracle.com/weblogic/weblogic-web-app/1.4/weblogic-web-app.xsd"> <wls:container-descriptor> <wls:prefer-application-packages> <wls:package-name>org.slf4j</wls:package-name> </wls:prefer-application-packages> </wls:container-descriptor></wls:weblogic-web-app>
9.17.4. Use Jedis Instead of Lettuce
By default, the Spring Boot starter (spring-boot-starter-data-redis) uses Lettuce. You need toexclude that dependency and include the Jedis one instead. Spring Boot manages both of thesedependencies so you can switch to Jedis without specifying a version.
The following example shows how to do so in Maven:
356

<dependency> <groupId>org.springframework.boot</groupId> <artifactId>spring-boot-starter-data-redis</artifactId> <exclusions> <exclusion> <groupId>io.lettuce</groupId> <artifactId>lettuce-core</artifactId> </exclusion> </exclusions></dependency><dependency> <groupId>redis.clients</groupId> <artifactId>jedis</artifactId></dependency>
The following example shows how to do so in Gradle:
configurations { compile.exclude module: "lettuce"}
dependencies { compile("redis.clients:jedis") // ...}
357

Chapter 10. Appendices
Appendix A: Common Application propertiesVarious properties can be specified inside your application.properties file, inside yourapplication.yml file, or as command line switches. This appendix provides a list of common SpringBoot properties and references to the underlying classes that consume them.
Spring Boot provides various conversion mechanism with advanced valueformatting, make sure to review the properties conversion section.
Property contributions can come from additional jar files on your classpath, so youshould not consider this an exhaustive list. Also, you can define your ownproperties.
10.A.1. Core properties
Key Default Value Description
debug false Enable debug logs.
info.* Arbitrary properties to add to the info endpoint.
logging.config Location of the logging configuration file. Forinstance, `classpath:logback.xml` for Logback.
logging.exception-conversion-word
%wEx Conversion word used when logging exceptions.
logging.file.clean-history-on-start
false Whether to clean the archive log files on startup.Only supported with the default logback setup.
logging.file.max-history
7 Maximum number of days archive log files arekept. Only supported with the default logbacksetup.
logging.file.max-size 10MB Maximum log file size. Only supported with thedefault logback setup.
logging.file.name Log file name (for instance, `myapp.log`).Names can be an exact location or relative to thecurrent directory.
logging.file.path Location of the log file. For instance, `/var/log`.
logging.file.total-size-cap
0B Total size of log backups to be kept. Onlysupported with the default logback setup.
logging.group.* Log groups to quickly change multiple loggers atthe same time. For instance,`logging.group.db=org.hibernate,org.springframework.jdbc`.
358

Key Default Value Description
logging.level.* Log levels severity mapping. For instance,`logging.level.org.springframework=DEBUG`.
logging.pattern.console
%clr(%d{${LOG_DATEFORMAT_PATTERN:-yyyy-MM-ddHH:mm:ss.SSS}}){faint}%clr(${LOG_LEVEL_PATTERN:-%5p}) %clr(${PID:-}){magenta} %clr(---){faint}%clr([%15.15t]){faint}%clr(%-40.40logger{39}){cyan}%clr(:){faint}%m%n${LOG_EXCEPTION_CONVERSION_WORD:-%wEx}
Appender pattern for output to the console.Supported only with the default Logback setup.
logging.pattern.dateformat
yyyy-MM-ddHH:mm:ss.SSS
Appender pattern for log date format. Supportedonly with the default Logback setup.
logging.pattern.file %d{${LOG_DATEFORMAT_PATTERN:-yyyy-MM-ddHH:mm:ss.SSS}}${LOG_LEVEL_PATTERN:-%5p} ${PID:- } ---[%t] %-40.40logger{39}:%m%n${LOG_EXCEPTION_CONVERSION_WORD:-%wEx}
Appender pattern for output to a file. Supportedonly with the default Logback setup.
logging.pattern.level %5p Appender pattern for log level. Supported onlywith the default Logback setup.
logging.pattern.rolling-file-name
${LOG_FILE}.%d{yyyy-MM-dd}.%i.gz
Pattern for rolled-over log file names. Supportedonly with the default Logback setup.
logging.register-shutdown-hook
false Register a shutdown hook for the logging systemwhen it is initialized.
spring.aop.auto true Add @EnableAspectJAutoProxy.
spring.aop.proxy-target-class
true Whether subclass-based (CGLIB) proxies are tobe created (true), as opposed to standard Javainterface-based proxies (false).
spring.application.admin.enabled
false Whether to enable admin features for theapplication.
spring.application.admin.jmx-name
org.springframework.boot:type=Admin,name=SpringApplication
JMX name of the application admin MBean.
spring.application.name
Application name.
spring.autoconfigure.exclude
Auto-configuration classes to exclude.
spring.banner.charset UTF-8 Banner file encoding.
359
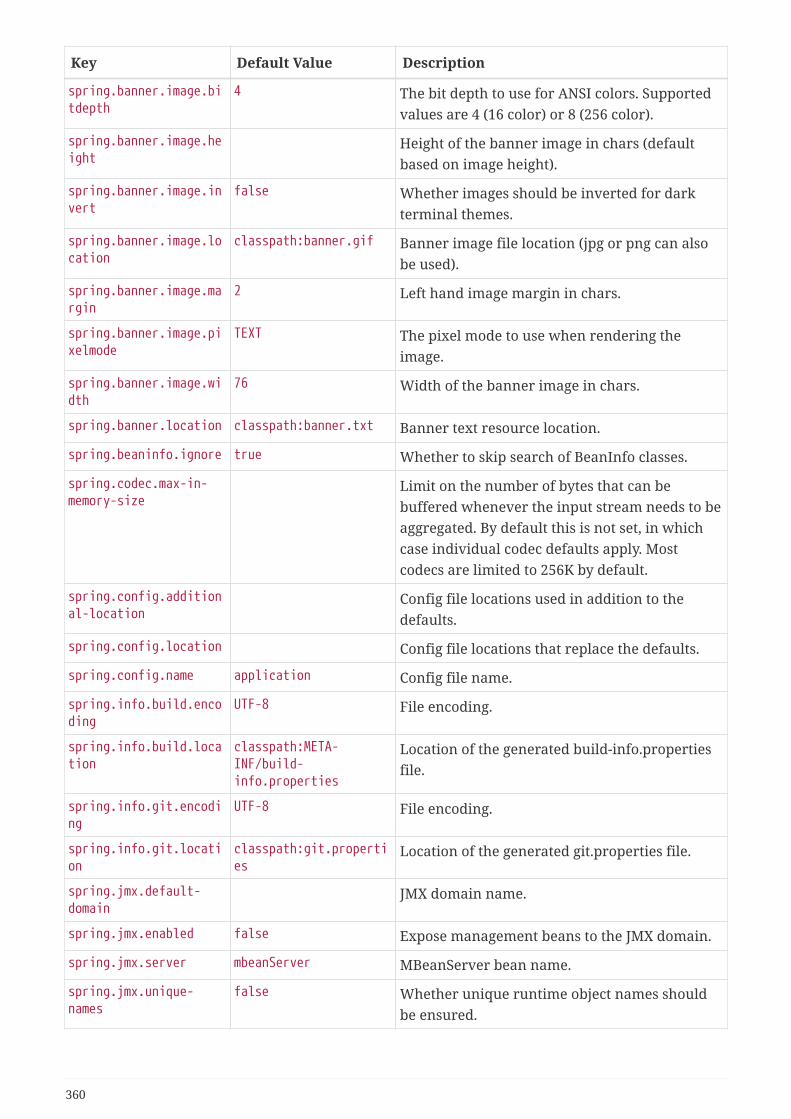
Key Default Value Description
spring.banner.image.bitdepth
4 The bit depth to use for ANSI colors. Supportedvalues are 4 (16 color) or 8 (256 color).
spring.banner.image.height
Height of the banner image in chars (defaultbased on image height).
spring.banner.image.invert
false Whether images should be inverted for darkterminal themes.
spring.banner.image.location
classpath:banner.gif Banner image file location (jpg or png can alsobe used).
spring.banner.image.margin
2 Left hand image margin in chars.
spring.banner.image.pixelmode
TEXT The pixel mode to use when rendering theimage.
spring.banner.image.width
76 Width of the banner image in chars.
spring.banner.location classpath:banner.txt Banner text resource location.
spring.beaninfo.ignore true Whether to skip search of BeanInfo classes.
spring.codec.max-in-memory-size
Limit on the number of bytes that can bebuffered whenever the input stream needs to beaggregated. By default this is not set, in whichcase individual codec defaults apply. Mostcodecs are limited to 256K by default.
spring.config.additional-location
Config file locations used in addition to thedefaults.
spring.config.location Config file locations that replace the defaults.
spring.config.name application Config file name.
spring.info.build.encoding
UTF-8 File encoding.
spring.info.build.location
classpath:META-INF/build-info.properties
Location of the generated build-info.propertiesfile.
spring.info.git.encoding
UTF-8 File encoding.
spring.info.git.location
classpath:git.properties
Location of the generated git.properties file.
spring.jmx.default-domain
JMX domain name.
spring.jmx.enabled false Expose management beans to the JMX domain.
spring.jmx.server mbeanServer MBeanServer bean name.
spring.jmx.unique-names
false Whether unique runtime object names shouldbe ensured.
360
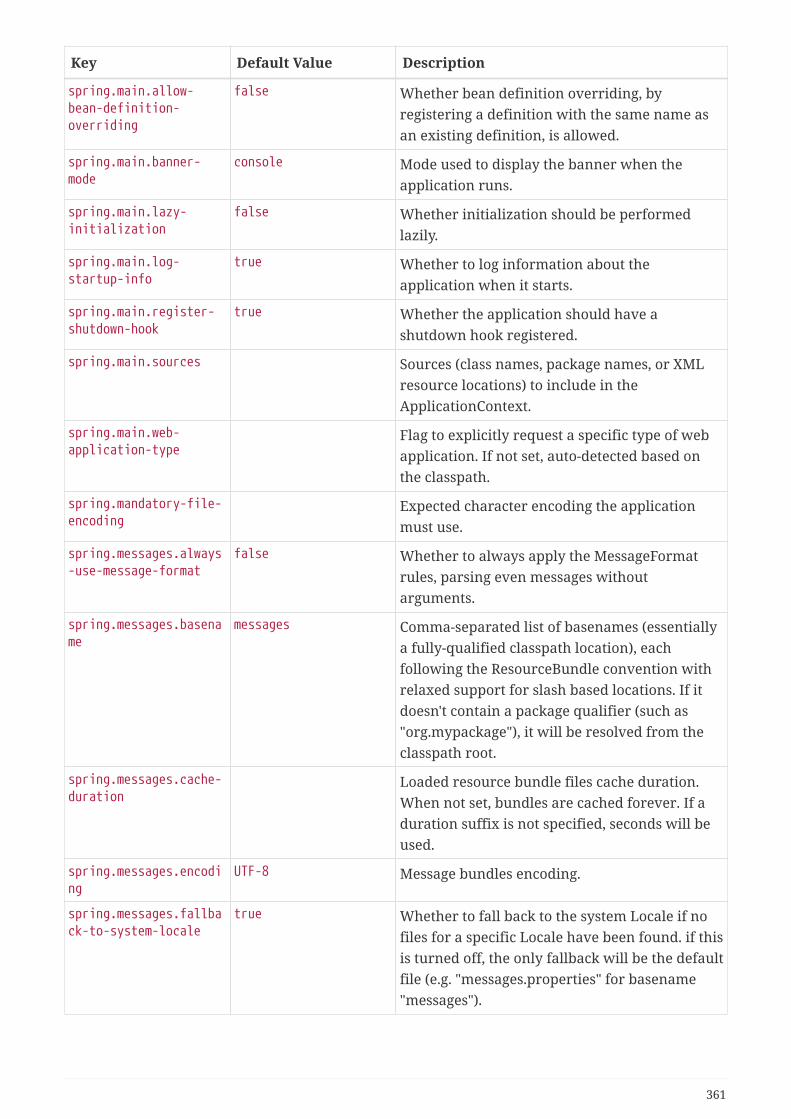
Key Default Value Description
spring.main.allow-bean-definition-overriding
false Whether bean definition overriding, byregistering a definition with the same name asan existing definition, is allowed.
spring.main.banner-mode
console Mode used to display the banner when theapplication runs.
spring.main.lazy-initialization
false Whether initialization should be performedlazily.
spring.main.log-startup-info
true Whether to log information about theapplication when it starts.
spring.main.register-shutdown-hook
true Whether the application should have ashutdown hook registered.
spring.main.sources Sources (class names, package names, or XMLresource locations) to include in theApplicationContext.
spring.main.web-application-type
Flag to explicitly request a specific type of webapplication. If not set, auto-detected based onthe classpath.
spring.mandatory-file-encoding
Expected character encoding the applicationmust use.
spring.messages.always-use-message-format
false Whether to always apply the MessageFormatrules, parsing even messages withoutarguments.
spring.messages.basename
messages Comma-separated list of basenames (essentiallya fully-qualified classpath location), eachfollowing the ResourceBundle convention withrelaxed support for slash based locations. If itdoesn't contain a package qualifier (such as"org.mypackage"), it will be resolved from theclasspath root.
spring.messages.cache-duration
Loaded resource bundle files cache duration.When not set, bundles are cached forever. If aduration suffix is not specified, seconds will beused.
spring.messages.encoding
UTF-8 Message bundles encoding.
spring.messages.fallback-to-system-locale
true Whether to fall back to the system Locale if nofiles for a specific Locale have been found. if thisis turned off, the only fallback will be the defaultfile (e.g. "messages.properties" for basename"messages").
361
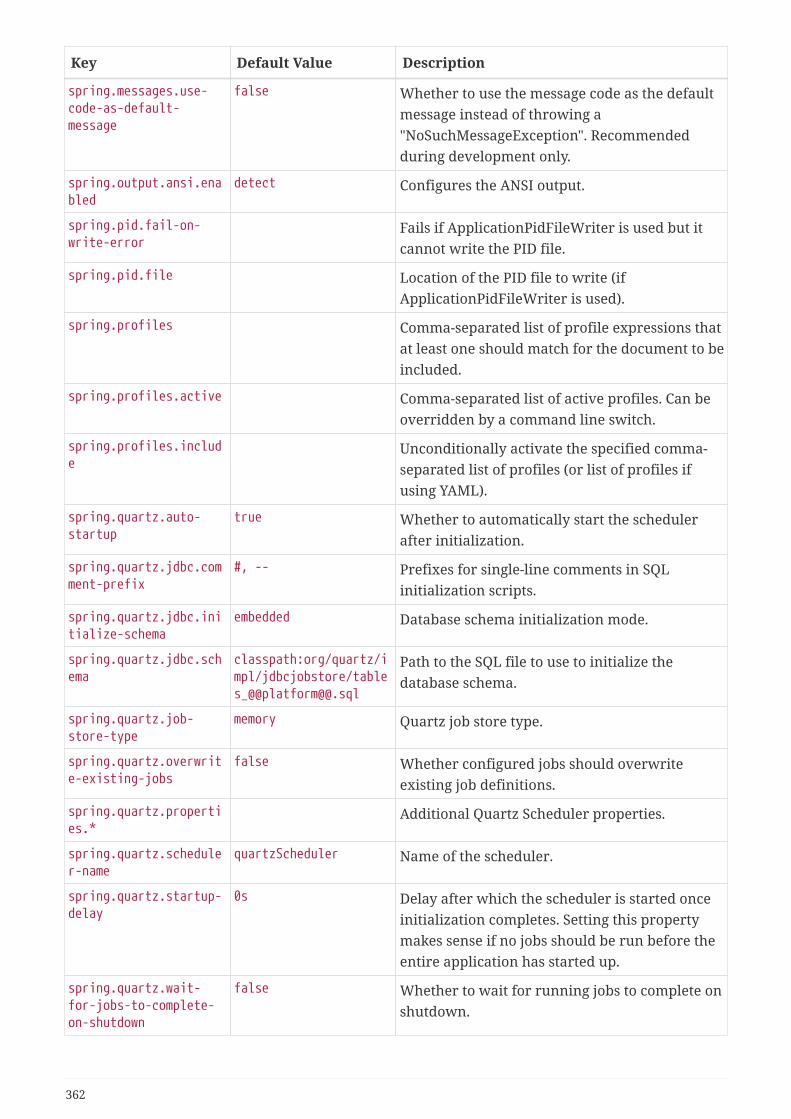
Key Default Value Description
spring.messages.use-code-as-default-message
false Whether to use the message code as the defaultmessage instead of throwing a"NoSuchMessageException". Recommendedduring development only.
spring.output.ansi.enabled
detect Configures the ANSI output.
spring.pid.fail-on-write-error
Fails if ApplicationPidFileWriter is used but itcannot write the PID file.
spring.pid.file Location of the PID file to write (ifApplicationPidFileWriter is used).
spring.profiles Comma-separated list of profile expressions thatat least one should match for the document to beincluded.
spring.profiles.active Comma-separated list of active profiles. Can beoverridden by a command line switch.
spring.profiles.include
Unconditionally activate the specified comma-separated list of profiles (or list of profiles ifusing YAML).
spring.quartz.auto-startup
true Whether to automatically start the schedulerafter initialization.
spring.quartz.jdbc.comment-prefix
#, -- Prefixes for single-line comments in SQLinitialization scripts.
spring.quartz.jdbc.initialize-schema
embedded Database schema initialization mode.
spring.quartz.jdbc.schema
classpath:org/quartz/impl/jdbcjobstore/tables_@@platform@@.sql
Path to the SQL file to use to initialize thedatabase schema.
spring.quartz.job-store-type
memory Quartz job store type.
spring.quartz.overwrite-existing-jobs
false Whether configured jobs should overwriteexisting job definitions.
spring.quartz.properties.*
Additional Quartz Scheduler properties.
spring.quartz.scheduler-name
quartzScheduler Name of the scheduler.
spring.quartz.startup-delay
0s Delay after which the scheduler is started onceinitialization completes. Setting this propertymakes sense if no jobs should be run before theentire application has started up.
spring.quartz.wait-for-jobs-to-complete-on-shutdown
false Whether to wait for running jobs to complete onshutdown.
362
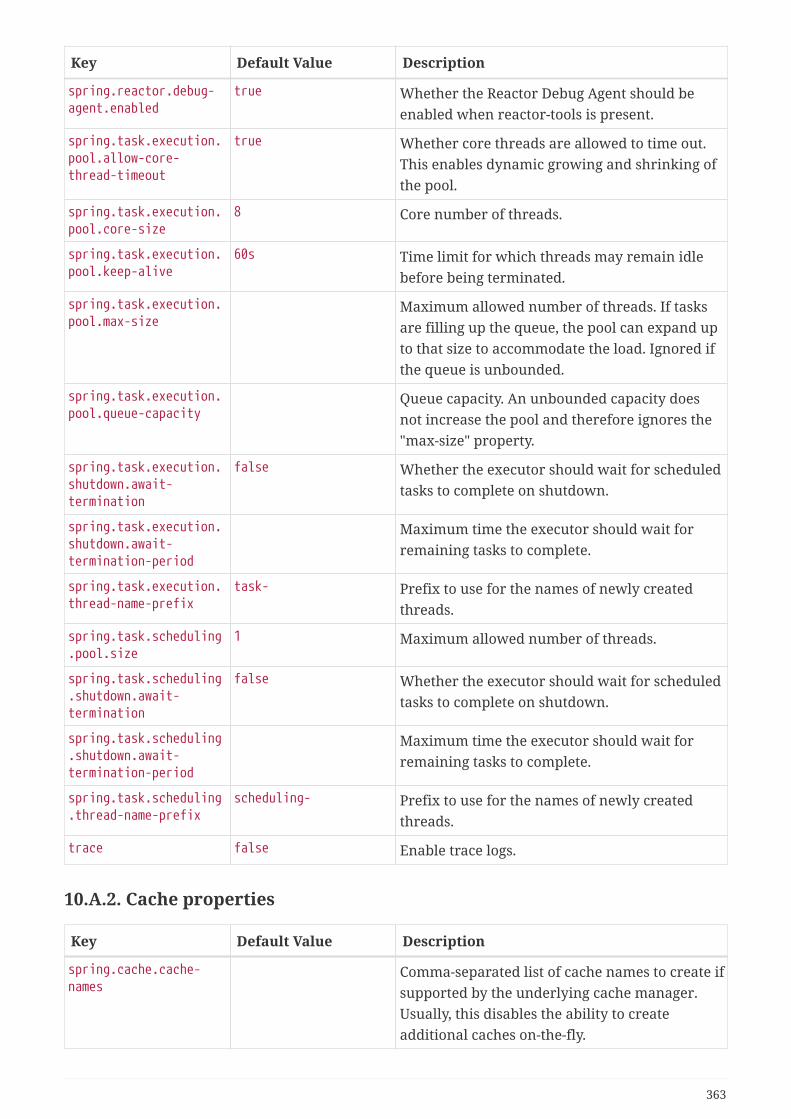
Key Default Value Description
spring.reactor.debug-agent.enabled
true Whether the Reactor Debug Agent should beenabled when reactor-tools is present.
spring.task.execution.pool.allow-core-thread-timeout
true Whether core threads are allowed to time out.This enables dynamic growing and shrinking ofthe pool.
spring.task.execution.pool.core-size
8 Core number of threads.
spring.task.execution.pool.keep-alive
60s Time limit for which threads may remain idlebefore being terminated.
spring.task.execution.pool.max-size
Maximum allowed number of threads. If tasksare filling up the queue, the pool can expand upto that size to accommodate the load. Ignored ifthe queue is unbounded.
spring.task.execution.pool.queue-capacity
Queue capacity. An unbounded capacity doesnot increase the pool and therefore ignores the"max-size" property.
spring.task.execution.shutdown.await-termination
false Whether the executor should wait for scheduledtasks to complete on shutdown.
spring.task.execution.shutdown.await-termination-period
Maximum time the executor should wait forremaining tasks to complete.
spring.task.execution.thread-name-prefix
task- Prefix to use for the names of newly createdthreads.
spring.task.scheduling.pool.size
1 Maximum allowed number of threads.
spring.task.scheduling.shutdown.await-termination
false Whether the executor should wait for scheduledtasks to complete on shutdown.
spring.task.scheduling.shutdown.await-termination-period
Maximum time the executor should wait forremaining tasks to complete.
spring.task.scheduling.thread-name-prefix
scheduling- Prefix to use for the names of newly createdthreads.
trace false Enable trace logs.
10.A.2. Cache properties
Key Default Value Description
spring.cache.cache-names
Comma-separated list of cache names to create ifsupported by the underlying cache manager.Usually, this disables the ability to createadditional caches on-the-fly.
363
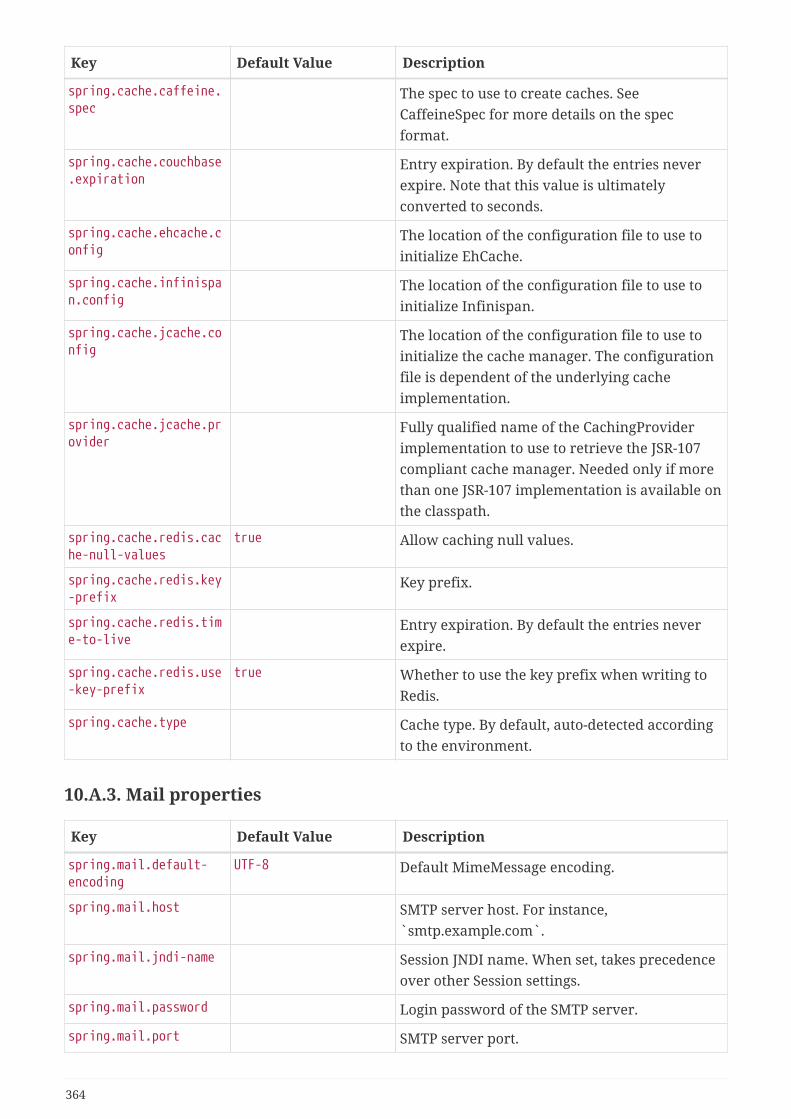
Key Default Value Description
spring.cache.caffeine.spec
The spec to use to create caches. SeeCaffeineSpec for more details on the specformat.
spring.cache.couchbase.expiration
Entry expiration. By default the entries neverexpire. Note that this value is ultimatelyconverted to seconds.
spring.cache.ehcache.config
The location of the configuration file to use toinitialize EhCache.
spring.cache.infinispan.config
The location of the configuration file to use toinitialize Infinispan.
spring.cache.jcache.config
The location of the configuration file to use toinitialize the cache manager. The configurationfile is dependent of the underlying cacheimplementation.
spring.cache.jcache.provider
Fully qualified name of the CachingProviderimplementation to use to retrieve the JSR-107compliant cache manager. Needed only if morethan one JSR-107 implementation is available onthe classpath.
spring.cache.redis.cache-null-values
true Allow caching null values.
spring.cache.redis.key-prefix
Key prefix.
spring.cache.redis.time-to-live
Entry expiration. By default the entries neverexpire.
spring.cache.redis.use-key-prefix
true Whether to use the key prefix when writing toRedis.
spring.cache.type Cache type. By default, auto-detected accordingto the environment.
10.A.3. Mail properties
Key Default Value Description
spring.mail.default-encoding
UTF-8 Default MimeMessage encoding.
spring.mail.host SMTP server host. For instance,`smtp.example.com`.
spring.mail.jndi-name Session JNDI name. When set, takes precedenceover other Session settings.
spring.mail.password Login password of the SMTP server.
spring.mail.port SMTP server port.
364
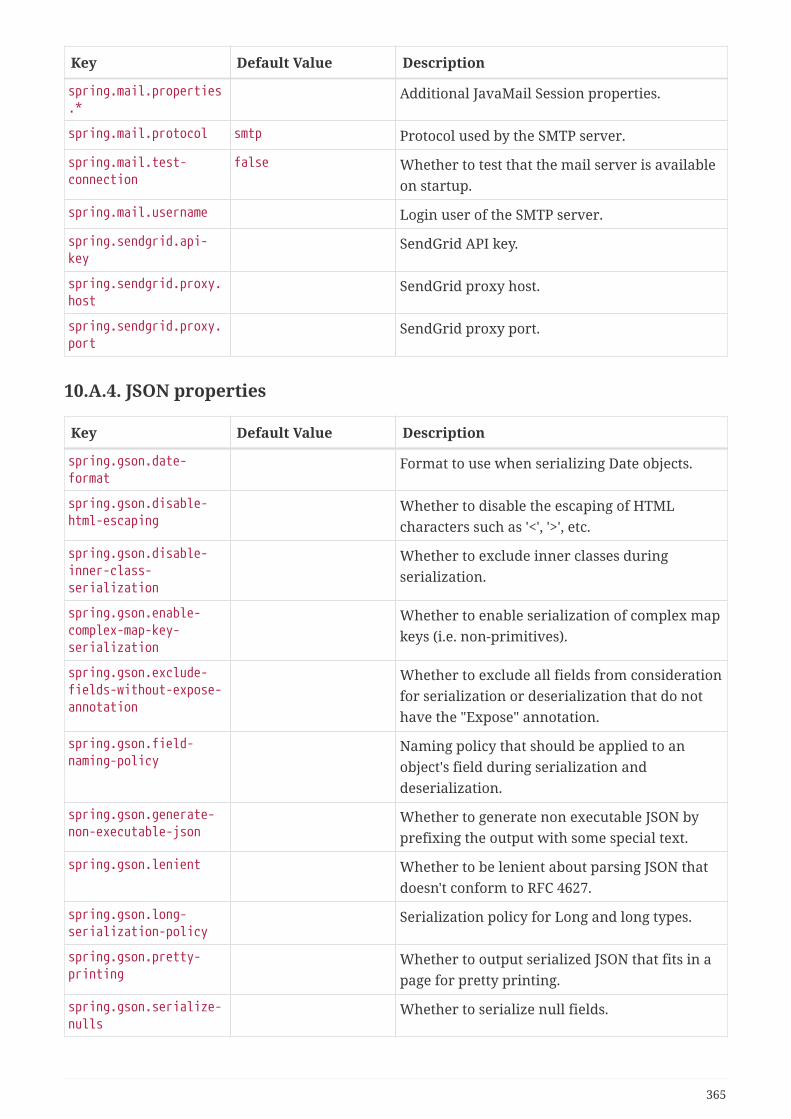
Key Default Value Description
spring.mail.properties.*
Additional JavaMail Session properties.
spring.mail.protocol smtp Protocol used by the SMTP server.
spring.mail.test-connection
false Whether to test that the mail server is availableon startup.
spring.mail.username Login user of the SMTP server.
spring.sendgrid.api-key
SendGrid API key.
spring.sendgrid.proxy.host
SendGrid proxy host.
spring.sendgrid.proxy.port
SendGrid proxy port.
10.A.4. JSON properties
Key Default Value Description
spring.gson.date-format
Format to use when serializing Date objects.
spring.gson.disable-html-escaping
Whether to disable the escaping of HTMLcharacters such as '<', '>', etc.
spring.gson.disable-inner-class-serialization
Whether to exclude inner classes duringserialization.
spring.gson.enable-complex-map-key-serialization
Whether to enable serialization of complex mapkeys (i.e. non-primitives).
spring.gson.exclude-fields-without-expose-annotation
Whether to exclude all fields from considerationfor serialization or deserialization that do nothave the "Expose" annotation.
spring.gson.field-naming-policy
Naming policy that should be applied to anobject's field during serialization anddeserialization.
spring.gson.generate-non-executable-json
Whether to generate non executable JSON byprefixing the output with some special text.
spring.gson.lenient Whether to be lenient about parsing JSON thatdoesn't conform to RFC 4627.
spring.gson.long-serialization-policy
Serialization policy for Long and long types.
spring.gson.pretty-printing
Whether to output serialized JSON that fits in apage for pretty printing.
spring.gson.serialize-nulls
Whether to serialize null fields.
365
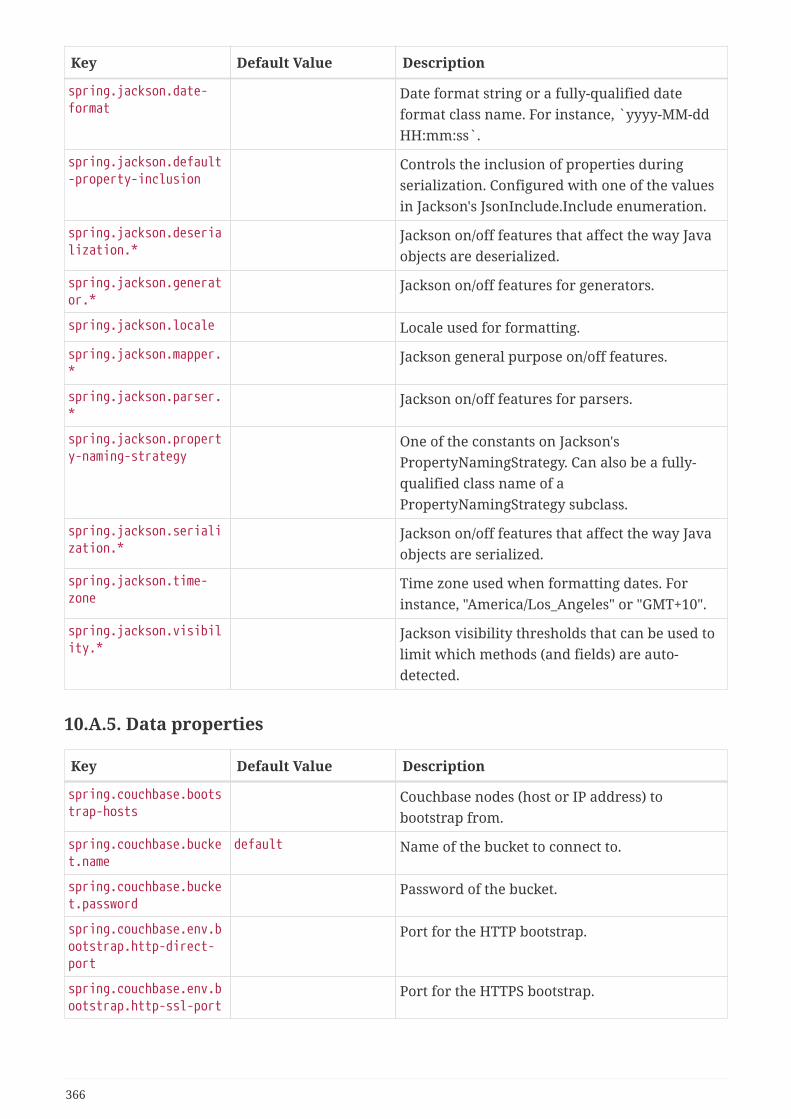
Key Default Value Description
spring.jackson.date-format
Date format string or a fully-qualified dateformat class name. For instance, `yyyy-MM-ddHH:mm:ss`.
spring.jackson.default-property-inclusion
Controls the inclusion of properties duringserialization. Configured with one of the valuesin Jackson's JsonInclude.Include enumeration.
spring.jackson.deserialization.*
Jackson on/off features that affect the way Javaobjects are deserialized.
spring.jackson.generator.*
Jackson on/off features for generators.
spring.jackson.locale Locale used for formatting.
spring.jackson.mapper.*
Jackson general purpose on/off features.
spring.jackson.parser.*
Jackson on/off features for parsers.
spring.jackson.property-naming-strategy
One of the constants on Jackson'sPropertyNamingStrategy. Can also be a fully-qualified class name of aPropertyNamingStrategy subclass.
spring.jackson.serialization.*
Jackson on/off features that affect the way Javaobjects are serialized.
spring.jackson.time-zone
Time zone used when formatting dates. Forinstance, "America/Los_Angeles" or "GMT+10".
spring.jackson.visibility.*
Jackson visibility thresholds that can be used tolimit which methods (and fields) are auto-detected.
10.A.5. Data properties
Key Default Value Description
spring.couchbase.bootstrap-hosts
Couchbase nodes (host or IP address) tobootstrap from.
spring.couchbase.bucket.name
default Name of the bucket to connect to.
spring.couchbase.bucket.password
Password of the bucket.
spring.couchbase.env.bootstrap.http-direct-port
Port for the HTTP bootstrap.
spring.couchbase.env.bootstrap.http-ssl-port
Port for the HTTPS bootstrap.
366
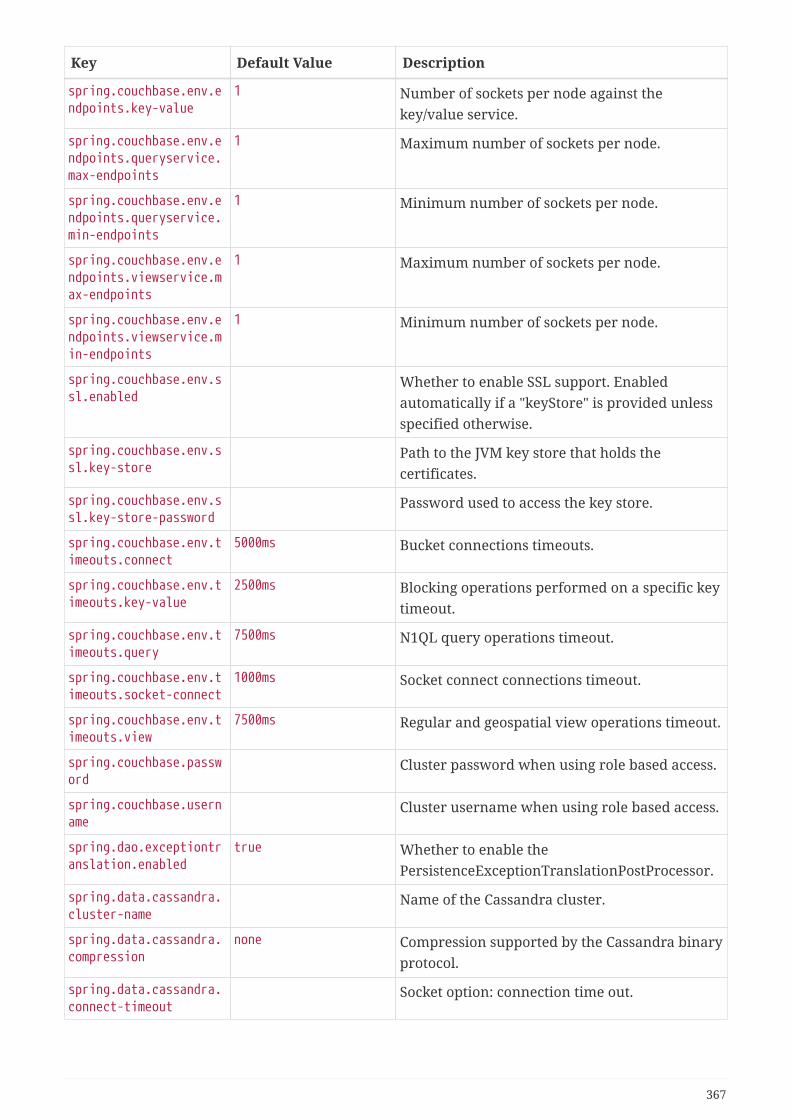
Key Default Value Description
spring.couchbase.env.endpoints.key-value
1 Number of sockets per node against thekey/value service.
spring.couchbase.env.endpoints.queryservice.max-endpoints
1 Maximum number of sockets per node.
spring.couchbase.env.endpoints.queryservice.min-endpoints
1 Minimum number of sockets per node.
spring.couchbase.env.endpoints.viewservice.max-endpoints
1 Maximum number of sockets per node.
spring.couchbase.env.endpoints.viewservice.min-endpoints
1 Minimum number of sockets per node.
spring.couchbase.env.ssl.enabled
Whether to enable SSL support. Enabledautomatically if a "keyStore" is provided unlessspecified otherwise.
spring.couchbase.env.ssl.key-store
Path to the JVM key store that holds thecertificates.
spring.couchbase.env.ssl.key-store-password
Password used to access the key store.
spring.couchbase.env.timeouts.connect
5000ms Bucket connections timeouts.
spring.couchbase.env.timeouts.key-value
2500ms Blocking operations performed on a specific keytimeout.
spring.couchbase.env.timeouts.query
7500ms N1QL query operations timeout.
spring.couchbase.env.timeouts.socket-connect
1000ms Socket connect connections timeout.
spring.couchbase.env.timeouts.view
7500ms Regular and geospatial view operations timeout.
spring.couchbase.password
Cluster password when using role based access.
spring.couchbase.username
Cluster username when using role based access.
spring.dao.exceptiontranslation.enabled
true Whether to enable thePersistenceExceptionTranslationPostProcessor.
spring.data.cassandra.cluster-name
Name of the Cassandra cluster.
spring.data.cassandra.compression
none Compression supported by the Cassandra binaryprotocol.
spring.data.cassandra.connect-timeout
Socket option: connection time out.
367

Key Default Value Description
spring.data.cassandra.consistency-level
Queries consistency level.
spring.data.cassandra.contact-points
localhost Cluster node addresses.
spring.data.cassandra.fetch-size
Queries default fetch size.
spring.data.cassandra.jmx-enabled
false Whether to enable JMX reporting. Default tofalse as Cassandra JMX reporting is notcompatible with Dropwizard Metrics.
spring.data.cassandra.keyspace-name
Keyspace name to use.
spring.data.cassandra.password
Login password of the server.
spring.data.cassandra.pool.heartbeat-interval
30s Heartbeat interval after which a message is senton an idle connection to make sure it's still alive.If a duration suffix is not specified, seconds willbe used.
spring.data.cassandra.pool.idle-timeout
120s Idle timeout before an idle connection isremoved. If a duration suffix is not specified,seconds will be used.
spring.data.cassandra.pool.max-queue-size
256 Maximum number of requests that get queued ifno connection is available.
spring.data.cassandra.pool.pool-timeout
5000ms Pool timeout when trying to acquire aconnection from a host's pool.
spring.data.cassandra.port
Port of the Cassandra server.
spring.data.cassandra.read-timeout
Socket option: read time out.
spring.data.cassandra.repositories.type
auto Type of Cassandra repositories to enable.
spring.data.cassandra.schema-action
none Schema action to take at startup.
spring.data.cassandra.serial-consistency-level
Queries serial consistency level.
spring.data.cassandra.ssl
false Enable SSL support.
spring.data.cassandra.username
Login user of the server.
spring.data.couchbase.auto-index
false Automatically create views and indexes. Use themeta-data provided by "@ViewIndexed","@N1qlPrimaryIndexed" and"@N1qlSecondaryIndexed".
368

Key Default Value Description
spring.data.couchbase.consistency
read-your-own-writes Consistency to apply by default on generatedqueries.
spring.data.couchbase.repositories.type
auto Type of Couchbase repositories to enable.
spring.data.elasticsearch.client.reactive.connection-timeout
Connection timeout.
spring.data.elasticsearch.client.reactive.endpoints
Comma-separated list of the Elasticsearchendpoints to connect to.
spring.data.elasticsearch.client.reactive.password
Credentials password.
spring.data.elasticsearch.client.reactive.socket-timeout
Read and Write Socket timeout.
spring.data.elasticsearch.client.reactive.use-ssl
false Whether the client should use SSL to connect tothe endpoints.
spring.data.elasticsearch.client.reactive.username
Credentials username.
spring.data.elasticsearch.repositories.enabled
true Whether to enable Elasticsearch repositories.
spring.data.jdbc.repositories.enabled
true Whether to enable JDBC repositories.
spring.data.jpa.repositories.bootstrap-mode
default Bootstrap mode for JPA repositories.
spring.data.jpa.repositories.enabled
true Whether to enable JPA repositories.
spring.data.ldap.repositories.enabled
true Whether to enable LDAP repositories.
spring.data.mongodb.authentication-database
Authentication database name.
spring.data.mongodb.auto-index-creation
Whether to enable auto-index creation.
spring.data.mongodb.database
Database name.
spring.data.mongodb.field-naming-strategy
Fully qualified name of the FieldNamingStrategyto use.
spring.data.mongodb.grid-fs-database
GridFS database name.
spring.data.mongodb.host
Mongo server host. Cannot be set with URI.
369
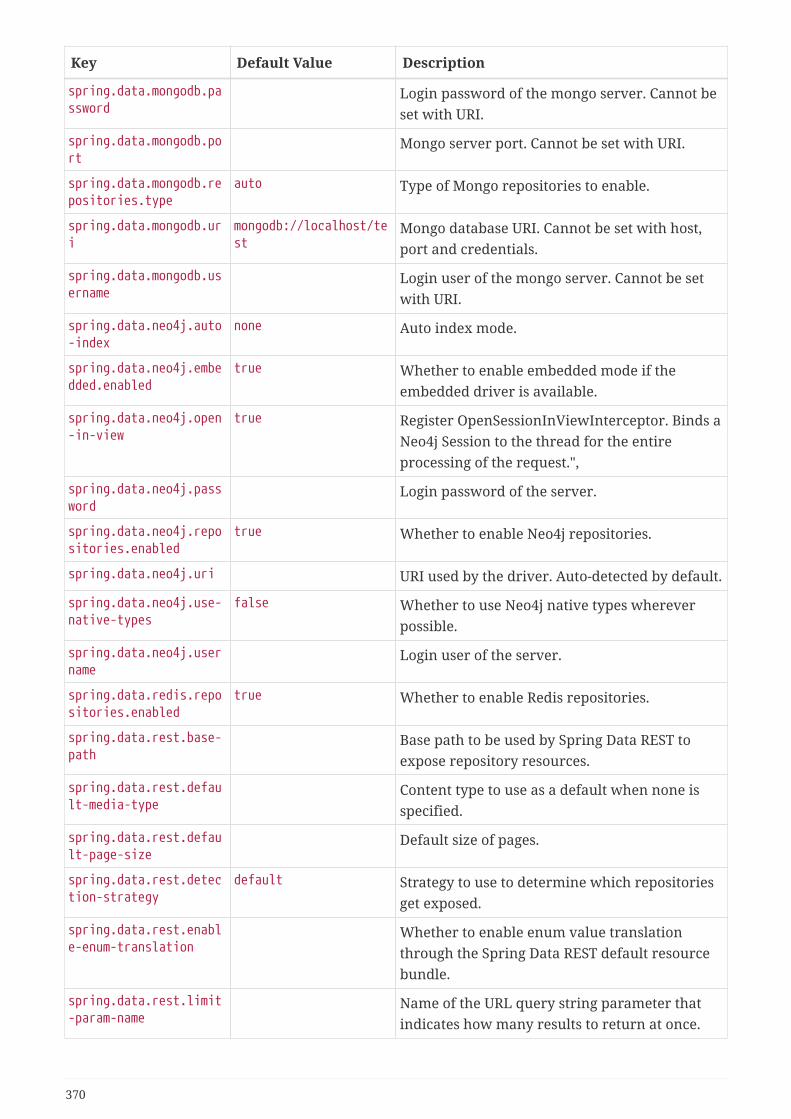
Key Default Value Description
spring.data.mongodb.password
Login password of the mongo server. Cannot beset with URI.
spring.data.mongodb.port
Mongo server port. Cannot be set with URI.
spring.data.mongodb.repositories.type
auto Type of Mongo repositories to enable.
spring.data.mongodb.uri
mongodb://localhost/test
Mongo database URI. Cannot be set with host,port and credentials.
spring.data.mongodb.username
Login user of the mongo server. Cannot be setwith URI.
spring.data.neo4j.auto-index
none Auto index mode.
spring.data.neo4j.embedded.enabled
true Whether to enable embedded mode if theembedded driver is available.
spring.data.neo4j.open-in-view
true Register OpenSessionInViewInterceptor. Binds aNeo4j Session to the thread for the entireprocessing of the request.",
spring.data.neo4j.password
Login password of the server.
spring.data.neo4j.repositories.enabled
true Whether to enable Neo4j repositories.
spring.data.neo4j.uri URI used by the driver. Auto-detected by default.
spring.data.neo4j.use-native-types
false Whether to use Neo4j native types whereverpossible.
spring.data.neo4j.username
Login user of the server.
spring.data.redis.repositories.enabled
true Whether to enable Redis repositories.
spring.data.rest.base-path
Base path to be used by Spring Data REST toexpose repository resources.
spring.data.rest.default-media-type
Content type to use as a default when none isspecified.
spring.data.rest.default-page-size
Default size of pages.
spring.data.rest.detection-strategy
default Strategy to use to determine which repositoriesget exposed.
spring.data.rest.enable-enum-translation
Whether to enable enum value translationthrough the Spring Data REST default resourcebundle.
spring.data.rest.limit-param-name
Name of the URL query string parameter thatindicates how many results to return at once.
370
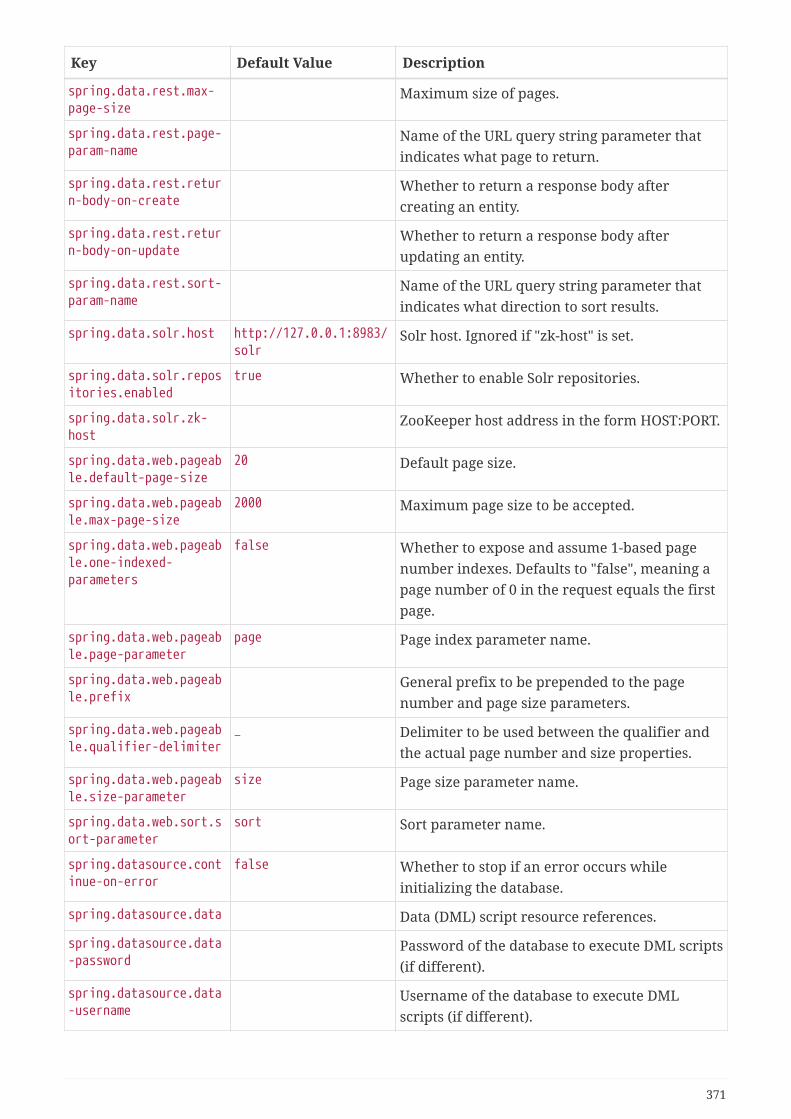
Key Default Value Description
spring.data.rest.max-page-size
Maximum size of pages.
spring.data.rest.page-param-name
Name of the URL query string parameter thatindicates what page to return.
spring.data.rest.return-body-on-create
Whether to return a response body aftercreating an entity.
spring.data.rest.return-body-on-update
Whether to return a response body afterupdating an entity.
spring.data.rest.sort-param-name
Name of the URL query string parameter thatindicates what direction to sort results.
spring.data.solr.host http://127.0.0.1:8983/solr
Solr host. Ignored if "zk-host" is set.
spring.data.solr.repositories.enabled
true Whether to enable Solr repositories.
spring.data.solr.zk-host
ZooKeeper host address in the form HOST:PORT.
spring.data.web.pageable.default-page-size
20 Default page size.
spring.data.web.pageable.max-page-size
2000 Maximum page size to be accepted.
spring.data.web.pageable.one-indexed-parameters
false Whether to expose and assume 1-based pagenumber indexes. Defaults to "false", meaning apage number of 0 in the request equals the firstpage.
spring.data.web.pageable.page-parameter
page Page index parameter name.
spring.data.web.pageable.prefix
General prefix to be prepended to the pagenumber and page size parameters.
spring.data.web.pageable.qualifier-delimiter
_ Delimiter to be used between the qualifier andthe actual page number and size properties.
spring.data.web.pageable.size-parameter
size Page size parameter name.
spring.data.web.sort.sort-parameter
sort Sort parameter name.
spring.datasource.continue-on-error
false Whether to stop if an error occurs whileinitializing the database.
spring.datasource.data Data (DML) script resource references.
spring.datasource.data-password
Password of the database to execute DML scripts(if different).
spring.datasource.data-username
Username of the database to execute DMLscripts (if different).
371
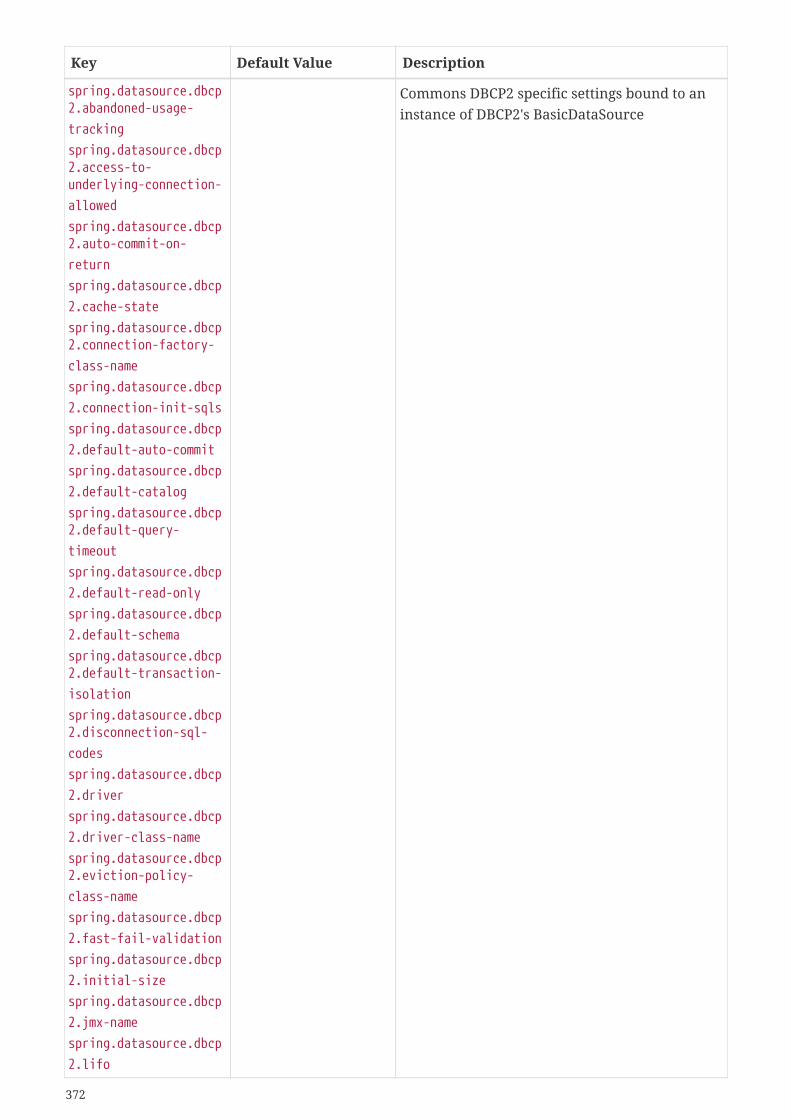
Key Default Value Description
spring.datasource.dbcp2.abandoned-usage-
tracking
spring.datasource.dbcp2.access-to-underlying-connection-
allowed
spring.datasource.dbcp2.auto-commit-on-
return
spring.datasource.dbcp
2.cache-state
spring.datasource.dbcp2.connection-factory-
class-name
spring.datasource.dbcp
2.connection-init-sqls
spring.datasource.dbcp
2.default-auto-commit
spring.datasource.dbcp
2.default-catalog
spring.datasource.dbcp2.default-query-
timeout
spring.datasource.dbcp
2.default-read-only
spring.datasource.dbcp
2.default-schema
spring.datasource.dbcp2.default-transaction-
isolation
spring.datasource.dbcp2.disconnection-sql-
codes
spring.datasource.dbcp
2.driver
spring.datasource.dbcp
2.driver-class-name
spring.datasource.dbcp2.eviction-policy-
class-name
spring.datasource.dbcp
2.fast-fail-validation
spring.datasource.dbcp
2.initial-size
spring.datasource.dbcp
2.jmx-name
spring.datasource.dbcp
2.lifo
Commons DBCP2 specific settings bound to aninstance of DBCP2's BasicDataSource
372

Key Default Value Description
spring.datasource.driver-class-name
Fully qualified name of the JDBC driver. Auto-detected based on the URL by default.
spring.datasource.generate-unique-name
false Whether to generate a random datasourcename.
373
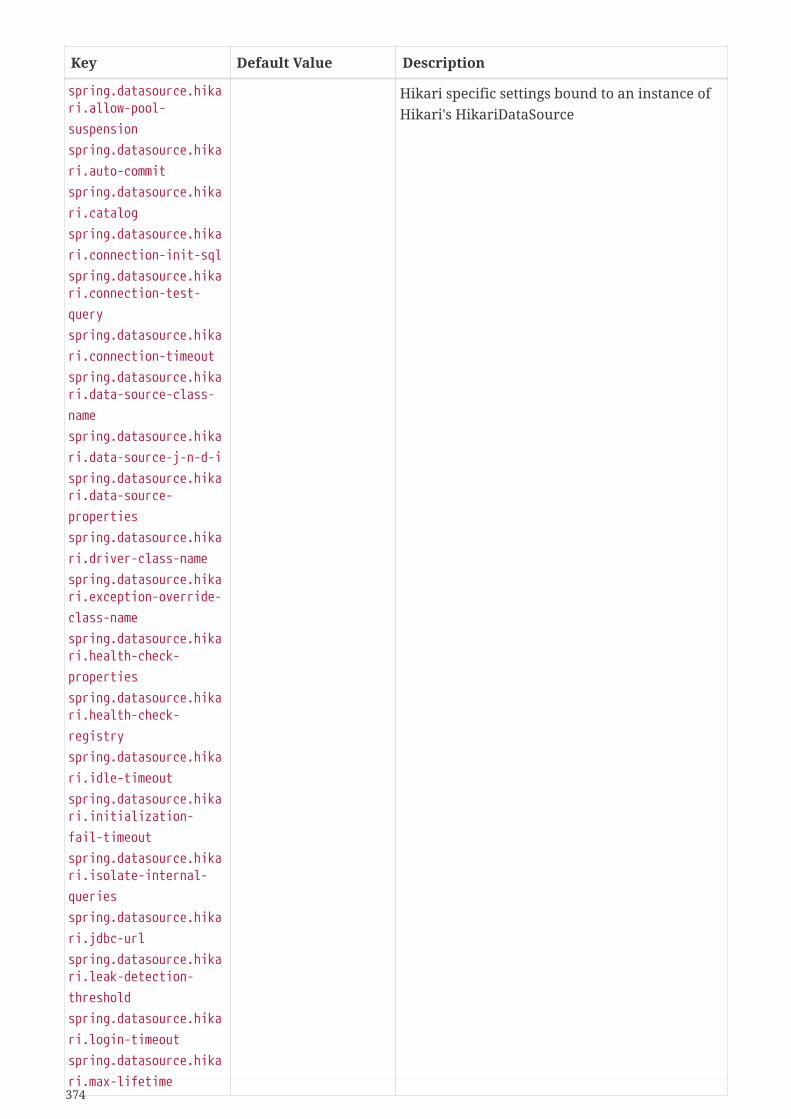
Key Default Value Description
spring.datasource.hikari.allow-pool-
suspension
spring.datasource.hika
ri.auto-commit
spring.datasource.hika
ri.catalog
spring.datasource.hika
ri.connection-init-sql
spring.datasource.hikari.connection-test-
query
spring.datasource.hika
ri.connection-timeout
spring.datasource.hikari.data-source-class-
name
spring.datasource.hika
ri.data-source-j-n-d-i
spring.datasource.hikari.data-source-
properties
spring.datasource.hika
ri.driver-class-name
spring.datasource.hikari.exception-override-
class-name
spring.datasource.hikari.health-check-
properties
spring.datasource.hikari.health-check-
registry
spring.datasource.hika
ri.idle-timeout
spring.datasource.hikari.initialization-
fail-timeout
spring.datasource.hikari.isolate-internal-
queries
spring.datasource.hika
ri.jdbc-url
spring.datasource.hikari.leak-detection-
threshold
spring.datasource.hika
ri.login-timeout
spring.datasource.hika
ri.max-lifetime
Hikari specific settings bound to an instance ofHikari's HikariDataSource
374
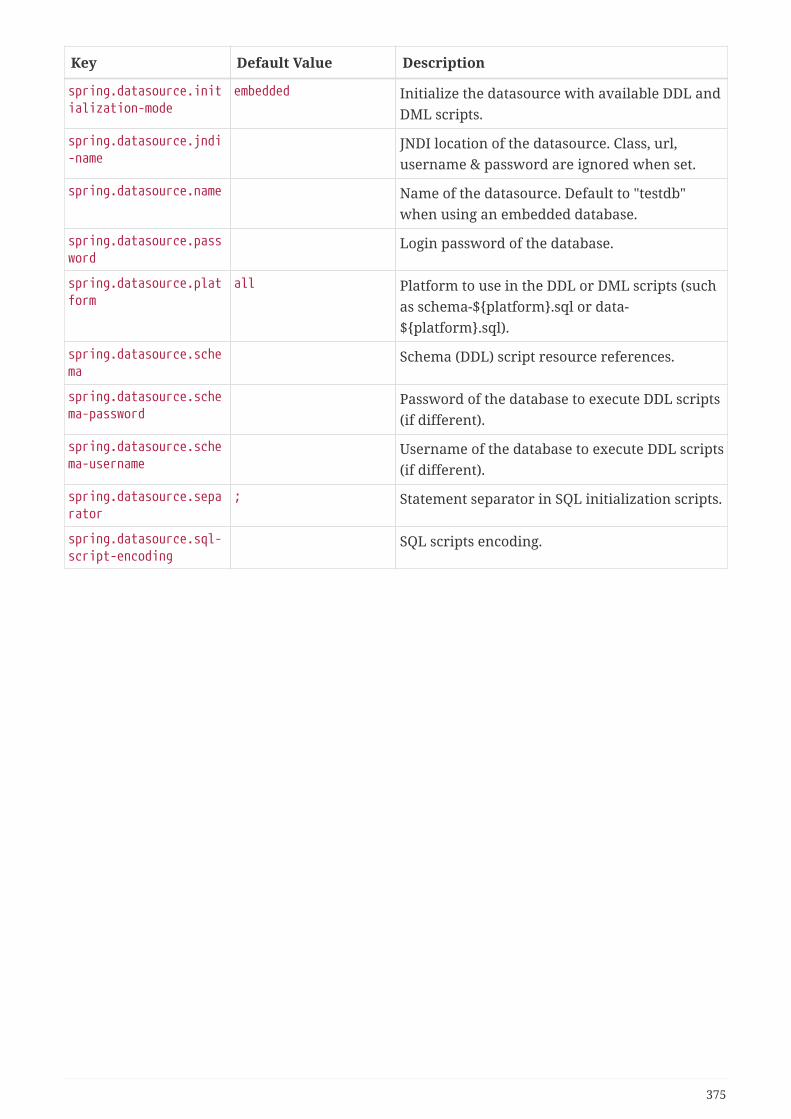
Key Default Value Description
spring.datasource.initialization-mode
embedded Initialize the datasource with available DDL andDML scripts.
spring.datasource.jndi-name
JNDI location of the datasource. Class, url,username & password are ignored when set.
spring.datasource.name Name of the datasource. Default to "testdb"when using an embedded database.
spring.datasource.password
Login password of the database.
spring.datasource.platform
all Platform to use in the DDL or DML scripts (suchas schema-${platform}.sql or data-${platform}.sql).
spring.datasource.schema
Schema (DDL) script resource references.
spring.datasource.schema-password
Password of the database to execute DDL scripts(if different).
spring.datasource.schema-username
Username of the database to execute DDL scripts(if different).
spring.datasource.separator
; Statement separator in SQL initialization scripts.
spring.datasource.sql-script-encoding
SQL scripts encoding.
375

Key Default Value Description
spring.datasource.tomcat.abandon-when-
percentage-full
spring.datasource.tomcat.access-to-underlying-connection-
allowed
spring.datasource.tomcat.alternate-username-
allowed
spring.datasource.tomc
at.commit-on-return
spring.datasource.tomcat.connection-
properties
spring.datasource.tomc
at.data-source
spring.datasource.tomc
at.data-source-j-n-d-i
spring.datasource.tomc
at.db-properties
spring.datasource.tomc
at.default-auto-commit
spring.datasource.tomc
at.default-catalog
spring.datasource.tomc
at.default-read-only
spring.datasource.tomcat.default-
transaction-isolation
spring.datasource.tomc
at.driver-class-name
spring.datasource.tomc
at.fair-queue
spring.datasource.tomcat.ignore-exception-
on-pre-load
spring.datasource.tomc
at.init-s-q-l
spring.datasource.tomc
at.initial-size
spring.datasource.tomc
at.jdbc-interceptors
spring.datasource.tomc
at.jmx-enabled
spring.datasource.tomc
at.log-abandoned
spring.datasource.tomcat.log-validation-
Tomcat datasource specific settings bound to aninstance of Tomcat JDBC's DataSource
376
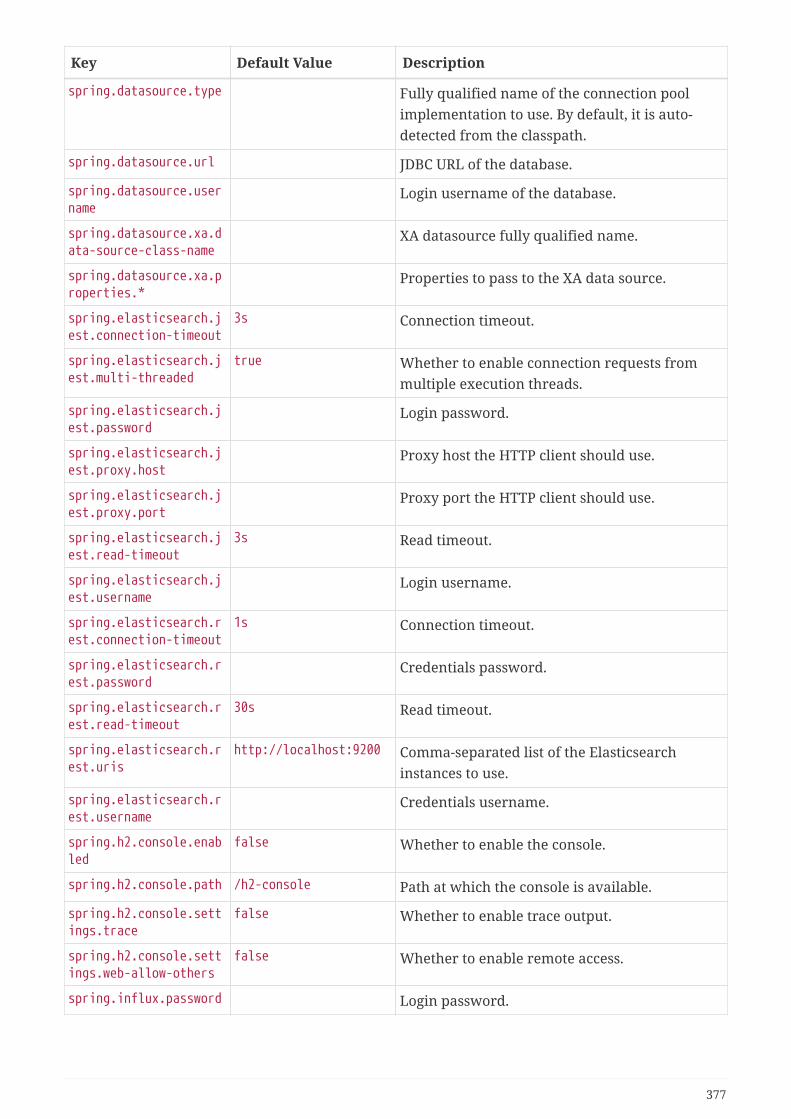
Key Default Value Description
spring.datasource.type Fully qualified name of the connection poolimplementation to use. By default, it is auto-detected from the classpath.
spring.datasource.url JDBC URL of the database.
spring.datasource.username
Login username of the database.
spring.datasource.xa.data-source-class-name
XA datasource fully qualified name.
spring.datasource.xa.properties.*
Properties to pass to the XA data source.
spring.elasticsearch.jest.connection-timeout
3s Connection timeout.
spring.elasticsearch.jest.multi-threaded
true Whether to enable connection requests frommultiple execution threads.
spring.elasticsearch.jest.password
Login password.
spring.elasticsearch.jest.proxy.host
Proxy host the HTTP client should use.
spring.elasticsearch.jest.proxy.port
Proxy port the HTTP client should use.
spring.elasticsearch.jest.read-timeout
3s Read timeout.
spring.elasticsearch.jest.username
Login username.
spring.elasticsearch.rest.connection-timeout
1s Connection timeout.
spring.elasticsearch.rest.password
Credentials password.
spring.elasticsearch.rest.read-timeout
30s Read timeout.
spring.elasticsearch.rest.uris
http://localhost:9200 Comma-separated list of the Elasticsearchinstances to use.
spring.elasticsearch.rest.username
Credentials username.
spring.h2.console.enabled
false Whether to enable the console.
spring.h2.console.path /h2-console Path at which the console is available.
spring.h2.console.settings.trace
false Whether to enable trace output.
spring.h2.console.settings.web-allow-others
false Whether to enable remote access.
spring.influx.password Login password.
377
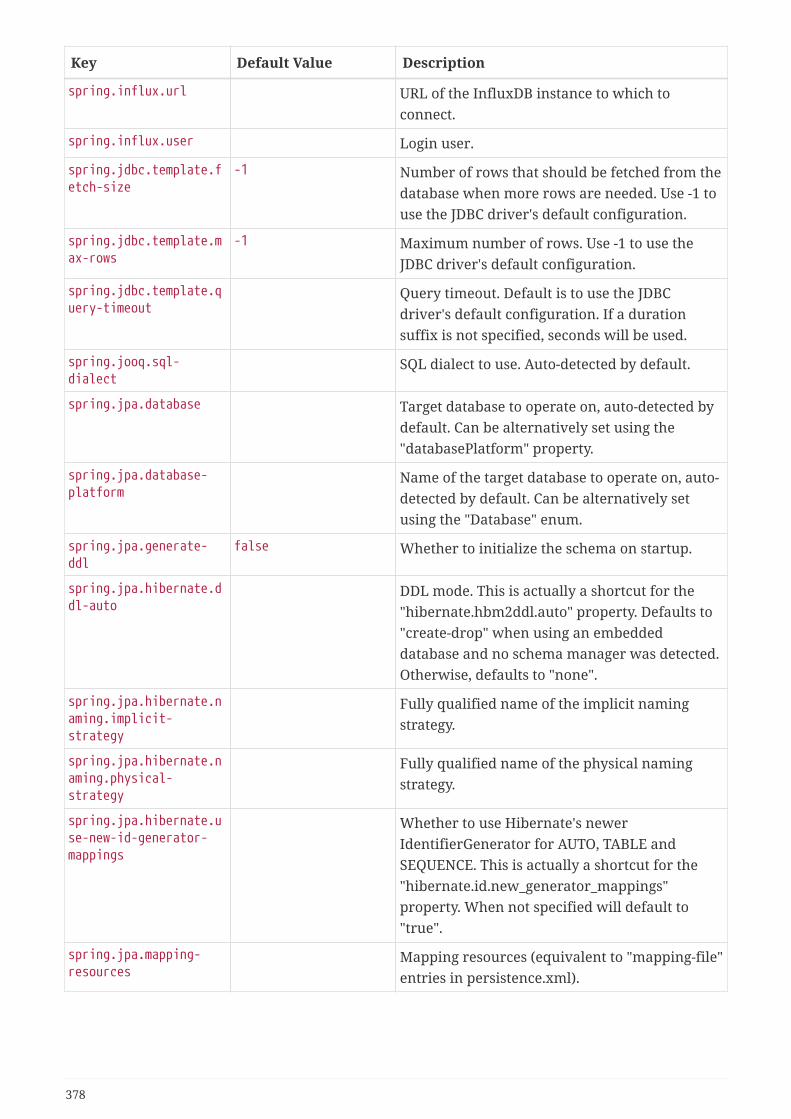
Key Default Value Description
spring.influx.url URL of the InfluxDB instance to which toconnect.
spring.influx.user Login user.
spring.jdbc.template.fetch-size
-1 Number of rows that should be fetched from thedatabase when more rows are needed. Use -1 touse the JDBC driver's default configuration.
spring.jdbc.template.max-rows
-1 Maximum number of rows. Use -1 to use theJDBC driver's default configuration.
spring.jdbc.template.query-timeout
Query timeout. Default is to use the JDBCdriver's default configuration. If a durationsuffix is not specified, seconds will be used.
spring.jooq.sql-dialect
SQL dialect to use. Auto-detected by default.
spring.jpa.database Target database to operate on, auto-detected bydefault. Can be alternatively set using the"databasePlatform" property.
spring.jpa.database-platform
Name of the target database to operate on, auto-detected by default. Can be alternatively setusing the "Database" enum.
spring.jpa.generate-ddl
false Whether to initialize the schema on startup.
spring.jpa.hibernate.ddl-auto
DDL mode. This is actually a shortcut for the"hibernate.hbm2ddl.auto" property. Defaults to"create-drop" when using an embeddeddatabase and no schema manager was detected.Otherwise, defaults to "none".
spring.jpa.hibernate.naming.implicit-strategy
Fully qualified name of the implicit namingstrategy.
spring.jpa.hibernate.naming.physical-strategy
Fully qualified name of the physical namingstrategy.
spring.jpa.hibernate.use-new-id-generator-mappings
Whether to use Hibernate's newerIdentifierGenerator for AUTO, TABLE andSEQUENCE. This is actually a shortcut for the"hibernate.id.new_generator_mappings"property. When not specified will default to"true".
spring.jpa.mapping-resources
Mapping resources (equivalent to "mapping-file"entries in persistence.xml).
378
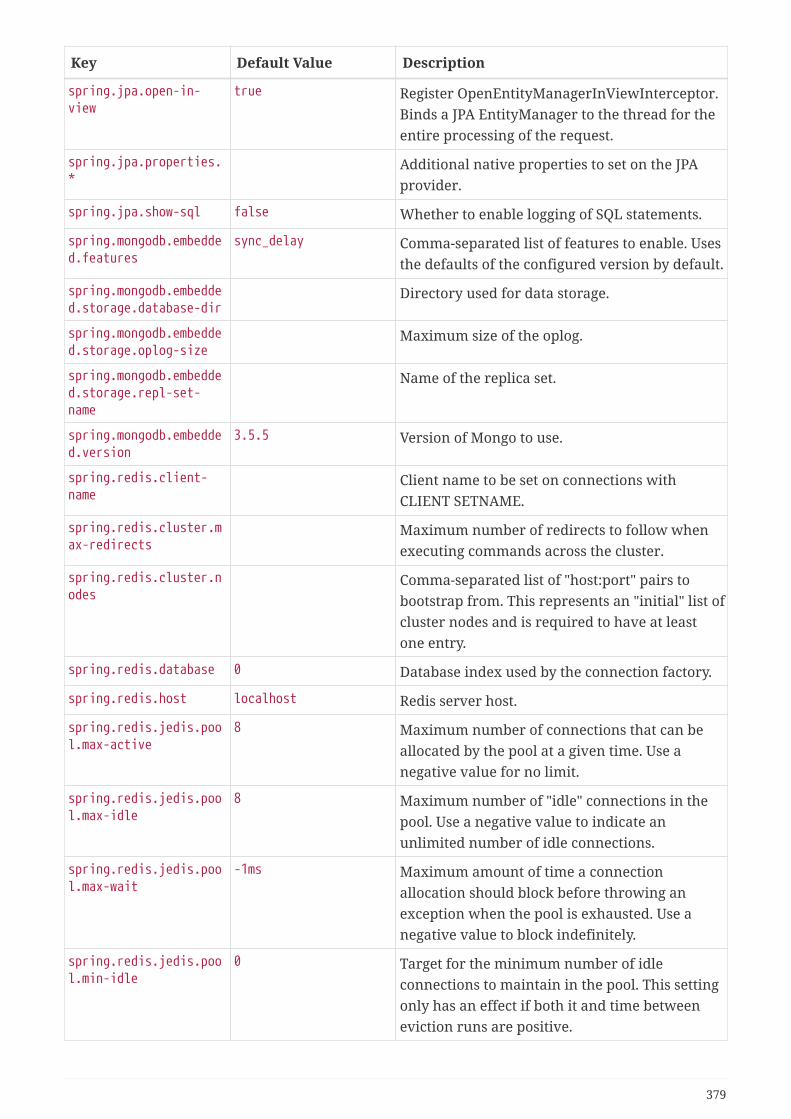
Key Default Value Description
spring.jpa.open-in-view
true Register OpenEntityManagerInViewInterceptor.Binds a JPA EntityManager to the thread for theentire processing of the request.
spring.jpa.properties.*
Additional native properties to set on the JPAprovider.
spring.jpa.show-sql false Whether to enable logging of SQL statements.
spring.mongodb.embedded.features
sync_delay Comma-separated list of features to enable. Usesthe defaults of the configured version by default.
spring.mongodb.embedded.storage.database-dir
Directory used for data storage.
spring.mongodb.embedded.storage.oplog-size
Maximum size of the oplog.
spring.mongodb.embedded.storage.repl-set-name
Name of the replica set.
spring.mongodb.embedded.version
3.5.5 Version of Mongo to use.
spring.redis.client-name
Client name to be set on connections withCLIENT SETNAME.
spring.redis.cluster.max-redirects
Maximum number of redirects to follow whenexecuting commands across the cluster.
spring.redis.cluster.nodes
Comma-separated list of "host:port" pairs tobootstrap from. This represents an "initial" list ofcluster nodes and is required to have at leastone entry.
spring.redis.database 0 Database index used by the connection factory.
spring.redis.host localhost Redis server host.
spring.redis.jedis.pool.max-active
8 Maximum number of connections that can beallocated by the pool at a given time. Use anegative value for no limit.
spring.redis.jedis.pool.max-idle
8 Maximum number of "idle" connections in thepool. Use a negative value to indicate anunlimited number of idle connections.
spring.redis.jedis.pool.max-wait
-1ms Maximum amount of time a connectionallocation should block before throwing anexception when the pool is exhausted. Use anegative value to block indefinitely.
spring.redis.jedis.pool.min-idle
0 Target for the minimum number of idleconnections to maintain in the pool. This settingonly has an effect if both it and time betweeneviction runs are positive.
379
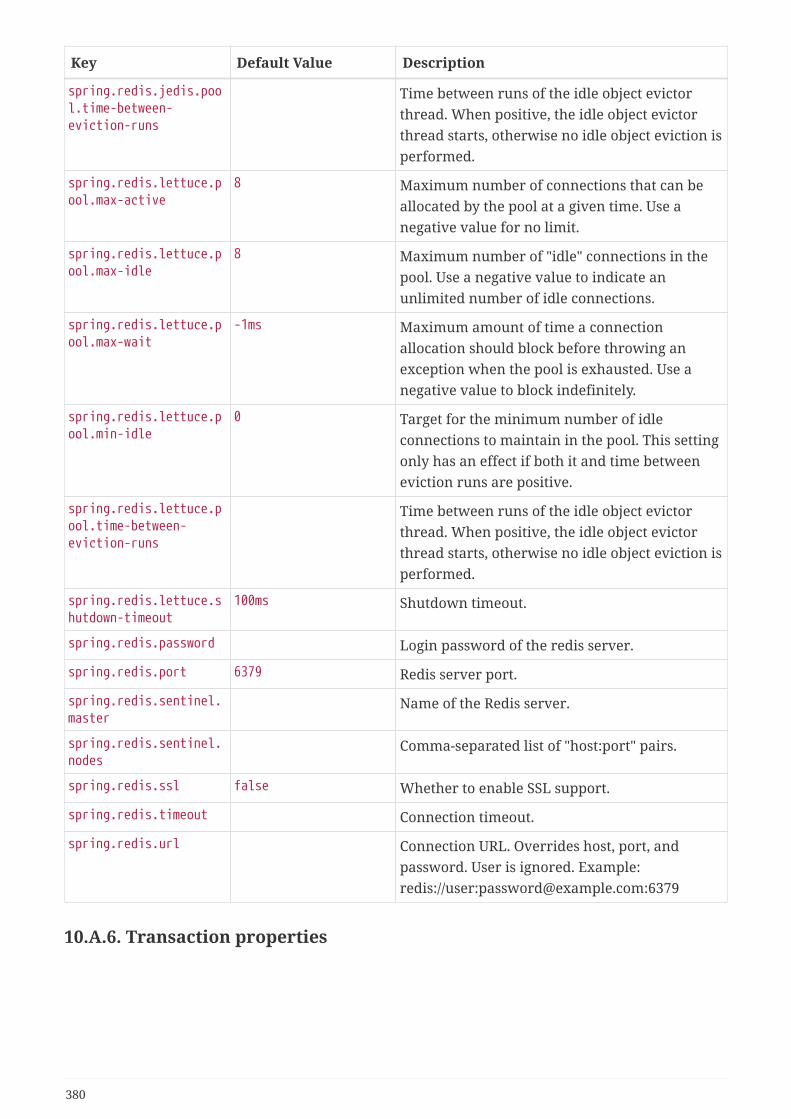
Key Default Value Description
spring.redis.jedis.pool.time-between-eviction-runs
Time between runs of the idle object evictorthread. When positive, the idle object evictorthread starts, otherwise no idle object eviction isperformed.
spring.redis.lettuce.pool.max-active
8 Maximum number of connections that can beallocated by the pool at a given time. Use anegative value for no limit.
spring.redis.lettuce.pool.max-idle
8 Maximum number of "idle" connections in thepool. Use a negative value to indicate anunlimited number of idle connections.
spring.redis.lettuce.pool.max-wait
-1ms Maximum amount of time a connectionallocation should block before throwing anexception when the pool is exhausted. Use anegative value to block indefinitely.
spring.redis.lettuce.pool.min-idle
0 Target for the minimum number of idleconnections to maintain in the pool. This settingonly has an effect if both it and time betweeneviction runs are positive.
spring.redis.lettuce.pool.time-between-eviction-runs
Time between runs of the idle object evictorthread. When positive, the idle object evictorthread starts, otherwise no idle object eviction isperformed.
spring.redis.lettuce.shutdown-timeout
100ms Shutdown timeout.
spring.redis.password Login password of the redis server.
spring.redis.port 6379 Redis server port.
spring.redis.sentinel.master
Name of the Redis server.
spring.redis.sentinel.nodes
Comma-separated list of "host:port" pairs.
spring.redis.ssl false Whether to enable SSL support.
spring.redis.timeout Connection timeout.
spring.redis.url Connection URL. Overrides host, port, andpassword. User is ignored. Example:redis://user:[email protected]:6379
10.A.6. Transaction properties
380

Key Default Value Description
spring.jta.atomikos.connectionfactory.borrow-connection-timeout
30 Timeout, in seconds, for borrowing connectionsfrom the pool.
spring.jta.atomikos.connectionfactory.ignore-session-transacted-flag
true Whether to ignore the transacted flag whencreating session.
spring.jta.atomikos.connectionfactory.local-transaction-mode
false Whether local transactions are desired.
spring.jta.atomikos.connectionfactory.maintenance-interval
60 Time, in seconds, between runs of the pool'smaintenance thread.
spring.jta.atomikos.connectionfactory.max-idle-time
60 Time, in seconds, after which connections arecleaned up from the pool.
spring.jta.atomikos.connectionfactory.max-lifetime
0 Time, in seconds, that a connection can bepooled for before being destroyed. 0 denotes nolimit.
spring.jta.atomikos.connectionfactory.max-pool-size
1 Maximum size of the pool.
spring.jta.atomikos.connectionfactory.min-pool-size
1 Minimum size of the pool.
spring.jta.atomikos.connectionfactory.reap-timeout
0 Reap timeout, in seconds, for borrowedconnections. 0 denotes no limit.
spring.jta.atomikos.connectionfactory.unique-resource-name
jmsConnectionFactory Unique name used to identify the resourceduring recovery.
spring.jta.atomikos.connectionfactory.xa-connection-factory-class-name
Vendor-specific implementation ofXAConnectionFactory.
spring.jta.atomikos.connectionfactory.xa-properties
Vendor-specific XA properties.
spring.jta.atomikos.datasource.borrow-connection-timeout
30 Timeout, in seconds, for borrowing connectionsfrom the pool.
spring.jta.atomikos.datasource.concurrent-connection-validation
true Whether to use concurrent connectionvalidation.
spring.jta.atomikos.datasource.default-isolation-level
Default isolation level of connections providedby the pool.
381

Key Default Value Description
spring.jta.atomikos.datasource.login-timeout
0 Timeout, in seconds, for establishing a databaseconnection.
spring.jta.atomikos.datasource.maintenance-interval
60 Time, in seconds, between runs of the pool'smaintenance thread.
spring.jta.atomikos.datasource.max-idle-time
60 Time, in seconds, after which connections arecleaned up from the pool.
spring.jta.atomikos.datasource.max-lifetime
0 Time, in seconds, that a connection can bepooled for before being destroyed. 0 denotes nolimit.
spring.jta.atomikos.datasource.max-pool-size
1 Maximum size of the pool.
spring.jta.atomikos.datasource.min-pool-size
1 Minimum size of the pool.
spring.jta.atomikos.datasource.reap-timeout
0 Reap timeout, in seconds, for borrowedconnections. 0 denotes no limit.
spring.jta.atomikos.datasource.test-query
SQL query or statement used to validate aconnection before returning it.
spring.jta.atomikos.datasource.unique-resource-name
dataSource Unique name used to identify the resourceduring recovery.
spring.jta.atomikos.datasource.xa-data-source-class-name
Vendor-specific implementation ofXAConnectionFactory.
spring.jta.atomikos.datasource.xa-properties
Vendor-specific XA properties.
spring.jta.atomikos.properties.allow-sub-transactions
true Specify whether sub-transactions are allowed.
spring.jta.atomikos.properties.checkpoint-interval
500 Interval between checkpoints, expressed as thenumber of log writes between two checkpoints.A checkpoint reduces the log file size at theexpense of adding some overhead in theruntime.
spring.jta.atomikos.properties.default-jta-timeout
10000ms Default timeout for JTA transactions.
spring.jta.atomikos.properties.default-max-wait-time-on-shutdown
How long should normal shutdown (no-force)wait for transactions to complete.
spring.jta.atomikos.properties.enable-logging
true Whether to enable disk logging.
382
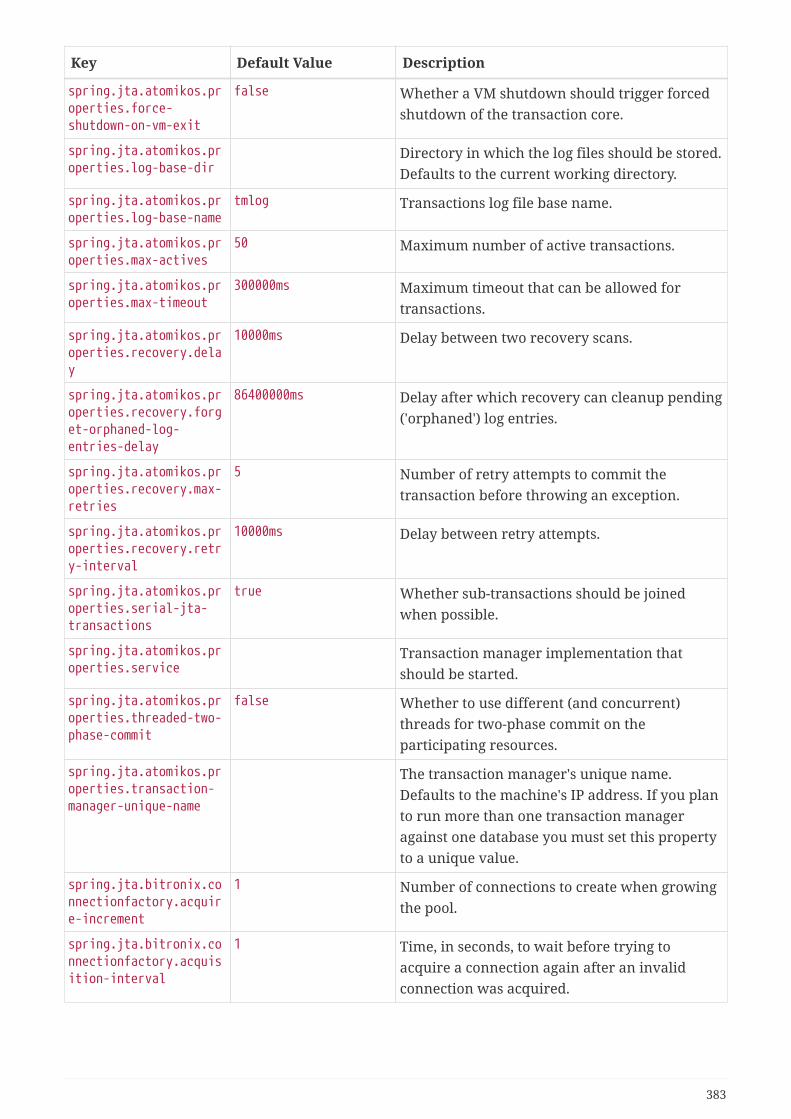
Key Default Value Description
spring.jta.atomikos.properties.force-shutdown-on-vm-exit
false Whether a VM shutdown should trigger forcedshutdown of the transaction core.
spring.jta.atomikos.properties.log-base-dir
Directory in which the log files should be stored.Defaults to the current working directory.
spring.jta.atomikos.properties.log-base-name
tmlog Transactions log file base name.
spring.jta.atomikos.properties.max-actives
50 Maximum number of active transactions.
spring.jta.atomikos.properties.max-timeout
300000ms Maximum timeout that can be allowed fortransactions.
spring.jta.atomikos.properties.recovery.delay
10000ms Delay between two recovery scans.
spring.jta.atomikos.properties.recovery.forget-orphaned-log-entries-delay
86400000ms Delay after which recovery can cleanup pending('orphaned') log entries.
spring.jta.atomikos.properties.recovery.max-retries
5 Number of retry attempts to commit thetransaction before throwing an exception.
spring.jta.atomikos.properties.recovery.retry-interval
10000ms Delay between retry attempts.
spring.jta.atomikos.properties.serial-jta-transactions
true Whether sub-transactions should be joinedwhen possible.
spring.jta.atomikos.properties.service
Transaction manager implementation thatshould be started.
spring.jta.atomikos.properties.threaded-two-phase-commit
false Whether to use different (and concurrent)threads for two-phase commit on theparticipating resources.
spring.jta.atomikos.properties.transaction-manager-unique-name
The transaction manager's unique name.Defaults to the machine's IP address. If you planto run more than one transaction manageragainst one database you must set this propertyto a unique value.
spring.jta.bitronix.connectionfactory.acquire-increment
1 Number of connections to create when growingthe pool.
spring.jta.bitronix.connectionfactory.acquisition-interval
1 Time, in seconds, to wait before trying toacquire a connection again after an invalidconnection was acquired.
383
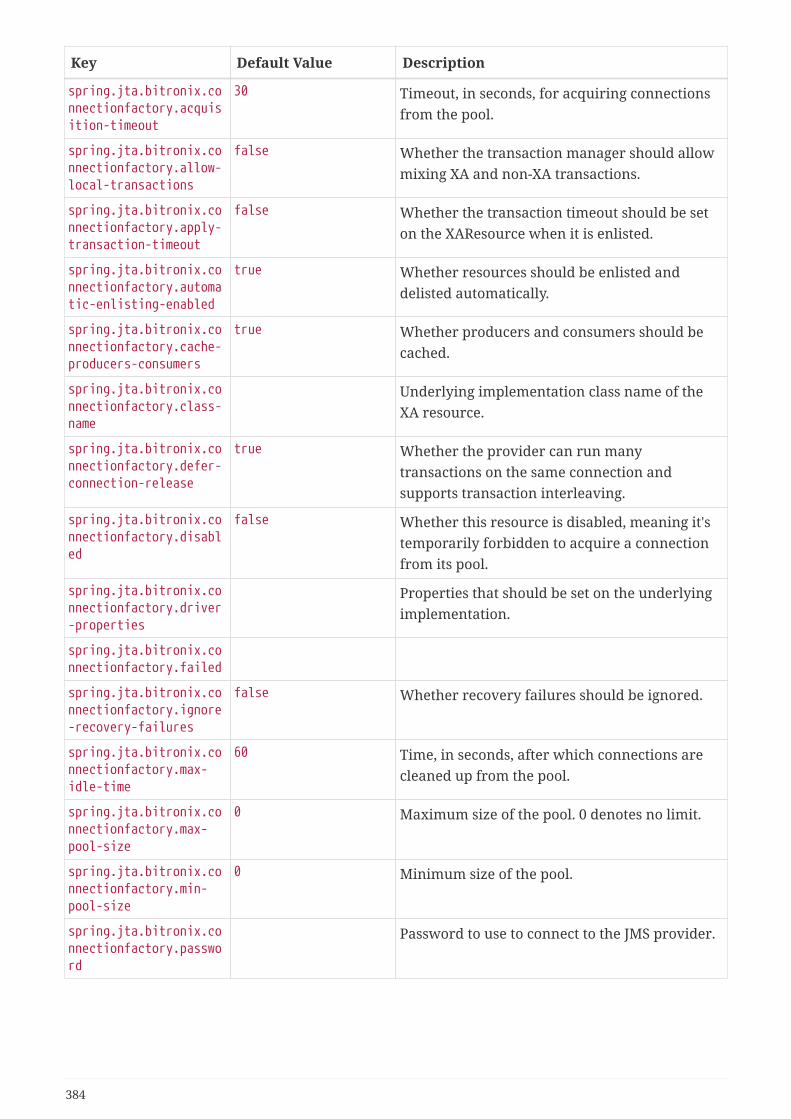
Key Default Value Description
spring.jta.bitronix.connectionfactory.acquisition-timeout
30 Timeout, in seconds, for acquiring connectionsfrom the pool.
spring.jta.bitronix.connectionfactory.allow-local-transactions
false Whether the transaction manager should allowmixing XA and non-XA transactions.
spring.jta.bitronix.connectionfactory.apply-transaction-timeout
false Whether the transaction timeout should be seton the XAResource when it is enlisted.
spring.jta.bitronix.connectionfactory.automatic-enlisting-enabled
true Whether resources should be enlisted anddelisted automatically.
spring.jta.bitronix.connectionfactory.cache-producers-consumers
true Whether producers and consumers should becached.
spring.jta.bitronix.connectionfactory.class-name
Underlying implementation class name of theXA resource.
spring.jta.bitronix.connectionfactory.defer-connection-release
true Whether the provider can run manytransactions on the same connection andsupports transaction interleaving.
spring.jta.bitronix.connectionfactory.disabled
false Whether this resource is disabled, meaning it'stemporarily forbidden to acquire a connectionfrom its pool.
spring.jta.bitronix.connectionfactory.driver-properties
Properties that should be set on the underlyingimplementation.
spring.jta.bitronix.connectionfactory.failed
spring.jta.bitronix.connectionfactory.ignore-recovery-failures
false Whether recovery failures should be ignored.
spring.jta.bitronix.connectionfactory.max-idle-time
60 Time, in seconds, after which connections arecleaned up from the pool.
spring.jta.bitronix.connectionfactory.max-pool-size
0 Maximum size of the pool. 0 denotes no limit.
spring.jta.bitronix.connectionfactory.min-pool-size
0 Minimum size of the pool.
spring.jta.bitronix.connectionfactory.password
Password to use to connect to the JMS provider.
384

Key Default Value Description
spring.jta.bitronix.connectionfactory.share-transaction-connections
false Whether connections in the ACCESSIBLE statecan be shared within the context of atransaction.
spring.jta.bitronix.connectionfactory.test-connections
false Whether connections should be tested whenacquired from the pool.
spring.jta.bitronix.connectionfactory.two-pc-ordering-position
1 Position that this resource should take duringtwo-phase commit (always first isInteger.MIN_VALUE, always last isInteger.MAX_VALUE).
spring.jta.bitronix.connectionfactory.unique-name
jmsConnectionFactory Unique name used to identify the resourceduring recovery.
spring.jta.bitronix.connectionfactory.use-tm-join
true Whether TMJOIN should be used when startingXAResources.
spring.jta.bitronix.connectionfactory.user
User to use to connect to the JMS provider.
spring.jta.bitronix.datasource.acquire-increment
1 Number of connections to create when growingthe pool.
spring.jta.bitronix.datasource.acquisition-interval
1 Time, in seconds, to wait before trying toacquire a connection again after an invalidconnection was acquired.
spring.jta.bitronix.datasource.acquisition-timeout
30 Timeout, in seconds, for acquiring connectionsfrom the pool.
spring.jta.bitronix.datasource.allow-local-transactions
false Whether the transaction manager should allowmixing XA and non-XA transactions.
spring.jta.bitronix.datasource.apply-transaction-timeout
false Whether the transaction timeout should be seton the XAResource when it is enlisted.
spring.jta.bitronix.datasource.automatic-enlisting-enabled
true Whether resources should be enlisted anddelisted automatically.
spring.jta.bitronix.datasource.class-name
Underlying implementation class name of theXA resource.
spring.jta.bitronix.datasource.cursor-holdability
Default cursor holdability for connections.
spring.jta.bitronix.datasource.defer-connection-release
true Whether the database can run manytransactions on the same connection andsupports transaction interleaving.
385
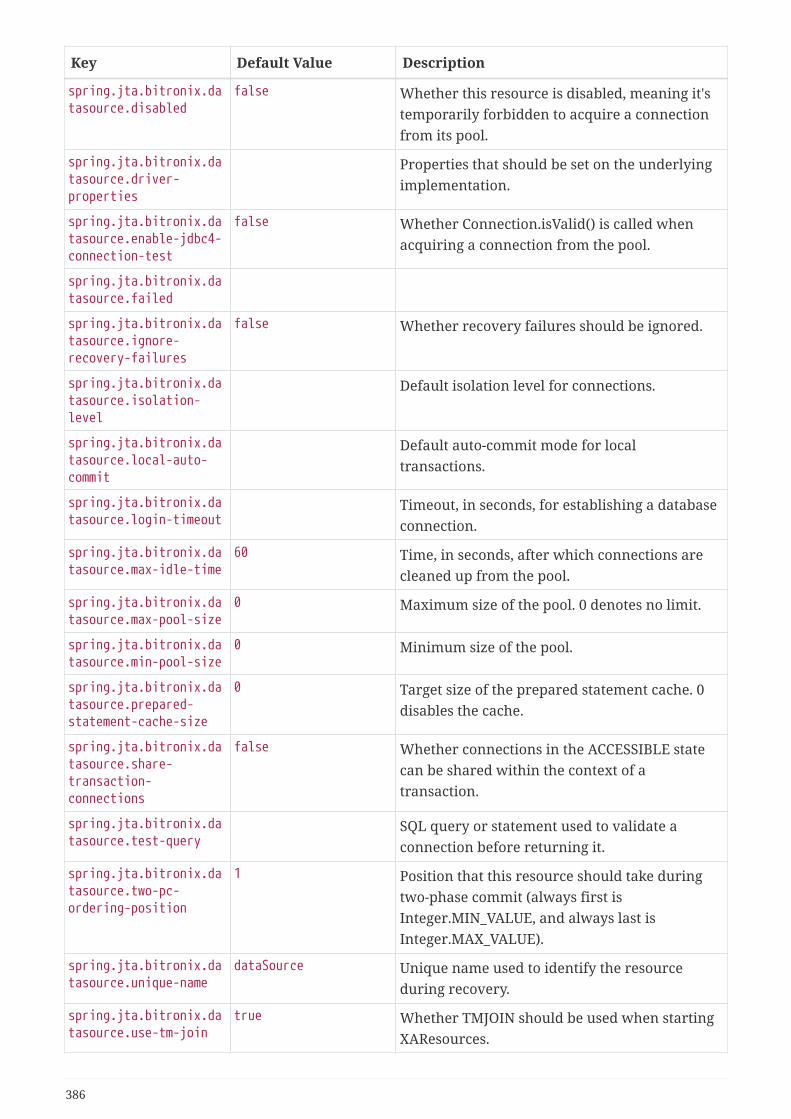
Key Default Value Description
spring.jta.bitronix.datasource.disabled
false Whether this resource is disabled, meaning it'stemporarily forbidden to acquire a connectionfrom its pool.
spring.jta.bitronix.datasource.driver-properties
Properties that should be set on the underlyingimplementation.
spring.jta.bitronix.datasource.enable-jdbc4-connection-test
false Whether Connection.isValid() is called whenacquiring a connection from the pool.
spring.jta.bitronix.datasource.failed
spring.jta.bitronix.datasource.ignore-recovery-failures
false Whether recovery failures should be ignored.
spring.jta.bitronix.datasource.isolation-level
Default isolation level for connections.
spring.jta.bitronix.datasource.local-auto-commit
Default auto-commit mode for localtransactions.
spring.jta.bitronix.datasource.login-timeout
Timeout, in seconds, for establishing a databaseconnection.
spring.jta.bitronix.datasource.max-idle-time
60 Time, in seconds, after which connections arecleaned up from the pool.
spring.jta.bitronix.datasource.max-pool-size
0 Maximum size of the pool. 0 denotes no limit.
spring.jta.bitronix.datasource.min-pool-size
0 Minimum size of the pool.
spring.jta.bitronix.datasource.prepared-statement-cache-size
0 Target size of the prepared statement cache. 0disables the cache.
spring.jta.bitronix.datasource.share-transaction-connections
false Whether connections in the ACCESSIBLE statecan be shared within the context of atransaction.
spring.jta.bitronix.datasource.test-query
SQL query or statement used to validate aconnection before returning it.
spring.jta.bitronix.datasource.two-pc-ordering-position
1 Position that this resource should take duringtwo-phase commit (always first isInteger.MIN_VALUE, and always last isInteger.MAX_VALUE).
spring.jta.bitronix.datasource.unique-name
dataSource Unique name used to identify the resourceduring recovery.
spring.jta.bitronix.datasource.use-tm-join
true Whether TMJOIN should be used when startingXAResources.
386
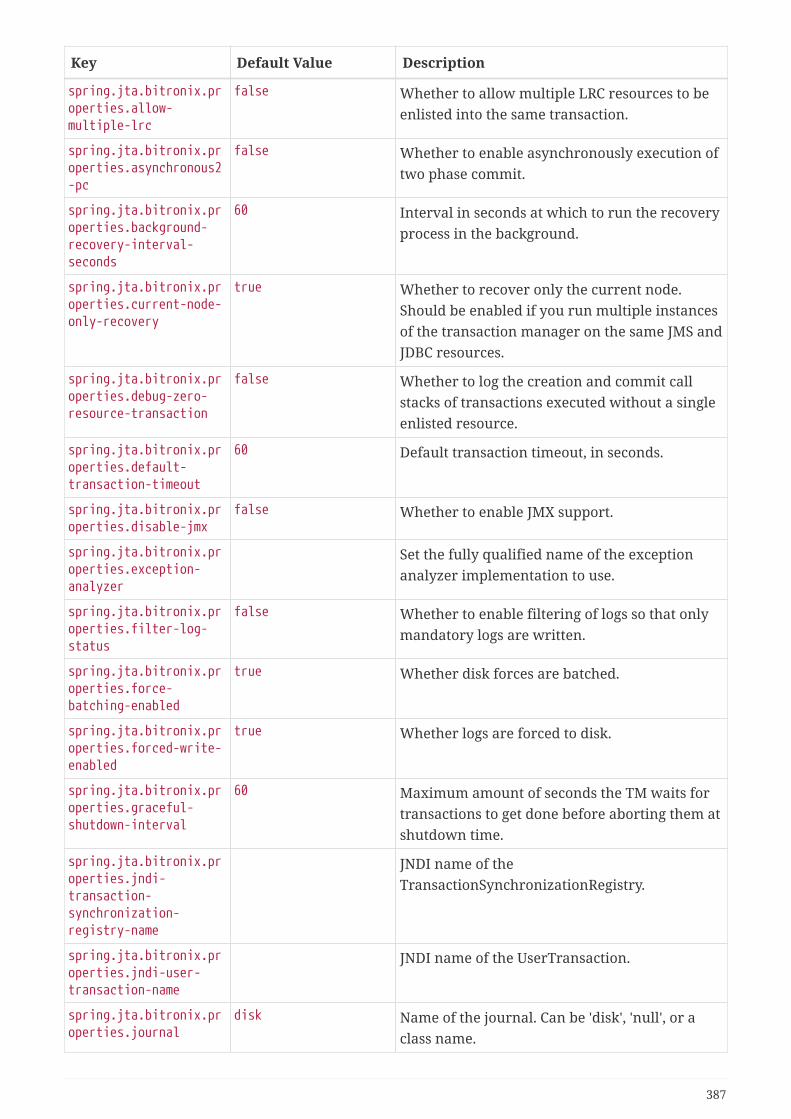
Key Default Value Description
spring.jta.bitronix.properties.allow-multiple-lrc
false Whether to allow multiple LRC resources to beenlisted into the same transaction.
spring.jta.bitronix.properties.asynchronous2-pc
false Whether to enable asynchronously execution oftwo phase commit.
spring.jta.bitronix.properties.background-recovery-interval-seconds
60 Interval in seconds at which to run the recoveryprocess in the background.
spring.jta.bitronix.properties.current-node-only-recovery
true Whether to recover only the current node.Should be enabled if you run multiple instancesof the transaction manager on the same JMS andJDBC resources.
spring.jta.bitronix.properties.debug-zero-resource-transaction
false Whether to log the creation and commit callstacks of transactions executed without a singleenlisted resource.
spring.jta.bitronix.properties.default-transaction-timeout
60 Default transaction timeout, in seconds.
spring.jta.bitronix.properties.disable-jmx
false Whether to enable JMX support.
spring.jta.bitronix.properties.exception-analyzer
Set the fully qualified name of the exceptionanalyzer implementation to use.
spring.jta.bitronix.properties.filter-log-status
false Whether to enable filtering of logs so that onlymandatory logs are written.
spring.jta.bitronix.properties.force-batching-enabled
true Whether disk forces are batched.
spring.jta.bitronix.properties.forced-write-enabled
true Whether logs are forced to disk.
spring.jta.bitronix.properties.graceful-shutdown-interval
60 Maximum amount of seconds the TM waits fortransactions to get done before aborting them atshutdown time.
spring.jta.bitronix.properties.jndi-transaction-synchronization-registry-name
JNDI name of theTransactionSynchronizationRegistry.
spring.jta.bitronix.properties.jndi-user-transaction-name
JNDI name of the UserTransaction.
spring.jta.bitronix.properties.journal
disk Name of the journal. Can be 'disk', 'null', or aclass name.
387

Key Default Value Description
spring.jta.bitronix.properties.log-part1-filename
btm1.tlog Name of the first fragment of the journal.
spring.jta.bitronix.properties.log-part2-filename
btm2.tlog Name of the second fragment of the journal.
spring.jta.bitronix.properties.max-log-size-in-mb
2 Maximum size in megabytes of the journalfragments.
spring.jta.bitronix.properties.resource-configuration-filename
ResourceLoader configuration file name.
spring.jta.bitronix.properties.server-id
ASCII ID that must uniquely identify this TMinstance. Defaults to the machine's IP address.
spring.jta.bitronix.properties.skip-corrupted-logs
false Skip corrupted transactions log entries. Use onlyat last resort when all you have to recover is apair of corrupted files.
spring.jta.bitronix.properties.warn-about-zero-resource-transaction
true Whether to log a warning for transactionsexecuted without a single enlisted resource.
spring.jta.enabled true Whether to enable JTA support.
spring.jta.log-dir Transaction logs directory.
spring.jta.transaction-manager-id
Transaction manager unique identifier.
spring.transaction.default-timeout
Default transaction timeout. If a duration suffixis not specified, seconds will be used.
spring.transaction.rollback-on-commit-failure
Whether to roll back on commit failures.
10.A.7. Data migration properties
Key Default Value Description
spring.flyway.baseline-description
<< Flyway Baseline >> Description to tag an existing schema with whenapplying a baseline.
spring.flyway.baseline-on-migrate
false Whether to automatically call baseline whenmigrating a non-empty schema.
spring.flyway.baseline-version
1 Version to tag an existing schema with whenexecuting baseline.
spring.flyway.batch Whether to batch SQL statements whenexecuting them. Requires Flyway Pro or FlywayEnterprise.
388
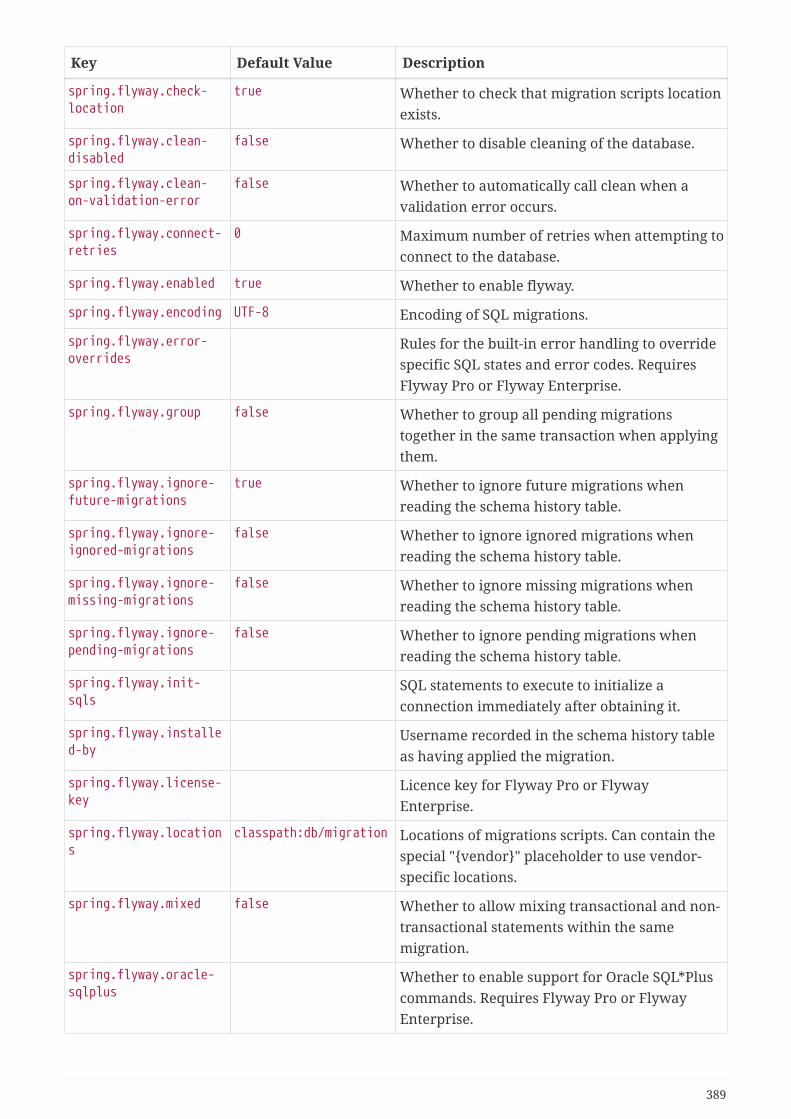
Key Default Value Description
spring.flyway.check-location
true Whether to check that migration scripts locationexists.
spring.flyway.clean-disabled
false Whether to disable cleaning of the database.
spring.flyway.clean-on-validation-error
false Whether to automatically call clean when avalidation error occurs.
spring.flyway.connect-retries
0 Maximum number of retries when attempting toconnect to the database.
spring.flyway.enabled true Whether to enable flyway.
spring.flyway.encoding UTF-8 Encoding of SQL migrations.
spring.flyway.error-overrides
Rules for the built-in error handling to overridespecific SQL states and error codes. RequiresFlyway Pro or Flyway Enterprise.
spring.flyway.group false Whether to group all pending migrationstogether in the same transaction when applyingthem.
spring.flyway.ignore-future-migrations
true Whether to ignore future migrations whenreading the schema history table.
spring.flyway.ignore-ignored-migrations
false Whether to ignore ignored migrations whenreading the schema history table.
spring.flyway.ignore-missing-migrations
false Whether to ignore missing migrations whenreading the schema history table.
spring.flyway.ignore-pending-migrations
false Whether to ignore pending migrations whenreading the schema history table.
spring.flyway.init-sqls
SQL statements to execute to initialize aconnection immediately after obtaining it.
spring.flyway.installed-by
Username recorded in the schema history tableas having applied the migration.
spring.flyway.license-key
Licence key for Flyway Pro or FlywayEnterprise.
spring.flyway.locations
classpath:db/migration Locations of migrations scripts. Can contain thespecial "{vendor}" placeholder to use vendor-specific locations.
spring.flyway.mixed false Whether to allow mixing transactional and non-transactional statements within the samemigration.
spring.flyway.oracle-sqlplus
Whether to enable support for Oracle SQL*Pluscommands. Requires Flyway Pro or FlywayEnterprise.
389
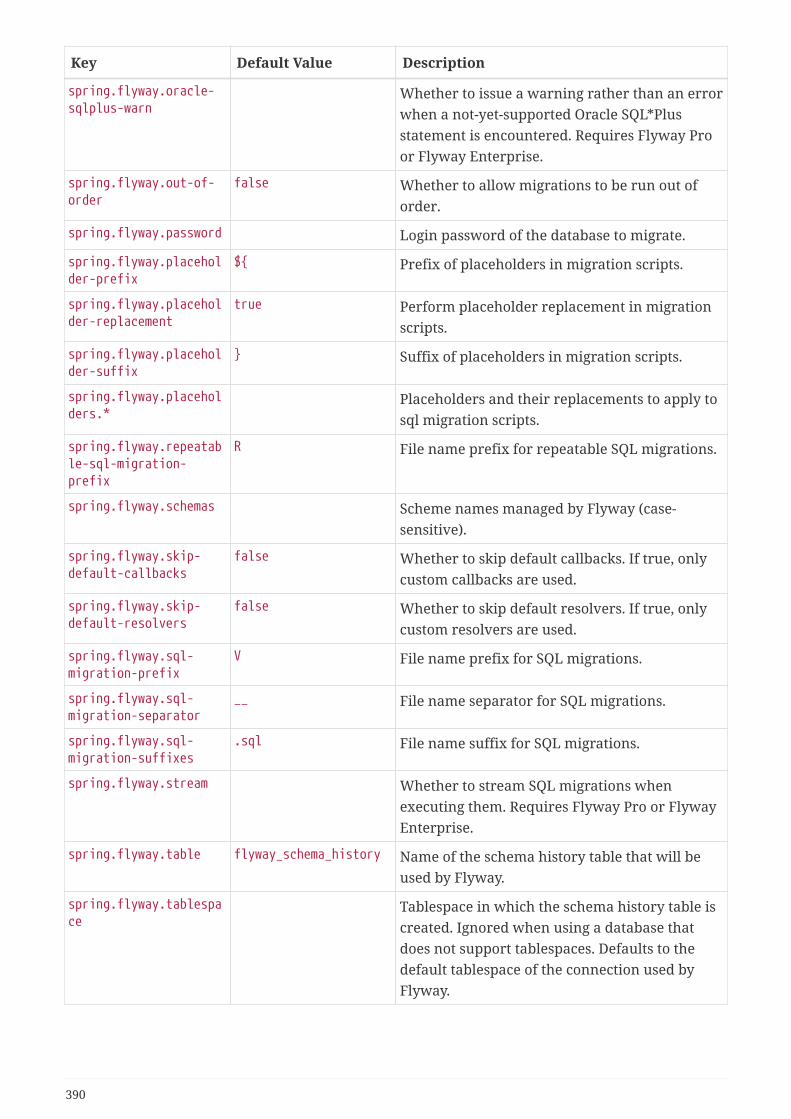
Key Default Value Description
spring.flyway.oracle-sqlplus-warn
Whether to issue a warning rather than an errorwhen a not-yet-supported Oracle SQL*Plusstatement is encountered. Requires Flyway Proor Flyway Enterprise.
spring.flyway.out-of-order
false Whether to allow migrations to be run out oforder.
spring.flyway.password Login password of the database to migrate.
spring.flyway.placeholder-prefix
${ Prefix of placeholders in migration scripts.
spring.flyway.placeholder-replacement
true Perform placeholder replacement in migrationscripts.
spring.flyway.placeholder-suffix
} Suffix of placeholders in migration scripts.
spring.flyway.placeholders.*
Placeholders and their replacements to apply tosql migration scripts.
spring.flyway.repeatable-sql-migration-prefix
R File name prefix for repeatable SQL migrations.
spring.flyway.schemas Scheme names managed by Flyway (case-sensitive).
spring.flyway.skip-default-callbacks
false Whether to skip default callbacks. If true, onlycustom callbacks are used.
spring.flyway.skip-default-resolvers
false Whether to skip default resolvers. If true, onlycustom resolvers are used.
spring.flyway.sql-migration-prefix
V File name prefix for SQL migrations.
spring.flyway.sql-migration-separator
__ File name separator for SQL migrations.
spring.flyway.sql-migration-suffixes
.sql File name suffix for SQL migrations.
spring.flyway.stream Whether to stream SQL migrations whenexecuting them. Requires Flyway Pro or FlywayEnterprise.
spring.flyway.table flyway_schema_history Name of the schema history table that will beused by Flyway.
spring.flyway.tablespace
Tablespace in which the schema history table iscreated. Ignored when using a database thatdoes not support tablespaces. Defaults to thedefault tablespace of the connection used byFlyway.
390
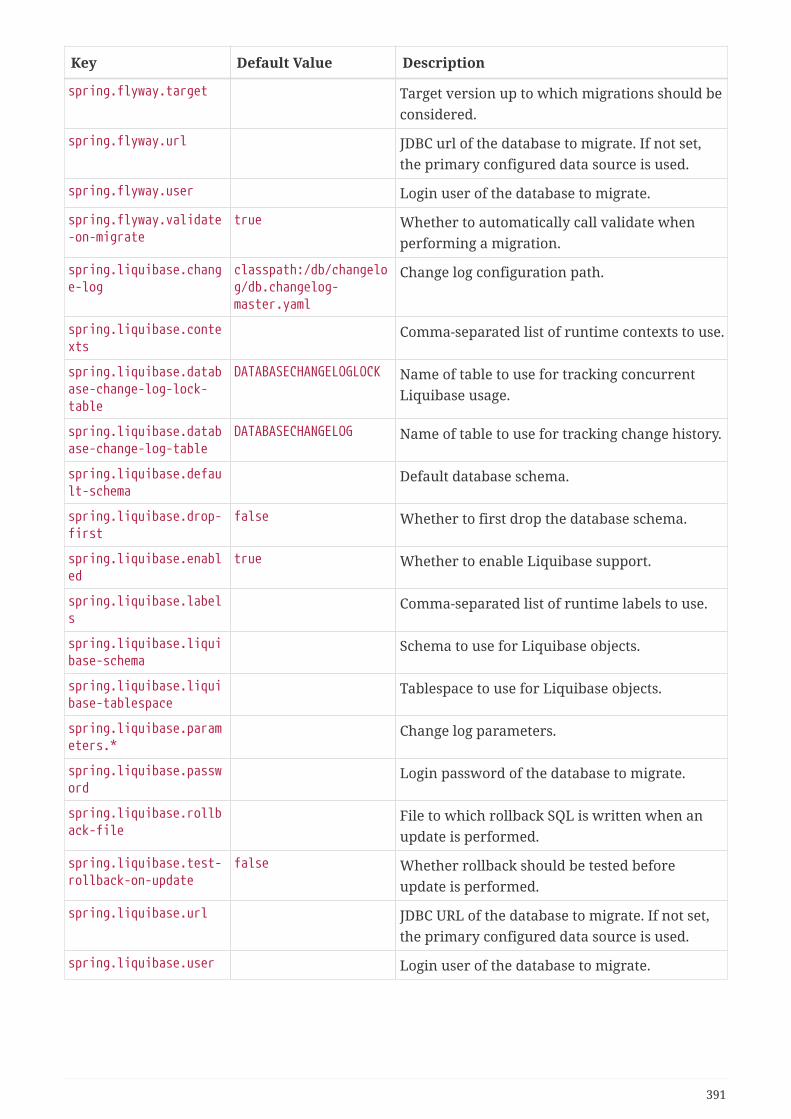
Key Default Value Description
spring.flyway.target Target version up to which migrations should beconsidered.
spring.flyway.url JDBC url of the database to migrate. If not set,the primary configured data source is used.
spring.flyway.user Login user of the database to migrate.
spring.flyway.validate-on-migrate
true Whether to automatically call validate whenperforming a migration.
spring.liquibase.change-log
classpath:/db/changelog/db.changelog-master.yaml
Change log configuration path.
spring.liquibase.contexts
Comma-separated list of runtime contexts to use.
spring.liquibase.database-change-log-lock-table
DATABASECHANGELOGLOCK Name of table to use for tracking concurrentLiquibase usage.
spring.liquibase.database-change-log-table
DATABASECHANGELOG Name of table to use for tracking change history.
spring.liquibase.default-schema
Default database schema.
spring.liquibase.drop-first
false Whether to first drop the database schema.
spring.liquibase.enabled
true Whether to enable Liquibase support.
spring.liquibase.labels
Comma-separated list of runtime labels to use.
spring.liquibase.liquibase-schema
Schema to use for Liquibase objects.
spring.liquibase.liquibase-tablespace
Tablespace to use for Liquibase objects.
spring.liquibase.parameters.*
Change log parameters.
spring.liquibase.password
Login password of the database to migrate.
spring.liquibase.rollback-file
File to which rollback SQL is written when anupdate is performed.
spring.liquibase.test-rollback-on-update
false Whether rollback should be tested beforeupdate is performed.
spring.liquibase.url JDBC URL of the database to migrate. If not set,the primary configured data source is used.
spring.liquibase.user Login user of the database to migrate.
391
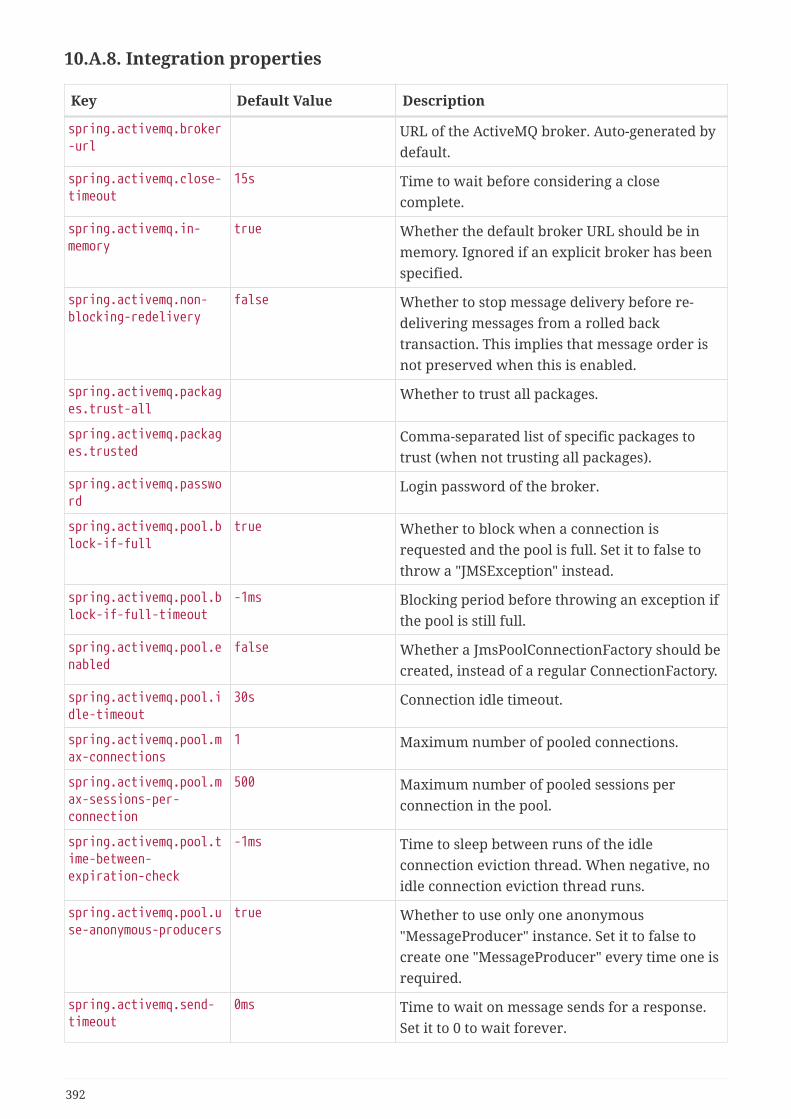
10.A.8. Integration properties
Key Default Value Description
spring.activemq.broker-url
URL of the ActiveMQ broker. Auto-generated bydefault.
spring.activemq.close-timeout
15s Time to wait before considering a closecomplete.
spring.activemq.in-memory
true Whether the default broker URL should be inmemory. Ignored if an explicit broker has beenspecified.
spring.activemq.non-blocking-redelivery
false Whether to stop message delivery before re-delivering messages from a rolled backtransaction. This implies that message order isnot preserved when this is enabled.
spring.activemq.packages.trust-all
Whether to trust all packages.
spring.activemq.packages.trusted
Comma-separated list of specific packages totrust (when not trusting all packages).
spring.activemq.password
Login password of the broker.
spring.activemq.pool.block-if-full
true Whether to block when a connection isrequested and the pool is full. Set it to false tothrow a "JMSException" instead.
spring.activemq.pool.block-if-full-timeout
-1ms Blocking period before throwing an exception ifthe pool is still full.
spring.activemq.pool.enabled
false Whether a JmsPoolConnectionFactory should becreated, instead of a regular ConnectionFactory.
spring.activemq.pool.idle-timeout
30s Connection idle timeout.
spring.activemq.pool.max-connections
1 Maximum number of pooled connections.
spring.activemq.pool.max-sessions-per-connection
500 Maximum number of pooled sessions perconnection in the pool.
spring.activemq.pool.time-between-expiration-check
-1ms Time to sleep between runs of the idleconnection eviction thread. When negative, noidle connection eviction thread runs.
spring.activemq.pool.use-anonymous-producers
true Whether to use only one anonymous"MessageProducer" instance. Set it to false tocreate one "MessageProducer" every time one isrequired.
spring.activemq.send-timeout
0ms Time to wait on message sends for a response.Set it to 0 to wait forever.
392
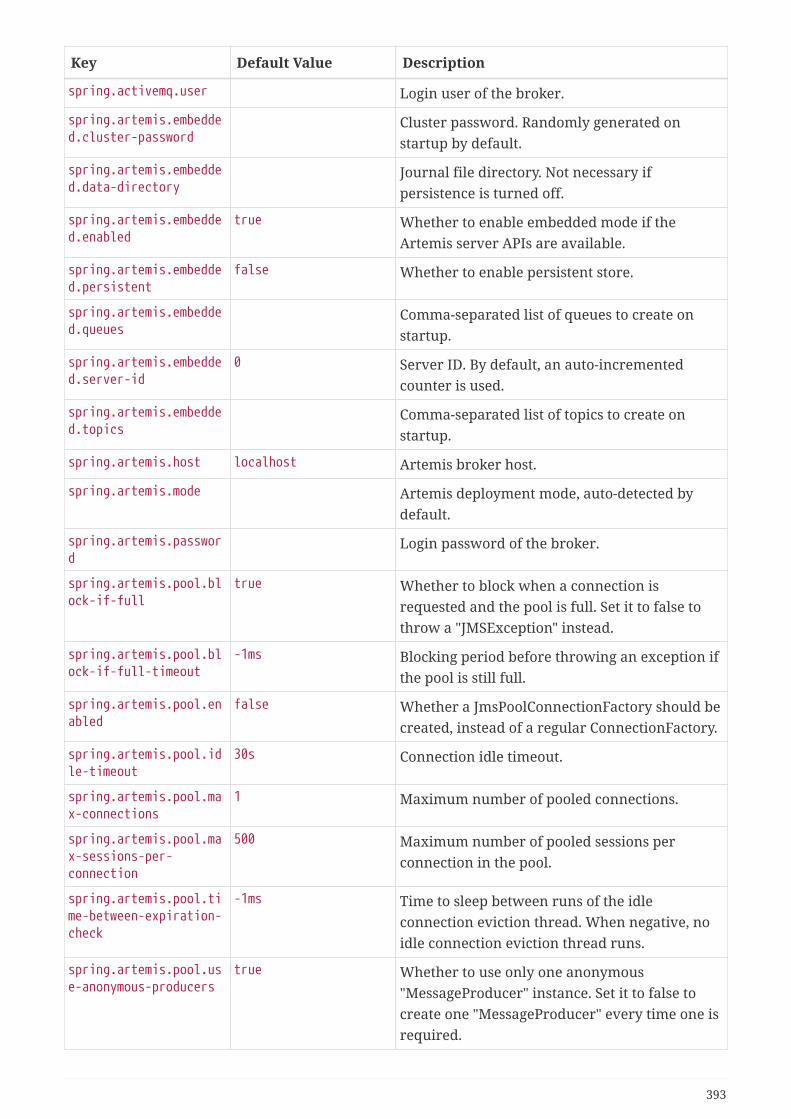
Key Default Value Description
spring.activemq.user Login user of the broker.
spring.artemis.embedded.cluster-password
Cluster password. Randomly generated onstartup by default.
spring.artemis.embedded.data-directory
Journal file directory. Not necessary ifpersistence is turned off.
spring.artemis.embedded.enabled
true Whether to enable embedded mode if theArtemis server APIs are available.
spring.artemis.embedded.persistent
false Whether to enable persistent store.
spring.artemis.embedded.queues
Comma-separated list of queues to create onstartup.
spring.artemis.embedded.server-id
0 Server ID. By default, an auto-incrementedcounter is used.
spring.artemis.embedded.topics
Comma-separated list of topics to create onstartup.
spring.artemis.host localhost Artemis broker host.
spring.artemis.mode Artemis deployment mode, auto-detected bydefault.
spring.artemis.password
Login password of the broker.
spring.artemis.pool.block-if-full
true Whether to block when a connection isrequested and the pool is full. Set it to false tothrow a "JMSException" instead.
spring.artemis.pool.block-if-full-timeout
-1ms Blocking period before throwing an exception ifthe pool is still full.
spring.artemis.pool.enabled
false Whether a JmsPoolConnectionFactory should becreated, instead of a regular ConnectionFactory.
spring.artemis.pool.idle-timeout
30s Connection idle timeout.
spring.artemis.pool.max-connections
1 Maximum number of pooled connections.
spring.artemis.pool.max-sessions-per-connection
500 Maximum number of pooled sessions perconnection in the pool.
spring.artemis.pool.time-between-expiration-check
-1ms Time to sleep between runs of the idleconnection eviction thread. When negative, noidle connection eviction thread runs.
spring.artemis.pool.use-anonymous-producers
true Whether to use only one anonymous"MessageProducer" instance. Set it to false tocreate one "MessageProducer" every time one isrequired.
393

Key Default Value Description
spring.artemis.port 61616 Artemis broker port.
spring.artemis.user Login user of the broker.
spring.batch.initialize-schema
embedded Database schema initialization mode.
spring.batch.job.enabled
true Execute all Spring Batch jobs in the context onstartup.
spring.batch.job.names Comma-separated list of job names to execute onstartup (for instance, `job1,job2`). By default, allJobs found in the context are executed.
spring.batch.schema classpath:org/springframework/batch/core/schema-@@platform@@.sql
Path to the SQL file to use to initialize thedatabase schema.
spring.batch.table-prefix
Table prefix for all the batch meta-data tables.
spring.hazelcast.config
The location of the configuration file to use toinitialize Hazelcast.
spring.integration.jdbc.initialize-schema
embedded Database schema initialization mode.
spring.integration.jdbc.schema
classpath:org/springframework/integration/jdbc/schema-@@platform@@.sql
Path to the SQL file to use to initialize thedatabase schema.
spring.jms.cache.consumers
false Whether to cache message consumers.
spring.jms.cache.enabled
true Whether to cache sessions.
spring.jms.cache.producers
true Whether to cache message producers.
spring.jms.cache.session-cache-size
1 Size of the session cache (per JMS Session type).
spring.jms.jndi-name Connection factory JNDI name. When set, takesprecedence to others connection factory auto-configurations.
spring.jms.listener.acknowledge-mode
Acknowledge mode of the container. By default,the listener is transacted with automaticacknowledgment.
spring.jms.listener.auto-startup
true Start the container automatically on startup.
spring.jms.listener.concurrency
Minimum number of concurrent consumers.
spring.jms.listener.max-concurrency
Maximum number of concurrent consumers.
394

Key Default Value Description
spring.jms.listener.receive-timeout
1s Timeout to use for receive calls. Use -1 for a no-wait receive or 0 for no timeout at all. The latteris only feasible if not running within atransaction manager and is generallydiscouraged since it prevents clean shutdown.
spring.jms.pub-sub-domain
false Whether the default destination type is topic.
spring.jms.template.default-destination
Default destination to use on send and receiveoperations that do not have a destinationparameter.
spring.jms.template.delivery-delay
Delivery delay to use for send calls.
spring.jms.template.delivery-mode
Delivery mode. Enables QoS (Quality of Service)when set.
spring.jms.template.priority
Priority of a message when sending. EnablesQoS (Quality of Service) when set.
spring.jms.template.qos-enabled
Whether to enable explicit QoS (Quality ofService) when sending a message. Whenenabled, the delivery mode, priority and time-to-live properties will be used when sending amessage. QoS is automatically enabled when atleast one of those settings is customized.
spring.jms.template.receive-timeout
Timeout to use for receive calls.
spring.jms.template.time-to-live
Time-to-live of a message when sending. EnablesQoS (Quality of Service) when set.
spring.kafka.admin.client-id
ID to pass to the server when making requests.Used for server-side logging.
spring.kafka.admin.fail-fast
false Whether to fail fast if the broker is not availableon startup.
spring.kafka.admin.properties.*
Additional admin-specific properties used toconfigure the client.
spring.kafka.admin.ssl.key-password
Password of the private key in the key store file.
spring.kafka.admin.ssl.key-store-location
Location of the key store file.
spring.kafka.admin.ssl.key-store-password
Store password for the key store file.
spring.kafka.admin.ssl.key-store-type
Type of the key store.
spring.kafka.admin.ssl.protocol
SSL protocol to use.
395

Key Default Value Description
spring.kafka.admin.ssl.trust-store-location
Location of the trust store file.
spring.kafka.admin.ssl.trust-store-password
Store password for the trust store file.
spring.kafka.admin.ssl.trust-store-type
Type of the trust store.
spring.kafka.bootstrap-servers
Comma-delimited list of host:port pairs to usefor establishing the initial connections to theKafka cluster. Applies to all components unlessoverridden.
spring.kafka.client-id ID to pass to the server when making requests.Used for server-side logging.
spring.kafka.consumer.auto-commit-interval
Frequency with which the consumer offsets areauto-committed to Kafka if 'enable.auto.commit'is set to true.
spring.kafka.consumer.auto-offset-reset
What to do when there is no initial offset inKafka or if the current offset no longer exists onthe server.
spring.kafka.consumer.bootstrap-servers
Comma-delimited list of host:port pairs to usefor establishing the initial connections to theKafka cluster. Overrides the global property, forconsumers.
spring.kafka.consumer.client-id
ID to pass to the server when making requests.Used for server-side logging.
spring.kafka.consumer.enable-auto-commit
Whether the consumer's offset is periodicallycommitted in the background.
spring.kafka.consumer.fetch-max-wait
Maximum amount of time the server blocksbefore answering the fetch request if there isn'tsufficient data to immediately satisfy therequirement given by "fetch-min-size".
spring.kafka.consumer.fetch-min-size
Minimum amount of data the server shouldreturn for a fetch request.
spring.kafka.consumer.group-id
Unique string that identifies the consumer groupto which this consumer belongs.
spring.kafka.consumer.heartbeat-interval
Expected time between heartbeats to theconsumer coordinator.
spring.kafka.consumer.isolation-level
Isolation level for reading messages that havebeen written transactionally.
spring.kafka.consumer.key-deserializer
Deserializer class for keys.
396

Key Default Value Description
spring.kafka.consumer.max-poll-records
Maximum number of records returned in asingle call to poll().
spring.kafka.consumer.properties.*
Additional consumer-specific properties used toconfigure the client.
spring.kafka.consumer.ssl.key-password
Password of the private key in the key store file.
spring.kafka.consumer.ssl.key-store-location
Location of the key store file.
spring.kafka.consumer.ssl.key-store-password
Store password for the key store file.
spring.kafka.consumer.ssl.key-store-type
Type of the key store.
spring.kafka.consumer.ssl.protocol
SSL protocol to use.
spring.kafka.consumer.ssl.trust-store-location
Location of the trust store file.
spring.kafka.consumer.ssl.trust-store-password
Store password for the trust store file.
spring.kafka.consumer.ssl.trust-store-type
Type of the trust store.
spring.kafka.consumer.value-deserializer
Deserializer class for values.
spring.kafka.jaas.control-flag
required Control flag for login configuration.
spring.kafka.jaas.enabled
false Whether to enable JAAS configuration.
spring.kafka.jaas.login-module
com.sun.security.auth.module.Krb5LoginModule
Login module.
spring.kafka.jaas.options.*
Additional JAAS options.
spring.kafka.listener.ack-count
Number of records between offset commitswhen ackMode is "COUNT" or "COUNT_TIME".
spring.kafka.listener.ack-mode
Listener AckMode. See the spring-kafkadocumentation.
spring.kafka.listener.ack-time
Time between offset commits when ackMode is"TIME" or "COUNT_TIME".
spring.kafka.listener.client-id
Prefix for the listener's consumer client.idproperty.
spring.kafka.listener.concurrency
Number of threads to run in the listenercontainers.
397
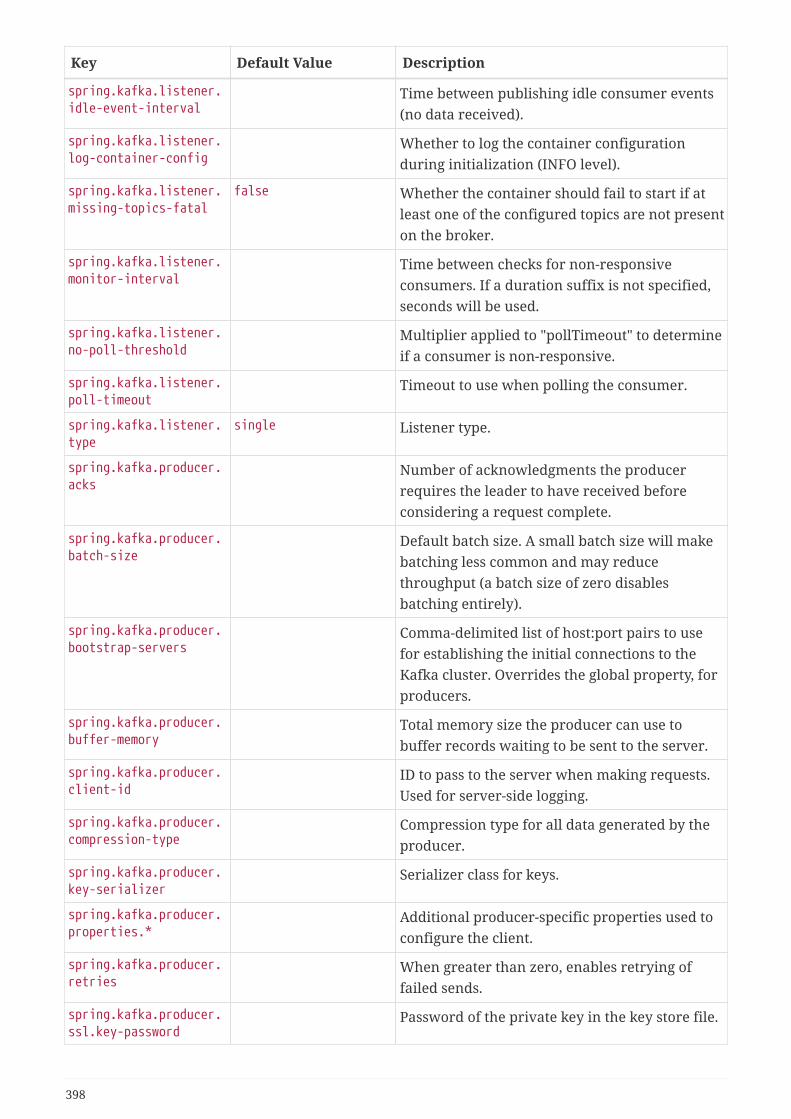
Key Default Value Description
spring.kafka.listener.idle-event-interval
Time between publishing idle consumer events(no data received).
spring.kafka.listener.log-container-config
Whether to log the container configurationduring initialization (INFO level).
spring.kafka.listener.missing-topics-fatal
false Whether the container should fail to start if atleast one of the configured topics are not presenton the broker.
spring.kafka.listener.monitor-interval
Time between checks for non-responsiveconsumers. If a duration suffix is not specified,seconds will be used.
spring.kafka.listener.no-poll-threshold
Multiplier applied to "pollTimeout" to determineif a consumer is non-responsive.
spring.kafka.listener.poll-timeout
Timeout to use when polling the consumer.
spring.kafka.listener.type
single Listener type.
spring.kafka.producer.acks
Number of acknowledgments the producerrequires the leader to have received beforeconsidering a request complete.
spring.kafka.producer.batch-size
Default batch size. A small batch size will makebatching less common and may reducethroughput (a batch size of zero disablesbatching entirely).
spring.kafka.producer.bootstrap-servers
Comma-delimited list of host:port pairs to usefor establishing the initial connections to theKafka cluster. Overrides the global property, forproducers.
spring.kafka.producer.buffer-memory
Total memory size the producer can use tobuffer records waiting to be sent to the server.
spring.kafka.producer.client-id
ID to pass to the server when making requests.Used for server-side logging.
spring.kafka.producer.compression-type
Compression type for all data generated by theproducer.
spring.kafka.producer.key-serializer
Serializer class for keys.
spring.kafka.producer.properties.*
Additional producer-specific properties used toconfigure the client.
spring.kafka.producer.retries
When greater than zero, enables retrying offailed sends.
spring.kafka.producer.ssl.key-password
Password of the private key in the key store file.
398
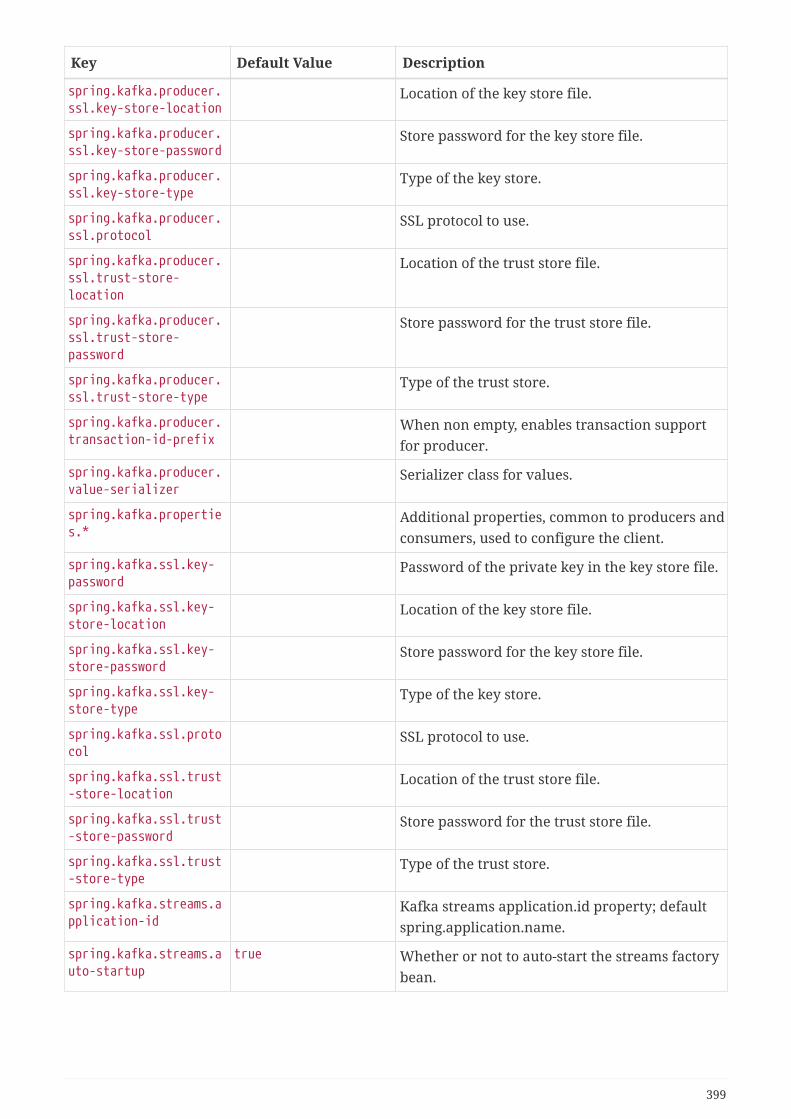
Key Default Value Description
spring.kafka.producer.ssl.key-store-location
Location of the key store file.
spring.kafka.producer.ssl.key-store-password
Store password for the key store file.
spring.kafka.producer.ssl.key-store-type
Type of the key store.
spring.kafka.producer.ssl.protocol
SSL protocol to use.
spring.kafka.producer.ssl.trust-store-location
Location of the trust store file.
spring.kafka.producer.ssl.trust-store-password
Store password for the trust store file.
spring.kafka.producer.ssl.trust-store-type
Type of the trust store.
spring.kafka.producer.transaction-id-prefix
When non empty, enables transaction supportfor producer.
spring.kafka.producer.value-serializer
Serializer class for values.
spring.kafka.properties.*
Additional properties, common to producers andconsumers, used to configure the client.
spring.kafka.ssl.key-password
Password of the private key in the key store file.
spring.kafka.ssl.key-store-location
Location of the key store file.
spring.kafka.ssl.key-store-password
Store password for the key store file.
spring.kafka.ssl.key-store-type
Type of the key store.
spring.kafka.ssl.protocol
SSL protocol to use.
spring.kafka.ssl.trust-store-location
Location of the trust store file.
spring.kafka.ssl.trust-store-password
Store password for the trust store file.
spring.kafka.ssl.trust-store-type
Type of the trust store.
spring.kafka.streams.application-id
Kafka streams application.id property; defaultspring.application.name.
spring.kafka.streams.auto-startup
true Whether or not to auto-start the streams factorybean.
399

Key Default Value Description
spring.kafka.streams.bootstrap-servers
Comma-delimited list of host:port pairs to usefor establishing the initial connections to theKafka cluster. Overrides the global property, forstreams.
spring.kafka.streams.cache-max-size-buffering
Maximum memory size to be used for bufferingacross all threads.
spring.kafka.streams.client-id
ID to pass to the server when making requests.Used for server-side logging.
spring.kafka.streams.properties.*
Additional Kafka properties used to configurethe streams.
spring.kafka.streams.replication-factor
The replication factor for change log topics andrepartition topics created by the streamprocessing application.
spring.kafka.streams.ssl.key-password
Password of the private key in the key store file.
spring.kafka.streams.ssl.key-store-location
Location of the key store file.
spring.kafka.streams.ssl.key-store-password
Store password for the key store file.
spring.kafka.streams.ssl.key-store-type
Type of the key store.
spring.kafka.streams.ssl.protocol
SSL protocol to use.
spring.kafka.streams.ssl.trust-store-location
Location of the trust store file.
spring.kafka.streams.ssl.trust-store-password
Store password for the trust store file.
spring.kafka.streams.ssl.trust-store-type
Type of the trust store.
spring.kafka.streams.state-dir
Directory location for the state store.
spring.kafka.template.default-topic
Default topic to which messages are sent.
spring.rabbitmq.addresses
Comma-separated list of addresses to which theclient should connect.
spring.rabbitmq.cache.channel.checkout-timeout
Duration to wait to obtain a channel if the cachesize has been reached. If 0, always create a newchannel.
spring.rabbitmq.cache.channel.size
Number of channels to retain in the cache.When "check-timeout" > 0, max channels perconnection.
400
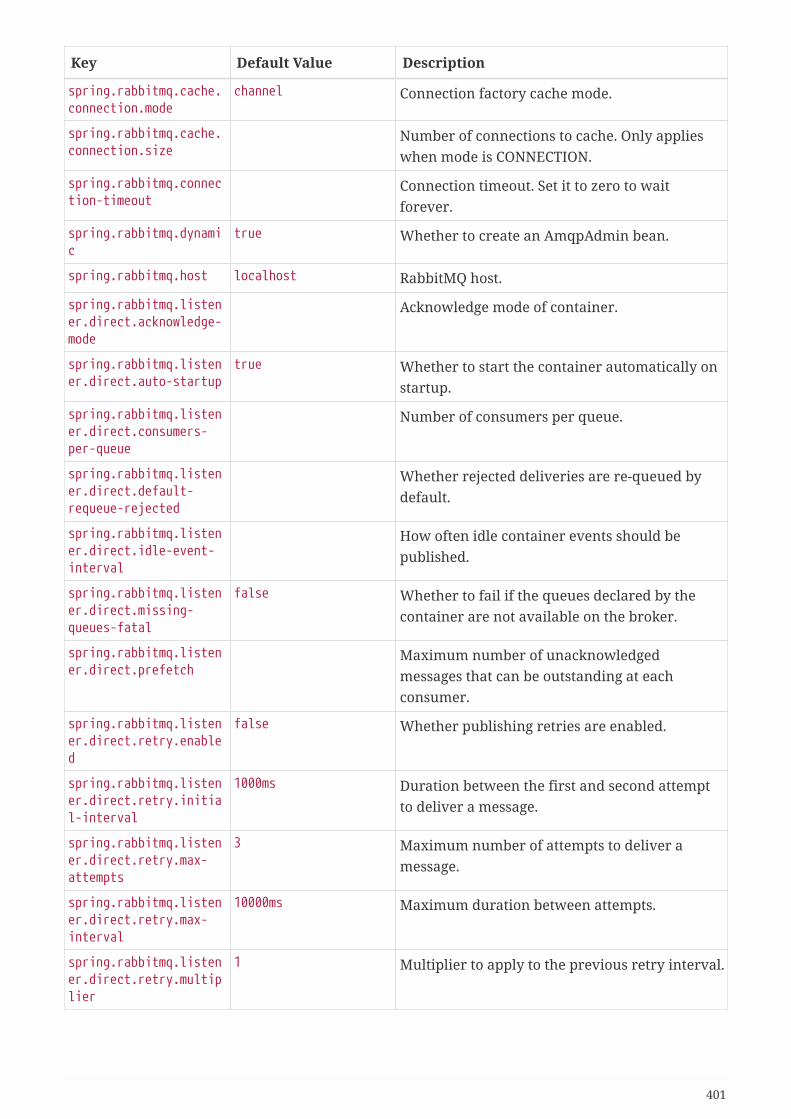
Key Default Value Description
spring.rabbitmq.cache.connection.mode
channel Connection factory cache mode.
spring.rabbitmq.cache.connection.size
Number of connections to cache. Only applieswhen mode is CONNECTION.
spring.rabbitmq.connection-timeout
Connection timeout. Set it to zero to waitforever.
spring.rabbitmq.dynamic
true Whether to create an AmqpAdmin bean.
spring.rabbitmq.host localhost RabbitMQ host.
spring.rabbitmq.listener.direct.acknowledge-mode
Acknowledge mode of container.
spring.rabbitmq.listener.direct.auto-startup
true Whether to start the container automatically onstartup.
spring.rabbitmq.listener.direct.consumers-per-queue
Number of consumers per queue.
spring.rabbitmq.listener.direct.default-requeue-rejected
Whether rejected deliveries are re-queued bydefault.
spring.rabbitmq.listener.direct.idle-event-interval
How often idle container events should bepublished.
spring.rabbitmq.listener.direct.missing-queues-fatal
false Whether to fail if the queues declared by thecontainer are not available on the broker.
spring.rabbitmq.listener.direct.prefetch
Maximum number of unacknowledgedmessages that can be outstanding at eachconsumer.
spring.rabbitmq.listener.direct.retry.enabled
false Whether publishing retries are enabled.
spring.rabbitmq.listener.direct.retry.initial-interval
1000ms Duration between the first and second attemptto deliver a message.
spring.rabbitmq.listener.direct.retry.max-attempts
3 Maximum number of attempts to deliver amessage.
spring.rabbitmq.listener.direct.retry.max-interval
10000ms Maximum duration between attempts.
spring.rabbitmq.listener.direct.retry.multiplier
1 Multiplier to apply to the previous retry interval.
401

Key Default Value Description
spring.rabbitmq.listener.direct.retry.stateless
true Whether retries are stateless or stateful.
spring.rabbitmq.listener.simple.acknowledge-mode
Acknowledge mode of container.
spring.rabbitmq.listener.simple.auto-startup
true Whether to start the container automatically onstartup.
spring.rabbitmq.listener.simple.batch-size
Batch size, expressed as the number of physicalmessages, to be used by the container.
spring.rabbitmq.listener.simple.concurrency
Minimum number of listener invoker threads.
spring.rabbitmq.listener.simple.default-requeue-rejected
Whether rejected deliveries are re-queued bydefault.
spring.rabbitmq.listener.simple.idle-event-interval
How often idle container events should bepublished.
spring.rabbitmq.listener.simple.max-concurrency
Maximum number of listener invoker threads.
spring.rabbitmq.listener.simple.missing-queues-fatal
true Whether to fail if the queues declared by thecontainer are not available on the broker and/orwhether to stop the container if one or morequeues are deleted at runtime.
spring.rabbitmq.listener.simple.prefetch
Maximum number of unacknowledgedmessages that can be outstanding at eachconsumer.
spring.rabbitmq.listener.simple.retry.enabled
false Whether publishing retries are enabled.
spring.rabbitmq.listener.simple.retry.initial-interval
1000ms Duration between the first and second attemptto deliver a message.
spring.rabbitmq.listener.simple.retry.max-attempts
3 Maximum number of attempts to deliver amessage.
spring.rabbitmq.listener.simple.retry.max-interval
10000ms Maximum duration between attempts.
spring.rabbitmq.listener.simple.retry.multiplier
1 Multiplier to apply to the previous retry interval.
spring.rabbitmq.listener.simple.retry.stateless
true Whether retries are stateless or stateful.
402

Key Default Value Description
spring.rabbitmq.listener.type
simple Listener container type.
spring.rabbitmq.password
guest Login to authenticate against the broker.
spring.rabbitmq.port 5672 RabbitMQ port.
spring.rabbitmq.publisher-confirm-type
Type of publisher confirms to use.
spring.rabbitmq.publisher-returns
false Whether to enable publisher returns.
spring.rabbitmq.requested-heartbeat
Requested heartbeat timeout; zero for none. If aduration suffix is not specified, seconds will beused.
spring.rabbitmq.ssl.algorithm
SSL algorithm to use. By default, configured bythe Rabbit client library.
spring.rabbitmq.ssl.enabled
false Whether to enable SSL support.
spring.rabbitmq.ssl.key-store
Path to the key store that holds the SSLcertificate.
spring.rabbitmq.ssl.key-store-password
Password used to access the key store.
spring.rabbitmq.ssl.key-store-type
PKCS12 Key store type.
spring.rabbitmq.ssl.trust-store
Trust store that holds SSL certificates.
spring.rabbitmq.ssl.trust-store-password
Password used to access the trust store.
spring.rabbitmq.ssl.trust-store-type
JKS Trust store type.
spring.rabbitmq.ssl.validate-server-certificate
true Whether to enable server side certificatevalidation.
spring.rabbitmq.ssl.verify-hostname
true Whether to enable hostname verification.
spring.rabbitmq.template.default-receive-queue
Name of the default queue to receive messagesfrom when none is specified explicitly.
spring.rabbitmq.template.exchange
Name of the default exchange to use for sendoperations.
spring.rabbitmq.template.mandatory
Whether to enable mandatory messages.
spring.rabbitmq.template.receive-timeout
Timeout for `receive()` operations.
spring.rabbitmq.template.reply-timeout
Timeout for `sendAndReceive()` operations.
403

Key Default Value Description
spring.rabbitmq.template.retry.enabled
false Whether publishing retries are enabled.
spring.rabbitmq.template.retry.initial-interval
1000ms Duration between the first and second attemptto deliver a message.
spring.rabbitmq.template.retry.max-attempts
3 Maximum number of attempts to deliver amessage.
spring.rabbitmq.template.retry.max-interval
10000ms Maximum duration between attempts.
spring.rabbitmq.template.retry.multiplier
1 Multiplier to apply to the previous retry interval.
spring.rabbitmq.template.routing-key
Value of a default routing key to use for sendoperations.
spring.rabbitmq.username
guest Login user to authenticate to the broker.
spring.rabbitmq.virtual-host
Virtual host to use when connecting to thebroker.
spring.webservices.path
/services Path that serves as the base URI for the services.
spring.webservices.servlet.init.*
Servlet init parameters to pass to Spring WebServices.
spring.webservices.servlet.load-on-startup
-1 Load on startup priority of the Spring WebServices servlet.
spring.webservices.wsdl-locations
Comma-separated list of locations of WSDLs andaccompanying XSDs to be exposed as beans.
10.A.9. Web properties
Key Default Value Description
spring.hateoas.use-hal-as-default-json-media-type
true Whether application/hal+json responses shouldbe sent to requests that accept application/json.
spring.http.converters.preferred-json-mapper
Preferred JSON mapper to use for HTTP messageconversion. By default, auto-detected accordingto the environment.
spring.http.encoding.charset
UTF-8 Charset of HTTP requests and responses. Addedto the "Content-Type" header if not set explicitly.
spring.http.encoding.enabled
true Whether to enable http encoding support.
spring.http.encoding.force
Whether to force the encoding to the configuredcharset on HTTP requests and responses.
404

Key Default Value Description
spring.http.encoding.force-request
Whether to force the encoding to the configuredcharset on HTTP requests. Defaults to true when"force" has not been specified.
spring.http.encoding.force-response
Whether to force the encoding to the configuredcharset on HTTP responses.
spring.http.encoding.mapping.*
Locale in which to encode mapping.
spring.http.log-request-details
false Whether logging of (potentially sensitive)request details at DEBUG and TRACE level isallowed.
spring.jersey.application-path
Path that serves as the base URI for theapplication. If specified, overrides the value of"@ApplicationPath".
spring.jersey.filter.order
0 Jersey filter chain order.
spring.jersey.init.* Init parameters to pass to Jersey through theservlet or filter.
spring.jersey.servlet.load-on-startup
-1 Load on startup priority of the Jersey servlet.
spring.jersey.type servlet Jersey integration type.
spring.mvc.async.request-timeout
Amount of time before asynchronous requesthandling times out. If this value is not set, thedefault timeout of the underlyingimplementation is used.
spring.mvc.contentnegotiation.favor-parameter
false Whether a request parameter ("format" bydefault) should be used to determine therequested media type.
spring.mvc.contentnegotiation.media-types.*
Map file extensions to media types for contentnegotiation. For instance, yml to text/yaml.
spring.mvc.contentnegotiation.parameter-name
Query parameter name to use when "favor-parameter" is enabled.
spring.mvc.date-format Date format to use. For instance, `dd/MM/yyyy`.
spring.mvc.dispatch-options-request
true Whether to dispatch OPTIONS requests to theFrameworkServlet doService method.
spring.mvc.dispatch-trace-request
false Whether to dispatch TRACE requests to theFrameworkServlet doService method.
spring.mvc.formcontent.filter.enabled
true Whether to enable Spring's FormContentFilter.
spring.mvc.hiddenmethod.filter.enabled
false Whether to enable Spring'sHiddenHttpMethodFilter.
405
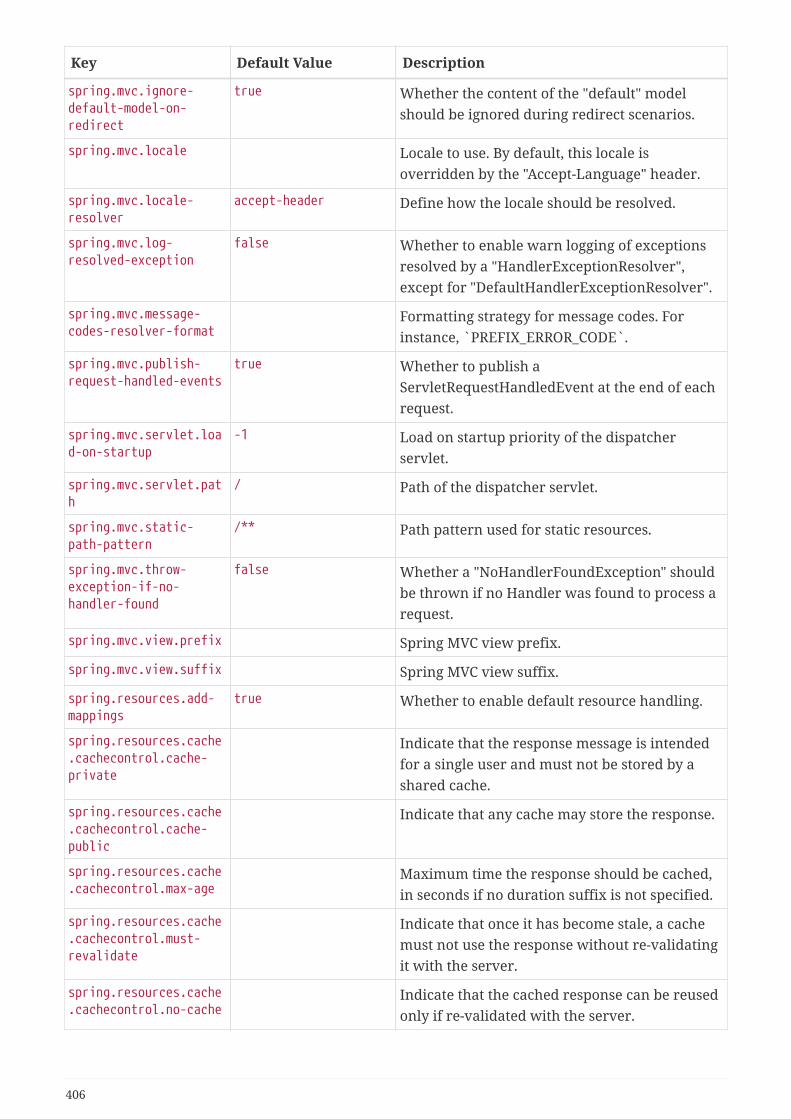
Key Default Value Description
spring.mvc.ignore-default-model-on-redirect
true Whether the content of the "default" modelshould be ignored during redirect scenarios.
spring.mvc.locale Locale to use. By default, this locale isoverridden by the "Accept-Language" header.
spring.mvc.locale-resolver
accept-header Define how the locale should be resolved.
spring.mvc.log-resolved-exception
false Whether to enable warn logging of exceptionsresolved by a "HandlerExceptionResolver",except for "DefaultHandlerExceptionResolver".
spring.mvc.message-codes-resolver-format
Formatting strategy for message codes. Forinstance, `PREFIX_ERROR_CODE`.
spring.mvc.publish-request-handled-events
true Whether to publish aServletRequestHandledEvent at the end of eachrequest.
spring.mvc.servlet.load-on-startup
-1 Load on startup priority of the dispatcherservlet.
spring.mvc.servlet.path
/ Path of the dispatcher servlet.
spring.mvc.static-path-pattern
/** Path pattern used for static resources.
spring.mvc.throw-exception-if-no-handler-found
false Whether a "NoHandlerFoundException" shouldbe thrown if no Handler was found to process arequest.
spring.mvc.view.prefix Spring MVC view prefix.
spring.mvc.view.suffix Spring MVC view suffix.
spring.resources.add-mappings
true Whether to enable default resource handling.
spring.resources.cache.cachecontrol.cache-private
Indicate that the response message is intendedfor a single user and must not be stored by ashared cache.
spring.resources.cache.cachecontrol.cache-public
Indicate that any cache may store the response.
spring.resources.cache.cachecontrol.max-age
Maximum time the response should be cached,in seconds if no duration suffix is not specified.
spring.resources.cache.cachecontrol.must-revalidate
Indicate that once it has become stale, a cachemust not use the response without re-validatingit with the server.
spring.resources.cache.cachecontrol.no-cache
Indicate that the cached response can be reusedonly if re-validated with the server.
406

Key Default Value Description
spring.resources.cache.cachecontrol.no-store
Indicate to not cache the response in any case.
spring.resources.cache.cachecontrol.no-transform
Indicate intermediaries (caches and others) thatthey should not transform the response content.
spring.resources.cache.cachecontrol.proxy-revalidate
Same meaning as the "must-revalidate"directive, except that it does not apply to privatecaches.
spring.resources.cache.cachecontrol.s-max-age
Maximum time the response should be cachedby shared caches, in seconds if no durationsuffix is not specified.
spring.resources.cache.cachecontrol.stale-if-error
Maximum time the response may be used whenerrors are encountered, in seconds if noduration suffix is not specified.
spring.resources.cache.cachecontrol.stale-while-revalidate
Maximum time the response can be served afterit becomes stale, in seconds if no duration suffixis not specified.
spring.resources.cache.period
Cache period for the resources served by theresource handler. If a duration suffix is notspecified, seconds will be used. Can beoverridden by the'spring.resources.cache.cachecontrol' properties.
spring.resources.chain.cache
true Whether to enable caching in the Resourcechain.
spring.resources.chain.compressed
false Whether to enable resolution of alreadycompressed resources (gzip, brotli). Checks for aresource name with the '.gz' or '.br' fileextensions.
spring.resources.chain.enabled
Whether to enable the Spring ResourceHandling chain. By default, disabled unless atleast one strategy has been enabled.
spring.resources.chain.html-application-cache
false Whether to enable HTML5 application cachemanifest rewriting.
spring.resources.chain.strategy.content.enabled
false Whether to enable the content Version Strategy.
spring.resources.chain.strategy.content.paths
/** Comma-separated list of patterns to apply to thecontent Version Strategy.
spring.resources.chain.strategy.fixed.enabled
false Whether to enable the fixed Version Strategy.
407

Key Default Value Description
spring.resources.chain.strategy.fixed.paths
/** Comma-separated list of patterns to apply to thefixed Version Strategy.
spring.resources.chain.strategy.fixed.version
Version string to use for the fixed VersionStrategy.
spring.resources.static-locations
classpath:/META-INF/resources/,classpath:/resources/,classpath:/static/,classpath:/public/
Locations of static resources. Defaults toclasspath:[/META-INF/resources/, /resources/,/static/, /public/].
spring.servlet.multipart.enabled
true Whether to enable support of multipart uploads.
spring.servlet.multipart.file-size-threshold
0B Threshold after which files are written to disk.
spring.servlet.multipart.location
Intermediate location of uploaded files.
spring.servlet.multipart.max-file-size
1MB Max file size.
spring.servlet.multipart.max-request-size
10MB Max request size.
spring.servlet.multipart.resolve-lazily
false Whether to resolve the multipart request lazilyat the time of file or parameter access.
spring.webflux.date-format
Date format to use. For instance, `dd/MM/yyyy`.
spring.webflux.hiddenmethod.filter.enabled
false Whether to enable Spring'sHiddenHttpMethodFilter.
spring.webflux.static-path-pattern
/** Path pattern used for static resources.
10.A.10. Templating properties
Key Default Value Description
spring.freemarker.allow-request-override
false Whether HttpServletRequest attributes areallowed to override (hide) controller generatedmodel attributes of the same name.
spring.freemarker.allow-session-override
false Whether HttpSession attributes are allowed tooverride (hide) controller generated modelattributes of the same name.
spring.freemarker.cache
false Whether to enable template caching.
spring.freemarker.charset
UTF-8 Template encoding.
spring.freemarker.check-template-location
true Whether to check that the templates locationexists.
408

Key Default Value Description
spring.freemarker.content-type
text/html Content-Type value.
spring.freemarker.enabled
true Whether to enable MVC view resolution for thistechnology.
spring.freemarker.expose-request-attributes
false Whether all request attributes should be addedto the model prior to merging with the template.
spring.freemarker.expose-session-attributes
false Whether all HttpSession attributes should beadded to the model prior to merging with thetemplate.
spring.freemarker.expose-spring-macro-helpers
true Whether to expose a RequestContext for use bySpring's macro library, under the name"springMacroRequestContext".
spring.freemarker.prefer-file-system-access
true Whether to prefer file system access fortemplate loading. File system access enables hotdetection of template changes.
spring.freemarker.prefix
Prefix that gets prepended to view names whenbuilding a URL.
spring.freemarker.request-context-attribute
Name of the RequestContext attribute for allviews.
spring.freemarker.settings.*
Well-known FreeMarker keys which are passedto FreeMarker's Configuration.
spring.freemarker.suffix
.ftlh Suffix that gets appended to view names whenbuilding a URL.
spring.freemarker.template-loader-path
classpath:/templates/ Comma-separated list of template paths.
spring.freemarker.view-names
View names that can be resolved.
spring.groovy.template.allow-request-override
false Whether HttpServletRequest attributes areallowed to override (hide) controller generatedmodel attributes of the same name.
spring.groovy.template.allow-session-override
false Whether HttpSession attributes are allowed tooverride (hide) controller generated modelattributes of the same name.
spring.groovy.template.cache
false Whether to enable template caching.
spring.groovy.template.charset
UTF-8 Template encoding.
spring.groovy.template.check-template-location
true Whether to check that the templates locationexists.
409
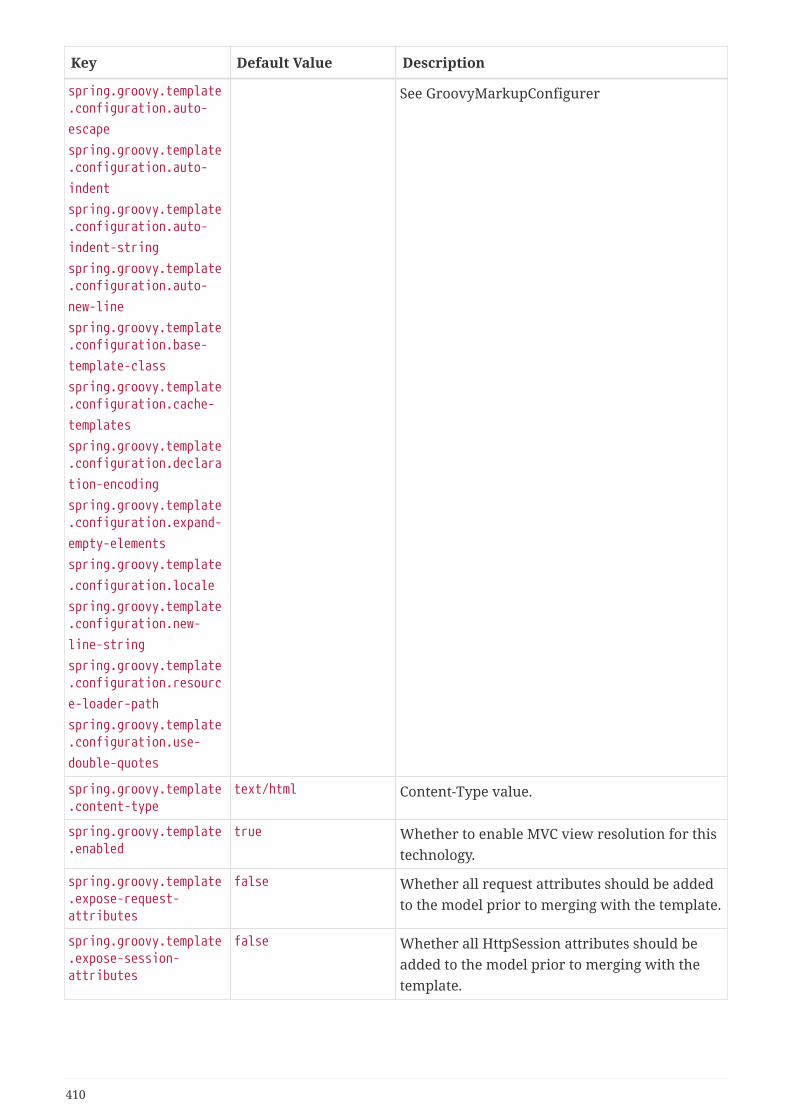
Key Default Value Description
spring.groovy.template.configuration.auto-
escape
spring.groovy.template.configuration.auto-
indent
spring.groovy.template.configuration.auto-
indent-string
spring.groovy.template.configuration.auto-
new-line
spring.groovy.template.configuration.base-
template-class
spring.groovy.template.configuration.cache-
templates
spring.groovy.template.configuration.declara
tion-encoding
spring.groovy.template.configuration.expand-
empty-elements
spring.groovy.template
.configuration.locale
spring.groovy.template.configuration.new-
line-string
spring.groovy.template.configuration.resourc
e-loader-path
spring.groovy.template.configuration.use-
double-quotes
See GroovyMarkupConfigurer
spring.groovy.template.content-type
text/html Content-Type value.
spring.groovy.template.enabled
true Whether to enable MVC view resolution for thistechnology.
spring.groovy.template.expose-request-attributes
false Whether all request attributes should be addedto the model prior to merging with the template.
spring.groovy.template.expose-session-attributes
false Whether all HttpSession attributes should beadded to the model prior to merging with thetemplate.
410

Key Default Value Description
spring.groovy.template.expose-spring-macro-helpers
true Whether to expose a RequestContext for use bySpring's macro library, under the name"springMacroRequestContext".
spring.groovy.template.prefix
Prefix that gets prepended to view names whenbuilding a URL.
spring.groovy.template.request-context-attribute
Name of the RequestContext attribute for allviews.
spring.groovy.template.resource-loader-path
classpath:/templates/ Template path.
spring.groovy.template.suffix
.tpl Suffix that gets appended to view names whenbuilding a URL.
spring.groovy.template.view-names
View names that can be resolved.
spring.mustache.allow-request-override
false Whether HttpServletRequest attributes areallowed to override (hide) controller generatedmodel attributes of the same name.
spring.mustache.allow-session-override
false Whether HttpSession attributes are allowed tooverride (hide) controller generated modelattributes of the same name.
spring.mustache.cache false Whether to enable template caching.
spring.mustache.charset
UTF-8 Template encoding.
spring.mustache.check-template-location
true Whether to check that the templates locationexists.
spring.mustache.content-type
text/html Content-Type value.
spring.mustache.enabled
true Whether to enable MVC view resolution for thistechnology.
spring.mustache.expose-request-attributes
false Whether all request attributes should be addedto the model prior to merging with the template.
spring.mustache.expose-session-attributes
false Whether all HttpSession attributes should beadded to the model prior to merging with thetemplate.
spring.mustache.expose-spring-macro-helpers
true Whether to expose a RequestContext for use bySpring's macro library, under the name"springMacroRequestContext".
spring.mustache.prefix classpath:/templates/ Prefix to apply to template names.
spring.mustache.request-context-attribute
Name of the RequestContext attribute for allviews.
spring.mustache.suffix .mustache Suffix to apply to template names.
411
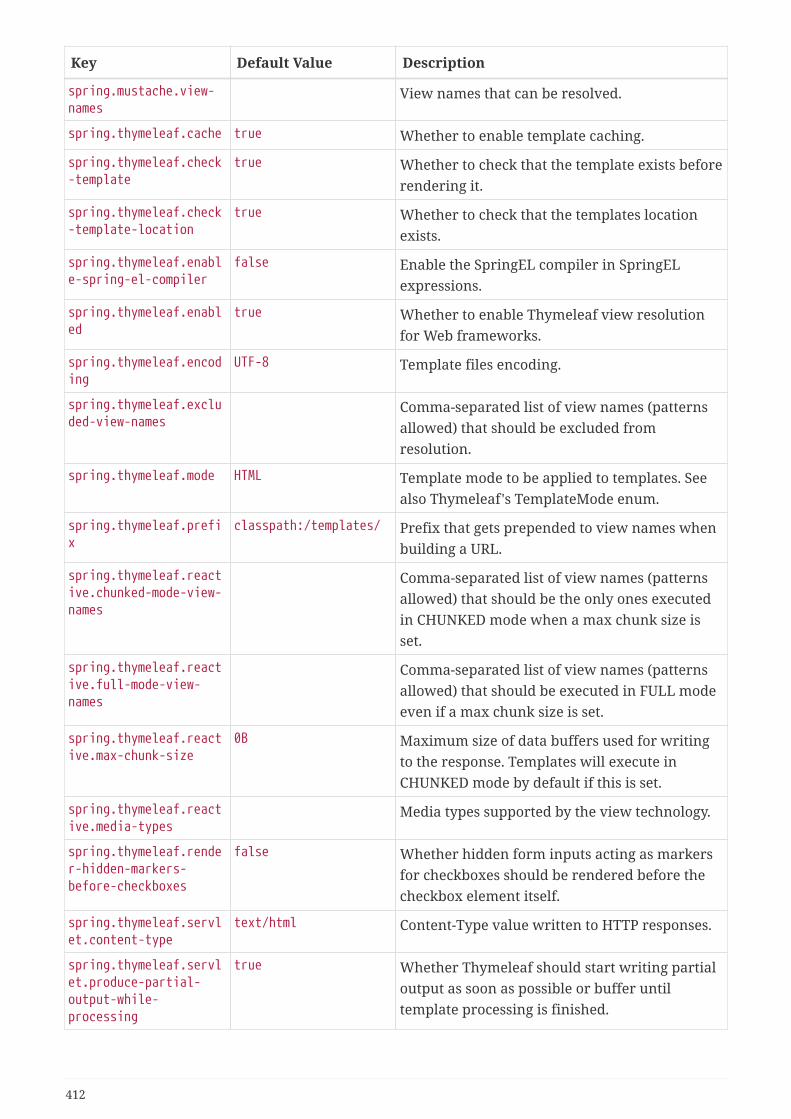
Key Default Value Description
spring.mustache.view-names
View names that can be resolved.
spring.thymeleaf.cache true Whether to enable template caching.
spring.thymeleaf.check-template
true Whether to check that the template exists beforerendering it.
spring.thymeleaf.check-template-location
true Whether to check that the templates locationexists.
spring.thymeleaf.enable-spring-el-compiler
false Enable the SpringEL compiler in SpringELexpressions.
spring.thymeleaf.enabled
true Whether to enable Thymeleaf view resolutionfor Web frameworks.
spring.thymeleaf.encoding
UTF-8 Template files encoding.
spring.thymeleaf.excluded-view-names
Comma-separated list of view names (patternsallowed) that should be excluded fromresolution.
spring.thymeleaf.mode HTML Template mode to be applied to templates. Seealso Thymeleaf's TemplateMode enum.
spring.thymeleaf.prefix
classpath:/templates/ Prefix that gets prepended to view names whenbuilding a URL.
spring.thymeleaf.reactive.chunked-mode-view-names
Comma-separated list of view names (patternsallowed) that should be the only ones executedin CHUNKED mode when a max chunk size isset.
spring.thymeleaf.reactive.full-mode-view-names
Comma-separated list of view names (patternsallowed) that should be executed in FULL modeeven if a max chunk size is set.
spring.thymeleaf.reactive.max-chunk-size
0B Maximum size of data buffers used for writingto the response. Templates will execute inCHUNKED mode by default if this is set.
spring.thymeleaf.reactive.media-types
Media types supported by the view technology.
spring.thymeleaf.render-hidden-markers-before-checkboxes
false Whether hidden form inputs acting as markersfor checkboxes should be rendered before thecheckbox element itself.
spring.thymeleaf.servlet.content-type
text/html Content-Type value written to HTTP responses.
spring.thymeleaf.servlet.produce-partial-output-while-processing
true Whether Thymeleaf should start writing partialoutput as soon as possible or buffer untiltemplate processing is finished.
412

Key Default Value Description
spring.thymeleaf.suffix
.html Suffix that gets appended to view names whenbuilding a URL.
spring.thymeleaf.template-resolver-order
Order of the template resolver in the chain. Bydefault, the template resolver is first in thechain. Order start at 1 and should only be set ifyou have defined additional "TemplateResolver"beans.
spring.thymeleaf.view-names
Comma-separated list of view names (patternsallowed) that can be resolved.
10.A.11. Server properties
Key Default Value Description
server.address Network address to which the server shouldbind.
server.compression.enabled
false Whether response compression is enabled.
server.compression.excluded-user-agents
Comma-separated list of user agents for whichresponses should not be compressed.
server.compression.mime-types
text/html, text/xml,text/plain, text/css,text/javascript,application/javascript, application/json,application/xml
Comma-separated list of MIME types that shouldbe compressed.
server.compression.min-response-size
2KB Minimum "Content-Length" value that isrequired for compression to be performed.
server.error.include-exception
false Include the "exception" attribute.
server.error.include-stacktrace
never When to include a "stacktrace" attribute.
server.error.path /error Path of the error controller.
server.error.whitelabel.enabled
true Whether to enable the default error pagedisplayed in browsers in case of a server error.
server.forward-headers-strategy
Strategy for handling X-Forwarded-* headers.
server.http2.enabled false Whether to enable HTTP/2 support, if thecurrent environment supports it.
server.jetty.acceptors -1 Number of acceptor threads to use. When thevalue is -1, the default, the number of acceptorsis derived from the operating environment.
413
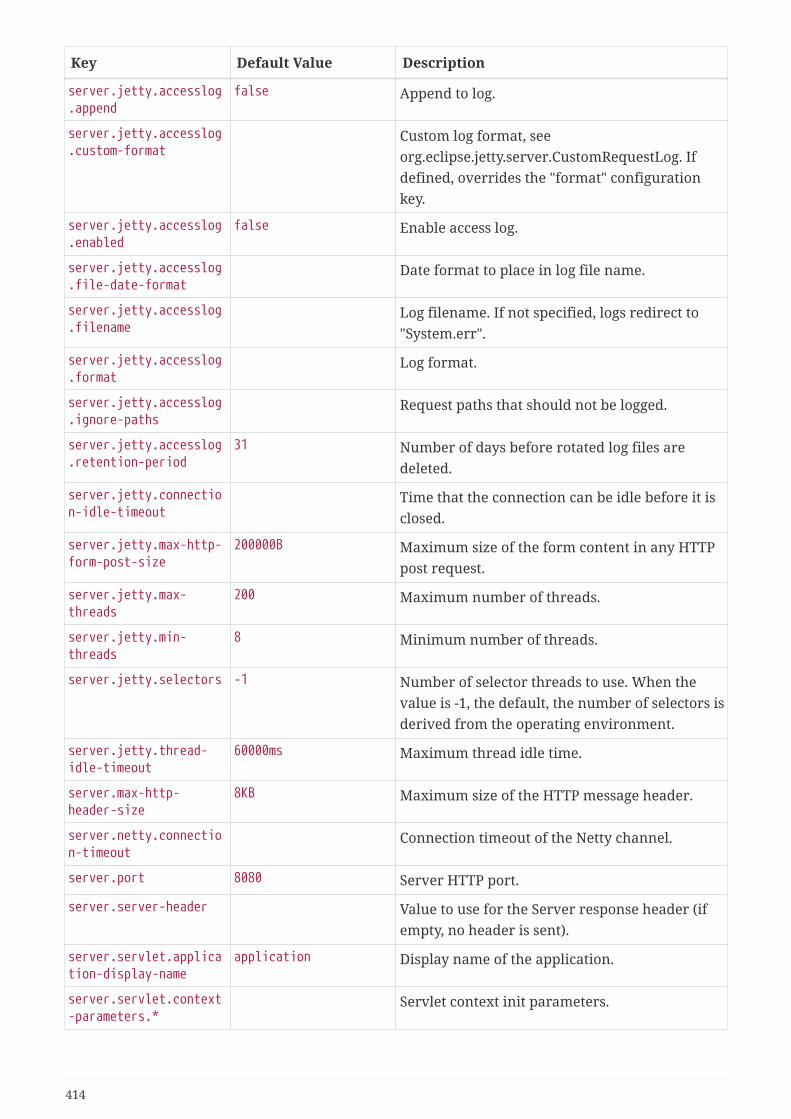
Key Default Value Description
server.jetty.accesslog.append
false Append to log.
server.jetty.accesslog.custom-format
Custom log format, seeorg.eclipse.jetty.server.CustomRequestLog. Ifdefined, overrides the "format" configurationkey.
server.jetty.accesslog.enabled
false Enable access log.
server.jetty.accesslog.file-date-format
Date format to place in log file name.
server.jetty.accesslog.filename
Log filename. If not specified, logs redirect to"System.err".
server.jetty.accesslog.format
Log format.
server.jetty.accesslog.ignore-paths
Request paths that should not be logged.
server.jetty.accesslog.retention-period
31 Number of days before rotated log files aredeleted.
server.jetty.connection-idle-timeout
Time that the connection can be idle before it isclosed.
server.jetty.max-http-form-post-size
200000B Maximum size of the form content in any HTTPpost request.
server.jetty.max-threads
200 Maximum number of threads.
server.jetty.min-threads
8 Minimum number of threads.
server.jetty.selectors -1 Number of selector threads to use. When thevalue is -1, the default, the number of selectors isderived from the operating environment.
server.jetty.thread-idle-timeout
60000ms Maximum thread idle time.
server.max-http-header-size
8KB Maximum size of the HTTP message header.
server.netty.connection-timeout
Connection timeout of the Netty channel.
server.port 8080 Server HTTP port.
server.server-header Value to use for the Server response header (ifempty, no header is sent).
server.servlet.application-display-name
application Display name of the application.
server.servlet.context-parameters.*
Servlet context init parameters.
414

Key Default Value Description
server.servlet.context-path
Context path of the application.
server.servlet.jsp.class-name
org.apache.jasper.servlet.JspServlet
Class name of the servlet to use for JSPs. Ifregistered is true and this class * is on theclasspath then it will be registered.
server.servlet.jsp.init-parameters.*
Init parameters used to configure the JSP servlet.
server.servlet.jsp.registered
true Whether the JSP servlet is registered.
server.servlet.session.cookie.comment
Comment for the session cookie.
server.servlet.session.cookie.domain
Domain for the session cookie.
server.servlet.session.cookie.http-only
Whether to use "HttpOnly" cookies for sessioncookies.
server.servlet.session.cookie.max-age
Maximum age of the session cookie. If aduration suffix is not specified, seconds will beused.
server.servlet.session.cookie.name
Session cookie name.
server.servlet.session.cookie.path
Path of the session cookie.
server.servlet.session.cookie.secure
Whether to always mark the session cookie assecure.
server.servlet.session.persistent
false Whether to persist session data betweenrestarts.
server.servlet.session.store-dir
Directory used to store session data.
server.servlet.session.timeout
30m Session timeout. If a duration suffix is notspecified, seconds will be used.
server.servlet.session.tracking-modes
Session tracking modes.
server.ssl.ciphers Supported SSL ciphers.
server.ssl.client-auth Client authentication mode. Requires a truststore.
server.ssl.enabled true Whether to enable SSL support.
server.ssl.enabled-protocols
Enabled SSL protocols.
server.ssl.key-alias Alias that identifies the key in the key store.
server.ssl.key-password
Password used to access the key in the key store.
415
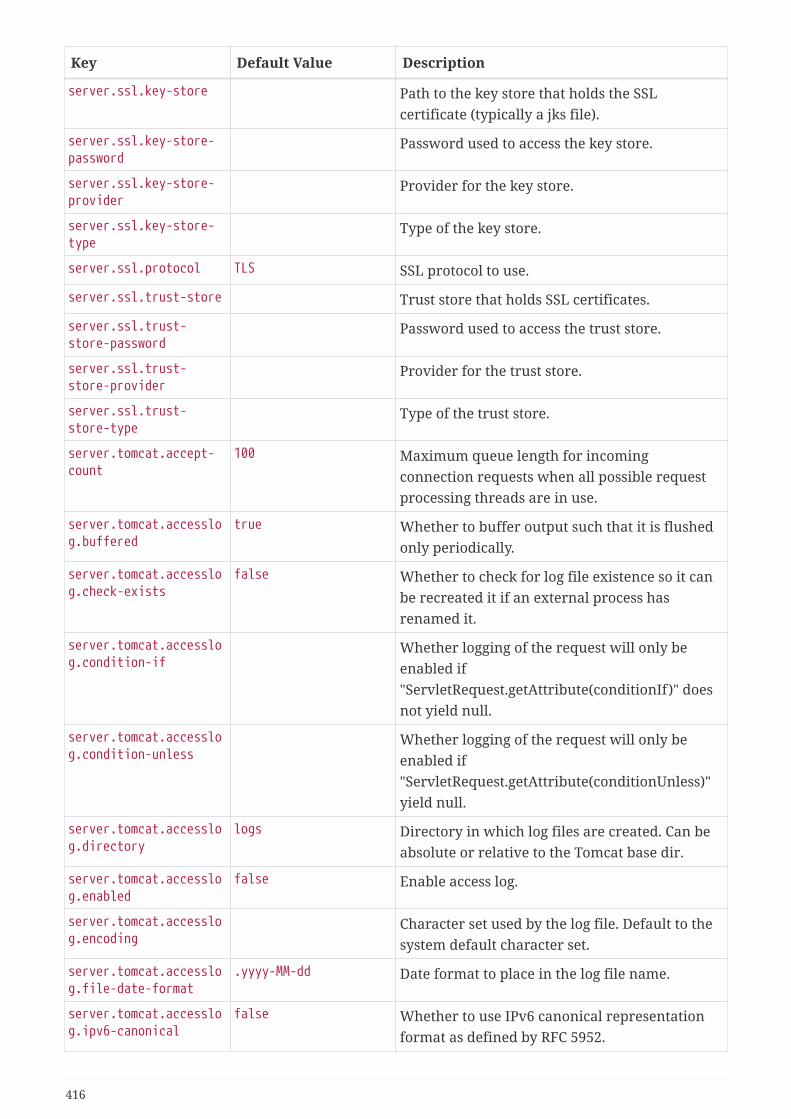
Key Default Value Description
server.ssl.key-store Path to the key store that holds the SSLcertificate (typically a jks file).
server.ssl.key-store-password
Password used to access the key store.
server.ssl.key-store-provider
Provider for the key store.
server.ssl.key-store-type
Type of the key store.
server.ssl.protocol TLS SSL protocol to use.
server.ssl.trust-store Trust store that holds SSL certificates.
server.ssl.trust-store-password
Password used to access the trust store.
server.ssl.trust-store-provider
Provider for the trust store.
server.ssl.trust-store-type
Type of the trust store.
server.tomcat.accept-count
100 Maximum queue length for incomingconnection requests when all possible requestprocessing threads are in use.
server.tomcat.accesslog.buffered
true Whether to buffer output such that it is flushedonly periodically.
server.tomcat.accesslog.check-exists
false Whether to check for log file existence so it canbe recreated it if an external process hasrenamed it.
server.tomcat.accesslog.condition-if
Whether logging of the request will only beenabled if"ServletRequest.getAttribute(conditionIf)" doesnot yield null.
server.tomcat.accesslog.condition-unless
Whether logging of the request will only beenabled if"ServletRequest.getAttribute(conditionUnless)"yield null.
server.tomcat.accesslog.directory
logs Directory in which log files are created. Can beabsolute or relative to the Tomcat base dir.
server.tomcat.accesslog.enabled
false Enable access log.
server.tomcat.accesslog.encoding
Character set used by the log file. Default to thesystem default character set.
server.tomcat.accesslog.file-date-format
.yyyy-MM-dd Date format to place in the log file name.
server.tomcat.accesslog.ipv6-canonical
false Whether to use IPv6 canonical representationformat as defined by RFC 5952.
416

Key Default Value Description
server.tomcat.accesslog.locale
Locale used to format timestamps in log entriesand in log file name suffix. Default to the defaultlocale of the Java process.
server.tomcat.accesslog.max-days
-1 Number of days to retain the access log filesbefore they are removed.
server.tomcat.accesslog.pattern
common Format pattern for access logs.
server.tomcat.accesslog.prefix
access_log Log file name prefix.
server.tomcat.accesslog.rename-on-rotate
false Whether to defer inclusion of the date stamp inthe file name until rotate time.
server.tomcat.accesslog.request-attributes-enabled
false Set request attributes for the IP address,Hostname, protocol, and port used for therequest.
server.tomcat.accesslog.rotate
true Whether to enable access log rotation.
server.tomcat.accesslog.suffix
.log Log file name suffix.
server.tomcat.additional-tld-skip-patterns
Comma-separated list of additional patterns thatmatch jars to ignore for TLD scanning. Thespecial '?' and '*' characters can be used in thepattern to match one and only one characterand zero or more characters respectively.
server.tomcat.background-processor-delay
10s Delay between the invocation ofbackgroundProcess methods. If a duration suffixis not specified, seconds will be used.
server.tomcat.basedir Tomcat base directory. If not specified, atemporary directory is used.
server.tomcat.connection-timeout
Amount of time the connector will wait, afteraccepting a connection, for the request URI lineto be presented.
server.tomcat.host-header
X-Forwarded-Host Name of the HTTP header from which theremote host is extracted.
417

Key Default Value Description
server.tomcat.internal-proxies
10\\.\\d{1,3}\\.\\d{1,3}\\.\\d{1,3}|192\\.168\\.\\d{1,3}\\.\\d{1,3}|169\\.254\\.\\d{1,3}\\.\\d{1,3}|127\\.\\d{1,3}\\.\\d{1,3}\\.\\d{1,3}|172\\.1[6-9]{1}\\.\\d{1,3}\\.\\d{1,3}|172\\.2[0-9]{1}\\.\\d{1,3}\\.\\d{1,3}|172\\.3[0-1]{1}\\.\\d{1,3}\\.\\d{1,3}|0:0:0:0:0:0:0:1|::1
Regular expression that matches proxies thatare to be trusted.
server.tomcat.max-connections
8192 Maximum number of connections that theserver accepts and processes at any given time.Once the limit has been reached, the operatingsystem may still accept connections based on the"acceptCount" property.
server.tomcat.max-http-form-post-size
2MB Maximum size of the form content in any HTTPpost request.
server.tomcat.max-swallow-size
2MB Maximum amount of request body to swallow.
server.tomcat.max-threads
200 Maximum amount of worker threads.
server.tomcat.mbeanregistry.enabled
false Whether Tomcat's MBean Registry should beenabled.
server.tomcat.min-spare-threads
10 Minimum amount of worker threads.
server.tomcat.port-header
X-Forwarded-Port Name of the HTTP header used to override theoriginal port value.
server.tomcat.processor-cache
200 Maximum number of idle processors that will beretained in the cache and reused with asubsequent request. When set to -1 the cachewill be unlimited with a theoretical maximumsize equal to the maximum number ofconnections.
server.tomcat.protocol-header
Header that holds the incoming protocol, usuallynamed "X-Forwarded-Proto".
server.tomcat.protocol-header-https-value
https Value of the protocol header indicating whetherthe incoming request uses SSL.
server.tomcat.redirect-context-root
true Whether requests to the context root should beredirected by appending a / to the path.
418
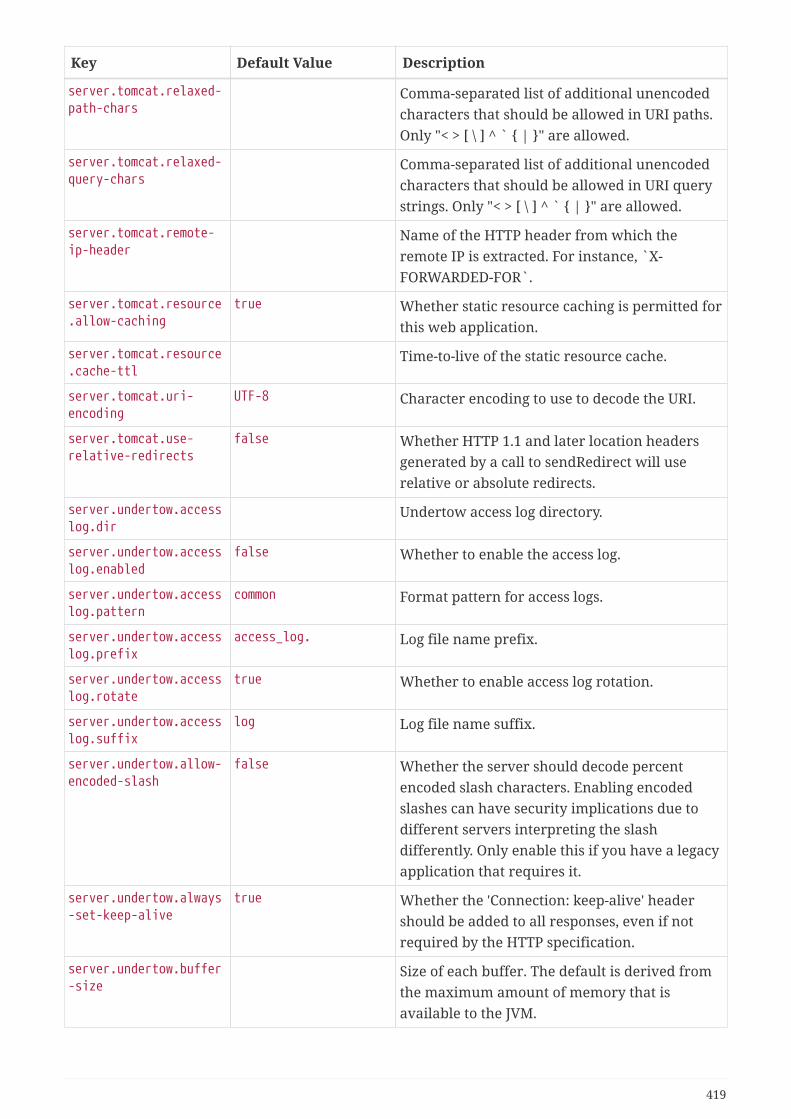
Key Default Value Description
server.tomcat.relaxed-path-chars
Comma-separated list of additional unencodedcharacters that should be allowed in URI paths.Only "< > [ \ ] ^ ` { | }" are allowed.
server.tomcat.relaxed-query-chars
Comma-separated list of additional unencodedcharacters that should be allowed in URI querystrings. Only "< > [ \ ] ^ ` { | }" are allowed.
server.tomcat.remote-ip-header
Name of the HTTP header from which theremote IP is extracted. For instance, `X-FORWARDED-FOR`.
server.tomcat.resource.allow-caching
true Whether static resource caching is permitted forthis web application.
server.tomcat.resource.cache-ttl
Time-to-live of the static resource cache.
server.tomcat.uri-encoding
UTF-8 Character encoding to use to decode the URI.
server.tomcat.use-relative-redirects
false Whether HTTP 1.1 and later location headersgenerated by a call to sendRedirect will userelative or absolute redirects.
server.undertow.accesslog.dir
Undertow access log directory.
server.undertow.accesslog.enabled
false Whether to enable the access log.
server.undertow.accesslog.pattern
common Format pattern for access logs.
server.undertow.accesslog.prefix
access_log. Log file name prefix.
server.undertow.accesslog.rotate
true Whether to enable access log rotation.
server.undertow.accesslog.suffix
log Log file name suffix.
server.undertow.allow-encoded-slash
false Whether the server should decode percentencoded slash characters. Enabling encodedslashes can have security implications due todifferent servers interpreting the slashdifferently. Only enable this if you have a legacyapplication that requires it.
server.undertow.always-set-keep-alive
true Whether the 'Connection: keep-alive' headershould be added to all responses, even if notrequired by the HTTP specification.
server.undertow.buffer-size
Size of each buffer. The default is derived fromthe maximum amount of memory that isavailable to the JVM.
419
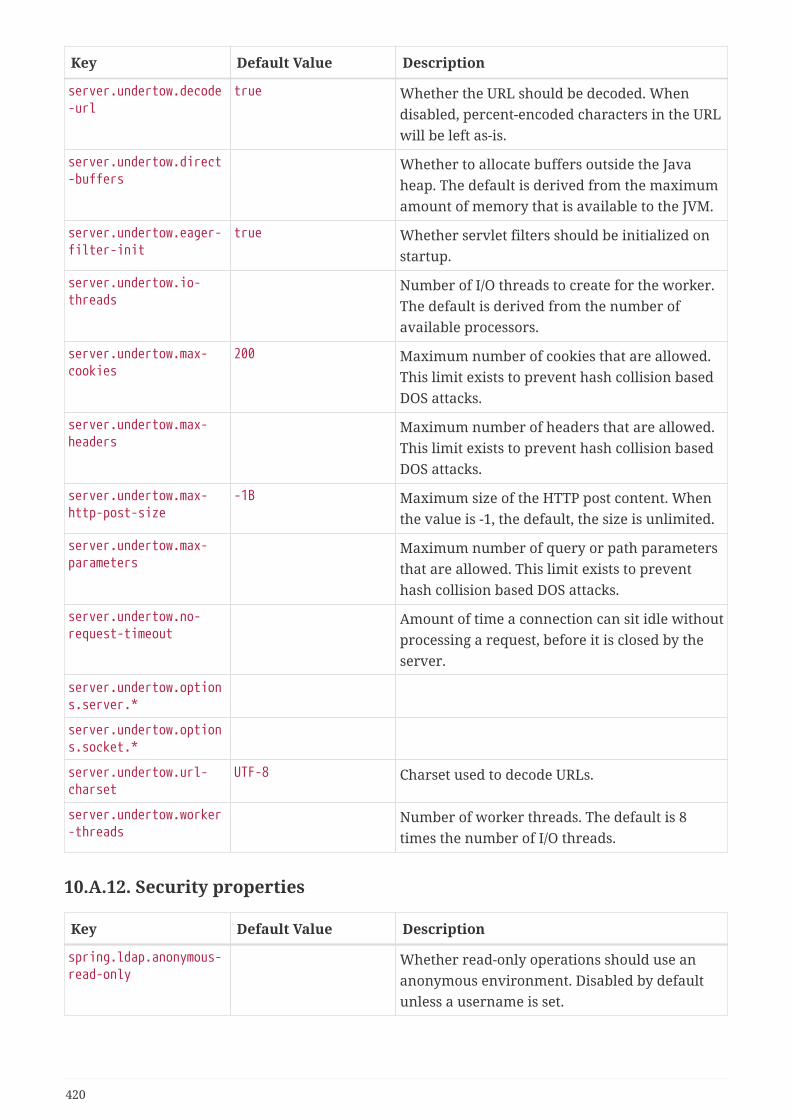
Key Default Value Description
server.undertow.decode-url
true Whether the URL should be decoded. Whendisabled, percent-encoded characters in the URLwill be left as-is.
server.undertow.direct-buffers
Whether to allocate buffers outside the Javaheap. The default is derived from the maximumamount of memory that is available to the JVM.
server.undertow.eager-filter-init
true Whether servlet filters should be initialized onstartup.
server.undertow.io-threads
Number of I/O threads to create for the worker.The default is derived from the number ofavailable processors.
server.undertow.max-cookies
200 Maximum number of cookies that are allowed.This limit exists to prevent hash collision basedDOS attacks.
server.undertow.max-headers
Maximum number of headers that are allowed.This limit exists to prevent hash collision basedDOS attacks.
server.undertow.max-http-post-size
-1B Maximum size of the HTTP post content. Whenthe value is -1, the default, the size is unlimited.
server.undertow.max-parameters
Maximum number of query or path parametersthat are allowed. This limit exists to preventhash collision based DOS attacks.
server.undertow.no-request-timeout
Amount of time a connection can sit idle withoutprocessing a request, before it is closed by theserver.
server.undertow.options.server.*
server.undertow.options.socket.*
server.undertow.url-charset
UTF-8 Charset used to decode URLs.
server.undertow.worker-threads
Number of worker threads. The default is 8times the number of I/O threads.
10.A.12. Security properties
Key Default Value Description
spring.ldap.anonymous-read-only
Whether read-only operations should use ananonymous environment. Disabled by defaultunless a username is set.
420
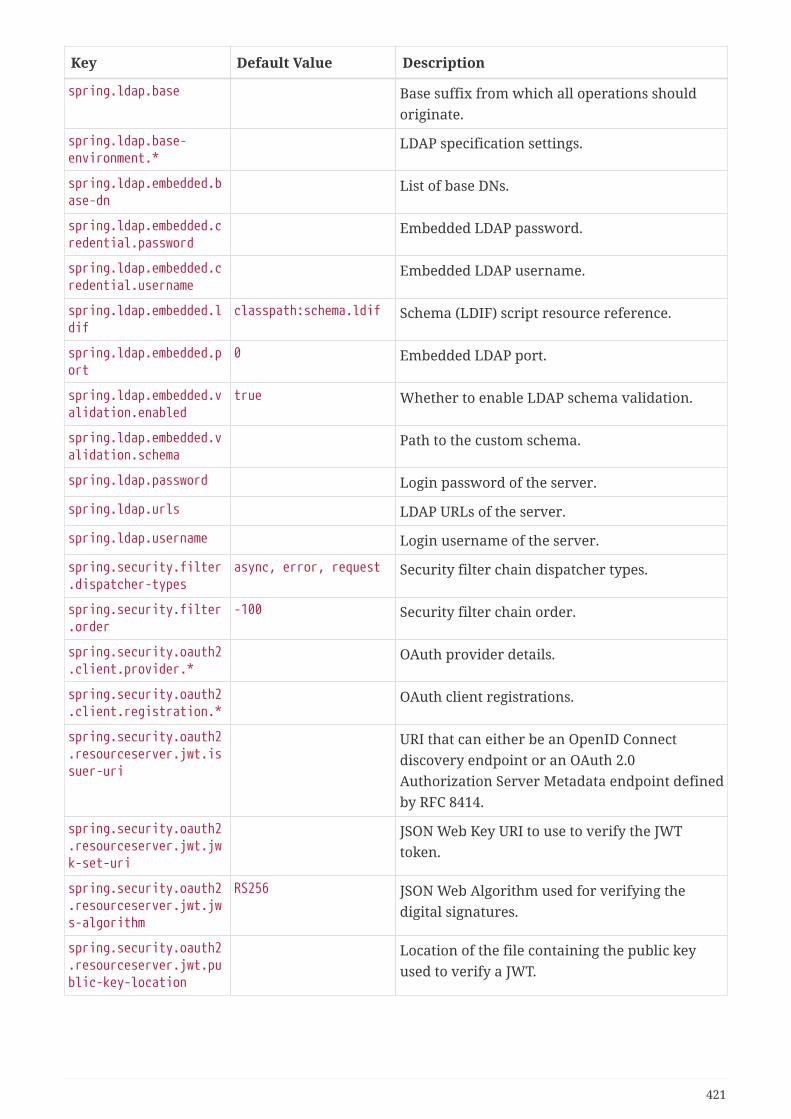
Key Default Value Description
spring.ldap.base Base suffix from which all operations shouldoriginate.
spring.ldap.base-environment.*
LDAP specification settings.
spring.ldap.embedded.base-dn
List of base DNs.
spring.ldap.embedded.credential.password
Embedded LDAP password.
spring.ldap.embedded.credential.username
Embedded LDAP username.
spring.ldap.embedded.ldif
classpath:schema.ldif Schema (LDIF) script resource reference.
spring.ldap.embedded.port
0 Embedded LDAP port.
spring.ldap.embedded.validation.enabled
true Whether to enable LDAP schema validation.
spring.ldap.embedded.validation.schema
Path to the custom schema.
spring.ldap.password Login password of the server.
spring.ldap.urls LDAP URLs of the server.
spring.ldap.username Login username of the server.
spring.security.filter.dispatcher-types
async, error, request Security filter chain dispatcher types.
spring.security.filter.order
-100 Security filter chain order.
spring.security.oauth2.client.provider.*
OAuth provider details.
spring.security.oauth2.client.registration.*
OAuth client registrations.
spring.security.oauth2.resourceserver.jwt.issuer-uri
URI that can either be an OpenID Connectdiscovery endpoint or an OAuth 2.0Authorization Server Metadata endpoint definedby RFC 8414.
spring.security.oauth2.resourceserver.jwt.jwk-set-uri
JSON Web Key URI to use to verify the JWTtoken.
spring.security.oauth2.resourceserver.jwt.jws-algorithm
RS256 JSON Web Algorithm used for verifying thedigital signatures.
spring.security.oauth2.resourceserver.jwt.public-key-location
Location of the file containing the public keyused to verify a JWT.
421

Key Default Value Description
spring.security.oauth2.resourceserver.opaquetoken.client-id
Client id used to authenticate with the tokenintrospection endpoint.
spring.security.oauth2.resourceserver.opaquetoken.client-secret
Client secret used to authenticate with the tokenintrospection endpoint.
spring.security.oauth2.resourceserver.opaquetoken.introspection-uri
OAuth 2.0 endpoint through which tokenintrospection is accomplished.
spring.security.saml2.relyingparty.registration.*
SAML2 relying party registrations.
spring.security.user.name
user Default user name.
spring.security.user.password
Password for the default user name.
spring.security.user.roles
Granted roles for the default user name.
spring.session.hazelcast.flush-mode
on-save Sessions flush mode. Determines when sessionchanges are written to the session store.
spring.session.hazelcast.map-name
spring:session:sessions
Name of the map used to store sessions.
spring.session.hazelcast.save-mode
Sessions save mode. Determines how sessionchanges are tracked and saved to the sessionstore.
spring.session.jdbc.cleanup-cron
0 * * * * * Cron expression for expired session cleanup job.
spring.session.jdbc.flush-mode
Sessions flush mode. Determines when sessionchanges are written to the session store.
spring.session.jdbc.initialize-schema
embedded Database schema initialization mode.
spring.session.jdbc.save-mode
Sessions save mode. Determines how sessionchanges are tracked and saved to the sessionstore.
spring.session.jdbc.schema
classpath:org/springframework/session/jdbc/schema-@@platform@@.sql
Path to the SQL file to use to initialize thedatabase schema.
spring.session.jdbc.table-name
SPRING_SESSION Name of the database table used to storesessions.
spring.session.mongodb.collection-name
sessions Collection name used to store sessions.
spring.session.redis.cleanup-cron
0 * * * * * Cron expression for expired session cleanup job.
422
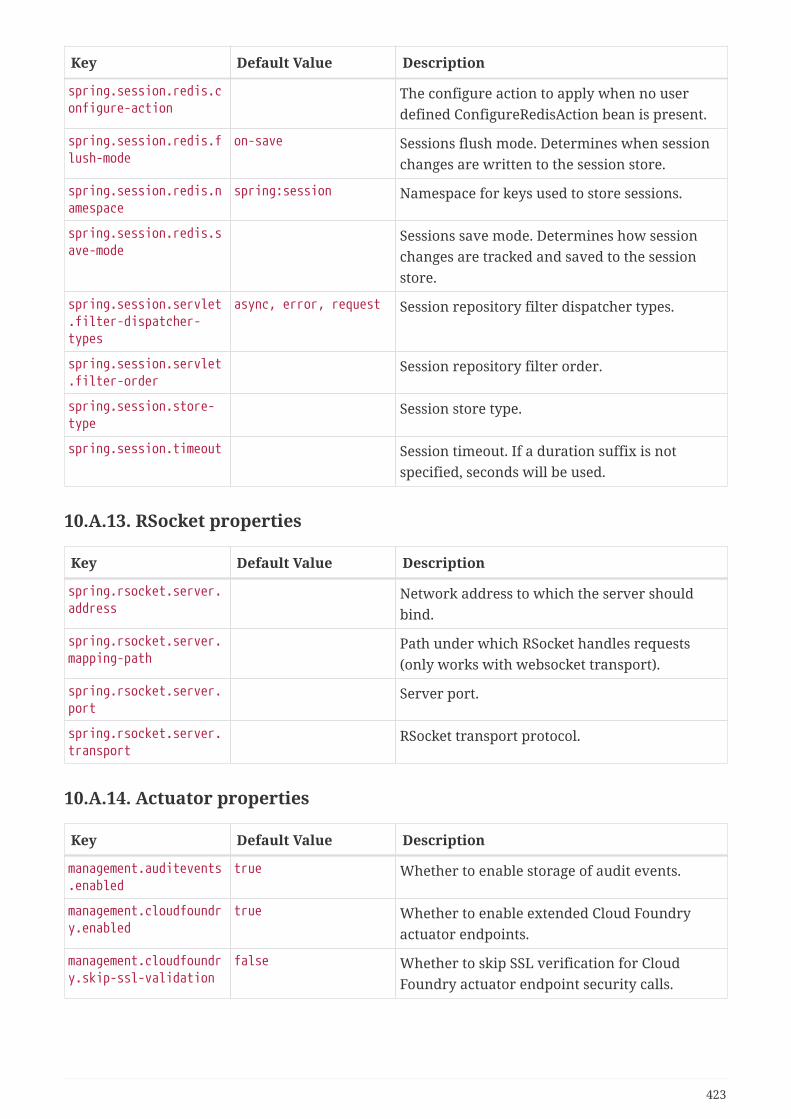
Key Default Value Description
spring.session.redis.configure-action
The configure action to apply when no userdefined ConfigureRedisAction bean is present.
spring.session.redis.flush-mode
on-save Sessions flush mode. Determines when sessionchanges are written to the session store.
spring.session.redis.namespace
spring:session Namespace for keys used to store sessions.
spring.session.redis.save-mode
Sessions save mode. Determines how sessionchanges are tracked and saved to the sessionstore.
spring.session.servlet.filter-dispatcher-types
async, error, request Session repository filter dispatcher types.
spring.session.servlet.filter-order
Session repository filter order.
spring.session.store-type
Session store type.
spring.session.timeout Session timeout. If a duration suffix is notspecified, seconds will be used.
10.A.13. RSocket properties
Key Default Value Description
spring.rsocket.server.address
Network address to which the server shouldbind.
spring.rsocket.server.mapping-path
Path under which RSocket handles requests(only works with websocket transport).
spring.rsocket.server.port
Server port.
spring.rsocket.server.transport
RSocket transport protocol.
10.A.14. Actuator properties
Key Default Value Description
management.auditevents.enabled
true Whether to enable storage of audit events.
management.cloudfoundry.enabled
true Whether to enable extended Cloud Foundryactuator endpoints.
management.cloudfoundry.skip-ssl-validation
false Whether to skip SSL verification for CloudFoundry actuator endpoint security calls.
423
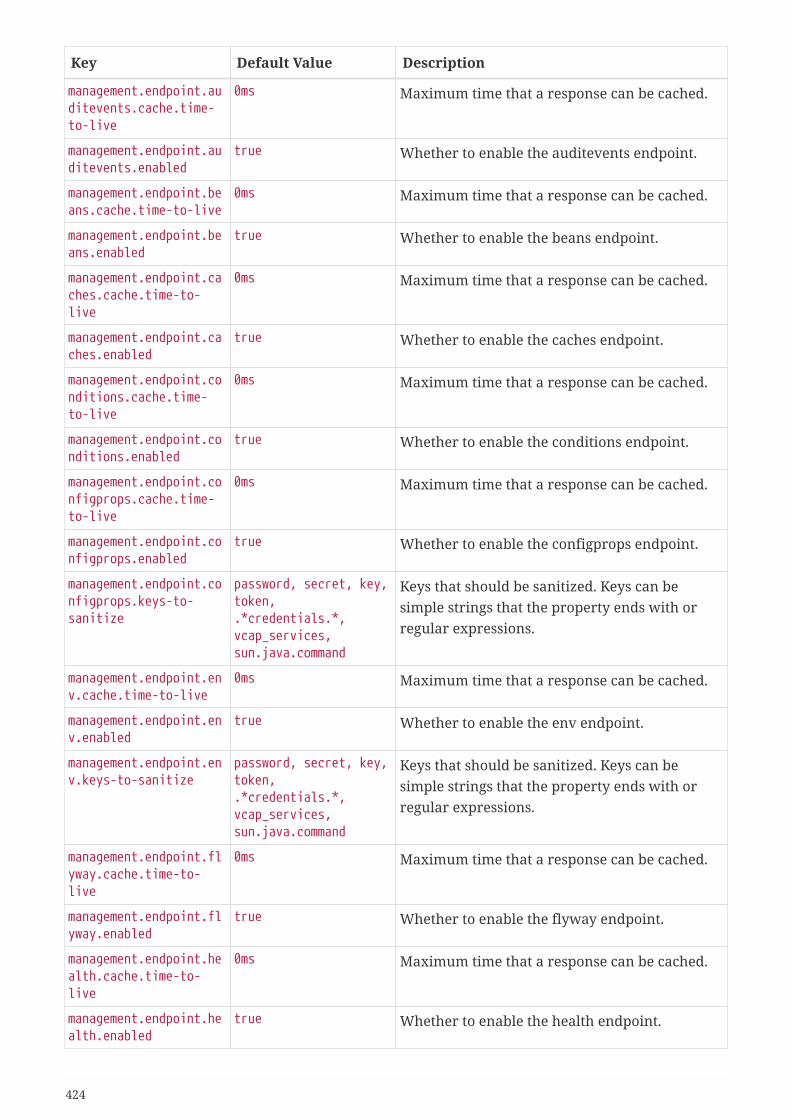
Key Default Value Description
management.endpoint.auditevents.cache.time-to-live
0ms Maximum time that a response can be cached.
management.endpoint.auditevents.enabled
true Whether to enable the auditevents endpoint.
management.endpoint.beans.cache.time-to-live
0ms Maximum time that a response can be cached.
management.endpoint.beans.enabled
true Whether to enable the beans endpoint.
management.endpoint.caches.cache.time-to-live
0ms Maximum time that a response can be cached.
management.endpoint.caches.enabled
true Whether to enable the caches endpoint.
management.endpoint.conditions.cache.time-to-live
0ms Maximum time that a response can be cached.
management.endpoint.conditions.enabled
true Whether to enable the conditions endpoint.
management.endpoint.configprops.cache.time-to-live
0ms Maximum time that a response can be cached.
management.endpoint.configprops.enabled
true Whether to enable the configprops endpoint.
management.endpoint.configprops.keys-to-sanitize
password, secret, key,token,.*credentials.*,vcap_services,sun.java.command
Keys that should be sanitized. Keys can besimple strings that the property ends with orregular expressions.
management.endpoint.env.cache.time-to-live
0ms Maximum time that a response can be cached.
management.endpoint.env.enabled
true Whether to enable the env endpoint.
management.endpoint.env.keys-to-sanitize
password, secret, key,token,.*credentials.*,vcap_services,sun.java.command
Keys that should be sanitized. Keys can besimple strings that the property ends with orregular expressions.
management.endpoint.flyway.cache.time-to-live
0ms Maximum time that a response can be cached.
management.endpoint.flyway.enabled
true Whether to enable the flyway endpoint.
management.endpoint.health.cache.time-to-live
0ms Maximum time that a response can be cached.
management.endpoint.health.enabled
true Whether to enable the health endpoint.
424
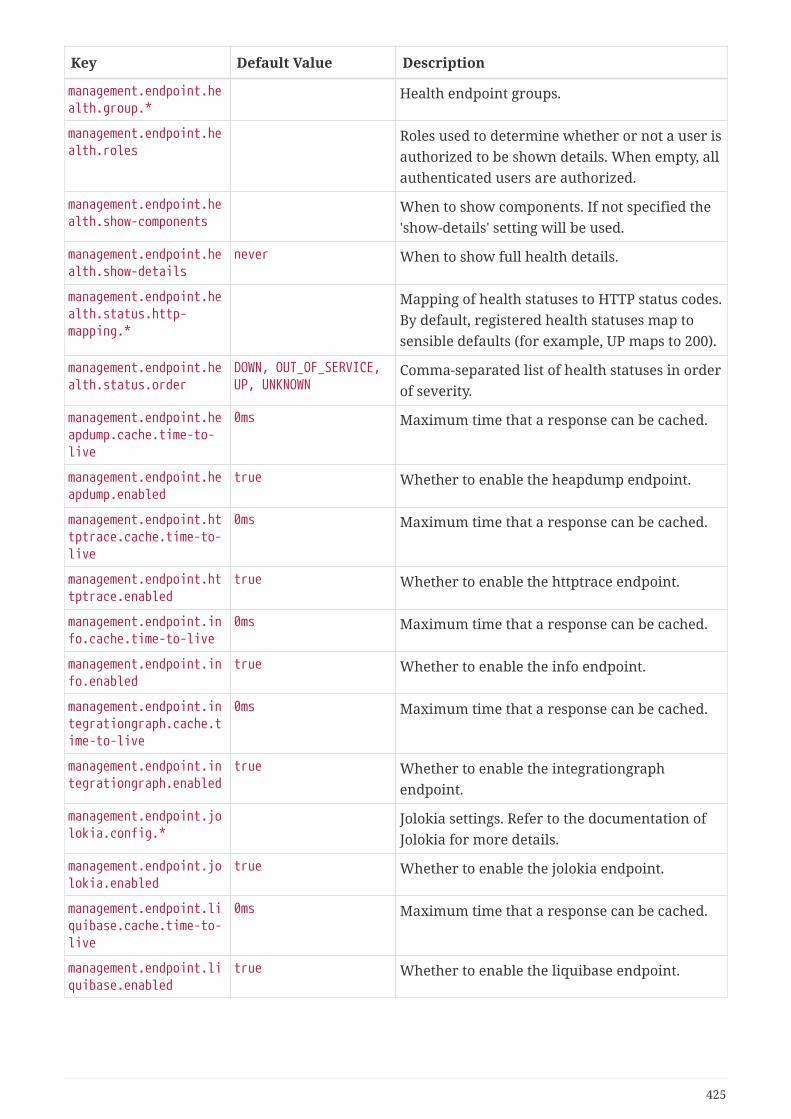
Key Default Value Description
management.endpoint.health.group.*
Health endpoint groups.
management.endpoint.health.roles
Roles used to determine whether or not a user isauthorized to be shown details. When empty, allauthenticated users are authorized.
management.endpoint.health.show-components
When to show components. If not specified the'show-details' setting will be used.
management.endpoint.health.show-details
never When to show full health details.
management.endpoint.health.status.http-mapping.*
Mapping of health statuses to HTTP status codes.By default, registered health statuses map tosensible defaults (for example, UP maps to 200).
management.endpoint.health.status.order
DOWN, OUT_OF_SERVICE,UP, UNKNOWN
Comma-separated list of health statuses in orderof severity.
management.endpoint.heapdump.cache.time-to-live
0ms Maximum time that a response can be cached.
management.endpoint.heapdump.enabled
true Whether to enable the heapdump endpoint.
management.endpoint.httptrace.cache.time-to-live
0ms Maximum time that a response can be cached.
management.endpoint.httptrace.enabled
true Whether to enable the httptrace endpoint.
management.endpoint.info.cache.time-to-live
0ms Maximum time that a response can be cached.
management.endpoint.info.enabled
true Whether to enable the info endpoint.
management.endpoint.integrationgraph.cache.time-to-live
0ms Maximum time that a response can be cached.
management.endpoint.integrationgraph.enabled
true Whether to enable the integrationgraphendpoint.
management.endpoint.jolokia.config.*
Jolokia settings. Refer to the documentation ofJolokia for more details.
management.endpoint.jolokia.enabled
true Whether to enable the jolokia endpoint.
management.endpoint.liquibase.cache.time-to-live
0ms Maximum time that a response can be cached.
management.endpoint.liquibase.enabled
true Whether to enable the liquibase endpoint.
425
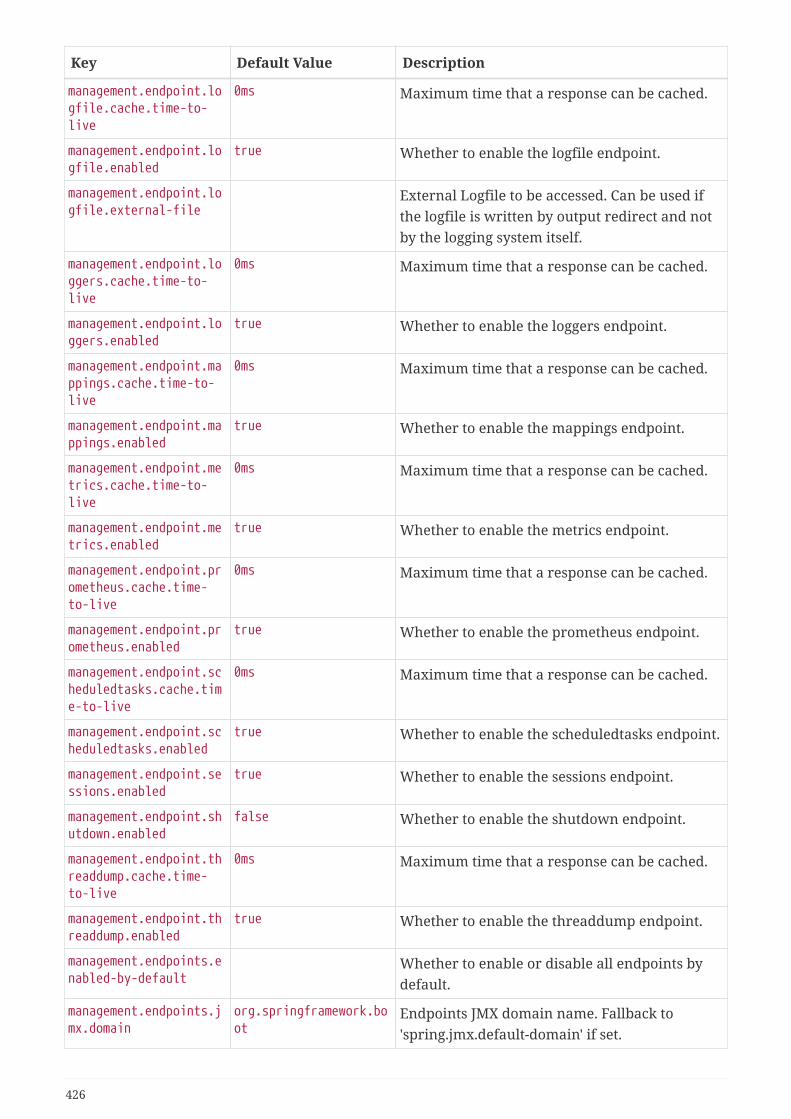
Key Default Value Description
management.endpoint.logfile.cache.time-to-live
0ms Maximum time that a response can be cached.
management.endpoint.logfile.enabled
true Whether to enable the logfile endpoint.
management.endpoint.logfile.external-file
External Logfile to be accessed. Can be used ifthe logfile is written by output redirect and notby the logging system itself.
management.endpoint.loggers.cache.time-to-live
0ms Maximum time that a response can be cached.
management.endpoint.loggers.enabled
true Whether to enable the loggers endpoint.
management.endpoint.mappings.cache.time-to-live
0ms Maximum time that a response can be cached.
management.endpoint.mappings.enabled
true Whether to enable the mappings endpoint.
management.endpoint.metrics.cache.time-to-live
0ms Maximum time that a response can be cached.
management.endpoint.metrics.enabled
true Whether to enable the metrics endpoint.
management.endpoint.prometheus.cache.time-to-live
0ms Maximum time that a response can be cached.
management.endpoint.prometheus.enabled
true Whether to enable the prometheus endpoint.
management.endpoint.scheduledtasks.cache.time-to-live
0ms Maximum time that a response can be cached.
management.endpoint.scheduledtasks.enabled
true Whether to enable the scheduledtasks endpoint.
management.endpoint.sessions.enabled
true Whether to enable the sessions endpoint.
management.endpoint.shutdown.enabled
false Whether to enable the shutdown endpoint.
management.endpoint.threaddump.cache.time-to-live
0ms Maximum time that a response can be cached.
management.endpoint.threaddump.enabled
true Whether to enable the threaddump endpoint.
management.endpoints.enabled-by-default
Whether to enable or disable all endpoints bydefault.
management.endpoints.jmx.domain
org.springframework.boot
Endpoints JMX domain name. Fallback to'spring.jmx.default-domain' if set.
426

Key Default Value Description
management.endpoints.jmx.exposure.exclude
Endpoint IDs that should be excluded or '*' forall.
management.endpoints.jmx.exposure.include
* Endpoint IDs that should be included or '*' forall.
management.endpoints.jmx.static-names
Additional static properties to append to allObjectNames of MBeans representing Endpoints.
management.endpoints.migrate-legacy-ids
false Whether to transparently migrate legacyendpoint IDs.
management.endpoints.web.base-path
/actuator Base path for Web endpoints. Relative toserver.servlet.context-path ormanagement.server.servlet.context-path ifmanagement.server.port is configured.
management.endpoints.web.cors.allow-credentials
Whether credentials are supported. When notset, credentials are not supported.
management.endpoints.web.cors.allowed-headers
Comma-separated list of headers to allow in arequest. '*' allows all headers.
management.endpoints.web.cors.allowed-methods
Comma-separated list of methods to allow. '*'allows all methods. When not set, defaults toGET.
management.endpoints.web.cors.allowed-origins
Comma-separated list of origins to allow. '*'allows all origins. When not set, CORS support isdisabled.
management.endpoints.web.cors.exposed-headers
Comma-separated list of headers to include in aresponse.
management.endpoints.web.cors.max-age
1800s How long the response from a pre-flight requestcan be cached by clients. If a duration suffix isnot specified, seconds will be used.
management.endpoints.web.exposure.exclude
Endpoint IDs that should be excluded or '*' forall.
management.endpoints.web.exposure.include
health, info Endpoint IDs that should be included or '*' forall.
management.endpoints.web.path-mapping.*
Mapping between endpoint IDs and the paththat should expose them.
management.health.cassandra.enabled
true Whether to enable Cassandra health check.
management.health.couchbase.enabled
true Whether to enable Couchbase health check.
management.health.db.enabled
true Whether to enable database health check.
427

Key Default Value Description
management.health.defaults.enabled
true Whether to enable default health indicators.
management.health.diskspace.enabled
true Whether to enable disk space health check.
management.health.diskspace.path
Path used to compute the available disk space.
management.health.diskspace.threshold
10MB Minimum disk space that should be available.
management.health.elasticsearch.enabled
true Whether to enable Elasticsearch health check.
management.health.influxdb.enabled
true Whether to enable InfluxDB health check.
management.health.jms.enabled
true Whether to enable JMS health check.
management.health.ldap.enabled
true Whether to enable LDAP health check.
management.health.mail.enabled
true Whether to enable Mail health check.
management.health.mongo.enabled
true Whether to enable MongoDB health check.
management.health.neo4j.enabled
true Whether to enable Neo4j health check.
management.health.ping.enabled
true Whether to enable ping health check.
management.health.rabbit.enabled
true Whether to enable RabbitMQ health check.
management.health.redis.enabled
true Whether to enable Redis health check.
management.health.solr.enabled
true Whether to enable Solr health check.
management.info.build.enabled
true Whether to enable build info.
management.info.defaults.enabled
true Whether to enable default info contributors.
management.info.env.enabled
true Whether to enable environment info.
management.info.git.enabled
true Whether to enable git info.
management.info.git.mode
simple Mode to use to expose git information.
management.metrics.distribution.maximum-expected-value.*
Maximum value that meter IDs starting-with thespecified name are expected to observe. Thelongest match wins. Values can be specified as along or as a Duration value (for timer meters,defaulting to ms if no unit specified).
428
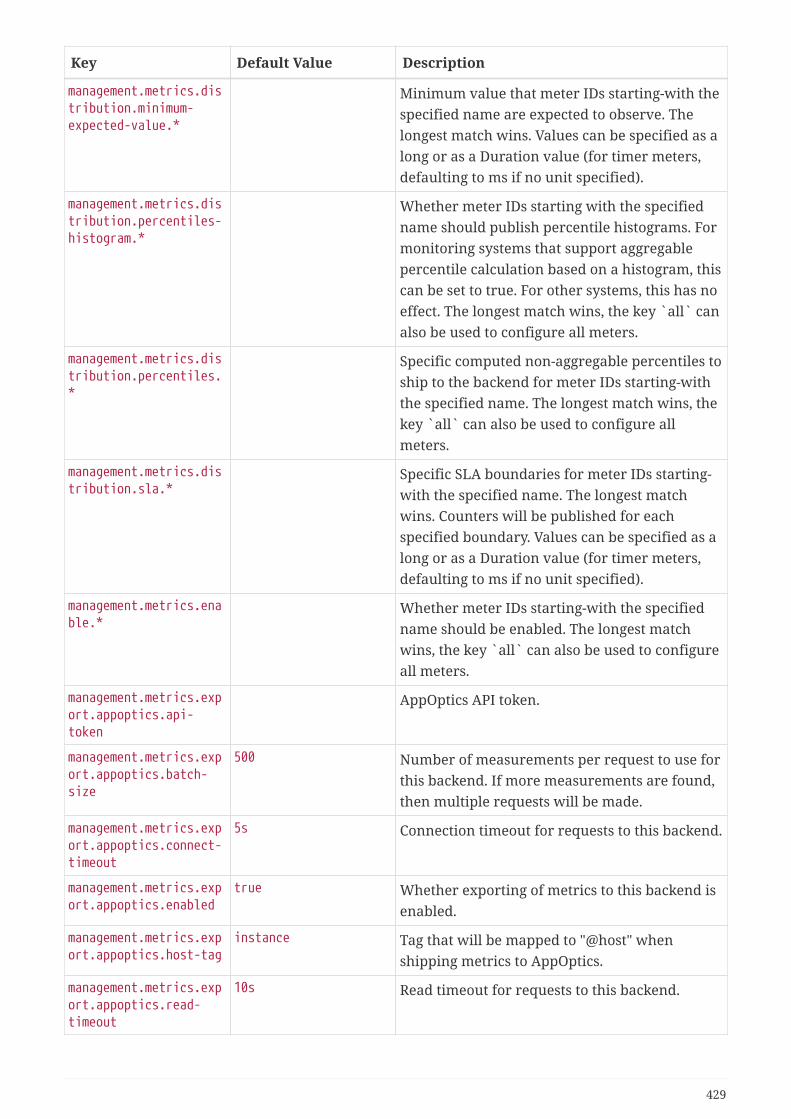
Key Default Value Description
management.metrics.distribution.minimum-expected-value.*
Minimum value that meter IDs starting-with thespecified name are expected to observe. Thelongest match wins. Values can be specified as along or as a Duration value (for timer meters,defaulting to ms if no unit specified).
management.metrics.distribution.percentiles-histogram.*
Whether meter IDs starting with the specifiedname should publish percentile histograms. Formonitoring systems that support aggregablepercentile calculation based on a histogram, thiscan be set to true. For other systems, this has noeffect. The longest match wins, the key `all` canalso be used to configure all meters.
management.metrics.distribution.percentiles.*
Specific computed non-aggregable percentiles toship to the backend for meter IDs starting-withthe specified name. The longest match wins, thekey `all` can also be used to configure allmeters.
management.metrics.distribution.sla.*
Specific SLA boundaries for meter IDs starting-with the specified name. The longest matchwins. Counters will be published for eachspecified boundary. Values can be specified as along or as a Duration value (for timer meters,defaulting to ms if no unit specified).
management.metrics.enable.*
Whether meter IDs starting-with the specifiedname should be enabled. The longest matchwins, the key `all` can also be used to configureall meters.
management.metrics.export.appoptics.api-token
AppOptics API token.
management.metrics.export.appoptics.batch-size
500 Number of measurements per request to use forthis backend. If more measurements are found,then multiple requests will be made.
management.metrics.export.appoptics.connect-timeout
5s Connection timeout for requests to this backend.
management.metrics.export.appoptics.enabled
true Whether exporting of metrics to this backend isenabled.
management.metrics.export.appoptics.host-tag
instance Tag that will be mapped to "@host" whenshipping metrics to AppOptics.
management.metrics.export.appoptics.read-timeout
10s Read timeout for requests to this backend.
429
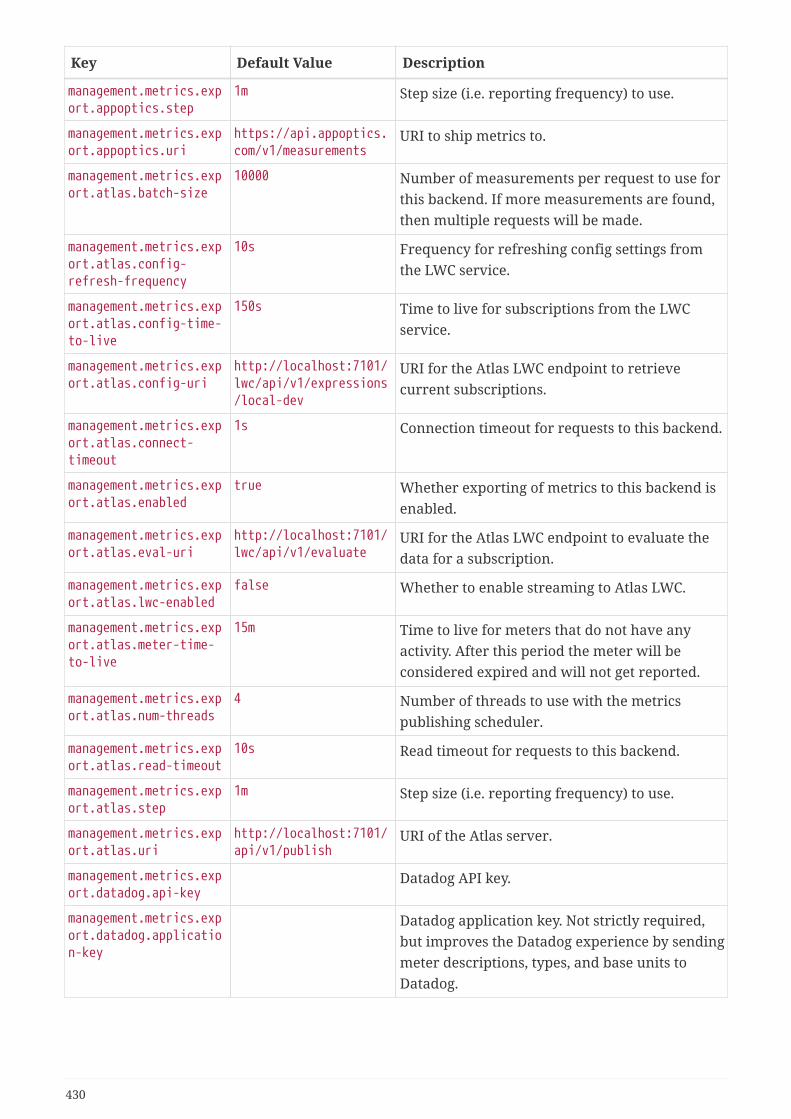
Key Default Value Description
management.metrics.export.appoptics.step
1m Step size (i.e. reporting frequency) to use.
management.metrics.export.appoptics.uri
https://api.appoptics.com/v1/measurements
URI to ship metrics to.
management.metrics.export.atlas.batch-size
10000 Number of measurements per request to use forthis backend. If more measurements are found,then multiple requests will be made.
management.metrics.export.atlas.config-refresh-frequency
10s Frequency for refreshing config settings fromthe LWC service.
management.metrics.export.atlas.config-time-to-live
150s Time to live for subscriptions from the LWCservice.
management.metrics.export.atlas.config-uri
http://localhost:7101/lwc/api/v1/expressions/local-dev
URI for the Atlas LWC endpoint to retrievecurrent subscriptions.
management.metrics.export.atlas.connect-timeout
1s Connection timeout for requests to this backend.
management.metrics.export.atlas.enabled
true Whether exporting of metrics to this backend isenabled.
management.metrics.export.atlas.eval-uri
http://localhost:7101/lwc/api/v1/evaluate
URI for the Atlas LWC endpoint to evaluate thedata for a subscription.
management.metrics.export.atlas.lwc-enabled
false Whether to enable streaming to Atlas LWC.
management.metrics.export.atlas.meter-time-to-live
15m Time to live for meters that do not have anyactivity. After this period the meter will beconsidered expired and will not get reported.
management.metrics.export.atlas.num-threads
4 Number of threads to use with the metricspublishing scheduler.
management.metrics.export.atlas.read-timeout
10s Read timeout for requests to this backend.
management.metrics.export.atlas.step
1m Step size (i.e. reporting frequency) to use.
management.metrics.export.atlas.uri
http://localhost:7101/api/v1/publish
URI of the Atlas server.
management.metrics.export.datadog.api-key
Datadog API key.
management.metrics.export.datadog.application-key
Datadog application key. Not strictly required,but improves the Datadog experience by sendingmeter descriptions, types, and base units toDatadog.
430

Key Default Value Description
management.metrics.export.datadog.batch-size
10000 Number of measurements per request to use forthis backend. If more measurements are found,then multiple requests will be made.
management.metrics.export.datadog.connect-timeout
1s Connection timeout for requests to this backend.
management.metrics.export.datadog.descriptions
true Whether to publish descriptions metadata toDatadog. Turn this off to minimize the amountof metadata sent.
management.metrics.export.datadog.enabled
true Whether exporting of metrics to this backend isenabled.
management.metrics.export.datadog.host-tag
instance Tag that will be mapped to "host" when shippingmetrics to Datadog.
management.metrics.export.datadog.read-timeout
10s Read timeout for requests to this backend.
management.metrics.export.datadog.step
1m Step size (i.e. reporting frequency) to use.
management.metrics.export.datadog.uri
https://app.datadoghq.com
URI to ship metrics to. If you need to publishmetrics to an internal proxy en-route toDatadog, you can define the location of theproxy with this.
management.metrics.export.dynatrace.api-token
Dynatrace authentication token.
management.metrics.export.dynatrace.batch-size
10000 Number of measurements per request to use forthis backend. If more measurements are found,then multiple requests will be made.
management.metrics.export.dynatrace.connect-timeout
1s Connection timeout for requests to this backend.
management.metrics.export.dynatrace.device-id
ID of the custom device that is exporting metricsto Dynatrace.
management.metrics.export.dynatrace.enabled
true Whether exporting of metrics to this backend isenabled.
management.metrics.export.dynatrace.group
Group for exported metrics. Used to specifycustom device group name in the Dynatrace UI.
management.metrics.export.dynatrace.read-timeout
10s Read timeout for requests to this backend.
management.metrics.export.dynatrace.step
1m Step size (i.e. reporting frequency) to use.
431

Key Default Value Description
management.metrics.export.dynatrace.technology-type
java Technology type for exported metrics. Used togroup metrics under a logical technology namein the Dynatrace UI.
management.metrics.export.dynatrace.uri
URI to ship metrics to. Should be used for SaaS,self managed instances or to en-route throughan internal proxy.
management.metrics.export.elastic.auto-create-index
true Whether to create the index automatically if itdoes not exist.
management.metrics.export.elastic.batch-size
10000 Number of measurements per request to use forthis backend. If more measurements are found,then multiple requests will be made.
management.metrics.export.elastic.connect-timeout
1s Connection timeout for requests to this backend.
management.metrics.export.elastic.enabled
true Whether exporting of metrics to this backend isenabled.
management.metrics.export.elastic.host
http://localhost:9200 Host to export metrics to.
management.metrics.export.elastic.index
metrics Index to export metrics to.
management.metrics.export.elastic.index-date-format
yyyy-MM Index date format used for rolling indices.Appended to the index name, preceded by a '-'.
management.metrics.export.elastic.password
Login password of the Elastic server.
management.metrics.export.elastic.read-timeout
10s Read timeout for requests to this backend.
management.metrics.export.elastic.step
1m Step size (i.e. reporting frequency) to use.
management.metrics.export.elastic.timestamp-field-name
@timestamp Name of the timestamp field.
management.metrics.export.elastic.user-name
Login user of the Elastic server.
management.metrics.export.ganglia.addressing-mode
multicast UDP addressing mode, either unicast ormulticast.
management.metrics.export.ganglia.duration-units
milliseconds Base time unit used to report durations.
management.metrics.export.ganglia.enabled
true Whether exporting of metrics to Ganglia isenabled.
432
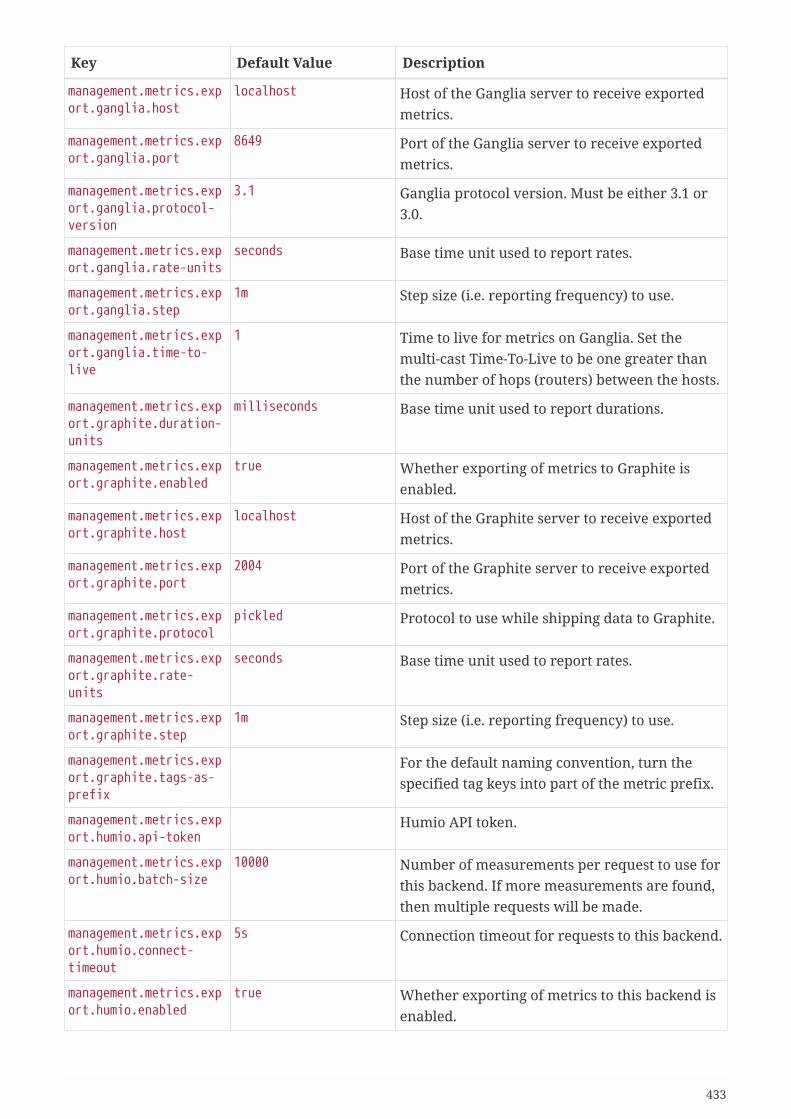
Key Default Value Description
management.metrics.export.ganglia.host
localhost Host of the Ganglia server to receive exportedmetrics.
management.metrics.export.ganglia.port
8649 Port of the Ganglia server to receive exportedmetrics.
management.metrics.export.ganglia.protocol-version
3.1 Ganglia protocol version. Must be either 3.1 or3.0.
management.metrics.export.ganglia.rate-units
seconds Base time unit used to report rates.
management.metrics.export.ganglia.step
1m Step size (i.e. reporting frequency) to use.
management.metrics.export.ganglia.time-to-live
1 Time to live for metrics on Ganglia. Set themulti-cast Time-To-Live to be one greater thanthe number of hops (routers) between the hosts.
management.metrics.export.graphite.duration-units
milliseconds Base time unit used to report durations.
management.metrics.export.graphite.enabled
true Whether exporting of metrics to Graphite isenabled.
management.metrics.export.graphite.host
localhost Host of the Graphite server to receive exportedmetrics.
management.metrics.export.graphite.port
2004 Port of the Graphite server to receive exportedmetrics.
management.metrics.export.graphite.protocol
pickled Protocol to use while shipping data to Graphite.
management.metrics.export.graphite.rate-units
seconds Base time unit used to report rates.
management.metrics.export.graphite.step
1m Step size (i.e. reporting frequency) to use.
management.metrics.export.graphite.tags-as-prefix
For the default naming convention, turn thespecified tag keys into part of the metric prefix.
management.metrics.export.humio.api-token
Humio API token.
management.metrics.export.humio.batch-size
10000 Number of measurements per request to use forthis backend. If more measurements are found,then multiple requests will be made.
management.metrics.export.humio.connect-timeout
5s Connection timeout for requests to this backend.
management.metrics.export.humio.enabled
true Whether exporting of metrics to this backend isenabled.
433
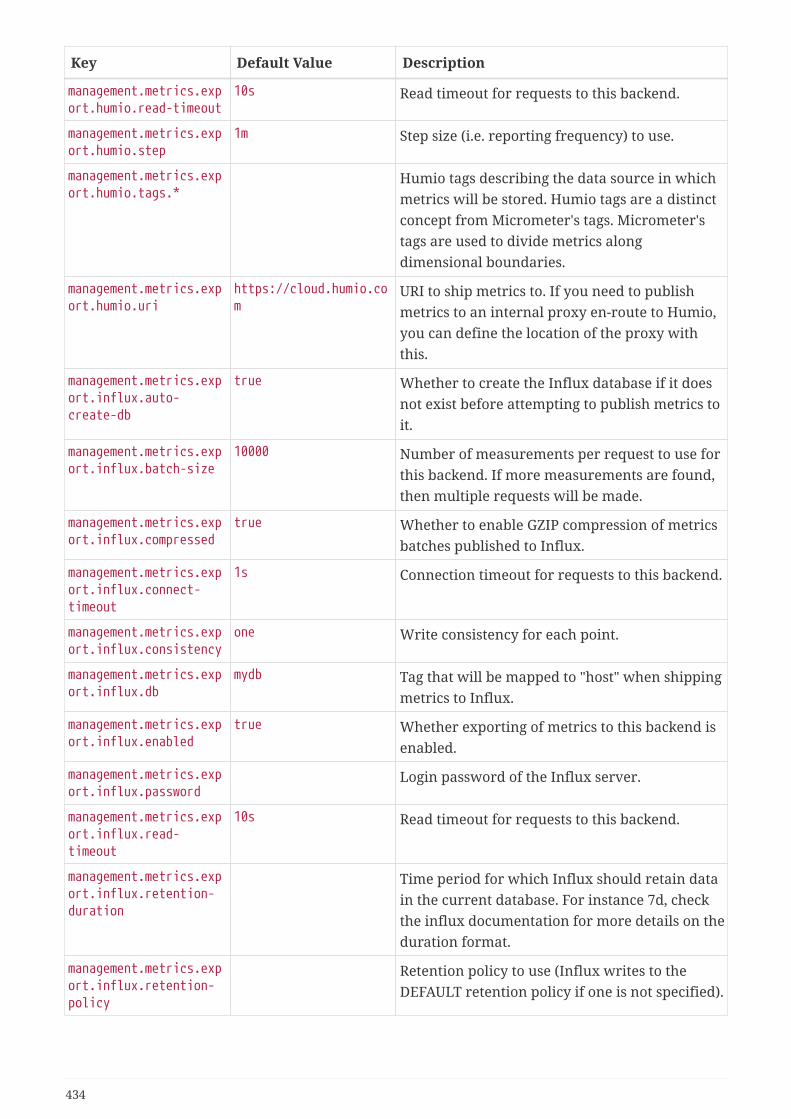
Key Default Value Description
management.metrics.export.humio.read-timeout
10s Read timeout for requests to this backend.
management.metrics.export.humio.step
1m Step size (i.e. reporting frequency) to use.
management.metrics.export.humio.tags.*
Humio tags describing the data source in whichmetrics will be stored. Humio tags are a distinctconcept from Micrometer's tags. Micrometer'stags are used to divide metrics alongdimensional boundaries.
management.metrics.export.humio.uri
https://cloud.humio.com
URI to ship metrics to. If you need to publishmetrics to an internal proxy en-route to Humio,you can define the location of the proxy withthis.
management.metrics.export.influx.auto-create-db
true Whether to create the Influx database if it doesnot exist before attempting to publish metrics toit.
management.metrics.export.influx.batch-size
10000 Number of measurements per request to use forthis backend. If more measurements are found,then multiple requests will be made.
management.metrics.export.influx.compressed
true Whether to enable GZIP compression of metricsbatches published to Influx.
management.metrics.export.influx.connect-timeout
1s Connection timeout for requests to this backend.
management.metrics.export.influx.consistency
one Write consistency for each point.
management.metrics.export.influx.db
mydb Tag that will be mapped to "host" when shippingmetrics to Influx.
management.metrics.export.influx.enabled
true Whether exporting of metrics to this backend isenabled.
management.metrics.export.influx.password
Login password of the Influx server.
management.metrics.export.influx.read-timeout
10s Read timeout for requests to this backend.
management.metrics.export.influx.retention-duration
Time period for which Influx should retain datain the current database. For instance 7d, checkthe influx documentation for more details on theduration format.
management.metrics.export.influx.retention-policy
Retention policy to use (Influx writes to theDEFAULT retention policy if one is not specified).
434

Key Default Value Description
management.metrics.export.influx.retention-replication-factor
How many copies of the data are stored in thecluster. Must be 1 for a single node instance.
management.metrics.export.influx.retention-shard-duration
Time range covered by a shard group. Forinstance 2w, check the influx documentation formore details on the duration format.
management.metrics.export.influx.step
1m Step size (i.e. reporting frequency) to use.
management.metrics.export.influx.uri
http://localhost:8086 URI of the Influx server.
management.metrics.export.influx.user-name
Login user of the Influx server.
management.metrics.export.jmx.domain
metrics Metrics JMX domain name.
management.metrics.export.jmx.enabled
true Whether exporting of metrics to JMX is enabled.
management.metrics.export.jmx.step
1m Step size (i.e. reporting frequency) to use.
management.metrics.export.kairos.batch-size
10000 Number of measurements per request to use forthis backend. If more measurements are found,then multiple requests will be made.
management.metrics.export.kairos.connect-timeout
1s Connection timeout for requests to this backend.
management.metrics.export.kairos.enabled
true Whether exporting of metrics to this backend isenabled.
management.metrics.export.kairos.password
Login password of the KairosDB server.
management.metrics.export.kairos.read-timeout
10s Read timeout for requests to this backend.
management.metrics.export.kairos.step
1m Step size (i.e. reporting frequency) to use.
management.metrics.export.kairos.uri
http://localhost:8080/api/v1/datapoints
URI of the KairosDB server.
management.metrics.export.kairos.user-name
Login user of the KairosDB server.
management.metrics.export.newrelic.account-id
New Relic account ID.
management.metrics.export.newrelic.api-key
New Relic API key.
management.metrics.export.newrelic.batch-size
10000 Number of measurements per request to use forthis backend. If more measurements are found,then multiple requests will be made.
435

Key Default Value Description
management.metrics.export.newrelic.connect-timeout
1s Connection timeout for requests to this backend.
management.metrics.export.newrelic.enabled
true Whether exporting of metrics to this backend isenabled.
management.metrics.export.newrelic.event-type
SpringBootSample The event type that should be published. Thisproperty will be ignored if 'meter-name-event-type-enabled' is set to 'true'.
management.metrics.export.newrelic.meter-name-event-type-enabled
false Whether to send the meter name as the eventtype instead of using the 'event-type'configuration property value. Can be set to 'true'if New Relic guidelines are not being followed orevent types consistent with previous Spring Bootreleases are required.
management.metrics.export.newrelic.read-timeout
10s Read timeout for requests to this backend.
management.metrics.export.newrelic.step
1m Step size (i.e. reporting frequency) to use.
management.metrics.export.newrelic.uri
https://insights-collector.newrelic.com
URI to ship metrics to.
management.metrics.export.prometheus.descriptions
true Whether to enable publishing descriptions aspart of the scrape payload to Prometheus. Turnthis off to minimize the amount of data sent oneach scrape.
management.metrics.export.prometheus.enabled
true Whether exporting of metrics to Prometheus isenabled.
management.metrics.export.prometheus.pushgateway.base-url
http://localhost:9091 Base URL for the Pushgateway.
management.metrics.export.prometheus.pushgateway.enabled
false Enable publishing via a PrometheusPushgateway.
management.metrics.export.prometheus.pushgateway.grouping-key.*
Grouping key for the pushed metrics.
management.metrics.export.prometheus.pushgateway.job
Job identifier for this application instance.
management.metrics.export.prometheus.pushgateway.push-rate
1m Frequency with which to push metrics.
436
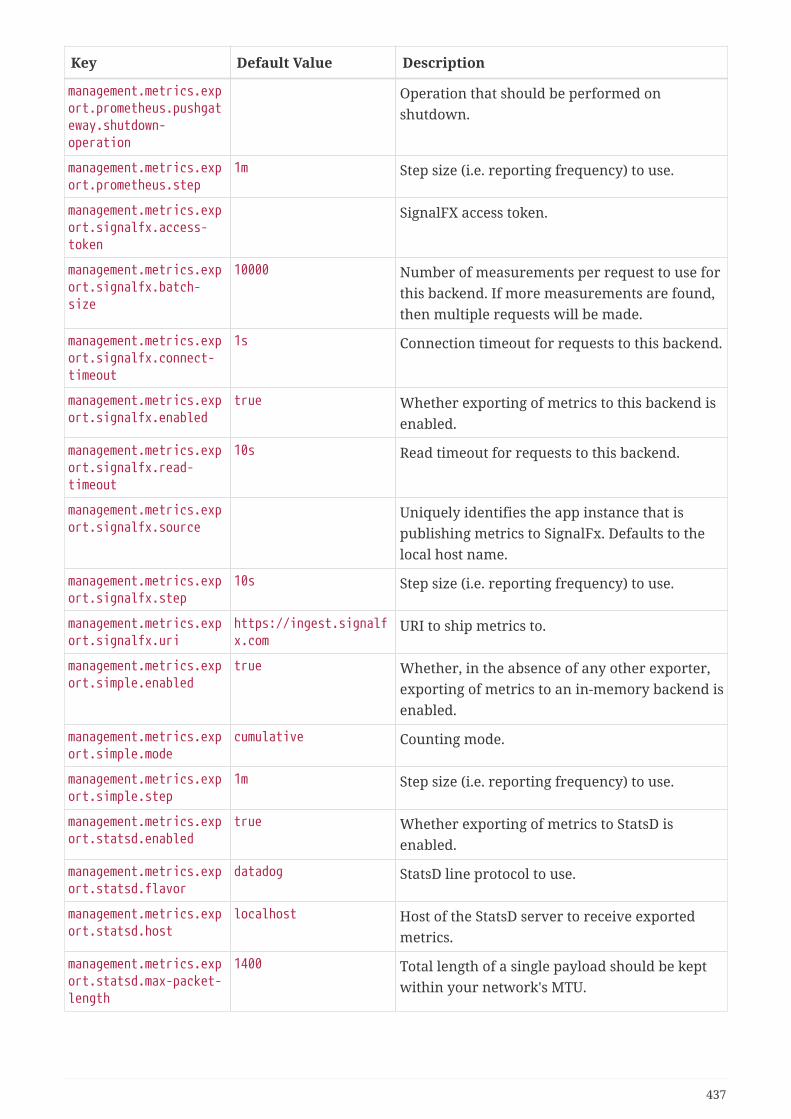
Key Default Value Description
management.metrics.export.prometheus.pushgateway.shutdown-operation
Operation that should be performed onshutdown.
management.metrics.export.prometheus.step
1m Step size (i.e. reporting frequency) to use.
management.metrics.export.signalfx.access-token
SignalFX access token.
management.metrics.export.signalfx.batch-size
10000 Number of measurements per request to use forthis backend. If more measurements are found,then multiple requests will be made.
management.metrics.export.signalfx.connect-timeout
1s Connection timeout for requests to this backend.
management.metrics.export.signalfx.enabled
true Whether exporting of metrics to this backend isenabled.
management.metrics.export.signalfx.read-timeout
10s Read timeout for requests to this backend.
management.metrics.export.signalfx.source
Uniquely identifies the app instance that ispublishing metrics to SignalFx. Defaults to thelocal host name.
management.metrics.export.signalfx.step
10s Step size (i.e. reporting frequency) to use.
management.metrics.export.signalfx.uri
https://ingest.signalfx.com
URI to ship metrics to.
management.metrics.export.simple.enabled
true Whether, in the absence of any other exporter,exporting of metrics to an in-memory backend isenabled.
management.metrics.export.simple.mode
cumulative Counting mode.
management.metrics.export.simple.step
1m Step size (i.e. reporting frequency) to use.
management.metrics.export.statsd.enabled
true Whether exporting of metrics to StatsD isenabled.
management.metrics.export.statsd.flavor
datadog StatsD line protocol to use.
management.metrics.export.statsd.host
localhost Host of the StatsD server to receive exportedmetrics.
management.metrics.export.statsd.max-packet-length
1400 Total length of a single payload should be keptwithin your network's MTU.
437
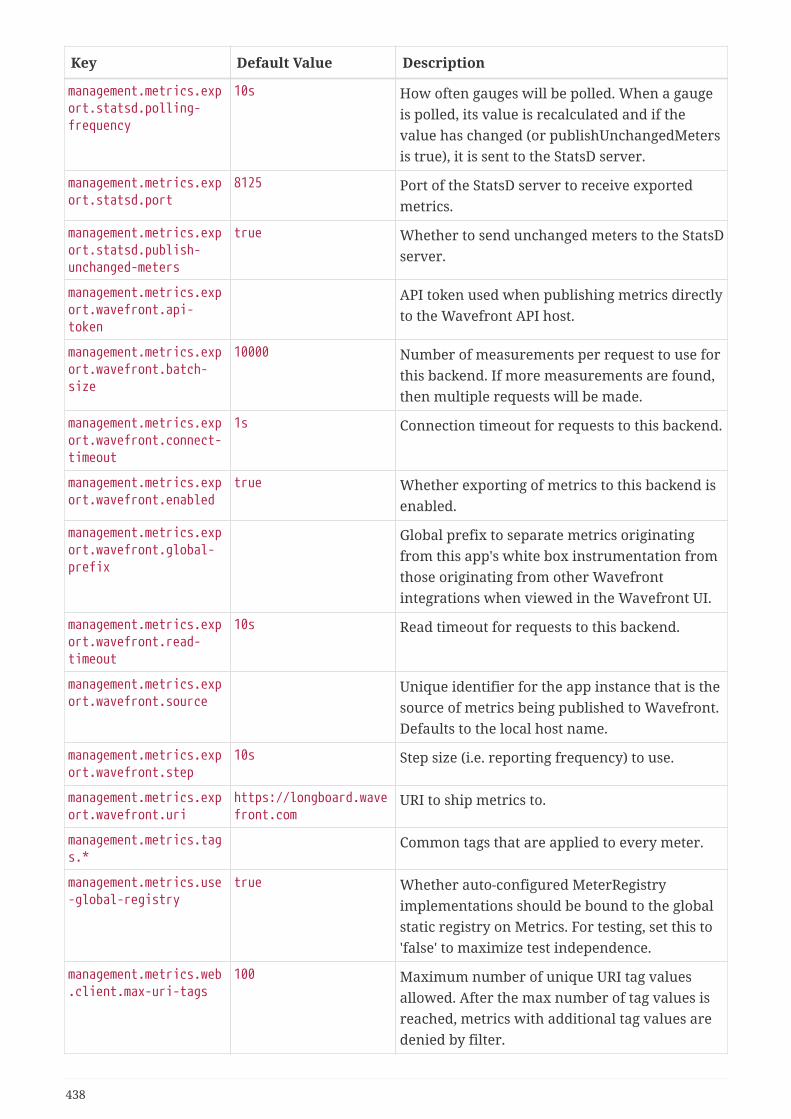
Key Default Value Description
management.metrics.export.statsd.polling-frequency
10s How often gauges will be polled. When a gaugeis polled, its value is recalculated and if thevalue has changed (or publishUnchangedMetersis true), it is sent to the StatsD server.
management.metrics.export.statsd.port
8125 Port of the StatsD server to receive exportedmetrics.
management.metrics.export.statsd.publish-unchanged-meters
true Whether to send unchanged meters to the StatsDserver.
management.metrics.export.wavefront.api-token
API token used when publishing metrics directlyto the Wavefront API host.
management.metrics.export.wavefront.batch-size
10000 Number of measurements per request to use forthis backend. If more measurements are found,then multiple requests will be made.
management.metrics.export.wavefront.connect-timeout
1s Connection timeout for requests to this backend.
management.metrics.export.wavefront.enabled
true Whether exporting of metrics to this backend isenabled.
management.metrics.export.wavefront.global-prefix
Global prefix to separate metrics originatingfrom this app's white box instrumentation fromthose originating from other Wavefrontintegrations when viewed in the Wavefront UI.
management.metrics.export.wavefront.read-timeout
10s Read timeout for requests to this backend.
management.metrics.export.wavefront.source
Unique identifier for the app instance that is thesource of metrics being published to Wavefront.Defaults to the local host name.
management.metrics.export.wavefront.step
10s Step size (i.e. reporting frequency) to use.
management.metrics.export.wavefront.uri
https://longboard.wavefront.com
URI to ship metrics to.
management.metrics.tags.*
Common tags that are applied to every meter.
management.metrics.use-global-registry
true Whether auto-configured MeterRegistryimplementations should be bound to the globalstatic registry on Metrics. For testing, set this to'false' to maximize test independence.
management.metrics.web.client.max-uri-tags
100 Maximum number of unique URI tag valuesallowed. After the max number of tag values isreached, metrics with additional tag values aredenied by filter.
438
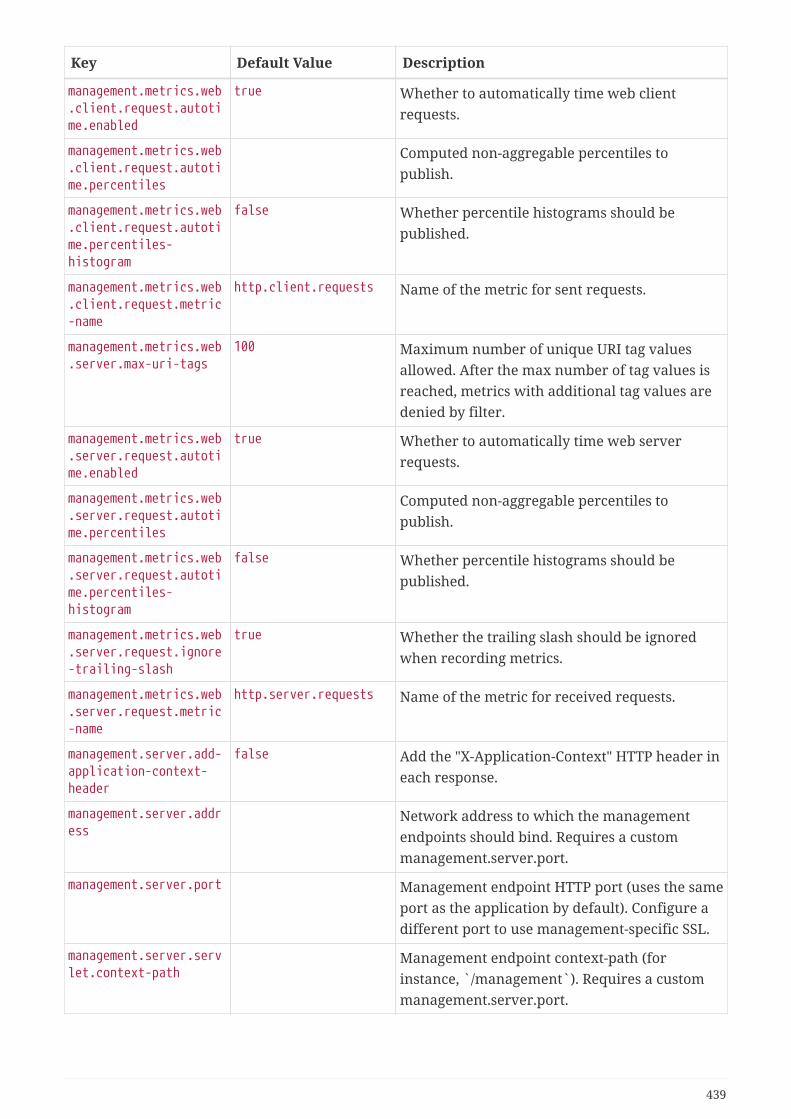
Key Default Value Description
management.metrics.web.client.request.autotime.enabled
true Whether to automatically time web clientrequests.
management.metrics.web.client.request.autotime.percentiles
Computed non-aggregable percentiles topublish.
management.metrics.web.client.request.autotime.percentiles-histogram
false Whether percentile histograms should bepublished.
management.metrics.web.client.request.metric-name
http.client.requests Name of the metric for sent requests.
management.metrics.web.server.max-uri-tags
100 Maximum number of unique URI tag valuesallowed. After the max number of tag values isreached, metrics with additional tag values aredenied by filter.
management.metrics.web.server.request.autotime.enabled
true Whether to automatically time web serverrequests.
management.metrics.web.server.request.autotime.percentiles
Computed non-aggregable percentiles topublish.
management.metrics.web.server.request.autotime.percentiles-histogram
false Whether percentile histograms should bepublished.
management.metrics.web.server.request.ignore-trailing-slash
true Whether the trailing slash should be ignoredwhen recording metrics.
management.metrics.web.server.request.metric-name
http.server.requests Name of the metric for received requests.
management.server.add-application-context-header
false Add the "X-Application-Context" HTTP header ineach response.
management.server.address
Network address to which the managementendpoints should bind. Requires a custommanagement.server.port.
management.server.port Management endpoint HTTP port (uses the sameport as the application by default). Configure adifferent port to use management-specific SSL.
management.server.servlet.context-path
Management endpoint context-path (forinstance, `/management`). Requires a custommanagement.server.port.
439
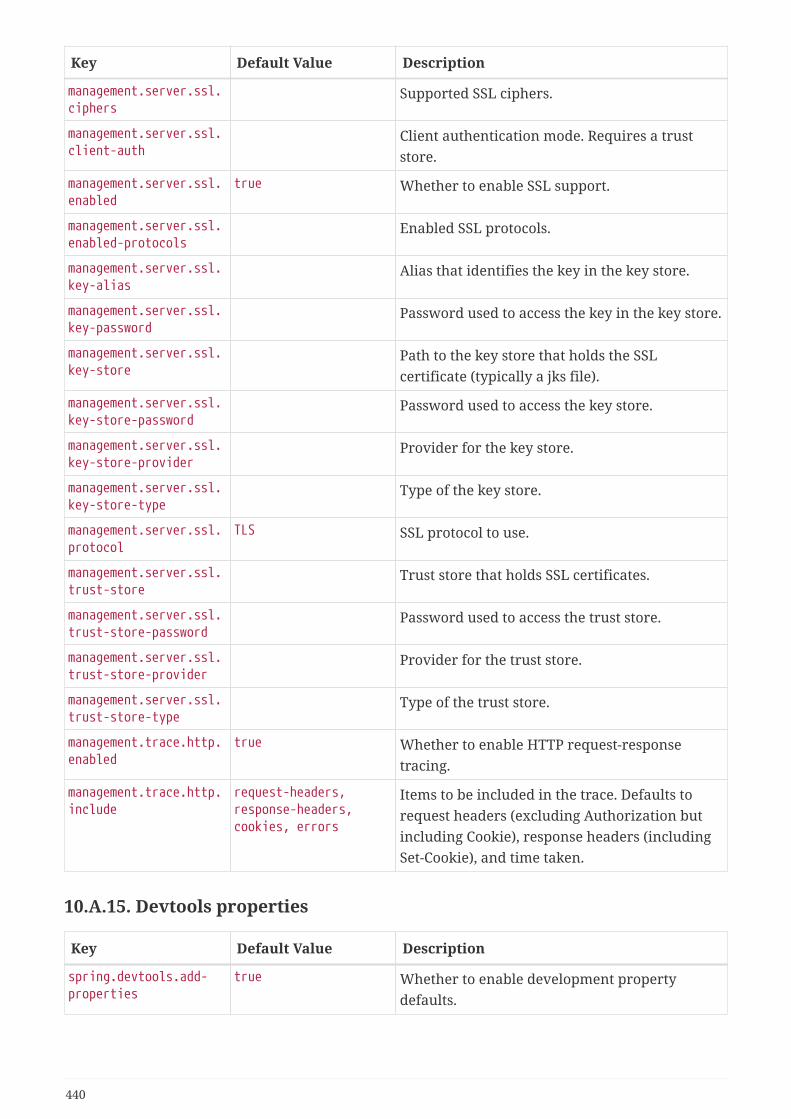
Key Default Value Description
management.server.ssl.ciphers
Supported SSL ciphers.
management.server.ssl.client-auth
Client authentication mode. Requires a truststore.
management.server.ssl.enabled
true Whether to enable SSL support.
management.server.ssl.enabled-protocols
Enabled SSL protocols.
management.server.ssl.key-alias
Alias that identifies the key in the key store.
management.server.ssl.key-password
Password used to access the key in the key store.
management.server.ssl.key-store
Path to the key store that holds the SSLcertificate (typically a jks file).
management.server.ssl.key-store-password
Password used to access the key store.
management.server.ssl.key-store-provider
Provider for the key store.
management.server.ssl.key-store-type
Type of the key store.
management.server.ssl.protocol
TLS SSL protocol to use.
management.server.ssl.trust-store
Trust store that holds SSL certificates.
management.server.ssl.trust-store-password
Password used to access the trust store.
management.server.ssl.trust-store-provider
Provider for the trust store.
management.server.ssl.trust-store-type
Type of the trust store.
management.trace.http.enabled
true Whether to enable HTTP request-responsetracing.
management.trace.http.include
request-headers,response-headers,cookies, errors
Items to be included in the trace. Defaults torequest headers (excluding Authorization butincluding Cookie), response headers (includingSet-Cookie), and time taken.
10.A.15. Devtools properties
Key Default Value Description
spring.devtools.add-properties
true Whether to enable development propertydefaults.
440

Key Default Value Description
spring.devtools.livereload.enabled
true Whether to enable a livereload.com-compatibleserver.
spring.devtools.livereload.port
35729 Server port.
spring.devtools.remote.context-path
/.~~spring-boot!~ Context path used to handle the remoteconnection.
spring.devtools.remote.proxy.host
The host of the proxy to use to connect to theremote application.
spring.devtools.remote.proxy.port
The port of the proxy to use to connect to theremote application.
spring.devtools.remote.restart.enabled
true Whether to enable remote restart.
spring.devtools.remote.secret
A shared secret required to establish aconnection (required to enable remote support).
spring.devtools.remote.secret-header-name
X-AUTH-TOKEN HTTP header used to transfer the shared secret.
spring.devtools.restart.additional-exclude
Additional patterns that should be excludedfrom triggering a full restart.
spring.devtools.restart.additional-paths
Additional paths to watch for changes.
spring.devtools.restart.enabled
true Whether to enable automatic restart.
spring.devtools.restart.exclude
META-INF/maven/**,META-INF/resources/**,resources/**,static/**,public/**,templates/**,**/*Test.class,**/*Tests.class,git.properties,META-INF/build-info.properties
Patterns that should be excluded from triggeringa full restart.
spring.devtools.restart.log-condition-evaluation-delta
true Whether to log the condition evaluation deltaupon restart.
spring.devtools.restart.poll-interval
1s Amount of time to wait between polling forclasspath changes.
spring.devtools.restart.quiet-period
400ms Amount of quiet time required without anyclasspath changes before a restart is triggered.
spring.devtools.restart.trigger-file
Name of a specific file that, when changed,triggers the restart check. Must be a simplename (without any path) of a file that appearson your classpath. If not specified, any classpathfile change triggers the restart.
441

10.A.16. Testing properties
Key Default Value Description
spring.test.database.replace
any Type of existing DataSource to replace.
spring.test.mockmvc.print
default MVC Print option.
Appendix B: Configuration MetadataSpring Boot jars include metadata files that provide details of all supported configurationproperties. The files are designed to let IDE developers offer contextual help and “code completion”as users are working with application.properties or application.yml files.
The majority of the metadata file is generated automatically at compile time by processing all itemsannotated with @ConfigurationProperties. However, it is possible to write part of the metadatamanually for corner cases or more advanced use cases.
10.B.1. Metadata Format
Configuration metadata files are located inside jars under META-INF/spring-configuration-
metadata.json. They use a JSON format with items categorized under either “groups” or “properties”and additional values hints categorized under "hints", as shown in the following example:
{"groups": [ { "name": "server", "type": "org.springframework.boot.autoconfigure.web.ServerProperties", "sourceType": "org.springframework.boot.autoconfigure.web.ServerProperties" }, { "name": "spring.jpa.hibernate", "type":"org.springframework.boot.autoconfigure.orm.jpa.JpaProperties$Hibernate", "sourceType": "org.springframework.boot.autoconfigure.orm.jpa.JpaProperties", "sourceMethod": "getHibernate()" } ...],"properties": [ { "name": "server.port", "type": "java.lang.Integer", "sourceType": "org.springframework.boot.autoconfigure.web.ServerProperties" }, { "name": "server.address", "type": "java.net.InetAddress", "sourceType": "org.springframework.boot.autoconfigure.web.ServerProperties"
442
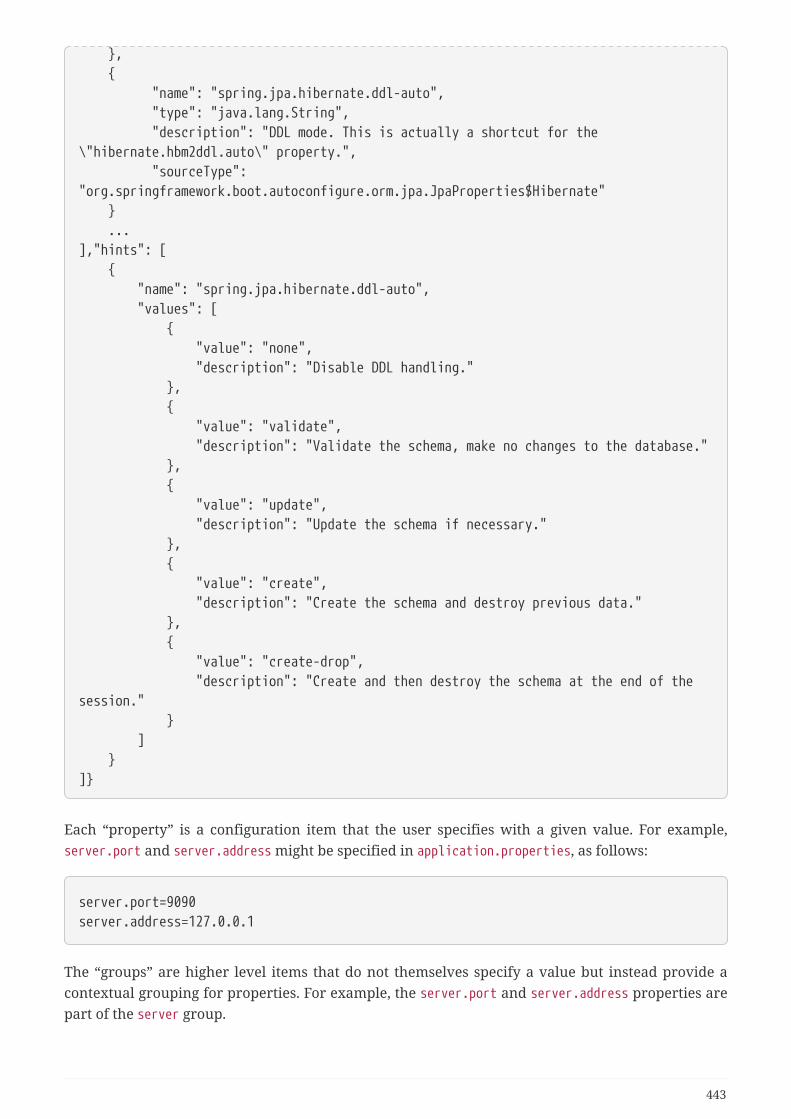
}, { "name": "spring.jpa.hibernate.ddl-auto", "type": "java.lang.String", "description": "DDL mode. This is actually a shortcut for the\"hibernate.hbm2ddl.auto\" property.", "sourceType":"org.springframework.boot.autoconfigure.orm.jpa.JpaProperties$Hibernate" } ...],"hints": [ { "name": "spring.jpa.hibernate.ddl-auto", "values": [ { "value": "none", "description": "Disable DDL handling." }, { "value": "validate", "description": "Validate the schema, make no changes to the database." }, { "value": "update", "description": "Update the schema if necessary." }, { "value": "create", "description": "Create the schema and destroy previous data." }, { "value": "create-drop", "description": "Create and then destroy the schema at the end of thesession." } ] }]}
Each “property” is a configuration item that the user specifies with a given value. For example,server.port and server.address might be specified in application.properties, as follows:
server.port=9090server.address=127.0.0.1
The “groups” are higher level items that do not themselves specify a value but instead provide acontextual grouping for properties. For example, the server.port and server.address properties arepart of the server group.
443

It is not required that every “property” has a “group”. Some properties might existin their own right.
Finally, “hints” are additional information used to assist the user in configuring a given property.For example, when a developer is configuring the spring.jpa.hibernate.ddl-auto property, a toolcan use the hints to offer some auto-completion help for the none, validate, update, create, andcreate-drop values.
Group Attributes
The JSON object contained in the groups array can contain the attributes shown in the followingtable:
Name Type Purpose
name String The full name of the group. This attribute is mandatory.
type String The class name of the data type of the group. For example, if thegroup were based on a class annotated with@ConfigurationProperties, the attribute would contain the fullyqualified name of that class. If it were based on a @Bean method, itwould be the return type of that method. If the type is not known,the attribute may be omitted.
description String A short description of the group that can be displayed to users. Ifno description is available, it may be omitted. It is recommendedthat descriptions be short paragraphs, with the first lineproviding a concise summary. The last line in the descriptionshould end with a period (.).
sourceType String The class name of the source that contributed this group. Forexample, if the group were based on a @Bean method annotatedwith @ConfigurationProperties, this attribute would contain thefully qualified name of the @Configuration class that contains themethod. If the source type is not known, the attribute may beomitted.
sourceMethod String The full name of the method (include parenthesis and argumenttypes) that contributed this group (for example, the name of a@ConfigurationProperties annotated @Bean method). If the sourcemethod is not known, it may be omitted.
Property Attributes
The JSON object contained in the properties array can contain the attributes described in thefollowing table:
444
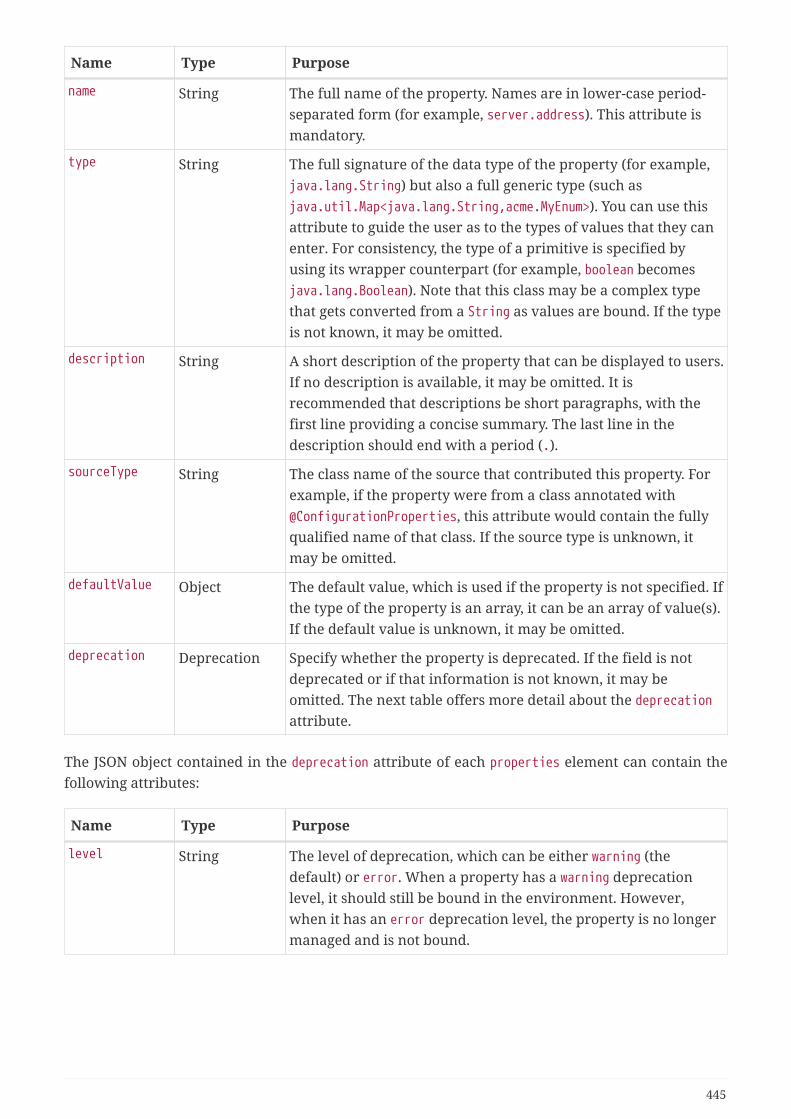
Name Type Purpose
name String The full name of the property. Names are in lower-case period-separated form (for example, server.address). This attribute ismandatory.
type String The full signature of the data type of the property (for example,java.lang.String) but also a full generic type (such asjava.util.Map<java.lang.String,acme.MyEnum>). You can use thisattribute to guide the user as to the types of values that they canenter. For consistency, the type of a primitive is specified byusing its wrapper counterpart (for example, boolean becomesjava.lang.Boolean). Note that this class may be a complex typethat gets converted from a String as values are bound. If the typeis not known, it may be omitted.
description String A short description of the property that can be displayed to users.If no description is available, it may be omitted. It isrecommended that descriptions be short paragraphs, with thefirst line providing a concise summary. The last line in thedescription should end with a period (.).
sourceType String The class name of the source that contributed this property. Forexample, if the property were from a class annotated with@ConfigurationProperties, this attribute would contain the fullyqualified name of that class. If the source type is unknown, itmay be omitted.
defaultValue Object The default value, which is used if the property is not specified. Ifthe type of the property is an array, it can be an array of value(s).If the default value is unknown, it may be omitted.
deprecation Deprecation Specify whether the property is deprecated. If the field is notdeprecated or if that information is not known, it may beomitted. The next table offers more detail about the deprecationattribute.
The JSON object contained in the deprecation attribute of each properties element can contain thefollowing attributes:
Name Type Purpose
level String The level of deprecation, which can be either warning (thedefault) or error. When a property has a warning deprecationlevel, it should still be bound in the environment. However,when it has an error deprecation level, the property is no longermanaged and is not bound.
445

Name Type Purpose
reason String A short description of the reason why the property wasdeprecated. If no reason is available, it may be omitted. It isrecommended that descriptions be short paragraphs, with thefirst line providing a concise summary. The last line in thedescription should end with a period (.).
replacement String The full name of the property that replaces this deprecatedproperty. If there is no replacement for this property, it may beomitted.
Prior to Spring Boot 1.3, a single deprecated boolean attribute can be used insteadof the deprecation element. This is still supported in a deprecated fashion andshould no longer be used. If no reason and replacement are available, an emptydeprecation object should be set.
Deprecation can also be specified declaratively in code by adding the@DeprecatedConfigurationProperty annotation to the getter exposing the deprecated property. Forinstance, assume that the app.acme.target property was confusing and was renamed toapp.acme.name. The following example shows how to handle that situation:
@ConfigurationProperties("app.acme")public class AcmeProperties {
private String name;
public String getName() { ... }
public void setName(String name) { ... }
@DeprecatedConfigurationProperty(replacement = "app.acme.name") @Deprecated public String getTarget() { return getName(); }
@Deprecated public void setTarget(String target) { setName(target); }}
There is no way to set a level. warning is always assumed, since code is stillhandling the property.
The preceding code makes sure that the deprecated property still works (delegating to the nameproperty behind the scenes). Once the getTarget and setTarget methods can be removed from your
446
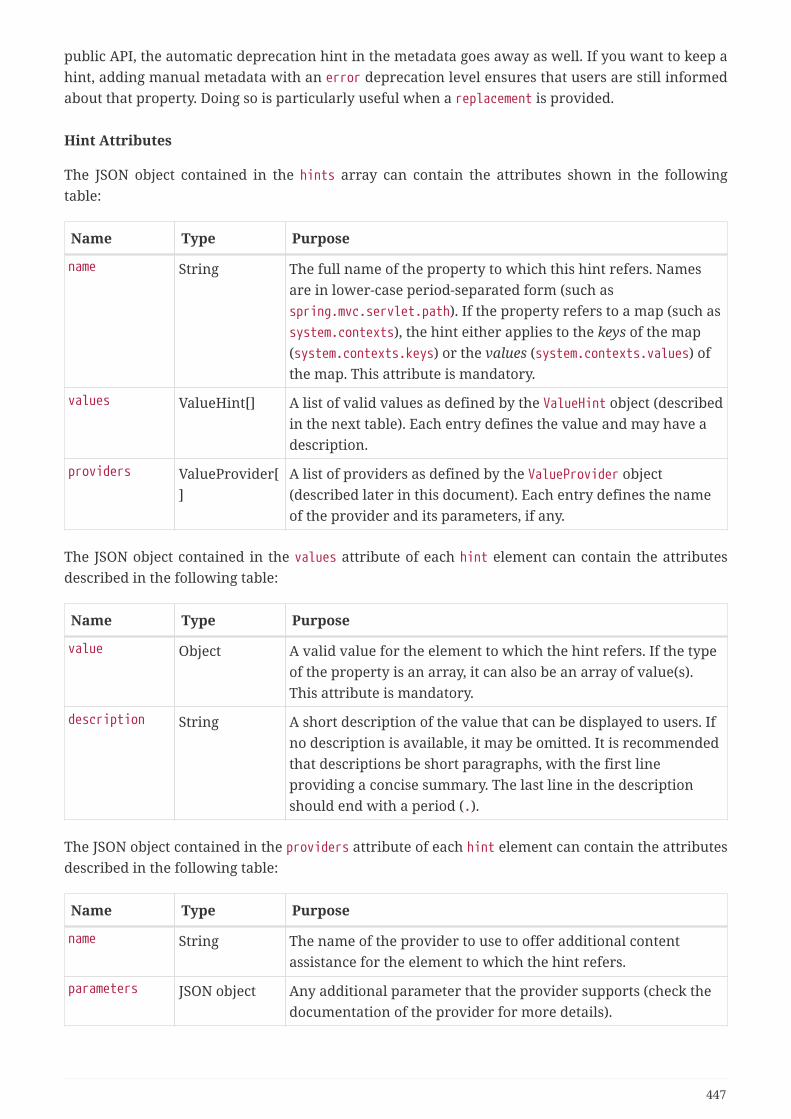
public API, the automatic deprecation hint in the metadata goes away as well. If you want to keep ahint, adding manual metadata with an error deprecation level ensures that users are still informedabout that property. Doing so is particularly useful when a replacement is provided.
Hint Attributes
The JSON object contained in the hints array can contain the attributes shown in the followingtable:
Name Type Purpose
name String The full name of the property to which this hint refers. Namesare in lower-case period-separated form (such asspring.mvc.servlet.path). If the property refers to a map (such assystem.contexts), the hint either applies to the keys of the map(system.contexts.keys) or the values (system.contexts.values) ofthe map. This attribute is mandatory.
values ValueHint[] A list of valid values as defined by the ValueHint object (describedin the next table). Each entry defines the value and may have adescription.
providers ValueProvider[]
A list of providers as defined by the ValueProvider object(described later in this document). Each entry defines the nameof the provider and its parameters, if any.
The JSON object contained in the values attribute of each hint element can contain the attributesdescribed in the following table:
Name Type Purpose
value Object A valid value for the element to which the hint refers. If the typeof the property is an array, it can also be an array of value(s).This attribute is mandatory.
description String A short description of the value that can be displayed to users. Ifno description is available, it may be omitted. It is recommendedthat descriptions be short paragraphs, with the first lineproviding a concise summary. The last line in the descriptionshould end with a period (.).
The JSON object contained in the providers attribute of each hint element can contain the attributesdescribed in the following table:
Name Type Purpose
name String The name of the provider to use to offer additional contentassistance for the element to which the hint refers.
parameters JSON object Any additional parameter that the provider supports (check thedocumentation of the provider for more details).
447
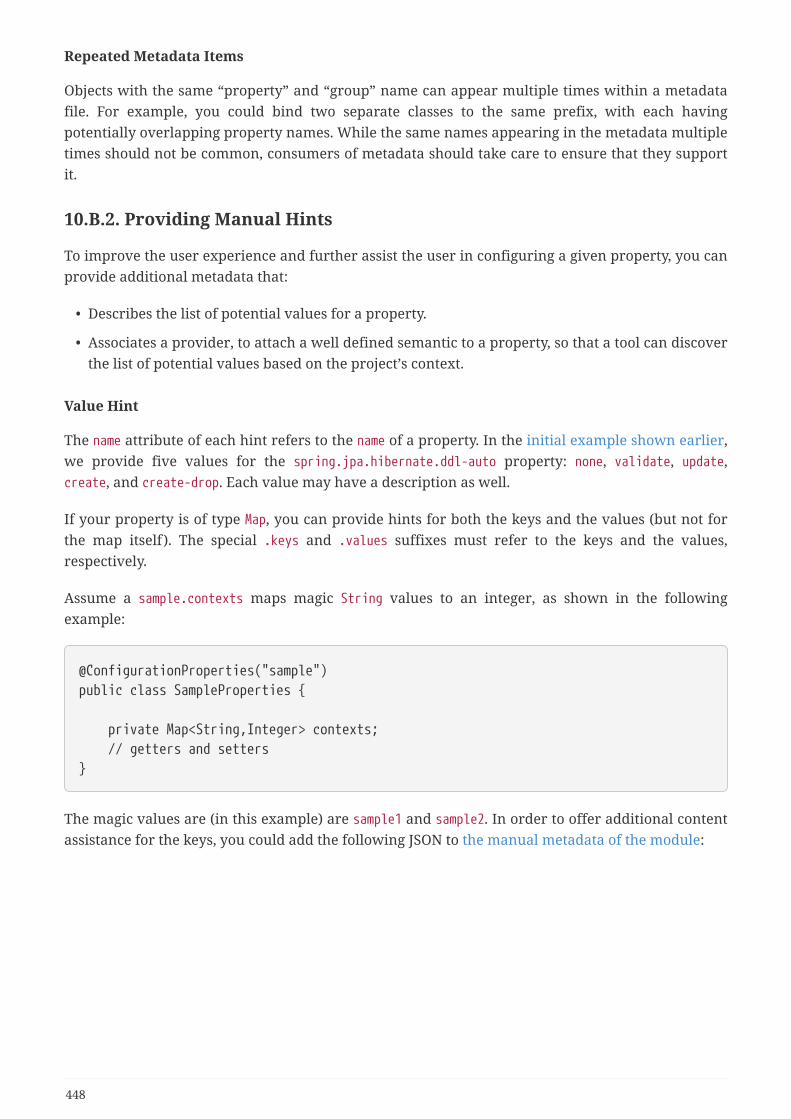
Repeated Metadata Items
Objects with the same “property” and “group” name can appear multiple times within a metadatafile. For example, you could bind two separate classes to the same prefix, with each havingpotentially overlapping property names. While the same names appearing in the metadata multipletimes should not be common, consumers of metadata should take care to ensure that they supportit.
10.B.2. Providing Manual Hints
To improve the user experience and further assist the user in configuring a given property, you canprovide additional metadata that:
• Describes the list of potential values for a property.
• Associates a provider, to attach a well defined semantic to a property, so that a tool can discoverthe list of potential values based on the project’s context.
Value Hint
The name attribute of each hint refers to the name of a property. In the initial example shown earlier,we provide five values for the spring.jpa.hibernate.ddl-auto property: none, validate, update,create, and create-drop. Each value may have a description as well.
If your property is of type Map, you can provide hints for both the keys and the values (but not forthe map itself). The special .keys and .values suffixes must refer to the keys and the values,respectively.
Assume a sample.contexts maps magic String values to an integer, as shown in the followingexample:
@ConfigurationProperties("sample")public class SampleProperties {
private Map<String,Integer> contexts; // getters and setters}
The magic values are (in this example) are sample1 and sample2. In order to offer additional contentassistance for the keys, you could add the following JSON to the manual metadata of the module:
448
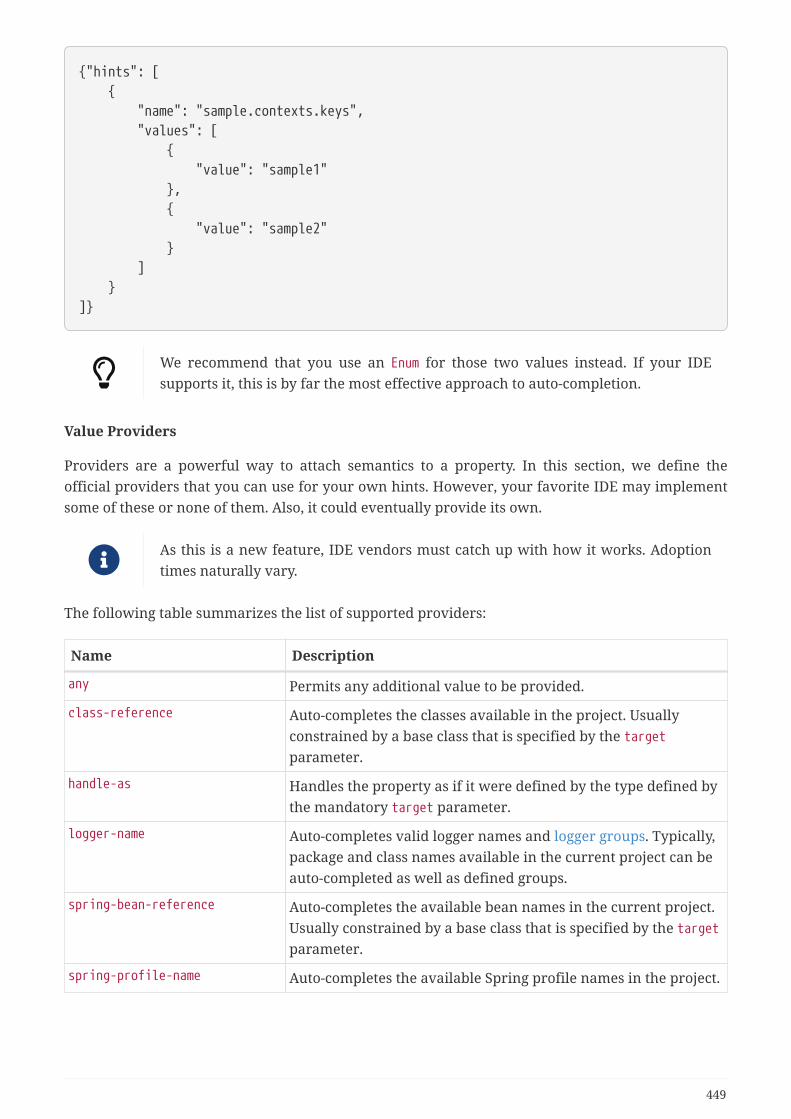
{"hints": [ { "name": "sample.contexts.keys", "values": [ { "value": "sample1" }, { "value": "sample2" } ] }]}
We recommend that you use an Enum for those two values instead. If your IDEsupports it, this is by far the most effective approach to auto-completion.
Value Providers
Providers are a powerful way to attach semantics to a property. In this section, we define theofficial providers that you can use for your own hints. However, your favorite IDE may implementsome of these or none of them. Also, it could eventually provide its own.
As this is a new feature, IDE vendors must catch up with how it works. Adoptiontimes naturally vary.
The following table summarizes the list of supported providers:
Name Description
any Permits any additional value to be provided.
class-reference Auto-completes the classes available in the project. Usuallyconstrained by a base class that is specified by the targetparameter.
handle-as Handles the property as if it were defined by the type defined bythe mandatory target parameter.
logger-name Auto-completes valid logger names and logger groups. Typically,package and class names available in the current project can beauto-completed as well as defined groups.
spring-bean-reference Auto-completes the available bean names in the current project.Usually constrained by a base class that is specified by the targetparameter.
spring-profile-name Auto-completes the available Spring profile names in the project.
449
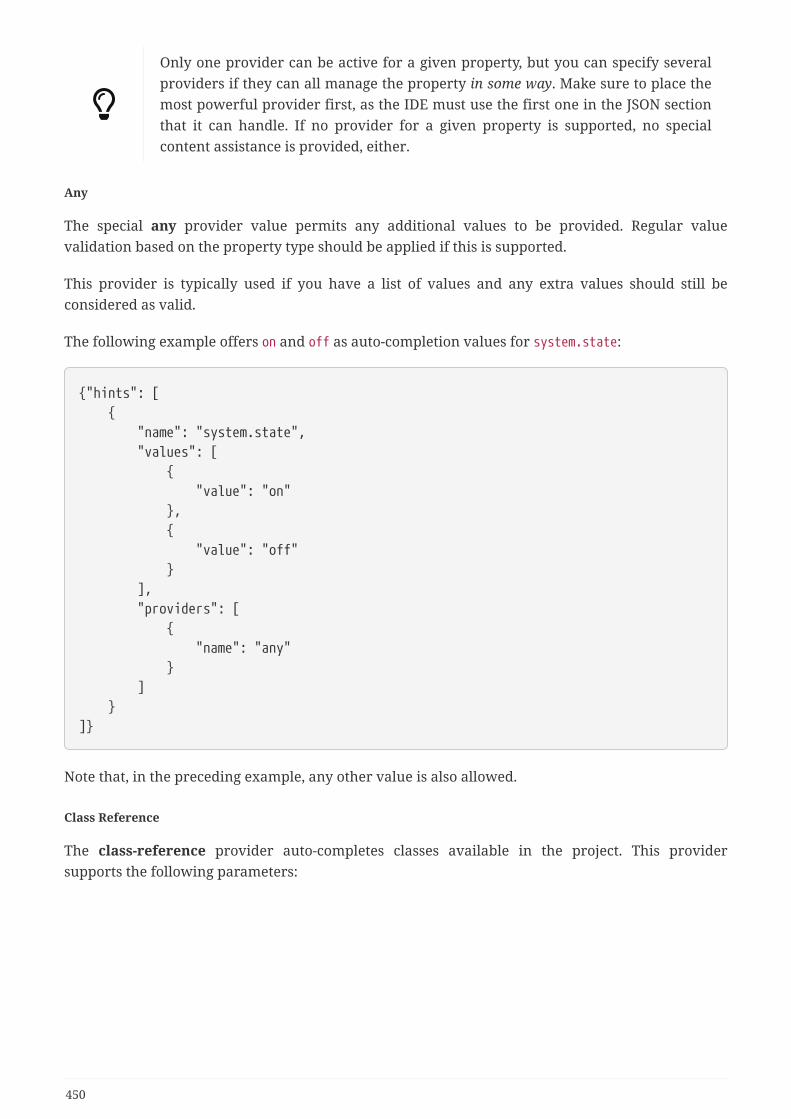
Only one provider can be active for a given property, but you can specify severalproviders if they can all manage the property in some way. Make sure to place themost powerful provider first, as the IDE must use the first one in the JSON sectionthat it can handle. If no provider for a given property is supported, no specialcontent assistance is provided, either.
Any
The special any provider value permits any additional values to be provided. Regular valuevalidation based on the property type should be applied if this is supported.
This provider is typically used if you have a list of values and any extra values should still beconsidered as valid.
The following example offers on and off as auto-completion values for system.state:
{"hints": [ { "name": "system.state", "values": [ { "value": "on" }, { "value": "off" } ], "providers": [ { "name": "any" } ] }]}
Note that, in the preceding example, any other value is also allowed.
Class Reference
The class-reference provider auto-completes classes available in the project. This providersupports the following parameters:
450

Parameter
Type Default value Description
target String
(Class)none The fully qualified name of the class that should
be assignable to the chosen value. Typically usedto filter out-non candidate classes. Note that thisinformation can be provided by the type itself byexposing a class with the appropriate upperbound.
concrete boolean true Specify whether only concrete classes are to beconsidered as valid candidates.
The following metadata snippet corresponds to the standard server.servlet.jsp.class-name
property that defines the JspServlet class name to use:
{"hints": [ { "name": "server.servlet.jsp.class-name", "providers": [ { "name": "class-reference", "parameters": { "target": "javax.servlet.http.HttpServlet" } } ] }]}
Handle As
The handle-as provider lets you substitute the type of the property to a more high-level type. Thistypically happens when the property has a java.lang.String type, because you do not want yourconfiguration classes to rely on classes that may not be on the classpath. This provider supports thefollowing parameters:
Parameter
Type Default value Description
target String
(Class)none The fully qualified name of the type to consider
for the property. This parameter is mandatory.
The following types can be used:
• Any java.lang.Enum: Lists the possible values for the property. (We recommend defining theproperty with the Enum type, as no further hint should be required for the IDE to auto-completethe values)
• java.nio.charset.Charset: Supports auto-completion of charset/encoding values (such as UTF-8)
451

• java.util.Locale: auto-completion of locales (such as en_US)
• org.springframework.util.MimeType: Supports auto-completion of content type values (such astext/plain)
• org.springframework.core.io.Resource: Supports auto-completion of Spring’s Resourceabstraction to refer to a file on the filesystem or on the classpath (such asclasspath:/sample.properties)
If multiple values can be provided, use a Collection or Array type to teach the IDEabout it.
The following metadata snippet corresponds to the standard spring.liquibase.change-log propertythat defines the path to the changelog to use. It is actually used internally as aorg.springframework.core.io.Resource but cannot be exposed as such, because we need to keep theoriginal String value to pass it to the Liquibase API.
{"hints": [ { "name": "spring.liquibase.change-log", "providers": [ { "name": "handle-as", "parameters": { "target": "org.springframework.core.io.Resource" } } ] }]}
Logger Name
The logger-name provider auto-completes valid logger names and logger groups. Typically,package and class names available in the current project can be auto-completed. If groups areenabled (default) and if a custom logger group is identified in the configuration, auto-completionfor it should be provided. Specific frameworks may have extra magic logger names that can besupported as well.
This provider supports the following parameters:
Parameter
Type Default value Description
group boolean true Specify whether known groups should beconsidered.
Since a logger name can be any arbitrary name, this provider should allow any value but couldhighlight valid package and class names that are not available in the project’s classpath.
452
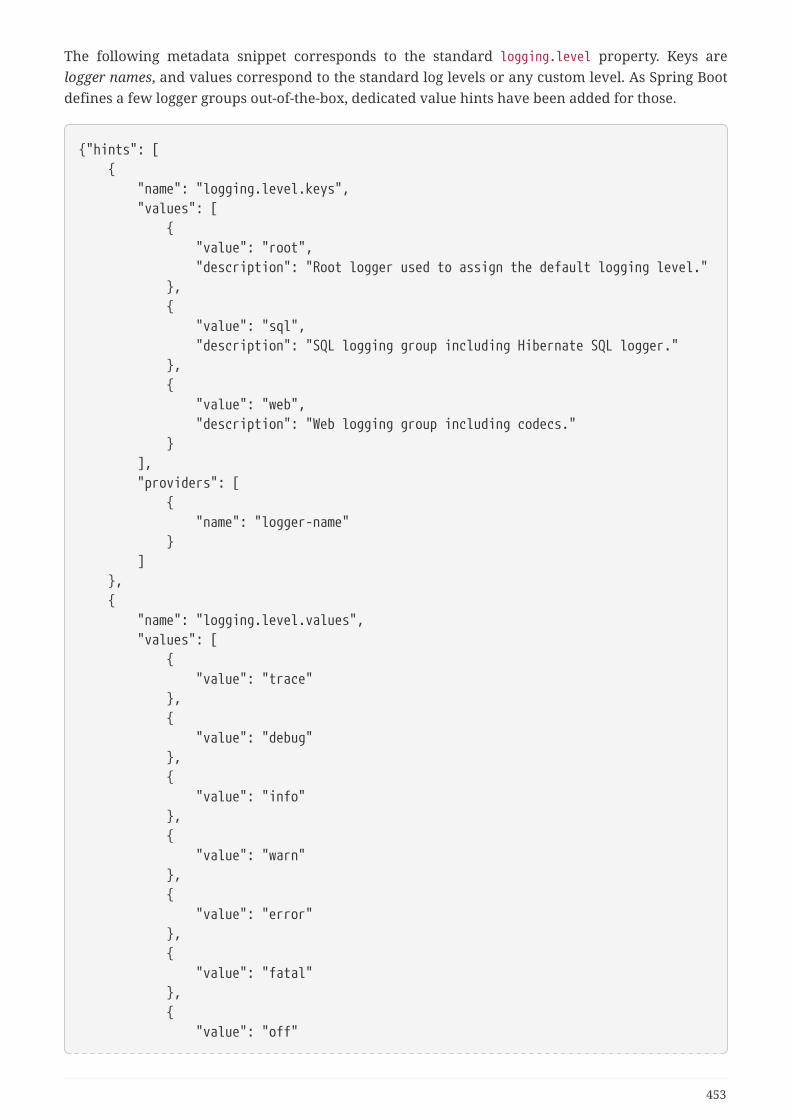
The following metadata snippet corresponds to the standard logging.level property. Keys arelogger names, and values correspond to the standard log levels or any custom level. As Spring Bootdefines a few logger groups out-of-the-box, dedicated value hints have been added for those.
{"hints": [ { "name": "logging.level.keys", "values": [ { "value": "root", "description": "Root logger used to assign the default logging level." }, { "value": "sql", "description": "SQL logging group including Hibernate SQL logger." }, { "value": "web", "description": "Web logging group including codecs." } ], "providers": [ { "name": "logger-name" } ] }, { "name": "logging.level.values", "values": [ { "value": "trace" }, { "value": "debug" }, { "value": "info" }, { "value": "warn" }, { "value": "error" }, { "value": "fatal" }, { "value": "off"
453
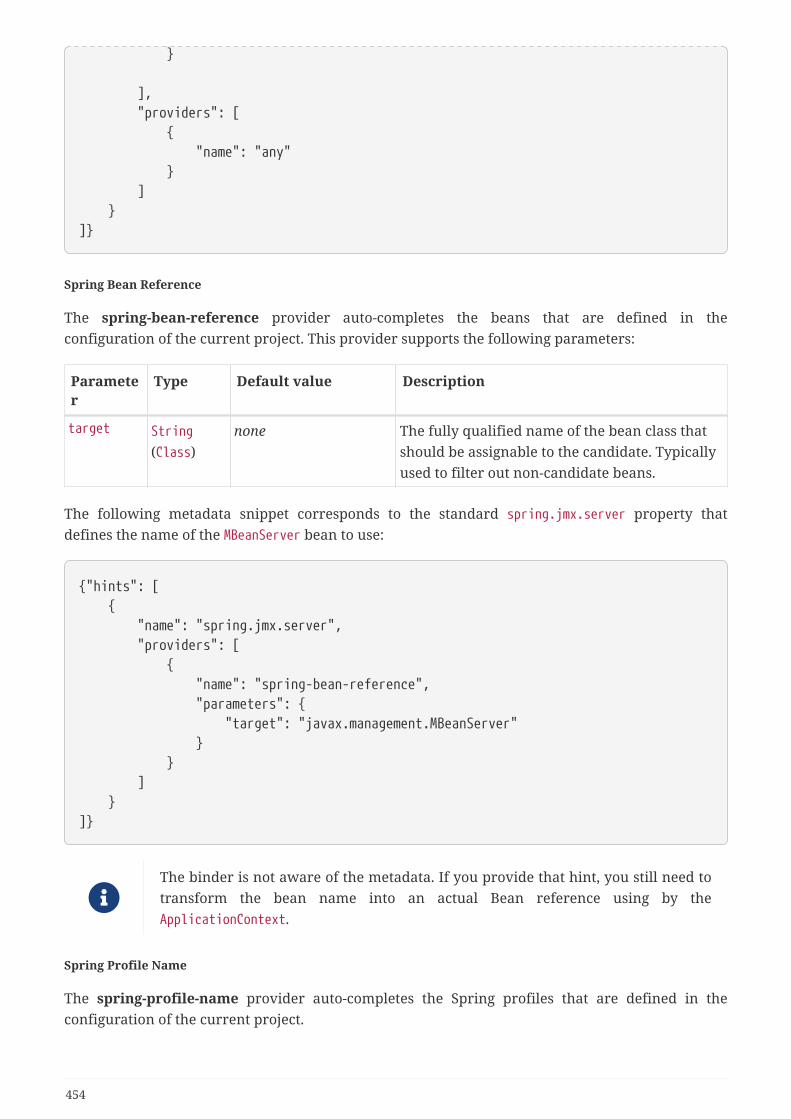
}
], "providers": [ { "name": "any" } ] }]}
Spring Bean Reference
The spring-bean-reference provider auto-completes the beans that are defined in theconfiguration of the current project. This provider supports the following parameters:
Parameter
Type Default value Description
target String
(Class)none The fully qualified name of the bean class that
should be assignable to the candidate. Typicallyused to filter out non-candidate beans.
The following metadata snippet corresponds to the standard spring.jmx.server property thatdefines the name of the MBeanServer bean to use:
{"hints": [ { "name": "spring.jmx.server", "providers": [ { "name": "spring-bean-reference", "parameters": { "target": "javax.management.MBeanServer" } } ] }]}
The binder is not aware of the metadata. If you provide that hint, you still need totransform the bean name into an actual Bean reference using by theApplicationContext.
Spring Profile Name
The spring-profile-name provider auto-completes the Spring profiles that are defined in theconfiguration of the current project.
454

The following metadata snippet corresponds to the standard spring.profiles.active property thatdefines the name of the Spring profile(s) to enable:
{"hints": [ { "name": "spring.profiles.active", "providers": [ { "name": "spring-profile-name" } ] }]}
10.B.3. Generating Your Own Metadata by Using the Annotation Processor
You can easily generate your own configuration metadata file from items annotated with@ConfigurationProperties by using the spring-boot-configuration-processor jar. The jar includes aJava annotation processor which is invoked as your project is compiled.
Configuring the Annotation Processor
To use the processor, include a dependency on spring-boot-configuration-processor.
With Maven the dependency should be declared as optional, as shown in the following example:
<dependency> <groupId>org.springframework.boot</groupId> <artifactId>spring-boot-configuration-processor</artifactId> <optional>true</optional></dependency>
If you have defined @ConfigurationProperties in your application, make sure to configure thespring-boot-maven-plugin to prevent the repackage goal from adding the dependency into the fat jar:
455
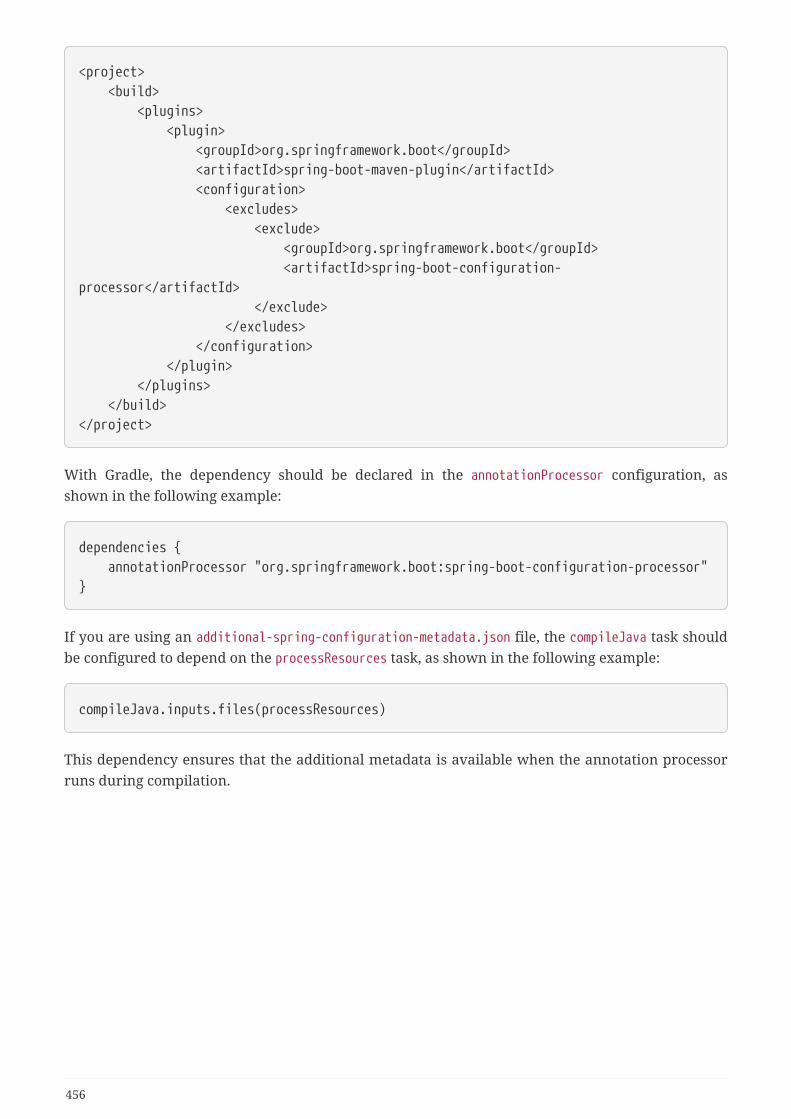
<project> <build> <plugins> <plugin> <groupId>org.springframework.boot</groupId> <artifactId>spring-boot-maven-plugin</artifactId> <configuration> <excludes> <exclude> <groupId>org.springframework.boot</groupId> <artifactId>spring-boot-configuration-processor</artifactId> </exclude> </excludes> </configuration> </plugin> </plugins> </build></project>
With Gradle, the dependency should be declared in the annotationProcessor configuration, asshown in the following example:
dependencies { annotationProcessor "org.springframework.boot:spring-boot-configuration-processor"}
If you are using an additional-spring-configuration-metadata.json file, the compileJava task shouldbe configured to depend on the processResources task, as shown in the following example:
compileJava.inputs.files(processResources)
This dependency ensures that the additional metadata is available when the annotation processorruns during compilation.
456
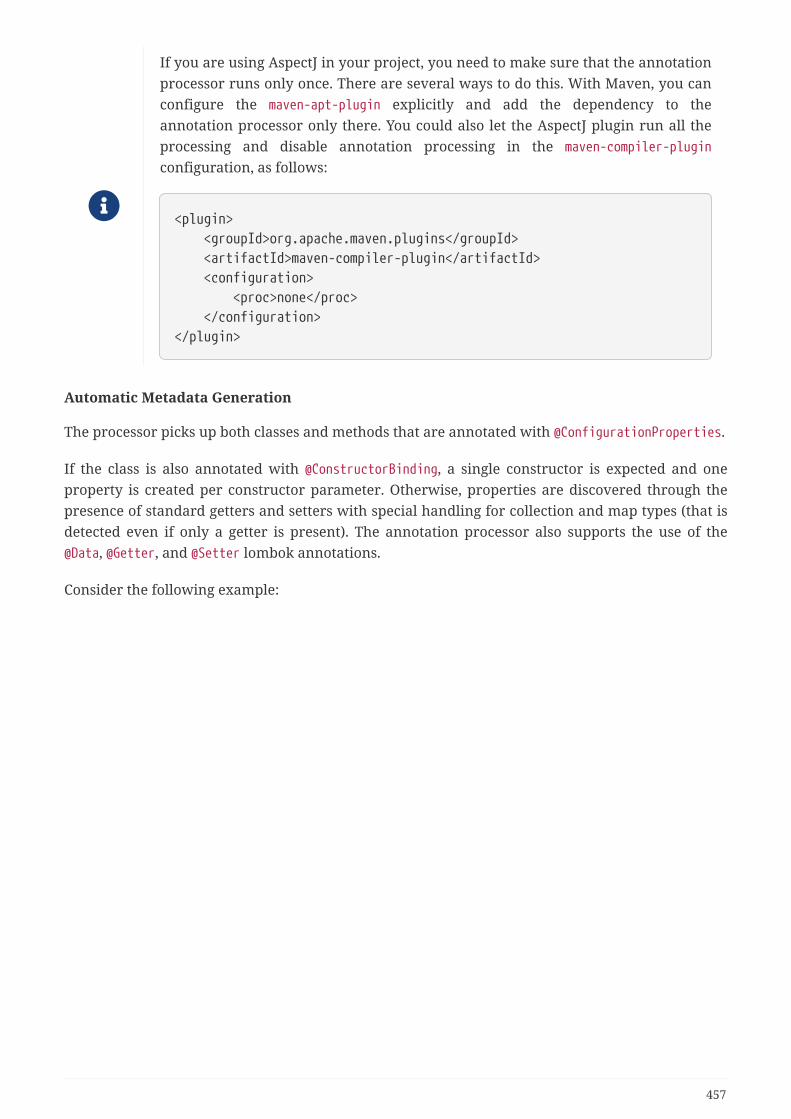
If you are using AspectJ in your project, you need to make sure that the annotationprocessor runs only once. There are several ways to do this. With Maven, you canconfigure the maven-apt-plugin explicitly and add the dependency to theannotation processor only there. You could also let the AspectJ plugin run all theprocessing and disable annotation processing in the maven-compiler-plugin
configuration, as follows:
<plugin> <groupId>org.apache.maven.plugins</groupId> <artifactId>maven-compiler-plugin</artifactId> <configuration> <proc>none</proc> </configuration></plugin>
Automatic Metadata Generation
The processor picks up both classes and methods that are annotated with @ConfigurationProperties.
If the class is also annotated with @ConstructorBinding, a single constructor is expected and oneproperty is created per constructor parameter. Otherwise, properties are discovered through thepresence of standard getters and setters with special handling for collection and map types (that isdetected even if only a getter is present). The annotation processor also supports the use of the@Data, @Getter, and @Setter lombok annotations.
Consider the following example:
457

@ConfigurationProperties(prefix="server")public class ServerProperties {
/** * Name of the server. */ private String name;
/** * IP address to listen to. */ private String ip = "127.0.0.1";
/** * Port to listener to. */ private int port = 9797;
// ... getter and setters
}
This exposes three properties where server.name has no default and server.ip and server.portdefaults to "127.0.0.1" and 9797 respectively. The Javadoc on fields is used to populate thedescription attribute. For instance, the description of server.ip is "IP address to listen to.".
You should only use plain text with @ConfigurationProperties field Javadoc, sincethey are not processed before being added to the JSON.
The annotation processor applies a number of heuristics to extract the default value from thesource model. Default values have to be provided statically. In particular, do not refer to a constantdefined in another class. Also, the annotation processor cannot auto-detect default values for Enumsand Collectionss.
For cases where the default value could not be detected, manual metadata should be provided.Consider the following example:
458
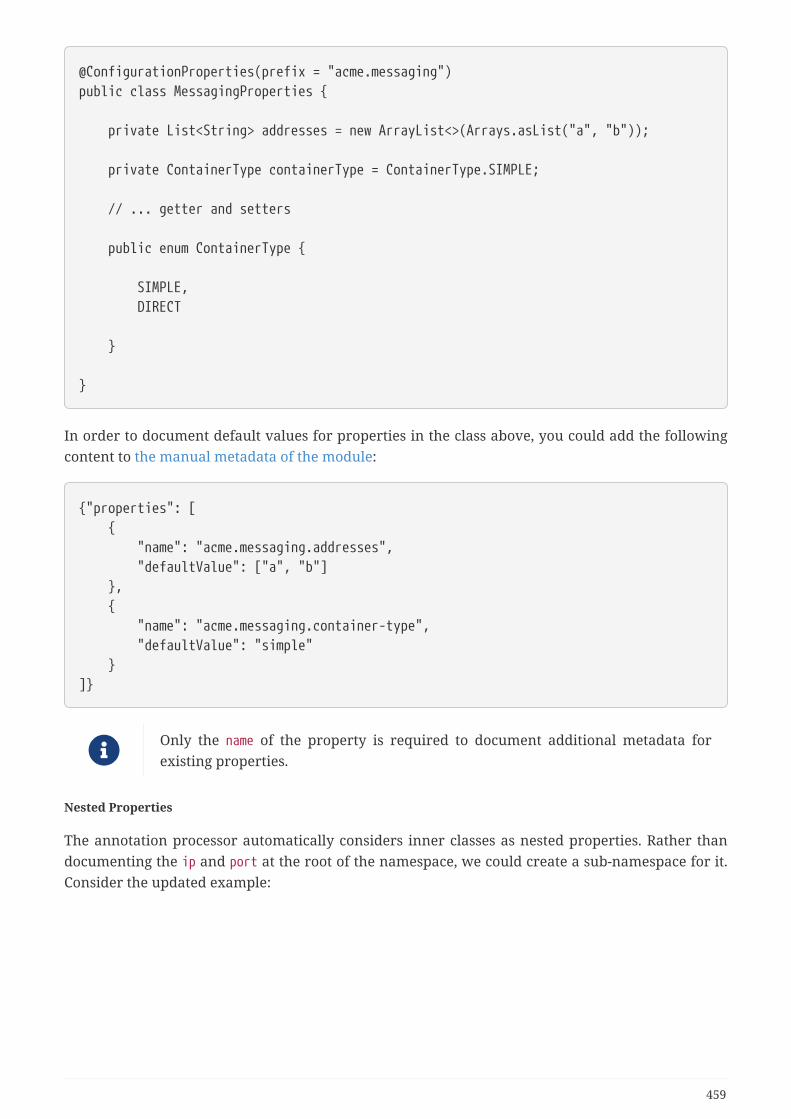
@ConfigurationProperties(prefix = "acme.messaging")public class MessagingProperties {
private List<String> addresses = new ArrayList<>(Arrays.asList("a", "b"));
private ContainerType containerType = ContainerType.SIMPLE;
// ... getter and setters
public enum ContainerType {
SIMPLE, DIRECT
}
}
In order to document default values for properties in the class above, you could add the followingcontent to the manual metadata of the module:
{"properties": [ { "name": "acme.messaging.addresses", "defaultValue": ["a", "b"] }, { "name": "acme.messaging.container-type", "defaultValue": "simple" }]}
Only the name of the property is required to document additional metadata forexisting properties.
Nested Properties
The annotation processor automatically considers inner classes as nested properties. Rather thandocumenting the ip and port at the root of the namespace, we could create a sub-namespace for it.Consider the updated example:
459

@ConfigurationProperties(prefix="server")public class ServerProperties {
private String name;
private Host host;
// ... getter and setters
public static class Host {
private String ip;
private int port;
// ... getter and setters
}
}
The preceding example produces metadata information for server.name, server.host.ip, andserver.host.port properties. You can use the @NestedConfigurationProperty annotation on a field toindicate that a regular (non-inner) class should be treated as if it were nested.
This has no effect on collections and maps, as those types are automaticallyidentified, and a single metadata property is generated for each of them.
Adding Additional Metadata
Spring Boot’s configuration file handling is quite flexible, and it is often the case that propertiesmay exist that are not bound to a @ConfigurationProperties bean. You may also need to tune someattributes of an existing key. To support such cases and let you provide custom "hints", theannotation processor automatically merges items from META-INF/additional-spring-configuration-metadata.json into the main metadata file.
If you refer to a property that has been detected automatically, the description, default value, anddeprecation information are overridden, if specified. If the manual property declaration is notidentified in the current module, it is added as a new property.
The format of the additional-spring-configuration-metadata.json file is exactly the same as theregular spring-configuration-metadata.json. The additional properties file is optional. If you do nothave any additional properties, do not add the file.
Appendix C: Auto-configuration ClassesThis appendix contains details of all of the auto-configuration classes provided by Spring Boot, withlinks to documentation and source code. Remember to also look at the conditions report in your
460

application for more details of which features are switched on. (To do so, start the app with --debugor -Ddebug or, in an Actuator application, use the conditions endpoint).
10.C.1. spring-boot-autoconfigure
The following auto-configuration classes are from the spring-boot-autoconfigure module:
Configuration Class Links
ActiveMQAutoConfiguration javadoc
AopAutoConfiguration javadoc
ArtemisAutoConfiguration javadoc
BatchAutoConfiguration javadoc
CacheAutoConfiguration javadoc
CassandraAutoConfiguration javadoc
CassandraDataAutoConfiguration javadoc
CassandraReactiveDataAutoConfiguration javadoc
CassandraReactiveRepositoriesAutoConfiguration javadoc
CassandraRepositoriesAutoConfiguration javadoc
ClientHttpConnectorAutoConfiguration javadoc
CloudServiceConnectorsAutoConfiguration javadoc
CodecsAutoConfiguration javadoc
ConfigurationPropertiesAutoConfiguration javadoc
CouchbaseAutoConfiguration javadoc
CouchbaseDataAutoConfiguration javadoc
CouchbaseReactiveDataAutoConfiguration javadoc
CouchbaseReactiveRepositoriesAutoConfiguration javadoc
CouchbaseRepositoriesAutoConfiguration javadoc
DataSourceAutoConfiguration javadoc
DataSourceTransactionManagerAutoConfiguration javadoc
DispatcherServletAutoConfiguration javadoc
ElasticsearchAutoConfiguration javadoc
ElasticsearchDataAutoConfiguration javadoc
ElasticsearchRepositoriesAutoConfiguration javadoc
EmbeddedLdapAutoConfiguration javadoc
EmbeddedMongoAutoConfiguration javadoc
EmbeddedWebServerFactoryCustomizerAutoConfiguration javadoc
461
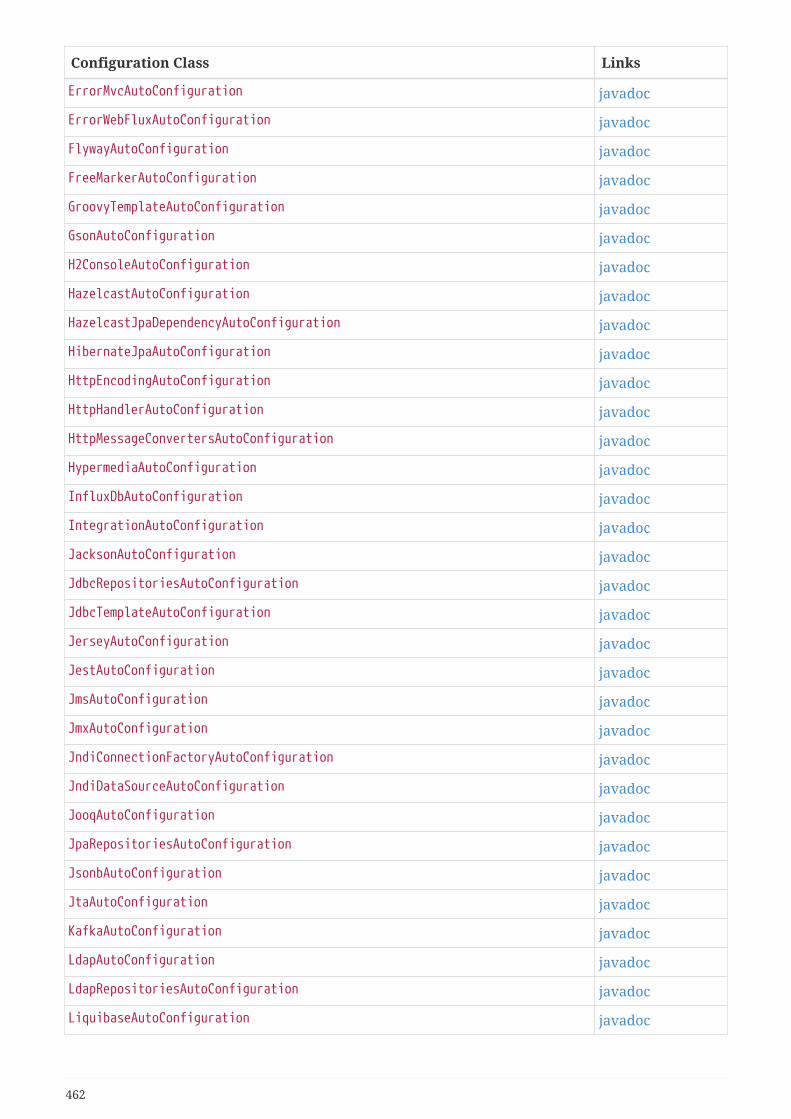
Configuration Class Links
ErrorMvcAutoConfiguration javadoc
ErrorWebFluxAutoConfiguration javadoc
FlywayAutoConfiguration javadoc
FreeMarkerAutoConfiguration javadoc
GroovyTemplateAutoConfiguration javadoc
GsonAutoConfiguration javadoc
H2ConsoleAutoConfiguration javadoc
HazelcastAutoConfiguration javadoc
HazelcastJpaDependencyAutoConfiguration javadoc
HibernateJpaAutoConfiguration javadoc
HttpEncodingAutoConfiguration javadoc
HttpHandlerAutoConfiguration javadoc
HttpMessageConvertersAutoConfiguration javadoc
HypermediaAutoConfiguration javadoc
InfluxDbAutoConfiguration javadoc
IntegrationAutoConfiguration javadoc
JacksonAutoConfiguration javadoc
JdbcRepositoriesAutoConfiguration javadoc
JdbcTemplateAutoConfiguration javadoc
JerseyAutoConfiguration javadoc
JestAutoConfiguration javadoc
JmsAutoConfiguration javadoc
JmxAutoConfiguration javadoc
JndiConnectionFactoryAutoConfiguration javadoc
JndiDataSourceAutoConfiguration javadoc
JooqAutoConfiguration javadoc
JpaRepositoriesAutoConfiguration javadoc
JsonbAutoConfiguration javadoc
JtaAutoConfiguration javadoc
KafkaAutoConfiguration javadoc
LdapAutoConfiguration javadoc
LdapRepositoriesAutoConfiguration javadoc
LiquibaseAutoConfiguration javadoc
462
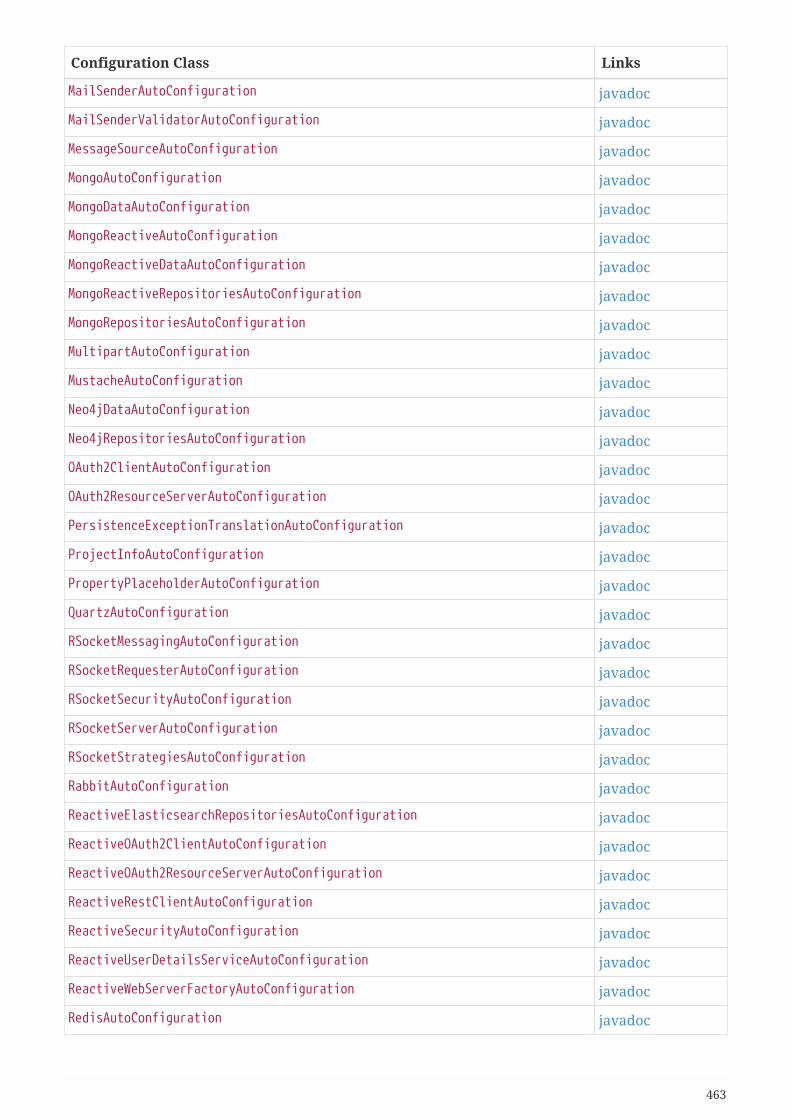
Configuration Class Links
MailSenderAutoConfiguration javadoc
MailSenderValidatorAutoConfiguration javadoc
MessageSourceAutoConfiguration javadoc
MongoAutoConfiguration javadoc
MongoDataAutoConfiguration javadoc
MongoReactiveAutoConfiguration javadoc
MongoReactiveDataAutoConfiguration javadoc
MongoReactiveRepositoriesAutoConfiguration javadoc
MongoRepositoriesAutoConfiguration javadoc
MultipartAutoConfiguration javadoc
MustacheAutoConfiguration javadoc
Neo4jDataAutoConfiguration javadoc
Neo4jRepositoriesAutoConfiguration javadoc
OAuth2ClientAutoConfiguration javadoc
OAuth2ResourceServerAutoConfiguration javadoc
PersistenceExceptionTranslationAutoConfiguration javadoc
ProjectInfoAutoConfiguration javadoc
PropertyPlaceholderAutoConfiguration javadoc
QuartzAutoConfiguration javadoc
RSocketMessagingAutoConfiguration javadoc
RSocketRequesterAutoConfiguration javadoc
RSocketSecurityAutoConfiguration javadoc
RSocketServerAutoConfiguration javadoc
RSocketStrategiesAutoConfiguration javadoc
RabbitAutoConfiguration javadoc
ReactiveElasticsearchRepositoriesAutoConfiguration javadoc
ReactiveOAuth2ClientAutoConfiguration javadoc
ReactiveOAuth2ResourceServerAutoConfiguration javadoc
ReactiveRestClientAutoConfiguration javadoc
ReactiveSecurityAutoConfiguration javadoc
ReactiveUserDetailsServiceAutoConfiguration javadoc
ReactiveWebServerFactoryAutoConfiguration javadoc
RedisAutoConfiguration javadoc
463

Configuration Class Links
RedisReactiveAutoConfiguration javadoc
RedisRepositoriesAutoConfiguration javadoc
RepositoryRestMvcAutoConfiguration javadoc
RestClientAutoConfiguration javadoc
RestTemplateAutoConfiguration javadoc
Saml2RelyingPartyAutoConfiguration javadoc
SecurityAutoConfiguration javadoc
SecurityFilterAutoConfiguration javadoc
SendGridAutoConfiguration javadoc
ServletWebServerFactoryAutoConfiguration javadoc
SessionAutoConfiguration javadoc
SolrAutoConfiguration javadoc
SolrRepositoriesAutoConfiguration javadoc
SpringApplicationAdminJmxAutoConfiguration javadoc
SpringDataWebAutoConfiguration javadoc
TaskExecutionAutoConfiguration javadoc
TaskSchedulingAutoConfiguration javadoc
ThymeleafAutoConfiguration javadoc
TransactionAutoConfiguration javadoc
UserDetailsServiceAutoConfiguration javadoc
ValidationAutoConfiguration javadoc
WebClientAutoConfiguration javadoc
WebFluxAutoConfiguration javadoc
WebMvcAutoConfiguration javadoc
WebServiceTemplateAutoConfiguration javadoc
WebServicesAutoConfiguration javadoc
WebSocketMessagingAutoConfiguration javadoc
WebSocketReactiveAutoConfiguration javadoc
WebSocketServletAutoConfiguration javadoc
XADataSourceAutoConfiguration javadoc
10.C.2. spring-boot-actuator-autoconfigure
The following auto-configuration classes are from the spring-boot-actuator-autoconfigure module:
464
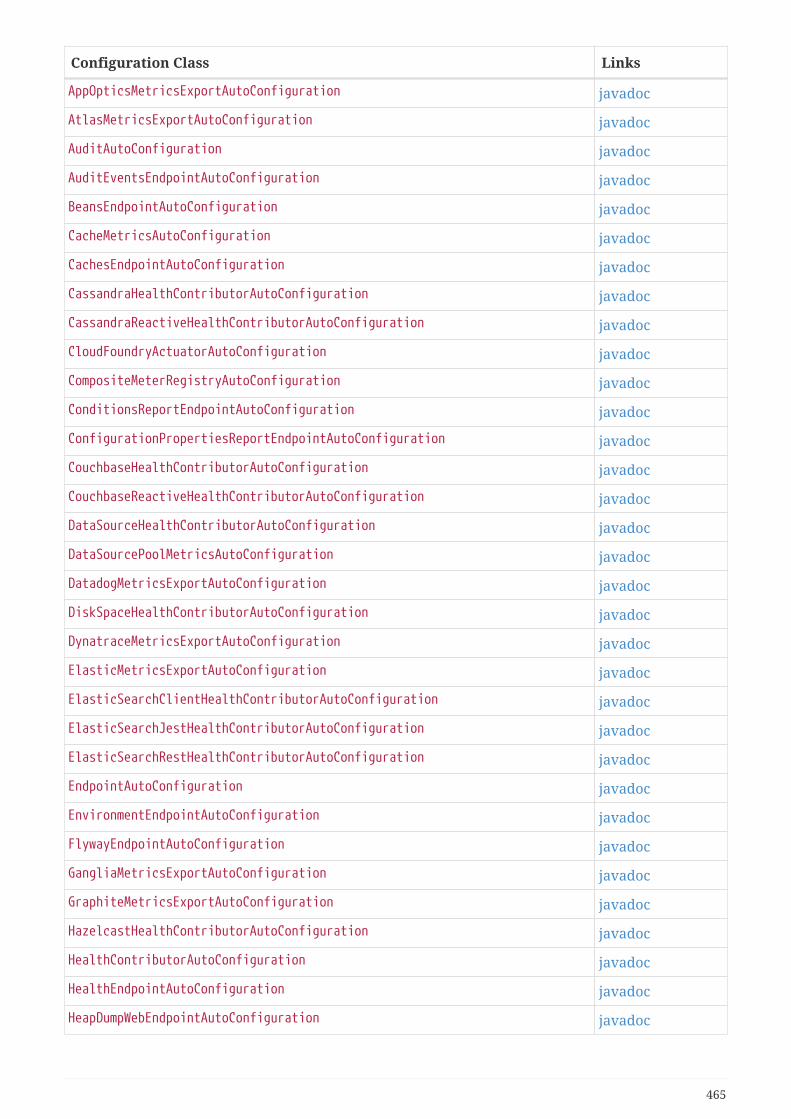
Configuration Class Links
AppOpticsMetricsExportAutoConfiguration javadoc
AtlasMetricsExportAutoConfiguration javadoc
AuditAutoConfiguration javadoc
AuditEventsEndpointAutoConfiguration javadoc
BeansEndpointAutoConfiguration javadoc
CacheMetricsAutoConfiguration javadoc
CachesEndpointAutoConfiguration javadoc
CassandraHealthContributorAutoConfiguration javadoc
CassandraReactiveHealthContributorAutoConfiguration javadoc
CloudFoundryActuatorAutoConfiguration javadoc
CompositeMeterRegistryAutoConfiguration javadoc
ConditionsReportEndpointAutoConfiguration javadoc
ConfigurationPropertiesReportEndpointAutoConfiguration javadoc
CouchbaseHealthContributorAutoConfiguration javadoc
CouchbaseReactiveHealthContributorAutoConfiguration javadoc
DataSourceHealthContributorAutoConfiguration javadoc
DataSourcePoolMetricsAutoConfiguration javadoc
DatadogMetricsExportAutoConfiguration javadoc
DiskSpaceHealthContributorAutoConfiguration javadoc
DynatraceMetricsExportAutoConfiguration javadoc
ElasticMetricsExportAutoConfiguration javadoc
ElasticSearchClientHealthContributorAutoConfiguration javadoc
ElasticSearchJestHealthContributorAutoConfiguration javadoc
ElasticSearchRestHealthContributorAutoConfiguration javadoc
EndpointAutoConfiguration javadoc
EnvironmentEndpointAutoConfiguration javadoc
FlywayEndpointAutoConfiguration javadoc
GangliaMetricsExportAutoConfiguration javadoc
GraphiteMetricsExportAutoConfiguration javadoc
HazelcastHealthContributorAutoConfiguration javadoc
HealthContributorAutoConfiguration javadoc
HealthEndpointAutoConfiguration javadoc
HeapDumpWebEndpointAutoConfiguration javadoc
465

Configuration Class Links
HibernateMetricsAutoConfiguration javadoc
HttpClientMetricsAutoConfiguration javadoc
HttpTraceAutoConfiguration javadoc
HttpTraceEndpointAutoConfiguration javadoc
HumioMetricsExportAutoConfiguration javadoc
InfluxDbHealthContributorAutoConfiguration javadoc
InfluxMetricsExportAutoConfiguration javadoc
InfoContributorAutoConfiguration javadoc
InfoEndpointAutoConfiguration javadoc
IntegrationGraphEndpointAutoConfiguration javadoc
JerseyServerMetricsAutoConfiguration javadoc
JettyMetricsAutoConfiguration javadoc
JmsHealthContributorAutoConfiguration javadoc
JmxEndpointAutoConfiguration javadoc
JmxMetricsExportAutoConfiguration javadoc
JolokiaEndpointAutoConfiguration javadoc
JvmMetricsAutoConfiguration javadoc
KafkaMetricsAutoConfiguration javadoc
KairosMetricsExportAutoConfiguration javadoc
LdapHealthContributorAutoConfiguration javadoc
LiquibaseEndpointAutoConfiguration javadoc
Log4J2MetricsAutoConfiguration javadoc
LogFileWebEndpointAutoConfiguration javadoc
LogbackMetricsAutoConfiguration javadoc
LoggersEndpointAutoConfiguration javadoc
MailHealthContributorAutoConfiguration javadoc
ManagementContextAutoConfiguration javadoc
ManagementWebSecurityAutoConfiguration javadoc
MappingsEndpointAutoConfiguration javadoc
MetricsAutoConfiguration javadoc
MetricsEndpointAutoConfiguration javadoc
MongoHealthContributorAutoConfiguration javadoc
MongoReactiveHealthContributorAutoConfiguration javadoc
466
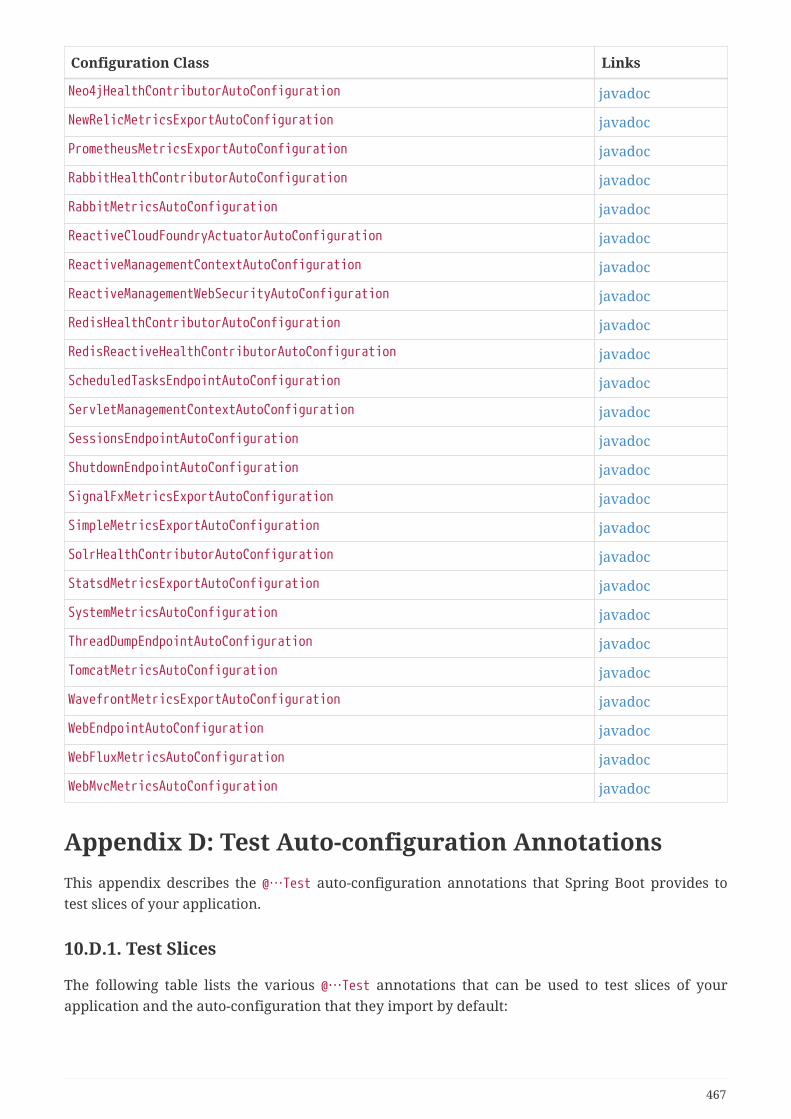
Configuration Class Links
Neo4jHealthContributorAutoConfiguration javadoc
NewRelicMetricsExportAutoConfiguration javadoc
PrometheusMetricsExportAutoConfiguration javadoc
RabbitHealthContributorAutoConfiguration javadoc
RabbitMetricsAutoConfiguration javadoc
ReactiveCloudFoundryActuatorAutoConfiguration javadoc
ReactiveManagementContextAutoConfiguration javadoc
ReactiveManagementWebSecurityAutoConfiguration javadoc
RedisHealthContributorAutoConfiguration javadoc
RedisReactiveHealthContributorAutoConfiguration javadoc
ScheduledTasksEndpointAutoConfiguration javadoc
ServletManagementContextAutoConfiguration javadoc
SessionsEndpointAutoConfiguration javadoc
ShutdownEndpointAutoConfiguration javadoc
SignalFxMetricsExportAutoConfiguration javadoc
SimpleMetricsExportAutoConfiguration javadoc
SolrHealthContributorAutoConfiguration javadoc
StatsdMetricsExportAutoConfiguration javadoc
SystemMetricsAutoConfiguration javadoc
ThreadDumpEndpointAutoConfiguration javadoc
TomcatMetricsAutoConfiguration javadoc
WavefrontMetricsExportAutoConfiguration javadoc
WebEndpointAutoConfiguration javadoc
WebFluxMetricsAutoConfiguration javadoc
WebMvcMetricsAutoConfiguration javadoc
Appendix D: Test Auto-configuration AnnotationsThis appendix describes the @…Test auto-configuration annotations that Spring Boot provides totest slices of your application.
10.D.1. Test Slices
The following table lists the various @…Test annotations that can be used to test slices of yourapplication and the auto-configuration that they import by default:
467

Test slice Imported auto-configuration
@DataJdbcTest org.springframework.boot.autoconfigure.cache.C
acheAutoConfigurationorg.springframework.boot.autoconfigure.data.jd
bc.JdbcRepositoriesAutoConfigurationorg.springframework.boot.autoconfigure.flyway.
FlywayAutoConfigurationorg.springframework.boot.autoconfigure.jdbc.Da
taSourceAutoConfigurationorg.springframework.boot.autoconfigure.jdbc.Da
taSourceTransactionManagerAutoConfigurationorg.springframework.boot.autoconfigure.jdbc.Jd
bcTemplateAutoConfigurationorg.springframework.boot.autoconfigure.liquiba
se.LiquibaseAutoConfigurationorg.springframework.boot.autoconfigure.transac
tion.TransactionAutoConfigurationorg.springframework.boot.test.autoconfigure.jdbc.TestDatabaseAutoConfiguration
@DataJpaTest org.springframework.boot.autoconfigure.cache.C
acheAutoConfigurationorg.springframework.boot.autoconfigure.data.jp
a.JpaRepositoriesAutoConfigurationorg.springframework.boot.autoconfigure.flyway.
FlywayAutoConfigurationorg.springframework.boot.autoconfigure.jdbc.Da
taSourceAutoConfigurationorg.springframework.boot.autoconfigure.jdbc.Da
taSourceTransactionManagerAutoConfigurationorg.springframework.boot.autoconfigure.jdbc.Jd
bcTemplateAutoConfigurationorg.springframework.boot.autoconfigure.liquiba
se.LiquibaseAutoConfigurationorg.springframework.boot.autoconfigure.orm.jpa
.HibernateJpaAutoConfigurationorg.springframework.boot.autoconfigure.transac
tion.TransactionAutoConfigurationorg.springframework.boot.test.autoconfigure.jd
bc.TestDatabaseAutoConfigurationorg.springframework.boot.test.autoconfigure.orm.jpa.TestEntityManagerAutoConfiguration
@DataLdapTest org.springframework.boot.autoconfigure.cache.C
acheAutoConfigurationorg.springframework.boot.autoconfigure.data.ld
ap.LdapRepositoriesAutoConfigurationorg.springframework.boot.autoconfigure.ldap.Ld
apAutoConfigurationorg.springframework.boot.autoconfigure.ldap.embedded.EmbeddedLdapAutoConfiguration
468

Test slice Imported auto-configuration
@DataMongoTest org.springframework.boot.autoconfigure.cache.C
acheAutoConfigurationorg.springframework.boot.autoconfigure.data.mo
ngo.MongoDataAutoConfigurationorg.springframework.boot.autoconfigure.data.mo
ngo.MongoReactiveDataAutoConfigurationorg.springframework.boot.autoconfigure.data.mongo.MongoReactiveRepositoriesAutoConfiguration
org.springframework.boot.autoconfigure.data.mo
ngo.MongoRepositoriesAutoConfigurationorg.springframework.boot.autoconfigure.mongo.M
ongoAutoConfigurationorg.springframework.boot.autoconfigure.mongo.M
ongoReactiveAutoConfigurationorg.springframework.boot.autoconfigure.mongo.embedded.EmbeddedMongoAutoConfiguration
@DataNeo4jTest org.springframework.boot.autoconfigure.cache.C
acheAutoConfigurationorg.springframework.boot.autoconfigure.data.ne
o4j.Neo4jDataAutoConfigurationorg.springframework.boot.autoconfigure.data.ne
o4j.Neo4jRepositoriesAutoConfigurationorg.springframework.boot.autoconfigure.transaction.TransactionAutoConfiguration
@DataRedisTest org.springframework.boot.autoconfigure.cache.C
acheAutoConfigurationorg.springframework.boot.autoconfigure.data.re
dis.RedisAutoConfigurationorg.springframework.boot.autoconfigure.data.redis.RedisRepositoriesAutoConfiguration
@JdbcTest org.springframework.boot.autoconfigure.cache.C
acheAutoConfigurationorg.springframework.boot.autoconfigure.flyway.
FlywayAutoConfigurationorg.springframework.boot.autoconfigure.jdbc.Da
taSourceAutoConfigurationorg.springframework.boot.autoconfigure.jdbc.Da
taSourceTransactionManagerAutoConfigurationorg.springframework.boot.autoconfigure.jdbc.Jd
bcTemplateAutoConfigurationorg.springframework.boot.autoconfigure.liquiba
se.LiquibaseAutoConfigurationorg.springframework.boot.autoconfigure.transac
tion.TransactionAutoConfigurationorg.springframework.boot.test.autoconfigure.jdbc.TestDatabaseAutoConfiguration
469

Test slice Imported auto-configuration
@JooqTest org.springframework.boot.autoconfigure.cache.C
acheAutoConfigurationorg.springframework.boot.autoconfigure.flyway.
FlywayAutoConfigurationorg.springframework.boot.autoconfigure.jdbc.Da
taSourceAutoConfigurationorg.springframework.boot.autoconfigure.jdbc.Da
taSourceTransactionManagerAutoConfigurationorg.springframework.boot.autoconfigure.jooq.Jo
oqAutoConfigurationorg.springframework.boot.autoconfigure.liquiba
se.LiquibaseAutoConfigurationorg.springframework.boot.autoconfigure.transaction.TransactionAutoConfiguration
@JsonTest org.springframework.boot.autoconfigure.cache.C
acheAutoConfigurationorg.springframework.boot.autoconfigure.gson.Gs
onAutoConfigurationorg.springframework.boot.autoconfigure.jackson
.JacksonAutoConfigurationorg.springframework.boot.autoconfigure.jsonb.J
sonbAutoConfigurationorg.springframework.boot.test.autoconfigure.json.JsonTestersAutoConfiguration
@RestClientTest org.springframework.boot.autoconfigure.cache.C
acheAutoConfigurationorg.springframework.boot.autoconfigure.gson.Gs
onAutoConfigurationorg.springframework.boot.autoconfigure.http.Ht
tpMessageConvertersAutoConfigurationorg.springframework.boot.autoconfigure.http.co
dec.CodecsAutoConfigurationorg.springframework.boot.autoconfigure.jackson
.JacksonAutoConfigurationorg.springframework.boot.autoconfigure.jsonb.J
sonbAutoConfigurationorg.springframework.boot.autoconfigure.web.cli
ent.RestTemplateAutoConfigurationorg.springframework.boot.autoconfigure.web.reactive.function.client.WebClientAutoConfigurati
onorg.springframework.boot.test.autoconfigure.web.client.MockRestServiceServerAutoConfiguratio
norg.springframework.boot.test.autoconfigure.web.client.WebClientRestTemplateAutoConfiguration
470
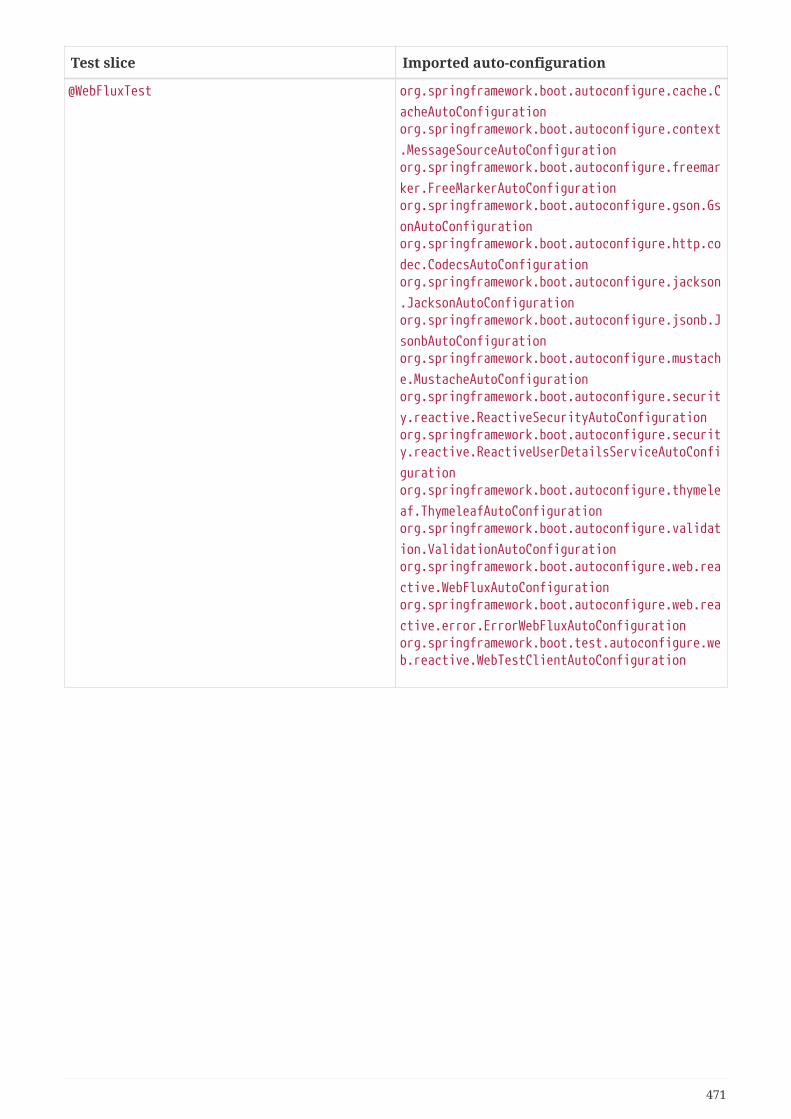
Test slice Imported auto-configuration
@WebFluxTest org.springframework.boot.autoconfigure.cache.C
acheAutoConfigurationorg.springframework.boot.autoconfigure.context
.MessageSourceAutoConfigurationorg.springframework.boot.autoconfigure.freemar
ker.FreeMarkerAutoConfigurationorg.springframework.boot.autoconfigure.gson.Gs
onAutoConfigurationorg.springframework.boot.autoconfigure.http.co
dec.CodecsAutoConfigurationorg.springframework.boot.autoconfigure.jackson
.JacksonAutoConfigurationorg.springframework.boot.autoconfigure.jsonb.J
sonbAutoConfigurationorg.springframework.boot.autoconfigure.mustach
e.MustacheAutoConfigurationorg.springframework.boot.autoconfigure.securit
y.reactive.ReactiveSecurityAutoConfigurationorg.springframework.boot.autoconfigure.security.reactive.ReactiveUserDetailsServiceAutoConfi
gurationorg.springframework.boot.autoconfigure.thymele
af.ThymeleafAutoConfigurationorg.springframework.boot.autoconfigure.validat
ion.ValidationAutoConfigurationorg.springframework.boot.autoconfigure.web.rea
ctive.WebFluxAutoConfigurationorg.springframework.boot.autoconfigure.web.rea
ctive.error.ErrorWebFluxAutoConfigurationorg.springframework.boot.test.autoconfigure.web.reactive.WebTestClientAutoConfiguration
471

Test slice Imported auto-configuration
@WebMvcTest org.springframework.boot.autoconfigure.cache.C
acheAutoConfigurationorg.springframework.boot.autoconfigure.context
.MessageSourceAutoConfigurationorg.springframework.boot.autoconfigure.data.we
b.SpringDataWebAutoConfigurationorg.springframework.boot.autoconfigure.freemar
ker.FreeMarkerAutoConfigurationorg.springframework.boot.autoconfigure.groovy.
template.GroovyTemplateAutoConfigurationorg.springframework.boot.autoconfigure.gson.Gs
onAutoConfigurationorg.springframework.boot.autoconfigure.hateoas
.HypermediaAutoConfigurationorg.springframework.boot.autoconfigure.http.Ht
tpMessageConvertersAutoConfigurationorg.springframework.boot.autoconfigure.jackson
.JacksonAutoConfigurationorg.springframework.boot.autoconfigure.jsonb.J
sonbAutoConfigurationorg.springframework.boot.autoconfigure.mustach
e.MustacheAutoConfigurationorg.springframework.boot.autoconfigure.securit
y.servlet.SecurityAutoConfigurationorg.springframework.boot.autoconfigure.securit
y.servlet.SecurityFilterAutoConfigurationorg.springframework.boot.autoconfigure.securit
y.servlet.UserDetailsServiceAutoConfigurationorg.springframework.boot.autoconfigure.task.Ta
skExecutionAutoConfigurationorg.springframework.boot.autoconfigure.thymele
af.ThymeleafAutoConfigurationorg.springframework.boot.autoconfigure.validat
ion.ValidationAutoConfigurationorg.springframework.boot.autoconfigure.web.ser
vlet.HttpEncodingAutoConfigurationorg.springframework.boot.autoconfigure.web.ser
vlet.WebMvcAutoConfigurationorg.springframework.boot.autoconfigure.web.ser
vlet.error.ErrorMvcAutoConfigurationorg.springframework.boot.test.autoconfigure.we
b.servlet.MockMvcAutoConfigurationorg.springframework.boot.test.autoconfigure.we
b.servlet.MockMvcSecurityConfigurationorg.springframework.boot.test.autoconfigure.we
b.servlet.MockMvcWebClientAutoConfigurationorg.springframework.boot.test.autoconfigure.web.servlet.MockMvcWebDriverAutoConfiguration
472

Appendix E: The Executable Jar FormatThe spring-boot-loader modules lets Spring Boot support executable jar and war files. If you use theMaven plugin or the Gradle plugin, executable jars are automatically generated, and you generallydo not need to know the details of how they work.
If you need to create executable jars from a different build system or if you are just curious aboutthe underlying technology, this appendix provides some background.
10.E.1. Nested JARs
Java does not provide any standard way to load nested jar files (that is, jar files that are themselvescontained within a jar). This can be problematic if you need to distribute a self-containedapplication that can be run from the command line without unpacking.
To solve this problem, many developers use “shaded” jars. A shaded jar packages all classes, fromall jars, into a single “uber jar”. The problem with shaded jars is that it becomes hard to see whichlibraries are actually in your application. It can also be problematic if the same filename is used(but with different content) in multiple jars. Spring Boot takes a different approach and lets youactually nest jars directly.
The Executable Jar File Structure
Spring Boot Loader-compatible jar files should be structured in the following way:
example.jar | +-META-INF | +-MANIFEST.MF +-org | +-springframework | +-boot | +-loader | +-<spring boot loader classes> +-BOOT-INF +-classes | +-mycompany | +-project | +-YourClasses.class +-lib +-dependency1.jar +-dependency2.jar
Application classes should be placed in a nested BOOT-INF/classes directory. Dependencies shouldbe placed in a nested BOOT-INF/lib directory.
The Executable War File Structure
Spring Boot Loader-compatible war files should be structured in the following way:
473

example.war | +-META-INF | +-MANIFEST.MF +-org | +-springframework | +-boot | +-loader | +-<spring boot loader classes> +-WEB-INF +-classes | +-com | +-mycompany | +-project | +-YourClasses.class +-lib | +-dependency1.jar | +-dependency2.jar +-lib-provided +-servlet-api.jar +-dependency3.jar
Dependencies should be placed in a nested WEB-INF/lib directory. Any dependencies that arerequired when running embedded but are not required when deploying to a traditional webcontainer should be placed in WEB-INF/lib-provided.
10.E.2. Spring Boot’s “JarFile” Class
The core class used to support loading nested jars is org.springframework.boot.loader.jar.JarFile.It lets you load jar content from a standard jar file or from nested child jar data. When first loaded,the location of each JarEntry is mapped to a physical file offset of the outer jar, as shown in thefollowing example:
myapp.jar+-------------------+-------------------------+| /BOOT-INF/classes | /BOOT-INF/lib/mylib.jar ||+-----------------+||+-----------+----------+||| A.class ||| B.class | C.class |||+-----------------+||+-----------+----------+|+-------------------+-------------------------+ ^ ^ ^ 0063 3452 3980
The preceding example shows how A.class can be found in /BOOT-INF/classes in myapp.jar atposition 0063. B.class from the nested jar can actually be found in myapp.jar at position 3452, andC.class is at position 3980.
Armed with this information, we can load specific nested entries by seeking to the appropriate part
474

of the outer jar. We do not need to unpack the archive, and we do not need to read all entry datainto memory.
Compatibility with the Standard Java “JarFile”
Spring Boot Loader strives to remain compatible with existing code and libraries.org.springframework.boot.loader.jar.JarFile extends from java.util.jar.JarFile and should workas a drop-in replacement. The getURL() method returns a URL that opens a connection compatiblewith java.net.JarURLConnection and can be used with Java’s URLClassLoader.
10.E.3. Launching Executable Jars
The org.springframework.boot.loader.Launcher class is a special bootstrap class that is used as anexecutable jar’s main entry point. It is the actual Main-Class in your jar file, and it is used to setupan appropriate URLClassLoader and ultimately call your main() method.
There are three launcher subclasses (JarLauncher, WarLauncher, and PropertiesLauncher). Theirpurpose is to load resources (.class files and so on) from nested jar files or war files in directories(as opposed to those explicitly on the classpath). In the case of JarLauncher and WarLauncher, thenested paths are fixed. JarLauncher looks in BOOT-INF/lib/, and WarLauncher looks in WEB-INF/lib/and WEB-INF/lib-provided/. You can add extra jars in those locations if you want more. ThePropertiesLauncher looks in BOOT-INF/lib/ in your application archive by default. You can addadditional locations by setting an environment variable called LOADER_PATH or loader.path inloader.properties (which is a comma-separated list of directories, archives, or directories withinarchives).
Launcher Manifest
You need to specify an appropriate Launcher as the Main-Class attribute of META-INF/MANIFEST.MF. Theactual class that you want to launch (that is, the class that contains a main method) should bespecified in the Start-Class attribute.
The following example shows a typical MANIFEST.MF for an executable jar file:
Main-Class: org.springframework.boot.loader.JarLauncherStart-Class: com.mycompany.project.MyApplication
For a war file, it would be as follows:
Main-Class: org.springframework.boot.loader.WarLauncherStart-Class: com.mycompany.project.MyApplication
You need not specify Class-Path entries in your manifest file. The classpath isdeduced from the nested jars.
475

10.E.4. PropertiesLauncher Features
PropertiesLauncher has a few special features that can be enabled with external properties (Systemproperties, environment variables, manifest entries, or loader.properties). The following tabledescribes these properties:
Key Purpose
loader.path Comma-separated Classpath, such aslib,${HOME}/app/lib. Earlier entries takeprecedence, like a regular -classpath on thejavac command line.
loader.home Used to resolve relative paths in loader.path. Forexample, given loader.path=lib, then${loader.home}/lib is a classpath location (alongwith all jar files in that directory). This propertyis also used to locate a loader.properties file, asin the following example /opt/app It defaults to${user.dir}.
loader.args Default arguments for the main method (spaceseparated).
loader.main Name of main class to launch (for example,com.app.Application).
loader.config.name Name of properties file (for example, launcher).It defaults to loader.
loader.config.location Path to properties file (for example,classpath:loader.properties). It defaults toloader.properties.
loader.system Boolean flag to indicate that all propertiesshould be added to System properties. It defaultsto false.
When specified as environment variables or manifest entries, the following names should be used:
Key Manifest entry Environment variable
loader.path Loader-Path LOADER_PATH
loader.home Loader-Home LOADER_HOME
loader.args Loader-Args LOADER_ARGS
loader.main Start-Class LOADER_MAIN
loader.config.location Loader-Config-Location LOADER_CONFIG_LOCATION
loader.system Loader-System LOADER_SYSTEM
476

Build plugins automatically move the Main-Class attribute to Start-Class when thefat jar is built. If you use that, specify the name of the class to launch by using theMain-Class attribute and leaving out Start-Class.
The following rules apply to working with PropertiesLauncher:
• loader.properties is searched for in loader.home, then in the root of the classpath, and then inclasspath:/BOOT-INF/classes. The first location where a file with that name exists is used.
• loader.home is the directory location of an additional properties file (overriding the default) onlywhen loader.config.location is not specified.
• loader.path can contain directories (which are scanned recursively for jar and zip files), archivepaths, a directory within an archive that is scanned for jar files (for example,dependencies.jar!/lib), or wildcard patterns (for the default JVM behavior). Archive paths canbe relative to loader.home or anywhere in the file system with a jar:file: prefix.
• loader.path (if empty) defaults to BOOT-INF/lib (meaning a local directory or a nested one ifrunning from an archive). Because of this, PropertiesLauncher behaves the same as JarLauncherwhen no additional configuration is provided.
• loader.path can not be used to configure the location of loader.properties (the classpath used tosearch for the latter is the JVM classpath when PropertiesLauncher is launched).
• Placeholder replacement is done from System and environment variables plus the propertiesfile itself on all values before use.
• The search order for properties (where it makes sense to look in more than one place) isenvironment variables, system properties, loader.properties, the exploded archive manifest,and the archive manifest.
10.E.5. Executable Jar Restrictions
You need to consider the following restrictions when working with a Spring Boot Loader packagedapplication:
• Zip entry compression: The ZipEntry for a nested jar must be saved by using the ZipEntry.STOREDmethod. This is required so that we can seek directly to individual content within the nested jar.The content of the nested jar file itself can still be compressed, as can any other entries in theouter jar.
• System classLoader: Launched applications should use Thread.getContextClassLoader() whenloading classes (most libraries and frameworks do so by default). Trying to load nested jarclasses with ClassLoader.getSystemClassLoader() fails. java.util.Logging always uses the systemclassloader. For this reason, you should consider a different logging implementation.
10.E.6. Alternative Single Jar Solutions
If the preceding restrictions mean that you cannot use Spring Boot Loader, consider the followingalternatives:
• Maven Shade Plugin
477

• JarClassLoader
• OneJar
• Gradle Shadow Plugin
Appendix F: Dependency versionsThis appendix provides details of the dependencies that are managed by Spring Boot.
10.F.1. Managed Dependency Coordinates
The following table provides details of all of the dependency versions that are provided by SpringBoot in its CLI (Command Line Interface), Maven dependency management, and Gradle plugin.When you declare a dependency on one of these artifacts without declaring a version, the versionlisted in the table is used.
Group ID Artifact ID Version
antlr antlr 2.7.7
ch.qos.logback logback-access 1.2.3
ch.qos.logback logback-classic 1.2.3
ch.qos.logback logback-core 1.2.3
com.atomikos transactions-jdbc 4.0.6
com.atomikos transactions-jms 4.0.6
com.atomikos transactions-jta 4.0.6
com.couchbase.client couchbase-spring-cache 2.1.0
com.couchbase.client java-client 2.7.16
com.datastax.cassandra cassandra-driver-core 3.7.2
com.datastax.cassandra cassandra-driver-mapping 3.7.2
com.fasterxml classmate 1.5.1
com.fasterxml.jackson.core jackson-annotations 2.10.5
com.fasterxml.jackson.core jackson-core 2.10.5
com.fasterxml.jackson.core jackson-databind 2.10.5
com.fasterxml.jackson.dataformat
jackson-dataformat-avro 2.10.5
com.fasterxml.jackson.dataformat
jackson-dataformat-cbor 2.10.5
com.fasterxml.jackson.dataformat
jackson-dataformat-csv 2.10.5
com.fasterxml.jackson.dataformat
jackson-dataformat-ion 2.10.5
478

Group ID Artifact ID Version
com.fasterxml.jackson.dataformat
jackson-dataformat-properties 2.10.5
com.fasterxml.jackson.dataformat
jackson-dataformat-protobuf 2.10.5
com.fasterxml.jackson.dataformat
jackson-dataformat-smile 2.10.5
com.fasterxml.jackson.dataformat
jackson-dataformat-xml 2.10.5
com.fasterxml.jackson.dataformat
jackson-dataformat-yaml 2.10.5
com.fasterxml.jackson.datatype jackson-datatype-eclipse-collections
2.10.5
com.fasterxml.jackson.datatype jackson-datatype-guava 2.10.5
com.fasterxml.jackson.datatype jackson-datatype-hibernate3 2.10.5
com.fasterxml.jackson.datatype jackson-datatype-hibernate4 2.10.5
com.fasterxml.jackson.datatype jackson-datatype-hibernate5 2.10.5
com.fasterxml.jackson.datatype jackson-datatype-hppc 2.10.5
com.fasterxml.jackson.datatype jackson-datatype-jaxrs 2.10.5
com.fasterxml.jackson.datatype jackson-datatype-jdk8 2.10.5
com.fasterxml.jackson.datatype jackson-datatype-joda 2.10.5
com.fasterxml.jackson.datatype jackson-datatype-json-org 2.10.5
com.fasterxml.jackson.datatype jackson-datatype-jsr310 2.10.5
com.fasterxml.jackson.datatype jackson-datatype-jsr353 2.10.5
com.fasterxml.jackson.datatype jackson-datatype-pcollections 2.10.5
com.fasterxml.jackson.jaxrs jackson-jaxrs-base 2.10.5
com.fasterxml.jackson.jaxrs jackson-jaxrs-cbor-provider 2.10.5
com.fasterxml.jackson.jaxrs jackson-jaxrs-json-provider 2.10.5
com.fasterxml.jackson.jaxrs jackson-jaxrs-smile-provider 2.10.5
com.fasterxml.jackson.jaxrs jackson-jaxrs-xml-provider 2.10.5
com.fasterxml.jackson.jaxrs jackson-jaxrs-yaml-provider 2.10.5
com.fasterxml.jackson.jr jackson-jr-all 2.10.5
com.fasterxml.jackson.jr jackson-jr-objects 2.10.5
com.fasterxml.jackson.jr jackson-jr-retrofit2 2.10.5
com.fasterxml.jackson.jr jackson-jr-stree 2.10.5
com.fasterxml.jackson.module jackson-module-afterburner 2.10.5
com.fasterxml.jackson.module jackson-module-guice 2.10.5
479

Group ID Artifact ID Version
com.fasterxml.jackson.module jackson-module-jaxb-annotations
2.10.5
com.fasterxml.jackson.module jackson-module-jsonSchema 2.10.5
com.fasterxml.jackson.module jackson-module-kotlin 2.10.5
com.fasterxml.jackson.module jackson-module-mrbean 2.10.5
com.fasterxml.jackson.module jackson-module-osgi 2.10.5
com.fasterxml.jackson.module jackson-module-parameter-names 2.10.5
com.fasterxml.jackson.module jackson-module-paranamer 2.10.5
com.fasterxml.jackson.module jackson-module-scala_2.10 2.10.5
com.fasterxml.jackson.module jackson-module-scala_2.11 2.10.5
com.fasterxml.jackson.module jackson-module-scala_2.12 2.10.5
com.fasterxml.jackson.module jackson-module-scala_2.13 2.10.5
com.github.ben-manes.caffeine caffeine 2.8.6
com.github.ben-manes.caffeine guava 2.8.6
com.github.ben-manes.caffeine jcache 2.8.6
com.github.ben-manes.caffeine simulator 2.8.6
com.github.mxab.thymeleaf.extras
thymeleaf-extras-data-attribute
2.0.1
com.google.appengine appengine-api-1.0-sdk 1.9.82
com.google.code.gson gson 2.8.6
com.h2database h2 1.4.200
com.hazelcast hazelcast 3.12.10
com.hazelcast hazelcast-client 3.12.10
com.hazelcast hazelcast-hibernate52 1.3.2
com.hazelcast hazelcast-hibernate53 1.3.2
com.hazelcast hazelcast-spring 3.12.10
com.ibm.db2 jcc 11.5.4.0
com.jayway.jsonpath json-path 2.4.0
com.jayway.jsonpath json-path-assert 2.4.0
com.microsoft.sqlserver mssql-jdbc 7.4.1.jre8
com.oracle.database.ha ons 19.3.0.0
com.oracle.database.ha simplefan 19.3.0.0
com.oracle.database.jdbc ojdbc10 19.3.0.0
com.oracle.database.jdbc ojdbc10dms 19.3.0.0
480
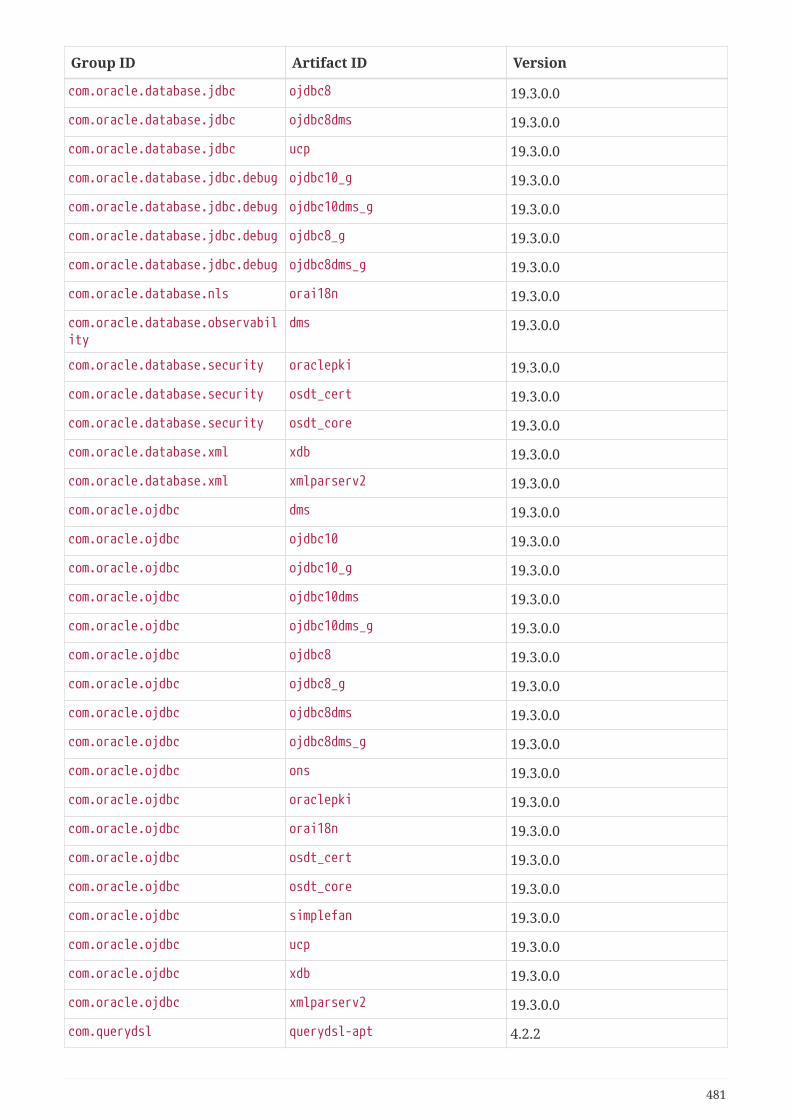
Group ID Artifact ID Version
com.oracle.database.jdbc ojdbc8 19.3.0.0
com.oracle.database.jdbc ojdbc8dms 19.3.0.0
com.oracle.database.jdbc ucp 19.3.0.0
com.oracle.database.jdbc.debug ojdbc10_g 19.3.0.0
com.oracle.database.jdbc.debug ojdbc10dms_g 19.3.0.0
com.oracle.database.jdbc.debug ojdbc8_g 19.3.0.0
com.oracle.database.jdbc.debug ojdbc8dms_g 19.3.0.0
com.oracle.database.nls orai18n 19.3.0.0
com.oracle.database.observability
dms 19.3.0.0
com.oracle.database.security oraclepki 19.3.0.0
com.oracle.database.security osdt_cert 19.3.0.0
com.oracle.database.security osdt_core 19.3.0.0
com.oracle.database.xml xdb 19.3.0.0
com.oracle.database.xml xmlparserv2 19.3.0.0
com.oracle.ojdbc dms 19.3.0.0
com.oracle.ojdbc ojdbc10 19.3.0.0
com.oracle.ojdbc ojdbc10_g 19.3.0.0
com.oracle.ojdbc ojdbc10dms 19.3.0.0
com.oracle.ojdbc ojdbc10dms_g 19.3.0.0
com.oracle.ojdbc ojdbc8 19.3.0.0
com.oracle.ojdbc ojdbc8_g 19.3.0.0
com.oracle.ojdbc ojdbc8dms 19.3.0.0
com.oracle.ojdbc ojdbc8dms_g 19.3.0.0
com.oracle.ojdbc ons 19.3.0.0
com.oracle.ojdbc oraclepki 19.3.0.0
com.oracle.ojdbc orai18n 19.3.0.0
com.oracle.ojdbc osdt_cert 19.3.0.0
com.oracle.ojdbc osdt_core 19.3.0.0
com.oracle.ojdbc simplefan 19.3.0.0
com.oracle.ojdbc ucp 19.3.0.0
com.oracle.ojdbc xdb 19.3.0.0
com.oracle.ojdbc xmlparserv2 19.3.0.0
com.querydsl querydsl-apt 4.2.2
481
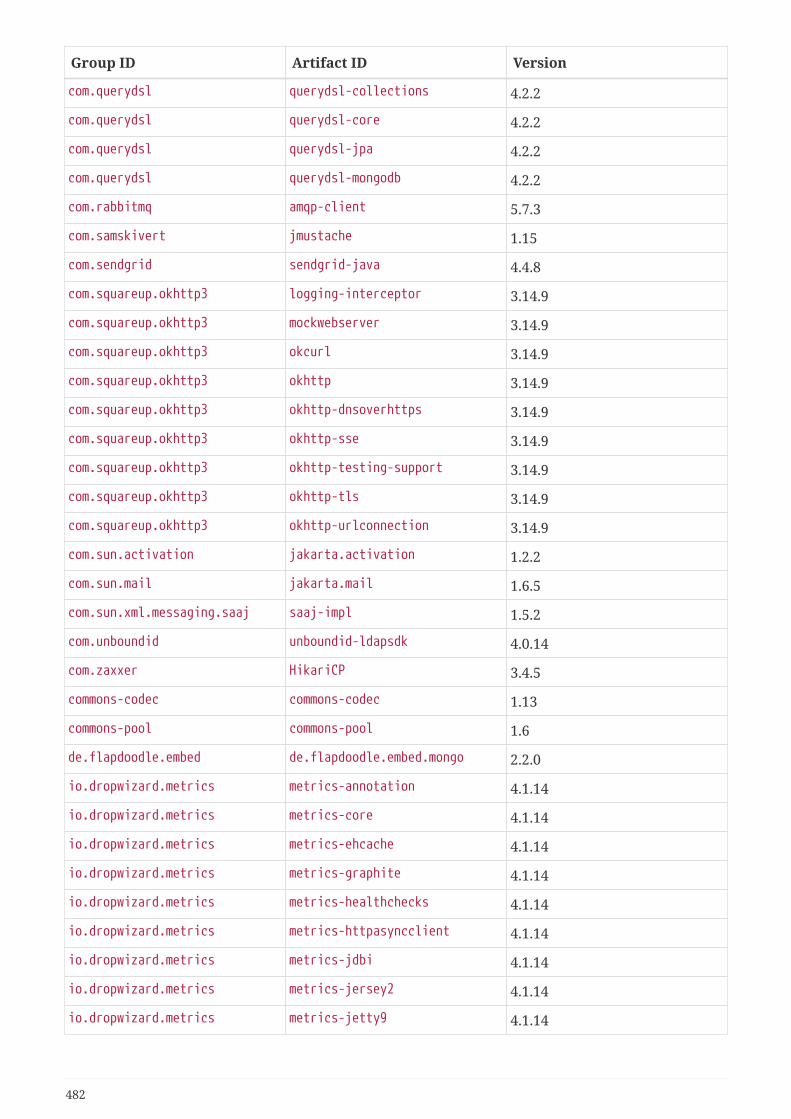
Group ID Artifact ID Version
com.querydsl querydsl-collections 4.2.2
com.querydsl querydsl-core 4.2.2
com.querydsl querydsl-jpa 4.2.2
com.querydsl querydsl-mongodb 4.2.2
com.rabbitmq amqp-client 5.7.3
com.samskivert jmustache 1.15
com.sendgrid sendgrid-java 4.4.8
com.squareup.okhttp3 logging-interceptor 3.14.9
com.squareup.okhttp3 mockwebserver 3.14.9
com.squareup.okhttp3 okcurl 3.14.9
com.squareup.okhttp3 okhttp 3.14.9
com.squareup.okhttp3 okhttp-dnsoverhttps 3.14.9
com.squareup.okhttp3 okhttp-sse 3.14.9
com.squareup.okhttp3 okhttp-testing-support 3.14.9
com.squareup.okhttp3 okhttp-tls 3.14.9
com.squareup.okhttp3 okhttp-urlconnection 3.14.9
com.sun.activation jakarta.activation 1.2.2
com.sun.mail jakarta.mail 1.6.5
com.sun.xml.messaging.saaj saaj-impl 1.5.2
com.unboundid unboundid-ldapsdk 4.0.14
com.zaxxer HikariCP 3.4.5
commons-codec commons-codec 1.13
commons-pool commons-pool 1.6
de.flapdoodle.embed de.flapdoodle.embed.mongo 2.2.0
io.dropwizard.metrics metrics-annotation 4.1.14
io.dropwizard.metrics metrics-core 4.1.14
io.dropwizard.metrics metrics-ehcache 4.1.14
io.dropwizard.metrics metrics-graphite 4.1.14
io.dropwizard.metrics metrics-healthchecks 4.1.14
io.dropwizard.metrics metrics-httpasyncclient 4.1.14
io.dropwizard.metrics metrics-jdbi 4.1.14
io.dropwizard.metrics metrics-jersey2 4.1.14
io.dropwizard.metrics metrics-jetty9 4.1.14
482
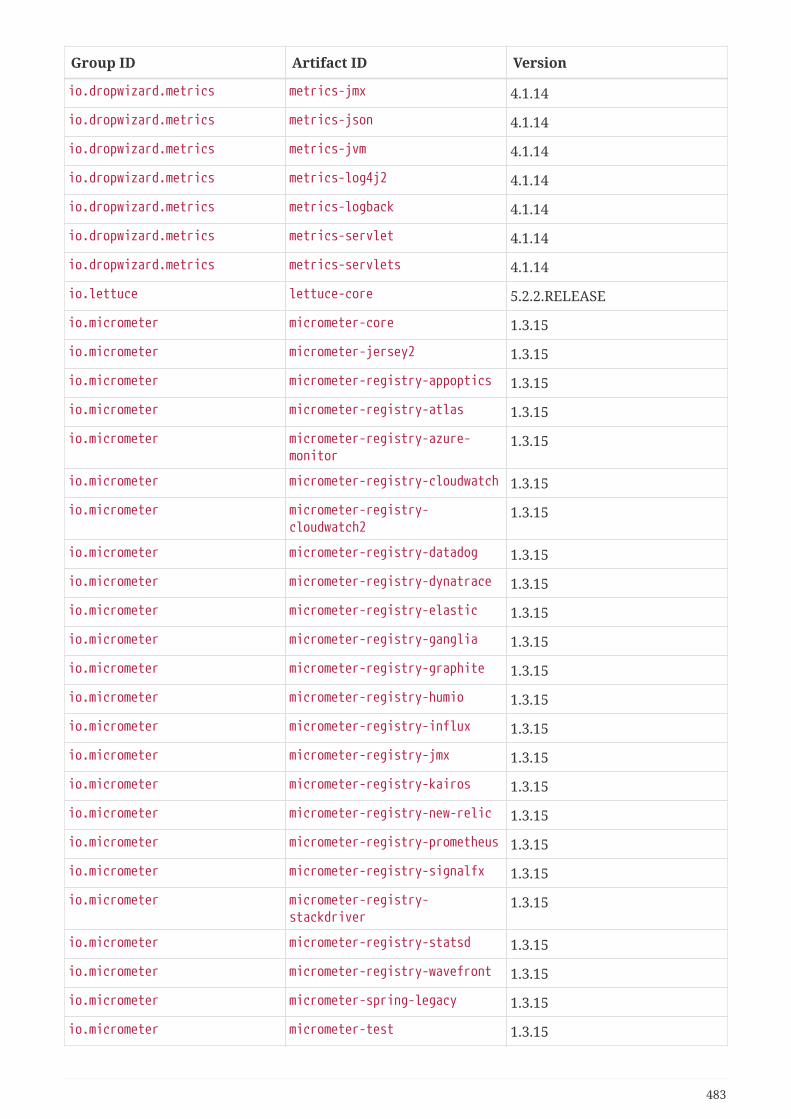
Group ID Artifact ID Version
io.dropwizard.metrics metrics-jmx 4.1.14
io.dropwizard.metrics metrics-json 4.1.14
io.dropwizard.metrics metrics-jvm 4.1.14
io.dropwizard.metrics metrics-log4j2 4.1.14
io.dropwizard.metrics metrics-logback 4.1.14
io.dropwizard.metrics metrics-servlet 4.1.14
io.dropwizard.metrics metrics-servlets 4.1.14
io.lettuce lettuce-core 5.2.2.RELEASE
io.micrometer micrometer-core 1.3.15
io.micrometer micrometer-jersey2 1.3.15
io.micrometer micrometer-registry-appoptics 1.3.15
io.micrometer micrometer-registry-atlas 1.3.15
io.micrometer micrometer-registry-azure-monitor
1.3.15
io.micrometer micrometer-registry-cloudwatch 1.3.15
io.micrometer micrometer-registry-cloudwatch2
1.3.15
io.micrometer micrometer-registry-datadog 1.3.15
io.micrometer micrometer-registry-dynatrace 1.3.15
io.micrometer micrometer-registry-elastic 1.3.15
io.micrometer micrometer-registry-ganglia 1.3.15
io.micrometer micrometer-registry-graphite 1.3.15
io.micrometer micrometer-registry-humio 1.3.15
io.micrometer micrometer-registry-influx 1.3.15
io.micrometer micrometer-registry-jmx 1.3.15
io.micrometer micrometer-registry-kairos 1.3.15
io.micrometer micrometer-registry-new-relic 1.3.15
io.micrometer micrometer-registry-prometheus 1.3.15
io.micrometer micrometer-registry-signalfx 1.3.15
io.micrometer micrometer-registry-stackdriver
1.3.15
io.micrometer micrometer-registry-statsd 1.3.15
io.micrometer micrometer-registry-wavefront 1.3.15
io.micrometer micrometer-spring-legacy 1.3.15
io.micrometer micrometer-test 1.3.15
483
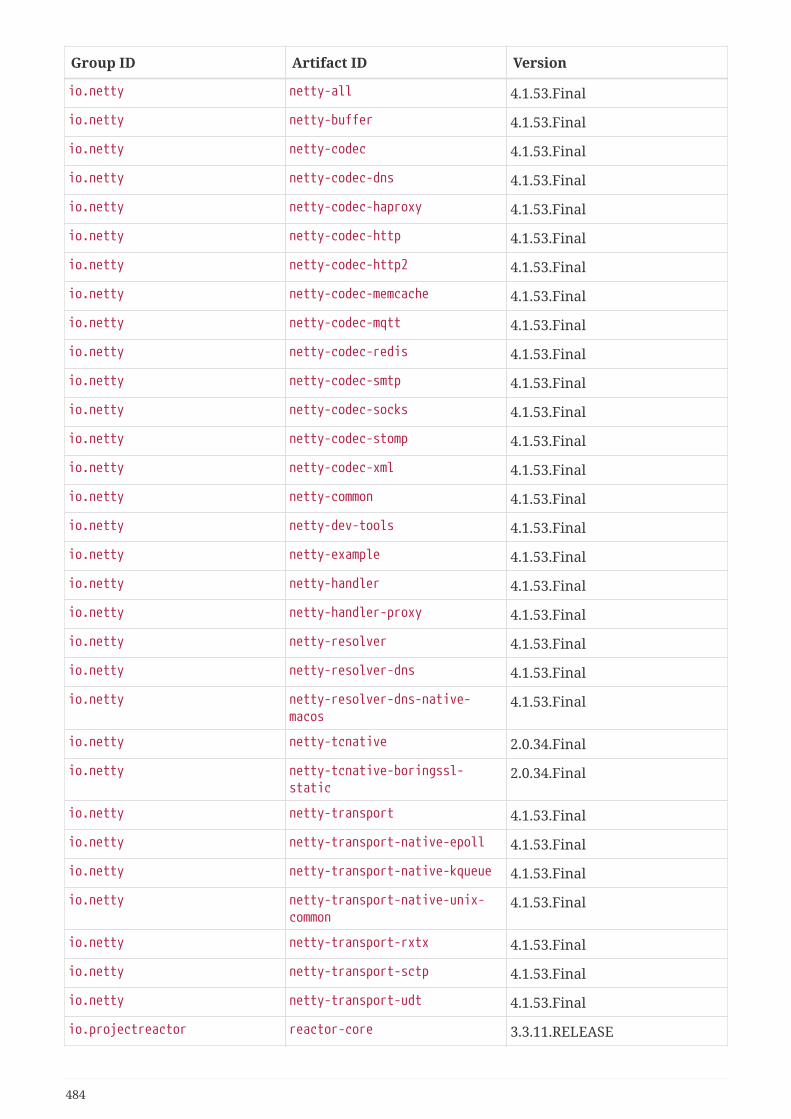
Group ID Artifact ID Version
io.netty netty-all 4.1.53.Final
io.netty netty-buffer 4.1.53.Final
io.netty netty-codec 4.1.53.Final
io.netty netty-codec-dns 4.1.53.Final
io.netty netty-codec-haproxy 4.1.53.Final
io.netty netty-codec-http 4.1.53.Final
io.netty netty-codec-http2 4.1.53.Final
io.netty netty-codec-memcache 4.1.53.Final
io.netty netty-codec-mqtt 4.1.53.Final
io.netty netty-codec-redis 4.1.53.Final
io.netty netty-codec-smtp 4.1.53.Final
io.netty netty-codec-socks 4.1.53.Final
io.netty netty-codec-stomp 4.1.53.Final
io.netty netty-codec-xml 4.1.53.Final
io.netty netty-common 4.1.53.Final
io.netty netty-dev-tools 4.1.53.Final
io.netty netty-example 4.1.53.Final
io.netty netty-handler 4.1.53.Final
io.netty netty-handler-proxy 4.1.53.Final
io.netty netty-resolver 4.1.53.Final
io.netty netty-resolver-dns 4.1.53.Final
io.netty netty-resolver-dns-native-macos
4.1.53.Final
io.netty netty-tcnative 2.0.34.Final
io.netty netty-tcnative-boringssl-static
2.0.34.Final
io.netty netty-transport 4.1.53.Final
io.netty netty-transport-native-epoll 4.1.53.Final
io.netty netty-transport-native-kqueue 4.1.53.Final
io.netty netty-transport-native-unix-common
4.1.53.Final
io.netty netty-transport-rxtx 4.1.53.Final
io.netty netty-transport-sctp 4.1.53.Final
io.netty netty-transport-udt 4.1.53.Final
io.projectreactor reactor-core 3.3.11.RELEASE
484
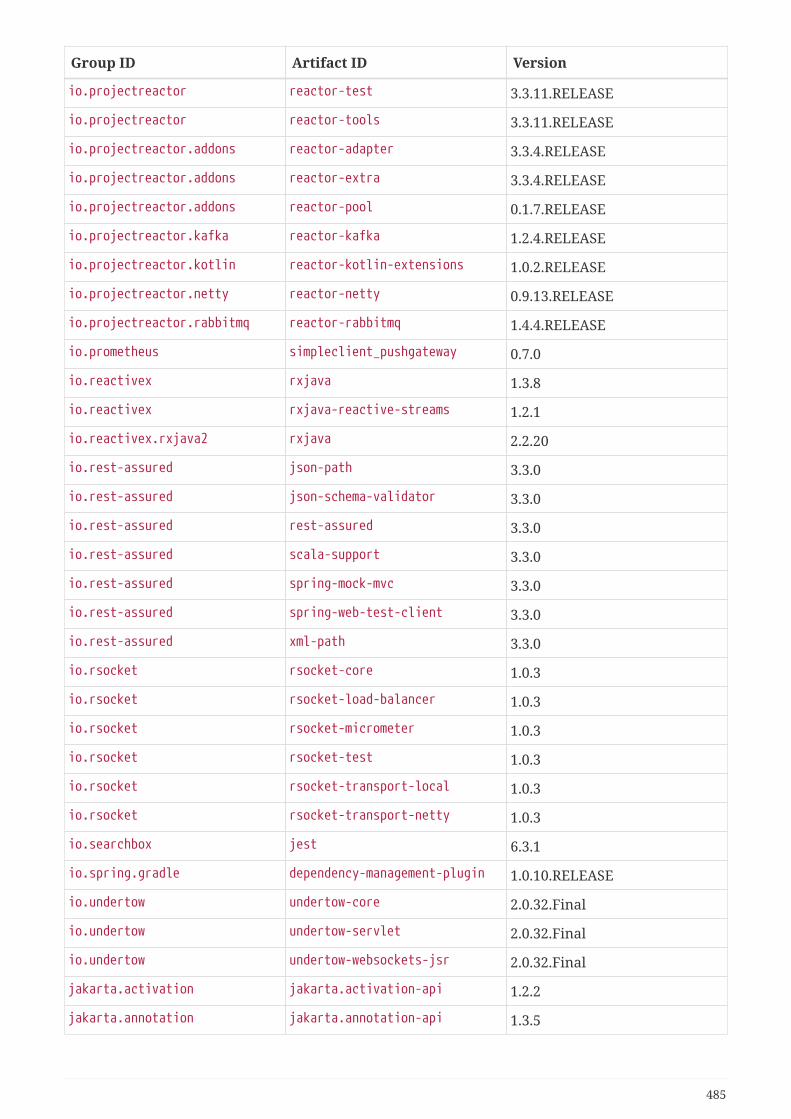
Group ID Artifact ID Version
io.projectreactor reactor-test 3.3.11.RELEASE
io.projectreactor reactor-tools 3.3.11.RELEASE
io.projectreactor.addons reactor-adapter 3.3.4.RELEASE
io.projectreactor.addons reactor-extra 3.3.4.RELEASE
io.projectreactor.addons reactor-pool 0.1.7.RELEASE
io.projectreactor.kafka reactor-kafka 1.2.4.RELEASE
io.projectreactor.kotlin reactor-kotlin-extensions 1.0.2.RELEASE
io.projectreactor.netty reactor-netty 0.9.13.RELEASE
io.projectreactor.rabbitmq reactor-rabbitmq 1.4.4.RELEASE
io.prometheus simpleclient_pushgateway 0.7.0
io.reactivex rxjava 1.3.8
io.reactivex rxjava-reactive-streams 1.2.1
io.reactivex.rxjava2 rxjava 2.2.20
io.rest-assured json-path 3.3.0
io.rest-assured json-schema-validator 3.3.0
io.rest-assured rest-assured 3.3.0
io.rest-assured scala-support 3.3.0
io.rest-assured spring-mock-mvc 3.3.0
io.rest-assured spring-web-test-client 3.3.0
io.rest-assured xml-path 3.3.0
io.rsocket rsocket-core 1.0.3
io.rsocket rsocket-load-balancer 1.0.3
io.rsocket rsocket-micrometer 1.0.3
io.rsocket rsocket-test 1.0.3
io.rsocket rsocket-transport-local 1.0.3
io.rsocket rsocket-transport-netty 1.0.3
io.searchbox jest 6.3.1
io.spring.gradle dependency-management-plugin 1.0.10.RELEASE
io.undertow undertow-core 2.0.32.Final
io.undertow undertow-servlet 2.0.32.Final
io.undertow undertow-websockets-jsr 2.0.32.Final
jakarta.activation jakarta.activation-api 1.2.2
jakarta.annotation jakarta.annotation-api 1.3.5
485
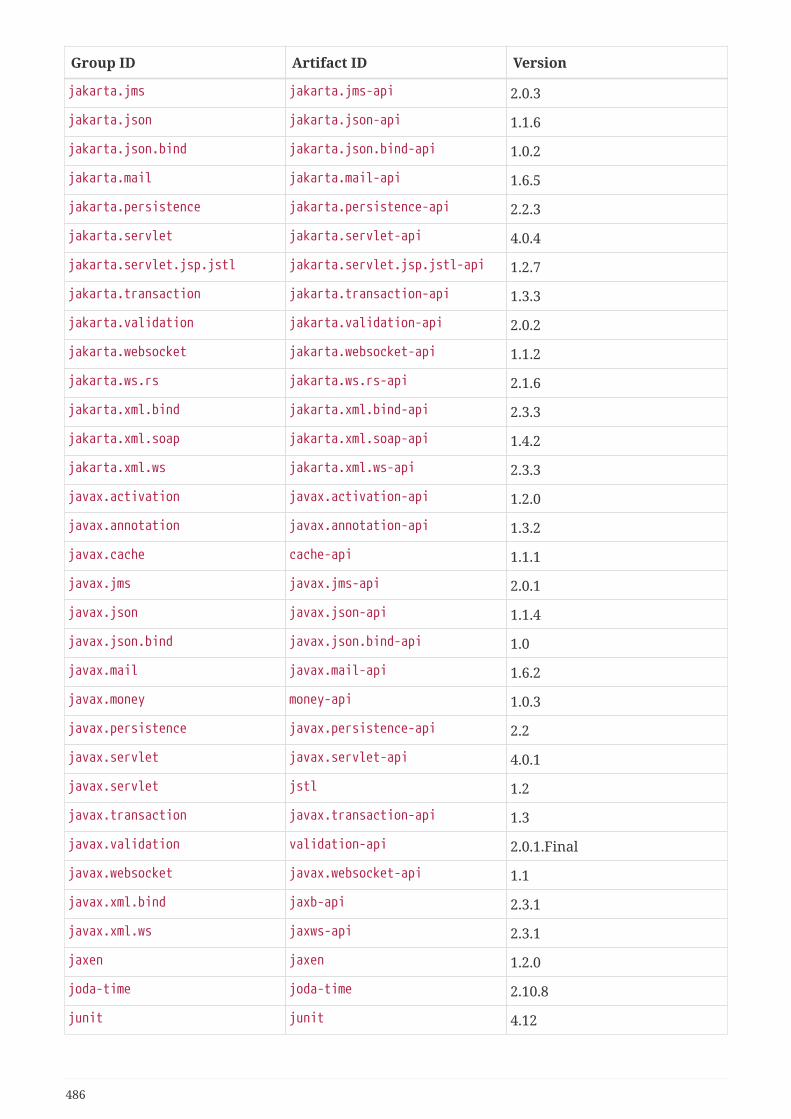
Group ID Artifact ID Version
jakarta.jms jakarta.jms-api 2.0.3
jakarta.json jakarta.json-api 1.1.6
jakarta.json.bind jakarta.json.bind-api 1.0.2
jakarta.mail jakarta.mail-api 1.6.5
jakarta.persistence jakarta.persistence-api 2.2.3
jakarta.servlet jakarta.servlet-api 4.0.4
jakarta.servlet.jsp.jstl jakarta.servlet.jsp.jstl-api 1.2.7
jakarta.transaction jakarta.transaction-api 1.3.3
jakarta.validation jakarta.validation-api 2.0.2
jakarta.websocket jakarta.websocket-api 1.1.2
jakarta.ws.rs jakarta.ws.rs-api 2.1.6
jakarta.xml.bind jakarta.xml.bind-api 2.3.3
jakarta.xml.soap jakarta.xml.soap-api 1.4.2
jakarta.xml.ws jakarta.xml.ws-api 2.3.3
javax.activation javax.activation-api 1.2.0
javax.annotation javax.annotation-api 1.3.2
javax.cache cache-api 1.1.1
javax.jms javax.jms-api 2.0.1
javax.json javax.json-api 1.1.4
javax.json.bind javax.json.bind-api 1.0
javax.mail javax.mail-api 1.6.2
javax.money money-api 1.0.3
javax.persistence javax.persistence-api 2.2
javax.servlet javax.servlet-api 4.0.1
javax.servlet jstl 1.2
javax.transaction javax.transaction-api 1.3
javax.validation validation-api 2.0.1.Final
javax.websocket javax.websocket-api 1.1
javax.xml.bind jaxb-api 2.3.1
javax.xml.ws jaxws-api 2.3.1
jaxen jaxen 1.2.0
joda-time joda-time 2.10.8
junit junit 4.12
486
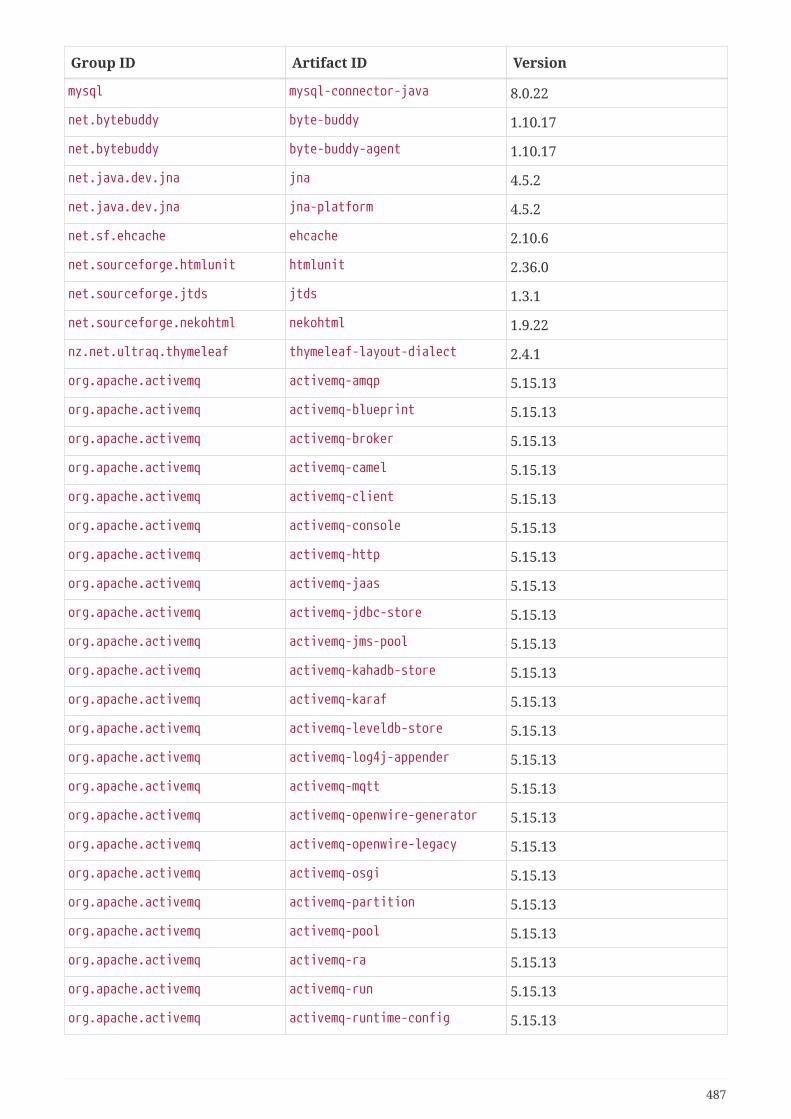
Group ID Artifact ID Version
mysql mysql-connector-java 8.0.22
net.bytebuddy byte-buddy 1.10.17
net.bytebuddy byte-buddy-agent 1.10.17
net.java.dev.jna jna 4.5.2
net.java.dev.jna jna-platform 4.5.2
net.sf.ehcache ehcache 2.10.6
net.sourceforge.htmlunit htmlunit 2.36.0
net.sourceforge.jtds jtds 1.3.1
net.sourceforge.nekohtml nekohtml 1.9.22
nz.net.ultraq.thymeleaf thymeleaf-layout-dialect 2.4.1
org.apache.activemq activemq-amqp 5.15.13
org.apache.activemq activemq-blueprint 5.15.13
org.apache.activemq activemq-broker 5.15.13
org.apache.activemq activemq-camel 5.15.13
org.apache.activemq activemq-client 5.15.13
org.apache.activemq activemq-console 5.15.13
org.apache.activemq activemq-http 5.15.13
org.apache.activemq activemq-jaas 5.15.13
org.apache.activemq activemq-jdbc-store 5.15.13
org.apache.activemq activemq-jms-pool 5.15.13
org.apache.activemq activemq-kahadb-store 5.15.13
org.apache.activemq activemq-karaf 5.15.13
org.apache.activemq activemq-leveldb-store 5.15.13
org.apache.activemq activemq-log4j-appender 5.15.13
org.apache.activemq activemq-mqtt 5.15.13
org.apache.activemq activemq-openwire-generator 5.15.13
org.apache.activemq activemq-openwire-legacy 5.15.13
org.apache.activemq activemq-osgi 5.15.13
org.apache.activemq activemq-partition 5.15.13
org.apache.activemq activemq-pool 5.15.13
org.apache.activemq activemq-ra 5.15.13
org.apache.activemq activemq-run 5.15.13
org.apache.activemq activemq-runtime-config 5.15.13
487
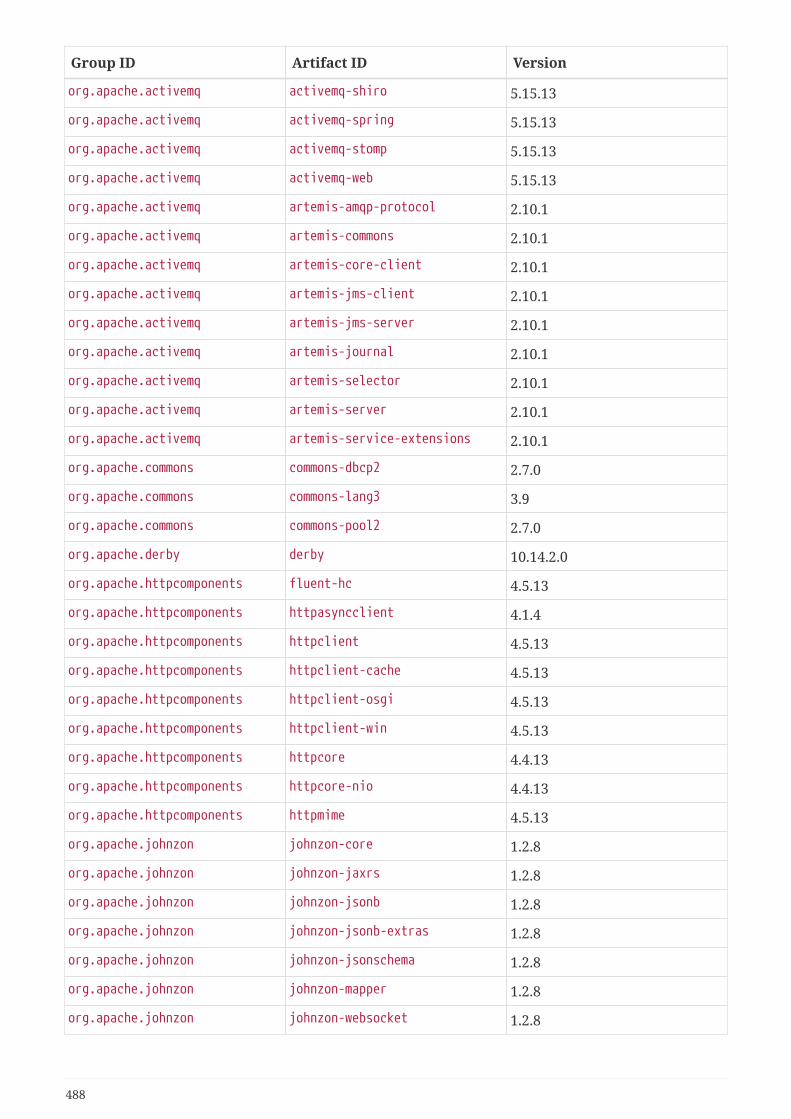
Group ID Artifact ID Version
org.apache.activemq activemq-shiro 5.15.13
org.apache.activemq activemq-spring 5.15.13
org.apache.activemq activemq-stomp 5.15.13
org.apache.activemq activemq-web 5.15.13
org.apache.activemq artemis-amqp-protocol 2.10.1
org.apache.activemq artemis-commons 2.10.1
org.apache.activemq artemis-core-client 2.10.1
org.apache.activemq artemis-jms-client 2.10.1
org.apache.activemq artemis-jms-server 2.10.1
org.apache.activemq artemis-journal 2.10.1
org.apache.activemq artemis-selector 2.10.1
org.apache.activemq artemis-server 2.10.1
org.apache.activemq artemis-service-extensions 2.10.1
org.apache.commons commons-dbcp2 2.7.0
org.apache.commons commons-lang3 3.9
org.apache.commons commons-pool2 2.7.0
org.apache.derby derby 10.14.2.0
org.apache.httpcomponents fluent-hc 4.5.13
org.apache.httpcomponents httpasyncclient 4.1.4
org.apache.httpcomponents httpclient 4.5.13
org.apache.httpcomponents httpclient-cache 4.5.13
org.apache.httpcomponents httpclient-osgi 4.5.13
org.apache.httpcomponents httpclient-win 4.5.13
org.apache.httpcomponents httpcore 4.4.13
org.apache.httpcomponents httpcore-nio 4.4.13
org.apache.httpcomponents httpmime 4.5.13
org.apache.johnzon johnzon-core 1.2.8
org.apache.johnzon johnzon-jaxrs 1.2.8
org.apache.johnzon johnzon-jsonb 1.2.8
org.apache.johnzon johnzon-jsonb-extras 1.2.8
org.apache.johnzon johnzon-jsonschema 1.2.8
org.apache.johnzon johnzon-mapper 1.2.8
org.apache.johnzon johnzon-websocket 1.2.8
488
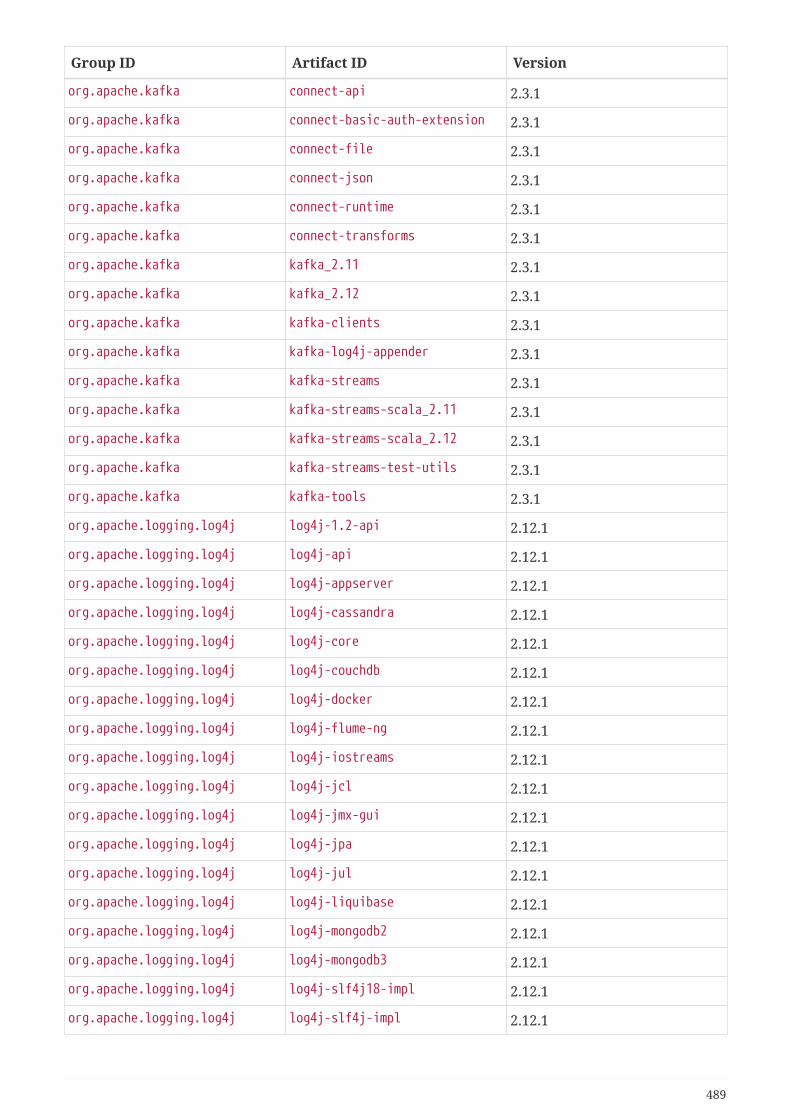
Group ID Artifact ID Version
org.apache.kafka connect-api 2.3.1
org.apache.kafka connect-basic-auth-extension 2.3.1
org.apache.kafka connect-file 2.3.1
org.apache.kafka connect-json 2.3.1
org.apache.kafka connect-runtime 2.3.1
org.apache.kafka connect-transforms 2.3.1
org.apache.kafka kafka_2.11 2.3.1
org.apache.kafka kafka_2.12 2.3.1
org.apache.kafka kafka-clients 2.3.1
org.apache.kafka kafka-log4j-appender 2.3.1
org.apache.kafka kafka-streams 2.3.1
org.apache.kafka kafka-streams-scala_2.11 2.3.1
org.apache.kafka kafka-streams-scala_2.12 2.3.1
org.apache.kafka kafka-streams-test-utils 2.3.1
org.apache.kafka kafka-tools 2.3.1
org.apache.logging.log4j log4j-1.2-api 2.12.1
org.apache.logging.log4j log4j-api 2.12.1
org.apache.logging.log4j log4j-appserver 2.12.1
org.apache.logging.log4j log4j-cassandra 2.12.1
org.apache.logging.log4j log4j-core 2.12.1
org.apache.logging.log4j log4j-couchdb 2.12.1
org.apache.logging.log4j log4j-docker 2.12.1
org.apache.logging.log4j log4j-flume-ng 2.12.1
org.apache.logging.log4j log4j-iostreams 2.12.1
org.apache.logging.log4j log4j-jcl 2.12.1
org.apache.logging.log4j log4j-jmx-gui 2.12.1
org.apache.logging.log4j log4j-jpa 2.12.1
org.apache.logging.log4j log4j-jul 2.12.1
org.apache.logging.log4j log4j-liquibase 2.12.1
org.apache.logging.log4j log4j-mongodb2 2.12.1
org.apache.logging.log4j log4j-mongodb3 2.12.1
org.apache.logging.log4j log4j-slf4j18-impl 2.12.1
org.apache.logging.log4j log4j-slf4j-impl 2.12.1
489
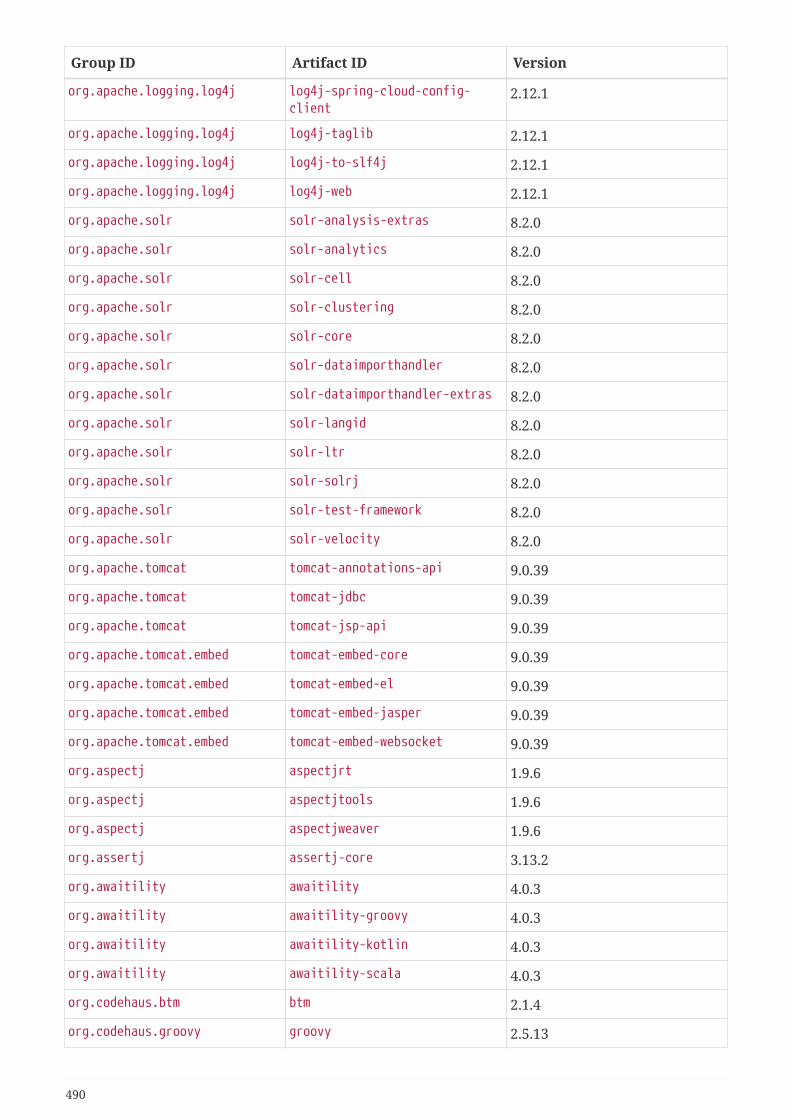
Group ID Artifact ID Version
org.apache.logging.log4j log4j-spring-cloud-config-client
2.12.1
org.apache.logging.log4j log4j-taglib 2.12.1
org.apache.logging.log4j log4j-to-slf4j 2.12.1
org.apache.logging.log4j log4j-web 2.12.1
org.apache.solr solr-analysis-extras 8.2.0
org.apache.solr solr-analytics 8.2.0
org.apache.solr solr-cell 8.2.0
org.apache.solr solr-clustering 8.2.0
org.apache.solr solr-core 8.2.0
org.apache.solr solr-dataimporthandler 8.2.0
org.apache.solr solr-dataimporthandler-extras 8.2.0
org.apache.solr solr-langid 8.2.0
org.apache.solr solr-ltr 8.2.0
org.apache.solr solr-solrj 8.2.0
org.apache.solr solr-test-framework 8.2.0
org.apache.solr solr-velocity 8.2.0
org.apache.tomcat tomcat-annotations-api 9.0.39
org.apache.tomcat tomcat-jdbc 9.0.39
org.apache.tomcat tomcat-jsp-api 9.0.39
org.apache.tomcat.embed tomcat-embed-core 9.0.39
org.apache.tomcat.embed tomcat-embed-el 9.0.39
org.apache.tomcat.embed tomcat-embed-jasper 9.0.39
org.apache.tomcat.embed tomcat-embed-websocket 9.0.39
org.aspectj aspectjrt 1.9.6
org.aspectj aspectjtools 1.9.6
org.aspectj aspectjweaver 1.9.6
org.assertj assertj-core 3.13.2
org.awaitility awaitility 4.0.3
org.awaitility awaitility-groovy 4.0.3
org.awaitility awaitility-kotlin 4.0.3
org.awaitility awaitility-scala 4.0.3
org.codehaus.btm btm 2.1.4
org.codehaus.groovy groovy 2.5.13
490

Group ID Artifact ID Version
org.codehaus.groovy groovy-ant 2.5.13
org.codehaus.groovy groovy-bsf 2.5.13
org.codehaus.groovy groovy-cli-commons 2.5.13
org.codehaus.groovy groovy-cli-picocli 2.5.13
org.codehaus.groovy groovy-console 2.5.13
org.codehaus.groovy groovy-datetime 2.5.13
org.codehaus.groovy groovy-dateutil 2.5.13
org.codehaus.groovy groovy-docgenerator 2.5.13
org.codehaus.groovy groovy-groovydoc 2.5.13
org.codehaus.groovy groovy-groovysh 2.5.13
org.codehaus.groovy groovy-jaxb 2.5.13
org.codehaus.groovy groovy-jmx 2.5.13
org.codehaus.groovy groovy-json 2.5.13
org.codehaus.groovy groovy-json-direct 2.5.13
org.codehaus.groovy groovy-jsr223 2.5.13
org.codehaus.groovy groovy-macro 2.5.13
org.codehaus.groovy groovy-nio 2.5.13
org.codehaus.groovy groovy-servlet 2.5.13
org.codehaus.groovy groovy-sql 2.5.13
org.codehaus.groovy groovy-swing 2.5.13
org.codehaus.groovy groovy-templates 2.5.13
org.codehaus.groovy groovy-test 2.5.13
org.codehaus.groovy groovy-test-junit5 2.5.13
org.codehaus.groovy groovy-testng 2.5.13
org.codehaus.groovy groovy-xml 2.5.13
org.codehaus.janino commons-compiler 3.1.2
org.codehaus.janino commons-compiler-jdk 3.1.2
org.codehaus.janino janino 3.1.2
org.eclipse.jetty apache-jsp 9.4.33.v20201020
org.eclipse.jetty apache-jstl 9.4.33.v20201020
org.eclipse.jetty infinispan-common 9.4.33.v20201020
org.eclipse.jetty infinispan-embedded-query 9.4.33.v20201020
org.eclipse.jetty infinispan-remote-query 9.4.33.v20201020
491
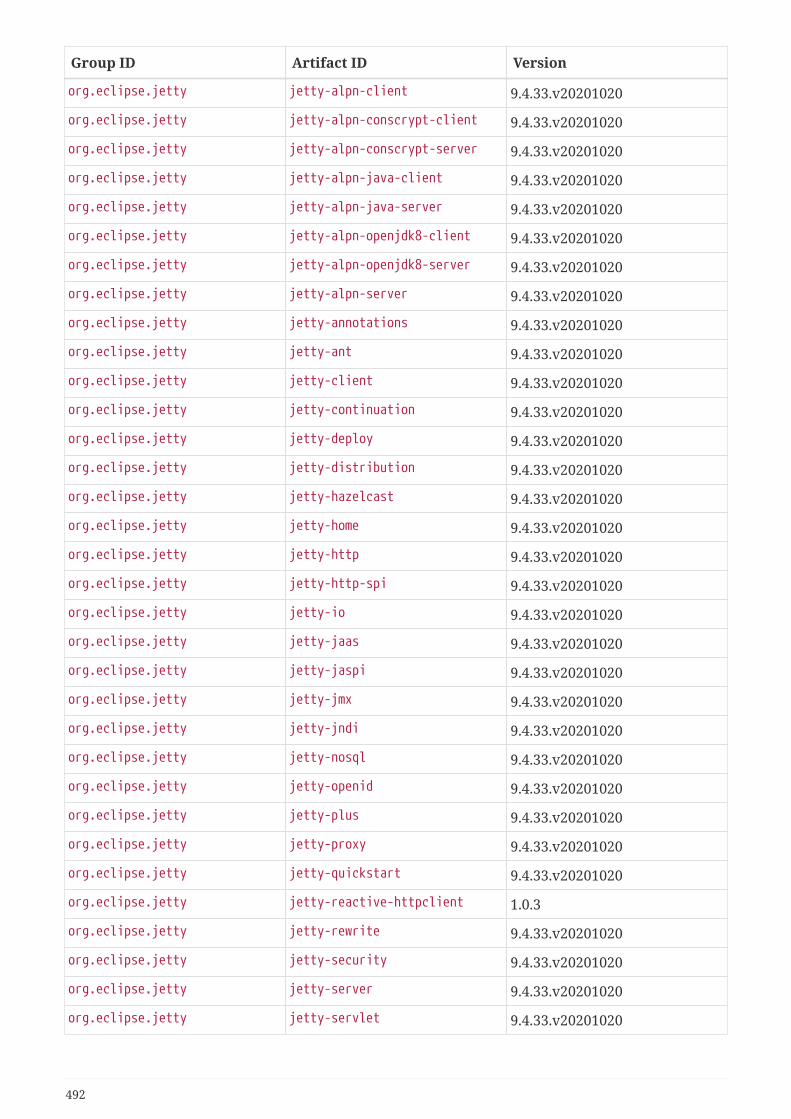
Group ID Artifact ID Version
org.eclipse.jetty jetty-alpn-client 9.4.33.v20201020
org.eclipse.jetty jetty-alpn-conscrypt-client 9.4.33.v20201020
org.eclipse.jetty jetty-alpn-conscrypt-server 9.4.33.v20201020
org.eclipse.jetty jetty-alpn-java-client 9.4.33.v20201020
org.eclipse.jetty jetty-alpn-java-server 9.4.33.v20201020
org.eclipse.jetty jetty-alpn-openjdk8-client 9.4.33.v20201020
org.eclipse.jetty jetty-alpn-openjdk8-server 9.4.33.v20201020
org.eclipse.jetty jetty-alpn-server 9.4.33.v20201020
org.eclipse.jetty jetty-annotations 9.4.33.v20201020
org.eclipse.jetty jetty-ant 9.4.33.v20201020
org.eclipse.jetty jetty-client 9.4.33.v20201020
org.eclipse.jetty jetty-continuation 9.4.33.v20201020
org.eclipse.jetty jetty-deploy 9.4.33.v20201020
org.eclipse.jetty jetty-distribution 9.4.33.v20201020
org.eclipse.jetty jetty-hazelcast 9.4.33.v20201020
org.eclipse.jetty jetty-home 9.4.33.v20201020
org.eclipse.jetty jetty-http 9.4.33.v20201020
org.eclipse.jetty jetty-http-spi 9.4.33.v20201020
org.eclipse.jetty jetty-io 9.4.33.v20201020
org.eclipse.jetty jetty-jaas 9.4.33.v20201020
org.eclipse.jetty jetty-jaspi 9.4.33.v20201020
org.eclipse.jetty jetty-jmx 9.4.33.v20201020
org.eclipse.jetty jetty-jndi 9.4.33.v20201020
org.eclipse.jetty jetty-nosql 9.4.33.v20201020
org.eclipse.jetty jetty-openid 9.4.33.v20201020
org.eclipse.jetty jetty-plus 9.4.33.v20201020
org.eclipse.jetty jetty-proxy 9.4.33.v20201020
org.eclipse.jetty jetty-quickstart 9.4.33.v20201020
org.eclipse.jetty jetty-reactive-httpclient 1.0.3
org.eclipse.jetty jetty-rewrite 9.4.33.v20201020
org.eclipse.jetty jetty-security 9.4.33.v20201020
org.eclipse.jetty jetty-server 9.4.33.v20201020
org.eclipse.jetty jetty-servlet 9.4.33.v20201020
492
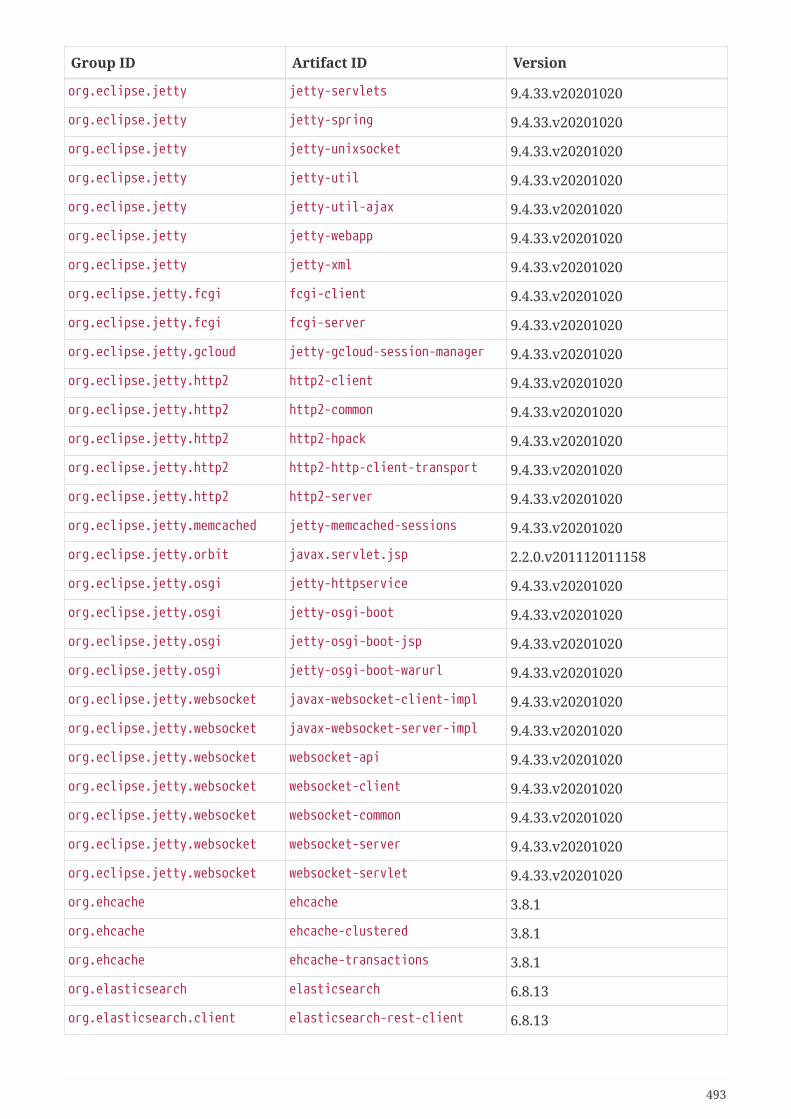
Group ID Artifact ID Version
org.eclipse.jetty jetty-servlets 9.4.33.v20201020
org.eclipse.jetty jetty-spring 9.4.33.v20201020
org.eclipse.jetty jetty-unixsocket 9.4.33.v20201020
org.eclipse.jetty jetty-util 9.4.33.v20201020
org.eclipse.jetty jetty-util-ajax 9.4.33.v20201020
org.eclipse.jetty jetty-webapp 9.4.33.v20201020
org.eclipse.jetty jetty-xml 9.4.33.v20201020
org.eclipse.jetty.fcgi fcgi-client 9.4.33.v20201020
org.eclipse.jetty.fcgi fcgi-server 9.4.33.v20201020
org.eclipse.jetty.gcloud jetty-gcloud-session-manager 9.4.33.v20201020
org.eclipse.jetty.http2 http2-client 9.4.33.v20201020
org.eclipse.jetty.http2 http2-common 9.4.33.v20201020
org.eclipse.jetty.http2 http2-hpack 9.4.33.v20201020
org.eclipse.jetty.http2 http2-http-client-transport 9.4.33.v20201020
org.eclipse.jetty.http2 http2-server 9.4.33.v20201020
org.eclipse.jetty.memcached jetty-memcached-sessions 9.4.33.v20201020
org.eclipse.jetty.orbit javax.servlet.jsp 2.2.0.v201112011158
org.eclipse.jetty.osgi jetty-httpservice 9.4.33.v20201020
org.eclipse.jetty.osgi jetty-osgi-boot 9.4.33.v20201020
org.eclipse.jetty.osgi jetty-osgi-boot-jsp 9.4.33.v20201020
org.eclipse.jetty.osgi jetty-osgi-boot-warurl 9.4.33.v20201020
org.eclipse.jetty.websocket javax-websocket-client-impl 9.4.33.v20201020
org.eclipse.jetty.websocket javax-websocket-server-impl 9.4.33.v20201020
org.eclipse.jetty.websocket websocket-api 9.4.33.v20201020
org.eclipse.jetty.websocket websocket-client 9.4.33.v20201020
org.eclipse.jetty.websocket websocket-common 9.4.33.v20201020
org.eclipse.jetty.websocket websocket-server 9.4.33.v20201020
org.eclipse.jetty.websocket websocket-servlet 9.4.33.v20201020
org.ehcache ehcache 3.8.1
org.ehcache ehcache-clustered 3.8.1
org.ehcache ehcache-transactions 3.8.1
org.elasticsearch elasticsearch 6.8.13
org.elasticsearch.client elasticsearch-rest-client 6.8.13
493

Group ID Artifact ID Version
org.elasticsearch.client elasticsearch-rest-high-level-client
6.8.13
org.elasticsearch.client transport 6.8.13
org.elasticsearch.distribution.integ-test-zip
elasticsearch 6.8.13
org.elasticsearch.plugin transport-netty4-client 6.8.13
org.firebirdsql.jdbc jaybird-jdk17 3.0.9
org.firebirdsql.jdbc jaybird-jdk18 3.0.9
org.flywaydb flyway-core 6.0.8
org.freemarker freemarker 2.3.30
org.glassfish jakarta.el 3.0.3
org.glassfish.jaxb codemodel 2.3.3
org.glassfish.jaxb codemodel-annotation-compiler 2.3.3
org.glassfish.jaxb jaxb-jxc 2.3.3
org.glassfish.jaxb jaxb-runtime 2.3.3
org.glassfish.jaxb jaxb-xjc 2.3.3
org.glassfish.jaxb txw2 2.3.3
org.glassfish.jaxb txwc2 2.3.3
org.glassfish.jaxb xsom 2.3.3
org.glassfish.jersey.bundles jaxrs-ri 2.29.1
org.glassfish.jersey.connectors
jersey-apache-connector 2.29.1
org.glassfish.jersey.connectors
jersey-grizzly-connector 2.29.1
org.glassfish.jersey.connectors
jersey-jdk-connector 2.29.1
org.glassfish.jersey.connectors
jersey-jetty-connector 2.29.1
org.glassfish.jersey.connectors
jersey-netty-connector 2.29.1
org.glassfish.jersey.containers
jersey-container-grizzly2-http 2.29.1
org.glassfish.jersey.containers
jersey-container-grizzly2-servlet
2.29.1
org.glassfish.jersey.containers
jersey-container-jdk-http 2.29.1
org.glassfish.jersey.containers
jersey-container-jetty-http 2.29.1
org.glassfish.jersey.containers
jersey-container-jetty-servlet 2.29.1
494

Group ID Artifact ID Version
org.glassfish.jersey.containers
jersey-container-netty-http 2.29.1
org.glassfish.jersey.containers
jersey-container-servlet 2.29.1
org.glassfish.jersey.containers
jersey-container-servlet-core 2.29.1
org.glassfish.jersey.containers
jersey-container-simple-http 2.29.1
org.glassfish.jersey.containers.glassfish
jersey-gf-ejb 2.29.1
org.glassfish.jersey.core jersey-client 2.29.1
org.glassfish.jersey.core jersey-common 2.29.1
org.glassfish.jersey.core jersey-server 2.29.1
org.glassfish.jersey.ext jersey-bean-validation 2.29.1
org.glassfish.jersey.ext jersey-declarative-linking 2.29.1
org.glassfish.jersey.ext jersey-entity-filtering 2.29.1
org.glassfish.jersey.ext jersey-metainf-services 2.29.1
org.glassfish.jersey.ext jersey-mvc 2.29.1
org.glassfish.jersey.ext jersey-mvc-bean-validation 2.29.1
org.glassfish.jersey.ext jersey-mvc-freemarker 2.29.1
org.glassfish.jersey.ext jersey-mvc-jsp 2.29.1
org.glassfish.jersey.ext jersey-mvc-mustache 2.29.1
org.glassfish.jersey.ext jersey-proxy-client 2.29.1
org.glassfish.jersey.ext jersey-servlet-portability 2.29.1
org.glassfish.jersey.ext jersey-spring4 2.29.1
org.glassfish.jersey.ext jersey-spring5 2.29.1
org.glassfish.jersey.ext jersey-wadl-doclet 2.29.1
org.glassfish.jersey.ext.cdi jersey-cdi1x 2.29.1
org.glassfish.jersey.ext.cdi jersey-cdi1x-ban-custom-hk2-binding
2.29.1
org.glassfish.jersey.ext.cdi jersey-cdi1x-servlet 2.29.1
org.glassfish.jersey.ext.cdi jersey-cdi1x-transaction 2.29.1
org.glassfish.jersey.ext.cdi jersey-cdi1x-validation 2.29.1
org.glassfish.jersey.ext.cdi jersey-weld2-se 2.29.1
org.glassfish.jersey.ext.microprofile
jersey-mp-config 2.29.1
495

Group ID Artifact ID Version
org.glassfish.jersey.ext.microprofile
jersey-mp-rest-client 2.29.1
org.glassfish.jersey.ext.rx jersey-rx-client-guava 2.29.1
org.glassfish.jersey.ext.rx jersey-rx-client-rxjava 2.29.1
org.glassfish.jersey.ext.rx jersey-rx-client-rxjava2 2.29.1
org.glassfish.jersey.inject jersey-cdi2-se 2.29.1
org.glassfish.jersey.inject jersey-hk2 2.29.1
org.glassfish.jersey.media jersey-media-jaxb 2.29.1
org.glassfish.jersey.media jersey-media-json-binding 2.29.1
org.glassfish.jersey.media jersey-media-json-jackson 2.29.1
org.glassfish.jersey.media jersey-media-json-jackson1 2.29.1
org.glassfish.jersey.media jersey-media-json-jettison 2.29.1
org.glassfish.jersey.media jersey-media-json-processing 2.29.1
org.glassfish.jersey.media jersey-media-kryo 2.29.1
org.glassfish.jersey.media jersey-media-moxy 2.29.1
org.glassfish.jersey.media jersey-media-multipart 2.29.1
org.glassfish.jersey.media jersey-media-sse 2.29.1
org.glassfish.jersey.security oauth1-client 2.29.1
org.glassfish.jersey.security oauth1-server 2.29.1
org.glassfish.jersey.security oauth1-signature 2.29.1
org.glassfish.jersey.security oauth2-client 2.29.1
org.glassfish.jersey.test-framework
jersey-test-framework-core 2.29.1
org.glassfish.jersey.test-framework
jersey-test-framework-util 2.29.1
org.glassfish.jersey.test-framework.providers
jersey-test-framework-provider-bundle
2.29.1
org.glassfish.jersey.test-framework.providers
jersey-test-framework-provider-external
2.29.1
org.glassfish.jersey.test-framework.providers
jersey-test-framework-provider-grizzly2
2.29.1
org.glassfish.jersey.test-framework.providers
jersey-test-framework-provider-inmemory
2.29.1
org.glassfish.jersey.test-framework.providers
jersey-test-framework-provider-jdk-http
2.29.1
org.glassfish.jersey.test-framework.providers
jersey-test-framework-provider-jetty
2.29.1
org.glassfish.jersey.test-framework.providers
jersey-test-framework-provider-simple
2.29.1
496
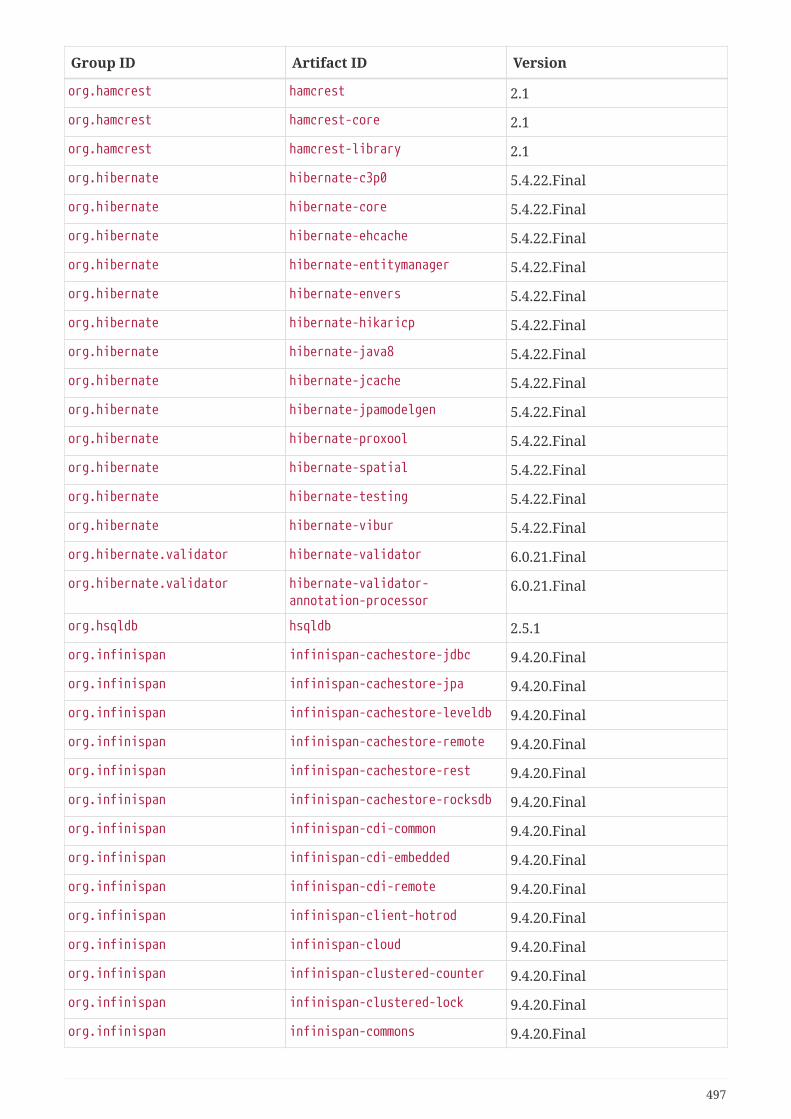
Group ID Artifact ID Version
org.hamcrest hamcrest 2.1
org.hamcrest hamcrest-core 2.1
org.hamcrest hamcrest-library 2.1
org.hibernate hibernate-c3p0 5.4.22.Final
org.hibernate hibernate-core 5.4.22.Final
org.hibernate hibernate-ehcache 5.4.22.Final
org.hibernate hibernate-entitymanager 5.4.22.Final
org.hibernate hibernate-envers 5.4.22.Final
org.hibernate hibernate-hikaricp 5.4.22.Final
org.hibernate hibernate-java8 5.4.22.Final
org.hibernate hibernate-jcache 5.4.22.Final
org.hibernate hibernate-jpamodelgen 5.4.22.Final
org.hibernate hibernate-proxool 5.4.22.Final
org.hibernate hibernate-spatial 5.4.22.Final
org.hibernate hibernate-testing 5.4.22.Final
org.hibernate hibernate-vibur 5.4.22.Final
org.hibernate.validator hibernate-validator 6.0.21.Final
org.hibernate.validator hibernate-validator-annotation-processor
6.0.21.Final
org.hsqldb hsqldb 2.5.1
org.infinispan infinispan-cachestore-jdbc 9.4.20.Final
org.infinispan infinispan-cachestore-jpa 9.4.20.Final
org.infinispan infinispan-cachestore-leveldb 9.4.20.Final
org.infinispan infinispan-cachestore-remote 9.4.20.Final
org.infinispan infinispan-cachestore-rest 9.4.20.Final
org.infinispan infinispan-cachestore-rocksdb 9.4.20.Final
org.infinispan infinispan-cdi-common 9.4.20.Final
org.infinispan infinispan-cdi-embedded 9.4.20.Final
org.infinispan infinispan-cdi-remote 9.4.20.Final
org.infinispan infinispan-client-hotrod 9.4.20.Final
org.infinispan infinispan-cloud 9.4.20.Final
org.infinispan infinispan-clustered-counter 9.4.20.Final
org.infinispan infinispan-clustered-lock 9.4.20.Final
org.infinispan infinispan-commons 9.4.20.Final
497

Group ID Artifact ID Version
org.infinispan infinispan-core 9.4.20.Final
org.infinispan infinispan-directory-provider 9.4.20.Final
org.infinispan infinispan-hibernate-cache-v53 9.4.20.Final
org.infinispan infinispan-jcache 9.4.20.Final
org.infinispan infinispan-jcache-commons 9.4.20.Final
org.infinispan infinispan-jcache-remote 9.4.20.Final
org.infinispan infinispan-lucene-directory 9.4.20.Final
org.infinispan infinispan-objectfilter 9.4.20.Final
org.infinispan infinispan-osgi 9.4.20.Final
org.infinispan infinispan-persistence-cli 9.4.20.Final
org.infinispan infinispan-persistence-soft-index
9.4.20.Final
org.infinispan infinispan-query 9.4.20.Final
org.infinispan infinispan-query-dsl 9.4.20.Final
org.infinispan infinispan-remote-query-client 9.4.20.Final
org.infinispan infinispan-remote-query-server 9.4.20.Final
org.infinispan infinispan-scripting 9.4.20.Final
org.infinispan infinispan-server-core 9.4.20.Final
org.infinispan infinispan-server-hotrod 9.4.20.Final
org.infinispan infinispan-server-memcached 9.4.20.Final
org.infinispan infinispan-server-router 9.4.20.Final
org.infinispan infinispan-spring4-common 9.4.20.Final
org.infinispan infinispan-spring4-embedded 9.4.20.Final
org.infinispan infinispan-spring4-remote 9.4.20.Final
org.infinispan infinispan-spring5-common 9.4.20.Final
org.infinispan infinispan-spring5-embedded 9.4.20.Final
org.infinispan infinispan-spring5-remote 9.4.20.Final
org.infinispan infinispan-tasks 9.4.20.Final
org.infinispan infinispan-tasks-api 9.4.20.Final
org.infinispan infinispan-tools 9.4.20.Final
org.infinispan infinispan-tree 9.4.20.Final
org.influxdb influxdb-java 2.15
org.jboss jboss-transaction-spi 7.6.0.Final
org.jboss.logging jboss-logging 3.4.1.Final
498

Group ID Artifact ID Version
org.jdom jdom2 2.0.6
org.jetbrains.kotlin kotlin-compiler 1.3.72
org.jetbrains.kotlin kotlin-compiler-embeddable 1.3.72
org.jetbrains.kotlin kotlin-daemon-client 1.3.72
org.jetbrains.kotlin kotlin-main-kts 1.3.72
org.jetbrains.kotlin kotlin-osgi-bundle 1.3.72
org.jetbrains.kotlin kotlin-reflect 1.3.72
org.jetbrains.kotlin kotlin-scripting-common 1.3.72
org.jetbrains.kotlin kotlin-scripting-jvm 1.3.72
org.jetbrains.kotlin kotlin-scripting-jvm-host 1.3.72
org.jetbrains.kotlin kotlin-script-runtime 1.3.72
org.jetbrains.kotlin kotlin-script-util 1.3.72
org.jetbrains.kotlin kotlin-stdlib 1.3.72
org.jetbrains.kotlin kotlin-stdlib-common 1.3.72
org.jetbrains.kotlin kotlin-stdlib-jdk7 1.3.72
org.jetbrains.kotlin kotlin-stdlib-jdk8 1.3.72
org.jetbrains.kotlin kotlin-stdlib-js 1.3.72
org.jetbrains.kotlin kotlin-test 1.3.72
org.jetbrains.kotlin kotlin-test-annotations-common 1.3.72
org.jetbrains.kotlin kotlin-test-common 1.3.72
org.jetbrains.kotlin kotlin-test-js 1.3.72
org.jetbrains.kotlin kotlin-test-junit 1.3.72
org.jetbrains.kotlin kotlin-test-junit5 1.3.72
org.jetbrains.kotlin kotlin-test-testng 1.3.72
org.jetbrains.kotlinx kotlinx-coroutines-android 1.3.8
org.jetbrains.kotlinx kotlinx-coroutines-core 1.3.8
org.jetbrains.kotlinx kotlinx-coroutines-core-common 1.3.8
org.jetbrains.kotlinx kotlinx-coroutines-core-js 1.3.8
org.jetbrains.kotlinx kotlinx-coroutines-core-native 1.3.8
org.jetbrains.kotlinx kotlinx-coroutines-debug 1.3.8
org.jetbrains.kotlinx kotlinx-coroutines-guava 1.3.8
org.jetbrains.kotlinx kotlinx-coroutines-javafx 1.3.8
org.jetbrains.kotlinx kotlinx-coroutines-jdk8 1.3.8
499
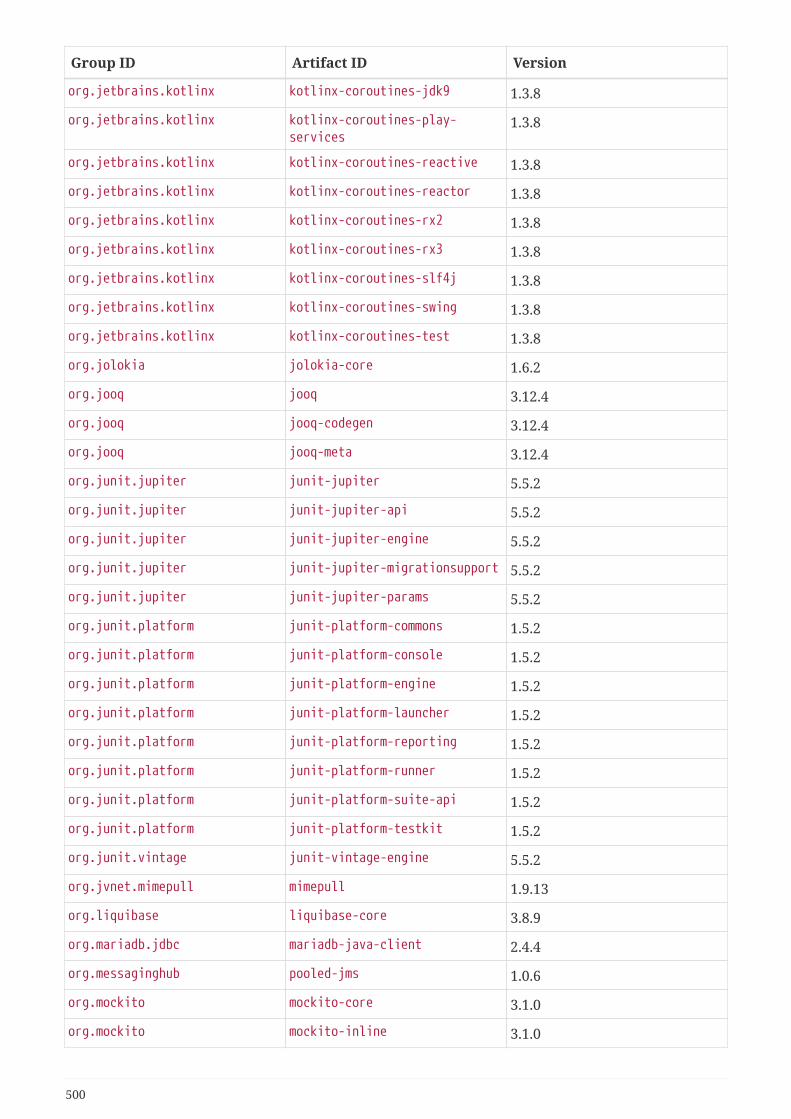
Group ID Artifact ID Version
org.jetbrains.kotlinx kotlinx-coroutines-jdk9 1.3.8
org.jetbrains.kotlinx kotlinx-coroutines-play-services
1.3.8
org.jetbrains.kotlinx kotlinx-coroutines-reactive 1.3.8
org.jetbrains.kotlinx kotlinx-coroutines-reactor 1.3.8
org.jetbrains.kotlinx kotlinx-coroutines-rx2 1.3.8
org.jetbrains.kotlinx kotlinx-coroutines-rx3 1.3.8
org.jetbrains.kotlinx kotlinx-coroutines-slf4j 1.3.8
org.jetbrains.kotlinx kotlinx-coroutines-swing 1.3.8
org.jetbrains.kotlinx kotlinx-coroutines-test 1.3.8
org.jolokia jolokia-core 1.6.2
org.jooq jooq 3.12.4
org.jooq jooq-codegen 3.12.4
org.jooq jooq-meta 3.12.4
org.junit.jupiter junit-jupiter 5.5.2
org.junit.jupiter junit-jupiter-api 5.5.2
org.junit.jupiter junit-jupiter-engine 5.5.2
org.junit.jupiter junit-jupiter-migrationsupport 5.5.2
org.junit.jupiter junit-jupiter-params 5.5.2
org.junit.platform junit-platform-commons 1.5.2
org.junit.platform junit-platform-console 1.5.2
org.junit.platform junit-platform-engine 1.5.2
org.junit.platform junit-platform-launcher 1.5.2
org.junit.platform junit-platform-reporting 1.5.2
org.junit.platform junit-platform-runner 1.5.2
org.junit.platform junit-platform-suite-api 1.5.2
org.junit.platform junit-platform-testkit 1.5.2
org.junit.vintage junit-vintage-engine 5.5.2
org.jvnet.mimepull mimepull 1.9.13
org.liquibase liquibase-core 3.8.9
org.mariadb.jdbc mariadb-java-client 2.4.4
org.messaginghub pooled-jms 1.0.6
org.mockito mockito-core 3.1.0
org.mockito mockito-inline 3.1.0
500
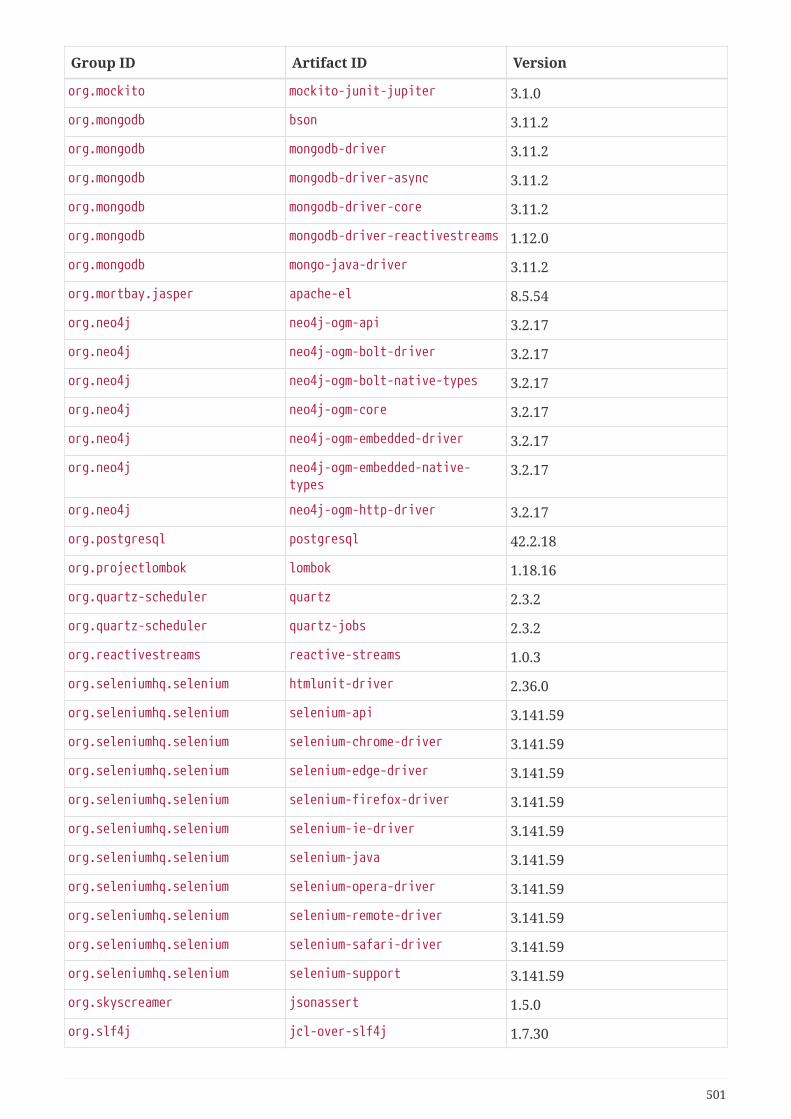
Group ID Artifact ID Version
org.mockito mockito-junit-jupiter 3.1.0
org.mongodb bson 3.11.2
org.mongodb mongodb-driver 3.11.2
org.mongodb mongodb-driver-async 3.11.2
org.mongodb mongodb-driver-core 3.11.2
org.mongodb mongodb-driver-reactivestreams 1.12.0
org.mongodb mongo-java-driver 3.11.2
org.mortbay.jasper apache-el 8.5.54
org.neo4j neo4j-ogm-api 3.2.17
org.neo4j neo4j-ogm-bolt-driver 3.2.17
org.neo4j neo4j-ogm-bolt-native-types 3.2.17
org.neo4j neo4j-ogm-core 3.2.17
org.neo4j neo4j-ogm-embedded-driver 3.2.17
org.neo4j neo4j-ogm-embedded-native-types
3.2.17
org.neo4j neo4j-ogm-http-driver 3.2.17
org.postgresql postgresql 42.2.18
org.projectlombok lombok 1.18.16
org.quartz-scheduler quartz 2.3.2
org.quartz-scheduler quartz-jobs 2.3.2
org.reactivestreams reactive-streams 1.0.3
org.seleniumhq.selenium htmlunit-driver 2.36.0
org.seleniumhq.selenium selenium-api 3.141.59
org.seleniumhq.selenium selenium-chrome-driver 3.141.59
org.seleniumhq.selenium selenium-edge-driver 3.141.59
org.seleniumhq.selenium selenium-firefox-driver 3.141.59
org.seleniumhq.selenium selenium-ie-driver 3.141.59
org.seleniumhq.selenium selenium-java 3.141.59
org.seleniumhq.selenium selenium-opera-driver 3.141.59
org.seleniumhq.selenium selenium-remote-driver 3.141.59
org.seleniumhq.selenium selenium-safari-driver 3.141.59
org.seleniumhq.selenium selenium-support 3.141.59
org.skyscreamer jsonassert 1.5.0
org.slf4j jcl-over-slf4j 1.7.30
501
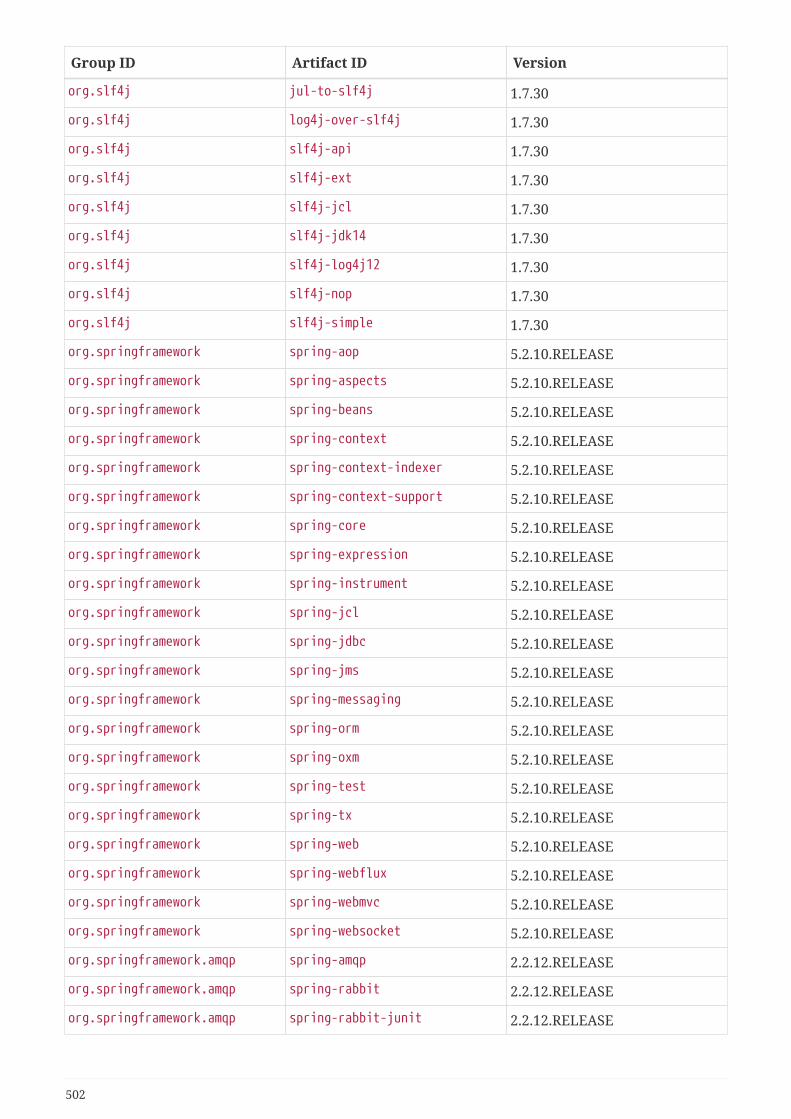
Group ID Artifact ID Version
org.slf4j jul-to-slf4j 1.7.30
org.slf4j log4j-over-slf4j 1.7.30
org.slf4j slf4j-api 1.7.30
org.slf4j slf4j-ext 1.7.30
org.slf4j slf4j-jcl 1.7.30
org.slf4j slf4j-jdk14 1.7.30
org.slf4j slf4j-log4j12 1.7.30
org.slf4j slf4j-nop 1.7.30
org.slf4j slf4j-simple 1.7.30
org.springframework spring-aop 5.2.10.RELEASE
org.springframework spring-aspects 5.2.10.RELEASE
org.springframework spring-beans 5.2.10.RELEASE
org.springframework spring-context 5.2.10.RELEASE
org.springframework spring-context-indexer 5.2.10.RELEASE
org.springframework spring-context-support 5.2.10.RELEASE
org.springframework spring-core 5.2.10.RELEASE
org.springframework spring-expression 5.2.10.RELEASE
org.springframework spring-instrument 5.2.10.RELEASE
org.springframework spring-jcl 5.2.10.RELEASE
org.springframework spring-jdbc 5.2.10.RELEASE
org.springframework spring-jms 5.2.10.RELEASE
org.springframework spring-messaging 5.2.10.RELEASE
org.springframework spring-orm 5.2.10.RELEASE
org.springframework spring-oxm 5.2.10.RELEASE
org.springframework spring-test 5.2.10.RELEASE
org.springframework spring-tx 5.2.10.RELEASE
org.springframework spring-web 5.2.10.RELEASE
org.springframework spring-webflux 5.2.10.RELEASE
org.springframework spring-webmvc 5.2.10.RELEASE
org.springframework spring-websocket 5.2.10.RELEASE
org.springframework.amqp spring-amqp 2.2.12.RELEASE
org.springframework.amqp spring-rabbit 2.2.12.RELEASE
org.springframework.amqp spring-rabbit-junit 2.2.12.RELEASE
502

Group ID Artifact ID Version
org.springframework.amqp spring-rabbit-test 2.2.12.RELEASE
org.springframework.batch spring-batch-core 4.2.4.RELEASE
org.springframework.batch spring-batch-infrastructure 4.2.4.RELEASE
org.springframework.batch spring-batch-integration 4.2.4.RELEASE
org.springframework.batch spring-batch-test 4.2.4.RELEASE
org.springframework.boot spring-boot 2.2.11.RELEASE
org.springframework.boot spring-boot-actuator 2.2.11.RELEASE
org.springframework.boot spring-boot-actuator-autoconfigure
2.2.11.RELEASE
org.springframework.boot spring-boot-autoconfigure 2.2.11.RELEASE
org.springframework.boot spring-boot-autoconfigure-processor
2.2.11.RELEASE
org.springframework.boot spring-boot-configuration-metadata
2.2.11.RELEASE
org.springframework.boot spring-boot-configuration-processor
2.2.11.RELEASE
org.springframework.boot spring-boot-devtools 2.2.11.RELEASE
org.springframework.boot spring-boot-loader 2.2.11.RELEASE
org.springframework.boot spring-boot-loader-tools 2.2.11.RELEASE
org.springframework.boot spring-boot-properties-migrator
2.2.11.RELEASE
org.springframework.boot spring-boot-starter 2.2.11.RELEASE
org.springframework.boot spring-boot-starter-activemq 2.2.11.RELEASE
org.springframework.boot spring-boot-starter-actuator 2.2.11.RELEASE
org.springframework.boot spring-boot-starter-amqp 2.2.11.RELEASE
org.springframework.boot spring-boot-starter-aop 2.2.11.RELEASE
org.springframework.boot spring-boot-starter-artemis 2.2.11.RELEASE
org.springframework.boot spring-boot-starter-batch 2.2.11.RELEASE
org.springframework.boot spring-boot-starter-cache 2.2.11.RELEASE
org.springframework.boot spring-boot-starter-cloud-connectors
2.2.11.RELEASE
org.springframework.boot spring-boot-starter-data-cassandra
2.2.11.RELEASE
org.springframework.boot spring-boot-starter-data-cassandra-reactive
2.2.11.RELEASE
org.springframework.boot spring-boot-starter-data-couchbase
2.2.11.RELEASE
org.springframework.boot spring-boot-starter-data-couchbase-reactive
2.2.11.RELEASE
503

Group ID Artifact ID Version
org.springframework.boot spring-boot-starter-data-elasticsearch
2.2.11.RELEASE
org.springframework.boot spring-boot-starter-data-jdbc 2.2.11.RELEASE
org.springframework.boot spring-boot-starter-data-jpa 2.2.11.RELEASE
org.springframework.boot spring-boot-starter-data-ldap 2.2.11.RELEASE
org.springframework.boot spring-boot-starter-data-mongodb
2.2.11.RELEASE
org.springframework.boot spring-boot-starter-data-mongodb-reactive
2.2.11.RELEASE
org.springframework.boot spring-boot-starter-data-neo4j 2.2.11.RELEASE
org.springframework.boot spring-boot-starter-data-redis 2.2.11.RELEASE
org.springframework.boot spring-boot-starter-data-redis-reactive
2.2.11.RELEASE
org.springframework.boot spring-boot-starter-data-rest 2.2.11.RELEASE
org.springframework.boot spring-boot-starter-data-solr 2.2.11.RELEASE
org.springframework.boot spring-boot-starter-freemarker 2.2.11.RELEASE
org.springframework.boot spring-boot-starter-groovy-templates
2.2.11.RELEASE
org.springframework.boot spring-boot-starter-hateoas 2.2.11.RELEASE
org.springframework.boot spring-boot-starter-integration
2.2.11.RELEASE
org.springframework.boot spring-boot-starter-jdbc 2.2.11.RELEASE
org.springframework.boot spring-boot-starter-jersey 2.2.11.RELEASE
org.springframework.boot spring-boot-starter-jetty 2.2.11.RELEASE
org.springframework.boot spring-boot-starter-jooq 2.2.11.RELEASE
org.springframework.boot spring-boot-starter-json 2.2.11.RELEASE
org.springframework.boot spring-boot-starter-jta-atomikos
2.2.11.RELEASE
org.springframework.boot spring-boot-starter-jta-bitronix
2.2.11.RELEASE
org.springframework.boot spring-boot-starter-log4j2 2.2.11.RELEASE
org.springframework.boot spring-boot-starter-logging 2.2.11.RELEASE
org.springframework.boot spring-boot-starter-mail 2.2.11.RELEASE
org.springframework.boot spring-boot-starter-mustache 2.2.11.RELEASE
org.springframework.boot spring-boot-starter-oauth2-client
2.2.11.RELEASE
org.springframework.boot spring-boot-starter-oauth2-resource-server
2.2.11.RELEASE
org.springframework.boot spring-boot-starter-quartz 2.2.11.RELEASE
504
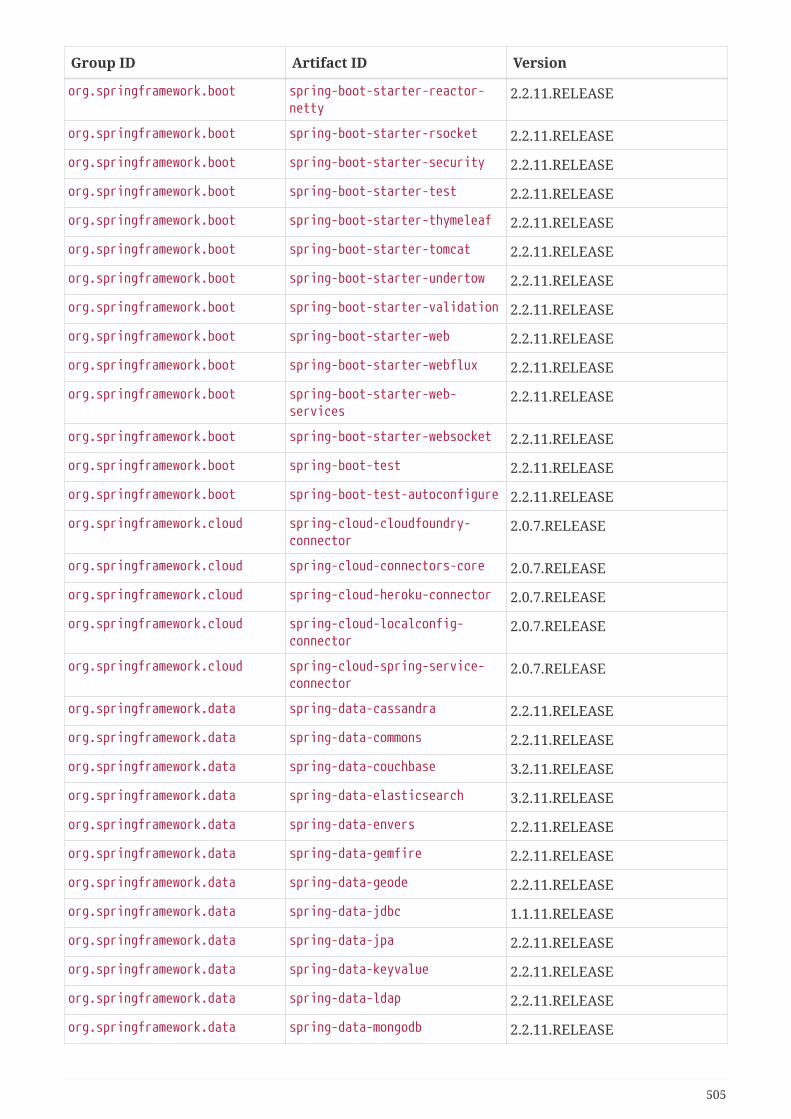
Group ID Artifact ID Version
org.springframework.boot spring-boot-starter-reactor-netty
2.2.11.RELEASE
org.springframework.boot spring-boot-starter-rsocket 2.2.11.RELEASE
org.springframework.boot spring-boot-starter-security 2.2.11.RELEASE
org.springframework.boot spring-boot-starter-test 2.2.11.RELEASE
org.springframework.boot spring-boot-starter-thymeleaf 2.2.11.RELEASE
org.springframework.boot spring-boot-starter-tomcat 2.2.11.RELEASE
org.springframework.boot spring-boot-starter-undertow 2.2.11.RELEASE
org.springframework.boot spring-boot-starter-validation 2.2.11.RELEASE
org.springframework.boot spring-boot-starter-web 2.2.11.RELEASE
org.springframework.boot spring-boot-starter-webflux 2.2.11.RELEASE
org.springframework.boot spring-boot-starter-web-services
2.2.11.RELEASE
org.springframework.boot spring-boot-starter-websocket 2.2.11.RELEASE
org.springframework.boot spring-boot-test 2.2.11.RELEASE
org.springframework.boot spring-boot-test-autoconfigure 2.2.11.RELEASE
org.springframework.cloud spring-cloud-cloudfoundry-connector
2.0.7.RELEASE
org.springframework.cloud spring-cloud-connectors-core 2.0.7.RELEASE
org.springframework.cloud spring-cloud-heroku-connector 2.0.7.RELEASE
org.springframework.cloud spring-cloud-localconfig-connector
2.0.7.RELEASE
org.springframework.cloud spring-cloud-spring-service-connector
2.0.7.RELEASE
org.springframework.data spring-data-cassandra 2.2.11.RELEASE
org.springframework.data spring-data-commons 2.2.11.RELEASE
org.springframework.data spring-data-couchbase 3.2.11.RELEASE
org.springframework.data spring-data-elasticsearch 3.2.11.RELEASE
org.springframework.data spring-data-envers 2.2.11.RELEASE
org.springframework.data spring-data-gemfire 2.2.11.RELEASE
org.springframework.data spring-data-geode 2.2.11.RELEASE
org.springframework.data spring-data-jdbc 1.1.11.RELEASE
org.springframework.data spring-data-jpa 2.2.11.RELEASE
org.springframework.data spring-data-keyvalue 2.2.11.RELEASE
org.springframework.data spring-data-ldap 2.2.11.RELEASE
org.springframework.data spring-data-mongodb 2.2.11.RELEASE
505
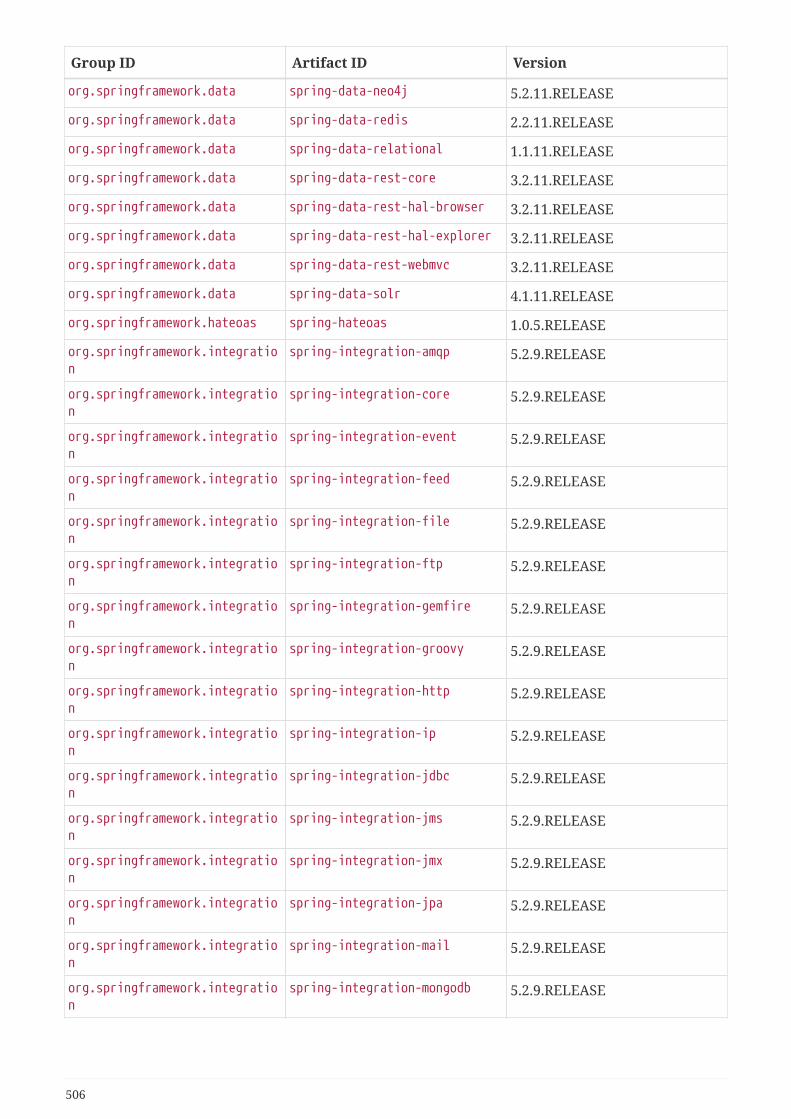
Group ID Artifact ID Version
org.springframework.data spring-data-neo4j 5.2.11.RELEASE
org.springframework.data spring-data-redis 2.2.11.RELEASE
org.springframework.data spring-data-relational 1.1.11.RELEASE
org.springframework.data spring-data-rest-core 3.2.11.RELEASE
org.springframework.data spring-data-rest-hal-browser 3.2.11.RELEASE
org.springframework.data spring-data-rest-hal-explorer 3.2.11.RELEASE
org.springframework.data spring-data-rest-webmvc 3.2.11.RELEASE
org.springframework.data spring-data-solr 4.1.11.RELEASE
org.springframework.hateoas spring-hateoas 1.0.5.RELEASE
org.springframework.integration
spring-integration-amqp 5.2.9.RELEASE
org.springframework.integration
spring-integration-core 5.2.9.RELEASE
org.springframework.integration
spring-integration-event 5.2.9.RELEASE
org.springframework.integration
spring-integration-feed 5.2.9.RELEASE
org.springframework.integration
spring-integration-file 5.2.9.RELEASE
org.springframework.integration
spring-integration-ftp 5.2.9.RELEASE
org.springframework.integration
spring-integration-gemfire 5.2.9.RELEASE
org.springframework.integration
spring-integration-groovy 5.2.9.RELEASE
org.springframework.integration
spring-integration-http 5.2.9.RELEASE
org.springframework.integration
spring-integration-ip 5.2.9.RELEASE
org.springframework.integration
spring-integration-jdbc 5.2.9.RELEASE
org.springframework.integration
spring-integration-jms 5.2.9.RELEASE
org.springframework.integration
spring-integration-jmx 5.2.9.RELEASE
org.springframework.integration
spring-integration-jpa 5.2.9.RELEASE
org.springframework.integration
spring-integration-mail 5.2.9.RELEASE
org.springframework.integration
spring-integration-mongodb 5.2.9.RELEASE
506
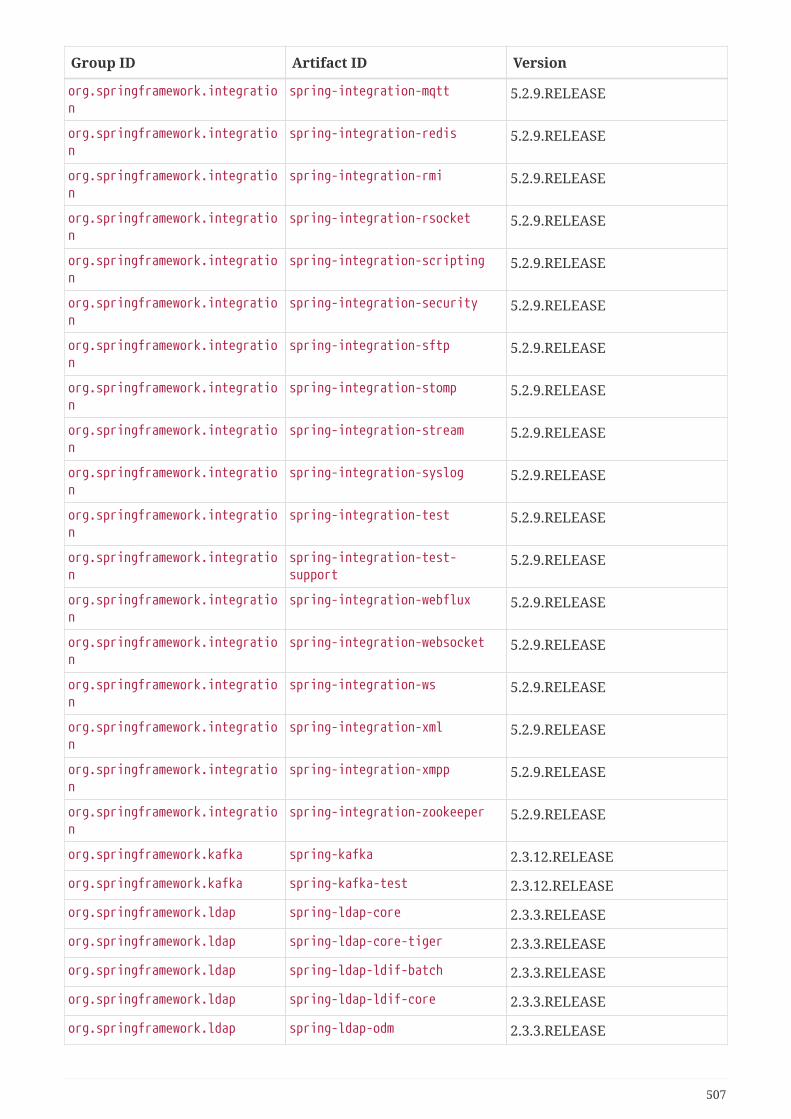
Group ID Artifact ID Version
org.springframework.integration
spring-integration-mqtt 5.2.9.RELEASE
org.springframework.integration
spring-integration-redis 5.2.9.RELEASE
org.springframework.integration
spring-integration-rmi 5.2.9.RELEASE
org.springframework.integration
spring-integration-rsocket 5.2.9.RELEASE
org.springframework.integration
spring-integration-scripting 5.2.9.RELEASE
org.springframework.integration
spring-integration-security 5.2.9.RELEASE
org.springframework.integration
spring-integration-sftp 5.2.9.RELEASE
org.springframework.integration
spring-integration-stomp 5.2.9.RELEASE
org.springframework.integration
spring-integration-stream 5.2.9.RELEASE
org.springframework.integration
spring-integration-syslog 5.2.9.RELEASE
org.springframework.integration
spring-integration-test 5.2.9.RELEASE
org.springframework.integration
spring-integration-test-support
5.2.9.RELEASE
org.springframework.integration
spring-integration-webflux 5.2.9.RELEASE
org.springframework.integration
spring-integration-websocket 5.2.9.RELEASE
org.springframework.integration
spring-integration-ws 5.2.9.RELEASE
org.springframework.integration
spring-integration-xml 5.2.9.RELEASE
org.springframework.integration
spring-integration-xmpp 5.2.9.RELEASE
org.springframework.integration
spring-integration-zookeeper 5.2.9.RELEASE
org.springframework.kafka spring-kafka 2.3.12.RELEASE
org.springframework.kafka spring-kafka-test 2.3.12.RELEASE
org.springframework.ldap spring-ldap-core 2.3.3.RELEASE
org.springframework.ldap spring-ldap-core-tiger 2.3.3.RELEASE
org.springframework.ldap spring-ldap-ldif-batch 2.3.3.RELEASE
org.springframework.ldap spring-ldap-ldif-core 2.3.3.RELEASE
org.springframework.ldap spring-ldap-odm 2.3.3.RELEASE
507

Group ID Artifact ID Version
org.springframework.ldap spring-ldap-test 2.3.3.RELEASE
org.springframework.restdocs spring-restdocs-asciidoctor 2.0.5.RELEASE
org.springframework.restdocs spring-restdocs-core 2.0.5.RELEASE
org.springframework.restdocs spring-restdocs-mockmvc 2.0.5.RELEASE
org.springframework.restdocs spring-restdocs-restassured 2.0.5.RELEASE
org.springframework.restdocs spring-restdocs-webtestclient 2.0.5.RELEASE
org.springframework.retry spring-retry 1.2.5.RELEASE
org.springframework.security spring-security-acl 5.2.7.RELEASE
org.springframework.security spring-security-aspects 5.2.7.RELEASE
org.springframework.security spring-security-cas 5.2.7.RELEASE
org.springframework.security spring-security-config 5.2.7.RELEASE
org.springframework.security spring-security-core 5.2.7.RELEASE
org.springframework.security spring-security-crypto 5.2.7.RELEASE
org.springframework.security spring-security-data 5.2.7.RELEASE
org.springframework.security spring-security-ldap 5.2.7.RELEASE
org.springframework.security spring-security-messaging 5.2.7.RELEASE
org.springframework.security spring-security-oauth2-client 5.2.7.RELEASE
org.springframework.security spring-security-oauth2-core 5.2.7.RELEASE
org.springframework.security spring-security-oauth2-jose 5.2.7.RELEASE
org.springframework.security spring-security-oauth2-resource-server
5.2.7.RELEASE
org.springframework.security spring-security-openid 5.2.7.RELEASE
org.springframework.security spring-security-remoting 5.2.7.RELEASE
org.springframework.security spring-security-rsocket 5.2.7.RELEASE
org.springframework.security spring-security-saml2-service-provider
5.2.7.RELEASE
org.springframework.security spring-security-taglibs 5.2.7.RELEASE
org.springframework.security spring-security-test 5.2.7.RELEASE
org.springframework.security spring-security-web 5.2.7.RELEASE
org.springframework.session spring-session-core 2.2.4.RELEASE
org.springframework.session spring-session-data-geode 2.2.4.RELEASE
org.springframework.session spring-session-data-mongodb 2.2.3.RELEASE
org.springframework.session spring-session-data-redis 2.2.4.RELEASE
org.springframework.session spring-session-hazelcast 2.2.4.RELEASE
508

Group ID Artifact ID Version
org.springframework.session spring-session-jdbc 2.2.4.RELEASE
org.springframework.ws spring-ws-core 3.0.10.RELEASE
org.springframework.ws spring-ws-security 3.0.10.RELEASE
org.springframework.ws spring-ws-support 3.0.10.RELEASE
org.springframework.ws spring-ws-test 3.0.10.RELEASE
org.springframework.ws spring-xml 3.0.10.RELEASE
org.synchronoss.cloud nio-multipart-parser 1.1.0
org.thymeleaf thymeleaf 3.0.11.RELEASE
org.thymeleaf thymeleaf-spring5 3.0.11.RELEASE
org.thymeleaf.extras thymeleaf-extras-java8time 3.0.4.RELEASE
org.thymeleaf.extras thymeleaf-extras-springsecurity5
3.0.4.RELEASE
org.webjars hal-browser 3325375
org.webjars webjars-locator-core 0.41
org.xerial sqlite-jdbc 3.28.0
org.xmlunit xmlunit-assertj 2.6.4
org.xmlunit xmlunit-core 2.6.4
org.xmlunit xmlunit-legacy 2.6.4
org.xmlunit xmlunit-matchers 2.6.4
org.xmlunit xmlunit-placeholders 2.6.4
org.yaml snakeyaml 1.25
redis.clients jedis 3.1.0
wsdl4j wsdl4j 1.6.3
509