SPECIAL PERFORMANCE FEATURES
28
SPECIAL PERFORMANCE FEATURES
-
Upload
khangminh22 -
Category
Documents
-
view
1 -
download
0
Transcript of SPECIAL PERFORMANCE FEATURES

SPECIALPERFORMANCE
FEATURES


3Special Performance Features
SPECIAL PERFORMANCE FEATURES
Ë REVERB
You can add Reverberation or “ambience” to the Drawbars and Extra Voices, and control the amount and type ofReverb.
REVERB Controls
The REVERB Controls are located on the extreme right side on the Control Panel.
REVERB Touch Tab
Touching this Touch Tab “ON” (red LED lit) will turn on the Reverb effect.
REVERB Rotary Control
This control allows you to adjust the Depth, or amount, of the Reverb effect.
The length and type of REVERB are determined by the settings in the REVERB Edit Menu,which is explained below.
REVERB Edit Menu
This Advanced Feature Menu allows you to select how the REVERB performs.
Accessing the REVERB Edit Menu using the MENU/EXIT Touch Button:
1. From the PLAY Screen, touch the MENU/EXIT Touch Button to see the first screen of the MENUMode. You will see “A" displayed in the extreme upper left corner of the Information Center Display.
2. Touch the PAGE UP Touch Button twice. You will now see the letter “C” displayed in the upper leftcorner of the display, and the legend “OD/EX” will be blinking.
3. Touch the PAGE RIGHT Touch Button twice. The word “REVERB” will be blinking.
4. Touch the ENTER Touch Button.
Accessing the REVERB Edit Menu using the Shortcut:
Touch and hold the REVERB Touch Tab. After approximately 1 second, the first page of the REVERB EditMenu will display.
You are now in the REVERB Edit Menu. You may now use the PAGE NAVIGATION Touch Buttons in conjunctionwith the VALUE Rotary Control to make various changes to the Reverb. This is explained starting below.
REVERB Edit Menu - Page 1
If you followed the instructions on the previous page, you should now see Page 1 of the REVERB Edit Menu. Nowtouch the PAGE LEFT Touch Button once so that the number underneath the word “DEPTH” will blink.
4 Special Performance Features
Reverb Depth
This Advanced Feature allows you to adjust the amount of Reverb that you prefer. You can select from “0" (no Reverb)through “127" (maximum Reverb).
Turn either the VALUE or the REVERB Rotary Control to the right to increase the amount of Reverb.
Turn either the VALUE or the REVERB Rotary Control to the left to decrease the amount of Reverb.
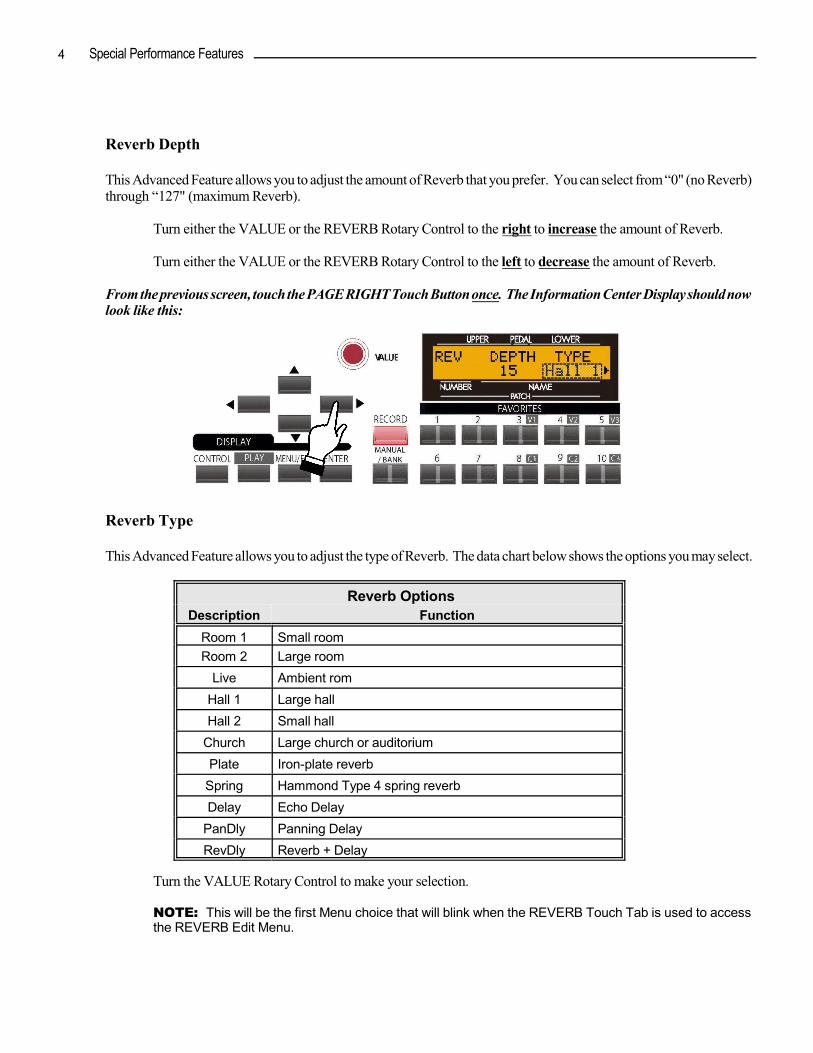
From the previous screen, touch the PAGE RIGHT Touch Button once. The Information Center Display should nowlook like this:
Reverb Type
This Advanced Feature allows you to adjust the type of Reverb. The data chart below shows the options you may select.
Reverb Options
Description Function
Room 1 Small room
Room 2 Large room
Live Ambient rom
Hall 1 Large hall
Hall 2 Small hall
Church Large church or auditorium
Plate Iron-plate reverb
Spring Hammond Type 4 spring reverb
Delay Echo Delay
PanDly Panning Delay
RevDly Reverb + Delay
Turn the VALUE Rotary Control to make your selection.
NOTE: This will be the first Menu choice that will blink when the REVERB Touch Tab is used to accessthe REVERB Edit Menu.
5Special Performance Features
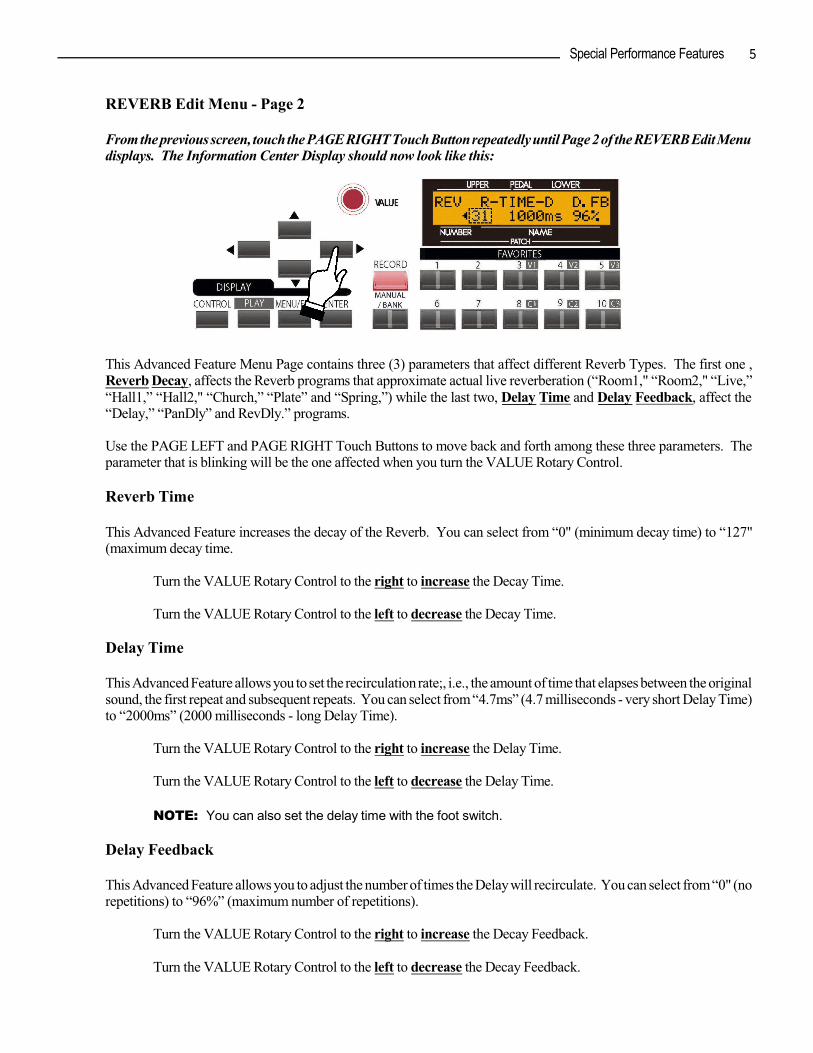
REVERB Edit Menu - Page 2
From the previous screen, touch the PAGE RIGHT Touch Button repeatedly until Page 2 of the REVERB Edit Menudisplays. The Information Center Display should now look like this:
This Advanced Feature Menu Page contains three (3) parameters that affect different Reverb Types. The first one ,Reverb Decay, affects the Reverb programs that approximate actual live reverberation (“Room1," “Room2," “Live,”“Hall1,” “Hall2," “Church,” “Plate” and “Spring,”) while the last two, Delay Time and Delay Feedback, affect the“Delay,” “PanDly” and RevDly.” programs.
Use the PAGE LEFT and PAGE RIGHT Touch Buttons to move back and forth among these three parameters. Theparameter that is blinking will be the one affected when you turn the VALUE Rotary Control.
Reverb Time
This Advanced Feature increases the decay of the Reverb. You can select from “0" (minimum decay time) to “127"(maximum decay time.
Turn the VALUE Rotary Control to the right to increase the Decay Time.
Turn the VALUE Rotary Control to the left to decrease the Decay Time.
Delay Time
This Advanced Feature allows you to set the recirculation rate;, i.e., the amount of time that elapses between the originalsound, the first repeat and subsequent repeats. You can select from “4.7ms” (4.7 milliseconds - very short Delay Time)to “2000ms” (2000 milliseconds - long Delay Time).
Turn the VALUE Rotary Control to the right to increase the Delay Time.
Turn the VALUE Rotary Control to the left to decrease the Delay Time.
NOTE: You can also set the delay time with the foot switch.
Delay Feedback
This Advanced Feature allows you to adjust the number of times the Delay will recirculate. You can select from “0" (norepetitions) to “96%” (maximum number of repetitions).
Turn the VALUE Rotary Control to the right to increase the Decay Feedback.
Turn the VALUE Rotary Control to the left to decrease the Decay Feedback.
6 Special Performance Features
Ë TRANSPOSE (Key Select)
This feature allows you to shift the musical key of the entire instrument. This isuseful if you have a piece of music written in one key but which needs to soundin another key; for example, a song written and played in C Major, could soundin G Major. TRANSPOSE will step either up or down six (6) semitones or half-steps from the center position. The TRANSPOSE feature consists the TRANSPOSE Touch Tab, plus the DOWN andUP Touch Tabs immediately to the right of the TRANSPOSE Touch Tab. The DOWN Touch Tab allows you totranspose lower and the UP Touch Tab allows you to transpose higher.
TRY THIS:
1. Make sure the instrument is un-transposed or playing in “concert” pitch (TRANSPOSE Touch TabLED not lit).
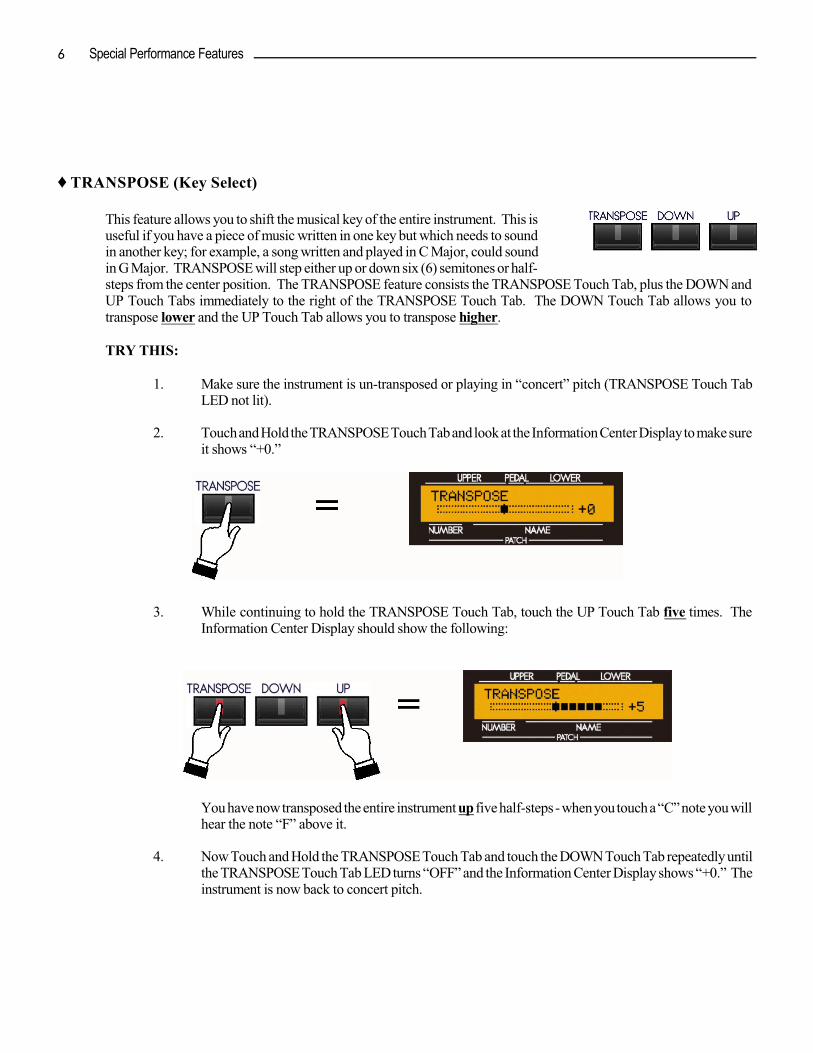
2. Touch and Hold the TRANSPOSE Touch Tab and look at the Information Center Display to make sureit shows “+0.”
3. While continuing to hold the TRANSPOSE Touch Tab, touch the UP Touch Tab five times. TheInformation Center Display should show the following:
You have now transposed the entire instrument up five half-steps - when you touch a “C” note you willhear the note “F” above it.
4. Now Touch and Hold the TRANSPOSE Touch Tab and touch the DOWN Touch Tab repeatedly untilthe TRANSPOSE Touch Tab LED turns “OFF” and the Information Center Display shows “+0.” Theinstrument is now back to concert pitch.

7Special Performance Features
5. While continuing to hold the TRANSPOSE Touch Tab, touch the DOWN Touch Tab five times. TheInformation Center Display should show the following:
You have now transposed the entire instrument down five half-steps - when you touch a “C” note youwill hear the note “G” below it.
To return the instrument to concert pitch, Touch and Hold the TRANSPOSE Touch Tab and touch the UP TouchTab repeatedly until the TRANSPOSE Touch Tab LED turns “OFF” and the Information Center Display shows“+0.”
Ë CONTROL Edit Menu
This Advanced Feature Menu allows you to select the parameters for the various Controls that you prefer.
To access the CONTROL Edit Menu, do the following:
1. From any of the PLAY Mode screens, touch the MENU/EXIT Touch Button once. The InformationCenter Display should now look like this:
The word “DRAWBAR” should now be blinking.

8 Special Performance Features
2. Touch the PAGE RIGHT Touch Button three times. The Information Center Display should now looklike this:
The word “CONTROL” should now be blinking.
3. Now touch the ENTER Touch Button once. The Information Center Display should now look like this:
You are now in the CONTROL Edit Menu. You may now use the PAGE NAVIGATION Touch Buttons inconjunction with the VALUE Rotary Control to make changes to the characteristics of the various Controls. Theses changes are explained starting on the next page.
9Special Performance Features
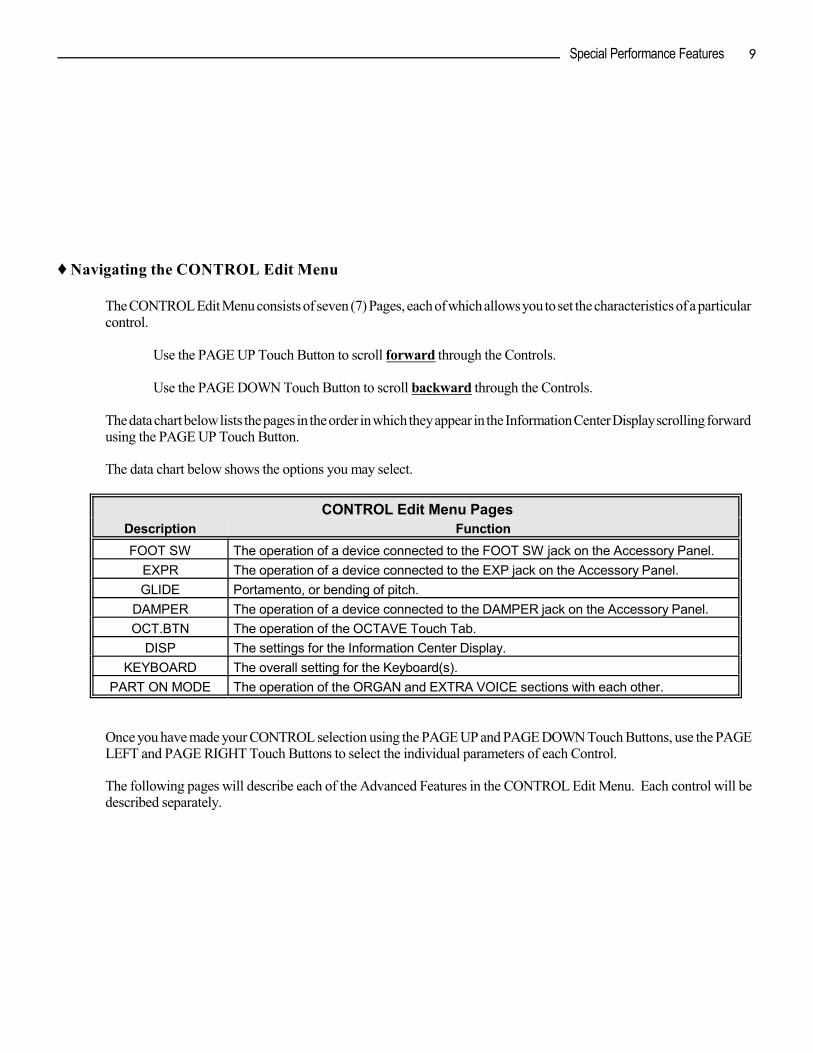
Ë Navigating the CONTROL Edit Menu
The CONTROL Edit Menu consists of seven (7) Pages, each of which allows you to set the characteristics of a particularcontrol.
Use the PAGE UP Touch Button to scroll forward through the Controls.
Use the PAGE DOWN Touch Button to scroll backward through the Controls.
The data chart below lists the pages in the order in which they appear in the Information Center Display scrolling forwardusing the PAGE UP Touch Button.
The data chart below shows the options you may select.
CONTROL Edit Menu Pages
Description Function
FOOT SW The operation of a device connected to the FOOT SW jack on the Accessory Panel.
EXPR The operation of a device connected to the EXP jack on the Accessory Panel.
GLIDE Portamento, or bending of pitch.
DAMPER The operation of a device connected to the DAMPER jack on the Accessory Panel.
OCT.BTN The operation of the OCTAVE Touch Tab.
DISP The settings for the Information Center Display.
KEYBOARD The overall setting for the Keyboard(s).
PART ON MODE The operation of the ORGAN and EXTRA VOICE sections with each other.
Once you have made your CONTROL selection using the PAGE UP and PAGE DOWN Touch Buttons, use the PAGELEFT and PAGE RIGHT Touch Buttons to select the individual parameters of each Control.
The following pages will describe each of the Advanced Features in the CONTROL Edit Menu. Each control will bedescribed separately.

10 Special Performance Features
CONTROL Edit Menu - Page 1 - Foot Switch Parameters
To display the FOOT SW Page of the CONTROL Edit Menu, follow the instructions shown on pages 2 and 3. Youshould see the screen shown below and the word “FOOT SW” should be blinking.
FOOT SW - Screen 1 - Foot Switch Device Select
The Foot Switch (FOOT SW) jack on the SKXs is set up to accept different types of devices. The data chart belowshows the options you may select.
FOOT SWITCH DEVICE SELECT Options
Description Function
FOOT SW A conventional foot switch such as the Hammond FS-9.
CU-1 Control Unit 1, a “half-moon” style speed switch, available as an optional accessory, whichallows you to select the Leslie Speeds.
Turn the VALUE Rotary Control to make your selection.
From the previous screen, touch the PAGE RIGHT Touch Button once. The Information Center Display should nowlook like this:
You will now see Screen 2 of the FOOT SW Edit Menu.

11Special Performance Features
What Is “TRS?”
A typical accessory Foot Switch will connect to an instrument such as the SK by means of a plug similar to the one shownbelow.
TRS is an acronym for Tip-Ring-Sleeve, and refers to the fact that a connecting plug can have more than one connector. This means that more than one Foot Switch can be connected to the SK instrument, thereby allowing you to control morethan one function using the same Foot Switch jack. If you wish to do this, you will need a Stereo Adapter which has aStereo plug and two (2) Mono jacks.
Simply insert the Stereo plug into the FOOT SW jack on the SK instrument and connect a Foot Switch to each of theMono input jacks. In most cases, the Left (L) input jack will access the Tip function while the Right (R) will access theRing function.
12 Special Performance Features
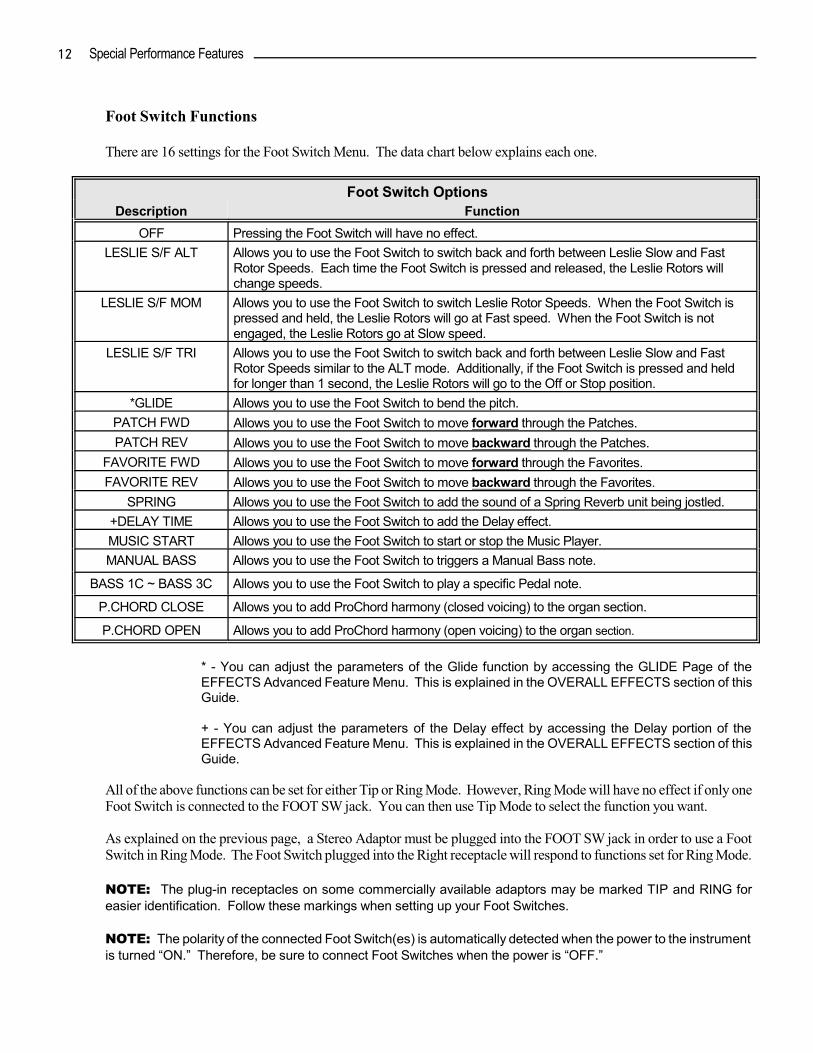
Foot Switch Functions
There are 16 settings for the Foot Switch Menu. The data chart below explains each one.
Foot Switch Options
Description Function
OFF Pressing the Foot Switch will have no effect.
LESLIE S/F ALT Allows you to use the Foot Switch to switch back and forth between Leslie Slow and FastRotor Speeds. Each time the Foot Switch is pressed and released, the Leslie Rotors willchange speeds.
LESLIE S/F MOM Allows you to use the Foot Switch to switch Leslie Rotor Speeds. When the Foot Switch ispressed and held, the Leslie Rotors will go at Fast speed. When the Foot Switch is notengaged, the Leslie Rotors go at Slow speed.
LESLIE S/F TRI Allows you to use the Foot Switch to switch back and forth between Leslie Slow and FastRotor Speeds similar to the ALT mode. Additionally, if the Foot Switch is pressed and heldfor longer than 1 second, the Leslie Rotors will go to the Off or Stop position.
*GLIDE Allows you to use the Foot Switch to bend the pitch.
PATCH FWD Allows you to use the Foot Switch to move forward through the Patches.
PATCH REV Allows you to use the Foot Switch to move backward through the Patches.
FAVORITE FWD Allows you to use the Foot Switch to move forward through the Favorites.
FAVORITE REV Allows you to use the Foot Switch to move backward through the Favorites.
SPRING Allows you to use the Foot Switch to add the sound of a Spring Reverb unit being jostled.
+DELAY TIME Allows you to use the Foot Switch to add the Delay effect.
MUSIC START Allows you to use the Foot Switch to start or stop the Music Player.
MANUAL BASS Allows you to use the Foot Switch to triggers a Manual Bass note.
BASS 1C ~ BASS 3C Allows you to use the Foot Switch to play a specific Pedal note.
P.CHORD CLOSE Allows you to add ProChord harmony (closed voicing) to the organ section.
P.CHORD OPEN Allows you to add ProChord harmony (open voicing) to the organ section.
* - You can adjust the parameters of the Glide function by accessing the GLIDE Page of theEFFECTS Advanced Feature Menu. This is explained in the OVERALL EFFECTS section of thisGuide.
+ - You can adjust the parameters of the Delay effect by accessing the Delay portion of theEFFECTS Advanced Feature Menu. This is explained in the OVERALL EFFECTS section of thisGuide.
All of the above functions can be set for either Tip or Ring Mode. However, Ring Mode will have no effect if only oneFoot Switch is connected to the FOOT SW jack. You can then use Tip Mode to select the function you want.
As explained on the previous page, a Stereo Adaptor must be plugged into the FOOT SW jack in order to use a FootSwitch in Ring Mode. The Foot Switch plugged into the Right receptacle will respond to functions set for Ring Mode.
NOTE: The plug-in receptacles on some commercially available adaptors may be marked TIP and RING foreasier identification. Follow these markings when setting up your Foot Switches.
NOTE: The polarity of the connected Foot Switch(es) is automatically detected when the power to the instrumentis turned “ON.” Therefore, be sure to connect Foot Switches when the power is “OFF.”
13Special Performance Features
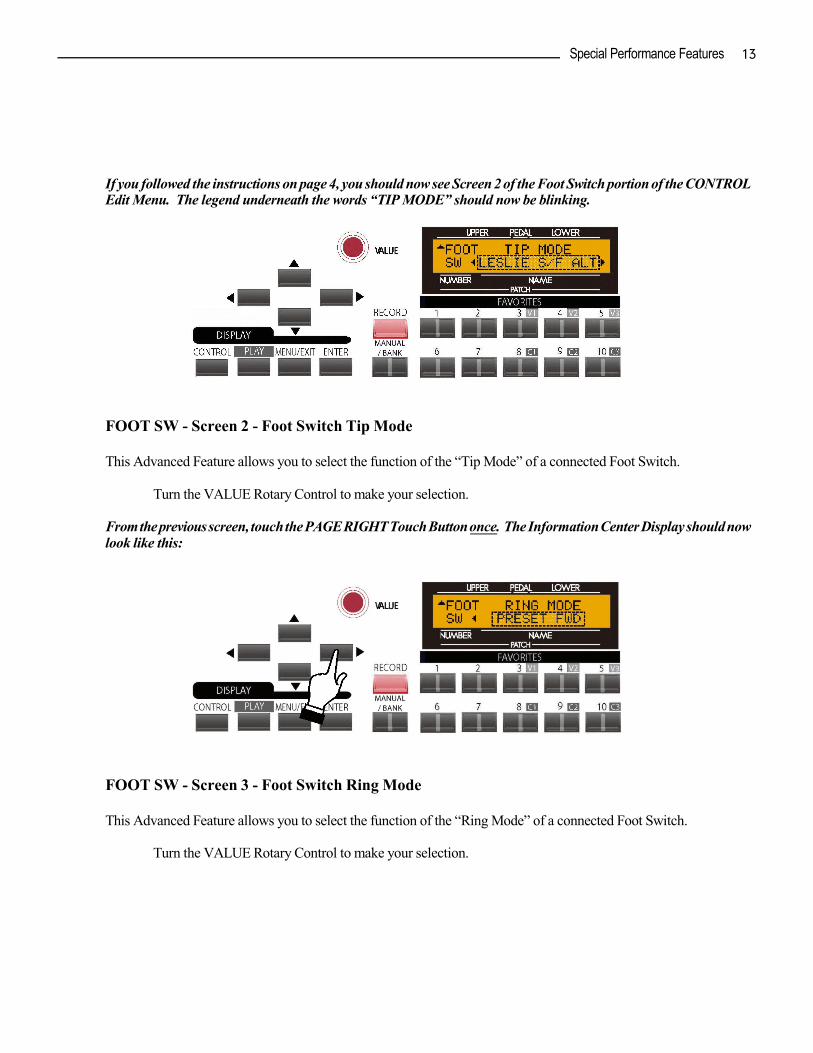
If you followed the instructions on page 4, you should now see Screen 2 of the Foot Switch portion of the CONTROLEdit Menu. The legend underneath the words “TIP MODE” should now be blinking.
FOOT SW - Screen 2 - Foot Switch Tip Mode
This Advanced Feature allows you to select the function of the “Tip Mode” of a connected Foot Switch.
Turn the VALUE Rotary Control to make your selection.
From the previous screen, touch the PAGE RIGHT Touch Button once. The Information Center Display should nowlook like this:
FOOT SW - Screen 3 - Foot Switch Ring Mode
This Advanced Feature allows you to select the function of the “Ring Mode” of a connected Foot Switch.
Turn the VALUE Rotary Control to make your selection.

14 Special Performance Features
CONTROL Edit Menu - Page 2 - Expression Parameters
This Advanced Feature Menu allows you to control how a connected Expression Pedal will function.
From the previous screen, touch the PAGE UP Touch Button once, then touch the PAGE LEFT Touch Button fourtimes. The Information Center Display should now look like this:
The legend underneath the word “SOURCE” should be blinking.
You are now in the portion of the CONTROL Edit Menu which pertains to Expression settings.
Use the PAGE LEFT and PAGE RIGHT Touch Buttons to move forward or backward through the variousparameters.
The following pages will explain how to set the Expression parameters the way you want.
EXPR - Screen 1
Expression Source
This Advanced Feature allows you to select the source of expression control. The data chart below shows the optionsyou may select.
Expression Source Options
Description Function
PED (NORM) Hammond EXP-50 Expression Pedal or compatible equivalent.
PED (REV) Expression pedal having reversed polarity.
MIDI MIDI Expression Data (controller #11) will be received at the UPPER keyboardchannel.
Turn the VALUE Rotary Control to make your selection.
Expression Monitor (“MON”)
This is not really an Advanced Feature but is merely a way to display the current Expression Value, with “0" beingminimum Expression (no audible sound) and “127" being maximum Expression. The Expression Monitor can be usefulas a troubleshooting aid if you either don’t hear any sound or can’t change the volume using a connected ExpressionPedal.

15Special Performance Features
From the previous screen, touch the PAGE RIGHT Touch Button once. The Information Center Display should nowlook like this:
EXPR - Screen 2
Expression Minimum Level
This Advanced Feature allows you to set the amount of volume when the Expression Pedal is “closed,” or all the wayback. You can select “OFF” (no sound when the pedal is closed) or from “ -40dB” to “0dB.” The higher the number,the greater the volume will be.
Turn the VALUE Rotary Control to make your selection.
From the previous screen, touch the PAGE RIGHT Touch Button once. The numbers just underneath “LF” shouldnow be blinking:
Expression Low Frequency Limit
This Advanced Feature allows you to adjust the amount of Low Frequencies (below 800Hz) that will be heard when theExpression Pedal is set at minimum. You can select “OFF,” (no sound), or from “0db” to “-40db” (minus 40 decibels).
Turn the VALUE Rotary Control to make your selection.

16 Special Performance Features
From the previous screen, touch the PAGE RIGHT Touch Button once. The numbers just underneath “HF” shouldnow be blinking:
Expression High Frequency Limit
This Advanced Feature Menu Page allows you to adjust the amount of High Frequencies (above 800Hz) that will beheard when the Expression Pedal is set at minimum. You can select “OFF,” (no sound), or from “0db” to “-40db” (minus40 decibels).
Turn the VALUE Rotary Control to make your selection.
From the previous screen, touch the PAGE RIGHT Touch Button once. The Information Center Display should nowlook like this:
EXPR - Screen 3
Expression Gain
This Advanced Feature allows you to adjust the range of a connected Expression Pedal. You can select from “0" through“100%;” however, the amount of actual audible change may differ depending on the specific Expression Pedal used. Use this Advanced Feature to obtain the desired response from your particular pedal.

17Special Performance Features
From the previous screen, touch the PAGE RIGHT Touch Button once. The Information Center Display should nowlook like this:
Expression Curve
This Advanced Feature allows you to set the “curve,” or change of expression value corresponding to the angle of theExpression Pedal when depressed. The diagram below shows the options you may select.
Turn the VALUE Rotary Control to make your selection.
NOTE: You will also see “MON” on the extreme right side of the display. This is the Expression Monitor which
is not an Advanced Feature but merely displays the current Expression Value, with “0" being minimum Expression(no audible sound) and “127" being maximum Expression.

18 Special Performance Features
CONTROL Edit Menu - Page 3
GLIDE Functions
The word, “Glide,” is a term used to designate the ability to bend the pitch using a Foot Switch, either on the side of anExpression Pedal, or a separate Foot Switch. It is called “Glide” in order to differentiate it from “Pitch Bend,” which isbending the pitch by means of a wheel control.
IMPORTANT NOTE: You will hear the effects of these settings ONLY if you have GLIDE selected as aFoot Switch function.
From the previous screen, touch the PAGE UP Touch Button once. The Information Center Display should now looklike this:
The legend underneath the word “RANG” should be blinking.
You are now in the portion of the CONTROL Edit Menu which allows you to select the characteristics of the Glidefunction.
RANG - Glide Range
This Advanced Feature Menu Page allows you to set the pitch range of the Glide. You can select from “-24" (down twooctaves) through “+12" (up one octave.
Turn the VALUE Rotary Control to the right to cause the Glide to bend up.
Turn the VALUE Rotary Control to the left to cause the Glide to bend down.

19Special Performance Features
From the previous screen, touch the PAGE RIGHT Touch Button once. The Information Center Display should nowlook like this:
The legend underneath the word “A-TIME” should be blinking.
Glide Attack Time
This Advanced Feature Menu Page allows you to set the amount of time for the Glide effect to reach the pitch selectedby the RANGE parameter. You can select from “0.1" (one-tenth of a second) to “5.0" (5 seconds).
Turn the VALUE Rotary Control to the right to increase the Glide Attack Time.
Turn the VALUE Rotary Control to the left to decrease the Glide Attack Time.
From the previous screen, touch the PAGE RIGHT Touch Button once. The Information Center Display should nowlook like this:
The legend underneath “R” should be blinking.
Glide Release Time
This Advanced Feature Menu Page allows you to set the amount of time for the Glide effect to return to the original pitchafter the Foot Switch is released. You can select from “0.1" (one-tenth of a second) to “5.0" (5 seconds).
Turn the VALUE Rotary Control to the right to increase the Glide Release Time.
Turn the VALUE Rotary Control to the left to decrease the Glide Release Time.

20 Special Performance Features
From the previous screen, touch the PAGE RIGHT Touch Button once. The Information Center Display should nowlook like this:
The legend underneath the word “RATE” should be blinking.
AMP - Glide Amplitude
This Advanced Feature Menu Page allows you to add a change in volume or Amplitude to the Glide effect. The datachart below shows the options you may select.
GLIDE AMPLITUDE Options
Description Function
ON When the Glide effect is used, the volume will gradually decrease until no sound isheard at the completion of the pitch excursion.
OFF The Glide effect works normally - there is no change in volume.
Turn the VALUE Rotary Control to make your selection.
From the previous screen, touch the PAGE RIGHT Touch Button once. The Information Center Display should nowlook like this:
The word underneath the word “DRB” should be blinking.
AMP - Glide ON/OFF
This Advanced Feature Menu Page allows you to select which portions of the instrument you want the Glide to affect. You can enable the Glide effect separately for Drawbars, Extra Voice 1 and Extra Voice 2.
Use the PAGE LEFT and PAGE RIGHT Select Touch Buttons to move back and forth among “DRB,” “EXV1,”and “EXV2.”.
Turn the VALUE Rotary Control to make your selection.
21Special Performance Features
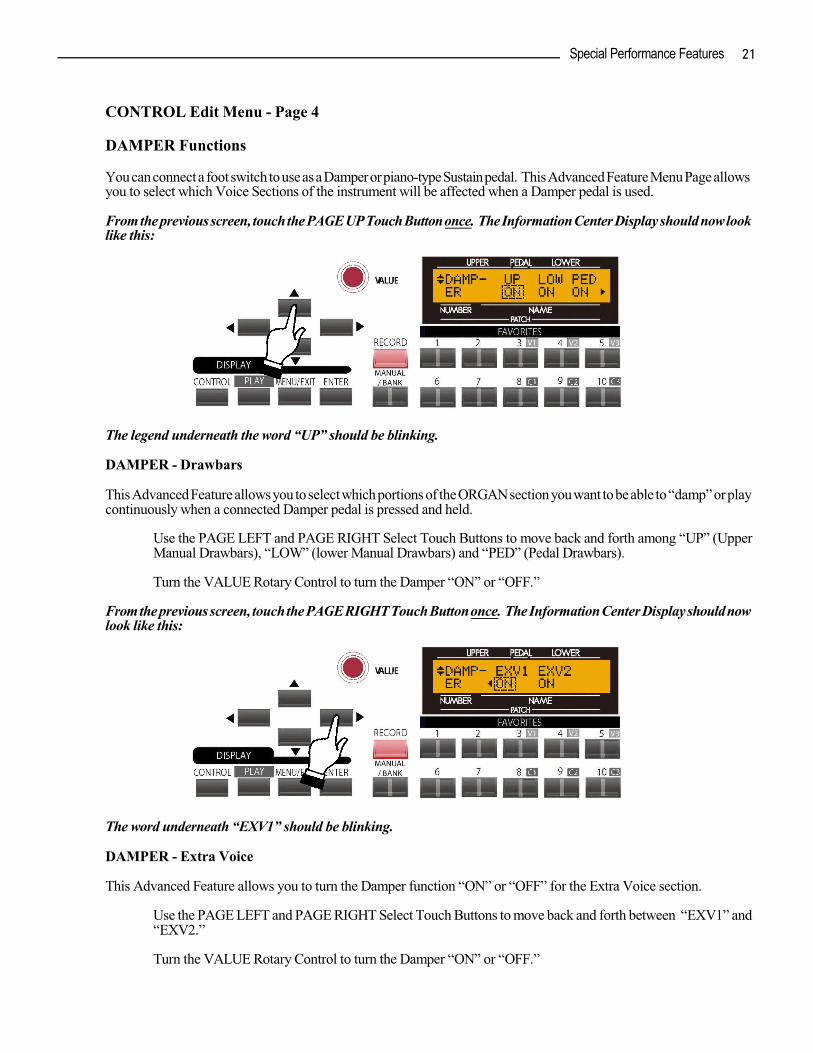
CONTROL Edit Menu - Page 4
DAMPER Functions
You can connect a foot switch to use as a Damper or piano-type Sustain pedal. This Advanced Feature Menu Page allowsyou to select which Voice Sections of the instrument will be affected when a Damper pedal is used.
From the previous screen, touch the PAGE UP Touch Button once. The Information Center Display should now looklike this:
The legend underneath the word “UP” should be blinking.
DAMPER - Drawbars
This Advanced Feature allows you to select which portions of the ORGAN section you want to be able to “damp” or playcontinuously when a connected Damper pedal is pressed and held.
Use the PAGE LEFT and PAGE RIGHT Select Touch Buttons to move back and forth among “UP” (UpperManual Drawbars), “LOW” (lower Manual Drawbars) and “PED” (Pedal Drawbars).
Turn the VALUE Rotary Control to turn the Damper “ON” or “OFF.”
From the previous screen, touch the PAGE RIGHT Touch Button once. The Information Center Display should nowlook like this:
The word underneath “EXV1” should be blinking.
DAMPER - Extra Voice
This Advanced Feature allows you to turn the Damper function “ON” or “OFF” for the Extra Voice section.
Use the PAGE LEFT and PAGE RIGHT Select Touch Buttons to move back and forth between “EXV1” and“EXV2.”
Turn the VALUE Rotary Control to turn the Damper “ON” or “OFF.”

22 Special Performance Features
CONTROL Edit Menu - Page 5
OCTAVE Touch Button Functions
This Advanced Feature Menu Page allows you to select different functions for the OCTAVE Touch Buttons.
From the previous screen, touch the PAGE UP Touch Button once, then touch the PAGE LEFT Touch Button once. The Information Center Display should now look like this:
The legend underneath the word “DOWN” should be blinking.
You can now select different functions for the OCTAVE DOWN, OCTAVE UP and LOWER Touch Buttons.
The data chart below shows the options you may select.
OCTAVE Touch Buttons Functions
Description Function
ORIGIN The selected Touch Button will perform its original function.
LES STOP The selected Touch Button will stop the Leslie rotors.
LES FAST The selected Touch Button will switch the Leslie rotors to FAST.
VIB UPPER The selected Touch Button will turn the Vibrato effect “ON” for the Upper Manual.
VIB LOWER The selected Touch Button will turn the Vibrato effect “ON” for the Lower Manual.
GLIDE The selected Touch Button will activate the Glide effect.
SPRING The selected Touch Button will produce the effect of jostling a spring-type Reverb unit.
DELAY TIME The selected Touch Button will allow you to program the Delay Time by touching it repeatedlyat the desired rate. Touching and Holding the button will turn the Delay effect “OFF.”
PRIO UPPER,PRIO LOWER
Drawbar Priority - Turning the selected Touch Button “ON” will override the Drawbarregistration in the selected Patch with the physical Drawbar registration
Use the PAGE LEFT and PAGE RIGHT Touch Buttons to select “DOWN,” “UP,” or “LOWER.”
Turn the VALUE Rotary Control to select the function once you have selected the Touch Button you want tochange.
23Special Performance Features
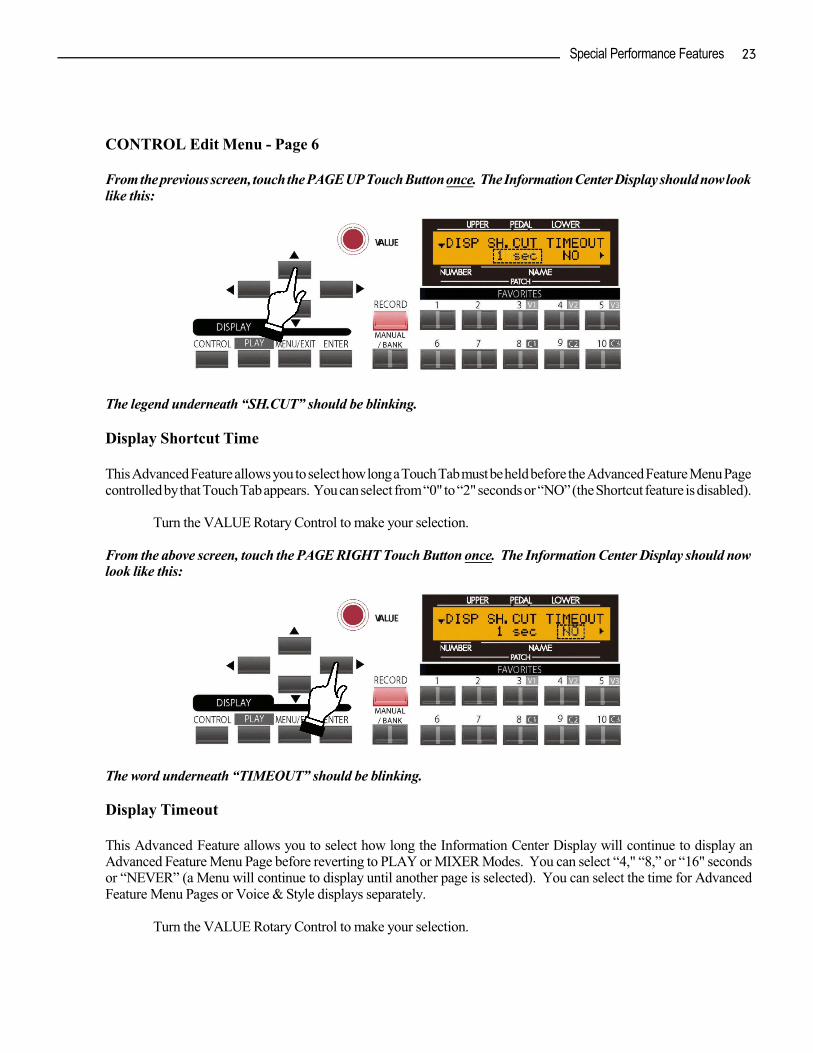
CONTROL Edit Menu - Page 6
From the previous screen, touch the PAGE UP Touch Button once. The Information Center Display should now looklike this:
The legend underneath “SH.CUT” should be blinking.
Display Shortcut Time
This Advanced Feature allows you to select how long a Touch Tab must be held before the Advanced Feature Menu Pagecontrolled by that Touch Tab appears. You can select from “0" to “2" seconds or “NO” (the Shortcut feature is disabled).
Turn the VALUE Rotary Control to make your selection.
From the above screen, touch the PAGE RIGHT Touch Button once. The Information Center Display should nowlook like this:
The word underneath “TIMEOUT” should be blinking.
Display Timeout
This Advanced Feature allows you to select how long the Information Center Display will continue to display anAdvanced Feature Menu Page before reverting to PLAY or MIXER Modes. You can select “4," “8,” or “16" secondsor “NEVER” (a Menu will continue to display until another page is selected). You can select the time for AdvancedFeature Menu Pages or Voice & Style displays separately.
Turn the VALUE Rotary Control to make your selection.

24 Special Performance Features
From the above screen, touch the PAGE RIGHT Touch Button once. The Information Center Display should nowlook like this:
The legend underneath “POPUP” should be blinking.
Display Popup
This Advanced Feature allows you to select the interval at which the Pop Up is displayed when you move the[OVERDRIVE] or [EFFECT AMOUNT] knob. Th e setting range is 0.5 to 2 seconds. At NO no Pop Up isdisplayed.You can select “4," “8,” or “16" seconds or “NEVER” (a Menu will continue to display until another page is selected). You can select the time for Advanced Feature Menu Pages or Voice & Style displays separately.
Turn the VALUE Rotary Control to make your selection.

25Special Performance Features
CONTROL Edit Menu - Page 7
From the above screen, touch the PAGE UP Touch Button once. The Information Center Display should now looklike this:
The number underneath “VEL OFFSET” should be blinking.
Velocity Offset
This Advanced Feature allows you to adjust the keyboard velocity to your personal taste or playing style. You can selectfrom “-32" to “+32" with “0" being the normal setting. Use the “minus” numbers for a heavy touch and the “plus”numbers for a lighter touch.
From the above screen, touch the PAGE RIGHT Touch Button once. The Information Center Display should nowlook like this:
The word underneath “SND POINT” should be blinking.
Sounding Point
This Advanced Feature allows you to set the point along the key travel at which sound is produced.
The data chart below shows the options you may select.
KEYBOARD SOUNDING POINT Options
Description Function
DEEP Both the Drawbar and Extra Voice tones will sounds at the deep point along the keystroke.
AUTO The Drawbar voices will sound at a shallow point along the keystroke if no EXTRA VOICEtone is registered.
NOTE: If AUTO is selected with no EXTRA VOICE tone, the External Zone notes will sound at the shallow pointwith a fixed velocity value of 100.

26 Special Performance Features
From the above screen, touch the PAGE RIGHT Touch Button once. The Information Center Display should nowlook like this:
The word underneath “ORG” should be blinking.
Transpose Octave Action
This Advanced Feature allows you to select whether you want Transpose to take effect while you are pressing andholding keys, or after you release and then touch a key or keys.
The data chart below shows the options you may select.
TRANSPOSE OCTAVE ACTION Options
Description Function
NEXT If you are pressing and holding playing keys and you transpose the instrument by octavesusing the TRANSPOSE buttons, you will not hear the transposition until you release the keysyou are holding and touch a new key.
EVERY If you are pressing and holding playing keys and you transpose the instrument by octavesusing the TRANSPOSE buttons, you will hear the octave change while you are holding thekeys down.

27Special Performance Features
CONTROL Edit Menu - Page 8
From the above screen, touch the PAGE UP Touch Button once. The Information Center Display should now looklike this:
The word underneath “PART ON MODE” should be blinking.
PART ON MODE
This Advanced Feature allows you to select how to register the ORGAN section along with the EXTRA VOICE Groups.
The data chart below shows the options you may select.
PART ON MODE Options
Description Function
ADDITIVE The ORGAN section and EXTRA VOICE Groups operate independently - when you turn onesection “ON,” its registration will “add” to the other if the other is also “ON.”
ALTERNATE The ORGAN and EXTRA VOICE Groups are mutually exclusive. When you turn the ORGANsection “ON,” the EXTRA VOICES registered for that Manual will turn “OFF.”
NOTE: The Upper and Lower Manuals are independent - if you turn the UPPER ORGAN Touch Button “ON,”doing so will not cancel an EXTRA VOICE registration for the Lower Manual.
NOTE: If “ALTERNATE” is selected, you can still “add” the ORGAN and EXTRA VOICE Sections by pressing and
holding the “ON” Touch Button for the section already selected, then touching the “ON” Touch Button for thesection you wish to add.

28 Special Performance Features
Ë CONTROL Touch Button
You can program the CONTROL Touch Button with an Advanced Feature you frequently use, such as Percussion,Equalizer, Foot Switch functions, etc. To do this:
1. Locate an Advanced Feature you use frequently. For this example we will use Master Equalizer, whichis located in the OD/EQU Edit Menu.
NOTE: For information about the Equalizer, please consult the EQUALIZER section of thisGuide.
2. When the Advanced Feature you want is displaying, Touch and Hold the RECORD Touch Button.
3. While holding the red RECORD Touch Button, en the Advanced Feature you want is displaying, Touchand Hold the RECORD Touch Button.
The Information Center Display should display the following for approximately 1 second:
When the above message disappears, your Advanced Feature will be saved to the CONTROL Touch Button.