Enterprise Deployment Guide for Oracle ... - Oracle Help Center
Upload
khangminh22Category
view
2download
0
[1] Oracle® Invoice MatchingOperations Guide
Release 15.0
E68579-02
January 2016

Oracle Retail Invoice Matching Operations Guide, Release 15.0
Copyright © 2015, Oracle and/or its affiliates. All rights reserved.
Primary Author: Nathan Young
This software and related documentation are provided under a license agreement containing restrictions on use and disclosure and are protected by intellectual property laws. Except as expressly permitted in your license agreement or allowed by law, you may not use, copy, reproduce, translate, broadcast, modify, license, transmit, distribute, exhibit, perform, publish, or display any part, in any form, or by any means. Reverse engineering, disassembly, or decompilation of this software, unless required by law for interoperability, is prohibited.
The information contained herein is subject to change without notice and is not warranted to be error-free. If you find any errors, please report them to us in writing.
If this is software or related documentation that is delivered to the U.S. Government or anyone licensing it on behalf of the U.S. Government, then the following notice is applicable:
U.S. GOVERNMENT END USERS: Oracle programs, including any operating system, integrated software, any programs installed on the hardware, and/or documentation, delivered to U.S. Government end users are "commercial computer software" pursuant to the applicable Federal Acquisition Regulation and agency-specific supplemental regulations. As such, use, duplication, disclosure, modification, and adaptation of the programs, including any operating system, integrated software, any programs installed on the hardware, and/or documentation, shall be subject to license terms and license restrictions applicable to the programs. No other rights are granted to the U.S. Government.
This software or hardware is developed for general use in a variety of information management applications. It is not developed or intended for use in any inherently dangerous applications, including applications that may create a risk of personal injury. If you use this software or hardware in dangerous applications, then you shall be responsible to take all appropriate fail-safe, backup, redundancy, and other measures to ensure its safe use. Oracle Corporation and its affiliates disclaim any liability for any damages caused by use of this software or hardware in dangerous applications.
Oracle and Java are registered trademarks of Oracle and/or its affiliates. Other names may be trademarks of their respective owners.
Intel and Intel Xeon are trademarks or registered trademarks of Intel Corporation. All SPARC trademarks are used under license and are trademarks or registered trademarks of SPARC International, Inc. AMD, Opteron, the AMD logo, and the AMD Opteron logo are trademarks or registered trademarks of Advanced Micro Devices. UNIX is a registered trademark of The Open Group.
This software or hardware and documentation may provide access to or information about content, products, and services from third parties. Oracle Corporation and its affiliates are not responsible for and expressly disclaim all warranties of any kind with respect to third-party content, products, and services unless otherwise set forth in an applicable agreement between you and Oracle. Oracle Corporation and its affiliates will not be responsible for any loss, costs, or damages incurred due to your access to or use of third-party content, products, or services, except as set forth in an applicable agreement between you and Oracle.
Value-Added Reseller (VAR) Language
Oracle Retail VAR Applications
The following restrictions and provisions only apply to the programs referred to in this section and licensed to you. You acknowledge that the programs may contain third party software (VAR applications) licensed to Oracle. Depending upon your product and its version number, the VAR applications may include:
(i) the MicroStrategy Components developed and licensed by MicroStrategy Services Corporation (MicroStrategy) of McLean, Virginia to Oracle and imbedded in the MicroStrategy for Oracle Retail Data Warehouse and MicroStrategy for Oracle Retail Planning & Optimization applications.
(ii) the Wavelink component developed and licensed by Wavelink Corporation (Wavelink) of Kirkland, Washington, to Oracle and imbedded in Oracle Retail Mobile Store Inventory Management.
(iii) the software component known as Access Via™ licensed by Access Via of Seattle, Washington, and imbedded in Oracle Retail Signs and Oracle Retail Labels and Tags.
(iv) the software component known as Adobe Flex™ licensed by Adobe Systems Incorporated of San Jose, California, and imbedded in Oracle Retail Promotion Planning & Optimization application.
You acknowledge and confirm that Oracle grants you use of only the object code of the VAR Applications. Oracle will not deliver source code to the VAR Applications to you. Notwithstanding any other term or condition of the agreement and this ordering document, you shall not cause or permit alteration of any VAR Applications. For purposes of this section, "alteration" refers to all alterations, translations, upgrades, enhancements, customizations or modifications of all or any portion of the VAR Applications including all

reconfigurations, reassembly or reverse assembly, re-engineering or reverse engineering and recompilations or reverse compilations of the VAR Applications or any derivatives of the VAR Applications. You acknowledge that it shall be a breach of the agreement to utilize the relationship, and/or confidential information of the VAR Applications for purposes of competitive discovery.
The VAR Applications contain trade secrets of Oracle and Oracle's licensors and Customer shall not attempt, cause, or permit the alteration, decompilation, reverse engineering, disassembly or other reduction of the VAR Applications to a human perceivable form. Oracle reserves the right to replace, with functional equivalent software, any of the VAR Applications in future releases of the applicable program.


v
Contents
Send Us Your Comments ....................................................................................................................... xiii
Preface ............................................................................................................................................................... xv
Audience..................................................................................................................................................... xvDocumentation Accessibility ................................................................................................................... xvRelated Documents ................................................................................................................................... xvCustomer Support ..................................................................................................................................... xviReview Patch Documentation ................................................................................................................. xviImproved Process for Oracle Retail Documentation Corrections ...................................................... xviOracle Retail Documentation on the Oracle Technology Network .................................................. xviiConventions .............................................................................................................................................. xvii
1 Introduction
What is Retail Invoice Matching? ......................................................................................................... 1-1Oracle Retail-Based Enterprises ............................................................................................................ 1-2Technical Architecture Overview .......................................................................................................... 1-2
2 Technical Architecture
Overview .................................................................................................................................................... 2-1Oracle Application Development Framework (ADF) .................................................................. 2-1
Model-View-Controller (MVC) Architectural Pattern .......................................................... 2-2ADF Security................................................................................................................................ 2-2ADF View (ADFv) ...................................................................................................................... 2-2ADF Controller (ADFc) .............................................................................................................. 2-2ADF Business Components (ADFbc)....................................................................................... 2-2ADF Model (ADFm)................................................................................................................... 2-3Oracle Metadata Services (MDS) .............................................................................................. 2-3
Retail Fusion Platform....................................................................................................................... 2-4Data Access Patterns.......................................................................................................................... 2-4
Database Access Using ADFbc ................................................................................................. 2-4Connection Pooling .................................................................................................................... 2-4
Data Storage ........................................................................................................................................ 2-4Accessing Merchandising System Data in Real Time............................................................ 2-4
RESTful Web Services ............................................................................................................................. 2-4Layering Model .................................................................................................................................. 2-5

vi
Client Program ............................................................................................................................ 2-6Enterprise Java Beans (EJB) ....................................................................................................... 2-6Application Module (AM) ......................................................................................................... 2-6Business Service .......................................................................................................................... 2-6Data Access Objects .................................................................................................................... 2-7Technical Services ....................................................................................................................... 2-7Threading Provider .................................................................................................................... 2-7
3 Backend System Administration and Configuration
System Assumptions ............................................................................................................................... 3-1reim.properties File .................................................................................................................................. 3-2
Array Process Size Settings............................................................................................................... 3-2EDI Injector Properties ...................................................................................................................... 3-2Credit Note AutoMatch Workspace Cleanup Setting .................................................................. 3-3
system.properties File.............................................................................................................................. 3-3Application Name.............................................................................................................................. 3-3
Logging Configuration............................................................................................................................ 3-3Log4J Conventions ............................................................................................................................. 3-3Log4J Properties ................................................................................................................................. 3-4
Internationalization ................................................................................................................................. 3-4Translation .......................................................................................................................................... 3-4Setting the User Language................................................................................................................ 3-5Setting Date, Time, and Number Formats ..................................................................................... 3-5Translations......................................................................................................................................... 3-6
ReIMResources.properties ..................................................................................................................... 3-6batch.properties ........................................................................................................................................ 3-6Managing Application Navigator ......................................................................................................... 3-6Managing Functional Security............................................................................................................... 3-7
Introduction to Retail Roles .............................................................................................................. 3-7Security Policy Stripe.................................................................................................................. 3-7Abstract Roles.............................................................................................................................. 3-7Job Roles ....................................................................................................................................... 3-7Duty Roles.................................................................................................................................... 3-8Privilege Roles ............................................................................................................................. 3-8
Retail Role Hierarchy......................................................................................................................... 3-8Default Security Reference Implementation ............................................................................... 3-10
Privileges .................................................................................................................................. 3-10Duties ........................................................................................................................................ 3-12Role Mapping ........................................................................................................................... 3-16
Extending the Default Security Reference Implementation ..................................................... 3-18Managing Roles in Retail Application Administration Console ...................................... 3-19
Disabling Content ........................................................................................................................... 3-19Safe Mode.................................................................................................................................. 3-20Disabling Links in the Sidebar ............................................................................................... 3-20
Managing Oracle Metadata Services (MDS) ............................................................................... 3-20Overview of Oracle Metadata Services ................................................................................ 3-20Using the System MBean Browser and the MDSAppRuntime MBean ........................... 3-21

vii
Exporting All Metadata Services Customizations .............................................................. 3-24Exporting Metadata Services Customization for a Specific User ..................................... 3-25Deleting All Metadata Services Customizations for a User............................................... 3-26Deleting a Customization for a Specific Page for All the Users........................................ 3-27Deleting a Customization for a Specific Page for a Particular User ................................. 3-28Importing All Metadata Services Customizations .............................................................. 3-28Importing a Specific Page Customization for a User.......................................................... 3-29Creating Metadata Labels ....................................................................................................... 3-30Promoting Metadata Labels ................................................................................................... 3-30Listing Metadata Labels .......................................................................................................... 3-30Deleting Metadata Labels ....................................................................................................... 3-31
4 Security in Retail Applications
SSO Setup for Retail Fusion Platform Applications......................................................................... 4-1Displaying External Application Contents in Non-SSO Environments ....................................... 4-1
5 Web Services in Retail Applications
Common Characteristics of Retail Application ReSTful Web Services ........................................ 5-1Deployment......................................................................................................................................... 5-1Security ................................................................................................................................................ 5-1Standard Request and Response Headers...................................................................................... 5-1Standard Error Response .................................................................................................................. 5-2
6 In-Context Launching Task Flows in Retail Applications
Limitations of In-Context Launch via URLs ....................................................................................... 6-1List of In-Context Launch Task Flows.................................................................................................. 6-1
7 Customizing Retail Applications
Using Custom Shared Library for Adding Custom Content ........................................................... 7-1Creating and Deploying a Custom Shared Library ...................................................................... 7-2
Download JDeveloper ................................................................................................................ 7-2Create the Custom Shared Library Workspace through JDeveloper .................................. 7-2Generate and Deploy the Custom Shared Library WAR...................................................... 7-8
Adding Custom Content into the Custom Shared Library....................................................... 7-10Customizing the Retail Application User Interface ....................................................................... 7-10
Overview of a Retail Application User Interface........................................................................ 7-10Adding a Dashboard ...................................................................................................................... 7-11Preparing the Custom Shared Library for Adding Dashboards.............................................. 7-12Adding a Dashboard into the UI Sidebar .................................................................................... 7-14
Adding an Oracle BI EE based Dashboard into the UI Sidebar ........................................ 7-14Securing Dashboard Access to Specific Roles ............................................................................. 7-18Adding Contextual Reports........................................................................................................... 7-18List of Contextual Business Events and Payloads...................................................................... 7-19Preparing the Custom Shared Library for Adding Contextual Reports ................................. 7-20Adding a Contextual Report To A Task Flow ............................................................................ 7-21

viii
8 Oracle BI EE Integration in Retail Application
Showing Oracle BI EE Reports and Dashboards in the Retail Application ................................. 8-1Various Examples of the BIReportFlow Taskflow ........................................................................ 8-4
Modifying the BIConnection Attributes at Runtime ........................................................................ 8-8Enabling In-Context Launch from the Oracle BI EE Content....................................................... 8-14
Enabling the ADF Contextual Event Action in Oracle BI EE ................................................... 8-15Preparing the Custom Shared Library for Contextual Event Model File ........................ 8-17
Enabling the ADF Contextual Event Action on the Target Column ....................................... 8-18Modifying the Oracle BI EE Analysis to Enable In-Context Launch....................................... 8-19Passing Parameters from the Oracle BI EE Analysis to the Taskflow..................................... 8-21Different Tabs for Each Set of Data .............................................................................................. 8-22Pre-Processing the Data Before Opening the Content............................................................... 8-23In-Context Launch from the Chart View of the Analysis ......................................................... 8-24Opening Different Taskflows from the Same Analysis ............................................................. 8-26
9 Troubleshooting
Oracle BI EE Integration ......................................................................................................................... 9-1The Oracle BI EE Dashboard Displays an Error Message 'An error occurred retrieving the BI content. Please contact your System Administrator' 9-1Troubleshooting In-Context Launch ............................................................................................... 9-1Contextual Area Displays a White Screen...................................................................................... 9-1
10 Integration
Integration Overview ........................................................................................................................... 10-1From the Supplier (to EDI) to ReIM ............................................................................................. 10-2From ReIM (to EDI) to the Supplier ............................................................................................. 10-2From ReIM to the Staging Table for Financial Systems Interface ............................................ 10-2From the Merchandising System to ReIM (Directly and Through EDI)................................. 10-2From ReIM to Receiver Unit and Cost Staging Tables to RMS ................................................ 10-3From ReIM to the Merchandising System................................................................................... 10-3
Electronic Data Interchange (EDI) Tables and Files ....................................................................... 10-4The EDI Reject Table....................................................................................................................... 10-4The EDI Reject File .......................................................................................................................... 10-5EDI Injector File Layout (Based on EDI 810)............................................................................... 10-5
All Files Layouts Input and Output ...................................................................................... 10-5Notes ........................................................................................................................................ 10-18
EDI Invoice Download File Layout (Based on EDI 812) ......................................................... 10-19Financial System Interface ................................................................................................................ 10-24
Foundation Financial Data Overview........................................................................................ 10-24Location Account Segments ................................................................................................. 10-24Department/Class Account Segments ............................................................................... 10-24
Financial Transactions .................................................................................................................. 10-25Complex and Fixed Deal-Related Posting.......................................................................... 10-25Financial Posting .................................................................................................................... 10-25
Tracking Receipt Posts ................................................................................................................. 10-25Tables Related to Tracking Receipt Posts ........................................................................... 10-25

ix
Multiple Lines for an Individual Receipt Item .................................................................. 10-26LDAP and Other User Interfaces...................................................................................................... 10-26
LDAP............................................................................................................................................... 10-26Setup Steps within LDAP ..................................................................................................... 10-27Setup Steps within ReIM....................................................................................................... 10-27Additional LDAP Resources ................................................................................................ 10-28
11 Technical Design
Locking Design Summary ................................................................................................................... 11-1Currency Design Summary ................................................................................................................. 11-2
Merchandising System (such as RMS) and ReIM Assumptions .............................................. 11-2Currency Conversion Process for Amount Tolerances ............................................................. 11-2Currency-Related System Validations ......................................................................................... 11-3Currency Formatting ...................................................................................................................... 11-3
12 Oracle E-Business Suite Financials Integration using Oracle Retail Financial Integration
Participating Applications................................................................................................................... 12-1Assumptions and Dependencies........................................................................................................ 12-1Data Setup............................................................................................................................................... 12-2
RMS Data Setup and Configuration............................................................................................. 12-2RMS System Options............................................................................................................... 12-2Organization Units .................................................................................................................. 12-2Currency Exchange Rates ....................................................................................................... 12-3Supplier Address Types.......................................................................................................... 12-3Country Codes.......................................................................................................................... 12-4Financial Calendar ................................................................................................................... 12-4Freight Terms............................................................................................................................ 12-4Payment Terms and Currency Exchange Rates .................................................................. 12-4Oracle E-Business Suite Financials Units and Site IDs ....................................................... 12-4Store and Warehouse Maintenance....................................................................................... 12-5RMS General Ledger Setup .................................................................................................... 12-6RMS General Ledger Cross Reference .................................................................................. 12-7ReSA General Ledger Cross Reference................................................................................. 12-7
ReIM Data Setup and Configuration............................................................................................ 12-8System Options ........................................................................................................................ 12-8Chart of Accounts Setup ......................................................................................................... 12-8Segment Mapping.................................................................................................................... 12-8Running the Initial Load from Oracle E-Business Suite Financials.................................. 12-9IM_SYSTEM_OPTIONS Table Setup .................................................................................... 12-9Configuring WebService Credentials in Weblogic Server Enterprise Manager........... 12-10
ReIM Transactional Maintenance .................................................................................................... 12-12Calculation of TRANS_AMOUNT ............................................................................................. 12-12Generation of Outgoing Data ...................................................................................................... 12-13Validation of Accounts When Posting Financial Entries ........................................................ 12-13Validation of Accounts When Prepaying a Merchandise Invoice ......................................... 12-14

x
Maintenance of Valid Accounts .................................................................................................. 12-15
13 PeopleSoft Financials Integration using Oracle Retail Financial Integration
Participating Applications ................................................................................................................... 13-1Assumptions and Dependencies........................................................................................................ 13-1Data Constraints .................................................................................................................................... 13-2Data Setup............................................................................................................................................... 13-2
RMS Data Setup and Configuration............................................................................................. 13-2Organization Units .................................................................................................................. 13-2Currency Exchange Rates ....................................................................................................... 13-3Supplier Address Types.......................................................................................................... 13-3Country Codes.......................................................................................................................... 13-4Financial Calendar ................................................................................................................... 13-5Freight Terms............................................................................................................................ 13-5Payment Terms and Currency Exchange Rates .................................................................. 13-5PeopleSoft Financials Units and Site IDs.............................................................................. 13-5Store and Warehouse Maintenance....................................................................................... 13-6RMS General Ledger Setup .................................................................................................... 13-6RMS General Ledger Cross Reference .................................................................................. 13-7ReSA General Ledger Cross Reference................................................................................. 13-7Configuring Drill Back and Forward Web Services ........................................................... 13-8
ReIM Data Setup and Configuration............................................................................................ 13-8System Options ........................................................................................................................ 13-8
CURRENCY PRECISION .............................................................................................................. 13-8Chart of Accounts Setup ......................................................................................................... 13-9Segment Mapping.................................................................................................................... 13-9Running the Initial Load from PeopleSoft Financials....................................................... 13-10IM_SYSTEM_OPTIONS Table Setup .................................................................................. 13-10Reporting................................................................................................................................. 13-10
ReIM Transactional Maintenance .................................................................................................... 13-11Calculation of TRANS_AMOUNT ............................................................................................. 13-11Generation of Outgoing Data ..................................................................................................... 13-12Validation of Accounts When Posting Financial Entries ........................................................ 13-12Maintenance of Valid Accounts .................................................................................................. 13-13Building and Posting Reference IDs........................................................................................... 13-13
Drilling Back ........................................................................................................................................ 13-14Drilling Back to RMS and ReSA from PeopleSoft Enterprise Financials .............................. 13-14Drilling Back to ReIM from PeopleSoft Enterprise Financials ............................................... 13-14
Drilling Forward ................................................................................................................................. 13-16Drilling Forward From RMS/ReSA to PeopleSoft Enterprise Financials............................. 13-16Drilling Forward From ReIM to PeopleSoft Enterprise Financials........................................ 13-16
14 System Configuration
Define System Options ........................................................................................................................ 14-1Define Supplier Options ..................................................................................................................... 14-2Define Matching Tolerance ................................................................................................................. 14-2Define matching Strategies ................................................................................................................. 14-2

xi
Define Reason Codes............................................................................................................................ 14-2Define GL Mappings............................................................................................................................ 14-4
15 Batch Processes
Batch Architectural Overview............................................................................................................. 15-1Batch Process Configuration.......................................................................................................... 15-2EDI-Related File-Based Batch Processes ..................................................................................... 15-2Internal Batch Processes ................................................................................................................. 15-3Internal Batch Processes that Write to Staging Tables............................................................... 15-3Batch Processes that Extract from Merchandising System (RMS) Staging Tables ................ 15-3
Batch Names ........................................................................................................................................... 15-3Functional Descriptions and Dependencies .................................................................................... 15-4Features of the Batch Processes .......................................................................................................... 15-6
Scheduler and the Command Line ............................................................................................... 15-6Batch Return Values........................................................................................................................ 15-6Batch Log and Error File Paths...................................................................................................... 15-6Multi-Threading Batch Processes ................................................................................................. 15-7
Complex Deal Upload (ComplexDealUploadBatch).......................................................... 15-7Fixed Deal Upload (FixedDealUploadBatch) ...................................................................... 15-7EDI Injector (EdiInjectorBatch) .............................................................................................. 15-7Auto-Match (AutoMatchBatch) ............................................................................................. 15-7
A Note about Restart and Recovery ............................................................................................. 15-7Executing Batch Processes ................................................................................................................... 15-7Tables Purge Batch Design .................................................................................................................. 15-8
Usage................................................................................................................................................. 15-8Purge Operational ........................................................................................................................... 15-8Purge Workspace ............................................................................................................................ 15-8Purge Workspace and Operational .............................................................................................. 15-8Primary Tables Involved................................................................................................................ 15-8
Operational ............................................................................................................................... 15-8Workspace................................................................................................................................. 15-9
Accounts Purge Batch Design ............................................................................................................. 15-9Usage................................................................................................................................................. 15-9Major Modules................................................................................................................................. 15-9Major Tables..................................................................................................................................... 15-9
EDI Invoice Injector Batch Design .................................................................................................... 15-9Usage............................................................................................................................................... 15-10Assumptions and Scheduling Notes ......................................................................................... 15-10Restart and Recovery.................................................................................................................... 15-10High-Level Flow Diagram ........................................................................................................... 15-10Primary Tables Involved.............................................................................................................. 15-10
Invoice Auto-Match Batch Design ................................................................................................... 15-11Usage............................................................................................................................................... 15-12Algorithms ..................................................................................................................................... 15-12Assumptions and Scheduling Notes .......................................................................................... 15-15High-Level Flow Diagram ........................................................................................................... 15-15Primary Tables Involved.............................................................................................................. 15-16

xii
Credit Note Auto-Match Batch Design ........................................................................................... 15-17Usage............................................................................................................................................... 15-18Algorithms ..................................................................................................................................... 15-18Assumptions and Scheduling Notes .......................................................................................... 15-19Post Processing .............................................................................................................................. 15-19High-Level Flow Diagram ........................................................................................................... 15-20Primary Tables Involved.............................................................................................................. 15-20
Receipt Write-Off Batch Design ....................................................................................................... 15-22Usage............................................................................................................................................... 15-23Assumptions and Scheduling Notes .......................................................................................... 15-23High-Level Flow Diagram ........................................................................................................... 15-23Primary Tables Involved.............................................................................................................. 15-23
REIM ........................................................................................................................................ 15-23RMS.......................................................................................................................................... 15-23
Reason Code Action Rollup Batch Design ..................................................................................... 15-23Usage............................................................................................................................................... 15-24Assumptions and Scheduling Notes .......................................................................................... 15-24High-Level Flow Diagram ........................................................................................................... 15-24Primary Tables Involved.............................................................................................................. 15-24
Financial Posting Batch Design ........................................................................................................ 15-24Usage............................................................................................................................................... 15-25Assumptions and Scheduling Notes .......................................................................................... 15-25Primary Tables Involved.............................................................................................................. 15-25
Lookup Tables that must be Populated.............................................................................. 15-25Tables to Which the Process Posts Data ............................................................................ 15-26
EDI Invoice Download Batch Design ............................................................................................. 15-28Usage............................................................................................................................................... 15-28Assumptions and Scheduling Notes .......................................................................................... 15-29Primary Tables Involved.............................................................................................................. 15-29Restart and Recovery.................................................................................................................... 15-29
Complex Deal Upload Batch Design ............................................................................................... 15-29Usage............................................................................................................................................... 15-29Primary Tables Involved.............................................................................................................. 15-29Multi-Threading ............................................................................................................................ 15-30BlockSize......................................................................................................................................... 15-30PartitionNo..................................................................................................................................... 15-30Generation of Debit Memo (or Credit Note Requests) for Deals ........................................... 15-30
Fixed Deal Upload Batch Design ..................................................................................................... 15-31Usage............................................................................................................................................... 15-31Primary Tables Involved.............................................................................................................. 15-31Multi-Threading ............................................................................................................................ 15-32BlockSize......................................................................................................................................... 15-32PartitionNo..................................................................................................................................... 15-32Generation of Debit Memo (or Credit Note Requests) for Deals ........................................... 15-32

xiii
Send Us Your Comments
Oracle Retail Invoice Matching Operations Guide, Release 14.1.1
Oracle welcomes customer comments and suggestions on the quality and usefulness of this document.
Your feedback is important, and helps us to best meet your needs as a user of our products. For example:
■ Are the implementation steps correct and complete?
■ Did you understand the context of the procedures?
■ Did you find any errors in the information?
■ Does the structure of the information help you with your tasks?
■ Do you need different information or graphics? If so, where, and in what format?
■ Are the examples correct? Do you need more examples?
If you find any errors or have any other suggestions for improvement, then please tell us your name, the name of the company who has licensed our products, the title and part number of the documentation and the chapter, section, and page number (if available).
Note: Before sending us your comments, you might like to check that you have the latest version of the document and if any concerns are already addressed. To do this, access the new Applications Release Online Documentation CD available on My Oracle Support and www.oracle.com. It contains the most current Documentation Library plus all documents revised or released recently.
Send your comments to us using the electronic mail address: [email protected]
Please give your name, address, electronic mail address, and telephone number (optional).
If you need assistance with Oracle software, then please contact your support representative or Oracle Support Services.
If you require training or instruction in using Oracle software, then please contact your Oracle local office and inquire about our Oracle University offerings. A list of Oracle offices is available on our Web site at www.oracle.com.

xiv
xv
Preface
This Operations Guide provides critical information about the processing and operating details of Product, including the following:
AudienceThis guide is for:
■ Systems administration and operations personnel
■ Systems analysts
■ Integrators and implementers
■ Business analysts who need information about Product processes and interfaces
Documentation AccessibilityFor information about Oracle's commitment to accessibility, visit the Oracle Accessibility Program website at http://www.oracle.com/pls/topic/lookup?ctx=acc&id=docacc.
Access to Oracle SupportOracle customers that have purchased support have access to electronic support through My Oracle Support. For information, visit http://www.oracle.com/pls/topic/lookup?ctx=acc&id=info or visit http://www.oracle.com/pls/topic/lookup?ctx=acc&id=trs if you are hearing impaired.
Related DocumentsFor more information, see the following documents in the Oracle Retail 15.0 documentation set:
■ Oracle Retail Invoice Matching Release Notes
■ Oracle Retail Invoice Matching Installation Guide
■ Oracle Retail Invoice Matching User Guide
■ Oracle Retail Invoice Matching Data Model
■ Oracle Retail Merchandising Batch Schedule
■ Oracle Retail Merchandising Implementation Guide

xvi
■ Oracle Retail Merchandising Security Guide
Customer SupportTo contact Oracle Customer Support, access My Oracle Support at the following URL:
https://support.oracle.com
When contacting Customer Support, please provide the following:
■ Product version and program/module name
■ Functional and technical description of the problem (include business impact)
■ Detailed step-by-step instructions to re-create
■ Exact error message received
■ Screen shots of each step you take
Review Patch DocumentationWhen you install the application for the first time, you install either a base release (for example, 14.1) or a later patch release (for example, 14.1.1). If you are installing the base release and additional patch releases, read the documentation for all releases that have occurred since the base release before you begin installation. Documentation for patch releases can contain critical information related to the base release, as well as information about code changes since the base release.
Improved Process for Oracle Retail Documentation CorrectionsTo more quickly address critical corrections to Oracle Retail documentation content, Oracle Retail documentation may be republished whenever a critical correction is needed. For critical corrections, the republication of an Oracle Retail document may at times not be attached to a numbered software release; instead, the Oracle Retail document will simply be replaced on the Oracle Technology Network Web site, or, in the case of Data Models, to the applicable My Oracle Support Documentation container where they reside.
This process will prevent delays in making critical corrections available to customers. For the customer, it means that before you begin installation, you must verify that you have the most recent version of the Oracle Retail documentation set. Oracle Retail documentation is available on the Oracle Technology Network at the following URL:
http://www.oracle.com/technetwork/documentation/oracle-retail-100266.html
An updated version of the applicable Oracle Retail document is indicated by Oracle part number, as well as print date (month and year). An updated version uses the same part number, with a higher-numbered suffix. For example, part number E123456-02 is an updated version of a document with part number E123456-01.
If a more recent version of a document is available, that version supersedes all previous versions.

xvii
Oracle Retail Documentation on the Oracle Technology NetworkDocumentation is packaged with each Oracle Retail product release. Oracle Retail product documentation is also available on the following Web site:
http://www.oracle.com/technetwork/documentation/oracle-retail-100266.html
(Data Model documents are not available through Oracle Technology Network. These documents are packaged with released code, or you can obtain them through My Oracle Support.)
Documentation should be available on this Web site within a month after a product release.
ConventionsThe following text conventions are used in this document:
Convention Meaning
boldface Boldface type indicates graphical user interface elements associated with an action, or terms defined in text or the glossary.
italic Italic type indicates book titles, emphasis, or placeholder variables for which you supply particular values.
monospace Monospace type indicates commands within a paragraph, URLs, code in examples, text that appears on the screen, or text that you enter.

xviii

1
Introduction 1-1
1Introduction
Oracle Retail Invoice Matching (ReIM) provides a critical control function to verify invoices against corresponding merchandise purchase receipts prior to payment of the supplier invoice. ReIM naturally complements the Oracle Retail Merchandising System (RMS), which supports ordering, receiving, and other inventory management functions in the purchasing cycle.
ReIM accurately and efficiently verifies supplier invoices against corresponding receipt data. When total invoice cost and quantity is supported by one or more receipts (that is, the quantity received in the system, valued at the negotiated purchase order cost) within pre-defined tolerances, the invoice is verified (or matched) and is ready for payment. Where differences exist between invoice and receipt, a dialog supports the resolution process. Invoices with resolved discrepancies can be paid. Invoices verified for payment are staged in a table for a retailer to extract to their accounts payable and general ledger solutions.
ReIM is designed as a standalone application, with logic built in to reference any merchandising system. However, integration between ReIM and RMS is very robust and offers a compelling business case to the retailer.
What is Retail Invoice Matching?Invoice matching describes a control procedure designed to ensure the retailer pays the negotiated cost for actual quantities received. Invoice verification or matching is a fundamental and critical control procedure for every retailer.
ReIM is designed to support the invoice verification process with accuracy and efficiency, focusing resources on exception management. ReIM accepts electronic invoice data uploads (EDI), and provides for rapid on-line summary entry of invoices. ReIM supports automated and on-line processes allowing one or more invoices to be matched against one or more receipts. When an invoice cost and quantities are matched within tolerance, it is ready for payment and staged to a table to allow a retailer to extract to their accounts payable solution.
If a cost or quantity difference between the invoice and receipts is outside tolerance, a discrepancy is recognized and must be resolved. A flexible resolution process allows discrepancies to be directed to the most appropriate user group for disposition. Reviewers are empowered to assign one or more reason codes that they are authorized to use, to resolve the discrepancy.
Each reason code is associated to a type of action (for example, create charge back or receiver cost adjustment). Many reason codes may be associated with a particular action type, allowing for more granular reporting, and so on. Actions drive document creation and EDI downloads to suppliers, inventory adjustments, and accounting

Oracle Retail-Based Enterprises
1-2 Oracle Retail Invoice Matching Operations Guide
activities. Actions also allow the invoice to be extracted by the retailer and posted for payment.
ReIM is highly integrated with RMS to drive efficiency, lower maintenance costs and improve control. ReIM integration provides access to the following data and more:
■ RMS foundation data (organizational and merchandising hierarchies, supplier data, currency, exchange rates, and so on)
■ Receipts tables and receiver adjustments
■ Self-billing transactions (consignment purchases, direct store deliveries, and so on)
■ RTV billings
■ Deals and rebate bill-backs
Other functionality within ReIM supports credit note matching against credit note requests (issued in resolution of invoice discrepancies, as well as for RTVs and so on), supplier-disputed debit memos, best terms and terms date processing, flexible tolerance definition dialog, and so on.
Oracle Retail-Based EnterprisesAlthough ReIM has been developed as a stand-alone product, the most efficient implementation would be as part of the Oracle Retail product suite. This integration provides the following important benefits:
■ The number of interface points that need to be maintained is minimized.
■ The amount of redundant data and processes within the retail organization is limited.
■ Future enhancements allow for greater extensibility into the retail enterprise.
■ Delays in product introductions can be minimized.
Technical Architecture OverviewThe Java architecture is built upon a layering model. That is, layers of the application communicate with one another through an established hierarchy and are able to communicate only with neighboring layers.
For more information, see "Chapter 2, "Technical Architecture".

2
Technical Architecture 2-1
2Technical Architecture
This chapter describes the overall software architecture for Oracle Retail Invoice Matching. The chapter provides a high-level discussion of the general structure of the system, including the various layers of Java code.
OverviewRetail Applications are based on the Oracle Application Development Framework (ADF). The following diagram shows the key components that make up the architecture of Retail Applications.
Figure 2–1 Oracle Retail Invoice Matching n-tier Architecture
Oracle Application Development Framework (ADF)Oracle Application Development Framework (ADF) supports organizations in building cutting-edge rich enterprise business applications that can be customized and personalized in all dimensions. Customizations are global changes, visible to all users that are performed by an administrator. Personalizations are user-made changes that are only visible to the person making the change.
ADF is based on the Java Enterprise Edition platform.

Overview
2-2 Oracle Retail Invoice Matching Operations Guide
Model-View-Controller (MVC) Architectural PatternApplications built using ADF follow a Model-View-Controller (MVC) architectural pattern. The goal of the MVC pattern is to clearly separate the application's functionality into a set of cooperating components.
ADF provides a set of components that realize the goals of each part of MVC pattern.
■ Model is realized by the ADF Bindings Layer.
■ Controller is realized by the ADF Controller Layer.
■ View is realized by the ADF Faces Layer.
■ ADF Business components and other backend components that sit below the Model layer are called Business Services.
ADF SecurityThe ADF security layer provides the following:
■ Standards based (Oracle Platform Security Services (OPSS)) security framework with default roles and permissions.
■ Tools to generate file-based identity store (for both Oracle Internet Directory and AD) based on the framework.
■ Tools to migrate file-based security store in to database for QA and production environments.
■ Reference implementation for clients to manage the security based on their business needs.
■ OPSS-based batch security framework (Retail Fusion Platform).
■ Tools/documentation to implement centralized logout in Single Sign-On (SSO) (Oracle Access Management (OAM)) environments.
ADF View (ADFv)The View layer provides the user interface to the application. The view layer uses HTML, rich Java components or XML and its variations to render the user interface. JSF based tag libraries are used to display the User Interface (UI).
ADF Controller (ADFc)The ADF Controller layer controls the application's flow. Web based applications are composed of multiple web pages with dynamic content. The controller layer manages the flow between these pages. Different models can be used when building this later. The most prominent architecture for Java-based web applications relies on a servlet that acts as the controller. The Apache Jakarta Struts controller, an open source framework controller, is the de facto standard for Java-based web systems. Oracle ADF uses the Struts controller to manage the flow of web applications.
ADF Business Components (ADFbc)The business service layer manages the interaction with a data persistence layer. It provides services as data persistence, object/relational mapping, transaction management, and business logic execution.
Business Components easily map the database object and extend it with business logic, validation, and so on.

Overview
Technical Architecture 2-3
The idea behind Business Components is to abstract the data layer from the view layer. This is a key concept in the MVC pattern. Business Components expose the interface to the view layer by using an application module that contains View Object. Those view objects contain a specific usage of the data layer.
ADF Business Components implements the business service through the following set of cooperating components:
■ Entity object – An entity object represents a row in a database table and simplifies modifying its data by handling all data manipulation language (DML) operations for you. It can encapsulate business logic for the row to ensure that your business rules are consistently enforced. You associate an entity object with others to reflect relationships in the underlying database schema to create a layer of business domain objects to reuse in multiple applications.
■ View object – A view object represents a SQL query. You use the full power of the familiar SQL language to join, filter, sort, and aggregate data into exactly the shape required by the end-user task. This includes the ability to link a view object with others to create master-detail hierarchies of any complexity. When end users modify data in the user interface, view objects collaborate with entity objects to consistently validate and save the changes.
■ Application module – An application module is the transactional component that UI clients use to work with application data. It defines an updatable data model and top-level procedures and functions (called service methods) related to a logical unit of work related to an end-user task.
ADF Model (ADFm)This is the component that acts as the connector between the view and business logic layers.
The Model layer connects the Business Services to the objects that use them in the other layers. Oracle ADF provides a Model layer implementation that sits on top of Business Services, providing a single interface that can be used to access any type of Business Services.
Developers get the same development experience when binding any type of Business Service layer implementation to the view and Controller layers. The Model layer in Oracle ADF served as the basis for JSR 227, A Standard Data binding & Data Access Facility for J2EE.
Oracle Metadata Services (MDS)The ability of an application to adapt to changes is a necessity that needs to be considered in the application design and that should drive the selection of the development platform and architecture. Flexible business applications must be able to adapt to organizational changes, different end user preferences and changes in the supported business are required.
MDS is the customization and personalization framework integral to Oracle Fusion Middleware and a key differentiator of the Oracle development platform. MDS provides a repository for storing metadata for applications, such as customizations and persisted personalization files and configurations.
Retail applications allow the following through MDS:
■ Personalization of saved searches through MDS.
■ Implicit personalization of few ADF UI attributes.

RESTful Web Services
2-4 Oracle Retail Invoice Matching Operations Guide
Retail Fusion PlatformThe Retail Fusion Platform (commonly referred to as Platform) is a collection of common, reusable software components that serve as foundation for building Oracle Retail's next generation ADF-based applications. The Platform imposes standards and patterns along with a consistent look and feel for Oracle Retail's ADF applications.
Data Access PatternsDatabase interaction between the middle tier and the database is done using the industry standard Java Database Connectivity Protocol (JDBC). JDBC facilitates the communication between a Java application and a relational database.
Database Access Using ADFbcJDBC is ingrained within Oracle ADF Business Components as the primary mechanism for its interaction between the middle tier and the database. SQL is realized within ADF business components to facilitate create, read, update and delete (CRUD) actions.
Connection PoolingWhen the application 'disconnects' a connection, the connection is saved into a pool instead of being actually disconnected. A standard connection pooling technique, this saved connection, enables Retail applications to reuse the existing connection from a pool. In other words, the application does not have to complete the connection process for each subsequent connection.
Data StorageThe Oracle database realizes the database tier in a Retail application’s architecture. It is the application's storage platform, containing the physical data (user and system) used throughout the application. The database tier is only intended to handle the storage and retrieval of information and is not involved in the manipulation or in the delivery of the data. This tier responds to queries; it does not initiate them.
Accessing Merchandising System Data in Real TimeThe data that the Retail application utilizes is located in both the application-specific and the merchandising system (RMS, for example) tables. Because Retail applications share the same schema as the merchandising system (RMS, for example), the application is able to interact with the merchandising system's data directly, in real time.
RESTful Web ServicesSeveral services used by the mobile application are exposed via RESTful web services.

Table 2–1 RESTful Web Services
Service Operation Type URL
Dashboard Get /dashboard
Supplier List Get /suppliers?employeeIds=[employeeId Array]&specificSearchValue=[]&numberOfInvoices=[]&supplierIds=[supplierId Array]&sortOrder=[]&screenSort=[]&pageSize=[]&pageNumber=[]
Supplier Get /supplier?supplierId=[]
Invoice List Get /invoices?employeeIds=[employeeId Array]&invoiceAmountHigh=[]&cashDiscount=[]&screenSort=[]&pageSize=[]&costDiscrepancy=[]&unitDiscrepancy=[]&specificSearchValue=[]&supplierIds=[supplierId Array]&pageNumber=[]&daysOut=[]&invoiceAmountLow=[]
Employee List Get /employees?pageNumber=[]&pageSize=[]&screenSort=[]&sortOrder=[]
Employee Get /employee?employeeId=[]
Supplier Criteria Get /supplierCriteria?pageNumber=[]&pageSize=[]&specificSearchValue=[]
Employee Criteria Get /employeeCriteria?pageNumber=[]&pageSize=[]&specificSearchValue=[]
RESTful Web Services
Technical Architecture 2-5
The ReIM batch processes execute in a client server model. The server side program is structured into a layering model.
Layering ModelThe following diagram offers a high level conceptual view of the layers and their responsibilities within the architecture. Key areas of the diagram are described in more detail in the sections that follow the diagram.

RESTful Web Services
2-6 Oracle Retail Invoice Matching Operations Guide
Client ProgramThe client program is a plain java program that is executed from a UNIX shell script or a scheduler. The client program is responsible for validation of the input parameters and initiating a call to the server program with user credentials for the authentication. Each batch program has a specific syntax that tells how the batch program needs to be executed and the parameters to be sent. The server side program comprises J2EE EJB, ADF Application Module and other layers of java code.
Enterprise Java Beans (EJB)Enterprise Java Beans is the server-side component architecture of the J2EE standard. The EJB reside on the application server. The EJB used in the process are stateless entity beans. The EJB modules are responsible for invoking corresponding application module program.
Application Module (AM)Application module is an ADF component that provides support for transaction control. It is wraps the relevant service method calls in a database transaction.
Business ServiceThe service layer consists of java classes that implement business logic (data retrieval, updates, deletions and so on) through one or more high-level methods. Generally the methods that are exposed by service layer classes accept and/or return business objects. The service layer encapsulates the business logic by calling down into business objects and the data access layer, thus making the code more maintainable.

RESTful Web Services
Technical Architecture 2-7
Data Access ObjectsThe data access objects abstract the actual persistence mechanism that is being used by service layer.
Technical ServicesTo increase the maintainability of the code, and enhance the development of new business logic, a number of base technical services are provided.
■ Factory Services – ReIM used two Factory Services for business services and DAO services respectively. They act as a factory for the business services, DAO objects.
■ Integration Service – This service provides a high-level mechanism for the integration of REIM with external financial web services.
■ Currency Service – This service provides a high-level mechanism for developers to represent a currency amount. This service provides the formatted representation of that currency.
Threading ProviderThis is a java module that performs the business process in multiple threads based on the threading configuration and the unit of works. Threading configuration consists of the work manager name that should be utilized for the execution of threads. For each of the batch process, there is a pre defined work manager that should be passed as a configuration parameter.
Table 2–2 Threading Configuration
Batch Process Work Manager
AutoMatch AutoMatchWM
EDI Injector EdiInjectorWM
Credit Note AutoMatch CNAutoMatchWM
Complex Deal Upload CDUploadWM

RESTful Web Services
2-8 Oracle Retail Invoice Matching Operations Guide
If a named work manager is not available in the WebLogic server, then the default work manager ('default') will be automatically assigned with the threading responsibility.
Fixed Deal Upload FDUploadWM
Financial Posting PostingWM
Table 2–2 (Cont.) Threading Configuration
Batch Process Work Manager

3
Backend System Administration and Configuration 3-1
3Backend System Administration and Configuration
This chapter of the operations guide is intended for administrators who provide support and monitor the running system.
The content in this chapter is not procedural, but is meant to provide descriptive overviews of the key system parameters that establish the ReIM environment.
See the Oracle Retail Invoice Matching Installation Guide for hardware and software requirements. Also see Oracle Retail application software compatibility information.
System Assumptions■ Unit of Measure
For invoices sent from RMS with quantities representing weight rather than number of eaches, ReIM converts the unit of measure (UOM) on the receipt to the UOM on the invoice.
■ ReIM uses non-merchandise codes defined on the RMS table NON_MERCH_CODE_HEAD. The form that allows users to enter non-merchandise codes in RMS is not available when the RMS invoice match indicator (SYSTEM_OPTIONS.REIM_IND) is set to no. Instead, non-merchandise codes should be added to the NON_MERCH_CODE_HEAD table using the database.
■ Supplier options
All suppliers must have options defined for their invoices to be processed by the system, and the terms defined for those suppliers must be completely updated in RMS. To support the use of suppliers in ReIM, terms must have the following properties on the TERMS_DETAIL table:
– ENABLED_FLAG is set to Y.
– START_DATE_ACTIVE must be defined.
– END_DATE_ACTIVE must be defined.
■ GL account maintenance
All reason codes, non-merchandise codes, and basic transactions must be mapped through GL account maintenance to support posting to the retailer's financial solution. Transactions are posted to a staging table in ReIM, the extract to update the accounts payable/financial solution is the retailer's responsibility.
■ TAX

reim.properties File
3-2 Oracle Retail Invoice Matching Operations Guide
If TAX is turned on, the retailer must have TAX regions, TAX items, and TAX codes set up in the merchandising system (such as RMS) to support validation of invoiced TAX charges. Verify the following values on the IM_SYSTEM_OPTIONS table:
Note: The values below should not be changed after initial setup. Changing them can cause errors in the system.
■ NUM_TAX_ALLOW is set to S (single) TAX, N (no) TAX.
TAX_VALIDATION_TYPE is set to RECON (Reconcile TAX), VENDR (Always Use Vendor TAX), or RETLR (Always use Retail TAX).
■ The DEFAULT_TAX_HEADER is set to Y or N.
■ TAX_DOCUMENT_CREATION_LVL is set to ITEM or FULL_INVOICE.
reim.properties FileRetailer-defined configurations for ReIM are located in the reim.properties file. Every setting in the reim.properties file is configurable, according to the retailer's specific business requirements. Some of these settings also are discussed in the Internationalization section later in this chapter.
The key system parameters contained in this file are described in the tables below. Although default values are given in some instances, retailers are responsible for setting these fields appropriately for their installation and hardware profile, rather than assuming these default values are the best choice.
Array Process Size SettingsThis setting establishes the size of the batch updates to the database. The value is expressed in number of records.
Note: The EDI Injector Batch process does not use this property.
Table 3–1 Array Process Size Settings
Parameter Description Comments
ARRAY_PROCESS_SIZE The threshold representing the maximum number of records to be part of a single INSERT or UPDATE operation in classes created by the DALGenerator. (Integer)
Default is 30.
EDI Injector Properties

Table 3–2 EDI Properties
Parameter Description Comments
injector.staged.history.days The number of days inject documents that failed to make it to the operational tables would be kept in the inject workspace.
injector.status.history.days The number of days processed inject status records would be kept in the application before getting purged.
Default is -.
Logging Configuration
Backend System Administration and Configuration 3-3
Credit Note AutoMatch Workspace Cleanup Setting
Table 3–3 Credit Note AutoMatch Workspace Cleanup Setting
Parameter Description Comments
creditnoteautomatchbatch. workspace.cleanup
This setting determines whether IM_MATCH_* tables are purged after the Credit Note AutoMatch Batch runs. If not purged, data from the previous matching batch process will remain in the workspace tables.
Valid values are:
true - After the Credit Note AutoMatch Batch runs, data is purged from IM-MATCH_* tables (except for IM_MATCH_*_HIST).
false - After the Credit Note AutoMatch Batch runs, data remains in the workspace tables.
system.properties FileThis file includes system options settings that cannot be accessed through the graphical user interface (GUI), because they cannot be changed once ReIM has been implemented.
Application Name
Table 3–4 Application Name
Parameter Description Default
system.application.name Represents the application name. REIM
Logging ConfigurationOracle Retail Invoice Matching utilizes the industry-standard Apache Log4j logging framework to log system messages and exceptions. This framework is embedded in the application code to allow for configurable logging to suit the needs of the retailer.
Log4J ConventionsThe Log4j API system utilizes three main configurable entities:
■ Loggers
■ Appenders
■ Layouts

Internationalization
3-4 Oracle Retail Invoice Matching Operations Guide
Loggers are responsible for defining exactly what gets logged. Typically, loggers define a specific level of detail (the log level) for a specific java package name as well as an appender the logger is assigned to. These criteria are then delegated to the appropriate appender for the specific logger. A single logger can be assigned to multiple appenders.
Appenders are used to dictate where logged content is directed to for a given logger. For example, the retailer may wish to configure a log appender to publish a log to a database table, a flat file, or an e-mail address. For each of these options, a separate appender would be defined and assigned to a specific logger.
Layouts are leveraged by the appender to dictate the exact content of the log message. Relevant information may include: date, time, and origin of the error message. These values can all be configured through the log layout.
Log4J PropertiesThe log4j.properties file holds all of the information relevant to logging for batch clients.
Table 3–5 Log4J Parameters
Parameter Description
log4j.appender.BATCHFILE Type of file appender.
log4j.appender.BATCHFILE.File Path to the log file where batches will write log entries.
log4j.appender.BATCHFILE.DatePattern Date pattern for log file.
log4j.appender.BATCHFILE.Append Indicator if the log should append entries to the existing file.
log4j.appender.BATCHFILE.Threshold Logging threshold level.
log4j.appender.BATCHFILE.layout Pattern layout for log entry.
log4j.appender.BATCHFILE.layout.ConversionPattern
Pattern for log entry.
InternationalizationInternationalization is the process of creating software that is able to be translated more easily. Changes to the code are not specific to any particular market. ReIM has been internationalized to support multiple languages.
This section describes configuration settings and features of the software that ensure that the base application can handle multiple languages.
TranslationTranslation is the process of interpreting and adapting text from one language into another. Although the code itself is not translated, components of the application that are translated may include the following:
■ Graphical user interface (GUI)
■ Error messages
The following components are not translated:
■ Documentation (online help, release notes, installation guide, user guide, operations guide)

Internationalization
Backend System Administration and Configuration 3-5
■ Batch programs and messages
■ Log files
■ Configuration tools
■ Reports
■ Demonstration data
■ Training materials
The user interface for ReIM has been translated into:
■ Chinese (simplified)
■ Chinese (traditional)
■ Croatian
■ Dutch
■ French
■ German
■ Greek
■ Hungarian
■ Italian
■ Japanese
■ Korean
■ Polish
■ Portuguese (Brazilian)
■ Russian
■ Spanish
■ Swedish
■ Turkish
Setting the User LanguageTo set the language ReIM displays in, set the user language. Choose Preferences from the drop-down menu under the user name, then choose Language in the taskbar. There are two language settings you can choose:
■ Default: This will permanently change the language for this user. All subsequent sessions will be in this language.
■ Current Session: This will change the language only for this session. It will revert back to the Default the next time this user logs in.
■ When finished making your selections, click the Save button.
Setting Date, Time, and Number Formats ReIM allows the user to see dates and times in a format appropriate for their own locale, regardless what the data is stored in. Set the language ReIM displays in, set the user language. Choose Preferences from the drop-down menu under the user name, then choose Regional in the taskbar. There are multiple settings you can choose:

ReIMResources.properties
3-6 Oracle Retail Invoice Matching Operations Guide
■ Territory: Choose a territory from this list. ReIM will automatically pick Date, Time, and Number formats appropriate for that territory.
■ Date Format: Choose an option from this menu to select a date format that is different from the default for the selected Territory.
■ Time Format: Choose an option from this menu to select a time format that is different from the default for the selected Territory.
■ Number Format: Choose an option from this menu to select a number format that is different from the default for the selected Territory.
■ Time Zone: Choose an option from this menu to select your time zone.
When finished making your selections, click the Save button.
TranslationsMost user interface and message translations are stored in xlf files. When you select a different language from the Preferences screen, ReIM will choose the correct xlf file for that language.
Some translations for some drop-down menus are stored on four database tables. The tables are RTC_LOOKUP_VALUES_TL, RTC_LOOKUP_TYPES_TL, RAF_FACET_ATTRIBUTE_CFG_TL, and RAF_NOTIFICATION_TYPE_TL. These tables are multilingual; all languages of these strings (English as well as all translations) are stored in the same place.
ReIMResources.propertiesThis file contains a key value pair for every label visible through the GUI at run time. Text labels and error messages have been identified, separated from the core source code, and placed into the properties file. The contents of the file can be used for retailer-specific configuration purposes (such as for the creation of custom labels or error messages).
batch.propertiesThis file contains security information about batch clients.
Table 3–6 batch.properties Parameters
Parameter Description
providerUrl URL of the server JNDI.
csm.wallet.partition.name Name of the wallet partition where the batch credentials are stored.
csm.wallet.path Path of the wallet where the batch credentials are stored
Managing Application NavigatorRetail Applications provide an ability to switch between applications using the Application Navigator facility. These applications are configured using the Manage Application Navigator screens on Retail Application Administration Console (RAAC). For more details on Application Navigator in RAAC, refer to the Oracle Retail

Managing Functional Security
Backend System Administration and Configuration 3-7
Application Administration Console chapter of the Oracle Retail Merchandising Implementation Guide.
Managing Functional SecurityThis section discusses the functional security for Retail applications and the components used to implement it. Functional security is based on OPSS. For more information on OPSS, refer to the Oracle Fusion Middleware Application Security Guide.
This section covers the following topics:
■ Introduction to Retail Roles
■ Retail Role Hierarchy
■ Default Security Reference Implementation
■ Extending the Default Security Reference Implementation
Introduction to Retail RolesUsers are not assigned to permissions directly; rather access is assigned to roles. Roles group particular permissions required to accomplish a task; instead of assigning individual permissions, roles match users with the permissions required to complete their particular task.
There are two main types of roles, enterprise and application.
The Identity Store contains enterprise roles that are available across applications. These are created as groups in LDAP, making them available across applications.
Applicable Retail Applications security provides four types of roles: abstract, job, duty, and privilege.
Applicable Retail Applications record job, abstract roles as enterprise roles and duty, privilege roles as application roles.
Security Policy StripeApplication roles are stored in the application-specific policy store. These roles are normally assigned by the system (based on user attributes), but can be provisioned to a user on request.
Abstract RolesAbstract roles are associated with a user, irrespective of their job or job function. These are also roles that are not associated with a job or duty. These roles are normally assigned by the system (based on user attributes), but can be provisioned to a user on request.
Naming Convention: All the Retail Abstract role names end with' _ABSTRACT'
Example: APPLICATION_ADMIN_ABSTRACT
Job RolesJJob roles are associated with the job of a user. A user with this job can have many job functions or job duties.
Note: These roles are called Job roles as the role names closely map to the jobs commonly found in most organizations.

Managing Functional Security
3-8 Oracle Retail Invoice Matching Operations Guide
Naming Convention: All the Retail Job role names end with' _JOB'
Example: REIM_APPLICATION_ADMINISTRATOR_JOB.
Duty RolesJob duties are tasks one must do on a job. A person is hired into a job role. These are the responsibilities one has for a job.
Duty roles are roles that are associated with a specific duty or a logical grouping of tasks. Generally, the list of duties for a job is a good indicator of what duty roles should be defined.
Duty roles should:
■ Read as a job description at a job posting site.
■ Duties that we create should be self-contained and pluggable into any existing or new job or abstract role.
Naming Convention: All the Retail duty role names end with' _DUTY'
Example: DOCUMENT_MANAGEMENT_DUTY
Privilege RolesPrivilege is the logical collection of permissions. A privilege can be associated with any number of User Interface components. Privileges are expressed as application roles.
Naming Convention: All the Retail Privilege role names end with' _PRIV'
Example: MAINTAIN_DOCUMENTS_PRIV
Privilege roles carry security grants.Example:<grant> <grantee> <principals> <principal><class>oracle.security.jps.service.policystore.ApplicationRole</class> <name>MAINTAIN_DOCUMENTS_PRIV</name> </principal> </principals> </grantee> <permissions> <permission> <class>oracle.adf.controller.security.TaskFlowPermission</class> <name>/oracle/retail/apps/reim/view/documentmaintenance/flow/DocumentMaintenanceFlow.xml#DocumentMaintenanceFlow</name> <actions>view</actions> </permission> </permissions></grant>
Retail Role HierarchyRetail role hierarchies are structured to reflect the Retail business process model.

Managing Functional Security
Backend System Administration and Configuration 3-9
Figure 3–1 Retail Role Hierarchy
Job roles inherit duty roles. For example, the ReIM application administrator Job role inherits the SYSTEM_OPTIONS_MAINTENANCE_DUTY roles.
<app-role> <name> SYSTEM_OPTIONS_MAINTENANCE_DUTY </name> <class>oracle.security.jps.service.policystore.ApplicationRole</class> <members> <member> <class>oracle.security.jps.internal.core.principals. JpsXmlEnterpriseRoleImpl</class> <name> REIM_APPLICATION_ADMINISTRATOR_JOB </name> </member> </members></app-role>
Duty roles inherit Privilege roles. Duty roles can inherit one or more other Duty roles.
Example: DOCUMENT_MANAGEMENT_DUTY inherits DOCUMENT_INQUIRY_DUTY role.
<app-role> <name>DOCUMENT_INQUIRY_DUTY</name> <class>oracle.security.jps.service.policystore.ApplicationRole</class> <members> <member> <class>oracle.security.jps.service.policystore.ApplicationRole</class> <name>DOCUMENT_MANAGEMENT_DUTY</name> </member> <member> <class>oracle.security.jps.internal.core.principals.JpsXmlEnterpriseRoleImpl</class> <name>REIM_APPLICATION_ADMINISTRATOR_JOB</name> </member> </members> </app-role>
Example: DOCUMENT_INQUIRY_DUTY role inherits the SEARCH_DOCUMENTS_PRIV role
<app-role> <name>SEARCH_DOCUMENTS_PRIV</name> <class>oracle.security.jps.service.policystore.ApplicationRole</class> <members> <member> <class>oracle.security.jps.service.policystore.ApplicationRole</class>

Managing Functional Security
3-10 Oracle Retail Invoice Matching Operations Guide
<name>DOCUMENT_INQUIRY_DUTY</name> </member> <member> <class>oracle.security.jps.internal.core.principals.JpsXmlEnterpriseRoleImpl</class> <name>REIM_APPLICATION_ADMINISTRATOR_JOB</name> </member> </members> </app-role>
Default Security Reference ImplementationRetail applications ship with default security reference implementations. The source of truth for default reference implementation is the jazn-data.xml file.
Privileges
Table 3–7 Privileges
Name Description
Search Documents Priv A privilege for searching for documents
Maintain Documents Priv A privilege for creating and editing documents.
Delete Documents Priv A privilege for deleting documents.
View Documents Priv A privilege for viewing documents,
Pay Invoice Manually Priv A privilege to allow user to pay an invoice before matching the invoice.
EDI Maintenance Priv A privilege for allowing a user to fix EDI errors.
Reverse Debit Memo Priv A privilege for allowing a user to reverse a Debit Memo
Create Credit Note from CNR Priv
A privilege for allowing a user to create a credit note from a credit note request
Void Credit Note Priv A privilege for allowing a user to void a credit note.
Search Tolerance Priv A privilege for searching for tolerance settings.
Maintain Tolerance Priv A privilege for creating and editing tolerance settings.
Delete Tolerance Priv A privilege for deleting a tolerance setting
View Tolerance Priv A privilege for viewing for tolerance settings.
Search Tolerance Mapping Priv
A privilege for searching for tolerance mapping settings.
Maintain Tolerance Mapping Priv
A privilege for creating and editing tolerance mapping settings.
Delete Tolerance Mapping Priv
A privilege for deleting a tolerance mapping setting
View Tolerance Mapping Priv
A privilege for viewing for tolerance mapping settings.
Search Match Strategy Priv A privilege for searching for Match Strategy settings.
Maintain Match Strategy Priv
A privilege for creating and editing Match Strategy settings.
Delete Match Strategy Priv A privilege for deleting a Match Strategy setting
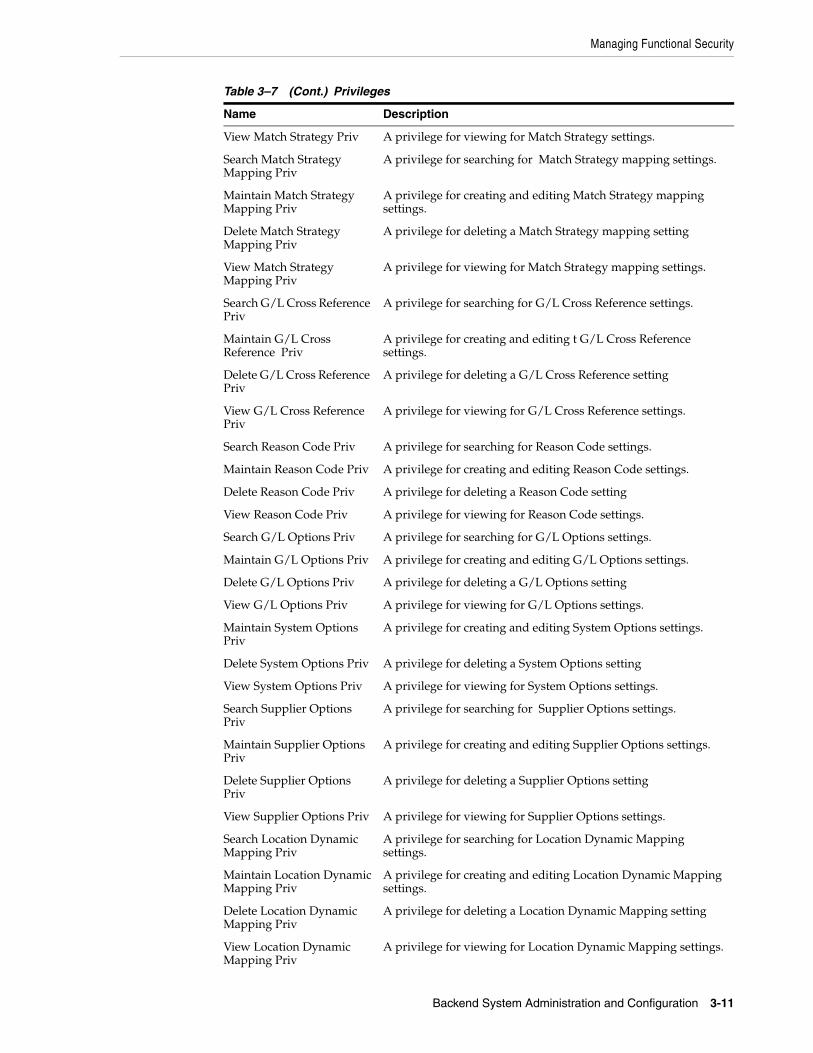
Managing Functional Security
Backend System Administration and Configuration 3-11
View Match Strategy Priv A privilege for viewing for Match Strategy settings.
Search Match Strategy Mapping Priv
A privilege for searching for Match Strategy mapping settings.
Maintain Match Strategy Mapping Priv
A privilege for creating and editing Match Strategy mapping settings.
Delete Match Strategy Mapping Priv
A privilege for deleting a Match Strategy mapping setting
View Match Strategy Mapping Priv
A privilege for viewing for Match Strategy mapping settings.
Search G/L Cross Reference Priv
A privilege for searching for G/L Cross Reference settings.
Maintain G/L Cross Reference Priv
A privilege for creating and editing t G/L Cross Reference settings.
Delete G/L Cross Reference Priv
A privilege for deleting a G/L Cross Reference setting
View G/L Cross Reference Priv
A privilege for viewing for G/L Cross Reference settings.
Search Reason Code Priv A privilege for searching for Reason Code settings.
Maintain Reason Code Priv A privilege for creating and editing Reason Code settings.
Delete Reason Code Priv A privilege for deleting a Reason Code setting
View Reason Code Priv A privilege for viewing for Reason Code settings.
Search G/L Options Priv A privilege for searching for G/L Options settings.
Maintain G/L Options Priv A privilege for creating and editing G/L Options settings.
Delete G/L Options Priv A privilege for deleting a G/L Options setting
View G/L Options Priv A privilege for viewing for G/L Options settings.
Maintain System Options Priv
A privilege for creating and editing System Options settings.
Delete System Options Priv A privilege for deleting a System Options setting
View System Options Priv A privilege for viewing for System Options settings.
Search Supplier Options Priv
A privilege for searching for Supplier Options settings.
Maintain Supplier Options Priv
A privilege for creating and editing Supplier Options settings.
Delete Supplier Options Priv
A privilege for deleting a Supplier Options setting
View Supplier Options Priv A privilege for viewing for Supplier Options settings.
Search Location Dynamic Mapping Priv
A privilege for searching for Location Dynamic Mapping settings.
Maintain Location Dynamic Mapping Priv
A privilege for creating and editing Location Dynamic Mapping settings.
Delete Location Dynamic Mapping Priv
A privilege for deleting a Location Dynamic Mapping setting
View Location Dynamic Mapping Priv
A privilege for viewing for Location Dynamic Mapping settings.
Table 3–7 (Cont.) Privileges
Name Description

Managing Functional Security
3-12 Oracle Retail Invoice Matching Operations Guide
Duties
Search Dept Class Dynamic Mapping Priv
A privilege for searching for Dept Class Dynamic Mapping settings.
Maintain Dept Class Dynamic Mapping Priv
A privilege for creating and editing Dept Class Dynamic Mapping settings.
Delete Dept Class Dynamic Mapping Priv
A privilege for deleting a Dept Class Dynamic Mapping setting
View Dept Class Dynamic Mapping Priv
A privilege for viewing for Dept Class Dynamic Mapping settings.
Search Manual Match Priv A privilege to allow a user search for invoices and receipts to be manually matched
Manual Match Priv A privilege to allow a user to match an invoice manually through the UI.
Search Credit Note Match Priv
A privilege to allow a user to search for Credit Notes to Credit Note Requests to be matched,.
Credit Note Match Priv A privilege to match Credit Notes to Credit Note Requests.
Search Discrepancy List Priv A privilege to search for Discrepancies.
Cost Resolution Priv A privilege to allow a cost discrepancy to be resolved.
Quantity Resolution Priv A privilege to allow a quantity discrepancy to be resolved
Override Department Security Priv
A privilege to allow a user to ignore department security on search of cost discrepancies.
Search Tax Discrepancy List Priv
A privilege to search for Tax Discrepancies
Tax Discrepancy Resolution Priv
A privilege to allow a tax discrepancy to be resolved.
Table 3–8 Duties
Name Description List of Privileges
Document Management Duty
A Duty for managing documents. This duty is an extension of the Document Inquiry Duty
■ All privileges found in the Document Inquiry Duty.
■ Maintain Documents Privilege
■ Delete Documents Privilege
Document Inquiry Duty
A duty for viewing documents
-View Documents Priv
-Search Documents Priv
Pay Invoice Duty
A duty for paying an invoice manually
-Pay Invoice Manually Priv
EDI Maintenance Duty
A duty for fixing EDI Errors.
-EDI Maintenance Priv
Reverse Debit Memo Duty
A duty to allow user to reverse a Credit Note
- Reverse Debit Memo Priv
Table 3–7 (Cont.) Privileges
Name Description

Managing Functional Security
Backend System Administration and Configuration 3-13
Create Credit Note from CNR Duty
A duty to allow user to create a Credit Note from a Credit Note Request
- Create Credit Note from CNR Priv
Void Credit Note Duty
A duty for voiding a Credit Note.
- Void Credit Note Priv
Tolerance Maintenance Duty
A Duty for managing Tolerance settings. This duty is an extension of the Tolerance Inquiry Duty
-All privileges found in the Tolerance Inquiry Duty.
-Maintain Tolerance Priv
-Delete Tolerance Priv
-Maintain Tolerance Mapping Priv
-Delete Tolerance Mapping Priv
Tolerance Inquiry Duty
A duty for viewing Tolerance settings
-View Tolerance Priv
-View Tolerance Mapping Priv
-Search Tolerance Priv
-Search Tolerance Mapping Priv
Match Strategy Maintenance Duty
A Duty for managing Match Strategy settings. This duty is an extension of the Match Strategy Inquiry Duty
-All privileges found in the Match Strategy Inquiry Duty.
-Maintain Match Strategy Priv
-Delete Match Strategy Priv
-Maintain Match Strategy Mapping Priv
-Delete Match Strategy Mapping Priv
Match Strategy Inquiry Duty
A duty for viewing Match Strategy settings
-View Match Strategy Priv
-View Match Strategy Mapping Priv
-Search Match Strategy Priv
-Search Match Strategy Mapping Priv
G/L Cross Reference Maintenance Duty
A Duty for managing G/L Cross Reference settings. This duty is an extension of the G/L Cross Reference Inquiry Duty
-All privileges found in the G/L Cross Reference Inquiry Duty.
-Maintain G/L Cross Reference Priv
-Delete G/L Cross Reference Priv
G/L Cross Reference Inquiry Duty
A duty for viewing G/L Cross Reference settings
-View G/L Cross Reference Priv
-Search G/L Cross Reference Priv
Reason Code Maintenance Duty
A Duty for managing Reason Code settings. This duty is an extension of the Reason Code Inquiry Duty
-All privileges found in the Reason Code Inquiry Duty.
-Maintain Reason Code Priv
-Delete Reason Code Priv
Table 3–8 (Cont.) Duties
Name Description List of Privileges

Managing Functional Security
3-14 Oracle Retail Invoice Matching Operations Guide
Reason Code Inquiry Duty
A duty for viewing Reason Code settings
-View Reason Code Priv
-Search Reason Code Priv
G/L Options Maintenance Duty
A Duty for managing G/L Options settings. This duty is an extension of the G/L Options Inquiry Duty
-All privileges found in the G/L Options Inquiry Duty.
-Maintain G/L Options Priv
-Delete G/L Options Priv
G/L Options Inquiry Duty
A duty for viewing G/L Options settings
-View G/L Options Priv
-Search G/L Options Priv
System Options Maintenance Duty
A Duty for managing System Options settings. This duty is an extension of the System Options Inquiry Duty
-All privileges found in the System Options Inquiry Duty.
-Maintain System Options Priv
-Delete System Options Priv
System Options Inquiry Duty
A duty for viewing System Options settings
-View System Options Priv
Supplier Options Maintenance Duty
A Duty for managing Supplier Options settings. This duty is an extension of the Supplier Options Inquiry Duty
-All privileges found in the Supplier Options Inquiry Duty.
-Maintain Supplier Options Priv
-Delete Supplier Options Priv
Supplier Options Inquiry Duty
A duty for viewing Supplier Options settings
-View Supplier Options Priv
-Search Supplier Options Priv
Location Dynamic Mapping Maintenance Duty
A Duty for managing Location Dynamic Mapping settings. This duty is an extension of the Location Dynamic Mapping Inquiry Duty
-All privileges found in the Location Dynamic Mapping Inquiry Duty.
-Maintain Location Dynamic Mapping Priv
-Delete Location Dynamic Mapping Priv
Location Dynamic Mapping Inquiry Duty
A duty for viewing Location Dynamic Mapping settings
-View Location Dynamic Mapping Priv
-Search Location Dynamic Mapping Priv
Table 3–8 (Cont.) Duties
Name Description List of Privileges

Managing Functional Security
Backend System Administration and Configuration 3-15
Dept Class Dynamic Mapping Maintenance Duty
A Duty for managing Dept Class Dynamic Mapping settings. This duty is an extension of the Dept Class Dynamic Mapping Inquiry Duty
-All privileges found in the Dept Class Dynamic Mapping Inquiry Duty.
-Maintain Dept Class Dynamic Mapping Priv
-Delete Dept Class Dynamic Mapping Priv
Dept Class Dynamic Mapping Inquiry Duty
A duty for viewing Dept Class Dynamic Mapping settings
-View Dept Class Dynamic Mapping Priv
-Search Dept Class Dynamic Mapping Priv
Invoice Matching Duty
A duty for manually matching invoices
-Manually Match Priv
-Search Manual Match Priv
Resolve Cost Discrepancies Duty
A duty for resolving cost discrepancies
-Cost Discrepancy Priv
-Search Discrepancy List Priv
Resolve Quantity Discrepancies Duty
A duty for resolving quantity discrepancies
-Quantity Discrepancy Priv
-Search Discrepancy List Priv
Resolve Discrepancies Duty
A duty for resolving either cost or quantity discrepancies
-Cost Discrepancy Priv
-Quantity Discrepancy Priv
-Search Discrepancy List Priv
Override Department Security Duty
A Duty to allow user to change check box for overriding department security on the Discrepancy Review List.
-Override Department Security Priv
Credit Note Matching Duty
A duty for matching Credit Notes
-Credit Note Match Priv
-Search Credit Note Match Priv-
Resolve Tax Discrepancy Duty
A duty for resolving tax discrepancies
-Tax Discrepancy Resolution Priv
-Search Tax Discrepancy List Priv-
Table 3–8 (Cont.) Duties
Name Description List of Privileges
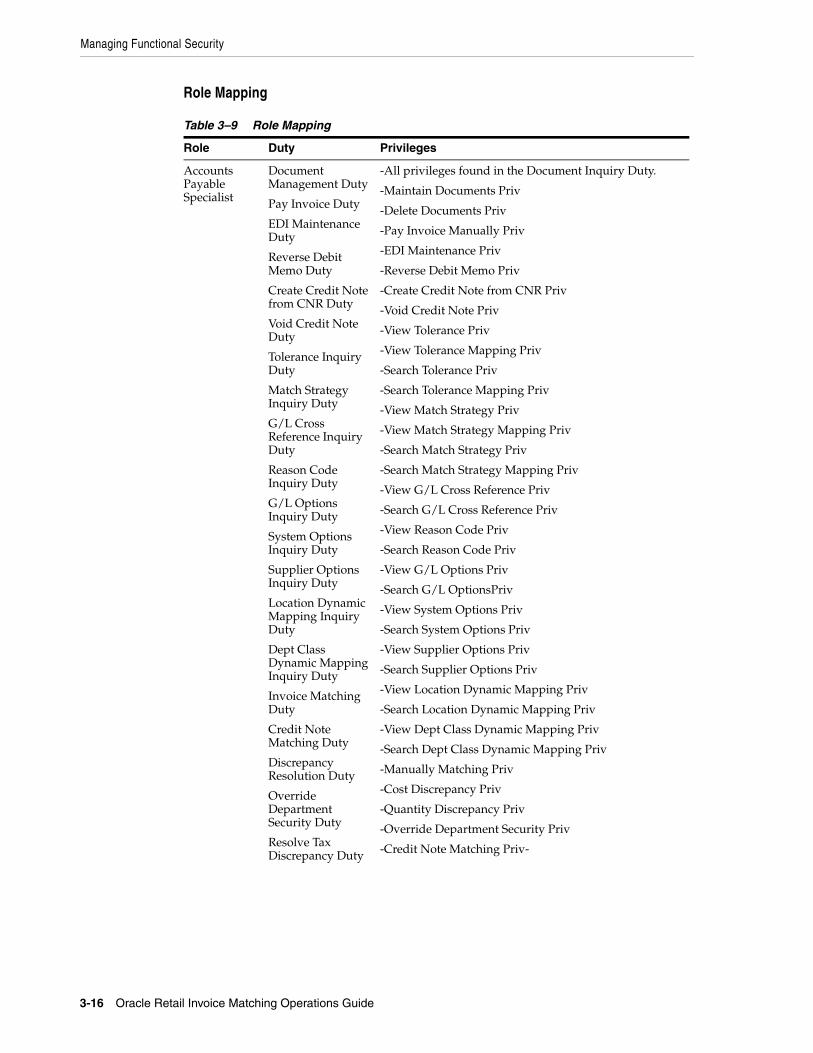
Managing Functional Security
3-16 Oracle Retail Invoice Matching Operations Guide
Role Mapping
Table 3–9 Role Mapping
Role Duty Privileges
Accounts Payable Specialist
Document Management Duty
Pay Invoice Duty
EDI Maintenance Duty
Reverse Debit Memo Duty
Create Credit Note from CNR Duty
Void Credit Note Duty
Tolerance Inquiry Duty
Match Strategy Inquiry Duty
G/L Cross Reference Inquiry Duty
Reason Code Inquiry Duty
G/L Options Inquiry Duty
System Options Inquiry Duty
Supplier Options Inquiry Duty
Location Dynamic Mapping Inquiry Duty
Dept Class Dynamic Mapping Inquiry Duty
Invoice Matching Duty
Credit Note Matching Duty
Discrepancy Resolution Duty
Override Department Security Duty
Resolve Tax Discrepancy Duty
-All privileges found in the Document Inquiry Duty.
-Maintain Documents Priv
-Delete Documents Priv
-Pay Invoice Manually Priv
-EDI Maintenance Priv
-Reverse Debit Memo Priv
-Create Credit Note from CNR Priv
-Void Credit Note Priv
-View Tolerance Priv
-View Tolerance Mapping Priv
-Search Tolerance Priv
-Search Tolerance Mapping Priv
-View Match Strategy Priv
-View Match Strategy Mapping Priv
-Search Match Strategy Priv
-Search Match Strategy Mapping Priv
-View G/L Cross Reference Priv
-Search G/L Cross Reference Priv
-View Reason Code Priv
-Search Reason Code Priv
-View G/L Options Priv
-Search G/L OptionsPriv
-View System Options Priv
-Search System Options Priv
-View Supplier Options Priv
-Search Supplier Options Priv
-View Location Dynamic Mapping Priv
-Search Location Dynamic Mapping Priv
-View Dept Class Dynamic Mapping Priv
-Search Dept Class Dynamic Mapping Priv
-Manually Matching Priv
-Cost Discrepancy Priv
-Quantity Discrepancy Priv
-Override Department Security Priv
-Credit Note Matching Priv-

Managing Functional Security
Backend System Administration and Configuration 3-17
Finance Manager
Document Management Duty
Pay Invoice Duty
EDI Maintenance Duty
Reverse Debit Memo Duty
Create Credit Note from CNR Duty
Void Credit Note Duty
Tolerance Maintenance Duty
Match Strategy Maintenance Duty
G/L Cross Reference Maintenance Duty
Reason Code Maintenance Duty
G/L Options Maintenance Duty
System Options Inquiry Duty
Supplier Options Maintenance Duty
Location Dynamic Mapping Maintenance Duty
Dept Class Dynamic Mapping Maintenance Duty
Invoice Matching Duty
Credit Note Matching Duty
Discrepancy Resolution Duty
Override Department Security Duty
Resolve Tax Discrepancy Duty
-All privileges found in the Document Inquiry Duty.
-Maintain Documents Priv
-Delete Documents Priv
-Pay Invoice Manually Priv
-EDI Maintenance Priv
-Reverse Debit Memo Priv
-Create Credit Note from CNR Priv
-Void Credit Note Priv
-All privileges found in the Tolerance Inquiry Duty.
-Maintain Tolerance Priv
-Delete Tolerance Priv
-Maintain Tolerance Mapping Priv
-Delete Tolerance Mapping Priv
-All privileges found in the Match Strategy Inquiry Duty.
-Maintain Match Strategy Priv
-Delete Match Strategy Priv
-Maintain Match Strategy Mapping Priv
-Delete Match Strategy Mapping Priv
-All privileges found in the G/L Cross Reference Inquiry Duty.
-Maintain G/L Cross Reference Priv
-Delete G/L Cross Reference Priv
-All privileges found in the Reason Code Inquiry Duty.
-Maintain Reason Code Priv
-Delete Reason Code Priv
-All privileges found in the G/L Options Inquiry Duty.
-Maintain G/L Options Priv
-Delete G/L Options Priv
-All privileges found in the System Options Inquiry Duty.
-All privileges found in the Supplier Options Inquiry Duty.
-Maintain Supplier Options Priv
-Delete Supplier Options Priv
-All privileges found in the Location Dynamic Mapping Inquiry Duty.
-Maintain Location Dynamic Mapping Priv
-Delete Location Dynamic Mapping Priv
-All privileges found in the Dept Class Dynamic Mapping Inquiry Duty.
-Maintain Dept Class Dynamic Mapping Priv
-Delete Dept Class Dynamic Mapping Priv
Table 3–9 (Cont.) Role Mapping
Role Duty Privileges

Managing Functional Security
3-18 Oracle Retail Invoice Matching Operations Guide
Extending the Default Security Reference Implementation
Note: Make sure that the policy store is loaded with the default security configuration. For more information, see the Post Installation steps in the Oracle Retail Invoice Matching Installation Guide.
The common decisions made to match your enterprise to the default security reference implementation include the following:
■ Do the default job roles match the equivalent job roles in your enterprise?
■ Do the jobs in your enterprise exist in the security reference implementation?
■ Do the duties performed by the jobs in your enterprise match the duties in the security reference implementation?
-Manually Match Priv
-Search Manual Match Priv
-Credit Note Match Priv
-Search Credit Note Match Priv
-Cost Discrepancy Priv
-Quantity Discrepancy Priv
-Search Discrepancy List Priv
-Override Department Security Priv
-Tax Discrepancy Resolution Priv
-Search Tax Discrepancy List Priv
Buyer Override Department Security Duty
Resolve Cost Discrepancies Duty
-Cost Discrepancy Priv
-Search Discrepancy List Priv
-Override Department Security Priv
Corporate Inventory Control Analyst
Resolve Quantity Discrepancies Duty
-Quantity Discrepancy Priv
-Search Discrepancy List Priv
ReIM Application Administrator
All duties. -All privileges
Table 3–9 (Cont.) Role Mapping
Role Duty Privileges

Managing Functional Security
Backend System Administration and Configuration 3-19
Figure 3–2 Decisions for Default Security Reference Implementation
Important: It is important when constructing a role hierarchy that circular dependencies are not introduced. The best practice is to leave the default security configuration in place and first incorporate your customized application roles in a test environment.
Managing Roles in Retail Application Administration ConsoleRetail applications provide a way in which retailers can modify the default roles to map to their security groups through the Retail Application Administration Console (RAAC).
RAAC is installed along with the Retail Application. Users with proper security privileges to access RAAC can launch RAAC by clicking on a link from the Retail Application's global menu.
For more information about using RAAC, refer to the Oracle Retail Application Administration Console chapter of the Oracle Retail Merchandising Implementation Guide.
Disabling ContentThere are situations where administrators need to disable certain links or the default content such as Dashboards due to unavailability or other reasons. Retail Applications provide the flexibility to disable such content so that the application remains largely unaffected.

Managing Functional Security
3-20 Oracle Retail Invoice Matching Operations Guide
Safe ModeApplications can choose to serve certain content such as dashboards to users upon launching the application. This is referred to as "Default Content". However sometimes this default content may cause delays in application launch after logging-in or worse it may render the application unusable.
To handle such scenarios Retail Applications provide a feature for Administrators called "Safe Mode" which. allows the user to log in without serving up any default content. Once this mode is turned on, no default content is shown to any user when the application is launched.
To turn on this mode the property "uishell.load.safe.mode" must be set to true in the RetailAppsViewController.properties file.
Disabling Links in the SidebarAdministrators may occasionally need to disable content launchable from links in the sidebar navigation tree. Retail applications provide the ability to disable such links.
To disable a link the Administrator must first find the "id" of that link as specified in the SidebarNavigationModel.xml file. This value must then be provided to the property "uishell.sidebar.invalid.item.ids" within the RetailAppsViewController.properties file. To disable more than one link, pass in multiple ids separated by a comma.
Managing Oracle Metadata Services (MDS)Retail Applications are built using ADF and one of the features within ADF is the Oracle Metadata Services (MDS) framework which provides a facility for retailers to customize the applications.
Refer to the document, Oracle Fusion Middleware Fusion Developer's Guide for Oracle Application Development Framework (https://docs.oracle.com/middleware/1213/adf/develop/adf-web-customizing-apps.htm#ADFFD2077), for more information about MDS.
Overview of Oracle Metadata Services Oracle Metadata Services (MDS) is a key infrastructure component in Oracle Fusion Middleware. It is the layer through which metadata is loaded, saved, cached, stored, managed, and customized both by various middleware components and by the applications built on Fusion Middleware.
The use of MDS in ADF applications, for example, can allow applications to remember how users like to work, and therefore not require them to set up the application for every session. This may include, for example, saving of common searches and screen layouts for every user. This allows making use of the application easier and more intuitive for the users. MDS provides a foundation that can be leveraged by Oracle Application Development Framework (ADF) applications to provide such persistent personalization.
Oracle Metadata Services (MDS) makes use of metadata repositories or partitions. A Metadata repository or partition contains metadata for Oracle Fusion Middleware components. It can also contain metadata about the configuration of Oracle Fusion Middleware and metadata for applications. Oracle Metadata Services (MDS) stores the customizations in a metadata repository and retrieves them at runtime to merge the customizations with the base metadata to reveal the customized application.
Managing Functional Security
Backend System Administration and Configuration 3-21
A common problem when a patch is installed for a Retail Application is that certain screens would fail to load or UI elements fail to display data properly.
The cause of this issue is commonly attributed to user personalization on screen elements that are now removed in the patch.
For example, prior to patching the application, users may have saved search criterias on certain screens as a way to conveniently recall their desired search results whenever they use the application. Those saved search criterias are persisted by ADF in the MDS repository. If the patch involves the removal of one of the attributes used in the search criterias, applying the patch will cause the screens that have those search criterias fail to load.
The MDS repository is configured in the WebLogic server where the Retail Application is deployed. The repository is database-based and it is organized or subdivided into partitions. Retail Applications are deployed with their own partition within the server's MDS repository.
It is recommended to not delete the MDS partition during the upgrade of the Retail application, instead use the functions described in this document to resolve any issues related to MDS.
Using the System MBean Browser and the MDSAppRuntime MBeanFor managing MDS Customizations in Retail Fusion Applications, use the Oracle Enterprise Manager to perform common metadata service tasks such as exporting, deleting, and importing of MDS Customizations. This can be done in the Oracle Enterprise Manager using the System MBean Browser and the MDSAppRuntime MBean.
Perform the following steps to access the MDSAppRuntime MBean.
1. Login to the Oracle Enterprise Manager by navigating to the URL in the following format:
http://<host>:<port>/em/
2. From the Navigation menu, under WebLogic Domain, right-click on the application domain and navigate to System MBean Browser from the context menu.
Choose the correct domain based on your installation. The figure below displays RAFDomain.

Managing Functional Security
3-22 Oracle Retail Invoice Matching Operations Guide
Figure 3–3 RAFDomain window
3. Under Application Defined MBeans, locate MDSAppRuntime which can be found under the following folder structure:
> oracle.mds.lcm > Server: AppServer > Application: Application Name > MDSAppRuntimeChoose the correct server and the Retail Application name based on your installation. The figure below displays RAFServer and RetailAppsFrameworkTest application.

Managing Functional Security
Backend System Administration and Configuration 3-23
Figure 3–4 RAFDomain System MBean Browser window
4. Click MDSAppRuntime management bean (MBean).

Managing Functional Security
3-24 Oracle Retail Invoice Matching Operations Guide
Figure 3–5 MDSAppRuntime window
5. Select the Operations tab to view the operations available for the MDSAppRuntime MBean.
Figure 3–6 Operations Tab window
These are the operations which can be used in managing MDS Customizations. The exportMetadata, deleteMetadata, importMetadata, createMetadataLabel, listMetadataLabels, deleteMetadataLabel, and promoteMetadataLabel; will be briefly discussed in the following sections.
Exporting All Metadata Services Customizations1. Navigate to the MDSAppRuntime management bean (MBean), as described in the
section "Using the System MBean Browser and the MDSAppRuntime MBean".

Managing Functional Security
Backend System Administration and Configuration 3-25
2. Export metadata by selecting the exportMetadata operation available from the Operations tab.
3. For toLocation, provide a valid absolute path to a directory or archive in the file system to which the selected documents will be exported. This location must be accessible from the machine where the application is running. If it does not exist, a directory will be created except that when the name ends with ".jar", ".JAR", ".zip", or ".ZIP", an archive will be created. Exporting metadata to an existing archive will overwrite the existing file.
Example: /tempDir/downloads/mdsExport/RetailAppsFrameworkTestMDS.zip
4. Click Invoke (located at the upper-right corner of the page) to proceed with the export operation.
5. Click Return to return to the list of operations.
Exporting Metadata Services Customization for a Specific User1. Navigate to the MDSAppRuntime management bean (MBean), as described in the
section "Using the System MBean Browser and the MDSAppRuntime MBean".
2. Export metadata by selecting the exportMetadata operation available from the Operations tab.
3. For toLocation, provide a valid absolute path to a directory or archive in the file system to which the selected documents will be exported. This location must be accessible from the machine where the application is running. If it does not exist, a directory will be created except that when the name ends with ".jar", ".JAR", ".zip", or ".ZIP", an archive will be created. Exporting metadata to an existing archive will overwrite the existing file.
Example: /tempDir/downloads/mdsExport/RetailAppsFrameworkTestMDS.zip
4. For docs, click the pencil icon. On the Edit Parameter popup, click Add, and in the Element box, enter a list of comma-separated, fully qualified document names or document name patterns to export.
To export customizations for a specific page, simply enter the fully qualified base document name in the Element box.
Example:
/oracle/retail/apps/framework/uishell/skin/page/TestTablesAndTrees.jsff
You can provide the path to multiple documents to export, by clicking the Add button. Do not provide any docs in case you want to export all customizations for the user.
5. For restrictCustTo, click the pencil icon. On the Edit Parameter popup, click Add, and in the Element box, enter the list of customization layer names. This can be a list of comma-separated customization layer names used to restrict the operation to only customization documents that match the specified customization layers.
Each customization layer name can contain, within a pair of brackets, optional customization layer values and value patterns separated by commas. Wildcards (%) may also be used for restricting the operation.
For example:

Table 3–10 Customization Values
Value Description
user[buyer] Restricts operation to the user ’buyer’
user[buyer, better_buyer] Restricts operation to the users ’buyer’ and ’better_buyer’
user[bu%] Restricts operation to user names that start with ’bu’ (for example, buyer)
user[be%] Restricts operation to user names that start with ’be’ (for example, betty_buyer)
user[%bu%] Restricts operation to users with ’bu’ in the name (for example, buyer and betty_buyer)
Managing Functional Security
3-26 Oracle Retail Invoice Matching Operations Guide
6. Click Invoke, located at the upper-right corner of the page, to proceed with the export operation.
7. A confirmation message will display in the page. Click Return to return to the list of operations.
Deleting All Metadata Services Customizations for a User1. Navigate to the MDSAppRuntime management bean (MBean), as described in the
section "Using the System MBean Browser and the MDSAppRuntime MBean".
2. Delete metadata by selecting the deleteMetadata operation available from the Operations tab.
3. For docs, click the pencil icon. On the Edit Parameter popup, click Add, and in the Element box, enter a list of comma-separated, fully qualified document names or document name patterns.
To delete all customizations for a user, enter "/**" (without the quotes).
This will recursively delete all customizations under "/" including any other customizations located in the folder(s) under it. Click OK.
4. For restrictCustTo, click the pencil icon. On the Edit Parameter popup, click Add, and in the Element box, enter the list of customization layer names. This can be used to restrict the operation to only customization documents that match the specified customization layers.
Each customization layer name can contain, within a pair of brackets, optional customization layer values and value patterns separated by commas. Wildcards (%) may also be used for restricting the operation.
For example:
Table 3–11 Customization Values
Value Description
user[buyer] Restricts operation to the user ’buyer’
user[buyer, better_buyer] Restricts operation to the users ’buyer’ and ’better_buyer’
user[bu%] Restricts operation to user names that start with ’bu’ (for example, buyer)
user[be%] Restricts operation to user names that start with ’be’ (for example, betty_buyer)

Managing Functional Security
Backend System Administration and Configuration 3-27
5. Click Invoke, located at the upper-right corner of the page, to proceed with the delete operation.
6. A confirmation message will display in the page. Click Return to return to the list of operations.
Deleting a Customization for a Specific Page for All the Users1. Navigate to the MDSAppRuntime management bean (MBean), as described in the
section "Using the System MBean Browser and the MDSAppRuntime MBean".
2. Delete metadata by selecting the deleteMetadata operation available from the Operations tab.
3. For excludeBaseDocs, select true. This is a Boolean value indicating whether to exclude base metadata documents from being deleted.
4. For docs, click the pencil icon. On the Edit Parameter popup, click Add, and in the Element box, enter a list of comma-separated, fully qualified document names or document name patterns.
To delete all customizations for a user, enter "/**" (without the quotes).
This will recursively delete all customizations under "/" including any other customizations located in the folder(s) under it. Click OK.
5. For restrictCustTo, click the pencil icon. On the Edit Parameter popup, click Add, and in the Element box, enter the list of customization layer names. This can be used to restrict the operation to only customization documents that match the specified customization layers.
Each customization layer name can contain, within a pair of brackets, optional customization layer values and value patterns separated by commas. Wildcards (%) may also be used for restricting the operation.
For example:
Table 3–12 Customization Values
Value Description
user[buyer] Restricts operation to the user ’buyer’
user[buyer, better_buyer] Restricts operation to the users ’buyer’ and ’better_buyer’
user[bu%] Restricts operation to user names that start with ’bu’ (for example, buyer)
user[be%] Restricts operation to user names that start with ’be’ (for example, betty_buyer)
user[%bu%] Restricts operation to users with ’bu’ in the name (for example, buyer and betty_buyer)
6. Click Invoke, located at the upper-right corner of the page, to proceed with the delete operation.
user[%bu%] Restricts operation to users with ’bu’ in the name (for example, buyer and betty_buyer)
Table 3–11 (Cont.) Customization Values
Value Description

Managing Functional Security
3-28 Oracle Retail Invoice Matching Operations Guide
7. A confirmation message will display in the page. Click Return to return to the list of operations.
Deleting a Customization for a Specific Page for a Particular User1. Navigate to the MDSAppRuntime management bean (MBean), as described in the
section "Using the System MBean Browser and the MDSAppRuntime MBean".
2. Delete metadata by selecting the deleteMetadata operation available from the Operations tab.
3. For excludeBaseDocs, select true. This is a Boolean value indicating whether to exclude base metadata documents from being deleted.
4. For docs, click the pencil icon. On the Edit Parameter popup, click Add, and in the Element box, enter a list of comma-separated, fully qualified document names or document name patterns.
To delete all customizations for a user, enter "/**" (without the quotes).
This will recursively delete all customizations under "/" including any other customizations located in the folder(s) under it. Click OK.
5. For restrictCustTo, click the pencil icon. On the Edit Parameter popup, click Add, and in the Element box, enter the list of customization layer names. This can be used to restrict the operation to only customization documents that match the specified customization layers.
Each customization layer name can contain, within a pair of brackets, optional customization layer values and value patterns separated by commas. Wildcards (%) may also be used for restricting the operation.
For example:
Table 3–13 Customization Values
Value Description
user[buyer] Restricts operation to the user ’buyer’
user[buyer, better_buyer] Restricts operation to the users ’buyer’ and ’better_buyer’
user[bu%] Restricts operation to user names that start with ’bu’ (for example, buyer)
user[be%] Restricts operation to user names that start with ’be’ (for example, betty_buyer)
user[%bu%] Restricts operation to users with ’bu’ in the name (for example, buyer and betty_buyer)
6. Click Invoke, located at the upper-right corner of the page, to proceed with the delete operation.
7. A confirmation message will display in the page. Click Return to return to the list of operations.
Importing All Metadata Services Customizations1. Navigate to the MDSAppRuntime management bean (MBean), as described in the
section "Using the System MBean Browser and the MDSAppRuntime MBean".
2. Import metadata by selecting the importMetadata operation available from the Operations tab.

Managing Functional Security
Backend System Administration and Configuration 3-29
3. For fromLocation, enter the path of the directory or archive from which the documents will be imported.
Example: /tempDir/downloads/mdsExport/RetailAppsFrameworkTestMDS.zip
4. Click Invoke, located at the upper-right corner of the page, to proceed with the import operation.
5. A confirmation message will display in the page. Click Return to return to the list of operations.
Importing a Specific Page Customization for a User1. Navigate to the MDSAppRuntime management bean (MBean), as described in the
section "Using the System MBean Browser and the MDSAppRuntime MBean".
2. Import metadata by selecting the importMetadata operation available from the Operations tab.
3. For fromLocation, enter the path of the directory or archive from which the documents will be imported.
Example: /tempDir/downloads/mdsExport/RetailAppsFrameworkTestMDS.zip
4. For excludeBaseDocs, select true. A Boolean value indicating whether to exclude base metadata documents from being imported.
5. For docs, click the pencil icon. On the Edit Parameter popup, click Add, and in the Element box, enter a list of comma-separated, fully qualified document names or document name patterns.
To import customizations for a specific page, simply enter the fully qualified base document name in the Element box.
For example: /oracle/retail/apps/framework/uishell/skin/page/TestTablesAndTrees.jsff
You can provide the path to multiple documents to be imported, by clicking the Add. When done, click OK
6. For restrictCustTo, click the pencil icon. On the Edit Parameter popup, click Add, and in the Element box, enter the list of customization layer names. This can be used to restrict the operation to only customization documents that match the specified customization layers.
Each customization layer name can contain, within a pair of brackets, optional customization layer values and value patterns separated by commas. Wildcards (%) may also be used for restricting the operation.
For example:
Table 3–14 Customization Values
Value Description
user[buyer] Restricts operation to the user ’buyer’
user[buyer, better_buyer] Restricts operation to the users ’buyer’ and ’better_buyer’
user[bu%] Restricts operation to user names that start with ’bu’ (for example, buyer)
user[be%] Restricts operation to user names that start with ’be’ (for example, betty_buyer)

Managing Functional Security
3-30 Oracle Retail Invoice Matching Operations Guide
7. Click Invoke, located at the upper-right corner of the page, to proceed with the import operation.
8. A confirmation message will display in the page. Click Return to return to the list of operations.
Creating Metadata Labels1. Navigate to the MDSAppRuntime management bean (MBean), as described in the
section "Using the System MBean Browser and the MDSAppRuntime MBean".
2. Create metadata label by selecting the createMetadataLabel operation available from the Operations tab.
3. For label, enter a valid name of the new metadata label to be created.
4. Click Invoke, located at the upper-right corner of the page, to proceed with the operation.
5. A confirmation message will display in the page. Click Return to return to the list of operations.
Promoting Metadata Labels1. Navigate to the MDSAppRuntime management bean (MBean), as described in the
section "Using the System MBean Browser and the MDSAppRuntime MBean".
2. Create metadata label by selecting the promoteMetadataLabel operation available from the Operations tab.
3. For label, enter a valid name of the new metadata label to be promoted. Promoting metadata labels can be used to roll back to an earlier version of the document, as captured by the label.
4. Click Invoke, located at the upper-right corner of the page, to proceed with the operation.
5. A confirmation message will display in the page. Click Return to return to the list of operations.
Listing Metadata Labels1. Navigate to the MDSAppRuntime management bean (MBean), as described in the
section "Using the System MBean Browser and the MDSAppRuntime MBean".
2. 2.List all metadata labels by selecting the listMetadataLabels operation available from the Operations tab.
3. Click Invoke, located at the upper-right corner of the page, to proceed with the operation.
4. This will list all the available metadata labels previously created. You can use this, for example, to get the latest metadata label that you want to promote.
5. Click Return to return to the list of operations.
user[%bu%] Restricts operation to users with ’bu’ in the name (for example, buyer and betty_buyer)
Table 3–14 (Cont.) Customization Values
Value Description

Managing Functional Security
Backend System Administration and Configuration 3-31
Deleting Metadata Labels1. Navigate to the MDSAppRuntime management bean (MBean), as described in the
section "Using the System MBean Browser and the MDSAppRuntime MBean".
2. Delete metadata label by selecting the deleteMetadataLabel operation available from the Operations tab.
3. For label, enter a valid name of the metadata label to be deleted.
4. Click Invoke, located at the upper-right corner of the page, to proceed with the operation.
5. A confirmation message will display in the page. Click Return to return to the list of operations.

Managing Functional Security
3-32 Oracle Retail Invoice Matching Operations Guide

4
Security in Retail Applications 4-1
4Security in Retail Applications
[2] Retail Applications leverage ADF's security framework that is based on the Oracle Platform Security Services.
[3] This section discusses the various assumptions around security for Retail Applications.
SSO Setup for Retail Fusion Platform ApplicationsRetail Fusion Platform provides the following applications as enterprise archive (EAR) files to Retail applications. By default, these applications are installing as part of Retail applications.
1. RetailAppsAdminConsole(RAAC)
2. RetailAppsMobileSecurity
a. RetailAppsMobileBasicAuth
b. RetailAppsMobileAccessService
3. RetailAppsRESTServices
In SSO environment, follow the SSO setup procedure for these applications similar to Retail applications.
Displaying External Application Contents in Non-SSO EnvironmentsRetail Applications allow retailers to display content from external applications. These contents are typically business intelligence reports from a third party application that are configured to display within the Retail Application's dashboard.
Some of these contents might be secured requiring users to login before the contents can be accessed and displayed.
In non-SSO environments, when a user logs out of the Retail Application, they may not be logged out of any secured content they had configured access to. Therefore, it is highly recommended that retailers only configure access to external content in a SSO-enabled environments where the application logout manages the logout from any other secured content that was previously accessed.

Displaying External Application Contents in Non-SSO Environments
4-2 Oracle Retail Invoice Matching Operations Guide

5
Web Services in Retail Applications 5-1
5Web Services in Retail Applications
[4] Retailers can access backend functionality in Retail Applications by calling the applications' ReSTful Web Services.
[5] Refer to http://www.oracle.com/technetwork/articles/javase/index-137171.html to learn more about ReST as an architectural style applied to building web services.
Common Characteristics of Retail Application ReSTful Web ServicesThis section describes the common characteristics.
DeploymentA Retail Application will package its ReST services as part of the application's Enterprise Archive (EAR) file. Specifically, those services are packaged as a Web Archive (WAR) within the EAR.
Installation of the ReST web services is therefore done by default.
SecurityServices are secured using J2EE-based security model.
■ Realm-based User Authentication. This verifies users through an underlying realm. The username and password is passed using Http Basic authentication.
■ Role-based Authorization. This assigns users to roles, which in turn are granted or restricted access to resources/services. The authorization of ReSTful web services is static and cannot be reassigned to other rules post installation. The following role(s) is/are associated with ReSTful Web Services and should be added to the Enterprise LDAP:
All enterprise roles defined above are mapped in web.xml and weblogic.xml of the ReST Service webapp.
The communication between the server and client is encrypted using one way SSL. In non-SSL environments the encoding defaults to BASE-64 so it is highly recommended that these ReST services are configured to be used in production environments secured with SSL connections.
Standard Request and Response HeadersRetail Application ReSTful web services have the following standard HTTP headers:
Accept: application/xml or application/JSONAccept-Version: 15.0 (service version number)

Common Characteristics of Retail Application ReSTful Web Services
5-2 Oracle Retail Invoice Matching Operations Guide
Accept-Language: en-US,en;q=0.8Accept-Versioning: False
Note: Specify 'Accept-Versioning: False' in the Service Request to bypass 'Accept-Version' validation on services.
Depending on the type of the operation or HTTP method, the corresponding response header is updated in the Http response with the following codes:
■ GET/READ : 200
■ PUT/CREATE : 201 created
■ POST/UPDATE : 204
■ DELETE : 204
Standard Error ResponseExample response payload in case of service error is depicted below:
<?xml version="1.0" encoding="UTF-8" standalone="yes"?> <messagesRDOes> <messagesRDO> <message>REST Service Version Mismatch</message> <messageType>ERROR</messageType> <status>BAD_REQUEST</status> </messagesRDO> </messagesRDOes>■ message: The error message - translated.
■ messageType: Value of 'ERROR' is returned.
■ status : For a bad request or error, the status is BAD_REQUEST.
■ The http error code for an error response is 400.

6
In-Context Launching Task Flows in Retail Applications 6-1
6In-Context Launching Task Flows in Retail Applications
Retail Applications can expose select task flows retailers can directly launch into. This feature is referred to as in-context launching in a Retail Application.
Retailers can launch these task flows directly through specific URLs.
Retail Applications will provide information about the various task flows retailers can in-context launch into including the URLs and the required parameters.
Retailers can use these URLs in other web pages as links. For example: the URL to a task flow that invokes the Summary Match Flow in a Retail Application can be added as a link to dashboard report on a BI server.
When the user clicks on a URL to a task flow, the Retail Application will open in a new browser window or tab depending on the specified target of the URL. The requested task flow will be shown as a UI tab within the Retail Application.
Limitations of In-Context Launch via URLs■ The In-Context launch feature will not detect if there is an already opened window
or tab for the Retail Application. So when a user clicks on a link to a Retail Application's task flow, say, a report on a BI server, a new browser window or tab will be opened even though the user already has an existing browser window or tab opened for that same Retail Application.
■ If a BI dashboard is added on the Retail Application, and if that dashboard has a report that contains links to in-context launchable task flows in the same Retail Application, a new browser window or tab will still be opened.
List of In-Context Launch Task Flows
Summary Match FlowIn-context launch from the Invoices Due Soon report located on the user dashboard. When this screen is launched from the Invoices Due Soon panel on the dashboard, the system fetches all the invoices and receipts associated with the default match key from the supplier and for the given invoice.
http://<host>:<port>/ReimViewController/faces/Home?navModelItemId=SummaryMatchService&supplier=130001&invoice=INVC 51319 02

Table 6–1 Summary Match Flow
Parameter ID Required? Description Sample URL
Supplier Yes Supplier/Vendor Id http://<host>:<port>/ReimViewController/faces/Home?navModelItemId=SummaryMatchService&supplier=130001&invoice=INVC 51319 02
Invoice Yes Invoice/Document Id
http://<host>:<port>/ReimViewController/faces/Home?navModelItemId=SummaryMatchService&supplier=130001&invoice=INVC 51319 02
List of In-Context Launch Task Flows
6-2 Oracle Retail Invoice Matching Operations Guide
Discrepancy List FlowIn-context launch from the Invoices Due Soon report located on the user dashboard. When this screen is launched from the Invoices Due Soon panel on the dashboard, the system fetches all the discrepant invoices for the given supplier and invoice
http://<host>:<port>/ReimViewController/faces/Home?navModelItemId=DiscrepancyListService&supplier=2300&invoice=am_6901_1
Table 6–2 Discrepancy List Flow
Parameter ID Required? Description Sample URL
Supplier Yes Supplier/Vendor Id http://<host>:<port>/ReimViewController/faces/Home?navModelItemId=DiscrepancyListService&supplier=2300&invoice=am_6901_1
Invoice Yes Invoice/Document Id
http://<host>:<port>/ReimViewController/faces/Home?navModelItemId=DiscrepancyListService&supplier=2300&invoice=am_6901_1

7
Customizing Retail Applications 7-1
7Customizing Retail Applications
This chapter discusses supported steps for customizing Retail applications.
Using Custom Shared Library for Adding Custom ContentWhen retailers want to add new content such as new pages, business components, or even Java code into a Retail Application, retailers will need to create a custom shared library, deploy that into the same managed server as the Retail Application, and register that library into the Retail Application.
Refer to the WebLogic documentation, Developing Applications with WebLogic Server, to learn more about developing and deploying shared libraries in WebLogic.
A Retail application that allows for customization will have as part of its installation an intermediary shared library that will serve as a registry to reference the actual customer-built shared libraries. The diagram below shows the deployment of a Retail Application with the Custom Shared Library Registry.
When retailers need to add their own content into the application, metadata to register their content into the application’s UI including the binaries for the content itself (for example, task flows and pages) are expected to be packaged into a Web Archive (WAR) file and deployed as a shared library in the same managed server as the application itself.
Then, the names of these shared libraries have to be referenced in the Custom Shared Library Registry.

Using Custom Shared Library for Adding Custom Content
7-2 Oracle Retail Invoice Matching Operations Guide
Creating and Deploying a Custom Shared LibraryThis section contains instructions on how retailers can create their own shared library that will contain custom content they want to include in the Retail Application UI.
The steps in this section are required before a retailer can customize a Retail Application.
Download JDeveloperTo create the custom shared library, it is recommended that you download and install JDeveloper version 12.1.3 by using the following link:
http://www.oracle.com/technetwork/developer-tools/jdev/downloads/index.html
Create the Custom Shared Library Workspace through JDeveloperThis section describes the steps to create and configure the Custom Shared Library Workspace in JDeveloper, which will house the code for any custom content the retailer wants to add into the Retail Application. Through JDeveloper, a shared library web application archive file (.WAR) can be generated which can be deployed in the same managed server as the Retail Application.
1. Open JDeveloper and choose Developer Role when prompted.
2. Create a new Fusion Web Application JDeveloper workspace.
a. Go to File > New to invoke the New Gallery dialog. Choose Fusion Web Application (ADF) as the type of application to create and click OK.

Using Custom Shared Library for Adding Custom Content
Customizing Retail Applications 7-3
b. Provide a meaningful application name, a directory path to the workspace, and an application (Java) package prefix. Click Finish.
c. JDeveloper will generate a new workspace with two projects: Model and View-Controller.

Using Custom Shared Library for Adding Custom Content
7-4 Oracle Retail Invoice Matching Operations Guide
3. Add a Manifest file containing the name of the shared library.
a. Right-click on the View-Controller project and choose New from the Context menu.
b. The New Gallery dialog appears. Choose the option, File (General), in the All Technologies section of the dialog. Click OK.

Using Custom Shared Library for Adding Custom Content
Customizing Retail Applications 7-5
c. The Create File dialog opens. For the File Name, specify MANIFEST.MF. For the Directory, the new file must be added under the src/META-INF sub-directory under the View-Controller project's directory.
d. Edit the new MANIFEST.MF file and add the following entries:
Manifest-Version: 1.0Implementation-Vendor: companyNameImplementation-Title: Custom Shared Library for companyNameImplementation-Version: 1.0Extension-Name: companyname.custom.shared.libSpecification-Version: 1.0Created-By: companyName
Modify the contents such that meaningful and unique values are used for Implementation-Vendor, Implementation-Title, Extension-Name, and Created-By. Example:
Manifest-Version: 1.0Implementation-Vendor: Acme RetailImplementation-Title: Custom Shared Library for Acme RetailImplementation-Version: 1.0Extension-Name: acmeretail.custom.shared.lib.procurementSpecification-Version: 1.0Created-By: AcmeRetail

Using Custom Shared Library for Adding Custom Content
7-6 Oracle Retail Invoice Matching Operations Guide
4. Create a deployment profile for the shared library.
a. Right-click on the View-Controller project and choose New from the Context menu.
b. The New Gallery dialog appears. Choose the option, WARFile (Deployment Profiles), in the All Technologies section of the dialog. Click OK.
c. Provide a unique and meaningful name for the Deployment Profile and click OK.

Using Custom Shared Library for Adding Custom Content
Customizing Retail Applications 7-7
d. The Edit WAR Deployment Profile Properties dialog is shown.
e. Under the General section, make sure that the Specify Java EE Web Context Root is selected without any value.
When you navigate away from this section, you will be prompted to confirm that you really want a blank context root. Click Yes to the confirmation dialog.

Using Custom Shared Library for Adding Custom Content
7-8 Oracle Retail Invoice Matching Operations Guide
f. Under the WAR Options section, enable the Include Manifest File option and Add the MANIFEST.MF file you created under …/View-Controller/src/META-INF.
g. Click OK.
Generate and Deploy the Custom Shared Library WARThis section describes the steps on how to generate and deploy the Custom Shared Library WAR file:
1. Generate the share library WAR file through JDeveloper.
a. Open the Custom Shared Library workspace.
b. Right-click on the View-Controller project and choose the shared library WAR deployment profile created previously under the Deploy option.

Using Custom Shared Library for Adding Custom Content
Customizing Retail Applications 7-9
c. The Deploy dialog opens. Select Deploy to WAR and click Finish.
d. JDeveloper generates the WAR file into the View-Controller project folder sub-directory, deploy.
2. Deploy the generated WAR file to the same managed server as the Retail Application as a shared library. Refer to section 6 of the Deploying Applications to Oracle WebLogic Server documentation (http://docs.oracle.com/cd/E23943_01/web.1111/e13702/deploy.htm). This task has to be done using the WebLogic

Customizing the Retail Application User Interface
7-10 Oracle Retail Invoice Matching Operations Guide
Administration Console or Enterprise Manager Fusion Middleware Control with a user having WebLogic administrator permissions.
Adding Custom Content into the Custom Shared LibraryThe Custom ADF and Java based components that add new content or functionality into the Retail Application can be coded or built into the Custom Shared Library workspace. Typically, retailers can include task flows that add new UI workflows into the Retail Application UI.
The WAR for the Custom Shared Library needs to be regenerated when new content is added.
To re-deploy the Custom Shared Library WAR, the Retail Application and its Custom Shared Library Registry must both be shutdown first.
Since Retail Applications are secured web applications, the addition of new ADF UI pages and task flows will need to be secured using the application roles and policies that are recognized by the Retail Application. The provisioning process is done using the Oracle Enterprise Manager Fusion Middleware Control Console.
Refer to section 9, Managing the Policy Store, of the Oracle Fusion Middleware Application Security Guide for details. (http://docs.oracle.com/cd/E23943_01/core.1111/e10043.pdf).
Customizing the Retail Application User InterfaceRetail Applications allow retailers to add and display custom content such as ADF task flows and URL to BI reports in the deployed application. These custom contents can be accessed from the Retail Application's user interface (UI).
Overview of a Retail Application User InterfaceThe Retail Application user interface organizes the contents into visual containers that fulfill common layout and navigational requirements in a structured, consistent manner.

Customizing the Retail Application User Interface
Customizing Retail Applications 7-11
The high level containers or areas in the UI are highlighted in the diagram below:
The Global Area presents branding, logged-in user information as well as menus that allow users to switch to other areas of the application. Notifications are also visually represented as an icon in this area.
The Sidebar Area is a collapsible area on the left of the page. A typical content of the sidebar area is the task navigation tree. Each node on the tree presents a business process or task that opens UI workflow screens in the Local Area.
The Local Area is the main content area for the application. The contents change as a result of actions selected in the Sidebar or Global Area. Typically, task flows are opened as tabs within the Local Area.
The Contextual Area is a collapsible area on the right of the page, which provides space to present information that can assist users in completing their tasks. The Contextual Area is presented per Local Area tab. Each task flow in presented in the local area can have their own contextual area.
Adding a DashboardA dashboard is a page within a Retail Application that displays the current status of metrics and key performance indicators relevant to the Retail Application. They are typically tailored for specific roles and they allow you to easily monitor the status of the current data within the application.
For Retail Applications, dashboards are typically built and maintained in a separate BI reporting tool. Oracle Retail recommends using Oracle Business Intelligence Enterprise Edition (OBIEE). Whatever the tool you use, the resulting dashboards must be accessible in a Web browser via a URL.

Customizing the Retail Application User Interface
7-12 Oracle Retail Invoice Matching Operations Guide
The following is an example dashboard built in Oracle BI EE:
The dashboards can be added into a Retail Application which a user can launch from the application UI’s sidebar task tree.
The dashboard pages are added into a Retail Application by adding and configuring the application's Sidebar Navigation Model XML file into the Custom Shared Library.
The example below shows the dashboard page as rendered in the local area of a Retail Application's UI.
Preparing the Custom Shared Library for Adding DashboardsThis section describes how to prepare the Custom Shared Library so retailers will be able to add dashboard pages into the Retail Application.
1. Perform the steps described in the section "Creating and Deploying a Custom Shared Library" to create a Custom Shared Library workspace, generate a shared

Customizing the Retail Application User Interface
Customizing Retail Applications 7-13
library WAR out of it, deploying the WAR, and associating the library to the Retail Application.
2. Obtain a copy of the application's sidebar navigation model XML file.
EarAllocCore.ear\AlcPublicUIViewController.war\WEB-INF\classes\oracle\retail\apps\framework\uishell\config\custom\HomeSidebarNavigationModel.xml
3. Using JDeveloper, open the Custom Shared Library workspace in Developer Role.
4. Add the sidebar model XML file in the View-Controller project src directory, preferably under a subdirectory called Custom.
Example:
If the sidebar navigation model is named HomeSidebarNavigationModel.xml,then that file's path must be View-Controller/src/custom/HomeSidebarNavigationModel.xml.
5. Add a new file called PageTemplateOverrideModel.properties under the View-Controller/src directory. Modify this file and add the following entry:
Home.sidebarModel=<path to sidebar model xml within view-controller/src>
Example:
Home.sidebarModel=/custom/HomeSidebarNavigationModel.xml
6. Verify the location of the files in the workspace.
7. Regenerate the shared library WAR file from the workspace and redeploy the shared library. Shutdown and restart of the Retail Application and its shared library registry is required.
8. Test the Retail Application. The original sidebar contents of the Retail Applications should be accessible.
The succeeding sections describe the steps to modify the model in order to add dashboard pages into the Retail Application.

Customizing the Retail Application User Interface
7-14 Oracle Retail Invoice Matching Operations Guide
Adding a Dashboard into the UI SidebarAdding a dashboard page to be accessible from the sidebar area of the Retail Application's UI entails the modification of the Sidebar Navigation Model XML file. The sidebar area renders a collection of links organized or grouped into folders. Each link represents a content that launches into a tab in the UI's local content area. A content is typically a workflow that allows users to accomplish specific tasks in the application. A content can be a dashboard page.
Adding an Oracle BI EE based Dashboard into the UI SidebarThis section describes the steps for adding an Oracle BI EE based Dashboard into the UI Sidebar. Refer to the section, "Oracle BI EE Integration in Retail Application", for more information about Oracle BI EE integration with Retail Applications
Before adding a dashboard into the UI Sidebar, you must have:
■ Built, prepared, deployed, and tested the Custom Shared Library as described in the section "Preparing the Custom Shared Library for Adding Dashboards".
■ Created one or more dashboard pages in their BI reporting tool (for example, OBIEE).
– The Web URL for the dashboard pages must be available in order to proceed with the steps in this section.
– Any parameters to modify the content of the dashboard must be known and should be accessible as parameters to the dashboard's URL.
Once the above pre-requisites have been satisfied, take the following steps:
1. Obtain the Oracle BI EE connection name from the Retail Application configured to point at the retailer's Oracle BI EE instance. The configuration of this Oracle BI EE connection is performed during the Retail Application installation.
BI Connection Server name = BIConnection
2. Create dashboard reports in the Oracle BI EE.
3. Build, prepare, deploy, and test the Custom Shared Library as described in the section "Preparing the Custom Shared Library for Adding Dashboards".
4. Open the Custom Shared Library workspace in JDeveloper.
5. Open the application's Sidebar Navigation Model XML file (for example, View-Controller/src/custom/HomeSidebarNavigationModel.xml).
6. Go to the bottom of the file and add a new folder into the list. A folder is represented by an <Item>/<Items> pair of XML elements of type "folder". These have to be added within the top most <Items> tag.
<?xml version="1.0" encoding="UTF-8" standalone="yes"?><NavigationDefinition … ><Items>... (existing contents)<!-- Add this paragraph --><Item id="myCustomDashboardFolder" title="My Custom Dashboards" type="folder"><Items><!-- add more items here --></Items></Item></Items></NavigationDefinition>

Customizing the Retail Application User Interface
Customizing Retail Applications 7-15
Provide a unique identifier to the Item and meaningful values for the title attributes of the Item tag. For this example, we will assume that the folder title is "My Custom Dashboards".
7. Add an <Item> element within the folder that references the dashboard page URL as well as the parameters to control the view of the dashboard if available.
The example below will filter the 'Demand Profit' analysis using the fiscal year as 2012 and fiscal quarters as 2012Quarter1, 2012Quarter2, 2012Quarter3 and 2012Quarter4. The analysis should have prompted filters added for the columns "Business Calendar"."Fiscal Year" and "Business Calendar"."Fiscal Quarter":.
<?xml version="1.0" encoding="UTF-8" standalone="yes"?><NavigationDefinition … ><Items>... (existing contents)<Item id="myCustomDashboardsFolder" title="My Custom Dashboards" type="folder"><Items><Item id="myDashboard1"type="link"title="Profitability Dashboard"><url> <![CDATA[http://mspdv171.us.oracle.com:9704/analytics/saw.dll?SyndicatePages&syndicate=portal&PortalPath=/shared/Customer Order/_portal/Customer Order&Page=Channel Profitability Comparisons&Action=Navigate]]></url><Parameters><Parameter id="col1">"Business Calendar"."Fiscal Year"</Parameter><Parameter id="val1">"2010"</Parameter><Parameter id="psa1">"Retail Merchandising Analytics As-Was"</Parameter><Parameter id="col2">"Business Calendar"."Fiscal Quarter"</Parameter><Parameter id="val2">"2010Quarter1" "2010Quarter2" "2010Quarter3"</Parameter><Parameter id="psa2">"Retail Merchandising Analytics As-Was"</Parameter></Parameters></Item></Items></Item></Items></NavigationDefinition>
To create this element, note the following attributes and sub-elements:
■ The <Item> type must be set as "taskflow".
■ The <Item> title must be meaningful.
■ The <Item> id attribute must be unique across all the other items in the XML file.
■ The <url> sub-element within <Item> indicates thea URL to the dashboard page built in the BI tool. The entire URL must be marked as character data (for example, enclosed in CDATA) to the Retail Applications task flow "BIReportFlow" which allows the integration of the Oracle BI EE dashboard into the Retail Application UI.
■ The <Parameters> sub-element within <Item> should list all the parameters to the BIReportFlow task flow including functional parameters to the dashboard being rendered. Each parameter is represented as a <Parameter> element inside <Parameters>.
– The <Parameter> id should be the actual parameter reference name recognized by the dashboard URL.

Customizing the Retail Application User Interface
7-16 Oracle Retail Invoice Matching Operations Guide
– The value of each <Parameter> is a string value. This is the only supported data type.
– The parameter connectionId refers to the name of the connection configured within the Retail Application to connect to a BI server instance. This is a required parameter of the BIReportFlow task flow.
– The parameter biCatalogPath refers to the path of the BI dashboard within the BI server. This is a required parameter of the BIReportFlow task flow.
– The parameter obipsType specifies if the Oracle BI EE content is an analysis or a dashboard. A value of biDashboardContent is required for dashboard objects.
– The parameter pair parameterNameN and parameterValueN specifies the name and value of the prompt to the report.
More information about the BIReportFlow task flow can be found in the section "Showing Oracle BI EE Reports and Dashboards in the Retail Application".
8. Re-generate the Custom Shared Library WAR file from the Custom Shared Library workspace. Shutdown the Retail aApplication and its Custom Shared Library Registry, redeploy the Custom Shared Library WAR file, and restart the Retail application components.
9. Test the Retail Application. Log in and verify that a link to the BI dashboard appears in the UI sidebar task tree under a folder "My Custom Dashboards".
Adding a non-Oracle BI EE Based Dashboard into the UI Sidebar This section describes the steps for adding non-Oracle BI EE based dashboards into the Retail Application's UI Sidebar. Non-Oracle BI EE based reports such as BI Publisher or Microstrategy can be integrated into the Retail Application by adding the web URL of the dashboard report in the application's sidebar navigation model XML file:
1. Create the dashboard report in the reporting server instance.
2. Obtain the URL to the dashboard report along with any parameters needed to render it.
3. Build, prepare, deploy, and test the Custom Shared Library as described in the section "Preparing the Custom Shared Library for Adding Dashboards".
4. Open the Custom Shared Library workspace in JDeveloper.
5. Open the application's sidebar navigation model XML file (for example, View-Controller/src/custom/HomeSidebarNavigationModel.xml).
6. Go to the bottom of the file and add a new folder into the list. A folder is represented by an <Item>/<Items> pair of XML elements of type "folder". These have to be added within the topmost <Items> tag.
<?xml version="1.0" encoding="UTF-8" standalone="yes"?><NavigationDefinition … > <Items> ... (existing contents)
<!-- Add this paragraph --> <Item id="myCustomDashboardFolder" title="My Custom Dashboards" type="folder"> <Items> <!-- add more items here --> </Items>

Customizing the Retail Application User Interface
Customizing Retail Applications 7-17
</Item>
</Items></NavigationDefinition>
Provide unique id to the Item and meaningful values for the title attributes of the Item tag. For this example, we will assume that the folder title is "My Custom Dashboards".
7. Add an <Item> element within the folder that references the dashboard page URL as well as parameters to control the view of the dashboard if available.
The example below shows an <Item> element that links to a BI dashboard URL with 6 parameters.
<?xml version="1.0" encoding="UTF-8" standalone="yes"?><NavigationDefinition … > <Items> ... (existing contents) <Item id="myCustomDashboardsFolder" title="My Custom Dashboards" type="folder"> <Items> <Item id="myDashboard1" type="link" title="Profitability Dashboard"> <url> <![CDATA[http://mspdv171.us.oracle.com:9704/analytics/saw.dll?SyndicatePages&syndicate=portal&PortalPath=/shared/Customer Order/_portal/Customer Order&Page=Channel Profitability Comparisons&Action=Navigate]]> </url> <Parameters> <Parameter id="col1">"Business Calendar"."Fiscal Year"</Parameter> <Parameter id="val1">"2010"</Parameter> <Parameter id="psa1">"Retail Merchandising Analytics As-Was"</Parameter> <Parameter id="col2">"Business Calendar"."Fiscal Quarter"</Parameter> <Parameter id="val2">"2010Quarter1" "2010Quarter2" "2010Quarter3"</Parameter> <Parameter id="psa2">"Retail Merchandising Analytics As-Was"</Parameter> </Parameters> </Item> </Items> </Item> </Items></NavigationDefinition>
To create this element, note the following attributes and sub-elements:
■ The <Item> type must be set as "link".
■ The <Item> title must be meaningful.
■ The <Item> id attribute must be unique across all the other items in the XML file.
Customizing the Retail Application User Interface
7-18 Oracle Retail Invoice Matching Operations Guide
■ The <url> sub-element within <Item> indicates the URL to the dashboard page built in the BI tool. The entire URL must be marked as character data (for example, enclosed in CDATA).
■ The <Parameters> sub-element within <Item> should list all the parameters to the dashboard page if there are any. Each parameter is represented as a <Parameter> element inside <Parameters>.
– The <Parameter> id should be the actual parameter reference name recognized by the dashboard URL.
– The value of each <Parameter> is a string value. This is the only supported data type.
8. Re-generate the Custom Shared Library WAR file from the Custom Shared Library workspace. Shutdown the Retail Application and its Custom Shared Library Registry, redeploy the Custom Shared Library WAR file, and restart the Retail Application components.
9. Test the Retail Application. Log-in and verify that a link to the BI dashboard appears in the UI's sidebar task tree under a folder "My Custom Dashboards".
Securing Dashboard Access to Specific RolesTo restrict access to the dashboard added on the sidebar to specific security roles, set the visible property on the <Item> element for the dashboard URL to an Expression Language (EL) expression that calls ADF's securityContext API's isUserInRole method. Example:
<Item id="myDashboard1"type="link"title="Profitability Dashboard"visible="#{securityContext.isUserInRole['BUYER_JOB']}" >
The parameter to the securityContext.isUserInRole method is a logical security role that is configured for the Retail Application. The API returns true if the user is included in the specified security role. If the user is not authenticated or is not found in the role, the API returns false.
Adding Contextual ReportsContextual Reports are reports that appear in a task flow's contextual area section. As discussed in the section, "Overview of a Retail Application User Interface", the Contextual Area is a collapsible section to the right of the local area that provides a space to present information that can assist users in completing their tasks.
Since information presented in a contextual area is presented depending on the task or workflow the user is on, contextual areas are associated with task flows and there can be at most one contextual area per task flow.
Within a contextual area, multiple contextual reports can be configured.
Each contextual report can change its contents depending on the action being performed in the user’s current workflow.
For example, supplier metrics are shown in the Invoice Summary screen contextual pane. If there are multiple suppliers in a matching group, the supplier contextual region information will change when changing record focus in the invoice section.

Customizing the Retail Application User Interface
Customizing Retail Applications 7-19
Each task flow publishes the contextual business events on key activities taking place in the screen. Contextual reports can listen to those events and change its contents depending on the payload information associated with the event.
Contextual reports are typically built and maintained in a separate BI reporting tool. Oracle Retail recommends using Oracle Business Intelligence Enterprise Edition (OBIEE). Whatever the tool the retailer users, the resulting reports must be accessible in a web browser via a URL.
The contextual reports are added in a Retail Application by adding and configuring the task flow's contextual area model XML file into the Custom Shared Library.
Retail Applications can also provide you with the list of possible contextual business events each flow generates. Retailers can configure their contextual reports to react to these events. Each event includes information about the event's payload information (for example, the Invoice used in the Summary match workflow).
List of Contextual Business Events and PayloadsThe following table lists the contextual business events and the payloads:
Event Name Task Flow Page
Contextual Area Model XML Location Generated when… Payload Values
loadEvent SummaryMatchFlow
SummaryMatch.jsff
Reim.ear\Reim_ReimViewController_webapp.war\WEB-INF\classes\oracle\retail\apps\framework\uishell\config\custom\contextualarea\ContextualAreaModelSummaryMatchFlow.xml
On load of Summary Match Screen.
■ siteid Supplier Site id
■ lang en (English)
■ locale en (English)
■ accessibility Default (As per user settings in preferences menu)
invoiceSelectionEvent1
DetailMatchFlow
DetailMatch.jsff
Reim.ear\Reim_ReimViewController_webapp.war\WEB-INF\classes\oracle\retail\apps\framework\uishell\config\custom\contextualarea\ContextualAreaModelDetailMatchFlow.xml
On load of Detail Match Screen and on invoice selection.
■ item item id
■ workSpaceId Workspace Id
■ entityType Entity Type- SKU/STYLE
■ lang en (English)
■ locale en (English)
■ accessibility Default (As per user settings in preferences menu)

Customizing the Retail Application User Interface
7-20 Oracle Retail Invoice Matching Operations Guide
Preparing the Custom Shared Library for Adding Contextual ReportsThis section describes how to prepare the Custom Shared Library so retailers will be able to add contextual reports in Retail Application task flows.
1. Perform the steps described in the section "Creating and Deploying a Custom Shared Library" to create a Custom Shared Library workspace, generate a shared library WAR out of it, deploying the WAR, and associating the library to the Retail Application.
2. Obtain a copy of the task flow contextual area model XML files where the contextual reports will be added. Refer to section, "List of Contextual Business Events and Payloads".
3. Using JDeveloper, open the Custom Shared Library workspace in a Developer Role.
invoiceSelectionEvent2
DetailMatchFlow
DetailMatch.jsff
Reim.ear\Reim_ReimViewController_webapp.war\WEB-INF\classes\oracle\retail\apps\framework\uishell\config\custom\contextualarea\ContextualAreaModelDetailMatchFlow.xml
On load of Detail Match Screen and on invoice selection.
■ item item id
■ workSpaceId Workspace Id
■ entityType Entity Type- SKU/STYLE
■ lang en (English)
■ locale en (English)
■ accessibility Default (As per user settings in preferences menu)
rowSelectionEventBinding
DiscrepancyListFlow.xml
discrepancyList.jsff
Reim.ear\Reim_ReimViewController_webapp.war\WEB-INF\classes\oracle\retail\apps\framework\uishell\config\custom\contextualarea\ ContextualAreaModelDiscrepancyListFlow.xml
On load of Discrepancy List Screen and on item selection.
■ item item id
■ workSpaceId Workspace Id
■ entityType Entity Type- SKU/STYLE
■ lang en (English)
■ locale en (English)
■ accessibility Default (As per user settings in preferences menu)
Event Name Task Flow Page
Contextual Area Model XML Location Generated when… Payload Values
Customizing the Retail Application User Interface
Customizing Retail Applications 7-21
4. Add the contextual area model XML file in the View-Controller project src directory, preferably under a sub-directory called Custom.
Example:
If the contextual area model XML for the task flow AllocMaintFlow is called AllocMaintFlowContextualAreaModel.xml, then that file's path must be View-Controller/src/custom/AllocMaintFlowContextualAreModel.xml.
5. Add a new or open the existing file called PageTemplateOverrideModel.properties under the View-Controller/src directory. Modify this file and add the following entry:
Home.sidebarModel=<path to sidebar model xml within view-controller/src><FlowName>.contextualAreaModel=<path to the contextual area model for the flow>
For example:
AllocMaintFlow.sidebarModel=/custom/AllocMaintFlowContextualAreaModel.xml
6. Regenerate the shared library WAR file from the workspace and redeploy the shared library. Shutdown and restart of the Retail Application and its shared library registry is required.
7. Test the Retail application. Navigate to the flow and make sure the flow is functional.
Adding a Contextual Report To A Task FlowAdding a contextual report to a task flow primary entails the modification of the task flow's Contextual Area Model XML file. Each report is rendered in a collapsible panel box.
Before adding a dashboard into the UI Sidebar, the retailer must have:
■ Built, prepared, deployed, and tested the Custom Shared Library as described in the section "Preparing the Custom Shared Library for Adding Contextual Reports".
■ Obtained information about the Retail Application's list of contextual business events that can be broadcast from various workflows.
■ Created one or more contextual BI reports in the BI reporting tool (for example, OBIEE).
– The web URL for each report must be available in order to proceed with the steps in this section.
– Any parameters to configure the content of the report must be known and should be accessible as parameters to the dashboard's URL.
Once the above pre-requisites have been satisfied, proceed with the following steps:
1. Assume the following example scenario when following the steps:
■ A contextual report called "Item Metrics" showing information about an item is to be added to the Allocation Maintenance Flow's main page. When the user selects an item on the page, the report displays information for the selected item.
■ The Retail Application has provided the following information about the contextual business event:

Event Name Task Flow Page
Contextual Area Model XML Location
Generated when… Payload Values
AlcAllocMaintenanceItemReviewSelectedEvent
AllocationMaintenanceFlow
AllocMaintenancePage
Allocation Maintenance, Item Review row change
■ selectedItem - the item selected by the user. Always generated.
■ selectedItemType - the type of item. Can be "regular" or "pack". Optional. If not supplied, assume item is a regular type.
Customizing the Retail Application User Interface
7-22 Oracle Retail Invoice Matching Operations Guide
■ The Item Metrics report was built in the retailer’s BI reporting tool (for example, OBIEE). It was built considering the payload values the contextual business event will generate.
2. Open the Custom Shared Library workspace in JDeveloper.
3. Open the task flow contextual area model XML file (for example, ViewController/src/custom/AllocMaintFlowContextualAreaModel.xml).
4. Add an <Item> element within the topmost <Items> element that reference the task flow called ViewContextAwareReportFlow. The ViewContextAwareReportFlow is a framework for rendering URL based reports that will be aware of contextual business events emanating from the Retail aplication task flows.
Example:
<?xml version="1.0" encoding="UTF-8" standalone="yes"?><NavigationDefinition … ><Items>......<Item id="showItemMetric"type="taskflow"title="Item Metric"><url>/WEB-INF/oracle/retail/apps/framework/contextawarereport/publicui/flow/ViewContextAwareReportFlow.xml#ViewContextAwareReportFlow</url></Item></Items></NavigationDefinition>
Note:
■ Make sure that the <Item> id is unique.
■ Make sure the <Item> type is "taskflow".
■ Provide a meaningful title.

Customizing the Retail Application User Interface
Customizing Retail Applications 7-23
5. Populate the parameters to the ViewContextAwareReportFlow by adding the following <Parameter>/<Parameters> elements:
<?xml version="1.0" encoding="UTF-8" standalone="yes"?><NavigationDefinition … ><Items><Item id="showCustomerMetric"type="taskflow"title="Customer Metric"><url>/WEB-INF/oracle/retail/apps/framework/contextawarereport/publicui/flow/ViewContextAwareReportFlow.xml#ViewContextAwareReportFlow</url><Parameters><Parameter id="reportDescription">Item Metric</Parameter><Parameter id="actionType">AllocMaintItemSelectedEvent</Parameter><Parameter id="primaryUrl"><![CDATA[http://companyobiee.com:9704/report/shared/itemMetric¶mItemId=<selectedItemId>¶mItemType=<selectedItemType:token01>¶mLanguage=<language>]]></Parameter><Parameter id="token01">regular</Parameter></Parameters></Item></Items></NavigationDefinition>

Note:
■ The <Parameter id="reportDescription"> element is the title of the contextual area report. Set this to a meaningful value.
■ The <Parameter id="actionType"> element indicates the contextual business event name the report listens to.
■ The <Parameter id="primaryUrl"> element indicates the URL for the contextual area report in the BI server. The entire URL must be marked as character data (for example, enclosed in CDATA). Note how the parameters to the URL are tokenized.
■ The "?paramItemId=<selectedItemId>" portion of the URL instructs the system to pass the contextual business event payload value called selectedItemId into the URL parameter paramItemId when rendering the contextual report.
■ The "?paramItemType=<selectedItemType:token01>" portion of the URL instructs the system to pass the contextual business event payload value called selectedItemType into the URL parameter paramItemType when rendering the contextual report. If that payload value is empty or null at runtime, then a default value of regular is used as referenced in a <Parameter id="token01"> entry.
■ The "?paramLanguage=<language>" portion of the URL instructs the system about your current locale. The "language" identifier is a reference to a value in the contextual event payload. This is a built-in value that exists in all Retail application contextual business event payloads.
■ The <Parameter id="token01"> element holds the default value for the URL parameter selectedItemType. Token parameters hold default values and you can define up to 20 default value tokens.
Customizing the Retail Application User Interface
7-24 Oracle Retail Invoice Matching Operations Guide
6. Re-generate the Custom Shared Library WAR file from the Custom Shared Library workspace. Shutdown the Retail Application and its Custom Shared Library Registry, redeploy the Custom Shared Library WAR file, and restart the Retail Application components.
7. Test the Retail Application. Go to the flow where the report was added and verify that the report is rendered correctly.

8
Oracle BI EE Integration in Retail Application 8-1
8Oracle BI EE Integration in Retail Application
Oracle Business Intelligence Enterprise Edition is a comprehensive business intelligence platform that delivers a full range of capabilities, including interactive dashboards, ad hoc queries, notifications and alerts, enterprise and financial reporting, scorecard and strategy management, business process invocation, search and collaboration, mobile, integrated systems management and more. Oracle BI EE is based on a proven web service-oriented unified architecture that integrates with an organization's existing information technology infrastructure for the lowest total cost of ownership and highest return on investment.
It is a common requirement to embed the content from Oracle BI EE into ADF applications. Using the Oracle BI EE Presentation Services connection, Retail Applications can embed Oracle BI Presentation Catalog objects such as analysis and dashboard onto their ADF pages.
Showing Oracle BI EE Reports and Dashboards in the Retail ApplicationOracle BI EE Catalog Objects can be displayed in a Retail Application using the BIReportFlow task flow (/WEB-INF/oracle/retail/apps/framework/bi/flow/BIReportFlow.xml#BIReportFlow). Typically, this task flow is configured to be launched from the application's sidebar task panel to render a dashboard page. Refer to the section, "Adding a non-Oracle BI EE Based Dashboard into the UI Sidebar" for more information on adding Oracle BI EE based dashboards into the Retail Application.
The BIReportFlow taskflow takes the following input parameters:
Table 8–1
Input Parameter Name Type Required Description
connectionId java.lang.String
true The connection name of the BISoapConnection. Example: BIConnection
biCatalogPath java.lang.String
true The path to the Oracle BI report or dashboard. Example: /shared/Customer Order/Demand Profit
obipsType java.lang.String
false The obipsType input parameter specifies if the Oracle BI EE content is an analysis or a dashboard. The acceptable values for the obipsType are biReportContent or biDashboardContent. If this input parameters is not provided biReportContent is used by default.

Showing Oracle BI EE Reports and Dashboards in the Retail Application
8-2 Oracle Retail Invoice Matching Operations Guide
subItem java.lang.String
false The subItem input parameter specifies the sub item for the Oracle BI EE content. If the Oracle BI EE content is an analysis then a specific view from the analysis can be displayed using the subItem attribute. The valid values are compoundView!1
dvtchart!1
narrativeView!1
tableView!1
titleView!1
viewSelector!1
If the Oracle BI EE content is a dashboard then a specific tab from the dashboard can be displayed using the subItem attribute. The valid value will be the name of the tab in the dashboard.
viewReportLinks
java.lang.String
false The input parameter viewReportLinks is used to display the links to refresh, print or export an analysis. The valid values are
r - refresh
p - print
d - export
Example: rfd
parameterName1
java.lang.String
false The name of the filter or prompt.
Example:
"Business Calendar"."Fiscal Quarter"
A maximum of ten parameters can be passed to the Oracle BI EE content using the following input parameters to the taskflow.
parameterName1, parameterName2,
parameterName3, parameterName4,
parameterName5, parameterName6,
parameterName7, parameterName8,
parameterName9, parameterName10.
Table 8–1 (Cont.)
Input Parameter Name Type Required Description

Showing Oracle BI EE Reports and Dashboards in the Retail Application
Oracle BI EE Integration in Retail Application 8-3
parameterValues1
java.lang.String
false The value of the filter or prompt to filter the analysis or dashboard. The parameterValues can be EL expression.
Example:
2012Quarter1;2012Quarter2;2012Quarter3;2012Quarter4
A maximum of ten parameter values can be passed to the Oracle BI EE content using the following input parameters to the taskflow.
parameterValues1, parameterValues2,
parameterValues3, parameterValues4,
parameterValues5, parameterValues6,
parameterValues7, parameterValues8,
parameterValues9, parameterValues10.
The parameterValues[n] should match parameterName[n]. In the example above, the column "Business Calendar"."Fiscal Quarter" will be filtered with the values 2012Quarter1, 2012Quarter2, 2012Quarter3 and 2012Quarter4.
Multiple values should be separated with a semi-colon. Example:
2012Quarter1;2012Quarter2;2012Quarter3;2012Quarter4
Table 8–1 (Cont.)
Input Parameter Name Type Required Description

Showing Oracle BI EE Reports and Dashboards in the Retail Application
8-4 Oracle Retail Invoice Matching Operations Guide
Various Examples of the BIReportFlow TaskflowThe examples below shows how the BIReportFlow taskflow can be used in the SideBarNavigationModel.xml file of the Retail Application to display the Oracle BI EE content in the application tab.
The example below will display the 'Demand Profit' analysis from the Oracle BI EE using the connection BIConnection.
<Item id="testBIReportFlow"
additionalParameters
java.util.HashMap
false A map that can be used to specify the parameters for the Oracle BI EE content. This parameter takes an EL expression.
Example:
#{TestBIReportFlowBean.demandProfitParametersMap}
Where the demandProfitParametersMap can be populated as follows
public Map<String, List> getDemandProfitParametersMap() {
Map<String, List> demandProfitParametersMap = new HashMap<String, List>();
List yearList = new ArrayList();
yearList.add(2010);
demandProfitParametersMap.put("\"Business Calendar\".\"Fiscal Year\"", yearList);
List quarterList = new ArrayList();
quarterList.add("2010Quarter1");
quarterList.add("2010Quarter2");
quarterList.add("2010Quarter3");
quarterList.add("2010Quarter4");
demandProfitParametersMap.put("\"Business Calendar\".\"Fiscal Quarter\"", quarterList);
return demandProfitParametersMap;
}
dashboardWidth
java.lang.String
false The width of the Oracle BI EE dashboard. This attribute is used when the obipsType is biDashboardContent. If not provided it defaults to 100%.
dashboardHeight
java.lang.String
false The height of the Oracle BI EE dashboard. This attribute is used when the obipsType is biDashboardContent. If not provided it defaults to 100%.
Table 8–1 (Cont.)
Input Parameter Name Type Required Description

Showing Oracle BI EE Reports and Dashboards in the Retail Application
Oracle BI EE Integration in Retail Application 8-5
title="#{adfBundle['RetailAppsJunitUiBundle'].TEST_BI_REPORT_FLOW}" type="taskflow"> <url>/WEB-INF/oracle/retail/apps/framework/bi/flow/BIReportFlow.xml#BIReportFlow</url> <Parameters> <Parameter id="connectionId">BIConnection</Parameter> <Parameter id="biCatalogPath">/shared/Customer Order/Demand Profit</Parameter> <Parameter id="obipsType">biReportContent</Parameter> </Parameters> </Item>
The example below will display the refresh print and export links in the 'Demand Profit' analysis.
<Item id="testBIReportWithRefreshPrintDownloadEnabled" title="#{adfBundle['RetailAppsJunitUiBundle'].TEST_BI_REPORT_WITH_REFRESH_PRINT_EXPORT_ENABLED}" type="taskflow"> <url>/WEB-INF/oracle/retail/apps/framework/bi/flow/BIReportFlow.xml#BIReportFlow</url> <Parameters> <Parameter id="connectionId">BIConnection</Parameter> <Parameter id="biCatalogPath">/shared/Customer Order/Demand Profit</Parameter> <Parameter id="obipsType">biReportContent</Parameter> <Parameter id="viewReportLinks">rfd</Parameter> </Parameters> </Item>
The example below will display just the dvtchart view from the 'Demand Profit' analysis.
<Item id="testDVTChartView" title="#{adfBundle['RetailAppsJunitUiBundle'].TEST_DVT_CHART_VIEW}" type="taskflow"> <url>/WEB-INF/oracle/retail/apps/framework/bi/flow/BIReportFlow.xml#BIReportFlow</url> <Parameters> <Parameter id="connectionId">BIConnection</Parameter> <Parameter id="biCatalogPath">/shared/Customer Order/Demand Profit</Parameter> <Parameter id="obipsType">biReportContent</Parameter> <Parameter id="subItem">dvtchart!1</Parameter> </Parameters> </Item>
The example below will display just the table view from the 'Demand Profit' analysis.
<Item id="testTableView" title="#{adfBundle['RetailAppsJunitUiBundle'].TEST_TABLE_VIEW}" type="taskflow"> <url>/WEB-INF/oracle/retail/apps/framework/bi/flow/BIReportFlow.xml#BIReportFlow</url> <Parameters> <Parameter id="connectionId">BIConnection</Parameter> <Parameter id="biCatalogPath">/shared/Customer Order/Demand

Showing Oracle BI EE Reports and Dashboards in the Retail Application
8-6 Oracle Retail Invoice Matching Operations Guide
Profit</Parameter> <Parameter id="obipsType">biReportContent</Parameter> <Parameter id="subItem">tableView!1</Parameter> </Parameters> </Item>
The example below will filter the 'Demand Profit' analysis using the fiscal year as 2012 and fiscal quarters as 2012Quarter1, 2012Quarter2, 2012Quarter3 and 2012Quarter4. The analysis should have prompted filters added for the columns Business Calendar"."Fiscal Year" and "Business Calendar"."Fiscal Quarter".
<Item id="testBIReportWithParameters" title="#{adfBundle['RetailAppsJunitUiBundle'].TEST_BI_REPORT_WITH_PARAMETERS}"
type="taskflow"> <url>/WEB-INF/oracle/retail/apps/framework/bi/flow/BIReportFlow.xml#BIReportFlow</url> <Parameters> <Parameter id="connectionId">BIConnection</Parameter> <Parameter id="biCatalogPath">/shared/Customer Order/Demand Profit</Parameter> <Parameter id="obipsType">biReportContent</Parameter> <Parameter id="viewReportLinks">rfd</Parameter> <Parameter id="parameterName1">"Business Calendar"."Fiscal Year"</Parameter> <Parameter id="parameterValues1">2012</Parameter> <Parameter id="parameterName2">"Business Calendar"."Fiscal Quarter"</Parameter> <Parameter id="parameterValues2">2012Quarter1;2012Quarter2;2012Quarter3;2012Quarter4</Parameter> </Parameters> </Item>
The example below will filter the 'Demand Profit' analysis using the fiscal year as 2010 and fiscal quarters as 2010Quarter1, 2010Quarter2, 2010Quarter3 and 2010Quarter4. Note that this example does not pass the parameters directly. It uses an EL expression to pass a parameter map with all the parameters.
<Item id="testBIReportWithParametersMap" title="#{adfBundle['RetailAppsJunitUiBundle'].TEST_BI_REPORT_WITH_PARAMETERS_MAP}" type="taskflow"> <url>/WEB-INF/oracle/retail/apps/framework/bi/flow/BIReportFlow.xml#BIReportFlow</url> <Parameters> <Parameter id="connectionId">BIConnection</Parameter> <Parameter id="biCatalogPath">/shared/Customer Order/Demand Profit</Parameter> <Parameter id="obipsType">biReportContent</Parameter> <Parameter id="viewReportLinks">rfd</Parameter> <Parameter id="additionalParameters">#{TestBIReportFlowBean.demandProfitParametersMap}</Parameter> </Parameters> </Item>

Showing Oracle BI EE Reports and Dashboards in the Retail Application
Oracle BI EE Integration in Retail Application 8-7
The demandProfitParametersMap can be created as follows in a bean.
public Map<String, List> getDemandProfitParametersMap() { Map<String, List> demandProfitParametersMap = new HashMap<String, List>(); List yearList = new ArrayList(); yearList.add(2010); demandProfitParametersMap.put("\"Business Calendar\".\"Fiscal Year\"", yearList); List quarterList = new ArrayList(); quarterList.add("2010Quarter1");
quarterList.add("2010Quarter2"); quarterList.add("2010Quarter3"); quarterList.add("2010Quarter4"); demandProfitParametersMap.put("\"Business Calendar\".\"Fiscal Quarter\"", quarterList); return demandProfitParametersMap; }
The example below will show the 'Customer Order' dashboard with all its tabs. Note that the obipsType has been changed to biDashboardContent. It also passes the dashboard prompt "Business Calendar"."Fiscal Year" as 2011 to filter the results in the dashboard for the year 2011.
<Item id="testBIDashboardAllTabs" title="#{adfBundle['RetailAppsJunitUiBundle'].TEST_BI_DASHBOARD_ALL_TABS}" type="taskflow"> <url>/WEB-INF/oracle/retail/apps/framework/bi/flow/BIReportFlow.xml#BIReportFlow</url> <Parameters> <Parameter id="connectionId">BIConnection</Parameter> <Parameter id="biCatalogPath">/shared/Customer Order/_portal/Customer Order</Parameter> <Parameter id="obipsType">biDashboardContent</Parameter> <Parameter id="parameterName1">"Business Calendar"."Fiscal Year"</Parameter> <Parameter id="parameterValues1">2011</Parameter> </Parameters> </Item>
The example below shows how to display one specific tab of the Oracle BI EE dashboard. It displays the 'Channel Profitability Comparisons' tab of the 'Customer Order dashboard. It passes the parameters map as EL expression just like the previous example.
<Item id="testBIDashboardSpecificTab" title="#{adfBundle['RetailAppsJunitUiBundle'].TEST_BI_DASHBOARD_SPECIFIC_TAB}" type="taskflow"> <url>/WEB-INF/oracle/retail/apps/framework/bi/flow/BIReportFlow.xml#BIReportFlow</url> <Parameters> <Parameter id="connectionId">BIConnection</Parameter>

Modifying the BIConnection Attributes at Runtime
8-8 Oracle Retail Invoice Matching Operations Guide
<Parameter id="biCatalogPath">/shared/Customer Order/_portal/Customer Order</Parameter> <Parameter id="obipsType">biDashboardContent</Parameter> <Parameter id="subItem">Channel Profitability Comparisons</Parameter> <Parameter id="additionalParameters">#{TestBIReportFlowBean.dashboardParametersMap}</Parameter> </Parameters> </Item>
Modifying the BIConnection Attributes at RuntimeWhen the application gets installed on the WebLogic Server, BIConnection is automatically created by the installer. However, it may happen that we may want to change the connection attributes post the application installation. This can be done for troubleshooting the existing BI connection or changing the BI connection to use a different Oracle BI EE server. The BI connection attributes can be modified using the Enterprise Manager using the following steps.
1. Login to the Enterprise Manager of the environment where the Oracle Retail Application is deployed and go to 'System MBean Browser' as shown below.
Figure 8–1 System MBean Browser
2. Go to 'Application Defined MBeans' and its sub folder 'oracle.adf.share.connections'.

Modifying the BIConnection Attributes at Runtime
Oracle BI EE Integration in Retail Application 8-9
Figure 8–2 Application Defined MBeans
3. Expand 'Application: <Application Name>' and select 'ADFConnections'. If the BIConnection is already created then you would be able to see the BIConnection as shown below.

Modifying the BIConnection Attributes at Runtime
8-10 Oracle Retail Invoice Matching Operations Guide
Figure 8–3 BIConnection
If the BIConnection is not available then the 'ADFConnections' will not be expandable as shown below.

Modifying the BIConnection Attributes at Runtime
Oracle BI EE Integration in Retail Application 8-11
Figure 8–4 ADFConnections
Do the steps below to create a BIConnection if it is not available.
4. Go to the 'Operations' tab and click 'createConnection'.
Figure 8–5 Create Connection

Modifying the BIConnection Attributes at Runtime
8-12 Oracle Retail Invoice Matching Operations Guide
5. Enter Connection Type as BISoapConnection and Connection Name as BIConnection. Click Invoke on top right.
Figure 8–6 BISoapConnection
6. Refresh the tree using the button 'Refresh cached tree data'.
Figure 8–7 Refresh Cached Tree Data
7. Once the tree is refreshed, you will notice that 'ADFConnections' becomes a folder and it has a new connection 'BIConnection'. Click on the BIConnection to open its properties in the right pane.
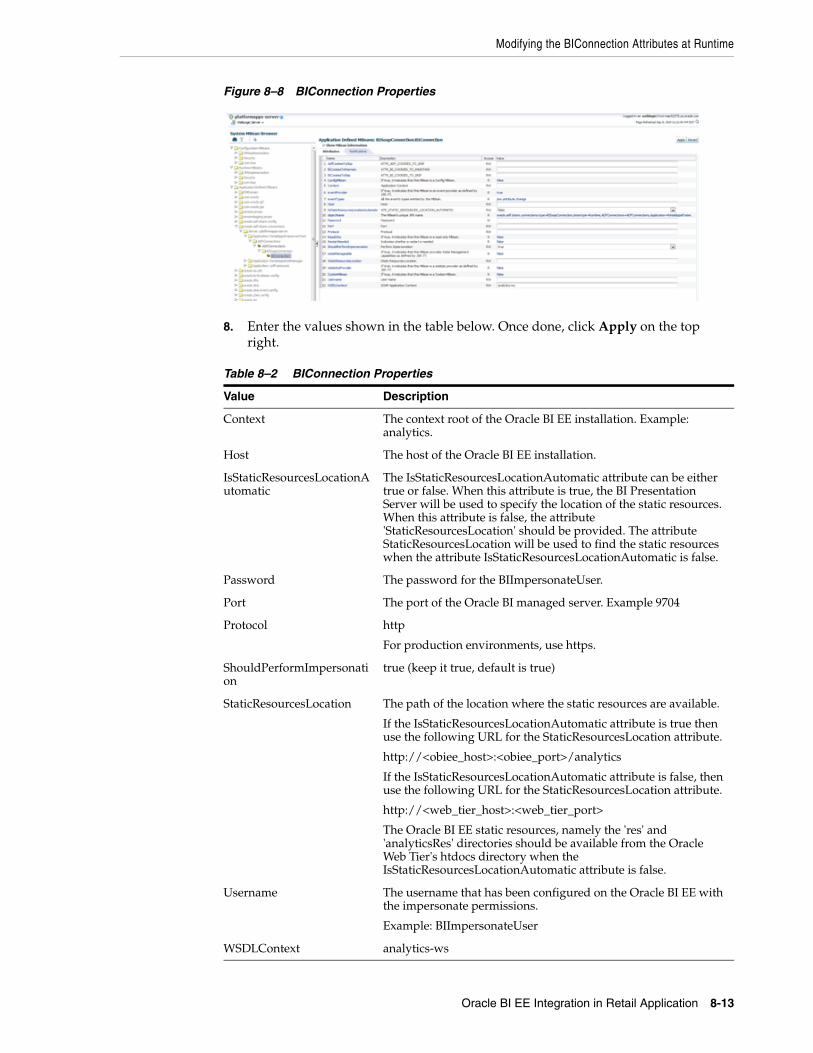
Modifying the BIConnection Attributes at Runtime
Oracle BI EE Integration in Retail Application 8-13
Figure 8–8 BIConnection Properties
8. Enter the values shown in the table below. Once done, click Apply on the top right.
Table 8–2 BIConnection Properties
Value Description
Context The context root of the Oracle BI EE installation. Example: analytics.
Host The host of the Oracle BI EE installation.
IsStaticResourcesLocationAutomatic
The IsStaticResourcesLocationAutomatic attribute can be either true or false. When this attribute is true, the BI Presentation Server will be used to specify the location of the static resources. When this attribute is false, the attribute 'StaticResourcesLocation' should be provided. The attribute StaticResourcesLocation will be used to find the static resources when the attribute IsStaticResourcesLocationAutomatic is false.
Password The password for the BIImpersonateUser.
Port The port of the Oracle BI managed server. Example 9704
Protocol http
For production environments, use https.
ShouldPerformImpersonation
true (keep it true, default is true)
StaticResourcesLocation The path of the location where the static resources are available.
If the IsStaticResourcesLocationAutomatic attribute is true then use the following URL for the StaticResourcesLocation attribute.
http://<obiee_host>:<obiee_port>/analytics
If the IsStaticResourcesLocationAutomatic attribute is false, then use the following URL for the StaticResourcesLocation attribute.
http://<web_tier_host>:<web_tier_port>
The Oracle BI EE static resources, namely the 'res' and 'analyticsRes' directories should be available from the Oracle Web Tier's htdocs directory when the IsStaticResourcesLocationAutomatic attribute is false.
Username The username that has been configured on the Oracle BI EE with the impersonate permissions.
Example: BIImpersonateUser
WSDLContext analytics-ws

Enabling In-Context Launch from the Oracle BI EE Content
8-14 Oracle Retail Invoice Matching Operations Guide
9. Go to 'ADFConections' to save the changes. Click on 'save' operation in the Operations tab.
Figure 8–9 Save Operation
10. Click Invoke on the top right to save the changes.
Figure 8–10 Invoke Save
11. Once the connection attributes for the BIConnection are saved, the changes are available to the Oracle Retail Application. There is no need to restart the server after saving. Simply logging out and logging in the application will suffice.
Enabling In-Context Launch from the Oracle BI EE ContentThe retail application provides the capability to launch taskflows in a new UIShell tab, from the Oracle BI EE content embedded directly in the application. The data from the Oracle BI EE analysis or dashboard can be passed to the application taskflow enabling in-context launch of the taskflow from the Oracle BI EE analysis or dashboard.
The retail application leverages the Action Framework of Oracle BI EE to deliver actionable business intelligence to user. The Action Framework provides functionality for creating, managing, and invoking actions. Actions are created and managed in the Oracle BI Presentation Services user interface. The retail application uses the ADF Contextual Event action to execute actions in the application.

Enabling In-Context Launch from the Oracle BI EE Content
Oracle BI EE Integration in Retail Application 8-15
More details about the ADF Contextual Event Action can be found in the document.
Oracle Fusion Middleware Developer's Guide for Oracle Business Intelligence Enterprise Edition at the following location:
https://docs.oracle.com/middleware/11119/biee/BIEDV/embedding_adf.htm#BIEDV1214
Enabling the ADF Contextual Event Action in Oracle BI EEThe ADF Contextual event action is not enabled by default in the Oracle BI EE installation. It has to be manually enabled. Edit the following file in your Oracle BI EE installation
<OBIEE_HOME>/instances/<INSTANCE_NAME>/config/OracleBIPresentationServicesComponent/coreapplication_obips1/instanceconfig.xml Add the following line in the above file and restart the Oracle BI EE instance.
<ActionLinks> <EnableADFContextualEvent>true</EnableADFContextualEvent> </ActionLinks>
This will enable the ADF Contextual Event action in Oracle BI EE. Verify that the ADF Contextual Event is enabled in Oracle BI EE using the following steps.
1. Edit any analysis and go to the Criteria tab.
Figure 8–11 Criteria Tab
2. Edit the Column Properties of any column and go to the Interaction tab.

Enabling In-Context Launch from the Oracle BI EE Content
8-16 Oracle Retail Invoice Matching Operations Guide
Figure 8–12 Column Properties
3. In the Interaction tab select the Primary Interaction as Action Links for the Value of the column and click on the + icon.
Figure 8–13 Primary Interaction

Enabling In-Context Launch from the Oracle BI EE Content
Oracle BI EE Integration in Retail Application 8-17
4. Verify that 'ADF Contextual Event' is available as a new Action Link item.
Figure 8–14 ADF Contextual Event
Preparing the Custom Shared Library for Contextual Event Model FileThis section describes how to prepare the Custom Shared Library so retailers will be able to add in-context launch item that will be launched from the Oracle BI EE report.
1. Perform the steps described in the section "Creating and Deploying a Custom Shared Library" to create a Custom Shared Library workspace, generate a shared library WAR out of it, deploying the WAR, and associating the library to the Retail Application.
2. Obtain a copy of the OBIEEADFContextualEventModel.xml file where the in-context launch taskflows will be added.
3. Using JDeveloper, open the Custom Shared Library workspace in Developer Role.
4. Add the OBIEEADFContextualEventModel.xml file in the View-Controller project src directory, preferably under a subdirectory called custom.
Example:
View-Controller/src/custom/bi/OBIEEADFContextualEventModel.xml
The file OBIEEADFContextualEventModel.xml is similar to the other navigation model xml files as it uses the same NavigationModel.xsd schema. The file will be used to define the taskflows that will be launched in-context from the Oracle BI EE reports. The contents of the file can be as follows.
<?xml version="1.0" encoding="UTF-8" standalone="yes"?><NavigationDefinition id="Folder_1" xmlns:xsi="http://www.w3.org/2001/XMLSchema-instance" xmlns="urn:www.oracle.com:oracle.retail.apps.framework.navigation" xsi:schemaLocation="urn:www.oracle.com:oracle.retail.apps.framework.navigation classpath:oracle/retail/apps/framework/uishell/navigation/model/schema/Navigati

Enabling In-Context Launch from the Oracle BI EE Content
8-18 Oracle Retail Invoice Matching Operations Guide
onModel.xsd"> <Items> <Item id="biInContextLaunchAction" title="BIInContextLaunchFlow" shortDesc="This taskflow is an example taskflow which is launched from an Oracle BI EE report in a new tab in Retail Application."type="taskflow" visible="#{true}" keysList="#{payload.valueMap['"Customer Order Submit Channel"."Submit Demand Channel"']}"targetTitle="#{adfBundle['RetailAppsJunitUiBundle'].BI_IN_CONTEXT_LAUNCH_FLOW} - #{payload.valueMap['"Customer Order Submit Channel"."Submit Demand Channel"']}"><url>/WEB-INF/oracle/retail/apps/framework/uishell/navigation/contentarea/flow/BIInContextLaunchFlow.xml#BIInContextLaunchFlow</url> <Parameters><Parameter id="parameter1">#{payload.valueMap['"Customer Order Submit Channel"."Submit Demand Channel"']}</Parameter><Parameter id="parameter2">#{payload.valueMap['"Customer Order Transaction"."CO Demand Order Ct"']}</Parameter><Parameter id="parameter3">#{payload.valueMap['"Customer Order Transaction"."CO Demand Qty"']}</Parameter><Parameter id="parameter4">#{payload.valueMap['"Customer Order Transaction"."CO Demand Retail Amt LY"']}</Parameter><Parameter id="parameter5">#{payload.valueMap['"Customer Order Transaction"."CO Demand Retail Amt"']}</Parameter><Parameter id="parameter6">#{payload.valueMap['"Customer Order Transaction"."CO Demand Profit LY"']}</Parameter><Parameter id="parameter7">#{payload.valueMap['"Customer Order Transaction"."CO Demand Profit"']}</Parameter> </Parameters> </Item> </Items></NavigationDefinition>
5. Regenerate the shared library WAR file from the workspace and redeploy the shared library. Shutdown and restart of the Retail Application and its shared library registry is required.
Enabling the ADF Contextual Event Action on the Target ColumnIn the above step, we deployed a custom navigation model file and defined a navigation item in the model file that will be launched from an action in the Oracle BI EE analysis. Now, let's try to enable the action in the Oracle BI EE analysis.
Let's consider an example. We have an analysis called 'Demand Profit' analysis as shown in the screenshot below. The analysis has a pie chart view and a table view.

Enabling In-Context Launch from the Oracle BI EE Content
Oracle BI EE Integration in Retail Application 8-19
Figure 8–15 Analysis Chart
When the user clicks on any row of the column 'Submit Demand Channel' in the table view of the above analysis, we want to open the taskflow defined in the file OBIEEADFContextualEventModel.xml. Also, we want to pass data for the user's selection in the analysis to the taskflow as input parameters.
First, step is to enable ADF Contextual Event action for the data of the column 'Submit Demand Channel'. Refer to the section "Enabling the ADF Contextual Event Action in Oracle BI EE" to see how to enable ADF Contextual Event for this column. Note that the Action Link should be added to the Value of the column and not to the Column Heading.
When a user clicks a data cell containing the Oracle BI EE ADF Contextual Event action, the system generates an Oracle BI EE ADF Contextual Event action that has a qualified data reference (QDR) of the cell as its payload. For more details about QDR, please refer to the Oracle Fusion Middleware Developer's Guide for Oracle Business Intelligence Enterprise Edition at location
https://docs.oracle.com/middleware/11119/biee/BIEDV/embedding_adf.htm#BIEDV1214
The payload received does not inform the application, which taskflow in the application should be opened for the ADF Contextual Event action from Oracle BI EE. The Retail Application relies on certain hidden columns in the analysis for this information.
Modifying the Oracle BI EE Analysis to Enable In-Context LaunchThe analysis in Oracle BI EE should be modified for enabling In-Context Launch. In the example above, we will edit the 'Demand Profit' analysis and add a hidden column as follows:
1. Edit the analysis and go to the Criteria tab.
2. Drag any column and add it to the analysis.
3. Edit the Formula for the column.

Enabling In-Context Launch from the Oracle BI EE Content
8-20 Oracle Retail Invoice Matching Operations Guide
Figure 8–16 Edit Formula
4. In the Edit Formula window, add a quoted text as follows.
Figure 8–17 Column Formula Text
5. The quoted text will tell application, what to open when the action is clicked in the Oracle BI EE analysis.
The text is in the format
'<path to the OBIEEADFContextualEventModel file>|<id of the item in the model file>'
Example:
'/custom/bi/OBIEEADFContextualEventModel.xml|biInContextLaunchAction'
The column has to be marked hidden so that it is not displayed when the analysis is run. Edit the Column Properties, go to the Column Format tab and check Hide as shown in the screenshot below.

Enabling In-Context Launch from the Oracle BI EE Content
Oracle BI EE Integration in Retail Application 8-21
Figure 8–18 Select Hide
Now, we have added a column to the analysis which is hidden from display. When the user clicks on any row on the table view of this analysis, the column will be included in the QDR payload. The application will open the content requested in the column.
In the example,
'/custom/bi/OBIEEADFContextualEventModel.xml|biInContextLaunchAction'
the application will open the navigation item with the Item id as biInContextLaunchAction in the file /custom/bi/OBIEEADFContextualEventModel.xml. The item id biInContextLaunchAction refers to the taskflow /WEB-INF/oracle/retail/apps/framework/uishell/navigation/contentarea/flow/BIInContextLaunchFlow.xml#BIInContextLaunchFlow as shown in the file "Preparing the Custom Shared Library for Contextual Event Model File". Ensure that the user has permissions to view the taskflow that you are trying to open.
Passing Parameters from the Oracle BI EE Analysis to the TaskflowWhen the user clicks on any column in the Oracle BI EE analysis that has the ADFContextualEvent action enabled, a qualified data reference (QDR) of the cell is received by the application as the payload. The application parses this payload and converts it into a format that could be easily used to populate the input parameters of the taskflow that is being opened in a new application tab.
The application will deliver a RetailAppsContextualEventPayload object whenever the ADFContextualEvent action is executed. The RetailAppsContextualEventPayload
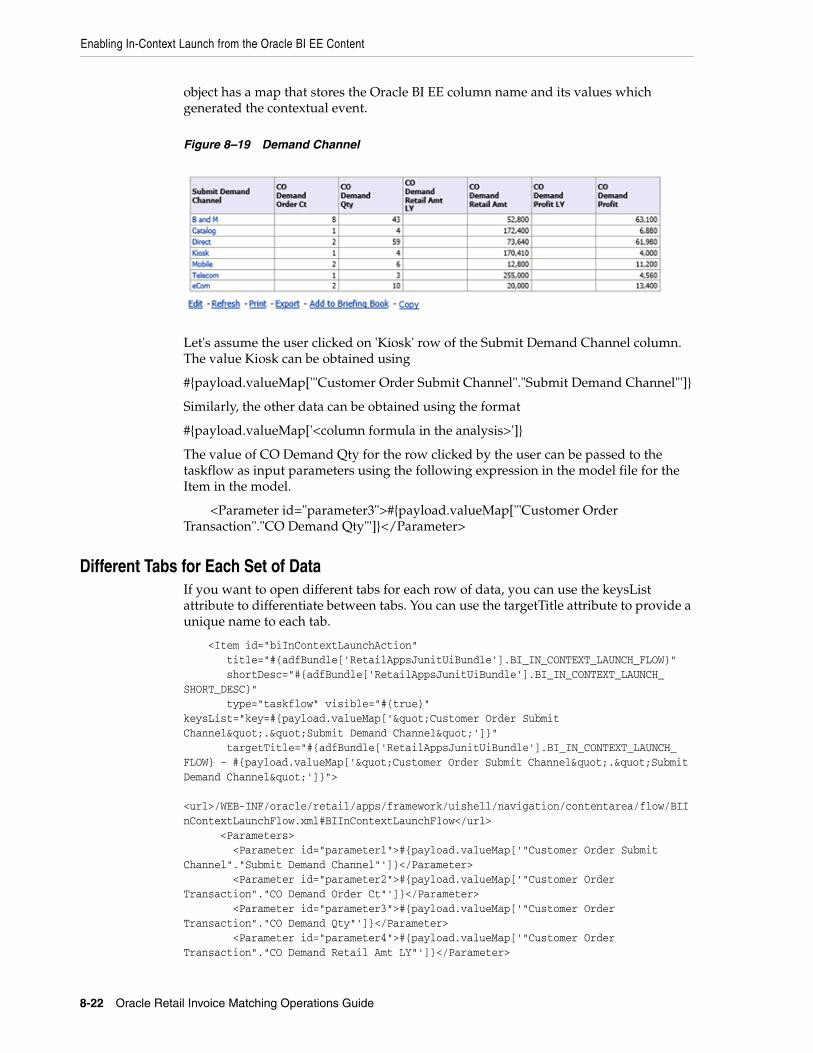
Enabling In-Context Launch from the Oracle BI EE Content
8-22 Oracle Retail Invoice Matching Operations Guide
object has a map that stores the Oracle BI EE column name and its values which generated the contextual event.
Figure 8–19 Demand Channel
Let's assume the user clicked on 'Kiosk' row of the Submit Demand Channel column. The value Kiosk can be obtained using
#{payload.valueMap['"Customer Order Submit Channel"."Submit Demand Channel"']}
Similarly, the other data can be obtained using the format
#{payload.valueMap['<column formula in the analysis>']}
The value of CO Demand Qty for the row clicked by the user can be passed to the taskflow as input parameters using the following expression in the model file for the Item in the model.
<Parameter id="parameter3">#{payload.valueMap['"Customer Order Transaction"."CO Demand Qty"']}</Parameter>
Different Tabs for Each Set of DataIf you want to open different tabs for each row of data, you can use the keysList attribute to differentiate between tabs. You can use the targetTitle attribute to provide a unique name to each tab.
<Item id="biInContextLaunchAction" title="#{adfBundle['RetailAppsJunitUiBundle'].BI_IN_CONTEXT_LAUNCH_FLOW}" shortDesc="#{adfBundle['RetailAppsJunitUiBundle'].BI_IN_CONTEXT_LAUNCH_SHORT_DESC}" type="taskflow" visible="#{true}" keysList="key=#{payload.valueMap['"Customer Order Submit Channel"."Submit Demand Channel"']}" targetTitle="#{adfBundle['RetailAppsJunitUiBundle'].BI_IN_CONTEXT_LAUNCH_FLOW} - #{payload.valueMap['"Customer Order Submit Channel"."Submit Demand Channel"']}"> <url>/WEB-INF/oracle/retail/apps/framework/uishell/navigation/contentarea/flow/BIInContextLaunchFlow.xml#BIInContextLaunchFlow</url> <Parameters> <Parameter id="parameter1">#{payload.valueMap['"Customer Order Submit Channel"."Submit Demand Channel"']}</Parameter> <Parameter id="parameter2">#{payload.valueMap['"Customer Order Transaction"."CO Demand Order Ct"']}</Parameter> <Parameter id="parameter3">#{payload.valueMap['"Customer Order Transaction"."CO Demand Qty"']}</Parameter> <Parameter id="parameter4">#{payload.valueMap['"Customer Order Transaction"."CO Demand Retail Amt LY"']}</Parameter>

Enabling In-Context Launch from the Oracle BI EE Content
Oracle BI EE Integration in Retail Application 8-23
<Parameter id="parameter5">#{payload.valueMap['"Customer Order Transaction"."CO Demand Retail Amt"']}</Parameter> <Parameter id="parameter6">#{payload.valueMap['"Customer Order Transaction"."CO Demand Profit LY"']}</Parameter> <Parameter id="parameter7">#{payload.valueMap['"Customer Order Transaction"."CO Demand Profit"']}</Parameter> </Parameters> </Item>In the example above, if the user clicks on Kiosk and Mobile, each will open in a new application tab instead of using the same tab. The title of each tab will suffix the value of the column "Customer Order Submit Channel"."Submit Demand Channel" to differentiate between the tabs.
Pre-Processing the Data Before Opening the ContentIt may be a requirement to pre-process the data that is received from Oracle BI EE before sending it to the application taskflow. For example, the application taskflow might require the data in certain data type which is different from what is received from Oracle BI EE. The Retail application provides a pre-processing hook for the applications to manipulate the data received from Oracle BI EE before sending it to the application taskflow. The applications can use the contentListener attribute of the Item element in the model file to invoke a pre-processing listener.
<Item id="biInContextLaunchAction" title="#{adfBundle['RetailAppsJunitUiBundle'].BI_IN_CONTEXT_LAUNCH_FLOW}" shortDesc="#{adfBundle['RetailAppsJunitUiBundle'].BI_IN_CONTEXT_LAUNCH_SHORT_DESC}" type="taskflow" visible="#{true}" keysList="key=#{payload.valueMap['"Customer Order Submit Channel"."Submit Demand Channel"']}" targetTitle="#{adfBundle['RetailAppsJunitUiBundle'].BI_IN_CONTEXT_LAUNCH_FLOW} - #{payload.valueMap['"Customer Order Submit Channel"."Submit Demand Channel"']}" contentListener="oracle.retail.apps.framework.uishell.navigation.contentarea.listener.OBIEEPreProcessListenerImpl"> <url>/WEB-INF/oracle/retail/apps/framework/uishell/navigation/contentarea/flow/BIInContextLaunchFlow.xml#BIInContextLaunchFlow</url> <Parameters> <Parameter id="parameter1">#{payload.valueMap['"Customer Order Submit Channel"."Submit Demand Channel"']}</Parameter> <Parameter id="parameter2">#{payload.valueMap['"Customer Order Transaction"."CO Demand Order Ct"']}</Parameter> <Parameter id="parameter3">#{payload.valueMap['"Customer Order Transaction"."CO Demand Qty"']}</Parameter> <Parameter id="parameter4">#{payload.valueMap['"Customer Order Transaction"."CO Demand Retail Amt LY"']}</Parameter> <Parameter id="parameter5">#{payload.valueMap['"Customer Order Transaction"."CO Demand Retail Amt"']}</Parameter> <Parameter id="parameter6">#{payload.valueMap['"Customer Order Transaction"."CO Demand Profit LY"']}</Parameter> <Parameter id="parameter7">#{payload.valueMap['"Customer Order Transaction"."CO Demand Profit"']}</Parameter> </Parameters> </Item>

Enabling In-Context Launch from the Oracle BI EE Content
8-24 Oracle Retail Invoice Matching Operations Guide
The listener implementation class should implement the oracle.retail.apps.framework.uishell.navigation.contentarea.listener.ContentListener interface and provide an implementation to the execute() method of this interface. The execute method will be invoked before the application taskflow is opened. In the example below, the data type of "Customer Order Transaction"."CO Demand Profit" is being changed from data type Integer to String as the application taskflow expects this value to be a String type.
package oracle.retail.apps.framework.uishell.navigation.contentarea.listener; import java.io.Serializable; import java.util.HashMap;import java.util.Map; import oracle.retail.apps.framework.publicui.contextualevent.RetailAppsContextualEventPayload;import oracle.retail.apps.framework.uicomponents.util.ADFFacesUtil; public class OBIEEPreProcessListenerImpl implements ContentListener, Serializable { @SuppressWarnings("compatibility") private static final long serialVersionUID = 1L; public OBIEEPreProcessListenerImpl() { super(); } @Override public void execute() { //get the original payload from the request RetailAppsContextualEventPayload payload = (RetailAppsContextualEventPayload)ADFFacesUtil.getRequestAttribute("payload"); //original value is of type Integer Integer demandProfit = (Integer)payload.getValue("\"Customer Order Transaction\".\"CO Demand Profit\""); //modify the value to be of type String Map valueMap = payload.getValueMap(); Map modifiedValueMap = new HashMap(); modifiedValueMap.putAll(valueMap); modifiedValueMap.put("\"Customer Order Transaction\".\"CO Demand Profit\"", String.valueOf(demandProfit)); //put the new payload object in the request RetailAppsContextualEventPayload modifiedPayload = new RetailAppsContextualEventPayload(modifiedValueMap, null); ADFFacesUtil.setRequestAttribute("payload", modifiedPayload); }}
In-Context Launch from the Chart View of the AnalysisIn-Context Launch from the chart view of the analysis is different from the table view. When the hidden column is added as described in the section "Modifying the Oracle

Enabling In-Context Launch from the Oracle BI EE Content
Oracle BI EE Integration in Retail Application 8-25
BI EE Analysis to Enable In-Context Launch", it becomes available in the QDR payload in case the analysis has a table view, which enables the Retail Applications Framework to launch the content requested in the hidden column.
If the analysis has a chart view, then the hidden column has to be explicitly added in the chart view to be included in the payload.
Figure 8–20 Demand Chart View
In the pie chart above, if the user clicks on B and M, the payload will not include the hidden column by default. In order include the hidden column in the payload, we will edit the chart and add the column to Sections in the chart.
Figure 8–21 Include Hidden Column
Adding this column to the Sections of the chart will not have any impact on the chart as the column has the same data for each row. However, this will include this column in the payload received from the chart, enabling the Retail Application to open the content requested in the payload.
There is an issue related to the ADFContextualEvent action generated from the chart view of an analysis. The payload only includes the dimensions and not the measures

Enabling In-Context Launch from the Oracle BI EE Content
8-26 Oracle Retail Invoice Matching Operations Guide
values. In the example above, only the dimension Submit Demand Channel will be included in the payload. The measure CO Demand Qty or CO Demand Retail Amt will not be included. So, the measure values cannot be passed to the taskflow as input parameters, if the ADFContextualEvent is generated from an Oracle BI EE chart.
Opening Different Taskflows from the Same AnalysisIt may be a requirement that you want to open one taskflow from one column in the analysis and a different taskflow from a different column. Let's consider an example.
Figure 8–22 Taskflow Column
If the user clicks on any Fiscal Week value in the table above we want to open a taskflow say Taskflow1 in a new application tab. If the user clicks on CO Pick Qty, we want to open another taskflow say Taskflow2 in a new application tab.
The Retail Application provides this capability to open different content from different columns in the analysis by using multiple hidden columns. In this example, we will use two hidden columns as shown in the screenshot below.
Figure 8–23 Two Hidden Columns

Enabling In-Context Launch from the Oracle BI EE Content
Oracle BI EE Integration in Retail Application 8-27
The first hidden column is
'/custom/bi/OBIEEADFContextualEventModel.xml|biInContextLaunchAction|"Business Calendar"."Fiscal Week"|biInContextLaunchMultipleTargetColumns1'
The second hidden column is
'/custom/bi/OBIEEADFContextualEventModel.xml|"Customer Order Transaction"."CO Pick Qty"|biInContextLaunchMultipleTargetColumns2'
When the user clicks either the Fiscal Week or the CO Pick Qty, the ADFContextualEvent action will generate the QDR of the cell as a payload. The payload will include both hidden columns that we added to the analysis. The Retail Application will check which column is clicked; it will then verify in the list of hidden columns which action to invoke for that column. So, in the above example, if the user clicks 2011Week32 as the Fiscal Week, the Retail Application will open the content defined for the Item id biInContextLaunchMultipleTargetColumns1 in the model file /custom/bi/OBIEEADFContextualEventModel.xml.
The format for defining hidden column in such a case is
'<path to the OBIEEADFContextualEventModel file>|<Column name in the analysis>|<id of the item in the model file>'

Enabling In-Context Launch from the Oracle BI EE Content
8-28 Oracle Retail Invoice Matching Operations Guide
9
Troubleshooting 9-1
9Troubleshooting
[6] This chapter covers troubleshooting.
Oracle BI EE IntegrationThis section covers the Oracle BI EE integration.
The Oracle BI EE Dashboard Displays an Error Message 'An error occurred retrieving the BI content. Please contact your System Administrator'
Go through the following steps to troubleshoot this issue.
1. Login directly to Oracle BI EE and verify if it is up and running. If the Oracle BI EE is down you may encounter the above error.
2. The Retail Application uses the BI Presentation Services connection to connect to Oracle BI EE. Ensure that Oracle BI EE is prepared for the Presentation Services connection. Refer to the chapter Embedding Business Intelligence Objects in ADF Applications of the Fusion Middleware Developer's Guide for Oracle Business Intelligence Enterprise Edition.
The link to the Fusion Middleware Developer's Guide for Oracle Business Intelligence Enterprise Edition is
https://docs.oracle.com/middleware/11119/biee/BIEDV/embedding_adf.htm
3. Ensure that the BIConnection attributes in the Retail Application to connect to Oracle BI EE are correct. Refer to the section "Modifying the BIConnection Attributes at Runtime" to change the BIConnection attributes post install.
4. Ensure that the user who logs into the application exists in Oracle BI EE and has permissions to view the Oracle BI EE content requested.
Troubleshooting In-Context LaunchIf the In-Context launch does not work after enabling the ADF Contextual Event action in the Oracle BI EE analysis and adding the hidden column as documented above, then you should enable FINER logging for oracle.retail.apps.framework.bi package.
The log file should log the QDR payload received from Oracle BI EE and the actions executed by the Retail Application code based on the QDR.
Contextual Area Displays a White ScreenThe Contextual Area displays the Oracle BI EE content using inline frames (IFrames). Ensure that IFrames are enabled in Oracle BI EE.

Oracle BI EE Integration
9-2 Oracle Retail Invoice Matching Operations Guide

10
Integration 10-1
10Integration
This chapter describes how ReIM integrates with other systems, related interfaces, and file layouts. It includes an integration overview, a discussion of EDI (with layouts), an explanation of how ReIM interfaces with financial systems, and a summary of LDAP user authentication.
Additional configuration may be needed to properly integrate other systems with ReIM. See Chapter 14, "System Configuration" for additional information.
Integration OverviewThis section provides a diagram that shows the overall direction of the data among the applications and tables. The accompanying explanations are written from a system/staging table-to-system/staging table perspective, illustrating the movement of data.
Integration Overview
10-2 Oracle Retail Invoice Matching Operations Guide
From the Supplier (to EDI) to ReIMReIM receives supplier invoices and credit notes through EDI or through on-line entry processes. These document types are described later in this chapter.
From ReIM (to EDI) to the SupplierReIM generates debit memos, credit note requests and credit memos for various reasons. Each of these documents is recorded in ReIM tables to allow for retailer reporting. Also, a ReIM process reads these tables and creates a file of these documents to support the retailer’s EDI transmissions to suppliers.
From ReIM to the Staging Table for Financial Systems InterfaceFor a description of the data that is sent through this interface, see "Financial System Interface" later in this chapter.
From the Merchandising System to ReIM (Directly and Through EDI)ReIM is able to access foundation data, such as item, purchase order, supplier, and other information directly from RMS tables. ReIM provides the drivers to access these tables without further integration work.
■ Receipts
Receipts are records of purchased merchandise arriving at the store or warehouse. Receipt data is accessed in RMS, and certain data elements are extracted from RMS into ReIM tables to support ReIM-specific actions performed against receipts (for example, splitting receipt quantities, updating statuses, and so on).
■ Purchase Orders
Purchase orders (POs) are created in RMS and represent a legally binding agreement between retailer and supplier for the purchase and sale of goods. The retailer records the quantity, cost and delivery location of items from the supplier. On a single PO, RMS supports different costs for the same item going to different locations. PO costs are used to value receipt quantities.
■ Item
ReIM processes matches at the item transaction-level (that is, SKUs). For reference purposes, UPCs may be used, so they should be provided by the merchandising system. See Oracle Retail Merchandising System documentation for more information about the multi-level item structure.
■ Partner
A partner is a business that supplies and bills a retailer for non-merchandise services. Examples of partners are banks, agents, and expense suppliers. A partner cannot send merchandise invoices to retailers.
■ Valued Added Tax (TAX) Code and Rate
TAX is embedded in the cost of the item. ReIM provides for validation of taxes charged on the invoice against TAX codes/rates stored in RMS tables for the item.
■ Consignment
Consignment is an arrangement whereby the physical control of merchandise (but not the title of ownership) is transferred from one business known as the consignor (for example, the vendor) to another known as the consignee (for example, the retailer). The title to the goods remains with the consignor until the

Integration Overview
Integration 10-3
goods are sold. When consigned goods are sold, the consignor invoices the consignee. On this invoice, the cost of each item is reduced to a certain proportion, called the consignment rate. The consignment rate, predetermined by both parties, represents the consignor’s share of the sale. Once the merchandising system records a sale, a consignment invoice is created in ReIM for a percentage of the sale cost. The receipt is implied based on the consignment rate applied to the selling price; accordingly, the self-billed invoice is assumed to be in matched status.
■ Return to Vendor (RTV)
An RTV is a retailer-initiated purchase return of inventoried goods to an external vendor. The merchandising system uses RTV data to update inventory positions and write requisite transactions to the stock ledger. ReIM receives RTV data through the merchandising system from the store and warehouse inventory systems where it is initiated, where a charge-back document is created.
■ Deal Bill Backs
RMS tracks certain types of supplier deals (for example, rebates, vendor funded markdowns, and so on) for billing back to the supplier. Information to support these billings is received in ReIM through an RMS extract. ReIM creates a charge back document for these billings, which may be subject to edit/approval in ReIM or automatically processed to the financial staging table for export to the retailer’s accounts payable solution, based on an RMS parameter.
■ Other Data Elements Received from RMS
– Non-merchandise codes
– Currency
– Exchange rates
– Store/warehouse location type
– Supplier information
– Supplier address (invoice address, returns address, and so on)
– Merchandise hierarchy
– Business date
– Terms and terms ranking
From ReIM to Receiver Unit and Cost Staging Tables to RMSReceiver cost and unit adjustments are initiated in ReIM update receipts held in RMS tables. Receiver adjustments, resulting from the ReIM discrepancy resolution process, create cost and/quantity adjustments to receipt tables in RMS, as well as to supplier and purchase order tables for certain types of cost resolutions.
From ReIM to the Merchandising System■ Receipt Status
When the entire receipt is matched (all the lines to invoices), ReIM provides and update to the invoice match status (that is, from unmatched to matched) on the shipment table in RMS.
■ Shipment (Receipts) Table Quantity Matched Update

Electronic Data Interchange (EDI) Tables and Files
10-4 Oracle Retail Invoice Matching Operations Guide
When ReIM matches a portion and/or all of a receipt line to an invoice line, ReIM makes a corresponding update to the quantity matched column.
Electronic Data Interchange (EDI) Tables and FilesElectronic Data Interchange (EDI) facilitates the computer-to-computer transmission of business information and transactions, such as invoices and purchase orders. EDI represents a convenient method by which a retailer and its suppliers can transfer information back and forth. The Voluntary Interindustry Commerce Standard (VICS) EDI is used by the general merchandise retail industry.
ReIM has two file-based EDI interfaces. Note that neither follows the VICS EDI standard. The ReIM EDI interfaces have been customized, and the retailer must translate them.
The interfaces represent the upload of invoices or other documents from a supplier or another application and the download of documents to suppliers. These two common types of EDI are described below:
■ EDI Injector is the standard description for an EDI process that uploads documents.
■ EDI invoice download is the standard description for an EDI process that downloads Debit Memo, Credit Note Request, and Credit Memo data from ReIM to suppliers.
For information about ReIM batch processes related to both of these types of EDI, see "Chapter 15, "Batch Processes". Note that although the majority of invoices are created through either EDI Injector or batch entry, users can also create invoices online and add details, or use the online dialog to add details to an invoice that was EDI uploaded.
The EDI Reject TableThe EDI Injector (reimediinjector) batch process uploads invoices and credit notes from EDI files into the Injector workspace tables (IM_INJECT_xxx), validates the data against a set of rules, and then moves valid documents into the operational tables. This process validates the information in the file against itself and against RMS/ReIM database. A limited set of data validation errors can cause the invalid transaction to remain in the Injector workspace tables (IM_INJECT_DOC_xxx) in fixable status where the data can be corrected through an online process.
The following errors can be manually corrected through the front end:
■ Supplier number (or Partner ID): This value must be a valid supplier site (SUPS table) or partner (PARTNER table) in RMS (or the equivalent merchandising system).
■ Order numbers: Order numbers must be approved and created for the supplier or linked suppliers in RMS (or the equivalent merchandising system) on the ORDHEAD table. Non-merchandise invoices may not have any order numbers associated, so this validation should be skipped for this type of invoice.
■ Order/location combination: The system validates that all order number/location combinations in the file are valid within RMS or the equivalent merchandising system (meaning that the relationship must exist on the ORDLOC table).
■ Terms code: All terms must exist within RMS or the equivalent merchandising system on the TERMS table.

Electronic Data Interchange (EDI) Tables and Files
Integration 10-5
■ Invoice date: A document cannot be older than the VDATE minus the post-dated document days' system level parameter value or newer than the VDATE.
■ Merchandise invoices cannot be associated with a partner; they must only be associated with a supplier.
■ Credit notes from a partner cannot have item records attached unless the partner type is a manufacturer, distributor, or wholesaler (type S1, S2, or S3).
The EDI Reject FileA limited set of data validation errors (identified in the file layout Validation column) cause the invalid transaction to be written to the reject file (named by the retailer).
EDI Injector File Layout (Based on EDI 810)The following describes the input and output specification for the EDI Injector File.
All Files Layouts Input and OutputInput file format:
FHEAD (1): Start of file.
THEAD (1…n): Transaction (document) level info. Each file must have at least 1 THEAD.
TDETL (0…n): Item detail records for this transaction. TDETL is required for Merchandise Invoices and optional for Non-Merchandise Invoices, Credit Note documents, and debit memo documents.
TALLW (0…n): Allowance records for this item. TALLW is optional.
TNMRC (0…n): Non-merchandise records for this transaction. Required on non-merchandise documents.
TVATS (0…n): VAT breakdown by VAT code. TVATS is optional.
TTAIL (1…n): Marks the end of a THEAD record. Each THEAD requires exactly one TTAIL.
FTAIL (1): Marks the end of the file.
TDETL and TNMRC do not need to occur in order. TALLW must follow TDETL
If records are encountered in any order other than specified above, execution of program will halt.
Example:
FHEAD
THEAD
TNMRC
FTAIL (no TTAIL encountered)
If a record descriptor is encountered other than those specified in this document, execution of program will halt.
Reject file will have an identical format. If no records are rejected, it will consist of only the FHEAD and FTAIL lines.

Electronic Data Interchange (EDI) Tables and Files
10-6 Oracle Retail Invoice Matching Operations Guide
All character variables should be right-padded with blanks and left justified; all numerical variables should be left-padded with zeroes and right-justified. Null variables should be blank.
Single location invoices will be inserted into IM_DOC_HEAD, IM_INVOICE_DETAIL and IM_DOC_NON_MERCH. Multi-location invoices will be inserted into IM_PARENT_INVOICE, IM_PARENT_INVOICE_DETAIL and IM_PARENT_NON_MERCH.
It is assumed all values that have dependent information included in the file (for example, location has dependent information of order no, upc, upc-supp, and so on) are valid for the RMS system. The following is never anticipated to happen: only locations A, B, and C exist in RMS; EDI reads a transaction that has location D. This sort of file may not be flagged as invalid in any way.
Uploaded documents with details must have at most one associated UPC, item or VPN identifier. When system Tax processing is enabled, documents that fail to meet these criteria will be rejected to the file by the EDI Injector Batch process. When Tax is disabled, the document will be available for review and correction through the Invoice Matching user interface in the EDI Maintenance screen.
FHEAD - File Header. First record of an upload file.
Field Name Field Type Description Req Validation
Record Descriptor
Char(5) Describes file record type Y Halt execution if not FHEAD.
Line id Number(10) Sequential file line number. Y Halt execution if not 0000000001.
Gentran ID Char(5) The type of transaction this file represents.
Y Halt execution if not UPINV.
Current date Char(14) File date in YYYYMMDDHH24MISS format.
Y Halt execution if invalid date format.
THEAD - Transaction Header. Start of a document transaction.
Field Name Field Type Description Req Validation
Record descriptor Char(5) Describes file record type Y THEAD
Line id Number(10) Sequential file line number Y Halt execution if not in sequence
Transaction number
Number(10) Sequential transaction number. All records within this transaction will also have this transaction number.
Y Reject entire file if:
transaction number is not numeric or not in sequence
first transaction number is not 0000000001

Electronic Data Interchange (EDI) Tables and Files
Integration 10-7
Document Type Char(6) Describes the type of document being uploaded. The document type will determine the types of detail information that are valid for the document upload. Stored in IM_DOC_HEAD.TYPE.
Valid values are:
MRCHI - Merchandise Invoice
NMRCHI - Non Merchandise Invoice
CRDNT - Credit Note
DBMC - Debit Memo Cost
DBMQ - Debit Memo Qty
CRDMC - Credit Memo Cost
CNRC- Credit Note Request Cost
CNRQ- Credit Note Request Qty
Y Reject transaction to file if document type is null document type is not MRCHI (merchandise invoice), NMRCHI (non-merchandise invoice), CRDNT (credit note), DBMC (Debit Memo-Cost), DBMQ (Debit Memo-Qty), CNRC (Credit Note Request-Cost), CNRQ (Credit Note Request-Qty), CRDMC (Credit Memo Cost) document type is CRDNT (credit note); vendor is not a supplier, manufacturer, distributor, or wholesaler. document type is CRDNT and TALLW records exist document type is MRCHI and item detail records DO exist for this transaction (this type of transaction must have no item detail records) document type is CRDNT,NMRCHI, DBMC, DBMQ, CRDMC, CNRC, CNRQ and any error occurs with the document
Vendor Document Number
Char(30) Vendor's document number. Stored in IM_DOC_HEAD.EXT_DOC_ID with all characters converted to their upper case (for example, ThisDocId -> THISDOCID).
Y Reject entire upload file if the same vendor document number occurs more than once in the file.
Reject transaction to file if:
■ Vendor document number is null.
■ Vendor document number is not unique for this vendor.
■ Vendor document number is not alphanumeric and the property INVOICE_NUMBER_VALIDATION_REGULAR_EXPRESSION in reim.properties is commented out.
■ Vendor document number contains special characters that are not specified in the property INVOICE_NUMBER_VALIDATION_REGULAR_EXPRESSION in reim.properties and the property is not commented out.
■ Vendor document number has leading zero and the property INVOICE_NUMBER_VALIDATION_ALLOW_ZERO in reim.properties is commented out or set to false.
Field Name Field Type Description Req Validation

Electronic Data Interchange (EDI) Tables and Files
10-8 Oracle Retail Invoice Matching Operations Guide
Group ID Char(10) The Group ID is an informational field, which can be used to identify groups of invoices that were transmitted to ReIM together.
N Reject transaction to file if:
■ Group ID exists and is non-numeric.
■ Group ID exists and is numeric and negative.
Vendor Type Char(6) Type of vendor (either supplier or partner) for this document. Stored in IM_DOC_HEAD.VENDOR_TYPE
Valid values are:
SUPP - Supplier
BK - Bank
AG - Agent
FF - Freight Forwarder
IM - Importer
BR - Broker
FA - Factory
AP - Applicant
CO - Consolidator
CN - Consignee
S1 - Merch Supp level 1
S2 - Merch Supp level 2
S3 - Merch Supp level 3
Y Reject transaction to file if:
■ Vendor type is null or if it is not a valid vendor type (from Vendor class).
■ Document type is MRCHI (merchandise invoice) and vendor type is not Supplier (SUPP).
Vendor ID Char(10) Vendor for this document (if a supplier, this field must be a supplier site) . Stored in IM_DOC_HEAD.VENDOR
Y Reject transaction to tables if:
■ Vendor is a supplier and supplier site is not valid.
■ Vendor is a supplier and vendor ID is not completely numeric.
Vendor Document Date
Char(14) Date document was issued by the vendor (in YYYYMMDDHH24MISS format). Stored in IM_DOC_HEAD.DOC_DATE
Y Reject transaction to file if:
■ Vendor document date is null.
■ Date is not a valid date format.
Reject transaction to tables if Vendor Document Date is:
■ After the vdate.
■ Before (vdate - post_dated_doc_days) (from im_system_options).
Field Name Field Type Description Req Validation

Electronic Data Interchange (EDI) Tables and Files
Integration 10-9
Order Number/ RTV Order Number
Number(12) Merchandising system order number for this document. Required for merchandise invoices and optional for others. Store in IM_DOC_HEAD.ORDER_NO.
This field can also contain the RTV order number if the RTV flag is 'Y'
N Reject transaction to file if:
■ Order/RTV order number exists and is not numeric.
■ Order/RTV order number is null and vendor type is a supplier.
■ Order/RTV order number is null and deal_id is null.
■ Order/RTV order number exists and vendor type is NOT a supplier.
■ Order/RTV order number exists and location or location type are null.
Reject transaction to tables if RTV flag is null or 'N' AND:
■ Order number exists but is not valid for the supplier or the supplier's linked suppliers.
■ Order number exists but is not valid for the location/location type.
Reject transaction to file if RTV flag is 'Y' AND:
■ RTV order number exists but is not valid for the supplier or the supplier's linked suppliers.
■ RTV order number exists but is not valid for the location/location type.
Location Number(10) Merchandising system location for this document. Required for merchandise invoices and optional for others. Stored in IM_DOC_HEAD.LOCATION.
Y Reject transaction to file if:
■ Location or location type do not exist.
■ Location exists and is not numeric.
■ Location exists and location type is not Store or Warehouse.
Reject transaction to tables if Location and Location Type exist but are not valid.
Location Type Char(1) Merchandising system location type (either Store or Warehouse) for this document. Required for merchandise invoices and optional for others. Stored in IM_DOC_HEAD.LOC_TYPE.
N Reject transaction to file if Location type exists and location is null.
Field Name Field Type Description Req Validation

Electronic Data Interchange (EDI) Tables and Files
10-10 Oracle Retail Invoice Matching Operations Guide
Terms Char(15) Terms of this document. If terms are not provided, the vendor's default terms are associated with this record. Stored in IM_DOC_HEAD.TERMS. This value is used to get the Terms Discount Percentage to be stored on IM_DOC_HEAD.TERMS_DSCNT_PCT.
N Reject transaction to tables if Terms exist and are not valid.
Due Date Char(14) Date the amount due is due to the vendor (YYYYMMDDHH24MISS format). If due date is not provided, default due date is calculated based on vendor and terms. Stored in IM_DOC_HEAD.DUE_DATE.
N Reject transaction to file if:
■ Due date exists and is not a valid date format.
■ Due date is before the vendor document date.
Payment method Char(6) Method for paying this document. Stored in IM_DOC_HEAD.PAYMENT_METHOD.
N Reject transaction to file if Payment method exists and is not valid.
Currency code Char(3) Currency code for all monetary amounts on this document. Stored in IM_DOC_HEAD.CURRENCY_CODE.
Y Reject transaction to file if:
■ Currency code is null.
■ Currency code is not valid.
■ Order number exists and currency code does not match the order's currency.
Exchange rate Number (12,4) Exchange rate for conversion of document currency to the primary currency. Stored in IM_DOC_HEAD.EXCHANGE_RATE.
N Reject transaction to file if Exchange rate exists and is not numeric.
Sign Indicator Char(1) Indicates either a positive (+) or a negative (-) total cost amount.
Y Reject transaction to file if sign indicator is null or if it is not + or -.
Total Cost Number(20,4) Total document cost, including all items and costs on this document. This value is in the document currency. Stored in IM_DOC_HEAD.TOTAL_COST and IM_DOC_HEAD.RESOLUTION_ADJUSTED_TOTAL_COST.
N Reject transaction to file if:
■ Total cost is null.
■ Total cost is not numeric.
■ Total cost does not equal the sum of extended costs for all item detail records in this transaction.
■ Total cost is not negative and vendor document type is CRDNT.
Sign Indicator Char(1) Indicates either a positive (+) or a negative (-) total Tax amount.
Y Reject transaction to file if sign indicator is null or if it is not + or -.
Field Name Field Type Description Req Validation

Electronic Data Interchange (EDI) Tables and Files
Integration 10-11
Total VAT Amount
Number(20,4) Total VAT amount, including all items and costs on this document. This value is in the document currency.
N Treat as zero if null.
Reject transaction to file if:
■ Total Tax amount is not null but is not numeric.
■ Total Tax amount does not equal the sum of Tax for all item detail records PLUS the sum of Tax for all non-merch items in this transaction PLUS the sum of Tax for all allowances in this transaction.
Sign Indicator Char(1) Indicates either a positive (+) or a negative (-) total Tax amount.
Y Reject transaction to file if sign indicator is null or if it is not + or -.
Total Quantity Number(12,4) Total quantity of items on this document. This value is in EACHES (no other units of measure are supported in ReIM). Stored in IM_DOC_HEAD.TOTAL_QTY and IM_DOC_HEAD.RESOLUTION_ADJUSTED_TOTAL_QTY.
Y Reject transaction to file if:
■ Total quantity is null.
■ Total quantity is not numeric.
■ Total quantity does not equal the sum of quantities for all item detail records in this transaction.
■ Total quantity is not zero when vendor document type is 'NMRCHI'.
Sign Indicator Char(1) Indicates either a positive (+) or a negative (-) total Tax amount.
Y Reject transaction to file if sign indicator is null or if it is not + or -.
Total Discount Number(12,4) Total discount applied to this document. This value is in the document currency. Stored in IM_DOC_HEAD.TOTAL_DISCOUNT
Y Reject transaction to file if:
■ Total discount is null.
■ Total discount is not numeric.
Freight Type Char(6) The freight method for this document.
N Reject transaction to file if Freight type exists and is not valid.
Paid Ind Char(1) Indicates if this document has been paid. Stored in IM_DOC_HEAD.MANUALLY_PAID_IND.
Y Reject transaction to file if:
■ Paid ind is null.
■ Paid ind is not Y or N.
Multi Location Char(1) Indicates if this invoice goes to multiple locations. If Yes, the record should be inserted to IM_PARENT_INVOICE table.
Y Reject transaction to file if:
■ Multi-location is null.
■ Multi-location is not Y or N.
■ Multi-location is Y and Consignment is Y.
Consignment indicator
Char(1) Y Y Reject transaction to file if:
■ Consignment indicator is null
■ Consignment indicator is not Y or N
Do not reject transaction to table if Consignment is Y.
Field Name Field Type Description Req Validation

Electronic Data Interchange (EDI) Tables and Files
10-12 Oracle Retail Invoice Matching Operations Guide
Deal Id Number(10) Deal Id from RMS if this invoice is a deal bill back invoice.
N If Deal Id is not null, Deal Approval indicator must be 'M' or 'A'.
Do not reject transaction to table if deal id is not null.
Deal Detail Id Number(10) Deal Detail Id from RMS and is stored in IM_DOC_HEAD. DEAL_DETAIL_ID
N
Deal Approval Indicator
Char(1) Indicates if the document on IM_DOC_HEAD is to be created in Approved or Submitted status.
N Reject to file if not blank, 'M' Submitted status or 'A' approved.
Do not reject transaction to table if value is not null.
RTV indicator Char(1) Indicates if this invoice is a RTV invoice.
Y Reject transaction to file if:
■ RTV indicator is null
■ RTV indicator is not Y or N
Do not reject transaction to table if RTV is Y.
Custom Document Reference 1
Char(90) This optional field is included in the upload file for client customization. No validation is performed on this field. Stored in IM_DOC_HEAD.CUSTOM_REF_1.
N
Custom Document Reference 2
Char(90) This optional field is included in the upload file for client customization. No validation is performed on this field. Stored in IM_DOC_HEAD.CUSTOM_REF_2.
N
Custom Document Reference 3
Char(90) This optional field is included in the upload file for client customization. No validation is performed on this field. Stored in IM_DOC_HEAD.CUSTOM_REF_3.
N
Custom Document Reference 4
Char(90) This optional field is included in the upload file for client customization. No validation is performed on this field. Stored in IM_DOC_HEAD.CUSTOM_REF_4.
N
Cross-reference document number
Number(10) Document that a credit note is for. Blank for all document types other than merchandise invoices. Stored in IM_DOC_HEAD.REF_DOC.
N Reject transaction to file if Cross-reference document number exists and is not numeric
Field Name Field Type Description Req Validation

Electronic Data Interchange (EDI) Tables and Files
Integration 10-13
TVATS - VAT breakdown by VAT code. This information is inserted in IM_DOC_TAX
Field Name Field Type Description Req Validation
Field record descriptor
Char(5) Marks costs at Tax rate line.
Y TVATS
Reject entire transaction to file if this type of record exists and the transaction has any error. See technical design for additional validations.
Reject to file if in im_system_options Tax is on, but there is no TVATS.
Line id Char(10) Sequential file line number.
Y Halt execution if not in sequence.
Transaction number
Number(10) Y Reject entire file if:
■ Transaction number is not numeric.
■ Transaction number is not the same as the current transaction.
VAT code Char(6) VAT code that applies to cost.
Y Reject to file if VAT code is not valid.
VAT rate Number(20,10) VAT Rate corresponding to the Tax code.
Y Reject to file if VAT rate is not numeric.
Sign indicator Char(1) Indicates either a positive (+) or a negative (-) Original Document Quantity amount.
Y Reject transaction to file if sign indicator is null or if it is not + or -.
Cost at this VAT code
Number(20,4) Total amount that must be taxed at the above VAT code.
Y Reject to file if not numeric.
TDETL - Item Detail Record. This information is inserted into the IM_INVOICE_DETAIL table for Merchandise Invoice and IM_DOC_DETAIL_REASON_CODES for Credit Notes.
Reference Invoice Number
Char(50) This optional field is included in the upload file for the reference of original invoice. This value is stored in IM_DOC_HEAD. REF_INV_EXT_DOC_ID
N
Reference Credit Note Request Number
Char(50) This optional field is included in the upload file for the reference of original credit note request. This value is stored in IM_DOC_HEAD. REF_CNR_EXT_DOC_ID
N
Field Name Field Type Description Req Validation

Electronic Data Interchange (EDI) Tables and Files
10-14 Oracle Retail Invoice Matching Operations Guide
Field Name Field Type Description Req Validation
Record descriptor
Char(5) Describes file record type.
Y TDETL
Line Id Number(10) Sequential file line number.
Y Halt execution if not in sequence.
Transaction number
Number(10) Transaction number for this item detail record.
Y Reject to file if Tax rate is not numeric
■ Transaction number is not numeric.
■ Transaction number is not the same as the current transaction.
UPC Char(25) UPC for this detail record. Valid item number is retrieved for the UPC. Stored in IM_INVOICE_DETAIL.ITEM or IM_DOC_DETAIL_REASON_CODES.ITEM.
Y
Exclusive with item
Reject transaction to file if:
■ UPC is null and Item is null.
■ Both UPC and Item are not null.
Reject transaction to tables if:
■ Valid item is not found for UPC and UPC supp.
■ Valid item is not associated with the supplier.
■ The item found is identical to another detail item for this transaction (no duplicate items).
UPC Supplement Number(5) Supplement for the UPC.
Note: UPC Supp is only valid for 9.0 implementation. For 10.1 implementation, this field will ALWAYS be blank.
N Reject transaction to file if:
■ UPC supplement exists and UPC doesn't exist.
■ UPC supplement exists and is not numeric.
Item Char(25) Item for this detail record. Item number is verified and stored in IM_INVOICE_DETAIL.ITEM or IM_DOC_DETAIL_REASON_CODES.ITEM.
Y
Exclusive with UPC
Reject transaction to file if:
■ UPC is null and Item is null.
■ Both UPC and Item are not null.
■ Valid item is not associated with the supplier.
■ The item found is identical to another detail item for this transaction (no duplicate items).
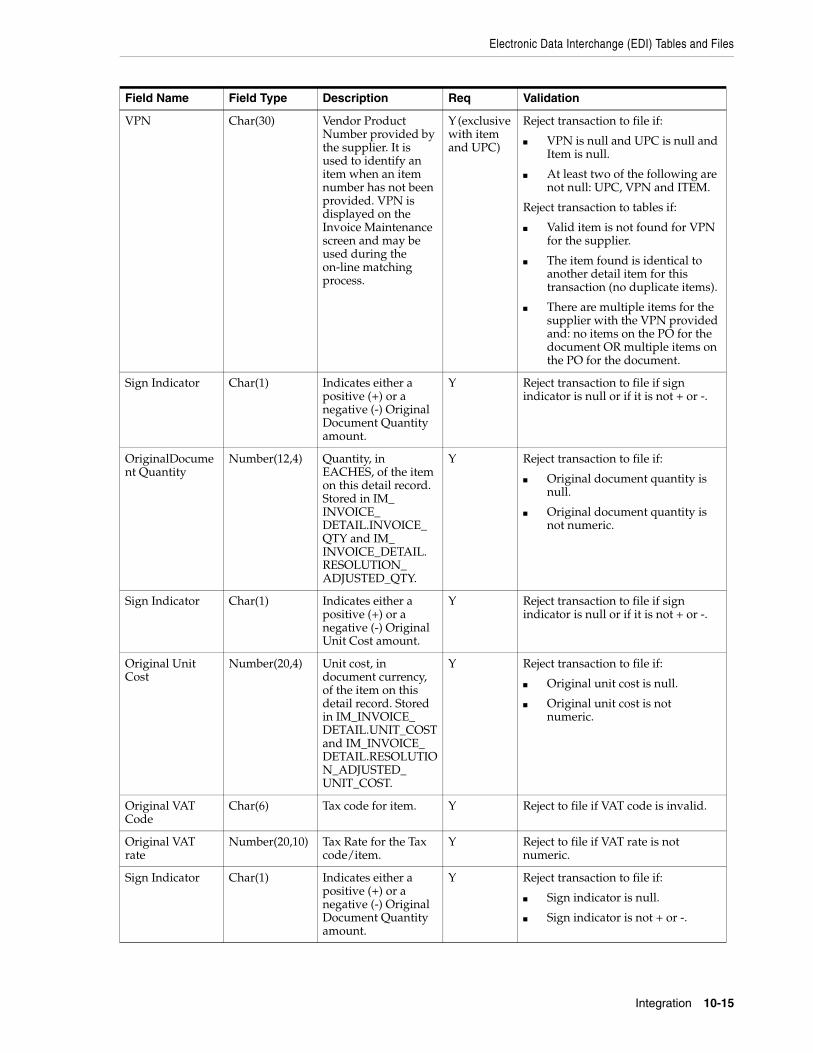
Electronic Data Interchange (EDI) Tables and Files
Integration 10-15
VPN Char(30) Vendor Product Number provided by the supplier. It is used to identify an item when an item number has not been provided. VPN is displayed on the Invoice Maintenance screen and may be used during the on-line matching process.
Y (exclusive with item and UPC)
Reject transaction to file if:
■ VPN is null and UPC is null and Item is null.
■ At least two of the following are not null: UPC, VPN and ITEM.
Reject transaction to tables if:
■ Valid item is not found for VPN for the supplier.
■ The item found is identical to another detail item for this transaction (no duplicate items).
■ There are multiple items for the supplier with the VPN provided and: no items on the PO for the document OR multiple items on the PO for the document.
Sign Indicator Char(1) Indicates either a positive (+) or a negative (-) Original Document Quantity amount.
Y Reject transaction to file if sign indicator is null or if it is not + or -.
OriginalDocument Quantity
Number(12,4) Quantity, in EACHES, of the item on this detail record. Stored in IM_INVOICE_DETAIL.INVOICE_QTY and IM_INVOICE_DETAIL. RESOLUTION_ADJUSTED_QTY.
Y Reject transaction to file if:
■ Original document quantity is null.
■ Original document quantity is not numeric.
Sign Indicator Char(1) Indicates either a positive (+) or a negative (-) Original Unit Cost amount.
Y Reject transaction to file if sign indicator is null or if it is not + or -.
Original Unit Cost
Number(20,4) Unit cost, in document currency, of the item on this detail record. Stored in IM_INVOICE_DETAIL.UNIT_COST and IM_INVOICE_DETAIL.RESOLUTION_ADJUSTED_UNIT_COST.
Y Reject transaction to file if:
■ Original unit cost is null.
■ Original unit cost is not numeric.
Original VAT Code
Char(6) Tax code for item. Y Reject to file if VAT code is invalid.
Original VAT rate
Number(20,10) Tax Rate for the Tax code/item.
Y Reject to file if VAT rate is not numeric.
Sign Indicator Char(1) Indicates either a positive (+) or a negative (-) Original Document Quantity amount.
Y Reject transaction to file if:
■ Sign indicator is null.
■ Sign indicator is not + or -.
Field Name Field Type Description Req Validation

Electronic Data Interchange (EDI) Tables and Files
10-16 Oracle Retail Invoice Matching Operations Guide
TALLW - Allowance Record. This information is inserted into IM_INVOICE_DETAIL_ALLOWANCE table.
Field Name Field Type Description Req Validation
Record descriptor
Char(5) Describes file record type. Y TALLW
Line id Number(10) Sequential file line number.
Y Halt execution if not in sequence.
Transaction Number
Number(10) Transaction number for this item allowance record.
Y Reject entire file if:
■ Transaction number is not numeric.
■ Transaction number is not the same as the current transaction.
Allowance Code Char(6) Allowance code for this allowance record. Stored in IM_INVOICE_DETAIL_ALLOWANCE.ALLOWANCE_CODE.
Y Reject transaction to file if:
■ Allowance code is null.
■ Allowance code is not valid.
Sign Indicator Char(1) Indicates either a positive (+) or a negative (-) allowance amount.
Y Reject transaction to file if sign indicator is null or if it is not + or -.
Allowance Amount
Number (20,4) Amount of allowance in document currency. Stored in IM_INVOICE_DETAIL_ALLOWANCE.ALLOWANCE_AMOUNT.
Y Reject transaction to file if allowance amount is null or not numeric.
Allowance VAT Code
Char(6) VAT Code for Allowance. Y Reject to file if VAT code is not valid.
Allowance VAT rate at this VAT code
Number (20,10) VAT Rate corresponding to theVAT code.
Y Reject to file if not numeric.
TNMRC - Non-Merchandise Record. Records of this type will contain non-merchandise costs. These costs are inserted into the IM_DOC_NON_MERCH table. Non-merchandise costs records are only required when the document type is non-merchandise. Non-merchandise cost records are also associated with merchandise type documents if the vendor associated with the document allows
Total Allowance Number(20,4) Sum of allowance details for this item detail record. If no allowances exist for this item detail record, value is 0.
Y Reject transaction to file if:
■ Total allowance is null.
■ Total allowance is not numeric.
■ Total allowance does not equal the sum of allowance amounts for all allowance records in this item detail record.
■ Total allowance is not 0 and vendor document type is CRDNT.
Field Name Field Type Description Req Validation

Electronic Data Interchange (EDI) Tables and Files
Integration 10-17
non-merch costs on merchandise invoices (IM_SUPPLIER_OPTIONS. MIX_MERCH_NON_MERCH_IND).
Field Name Field Type Description Req Validation
Record descriptor
Char(5) Describes file record type. Y TNMRC
Line id Number(10) Sequential file line number.
Y Halt execution if not in sequence.
Transaction number
Number(10) Transaction number for this non-merchandise record.
Y Reject entire file if:
■ Transaction number is not numeric.
■ Transaction number is not the same as the current transaction.
Non Merchandise Code
Char(6) Non-Merchandise code that describes this cost. Stored in IM_DOC_NON_MERCH.NON_MERCH_CODE.
Y Reject transaction to file if:
■ Non-merchandise code is null.
■ Non-merchandise code is not valid.
Sign Indicator Char(1) Indicates either a positive (+) or a negative (-) Non Merchandise Amt.
Y Reject transaction to file if sign indicator is null or if it is not + or -.
Non Merchandise Amt
Number(20,4) Cost in the document currency. Stored in IM_DOC_NON_MERCH.NON_MERCH_AMT.
Y Reject transaction to file if:
■ Non-merchandise amount is null.
■ Non-merchandise amount is not numeric.
■ Non-merchandise amount does not have a negative value and this is part of a credit note document (THEAD.Vendor Document Type = CRDNT).
Non Merch VAT Code
Char(6) VAT Code for Non-Merchandise.
Y Reject to file if VAT code is not valid.
Non Merch VAT code at this VAT code
Number(20,10) VAT Rate corresponding to the VAT code.
Y Reject to file if not numeric.
Service Performed Indicator
Char(1) Indicates if a service has actually been performed. Stored in IM_DOC_NON_MERCH.SERVICE_PERF_IND.
Y Reject transaction to file if:
■ Service performed indicator is null.
■ Service performed indicator is not Y or N.
Store Number(10) Store at which the service was performed. Stored in IM_DOC_NON_MERCH.STORE.
N Reject transaction to file if:
■ Store exists and is not numeric.
■ Service performed indicator is Y and store is not valid.
TTAIL - Transaction Tail. Marks the end of a transaction.
Field Name Field Type Description Req Validation
Record descriptor
Char(5) Describes file record type. Y TTAIL

Electronic Data Interchange (EDI) Tables and Files
10-18 Oracle Retail Invoice Matching Operations Guide
FTAIL - File TAIL. Marks the end of the upload file.
Field Name Field Type Description Req Validation
Record descriptor
Char(5) Describes file record type.
Y FTAIL
Line id Number(10) Sequential file line number.
Y Halt execution if not in sequence.
Number of lines Number(10) Total number of lines within this file not counting FHEAD and FTAIL.
Y Halt execution if number of lines is not numeric, if it does not match the count of lines within the file (excluding FHEAD and FTAIL), or if it is 2 (FHEAD and FTAIL only, file has no transactions).
NotesConsider the following.
■ The EDI Injector Batch process has the ability to recognize only a new document type. In FHEAD of the EDI flat file, the Document Type does not include CRDMC (credit memo cost). When the document type in the flat file is Debit Memo Cost, Debit Memo Qty, Credit Note Request Cost, or Credit Note Request Qty, and if the amount (Total Cost) for a Deal Charge Back Document that is sent over from RMS is negative a Credit Memo Cost is created.
■ For charge back documents, use the following flow chart to determine what document type to be populated in the database.
■ If the document type is merchandise invoice and the consignment indicator is Y, the status is matched; if the consignment indicator is not Y, the status isready for match; if the document type is not merchandise invoice, the status is approved.
Line id Number(10) Sequential file line number.
Y Halt execution if not in sequence.
Transaction number
Number(10) Transaction number for the transaction that this record is closing.
Y Reject entire file if:
■ Transaction number is not numeric.
■ Transaction number is not the same as the current transaction.
Transaction lines Number(6) Total number of detail lines within this transaction.
Y Reject transaction to file if transaction lines is not numeric, if it does not match the count of lines within the transaction, or if it is zero (transaction must have details).
Field Name Field Type Description Req Validation

Electronic Data Interchange (EDI) Tables and Files
Integration 10-19
■ If the consignment indicator is Y, then set the terms to Due Immediately terms (term ID = 48), and set the terms discount percentage to 0.
■ That Tax codes and rates in the detail of documents are those known for the item and location when the document is not an import Document. Given a combination of TDETL.item and location, we could find a Tax. The Tax code and Tax rate in the Tax should be the same as the original Tax code and original Tax rate in the TDETL.
■ The merchandises header Tax and detail Tax are consistent (for example, Tax basis by Tax rate and Tax amount by Tax rate). Total header Merchandise Tax information is calculated from total document Tax information and Tax information for non merchandise costs. For example, for each Tax Code in TDETL and TNMRC: Thead.Total VAT Amount at this Tax code = total Tax from TDETL at this Tax code + total Tax from TNMRC at this Tax code. Total Tax from TDETL at this Tax code = sum(original document quantity * original unit cost * original Tax rate). Total Tax from TNMRC at this Tax code =sum(Non Merch Tax rate * Non Merch Amt).Thead.Total VAT Amount at this VAT code = sum(TVATS.Vat rate * TVATS.cost at this VAT code).
■ For an EDI upload document, if the Tax Region of the header is different from the Tax region of the supplier, it is an import document. Import document will not contain Tax information. (LocVatRegion != SupplierVatRegion, then it is an import document). If a document is not an import document, plus the system_option.vat is on; if the TVATS is null, reject to file.
■ To decide whether a Tax code is valid in the TDETL, first find the Tax code given the information of item and location. If they are equal, then the Tax code is valid; if they are not equal, check if the Tax code exists in the effective Tax codes; if the Tax code exists, then it is valid but is populated to the audit table.
■ If RTV indicator or consignment indicator is Yes and deal ID is not null, it must reject to file.
■ If Item field is populated and there is an error it should always reject to file. In order to reject to the tables, we must have the UPC field populated and not the Item field.
EDI Invoice Download File Layout (Based on EDI 812)Output file format:
FHEAD (1): Start of file.
THEAD (1…n): Transaction (document) level info. Each file must have at least 1 THEAD.
TDETL (0…n): Item detail records for this transaction.
TNMRC (0…n): Non-merchandise records for this transaction.
Required on non-merchandise documents, optional otherwise.
TVATS (0…n): Doc Tax detail records for this transaction, optional.
TTAIL (1…n): Marks the end of a THEAD record. Each THEAD requires exactly one TTAIL.
FTAIL (1): Marks the end of the file.
If records are encountered in any order other than specified above, execution of program will halt.

Electronic Data Interchange (EDI) Tables and Files
10-20 Oracle Retail Invoice Matching Operations Guide
Example:
FHEAD
THEAD
TNMRC
TVATS
FTAIL (no TTAIL encountered)
If a record descriptor is encountered other than those specified in this document, execution of program will halt.
All character variables should be right-padded with blanks and left justified; all numerical variables should be left-padded with zeroes and right-justified. Null variables should be blank.
Note: The file is not threaded, but rather ordered by vendor id (THEAD). It is assumed that this file is broken out by vendor id during the translation process.
FHEAD - File Header. First record of an upload file.
Field Name Field Type Description Req Validation
Record descriptor
Char(5) FHEAD Y
Line id Number(10) Generated Sequential file line number. Y
Gentran ID Char(5) DNINV Y
Current date Char(14) File date in YYYYMMDDHH24MISS format.
Y
THEAD - Transaction Header. Start of a document transaction.
Field Name Field Type Description Req Validation
Record descriptor
Char(5) THEAD Y
Line id Number(10) Generated Sequential file line number. Y
Transaction number
Number(10) Sequential transaction number. All records within this transaction will also have this transaction number.
Y
Document Type
Char(6) Describes the type of document being downloaded. The document type will determine the types of detail information that are valid for the document downloaded. Retrieved from IM_DOC_HEAD.TYPE where type is debit memo, credit note request or credit memo and in Approved or Posted Status.
Y
Vendor Document Number
Char(30) Vendor's document number. Retrieved from IM_DOC_HEAD.EXT_DOC_ID.
Y

Electronic Data Interchange (EDI) Tables and Files
Integration 10-21
TDETL - Item Detail Record. This information is inserted into the IM_DOC_DETAIL_REASON_CODES table.
Invoice Number
Char(6) Corresponding invoice resolved by the document. Retrieved from IM_DOC_HEAD.REF_DOC.
Y
Vendor ID Number(10) Vendor for this document. Retrieved from IM_DOC_HEAD.VENDOR
Y
Document Date Char(14) Date the document was entered into the system in YYYYMMDDHH24MISS format. Retrieved from IM_DOC_HEAD.DOC_DATE
Y
Order Number(10) Order number for this document, if any. Retrieved from IM_DOC_HEAD.ORDER_NO
N
Location Number(10) Location for this document, if any. Retrieved from IM_DOC_HEAD.LOCATION.
N
Location Type Char(1) Location type for this document, if any. Retrieved from IM_DOC_HEAD.LOC_TYPE.
N
Terms Char(15) Terms of this document. Retrieved from IM_DOC_HEAD.TERMS.
N
Due Date Char(14) Date the amount due is due from the vendor (YYYYMMDDHH24MISS format). Retrieved from IM_DOC_HEAD.DUE_DATE.
N
Currency Code Char(3) Currency code for this document. Retrieved from IM_DOC_HEAD.CURRENCY_CODE.
N
Exchange Rate Number(12,4) Exchange rate for conversion of document currency to the primary currency. Retrieved from IM_DOC_HEAD.EXCHANGE_RATE.
N
Sign indicator Char(1) Indicates either a positive (+) or a negative (-) total cost.
Y
Total Cost Number(20,4) Total document cost, including all items and costs on this document. This value is in the document currency. Retrieved from IM_DOC_HEAD.TOTAL_COST.
Y
Sign indicator Char(1) Indicates either a positive (+) or a negative (-) total VAT amount
Y
Total VAT Amount
Number(20,4) Total VAT amount, including all items and costs on this document. This value is in the document currency.
N
Sign indicator Char(1) Indicates a positive (+) or negative (-) quantity
Y
Total Quantity Number(12,4) Total quantity of items on this document. This value is in EACHES (no other units of measure are supported in ReIM). Retrieved from IM_DOC_HEAD.TOTAL_QTY.
Y
Field Name Field Type Description Req Validation

Field Name Field Type Description Req Validation
Record descriptor
Char(5) TDETL Y
Line id Number(10) Generated Sequential file line number. Y
Transaction number
Number(10) Generated Transaction number for this item detail record
Y
Item Char(25) Internal SKU/Item for this document. This is always sent. Retrieved from IM_DOC_DETAIL.ITEM.
Y
UPC Char(25) UPC for this detail record. Retrieved from UPC_EAN.UPC (RMS 9.0) or ITEM_MASTER.ITEM (RMS 10.1). This field is sent if available.
Note: UPC is used for RMS 9.0 and Ref-Item is used for RMS 10.1. Ref-Item consists of UPC and UPC-Supp appended together with a separating hyphen(-).
N
UPC Supplement
Number(5) Supplement for the UPC. Retrieved from UPC_EAN.UPC_SUPPLEMENT. This field is sent if available.
Note: UPC Supp is only valid for 9.0 implementation. For 10.1 implementation, this field will always be blank.
N
VPN Char(30) Vendor Product Number. This field is sent if available. Retrieved from ITEM_SUPPLIER.VPN.
N
Comments Char(200) Comments associated with Reason Code. Retrieved from IM_DOC_DETAIL_COMMENTS.TEXT
Y
Reason Code Char(6) Reason Code for this document. Retrieved from IM_DOC_DETAIL_REASON_CODES.REASON_CODE_ID
Y
Reason Code description
Char(50) Description associated with Reason Code. Retrieved from IM_REASON_CODES.REASON_CODE_DESC
Sign indicator Char(1) Indicates a positive (+) discrepant qty. Y
Discrepant Quantity
Number(12,4) Quantity, in EACHES, of the item that is discrepant for this detail record. Retrieved from IM_DOC_DETAIL_REASON_CODES.ADJUSTED_QTY.
Y
Sign indicator Char(1) Indicates either a positive (+) or a negative (-) discrepant cost.
Y
Discrepant cost Number(20,4) Unit cost, in document currency, of the item that is discrepant for this detail record. Retrieved from IM_DOC_DETAIL_REASON_CODES.ADJUSTED_UNIT_COST.
Y
Original VAT code
Char(6) VAT code for item.
Original VAT rate
Number(20,10)
VATRate for the VAT code/item.
Electronic Data Interchange (EDI) Tables and Files
10-22 Oracle Retail Invoice Matching Operations Guide

Electronic Data Interchange (EDI) Tables and Files
Integration 10-23
TNMRC - Non-Merchandise Record. Records of this type will contain non-merchandise costs. These costs are retrieved from the IM_DOC_NON_MERCH table. Non-merchandise cost records are only required when the document type is non-merchandise. Non-merchandise cost records are also associated with merchandise type documents if the vendor associated with the document allows non-merch costs on merchandise invoices (IM_SUPPLIER_OPTIONS. MIX_MERCH_NON_MERCH_IND).
Field Name Field Type Description Req Validation
Record descriptor
Char(5) TNMRC Y
Line id Number(10) Generated Sequential file line number. Y
Transaction number
Number(10) Generated Transaction number for this non-merchandise record.
Y
Non Merchandise Code
Char(6) Non-Merchandise code that describes this cost. Retrieved from IM_DOC_NON_MERCH.NON_MERCH_CODE.
Y
Sign indicator Char(1) Indicates either a positive (+) or a negative (-) non merchandise amount.
Y
Non Merchandise Amt
Number(20,4) Cost in the document currency. Retrieved from IM_DOC_NON_MERCH.NON_MERCH_AMT.
Y
Non Merch VAT code
Char(6) VAT Code for Non_merchandise. Y
Non Merch VAT code at this VAT code
Number(20,10)
VATRate corresponding to the VAT code.
TVATS - VAT Detail record.
Field Name Field Type Description Req Validation
Record descriptor
Char(5) TVATS Y
Line id Number(10) Sequential line number. Y
Transaction number
Number(10) Y
VAT code Char(6) VAT code that applies to cost. Y
VAT rate Number(20,10)
VAT Rate corresponding to the VAT code. Y
Sign indicator Char(1) Indicates either a positive (+) or a negative (-) Original Document Quantity amount.
Y
VAT Basis Number(20,4) Total amount that must be taxed at the above VAT code.
Y
TTAIL - Transaction Tail. Marks the end of a transaction.

Field Name Field Type Description Req Validation
Record descriptor
Char(5) TTAIL Y
Line id Number(10) Generated Sequential file line number. Y
Line number Number(10) Generated Transaction number for the transaction that this record is closing.
Y
Transaction lines
Number(6) Total number of detail lines within this transaction.
Y
Financial System Interface
10-24 Oracle Retail Invoice Matching Operations Guide
FTAIL - File TAIL. Marks the end of the upload file.
Field Name Field Type Description Req Validation
Record descriptor
Char(5) FTAIL Y
Line id Number(10) Generated Sequential file line number. Y
Number of lines
Number(10) Total number of lines within this file, not including FHEAD and FTAIL.
Y
Financial System InterfaceReIM exports data to financial staging tables. This section describes these tables.
Foundation Financial Data OverviewThe following types of financial information are imported in ReIM:
■ Terms ranking data
■ Variable department/class account segments
■ Variable company/location account segments
Terms ranking information is used in the best terms calculation to choose the best term for each document. This best terms information is posted to the financial system.
Variable department/class and company/location segments are used to determine the account segments to which a document is posted.
The retailer is responsible for populating variable department/class and company/location segments. No API is provided.
Location Account SegmentsReIM uses location account segments in general ledger (GL) account mappings. The location account segments are accessed and maintained through the ReIM user interface. The segments are dynamically assigned during posting, based on the location on the invoice. The data is stored in the location account segments table (IM_DYNAMIC_SEGMENT_LOC).
Department/Class Account SegmentsReIM uses department/class account segments in GL account mappings. The department/class account segments are accessed and maintained through the ReIM user interface. The segments are dynamically assigned during posting, based on the

Financial System Interface
Integration 10-25
item on the invoice. The data is stored in the department/class account segment table (IM_DYNAMIC_SEGMENT_DEPT_CLASS).
Financial TransactionsReIM writes two types of transactions to the financial staging tables. Documents which are expected to be sent to the A/P system are sent to the IM_AP_STAGE_HEAD and IM_AP_STAGE_DETAIL tables. Transactions expected to go to the G/L system go to the IM_FINACIALS_STAGE table. The RFI integration will send the data in these tables to EBS or Peoplesoft. Retailers using other financial systems can still use these tables to integrate to their specific A/P and G/L systems.
Complex and Fixed Deal-Related PostingFor complex and fixed deals, batch processes copy most of the data from the RMS staging tables into ReIM detail tables (IM_COMPLEX_DEAL_DETAIL, IM_FIXED_DEAL_DETAIL). Some of the data on these tables is later referenced during the posting process for the created documents, including:
■ Location
■ Item
Financial PostingTo understand the process that posts data from ReIM to the financials staging table (IM_FINANCIAL_STAGE), see "Financial Posting Batch Design".
Tracking Receipt PostsReceipt tracking functionality allows the retailer to track what receipts have posted. This processing helps the retailer check the integrity of its financial data.
Note that Oracle Retail does not provide packaged reporting in conjunction with this processing. Rather, the retailer builds its own processes and creates its own reporting mechanisms against the data resulting from the receipt tracking functionality.
Tables Related to Tracking Receipt Posts
In-Process Tables
The tables illustrated below are for the retailer's understanding, but the data on these tables should not be used by the retailer as it builds its processes and reports.
Each area of the system that matches receipts to invoices updates the IM_RECEIPT_ITEM_POSTING table. This table tracks how much of an individual receipt item has been matched and posted.
IM_RECEIPT_ITEM_POSTING
Column Type Type Nullable
SEQ_NO NUMBER(10) N
RECEIPT_ID NUMBER(10) N
ITEM_ID VARCHAR(25) N
QTY_MATCHED NUMBER(12,4) Y

LDAP and Other User Interfaces
10-26 Oracle Retail Invoice Matching Operations Guide
IM_RCPT_ITEM_POSTING_INVOICE
Column Type Type Nullable
SEQ_NO (from IM_RECEIPT_ITEM_POSTING)
NUMBER(10) N
DOC_ID NUMBER(10) N
STATUS VARCHAR2(1) Y
Staging Tables to be used for Reporting Once posting is completed, the following staging tables contain all currently posted entries. Thus, to build processes and reporting that tracks receipt posts, the retailer should use only the data from these staging tables.
IM_RECEIPT_ITEM_POSTING_STAGE
Column Type Type Nullable
SEQ_NO NUMBER(10) N
RECEIPT_ID NUMBER(10) N
ITEM_ID VARCHAR(25) N
QTY_POSTED NUMBER(12,4) N
CREATE_DATE DATE N
IM_RCPT_ITEM_POSTING_INV_STAGE
Column Type Type Nullable
SEQ_NO NUMBER(10) N
DOC_NO NUMBER(10) N
Multiple Lines for an Individual Receipt ItemFor a given line item on a receipt, a line item can be split between multiple invoices. For example, one invoice could match half of a line item; another invoice could match the other half of the line item. Two separate lines would thus appear. The retailer should note that these values (and those in equivalent business scenarios) need adding together to indicate how much of a given receipt item is posted.
LDAP and Other User InterfacesReIM supports only LDAP user authentication. To indicate the authentication method, select LDAP for the property called authentication_source in the reim.properties file.
LDAPLight Directory Access Protocol (LDAP) is the means of user authentication supported by ReIM. It defines a network protocol for accessing information in a directory.
QTY_POSTED NUMBER(12,4) Y
Column Type Type Nullable

LDAP and Other User Interfaces
Integration 10-27
Only LDAP is used within ReIM for user authentication. Because ReIM has specific requirements for ReIM user roles and permissions that are easily configurable by the retailer, they are defined in the application itself. ReIM reads standard user information from an LDAP server.
There are two types of roles; business roles and enterprise roles. Business roles are defined within the ReIM application and define what functional privileges the user has. Enterprise roles are defined in LDAP (it is the same as user group). Any ReIM user defined in LDAP should be part of an LDAP user group defined by roles_base_dn in ldap.properties
If the retailer already stores user information using LDAP, the only interfacing configuration required is through the LDAP-specific properties file. The entries in this file point ReIM to the appropriate machine and port to find the LDAP server. Other properties also may be modified to reflect the names of attributes that the retailer uses in its LDAP schema.
Setting up the LDAP interface entails completing tasks within LDAP andReIM as follows.
Setup Steps within LDAPIn LDAP, complete the following steps.
1. Define the following attributes (or find the existing attributes that provide the same information) within your LDAP (actual name is not important).
■ User ID (standard uid).
■ Password.
■ First name (standard cn).
■ Last name (standard sn).
■ Preferred user language (identifies user locale).
■ Preferred user country (identifies user locale).
■ Preferred email (standard mail).
Note: All attributes listed above should be single value and mandatory. For attributes with multiple values, the first value is used within ReIM.
2. Create an attribute class that encompasses all the attributes above.
3. Select a container within your LDAP to hold users, which may be created directly in the container or in enclosed containers.
4. Either create new users based on the attribute class just created above, or add the attribute class to the existing users. Define missing values as needed.
Setup Steps within ReIMIn ReIM, complete the following steps.
1. In reim.properties, change authentication_source to LDAP.
2. In ldap.properties, define the values for the parameters shown in the following table.

Parameter Description
connection_url Machine and port for your LDAP server
ldap_alias Alias for the wallet entry containing the credentials for the user defined within LDAP that has ADMIN privileges
base_dn Name of the container for ReIM users
roles_base_dn Name of the container for ReIM role
login_id_attribute_name Name for user ID attribute used within the attribute class
user_container Name of the container for ReIM users
user_first_name_attribute_name- Name for the first name attribute used within the attribute class
user_last_name_attribute_name Name for the last name attribute used within the attribute class
user_email_attribute_name- Name for the email attribute used within the attribute class
user_password_attribute_name- Name for the password attribute used within the attribute class
user_language_attribute_name Name for the preferred language attribute used within the attribute class
user_country_attribute_name- Name for the preferred country attribute used within the attribute class
user_main_key User attribute which stores the username to be used in ReIM
role_member Group attribute which stores the distinguished name of users in the group
role_application Group attribute which stores the group name.
WildCard Wild character used to identify any search criteria filter
referral_handling Property defining how the LDAP should handle referrals.
LDAP and Other User Interfaces
10-28 Oracle Retail Invoice Matching Operations Guide
Additional LDAP Resources■ http://www.openldap.org/
This site contains the OpenLDAP main page. This site contains introduction, downloads, and documentation.
■ http://www.iit.edu/~gawojar/ldap/ This site is the LDAP browser site.
■ http://ldap.akbkhome.com/ This site contains an LDAP schema view with some definitions of the standard LDAP object classes and attributes.

11
Technical Design 11-1
11Technical Design
This chapter contains information related to the technical design of ReIM.
Locking Design SummaryReIM user interface is based on the optimistic locking strategy. It means that no entities will be preemptively locked before modification. Only at the point when modification needs to be performed the locking mechanism will be used. If two users are trying to modify the same entity, for example the same invoice, both users can do this on the screen. At the same time only the first user to attempt to save the changes will actually successfully save them and the second user will get an error message and would need to refresh the entity and try again.
Example
User1 is trying to update document D0. Document D0 has terms T0. User1 is trying to update T0 to T1. User2 is also trying to update document D0. User2 is trying to update T0 to T2. If User1 will be the first to attempt to save the change to D0 then D0 will have terms T1. User2 would need to refresh D0 to see the ne value of the terms and only after that would be able to change T1 to T2.
All user interface workflows can be sub-divided into 2 categories - simple entity workflows and complex process workflows. For simple entity workflows the locking is handled by the ADF framework. For complex workflows the workflow entities are copied into session (workspace) tables. For such workflows the locking is done by custom logic to allow data to be modified both by ADF framework code and by backend PL/SQL.
To facilitate locking, all tables that hold modifiable data have a standard - OBJECT_VERSION_ID - that is updated every time the entity is modified. New entity is created with OBJECT_VERSION_ID of 1. Modification verification is performed by comparing the copy's being modified version id with the original copy version id. If it different then the user's copy of the entity is out of sync.

Currency Design Summary
11-2 Oracle Retail Invoice Matching Operations Guide
In a batch mode no locking is performed. It is assumed that the batches will be run during the batch windows. It means the assumption is that he batch user will be the sole user of the entities. Because of this the batches should not be run ad-hoc during the normal business hours.
Currency Design SummaryReIM has been designed to handle a multiple number of currencies. This section addresses the system's assumptions, conversion process, and validations that are related to this capability.
Merchandising System (such as RMS) and ReIM AssumptionsConsider the following assumptions.
■ RMS defines one currency as the primary currency of the system (held on the RMS SYSTEM_OPTIONS table in the CURRENCY_CODE field).
■ RMS specifies that each purchase order can have one currency. This purchase order currency does not have to be the same as the RMS primary system currency or the RMS supplier currency.
■ ReIM requires that each document have its currency stated (IM_DOC_HEAD.CURRENCY_CODE). This invoice currency does not have to be the same as the system primary currency.
■ ReIM assumes that a purchase order and any invoices associated with that purchase order are in the same currency. This assumption is based on the business reality that these currencies are almost always the same and on the development consideration that currency conversion processes have an adverse impact on system performance.
Currency Conversion Process for Amount TolerancesThe following is information about the currency conversion process for amount tolerances.
■ Amount tolerances are established in the currency of the tolerance entity (each tolerance entity has a currency setting). However, because the invoices and POs to be matched could reflect a different currency, amount tolerances must be converted before they can be applied. In other words, the currency established for amount tolerances is converted when the invoice/PO combination is not in the tolerance currency. For example, a tolerance defined as 10 US dollars (USD) has a much different meaning than a purchase order/invoice defined in Thai Baht (10 Thai Baht is about 0.23 USD). If the system merely utilized the number 10 and failed to perform a currency conversion, the amount tolerances would not apply correctly.
■ Currency conversion rates are stored on the RMS CURRENCY_RATES table. The conversion factors on this table are in terms of the primary currency of the system. For example, suppose a retailer wishes to convert from Thai Baht to Uruguayan Pesos and the system's primary currency is USD. First, the system performs a conversion from Thai Baht to USD. Secondly, the system converts the USD value to Uruguayan Pesos. In other words, to perform its conversions, the system always must 'go through' the primary currency of the system.
■ Currency conversion is always done based on he consolidated exchange rate.
Currency Design Summary
Technical Design 11-3
Currency-Related System ValidationsOne of the validations performed by the EDI Injector process is that it determines whether the currency on the invoice is the same as the currency on the purchase order. If the invoice currency is not the same as the purchase order currency, the invoice is rejected.
The graphical user interface (GUI) invoice entry process also validates that the currency on the invoice is the same as the currency on the PO associated with the invoice. If the currencies are not the same, the user receives a warning message.
Currency FormattingMonetary values must be properly formatted according to the associated currency for matting rule. The precision for the currency formatting is defined in RMS CURRENCIES table.

Currency Design Summary
11-4 Oracle Retail Invoice Matching Operations Guide

12
Oracle E-Business Suite Financials Integration using Oracle Retail Financial Integration 12-1
12Oracle E-Business Suite Financials Integration using Oracle Retail Financial
Integration
This chapter describes the integration between Oracle Retail systems and Oracle E-Business Suite Financials (including Oracle General Ledger and Oracle Payables), as developed and supported by Oracle Retail Financial Integration (ORFI).
When the option to integrate is chosen, the selected information is shared between the systems. Integration and validation services are in place to ensure the shared data matches.
Note: This chapter addresses the points within Oracle Retail systems that are essential to integration. For more information about the entire integration process, including mapping to Oracle E-Business Suite data and settings, see the ORFI document, Oracle Retail Financial Integration for Oracle Retail Merchandising Suite and Oracle E-Business Suite Financials - Implementation Guide. For more information about Web services, see the following chapters in the Oracle Retail Merchandising System Operations Guide, Volume 2: "Service Provider Implementations API Designs" and "Web Services."
Participating ApplicationsThe following Oracle Retail applications are included in the integration covered by this chapter:
■ Oracle Retail Merchandising System (RMS)
■ Oracle Retail Sales Audit (ReSA)
■ Oracle Retail Invoice Matching (ReIM)
■ Oracle Retail Integration Bus (RIB)
Assumptions and Dependencies■ The option to integrate must be selected during initial set up of the RMS system.
■ ReIM accesses RMS to determine if integration is active. The RMS set up must be done before integrating with REIM.

Data Setup
12-2 Oracle Retail Invoice Matching Operations Guide
■ The URLs for the RFI Web services that are necessary for this integration are maintained in the RETAIL_SERVICE_REPORT_URL table and in the ReIM IM_SYSTEM_OPTIONS table.
■ Real time account validation is done only when the financial integration with Oracle E-Business Suite is ON.
■ Partners must be set up as suppliers in Oracle E-Business Suite. Then the partner must be manually set up in RMS using the RMS Supplier ID that was generated when the Oracle E-Business Suite supplier was interfaced to Oracle Retail. Partner functionality within RMS and ReIM can then proceed normally. The RMS supplier generated as part of this process is not used.
■ Payment terms and freight terms are manually maintained.
Data SetupIntegration of Oracle Retail applications and Oracle E-Business Suite Financials relies on synchronization of essential data, such as currency exchange rates and suppliers. Through careful discussions, the users of both systems determine the common codes and descriptions that will best serve their business needs.
When an agreement is reached, this information is set up and maintained. Depending on the volume, some shared information is set up in Oracle Retail applications or in Oracle E-Business Suite and electronically transferred to other systems. Otherwise, shared information is set up manually within each system, and the users of both systems must ensure that the code and the description match.
RMS Data Setup and ConfigurationThis section describes setup considerations for the RMS data.
RMS System OptionsAs part of the RMS system options setup, set the following options as indicated:
This SYSTEM_OPTION indicates that the Oracle Retail system is integrated with a financial system:
■ FINANCIAL_AP=A
A value of A indicates that the financial system to which RMS is interfaced is Oracle E-Business Suite through Oracle Retail Financial Integration (ORFI).
■ GL_ROLL_UP can be D/S/C
■ SUPPLIER_SITE_IND = Y
■ ORG_UNIT_IND = Y
Organization UnitsUse the Organizational Unit window (RMS Start Menu > Control > Setup > Org Unit >Edit) to define organizational units in RMS that match those being setup in Oracle E-Business Suite. When an organizational unit is entered in RMS, the valid organizational units are those associated with the Set Of Books (SOB) used for the general ledger interface.

Data Setup
Oracle E-Business Suite Financials Integration using Oracle Retail Financial Integration 12-3
Currency Exchange RatesCurrency exchange rate is used to translate the monetary value of one currency in terms of another. Depending on business needs, a Currency Exchange Rate Type of Operational or Consolidation is selected for use in all transactions.
This value is set up manually in RMS and mapped to Oracle E-Business Suite through the Currency Exchange Type mapping window. Currency Exchange Rate data is owned by Oracle General Ledger and updates are sent to Oracle Retail applications.
Determine the Exchange Type being sent by Oracle General Ledger (for example, Consolidation or Operational) that you want RMS to use.
Update the FIF_CURRENCY_XREF for mapping the external exchange type being sent by Oracle General Ledger with RMS Exchange Type. For example, for Consolidation and Operational exchange types, the FIF_CURRENCY_XREF table holds the following entries:
Table 12–1
FIF_EXCHANGE_TYPE RMS_EXCHANGE_TYPE
C C
O O
Supplier Address TypesWithin RMS, supplier information (such as Order From and Remit To addresses) is used for generating the purchase orders. Oracle Payables uses supplier information for payment generation. It is important that this information is synchronized.
Suppliers are created in Oracle Payables and exported to RMS. When FINANCIAL_AP is set to A, suppliers cannot be created using the RMS forms. However, if a supplier exists in RMS, all data values for the supplier (except supplier name and status) are

Data Setup
12-4 Oracle Retail Invoice Matching Operations Guide
updated using the RMS forms. The association of supplier sites to organization units is accessed only in view mode through RMS forms. One supplier site per supplier and organization unit combination can be marked as primary payment site.
Where SYSTEM_OPTIONS.FINANCIAL_AP is A, disable auto generate supplier/partner numbers and associated check boxes.
Note: Supplier information is created, updated and inactivated only in Oracle Payables. This information is transferred from Oracle Payables to the participating Oracle Retail applications, where additional retail-specific attributes are maintained.
Country CodesWhen country codes are defined and seeded in RMS, ensure that country codes are mapped to Oracle E-Business Suite country codes through RFI DVM mapping. The following is an example of RFI DVM Mapping (Table RFI_XREF_DVM, available in RFI schema in Retail.
Table 12–2
EXT_SYSTEM_ID COMMON_ID RETL_ID
USA 700 US
CAN 701 CA
Financial CalendarThe financial calendar within Oracle Retail systems is manually set up and maintained separately from the Oracle General Ledger financial calendar.
Freight TermsA freight term is an agreement between the retailer and a supplier regarding transportation charges for goods delivered by the supplier. Freight terms are used by RMS as purchase orders are generated.
Within the RMS system, freight terms are set up and maintained manually. They are also maintained in Oracle Payables.
Payment Terms and Currency Exchange RatesCurrency, exchange rates are created and updated in Oracle General Ledger and exported to RMS. Changes to Retail currency exchange rates are not propagated to Oracle General Ledger. Payment terms, however, are manually set up and maintained in each system.
Oracle E-Business Suite Financials Units and Site IDsThe data concepts of Org Units and Site IDs in RMS mirror the data maintained in Oracle E-Business Suite. RMS forms are used to manage and view Oracle Org Units and Site IDs. The RMS windows for Store and Warehouse maintenance allow for the association of each store and warehouse with an Org Unit. The following is an example of the Organizational Unit form:

Data Setup
Oracle E-Business Suite Financials Integration using Oracle Retail Financial Integration 12-5
Store and Warehouse MaintenanceThe organizational unit is found in the Store Maintenance and Warehouse forms, which allow the Oracle E-Business Suite operating unit to be associated with the Store or Warehouse.
■ When RMS is set up for multi-channel operation, the organizational unit is set up at the virtual warehouse level.
Financial sales audit and inventory information is identified through interface routines and posted to the appropriate general ledger accounts. An organizational unit must be designated for each Store and Warehouse location in the RMS.
The following are examples of the Store Maintenance and Warehouse Maintenance forms:

Data Setup
12-6 Oracle Retail Invoice Matching Operations Guide
RMS General Ledger SetupFor RMS and ReSA, manual setup is required for validating the chart of accounts. Valid chart of accounts are created and stored in general ledger cross reference tables. Once the validation is completed, transaction data is assigned to specific account codes.
Ongoing maintenance of the chart of accounts information (such as adding, changing, or deleting chart of accounts) requires re-validation. In this regard, Oracle General Ledger is the system of record, as it is used to verify the chart of accounts used by Oracle Retail applications. When these applications send a chart of accounts for validation, Oracle General Ledgers issues a message with:
■ Valid or invalid status
■ Response date
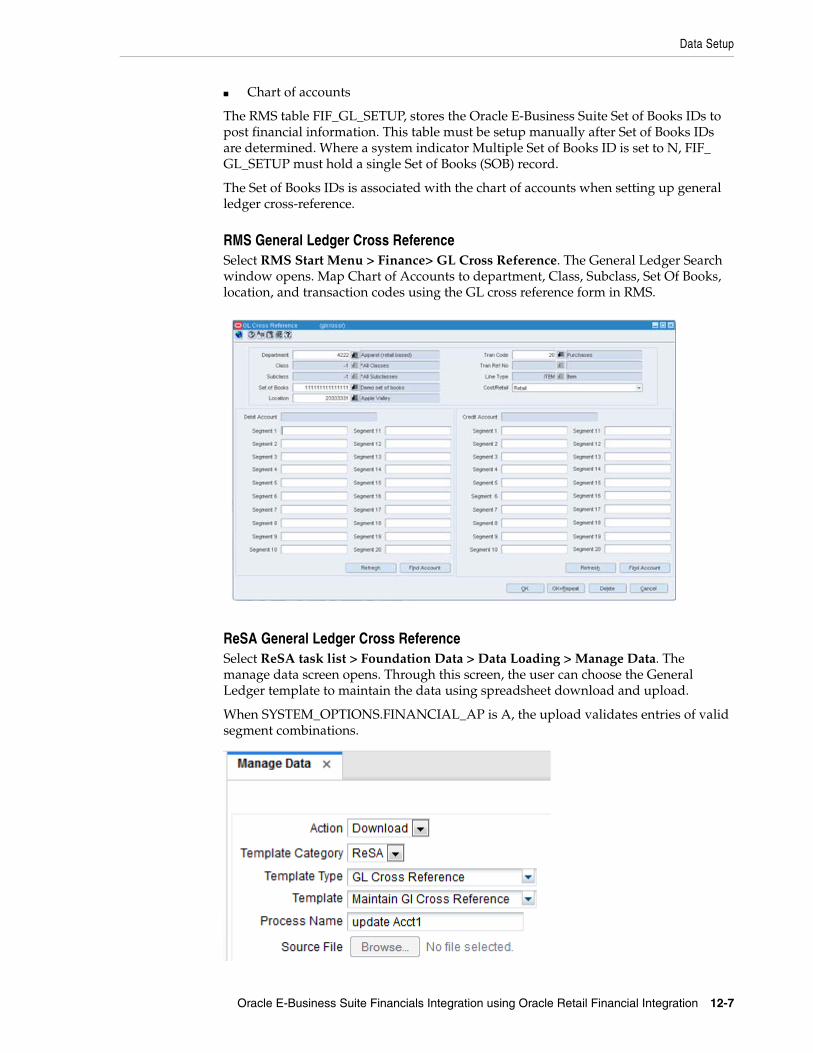
Data Setup
Oracle E-Business Suite Financials Integration using Oracle Retail Financial Integration 12-7
■ Chart of accounts
The RMS table FIF_GL_SETUP, stores the Oracle E-Business Suite Set of Books IDs to post financial information. This table must be setup manually after Set of Books IDs are determined. Where a system indicator Multiple Set of Books ID is set to N, FIF_GL_SETUP must hold a single Set of Books (SOB) record.
The Set of Books IDs is associated with the chart of accounts when setting up general ledger cross-reference.
RMS General Ledger Cross ReferenceSelect RMS Start Menu > Finance> GL Cross Reference. The General Ledger Search window opens. Map Chart of Accounts to department, Class, Subclass, Set Of Books, location, and transaction codes using the GL cross reference form in RMS.
ReSA General Ledger Cross ReferenceSelect ReSA task list > Foundation Data > Data Loading > Manage Data. The manage data screen opens. Through this screen, the user can choose the General Ledger template to maintain the data using spreadsheet download and upload.
When SYSTEM_OPTIONS.FINANCIAL_AP is A, the upload validates entries of valid segment combinations.

Data Setup
12-8 Oracle Retail Invoice Matching Operations Guide
ReIM Data Setup and ConfigurationThis section describes setup considerations for ReIM data.
System OptionsAs part of the RMS system options setup script, set the following options as indicated:
■ FINANCIAL_AP =A
Chart of Accounts SetupThe chart of accounts is set up manually in Oracle Retail applications and in Oracle General Ledger. All account combinations are set up in each Set Of Books. Account validation is done while executing Financial Posting batch:
Segment MappingThe retailer determines how many segments are populated. Up to 20 account segments can be specified. The following is an example of how segments are mapped between the ReIM transaction table and Oracle General Ledger:
Table 12–3
ReIM SegmentsOracle General Ledger Chart of Accounts
Segment 1 PRODUCT
Segment 2 ACCOUNT
Segment 3 ALTACCT
Segment 4 OPERATING_UNIT
Segment 5 FUND_CODE
Segment 6 DEPTID
Segment 7 PROGRAM_CODE
Segment 8 CLASS_FLD
Segment 9 BUDGET_REF
Segment 10 BUSINESS_UNIT_PC
Segment 11 PROJECT_ID
Segment 12 ACTIVITY_ID
Segment 13 RESOURCE_TYPE
Segment 14 RESOURCE_CATEGORY
Segment 15 RESOURCE_SUB_CAT
Segment 16 CHARTFIELD1
Segment 17 CHARTFIELD2
Segment 18 CHARTFIELD3
Segment 19 AFFILIATE
Segment 20 AFFILIATE_INTRA1
If any one of the values in the 20 segments does not match the Oracle General Ledger, the account combination is considered as invalid. The following error message is

Data Setup
Oracle E-Business Suite Financials Integration using Oracle Retail Financial Integration 12-9
added to IM_POSTING_DOC_ERRORS table; "One or more accounts subjected to posting is invalid”.
Segments 1 and 2 may be set up as dynamic at the Location level, or Segments 4 and 5 can be dynamic at the Department and Class level respectively. Segments defined as dynamic are allowed to be null for certain types of Basic Transaction or Reason Code cross-reference types. When a segment is null, the segment is assigned dynamically when transactions are posted. (Non-dynamic segments cannot be blank). Validation applies to the segment combination, not to individual segments.
Note: For Tran code TAP, each segment must have a value regardless of whether the segment is dynamic.
Running the Initial Load from Oracle E-Business Suite FinancialsThe initial load for ReIM is run by Oracle E-Business Suite and includes the following information:
■ Suppliers
■ Currency Rates
Note: The view, mv_currency_conversion_rates should be refreshed once the initial loads of currencies from Oracle General Ledger are loaded to ReIM.
IM_SYSTEM_OPTIONS Table SetupTo accommodate integration, the IM_SYSTEM_OPTOINS table should be configured with the following properties.
WS_FIN_ACC_VALID_URL - This attribute holds the URL for the financial account validation web service.WS_FIN_ACC_VALID_CRED - This attribute indicates if the account validation web service call is authenticated or not. Y means Authentication enabled. N means Authentication is not enabled (See configuring web service credentials in weblogic server). WS_FIN_DRILL_FWD_URL - This attribute holds the URL for the financial drill forward web service. WS_FIN_DRILL_FWD_CRED - This attribute indicates if the drill forward web service call is authenticated or not. Y means Authentication enabled. N means Authentication is not enabled (See configuring web service credentials in weblogic server).
The above attributes are configured in the System Options screen.

Data Setup
12-10 Oracle Retail Invoice Matching Operations Guide
Configuring WebService Credentials in Weblogic Server Enterprise ManagerThe credentials for the web service call are configured in the default domain credential store of the WebLogic server through the admin console.
Create Map:
Creating Credentials:
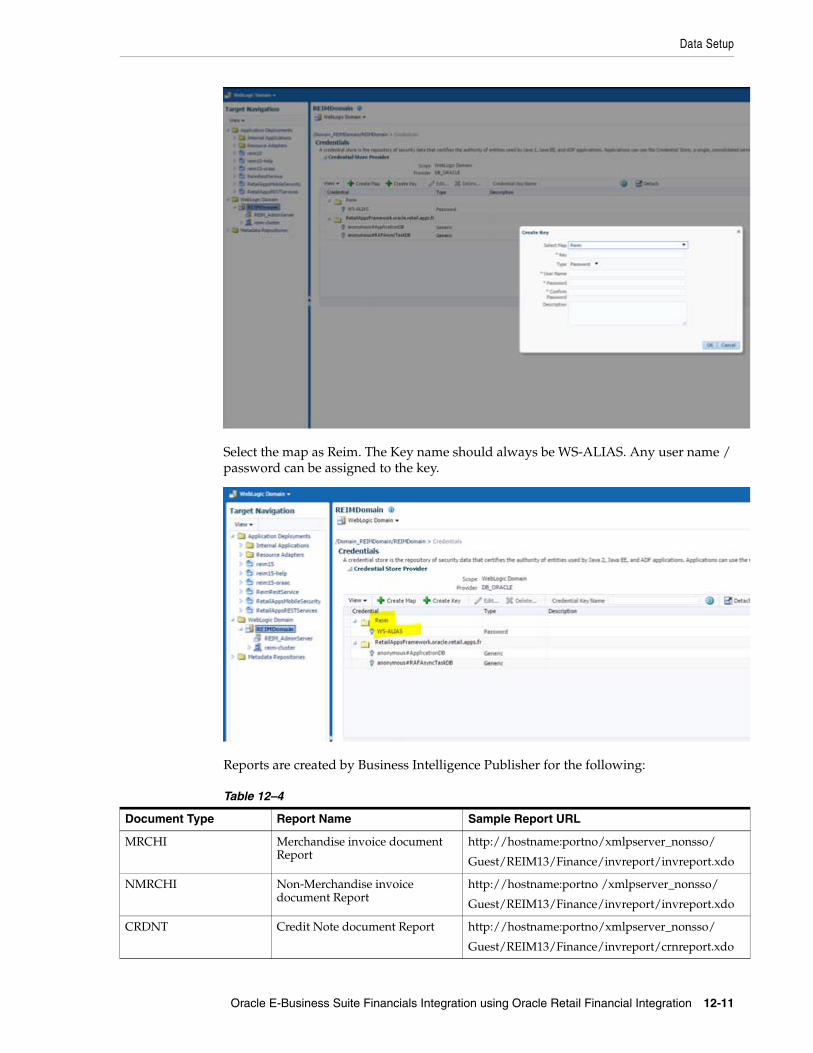
Data Setup
Oracle E-Business Suite Financials Integration using Oracle Retail Financial Integration 12-11
Select the map as Reim. The Key name should always be WS-ALIAS. Any user name / password can be assigned to the key.
Reports are created by Business Intelligence Publisher for the following:
Table 12–4
Document Type Report Name Sample Report URL
MRCHI Merchandise invoice document Report
http://hostname:portno/xmlpserver_nonsso/
Guest/REIM13/Finance/invreport/invreport.xdo
NMRCHI Non-Merchandise invoice document Report
http://hostname:portno /xmlpserver_nonsso/
Guest/REIM13/Finance/invreport/invreport.xdo
CRDNT Credit Note document Report http://hostname:portno/xmlpserver_nonsso/
Guest/REIM13/Finance/invreport/crnreport.xdo

ReIM Transactional Maintenance
12-12 Oracle Retail Invoice Matching Operations Guide
The URL for each report must be updated in the table, RETAIL_SERVICE_REPORT_URL. The following table provides sample URLs.
ReIM Transactional MaintenanceIntegration to Oracle General Ledger includes a number of transactions, as described below.
Calculation of TRANS_AMOUNTThe TRANS_AMOUNT field in the IM_FINANCIAL_STAGE table stores the value of the journal entry to be posted to Oracle General Ledger. (The currency for the calculated amount is the currency assigned to the transaction). The TRANS_AMOUNT value is calculated as follows:
Table 12–5
Row Description DEBIT_CREDIT_IND TRANS_AMOUNT Value
Normal Debit Transaction Amount
Normal Credit (-1) * Transaction Amount
VAT Debit Transaction Amount * VAT Rate
VAT Credit (-1) * Transaction Amount * VAT Rate
Note: Transaction Amount is taken from the database column, IM_FINANCIALS_STAGE.AMOUNT.
CRDMEC Credit Memo cost document Report
http://hostname:portno/xmlpserver_nonsso/
Guest/REIM13/Finance/invreport/memoreport.xdo
CRDMEQ Credit Memo quantity document Report
http://hostname:portno/xmlpserver_nonsso/
Guest/REIM13/Finance/invreport/memoreport.xdo
DEBMEC Debit Memo cost document Report
http://hostname:portno/xmlpserver_nonsso/
Guest/REIM13/Finance/invreport/imemoreport.xdo
DEBMEQ Debit Memo quantity document Report
http://hostname:portno/xmlpserver_nonsso/
Guest/REIM13/Finance/invreport/memoreport.xdo
DEBMEV Debit Memo Tax document Report
http://hostname:portno/xmlpserver_nonsso/
Guest/REIM13/Finance/invreport/memoreport.xdo
RWO Receipt Write Off document Report
http://hostname:portno/xmlpserver_nonsso/
Guest/REIM13/Finance/invreport/rworeport.xdo
Table 12–4 (Cont.)
Document Type Report Name Sample Report URL

ReIM Transactional Maintenance
Oracle E-Business Suite Financials Integration using Oracle Retail Financial Integration 12-13
Generation of Outgoing DataA staging table accommodates the outgoing transfer of data. The reference key assigned to each document or receipt is used to find data on this table.
Table 12–6
From To Transactions
ReIM Oracle Payables ■ Invoices
■ Debit Memos
■ Credit Memos
■ Credit Notes
ReIM Oracle General Ledger General Ledger accounting entries resulting from the Invoice Matching process, including:
■ Pre-paid invoices
■ Receipt Write-offs
RMS Oracle General Ledger Accounting entry data (potentially very high volume)
ReSA Oracle General Ledger Accounting entry data (potentially very high volume)
Validation of Accounts When Posting Financial EntriesValid chart of accounts are stored in the ReIM table, IM_VALID_ACCOUNTS, which includes the Set of Books ID (sob_id) and 20 segments. An ORFI Web service validates accounts against the Oracle General Ledger. Valid accounts are posted to IM_VALID_ACCOUNTS; invalid accounts are posted to IM_POSTING_DOC_ERROR. The following steps describe the validation process:
1. The ReIM system invokes the validation Web service to validate the chart of accounts. (A URL for the ORFI Web service is configured in the SYSTEM_OPTIONS table
2. The posting batch job checks the accounts to be posted against the IM_VALID_ACCOUNTS table.
3. If the chart of accounts is in the table, the transaction is posted to staging tables.
4. If the chart of account does not exist in the table, a collection of accounts is built. These collected accounts are validated against the Oracle General Ledger, and a status is returned.
■ If the status of the collected accounts is valid, the accounts are inserted in the IM_VALID_ACCOUNTS table, and the transactions are posted to the staging tables.
■ If the status of the accounts is NOT valid, the entire collection is flagged as errors, and transactions are posted to IM_POSTING_DOC_ERROR.

Note: ReIM completes the first level of account validation and posts the transaction to staging tables. It is assumed the second level of account validation is done at the end of the extraction process (where transactions are moved from ReIM staging tables to Oracle General Ledger). If account validation fails at this point, Oracle General Ledger must change the account information before transactions are loaded to Oracle General Ledger, and the chart of accounts must be re-validated in ReIM.
ReIM Transactional Maintenance
12-14 Oracle Retail Invoice Matching Operations Guide
Validation of Accounts When Prepaying a Merchandise InvoiceA Merchandise document with a ready for match status can be pre paid before matching. The Document Search screen provides this option.
Valid chart of accounts are stored in the ReIM table, IM_VALID_ACCOUNTS, which includes the Set of Books ID (sob_id) and 20 segments. An ORFI Web service validates accounts against the Oracle General Ledger. Valid accounts are posted to IM_VALID_ACCOUNTS; invalid accounts are posted to IM_POSTING_DOC_ERROR. The following steps describe the validation process:
1. The ReIM system invokes the validation Web service to validate the chart of accounts. (A URL for the ORFI Web service is configured in the SYSTEM_OPTIONS table.
2. The Prepay operation checks the accounts to be posted against the IM_VALID_ACCOUNTS table.
If the chart of accounts is in the table, the transaction is posted to staging tables.
If the chart of account does not exist in the table, a collection of accounts is built. These collected accounts are validated against the Oracle General Ledger, and a status is returned.
■ If the status of the collected accounts is valid, the accounts are inserted in the IM_VALID_ACCOUNTS table, and the transactions are posted to the staging tables.
■ If the status of the accounts is NOT valid, the entire collection is flagged as errors, and transactions are posted to IM_POSTING_DOC_ERROR and the user will be shown an error message "One or more accounts subjected to posting is invalid".

ReIM Transactional Maintenance
Oracle E-Business Suite Financials Integration using Oracle Retail Financial Integration 12-15
Maintenance of Valid AccountsAs account information is changed in the Oracle General Ledger, Retail must re-validate the locally stored chart of accounts. Oracle General Ledger will not propagate chart of account changes to Retail. The AccountWorkspacePurge Batch can clear all valid accounts in the IM_VALID_ACCOUNTS table or only those that are considered updates in Oracle E-Business Suite.
Usage
AccountWorkspacePurge userid/password PURGE [ALL | <Accounts>]
Where:
■ The argument is a combination of user ID and password.
■ The argument is the word PURGE.
■ The argument is either ALL or specific accounts to be deleted from the local table.

ReIM Transactional Maintenance
12-16 Oracle Retail Invoice Matching Operations Guide

PeopleSoft Financials Integration using Oracle Retail Financial Integration 13-1
13PeopleSoft Financials Integration using
Oracle Retail Financial Integration
This chapter describes the integration between Oracle Retail systems and PeopleSoft Financials (including PeopleSoft General Ledger and PeopleSoft Payables), as developed and supported by Oracle Retail Financial Integration (ORFI).
When the option to integrate is chosen, the selected information is shared between the systems. Integration and validation services are in place to ensure the shared data matches.
Note: This chapter addresses the points within Oracle Retail systems that are essential to integration. For more information about the entire integration process, including mapping to data and settings, see the ORFI document, Oracle Retail Financial Integration for Oracle Retail Merchandise Operations Management and Oracle Financials Implementation Guide. For more information about Web services, see the following chapters in the Oracle Retail Merchandising System Operations Guide, Volume 2: "Service Provider Implementations API Designs" and "Web Services."
Participating ApplicationsThe following Oracle Retail applications are included in the integration covered by this chapter:
■ Oracle Retail Merchandising System (RMS)
■ Oracle Retail Sales Audit (ReSA)
■ Oracle Retail Invoice Matching (ReIM)
■ Oracle Retail Integration Bus (RIB)
Assumptions and Dependencies■ The option to integrate must be selected during initial set up of the RMS system.
■ ReIM accesses RMS to determine if integration is active. Initial set up of RMS must occur prior to the integration of ReIM.
■ The URLs for the RFI Web services that are a necessary for this integration must be maintained in the RETAIL_SERVICE_REPORT_URL table and in the ReIM SYSTEM_OPTIONS table.

Data Constraints
13-2 Oracle Retail Invoice Matching Operations Guide
■ Real time account validation is done only when the financial integration with PeopleSoft Financials is ON.
■ Partners must be set up as suppliers in PeopleSoft. Then the partner must be manually set up in RMS using the RMS Supplier ID that was generated when the PeopleSoft supplier was interfaced to Oracle Retail. Partner functionality within RMS and ReIM can then proceed normally. The RMS supplier generated as part of this process is not used.
■ Payment terms and freight terms are manually maintained.
Data Constraints■ The Location ID field is restricted to eight characters, to accommodate PeopleSoft
Operating Unit, which has a maximum of eight characters.
■ The Ext_Doc_ID field is restricted to 30 characters, because the corresponding PeopleSoft field has only 30 characters. Characters beyond 30 are truncated.
■ RMS allows for four decimals, and PeopleSoft allows only three. Truncation may occur when data is passed to PeopleSoft Enterprise Financials.
■ ReIM values in the IM_CURRENCY_LOCALE are restricted to three decimals, because the corresponding PeopleSoft Enterprise Financials field can accept no more than three decimal positions.
Data SetupIntegration of Oracle Retail applications and PeopleSoft Financials relies on synchronization of essential data, such as currency exchange rates, suppliers, and payment terns. Through careful discussions, the users of both systems determine the common codes and descriptions that will best serve their business needs.
Once agreement is reached, this information is set up and maintained. Depending on the volume, some shared information is set up in Oracle Retail applications or in PeopleSoft and electronically transferred to the other systems. Otherwise, shared information is set up manually within each system, and the user of both systems must ensure that the code and the description match.
RMS Data Setup and ConfigurationThis section describes setup considerations for the RMS data.
This system_option indicates that the Oracle Retail system is integrated with a financial system:
■ FINANCIAL_AP=A
A value of A indicates that the financial system to which RMS is interfaced is PeopleSoft through Oracle Retail Financial Integration (ORFI).
■ GL_ROLL_UP can be D/S/C
■ SUPPLIER_SITE_IND = Y
■ ORG_UNIT_IND = Y
Organization UnitsUse the Organizational Unit window (RMS Start Menu > Control > Setup > Org Unit >Edit) to define organizational units in RMS that match those being setup in

Data Setup
PeopleSoft Financials Integration using Oracle Retail Financial Integration 13-3
PeopleSoft. When an organizational unit is entered in RMS, the valid organizational units are those associated with the Set Of Books (SOB) that is being used for the general ledger interface.
Currency Exchange RatesCurrency exchange rate is used to translate the monetary value of one currency in terms of another. Depending on business needs, a Currency Exchange Rate Type of Operational or Consolidation is selected for use in all transactions.
This value is set up manually in RMS and mapped to PeopleSoft through the Currency Exchange Type mapping window. Currency Exchange Rate data is owned by PeopleSoft General Ledger and updates are sent to Oracle Retail applications.
Determine the Exchange Type being sent by PeopleSoft General Ledger (for example, Consolidation or Operational) that you want RMS to use. Update the FIF_CURRENCY_XREF for mapping the external exchange type being sent by PeopleSoft General Ledger with RMS Exchange Type.
For example, for Consolidation and Operational exchange types, the FIF_CURRENCY_XREF table holds the following entries:
Table 13–1
FIF_EXCHANGE_TYPE RMS_EXCHANGE_TYPE
C C
O O
Supplier Address TypesWithin RMS, supplier information (such as Order From and Remit To addresses) is used for generating the purchase orders. PeopleSoft Payables uses supplier information for payment generation. It is important that this information is synchronized.

Data Setup
13-4 Oracle Retail Invoice Matching Operations Guide
Suppliers are created in PeopleSoft Payables and exported to RMS. When FINANCIAL_AP is set to A, suppliers cannot be created using the RMS forms. However, after the supplier exists in RMS, all data values for the supplier (except supplier name and status) continue to be updated using the RMS forms. The association of supplier sites to organization units is accessed only in view mode through RMS forms. One supplier site per supplier organization unit combination can be marked as primary payment site.
Where SYSTEM_OPTIONS.FINANCIAL_AP is A, disable auto generate supplier/partner numbers and associated check boxes.
Note: Supplier information is created, updated and inactivated only in PeopleSoft Payables. This information is transferred from PeopleSoft Payables to the participating Oracle Retail applications, where additional retail-specific attributes may be maintained.
Country CodesWhen country codes are defined and seeded in RMS, ensure that country codes are mapped to PeopleSoft country codes through RFI DVM mapping. The following is an example of RFI DVM Mapping (Table RFI_XREF_DVM, available in RFI schema in Retail.
Table 13–2
EXT_SYSTEM_ID COMMON_ID RETL_ID
USA 700 US
CAN 701 CA

Data Setup
PeopleSoft Financials Integration using Oracle Retail Financial Integration 13-5
Financial CalendarThe financial calendar within Oracle Retail systems is manually set up and maintained separately from the PeopleSoft General Ledger financial calendar..
Freight TermsA freight term is an agreement between the retailer and a supplier regarding transportation charges for goods delivered by the supplier. Freight terms are used by RMS as purchase orders are generated.
Within the RMS system, freight terms are set up and maintained manually. They also are maintained in PeopleSoft Payables.
Payment Terms and Currency Exchange RatesCurrency exchange rates are created and updated in PeopleSoft General Ledger and exported to RMS. Changes to Retail currency exchange rates are not propagated to PeopleSoft General Ledger. Payment terms set up in PeopleSoft are propagated to RMS but changes to payment terms in RMS are not propagated back to PeopleSoft.
PeopleSoft Financials Units and Site IDsThe data concepts of Org Units and Site IDs in RMS mirror the data maintained in PeopleSoft. RMS forms are used to manage and view Oracle Org Units and Site IDs. The RMS windows for Store and Warehouse maintenance allows for the association of each store and warehouse with an Org Unit. The following is an example of the Organizational Unit form:
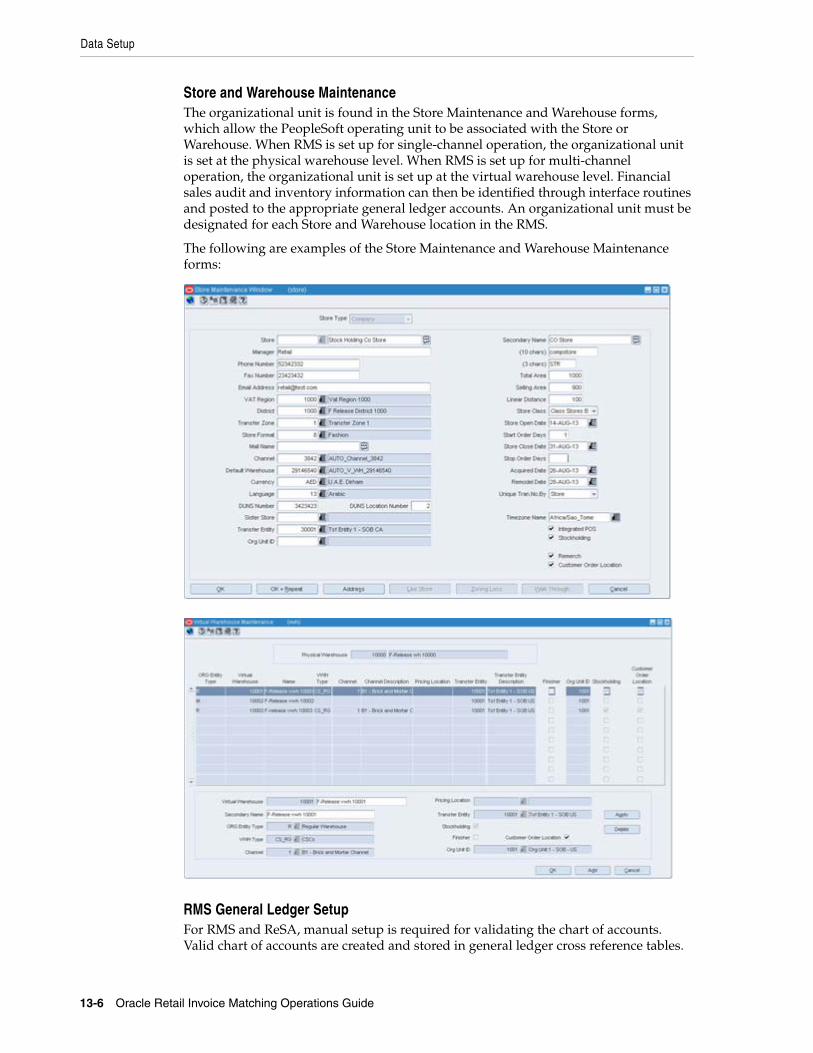
Data Setup
13-6 Oracle Retail Invoice Matching Operations Guide
Store and Warehouse MaintenanceThe organizational unit is found in the Store Maintenance and Warehouse forms, which allow the PeopleSoft operating unit to be associated with the Store or Warehouse. When RMS is set up for single-channel operation, the organizational unit is set at the physical warehouse level. When RMS is set up for multi-channel operation, the organizational unit is set up at the virtual warehouse level. Financial sales audit and inventory information can then be identified through interface routines and posted to the appropriate general ledger accounts. An organizational unit must be designated for each Store and Warehouse location in the RMS.
The following are examples of the Store Maintenance and Warehouse Maintenance forms:
RMS General Ledger SetupFor RMS and ReSA, manual setup is required for validating the chart of accounts. Valid chart of accounts are created and stored in general ledger cross reference tables.

Data Setup
PeopleSoft Financials Integration using Oracle Retail Financial Integration 13-7
Once the validation is completed, transaction data can be assigned to specific account codes.
Ongoing maintenance of the chart of accounts information (such as adding, changing, or deleting chart of accounts) requires re-validation. In this regard, PeopleSoft General Ledger is the system of record, as it is used to verify the chart of accounts used by Oracle Retail applications. When these applications send a chart of accounts for validation, PeopleSoft General Ledgers issues a message with:
■ Valid or invalid status
■ Response date
■ Chart of accounts
The RMS table, FIF_GL_SETUP, stores the PeopleSoft Set of Books IDs to post financial information. This table must be setup manually after Set of Books IDs are determined. Where system indicator Multiple Set of Books ID is set to N, FIF_GL_SETUP must hold a single Set of Books (SOB) record.
The Set of Books IDs is associated with the chart of accounts when setting up general ledger cross reference.
RMS General Ledger Cross ReferenceNavigate: RMS Start Menu > Finance> GL Cross Reference. The General Ledger Search window opens. Map Chart of Accounts to department, Class, Subclass, Set Of Books, location, and transaction codes using the GL cross reference form in RMS.
ReSA General Ledger Cross ReferenceNavigate: ReSA task list > Foundation Data > Data Loading > Manage Data. The manage data screen opens. Through this screen, the user can choose the General Ledger template to maintain the data using spreadsheet download and upload.
When SYSTEM_OPTIONS.FINANCIAL_AP is A, the upload validates entries of valid segment combinations.

Data Setup
13-8 Oracle Retail Invoice Matching Operations Guide
Configuring Drill Back and Forward Web ServicesRetail web services table, RETAIL_SERVICE_REPORT_URL, must be updated with appropriate URLs to integrate with PeopleSoft Enterprise Financials.
■ The records in the table for Services (indicated by RS_TYPE=S) for Account Validation (RAV) and Drill Forward (RDF), must be updated with the URL information from AIA where the services are hosted.
Note: If Web services are secure, then the SYS_ACCOUNT column must be populated with authentication information in the form of user name/password.
■ The records in the table for Reports (indicated by RS_TYPE=R) for both RMS and ReIM reports , must be updated with the URL information from the BIP Server where the reports are hosted.
ReIM Data Setup and ConfigurationThis section describes setup considerations for ReIM data.
System OptionsAs part of the RMS system options setup script, set the following options as indicated:
■ FINANCIAL_AP =A
CURRENCY PRECISIONBecause PeopleSoft Enterprise Financials uses only three decimals, the transactions generated by the Oracle Retail ReIM application must not include more than three decimals.
Make sure that the RMS table CURRENCIES has maximum of 3 decimal places for the currency_cost_dec attribute for difference currency codes.
The currency_rates table in RMS should be loaded initially by PeopleSoft Enterprise Financials.
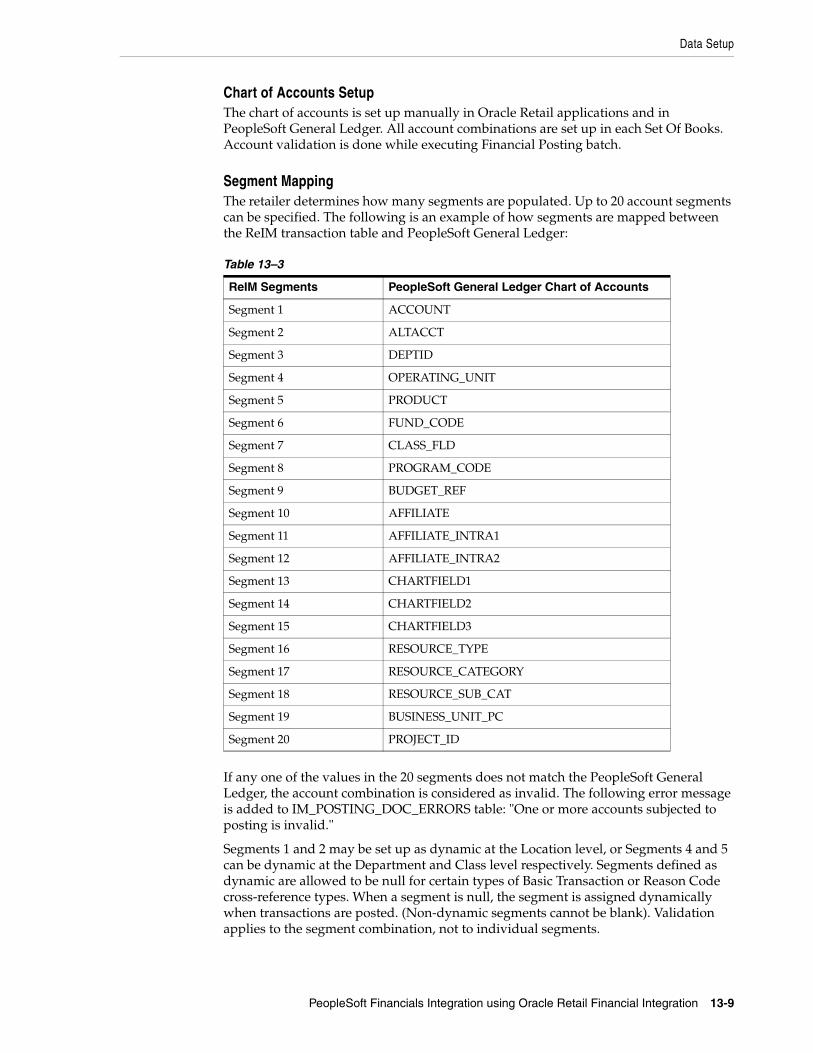
Data Setup
PeopleSoft Financials Integration using Oracle Retail Financial Integration 13-9
Chart of Accounts SetupThe chart of accounts is set up manually in Oracle Retail applications and in PeopleSoft General Ledger. All account combinations are set up in each Set Of Books. Account validation is done while executing Financial Posting batch.
Segment MappingThe retailer determines how many segments are populated. Up to 20 account segments can be specified. The following is an example of how segments are mapped between the ReIM transaction table and PeopleSoft General Ledger:
Table 13–3
ReIM Segments PeopleSoft General Ledger Chart of Accounts
Segment 1 ACCOUNT
Segment 2 ALTACCT
Segment 3 DEPTID
Segment 4 OPERATING_UNIT
Segment 5 PRODUCT
Segment 6 FUND_CODE
Segment 7 CLASS_FLD
Segment 8 PROGRAM_CODE
Segment 9 BUDGET_REF
Segment 10 AFFILIATE
Segment 11 AFFILIATE_INTRA1
Segment 12 AFFILIATE_INTRA2
Segment 13 CHARTFIELD1
Segment 14 CHARTFIELD2
Segment 15 CHARTFIELD3
Segment 16 RESOURCE_TYPE
Segment 17 RESOURCE_CATEGORY
Segment 18 RESOURCE_SUB_CAT
Segment 19 BUSINESS_UNIT_PC
Segment 20 PROJECT_ID
If any one of the values in the 20 segments does not match the PeopleSoft General Ledger, the account combination is considered as invalid. The following error message is added to IM_POSTING_DOC_ERRORS table: "One or more accounts subjected to posting is invalid."
Segments 1 and 2 may be set up as dynamic at the Location level, or Segments 4 and 5 can be dynamic at the Department and Class level respectively. Segments defined as dynamic are allowed to be null for certain types of Basic Transaction or Reason Code cross-reference types. When a segment is null, the segment is assigned dynamically when transactions are posted. (Non-dynamic segments cannot be blank). Validation applies to the segment combination, not to individual segments.

Note: For Tran code TAP, each segment must have a value regardless of whether the segment is dynamic.
Data Setup
13-10 Oracle Retail Invoice Matching Operations Guide
Running the Initial Load from PeopleSoft FinancialsThe initial load for ReIM is run by PeopleSoft and includes the following information:
■ Suppliers
■ Currency Rates
■ Payment Terms
Note: The view, mv_currency_conversion_rates should be refreshed once the initial loads of currencies from PeopleSoft General Ledger are loaded to ReIM.
IM_SYSTEM_OPTIONS Table SetupTo accommodate integration, IM_SYSTEM_OPTOINS table should be configured with the following properties.
Note: Drill forward functionality is applicable for PeopleSoft - RMS and ReIM integration. Drill backward functionality is only applicable for PeopleSoft - RMS integration.
WS_FIN_ACC_VALID_URL - This attribute holds the URL for the financial account validation web service.
WS_FIN_ACC_VALID_CRED - This attribute indicates if the account validation web service call is authenticated or not. Y means Authentication enabled. N means Authentication is not enabled (See configuring web service credentials in weblogic server).
WS_FIN_DRILL_FWD_URL - This attribute holds the URL for the financial drill forward web service.
WS_FIN_DRILL_FWD_CRED - This attribute indicates if the drill forward web service call is authenticated or not. Y means Authentication enabled. N means Authentication is not enabled (See configuring web service credentials in weblogic server).
The above attributes are configured in the System Options screen.
Reports are created by Business Intelligence Publisher for the following:
The URL for each report must be updated in the table, retail_service_report_url. The following table provides sample URLs.
ReportingReports are created by Business Intelligence Publisher for the following:
■ Merchandise Invoice
■ Non-Merchandise Invoice
■ Credit Note
■ Credit Memo

ReIM Transactional Maintenance
PeopleSoft Financials Integration using Oracle Retail Financial Integration 13-11
■ Debit Memo
■ Receipt Write-Off
The URL for each report must be updated in the table, retail_service_report_url. The following table provides sample URLs:
Table 13–4
Document Type Report Name Sample Report URL
MRCHI Merchandise invoice document Report
http://hostname:portno/xmlpserver_nonsso/
Guest/REIM13/Finance/invreport/invreport.xdo
NMRCHI Non-Merchandise invoice document Report
http://hostname:portno /xmlpserver_nonsso/
Guest/REIM13/Finance/invreport/invreport.xdo
CRDNT Credit Note document Report http://hostname:portno/xmlpserver_nonsso/
Guest/REIM13/Finance/invreport/crnreport.xdo
CRDMEC Credit Memo cost document Report
http://hostname:portno/xmlpserver_nonsso/
Guest/REIM13/Finance/invreport/memoreport.xdo
CRDMEQ Credit Memo quantity document Report
http://hostname:portno/xmlpserver_nonsso/
Guest/REIM13/Finance/invreport/memoreport.xdo
DEBMEC Debit Memo cost document Report
http://hostname:portno/xmlpserver_nonsso/
Guest/REIM13/Finance/invreport/imemoreport.xdo
DEBMEQ Debit Memo quantity document Report
http://hostname:portno/xmlpserver_nonsso/
Guest/REIM13/Finance/invreport/memoreport.xdo
DEBMEV Debit Memo Tax document Report
http://hostname:portno/xmlpserver_nonsso/
Guest/REIM13/Finance/invreport/memoreport.xdo
RWO Receipt Write Off document Report
http://hostname:portno/xmlpserver_nonsso/
Guest/REIM13/Finance/invreport/rworeport.xdo
ReIM Transactional MaintenanceIntegration to PeopleSoft General Ledger includes a number of transactions, as described below.
Calculation of TRANS_AMOUNTThe TRANS_AMOUNT field in the im_financial_stage table stores the value of the journal entry to be posted to PeopleSoft General Ledger. (The currency for the calculated amount is the currency assigned to the transaction). The TRANS_AMOUNT value is calculated as follows:
Table 13–5
Row Description DEBIT_CREDIT_IND TRANS_AMOUNT Value
Normal Debit Transaction Amount
Normal Credit (-1) * Transaction Amount

ReIM Transactional Maintenance
13-12 Oracle Retail Invoice Matching Operations Guide
Generation of Outgoing Data A staging table accommodates the outgoing transfer of data. The reference key assigned to each document or receipt is used to find data on this table.
Outgoing Data
Table 13–6
From To Transactions
ReIM PeopleSoft Accounts Payable
Invoices
Debit Memos
Credit Memos
Credit Notes
ReIM PeopleSoft General Ledger General Ledger accounting entries resulting from the Invoice Matching process, including:
Pre-paid invoices
Receipt Write-offs
RMS PeopleSoft General Ledger Accounting entry data (potentially very high volume)
ReSA PeopleSoft General Ledger Accounting entry data (potentially very high volume)
Validation of Accounts When Posting Financial EntriesValid accounts are stored in the ReIM table, IM_VALID_ACCOUNTS, which includes the Set of Books ID (sob_id) and 20 segments. An ORFI Web service validates accounts against the PeopleSoft Enterprise Financials system. Valid accounts are posted to IM_VALID_ACCOUNTS; invalid accounts are posted to IM_POSTING_DOC_ERROR. The following steps describe the validation process:
1. The ReIM system invokes the account validation Web service to validate the account. (A URL for the ORFI Web service is configured in the Reim SYSTEM_OPTIONS table.)
2. The posting batch job checks the accounts to be posted against the IM_VALID_ACCOUNTS table.
3. If the account entries are in the table, the transaction is posted to the G/L or AP tables.
VAT Debit Transaction Amount * Tax Rate
VAT Credit (-1) * Transaction Amount * Tax Rate
Note: Transaction Amount is taken from the database column, IM_FINANCIALS_STAGE.AMOUNT.
Table 13–5 (Cont.)
Row Description DEBIT_CREDIT_IND TRANS_AMOUNT Value

ReIM Transactional Maintenance
PeopleSoft Financials Integration using Oracle Retail Financial Integration 13-13
4. If the account does not exist in the table, a collection of accounts is built. These collected accounts are validated against the PeopleSoft Enterprise Financials system, and a status is returned.
■ If the status of the collected accounts is valid, the accounts are inserted in the IM_VALID_ACCOUNTS table, and the transactions are posted to the staging tables.
■ If the status of the accounts is NOT valid, the entire collection is flagged as errors, and transactions are posted to IM_POSTING_DOC_ERROR.
Note: ReIM completes the first level of account validation and posts the transaction to staging tables. It is assumed the second level of account validation is done at the end of the extraction process (where transactions are moved from ReIM staging tables to PeopleSoft). If account validation fails at this point, Oracle Data Integrator (ODI) or PeopleSoft must change the account information before transactions are loaded to PeopleSoft, and the account change must be communicated to ReIM.
Maintenance of Valid AccountsAs account information is changed in the PeopleSoft system, the same changes are communicated to, and manually completed in, the ReIM system. After ReIM is updated accordingly, the AccountWorkspacePurge Batch is run to clear the valid accounts maintained locally in ReIM.
The AccountWorkspacePurge Batch can clear all valid accounts in the IM_VALID_ACCOUNTS table or only those that are considered updates in PeopleSoft.
Usage:
AccountPurge batch-alias-name PURGE [ALL | <Accounts>]Where
The first argument is batch alias name.
The second argument is the word PURGE.
The third argument is either ALL or specific accounts to be deleted from the local table.
Building and Posting Reference IDsDrill back and drill forward functionality uses Reference ID to locate documents and receipts. A Reference ID is a combination of document type and document (or receipt) ID, as illustrated in the table below:
Table 13–7
Type Doc ID Receipt ID Reference ID
Merchandise Invoice 101 Null MRCHI#101
Non-Merchandise Invoice 102 Null NMRCHI#102
Receipt Null 103 RECEIPT#103
For documents, the Resolution Posting Batch program builds the Reference ID using the standard, Document Type + DeLimiter + Doc_id. For receipts, the program builds the Reference ID using the standard, Document Type + DeLimiter + Receipt_id.

Drilling Back
13-14 Oracle Retail Invoice Matching Operations Guide
To enable drill down functionality, Reference IDs are loaded to staging tables. FinancialsAPStageDao and FinancialsGLStageDao are populated, as are IM_RWO_SHIPMENT_HIST and IM_RWO_SHIPSKU_HIST.
Drilling BackDrilling back allows users to view the source of posted PeopleSoft transactions that originated in Oracle Retail systems (from a voucher to an invoice, for example).
When drilling back from PeopleSoft Enterprise Financials, users are not directed to an actual screen within RMS, ReIM or ReSA. Rather, a retail Web service generates and launches a URL to a BI Publisher report. The report contains the information that typically appears on the appropriate retail screen.
Depending on the information requested by the user, PeopleSoft invokes web service in the ORFI layer which in turn calls the report locator service available in RMS. This service returns back BIP report reference URL which is passed back to PeopleSoft and report gets launched in browser window.
Information from the reference key determines what kind of report URL to issue. For example, if the retail key has a prefix of ReIM, the ReIM_REPORT_URL function is called, else the RMS_REPORT_URL function is called to retrieve the appropriate report URL. If the key does not match any key in the retail systems, an error message is launched.
Drilling Back to RMS and ReSA from PeopleSoft Enterprise FinancialsThe following function determines which RMS report to return to the user:
RMS_REPORT_URL() - O_error_message IN OUT RTK_ERRORS.RTK_TEXT%TYPE O_rpt_url IN OUT RETAIL_SERVICE_REPORT_URL.URL%TYPE I_ref_key IN KEY_MAP_GL.REFERENCE_TRACE_ID%TYPE
The appropriate report URL is found and issued as follows:
1. The ref_trace_type is found on KEY_MAP_GL by matching I_ref_key with the KEY_MAP_GL.REFERENCE_TRACE_ID column.
2. When ref type is determined, the re_trace_type is used to find the appropriate report URL on the RETAIL_SERVICE_REPORT_URL table.
3. The value of I_ref_key is appended to the end of the URL retrieved from the table.
4. The URL is sent back to the calling function.
5. If I_ref_key does not exist on KEY_MAP_GL, an error message is sent back to the calling function.
Drilling Back to ReIM from PeopleSoft Enterprise FinancialsThe following drill back options are available for viewing information within the ReIM system:
■ Using Document ID, users can drill back to ReIM to view information related to a voucher or payment. The report includes information from im_doc_head and im_invoice_detail, the same data shown on the Document Maintenance Header screen within ReIM.
■ Using the Receipt ID, users can drill back to view information from the Receipt Write-off History screen. Receipt write-offs occur either when an open receipt is

Drilling Back
PeopleSoft Financials Integration using Oracle Retail Financial Integration 13-15
closed in ReIM or if a receipt is purged in RMS before it is fully matched. Details come from the IM_RWO_SHIPMENT_HIST and IM_RWO_SHIPSKU_HIST tables.
The function below determines which of the two ReIM reports to return to the user:
REIM_REPORT_URL() - O_error_message IN OUT RTK_ERRORS.RTK_TEXT%TYPE O_rpt_url IN OUT RETAIL_SERVICE_REPORT_URL.URL%TYPE I_ref_key IN KEY_MAP_GL.REFERENCE_TRACE_ID%TYPE
The I_ref_key contains the reference ID, which ultimately determines the type of report required. The appropriate BI Publisher report URL is found on the RETAIL_SERVICE_REPORT_URL table.
In general, if the reference ID has a prefix of RECEIPT, the report type (RS_CODE) is RCPT. Otherwise, the report type is DOC. For example:
Table 13–8
Reference ID Report Type (RS_CODE)
MRCHI#101 DOC
NMRCHI#102 DOC
RECEIPT#103 RCPT
The following is an example of a BI Publisher URL that is generated upon drilling back to PeopleSoft Enterprise Financials for information on an invoice in ReIM, using Document ID as the search parameter:
http://myserver:myport/BIPublisher/Guest/ReIM/13.0.3/doc/tsf_det.xdo ?doc_id=101
Where
■ http://myserver:myport/BIPublisher = the BI Publisher application server address and port
■ Guest/ReIM/13.0.3 = the directory/folder location
■ doc/tsf_det.xdo ? = report name (Document Report)
■ doc_id=101 = the parameter name and value (Document ID 101)
The following is an example of an Oracle Business Intelligence Publisher URL that is generated upon drilling back to PeopleSoft Enterprise Financials for information on an invoice in ReIM, using Receipt ID as the search parameter:
http://myserver:myport/BIPublisher/Guest/ReIM/13.0.3/doc/tsf_det.xdo ?receipt_id=101
Where
■ http://myserver:myport/BIPublisher = the BI Publisher application server address and port
■ Guest/ReIM/13.0.3 = the directory/folder location
■ doc/tsf_det.xdo ? = report name (Receipt Report)
■ receipt_id=101 = the parameter name and value (Receipt ID 101)

Drilling Forward
13-16 Oracle Retail Invoice Matching Operations Guide
Drilling Forward Drilling forward allows users to see detailed information about retail transactions that have been posted to PeopleSoft Enterprise Financials. When drilling forward, users are directed to selected "view-only" screens.
Drilling Forward From RMS/ReSA to PeopleSoft Enterprise FinancialsThe following forms may be used to drill forward from RMS/ReSA:
■ RMS StartMenu->Finance->Transaction Data View (trandata.fmb)
■ RMS StartMenu->Ordering->Fixed Deals->Fixed Deal Transaction Data View (fdltrandata.fmb)
■ RMS StartMenu->Action->Sales Audit->Sales Audit Transaction Data View (satrandata.fmb)
Drilling Forward From ReIM to PeopleSoft Enterprise FinancialsFor drilling forward, the ORFI Web service uses the Invoice ID and Accounting Entry parameters. The ReIM system uses these parameters together as the Reference ID.
■ From the Document Search screen, users can drill forward to PeopleSoft Enterprise Financials accounts payable to view voucher and payment status. The information is displayed on a read-only Payment Doc Status Inquiry screen. Drill forward access to the accounts payable system is available only for pre-paid invoices (but not for manually pre-paid invoices).
To drill down to the payables/ledger screens, the user invokes the Web service as follows:
Invoice ID/Accounting Entry parameter = Reference ID
■ Drill forward access to the G/L system is available only for pre-paid and manually pre-paid invoices.
Note: For more information on drilling forward, see the Oracle Retail Financial Integration for Oracle Retail Merchandise Operations Management and Oracle Financials Suite (E-Business Suite Financials or PeopleSoft Financials).

14
System Configuration 14-1
14 System Configuration
After installation, some of the mandatory steps need to be performed for the application to be functioning correctly. The objective of the checklist is to make sure that all the required data elements have been provided to eliminate failure in the document processing lifecycle.
Define System OptionsOut of the box some of the system options have been set to default values. You need to verify that the values meet your business requirements. Some of the attributes that would need to reference identifiers for the existing entities could not be defaulted and would need to be set explicitly. Such attributes are:
■ Default Pay Now Terms (Deals)
■ Default Pay Now Terms (RTV)
■ Default Location
■ Default Department
■ Default Class
■ Default Set Of Books
■ URL for account validation web service
■ URL for drill forward web service
Please see the Oracle Retail Invoice Matching User Guide, System Options section for more information.

Define Supplier Options
14-2 Oracle Retail Invoice Matching Operations Guide
Define Supplier OptionsEach supplier in Retail Merchandising System would need to have Supplier Options defined before it can be "visible" within the Invoice Matching application. Supplier options can be defined at the Supplier level, Supplier Site level and Supplier Group level. Only Supplier level options are mandatory.
Please see the Oracle Retail Invoice Matching User Guide, Supplier Options section for more information.
Define Matching ToleranceIf you expect to match documents within tolerance rather than matching exactly, you would need to define tolerance entities and map tolerances to appropriate tolerance nodes. Please see the User Guide, Tolerance Maintenance and Tolerance Mapping sections for more information.
Define matching StrategiesIf you expect to run Auto Match batch process, and you probably would, you would need to define some Matching Strategies. Please see the User Guide, Match Strategy Maintenance section for more information.
Define Reason CodesReason codes would need to be defined to perform discrepancies resolutions. Reason codes are synonyms for the resolution actions that the application user can take to resolve matching discrepancies. This release of Invoice Matching application doesn't provide a dedicated screen for reason code maintenance. As such, the reason codes would need to be defined via back-end. The reason codes are defined in IM_REASON_CODES table.
An example reason code script to populate the table would look similar to the following:

Define Reason Codes
System Configuration 14-3
You can also consult im_demo_data.sql script that is shipped with the product. Please note that the script would need to be modified to suite your needs.
There should be at least one entry for each action that would need to be performed. Actions are subdivided based on categories (REASON_CODE_TYPE).
■ Cost ('C')
■ Quantity ('Q')
■ Credit Note Matching related ('CNT')
■ Return to vendor ('RTV')
■ Tax ('T')
The same action can be mapped to more than one reason code. If you would need some comments to be provided when using the reason code, set the COMMENT_REQUIRED_IND to 'Y'. Hint comment can be optionally provided.
In addition to populating IM_REASON_CODES table with the reason codes, you would also need to populate IM_SEC_GRP_REASON_CODE table for each reason code. This table assigns reason codes to the security user groups defined in RMS. Only the reason codes that have been assigned to the user's security group will be available for processing. There should be a record for each user group/reason code that would require reason code access.
An example reason code security script to populate the table would look like:
The example is also available in the im_demo_data.sql script.

Define GL Mappings
14-4 Oracle Retail Invoice Matching Operations Guide
See the Oracle Retail Invoice Matching Data Model for more information on the tables structure.
Define GL MappingsTo be able to successfully post transactions to Financial System, such as EBS you would need to define General Ledger account mappings. This release of Invoice Matching application doesn't provide a dedicated screen for General Ledger mappings. As such, the mappings would need to be defined via back-end. The mappings are defined in IM_GL_CROSS_REF table.
An example GL Cross Ref script to populate the table would look similar to the following:
The example also is available in im_demo_data.sql script.
The application supports up to 20 segments. Not all segments are required. Usually the number of segments doesn't exceed 10. There should be a separate set of mappings for each set of books defined in the system. Mappings would need to be defined for all basic transactions, as well as for all non-merchandising codes and for all reason codes defined in the previous step.
Optionally, the mappings can be differentiated per tax code.
In addition to populating IM_GL_CROSS_REF table with the GL mappings, you would also need to populate IM_GL_OPTIONS to indicate what segments, if any, would be dynamic. Dynamic segments don't need explicit mappings, but rather the mappings are dynamically determined based of the segment meaning.
An example GL Options script to populate the table will look similar to the following:

Define GL Mappings
System Configuration 14-5
The example also is available in im_demo_data.sql script.
If Location segments are defined as dynamic then location segment mapping would need to be provided. It is done by populating IM_DYNAMIC_SEGMENT_LOC table. There should be an entry for each location that would need to be posted. There should be a separate set of mappings for each set of books defined in the system.
An example location mapping script to populate the table will look similar to the following:

Define GL Mappings
14-6 Oracle Retail Invoice Matching Operations Guide
If Department or Class segments are defined as dynamic then merchandising hierarchy segment mapping would need to be provided. It is done by populating IM_DYNAMIC_SEGMENT_DEPT_CLASS table. There should be an entry for every department/class combination that would need to be posted. There should be a separate set of mappings for each set of books defined in the system.
An example department/class mapping script to populate the table will look similar to the following:
See the Oracle Retail Invoice Matching Data Model for more information on the tables structure.

15
Batch Processes 15-1
15Batch Processes
This chapter provides the following:
■ An overview of the batch architecture
■ A functional summary of each batch process, along with its dependencies
■ A description of some of the features of the batch processes (batch return values, batch threading, and so on)
■ Development designs for each batch process
Batch Architectural OverviewReIM batch processes are run as Java applications. Batch processes engage in a shared processing with the UI in a client server model.
Services retrieve the data on which the batch processes work to complete their tasks. As noted in "Chapter 2, "Technical Architecture" the service layer consists of a collection of Java classes that implements business logic (data retrieval, updates, deletions, and so on) through one or more high-level methods.
The business logic occurs within the service code, while the technical processing occurs within the batch code.
Note the following characteristics of the ReIM batch processes:
■ They are not accessible through a graphical user interface (GUI).
■ They are scheduled by the retailer.
■ They are designed to process large volumes of data. However, the volume can be managed using the inclusion-exclusion configuration feature (see section Batch Configuration)
■ ReIM batches should run only in the batch window when no users exist in the system. This requirement is related to locking consideration (see locking section for more information).
■ They run in a client server model. Client side code is a plain java which basically responsible for the validation of input parameters, retrieval of user credentials for the given alias name.
■ In case there is no valid user/password pair is found for the given alias name, the client program complains the same and terminates. On the successful identification of credentials, client program makes a call to execute<<Batch>> method of corresponding EJB on the application server

Batch Architectural Overview
15-2 Oracle Retail Invoice Matching Operations Guide
Batch Process ConfigurationFor programs in the financial posting batch cycle, we have implemented a new configuration feature. The volume of data processed by each batch execution can be controlled through a table configuration. While executing a particular batch program (say AUTOMATCH), we may restrict the batch candidates to either a particular supplier or exclude a particular supplier to manage the batch load. At any point of time, a max of one exclude or one include should be configured per a particular day.
A new table IM_BATCH_CONFIG is included in the data model which is used for configuring the exclusion or inclusion of suppliers per batch for a particular day. An indicator called 'PROCESSED_IND' is in the table that tells if the inclusion/ exclusion are already processed or not. Its initial value is N.
Table 15–1 IM_BATCH_CONFIG Parameters
Parameter Description
BATCH_NAME Used for configuring the batch name.
SUPPLIER The supplier that the batch should exclude/include.
SCOPE Exclude (E)/Include (I)
PROCESSED Initial value N. Once the batch completes, program sets it to Y so that it would not considered next execution.
PROCESSED_DATE This attribute is added for the auditing purpose. It also cater as a constraint to make sure that only one Exclude or Include are configured per supplier per day.
The query that picks the candidates for the each batch is modified to join with IM_BATCH_CONFIG table to first exclude the documents/data that are of SUPPLIERS configured to exclude in the particular batch program with a PROCESSED value N. Then the inclusion logic is applied, if any. If no exclusions/inclusions have been configured for a particular batch with PROCESSED value N, then the batch will process all the eligible data.
The batches that have this capability are
■ Automatch batch
■ Financial Posting batch
■ Resolution Action Rollup batch
■ Complex Deal Upload
■ Fixed Deal Upload
EDI-Related File-Based Batch Processes ReIM EDI-related batch processes are file based. For example, they either input a flat file into the system (EDI Injector) from outside the system, or they output a flat file from the system (EDI invoice download) to be sent to another system (that of a vendor). Both the EDI Injector and the EDI invoice download batch processes are described later in this chapter. For the EDI Injector batch, the input file/folder and the rejection file/folder should be on the same physical machine as the application server is running on. This is a requirement from the file system access permission stand point. Similarly, the EDI download batch process can save the edi output file only to a folder that is on the same machine as the server is running on.

Batch Names
Batch Processes 15-3
Internal Batch ProcessesOther batch processes within ReIM do not input or output files. Rather, the goal of these batch processes is to take a snapshot of potentially large amounts of data from the key tables within the database, transform that data through processing, and then return it.
Internal batch processes that are described later in this chapter include:
■ Auto-match
■ Batch purge
■ Account purge
■ Reason Code action rollup
Internal Batch Processes that Write to Staging TablesThe third type of batch process within ReIM takes a snapshot of potentially large amounts of data from the key tables within the database, transforms that data through processing, and then writes that data to staging tables.
This communication process has been designed with the assumption that, during production, ReIM will reside within the same database as the merchandising system. Presumably, during implementation, the retailer will develop an optimum way to move the applicable data from the staging tables to the appropriate location for that data.
The internal batch processes that write to staging tables are described later in this chapter.
Batch Processes that Extract from Merchandising System (RMS) Staging TablesThe fourth type of batch process within ReIM extracts data from merchandising system staging tables, create documents with the data, and write the data to ReIM tables. The batch processes that follow this processing pattern include the following:
■ Complex deal upload
■ Fixed deal upload
Batch NamesThe following table describes ReIM batch processes. The table order reflects the dependencies that exist among the ReIM batch processes but does not include any dependencies that exist between ReIM and the merchandising system with which it interacts.
Table 15–2 Batch Names
Batch Name Class (oracle.retail.apps.reim.batch.client)
Tables purge TablesPurgeBatchClient
Account purge AccountWorkspacePurgeBatchClient
EDI Injector EdiInjectorBatchClient
Auto-match AutoMatchBatchClient
Receipt write-off ReceiptWriteOffBatchClient
Reason code action rollup ReasonCodeActionRollupBatchClient
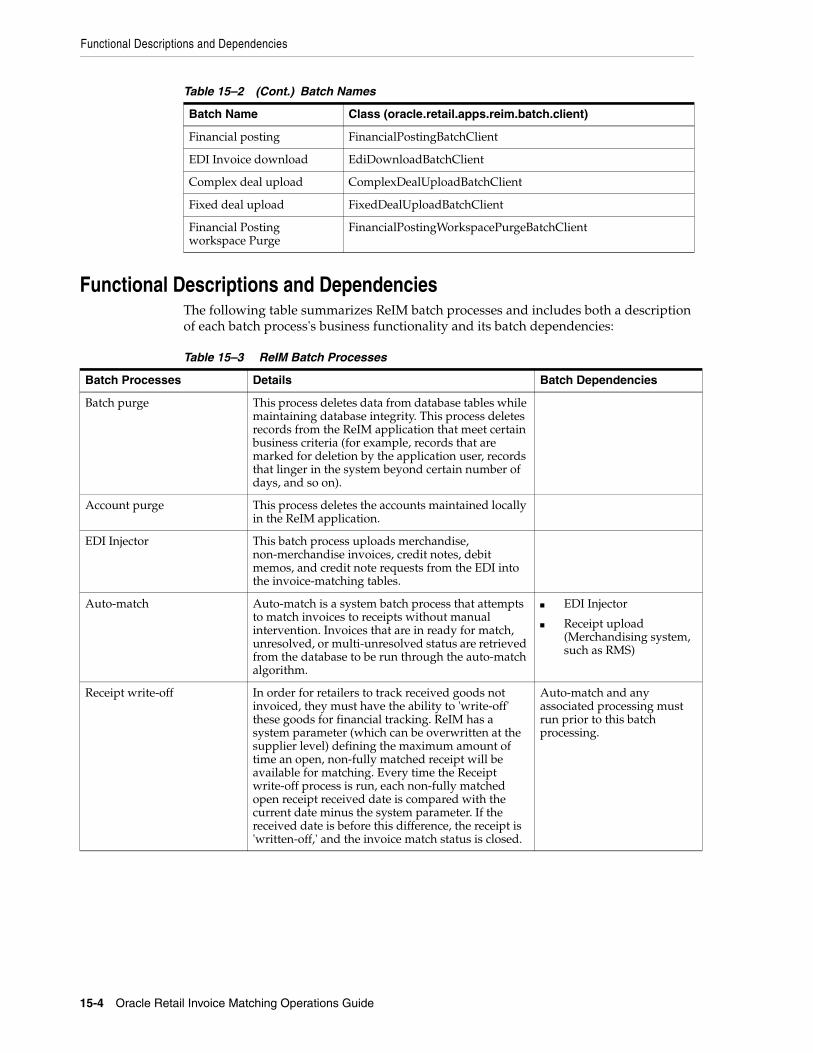
Functional Descriptions and Dependencies
15-4 Oracle Retail Invoice Matching Operations Guide
Functional Descriptions and DependenciesThe following table summarizes ReIM batch processes and includes both a description of each batch process's business functionality and its batch dependencies:
Financial posting FinancialPostingBatchClient
EDI Invoice download EdiDownloadBatchClient
Complex deal upload ComplexDealUploadBatchClient
Fixed deal upload FixedDealUploadBatchClient
Financial Posting workspace Purge
FinancialPostingWorkspacePurgeBatchClient
Table 15–3 ReIM Batch Processes
Batch Processes Details Batch Dependencies
Batch purge This process deletes data from database tables while maintaining database integrity. This process deletes records from the ReIM application that meet certain business criteria (for example, records that are marked for deletion by the application user, records that linger in the system beyond certain number of days, and so on).
Account purge This process deletes the accounts maintained locally in the ReIM application.
EDI Injector This batch process uploads merchandise, non-merchandise invoices, credit notes, debit memos, and credit note requests from the EDI into the invoice-matching tables.
Auto-match Auto-match is a system batch process that attempts to match invoices to receipts without manual intervention. Invoices that are in ready for match, unresolved, or multi-unresolved status are retrieved from the database to be run through the auto-match algorithm.
■ EDI Injector
■ Receipt upload (Merchandising system, such as RMS)
Receipt write-off In order for retailers to track received goods not invoiced, they must have the ability to 'write-off' these goods for financial tracking. ReIM has a system parameter (which can be overwritten at the supplier level) defining the maximum amount of time an open, non-fully matched receipt will be available for matching. Every time the Receipt write-off process is run, each non-fully matched open receipt received date is compared with the current date minus the system parameter. If the received date is before this difference, the receipt is 'written-off,' and the invoice match status is closed.
Auto-match and any associated processing must run prior to this batch processing.
Table 15–2 (Cont.) Batch Names
Batch Name Class (oracle.retail.apps.reim.batch.client)

Functional Descriptions and Dependencies
Batch Processes 15-5
Reason code action rollup This batch process sweeps the action staging table and creates debit memos, credit memos, and credit note requests as needed. Only a single debit or credit memo is created per invoice/discrepancy type, with line details from all related actions for the same discrepancy type. If hold invoice functionality is on, each generated document is assigned the invoice number to which it corresponds to ensure all related documents are released to accounts payable at the same time. This process deletes these records when completed; they are deleted after posting. Note that a separate, retailer-created batch process sweeps the receiver adjustment table. The action staging table is used during posting to post the reason code actions to the financial staging table. A separate, retailer-created batch process sweeps the receiver adjustment table. The process compares the unit cost and/or quantity received for the item on the shipment with the expected unit cost and/or quantity on the IM_RECEIVER_COST_ADJUST and/or IM_RECEIVER_UNIT_ADJUST tables. If a match exists, the receiver cost and/or unit adjustment has occurred in RMS (or the equivalent merchandising system). As a result, the process sets the 'pending adjustment' flag on IM_INVOICE_DETAIL table to false for the invoice line. The reason code actions are rolled up for an invoice only if no invoice lines on the invoice have any pending adjustments.
Financial posting A recurring resolution posting process retrieves all matched invoices and approved documents. If hold invoice functionality is used, then matched Credit Notes rather than approved Credit Notes are processed.
Documents which should be sent to the Financial A/P system are sent to the AP staging tables: IM_AP_STAGE_HEAD, and IM_AP_STAGE_DETAIL.
Transactions which should be sent to the Financial G/L system are sent to the IM_FINANCIALS_STAGE table
Table 15–3 (Cont.) ReIM Batch Processes
Batch Processes Details Batch Dependencies

Features of the Batch Processes
15-6 Oracle Retail Invoice Matching Operations Guide
Features of the Batch ProcessesThis section describes the features of batch processes.
Scheduler and the Command LineIf the client uses a scheduler, batch process arguments are placed into the scheduler.
If the client does not use a scheduler, batch process parameters must be passed in at the UNIX command line.
Each of these scripts interacts with the generic shell script. These scripts take any and all arguments that their corresponding batch process would take when executing.
Batch Return ValuesThe following guidelines describe the batch process return values that ReIM batch processes utilize:
■ SUCCESS = 0
■ FAILED_INIT = 1
■ FAILED_PROCESS = 2
Batch Log and Error File PathsThe client side log file location is determined by the retailer through the logj4.properties file. The errors that occur on the server side program will be written to the server log which can be configured by weblogic administrator. If an error occurs that causes a batch process to suddenly come to a complete halt, the system writes to the configured log file. See "Chapter 3, "Backend System Administration and Configuration" for more information.
EDI invoice download The EdiDownload module creates a flat file to match the EDI invoice download file format. The module retrieves all header, detail, and non-merchandise information and formats the data as needed.
In other words, the EDI invoice download process retrieves debit memos, credit note requests, and credit memos in 'approved' status from the resolution posting process and creates a flat file. The client converts the flat file into an EDI format by the client and sends it through the EDI invoice download transaction set.
Auto-match must run prior to the EDI invoice download.
Complex deal upload This module reads data from RMS staging tables, creates credit memos, debit memos, and credit note requests out of the data, and stores the supporting deal data on a ReIM table for later use during posting.
Fixed deal upload This module reads data from RMS staging tables, creates credit memos, debit memos, and credit note requests out of those, and stores the supporting deal data on a ReIM table for later use during posting.
Table 15–3 (Cont.) ReIM Batch Processes
Batch Processes Details Batch Dependencies

Executing Batch Processes
Batch Processes 15-7
Multi-Threading Batch ProcessesThe following batch processes shown below have multi-threading capabilities. The configuration related to some of the multi threaded batches can be configured in REIM System options. See "Chapter 3, "Backend System Administration and Configuration" for more information.
Complex Deal Upload (ComplexDealUploadBatch)This process is threaded by a group (or bulk) of deals. Each group constitutes a thread.
Fixed Deal Upload (FixedDealUploadBatch)This process is threaded by a group (or bulk) of deals. Each group constitutes a thread.
EDI Injector (EdiInjectorBatch)This process is threaded into groups of documents. Each thread handles the business validation of the entire document group.
Auto-Match (AutoMatchBatch)Auto-match is threaded based on the number of invoice-items and receipt-items involved in the match.
A Note about Restart and RecoveryMost ReIM batch processes do not utilize any type of restart and recovery procedures. Rather, if a restart is required, the process can simply be restarted, and it will start where it left off.
This solution is true for all batch processes other than those noted below:
■ EDI injector (its restart and recovery methods is described in its design below).
■ EDI invoice download (its restart and recovery methods is described in its design below).
Executing Batch ProcessesBatch processes are executed through the batch client framework. This framework is responsible for ensuring that the batch job is passed the appropriate arguments. The arguments for the batch runner are as follows:
■ Batch job class name
■ batch-alias-name
■ Batch arguments
Note: Batches are run with an alias name rather than with a user name/password combination. The alias name is mapped to the user credentials inside a password store called a wallet.
At run time the batches access the wallet and retrieve the user ID and password for authentication purposes.
Below is an example of how the batch runner would be utilized to execute the EdiInjectorBatch process:

Tables Purge Batch Design
15-8 Oracle Retail Invoice Matching Operations Guide
reimediinjector batch-alias-name /dir/input.dat /dir2/output.dat
The batch client programs require the application libraries (JAR files) to be on the classpath in order to execute successfully.
Tables Purge Batch DesignThe batch purging process deletes data from database tables while maintaining database integrity. This process deletes records from the ReIM application that meet certain business criteria (for example, records that are marked for deletion by the application user, records that linger in the system beyond certain number of days, and so on). The TablesPurge process does not generate any cascade relationships and/or SQL queries on the fly. The main features of the process are illustrated below:
UsageThe following arguments are applicable for the TablesPurgeBatch process:
reimpurge batch-alias-name [PURGE_OPERATIONALS | PURGE_WORKSPACES | PURGE_WORKSPACES_AND_OPERATIONALS]The first argument is batch alias name. The second argument is the purge action. PURGE_OPERATIONALS would make the batch purge data from operational tables alone, PURGE_WORKSPACES would make the batch purge data from all workspace tables, PURGE_WORKSPACES_AND_OPERATIONALS would make the batch purge data from both operational and workspace tables. By default, the purge action is committed.
Purge OperationalData from the operational tables will be purged based on the document history days system option. The tables are purged in the reverse order of their relationship to each other, history tables first and then the details and then the main or primary table.
Purge WorkspaceThe workspace tables used for display or internal calculation purposes for Search, document maintenance, Matching or Posting processes would be truncated. Indexes on all affected tables would be rebuilt after truncate. It is recommended that the workspace tables be truncated frequently, as they need to be well maintained to ensure optimal performance of the front end.
Purge Workspace and OperationalData from the workspace tables are truncated followed by the deletion of data from the operational tables.
Primary Tables InvolvedThe following lists include the tables on which the purging algorithm is applied:
Operational■ IM_DOC_HEAD
■ IM_INVOICE_DETAIL
■ IM_RESOLUTION_ACTION

EDI Invoice Injector Batch Design
Batch Processes 15-9
■ IM_RECEIPT_ITEM_POSTING_%
■ IM_%_MATCH_HISTORY
Workspace■ IM_%_SEARCH_WS
■ IM_MATCH_%_WS
■ IM_MATCH_POOL_%
■ IM_POSTING_DOC_%
Other tables of less significance also get purged.
Accounts Purge Batch DesignThis process deletes the accounts maintained locally in the ReIM application. The batch retrieves the accounts in IM_VALID_ACCOUNTS table and validates the account against the integrated financial system. Accounts that are invalid in the financial system are deleted from IM_VALID_ACCOUNTS table.
Note: Run the batch whenever account information changes are communicated to ReIM.
UsageThe following arguments are applicable for the AccountWorkspacePurgeBatch process:
reimaccountworkspacepurge batch-alias-name
Major ModulesAccountWorkspacePurgeBatchClient
Major TablesIM_VALID_ACCOUNTS
EDI Invoice Injector Batch DesignThe EDI Injector Batch process performs the following:
■ Reads each transaction within the file.
■ Runs a file format validation (verifying file descriptors and line numbers; ensuring that numeric fields are all numeric and that character fields are all characters; looking for the invalid ordering of record type-THEAD followed directly by another THEAD; and so on). Certain file formatting errors cause the process to terminate with a message indicating the problem. A limited set of data validation errors can cause invalid EDI transaction to be fixable, where the data can be corrected through online process. The rest of the data validation errors cause the invalid transaction to be written to a set of reject files where a user must correct the problems and re-run the files.
■ Validates the data against the ReIM system and the merchandising system (RMS).

EDI Invoice Injector Batch Design
15-10 Oracle Retail Invoice Matching Operations Guide
■ Any errors found are recorded in to the error table (IM_INJECT_DOC_ERROR) so that users can audit and fix any transactions that were rejected.
■ Adds the data to the ReIM system. All valid transactions are written to the IM_DOC_xxx, IM_INVOICE_xxxtables.
■ The size of the Logical Unit of work for each chunk needs to be defined in ReIM's system options.
UsageThe following arguments are applicable for the EDI Injector Batch process:
reimediinjector batch-alias-name input-file/input-path output-file/output-path
Assumptions and Scheduling Notes This process can be run ad-hoc but in general it should be run before the auto-match process.
Restart and RecoveryIf the EDI Injector Batch aborts without processing an entire file, the file can simply be rerun. When this action is completed, there will be multiple errors for the transactions that were successfully uploaded and the other transactions will be uploaded at that time as well. If the cause of the aborted process is software related, this fix may not solve the issue. Other steps may be required to ensure that the process completes its entire initial run.
High-Level Flow DiagramThe following diagram offers a high-level view of the processing logic utilized within the EDI Injector Batch process.
Primary Tables InvolvedThe following tables are involved in the EDI Injector Batch process:
Operational Data Tables

Invoice Auto-Match Batch Design
Batch Processes 15-11
■ IM_DOC_HEAD
■ IM_DOC_TAX
■ IM_INVOICE_DETAIL
■ IM_INVOICE_DETAIL_TAX
■ IM_INVOICE_DETAIL _ALLOWANCE
■ IM_INVOICE_DETAIL_ALLW_TAX
■ IM_DOC_NON_MERCH
■ IM_DOC_NON_MERCH_TAX
■ IM_DOC_DETAIL_REASON_CODES
■ IM_DOC_DETAIL_RC_TAX
Injector Workspace Tables
■ IM_INJECT_DOC_DETAIL
■ IM_INJECT_DOC_DETAIL_ALLOWANCE
■ IM_INJECT_DOC_DETAIL_ALLOW_TAX
■ IM_INJECT_DOC_DETAIL_TAX
■ IM_INJECT_DOC_ERROR
■ IM_INJECT_DOC_HEADER
■ IM_INJECT_DOC_NON_MERCH
■ IM_INJECT_DOC_NON_MERCH_TAX
■ IM_INJECT_DOC_RECORD
■ IM_INJECT_DOC_RULE
■ IM_INJECT_DOC_TAX
■ IM_INJECT_STATUS
Invoice Auto-Match Batch DesignAuto-match is a system batch process that attempts to match invoices to receipts without manual intervention. Invoices that are in ready-for-match, unresolved, or multi-unresolved status are retrieved from the database to be run through the auto-match algorithm.
The inputs into the auto-match process include the following:
■ Invoices
■ Receipts
■ Purchase orders
■ Match Strategy
■ Tolerance
ReIM owns invoices, Match Strategy, and Tolerance while receipts and purchase orders are owned by a merchandising system, such as RMS.
The Match Strategy rules feature allows retailers to build and maintain match strategies which specifically define the types of matches which should be attempted

Invoice Auto-Match Batch Design
15-12 Oracle Retail Invoice Matching Operations Guide
and the order in which they should be tried during the auto-match process. The match strategies can be defined at the system, supplier group or supplier level. The creation of a Supplier Group is tightly integrated to the logic for selecting documents to be processed by the match engine. If a Supplier Group is created, all the documents for all the suppliers in the group are considered by the match engine together. If a match strategy is defined at the Supplier Group level, then it is used to determine what match attempts to apply against the documents in the supplier group. If a match strategy is not defined at the supplier group level, then the system default match strategy is used to determine which match attempts are used to attempt to match documents for the supplier group. If a match strategy was set up for one of the suppliers for a supplier group, it is ignored by the match engine. If a supplier is not part of a supplier group, then all the documents for that supplier are considered by the match engine together. If a match strategy is defined at the Supplier level, then it is used to determine what match attempts to apply against the documents for that supplier. If a match strategy is not defined at the supplier level, then the system default match strategy is used to determine which match attempts should be used to attempt to match documents for the supplier.
The auto-match process attempts to match the invoices to receipts to the best of its abilities. The process assign different statuses according to the level of matching achieved.
If an invoice arrives prior to a receipt (for a particular PO), the auto-match process attempts only to match invoice unit cost to PO unit cost if Cost Pre-matching is opted while running the auto-match batch.
When a complete match cannot be made, manual intervention is required through online processes.
The size of the Logical Unit of work for each chunk needs to be defined in ReIM's system options.
UsageThe following arguments are applicable for the Invoice Auto-Match Batch process:
reimautomatch batch-alias-name
AlgorithmsThe following algorithms comprise the auto-match process:
Cost pre-matching
The Cost Pre-Matching routine is optional but if it is run, it runs as the first step of the Auto-match batch. When the Cost Pre-Matching routine is run, it is run against all suppliers. The routine is only executed if no receipt exists for the order on the invoice. If it finds differences in the cost on the order and the cost on the invoice which are outside of the tolerance level, it generates a cost discrepancy. If a match can be obtained, the invoice remains in ready-for-match status and is retrieved again for matching once the receipt comes in.
Summary matching
The Auto match batch attempts various types of Summary Matches based on the Match Strategy associated with the supplier or supplier group. Summary Matching involves looking at the total document values (cost and optionally quantity) without considering the specific items on each document.
Summary Match All-to-All

Invoice Auto-Match Batch Design
Batch Processes 15-13
The all-to-all match attempts to match all invoice documents to all receipt documents in the match pool. Used in combination with the Match Strategy table, all-to-all matching provides the user:
■ The option to choose whether or not to run the all-to-all match.
■ The option to choose the order in which the all-to-all match is attempted. The user could decide to execute other match attempts before the all-to-all match.
■ The option to decide how to group the invoices and receipts together to attempt matching by specifying the match key.
Summary Match One-to-Many
The one-to-many match attempts to match one invoice document to one or more receipt documents. There are two options when performing a one-to-many summary match:
■ Regular Match
Regular Match attempts to match the invoices and receipts in the pool as one to one matches. If an invoice could match to two or more receipts within tolerance, then the match fails. Similarly, if two or more receipts could match to a single receipt (within tolerance), then the match fails and both invoices are put in multi-unresolved status. If Regular Match fails because the invoice could be matched to multiple receipts or if it failed because multiple invoices could be matched to one receipt, the invoice is flagged as multi-unresolved. If a Regular Match fails for any other reason, the invoice is flagged as an 'Unresolved' match.
■ Best Match
The Best Match setting applies additional logic to select better matches when multiple receipts or receipt combinations can be matched to a single invoice. The best match process creates all combinations of one invoice to one or more receipts and selects the best match. The best match logic selects the receipt or combination of receipts that provides the lowest absolute variance. If two potential matches to the invoice have the same absolute variance but one is an overbill and one is an underbill, the underbill takes precedence. If the two potential matches have identical variances, then the invoice quantity matching will be used as an additional criteria. The match with the smallest absolute quantity variance, taken as the best match. If the absolute quantity variances are the same, then no best match can be determined, and the invoice is left as unmatched.
SKU Compliance on Summary Match
The SKU compliance feature can be used to match invoice items and values to what was actually received. SKU compliance is only calculated if all invoices in a match have details. Therefore, if any of the invoices in the match is a header only invoice, the SKU compliance is skipped. SKU compliance checks for how many of the items on the invoice(s) are on the receipt(s) and how many of the items on the receipt(s) are on the invoice(s). There is a percent calculation for each of these ratios, and both ratios must pass the SKU compliance percent for the match to be accepted.
Tax Validation on Header only Matches
ReIM uses a routine in the auto-matching program to perform a tax validation for header only invoices. The tax validation is executed when a header only invoice matches (either perfectly or within tolerance). The tax validation compares the taxes on the invoice to the taxes generated by the items from the receipt. In addition, the tax validation:

Invoice Auto-Match Batch Design
15-14 Oracle Retail Invoice Matching Operations Guide
■ ensures that all tax codes used on the invoice(s) are also used on the receipts in the match, and that the tax rates are exactly the same.
■ ensures that all tax codes on the receipts used in the match are also on the invoice(s) and that the rates match.
If the match passes these two criteria, the invoice (and receipts) can be considered matched. If the validation fails, the invoice(s) are put into tax discrepant status.
Detail matching
In auto-matching, matching can be performed for entire invoices or broken down to the line level. Detail matching is performed by item.
■ Eligibility for Detail Matching
In order to be eligible for detail matching, an invoice or receipt must meet the following conditions:
1. Item lines must be present on the invoice:
2. The invoice or receipt must not be part of a manual group.
■ Regular versus Best Match
Regular detail matching compares the invoice item with the matching receipt item from all receipts in the pool. When regular matching is only done within a PO, the unit cost on all the receipt items is the same. If the match key being used allows the user to cross PO's, a constraint is included to require all receipt costs on an item to be the same. If receipt costs are different for the same item, detail matching is not allowed for the item.
The Best Match Strategy for detail matching does two separate routines to attempt to match items within the match pool:
1. If the cost of the item on all invoices in the pool is the same, Best Match attempts to match all invoices to all receipts in the pool for that item (an all-to-all match). If they are within tolerance for both cost and quantity in the all-to-all step, then the item is matched on all invoices and on all receipts within the pool. If either the cost or quantity match fails, then nothing is flagged as matched.
2. For the item, look at the item on each invoice in the pool individually and compare it to the sum of all receipts in the pool and select the best match. The criteria for determining the best match in this scenario is as follows:
– Calculate the unit cost variance, and if it is out of tolerance the invoice is rejected from best match consideration.
– Calculate the quantity variance and if it is out of tolerance the invoice is rejected from best match consideration.
– Calculate the variance on the extended cost between the invoice item and the receipt item(s). This variance is compared against all matches which pass the previous steps. Compare the absolute variance for all the matches which are eligible for best match consideration. Take the match with the least absolute variance as the best match. If two matches have the same absolute variance but one is an overbill and one is an underbill, select the underbill as the best match. If the variances are identical, then a best match is not possible, so the match is skipped.
If the Best Match attempt is unsuccessful, it means that the Regular Match would also have not been successful. However, if the routing date has passed you should

Invoice Auto-Match Batch Design
Batch Processes 15-15
attempt regular matching including the auto-resolution process and the generation of discrepancies.
The Regular Match attempts to match the invoice item with the receipt items from all receipts in the match key (receipt unit cost must all match the unit cost of the item on the PO(/loc) for the invoice being matched).
Generating Discrepancies
During regular detail matching, the auto-matching process generates discrepancies for cost and quantity discrepancies which are outside of tolerance.
The Tolerance table includes an Auto Resolution column which is used to determine the variance percent (or amount) allowed to complete an automatic resolution. The Auto Resolution column means that there are three types of discrepancies:
■ Discrepancies which are within the 'variance within tolerance' (VWT) setting.
■ Discrepancies which have a variance which can be automatically resolved.
■ Discrepancies which have a variance which is too large to be resolved automatically. These variances generate a discrepancy and are sent to the Discrepancy Review list.
Automated Discrepancy Resolution
When a discrepancy has been identified as one which can be automatically resolved (based on comparing the variance with the applicable tolerance from the tolerance table), the system looks up the appropriate resolution action on the reason code table using the code assigned on the tolerance table row associated with the discrepancy. The resolution action is applied to resolve the discrepancy. If this is the last item on the invoice to be resolved then the whole invoice is flagged as matched. If this was the last item for the receipt to be resolved, then the receipt is also flagged as matched.
Assumptions and Scheduling NotesConsider the following assumptions and scheduling notes.
■ Auto-match cannot be run during the day when there are users online interacting with the system.
■ Both the invoice unit cost and the unit cost of the PO must be expressed in the same currency. In order to compare the invoice unit costs with the PO's unit costs, auto-match does not engage in currency conversion. Match Keys which involve multiple currencies or vat regions or set of books will be removed from the matching process.
High-Level Flow DiagramThe following diagram offers a high-level view of the processing logic utilized within the auto-match batch process.

Invoice Auto-Match Batch Design
15-16 Oracle Retail Invoice Matching Operations Guide
Primary Tables InvolvedThe following tables are involved in the Invoice Auto-Match batch process.
■ IM_DOC_HEAD
■ IM_INVOICE_DETAIL
■ SHIPMENT(RMS)
■ SHIPSKU(RMS)
■ IM_PARTIALLY_MATCHED_RECEIPTS
■ ORDHEAD(RMS)
■ ORDSKU(RMS)
■ ORDLOC(RMS)
■ IM_TOLERANCE_LEVEL_MAP
■ IM_SUPPLIER_OPTIONS
■ IM_SYSTEM_OPTIONS

Credit Note Auto-Match Batch Design
Batch Processes 15-17
■ IM_MATCH_INVC_WS
■ IM_MATCH_INVC_DETL_WS
■ IM_MATCH_RCPT_WS
■ IM_MATCH_RCPT_DETL_WS
■ IM_MATCH_GROUP_HEAD_WS
■ IM_MATCH_GROUP_INVC_WS
■ IM_MATCH_GROUP_RCPT_WS
Credit Note Auto-Match Batch DesignCredit Note Auto-Matching pairs credit note requests to corresponding credit notes sent by the supplier. The CreditNoteAutoMatchBatch attempts auto-matching of credit notes from suppliers, to credit note requests from the retailer without manual intervention. The batch also creates and resolves detail level discrepancies utilizing a predefined set of reason codes. These reason codes are defined within Invoice Matching through the System Options Maintenance screen. In addition, the batch utilizes a variety of configurable keys to allow for document groups to be matched in ways other than just distinct purchase order and location combinations.
When invoked, the batch creates a pool of matchable credit notes and credit note requests. The candidates are selected depending on which customizable fields are populated and a status of credit notes and credit note requests. For information, see the Oracle Retail Invoice Matching User Guide.
Once a pool of matchable documents is established, the batch proceeds to group the documents with respect to unique suppliers listed on the documents. Suppliers are the first layer of grouping, which facilitates further processing of each group in parallel using threads.
If threading is enabled for the batch, each supplier based group is processed in its own thread. Each supplier based group further divides the documents for that supplier into smaller document-key sets. These document-key sets are categorized by common attributes defined on the document itself. The attributes, also referred to as Configurable or Flexible 'Pool Keys' allow documents to be grouped in several combinations in addition to the distinct purchase order and location combination (which is the only combination possible in the current Invoice Auto-Matching framework).
Matching is not attempted for groups not containing both credit notes and credit note requests.
By default the CreditNoteAutoMatch process creates document-key sets based on the following key distinctions:
■ Deal ID
■ Deal Component ID
■ Credit Note Request ID
■ Original Invoice ID
■ PO/Location combination
To enable the use of all five keys, the reference fields in the credit notes and credit note requests must be populated. For information, see the Oracle Retail Invoice Matching User Guide. The reference credit note request ID field holds the credit note request ID,

Credit Note Auto-Match Batch Design
15-18 Oracle Retail Invoice Matching Operations Guide
reference invoice ID field holds the original invoice ID, deal ID field holds the deal ID and deal detail ID field holds the deal component ID. In case none of these fields are populated with the required data, the PO/Location combination is the only key available to the CreditNoteAutoMatchBatch process.
Within each document-key set, matching is attempted using three algorithms: summary, one-to-one matching, and detail level matching. Summary-level matching attempts to match all credit notes with credit note requests at a summary level by comparing extended costs, or quantities within tolerance. One-to-one matching requires that extended costs or quantities of one distinct credit note match to only one distinct credit note request within tolerance. Line-level matching is only attempted if there is one unmatched credit note left. It attempts to match the line items of an unmatched credit note with line items of all unmatched credit note requests.
Below is the flow for attempting a match for each of the document-key set:
1. Summary Matching (matching algorithm)
2. One to One Matching (matching algorithm)
3. Line-level Matching (matching algorithm)
If Tax is enabled in the system, CreditNoteAutoMatchBatch only detects Tax discrepancies at the detail level. This means that when documents are being processed by the detail matching algorithm, a check is performed prior to matching, ensuring that the Tax codes and rates for each item on the credit note match those on the credit note request for the corresponding item. When a discrepancy is detected, processing for that document stops and detail matching is not performed for that document. In such a case, the Invoice Matching user will have to match and resolve the Tax discrepancy manually through the user interface.
Tolerances are handled in a manner similar to the Invoice auto-match batch process. The tolerances are first selected with respect to supplier, then with respect to the system. For information, see the Oracle Retail Invoice Matching User Guide.
If a match is achieved, the information related to the matched document is migrated to the history tables, and all CreditNoteAutoMatch Batch related tables are purged for those documents. The migration process is enabled depending on the value of the creditnoteautomatchbatch.workspace.cleanup property in the reim.properties file. For information, see "Credit Note AutoMatch Workspace Cleanup Setting" in Chapter 2.
In case of an unsuccessful match manual intervention is required through online processes, and the match attempt related data for those documents is not cleaned up from the respective tables. See "Primary Tables Involved" in this section for more details on the tables involved.
UsageThe following arguments are applicable for the Credit Note Auto-Match Batch process:
reimcreditnoteautomatch batch-alias-name
AlgorithmsThe Credit NoteAutoMatch batch process includes the following algorithms.
■ Summary Matching
Credit notes and credit note requests in the document set are matched at the summary level by comparing extended costs. If the extended costs of the document set falls within tolerances, the documents are considered matched and

Credit Note Auto-Match Batch Design
Batch Processes 15-19
flagged as such, processing continues with the next set. Note that since total extended costs are being compared, only total merchandise amounts will be factored into the actual matching calculations. If the documents in the set are from a supplier that requires quantity matching, quantity matching will be performed within tolerances as well.
■ One to One Matching
One to one matching is a variation of summary matching. It requires that one distinct credit note matches to only one distinct credit note request within tolerance for the document set. Extended costs are compared and quantities are also compared if the supplier option for quantity matching is enabled.
■ Detail Matching
For a given document set, when only one credit note remains unmatched and multiple credit note requests remain unmatched, the system will attempt to match line items from the credit note to the credit note request at the line level. If a match is not found, discrepancies are created and routed for resolution. When discrepancies are created as part of the detail (line-level) matching process, they are automatically resolved by the batch process. This resolution will take place by selecting the appropriate pre-defined reason code from the system options and resolving the discrepancy. During the reason code action rollup process, these newly created resolution actions will be rolled up to create the appropriate resolution documents. In case no applicable reason codes exist in the system for the discrepancy, the credit note will not be matched and processing will stop for the document set.
Assumptions and Scheduling NotesConsider the following assumptions and scheduling notes.
■ Both the credit note and credit note request unit cost must be expressed in the same currency.
■ The quantities on the credit note must be expressed in the same unit of measure as the quantities on the credit note requests. The batch performs no unit of measure conversion.
Post Processing■ CreditNoteAutoMatch updates the status of qualified documents that have been
matched.
■ The CreditNoteAutoMatch workspace is cleaned up depending on the related setting in the reim.properties file (refer to the Credit Note AutoMatch Workspace Cleanup Setting section in the reim.properties section).
■ The batch creates and resolves discrepancies by utilizing pre-defined reason codes. The Reason Code Rollup Batch must ensure that the respective documents are created.

Credit Note Auto-Match Batch Design
15-20 Oracle Retail Invoice Matching Operations Guide
High-Level Flow Diagram
Primary Tables InvolvedThe following are lookup tables that must be populated.
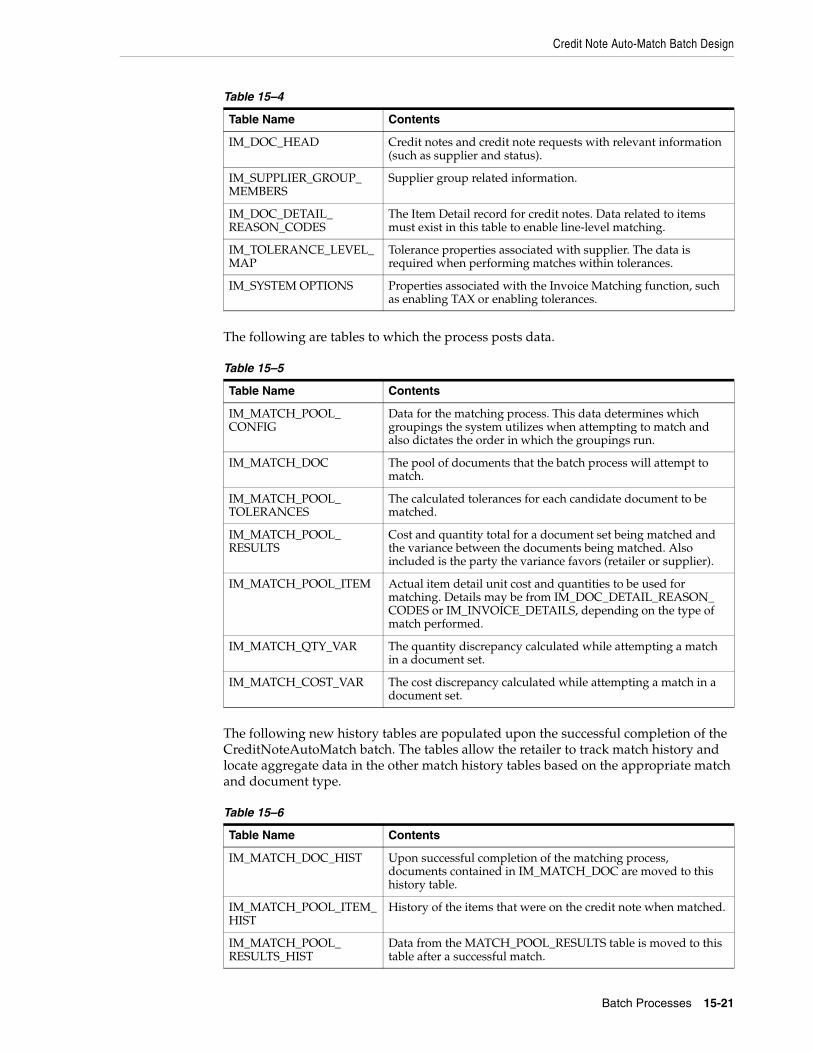
Table 15–4
Table Name Contents
IM_DOC_HEAD Credit notes and credit note requests with relevant information (such as supplier and status).
IM_SUPPLIER_GROUP_MEMBERS
Supplier group related information.
IM_DOC_DETAIL_REASON_CODES
The Item Detail record for credit notes. Data related to items must exist in this table to enable line-level matching.
IM_TOLERANCE_LEVEL_MAP
Tolerance properties associated with supplier. The data is required when performing matches within tolerances.
IM_SYSTEM OPTIONS Properties associated with the Invoice Matching function, such as enabling TAX or enabling tolerances.
Credit Note Auto-Match Batch Design
Batch Processes 15-21
The following are tables to which the process posts data.
Table 15–5
Table Name Contents
IM_MATCH_POOL_CONFIG
Data for the matching process. This data determines which groupings the system utilizes when attempting to match and also dictates the order in which the groupings run.
IM_MATCH_DOC The pool of documents that the batch process will attempt to match.
IM_MATCH_POOL_TOLERANCES
The calculated tolerances for each candidate document to be matched.
IM_MATCH_POOL_RESULTS
Cost and quantity total for a document set being matched and the variance between the documents being matched. Also included is the party the variance favors (retailer or supplier).
IM_MATCH_POOL_ITEM Actual item detail unit cost and quantities to be used for matching. Details may be from IM_DOC_DETAIL_REASON_CODES or IM_INVOICE_DETAILS, depending on the type of match performed.
IM_MATCH_QTY_VAR The quantity discrepancy calculated while attempting a match in a document set.
IM_MATCH_COST_VAR The cost discrepancy calculated while attempting a match in a document set.
The following new history tables are populated upon the successful completion of the CreditNoteAutoMatch batch. The tables allow the retailer to track match history and locate aggregate data in the other match history tables based on the appropriate match and document type.
Table 15–6
Table Name Contents
IM_MATCH_DOC_HIST Upon successful completion of the matching process, documents contained in IM_MATCH_DOC are moved to this history table.
IM_MATCH_POOL_ITEM_HIST
History of the items that were on the credit note when matched.
IM_MATCH_POOL_RESULTS_HIST
Data from the MATCH_POOL_RESULTS table is moved to this table after a successful match.

Receipt Write-Off Batch Design
15-22 Oracle Retail Invoice Matching Operations Guide
The following tables are populated for compatibility with the existing Invoice Matching history maintenance data model.
■ IM_CN_SUMMARY_MATCH_HIS
■ IM_CN_DETAIL_MATCH_HIS
Receipt Write-Off Batch DesignRetailers track received goods that are not invoiced, and they must have the ability to 'write-off' these goods for financial tracking. Two types of processes can determine when these written-off goods will be written to financials: purged receipts from merchandising system, and close open receipts from invoice matching. Because receipts can be purged outside of the invoice matching dialogue, these purged receipts must be maintained until their unmatched amount has been accounted for. These receipts are tracked through STAGE_PURGED_SHIPMENTS and STAGE_PURGED_SHIPSKUS. Every purged shipment record that is not fully matched will have a record by item written to the stage tables. In addition, invoice matching has a system parameter (which can be overwritten at the supplier level) defining the maximum amount of time an open, non-fully matched receipt will be available for matching.
Every time the write-off process is run, each non-fully matched open receipt received date is compared with the current date minus the system parameter. If the received date is before this difference, then the receipt will be written-off and the invoice match status is closed.
The department/class of each receipt item must be identified to ensure accurate accounting. The form of the accounting distribution is as follows:
Table 15–7
Transaction Type Sign Value Notes
Unmatched receipt Debit Value of unmatched items on receipt
Receipt write-Off Credit Same as above
Trade accounts payable
Credit 0 Written as a matter of form
This account distribution mapping is set up through the account cross-reference screen.
Note: If IM_SUPPLIER_OPTIONS.CLOSE_OPEN_RECEIPT_MONTHS is not defined, the value is retrieved from IM_SYSTEM_OPTIONS.CLOSE_OPEN_RECEIPT_MONTHS.
IM_MATCH_QTY_VAR_HIST
IM_MATCH_COST_VAR_HIST
History related to any quantity or cost variance detected during the match process.
Table 15–6 (Cont.)
Table Name Contents

Reason Code Action Rollup Batch Design
Batch Processes 15-23
UsageThe following arguments are applicable for the Receipt Write-Off Batch process:
reimreceiptwriteoff batch-alias-name
Assumptions and Scheduling Notes■ When setting up the Close Open Receipt Months in ReIM Supplier Options
and/or System Options, the value should be less than or equal to RMS UNIT_OPTIONS.ORDER_HISTORY_MONTHS if the intention is to have invoice matching pick up receipts prior to purging.
■ Auto-match and any associated processing must be run prior to this batch processing.
High-Level Flow Diagram
Primary Tables InvolvedThe following tables are involved in the Receipt Write-off batch process.
REIM■ IM_FINANCIALS_STAGE
■ IM_SYSTEM_OPTION
■ IM_SUPPLIER_OPTIONS
■ IM_PARTIALLY_MATCHED_RECEIPTS
RMS■ UNIT_OPTIONS
■ SHIPMENT
■ STAGE_PURGED_SHIPMENT
■ SHIPSKU
■ STAGE_PURGE_SHIPSKU
Reason Code Action Rollup Batch DesignReason code actions are resolutions assigned at the discrepancy line level. A number of fixed actions are available to resolve a line item discrepancy; the specific results depend on the action.

Financial Posting Batch Design
15-24 Oracle Retail Invoice Matching Operations Guide
The resolution posting process sweeps the IM_RESOLUTION_ACTION table and creates debit and credit memos as needed. Only a single debit or credit memo is created per invoice/discrepancy type, with line details from all related actions for the same discrepancy type.
This process does not delete these records when completed; rather, they are deleted after posting.
The action staging table is used during posting to post the reason code actions to the financial staging table.
UsageThe following arguments are applicable for the Reason Code Action Rollup Batch process:
reimrollup batch-alias-name
Assumptions and Scheduling NotesThe memo staging table sweep must occur before the posting batch process, or a delay of one day results before posting can occur.
High-Level Flow DiagramThe following diagram offers a high-level view of the processing logic utilized within the reason code action rollup batch process.
Primary Tables InvolvedThe following tables are involved in the Reason Code Action Rollup batch process.
■ IM_DOC_HEAD
■ IM_INVOICE_DETAIL
■ IM_PARTIALLY_MATCHED_RECEIPTS
■ IM_RESOLUTION_ACTION
■ IM_RECEIVER_COST_ADJUST
■ IM_RECEIVER_UNIT_ADJUST
Financial Posting Batch DesignFor each invoice, the batch process writes applicable financial accounting transactions to either of the following tables:

Financial Posting Batch Design
Batch Processes 15-25
■ The Financials staging table, IM_FINANCIALS_STAGE.
■ The AP staging tables, IM_AP_STAGE_HEADER and IM_AP_STAGE_DETAIL, or the IM_FINANCIALS_STAGE, depending on the transaction type.
The processing occurs after discrepancies for documents have been resolved by resolution documents. Once all of the resolution documents for a matched invoice are built, and all of the RCA/RUA external processing has been confirmed, the process inserts financial accounting transactions to the financials staging table, to represent the resolution and consequent posting of the invoice. The process also inserts financial accounting transactions for the approved documents that are being handled.
Once all of the transactions have been written, the process switches the status of the current invoices/documents to Posted and moves on to the next invoice/document.
If a segment look-up fails, the failed record is written to a financials error table.
UsageThe following arguments are applicable for the Financial Posting Batch process:
reimposting batch-alias-name
Assumptions and Scheduling NotesBefore posting can occur, the following information must be set up:
■ Segment definitions in the GL options.
■ GL account segments on the GL Options screen.
■ All the accounts using the GL Cross Reference screen.
■ Country
■ Location
■ Dept
■ Class
If dynamic segments are defined, the values for the segments must be defined in the applicable tables, IM_DYNAMIC_SEGMENT_DEPT_CLASS or IM_DYNAMIC_SEGMENT_LOC.
Primary Tables InvolvedThe following tables are involved in the Financial Posting batch process.
■ The IM_DOC_HEAD table contains the matched, void, and approved documents.
■ The IM_DOC_NON_MERCH table contains the non-merchandise costs for invoices.
Lookup Tables that must be Populated■ IM_GL_OPTIONS. Order of segments, business attributes, and dynamic segments
defined.
■ IM_GL_CROSS_REF. Account values defined for account types and account codes.
■ IM_DYNAMIC_SEGMENT_DEPT_CLASS. Accounts defined for each department/class combination.
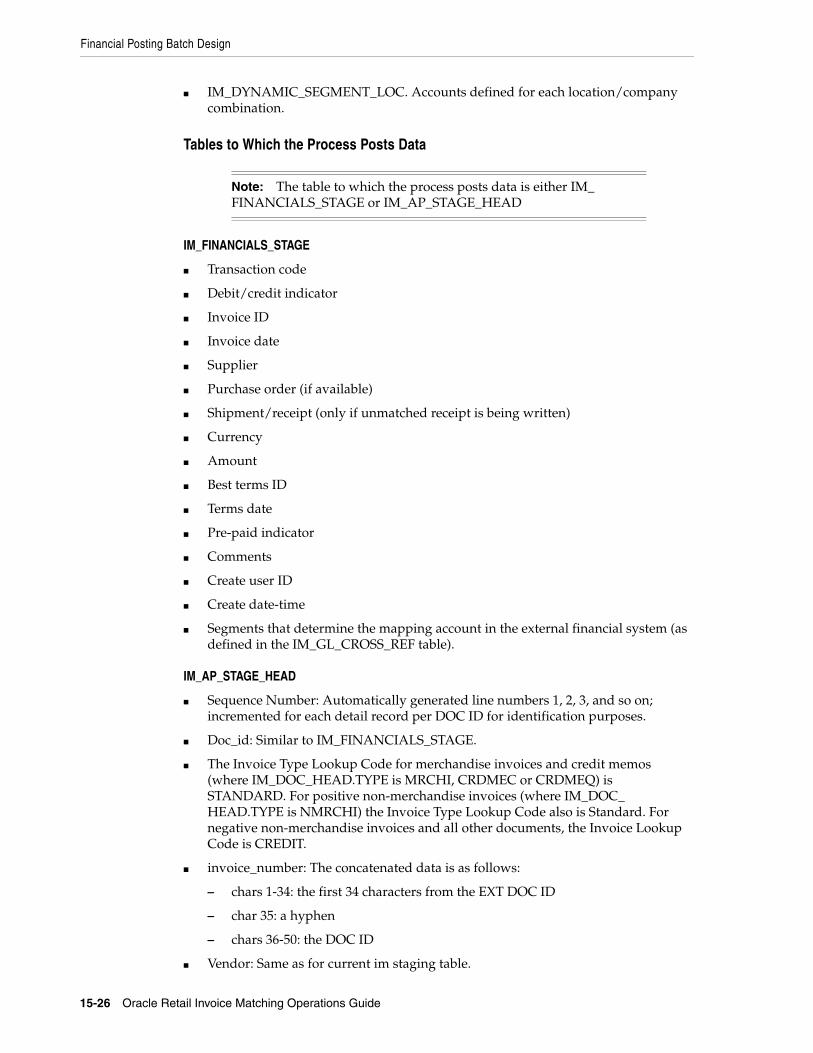
Financial Posting Batch Design
15-26 Oracle Retail Invoice Matching Operations Guide
■ IM_DYNAMIC_SEGMENT_LOC. Accounts defined for each location/company combination.
Tables to Which the Process Posts Data
Note: The table to which the process posts data is either IM_FINANCIALS_STAGE or IM_AP_STAGE_HEAD
IM_FINANCIALS_STAGE
■ Transaction code
■ Debit/credit indicator
■ Invoice ID
■ Invoice date
■ Supplier
■ Purchase order (if available)
■ Shipment/receipt (only if unmatched receipt is being written)
■ Currency
■ Amount
■ Best terms ID
■ Terms date
■ Pre-paid indicator
■ Comments
■ Create user ID
■ Create date-time
■ Segments that determine the mapping account in the external financial system (as defined in the IM_GL_CROSS_REF table).
IM_AP_STAGE_HEAD
■ Sequence Number: Automatically generated line numbers 1, 2, 3, and so on; incremented for each detail record per DOC ID for identification purposes.
■ Doc_id: Similar to IM_FINANCIALS_STAGE.
■ The Invoice Type Lookup Code for merchandise invoices and credit memos (where IM_DOC_HEAD.TYPE is MRCHI, CRDMEC or CRDMEQ) is STANDARD. For positive non-merchandise invoices (where IM_DOC_HEAD.TYPE is NMRCHI) the Invoice Type Lookup Code also is Standard. For negative non-merchandise invoices and all other documents, the Invoice Lookup Code is CREDIT.
■ invoice_number: The concatenated data is as follows:
– chars 1-34: the first 34 characters from the EXT DOC ID
– char 35: a hyphen
– chars 36-50: the DOC ID
■ Vendor: Same as for current im staging table.

Financial Posting Batch Design
Batch Processes 15-27
■ Oracle_site_id:
– The loc from this transaction to read new RMS Location/Org Unit data to find the Org Unit.
– The Org Unit to read new RMS Supplier Addr/Org Unit/Site ID data to find Oracle Site ID.
– The Org Unit of the Location from this transaction should match the Org Unit of the Site ID. Otherwise, this field value will be null.
■ Currency Code: Valued if this is a foreign currency invoice, otherwise null.
■ Exchange Rate: If exchange rate is valued, this should be the literal, USER; otherwise blank.
■ Exchange Rate Type
■ Document Date: Same as in current im staging table.
■ Amount: The TOTAL amount including tax.
■ Best Terms Date: Same as in current im staging table.
■ Segment1: Same as in current IM financials staging table.
■ Segment2: Same as in current IM financials staging table.
■ Segment3: Same as in current IM financials staging table.
■ Segment 4: Same as in current IM financials staging table.
■ Segment 5: Same as in current IM financials staging table.
■ Segment 6: Same as in current IM financials staging table.
■ Segment 7: Same as in current IM financials staging table.
■ Segment 8: Same as in current IM financials staging table.
■ Segment 9: Same as in current IM financials staging table.
■ Segment 10: Same as in current IM financials staging table.
■ Create Date: Same as in current IM financials staging table.
■ Best Terms ID: Same as in current IM financials staging table.
IM_AP_STAGE_DETAIL
■ Doc_id
■ Sequence number: Automatically generated line numbers 1, 2, 3, and so on; incremented for each detail record per DOC ID; for identification purpose.
■ Transaction Code
■ Line Type Lookup Code: This value varies. The rules are:
– If the tran-code is UNR or VWT or REASON or CRN then this value is ITEM.
– If this is a generated tax line, then this value will be TAX.
Recent modifications have been made to the ReIM posting process to better support integration with EBS with respect to VAT requirements. Previous to the modifications, ReIM would post Invoices to the staging tables which passed information to Accounts Payables in a manner where in certain scenarios, the VAT lines could not be easily associated with corresponding Merchandise lines on the invoice. The details of the association between Items
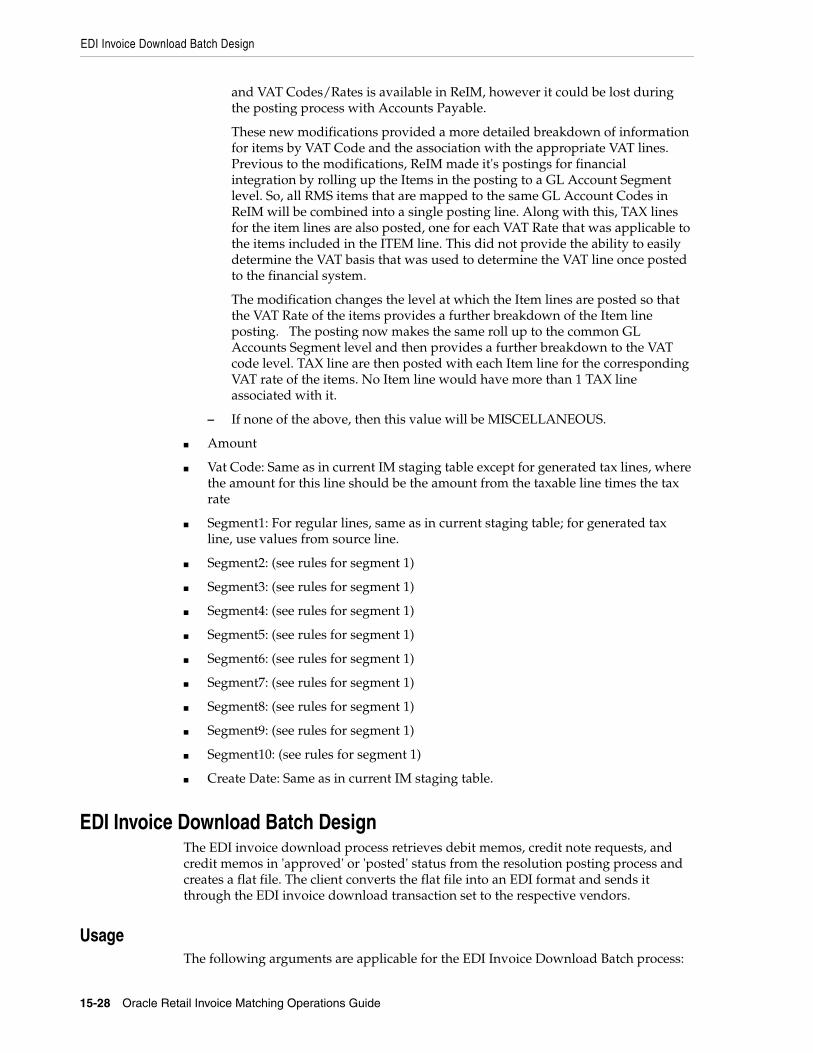
EDI Invoice Download Batch Design
15-28 Oracle Retail Invoice Matching Operations Guide
and VAT Codes/Rates is available in ReIM, however it could be lost during the posting process with Accounts Payable.
These new modifications provided a more detailed breakdown of information for items by VAT Code and the association with the appropriate VAT lines. Previous to the modifications, ReIM made it's postings for financial integration by rolling up the Items in the posting to a GL Account Segment level. So, all RMS items that are mapped to the same GL Account Codes in ReIM will be combined into a single posting line. Along with this, TAX lines for the item lines are also posted, one for each VAT Rate that was applicable to the items included in the ITEM line. This did not provide the ability to easily determine the VAT basis that was used to determine the VAT line once posted to the financial system.
The modification changes the level at which the Item lines are posted so that the VAT Rate of the items provides a further breakdown of the Item line posting. The posting now makes the same roll up to the common GL Accounts Segment level and then provides a further breakdown to the VAT code level. TAX line are then posted with each Item line for the corresponding VAT rate of the items. No Item line would have more than 1 TAX line associated with it.
– If none of the above, then this value will be MISCELLANEOUS.
■ Amount
■ Vat Code: Same as in current IM staging table except for generated tax lines, where the amount for this line should be the amount from the taxable line times the tax rate
■ Segment1: For regular lines, same as in current staging table; for generated tax line, use values from source line.
■ Segment2: (see rules for segment 1)
■ Segment3: (see rules for segment 1)
■ Segment4: (see rules for segment 1)
■ Segment5: (see rules for segment 1)
■ Segment6: (see rules for segment 1)
■ Segment7: (see rules for segment 1)
■ Segment8: (see rules for segment 1)
■ Segment9: (see rules for segment 1)
■ Segment10: (see rules for segment 1)
■ Create Date: Same as in current IM staging table.
EDI Invoice Download Batch DesignThe EDI invoice download process retrieves debit memos, credit note requests, and credit memos in 'approved' or 'posted' status from the resolution posting process and creates a flat file. The client converts the flat file into an EDI format and sends it through the EDI invoice download transaction set to the respective vendors.
UsageThe following arguments are applicable for the EDI Invoice Download Batch process:

Complex Deal Upload Batch Design
Batch Processes 15-29
reimediinvdownload batch-alias-name
Assumptions and Scheduling NotesConsider the following assumptions and scheduling notes.
■ All data is valid in the IM_DOC_HEAD tables. ReIM does not validate details.
■ Auto-match must run prior to the EDI invoice download.
Primary Tables InvolvedThe EDI invoice download batch process reads from the following tables:
■ IM_DOC_HEAD
■ IM_DOC_DETAIL_REASON_CODES
■ IM_DOC_NON_MERCH
■ IM_DOC_DETAIL_COMMENTS
Restart and RecoveryIf the EDI invoice download aborts while processing, an incomplete file is generated. To generate a complete file, the process simply needs to be rerun and allowed to fully process. If the cause of the aborted process is software related, this action might not solve the issue; other steps may be required to ensure that the process completes its entire initial run.
Complex Deal Upload Batch DesignThe Complex Deal Upload batch process reads data from header and detail complex deals staging tables in RMS.
For each combination of deal ID and deal detail ID on the RMS staging tables, the batch process creates a credit memo, a debit memo, or a credit note request, depending upon an indicator on the staging tables.
The batch process also copies most of the data from the RMS staging tables into one ReIM detail table (IM_COMPLEX_DEAL_DETAIL). This data is later referenced during the posting process for the created documents.
UsageThe following arguments are applicable for the Complex Deal Upload Batch process:
reimcomplexdealupload batch-alias-name block-size partition-no partition-size
Primary Tables Involved
Note: For descriptions of RMS tables, see the Oracle Retail Merchandising System Data Model.
■ STAGE_COMPLEX_DEAL_HEAD (RMS table)
■ STAGE_COMPLEX_DEAL_DETAIL (RMS table)

Complex Deal Upload Batch Design
15-30 Oracle Retail Invoice Matching Operations Guide
■ IM_DOC_HEAD. This table holds general information for documents of all types. Documents include merchandise invoices, non-merchandise invoices, consignment invoices, credit notes, credit note requests, credit memos, and debit memos. Documents remain on this table for SYSTEM_OPTIONS.DOC_HISTORY_MONTHS after they are posted to the ledger.
■ IM_DOC_DETAIL_REASON_CODES. This table contains quantity/unit cost adjustments for a given document/item/reason code.
■ IM_DOC_TAX. This table associates the document with its value added tax information.
■ IM_COMPLEX_DEAL_DETAIL. This table holds the details of the complex deal stored in ReIM. It is used during complex deal detail posting.
■ IM_COMPLEX_DEAL_DETAIL_TAX. This table holds the tax information of the complex deal.
Multi-ThreadingThe Complex Deals upload batch is run in multi-threaded mode as follows:
■ reimcomplexdealupload user/password BlockSize PartitionNo
BlockSizeThe BlockSize is used to decide how many deal IDs to process in every thread. It should be greater than 1.
For example, if there are 15 deals to be processed in the staging tables and BlockSize input argument is provided as 3, then there will be 5 threads to process 3 deals each simultaneously.
A total of 3 deals records are processed in each of the 5 threads.
PartitionNoThe PartitionNo is used by huge data block that are in the units of millions (for example, 4 million).
The batch is used by the query to pick all the records and it retrieves ALL the deal numbers to be processed by the batch.
For example, the input command line arguments:
reimfixeddealupload user/password 3 1
Generation of Debit Memo (or Credit Note Requests) for DealsThe RMS system generates Debit Memos (or Credit Note Requests) for Fixed or Complex deals and pass them through to ReIM via custom upload batch programs. The RMS system includes a system option called 'Credit Memo Level' which will control the level at which the Debit Memo (or Credit Note Request) is generated.
The valid values for the Credit Memo Level option are:
■ L – Location
■ T – Transfer Entity
■ B – Set of Books
■ D – Deal/Component

Fixed Deal Upload Batch Design
Batch Processes 15-31
Therefore, if a retailer wishes to generate a separate Debit Memo (or Credit Note Request) for each location on a deal, they would set the Credit Memo Level option to 'L', and RMS would send a separate transaction for each location on the deal. If this level of detail is not needed, the retailer could set the option to 'D' and only a single document would be sent to ReIM for each deal/component. Note that if the deal/component level is selected, ReIM still internally tracks the locations on each deal and will use this information to credit the correct locations on the deal when making the accounting entries.
Fixed Deal Upload Batch DesignThe Fixed Deal Upload batch process reads data from header and detail fixed deals staging tables in RMS.
For each deal ID on the RMS staging tables, the batch process creates a credit memo, a debit memo, or a credit note request, depending upon an indicator on the staging tables.
The batch process also copies most of the data from the RMS staging tables into one ReIM detail table (IM_FIXED_DEAL_DETAIL). This data is later referenced during the posting process for the created documents.
For non-merchandise fixed deals that are not associated with an RMS location, the org unit has been added to the RMS staging table. During the Fixed Deal upload process, the set of books ID associated with this org unit is used to access a new table (FIXED_DEAL_SOB_LOC_DEFAULT) to get the location to use for the deal document in IM_DOC_HEAD. Then, the resolution posting job populates the financial staging tables with the set of books ID associated with the location just like it does with all other documents.
UsageThe following arguments are applicable for the Fixed Deal Upload Batch process:
reimfixeddealupload batch-alias-name block-size partition-no partition-size
Primary Tables Involved
Note: For descriptions of RMS tables, see the Oracle Retail Merchandising System Data Model.
■ STAGE_FIXED_DEAL_HEAD (RMS table)
■ STAGE_FIXED_DEAL_DETAIL (RMS table)
■ IM_DOC_HEAD. This table holds general information for documents of all types. Documents include merchandise invoices, non-merchandise invoices, consignment invoices, credit notes, credit note requests, credit memos, and debit memos. Documents remain on this table for SYSTEM_OPTIONS.DOC_HISTORY_MONTHS after they are posted to the ledger.
■ IM_DOC_NON_MERCH. This table holds various user-defined non-merchandise costs associated with an invoice. Non merchandise costs can be associated with merchandise invoice if the IM_SUPPLIER_OPTIONS.MIX_MERCH_NON_MERCH_IND for the vendor is 'Y'. If the MIX_MERCH_NON_MERCH_IND for the vendor is N, non merchandise expenses can only be on non merchandise invoice documents.

Fixed Deal Upload Batch Design
15-32 Oracle Retail Invoice Matching Operations Guide
■ IM_DOC_TAX. This table associates the document with its value added tax information.
■ IM_FIXED_DEAL_DETAIL. This table holds the details of the fixed deals in the ReIM system. It will be used during fixed deal detail posting.
■ IM_FIXED_DEAL_DETAIL_TAX. This table holds the tax information of the fixed deal.
Multi-ThreadingThe Fixed Deals upload batch is run in multi-threaded mode as follows:
■ reimfixeddealupload user/password BlockSize PartitionNo
BlockSizeThe BlockSize is used to decide how many deal IDs to process in every thread. It should be greater than 1.
For example, if there are 15 deals to be processed in the staging tables and BlockSize input argument is provided as 3, then there will be 5 threads to process 3 deals each simultaneously.
A total of 3 deals records are processed in each of the 5 threads.
PartitionNoThe PartitionNo is used by huge data block that are in the units of millions (for example, 4 million).
The batch is used by the query to pick all the records and it retrieves ALL the deal numbers to be processed by the batch.
For example, the input command line arguments:
reimfixeddealupload user/password 3 1
Generation of Debit Memo (or Credit Note Requests) for DealsThe RMS system generates Debit Memos (or Credit Note Requests) for Fixed or Complex deals and pass them through to ReIM via custom upload batch programs. The RMS system includes a system option called 'Credit Memo Level' which will control the level at which the Debit Memo (or Credit Note Request) is generated.
The valid values for the Credit Memo Level option are:
■ L – Location
■ T – Transfer Entity
■ B – Set of Books
■ D – Deal/Component
Therefore, if a retailer wishes to generate a separate Debit Memo (or Credit Note Request) for each location on a deal, they would set the Credit Memo Level option to 'L', and RMS would send a separate transaction for each location on the deal. If this level of detail is not needed, the retailer could set the option to 'D' and only a single document would be sent to ReIM for each deal/component. Note that if the deal/component level is selected, ReIM still internally tracks the locations on each deal

Fixed Deal Upload Batch Design
Batch Processes 15-33
and will use this information to credit the correct locations on the deal when making the accounting entries.

Fixed Deal Upload Batch Design
15-34 Oracle Retail Invoice Matching Operations Guide
Copyright © 2022 FDOKUMEN