Oracle Server Manager User's Guide - Oracle Help Center
416
Oracle Server Manager t User’s Guide Release 2.1 Part No. A30887–1
-
Upload
khangminh22 -
Category
Documents
-
view
0 -
download
0
Transcript of Oracle Server Manager User's Guide - Oracle Help Center

Oracle ServerManager� User’sGuideRelease 2.1
Part No. A30887–1
Oracle Server Manager User’s Guide, Release 2.1
Part No. A30887–1
Copyright � Oracle Corporation 1993, 1994, 1995
All rights reserved. Printed in the U.S.A.
Contributing Authors: Eric Belden, Valerie Kane, Vrinda Kirloskar, Harry Sun
Contributors: Bruce Arthur, Dennis Buchheim, Edith Cheng, George Dong,Michael Hartstein, Stella Jacoby, Robin Keller, Alex Meyer, Valarie Moore, MariaPratt, Marc Sinykin, Anthony Sirna, Daniel Sternbergh, Scott Storkel, DavidUrry, Michael Wei, Kim Zabora
This software was not developed for use in any nuclear, aviation, masstransit, medical, or other inherently dangerous applications. It is thecustomer’s responsibility to take all appropriate measures to ensure the safeuse of such applications if the programs are used for such purposes.
This software/documentation contains proprietary information of OracleCorporation; it is provided under a license agreement containing restrictions onuse and disclosure and is also protected by copyright law. Reverse engineeringof the software is prohibited.
If this software/documentation is delivered to a U.S. Government Agency ofthe Department of Defense, then it is delivered with Restricted Rights and thefollowing legend is applicable:
Restricted Rights Legend Use, duplication, or disclosure by the Government issubject to restrictions as set forth in subparagraph (c)(1)(ii) of DFARS252.227–7013, Rights in Technical Data and Computer Software (October 1988).
Oracle Corporation, 500 Oracle Parkway, Redwood City, CA 94065.
If this software/documentation is delivered to a U.S. Government Agency notwithin the Department of Defense, then it is delivered with “Restricted Rights”,as defined in FAR 52.227–14, Rights in Data – General, including Alternate III(June 1987).
The information in this document is subject to change without notice. If youfind any problems in the documentation, please report them to us in writing.Oracle Corporation does not warrant that this document is error–free.
Oracle and SQL*DBA are registered trademarks of Oracle Corporation. Oracle7,Oracle Server Manager, and PL/SQL are trademarks of Oracle Corporation.Windows is a trademark of Microsoft Corporation. Motif is a trademark of theOpen Software Foundations, Inc. All trade names referenced are the servicemark, trademark, or registered trademark of the respective manufacturer.
All other products or company names are used for identification purposes only,and may be trademarks of their respective owners.

T
iiiPreface
Preface
his section describes the purpose and organization of this guide:the Oracle Server Manager User’s Guide. This section also illustrates theconventions used in this guide.
The Preface contains the following information:
• the purpose of the guide
• the intended audience for the guide
• the organization of the guide

Knowledge Assumedof the Reader
iv Oracle Server Manager User’s Guide
Purpose of this Guide
This guide describes how to use Oracle Server ManagerTM, Oracle’sdatabase administration tool. This guide describes Server Manager’sgraphical component (Server Manager/GUI) and line mode component(Server Manager/LineMode).
Information in this guide applies to Server Manager running on allplatforms. Where some functionality may differ from platform toplatform, this guide refers you to your operating system–specificdocumentation.
Audience
This guide is written for those who wish to use Oracle Server Managerto perform database administration tasks.
This guide assumes you are familiar with the administrative tasks youwish to perform. If you are not, refer to the Oracle7 Serverdocumentation set. The Oracle7 Server documentation set containsspecific and thorough descriptions of the database administration tasksyou can perform with Server Manager. In addition, the Oracle7 Serverdocumentation set provides recommendations on how to administeryour database optimally.
If you have not yet read the introductory chapters of the Oracle7 ServerAdministrator’s Guide, we recommend that you do so. These chaptersdescribe the specific responsibilities of a database administrator.
Because Server Manager is available for several different Graphical UserInterfaces (GUIs), this guide also assumes that you are familiar with theoperation of your GUI. Refer to the user interface documentation foryour system, if necessary.

Part I: Introduction toServer Manager
Part II: TheAdministrationManager
vPreface
How the Oracle Server Manager User’s Guide Is Organized
This guide is divided into parts and chapters, as described below.
Chapter 1: Overview of Server Manager
This chapter describes the overall organization and behavior of ServerManager’s graphical interface. It discusses connecting to one or moredatabases with Server Manager. It also describes how to use ServerManager’s launch in context facility to start up Server Manager andjump to a specified place in the graphical interface.
Chapter 2: Overview of the Administration Manager
This chapter introduces the Administration Manager. It also describesthe user interface elements used in the Administration Manager.
Chapter 3: Managing Database Storage
This chapter explains how to use the Administration Manager tomanage the datafiles, tablespaces, and rollback segments in yourdatabase.
Chapter 4: Controlling Database Security
This chapter describes how to use the Administration Manager tomanage users, roles, and profiles. It also describes how to view the auditoptions set for your system.
Chapter 5: Managing Instances and Sessions
This chapter describes how to use the Administration Manager to startup or shut down your database, and examine the values of theinitialization parameters used to start up the instance. It also describeshow to manage in–doubt transactions and users’ sessions.
Chapter 6: Backing Up and Recovering the Database
This chapter describes how to use the Administration Manager to backup your database, perform recovery, and manage the redo log files.
Chapter 7: Viewing Schema Objects
This chapter describes how to use the Administration Manager toexamine various objects in your database. It also explains how todetermine which objects have been analyzed and how to list the SQLstatements whose execution plans are stored in the PLAN_TABLE.
Chapter 8: Managing a Replication Environment
This chapter describes how to use the Administration Manager tomanage and view information about your replication environment.

Part III: The SQLWorksheet
Part IV: SystemMonitors
Part V: Line Mode
Part VI: Reference
vi Oracle Server Manager User’s Guide
Chapter 9: Using the SQL Worksheet
This chapter explains how to use the SQL Worksheet to enter ad hocSQL and PL/SQL statements. It also describes the editing capabilities ofthe SQL Worksheet, as well as the command history and session logfeatures.
Chapter 10: Overview of the System Monitors
This chapter introduces the System Monitors. It describes the interfaceelements common to the monitors available in Server Manager.
Chapter 11: Monitoring System Performance
This chapter describes the System Monitors and statistics that you canview using Server Manager.
Chapter 12: Using Server Manager in Line Mode
This chapter describes how to use Server Manager in line mode.
Appendix A: Server Manager Command Reference
This appendix describes the Server Manager commands available in theSQL Worksheet and in line mode.
Appendix B: Server Manager Messages and Codes
This appendix describes the messages generated by Server Manager,and lists probable causes and actions for each message.
Appendix C: Compatibility with SQL*DBA
This appendix describes the differences in functionality and behaviorbetween Server Manager/Line Mode and SQL*DBA.
Appendix D: Keyboard Shortcuts
This appendix lists the keyboard shortcuts implemented in ServerManager.
Appendix E: Motif–Specific Operations
This appendix describes operations that are specific to running ServerManager under Motif.
Appendix F: Windows–Specific Operations
This appendix describes operations that are specific to running ServerManager under Microsoft Windows.

Syntax Diagrams
viiPreface
Appendix G: Operating System Dependencies
This appendix lists all the operating system–specific references withinthis guide.
How to Use This Guide
This Oracle Server Manager User’s Guide has been designed to be usedclosely with the Oracle7 Server documentation set. While this guideteaches you how to use Server Manager to perform databaseadministration tasks, the Oracle7 Server documentation set describes thereasons for and the implications of performing these tasks.Consequently, you should refer to the Oracle7 Server documentation setwhile using Server Manager to perform your administrative tasks.
Before using Server Manager, you should read Chapter 1, “Overview ofServer Manager.” After reading Chapter 1, you may choose to proceeddirectly to those chapters that are relevant to the tasks you plan toperform using Server Manager.
Before using the Administration Manager, you should read Chapter 2,“Overview of the Administration Manager.” Chapter 2 provides anoverview of the organization and user interface elements of theAdministration Manager.
Conventions Used in This Guide
The following sections explain the conventions used in this guide.
The syntax diagrams in this guide show the complete syntax for theServer Manager commands. Syntax diagrams are composed of theseitems:
Keywords Keywords are words that have special meanings. In thesyntax diagrams in this guide, keywords appear in uppercase. Whenyou specify them, they can be in uppercase or lowercase, but they mustbe used exactly as they appear in the syntax diagram.
Parameters Parameters act as place holders in syntax diagrams. Theyappear in lowercase. Parameters are usually names of schema objects,Oracle datatypes, or expressions. When you see a parameter in a syntaxdiagram, you should substitute an object or expression of theappropriate type. Note that parameter names appear in italics in the textof this guide.

viii Oracle Server Manager User’s Guide
Graphic Components Syntax diagrams use lines and arrows to showsyntactic structure. The following list shows combinations of lines andarrows and their meanings within railroad diagrams:
Beginning of a diagram.
The diagram is continued onthe next line.
The diagram is continuedfrom the previous line.
A required item (parameter or keyword). You must use it.
An optional item. You can usethe item or omit it.
,You can optionally repeat the itemmultiple times. Consecutive itemsmust be separated by a comma.
End of a diagram.
You must use one of these items.
You can optionally use only oneof the items. If there is a defaultitem, it is underlined.
A list of specific items. Eachitem can only appear once,unless otherwise specified.The items can appear in anyorder.
INITIAL integer
EXCLUSIVE
OPTIMAL
DELETE
PUBLIC
column
UNION
UNION ALL
INTERSECT
UNION ALL
INTERSECT
FREELISTS integer
NULL
integer

Examples
Illustrations
Special Icons
OSDoc
☞
ixPreface
This guide also contains examples. This is an example of a SELECTstatement:
SELECT * FROM emp
Note that the text of examples appears in a different font than the text ofthe guide.
Examples in this guide follow these case conventions:
• Keywords, such as CREATE and NUMBER, appear in uppercase.
• Names of database objects and their parts, such as emp andempno, appear in lowercase.
However, in the text of this guide, names of database objects andtheir parts appear in uppercase.
Included throughout this guide are illustrations of various ServerManager windows, dialog boxes, and alert boxes. The illustrations showServer Manager Version 2.1.3 running on Microsoft Windows NT.
Special icons are provided to alert you to particular information withinthe body of this guide and within other manuals.
Additional Information: Operating System–SpecificDocumentation Where necessary, this guide refers you to youroperating system–specific Oracle documentation for additionalinformation.
Attention: The attention icon highlights information that isimportant to remember when performing the described task.
Suggestion: The suggestion icon signifies suggestions andpractical hints that can be helpful when using Server Manager.
Warning: The warning icon indicates information that youshould be aware of before you perform the action described inthe current section.

OSDoc
x Oracle Server Manager User’s Guide
Related Publications
The Oracle Server Manager User’s Guide is one of many books that explainvarious parts of an Oracle database system.
In many sections of this guide, the information is general because theguide is written to apply to Server Manager working under anyoperating system and configuration. Therefore, you will also find manyreferences in this book to important information in the relatedpublications. The related books referred to in this guide are listed below:
• For general information about the Oracle7 Server and how itworks, see the Oracle7 Server Concepts.
• For information about administering the Oracle7 Server, see theOracle7 Server Administrator’s Guide.
• For information about developing database applications withinthe Oracle7 Server, see the Oracle7 Server Application Developer’sGuide.
• For the procedures for migrating a previous version of Oracle toOracle7, see the Oracle7 Server Migration.
• For information on Oracle’s SQL commands and functions, seethe Oracle7 Server SQL Reference.
• For information about Oracle’s procedural language extension toSQL, PL/SQL, see the PL/SQL User’s Guide and Reference.
• For information about Oracle messages and codes, refer to Oracle7Server Messages.
• For information about the utilities bundled with the OracleServer, including Export, Import, and SQL*Loader, refer to theOracle7 Server Utilities.
• For information specific to the Oracle Server working on yourhost operating system, see your operating system–specific Oracledocumentation (specific book titles vary by operating system) andsystem release bulletins, if available.
• For information about SQL*Net, see the SQL*Net documentation,which includes Understanding SQL*Net, the Oracle NetworkManager Administrator’s Guide, the Oracle Names Administrator’sGuide, the Oracle Network Products Messages Manual, and the OracleMultiProtocol Interchange Administrator’s Guide.
OSDoc
xiPreface
Oracle Corporation also publishes several ASCII files, which areavailable on your distribution media. These files describe differencesbetween minor releases of Oracle software that are not accompanied bynew manuals. These files are usually named README.DOC,BUGFIX.DOC, BUGHST.DOC, and RESTRICT.DOC. Read these files tolearn about changes to the software that are not described in the regularmanuals.
The release notes for Server Manager are also available on yourdistribution media. The file is commonly called SVRMGR.TXT.
Additional Information: The exact names and locations of thefiles mentioned above may vary, depending on your operatingsystem. See your operating system–specific Oracledocumentation for information about these files.
Your Comments Are Welcome
We value and appreciate your comments as an Oracle user and reader ofthe manuals. As we write, revise, and evaluate our documentation, youropinions are the most important input we receive. At the back of ourprinted manuals is a Reader’s Comment Form, which we encourage youto use to tell us what you like and dislike about this manual or otherOracle manuals. If the form is not available, please use the followingaddress or FAX number.
Server Manager Product ManagerOracle Corporation500 Oracle ParkwayRedwood City, CA 94065U.S.A.FAX: 415–506–7200

xii Oracle Server Manager User’s Guide

xiiiContents
Contents
PART I INTRODUCTION TO SERVER MANAGER
Chapter 1 Overview of Server Manager 1 – 1. . . . . . . . . . . . . . . . . . . . . . . . . . . . . What is Server Manager? 1 – 2. . . . . . . . . . . . . . . . . . . . . . . . . . . . . . . . . .
Server Manager and Database Administration 1 – 2. . . . . . . . . . . Portability 1 – 3. . . . . . . . . . . . . . . . . . . . . . . . . . . . . . . . . . . . . . . . . . . Supported Oracle Server Releases 1 – 3. . . . . . . . . . . . . . . . . . . . . . Server Manager/LineMode 1 – 3. . . . . . . . . . . . . . . . . . . . . . . . . . . .
Using Server Manager 1 – 3. . . . . . . . . . . . . . . . . . . . . . . . . . . . . . . . . . . . Installing Server Manager Views 1 – 4. . . . . . . . . . . . . . . . . . . . . . . Dropping Server Manager Views 1 – 4. . . . . . . . . . . . . . . . . . . . . . . Other Scripts Needed for Server Manager 1 – 4. . . . . . . . . . . . . . . Privileged Operations 1 – 5. . . . . . . . . . . . . . . . . . . . . . . . . . . . . . . . .
Starting Up Server Manager 1 – 6. . . . . . . . . . . . . . . . . . . . . . . . . . . . . . . Preliminary Server Manager Windows 1 – 6. . . . . . . . . . . . . . . . . . Skipping to a Specified Window 1 – 6. . . . . . . . . . . . . . . . . . . . . . . .
Server Manager Organization 1 – 6. . . . . . . . . . . . . . . . . . . . . . . . . . . . . Administration Manager 1 – 7. . . . . . . . . . . . . . . . . . . . . . . . . . . . . . SQL Worksheets 1 – 7. . . . . . . . . . . . . . . . . . . . . . . . . . . . . . . . . . . . . . System Monitors 1 – 8. . . . . . . . . . . . . . . . . . . . . . . . . . . . . . . . . . . . .
Server Manager Menus 1 – 8. . . . . . . . . . . . . . . . . . . . . . . . . . . . . . . . . . . File Menu 1 – 9. . . . . . . . . . . . . . . . . . . . . . . . . . . . . . . . . . . . . . . . . . . Edit Menu 1 – 10. . . . . . . . . . . . . . . . . . . . . . . . . . . . . . . . . . . . . . . . . . . Window Menu 1 – 11. . . . . . . . . . . . . . . . . . . . . . . . . . . . . . . . . . . . . . . Help Menu 1 – 12. . . . . . . . . . . . . . . . . . . . . . . . . . . . . . . . . . . . . . . . . .
Connecting to an Instance 1 – 13. . . . . . . . . . . . . . . . . . . . . . . . . . . . . . . . .

xiv Oracle Server Manager User’s Guide
Multiple Connections 1 – 15. . . . . . . . . . . . . . . . . . . . . . . . . . . . . . . . . Opening New Windows 1 – 15. . . . . . . . . . . . . . . . . . . . . . . . . . . . . . . Limits on the Number of Connections 1 – 15. . . . . . . . . . . . . . . . . . .
Using Online Help 1 – 16. . . . . . . . . . . . . . . . . . . . . . . . . . . . . . . . . . . . . . . Accessing Online Help 1 – 16. . . . . . . . . . . . . . . . . . . . . . . . . . . . . . . .
Launching Server Manager in Context 1 – 17. . . . . . . . . . . . . . . . . . . . . . Jumping to the Administration Manager 1 – 17. . . . . . . . . . . . . . . . Jumping to a SQL Worksheet 1 – 17. . . . . . . . . . . . . . . . . . . . . . . . . . Jumping to a System Monitor 1 – 17. . . . . . . . . . . . . . . . . . . . . . . . . .
Global Parameters for Launch in Context 1 – 18. . . . . . . . . . . . . . . . . . . Specifying Connect Information 1 – 18. . . . . . . . . . . . . . . . . . . . . . . . Specifying a Subsystem 1 – 19. . . . . . . . . . . . . . . . . . . . . . . . . . . . . . .
Parameters for the Administration Manager 1 – 19. . . . . . . . . . . . . . . . . AREA Parameter 1 – 20. . . . . . . . . . . . . . . . . . . . . . . . . . . . . . . . . . . . . OBJECT Parameter 1 – 22. . . . . . . . . . . . . . . . . . . . . . . . . . . . . . . . . . . MENU Parameter 1 – 22. . . . . . . . . . . . . . . . . . . . . . . . . . . . . . . . . . . .
Parameters for the SQL Worksheet 1 – 23. . . . . . . . . . . . . . . . . . . . . . . . . Parameters for the System Monitors 1 – 24. . . . . . . . . . . . . . . . . . . . . . . .

xvContents
PART II THE ADMINISTRATION MANAGER
Chapter 2 Overview of the Administration Manager 2 – 1. . . . . . . . . . . . . . . . . . The Administration Manager 2 – 2. . . . . . . . . . . . . . . . . . . . . . . . . . . . . . Administration Drawers and Folders 2 – 3. . . . . . . . . . . . . . . . . . . . . . .
The Storage Drawer 2 – 3. . . . . . . . . . . . . . . . . . . . . . . . . . . . . . . . . . The Security Drawer 2 – 3. . . . . . . . . . . . . . . . . . . . . . . . . . . . . . . . . . The Instance Drawer 2 – 4. . . . . . . . . . . . . . . . . . . . . . . . . . . . . . . . . . The Recovery Drawer 2 – 4. . . . . . . . . . . . . . . . . . . . . . . . . . . . . . . . . The Schema Drawer 2 – 4. . . . . . . . . . . . . . . . . . . . . . . . . . . . . . . . . . The Replication Drawer 2 – 5. . . . . . . . . . . . . . . . . . . . . . . . . . . . . . . Opening a Drawer 2 – 6. . . . . . . . . . . . . . . . . . . . . . . . . . . . . . . . . . . . Opening a Folder 2 – 7. . . . . . . . . . . . . . . . . . . . . . . . . . . . . . . . . . . . .
Common Interface Elements 2 – 8. . . . . . . . . . . . . . . . . . . . . . . . . . . . . . . Object Lists 2 – 8. . . . . . . . . . . . . . . . . . . . . . . . . . . . . . . . . . . . . . . . . . Folder Pull–Down Menu 2 – 11. . . . . . . . . . . . . . . . . . . . . . . . . . . . . . Property Sheets 2 – 12. . . . . . . . . . . . . . . . . . . . . . . . . . . . . . . . . . . . . . Showing SQL Statements 2 – 13. . . . . . . . . . . . . . . . . . . . . . . . . . . . . .
Chapter 3 Managing Database Storage 3 – 1. . . . . . . . . . . . . . . . . . . . . . . . . . . . . . The Tablespaces Folder 3 – 2. . . . . . . . . . . . . . . . . . . . . . . . . . . . . . . . . . .
Tablespace Object List 3 – 2. . . . . . . . . . . . . . . . . . . . . . . . . . . . . . . . . Creating a Tablespace 3 – 3. . . . . . . . . . . . . . . . . . . . . . . . . . . . . . . . . Altering a Tablespace 3 – 7. . . . . . . . . . . . . . . . . . . . . . . . . . . . . . . . . Dropping a Tablespace 3 – 13. . . . . . . . . . . . . . . . . . . . . . . . . . . . . . . . Adding a Datafile to a Tablespace 3 – 14. . . . . . . . . . . . . . . . . . . . . . Placing a Tablespace Online or Taking a Tablespace Offline 3 – 15
The Datafiles Folder 3 – 17. . . . . . . . . . . . . . . . . . . . . . . . . . . . . . . . . . . . . . Datafile Object List 3 – 17. . . . . . . . . . . . . . . . . . . . . . . . . . . . . . . . . . . Creating a Datafile 3 – 18. . . . . . . . . . . . . . . . . . . . . . . . . . . . . . . . . . . . Renaming a Datafile 3 – 19. . . . . . . . . . . . . . . . . . . . . . . . . . . . . . . . . .
The Rollback Folder 3 – 20. . . . . . . . . . . . . . . . . . . . . . . . . . . . . . . . . . . . . . Rollback Object List 3 – 20. . . . . . . . . . . . . . . . . . . . . . . . . . . . . . . . . . Creating a Rollback Segment 3 – 21. . . . . . . . . . . . . . . . . . . . . . . . . . . Altering a Rollback Segment 3 – 24. . . . . . . . . . . . . . . . . . . . . . . . . . . Dropping a Rollback Segment 3 – 26. . . . . . . . . . . . . . . . . . . . . . . . . . Placing a Rollback Segment Online or Taking a Rollback SegmentOffline 3 – 27. . . . . . . . . . . . . . . . . . . . . . . . . . . . . . . . . . . . . . . . . . . . . .

xvi Oracle Server Manager User’s Guide
Chapter 4 Controlling Database Security 4 – 1. . . . . . . . . . . . . . . . . . . . . . . . . . . . The Users Folder 4 – 2. . . . . . . . . . . . . . . . . . . . . . . . . . . . . . . . . . . . . . . . .
User Object List 4 – 2. . . . . . . . . . . . . . . . . . . . . . . . . . . . . . . . . . . . . . Creating a User 4 – 3. . . . . . . . . . . . . . . . . . . . . . . . . . . . . . . . . . . . . . Altering a User 4 – 14. . . . . . . . . . . . . . . . . . . . . . . . . . . . . . . . . . . . . . . Dropping a User 4 – 22. . . . . . . . . . . . . . . . . . . . . . . . . . . . . . . . . . . . . Adding a Privilege to or Removing a Privilege from a User 4 – 23Disconnecting a User 4 – 24. . . . . . . . . . . . . . . . . . . . . . . . . . . . . . . . .
The Profiles Folder 4 – 25. . . . . . . . . . . . . . . . . . . . . . . . . . . . . . . . . . . . . . . Profile Object List 4 – 25. . . . . . . . . . . . . . . . . . . . . . . . . . . . . . . . . . . . Creating a Profile 4 – 26. . . . . . . . . . . . . . . . . . . . . . . . . . . . . . . . . . . . . Altering a Profile 4 – 32. . . . . . . . . . . . . . . . . . . . . . . . . . . . . . . . . . . . . Dropping a Profile 4 – 36. . . . . . . . . . . . . . . . . . . . . . . . . . . . . . . . . . . .
The Roles Folder 4 – 37. . . . . . . . . . . . . . . . . . . . . . . . . . . . . . . . . . . . . . . . . Role Object List 4 – 37. . . . . . . . . . . . . . . . . . . . . . . . . . . . . . . . . . . . . . Creating a Role 4 – 38. . . . . . . . . . . . . . . . . . . . . . . . . . . . . . . . . . . . . . . Altering a Role 4 – 45. . . . . . . . . . . . . . . . . . . . . . . . . . . . . . . . . . . . . . . Dropping a Role 4 – 47. . . . . . . . . . . . . . . . . . . . . . . . . . . . . . . . . . . . . Granting a Role 4 – 48. . . . . . . . . . . . . . . . . . . . . . . . . . . . . . . . . . . . . . Revoking a Role 4 – 49. . . . . . . . . . . . . . . . . . . . . . . . . . . . . . . . . . . . . . Adding a Privilege to or Removing a Privilege from a Role 4 – 50
The Audit Folder 4 – 51. . . . . . . . . . . . . . . . . . . . . . . . . . . . . . . . . . . . . . . . Audit Object List 4 – 51. . . . . . . . . . . . . . . . . . . . . . . . . . . . . . . . . . . . .
Chapter 5 Managing Instances and Sessions 5 – 1. . . . . . . . . . . . . . . . . . . . . . . . . The Database Folder 5 – 2. . . . . . . . . . . . . . . . . . . . . . . . . . . . . . . . . . . . . .
Database Object List 5 – 2. . . . . . . . . . . . . . . . . . . . . . . . . . . . . . . . . . Starting Up a Database 5 – 3. . . . . . . . . . . . . . . . . . . . . . . . . . . . . . . . Shutting Down a Database 5 – 5. . . . . . . . . . . . . . . . . . . . . . . . . . . . Mounting or Opening a Database 5 – 6. . . . . . . . . . . . . . . . . . . . . . .
The Initialization Folder 5 – 7. . . . . . . . . . . . . . . . . . . . . . . . . . . . . . . . . . Initialization Object List 5 – 7. . . . . . . . . . . . . . . . . . . . . . . . . . . . . . .
The Transactions Folder 5 – 8. . . . . . . . . . . . . . . . . . . . . . . . . . . . . . . . . . . Transaction Object List 5 – 8. . . . . . . . . . . . . . . . . . . . . . . . . . . . . . . . Forcing a Commit or Rollback 5 – 9. . . . . . . . . . . . . . . . . . . . . . . . . .
The Sessions Folder 5 – 10. . . . . . . . . . . . . . . . . . . . . . . . . . . . . . . . . . . . . . Session Object List 5 – 10. . . . . . . . . . . . . . . . . . . . . . . . . . . . . . . . . . . . Disconnecting a User’s Session 5 – 11. . . . . . . . . . . . . . . . . . . . . . . . . Restricting or Allowing Sessions 5 – 11. . . . . . . . . . . . . . . . . . . . . . .

xviiContents
Chapter 6 Backing Up and Recovering the Database 6 – 1. . . . . . . . . . . . . . . . . . The Backup Folder 6 – 2. . . . . . . . . . . . . . . . . . . . . . . . . . . . . . . . . . . . . . .
Backup Object List 6 – 2. . . . . . . . . . . . . . . . . . . . . . . . . . . . . . . . . . . . Starting or Ending an Online Backup 6 – 3. . . . . . . . . . . . . . . . . . .
The Recovery Folder 6 – 4. . . . . . . . . . . . . . . . . . . . . . . . . . . . . . . . . . . . . Recovery Object List 6 – 4. . . . . . . . . . . . . . . . . . . . . . . . . . . . . . . . . . Applying a Log File 6 – 5. . . . . . . . . . . . . . . . . . . . . . . . . . . . . . . . . .
The Redo Logs Folder 6 – 7. . . . . . . . . . . . . . . . . . . . . . . . . . . . . . . . . . . . Redo Log Object List 6 – 7. . . . . . . . . . . . . . . . . . . . . . . . . . . . . . . . . . Adding a Log File Group 6 – 8. . . . . . . . . . . . . . . . . . . . . . . . . . . . . . Dropping a Log File Group 6 – 10. . . . . . . . . . . . . . . . . . . . . . . . . . . . Adding a Log File Member 6 – 11. . . . . . . . . . . . . . . . . . . . . . . . . . . . Dropping a Log File Member 6 – 12. . . . . . . . . . . . . . . . . . . . . . . . . . Renaming a Log File Member 6 – 12. . . . . . . . . . . . . . . . . . . . . . . . . . Forcing a Log Switch or a Checkpoint 6 – 13. . . . . . . . . . . . . . . . . . .
Chapter 7 Viewing Schema Objects 7 – 1. . . . . . . . . . . . . . . . . . . . . . . . . . . . . . . . . The Constraints Folder 7 – 2. . . . . . . . . . . . . . . . . . . . . . . . . . . . . . . . . . .
Constraint Object List 7 – 3. . . . . . . . . . . . . . . . . . . . . . . . . . . . . . . . . The Triggers Folder 7 – 4. . . . . . . . . . . . . . . . . . . . . . . . . . . . . . . . . . . . . .
Trigger Object List 7 – 5. . . . . . . . . . . . . . . . . . . . . . . . . . . . . . . . . . . . The Packages Folder 7 – 6. . . . . . . . . . . . . . . . . . . . . . . . . . . . . . . . . . . . .
Package Object List 7 – 7. . . . . . . . . . . . . . . . . . . . . . . . . . . . . . . . . . . The Links Folder 7 – 8. . . . . . . . . . . . . . . . . . . . . . . . . . . . . . . . . . . . . . . . .
Link Object List 7 – 8. . . . . . . . . . . . . . . . . . . . . . . . . . . . . . . . . . . . . . The Synonyms Folder 7 – 9. . . . . . . . . . . . . . . . . . . . . . . . . . . . . . . . . . . .
Synonym Object List 7 – 9. . . . . . . . . . . . . . . . . . . . . . . . . . . . . . . . . . The Optimizer Folder 7 – 10. . . . . . . . . . . . . . . . . . . . . . . . . . . . . . . . . . . . .
Optimizer Object List 7 – 11. . . . . . . . . . . . . . . . . . . . . . . . . . . . . . . . . The Explain Plans Folder 7 – 11. . . . . . . . . . . . . . . . . . . . . . . . . . . . . . . . . .
Explain Plan Object List 7 – 12. . . . . . . . . . . . . . . . . . . . . . . . . . . . . . . The Snapshots Folder 7 – 13. . . . . . . . . . . . . . . . . . . . . . . . . . . . . . . . . . . . .
Snapshot Object List 7 – 14. . . . . . . . . . . . . . . . . . . . . . . . . . . . . . . . . . The Snapshot Logs Folder 7 – 15. . . . . . . . . . . . . . . . . . . . . . . . . . . . . . . . .
Snapshot Log Object List 7 – 15. . . . . . . . . . . . . . . . . . . . . . . . . . . . . .

xviii Oracle Server Manager User’s Guide
Chapter 8 Managing a Replication Environment 8 – 1. . . . . . . . . . . . . . . . . . . . . The Schemas Folder 8 – 2. . . . . . . . . . . . . . . . . . . . . . . . . . . . . . . . . . . . . .
Schema Object List 8 – 2. . . . . . . . . . . . . . . . . . . . . . . . . . . . . . . . . . . Suspending Replication Activity for a Schema 8 – 3. . . . . . . . . . . . Resuming Replication Activity for a Schema 8 – 4. . . . . . . . . . . . . Executing DDL Statements 8 – 5. . . . . . . . . . . . . . . . . . . . . . . . . . . . Replication Environment Summary 8 – 7. . . . . . . . . . . . . . . . . . . . .
The Objects Folder 8 – 10. . . . . . . . . . . . . . . . . . . . . . . . . . . . . . . . . . . . . . . Object Object List 8 – 10. . . . . . . . . . . . . . . . . . . . . . . . . . . . . . . . . . . . . Adding Replicated Objects to a Master Schema 8 – 11. . . . . . . . . . .
The Registered Snapshots Folder 8 – 13. . . . . . . . . . . . . . . . . . . . . . . . . . . Registered Snapshot Object List 8 – 14. . . . . . . . . . . . . . . . . . . . . . . .
The Masters Folder 8 – 15. . . . . . . . . . . . . . . . . . . . . . . . . . . . . . . . . . . . . . . Master Object List 8 – 15. . . . . . . . . . . . . . . . . . . . . . . . . . . . . . . . . . . . Adding a Master Database to the Replication Environment 8 – 16Scheduling Automatic Execution of the Deferred TransactionQueue 8 – 18. . . . . . . . . . . . . . . . . . . . . . . . . . . . . . . . . . . . . . . . . . . . . .
The Conflict Resolution Folder 8 – 20. . . . . . . . . . . . . . . . . . . . . . . . . . . . . Conflict Resolution Object List 8 – 20. . . . . . . . . . . . . . . . . . . . . . . . .
The Deferred Transactions Folder 8 – 21. . . . . . . . . . . . . . . . . . . . . . . . . . Deferred Transaction Object List 8 – 21. . . . . . . . . . . . . . . . . . . . . . . . Manually Executing Queued Transactions 8 – 22. . . . . . . . . . . . . . . Showing Detailed Information about Deferred Transactions 8 – 23
The Errors Folder 8 – 27. . . . . . . . . . . . . . . . . . . . . . . . . . . . . . . . . . . . . . . . Error Object List 8 – 27. . . . . . . . . . . . . . . . . . . . . . . . . . . . . . . . . . . . . . Manually Re–executing Failed Transactions 8 – 28. . . . . . . . . . . . . . Dropping an Failed Transaction 8 – 28. . . . . . . . . . . . . . . . . . . . . . . . Show Detailed Information about Unresolved Errors 8 – 29. . . . . . Purging the Error Queue 8 – 30. . . . . . . . . . . . . . . . . . . . . . . . . . . . . .
The Request Log Folder 8 – 31. . . . . . . . . . . . . . . . . . . . . . . . . . . . . . . . . . . Request Log Object List 8 – 31. . . . . . . . . . . . . . . . . . . . . . . . . . . . . . . Manually Applying Administrative Requests 8 – 32. . . . . . . . . . . . Dropping Administrative Requests 8 – 34. . . . . . . . . . . . . . . . . . . . . Purging the Replication Administration Request Queue 8 – 34. . .

xixContents
PART III THE SQL WORKSHEET
Chapter 9 Using the SQL Worksheet 9 – 1. . . . . . . . . . . . . . . . . . . . . . . . . . . . . . . . The SQL Worksheet 9 – 2. . . . . . . . . . . . . . . . . . . . . . . . . . . . . . . . . . . . . .
Starting a SQL Worksheet 9 – 2. . . . . . . . . . . . . . . . . . . . . . . . . . . . . Using the SQL Worksheet 9 – 2. . . . . . . . . . . . . . . . . . . . . . . . . . . . . The Worksheet Menu 9 – 4. . . . . . . . . . . . . . . . . . . . . . . . . . . . . . . . .
Executing Commands in the SQL Worksheet 9 – 6. . . . . . . . . . . . . . . . Entering Commands in the Input Pane 9 – 6. . . . . . . . . . . . . . . . . . Executing Commands in the Input Pane 9 – 6. . . . . . . . . . . . . . . . . Executing Server Manager Commands 9 – 7. . . . . . . . . . . . . . . . . . Connecting from a Worksheet 9 – 8. . . . . . . . . . . . . . . . . . . . . . . . . . Performing Recovery from the SQL Worksheet 9 – 8. . . . . . . . . . .
Using the Command History 9 – 9. . . . . . . . . . . . . . . . . . . . . . . . . . . . . . Retrieving a Selection from the Command History 9 – 10. . . . . . . . Retrieving a Command Using the Worksheet Menu 9 – 10. . . . . . .
Saving Your Work 9 – 11. . . . . . . . . . . . . . . . . . . . . . . . . . . . . . . . . . . . . . . . Running Scripts from the SQL Worksheet 9 – 12. . . . . . . . . . . . . . . . . . . Starting a Monitor from the SQL Worksheet 9 – 13. . . . . . . . . . . . . . . . .

xx Oracle Server Manager User’s Guide
PART IV SYSTEM MONITORS
Chapter 10 Overview of the System Monitors 10 – 1. . . . . . . . . . . . . . . . . . . . . . . . . The System Monitors 10 – 2. . . . . . . . . . . . . . . . . . . . . . . . . . . . . . . . . . . . . Using the System Monitors 10 – 2. . . . . . . . . . . . . . . . . . . . . . . . . . . . . . . . Starting a Monitor 10 – 4. . . . . . . . . . . . . . . . . . . . . . . . . . . . . . . . . . . . . . . Common Interface Elements 10 – 5. . . . . . . . . . . . . . . . . . . . . . . . . . . . . . .
Statistics Lists 10 – 5. . . . . . . . . . . . . . . . . . . . . . . . . . . . . . . . . . . . . . . . Sampling Controls 10 – 6. . . . . . . . . . . . . . . . . . . . . . . . . . . . . . . . . . . . Filtering Statistics 10 – 8. . . . . . . . . . . . . . . . . . . . . . . . . . . . . . . . . . . .
Chapter 11 Monitoring System Performance 11 – 1. . . . . . . . . . . . . . . . . . . . . . . . . . The Circuit Monitor 11 – 2. . . . . . . . . . . . . . . . . . . . . . . . . . . . . . . . . . . . . .
SQL Worksheet Equivalent 11 – 3. . . . . . . . . . . . . . . . . . . . . . . . . . . . Required Views 11 – 3. . . . . . . . . . . . . . . . . . . . . . . . . . . . . . . . . . . . . .
The Dispatcher Monitor 11 – 4. . . . . . . . . . . . . . . . . . . . . . . . . . . . . . . . . . . Filters 11 – 5. . . . . . . . . . . . . . . . . . . . . . . . . . . . . . . . . . . . . . . . . . . . . . . SQL Worksheet Equivalent 11 – 5. . . . . . . . . . . . . . . . . . . . . . . . . . . . Required Views 11 – 5. . . . . . . . . . . . . . . . . . . . . . . . . . . . . . . . . . . . . .
The File I/O Monitor 11 – 6. . . . . . . . . . . . . . . . . . . . . . . . . . . . . . . . . . . . . Filters 11 – 7. . . . . . . . . . . . . . . . . . . . . . . . . . . . . . . . . . . . . . . . . . . . . . . SQL Worksheet Equivalent 11 – 7. . . . . . . . . . . . . . . . . . . . . . . . . . . . Required Views 11 – 7. . . . . . . . . . . . . . . . . . . . . . . . . . . . . . . . . . . . . . Interpreting File I/O Statistics 11 – 7. . . . . . . . . . . . . . . . . . . . . . . . . .
The Latch Monitor 11 – 8. . . . . . . . . . . . . . . . . . . . . . . . . . . . . . . . . . . . . . . SQL Worksheet Equivalent 11 – 9. . . . . . . . . . . . . . . . . . . . . . . . . . . . Required Views 11 – 9. . . . . . . . . . . . . . . . . . . . . . . . . . . . . . . . . . . . . .
The Library Cache Monitor 11 – 10. . . . . . . . . . . . . . . . . . . . . . . . . . . . . . . . Filters 11 – 12. . . . . . . . . . . . . . . . . . . . . . . . . . . . . . . . . . . . . . . . . . . . . . . SQL Worksheet Equivalent 11 – 12. . . . . . . . . . . . . . . . . . . . . . . . . . . . Required Views 11 – 12. . . . . . . . . . . . . . . . . . . . . . . . . . . . . . . . . . . . . .
The Lock Monitor 11 – 13. . . . . . . . . . . . . . . . . . . . . . . . . . . . . . . . . . . . . . . . Filters 11 – 14. . . . . . . . . . . . . . . . . . . . . . . . . . . . . . . . . . . . . . . . . . . . . . . SQL Worksheet Equivalent 11 – 14. . . . . . . . . . . . . . . . . . . . . . . . . . . . Required Views 11 – 14. . . . . . . . . . . . . . . . . . . . . . . . . . . . . . . . . . . . . .
The Process Monitor 11 – 15. . . . . . . . . . . . . . . . . . . . . . . . . . . . . . . . . . . . . . Filters 11 – 16. . . . . . . . . . . . . . . . . . . . . . . . . . . . . . . . . . . . . . . . . . . . . . . SQL Worksheet Equivalent 11 – 16. . . . . . . . . . . . . . . . . . . . . . . . . . . . Required Views 11 – 16. . . . . . . . . . . . . . . . . . . . . . . . . . . . . . . . . . . . . .

xxiContents
The Queue Monitor 11 – 17. . . . . . . . . . . . . . . . . . . . . . . . . . . . . . . . . . . . . . SQL Worksheet Equivalent 11 – 18. . . . . . . . . . . . . . . . . . . . . . . . . . . . Required Views 11 – 18. . . . . . . . . . . . . . . . . . . . . . . . . . . . . . . . . . . . . .
The Rollback Monitor 11 – 19. . . . . . . . . . . . . . . . . . . . . . . . . . . . . . . . . . . . Filters 11 – 20. . . . . . . . . . . . . . . . . . . . . . . . . . . . . . . . . . . . . . . . . . . . . . . SQL Worksheet Equivalent 11 – 20. . . . . . . . . . . . . . . . . . . . . . . . . . . . Required Views 11 – 20. . . . . . . . . . . . . . . . . . . . . . . . . . . . . . . . . . . . . . Interpreting Rollback Statistics 11 – 20. . . . . . . . . . . . . . . . . . . . . . . . .
The Session Monitor 11 – 21. . . . . . . . . . . . . . . . . . . . . . . . . . . . . . . . . . . . . . Filters 11 – 22. . . . . . . . . . . . . . . . . . . . . . . . . . . . . . . . . . . . . . . . . . . . . . . SQL Worksheet Equivalent 11 – 22. . . . . . . . . . . . . . . . . . . . . . . . . . . . Required Views 11 – 22. . . . . . . . . . . . . . . . . . . . . . . . . . . . . . . . . . . . . .
The Shared Server Monitor 11 – 23. . . . . . . . . . . . . . . . . . . . . . . . . . . . . . . . Filters 11 – 24. . . . . . . . . . . . . . . . . . . . . . . . . . . . . . . . . . . . . . . . . . . . . . . SQL Worksheet Equivalent 11 – 24. . . . . . . . . . . . . . . . . . . . . . . . . . . . Required Views 11 – 24. . . . . . . . . . . . . . . . . . . . . . . . . . . . . . . . . . . . . .
The SQL Area Monitor 11 – 25. . . . . . . . . . . . . . . . . . . . . . . . . . . . . . . . . . . . Filters 11 – 26. . . . . . . . . . . . . . . . . . . . . . . . . . . . . . . . . . . . . . . . . . . . . . . SQL Worksheet Equivalent 11 – 26. . . . . . . . . . . . . . . . . . . . . . . . . . . . Required Views 11 – 26. . . . . . . . . . . . . . . . . . . . . . . . . . . . . . . . . . . . . .
The System I/O Monitor 11 – 27. . . . . . . . . . . . . . . . . . . . . . . . . . . . . . . . . . SQL Worksheet Equivalent 11 – 28. . . . . . . . . . . . . . . . . . . . . . . . . . . . Required Views 11 – 28. . . . . . . . . . . . . . . . . . . . . . . . . . . . . . . . . . . . . .
The System Statistics Monitor 11 – 29. . . . . . . . . . . . . . . . . . . . . . . . . . . . . . SQL Worksheet Equivalent 11 – 30. . . . . . . . . . . . . . . . . . . . . . . . . . . . Required Views 11 – 30. . . . . . . . . . . . . . . . . . . . . . . . . . . . . . . . . . . . . . Interpreting System Statistics 11 – 30. . . . . . . . . . . . . . . . . . . . . . . . . . System Statistics 11 – 30. . . . . . . . . . . . . . . . . . . . . . . . . . . . . . . . . . . . . .
The Table Access Monitor 11 – 41. . . . . . . . . . . . . . . . . . . . . . . . . . . . . . . . . Filters 11 – 41. . . . . . . . . . . . . . . . . . . . . . . . . . . . . . . . . . . . . . . . . . . . . . . SQL Worksheet Equivalent 11 – 42. . . . . . . . . . . . . . . . . . . . . . . . . . . . Required Views 11 – 42. . . . . . . . . . . . . . . . . . . . . . . . . . . . . . . . . . . . . . Interpreting Table Access Statistics 11 – 42. . . . . . . . . . . . . . . . . . . . . .
The Tablespace Monitor 11 – 43. . . . . . . . . . . . . . . . . . . . . . . . . . . . . . . . . . . Filters 11 – 43. . . . . . . . . . . . . . . . . . . . . . . . . . . . . . . . . . . . . . . . . . . . . . . SQL Worksheet Equivalent 11 – 44. . . . . . . . . . . . . . . . . . . . . . . . . . . . Required Views 11 – 44. . . . . . . . . . . . . . . . . . . . . . . . . . . . . . . . . . . . . .
xxii Oracle Server Manager User’s Guide
PART V LINE MODE
Chapter 12 Using Server Manager in Line Mode 12 – 1. . . . . . . . . . . . . . . . . . . . . . Starting Server Manager in Line Mode 12 – 2. . . . . . . . . . . . . . . . . . . . . . Using Server Manager in Line Mode 12 – 2. . . . . . . . . . . . . . . . . . . . . . . .
Entering Server Manager Commands 12 – 2. . . . . . . . . . . . . . . . . . . Entering SQL or PL/SQL Code 12 – 2. . . . . . . . . . . . . . . . . . . . . . . . . Running Scripts 12 – 2. . . . . . . . . . . . . . . . . . . . . . . . . . . . . . . . . . . . . .
PART VI REFERENCE
Appendix A Server Manager Command Reference A – 1. . . . . . . . . . . . . . . . . . . . . . Server Manager Commands A – 2. . . . . . . . . . . . . . . . . . . . . . . . . . . . . . . @ (at symbol) A – 3. . . . . . . . . . . . . . . . . . . . . . . . . . . . . . . . . . . . . . . . . . . . ARCHIVE LOG A – 4. . . . . . . . . . . . . . . . . . . . . . . . . . . . . . . . . . . . . . . . . . CONNECT A – 7. . . . . . . . . . . . . . . . . . . . . . . . . . . . . . . . . . . . . . . . . . . . . . DESCRIBE A – 9. . . . . . . . . . . . . . . . . . . . . . . . . . . . . . . . . . . . . . . . . . . . . . DISCONNECT A – 10. . . . . . . . . . . . . . . . . . . . . . . . . . . . . . . . . . . . . . . . . . EXECUTE A – 10. . . . . . . . . . . . . . . . . . . . . . . . . . . . . . . . . . . . . . . . . . . . . . . EXIT A – 11. . . . . . . . . . . . . . . . . . . . . . . . . . . . . . . . . . . . . . . . . . . . . . . . . . . HELP A – 12. . . . . . . . . . . . . . . . . . . . . . . . . . . . . . . . . . . . . . . . . . . . . . . . . . HOST A – 12. . . . . . . . . . . . . . . . . . . . . . . . . . . . . . . . . . . . . . . . . . . . . . . . . . MONITOR A – 13. . . . . . . . . . . . . . . . . . . . . . . . . . . . . . . . . . . . . . . . . . . . . . PRINT A – 15. . . . . . . . . . . . . . . . . . . . . . . . . . . . . . . . . . . . . . . . . . . . . . . . . . RECOVER A – 16. . . . . . . . . . . . . . . . . . . . . . . . . . . . . . . . . . . . . . . . . . . . . . REMARK A – 19. . . . . . . . . . . . . . . . . . . . . . . . . . . . . . . . . . . . . . . . . . . . . . . SET A – 20. . . . . . . . . . . . . . . . . . . . . . . . . . . . . . . . . . . . . . . . . . . . . . . . . . . . SHOW A – 26. . . . . . . . . . . . . . . . . . . . . . . . . . . . . . . . . . . . . . . . . . . . . . . . . SHUTDOWN A – 30. . . . . . . . . . . . . . . . . . . . . . . . . . . . . . . . . . . . . . . . . . . SPOOL A – 31. . . . . . . . . . . . . . . . . . . . . . . . . . . . . . . . . . . . . . . . . . . . . . . . . STARTUP A – 32. . . . . . . . . . . . . . . . . . . . . . . . . . . . . . . . . . . . . . . . . . . . . . . VARIABLE A – 36. . . . . . . . . . . . . . . . . . . . . . . . . . . . . . . . . . . . . . . . . . . . . .
Appendix B Server Manager Messages and Codes B – 1. . . . . . . . . . . . . . . . . . . . . .

xxiiiContents
Appendix C Compatibility with SQL*DBA C – 1. . . . . . . . . . . . . . . . . . . . . . . . . . . . Functional Differences C – 2. . . . . . . . . . . . . . . . . . . . . . . . . . . . . . . . . . . . Cosmetic Differences C – 3. . . . . . . . . . . . . . . . . . . . . . . . . . . . . . . . . . . . . Unsupported Options C – 4. . . . . . . . . . . . . . . . . . . . . . . . . . . . . . . . . . . . Obsolete Functionality C – 5. . . . . . . . . . . . . . . . . . . . . . . . . . . . . . . . . . . .
Appendix D Keyboard Shortcuts D – 1. . . . . . . . . . . . . . . . . . . . . . . . . . . . . . . . . . . . . . Menu Accelerators D – 2. . . . . . . . . . . . . . . . . . . . . . . . . . . . . . . . . . . . . . . Menu Mnemonics D – 3. . . . . . . . . . . . . . . . . . . . . . . . . . . . . . . . . . . . . . . .
Appendix E Motif–Specific Operations E – 1. . . . . . . . . . . . . . . . . . . . . . . . . . . . . . . Using Online Help with Server Manager for Motif E – 2. . . . . . . . . . .
Appendix F Windows–Specific Operations F – 1. . . . . . . . . . . . . . . . . . . . . . . . . . . . Starting Server Manager with Windows File Manager F – 2. . . . . . . . Starting Server Manager with Windows Program Manager F – 3. . . . Starting Server Manager from the Windows MS–DOS Prompt F – 4. Using Launch in Context with Windows File Manager F – 5. . . . . . . . Using Launch in Context with Windows Program Manager F – 5. . . Using Launch in Context with MS–DOS F – 6. . . . . . . . . . . . . . . . . . . .
Appendix G Operating System Dependencies G – 1. . . . . . . . . . . . . . . . . . . . . . . . . .
Index

xxiv Oracle Server Manager User’s Guide

P A R T
I Introduction to ServerManager


C H A P T E R
1T
1 – 1Overview of Server Manager
Overview of ServerManager
his chapter introduces Oracle Server Manager and gives you anoverview of its major components.
This chapter covers the following topics:
• A description of Server Manager
• An overview of Server Manager’s organization
• An introduction to Server Manager’s pull–down menus
• A discussion of connecting to one or more databases andmanaging multiple Server Manager windows
• A description of Server Manager’s online Help system

Server Manager andDatabaseAdministration
1 – 2 Oracle Server Manager User’s Guide
What is Server Manager?
Server Manager is Oracle’s database administration tool. The graphicalcomponent of Server Manager (Server Manager/GUI) allows you toperform database administration tasks with the convenience of agraphical user interface (GUI). The line mode component of ServerManager (Server Manager/LineMode) provides a line mode interface.
Server Manager is designed to provide administrative functionality viaan easy–to–use interface. You can use Server Manager to:
• Perform traditional administrative tasks, such as databasestartup, shutdown, backup, and recovery. Rather than manuallyentering the SQL commands to perform these tasks, you can useServer Manager’s graphical interface to execute the commandsquickly and conveniently by pointing and clicking with themouse.
• Concurrently perform multiple tasks. Because you can openmultiple windows simultaneously in Server Manager, you canperform multiple administrative and non–administrative tasksconcurrently.
• Administer multiple databases. You can use Server Manager toadminister a single database or to simultaneously administermultiple databases.
• Centralize database administration tasks. You can administerboth local and remote databases running on any Oracle platformin any location worldwide. In addition, these Oracle platformscan be connected by any network protocol(s) supported bySQL*Net and the MultiProtocol Interchange.
• Dynamically execute SQL, PL/SQL, and Server Managercommands. You can use Server Manager to enter, edit, andexecute statements. Server Manager also maintains a history ofstatements executed. Thus, you can re–execute statementswithout retyping them, a particularly useful feature if you need toexecute lengthy statements repeatedly.
• Perform administrative tasks using Server Manager’s line modeinterface when a graphical user interface is unavailable orundesirable.
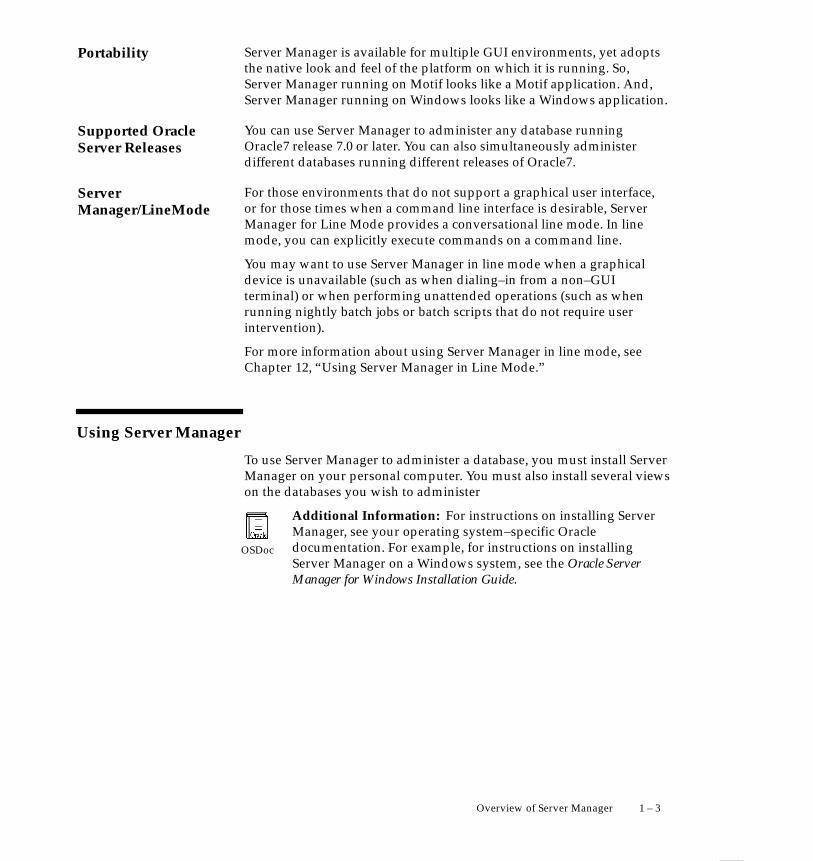
Portability
Supported OracleServer Releases
ServerManager/LineMode
OSDoc
1 – 3Overview of Server Manager
Server Manager is available for multiple GUI environments, yet adoptsthe native look and feel of the platform on which it is running. So,Server Manager running on Motif looks like a Motif application. And,Server Manager running on Windows looks like a Windows application.
You can use Server Manager to administer any database runningOracle7 release 7.0 or later. You can also simultaneously administerdifferent databases running different releases of Oracle7.
For those environments that do not support a graphical user interface,or for those times when a command line interface is desirable, ServerManager for Line Mode provides a conversational line mode. In linemode, you can explicitly execute commands on a command line.
You may want to use Server Manager in line mode when a graphicaldevice is unavailable (such as when dialing–in from a non–GUIterminal) or when performing unattended operations (such as whenrunning nightly batch jobs or batch scripts that do not require userintervention).
For more information about using Server Manager in line mode, seeChapter 12, “Using Server Manager in Line Mode.”
Using Server Manager
To use Server Manager to administer a database, you must install ServerManager on your personal computer. You must also install several viewson the databases you wish to administer
Additional Information: For instructions on installing ServerManager, see your operating system–specific Oracledocumentation. For example, for instructions on installingServer Manager on a Windows system, see the Oracle ServerManager for Windows Installation Guide.

Installing ServerManager Views
Dropping ServerManager Views
Other Scripts Neededfor Server Manager
OSDoc
1 – 4 Oracle Server Manager User’s Guide
You must install the Server Manager views on each database you wishto administer. Even if you use one copy of Server Manager to administerseveral databases, the Server Manager views must be installed on eachdatabase.
The script CATSVRMG.SQL creates the views used by Server Manager,as well as a public synonym called SM$VERSION. SM$VERSIONcontains the script’s version number, which appears in ServerManager’s version banner. The CATSVRMG.SQL script is included withServer Manager on your distribution media.
In Oracle7 release 7.1 and later, the CATSVRMG.SQL script is runautomatically by CATALOG.SQL.
If you wish to use Server Manager to administer a database runningOracle7 release 7.0, you must run the CATSVRMG.SQL script manually.You can run this script from a SQL Worksheet or while using ServerManager in line mode.
When running the CATSVRMG.SQL script, you must be connected withthe schema SYS. So, in a release 7.0 database, you must connect as eitherSYS or INTERNAL. In a release 7.1 or later database, you can connectwith either SYSDBA or SYSOPER privileges.
To verify that the Server Manager views have been installed, you canexamine the version banner in the Administration window or querySM$VERSION (SELECT * FROM sm$version ). Figure 1 – 1 illustratesthe version banner in the Administration window.
The script CATNOSVM.SQL drops all the objects created byCATSVRMG.SQL.
Server Manager also relies on other scripts. For information aboutServer Manager and the UTLXPLAN.SQL script, see Chapter 7,“Viewing Schema Objects.” For information about Server Manager andthe UTLMONTR.SQL script, see Chapter 10, “Overview of the SystemMonitors.”
Additional Information: The script names given above are thestandard names. On some operating systems, the names andlocations of these scripts may differ. See your operatingsystem–specific Oracle documentation for details.

Privileged Operations
1 – 5Overview of Server Manager
Oracle Server
Server Manager
Connect information
release information
release information
Version of CATSVRMG.SQL usedto create Server Manager views
Figure 1 – 1 Administration Window Version Banner
To perform an operation or task using Server Manager, you must havethe appropriate privileges. For example, to create a tablespace usingServer Manager, you must have the CREATE TABLESPACE systemprivilege.
Because many of Server Manager’s windows include informationselected from data dictionary tables, you need the SELECT ANY TABLEsystem privilege to fully utilize Server Manager’s interface. The SELECTANY TABLE system privilege is also part of the DBA role.
Server Manager does not enable any additional roles, so any privilegesyou need must be part of your default role(s) and privileges.
For information about privileges and roles, refer to the Oracle7 ServerConcepts and Oracle7 Server Administrator’s Guide.

OSDoc
Preliminary ServerManager Windows
Skipping to a SpecifiedWindow
1 – 6 Oracle Server Manager User’s Guide
Starting Up Server Manager
The method for starting up Server Manager depends on your platform.
Additional Information: For information about starting upServer Manager, see your operating system–specific Oracledocumentation. For information on starting Server Manager with Windows, seeAppendix F, “Windows–Specific Operations.”
When you start up Server Manager, the copyright window appears. Thecopyright window disappears in seven seconds. You can also type anykey or click anywhere in the window to make the window disappearimmediately.
Next, the Connect dialog box appears. You may connect to an Oracleinstance at this time or close the dialog box. For more information aboutconnecting to an instance, see “Connecting to an Instance” on page1 – 13.
You can start up Server Manager and jump to a specified window in theinterface. This allows you to skip any intermediate windows. Thisfacility is called launch in context.
For a description of how to use launch in context, see “Launching ServerManager in Context” on page 1 – 17.
Server Manager Organization
Server Manager’s graphical interface is divided into three majorcomponents:
• Administration Manager
• SQL Worksheet
• System Monitors
The following sections give you an overview of these components.

AdministrationManager
SQL Worksheets
1 – 7Overview of Server Manager
The Administration Manager is the primary administrative componentof Server Manager. You will probably use the Administration Managerto perform most of your administrative tasks.
The Administration Manager divides database administration tasks intocategories:
• Managing storage
• Controlling security
• Managing instances and sessions
• Backing up and recovering a database
• Viewing schema objects
• Managing a replication environment
Each of these categories is associated with its own pull–down menusand dialog boxes.
The Administration Manager and these categories of tasks are discussedin detail in Part II , “The Administration Manager.”
A SQL Worksheet allows you to dynamically enter SQL statements,PL/SQL code, and Server Manager commands. You can also run scriptsfrom a SQL Worksheet.
A SQL Worksheet maintains a history of the commands you haveentered. Thus, you can use the SQL Worksheet to edit and re–execute anearlier command without having to retype it.
You can have multiple SQL Worksheets open at a time, each of which isseparate from the others. So, you can commit or roll back work in eachworksheet independently.
SQL Worksheets are discussed in detail in Part III, “The SQLWorksheet.”

System Monitors
1 – 8 Oracle Server Manager User’s Guide
The System Monitors allow you to gather and inspect performancestatistics. These statistics can be useful for tuning your database.
The types of System Monitors are:
• Circuit • Rollback
• Dispatcher • Session
• File I/O • Shared Server
• Latch • SQL Area
• Library Cache • System I/O
• Lock • System Statistics
• Process • Table Access
• Queue • Tablespace
By selecting which aspects of system performance you want to monitor,you can view performance statistics. You can sample these statistics asfrequently as you like by setting sampling intervals.
The System Monitors and the specific types of statistics you can monitorare discussed in detail in Part IV , “System Monitors.”
Server Manager Menus
Server Manager includes four main pull–down menus:
• File
• Edit
• Window
• Help
Some windows include other menus as well. For example, when youopen the Tablespaces folder in the Administration Manager, apull–down menu called Tablespace is added to the menu bar.
When a menu item is dimmed, it is not currently available. Menu itemsthat end with an ellipsis (...) indicate that you will be asked to entermore information to complete the command.

File Menu
1 – 9Overview of Server Manager
The File menu items allow you to open or close Server Managerwindows and create new connections.
The following figure illustrates the File menu.
Figure 1 – 2 File Menu
The File menu is described below:
Displays the Connect dialog box to connect toan instance and open an Administrationwindow for that database.
Brings the associated Administration windowforward, or displays a new Administrationwindow.
Starts a new SQL Worksheet.
Displays the Monitor dialog box, which allowsyou to choose a System Monitor to start.
Closes the current window.
Exits Server Manager.
The Administration window, New Worksheet, and Monitor menu itemsare only available from a window connected to an instance. These itemsdisplay a window associated with that connection.
Connect
AdministrationWindow
New Worksheet
Monitor
Close
Exit

Edit Menu
1 – 10 Oracle Server Manager User’s Guide
The Edit menu contains the standard editing menu items for yourplatform. These commands are useful when editing text in the SQLWorksheet or in the filters in the System Monitors. On some platforms,these editing capabilities may also be available for use in dialog boxes,although sometimes via keyboard equivalents only.
The following figure illustrates the Edit menu.
Figure 1 – 3 Edit Menu
Warning: The Undo menu item, when available, undoes thelast edit you performed on text. It does not undo the lastoperation performed on the database you are administering.

Window Menu
1 – 11Overview of Server Manager
The Window menu contains a list of all the Server Manager windowsyou have open. To bring a window forward, choose its name from theWindow menu.
The following figure illustrates a sample Window menu.
Figure 1 – 4 Window Menu
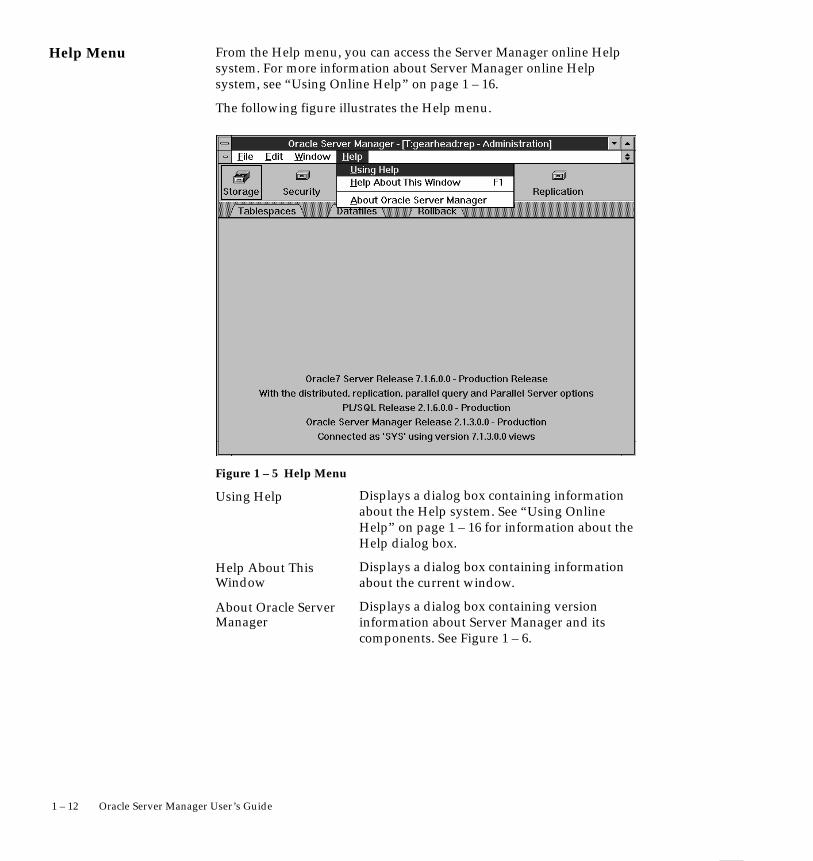
Help Menu
1 – 12 Oracle Server Manager User’s Guide
From the Help menu, you can access the Server Manager online Helpsystem. For more information about Server Manager online Helpsystem, see “Using Online Help” on page 1 – 16.
The following figure illustrates the Help menu.
Figure 1 – 5 Help Menu
Displays a dialog box containing informationabout the Help system. See “Using OnlineHelp” on page 1 – 16 for information about theHelp dialog box.
Displays a dialog box containing informationabout the current window.
Displays a dialog box containing versioninformation about Server Manager and itscomponents. See Figure 1 – 6.
Using Help
Help About ThisWindow
About Oracle ServerManager

1 – 13Overview of Server Manager
Figure 1 – 6 About Oracle Server Manager Dialog Box
Connecting to an Instance
You can connect to an Oracle instance using the Server ManagerConnect dialog box. When you start up Server Manager, the Connectdialog box appears. You can connect to an instance, or click Cancel andconnect later. You can also display the Connect dialog box by choosingConnect from the File menu.

OSDoc
1 – 14 Oracle Server Manager User’s Guide
The following figure illustrates the Connect dialog box.
Figure 1 – 7 Connect Dialog Box
The elements of the Connect dialog box are described below:
Your Oracle username for the database to whichyou are connecting.
Your Oracle password for the database to whichyou are connecting.
SQL*Net service name for the database towhich you are connecting.
Server Manager accepts connections usingSQL*Net Version 1 or SQL*Net Version 2.Server Manager recognizes SQL*Net Version 1connect strings, such as T:BOSTON:A, andSQL*Net Version 2 service names, such asNY_FINANCE.
Pop–up menu containing Normal, SYSOPER,and SYSDBA for Oracle7 release 7.1 or later.Only Normal is allowed for release 7.0.
Initiates connection.
Exits dialog box without connecting.
Displays help information.
Additional Information: If you do not specify a databaseservice name, you connect to the default database for yourplatform. Refer to your operating system–specific Oracledocumentation and SQL*Net documentation for moreinformation.
Username
Password
Service Name
Connect As
Connect
Cancel
Help

Multiple Connections
Opening NewWindows
Limits on the Numberof Connections
OSDoc
1 – 15Overview of Server Manager
In Server Manager you can have multiple connections opensimultaneously. For each connection you initiate, you can have oneAdministration window, multiple SQL Worksheets, and one of each typeof System Monitor.
The service name you specify when you connect becomes part of thetitle for each window associated with that connection. If you do notspecify a service name, the title of each window associated with theconnection begins with the word “Default”. This scheme distinguisheswindows associated with different connections, and organizes themconveniently in the Window menu.
Using the File menu, you can open new windows from theAdministration Manager, a SQL Worksheet, or a System Monitor. Whenyou open a new window, it is associated with the instance and usernameof your current window.
Each new SQL Worksheet automatically initiates a separate physicalconnection to an instance; you do not have to re–enter your connectioninformation. The first System Monitor you open also creates a newphysical connection. However, subsequent monitors share the sameconnection.
On some platforms there may be a limit on the number of connectionsyou can have open simultaneously.
Additional Information: For information about the limit onopen connections, see your operating system–specific Oracledocumentation.

Accessing Online Help
1 – 16 Oracle Server Manager User’s Guide
Using Online Help
Server Manager includes an online Help system that provides you withhelp information for every window and dialog box. The Help system iscontext sensitive, but you can also search through help information tofind a particular topic.
There are two ways of accessing the online Help system. In a mainwindow, such as the Administration window, you can access the Helpsystem by choosing Help About This Window from the Help menu.Figure 1 – 5 illustrates the Help menu.
In a dialog box, click Help to access the online Help system. Figure 1 – 7shows the Connect dialog box and its Help button.
On Microsoft Windows, Server Manager provides a native online helpsystem. Refer to your Microsoft Windows documentation forinformation on using online help.
On Motif systems, Server Manager also provides an online help system.See Appendix E, “Motif–Specific Operations,” for instructions on usingthe online help when running Server Manager for Motif.

OSDoc
Jumping to theAdministrationManager
Jumping to a SQLWorksheet
Jumping to a SystemMonitor
1 – 17Overview of Server Manager
Launching Server Manager in Context
Using the launch in context facility, you can start up Server Managerand immediately access a specific window or dialog box. You specify thelocation to jump to using command–line parameters.
With the command–line parameters, you can bypass initial windowsthat require user input (such as the Connect dialog box) and jumpdirectly to Server Manger’s Administration Manager, SQL Worksheet, orSystem Monitor components. For example, the statement:
svrmgrm user=scott password=tiger service=t:oraserv:smtg71
subsystem=administration area=requestlog
does the following:
• starts up Server Manager in a Motif environment
• connects as SCOTT with the password TIGER to the databasespecified by the service name T:ORASERV:SMTG71
• starts the Administration Manager and opens the Request Logfolder in the Replication drawer
• displays the Request Log object list
Suggestion: You can use launch in context under your owncommand–line interface or via menu items and commands inmanagement consoles.
Additional Information: Starting Server Manager using thelaunch in context facility varies with specific operating systems.For information about using the launch in context facility, seeyour operating system–specific Oracle documentation. For information on using launch in context with Windows, seeAppendix F, “Windows–Specific Operations.”
When accessing the Administration Manager, you can specify:
• the folder to open
• the object to select in the folder’s object list
• the menu command to execute
When accessing a SQL Worksheet, you can specify:
• a SQL statement or PL/SQL block to execute
• a script to execute
When accessing System Monitors, you can specify the monitor todisplay.

Specifying ConnectInformation
1 – 18 Oracle Server Manager User’s Guide
Global Parameters for Launch in Context
The global parameters for launch in context control your databaseconnection and the Server Manager component you access when youstart up Server Manager.
Table 1 – 1 lists the various global parameters you can use with launchin context.
Global Parameter Value Specifies
user username Name of user toconnect as.
password password Password for the user.
service service name SQL*Net service namefor the database towhich you areconnecting.
as normal | sysdba |sysoper
Privileges with which toconnect. Default isnormal.
subsystem administration | monitor |worksheet
Subsystem to access.Default is administration.
Table 1 – 1 Global Launch in Context Parameters
When you start up Server Manager without any command–lineparameters, the copyright window and Connect dialog box appear. SeeFigure 1 – 7 on page 1 – 14 for an example of a Connect box.
However, if you specify the connect information on the command line,you bypass the copyright window and Connect dialog box.
If you do not specify enough information on the command line forServer Manager to complete the connection, the Connect dialog boxappears partially filled in. For example, if you specify a service namebut omit the user, Server Manager opens the Connect dialog box withthe service name filled in.
You must supply the missing information to complete the connectionand click Connect to proceed.
Suggestion: For security reasons, you may want to omit thepassword parameter and require that users enter a password inthe Connect dialog box when using the launch in context facility.

Specifying aSubsystem
1 – 19Overview of Server Manager
Server Manager normally proceeds to the Administration Manager afterconnecting to a database. However, you can specify a differentsubsystem to jump to using the SUBSYSTEM parameter.
For example, the statement:
svrmgrm subsystem=worksheet
starts up Server Manager and immediately displays the Connect dialogbox. Once you have specified the connect information and connected toa database, Server Manager jumps to a SQL Worksheet.
Parameters for the Administration Manager
The Administration Manager parameters control the drawer that isopened, the folder that is displayed, the object that is selected, and themenu command that is executed.
Table 1 – 2 lists the Administration Manager parameters you can usewith launch in context.
AdministrationParameter
Value Specifies
area folder_name Name of the folder to open.Server Manager infers thecorrect drawer to open. See“AREA Parameter” on page1 – 20.
object object_name Name of the object to select.See “OBJECT Parameter” onpage 1 – 22.
menu menu_item | default Menu command to executefor the folder specified. See“MENU Parameter” on page1 – 22.
Table 1 – 2 Administration Manager in Context Parameters

AREA Parameter
1 – 20 Oracle Server Manager User’s Guide
Use the AREA parameter to specify the folder to open in theAdministration Manager. Because the folder names are unique, ServerManager infers the corresponding drawer to open.
Folder names for the AREA parameter must be entered:
• in lower case
• without any spaces between words
For example, the statement:
svrmgrm user=scott password=tiger service=t:oraserv:smtg71
area=requestlog
does the following:
• starts up Server Manager
• connects as SCOTT to the specified database
• opens the Request Log folder in the Replication drawer
Suggestion: Because Server Manager normally proceeds to theAdministration Manager after connecting, you can omit theSUBSYSTEM parameter when you want to jump to any locationin the Administration Manager.
Table 1 – 3 lists the possible folder names for the AREA parameter.
Area Argument Specifies
tablespaces Storage drawer Tablespaces folder
datafiles Storage drawer Datafiles folder
rollback Storage drawer Rollback folder
users Security drawer Users folder
profiles Security drawer Profiles folder
roles Security drawer Roles folder
audit Security drawer Audit folder
database Instance drawer Database folder
initialization Instance drawer Initialization folder
transactions Instance drawer Transactions folder
sessions Instance drawer Sessions folder
backup Recovery drawer Backup folder
recovery Recovery drawer Recovery folder
Table 1 – 3 Values for the AREA Parameter, continued on next page

1 – 21Overview of Server Manager
Area Argument Specifies
redologs Recovery drawer Redo Logs folder
optimizer Schema drawer Optimizer folder
explainplans Schema drawer Explain Plans folder
snapshots Schema drawer Snapshots folder
snapshotlogs Schema drawer Snapshot Logs folder
links Schema drawer Links folder
synonyms Schema drawer Synonyms folder
packages Schema drawer Packages folder
triggers Schema drawer Triggers folder
constraints Schema drawer Constraints folder
schemas Replication drawer Schemas folder
objects Replication drawer Objects folder
registeredsnapshots Replication drawer Registered Snapshotsfolder
masters Replication drawer Masters folder
conflictresolution Replication drawer Conflict Resolution folder
deferredtransactions Replication drawer Deferred Transactionsfolder
errors Replication drawer Errors folder
requestlog Replication drawer Request Log folder
Table 1 – 3 Values for the AREA Parameter
OBJECT Parameter
☞
MENU Parameter
☞
1 – 22 Oracle Server Manager User’s Guide
Use the OBJECT parameter to specify the object you want to select in theobject list. The entry in the first column is the identifier for each object.
Object names for the OBJECT parameter:
• must be one of the object names listed in the first column of theobject list
• are case–sensitive
For example, the statement:
svrmgrm user=scott password=tiger service=t:oraserv:smtg71
subsystem=administration area=tablespaces object=SYSTEM
does the following:
• starts up Server Manager
• connects as SCOTT to the specified database
• opens the Storage drawer and Tablespaces folder
• selects the tablespace SYSTEM in the Tablespace object list
Note: “Tablespace” is the first column of the Tablespace object list.SYSTEM is the identifier for the object and is located in the“Tablespace” column.
Attention: If the object list is long, the selected object may notbe visible. Scroll down the list to display the object.
If you specify an object that does not exist, Server Manager opens thefolder you specified but does not select any objects in the folder’s objectlist. If there are multiple objects with the same identifier in the firstcolumn, the first object that matches is selected.
Use the MENU parameter to specify the menu command to execute on aselected object.
Menu commands for the MENU parameter must be either:
• a number starting with 1, which is the position of the menucommand from the top of the pull–down menu
Attention: The position number includes menu separator lines.See Figure 2 – 3 on page 2 – 7 for an example of a pull–downmenu. In that menu, Add Datafile is in position 5.
or
• the word “default”, which represents the menu command thatwould be executed if you double–clicked on the selected object inthe object list
☞
1 – 23Overview of Server Manager
For example, both statements:
svrmgrm user=scott password=tiger service=t:oraserv:smtg71
subsystem=administration area=tablespaces object=SYSTEM
menu=2
and
svrmgrm user=scott password=tiger service=t:oraserv:smtg71
subsystem=administration area=tablespaces object=SYSTEM
menu=default
do the following:
• start up Server Manager
• connect as SCOTT to the specified database
• open the Storage drawer and Tablespaces folder
• select the tablespace SYSTEM in the Tablespace object list
• display the Alter Tablespace property sheet for the SYSTEMtablespace
Note: The Alter menu command is the second menu item fromthe top of the Tablespace pull–down menu.
Equivalently, double–clicking on SYSTEM in Tablespaces objectlist also executes the Alter command.
Parameters for the SQL Worksheet
The launch in context parameter for the SQL Worksheet is theCOMMAND parameter. Use the COMMAND parameter to specify astatement, command, or script to execute.
The value for COMMAND:
• can be any valid SQL or PL/SQL statement, or Server Managercommand
• must be enclosed in quotation marks if the command or statementcontains multiple words
• must use the ’@’ operator to run a script
Attention: When running under Windows, you can only usethe COMMAND parameter to specify a script to execute.
1 – 24 Oracle Server Manager User’s Guide
For example, the statement:
svrmgrm user=scott password=tiger service=t:oraserv:smtg71
subsystem=worksheet command=@utlxplan
does the following:
• starts up Server Manager in a Motif environment
• connects as SCOTT to the specified database
• opens a SQL Worksheet and runs the UTLXPLAN.SQL script
The COMMAND parameter is optional. You can specify SUBSYSTEMequals worksheet without including the COMMAND parameter. In thiscase, Server Manager just starts a SQL Worksheet.
Parameters for the System Monitors
The launch in context parameter for the System Monitors is theMONITOR parameter. Use the MONITOR parameter to specify the typeof monitor to start.
You may only start one monitor with the MONITOR parameter.
Monitor names for the MONITOR parameter must:
• be entered in lower case
• include any punctuation present in the name of the monitor
For example, the statement:
svrmgrm user=scott password=tiger service=t:oraserv:smtg71
monitor=systemi/o
does the following:
• starts up Server Manager
• connects as SCOTT to the specified database
• starts the System I/O monitor
Suggestion: If you specify a monitor type with the MONITORparameter, you can omit the SUBSYSTEM parameter.

1 – 25Overview of Server Manager
Table 1 – 4 lists the possible monitor names for the MONITORparameter.
Monitor Arguments Specifies
circuit Circuit monitor
dispatcher Dispatcher monitor
filei/o, file File I/O monitor
latch Latch monitor
librarycache, library Library Cache monitor
lock Lock monitor
process Process monitor
queue, q Queue monitor
rollback Rollback monitor
session Session monitor
sharedserver, shared Shared Server monitor
sqlarea, sql SQL Area monitor
systemi/o, sio System I/O monitor
systemstatistics, ss System Statistics monitor
tableaccess, table Table Access monitor
tablespace Tablespace monitor
Table 1 – 4 Values for the MONITOR Parameter
The MONITOR parameter is optional. You can specify SUBSYSTEMequals monitor without including the MONITOR parameter. In this case,Server Manager jumps to the Monitor dialog box from which you canselect the type of monitor to start.

1 – 26 Oracle Server Manager User’s Guide

P A R T
II The AdministrationManager


C H A P T E R
2
T
2 – 1Overview of the Administration Manager
Overview of theAdministrationManager
his chapter describes the organization and basic elements of theAdministration Manager, which is part of Server Manager. Specifically, itexplains the following elements:
• Drawers
• Folders
• Folder Tabs
• Folder Menus
• Object Lists
• Property Sheets
• Pages
• Page Tabs

2 – 2 Oracle Server Manager User’s Guide
The Administration Manager
The Administration Manager is the primary administrative componentof Server Manager. Once you connect to a database service, ServerManager automatically proceeds to the Administration window.
The following figure illustrates the Administration window.
Drawers
Figure 2 – 1 Administration Window

The Storage Drawer
The Security Drawer
2 – 3Overview of the Administration Manager
Administration Drawers and Folders
In the Administration Manager, tasks are divided into categories, eachrepresented by a drawer. Each drawer contains individual folders thatorganize the tasks associated with that drawer.
The drawers, shown in Figure 2 – 1, are named:
• Storage
• Security
• Instance
• Recovery
• Schema
• Replication
The following sections describe each drawer and its folders. For detaileddescriptions of the objects and commands available in each drawer, seeChapters 3 through 8.
In the Storage drawer you can perform administrative tasks associatedwith managing database storage. These tasks include managingtablespaces and rollback segments, and adding and renaming datafiles.
The Storage drawer contains the following folders:
• Tablespaces
• Datafiles
• Rollback
In the Security drawer you can manage database security. You cancreate, alter, and drop users, roles, and profiles. In addition, the Auditfolder allows you to view audit options.
The Security drawer contains the following folders:
• Users
• Profiles
• Roles
• Audit

The Instance Drawer
The Recovery Drawer
The Schema Drawer
2 – 4 Oracle Server Manager User’s Guide
In the Instance drawer you can start up or shut down a database,examine database initialization parameters, manage in–doubttransactions, and manage users’ sessions.
The Instance drawer contains the following folders:
• Database
• Initialization
• Transactions
• Sessions
In the Recovery drawer you can recover a database and manage theredo logs. You can also manage online tablespace backups.
The Recovery drawer contains the following folders:
• Backup
• Recovery
• Redo Logs
In the Schema drawer you can view information about schema objects.You can examine information about synonyms, stored procedures andpackages, triggers, constraints, snapshots, snapshot logs, and databaselinks. You can determine if optimizer statistics have been collected forobjects in your database. You can also see which SQL statements haveexecution plans stored in the table PLAN_TABLE.
The Schema drawer contains the following folders:
• Constraints
• Triggers
• Packages
• Links
• Synonyms
• Snapshots
• Snapshot Logs
• Optimizer
• Explain Plans
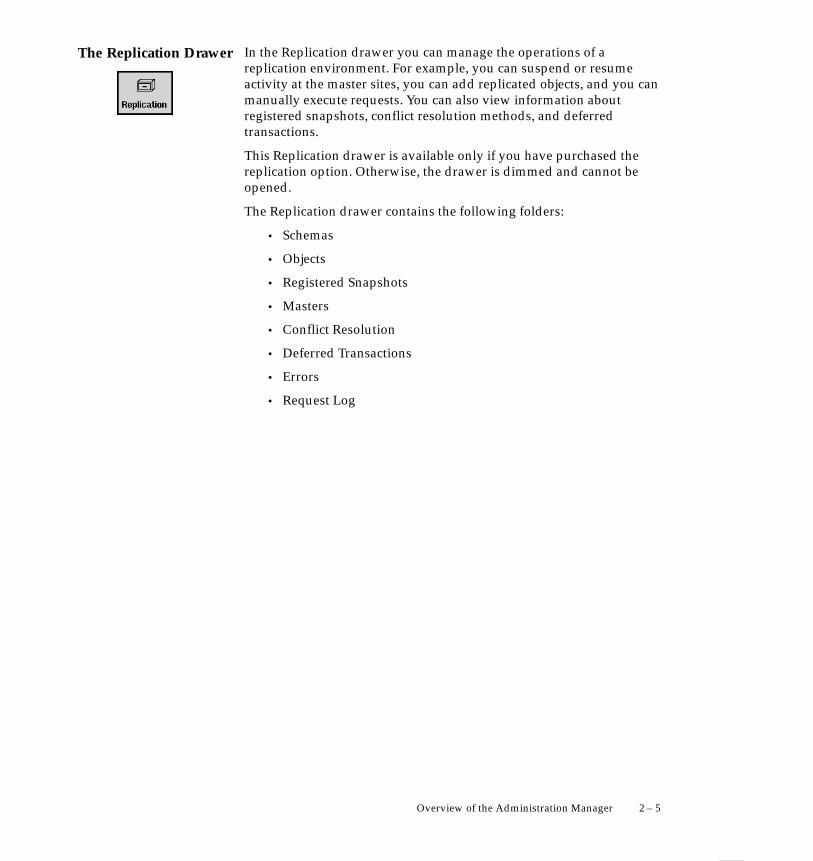
The Replication Drawer
2 – 5Overview of the Administration Manager
In the Replication drawer you can manage the operations of areplication environment. For example, you can suspend or resumeactivity at the master sites, you can add replicated objects, and you canmanually execute requests. You can also view information aboutregistered snapshots, conflict resolution methods, and deferredtransactions.
This Replication drawer is available only if you have purchased thereplication option. Otherwise, the drawer is dimmed and cannot beopened.
The Replication drawer contains the following folders:
• Schemas
• Objects
• Registered Snapshots
• Masters
• Conflict Resolution
• Deferred Transactions
• Errors
• Request Log

Opening a Drawer
2 – 6 Oracle Server Manager User’s Guide
To open a drawer, click its icon. The drawer opens, and folder tabs forthe folders in the drawer appear. In Figure 2 – 1, none of theAdministration drawers are open. However, in the following figure, theStorage drawer is open and its three folder tabs are visible.
Folder Tabs
Drawers
Figure 2 – 2 Opening a Drawer
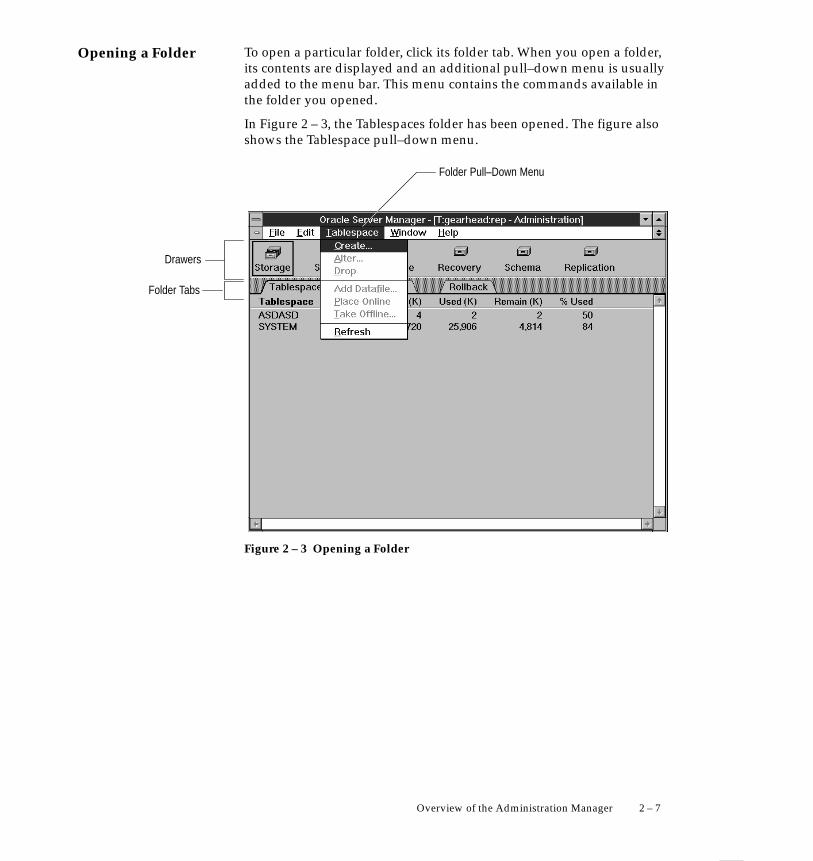
Opening a Folder
2 – 7Overview of the Administration Manager
To open a particular folder, click its folder tab. When you open a folder,its contents are displayed and an additional pull–down menu is usuallyadded to the menu bar. This menu contains the commands available inthe folder you opened.
In Figure 2 – 3, the Tablespaces folder has been opened. The figure alsoshows the Tablespace pull–down menu.
Folder Pull–Down Menu
Folder Tabs
Drawers
Figure 2 – 3 Opening a Folder

Object Lists
2 – 8 Oracle Server Manager User’s Guide
Common Interface Elements
In addition to the drawers, folders, and folder tabs, there are otherinterface elements common to the windows of the AdministrationManager. The following sections describe these elements and theirbehavior.
When you open a folder, an object list appears. For example, when youopen the Tablespaces folder in the Storage drawer, a list of thetablespaces in your database appears.
The following figure illustrates the object list for the Tablespaces folder.
Column
Object List
Headings
Figure 2 – 4 Tablespace Object List
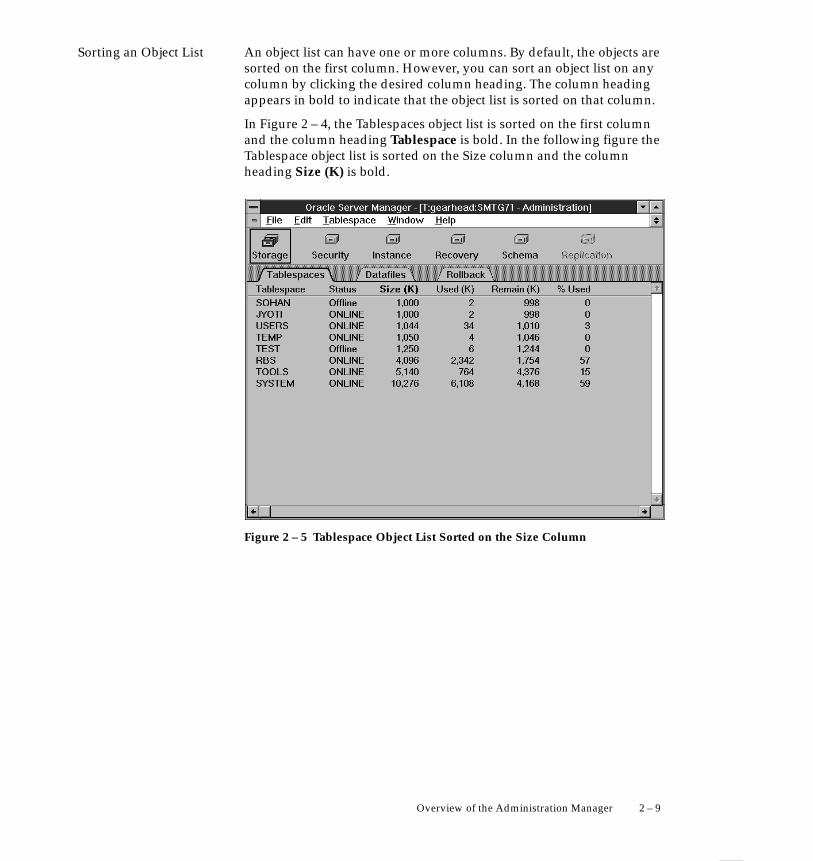
Sorting an Object List
2 – 9Overview of the Administration Manager
An object list can have one or more columns. By default, the objects aresorted on the first column. However, you can sort an object list on anycolumn by clicking the desired column heading. The column headingappears in bold to indicate that the object list is sorted on that column.
In Figure 2 – 4, the Tablespaces object list is sorted on the first columnand the column heading Tablespace is bold. In the following figure theTablespace object list is sorted on the Size column and the columnheading Size (K) is bold.
Figure 2 – 5 Tablespace Object List Sorted on the Size Column

Selecting an Object
2 – 10 Oracle Server Manager User’s Guide
Most administrative tasks involve managing a specific object. Toperform these tasks, you must first select the object by clicking its row in the object list.
The following figure shows a selected tablespace in the Tablespaceobject list.
Figure 2 – 6 Selecting an Object
Suggestion: In most cases, double–clicking an object selects itand issues an Alter command on that object.

Folder Pull–DownMenu
2 – 11Overview of the Administration Manager
Most folders in the Administration Manager include a pull–down menuthat contains the commands available in that folder. Many of thesecommands, such as Alter, require that you select an object first. Thesecommands are unavailable until you select an appropriate object.Unavailable commands are represented by dimmed menu items. Othermenu items, such as Create, do not require an object selection and arenever dimmed.
A menu item can be dimmed even when an object is selected becausethe command does not apply to that particular object. For example, inthe following figure, the Place Online menu item is dimmed because theselected tablespace is already online.
Figure 2 – 7 Tablespace Pull–Down Menu
Some menu items are followed by an ellipsis (...). This indicates that tocomplete the command, Server Manager will prompt you for moreinformation with a dialog box or property sheet.
All folder menus have a Refresh command, which refreshes the objectlist for the current folder. This command is useful when other databaseadministrators are making changes to the objects you are viewing, orwhen you are making such changes in a different window, such as aSQL Worksheet.
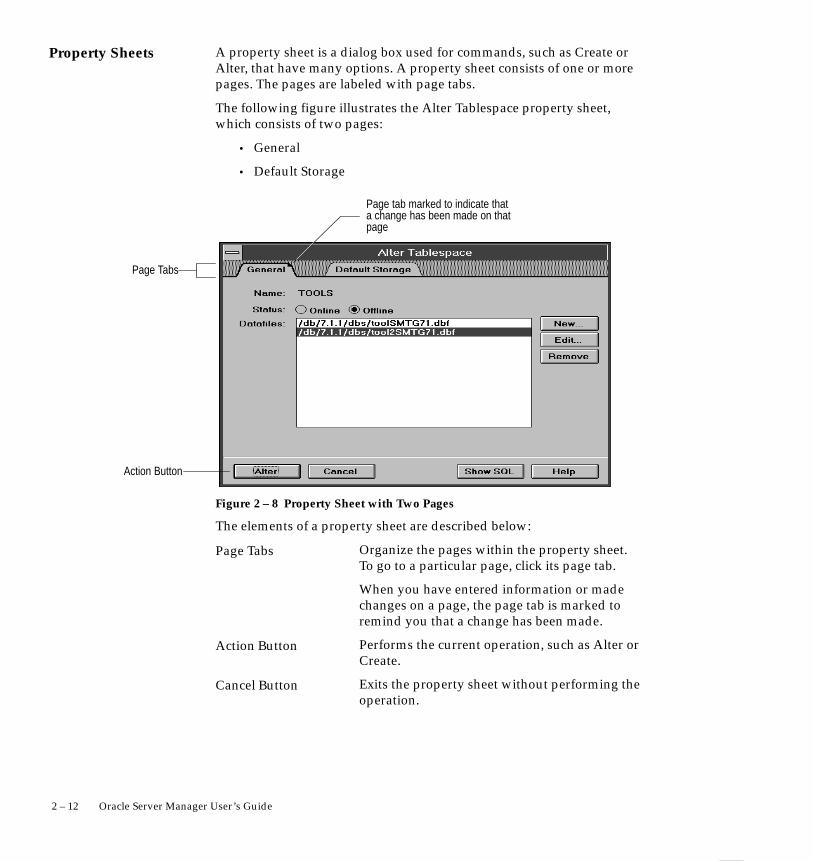
Property Sheets
2 – 12 Oracle Server Manager User’s Guide
A property sheet is a dialog box used for commands, such as Create orAlter, that have many options. A property sheet consists of one or morepages. The pages are labeled with page tabs.
The following figure illustrates the Alter Tablespace property sheet,which consists of two pages:
• General
• Default Storage
Page Tabs
Page tab marked to indicate thata change has been made on thatpage
Action Button
Figure 2 – 8 Property Sheet with Two Pages
The elements of a property sheet are described below:
Organize the pages within the property sheet.To go to a particular page, click its page tab.
When you have entered information or madechanges on a page, the page tab is marked toremind you that a change has been made.
Performs the current operation, such as Alter orCreate.
Exits the property sheet without performing theoperation.
Page Tabs
Action Button
Cancel Button

Showing SQLStatements
2 – 13Overview of the Administration Manager
Displays or hides the SQL statement(s)generated by the property sheet. Forinformation about the Show SQL/Hide SQLbutton, see “Showing SQL Statements” on page2 – 13.
Displays help information for the page.
The following figure illustrates the Alter Tablespace property sheet afterthe Show SQL button has been clicked. When you click Show SQL,Server Manager displays the SQL statement(s) that will be executedwhen you click the Action button. In Figure 2 – 9, the Action button isthe Alter button.
Click Hide SQL to hide the SQL statements.
Figure 2 – 9 Property Sheet with the Show SQL Option Selected
Show SQL/Hide SQLButton
Help Button

2 – 14 Oracle Server Manager User’s Guide

C H A P T E R
3T
3 – 1Managing Database Storage
Managing DatabaseStorage
his chapter describes how to use Server Manager to managedatabase storage. This chapter assumes that you have read Chapter 2,“Overview of the Administration Manager,” and are familiar with theinterface elements of the Administration Manager.
In the Storage drawer, you can manage the tablespaces, datafiles, androllback segments in your database. This chapter describes thecommands available in the Storage drawer’s folders:
• Tablespaces
• Datafiles
• Rollback
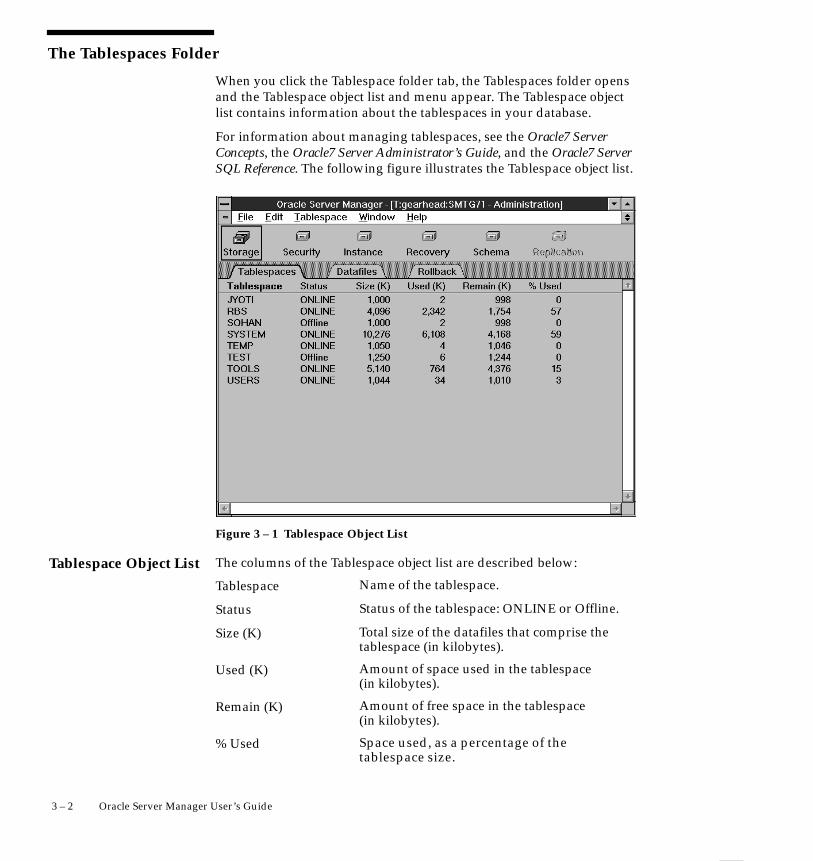
Tablespace Object List
3 – 2 Oracle Server Manager User’s Guide
The Tablespaces Folder
When you click the Tablespace folder tab, the Tablespaces folder opensand the Tablespace object list and menu appear. The Tablespace objectlist contains information about the tablespaces in your database.
For information about managing tablespaces, see the Oracle7 ServerConcepts, the Oracle7 Server Administrator’s Guide, and the Oracle7 ServerSQL Reference. The following figure illustrates the Tablespace object list.
Figure 3 – 1 Tablespace Object List
The columns of the Tablespace object list are described below:
Name of the tablespace.
Status of the tablespace: ONLINE or Offline.
Total size of the datafiles that comprise thetablespace (in kilobytes).
Amount of space used in the tablespace (in kilobytes).
Amount of free space in the tablespace (in kilobytes).
Space used, as a percentage of the tablespace size.
Tablespace
Status
Size (K)
Used (K)
Remain (K)
% Used

Creating a Tablespace
Create Tablespace:General Page
3 – 3Managing Database Storage
To create a new tablespace, choose Create from the Tablespace menu.The Create Tablespace property sheet appears.
The Create Tablespace property sheet consists of the following pages:
• General
• Default Storage
The following figure illustrates the General page.
Figure 3 – 2 General Page of the Create Tablespace Property Sheet
The General page of the Create Tablespace property sheet is describedbelow:
Name of the tablespace to be created.
Enter the name of the new tablespace. Thetablespace name can only contain charactersfrom your database character set and can be atmost 30 bytes long.
Status of the tablespace to be created.
Click Online or Offline to specify the initialstatus of the tablespace. The default is online.
Scrolling list of the datafiles belonging to the tablespace.
Name
Status
Datafiles

New Datafile Dialog Box
3 – 4 Oracle Server Manager User’s Guide
Displays the New Datafile dialog box, whichallows you to specify each new datafilebelonging to the new tablespace. For adescription of the New Datafile dialog box, see“New Datafile Dialog Box” on page 3 – 4.
Displays the Edit Datafile dialog box, whichallows you to edit the file specification for thedatafile selected in the Datafiles scrolling list.For a description of the Edit Datafile dialog box,see “Edit Datafile Dialog Box” on page 3 – 5.
Removes the datafile selected in the Datafilesscrolling list.
Use the New Datafile dialog box to specify a new datafile to be added toa tablespace. The following figure illustrates the New Datafile dialogbox.
Figure 3 – 3 New Datafile Dialog Box
The New Datafile dialog box is described below:
Name of the datafile to be created.
Enter the new filename. The filename must bespecified according to the conventions of youroperating system.
New
Edit
Remove
Filename

OSDoc
Edit Datafile Dialog Box
3 – 5Managing Database Storage
Displays the standard file selection dialog box for your system, which you can use toselect a file.
Designates that the datafile already exists andshould be reused.
Designates that Oracle should create the file.
Enter a value for the file size. Use the pop–upmenu to specify the units of the new datafile’ssize as either kilobytes or megabytes.
Additional Information: For information about specifying file names on your system, see your operating system–specificOracle documentation. For information about the standard fileselection dialog box for your system, see your operating system–specific documentation.
Use the Edit Datafile dialog box to edit the specification of a datafile.The following figure illustrates the Edit Datafile dialog box.
Figure 3 – 4 Edit Datafile Dialog Box
The Edit Datafile dialog box is identical to the New Datafile dialog box.See “New Datafile Dialog Box” on page 3 – 4 for a description of theelements of the New Datafile dialog box.
Find File
Use Existing File
New File Size

Create Tablespace:Default Storage Page
3 – 6 Oracle Server Manager User’s Guide
On the Default Storage page, you can specify the default storageparameters for all objects created in the tablespace. The following figureillustrates the Default Storage page of the Create Tablespace property sheet.
Figure 3 – 5 Default Storage Page of the Create Tablespace Property Sheet
The Default Storage page is described below:
Size of the object’s first extent.
Enter the size of the initial extent. Use thepop–up menu to specify either kilobytes ormegabytes. If you do not specify a size, thedefault is the size of 5 data blocks.
Size of the next extent to be allocated to the object.
Enter the size of the next extent. Use thepop–up menu to specify either kilobytes ormegabytes. If you do not specify a size, thedefault is the size of 5 data blocks.
Total number of extents to be allocated when anobject is created in the tablespace.
Enter the minimum number of extents. If youdo not specify a number, the default value is 1.
Initial Extent
Next Extent
Minimum Extents

Altering a Tablespace
3 – 7Managing Database Storage
Maximum number of extents that can beallocated to an object created in the tablespace.
Enter the maximum number of extents. If youdo not specify a value, the default valueapplies. The default and maximum valuesdepend on the data block size.
Percent by which each extent after the secondgrows over the previous extent.
Enter a value for percent increase. If you do notspecify a value, the default is 50.
To alter an existing tablespace, select the tablespace from the Tablespaceobject list and choose Alter from the Tablespace menu. The AlterTablespace property sheet appears. You can also bring up the AlterTablespace property sheet by double–clicking on a tablespace in theTablespace object list.
The Alter Tablespace property sheet consists of the following pages:
• General
• Default Storage
The following figure illustrates the General page.
Figure 3 – 6 General Page of the Alter Tablespace Property Sheet
Maximum Extents
Percentage Increase
Alter Tablespace:General Page
☞
3 – 8 Oracle Server Manager User’s Guide
The General page of the Alter Tablespace property sheet is describedbelow:
Name of the tablespace to be altered.
Status of the tablespace. Click Online or Offlineto alter the status of the tablespace.
Scrolling list of the datafiles belonging to thetablespace.
Displays the New Datafile dialog box, whichallows you to specify a datafile to add to thetablespace. For a description of the NewDatafile dialog box, see “New Datafile DialogBox” on page 3 – 9.
Allows you to edit the file specification for thedatafile selected in the Datafiles scrolling list.
If the selected datafile is one you have justadded to the Datafiles scrolling list, the Editbutton displays the Edit Datafile dialog box. Fora description of the Edit Datafile dialog box, see“Edit Datafile Dialog Box” on page 3 – 10.
If the selected datafile has already been addedto the tablespace, the Edit button displays theRename Datafile dialog box, which allows youto rename the selected datafile. For adescription of the Rename Datafile dialog box,see “Rename Datafile Dialog Box” on page3 – 10. In order to rename a datafile, itstablespace must be offline.
Removes the datafile selected in the Datafilesscrolling list.You can only remove a filespecification you have just added to theDatafiles scrolling list. You cannot remove adatafile that has already been added to thetablespace.
Attention: When you use the Alter Tablespace property sheetto take a tablespace offline, Server Manager takes the tablespaceoffline in NORMAL mode. If you want to take a tablespaceoffline in TEMPORARY or IMMEDIATE mode, choose TakeOffline from the Tablespace menu. The Take Offline menu itemis described in “Placing a Tablespace Online or Taking aTablespace Offline” on page 3 – 15.
Name
Status
Datafiles
New
Edit
Remove

New Datafile Dialog Box
OSDoc
3 – 9Managing Database Storage
Use the New Datafile dialog box to specify a new datafile to be added toa tablespace. The following figure illustrates the New Datafile dialog box.
Figure 3 – 7 New Datafile Dialog Box
The New Datafile dialog box is described below:
Name of the datafile to be created.
Enter the new filename. The filename must bespecified according to the conventions of youroperating system.
Displays the standard file selection dialog boxfor your system, which you can use to select afile.
Designates that the datafile already exists andshould be reused.
Designates that Oracle should create the file.
Enter a value for the file size. Use the pop–upmenu to specify the units of the new datafile’ssize as either kilobytes or megabytes.
Additional Information: For information about specifying filenames on your system, see your operating system–specificOracle documentation. For information about the standard fileselection dialog box for your system, see your operatingsystem–specific documentation.
Filename
Find File
Use Existing File
New File Size

Edit Datafile Dialog Box
Rename Datafile DialogBox
3 – 10 Oracle Server Manager User’s Guide
Use the Edit Datafile dialog box to edit the specification of a datafile.The following figure illustrates the Edit Datafile dialog box.
Figure 3 – 8 Edit Datafile Dialog Box
The Edit Datafile dialog box is identical to the New Datafile dialog box.See “New Datafile Dialog Box” on page 3 – 9 for a description of theelements of the New Datafile dialog box.
The Rename Datafile dialog box allows you to rename a datafilebelonging to a tablespace. You must rename a tablespace’s datafile if youhave changed the name of the corresponding operating system file or ifyou have moved the file to a new location. In order to rename a datafile,its tablespace must be offline.
The following figure illustrates the Rename Datafile dialog box.
Figure 3 – 9 Rename Datafile Dialog Box

☞
Alter Tablespace:Default Storage Page
3 – 11Managing Database Storage
The Rename Datafile dialog box is described below:
Old filename.
New filename.
Enter the new filename. The filename must bespecified according to the conventions of youroperating system.
Attention: When you rename a datafile using Server Manager,the name of the operating system file is not changed. The newfilename is only associated with the tablespace. Before renamingthe datafile using Server Manager, you must change the name ofthe file through your operating system.
On the Default Storage page of the Alter Tablespace property sheet, youcan alter the default storage parameters for objects subsequently createdin the tablespace. The following figure illustrates the Default Storagepage of the Alter Tablespace property sheet.
Figure 3 – 10 Default Storage Page of the Alter Tablespace Property Sheet
On the Default Storage page of the Alter Tablespace property sheet,Server Manager displays the current storage characteristics of the tablespace.
From
To

3 – 12 Oracle Server Manager User’s Guide
The Default Storage page is described below:
Size of the object’s first extent.
Enter the size of the initial extent. Use thepop–up menu to specify either kilobytes ormegabytes. If you do not specify a size, thedefault is the size of 5 data blocks.
Size of the next extent to be allocated to theobject.
Enter the size of the next extent. Use thepop–up menu to specify either kilobytes ormegabytes. If you do not specify a size, thedefault is the size of 5 data blocks.
Total number of extents to be allocated when anobject is created in the tablespace.
Enter the minimum number of extents. If youdo not specify a number, the default value is 1.
Maximum number of extents that can beallocated to an object created in the tablespace.
Enter the maximum number of extents. If youdo not specify a value, the default valueapplies. The default and maximum valuesdepend on the data block size.
Percent by which each extent after the secondgrows over the previous extent.
Enter a value for percent increase. If you do notspecify a value, the default is 50.
Initial Extent
Next Extent
Minimum Extents
Maximum Extents
Percentage Increase

Dropping a Tablespace
3 – 13Managing Database Storage
To drop an existing tablespace, select the tablespace to be dropped fromthe Tablespace object list and choose Drop from the Tablespace menu.The Drop Tablespace alert box appears.
When you drop a tablespace, all objects in the tablespace are dropped aswell. Server Manager also drops all referential integrity constraints fromtables outside the tablespace that refer to primary or unique keys in thetables stored in the dropped tablespace.
The following figure illustrates the Drop Tablespace alert box.
Figure 3 – 11 Drop Tablespace Alert Box
The Drop Tablespace alert box indicates if the tablespace to be droppedcontains any objects or contains any tables referenced by integrityconstraints from tables outside the tablespace being dropped.
Suggestion: Before dropping a tablespace, take it offline. Thisensures that SQL statements that are currently runningtransactions do not access objects in the tablespace.
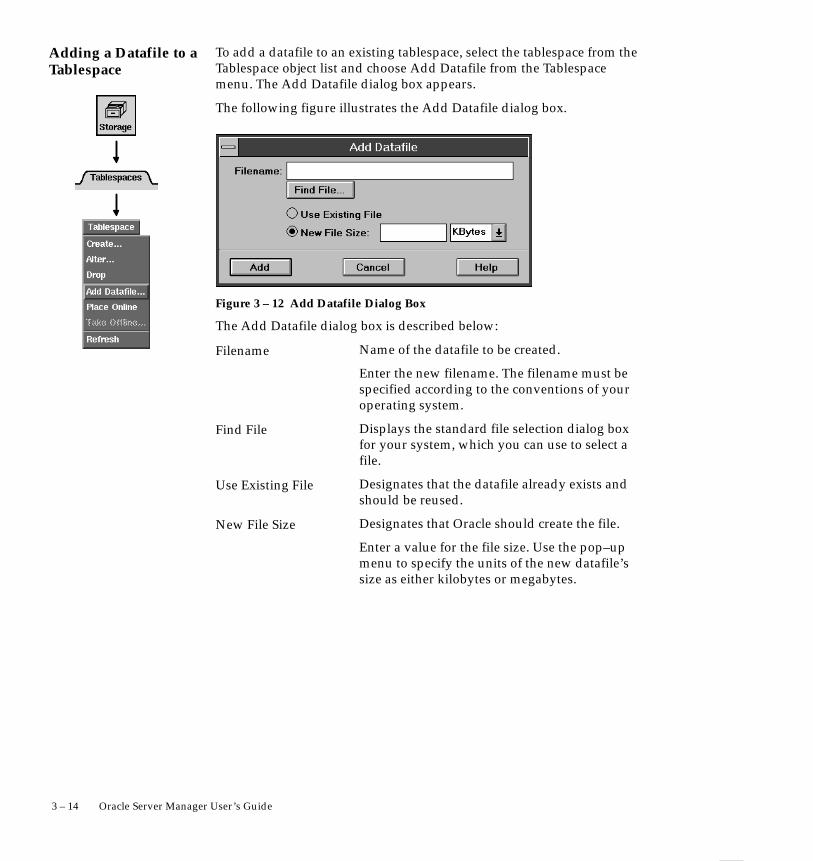
Adding a Datafile to aTablespace
3 – 14 Oracle Server Manager User’s Guide
To add a datafile to an existing tablespace, select the tablespace from theTablespace object list and choose Add Datafile from the Tablespacemenu. The Add Datafile dialog box appears.
The following figure illustrates the Add Datafile dialog box.
Figure 3 – 12 Add Datafile Dialog Box
The Add Datafile dialog box is described below:
Name of the datafile to be created.
Enter the new filename. The filename must bespecified according to the conventions of youroperating system.
Displays the standard file selection dialog boxfor your system, which you can use to select afile.
Designates that the datafile already exists andshould be reused.
Designates that Oracle should create the file.
Enter a value for the file size. Use the pop–upmenu to specify the units of the new datafile’ssize as either kilobytes or megabytes.
Filename
Find File
Use Existing File
New File Size
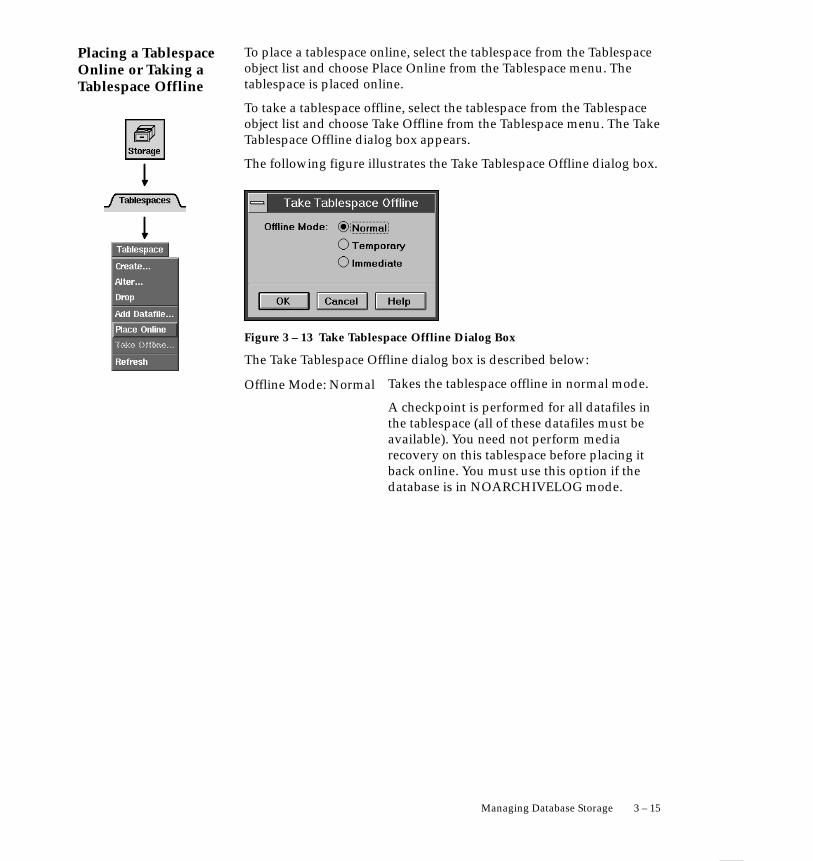
Placing a TablespaceOnline or Taking aTablespace Offline
3 – 15Managing Database Storage
To place a tablespace online, select the tablespace from the Tablespaceobject list and choose Place Online from the Tablespace menu. Thetablespace is placed online.
To take a tablespace offline, select the tablespace from the Tablespaceobject list and choose Take Offline from the Tablespace menu. The TakeTablespace Offline dialog box appears.
The following figure illustrates the Take Tablespace Offline dialog box.
Figure 3 – 13 Take Tablespace Offline Dialog Box
The Take Tablespace Offline dialog box is described below:
Takes the tablespace offline in normal mode.
A checkpoint is performed for all datafiles inthe tablespace (all of these datafiles must beavailable). You need not perform mediarecovery on this tablespace before placing itback online. You must use this option if thedatabase is in NOARCHIVELOG mode.
Offline Mode: Normal
3 – 16 Oracle Server Manager User’s Guide
Takes the tablespace offline in temporary mode.
A checkpoint is performed for all onlinedatafiles in the tablespace but does not ensurethat all files can be written. Any offline filesmay require media recovery before you placethe tablespace back online.
Takes the tablespace offline in immediate mode.
Oracle does not ensure that the datafiles areavailable, and no checkpoint is performed. Youmust perform media recovery on the tablespacebefore placing it back online.
Use the SQL Worksheet to perform mediarecovery on a specific tablespace or datafile. Forinformation about the SQL Worksheet, seeChapter 9, “Overview of the System Monitors.”
Offline Mode:Temporary
Offline Mode:Immediate
Datafile Object List
3 – 17Managing Database Storage
The Datafiles Folder
When you click the Datafiles folder tab, the Datafiles folder opens andthe Datafile object list and menu appear. The Datafile object list containsinformation about the datafiles in your database.
For information about datafiles, see the Oracle7 Server Concepts and theOracle7 Server Administrator’s Guide.
The following figure illustrates the Datafile object list.
Figure 3 – 14 Datafile Object List
The columns of the Datafile object list are described below:
Name of the datafile.
Tablespace to which the datafile belongs.
Status of the datafile: Available or Invalid.
Size of the datafile in kilobytes.
Filename
Tablespace
Status
Size (K)

Creating a Datafile
Datafile Specification Page
3 – 18 Oracle Server Manager User’s Guide
To create a new datafile, choose Create from the Datafile menu. TheCreate Datafile property sheet appears. The Create Datafile propertysheet consists of one page, called the Datafile Specification page.
The following figure illustrates the Datafile Specification page.
Figure 3 – 15 Datafile Specification Page of the Create Datafile PropertySheet
The Datafile Specification page of the Create Datafile property sheet isdescribed below:
Name of the tablespace to which the newdatafile belongs.
Use the pop–up menu to choose the tablespace.
Name of the datafile to be created.
Enter the name of the new datafile. Thefilename must be specified according to theconventions of your operating system.
Displays the standard file selection dialog boxfor your system, which you can use to select alocal file. Remote files cannot be seen.
Tablespace
Filename
Find File

Renaming a Datafile
Rename Datafile DialogBox
☞
3 – 19Managing Database Storage
Designates that the datafile already exists andshould be reused.
Designates that Oracle should create the file.
Enter the size of the new datafile. Use the pop–upmenu to specify either kilobytes or megabytes.
To rename an existing datafile, select the datafile to be renamed from theDatafile object list and choose Rename from the Datafile menu. TheRename Datafile dialog box appears. You can also bring up the RenameDatafile dialog box by double–clicking on the datafile in the Datafileobject list.
You must rename a datafile if you have changed the name of thecorresponding operating system file or if you have moved the file to anew location. To rename a datafile, its tablespace must be offline.
The following figure illustrates the Rename Datafile dialog box.
Figure 3 – 16 Rename Datafile Dialog Box
The Rename Datafile dialog box is described below:
Old filename.
New filename.
Enter the new filename. The filename must bespecified according to the conventions of youroperating system.
Attention: When you rename a datafile using Server Manager,the name of the operating system file is not changed. The newfilename is only associated with the tablespace. Before renamingthe datafile using Server Manager, you must change the name ofthe file through your operating system.
Use Existing File
New File Size
From
To

Rollback Object List
3 – 20 Oracle Server Manager User’s Guide
The Rollback Folder
When you click the Rollback folder tab, the Rollback folder opens andthe Rollback object list and menu appear. The Rollback object listcontains information about the rollback segments in your database.
For information about managing rollback segments, see the Oracle7Server Concepts, the Oracle7 Server Administrator’s Guide, and the Oracle7Server SQL Reference.
The following figure illustrates the Rollback object list.
Figure 3 – 17 Rollback Object List
The columns of the Rollback object list are described below:
Name of the rollback segment.
Tablespace that contains the rollback segment.
Status of the rollback segment: ONLINE,Offline, Invalid, Needs Recovery, or PartlyAvailable.
Number of extents allocated to the rollback segment.
Segment
Tablespace
Status
Extents

Creating a RollbackSegment
3 – 21Managing Database Storage
Maximum number of extents allowed for therollback segment.
Space allocated to the rollback segment (in kilobytes).
Optimal size, in kilobytes, of the rollbacksegment (blank if optimal is not specified forthe rollback segment). Optimal is not displayedfor offline rollback segments.
To create a new rollback segment, choose Create from the Rollbackmenu. The Create Rollback Segment property sheet appears.
The Create Rollback Segment property sheet consists of the followingpages:
• General
• Storage
The following figure illustrates the General page.
Figure 3 – 18 General Page of the Create Rollback Segment Property Sheet
Max
Size (K)
Optimal

Create Rollback Segment:General Page
Create Rollback Segment:Storage Page
3 – 22 Oracle Server Manager User’s Guide
The General page of the Create Rollback Segment property sheet isdescribed below:
Name of the rollback segment to be created.
Enter the name of the new rollback segment.The rollback segment name can only containcharacters from your database character set andcan be at most 30 bytes long.
Name of the tablespace in which to create therollback segment.
Use the pop–up menu to choose the tablespace.
Status of the rollback segment to be created.
Click Online or Offline to specify the initialstatus of the rollback segment.
On the Storage page you can specify the storage characteristics of therollback segment. The Storage page of the Create Rollback Segmentproperty sheet is illustrated in the following figure.
Figure 3 – 19 Storage Page of the Create Rollback Segment Property Sheet
Rollback Segment
Tablespace
Status
3 – 23Managing Database Storage
The Storage page is described below:
Size of the rollback segment’s first extent.
Enter the size of the initial extent. Use thepop–up menu to specify either kilobytes or megabytes. The default is the size of 5 data blocks.
Size of the next extent allocated to the rollbacksegment.
Enter the size of the next extent. Use thepop–up menu to specify either kilobytes ormegabytes. The default is the size of 5 datablocks.
Optimal size for the rollback segment. Optimalis not displayed for offline rollback segments.
Enter the value for Optimal. Use the pop–upmenu to specify either kilobytes or megabytes.Oracle tries to maintain the optimal size of therollback segment by dynamically deallocatingextents when their data is no longer needed foractive transactions. A blank field assumes thedefault value.
The default value of Optimal is null. If Optimalis null, Oracle never deallocates the rollbacksegment’s unused extents.
The value of Optimal can never be less than thespace initially allocated to the rollback segment,as specified by the values of Initial Extent, NextExtent, and Minimum Extents.
Total number of extents to be allocated whenthe rollback segment is created.
Enter the minimum number of extents. Thedefault and minimum value is 2.
Maximum number of extents that can beallocated to the rollback segment.
Enter the maximum number of extents. Thedefault and maximum values depend on thedata block size.
Initial Extent
Next Extent
Optimal
Minimum Extents
Maximum Extents

Altering a RollbackSegment
Alter Rollback Segment:General Page
3 – 24 Oracle Server Manager User’s Guide
To alter an existing rollback segment, select the rollback segment to bealtered from the Rollback object list and choose Alter from the Rollbackmenu. The Alter Rollback Segment property sheet appears. You can alsobring up the Alter Rollback Segment property sheet by double–clickingon the rollback segment in the Rollback object list. The Alter RollbackSegment property sheet consists of the following pages:
• General
• Storage
The following figure illustrates the General page.
Figure 3 – 20 General Page of the Alter Rollback Segment Property Sheet
The General page of the Alter Rollback Segment property sheet isdescribed below:
Name of the rollback segment to be altered.
Tablespace to which the rollback segmentbelongs.
Status of the rollback segment.
Click Online or Offline to alter the status of therollback segment. For information aboutplacing a rollback segment online or taking itoffline, see “Placing a Rollback Segment Onlineor Taking a Rollback Segment Offline” on page3 – 27.
Rollback Segment
Tablespace
Status

Alter Rollback Segment:Storage Page
3 – 25Managing Database Storage
On the Storage page you can alter the storage characteristics of therollback segment. These changes apply to any subsequent extentallocations to the rollback segment. The Storage page of the AlterRollback Segment property sheet is illustrated in the following figure.
Figure 3 – 21 Storage Page of the Alter Rollback Segment Property Sheet
The Storage page of the Alter Rollback Segment property sheet isdescribed below:
Size of the initial extent that was allocated to therollback segment when it was created.
Size of the next extent to be allocated to therollback segment.
Enter the size of the next extent. Use thepop–up menu to specify either kilobytes or megabytes.
Optimal size for the rollback segment. Optimalis not displayed for offline rollback segments.
Enter the value for Optimal. Use the pop–upmenu to specify either kilobytes or megabytes.For more information on Optimal, see “CreateRollback Segment: Storage Page” on page3 – 23.
Initial Extent
Next Extent
Optimal Size

Dropping a RollbackSegment
☞
3 – 26 Oracle Server Manager User’s Guide
Number of extents that were allocated to therollback segment when it was created.
Maximum number of extents that can beallocated to the rollback segment.
Enter the maximum number of extents. Thedefault and maximum values depend on thedata block size.
To drop an existing rollback segment, select the rollback segment to bedropped from the Rollback object list and choose Drop from theRollback menu. The Drop Rollback Segment alert box appears.
The following figure illustrates the Drop Rollback Segment alert box.
Figure 3 – 22 Drop Rollback Segment Alert Box
Attention: You can only drop a rollback segment that is offline.
Minimum Extents
Maximum Extents
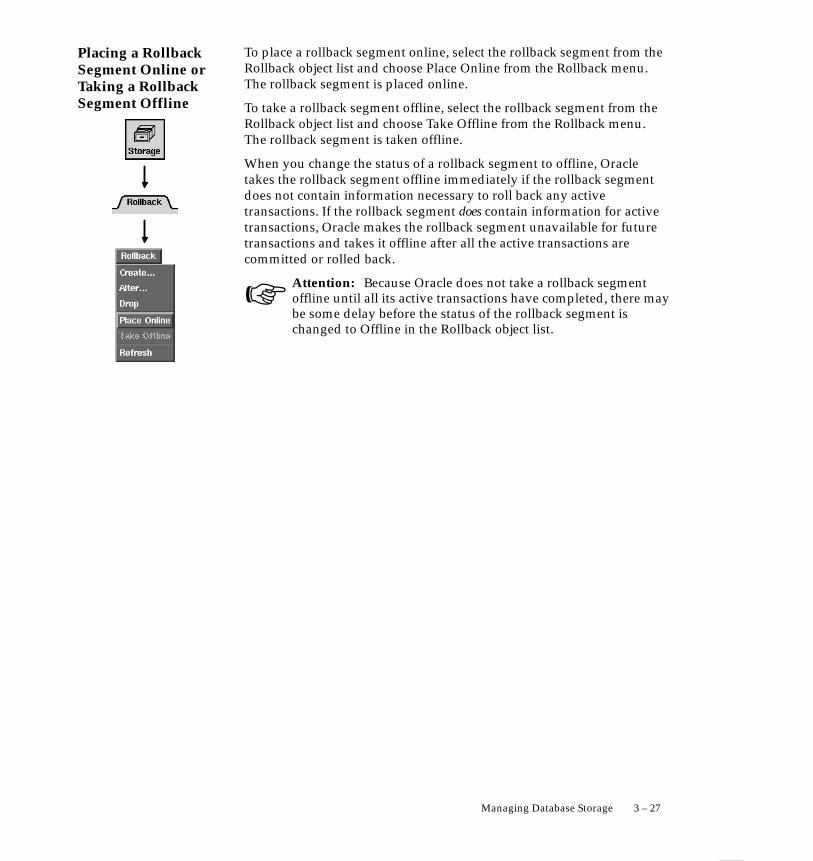
Placing a RollbackSegment Online orTaking a RollbackSegment Offline
☞
3 – 27Managing Database Storage
To place a rollback segment online, select the rollback segment from theRollback object list and choose Place Online from the Rollback menu.The rollback segment is placed online.
To take a rollback segment offline, select the rollback segment from theRollback object list and choose Take Offline from the Rollback menu.The rollback segment is taken offline.
When you change the status of a rollback segment to offline, Oracletakes the rollback segment offline immediately if the rollback segmentdoes not contain information necessary to roll back any activetransactions. If the rollback segment does contain information for activetransactions, Oracle makes the rollback segment unavailable for futuretransactions and takes it offline after all the active transactions arecommitted or rolled back.
Attention: Because Oracle does not take a rollback segmentoffline until all its active transactions have completed, there maybe some delay before the status of the rollback segment ischanged to Offline in the Rollback object list.

3 – 28 Oracle Server Manager User’s Guide

C H A P T E R
4T
4 – 1Controlling Database Security
Controlling DatabaseSecurity
his chapter describes how to use Server Manager to managedatabase security. This chapter assumes that you have read Chapter 2,“Overview of the Administration Manager,” and are familiar with theinterface elements of the Administration Manager.
In the Security drawer, you can manage users, roles and profiles. Youcan also view the auditing options that are set for your system. Thischapter describes the commands available in the Security drawer’sfolders:
• Users
• Profiles
• Roles
• Audit
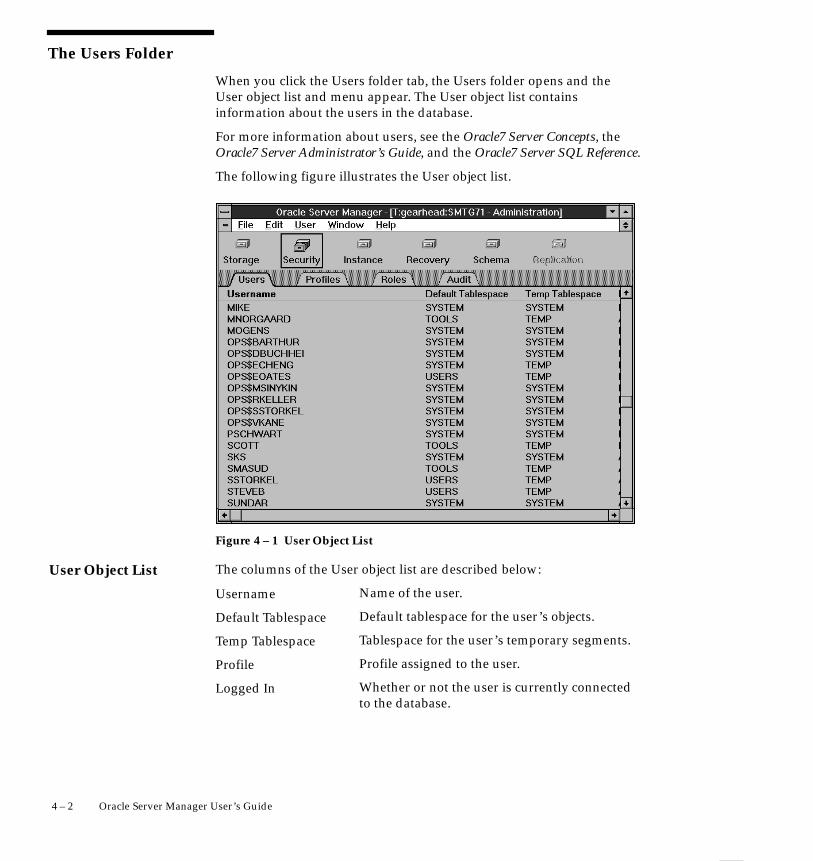
User Object List
4 – 2 Oracle Server Manager User’s Guide
The Users Folder
When you click the Users folder tab, the Users folder opens and theUser object list and menu appear. The User object list containsinformation about the users in the database.
For more information about users, see the Oracle7 Server Concepts, theOracle7 Server Administrator’s Guide, and the Oracle7 Server SQL Reference.
The following figure illustrates the User object list.
Figure 4 – 1 User Object List
The columns of the User object list are described below:
Name of the user.
Default tablespace for the user’s objects.
Tablespace for the user’s temporary segments.
Profile assigned to the user.
Whether or not the user is currently connectedto the database.
Username
Default Tablespace
Temp Tablespace
Profile
Logged In

Creating a User
Create User:General Page
4 – 3Controlling Database Security
To create a new user, choose Create from the User menu. The CreateUser property sheet appears.
The Create User property sheet consists of the following pages:
• General
• Quotas
• Privs & Roles (Privileges and Roles)
• Default Role
The following figure illustrates the General page.
Figure 4 – 2 General Page of the Create User Property Sheet
The General page of the Create User property sheet is described below:
Name of the user to be created.
Enter the name of the new user. The usernamecan only contain characters from your databasecharacter set and can be at most 30 bytes long.
Username
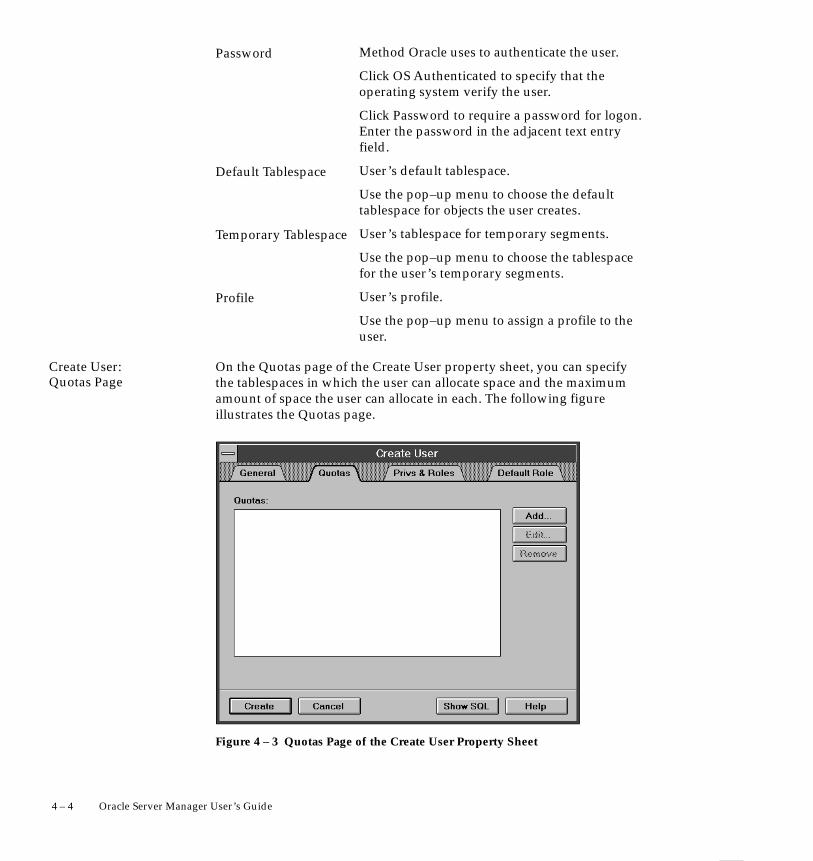
Create User:Quotas Page
4 – 4 Oracle Server Manager User’s Guide
Method Oracle uses to authenticate the user.
Click OS Authenticated to specify that theoperating system verify the user.
Click Password to require a password for logon.Enter the password in the adjacent text entryfield.
User’s default tablespace.
Use the pop–up menu to choose the defaulttablespace for objects the user creates.
User’s tablespace for temporary segments.
Use the pop–up menu to choose the tablespacefor the user’s temporary segments.
User’s profile.
Use the pop–up menu to assign a profile to theuser.
On the Quotas page of the Create User property sheet, you can specifythe tablespaces in which the user can allocate space and the maximumamount of space the user can allocate in each. The following figureillustrates the Quotas page.
Figure 4 – 3 Quotas Page of the Create User Property Sheet
Password
Default Tablespace
Temporary Tablespace
Profile

Add Quota Dialog Box
4 – 5Controlling Database Security
The Quotas page is described below:
Scrolling list of the tablespace quotas assignedto the user.
Displays the Add Quota dialog box, whichallows you to specify a quota for the user. For adescription of the Add Quota dialog box, seepage 4–5.
When you have specified a quota, that quotaappears in the Quotas scrolling list.
Displays the Edit Quota dialog box, whichallows you to alter the quota selected in theQuotas scrolling list. For a description of theEdit Quota dialog box, see page 4–6.
Removes the quota selected in the Quotasscrolling list.
Use the Add Quota dialog box to specify a user’s quota on a specifictablespace. The following figure illustrates the Add Quota dialog box.
Figure 4 – 4 Add Quota Dialog Box
The Add Quota dialog box is described below:
Tablespace to which the quota applies.
Use the pop–up menu to specify the tablespacefor the quota.
Quotas
Add
Edit
Remove
Tablespace

Edit Quota Dialog Box
4 – 6 Oracle Server Manager User’s Guide
Maximum amount of space the user is allowedto allocate in the tablespace.
To specify an unlimited quota for thetablespace, click the Unlimited button. With anunlimited quota, the user can allocate anunbounded amount of space in the tablespace.
To specify a specific quota, click the quota sizelower button and enter a quota value in theadjacent text entry field. Use the pop–up menuto specify kilobytes or megabytes.
Use the Edit Quota dialog box to alter a user’s quota on a specifiedtablespace. The following figure illustrates the Edit Quota dialog box.
Figure 4 – 5 Edit Quota Dialog Box
The Edit Quota dialog box is described below:
Name of the tablespace for which you arechanging the quota.
New quota size.
The quota value is the maximum amount ofspace the user can allocate in the tablespace.
To specify an unlimited quota for thetablespace, click Unlimited. With an unlimitedquota, the user can allocate an unboundedamount of space in the tablespace.
To specify a specific quota, click the quota sizebutton and enter a quota value in the adjacenttext entry field. Use the pop–up menu tospecify kilobytes or megabytes.
Quota Size
Tablespace
Quota Size

Create User:Privileges and Roles Page
4 – 7Controlling Database Security
On the Privileges and Roles page of the Create User property sheet, youcan assign roles and grant individual privileges to the user. Thefollowing figure illustrates the Privileges and Roles page.
Figure 4 – 6 Privileges and Roles Page of the Create User Property Sheet
The Privileges and Roles page is described below:
Scrolling list of the roles and privileges to begranted to the user.
Displays the Add Privilege to User dialog box.See page 4–8 for a description of the AddPrivilege to User dialog box.
Removes the role or privilege selected in thePrivileges and Roles scrolling list.
Privileges and Roles
Add
Remove

Add Privilege to UserDialog Box
4 – 8 Oracle Server Manager User’s Guide
In the Add Privilege to User dialog box you can grant roles, systemprivileges, and object privileges to a user. You can add a privilege to auser when you create a new user, alter a user, or choose Add Privilege toUser from the User menu.
The following figure illustrates the Add Privilege to User dialog boxwith the Role Privilege Type selected.
Figure 4 – 7 Add Privilege to User Dialog Box with the Role Privilege Type Selected

4 – 9Controlling Database Security
The Add Privilege to User dialog box in Figure 4–7 is described below:
Displays the roles you can grant to the user.
Scrolling list of the roles you can grant. Theseare roles you have created and roles you havebeen granted with the Admin Option. If youhave the GRANT ANY ROLE system privilege,all roles are listed.
Select the role you wish to grant to the user.
Allows the user to grant the role to other usersor roles. If you grant a role with the AdminOption, the user can also alter or drop the role.
The following figure illustrates the Add Privilege to User dialog boxwith the System Privilege Type selected.
Figure 4 – 8 Add Privilege to User Dialog Box with the System Privilege Type Selected
Privilege Type: Role
Defined Roles
Admin Option

4 – 10 Oracle Server Manager User’s Guide
The Add Privilege to User dialog box in Figure 4–8 is described below:
Displays the system privileges you can grant tothe user.
Scrolling list of the system privileges you cangrant. These are the system privileges you havebeen granted with the Admin Option. If youhave the GRANT ANY PRIVILEGE systemprivilege, all privileges are listed.
Select the system privilege you wish to grant tothe user.
Allow the user to grant the system privilege toother users or roles.
The following figure illustrates the Add Privilege to User dialog boxwith the Object Privilege Type selected.
Figure 4 – 9 Add Privilege to User Dialog Box with the Object Privilege Type Selected
Privilege Type: System
System Privileges
Admin Option

☞
4 – 11Controlling Database Security
The Add Privilege to User dialog box in Figure 4–9 is described below:
Displays object privileges.
Scrolling list of all object privileges.
You can grant an object privilege that you havebeen granted with the Grant Option. If you arethe owner of the object, you can grant allprivileges on the object.
The scrolling list includes the item ALL, whichrepresents all object privileges you can grant onan object.
Schema and name of the object on which youare granting privileges.
Enter the schema and object name, or click FindObject.
Displays the Find Schema Object dialog box.See page 4–12 for a description of the FindSchema Object dialog box.
Allows the user to grant the object privilege toother users and roles.
Attention: In the SQL Worksheet, use the GRANT command togrant privileges on a column in a table or view. For informationabout the GRANT command, see the Oracle7 Server SQLReference.
Privilege Type: Object
Object Privileges
Object Name
Find Object
Admin Option

Find Schema ObjectDialog Box
4 – 12 Oracle Server Manager User’s Guide
In the Find Schema Object dialog box you can specify an object on whichto grant object privileges. The following figure illustrates the FindSchema Object dialog box.
Object Name
Figure 4 – 10 Find Schema Object Dialog Box
The Find Schema Object dialog box is described below:
Types of objects on which you can grant objectprivileges.
Click the object types you wish to find, thenclick Filter to find the objects.
Scrolling list of schemas in your database.
Select a schema from the Schema scrolling list.Server Manager retrieves all the objects in thatschema that match the object types you chose inthe Filters.
Scrolling list of objects in the selected schemathat match the object types you chose in theFilters.
Select the object on which you wish to grantobject privileges.
Retrieves the objects in the selected schema thatmatch the object types you chose in the Filters.
Filters
Schema
Object
Filter

Create User:Default Role Page
4 – 13Controlling Database Security
On the Default Role page of the Create User property sheet, you canspecify the default roles for the user. Oracle enables the user’s defaultroles at logon.
Only a role granted directly to the user can be specified as a default role.A role granted through another role cannot be a default role.
The following figure illustrates the Default Role page.
Figure 4 – 11 Default Role Page of the Create User Property Sheet
The Default Role page is described below:
Scrolling list of the roles to be granted to thenew user.
Select the roles you wish to designate as theuser’s default roles. Unlike most other scrollinglists in Server Manager, the Default Rolesscrolling list allows you to make multipleselections.
Selects all roles in the Default Roles scrolling list.
Click All to make all roles granted to the userdefault roles.
Default Roles
All

Altering a User
4 – 14 Oracle Server Manager User’s Guide
Selects none of the roles in the Default Rolesscrolling list.
Click None to make none of the roles granted tothe user default roles.
To alter the characteristics of a user, select the user to be altered from theUser object list and choose Alter from the User menu. The Alter Userproperty sheet appears. You can also bring up the Alter User propertysheet by double–clicking on the user in the User object list.
The Alter User property sheet consists of the following pages:
• General
• Quotas
• Privs & Roles (Privileges and Roles)
• Default Role
• Objects
The following figure illustrates the General page.
Figure 4 – 12 General Page of the Alter User Property Sheet
None

Alter User:General Page
4 – 15Controlling Database Security
The General page of the Alter User property sheet is described below:
Name of the user to be altered.
Method Oracle uses to authenticate the user.
Click OS Authenticated to specify that theoperating system verify the user.
Click Password to require a password for logon.Enter the new password in the adjacent textentry field.
User’s default tablespace.
Use the pop–up menu to choose the newdefault tablespace for objects the user creates.
User’s tablespace for temporary segments.
Use the pop–up menu to choose the newtablespace for the user’s temporary segments.
User’s profile.
Use the pop–up menu to assign a new profile tothe user.
Username
Password
Default Tablespace
Temporary Tablespace
Profile

Alter User:Quotas Page
☞
4 – 16 Oracle Server Manager User’s Guide
On the Quotas page of the Alter User property sheet, you can specify thetablespaces in which the user can allocate space and the maximumamount of space the user can allocate in each. You can also modify orremove existing quotas. The following figure illustrates the Quotas page.
Figure 4 – 13 Quotas Page of the Alter User Property Sheet
The Quotas page is described below:
Scrolling list of the quotas assigned to the user.
Displays the Add Quota dialog box, whichallows you to specify a quota for the user. For adescription of the Add Quota dialog box, seepage 4–17.
Displays the Edit Quota dialog box, whichallows you to alter the quota selected in theQuotas scrolling list. For a description of theEdit Quota dialog box, see page 4–18.
Attention: To remove a quota you have assigned to a user,change the value of the quota to zero.
Quotas
Add
Edit

Add Quota Dialog Box
4 – 17Controlling Database Security
Use the Add Quota dialog box to specify a user’s quota on a specifictablespace. The following figure illustrates the Add Quota dialog box.
Figure 4 – 14 Add Quota Dialog Box
The Add Quota dialog box is described below:
Tablespace to which the quota applies.
Use the pop–up menu to specify the tablespacefor the quota.
Maximum amount of space the user is allowedto allocate in the tablespace.
To specify an unlimited quota for thetablespace, click the Unlimited button. With anunlimited quota, the user can allocate anunbounded amount of space in the tablespace.
To specify a specific quota, click the quota sizelower button and enter a quota value in theadjacent text entry field. Use the pop–up menuto specify kilobytes or megabytes.
Tablespace
Quota Size
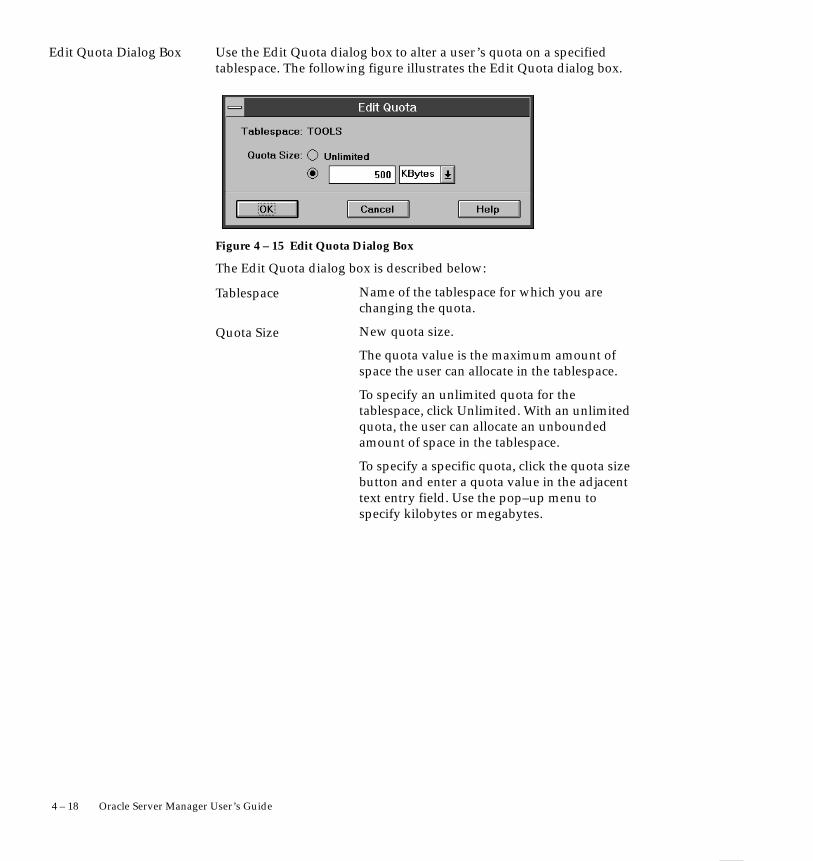
Edit Quota Dialog Box
4 – 18 Oracle Server Manager User’s Guide
Use the Edit Quota dialog box to alter a user’s quota on a specifiedtablespace. The following figure illustrates the Edit Quota dialog box.
Figure 4 – 15 Edit Quota Dialog Box
The Edit Quota dialog box is described below:
Name of the tablespace for which you arechanging the quota.
New quota size.
The quota value is the maximum amount ofspace the user can allocate in the tablespace.
To specify an unlimited quota for thetablespace, click Unlimited. With an unlimitedquota, the user can allocate an unboundedamount of space in the tablespace.
To specify a specific quota, click the quota sizebutton and enter a quota value in the adjacenttext entry field. Use the pop–up menu tospecify kilobytes or megabytes.
Tablespace
Quota Size

Alter User:Privileges and Roles Page
4 – 19Controlling Database Security
On the Privileges and Roles page of the Alter User property sheet, youcan grant or revoke roles or individual privileges from the user. Thefollowing figure illustrates the Privileges and Roles page.
Figure 4 – 16 Privileges and Roles Page of the Alter User Property Sheet
The Privileges and Roles page is described below:
Scrolling list of the roles and privilegesassigned to the user.
Displays the Add Privilege to User dialog box.See page 4–8 for a description of the AddPrivilege to User dialog box.
Removes the role or privilege selected in thePrivileges and Roles scrolling list.
Privileges and Roles
Add
Remove

Alter User:Default Role Page
4 – 20 Oracle Server Manager User’s Guide
On the Default Role page of the Alter User property sheet, you canchange the default roles for the user.
Only a role granted directly to the user can be specified as a default role.A role granted through another role cannot be a default role.
The following figure illustrates the Default Role page.
Figure 4 – 17 Default Role Page of the Alter User Property Sheet
The Default Role page is described below:
Scrolling list of all of the roles granted to theuser.
Select the roles you wish to designate as theuser’s default roles. Unlike most other scrollinglists in Server Manager, the Default Rolesscrolling list allows you to make multipleselections.
Note: Roles assigned as default roles appearselected. Unselected roles are not default rolesfor this user and need to be activated explicitlyby the user after connecting to the database.
Selects all roles in the Default Roles scrollinglist.
Click All to make all roles granted to the userdefault roles.
Default Roles
All

Alter User: Objects Page
4 – 21Controlling Database Security
Selects none of the roles in the Default Rolesscrolling list.
Click None to make none of the roles granted tothe user default roles.
On the Objects page of the Alter User property sheet, you can view thenames of the objects the user owns.
Figure 4 – 18 Objects Page of the Alter User Property Sheet
None
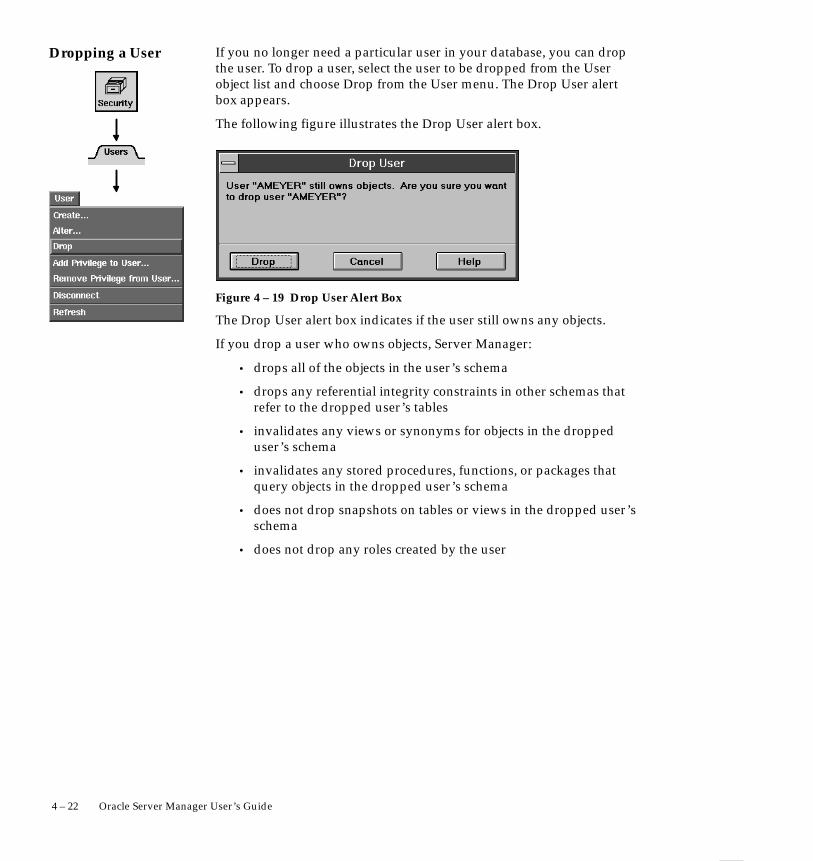
Dropping a User
4 – 22 Oracle Server Manager User’s Guide
If you no longer need a particular user in your database, you can dropthe user. To drop a user, select the user to be dropped from the Userobject list and choose Drop from the User menu. The Drop User alertbox appears.
The following figure illustrates the Drop User alert box.
Figure 4 – 19 Drop User Alert Box
The Drop User alert box indicates if the user still owns any objects.
If you drop a user who owns objects, Server Manager:
• drops all of the objects in the user’s schema
• drops any referential integrity constraints in other schemas thatrefer to the dropped user’s tables
• invalidates any views or synonyms for objects in the droppeduser’s schema
• invalidates any stored procedures, functions, or packages thatquery objects in the dropped user’s schema
• does not drop snapshots on tables or views in the dropped user’sschema
• does not drop any roles created by the user

Adding a Privilege toor Removing aPrivilege from a User
4 – 23Controlling Database Security
To add a privilege to a user, select the user from the User object list andchoose Add Privilege to User from the User menu. The Add Privilege toUser dialog box appears. See page 4–8 for a description of the AddPrivilege to User dialog box.
To remove a privilege from a user, select the user from the User objectlist and choose Remove Privilege from User from the User menu. TheRemove Privilege from User dialog box appears.
The following figure illustrates the Remove Privilege from User dialog box.
Figure 4 – 20 Remove Privilege from User Dialog Box
The Remove Privilege dialog box is described below:
Scrolling list of the privileges and rolesassigned to the user.
Select the role or privilege you wish to revokefrom the user.
Privileges and Roles

Disconnecting a User
☞
4 – 24 Oracle Server Manager User’s Guide
To disconnect a user’s sessions, select a logged in user from the Userobject list and choose Disconnect from the User menu. The DisconnectUser alert box appears.
The following figure illustrates the Disconnect User alert box.
Figure 4 – 21 Disconnect User Alert Box
The Disconnect menu item in the User menu disconnects all sessions forthe user. If you wish to disconnect a specific session, use the Sessionsfolder in the Instance drawer. For information about disconnecting asession from the Sessions folder, see “Disconnecting a User’s Session”on page 5 – 11.
Attention: When you disconnect a session, the session is notactually terminated until the user tries to execute a databaseoperation. In the User object list, the user continues to be listedas logged in until the user tries to executes a database operation.
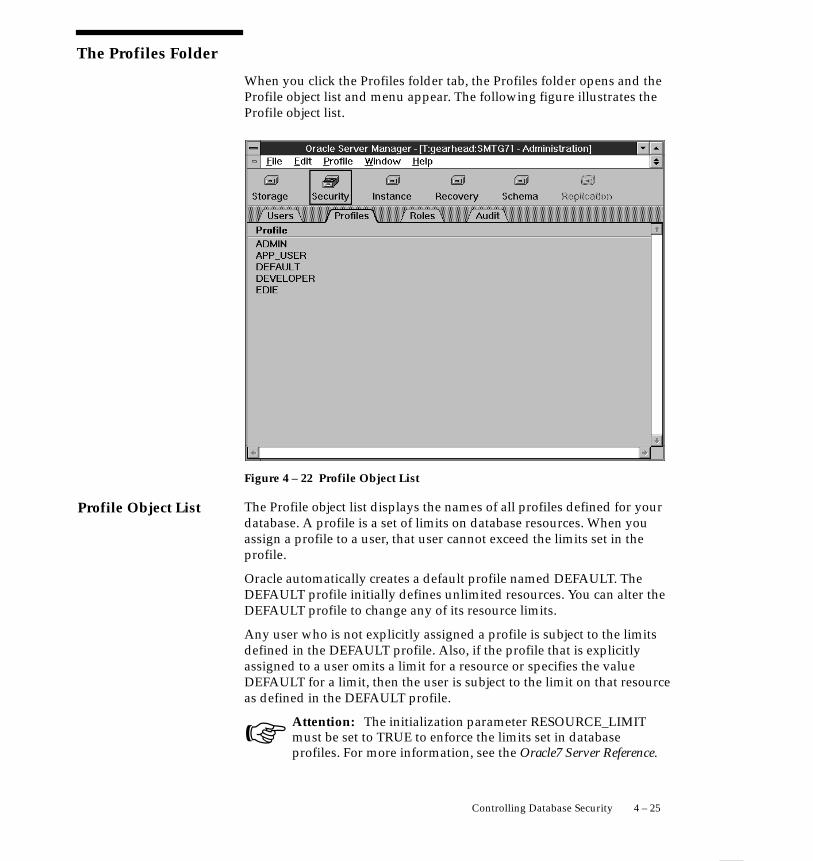
Profile Object List
☞
4 – 25Controlling Database Security
The Profiles Folder
When you click the Profiles folder tab, the Profiles folder opens and theProfile object list and menu appear. The following figure illustrates theProfile object list.
Figure 4 – 22 Profile Object List
The Profile object list displays the names of all profiles defined for yourdatabase. A profile is a set of limits on database resources. When youassign a profile to a user, that user cannot exceed the limits set in theprofile.
Oracle automatically creates a default profile named DEFAULT. TheDEFAULT profile initially defines unlimited resources. You can alter theDEFAULT profile to change any of its resource limits.
Any user who is not explicitly assigned a profile is subject to the limitsdefined in the DEFAULT profile. Also, if the profile that is explicitlyassigned to a user omits a limit for a resource or specifies the valueDEFAULT for a limit, then the user is subject to the limit on that resourceas defined in the DEFAULT profile.
Attention: The initialization parameter RESOURCE_LIMITmust be set to TRUE to enforce the limits set in databaseprofiles. For more information, see the Oracle7 Server Reference.

Creating a Profile
Create Profile:Session and CPU Page
4 – 26 Oracle Server Manager User’s Guide
For information about profiles, see the Oracle7 Server Concepts, theOracle7 Server Administrator’s Guide, and the Oracle7 Server SQL Reference.
To create a profile, choose Create from the Profile menu. The CreateProfile property sheet appears.
The Create Profile property sheet consists of the following pages:
• Session and CPU
• Database Services
• Users
The following figure illustrates the Session and CPU page.
Figure 4 – 23 Session and CPU Page of the Create Profile Property Sheet
The Session and CPU page is described below:
Name of the new profile.
Enter the name of the profile to be created.
Profile Name
4 – 27Controlling Database Security
When you complete the CPU per Session, CPU per Call, Connect Time,and Idle Time fields, a pop–menu provides the following choices:
Use the limit specified for thisresource in the DEFAULTprofile.
The user’s access to thisresource is unlimited.
Enter a value for the limit. Thetext entry fields are unavailableuntil you choose Value fromthe pop–up menu.
Total amount of CPU time allowed in a session.
Use the pop–up menu to choose a limit for totalCPU time used in a session. The limit isexpressed in hundredths of a second.
Maximum amount of CPU time allowed for acall (a parse, execute, or fetch).
Use the pop–up menu to choose a limit for theCPU time used for a call. The limit is expressedin hundredths of a second.
Maximum elapsed time allowed for a session.
Use the pop–up menu to choose a limit for thetotal time for a session. The limit is expressed inminutes.
Maximum idle time allowed in a session.
Idle time is a continuous period of inactive timeduring a session. Long–running queries andother operations are not subject to this limit.
Use the pop–up menu to specify a limit for idletime in a session. The limit is expressed inminutes.
Default
Unlimited
Value
CPU per Session
CPU per Call
Connect Time
Idle Time

Create Profile:Database Services Page
4 – 28 Oracle Server Manager User’s Guide
The following figure illustrates the Database Services page of the CreateProfile property sheet.
Figure 4 – 24 Database Services Page of the Create Profile Property Sheet
The Database Services page is described below:
When you complete the Sessions per User, Reads per Session, and Readsper Call, a pop–menu provides the following choices:
Use the limit specified for thisresource in the DEFAULTprofile.
The user’s access to thisresource is unlimited.
Enter a value for the limit. Thetext entry fields are unavailableuntil you choose Value fromthe pop–up menu.
Maximum number of concurrent sessionsallowed for a user.
Use the pop–up menu to choose a limit for thenumber of concurrent sessions a user can have.
Total number of data block reads allowed in asession.
Default
Unlimited
Value
Sessions per User
Reads per Session

☞
4 – 29Controlling Database Security
Use the pop–up menu to choose a limit for thenumber of data blocks read in a session,including blocks read from memory and disk.
Maximum number of data block reads allowedfor a call (a parse, execute, or fetch).
Use the pop–up menu to choose a limit for thenumber of data blocks read for a call to processa SQL statement.
Maximum amount of private space a sessioncan allocate.
Use the pop–up menu to choose a limit for theamount of private space a session can allocatein the shared pool of the System Global Area(SGA). Use the pop–up menu to specify thelimit in bytes, kilobytes, or megabytes. ThePrivate SGA limit applies only if you are usingthe multi–threaded server architecture.
Total resource cost for a session.
The resource cost for a session is the weightedsum of the CPU time used in the session, theconnect time, the number of reads made in thesession, and the amount of private SGA spaceallocated.
Use the pop–up menu to choose a limit for thetotal resource cost for a session. The limit isexpressed in service units.
Attention: In the SQL Worksheet, you can use the SQLcommand ALTER RESOURCE COST to specify the weights forthe resources in the Composite Limit. For information about theALTER RESOURCE COST command, see the Oracle7 Server SQLReference.
Reads per Call
Private SGA
Composite Limit

Create Profile:Users Page
4 – 30 Oracle Server Manager User’s Guide
On the Users page of the Create Profile property sheet you can assignthe profile to users. The following figure illustrates the Users page.
Figure 4 – 25 Users Page of the Create Profile Property Sheet
The Users page is described below:
Scrolling list of users who have been assignedthe profile.
Displays the Assign Profile dialog box. TheAssign Profile dialog box is described in“Assign Profile Dialog Box” on page 4 – 31.
Removes the user selected in the Users scrollinglist.
Users
Assign
Remove
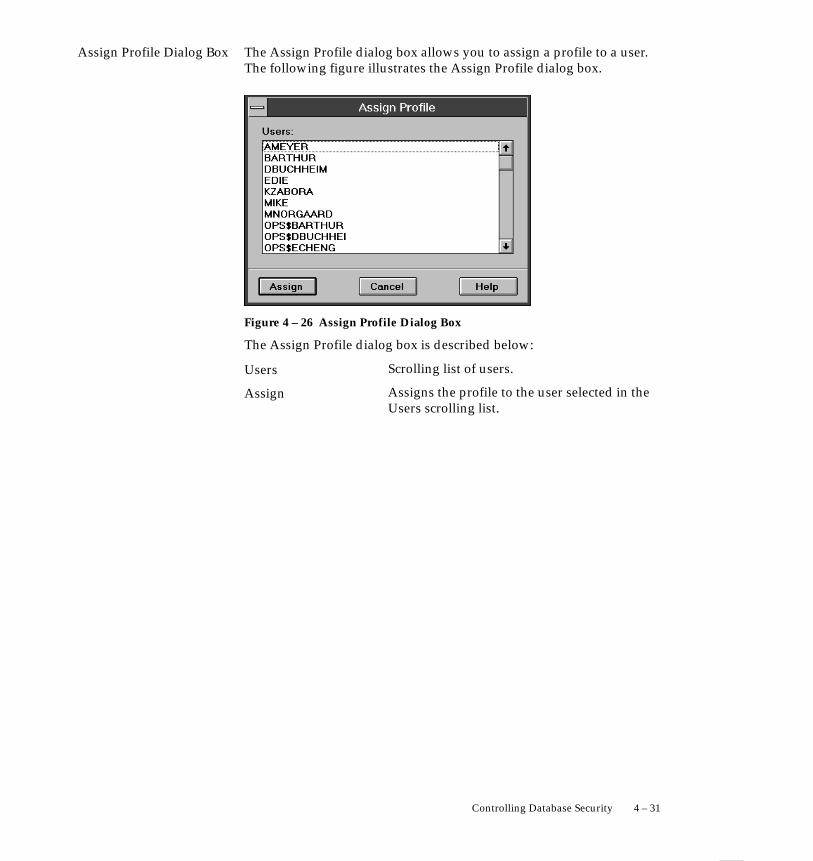
Assign Profile Dialog Box
4 – 31Controlling Database Security
The Assign Profile dialog box allows you to assign a profile to a user.The following figure illustrates the Assign Profile dialog box.
Figure 4 – 26 Assign Profile Dialog Box
The Assign Profile dialog box is described below:
Scrolling list of users.
Assigns the profile to the user selected in theUsers scrolling list.
Users
Assign

Altering a Profile
4 – 32 Oracle Server Manager User’s Guide
To alter the resource limits for an existing profile, select the profile to bealtered from the Profile object list and choose Alter from the Profilemenu. The Alter Profile property sheet appears. You can also bring upthe Alter Profile property sheet by double–clicking on the profile in theProfile object list.
The Alter Profile property sheet consists of the following pages:
• Session and CPU
• Database Services
• Users
The following figure illustrates the Session and CPU page.
Figure 4 – 27 Session and CPU Page of the Alter Profile Property Sheet

Alter Profile:Session and CPU Page
4 – 33Controlling Database Security
The Session and CPU page is described below:
Name of the new profile.
When you complete the CPU per Session, CPU per Call, Connect Time,and Idle Time fields, a pop–menu provides the following choices:
Use the limit specified for thisresource in the DEFAULTprofile.
The user’s access to thisresource is unlimited.
Enter a value for the limit. Thetext entry fields are unavailableuntil you choose Value fromthe pop–up menu.
Total amount of CPU time allowed in a session.
Use the pop–up menu to choose a limit for totalCPU time used in a session. The limit isexpressed in hundredths of a second.
Maximum amount of CPU time allowed for acall (a parse, execute, or fetch).
Use the pop–up menu to choose a limit for theCPU time used for a call. The limit is expressedin hundredths of a second.
Maximum elapsed time allowed for a session.
Use the pop–up menu to choose a limit for thetotal time for a session. The limit is expressed inminutes.
Maximum idle time allowed in a session.
Idle time is a continuous period of inactive timeduring a session. Long–running queries andother operations are not subject to this limit.
Use the pop–up menu to specify a limit for idletime in a session. The limit is expressed inminutes.
Profile Name
Default
Unlimited
Value
CPU per Session
CPU per Call
Connect Time
Idle Time

Alter Profile:Database Services Page
4 – 34 Oracle Server Manager User’s Guide
The following figure illustrates the Database Services page of the AlterProfile property sheet.
Figure 4 – 28 Database Services Page of the Alter Profile Property Sheet
The Database Services page is described below:
When you complete the Sessions per User, Reads per Session, and Readsper Call, a pop–menu provides the following choices:
Use the limit specified for thisresource in the DEFAULTprofile.
The user’s access to thisresource is unlimited.
Enter a value for the limit. Thetext entry fields are unavailableuntil you choose Value fromthe pop–up menu.
Maximum number of concurrent sessionsallowed for a user.
Use the pop–up menu to choose a limit for thenumber of concurrent sessions a user can have.
Total number of data block reads allowed in asession.
Default
Unlimited
Value
Sessions per User
Reads per Session

☞
4 – 35Controlling Database Security
Use the pop–up menu to choose a limit for thenumber of data blocks read in a session,including blocks read from memory and disk.
Maximum number of data block reads allowedfor a call (a parse, execute, or fetch).
Use the pop–up menu to choose a limit for thenumber of data blocks read for a call to processa SQL statement.
Maximum amount of private space a sessioncan allocate.
Use the pop–up menu to choose a limit for theamount of private space a session can allocatein the shared pool of the System Global Area(SGA). Use the pop–up menu to specify thelimit in bytes, kilobytes, or megabytes. ThePrivate SGA limit applies only if you are usingthe multi–threaded server architecture.
Total resource cost for a session.
The resource cost for a session is the weightedsum of the CPU time used in the session, theconnect time, the number of reads made in thesession, and the amount of private SGA spaceallocated.
Use the pop–up menu to choose a limit for thetotal resource cost for a session. The limit isexpressed in service units.
Attention: In the SQL Worksheet, you can use the SQLcommand ALTER RESOURCE COST to specify the weights forthe resources in the Composite Limit. For information about theALTER RESOURCE COST command, see the Oracle7 Server SQLReference.
Reads per Call
Private SGA
Composite Limit

Alter Profile:Users Page
Dropping a Profile
☞
4 – 36 Oracle Server Manager User’s Guide
On the Users page of the Alter Profile property sheet you can view theusers who are assigned the profile. The following figure illustrates theUsers page.
Figure 4 – 29 Users Page of the Alter Profile Property Sheet
If a profile is no longer needed, you can drop it. To drop a profile, selectthe profile to be dropped from the Profile object list and choose Dropfrom the Profile menu. The Drop Profile alert box appears.
The following figure illustrates the Drop Profile alert box.
Figure 4 – 30 Drop Profile Alert Box
The Drop Profile alert box indicates if the profile you wish to drop isassigned to any users. If you drop a profile that is assigned to users,Server Manager assigns the DEFAULT profile to them.
Attention: You cannot drop the DEFAULT profile.

Role Object List
4 – 37Controlling Database Security
The Roles Folder
When you click the Roles folder tab, the Roles folder opens and the Roleobject list and menu appear. The Role object list displays the rolesdefined in your database.
Roles are named groups of privileges granted to users or other roles. Forinformation about managing roles, see the Oracle7 Server Concepts, theOracle7 Server Administrator’s Guide, and the Oracle7 Server SQL Reference.
The following figure illustrates the Role object list.
Figure 4 – 31 Role Object List
The columns of the Role object list are described below:
Name of the role.
Whether or not the role requires a password tobe enabled.
Role
Password
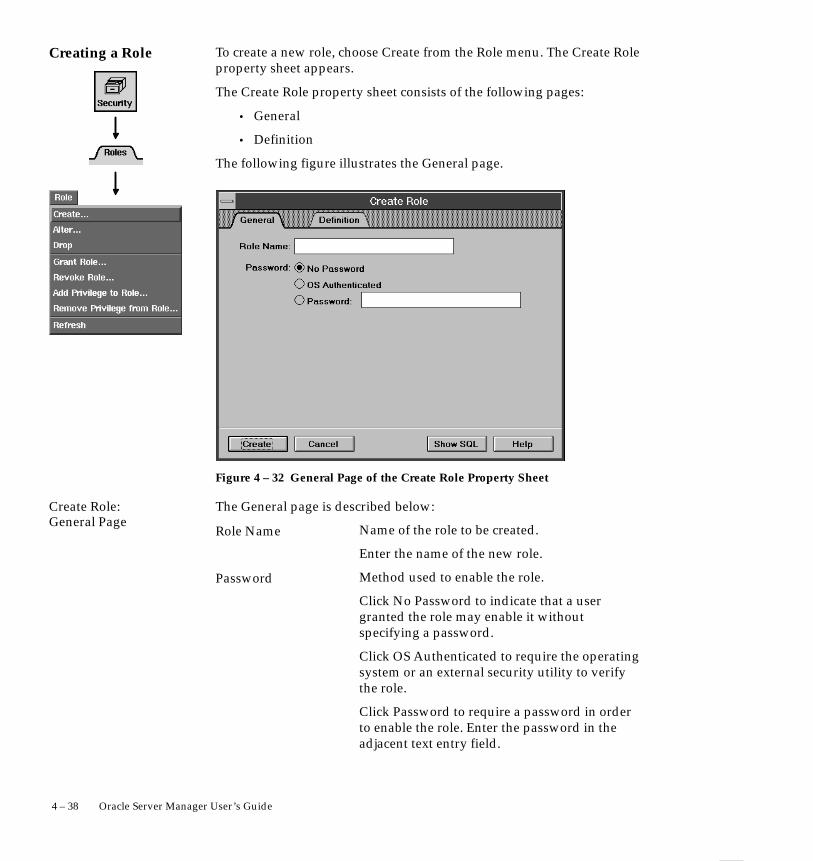
Creating a Role
Create Role:General Page
4 – 38 Oracle Server Manager User’s Guide
To create a new role, choose Create from the Role menu. The Create Roleproperty sheet appears.
The Create Role property sheet consists of the following pages:
• General
• Definition
The following figure illustrates the General page.
Figure 4 – 32 General Page of the Create Role Property Sheet
The General page is described below:
Name of the role to be created.
Enter the name of the new role.
Method used to enable the role.
Click No Password to indicate that a usergranted the role may enable it withoutspecifying a password.
Click OS Authenticated to require the operatingsystem or an external security utility to verifythe role.
Click Password to require a password in orderto enable the role. Enter the password in theadjacent text entry field.
Role Name
Password

Create Role:Definition Page
4 – 39Controlling Database Security
On the Definition page of the Create Role property sheet you can assignroles and grant individual privileges to the role. The following figureillustrates the Definition page.
Figure 4 – 33 Definition Page of the Create Role Property Sheet
The Definition page is described below:
Scrolling list of the roles and privileges to beassigned to the new role.
Displays the Add Privilege to Role dialog box.See “Add Privilege to Role Dialog Box” on page4 – 40 for a description of the Add Privilege toRole dialog box.
Removes the role or privilege selected in thePrivileges and Roles scrolling list.
Privileges and Roles
Add
Remove

Add Privilege to RoleDialog Box
4 – 40 Oracle Server Manager User’s Guide
In the Add Privilege to Role dialog box you can grant roles, systemprivileges, and object privileges to a role. You can add a privilege to arole when you create a new role, alter a role, or choose Add Privilege toRole from the Role menu.
The following figure illustrates the Add Privilege to Role dialog boxwith the Role Privilege Type selected.
Figure 4 – 34 Add Privilege to Role Dialog Box with the Role Privilege Type Selected

4 – 41Controlling Database Security
The Add Privilege to Role dialog box in Figure 4 – 34 is described below:
Displays the roles you can grant to the role youare creating or altering.
Scrolling list of the roles you can grant. Theseare roles you have created and roles you havebeen granted with the Admin Option. If youhave the GRANT ANY ROLE system privilege,all roles are listed.
Select the role you wish to grant to the role youare creating or altering.
Allow a grantee to grant the role to other usersor roles.
The following figure illustrates the Add Privilege to Role dialog boxwith the System Privilege Type selected.
Figure 4 – 35 Add Privilege to Role Dialog Box with the System Privilege Type Selected
The Add Privilege to Role dialog box in Figure 4 – 35 is described below:
Displays the system privileges you can grant tothe role.
Privilege Type: Role
Defined Roles
Admin Option
Privilege Type: System

4 – 42 Oracle Server Manager User’s Guide
Scrolling list of the system privileges you cangrant. These are the system privileges you havebeen granted with the Admin Option. If youhave the GRANT ANY PRIVILEGE systemprivilege, all privileges are listed.
Select the system privilege you wish to grant tothe role.
Allow users assigned this role to grant thesystem privilege to other users or roles.
The following figure illustrates the Add Privilege to Role dialog boxwith the Object Privilege Type selected.
Figure 4 – 36 Add Privilege to Role Dialog Box with the Object Privilege Type Selected
System Privileges
Admin Option

4 – 43Controlling Database Security
The Add Privilege to Role dialog box in Figure 4 – 36 is described below:
Displays object privileges.
Scrolling list of all object privileges.
You can grant an object privilege that you havebeen granted with the Grant Option. If you arethe owner of the object, you can grant allprivileges on the object.
The scrolling list includes the item ALL, whichrepresents all object privileges you can grant foran object.
Schema and name of the object on which youare granting privileges.
Enter the schema and object name, or click FindObject.
Displays the Find Schema Object dialog box.See “Find Schema Object Dialog Box” on page4 – 44 for a description of the Find SchemaObject dialog box.
Privilege Type: Object
Object Privileges
Object Name
Find Object

Find Schema ObjectDialog Box
4 – 44 Oracle Server Manager User’s Guide
In the Find Schema Object dialog box you can specify an object on whichto grant object privileges. The following figure illustrates the FindSchema Object dialog box.
Object Name
Figure 4 – 37 Find Schema Object Dialog Box
The Find Schema Object dialog box is described below:
Types of objects on which you can grant objectprivileges.
Click the object types you wish to find, thenclick Filter to find the objects.
Scrolling list of schemas in your database.
Select a schema from the Schema scrolling list.Server Manager retrieves all the objects in thatschema that match the object types you chose inthe Filters.
Filters
Schema
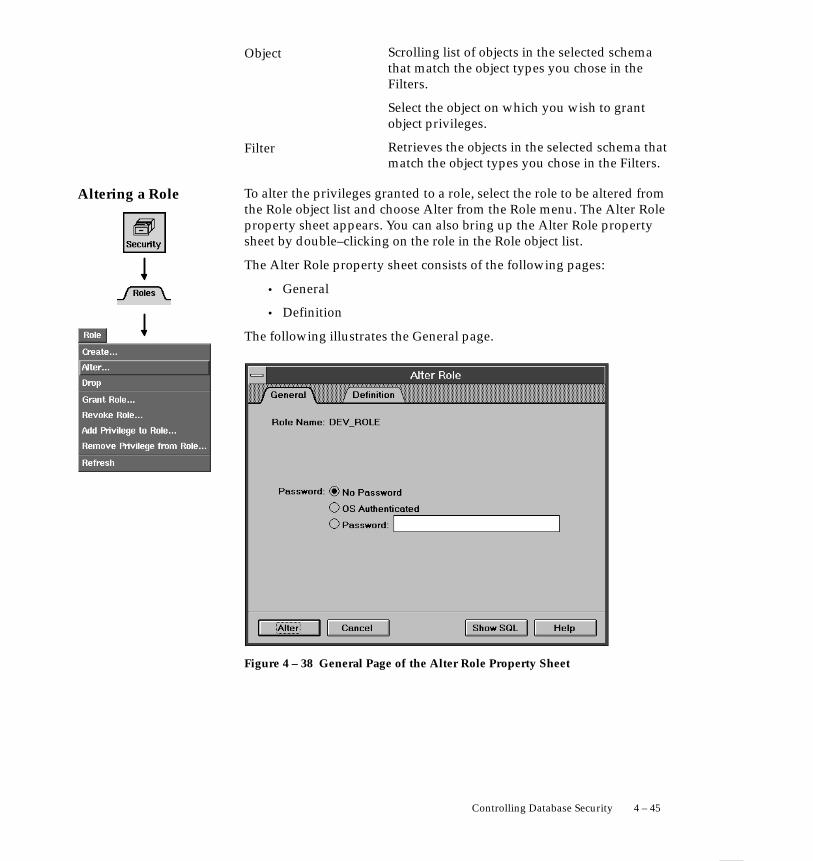
Altering a Role
4 – 45Controlling Database Security
Scrolling list of objects in the selected schemathat match the object types you chose in theFilters.
Select the object on which you wish to grantobject privileges.
Retrieves the objects in the selected schema thatmatch the object types you chose in the Filters.
To alter the privileges granted to a role, select the role to be altered fromthe Role object list and choose Alter from the Role menu. The Alter Roleproperty sheet appears. You can also bring up the Alter Role propertysheet by double–clicking on the role in the Role object list.
The Alter Role property sheet consists of the following pages:
• General
• Definition
The following illustrates the General page.
Figure 4 – 38 General Page of the Alter Role Property Sheet
Object
Filter

Alter Role:General Page
Alter Role:Definition Page
4 – 46 Oracle Server Manager User’s Guide
The General page is described below:
Name of the role you wish to alter.
Method used to enable the role.
Click No Password to indicate that a usergranted the role may enable it withoutspecifying a password.
Click OS Authenticated to require the operatingsystem or an external security utility to verifythe role.
Click Password to require a password in orderto enable the role. Enter the password in theadjacent text entry field.
On the Definition page of the Alter Role property sheet you can grant orrevoke roles or privileges from the role. The following figure illustratesthe Definition page.
Figure 4 – 39 Definition Page of the Alter Role Property Sheet
Role Name
Password

Dropping a Role
4 – 47Controlling Database Security
The Definition page is described below:
Scrolling list of the roles and privilegesassigned to the role being altered.
Displays the Add Privilege to Role dialog box.See “Add Privilege to Role Dialog Box” on page4 – 40 for a description of the Add Privilege toRole dialog box.
Removes the role or privilege selected in thePrivileges and Roles scrolling list.
If a particular role is no longer needed, you can drop it. To drop a role,select the role to be dropped from the Role object list and choose Dropfrom the Role menu. The Drop Role alert box appears.
The following figure illustrates the Drop Role alert box.
Figure 4 – 40 Drop Role Alert Box
Privileges and Roles
Add
Remove
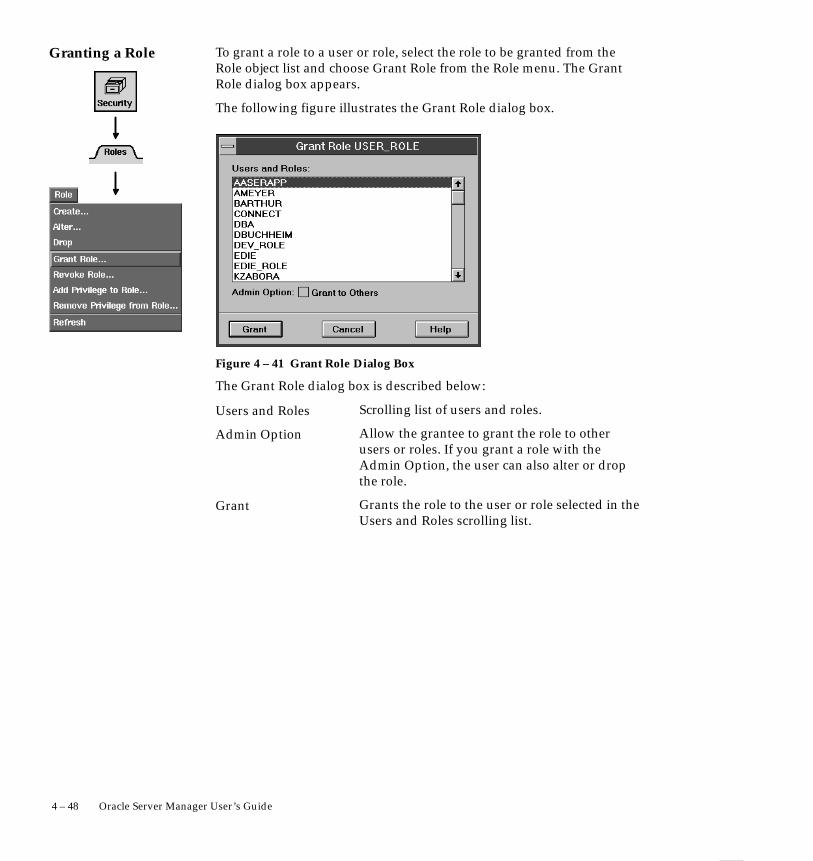
Granting a Role
4 – 48 Oracle Server Manager User’s Guide
To grant a role to a user or role, select the role to be granted from theRole object list and choose Grant Role from the Role menu. The GrantRole dialog box appears.
The following figure illustrates the Grant Role dialog box.
Figure 4 – 41 Grant Role Dialog Box
The Grant Role dialog box is described below:
Scrolling list of users and roles.
Allow the grantee to grant the role to otherusers or roles. If you grant a role with theAdmin Option, the user can also alter or dropthe role.
Grants the role to the user or role selected in theUsers and Roles scrolling list.
Users and Roles
Admin Option
Grant

Revoking a Role
4 – 49Controlling Database Security
To revoke a role from a user or role, select the role to be revoked fromthe Role object list and choose Revoke Role from the Role menu. TheRevoke Role dialog box appears.
The following figure illustrates the Revoke Role dialog box.
Figure 4 – 42 Revoke Role Dialog Box
The Revoke Role dialog box is described below:
Scrolling list of users and roles that have beengranted the role.
Revokes the role from the user or role selectedin the Users and Roles scrolling list.
Users and Roles
Revoke

Adding a Privilege toor Removing aPrivilege from a Role
4 – 50 Oracle Server Manager User’s Guide
To add a privilege to a role, select the role from the Role object list andchoose Add Privilege to Role from the Role menu. The Add Privilege toRole dialog box appears. For a description of the Add Privilege to Roledialog box, see “Add Privilege to Role Dialog Box” on page 4 – 40.
To remove a privilege from a role, select the role from the Role object listand choose Remove Privilege from Role from the Role menu. TheRemove Privilege from Role dialog box appears.
The following figure illustrates the Remove Privilege from Role dialogbox.
Figure 4 – 43 Remove Privilege from Role Dialog Box
The Remove Privilege from Role dialog box is described below:
Scrolling list of privileges and roles assigned tothe role.
Select the role or privilege you wish to revokefrom the role.
Privileges and Roles
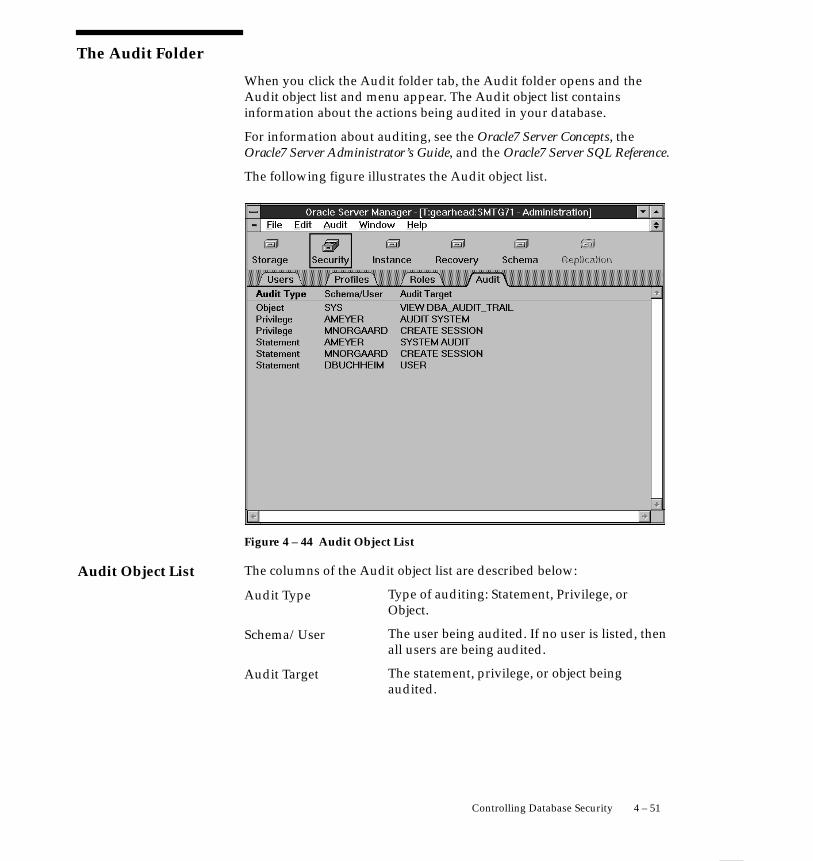
Audit Object List
4 – 51Controlling Database Security
The Audit Folder
When you click the Audit folder tab, the Audit folder opens and theAudit object list and menu appear. The Audit object list containsinformation about the actions being audited in your database.
For information about auditing, see the Oracle7 Server Concepts, theOracle7 Server Administrator’s Guide, and the Oracle7 Server SQL Reference.
The following figure illustrates the Audit object list.
Figure 4 – 44 Audit Object List
The columns of the Audit object list are described below:
Type of auditing: Statement, Privilege, orObject.
The user being audited. If no user is listed, thenall users are being audited.
The statement, privilege, or object beingaudited.
Audit Type
Schema/User
Audit Target

4 – 52 Oracle Server Manager User’s Guide

C H A P T E R
5T
5 – 1Managing Instances and Sessions
Managing Instancesand Sessions
his chapter describes how to use Server Manager to manageinstances and sessions. This chapter assumes that you have readChapter 2, “Overview of the Administration Manager,” and are familiarwith the interface elements of the Administration Manager.
In the Instance drawer, you can start up and shut down a database, viewthe values of initialization parameters, resolve in–doubt transactions,and manage users’ sessions. This chapter describes the commandsavailable in the Instance drawer’s folders:
• Database
• Initialization
• Transactions
• Sessions

Database Object List
☞
5 – 2 Oracle Server Manager User’s Guide
The Database Folder
When you click the Database folder tab, the Database folder opens andthe Database object list and menu appear. The Database object listcontains information about the memory assigned to the System GlobalArea (SGA).
The SGA is a shared memory region that contains data and controlinformation for an Oracle instance. For more information about theSystem Global Area, see the Oracle7 Server Concepts.
The following figure illustrates the Database object list.
Figure 5 – 1 Database Object List
The columns of the Database object list are described below:
The four components of the SGA.
Size of each SGA component in kilobytes.
Attention: If the database is not running, the Database objectlist contains the message “ORACLE not available.”
SGA Component
Size (K)

Starting Up a Database
Startup Database DialogBox
5 – 3Managing Instances and Sessions
Before starting up a release 7.1 or later database, you must connect asSYSDBA or SYSOPER. For information about connecting as SYSDBA orSYSOPER, see the Oracle7 Server Documentation Addendum. For release7.0, you must be connected as INTERNAL before starting up thedatabase. For information about starting up a database, see the Oracle7Server Administrator’s Guide.
To start up an instance and optionally mount and open a database,choose Startup from the Database menu. The Startup Database dialogbox appears.
The following figure illustrates the Startup Database dialog box.
Figure 5 – 2 Startup Database Dialog Box
The Startup Database dialog box is described below:
Starts up the instance, and mounts and opensthe database.
Starts up the instance and mounts the database.The database is accessible only to databaseadministrators.
Starts up the instance, but does not mount thedatabase. Use this mode when you are planningto create a database.
Startup Mode: Open
Startup Mode: Mount
Startup Mode:Nomount

OSDoc
OSDoc
5 – 4 Oracle Server Manager User’s Guide
Name of the parameter file used to start theinstance. The parameter file must reside on themachine on which you are running ServerManager.
If you do not specify a parameter file, ServerManager looks for the parameter file in thedefault location for your platform. Forinformation about the default location for theparameter file, see your operatingsystem–specific Oracle documentation.
Displays the standard file selection dialog boxfor your platform and allows you to locate theparameter file. For information about thestandard file selection dialog box for yoursystem, see your operating system–specificdocumentation.
Performs a shutdown in abort mode beforetrying to start the database.
Indicates that the database should be opened inrestricted mode. In restricted mode, thedatabase is accessible only to users with theRESTRICTED SESSION system privilege.
Parameter File
Find File
Startup Options: Force
Startup Options:Restrict

Shutting Down aDatabase
Shutdown DatabaseDialog Box
☞
5 – 5Managing Instances and Sessions
Before shutting down a release 7.1 or later database, you must connectas SYSDBA or SYSOPER. For information about connecting as SYSDBAor SYSOPER, see the Oracle7 Server Documentation Addendum. For release7.0, you must be connected as INTERNAL before shutting down thedatabase. For information about shutting down a database, see theOracle7 Server Administrator’s Guide.
To shut down a database, choose Shutdown from the Database menu.The Shutdown Database dialog box appears.
The following figure illustrates the Shutdown Database dialog box.
Figure 5 – 3 Shutdown Database Dialog Box
The Shutdown Database dialog box is described below:
Shuts down the database in normal mode:
• No new connections are allowed.
• Before shutting down the database,Oracle waits for all currently connectedusers to disconnect.
• The next startup of the database does notrequire instance recovery.
Attention: The Administration Manager, SQL Worksheet, andSystem Monitors create separate connections when you startthem. When performing a shutdown in normal mode,remember to close these windows, or the shutdown will notcomplete.
Shutdown Mode:Normal
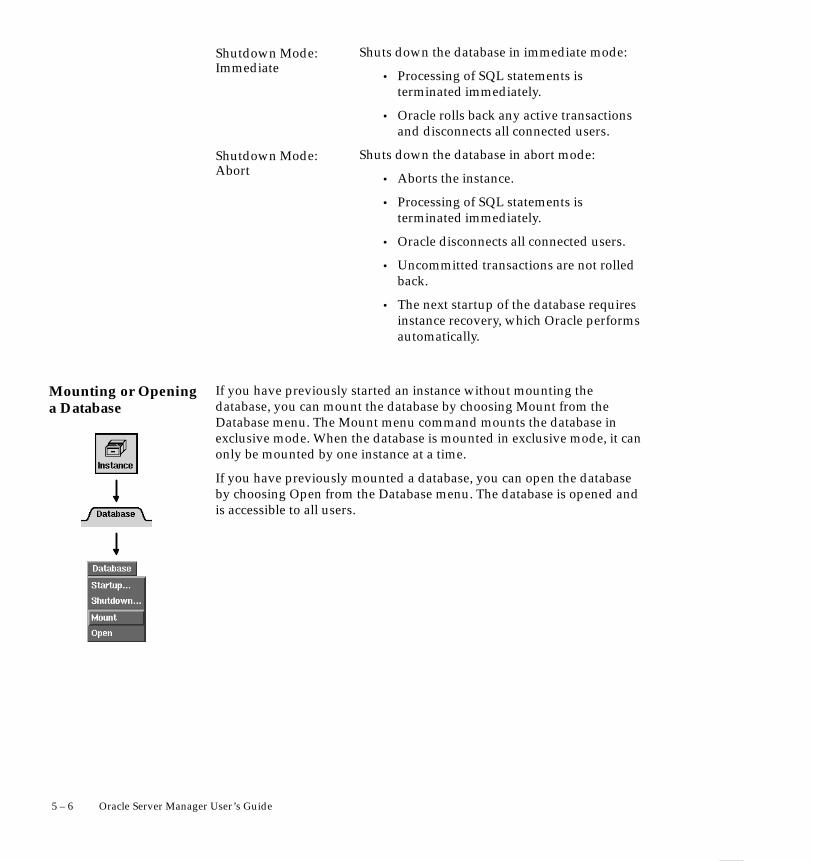
Mounting or Openinga Database
5 – 6 Oracle Server Manager User’s Guide
Shuts down the database in immediate mode:
• Processing of SQL statements isterminated immediately.
• Oracle rolls back any active transactionsand disconnects all connected users.
Shuts down the database in abort mode:
• Aborts the instance.
• Processing of SQL statements isterminated immediately.
• Oracle disconnects all connected users.
• Uncommitted transactions are not rolledback.
• The next startup of the database requiresinstance recovery, which Oracle performsautomatically.
If you have previously started an instance without mounting thedatabase, you can mount the database by choosing Mount from theDatabase menu. The Mount menu command mounts the database inexclusive mode. When the database is mounted in exclusive mode, it canonly be mounted by one instance at a time.
If you have previously mounted a database, you can open the databaseby choosing Open from the Database menu. The database is opened andis accessible to all users.
Shutdown Mode:Immediate
Shutdown Mode:Abort

Initialization ObjectList
5 – 7Managing Instances and Sessions
The Initialization Folder
When you click the Initialization folder tab, the Initialization folderopens and the Initialization object list appears. The Initialization objectlist contains information about the parameters defined in theinitialization parameter file used to start up your instance. TheInitialization folder contains only the Initialization object list. There areno commands available in the Initialization folder.
The following figure illustrates the Initialization object list.
Figure 5 – 4 Initialization Object List
The columns of the Initialization object list are described below:
Name of the initialization parameter.
Whether the parameter’s value is the defaultvalue.
Datatype of the parameter.
Value of the parameter.
Parameter Name
Default
Type
Value
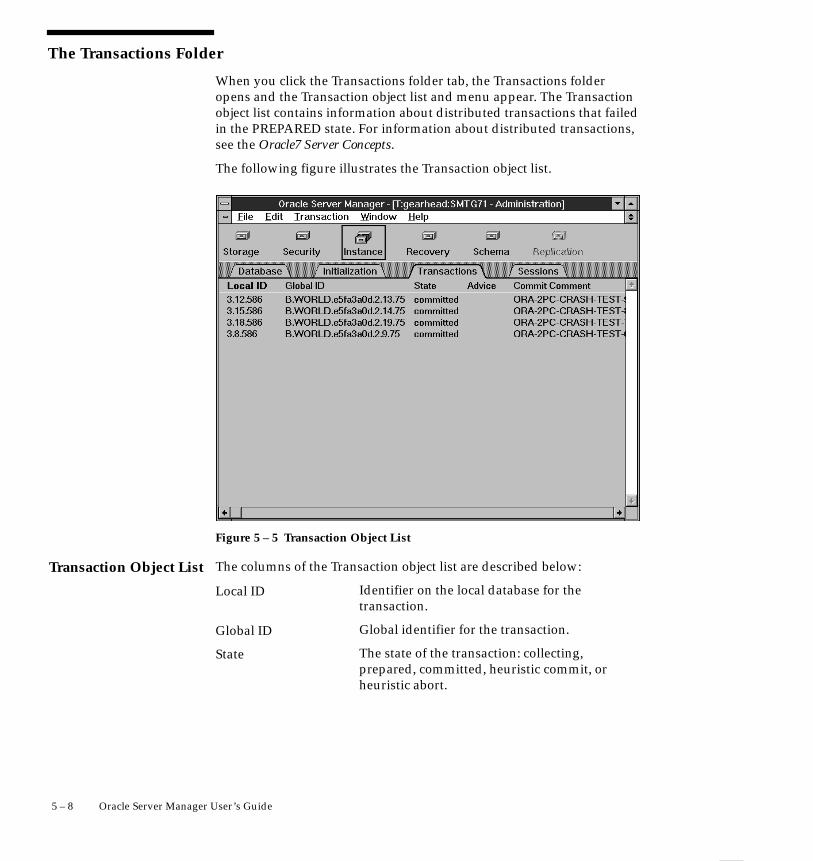
Transaction Object List
5 – 8 Oracle Server Manager User’s Guide
The Transactions Folder
When you click the Transactions folder tab, the Transactions folderopens and the Transaction object list and menu appear. The Transactionobject list contains information about distributed transactions that failedin the PREPARED state. For information about distributed transactions,see the Oracle7 Server Concepts.
The following figure illustrates the Transaction object list.
Figure 5 – 5 Transaction Object List
The columns of the Transaction object list are described below:
Identifier on the local database for thetransaction.
Global identifier for the transaction.
The state of the transaction: collecting,prepared, committed, heuristic commit, orheuristic abort.
Local ID
Global ID
State
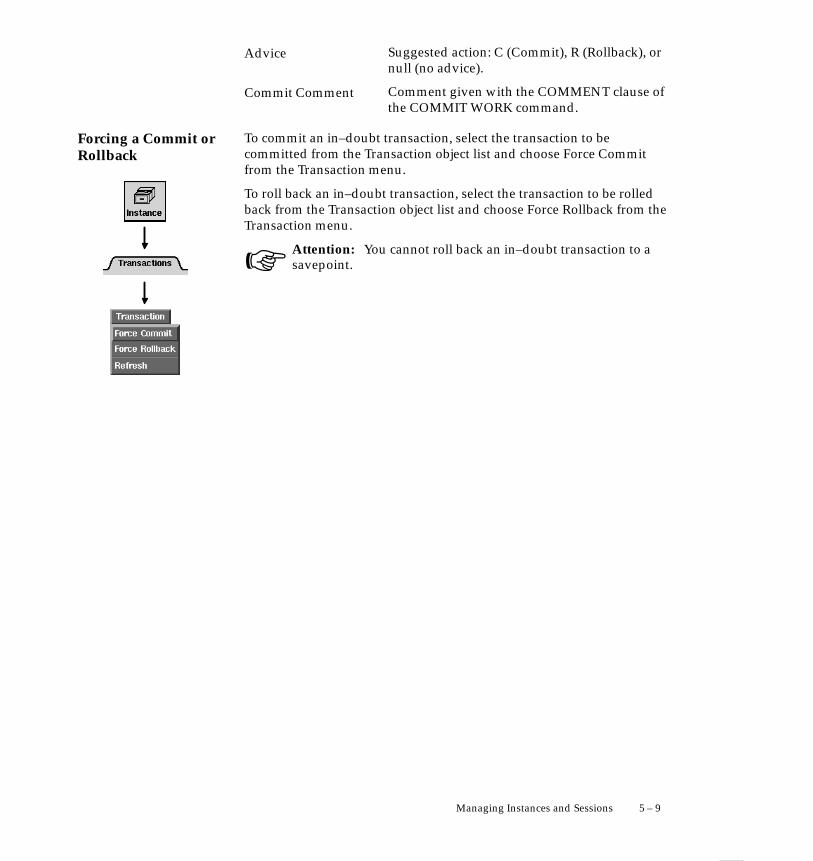
Forcing a Commit orRollback
☞
5 – 9Managing Instances and Sessions
Suggested action: C (Commit), R (Rollback), ornull (no advice).
Comment given with the COMMENT clause ofthe COMMIT WORK command.
To commit an in–doubt transaction, select the transaction to becommitted from the Transaction object list and choose Force Commitfrom the Transaction menu.
To roll back an in–doubt transaction, select the transaction to be rolledback from the Transaction object list and choose Force Rollback from theTransaction menu.
Attention: You cannot roll back an in–doubt transaction to asavepoint.
Advice
Commit Comment
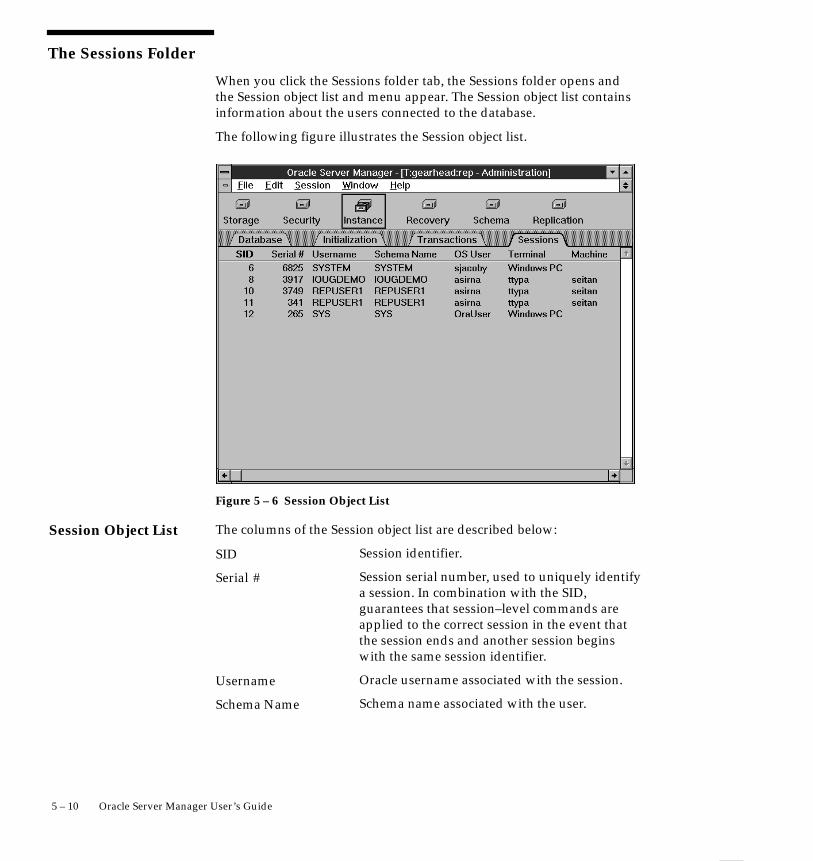
Session Object List
5 – 10 Oracle Server Manager User’s Guide
The Sessions Folder
When you click the Sessions folder tab, the Sessions folder opens andthe Session object list and menu appear. The Session object list containsinformation about the users connected to the database.
The following figure illustrates the Session object list.
Figure 5 – 6 Session Object List
The columns of the Session object list are described below:
Session identifier.
Session serial number, used to uniquely identifya session. In combination with the SID,guarantees that session–level commands areapplied to the correct session in the event thatthe session ends and another session beginswith the same session identifier.
Oracle username associated with the session.
Schema name associated with the user.
SID
Serial #
Username
Schema Name

Disconnecting a User’sSession
Restricting or AllowingSessions
5 – 11Managing Instances and Sessions
Operating system username.
Operating system terminal name.
Operating system machine through which theuser is connected.
To disconnect a user’s session, select the session to disconnect from theSession object list and choose Disconnect from the Session menu. TheDisconnect Session alert box appears.
The following figure illustrates the Disconnect Session alert box.
Figure 5 – 7 Disconnect Session Alert Box
To make the database accessible only to users with the RESTRICTEDSESSION system privilege, choose Restrict from the Session menu. Onlyusers with the RESTRICTED SESSION system privilege are allowed toconnect. Users already connected are not affected.
To make the database accessible to all users, choose Allow All from theDatabase menu. All users with the CREATE SESSION system privilegeare allowed to connect.
OS User
Terminal
Machine

5 – 12 Oracle Server Manager User’s Guide

C H A P T E R
6
T
6 – 1Backing Up and Recovering the Database
Backing Up andRecovering theDatabase
his chapter describes how to use Server Manager to manage onlinebackups, apply log files during recovery, and manage your redo logfiles. This chapter assumes that you have read Chapter 2, “Overview ofthe Administration Manager,” and are familiar with the interfaceelements of the Administration Manager.
This chapter describes the commands available in the Recoverydrawer’s folders:
• Backup
• Recovery
• Redo Logs

Backup Object List
6 – 2 Oracle Server Manager User’s Guide
The Backup Folder
When you click the Backup folder tab, the Backup folder opens and theBackup object list and menu appear. The Backup folder object listdisplays the size and backup status of each tablespace in the database.
The following figure illustrates the Backup object list.
Figure 6 – 1 Backup Object List
The columns of the Backup object list are described below:
Name of the tablespace.
Size of the tablespace (in kilobytes).
Status of the tablespace: ONLINE, Offline, orReady for Backup (marked for online backup).
Time the online tablespace backup started.
Tablespace
Size (K)
Backup Status
Started

Starting or Ending anOnline Backup
☞
OSDoc
☞
6 – 3Backing Up and Recovering the Database
To prepare the datafiles of an online tablespace for backup, select thetablespace to be backed up and choose Start Online Backup from theBackup menu. In the Backup object list, the status of the tablespacechanges to Ready for Backup.
Tablespaces that are offline can be backed up at any time, so there is noneed to mark offline tablespaces for online backup.
After you have marked a tablespace as ready for backup, you can backup the datafiles that belong to the tablespace. You must back up thedatafiles through your operating system. You can use the Datafilesfolder in the Storage drawer to identify all datafiles belonging to atablespace.
Attention: In order to perform an online backup, you must beoperating in ARCHIVELOG mode. See the Oracle7 ServerAdministrator’s Guide for information about ARCHIVELOGmode.
Additional Information: For information about performingbackups on your operating system, see your platform–specificOracle documentation.
Once you have completed your backup of the tablespace, mark the endof the backup. To mark the completion of an online tablespace backup,choose End Online Backup from the Backup menu.
Attention: If you forget to indicate the end of an onlinetablespace backup and subsequently shut down the database,Oracle assumes that media recovery is necessary at the nextinstance startup. Recovery may require the use of the archivedredo log files.

Recovery Object List
6 – 4 Oracle Server Manager User’s Guide
The Recovery Folder
When you click the Recovery folder tab, the Recovery folder opens andthe Recovery object list and menu appear. The Recovery object listdisplays information about archived log files needed for recovery. If norecovery is needed, the object list contains the message “No datafound”.
The following figure illustrates the Recovery object list.
Figure 6 – 2 Recovery Object List
The columns of the Recovery object list are described below:
Sequence number of the archived log.
Time at which the log was archived.
Name of the file when archived.
Sequence
Time
Archive Name

Applying a Log File
6 – 5Backing Up and Recovering the Database
To apply archived redo log files during media recovery, choose Applyfrom the Recovery menu. The Apply Recovery Archives dialog boxappears.
The following figure illustrates the Apply Recovery Archives dialog box.
Figure 6 – 3 Apply Recovery Archives Dialog Box
The Apply Recovery Archives dialog box is described below:
An output pane that displays prompts andstatus messages as recovery proceeds.
Text entry field that displays the next archivedlog file to apply.
The Next Archive File field displays the defaultnext log file. You can edit the name of the file orenter the name of a different file to apply.
History
Next Archive File

OSDoc
6 – 6 Oracle Server Manager User’s Guide
Scrolling list that displays the archived redologs that still need to be applied.
Saves the contents of the History pane to a file.Displays the standard file selection dialog boxfor your platform and allows you to specify thefile.
Displays the standard file selection dialog boxfor your platform, and allows you to select a fileto apply next.
Applies the file specified in the Next ArchiveFile field.
Applies all remaining archived redo log files.When the last log has been applied, the button’sname changes to “Done”.
Stops the recovery operation. Database isrecovered up through the last log file applied.
Additional Information: For information about the standardfile selection dialog box for your system, see your operatingsystem–specific documentation.
Remaining Archives
Save History
Find Archive
Apply Next
Apply All
Cancel
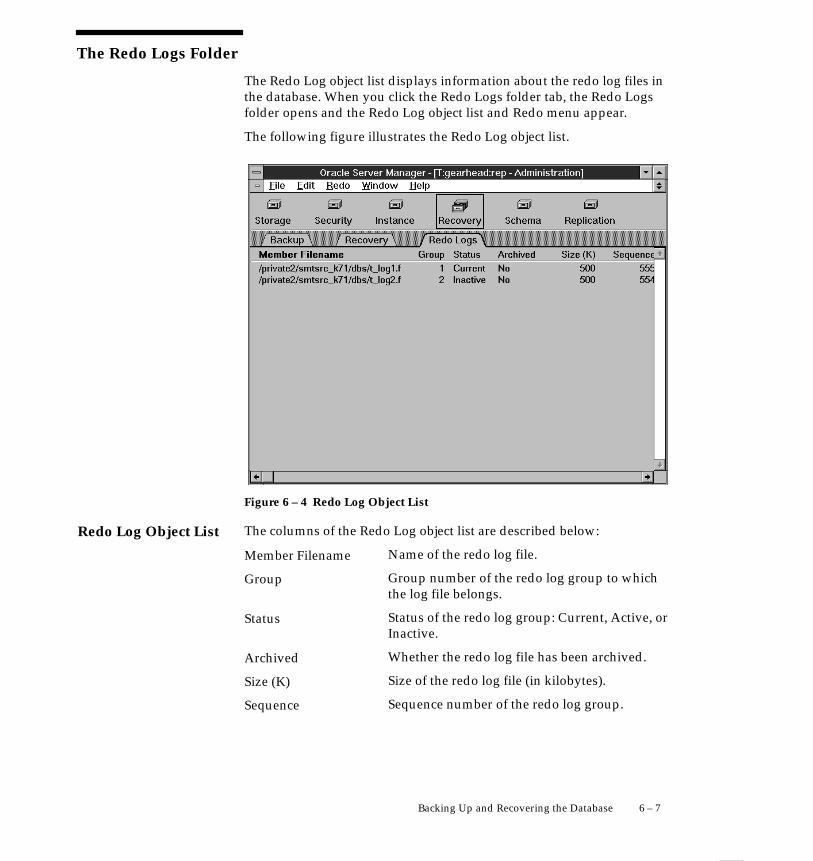
Redo Log Object List
6 – 7Backing Up and Recovering the Database
The Redo Logs Folder
The Redo Log object list displays information about the redo log files inthe database. When you click the Redo Logs folder tab, the Redo Logsfolder opens and the Redo Log object list and Redo menu appear.
The following figure illustrates the Redo Log object list.
Figure 6 – 4 Redo Log Object List
The columns of the Redo Log object list are described below:
Name of the redo log file.
Group number of the redo log group to whichthe log file belongs.
Status of the redo log group: Current, Active, orInactive.
Whether the redo log file has been archived.
Size of the redo log file (in kilobytes).
Sequence number of the redo log group.
Member Filename
Group
Status
Archived
Size (K)
Sequence

Adding a Log FileGroup
Group Specification Page
6 – 8 Oracle Server Manager User’s Guide
To add a new redo log group to your database, choose Add LogfileGroup from the Redo menu. The Add Redo Logfile Group propertysheet appears. The Add Redo Logfile Group property sheet consists ofone page, called the Group Specification page.
The following figure illustrates the Add Redo Logfile Group propertysheet.
Figure 6 – 5 Add Redo Logfile Group Property Sheet
The Group Specification page is described below:
Group number for the redo log group.
The group number uniquely identifies the redolog group. Server Manager generates thedefault value automatically. You can enter adifferent group number in this field, if youdesire.
Allows Oracle to reuse existing file(s).
Instructs Oracle to create new file(s).
Specify the size of the new file(s) in the Newfile(s) size field. Use the pop–up menu tospecify kilobytes or megabytes.
Scrolling list of members to be included in theredo log group.
Group Number
Use existing file(s)
New file(s) size
Files scrolling list

New Logfile Dialog Box
OSDoc
6 – 9Backing Up and Recovering the Database
Displays the New Logfile dialog box and allowsyou to specify a member to add to the redo loggroup.
When you add a new member to the group, itsname appears in the Files scrolling list. See“New Logfile Dialog Box” on page 6 – 9 for adescription of the New Logfile dialog box.
Displays the Edit Logfile dialog box.
Select the filename you wish to edit from theFiles scrolling list and click Edit to edit thefilename. See “Edit Logfile Dialog Box” on page6 – 10 for a description of the Edit Logfile dialogbox.
Removes a member from the redo log group.
Select the member to be removed from the Filesscrolling list and click Remove.
Use the New Logfile dialog box to specify the name of a log file to addto the redo log group. The following figure illustrates the New Logfiledialog box.
Figure 6 – 6 New Logfile Dialog Box
Enter the name of the new group member in the Filename text entryfield. The file must be fully specified according to the conventions ofyour operating system. You can also click the Find File button to bringup the standard file selection dialog box for your platform.
Additional Information: For information about specifyingfilenames for your system, see your operating system–specificOracle documentation.
New
Edit
Remove

Edit Logfile Dialog Box
Dropping a Log FileGroup
☞
6 – 10 Oracle Server Manager User’s Guide
Use the Edit Logfile dialog box to edit the name of a log file in a redo loggroup. The following figure illustrates the Edit Logfile dialog box.
Figure 6 – 7 Edit Logfile Dialog Box
You can edit the filename in the Filename field. You can also click theFind File button to bring up the standard file selection dialog box foryour platform.
To drop a redo log group, select a member of the group to be droppedfrom the Redo Log object list and choose Drop Logfile Group from theRedo menu. The Drop Logfile Group alert box appears.
The following figure illustrates the Drop Logfile Group alert box.
Figure 6 – 8 Drop Logfile Group Alert Box
Attention: Dropping a log file group drops all of its members.You cannot drop the active redo log group.

Adding a Log FileMember
Member SpecificationPage
6 – 11Backing Up and Recovering the Database
To add a new member to a redo log group, choose Add Logfile Memberfrom the Redo menu. The Add Redo Logfile Member property sheetappears. The Add Redo Logfile Member property sheet consists of onepage, called the Member Specification page.
The following figure illustrates the Add Redo Logfile Member propertysheet.
Figure 6 – 9 Add Redo Logfile Member Property Sheet
The Member Specification page is described below:
Name of the file to add to the redo log group.
Enter the name of the file in the Filename field.The file must be fully specified according to theconventions of your operating system.
Displays the standard file selection dialog boxfor your platform.
Allows Oracle to reuse an existing file.
Instructs Oracle to create the specified file.
Scrolling list of existing redo log groups.
To specify the new file’s group, select the groupnumber from the Group scrolling list.
Filename
Find File
Use Existing File
New File
Group

Dropping a Log FileMember
Renaming a Log FileMember
OSDoc
6 – 12 Oracle Server Manager User’s Guide
To drop a log file member from a redo log group, select the log file to bedropped from the Redo Log object list and choose Drop Logfile Memberfrom the Redo menu. The Drop Logfile Member alert box appears.
The following figure illustrates the Drop Logfile Member alert box.
Figure 6 – 10 Drop Logfile Member Alert Box
To rename a log file, select the log file to be renamed from the Redo Logobject list and choose Rename Logfile Member from the Redo menu. TheRename Logfile Member dialog box appears. For information aboutrenaming redo log files, see the Oracle7 Server Administrator’s Guide.
The following figure illustrates the Rename Logfile Member dialog box.
Figure 6 – 11 Rename Logfile Member Dialog Box
The Rename Logfile Member menu command only renames the log filein the control file. It does not actually rename the file in your operatingsystem. You must rename the file manually.
Additional Information: For information about renaming files on your system, see your operating system–specific Oracle documentation.
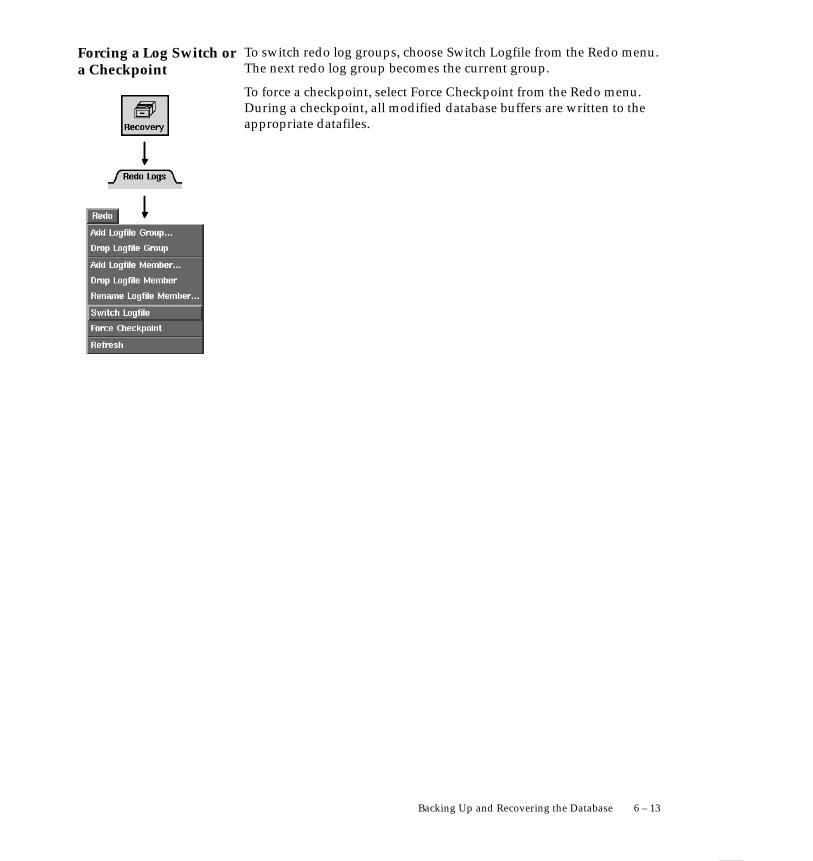
Forcing a Log Switch ora Checkpoint
6 – 13Backing Up and Recovering the Database
To switch redo log groups, choose Switch Logfile from the Redo menu.The next redo log group becomes the current group.
To force a checkpoint, select Force Checkpoint from the Redo menu.During a checkpoint, all modified database buffers are written to theappropriate datafiles.

6 – 14 Oracle Server Manager User’s Guide

C H A P T E R
7T
7 – 1Viewing Schema Objects
Viewing SchemaObjects
his chapter describes how to use Server Manager to viewinformation about schema objects in your database. This chapterassumes that you have read Chapter 2, “Overview of the AdministrationManager,” and are familiar with the interface elements of theAdministration Manager.
The information in the Schema drawer is for viewing only. From theSchema drawer, you cannot create, alter, or drop any schema objects.You can create, alter, or drop schema objects using the SQL Worksheet.For a description of the SQL Worksheet, see Chapter 9, “The SQLWorksheet.”
This chapter describes the Schema drawer’s folders:
• Constraints • Snapshots
• Triggers • Snapshot Logs
• Packages • Optimizer
• Links • Explain Plans
• Synonyms

7 – 2 Oracle Server Manager User’s Guide
The Constraints Folder
When you click the Constraints folder tab, the Constraints folder opensand the Constraint object list appears. The Constraint object list containsinformation about the integrity constraints defined on the tables in thedatabase.
Integrity constraints prevent invalid data from being entered intodatabase tables. An integrity constraint is declared on one or morecolumns in a table, and defines a rule for the data in those columns. Forinformation about data integrity and declarative constraints, see theOracle7 Server Concepts.
The following figure illustrates the Constraint object list.
Figure 7 – 1 Constraint Object List

Constraint Object List
7 – 3Viewing Schema Objects
The columns of the Constraint object list are described below:
Table owner and table name.
Number of constraints defined on the table.
Number of constraints currently enabled in thetable.
Number of constraints currently disabled in thetable.
Table Name
Constraints
Enabled
Disabled

7 – 4 Oracle Server Manager User’s Guide
The Triggers Folder
When you click the Triggers folder tab, the Triggers folder opens and theTrigger object list appears. The Trigger object list contains informationabout triggers defined on tables in the database.
A trigger is PL/SQL code that is implicitly executed when inserting,updating, or deleting data in a table. For information about triggers, seethe Oracle7 Server Concepts and the Oracle7 Server Application Developer’sGuide.
The following figure illustrates the Trigger object list.
Figure 7 – 2 Trigger Object List

Trigger Object List
7 – 5Viewing Schema Objects
The columns of the Trigger object list are described below:
Trigger owner and trigger name.
Owner and name of table on which the triggeris defined.
When the trigger fires: Before/After Statementor Before/After Each Row.
Type of statements that fire the trigger: Insert,Update, and/or Delete.
Status of the trigger: Enabled or Disabled.
Condition that must be true for the trigger tofire (only applies to row triggers).
Trigger
Table
Type
Event
Status
When

7 – 6 Oracle Server Manager User’s Guide
The Packages Folder
When you click the Packages folder tab, the Packages folder opens andthe Package object list appears. The Package object list containsinformation about stored procedures, functions, and packages.
A procedure or function is a set of SQL or PL/SQL statements thatperform a specific task. A package is a group of related functions,procedures, cursors, and variables. For information about storedprocedures, functions, and packages, see the Oracle7 Server Concepts andthe Oracle7 Server Application Developer’s Guide. For information onPL/SQL, see the PL/SQL User’s Guide and Reference.
The following figure illustrates the Packages object list.
Figure 7 – 3 Package Object List

Package Object List
7 – 7Viewing Schema Objects
The columns of the Package object list are described below:
Object owner and name of the object.
Type of object: Function, Package, PackageBody, or Procedure.
Status of the object: Valid or Invalid (needs to berecompiled).
Date the object was last modified as the resultof a DDL (Data Definition Language)command, including GRANT and REVOKE.
Name
Type
Status
Modified

Link Object List
7 – 8 Oracle Server Manager User’s Guide
The Links Folder
When you click the Links folder tab, the Links folder opens and the Linkobject list appears. The Link object list contains information about thedatabase links defined in the database.
A database link allows you to access a remote database. For informationabout database links, see the Oracle7 Server Concepts.
The following figure illustrates the Link object list.
Figure 7 – 4 Link Object List
The columns of the Link object list are described below:
Name of the database link.
Owner of the database link.
Name of the user to log in as on the remotedatabase.
SQL*Net service name for the remote database.
Date on which the link was created.
DB Link
Owner
Username
Host
Created

Synonym Object List
7 – 9Viewing Schema Objects
The Synonyms Folder
When you click the Synonyms folder tab, the Synonyms folder opensand the Synonym object list appears. The Synonym object list containsinformation about the synonyms defined in the database.
A synonym is an alias for a table, view, snapshot, sequence, procedurefunction, package, or another synonym. For information aboutsynonyms, see the Oracle7 Server Concepts.
The following figure illustrates the Synonym object list.
Figure 7 – 5 Synonym Object List
The columns of the Synonym object list are described below:
Name of the synonym.
Owner of the synonym.
Owner and name of the object referenced by thesynonym.
Name of database link used in a synonym for aremote object.
Synonym Name
Owner
Object Name
DB Link

7 – 10 Oracle Server Manager User’s Guide
The Optimizer Folder
When you click the Optimizer folder tab, the Optimizer folder opensand the Optimizer object list appears. The Optimizer object list containsinformation about the optimizer statistics generated for objects in thedatabase. The Optimizer object list shows whether statistics have beengenerated for tables, clusters, and indexes in the database.
The Oracle optimizer chooses the execution plan for a SQL statement.When using the cost–based approach, the optimizer can utilize statisticsfor the objects accessed in the SQL statement. You generate thesestatistics using the ANALYZE command.
For information about the optimizer and generating statistics, see theOracle7 Server Concepts and the ANALYZE command in the Oracle7Server SQL Reference.
The following figure illustrates the Optimizer object list.
Figure 7 – 6 Optimizer Object List

Optimizer Object List
7 – 11Viewing Schema Objects
The columns of the Optimizer object list are described below:
The owner and name of the object.
Object type: Table, Cluster, or Index.
Whether or not statistics have been generatedfor the object.
The Explain Plans Folder
When you click the Explain Plans folder tab, the Explain Plans folderopens and the Explain Plan object list appears. The Explain Plan objectlist contains a list of the SQL statements that have execution plans storedin the table PLAN_TABLE.
You can use the EXPLAIN PLAN command to generate the executionplan for a particular SQL statement. The execution plan is stored in atable, which by default is called PLAN_TABLE. For information aboutexecution plans and the EXPLAIN PLAN command, see the Oracle7Server Concepts, the Oracle7 Server Application Developer’s Guide, and theOracle7 Server SQL Reference.
Object
Object Type
Statistics?

Explain Plan ObjectList
☞
OSDoc
7 – 12 Oracle Server Manager User’s Guide
The following figure illustrates the Explain Plan object list.
Figure 7 – 7 Explain Plan Object List
The columns of the Explain Plan object list are described below:
Identifier for the SQL statement (can be null).
Date the EXPLAIN PLAN command wasexecuted for the statement.
Attention: The information displayed in the Explain Planobject list is from the table named PLAN_TABLE belonging tothe schema SYS. Server Manager does not display informationfrom any other plan tables. If SYS does not own a PLAN_TABLEor if you do not have access to SYS.PLAN_TABLE, you cannotopen the Explain Plans folder.
Additional Information: You can run the scriptUTLXPLAN.SQL to create a PLAN_TABLE. The location of thescript UTLXPLAN.SQL is platform dependent. For informationabout running UTLXPLAN.SQL, see your operatingsystem–specific Oracle documentation.
Statement ID
Timestamp
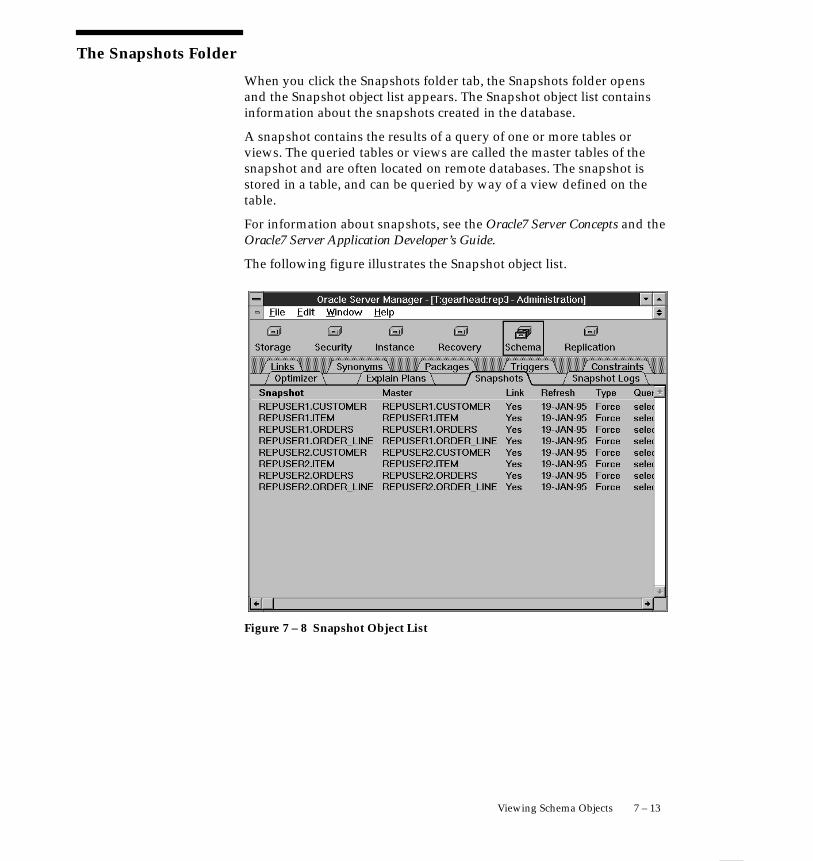
7 – 13Viewing Schema Objects
The Snapshots Folder
When you click the Snapshots folder tab, the Snapshots folder opensand the Snapshot object list appears. The Snapshot object list containsinformation about the snapshots created in the database.
A snapshot contains the results of a query of one or more tables orviews. The queried tables or views are called the master tables of thesnapshot and are often located on remote databases. The snapshot isstored in a table, and can be queried by way of a view defined on thetable.
For information about snapshots, see the Oracle7 Server Concepts and theOracle7 Server Application Developer’s Guide.
The following figure illustrates the Snapshot object list.
Figure 7 – 8 Snapshot Object List

Snapshot Object List
☞
7 – 14 Oracle Server Manager User’s Guide
The columns of the Snapshot object list are described below:
Owner of the snapshot and the name of theview associated with the snapshot.
Owner and name of the snapshot’s mastertable.
Whether or not a database link to the mastersite is used in the snapshot specification.
Date of the last refresh (at the master site).
Type of refresh for automatic refreshes:Complete, Fast, or Force.
Original query defining the snapshot.
Attention: You cannot sort the Snapshot object list on theQuery column.
Snapshot
Master
Link
Refresh
Type
Query

Snapshot Log ObjectList
7 – 15Viewing Schema Objects
The Snapshot Logs Folder
When you click the Snapshot Logs folder tab, the Snapshot Logs folderopens and the Snapshot Log object list appears. The Snapshot Log objectlist contains information about the snapshot logs created in the database.
A snapshot log is a table associated with the master table of a snapshot.The snapshot log contains information about changes made to itsassociated master table. The information in the snapshot log is used torefresh the snapshot. For information about snapshot logs, see theOracle7 Server Concepts and the Oracle7 Server Administrator’s Guide.
The following figure illustrates the Snapshot Log object list.
Figure 7 – 9 Snapshot Log Object List
The columns of the Snapshot Log object list are described below:
Owner of the snapshot log and master table ofthe log.
Date snapshot was last refreshed (one date foreach snapshot defined on the master table).
Table Being Logged
Last Refreshed

7 – 16 Oracle Server Manager User’s Guide

C H A P T E R
8T
8 – 1Managing a Replication Environment
Managing a ReplicationEnvironment
his chapter describes how to use Server Manager to manage yoursymmetric replication site. This chapter assumes that you have readChapter 2, “Overview of the Administration Manager” and are familiarwith the interface elements of the Administration Manager. It alsoassumes that you have read Oracle7 Server Distributed Systems, Volume IIand are familiar with the symmetric replication facility.
In the Replication drawer, you can manage replicated schemas,replicated objects, the deferred transaction queue, the replication errorqueue, the replication administration request queue, and the remotedatabases involved in the replication of each replicated schema. You canalso display snapshots that are registered with symmetric replicationand information about conflict resolution. This chapter describes thecommands available in the Replication drawer’s folders:
• Schemas • Masters
• Objects • Deferred Transactions
• Conflict Resolution • Errors
• Registered Snapshots • Request Log

Schema Object List
8 – 2 Oracle Server Manager User’s Guide
The Schemas Folder
When you click the Schemas folder tab, the Schemas folder opens andthe Schema object list and menu appear. The Schema object list containsinformation about the replicated schemas in the local database.
For more information about replicated schemas, see Oracle7 ServerDistributed Systems, Volume II.
The following figure illustrates the Schema object list.
Figure 8 – 1 Schema Object List
The columns of the Schema object list are described below:
Name of the replicated schema.
Indicates if local database is a MasterDefinition, Master, or a Snapshot site for thereplicated schema.
Indicates if the replicated schema is Normal,Quiescing, or Quiesced.
Number of replicated objects contained in theschema.
User comment for the replicated schema.
Name
Site Type
Status
Objects
Comment
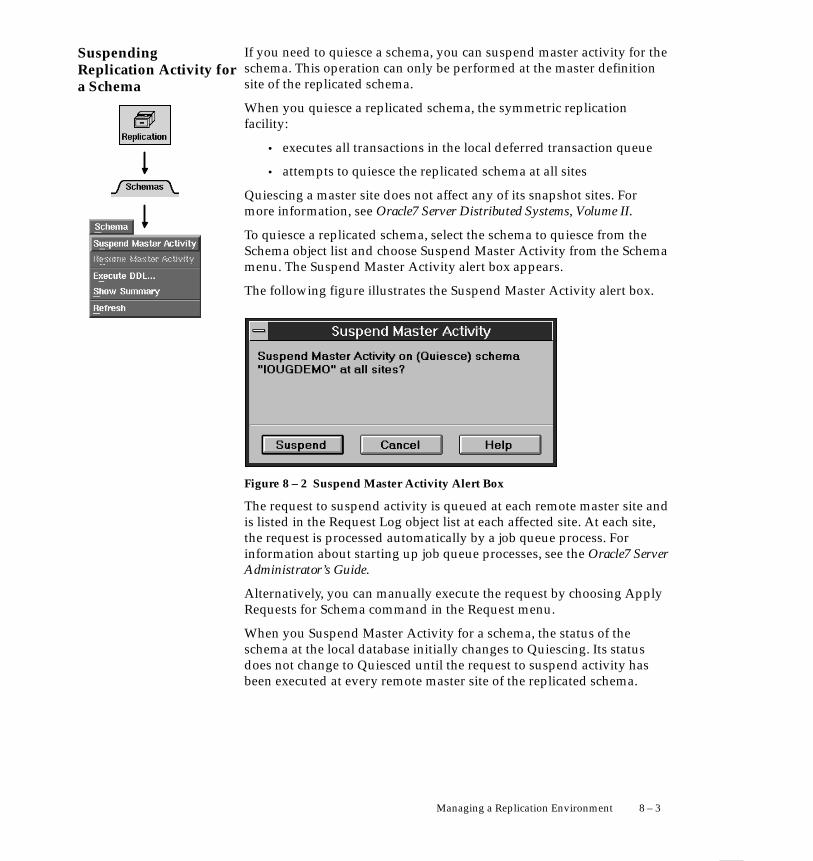
SuspendingReplication Activity fora Schema
8 – 3Managing a Replication Environment
If you need to quiesce a schema, you can suspend master activity for theschema. This operation can only be performed at the master definitionsite of the replicated schema.
When you quiesce a replicated schema, the symmetric replicationfacility:
• executes all transactions in the local deferred transaction queue
• attempts to quiesce the replicated schema at all sites
Quiescing a master site does not affect any of its snapshot sites. Formore information, see Oracle7 Server Distributed Systems, Volume II.
To quiesce a replicated schema, select the schema to quiesce from theSchema object list and choose Suspend Master Activity from the Schemamenu. The Suspend Master Activity alert box appears.
The following figure illustrates the Suspend Master Activity alert box.
Figure 8 – 2 Suspend Master Activity Alert Box
The request to suspend activity is queued at each remote master site andis listed in the Request Log object list at each affected site. At each site,the request is processed automatically by a job queue process. Forinformation about starting up job queue processes, see the Oracle7 ServerAdministrator’s Guide.
Alternatively, you can manually execute the request by choosing ApplyRequests for Schema command in the Request menu.
When you Suspend Master Activity for a schema, the status of theschema at the local database initially changes to Quiescing. Its statusdoes not change to Quiesced until the request to suspend activity hasbeen executed at every remote master site of the replicated schema.

Resuming ReplicationActivity for a Schema
8 – 4 Oracle Server Manager User’s Guide
If you need to resume master activity for a schema, you can unquiescethe schema. This operation can only be performed at the MasterDefinition site of the replicated schema. To unquiesce a replicatedschema, select the schema to be unquiesced from the Schema object listand choose Resume Master Activity from the Schema menu. TheResume Master Activity alert box appears.
The following figure illustrates the Resume Master Activity alert box.
Figure 8 – 3 Resume Master Activity Alert Box
The request to resume activity is queued at each remote site and is listedin the Request Log object list. At each site, the request is executedautomatically by a job queue process. For information about starting upjob queue processes, see the Oracle7 Server Administrator’s Guide.
Alternatively, you can manually execute the request using the ApplyRequests for schema command of the Request menu.
Once you execute the Resume Master Activity operation, the schema’sstatus at the local database immediately changes to Normal. The statusof a remote site changes to Normal once the request to resume activity isexecuted at the site.
Note: The status of the master definition site can change toNormal before all remote sites have executed their requests toresume activity.

Executing DDLStatements
Execute DDL: MasterDatabases Page
8 – 5Managing a Replication Environment
To execute DDL statements in a replicated schema on one or moredatabases, select the schema from the Schema object list and chooseExecute DDL from the Schema menu. This operation can only beperformed at the Master Definition site of a replicated schema. TheExecute DDL property sheet appears.
The Execute DDL property sheet consists of the following pages:
• Master Databases
• DDL Text
The following figure illustrates the Master Databases page.
Figure 8 – 4 Master Databases Page of the Execute DDL Property Sheet
The Master Databases page of the Execute DDL property sheet isdescribed below:
Schema in which to perform the DDL. This is aread–only text field to provide information tothe user.
Databases on which to execute the DDL. This isa scrolling list that allows users to select one ormore items.
Select all master databases from the list.
Deselect all master databases from the list.
Master Schema
Master Databases
All
None

Execute DDL: DDL TextPage
8 – 6 Oracle Server Manager User’s Guide
On the DDL Text page of the Execute DDL property sheet, you canspecify the DDL statement to be executed. A semicolon is not needed toterminate the DDL statement and will cause an error if included. Thefollowing figure illustrates the DDL Text page.
Figure 8 – 5 DDL Text Page of the Execute DDL Property Sheet
The DDL Text page displays the DDL statement to be executed.

ReplicationEnvironment Summary
8 – 7Managing a Replication Environment
To obtain information about a replicated schema and the replicationenvironment, choose Show Summary from the Schema menu. TheReplication Environment Summary window appears.
The summary is visually and logically separated into three sections. Thefirst section provides information at the database level. The secondprovides information at the schema level. And the last section providessite–dependent information (information related to Master, MasterDefinition or Snapshot sites).
The following figure illustrates the Replication Environment Summarywindow.
Figure 8 – 6 Replication Environment Summary Window

8 – 8 Oracle Server Manager User’s Guide
The Replication Environment Summary window is described below:
Database information:
Global name of the local database.
Number of pending two–phase commits.
Some replication operations require the use oftwo phase commits. For more information, seeOracle7 Server Distributed Systems, Volume II.
Number of disabled triggers used forreplication.
If a replication trigger is disabled, then the tablesupported by that trigger is not replicated.
Number of invalid packages used forreplication.
If a replication package is invalid, then the tablesupported by that package will not receiveupdates from remote databases.
Number of entries in the deferred transactionqueue.
Number of entries in the error queue.
Number of replicated schemas at the localdatabase.
Schema information:
Name of the selected schema.
Number of remote masters participating inreplicating the selected schema.
Site type of the local database for the selectedschema: Master Def, Master, or Snapshot.
Status of the selected schema at the local site:Normal, Quiescing, or Quiesced.
Number of replicated objects owned by theselected schema.
Database Name
Pending 2PCs
Disabled ReplicationTriggers
Invalid ReplicationPackages
Deferred Transactions
Unresolved Errors
Replicated Schemas
Schema Name
Replication Links
Schema Type
Schema Status
Replicated Objects
8 – 9Managing a Replication Environment
Master Definition or Master site information:
Number of entries in the replicationadministration queue.
Number of replication administration requeststhat have caused an error.
Statistical information collected for conflictresolution.
Snapshot site information:
Database in which the master schema for theselected snapshot schema is located.
Number of refresh groups at the local database.
Number of broken refresh groups at the localdatabase. Broken refresh groups will no longerrefresh automatically.
Replication AdminRequests
Replication AdminError
Collected ResolvedConflicts
Refresh Master
Refresh Groups
Broken RefreshGroups

Object Object List
8 – 10 Oracle Server Manager User’s Guide
The Objects Folder
When you click the Objects folder tab, the Objects folder opens and theObject object list and menu appear. The Object object list containsinformation about the replicated objects in the local database.
For more information about replicated objects, see Oracle7 ServerDistributed Systems, Volume II.
The following figure illustrates the Object object list.
Figure 8 – 7 Object Object List
The columns of the Object object list are described below:
Owner of the replicated object.
Name of the replicated object.
Replicated object type. Valid types are table,trigger, package, package body, snapshot, andindex.
Schema
Name
Type

Adding ReplicatedObjects to a MasterSchema
8 – 11Managing a Replication Environment
Status of the replicated object. Possible statesare create, compare, valid, dropped, and error.
User comments for the object. If the object wasgenerated by symmetric replication, it will benoted in this column.
To add objects to a replicated schema, choose Add Master Repobjectfrom the Object menu. The Add Master Replication Objects propertysheet appears.
The Add Master Replication Objects property sheet consists of one page,called the Object Specifications page. The following figure illustrates theObject Specifications page.
Figure 8 – 8 Object Specifications Page of the Add Master ReplicationObjects Property Sheet
Status
Comment

Add Master ReplicationObjects: ObjectSpecifications Page
Add Objects Dialog Box
8 – 12 Oracle Server Manager User’s Guide
The Object Specifications page of the Add Master Replication Objectsproperty sheet is described below:
Schema in which to add replicated objects.
Multi–column scrolling list containing objects toreplicate. The Replicated Objects multi–columnscrolling list contains the following columns:
Name of the object.
Object type.
Whether or not the object isreplicated.
Displays the Add Objects dialog box, whichallows you to select a set of objects to replicate.For a description of the Add Object dialog box,see page 8 – 12.
Drop the object selected in the ReplicatedObjects multi–column scrolling list.
To select a set of objects to replicate, click Add on the ObjectSpecifications page. The Add Objects dialog box appears. The followingfigure illustrates the Add Objects dialog box.
Figure 8 – 9 Add Objects Dialog Box
Master Schema
Replicated Objects
Name
Type
Replicated
Add
Drop

8 – 13Managing a Replication Environment
The Add Objects dialog box is described below:
Set of objects in the selected schema that are notbeing replicated. You can select one or moreobjects from the Objects to Replicate scrollinglist.
Select all objects from the list.
Deselect all objects from the list.
This operation can only be applied from a master definition site. To addobjects to the replicated schema, the schema must be Quiesced.Replication support for the selected objects is generated automatically.See “Suspending Replication Activity for a Schema” on page 8 – 3 for adescription of how quiesce a schema.
The Registered Snapshots Folder
When you click the Registered Snapshots folder tab, the RegisteredSnapshots folder opens and the Registered Snapshot object list appears.The Registered Snapshot object list contains information about thesnapshots that have been registered as replicated objects in the localdatabase.
For more information about snapshots and replicated objects, seeOracle7 Server Distributed Systems, Volume II.
The following figure illustrates the Registered Snapshot object list.
Objects to Replicate
All
None

Registered SnapshotObject List
8 – 14 Oracle Server Manager User’s Guide
Figure 8 – 10 Registered Snapshot Object List
The columns of the Registered Snapshot object list are described below:
Owner of the snapshot.
Name of the snapshot.
Indicates if the snapshot is updatable orread–only.
Time when the snapshot was last refreshed.
Next time the snapshot will be refreshed.
Name of the refresh group to which thesnapshot belongs.
Name of the snapshot base table.
Oracle error code of the error returned the lasttime an automatic refresh was attempted.
User comments for the snapshot.
Schema
Name
Updatable
Last Refresh
Next Refresh
Refresh Group
Table
Error Code
Comment

Master Object List
8 – 15Managing a Replication Environment
The Masters Folder
When you click the Masters folder tab, the Masters folder opens and theMaster object list and menu appear. The Master object list containsinformation about the remote databases involved in the replication ofeach schema.
For more information about replicated schemas and master sites, seeOracle7 Server Distributed Systems, Volume II.
The following figure illustrates the Master object list.
Figure 8 – 11 Master Object List
The columns of the Master object list are described below:
Name of the replicated schema.
Remote database that is involved in thereplication of the schema.
Schema
Remote MasterDatabase

Adding a MasterDatabase to theReplicationEnvironment
Add Remote MasterDatabase: MasterSpecifications Page
8 – 16 Oracle Server Manager User’s Guide
Whether or not the remote database is themaster definition site for the replicated schema.
For snapshot sites, whether or not the remotedatabase is the current refresh master.
User comments for the remote master database.
To add master sites to a schema, choose Add from the Master menu. TheAdd Remote Master Database property sheet appears.
The Add Master Database property sheet consists of one page, called theMaster Specifications page. The following figure illustrates the MasterSpecifications page.
Figure 8 – 12 Master Specifications Page of the Add Remote Master DatabaseProperty Sheet
The Master Specifications page of the Add Remote Master Databaseproperty sheet is described below:
Schema for which to add a remote masterdatabase. Use the pop–up menu to specify theschema.
Database link to the new remote master.
Master Def
Refresh Master
Comment
Replicated Schema
Remote Master

8 – 17Managing a Replication Environment
Whether or not to use existing objects.
Click Yes to use the existing database objects atthe new master site. If the object does not exist,it is created automatically.
Click No to create the object if it does not exist.If the object exists, raise the duplicateobjectexception.
Whether or not to use data from the masterdefinition site.
Click Yes to populate tables with data from themaster definition site.
Click No if you plan to load the data yourself.You must ensure that the data is identical tothat at the master site.
This operation can only be applied from amaster definition site. The status of the schemamust be quiescing.
Additional Information: For information about theduplicateobject exception and about specifying Use ExistingObjects and Copy Rows, see Oracle7 Server Distributed Systems,Volume II.
Use Existing Objects
Copy Rows

Scheduling AutomaticExecution of theDeferred TransactionQueue
8 – 18 Oracle Server Manager User’s Guide
To schedule when deferred transactions are executed at a remote site,choose Schedule Execution from the Master menu. The ScheduleExecution property sheet appears.
The Schedule Execution property sheet consists of one page, called theSchedule Specification page. The following figure illustrates theSchedule Specification page.
Figure 8 – 13 Schedule Specification Page of the Schedule Execution PropertySheet

Schedule Execution:Schedule SpecificationPage
8 – 19Managing a Replication Environment
The Schedule Specification page of the Schedule Execution propertysheet is described below:
Scrolling list containing the set of remotemasters in the replication environment.
Select the remote master site(s) for which youwant to schedule execution of the deferredtransactions.
Selects all master databases from the list.
Deselects all master databases from the list.
Interval at which the Deferred Transactionqueue is executed. For example, to executeevery 6 hours enter “sysdate + 1/4”.
Next time to execute the queue.
Deferred transactions are executed by job queue processes. Forinformation about job queue processes, see the Oracle7 ServerAdministrator’s Guide.
Remote Masters
All
None
Interval
Next Date

Conflict ResolutionObject List
8 – 20 Oracle Server Manager User’s Guide
The Conflict Resolution Folder
When you click the Conflict Resolution folder tab, the ConflictResolution folder opens and the Conflict Resolution object list appears.The Conflict Resolution object list contains information about each typeof conflict resolution method defined on a replicated table.
For more information about declarative conflict resolution, see Oracle7Server Distributed Systems, Volume II.
The following figure illustrates the Conflict Resolution object list.
Figure 8 – 14 Conflict Resolution Object List
The columns of the Conflict Resolution object list are described below:
Owner of the replicated table.
Name of the replicated table.
Number of Update conflict resolution methodsdeclared on the replicated table.
Number of Uniqueness conflict resolutionmethods declared on the replicated table.
Number of Delete conflict resolution methodsdeclared on the replicated table.
Schema
Table Name
Update
Uniqueness
Delete

Deferred TransactionObject List
8 – 21Managing a Replication Environment
The Deferred Transactions Folder
When you click the Deferred Transactions folder tab, the DeferredTransactions folder opens and the Deferred Transaction object list andmenu appear. The Deferred Transaction object list contains summaryinformation about the deferred transaction queue at the local database.
For more information about deferred transactions, see Oracle7 ServerDistributed Systems, Volume II.
The following figure illustrates the Deferred Transaction object list.
Figure 8 – 15 Deferred Transaction Object List
The columns of the Deferred Transaction object list are described below:
Destination target of the deferred transactions.
Number of transactions queued for thedestination database.
Number of failed attempts at scheduling thedeferred transaction queue.
Destination Database
Transactions
Push Failures
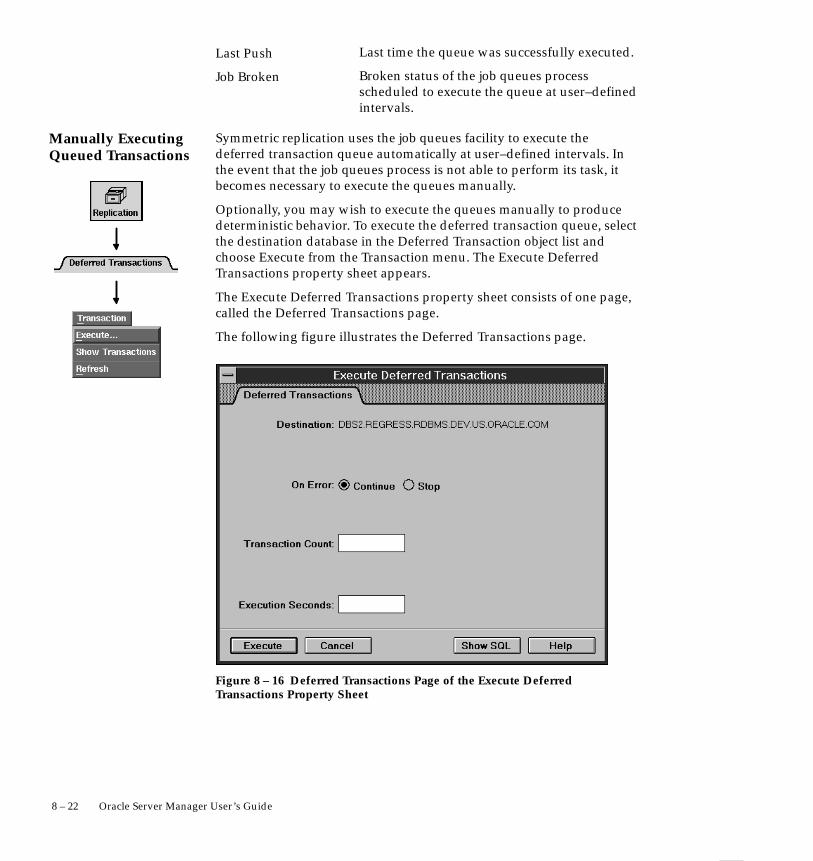
Manually ExecutingQueued Transactions
8 – 22 Oracle Server Manager User’s Guide
Last time the queue was successfully executed.
Broken status of the job queues processscheduled to execute the queue at user–definedintervals.
Symmetric replication uses the job queues facility to execute thedeferred transaction queue automatically at user–defined intervals. Inthe event that the job queues process is not able to perform its task, itbecomes necessary to execute the queues manually.
Optionally, you may wish to execute the queues manually to producedeterministic behavior. To execute the deferred transaction queue, selectthe destination database in the Deferred Transaction object list andchoose Execute from the Transaction menu. The Execute DeferredTransactions property sheet appears.
The Execute Deferred Transactions property sheet consists of one page,called the Deferred Transactions page.
The following figure illustrates the Deferred Transactions page.
Figure 8 – 16 Deferred Transactions Page of the Execute DeferredTransactions Property Sheet
Last Push
Job Broken

Execute DeferredTransactions: DeferredTransactions Page
Showing DetailedInformation aboutDeferred Transactions
8 – 23Managing a Replication Environment
The Deferred Transactions page is described below:
Database in which to execute the transactions.
Continue execution after errors, such asconflicts, are encountered.
Stop execution when the first error isencountered.
Stop execution after this number oftransactions.
A null value indicates that there is no limit onthe number of transactions being executed.
Stop execution after this many seconds.
A null value indicates that there is not limit onthe amount of time permitted for execution.
The Deferred Transaction object list only presents summary informationabout the number of deferred transactions queued for each destination.To show the individual transactions, choose Show Transactions from theTransaction menu. The Deferred Transactions dialog box appears.
The following figure illustrates the Deferred Transactions dialog box.
Figure 8 – 17 Deferred Transactions Dialog Box
Destination
On Error: Continue
On Error: Stop
Transaction Count
Execution Seconds

8 – 24 Oracle Server Manager User’s Guide
The columns of the multi–column scrolling list in the DeferredTransactions dialog box are described below:
Transaction identifier.
System Change Number (SCN) of thetransaction. The SCN uniquely identifies thetransaction.
Starting time of the transaction.
Source database of the transaction.
Comment on the transaction.
To display the calls and arguments of a deferred transaction,double–click a queued transaction or select a queued transaction andclick Show Calls in the Deferred Transactions dialog box. The DeferredCalls dialog box appears.
Trans ID
Delivery Order
Start Time
Source Database
Transaction Comment
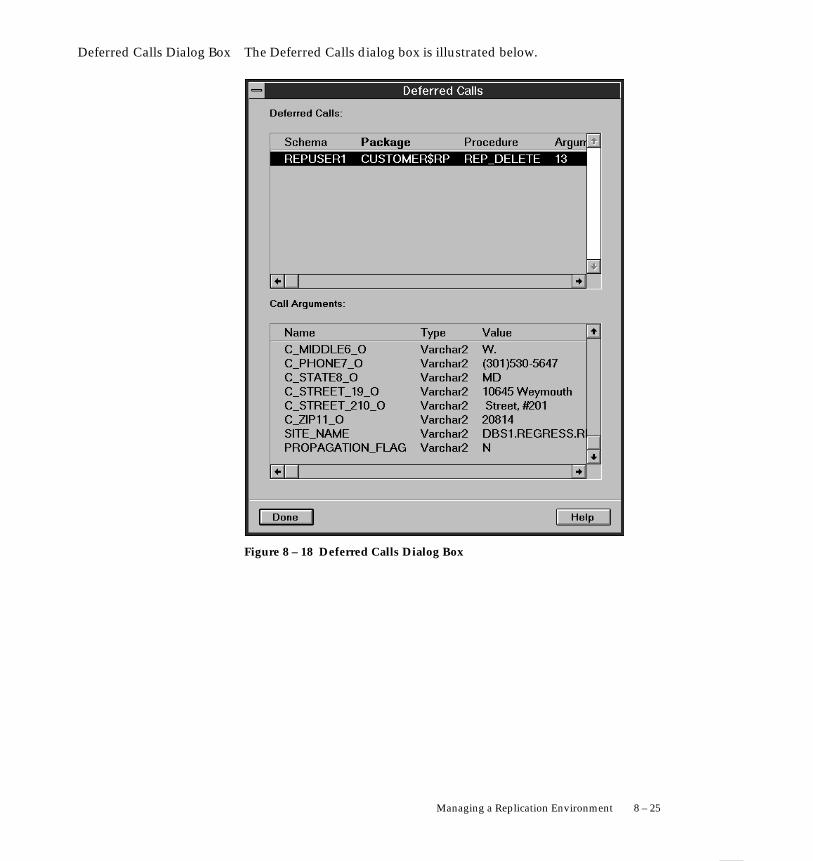
Deferred Calls Dialog Box
8 – 25Managing a Replication Environment
The Deferred Calls dialog box is illustrated below.
Figure 8 – 18 Deferred Calls Dialog Box

8 – 26 Oracle Server Manager User’s Guide
The columns of the Deferred Calls multi–column scrolling list aredescribed below:
Owner of the called procedure.
Package containing the called procedure.
Called procedure.
Number of procedure arguments.
To display the arguments of a call, select a deferred call from theDeferred Calls list. The arguments for the selected call appear in the CallArguments list.
The columns of the Call Arguments multi–column scrolling list aredescribed below:
Name of the argument.
Argument type. All arguments are validOracle7 datatypes.
Argument Value.
Schema
Package
Procedure
Arguments
Name
Type
Value

Error Object List
8 – 27Managing a Replication Environment
The Errors Folder
When you click the Errors folder tab, the Errors folder opens and theError object list and menu appear. The Error object list containsinformation about the transactions that encountered errors whileexecuting at the local database. For more information about replicationerrors, see Oracle7 Server Distributed Systems, Volume II. The followingfigure illustrates the Error object list.
Figure 8 – 19 Error Object List
The columns of the Error object list are described below:
Transaction identifier.
Oracle error code.
Message text.
Time error occurred.
Unique identifier of the call.
Trans ID
Error Number
Error Message
Time Occurred
Call Number
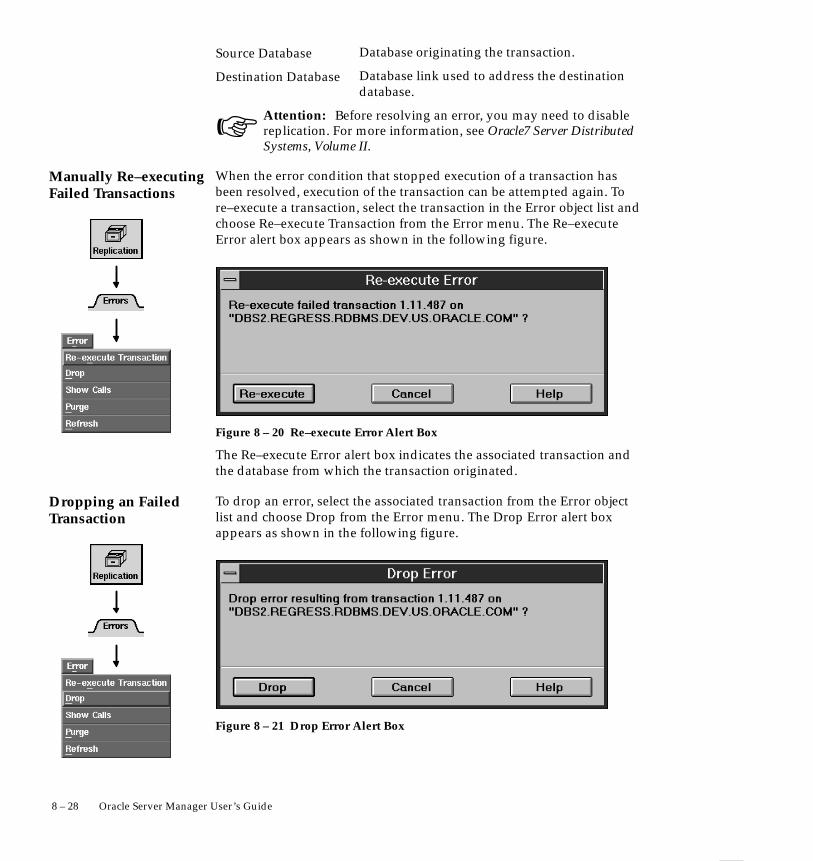
☞
Manually Re–executingFailed Transactions
Dropping an FailedTransaction
8 – 28 Oracle Server Manager User’s Guide
Database originating the transaction.
Database link used to address the destinationdatabase.
Attention: Before resolving an error, you may need to disablereplication. For more information, see Oracle7 Server DistributedSystems, Volume II.
When the error condition that stopped execution of a transaction hasbeen resolved, execution of the transaction can be attempted again. Tore–execute a transaction, select the transaction in the Error object list andchoose Re–execute Transaction from the Error menu. The Re–executeError alert box appears as shown in the following figure.
Figure 8 – 20 Re–execute Error Alert Box
The Re–execute Error alert box indicates the associated transaction andthe database from which the transaction originated.
To drop an error, select the associated transaction from the Error objectlist and choose Drop from the Error menu. The Drop Error alert boxappears as shown in the following figure.
Figure 8 – 21 Drop Error Alert Box
Source Database
Destination Database

Show DetailedInformation aboutUnresolved Errors
8 – 29Managing a Replication Environment
The Drop Error alert box indicates the associated transaction and thedatabase from which the transaction originated. Dropping the errordrops the transaction and the calls and arguments associated with thetransaction from the local database.
To display the calls and arguments of the failed transaction, select thetransaction from the Error object list and choose Show Calls from theError Menu. The Deferred Calls dialog box appears as shown in thefollowing figure.
Figure 8 – 22 Deferred Calls Dialog Box

Purging the ErrorQueue
8 – 30 Oracle Server Manager User’s Guide
The columns of the Deferred Calls multi–column scrolling list aredescribed below:
Owner of the called procedure.
Package containing the called procedure.
Called procedure.
Number of procedure arguments.
To show the arguments of a call, select a deferred call from the DeferredCalls multi–column scrolling list. The arguments for the selected callappear in the Call Arguments list.
The columns of the Call Arguments multi–column scrolling list aredescribed below:
Name of the argument.
Argument type. All arguments are validOracle7 datatypes.
Argument Value.
To drop the entire contents of the error queue, choose Purge from theError menu. The Purge Errors alert box appears as shown in thefollowing figure.
Figure 8 – 23 Purge Errors Alert Box
After the errors are dropped, all of the calls associated with the errorsare dropped.
Warning: Once you purge the error queue, you cannot recoverthe errors.
Schema
Package
Procedure
Arguments
Name
Type
Value

Request Log ObjectList
8 – 31Managing a Replication Environment
The Request Log Folder
When you click the Request Log folder tab, the Request Log folderopens and the Request Log object list and menu appear. The RequestLog object list contains information about replication administrationrequests.
For more information about replication administration requests, seeOracle7 Server Distributed Systems, Volume II.
The following figure illustrates the Request Log object list.
Figure 8 – 24 Request Log Object List
The columns of the Request Log object list are described below:
Replication administrative procedure name.
Name of the replicated schema associated withthe request.
Status of the request. Possible states are Ready,Do_Callback, Await_Callback, and Error.
Time the request was made.
Indicates the Oracle error code if the requestproduced an error.
Request
Schema
Status
Time Logged
Error Code

Manually ApplyingAdministrativeRequests
8 – 32 Oracle Server Manager User’s Guide
Error message indicating the error that occurredwhile applying the request.
Database in which the request originated.
User who made the request.
Transaction identifier.
Referenced object name of the request, ifapplicable.
Role of the database making the request.Possible values are Master and Master Def.
Symmetric replication uses the job queues facility to execute thereplication administration queue automatically at user–definedintervals. In the event that the job queues process is not able to performits task, it becomes necessary to execute the queues manually.
Optionally, you may wish to execute the queues manually to producedeterministic behavior. To execute the replication administration queue,choose Apply Requests for Schema from the Request menu. The ApplyAdministration Requests property sheet appears.
The Apply Administration Requests property sheet consists of one page,called the Administration Requests page. The following figure illustratesthe Apply Administration Requests property sheet.
Error Message
Source Database
User
Trans ID
Object
Role

Apply RequestsTransactions: ApplyAdministration Requests
8 – 33Managing a Replication Environment
Figure 8 – 25 Apply Requests Page of the Apply Administration RequestsProperty Sheet
The Administration Requests page is described below:
Replicated schema for which to apply theadministration requests.
Notifies the job queues process at all remotedatabases involved in the replication of themaster schema.
Apply requests only to the local database.
Master Schema
All Masters
Local Database

DroppingAdministrativeRequests
Purging the ReplicationAdministration RequestQueue
8 – 34 Oracle Server Manager User’s Guide
To drop an administration request that is no longer needed, select therequest to be dropped and choose Drop from the Request menu. TheDrop Administration Request alert box appears. The following figureillustrates the Drop Administration Request alert box.
Figure 8 – 26 Drop Request Alert Box
The Drop Administration Request alert box indicates the administrativerequest procedure name and the database from which the request wasmade.
To drop the entire contents of the administration request queue, choosePurge from the Request menu. The Purge Requests alert box appears asshown in the following figure.
Figure 8 – 27 Purge Requests Alert Box
Warning: Once you purge the request queue, you cannotrecover the purged requests.

P A R T
III The SQL Worksheet


C H A P T E R
9T
9 – 1Using the SQL Worksheet
Using the SQLWorksheet
his chapter describes how to use the SQL Worksheet, which is part ofServer Manager. It explains how to:
• Start a SQL Worksheet
• Enter and edit commands in a SQL Worksheet
• Execute commands from a SQL Worksheet
• Access commands you executed previously
• Save your work
• Run scripts from a SQL Worksheet
• Start a System Monitor from a SQL Worksheet

Starting a SQLWorksheet
Using the SQLWorksheet
9 – 2 Oracle Server Manager User’s Guide
The SQL Worksheet
Using the SQL Worksheet, you can enter, edit, and execute SQL andPL/SQL code. You can also execute the Server Manager commandsdescribed in Appendix A, “Server Manager Command Reference.” Youcan also run scripts from the SQL Worksheet. The SQL Worksheetmaintains a history of the commands you have issued, so you can easilyretrieve and re–execute previous commands.
You can start a SQL Worksheet from any Server Manager window bychoosing New Worksheet from the File menu. The new worksheet isconnected to the same database as the window from which you startedthe SQL Worksheet.
A SQL Worksheet window consists of the following elements:
• Input pane
• Output pane
• Split bar
• Execute button
• Command History button
• Run Script button
• Worksheet pull–down menu
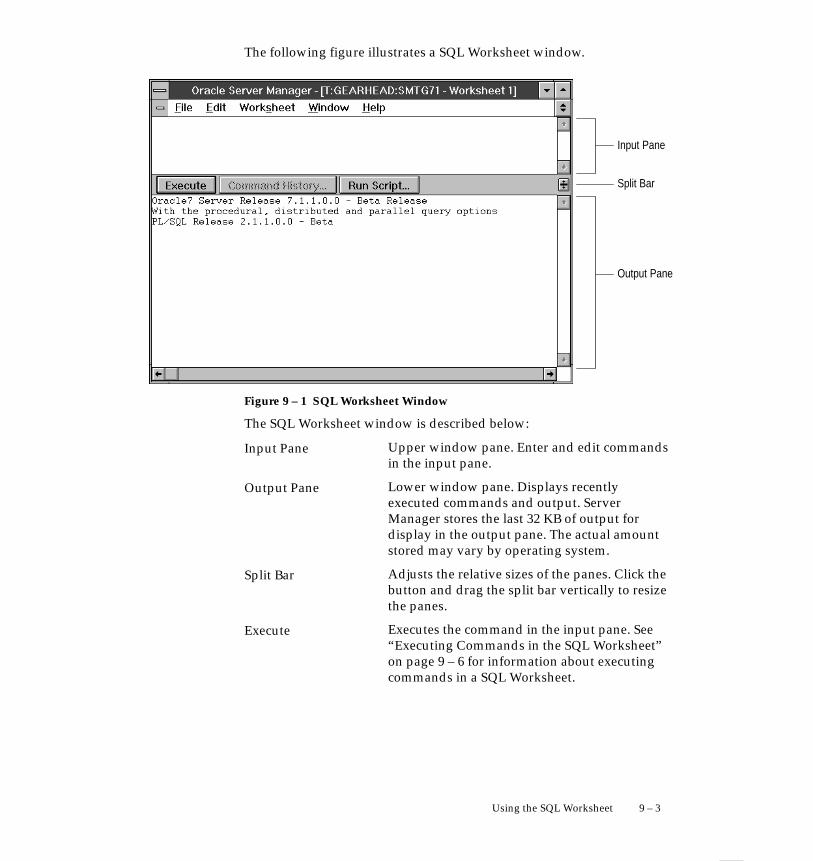
9 – 3Using the SQL Worksheet
The following figure illustrates a SQL Worksheet window.
Input Pane
Split Bar
Output Pane
Figure 9 – 1 SQL Worksheet Window
The SQL Worksheet window is described below:
Upper window pane. Enter and edit commandsin the input pane.
Lower window pane. Displays recentlyexecuted commands and output. ServerManager stores the last 32 KB of output fordisplay in the output pane. The actual amountstored may vary by operating system.
Adjusts the relative sizes of the panes. Click thebutton and drag the split bar vertically to resizethe panes.
Executes the command in the input pane. See“Executing Commands in the SQL Worksheet”on page 9 – 6 for information about executingcommands in a SQL Worksheet.
Input Pane
Output Pane
Split Bar
Execute

The Worksheet Menu
9 – 4 Oracle Server Manager User’s Guide
Displays the Command History dialog box,which displays previously executed commands.See “Using the Command History” on page9 – 9 for information about using thecommand history.
Allows you to select and execute a script. See“Running Scripts from the SQL Worksheet” onpage 9 – 12 for information about runningscripts from a SQL Worksheet.
The following figure illustrates the Worksheet pull–down menu.
Figure 9 – 2 Worksheet Pull–Down Menu
The Worksheet menu items are described below:
Displays the Command History dialog box,which displays previously executed commands.Equivalent to the Command History button. See“Using the Command History” on page 9 – 9for information about using the commandhistory.
Executes the command in the input pane.Equivalent to the Execute button or the Enterkey. If there are multiple commands in the inputpane, commands are executed up to the firstterminator (; or /).
See “Executing Commands from the SQLWorksheet” on page 9 – 6 for informationabout executing commands in a SQLWorksheet.
Command History
Run Script
Command History
Execute
9 – 5Using the SQL Worksheet
Allows you to select and execute a script.Equivalent to the Run Script button. See“Running Scripts from the SQL Worksheet” onpage 9 – 12 for information about runningscripts from a SQL Worksheet.
Writes output to a specified file. See “SavingYour Work” on page 9 – 11 for informationabout spooling the output of a SQL Worksheet.
Closes the previously opened spool file.
Clears the lines that have scrolled off the top ofthe output pane.
Writes the output pane, including lines thathave scrolled off the pane, to a specified file. See“Saving Your Work” on page 9 – 11 forinformation about saving the output pane.
Writes selected text to a specified file. Text canbe selected from the input or output pane. See“Saving Your Work” on page 9 – 11 forinformation about saving selected text.
Retrieves the previous command from thecommand history and enters it in the inputpane. The retrieved command replaces theentire contents of the input pane.
You can execute Previous Command repeatedlyto work back through the command history.Previous Command is unavailable if you havecurrently retrieved the oldest command fromthe command history.
Retrieves the next command from thecommand history and enters it in the inputpane. The retrieved command replaces theentire contents of the input pane.
Next Command is unavailable if you havecurrently retrieved the most recent commandfrom the command history.
Suggestion: Use the keyboard shortcuts to quickly access andexecute commands from the command history.
Run Script
Spool
Stop Spooling
Clear Lines Off Top
Write Log
Write Selection
Previous Command
Next Command

Entering Commands inthe Input Pane
Executing Commandsin the Input Pane
9 – 6 Oracle Server Manager User’s Guide
Executing Commands in the SQL Worksheet
Server Manager executes commands you have entered in the input paneof a SQL Worksheet.
You can enter SQL, PL/SQL, and Server Manager commands in theinput pane of a SQL Worksheet. A command entered in the input panecan contain tabs or carriage returns.
All standard text editing capabilities are available in the input pane of aSQL Worksheet. You can edit text in the input pane using the mouse,keyboard functions, and the Edit menu. In addition, you can select textfrom the output pane and paste it into the input pane.
To execute the command you have entered in the input pane, clickExecute. You can also execute the command by choosing Execute fromthe Worksheet menu.
When you execute a command, the command and its output appear inthe output pane. However, if you set the parameter ECHO to off, onlythe output of the command is displayed. For information about settingServer Manager parameters, see the SET command in Appendix A,“Server Manager Command Reference.”
The following figure illustrates executing a SQL statement in a worksheet.
Figure 9 – 3 Executing a Command in the SQL Worksheet

Executing ServerManager Commands
OSDoc
9 – 7Using the SQL Worksheet
After you execute a command, the command remains in the input pane,but is selected, as shown in Figure 9 – 3. You can then type in the nextcommand, and it replaces the previous command. You do not need todelete the previous command unless you are running Server Managerunder Windows.
In a SQL Worksheet you can execute the Server Manager commandsdescribed in Appendix A, “Server Manager Command Reference.”Some of these commands behave differently when executed in a SQLWorksheet than when executed in line mode. These commands aresummarized below:
Displays the standard file selection dialog boxwhen you issue the @ command withoutspecifying a filename.
Displays the Connect dialog box when youissue the CONNECT command withoutspecifying complete connect information. Forinformation about the Connect dialog box, seeChapter 1, “Overview of Server Manager.”
Displays the Help window.
Displays the standard file selection dialog boxfor your platform when you issue the SPOOLcommand without specifying a filename.
If recovery is needed, displays the Recoverdialog box when you issue the RECOVERcommand without arguments. Otherwise, anerror message is generated.
Closes the worksheet.
Note: The line mode command HOST is not available in theSQL Worksheet.
Additional Information: For information about the standardfile selection dialog box for your system, see your operatingsystem–specific documentation.
@
CONNECT
HELP
SPOOL
RECOVER
EXIT
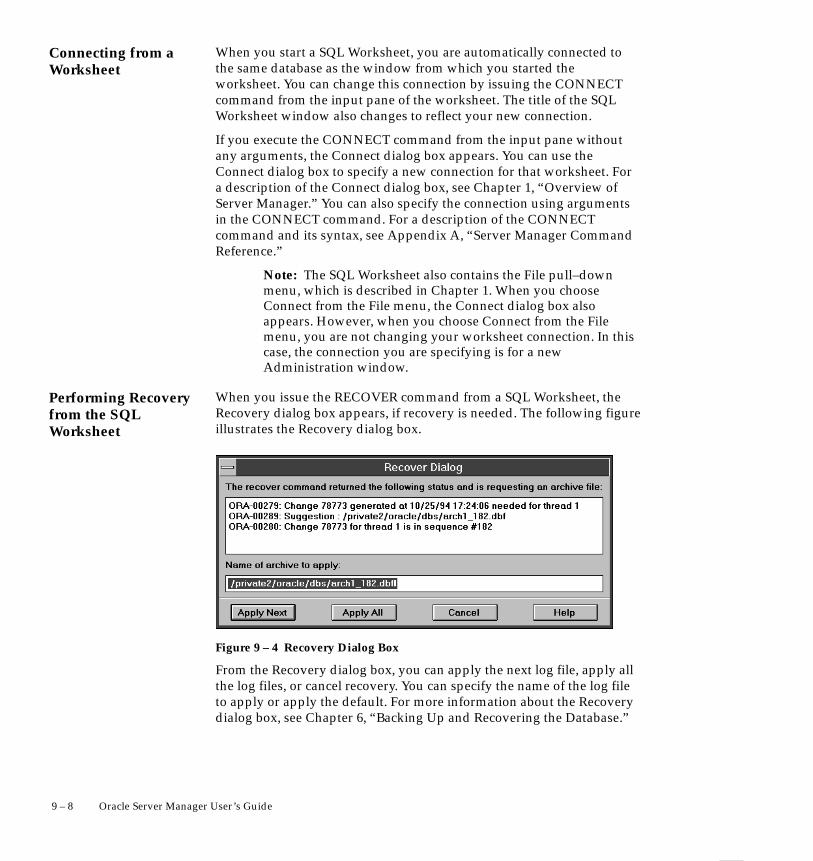
Connecting from aWorksheet
Performing Recoveryfrom the SQLWorksheet
9 – 8 Oracle Server Manager User’s Guide
When you start a SQL Worksheet, you are automatically connected tothe same database as the window from which you started theworksheet. You can change this connection by issuing the CONNECTcommand from the input pane of the worksheet. The title of the SQLWorksheet window also changes to reflect your new connection.
If you execute the CONNECT command from the input pane withoutany arguments, the Connect dialog box appears. You can use theConnect dialog box to specify a new connection for that worksheet. Fora description of the Connect dialog box, see Chapter 1, “Overview ofServer Manager.” You can also specify the connection using argumentsin the CONNECT command. For a description of the CONNECTcommand and its syntax, see Appendix A, “Server Manager CommandReference.”
Note: The SQL Worksheet also contains the File pull–downmenu, which is described in Chapter 1. When you chooseConnect from the File menu, the Connect dialog box alsoappears. However, when you choose Connect from the Filemenu, you are not changing your worksheet connection. In thiscase, the connection you are specifying is for a newAdministration window.
When you issue the RECOVER command from a SQL Worksheet, theRecovery dialog box appears, if recovery is needed. The following figureillustrates the Recovery dialog box.
Figure 9 – 4 Recovery Dialog Box
From the Recovery dialog box, you can apply the next log file, apply allthe log files, or cancel recovery. You can specify the name of the log fileto apply or apply the default. For more information about the Recoverydialog box, see Chapter 6, “Backing Up and Recovering the Database.”

9 – 9Using the SQL Worksheet
Using the Command History
A SQL Worksheet maintains a history of the last 20 commands you haveissued in that worksheet. To bring up the Command History dialog box,click Command History or choose Command History from theWorksheet menu.
The Command History dialog box contains a scrolling list of thecommands in the worksheet’s command history. The following figureillustrates the Command History dialog box.
CommandHistoryScrollingList
Figure 9 – 5 Command History Dialog Box
The Command History dialog box is described below:
Retrieves the selected command, or selectedportion of a command, from the commandhistory scrolling list and enters it in the inputpane. See “Retrieving a Selection from theCommand History” on page 9 – 10 for moreinformation about retrieving commands.
Closes the dialog box without retrieving anytext.
Selects the previous command in the commandhistory.
Selects the next command in the commandhistory.
Displays help information for the CommandHistory dialog box.
Retrieve Selection
Cancel
Up
Down
Help
Retrieving a Selectionfrom the CommandHistory
Retrieving a CommandUsing the WorksheetMenu
9 – 10 Oracle Server Manager User’s Guide
To retrieve an entire command from the Command History dialog box,position the cursor anywhere within the command and click RetrieveSelection. Alternatively, you can select the entire command and clickRetrieve Selection.
To retrieve only a portion of a command from the Command Historydialog box, select the text you wish to retrieve and click RetrieveSelection.
The text retrieved from the Command History dialog box is entered inthe worksheet’s input pane. If no text is selected in the input pane, theretrieved text is inserted at the cursor position. If you have selected textin the input pane, then the retrieved text replaces the selected text.
After you have retrieved text from the command history, you can edit orexecute the command, as desired.
You can also retrieve commands without using the Command Historydialog box. The Previous Command and Next Command menu itemsretrieve commands from the command history and enter them in theinput pane, completely replacing the existing contents of the input pane.For more information on the Previous Command and Next Commandmenu items, see “The Worksheet Menu” on page 9 – 5.
OSDoc
9 – 11Using the SQL Worksheet
Saving Your Work
The Spool, Write Log, and Write Selection menu items allow you to savethe work you have performed in a SQL Worksheet. Each of theseWorksheet menu commands displays your platform’s standard fileselection dialog box, which you can use to specify the file in which tosave your work.
The Spool menu item saves all output to a specified file. Server Managercontinues to save the output of your worksheet until you choose StopSpooling from the menu.
The Write Log menu item writes the current contents of yourworksheet’s output pane to a specified file. The output pane contains thelast 32 KB of output and the last 100 lines of text. The actual amountmay vary by operating system.
Any text that has scrolled out of the output pane is also written to thefile. However, if you have used the Clear Lines Off Top menu item toclear any lines from the output pane, those lines are not written to thefile.
The Write Selection menu item writes any text you have selected to aspecified file. You can select text from the input or output pane.
Additional Information: Server Manager appends a fileextension, such as .log or .txt, to the name of each file created bythe Spool, Write Log, and Write Selection commands. These fileextensions are operating system–dependent. Refer to youroperating system–specific Oracle documentation forinformation about the file extensions for your system.

9 – 12 Oracle Server Manager User’s Guide
Running Scripts from the SQL Worksheet
From a SQL Worksheet, you can run any script that contains SQL,PL/SQL, or Server Manager commands. There are three ways to runscripts from a SQL Worksheet:
• Clicking Run Script
• Choosing Run Script from the Worksheet menu
• Executing the Server Manager @ command from the input pane
Click the Run Script button or choose Run Script from the menu to bringup your platform’s standard file selection dialog box, which you canthen use to select a script to run.
You can also run a script from the input pane of a worksheet by enteringan @ command followed by the script name. The following figureillustrates running a script from the input pane of a worksheet. If youenter an @ command without a script name, your platform’s standardfile selection dialog box appears to allow you to specify a script name.
Figure 9 – 6 Running a Script from the Input Pane
Note: In a script you can run other scripts. In the original scriptyou can include the line @@second_scriptname to run anotherscript called second_scriptname. The @@ command indicates thatthe second script is in the same directory as the original script.

9 – 13Using the SQL Worksheet
Starting a Monitor from the SQL Worksheet
You can start any of the System Monitors from a SQL Worksheet usingthe Server Manager MONITOR command. If you issue the MONITORcommand without specifying a monitor type, the Monitor dialog boxappears. You can then select the type of monitor to start.
You can also issue the MONITOR command followed by the name ofthe monitor you want to start. For example, the statement MONITORLOCK starts a lock monitor. For a list of the monitor names andabbreviations, see Table 1 – 4 on page 1 – 25.
You may start only one monitor of each type for each connection to aninstance. If you try to start a monitor that has already been started,Server Manager brings that monitor window forward.
For a description of the System Monitors and the Monitor dialog box,see Part IV, “System Monitors.”

9 – 14 Oracle Server Manager User’s Guide

P A R T
IV System Monitors


C H A P T E R
10T
10 – 1Overview of the System Monitors
Overview of the SystemMonitors
his chapter describes the basic elements and operation of the SystemMonitors, which are part of Server Manager. It explains how to:
• Start a System Monitor
• View the monitor’s statistics
• Sample statistics
• Filter statistics
OSDoc
10 – 2 Oracle Server Manager User’s Guide
The System Monitors
The System Monitors allow you to collect and inspect performancestatistics. You can collect these statistics as frequently as you like bysetting specific collection intervals.
Table 10 – 1 describes the monitors available in Server Manager. For adetailed description of each monitor, see Chapter 11, “MonitoringSystem Performance.”
Using the System Monitors
Because the System Monitors utilize information in the dynamicperformance tables, you must have access to these tables to use themonitors. To grant all users access to the dynamic performance tablesused by the System Monitors, the database administrator can run thescript UTLMONTR.SQL. This script grants access to these tables toPUBLIC.
Additional Information: The location of the UTLMONTR.SQLscript is platform dependent. For information about runningUTLMONTR.SQL, see your operating system–specificdocumentation.
You can also grant specific users access to the individual views used byeach monitor. For a list of the views used by each monitor, see Chapter11, “Monitoring System Performance.”
For monitors that include statistics related to time, you may want to setthe initialization parameter TIMED_STATISTICS to TRUE. WhenTIMED_STATISTICS is TRUE, Oracle gathers timed–based statistics. IfTIMED_STATISTICS is FALSE, statistics related to time are set to zero.For example, the statistics for read time and write time in the File I/OMonitor are not collected if TIMED_STATISTICS is FALSE.
For more information about the TIMED_STATISTICS parameter andsetting initialization parameters, see the Oracle7 Server Administrator’sGuide.

10 – 3Overview of the System Monitors
Monitor Name Monitor Function
Circuit Monitor Displays information about the sharedservers’ virtual circuits, through which us-ers connect to the database.
Dispatcher Monitor Displays information about the sharedserver’s dispatcher processes.
File I/O Monitor Displays the read and write activity foreach file in the database.
Latch Monitor Displays the latches on shared internaldata structures in the SGA.
Library Cache Monitor Displays the activity in and the effective-ness of the library cache.
Lock Monitor Displays current database locks.
Process Monitor Displays all background and user pro-cesses currently accessing the databasethrough the current instance.
Queue Monitor Displays information on the multi–threaded server’s message queues.
Rollback Monitor Displays the current status of rollback seg-ments.
Session Monitor Displays statistics and information foreach user session in the current instance.
Shared Server Monitor Displays statistics for the shared serverprocesses.
SQL Area Monitor Displays the memory used to process SQLstatements that have been or are beingexecuted.
System I/O Monitor Displays the percentage of I/O activitygenerated by each background and userprocess that is accessing the databasethrough the current instance.
System Statistics Monitor Displays runtime statistics for the system.
Table Access Monitor Displays objects being accessed and thesession Id that is accessing them.
Tablespace Monitor Displays information about the table-spaces created in the database.
Table 10 – 1 System Monitors

10 – 4 Oracle Server Manager User’s Guide
Starting a Monitor
You can start a monitor from any Server Manager window by choosingMonitor from the File menu. You can also start a monitor by executingthe MONITOR command in a SQL Worksheet. For information onstarting a monitor from a worksheet, see Chapter 9, “Using the SQLWorksheet.”
When you start a monitor, the monitor is connected to the samedatabase as the window from which you started the monitor and showsstatistics for that database instance.
When you choose Monitor from the File menu or execute the MONITORcommand from a SQL Worksheet, the Monitor dialog box appears. Thefollowing figure illustrates the Monitor dialog box.
Figure 10 – 1 Monitor Dialog Box
In the Monitor dialog box, you select the type of monitor to start, andthen click OK to start the monitor. You can also start a monitor bydouble–clicking its type in the scrolling list.
If the monitor you selected has already been started, Server Managerbrings that window to the front. You may run only one monitor of eachtype for each instance to which you are connected.

Statistics Lists
10 – 5Overview of the System Monitors
Common Interface Elements
Although each monitor type has its own window, most of the elementsand functions of the monitor windows are the same. This sectiondescribes these common features. For a detailed description of eachmonitor window, see Chapter 11, “Monitoring System Performance.”
The following figure illustrates a monitor window. Only the left–mostcolumns are displayed. To view additional columns, you need to scrollthe column list to the right.
StatisticsList
SamplingControls
Filters
ColumnHeadings
Figure 10 – 2 A Monitor Window
When you open a monitor window, a statistics list appears. The statisticslist contains the statistics displayed in the monitor.
By default, the statistics are sorted on the first column. You can sort astatistics list on another column by clicking that column heading. Acolumn name appears in bold to indicate that the statistics list is sortedon that column.
A few monitors contain columns on which you cannot sort the statisticslist. When you click the column heading for one of these columns, thestatistics list is not sorted again.
Note: When you click a column heading to sort on that column,a new sample is automatically taken.

Sampling Controls
10 – 6 Oracle Server Manager User’s Guide
The statistics in a monitor can be sampled cyclically (the default) or ondemand. To sample cyclically, click Cycle. Use the Interval pop–upmenu to set the sampling interval. The default sampling interval is 30seconds.
The following figure illustrates setting the sampling interval.
Figure 10 – 3 Setting the Sampling Interval
The Interval pop–up menu contains several predefined samplingintervals that you can select from. You can also specify a differentinterval by choosing Other from the Interval pop–up menu.

10 – 7Overview of the System Monitors
When you choose Other, the Other Interval dialog box appears. Thefollowing figure illustrates the Other Interval dialog box.
Figure 10 – 4 Other Interval Dialog Box
In the Other Interval dialog box, you can specify a sampling interval inminutes and seconds. The minimum sampling interval is 15 seconds.The maximum is 100 minutes and 39 seconds, which you can express as99 minutes and 99 seconds in the Other Interval dialog box.
When sampling cyclically, clicking the Hold button allows you to suspendsampling. The Hold button is replaced with a Resume button and thecurrent statistics are not refreshed. To resume sampling, click Resume.
To sample statistics on demand, click Sample on Demand. The Holdbutton is replaced by a Sample button. Click Sample each time you wantto sample statistics. The following figure illustrates sampling on demand.
Figure 10 – 5 Sampling on Demand
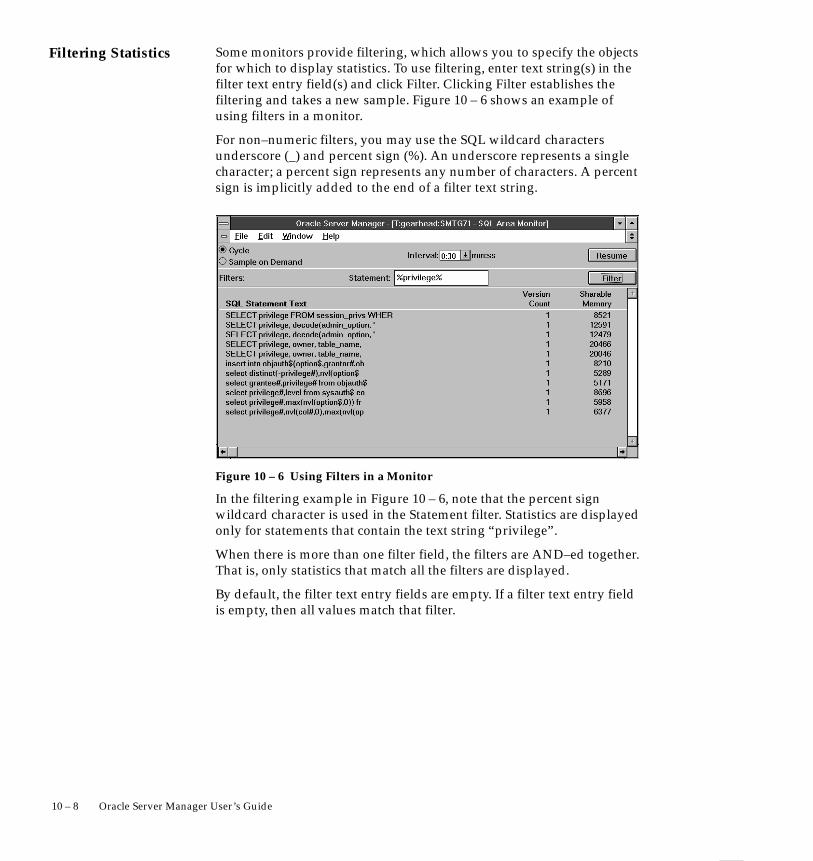
Filtering Statistics
10 – 8 Oracle Server Manager User’s Guide
Some monitors provide filtering, which allows you to specify the objectsfor which to display statistics. To use filtering, enter text string(s) in thefilter text entry field(s) and click Filter. Clicking Filter establishes thefiltering and takes a new sample. Figure 10 – 6 shows an example ofusing filters in a monitor.
For non–numeric filters, you may use the SQL wildcard charactersunderscore (_) and percent sign (%). An underscore represents a singlecharacter; a percent sign represents any number of characters. A percentsign is implicitly added to the end of a filter text string.
Figure 10 – 6 Using Filters in a Monitor
In the filtering example in Figure 10 – 6, note that the percent signwildcard character is used in the Statement filter. Statistics are displayedonly for statements that contain the text string “privilege”.
When there is more than one filter field, the filters are AND–ed together.That is, only statistics that match all the filters are displayed.
By default, the filter text entry fields are empty. If a filter text entry fieldis empty, then all values match that filter.

C H A P T E R
11T
11 – 1Monitoring System Performance
Monitoring SystemPerformance
his chapter describes each of the System Monitors available in ServerManager. This chapter assumes that you have read Chapter 10,“Overview of the System Monitors,” and are familiar with the interfaceelements of a monitor window. See Chapter 10 for a description of howto start a monitor.
For each monitor, this chapter describes the statistics displayed in themonitor, the filters available in the monitor, the command to invoke themonitor from a worksheet, and the performance tables on which themonitor’s view is based.
The System Monitors described in this chapter are:
• Circuit • Rollback
• Dispatcher • Session
• File I/O • Shared Server
• Latch • SQL Area
• Library Cache • System I/O
• Lock • System Statistics
• Process • Table Access
• Queue • Tablespace

11 – 2 Oracle Server Manager User’s Guide
The Circuit Monitor
The Circuit Monitor displays information about virtual circuits. Avirtual circuit is a connection to an instance through a dispatcher andthe shared server currently processing the user’s request.
The following figure illustrates the left–most columns of the CircuitMonitor.
Figure 11 – 1 Circuit Monitor
The Circuit Monitor is described below:
Address of the virtual circuit.
Name of the dispatcher associated with thevirtual circuit.
Name of the shared server currently associatedwith the virtual circuit.
Identifier for the session bound to the virtualcircuit.
Circuit
Dispatcher Name
Server
Session SID
SQL WorksheetEquivalent
Required Views
11 – 3Monitoring System Performance
Session serial number, used to uniquely identifya session’s objects. Guarantees thatsession–level commands are applied to thecorrect session objects if the session ends andanother session begins with the same sessionidentifier.
Status of the circuit:
Currently interrupted.
About to be removed.
A link to a remote database.
Normal circuit into the localdatabase.
Name of the queue the circuit is currently on:
Waiting for request to bepicked up by a server process.
Waiting for the dispatcherprocess.
Waiting for server to finishprocessing request.
Waiting to establish anoutbound connection.
Idle circuit.
Total number of messages that have gonethrough the circuit.
Total number of bytes that have gone throughthe circuit.
To start the Circuit Monitor from a SQL Worksheet, you can use thefollowing Server Manager command:
MONITOR CIRCUIT
To use the Circuit Monitor, you must have access to:
• V$CIRCUIT
• V$DISPATCHER
• V$SESSION
• V$SHARED_SERVER
Session Serial #
Status
BREAK
EOF
OUTBOUND
NORMAL
Queue
COMMON
DISPATCHER
SERVER
OUTBOUND
NONE
Messages
Bytes
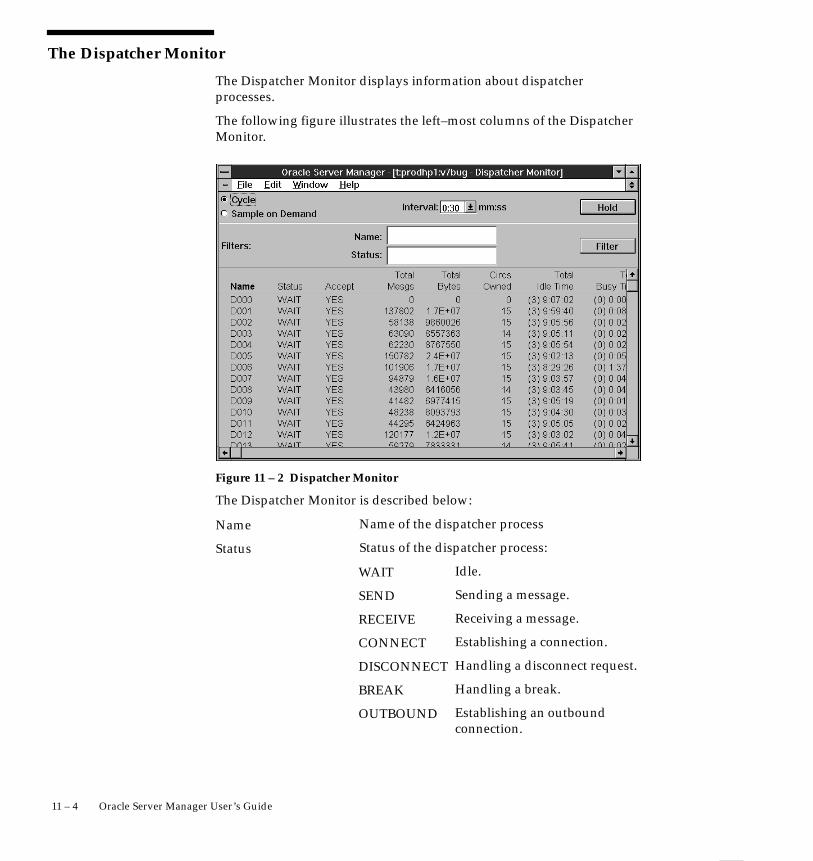
11 – 4 Oracle Server Manager User’s Guide
The Dispatcher Monitor
The Dispatcher Monitor displays information about dispatcherprocesses.
The following figure illustrates the left–most columns of the DispatcherMonitor.
Figure 11 – 2 Dispatcher Monitor
The Dispatcher Monitor is described below:
Name of the dispatcher process
Status of the dispatcher process:
Idle.
Sending a message.
Receiving a message.
Establishing a connection.
Handling a disconnect request.
Handling a break.
Establishing an outboundconnection.
Name
Status
WAIT
SEND
RECEIVE
CONNECT
DISCONNECT
BREAK
OUTBOUND

Filters
SQL WorksheetEquivalent
Required Views
11 – 5Monitoring System Performance
Whether this dispatcher is accepting new connections.
Total number of messages processed by the dispatcher.
Total size in bytes of the messages processed bythe dispatcher.
Number of virtual circuits owned by thedispatcher.
Total idle time for the dispatcher, expressed in:
(Days) Hours : Minutes : Seconds
Total busy time for the dispatcher, expressed in:
(Days) Hours : Minutes : Seconds
The fraction of its lifetime that the dispatcherhas been busy:
Busy Time/(Busy Time + Idle Time)
The following filters are available in the Dispatcher Monitor:
Filter for dispatcher name. Monitor displaysinformation for dispatchers whose namesmatch the Name filter.
Filter for dispatcher status. Monitor displaysinformation for dispatchers with the specifiedstatus.
To start the Dispatcher Monitor from a SQL Worksheet, you can use thefollowing Server Manager command:
MONITOR DISPATCHER
To use the Dispatcher Monitor, you must have access to:
• V$DISPATCHER
Accept
Total Mesgs
Total Bytes
Circs Owned
Total Idle Time
Total Busy Time
Load
Name
Status

11 – 6 Oracle Server Manager User’s Guide
The File I/O Monitor
The File I/O Monitor contains one row for each file in the database andsummarizes the read and write activity for each file. Only Oracle filesare shown in the File I/O Monitor.
The following figure illustrates the left–most columns of the File I/OMonitor.
Figure 11 – 3 File I/O Monitor
The File I/O Monitor is described below:
Name of the database file.
Number of physical reads per second since thelast sample.
Number of physical writes per second since thelast sample.
Number of physical blocks per read since thelast sample.
Number of physical blocks per write since thelast sample.
Time per read, if TIMED_STATISTICS is TRUE.
Time per write, if TIMED_STATISTICS is TRUE.
Datafile
Request Reads/s
Request Writes/s
Batch Blks/rd
Batch Blks/wt
Resp Time ms/rd
Resp Time ms/wt

☞
Filters
SQL WorksheetEquivalent
Required Views
Interpreting File I/OStatistics
11 – 7Monitoring System Performance
Attention: Statistics related to time are not collected unless theparameter TIMED_STATISTICS is set to TRUE. For informationabout setting parameters, see the Oracle7 Server Administrator’sGuide.
The following filter is available in the File I/O Monitor:
Filter for the name of the database file. Monitordisplays information for files whose namesmatch the Datafile filter.
To start the File I/O Monitor from a SQL Worksheet, you can use thefollowing Server Manager commands:
MONITOR FILEI/O
MONITOR FILE
To use the File I/O Monitor, you must have access to:
• V$DBFILE
• V$FILESTAT
If the values of Request Reads or Request Writes are high for all files ona given drive, you should consider restructuring your database toallocate database files and tablespaces across additional disk drives.
The product of Request Writes/s and Batch Blks/rd is the amount ofdata written to the file per second. If this value is high relative to thecapacity of the corresponding disk, then you should consider changingthe disk to one with a higher transfer rate.
When an index is generated or a SELECT statement is issued, atemporary sort file may be created. Look for excessive I/O to such files.Consider increasing the parameter SORT_AREA_SIZE or assigningdifferent temporary tablespaces to different groups of users. Forinformation about setting parameters, see the Oracle7 ServerAdministrator’s Guide.
Datafile
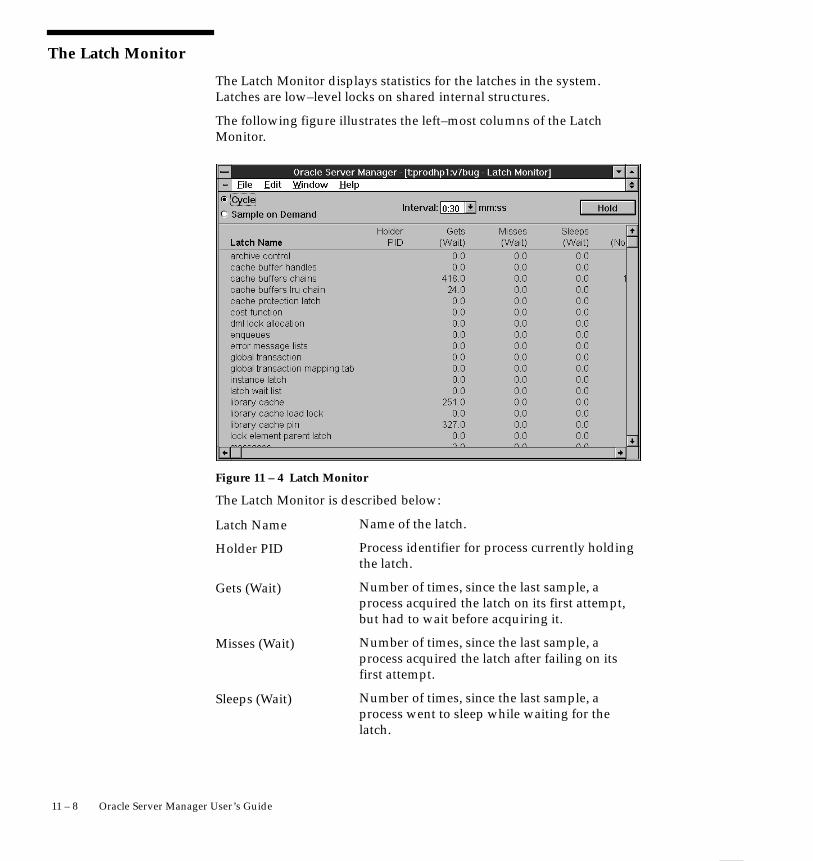
11 – 8 Oracle Server Manager User’s Guide
The Latch Monitor
The Latch Monitor displays statistics for the latches in the system.Latches are low–level locks on shared internal structures.
The following figure illustrates the left–most columns of the LatchMonitor.
Figure 11 – 4 Latch Monitor
The Latch Monitor is described below:
Name of the latch.
Process identifier for process currently holdingthe latch.
Number of times, since the last sample, aprocess acquired the latch on its first attempt,but had to wait before acquiring it.
Number of times, since the last sample, aprocess acquired the latch after failing on itsfirst attempt.
Number of times, since the last sample, aprocess went to sleep while waiting for thelatch.
Latch Name
Holder PID
Gets (Wait)
Misses (Wait)
Sleeps (Wait)

☞SQL WorksheetEquivalent
Required Views
11 – 9Monitoring System Performance
Number of times, since the last sample, aprocess acquired the latch without waiting.
Number of times, since the last sample, aprocess failed to acquire the latch and did notwait.
Attention: In the Latch Monitor you can only sort on the LatchName and Holder PID columns.
To start the Latch Monitor from a SQL Worksheet, you can use thefollowing Server Manager command:
MONITOR LATCH
To use the Latch Monitor, you must have access to:
• V$LATCH
• V$LATCHHOLDER
• V$LATCHNAME
Gets (No Wait)
Misses (No Wait)

11 – 10 Oracle Server Manager User’s Guide
The Library Cache Monitor
The Library Cache Monitor displays statistics about performance of thelibrary cache. The library cache contains shared cursors and is part ofthe shared pool in the SGA.
The following figure illustrates the left–most columns of the LibraryCache Monitor.
Figure 11 – 5 Library Cache Monitor
The Library Cache Monitor is described below:
Name of the library cache item. Statistics for thefollowing Name Space items reflect activity forSQL statements and PL/SQL blocks:
• SQL AREA
• TABLE/PROCEDURE
• BODY
• TRIGGER
Statistics for other Name Space items reflectactivity for object definitions Oracle uses fordependency maintenance.
Name Space

11 – 11Monitoring System Performance
Number of times the system requests handles tolibrary objects belonging to the name space.
Number of times the requested handle isalready allocated in the cache.
If the handle is not already allocated, it is amiss. The handle is then allocated and insertedinto the cache.
Number of Gets Hits divided by Gets Requests.
Values close to 1 indicate that most of thehandles the system has tried to get were in thecache.
Number of times the system issues pin requestsfor library objects in the cache to access them.
Number of times the system pinned andaccessed objects that were already allocated andinitialized in the cache. Otherwise, it is a miss,and the system has to allocate the object in thecache and initialize it.
Number of Pins Hits divided by Pins Requests.
Values close to 1 indicate that most of theobjects the system has tried to pin and accesswere in the cache.
Number of times library objects had to bereinitialized and reloaded with data becausethey had been aged out or invalidated.
Number of times that non–persistent libraryobjects, such as shared SQL areas, have beeninvalidated.
Gets Requests
Gets Hits
Gets Ratio
Pins Requests
Pins Hits
Pins Ratio
Reloads
Invalidations

Filters
SQL WorksheetEquivalent
Required Views
11 – 12 Oracle Server Manager User’s Guide
The following filter is available in the Library Cache Monitor:
Filter for the type of library cache object.Monitor displays statistics only for those objectsin name spaces that match the Name Spacefilter.
To start the Library Cache Monitor from a SQL Worksheet, you can usethe following Server Manager commands:
MONITOR LIBRARYCACHE
MONITOR LIBRARY
To use the Library Cache Monitor, you must have access to:
• V$LIBRARYCACHE
Name Space

11 – 13Monitoring System Performance
The Lock Monitor
The Lock Monitor displays information about locks that are held andlocks that are requested.
The following figure illustrates the left–most columns of the LockMonitor.
Figure 11 – 6 Lock Monitor
The Lock Monitor is described below:
Oracle user associated with the session that isholding or requesting the lock.
Identifier for the session that is holding orrequesting the lock.
Session serial number, used to uniquely identifya session’s objects. Guarantees thatsession–level commands are applied to thecorrect session objects if the session ends andanother session begins with the same sessionidentifier.
Username
Session ID
Serial Number

Filters
SQL WorksheetEquivalent
Required Views
11 – 14 Oracle Server Manager User’s Guide
Type of lock being held or requested. Userlocks, which are locks obtained by userapplications, are described below:
DML enqueue lock.
Transaction enqueue lock.
User supplied lock.
All other locks are system locks, which are heldfor extremely short periods of time.
Identifier for resource being locked.
Additional identifier for resource being locked.
Mode in which the lock is held, or NONE ifwaiting for the lock. The lock modes aredescribed below:
Row share.
Row exclusive.
Share.
Share row exclusive.
Exclusive.
Mode in which lock has been requested, orNONE if the lock has been acquired. See thelock modes defined above.
The following filter is available in the Lock Monitor:
Filter for the user associated with the sessionthat is holding or requesting the lock. Monitordisplays lock information only for users whosenames match the Username filter.
To start the Lock Monitor from a SQL Worksheet, you can use thefollowing Server Manager command:
MONITOR LOCK
To use the Lock Monitor, you must have access to:
• V$LOCK
• V$SESSION
Lock Type
TM
TX
UL
Resource ID 1
Resource ID 2
Mode Held
SS
SX
S
SSX
X
Mode Requested
Username

11 – 15Monitoring System Performance
The Process Monitor
The Process Monitor shows the background and user processes for theinstance.
The following figure illustrates the left–most columns of the ProcessMonitor.
Figure 11 – 7 Process Monitor
The Process Monitor is described below:
Oracle process identifier.
Operating system process identifier.
Username associated with the operating systemprocess.
Operating system terminal, if any.
Address of the latch the process is waiting for,or null if not waiting for a latch.
Name of the program the process is executing.
Oracle PID
System PID
Username
Terminal
Latchwait
Program

Filters
SQL WorksheetEquivalent
Required Views
11 – 16 Oracle Server Manager User’s Guide
The following filters are available in the Process Monitor:
Minimum process ID. Monitor displaysprocesses with ID numbers greater than orequal to Min PID.
Maximum process ID. Monitor displays processwith ID numbers less than or equal to Max PID.
To start the Process Monitor from a SQL Worksheet, you can use thefollowing Server Manager command:
MONITOR PROCESS
To use the Process Monitor, you must have access to:
• V$PROCESS
Min PID
Max PID

11 – 17Monitoring System Performance
The Queue Monitor
The Queue Monitor displays information about the queues used in themulti–threaded server.
The following figure illustrates the left–most columns of the QueueMonitor.
Figure 11 – 8 Queue Monitor
The Queue Monitor is described below:
Address of the process that owns the queue.
The type of queue:
Request queue.
Queue used by remote servers.
Response queue.
Number of items in the queue.
Total number of items that have ever been inthe queue.
Average time an item waits in the queue, inseconds.
Process Address
Queue Type
COMMON
OUTBOUND
DISPATCHER
Current Queued
Total Queued
Average Wait (sec)

SQL WorksheetEquivalent
Required Views
11 – 18 Oracle Server Manager User’s Guide
To start the Queue Monitor from a SQL Worksheet, you can use thefollowing Server Manager command:
MONITOR QUEUE
MONITOR Q
To use the Queue Monitor, you must have access to:
• V$QUEUE

11 – 19Monitoring System Performance
The Rollback Monitor
The Rollback Monitor displays statistics and information about onlinerollback segments. The following figure illustrates the left–mostcolumns of the Rollback Monitor.
Figure 11 – 9 Rollback Monitor
The Rollback Monitor is described below:
Name of the rollback segment.
Rollback segment number.
Size of the rollback segment, in bytes.
Number of extents in the rollback segment.
Number of active transactions using therollback segment.
Rate at which bytes were written to the rollbacksegment since the last sample.
Number of times the rollback segment’s headerwas accessed since the last sample.
Number of times a process had to wait to accessthe rollback segment’s header since the lastsample.
Optimal size of the rollback segment.
RS ID
Rollback Segment
Size (bytes)
Extents
Active Xactions
Write Rate (bytes/s)
Header Gets
Header Waits
Optimal Size

☞
Filters
SQL WorksheetEquivalent
Required Views
Interpreting RollbackStatistics
11 – 20 Oracle Server Manager User’s Guide
High water mark for the rollback segment (thelargest size the rollback segment has grown to),in bytes.
Current average size of active extents (extentsthat contain uncommitted transaction data), inbytes.
Total size of freed extents divided by number ofshrinks, in bytes.
Number of times the rollback segment wrapsfrom one extent to another.
Number of times the rollback segment wasextended and allocated a new extent.
Number of times the rollback segment shrank,deallocating one or more extents.
Attention: In the Rollback Monitor you can sort on the RS ID,Rollback Segment, Size, Extents, Active Xactions, Optimal Size,HWM Size, Average Active, Average Shrink, Wraps, Extends,and Shrinks columns.
The following filter is available in the Rollback Monitor:
Filter for the rollback segment name. Monitordisplays information only for rollback segmentswhose names match the Rollback SegmentName filter.
To start the Rollback Monitor from a SQL Worksheet, you can use thefollowing Server Manager command:
MONITOR ROLLBACK
To use the Rollback Monitor, you must have access to:
• V$ROLLNAME
• V$ROLLSTAT
When you have multiple rollback segments, the values in the HeaderGets column should be roughly equal for all rollback segments. Thisindicates that the rollback segments are being accessed evenly.
If the value in the Extents column is high, you may want to createadditional rollback segments or increase the size of current segments.
A high value in the Header Waits column indicates contention for theheaders of rollback segments. In this case, you should consider addingmore rollback segments.
HWM Size
Average Active
Average Shrink
Wraps
Extends
Shrinks
Rollback SegmentName

11 – 21Monitoring System Performance
The Session Monitor
The Session Monitor displays information about users’ sessions.
The following figure illustrates the left–most columns of the SessionMonitor.
Figure 11 – 10 Session Monitor
The Session Monitor is described below:
Identifier for the session.
Session serial number, used to uniquely identifya session’s objects. Guarantees thatsession–level commands are applied to thecorrect session objects if the session ends andanother session begins with the same sessionidentifier.
Oracle identifier for the process that owns thesession.
Status of the session: ACTIVE, INACTIVE,KILLED.
Oracle user associated with the session.
Address of the lock the session is waiting for, ornull if not waiting for a lock.
Session ID
Serial Number
Process ID
Status
Username
Lockwait

Filters
SQL WorksheetEquivalent
Required Views
11 – 22 Oracle Server Manager User’s Guide
Command currently executing.
The following filter is available in the Session Monitor:
Filter for the user associated with the session.Monitor displays information for sessionswhose users match the Username filter.
To start the Session Monitor from a SQL Worksheet, you can use thefollowing Server Manager command:
MONITOR SESSION
To use the Session Monitor, you must have access to:
• V$PROCESS
• V$SESSION
Current Statement
Username

11 – 23Monitoring System Performance
The Shared Server Monitor
The Shared Server Monitor displays information about shared serverprocesses.
The following figure illustrates the left–most columns of the SharedServer Monitor.
Figure 11 – 11 Shared Server Monitor
The Shared Server Monitor is described below:
Name of the shared server process.
Status of the shared server process.
Executing SQL.
Waiting for a lock.
Waiting to send data to theuser.
Idle, waiting for a user request.
Waiting for a circuit to resetafter a break.
Terminating.
Name
Status
EXEC
WAIT (ENQ)
WAIT (SEND)
WAIT(COMMON)
WAIT (RESET)
QUIT

Filters
SQL WorksheetEquivalent
Required Views
11 – 24 Oracle Server Manager User’s Guide
Total number of requests taken from the requestqueue by the server.
Total idle time for the server, expressed in:
(Days) Hours : Minutes : Seconds
Total busy time for the server, expressed in:
(Days) Hours : Minutes : Seconds
The fraction of its lifetime that the server hasbeen busy:
Busy Time/(Busy Time + Idle Time)
The address of the circuit that the server iscurrently serving.
The following filters are available in the Shared Server Monitor:
Filter for shared server name. Monitor displaysinformation for servers whose names match theName filter.
Filter for the shared server status. Monitordisplays information for servers with thespecified status.
To start the Shared Server Monitor from a SQL Worksheet, you can usethe following Server Manager commands:
MONITOR SHAREDSERVER
MONITOR SHARED
To use the Shared Server Monitor, you must have access to:
• V$SHARED_SERVER
Requests
Total Idle Time
Total Busy Time
Load
Circuit
Name
Status

11 – 25Monitoring System Performance
The SQL Area Monitor
The SQL Area Monitor displays information about shared cursors in thelibrary cache. Each shared cursor contains information used to executeits SQL statement or PL/SQL block. Each row in the monitor showsstatistics for one shared cursor.
The following figure illustrates the left–most columns of the SQL AreaMonitor.
Figure 11 – 12 SQL Area Monitor
The SQL Area Monitor is described below:
Text of the cursor’s SQL statement or thePL/SQL anonymous code.
Number of different versions of the cursor
The same text might be used by different users,each on their own version of an object. Forexample, if users SCOTT and BLAKE own EMPtables and execute the statement SELECT *FROM emp, they each have a different versionof the cursor.
Amount of memory in bytes that can be sharedbetween users.
SQL Statement Text
Version Count
Sharable Memory

Filters
SQL WorksheetEquivalent
Required Views
11 – 26 Oracle Server Manager User’s Guide
For each user, the amount of memory in bytesthat persists for the life of the cursor. Persistentmemory is retained between executions of thestatement.
For each user, the amount of memory in bytesthat is needed only during execution. Runtimememory exists only while the statement is beingexecuted.
The following filter is available in the SQL Area Monitor:
Filter for the statement text. Monitor displaysinformation for cursors whose text matches theStatement filter.
To start the SQL Area Monitor from a SQL Worksheet, you can use thefollowing Server Manager commands:
MONITOR SQLAREA
MONITOR SQL
To use the SQL Area Monitor, you must have access to:
• V$SQLAREA
Memory/UserPersistent
Memory/UserRuntime
Statement

11 – 27Monitoring System Performance
The System I/O Monitor
The System I/O Monitor displays the percentage of input/outputactivity generated by background and user processes accessing thedatabase. The statistics shown are relative distributions among theprocesses, not precise counts of I/O operations.
The following figure illustrates the left–most columns of the System I/OMonitor.
Figure 11 – 13 System I/O Monitor
The System I/O Monitor is described below:
Oracle process identifier.
Session identifier.
Username associated with the system process.
Change in the percentage logical reads for theprocess since the last sample.
Change in the percentage physical reads for theprocess since the last sample.
Change in the percentage logical writes for theprocess since the last sample.
Process ID
Session ID
System Username
Change in % logicalreads
Change in % physicalreads
Change in % logicalwrites

☞SQL WorksheetEquivalent
Required Views
11 – 28 Oracle Server Manager User’s Guide
Logical reads for the process as a percentage ofall logical reads since startup.
Physical reads for the process as a percentage ofall physical reads since startup.
Logical writes for the process as a percentage ofall logical writes since startup.
Attention: In the System I/O Monitor you can only sort on theProcess ID, Session ID, and System Username columns.
To start the System I/O Monitor from a SQL Worksheet, you can use thefollowing Server Manager commands:
MONITOR SYSTEMI/O
MONITOR SIO
To use the System I/O Monitor, you must have access to:
• V$PROCESS
• V$SESSION
• V$SESS_IO
Total % logical reads
Total % physical reads
Total % logical writes

☞
11 – 29Monitoring System Performance
The System Statistics Monitor
The System Statistics Monitor displays the runtime statistics on systemuse and performance for the current instance.
The following figure illustrates the left–most columns of the SystemStatistics Monitor.
Figure 11 – 14 System Statistics Monitor
The System Statistics Monitor is described below:
Name of the statistic.
Cumulative value of the statistic.
Value of the statistic since the last sample.
Average value of the statistic since you startedthe monitor.
Minimum value of the statistic since you startedthe monitor.
Maximum value of the statistic since youstarted the monitor.
Attention: In the System Statistics Monitor you can only sorton the Statistic Name and Total columns.
Statistic Name
Total
Current
Average
Minimum
Maximum

SQL WorksheetEquivalent
Required Views
Interpreting SystemStatistics
☞
System Statistics
User Statistics
11 – 30 Oracle Server Manager User’s Guide
To start the System Statistics Monitor from a SQL Worksheet, you canuse the following Server Manager command:
MONITOR SYSTEMSTATISTICS
MONITOR SS
To use the System Statistics Monitor, you must have access to:
• V$SYSSTAT
Most statistics in the System Statistics Monitor are shown as rates persecond. The exceptions are noted in the statistics descriptions at the endof this section.
Attention: Statistics related to time are not collected unless theparameter TIMED_STATISTICS is set to TRUE. For informationabout setting parameters, see the Oracle7 Server Administrator’sGuide.
The following tables describe the system statistics shown in the SystemStatistics Monitor.
User statistics provide information on CPU and resource use by Oracleusers, and also the calls, commits, and rollbacks the users initiate. TheSystem Statistics Monitor covers all sessions. The following tabledescribes the user statistics.
User Statistic Description
CPU used by thissession
Amount of CPU time used in 1/100’s of asecond.
logons cumulative On a systemwide basis, the number in theCURRENT column is the number of newlogons this cycle and always equals thecorresponding number in current logons. On aper–process basis, this number is always 0 or1. The number in the TOTAL column is thenumber of processes that have ever logged onand is cumulative from the last warm start.
opened cursorscumulative
The total number of cursors that have beenopened.
logons current The number of current logons.
opened cursorscurrent
The number of cursors that are currentlyopen.
Table 11 – 1 User Statistics, continued on next page
11 – 31Monitoring System Performance
User Statistic Description
cursor authentications The number of times that cursor privilegeshave been verified, either for a SELECT orbecause privileges were revoked from anobject, causing all users of the cursor to bere–authenticated.
session logical reads The number of logical disk reads that weresatisfied either from the cache or by a physicalread from the disk.
session pga memorymax
Maximum amount of PGA memory everused.
session uga memorymax
Maximum amount of system memory everused.
session pga memory Amount of PGA memory currently in use.
recursive calls The number of recursive calls including datadictionary operations. A high numberindicates that information is not being foundoften enough in the dictionary cache. Thiscould be because parsing is occurring (too)often or because the cache is not large enough.You should consider increasing theinitialization parameterSHARED_POOL_SIZE.
recursive cpu usage The amount of CPU time (in 1/100’s of asecond) that was spent updating internaltables while processing user SQL statements;for example, time spent doing spaceallocation. A high value indicates a lot of datadictionary work.
session connect time The total elapsed time that the session hasbeen connected to the server, in 1/100’s of asecond.
session uga memory Amount of used session memory.
session storedprocedure space
The number of bytes allocated to storedprocedures used in the session.
user calls The number of user calls processed.
Table 11 – 1 User Statistics, continued on next page
Redo Statistics
11 – 32 Oracle Server Manager User’s Guide
User Statistic Description
user commits The number of transactions for this process orsystemwide. This number should equal USERCALLS minus USER ROLLBACKS.
user rollbacks The number of rollbacks for this process.
Table 11 – 1 User Statistics
Redo statistics provide information on the redo log files. The followingtable describes the redo statistics.
Redo Statistic Description
redo blocks written The total number of redo blocks written.
redo buffer allocationretries
The total number of retries necessary toallocate space in the redo buffer. Retries areneeded either because the redo writer hasfallen behind or because an event such as alog switch is occurring.
redo entries The number of redo entries generated.
redo entries linearized The number of entries less than or equal toREDO_ENTRY_PREBUILD_THRESHOLD.Building these entries requires additional CPUtime but increases concurrency onmultiple–user systems.
redo log spacerequests
Number of times LGWR was given a requestto write a redo log buffer.
redo log space waittime
Time spent waiting for log space (in 1/100’s ofa second). A very high or rapidly increasingvalue may indicated a problem with logarchiving.
redo log switchinterrupts
The count of times an instance log–switch wasrequested by another instance when runningin parallel mode.
redo ordering marks Number of extra SCN’s allocated to maintainordering of redo logs, as a result of blocksmigrating from one instance’s cache toanother. The count of these pings is ameasurement of cross–talk between instanceswhen running in parallel mode. If this value isvery high, it may indicate a need for a betterseparation of instance–activities.
redo size The amount of redo generated in bytes.
Table 11 – 2 Redo Statistics, continued on next page
Enqueue Statistics
11 – 33Monitoring System Performance
Redo Statistic Description
redo small copies The total number of entries less than or equalto LOG_SMALL_ENTRY_MAX_SIZE. Theseentries are copied under the protection of theallocation latch, eliminating the necessity ofthe copy latch. This statistic generally isapplicable to only multiple–processorsystems.
redo wastage Cumulative total of unused bytes that werewritten to the log. The redo buffer is flushedperiodically even when not completely filled,so this value may be nonzero.
redo write time Cumulative elapsed time spent on log I/O.
redo writes The total number of redo writes.
Table 11 – 2 Redo Statistics
Enqueue statistics provide information about the locks. The followingtable describes the enqueue statistics.
Enqueue Statistic Description
enqueue requests Number of times an enqueue (lock) wasrequested.
enqueue waits The number of times an enqueue requestresulted in a wait. Enqueue requests minusenqueue waits is the number of no–waitenqueue requests.
enqueue timeouts The number of times an enqueue (lock)request was not granted within the allottedwait time. A very large or rapidly increasingvalue indicates a high degree of internalcontention. Tuning may be required.
enqueue conversions Number of enqueue locks converted to adifferent mode; for example, from shared toexclusive.
enqueue releases Number of times an enqueue (lock) wasreleased. This statistic should keep pace withenqueue requests.
enqueue deadlocks The number of process deadlocks thatoccurred due to enqueues (locks) for DDLoperations.
Table 11 – 3 Enqueue Statistics
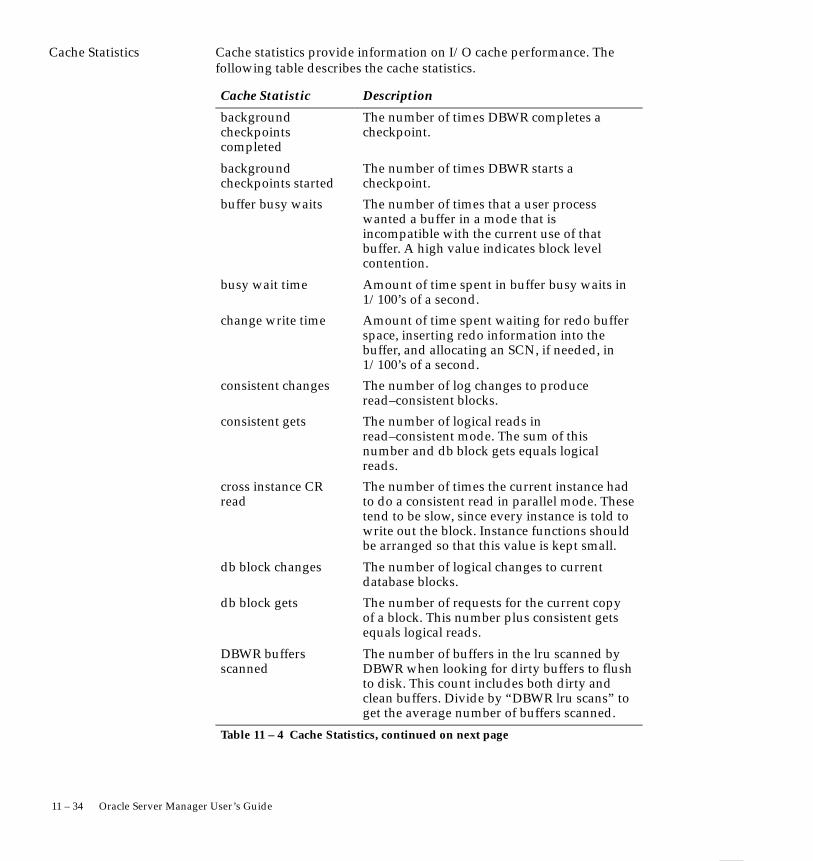
Cache Statistics
11 – 34 Oracle Server Manager User’s Guide
Cache statistics provide information on I/O cache performance. Thefollowing table describes the cache statistics.
Cache Statistic Description
backgroundcheckpointscompleted
The number of times DBWR completes acheckpoint.
backgroundcheckpoints started
The number of times DBWR starts acheckpoint.
buffer busy waits The number of times that a user processwanted a buffer in a mode that isincompatible with the current use of thatbuffer. A high value indicates block levelcontention.
busy wait time Amount of time spent in buffer busy waits in1/100’s of a second.
change write time Amount of time spent waiting for redo bufferspace, inserting redo information into thebuffer, and allocating an SCN, if needed, in1/100’s of a second.
consistent changes The number of log changes to produceread–consistent blocks.
consistent gets The number of logical reads inread–consistent mode. The sum of thisnumber and db block gets equals logicalreads.
cross instance CRread
The number of times the current instance hadto do a consistent read in parallel mode. Thesetend to be slow, since every instance is told towrite out the block. Instance functions shouldbe arranged so that this value is kept small.
db block changes The number of logical changes to currentdatabase blocks.
db block gets The number of requests for the current copyof a block. This number plus consistent getsequals logical reads.
DBWR buffersscanned
The number of buffers in the lru scanned byDBWR when looking for dirty buffers to flushto disk. This count includes both dirty andclean buffers. Divide by “DBWR lru scans” toget the average number of buffers scanned.
Table 11 – 4 Cache Statistics, continued on next page

11 – 35Monitoring System Performance
Cache Statistic Description
DBWR checkpoints The number of times DBWR was notified todo a checkpoint.
DBWR cross instancewrites
The number of blocks written forcross–instance calls so that another instancecould do a consistent read.
DBWR exchangewaits
Used in the Parallel Server only, the number oftimes the DBWR was requested to exchangeblocks between instances. Useful only whenshown for the DBWR process.
DBWR free buffersfound
The number of buffers that DBWR foundalready clean when requested to make freebuffers. Divide by “DBWR make freerequests” to find the average number ofreusable buffers at the end of the lru. Thisvalue is only incremented when the lru isscanned in response to a make–free request.
DBWR lru scans The number of times DBWR does a scan of thelru queue looking for more buffers to write.This includes times when the scan is made tofill out a batch being written for anotherpurpose, such as a checkpoint, so it willalways be equal to or greater than “DBWRmake free requests”.
DBWR make freerequests
The number of requests received by DBWR tomake more free buffers for the lru. Thisincludes the times that DBWR sends such arequest to itself.
DBWR summed scandepth
Sum of the current scan depth for each scan ofthe lru by DBWR when DBWR is looking fordirty buffers. The actual number of buffersscanned may be less than the scan depth, as aresult of dirty buffers being placed in the dirtyqueue by foreground processes. Divide by“DBWR lru scans” to find the average scandepth. Compare this value with the valuecalculated from “DBWR buffers scanned” tosee how much scanning is actually performed.
DBWR timeouts The number of timeouts at which DBWR hadbeen idle since the last timeout. These are thetimes that DBWR looked for buffers to idlewrite.
Table 11 – 4 Cache Statistics, continued on next page
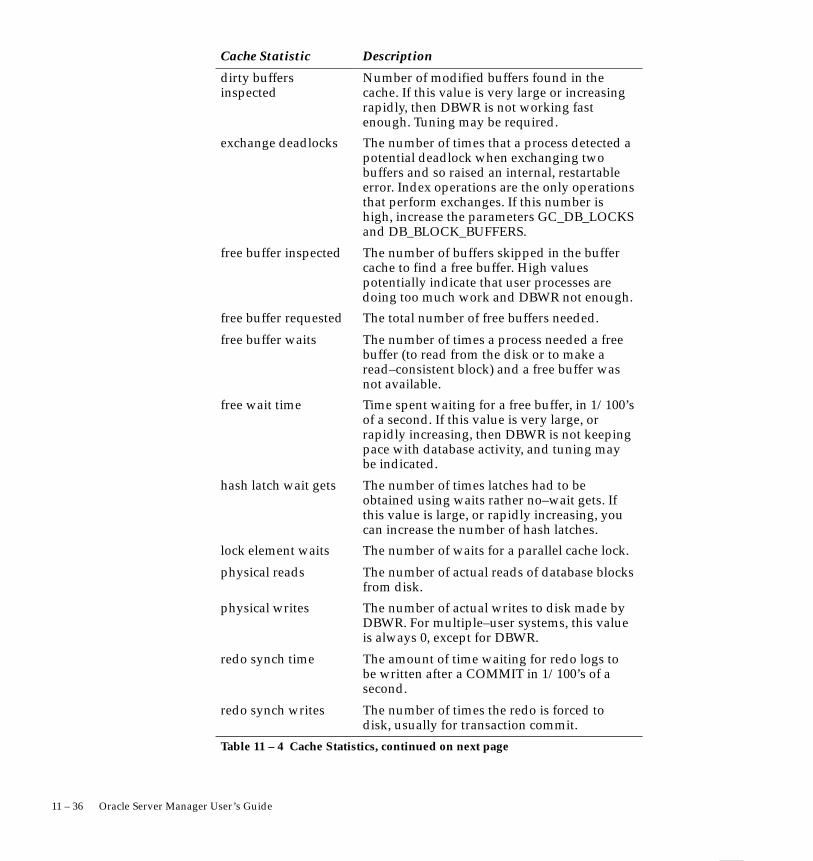
11 – 36 Oracle Server Manager User’s Guide
Cache Statistic Description
dirty buffersinspected
Number of modified buffers found in thecache. If this value is very large or increasingrapidly, then DBWR is not working fastenough. Tuning may be required.
exchange deadlocks The number of times that a process detected apotential deadlock when exchanging twobuffers and so raised an internal, restartableerror. Index operations are the only operationsthat perform exchanges. If this number ishigh, increase the parameters GC_DB_LOCKSand DB_BLOCK_BUFFERS.
free buffer inspected The number of buffers skipped in the buffercache to find a free buffer. High valuespotentially indicate that user processes aredoing too much work and DBWR not enough.
free buffer requested The total number of free buffers needed.
free buffer waits The number of times a process needed a freebuffer (to read from the disk or to make aread–consistent block) and a free buffer wasnot available.
free wait time Time spent waiting for a free buffer, in 1/100’sof a second. If this value is very large, orrapidly increasing, then DBWR is not keepingpace with database activity, and tuning maybe indicated.
hash latch wait gets The number of times latches had to beobtained using waits rather no–wait gets. Ifthis value is large, or rapidly increasing, youcan increase the number of hash latches.
lock element waits The number of waits for a parallel cache lock.
physical reads The number of actual reads of database blocksfrom disk.
physical writes The number of actual writes to disk made byDBWR. For multiple–user systems, this valueis always 0, except for DBWR.
redo synch time The amount of time waiting for redo logs tobe written after a COMMIT in 1/100’s of asecond.
redo synch writes The number of times the redo is forced todisk, usually for transaction commit.
Table 11 – 4 Cache Statistics, continued on next page

Parallel Server Statistics
11 – 37Monitoring System Performance
Cache Statistic Description
remote instance undorequests
The number of times this instance acquired anSS lock on undo from another instance inorder to perform a consistent read.
remote instance undowrites
The number of times this instance wrote adirty undo block so another instance couldread it.
summed dirty queuelength
The number of buffers pending for writing. Ifthis value is large, or increasing rapidly, thenincrease the write–batch size.
write complete waits The number of times a process waited forDBWR to write a current block before makinga change.
write requests The number of multi–block writes performed.
write wait time The amount of time spent waiting for DBWRto finish writing a block in the buffer cachebefore being allowed to change it.
Table 11 – 4 Cache Statistics
Parallel Server statistics provide information on the Parallel Server. Thefollowing table describes the Parallel Server statistics.
Parallel ServerStatistic
Description
cross instance CRread
The number of times the current instance hadto do a consistent read in parallel mode. Thesetend to be slow, since every instance is told towrite out the block. Instance functions shouldbe arranged so that this value is kept small.
DBWR cross instancewrites
The number of blocks written for cross–instancecalls so that another instance could do aconsistent read.
global lock converts(asynchronous)
The number of instance locks that wereconverted from one mode to another, duringwhich other tasks were enabled.
global lock converts(non–asynchronous)
The number of instance locks that wereconverted from one mode to another, duringwhich no other tasks could run.
global lock convertstime
The amount of time spent waiting for instancelock conversion in 1/100’s of a second.
Table 11 – 5 Parallel Server Statistics, continued on next page

11 – 38 Oracle Server Manager User’s Guide
Parallel ServerStatistic
Description
global lock gets(asynchronous)
The number of instance locks that wereacquired when other tasks could be enabledduring the wait.
global lock gets(non–asynchronous)
The number of instance locks that wereacquired when other tasks could run duringthe wait.
global lock get time The amount of time spent waiting to acquireinstance locks in 1/100’s of a second.
global lock releases(asynchronous)
The number of instance locks that were releasedwhen other tasks could be enabled during thewait.
global lock releases(nonasynchronous)
The number of instance locks that were releasedwhen other tasks could run during the wait.
global lock releasetime
The amount of time spent waiting to releaseinstance locks in 1/100’s of a second.
hash latch wait gets The number of times latches had to be obtainedusing waits rather than no–wait gets. If thisvalue is large, or rapidly increasing, you canincrease the number of hash latches.
lock element waits The number of waits for a parallel cache lock
next SCNs gottenwithout going toDLM
The number of SCNs obtained without resortingto Distributed Lock management. To measurethe effectiveness of the Parallel Server’s SCNcache, divide this value by the total number ofSCN gets as given by the user statistic “usercommits”. This gives the percentage of SCNgets satisfied from the cache.
remote instance undorequests
The number of times this instance acquired anSS lock on undo from another instance inorder to perform a consistent read.
remote instance undowrites
The number of times this instance wrote adirty undo block so another instance couldread it.
Table 11 – 5 Parallel Server Statistics

SQL Tuning Statistics
11 – 39Monitoring System Performance
The SQL tuning statistics provide information on SQL tuning and tablecharacteristics. The following table describes the SQL tuning statistics.
SQL Tuning Statistic Description
cluster key scans The number of full table scans or clusteredtables performed by fetching rows using thecluster key.
cluster key scan blockgets
The number of blocks read while performingfull table scans or clustered tables using thecluster key.
table fetch by rowid The number of logical rows fetched from atable.
table fetch continuedrow
The number of additional physical fetchesrequired to access broken rows. Divide thisnumber by “table fetch by rowid” for apercentage of broken rows, where rows withmultiple breaks count as multiple brokenrows.
table scan rows gotten The number of rows fetched during full tablescans.
table scan blocksgotten
Number of logical block reads during tablescans.
table scans (longtables)
The number of long table scans. All blocks inexcess of the value specified by the parameterSMALL_TABLE_THRESHOLD areimmediately resumed, instead of aging out ofthe lru queue.
table scans (shorttables)
The number of full table scans of short tables.All of the table’s blocks are aged out of the lruqueue in normal fashion. These tables aresmaller than the value ofSMALL_TABLE_THRESHOLD.
parse count The number of SQL statements parsed.
parse time cpu The amount of CPU time spent parsing SQLstatements, in 1/100’s of a second.
parse time elapsed The amount of elapsed time spent parsingSQL statements, in 1/100’s of a second.
sorts (disk) The number of disk sorts. Each disk sortrequires the memory specified by theSORT_AREA_SIZE parameter.
Table 11 – 6 SQL Tuning Statistics, continued on next page
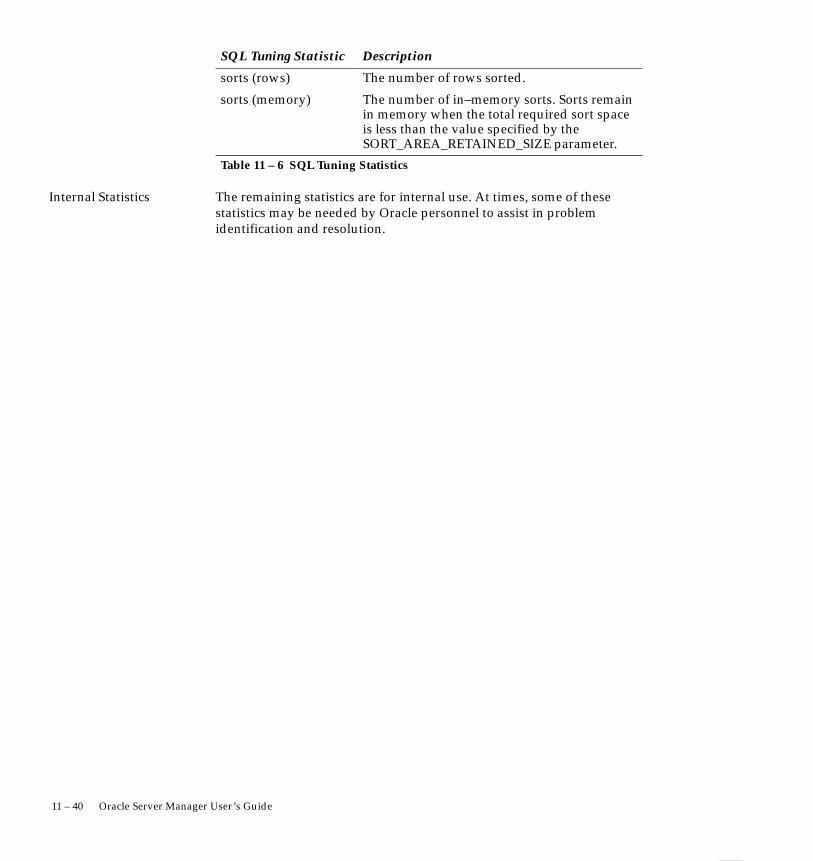
Internal Statistics
11 – 40 Oracle Server Manager User’s Guide
SQL Tuning Statistic Description
sorts (rows) The number of rows sorted.
sorts (memory) The number of in–memory sorts. Sorts remainin memory when the total required sort spaceis less than the value specified by theSORT_AREA_RETAINED_SIZE parameter.
Table 11 – 6 SQL Tuning Statistics
The remaining statistics are for internal use. At times, some of thesestatistics may be needed by Oracle personnel to assist in problemidentification and resolution.

Filters
11 – 41Monitoring System Performance
The Table Access Monitor
The Table Access Monitor lists database objects that are being accessedand the sessions that are accessing them.
The following figure illustrates the left–most columns of the TableAccess Monitor.
Figure 11 – 15 Table Access Monitor
The Table Access Monitor is described below:
Identifier for the session currently accessing theobject.
Owner of the object being accessed.
Name of the object being accessed.
The following filters are available in the Table Access Monitor:
Minimum session ID. Monitor displays sessionswith ID numbers greater than or equal to MinSID.
Maximum session ID. Monitor displayssessions with ID number less than or equal toMax SID.
SID
Schema Name
Table Name
Min SID
Max SID

SQL WorksheetEquivalent
Required Views
Interpreting TableAccess Statistics
11 – 42 Oracle Server Manager User’s Guide
Filter for owner name. Monitor displaysinformation for objects whose owners match theSchema filter.
Filter for object names. Monitor displaysinformation for objects whose names match theTable filter.
To start the Table Access Monitor from a SQL Worksheet, you can usethe following Server Manager commands:
MONITOR TABLEACCESS
MONITOR TABLE
To use the Table Access Monitor, you must have access to:
• V$ACCESS
Use the Session Monitor to look up the user associated with a particularSID listed in the Table Access Monitor.
Schema
Table

Filters
11 – 43Monitoring System Performance
The Tablespace Monitor
The Tablespace Monitor displays information about the tablespaces inthe database.
The following figure illustrates the left–most columns of the TablespaceMonitor.
Figure 11 – 16 Tablespace Monitor
The Tablespace Monitor is described below:
Name of the tablespace.
Status of the tablespace: ONLINE or OFFLINE.
Size of the tablespace in database blocks.
Number of database blocks currently allocatedto users’ objects in the tablespace.
The following filter is available in the Tablespace Monitor:
Filter for the tablespace name. Monitor displaysinformation for tablespaces whose names matchthe Tablespace filter.
Tablespace Name
Status
Total File Blocks
Total Quota Blocks
Tablespace

SQL WorksheetEquivalent
Required Views
11 – 44 Oracle Server Manager User’s Guide
To start the Tablespace Monitor from a SQL Worksheet, you can use thefollowing Server Manager command:
MONITOR TABLESPACE
To use the Tablespace Monitor, you must have access to:
• DBA_TABLESPACES
• DBA_TS_QUOTAS
• DBA_DATA_FILES

P A R T
V Line Mode


C H A P T E R
12T
12 – 1Using Server Manager in Line Mode
Using Server Managerin Line Mode
his chapter describes how to use Server Manager in line mode. Linemode is useful for performing unattended operations, such as runningnightly batch jobs or scripts. In addition, you can use line mode when agraphical device is unavailable.

OSDoc
Entering ServerManager Commands
Entering SQL orPL/SQL Code
Running Scripts
12 – 2 Oracle Server Manager User’s Guide
Starting Server Manager in Line Mode
You start up Server Manager in line mode by typing the appropriatecommand at the operating system prompt. For example, on somesystems the command svrmgrl starts up Server Manager in line mode.
You can also start up Server Manager in line mode and execute a script.For example, to execute the script SMSTART.SQL, enter the following atthe operating system prompt.
svrmgrl command=@smstart
Additional Information: The exact command for starting upServer Manager in line mode depends on your platform. Forinformation about starting up Server Manager in line mode, seeyour operating system–specific Oracle documentation.
Using Server Manager in Line Mode
In line mode you can execute the Server Manager commands describedin Appendix A, “Server Manager Command Reference.” In addition,you can execute SQL statements and PL/SQL code.
Single–line Server Manager commands do not require punctuation orterminators. A Server Manager command may span more than one lineif you use a backslash (\) at the end of each line to indicate acontinuation.
You can enter single–line or multiple–line SQL statements in line mode.Continuation characters are not needed in multiple–line SQL statements.To end a SQL statement and execute it, either type a semicolon (;) at theend of the statement or type a slash (/) by itself on the last input line.
To execute PL/SQL code, type a slash (/) by itself on the last input line.
In line mode you can also run scripts using the @ command. Forexample, to run the script TEST.SQL, issue the statement @test . If youdo not specify a script name, Server Manager prompts you for one, as inthe following example:
SVRMGR> @
Name of script file: test
P A R T
VI Reference


A P P E N D I X
AT
A – 1Server Manager Command Reference
Server ManagerCommand Reference
his appendix describes the Server Manager commands available inline mode. These commands can also be used in a SQL Worksheet,although some of these commands behave differently when used in aworksheet. See Chapter 8, “Using the SQL Worksheet,” for informationabout using Server Manager commands in a SQL Worksheet.

A – 2 Oracle Server Manager User’s Guide
Server Manager Commands
The Server Manager commands described in this appendix are:
• @
• ARCHIVE LOG
• CONNECT
• DESCRIBE
• DISCONNECT
• EXECUTE
• EXIT
• HELP
• HOST
• MONITOR
• RECOVER
• REMARK
• SET
• SHOW
• SHUTDOWN
• SPOOL
• STARTUP
• VARIABLE
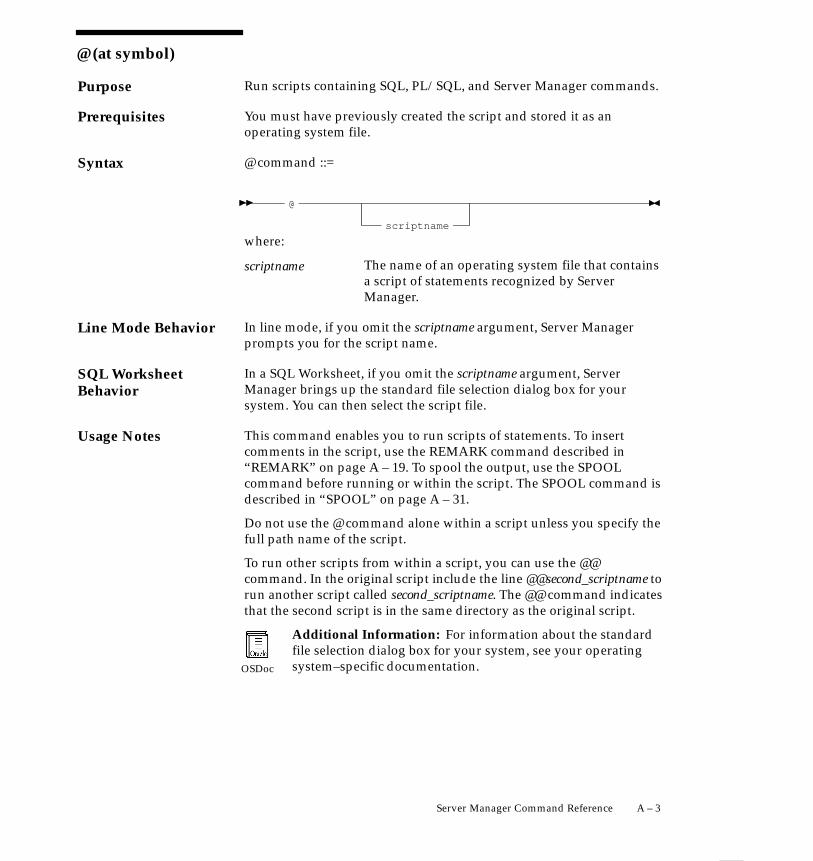
Purpose
Prerequisites
Syntax
Line Mode Behavior
SQL WorksheetBehavior
Usage Notes
OSDoc
A – 3Server Manager Command Reference
@ (at symbol)
Run scripts containing SQL, PL/SQL, and Server Manager commands.
You must have previously created the script and stored it as anoperating system file.
@ command ::=
@
scriptname
where:
The name of an operating system file that containsa script of statements recognized by ServerManager.
In line mode, if you omit the scriptname argument, Server Managerprompts you for the script name.
In a SQL Worksheet, if you omit the scriptname argument, ServerManager brings up the standard file selection dialog box for yoursystem. You can then select the script file.
This command enables you to run scripts of statements. To insertcomments in the script, use the REMARK command described in“REMARK” on page A – 19. To spool the output, use the SPOOLcommand before running or within the script. The SPOOL command isdescribed in “SPOOL” on page A – 31.
Do not use the @ command alone within a script unless you specify thefull path name of the script.
To run other scripts from within a script, you can use the @@command. In the original script include the line @@second_scriptname torun another script called second_scriptname. The @@ command indicatesthat the second script is in the same directory as the original script.
Additional Information: For information about the standardfile selection dialog box for your system, see your operatingsystem–specific documentation.
scriptname

Purpose
Prerequisites
Syntax
A – 4 Oracle Server Manager User’s Guide
ARCHIVE LOG
Start or stop automatic archiving of online redo log files, manually(explicitly) archive specified redo log files, or display information aboutredo log files.
Note: This command applies only to the current instance. Tospecify archiving for a different instance or for all instances in aParallel Server, use the SQL command ALTER SYSTEM.
You must be connected to an open Oracle database as INTERNAL,SYSOPER, or SYSDBA.
ARCHIVE LOG command ::=
ARCHIVE LOG LIST
STOP
START
NEXTALL
integer
TO destination
where:
Requests a display that shows the range of redo logfiles to be archived, the current log file group’ssequence number, and the current archivedestination (specified by either the optionalcommand text or by the initialization parameterLOG_ARCHIVE_DEST).
If you are using both ARCHIVELOG mode andautomatic archiving, the display might appear like:
Database log mode Archive Mode
Automatic archival Enabled
Archive destination DISK9:ARCH
Oldest online log sequence 30
Next log sequence to archive 33
Current log sequence 33
Because the log sequence number of the current loggroup and the next log group to archive are thesame, automatic archival has archived all loggroups up to the current one.
LIST

A – 5Server Manager Command Reference
If you are using ARCHIVELOG but have disabledautomatic archiving, the last three lines might looklike:
Oldest online log sequence 30
Next log sequence to archive 30
Current log sequence 33
If you are using NOARCHIVELOG mode, the“next log sequence to archive” line is suppressed.
The log sequence increments every time LGWRbegins to write to another redo log file group; itdoes not indicate the number of logs being used.Every time an online redo log file group is reused,the contents are assigned a new log sequencenumber.
Disables automatic archival. If the instance is stillin ARCHIVELOG mode and all redo log filegroups fill, database operation is suspended until aredo log file is archived (for example, until youenter the command ARCHIVE LOG NEXT orARCHIVE LOG ALL).
Enables automatic archiving. Starts the backgroundprocess ARCH, which performs automaticarchiving as required. If ARCH is started and afilename is supplied, the filename becomes the newdefault archive destination.
ARCH automatically starts on instance startup ifthe initialization parameterLOG_ARCHIVE_START is set to TRUE.
Manually archives the next online redo log filegroup that has been filled but not yet archived.
Manually archives all filled, but not yet archived,online log file groups.
Causes archival of the online redo log file groupwith log sequence number n. You can specify anyredo log file group that is still online. An erroroccurs if the log file cannot be found online or thesequence number is not valid. This option can beused to re–archive a log file group.
STOP
START
NEXT
ALL
integer
OSDoc
Usage Notes
Examples
A – 6 Oracle Server Manager User’s Guide
Specifies the destination device or directory in anoperating system. Specification of archivedestination devices is installation–specific; see yourplatform–specific Oracle documentation forexamples of specifying archive destinations. Onmany operating systems, multiple log files can bespooled to the same tape.
If not specified in the command line, the archivedestination is derived from the initializationparameter LOG_ARCHIVE_DEST. The commandARCHIVE LOG START ’destination’ causes thespecified device or directory to become the newdefault archive destination for all future automaticor manual archives. A destination specified withany other option is a temporary destination that isin effect only for the current (manual) archive. Itdoes not change the default archive destination forsubsequent automatic archives.
Additional Information: For information about specifyingarchive destinations, see your platform–specific Oracledocumentation.
If an online redo log file group fills and none are available for reuse,database operation is suspended. The condition can be resolved byarchiving a log file group.
ARCHIVE LOG START
Starts up the archiver process and begins automatic archiving, usingthe archive destination specified in LOG_ARCHIVE_DEST.
ARCHIVE LOG STOP
Stops automatic archiving.
ARCHIVE LOG 1001 ’DISK9:[TEMPARCH]TEMP’
Archives the log file group with the sequence number 1001 to thedestination specified. ’TEMP’ specifies the prefix of the filename on thedestination device; the remainder of the filename is dependent on theinitialization parameter LOG_ARCHIVE_FORMAT, which specifies thefilename format for archived redo log files.
‘destination’

Purpose
Prerequisites
Syntax
A – 7Server Manager Command Reference
CONNECT
Connect to a database using the specified username.
Only valid username/password combinations can successfully connect.The AS clause allows users to connect to an instance with a defaultschema of SYS for database administration. Users connecting asSYSOPER or SYSDBA must have the necessary privileges to access theSYS schema.
CONNECT command ::=
CONNECT
/password
/
AS SYSOPER
SYSDBA
@instance path
INTERNAL
/password @instance path
username
where:
Any valid Oracle username for the currentdatabase. It can be a null string. If neitherusername nor INTERNAL is specified, you areprompted for a username and password.
The password corresponding to the specifiedusername. Password can be a null string.
A valid specification for an instance/databasecombination. If an instance is specified, it becomesthe current instance for the duration of theconnection. It does not become the default instancefor subsequent connections.
The AS clause allows privileged connections byusers who have been granted SYSOPER orSYSDBA system privileges, if using a passwordfile, or their operating system equivalents, if usingOS authentication.
Uses operating system authentication.
Connects as username SYS via keywordINTERNAL. Should be used rarely and only by theDBA for certain maintenance purposes; requiresoperating system privileges. CONNECT
username
password
instance–path
SYSOPER/SYSDBA
/
INTERNAL

Line Mode Behavior
SQL WorksheetBehavior
Usage Notes
Connecting as SYSOPERor SYSDBA over aNon–Secure Connection
Connecting as SYSOPERor SYSDBA over a Localor Secure Connection
OSDoc
A – 8 Oracle Server Manager User’s Guide
INTERNAL is supported for backwardscompatibility only.
In line mode, if you omit the password, Server Manager prompts you forone. If you omit both the username and password, Server Managerprompts you for both.
In a SQL Worksheet, if you omit the username argument, ServerManager brings up the Connect dialog box.
If only the Oracle username is specified, the password is requestedusing the prompt “Password:”. The entered password is not echoed.
CONNECT can be used without a DISCONNECT to connect to anotherusername.
The connect is always accompanied by the opening of a cursor.
You can specify an instance path for a remote instance whenconnecting. If you attempt a connection to a remote instance,authentication occurs on the remote node, so you must have theappropriate privileges on the remote node.
To connect to Oracle as a privileged user over a non–secure connection,you must satisfy the following conditions:
• The server to which you are connecting must have a password file.
• You must be granted the SYSOPER or SYSDBA system privilege.
• You must connect using a username and password.
For information about creating a password file, see the Oracle7 ServerConcepts and the Oracle7 Server Administrator’s Guide,
To connect to Oracle as a privileged user over a local or a secureconnection, you must satisfy either of the following sets of conditions:
• You can connect using a password file, provided you meet thecriteria outlined above.
• If the server is not using a password file, or you have not beengranted SYSOPER or SYSDBA and are therefore not in thepassword file, your operating system name must beauthenticated by the operating system for a privilegedconnection. This form of authentication is system–specific.
Additional Information: For information about operatingsystem authentication, see your operating system–specificOracle documentation.
Examples
Connecting asINTERNAL
Purpose
Prerequisites
Syntax
A – 9Server Manager Command Reference
To connect to an instance on the current default node, enter:
CONNECT
To connect to an instance on the current node as username SCOTT withpassword TIGER, enter:
CONNECT scott/tiger
To use a password file to connect to an instance on the current node asa privileged user named SCOTT with password TIGER, enter:
CONNECT scott/tiger AS SYSDBA
Note that your default schema is now SYS, not SCOTT.
To perform the same connection using OS authentication, enter:
CONNECT / AS SYSDBA
To connect to an instance on a different node as username SCOTT withpassword TIGER, enter:
CONNECT scott/tiger@instance–path
Using Server Manager you can connect as INTERNAL to a release 7.0database. CONNECT INTERNAL is supported for backwardscompatibility only. For information on how to use CONNECTINTERNAL, refer to your Oracle7 Server Administrator’s Guide.
DESCRIBE
Describe a function, package, package body, procedure, table, or view.
You must be currently connected to a database.
DESCRIBE command ::=
nameDESCRIBE FUNCTION
PACKAGE BODY
PROCEDURE
TABLE
VIEW
PACKAGE
where:
The name of the object to describe.name

Usage Notes
Example
Purpose
Prerequisites
Syntax
Usage Notes
Example
Purpose
Prerequisites
Syntax
A – 10 Oracle Server Manager User’s Guide
Procedures inside of packages cannot be described with this command.
A command like
DESCRIBE PROCEDURE scott.addemp
produces output similar to the following example:
PROCEDURE SCOTT.ADDEMP (EMPNO INTEGER, ENAME VARCHAR2, SAL
NUMBER(9,2))
DISCONNECT
Disconnect from an Oracle server.
You must be currently connected to a database.
DISCONNECT command ::=
DISCONNECT
Upon disconnection, line mode reverts to the current default hostmachine after closing all open cursors and committing anyuncommitted transactions.
DISCONNECT
EXECUTE
Executes a one–line PL/SQL statement.
You must be currently connected to a database. You must also haveprivileges to use any stored procedures, packages, package variables,and functions referenced with this command.
EXECUTE command ::=
EXECUTE PL/SQL block

Usage Notes
Example
Purpose
Prerequisites
Syntax
Line Mode Behavior
SQL WorksheetBehavior
Example
A – 11Server Manager Command Reference
You can execute only one line of PL/SQL code with the EXECUTEcommand. If you wish to execute a PL/SQL block with many lines, youmust use the format:
BEGIN
[PL/SQL BLOCK]
END;
You can reference any command line mode bind variables in PL/SQLstatements by preceding the variable name with a colon. The examplebelow illustrates the use of bind variables with the VARIABLE,EXECUTE, and PRINT commands.
VARIABLE balance NUMBEREXECUTE :balance := get_balance(34056)
PRINT balance
BALANCE
––––––––––
4678.24
EXIT
Exits Server Manager line mode or closes a SQL Worksheet.
None.
EXIT command ::=
EXIT
The EXIT command leaves line mode unconditionally, commits thecurrent transaction, and returns to the operating system prompt.
The EXIT command commits the current transaction and closes theworksheet.
EXIT

Purpose
Prerequisites
Syntax
Line Mode Behavior
SQL WorksheetBehavior
Example
Purpose
Prerequisites
Syntax
Usage Notes
OSDoc
A – 12 Oracle Server Manager User’s Guide
HELP
Displays help information.
None.
HELP command ::=
HELP
Displays simplified syntax descriptions for some commands.
Brings up the Help window.
HELP
HOST
Execute an operating system command without exiting line mode. TheHOST command is not available in a SQL Worksheet.
None.
HOST command ::=
HOST
operating–system command
This command is particularly useful for listing files that are currently ofinterest to the database administrator, or for editing files to be runwhile in line mode. Your operating system may also support additionalsymbols or characters to invoke operating system commands.
If you omit the operating system command and enter simply HOST,you temporarily exit line mode on the assumption you want to runmultiple operating system commands.
Additional Information: To return to line mode afterexecuting a HOST command, you must use an operatingsystem–specific entry. Refer to your operating system–specificOracle documentation for more information.

Example
Purpose
Prerequisites
Syntax
A – 13Server Manager Command Reference
For VMS:
HOST TYPE INIT.ORA
For UNIX:
HOST cat INIT.ORA
MONITOR
Start a System Monitor. The MONITOR command is not available inline mode.
To use monitors, you must have access to the dynamic performancetables used by the type of monitor you select. For information about themonitors and the performance tables they use, see Part IV, “SystemMonitors.”
MONITOR command ::=
MONITOR
CIRCUIT
DISPATCHER
FILEI/O
LATCH
LIBRARYCACHE
LOCK
PROCESS
QUEUE
ROLLBACK
SESSION
SHAREDSERVER
SYSTEMI/O
SQLAREA
SYSTEMSTATISTICS
TABLEACCESS
TABLESPACE

Usage Notes
A – 14 Oracle Server Manager User’s Guide
where:
Starts the Circuit monitor.
Starts the Dispatcher monitor.
Starts the File I/O monitor.
Starts the Latch monitor.
Starts the Library Cache monitor.
Starts the Lock monitor.
Starts the Process monitor.
Starts the Queue monitor.
Starts the Rollback Segment monitor.
Starts the Session monitor.
Starts the Shared Server monitor.
Starts the SQL Area monitor.
Starts the System I/O monitor.
Starts the System Statistics monitor.
Starts the Table Access monitor.
Starts the Tablespace monitor.
For a list of the monitor names and abbreviations, see Table 1 – 4 onpage 1 – 25.
When you enter the MONITOR command without specifying amonitor type, Server Manager brings up the monitor dialog box. Selectthe type of monitor to start from the scrolling list in the monitor dialogbox.
CIRCUIT
DISPATCHER
FILEI/O
LATCH
LIBRARYCACHE
LOCK
PROCESS
QUEUE
ROLLBACK
SESSION
SHAREDSERVER
SQLAREA
SYSTEMI/O
SYSTEMSTATISTICS
TABLEACCESS
TABLESPACE

Purpose
Prerequisites
Syntax
Usage Notes
Examples
A – 15Server Manager Command Reference
Print the value of a variable defined with the VARIABLE command.
None.
PRINT command ::=
variable
where:
The name of a variable defined by the VARIABLEcommand.
Bind variables referenced with the print command do not need to bepreceded by a colon. You can use the PRINT command to displayvariables defined only in the current line mode session. The SETCHARWIDTH and SET NUMWIDTH commands can affect the displayof the PRINT command.
If no variable name is specified all currently defined variables areprinted.
PRINT balanceBALANCE
––––––––––
4687.24
SET CHARWIDTH 10
PRINT ename
ENAME
––––––––––
SCOTT
variable

Purpose
Prerequisites
Syntax
A – 16 Oracle Server Manager User’s Guide
RECOVER
Performs media recovery on one or more tablespaces, one or moredatafiles, or the entire database.
You must be connected to the Oracle server as INTERNAL, SYSOPER,or SYSDBA. You cannot use the RECOVER command when connectedvia the multi–threaded server.
RECOVER command ::=
RECOVER
UNTIL USING BACKUP CONTROLFILE
,
tablespace
DATABASE
PARALLEL clause
TABLESPACE
’filename’DATAFILE
,PARALLEL clause
PARALLEL clause
UNTIL clause ::=
CHANGE
UNTIL
TIME date
CANCEL
integer
PARALLEL clause ::=
NOPARALLEL
integerDEGREE
DEFAULT
integerINSTANCES
DEFAULT
PARALLEL ( )
A – 17Server Manager Command Reference
where:
Specifies recovering the entire database.
Specifies that a backup of the control file is beingused instead of the current control file.
Specifies recovering a particular tablespace.Tablespace is the name of a tablespace in the currentdatabase. You may recover up to 16 tablespaces inone statement.
Specifies recovering a particular datafile. You canspecify any number of datafiles.
Specifies an incomplete, cancel–based recovery.Recovery proceeds by prompting you with thesuggested filenames of archived redo log files, andrecovery completes when you specify CANCELinstead of a filename.
Specifies an incomplete, change–based recovery.The integer is the number of the SCN following thelast change to which you wish to recover. Forexample, if you want to restore your database upto the transaction with an SCN of 9, you wouldspecify UNTIL CHANGE 10.
Specifies an incomplete, time–based recovery. Usesingle quotes, and use the following format:
’YYYY–MM–DD:HH24:MI:SS’ .
DEGREE specifies the number of recoveryprocesses used to apply redo entries to datafiles oneach instance. An integer specified for DEGREEoverrides the initialization parameterRECOVERY_PARALLELISM.
DEGREE DEFAULT indicates that twice thenumber of datafiles being recovered is the numberof recovery processes to use.
INSTANCES specifies the number of instances touse for parallel recovery. The number of recoveryprocesses specified with DEGREE is used on eachinstance, thus the total number of recoveryprocesses is the integer specified with DEGREEmultiplied by the integer specified withINSTANCES. INSTANCES is only pertinent for theOracle Parallel Server.
DATABASE
USING BACKUPCONTROL FILE
TABLESPACEtablespace
DATAFILEfilename
UNTIL CANCEL
UNTIL CHANGEinteger
UNTIL TIME date
PARALLEL
OSDoc
SQL WorksheetBehavior
Usage Notes
A – 18 Oracle Server Manager User’s Guide
INSTANCES DEFAULT or not including theINSTANCES keyword causes has operatingsystem–specific consequences. Consult your Oracleoperating system documentation for a descriptionof the default behavior of the INSTANCESDEFAULT specification.
Specifies that recovery is to proceed serially. Notethat a specification of PARALLEL(DEGREE 1INSTANCES 1) is equivalent to specifying theNOPARALLEL keyword.
The PARALLEL keyword overrides the RECOVERY_PARALLELISMinitialization parameter. The number specified with the PARALLELkeyword is the number of recovery processes used to apply redoentries to datafiles.
In a SQL Worksheet, if you issue the RECOVER command withoutarguments, Server Manager brings up the Recover dialog box. For adescription of the Recover dialog box, see Chapter 9, “Using the SQLWorksheet.”
To perform media recovery on an entire database (all tablespaces), thedatabase must be mounted EXCLUSIVE and closed.
To perform media recovery on a tablespace, the database must bemounted and open, and the tablespace must be offline.
To perform media recovery on a datafile, the database can remain openand mounted with the damaged datafiles offline (unless the file is partof the SYSTEM tablespace).
Before using the RECOVER command you must have restored goodcopies of the damaged datafile(s) from a previous backup. Be sure youcan access all archived and online redo log files dating back to whenthat backup was made.
When another log file is required during recovery, a prompt suggeststhe names of files that are needed. The name is derived from the valuesspecified in the initialization parameters LOG_ARCHIVE_DEST andLOG_ARCHIVE_FORMAT. You should restore copies of the archivedredo log files needed for recovery to the destination specified inLOG_ARCHIVE_DEST, if necessary. You can override the initializationparameters by setting the LOGSOURCE variable.
During recovery you can accept the suggested log name by hittingreturn, cancel recovery by entering CANCEL instead of a log name, orenter AUTO for automatic file selection without further prompting.
NOPARALLEL

Examples
Purpose
Prerequisites
Syntax
Usage Notes
Examples
A – 19Server Manager Command Reference
If you have enabled autorecovery (that is, SET AUTORECOVERY ON),recovery proceeds without prompting you with filenames. Statusmessages are displayed when each log file is applied.
When normal media recovery is done, a completion status is returned.
For more information on recovery and the RECOVER command, seethe Oracle7 Server Administrator’s Guide.
RECOVER DATABASERECOVER DATABASE UNTIL TIME 30–AUG–90:04:32:00
RECOVER TABLESPACE ts_one, ts_two
RECOVER DATAFILE ’data1.db’
REMARK
Enter a comment, typically in SQL script files.
None.
REMARK command ::=
REMARK
text
Primarily for batch use of line mode. The comment is ignored by linemode and by Oracle. REMARK can be shortened to REM.
REM must be the first non–blank character string in the line.
Examples of valid comments embedded in a SQL file follow:
REM This command file is used to create a
REM database. Edit it to fill in file names
REM and sizes, and invoke it from line mode.
REM
REM
CREATE DATABASE dbname ....
/* This is a SQL comment */ ...
...
;
REMARKs are recognized by SQL*Plus, as well as by line mode. Theyare used to put comments between SQL statements, while SQLcomments (/*...*/) are used to place comments within statements.
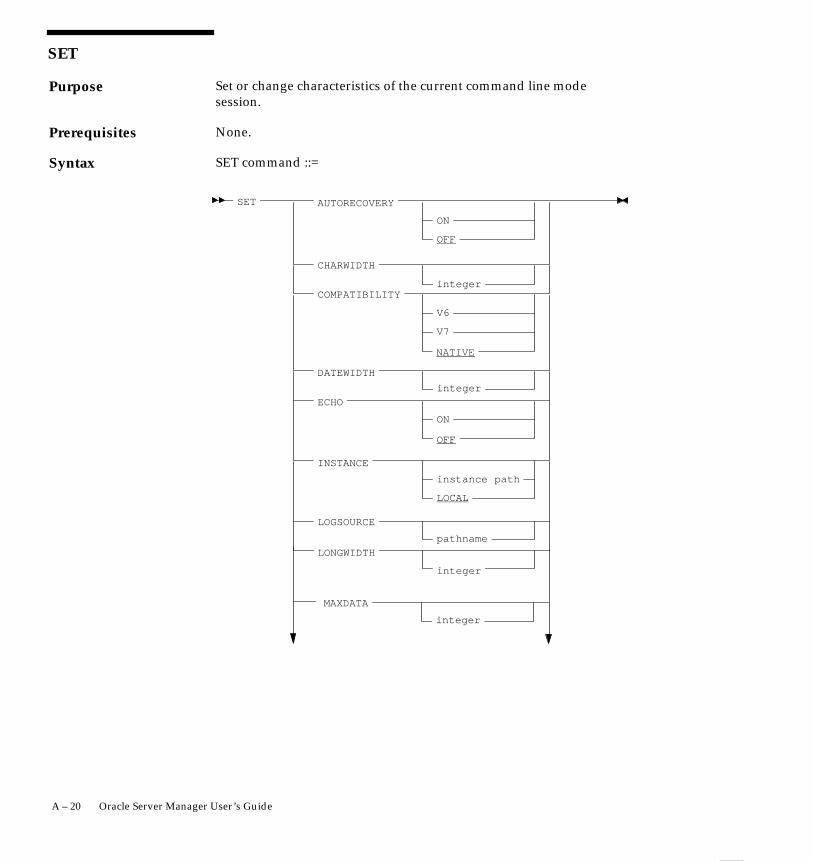
Purpose
Prerequisites
Syntax
A – 20 Oracle Server Manager User’s Guide
SET
Set or change characteristics of the current command line modesession.
None.
SET command ::=
SET
ON
OFF
integer
V6
V7
integer
ON
instance path
LOCAL
pathname
AUTORECOVERY
CHARWIDTH
COMPATIBILITY
DATEWIDTH
ECHO
INSTANCE
LOGSOURCE
OFF
integer
integer
LONGWIDTH
MAXDATA
NATIVE

A – 21Server Manager Command Reference
integer
INFINITE
integer
OFF
ON
RETRIES
NUMWIDTH
SERVEROUTPUT
SIZE n
ON
OFF
STOPONERROR
ON
OFF
TERMOUT
ON
OFF
TIMING
where:
Specifying ON causes the RECOVER command toautomatically apply the default filenames ofarchived redo log files needed during recovery. Nointeraction is needed when AUTORECOVERY isset to ON, provided the necessary files are in theexpected locations with the expected names. Thefilenames used when AUTORECOVERY is ON arederived from the values of the initializationparameters LOG_ARCHIVE_DEST andLOG_ARCHIVE_FORMAT.
OFF, the default option, requires that you enter thefilenames manually or accept the suggested defaultfilename given.
AUTO–RECOVERY
A – 22 Oracle Server Manager User’s Guide
Sets the column display width for CHAR data. Ifentered with no argument, returns the setting tothe default. The default is 80; the range of values isoperating system–specific.
Sets compatibility mode to V6, V7, or NATIVE. Thecompatibility mode setting affects the specificationof character columns, integrity constraints, androllback segment storage parameters. NATIVEmatches the version of the database.
CHAR Columns: When creating tables in Version 6compatibility mode, CHAR columns are variablelength. In Oracle7, such column definitions arefixed length.
Integrity Constraints: In Version 6 compatibilitymode, the Version 6 syntax is still recognized, andthe Oracle7 syntax is disabled. For V6 mode, tableconstraints on CREATE TABLE statements arespecified with V6 syntax:
CREATE TABLE {UNIQUE | PRIMARY KEY} CONSTRAINT ....
and specified constraints are disabled by default.For V7 mode, table constraints are specified withOracle7 syntax:
CREATE TABLE CONSTRAINT .... {UNIQUE | PRIMARY KEY}
and they are enabled.
Rollback Segment Parameters: Version 6compatibility mode allows PCTINCREASE andMAXEXTENTS to be specified for rollbacksegments, as well as for other segments. Althoughthe specifications are ignored, the syntax isallowed. (Use of these parameters is notrecommended. They exist only for backwardcompatibility.)
Bind Variables: Bind variables of type VARCHAR2are given type CHAR in Version 6 compatibilitymode.
CHARWIDTHinteger
COMPATIBILITY

OSDoc
OSDoc
A – 23Server Manager Command Reference
Sets the column display width for DATE data. Ifentered with no argument, the setting returns tothe default. The default is 9; the range of values isoperating system–specific.
ON enables echoing of commands entered fromcommand files. OFF, the default, disables echoingof commands.
In a SQL Worksheet the default is ECHO ON.
Changes the default instance for your session to thespecified instance path. Does not connect to adatabase. The default instance is used forcommands when no instance is specified.
Any commands preceding the first use of SETINSTANCE communicate with the defaultinstance.
To reset the instance to the default value for youroperating system, you can either enter SETINSTANCE with no instance–name or SETINSTANCE LOCAL. See your operatingsystem–specific Oracle documentation for adescription of how to set the initial defaultinstance.
This command may only be issued when SQL*Netis running. You can use any valid SQL*Net connectstring as the specified instance path. See youroperating system–specific Oracle documentationfor a complete description of how your operatingsystem specifies SQL*Net connect strings. Themaximum length of the instance path is 64characters.
Specifies the location from which archive logs areretrieved during recovery. The default value is setby the LOG_ARCHIVE_DEST initializationparameter. Issuing the SET LOGSOURCEcommand without a pathname restores the defaultlocation.
Sets the column display width for LONG data. Ifentered with no argument, the setting returns tothe default. The default is 80; the range of values isoperating system–specific.
DATEWIDTHinteger
ECHO
INSTANCEinstance–path
LOGSOURCEpathname
LONGWIDTHinteger
A – 24 Oracle Server Manager User’s Guide
Sets the maximum data size. Indicates themaximum data that can be received in a singlefetch during a SELECT statement. The default is20480 bytes (20K). The maximum is operatingsystem–specific.
Sets the column display width for NUMBER data.If entered with no argument, the setting returns tothe default. The default is 10; the range of values isoperating system–specific.
Sets the number of tries that are attempted whenthe RETRY option is used with the STARTUPcommand (see “STARTUP” on page A – 34).INFINITE, the default, specifies an infinite numberof retries.
ON enables debugging output from storedprocedures that use DBMS_OUTPUT PUT andPUT_LINE commands. OFF disables output.
You can specify the size in bytes of the messagebuffer using the syntax SIZE n. That is the totalnumber of bytes of all messages sent that can beaccumulated at one time. The minimum is 2,000bytes. If the buffer fills before calls to theget–message routines make room for additionalmessage bytes, an error is returned to themessage–sending program.
Specifying ON indicates that if a command file isrunning and an error occurs, execution shouldterminate. OFF disables STOPONERROR.
ON, the default, enables terminal output for SQLcommands. OFF disables terminal output. Usefulfor preventing output to terminal when spoolingoutput to files. Note that nothing appears on theterminal until SET TERMOUT ON is used.
ON displays parse, execute, and fetch times (CPUand elapsed) for each SQL statement executed.OFF, the default, does not display timinginformation.
MAXDATAinteger
NUMWIDTHinteger
RETRIESinteger |INFINITE
SERVEROUTPUT
STOPONERROR
TERMOUT
TIMING
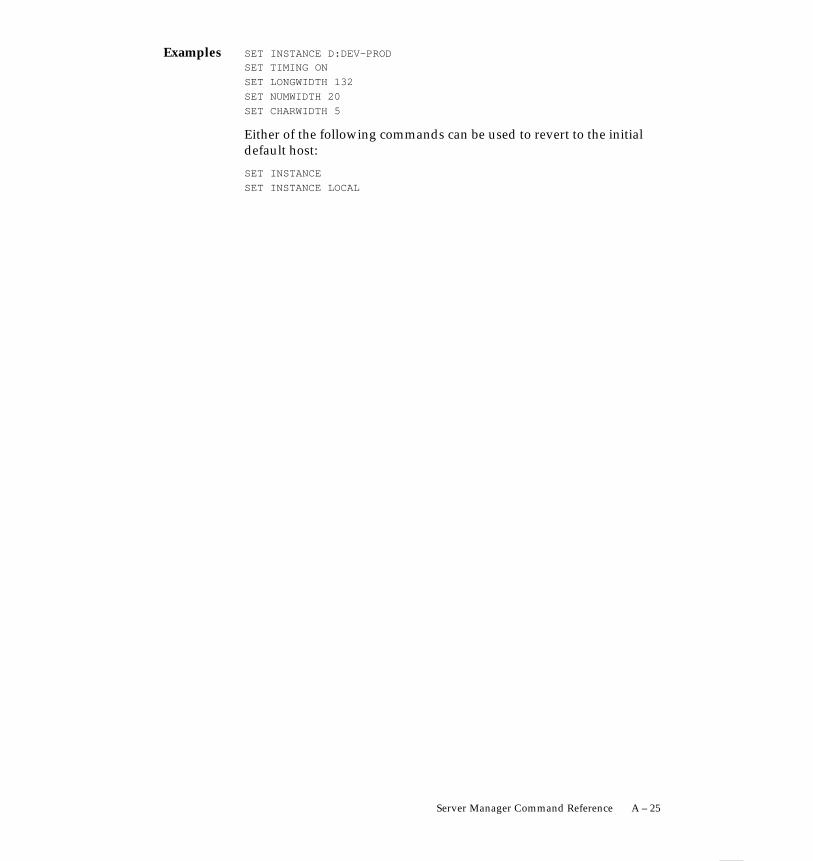
Examples
A – 25Server Manager Command Reference
SET INSTANCE D:DEV–PRODSET TIMING ON
SET LONGWIDTH 132
SET NUMWIDTH 20
SET CHARWIDTH 5
Either of the following commands can be used to revert to the initialdefault host:
SET INSTANCE
SET INSTANCE LOCAL

Purpose
Prerequisites
Syntax
A – 26 Oracle Server Manager User’s Guide
SHOW
Show settings currently in effect.
None.
SHOW command ::=
ALL
AUTORECOVERY
CHARWIDTH
COMPATIBILITY
DATEWIDTH
ECHO
ERRORS
INSTANCE
LOGSOURCE
SHOW
LONGWIDTH
MAXDATA
NUMWIDTH
PARAMETERS
RETRIES
SERVEROUTPUT
SGA
SPOOL
STOPONERROR
TERMOUT
TIMING
parameter name
Package body name
Package name
Procedure name
Function name

A – 27Server Manager Command Reference
where:
Shows all settings except for ERRORS,PARAMETERS, and SGA.
Shows whether or not autorecovery is enabled.
Shows the column display width for CHAR data.
Shows the sessions compatibility mode: V6, V7, orNATIVE.
Shows the column display width for DATE data.
Shows whether or not commands from commandfiles are echoed.
Shows the errors generated from the lastcompilation of a procedure, package, or function, ifany. This option displays the line number, columnnumber, and the error message generated. Use theSHOW ERRORS command if line mode error 72 isreturned after compiling a package.
The SET CHARWIDTH command can be used toexpand or truncate the display from the SHOWERRORS command.
Shows the connect string for the default instance.SHOW INSTANCE returns the value LOCAL ifyou have not used SET INSTANCE or if you haveused the LOCAL option of the SET INSTANCEcommand.
Shows the current setting for archive log location.Displays DEFAULT if the default setting is ineffect, as specified by the LOG_ARCHIVE_DESTinitialization parameter.
Shows the column display width for LONG data.
Shows the maximum data size.
Shows column display width for NUMBER data.
ALL
AUTORECOVERY
CHARWIDTH
COMPATIBILITY
DATEWIDTH
ECHO
ERRORS
INSTANCE
LOGSOURCE
LONGWIDTH
MAXDATA
NUMWIDTH

A – 28 Oracle Server Manager User’s Guide
Displays the current values for one or moreinitialization parameters. You can use a string afterthe command to see a subset of parameters whosenames include that string. For example, if youenter:
SHOW PARAMETERS COUNT
you would see:
NAME TYPE VALUE
––––––––––––––––––– ––––––– –––––
db_file_multiblock_read_count integer 12
spin_count integer 0
The SHOW PARAMETERS command, without anystring following the command, displays allinitialization parameters.
Displays the number of retries that will beattempted when restarting an instance in parallelmode. (See the RETRY option in “STARTUP” onpage A – 34.)
Displays ON if output from stored procedures andfunctions is enabled. Otherwise, displays OFF.SERVEROUTPUT is reset to OFF if you issue aCONNECT command.
Displays information about the current instance’sSystem Global Area.
If spooling is enabled, displays the name of theoutput spool file. Otherwise, displays OFF.
Displays whether or not errors encountered duringexecution of command files should stop executionof the file.
Shows if output to the terminal is enabled.
Shows whether or not the parse, execute, and fetchtimes (CPU and elapsed) for each SQL statementexecuted are shown.
PARAMETERS
RETRIES
SERVEROUTPUT
SGA
SPOOL
STOPONERROR
TERMOUT
TIMING

Usage Notes
Examples
A – 29Server Manager Command Reference
SHOW with no arguments is the same as SHOW ALL.
SHOW TIMING
returns a display such as:
Timing OFF
SHOW ALL
returns a display like:
Instance local
Spool OFF
Timing OFF
Termout ON
Echo OFF
Stoponerror OFF
Autorecovery OFF
Logsource <default>
Maxdata 20480
Numwidth 10
Charwidth 80
Longwidth 80
Datewidth 9
Labwidth 32
Compatibility NATIVE
Retries infinite
Server Output OFF
SHOW SGA
returns a display like:
Total Shared Global Area 4612820 bytes
Fixed Size 36376 bytes
Variable Size 4445372 bytes
Database Buffers 122880 bytes
Redo Buffers 8192 bytes
SHOW ERRORS PACKAGE BODY name
returns a display like:
ERRORS FOR PACKAGE BODY name:
LINE/COL ERRORS
–––––––––––––––––––––––––––––––––––––––––––––––––––––––––––––––
...

Purpose
Prerequisites
Syntax
☞
A – 30 Oracle Server Manager User’s Guide
SHUTDOWN
Shut down a currently running Oracle instance, optionally closing anddismounting a database.
You must be connected to a database as INTERNAL, SYSOPER, orSYSDBA. You cannot be connected via a multi–threaded server.
SHUTDOWN command ::=
ABORT
IMMEDIATE
NORMAL
SHUTDOWN
where:
Proceeds with the fastest possible shutdown. Doesnot wait for calls to complete or users todisconnect. Does not close or dismount thedatabase, but does shut down the instance.Requires instance recovery on next startup. Youmust use this option if a background processterminates abnormally.
Does not wait for current calls to complete,prohibits further connects, and closes anddismounts the database. Finally, shuts down theinstance. Does not wait for connected users todisconnect. Does not require instance recovery onnext startup.
Waits for currently connected users to disconnectfrom the database, prohibits further connects, andcloses and dismounts the database. Finally, shutsdown the instance. Does not require instancerecovery on next startup. NORMAL is the default option.
Attention: In Server Manager/GUI, the AdministrationManager, SQL Worksheet, and System Monitors create separateconnections when you start them. If you have any of thesewindows open, remember to close them before performing ashutdown in normal mode. Otherwise, the shutdown will notcomplete.
ABORT
IMMEDIATE
NORMAL

Usage Notes
Example
Purpose
Prerequisites
Syntax
SQL WorksheetBehavior
Usage Notes
OSDoc
Example
A – 31Server Manager Command Reference
SHUTDOWN with no arguments is equivalent to SHUTDOWNNORMAL.
SHUTDOWNDatabase closed.
Database dismounted.
Oracle instance shut down.
SPOOL
Enable or disable spooling of output to a specified file.
None.
SPOOL command ::=
filename
OFF
SPOOL
where:
Any valid name for a spool file. If not specified, thefile type or file extension is LOG. If a file by thespecified name exists, an error is generated.
Closes the previously opened spool file.
In a SQL Worksheet, if you issue the SPOOL command withoutspecifying a filename, Server Manager brings up the standard fileselection dialog box for your system.
If you do not specify a file, Server Manager prompts you for a filename.
Additional Information: The default filename is operatingsystem specific. Refer to your operating system–specific Oracledocumentation for the default filename on your operatingsystem. To see whether you are currently spooling, enterSHOW SPOOL.
To create a file named NOV2.LOG, enter:
SPOOL NOV2
filename
OFF
Purpose
Prerequisites
Syntax
A – 32 Oracle Server Manager User’s Guide
STARTUP
Start an Oracle instance with several options, including mounting andopening a database.
You must be connected to a database as INTERNAL, SYSOPER, orSYSDBA. You cannot be connected via a multi–threaded server.
STARTUP command ::=
OPEN
RECOVER
FORCE
STARTUP
RESTRICT PFILE=filename
MOUNT
NOMOUNT
database
mount_options
MOUNT_OPTIONS clause ::=
SHARED RETRY
PARALLEL
EXCLUSIVE
where:
Shuts down the current Oracle instance (if it isrunning) with SHUTDOWN mode ABORT, beforerestarting it. If the current instance is running andFORCE is not specified, an error results. FORCE isuseful while debugging and under abnormalcircumstances. It should not normally be used.
Only allows Oracle users with the RESTRICTEDSESSION system privilege to connect to thedatabase. Later, you can use the ALTER SYSTEMcommand to disable the restricted session feature.
Causes the specified parameter file to be usedwhile starting up the instance.
Mounts a database but does not open it.
FORCE
RESTRICT
PFILE=filename
MOUNT
A – 33Server Manager Command Reference
Mounts and opens the specified database.
Causes the database not to be mounted uponinstance startup. Cannot be used with SHARED,EXCLUSIVE, PARALLEL, MOUNT, or OPEN.
Specifies that media recovery should be performed,if necessary, before starting the instance. STARTUPRECOVER has the same effect as issuing theRECOVER DATABASE command and starting aninstance. Only complete recovery is possible withthe RECOVER option.
Recovery proceeds, if necessary, as ifAUTORECOVERY is set to ON, regardless ofwhether or not AUTORECOVERY is enabled. If aredo log file is not found in the expected location,recovery continues as if AUTORECOVERY isdisabled, by prompting you with the suggestedlocation and name of the subsequent log files thatneed to be applied. See “Usage Notes” in“RECOVER” on page A – 18 for a description ofhow to proceed with recovery whenAUTORECOVERY is disabled.
If recovery fails using the RECOVER option, thedatabase remains mounted and closed.
The name of the database to mount or open. If nodatabase name is specified, the database name istaken from the initialization parameter DB_NAME.
Signifies that the database can only be mountedand opened by the current instance (it cannot beopened simultaneously by multiple instances).Cannot be used with SHARED, PARALLEL, orNOMOUNT. If no mounting option is specified,EXCLUSIVE is assigned by default.
Must be specified if the database is to be mountedby multiple instances concurrently. Cannot be usedwith EXCLUSIVE or NOMOUNT. Invalid if theinitialization parameter SINGLE_PROCESS is setto TRUE.
Synonym for PARALLEL.
OPEN
NOMOUNT
RECOVER
database
EXCLUSIVE
PARALLEL
SHARED

Examples
A – 34 Oracle Server Manager User’s Guide
Specifies that opening the database should beattempted every five seconds if the instance is busybeing recovered by another instance. When aninstance is being recovered by another instance, thedown instance cannot open the database untilrecovery is complete. If the database cannot beopened for any other reason, RETRY does notattempt to open the database again. This option isonly available for instances operating inPARALLEL mode. The number of times RETRYattempts to start the database can be set with theSET RETRIES command (see “RETRIES” in “SET”on page A – 24).
To start an instance using the standard parameter file, mount thedefault database in exclusive mode, and open the database, enter:
STARTUP
or enter:
STARTUP OPEN databasename EXCLUSIVE
To start an instance using the standard parameter file, mount thedefault database in parallel mode, and open the database, enter:
STARTUP PARALLEL
STARTUP OPEN databasename PARALLEL
To restart an instance that went down in parallel mode and may not yethave been recovered by other instances, use the RETRY option:
STARTUP PARALLEL RETRY
To shut down the current instance, immediately restart it withoutmounting or opening, and allow only database administrators toconnect, enter:
STARTUP FORCE NOMOUNT RESTRICT
To start an instance using the parameter file TESTPARM withoutmounting the database, enter:
STARTUP PFILE=testparm NOMOUNT
To shut down a particular database, immediately restart and open it inparallel mode, allow access only to database administrators, and usethe parameter file MYINIT.ORA. enter:
STARTUP OPEN databasename PFILE=myinit.ora FORCE SHARED RESTRICT
RETRY

A – 35Server Manager Command Reference
To start up an instance and mount but not open a database, you can usethe following sequence of commands (the system’s response is alsoshown):
CONNECT INTERNAL
Connected.
STARTUP NOMOUNT
Oracle instance started.
ALTER DATABASE MOUNT
Statement processed.
At this point, you could run a maintenance command and then openthe database, as shown in the following commands:
ALTER DATABASE ARCHIVELOG;
Statement processed.
ALTER DATABASE OPEN;
Statement processed.

Purpose
Prerequisites
Syntax
Usage Notes
Examples
A – 36 Oracle Server Manager User’s Guide
VARIABLE
Declare a bind variable for use in the current session with theEXECUTE or PRINT command, or for use with a PL/SQL block.
None.
VARIABLE command ::=
VARIABLE name type
(integer)
where:
The name of the bind variable you wish to define.
The datatype of the bind variable. The validdatatypes are NUMBER, CHAR, and VARCHAR2.You can specify a length from 1 to 255 for CHAR,and from 1 to 2,000 for VARCHAR2. If you do notspecify a length, CHAR and VARCHAR2 default tothe current setting of CHARWIDTH.
Bind variables defined with the VARIABLE command exist until theend of the session. Variables defined in your session cannot be accessedor changed by a different session.
Warning: CHAR variables are fixed length, padded withblanks. VARCHAR2 variables are variable length. You must useCHAR when passing a character variable to a PL/SQLprocedure that defines a CHAR parameter. Otherwise, aconversion error results. A PL/SQL procedure that expects aVARCHAR2 variable, on the other hand, will automaticallyconvert a CHAR parameter to the proper form. (In general, it isa good idea to avoid the use of CHAR variables in PL/SQLprocedures unless blank–padding is an absolute requirement.)
Note: In V6 compatibility mode, a CHAR variable is variablelength, rather than fixed.
VARIABLE balance NUMBERVARIABLE ename CHAR(20)
name
type

A P P E N D I X
BT
B – 1Server Manager Messages and Codes
Server ManagerMessages and Codes
his chapter lists the messages generated by Server Manager. For eachmessage, the probable cause and corrective action are given.

Cause
Action
Cause
Action
Cause
Action
Cause
Action
Cause
Action
Cause
Action
Cause
Action
B – 2 Oracle Server Manager User’s Guide
00100–00199: Server Manager Line Mode Parsing Messages
MGR–00100 invalid SPOOL file name
When using the SPOOL command, you entered an invalid file specification orthe name of a file that already exists.
Specify a valid name for a file that does not currently exist.
MGR–00101 extraneous text at end of command
There were unrecognized commands or other text on the command line.
Issue the command without the extraneous text.
MGR–00102 missing LOG keyword
The LOG keyword was missing from the ARCHIVE LOG command.
Correct the syntax of the command, then issue the command again.
MGR–00103 illegal ARCHIVE LOG option
An option specified was not LIST, STOP, START, NEXT, ALL, a number, or afilename in the ARCHIVE LOG command.
Correct the syntax of the command, then issue the command again.
MGR–00104 illegal RECOVER option
You specified an invalid option. Valid options for the RECOVER command areDATABASE, MANUAL, UNTIL, TABLESPACE, or DATAFILE.
Correct the syntax of the command, then issue the command again.
MGR–00105 invalid INSTANCE name
An invalid SQL*Net service name was specified for the instance name.
Refer to your Oracle platform–specific documentation for a complete descriptionof specifying SQL*Net service names.
MGR–00106 invalid ECHO switch
An invalid option for the SET ECHO command was specified.
Use either ON or OFF as an option for the SET ECHO command.

Cause
Action
Cause
Action
Cause
Action
Cause
Action
Cause
Action
Cause
Action
Cause
Action
B – 3Server Manager Messages and Codes
MGR–00107 invalid TERMOUT switch
An invalid option for the SET TERMOUT command was specified.
Use either ON or OFF as an option for the SET TERMOUT command.
MGR–00108 invalid TIMING switch
An invalid option for the SET TIMING command was specified.
Use either ON or OFF as an option for the SET TIMING command.
MGR–00109 invalid CYCLE value
An invalid value for the SET CYCLE command was specified.
The SET CYCLE command requires a value between 15 seconds and 99:99(min:sec), inclusive.
MGR–00110 illegal SET option
An invalid option for the SET command was specified.
Correct the syntax of the SET command and issue the command again. See theOracle Server Manager User’s Guide for the correct syntax.
MGR–00111 illegal SHOW option
An invalid option for the SHOW command was specified.
Correct the syntax of the SHOW command and issue the command again. Seethe Oracle Server Manager User’s Guide for the correct syntax.
MGR–00113 invalid PFILE name
Server Manager does not recognize the file specified by the PFILE option.
Specify a legal parameter file.
MGR–00114 invalid database name
The specified database name is not recognized.
Specify a legal database name.

Cause
Action
Cause
Action
Cause
Action
Cause
Action
Cause
Action
Cause
Action
Cause
Action
B – 4 Oracle Server Manager User’s Guide
MGR–00115 unexpected end of command
An option was specified without any arguments.
Correct the syntax of the command and enter the command again with theappropriate arguments for options that require values.
MGR–00116 illegal SHUTDOWN option
An option was specified that was not NORMAL, IMMEDIATE, or ABORT forthe SHUTDOWN command.
Correct the syntax of the command, then issue the command again.
MGR–00117 invalid tablespace name
The specified tablespace name was not recognized.
Specify a legal tablespace name.
MGR–00118 invalid process identifier or statistics class
Something other than a number for a process identifier, or an invalid class wasspecified after the MONITOR STATISTICS command.
Specify only numbers as process identifiers, or specify a valid class for theMONITOR STATISTICS command.
MGR–00119 illegal STARTUP option
An option was specified that was not DBA, PFILE, EXCLUSIVE, SHARED,MOUNT, OPEN, RECOVER, or NOMOUNT for the STARTUP command.
Correct the syntax of the command, then issue the command again.
MGR–00120 invalid STOPONERROR switch
An invalid option was specified for the SET STOPONERROR command.
Use either ON or OFF as an option for the SET STOPONERROR command.
MGR–00121 illegal MONITOR option
An illegal option was specified for the MONITOR command.
Correct the syntax of the MONITOR command in the Oracle Server ManagerUser’s Guide and issue the command again.

Cause
Action
Cause
Action
Cause
Action
Cause
Action
Cause
Action
Cause
Action
B – 5Server Manager Messages and Codes
MGR–00122 invalid SET numeric parameter
A character or an invalid value was specified when a number was expected as avalue for a SET command option.
Correct the syntax of the command, use an appropriate number for the optionand issue the command again.
MGR–00123 invalid tablespace name list
An invalid string was specified as one of the values in the list of tablespaces inthe ARCHIVE LOG command. For example, an empty string is an invalid string.
Correct the syntax of the command, use valid tablespace names for all names inthe list, then enter the command again.
MGR–00124 invalid ARCHIVE destination
The specified ARCHIVE destination was not recognized.
Specify a legal ARCHIVE destination. See the Oracle Server Manager User’s Guidefor the correct syntax.
MGR–00125 integer value overflow
A numeric value was specified that was too large.
Use a smaller number.
MGR–00127 invalid combination of STARTUP options
The specified options of the STARTUP command cannot be used simultaneously.
Correct the syntax of the STARTUP command and issue the command again. Seethe Oracle Server Manager User’s Guide for options that can be used withSTARTUP.
MGR–00128 invalid DEBUG switch
The DEBUG switch was not recognized.
Specify a legal DEBUG switch. See the Oracle Server Manager User’s Guide for thecorrect syntax.

Cause
Action
Cause
Action
Cause
Action
Cause
Action
Cause
Action
Cause
Action
Cause
Action
B – 6 Oracle Server Manager User’s Guide
MGR–00129 value out of range (1 – num)
The specified value was out of range. The valid range is given by the errormessage.
Use a number within the range specified by this error.
MGR–00131 invalid ARCHIVE TO device
The specified ARCHIVE TO device was not recognized.
Specify a legal ARCHIVE TO device. See the Oracle Server Manager User’s Guidefor the correct syntax.
MGR–00132 null hostname/password specified
“hostname/password” was not specified.
Specify the correct “hostname/password”.
MGR–00133 invalid datafile list
An invalid string was entered as one of the values in the list of datafiles in theARCHIVE LOG command. For example, an empty string is an invalid string.
Correct the syntax of the command, use valid datafile names for all names in thelist, then enter the command again.
MGR–00134 invalid AUTORECOVERY switch
An invalid option was specified for the SET AUTORECOVERY command.
Use either ON or OFF as options for the SET AUTORECOVERY command.
MGR–00136 bad variable specification
A variable was incorrectly specified using the VARIABLE command.
Correct the syntax of the command, then issue the command again.
MGR–00137 syntax error in PL/SQL Block
The PL/SQL block contains a syntax error.
Correct the syntax error.

Cause
Action
Cause
Action
Cause
Action
Cause
Action
Cause
Action
Cause
Action
Cause
Action
B – 7Server Manager Messages and Codes
MGR–00139 invalid ALTER DATABASE option
The specified ALTER DATABASE option was not recognized.
Specify a legal option. See the Oracle Server Manager User’s Guide for the correctsyntax.
MGR–00140 invalid COMPATIBILITY switch
The specified COMPATIBILITY switch was not recognized.
Specify a legal COMPATIBILITY switch. See the Oracle Server Manager User’sGuide for the correct syntax.
MGR–00141 invalid RETRIES value
The specified RETRIES value was not recognized.
Specify a legal RETRIES value. See the Oracle Server Manager User’s Guide for thecorrect syntax.
MGR–00142 cannot recognize object type, owner, or name
The specified object type, owner, or name was not recognized.
Specify a legal object type, owner, or name.
MGR–00143 variable “name” has not been defined
The specified variable was not recognized.
Specify an existing variable. You can use the PRINT command to displaycurrently defined variables.
MGR–00144 invalid object type for DESCRIBE
The specified object type was not TABLE, VIEW, or PROCEDURE.
Check that the object is a table, view, or procedure. If so, check that you specifiedthe correct name and try again. If not, you cannot DESCRIBE the object.
MGR–00145 invalid object name for DESCRIBE
The specified table, view, stored procedure, or function was not recognized.
Check your spelling and be sure to specify an existing table, view, storedprocedure, or function.

Cause
Action
Cause
Action
Cause
Action
Cause
Action
Cause
Action
Cause
Action
B – 8 Oracle Server Manager User’s Guide
MGR–00146 invalid HISTORY value
The specified HISTORY value was not recognized.
Specify a legal HISTORY value. See the Oracle Server Manager User’s Guide for thecorrect syntax.
MGR–00147 invalid LINES value
The specified LINES value was not recognized.
Specify a legal LINES value. See the Oracle Server Manager User’s Guide for thecorrect syntax.
00300–00399: Server Manager Line Mode Execution Messages
MGR–00300 internal error code, argument: [num]
You have encountered an internal error in Server Manager.
Call Customer Support with the circumstances and complete set of messagesleading to the error.
MGR–00301 cannot SET INSTANCE while connected to a database
You used SET INSTANCE while you were connected to a database.
Disconnect from the database before using SET INSTANCE if you wish tochange the current instance.
MGR–00302 not connected to a database
You must be connected to the database for the requested operation.
Connect to the database using a valid username and password before retryingthe operation.
MGR–00304 input file I/O error [num]; input aborted
A command file used as input to Server Manager is corrupted or invalid.
Check the file before trying the operation again.

Cause
Action
Cause
Action
Cause
Action
Cause
Action
Cause
Action
Cause
Action
B – 9Server Manager Messages and Codes
MGR–00305 command size exceeds internal buffer size (num)
The SQL statement size exceeds Server Manager’s buffer size.
Shorten the SQL statement by removing extra blanks or by convertingintermediate statements to views.
MGR–00306 monitor cycle interval time out of range (1 – num)
You entered an invalid number for the cycle interval.
Enter a value between 15 seconds and 99:99 (min:sec), inclusive, for the cycleinterval.
MGR–00307 cannot open spool file “name”
Server Manager tried to open a spool file after you entered SPOOL <filename>,but could not open the file. Possible causes are a lack of disk space or inadequateprivileges to create a file.
Determine why Server Manager could not create a new file and try the operationagain.
MGR–00308 no spool file opened
You entered SPOOL OFF, but you were not spooling at the time, so there was nofile to close.
If you wish to capture session output, first use the SPOOL command to open afile, then enter your commands before closing the file with SPOOL OFF.
MGR–00309 cannot close spool file “name”
SPOOL OFF could not close the currently open spool file.
Check for operating system circumstances that are preventing the file from beingclosed.
MGR–00310 cannot open parameter file “name”
Server Manager cannot locate or open the file specified by the PFILE option,either because the file does not exist or because Server Manager has insufficientprivileges to open the file.
Make sure the file exists in a location expected by Server Manager and can beopened.

Cause
Action
Cause
Action
Cause
Action
Cause
Action
Cause
Action
Cause
Action
Cause
Action
B – 10 Oracle Server Manager User’s Guide
MGR–00311 data exceeds internal buffer size
The results returned by a SQL query exceed the size of Server Manager’sinternal buffer.
Use the SET command to increase MAXDATA or decrease ARRAYSIZE.
MGR–00312 invalid pid range num num
You entered an invalid range. Ranges must be specified using the lower numberfirst. Note: If a valid range includes any currently active process identificationnumbers, the range will be accepted.
Enter a valid range.
MGR–00313 no active processes to monitor
You specified process identification numbers that do not correspond to anycurrently active processes.
Try again by entering process identification numbers that you know to becurrently active.
MGR–00314 unable to attach to default host
The default host has not been set up correctly.
Use the SET INSTANCE command with a valid host specification to set up adefault host.
MGR–00315 cannot open command file “name”
Server Manager cannot locate the specified command file.
Verify the file’s name and Server Manager’s access to it before retrying.
MGR–00318 Server Manager command line error [num]
You made a syntax or typing error while entering a Server Manager command.
Correct the syntax and try again.
MGR–00321 instance name too long
You specified an instance name that may or may not be valid, but is too long(exceeds 127 characters).
Verify the name of the desired instance and try again.
Cause
Action
Cause
Action
Cause
Action
Cause
Action
Cause
Action
Cause
Action
Cause
Action
B – 11Server Manager Messages and Codes
MGR–00322 total size of command line parameters exceeds buffer size
You entered too many command line arguments and the size of the ServerManager buffer was exceeded.
Reduce the number of command line arguments.
MGR–00323 invalid date specification; use DD–MON–YY:HH:MM:SS
You entered an improper date specification in the RECOVER DATABASEcommand.
Use a valid date specification. For example: 24–DEC–1988:12:33:26.
MGR–00324 maximum number of tablespaces (num) exceeded; last num ignored
You specified too many tablespace names in the RECOVER TABLESPACEcommand. You may only specify up to 16 tablespace names.
Reduce the number of tablespaces. If you want to recover more than 16tablespaces, use the RECOVER command multiple times.
MGR–00325 read error on parameter file “filename”
The file you specified using the PFILE option of the STARTUP command is toolarge (exceeds 8K), the file contains a line that is too long, or another file systemerror occurred.
Reduce the size of the parameter file before specifying it again or shortenextremely long lines in the file.
MGR–00326 currently no statistics belong to the specified class
At this time no statistics exist in the class you specified.
None.
MGR–00327 command not available in this mode
You have specified a command that is not available in this mode.
Do not specify the command in the current mode.
MGR–00328 insufficient privileges for this display
You do not have sufficient privileges to view the monitor you requested.
Contact your database administrator to obtain the required privileges.

Cause
Action
Cause
Action
Cause
Action
Cause
Action
Cause
Action
Cause
Action
Cause
Action
Cause
Action
B – 12 Oracle Server Manager User’s Guide
MGR–00329 insufficient privileges for SHOW SGA
You attempted to use SHOW SGA without sufficient privileges.
Contact your database administrator to obtain the required privileges.
MGR–00330 logsource name too long
You specified a logsource name that may or may not be valid, but is too long(exceeds 127 characters).
Verify the logsource name and try again.
MGR–00336 insufficient privileges for SHOW PARAMETERS
You attempted to use SHOW PARAMETERS without sufficient privileges.
Contact your database administrator to obtain the required privileges.
MGR–00337 missing instance name
Instance name or service name not specified in the CONNECT statement.
Use CONNECT username/password@instance.
MGR–00340 display size exceeded; extra lines truncated
The monitor display retrieved too many lines.
Increase the granularity of your selection.
MGR–00341 the bind variable name is undefined
The SQL statement refers to an undefined bind variable.
Use the VARIABLE command to define the bind variable and execute the queryagain.
MGR–00342 unable to complete internal login
An attempt was made to complete an internal connection to a database. Thisconnection attempt has failed as a result of the indicated database error.
Correct the database error and try again.
MGR–00343 no such parameter
SHOW PARAMETER was given a parameter name that does not exist.
Use a different argument with SHOW PARAMETER.

Cause
Action
Cause
Action
Cause
Action
Cause
Action
Cause
Action
Cause
Action
B – 13Server Manager Messages and Codes
MGR–00360 object to be described does not exist
The object in a DESCRIBE FUNCTION/PROCEDURE/PACKAGE statementdoes not exist.
Check that the object name and owner are correct and that the object exists.
MGR–00361 no privilege to describe this object
You do not have sufficient privileges to describe the object.
The object owner must grant privileges on the object.
MGR–00362 text too long for DESCRIBE
The object’s text is too long for the DESCRIBE command.
The object cannot be used with the DESCRIBE command.
MGR–00363 logic error in DESCRIBE
You have encountered an internal error in Server Manager.
Call Customer Support with the circumstances and complete set of messagesleading to the error.
MGR–00364 out of space for identifier in DESCRIBE
You have encountered an internal error in Server Manager.
Call Customer Support with the circumstances and complete set of messagesleading to the error.
MGR–00365 DESCRIBE PACKAGE BODY is not supported
Only a package’s specification can be described. The keyword BODY cannot beused with DESCRIBE PACKAGE.
Remove the BODY keyword.
Cause
Action
Cause
Action
Cause
Action
Cause
Action
Cause
Action
Cause
Action
Cause
Action
B – 14 Oracle Server Manager User’s Guide
01500–01599: Server Manager Internal Messages
MGR–01501 Server Manager has run out of memory
Server Manager was unable to obtain the memory it required.
Close some windows or exit and restart Server Manager.
MGR–01503 an invalid argument was sent to a function
An internal Server Manager function was called incorrectly.
Call Customer Support with the circumstances and complete set of messagesleading to the error.
MGR–01505 user requested cancel
You cancelled out of the middle of a process.
None.
MGR–01506 unknown error
Unknown.
Call Customer Support with the circumstances and complete set of messagesleading to the error.
MGR–01507 unable to open file “filename”
Server Manager was unable to open an existing file or create a new one.
Check that the file exists and Server Manager can locate the file. Or make surethere is enough free disk space and you have sufficient privileges to create a file.
MGR–01508 unable to close the current file
Server Manager was unable to close a file.
Check for operating system circumstances that are preventing the file from beingclosed.
MGR–01509 unexpected EOF encountered
Server Manager encountered an unexpected End–Of–File marker.
Examine the script(s) to determine the problem.

Cause
Action
Cause
Action
Cause
Action
B – 15Server Manager Messages and Codes
MGR–01523 invalid monitor name: name
The entered monitor name is not a valid monitor type.
Enter a different monitor name.
02000–02009: Server Manager About Box Messages
MGR–02001 unable to destroy a timer
MGR–02002 unable to create a timer
You have encountered an internal error in Server Manager.
Call Customer Support with the circumstances and complete set of messagesleading to the error.
MGR–02003 unable to load a window from a resource file
MGR–02004 unable to find a needed resource: masplash.tif
A resource file is missing or corrupted.
Check your Oracle platform–specific documentation to make sure ServerManager is installed correctly. Reinstall if necessary. If the problem persists, callCustomer Support with the circumstances and complete set of messages leadingto the error.

Cause
Action
Cause
Action
B – 16 Oracle Server Manager User’s Guide
02010–02019: Server Manager Administration Window Internal Messages
Most messages in this range indicate that you have encountered an internalerror. For these messages, call Customer Support with the circumstances andcomplete set of messages leading to the error.
For other messages in this range, specific actions can be taken. These messagesare listed below:
MGR–02011 a control is missing from a resource
MGR–02016 an error occurred while loading a window from the resource file
MGR–02017 unable to get subview
A resource file is corrupted.
Check your Oracle platform–specific documentation to make sure ServerManager is installed correctly. Reinstall if necessary. If the problem persists, callCustomer Support with the circumstances and complete set of messages leadingto the error.
MGR–02019 an error occurred while accessing help
An error occurred in Oracle Help.
Examine subsequent messages.
02020–02029: Server Manager Event Handler Messages
Messages in this range indicate that you have encountered an internal error. Forthese messages, call Customer Support with the circumstances and complete setof messages leading to the error.

Cause
Action
Cause
Action
Cause
Action
B – 17Server Manager Messages and Codes
02030–02039: Server Manager Connection List Messages
Messages in this range indicate that you have encountered an internal error. Forthese messages, call Customer Support with the circumstances and complete setof messages leading to the error.
02040–02069: Server Manager Startup Messages
Most messages in this range indicate that you have encountered an internalerror. For these messages, call Customer Support with the circumstances andcomplete set of messages leading to the error.
For other messages in this range, specific actions can be taken. These messagesare listed below:
MGR–02042 unable to open resource file: name
MGR–02046 unable to get a resource
MGR–02047 unable to load window system resources
MGR–02051 an error occurred while initializing Multimedia
The multimedia resource file (mmmwm.res) may be missing or corrupted.
Check your Oracle platform–specific documentation to make sure ServerManager is installed correctly. Reinstall if necessary. If the problem persists, callCustomer Support with the circumstances and complete set of messages leadingto the error.
MGR–02056 unable to load the splash screen from the resource file
MGR–02057 unable to find a necessary resource file
A resource file is corrupted.
Check your Oracle platform–specific documentation to make sure ServerManager is installed correctly. Reinstall if necessary. If the problem persists, callCustomer Support with the circumstances and complete set of messages leadingto the error.
MGR–02059 unable to open .msb file for product name, facility name
The message file for the specified product and facility cannot be found.
Check your Oracle platform–specific documentation to make sure ServerManager is installed correctly. Reinstall if necessary. If the problem persists, callCustomer Support with the circumstances and complete set of messages leadingto the error.

Cause
Action
Cause
Action
Cause
Action
B – 18 Oracle Server Manager User’s Guide
02070–02089: Server Manager Window and Menu Handler Messages
Most messages in this range indicate that you have encountered an internalerror. For these messages, call Customer Support with the circumstances andcomplete set of messages leading to the error.
For other messages in this range, specific actions can be taken. These messagesare listed below:
MGR–02073 an error occurred while connecting to a database
An error occurred while connecting to a database.
Examine subsequent messages.
MGR–02076 an error occurred while disconnecting from a database
An error occurred while disconnecting from a database.
Examine subsequent messages.
MGR–02083 unable to load the Connect dialog box
A resource file is corrupted.
Check your Oracle platform–specific documentation to make sure ServerManager is installed correctly. Reinstall if necessary. If the problem persists, callCustomer Support with the circumstances and complete set of messages leadingto the error.
02090–02099: Server Manager Utility Messages
Messages in this range indicate that you have encountered an internal error. Forthese messages, call Customer Support with the circumstances and complete setof messages leading to the error.

Cause
Action
Cause
Action
B – 19Server Manager Messages and Codes
02100–02109: Server Manager Window Handler Messages
Messages in this range indicate that you have encountered an internal error. Forthese messages, call Customer Support with the circumstances and complete setof messages leading to the error.
02110–02119: Server Manager Root Window Messages
Messages in this range indicate that you have encountered an internal error. Forthese messages, call Customer Support with the circumstances and complete setof messages leading to the error.
02130–02139: Server Manager Administration Window Button and Folder TabMessages
Most messages in this range indicate that you have encountered an internalerror. For these messages, call Customer Support with the circumstances andcomplete set of messages leading to the error.
For other messages in this range, specific actions can be taken. These messagesare listed below:
MGR–02134 tab “name” failed; maybe catsvrmg.sql not run or not a DBA
MGR–02135 tab “name” failed; maybe insufficient privileges
Either Server Manager was not installed fully, or you do not have access to thisinformation.
Run the CATSVRMG.SQL script as SYS, if necessary. Then connect as a user withthe DBA role as a default role.
MGR–02136 tab “name” failed, maybe utlxplan.sql not run
The table sys.plan_table does not exist.
Run the script UTLXPLAN.SQL as SYS.
Cause
Action
Cause
Action
Cause
Action
B – 20 Oracle Server Manager User’s Guide
MGR–02137 tab “name” failed, maybe catrepad.sql not run or not a DBA
Either Server Manager was not installed fully, or you do not have access to thisinformation.
Run the catrepad.sql script as SYS, if necessary. Then connect as a user with theDBA role as a default role.
02140–02149: Server Manager Administration Window Messages
Messages in this range indicate that you have encountered an internal error. Forthese messages, call Customer Support with the circumstances and complete setof messages leading to the error.
02150–02159: Server Manager Administration Window SQL Interface Messages
Most messages in this range indicate that you have encountered an internalerror. For these messages, call Customer Support with the circumstances andcomplete set of messages leading to the error.
For other messages in this range, specific actions can be taken. These messagesare listed below:
MGR–02150 an unrecognized database version was encountered
You have tried to administer a database version that Server Manager does notsupport.
Consider upgrading your database.
MGR–02151 a specification for action string could not be found
A resource file is corrupted.
Check your Oracle platform–specific documentation to make sure ServerManager is installed correctly. Reinstall if necessary. If the problem persists, callCustomer Support with the circumstances and complete set of messages leadingto the error.
Cause
Action
B – 21Server Manager Messages and Codes
MGR–02156 Server Manager could not perform action string
MGR–02157 action string failed; maybe catsvrmg.sql not run or not a DBA
MGR–02158 action string failed; maybe insufficient privileges
Either Server Manager was not installed fully, or you do not have access to thisinformation.
Run the CATSVRMG.SQL script as SYS, if necessary. Then connect as a user withthe DBA role as a default role.
02160–02169: Server Manager Administration Window Menu Handler Messages
Messages in this range indicate that you have encountered an internal error. Forthese messages, call Customer Support with the circumstances and complete setof messages leading to the error.
02170–02179: Server Manager Administration Window Lower Pane Messages
Messages in this range indicate that you have encountered an internal error. Forthese messages, call Customer Support with the circumstances and complete setof messages leading to the error.
02180–02189: Server Manager Administration Window Object List Messages
Messages in this range indicate that you have encountered an internal error. Forthese messages, call Customer Support with the circumstances and complete setof messages leading to the error.
02190–02199: Server Manager Administration Window Database BannerMessages
Messages in this range indicate that you have encountered an internal error. Forthese messages, call Customer Support with the circumstances and complete setof messages leading to the error.

Cause
Action
Cause
Action
Cause
Action
Cause
Action
B – 22 Oracle Server Manager User’s Guide
03000–03499: Server Manager Monitor Messages
Most messages in this range indicate that you have encountered an internalerror. For these messages, call Customer Support with the circumstances andcomplete set of messages leading to the error.
For other messages in this range, specific actions can be taken. These messagesare listed below:
MGR–03006 the monitor_name could not enable its child views
MGR–03007 the monitor_name could not disable its child views
A monitor resource is corrupted.
Check your Oracle platform–specific documentation to make sure ServerManager is installed correctly. Reinstall if necessary. If the problem persists, callCustomer Support with the circumstances and complete set of messages leadingto the error.
MGR–03008 the monitor_name could not be resized
The monitor was not able to be resized.
Examine subsequent messages. A Toolkit error should follow this message.
MGR–03009 the monitor_name could not sort on the selected column
MGR–03010 the monitor_name cannot set its Cycle radio button
MGR–03011 the monitor_name cannot set its Sample on Demand radio button
MGR–03012 the monitor_name cannot reset a button
A monitor resource is corrupted.
Check your Oracle platform–specific documentation to make sure ServerManager is installed correctly. Reinstall if necessary. If the problem persists, callCustomer Support with the circumstances and complete set of messages leadingto the error.
MGR–03013 the monitor_name cannot complete the filter operation
Text in the Filter field is invalid.
Enter valid text in the Filter field.

Cause
Action
Cause
Action
Cause
Action
Cause
Action
Cause
Action
Cause
Action
B – 23Server Manager Messages and Codes
MGR–03016 a monitor_name is closing because its SQL command failed
Connection to the database has been lost during the execution of a SQLcommand.
Verify that the database is still running and that the network is functioningproperly. Attempt to reconnect.
MGR–03017 a monitor_name is closing because its Interval pop–up menu failed
An error was generated when the Interval pop–up menu was used.
Examine subsequent messages.
MGR–03018 the monitor_name is in an unknown state and could not be removed
The monitor failed to shut down properly.
Call Customer Support with the circumstances and complete set of messagesleading to the error.
MGR–03019 the monitor_name was not found
A monitor resource is corrupted.
Check your Oracle platform–specific documentation to make sure ServerManager is installed correctly. Reinstall if necessary. If the problem persists, callCustomer Support with the circumstances and complete set of messages leadingto the error.
MGR–03020 the following title was too long: “name”
You attempted to create a monitor with a connection name longer than 80characters.
Shorten your SQL*Net service names.
MGR–03021 a monitor_name is closing because of an error finishing a SQL command
The monitor lost connection with the database while a SQL command wasrunning.
Verify that the database is still running and that the network is functioningproperly. Attempt to reconnect. A more specific error message will follow,probably indicating that the connection state has changed.

Cause
Action
Cause
Action
Cause
Action
Cause
Action
Cause
Action
Cause
Action
B – 24 Oracle Server Manager User’s Guide
MGR–03022 select a monitor from the scrolling list and click OK
A resource file is missing or corrupted.
Check your Oracle platform–specific documentation to make sure ServerManager is installed correctly. Reinstall if necessary. If the problem persists, callCustomer Support with the circumstances and complete set of messages leadingto the error.
MGR–03023 monitor selection failed
An error occurred during the selection of a monitor.
Examine subsequent messages.
MGR–03024 interval must be at least 15 seconds
User entered an interval less than 15 seconds.
Enter a valid interval of 15 seconds or more.
MGR–03025 numeric filter fields must contain numeric values
User entered a non–numeric value for a numeric filter field.
Enter a valid number in the filter field and click filter again.
MGR–03050 a monitor_name is closing because of an error in parse/bind/define
An error was encountered when attempting to parse, bind, or define a SQLstatement for the monitor.
Verify that the database is still running and that the network is functioningproperly. Attempt to reconnect. A more specific error message will follow,probably indicating that the connection state has changed.
MGR–03051 an error occurred while executing a monitor query
MGR–03052 the query for the monitor_name failed to execute
An error occurred when the monitor was interacting with the SQL engine.
Verify that the database is still running and that the network is functioningproperly. Attempt to reconnect. A more specific error message will follow,probably indicating that the connection state has changed.
Cause
Action
Cause
Action
Cause
Action
Cause
Action
Cause
Action
Cause
Action
B – 25Server Manager Messages and Codes
MGR–03053 an error occurred after completing a monitor query
MGR–03054 one or more monitors are closing due to a connection problem
The state of the monitor connection has changed as a result of actions takenoutside of the monitor subsystem.
Verify that the database is still running and that the network is functioningproperly. Attempt to reconnect. A more specific error message will follow,probably indicating that the connection state has changed.
03500–03536: Server Manager SQL Engine Messages
MGR–03500 encountered an unterminated quote
The last command contained an open quote without a matching close quote.
Correct the quoting and issue the command again.
MGR–03501 unable to process so many nested scripts
You have attempted to run a script that in turn tries to run too many nestedlevels of scripts.
Restructure your scripts so the nesting depth decreases.
MGR–03502 the @@ operator is only allowed within SQL scripts
You attempted to use the @@ operator from the interactive mode.
The @@ operator is only allowed from within a script. In the interactive mode,use the @ operator to run a SQL script.
MGR–03503 could not resolve the symbols in “filename”
The filename you provided for the parameter file contained undefined symbols.
Check the text of the parameter filename you provided.
MGR–03504 CYCLE is no longer a valid global property
You attempted to set the CYCLE property.
Set the interval in the monitor(s) you are running.

Cause
Action
Cause
Action
Cause
Action
Cause
Action
Cause
Action
Cause
Action
Cause
Action
B – 26 Oracle Server Manager User’s Guide
MGR–03505 ARRAYSIZE is no longer a valid global property
You attempted to set the ARRAYSIZE property.
None. Server Manager will fetch as many rows as possible given the current sizeof the MAXDATA buffer.
MGR–03506 expected a number (num–999999), not “string”
You attempted to set a property (NUMWIDTH, CHARWIDTH, and so on) to anon–numeric value or a number outside of the legal range.
Use a value within the specified range.
MGR–03509 corrupted internal Oracle number representation
You attempted to use a bind variable that appears to have been corrupted.
Call Customer Support with the circumstances and complete set of messagesleading to the error.
MGR–03510 corrupted bind variable type [type]
You attempted to use a bind variable that appears to have been corrupted.
Call Customer Support with the circumstances and complete set of messagesleading to the error.
MGR–03511 the HOST command is not supported in graphical mode
You tried to use the HOST command from within a SQL Worksheet.
Scripts that make use of the HOST command must be run from Server Managerline mode.
MGR–03512 spool file “name” is already open
You attempted to open a second spool file.
Use SPOOL OFF to close the existing spool file.
MGR–03514 unable to start the database
The cause is listed in subsequent error messages.
Examine the subsequent errors.
Cause
Action
Cause
Action
Cause
Action
Cause
Action
Cause
Action
Cause
Action
B – 27Server Manager Messages and Codes
MGR–03515 invalid SERVEROUTPUT switch
You attempted to set SERVEROUTPUT to something other than ON or OFF.
Use ON or OFF as arguments with SET SERVEROUTPUT.
MGR–03523 no parameter for SHOW ERRORS and no object has been compiled
You issued a SHOW ERRORS command, but have yet to compile a PL/SQLobject.
You can find error information for a specific object by selecting from theALL_ERRORS view where NAME = <object>.
MGR–03524 unable to shutdown the database
You attempted to shut down the database without sufficient privileges.
Enable the privileges required for shutdown.
MGR–03525 expected SYSDBA or SYSOPER, not “string”
You attempted to use the CONNECT AS syntax and specified something otherthan SYSDBA or SYSOPER.
Correct the syntax and issue the command again. If the problem persists, callCustomer Support with the circumstances and complete set of messages leadingto the error.
MGR–03534 invalid AUTOPRINT switch
You attempted to set AUTOPRINT to something other than ON or OFF
Use ON or OFF as arguments with SET AUTOPRINT.
MGR–03536 variable type REFCURSOR not available
You tried to declare a REFCURSOR variable against a version of server managerwhich which does not support this variable type.
The version of Server Manager you are running against does not support theREFCURSOR feature. It was most likely compiled against a pre–7.2 database.
Cause
Action
Cause
Action
Cause
Action
Cause
Action
Cause
Action
B – 28 Oracle Server Manager User’s Guide
04000–04008: Server Manager Worksheet Command Messages
Messages in this range indicate that a SQL Worksheet command failed toexecute properly. Other messages will follow the SQL Worksheet commandmessages. Examine the subsequent messages to determine the proper action.
04009–04099: Server Manager Worksheet Messages
MGR–04017 the attempted font change did not succeed
This action is not available to you.
Do not change the font.
MGR–04022 the Write Selection menu item was chosen without a text selection
You chose Write Selection from the Worksheet menu without having any textselected in the input or output panes of a SQL Worksheet.
Attempt the command with text selected.
MGR–04024 unable to open specified file: “name”
A specified file could not be opened.
The file is either invalid or in an unexpected format. Verify the filename andreplace the file with a usable file, if necessary.
MGR–04025 the Get File option of the Recover dialog box failed
You specified a filename which was invalid.
Specify a valid filename.
MGR–04026 the Apply Recovery Archives dialog box failed
An error occurred in the operation of the Worksheet’s Apply Recovery Archivesdialog box.
Examine subsequent messages.

Cause
Action
Cause
Action
Cause
Action
Cause
Action
Cause
Action
Cause
Action
B – 29Server Manager Messages and Codes
MGR–04027 the database is not available
The Oracle database is not accessible from your system.
Verify that the database is available and that you have the ability to connect tothe database from the current location.
04501–04549: Server Manager Line Mode Messages
MGR–04501 monitors are not available from the line mode Server Manager
You attempted the MONITOR command from Server Manager line mode.
Start Server Manager in graphical mode to run monitors.
MGR–04544 invalid parameter format
You gave an invalid command line argument.
Start Line mode with the correct arguments. These should be of the formatcommand=”command” . Note that the command should be in quotes.
MGR–04545 too many parameters
You gave too many parameters on the command line, or your command lineparameters may have been parsed separately.
Pass in only the supported number of arguments. Make sure they are of theformat command=”command” . Note that the command should be in quotes.
MGR–04546 invalid connect string
Your connect string contained invalid information.
Check the syntax of your connect string. It should be ”[username ][/password ] [@instance path ]”.
MGR–04547 duplicate password
Your connect string contained either a null password or multiple passwordstrings.
Make sure your connect string only gives a single password. It should be of theform ”/password ”.

Cause
Action
Cause
Action
Cause
Action
Cause
Action
Cause
Action
Cause
Action
B – 30 Oracle Server Manager User’s Guide
MGR–04548 null username/password not valid with connection name
A connect string with a null username/password and a non–null connection nameis invalid.
You must explicitly specify a null username/password using the ”/” designatorwhen giving a connection name in the user string. For example:”/@t:lorax:E” .
MGR–04549 null or invalid connection name
Your connect string contained either a null or invalid host string.
Check the syntax of your connect string.
05500–05509: Server Manager User Program Interface Messages
MGR–05500 out of unique ids for asynchronous connections
You have too many outstanding asynchronous connections.
Close some less important windows or restart Server Manager.
MGR–05501 user string overflow
You have tried to connect using a username that is greater than 30 characters inlength.
Specify a shorter username.
MGR–05502 password string overflow
You have tried to connect using a password that is greater than 30 characters inlength.
Specify a shorter password.
MGR–05503 host string overflow
You have tried to connect using a hostname that is greater than 80 characters inlength.
Use a shorter service name.

Cause
Action
Cause
Action
Cause
Action
Cause
Action
Cause
Action
Cause
Action
B – 31Server Manager Messages and Codes
MGR–05504 cannot connect to an Oracle version_num instance
You have attempted to connect to an old version of Oracle.
Server Manager can only run against Version 7 or later. You can upgrade theinstance, or use the SQL*DBA included with your release of Oracle.
MGR–05505 cannot perform a CONNECT usr/pswd AS name to an ORACLE 7.0 instance
You tried to connect to a version 7.0 database AS SYSDBA or AS SYSOPER.
In Version 7.0 you must CONNECT INTERNAL [/password].
MGR–05506 unable to release an allocated connection
You attempted to close a window which could not be closed.
Call Customer Support with the circumstances and complete set of messagesleading to the error.
MGR–05507 the list of connections has been corrupted
You have encountered an internal error in Server Manager.
Call Customer Support with the circumstances and complete set of messagesleading to the error.
06500–06529: Server Manager Oracle Toolkit II Messages
Most messages in this range indicate that you have encountered an internalerror. Call Customer Support with the circumstances and complete set ofmessages leading to the error.
For other messages in this range, specific actions can be taken. These messagesare listed below:
MGR–06512 Oracle Toolkit II has run out of memory
There is not enough memory.
Free up or add memory.
MGR–06513 Oracle Toolkit II’s client has run out of memory
There is not enough memory.
Free up or add memory.

Cause
Action
Cause
Action
Cause
Action
Cause
Action
Cause
Action
B – 32 Oracle Server Manager User’s Guide
MGR–06518 Oracle Toolkit II’s connection to the window system was refused
The windowing system (usually X Windows) denied permission to connect.
On X Windows, set the DISPLAY to a server that will allow connections.
06600–06699: Server Manager Oracle Help Messages
Most messages in this range indicate that you have encountered an internalerror. For these messages, call Customer Support with the circumstances andcomplete set of messages leading to the error.
For other messages in this range, specific actions can be taken. These messagesare listed below:
MGR–06602 the Oracle Help book is in a format not recognized by object store
The Oracle Help book has not been installed properly or is corrupted.
Reinstall the help book(s) or the entire product.
MGR–06603 Oracle Help has run out of memory
There is not enough memory.
Free up or add memory.
MGR–06606 Oracle Help could not find a help target
The program tried to access an Oracle Help target not contained in the helpbook(s).
Reinstall the help book(s) or the entire product. If this does not solve theproblem, contact Customer Support with the circumstances and complete set ofmessages leading to the error.
MGR–06607 Oracle Help could not find the specified word
The find operation could not locate the specified word.
The word does not exist in the Help document. Try another word.

Cause
Action
Cause
Action
Cause
Action
Cause
Action
Cause
Action
Cause
Action
B – 33Server Manager Messages and Codes
MGR–06608 Oracle Help could not link to external document
External document is either damaged, non–existent, or is not an Oracle Bookdocument.
Replace the document or link to a valid document.
MGR–06610 the document is not an Oracle Help document
The Oracle Help book has not been installed properly or has become corrupted.
Reinstall the help book(s) or the entire product.
MGR–06611 the document is newer than Oracle Help
The Oracle Help book has not been installed properly or has become corrupted.
Reinstall the help book(s) or the entire product. If this does not solve theproblem, contact Customer Support with the circumstances and complete set ofmessages leading to the error.
MGR–06614 Oracle Help encountered an invalid link
The program tried to follow an Oracle Help link not contained in the help book(s).
Reinstall the help book(s) or the entire product. If this does not solve theproblem, contact Customer Support with the circumstances and complete set ofmessages leading to the error.
MGR–06618 the string begins with a percent sign
An entered string begins with a percent sign.
Remove the percent sign from the beginning of the string.
07001–08529: Server Manager DRUID Messages
MGR–07368 the Username field must contain a valid Oracle username
The text you entered in the Username field is not a valid Oracle username.
Check to make sure the value entered conforms to the guidelines for Oracleusernames given in Chapter 2 of the Oracle7 Server SQL Reference.
Cause
Action
Cause
Action
Cause
Action
Cause
Action
Cause
Action
B – 34 Oracle Server Manager User’s Guide
MGR–07369 the Password field must contain a password string
You selected Password in the Create/Alter User property sheet, but did notspecify a password.
Select another password option or assign a password to the user.
MGR–07401 the Composite Limit field must contain a valid number
MGR–07402 the Private SGA field must contain a valid number
MGR–07403 the Reads per Call field must contain a valid number
MGR–07404 the Reads per Session field must contain a valid number
MGR–07405 the Idle Time field must contain a valid number
MGR–07406 the Connect Time field must contain a valid number
MGR–07407 the CPU per Call field must contain a valid number
MGR–07408 the CPU per Session field must contain a valid number
MGR–07409 the Sessions per User field must contain a valid number
The number entered in the indicated field is not valid.
Check to make sure there are no extraneous alphabetic or punctuation charactersin the field. Make sure the value entered is within the range of valid values.
MGR–07410 the Profile Name field must contain a valid Oracle identifier
The value entered in the Profile Name field is not an Oracle identifier.
Check to make sure the value entered conforms to the guidelines for Oracleidentifiers given in Chapter 2 of the Oracle7 Server SQL Reference.
MGR–07537 the System Change Number field must contain a positive number
The value you have entered in the field is not a valid SCN.
In general, you should allow Oracle to determine the SCN, so try committing thetransaction without specifying an SCN.
MGR–07539 the Group Number field must contain a valid number
The value in the field is not a number.
The group number must be a positive number that is not the number of anexisting group. When the dialog box appears, Server Manager initializes thisfield to be one greater than the greatest log file group number.
Cause
Action
Cause
Action
Cause
Action
Cause
Action
Cause
Action
Cause
Action
Cause
Action
B – 35Server Manager Messages and Codes
MGR–07540 the New File Size field must contain a valid number
The value in this field is not a number.
Provide a valid positive number.
MGR–07541 at least one file must be specified
You have not specified the name of at least one file.
Use the New button to bring up the file specification dialog box from which youcan select a file.
MGR–07542 the Filename field must contain a valid filename
The field is empty or contains an invalid file.
Provide a valid filename.
MGR–07543 you must select a log file group in which to place the log file
You have not selected the group into which this log file will be placed.
Choose one of the provided groups.
MGR–07544 the To field must contain a valid filename
The field is empty or contains an invalid file.
Provide a valid filename.
MGR–07547 the Name field must contain a valid Oracle identifier
The Name field is empty or contains a value that is not a valid Oracle identifier.
Check to make sure the value entered conforms to the guidelines for Oracleidentifiers given in Chapter 2 of the Oracle7 Server SQL Reference.
MGR–07548 you must specify at least one datafile
There are no entries in the list of datafiles.
Use the New button to bring up a dialog box that will allow you to specify adatafile.
Cause
Action
Cause
Action
Cause
Action
Cause
Action
Cause
Action
Cause
Action
B – 36 Oracle Server Manager User’s Guide
MGR–07549 the Initial Extent field must be empty or contain a valid number
MGR–07550 the Next Extent field must be empty or contain a valid number
MGR–07551 the Minimum Extents field must be empty or contain a valid number
MGR–07552 the Maximum Extents field must be empty or contain a valid number
MGR–07553 the Percentage Increase field must be empty or contain a valid number
The value is not a positive number.
Specify a positive number or leave the field empty.
MGR–07555 unable to find tablespace information for “name”
Server Manager was unable to find the default storage settings for the chosentablespace.
Refresh the Tablespaces object list and try to alter the tablespace again. If theproblem persists, call Customer Support with the circumstances and completeset of messages leading to the error.
MGR–07556 the Rollback Segment field must contain a valid Oracle identifier
The Rollback Segment field is empty or contains a value that is not a validOracle identifier.
Check to make sure the value entered conforms to the guidelines for Oracleidentifiers given in Chapter 2 of the Oracle7 Server SQL Reference..
MGR–07557 the Optimal field must be empty or contain a valid number
The value is not a positive number.
Specify a positive number or leave the field empty.
MGR–08049 the Role Name field must contain a valid Oracle identifier
The text you entered in the Role Name field is not a valid Oracle identifier.
Check to make sure the value entered conforms to the guidelines for Oracleusernames given in Chapter 2 of the Oracle7 Server SQL Reference.
MGR–08050 with Password selected, a password must be specified
You selected Password in the Create/Alter Role property sheet, but did notspecify a password.
Select another password option or assign a password to the role.

Cause
Action
Cause
Action
Cause
Action
Cause
Action
Cause
Action
Cause
Action
B – 37Server Manager Messages and Codes
MGR–08051 a user or role must be specified
No user or role was specified in the Grant/Revoke Role dialog box.
Select a user or role from the scrolling list.
MGR–08052 with the Role privilege type selected, a role must be chosen
With the Role privilege type selected, you clicked the OK button in the AddPrivilege to Role dialog box before selecting a role from the Defined Rolesscrolling list.
Select a role from the Defined Roles scrolling list or click the Cancel button toexit the dialog box.
MGR–08053 with the System privilege type selected, a privilege must be chosen
With the System Privileges privilege type selected, you clicked the OK button inthe Add Privilege to Role dialog box before selecting a system privilege from theSystem Privileges scrolling list.
Select a privilege from the System Privileges scrolling list or click the Cancelbutton to exit the dialog box.
MGR–08054 with the Object privilege type selected, an object must be specified
With the Object privilege type selected, you clicked the OK button in the AddPrivilege to Role dialog box before entering an object in the Object Name field.
Enter an object into the Object Name field or click the Cancel button to exit thedialog box.
MGR–08055 a schema must be chosen
You clicked the OK button in the Find Schema Object dialog box withoutselecting a schema from the Schema scrolling list.
Select a schema from the Schema scrolling list or click the Cancel button to exitthe dialog box.
MGR–08056 an object must be chosen
You clicked the OK button in the Find Schema Object dialog box withoutselecting an object from the Object scrolling list.
Select an object from the Object scrolling list or click the Cancel button to exit thedialog box.
Cause
Action
Cause
Action
Cause
Action
Cause
Action
Cause
Action
Cause
Action
Cause
Action
B – 38 Oracle Server Manager User’s Guide
MGR–08504 the tablespace “name” is not offline so this datafile cannot be renamed
You tried to rename a datafile in an online tablespace.
Take the corresponding tablespace offline and then rename the datafile.
MGR–08505 the tablespace “name” is invalid so this datafile cannot be renamed
You tried to rename a datafile in an invalid tablespace.
Repair the tablespace to make it valid and then rename the datafile.
MGR–08507 the Quota Size field must contain a valid number
A negative number or a non–numeric character was entered in the Quota Sizefield of the Add/Edit Quota dialog box.
Enter a valid quota size.
MGR–08510 a user must be specified
No user was specified in the Users scrolling list of the Assign Profile dialog box.
Specify a user.
MGR–08515 this datafile has already been added to the database and cannot be removed
You tried to remove from a tablespace a datafile which belongs to a tablespace.
None. A previously added datafile cannot be removed.
MGR–08517 the Object Name field does not contain a valid schema object
You entered a schema object that does not follow proper naming or quotingconventions.
Enter a valid schema object name.
MGR–08524 a privilege or role must be specified
A Privilege or Role was not specified in the Remove Privilege from User/Roledialog box.
Select a privilege or role from the list before clicking the Remove button.

Cause
Action
Cause
Action
Cause
Action
Cause
Action
Cause
Action
B – 39Server Manager Messages and Codes
09500–09999: Server Manager Help System Messages
Most messages in this range indicate that you have encountered an internalerror. Call Customer Support with the circumstances and complete set ofmessages leading to the error.
For other messages in this range, specific actions can be taken. These messagesare listed below:
MGR–09501 help is not available for the active window
The active window does not have a help target. This is probably because it is asystem window rather than a Server Manager window.
None. Refer to your documentation for the information about which you werelooking for help.
MGR–09502 Oracle Help returned an error
Unknown.
A second message will include the Oracle Help error. This number should belooked up in the Oracle Help documentation.
MGR–09506 Oracle Help was not able to respond to the user request
Multiple causes; to be clarified by additional error messages.
Examine subsequent messages.
MGR–09507 Oracle Help text was not found
The Oracle Help book, mahelp.obd, is not properly installed or slfindfile()cannot find it.
Reinstall Oracle Book or verify the response of slfindfile() for your platform.
MGR–09508 the text for target “string” was not found
The context string in the maht (help table) did not have a corresponding string inthe mahelp.obd book.
Call Customer Support with the circumstances and complete set of messagesleading to the error. The file mahelp.obd or the maht will need to be modified.

Cause
Action
Cause
Action
Cause
Action
B – 40 Oracle Server Manager User’s Guide
10000–10099: Server Manager National Language Support Messages
Messages in this range indicate that you have encountered an internal error. Forthese messages, call Customer Support with the circumstances and complete setof messages leading to the error.
10500–10599: Server Manager Oracle Toolkit II Resource Manager Messages
Messages in this range indicate that you have encountered an internal error. Forthese messages, call Customer Support with the circumstances and complete setof messages leading to the error.
11000–11499: Server Manager Core Messages
Messages in this range indicate that you have encountered an internal error. Forthese messages, call Customer Support with the circumstances and complete setof messages leading to the error.
For other messages in this range, specific actions can be taken. These messagesare listed below:
MGR–11401 input error, unable to read input line
An error in reading from the input source occurred. This is most likely becausethe input line is too long.
Try breaking the input line into multiple lines of no more than 1024 bytes perline.
MGR–11402 error while writing output to a file
An error in writing to the output file occurred. This is most likely because theoutput line is too long.
Call Customer Support with the circumstances and complete set of messagesleading to the error.
MGR–11403 error while writing output
An error in writing to the output source (generally stdout) occurred. This ismost likely because the output line is too long.
If this occurred in Server Manager Line Mode, try executing the query in theServer Manager Worksheet.

Cause
Action
Cause
Action
Cause
Action
Cause
Action
Cause
Action
Cause
Action
B – 41Server Manager Messages and Codes
MGR–11404 error formatting output
An error occurred during the CORE sprintf routine.
Call Customer Support with the circumstances and complete set of messagesleading to the error.
11500–11999: Server Manager Replication Messages
Most messages in this range indicate that you have encountered an internalerror. For these messages, call Customer Support with the circumstances andcomplete set of messages leading to the error.
For other messages in this range, specific actions can be taken. These messagesare listed below:
MGR–11500 you must quiesce the replicated schema before performing the operation
You attempted to alter a master repschema that has not been quiesced.
First Suspend Master Activity on the replicated schema, then try again.
MGR–11502 the current operation is only valid for master definition sites
You attempted to use an operation that is only valid for master definition sites.
Perform operation on a master definition site.
MGR–11505 the Remote Master field must contain a valid remote database
The operation needs a list of one or more remote masters on which to operate.
Specify a list of masters in the Server Manager dialog using multi–select.
MGR–11506 the DDL Text field must contain a valid DDL statement
The operation needs a DDL statement.
Enter a DDL statement in the Server Manager dialog.
MGR–11517 the selected Destination Database has no transactions queued for remoteexecution
You attempted an operation on a Destination Database which has notransactions queued for remote execution.
Retry this operation when there are transactions queued for remote execution.
Cause
Action
Cause
Action
Cause
Action
Cause
Action
Cause
Action
Cause
Action
Cause
Action
B – 42 Oracle Server Manager User’s Guide
MGR–11519 the Transaction Count field must contain a positive integer
The number entered in the indicated field is not valid.
Check to make sure there are no extraneous alphabetic or punctuation charactersin the field. Make sure the value entered is within the range of valid values.
MGR–11520 the Execution Seconds field must contain a positive integer
The number entered in the indicated field is not valid.
Check to make sure there are no extraneous alphabetic or punctuation charactersin the field. Make sure the value entered is within the range of valid values.
MGR–11521 the selected deferred transaction has no associated calls
A deferred transaction was queued for execution, but the transaction does notcontain any operations (i.e. a null transaction)
Call Customer Support with the circumstances and complete set of messagesleading to the error.
MGR–11523 the deferred call arguments could not be extracted
An error occurred while trying to extract and store the arguments for a call in adeferred transaction.
Call Customer Support with the circumstances and complete set of messagesleading to the error.
MGR–11525 the local database is not a master site
An operation originating from a remote database or locally assumes that thelocal database is a master site for replication.
No action can be taken in this case.
MGR–11528 all objects in the chosen schema are already replicated
All the objects in the chosen schema are replicated.
Choose a different schema or add some more objects to this schema.
MGR–11530 you must select at least one Remote Master from the list
The operation needs a list of one or more remote masters on which to operate.
Specify a list of masters in the Server Manager dialog using multi–select.

Cause
Action
Cause
Action
Cause
Action
Cause
Action
B – 43Server Manager Messages and Codes
MGR–11531 cannot generate replication support for name. Table has no PRIMARY KEY.
Replication will not work for tables without a PRIMARY KEY.
Recreate table with a PRIMARY KEY or call procedureDBMS_REPCAT.SET_COLUMNS after CREATE_MASTER_REPOBJECT butbefore GENERATE_REPLICATION_SUPPORT.
MGR–11532 you must select at least one Master Database from the list
The operation needs a list of one or more remote masters on which to operate.
Specify a list of masters in the Server Manager dialog using multi–select.
MGR–11533 cannot execute package SYS.DBMS_DEFER_PRINT. Maybe CATREPAD.SQLnot run or no EXECUTE privilege
Server manager cannot execute DBMS_DEFER_PRINT.
Make sure CATREPAD.SQL has been run and the current user has executeprivileges on DBMS_DEFER_PRINT.
MGR–11534 cannot display call arguments for a remote procedure from a snapshot site
Cannot get the call arguments for remote procedure.
No action is available from a snapshot site.

B – 44 Oracle Server Manager User’s Guide

A P P E N D I X
CT
C – 1Compatibility with SQL*DBA
Compatibility withSQL*DBA
his appendix lists the differences between Oracle7 SQL*DBA andServer Manager.

C – 2 Oracle Server Manager User’s Guide
Functional Differences
Feature SQL*DBA Server Manager
DESCRIBE DESCRIBE <object name > DESCRIBE <object type ><object name >
DESCRIBE forPL/SQL
Lists information about theprocedure’s arguments in atabular form
Lists the definition of theprocedure’s arguments
PRINT <no args> Does nothing Prints all defined variables
PRINT(before connect)
SQLDBA> print aDBA–00302: not connectedto a database
SVRMGR> print aA–––––––––– 10
SET COMPATIBILITYNATIVE
Unsupported Server Manager uses the nativeSQL of the database to whichyou are connected
SHOW <no args> SQLDBA> showshow *DBA–00115: unexpected endof command
Prints current Server Managersettings
SPOOL <no args> SQLDBA> spool
File sqldba.log opened...
No prompt
SVRMGR> spool
Name for the spool file:
(svrmgr.log)
Prompts for a filename. Thedefault is SVRMGR.LOG.
STARTUP If any step of STARTUP fails,SQL*DBA backs out and leavesthe database in a shutdownstate.
If any step of STARTUP fails,Server Manager leaves thedatabase in its current state.For example, if an error is en-countered after the mountstage, Server Manager leavesthe database mounted.
VARIABLE a CHAR Default size is 1 Default size is CHARWIDTH
Table C – 1 Functional Differences, continued on next page
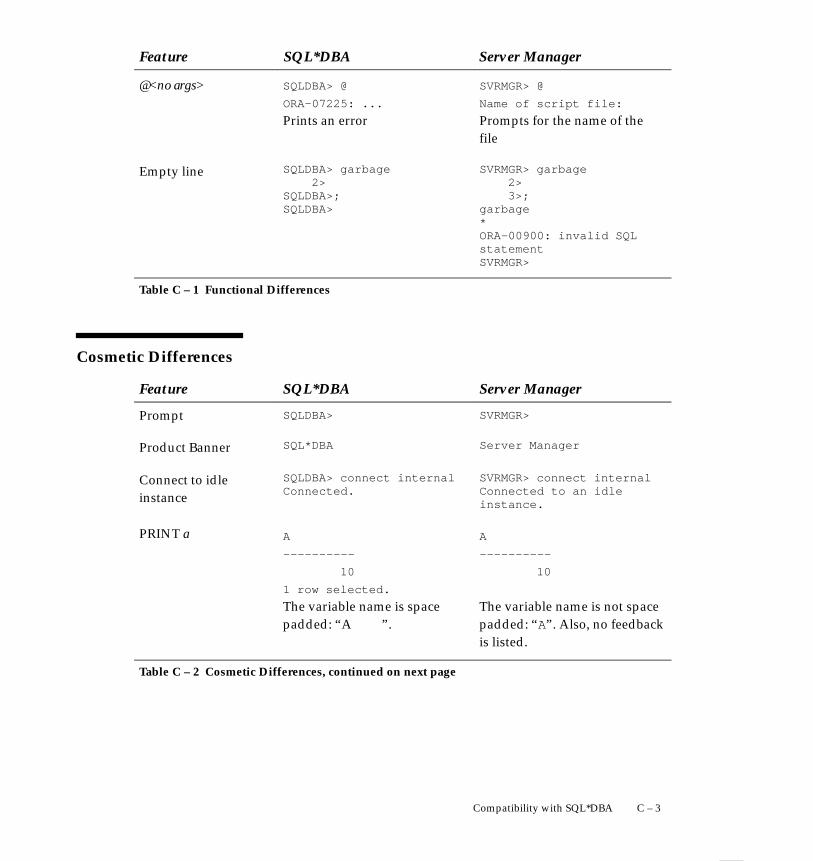
C – 3Compatibility with SQL*DBA
Feature Server ManagerSQL*DBA
@<no args> SQLDBA> @
ORA–07225: ...
Prints an error
SVRMGR> @
Name of script file:
Prompts for the name of thefile
Empty line SQLDBA> garbage 2>SQLDBA>;SQLDBA>
SVRMGR> garbage 2> 3>;garbage*ORA–00900: invalid SQLstatementSVRMGR>
Table C – 1 Functional Differences
Cosmetic Differences
Feature SQL*DBA Server Manager
Prompt SQLDBA> SVRMGR>
Product Banner SQL*DBA Server Manager
Connect to idleinstance
SQLDBA> connect internalConnected.
SVRMGR> connect internalConnected to an idleinstance.
PRINT a A
––––––––––
10
1 row selected.
The variable name is spacepadded: “A ”.
A
––––––––––
10
The variable name is not spacepadded: “A”. Also, no feedbackis listed.
Table C – 2 Cosmetic Differences, continued on next page

C – 4 Oracle Server Manager User’s Guide
Feature Server ManagerSQL*DBA
SET SQLDBA> set echo onSQLDBA>
SVRMGR> set echo on
Echo ON
SVRMGR> Server Manager echoes thenew value
Error Message Prefix DBA–xxxxx : ... MGR– xxxxx : ...
Wrapping text Writes 80 characters and thenwraps
Writes the entire width andrelies on the display device todeal with wrapping. This isbetter for wide terminals.
Table C – 2 Cosmetic Differences
Unsupported Options
Feature SQL*DBA Server Manager
RECOVERY prompt FROM <logsource> clause isunsupported
SET FETCHROWS Limits the total number ofrows to fetch
Unsupported
SET FLAGGER... SET FLAGGER ENTRY Unsupported: Use the ALTERSESSION SET FLAGGERstatement
SHOW FLAGGER Shows FLAGGER value Unsupported
SET LABELWIDTH Unsupported
SET RETRIES Unsupported
SHOW VARIABLESSHOW VAR
Shows all defined variables Unsupported: Use the PRINTcommand with no arguments
Table C – 3 Unsupported Options, continued on next page

C – 5Compatibility with SQL*DBA
Feature Server ManagerSQL*DBA
SHUTDOWN dbname Unsupported
VARIABLE a DATE Unsupported
Table C – 3 Unsupported Options
Obsolete Functionality
Feature SQL*DBA Server Manager
SET ARRAYSIZE Changes the size of each fetch call
No longer used: ServerManager automatically choosesoptimum fetch size.
SET CYCLE Sets the monitor interval No longer used
SET/SHOWDISPWIDTH
Line mode No longer used
SET HISTORY Screen mode No longer used
SET LINES Screen mode No longer used
SET/SHOWLOGWIDTH
Line mode No longer used
SET TERM Screen mode No longer used
Table C – 4 Obsolete Functionality

C – 6 Oracle Server Manager User’s Guide

A P P E N D I X
DT
D – 1Keyboard Shortcuts
Keyboard Shortcuts
his appendix explains the keyboard shortcuts to use when runningServer Manager.
This appendix cover the following topics:
• menu accelerators
• menu mnemonics

File Menu
Edit Menu
Help Menu
D – 2 Oracle Server Manager User’s Guide
Menu Accelerators
This section lists the keyboard combinations you can use with ServerManager. You can use these keyboard combinations instead of thecorresponding menu commands.
Table 12 – 1 lists the menu accelerators for the File menu.
Keyboard Shortcut Action
CTRL + O Brings up the connect dialog box
CTRL + D Returns to the existing Administrationwindow, or open a new Administrationwindow
CTRL + T Brings up the SQL Worksheet
CTRL + R Brings up the Monitors dialog box
Table 12 – 1 Accelerators for the File Menu
Table 12 – 2 lists the menu accelerators for the Edit menu.
Keyboard Shortcut Action
CTRL + Z Undo
CTRL + X Cut
CTRL + V Paste
DELETE Clear
CTRL + A Select All
Table 12 – 2 Accelerators for the Edit Menu
Table 12 – 3 lists the menu accelerator for the Help menu.
Keyboard Shortcut Action
F1 Launches context sensitive help for thewindow currently open
Table 12 – 3 Accelerator for the Help Menu

Worksheet Menu
Example
D – 3Keyboard Shortcuts
Table 12 – 4 lists the menu accelerators for the Worksheet menu.
Keyboard Shortcut Action
CTRL + E Executes the command in the windowpane
CTRL + P Retrieves the previous command from thecommand history
CTRL + N Retrieves the next command from thecommand history
Table 12 – 4 Accelerators for the Worksheet Menu
Menu Mnemonics
Server Manager offers standard menu mnemonics. This allows you toaccess menu options using only a few keystrokes.
To use the menu mnemonics, use the following procedure:
1. To access the menu bar, press the ALT key when running underMicrosoft Windows or press F10 when running under Motif.
2. To choose the desired menu, type the underlined character in thetitle of the menu.
3. To execute the desired menu command, press the underlinedcharacter in the name of the desired menu item.
The following example uses mnemonics to bring up a new SQLWorksheet when running under Windows.
ALT –> F –> W
Pressing ’ALT’ highlights the menu bar. Pressing ’F’ pulls down the Filemenu. Pressing ’W’ brings up a new SQL Worksheet.

D – 4 Oracle Server Manager User’s Guide

A P P E N D I X
ET
E – 1Motif–Specific Operations
Motif–SpecificOperations
his appendix describes operations that are specific to runningServer Manager under Motif.
The Help Dialog Box
E – 2 Oracle Server Manager User’s Guide
Using Online Help with Server Manager for Motif
Server Manager includes an online Help system that provides you withhelp information for every window and dialog box. The Help system iscontext sensitive, but you can also search through help information tofind a particular topic.
When you choose Help from the Help menu or click a Help button,Server Manager displays the Help dialog box. The help informationdisplayed describes your current window or dialog box.
The following figure illustrates the Help dialog box as it appears whenopened from the Connect dialog box.
Figure 12 – 1 Help Dialog Box

E – 3Motif–Specific Operations
The elements of the Help dialog box are described below:
Displays a dialog box listing the titles of eachhelp screen. You may select a title and godirectly to that help screen.
Displays a dialog box listing an index for theonline Help system. You may select an indextopic and go directly to the corresponding helpscreen.
Displays a dialog box listing the titles of thehelp screens you have viewed previously. Youmay select a title and go directly to that helpscreen.
Backs up sequentially through the help screenslisted in your history.
Marks a place in the help system or allows youto return to the help screen you have marked.
Goes to the previous help screen.
Goes to the next help screen.
Prints the current help screen.
Searches for all help screens that contain aspecified text string.
Closes the Help dialog box.
Contents
Index
History
Go Back
Bookmark
Previous
Next
Find
Close

Searching Through theHelp System
E – 4 Oracle Server Manager User’s Guide
You can search for a particular help screen using the Contents, Index,History, or Find commands.
The following figure illustrates the Contents dialog box. The Index andHistory dialog boxes are similar.
Figure 12 – 2 Contents Dialog Box
In the Contents, Index, or History dialog boxes, you can select a topicfrom the scrolling list and click Go To to go directly to the correspondinghelp screen. Click Close to close the dialog box without changing yourcurrent help screen.
The following figure illustrates the Find dialog box.
Figure 12 – 3 Find Dialog Box
Using the Bookmark
E – 5Motif–Specific Operations
In the text field of the Find dialog box, you can specify a text string.Click Find Word and the Help system searches for all help screens thatcontain that text. The titles of those help screens are listed in thescrolling list. You can select a title and click Go To to go directly to thathelp screen. The Close button closes the dialog box without changingyour current help screen.
You can mark a location in the Help system or return to a markedlocation using the Bookmark command. The following figure illustratesthe Bookmark dialog box.
Figure 12 – 4 Bookmark Dialog Box
Click Put Bookmark Here to set a bookmark. Click Go To Bookmark togo to the last location you marked. Click Close to close the dialog boxwithout moving the bookmark or changing your current help screen.

E – 6 Oracle Server Manager User’s Guide
A P P E N D I X
FT
F – 1Windows–Specific Operations
Windows–SpecificOperations
his appendix describes operations that are specific to runningServer Manager under Microsoft Windows.

F – 2 Oracle Server Manager User’s Guide
Starting Server Manager with Windows File Manager
To start Server Manager using the Windows File Manager, you need to:
1. Double–click on the File Manager icon in the Windows Main group.See Figure F – 1.
Figure F – 1 The Windows Main Window
2. Open the directory where the Server Manager program(SVRMGR21.EXE) is located. For example, if the default destinationwas used during the installation, open the C:\ORAWIN\BINdirectory. See Figure F – 2.
Figure F – 2 The File Manager Window
3. Select the Server Manager program name (SVRMGR21.EXE) fromthe list of file names.

F – 3Windows–Specific Operations
4. Choose Run from the File Manager File menu. The Server Managerprogram name (SVRMGR21.EXE) displays in the Command Linebox.
5. Press the Enter key or click the OK button to start Server Manager.
Note: You can bypass steps 4 and 5 by double–clicking on theServer Manager program name in the directory listing.
Starting Server Manager with Windows Program Manager
1. Choose Run from the Program Manager File menu.
2. Click on the Browse button and locate the directory where theServer Manager program (SVRMGR21.EXE) is located. For example,if the default destination was used during the installation, open theC:\ORAWIN\BIN directory. See Figure F – 3.
Figure F – 3 The Program Manager Browse Dialog Box
3. Select the Server Manager program name (SVRMGR21.EXE) fromthe list of file names, then click on the OK button. The ServerManager program name (SVRMGR21.EXE) displays in theCommand Line box. See Figure F – 4.
F – 4 Oracle Server Manager User’s Guide
Figure F – 4 The Program Manager Run Dialog Box
4. Click the OK button to start Server Manager.
Starting Server Manager from the Windows MS–DOS Prompt
To start Server Manager from the MS–DOS prompt, you need to:
1. Double–click on the MS–DOS Prompt icon in the Windows Maingroup. See Figure F – 1 on page F – 2.
2. At the MS–DOS prompt, enter the Server Manager executablefilename (SVRMGR21) and press Enter.
Note: If the MS–DOS PATH variable does not include thedirectory where the Server Manager program (SVRMGR21.EXE)is located, you need to change to that directory before startingServer Manager. For example, if the default destination wasused during the installation, enter CD C:\ORAWIN\BIN at theMS–DOS prompt.

F – 5Windows–Specific Operations
Using Launch in Context with Windows File Manager
To start Server Manager using launch in context with Windows FileManager, you need to:
1. Double–click on the File Manager icon in the Windows Main group.See Figure F – 1 on page F – 2.
2. Open the directory where the Server Manager program(SVRMGR21.EXE) is located. For example, if the default destinationwas used during the installation, open the C:\ORAWIN\BINdirectory. See Figure F – 2 on page F – 2.
3. Select the Server Manager program name (SVRMGR21.EXE) fromthe list of file names.
4. Choose Run from the File Manager File menu.
5. Press the right arrow key to deselect the text in the Command Linebox, then enter the command–line parameters. See Figure F – 5.
Figure F – 5 The File Manager Run Dialog Box
6. After you have finished entering the parameters, press the Enter keyor click the OK button to start Server Manager.
Using Launch in Context with Windows Program Manager
To start Server Manager using launch in context with Windows ProgramManager, you need to:
1. Choose Run from the Program Manager File menu.
2. Click on the Browse button and locate the directory where theServer Manager program (SVRMGR21.EXE) is located. For example,if the default destination was used during the installation, open theC:\ORAWIN\BIN directory. See Figure F – 3 on page F – 3.
3. Select the Server Manager program name (SVRMGR21.EXE) fromthe list of file names, then click on the OK button. The Server

F – 6 Oracle Server Manager User’s Guide
Manager program name (SVRMGR21.EXE) displays in theCommand Line box. See Figure F – 4 on page F – 4.
4. Enter command–line parameters in the Command Line box after theServer Manager program name.
5. After you have finished entering the parameters, click the OKbutton to start Server Manager.
Using Launch in Context with MS–DOS
To start Server Manager using launch in context at the MS–DOS prompt,you need to:
1. Double–click on the MS–DOS Prompt icon in the Windows Maingroup. See Figure F – 1 on page F – 2.
2. At the MS–DOS prompt, enter the Server Manager executablefilename (SVRMGR21) followed by command–line parameters. Forexample:
svrmgr21 user=scott password=tiger service=t:orser:smg71
After you have entered all the command–line parameters, pressEnter.
Note: If the MS–DOS PATH variable does not include thedirectory where the Server Manager program (SVRMGR21.EXE)is located, you need to change to that directory before startingServer Manager. For example, if the default destination wasused during the installation, enter CD C:\ORAWIN\BIN at theMS–DOS prompt.

A P P E N D I X
GT
G – 1Operating System Dependencies
Operating SystemDependencies
his guide occasionally refers to operating system–specificinformation and Oracle documentation that contains detailedinformation about using Server Manager on a specific operating system,or about remotely managing an Oracle database on a specific operatingsystem. The Oracle documentation manuals are often called installationor user’s guides, although the exact name may vary on differentoperating systems.
This appendix lists operating system–specific references within the textof this book.

G – 2 Oracle Server Manager User’s Guide
Operating System References
Reference Page Number
System specific documentation x
Location of README files and release notes xi
Standard script names 1 – 4
Starting up Server Manager/GUI 1 – 6
Default database service name 1 – 14, A – 23
Limit on the number of simultaneous openconnections
1 – 15
Using the launch in context facility 1 – 17
Launch in context COMMAND parameter 1 – 23
Standard file selection dialog box 3 – 5, 3 – 9, 5 – 4,6 – 6, 9 – 7, A – 3
Specifying filenames 3 – 5, 3 – 9, 6 – 9
Renaming files 6 – 12
Default location of parameter file 5 – 4
Performing backups on your system 6 – 3
Running the UTLXPLAN.SQL script 7 – 12
Deleting commands in SQL Worksheet 9 – 7
Filename extensions 9 – 11
Running the UTLMONTR.SQL script 10 – 2
Archive log destination A – 6
Operating system authentication A – 8
Omitting the INSTANCES keyword in the RECOVER command
A – 18
Setting your default instance A – 23
Default spool filename A – 31
Using Motif Online Help E – 2
Starting up Server Manager for Windows F – 2
Using launch in context with Windows F – 5

Index – 1
Index
AABORT mode, A – 30Add Datafile dialog box, 3 – 14Add Privilege to Role dialog box, 4 – 40Add Privilege to User dialog box, 4 – 8Add Quota dialog box, 4 – 5, 4 – 17Administration Manager
about, 2 – 2drawers, 2 – 3 to 2 – 7File menu item, 1 – 9folders, 2 – 3 to 2 – 7object lists, 2 – 8property sheets, 2 – 12
administration requestsdropping, 8 – 34manually pushing, 8 – 32purging, 8 – 34
Alter Profile property sheetabout, 4 – 32Database Services page, 4 – 34Session and CPU page, 4 – 33Users page, 4 – 36
Alter Role property sheetabout, 4 – 45Definition page, 4 – 46General page, 4 – 46
Alter Rollback Segment property sheetabout, 3 – 24General page, 3 – 24Storage page, 3 – 25
Alter Tablespace property sheetabout, 3 – 7Default Storage page, 3 – 11General page, 3 – 8Rename Datafile dialog box, 3 – 10
Alter User property sheetabout, 4 – 14Default Role page, 4 – 20General page, 4 – 15Objects page, 4 – 21Privileges and Roles page, 4 – 19Quotas page, 4 – 16
Apply Recovery Archives dialog box, 6 – 5ARCH background process, starting, A – 5ARCHIVE LOG command
about, A – 4ALL option, A – 5LIST option, A – 4NEXT option, A – 5START option, A – 5STOP option, A – 5
archiving redo log filesabout, A – 4archive location, A – 4device written to, A – 6re–archiving, A – 5stopping, A – 5
Audit folderabout, 4 – 51object list, 4 – 51
AUTORECOVERY option, A – 21, A – 27

Index – 2 Oracle Server Manager User’s Guide
Bbackground processes, startup after abnormal
termination, A – 30Backup folder
about, 6 – 2object list, 6 – 2online backup, 6 – 3
CCATNOSVM.SQL script, 1 – 4CATSVRMG.SQL script
about, 1 – 4running, 1 – 4version number, 1 – 4
CHAR datatypedisplaying in line mode, A – 22in line mode, A – 27
checkpoint, forcing, 6 – 13Circuit Monitor, 11 – 2 to 11 – 3closing windows, 1 – 9command history
about, 9 – 9and Worksheet menu commands, 9 – 10retrieving a command from, 9 – 10
Command History dialog box, 9 – 9 to 9 – 10commands, executing in SQL worksheet, 9 – 6
to 9 – 8commands (Server Manager)
@ command, A – 3@ command, in a SQL Worksheet, 9 – 7,
9 – 12@@ command, 9 – 12, A – 3ARCHIVE LOG command, A – 4CONNECT command, A – 7DESCRIBE command, A – 9DISCONNECT command, A – 10EXECUTE command, A – 10executing operating system commands,
A – 12EXIT command, A – 11HOST command, A – 12MONITOR command, A – 13PRINT command, A – 15programs, setting characteristics of, A – 20
RECOVER command, A – 16REMARK command, A – 19SET command, A – 20SHOW command, A – 26SHUTDOWN command, A – 30SPOOL command, A – 31STARTUP command, A – 32VARIABLE command, A – 36
comments, in scripts, A – 19commit, forcing, 5 – 9concurrency, instances, multiple, A – 33Conflict Resolution folder
about, 8 – 20object list, 8 – 20
CONNECT commandabout, A – 7INTERNAL option, A – 7user SYS, A – 7
Connect dialog box, 1 – 13connecting
about, 1 – 13as SYSOPER or SYSDBA, 1 – 14File menu item, 1 – 9SQL*Net service name, 1 – 14
connecting to a database, A – 7connections
changing, in a SQL Worksheet, 9 – 8multiple, 1 – 15new windows and, 1 – 15
Constraints folderabout, 7 – 2object list, 7 – 3
Create Datafile property sheetabout, 3 – 18Datafile Specification page, 3 – 18
Create Profile property sheetabout, 4 – 26Assign Profile dialog box, 4 – 31Database Services page, 4 – 28Session and CPU page, 4 – 26Users page, 4 – 30
Create Role property sheetabout, 4 – 38Add Privilege to Role dialog box, 4 – 40Definition page, 4 – 39General page, 4 – 38

Index – 3
Create Rollback Segment property sheetabout, 3 – 21General page, 3 – 22Storage page, 3 – 22
Create Tablespace property sheetabout, 3 – 3Default Storage page, 3 – 6Edit Datafile dialog box, 3 – 5, 3 – 10General page, 3 – 3New Datafile dialog box, 3 – 4, 3 – 9
Create User property sheetabout, 4 – 3Add Privilege to User dialog box, 4 – 8Add Quota dialog box, 4 – 5, 4 – 17Default Role page, 4 – 13Edit Quota dialog box, 4 – 6, 4 – 18Find Schema Object dialog box, 4 – 12, 4 – 44General page, 4 – 3Privileges and Roles page, 4 – 7Quotas page, 4 – 4
cursorsdisconnect and closing cursors, A – 10opened at CONNECT, A – 8
Ddatabase
changing connections, 9 – 8mounting, 5 – 6, A – 32opening, 5 – 6, A – 33recovering from SQL worksheet, 9 – 8shutting down, 5 – 5starting up, 5 – 3
database files, recovering, A – 16Database folder
about, 5 – 2mounting a database, 5 – 6object list, 5 – 2opening a database, 5 – 6shutting down a database, 5 – 5starting up a database, 5 – 3
database name, at startup, A – 32datafiles
creating, 3 – 18
renaming, 3 – 19Datafiles folder
about, 3 – 17creating a datafile, 3 – 18object list, 3 – 17renaming a datafile, 3 – 19
DATE datatype, in line mode, A – 23, A – 27DBA mode, A – 32DBA privilege, 1 – 5, A – 32deferred calls, displaying, 8 – 24deferred transaction, scheduling execution,
8 – 18Deferred Transactions folder
about, 8 – 21Execute Deferred Transactions property
sheet, 8 – 22Deferred Transactions page, 8 – 22, 8 – 23
manually executing queued transactions, 8 – 22
object list, 8 – 21showing deferred calls, 8 – 24
arguments of a selected call, 8 – 26showing information about deferred
transactions, 8 – 23DESCRIBE command, A – 9destination
archive, A – 6overriding default, A – 6
DISCONNECT command, A – 10disconnecting, 5 – 11, A – 10Dispatcher Monitor, 11 – 4 to 11 – 5drawers, opening, 2 – 6Drop Tablespace property sheet, 3 – 13
EEdit Logfile dialog box, 6 – 10Edit menu, 1 – 10Edit Quota dialog box, 4 – 6, 4 – 18editing, Edit menu, 1 – 10elapsed timing, A – 24, A – 28

Index – 4 Oracle Server Manager User’s Guide
erred transactiondisplaying, 8 – 29dropping, 8 – 28purging, 8 – 30
erred transactions, manually re–executing, 8 – 28
Errors folderabout, 8 – 27displaying erred transactions, 8 – 29dropping erred transactions, 8 – 28manually re–executing erred transactions,
8 – 28object list, 8 – 27purging erred transactions, 8 – 30
EXCLUSIVE mode, A – 33EXECUTE command, A – 10EXIT command, A – 11exiting Server Manager, 1 – 9Explain Plans folder
about, 7 – 11object list, 7 – 12
Ffetching rows in a query, setting MAXDATA,
A – 24File I/O Monitor, 11 – 6 to 11 – 7File menu, 1 – 9filtering statistics, 10 – 8Find Schema Object dialog box, 4 – 12, 4 – 44folder pull–down menus
about, 2 – 7using, 2 – 11
folder tabs, 2 – 6folders
opening, 2 – 7pull–down menu, 2 – 7
FORCE option, A – 32
GGrant Role dialog box, 4 – 48
HHelp menu, 1 – 12Help system
using, 1 – 12, 1 – 16with Server Manager for Motif, E – 1
Help system (Motif)bookmark, E – 3, E – 5contents, E – 3, E – 4finding a text string, E – 3, E – 5 to E – 6help dialog box, E – 2history, E – 3, E – 4index, E – 3, E – 4
host name, A – 7HOST command, A – 12
IIcons, book, xIMMEDIATE mode, A – 30in–doubt transactions
forcing a commit, 5 – 9forcing a rollback, 5 – 9
INIT.ORA file. See Parameter fileInitialization folder
about, 5 – 7object list, 5 – 7
Initialization parameters, displaying, A – 28Instance drawer, about, 2 – 4instances
connecting, 1 – 13, A – 7default, A – 27displaying current, A – 27multiple, sharing a database, A – 33shutting down, A – 30starting, A – 32

Index – 5
LLatch Monitor, 11 – 8 to 11 – 9Launch in Context, specifying connect
information, 1 – 18launch in context
about, 1 – 17Administration Manager parameters, 1 – 19Area parameter, 1 – 20
folder names, 1 – 20Command parameter, 1 – 23command–line parameters, 1 – 17global parameters, 1 – 18Menu parameter, 1 – 22Monitor parameter, 1 – 24
monitor names, 1 – 25Object parameter, 1 – 22specifying a subsystem, 1 – 19SQL Worksheet parameters, 1 – 23System Monitors parameter, 1 – 24using with Windows File Manager, F – 5using with Windows MS–DOS prompt, F – 6using with Windows Program Manager,
F – 5Library Cache Monitor, 11 – 10 to 11 – 12line mode
about, 1 – 3, 12 – 1entering commands in, 12 – 2entering PL/SQL in, 12 – 2entering SQL in, 12 – 2running scripts from, 12 – 2starting, 12 – 2using, 12 – 2 to 12 – 3
Links folderabout, 7 – 8object list, 7 – 8
LIST option, A – 4Lock Monitor, 11 – 13 to 11 – 14log sequence numbers, listing, A – 4
log filesadding a group, 6 – 8adding a member, 6 – 11applying during recovery, 6 – 5 to 6 – 7dropping a group, 6 – 10dropping a member, 6 – 12renaming members, 6 – 12
log sequence numbers, for manual archiving,A – 5
log switch, forcing, 6 – 13LOG_ARCHIVE_DEST parameter
ARCHIVE LOG LIST, A – 4overriding, A – 6
LOG_ARCHIVE_START parameter, ARCHIVELOG command, A – 5
Mmaster database, adding to replicated
environment, 8 – 16Masters folder
about, 8 – 15Add Master Database property sheet, 8 – 16
Master Specifications page, 8 – 16adding master databases, 8 – 16object list, 8 – 15Schedule Execution property sheet, 8 – 18
Schedule Specification page, 8 – 18, 8 – 19scheduling execution of deferred
transactions, 8 – 18menus
Edit menu, 1 – 10File menu, 1 – 9folder pull–down, about, 2 – 7folder pull–down, using, 2 – 11Help menu, 1 – 12Windows menu, 1 – 11
MONITOR command, A – 13

Index – 6 Oracle Server Manager User’s Guide
monitorsCircuit Monitor, 11 – 2 to 11 – 3descriptions of, 10 – 3Dispatcher Monitor, 11 – 4 to 11 – 5File I/O Monitor, 11 – 6 to 11 – 7File menu item, 1 – 9filtering statistics, 10 – 8Latch Monitor, 11 – 8 to 11 – 9Library Cache Monitor, 11 – 10 to 11 – 12Lock Monitor, 11 – 13 to 11 – 14Process Monitor, 11 – 15 to 11 – 16Queue Monitor, 11 – 17 to 11 – 18requirements to use, A – 13Rollback Monitor, 11 – 19 to 11 – 20sampling controls, 10 – 6Session Monitor, 11 – 21 to 11 – 22Shared Server Monitor, 11 – 23 to 11 – 24SQL Area Monitor, 11 – 25 to 11 – 26starting, 10 – 4starting from SQL worksheet, 9 – 13 to 9 – 14statistics lists, 10 – 5System I/O Monitor, 11 – 27 to 11 – 28System Statistics Monitor, 11 – 29 to 11 – 40Table Access Monitor, 11 – 41 to 11 – 42Tablespace Monitor, 11 – 43 to 11 – 45using, 10 – 2 to 10 – 3
Motif (Server Manager for), online help, E – 1mounting, shared databases, A – 33mounting a database, A – 32
NNew Logfile dialog box, 6 – 9NORMAL mode, A – 30NUMBER datatype, in line mode, A – 24,
A – 27
Oobject lists
about, 2 – 8refreshing, 2 – 11selecting from, 2 – 10sorting, 2 – 9
Objects folderabout, 8 – 10
Add Master Replication Objects propertysheet, 8 – 11
Object Specifications page, 8 – 12adding replicated objects, 8 – 11object list, 8 – 10
online backup, 6 – 3online help. See Help systemonline redo log files, re–archiving, A – 5opening a database, A – 33Optimizer folder
about, 7 – 10object list, 7 – 11
Oracle Server releases supported by ServerManager, 1 – 3
PPackages folder
about, 7 – 6object list, 7 – 7
page tabs, 2 – 12pages, 2 – 12parameter files (INIT.ORA files), specifying
alternate, A – 32passwords, CONNECT command, A – 7PRINT command, A – 15privileges, needed to use Server Manager, 1 – 5Process Monitor, 11 – 15 to 11 – 16profiles
altering, 4 – 32creating, 4 – 26dropping, 4 – 36
Profiles folderabout, 4 – 25altering a profile, 4 – 32creating a profile, 4 – 26dropping a profile, 4 – 36object list, 4 – 25
programs, setting characteristics of, A – 20property sheets
about, 2 – 12page tabs, 2 – 12pages, 2 – 12

Index – 7
QQueue Monitor, 11 – 17 to 11 – 18quitting Server Manager, 1 – 9
RRECOVER command, A – 16recovery
See also Recovery folderRECOVER command, A – 16SQL worksheet and, 9 – 8
Recovery drawer, about, 2 – 4Recovery folder
about, 6 – 4applying a log file, 6 – 5object list, 6 – 4
redo log filesarchiving, A – 4listing range of, A – 4re–archiving, A – 5
Redo Logs folderabout, 6 – 7adding a log file group, 6 – 8adding a log file member, 6 – 11checkpoint, forcing, 6 – 13dropping a log file group, 6 – 10dropping a log file member, 6 – 12Edit Logfile dialog box, 6 – 10Group Specification page, 6 – 8log switch, forcing, 6 – 13Member Specification page, 6 – 11New Logfile dialog box, 6 – 9object list, 6 – 7renaming a log file member, 6 – 12
refresh command, using, 2 – 11Registered Snapshots folder
about, 8 – 13object list, 8 – 13, 8 – 14
Related publications, xREMARK command, A – 19Remove Privilege from Role dialog box, 4 – 50
Rename Datafile dialog box, 3 – 19Replication drawer, about, 2 – 5, 8 – 1Request Log folder
about, 8 – 31Apply Administration Requests property
sheet, 8 – 32Administration Requests page, 8 – 32,
8 – 33dropping administration requests, 8 – 34manually apply requests, 8 – 32manually executing job queues, 8 – 32object list, 8 – 31purging administration requests, 8 – 34
resetting defaults, A – 24Revoke Role dialog box, 4 – 49roles
adding privilege to, 4 – 50altering, 4 – 45creating, 4 – 38dropping, 4 – 47granting to user or role, 4 – 48removing privilege from, 4 – 50revoking from user or role, 4 – 49
Roles folderabout, 4 – 37adding privilege to role, 4 – 50altering a role, 4 – 45creating a role, 4 – 38dropping a role, 4 – 47granting a role, 4 – 48object list, 4 – 37removing privilege from role, 4 – 50revoking a role, 4 – 49
rollback, forcing, 5 – 9Rollback folder
about, 3 – 20altering a rollback segment, 3 – 24creating a rollback segment, 3 – 21dropping a rollback segment, 3 – 26object list, 3 – 20placing rollback segment online, 3 – 27taking rollback segment offline, 3 – 27
Rollback Monitor, 11 – 19 to 11 – 20
Index – 8 Oracle Server Manager User’s Guide
rollback segmentsaltering, 3 – 24creating, 3 – 21dropping, 3 – 26placing online, 3 – 27taking offline, 3 – 27
rolling forward, A – 16running scripts
@ command, 9 – 12, A – 3@@ command, 9 – 12, A – 3
Ssampling controls, 10 – 6saving, 9 – 11schema
adding objects to a replicated, 8 – 11display information about replicated, 8 – 7execute DDL statement on replicated, 8 – 5information about replicated, 8 – 2resuming replication activity, 8 – 4suspending replication activity, 8 – 3
Schema drawer, about, 2 – 4Schema folder
about, 8 – 2execute DDL property sheet, 8 – 5
DDL Text page, 8 – 6Master Databases page, 8 – 5
executing DDL statements, 8 – 5object list, 8 – 2quiesce a schema, 8 – 3Replication Environment Summary, 8 – 7
database information, 8 – 8Master Def or Master site information,
8 – 9schema information, 8 – 8snapshot site information, 8 – 9
resuming replication activity, 8 – 4suspending replication activity, 8 – 3unquiesce a schema, 8 – 4
scriptsrunning, A – 3running from line mode, 12 – 2running from SQL worksheet, 9 – 12
Security drawer, about, 2 – 3
SELECT command, MAXDATA, A – 24Server Manager
about, 1 – 2components, 1 – 6database administration and, 1 – 2menus, 1 – 8Oracle releases supported by, 1 – 3portability, 1 – 3privileges needed to use, 1 – 5quitting, 1 – 9starting up, 1 – 6version banner, 1 – 4views, about, 1 – 3views, dropping, 1 – 4views, installing, 1 – 4
See also CATSVRMG.SQL scriptServer Manager commands, executing, 9 – 7Server Manager/LineMode. See line modeSERVEROUTPUT
SET, A – 24SHOW, A – 28
service namein window titles, 1 – 15specifying, 1 – 14
Session Monitor, 11 – 21 to 11 – 22Sessions folder
about, 5 – 10disconnecting user session, 5 – 11object list, 5 – 10restricting sessions, 5 – 11
SET commandabout, A – 20AUTORECOVERY option, A – 27INSTANCE option, A – 27SERVEROUTPUT, A – 24
shared disk systems, mounting shared, A – 33shared mode, database, A – 33Shared Server Monitor, 11 – 23 to 11 – 24SHOW command, A – 26showing SQL statements, 2 – 13SHUTDOWN command, A – 30Shutdown Database dialog box, 5 – 5shutting down a database, 5 – 5SM$VERSION synonym, 1 – 4

Index – 9
Snapshot Logs folderabout, 7 – 15object list, 7 – 15
snapshots, viewing information about, 8 – 13Snapshots folder
about, 7 – 13object list, 7 – 14
SPOOL command, A – 31spooling multiple log files, A – 6SQL Area Monitor, 11 – 25 to 11 – 26SQL statements, showing, 2 – 13SQL Worksheet
about, 9 – 2 to 9 – 5connecting from, 9 – 8entering commands, 9 – 6executing commands in, 9 – 6 to 9 – 8executing Server Manager commands, 9 – 7File menu item, 1 – 9input pane, 9 – 6recovering a database, 9 – 8running scripts from, 9 – 12saving work, 9 – 11starting, 9 – 2starting monitors, 9 – 13 to 9 – 14using, 9 – 2Worksheet menu, 9 – 4
SQL*Net, specifying service names, 1 – 14starting up a database, 5 – 3starting up Server Manager
about, 1 – 6at Windows MS–DOS prompt, F – 4launch in context, 1 – 17using launch in context with Windows, F – 5,
F – 6with Windows File Manager, F – 2with Windows Program Manager, F – 3
STARTUP command, A – 32Startup Database dialog box, 5 – 3statistics lists, 10 – 5Storage drawer, about, 2 – 3supported Oracle releases, 1 – 3Synonyms folder, 7 – 9
object list, 7 – 9SYS username, CONNECT INTERNAL, A – 7
System Global Area (SGA), displaying, A – 28System I/O Monitor, 11 – 27 to 11 – 28System Monitors. See monitorsSystem Statistics Monitor
about, 11 – 29cache statistics, 11 – 34enqueue statistics, 11 – 33parallel server statistics, 11 – 37redo statistics, 11 – 32SQL tuning statistics, 11 – 39user statistics, 11 – 30
TTable Access Monitor, 11 – 41 to 11 – 42tables, DESCRIBE command, A – 9Tablespace Monitor, 11 – 43 to 11 – 45tablespaces
adding a datafile to, 3 – 14altering, 3 – 7creating, 3 – 3dropping, 3 – 13placing online, 3 – 15recovering, A – 16taking offline, 3 – 15
Tablespaces folderabout, 3 – 2adding a datafile, 3 – 14altering a tablespace, 3 – 7creating a tablespace, 3 – 3dropping a tablespace, 3 – 13object list, 3 – 2placing tablespace online, 3 – 15taking tablespace offline, 3 – 15
Take Tablespace Offline dialog box, 3 – 15tape drive, spooling multiple log files, A – 6terminals, redirecting output, A – 24timing, CPU and elapsed, A – 24, A – 28transactions, committing at disconnect, A – 10Transactions folder
about, 5 – 8forcing a commit, 5 – 9forcing a rollback, 5 – 9object list, 5 – 8

Index – 10 Oracle Server Manager User’s Guide
Triggers folderabout, 7 – 4object list, 7 – 5
tuning SQL, system statistics monitor and, 11 – 39
Uusernames, A – 7users
adding privileges to, 4 – 23altering, 4 – 14creating, 4 – 3disconnecting, 4 – 24dropping, 4 – 22removing privileges from, 4 – 23
Users folderabout, 4 – 2adding privileges to a user, 4 – 23altering a user, 4 – 14
creating a user, 4 – 3disconnecting a user, 4 – 24dropping a user, 4 – 22object list, 4 – 2removing privileges from a user, 4 – 23
VVARIABLE command, A – 36version banner, 1 – 4
Wwindow titles, 1 – 15Windows
starting up Server Manager, F – 2, F – 3, F – 4using launch in context, F – 5, F – 6
Windows menu, 1 – 11Worksheet menu, 9 – 4

Reader’s Comment Form
Name of Document: Oracle Server Manager � User’s GuidePart No. A30887–1
Oracle Corporation welcomes your comments and suggestions on the quality and usefulnessof this publication. Your input is an important part of the information used for revision.
• Did you find any errors?
• Is the information clearly presented?
• Do you need more information? If so, where?
• Are the examples correct? Do you need more examples?
• What features did you like most about this manual?
If you find any errors or have any other suggestions for improvement, please indicate the topic, chapter,and page number below:
Please send your comments to:
Server Manager Product ManagerOracle Corporation500 Oracle ParkwayRedwood City, CA 94065 U.S.A.Fax: (415) 506–7200
If you would like a reply, please give your name, address, and telephone number below:
Thank you for helping us improve our documentation.