Bosch LSU 4.2 Wideband O2 Sensor Testing (2001 ... - Instructables
Upload
khangminh22Category
view
0download
0
instructables
Quick & Easy DIY Miter Saw Station
by robertjkeller
Step 1: Cutting and Assembling the Legs
I wanted to build a miter saw station, but I wanted it to be really easy, not very time consuming, and not tooexpensive. Here’s what I came up with!
https://youtu.be/q4j6f2MHn40
Using the miter saw, I cut 16 pieces of 2x4 to 33 inches. This will result in an overall bench height of approximately33 3/4 inches, so adjust the leg height up or down according to your preferences.
After cutting, I used 2-1/2 inch construction screws to attach the short end of one leg piece to the face of another.This will result in 8 90-degree leg pieces.
Quick & Easy DIY Miter Saw Station: Page 1

Step 2: Cutting and Assembly the Side Braces
I cut 8 pieces of 2x4 to 20 7/8 inches. I was careful tomake the sides just under 21 inches so that half of a4x8 sheet of plywood would be enough to cover bothbenches (keep in mind that the total depth will be 207/8 + the width of the front and back braces). If thebenches are deeper than 24 inches, more than onesheet of plywood will be needed to complete the
project.
I made sure everything was ush and square, thenattached 2 side pieces to each pair of legs, making 4leg assemblies as shown in the picture. The lower sidepieces are about 8 inches from the bottom of the legs.
Quick & Easy DIY Miter Saw Station: Page 2

Step 3: Attaching Leveling Feet
Step 4: Cutting and Assembling the Front and Back Braces
Depending on how at the oor is in your workshop, you may want to add leveling feet to the workbench since alevel surface is so important to making cuts with the miter saw. My garage is very far from at, so I installed theseleveling feet that I bought on Amazon. The needed hardware was included.
The length of the back and front braces will depend on your speci c space and layout. I cut mine to 6 feet. After
Quick & Easy DIY Miter Saw Station: Page 3
Step 5: Cutting and Attaching the Plywood Tops
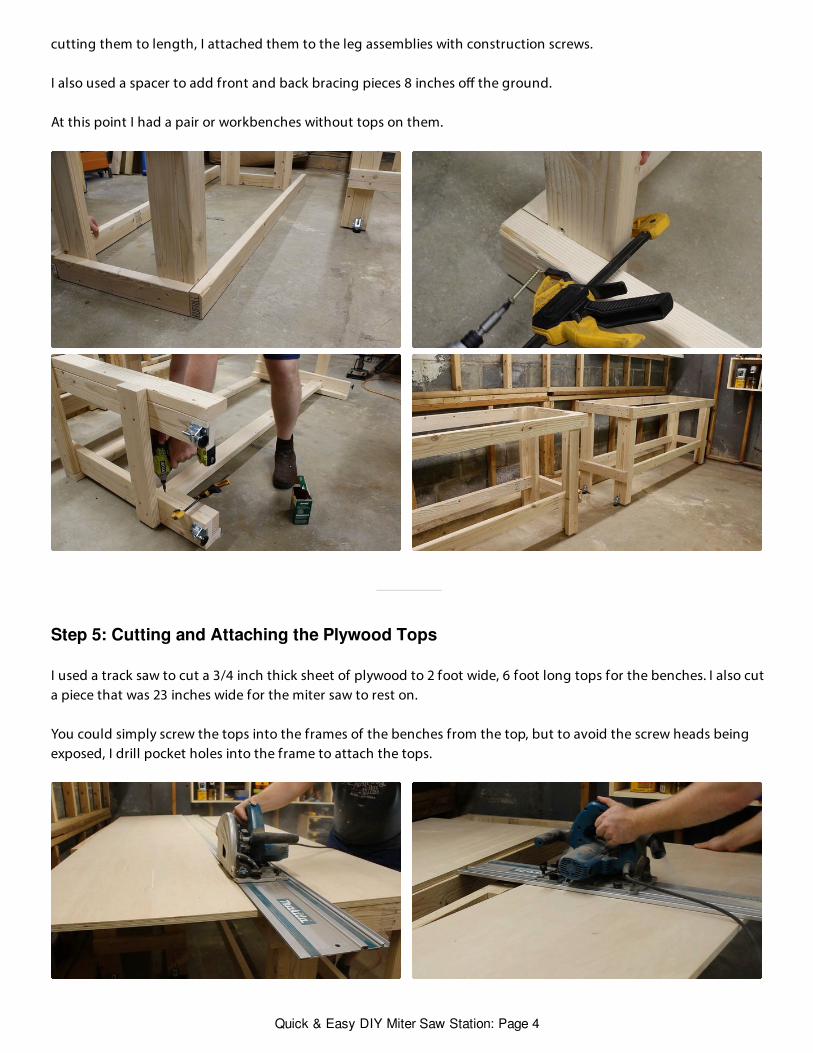
cutting them to length, I attached them to the leg assemblies with construction screws.
I also used a spacer to add front and back bracing pieces 8 inches o the ground.
At this point I had a pair or workbenches without tops on them.
I used a track saw to cut a 3/4 inch thick sheet of plywood to 2 foot wide, 6 foot long tops for the benches. I also cuta piece that was 23 inches wide for the miter saw to rest on.
You could simply screw the tops into the frames of the benches from the top, but to avoid the screw heads beingexposed, I drill pocket holes into the frame to attach the tops.
Quick & Easy DIY Miter Saw Station: Page 4

Step 6: Attaching the Miter Saw Section
Step 7: Positioning and Securing the Miter Saw
I installed a front and back piece to attach the two workbenches. I made sure that I installed these pieces at theheight of my miter saw plus 3/4 of an inch— in other words, once I add the plywood on top of these braces, mymiter saw will be exactly ush with the tops of the workbenches. This height will vary depending on themake/model of your miter saw.
Lastly, I set the miter saw in place and used the track from my track saw to ensure that the miter saw was 90degrees perpendicular to the workbenches. I did this by placing the track up against the miter saw fence andmeasuring from the front of the workbenches to the track saw and adjusting until the measurements were equal.Then I used construction screws to attach the miter saw to the plywood underneath it.
Quick & Easy DIY Miter Saw Station: Page 5

Classy, minimal, and efficient...and with clear instructions...thanks!
nice build - any plans to add a continuation to the rail of the miter?
really nice ahahaha :D
Looks like a pretty easy build. I haven't really got the space at the moment for something like this.Have you got any plans for utilising the space under the benches?
Wowser... You made that build look so easy! Nicely done and I'm going to use this as a startingpoint for my new bench build. Thanks a ton for making this structable!
Nicely done! Love how clean it looks, too. I definitely need one of these. :D
Thanks!
Step 8: Done!
That’s it! Easy, right? Check out the video for clari cation, it’s a really simple process. I hope this was helpful— checkout my YouTube channel for other projects.
youtube.com/robertjkeller
Good luck!
Quick & Easy DIY Miter Saw Station: Page 6
Copyright © 2022 FDOKUMEN