DIY Project A Day - Goody Beads Blog
36
February: DIY Project A Day We’re kicking off the new year with another month of DIY Project a day. For the entire month of February, every day we will give you a DIY project. We will have everything from simple hoop earrings to fun bead-stitching designs. We’ll incorporate a lot of our favorites like gemstones, crystals, tassels, leather and more! Plus, as a bonus for this month, we have special guest designers to help inspire your month! Each blog post and project will include a high quality image with a full components list and a simple, easy-to-follow directions. Here is a calendar and list of our daily DIY projects to get you inspired!
-
Upload
khangminh22 -
Category
Documents
-
view
3 -
download
0
Transcript of DIY Project A Day - Goody Beads Blog

February: DIY Project A DayWe’re kicking off the new year with another month of DIYProject a day. For the entire month of February, every day wewill give you a DIY project. We will have everything fromsimple hoop earrings to fun bead-stitching designs. We’llincorporate a lot of our favorites like gemstones, crystals,tassels, leather and more! Plus, as a bonus for this month, wehave special guest designers to help inspire your month!
Each blog post and project will include a high quality imagewith a full components list and a simple, easy-to-followdirections.
Here is a calendar and list of our daily DIY projects to getyou inspired!

List of Daily Projects:
Garnet Gemstone Wire Wrapped Cuff1.Golden Goddess Earrings with Lapis Gemstones2.Boho Babe Earrings3.White Heart-Day Leather Bracelet4.

FLASHBACK Friday: Skipping Heartbeat Earrings5.Easy Threader Earrings with Pearls6.Leaf Drop and Straw Necklace with Beadable Accessories7.Fan Tassel Hoop Earrings8.Purple Garnet Hoop Earrings with Mircofacet Gemstones9.Paradise Beading Necklace with Swarovski Crystals10.Chunky Paperclip Chain Bracelet11.FLASHBACK Friday: Statement Bib Necklace with Chinese12.CrystalsCowrie Shell Earrings13.Carabiner Wrap Bracelet or Necklace14.Baroque Pearl Tiered Earrings15.Hanging Earrings with Purple Lace Agates16.Beadable Fan Earrings with Diamond Drop17.Large Snowflake Earrings (Winter’s not over yet…)18.FLASHBACK Friday: Easy Leather Hook Bracelet19.Half Circle Chain Earrings with Turquoise Seed Beads20.Hook Wrap Bracelet with Vegan Bolo Leather Cord21.Starburst Post Earrings with Beadable Pendant22.Arrow Leather Bracelet23.Macrame Wheel Earrings24.Tropical Statement Earrings25.FLASHBACK Friday: Stone Ripple Leather Bracelet26.Jacque Tassel Earrings27.Fringe Earrings with Triangle Link28.
DIY Golden Goddess Earrings

with Lapis GemstonesOur February Daily DIY project is all about layering! The DIYGolden Goddess Earrings with Lapis Gemstones are designed byJacque, who made the amazing Macrame Planter Hanger withLarge-Hole Beads last summer. She is showing off her jewelryskills with these post earring made with Lapis gemstones,enamel connector and gold findings.
Items used in Post Earrings:
Z016675 (2) – 43mm Satin Gold Etched Round HoopZ016258 (2) – 27mm White Enamel Gold Plated RingConnector PendantZ006000 – 12mm Gold Plated Stainless Steel Sun BurstPost Earrings with LoopLAP12DC-8 – 12mm Lapis Coin Gemstone BeadsA011525 – 9mm Gold Plated 20 Gauge Round Jump RingA011523 – 8mm Gold Plated 20 Gauge Round Jump RingA008801 – 5mm Gold Plated 21 Gauge Oval Jump RingsA019662 – 1 Inch Gold Plated 22 Gauge Headpins

Directions:
Slide a lapis gemstone onto a headpin and make a simple1.or wrapped loop.Open 8mm jump ring, slide on one hole of enamel link and2.through hoop of Gold Etched Round Hoop. Close jump ring.Open 9mm jump ring, slide through other hole of enamel3.link, lapis dangle and top loop of Gold Etched RoundHoop. You want to make sure the dangle is behind the

enamel. Close jump ring.Open oval jump ring, through top loop of Gold Etched4.Round Hoop and post earring loop. Close jump ring. Makesure the white enamel is facing outwards.Repeat all steps for other earring.5.
Designed by Jacque
Holiday Gift Guide for Last-Minute Easy DIYsChristmas is fast approaching, so here are some last-minuteeasy DIYs you can whip up in no time and with just a fewcomponents. Our ideas consists of Easy Bracelets, Easy HoopEarrings, DIYs for the Table and DIY Kits.
Easy DIY Bracelets

Here are some easy DIYs for simple bracelets!
EZDIY Stackable BraceletsEZDIY Leather Hook BraceletLeather Safari BraceletPaperclip Charm BraceletsCarabiner Clasp BraceletsTurquoise Satin BraceletMORE Bracelet Ideas on the Blog
DIY Hook Earrings

Here are some easy DIYs to make trendy hoop earrings:
Acetate Drop EarringsBeachside Hoop EarringsPearl Hoop EarringsSkull EarringsHoop Earrings with Classic Cut CrystalsStraw Hoop EarringsMore Earrings Ideas on the Blog
DIYs for the Table
Here are some easy DIYs to make for the dinner table, beadingtable or even your work table:
Metal Stamped BookmarksBookmark TasselsDIY Wine Stopper with Large Swarovski crystalDIY Bottle OpenerBead Pens

Dinner Beadable Gifts
DIY Kits
Need more ideas? Get some DIY kits so you can get started!
DIY Golden Fringe Earringswith Ball ChainLet’s celebrate and toast to 2019 and welcome 2020! We havethe perfect pair of earrings to celebrate the glam with thisDIY Golden Fringe Earrings. Designed with ball chain and endtubes, you can whip up this pair of easy earrings before theball drops!
What you’ll need:
2 – 16mm Gold Tube End (Z011022) / Silver (Z009110)4 feet – 1.5mm Gold Plated Ball Chain (CH00723) / Silver(CH00722)Gold Earring Finding (Used in example Z016754) / Silver

(Z016753)4mm Gold Jump Ring (A011517) / Silver (Z011500)
Directions:
Cut chain with the following ball counts: 17, 23, 25,1.31, and 35. Cut a quantity fo two each.Slide the following chain into the tube by hooking one2.ball inside the tube: 17, 23, 25, 31, 35, 35, 31, 25,23, 17.Close the other side of the end tube with a flat nose.3.Open jump ring and slide on loop of earwire and loop of4.end tube. Close jump ring.

Repeat all steps for other earring.5.
Impress Art®: How Make aMetal Bracelet with theBracelet Bending Bar KitThis week’s tutorial from ImpressArt is a simple tutorial onbracelet bending. See how easy it is to make a bracelet byusing the bracelet bending tool.
Here are some tool you’ll need:
Bracelet Guides (Z021583) – This will help to keep yourlettering straight when writing names or a simplephrase.Bracelet Bending Pliers (TL00350) – This tool will give

you the curve your bracelet will need to obtain a curvedshape.Bracelet Bending Bar Kit (TL00352) – This tool is veryuseful in bending the ends of your bar. Plus, this kitincludes (4) 1/4 inch and (4) 38 inch Aluminum BraceletBlanks.Other Tools: Letters Stamping Set, Enamel Marker, Hammer& Steel Block.
Bracelet Bending Tutorial

DIY Jewelry and Crafts withSwarovski® Ruby crystalsWe’ve got THREE easy projects using December’s SwarovskiPsychology of Color: Ruby. Design jewelry with this bold hue!
Ruby Snowflake OrnamentFitting for the holiday season is making snowflake ornaments!Here’s our version using Ruby crystals, clear crystals andwavy discs.

Items used in ornament: SW00131 (12), SW00102 (12), SW00104(6), Z018412, SB00423 & A006240
Directions:
On a prong, slide on the following and make a simple1.loop with memory wire finishing pliers:
3 seed beads, 4mm crystal, disc, ruby crystal,1.disc, 8mm crystal, disc, ruby crystal, disc, 4mmcrystal, 3 seed beads.
Repeat the same sequence of beads to each prong.2.

Ruby Hoop EarringsMake this pair of trendy hoop earrings!
Items used in earrings: SW00131 (10), TC00278 (4), Z001052 &A015821.
Directions:
Slide through the hoop:1.bead cap, 5 ruby crystals and bead cap.1.
To the top of the last bead cap, add a small dot of2.glue. Let this dry for a few minutes to keep bead cap inplace with the hoop earrings.
Repeat all steps for other earring.3.
Ruby Rockestar EarringsThese beautiful Ruby crystals really standout next tothese grey/black diamond crystals.
Items used in earrings:SW00131 (2), SW02072 (2), TC00278 (2),SB00422, TC00055 (2), A007499 & A001495
Directions:
Open eyepin loop, slide on star charm and close eyepin.1.On the eyepin, slide a seed bead, Ruby crystal, bead2.
cap, 4mm black diamond crystal, and seed bead. Makesimple loop.Open dangle loop and slide on post earring loop. Close3.loop.Repeat all steps for other earring.4.
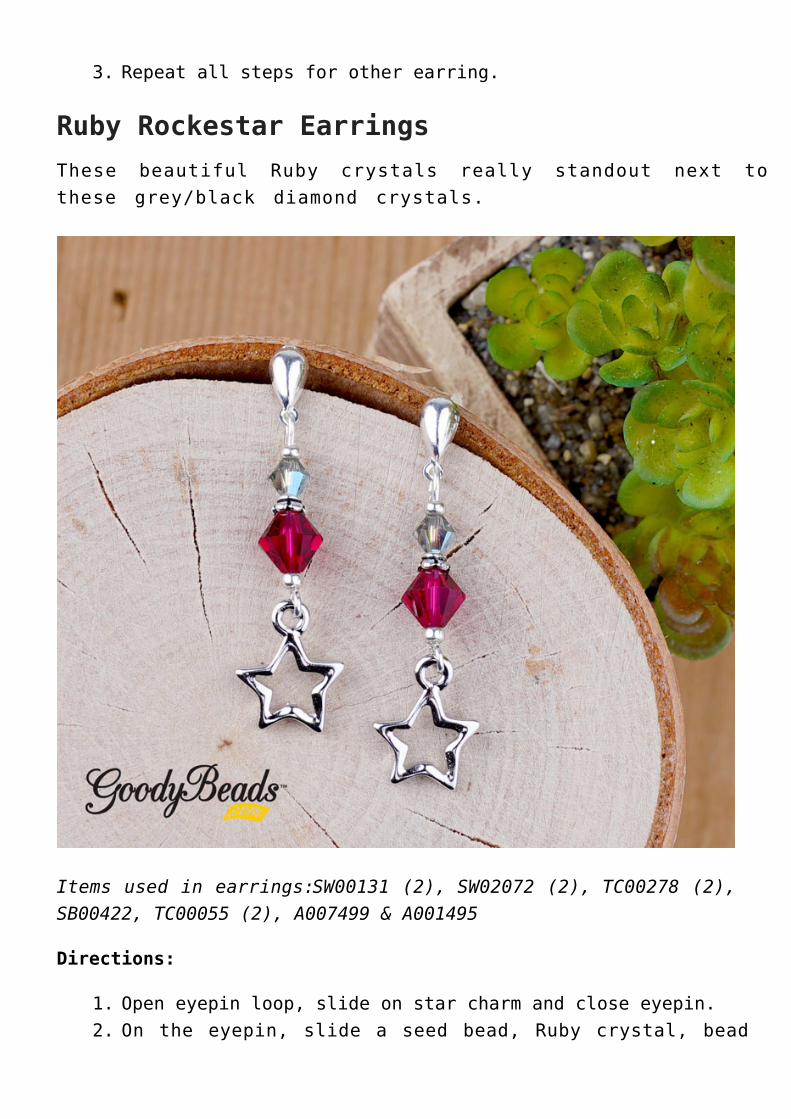
DIY Stretch Bracelets withMiyuki Tila BeadsWe are seeing these Tila stretch bracelets circulating onlineand cannot fathom how cute and easy they are! Check out thesebracelets from Anthropologie we adore:
(image from Anthropologie)
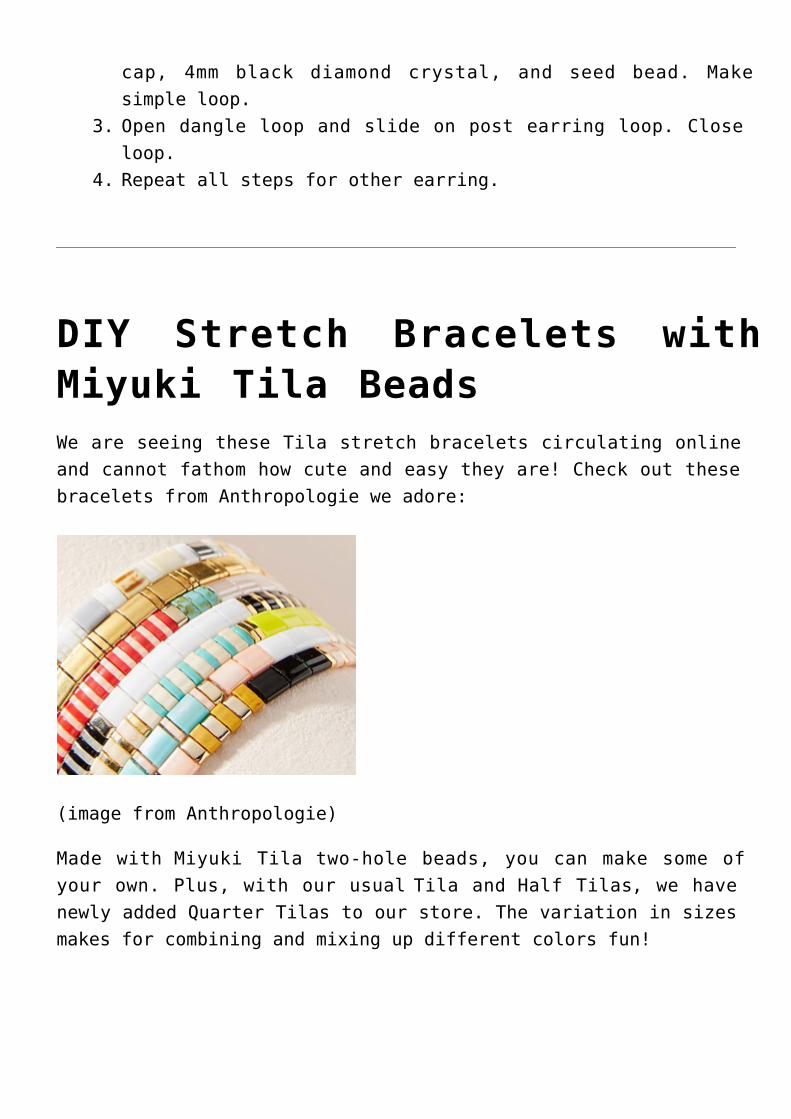
Made with Miyuki Tila two-hole beads, you can make some ofyour own. Plus, with our usual Tila and Half Tilas, we havenewly added Quarter Tilas to our store. The variation in sizesmakes for combining and mixing up different colors fun!
Here’s what you’ll need to make your own Tila StretchBracelets:
Miyuki TilaMiyuki Half TilaMiyuki Quarter Tila0.5mm Beadalon Elasticity – A021633
TUTORIAL on tying Surgeon’s Knot

Items used in bracelet: A021633, SB03744, SB01934 & SB00870.
Directions:
Cut two pieces of elastic at about 9 inches.1.Stretch out one cord to loosen the elasticity.2.Slide on your beads.Mix up the sequence of beads or not,3.this design is up to you!Make sure to add enough beads to wrap around your wrist4.comfortably.Make a surgeon’s knot to your cord ends. (Optional, you5.can add a small dot of glue)Cut off excess elastic.6.
Take other elastic and stretch out to loosen the7.elasticity.Starting from the same beads from where you started,8.slide elastic through the second hole of each bead, allthe way around.Make a surgeon’s knot and cut off excess elastic.9.You’re done! Now you can make more!10.
Mix up the sequence of beads or not, you can make a whole lotof these bracelets in no time!
Holiday Wreath with MemoryWireWe had created the beautiful Sparkling Beaded HolidayWreath and Beadable Holiday Wreath Earrings last month.We’re continuing our festive tutorials with MORE holidaywreaths! We have three holiday wreath ideas for you tocelebrate with this holiday season using memory wire.
Jingle Bell Wreath

Items used in wreath: SBBM0005 (10 pks) & WR00121
Tory had designed a cute wreath on our Facebook Live episode,using memory wire and jingle bell charm/beads (SBBM0005). Thislightweight jingle bell wreath dangle would be cute as apresent topper, Christmas tree ornament or even make a pair ofearrings with them! Here is the video tutorial where Toryteaches how to quickly make and assemble a wreath of your own.It will be helpful to know how to make a hoop with memorywire.

Red & Green Miracle Bead Wreath
Items used in wreath:SBBM0005 (5 pks), MIRA0008 (3 pks),WR00121 & MIRA0002 (3 pks)
Tory combines red and green miracle beads with jingle bells inthis wreath version.
Using a ball headpin, slide on a miracle bead and make a1.simple loop. Make a total of 27 Red miracle beads (8mm)and 54 Green miracle beads (6mm).Cut one loop of memory wire.2.Make a perpendicular loop at one end of your memory3.wire.

Slide on dangles in the follow sequence:4.2 green, red, 2 green, red, 3 green & 5 jingle1.bells.Repeat this sequence 8 more times.2.
Slide the other end of memory wire through loop you made5.in Step 3 and curl a loop (It’s alright to loop it acouple of times).Your wreath is complete! Add ribbons and a bow.6.
Red Satin Wreath

Items used in wreath: A017124 (1 pk), A01722 (3 pks), SB00107,WR00134 & A019663 (2 pks)
Inspired with Tory’s cute wreaths, So Vang designed thislarger wreath with gorgeous satin beads strung on Extra HeadyDuty Necklace Memory Wire.
On a headpin slide on a seed bead and a satin bead. Make1.a rolled loop, coiling more than once is fine. Make atotal of 22 of the 14mm Satin beads and 110 of the 10mmSatin Beads.
Cut a coil of the necklace memory wire with Memory Wire2.cutters.Using Memory Wire Finishing Pliers, make a perpendicular3.loop at one end.Slide on the following sequence:4.
14mm Satin dangle & FIVE 10mm Satin dangle.1.Repeat this sequence 21 more times.2.
Slide the other end of the memory wire through the loop5.you made in step 3 and curl a loop (It’s alright to loopit a couple of times.)Your wreath is complete. Add ribbons and a bow!6.

Holiday Gift Ideas: DIYCraftsHere are some fun DIY Crafts for the holidays. Turning fromour traditional DIY jewelry, we want to offer some fun DIYCraft options for your friend who loves to accessorize withbookmarks, ornaments and more!
Holiday Bead Pens1.Holiday Lightbulb Ornament2.Fancy Swarovski Snowflake3.Glass Bead Sun Catcher Tutorial4.Beaded Holiday Ornament Charms5.DIY Bookmarks with Tassels6.
Oh and don’t forget our most recent post on our DIY HolidayWreath!

Holiday DIY Gift Ideas forthe NaturalistNeed some DIY gift ideas for your naturalist friend? He/Shemost likely love neutral colors, leather and gemstones. Hereare some gorgeous DIY jewelry for the naturalist friend thisholiday season!

Black Gold Amazonite Tassel Necklace1.Crystal Quartz Drop Earrings2.DIY Diffuser Necklace with Lava Beads3.Leather & Tube Bead Necklace4.Easy Leather Hook Bracelet5.Stone Ripple Leather Bracelet6.Gemstone Donut Bails7.Gemstone Post Earrings with Cabochons8.
Holiday Gift Ideas:TrendsetterHere are some great DIY jewelry gift ideas for our trendyfriend. Our Trendsetter is always wearing the latest fashionand jewelry. She not only wears it, but also influences othersto join in on the fad. So try out some of these DIY jewelrywith some of our newest products like wood and resin pendantcharms, Acetate, Enamel, post earrings, lariat necklaces,adjustable bracelets with sliding clasps and DIY kits are

trendy. It will surely be a eyeopener for your Trendsetterfriend!
Wood and Resin Pendant Necklace1.Golden Halo Earrings with Swarovski Crystals2.DIY Jewelry using Enamel Component3.Tory’s Acetate & Silver Drop Earrings4.Acetate Fringe Earrings5.Lariat Gemstones and Tassel Necklace6.Diakonos Kits7.
Holiday Gift Ideas toSparkle, Glam and BlingKnow someone who needs a fun holiday gift that brings sparkle,glam and bling to their outfit? These gift ideas uses the

sparkle of Swarovski® crystals and pearls. Gift some excitingDIY jewelry that’ll make her shine! Here are some ideas to getyou started:
Swarovski Aquarmarine1.Swarovski Raindrop Pendant2.Memory Wire Wrap Bracelets with Swarovski Fine Rocks3.BeadsClassic Crystal Hoop Earrings4.Adjustable Bracelets with Swarovski Crystals5.Rhinestone Chain Bracelet6.Pearl Jewelry, a Classic Trend7.How to Use Pinch Bails with Swarovski Pendants8.
Holiday DIY Gift Ideas forthe Boho BeautyThese Holiday DIY gift ideas are for the Boho Beauty in yourlife.She seeks a relaxing vibe and a moment of zen. She loves

natural and earthy tone, so make sure you design with fiberslike Ribbon, Tassels, Leather and Straw, as well as someGemstone. Here are some great DIY projects for the BohoBeauty!
Straw & Leather Macrame1.Fishtail Cuff2.Fabric Tassel Jewelry3.Fan Tassels4.Macrame Leather Bracelet5.Boho Feather Earrings6.Silk Ribbon in Jewelry7.Long Tassels8.
Holiday Gift Ideas: ModernMinimalistThese gift ideas are for the Modern Minimalistic stylist inyour life. They love the simplistic, clean lines like a singlechain necklace and dramatic shapes like a large pair of hoop

earrings or a triangular pendant. They like the monochromaticof silver and the bold shine of gold or even feel gorgeouswith the rose gold color! There’s minimal colors in theirjewelry palette and LOVE the many ways they can layer up theirpieces!
Here are some DIY projects to gift to your ModernMinimalistic friend:
Silver Jewelry

Heidi’s Geometric Jewelry1.Metal Fringe Earrings2.Lariat Beading Chain3.Chevron Chain Necklace4.
Gold Jewelry
Pearl Hoop Earrings1.Silk Cord Jewelry2.DIY Beadable3.Enamel Point Earrings4.

Beadable Holiday WreathEarring with TutorialWho doesn’t LOVE a fun pair of festive, holiday wreathearrings? This pair is designed using our Beadable RingPendant (Z011336) and 11/0 Delica Seed Beads. Design withclassic red and green colors or mix it up!
What you’ll need:
Beadable Ring Pendant – Z011336 (2)11/0 Delica Seed Beads – We used SB03540 & SB03545
Other Green-color DelicasOther Red-color Delicas
Beading Thread and NeedleEarring Findings – We used TC02297

Directions:
Using a 3 feet piece of beading thread, add a stopper1.bead to the end of your beading thread, leaving 4-5 inchtail. (To add a stopper bead, pick up a bead and slidetowards to end of your thread end, leaving 4-5 inchtail. Sew through the bead, looping two times throughthe seed bead.)
Sew through an outer hole of your beadable pendant.2.Pick up 7 beads (do variation of reds and green, using3.

more green than reds).Sew down the hole across the channel. (The beads wont be4.sitting in the channel.)Sew up through the next hole and repeat steps 3 and 4.5.You will repeat this process, zigzagging through the6.pendant until you have gone all the way around.While on the backside of your pendant, sew up the next7.hole and through the first seed bead. Pick up 4 seedbeads, sew across the channel, down the last delica beadand through the hole.Repeat step 7 as you sew back through the beadable8.pendant again.Once you’ve finished, tie off your thread ends and cut9.off excess.Open your earring loop and slide your beadable wreath10.on.Repeat all steps for other earring.11.