DIY Organizer Kits - GarbageDay
7
Inspired by Created by friends at RBC Ventures DIY Organizer Kits “ I’m a designer that loves using what we already have. – Tiffany Pratt Get ready to organize your stuff as host Tiffany Pratt teaches you how to create a DIY Organizer Kit. By using just a few common household items, Tiffany will show you how to craft your very own organizational masterpiece. Let’s get started. What you will need: • 1 cardboard box/shoebox • Empty paper towel rolls/toilet paper rolls • Craft paper/decorative wallpaper samples • Colourful straws • Choice of coloured paint (optional glitter) • Sponge brush • Scissors • Hot glue gun (additional glue sticks) • Decorative paper plates • Newspaper Step-by-step This is a
-
Upload
khangminh22 -
Category
Documents
-
view
4 -
download
0
Transcript of DIY Organizer Kits - GarbageDay

Inspired by Created by friends at RBC Ventures
DIY Organizer Kits
“I’m a designer that loves using what we already have.
– Tiffany Pratt
Get ready to organize your stuff as host Tiffany Pratt teaches you how to create a DIY Organizer Kit.
By using just a few common household items, Tiffany will show you how to craft your very own organizational masterpiece. Let’s get started.
What you will need:
• 1 cardboard box/shoebox
• Empty paper towel rolls/toilet paper rolls
• Craft paper/decorative wallpaper samples
• Colourful straws
• Choice of coloured paint (optional glitter)
• Sponge brush
• Scissors
• Hot glue gun (additional glue sticks)
• Decorative paper plates
• Newspaper
Step-by-stepThis is a

“When I’m looking around the house for something to create with, I’m looking at the space of something, not where it comes from. So, just because it’s an old shoebox or an old toilet paper roll, don’t think about what they once were – think about what they can become.
– Tiffany Pratt
“I like to use things instead of recycling them or tossing them out. What can we use! It’s a new philosophy, and I like that thought.
– Tiffany Pratt
Side Note: Don’t underestimate the organizational power of toilet paper rolls.
No longer items you just throw out, toilet paper rolls can be used to hold many things around your home like wires, pencils and pens, and smaller objects you have no place to store away.
Step 1: Set up your work station
1
Once you’ve gathered your materials, it’s time to set up your work station. Begin by covering your table with newspaper to protect the surface from damages.
Next, gather the materials you will need to build your Organizer Kit, like the box you selected, the paper/toilet paper rolls, and any additional items to decorate it.
Plug in your hot glue gun, so it’s ready to go and prepare your paint tray and optional glitter. Keep the common tools like scissors and your sponge brush close so you can access them easily throughout the steps.
Step 2: Prepare your rolls
Select the rolls you would like to use for your kit. If you’re using paper towel rolls, you may choose to cut them in half or varying sizes.
Hot tip from Tiff:Don’t worry about the different heights of your paper towel/ toilet paper rolls. You are going to have different heights of things to organize.
You can even create rolls out of thick paper.

Sponge brushes are reusable, easy to clean, and they give a nice even stroke of paint every time.
Recycling shoe-boxes for your personal use leaves a great sense of multipurpose.
Great material to build your very own organizational kit.
Step 3: Paint !
1 2
43
Paint the inside and outside of one end of the roll. They do not need to be perfectly done. Tiffany is all about speed and efficiency, and using a sponge brush gets the job done fast.
(Optional)
Tiffany loves glitter.
Once you have the inside and outside of your roll painted, you can add a little glitter to make it sparkle. Do this by simply dipping the outside rim in glitter. Then set to dry.
Keep in mind: You can set up as many roll holders as you please within the box.
Tiffany recommends Don’t worry about painting the whole roll on both ends. You will not be able to see all the way down since it is full.
Step 4: Prep your box
When planning the layout of your kit, it’s best to think about where certain items might go. Tiffany recommends placing the rolls on the outer corners of the box to leave room for bigger items in the centre.
If you have a shoebox, it is easy to cut the lid off with an Exacto knife. You will only need the bottom of the box moving forward.
Reuse as much paper has you can. Try to avoid having big pieces scraps paper lift-over.
Reduce the amount of glue used. Mark areas like corners with only small dots of glue.
Recycle any lift-over paper. See a spot missed on your box? Cover that bad boy up with your samples.
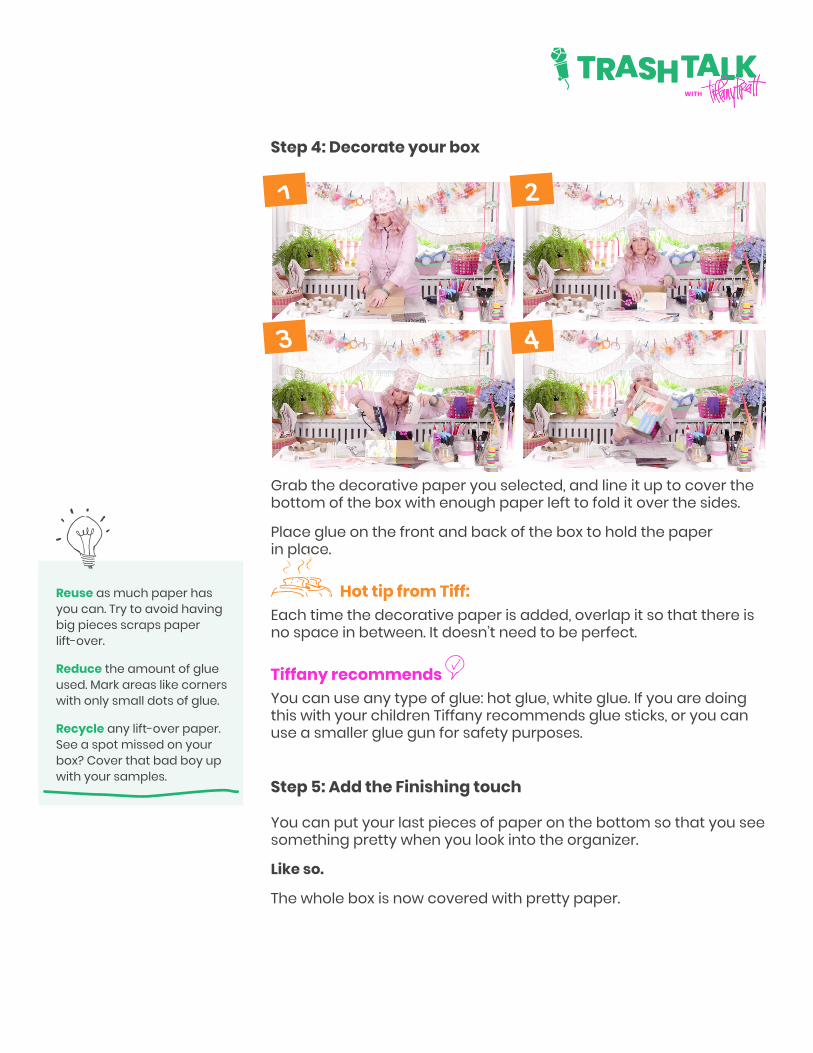
Step 4: Decorate your box
1 2
43
Grab the decorative paper you selected, and line it up to cover the bottom of the box with enough paper left to fold it over the sides.
Place glue on the front and back of the box to hold the paper in place.
Hot tip from Tiff:Each time the decorative paper is added, overlap it so that there is no space in between. It doesn’t need to be perfect.
Tiffany recommends You can use any type of glue: hot glue, white glue. If you are doing this with your children Tiffany recommends glue sticks, or you can use a smaller glue gun for safety purposes.
Step 5: Add the Finishing touch
You can put your last pieces of paper on the bottom so that you see something pretty when you look into the organizer.
Like so.
The whole box is now covered with pretty paper.

Save yourself the trouble about worrying about glue drying too fast. Tiffany has some hot tips.
Save any fabulous paper plates lift-over from parties. These will become useful again.
Save any thick scrap craft paper. These pieces now have a purpose again.
Step 6: Glue down the rolls
1 2
3
Hot tip from Tiff:Create channels of rolls and prepare to glue them down. Add piles of glue to the bottom of your box then set the rolls inside to secure them.
And don’t forget to place the colour and/or glitter end facing up.
Tiffany recommends Glue down channels of rolls on both sides so you can leave the centre open for larger items.
Almost done. Final steps.
Step 7: Make your box dazzle
Tiffany found fabulous shell plates from the Dollar Store. However, you can use any colourful paper plates, cutouts, objects, etc. to make your box stand out — the sky is the limit.
Tiffany recommends Cut shapes out of coloured paper if you don’t have random items kicking around.
Use these items to cover up any seams from the paper you used to cover the box.

No more plastic straws.
The no-straw movement is trending for a reason. Learn more here.
Straws. If you have them, please reuse them.
Step 8: Think outside of the box
21
Tiffany recommends Add colourful straws.
To keep the box strong while storing items, glue plastic straws down on each corner of the box. Tiffany says, it not only makes it strong, but it looks really pretty, too.
Now that you’ve created your unique organizer, fill it up so it can begin to take shape!
Voilà!
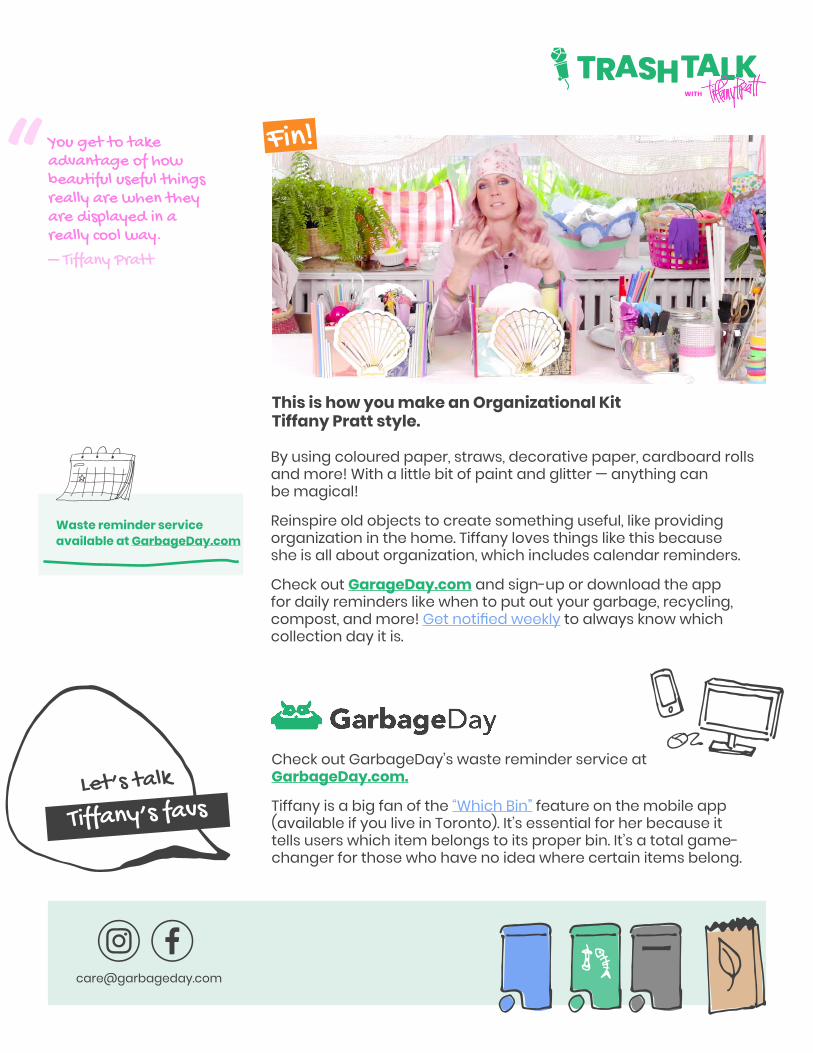
Fin!
T This is how you make an Organizational Kit Tiffany Pratt style.
By using coloured paper, straws, decorative paper, cardboard rolls and more! With a little bit of paint and glitter — anything can be magical!
Reinspire old objects to create something useful, like providing organization in the home. Tiffany loves things like this because she is all about organization, which includes calendar reminders.
Check out GarageDay.com and sign-up or download the app for daily reminders like when to put out your garbage, recycling, compost, and more! Get notified weekly to always know which collection day it is.
“You get to take advantage of how beautiful useful things really are when they are displayed in a really cool way.
– Tiffany Pratt
Tiffany’s favs
Check out GarbageDay’s waste reminder service at GarbageDay.com.
Tiffany is a big fan of the “Which Bin” feature on the mobile app (available if you live in Toronto). It’s essential for her because it tells users which item belongs to its proper bin. It’s a total game-changer for those who have no idea where certain items belong.
Waste reminder service available at GarbageDay.com
Let’s talk