Ikea Chair Sled - Instructables
13
instructables Ikea Chair Sled by JON-A-TRON It's not easy to bend wood, so I decided to let Ikea to the hard work for me. The POÄNG chair has all the curved wood you need to make a sturdy sled! The Scandinavians are well known for their exceptional modernist design skills, both in furniture and architecture, and it seems fitting that Ikea's famous lounge chair easily doubles as a sled (see what I did there?). It's in a book! This project has been included in Asa Christiana's new book, Handmade: A Hands-On Guide: Make the Things You Use Every Day available now on Amazon. https://www.amazon.com/Handmade-Hands -Guide-Thing... this this this Ikea Chair Sled: Page 1
-
Upload
khangminh22 -
Category
Documents
-
view
0 -
download
0
Transcript of Ikea Chair Sled - Instructables

instructables
Ikea Chair Sled
by JON-A-TRON
It's not easy to bend wood, so I decided to let Ikea tothe hard work for me. The POÄNG chair has all thecurved wood you need to make a sturdy sled!
The Scandinavians are well known for theirexceptional modernist design skills, both in furnitureand architecture, and it seems fitting that Ikea'sfamous lounge chair easily doubles as a sled (seewhat I did there?).
It's in a book!This project has been included in Asa Christiana'snew book, Handmade: A Hands-On Guide: Makethe Things You Use Every Day available now onAmazon. https://www.amazon.com/Handmade-Hands-Guide-Thing...
this
this
this
Ikea Chair Sled: Page 1

http://youtu.be/UjeZpqqbzBw
Ikea Chair Sled: Page 2
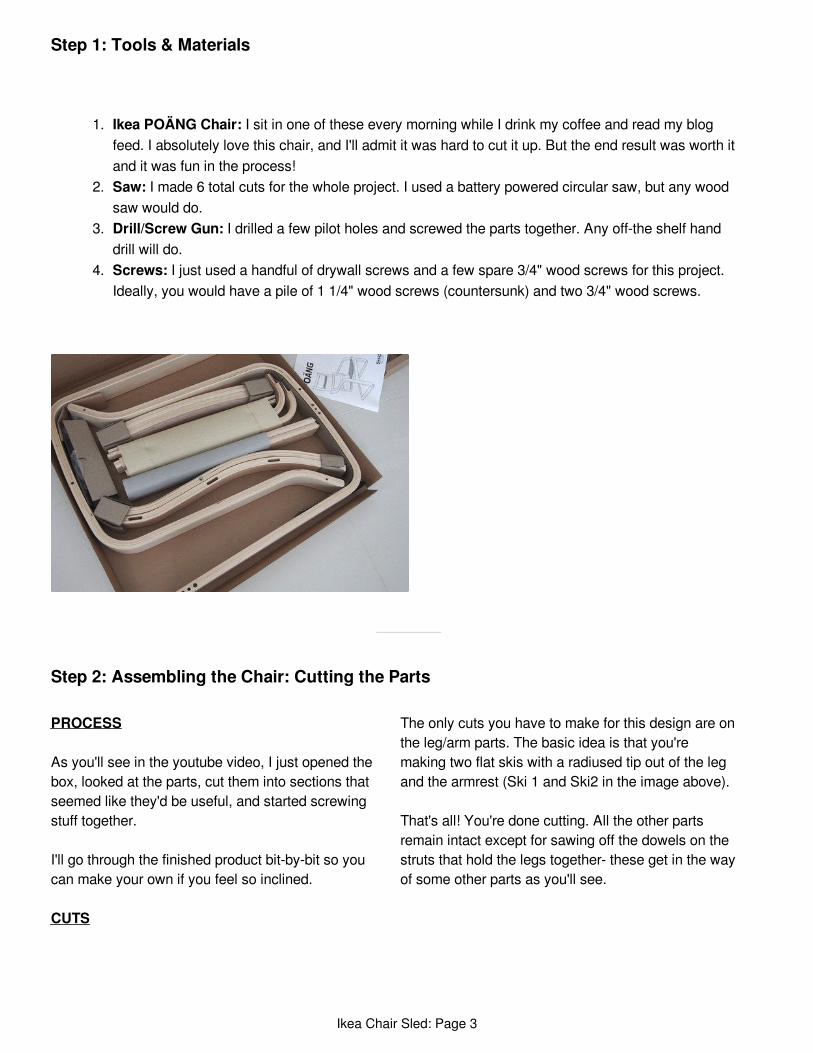
Step 1: Tools & Materials
1. Ikea POÄNG Chair: I sit in one of these every morning while I drink my coffee and read my blogfeed. I absolutely love this chair, and I'll admit it was hard to cut it up. But the end result was worth itand it was fun in the process!
2. Saw: I made 6 total cuts for the whole project. I used a battery powered circular saw, but any woodsaw would do.
3. Drill/Screw Gun: I drilled a few pilot holes and screwed the parts together. Any off-the shelf handdrill will do.
4. Screws: I just used a handful of drywall screws and a few spare 3/4" wood screws for this project.Ideally, you would have a pile of 1 1/4" wood screws (countersunk) and two 3/4" wood screws.
Step 2: Assembling the Chair: Cutting the Parts
PROCESS
As you'll see in the youtube video, I just opened thebox, looked at the parts, cut them into sections thatseemed like they'd be useful, and started screwingstuff together.
I'll go through the finished product bit-by-bit so youcan make your own if you feel so inclined.
CUTS
The only cuts you have to make for this design are onthe leg/arm parts. The basic idea is that you'remaking two flat skis with a radiused tip out of the legand the armrest (Ski 1 and Ski2 in the image above).
That's all! You're done cutting. All the other partsremain intact except for sawing off the dowels on thestruts that hold the legs together- these get in the wayof some other parts as you'll see.
Ikea Chair Sled: Page 3

Step 3: Sled: Back Half
To make the back half of the sled, I used Ski 1 from the photo in step 2, one of the flat profile leg support beams,and one of the curved back supports.
1. The back of the flat leg support screws into both Ski 1's about 8" from the flat back of the skis.2. Once the flat leg support is screwed to both skis at a right angle, I screwed in a curved back support
so that it was centered on the flat leg support. This creates a spring action for the seat, kind of like aleaf spring on a car.
Ikea Chair Sled: Page 4

Step 4: Sled: Front Half
The front half is basically the same as the back half. It uses SKI 2 and has the other flat leg support attached sothat it is flush with the back end of the ski.
Ikea Chair Sled: Page 5

Ikea Chair Sled: Page 6

Step 5: Attach the Sled Parts
Next, I attached the front and back sled parts end-to-end. With the curved and of the back sled touchingthe back end of the front sled on a flat surface, Itoenailed some long screws through both. Thestructural connection here isn't that important, thereare a lot of other connections holding the parts
together.
If the spacing of the flat leg supports is correct, theseat will fit perfectly so that the seat supports line upwith the curved back supports.
Ikea Chair Sled: Page 7

Step 6: Attach the Seat
First, I put the seat together per Ikea's instructions. The two curved seat supports slide into the fabric sleeves andbolt into the sides of the seat.
Once the seat was assembled, I screwed the curved seat supports into the curved back supports sticking up onthe back and front parts of the sled.
Ikea Chair Sled: Page 8

Step 7: Side Struts
The sides struts are really important. Without them this thing would snap in half at the first bump.
Setting the sled on its side, I used the back rails as the side struts. With the pockets facing out and the notchedend facing forward, I screwed the back rails into the sled in 3 place: two places in the side of the seat, and one inthe front ski.
Mirroring this on the other side gave me a very sturdy finished product.
Ikea Chair Sled: Page 9

Ikea Chair Sled: Page 10

Step 8: Cross Beam
The last step is to add a cross beam to keep the front skis in line. For this I used the last curved back support andscrewed it in towards the front.
Ikea Chair Sled: Page 11

ouch yay! I'm speachless! I really like your ikea chair sled!
Thanks for saying so! It was a really quick project- it took maybe 2 hours to get it right. This chairWANTS to be a sled!
A bit expensive your sled, no ?
Who could have guessed that Ikea flat pack furniture would be perfect for a sled! :D
Genius!
Nice sled, but I suggest you add a cross bar across the back of the seat to keep from beingpunctured by the uprights if you hit something and tumble.
Step 9: Shoot the Slopes!
I'm a little embarrassed to admit this was my first time sledding. I grew up in South Louisiana; it snowed oncewhen I was 7, and there were no hills to sled on.
That being said, it seemed to work pretty well except there's really no way to steer. I got a lot of compliments frompassers-by, molded plywood looks a lot classier than brightly colored plastic!
Ikea Chair Sled: Page 12

Perfect idea !
Thanks!
Oh, but there is a very simple way of steering, its just the same as it is on classic sleds: Stick theheel of the "inner curve" foot into the snow and you should turn... Stick in both heels and there'syour brake.
Very nice 'ible, and very classy sled, sir! I am not going to make it (we already have a sled, and nosnow) but I really like the result!
Thanks for the tip! I had just been leaning to try to get it to go whee I wanted, but that makesperfect sense.
I'm pretty sure you meant to say "where" but I'm not imagining you sliding down a hill on your sledscreaming "Wheeeeeeeee!" in a high pitched voice, haha.
Anyways, nice Ikea hack!
Subconscious slip!
If the seat was attached curved ends to the front instead of the rear, it would give you perfecthandles to hang onto! Plus, my worry is that if you fall off, those curves could really smack youhard in the kidneys!
Great suggestion. I think I might have been thinking that I'd make some kind of back rests out ofone of the back support pieces, but that's obviously useless.
Very nice! In stead of waxing, you can also add some metal runners. They should be sowhatrounded, so that the the surface area where the sled touches the snow is reduced. You could waxthose metal-skids too, to make it even faster.
Good idea. To stay true to the idea, I'd have to repurpose ikea products that have something akinto metal skids. I'll keep my eyes open!
The true Ikea hacker :)
I´m sure you will find something that works.
It turns out that before the days of plastic skis (we use plastic in the material science defn.), skiiersand wooden sled users would use pine tar to prepare the wooden ski surface to waterproof andprotect the wood. Additional preparation, like using wax designed for wooden skis gives even morespeed. Nonetheless, I'd say waxing the wood alone is certainly fine, but somewhat foolish (fromthe perspective of speed and wood preservation- which it doesn't greatly improve)
Brilliant
This is a fine looking sled! Did you wax the skids?
You know, this was my first time sledding! I didn't know sleds needed to be waxed, but it probablywould have made it go a bit faster.
Ikea Chair Sled: Page 13