Portable Class III Biological Safety Cabinet (PGB Series) User ...
36
Germfree - Portable Class III Biological Safety Cabinet User Manual - v1.1 - 05/03/21 - RMH Portable Class III Biological Safety Cabinet (PGB Series) User Manual Models PGB-30 / PGB-36
-
Upload
khangminh22 -
Category
Documents
-
view
1 -
download
0
Transcript of Portable Class III Biological Safety Cabinet (PGB Series) User ...

Germfree - Portable Class III Biological Safety Cabinet User Manual - v1.1 - 05/03/21 - RMH
Portable Class III Biological Safety Cabinet (PGB Series)User Manual
Models PGB-30 / PGB-36
Portable Class III Biological Safety Cabinet (PGB Series)User Manual
2
ContentsEquipment Warranty . . . . . . . . . . . . . . . . . . . . . . . . . . . . . . . . . . . . . . . . . . . . . . . . . . . 4Introduction . . . . . . . . . . . . . . . . . . . . . . . . . . . . . . . . . . . . . . . . . . . . . . . . . . . . . . . . . . . 5
Advance Planning & Good Technique . . . . . . . . . . . . . . . . . . . . . . . . . . . . . . 5Gloves . . . . . . . . . . . . . . . . . . . . . . . . . . . . . . . . . . . . . . . . . . . . . . . . . . . . . . . . . . 5Personal Protective Equipment (PPE) . . . . . . . . . . . . . . . . . . . . . . . . . . . . . . . 5Safety Practices and Information . . . . . . . . . . . . . . . . . . . . . . . . . . . . . . . . . . 5
System Operating Information . . . . . . . . . . . . . . . . . . . . . . . . . . . . . . . . . . . . . . . . . . 7Airflow Characteristics . . . . . . . . . . . . . . . . . . . . . . . . . . . . . . . . . . . . . . . . . . . 8
Equipment Construction & Operation . . . . . . . . . . . . . . . . . . . . . . . . . . . . . . . . . . . . 9Coated Aluminum . . . . . . . . . . . . . . . . . . . . . . . . . . . . . . . . . . . . . . . . . . . . . . . 9Valves . . . . . . . . . . . . . . . . . . . . . . . . . . . . . . . . . . . . . . . . . . . . . . . . . . . . . . . . . . . 9Filtration . . . . . . . . . . . . . . . . . . . . . . . . . . . . . . . . . . . . . . . . . . . . . . . . . . . . . . . . 10Control Panel . . . . . . . . . . . . . . . . . . . . . . . . . . . . . . . . . . . . . . . . . . . . . . . . . . . . 13Double-Door Pass-Through . . . . . . . . . . . . . . . . . . . . . . . . . . . . . . . . . . . . . . 13Pass-Through Chamber Assembly . . . . . . . . . . . . . . . . . . . . . . . . . . . . . . . . . 14Window . . . . . . . . . . . . . . . . . . . . . . . . . . . . . . . . . . . . . . . . . . . . . . . . . . . . . . . . . 16Glove-ports . . . . . . . . . . . . . . . . . . . . . . . . . . . . . . . . . . . . . . . . . . . . . . . . . . . . . 16Gloves . . . . . . . . . . . . . . . . . . . . . . . . . . . . . . . . . . . . . . . . . . . . . . . . . . . . . . . . . . 16Electrical Components . . . . . . . . . . . . . . . . . . . . . . . . . . . . . . . . . . . . . . . . . . . 17Shipping Case . . . . . . . . . . . . . . . . . . . . . . . . . . . . . . . . . . . . . . . . . . . . . . . . . . . 18
Class III BSC Operation . . . . . . . . . . . . . . . . . . . . . . . . . . . . . . . . . . . . . . . . . . . . . . . . . 19Set-up . . . . . . . . . . . . . . . . . . . . . . . . . . . . . . . . . . . . . . . . . . . . . . . . . . . . . . . . . . 19BSC Start-Up Instructions . . . . . . . . . . . . . . . . . . . . . . . . . . . . . . . . . . . . . . . . . 19Gas Decontamination . . . . . . . . . . . . . . . . . . . . . . . . . . . . . . . . . . . . . . . . . . . . 20
Description Guides . . . . . . . . . . . . . . . . . . . . . . . . . . . . . . . . . . . . . . . . . . . . . . . . . . . . . 21Class III BSC . . . . . . . . . . . . . . . . . . . . . . . . . . . . . . . . . . . . . . . . . . . . . . . . . . . . . 21Control Panel . . . . . . . . . . . . . . . . . . . . . . . . . . . . . . . . . . . . . . . . . . . . . . . . . . . 23
Portable Class III Biological Safety Cabinet (PGB Series)User Manual
3
Maintenance . . . . . . . . . . . . . . . . . . . . . . . . . . . . . . . . . . . . . . . . . . . . . . . . . . . . . . . . . . 24General Care . . . . . . . . . . . . . . . . . . . . . . . . . . . . . . . . . . . . . . . . . . . . . . . . . . . . 24Filter Care . . . . . . . . . . . . . . . . . . . . . . . . . . . . . . . . . . . . . . . . . . . . . . . . . . . . . . . 24Replacing a Class III BSC HEPA Filter . . . . . . . . . . . . . . . . . . . . . . . . . . . . . . . 24Maintenance Schedule . . . . . . . . . . . . . . . . . . . . . . . . . . . . . . . . . . . . . . . . . . . 25Replacing Class III BSC Gloves . . . . . . . . . . . . . . . . . . . . . . . . . . . . . . . . . . . . . 26
Trouble-Shooting . . . . . . . . . . . . . . . . . . . . . . . . . . . . . . . . . . . . . . . . . . . . . . . . . . . . . . 28Replacement Parts & Components . . . . . . . . . . . . . . . . . . . . . . . . . . . . . . . . . . . . . . . 29Class III BSC Testing . . . . . . . . . . . . . . . . . . . . . . . . . . . . . . . . . . . . . . . . . . . . . . . . . . . . 30Technical drawings (PGB-30) . . . . . . . . . . . . . . . . . . . . . . . . . . . . . . . . . . . . . . . . . . . . 32Technical drawings (PGB-36) . . . . . . . . . . . . . . . . . . . . . . . . . . . . . . . . . . . . . . . . . . . . 34Quality Statement . . . . . . . . . . . . . . . . . . . . . . . . . . . . . . . . . . . . . . . . . . . . . . . . . . . . . 36Our Company . . . . . . . . . . . . . . . . . . . . . . . . . . . . . . . . . . . . . . . . . . . . . . . . . . . . . . . . . 36Germfree’s Mission . . . . . . . . . . . . . . . . . . . . . . . . . . . . . . . . . . . . . . . . . . . . . . . . . . . . 36

Portable Class III Biological Safety Cabinet (PGB Series)User Manual
4
Equipment WarrantyAll Germfree Laboratories equipment is constructed with quality materials to meet the highest standards of workmanship. Our warranty covers equipment of our manufacture, which shows defects in workmanship or materials, for a period of 24 months from date of final customer acceptance. We will send prepaid replacements for any defective pieces. Labor incurred for repairs or defective pieces is covered until acceptance of third party certification documents by the owner. Upon certification acceptance, labor expenses are not covered as part of the warranty. An optional preventative maintenance contract and service agreement is available for purchase.
THIS LIMITED GUARANTEE WILL BE HONORED ONLY IN THE LIMITS OF LOCATION/SERVICE IN WHICH GERMFREE PLACED THE EQUIPMENT.
Germfree has the sole discretion in determining if repairs or replacement of workmanship or materials will be provided in accordance with the warranty which is subject to all conditions or limitations included herein. The guarantee does not cover circumstances beyond our control, or problems caused by an inability to follow the described methods of use in the equipment manuals.
Germfree does not offer any other explicit or implicit guarantee for this product. In the case where the exclusion of all implicit guarantees is contradicted by the law, the duration of the implicit guarantee will be for one year from the date of purchase.
Excluded from the coverage are the routine replacement and or maintenance of consumable pieces. This guarantee is void in the case of modification done without direct authorization by Germfree, negligence or abuse on the part of the user.
Germfree offers optional “Total Customer Care” (TCC) plans for our equipment. The TCC programs provide extended service and maintenance periods, by Germfree Factory Authorized Representatives (FAR), to insure that the product(s) provided continue to meet or exceed expected levels of performance beyond the initial warranty period. Please contact a Germfree Salesperson for details.
Contact Germfree Customer Service+1 386.265.4300

Portable Class III Biological Safety Cabinet (PGB Series)User Manual
5
IntroductionThe laboratory Safety Officer and Laboratory Director should make Standard Operating Procedures (SOPs) readily available to all personnel. Professional training prior to commencing work inside a Class III BSC is highly recommended.
Advance Planning & Good TechniqueThe successful use of the Class III BSC as a safety tool depends on two factors: advance planning and good operational practices. Even the most sophisticated and elaborate systems are unsafe if proper technique is not employed. It is, therefore, the responsibility of the safety officer or head of the particular project to train the personnel who will use the unit and to ensure good technique is maintained.
Planning is a critical part of laboratory safety. To achieve maximum safety and utility of the Class III BSC take into account all equipment and materials necessary for the proposed operation and outline the procedural details in advance. The best way to accomplish this is by the use of a checklist and/or protocol that includes the equipment, apparatus, tools, supplies, and other details necessary for the successful completion of the proposed operation. Every process, procedure, and item involved in an experiment must be carefully outlined and planned for.
The order of events should also be clearly listed, with the sequence in which materials must be passed into or out of the Class III BSC particularly well detailed, especially if cross-contamination is a concern.
Gloves Gloves are the most susceptible component of the Class III BSC system. If there is a containment breach, more often than not, it is due to a glove leak. For this reason, it is important to inspect gloves regularly; before and following each use of the Class III BSC. A quick pressure test will indicate if there is a glove leak. It is also important to have spare gloves readily available.
All operators should be practiced in glove replacement. Furthermore, laboratory personnel should understand protocol in the event of a glove leak.
Personal Protective Equipment (PPE)Laboratory personnel should always wear appropriate Personal Protective Equipment (PPE) when using this equipment (e.g. protective clothing, eye protection, etc.). Appropriate PPE should be specified in the recommended safety procedures corresponding to the work being performed in the Class III BSC.
Safety Practices and InformationThe Class III BSC operates under negative pressure in relation to the area in which it is situated. This negative pressure provides the increased level of safety required in the event of a breach of containment, such as a leak in a glove.
Air exiting the Class III BSC is filtered by a 8”x 8”x 3” and a 12”x 24”x 3” HEPA filter. HEPA filters remove 99.99% of all particulates 0.3µm in size. As particle size increases (bacteria, fungi) and decreases (viruses), the filter efficiency increases due to several complimentary filtering mechanisms, including inertial impaction, straining, diffusion, electrostatic charges, and direct interception. HEPA filter efficiency increases as they become more loaded and trap more particles.

Portable Class III Biological Safety Cabinet (PGB Series)User Manual
6
Never use damaged HEPA filters. The damaged area will allow potentially hazardous particulates to flow out of the Class III BSC. In addition to the operator, a second person should be present during Class III BSC operation to provide support and assistance to the operator.
Always wear appropriate Personal Protective Equipment (PPE) when using this unit. Appropriate PPE should be indicated in the recommended safety procedures corresponding to the work being performed in the Class III BSC.
Bleach and other decontaminating agents are irritants and may be caustic. Proper PPE should be worn when handling bleach (e.g., transferring waste bags, etc.). When decontaminating the Class III BSC, proper decontamination and wipe down procedures must be followed, and a thorough rinse using fresh water must be performed in order to preserve the coating.
Many components of the Class III BSC and Filtration System are metal and may have sharp edges that could puncture PPE. This risk is more probable during disassembly/reassembly operation.
During operation, negative pressure is maintained throughout the Class III BSC, ducting, and Filtration System. Hazardous materials are not exhausted to the environment or returned back into the system.
The digital pressure gauge monitors the Class III BSC pressure relative to the surrounding environment. A mechanical pressure gauge is used as a backup and will operate without electrical power.
If Class III BSC pressure rises above the pre-set pressure level, the audible alarm will sound. Unless negative pressure can be immediately regained, Class III BSC Supply and Exhaust valves should be closed, and decontamination and test sample safety procedures should be initiated.
Before using the Class III BSC, performing a 10 minute Rate of Rise pressure test is recommended. The gloves used when operating the Class III BSC are made of specialized material and are date stamped. The Class III BSC gloves should pass inspection and testing for integrity. This provides quality assurance that the gloves are an optimal barrier for operator safety.
Prior to operations, all gloves should be visually inspected and replaced if punctures, “dry rot,” creases, or other defects are found. Check between fingers, palm area, and tops of gloves.

Portable Class III Biological Safety Cabinet (PGB Series)User Manual
7
System Operating InformationThe Class III BSC operates under negative pressure in relation to the area in which it is situated. This negative pressure provides the increased level of safety required in the event of a breach of containment, such as a leak in a glove.
Negative pressure is maintained throughout the Class III BSC. Pressure gauges monitor Class III BSC differential pressure relative to the surrounding environment. Mechanical minihelic pressure gauges will operate without electricity, in the event of power loss.
If Class III BSC pressure rises above -0.5” H₂O (-125 Pa) the alarm will sound. Unless negative pressure can be immediately regained, Class III BSC Supply and Exhaust valves should be closed, and decontamination and test sample safety procedures should be initiated.
The desired operational pressure within the Class III BSC ranges from approximately -.5” to -1.2” H₂O (-125 to -300 Pa). Nominal operating pressure should be specified in laboratory SOPs. Cabinet operating pressure is adjustable by the use of 76mm manual butterfly valves.
The system should be carefully inspected and thoroughly tested prior to the introduction of any hazardous materials. Periodic inspection of the system’s filter housings and gaskets is highly recommended.The Class III BSC requires dedicated circuits for operation.

Portable Class III Biological Safety Cabinet (PGB Series)User Manual
8
Airflow Characteristics Typically, airflow in Class III BSCs is referred to as turbulent airflow. This means the airflow is drawn into the Class III BSC through the inlet/supply HEPA filter and moves toward the exhaust outlet in a manner whereby velocity and pressures are randomized throughout the cabinet. The following images depict typical turbulent airflow patterns inside a Class III BSC.
Unique airflow rates, as with all characteristics of the operations, should have an accompanying risk assessment. Proper Standard Operating Procedures (SOPs), administrative controls, use of simulations during training and proficiency demonstration, and testing procedures should be developed and followed based on design.
Portable Class III Biological Safety Cabinet (PGB Series)User Manual
9
Equipment Construction & OperationCoated Aluminum The Class III BSC is constructed of all welded Aluminum and is coated with a chemical resistant coating. The construction and coating facilitate cleaning and decontamination; however, proper selection and usage of cleaning and sanitizing chemicals are necessary in order to maintain the finish of the cabinet and longevity of Class III BSC components.
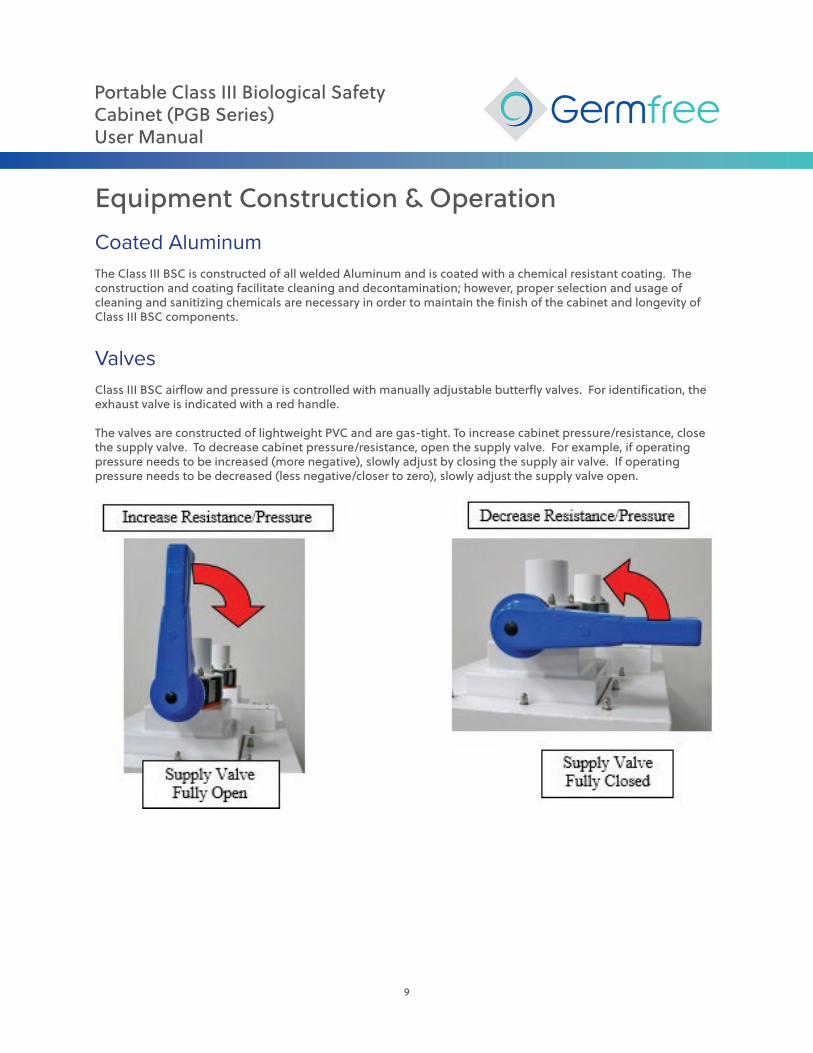
ValvesClass III BSC airflow and pressure is controlled with manually adjustable butterfly valves. For identification, the exhaust valve is indicated with a red handle.
The valves are constructed of lightweight PVC and are gas-tight. To increase cabinet pressure/resistance, close the supply valve. To decrease cabinet pressure/resistance, open the supply valve. For example, if operating pressure needs to be increased (more negative), slowly adjust by closing the supply air valve. If operating pressure needs to be decreased (less negative/closer to zero), slowly adjust the supply valve open.

Portable Class III Biological Safety Cabinet (PGB Series)User Manual
10
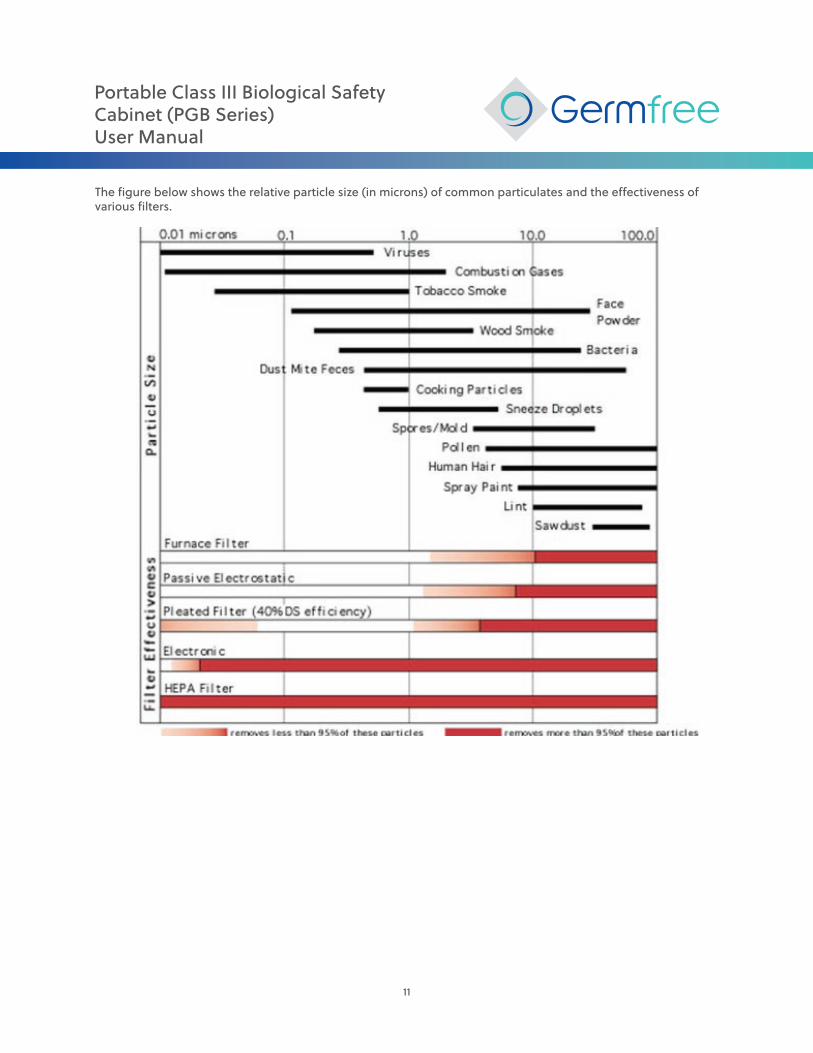
Filtration High Efficiency Particulate Air (HEPA) Filters use a continuous sheet fiberglass medium to capture particulates; HEPA filters do not filter chemicals or gasses. HEPA filters are mechanical filters. The efficiency is lowest when HEPA filters are new; as the filter loads, efficiency increases. HEPA filters remove 99.99% of all particulates 0.3µm in size (The filter is more efficient for particles larger or smaller than 0.3µm).
HEPA filters efficiency increases due to the following complimentary filtering mechanisms:
• Impingement: Large particulates, (dust), high density particles are captured• Interception: Particulates follow airstream around filter fibers and become captured by contact with an
edge, or intercepts.• Diffusion: Small particles acquire random motion due to collision with gas molecules (Brownian motion) and
contact the filter fibers.• Straining: The smallest dimension of dust is greater than the distance between adjoining filter media fibers• Electrostatic Attraction: Attraction of oppositely charged particles to charged media
Portable Class III Biological Safety Cabinet (PGB Series)User Manual
11
The figure below shows the relative particle size (in microns) of common particulates and the effectiveness of various filters.
Portable Class III Biological Safety Cabinet (PGB Series)User Manual
12
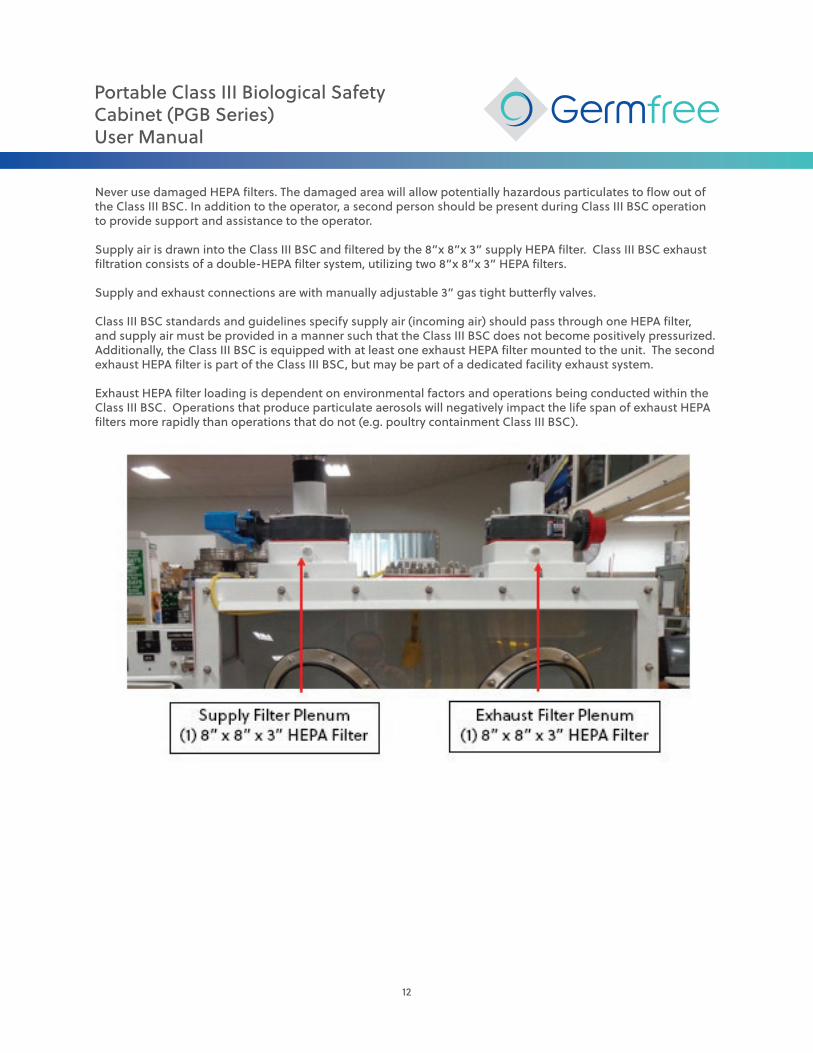
Never use damaged HEPA filters. The damaged area will allow potentially hazardous particulates to flow out of the Class III BSC. In addition to the operator, a second person should be present during Class III BSC operation to provide support and assistance to the operator.
Supply air is drawn into the Class III BSC and filtered by the 8”x 8”x 3” supply HEPA filter. Class III BSC exhaust filtration consists of a double-HEPA filter system, utilizing two 8”x 8”x 3” HEPA filters. Supply and exhaust connections are with manually adjustable 3” gas tight butterfly valves.
Class III BSC standards and guidelines specify supply air (incoming air) should pass through one HEPA filter, and supply air must be provided in a manner such that the Class III BSC does not become positively pressurized. Additionally, the Class III BSC is equipped with at least one exhaust HEPA filter mounted to the unit. The second exhaust HEPA filter is part of the Class III BSC, but may be part of a dedicated facility exhaust system.
Exhaust HEPA filter loading is dependent on environmental factors and operations being conducted within the Class III BSC. Operations that produce particulate aerosols will negatively impact the life span of exhaust HEPA filters more rapidly than operations that do not (e.g. poultry containment Class III BSC).
Portable Class III Biological Safety Cabinet (PGB Series)User Manual
13
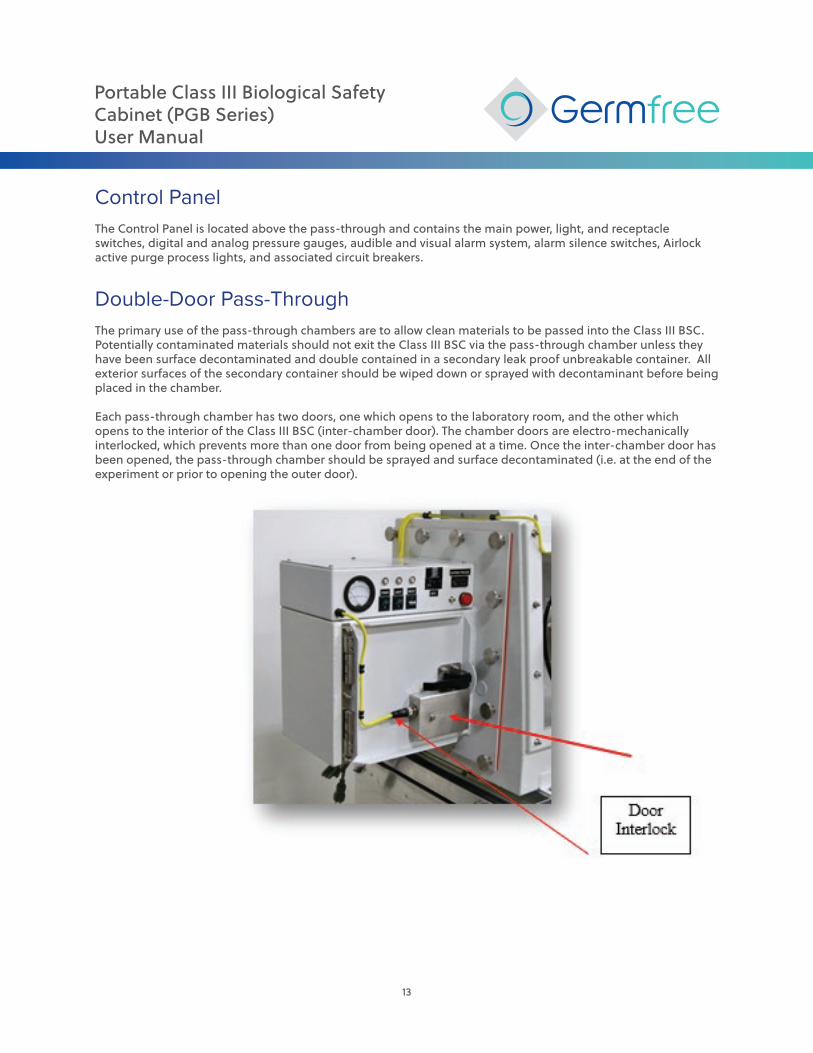
Control PanelThe Control Panel is located above the pass-through and contains the main power, light, and receptacle switches, digital and analog pressure gauges, audible and visual alarm system, alarm silence switches, Airlock active purge process lights, and associated circuit breakers.
Double-Door Pass-Through The primary use of the pass-through chambers are to allow clean materials to be passed into the Class III BSC. Potentially contaminated materials should not exit the Class III BSC via the pass-through chamber unless they have been surface decontaminated and double contained in a secondary leak proof unbreakable container. All exterior surfaces of the secondary container should be wiped down or sprayed with decontaminant before being placed in the chamber.
Each pass-through chamber has two doors, one which opens to the laboratory room, and the other which opens to the interior of the Class III BSC (inter-chamber door). The chamber doors are electro-mechanically interlocked, which prevents more than one door from being opened at a time. Once the inter-chamber door has been opened, the pass-through chamber should be sprayed and surface decontaminated (i.e. at the end of the experiment or prior to opening the outer door).
Portable Class III Biological Safety Cabinet (PGB Series)User Manual
14
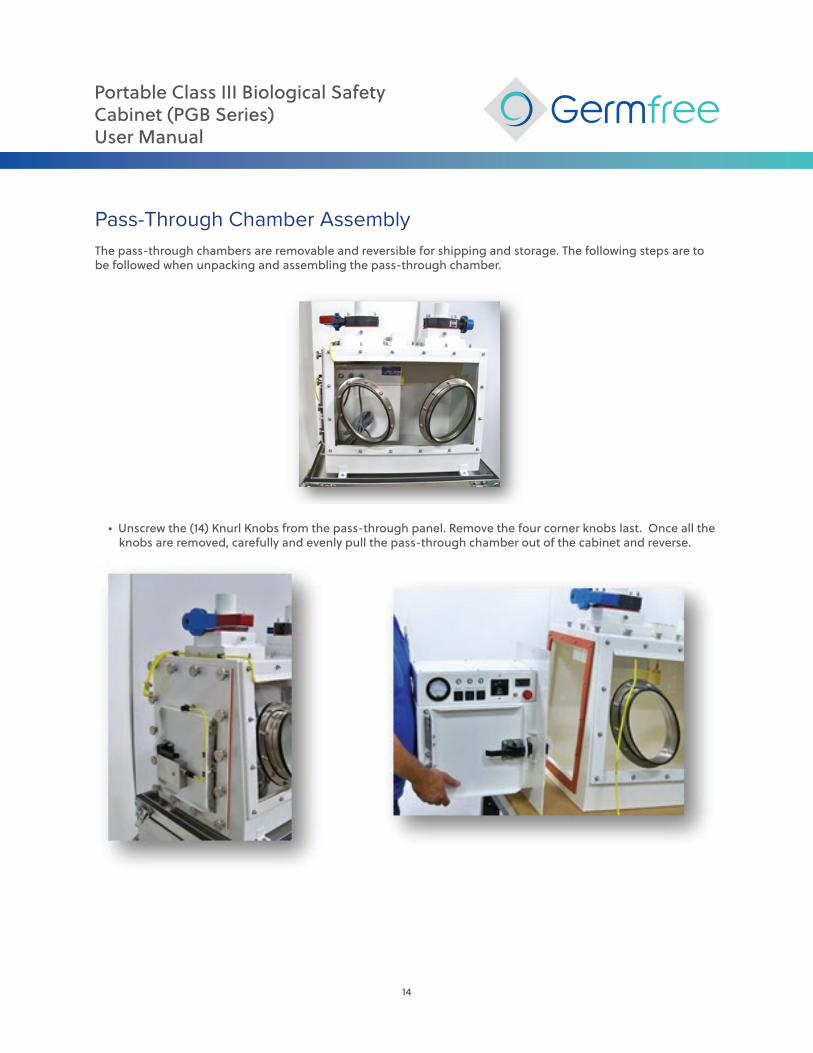
Pass-Through Chamber Assembly The pass-through chambers are removable and reversible for shipping and storage. The following steps are to be followed when unpacking and assembling the pass-through chamber.
• Unscrew the (14) Knurl Knobs from the pass-through panel. Remove the four corner knobs last. Once all the knobs are removed, carefully and evenly pull the pass-through chamber out of the cabinet and reverse.
Portable Class III Biological Safety Cabinet (PGB Series)User Manual
15
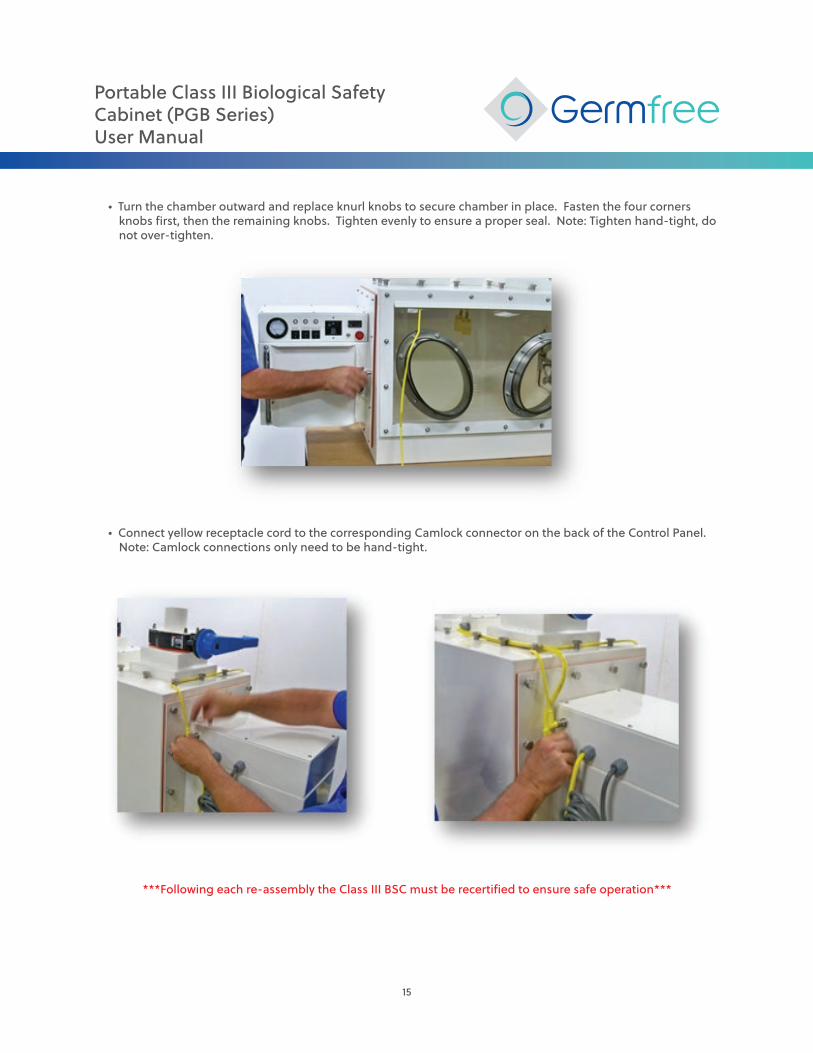
• Turn the chamber outward and replace knurl knobs to secure chamber in place. Fasten the four corners knobs first, then the remaining knobs. Tighten evenly to ensure a proper seal. Note: Tighten hand-tight, do not over-tighten.
• Connect yellow receptacle cord to the corresponding Camlock connector on the back of the Control Panel. Note: Camlock connections only need to be hand-tight.
***Following each re-assembly the Class III BSC must be recertified to ensure safe operation***
Portable Class III Biological Safety Cabinet (PGB Series)User Manual
16
Window The viewing window is 3/8” thick and made of polycarbonate. It is sealed to the Class III BSC with a coated aluminum frame and water jet cut silicone gasket. The stainless steel glove-ports are sealed into the window with EPDM gaskets. (Note: Window nuts are torqued to 45 inch-pounds at the factory, do not over-tighten).
Glove-ports The Class III BSC has two 11” x 7” oval glove-ports (for use with 8” cuff gloves). The double groove stainless steel design allows for glove changes without breaking containment. Gloves are sealed onto the glove-ports by the use of EPDM O-rings. A trim guard is provided to the glove-port edge to protect gloves from any puncturing or tearing.
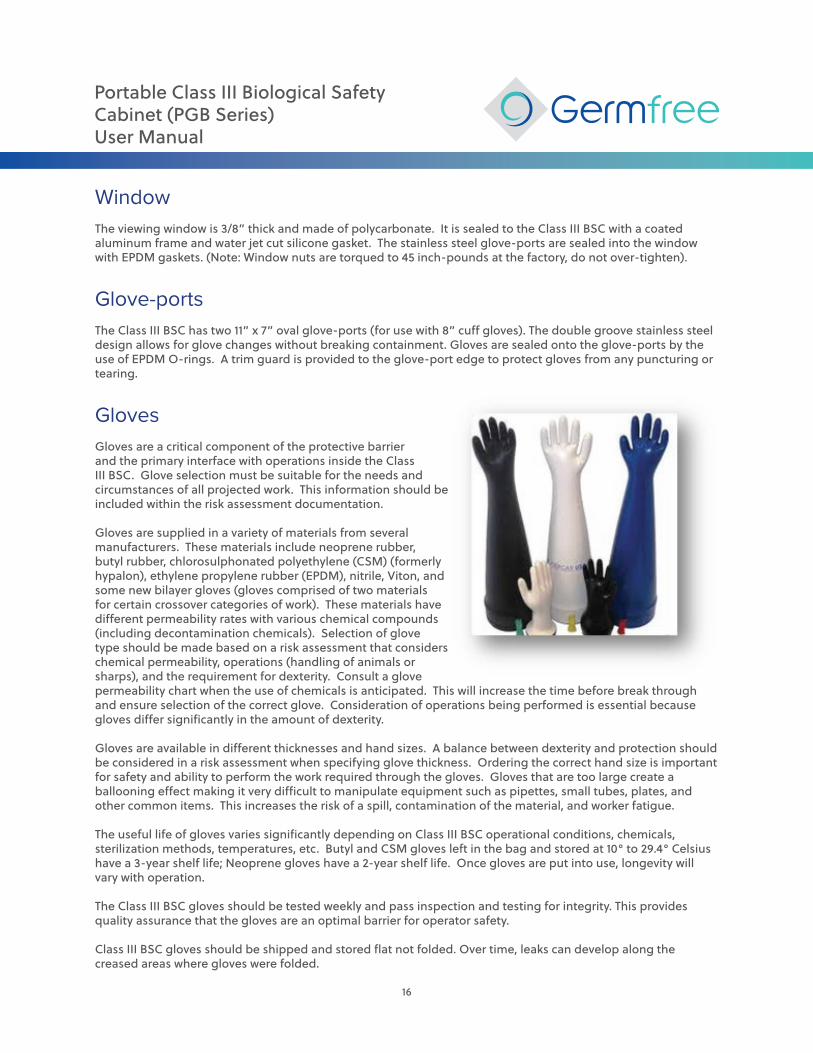
GlovesGloves are a critical component of the protective barrier and the primary interface with operations inside the Class III BSC. Glove selection must be suitable for the needs and circumstances of all projected work. This information should be included within the risk assessment documentation.
Gloves are supplied in a variety of materials from several manufacturers. These materials include neoprene rubber, butyl rubber, chlorosulphonated polyethylene (CSM) (formerly hypalon), ethylene propylene rubber (EPDM), nitrile, Viton, and some new bilayer gloves (gloves comprised of two materials for certain crossover categories of work). These materials have different permeability rates with various chemical compounds (including decontamination chemicals). Selection of glove type should be made based on a risk assessment that considers chemical permeability, operations (handling of animals or sharps), and the requirement for dexterity. Consult a glove permeability chart when the use of chemicals is anticipated. This will increase the time before break through and ensure selection of the correct glove. Consideration of operations being performed is essential because gloves differ significantly in the amount of dexterity.
Gloves are available in different thicknesses and hand sizes. A balance between dexterity and protection should be considered in a risk assessment when specifying glove thickness. Ordering the correct hand size is important for safety and ability to perform the work required through the gloves. Gloves that are too large create a ballooning effect making it very difficult to manipulate equipment such as pipettes, small tubes, plates, and other common items. This increases the risk of a spill, contamination of the material, and worker fatigue.
The useful life of gloves varies significantly depending on Class III BSC operational conditions, chemicals, sterilization methods, temperatures, etc. Butyl and CSM gloves left in the bag and stored at 10° to 29.4° Celsius have a 3-year shelf life; Neoprene gloves have a 2-year shelf life. Once gloves are put into use, longevity will vary with operation.
The Class III BSC gloves should be tested weekly and pass inspection and testing for integrity. This provides quality assurance that the gloves are an optimal barrier for operator safety.
Class III BSC gloves should be shipped and stored flat not folded. Over time, leaks can develop along the creased areas where gloves were folded.

Portable Class III Biological Safety Cabinet (PGB Series)User Manual
17
Prior to operations, all gloves should be visually inspected and replaced if punctures, “dry rot,” creases, or other defects are found. Check between fingers, palm area, and tops of gloves for holes, discoloration, and any imperfections.
Also pay particular attention to the glove area around the glove port(s), making sure there are no holes, stressed, or age related problems. Damaged gloves should be replaced immediately.
Performing a 10 minute Rate of Rise test is recommended on a weekly basis.
Gloves should be carefully inspected for wear, stress, and operational damage before and after working within a Class III BSC. Gloves should be visually inspected periodically for cleanliness during work, especially if a breach is suspected. Gloves should be replaced when any cracks, wear areas, or tears are observed.
Electrical Components Lighting
The interior of the Class III BSC is illuminated by non-glare LED lights in an exterior-mounted housing. The lights are isolated from the work area by the front window which is sealed with a stainless steel frame and silicone gasket, allowing light bulbs to be changed without breaking containment.
Electrical Receptacles
The Class III BSC features hanging specified electrical receptacles on the interior of the cabinet used for powering equipment. The receptacles are sealed into the work area via a sealed plug connection, and are removable and replaceable should they become contaminated; without breaking containment. To remove the receptacle, simply unscrew the stainless steel connector at the top of the receptacle cord (indicated in picture).
Receptacle power is independently switched at the control panel.
Portable Class III Biological Safety Cabinet (PGB Series)User Manual
18
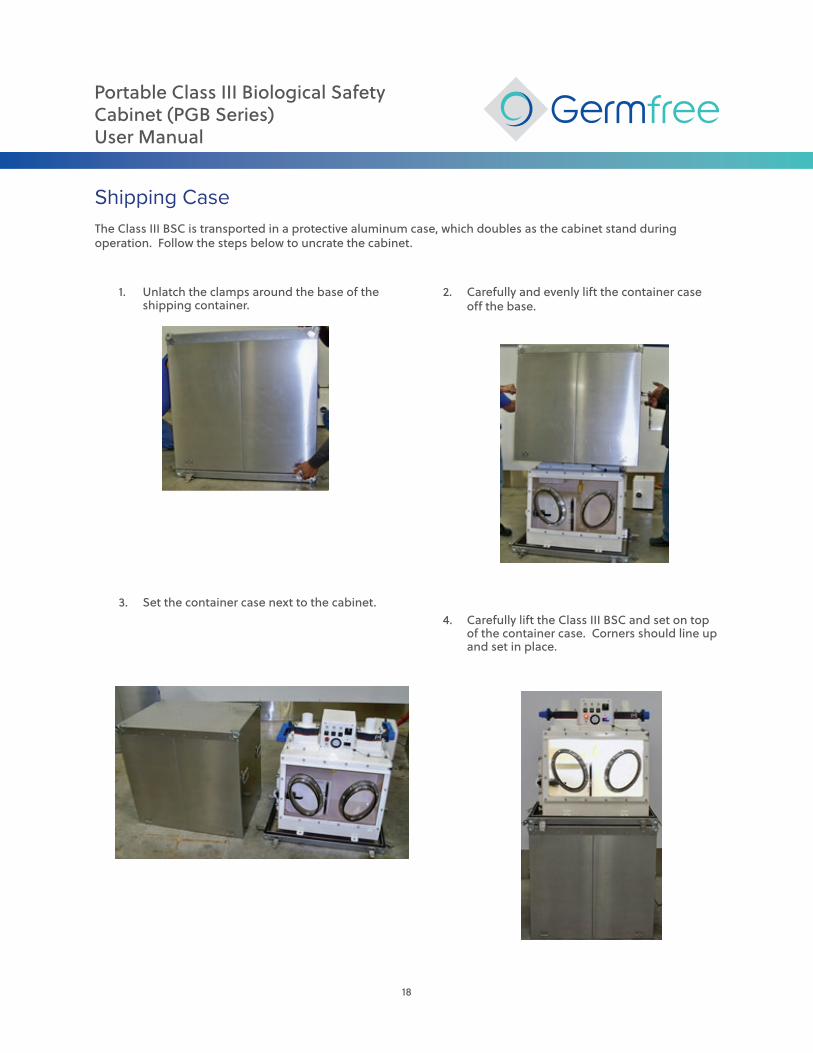
Shipping Case The Class III BSC is transported in a protective aluminum case, which doubles as the cabinet stand during operation. Follow the steps below to uncrate the cabinet.
1. Unlatch the clamps around the base of the shipping container.
2. Carefully and evenly lift the container case off the base.
3. Set the container case next to the cabinet. 4. Carefully lift the Class III BSC and set on top
of the container case. Corners should line up and set in place.

Portable Class III Biological Safety Cabinet (PGB Series)User Manual
19
Class III BSC OperationThe Class III BSC system was fully assembled by GERMFREE technicians. Following production, the equipment was tested to ensure safe operability. Prior to use, the Class III BSC must be certified by an accredited individual or certification organization. The Class III BSC should be recertified if it is relocated, serviced, or at least annually.
The certifier is recommended to perform the following tests at the initial certification:
• Rate of Rise Pressure Test• Mass Spectrometer Leak Detector Test• HEPA Filter Integrity Test• Glove Breach (Inflow) Test• Alarm & Interlock Test• GFCI Test
Set-upThe components of the Class III BSC are assembled with great care paying particular attention to the alignment and placement of gaskets and the tightness of the clamps between the Class III BSC and the filtration housings. The system should be carefully inspected and thoroughly tested prior to the introduction of any hazardous materials. Periodic inspection of the systems filter housings and gaskets is highly recommended.
The desired operational pressure within the Class III BSC ranges from approximately -125 Pa to -300 Pa (-0.5in H20 - 1.2in H20).
Standard operating pressure should be defined in the SOP. Cabinet pressure is adjustable by the use of manual butterfly valves.
BSC Start-Up Instructions1. Visually inspect Class III BSC elements, particularly for damage to the exposed surfaces of the HEPA filters,
gloves, O-rings and hoses. Make sure duct clamps are tight and in place.2. Close all doors on Class III BSC.3. Open Class III BSC Supply and Exhaust air valves.4. Pressure test the Class III BSC for leaks.
• Note that temperature changes within the Class III BSC and/or Laboratory will have a dramatic effect on the pressure within the Class III BSC. The use of accurate thermometers inside and outside the box is recommended.
• Turn power switch on.• Close the Supply Air Valve. This will increase negative pressure and pull the gloves into the Class III BSC.• Close the Exhaust Air Valve.• Gradually reduce negative pressure in the Class III BSC by slightly opening the Supply Air Valve until
pressure gets close to -500 Pa (-2.0in H20, then close tightly. Let pressure settle for approximately 10 minutes.
• Record pressure from Digihelic Pressure Gauge.• After 10 minutes elapses, record new pressure reading. Pressure should not rise more than 125 Pa (0.5in H20)
in 10 min. • If there is less than 125 Pa (0.5in H20) difference between the start and finish pressure readings the Class III
BSC is considered leak-tight.
Portable Class III Biological Safety Cabinet (PGB Series)User Manual
20
• If the difference between the start and finish pressure readings exceeds 125 Pa (0.5in H20), the Class III BSC is not considered operational and the source of the leak must be found and corrected.
5. Test the Class III BSC Pressure Alarm.
• Ensure the Supply and Exhaust Air valves are fully open.• Close the Supply Air Valve until BSC pressure registers between -250 Pa (-1.0in H20) and -325 Pa (-1.3in H20).• Record negative pressure attained and time.• Momentarily close the Exhaust Air Valve.• Alarm should sound when indicated pressure rises above -125 Pa (0.5in H20). • Silence the Alarm.• Return valve to initial position after verification.
6. Begin to use Class III BSC
Gas DecontaminationNote: Decontamination should be performed by contractor or trained personnel
1. Confirm Decontamination Port Shut - Off valves are closed.2. Remove caps from ports.3. Connect hoses from aerosolized gas source to ports using gaskets and clamps.4. Follow decontaminant manufacturer’s procedures for decontamination.5. After decontamination cycle has completed, close shut-off valves, remove hoses, and replace caps.
Vaporized Hydrogen Peroxide (VHP) is compatible with, and safe for, a wide range of materials used in the construction of Class III Biological Safety Cabinets, including 304 and 316 series stainless steel. It is also safe for a wide range of plastics including polycarbonate as well as gasket material including silicone and EPDM. Additional compatibility and life cycle testing information will be provided by the manufacturers of the VHP systems.
For general decontamination information about different methods, contact Germfree Laboratories for a copy of Basic Principles of Decontamination for Class III Biological Safety Cabinets

Portable Class III Biological Safety Cabinet (PGB Series)User Manual
21
Description GuidesClass III BSCComponents listed below are identified below:
1. Control Panel: Includes gauges, light switch, main power switch, receptacle switch, pressure alarm, GFCI, and associated circuit breakers.
2. BSC Supply HEPA Filter Housing: Contains a single 8”x 8”x 3” HEPA filter. Ensures all air entering the Class III BSC is particle-free.
3. BSC Supply Air Valve: Supply air flows through this valve prior to entering the Supply HEPA filter; allows for flow adjustment and complete sealing of the cabinet. If the handle is vertical, the valve is fully open; if the handle is horizontal, the valve is fully closed.
4. Pre-Filter: Supply air for the class III BSC flows through a 12”x 12”x 1” pre-filter to capture larger particles prior to entering the supply HEPA filter.
5. Sealed USB and Firewire connector: This connector is a Sealed USB and Firewire connector for transferring data from within the BSC to an external computer. This connector is removable and replaceable if it becomes contaminated.

Portable Class III Biological Safety Cabinet (PGB Series)User Manual
22
6. Exhaust Hose: This chemical resistant Polytetrafluoroethylene (PTFE) hose connects the Class III BSC to the filtration system with blower. It is attached to the exhaust plenum via hose clamp.
7. BSC Exhaust Air Valve: Air exiting the cabinet passes through this valve, allows for flow adjustment and complete sealing of the cabinet. If the handle is vertical, the valve is fully open; if the handle is horizontal, the valve is fully closed.
8. BSC Exhaust HEPA Filter Housing: Houses double 8”x 8”x 3” HEPA filters; ensures all air exiting the Class III BSC is particle-free.
9. Light Housing: Houses LED lights, which are mounted to the exterior, allowing for light replacement without breaching containment.
10. Electrical Receptacles: Single phase receptacles for powering equipment inside the cabinet. Receptacles are sealed in the work area via a sealed plug. They are removable and replaceable if they become contaminated.
11. Glove-ports: Double-groove ports provide structure for gloves to secure to.12. Window: Viewing window is 3/8” thick polycarbonate, and sealed to the Class III BSC with a coated aluminum
frame and seamless silicone gasket.13. Shipping Case and BSC Base: Aluminum shipping case doubles as the cabinet stand. 14. Double Door Airlock: Allows for transfer of items into and out of the Class III BSC.

Portable Class III Biological Safety Cabinet (PGB Series)User Manual
23
Control Panel Components listed below are identified below:
1. Main Power & Associated Circuit Breaker: Powers digital pressure gauge, pressure alarm, and the filtration system for the Class III BSC system.
2. LED Light Switch & Associated Circuit Breaker: Powers lights within the Class III BSC. 3. Receptacle Switch & Associated Circuit Breaker: Powers electrical receptacles inside the cabinet. 4. Ground Fault Circuit Interrupter (GFCI): Protects the electrical receptacles inside the Class III BSC from
ground faults. 5. BSC Digital Pressure Gauge: Gauge indicates inches of water of negative pressure within the Class III BSC.
(Note: Gauge is accurate down to -2.5” H₂O). 6. BSC Pressure Alarm & Silence Switch: Indicates low/high pressure conditions inside the Class III BSC. Alarm
will continue until pressure is within acceptable range. The silence switch temporarily silences cabinet pressure alarm (approximately 30 seconds).
7. BSC Minihelic Pressure Gauges: Indicates inches of water of negative pressure within the Class III BSC. The analog gauges serve as a back-up to the digital gauge in the event of power loss.
Portable Class III Biological Safety Cabinet (PGB Series)User Manual
24
MaintenanceGeneral CareGuidelines in this section will help maintain and extend the functional integrity of the Class III BSC and associated equipment. The integrity of the equipment is critical to its successful use. Some maintenance, such as keeping the Class III BSC certified by qualified personnel, should be performed by independent contractors at least annually.
The Class III BSC’s polycarbonate viewing window can be periodically cleaned with a soft, dry cloth to remove dust or particulate accumulation. If desired, a solution of isopropyl alcohol or commercially available detergent may be used to decontaminate the surfaces. Commercial window cleaner containing ammonia and abrasive cleaners are incompatible with the polycarbonate surfaces and should never be used. For aesthetic purposes, an anti-static cleaner may be applied to prevent accumulation of particulates on the exterior.Care should be taken during the cleaning of the equipment to avoid wetting the HEPA filters. If a HEPA filter becomes wet, it should not be assumed that it has been damaged. Simply turn off the unit and allow sufficient time for the filter media to dry. In extreme cases, it is advisable to have the unit recertified prior to use.HEPA filters should be stored in a place where the filter media will not be damaged, punctured, or touched.Class III BSC gloves should be shipped and stored flat; never folded. Over time, leaks may develop along the creased areas where gloves were folded.
The Class III BSC is equipped with LED lights located on the front of the cabinet. These can be changed from the outside without breaking the barrier inside the Class III BSC by removing the bolts that attach the light housing to the unit and turning it over to reveal the light strips. The LED lights should last for many years before replacement is necessary. If lights need replaced, contact Germfree customer service department.
Filter CareHEPA filter media is very fragile and is easily damaged. Care should be taken during the cleaning of the equipment to avoid wetting the HEPA filters. If a HEPA filter becomes wet, it should not be assumed that it has been damaged. Simply turn off the unit and allow sufficient time for the filter media to dry. In extreme cases, it is advisable to have the unit recertified prior to use.
HEPA filters should be stored in a place where the filter media will not be damaged, punctured, or touched.
Replacing a Class III BSC HEPA Filter(Performed by contractor or trained personnel)
1. After the Class III BSC has been decontaminated, don the proper PPE and pass in through the Airlock the necessary equipment: bags, spray bottle of bleach, and tools for HEPA filter removal.
2. With the exhaust system operating, first close the Supply Air Valve, then the Exhaust Air Valve. Then turn off the blower system.
3. Using a 7/16” (10mm) socket wrench, remove all nuts on the exhaust HEPA retaining frame. With one hand, lower frame with HEPA. Place HEPA in a disposal bag. Wipe the outside of the bag with bleach and place inside a second sealable bag; wipe bag down with bleach. Process items out via Airlock.
4. Repeat the above procedure for the Supply HEPA filter.5. Decontaminate tools by spraying bleach on them, and bag them for removal through the Airlock.
Portable Class III Biological Safety Cabinet (PGB Series)User Manual
25
6. Spray bleach onto the interior of the removed HEPA filter housings and all other areas in the Class III BSC that may have contacted the contaminated filters or filter frames during their removal. Allow bleach to sit for 30 minutes.
7. After 30 minutes, wipe up and repeat procedure two more times.8. Thoroughly rinse bleach away with water by spraying and wiping down three times. 9. Place all refuse items in bags for proper disposal.
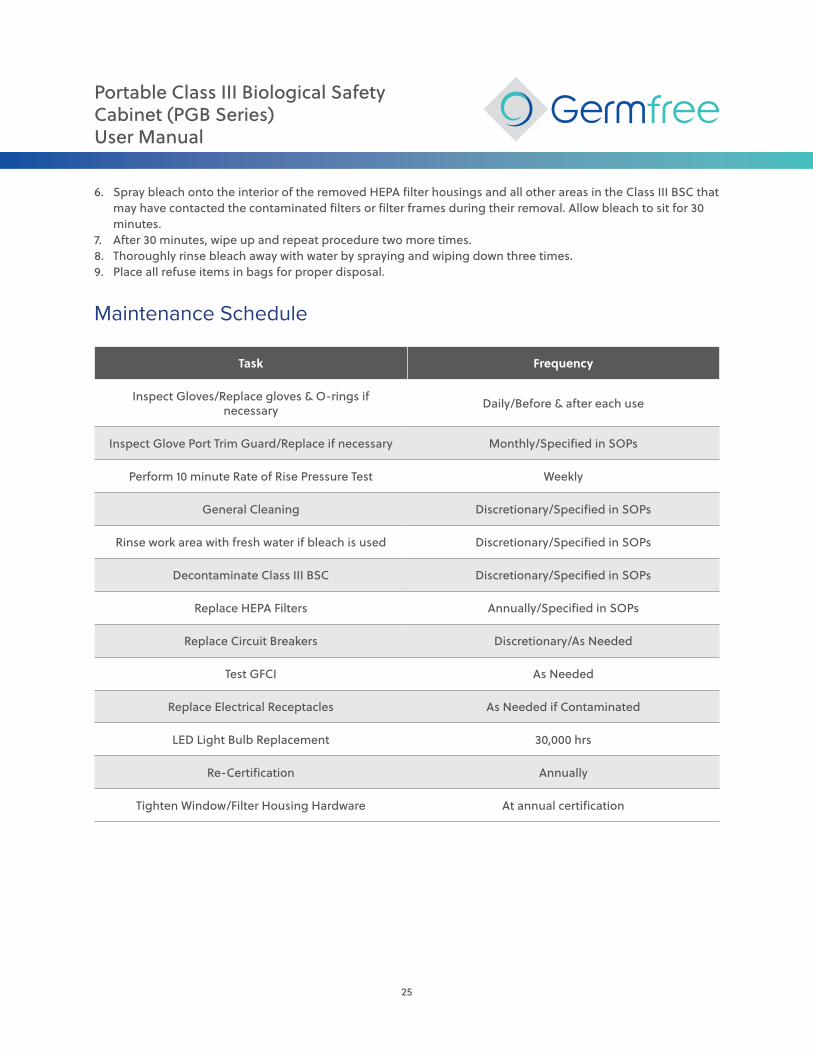
Maintenance Schedule
Task Frequency
Inspect Gloves/Replace gloves & O-rings if necessary Daily/Before & after each use
Inspect Glove Port Trim Guard/Replace if necessary Monthly/Specified in SOPs
Perform 10 minute Rate of Rise Pressure Test Weekly
General Cleaning Discretionary/Specified in SOPs
Rinse work area with fresh water if bleach is used Discretionary/Specified in SOPs
Decontaminate Class III BSC Discretionary/Specified in SOPs
Replace HEPA Filters Annually/Specified in SOPs
Replace Circuit Breakers Discretionary/As Needed
Test GFCI As Needed
Replace Electrical Receptacles As Needed if Contaminated
LED Light Bulb Replacement 30,000 hrs
Re-Certification Annually
Tighten Window/Filter Housing Hardware At annual certification
Portable Class III Biological Safety Cabinet (PGB Series)User Manual
26
Replacing Class III BSC GlovesDuring Routine Maintenance
1. Visually inspect the new gloves for defects before installation. Then, during routine maintenance, when the Class III BSC is clean, simply remove the O-ring from the glove port, pull off the gloves, and replace the gloves with date stamped new gloves. Be sure to position the end of the glove on the innermost glove-port groove.
2. Before replacing the O-ring, make sure the thumbs on the gloves are pointed upward. Check the O-ring for snugness of fit, cracks, and replace if necessary. Attach the O-ring over the outermost groove on the glove port.
3. After changing gloves, it is advisable to perform the Class III BSC leak test, and confirm that it still attains acceptable negative pressure.
During Operations
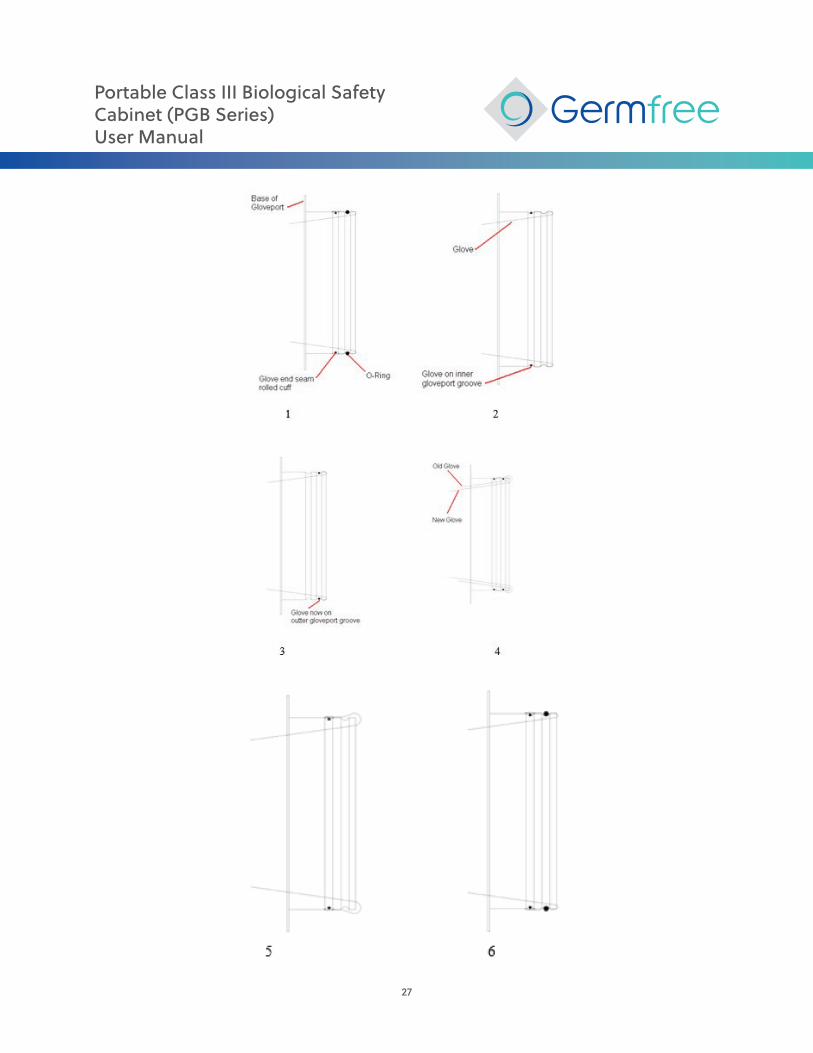
1. To change gloves during operations with a potentially contaminated work area, decontaminate as much of the glove and surrounding area as possible inside the cabinet. Only one glove can be changed at a time. Visually inspect new glove for defects before installation. Wear proper protective equipment. The starting point is represented in Diagram 1.
2. Remove the O-ring, and carefully slide the rolled cuff of the damaged glove from the inner glove groove to the outer glove groove. See Diagrams 2 and 3.
3. Orient the new glove so it is thumb up, and push it inside the damaged glove. Once it is inside the cabinet, slide the cuff of the new glove over the old glove cuff until the end is seated in the inner groove. See Diagram 4.
4. Place hand in adjoining glove-port glove and reach over to the damaged glove. Pull damaged glove into the work area while using your free hand to make sure the new glove cuff remains in place on the glove-port. See Diagram 5.
5. Make sure there are no twists or wrinkles in the new glove. Slide the O-ring over the glove to the outer glove groove. See Diagram 6.
6. After changing the glove, perform the leak test and confirm the unit still attains acceptable negative pressure.
Portable Class III Biological Safety Cabinet (PGB Series)User Manual
27

Portable Class III Biological Safety Cabinet (PGB Series)User Manual
28
Trouble-Shooting
Problem Possible Cause Corrective Action
Power Failure in Class III BSC or Filtration System
Power switch not in “on” position.
Turn on power switch at Class III BSC.
Power cord to Class III BSC disconnected. Plug in Class III BSC.
Power interruption during operation.
Check all switches and receptacles (plugs).
Tripped circuit breaker. Reset or replace circuit breaker.
Pressure Failure and Leaks
Penetration in gloves.Visually examine, soap bubble
test, and change damaged gloves.
Gloves not properly installed.Visually inspect for wrinkles, kinks and improper o-ring
installation. Repair.
Gasket compression, damage, or dryness around pass-through or
filters.
Grease with Dow Corning 111 valve lubricant and sealant or call a certified technician to replace gaskets or tighten the nut and latching clamps to increase the
seal.
Valves loose or stainless steel clamps loose.
Tighten the nut and latching clamp to increase the seal to the
proper torque.
Excess Internal Particle Count
Interior of Class III BSC is dirty. Wipe down interior with damp lint-free rag.
Items in Class III BSC are dirty. Remove items, wipe down Class III BSC surface and test again.
HEPA filter is damaged or improperly installed.
Visually inspect for damage, and replace

Portable Class III Biological Safety Cabinet (PGB Series)User Manual
29
Replacement Parts & Components
Replacement Parts Supplier Part #
Gloves 8”dia. Hypalon Glove Germfree 521-2002-01
O-Rings for Gloves Germfree 396-0002-00
HEPA Filter (8”x 8”x 3”) Germfree 375-1028-00
Pre-Filters (Pkg of 12) Germfree 750-0003-00
Pre-Filter Housing w/ 2” Cou-pling Germfree 750-0001-00
Sterile Wipes (30/pkg), box of 48 pkgs Germfree 001-2013-00
Analog Pressure Gauge Germfree 164-3012-00
Sound Alarm Germfree 349-0004-01
Red Alarm Light Germfree 156-3005-00
LED Light Strip Germfree 147-1041-00
Silence Push Button Germfree 170-0043-00
Power Switch Germfree 170-0030-00
Electrical Receptacle Germfree 112-0028-00
Circuit Breaker 5A Germfree 163-0050-00
Circuit Breaker 10A Germfree 163-0062-00
Circuit Breaker 15A Germfree 163-0066-00
GFCI Germfree 163-0065-00
Blower Germfree 183-0023-00
3” Exhaust Hose (10’ long) Germfree 750-0002-00
Portable Class III Biological Safety Cabinet (PGB Series)User Manual
30
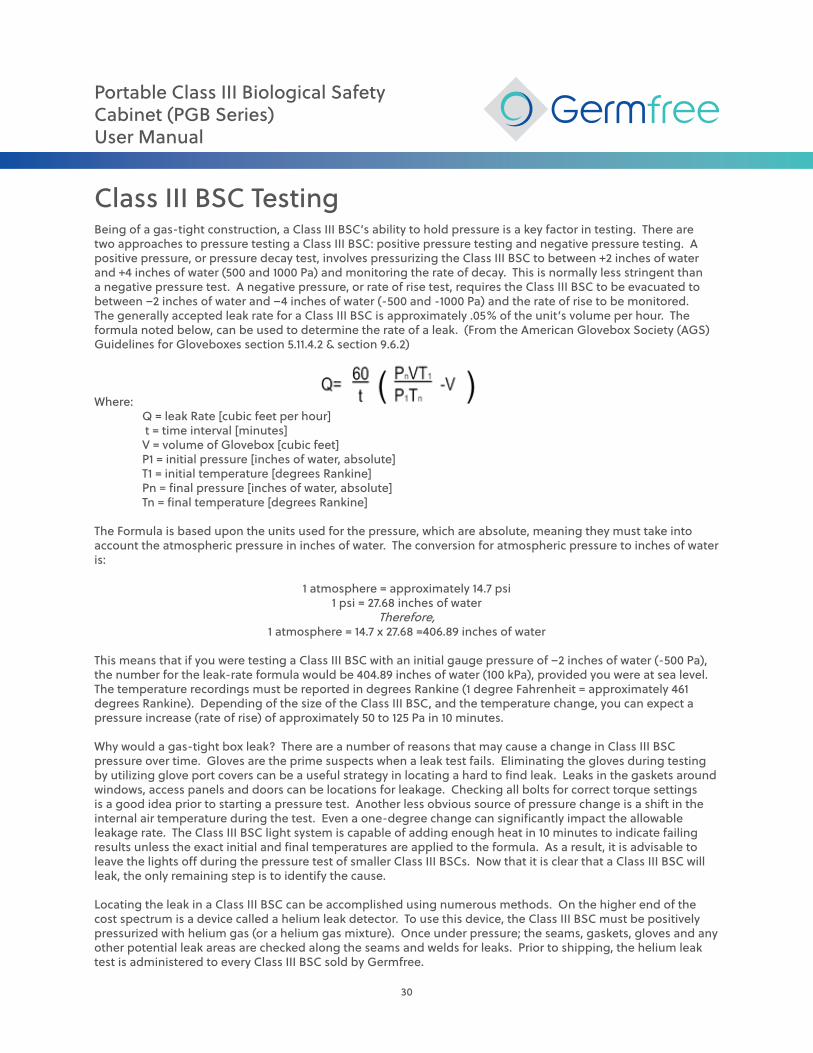
Class III BSC TestingBeing of a gas-tight construction, a Class III BSC’s ability to hold pressure is a key factor in testing. There are two approaches to pressure testing a Class III BSC: positive pressure testing and negative pressure testing. A positive pressure, or pressure decay test, involves pressurizing the Class III BSC to between +2 inches of water and +4 inches of water (500 and 1000 Pa) and monitoring the rate of decay. This is normally less stringent than a negative pressure test. A negative pressure, or rate of rise test, requires the Class III BSC to be evacuated to between –2 inches of water and –4 inches of water (-500 and -1000 Pa) and the rate of rise to be monitored. The generally accepted leak rate for a Class III BSC is approximately .05% of the unit’s volume per hour. The formula noted below, can be used to determine the rate of a leak. (From the American Glovebox Society (AGS) Guidelines for Gloveboxes section 5.11.4.2 & section 9.6.2)
Where: Q = leak Rate [cubic feet per hour] t = time interval [minutes] V = volume of Glovebox [cubic feet] P1 = initial pressure [inches of water, absolute] T1 = initial temperature [degrees Rankine] Pn = final pressure [inches of water, absolute] Tn = final temperature [degrees Rankine]
The Formula is based upon the units used for the pressure, which are absolute, meaning they must take into account the atmospheric pressure in inches of water. The conversion for atmospheric pressure to inches of water is:
1 atmosphere = approximately 14.7 psi1 psi = 27.68 inches of water
Therefore,1 atmosphere = 14.7 x 27.68 =406.89 inches of water
This means that if you were testing a Class III BSC with an initial gauge pressure of –2 inches of water (-500 Pa), the number for the leak-rate formula would be 404.89 inches of water (100 kPa), provided you were at sea level. The temperature recordings must be reported in degrees Rankine (1 degree Fahrenheit = approximately 461 degrees Rankine). Depending of the size of the Class III BSC, and the temperature change, you can expect a pressure increase (rate of rise) of approximately 50 to 125 Pa in 10 minutes.
Why would a gas-tight box leak? There are a number of reasons that may cause a change in Class III BSC pressure over time. Gloves are the prime suspects when a leak test fails. Eliminating the gloves during testing by utilizing glove port covers can be a useful strategy in locating a hard to find leak. Leaks in the gaskets around windows, access panels and doors can be locations for leakage. Checking all bolts for correct torque settings is a good idea prior to starting a pressure test. Another less obvious source of pressure change is a shift in the internal air temperature during the test. Even a one-degree change can significantly impact the allowable leakage rate. The Class III BSC light system is capable of adding enough heat in 10 minutes to indicate failing results unless the exact initial and final temperatures are applied to the formula. As a result, it is advisable to leave the lights off during the pressure test of smaller Class III BSCs. Now that it is clear that a Class III BSC will leak, the only remaining step is to identify the cause.
Locating the leak in a Class III BSC can be accomplished using numerous methods. On the higher end of the cost spectrum is a device called a helium leak detector. To use this device, the Class III BSC must be positively pressurized with helium gas (or a helium gas mixture). Once under pressure; the seams, gaskets, gloves and any other potential leak areas are checked along the seams and welds for leaks. Prior to shipping, the helium leak test is administered to every Class III BSC sold by Germfree.
Portable Class III Biological Safety Cabinet (PGB Series)User Manual
31
Another option is to introduce an open source of ammonia to the Class III BSC before checking the seams and welds. An aerosol ammonia leak check can be sprayed directly on the seam or other leak points, but that tends to get a bit messy. A cleaner approach is to spread a cloth impregnated with the reactant chemical over the seams. In either case, the yellow color will turn to blue in the presence of ammonia. This method is effective for field use because of the ready availability of ammonia and the small and lightweight equipment required.A soap bubble test is another option; however, smaller leaks may not be as detectable with a liquid as they are with a gas. This method is not efficient, except for locating large scale leaks.
Beyond these guidelines, testing will be application specific and the lines of communication with the customer and manufacturer will become the key to successful Class III BSC testing.
If you have any questions regarding a Germfree Class III BSC, please contact the High Containment Technical Service Department.
Portable Class III Biological Safety Cabinet (PGB Series)User Manual
32
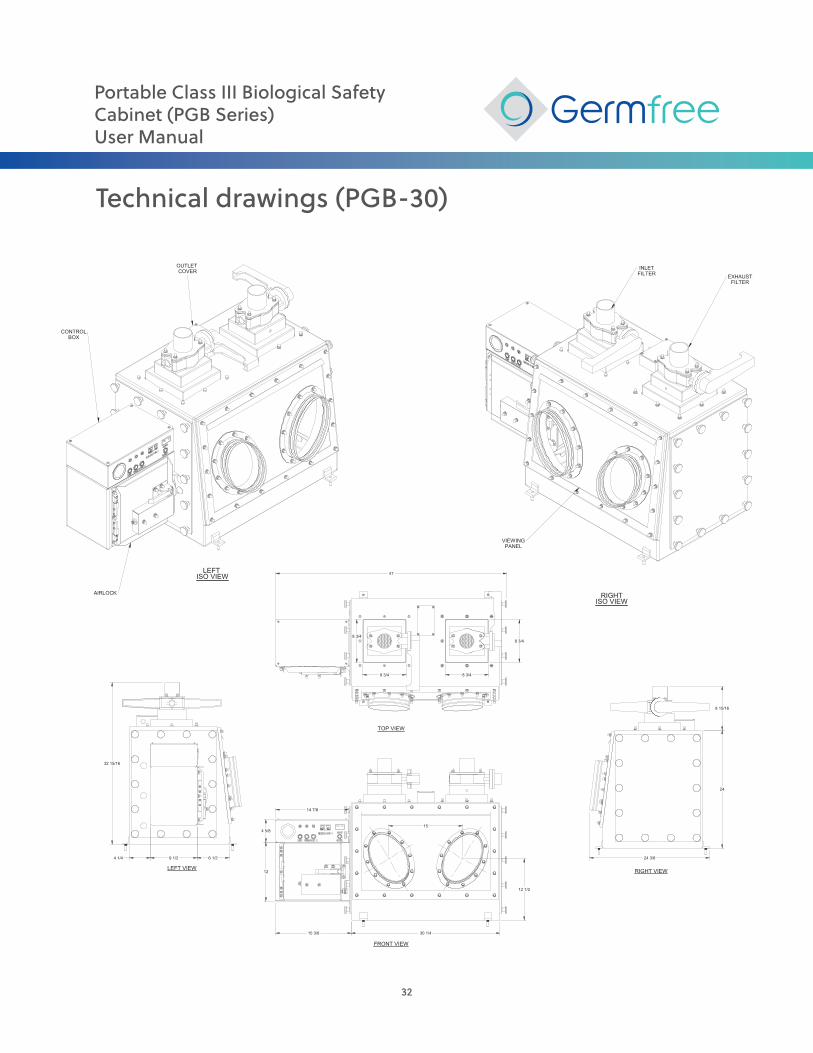
Technical drawings (PGB-30)
Portable Class III Biological Safety Cabinet (PGB Series)User Manual
33
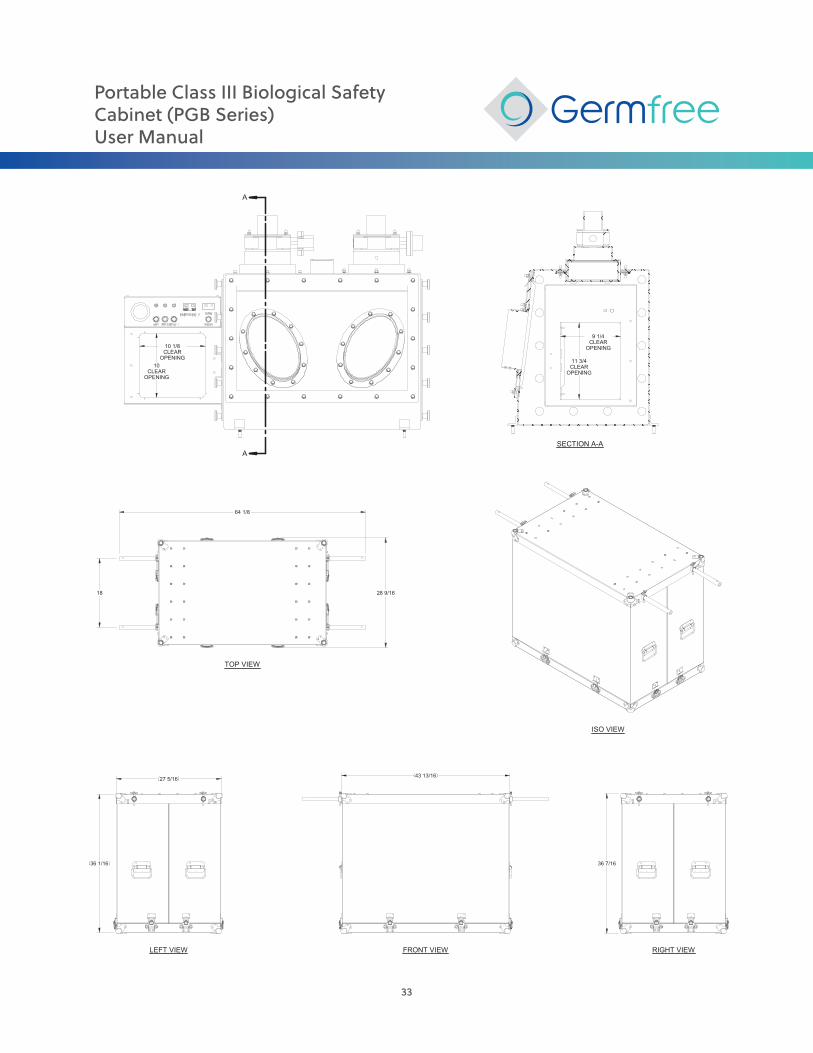
TOP VIEW
ISO VIEW
64 1/8
28 9/1618
FRONT VIEWLEFT VIEW RIGHT VIEW
27 5/16
36 1/16
43 13/16
36 7/16

Portable Class III Biological Safety Cabinet (PGB Series)User Manual
34
Technical drawings (PGB-36)
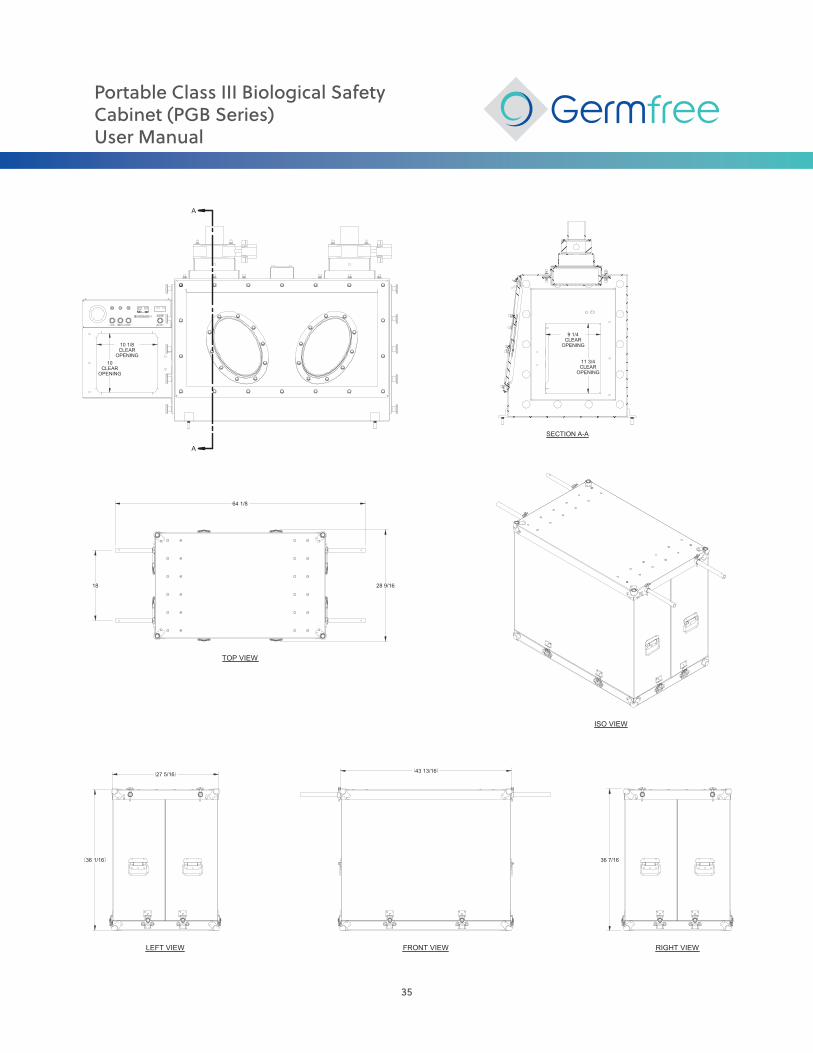
Portable Class III Biological Safety Cabinet (PGB Series)User Manual
35
TOP VIEW
ISO VIEW
64 1/8
28 9/1618
FRONT VIEWLEFT VIEW RIGHT VIEW
27 5/16
36 1/16
43 13/16
36 7/16

Portable Class III Biological Safety Cabinet (PGB Series)User Manual
36
Our CompanyGermfree has been a leading innovator in aseptic control and isolation systems since 1962.
We design and manufacture a diverse range of equipment and facilities for life science applications.
Our systems are integral to critical processes across many sectors. We specialize in complex projects and custom applications that serve the rigorous demands of our clients. Our high-specification bioGO Modular Facilities operate across the world, and are sustainable as permanent facilities in remote regions with harsh conditions.
Quality StatementAccountabilityWe will deliver our products on time, as promised, and free from defects.
OwnershipWe will strive to exceed expectations at every level and we will work to make sure that each customer is satisfied with the service that they receive.
LongevityAll of our products are constructed from the highest quality materials and are designed to operate reliably for decades. We stand behind our work and take pride in our superior craftsmanship.
Germfree’s MissionCreating Environments that Serve Life Science Innovation and Advance Global Health
Germfree4 Sunshine Blvd.
Ormond Beach, Florida, USA 32174
+1 386.265.4300
www.germfree.com