
Par cipant Handbook - eSkill India
370
Sector Furniture and Fi�ngs Reference ID: FFS/Q5102, Version 1.0 NSQF level: 3 Sub-Sector Modular Furniture Occupa�on Produc�on - Modular Furniture Cabinet Maker Modular Kitchen Par�cipant Handbook
-
Upload
khangminh22 -
Category
Documents
-
view
0 -
download
0
Transcript of Par cipant Handbook - eSkill India

SectorFurniture and Fi�ngs
Reference ID: FFS/Q5102, Version 1.0NSQF level: 3
Sub-SectorModular Furniture
Occupa�onProduc�on - Modular Furniture
Cabinet MakerModular Kitchen
Par�cipant Handbook
Published by
VIKAS® PUBLISHING HOUSE PVT. LTD.
E-28, Sector-8, Noida-201301 (UP)
Phone: 0120-4078900 • Fax: 0120-4078999
Regd. Office: 7361, Ravindra Mansion, Ram Nagar, New Delhi-110055
Website: www.vikaspublishing.com • Email: [email protected]
All Rights Reserved
First Edition, August 2018
ISBN 978-93-5271-242-7
Printed in India
Copyright © 2018
Furniture & Fittings Skill Council
Address: 407-408, 4th Floor, DLF City Court, MG Road, Sikanderpur
Gurugram-122002, Haryana, India
Email: [email protected] ; Phone: +91 124 4513900
Disclaimer
The information contained herein has been obtained from sources reliable to Furniture and Fittings Skill Council. Furniture and Fittings Skill Council disclaims all warranties to the accuracy, completeness or adequacy of such information. Furniture and Fittings Skill Council shall have no liability for errors, omissions, or inadequacies, in the information contained herein, or for interpretations thereof. Every effort has been made to trace the owners of the copyright material included in the book. The publishers would be grateful for any omissions brought to their notice for acknowledgments in future editions of the book. No entity in Furniture and Fittings Skill Council shall be responsible for any loss whatsoever, sustained by any person who relies on this material. The material in this publication is copyrighted. No parts of this publication may be reproduced, stored or distributed in any form or by any means either on paper or electronic media, unless authorized by the Furniture and Fittings Skill Council .

Skilling is building a be�er India.If we have to move India towards
development then Skill Developmentshould be our mission.
Shri Narendra ModiPrime Minister of India
iii

Job Role / Qualifica “Cabinet Maker Modular Kitchen”QP No. “FFS/Q5102, NSQF Level 3”
FURNITURE & FITTINGS SKILL COUNCIL
Authorised Signatory(Furnitur
July 12th, 2017July 11th, 2020
iv

Furniture and Fittings Skill Council (FFSC) would like to express its gratitude to all the individuals and institutions who contributed in different ways towards the preparation of this "Participant Handbook". Without their contribution it could not have been completed. Special thanks are extended to those who collaborated in the preparation of its different modules. Sincere appreciation is also extended to all who provided peer review for these modules.
The preparation of this handbook would not have been possible without the Furniture & Fittings Industry's support. Industry feedback has been extremely encouraging from inception to conclusion and it is with their input that we have tried to bridge the skill gaps existing today in the industry.
This participant handbook is dedicated to the aspiring youth who desire to achieve special skills which will be a lifelong asset for their future endeavors.
Acknowledgements
v
Participant Handbook Cabinet Maker Modular Kitchen
This Participant Handbook is designed for providing skill training and /or upgrading the knowledge level of the Trainees to take up the job of an “Cabinet Maker Modular Kitchen" in the Furniture and Fittings Sector.
This Participant Handbook is designed based on the Qualification Pack (QP) under the National Skill Qualification framework (NSQF) and it comprises of the following National Occupational Standards (NOS)/topics and additional topics.
• (FFS/N5102) Make modular kitchen• (FFS/N8601) Ensure health and safety at workplace• (FFS/N8501) Maintain work area, tools and machines• (FFS/N8801) Work effectively with others
About this book
vi
Participant Handbook Cabinet Maker Modular Kitchen
Table of Contents
S.No Modules and Units Page No
1. Make Modular Kitchen (FFS/N5102) 1
Unit 1.1 - Basic Introduction to the Responsibilities of a Cabinet Maker 3
Unit 1.2 - Make Modular Kitchen 5
Unit 1.3 - Understand Kitchen Layout 14
Unit 1.4 - Making of Furniture and Assembling of Parts 28
Unit 1.5 - Different Types of Tools and Equipment and the Processes of Operating 72
2. Maintain Work Area Tools and Machines (FFS/N8501) 99
Unit 2.1 - Follow Safe Working Practices while at Work 101
Unit 2.2 - Organizational Procedures for Safe Handling of Tools and Equipment 103
Unit 2.3 - Respond to an Emergency Situation 107
Unit 2.4 - Organizational Reporting Protocol 112
Unit 2.5 - Various Types of Safety Signs 115
Unit 2.6 - Deal With an Accident Involving Human Life 122
Unit 2.7 - Different Types of Personal Protective Gear 124
Unit 2.8 - Basic First Aid Treatment Relevant to the Condition 127
Unit 2.9 - Preventative and Remedial Actions for Exposure to Toxic Materials 132
Unit 2.10 - Maintain Appropriate Environment to Protect Stock from Pilfering, Theft, Damage and Deterioration 134
3. Ensure Health and Safety at Workplace (FFS/N8601) 141
Unit 3.1 - Health and Safety Hazards and Precautions 143
Unit 3.2 - Potential Risks and Threats 150
Unit 3.3 - Potential Hazards and Risks which may be Present at Furniture and Fittings Related Workplace 153
Unit 3.4 - Storage and Handling of Hazardous Substances 157
Unit 3.5 - Common Health and Safety Practices at Workplace 160
Unit 3.6 - Different Risks Associated with the Use of Electrical Equipment 165
vii
Participant Handbook Cabinet Maker Modular Kitchen
4. Fighting Fire (FFS/N8601) 171
Unit 4.1 - Various Causes of Fire 173
Unit 4.2 - Different Types of Fire Extinguishers 177
Unit 4.3 - Techniques of Using Different Fire Extinguishers 179
5. Safe Lifting Practices and Ergonomics (FFS/N8601) 183
Unit 5.1 - Safe Lifting Practices 185
Unit 5.2 - Correct Body Postures 186
Unit 5.3 - Correct Lifting, Loading, Unloading and Handling Procedures 189
6. Common Issues, Troubleshooting Knowledge and Method of Inspection (FFS/N8501) 195
Unit 6.1 - Common Issues Troubleshooting Knowledge 197
Unit 6.2 - Method of Conducting Visual Inspection for any Errors or Damages 202
7. Safe Cleaning and Waste Management Practices (FFS/N8501) 207
Unit 7.1 - Importance of Good Housekeeping 209
Unit 7.2 - Different Types of Cleaning Equipment & Substances 211
Unit 7.3 - Safe Working Practices for Cleaning and their Methods 214
Unit 7.4 - Common Types of Waste and Contaminants in Workplace 219
Unit 7.5 - Effects of Contamination on Products 221
Unit 7.6 - Different Ways of Minimizing Waste 222
Unit 7.7 - Know-How of Cleaning and Waste Disposal Procedures 224
8. Work Effectively with Others (FFS/N8801) 229
Unit 8.1 - Work Effectively with Others 231
Unit 8.2 - Importance of Effective Communication and Establishing Good Working Relationships 241
Unit 8.3 - Prepare and Organize Work 249
Unit 8.4 - Decision Making 251
Unit 8.5 - Problem Solving 253
S.No Modules and Units Page No
viii

Participant Handbook Cabinet Maker Modular Kitchen
S.No Modules and Units Page No
Unit 8.6 - Manage Anger and Stress 255
Unit 8.7 - Manage Time 258
Unit 8.8 - Set Goals for Oneself and the Team 259
Unit 8.9 - Understanding Technical Drawings and Blueprints 261
9. Employability & Entrepreneurship Skills 279
Unit 9.1 - Personal Strengths & Value Systems 283
Unit 9.2 - Digital Literacy: A Recap 300
Unit 9.3 - Money Matters 305
Unit 9.4 - Preparing for Employment & Self Employment 314
Unit 9.5 - Understanding Entrepreneurship 322
Unit 9.6 - Preparing to be an Entrepreneur 344
ix

Participant Handbook Cabinet Maker Modular Kitchen
x
Participant Handbook Cabinet Maker Modular Kitchen
1. Make Modular Kitchen
Unit 1.1 - Basic Introduction to the Responsibilities of a Cabinet Maker
Unit 1.2 - Make Modular Kitchen
Unit 1.3 - Understand Kitchen Layout
Unit 1.4 - Making of Furniture and Assembling of Parts
Unit 1.5 - Different Types of Tools and Equipment and the Processes of Operating
FFS/N5102

Participant Handbook Cabinet Maker Modular Kitchen
At the end of this module, you will be able to:
1. Evaluate the responsibilities of a cabinet maker2. Practice making modular kitchen3. Describe the kitchen layout in detail4. Demonstrate making of furniture and assembling of parts5. Identify different types of tools and equipment
Key Learning Outcomes
2

Participant Handbook Cabinet Maker Modular Kitchen
At the end of this unit, you will be able to:
1. Demonstrate the job responsibilities of a cabinet maker2. List the job skills and personal attributes required
Unit Objectives
UNIT 1.1: Basic Introduction to the Responsibilities of a Cabinet Maker
Among furniture makers, cabinet makers are wood workers with a specialty. These furniture makers construct and install cabinets in kitchens, bathrooms other locations of businesses and homes. Characteristic duties of cabinet makers involve designing customized cabinets, constructing cabinets, installing cabinetry, coordinating with clients and various other duties. As a modular kitchen cabinet maker, you have the responsibility of cutting and shaping wood, developing surfaces and fashioning a finished product.
This job role would require you to work with a vast range of tools like drum sanders, a saw table, dust extraction system etc. You would need to become familiar with a variety of hand tools like finish staplers, jigsaws, cordless drills and laminate trimmers. Cabinet makers also handle screws, nails, wood glue, dowels and other fasteners to construct finished furniture and cabinets.
Taking accurate measurements of the client's interior space proves a vital aspect of the job, whether you are constructing kitchen cabinets that effortlessly fit into the available space, or if you are constructing an item of furniture based on precise measurements. Another important aspect is creating drawings for the client that depict what the finished item will look like, as this enables the client to visualize and proceed with the project.
Job Responsibilities of a Cabinet Maker
Make sure that all equipment necessary for your work has been cleaned and repaired, for example, skill saws, table saws, handsaws, sanding tools and all types of drilling equipmentWhile carrying out measurements and markings you need to be precise, in order to ensure that resources are used efficiently and the projects remain within the budgetary restrictionsProduce and assemble components of the cabinet, ensuring that every piece fits the specific dimensions mentioned by the clientConfirm and double check all measurements and calculations to make sure that there is correct alignment in relation to hinges, doors, and side panels, etc. by using blueprints or design plans for referenceInstall the suitable hardware, for instance, handles and hinges, and replenish with replacement materials, when neededSee that materials and grains are appropriately matched to create a uniform appearance for all the matching unitsReinforce attachments and joints to optimize durability and sturdiness without causing a compromise to either functionality or aesthetic appealKeep up a safe working environment by routinely cleaning and disposing of old materials, for instance screws and nails
3
Participant Handbook Cabinet Maker Modular Kitchen
__________________________________________________________________________________
__________________________________________________________________________________
__________________________________________________________________________________
__________________________________________________________________________________
__________________________________________________________________________________
__________________________________________________________________________________
__________________________________________________________________________________
__________________________________________________________________________________
__________________________________________________________________________________
__________________________________________________________________________________
__________________________________________________________________________________
__________________________________________________________________________________
__________________________________________________________________________________
__________________________________________________________________________________
__________________________________________________________________________________
__________________________________________________________________________________
__________________________________________________________________________________
__________________________________________________________________________________
__________________________________________________________________________________
__________________________________________________________________________________
__________________________________________________________________________________
Notes
Job Skills and Personal Attributes Required
• Cabinet maker modular kitchen should have:• Knowledge of wood, MDF, HDF, plyboard, laminates etc.• Knowledge of different type of hardware and adhesives used in cabinet making• Flexibility in terms of adapting their style of work to different types of furniture design• An inclination towards aesthetics• Good mathematical skills• Accuracy in measurement • Good hand-eye coordination • A physically fit physique
4
Participant Handbook Cabinet Maker Modular Kitchen
At the end of this unit, you will be able to:
1. Demonstrate the preparatory activities for cabinet making2. Create records of architectural features present in the room3. Evaluate the requirements of the client from supervisor
Unit Objectives
UNIT 1.2: Make Modular Kitchen
Preparatory activities for Cabinet Making
Take Measurements for Making Layout and Designs
1. Ensure that the measurements are accurate. Tools you would need include a straight edge graph paper and tape measure.
2. Take measurements clockwise. Make records of the overall length of each wall, working to your right around the room. Get walls, doors and windows labeled with numbers.
3. Confirm the width and height. Carry out horizontal measurements of walls at 36-inch height. Make a record of the vertical measurements floor to windowsill, beginning from the windowsill right up to top of window, and then proceed from the top of the window to the ceiling, after that from floor to ceiling.
4. Figure out the center. Designate the centerline of all permanent features in all measurements including windows, doors, oven, cooking range, sinks, walls, closets, outlets and ducts.
5. Consider the trim. While taking measurements of the doors and windows, take the casing into consideration as part of the door or window.
Doors and windows
1. Take measurements the size of windows and doors, as well as the distance and height of each from the floor, ceiling, and edges.
2. In case you intend on placing a cabinet under the window, bear in mind that the minimum distance between the window frame and the floor needs to be 90 cm, and preferably 105 cm.
Walls and floors
1. Take measurements from the floor to the ceiling.2. Take the distance between walls.3. Measure from the corners to the doors.4. You would also need to make a record of any features that protrude into the room, for instance, as
ventilation, radiators, special angles, pipes and any other major architectural features.
5
Participant Handbook Cabinet Maker Modular Kitchen
Sockets, switches, water connections1. After this, record the location of existing electrical water, switches, sockets, and gas connections.2. Bear in mind that these can be shuffled around to suit your new kitchen.3. Record the estimated position of the area where you would prefer these new switches, connections
and outlets to be positioned.
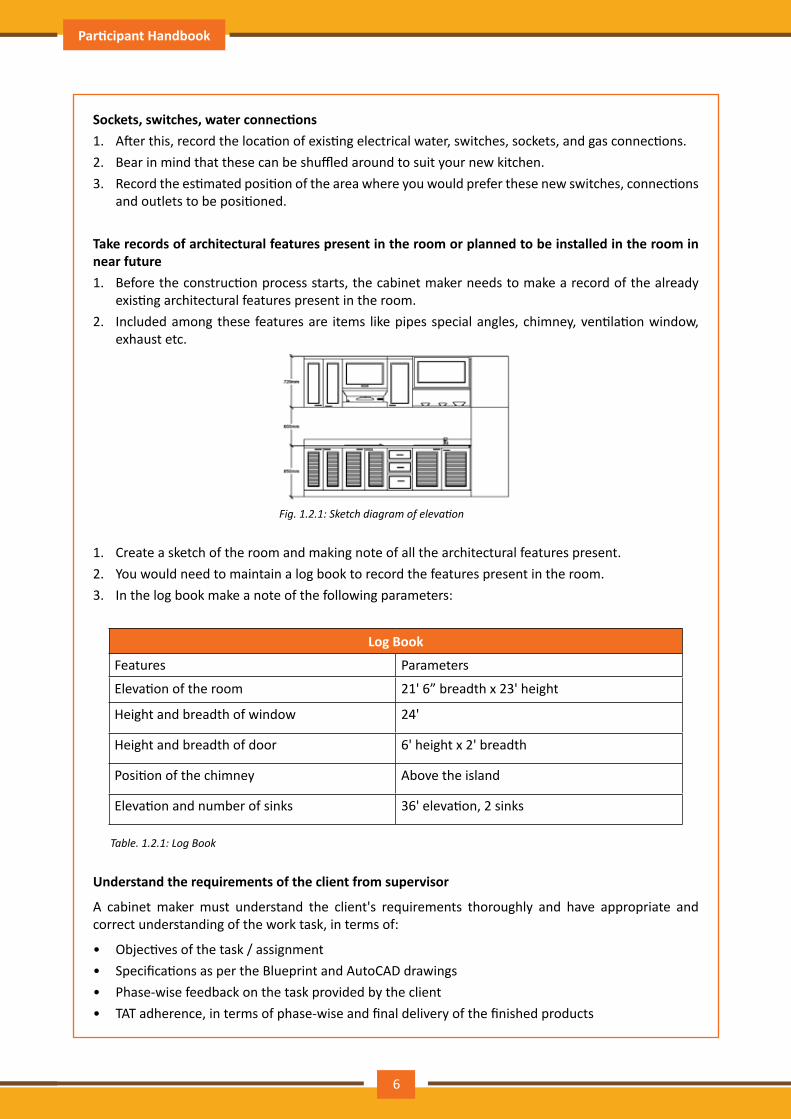
Take records of architectural features present in the room or planned to be installed in the room in near future1. Before the construction process starts, the cabinet maker needs to make a record of the already
existing architectural features present in the room.2. Included among these features are items like pipes special angles, chimney, ventilation window,
exhaust etc.
Fig.1.2.1:Sketchdiagramofelevation
1. Create a sketch of the room and making note of all the architectural features present.2. You would need to maintain a log book to record the features present in the room.3. In the log book make a note of the following parameters:
Log Book
Features Parameters
Elevation of the room 21' 6” breadth x 23' height
Height and breadth of window 24'
Height and breadth of door 6' height x 2' breadth
Position of the chimney Above the island
Elevation and number of sinks 36' elevation, 2 sinks
Table. 1.2.1: Log Book
Understand the requirements of the client from supervisor
A cabinet maker must understand the client's requirements thoroughly and have appropriate and correct understanding of the work task, in terms of:
• Objectives of the task / assignment• Specifications as per the Blueprint and AutoCAD drawings• Phase-wise feedback on the task provided by the client• TAT adherence, in terms of phase-wise and final delivery of the finished products
6
Participant Handbook Cabinet Maker Modular Kitchen
• Understanding the brief from the customer thoroughly in order to accommodate the specifications of the client regarding the aesthetic aspects of the cabinets being constructed.
• Discussing the projects at hand with the client/supervisor and drawing up detailed specifications as per their requests.
• Visualizing and interpreting the clients' wishes when it comes to style, color, kind of raw material requested etc., giving advice and making recommendations or providing options which meet/improve their original design.
• Working with the sole aim of putting in one's best efforts to abide my all client requirements, thus, in turn, completely satisfying the client and earning appreciations
• Ensuring that there is no communication gap between the modular kitchen cabinet maker and the client in understanding requirements and specifications , by providing the client with daily or weekly (as prescribed by the organization) updates on the different phases of the assignment
Assist in deciding the design shape of kitchen and size of kitchen cabinets with consultation of supervisor and or client
Above design or style desired by the client, it is essential to define a module so as to optimize performance and minimize the manufacturing costs of the different pieces. This way, measurements of all the components of a kitchen are set before defining the space that will house them.
Workspaces and Flow
• Several studies served to define five general areas in a kitchen:• Storage area: utensils, appliances, cookware• Cooking area: oven and stove• Pantry area: canned goods, refrigerator, food storage space• Sink area: cleaning area, cleaning supplies area• Preparation area: preferably a sizeable counter space to carry out cooking prep
A kitchen's overall layout is the shape that is created by the positioning of the major appliances storage areas and countertop. This is what forms the floor plan and creates the kitchen's work triangle (the shape of figure that one follows while moving around the kitchen from the sink, to the refrigerator, to the oven/cooking range to prepare a meal).
Five different layouts are recognized in contemporary kitchens–the L, G, U, galley and single. Despite the fact that particular floor plans create a more efficient, spacious kitchen.
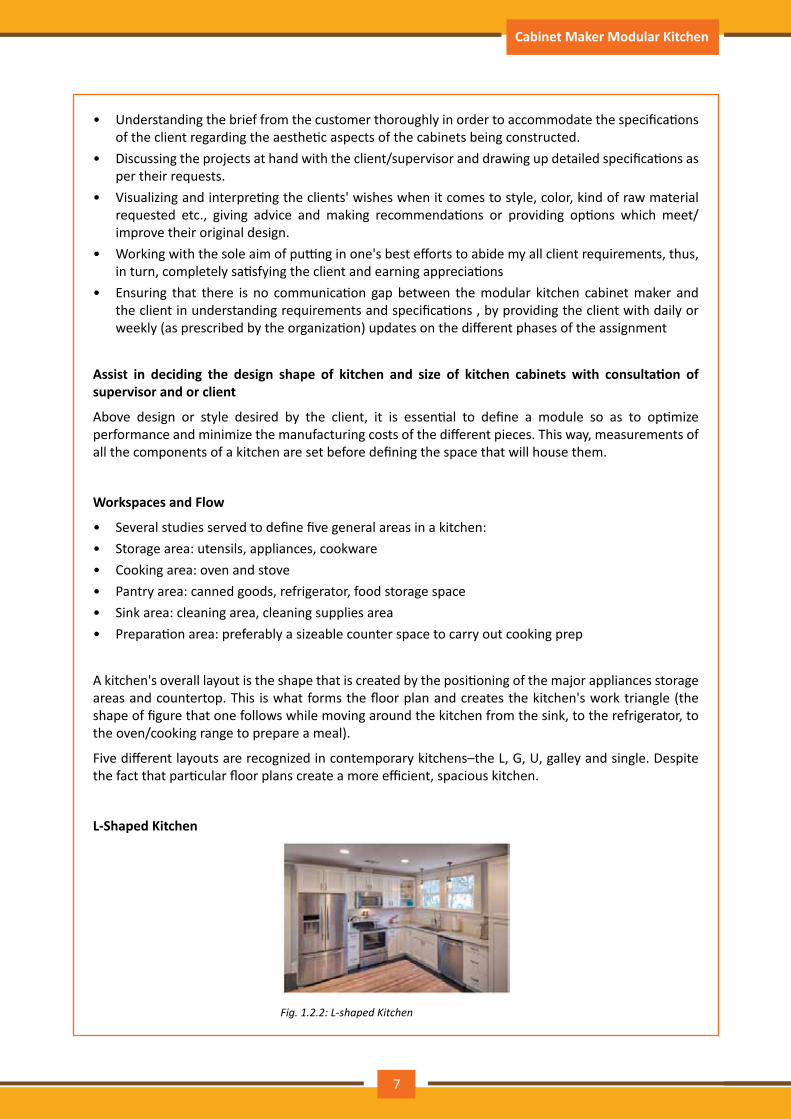
L-Shaped Kitchen
Fig.1.2.2:L-shapedKitchen
7
Participant Handbook Cabinet Maker Modular Kitchen
• L-shaped kitchens are the type of design that very popular among clients.• This design is characterized by two counters joined together which then create a right angle in a
corner of the kitchen.• L-shaped layouts have the benefit of providing great traffic or work flow through the kitchen.• This enables multiple people to work together while still allowing the space for others to walk
through the kitchen without hampering any work.• An L-shaped layout has two walls along which you can install cabinets and shelves both above and
below the countertop, without requiring any additional floor space.• In an L-shaped kitchen the third side can be used to accommodate wall niches for the gadgets like
refrigerator, oven, microwave etc. and built-in cabinets.• Preferably you would need to exploit corner storage space in an L-shaped layout.• A carousel cabinet can also be installed which can hold several of items.
Fig.1.2.3:LayoutPlanofL-shapedKitchen
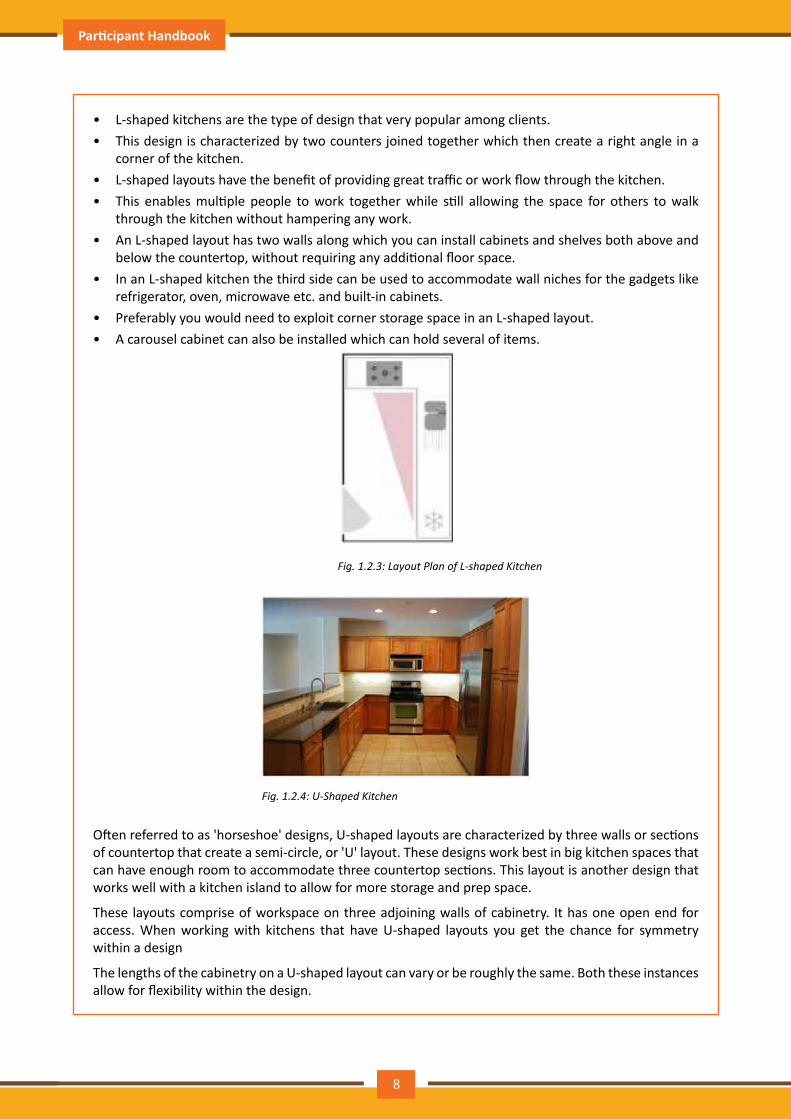
Fig.1.2.4:U-ShapedKitchen
Often referred to as 'horseshoe' designs, U-shaped layouts are characterized by three walls or sections of countertop that create a semi-circle, or 'U' layout. These designs work best in big kitchen spaces that can have enough room to accommodate three countertop sections. This layout is another design that works well with a kitchen island to allow for more storage and prep space.
These layouts comprise of workspace on three adjoining walls of cabinetry. It has one open end for access. When working with kitchens that have U-shaped layouts you get the chance for symmetry within a design
The lengths of the cabinetry on a U-shaped layout can vary or be roughly the same. Both these instances allow for flexibility within the design.
8
Participant Handbook Cabinet Maker Modular Kitchen
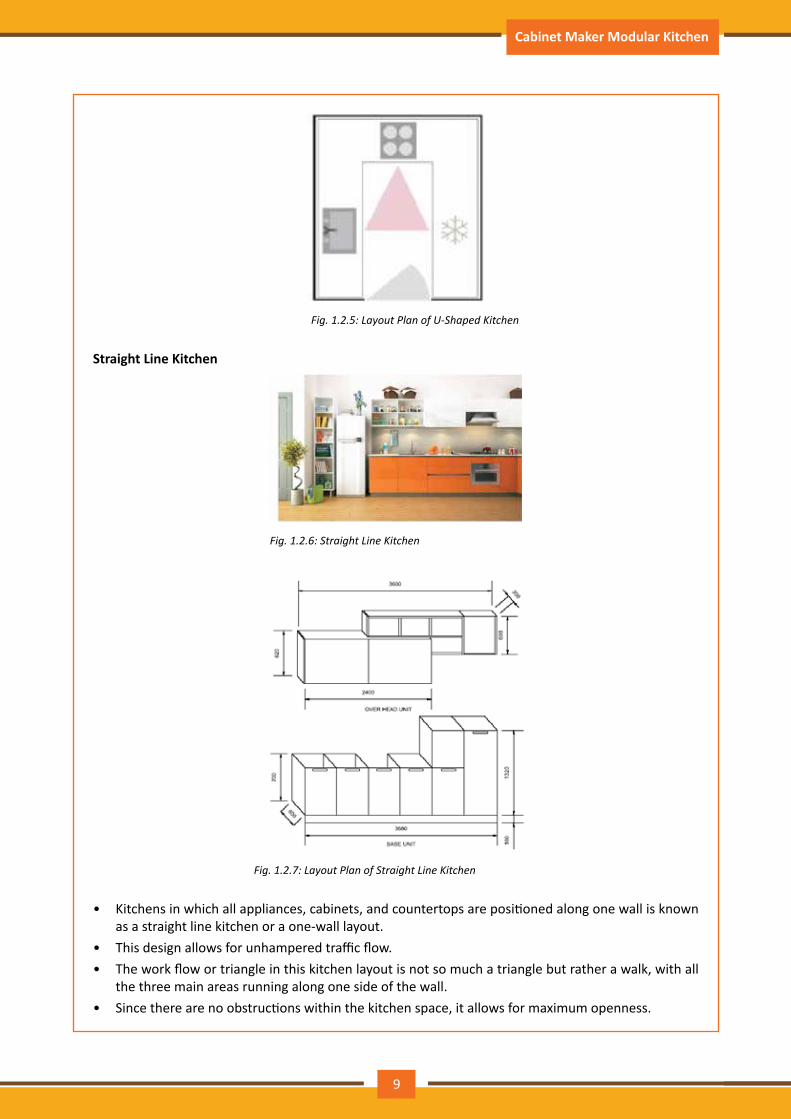
Fig.1.2.5:LayoutPlanofU-ShapedKitchen
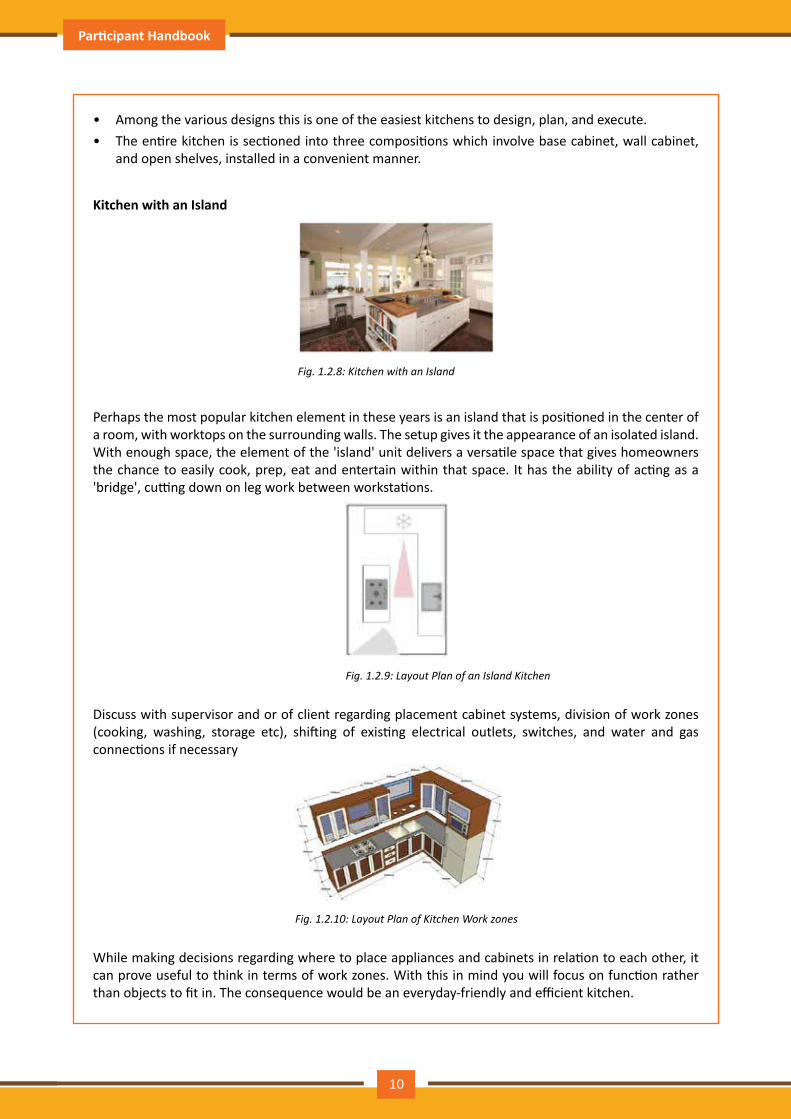
Straight Line Kitchen
Fig.1.2.6:StraightLineKitchen
Fig.1.2.7:LayoutPlanofStraightLineKitchen
• Kitchens in which all appliances, cabinets, and countertops are positioned along one wall is known as a straight line kitchen or a one-wall layout.
• This design allows for unhampered traffic flow.• The work flow or triangle in this kitchen layout is not so much a triangle but rather a walk, with all
the three main areas running along one side of the wall.• Since there are no obstructions within the kitchen space, it allows for maximum openness.
9
Participant Handbook Cabinet Maker Modular Kitchen
• Among the various designs this is one of the easiest kitchens to design, plan, and execute.• The entire kitchen is sectioned into three compositions which involve base cabinet, wall cabinet,
and open shelves, installed in a convenient manner.
Kitchen with an Island
Fig.1.2.8:KitchenwithanIsland
Perhaps the most popular kitchen element in these years is an island that is positioned in the center of a room, with worktops on the surrounding walls. The setup gives it the appearance of an isolated island. With enough space, the element of the 'island' unit delivers a versatile space that gives homeowners the chance to easily cook, prep, eat and entertain within that space. It has the ability of acting as a 'bridge', cutting down on leg work between workstations.
Fig.1.2.9:LayoutPlanofanIslandKitchen
Discuss with supervisor and or of client regarding placement cabinet systems, division of work zones (cooking, washing, storage etc), shifting of existing electrical outlets, switches, and water and gas connections if necessary
Fig.1.2.10:LayoutPlanofKitchenWorkzones
While making decisions regarding where to place appliances and cabinets in relation to each other, it can prove useful to think in terms of work zones. With this in mind you will focus on function rather than objects to fit in. The consequence would be an everyday-friendly and efficient kitchen.
10
Participant Handbook Cabinet Maker Modular Kitchen
The three main zones are, in relevance to the working triangle, are: storage (fridge/freezer and dry storage), washing (sink, dishwasher) and cooking (cooking hob, oven, chimney, microwave). Placing them well is crucial to achieving an ergonomic work triangle, with a natural workflow and everything within reach.
The following are basic tips to bear in mind when planning your work zones:
Cooking zone:
Steer clear of crossing the kitchen with hot and heavy pans and pots. Consider positioning the oven and hob in proximity to the worktops and sink.
Washing zone:
The sink can be considered as a vital area in the kitchen. Arrange to have the fridge near at hand which would allow for easy food prep. The proximity to the hob would make it simpler to do tasks like draining pasta and washing vegetables etc.
Storage zone:
In terms of storing items, there should be enough storage for all the food - both in the fridge and for dry goods. Positioning a worktop next to the fridge and high cabinets allows you to unpack shopping bags easily.
Placement cabinet systems
As regards cabinet sizing, a host of factors come into play, as you would need to design the kitchen efficiently in terms of the space.
Base Cabinet Sizes
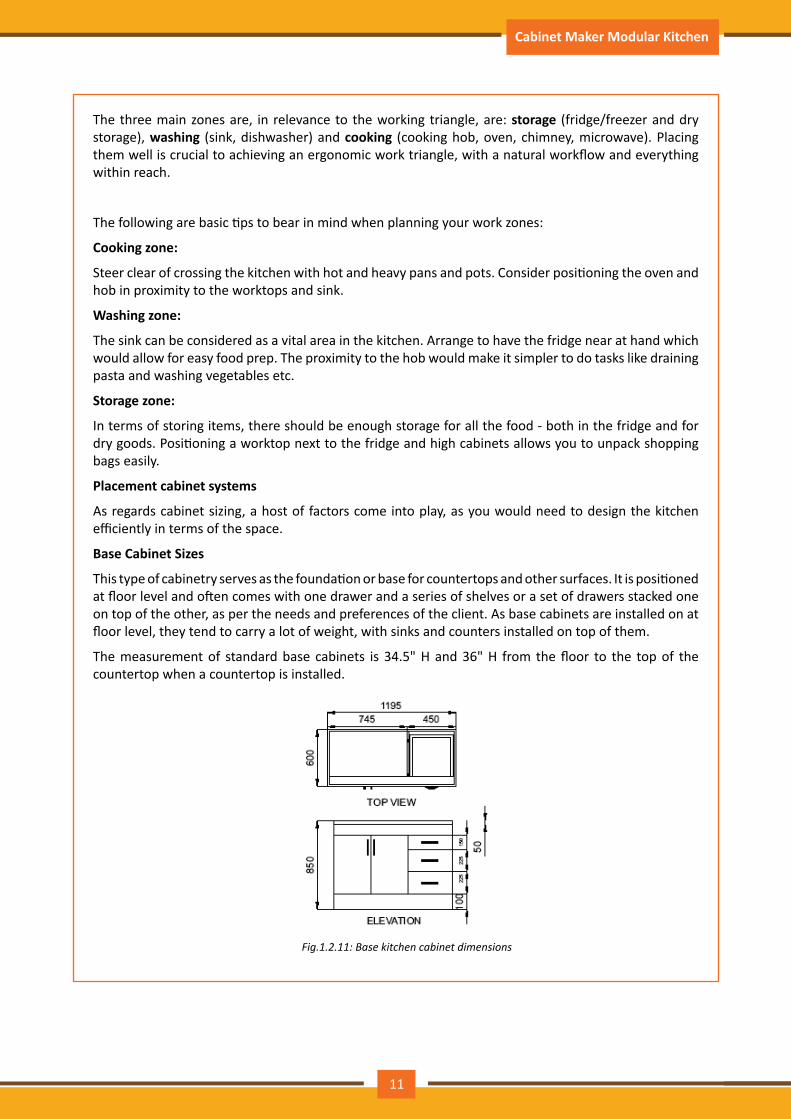
This type of cabinetry serves as the foundation or base for countertops and other surfaces. It is positioned at floor level and often comes with one drawer and a series of shelves or a set of drawers stacked one on top of the other, as per the needs and preferences of the client. As base cabinets are installed on at floor level, they tend to carry a lot of weight, with sinks and counters installed on top of them.
The measurement of standard base cabinets is 34.5" H and 36" H from the floor to the top of the countertop when a countertop is installed.
Fig.1.2.11:Basekitchencabinetdimensions
11
Participant Handbook Cabinet Maker Modular Kitchen
Wall Cabinet Sizes
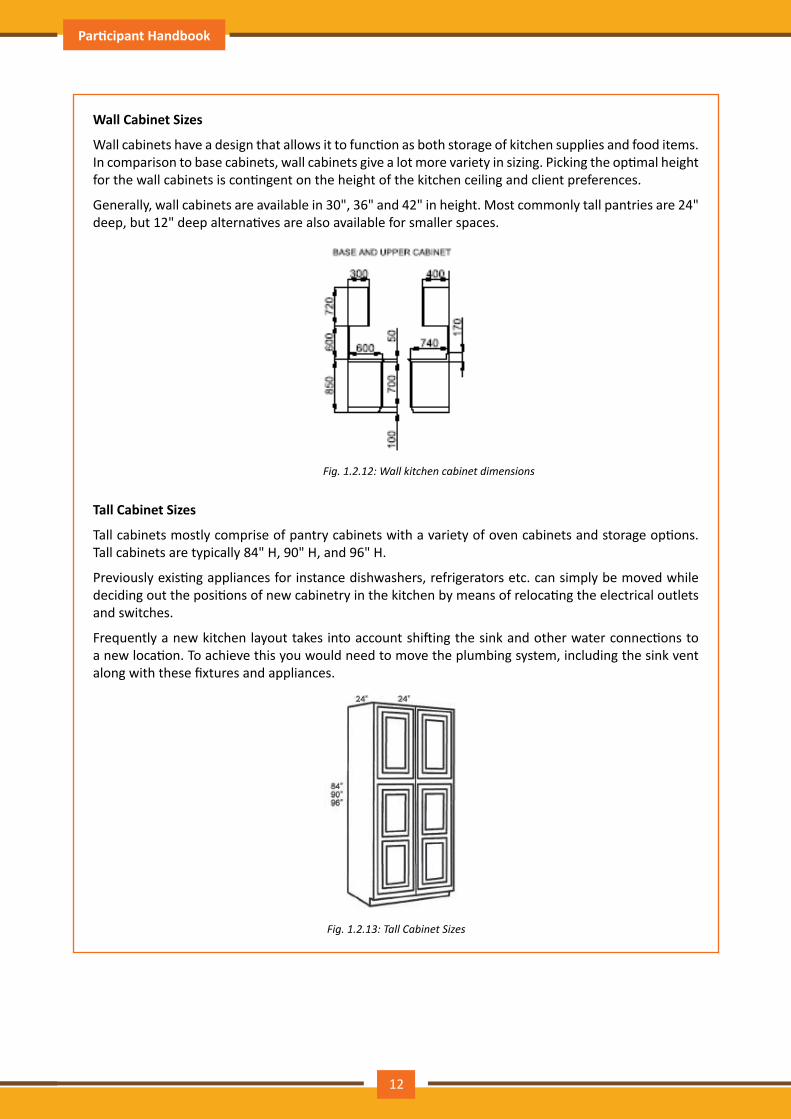
Wall cabinets have a design that allows it to function as both storage of kitchen supplies and food items. In comparison to base cabinets, wall cabinets give a lot more variety in sizing. Picking the optimal height for the wall cabinets is contingent on the height of the kitchen ceiling and client preferences.
Generally, wall cabinets are available in 30", 36" and 42" in height. Most commonly tall pantries are 24" deep, but 12" deep alternatives are also available for smaller spaces.
Fig.1.2.12:Wallkitchencabinetdimensions
Tall Cabinet Sizes
Tall cabinets mostly comprise of pantry cabinets with a variety of oven cabinets and storage options. Tall cabinets are typically 84" H, 90" H, and 96" H.
Previously existing appliances for instance dishwashers, refrigerators etc. can simply be moved while deciding out the positions of new cabinetry in the kitchen by means of relocating the electrical outlets and switches.
Frequently a new kitchen layout takes into account shifting the sink and other water connections to a new location. To achieve this you would need to move the plumbing system, including the sink vent along with these fixtures and appliances.
Fig.1.2.13:TallCabinetSizes
12

Participant Handbook Cabinet Maker Modular Kitchen
__________________________________________________________________________________
__________________________________________________________________________________
__________________________________________________________________________________
__________________________________________________________________________________
__________________________________________________________________________________
__________________________________________________________________________________
__________________________________________________________________________________
__________________________________________________________________________________
__________________________________________________________________________________
__________________________________________________________________________________
__________________________________________________________________________________
__________________________________________________________________________________
__________________________________________________________________________________
__________________________________________________________________________________
__________________________________________________________________________________
__________________________________________________________________________________
__________________________________________________________________________________
__________________________________________________________________________________
__________________________________________________________________________________
__________________________________________________________________________________
__________________________________________________________________________________
__________________________________________________________________________________
__________________________________________________________________________________
__________________________________________________________________________________
__________________________________________________________________________________
__________________________________________________________________________________
__________________________________________________________________________________
__________________________________________________________________________________
__________________________________________________________________________________
__________________________________________________________________________________
__________________________________________________________________________________
Notes
13

Participant Handbook Cabinet Maker Modular Kitchen
At the end of this unit, you will be able to:
1. Identify different kitchen layouts2. Analyze and study the drawing (2d/3d) and designs3. Arrange materials and fittings hardware
Unit Objectives
UNIT 1.3: Understand Kitchen Layout
Study the design & drawing (2D/3D) prepared by supervisor to further understand the requirement and specifications for the work to be done
The job of a Cabinet Maker is practically impossible without the skills of reading, studying and interpreting work orders, technical drawings and blueprints.
Ability to Interpret Work Specifications Accurately
• Work Order is a task, job or assignment, which can be assigned to a person for completion.• A work order may be issued from the client's end or circulated internally within the organization.• Work Orders comprise details and specifications of a certain job per work-piece.• It explains the client's expectations about the assignment.• The essential components of Work Orders are:
ᴑ Instructions and Guidelines ᴑ Cost Estimates ᴑ Forms and Annexures ᴑ Date and time to execute the work order ᴑ Information about the location and entities to execute the work order ᴑ The person to whom the work order is assigned
• Job Orders are the work orders circulated internally within the organization.• Job Orders are the work orders circulated internally within the organization.• A Job Order is prepared during the initial stages of an assignment / project and is connected with
the final Bill of Materials.• The essential components of a Job Order are:
ᴑ Quantity of the product to be manufactured, assembled, installed or repaired ᴑ Quantity of the raw material to be used, along with its Price per unit and the number of units
required ᴑ The types of labour needed (casual or skilled), rate per hour or per unit and amount required ᴑ Machine utilization of each machine involved in carrying out the assignment, the rate and the
amount
14
Participant Handbook Cabinet Maker Modular Kitchen
Study the drawing (2D/3D) and designs and understand the requirement Blueprint and its Parts
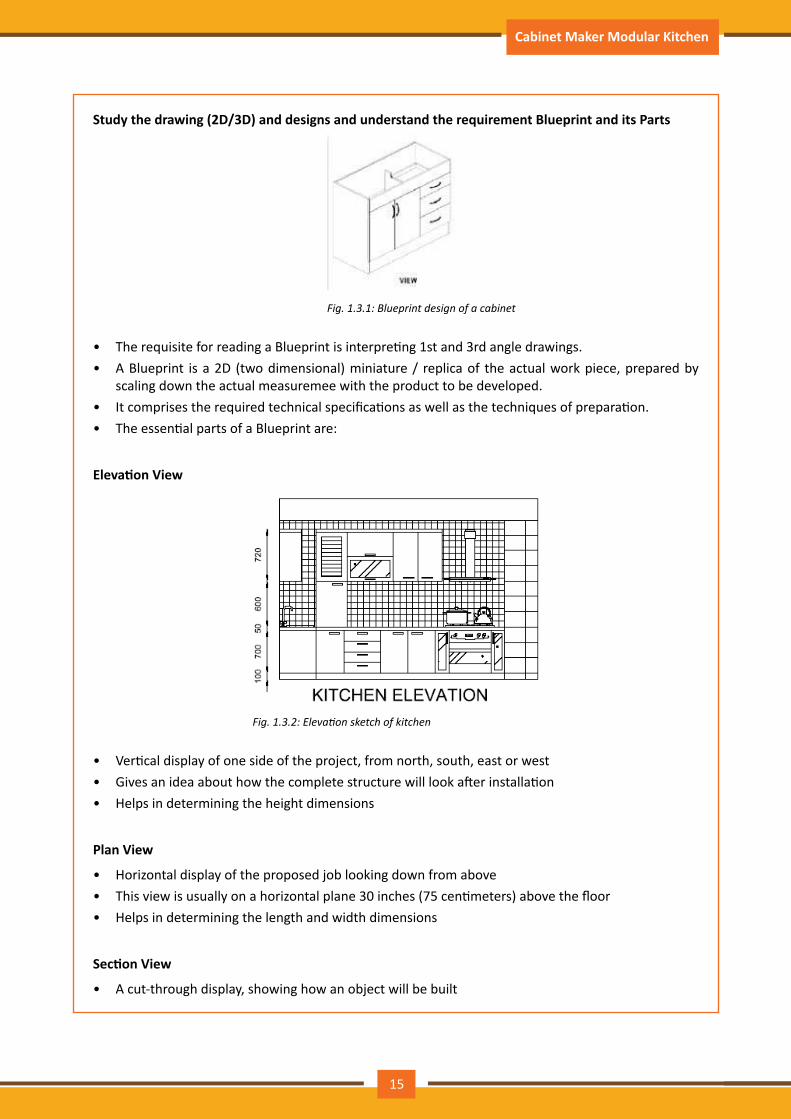
Fig.1.3.1:Blueprintdesignofacabinet
• The requisite for reading a Blueprint is interpreting 1st and 3rd angle drawings.• A Blueprint is a 2D (two dimensional) miniature / replica of the actual work piece, prepared by
scaling down the actual measuremee with the product to be developed.• It comprises the required technical specifications as well as the techniques of preparation.• The essential parts of a Blueprint are:
Elevation View
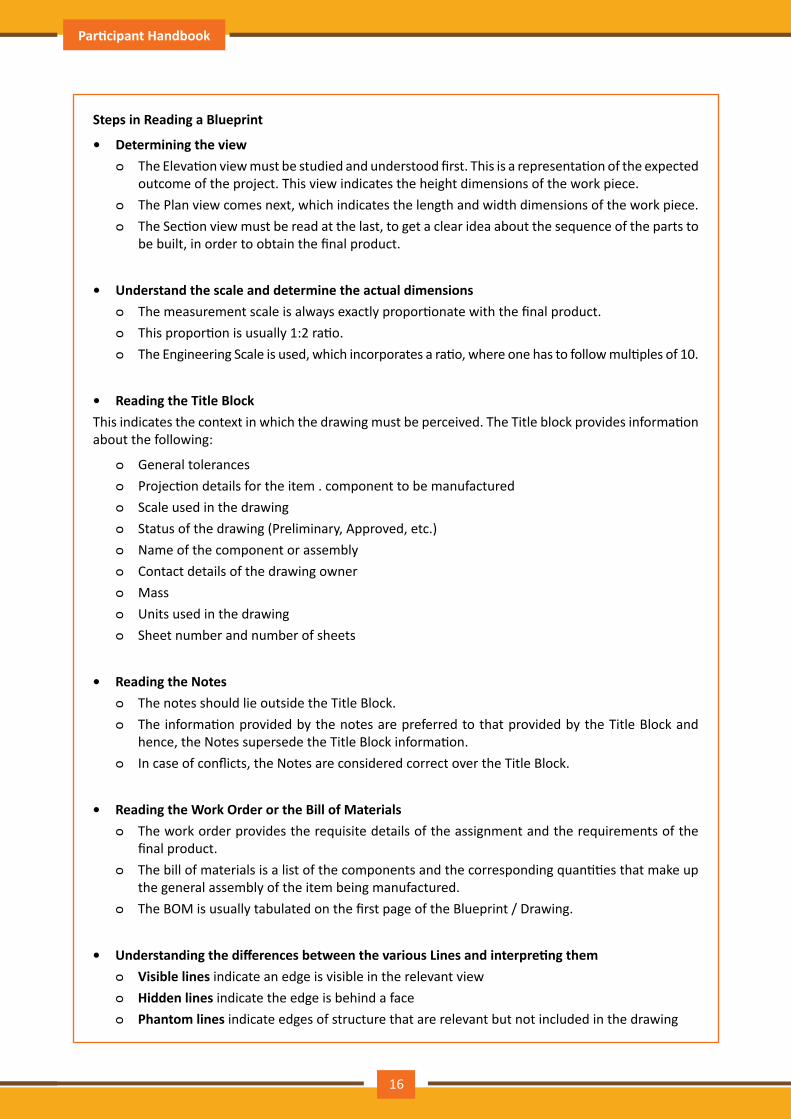
Fig.1.3.2:Elevationsketchofkitchen
• Vertical display of one side of the project, from north, south, east or west • Gives an idea about how the complete structure will look after installation • Helps in determining the height dimensions
Plan View
• Horizontal display of the proposed job looking down from above• This view is usually on a horizontal plane 30 inches (75 centimeters) above the floor• Helps in determining the length and width dimensions
Section View
• A cut-through display, showing how an object will be built
15
Participant Handbook Cabinet Maker Modular Kitchen
Steps in Reading a Blueprint
• Determining the view ᴑ The Elevation view must be studied and understood first. This is a representation of the expected
outcome of the project. This view indicates the height dimensions of the work piece. ᴑ The Plan view comes next, which indicates the length and width dimensions of the work piece. ᴑ The Section view must be read at the last, to get a clear idea about the sequence of the parts to
be built, in order to obtain the final product.
• Understand the scale and determine the actual dimensions ᴑ The measurement scale is always exactly proportionate with the final product. ᴑ This proportion is usually 1:2 ratio. ᴑ The Engineering Scale is used, which incorporates a ratio, where one has to follow multiples of 10.
• Reading the Title BlockThis indicates the context in which the drawing must be perceived. The Title block provides information about the following:
ᴑ General tolerances ᴑ Projection details for the item . component to be manufactured ᴑ Scale used in the drawing ᴑ Status of the drawing (Preliminary, Approved, etc.) ᴑ Name of the component or assembly ᴑ Contact details of the drawing owner ᴑ Mass ᴑ Units used in the drawing ᴑ Sheet number and number of sheets
• Reading the Notes ᴑ The notes should lie outside the Title Block. ᴑ The information provided by the notes are preferred to that provided by the Title Block and
hence, the Notes supersede the Title Block information. ᴑ In case of conflicts, the Notes are considered correct over the Title Block.
• Reading the Work Order or the Bill of Materials ᴑ The work order provides the requisite details of the assignment and the requirements of the
final product. ᴑ The bill of materials is a list of the components and the corresponding quantities that make up
the general assembly of the item being manufactured. ᴑ The BOM is usually tabulated on the first page of the Blueprint / Drawing.
• Understanding the differences between the various Lines and interpreting them ᴑ Visible lines indicate an edge is visible in the relevant view ᴑ Hidden lines indicate the edge is behind a face ᴑ Phantom lines indicate edges of structure that are relevant but not included in the drawing
16
Participant Handbook Cabinet Maker Modular Kitchen
ᴑ Phantom lines could also mean a tangent line (where a curve starts or ends) ᴑ Centre lines indicate the geometric center of the assembly
• Understand and interpret the projections, sections and details ᴑ View the drawing itself, regardless of the dimensions, trying to visualise how and what the
assembly looks like in 3D. ᴑ Use the sections and details as a start point and you will soon realise that the details and sections
have been created to highlight important components or features.• With the aid of the BOM / Work Order, find out the components in the drawing in order to understand
the role each component plays.• Find out the notes that have arrows pointing towards the assembly. These information are extremely
vital to the assembly and its functionality.• Use the dimensions in the drawing to comprehend the size of the component / Assembly / Final
product.
• Understanding Allowances from the Blueprint ᴑ Allowance is the minimum clearance (positive allowance), or maximum interference (negative
allowance) between parts of an Assembly. ᴑ While preparing Blueprints and technical drawings, high degree of diligence is implemented to
incorporate Allowances, thus ensuring "Zero Wastage". ᴑ This helps in reducing the Cost of Production per unit and increasing the productivity of the
assignment.
Assist in listing out required raw material, furniture, hardware to meet quality standards Raw materials required for modular kitchen cabinets
Some of the raw materials involved in constructing modular kitchen cabinets are listed below:
Solid Wood:
Solid wood refers to the timbre that is used to build structures.
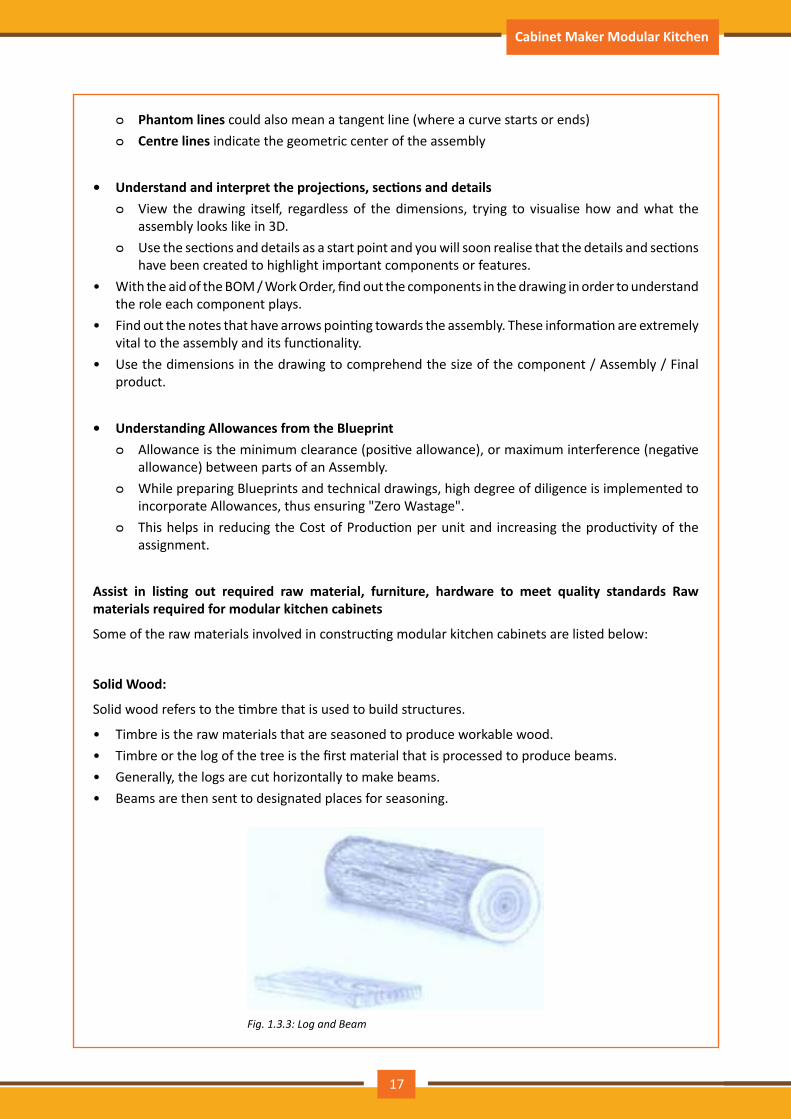
• Timbre is the raw materials that are seasoned to produce workable wood.• Timbre or the log of the tree is the first material that is processed to produce beams.• Generally, the logs are cut horizontally to make beams.• Beams are then sent to designated places for seasoning.
Fig.1.3.3:LogandBeam
17
Participant Handbook Cabinet Maker Modular Kitchen
Engineered Wood:
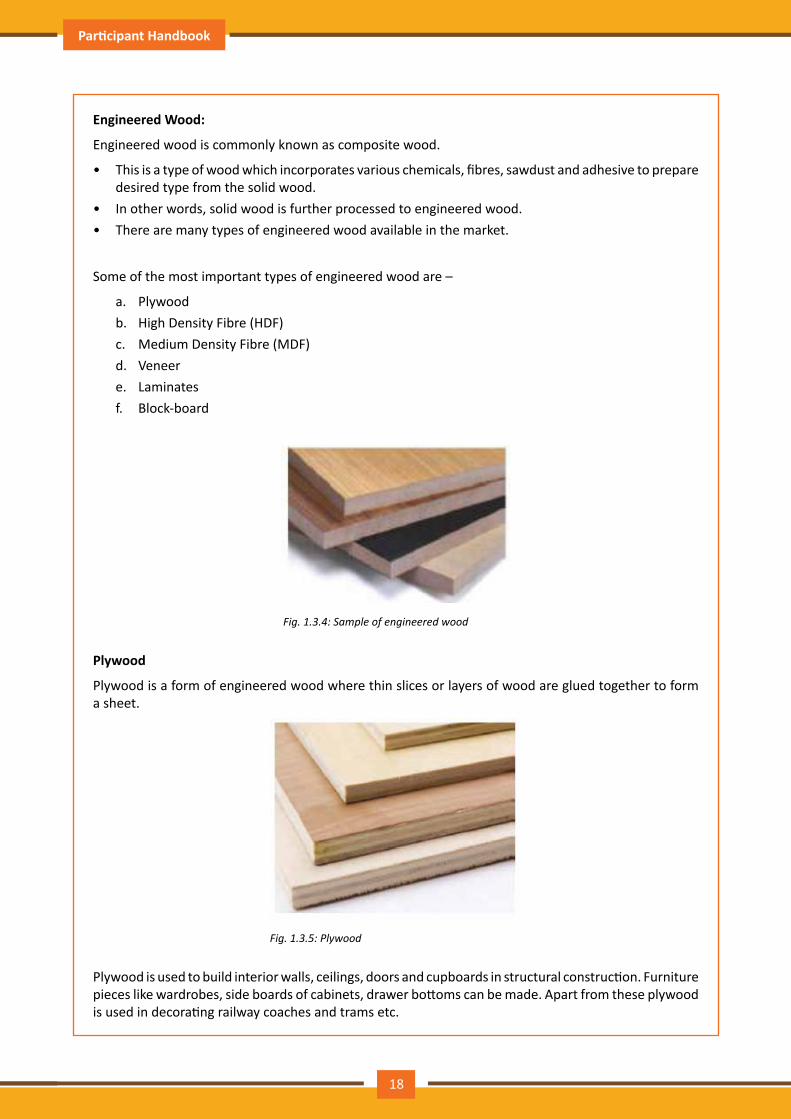
Engineered wood is commonly known as composite wood.
• This is a type of wood which incorporates various chemicals, fibres, sawdust and adhesive to prepare desired type from the solid wood.
• In other words, solid wood is further processed to engineered wood.• There are many types of engineered wood available in the market.
Some of the most important types of engineered wood are –
a. Plywoodb. High Density Fibre (HDF)c. Medium Density Fibre (MDF)d. Veneere. Laminatesf. Block-board
Fig.1.3.4:Sampleofengineeredwood
Plywood
Plywood is a form of engineered wood where thin slices or layers of wood are glued together to form a sheet.
Fig.1.3.5:Plywood
Plywood is used to build interior walls, ceilings, doors and cupboards in structural construction. Furniture pieces like wardrobes, side boards of cabinets, drawer bottoms can be made. Apart from these plywood is used in decorating railway coaches and trams etc.
18
Participant Handbook Cabinet Maker Modular Kitchen
High Density Fibre (HDF)
HDF, also known as Hardboard, is made up of highly-compressed wood fibres. The higher magnitude of compression makes hardboard denser and harder.
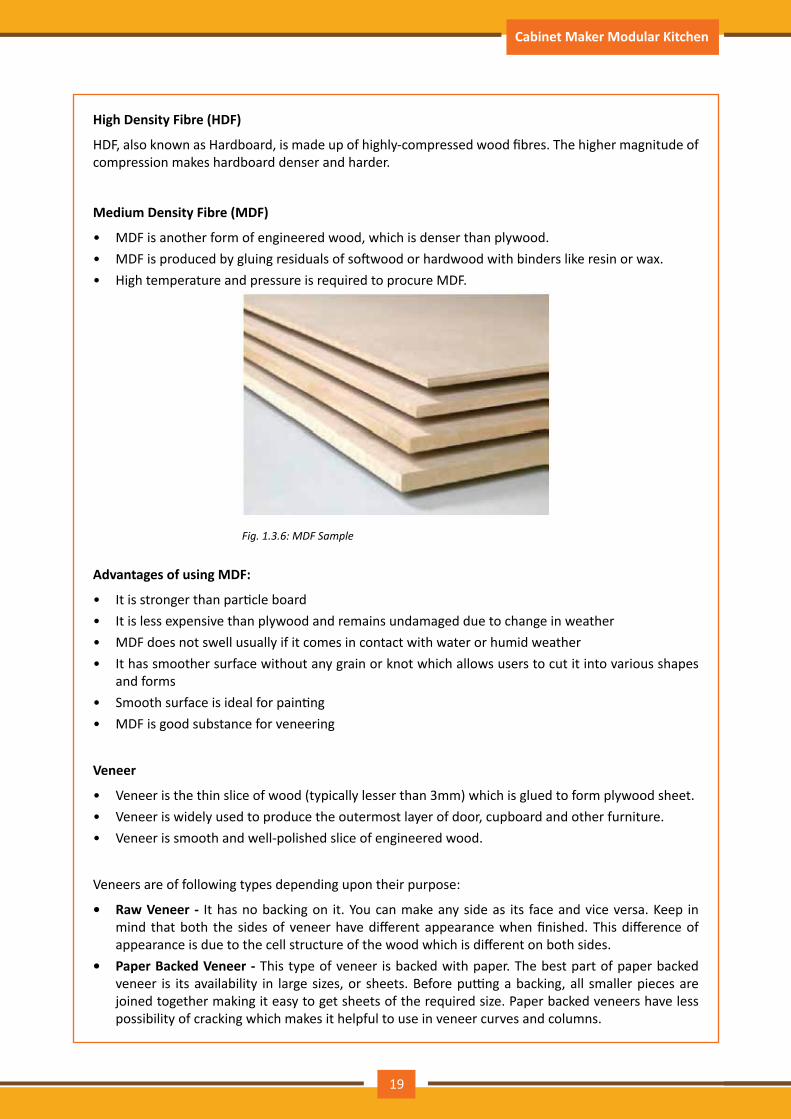
Medium Density Fibre (MDF)
• MDF is another form of engineered wood, which is denser than plywood.• MDF is produced by gluing residuals of softwood or hardwood with binders like resin or wax.• High temperature and pressure is required to procure MDF.
Fig. 1.3.6: MDF Sample
Advantages of using MDF:
• It is stronger than particle board• It is less expensive than plywood and remains undamaged due to change in weather• MDF does not swell usually if it comes in contact with water or humid weather• It has smoother surface without any grain or knot which allows users to cut it into various shapes
and forms• Smooth surface is ideal for painting• MDF is good substance for veneering
Veneer
• Veneer is the thin slice of wood (typically lesser than 3mm) which is glued to form plywood sheet.• Veneer is widely used to produce the outermost layer of door, cupboard and other furniture.• Veneer is smooth and well-polished slice of engineered wood.
Veneers are of following types depending upon their purpose:
• Raw Veneer - It has no backing on it. You can make any side as its face and vice versa. Keep in mind that both the sides of veneer have different appearance when finished. This difference of appearance is due to the cell structure of the wood which is different on both sides.
• Paper Backed Veneer - This type of veneer is backed with paper. The best part of paper backed veneer is its availability in large sizes, or sheets. Before putting a backing, all smaller pieces are joined together making it easy to get sheets of the required size. Paper backed veneers have less possibility of cracking which makes it helpful to use in veneer curves and columns.
19

Participant Handbook Cabinet Maker Modular Kitchen
• Phenolic Backed Veneer - It is very uncommon type of veneer. Mostly, it is used for composite or manmade wood veneers. It is gaining popularity as it helps in saving the natural resource. The phenolic backed veneer is available in sheets and can be used for curves as it does not crack if handled with care.
• Laid Up Veneer - It is also called raw veneer which is joined together to get larger pieces. It is very time consuming process and requires very careful handling. There is no need to use any expensive machinery or tool to join these pieces. You can easily get veneers laid up to any size, shape and design manually.
• Reconstituted Veneer - It is made from fast-growing tropical species. Raw veneer is cut from a log, and dyed if necessary. After drying the sheets are laminated to form a block. Then this block is sliced so that the edges of the laminated veneer become the “grain” of the reconstituted veneer.
• Wood on Wood - It is commonly called 2-ply. It is a decorative wood veneer face with a utility grade wood backer applied on the opposite direction to the face veneer.
Fig.1.3.7:SampleVeneer
Laminates
Laminated wood is typically used to prepare flooring tiles. Generally, photographs or designs are glued on the thin slice of wood to produce laminates.
Fig.1.3.8:Decorativelaminates
Decorative laminates are usually used for furniture surfaces and wall panelling. This includes cabinets, tables, showcases and etc. The laminates are easy to maintain nut exposure to water may cause warping or balooning. Decorative laminates are used in the cubical toilets, kitchen or laboratory tables to resist moisture.
Laminates are made by compressing thin layers of flat papers and plastic resins. The upper layer is printed with decorative textures, patterns and colours. The typical size of laminate sheets are 8” by 4”. These sheets are pasted on plywood, block board or MDF with adhesive.
20
Participant Handbook Cabinet Maker Modular Kitchen
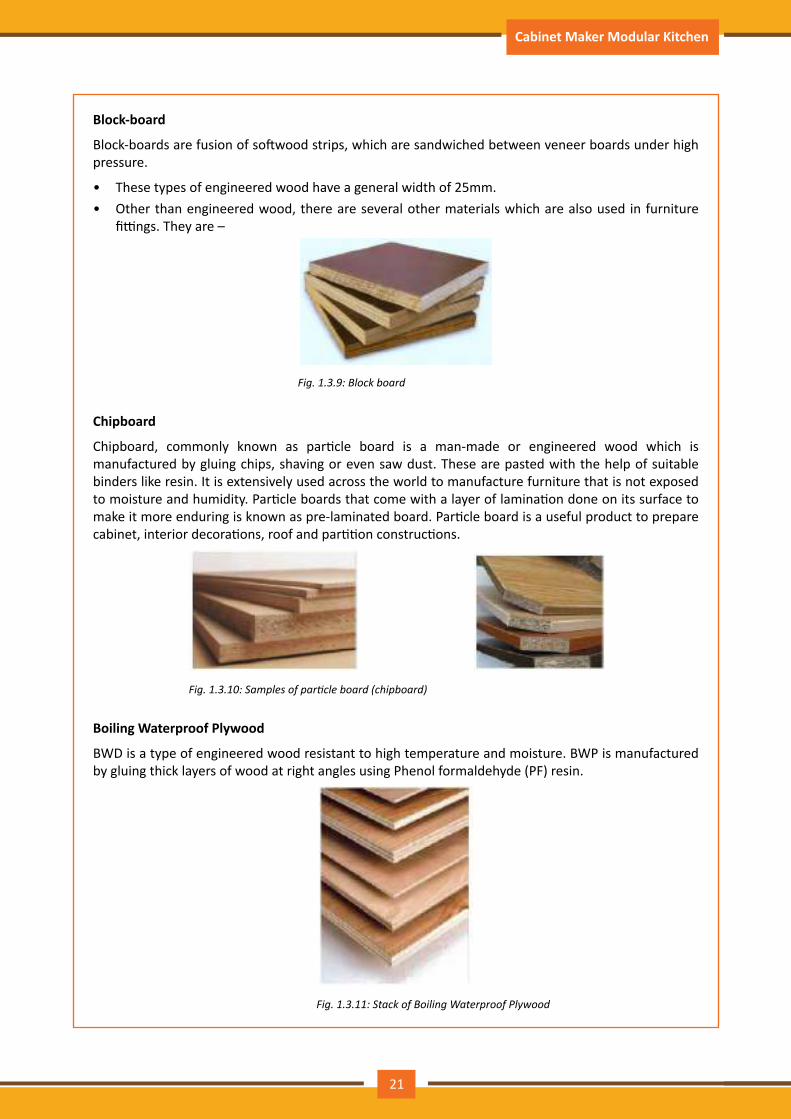
Block-board
Block-boards are fusion of softwood strips, which are sandwiched between veneer boards under high pressure.
• These types of engineered wood have a general width of 25mm.• Other than engineered wood, there are several other materials which are also used in furniture
fittings. They are –
Fig. 1.3.9: Block board
Chipboard
Chipboard, commonly known as particle board is a man-made or engineered wood which is manufactured by gluing chips, shaving or even saw dust. These are pasted with the help of suitable binders like resin. It is extensively used across the world to manufacture furniture that is not exposed to moisture and humidity. Particle boards that come with a layer of lamination done on its surface to make it more enduring is known as pre-laminated board. Particle board is a useful product to prepare cabinet, interior decorations, roof and partition constructions.
Fig.1.3.10:Samplesofparticleboard(chipboard)
Boiling Waterproof Plywood
BWD is a type of engineered wood resistant to high temperature and moisture. BWP is manufactured by gluing thick layers of wood at right angles using Phenol formaldehyde (PF) resin.
Fig.1.3.11:StackofBoilingWaterproofPlywood
21

Participant Handbook Cabinet Maker Modular Kitchen
Some of the advantages of BWP are:
• It is better than solid wood in handling water exposure. Therefore, BWP is the first preference to manufacture kitchen cabinets, laboratory tables and other useful items
• It is free from termites or borer attacks• It is stronger and more endurable than MDF or particle board and is lesser prone to warping• It can be covered with laminates or veneer as per clients' requirement
Edge Bands (PVC Tapes)
The edges of a panel, made of plywood, MDF or particle board need to be covered, secured, decorated so that the furniture look good and hide the rough edges. To give furniture a clean and polished finish, edge banding is used. Edge banding, used for modular furniture, is made up of PVC materials. Edge bands are available in circular bangle form. The length of the roll or the bangle is typically 15 meters (50 feet) and the width varies from 7/8 inches to 2 inches. In certain cases, aluminium edge bands are also used to protect the modular furniture.
Fig.1.3.12:EdgebandsorPVCTapes
Metals (Mild Steel and Stainless Steel): Mild steels are used in combination with the wooden members to manufacture furniture. Mild steel or simply iron are subjected to powder coating or colour coating, whereas, stainless steels are subjected to matt polish or gloss polish.
Hardware: Hardware commonly denotes the hinges or the channels used in furniture fittings. For example, telescopic channel and auto hinge are hardware which are used to install drawer and doors respectively.
Organize materials and fitti ngs hardware required for manufacturing/assembling in a sequence as per requirement
Fig.1.3.13:Blueprintsketchofacabinet
22
Participant Handbook Cabinet Maker Modular Kitchen
• Start by keeping the MDF, plywood or any similar material ready for the side panels of the cabinet• Cut and keep the base panel, top bracers and face panels ready.• Next you will need adhesive/glue for the top braces• Then keep nails of the appropriate size ready to make the back panel• After that you will need corner brackets and screws to reinforce the connections• With regard to cabinet drawers keep ball-bearing slides, affordable roller-bearing slides, hidden
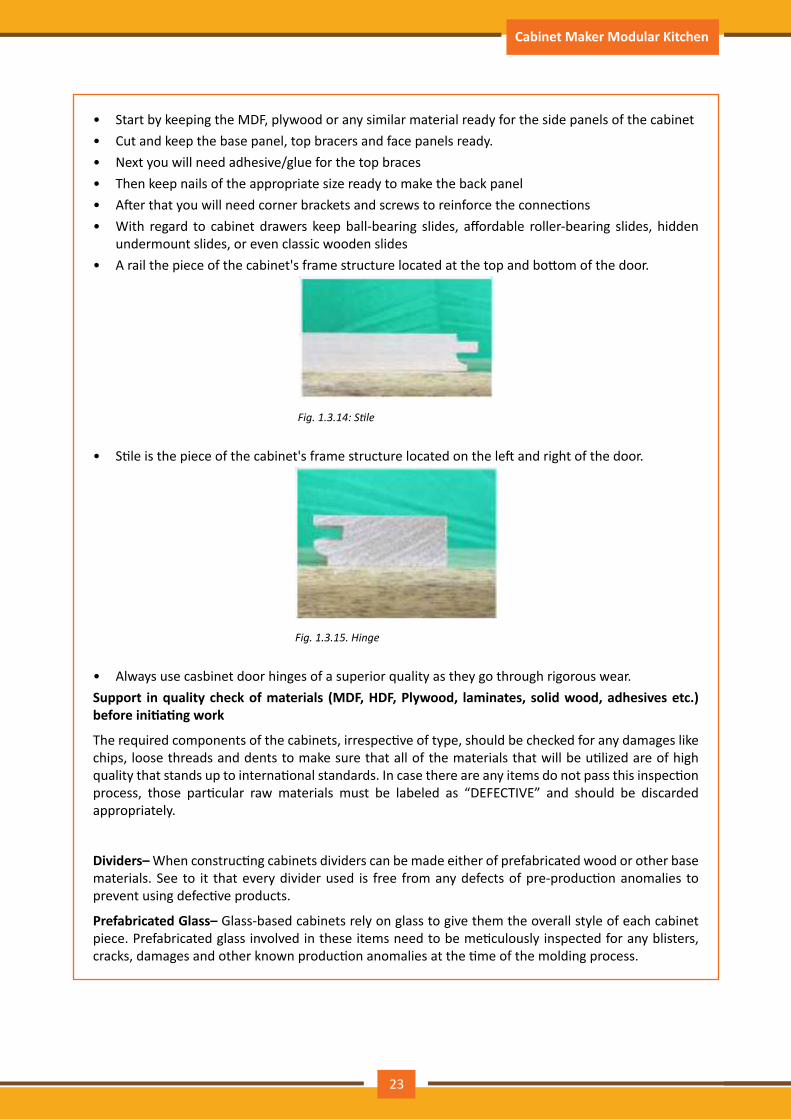
undermount slides, or even classic wooden slides• A rail the piece of the cabinet's frame structure located at the top and bottom of the door.
Fig.1.3.14:Stile
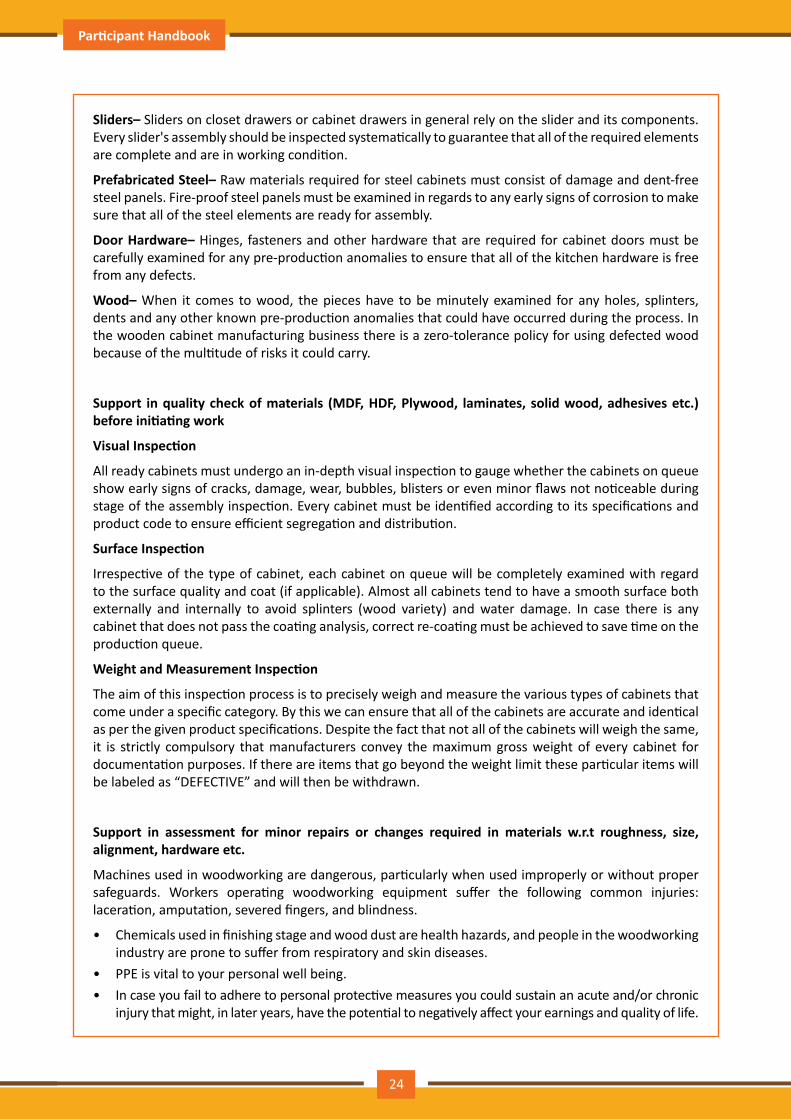
• Stile is the piece of the cabinet's frame structure located on the left and right of the door.
Fig.1.3.15.Hinge
• Always use casbinet door hinges of a superior quality as they go through rigorous wear.Support in quality check of materials (MDF, HDF, Plywood, laminates, solid wood, adhesives etc.) before initiating work
The required components of the cabinets, irrespective of type, should be checked for any damages like chips, loose threads and dents to make sure that all of the materials that will be utilized are of high quality that stands up to international standards. In case there are any items do not pass this inspection process, those particular raw materials must be labeled as “DEFECTIVE” and should be discarded appropriately.
Dividers– When constructing cabinets dividers can be made either of prefabricated wood or other base materials. See to it that every divider used is free from any defects of pre-production anomalies to prevent using defective products.
Prefabricated Glass– Glass-based cabinets rely on glass to give them the overall style of each cabinet piece. Prefabricated glass involved in these items need to be meticulously inspected for any blisters, cracks, damages and other known production anomalies at the time of the molding process.
23
Participant Handbook Cabinet Maker Modular Kitchen
Sliders– Sliders on closet drawers or cabinet drawers in general rely on the slider and its components. Every slider's assembly should be inspected systematically to guarantee that all of the required elements are complete and are in working condition.
Prefabricated Steel– Raw materials required for steel cabinets must consist of damage and dent-free steel panels. Fire-proof steel panels must be examined in regards to any early signs of corrosion to make sure that all of the steel elements are ready for assembly.
Door Hardware– Hinges, fasteners and other hardware that are required for cabinet doors must be carefully examined for any pre-production anomalies to ensure that all of the kitchen hardware is free from any defects.
Wood– When it comes to wood, the pieces have to be minutely examined for any holes, splinters, dents and any other known pre-production anomalies that could have occurred during the process. In the wooden cabinet manufacturing business there is a zero-tolerance policy for using defected wood because of the multitude of risks it could carry.
Support in quality check of materials (MDF, HDF, Plywood, laminates, solid wood, adhesives etc.) before initiating work
Visual Inspection
All ready cabinets must undergo an in-depth visual inspection to gauge whether the cabinets on queue show early signs of cracks, damage, wear, bubbles, blisters or even minor flaws not noticeable during stage of the assembly inspection. Every cabinet must be identified according to its specifications and product code to ensure efficient segregation and distribution.
Surface Inspection
Irrespective of the type of cabinet, each cabinet on queue will be completely examined with regard to the surface quality and coat (if applicable). Almost all cabinets tend to have a smooth surface both externally and internally to avoid splinters (wood variety) and water damage. In case there is any cabinet that does not pass the coating analysis, correct re-coating must be achieved to save time on the production queue.
Weight and Measurement Inspection
The aim of this inspection process is to precisely weigh and measure the various types of cabinets that come under a specific category. By this we can ensure that all of the cabinets are accurate and identical as per the given product specifications. Despite the fact that not all of the cabinets will weigh the same, it is strictly compulsory that manufacturers convey the maximum gross weight of every cabinet for documentation purposes. If there are items that go beyond the weight limit these particular items will be labeled as “DEFECTIVE” and will then be withdrawn.
Support in assessment for minor repairs or changes required in materials w.r.t roughness, size, alignment, hardware etc.
Machines used in woodworking are dangerous, particularly when used improperly or without proper safeguards. Workers operating woodworking equipment suffer the following common injuries: laceration, amputation, severed fingers, and blindness.
• Chemicals used in finishing stage and wood dust are health hazards, and people in the woodworking industry are prone to suffer from respiratory and skin diseases.
• PPE is vital to your personal well being.• In case you fail to adhere to personal protective measures you could sustain an acute and/or chronic
injury that might, in later years, have the potential to negatively affect your earnings and quality of life.
24

Participant Handbook Cabinet Maker Modular Kitchen
• Thus, it is compulsory that the PPE recommendation is followed in regard to all machine operations and where any safety sign is indicated.
• Before entering a machine shop or performing any activity recognized as requiring PPE, the worker must be wearing the appropriate personal protective equipment; which could include:
Eye Protection
Fig.1.3.16:EyeProtection
Woodworkers are required to wear safety glasses, goggles or face shields at all times in areas where small flying fragments or dust can be encountered.
Hearing Protection
Fig.1.3.17.HearingProtection
Due to the high level of sound pollution in furniture making environments, hearing protection must be worn at all times.
Protective Footwear
Fig.1.3.18.ProtectiveFootwear
In woodworking environments appropriate footwear must be worn at all times. Closed shoes with leather uppers or safety boots are appropriate.
25
Participant Handbook Cabinet Maker Modular Kitchen
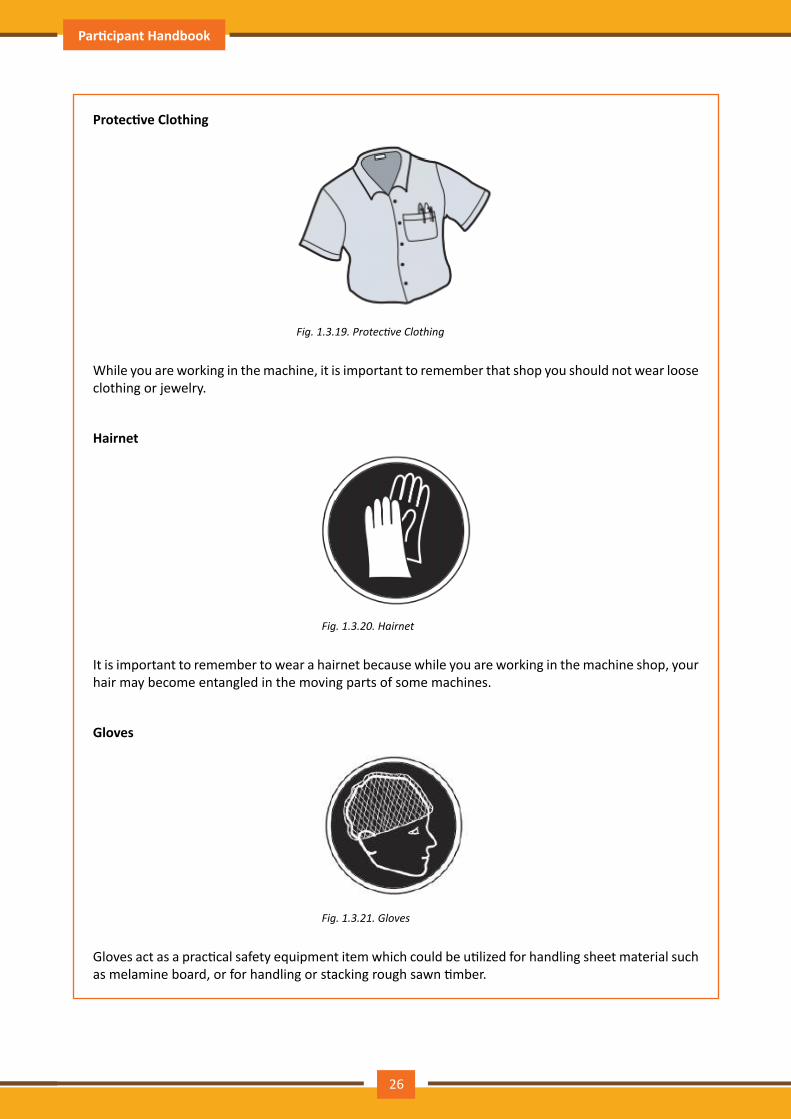
Protective Clothing
Fig.1.3.19.ProtectiveClothing
While you are working in the machine, it is important to remember that shop you should not wear loose clothing or jewelry.
Hairnet
Fig.1.3.20.Hairnet
It is important to remember to wear a hairnet because while you are working in the machine shop, your hair may become entangled in the moving parts of some machines.
Gloves
Fig. 1.3.21. Gloves
Gloves act as a practical safety equipment item which could be utilized for handling sheet material such as melamine board, or for handling or stacking rough sawn timber.
26
Participant Handbook Cabinet Maker Modular Kitchen
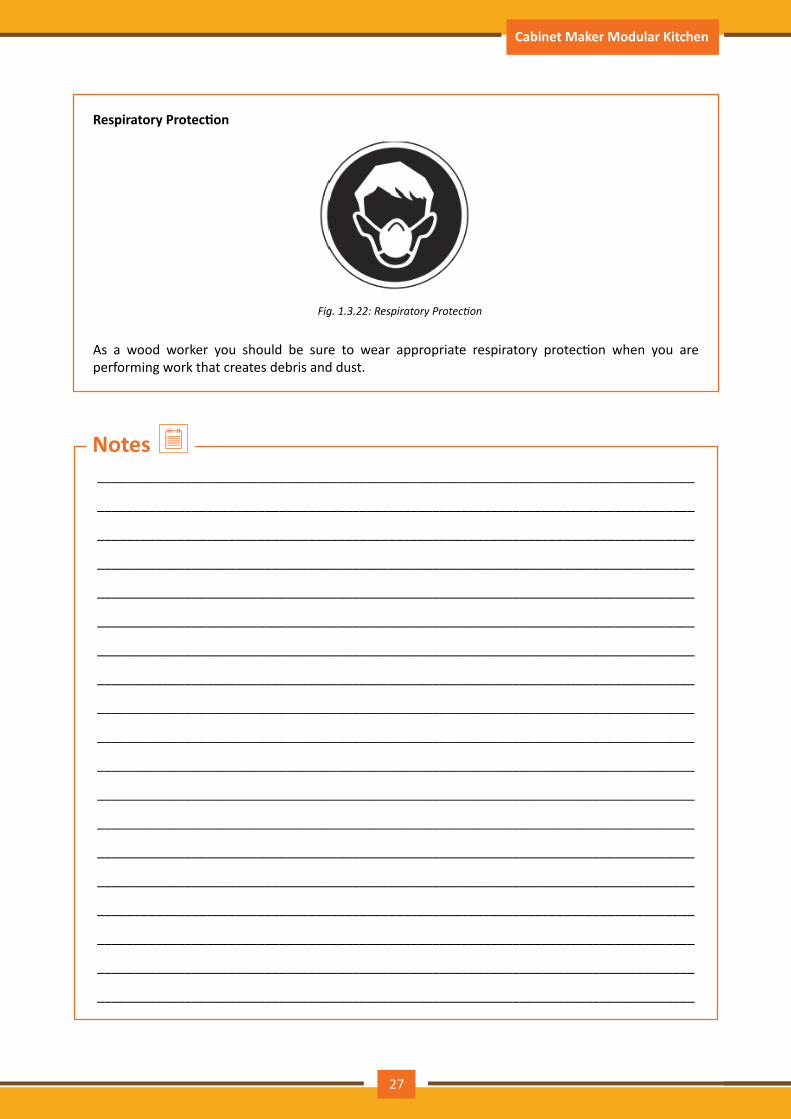
Respiratory Protection
Fig.1.3.22:RespiratoryProtection
As a wood worker you should be sure to wear appropriate respiratory protection when you are performing work that creates debris and dust.
__________________________________________________________________________________
__________________________________________________________________________________
__________________________________________________________________________________
__________________________________________________________________________________
__________________________________________________________________________________
__________________________________________________________________________________
__________________________________________________________________________________
__________________________________________________________________________________
__________________________________________________________________________________
__________________________________________________________________________________
__________________________________________________________________________________
__________________________________________________________________________________
__________________________________________________________________________________
__________________________________________________________________________________
__________________________________________________________________________________
__________________________________________________________________________________
__________________________________________________________________________________
__________________________________________________________________________________
__________________________________________________________________________________
Notes
27
Participant Handbook Cabinet Maker Modular Kitchen
At the end of this unit, you will be able to:
1. Practice making of furniture and assembling of parts2. Recall the measurement of length, width & depth in mks & fps system3. Demonstrate knowledge of different work zones in kitchen4. Apply the technique of joining the materials with screws, staples, or adhesives5. Explain the technique of touch up of furniture6. Practice smoothening of outer surface of furniture
Unit Objectives
UNIT 1.4: Making of Furniture and Assembling of Parts
The process of site measurement for project level work
Defining Site Measurement
• The term "Site" implies an area or premises, where a structure, like building or a piece of furniture, is constructed.
• The term “Measurement” implies “determining the physical quantity or dimensions of an object or place, in terms of numbers and units, with the help of tools and equipment”.
• The dimensions that are required to be measured during assembling and installing modular furniture are:
ᴑ Length and Breadth (includes radius and diameter of circles) ᴑ Height, Depth and Thickness ᴑ Area ᴑ Volume ᴑ Weight ᴑ Density ᴑ Viscosity ᴑ Temperature ᴑ Time ᴑ Electric
• “Unit” is defined as “a standard amount of a physical quantity, specified multiples of which are used to express amounts of that physical quantity”.
• “Site Measurement”, thus, can be defined as “the process of establishing dimensions of a place, in terms of numbers and units, with the help of tools and equipment”.
Understanding the Process of Site Measurement For Project Level Work
A. The Process Steps:• The process of Site Measurement varies according to the below criteria:• Requirements and Specifications of the Project
28
Participant Handbook Cabinet Maker Modular Kitchen
• Site location• Availability of resources, like time, manpower, funds and equipment• Constraints and limitations involved in the project
However, the general steps involved in measuring a site are:
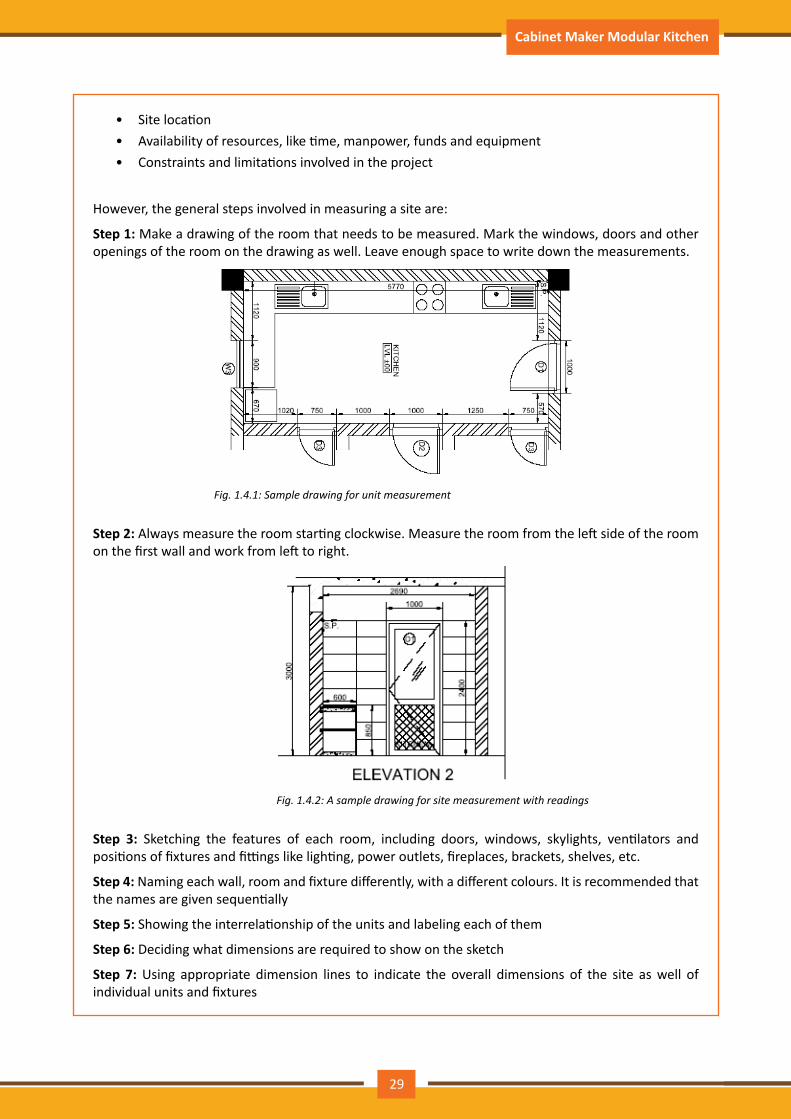
Step 1: Make a drawing of the room that needs to be measured. Mark the windows, doors and other openings of the room on the drawing as well. Leave enough space to write down the measurements.
Fig.1.4.1:Sampledrawingforunitmeasurement
Step 2: Always measure the room starting clockwise. Measure the room from the left side of the room on the first wall and work from left to right.
Fig.1.4.2:Asampledrawingforsitemeasurementwithreadings
Step 3: Sketching the features of each room, including doors, windows, skylights, ventilators and positions of fixtures and fittings like lighting, power outlets, fireplaces, brackets, shelves, etc.
Step 4: Naming each wall, room and fixture differently, with a different colours. It is recommended that the names are given sequentially
Step 5: Showing the interrelationship of the units and labeling each of them
Step 6: Deciding what dimensions are required to show on the sketch
Step 7: Using appropriate dimension lines to indicate the overall dimensions of the site as well of individual units and fixtures
29
Participant Handbook Cabinet Maker Modular Kitchen
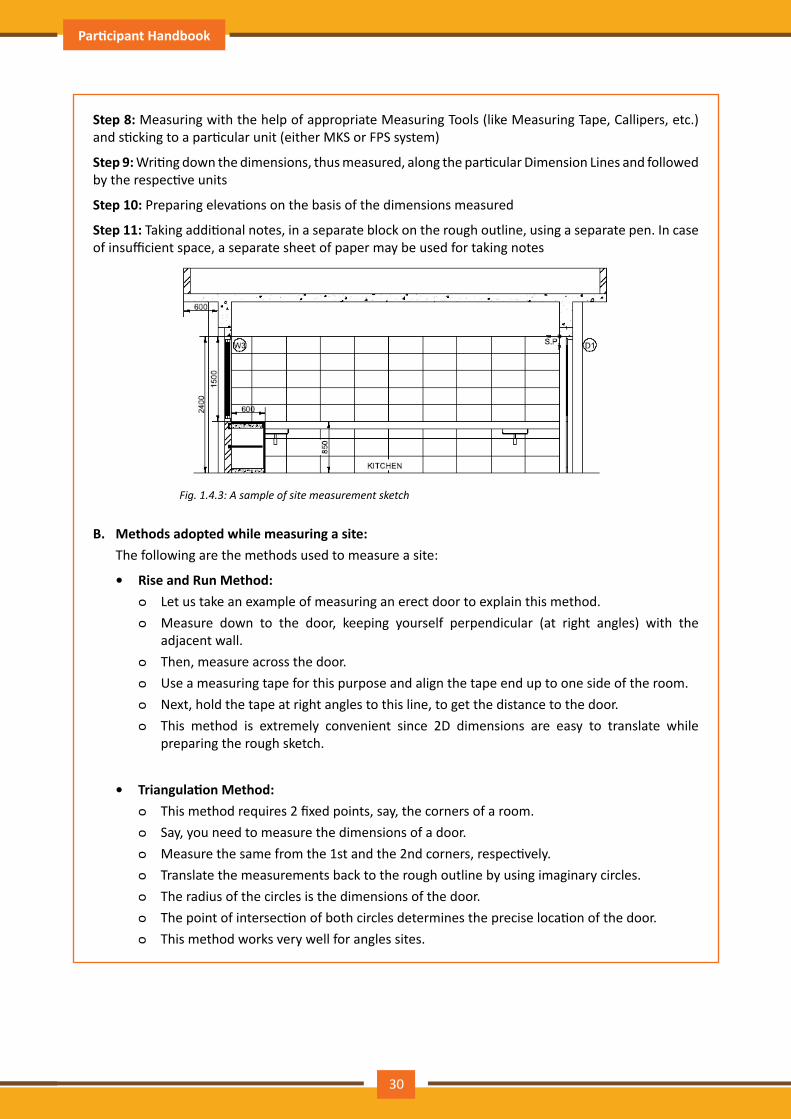
Step 8: Measuring with the help of appropriate Measuring Tools (like Measuring Tape, Callipers, etc.) and sticking to a particular unit (either MKS or FPS system)
Step 9: Writing down the dimensions, thus measured, along the particular Dimension Lines and followed by the respective units
Step 10: Preparing elevations on the basis of the dimensions measured
Step 11: Taking additional notes, in a separate block on the rough outline, using a separate pen. In case of insufficient space, a separate sheet of paper may be used for taking notes
Fig.1.4.3:Asampleofsitemeasurementsketch
B. Methods adopted while measuring a site:The following are the methods used to measure a site:
• Rise and Run Method: ᴑ Let us take an example of measuring an erect door to explain this method. ᴑ Measure down to the door, keeping yourself perpendicular (at right angles) with the
adjacent wall. ᴑ Then, measure across the door. ᴑ Use a measuring tape for this purpose and align the tape end up to one side of the room. ᴑ Next, hold the tape at right angles to this line, to get the distance to the door. ᴑ This method is extremely convenient since 2D dimensions are easy to translate while
preparing the rough sketch.
• Triangulation Method: ᴑ This method requires 2 fixed points, say, the corners of a room. ᴑ Say, you need to measure the dimensions of a door. ᴑ Measure the same from the 1st and the 2nd corners, respectively. ᴑ Translate the measurements back to the rough outline by using imaginary circles. ᴑ The radius of the circles is the dimensions of the door. ᴑ The point of intersection of both circles determines the precise location of the door. ᴑ This method works very well for angles sites.
30
Participant Handbook Cabinet Maker Modular Kitchen
Measurement of Length, Width & Depth in MKS & FPS System and its application and undertake measuring accurately
Types of Units in Measurement
• Measurement is the process of determining the magnitude of and quantifying a physical parameter.• The method of measuring physical parameters is called Metrology.• Each physical parameter is estimated and expressed in numerical values, along with Units. For
example, the units for temperature are Kelvin, Celsius, Fahrenheit, etc.• Units of measurement are of two types: System International (SI) and the Centimeter - Gram -
Second (CGS).
A. System InternationalThis comprises the Base Units, measuring the Base Quantities and the Derived Units, measuring the Derived Quantities. Base Quantities are those physical quantities, which are distinct and are independent of other physical quantities. Derived Quantities are those physical quantities, which result from the Base Quantities.
Base Quantities: Length, Time, Mass, Electric Current, Temperature, Amount of Substance and Luminous Intensity.
Derived Quantities: Velocity, Acceleration, Area, Volume, Force, Capacitance, Density, Electric Charge, Voltage, Energy, Work, Resistance, etc.
Examples of SI units are: (Both Base and Derived Quantities)
Physical Quantity SI Unit
Length, Width, Height, Depth Meter
Mass Kilogram
Temperature Kelvin
Electric Charge Coulomb
Force Newton
Electric Current Ampere
Electric Power kiloWatt
Energy Joule
Luminous Intensity Candela
Plane Angle Radian
Solid Angle Steradian
31
Participant Handbook Cabinet Maker Modular Kitchen
B. CGS Unit Examples of CGS units are:
Physical Quantity CGS Unit
Length, Width, Height, Depth Centimeter
Time Second
Mass Gram
Temperature Kelvin
Electric Charge Franklin
Force Dyne
Electric Current Biot
Energy Calorie
The MKS and FPS System of Measurement
The FPS system, or the Foot - Pound - Second system, comprises the following:
The MKS system, or the Meter - Kilogram - Second system, comprises the following:
Length Inch 1/12th ft
Foot 1 ft
Yard 3 ft
Mile 5280 ft
Nautical Mile 6080 ft
Area Acre 43,560 Sq. ft
Volume Fluid Ounce 1/20th Pint
Pint 1 Pint
Quart 2 Pint
Gallon 8 Pint
Weight Ounce 1/16th Lb
Pound 1 Lb
Stone 14 Lb
Ton 2240 Lb
32
Participant Handbook Cabinet Maker Modular Kitchen
The MKS system, or the Meter - Kilogram - Second system, comprises the following:
1 Km = 1000m 1 Kg = 1000g 1 kL = 1000 L
1 m = 0.001 Km 1 g = 0.001 Kg 1 L = 0.001 kL
1 m = 100 cm 1 g = 100 cg 1 L = 100 cL
1 cm = 0.01 m 1 cg = 0.01 g 1 cL = 0.01 L
1 m = 1000 mm 1 g = 1000 mg 1 L = 1000 mL
1 mm = 0.001 m 1 mg = 0.001 g 1 mL = 0.001 L
Tips to Measure Accurately
Determine what physical quantity you need to measure.
Fig.1.4.6:Correctpositioningofpencilformarking
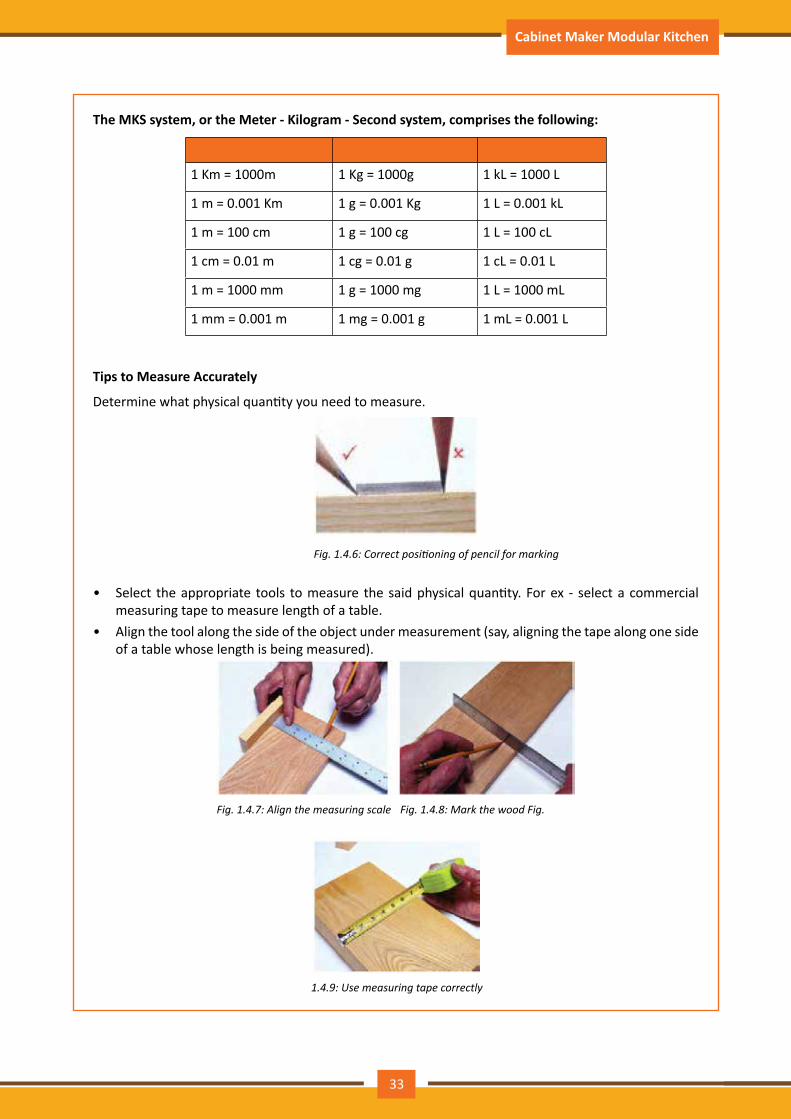
• Select the appropriate tools to measure the said physical quantity. For ex - select a commercial measuring tape to measure length of a table.
• Align the tool along the side of the object under measurement (say, aligning the tape along one side of a table whose length is being measured).
Fig.1.4.7:Alignthemeasuringscale Fig.1.4.8:MarkthewoodFig.
1.4.9:Usemeasuringtapecorrectly
33
Participant Handbook Cabinet Maker Modular Kitchen
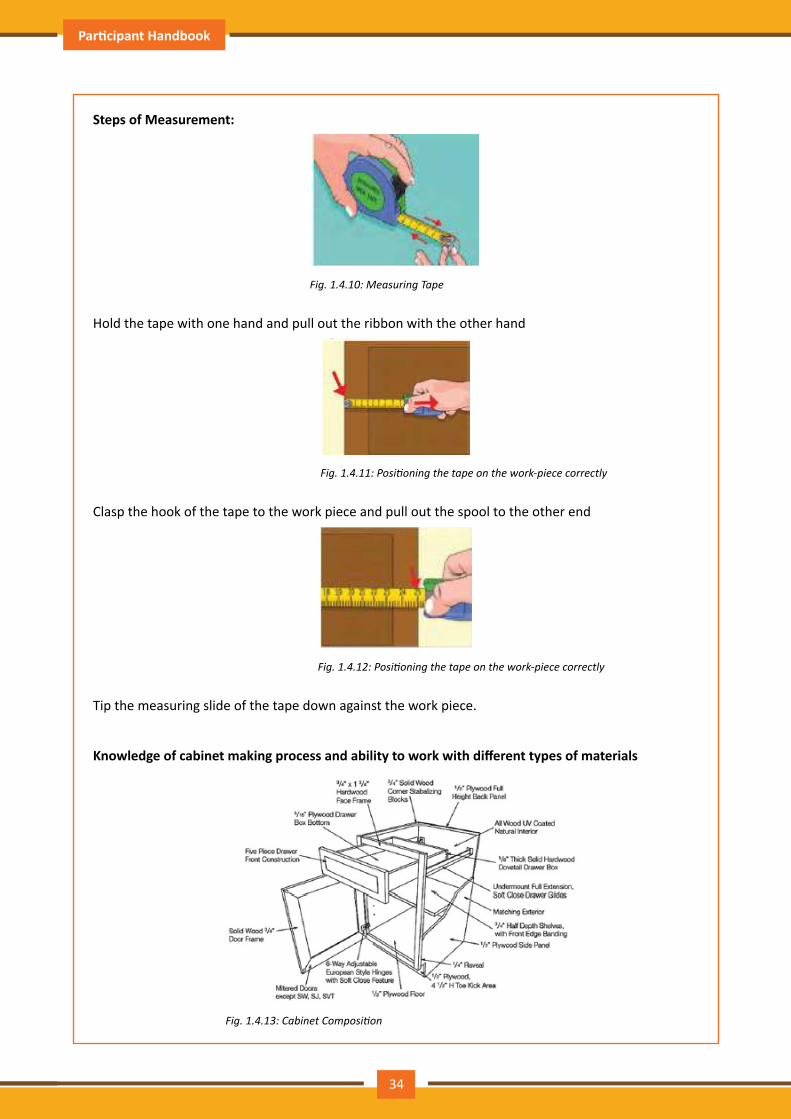
Steps of Measurement:
Fig.1.4.10:MeasuringTape
Hold the tape with one hand and pull out the ribbon with the other hand
Fig.1.4.11:Positioningthetapeonthework-piececorrectly
Clasp the hook of the tape to the work piece and pull out the spool to the other end
Fig.1.4.12:Positioningthetapeonthework-piececorrectly
Tip the measuring slide of the tape down against the work piece.
Knowledge of cabinet making process and ability to work with different types of materials
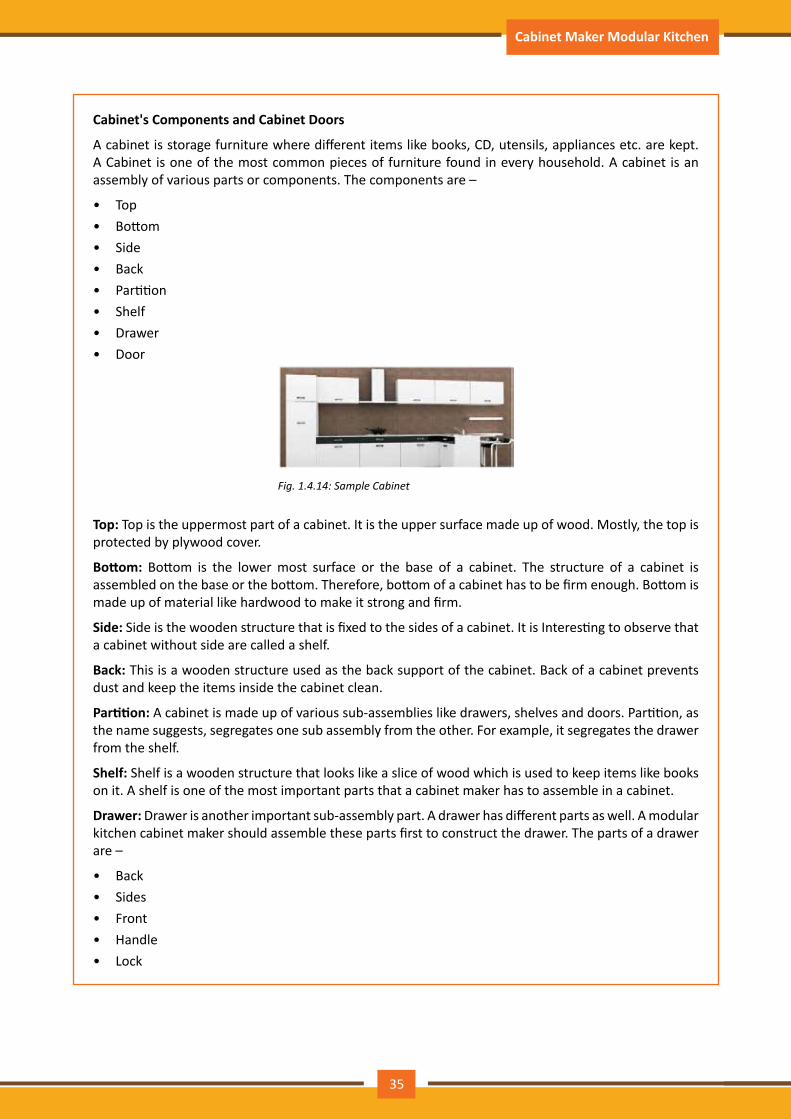
Fig.1.4.13:CabinetComposition
34
Participant Handbook Cabinet Maker Modular Kitchen
Cabinet's Components and Cabinet Doors
A cabinet is storage furniture where different items like books, CD, utensils, appliances etc. are kept. A Cabinet is one of the most common pieces of furniture found in every household. A cabinet is an assembly of various parts or components. The components are –
• Top• Bottom• Side• Back• Partition• Shelf• Drawer• Door
Fig.1.4.14:SampleCabinet
Top: Top is the uppermost part of a cabinet. It is the upper surface made up of wood. Mostly, the top is protected by plywood cover.
Bottom: Bottom is the lower most surface or the base of a cabinet. The structure of a cabinet is assembled on the base or the bottom. Therefore, bottom of a cabinet has to be firm enough. Bottom is made up of material like hardwood to make it strong and firm.
Side: Side is the wooden structure that is fixed to the sides of a cabinet. It is Interesting to observe that a cabinet without side are called a shelf.
Back: This is a wooden structure used as the back support of the cabinet. Back of a cabinet prevents dust and keep the items inside the cabinet clean.
Partition: A cabinet is made up of various sub-assemblies like drawers, shelves and doors. Partition, as the name suggests, segregates one sub assembly from the other. For example, it segregates the drawer from the shelf.
Shelf: Shelf is a wooden structure that looks like a slice of wood which is used to keep items like books on it. A shelf is one of the most important parts that a cabinet maker has to assemble in a cabinet.
Drawer: Drawer is another important sub-assembly part. A drawer has different parts as well. A modular kitchen cabinet maker should assemble these parts first to construct the drawer. The parts of a drawer are –
• Back• Sides• Front• Handle• Lock
35
Participant Handbook Cabinet Maker Modular Kitchen
Fig.1.4.15:DrawerStructure
Shutter: Shutter is assembled to the cabinet with the help of hinges. Shutter adds security to the cabinet.
Different parts like lock, handle are assembled on the shutter at the time of installation. The number of shutter depends on the size of the cabinet. In case of small cabinets, one shutter is enough to cover the cabinet space; however, if the cabinet is bigger in size, two shutters might be needed.
The type of shutter depends on the requirement or the organization policy. A cabinet shutter can be open outward type or sliding type. However, open inward is a strict no in case of cabinets.
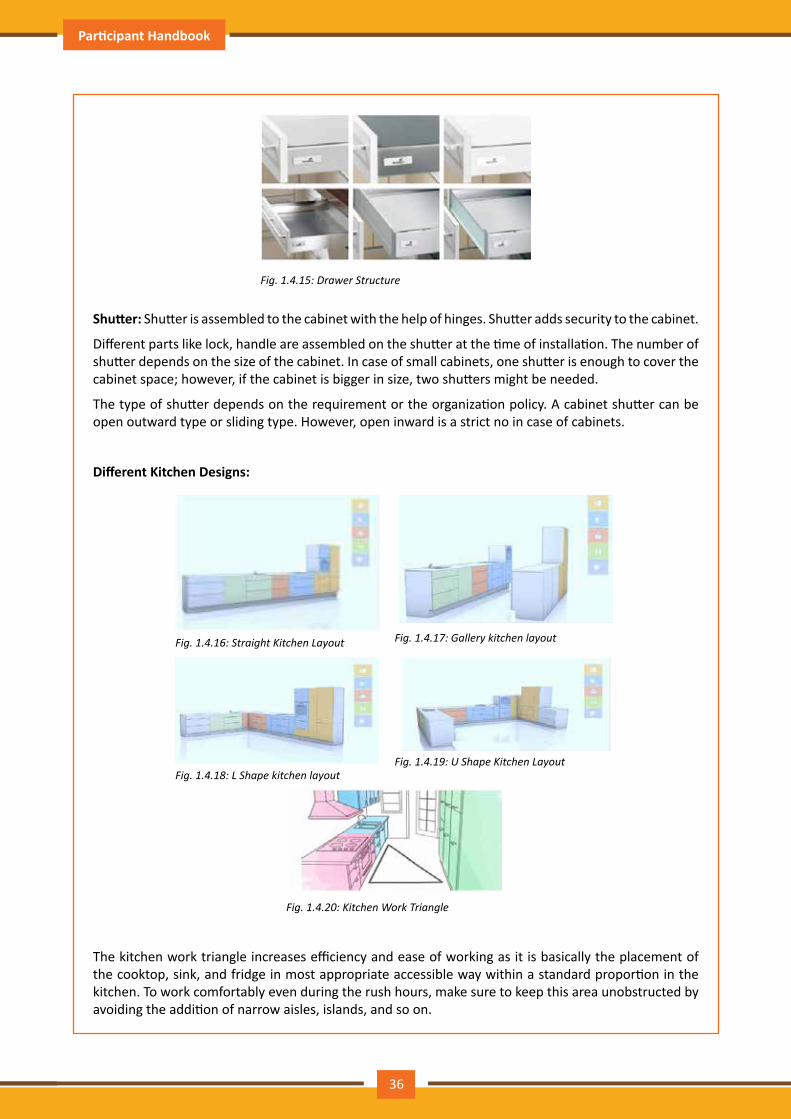
Different Kitchen Designs:
Fig.1.4.16:StraightKitchenLayout Fig.1.4.17:Gallerykitchenlayout
Fig.1.4.18:LShapekitchenlayoutFig.1.4.19:UShapeKitchenLayout
Fig.1.4.20:KitchenWorkTriangle
The kitchen work triangle increases efficiency and ease of working as it is basically the placement of the cooktop, sink, and fridge in most appropriate accessible way within a standard proportion in the kitchen. To work comfortably even during the rush hours, make sure to keep this area unobstructed by avoiding the addition of narrow aisles, islands, and so on.
36
Participant Handbook Cabinet Maker Modular Kitchen
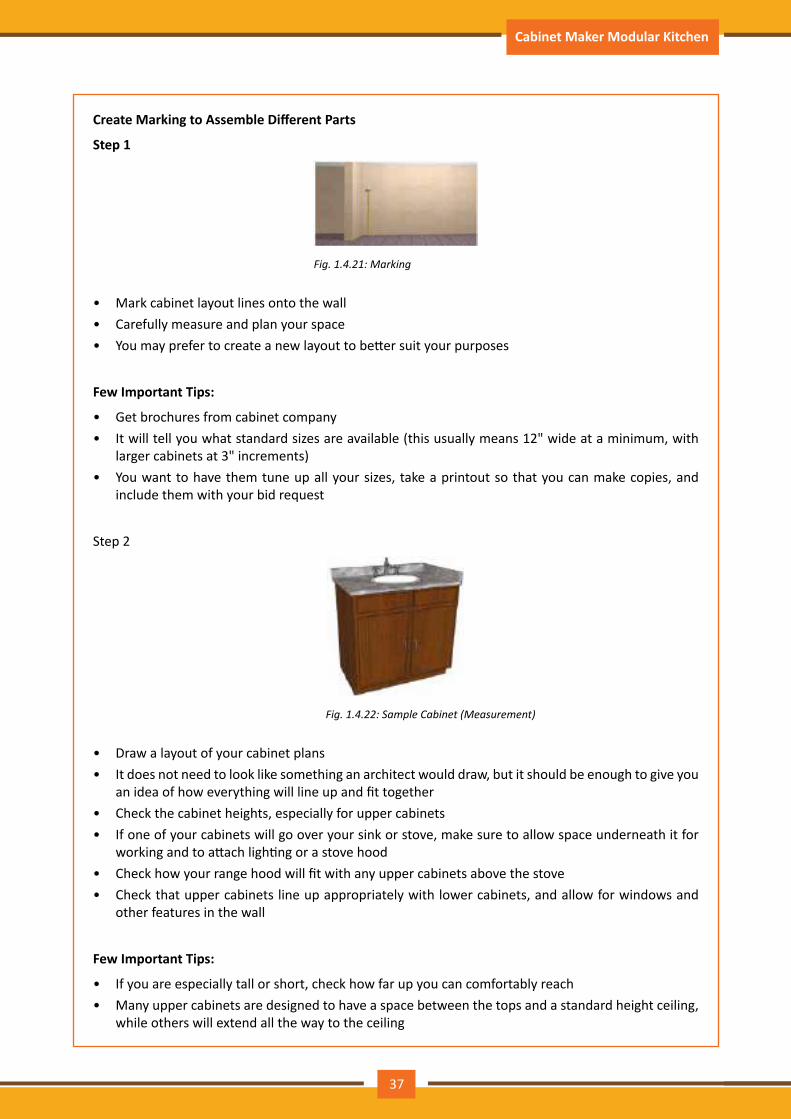
Create Marking to Assemble Different Parts
Step 1
Fig.1.4.21:Marking
• Mark cabinet layout lines onto the wall• Carefully measure and plan your space• You may prefer to create a new layout to better suit your purposes
Few Important Tips:
• Get brochures from cabinet company• It will tell you what standard sizes are available (this usually means 12" wide at a minimum, with
larger cabinets at 3" increments)• You want to have them tune up all your sizes, take a printout so that you can make copies, and
include them with your bid request
Step 2
Fig.1.4.22:SampleCabinet(Measurement)
• Draw a layout of your cabinet plans• It does not need to look like something an architect would draw, but it should be enough to give you
an idea of how everything will line up and fit together• Check the cabinet heights, especially for upper cabinets• If one of your cabinets will go over your sink or stove, make sure to allow space underneath it for
working and to attach lighting or a stove hood• Check how your range hood will fit with any upper cabinets above the stove• Check that upper cabinets line up appropriately with lower cabinets, and allow for windows and
other features in the wall
Few Important Tips:
• If you are especially tall or short, check how far up you can comfortably reach• Many upper cabinets are designed to have a space between the tops and a standard height ceiling,
while others will extend all the way to the ceiling
37
Participant Handbook Cabinet Maker Modular Kitchen
• Most systems have special cabinets to go under the sink, in corners and in other special locations. Learn how these work and incorporate them into your layout
• Consider how you use your kitchen (or other workspace)
Specified Joinery Techniques and Required Adhesives /Screws
Fig.1.4.23:CabinetParts
In our last discussion, we have come to know about the sub-assembly names of a cabinet. Here, we will discuss the technique of joining the sub-assemblies.
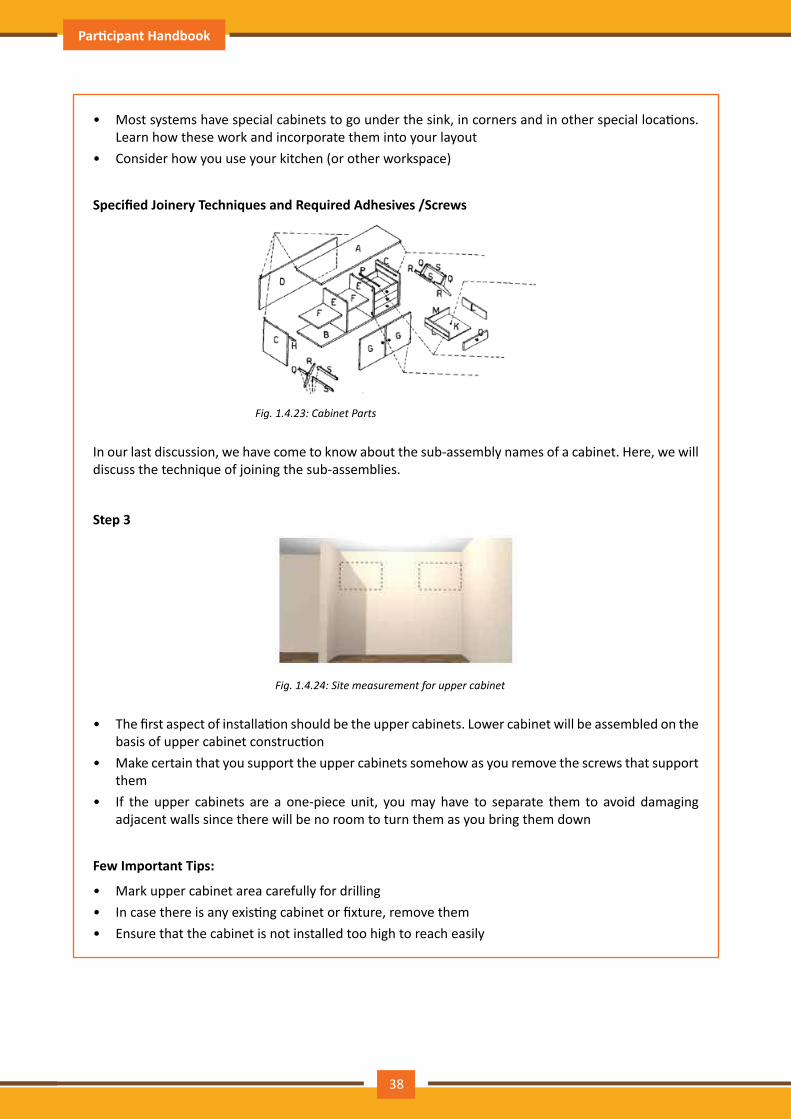
Step 3
Fig.1.4.24:Sitemeasurementforuppercabinet
• The first aspect of installation should be the upper cabinets. Lower cabinet will be assembled on the basis of upper cabinet construction
• Make certain that you support the upper cabinets somehow as you remove the screws that support them
• If the upper cabinets are a one-piece unit, you may have to separate them to avoid damaging adjacent walls since there will be no room to turn them as you bring them down
Few Important Tips:
• Mark upper cabinet area carefully for drilling• In case there is any existing cabinet or fixture, remove them• Ensure that the cabinet is not installed too high to reach easily
38
Participant Handbook Cabinet Maker Modular Kitchen
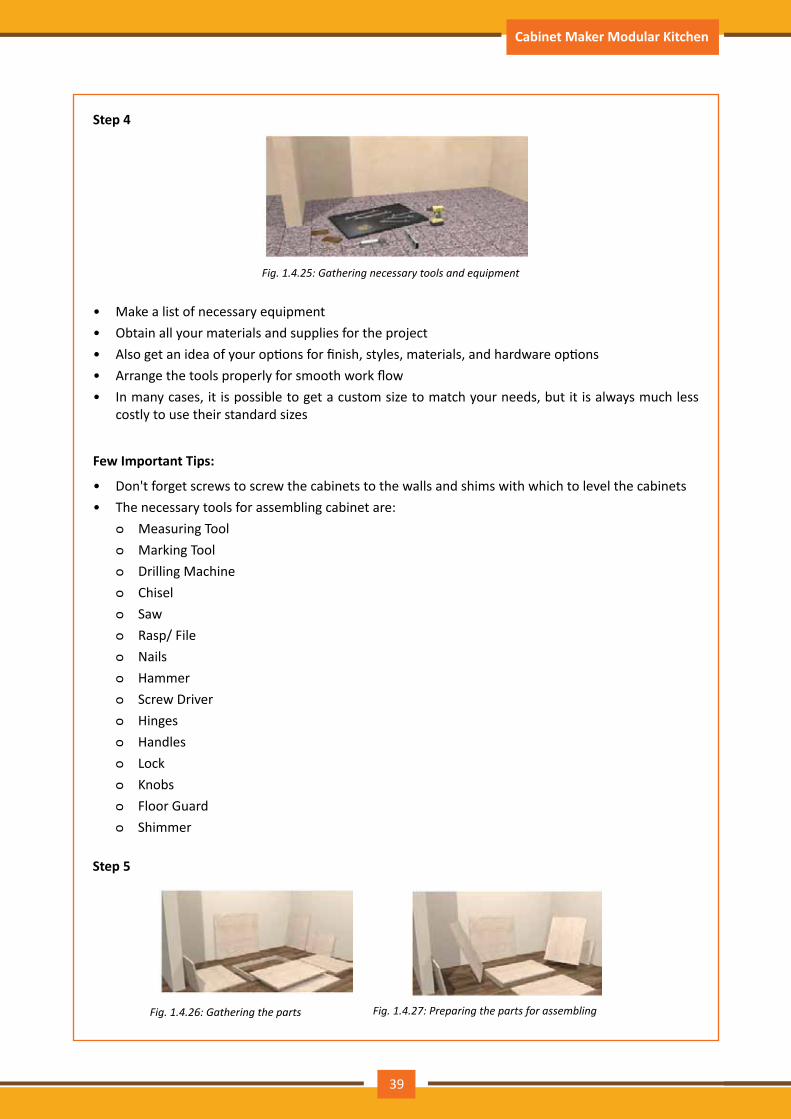
Step 4
Fig.1.4.25:Gatheringnecessarytoolsandequipment
• Make a list of necessary equipment• Obtain all your materials and supplies for the project• Also get an idea of your options for finish, styles, materials, and hardware options• Arrange the tools properly for smooth work flow• In many cases, it is possible to get a custom size to match your needs, but it is always much less
costly to use their standard sizes
Few Important Tips:
• Don't forget screws to screw the cabinets to the walls and shims with which to level the cabinets• The necessary tools for assembling cabinet are:
ᴑ Measuring Tool ᴑ Marking Tool ᴑ Drilling Machine ᴑ Chisel ᴑ Saw ᴑ Rasp/ File ᴑ Nails ᴑ Hammer ᴑ Screw Driver ᴑ Hinges ᴑ Handles ᴑ Lock ᴑ Knobs ᴑ Floor Guard ᴑ Shimmer
Step 5
Fig.1.4.26:Gatheringtheparts Fig.1.4.27:Preparingthepartsforassembling
39
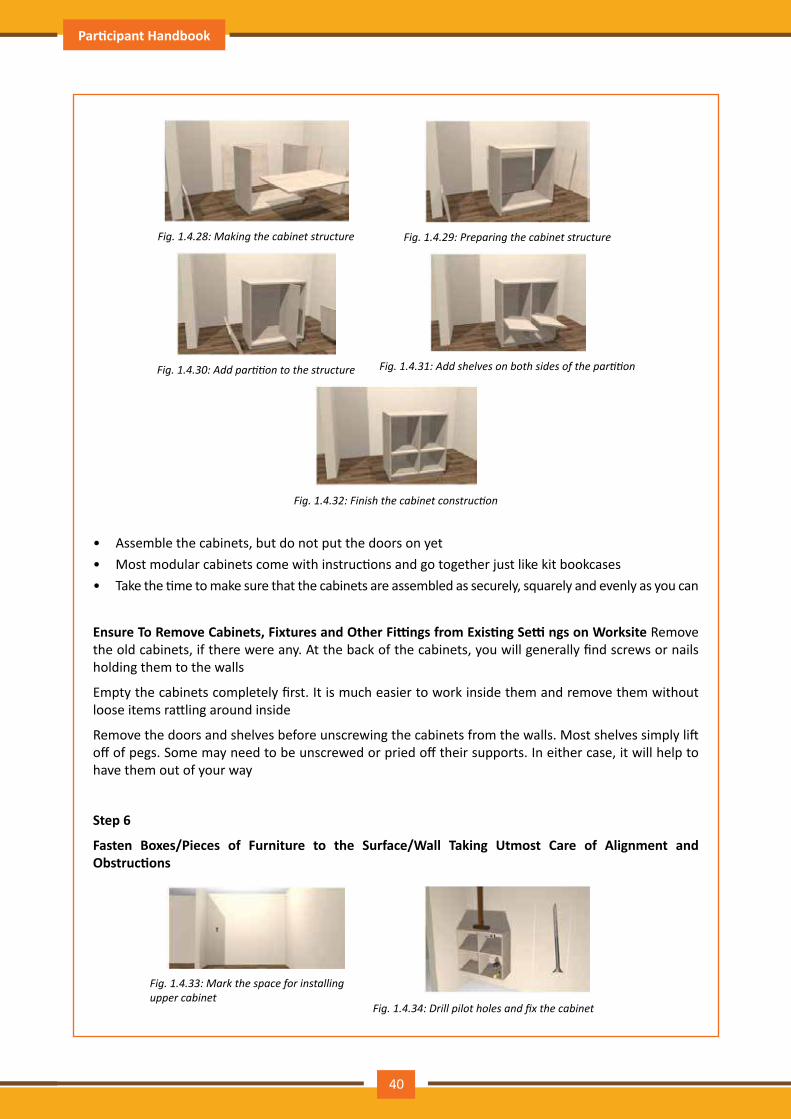
Participant Handbook Cabinet Maker Modular Kitchen
Fig.1.4.28:Makingthecabinetstructure Fig.1.4.29:Preparingthecabinetstructure
Fig.1.4.30:Addpartitiontothestructure Fig.1.4.31:Addshelvesonbothsidesofthepartition
Fig.1.4.32:Finishthecabinetconstruction
• Assemble the cabinets, but do not put the doors on yet• Most modular cabinets come with instructions and go together just like kit bookcases• Take the time to make sure that the cabinets are assembled as securely, squarely and evenly as you can
Ensure To Remove Cabinets, Fixtures and Other Fittings from Existing Setti ngs on Worksite Remove the old cabinets, if there were any. At the back of the cabinets, you will generally find screws or nails holding them to the walls
Empty the cabinets completely first. It is much easier to work inside them and remove them without loose items rattling around inside
Remove the doors and shelves before unscrewing the cabinets from the walls. Most shelves simply lift off of pegs. Some may need to be unscrewed or pried off their supports. In either case, it will help to have them out of your way
Step 6
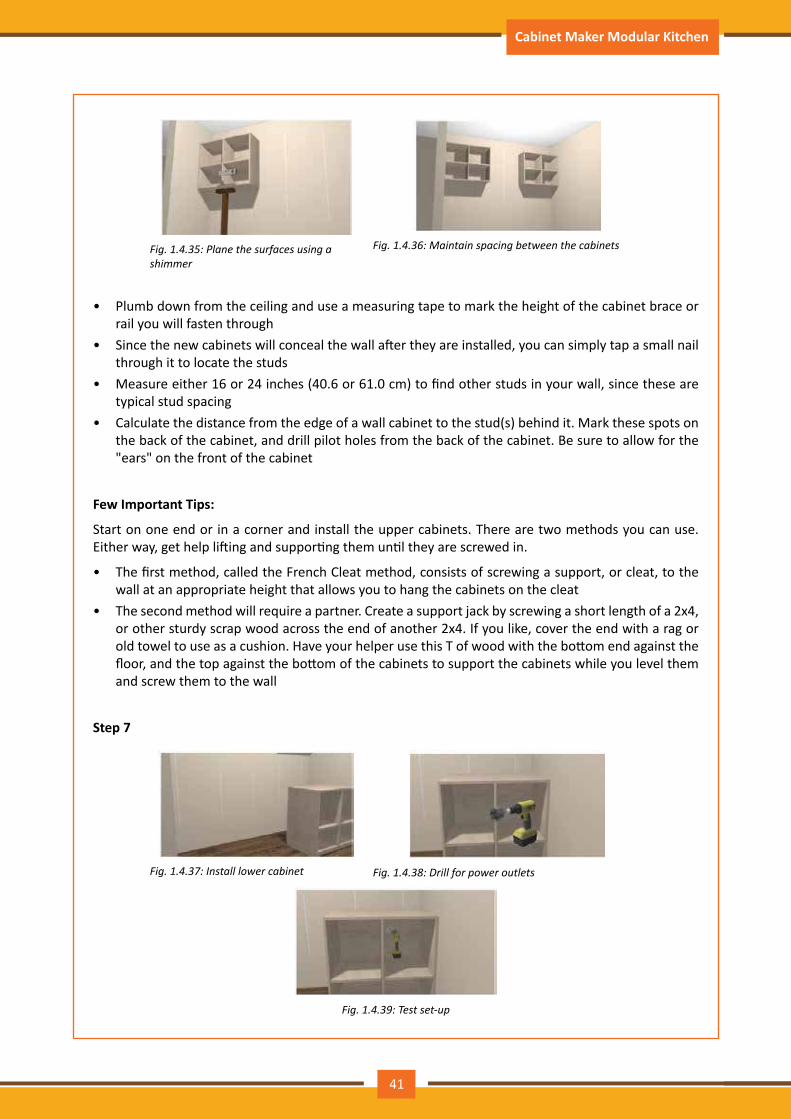
Fasten Boxes/Pieces of Furniture to the Surface/Wall Taking Utmost Care of Alignment and Obstructions
Fig.1.4.33:Markthespaceforinstallinguppercabinet
Fig.1.4.34:Drillpilotholesandfixthecabinet
40
Participant Handbook Cabinet Maker Modular Kitchen
Fig.1.4.35:Planethesurfacesusingashimmer
Fig.1.4.36:Maintainspacingbetweenthecabinets
• Plumb down from the ceiling and use a measuring tape to mark the height of the cabinet brace or rail you will fasten through
• Since the new cabinets will conceal the wall after they are installed, you can simply tap a small nail through it to locate the studs
• Measure either 16 or 24 inches (40.6 or 61.0 cm) to find other studs in your wall, since these are typical stud spacing
• Calculate the distance from the edge of a wall cabinet to the stud(s) behind it. Mark these spots on the back of the cabinet, and drill pilot holes from the back of the cabinet. Be sure to allow for the "ears" on the front of the cabinet
Few Important Tips:
Start on one end or in a corner and install the upper cabinets. There are two methods you can use. Either way, get help lifting and supporting them until they are screwed in.
• The first method, called the French Cleat method, consists of screwing a support, or cleat, to the wall at an appropriate height that allows you to hang the cabinets on the cleat
• The second method will require a partner. Create a support jack by screwing a short length of a 2x4, or other sturdy scrap wood across the end of another 2x4. If you like, cover the end with a rag or old towel to use as a cushion. Have your helper use this T of wood with the bottom end against the floor, and the top against the bottom of the cabinets to support the cabinets while you level them and screw them to the wall
Step 7
Fig.1.4.37:Installlowercabinet Fig.1.4.38:Drillforpoweroutlets
Fig. 1.4.39: Test set-up
41
Participant Handbook Cabinet Maker Modular Kitchen
• Mark the locations of your clamp for the lower cabinets, then bring in the cabinets and set them into place
• It is easier to shim the others up to this height than to shorten the tall one
Few Important Tips:
Always secure the cabinets firmly to studs before loading them with their contents. Secure cabinets to each other as well as the wall.
Drill pilot holes in the cabinet frame and screw together with good wood screws
Step 8
Fig.1.4.40:Shimmingthesurfaces Fig.1.4.41:Fixingthelowercabinettothewahll
• Level the top of the cabinets by shimming under and behind them• Screw the lower cabinets to the wall. You can often screw right through the spacers
Few Important Tips:
• Remember that you will install a counter top on the cabinets, so you want this reasonably level and all the joints to be flush
• Look at the appearance of the cabinet fronts and make sure those are even
Fig.1.4.42:Kitchencabinetset-up
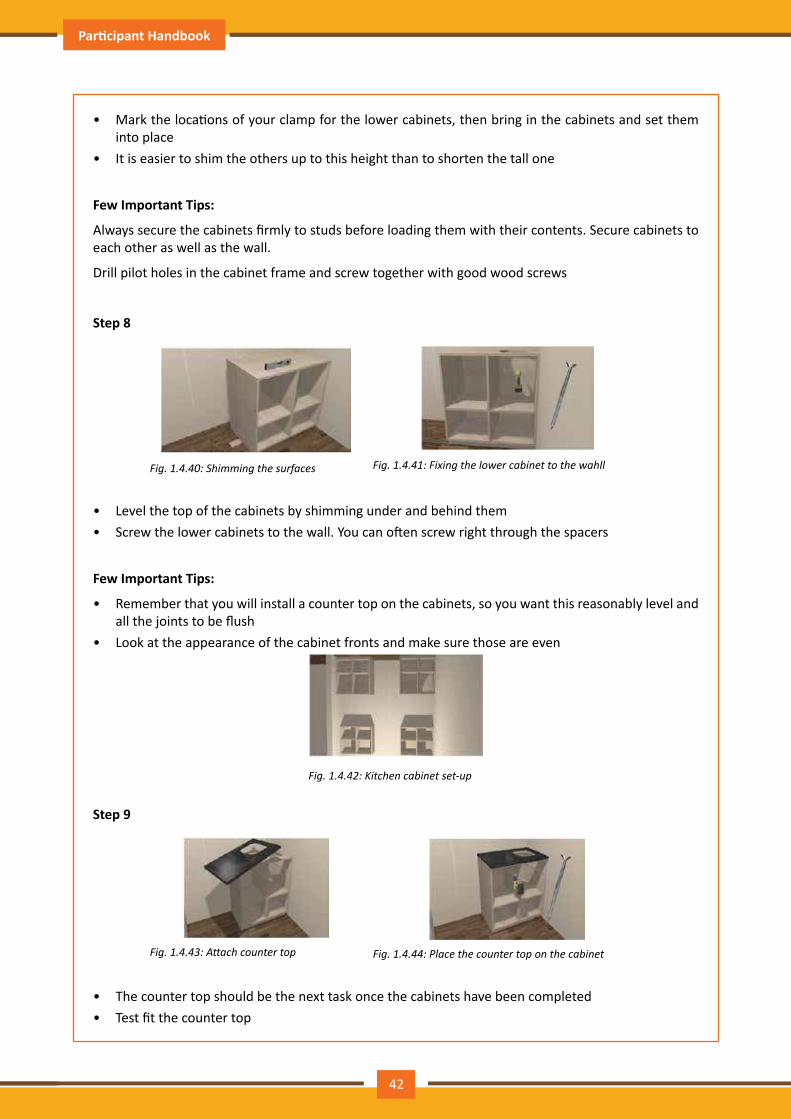
Step 9
Fig.1.4.43:Attachcountertop Fig.1.4.44:Placethecountertoponthecabinet
• The counter top should be the next task once the cabinets have been completed• Test fit the counter top
42
Participant Handbook Cabinet Maker Modular Kitchen
• Cut it to length if required, and cut out the sink opening and the opening for the stove (hob) if it will be built in
• For post formed (laminate on particle board) counter tops, you will get better results cutting it to length with a "finish", or "plywood" blade rather than a ripping or combination circular saw blade
• For cutting a sink opening, invert your sink at the location it will go, mark the outline of the outside rim lightly with a pencil, then make another mark about 5⁄16 inch (0.8 cm) inside this line for your cut
• Place masking tape on the outside of the cut mark, and use a jigsaw to make your• cut. If you cannot "plunge" your jigsaw (starting inside the cut line), you may drill a 1⁄2 inch (1.3 cm)
hole to drop your blade into to start your cut• Place the counter top on top of the lower cabinets. Screw it in from underneath, making sure that
the screws you use are not so long that they will break through the material to the top
Few Important Tips:
• You may need to cut the counter top short so that it will set in if it is between two walls• If you allow a 1⁄4 inch (0.6 cm) on the overall length, you can caulk the ends after it is installed• Cutting with the counter top upside down will reduce chipping, but make sure you support the
piece until the cut is complete• Seal all cut surfaces of post formed counter tops before installing to prevent moisture from swelling
the material later if your caulking fails to seal• More durable counter tops can be made from synthetic marble (Corian, etc.), natural granite or
other stone, cement backer board or plywood covered with ceramic tile
Fig.1.4.45:Lowercabinetswithcountertop
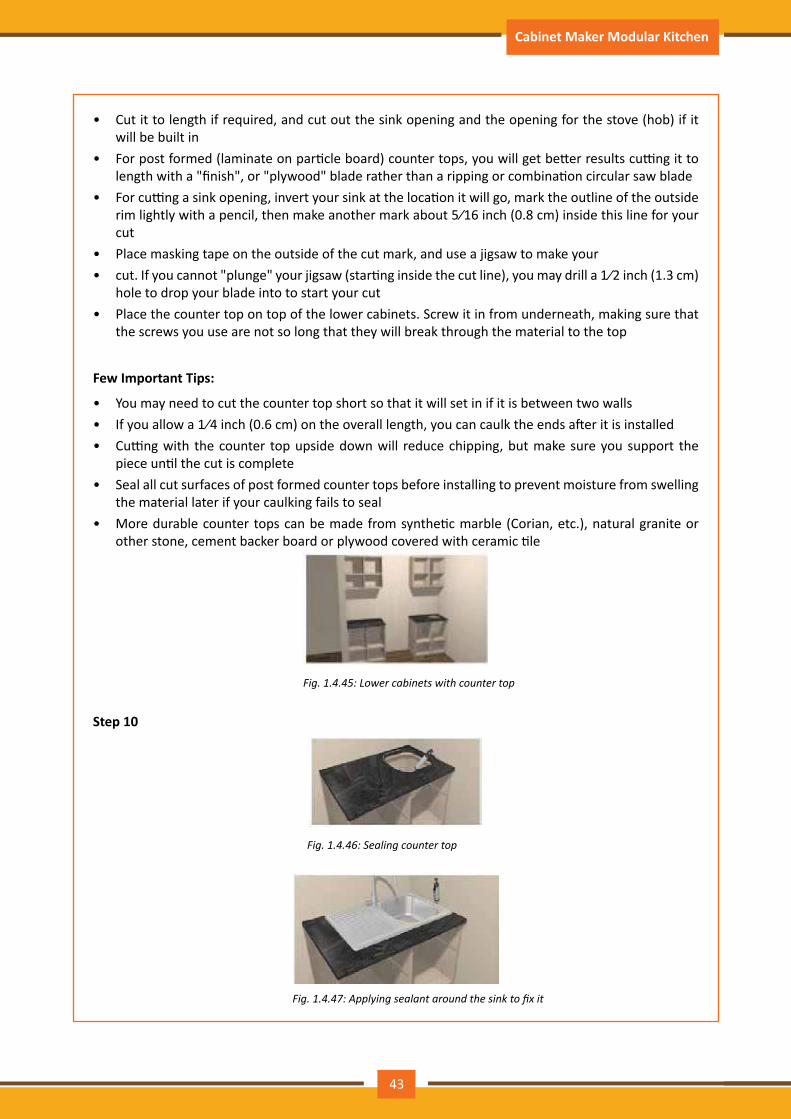
Step 10
Fig.1.4.46:Sealingcountertop
Fig.1.4.47:Applyingsealantaroundthesinktofixit
43
Participant Handbook Cabinet Maker Modular Kitchen
• Begin closing the joints once the counter top has been finished• Apply silicone or sealant like m- seal around the sink cut-out and lowers the sink into place• Check the fit and location, and then secure it into place with the brackets underneath. Apply sealant
around the rim of the sink• Apply sealant around the edges of the counter top and between the backsplash and the wall• In modular furniture assembly and installation, sealant works as a filler to join the gaps
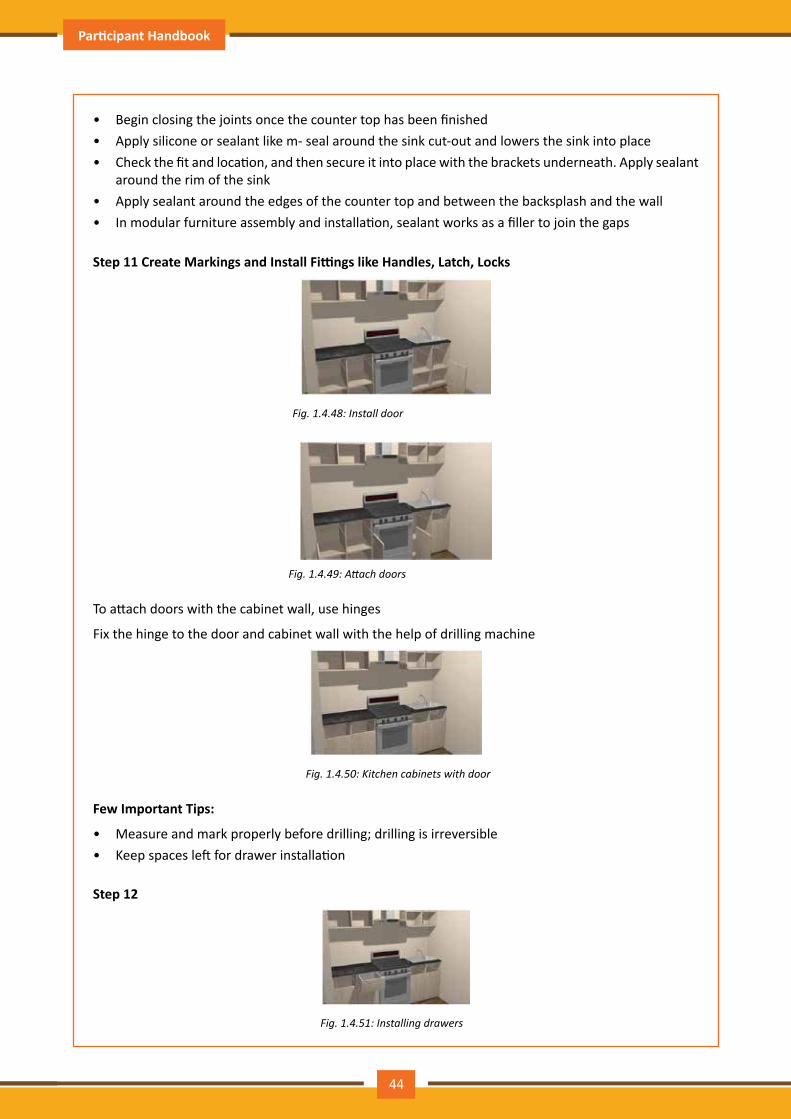
Step 11 Create Markings and Install Fittings like Handles, Latch, Locks
Fig.1.4.48:Installdoor
Fig.1.4.49:Attachdoors
To attach doors with the cabinet wall, use hinges
Fix the hinge to the door and cabinet wall with the help of drilling machine
Fig.1.4.50:Kitchencabinetswithdoor
Few Important Tips:
• Measure and mark properly before drilling; drilling is irreversible• Keep spaces left for drawer installation
Step 12
Fig.1.4.51:Installingdrawers
44

Participant Handbook Cabinet Maker Modular Kitchen
• Install drawers in the required slots• Place the drawers on the cleats with accurate alignment• Recheck alignment and smoothness of the drawer
Step 13
Fig.1.4.52:Installingdoors
Fig.1.4.53:Installationofhingetoattachdoor
• Mark and measure the dimensions of the doors and cabinet wall to install hinges• Attach hinges to the door• Install doors to the upper cabinet
Step 14
Fig.1.4.54:Installhardwaresothatthedoorshangproperly
45

Participant Handbook Cabinet Maker Modular Kitchen
Fig.1.4.55:Installhandlestothedoorsanddrawers
• Mark the joining areas with a pencil• Drill the joining areas to fit in the screws• Clean the holes carefully and place the handle with accurate alignment to the drilled holes• Put the screws in the holes and fit it in
Different Types of Wood
Particle board
This type of board is made when wood chips are compressed with glue. In terms of flat-pressed particle board, the chips primarily lie parallel to the surface. Chips in the surface layer are thinner than those found in the middle layer, which makes the surface of the particle board compact and denser than the middle.
• In a particle board the amount of glue used is 10%.• Particle boards are homogeneous possess the same degree of strength in various directions.• Particle boards have no grain direction• The dynamics of the particle board in the direction of the plane surface is minor.• These boards can be coated with several different surface materials, for example melamine,
laminate, veneer, paper, plastic etc.• So as to prevent warping the boards are usually coated on both sides.
The following information should be given when ordering particle boards:
• Thickness as a nominal thickness (mm)• Board size (mm x mm)• Board type (e.g. P6) and surface quality according to application• For coated particle boards either the product name or the quality of the covering of both surfaces,
the methods of protecting the edges (or edge battening) and color.
Plywood
Plywood can be described as cluster of wood veneers bonded together to create a flat sheet. Four types of plywood products include:
• Exterior• Structural• Marine• Interior
46
Participant Handbook Cabinet Maker Modular Kitchen
This type of wood offers all the intrinsic advantages of the original (parent) wood in addition to heightened properties in its laminated structure.
It has the capacity to accommodate the occasional short-term overload; up to twice the design load.
Cross laminated construction of plywood makes sure that wood sheets stay fairly stable no matter the changes of temperature and moisture.
Thanks to its cross laminated structure the panel shear of plywood is almost double that of solid timber.
Plywood does not have corroding properties due to its high chemical resistance. The following information should be given when ordering plywood boards:
• Use• Thickness as a nominal thickness (mm)• Size of the board with the measurement of the surface veneer in the direction of the grain always
mentioned first (mm x mm)• Type of plywood• Qualities of both surfaces, the visible surface always mentioned first
MDF
Medium Density Fibreboard (MDF) can be described as a reconstituted wood panel product. It is dry- processed fibreboard manufactured from wood fibres, as opposed to veneers or particles, and is denser than plywood and particleboard. MDF has an even density throughout and is smooth on both sides. It is reconstituted into wood sheets of a variety of lengths and widths. Bonding is attained by adding synthetic resin adhesives that have been cured under pressure and heat. Paraffin wax is an element that is added to it, which essentially assists with water repellency. MDF is developed through the use of urea- formaldehyde.
HDF
It is a wood-based product similar to MDF but exceeding its density. High Density Fibreboard has an extremely high dimensional stability, high strength characteristics.
HDF is made for usage where integrity, physical property and surface finish is vital. The average density of more than 820 kg/m3 (51 lb/ft3) ensures high core strength and face density. HDF can act as a substitute to veneer cross bands in hardwood veneered plywoods by providing a superior smooth surface to reduce potential surface defects.
Laminates
Laminate is an substitute option to hardwood cabinet systems. In laminates, the wood core is created using either granulized wood or chips which are often recycled. They are bonding with resin under high pressure. Wood laminate is a thin sheet of material employed to cover the core of a wood project with an effort to change the appearance of the material. Laminates could be of a wide range of materials, but frequently they are made veneers (thin sheets of wood).
Adhesive
In relation to the particular wood being glued together, cabinet makers need to find the right adhesive to achieve appropriate results
Here are five main types of wood glue used in woodworking:
47
Participant Handbook Cabinet Maker Modular Kitchen
• PVA (Poly-vinyl acetate)• Epoxy• CA (Cyanoacrylate)• Hide• Polyurethane
Poly-vinyl acetate (PVA):
Wood glue is ideal for basic woodworking projects. It is non-toxic, low-priced and readily available; it has a modest tack and cleans up with water.
CA Glue:
Cyanoacrylate (CA) glue is ideal for small repairs tasks, especially when turning or carving. Bear in mind that this wood glue dries promptly and forms a stiff, plastic-like bond.
Epoxy:
Epoxy is available in two parts: a hardener and a resin. While both components come in the liquid state, when they are combined together a chemical reaction takes place that allows the epoxy to harden.
Polyurethane:
As this type of glue cures in the presence of water, you would need to wet the two mating surfaces before you begin applying the wood glue. It bonds well to wood and many other materials, including fabric, metal, plastic etc.
Hide Glue:
Hot hide glue is developed by heating granules of hide glue in a pot with water. As it heats, the glue liquefies, and as it cools, it becomes solid.
Select and Apply Adhesives:
Step 1: Clean the wood surfaces to be glued.
Step 2: Prepare the glue as directed by the glue manufacturers.
Step 3: Apply a generous amount of glue to one surface. Use a brush to spread the glue evenly.
Step 4: Place the second onto the glue-covered surface.
Step 5: Clamp the surface together.
Step 6: Tighten the clamps making sure the excess glue oozes out all the way
Step 7: Clean up the excess glue with a damp cloth.
Step 8: Allow the glue to dry according to the manufacturer's instructions.
Step 9: Remove the clamps after the glue is dry.
Knowledge of various types of furniture accessories, hardware fitti ngs, joineries etc
Accessories and fitting in carpentry includes various items like handles, locks, hinges, staples, knobs and so on. A cabinet maker should have detailed information about accessories and fittings. He should also know about the fittings and how to use them.
48

Participant Handbook Cabinet Maker Modular Kitchen
Hinges:
Hinges are a type of bearing that connects two solid objects allowing them to open till a defined angle. They are available in several shapes, sizes and materials. Hinges are most commonly made of steel, brass and copper. The doors are classified as left handed and right handed door according to the installation of the hinges in it. The left handed doors have hinges installed to the left hand corner while the right hand doors have them on its right side.
Different Types of Hinges
Butt Hinges: These are the most commonly used hinges. They are cheap and very durable. This kind of hinge is used for doors and casements. The application method of butt hinges is very simple. The butt hinge consists of two halves called leaves and flaps. Both the parts are held together with the help of a pin. When the doors are closed both the leaves fold together. The leaves are set into recesses in the door and post. Butt hinges are of various types: broad suit butt hinge, narrow suite hinge.
Fig.1.4.56:ButtHinge
Another kind of butt hinge is rising butt hinge. This hinge has a helical knuckle joint due to which the shutter is raised by 10 cm on opening. It helps the door to close automatically. Majority of times these hinges are used for doors or rooms that have carpets etc.
Strap Hinges: It is a heavy duty hinge. It is used as a substitute of garent or strap hinge. This is used for ledged and braced doors and heavy doors or gates like garages, stables, gates etc.
Fig.1.4.57:StrapHinge
Spring Hinges: Spring hinges are of two types; single acting and double acting spring hinges. Both the types of spring hinges are used in swinging doors. The single acting spring hinges are used in the doors that open in only one direction. The double acting hinges are used in the shutters or doors that open in both the directions. The door closes automatically due to the action of the spring.
Fig.1.4.58:SpringHinge
49
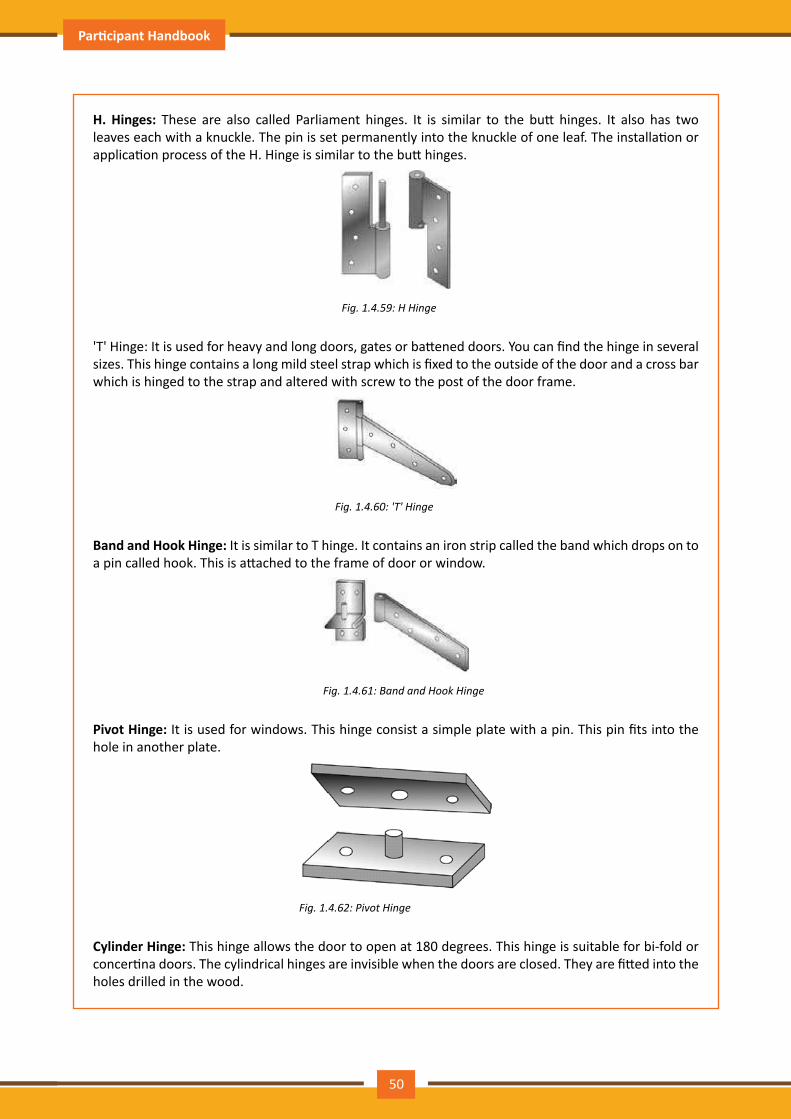
Participant Handbook Cabinet Maker Modular Kitchen
H. Hinges: These are also called Parliament hinges. It is similar to the butt hinges. It also has two leaves each with a knuckle. The pin is set permanently into the knuckle of one leaf. The installation or application process of the H. Hinge is similar to the butt hinges.
Fig.1.4.59:HHinge
'T' Hinge: It is used for heavy and long doors, gates or battened doors. You can find the hinge in several sizes. This hinge contains a long mild steel strap which is fixed to the outside of the door and a cross bar which is hinged to the strap and altered with screw to the post of the door frame.
Fig.1.4.60:'T'Hinge
Band and Hook Hinge: It is similar to T hinge. It contains an iron strip called the band which drops on to a pin called hook. This is attached to the frame of door or window.
Fig.1.4.61:BandandHookHinge
Pivot Hinge: It is used for windows. This hinge consist a simple plate with a pin. This pin fits into the hole in another plate.
Fig.1.4.62:PivotHinge
Cylinder Hinge: This hinge allows the door to open at 180 degrees. This hinge is suitable for bi-fold or concertina doors. The cylindrical hinges are invisible when the doors are closed. They are fitted into the holes drilled in the wood.
50
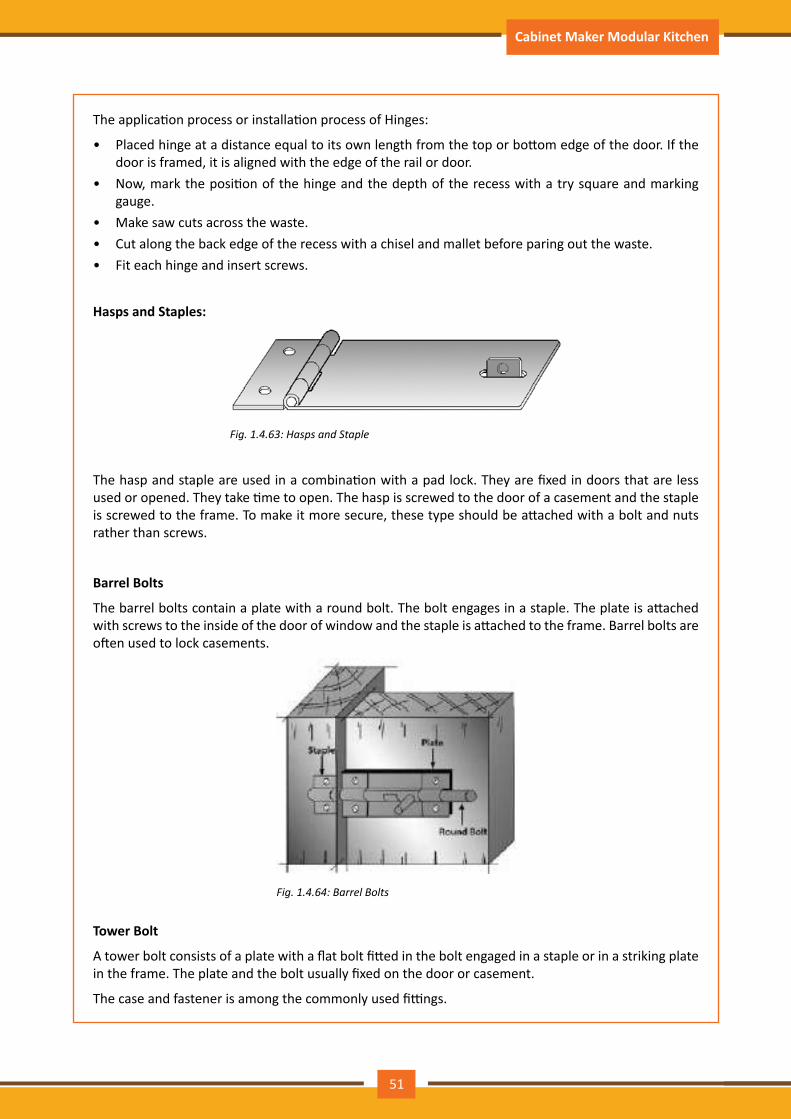
Participant Handbook Cabinet Maker Modular Kitchen
The application process or installation process of Hinges:
• Placed hinge at a distance equal to its own length from the top or bottom edge of the door. If the door is framed, it is aligned with the edge of the rail or door.
• Now, mark the position of the hinge and the depth of the recess with a try square and marking gauge.
• Make saw cuts across the waste.• Cut along the back edge of the recess with a chisel and mallet before paring out the waste.• Fit each hinge and insert screws.
Hasps and Staples:
Fig.1.4.63:HaspsandStaple
The hasp and staple are used in a combination with a pad lock. They are fixed in doors that are less used or opened. They take time to open. The hasp is screwed to the door of a casement and the staple is screwed to the frame. To make it more secure, these type should be attached with a bolt and nuts rather than screws.
Barrel Bolts
The barrel bolts contain a plate with a round bolt. The bolt engages in a staple. The plate is attached with screws to the inside of the door of window and the staple is attached to the frame. Barrel bolts are often used to lock casements.
Fig. 1.4.64: Barrel Bolts
Tower Bolt
A tower bolt consists of a plate with a flat bolt fitted in the bolt engaged in a staple or in a striking plate in the frame. The plate and the bolt usually fixed on the door or casement.
The case and fastener is among the commonly used fittings.
51
Participant Handbook Cabinet Maker Modular Kitchen
Fig.1.4.65:TowerBolt
Locks and Fittings:
There are several kinds of locks and fittings available in market. Locks are majority used for doors and casements. It is important to know the way the doors will open before actually ordering the locks and fittings.
Commonly used Locks and Fittings Mortise locks
A mortise lock contains a stock, face plate, latch bolt and a handle. The handle fits into the bush and there is a lock bolt which is moved with a key. Two bolts fit in the striking plate which is attached by the screws of the door post. The mortise lock fits in to a mortise in the edge of the door. The stroke should fit tightly against the sides of the mortise so that the door itself faces the strain not the screw which only holds the lock in position. This type of lock can only be installed in door with enough thickness to receive a mortise. It is different to force open, since they are installed inside.
Fig.1.4.66:Mortiselocks
Application or installation of Mortise locks
The door furniture contains two leaf plates: two hands and a spindle. The spindle is fit in the one hand and secured in the other by a pin. Be careful to fix the handle inside the door. This makes the lock more secure as it cannot be loosened from the outside. The leaf plates are attached to both the sides of the door with screws.
Rim locks
Rim locks have a latch bolt operated by a handle and a lock bolt which is operated by a key. You can operate the lock from both inside and outside the door. The lock is attached with screws to inside face
52
Participant Handbook Cabinet Maker Modular Kitchen
of the door and the boot shoot into a staple. There is a face plate which is attached with screws to the door edge. The outer side of the door has two round plates; one to hold the handle and other to cover the key hole. The handles have a square spindle which fits into the brush of the lock.
Fig. 1.4.67: Rim locks
Rim lock is available in one more type, 'Cylinder Rim Night Latch'. This lock consists of a latch, a locking cylinder and a staple. The face plate which is a part of the shell is attached to the spindle and fixed in the cylinder. The latch is operated from outer side by a key which rotates the spindle. The spindle moves the bolt mechanism inside the latch. The bolt may also be shot back from the staple by turning the knob of the latch inside. The locking arm is used to fix the bolt in place so that it cannot be operated from either side by key or the knob.
Fig.1.4.68:CylinderRimNightLatch
Pad locks
Pad locks have a ring which locks into a body. The locking mechanism can be either a lever mechanism or a locking cylinder as in the case of mortise lock.
Handles and Knobs: Knobs and handles allow easy access to doors, windows, casements and other furniture items. Designer knot and handles make the furniture piece more decorative and stylish. Handles are functional piece of
hard ware. They are highly used to enhance the beauty of drawers and cabinets etc.
While selecting handles and knobs, it is important for you to take appropriate its size and shape. The style, size and shape of the handles and knobs should be in scale to your work piece and the interior of the place.
Knobs are generally of small size and mostly used for drawers or kitchen cabinets.
53
Participant Handbook Cabinet Maker Modular Kitchen
Given below are some commonly used knobs and handles with their application or installation procedure in brief:
Cabinet Handle
The classic handle for cabinet is suspended from two pivots one at each end. This kind of handle is available in variety of sizes and forms.
Drop Handle
A single handle with a tear drop shaped or decorative finger grip is suspended from the center of a drop handle. It is mostly fixed in the center of a small drawer.
Ring pull Handle
In construction this handle is similar to tear drop shaped handle. There is a ring that hangs from the top of a backing plate.
Door or drawer knob
It is a round shaped knob that is made of wood, metal or ceramic. This knob is mostly used for furniture ranging from wardrobes to collectors cabinets. The application method is a screw that is projecting from its back. The other method is by fixing an ordinary screw or a machine screw passed through the cabinet front from the knob.
Flush handle
A pivoted ring or D- Shaped handle lies flush with a thick solid- brass back support plate. This plate is recessed into the drawer front and fixed with countersunk wood screws.
Drawer Pull
It is one piece handle. They are originally used on military chests. They are counted as strong screw fixed handles for cup boards and chests of drawers.
D- Handle
They are handles made of wood, metal or plastic. They suit perfectly to all simple modern and stylish furniture. They are invariably made with threaded inserts for machine- screw attachment.
Sliding- Door Handle
These handles are generally circular or rectangular shaped. They have finely shaped finger grips which are made for gluing into over lapping sliding doors.
Types of Joineries
Wood joinery is one of the most basic concepts in woodworking. As a modular kitchen cabinet maker one cannot achieve much without using joints.
• The joints are used either to bring pieces together or to make a firm structure.• The most basic joint involves two members butted together and connected with a fastener like a
screw or adhesive.
54
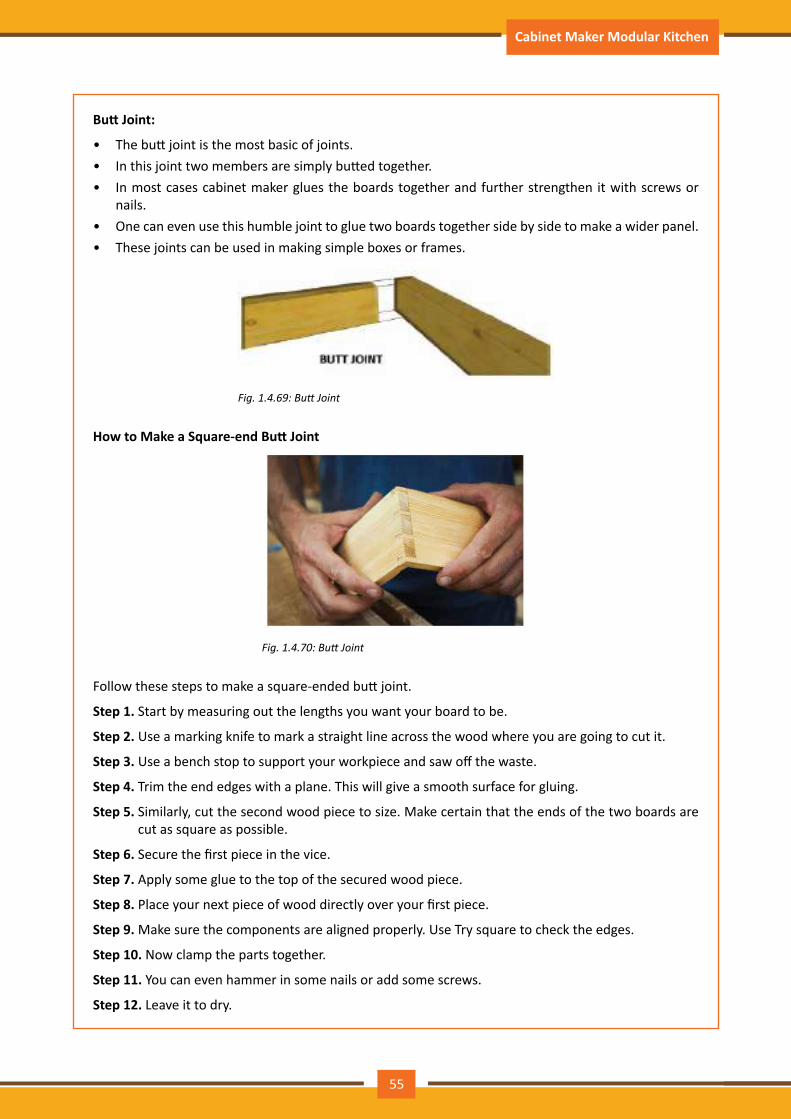
Participant Handbook Cabinet Maker Modular Kitchen
Butt Joint:
• The butt joint is the most basic of joints.• In this joint two members are simply butted together.• In most cases cabinet maker glues the boards together and further strengthen it with screws or
nails.• One can even use this humble joint to glue two boards together side by side to make a wider panel.• These joints can be used in making simple boxes or frames.
Fig.1.4.69:ButtJoint
How to Make a Square-end Butt Joint
Fig.1.4.70:ButtJoint
Follow these steps to make a square-ended butt joint.
Step 1. Start by measuring out the lengths you want your board to be.
Step 2. Use a marking knife to mark a straight line across the wood where you are going to cut it.
Step 3. Use a bench stop to support your workpiece and saw off the waste.
Step 4. Trim the end edges with a plane. This will give a smooth surface for gluing.
Step 5. Similarly, cut the second wood piece to size. Make certain that the ends of the two boards are cut as square as possible.
Step 6. Secure the first piece in the vice.
Step 7. Apply some glue to the top of the secured wood piece.
Step 8. Place your next piece of wood directly over your first piece.
Step 9. Make sure the components are aligned properly. Use Try square to check the edges.
Step 10. Now clamp the parts together.
Step 11. You can even hammer in some nails or add some screws.
Step 12. Leave it to dry.
55
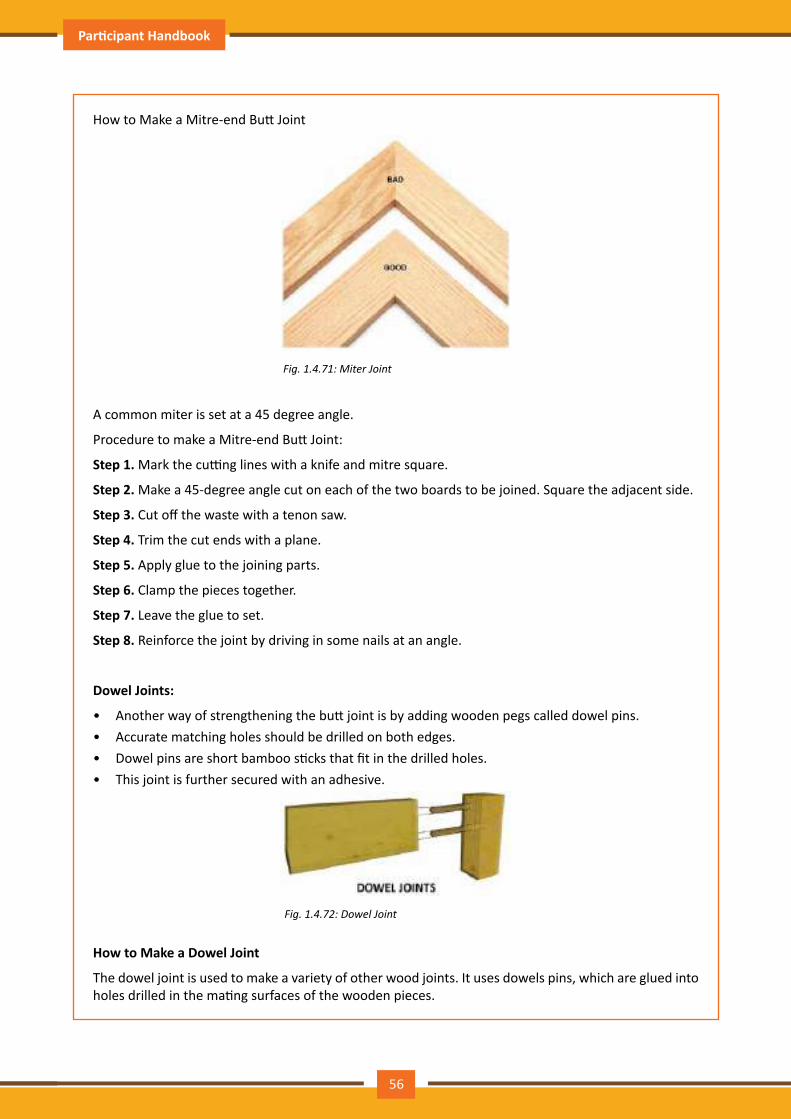
Participant Handbook Cabinet Maker Modular Kitchen
How to Make a Mitre-end Butt Joint
Fig.1.4.71:MiterJoint
A common miter is set at a 45 degree angle.
Procedure to make a Mitre-end Butt Joint:
Step 1. Mark the cutting lines with a knife and mitre square.
Step 2. Make a 45-degree angle cut on each of the two boards to be joined. Square the adjacent side.
Step 3. Cut off the waste with a tenon saw.
Step 4. Trim the cut ends with a plane.
Step 5. Apply glue to the joining parts.
Step 6. Clamp the pieces together.
Step 7. Leave the glue to set.
Step 8. Reinforce the joint by driving in some nails at an angle.
Dowel Joints:
• Another way of strengthening the butt joint is by adding wooden pegs called dowel pins.• Accurate matching holes should be drilled on both edges.• Dowel pins are short bamboo sticks that fit in the drilled holes.• This joint is further secured with an adhesive.
Fig.1.4.72:DowelJoint
How to Make a Dowel Joint
The dowel joint is used to make a variety of other wood joints. It uses dowels pins, which are glued into holes drilled in the mating surfaces of the wooden pieces.
56
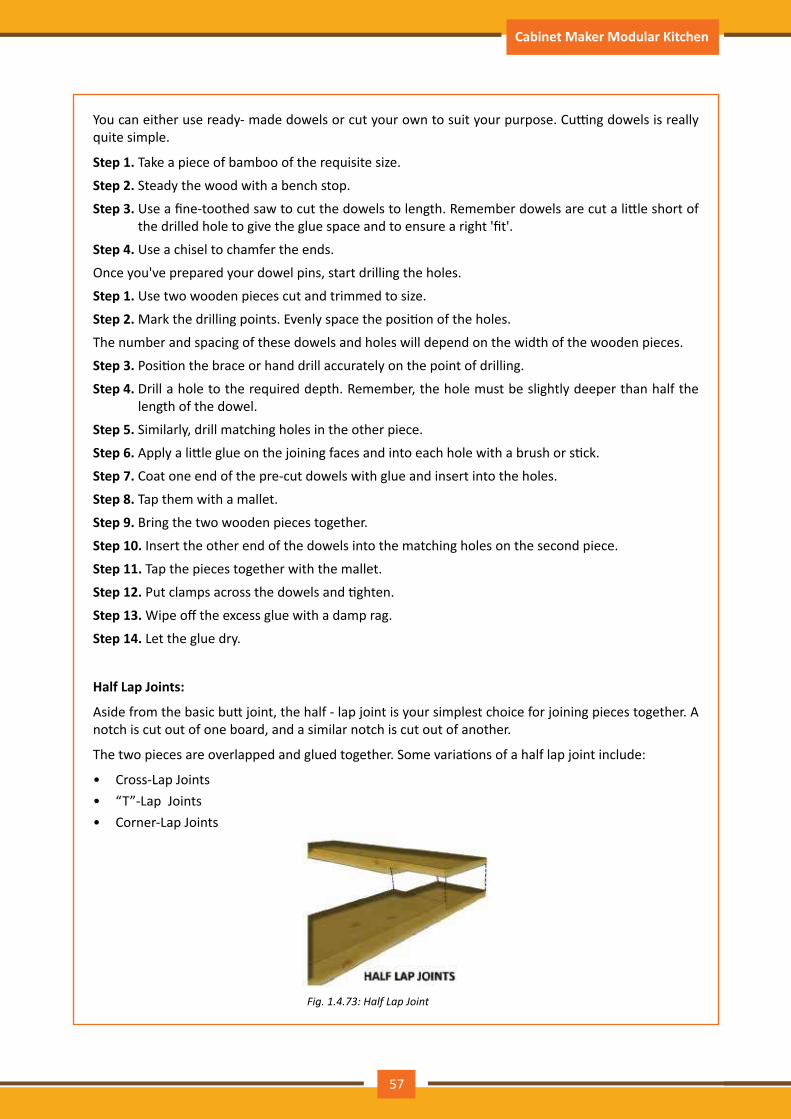
Participant Handbook Cabinet Maker Modular Kitchen
You can either use ready- made dowels or cut your own to suit your purpose. Cutting dowels is really quite simple.
Step 1. Take a piece of bamboo of the requisite size.
Step 2. Steady the wood with a bench stop.
Step 3. Use a fine-toothed saw to cut the dowels to length. Remember dowels are cut a little short of the drilled hole to give the glue space and to ensure a right 'fit'.
Step 4. Use a chisel to chamfer the ends.
Once you've prepared your dowel pins, start drilling the holes.
Step 1. Use two wooden pieces cut and trimmed to size.
Step 2. Mark the drilling points. Evenly space the position of the holes.
The number and spacing of these dowels and holes will depend on the width of the wooden pieces.
Step 3. Position the brace or hand drill accurately on the point of drilling.
Step 4. Drill a hole to the required depth. Remember, the hole must be slightly deeper than half the length of the dowel.
Step 5. Similarly, drill matching holes in the other piece.
Step 6. Apply a little glue on the joining faces and into each hole with a brush or stick.
Step 7. Coat one end of the pre-cut dowels with glue and insert into the holes.
Step 8. Tap them with a mallet.
Step 9. Bring the two wooden pieces together.
Step 10. Insert the other end of the dowels into the matching holes on the second piece.
Step 11. Tap the pieces together with the mallet.
Step 12. Put clamps across the dowels and tighten.
Step 13. Wipe off the excess glue with a damp rag.
Step 14. Let the glue dry.
Half Lap Joints:
Aside from the basic butt joint, the half - lap joint is your simplest choice for joining pieces together. A notch is cut out of one board, and a similar notch is cut out of another.
The two pieces are overlapped and glued together. Some variations of a half lap joint include:
• Cross-Lap Joints • “T”-Lap Joints • Corner-Lap Joints
Fig.1.4.73:HalfLapJoint
57
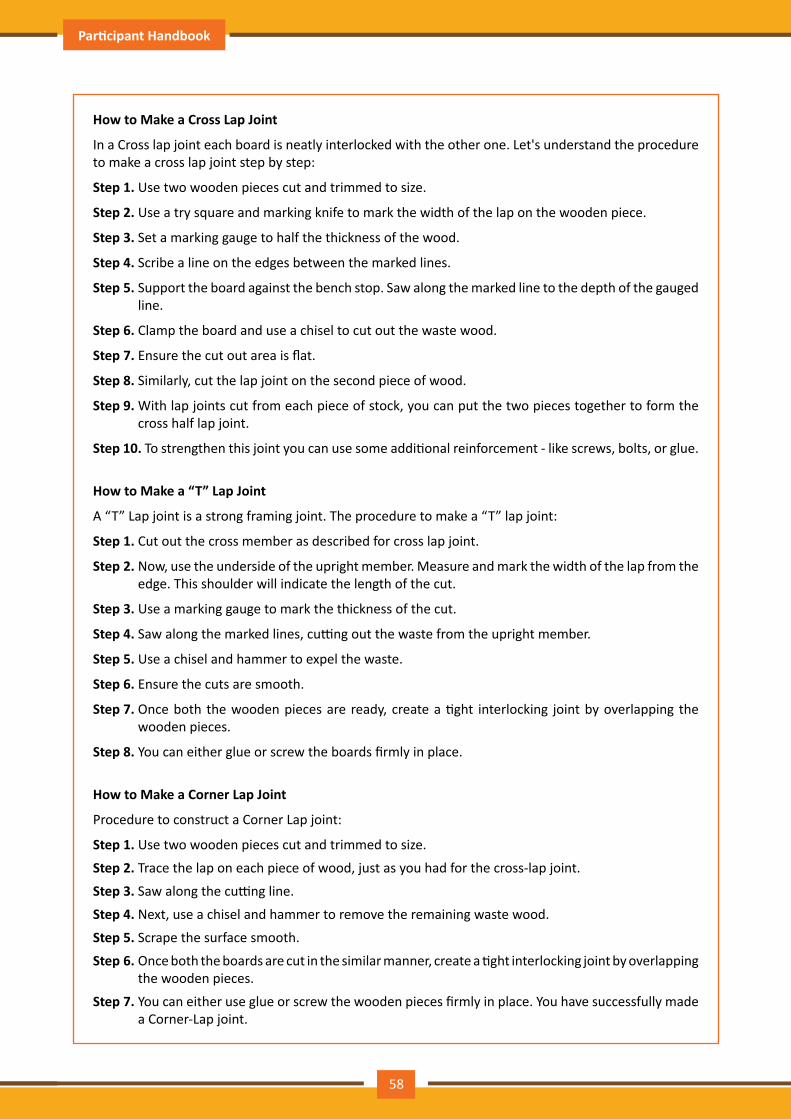
Participant Handbook Cabinet Maker Modular Kitchen
How to Make a Cross Lap Joint
In a Cross lap joint each board is neatly interlocked with the other one. Let's understand the procedure to make a cross lap joint step by step:
Step 1. Use two wooden pieces cut and trimmed to size.
Step 2. Use a try square and marking knife to mark the width of the lap on the wooden piece.
Step 3. Set a marking gauge to half the thickness of the wood.
Step 4. Scribe a line on the edges between the marked lines.
Step 5. Support the board against the bench stop. Saw along the marked line to the depth of the gauged line.
Step 6. Clamp the board and use a chisel to cut out the waste wood.
Step 7. Ensure the cut out area is flat.
Step 8. Similarly, cut the lap joint on the second piece of wood.
Step 9. With lap joints cut from each piece of stock, you can put the two pieces together to form the cross half lap joint.
Step 10. To strengthen this joint you can use some additional reinforcement - like screws, bolts, or glue.
How to Make a “T” Lap Joint
A “T” Lap joint is a strong framing joint. The procedure to make a “T” lap joint:
Step 1. Cut out the cross member as described for cross lap joint.
Step 2. Now, use the underside of the upright member. Measure and mark the width of the lap from the edge. This shoulder will indicate the length of the cut.
Step 3. Use a marking gauge to mark the thickness of the cut.
Step 4. Saw along the marked lines, cutting out the waste from the upright member.
Step 5. Use a chisel and hammer to expel the waste.
Step 6. Ensure the cuts are smooth.
Step 7. Once both the wooden pieces are ready, create a tight interlocking joint by overlapping the wooden pieces.
Step 8. You can either glue or screw the boards firmly in place.
How to Make a Corner Lap Joint
Procedure to construct a Corner Lap joint:
Step 1. Use two wooden pieces cut and trimmed to size.
Step 2. Trace the lap on each piece of wood, just as you had for the cross-lap joint.
Step 3. Saw along the cutting line.
Step 4. Next, use a chisel and hammer to remove the remaining waste wood.
Step 5. Scrape the surface smooth.
Step 6. Once both the boards are cut in the similar manner, create a tight interlocking joint by overlapping the wooden pieces.
Step 7. You can either use glue or screw the wooden pieces firmly in place. You have successfully made a Corner-Lap joint.
58
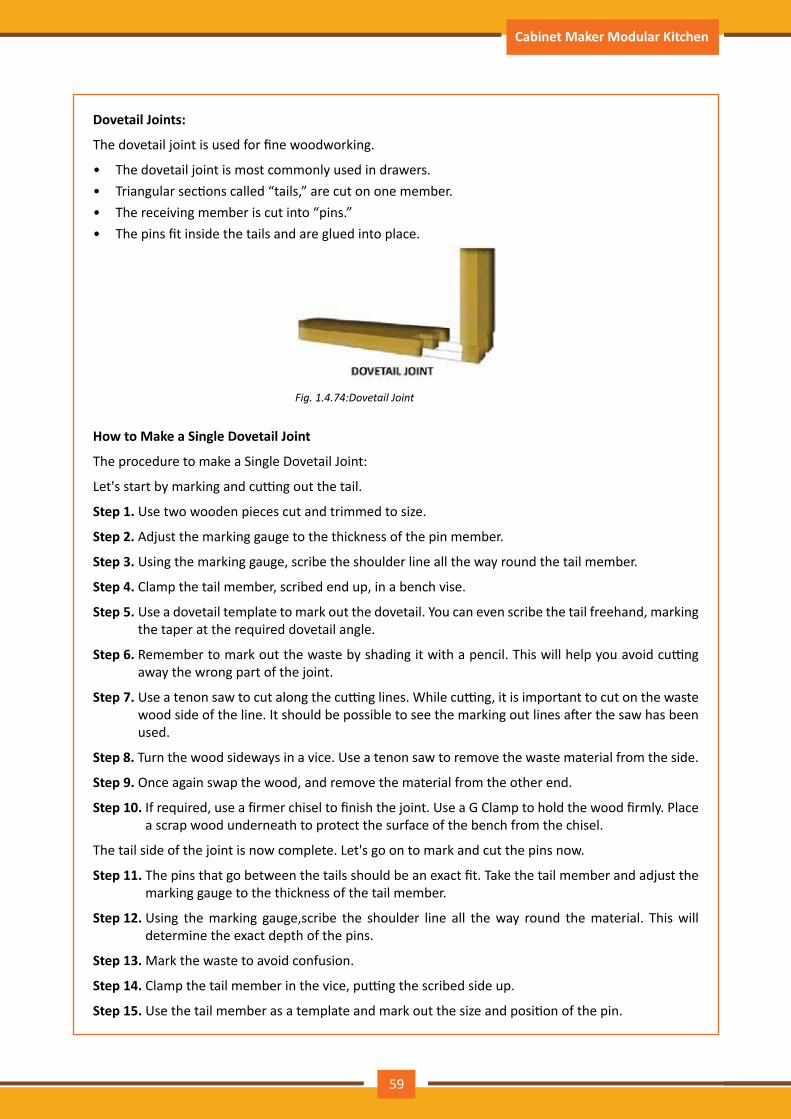
Participant Handbook Cabinet Maker Modular Kitchen
Dovetail Joints:
The dovetail joint is used for fine woodworking.
• The dovetail joint is most commonly used in drawers.• Triangular sections called “tails,” are cut on one member.• The receiving member is cut into “pins.”• The pins fit inside the tails and are glued into place.
Fig.1.4.74:DovetailJoint
How to Make a Single Dovetail Joint
The procedure to make a Single Dovetail Joint:
Let's start by marking and cutting out the tail.
Step 1. Use two wooden pieces cut and trimmed to size.
Step 2. Adjust the marking gauge to the thickness of the pin member.
Step 3. Using the marking gauge, scribe the shoulder line all the way round the tail member.
Step 4. Clamp the tail member, scribed end up, in a bench vise.
Step 5. Use a dovetail template to mark out the dovetail. You can even scribe the tail freehand, marking the taper at the required dovetail angle.
Step 6. Remember to mark out the waste by shading it with a pencil. This will help you avoid cutting away the wrong part of the joint.
Step 7. Use a tenon saw to cut along the cutting lines. While cutting, it is important to cut on the waste wood side of the line. It should be possible to see the marking out lines after the saw has been used.
Step 8. Turn the wood sideways in a vice. Use a tenon saw to remove the waste material from the side.
Step 9. Once again swap the wood, and remove the material from the other end.
Step 10. If required, use a firmer chisel to finish the joint. Use a G Clamp to hold the wood firmly. Place a scrap wood underneath to protect the surface of the bench from the chisel.
The tail side of the joint is now complete. Let's go on to mark and cut the pins now.
Step 11. The pins that go between the tails should be an exact fit. Take the tail member and adjust the marking gauge to the thickness of the tail member.
Step 12. Using the marking gauge,scribe the shoulder line all the way round the material. This will determine the exact depth of the pins.
Step 13. Mark the waste to avoid confusion.
Step 14. Clamp the tail member in the vice, putting the scribed side up.
Step 15. Use the tail member as a template and mark out the size and position of the pin.
59
Participant Handbook Cabinet Maker Modular Kitchen
Step 16. Use a tenon saw to cut straight down on the waste side of the cutting line.
Step 17. Use a coping saw to cut out the socket between the pins.
Step 18. A coping saw might not get to the exact depth, to this end use a chisel and hammer to finish the joint, if it is needed.
Step 19. All you have to do is fit the tail in the pin socket. Use a mallet to assemble the parts together. The joint should fit together perfectly, if care has been taken when marking out and cutting the two sides.
Step 20. This is the time to check for any cracks in the wood that might occur if the fit is too tight. If necessary, take the joint apart and use a chisel to correct it.
Step 21. Now you can bond the joint together with glue. Use a try square to check if it is still square.
Step 22. Use a brush to apply glue to the joining parts.
Step 23. Clamp the parts together.
Step 24. Remove the excess glue with a damp cloth. Step 25. Leave the glue to dry.
Step 26. Some nails can be added in the dovetail pin to keep the joint closed and square while it dries.
How to Make a Through Dovetail Joint
The steps to make a Through Dovetail Joints:
Let's first start by marking and cutting out the tails, just as we had for a single dovetail joint.
Step 1. Use two wooden pieces cut and trimmed to size.
Step 2. Set the marking gauge to the thickness of the wood.
Step 3. Using the marking gauge, mark the shoulder line for the tails all around the end of the tail member.
Step 4. Clamp the tail member, scribed end up, in a bench vise.
Step 5. Use a dovetail template to mark out the dovetails. The size and number can vary according to the width of the boards being joined.
If you are scribing them freehand, ensure you keep the tails of the same size and equally spaced.
Step 6. Scribe the line first with a sharp blade, and then darken with a pencil if desired. It should look like this when you're done.
Step 7. Mark the waste to avoid confusion.
Step 8. Use a tenon saw to cut along the waste side of the cutting lines.
Step 9. Reset the work piece and trim the wood from both sides.
Step 10. Once the dovetails have been cut out you can use a chisel to clean up the joints or remove some excess wood.
The tail member is ready. Now the procedure to make the pins:
Step 1. Set the marking gauge to the thickness of the tail member.
Step 2. Scribe a shoulder line around all faces and sides of the pin member.
Step 3. Secure the pin member in a vice and then line up your tail member on top.
Step 4. Use the dovetails as a template and mark lines on the pin member.
60
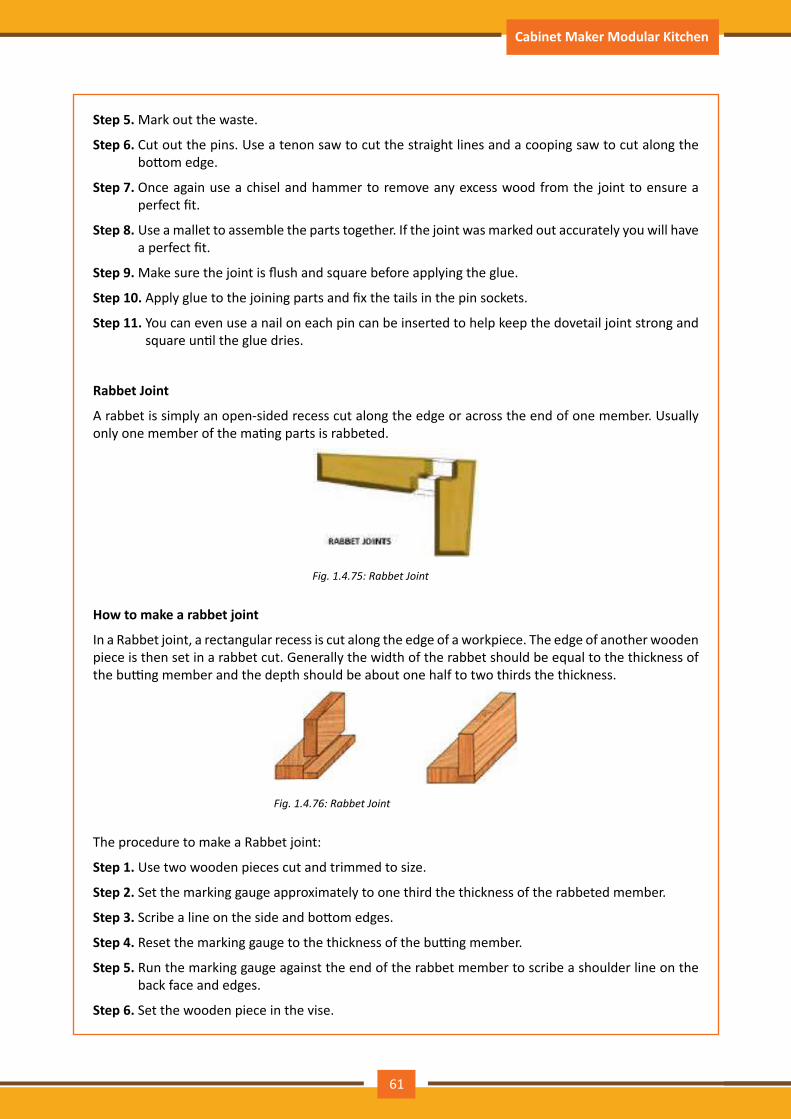
Participant Handbook Cabinet Maker Modular Kitchen
Step 5. Mark out the waste.
Step 6. Cut out the pins. Use a tenon saw to cut the straight lines and a cooping saw to cut along the bottom edge.
Step 7. Once again use a chisel and hammer to remove any excess wood from the joint to ensure a perfect fit.
Step 8. Use a mallet to assemble the parts together. If the joint was marked out accurately you will have a perfect fit.
Step 9. Make sure the joint is flush and square before applying the glue.
Step 10. Apply glue to the joining parts and fix the tails in the pin sockets.
Step 11. You can even use a nail on each pin can be inserted to help keep the dovetail joint strong and square until the glue dries.
Rabbet Joint
A rabbet is simply an open-sided recess cut along the edge or across the end of one member. Usually only one member of the mating parts is rabbeted.
Fig.1.4.75:RabbetJoint
How to make a rabbet joint
In a Rabbet joint, a rectangular recess is cut along the edge of a workpiece. The edge of another wooden piece is then set in a rabbet cut. Generally the width of the rabbet should be equal to the thickness of the butting member and the depth should be about one half to two thirds the thickness.
Fig.1.4.76:RabbetJoint
The procedure to make a Rabbet joint:
Step 1. Use two wooden pieces cut and trimmed to size.
Step 2. Set the marking gauge approximately to one third the thickness of the rabbeted member.
Step 3. Scribe a line on the side and bottom edges.
Step 4. Reset the marking gauge to the thickness of the butting member.
Step 5. Run the marking gauge against the end of the rabbet member to scribe a shoulder line on the back face and edges.
Step 6. Set the wooden piece in the vise.
61
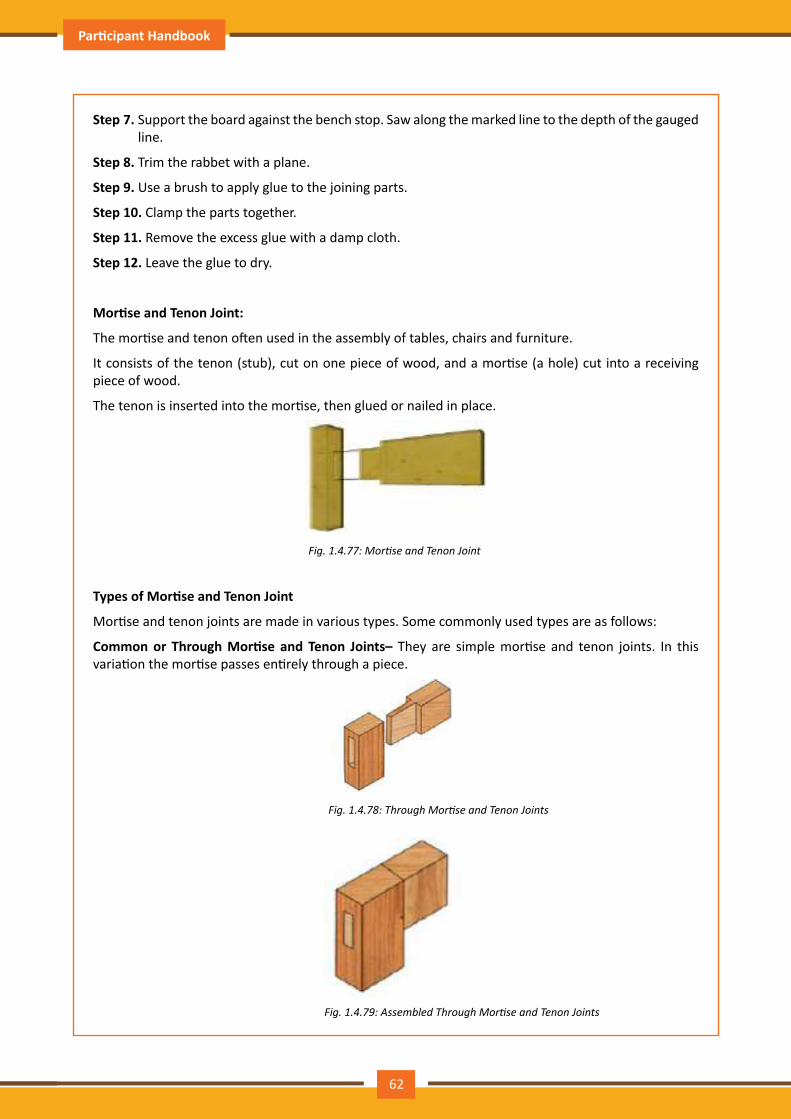
Participant Handbook Cabinet Maker Modular Kitchen
Step 7. Support the board against the bench stop. Saw along the marked line to the depth of the gauged line.
Step 8. Trim the rabbet with a plane.
Step 9. Use a brush to apply glue to the joining parts.
Step 10. Clamp the parts together.
Step 11. Remove the excess glue with a damp cloth.
Step 12. Leave the glue to dry.
Mortise and Tenon Joint:
The mortise and tenon often used in the assembly of tables, chairs and furniture.
It consists of the tenon (stub), cut on one piece of wood, and a mortise (a hole) cut into a receiving piece of wood.
The tenon is inserted into the mortise, then glued or nailed in place.
Fig.1.4.77:MortiseandTenonJoint
Types of Mortise and Tenon Joint
Mortise and tenon joints are made in various types. Some commonly used types are as follows:
Common or Through Mortise and Tenon Joints– They are simple mortise and tenon joints. In this variation the mortise passes entirely through a piece.
Fig.1.4.78:ThroughMortiseandTenonJoints
Fig.1.4.79:AssembledThroughMortiseandTenonJoints
62
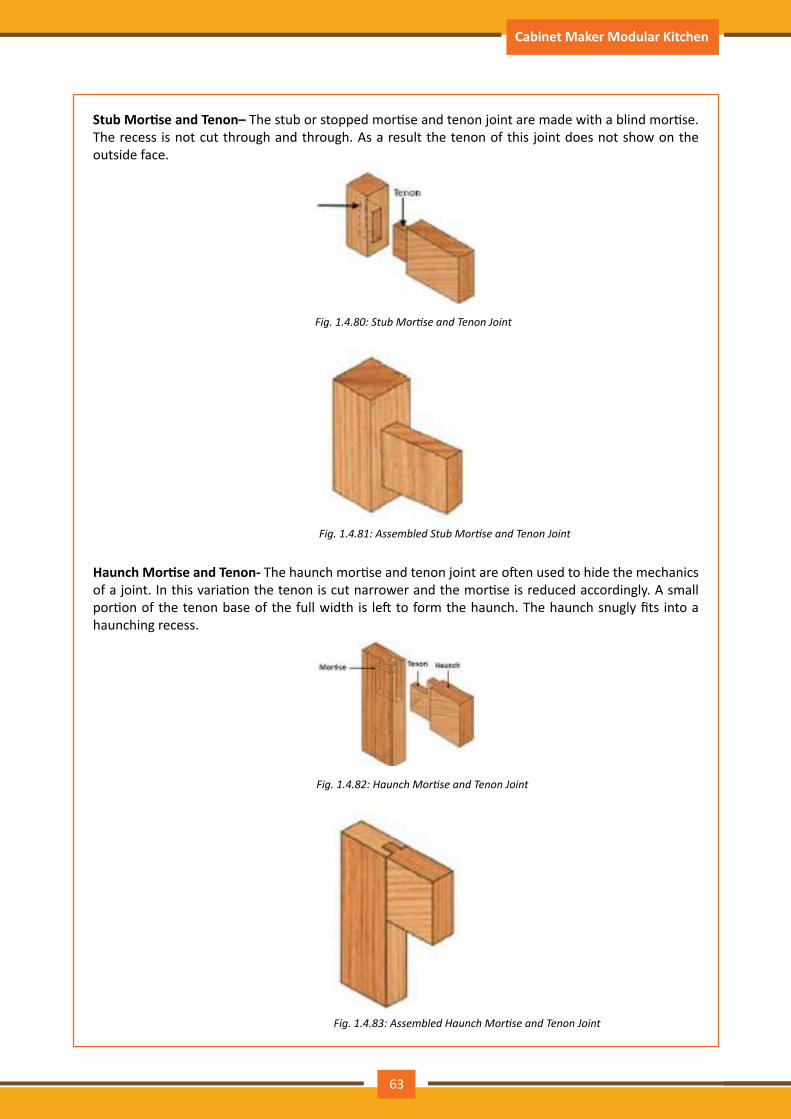
Participant Handbook Cabinet Maker Modular Kitchen
Stub Mortise and Tenon– The stub or stopped mortise and tenon joint are made with a blind mortise. The recess is not cut through and through. As a result the tenon of this joint does not show on the outside face.
Fig.1.4.80:StubMortiseandTenonJoint
Fig.1.4.81:AssembledStubMortiseandTenonJoint
Haunch Mortise and Tenon- The haunch mortise and tenon joint are often used to hide the mechanics of a joint. In this variation the tenon is cut narrower and the mortise is reduced accordingly. A small portion of the tenon base of the full width is left to form the haunch. The haunch snugly fits into a haunching recess.
Fig.1.4.82:HaunchMortiseandTenonJoint
Fig.1.4.83:AssembledHaunchMortiseandTenonJoint
63

Participant Handbook Cabinet Maker Modular Kitchen
How to Make a Common Mortise and Tenon Joint
The steps to make a common mortise-and-tenon joint:
The first thing you must do is mark out the tenon.
Step 1. Cut the mortise and tenon pieces to the requisite size.
Step 2. Select and mark the face side and edge on both the pieces.
Step 3. From the end of the tenon piece, measure and mark the length of the tenon. Remember the length of the tenon is usually only about 2/3rd of the width of the tenon member.
Step 4. Using a try square and marking knife, continue to mark all the way around tenon piece.
Step 5. Now you must mark out the tenon width. It should be around 1/3rd the thickness of the wood. Select a mortise chisel that matches the width you want.
Step 6. Adjust the pins of a mortise gauge to the width of the chisel.
Step 7. Rest the stock of the mortise gauge against the face side. Adjust the gauge until the marks it makes are the same from either side.
Step 8. Now mark the tenon with the mortise gauge. Working from the face side, scribe the lines from the shoulder lines on one edge, over the end and back down to the shoulder line on the other end.
This will determine the thickness of the tongue.
Step 9. Use a pencil to emphasize the line for greater visibility.
Step 10. Mark the waste to avoid making a mistake while cutting.
Move on to mark the layout of the mortise, on the second wooden piece.
Decide the position of the joint. Now, use the Tenon member as a guide and mark its width onto the mortise member.
Now that you have the width sorted you must mark the thickness of the mortise. The thickness will be the same as the tenon's thickness. Use the same setting of the mortise gauge as you had used for the tenon. Adjust the gauge to ensure the mortise is marked out exactly in the center.
Once, you have the layout marked carefully, you can go about cutting out the waste. Clamp the mortise member to the work bench.
Step 11. Use the mortise chisel to start the cut in the middle.
Step 12. Drive the chisel with a mallet to cut half way through the hole.
Step 13. Clear out all debris from inside mortise to leave a clean hole.
Step 14. Reset the work piece.
Step 15. Chop out the waste in the same way till you meet the cut out from the other side.
Step 16. Set the tenon member in a vise at an angle, with the corner edge facing away from you.
Step 17. Position the tenon saw inside on the waste side of the cutting line.
Step 18. Cut down the side of the tenon all the way to the depth line. Take care not to overrun.
Step 19. Reset the tenon member, so it faces you this time.
Step 20. Cut down the other side.
Step 21. Use the mallet and chisel carefully to smooth any rough edges and straighten the tenon.
Step 22. Fit the tenon into the mortise to see if they fit snugly.
64

Participant Handbook Cabinet Maker Modular Kitchen
Step 23. If required, trim tenon with a saw until the two pieces fit together.
Step 24. Apply wood glue to the tenon and inside the mortise and join the pieces.
Step 25. Clamp together until glue dries.
How to make a stub mortise and tenon joint
The following steps are used to make a Stub mortise and tenon joints:
Step 1. Use two wooden pieces cut and trimmed to size.
Step 2. Select and mark the face side and edge on both the wooden pieces.
Step 3. Measure the width of the mortise member to calculate the depth of the mortise and the length of the tenon. The depth of the mortise should be three-quarters of the thickness of the mortise member. This will also determine the length of the tenon. Ideally, the tenon should be kept 2- 3mm short of the mortise depth.
Step 4. Use a try square and marking knife to scribe a shoulder line all the around the tenon member. Step 5. Adjust the mortise gauge to the width of the chisel.
Step 6. Rest the stock of the mortise gauge against the face side.
Step 7. Position it in the center. Scribe the gauge lines, marking out the waste.
Step 8. Next, determine the position of the mortise on the mortise member.
Step 9. Mark out the width using the tenon member as a guide.
Step 10. Use a try square and marking knife to square the lines across.
Step 11. Use the mortise gauge with the previous setting to scribe lines between the squared lines. This will determine the thickness of the mortise recess.
Step 12. In order to determine the depth of the recess use this simple trick. Set the chisel blade against the tenon length.
Step 13. Apply a band of masking tape a little over the length of the tenon. This will act as a guide while you're removing the material from the recess.
Step 14. Saw of the waste from the tenon just as you did for a common mortise joint.
Step 15. Chop out the mortise, working from one side only.
Step 16. Stop when the set tape is in level with the surface. Step 17. Ensure the bottom is level.
Step 18. Fit the tenon into the mortise to see if they fit snugly.
Step 19. If required, trim tenon with a saw, until the two pieces fit together.
Step 20. Apply wood glue to the tenon and inside the mortise and join the pieces.
Step 21. Clamp together until glue dries.
How to Make a Haunched Mortise and Tenon Joint
The procedure to construct a Haunched Mortise and Tenon joint:
Step 1. Cut and trim the tenon member to size.
Step 2. Select and mark the face side and edge.
Step 3. Measure and mark the length of the tenon. Using a try square and marking knife, scribe the shoulder line all around the tenon member.
65
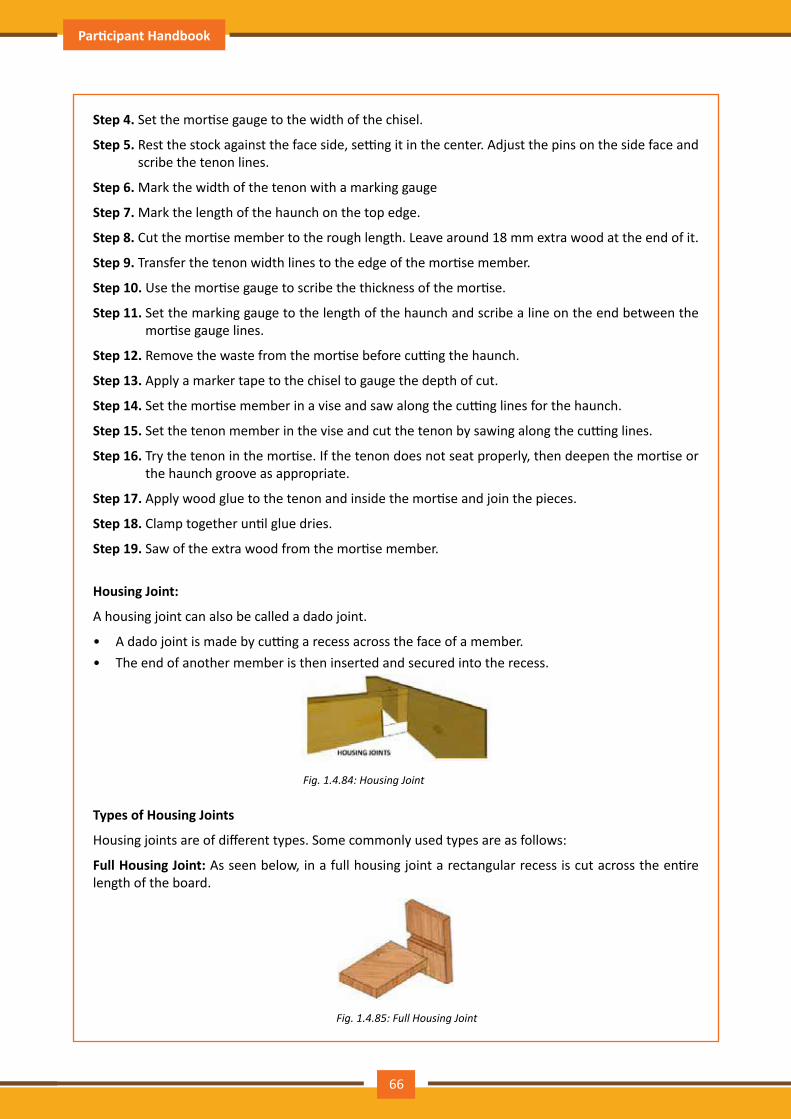
Participant Handbook Cabinet Maker Modular Kitchen
Step 4. Set the mortise gauge to the width of the chisel.
Step 5. Rest the stock against the face side, setting it in the center. Adjust the pins on the side face and scribe the tenon lines.
Step 6. Mark the width of the tenon with a marking gauge
Step 7. Mark the length of the haunch on the top edge.
Step 8. Cut the mortise member to the rough length. Leave around 18 mm extra wood at the end of it.
Step 9. Transfer the tenon width lines to the edge of the mortise member.
Step 10. Use the mortise gauge to scribe the thickness of the mortise.
Step 11. Set the marking gauge to the length of the haunch and scribe a line on the end between the mortise gauge lines.
Step 12. Remove the waste from the mortise before cutting the haunch.
Step 13. Apply a marker tape to the chisel to gauge the depth of cut.
Step 14. Set the mortise member in a vise and saw along the cutting lines for the haunch.
Step 15. Set the tenon member in the vise and cut the tenon by sawing along the cutting lines.
Step 16. Try the tenon in the mortise. If the tenon does not seat properly, then deepen the mortise or the haunch groove as appropriate.
Step 17. Apply wood glue to the tenon and inside the mortise and join the pieces.
Step 18. Clamp together until glue dries.
Step 19. Saw of the extra wood from the mortise member.
Housing Joint:
A housing joint can also be called a dado joint.
• A dado joint is made by cutting a recess across the face of a member.• The end of another member is then inserted and secured into the recess.
Fig.1.4.84:HousingJoint
Types of Housing Joints
Housing joints are of different types. Some commonly used types are as follows:
Full Housing Joint: As seen below, in a full housing joint a rectangular recess is cut across the entire length of the board.
Fig.1.4.85:FullHousingJoint
66

Participant Handbook Cabinet Maker Modular Kitchen
Stopped Housing Joint: The dado of a stopped housing joint (as shown below) ends some 9 to 12 millimetre short of the shelf width.
Fig.1.4.86:StoppedHousingJoint
How to Make a Full Housing Joint
Step 1. The procedure to make a full housing joint:
Step 2. Use two wooden pieces cut and trimmed to size.
Step 3. Select and mark the face side and edge.
Step 4. Start by marking out a dado. Measure the wood with the tape measure to determine where you want the dado joint to sit.
Step 5. Use a marking knife to scribe the bottom line of the groove.
Step 6. Use a marking knife and try square to scribe lines across the width of the side member. Remember the width of the channel will be the same width as the wood to be inserted into it.
Step 7. Set the marking gauge approximately to one third the thickness of the shelf member.
Step 8. Scribe a line between the marks on both edges.
Step 9. Once you have marked out your recess you can now cut along the lines with a saw.
Step 10. Support the board against the bench stop. Saw along the marked line to the depth of the gauged line.
Step 11. Use a chisel and mallet to clean out the excess wood.
Step 12. Ensure the two pieces sit flush against each other.
Step 13. Use a brush to apply glue to the joining parts.
Step 14. Clamp the parts together.
Step 15. Remove the excess glue with a damp cloth.
Step 16. Leave the glue to dry.
How to Make a Stopped Housing Joint
The procedure to make a stopped housing joint:
Step 1. Use two wooden pieces cut and trimmed to size.
Step 2. Select and mark the face side and edge.
Step 3. Start by marking out a dado, just as you did for the full housing joint.
Step 4. Mark the width of the recess to match the thickness of the shelf member.
67
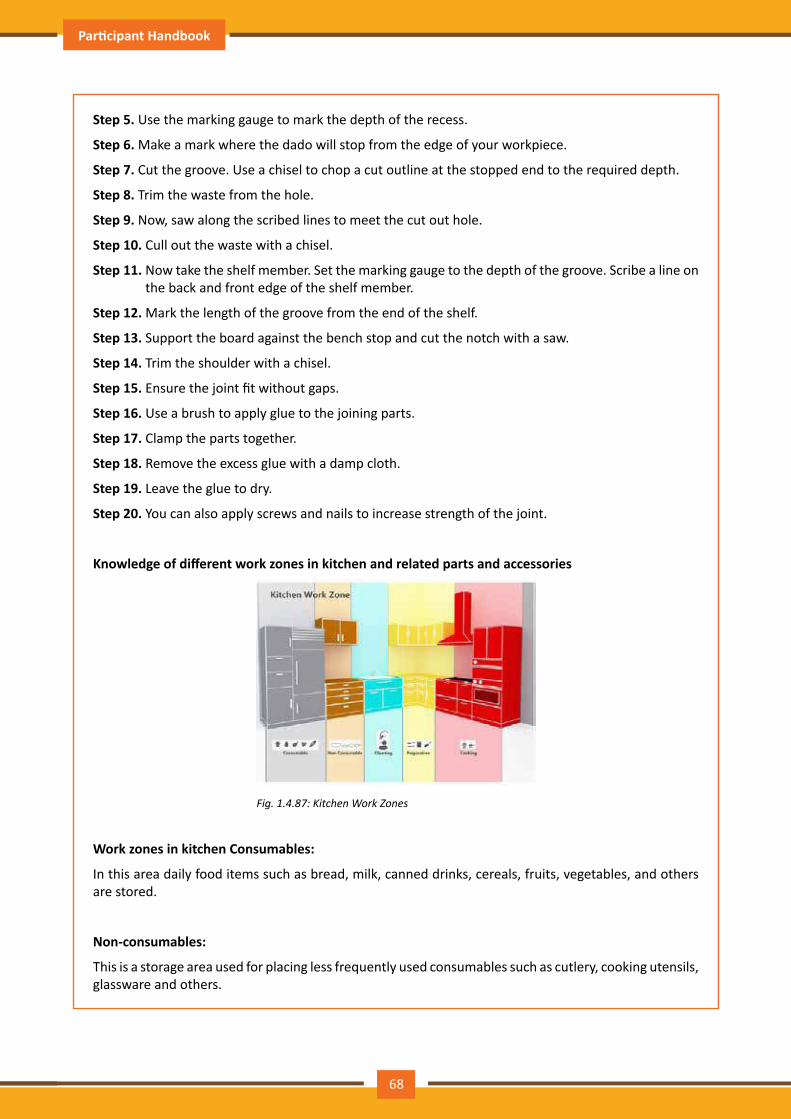
Participant Handbook Cabinet Maker Modular Kitchen
Step 5. Use the marking gauge to mark the depth of the recess.
Step 6. Make a mark where the dado will stop from the edge of your workpiece.
Step 7. Cut the groove. Use a chisel to chop a cut outline at the stopped end to the required depth.
Step 8. Trim the waste from the hole.
Step 9. Now, saw along the scribed lines to meet the cut out hole.
Step 10. Cull out the waste with a chisel.
Step 11. Now take the shelf member. Set the marking gauge to the depth of the groove. Scribe a line on the back and front edge of the shelf member.
Step 12. Mark the length of the groove from the end of the shelf.
Step 13. Support the board against the bench stop and cut the notch with a saw.
Step 14. Trim the shoulder with a chisel.
Step 15. Ensure the joint fit without gaps.
Step 16. Use a brush to apply glue to the joining parts.
Step 17. Clamp the parts together.
Step 18. Remove the excess glue with a damp cloth.
Step 19. Leave the glue to dry.
Step 20. You can also apply screws and nails to increase strength of the joint.
Knowledge of different work zones in kitchen and related parts and accessories
Fig.1.4.87:KitchenWorkZones
Work zones in kitchen Consumables:
In this area daily food items such as bread, milk, canned drinks, cereals, fruits, vegetables, and others are stored.
Non-consumables:
This is a storage area used for placing less frequently used consumables such as cutlery, cooking utensils, glassware and others.
68
Participant Handbook Cabinet Maker Modular Kitchen
Cleaning:
This area includes the sink and the surrounding space that is used to store washing equipment such as liquid soap, soap, brush, garbage bin and others.
Preparation:
This area is where the food is prepared mixed before cooking. Generally items like knives, cutting boards, mixing bowls, and others are stored here.
Cooking:
This zone where you store items meant for cooking utensils such as pots, pans, cake trays and cookie cans, oven, cooking hob etc.
Placement of various kitchen parts and accessories
Cooking hob:
• Keep in mind the design of your kitchen and the size of the worktop. Ensure that you have sufficient workspace around the hob.
• Ideally you would need to place the hob as far away as you can from the edge of the cabinet run or any tall cabinets.
• While decided the positioning of the hob in relation to the sink, a minimum 60cm clearance must be maintained for safety and health reasons.
Chimney:
• For all types of cooking ranges, be it an electric cooking range, built in hob or a usual cooktop, the distance to be maintained between hob and chimney is same.
• The distance shall not be less than 26” nor more than 30”.
Sink:
• In cases where the client desires the sink to be moved, the plumbing would need to be moved as well.
• Ideally the dishwasher and sink need to be next to each other to allow for efficient working.• Often when the kitchen has two sinks one sink is typically used for clean-up and a second sink for
food preparation
Oven:
• Generally, an oven is situation on the floor free-standing, mounted under the bench, or mounted in the wall.
• Accessibility and visibility are the key terms to focus on.• Small ovens can be placed in a convenient location on the counter itself, or alternatively it can be
placed in a shelf below the counter.• Ovens must never be positioned behind a door or open towards the door.
69
Participant Handbook Cabinet Maker Modular Kitchen
Different types of product and related work. E.g. Base Unit, Wall Unit, Crockery units, Drawers, Storage units, Partition, unit for appliances etc.
Upper Unit
Fig.1.4.88:StoppedHousingJoint
• Wall cabinets or upper units that are typically installed above the kitchen counter, have a standard measurement of 12 to 18 inches deep.
• Making the length of the cabinet such that they go right up to the height of the ceiling is an optimal way of creating more storage space.
• Upper cabinets are utilized for storage of rarely-used items• This type of cabinet also comes as a glass-fronted variety or open shelving for display.• While installing the upper cabinets be sure to attach a level cleat to the wall which will act as a
support to the base of the cabinets.
Base Unit
Fig.1.4.89:StoppedHousingJoint
• Base cabinets or base units have a standard measurement of being 24 inches deep and 36 inches tall.
• This type of cabinet sits over a four inch riser referred to as a kick plate.• This type of unit can be made up of shallow drawers, shelved cabinets, deep drawers or specialty
cabinets sections like bin drawers.• As they tend to be large, these cabinets provide bulk storage space.• Commonly they have shelving inside for items such as cookware, pans and pots, or cleaning supplies• Drawer type base cabinets are recommended as they make it much more easier to find items
without having to dig deep into shelving• Open Base Cabinets have no doors and feature open shelving for storing or displaying various items.
70
Participant Handbook Cabinet Maker Modular Kitchen
Crockery Unit
Fig.1.4.90:CrockeryUnit
• Crockery units are made not merely for their functional benefits but also for their aesthetic appeal.• A combination of wood and glass is the preferred choice while designing a crockery unit• In terms of colors a crockery unit typically should provide a sharp contrast to the rest of the kitchen
space.
Cabinet Drawers
Fig.1.4.91:CabinetDrawers
• Thanks to better glide technology we have recourse to bigger drawers that can handle heavier items• Drawers are used to store everything from cutlery, utensils, and spices to bulkier items like dishware,
pans, pots and chopping blocks.• Solid hardwood has traditionally been the choice material for drawer box fronts and sides.• Engineered woods, such as veneered plywood, particleboard and MDF are also used.
71
Participant Handbook Cabinet Maker Modular Kitchen
At the end of this unit, you will be able to:
1. Identify the hand tools used in carpentry2. Identify the power tools used in carpentry3. Identify the woodwork adhesives4. Identify the fastening tools and connectors
Unit Objectives
UNIT 1.5: Different Types of Tools and Equipment and the Processes of Operating
Fig.1.5.1:Toolsusedinwoodworking
Hand Tools
Tools Images
1. Measuring Tools:
Measuring tools are used by a modular kitchen cabinet maker to measure the area and extent of cutting an object. Common measuring tools include:
• Tape Measure • Steel Rule• Zig-Zag Rule• Folding Rule• Try Square• Mitre Square • Firm Joint Callipers • Spring Joint Calliper
Measuring Tools
72
Participant Handbook Cabinet Maker Modular Kitchen
2. Marking Tools:
Apart from the pencil, there are other marking tools used by a modular kitchen cabinet maker to sketch cutting lines on the object. Common Marking tools include:
• Steel Scriber• Marking Knife• Marking Gauge• Mortise Gauge• Cutting Gauge• Chalk Line
Marking Pencil
3. Hand saws:
The modular kitchen cabinet maker uses a variety of hand saws to carry out activities like rough cutting, curved cutting, straight cutting, fine cutting etc. Common Hand saws include:
• Rip saw• Cross cut saw• Panel saw• Tenon saw• Fret saw• Key hole saw
Saw
4. Bench Plane:
The Bench Plane acts as the base for levelling wooden surfaces. Common Bench Planes include:
• Jack Plane• Smoothing Plane• Trying Plane• Rebate Plane• Grooving and Plane5. Hammers and Mallets:
A good quality Steel hammer is
used to drive nails whereas mallets are used for chiselling. Common
• Hammers include:• Claw Hammer• Ball Pein Hammer• Cross Pein Hammer• Straight Pein Hammer• Wooden Mallet
Hammer
Mallet
73
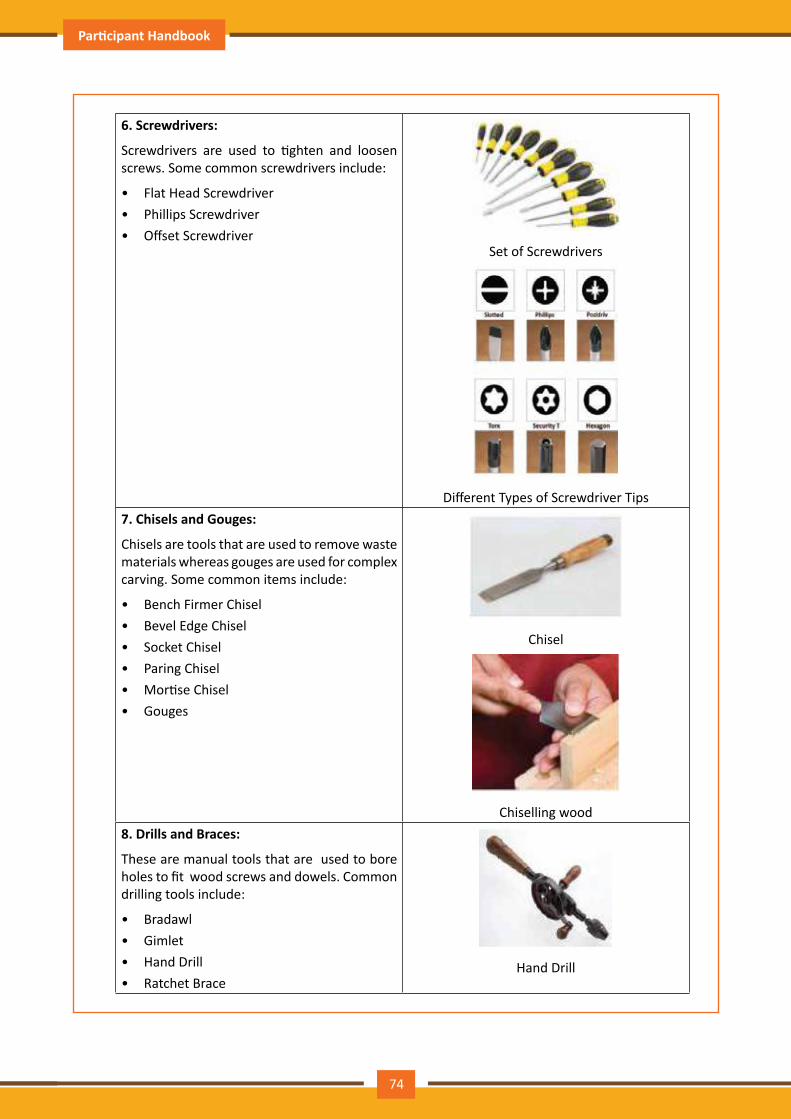
Participant Handbook Cabinet Maker Modular Kitchen
6. Screwdrivers:
Screwdrivers are used to tighten and loosen screws. Some common screwdrivers include:
• Flat Head Screwdriver• Phillips Screwdriver• Offset Screwdriver
Set of Screwdrivers
Different Types of Screwdriver Tips7. Chisels and Gouges:
Chisels are tools that are used to remove waste materials whereas gouges are used for complex carving. Some common items include:
• Bench Firmer Chisel• Bevel Edge Chisel• Socket Chisel• Paring Chisel• Mortise Chisel• Gouges
Chisel
Chiselling wood8. Drills and Braces:
These are manual tools that are used to bore holes to fit wood screws and dowels. Common drilling tools include:
• Bradawl• Gimlet• Hand Drill• Ratchet Brace
Hand Drill
74
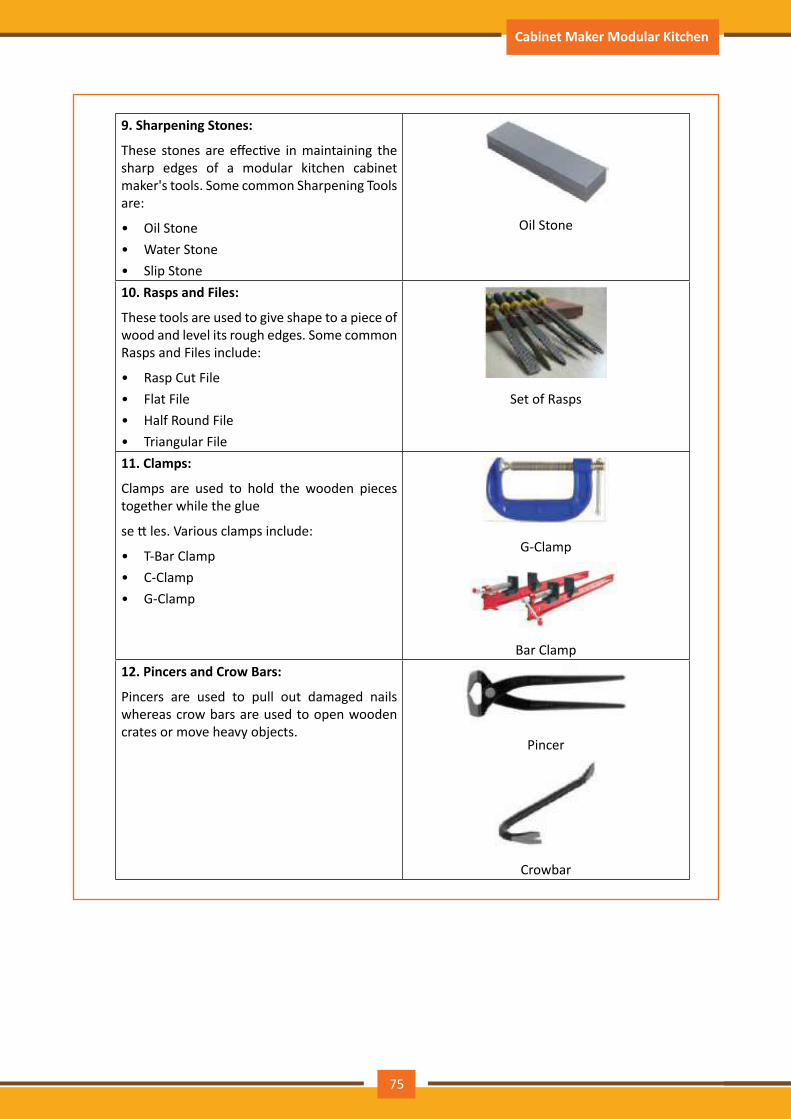
Participant Handbook Cabinet Maker Modular Kitchen
9. Sharpening Stones:
These stones are effective in maintaining the sharp edges of a modular kitchen cabinet maker's tools. Some common Sharpening Tools are:
• Oil Stone• Water Stone• Slip Stone
Oil Stone
10. Rasps and Files:
These tools are used to give shape to a piece of wood and level its rough edges. Some common Rasps and Files include:
• Rasp Cut File• Flat File• Half Round File• Triangular File
Set of Rasps
11. Clamps:
Clamps are used to hold the wooden pieces together while the glue
se tt les. Various clamps include:
• T-Bar Clamp• C-Clamp• G-Clamp
G-Clamp
Bar Clamp12. Pincers and Crow Bars:
Pincers are used to pull out damaged nails whereas crow bars are used to open wooden crates or move heavy objects.
Pincer
Crowbar
75
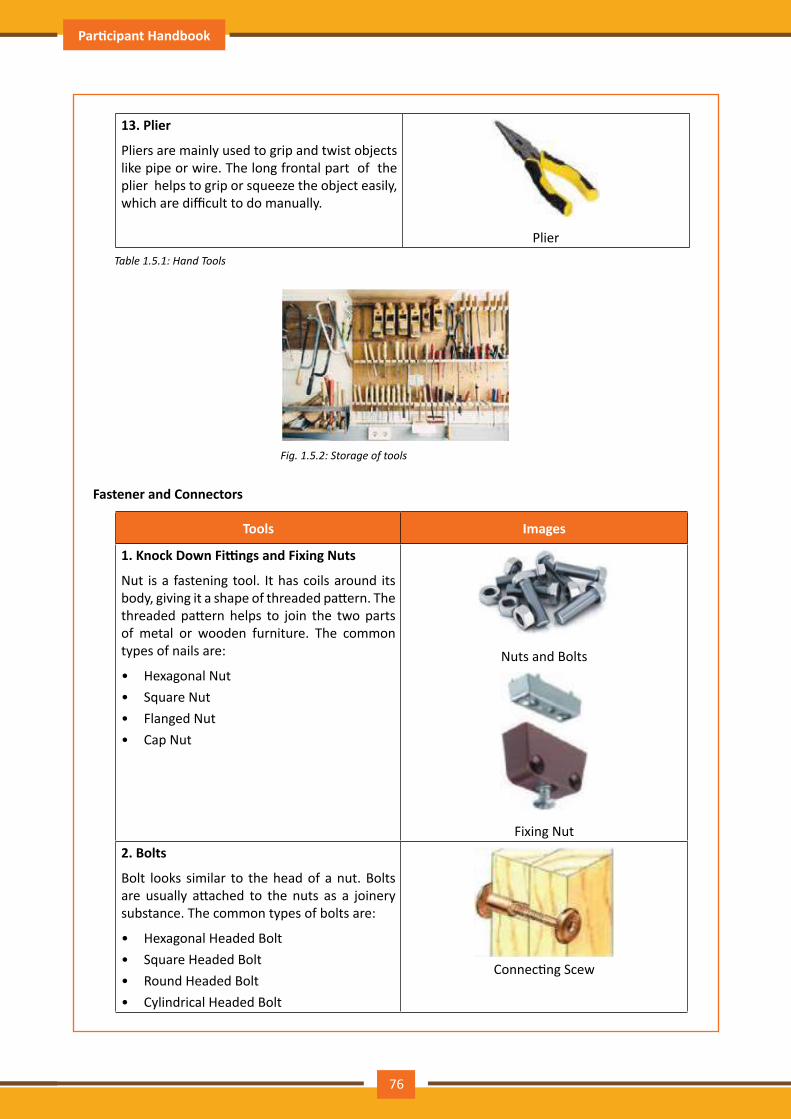
Participant Handbook Cabinet Maker Modular Kitchen
13. Plier
Pliers are mainly used to grip and twist objects like pipe or wire. The long frontal part of the plier helps to grip or squeeze the object easily, which are difficult to do manually.
Plier Table1.5.1:HandTools
Fig. 1.5.2: Storage of tools
Fastener and Connectors
Tools Images
1. Knock Down Fittings and Fixing Nuts
Nut is a fastening tool. It has coils around its body, giving it a shape of threaded pattern. The threaded pattern helps to join the two parts of metal or wooden furniture. The common types of nails are:
• Hexagonal Nut• Square Nut • Flanged Nut • Cap Nut
Nuts and Bolts
Fixing Nut2. Bolts
Bolt looks similar to the head of a nut. Bolts are usually attached to the nuts as a joinery substance. The common types of bolts are:
• Hexagonal Headed Bolt• Square Headed Bolt• Round Headed Bolt• Cylindrical Headed Bolt
Connecting Scew
76
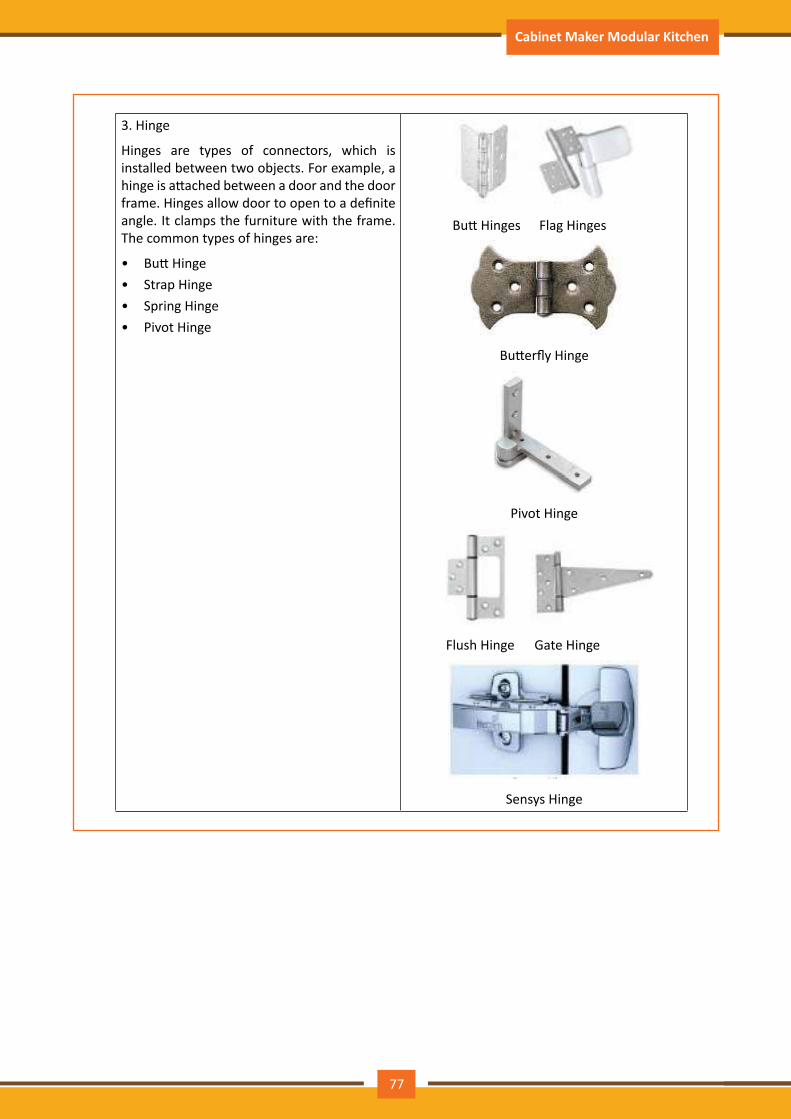
Participant Handbook Cabinet Maker Modular Kitchen
3. Hinge
Hinges are types of connectors, which is installed between two objects. For example, a hinge is attached between a door and the door frame. Hinges allow door to open to a definite angle. It clamps the furniture with the frame. The common types of hinges are:
• Butt Hinge • Strap Hinge • Spring Hinge • Pivot Hinge
Butt Hinges Flag Hinges
Butterfly Hinge
Pivot Hinge
Flush Hinge Gate Hinge
Sensys Hinge
77

Participant Handbook Cabinet Maker Modular Kitchen
4. Lock
Lock is used as a security option. Different Types of locks available in the market are:
• Padlock (traditional key-lock system)• Deadbolts (with thumb turns)• Rim Lock (long latch) Cylindrical Lock
Traditional Lock
Furniture Lock
78
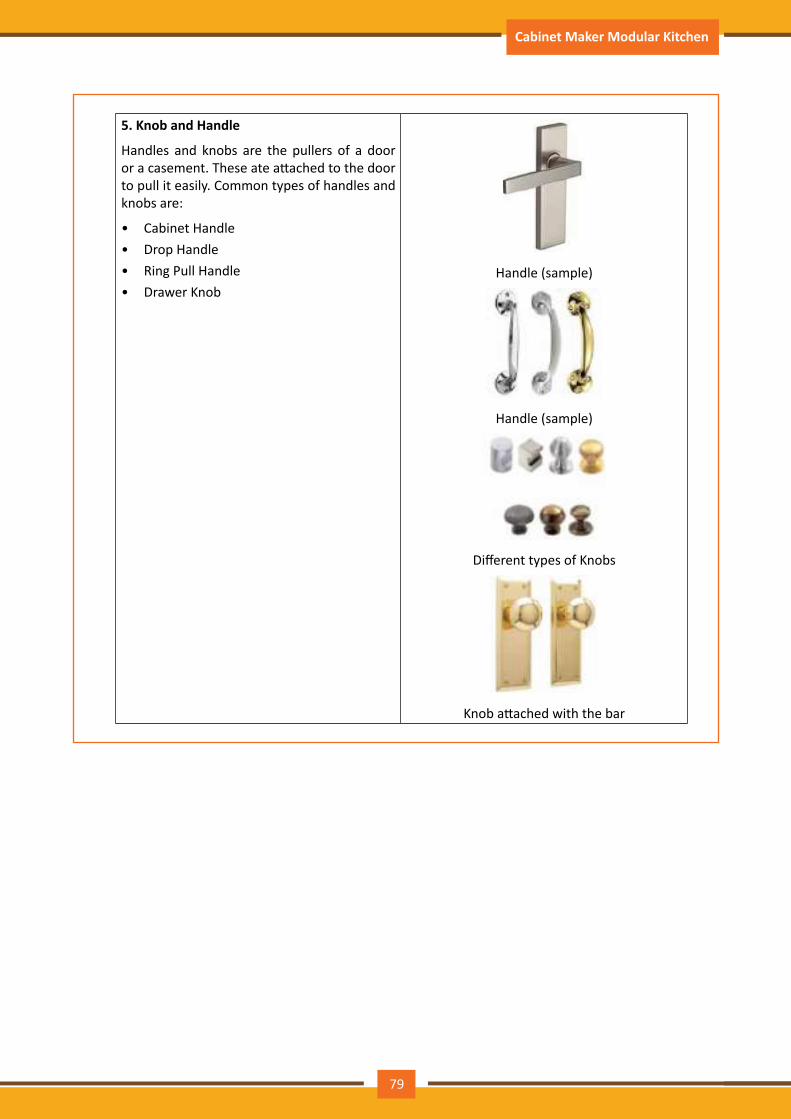
Participant Handbook Cabinet Maker Modular Kitchen
5. Knob and Handle
Handles and knobs are the pullers of a door or a casement. These ate attached to the door to pull it easily. Common types of handles and knobs are:
• Cabinet Handle• Drop Handle• Ring Pull Handle• Drawer Knob
Handle (sample)
Handle (sample)
Different types of Knobs
Knob attached with the bar
79

Participant Handbook Cabinet Maker Modular Kitchen
6. Nail
Nails are used to securely join pieces of timber or material to timber.
Nails have a head, shank and a point. Usually, the nails are made of wire or plate metal and mild steel. Common types of nails include:
• Oval wire nail • Headless nail • Annual ring nail • Panel nail• Tack• Staples
Nails
Staples7. Screw
A screw is a cylindrical rod carved with one or more helical or advancing spiral threads, as a lead screw or worm screw. It has a head and a point. Common types of screws include:
• Flat head screw• Round head screw • Raised head screw • Square head screw• Phillips or cross head screw
Flat Head Screw
Round Head Screw
Raised Head Screw
Cross Head Screw Table1.5.2:FastenersandConnectors
80
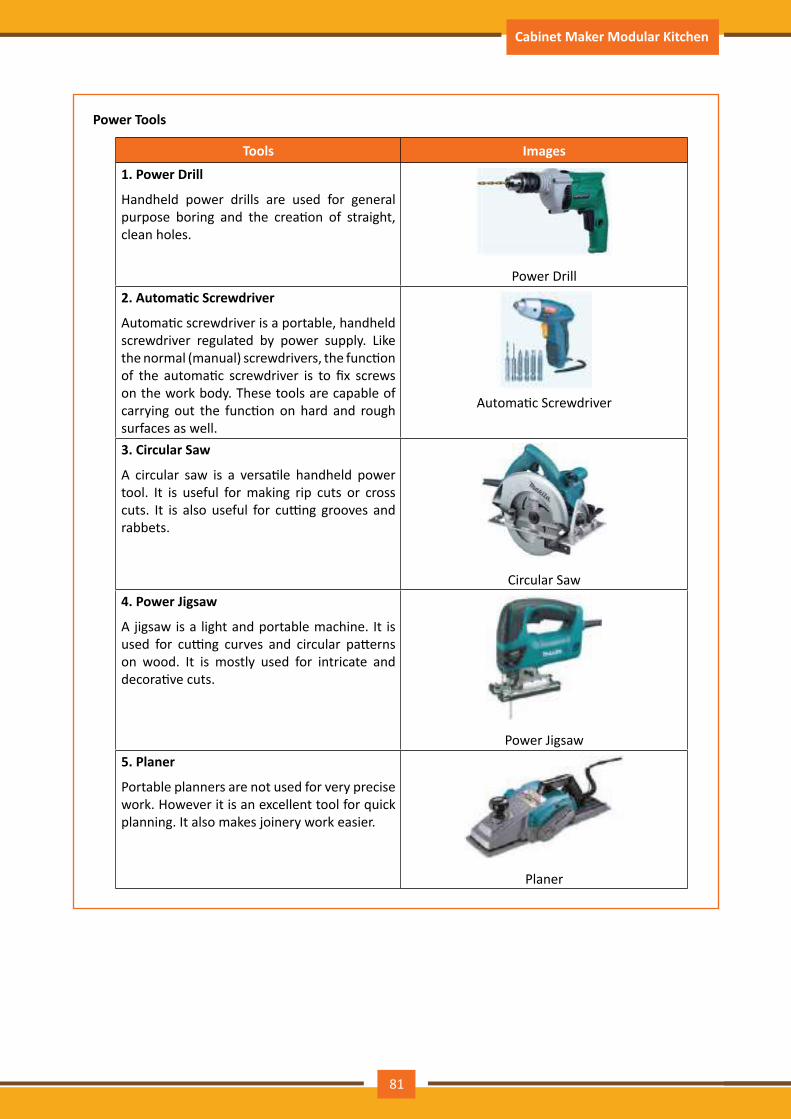
Participant Handbook Cabinet Maker Modular Kitchen
Power Tools
Tools Images
1. Power Drill
Handheld power drills are used for general purpose boring and the creation of straight, clean holes.
Power Drill2. Automatic Screwdriver
Automatic screwdriver is a portable, handheld screwdriver regulated by power supply. Like the normal (manual) screwdrivers, the function of the automatic screwdriver is to fix screws on the work body. These tools are capable of carrying out the function on hard and rough surfaces as well.
Automatic Screwdriver
3. Circular Saw
A circular saw is a versatile handheld power tool. It is useful for making rip cuts or cross cuts. It is also useful for cutting grooves and rabbets.
Circular Saw4. Power Jigsaw
A jigsaw is a light and portable machine. It is used for cutting curves and circular patterns on wood. It is mostly used for intricate and decorative cuts.
Power Jigsaw5. Planer
Portable planners are not used for very precise work. However it is an excellent tool for quick planning. It also makes joinery work easier.
Planer
81

Participant Handbook Cabinet Maker Modular Kitchen
6. Router
A portable router is used for moulding, grooving and rebating work in carpentry. A router bit's shape determines the type of cut it creates.
Router Table1.5.3:PowerTools
Take the measurement as per design drawing and specification and create marking on the plyboard, MDF, HDF etc.
Once you have measured out your project, you need to create cut lines and mark out the layout. These cut lines provide guidance to the modular kitchen cabinet maker during the sequence of the operation.
Marking out is a critical part of woodwork projects. If components are marked out wrongly before being cut out, there is no chance of them fitting together when they are assembled.
Different types of marking tools are used to create guidelines for modular kitchen cabinet makers to follow before they actually begin to cut materials. This session will walk you through the commonly used marking tools in carpentry.
Marking Tools: While a flat pencil may be a carpenter's best friend, there are other marking tools that help him/her draw precise cutting lines. Take a look at some other marking tools that come in handy to draw precise reference lines.
• Steel Scriber • Marking Knife • Marking Gauge • Mortise Gauge• Cutting Gauge• Chalk Line
Pencil
• The carpenter's pencil is flat and wide it tends to have a harder tip than standard pencils.• It is used to leave a clear but temporary mark on wood. Most carpenters use the pencil only for the
preliminary marks.• These marks are then etched on the wood using other marking tools.• It is quite simple to use.• Hold the pencil just as you would hold a standard pencil while writing.• Measure and mark both ends, where the wood is to be cut.• Use a steel rule to draw a line from mark to mark.• You can also draw a line along the try square.• Do not press the pencil unreasonably hard as it may break the lead.• Use a chisel or a jack plane to sharpen your pencil.
Fig.1.5.3:Carpenter'sPencil
82
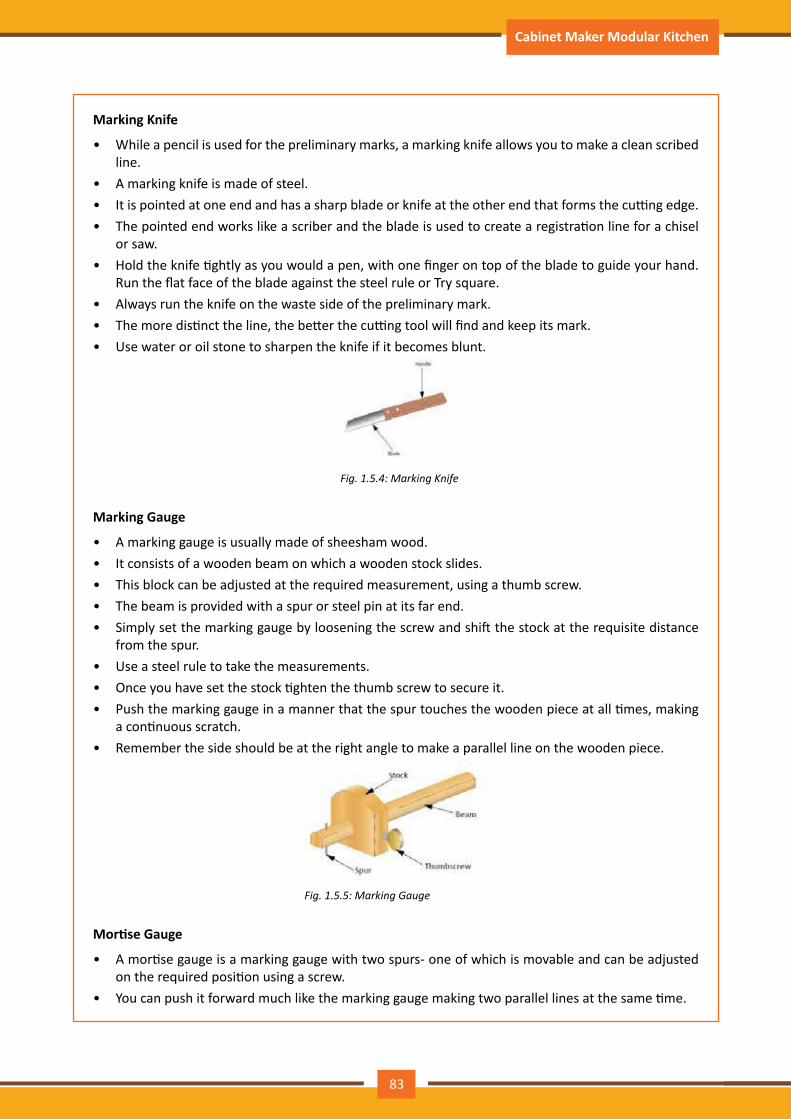
Participant Handbook Cabinet Maker Modular Kitchen
Marking Knife
• While a pencil is used for the preliminary marks, a marking knife allows you to make a clean scribed line.
• A marking knife is made of steel.• It is pointed at one end and has a sharp blade or knife at the other end that forms the cutting edge.• The pointed end works like a scriber and the blade is used to create a registration line for a chisel
or saw.• Hold the knife tightly as you would a pen, with one finger on top of the blade to guide your hand.
Run the flat face of the blade against the steel rule or Try square.• Always run the knife on the waste side of the preliminary mark.• The more distinct the line, the better the cutting tool will find and keep its mark.• Use water or oil stone to sharpen the knife if it becomes blunt.
Fig.1.5.4:MarkingKnife
Marking Gauge
• A marking gauge is usually made of sheesham wood.• It consists of a wooden beam on which a wooden stock slides.• This block can be adjusted at the required measurement, using a thumb screw.• The beam is provided with a spur or steel pin at its far end.• Simply set the marking gauge by loosening the screw and shift the stock at the requisite distance
from the spur.• Use a steel rule to take the measurements.• Once you have set the stock tighten the thumb screw to secure it.• Push the marking gauge in a manner that the spur touches the wooden piece at all times, making
a continuous scratch.• Remember the side should be at the right angle to make a parallel line on the wooden piece.
Fig.1.5.5:MarkingGauge
Mortise Gauge
• A mortise gauge is a marking gauge with two spurs- one of which is movable and can be adjusted on the required position using a screw.
• You can push it forward much like the marking gauge making two parallel lines at the same time.
83
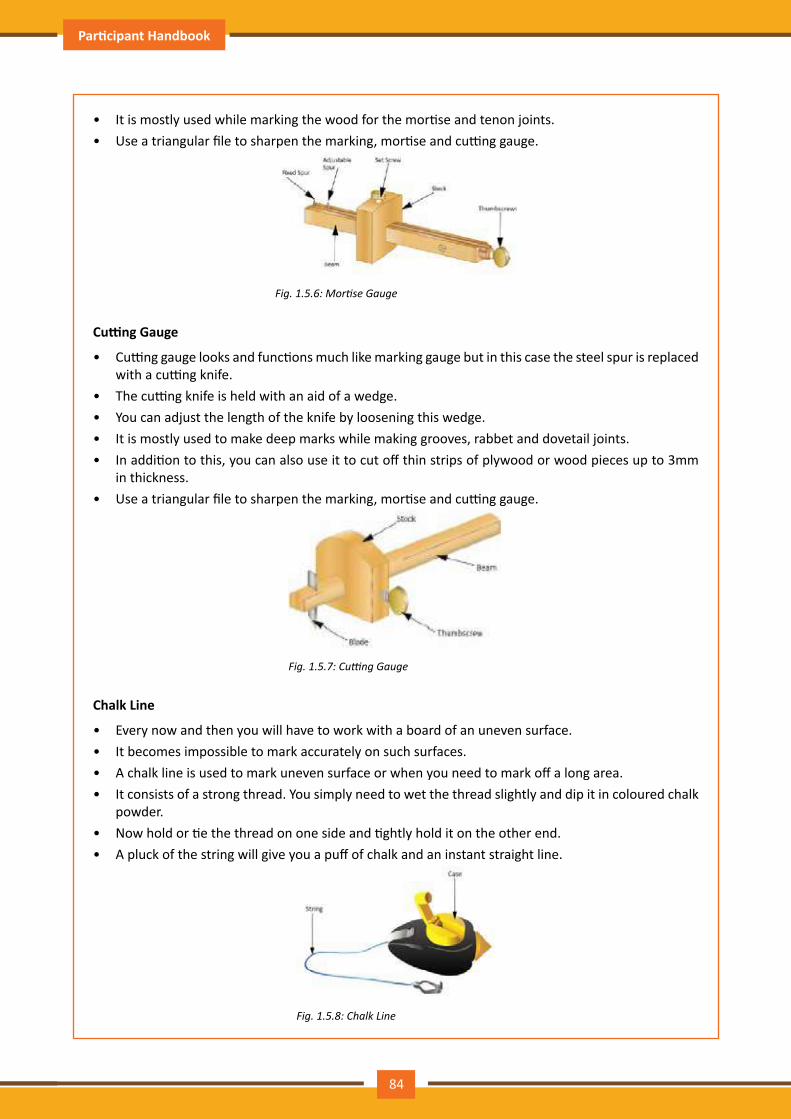
Participant Handbook Cabinet Maker Modular Kitchen
• It is mostly used while marking the wood for the mortise and tenon joints.• Use a triangular file to sharpen the marking, mortise and cutting gauge.
Fig.1.5.6:MortiseGauge
Cutting Gauge
• Cutting gauge looks and functions much like marking gauge but in this case the steel spur is replaced with a cutting knife.
• The cutting knife is held with an aid of a wedge.• You can adjust the length of the knife by loosening this wedge.• It is mostly used to make deep marks while making grooves, rabbet and dovetail joints.• In addition to this, you can also use it to cut off thin strips of plywood or wood pieces up to 3mm
in thickness.• Use a triangular file to sharpen the marking, mortise and cutting gauge.
Fig.1.5.7:CuttingGauge
Chalk Line
• Every now and then you will have to work with a board of an uneven surface.• It becomes impossible to mark accurately on such surfaces.• A chalk line is used to mark uneven surface or when you need to mark off a long area.• It consists of a strong thread. You simply need to wet the thread slightly and dip it in coloured chalk
powder.• Now hold or tie the thread on one side and tightly hold it on the other end.• A pluck of the string will give you a puff of chalk and an instant straight line.
Fig.1.5.8:ChalkLine
84
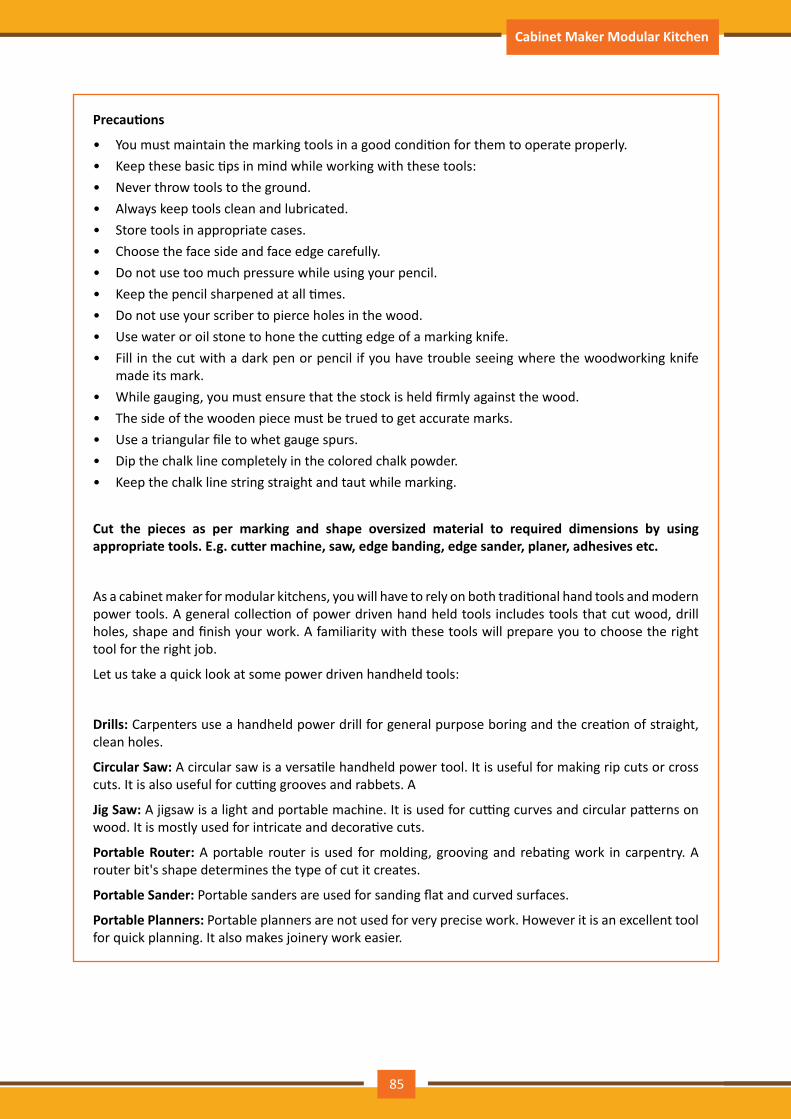
Participant Handbook Cabinet Maker Modular Kitchen
Precautions
• You must maintain the marking tools in a good condition for them to operate properly.• Keep these basic tips in mind while working with these tools:• Never throw tools to the ground.• Always keep tools clean and lubricated.• Store tools in appropriate cases.• Choose the face side and face edge carefully.• Do not use too much pressure while using your pencil.• Keep the pencil sharpened at all times.• Do not use your scriber to pierce holes in the wood.• Use water or oil stone to hone the cutting edge of a marking knife.• Fill in the cut with a dark pen or pencil if you have trouble seeing where the woodworking knife
made its mark.• While gauging, you must ensure that the stock is held firmly against the wood.• The side of the wooden piece must be trued to get accurate marks.• Use a triangular file to whet gauge spurs.• Dip the chalk line completely in the colored chalk powder.• Keep the chalk line string straight and taut while marking.
Cut the pieces as per marking and shape oversized material to required dimensions by using appropriate tools. E.g. cutter machine, saw, edge banding, edge sander, planer, adhesives etc.
As a cabinet maker for modular kitchens, you will have to rely on both traditional hand tools and modern power tools. A general collection of power driven hand held tools includes tools that cut wood, drill holes, shape and finish your work. A familiarity with these tools will prepare you to choose the right tool for the right job.
Let us take a quick look at some power driven handheld tools:
Drills: Carpenters use a handheld power drill for general purpose boring and the creation of straight, clean holes.
Circular Saw: A circular saw is a versatile handheld power tool. It is useful for making rip cuts or cross cuts. It is also useful for cutting grooves and rabbets. A
Jig Saw: A jigsaw is a light and portable machine. It is used for cutting curves and circular patterns on wood. It is mostly used for intricate and decorative cuts.
Portable Router: A portable router is used for molding, grooving and rebating work in carpentry. A router bit's shape determines the type of cut it creates.
Portable Sander: Portable sanders are used for sanding flat and curved surfaces.
Portable Planners: Portable planners are not used for very precise work. However it is an excellent tool for quick planning. It also makes joinery work easier.
85

Participant Handbook Cabinet Maker Modular Kitchen
Wood cutting machine
A wood cutting machine is a multi-operation mechanical material cutting machine that serves the function of cutting wooden articles. Its setup it dependent on a rotating shaft fitted with a cutter, which rotates in opposite direction to that of wood movement.
Fig.1.5.9:Woodcuttingmachine
Planer
This machine is utilized in the initial stages of developing the wood, producing square edges and flat faces. Surface planing machines have a rigid main frame acts as a supports for the outfeed and the infeed table. A cutterblock is positioned between the two tables and fixed on ball bearings. This machine is used for both thickness and surface planing.
Fig.1.5.10:WoodPlaningMachine
Saw
A circular saw is indispensible to workers in the woodworking industry. It is avaiable in two basic styles, direct-drive and worm-drive. The three basic saw cuts used by wood workers are the rip cut plunge cut and crosscut.
Fig.1.5.11:CircularSaw
86

Participant Handbook Cabinet Maker Modular Kitchen
Edge Banding
Edge Banding is the process employed to finish the thickness or sides of material like particle board, MDF and plywood. It is used to create visually appealing and durable trim edges during finish carpentry. Edge banding involves either a hardwood or veneer that is pre-sanded. For modular furniture the machine that applies edge banding is called an Edgebander.
Fig.1.5.12:Edgebander
Edge sanders
Edge sanders can be described as the ideal electrical woodworking power tool utilized for smoothing and finishing. Two standard types available are portable floor sanders and belt sanders.
Fig.1.5.13:EdgeSander
Arrange and check combination of assembling parts manufactured at work site to rectify defects if any
• Visually inspecting each step help in detecting issues in the early stages of the task.• Early detection of faults and issues, in the hardware tools and the modules, helps in avoiding
wastage of money, time and manpower.• Visual Inspection eliminates chances of future breakdowns and major faults.• This helps in avoiding serious defects in the final products, and, in turn, product recall.
The common methods of conducting visual inspection, during assembly and installation processes, are:
• Tallying all aspects of the assembled and installed product against the AutoCAD sketches, blueprints and approved samples
• Visually checking for defects related to: ᴑ Wrong dimensions (not according to specifications in Work Order) ᴑ Discolouration, Staining and Tainting ᴑ Improper and inadequate Finishing
87
Participant Handbook Cabinet Maker Modular Kitchen
ᴑ Scratches ᴑ Mismatched and misfit parts ᴑ Warping ᴑ Blistering ᴑ Other defects
• Conducting Stability and Usage Inspection like: ᴑ Load Tests ᴑ Impact Tests ᴑ Strength Tests ᴑ Drop Tests
Conducting Packaging Inspection for checking the appropriate packaging of all pieces and modules to protect against abrasions and proper climate controls to prevent damage during transportation
Technique of joining the materials with screws, staples, or adhesives and the quantity to be used
The cabinet maker should assist in selection of adhesives/screws/ hardware as per requirement and follow the instruction received for fastening the required furniture parts, wherever required.
Keep the following in mind while joining the materials with screws, staples, or adhesives:
• Typically PVA glue bonds through a chemical reaction within the wood's cell structure.• The glue needs to sufficiently enter the wood cells on both sides before it can chemically join the
two parts.• Nonetheless, there is no requirement for excess glue to remain in between the parts.• When using PVA glue, you can use as many clamps and as much pressure as possible. • Epoxy glue, on the other hand, bonds on top of the wood, not within the cell structure. • Epoxy glue requires some glue-line thickness for proper strength.• Bear in mind that overclamping will squeeze out too much glue and fail to achieve an optimal bond.• Precisely made joints that fit well together, are best glued with PVA glue.• For joinery is not so perfect in alignment and smoothness you can use 24-hour.• Glue can be applied by using a brush, roller, scraper etc.• Several cabinet workshops employ staples to fasten wood pieces together.• High pressure is needed to squeeze out all excess glue and produce a zero glue-line thickness with
PVA glue.• Often fastening with staples serves as merely a temporary procedure until the glue in a joint can
cure.• At other times, the staple is the key fastener for a joint.
Technique of touch up of furniture for proper finishing
• This is one of the last steps of manufacturing furniture. The cabinet maker should assist in cleaning, sanding and finishing of manufactured product. Wood polishing is a significant procedure that a cabinet maker should be aware of.
• Polishing protects the wooden surface from apparent damages from water, humidity and gives a glossy look to the furniture.
• Polishing can be performed in many ways. Few of the widely used polishing methods are discussed below.
88
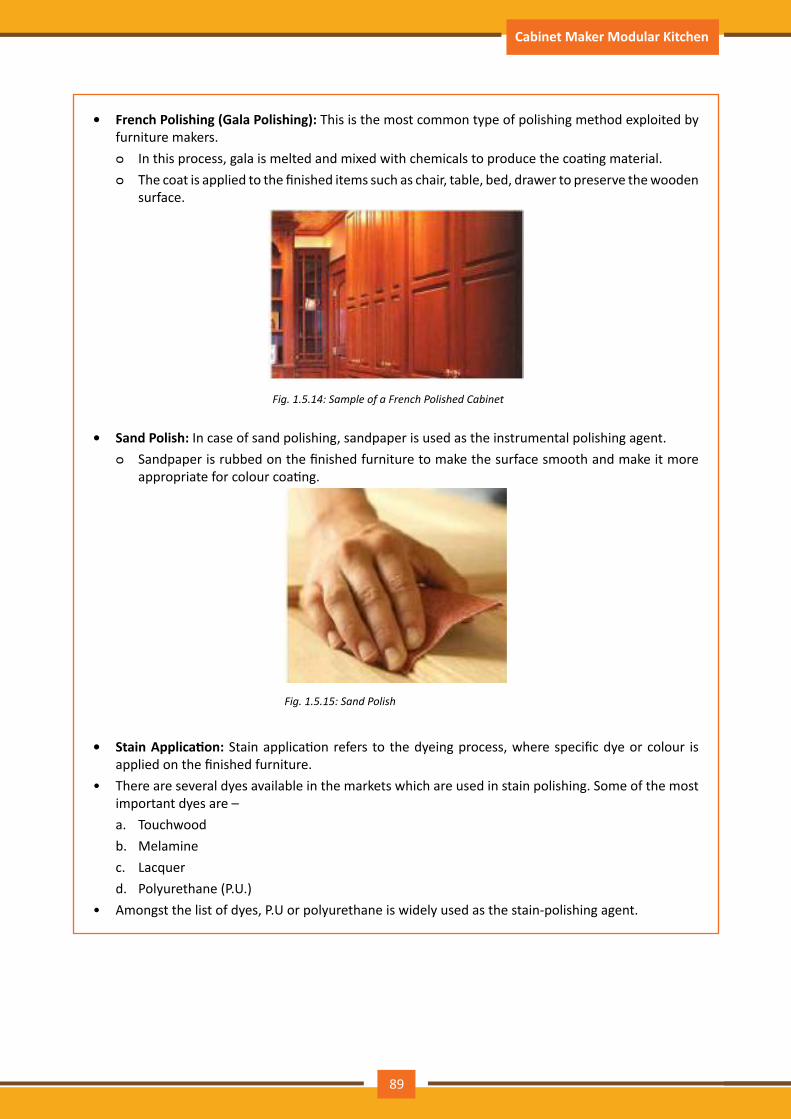
Participant Handbook Cabinet Maker Modular Kitchen
• French Polishing (Gala Polishing): This is the most common type of polishing method exploited by furniture makers.
ᴑ In this process, gala is melted and mixed with chemicals to produce the coating material. ᴑ The coat is applied to the finished items such as chair, table, bed, drawer to preserve the wooden
surface.
Fig.1.5.14:SampleofaFrenchPolishedCabinet
• Sand Polish: In case of sand polishing, sandpaper is used as the instrumental polishing agent. ᴑ Sandpaper is rubbed on the finished furniture to make the surface smooth and make it more
appropriate for colour coating.
Fig.1.5.15:SandPolish
• Stain Application: Stain application refers to the dyeing process, where specific dye or colour is applied on the finished furniture.
• There are several dyes available in the markets which are used in stain polishing. Some of the most important dyes are –a. Touchwoodb. Melaminec. Lacquerd. Polyurethane (P.U.)
• Amongst the list of dyes, P.U or polyurethane is widely used as the stain-polishing agent.
89
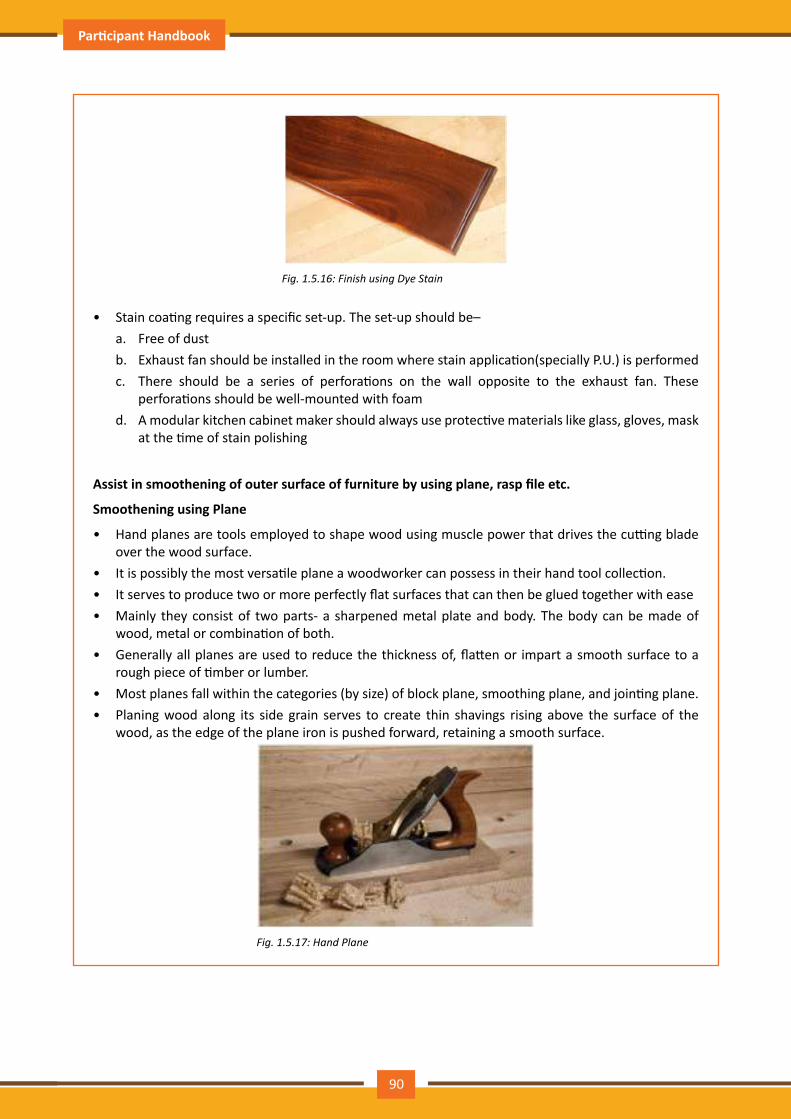
Participant Handbook Cabinet Maker Modular Kitchen
Fig.1.5.16:FinishusingDyeStain
• Stain coating requires a specific set-up. The set-up should be–a. Free of dustb. Exhaust fan should be installed in the room where stain application(specially P.U.) is performedc. There should be a series of perforations on the wall opposite to the exhaust fan. These
perforations should be well-mounted with foamd. A modular kitchen cabinet maker should always use protective materials like glass, gloves, mask
at the time of stain polishing
Assist in smoothening of outer surface of furniture by using plane, rasp file etc.
Smoothening using Plane
• Hand planes are tools employed to shape wood using muscle power that drives the cutting blade over the wood surface.
• It is possibly the most versatile plane a woodworker can possess in their hand tool collection.• It serves to produce two or more perfectly flat surfaces that can then be glued together with ease• Mainly they consist of two parts- a sharpened metal plate and body. The body can be made of
wood, metal or combination of both.• Generally all planes are used to reduce the thickness of, flatten or impart a smooth surface to a
rough piece of timber or lumber.• Most planes fall within the categories (by size) of block plane, smoothing plane, and jointing plane.• Planing wood along its side grain serves to create thin shavings rising above the surface of the
wood, as the edge of the plane iron is pushed forward, retaining a smooth surface.
Fig.1.5.17:HandPlane
90
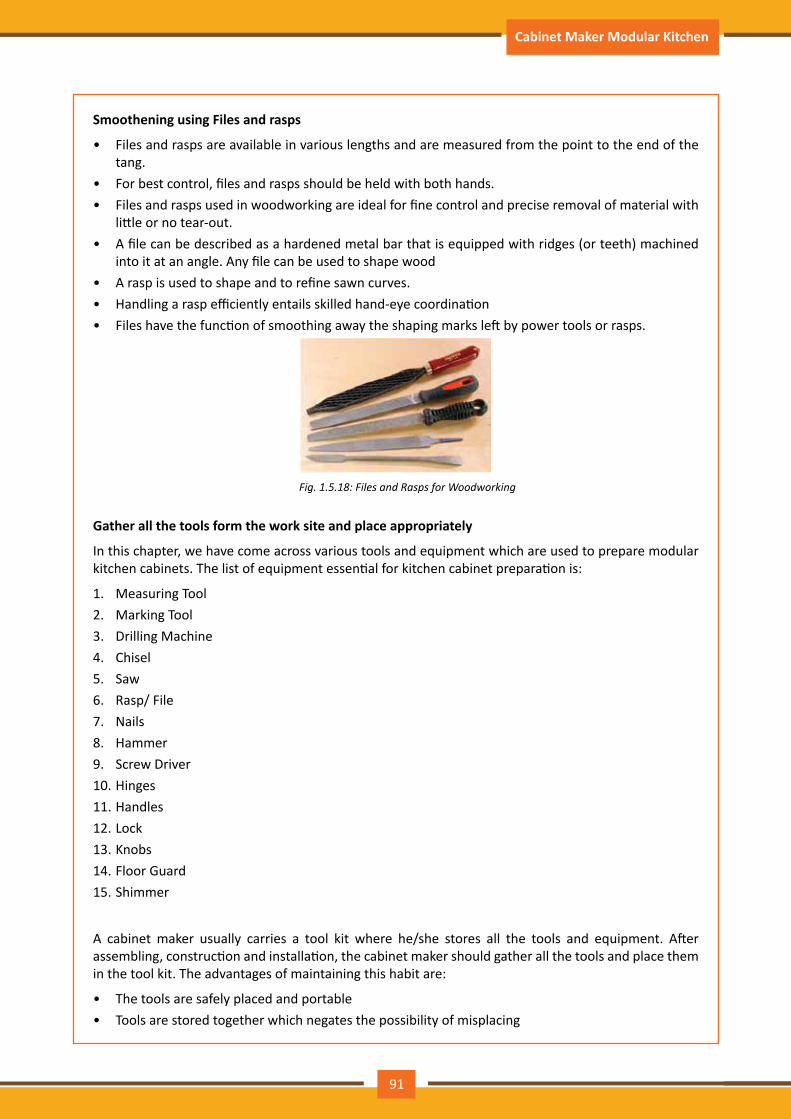
Participant Handbook Cabinet Maker Modular Kitchen
Smoothening using Files and rasps
• Files and rasps are available in various lengths and are measured from the point to the end of the tang.
• For best control, files and rasps should be held with both hands.• Files and rasps used in woodworking are ideal for fine control and precise removal of material with
little or no tear-out.• A file can be described as a hardened metal bar that is equipped with ridges (or teeth) machined
into it at an angle. Any file can be used to shape wood• A rasp is used to shape and to refine sawn curves.• Handling a rasp efficiently entails skilled hand-eye coordination• Files have the function of smoothing away the shaping marks left by power tools or rasps.
Fig.1.5.18:FilesandRaspsforWoodworking
Gather all the tools form the work site and place appropriately
In this chapter, we have come across various tools and equipment which are used to prepare modular kitchen cabinets. The list of equipment essential for kitchen cabinet preparation is:
1. Measuring Tool2. Marking Tool3. Drilling Machine4. Chisel5. Saw6. Rasp/ File7. Nails8. Hammer9. Screw Driver10. Hinges11. Handles12. Lock13. Knobs14. Floor Guard15. Shimmer
A cabinet maker usually carries a tool kit where he/she stores all the tools and equipment. After assembling, construction and installation, the cabinet maker should gather all the tools and place them in the tool kit. The advantages of maintaining this habit are:
• The tools are safely placed and portable• Tools are stored together which negates the possibility of misplacing
91
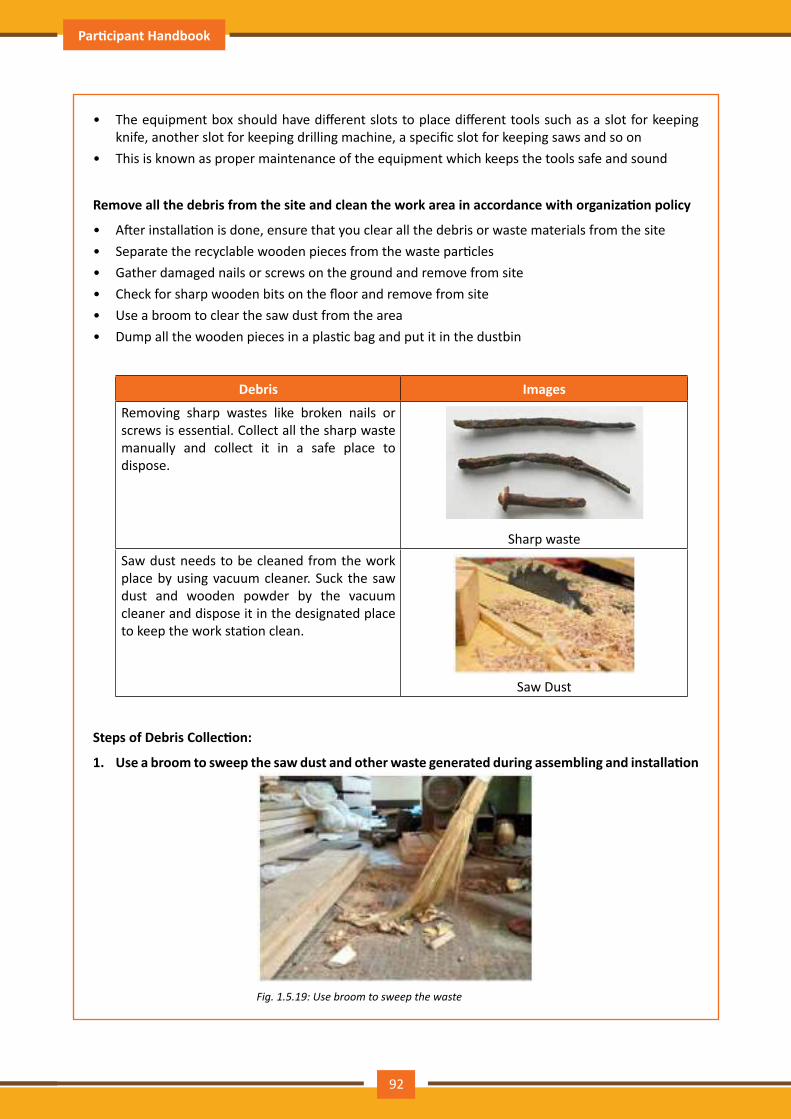
Participant Handbook Cabinet Maker Modular Kitchen
• The equipment box should have different slots to place different tools such as a slot for keeping knife, another slot for keeping drilling machine, a specific slot for keeping saws and so on
• This is known as proper maintenance of the equipment which keeps the tools safe and sound
Remove all the debris from the site and clean the work area in accordance with organization policy
• After installation is done, ensure that you clear all the debris or waste materials from the site• Separate the recyclable wooden pieces from the waste particles• Gather damaged nails or screws on the ground and remove from site• Check for sharp wooden bits on the floor and remove from site• Use a broom to clear the saw dust from the area• Dump all the wooden pieces in a plastic bag and put it in the dustbin
Debris Images
Removing sharp wastes like broken nails or screws is essential. Collect all the sharp waste manually and collect it in a safe place to dispose.
Sharp wasteSaw dust needs to be cleaned from the work place by using vacuum cleaner. Suck the saw dust and wooden powder by the vacuum cleaner and dispose it in the designated place to keep the work station clean.
Saw Dust
Steps of Debris Collection:
1. Use a broom to sweep the saw dust and other waste generated during assembling and installation
Fig.1.5.19:Usebroomtosweepthewaste
92
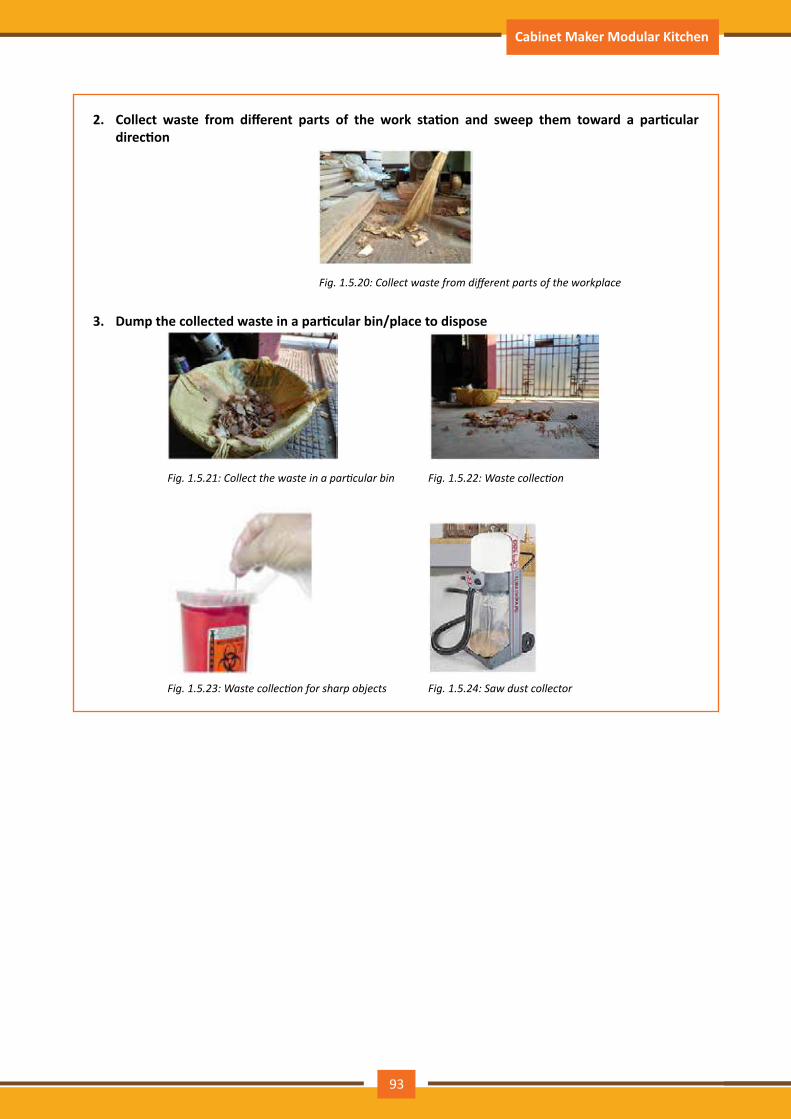
Participant Handbook Cabinet Maker Modular Kitchen
2. Collect waste from different parts of the work station and sweep them toward a particular direction
Fig.1.5.20:Collectwastefromdifferentpartsoftheworkplace
3. Dump the collected waste in a particular bin/place to dispose
Fig.1.5.21:Collectthewasteinaparticularbin Fig.1.5.22:Wastecollection
Fig.1.5.23:Wastecollectionforsharpobjects Fig.1.5.24:Sawdustcollector
93

Participant Handbook Cabinet Maker Modular Kitchen
__________________________________________________________________________________
__________________________________________________________________________________
__________________________________________________________________________________
__________________________________________________________________________________
__________________________________________________________________________________
__________________________________________________________________________________
__________________________________________________________________________________
__________________________________________________________________________________
__________________________________________________________________________________
__________________________________________________________________________________
__________________________________________________________________________________
__________________________________________________________________________________
__________________________________________________________________________________
__________________________________________________________________________________
__________________________________________________________________________________
__________________________________________________________________________________
__________________________________________________________________________________
__________________________________________________________________________________
__________________________________________________________________________________
__________________________________________________________________________________
__________________________________________________________________________________
__________________________________________________________________________________
__________________________________________________________________________________
__________________________________________________________________________________
__________________________________________________________________________________
__________________________________________________________________________________
__________________________________________________________________________________
__________________________________________________________________________________
__________________________________________________________________________________
__________________________________________________________________________________
__________________________________________________________________________________
Notes
94
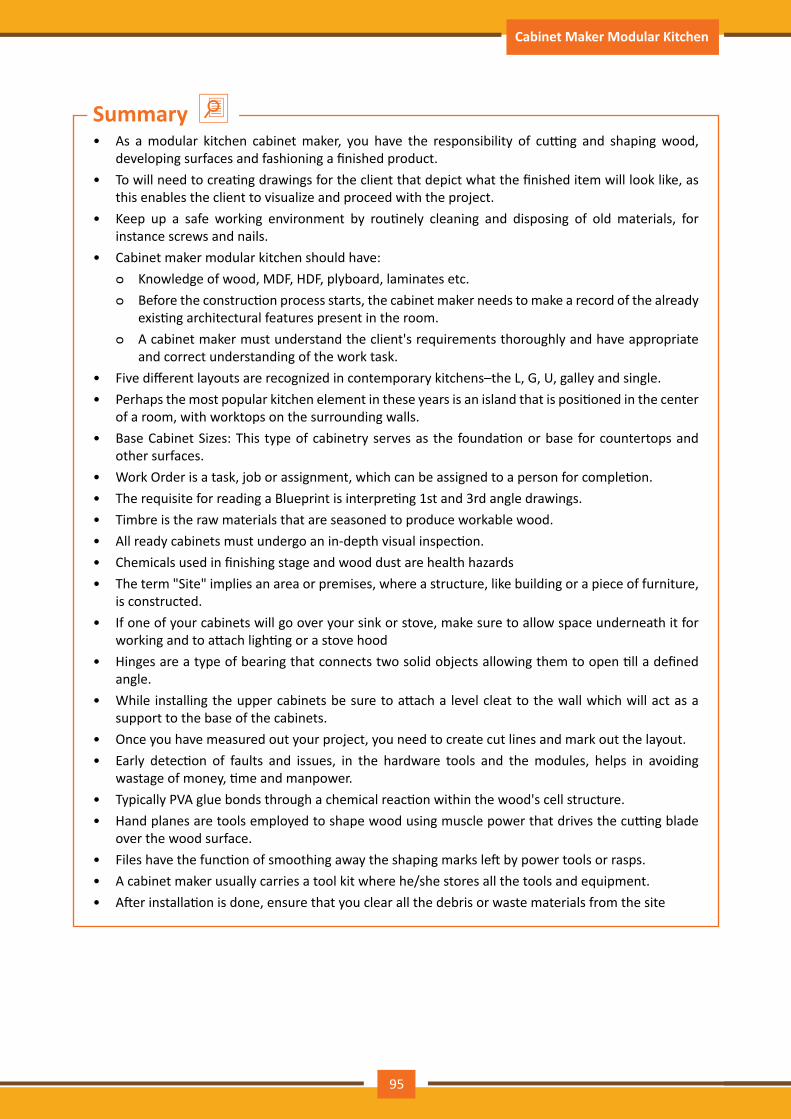
Participant Handbook Cabinet Maker Modular Kitchen
• As a modular kitchen cabinet maker, you have the responsibility of cutting and shaping wood, developing surfaces and fashioning a finished product.
• To will need to creating drawings for the client that depict what the finished item will look like, as this enables the client to visualize and proceed with the project.
• Keep up a safe working environment by routinely cleaning and disposing of old materials, for instance screws and nails.
• Cabinet maker modular kitchen should have: ᴑ Knowledge of wood, MDF, HDF, plyboard, laminates etc. ᴑ Before the construction process starts, the cabinet maker needs to make a record of the already
existing architectural features present in the room. ᴑ A cabinet maker must understand the client's requirements thoroughly and have appropriate
and correct understanding of the work task.• Five different layouts are recognized in contemporary kitchens–the L, G, U, galley and single.• Perhaps the most popular kitchen element in these years is an island that is positioned in the center
of a room, with worktops on the surrounding walls.• Base Cabinet Sizes: This type of cabinetry serves as the foundation or base for countertops and
other surfaces.• Work Order is a task, job or assignment, which can be assigned to a person for completion.• The requisite for reading a Blueprint is interpreting 1st and 3rd angle drawings.• Timbre is the raw materials that are seasoned to produce workable wood.• All ready cabinets must undergo an in-depth visual inspection.• Chemicals used in finishing stage and wood dust are health hazards• The term "Site" implies an area or premises, where a structure, like building or a piece of furniture,
is constructed.• If one of your cabinets will go over your sink or stove, make sure to allow space underneath it for
working and to attach lighting or a stove hood• Hinges are a type of bearing that connects two solid objects allowing them to open till a defined
angle.• While installing the upper cabinets be sure to attach a level cleat to the wall which will act as a
support to the base of the cabinets.• Once you have measured out your project, you need to create cut lines and mark out the layout.• Early detection of faults and issues, in the hardware tools and the modules, helps in avoiding
wastage of money, time and manpower.• Typically PVA glue bonds through a chemical reaction within the wood's cell structure.• Hand planes are tools employed to shape wood using muscle power that drives the cutting blade
over the wood surface.• Files have the function of smoothing away the shaping marks left by power tools or rasps. • A cabinet maker usually carries a tool kit where he/she stores all the tools and equipment. • After installation is done, ensure that you clear all the debris or waste materials from the site
Summary
95
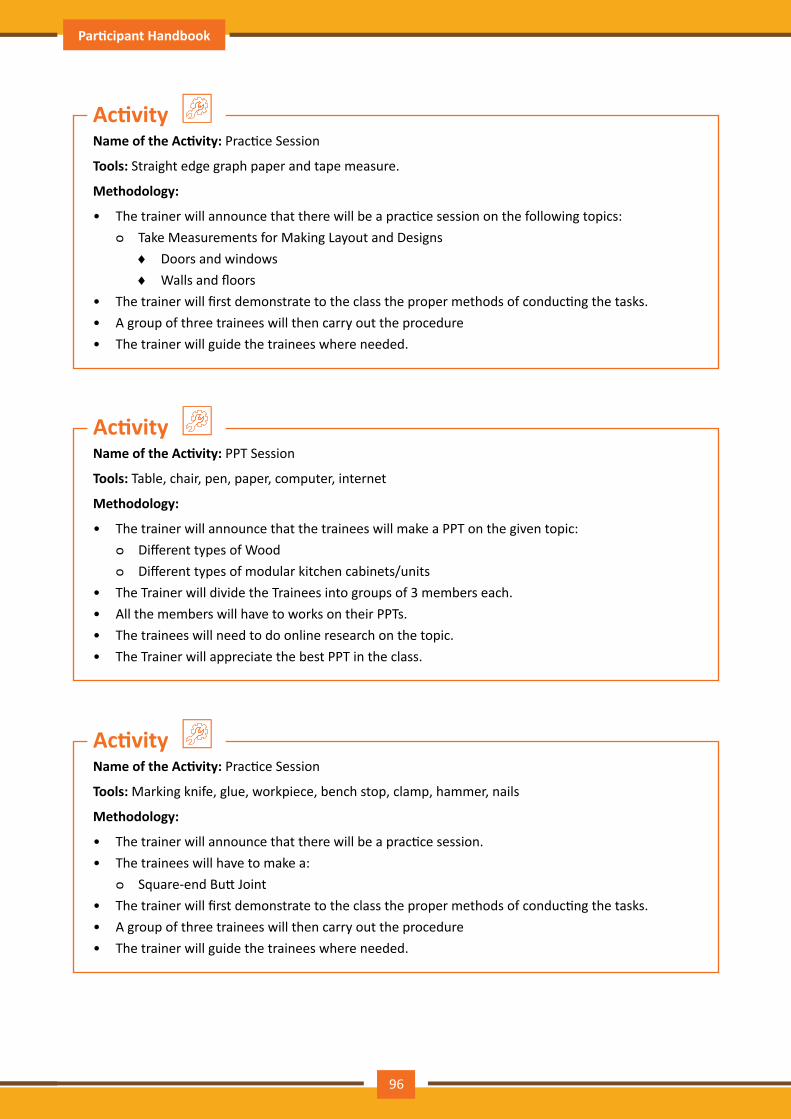
Participant Handbook Cabinet Maker Modular Kitchen
Name of the Activity: Practice Session
Tools: Straight edge graph paper and tape measure.
Methodology:
• The trainer will announce that there will be a practice session on the following topics: ᴑ Take Measurements for Making Layout and Designs
♦ Doors and windows ♦ Walls and floors
• The trainer will first demonstrate to the class the proper methods of conducting the tasks.• A group of three trainees will then carry out the procedure• The trainer will guide the trainees where needed.
Name of the Activity: PPT Session
Tools: Table, chair, pen, paper, computer, internet
Methodology:
• The trainer will announce that the trainees will make a PPT on the given topic: ᴑ Different types of Wood ᴑ Different types of modular kitchen cabinets/units
• The Trainer will divide the Trainees into groups of 3 members each.• All the members will have to works on their PPTs.• The trainees will need to do online research on the topic.• The Trainer will appreciate the best PPT in the class.
Name of the Activity: Practice Session
Tools: Marking knife, glue, workpiece, bench stop, clamp, hammer, nails
Methodology:
• The trainer will announce that there will be a practice session.• The trainees will have to make a:
ᴑ Square-end Butt Joint• The trainer will first demonstrate to the class the proper methods of conducting the tasks.• A group of three trainees will then carry out the procedure• The trainer will guide the trainees where needed.
Activity
Activity
Activity
96
Participant Handbook Cabinet Maker Modular Kitchen
Fill in the blanks appropriately:
1. A cabinet maker must see that materials and ________________ are appropriately matched to create a uniform appearance for all the matching units. (food, grains, shavings)
2. Before the construction process starts, the cabinet maker needs to make a ________________ of the already existing architectural features present in the room. (example, PPT, record)
3. A kitchen's overall ________________ is the shape that is created by the positioning of the major appliances storage areas and countertop. (layout, theme, lighting)
4. ________________ are the work orders circulated internally within the organization. (Employee Orders, Supervisor Orders, Job Orders)
5. ________________ wood is commonly known as composite wood. (Edge, Elevated, Engineered)
6. BWD is a type of engineered wood resistant to high temperature and ________________. (moisture, light, sound)
7. Due to the high level of sound pollution in furniture making environments, ________________ protection must be worn at all times. (facial, hearing, oral)
8. ________________ is the process of determining the magnitude of and quantifying a physical parameter. (Investigation, Measurement, Analysis)
9. A cabinet maker should have ________________ information about accessories and fittings. (scanty, detailed, interesting)
10. ________________ cabinets or base units have a standard measurement of being 24 inches deep and 36 inches tall. (Tall, Crockery, Base)
11. The carpenter's pencil is flat and wide it tends to have a harder ________________ than standard pencils. (tip, eraser, saw)
12. ________________ protects the wooden surface from apparent damages from water, humidity and gives a glossy look to the furniture. (grinding, scavenging, polishing)
Answer in brief:
1. Give one feature each of the U-shaped kitchen, and L-shaped kitchen layouts.2. Give 2 examples of appropriate personal protective equipment in a woodworking environment.3. Name the different Types of Hinges.4. What is Edge Banding?
Exercise
97

Participant Handbook Cabinet Maker Modular Kitchen
98
Participant Handbook Cabinet Maker Modular Kitchen
2. Maintain Work Area Tools and Machines
Unit 2.1 - Follow Safe Working Practices while at Work
Unit 2.2 - Organizational Procedures for Safe Handling of Tools and Equipment
Unit 2.3 - Respond to an Emergency Situation
Unit 2.4 - Organizational Reporting Protocol
Unit 2.5 - Various Types of Safety Signs
Unit 2.6 - Deal With an Accident Involving Human Life
Unit 2.7 - Different Types of Personal Protective Gear
Unit 2.8 - Basic First Aid Treatment Relevant to the Condition
Unit 2.9 - Preventative and Remedial Actions for Exposure to Toxic Materials
Unit 2.10 - Maintain Appropriate Environment to Protect Stock from Pilfering, Theft, Damage and Deterioration
FFS/N850199
Participant Handbook Cabinet Maker Modular Kitchen
At the end of this module, you will be able to:
1. Demonstrate how to follow safe working practices while at work2. Discuss the organizational procedures for safe handling of tools and equipment3. Discuss how to respond to an emergency situation4. Recognize the organizational reporting protocol5. Identify the various types of safety signs and what they mean6. Recall how to deal with an accident which involve human life7. Recall the different types of personal protective equipment and their use8. Practice basic first aid treatment relevant to the condition9. Illustrate how to apply the appropriate preventative and remedial actions to be taken in the
case of exposure to toxic materials10. Discuss how to maintain appropriate environment to protect stock from pilfering, theft, damage
and deterioration
Key Learning Outcomes
100
Participant Handbook Cabinet Maker Modular Kitchen
At the end of this unit, you will be able to:
1. Demonstrate the methods to follow safe working practices at all times2. Demonstrate about the hazards likely to be encountered when conducting routine maintenance3. Identify and discuss the maintenance procedures of tools, equipment and consumables as per
manufacturer's instructions
Unit Objectives
UNIT 2.1: Follow Safe Working Practices while at Work
Cabinet makers for Modular Furniture may follow safe working practices by:• Working safely with all tools, tackles and equipment• Using PPE appropriately and safely and storing and maintaining them, as instructed by the
manufacturer• Maintaining and storing tools and equipment in excellent working condition, according to
organizational requirements and standards• Checking all tools and the entire work area for possible hazards and risks, before starting with the
task Conducting regular electrical inspections at the workplace by an experienced and licensed electrician Conducting frequent inspection of powered tools and equipment, by licensed electricians, preferably
• every month• Replacing defective machinery and accessories with new ones, if deemed absolutely necessary• Ensuring that the work area is absolutely free of clutter• Reporting any spills to the housekeeping staff immediately• Operating machines and equipment only with the safety guards and safety switch techniques in
place• Enforcing adequate and timely lock-out and tag-out mechanisms in powered tools and machinery• Maintaining good ventilation and lighting conditions in the work area and reporting to concerned
authorities if otherwise• Keeping a fully equipped First Aid kit handy• Abiding by safe ergonomic practices• Ensuring that the power supply to all powered machinery, equipment and tools is disconnected
while conducting troubleshooting, routine maintenance and repair / replacement operations• Taking short breaks without hampering the schedule and productivity of the system• Always abiding by safe housekeeping practices
2.1.1 Follow safe working practices at all times
101
Participant Handbook Cabinet Maker Modular Kitchen
Preventive or Proactive Maintenance, commonly identified as Routine Maintenance, are subjected to few hazards, like:
• Electrical hazards from powered tools, while one is operating on them for checking and inspection• Splinters, Dust and Debris during drilling holes or replacement of parts and accessories• Working at heights, including working form hoisted cranes, trolleys and ladders, which can subject
one to the risk of trips, falls and injuries• Bumping with heavy items, like large loads and heavy machinery and tools• Working with toxic fluxes and harmful chemicals during cleaning , repair and maintenance operations
2.1.2 Hazards likely to be encountered when conducting routine maintenance
__________________________________________________________________________________
__________________________________________________________________________________
__________________________________________________________________________________
__________________________________________________________________________________
__________________________________________________________________________________
__________________________________________________________________________________
__________________________________________________________________________________
__________________________________________________________________________________
__________________________________________________________________________________
__________________________________________________________________________________
__________________________________________________________________________________
__________________________________________________________________________________
__________________________________________________________________________________
__________________________________________________________________________________
__________________________________________________________________________________
__________________________________________________________________________________
__________________________________________________________________________________
__________________________________________________________________________________
__________________________________________________________________________________
__________________________________________________________________________________
__________________________________________________________________________________
__________________________________________________________________________________
Notes
102
Participant Handbook Cabinet Maker Modular Kitchen
At the end of this unit, you will be able to:
1. Comply with the organizational procedures to handle all required tools, machines , materials & equipment safely
2. Discuss the method to make use of the information detailed in specifications and instructions
Unit Objectives
UNIT 2.2: Organizational Procedures for Safe Handling of Tools and Equipment
Every organization, where a cabinet maker for modular furniture would work, has few predefined Standard Operating Procedures (SOPs) for the safe handling of the various tools and equipment. Adherence to these organizational procedures is extremely crucial for ensuring safety of the individual as well as others.
A. Safe Handling of Power Tools• Before Using
ᴑ Appropriate measures should be taken to inspect the tool and the power supply. If the tool or any part /accessory is found defective, it must be either replaced immediately or removed from service and tagged appropriately as "Out of Service for Repair".
ᴑ Care should be taken that no defective tool must be used at any point of time. ᴑ All repair and maintenance work must be accomplished by licensed and experienced
persons. ᴑ Before operating Powered Tools, the Instruction Manual must be read thoroughly. ᴑ The guidelines and recommendations (by manufacturer) must be stringently followed, as
per the Instruction Manual or Directions of Use. ᴑ The tools must be grounded adequately with the help of a three-pronged plug (equipped
with relevant 3-wired colour coded cord) and double insulation. This helps in preventing electric shocks.
ᴑ All powered tools must be checked with a continuity tester or a Ground Fault Circuit Interrupter (GFCI), for effective grounding.
ᴑ Powered tools must be switched off before connecting them to a power supply. ᴑ Powered tools must be switched off before connecting them to a power supply.
• While Using ᴑ Issues, like a tool getting heated too soon or appearance of sparks, must be inspected and
rectified by a licensed electrician only. ᴑ All power cords must be kept clear of tools and the path along which the tool will operate. ᴑ Approved extension cords, with proper specifications, power requirement (for the tool) and
dimensions must be used, to prevent overheating and fraying of the cord. ᴑ Outdoor work must be done with the help of outdoor extension cords labelled with "W-A"
or "W".
2.2.1 Handle tools and equipment safely
103
Participant Handbook Cabinet Maker Modular Kitchen
ᴑ Cords must be suspended over the work area to mitigate trips and falls. ᴑ Octopus connections must be avoided by deploying a power bar or power distribution,
comprising multiple receptacle plugs. ᴑ While unplugging the tool from the socket, the plug must be pulled gently and not the cord.
Forcibly pulling the cord leads to fraying and subsequent risk of electric shocks. ᴑ The entire work area must be kept dry and away from heat, sharp edges and oil, to avoid
damage of insulation. ᴑ Cords, instead of knots, may be looped, using a twist lock plug. ᴑ Ensure to use Insulated tape for connecting wires and avoid using masking tape.
B. Safe Handling of Hand Tools• The user must ensure that he / she is adequately trained in the secure usage of hand tools.• Appropriate and accurate choice must be made on the right tool for the task.• The user must deploy the correct techniques of handling and using the hand tools thus selected
for the task.• The user must operate hand tools by keeping the wrist straight.• Hand tools must be thoroughly inspected before use and must be repaired immediately or
replaced, whenever necessary.• The user must ensure that handles of axes, hammers, saws and chisels must fit tightly into the
head of the tool, to avoid accidental injuries.• One must always pull on pliers or wrench.• Worn jaws of pliers, pipe tools and wrenches must be replaced immediately.• All hand tools must be kept in a robust toolbox, in a clean and dry place, away from the work
area.• While using hand tools, one must wear appropriate PPE, according to the types of hazards
involved in the task. This includes protective gloves of appropriate material, heavy aprons, safety goggles and face shields.
• When not in use, sharp and cutting tools must be covered with appropriate sheaths to avoid injuries.
C. Adhere to relevant occupational safety policies while handling sharp tools to make and install furniture and fitti ngsOccupational Safety Policies, while handling sharp tools, can be implemented via the Hierarchy of Control:
1. Elimination– Removing the sharp tool hazard completely from the work area2. Substitution– Replacing the sharp tool hazard with a comparatively less hazardous one3. Isolation– Isolate the sharp tool hazard by controlling general access or guarding it4. Engineering Control– Redesign the sharp tool hazard to mitigate or remove the risk5. Administrative Control– Encouraging safe working practices via policies, SOPs and training6. Sharps Management– This includes the following:
• Classifying the broken bits from sharp tools as "Sharps"• Disposing of sharps into appropriate Sharp container• Using appropriate PPE to safeguard oneself while handling sharp tools and broken bits
104
Participant Handbook Cabinet Maker Modular Kitchen
D. Perform basic safety checks before operation of all machines, tools and electrical equipmentA cabinet maker must perform basic safety checks before operating all equipment as a part of the Standard Operating Procedures. Before starting with the basic safety checks, one must go through the Instruction Manual, Manufacturer's Recommendations and Directions of Use thoroughly. These documents are essential because one can find detailed and stepwise instructions about the maintenance and operating procedures as well as emergency shutdown and tag-out mechanisms in them. In case a machine or tool is marked with a lock or tag, it must not be removed and not used. Machines and tools, that are floor or bench-mounted, must be anchored or firmly clamped to a robust foundation, before maintenance operations. In case a machine does not have safety valves or guards on, one must not operate that for maintenance purpose. Check out for frayed out electric cables or loose live prongs in plugs. Ensure that power supply is off, before one starts maintenance operations.
The implications of Improper handling of tools and equipment are:
• Powered tools must never be carried by pulling the power cords.• Powered tools must never be operated unless one is aware of the technique of use, the hazards and
limitations involved.• A running tool must never be left unattended. One must not leave behind a running powered tool,
unless it has been duly switched off and disconnected from the power supply.• Loose clothing, gloves, long hairdo and jewellery must never be worn while operating powered
tools.• Powered tools must never be exposed to wet conditions, unless they are properly earthed by GFCI.• One must avoid tying the power cords into knots because knots may lead to short circuits and
electric shocks.• A 3-pronged plug, with the 3rd prong broken, must never be used.• Extension Cords must never be used as permanent wiring.• Powered tools must never be operated in an area comprising explosive gases or vapors.• Powered tools must never be cleaned with flammable agents.• One must never attempt to catch a falling hand tool.• Excessive force or undue pressure must never be imposed on hand tools.• The job or work piece must never be handheld while using a screwdriver or any cutting tool.• Sharp tools must never be carried in one's pocket.• No hand tool must be used for electrical work, unless it is specially designed and adequately
insulated for doing so.• Bulky and heavy gloves must never be worn while using hand tools.• Hand tools must never be thrown.• Hand tools must never be left on high platforms and elevated places like ladders and scaffolding,
because bumping against such structures may cause the tools to fall on someone and cause fatal injuries.
2.2.2 The health and safety implications of not handling tools properly
105
Participant Handbook Cabinet Maker Modular Kitchen
A cabinet maker must read thoroughly the specification sheet to obtain concrete information on the following:
• The Table of Contents, as the name suggests, briefs the reader / user about what information does the specifications comprise
• The name, address and contact details of authorized experts, who are responsible for preparing the specifications, deviations and updates
• The significance, scope and purpose of the specification• The intended use of the specification• Glossary of important terms and abbreviations• Test methods for measuring all specified characteristics• Material requirements in terms of rate and quantity, targets and tolerances• Drawings, sketches, photographs and illustrations• Safety requirements and guidelines / instructions on the same• Quality Control and Assurance standards, requirements and performance testing criteria• Expected TAT / deadline for delivery of the project • Rejection, inspection and correction provisions • Relevant annexes and appendices
2.2.3 Method to make use of the information detailed in specifications and instructions
__________________________________________________________________________________
__________________________________________________________________________________
__________________________________________________________________________________
__________________________________________________________________________________
__________________________________________________________________________________
__________________________________________________________________________________
__________________________________________________________________________________
__________________________________________________________________________________
__________________________________________________________________________________
__________________________________________________________________________________
__________________________________________________________________________________
__________________________________________________________________________________
__________________________________________________________________________________
__________________________________________________________________________________
__________________________________________________________________________________
Notes
106

Participant Handbook Cabinet Maker Modular Kitchen
At the end of this unit, you will be able to:
1. Explain the procedure of responding to an emergency situation
Unit Objectives
UNIT 2.3: Respond to an Emergency Situation
How to Respond to an Emergency Situation
An Emergency can be defined as "a serious, unexpected, and often dangerous situation requiring immediate action." Responding to an Emergency situation, while working at the site, involves the following steps:
A. Evaluating the Emergency• One must remain calm and composed during an emergency situation because stress during an
emergency complicates things and confuses a person.• One must critically and rationally think and evaluate the severity of the emergency and
determine, what requires to be done on immediate basis.• One must look for additional help by calling up the emergency toll free number, which would
help the caller reach an official or 'dispatcher'.• The emergency dispatcher aims at providing immediate and appropriate help, depending on
the nature and degree of emergency.• One must help the dispatcher by answering his / her questions and providing the dispatcher
with the accurate location and nature of emergency.• It is recommended that one should call from a GPS equipped phone, so that the dispatcher is
able to track the location, even if the caller is unable to speak.• One must determine the nature of the emergency, i.e. if it is a medical, mental health or
behavioural emergency.• One must assess the immediate threats, for example, in case a person is severely injured from a
running machine, the machine must be turned off immediately to prevent others from getting hurt as well.
B. Handling the Emergency• Extremely high casualties must be reported to the Occupational Health and Safety Committee
(OHSC).• One must move farther from the emergency spot and help others do the same.• Evacuation Plans must be adopted and Escape Routes must be taken.• Secondary Hazards must be eliminated or mitigated, at least. For example, a car accident
involves the risk of a violent explosion and fire outbreak resulting from spilled fuel.• One must help the other victims and take appropriate measures to help the specially abled
ones.• One must never feel guilty if nothing can be done to help the others.• Once the emergency team arrives, it must be provided with all required and relevant information.
107

Participant Handbook Cabinet Maker Modular Kitchen
• In case nothing can be done to mitigate the severity of the situation, one must provide support to the others by comforting them, inquiring about their medical history, noting events as they occur, etc. These information may prove crucial for the emergency response team.
• A First Aid kit must be used, wherever applicable.• One must try reviving a seemingly unconscious victim by rubbing the chest, pinching the
earlobes, providing Cardiopulmonary Resuscitation (combination of chest compression and artificial respiration)
• One must avoid moving a severely injured victim and provide only the basic first aids.• Only the emergency services can properly handle and move such victims.
C. Undertake first aid activities in case of any accident, if required and asked to do so• First Aid is an emergency care or treatment given to an ill or injured person before regular
medical aid can be obtained.• Before administering First Aid to a victim, one must check the category and degree of emergency
and then apply the techniques duly.• Stop and look at the scene and the person before responding.• Ask yourself the following questions:
ᴑ Is the scene safe for you to enter? ᴑ What happened exactly? ᴑ What is the casualty? ᴑ What is the category and nature of the emergency? ᴑ Is the accident fatal for the victim? ᴑ Is anyone else available at the place to help?
• Do the following if the victim is conscious and injury is not fatal: ᴑ Ask for the victim's consent to administer first aid. ᴑ Put on appropriate PPE, if possible. ᴑ Interview the victim to ask basic medical questions, so that accurate information may be
provided to the Emergency Medical Team, once it arrives. ᴑ Conduct a thorough check for undetected injuries. ᴑ Administer appropriate care and technique.
• If the victim is unconscious, try reviving the person by addressing him/her, rubbing shoulders, hands or the sole of feet.
• Fetch the AED and use it, along with Artificial Respiration.
D. List of names (and job titles if applicable), and the contact details of all the people responsible for health and safety in a workplace• As an important part of the emergency management procedure, any workplace must elect a
Safety Committee, which comprise responsible and senior people from all departments and teams.
• This committee would act as the legislative body, the authority and the first point of contact for reporting any hazard, potential risks / threats and emergency situations at the entire workplace.
• This committee would also be responsible for conducting training sessions, safety audits and drills, to help all employees prepare themselves for emergency and unprecedented situations.
• The list of the committee members, their designations and job titles, as well as contact numbers must be listed and circulated among all staff members.
108
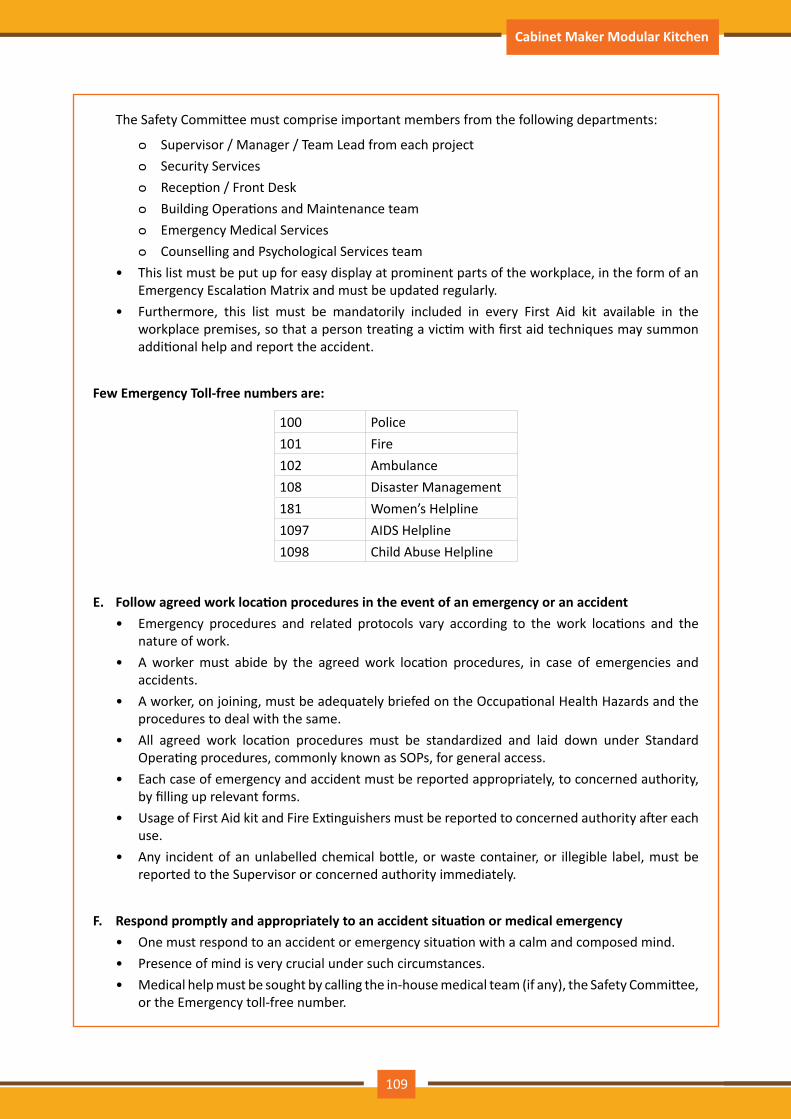
Participant Handbook Cabinet Maker Modular Kitchen
The Safety Committee must comprise important members from the following departments:
ᴑ Supervisor / Manager / Team Lead from each project ᴑ Security Services ᴑ Reception / Front Desk ᴑ Building Operations and Maintenance team ᴑ Emergency Medical Services ᴑ Counselling and Psychological Services team
• This list must be put up for easy display at prominent parts of the workplace, in the form of an Emergency Escalation Matrix and must be updated regularly.
• Furthermore, this list must be mandatorily included in every First Aid kit available in the workplace premises, so that a person treating a victim with first aid techniques may summon additional help and report the accident.
Few Emergency Toll-free numbers are:
100 Police101 Fire102 Ambulance108 Disaster Management181 Women’s Helpline1097 AIDS Helpline1098 Child Abuse Helpline
E. Follow agreed work location procedures in the event of an emergency or an accident• Emergency procedures and related protocols vary according to the work locations and the
nature of work.• A worker must abide by the agreed work location procedures, in case of emergencies and
accidents.• A worker, on joining, must be adequately briefed on the Occupational Health Hazards and the
procedures to deal with the same.• All agreed work location procedures must be standardized and laid down under Standard
Operating procedures, commonly known as SOPs, for general access.• Each case of emergency and accident must be reported appropriately, to concerned authority,
by filling up relevant forms.• Usage of First Aid kit and Fire Extinguishers must be reported to concerned authority after each
use.• Any incident of an unlabelled chemical bottle, or waste container, or illegible label, must be
reported to the Supervisor or concerned authority immediately.
F. Respond promptly and appropriately to an accident situation or medical emergency• One must respond to an accident or emergency situation with a calm and composed mind.• Presence of mind is very crucial under such circumstances.• Medical help must be sought by calling the in-house medical team (if any), the Safety Committee,
or the Emergency toll-free number.
109
Participant Handbook Cabinet Maker Modular Kitchen
• Appropriate first aid treatment must be administered to anyone in need, by a trained person / colleague.
• In case a victim cannot be adequately treated by first aid, and the emergency team is yet to arrive on the spot, the victim must be taken to the emergency ward of the nearest hospital.
• Ambulance services may be summoned by calling up the toll-free number for the same.• The Environmental Health and Safety (EHS) department must be notified about the accident
within 48 hours of the Supervisor being informed.• Care should be taken that a seriously injured victim must not be moved and one must wait for
the emergency team to arrive.
G. Participate in emergency procedures• Raising Alarm: Fire Alarms can either have a "Break Glass" or a "Pull / Push" mechanism. In the
"Break Glass" system, the glass sheet must be forcefully hit with clenched fist. One must repeat the process till the glass breaks. In the "Pull / Push" systems, one must smash the glass first and then either pull down or push up the lever to raise the alarm.
• Safe and efficient evacuation: Appropriate evacuation procedures (already discussed in the previous chapter) must be adopted for general public and for specially abled persons. Specially abled persons must be helped to evacuate the place by providing them access to Wheelchairs and other aids.
• Correct Assembly Point: Proper instructions must be given to the workers about the location of and the directions to the correct assembly point in the workplace. Information about this must be provided during mock evacuation drills and training sessions as well.
• Roll call: Once everybody has evacuated the building / workshop and arrived at the Assembly Point, Roll call or Head Count must be done to ensure that nobody is left behind in the affected area. This must be done mandatorily to ensure that everybody within the premises is safe.
• Correct return to work: Evacuation must be conducted in a very organized, streamlined and noiseless manner. Likewise, everybody, who had evacuated the workplace, must return to his / her respective locations / positions / seats, following normal or emergency routes, depending on whether the situation has been restored to normal or not. Once everybody is back in place, another Roll call is conducted.
H. State methods of accident prevention in the work environmentOne must stay aware and updated about the various methods of accident prevention in the work environment. Few of these are:
• Training in health and safety procedures - One must be trained in the industrial health and safety procedures through drills and training sessions. Apart from the procedures popular in the industry, every organization has its own set of procedures and protocols, laid down and standardized in the form of Standard Operating Procedures (SOPs).
• Using health and safety procedures - Ergonomic practices, use of PPE, hygiene and importance of good housekeeping practices must be promoted among workers.
• Use of equipment and working practices- Proper use, storage and maintenance of PPE, as well as medically recommended lifting, carrying and transporting practices must be taught and promoted among workers.
• Safety notices, advice and instructions from colleagues and supervisors- Workers must always keep their eyes open, so that they do not miss out safety notices, advice and instructions being circulated around them. Such safety notices, plans and instructions are often displayed for general public access at prominent and common places at workplace.
110
Participant Handbook Cabinet Maker Modular Kitchen
I. Check and ensure general health and safety equipment are available at work siteWorkers must ensure the availability of general and safety equipment like Fire extinguishers, First aid equipment, safety instruments and clothing (Personal Protective Equipment) as well as safety installations like neon-enabled and glowing fire exits, exhaust fans, etc. All such equipment must be in good operating condition and must be periodically maintained.
J. Comply with restrictions imposed on harmful chemicals inside work area during working hoursFew hazardous chemicals in the workplace are recommended for restricted and expert use only. These chemicals must be stored in cool, dry and clean storage locations, in containers made of compatible materials and labelled with relevant Directions of Use, Precautionary Measures, Ingredients and Hazard Warnings.
__________________________________________________________________________________
__________________________________________________________________________________
__________________________________________________________________________________
__________________________________________________________________________________
__________________________________________________________________________________
__________________________________________________________________________________
__________________________________________________________________________________
__________________________________________________________________________________
__________________________________________________________________________________
__________________________________________________________________________________
__________________________________________________________________________________
__________________________________________________________________________________
__________________________________________________________________________________
__________________________________________________________________________________
__________________________________________________________________________________
__________________________________________________________________________________
__________________________________________________________________________________
__________________________________________________________________________________
__________________________________________________________________________________
__________________________________________________________________________________
__________________________________________________________________________________
Notes
111

Participant Handbook Cabinet Maker Modular Kitchen
At the end of this unit, you will be able to:
1. Practice the 6cs of reporting protocol2. Identify and report any hazards and potential risks/ threats to supervisors or other authorized
personnel3. Report accident/incident report to authorized person
Unit Objectives
UNIT 2.4: Organizational Reporting Protocol
The general highlights of the Organizational Reporting Protocol, commonly known as the 6Cs, are:
1. Communicate First– The first source of information during emergency is the preferred source. Crises are time-bound and hence it is important to communicate promptly.
2. Communicate Rightly– Distortion of information due to panic must be avoided. Proper, accurate information must be provided to concerned authorities and this can save lives.
3. Communicate Credibly– Integrity and truthfulness must never be forgotten during emergencies.4. Communicate empathetically– One must wear the shoes of the victims while communicating
emergencies.5. Communicate to instigate appropriate action– Communicating to the right authorities help in
taking the necessary action.6. Communicate to promote respect– Communicating with the victims with respect help in earning
their trust and thus eases the disaster management process.
Hazards and potential risks / threats can be identified and then reported to supervisors or other authorized persons in the following ways:
Fig.2.4.2.1:Theprocessofreportingahazardorpotentialrisk
While identifying and reporting a hazard/potential threat/potential risk, one must describe the following:
2.4.1 The 6Cs of reporting protocol
2.4.2 Identify and report any hazards and potential risks/Threats to supervisors or other authorized personnel
112
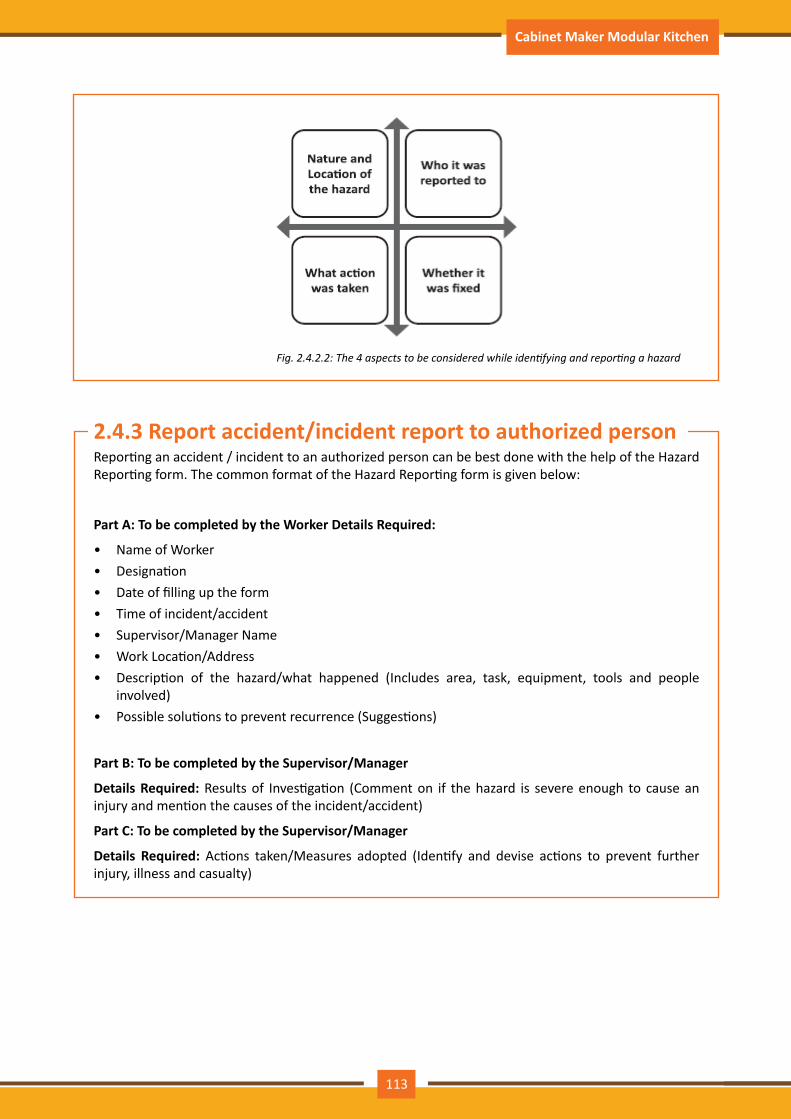
Participant Handbook Cabinet Maker Modular Kitchen
Fig.2.4.2.2:The4aspectstobeconsideredwhileidentifyingandreportingahazard
Reporting an accident / incident to an authorized person can be best done with the help of the Hazard Reporting form. The common format of the Hazard Reporting form is given below:
Part A: To be completed by the Worker Details Required:
• Name of Worker• Designation• Date of filling up the form • Time of incident/accident • Supervisor/Manager Name • Work Location/Address• Description of the hazard/what happened (Includes area, task, equipment, tools and people
involved)• Possible solutions to prevent recurrence (Suggestions)
Part B: To be completed by the Supervisor/Manager
Details Required: Results of Investigation (Comment on if the hazard is severe enough to cause an injury and mention the causes of the incident/accident)
Part C: To be completed by the Supervisor/Manager
Details Required: Actions taken/Measures adopted (Identify and devise actions to prevent further injury, illness and casualty)
2.4.3 Report accident/incident report to authorized person
113

Participant Handbook Cabinet Maker Modular Kitchen
Action Responsibility Completion Date
__________________________________________________________________________________
__________________________________________________________________________________
__________________________________________________________________________________
__________________________________________________________________________________
__________________________________________________________________________________
__________________________________________________________________________________
__________________________________________________________________________________
__________________________________________________________________________________
__________________________________________________________________________________
__________________________________________________________________________________
__________________________________________________________________________________
__________________________________________________________________________________
__________________________________________________________________________________
__________________________________________________________________________________
__________________________________________________________________________________
__________________________________________________________________________________
__________________________________________________________________________________
__________________________________________________________________________________
__________________________________________________________________________________
__________________________________________________________________________________
__________________________________________________________________________________
__________________________________________________________________________________
Notes
114
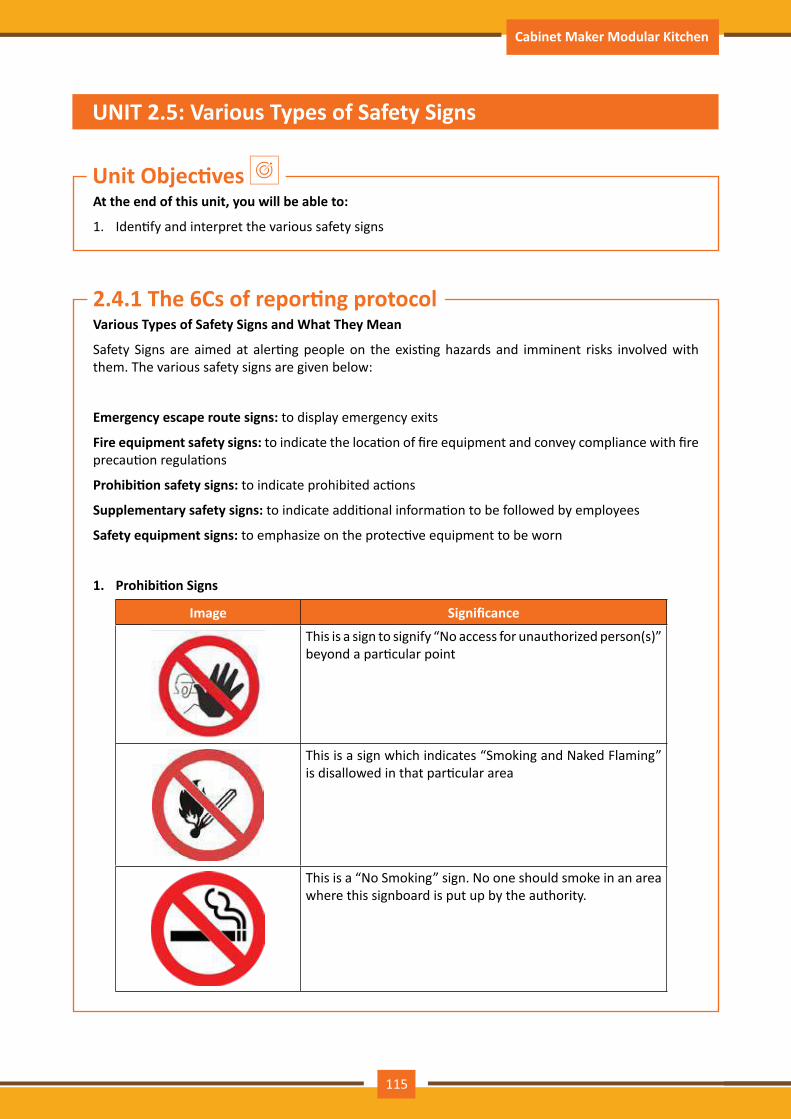
Participant Handbook Cabinet Maker Modular Kitchen
At the end of this unit, you will be able to:
1. Identify and interpret the various safety signs
Unit Objectives
UNIT 2.5: Various Types of Safety Signs
Various Types of Safety Signs and What They Mean
Safety Signs are aimed at alerting people on the existing hazards and imminent risks involved with them. The various safety signs are given below:
Emergency escape route signs: to display emergency exits
Fire equipment safety signs: to indicate the location of fire equipment and convey compliance with fire precaution regulations
Prohibition safety signs: to indicate prohibited actions
Supplementary safety signs: to indicate additional information to be followed by employees
Safety equipment signs: to emphasize on the protective equipment to be worn
1. Prohibition Signs
Image Significance
This is a sign to signify “No access for unauthorized person(s)” beyond a particular point
This is a sign which indicates “Smoking and Naked Flaming” is disallowed in that particular area
This is a “No Smoking” sign. No one should smoke in an area where this signboard is put up by the authority.
2.4.1 The 6Cs of reporting protocol
115
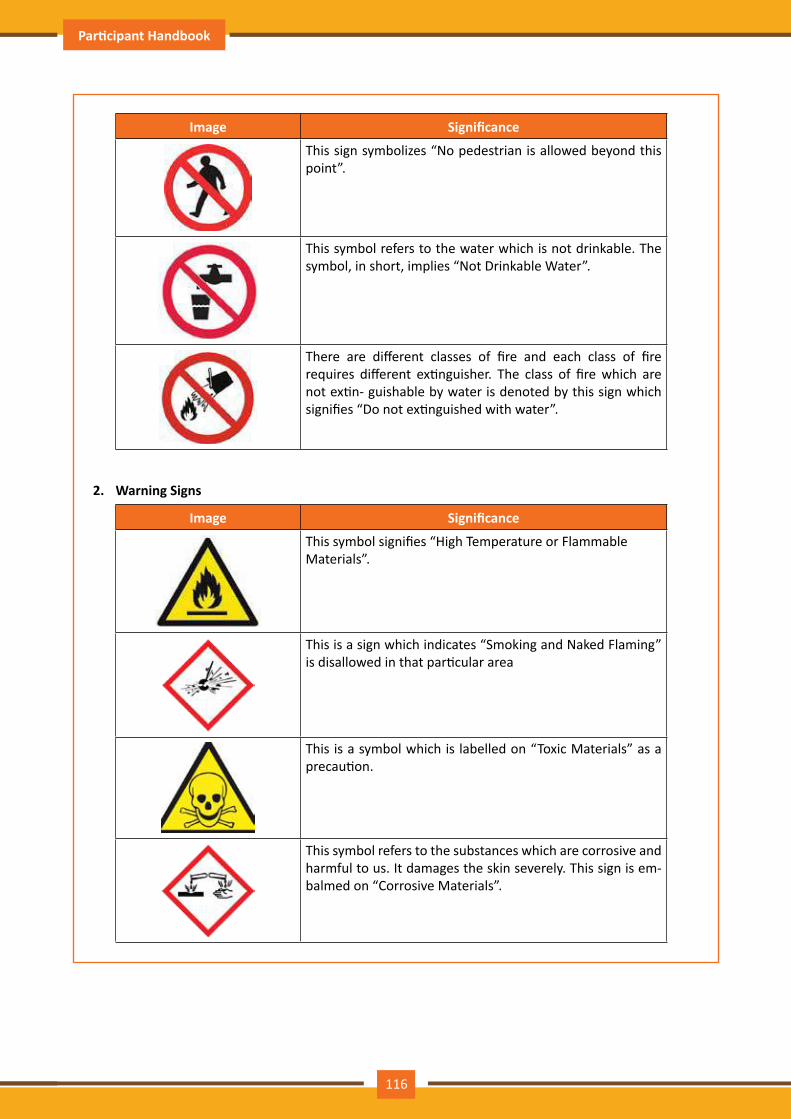
Participant Handbook Cabinet Maker Modular Kitchen
Image Significance
This sign symbolizes “No pedestrian is allowed beyond this point”.
This symbol refers to the water which is not drinkable. The symbol, in short, implies “Not Drinkable Water”.
There are different classes of fire and each class of fire requires different extinguisher. The class of fire which are not extin- guishable by water is denoted by this sign which signifies “Do not extinguished with water”.
2. Warning Signs
Image Significance
This symbol signifies “High Temperature or Flammable Materials”.
This is a sign which indicates “Smoking and Naked Flaming” is disallowed in that particular area
This is a symbol which is labelled on “Toxic Materials” as a precaution.
This symbol refers to the substances which are corrosive and harmful to us. It damages the skin severely. This sign is em- balmed on “Corrosive Materials”.
116
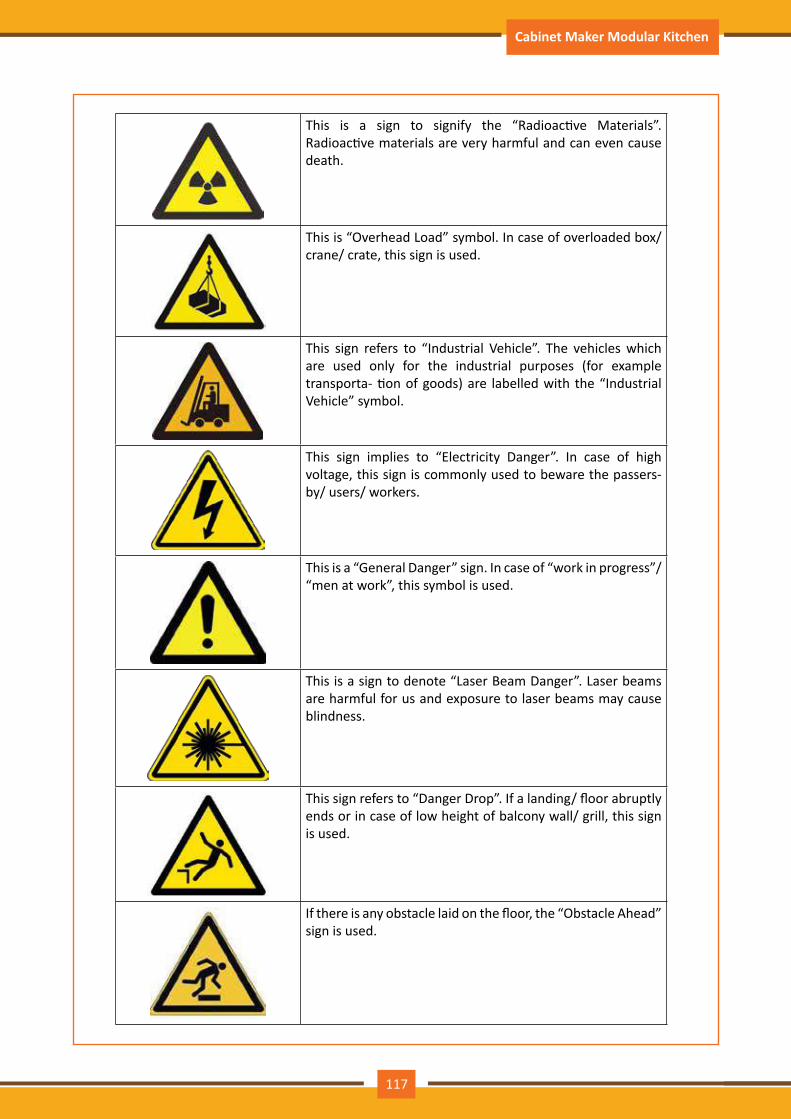
Participant Handbook Cabinet Maker Modular Kitchen
This is a sign to signify the “Radioactive Materials”. Radioactive materials are very harmful and can even cause death.
This is “Overhead Load” symbol. In case of overloaded box/ crane/ crate, this sign is used.
This sign refers to “Industrial Vehicle”. The vehicles which are used only for the industrial purposes (for example transporta- tion of goods) are labelled with the “Industrial Vehicle” symbol.
This sign implies to “Electricity Danger”. In case of high voltage, this sign is commonly used to beware the passers-by/ users/ workers.
This is a “General Danger” sign. In case of “work in progress”/ “men at work”, this symbol is used.
This is a sign to denote “Laser Beam Danger”. Laser beams are harmful for us and exposure to laser beams may cause blindness.
This sign refers to “Danger Drop”. If a landing/ floor abruptly ends or in case of low height of balcony wall/ grill, this sign is used.
If there is any obstacle laid on the floor, the “Obstacle Ahead” sign is used.
117
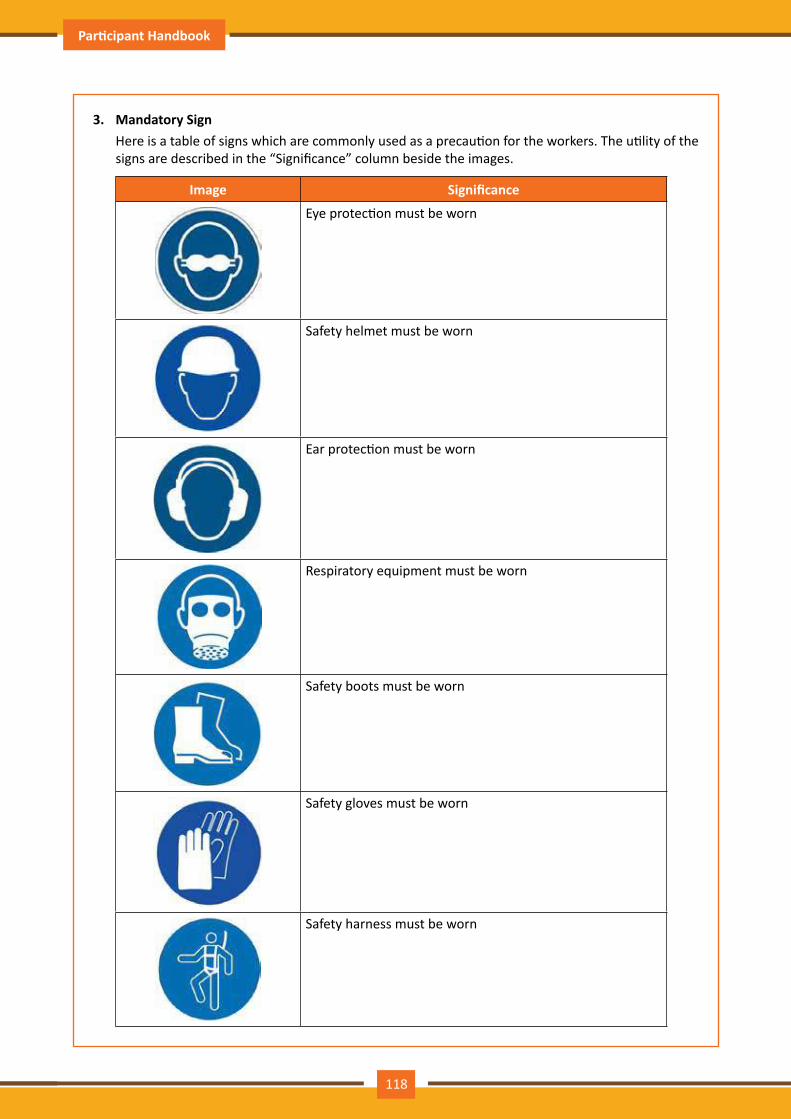
Participant Handbook Cabinet Maker Modular Kitchen
3. Mandatory SignHere is a table of signs which are commonly used as a precaution for the workers. The utility of the signs are described in the “Significance” column beside the images.
Image Significance
Eye protection must be worn
Safety helmet must be worn
Ear protection must be worn
Respiratory equipment must be worn
Safety boots must be worn
Safety gloves must be worn
Safety harness must be worn
118
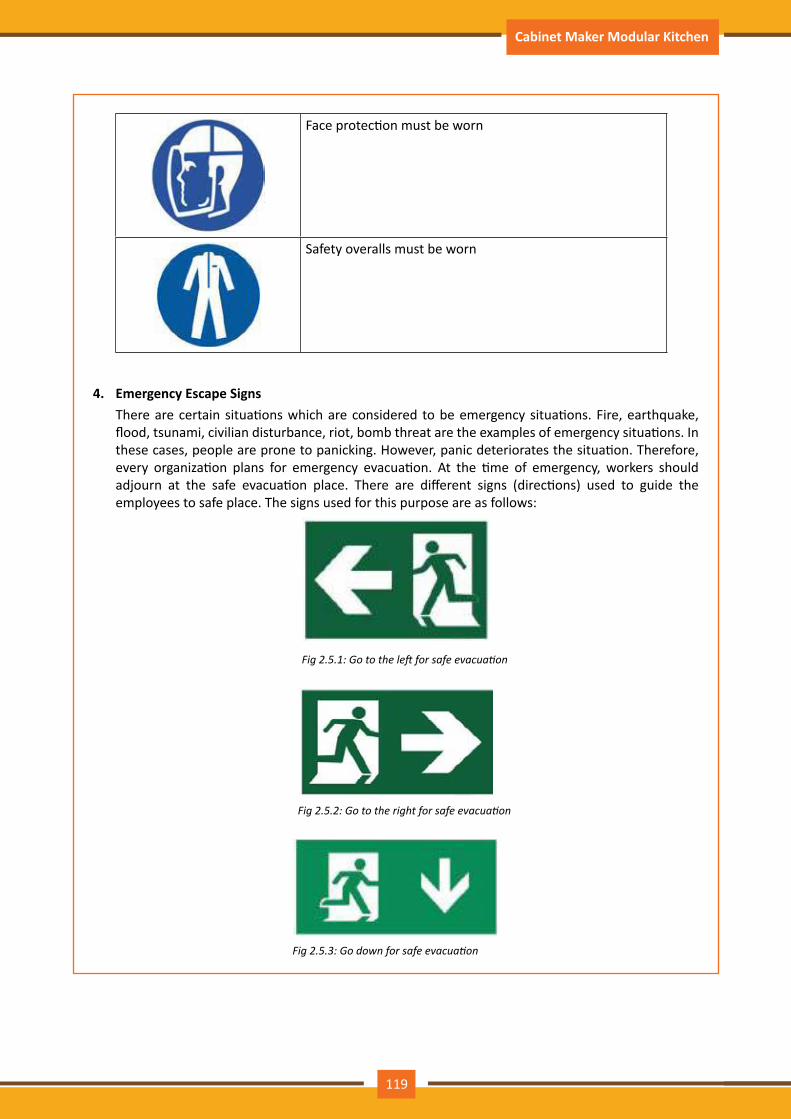
Participant Handbook Cabinet Maker Modular Kitchen
Face protection must be worn
Safety overalls must be worn
4. Emergency Escape SignsThere are certain situations which are considered to be emergency situations. Fire, earthquake, flood, tsunami, civilian disturbance, riot, bomb threat are the examples of emergency situations. In these cases, people are prone to panicking. However, panic deteriorates the situation. Therefore, every organization plans for emergency evacuation. At the time of emergency, workers should adjourn at the safe evacuation place. There are different signs (directions) used to guide the employees to safe place. The signs used for this purpose are as follows:
Fig2.5.1:Gototheleftforsafeevacuation
Fig2.5.2:Gototherightforsafeevacuation
Fig2.5.3:Godownforsafeevacuation
119

Participant Handbook Cabinet Maker Modular Kitchen
Fig2.5.4:Goupforsafeevacuation
5. First Aid SignsIn every organization, first aid is a mandatory. Especially, in the organizations that deal with different types of hand and power tools, first aid is a compulsory. In the following table, the symbols and their significance are discussed.
Image Significance
This is a general symbol for first aid. Generally, this sign is used to denote first aid room, first aid box.
This is the “First Aid Stretcher” symbol. In case of accidents, where the victim is unable to stand up on feet and walk, first aid stretcher is used.
This symbol signifies “Eye wash”.
This is a “Safety Shower” sign.
This is the “Emergency Telephone” sign. In case of accidents, when the first aid is required on an immediate basis, this tele- phone is used.
120

Participant Handbook Cabinet Maker Modular Kitchen
__________________________________________________________________________________
__________________________________________________________________________________
__________________________________________________________________________________
__________________________________________________________________________________
__________________________________________________________________________________
__________________________________________________________________________________
__________________________________________________________________________________
__________________________________________________________________________________
__________________________________________________________________________________
__________________________________________________________________________________
__________________________________________________________________________________
__________________________________________________________________________________
__________________________________________________________________________________
__________________________________________________________________________________
__________________________________________________________________________________
__________________________________________________________________________________
__________________________________________________________________________________
__________________________________________________________________________________
__________________________________________________________________________________
__________________________________________________________________________________
__________________________________________________________________________________
__________________________________________________________________________________
__________________________________________________________________________________
__________________________________________________________________________________
__________________________________________________________________________________
__________________________________________________________________________________
__________________________________________________________________________________
__________________________________________________________________________________
__________________________________________________________________________________
__________________________________________________________________________________
__________________________________________________________________________________
Notes
121
Participant Handbook Cabinet Maker Modular Kitchen
At the end of this unit, you will be able to:
1. Discuss how to deal with accidents that involve human life
Unit Objectives
UNIT 2.6: Deal With an Accident Involving Human Life
How to Deal With an Accident Which Involves Human Life
An accident, that may lead to the loss of human life, falls under the "Critical" and "Possible" categories of the Risk Assessment Matrix, as mentioned in section 3.2.2. Thus, considering the degree of severity, one may follow the below steps while dealing with an accident that involves the loss of human life:
• Turn off and stall the source of the accident. For example, in case a severe accident has occurred due to a running machine, the machine must be turned off and stopped first, to prevent other people from getting injured in the same manner.
• One must not panic and not allow anybody else to panic at the scene. Maintaining a calm and composed attitude is extremely crucial for bystanders.
• One must assess the severity of the accident and promptly decide if emergency services must be summoned.
• One must look over the accident scene carefully, to gather information for the emergency services personnel.
• One must take initiatives to keep the accident spot clear, so that the victim/s are not asphyxiated with lack of breathing air. Alarms may be raised, if possible, to notify and warn everyone else at the work area about the accident.
• Before approaching the victim for extending help and support, one must ensure that the spot and the victim's body is safe for one to touch and access. For example, in case of electrocution, the main power supply must be switched off before touching the victim's body.
• A seemingly unconscious victim may be revived to consciousness by rubbing the chest, artificial respiration or pinching the earlobes.
• Such a victim must be asked if he/she requires any assistance.• One must provide the best possible assistance to the victim, before summoning emergency services.• The victim must not be removed from the spot (unless there are imminent dangers like fire or
electrocution) before the arrival of the emergency team.• The legs of a victim in shock must be raised to mitigate the impact.• One must use encouraging and comforting words to help the victim in reviving.
122

Participant Handbook Cabinet Maker Modular Kitchen
__________________________________________________________________________________
__________________________________________________________________________________
__________________________________________________________________________________
__________________________________________________________________________________
__________________________________________________________________________________
__________________________________________________________________________________
__________________________________________________________________________________
__________________________________________________________________________________
__________________________________________________________________________________
__________________________________________________________________________________
__________________________________________________________________________________
__________________________________________________________________________________
__________________________________________________________________________________
__________________________________________________________________________________
__________________________________________________________________________________
__________________________________________________________________________________
__________________________________________________________________________________
__________________________________________________________________________________
__________________________________________________________________________________
__________________________________________________________________________________
__________________________________________________________________________________
__________________________________________________________________________________
__________________________________________________________________________________
__________________________________________________________________________________
__________________________________________________________________________________
__________________________________________________________________________________
__________________________________________________________________________________
__________________________________________________________________________________
__________________________________________________________________________________
__________________________________________________________________________________
__________________________________________________________________________________
Notes
123

Participant Handbook Cabinet Maker Modular Kitchen
At the end of this unit, you will be able to:
1. Identify the different types of PPE and discuss their use
Unit Objectives
UNIT 2.7: Different Types of Personal Protective Gear
Different types of Personal Protective Gear and their usage
Personal Protective Equipment, commonly termed as PPE, is specialized clothing or equipment worn and used by employees for safeguarding themselves against Occupational Health and Safety hazards. Such clothing are aimed at protecting different parts of the body, like hands, eyes, ears, face, feet, head, etc.
Here is a table of personal protective equipment that are widely used.
• Hand Gloves– Used for protecting the hands from harmful and corrosive chemicals, extreme temperatures, sharp and contaminated objects. For example, Nitrile gloves are used for protecting the hands against solvents, oils, greases, tar, acids and alkalis. Gloves made of natural rubber or Latex are used for protection against contaminations and biohazard risks. Asbestos gloves are worn while dealing with extremely hot materials.
• Safety Shoes– These are made of highly durable and robust material and protect the feet from injuries due to cuts and bruises.
• Safety Goggles– These protect the eyes from harmful radiation, dust particles and splinters.• Masks and Face Shields– These are worn especially during welding, gas cutting and brazing
operations, in order to protect the face from direct flame, extreme temperatures, dust particles and splinters.
• Apron– This protects the clothes from dust and other impurities. These are often heat-resistant and anti-abrasive in nature.
• Ear Muffs– These are used in extremely noisy places like factories and workshops, in order to protect the ears from deafening.
• Respirators– These masks, if of the FFP3 (Filtering Face Piece Grade-3) specification, allow a maximum air pollutant leakage of 5% only and filter 99% of all particles measuring up to 0.6 μm.
Name Function Image
Head Protection Safety Helmet)
Head injury can impair a worker for the lifetime. Wearing safety helmet is the easiest way to avoid such situations. Safety helmet is used to –
• Protect head from falling objects and knocks• Reduce risk of head bumping against fixed
objects like exposed pipes and beams• Protect head from accidental electrical hazardsSafety helmet comes in different forms. Some helmets include other protective elements such as goggles, earmuffs attached to it. Safety helmet should be worn on the head, not on any hat or cap.
Safety Helmet
124
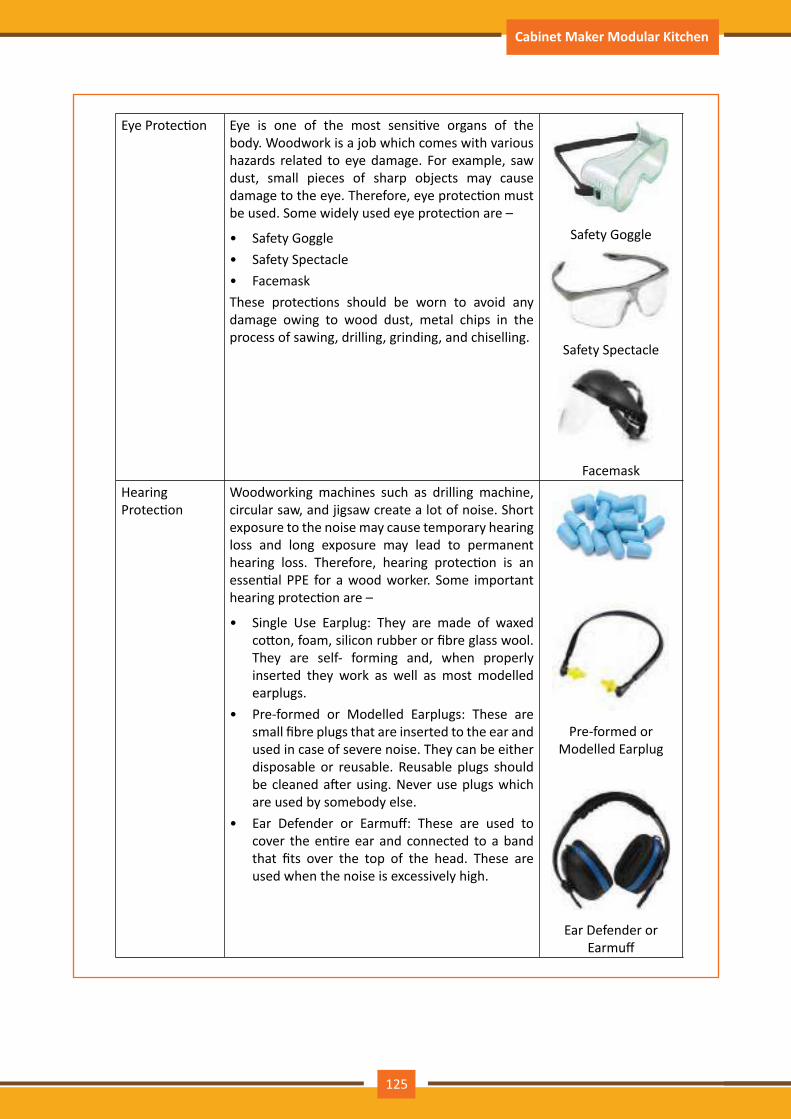
Participant Handbook Cabinet Maker Modular Kitchen
Eye Protection Eye is one of the most sensitive organs of the body. Woodwork is a job which comes with various hazards related to eye damage. For example, saw dust, small pieces of sharp objects may cause damage to the eye. Therefore, eye protection must be used. Some widely used eye protection are –
• Safety Goggle • Safety Spectacle • FacemaskThese protections should be worn to avoid any damage owing to wood dust, metal chips in the process of sawing, drilling, grinding, and chiselling.
Safety Goggle
Safety Spectacle
FacemaskHearing Protection
Woodworking machines such as drilling machine, circular saw, and jigsaw create a lot of noise. Short exposure to the noise may cause temporary hearing loss and long exposure may lead to permanent hearing loss. Therefore, hearing protection is an essential PPE for a wood worker. Some important hearing protection are –
• Single Use Earplug: They are made of waxed cotton, foam, silicon rubber or fibre glass wool. They are self- forming and, when properly inserted they work as well as most modelled earplugs.
• Pre-formed or Modelled Earplugs: These are small fibre plugs that are inserted to the ear and used in case of severe noise. They can be either disposable or reusable. Reusable plugs should be cleaned after using. Never use plugs which are used by somebody else.
• Ear Defender or Earmuff: These are used to cover the entire ear and connected to a band that fits over the top of the head. These are used when the noise is excessively high.
Pre-formed or Modelled Earplug
Ear Defender or Earmuff
125
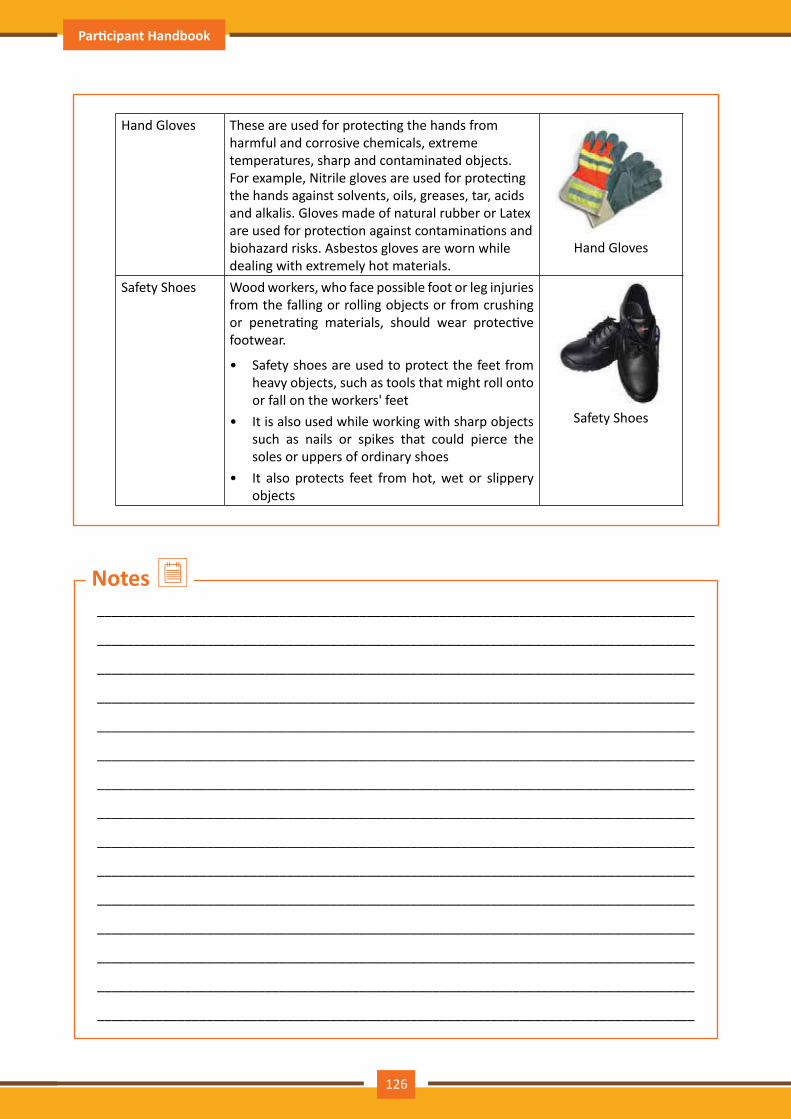
Participant Handbook Cabinet Maker Modular Kitchen
Hand Gloves These are used for protecting the hands from harmful and corrosive chemicals, extreme temperatures, sharp and contaminated objects. For example, Nitrile gloves are used for protecting the hands against solvents, oils, greases, tar, acids and alkalis. Gloves made of natural rubber or Latex are used for protection against contaminations and biohazard risks. Asbestos gloves are worn while dealing with extremely hot materials.
Hand Gloves
Safety Shoes Wood workers, who face possible foot or leg injuries from the falling or rolling objects or from crushing or penetrating materials, should wear protective footwear.
• Safety shoes are used to protect the feet from heavy objects, such as tools that might roll onto or fall on the workers' feet
• It is also used while working with sharp objects such as nails or spikes that could pierce the soles or uppers of ordinary shoes
• It also protects feet from hot, wet or slippery objects
Safety Shoes
__________________________________________________________________________________
__________________________________________________________________________________
__________________________________________________________________________________
__________________________________________________________________________________
__________________________________________________________________________________
__________________________________________________________________________________
__________________________________________________________________________________
__________________________________________________________________________________
__________________________________________________________________________________
__________________________________________________________________________________
__________________________________________________________________________________
__________________________________________________________________________________
__________________________________________________________________________________
__________________________________________________________________________________
__________________________________________________________________________________
Notes
126

Participant Handbook Cabinet Maker Modular Kitchen
At the end of this unit, you will be able to:
1. Recall the importance of first aid in emergency management and the techniques of administering the same
Unit Objectives
UNIT 2.8: Basic First Aid Treatment Relevant to the Condition
Principles of First Aid
• Act calmly and logically.• Be in control – both of yourself and the problem.• Be gentle but firm.• Speak to the casualty kindly but purposefully.• Build up trust through talking to the casualty throughout the examination and treatment.• Avoid giving any misleading information.• Never leave the casualty alone and continue to talk to him/her until the ambulance or doctor arrives.• Continuously reassure the casualty.• Send the casualty to a hospital or doctor by the quickest means of transport.• Always inform the police about serious accidents.• Inform relatives of the casualty.
Objectives of First Aid
• Preservation of life by promptness of action• Relief from pain• Prevention of the worsening of illness or injury• Enhancement of chances of recovery• Protection of the unconscious or semi-conscious
Appropriate Basic First Aid Treatment Relevant to the Condition
Importance of FirstAid in emergency management can be elaborated through the following points:
A. For heavy bleeding–• Put pressure on the wound with whatever is available to stop or slow down the flow of blood.• As soon as possible, call the Emergency Toll Free number or get someone else to do it.• Keep pressure on the wound until help arrives.
127
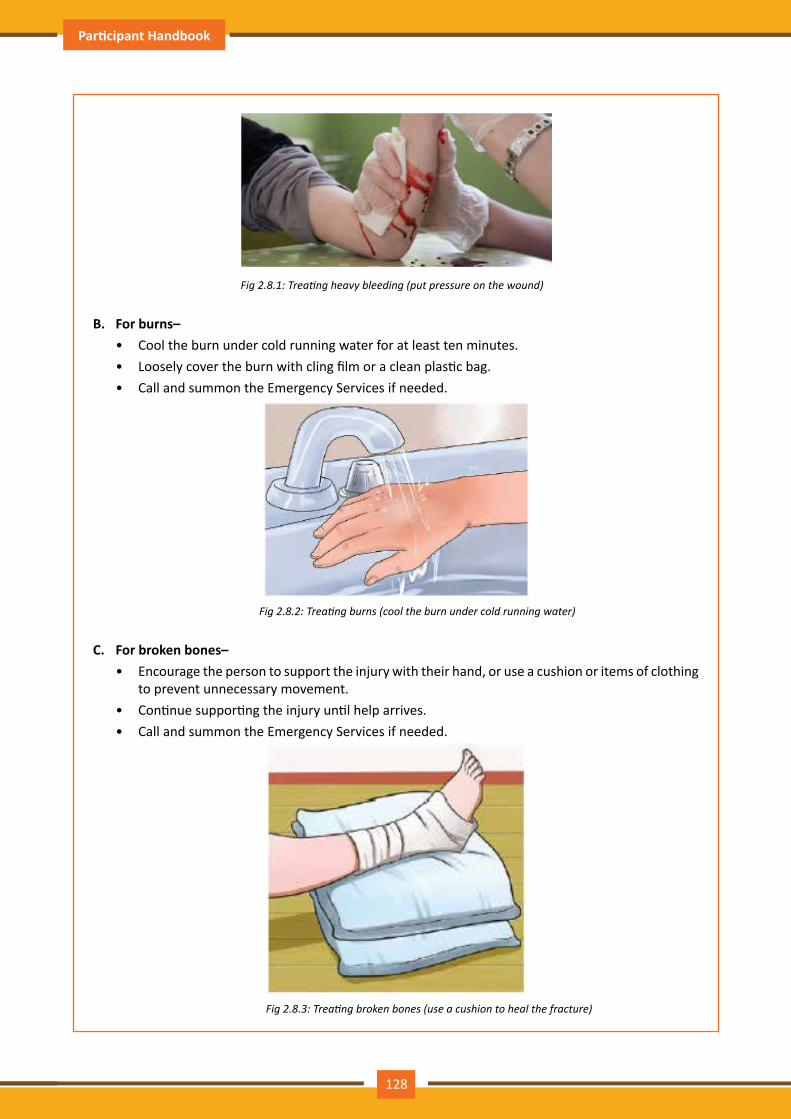
Participant Handbook Cabinet Maker Modular Kitchen
Fig2.8.1:Treatingheavybleeding(putpressureonthewound)
B. For burns–• Cool the burn under cold running water for at least ten minutes.• Loosely cover the burn with cling film or a clean plastic bag.• Call and summon the Emergency Services if needed.
Fig2.8.2:Treatingburns(cooltheburnundercoldrunningwater)
C. For broken bones–• Encourage the person to support the injury with their hand, or use a cushion or items of clothing
to prevent unnecessary movement.• Continue supporting the injury until help arrives.• Call and summon the Emergency Services if needed.
Fig2.8.3:Treatingbrokenbones(useacushiontohealthefracture)
128
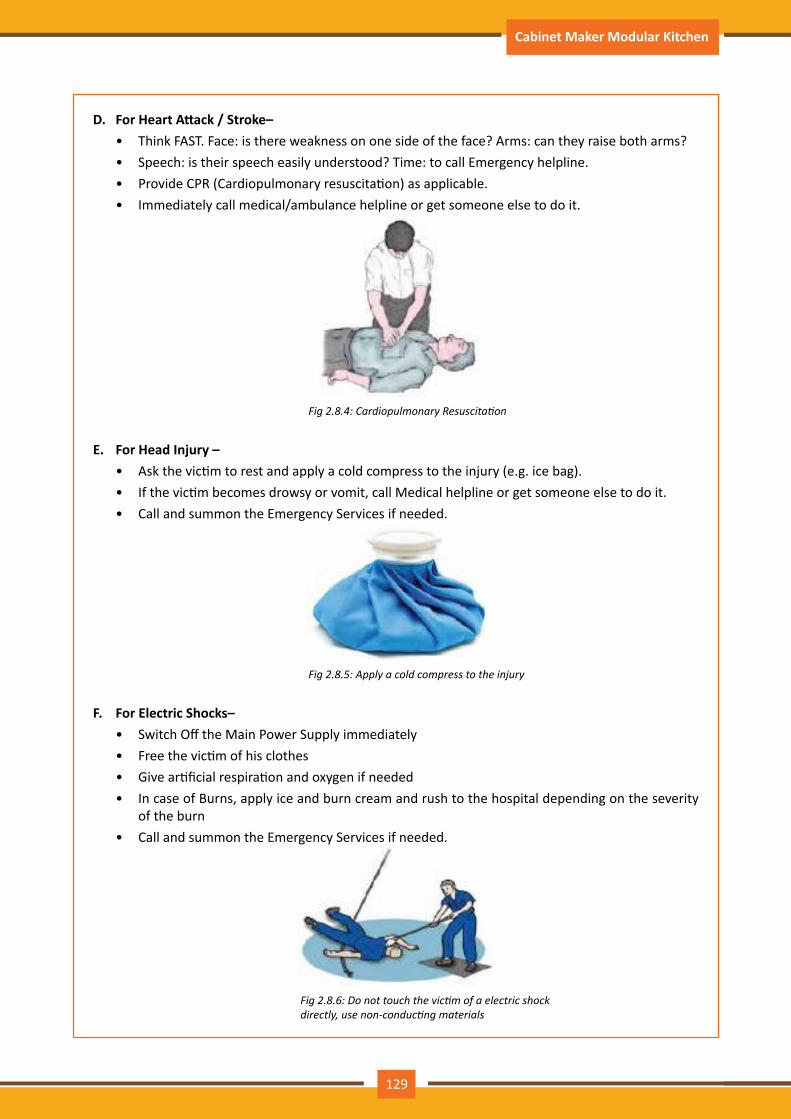
Participant Handbook Cabinet Maker Modular Kitchen
D. For Heart Attack / Stroke–• Think FAST. Face: is there weakness on one side of the face? Arms: can they raise both arms?• Speech: is their speech easily understood? Time: to call Emergency helpline.• Provide CPR (Cardiopulmonary resuscitation) as applicable.• Immediately call medical/ambulance helpline or get someone else to do it.
Fig2.8.4:CardiopulmonaryResuscitation
E. For Head Injury –• Ask the victim to rest and apply a cold compress to the injury (e.g. ice bag).• If the victim becomes drowsy or vomit, call Medical helpline or get someone else to do it.• Call and summon the Emergency Services if needed.
Fig2.8.5:Applyacoldcompresstotheinjury
F. For Electric Shocks–• Switch Off the Main Power Supply immediately• Free the victim of his clothes• Give artificial respiration and oxygen if needed• In case of Burns, apply ice and burn cream and rush to the hospital depending on the severity
of the burn• Call and summon the Emergency Services if needed.
Fig2.8.6:Donottouchthevictimofaelectricshock directly,usenon-conductingmaterials
129
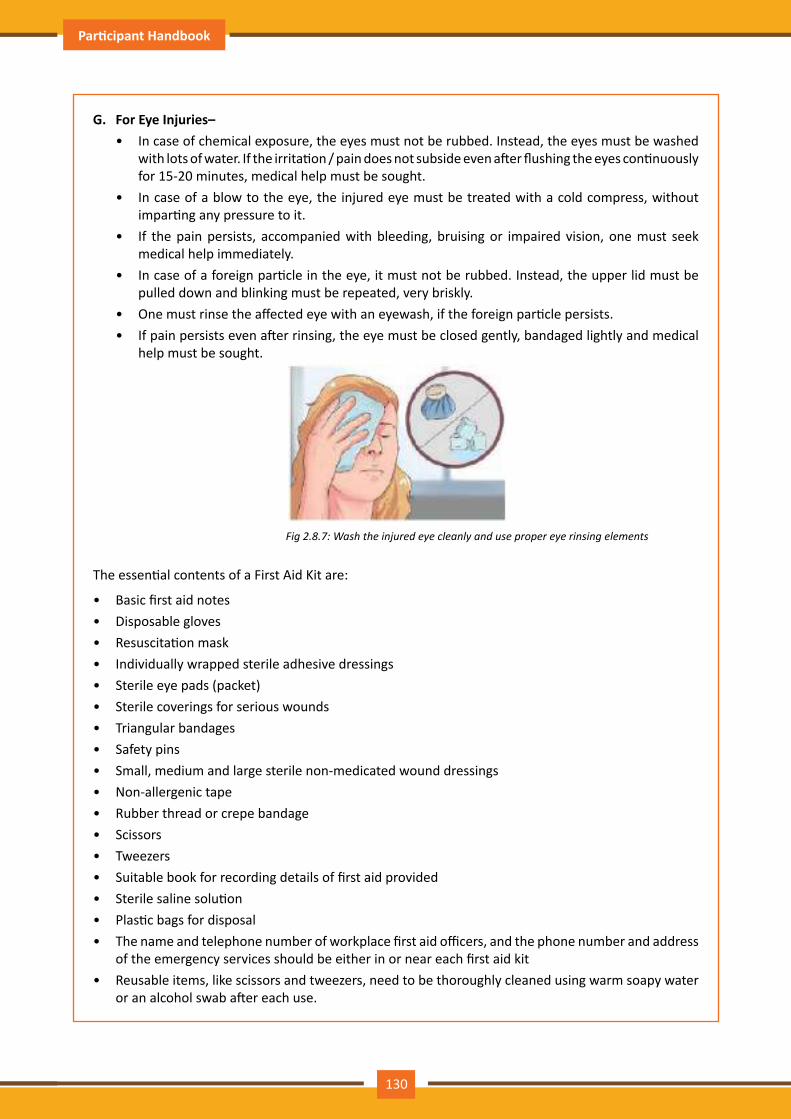
Participant Handbook Cabinet Maker Modular Kitchen
G. For Eye Injuries–• In case of chemical exposure, the eyes must not be rubbed. Instead, the eyes must be washed
with lots of water. If the irritation / pain does not subside even after flushing the eyes continuously for 15-20 minutes, medical help must be sought.
• In case of a blow to the eye, the injured eye must be treated with a cold compress, without imparting any pressure to it.
• If the pain persists, accompanied with bleeding, bruising or impaired vision, one must seek medical help immediately.
• In case of a foreign particle in the eye, it must not be rubbed. Instead, the upper lid must be pulled down and blinking must be repeated, very briskly.
• One must rinse the affected eye with an eyewash, if the foreign particle persists.• If pain persists even after rinsing, the eye must be closed gently, bandaged lightly and medical
help must be sought.
Fig2.8.7:Washtheinjuredeyecleanlyandusepropereyerinsingelements
The essential contents of a First Aid Kit are:
• Basic first aid notes • Disposable gloves • Resuscitation mask• Individually wrapped sterile adhesive dressings• Sterile eye pads (packet)• Sterile coverings for serious wounds• Triangular bandages• Safety pins• Small, medium and large sterile non-medicated wound dressings• Non-allergenic tape• Rubber thread or crepe bandage• Scissors• Tweezers• Suitable book for recording details of first aid provided• Sterile saline solution• Plastic bags for disposal• The name and telephone number of workplace first aid officers, and the phone number and address
of the emergency services should be either in or near each first aid kit• Reusable items, like scissors and tweezers, need to be thoroughly cleaned using warm soapy water
or an alcohol swab after each use.
130

Participant Handbook Cabinet Maker Modular Kitchen
Fig2.8.8:Essentialfirstaiditem
Besides these, adequate and medically prescribed Oxygen supply must be help in hand at the workplace.
131

Participant Handbook Cabinet Maker Modular Kitchen
At the end of this unit, you will be able to:
1. Discuss the preventative and remedial actions to be administered in cases of exposure to toxic materials
Unit Objectives
UNIT 2.9: Preventative and Remedial Actions for Exposure toToxic Materials
Preventative and Remedial Actions to be Taken in the Case of Exposure to Toxic Materials
A. Toxic SolventsA cabinet maker of modular furniture is often exposed to toxic solvents like acetone, chloroform, gasoline, carbon tetrachloride, diethyl ether, ethyl alcohol and methyl (ethanol), toluene, benzene, ethers, trichlorethylene, dichloroethane, tricresyl phosphate, nitroparaffins, tetralin, decalin, etc. Exposure of the body to toxic solvents can be via Ingestion, Skin Contact and Inhalation.
The more volatile a toxic solvent is, the higher are its chances of poisoning the respiratory system. Apart from administering appropriate first aid techniques, one must seek medical help and report the concerned supervisor.
Remedial actions for exposure to toxic solvents:
• In case of inhalation of toxic solvents or resulting fumes, moving the victim to fresh air immediately, thus exposing the person to adequate oxygen supply.
• In case of skin contact with toxic solvents, the affected area must be washed thoroughly with lukewarm water and soap.
• In case of ingestion, vomiting must be instigated and the stomach must be washed.• Activated charcoal may be administered in case of ingestion and inhalation.• In case the eye is affected, it must be splashed and rinsed off with cold water till the effect subsides.
Preventative actions for exposure to toxic solvents:
• Appropriate PPE, like protective chemical-resistant gloves, respiratory masks (for protection against toxic fumes) , aprons, etc. must be worn.
• Initiatives must be taken to provide adequate ventilation to the work area.• Any spillage of toxic chemicals must be wiped off immediately with wet cloth.• The containers must be closed tightly after every use, to prevent spillage or leakage of fumes.• Solvents must be kept away from naked flames, in a cool and dark place.• All solvents must be stored in neatly labelled containers and provided with MSDS (Material Safety
Data Sheets).
132
Participant Handbook Cabinet Maker Modular Kitchen
B. Toxic FluxFlux is an agent for chemical cleaning, purifying or flowing. Fluxes are extensively used in extractive metallurgy, furniture manufacture and metal joining techniques. Few common fluxes are Beeswax, Lead, Paraffin Wax, Borax, resin, Palm Oil, Cryolite, Unslaked Lime, Common Salt, Solder, etc.
The most toxic fluxes are Acid fluxes (which may comprise harmful agents like Hydrochloric acid, Ammonium chloride, Zinc chloride, etc.), Resin fluxes (which may lead to Asthma), Molten Solder fluxes (which can cause severe burns on the skin), Lead and Mercury fluxes (which are very easily absorbed by the body and cause countless health issues and even death).
Remedial actions for exposure to toxic fluxes:
• The victim must be carefully removed from the exposure area, to a well-ventilated place.• In case of skin contact or eye injury with toxic fluxes, the affected area must be washed
thoroughly with generous amount of water for at least 15-20 minutes.• In case of ingestion, vomiting must not be induced unless prescribed by a physician.• Ingestion must be treated with a drink of cold water or milk.• In case of inhalation, adequate breathing support must be provided to the victim.• Washing of the skin and the eye must be followed by a suitable skin or eye ointment.• In case of difficulty in swallowing and unconsciousness in the victim, no oral remedy must be
administered to prevent choking.• Medical help must be summoned in case of severity.
Preventative actions for exposure to toxic fluxes:
• Appropriate PPE must be used while working with toxic fluxes.• The Directions of Use provided by the supplier/manufacturer must be strictly abided by.
__________________________________________________________________________________
__________________________________________________________________________________
__________________________________________________________________________________
__________________________________________________________________________________
__________________________________________________________________________________
__________________________________________________________________________________
__________________________________________________________________________________
__________________________________________________________________________________
__________________________________________________________________________________
__________________________________________________________________________________
__________________________________________________________________________________
Notes
133

Participant Handbook Cabinet Maker Modular Kitchen
At the end of this unit, you will be able to:
1. Identify risks like theft, pilfering, damage and deterioration in the workshop2. Identify methods of surveillance that helps in maintaining appropriate environment to protect stock
against such risks3. Illustrate how to maintain a clean and hazard-free working area
Unit Objectives
UNIT 2.10: Maintain Appropriate Environment to Protect Stock from Pilfering, Theft, Damage and Deterioration
Any workshop is comprised of raw material, countless tools, equipment, heavy machinery, cleaning equipment, PPE, documents, cash and several other important properties. A workshop and its security is threatened by the following factors, which can be mitigated and even eliminated with the help of apt surveillance processes:
• Theft– Apart from raw materials, deliverable Finished Products, tool, machinery and equipment, important documents like database, manuals and blueprints, which are considered the Intellectual properties of the workshop, are exposed to the risk of theft.
• Pilfering– Pilfering involves the theft of items, which are of comparatively lesser importance, in terms of cost and utility. For example, theft of petty cash, stationery items, tiny machine parts, screws, nails, adhesives, etc. is considered Pilfering.
• Damage and Deterioration– Properties in a workshop may be damage and get deteriorated due to multiple factors. These factors can be natural or man-made. For example, cases of Sabotage and Vandalism are brought about by human miscreants.Damages and deterioration can occur naturally, over time, due to wear and tear of tools, equipment and products, as well as poor inventory management. Man-made factors can be unintentional and may occur due to human errors and fatigue.
The common methods of Surveillance and Monitoring are:
• Closed Circuit Television (CCTV) Camera• Security Guards at the entrance and exit• Access Control for workshop database and Intellectual Property• Biometric Access (Fingerprint Access) for visitors and staff members• Handheld Metal Detectors (used by Security Guards)• Checking ID cards manually and Frisking• Quality Inspection and Audit for checking deterioration and damage of equipment, raw materials
and finished products
2.10.1 Theft, pilfering, damage and deterioration in the workshop
2.10.2 Methods of surveillance and monitoring
134
Participant Handbook Cabinet Maker Modular Kitchen
A. Handle materials, machinery, equipment and tools safely and correctly• Workers should never carry tools up or down a ladder in a way that inhibits grip.• Tools should be hoisted up and down using a bucket or strong bag, rather than being carried by
the worker.• Tools should be carefully handed over from one worker to another and must never be tossed.• Pointed tools should be passed either in their carrier or with the handles toward the receiver.• Workers carrying large tools or equipment on their shoulders should stay alert of clearances,
while turning and manoeuvring around the workplace.• Pointed tools, such as chisels and screwdrivers, should never be carried in a worker's pocket.• Recommended ways to carry them are:• In a toolbox, pointed down in a tool belt or pocket tool pouch• In the hand with the tip always held away from the body• Tools should be put away when not in use. Leaving tools unattended on an elevated structure
such as a scaffold poses a significant risk to workers below. This risk increases in areas with heavy vibration.
B. Use correct handling procedures• Lack of knowledge in correct handling procedure can lead to Musculoskeletal Disorders. Handling
involves lifting, lowering, pushing, pulling and carrying. Correct handling techniques involve:• Lifting, by taking into consideration:
ᴑ Nature of load ᴑ Individual capacity ᴑ Environmental condition
• Reduce the amount of twisting and stooping while handling things manually Do not lift from floor level or above shoulder height, especially for heavy loads Adjust storage areas to mitigate the need to execute such motions
• Consider how you can mitigate transporting load across distances• Evaluate the weight to be carried and identify if the worker can move the load safely or needs
assistance• Identify if the load can be broken down into smaller, lighter components
C. Maintain tools equipment and consumables• It is essential that in order to keep tools, equipment and consumables in good working condition,
they must be subjected to periodic maintenance.• The frequency of maintenance depends upon the following factors:
ᴑ The manufacturer's instructions and recommendations ᴑ The intensity and degree of use ᴑ The physical working conditions like temperature, humidity, weathering, etc. ᴑ The severity of potential risks and threats arising from unprecedented but likely malfunction
2.10.3 Maintain a clean and hazard free working area
135

Participant Handbook Cabinet Maker Modular Kitchen
D. Use cleaning equipment and methods appropriate for the work to be carried out• Cleaning tools and equipment must be selected according to the nature of task, surface and the
required intensity of cleaning.• Delicate surfaces must not be treated with strong and corrosive cleaning agents like acids and
alkalis.• On the contrary, surfaces that require intensive cleaning cannot be treated with mild cleaning
agents.• Cleaning equipment, especially the powered ones, come with Instruction Manuals, which not
only explain the steps involved in using the, but also comprise Precautionary Measures, Dos and Don'ts of handling them. For example, Vacuum Cleaners must never be used on wet surfaces.
E. Ensure safe and correct handling of materials, equipment and tools• Supervisors must inspect the ongoing tasks in the work area to ensure safe and correct handling
of materials, equipment and tools.• Surprise Audits must be conducted from time to time to ensure that all safety measures, like
ergonomic procedures and safe handling of powered tools, are being adhered to by the workers.• Checklists and inspection sheets must be maintained at the workplace to keep a track of the
maintenance and audit schedules.• Workers must refer to SOPs from time to time, to ensure that they do not deviate from the
safety protocols in handling materials, equipment and tools.
F. Store cleaning equipment safely after use• Cleaning tool and agents, which fall under the same category, must be kept and stored together.• Cleaning agents must be stored in a cool, dry place in containers of compatible materials.• Flammable liquids and gases must be stored in pressure-safe containers with appropriate labels
on.• Such flammable substances must be stored in secluded and well-ventilated places, at least 50
feet away from sources of heat or flame.• Places for storing chemicals must contain a book of all MSDS sheets.• Chemical cleaning agents must be stored in secure shelve or in a locked cupboard.• Sharp equipment must be stored in sheaths or designated racks.• Powered equipment must be turned off, when not in use.
G. Deal with work interruptions• Interruptions can hamper a cabinet maker's productivity, by stalling the seamless flow of tasks
and disturbing his / her focus.• A cabinet maker must maintain a log of the regular interruptions and discuss the same with the
supervisor, to devise solutions.• In case an interruption result in any protocol deviation, the same may be reported to the
concerned personnel in the Escalation Matrix.• However, short breaks can bust stress and increase one's productivity; they are recommended
in the workplace and are not considered interruptions.
136

Participant Handbook Cabinet Maker Modular Kitchen
__________________________________________________________________________________
__________________________________________________________________________________
__________________________________________________________________________________
__________________________________________________________________________________
__________________________________________________________________________________
__________________________________________________________________________________
__________________________________________________________________________________
__________________________________________________________________________________
__________________________________________________________________________________
__________________________________________________________________________________
__________________________________________________________________________________
__________________________________________________________________________________
__________________________________________________________________________________
__________________________________________________________________________________
__________________________________________________________________________________
__________________________________________________________________________________
__________________________________________________________________________________
__________________________________________________________________________________
__________________________________________________________________________________
__________________________________________________________________________________
__________________________________________________________________________________
__________________________________________________________________________________
__________________________________________________________________________________
__________________________________________________________________________________
__________________________________________________________________________________
__________________________________________________________________________________
__________________________________________________________________________________
__________________________________________________________________________________
__________________________________________________________________________________
__________________________________________________________________________________
__________________________________________________________________________________
Notes
137
Participant Handbook Cabinet Maker Modular Kitchen
• One must always abide by safe practices at work.• Adherence to SOPs is extremely crucial for ensuring safety of the individual as well as others.• One must handle, store and operate on powered tools very carefully.• One must remain calm and composed during an emergency situation.• Organizational Reporting Protocol is guided by the 6Cs of emergency communication.• An accident, that may lead to the loss of human life, falls under the "Critical" and "Possible"
categories of the Risk Assessment Matrix.• Personal Protective Equipment, commonly termed as PPE, is specialized clothing or equipment
worn and used by employees for safeguarding themselves against Occupational Health and Safety hazards.
• Basic knowledge of first aid treatment must be imparted to all.• One must know about the preventative and remedial actions to be administered in cases of exposure
to toxic materials.
Summary
• The trainer takes the students on a field visit to a nearby furniture workshop, so that they can observe the various safe working practices adopted by the workers.
• The trainer invites an industry veteran to the class to interact with the students and clarify their doubts on the importance of responding to emergency situations while at work.
• The trainer provides each student with a Hazard Report Form and asks them to fill the form carefully so that they do not get confused in future when they are asked to fill up this form.
• The trainer makes the students participate in a mock session, where they get to observe and practise basic First Aid techniques.
• The trainer shows, from his laptop, few ppt slides comprising images of various safety and warning signs. The students identify and interpret the same.
Activity
138
Participant Handbook Cabinet Maker Modular Kitchen
Fill in the Blanks:
1. Wood is _____________ in nature.a) Hygroscopic b) Microscopic c) Brittle
A: Hygroscopic
2. 90% volume of waste gets reduced and converted into incombustible, light-weight materials like _____________.a) Gas b) Ash c) Leaf
A: Ash
3. _____________ involves the degradation of organic waste into manure with the help of worms.a) Caterpillar waste b) Manure making c) Vermicompost
A: Vermicompost
4. It is always advisable for a furniture maker to protect the tools from _____________.a) Grease b) Moisture c) Oil
A: Moisture
5. _____________ is used for storing fasteners.a) Tackle box b) Shoe box c) Fastener box
A: Tackle box
Exercise
139

Participant Handbook Cabinet Maker Modular Kitchen
140

Participant Handbook Cabinet Maker Modular Kitchen
3. Ensure Health and Safety at Workplace
Unit 3.1 - Health and Safety Hazards and Precautions
Unit 3.2 - Potential Risks and Threats
Unit 3.3 - Potential Hazards and Risks which may be Present at Furniture and Fittings Related Workplace
Unit 3.4 - Storage and Handling of Hazardous Substances
Unit 3.5 - Common Health and Safety Practices at Workplace
Unit 3.6 - Different Risks Associated with the Use of Electrical Equipment
FFS/N8601141

Participant Handbook Cabinet Maker Modular Kitchen
At the end of this module, you will be able to:
1. Discuss the common health and safety standards2. Identify the potential risks and threats3. Identify the potential hazards and risks which may be present at furniture and fittings related
workplace4. Comply with the storage and handling of hazardous substances5. Discuss the common health and safety practices at workplace6. List the difference risks associated with the use of electrical equipment
Key Learning Outcomes
142
Participant Handbook Cabinet Maker Modular Kitchen
At the end of this unit, you will be able to:
1. Differentiate between risk, hazard and threat2. Interpret the meaning of occupational hazards3. Identify the common health and safety hazards4. Identify the other categories of hazards5. Demonstrate the use of pictograms and symbols in identifying hazards6. Discuss the common methods of identifying hazards
Unit Objectives
UNIT 3.1: Health and Safety Hazards and Precautions
Hazard is defined as a factor, which may cause harm to people and properties alike, like electricity, inflammable products, explosive material, corrosive chemical, using heavy ladders at workplace, etc. Simply put, a Hazard is simply a condition or a set of circumstances that present a potential for harm. Risk is defined as the likeliness or the chance that a hazard can actually cause harm to somebody. For example, smokers of cigarettes run the risk of developing Cancer. The potential or imminent danger that Risks and Hazards expose the concerned premises to, is known as Threat. For example, a person, who has the potential of blowing up a building, is a threat to that building and its inhabitants.
The steps involved in Risk Management are:
1. Identifying Hazards2. Assessing Risks3. Controlling and mitigating Risks
Any job role and any occupation in this world has some hazards, in varying severity, associated with it. These are called Occupational Hazards. Occupational Hazard can be defined as “a risk accepted as a consequence of a particular occupation”. According to the Collins English Dictionary, it is defined as “something unpleasant that one may suffer or experience as a result of doing his or her job”.
Occupational Hazards are caused by the following:
A. Hazardous Working Ambience• Unsafe and unguarded machinery and tools• Hazardous and unmonitored processes• Inappropriate and inadequate ventilation • Inappropriate and inadequate illumination • Inappropriate and unsafe dress
3.1.1 Difference between risk, hazard and threat
3.1.2 Understanding occupational hazards
143
Participant Handbook Cabinet Maker Modular Kitchen
B. Hazardous Behaviour and Acts• Using unsafe and unguarded machinery and tools• Neglecting safety guidelines while working• Ignoring the Instruction Manual or Directions for Use• Unsafe lifting, loading, staging, assembling and installing• Not adopting the prescribed ergonomic postures• Handling Personal Protective Equipment (PPE) and Safety Devices dysfunctional
On the basis of effects on individuals, Occupational Hazards can be broadly categorized into: Health and Safety Hazards. Examples of Health Hazards are:
• Carcinogenic factors• Corrosive• Toxic• Irritant• Factors that may lead to chronic and adverse effects on one's health
Examples of Safety Hazards are:
• Spills on floors• Tripping hazards like loose cords and cluttered workplace Working from high or raised areas like
ladders, cranes, scaffolds, rooftops etc.• Unsafe and unguarded machinery and their moving parts• Electrical hazards like live wires, lack of earthing, loose cables, frayed cords, wet and poorly insulated
devices, etc.• Inadequate space
Fig.3.1.3.1:DifferencesbetweenHealth&SafetyHazards
3.1.3 Common health and safety hazards
144
Participant Handbook Cabinet Maker Modular Kitchen
Apart from the ones mentioned above, Hazards can also be categorized on the basis of the Source of Energy. The types of hazards, according to the Source of Energy, are:
Fig.3.1.4.1:Varioustypesofhazards
1. Biological– These hazards are associated with working with animals, plants and their products, as well as contagious or infectious materials. Examples are:• Body fluids like Blood, Saliva, Sweat and Semen• Bacteria, Fungi and Viruses• Insect bites• Human and animal waste
2. Chemical– These hazards occur, if, the inherent properties of materials pose harm to animal life, property or the environment as a whole. Severity of chemical hazards depends on the dosage and amount of the harmful components in a given chemical. Typical examples are:• Chemicals in unlabeled container• Various types of cleaning products, chemical agents, solvents, solutions, paints, acids, etc.• Vapours and fumes resulting from welding and gas cutting operations, as well as from strong
solvents and solutions• Harmful gases like CFCs, Acetylene, Carbon Monoxide, Sulphur Monoxide, Propane, Helium• Insecticides and pesticides
3. Ergonomic– These hazards occur, when the nature of work, body postures and working conditions exert strain on one's body. Common examples are:• Inappropriately set up workstations and seats • Frequent lifting by inappropriate techniques • Repetitive and exhaustive movement• Exertion of excessive force• Excessive mechanical vibration
4. Physical– These hazards result from natural disasters, like earthquakes, floods, storms, etc., which cause massive loss of life and property. The hazardous factors are generally:• Radiation• Noise• Dust and Debris• Extreme temperatures (extremely high or low)
3.1.4 Other categories of hazards
145

Participant Handbook Cabinet Maker Modular Kitchen
5. Psychosocial– These hazards mainly result from stress in one's social and professional life. These include:• Excessive workload • Violence at workplace • Sexual Harassment• Lack of respect at workplace • Lack of flexibility at workplace • Poor work relations• Grapevine gossips
Identification implies, that, the job is half done. In order to take adequate precautionary measures against hazards, one needs to identify the hazards commonly found in the workplace. The common methods of hazard identification are:
Job Hazard Analysis (JHA): This is a popular technique to identify the perils associated with specific tasks ina job role, in order to lessen the risk of injuries to employees. The steps involved in successfully conducting JHA are:
A. Divide the entire job role into small tasks or stepsLet us understand the concept with the help of an example, where JHA is being conducted on Carpentry work.
Steps Hazards Associated Recommendations1. Loading job with tools and
equipment2. Framing and Sheathing3. Prepping up and Painting
B. Spot out the hazards associated with each step by asking questions like:• What can go wrong with this task?• What would be the consequences if the task went wrong?• How could the task go wrong?• What are the other contributing factors?• What are the chances that this hazard will take place?
3.1.5 Common methods of identifying hazards
146
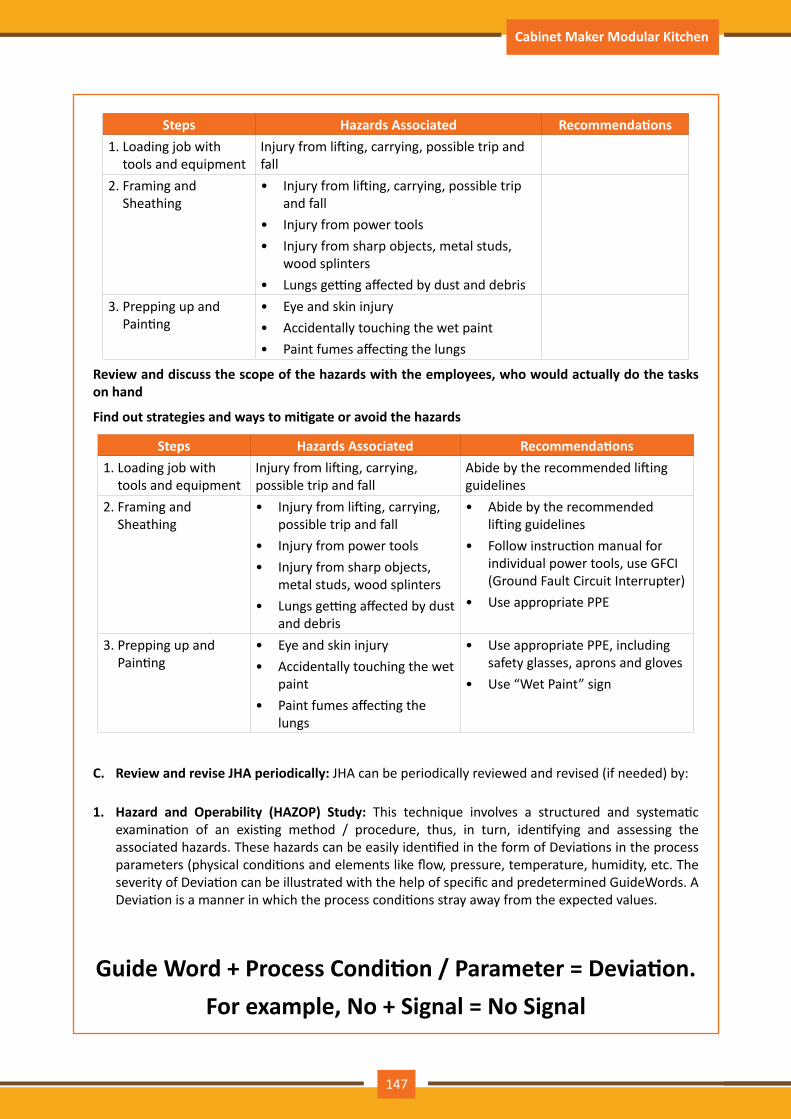
Participant Handbook Cabinet Maker Modular Kitchen
Steps Hazards Associated Recommendations1. Loading job with
tools and equipmentInjury from lifting, carrying, possible trip and fall
2. Framing and Sheathing
• Injury from lifting, carrying, possible trip and fall
• Injury from power tools• Injury from sharp objects, metal studs,
wood splinters• Lungs getting affected by dust and debris
3. Prepping up and Painting
• Eye and skin injury• Accidentally touching the wet paint• Paint fumes affecting the lungs
Review and discuss the scope of the hazards with the employees, who would actually do the tasks on hand
Find out strategies and ways to mitigate or avoid the hazards
Steps Hazards Associated Recommendations1. Loading job with
tools and equipmentInjury from lifting, carrying, possible trip and fall
Abide by the recommended lifting guidelines
2. Framing and Sheathing
• Injury from lifting, carrying, possible trip and fall
• Injury from power tools• Injury from sharp objects,
metal studs, wood splinters• Lungs getting affected by dust
and debris
• Abide by the recommended lifting guidelines
• Follow instruction manual for individual power tools, use GFCI (Ground Fault Circuit Interrupter)
• Use appropriate PPE
3. Prepping up and Painting
• Eye and skin injury• Accidentally touching the wet
paint• Paint fumes affecting the
lungs
• Use appropriate PPE, including safety glasses, aprons and gloves
• Use “Wet Paint” sign
C. Review and revise JHA periodically: JHA can be periodically reviewed and revised (if needed) by:
1. Hazard and Operability (HAZOP) Study: This technique involves a structured and systematic examination of an existing method / procedure, thus, in turn, identifying and assessing the associated hazards. These hazards can be easily identified in the form of Deviations in the process parameters (physical conditions and elements like flow, pressure, temperature, humidity, etc. The severity of Deviation can be illustrated with the help of specific and predetermined GuideWords. A Deviation is a manner in which the process conditions stray away from the expected values.
Guide Word + Process Condition / Parameter = Deviation. For example, No + Signal = No Signal
147
Participant Handbook Cabinet Maker Modular Kitchen
The steps involved in conducting HAZOP are:
• Segregating the entire system or process into sections or components• Select a study node or point• Define the expected outcome or consequence• Choose a process parameter, based on the expected consequence• Implement a suitable Guide Word• Determine the Cause behind the deviation• Start with the cause that may lead to the worst possible consequence• Assess the deviations thus detected• Devise and prescribe action• Record and document information• Repeat the process from B
Common examples of process conditions / parameters are:
• Temperature• Pressure• Flow• pH value • Viscosity • Time• Addition • Reduction • Separation • Signal• Mixing• Communication• Sequence• Control
148
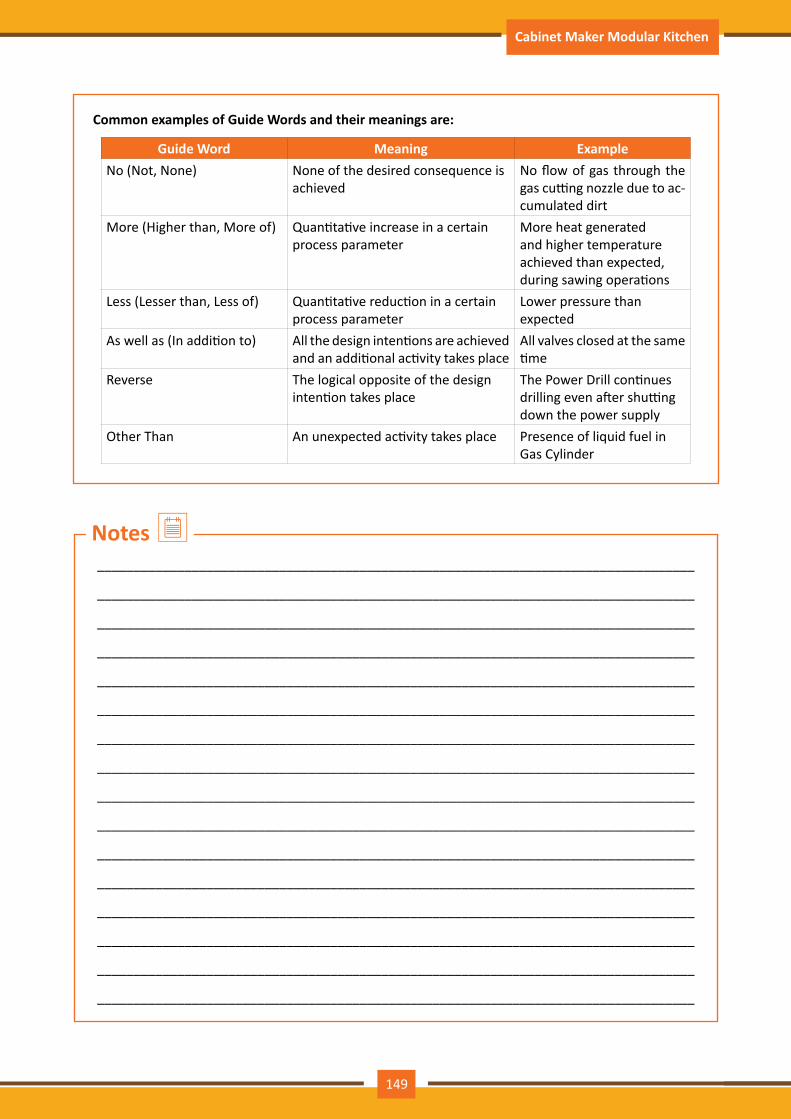
Participant Handbook Cabinet Maker Modular Kitchen
Common examples of Guide Words and their meanings are:
Guide Word Meaning ExampleNo (Not, None) None of the desired consequence is
achievedNo flow of gas through the gas cutting nozzle due to ac-cumulated dirt
More (Higher than, More of) Quantitative increase in a certain process parameter
More heat generated and higher temperature achieved than expected, during sawing operations
Less (Lesser than, Less of) Quantitative reduction in a certain process parameter
Lower pressure than expected
As well as (In addition to) All the design intentions are achieved and an additional activity takes place
All valves closed at the same time
Reverse The logical opposite of the design intention takes place
The Power Drill continues drilling even after shutting down the power supply
Other Than An unexpected activity takes place Presence of liquid fuel in Gas Cylinder
__________________________________________________________________________________
__________________________________________________________________________________
__________________________________________________________________________________
__________________________________________________________________________________
__________________________________________________________________________________
__________________________________________________________________________________
__________________________________________________________________________________
__________________________________________________________________________________
__________________________________________________________________________________
__________________________________________________________________________________
__________________________________________________________________________________
__________________________________________________________________________________
__________________________________________________________________________________
__________________________________________________________________________________
__________________________________________________________________________________
__________________________________________________________________________________
Notes
149

Participant Handbook Cabinet Maker Modular Kitchen
At the end of this unit, you will be able to:
1. Discuss the risk management process2. Evaluate the importance of risk assessment matrix3. Devise risk control strategies
Unit Objectives
UNIT 3.2: Potential Risks and Threats
Hazards indicate the presence and severity of potential risks and threats. Risk Management can be defined as the estimation and evaluation of risks, followed by the formulation of strategies to mitigate or avoid their adverse effects on a system.
The steps involved in the Risk Management process are:
Step 1. Identify and define the risk
Step 2. Analyze the risk in terms of likelihood and consequence
Step 3. Assess and rank the risk in terms of severity
Step 4. Treat the risk via Risk Response Planning
Step 5. Monitor, track and review the risk
It is a good industrial practice to assess the severity and likeliness of risks, before undertaking a particular project or assignment. This can be successfully understood from a Risk Assessment Matrix or Risk Matrix. Risks can be assessed from the below parameters:
Severity: Negligible, Marginal, Critical and Catastrophic
Likeliness: Rare, Unlikely, Possible, Likely and Certain
Negligible Marginal Critical CatastrophicCertain High High Extreme ExtremeLikely Moderate High High ExtremePossible Low Moderate High ExtremeUnlikely Low Low Moderate ExtremeRare Low Low Moderate High
3.2.1 The risk management process
3.2.2 Importance of risk assessment matrix
150
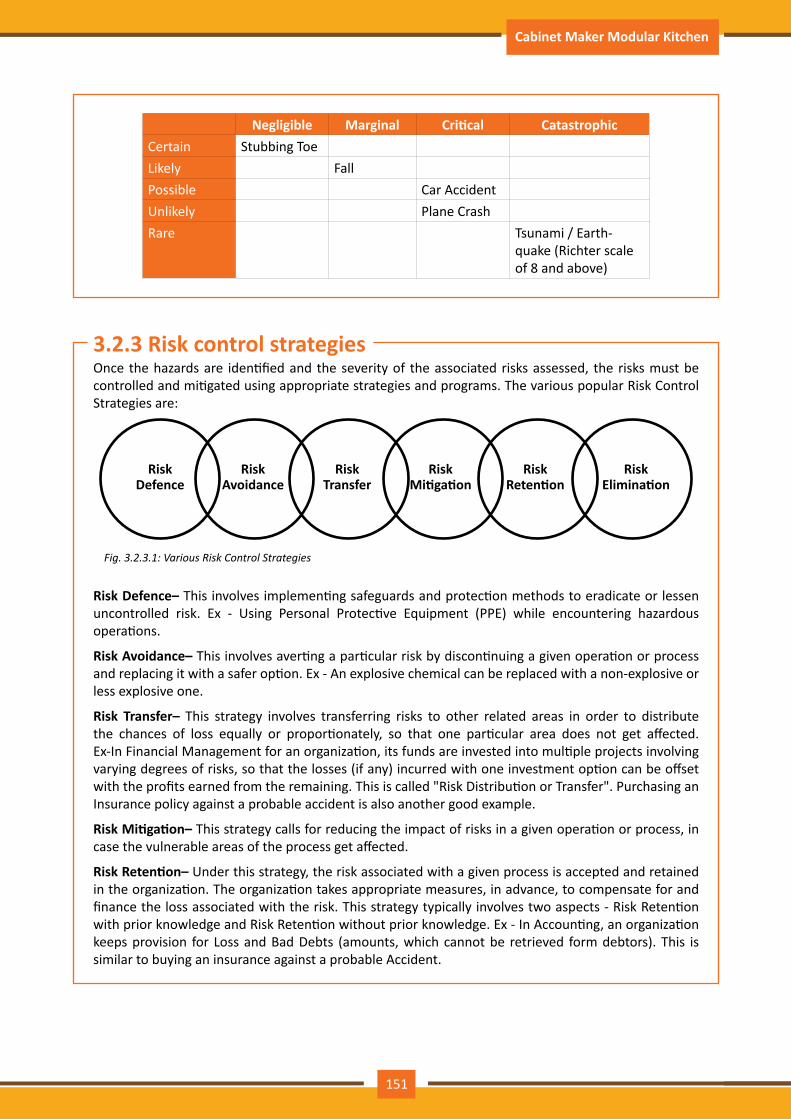
Participant Handbook Cabinet Maker Modular Kitchen
Negligible Marginal Critical CatastrophicCertain Stubbing ToeLikely FallPossible Car AccidentUnlikely Plane CrashRare Tsunami / Earth-
quake (Richter scale of 8 and above)
Once the hazards are identified and the severity of the associated risks assessed, the risks must be controlled and mitigated using appropriate strategies and programs. The various popular Risk Control Strategies are:
Fig.3.2.3.1:VariousRiskControlStrategies
Risk Defence– This involves implementing safeguards and protection methods to eradicate or lessen uncontrolled risk. Ex - Using Personal Protective Equipment (PPE) while encountering hazardous operations.
Risk Avoidance– This involves averting a particular risk by discontinuing a given operation or process and replacing it with a safer option. Ex - An explosive chemical can be replaced with a non-explosive or less explosive one.
Risk Transfer– This strategy involves transferring risks to other related areas in order to distribute the chances of loss equally or proportionately, so that one particular area does not get affected. Ex-In Financial Management for an organization, its funds are invested into multiple projects involving varying degrees of risks, so that the losses (if any) incurred with one investment option can be offset with the profits earned from the remaining. This is called "Risk Distribution or Transfer". Purchasing an Insurance policy against a probable accident is also another good example.
Risk Mitigation– This strategy calls for reducing the impact of risks in a given operation or process, in case the vulnerable areas of the process get affected.
Risk Retention– Under this strategy, the risk associated with a given process is accepted and retained in the organization. The organization takes appropriate measures, in advance, to compensate for and finance the loss associated with the risk. This strategy typically involves two aspects - Risk Retention with prior knowledge and Risk Retention without prior knowledge. Ex - In Accounting, an organization keeps provision for Loss and Bad Debts (amounts, which cannot be retrieved form debtors). This is similar to buying an insurance against a probable Accident.
3.2.3 Risk control strategies
151
Participant Handbook Cabinet Maker Modular Kitchen
__________________________________________________________________________________
__________________________________________________________________________________
__________________________________________________________________________________
__________________________________________________________________________________
__________________________________________________________________________________
__________________________________________________________________________________
__________________________________________________________________________________
__________________________________________________________________________________
__________________________________________________________________________________
__________________________________________________________________________________
__________________________________________________________________________________
__________________________________________________________________________________
__________________________________________________________________________________
__________________________________________________________________________________
__________________________________________________________________________________
__________________________________________________________________________________
__________________________________________________________________________________
__________________________________________________________________________________
__________________________________________________________________________________
__________________________________________________________________________________
__________________________________________________________________________________
__________________________________________________________________________________
__________________________________________________________________________________
__________________________________________________________________________________
__________________________________________________________________________________
__________________________________________________________________________________
Notes
Risk Elimination– This strategy can be implemented by adopting suitable measures to curb the severity of a given risk. This can be accomplished by fixing a vulnerability or weakness in the organization, that exposes the organization and its operations to the risk. Compensatory control systems are set up to either mitigate the probability of the weakness, at its very root, or lessening the severity of its impact.
152
Participant Handbook Cabinet Maker Modular Kitchen
At the end of this unit, you will be able to:
1. Identify the potential hazards and risks associated with furniture & fittings related workplace2. Discuss how to get acquainted with common hazardous substances3. Apply safety measures while handling glass, heavy wood, materials, chemicals etc.
Unit Objectives
UNIT 3.3: Potential Hazards and Risks which may be Present at Furniture and Fittings Related Workplace
A cabinet maker is exposed to multiple Occupational Health Hazards. Potential hazards and risks are the ones, which are likely to occur, but have not occurred yet. The knowledge on the same is essential so that the trainees stay aware and alert while working hands on live assignments. These are:
• Injury (of varying severity) hazards and risks from the use of different equipment, machinery and tools
• Ergonomic injuries, fatigue and muscle stress arising from working in long shifts, in awkward and inconvenient positions, exposure to repetitive tasks and lifting as per inappropriate methods
• Biologically and chemically toxic hazards like prolonged exposure to toxic pathogens (harmful microorganisms like bacteria, fungi and moulds, viruses and their vectors and carriers) , corrosive, harmful and radioactive chemicals
• Exposure to extreme temperatures and the resulting risks like Heat Stroke and Hypothermia (the condition of having fatally low body temperature)
• Prolonged or repetitive exposure to carcinogenic (causing cancer) materials like radioactive materials, radiations and waste like wood dust and formaldehyde in pressed wood
• Exposure to toxic fumes from chemical solvents and hydrocarbons• Exposure to highly combustible materials like wood debris, straw and hay, gas cylinders, etc.• Exposure of the eye to sharps, debris and flying splinters• Exposure to climbing heights (trolleys, ladders, scaffolding and cranes) and the resultant risk of
falling from them
1. Common Toxins– A Toxin can be commonly defined as a poison of plant, animal or chemical origin, that varies in severity and causes damage to plant, animal and human life.The various types of toxins are:
a. Chemical Toxins– These include both inorganic and organic substances like:• Mercury• Lead
3.3.1 Potential Hazards and Risks Associated with Furniture & Fittings Related Workplace
3.3.2 Common Hazardous Substances that Cabinet Makers of Modular Furniture Encounter
153
Participant Handbook Cabinet Maker Modular Kitchen
• Hydrofluoric Acid• Cyanides like Hydrocyanic Acid and Potassium cyanide• Chlorofluorocarbons (CFCs) present in Cooling Fluids, Refrigerants, Aerosol Sprays, Solvents,
Pesticides, Propellants, etc.• Carbon Monoxide• Benzene• Methane and Methyl Alcohol• Paints• Miscellaneous chemical solvents like Formaldehyde Chemical Toxins chemically react or
interfere with the various physiological processes in the body.b. Physical Toxins– These include substances, which, owing to their physical nature, adversely
affect the various biological processes of the body. Common examples are:• Coal Dust• Finely divided Silicon dioxide• Asbestos fibres• Miscellaneous Air Pollutants
c. Asphyxiating gases– These are generally heavier than Oxygen and replace Oxygen in breathable air, thus suffocating the exposed victims to paralysis and even death) like Hydrogen, Helium, Argon, Nitrogen, Carbon dioxide, Butane, Propane, Sulphur dioxide, etc.
d. Biological Toxins– These include harmful microorganisms, commonly known as “Pathogens”, like Viruses, Bacteria, Fungi, Parasites (like Pests, Hookworm, Tapeworm, etc.), pathogen-carrying vectors (like Mosquitoes, Flies, Beetles and Rats), poisonous animals (like Snakes, Spiders, Jellyfish, Scorpions, certain species of frogs, fish, etc.), poisonous plants(like Cassava, Opium, Datura, Hemlock, Poison Ivy, etc.)Common effects of Toxins on human beings are:
• Nausea• Diarrhoea• Perspiration• Abdominal Pain• Thrombosis• Seizure• Muscle Spasms• Confusion • Loss of Vision • Suffocation • Panic• Necrosis• Paralysis• Abnormal skin colour like black, blue, green and yellow
154
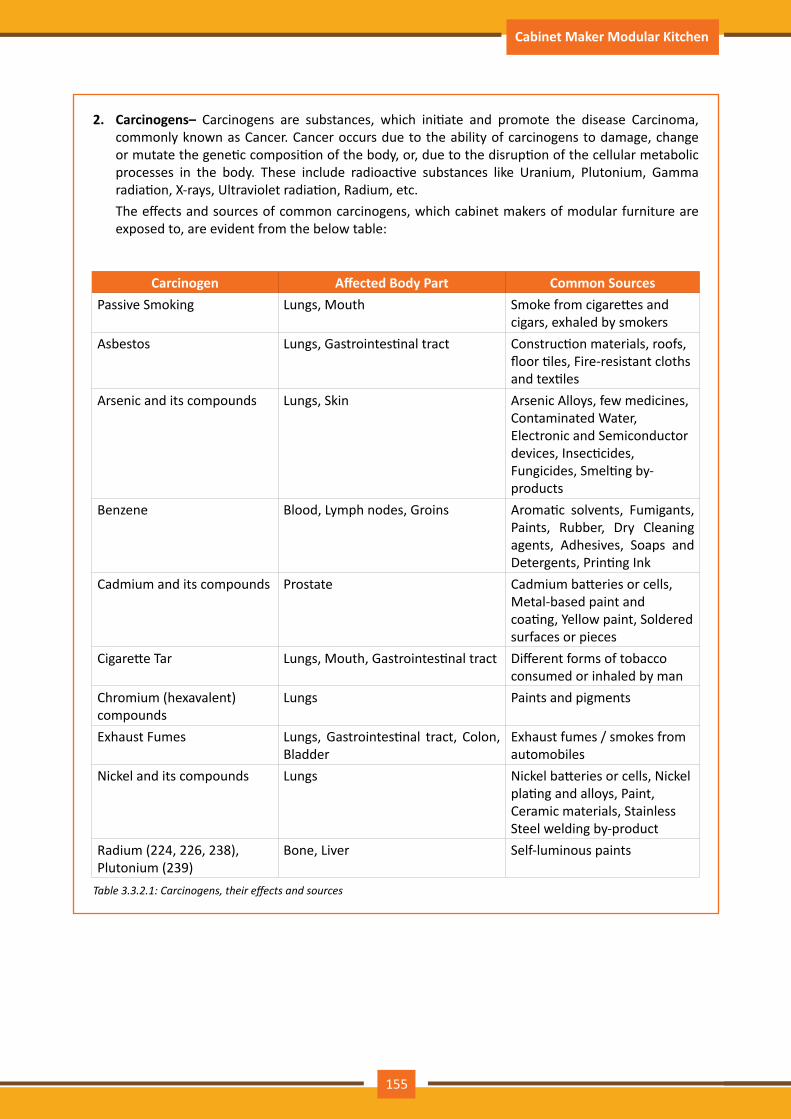
Participant Handbook Cabinet Maker Modular Kitchen
2. Carcinogens– Carcinogens are substances, which initiate and promote the disease Carcinoma, commonly known as Cancer. Cancer occurs due to the ability of carcinogens to damage, change or mutate the genetic composition of the body, or, due to the disruption of the cellular metabolic processes in the body. These include radioactive substances like Uranium, Plutonium, Gamma radiation, X-rays, Ultraviolet radiation, Radium, etc.The effects and sources of common carcinogens, which cabinet makers of modular furniture are exposed to, are evident from the below table:
Carcinogen Affected Body Part Common SourcesPassive Smoking Lungs, Mouth Smoke from cigarettes and
cigars, exhaled by smokersAsbestos Lungs, Gastrointestinal tract Construction materials, roofs,
floor tiles, Fire-resistant cloths and textiles
Arsenic and its compounds Lungs, Skin Arsenic Alloys, few medicines, Contaminated Water, Electronic and Semiconductor devices, Insecticides, Fungicides, Smelting by- products
Benzene Blood, Lymph nodes, Groins Aromatic solvents, Fumigants, Paints, Rubber, Dry Cleaning agents, Adhesives, Soaps and Detergents, Printing Ink
Cadmium and its compounds Prostate Cadmium batteries or cells, Metal-based paint and coating, Yellow paint, Soldered surfaces or pieces
Cigarette Tar Lungs, Mouth, Gastrointestinal tract Different forms of tobacco consumed or inhaled by man
Chromium (hexavalent) compounds
Lungs Paints and pigments
Exhaust Fumes Lungs, Gastrointestinal tract, Colon, Bladder
Exhaust fumes / smokes from automobiles
Nickel and its compounds Lungs Nickel batteries or cells, Nickel plating and alloys, Paint, Ceramic materials, Stainless Steel welding by-product
Radium (224, 226, 238), Plutonium (239)
Bone, Liver Self-luminous paints
Table3.3.2.1:Carcinogens,theireffectsandsources
155
Participant Handbook Cabinet Maker Modular Kitchen
3. Combustible Materials– A material is said to be Combustible if it catches fire and burns easily. Combustible substances are also called Inflammable substances.
Combustible materials can be broadly categorized into the following:
• Flammable solids– Examples are desensitized explosives, thermally unstable and self-reactive materials like Peroxides, Sodium (solid, metallic form), etc.
• Flammable liquids– Examples are alcohols, fuel oils, acetone, solvents, paints and wood thinners• Flammable gases– Examples are Hydrogen, Butane, Methane and Acetylene, LPG, etc.
4. Sharps– These include objects or devices that can puncture the skin. Common examples of Sharps are:• Hypodermic syringes and attached lancets/needles• Scalpels, Razors and Blades• Glass, Wood, Metal or Fibre Splinters
Sharps are considered Biological Hazards and Toxins since they are often infected from prior human or animal contact.
__________________________________________________________________________________
__________________________________________________________________________________
__________________________________________________________________________________
__________________________________________________________________________________
__________________________________________________________________________________
__________________________________________________________________________________
__________________________________________________________________________________
__________________________________________________________________________________
__________________________________________________________________________________
__________________________________________________________________________________
__________________________________________________________________________________
__________________________________________________________________________________
__________________________________________________________________________________
__________________________________________________________________________________
__________________________________________________________________________________
__________________________________________________________________________________
__________________________________________________________________________________
__________________________________________________________________________________
Notes
156
Participant Handbook Cabinet Maker Modular Kitchen
At the end of this unit, you will be able to:
1. Comply with recommended material handling procedure to control damage and personal injury
Unit Objectives
UNIT 3.4: Storage and Handling of Hazardous Substances
Follow recommended material handling procedure to control damage and personal injury
In order to ensure appropriate safety practices at the workplace, one must understand the importance of following recommended material handling procedure to control damage and personal injury. The essentials of the same have been discussed below:
A. Biological• Infectious and potentially infectious materials must be inactivated by bleaching or Autoclave
Sterilization during storage and before disposal.• Infectious waste must be inactivated within 24 hours and marked with "Biohazard" symbol.• Appropriate PPE must be worn or used while procuring, handling and disposing of infectious
materials.• Non-infectious biological waste do not need inactivation but must be put away separately in
biological waste box, lined with red garbage bag• Non-infectious biological waste include used but uncontaminated laboratory utensils, disposable
clothing and gloves• Sharps waste (including metal lancets, hypodermic needles, scalpel blades, medical instruments
for cutting and piercing), used and unused, must be placed in red sharp boxes.• Sharps boxes must be closed, when they get 3/4 full.• Closed Sharp boxes must not be stored for more than 30 days.• Contaminated sharps must be autoclaved and inactivated before storing for disposal.• Penetration-resistant gloves must be worn for handling and storing contaminated sharps.
B. Chemicals• One must read all information stated in the Material Safety Data Sheet (MSDS), before handling
chemically toxic materials, so that the user is aware of the hazards involved and the necessary precautions
• All storage containers must be appropriately and accurately labelled.• Any incident of damaged container or illegible label must be reported to the concerned authority.• One must ensure that incompatible materials (like Acetone and concentrated Nitric Acid, Molten
Wax and Water)are stored and used separately.• To avoid destruction of containers, corrosive chemicals must never be stored in containers
made of inappropriate materials.• Containers of corrosive materials must be closed tightly.• Appropriate PPE must be worn while handling toxic and corrosive chemicals.• One must never consume anything while handling toxic chemicals and can do so only after
thoroughly cleansing oneself with appropriate soap and solutions.
157
Participant Handbook Cabinet Maker Modular Kitchen
• Chemicals that produce a lot of fumes must be used carefully, enclosed in a Fume Hood.• Flammable chemicals like alcohol, benzene, gasoline, Carbon disulphide, etc. must be handled
only after turning off all sources of flame (burners, ovens, heaters, etc.)• Flammable liquids must be only heated in a flask fitted with a Reflux Condenser; they must
never be heated in open containers over open flames.• While working with acids, one must wear acid resistant chemical gloves and clothing.• One must keep emergency eye wash solutions handy.• Dilution of acids must be done very carefully, by gradually stirring the concentrated acid into
the water.• Ethers must not be kept open and exposed to open air, because, this would create peroxides,
which are highly unstable and may lead to violent explosions.• All chemicals must be treated as a potential toxin and hence, one must keep appropriate
antidotes nearby.
C. Radioactive• Containers for storing radioactive materials or items contaminated with radioactivity must be
labelled with "Nuclear" or "Radioactive Hazard" sign and the Radioactive tape.• Severely contaminated items must be stored and handled under specially designated Fume
Hoods and Radioactive Materials (RAM) Hood.• Lead is considered the most appropriate material to store and contain radioactive materials.• One must never pipette radioactive materials by mouth.• Radioactive waste cans must remain covered at all times and must be placed in enclosed,
secluded areas, away from the working premises.• Radioactive waste cans, if contaminated with substantial external radiation levels, must be
provided with additional shielding.• While handling or storing radioactive materials, the work surface must be covered with
Absorbent Paper sheet to capture contamination.• A separate set of equipment must be dedicated to handling and storing radioactive materials
and must be labelled carefully with radioactive tape.• Radioactive materials must never be left unsecured and unattended, even for a short span of
time.• One must never leave edible items open near radioactive materials.• One must keep on surveying the skin of the wrists while handling radioactive materials.• Long gloves and lead-lined protective clothing must be worn.
D. Flammable and Explosive• Appropriate PPE, like disposable gloves (generally lead-lined latex or nitrile gloves) and close-
toed shoes must be worn while handling radioactive materials.• Flammable materials must be contained, stored or transported in vapour-proof, metal or plastic
containers and must be equipped with welded seams, spark / flame arrestors, pressure release valves, spring closing lids with spout covers, etc.
• Care must be taken that the flammable material does not react with the container material.• Containers must be labelled with "Flammable" sign. • The labeling comprises the following information: • Name of the flammable material
158
Participant Handbook Cabinet Maker Modular Kitchen
• Disclaimer that the contents are flammable• Precautions to be taken, like the fact that the container should be kept away from open flames,
spark and other sources of ignition• Storage and transportation containers for flammable substances must remain closed, when not
in use.• Flammable gas cylinders must be stored in a separate room• Cylinders must be fitted with appropriate valves so that they do not run the chances of leakage• Parts of the cylinder, like valves, hoses and container, must be checked regularly for damages.• Compressed gases must never be stored along with or near bulk storage containers for
flammable materials.• Pieces of wood, straw and hay, saw dust, paper, cardboard etc. must be cleared off as soon as
they are procured during the Furniture & Fittings operations.• Adequate care must be adopted to ensure that the entire work area is a non-smoking zone.
__________________________________________________________________________________
__________________________________________________________________________________
__________________________________________________________________________________
__________________________________________________________________________________
__________________________________________________________________________________
__________________________________________________________________________________
__________________________________________________________________________________
__________________________________________________________________________________
__________________________________________________________________________________
__________________________________________________________________________________
__________________________________________________________________________________
__________________________________________________________________________________
__________________________________________________________________________________
__________________________________________________________________________________
__________________________________________________________________________________
__________________________________________________________________________________
__________________________________________________________________________________
__________________________________________________________________________________
__________________________________________________________________________________
__________________________________________________________________________________
Notes
159
Participant Handbook Cabinet Maker Modular Kitchen
At the end of this unit, you will be able to:
1. Identify the common health and safety practices at workplace for cabinet maker.
Unit Objectives
UNIT 3.5: Common Health and Safety Practices at Workplace
Common Health and Safety Practices at Workplace for cabinet maker
A. Work safely at all times, complying with health and safety legislation, regulations and other relevant guidelines• Ensure that all emergency route maps are on display, in publicly accessible places, on all floors
of the workplace• Ensure that appropriate Fire Extinguishers are available on all the floors of the workplace• Ask your supervisor how you may retrieve PPE and how to maintain and store the same• Stay aware that confined spaces must bear appropriate signs, to restrict claustrophobic people
from accessing them• Learn and abide by company policy and procedures for dealing with security risks in your
workplace• Learn and abide by Company policies and procedures for making sure that security will be
maintained when you go on your breaks and when you finish work
B. Ensure that health and safety instructions applicable to the work place are being followed• Lighting should be adequate in all areas and replacement bulbs should be kept handy• Ensure that all manual cutting tools must be honed in advance, because blunt tools can slip and
lead to deep cuts• Ensure that, while using cutting tools, the direction of cutting is always away from your body• Arrange for frequent Safety Drills and Trainings for employees to promote safety awareness• Have clear idea of how much authority and responsibility you have to deal with security risks,
including your legal rights and duties• Learn and abide by company policies and procedures for maintaining security while you work
C. Check the worksite for any possible health and safety hazards• Appoint a Safety Supervisor in workshop• This Safety Supervisor will stay responsible for checking the worksite for potential health and
safety hazards• Have your employer develop a daily checklist for all areas, delegated to appropriate employees
D. Follow manufacturers' instructions and job specifications relating to safe use of materials specifically chemicals and power equipment• Ensure that all Chemical Solutions, used on display shelves or for Housekeeping purposes, must
be used only after referring to the relevant MSDS (Material Safety Data Sheets) or Instruction Manuals
160

Participant Handbook Cabinet Maker Modular Kitchen
• Loosely fitted clothes must be completely avoided because the loose ends may get caught in powered machinery and tools and may be fatal
• Ensure that you read the Instruction Manual thoroughly before handling powered tools and equipment.
E. Follow electrical safety measures while working with electrically powered tools & equipment • Powered tools and equipment must be inspected for any damage, before and after every use. • The power cord must be checked carefully for any fraying, faults, cracks or loss of insulation. • Damaged switches must be reported to supervisor and repaired immediately.• Plugs must be checked for missing or faulty prongs / pins.
F. Ensure safe handling and disposal of waste and debris• All walkways should be cleared of clutter and debris, to avoid trips and falls.• Any spill should be cleared off immediately and 'Wet Floor' or 'Work in Progress' signs should
be used in appropriate places.• Store equipment, Tools and Chemicals should be stored appropriately, abiding by all instructions
provided in the Instruction Manual and 'Directions for Use'.
G. Follow emergency and evacuation procedures in case of accidents, fires, natural calamities For Fire Outbreak:The emergency and evacuation procedures are:
• A clear passageway must be present to all escape routes.• Signage like escape routes should be clearly marked.• Enough exits and routes must be there for all people to escape• Emergency doors, that open easily, must be present.• Emergency lighting (Infrared lights for night and blurred vision) must be present.• All people at the workplace must be given brief instructions about the positions of the escape
routes.• Brief instructions must also be given regarding the availability and use of fire extinguishers.• The workplace must have a safe meeting point or assembly area for the staff.• Nobody should use the Elevator during fire.
Correctly demonstrate rescue techniques applied during fire hazard:
A. Responding to Fire• The Fire Alarm System must be initiated and an alert must be raised. • A safe evacuation path must be identified before dealing with the fire. • The appropriate class of Fire Extinguisher must be chosen.• The P.A.S.S technique must be adopted for extinguishing the fire.• Immediate evacuation must be initiated if the extinguisher is exhausted and the fire still exists.• Call the workplace security or the local emergency services.• Summon the fire fighting services at the earliest.• Stay as far as possible from smoke, because smoke may comprise toxic gases.• Cover your mouth and nose with a damp cloth to protect yourself. If possible, help your
colleagues (those who are with you) to repeat the same.
161
Participant Handbook Cabinet Maker Modular Kitchen
• Look out for the nearest emergency exit routes and call out for people, who you can take along with you.
• While opening a door, first touch the door with the back side of your palm.• Keep doors open, after you open them.• Start moving out of the building and ask your colleagues to do so.• Always use a staircase and not the elevator.• Do not rush.• As you move out of the building, gather people, whoever you come across.• Always move downstairs and avoid returning to the burning premises, till the firefighters arrive.
B. Initiate Evacuation• Stop your work but safely and without spreading panic.• Gather and carry only the most important items like cell phone.• Leave the workplace through the nearest door bearing an "Exit" sign.• Report to the designated Assembly Area.• Await instructions from the Safety Committee.• Incorporate first aid treatment to anyone in need.
For Natural Calamities/Disasters:
A. Earthquake• The emergency and evacuation procedures are:• Quickly shutdown any hazardous operations or processes and render them safe.• Notify others in the area by raising an alarm if they have not heard it while you are evacuating
yourself.• Exit the room.• Take jackets or other clothing needed for protection from the weather.• If possible, close windows and doors as you leave, but do not lock the doors and emergency
exit routes.• Exit the building, walk to the nearest safe exit route. Do not run. Do not use elevators.
B. Flood and Storms• The emergency and evacuation procedures are:• Stay alert, avoid panicking and monitor the surroundings with eyes and ears open.• Move to the high grounds and help others move before the flood strikes.• Accumulate disaster supplies like:
ᴑ Canned, dry, ready-to-eat and packaged food, which do not require refrigeration or cooking ᴑ Liquid cash ᴑ Drinking water in clean containers ᴑ First Aid Kit ᴑ Essential clothing ᴑ Flashlights ᴑ Adequate batteries
162

Participant Handbook Cabinet Maker Modular Kitchen
• Instruct people around you not to drive• Do not walk or swim through flooded water• Shut off the Mains Supply (electricity) at the circuit breakers• Stay alert for evacuation calls and help people identify alternate routes of getting there
For Accidents: The emergency and evacuation procedures are:
Summon emergency medical help by calling up the Safety Committee officials or the toll-free number.
Check and examine the site, to gather as much information (location, nature and severity of injuries, casualty if any, hazards present, etc.) as possible, so that the same can be provided to the emergency team, once it arrives.
One must inform the immediate supervisor about an injury or illness.
If possible, workers may treat themselves to first aid or ask colleagues to do so.
One must extend help and assistance to others.
The general steps involved in carrying out an evacuation are:
Stop your work but safely and without spreading panic.
Gather and carry only the most important items like cell phone.
Leave the workplace through the nearest door bearing an "Exit" sign.
Report to the designated Assembly Area.
Await instructions from the Safety Committee.
Incorporate first aid treatment to anyone in need.
Evacuation and emergency procedures for the specially-abled:
• The Visually Impaired ᴑ Announce the type of emergency ᴑ Offer your arm for help
• With Impaired Hearing ᴑ Turn lights on/off to gain the person's attention, or indicate directions with gestures, or write a
note with evacuation directions• People with Prosthetic Limbs, Crutches, Canes, Walkers, etc.
ᴑ Evacuate these individuals along a route specially designated as injured persons. ᴑ Assist and accompany to evacuation site if possible. ᴑ Use a sturdy chair, or a wheeled one, to move the person to an enclosed stairwell. ᴑ Notify emergency crew of their location.
163
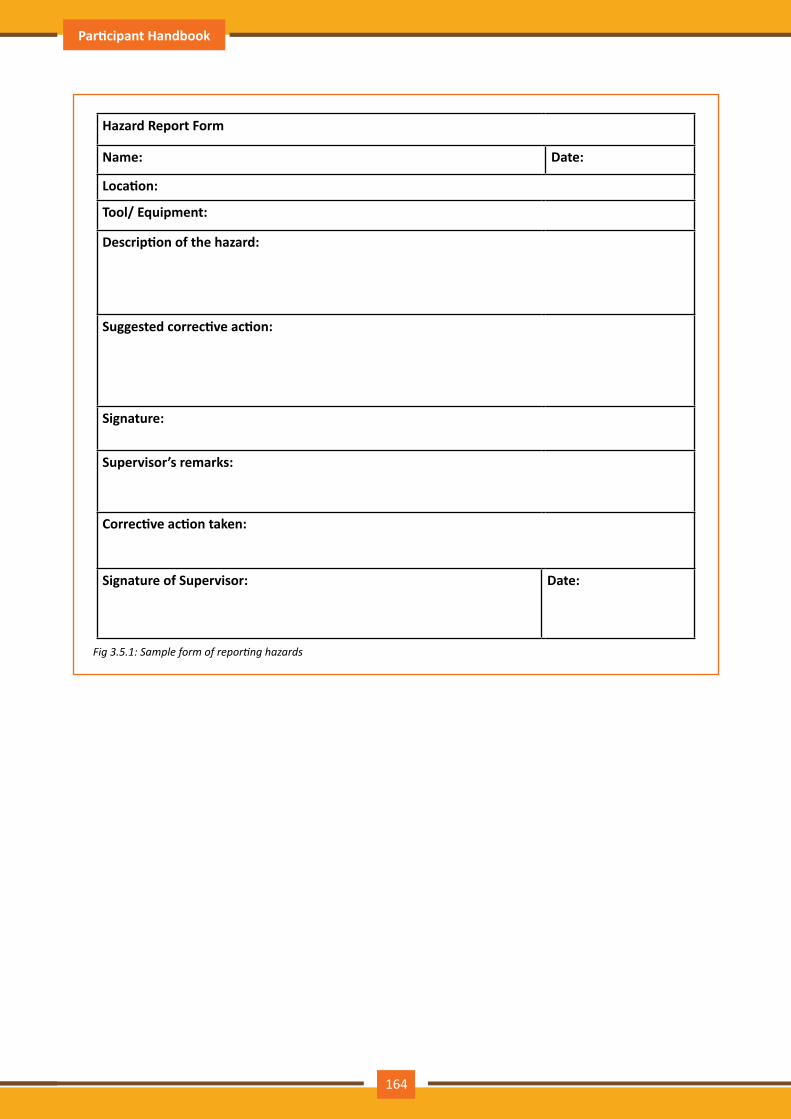
Participant Handbook Cabinet Maker Modular Kitchen
Hazard Report Form
Name: Date:
Location:
Tool/ Equipment:
Description of the hazard:
Suggested corrective action:
Signature:
Supervisor’s remarks:
Corrective action taken:
Signature of Supervisor: Date:
Fig3.5.1:Sampleformofreportinghazards
164
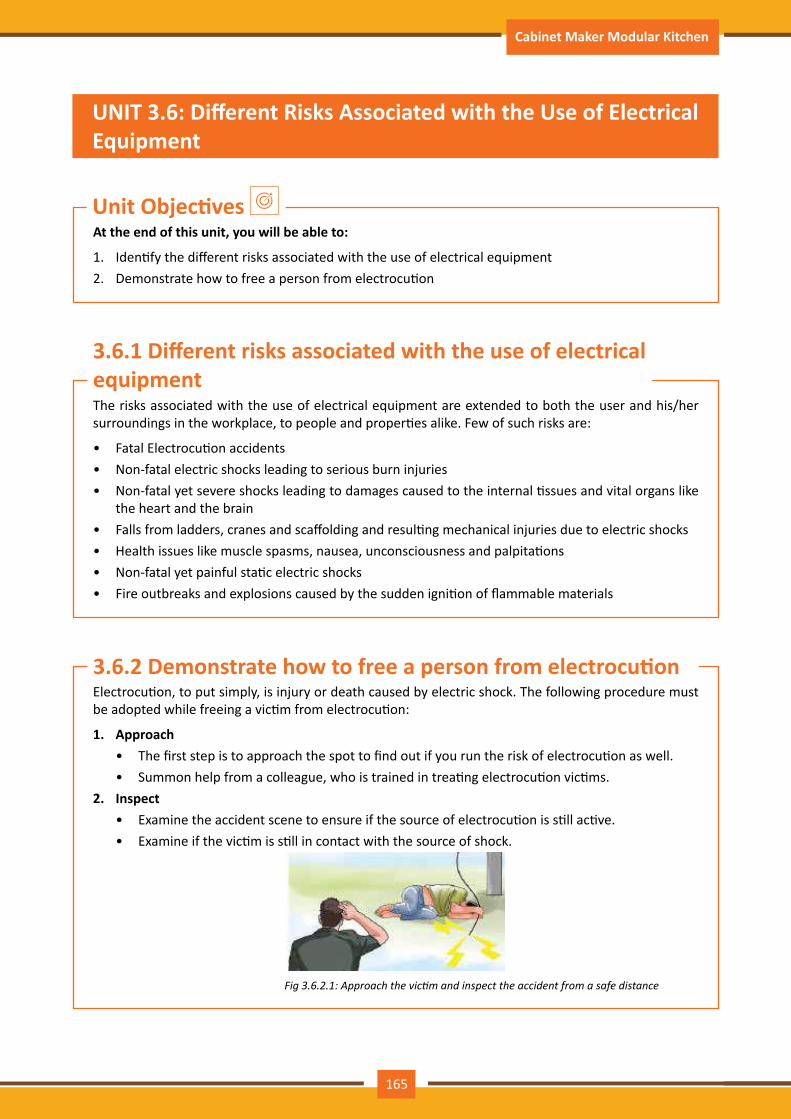
Participant Handbook Cabinet Maker Modular Kitchen
At the end of this unit, you will be able to:
1. Identify the different risks associated with the use of electrical equipment2. Demonstrate how to free a person from electrocution
Unit Objectives
UNIT 3.6: Different Risks Associated with the Use of Electrical Equipment
The risks associated with the use of electrical equipment are extended to both the user and his/her surroundings in the workplace, to people and properties alike. Few of such risks are:
• Fatal Electrocution accidents• Non-fatal electric shocks leading to serious burn injuries• Non-fatal yet severe shocks leading to damages caused to the internal tissues and vital organs like
the heart and the brain• Falls from ladders, cranes and scaffolding and resulting mechanical injuries due to electric shocks• Health issues like muscle spasms, nausea, unconsciousness and palpitations• Non-fatal yet painful static electric shocks• Fire outbreaks and explosions caused by the sudden ignition of flammable materials
Electrocution, to put simply, is injury or death caused by electric shock. The following procedure must be adopted while freeing a victim from electrocution:
1. Approach• The first step is to approach the spot to find out if you run the risk of electrocution as well.• Summon help from a colleague, who is trained in treating electrocution victims.
2. Inspect• Examine the accident scene to ensure if the source of electrocution is still active.• Examine if the victim is still in contact with the source of shock.
Fig3.6.2.1:Approachthevictimandinspecttheaccidentfromasafedistance
3.6.1 Different risks associated with the use of electrical equipment
3.6.2 Demonstrate how to free a person from electrocution
165
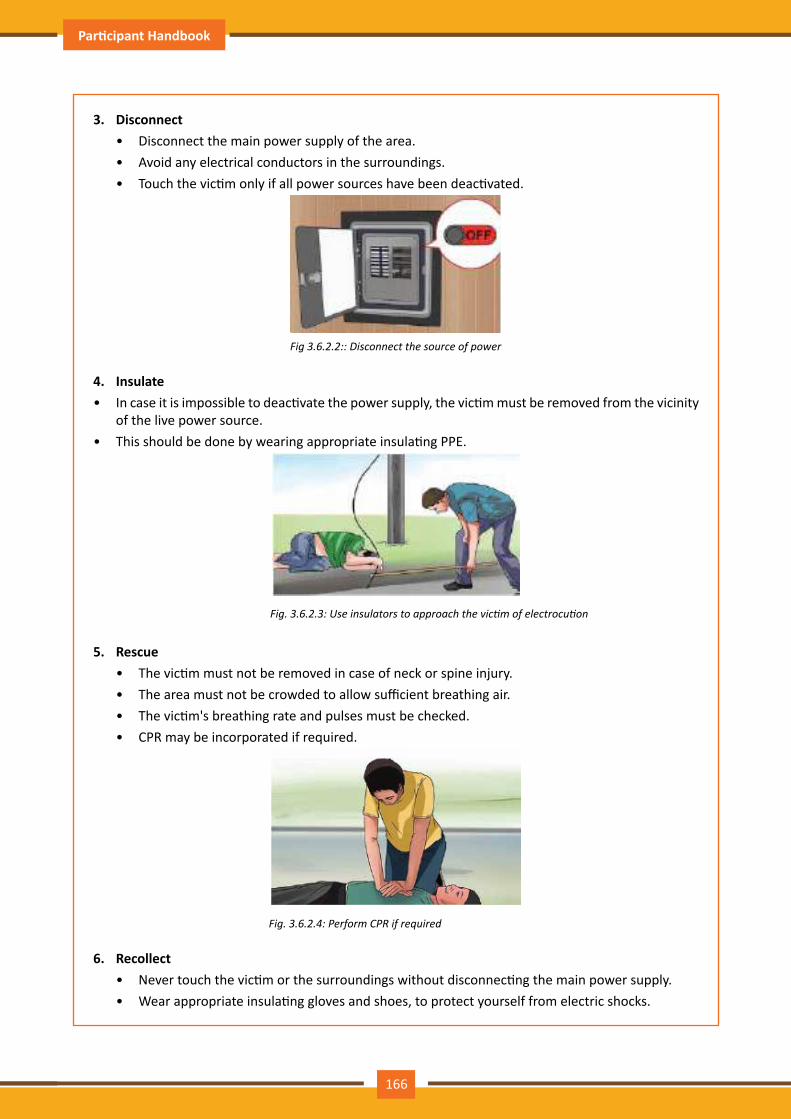
Participant Handbook Cabinet Maker Modular Kitchen
3. Disconnect• Disconnect the main power supply of the area.• Avoid any electrical conductors in the surroundings.• Touch the victim only if all power sources have been deactivated.
Fig3.6.2.2::Disconnectthesourceofpower
4. Insulate• In case it is impossible to deactivate the power supply, the victim must be removed from the vicinity
of the live power source.• This should be done by wearing appropriate insulating PPE.
Fig.3.6.2.3:Useinsulatorstoapproachthevictimofelectrocution
5. Rescue• The victim must not be removed in case of neck or spine injury. • The area must not be crowded to allow sufficient breathing air. • The victim's breathing rate and pulses must be checked.• CPR may be incorporated if required.
Fig.3.6.2.4:PerformCPRifrequired
6. Recollect• Never touch the victim or the surroundings without disconnecting the main power supply.• Wear appropriate insulating gloves and shoes, to protect yourself from electric shocks.
166
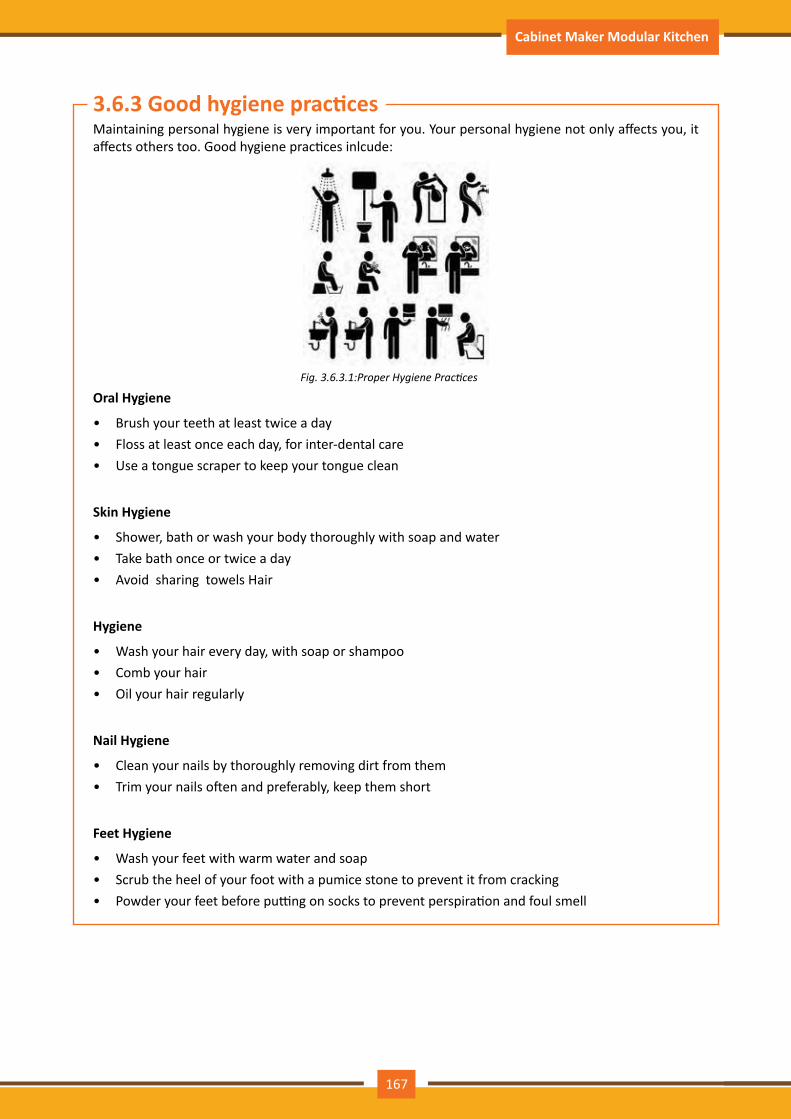
Participant Handbook Cabinet Maker Modular Kitchen
Maintaining personal hygiene is very important for you. Your personal hygiene not only affects you, it affects others too. Good hygiene practices inlcude:
Fig.3.6.3.1:ProperHygienePractices
Oral Hygiene
• Brush your teeth at least twice a day• Floss at least once each day, for inter-dental care• Use a tongue scraper to keep your tongue clean
Skin Hygiene
• Shower, bath or wash your body thoroughly with soap and water• Take bath once or twice a day • Avoid sharing towels Hair
Hygiene
• Wash your hair every day, with soap or shampoo• Comb your hair• Oil your hair regularly
Nail Hygiene
• Clean your nails by thoroughly removing dirt from them • Trim your nails often and preferably, keep them short
Feet Hygiene
• Wash your feet with warm water and soap• Scrub the heel of your foot with a pumice stone to prevent it from cracking• Powder your feet before putting on socks to prevent perspiration and foul smell
3.6.3 Good hygiene practices
167
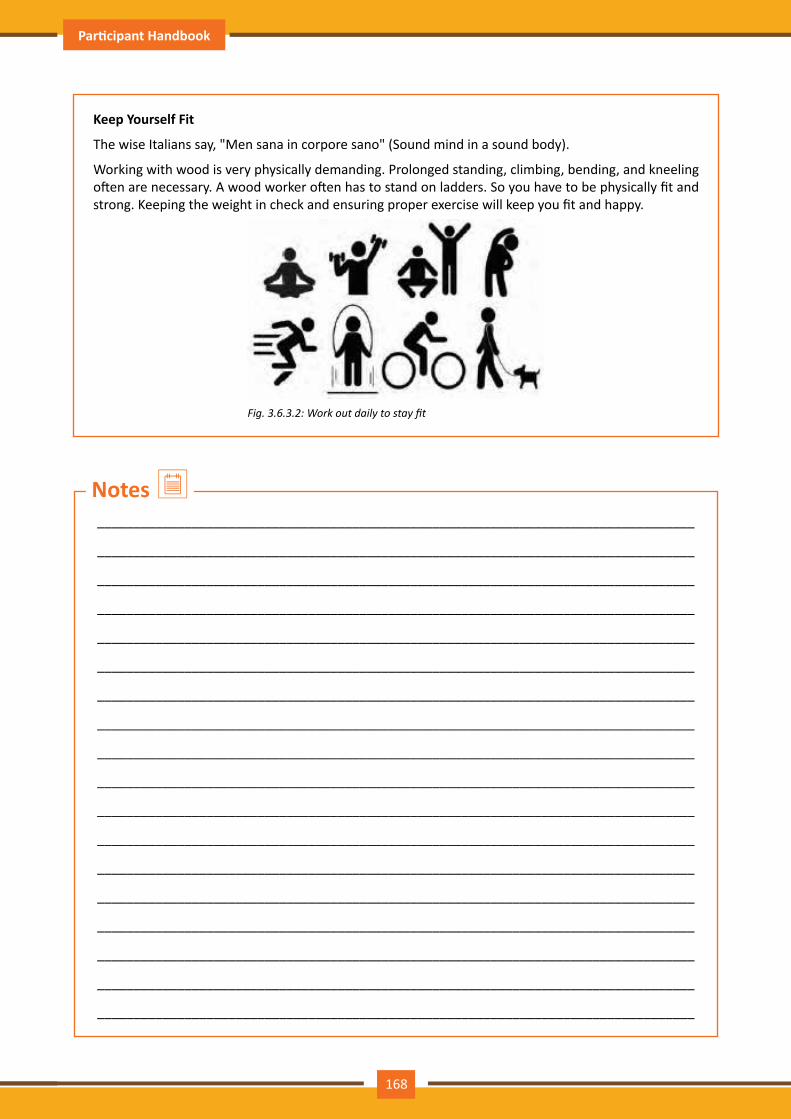
Participant Handbook Cabinet Maker Modular Kitchen
Keep Yourself Fit
The wise Italians say, "Men sana in corpore sano" (Sound mind in a sound body).
Working with wood is very physically demanding. Prolonged standing, climbing, bending, and kneeling often are necessary. A wood worker often has to stand on ladders. So you have to be physically fit and strong. Keeping the weight in check and ensuring proper exercise will keep you fit and happy.
Fig.3.6.3.2:Workoutdailytostayfit
__________________________________________________________________________________
__________________________________________________________________________________
__________________________________________________________________________________
__________________________________________________________________________________
__________________________________________________________________________________
__________________________________________________________________________________
__________________________________________________________________________________
__________________________________________________________________________________
__________________________________________________________________________________
__________________________________________________________________________________
__________________________________________________________________________________
__________________________________________________________________________________
__________________________________________________________________________________
__________________________________________________________________________________
__________________________________________________________________________________
__________________________________________________________________________________
__________________________________________________________________________________
__________________________________________________________________________________
Notes
168
Participant Handbook Cabinet Maker Modular Kitchen
• Hazard is defined as a factor, which may cause harm to people and properties alike.• Risk is defined as the likeliness or the chance that a hazard can actually cause harm to somebody.• The potential or imminent danger that Risks and Hazards expose the concerned premises to, is
known as Threat.• Any job role and any occupation in this world has some hazards, in varying severity, associated with
it.• Symbols, labels and pictograms help in cautioning people against hazards.• Job Hazard Analysis is a popular technique to identify the perils associated with specific tasks in a
job role.• Risk Management can be defined as the estimation and evaluation and mitigation or avoidance of
risks.• PPE are tools and apparatus that protect the user against occupational hazards.• One must understand the importance of storage and handling of hazardous substances.
Summary
• The trainer divides the class into few groups. Ask each group to think about and share few points on any one of the following topics:
ᴑ Occupational Hazards for cabinet makers and how to reduce the same ᴑ How to save an electrocuted victim ᴑ Common Chemical Hazards ᴑ Common Electrical Hazards ᴑ Types of Toxins ᴑ Storage and handling of sharps ᴑ Storage and handling of inflammable materials ᴑ PPE used while handling biologically hazardous materials ᴑ Storage and handling of Radioactive materials ᴑ Treating infected waste
• The trainer shows, from his/her laptop, few ppt slides comprising images of different hazardous substances. The students identify the categories of each substance and prepare a list on how each substance must be stored and handled.
Activity
169
Participant Handbook Cabinet Maker Modular Kitchen
Fill in the Blanks
1. Incorrect and irregular disposal of wood dust/wood debris can lead to _____________.a) Head injury b) Eye Injury c) Bleeding Gums
A: Eye Injury
2. _____________ waste do not need inactivation but must be put away separately in biological waste box lined with red garbage bag.a) Non-infectious biological b) Atomic c) Water based
A: Non-infectious biological
3. Reporting an accident / incident to an authorized person can be best done with the help of the _____________.a) Accident form b) Supervisor c) Hazard reporting form
A: Hazard reporting form
4. Personal protective equipment is commonly referred to as _____________.a) PPE b) GPE c) APE
A: PPE
5. _____________ may be administered in case of ingestion and inhalation of toxic solvents.a) Saline Water b) Activated charcoal c) Milk
A: Activated charcoa
Exercise
170

Participant Handbook Cabinet Maker Modular Kitchen
4. Fighting Fire
Unit 4.1 - Various Causes of Fire
Unit 4.2 - Different Types of Fire Extinguishers
Unit 4.3 - Techniques of Using Different Fire Extinguishers
FFS/N8601171

Participant Handbook Cabinet Maker Modular Kitchen
At the end of this module, you will be able to:
1. Identify the various causes of fire2. Discuss the different types of fire extinguishers and their use3. Practice the techniques of using the different fire extinguishers
Key Learning Outcomes
172
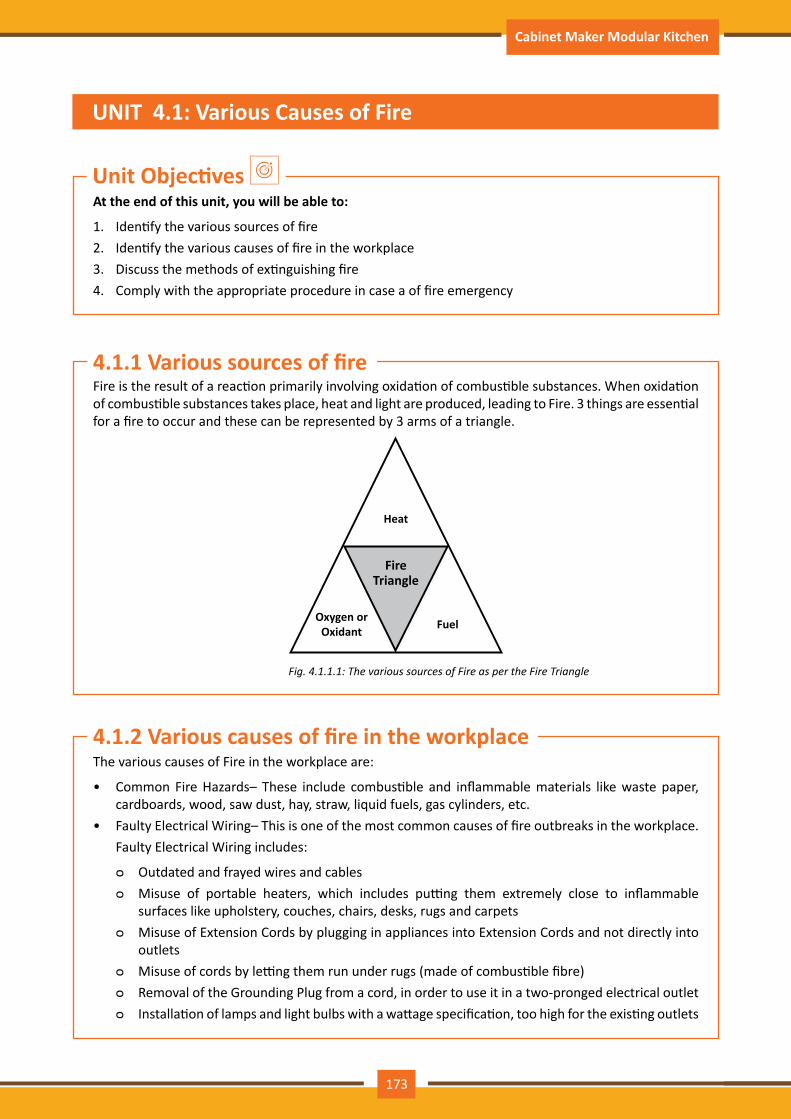
Participant Handbook Cabinet Maker Modular Kitchen
At the end of this unit, you will be able to:
1. Identify the various sources of fire2. Identify the various causes of fire in the workplace3. Discuss the methods of extinguishing fire4. Comply with the appropriate procedure in case a of fire emergency
Unit Objectives
UNIT 4.1: Various Causes of Fire
Fire is the result of a reaction primarily involving oxidation of combustible substances. When oxidation of combustible substances takes place, heat and light are produced, leading to Fire. 3 things are essential for a fire to occur and these can be represented by 3 arms of a triangle.
Fig.4.1.1.1:ThevarioussourcesofFireaspertheFireTriangle
The various causes of Fire in the workplace are:
• Common Fire Hazards– These include combustible and inflammable materials like waste paper, cardboards, wood, saw dust, hay, straw, liquid fuels, gas cylinders, etc.
• Faulty Electrical Wiring– This is one of the most common causes of fire outbreaks in the workplace.Faulty Electrical Wiring includes:
ᴑ Outdated and frayed wires and cables ᴑ Misuse of portable heaters, which includes putting them extremely close to inflammable
surfaces like upholstery, couches, chairs, desks, rugs and carpets ᴑ Misuse of Extension Cords by plugging in appliances into Extension Cords and not directly into
outlets ᴑ Misuse of cords by letting them run under rugs (made of combustible fibre) ᴑ Removal of the Grounding Plug from a cord, in order to use it in a two-pronged electrical outlet ᴑ Installation of lamps and light bulbs with a wattage specification, too high for the existing outlets
4.1.1 Various sources of fire
4.1.2 Various causes of fire in the workplace
173
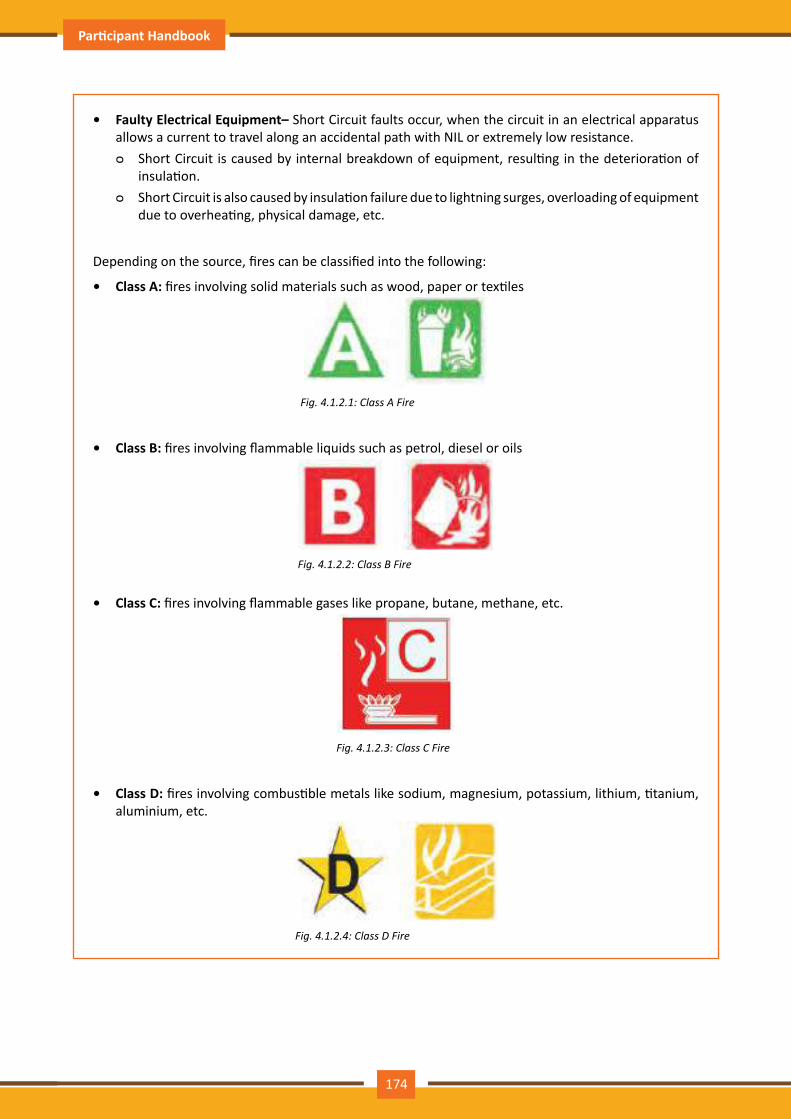
Participant Handbook Cabinet Maker Modular Kitchen
• Faulty Electrical Equipment– Short Circuit faults occur, when the circuit in an electrical apparatus allows a current to travel along an accidental path with NIL or extremely low resistance.
ᴑ Short Circuit is caused by internal breakdown of equipment, resulting in the deterioration of insulation.
ᴑ Short Circuit is also caused by insulation failure due to lightning surges, overloading of equipment due to overheating, physical damage, etc.
Depending on the source, fires can be classified into the following:
• Class A: fires involving solid materials such as wood, paper or textiles
Fig. 4.1.2.1: Class A Fire
• Class B: fires involving flammable liquids such as petrol, diesel or oils
Fig. 4.1.2.2: Class B Fire
• Class C: fires involving flammable gases like propane, butane, methane, etc.
Fig. 4.1.2.3: Class C Fire
• Class D: fires involving combustible metals like sodium, magnesium, potassium, lithium, titanium, aluminium, etc.
Fig. 4.1.2.4: Class D Fire
174
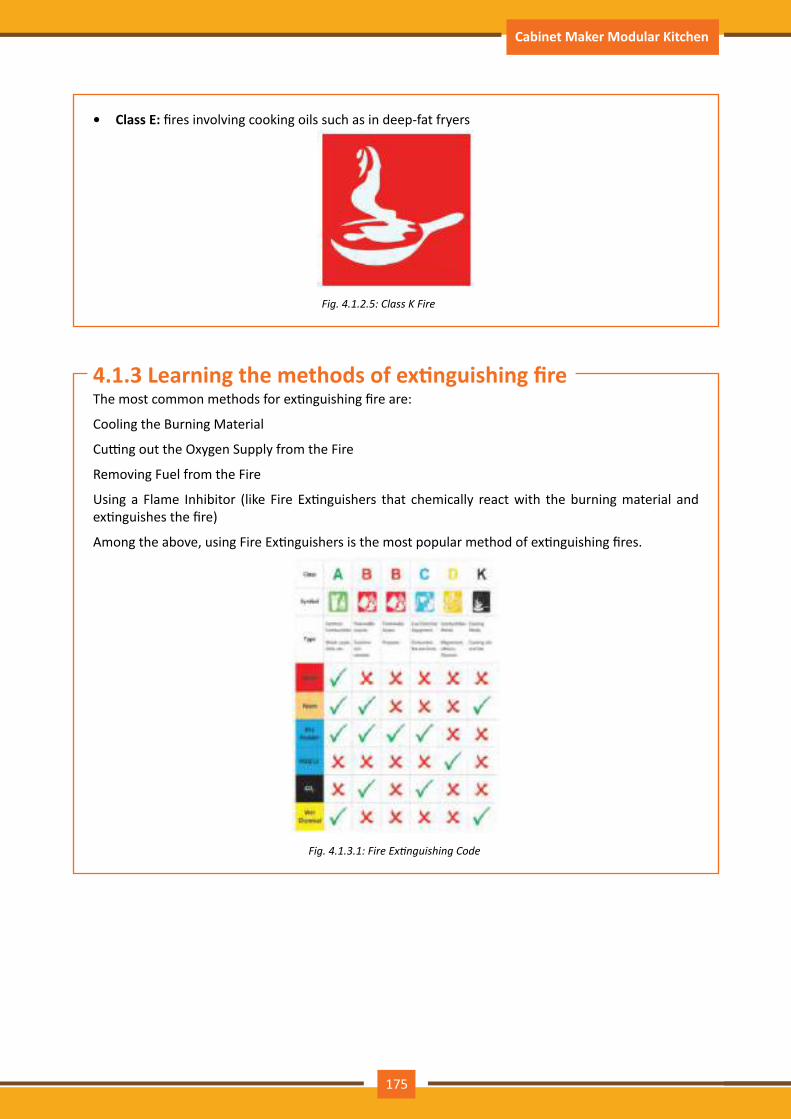
Participant Handbook Cabinet Maker Modular Kitchen
The most common methods for extinguishing fire are:
Cooling the Burning Material
Cutting out the Oxygen Supply from the Fire
Removing Fuel from the Fire
Using a Flame Inhibitor (like Fire Extinguishers that chemically react with the burning material and extinguishes the fire)
Among the above, using Fire Extinguishers is the most popular method of extinguishing fires.
Fig.4.1.3.1:FireExtinguishingCode
• Class E: fires involving cooking oils such as in deep-fat fryers
Fig. 4.1.2.5: Class K Fire
4.1.3 Learning the methods of extinguishing fire
175
Participant Handbook Cabinet Maker Modular Kitchen
Dos Don’tsSwitch off the isolation switch to stop the electric supply. This will prevent the spreading of fire.
Do not place combustible items like cottonwaste - oil soaked cotton or oil, near the brazing or electrical points. These are highly inflammable and even a small spark may start a fire.
Use a wooden stick to switch off the isolation switch to protect yourself from an electric shock.
Do not keep the LPG cylinder’s regulator switched on.
Check electrical sockets and switches to ensure there are no loose wires.
Do not use water on electrical fires.
Use appropriate Fire Extinguishers to put out Fire.
4.1.4 Follow appropriate procedure in case of a fire emergency
__________________________________________________________________________________
__________________________________________________________________________________
__________________________________________________________________________________
__________________________________________________________________________________
__________________________________________________________________________________
__________________________________________________________________________________
__________________________________________________________________________________
__________________________________________________________________________________
__________________________________________________________________________________
__________________________________________________________________________________
__________________________________________________________________________________
__________________________________________________________________________________
__________________________________________________________________________________
__________________________________________________________________________________
__________________________________________________________________________________
__________________________________________________________________________________
__________________________________________________________________________________
__________________________________________________________________________________
Notes
176

Participant Handbook Cabinet Maker Modular Kitchen
At the end of this unit, you will be able to:
1. Discuss the different types of fire extinguishers and their use
Unit Objectives
UNIT 4.2: Different Types of Fire Extinguishers
The main types of Fire Extinguishers and their uses are:
• Water– For extinguishing wood, cloth, plastics, coal, textile, paper and fires from other solid combustible materials
Fig.4.2.1.1:WaterExtinguisher
• Powder– For extinguishing fires from solid combustible materials, liquid, gas and electrical sources
Fig.4.2.1.2:DryChemicalPowder(DCP)
• Foam– For extinguishing fires from combustible solid and liquid materials
Fig.4.2.1.3:FoamExtinguisher
4.2.1 Different types of fire extinguishers
177
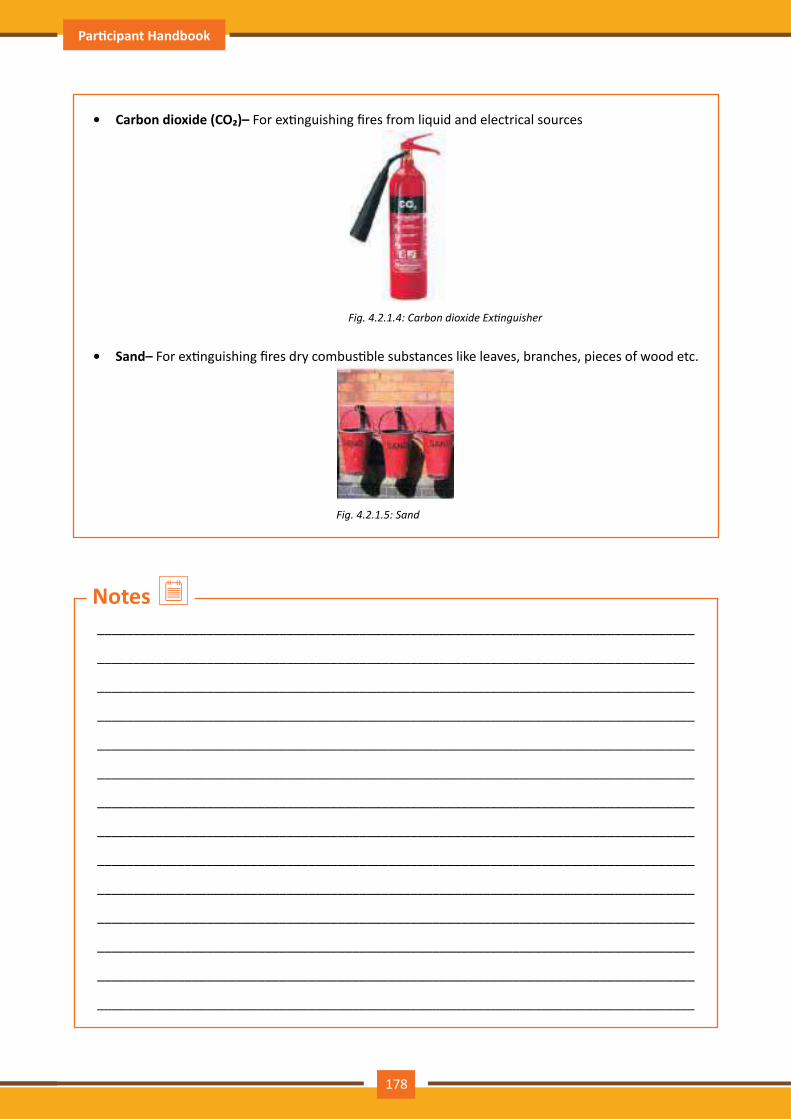
Participant Handbook Cabinet Maker Modular Kitchen
• Carbon dioxide (CO₂)– For extinguishing fires from liquid and electrical sources
Fig.4.2.1.4:CarbondioxideExtinguisher
• Sand– For extinguishing fires dry combustible substances like leaves, branches, pieces of wood etc.
Fig.4.2.1.5:Sand
__________________________________________________________________________________
__________________________________________________________________________________
__________________________________________________________________________________
__________________________________________________________________________________
__________________________________________________________________________________
__________________________________________________________________________________
__________________________________________________________________________________
__________________________________________________________________________________
__________________________________________________________________________________
__________________________________________________________________________________
__________________________________________________________________________________
__________________________________________________________________________________
__________________________________________________________________________________
__________________________________________________________________________________
Notes
178
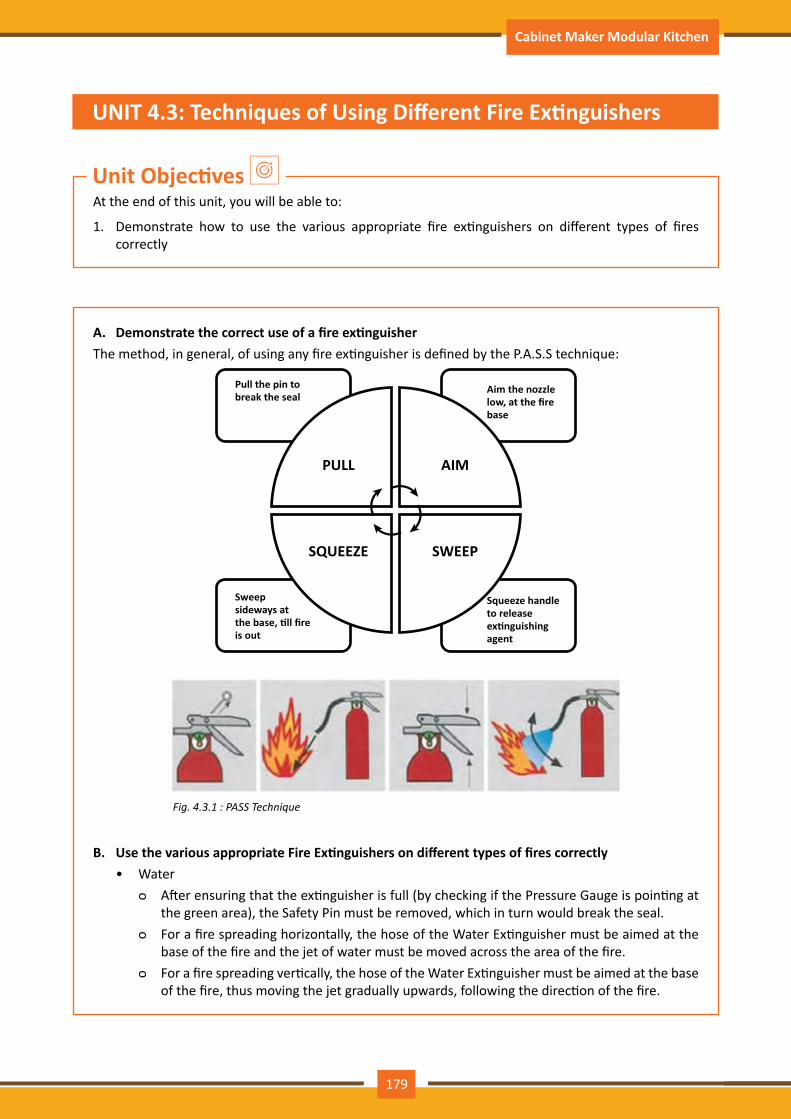
Participant Handbook Cabinet Maker Modular Kitchen
At the end of this unit, you will be able to:
1. Demonstrate how to use the various appropriate fire extinguishers on different types of fires correctly
Unit Objectives
UNIT 4.3: Techniques of Using Different Fire Extinguishers
A. Demonstrate the correct use of a fire extinguisherThe method, in general, of using any fire extinguisher is defined by the P.A.S.S technique:
Fig.4.3.1:PASSTechnique
B. Use the various appropriate Fire Extinguishers on different types of fires correctly• Water
ᴑ After ensuring that the extinguisher is full (by checking if the Pressure Gauge is pointing at the green area), the Safety Pin must be removed, which in turn would break the seal.
ᴑ For a fire spreading horizontally, the hose of the Water Extinguisher must be aimed at the base of the fire and the jet of water must be moved across the area of the fire.
ᴑ For a fire spreading vertically, the hose of the Water Extinguisher must be aimed at the base of the fire, thus moving the jet gradually upwards, following the direction of the fire.
179
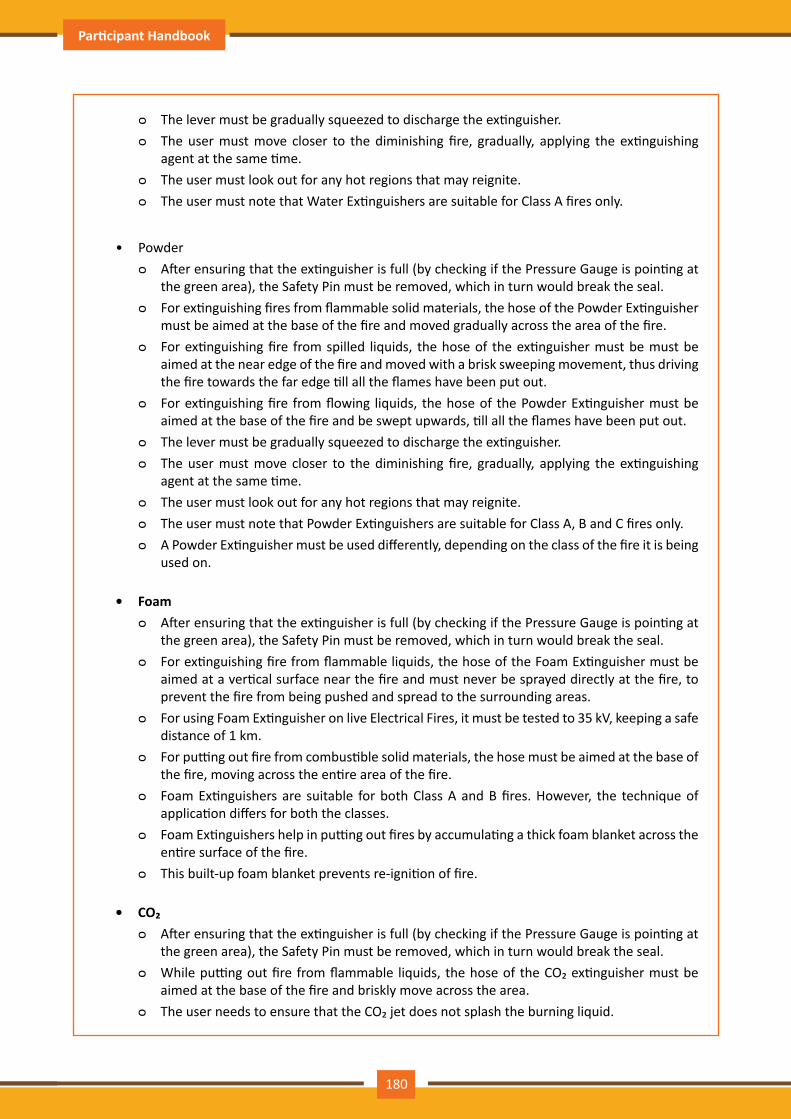
Participant Handbook Cabinet Maker Modular Kitchen
ᴑ The lever must be gradually squeezed to discharge the extinguisher. ᴑ The user must move closer to the diminishing fire, gradually, applying the extinguishing
agent at the same time. ᴑ The user must look out for any hot regions that may reignite. ᴑ The user must note that Water Extinguishers are suitable for Class A fires only.
• Powder ᴑ After ensuring that the extinguisher is full (by checking if the Pressure Gauge is pointing at
the green area), the Safety Pin must be removed, which in turn would break the seal. ᴑ For extinguishing fires from flammable solid materials, the hose of the Powder Extinguisher
must be aimed at the base of the fire and moved gradually across the area of the fire. ᴑ For extinguishing fire from spilled liquids, the hose of the extinguisher must be must be
aimed at the near edge of the fire and moved with a brisk sweeping movement, thus driving the fire towards the far edge till all the flames have been put out.
ᴑ For extinguishing fire from flowing liquids, the hose of the Powder Extinguisher must be aimed at the base of the fire and be swept upwards, till all the flames have been put out.
ᴑ The lever must be gradually squeezed to discharge the extinguisher. ᴑ The user must move closer to the diminishing fire, gradually, applying the extinguishing
agent at the same time. ᴑ The user must look out for any hot regions that may reignite. ᴑ The user must note that Powder Extinguishers are suitable for Class A, B and C fires only. ᴑ A Powder Extinguisher must be used differently, depending on the class of the fire it is being
used on.
• Foam ᴑ After ensuring that the extinguisher is full (by checking if the Pressure Gauge is pointing at
the green area), the Safety Pin must be removed, which in turn would break the seal. ᴑ For extinguishing fire from flammable liquids, the hose of the Foam Extinguisher must be
aimed at a vertical surface near the fire and must never be sprayed directly at the fire, to prevent the fire from being pushed and spread to the surrounding areas.
ᴑ For using Foam Extinguisher on live Electrical Fires, it must be tested to 35 kV, keeping a safe distance of 1 km.
ᴑ For putting out fire from combustible solid materials, the hose must be aimed at the base of the fire, moving across the entire area of the fire.
ᴑ Foam Extinguishers are suitable for both Class A and B fires. However, the technique of application differs for both the classes.
ᴑ Foam Extinguishers help in putting out fires by accumulating a thick foam blanket across the entire surface of the fire.
ᴑ This built-up foam blanket prevents re-ignition of fire.
• CO₂ ᴑ After ensuring that the extinguisher is full (by checking if the Pressure Gauge is pointing at
the green area), the Safety Pin must be removed, which in turn would break the seal. ᴑ While putting out fire from flammable liquids, the hose of the CO₂ extinguisher must be
aimed at the base of the fire and briskly move across the area. ᴑ The user needs to ensure that the CO₂ jet does not splash the burning liquid.
180
Participant Handbook Cabinet Maker Modular Kitchen
ᴑ For extinguishing live electrical fire, the power supply must be switched off, if it is safe to do the same, and then, the hose must be aimed directly at the fire.
ᴑ Adequate care must be taken to extinguish the fire completely, since reignition is possible while using CO₂ extinguishers.
ᴑ These extinguishers are suitable for using on Class B and E fires. However, the technique of application differs for both the classes.
• Wet Chemical ᴑ After ensuring that the extinguisher is full (by checking if the Pressure Gauge is pointing at
the green area), the Safety Pin must be removed, which in turn would break the seal. ᴑ The heat source must be turned off. ᴑ The lance must be held at an arm's length from the body, thus maintaining a safe distance
with the fire. ᴑ The nozzle, at this juncture, must be at least 1 m away from the source of fire. ᴑ The lever must be squeezed slowly to discharge the extinguishing agent. ᴑ The spray must be applied in gentle round movements, allowing the wet chemical to enter
the fire gradually, thus preventing hot molten fats and oils from splashing on to the user. ᴑ The user must ensure that the entire fire has been extinguished, since wet chemical may
instigate re-ignition. ᴑ These extinguishers are suitable to put out Class A, B and F fires.
__________________________________________________________________________________
__________________________________________________________________________________
__________________________________________________________________________________
__________________________________________________________________________________
__________________________________________________________________________________
__________________________________________________________________________________
__________________________________________________________________________________
__________________________________________________________________________________
__________________________________________________________________________________
__________________________________________________________________________________
__________________________________________________________________________________
__________________________________________________________________________________
__________________________________________________________________________________
__________________________________________________________________________________
__________________________________________________________________________________
Notes
181
Participant Handbook Cabinet Maker Modular Kitchen
• 3 things are essential for a fire to occur and these can be represented by 3 arms of a triangle: Heat, Oxygen / Oxidant and Fuel.
• The common fire hazards include combustible and inflammable materials like waste paper, cardboards, wood, saw dust, hay, straw, liquid fuels, gas cylinders, etc.
• The main types of Fire Extinguishers are: Water, Foam, Powder, CO₂ and Wet Chemical.• Different fire extinguishers have different techniques of usage.
Summary
• The trainer provides the participants with a fire extinguisher and teach them how to use it. Then, the trainer arranges for a fire drill session and asks the students to demonstrate the P.A.S.S technique of extinguishing fire. Before applying the P.A.S.S technique, the students select the class of fire extinguisher appropriate for the given type of fire.
Activity
State True or False:
1. Diesel, petrol comes under class A fire. (T/F)2. Class C fires involves flammable gases like propane, butane etc. (T/F)3. Water, powder and foam are agents used for the purpose of cooling. (T/F)4. PASS technique is used to handle water pressure. (T/F)5. Flame Inhibitor can react with the burning material to assist in extinguishing fire. (T/F)
Exercise
182

Participant Handbook Cabinet Maker Modular Kitchen
5. Safe Lifting Practices and Ergonomics
Unit 5.1 - Safe Lifting Practices
Unit 5.2 - Correct Body Postures
Unit 5.3 - Correct Lifting, Loading, Unloading and Handling Procedures
FFS/N8601183

Participant Handbook Cabinet Maker Modular Kitchen
At the end of this module, you will be able to:
1. Recall the importance of safe lifting practices2. Recognize the correct body postures3. Practise the correct lifting, loading, unloading and handling procedures
Key Learning Outcomes
184

Participant Handbook Cabinet Maker Modular Kitchen
At the end of this unit, you will be able to:
1. Practice different safe lifting procedures
Unit Objectives
UNIT 5.1: Safe Lifting Practices
Safe Lifting Practices (as recommended by OSHA) - Dos and Don'ts
DOs
• Check the exact weight of an object before moving it.• Always size up the load. Get help from others for heavy objects.• Chose the flattest, straightest, and clearest route before your lift the object.• If the load is wet or slippery, wipe it off before lifting.• Make sure the weight of the object is stable and distributed evenly if possible.• Stand close to the object with legs at shoulder-width stance.• Check your footing before you pull the load close to your body. Lift with your legs, not your back.• Use material handling equipment whenever possible.• When unloading, do face the spot you have chosen and lower the load slowly by bending your
knees.
DON’Ts
• Never lift more than you can easily handle or without knowing the weight.• Avoid twisting your body when lifting or when carrying.• Never lift with a rounded back and straight legs.• Never lift from an unbalanced position.• Never carry a load that blocks your view or is big enough for the path you are following.• Never look down when lifting.• Never reach over your shoulders to lift. Instead, use a step stool or platform. If possible.• Avoid heavy lifting if you have had previous joint injuries.• Don't bend over to load or unload a heavy object, it may hurt your back.
__________________________________________________________________________________
__________________________________________________________________________________
__________________________________________________________________________________
__________________________________________________________________________________
Notes
185
Participant Handbook Cabinet Maker Modular Kitchen
At the end of this unit, you will be able to:
1. Discuss the importance of Ergonomics for the job role2. Identify and maintain the correct body posture while standing and working for long hours and
carrying heavy materials
Unit Objectives
UNIT 5.2: Correct Body Postures
Ergonomics, in simple terms, is the “science of work”. Ergonomics is the scientific process of designing or arranging work areas, equipment and systems, so that they become apt for the people using them. Ergonomic practices aim at improving the general health and working conditions of people, thus, in turn, improving their productivity at work. Ergonomic practices help in identifying the occupational health hazards due to various environmental factors and methods of eliminating or mitigating them.
Few physical and environmental factors that are considered hazards, according to ergonomic principles, are:
• Repetitive motions, without taking breaks• Unsafe lifting, loading, unloading and handling practices• Resorting to awkward working positions like stooping, twisting, bending and overhead reaching• Staying in a particular position for a long time, with nil or little movement• Exerting continuous pressure or abrasive force from a hard or rough surface on any part of the body• Working under extreme temperature conditions (either too hot or too cold)• Working with vibrating, noisy machinery for long hours
Ergonomics encourages the following practices:
• Protecting oneself• Choosing the right equipment for one's job role and assignments• Implementing good and safe housekeeping practices
On the whole, the benefits of Ergonomics are:
• Improved Employee Productivity• Reduced Costs• Improved Quality of Work• Improved Employee Involvement• Enhanced Safety at Work• Nowadays, any organization takes up active initiatives in promoting ergonomic practices via frequent
training programs.
5.2.1 Importance of ergonomics for the job role
186
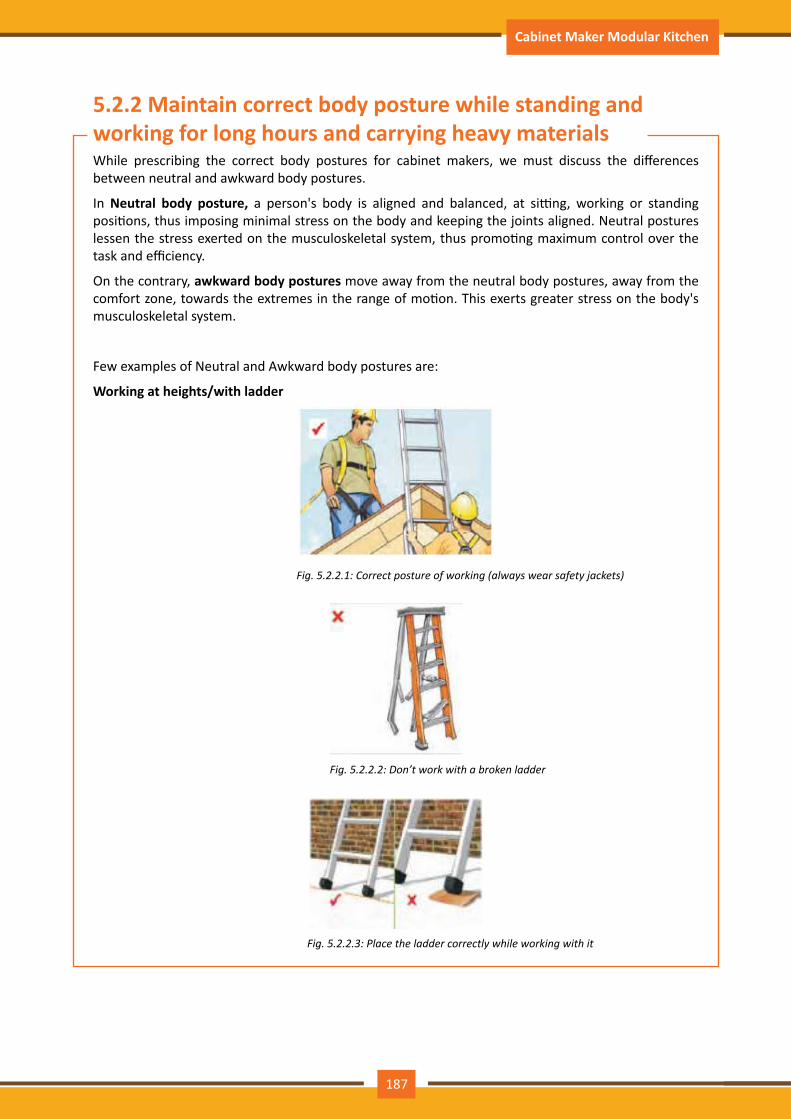
Participant Handbook Cabinet Maker Modular Kitchen
While prescribing the correct body postures for cabinet makers, we must discuss the differences between neutral and awkward body postures.
In Neutral body posture, a person's body is aligned and balanced, at sitting, working or standing positions, thus imposing minimal stress on the body and keeping the joints aligned. Neutral postures lessen the stress exerted on the musculoskeletal system, thus promoting maximum control over the task and efficiency.
On the contrary, awkward body postures move away from the neutral body postures, away from the comfort zone, towards the extremes in the range of motion. This exerts greater stress on the body's musculoskeletal system.
Few examples of Neutral and Awkward body postures are:
Working at heights/with ladder
Fig.5.2.2.1:Correctpostureofworking(alwayswearsafetyjackets)
Fig.5.2.2.2:Don’tworkwithabrokenladder
Fig.5.2.2.3:Placetheladdercorrectlywhileworkingwithit
5.2.2 Maintain correct body posture while standing and working for long hours and carrying heavy materials
187
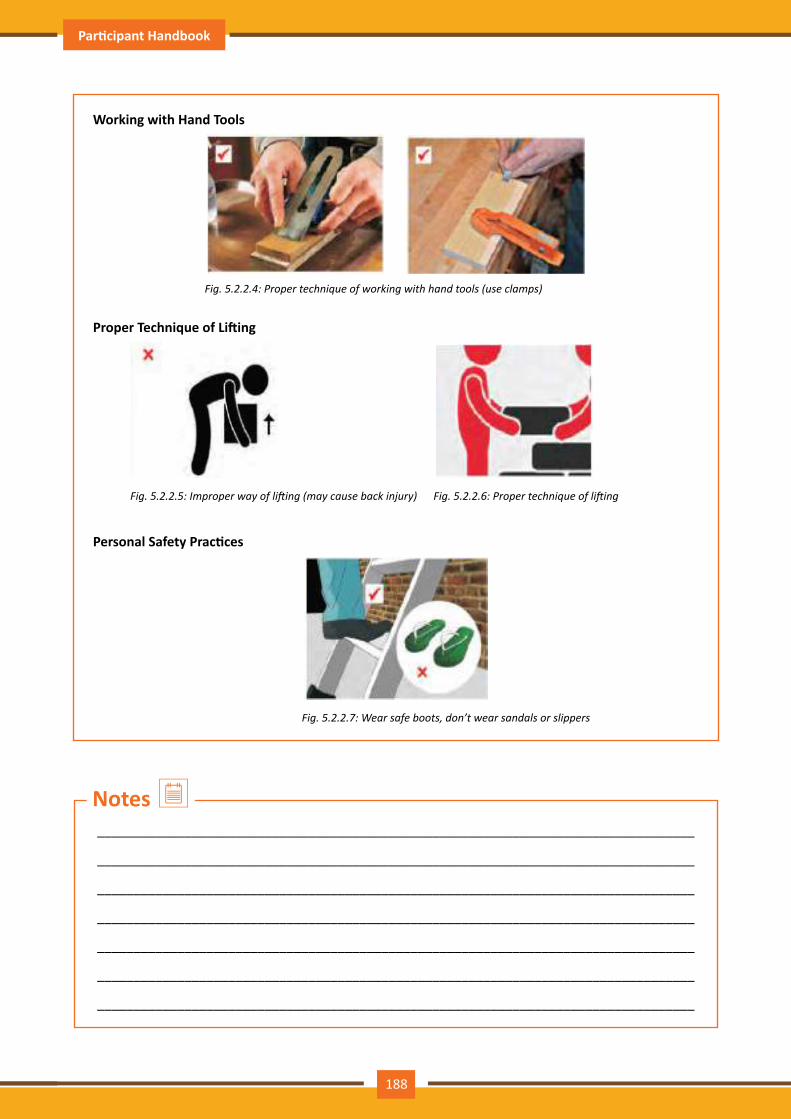
Participant Handbook Cabinet Maker Modular Kitchen
Working with Hand Tools
Fig.5.2.2.4:Propertechniqueofworkingwithhandtools(useclamps)
Proper Technique of Lifting
Fig.5.2.2.5:Improperwayoflifting(maycausebackinjury) Fig.5.2.2.6:Propertechniqueoflifting
Personal Safety Practices
Fig.5.2.2.7:Wearsafeboots,don’twearsandalsorslippers
__________________________________________________________________________________
__________________________________________________________________________________
__________________________________________________________________________________
__________________________________________________________________________________
__________________________________________________________________________________
__________________________________________________________________________________
__________________________________________________________________________________
Notes
188
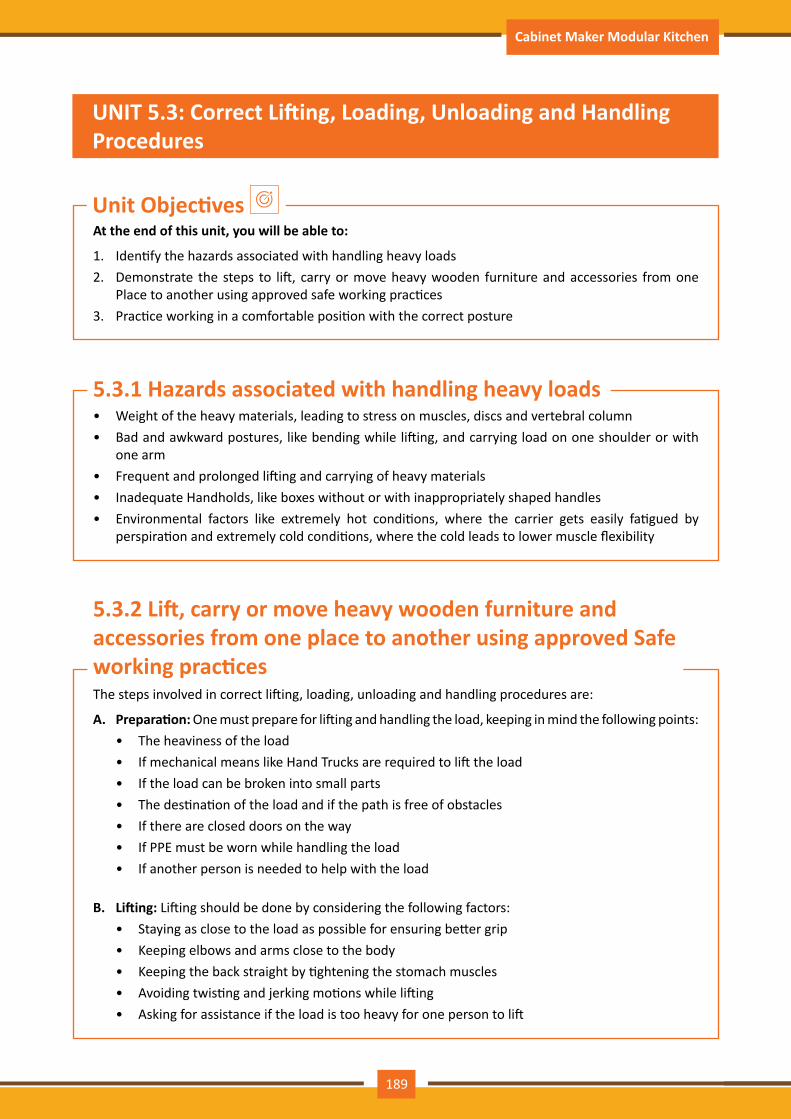
Participant Handbook Cabinet Maker Modular Kitchen
At the end of this unit, you will be able to:
1. Identify the hazards associated with handling heavy loads2. Demonstrate the steps to lift, carry or move heavy wooden furniture and accessories from one
Place to another using approved safe working practices3. Practice working in a comfortable position with the correct posture
Unit Objectives
UNIT 5.3: Correct Lifting, Loading, Unloading and Handling Procedures
• Weight of the heavy materials, leading to stress on muscles, discs and vertebral column• Bad and awkward postures, like bending while lifting, and carrying load on one shoulder or with
one arm• Frequent and prolonged lifting and carrying of heavy materials• Inadequate Handholds, like boxes without or with inappropriately shaped handles• Environmental factors like extremely hot conditions, where the carrier gets easily fatigued by
perspiration and extremely cold conditions, where the cold leads to lower muscle flexibility
The steps involved in correct lifting, loading, unloading and handling procedures are:
A. Preparation: One must prepare for lifting and handling the load, keeping in mind the following points:• The heaviness of the load• If mechanical means like Hand Trucks are required to lift the load• If the load can be broken into small parts• The destination of the load and if the path is free of obstacles• If there are closed doors on the way• If PPE must be worn while handling the load• If another person is needed to help with the load
B. Lifting: Lifting should be done by considering the following factors: • Staying as close to the load as possible for ensuring better grip • Keeping elbows and arms close to the body• Keeping the back straight by tightening the stomach muscles• Avoiding twisting and jerking motions while lifting• Asking for assistance if the load is too heavy for one person to lift
5.3.1 Hazards associated with handling heavy loads
5.3.2 Lift, carry or move heavy wooden furniture and accessories from one place to another using approved Safe working practices
189
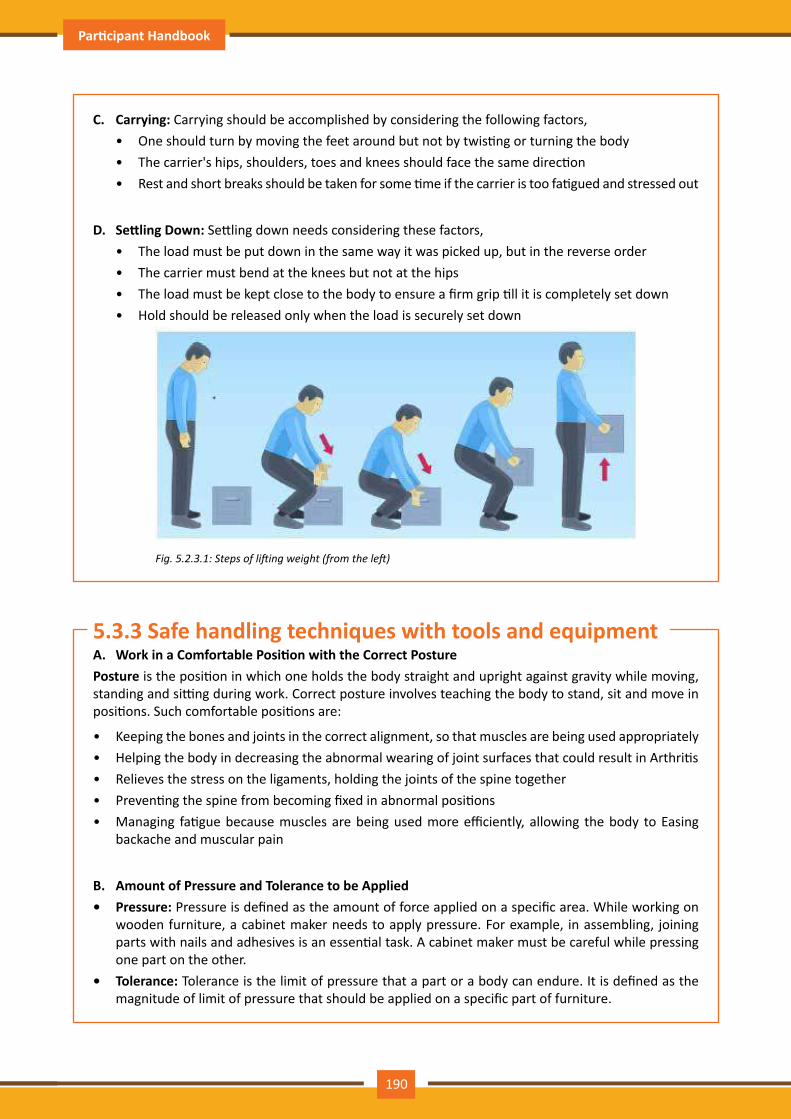
Participant Handbook Cabinet Maker Modular Kitchen
C. Carrying: Carrying should be accomplished by considering the following factors,• One should turn by moving the feet around but not by twisting or turning the body• The carrier's hips, shoulders, toes and knees should face the same direction• Rest and short breaks should be taken for some time if the carrier is too fatigued and stressed out
D. Settling Down: Settling down needs considering these factors,• The load must be put down in the same way it was picked up, but in the reverse order• The carrier must bend at the knees but not at the hips• The load must be kept close to the body to ensure a firm grip till it is completely set down• Hold should be released only when the load is securely set down
Fig.5.2.3.1:Stepsofliftingweight(fromtheleft)
A. Work in a Comfortable Position with the Correct PosturePosture is the position in which one holds the body straight and upright against gravity while moving, standing and sitting during work. Correct posture involves teaching the body to stand, sit and move in positions. Such comfortable positions are:
• Keeping the bones and joints in the correct alignment, so that muscles are being used appropriately • Helping the body in decreasing the abnormal wearing of joint surfaces that could result in Arthritis • Relieves the stress on the ligaments, holding the joints of the spine together• Preventing the spine from becoming fixed in abnormal positions• Managing fatigue because muscles are being used more efficiently, allowing the body to Easing
backache and muscular pain
B. Amount of Pressure and Tolerance to be Applied• Pressure: Pressure is defined as the amount of force applied on a specific area. While working on
wooden furniture, a cabinet maker needs to apply pressure. For example, in assembling, joining parts with nails and adhesives is an essential task. A cabinet maker must be careful while pressing one part on the other.
• Tolerance: Tolerance is the limit of pressure that a part or a body can endure. It is defined as the magnitude of limit of pressure that should be applied on a specific part of furniture.
5.3.3 Safe handling techniques with tools and equipment
190
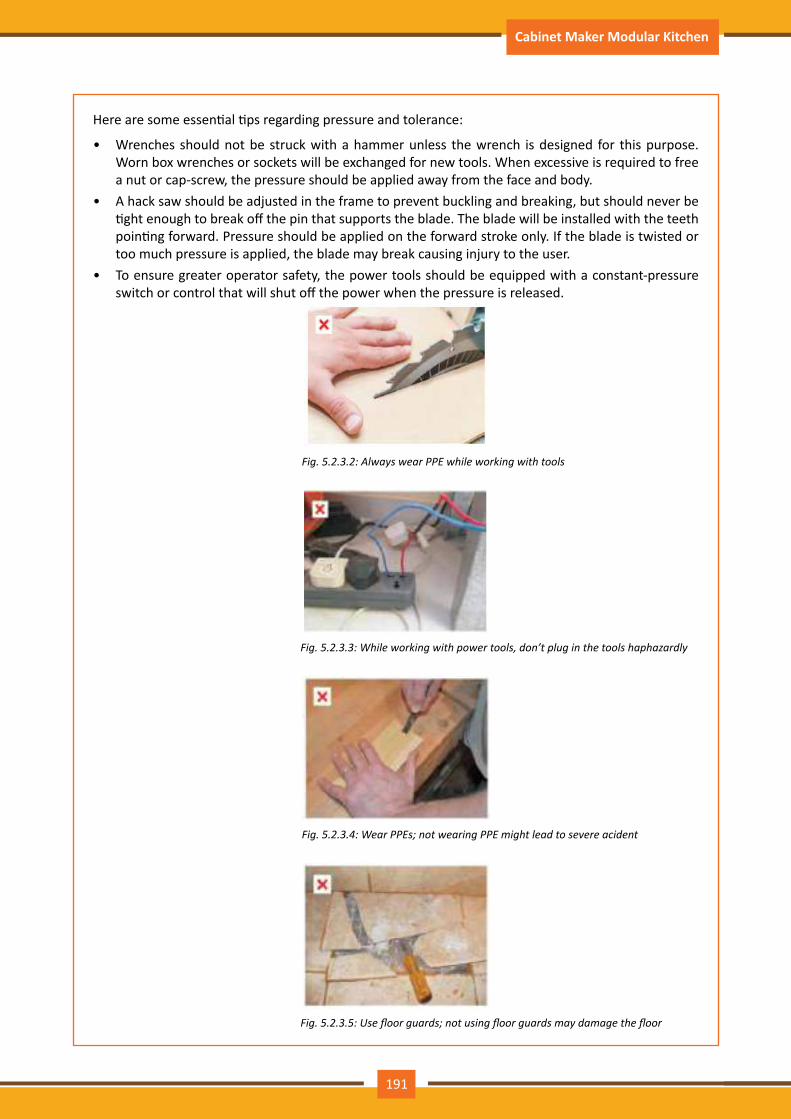
Participant Handbook Cabinet Maker Modular Kitchen
Here are some essential tips regarding pressure and tolerance:
• Wrenches should not be struck with a hammer unless the wrench is designed for this purpose. Worn box wrenches or sockets will be exchanged for new tools. When excessive is required to free a nut or cap-screw, the pressure should be applied away from the face and body.
• A hack saw should be adjusted in the frame to prevent buckling and breaking, but should never be tight enough to break off the pin that supports the blade. The blade will be installed with the teeth pointing forward. Pressure should be applied on the forward stroke only. If the blade is twisted or too much pressure is applied, the blade may break causing injury to the user.
• To ensure greater operator safety, the power tools should be equipped with a constant-pressure switch or control that will shut off the power when the pressure is released.
Fig.5.2.3.2:AlwayswearPPEwhileworkingwithtools
Fig.5.2.3.3:Whileworkingwithpowertools,don’tpluginthetoolshaphazardly
Fig.5.2.3.4:WearPPEs;notwearingPPEmightleadtosevereacident
Fig.5.2.3.5:Usefloorguards;notusingfloorguardsmaydamagethefloor
191

Participant Handbook Cabinet Maker Modular Kitchen
__________________________________________________________________________________
__________________________________________________________________________________
__________________________________________________________________________________
__________________________________________________________________________________
__________________________________________________________________________________
__________________________________________________________________________________
__________________________________________________________________________________
__________________________________________________________________________________
__________________________________________________________________________________
__________________________________________________________________________________
__________________________________________________________________________________
__________________________________________________________________________________
__________________________________________________________________________________
__________________________________________________________________________________
__________________________________________________________________________________
__________________________________________________________________________________
__________________________________________________________________________________
__________________________________________________________________________________
__________________________________________________________________________________
__________________________________________________________________________________
__________________________________________________________________________________
__________________________________________________________________________________
__________________________________________________________________________________
__________________________________________________________________________________
__________________________________________________________________________________
__________________________________________________________________________________
__________________________________________________________________________________
__________________________________________________________________________________
__________________________________________________________________________________
__________________________________________________________________________________
__________________________________________________________________________________
Notes
192

Participant Handbook Cabinet Maker Modular Kitchen
• One must not lift excessively heavy objects because every individual has his / her specific capacity of lifting weights.
• Ergonomics is the scientific process of designing or arranging work areas, equipment and systems, so that they become apt for the people using them.
• Neutral postures mitigate the stress exerted on the musculoskeletal system. • Ergonomic guidelines also recommend the use of Inline Grips over Pistol Grips. • One must abide by correct lifting, loading, unloading and handling procedures.
Summary
• The trainer divides the class into few groups. each groups prepare and presents a chart on any one of the below topics:
ᴑ Dos of Safe Lifting ᴑ Don'ts of Safe Lifting ᴑ Importance of Ergonomics ᴑ Neutral and Awkward postures ᴑ Steps involved in correct lifting, loading, unloading and handling procedures
• The trainer invites a Physiotherapist/Yoga Expert to the class. The person demonstrates various safe working postures, movements and yoga positions and makes the students practise them.
Activity
State True or False:
1. Posture is the position in which one holds the body straight and upright against gravity while moving. (T/F)
2. Tolerance is the limit of pressure that a machine can carry. (T/F)3. Ergonomics, in simple terms, is the “science of work”. (T/F)4. In Neutral body posture, a person's body is no aligned and dis-balanced. (T/F)5. A hack saw should be adjusted in the frame to prevent buckling and breaking. (T/F)
Exercise
193

Participant Handbook Cabinet Maker Modular Kitchen
194

Participant Handbook Cabinet Maker Modular Kitchen
6. Common Issues, Troubleshooting Knowledge and Method of Inspection
Unit 6.1 - Common Issues Troubleshooting Knowledge
Unit 6.2 - Method of Conducting Visual Inspection for any Errors or Damages
FFS/N8501

Participant Handbook Cabinet Maker Modular Kitchen
At the end of this module, you will be able to:
1. Recall the common issues troubleshooting knowledge2. Demonstrate the method of conducting visual inspection
Key Learning Outcomes
196
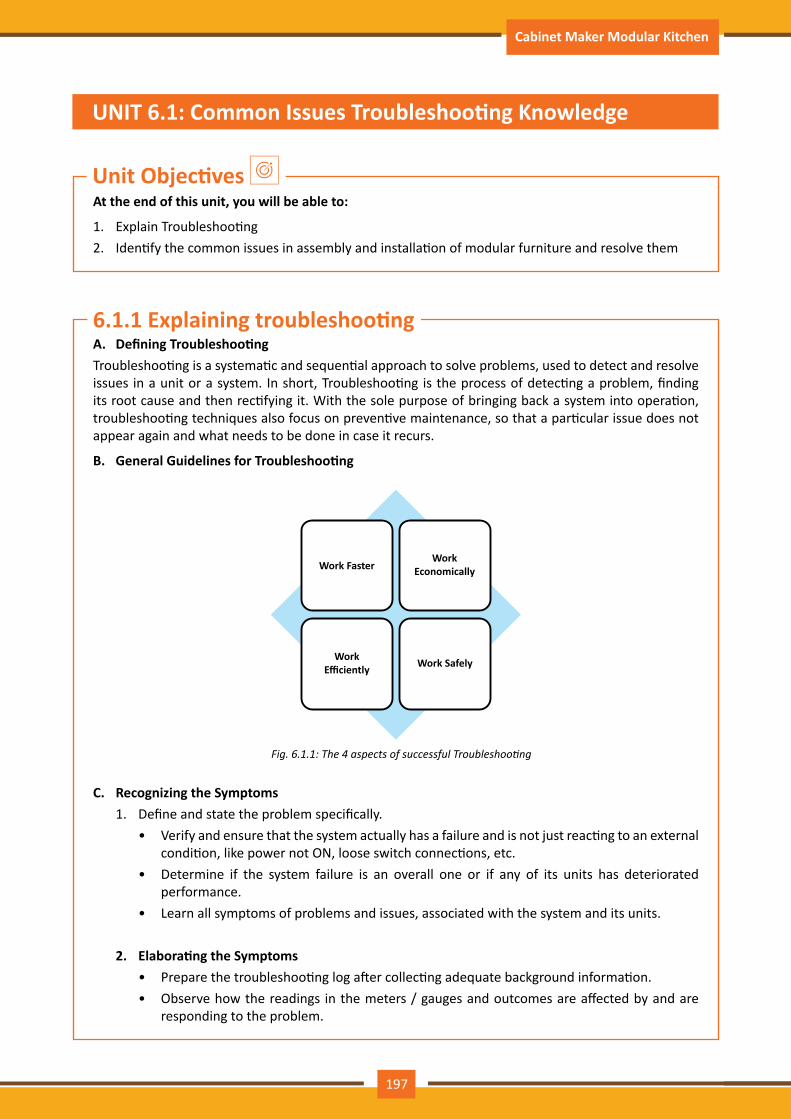
Participant Handbook Cabinet Maker Modular Kitchen
At the end of this unit, you will be able to:
1. Explain Troubleshooting2. Identify the common issues in assembly and installation of modular furniture and resolve them
Unit Objectives
UNIT 6.1: Common Issues Troubleshooting Knowledge
A. Defining TroubleshootingTroubleshooting is a systematic and sequential approach to solve problems, used to detect and resolve issues in a unit or a system. In short, Troubleshooting is the process of detecting a problem, finding its root cause and then rectifying it. With the sole purpose of bringing back a system into operation, troubleshooting techniques also focus on preventive maintenance, so that a particular issue does not appear again and what needs to be done in case it recurs.
B. General Guidelines for Troubleshooting
Fig.6.1.1:The4aspectsofsuccessfulTroubleshooting
C. Recognizing the Symptoms1. Define and state the problem specifically.
• Verify and ensure that the system actually has a failure and is not just reacting to an external condition, like power not ON, loose switch connections, etc.
• Determine if the system failure is an overall one or if any of its units has deteriorated performance.
• Learn all symptoms of problems and issues, associated with the system and its units.
2. Elaborating the Symptoms• Prepare the troubleshooting log after collecting adequate background information.• Observe how the readings in the meters / gauges and outcomes are affected by and are
responding to the problem.
6.1.1 Explaining troubleshooting
197
Participant Handbook Cabinet Maker Modular Kitchen
• Verify if any adjustment or recalibration affects the symptom.• Determine if the symptom has developed gradually or drastically.• Try breaking the above processes into as many minute parts as you can.
3. Determining the probable Faults• Use the Block Diagram / Sketch / Instruction Manual to ensure that all possible functions
and modes of operation are verified.• Note down all possible types of faults that may occur with the system and its individual
units. For ex - faults may lie with the Drill Machine as well as the Drill Bits.• Have an open mind and do not bind yourself to the knowledge of a technician alone.• Recall and implement past troubleshooting experience.• Analyze and map a given symptom with the known and possible faults.
Furniture, like any other product is susceptible to damages. Wooden products like plywood get damaged by water and humidity, and thus carpenter should be well aware of the troubleshooting steps. Here, we will discuss few common issues with furniture.
• Hardware Malfunction• Hardware, as discussed earlier, refers to the hinges or the channels which are assembled to the
furniture at the time of installation. However, the range of hardware breakage troubleshooting does not lie strictly within the domain of hinges or channels. Some common instances of hardware malfunction are –
• Damaged edge• Cracks or scratches on the furniture• Breakage of backrest/ handle/ foot rest• Plywood malfunction• Rusted metal (in cases of hinges and channels)• Damages owing to spillage
Wooden Member MalfunctionIn case of an assembly of various products (material), the raw materials used in assembling are referred to as assembling members. Wooden member is the wooden part of the assembled product. For example, a showcase has different assembling members like, wood, iron, glass and etc. If the wooden part of the showcase is dysfunctional, a carpenter should take care of that.
Damage at the Time of DeliveryProper packing technique is essential to avoid any damage at the time of delivery of furniture. The deliverable items may be subjected to transportation which increases the possibility of damages. Therefore, to prevent damages, precautionary steps should be taken at the time of delivery. The proper technique of packing is discussed under the Quality Checking chapter.
Veneer MalfunctionVeneering is the technique of fixing slices of wood together. For example, the plywood fixation on the table is a veneering process. In case of laminated walls or floor, laminates are fused on the wood board or tile. Due to over exposure to heat, spillage, humidity, rough use – the veneering might get damaged. The plywood may get scratched, or the corner may get torn. These are very common issues with veneers. This is known as veneer malfunction.
198
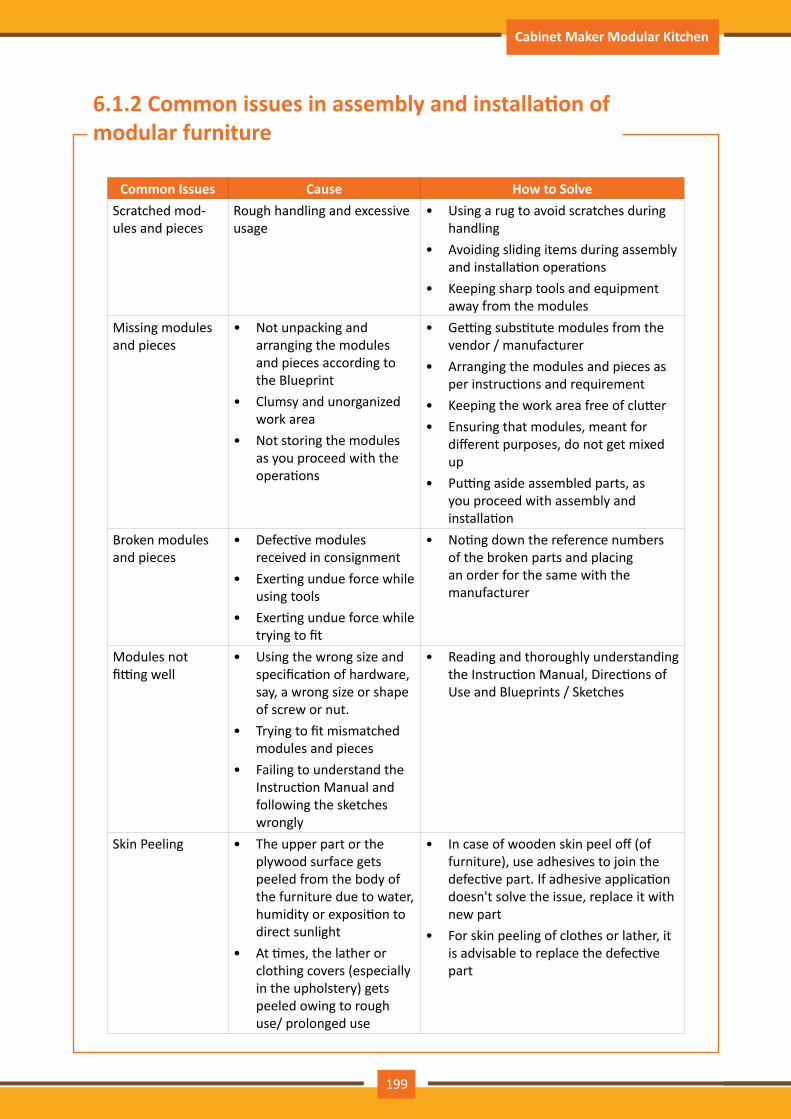
Participant Handbook Cabinet Maker Modular Kitchen
Common Issues Cause How to SolveScratched mod-ules and pieces
Rough handling and excessive usage
• Using a rug to avoid scratches during handling
• Avoiding sliding items during assembly and installation operations
• Keeping sharp tools and equipment away from the modules
Missing modules and pieces
• Not unpacking and arranging the modules and pieces according to the Blueprint
• Clumsy and unorganized work area
• Not storing the modules as you proceed with the operations
• Getting substitute modules from the vendor / manufacturer
• Arranging the modules and pieces as per instructions and requirement
• Keeping the work area free of clutter• Ensuring that modules, meant for
different purposes, do not get mixed up
• Putting aside assembled parts, as you proceed with assembly and installation
Broken modules and pieces
• Defective modules received in consignment
• Exerting undue force while using tools
• Exerting undue force while trying to fit
• Noting down the reference numbers of the broken parts and placing an order for the same with the manufacturer
Modules not fitting well
• Using the wrong size and specification of hardware, say, a wrong size or shape of screw or nut.
• Trying to fit mismatched modules and pieces
• Failing to understand the Instruction Manual and following the sketches wrongly
• Reading and thoroughly understanding the Instruction Manual, Directions of Use and Blueprints / Sketches
Skin Peeling • The upper part or the plywood surface gets peeled from the body of the furniture due to water, humidity or exposition to direct sunlight
• At times, the lather or clothing covers (especially in the upholstery) gets peeled owing to rough use/ prolonged use
• In case of wooden skin peel off (of furniture), use adhesives to join the defective part. If adhesive application doesn't solve the issue, replace it with new part
• For skin peeling of clothes or lather, it is advisable to replace the defective part
6.1.2 Common issues in assembly and installation of modular furniture
199
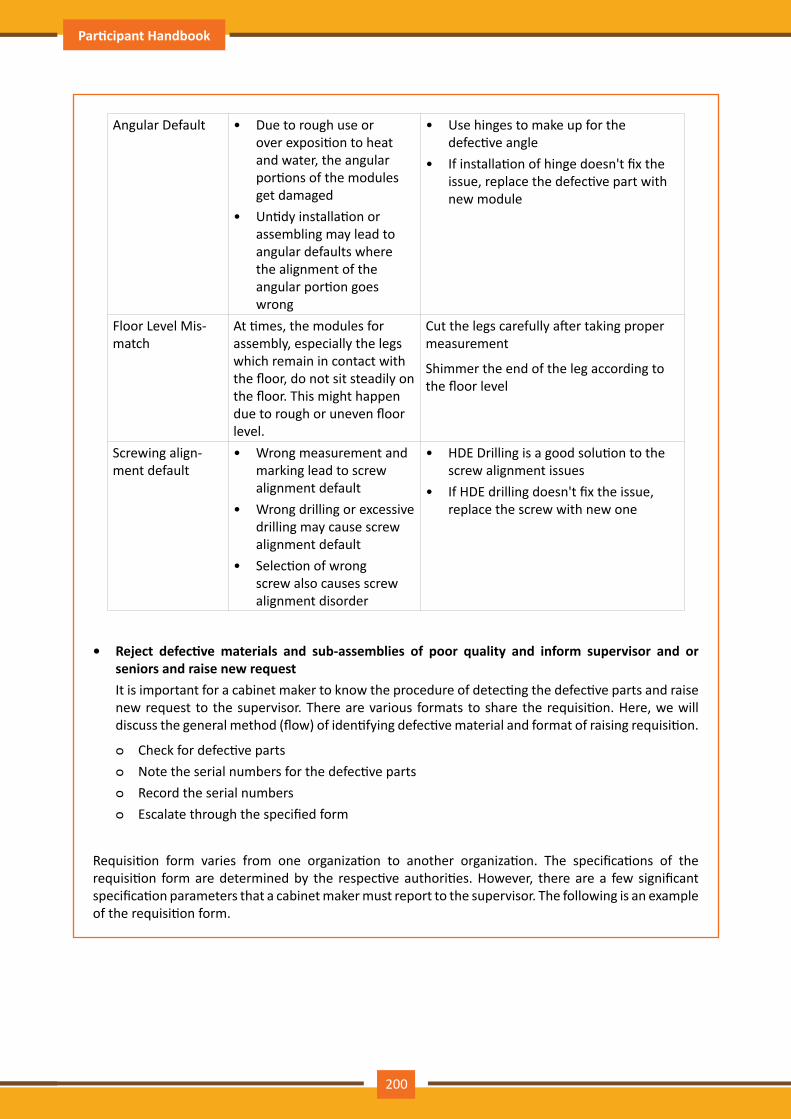
Participant Handbook Cabinet Maker Modular Kitchen
Angular Default • Due to rough use or over exposition to heat and water, the angular portions of the modules get damaged
• Untidy installation or assembling may lead to angular defaults where the alignment of the angular portion goes wrong
• Use hinges to make up for the defective angle
• If installation of hinge doesn't fix the issue, replace the defective part with new module
Floor Level Mis-match
At times, the modules for assembly, especially the legs which remain in contact with the floor, do not sit steadily on the floor. This might happen due to rough or uneven floor level.
Cut the legs carefully after taking proper measurement
Shimmer the end of the leg according to the floor level
Screwing align-ment default
• Wrong measurement and marking lead to screw alignment default
• Wrong drilling or excessive drilling may cause screw alignment default
• Selection of wrong screw also causes screw alignment disorder
• HDE Drilling is a good solution to the screw alignment issues
• If HDE drilling doesn't fix the issue, replace the screw with new one
• Reject defective materials and sub-assemblies of poor quality and inform supervisor and or seniors and raise new requestIt is important for a cabinet maker to know the procedure of detecting the defective parts and raise new request to the supervisor. There are various formats to share the requisition. Here, we will discuss the general method (flow) of identifying defective material and format of raising requisition.
ᴑ Check for defective parts ᴑ Note the serial numbers for the defective parts ᴑ Record the serial numbers ᴑ Escalate through the specified form
Requisition form varies from one organization to another organization. The specifications of the requisition form are determined by the respective authorities. However, there are a few significant specification parameters that a cabinet maker must report to the supervisor. The following is an example of the requisition form.
200
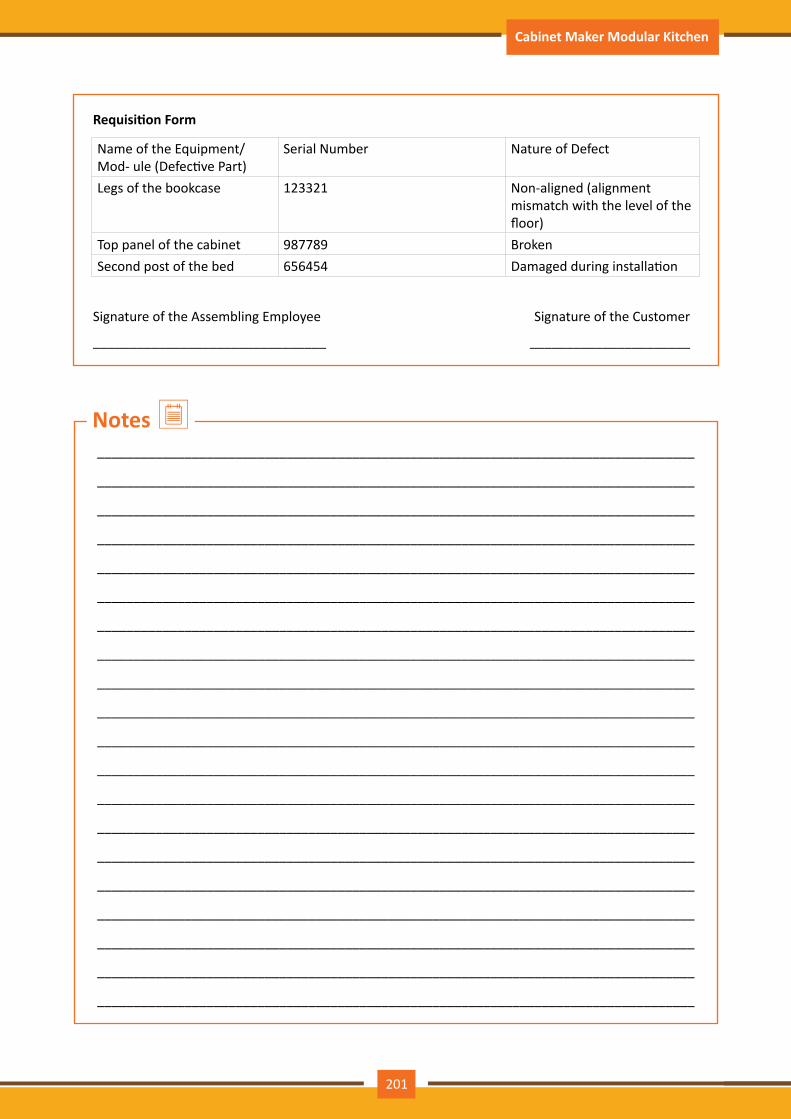
Participant Handbook Cabinet Maker Modular Kitchen
Requisition Form
Name of the Equipment/ Mod- ule (Defective Part)
Serial Number Nature of Defect
Legs of the bookcase 123321 Non-aligned (alignment mismatch with the level of the floor)
Top panel of the cabinet 987789 BrokenSecond post of the bed 656454 Damaged during installation
Signature of the Assembling Employee Signature of the Customer
________________________________ ______________________
__________________________________________________________________________________
__________________________________________________________________________________
__________________________________________________________________________________
__________________________________________________________________________________
__________________________________________________________________________________
__________________________________________________________________________________
__________________________________________________________________________________
__________________________________________________________________________________
__________________________________________________________________________________
__________________________________________________________________________________
__________________________________________________________________________________
__________________________________________________________________________________
__________________________________________________________________________________
__________________________________________________________________________________
__________________________________________________________________________________
__________________________________________________________________________________
__________________________________________________________________________________
__________________________________________________________________________________
__________________________________________________________________________________
__________________________________________________________________________________
Notes
201
Participant Handbook Cabinet Maker Modular Kitchen
At the end of this unit, you will be able to:
1. Discuss the importance of visual inspection in assembly and installation operations2. Discuss elaborately the method of conducting visual inspection for any errors or damages to the cut
components
Unit Objectives
UNIT 6.2: Method of Conducting Visual Inspection for any Errors or Damages
Quality checking is the method of conducting visual inspection for any errors or damages to the cut components. It is important to undertake quality checks at regular intervals to avoid any error detection at later stage. The quality checking parameters are as follows:
• Recheck measurement, alignments as per design drawing to avoid any damage during installation• Conduct post installation visual and quality check with respect to placement, levelling, functioning
etc. and perform touch up, cleaning /sanding/ finishing as needed for the installed product• Rectify any error or faults observed to comply with organizational quality standards• There should be an ideal procedure for quality checking. The set-up is discussed below.
There should be a specific room for quality checking. After finishing a product, the item should be taken to that room for quality checking. The room should be clean and there should be sufficient light in that room. Typically, Milk White Lights are used in the quality checking process. The walls should be strictly perpendicular to the floor surface. For example, if a table has to be checked, the table should be set in front of the vertical wall to check the straightness and smoothness of the edges. If the wall is inclined, the purpose of quality checking will not be successful.
On the same note, the floor should be levelled and there should not be any up and down (roughness) on the floor. If the floor surface is rough, smoothness of the finished product cannot be gauged. Proper lighting is required to check the polish and the finishing of the furniture. Milk White Light is the best option that should be used in quality checking of furniture.
Visually inspecting each step help in detecting issues in the early stages of the task. Early detection of faults and issues, in the hardware tools and the modules, helps in avoiding wastage of money, time and manpower. Visual Inspection eliminates chances of future breakdowns and major faults. This helps in avoiding serious defects in the final products, and, in turn, product recall.
6.2.1 Selection of ideal place
6.2.2 Importance of visual inspection in assembly and installation operations
202
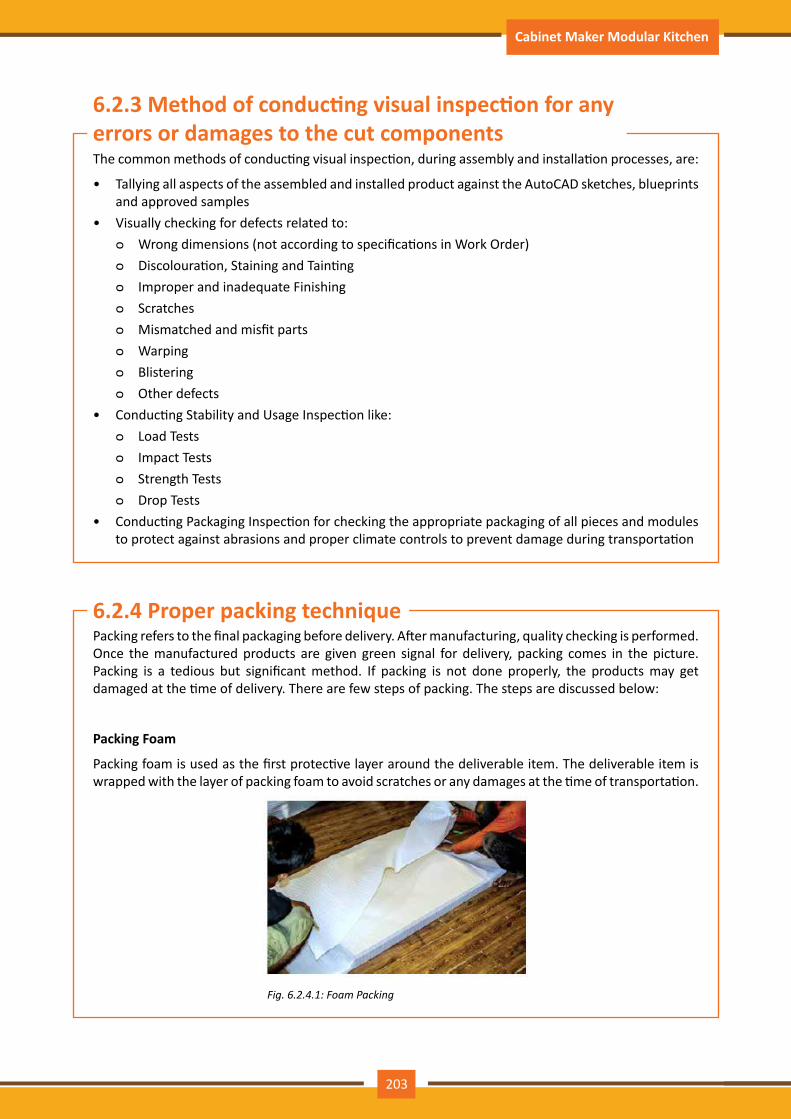
Participant Handbook Cabinet Maker Modular Kitchen
The common methods of conducting visual inspection, during assembly and installation processes, are:
• Tallying all aspects of the assembled and installed product against the AutoCAD sketches, blueprints and approved samples
• Visually checking for defects related to: ᴑ Wrong dimensions (not according to specifications in Work Order) ᴑ Discolouration, Staining and Tainting ᴑ Improper and inadequate Finishing ᴑ Scratches ᴑ Mismatched and misfit parts ᴑ Warping ᴑ Blistering ᴑ Other defects
• Conducting Stability and Usage Inspection like: ᴑ Load Tests ᴑ Impact Tests ᴑ Strength Tests ᴑ Drop Tests
• Conducting Packaging Inspection for checking the appropriate packaging of all pieces and modules to protect against abrasions and proper climate controls to prevent damage during transportation
6.2.3 Method of conducting visual inspection for any errors or damages to the cut components
Packing refers to the final packaging before delivery. After manufacturing, quality checking is performed. Once the manufactured products are given green signal for delivery, packing comes in the picture. Packing is a tedious but significant method. If packing is not done properly, the products may get damaged at the time of delivery. There are few steps of packing. The steps are discussed below:
Packing Foam
Packing foam is used as the first protective layer around the deliverable item. The deliverable item is wrapped with the layer of packing foam to avoid scratches or any damages at the time of transportation.
Fig.6.2.4.1:FoamPacking
6.2.4 Proper packing technique
203

Participant Handbook Cabinet Maker Modular Kitchen
Cardboard Layers
After wrapping the furniture with packing foam, cardboard layers are applied as another precautionary measurement. At the time of transportation during delivery, these cardboard layers protect the wooden items from damages owing to jerks or dashes.
Fig.6.2.4.2:Layering
Corner Binder
Corner binder is one of the most important part of packing technique. The edges or the corners of furniture are more susceptible to damages. Thus, corner binders are used to meticulously wrap the edges of the deliverable items. Corner binders protect the edges from getting smashed or cracked at the time of transportation.
Fig.6.2.4.3:CornerBinder
Lamination Plastic Covering
This is a roll or sheet of lamination plastic which is used to wrap furniture. Typically, flat-surfaced wooden structures such as door are covered with lamination plastic covering.
Fig.6.2.4.4:PlasticCovering
204
Participant Handbook Cabinet Maker Modular Kitchen
• Troubleshooting is a systematic and sequential approach to solve problems, used to detect and resolve issues in a unit or a system.
• Prepare the troubleshooting log after collecting adequate background information.• Observe how the readings in the meters / gauges and outcomes are affected by and are responding
to the problem.• Wooden products like plywood get damaged by water and humidity, and thus carpenter should be
well aware of the troubleshooting steps.• Hardware, as discussed earlier, refers to the hinges or the channels which are assembled to the
furniture at the time of installation.• Proper packing technique is essential to avoid any damage at the time of delivery of furniture.• Veneering is the technique of fixing slices of wood together.• Packing refers to the final packaging before delivery. After manufacturing, quality checking is
performed.
Summary
• The trainer divides the class into few groups. Each group selects an issue, explains its cause and suggests a tested remedy. This activity is called "Think and Share" session.
• The trainer takes the students to the laboratory and provides them with broken pieces of furniture. The students identify the defects in the furniture pieces by visually inspecting the same.
• In the laboratory, the students practise the process of packing the various components of an Upper cabinet.
Activity
Fill in the blanks:
1. Troubleshooting is a _______________ approach to solve problems.a) Aggression b) Systematic c) Conformation deviation
2. __________this technique of fixing slices of wood together.a) Veneering b) Systematic
3. Packing foam is used as the _________________ oundar the deliverable item.a) First protective layer b) Supplement
4. _____________ rolla or sheet of lamination plastic used to wrap furniture.a) Lamination plastic b) Carbon paper c) Plastic
5. Corner binder is used to protect the _______________ of the furniture.a) Paint b) Corners c) Look
Exercise
205

Participant Handbook Cabinet Maker Modular Kitchen
206

Participant Handbook Cabinet Maker Modular Kitchen
7. Safe Cleaning and Waste Management Practices
Unit 7.1 - Importance of Good Housekeeping
Unit 7.2 - Different Types of Cleaning Equipment & Substances
Unit 7.3 - Safe Working Practices for Cleaning and their Methods
Unit 7.4 - Common Types of Waste and Contaminants in Workplace
Unit 7.5 - Effects of Contamination on Products
Unit 7.6 - Different Ways of Minimizing Waste
Unit 7.7 - Know-How of Cleaning and Waste Disposal Procedures
FFS/N8501

Participant Handbook Cabinet Maker Modular Kitchen
At the end of this module, you will be able to:
1. Discuss the importance of good housekeeping2. Discuss the use of the different types of cleaning equipment &substances and their use3. Identify the safe working practices for cleaning and the method of carrying them out4. Identify the common types of waste and contaminants in workplace5. Discuss the different ways of minimizing waste6. Explain the effects of contamination on products
Key Learning Outcomes
208
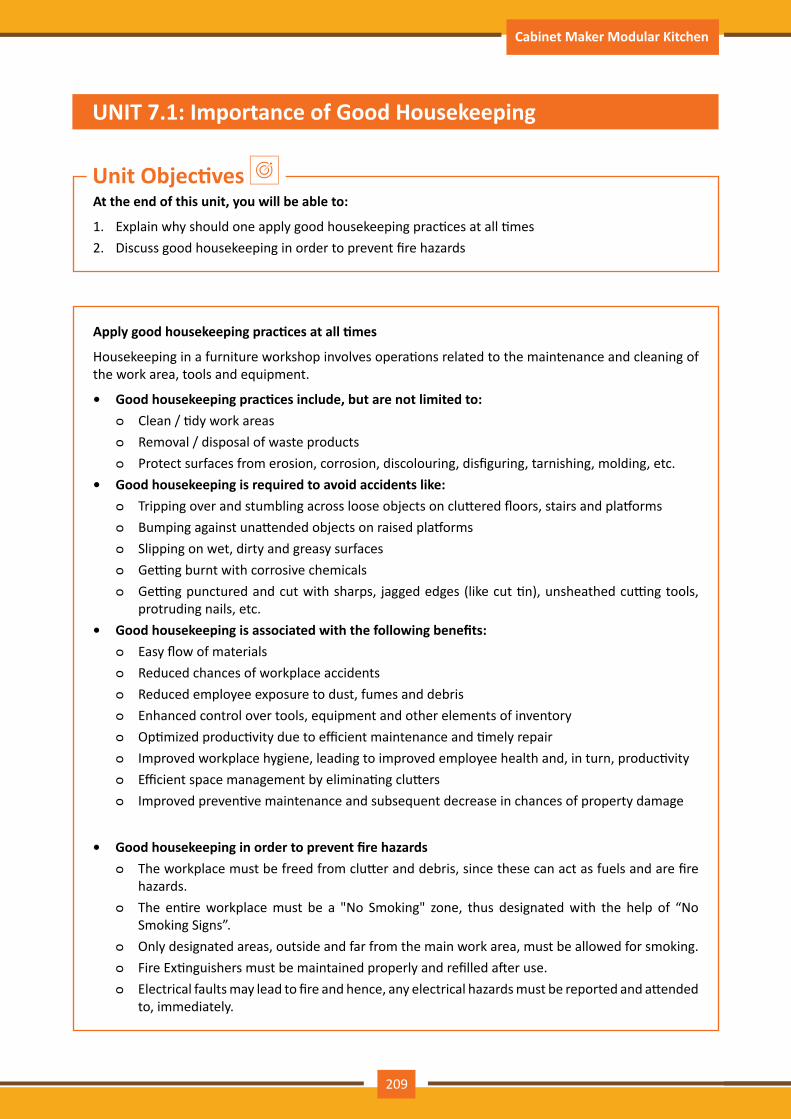
Participant Handbook Cabinet Maker Modular Kitchen
At the end of this unit, you will be able to:
1. Explain why should one apply good housekeeping practices at all times2. Discuss good housekeeping in order to prevent fire hazards
Unit Objectives
UNIT 7.1: Importance of Good Housekeeping
Apply good housekeeping practices at all times
Housekeeping in a furniture workshop involves operations related to the maintenance and cleaning of the work area, tools and equipment.
• Good housekeeping practices include, but are not limited to: ᴑ Clean / tidy work areas ᴑ Removal / disposal of waste products ᴑ Protect surfaces from erosion, corrosion, discolouring, disfiguring, tarnishing, molding, etc.
• Good housekeeping is required to avoid accidents like: ᴑ Tripping over and stumbling across loose objects on cluttered floors, stairs and platforms ᴑ Bumping against unattended objects on raised platforms ᴑ Slipping on wet, dirty and greasy surfaces ᴑ Getting burnt with corrosive chemicals ᴑ Getting punctured and cut with sharps, jagged edges (like cut tin), unsheathed cutting tools,
protruding nails, etc.• Good housekeeping is associated with the following benefits:
ᴑ Easy flow of materials ᴑ Reduced chances of workplace accidents ᴑ Reduced employee exposure to dust, fumes and debris ᴑ Enhanced control over tools, equipment and other elements of inventory ᴑ Optimized productivity due to efficient maintenance and timely repair ᴑ Improved workplace hygiene, leading to improved employee health and, in turn, productivity ᴑ Efficient space management by eliminating clutters ᴑ Improved preventive maintenance and subsequent decrease in chances of property damage
• Good housekeeping in order to prevent fire hazards ᴑ The workplace must be freed from clutter and debris, since these can act as fuels and are fire
hazards. ᴑ The entire workplace must be a "No Smoking" zone, thus designated with the help of “No
Smoking Signs”. ᴑ Only designated areas, outside and far from the main work area, must be allowed for smoking. ᴑ Fire Extinguishers must be maintained properly and refilled after use. ᴑ Electrical faults may lead to fire and hence, any electrical hazards must be reported and attended
to, immediately.
209
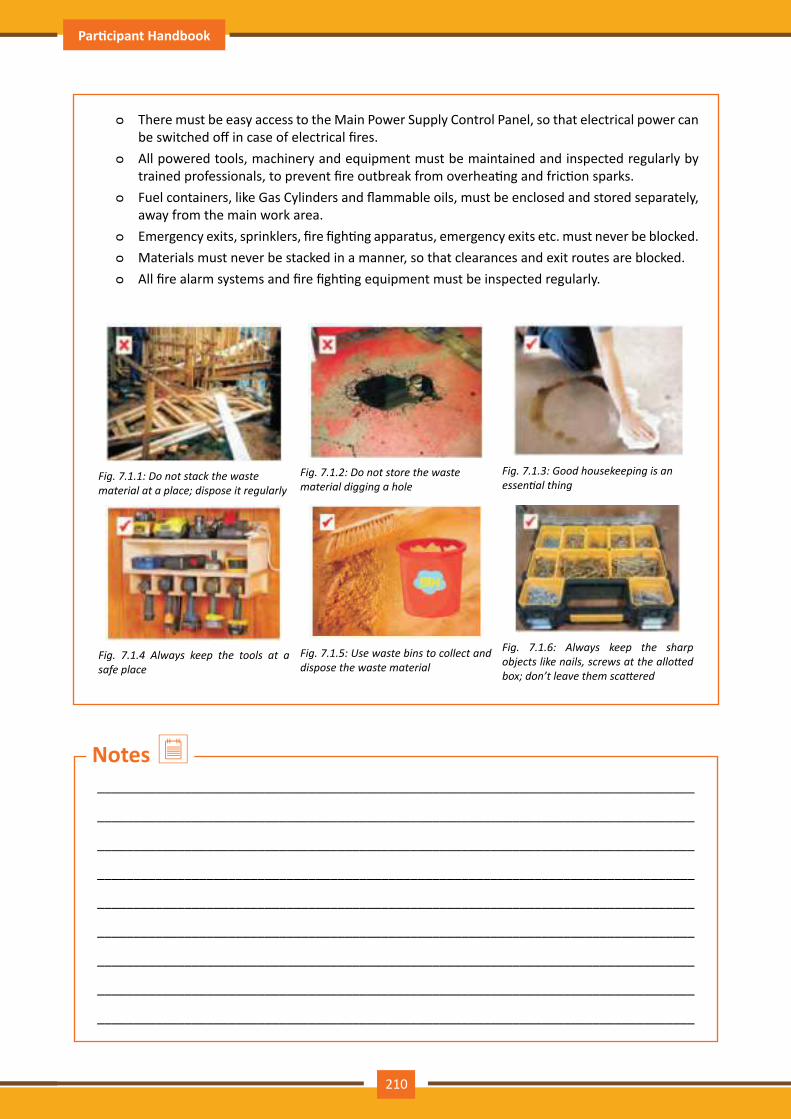
Participant Handbook Cabinet Maker Modular Kitchen
ᴑ There must be easy access to the Main Power Supply Control Panel, so that electrical power can be switched off in case of electrical fires.
ᴑ All powered tools, machinery and equipment must be maintained and inspected regularly by trained professionals, to prevent fire outbreak from overheating and friction sparks.
ᴑ Fuel containers, like Gas Cylinders and flammable oils, must be enclosed and stored separately, away from the main work area.
ᴑ Emergency exits, sprinklers, fire fighting apparatus, emergency exits etc. must never be blocked. ᴑ Materials must never be stacked in a manner, so that clearances and exit routes are blocked. ᴑ All fire alarm systems and fire fighting equipment must be inspected regularly.
Fig.7.1.1:Donotstackthewastematerialataplace;disposeitregularly
Fig.7.1.2:Donotstorethewastematerialdiggingahole
Fig.7.1.3:Goodhousekeepingisanessentialthing
Fig. 7.1.4 Always keep the tools at asafe place
Fig.7.1.5:Usewastebinstocollectanddisposethewastematerial
Fig. 7.1.6: Always keep the sharpobjectslikenails,screwsattheallottedbox;don’tleavethemscattered
__________________________________________________________________________________
__________________________________________________________________________________
__________________________________________________________________________________
__________________________________________________________________________________
__________________________________________________________________________________
__________________________________________________________________________________
__________________________________________________________________________________
__________________________________________________________________________________
__________________________________________________________________________________
Notes
210
Participant Handbook Cabinet Maker Modular Kitchen
At the end of this unit, you will be able to:
1. Identify the different types of cleaning equipment & substances and learn their use
Unit Objectives
UNIT 7.2: Different Types of Cleaning Equipment & Substances
Different Types of Cleaning Equipment & Substances and their Use
The various materials to be used by the housekeeping staff for cleaning are:
• Cleaning Agents• Manual Equipment• Powered Equipment
A. Cleaning AgentsSolvents: A solvent is a liquid that dissolves a solid or liquid solute, resulting in a solution. The most common solvent used in everyday life is water. Water can be used to dilute any cleaning solution for easy use. Warm water dissolves soap more readily than cold water.
Detergents & Soaps: Detergents and soaps are used for cleaning because pure water cannot remove oily, organic soiling. Soap allows oil and water to mix so that oily grime can be removed during rinsing. Detergents are similar to soap, but they are less likely to form films (soap scum) and are not as affected by the presence of minerals in water (hard water).
Detergents to be used depend on:
• Material to be cleaned• Cleaning equipment to be used• Type of dirt
Liquid Cleaning Agents: Liquid cleaning agents can be either diluted in a little water or used directly with a dry cloth.
Washing Soda: It is useful for emulsifying grease on drainpipes, gutters or stone surfaces. In strong concentration, it could be an irritant and injurious to skin, fabrics brushes, wood and paint. Washing soda is useful as a water softener.
Soda bars, Powders and Flakes: Nowadays soaps have been replaced by excellent synthetic soap less detergents, which are unaffected by hard water. They give instant lather. When used, care should be taken that they are thoroughly dissolved. Should know the right concentration for best results. Should be stored on open shelves in a dry storage area.
211
Participant Handbook Cabinet Maker Modular Kitchen
Acid: Acids are used for the removal of metal stains. Vinegar and lemon are used for the removal of tarnish of copper and brass and of mild water stains on bathtubs, etc. More resistant water stains may be removed with stronger acids such as oxalic acid or hydrochloric acid. This should be only used under strict and experienced supervision so that it is used carefully and not in excess.
Alkali: Caustic soda, sodium hydroxide and ammonia are alkalis and are used as grease emulsifiers and stain removal agents. Strong alkaline cleaning agents based on caustic soda in flakes or in liquid form are available for the cleaning, of blocked drains, and other large industrial equipment. Extreme care is to be taken in their use as they are very strong and are highly corrosive.
Absorbents: These perform the cleaning action by absorbing the stain or grease; for example starch, French chalk powders, and besan or gram flour. Their constituents vary and many are of vegetable origin. Unlike abrasives, they are not manufactured.
Toilet Disinfectants & Antiseptics: Disinfectants & Antiseptics are not strictly cleaning agents but are often used during cleaning operations. Disinfectants kill bacteria. Antiseptics prevent bacterial growth.
B. Manual and Powered EquipmentManual cleaning tools and equipment are operated by hands while Powered equipment are connected to a power supply or battery.
• Funnel• Rubber Spatula• Floor Mop • Bowl Swab • Plastic Caddie • Spray Bottle• Cobweb Cleaner• Dry Vacuum Cleaner (Commercial)• Suction Dryer• Dust Pan and Brush • Bucket and Mug • Squeegees• Scrubbing Brush• Sponge• Scraper
212

Participant Handbook Cabinet Maker Modular Kitchen
__________________________________________________________________________________
__________________________________________________________________________________
__________________________________________________________________________________
__________________________________________________________________________________
__________________________________________________________________________________
__________________________________________________________________________________
__________________________________________________________________________________
__________________________________________________________________________________
__________________________________________________________________________________
__________________________________________________________________________________
__________________________________________________________________________________
__________________________________________________________________________________
__________________________________________________________________________________
__________________________________________________________________________________
__________________________________________________________________________________
__________________________________________________________________________________
__________________________________________________________________________________
__________________________________________________________________________________
__________________________________________________________________________________
__________________________________________________________________________________
__________________________________________________________________________________
__________________________________________________________________________________
__________________________________________________________________________________
__________________________________________________________________________________
__________________________________________________________________________________
__________________________________________________________________________________
__________________________________________________________________________________
__________________________________________________________________________________
__________________________________________________________________________________
__________________________________________________________________________________
__________________________________________________________________________________
Notes
213
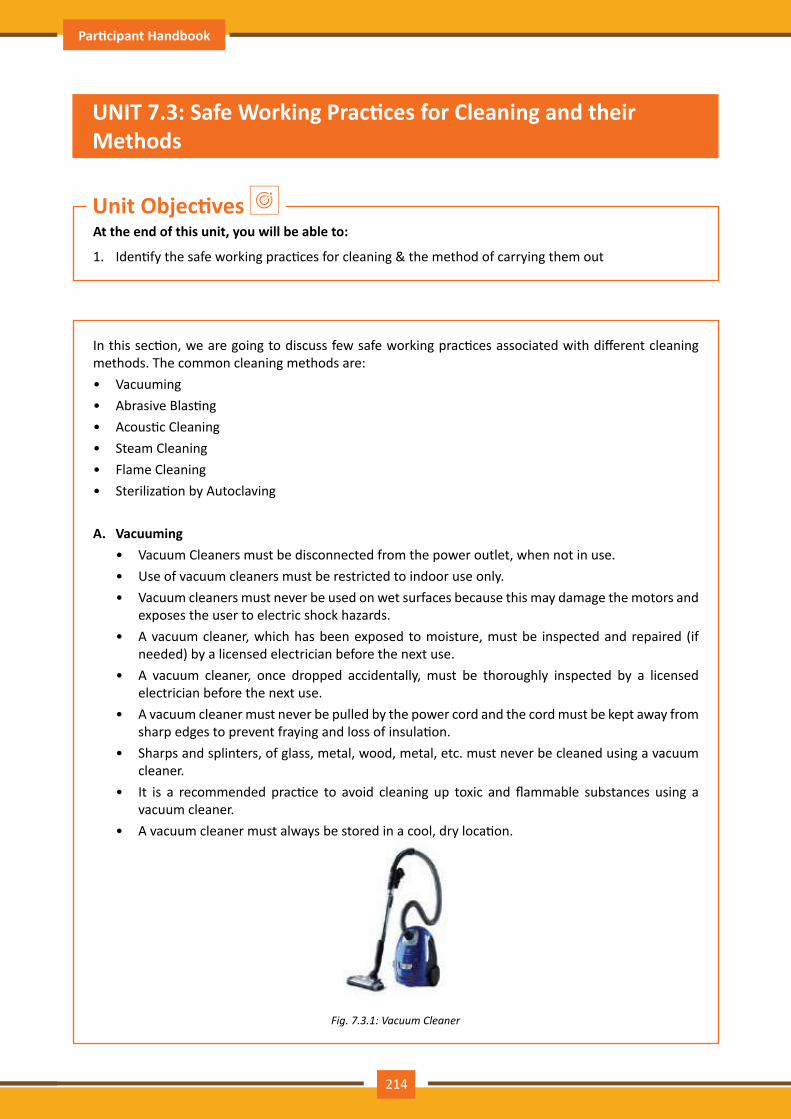
Participant Handbook Cabinet Maker Modular Kitchen
At the end of this unit, you will be able to:
1. Identify the safe working practices for cleaning & the method of carrying them out
Unit Objectives
UNIT 7.3: Safe Working Practices for Cleaning and their Methods
In this section, we are going to discuss few safe working practices associated with different cleaning methods. The common cleaning methods are:• Vacuuming• Abrasive Blasting • Acoustic Cleaning • Steam Cleaning • Flame Cleaning• Sterilization by Autoclaving
A. Vacuuming• Vacuum Cleaners must be disconnected from the power outlet, when not in use.• Use of vacuum cleaners must be restricted to indoor use only.• Vacuum cleaners must never be used on wet surfaces because this may damage the motors and
exposes the user to electric shock hazards.• A vacuum cleaner, which has been exposed to moisture, must be inspected and repaired (if
needed) by a licensed electrician before the next use.• A vacuum cleaner, once dropped accidentally, must be thoroughly inspected by a licensed
electrician before the next use.• A vacuum cleaner must never be pulled by the power cord and the cord must be kept away from
sharp edges to prevent fraying and loss of insulation.• Sharps and splinters, of glass, metal, wood, metal, etc. must never be cleaned using a vacuum
cleaner.• It is a recommended practice to avoid cleaning up toxic and flammable substances using a
vacuum cleaner.• A vacuum cleaner must always be stored in a cool, dry location.
Fig.7.3.1:VacuumCleaner
214
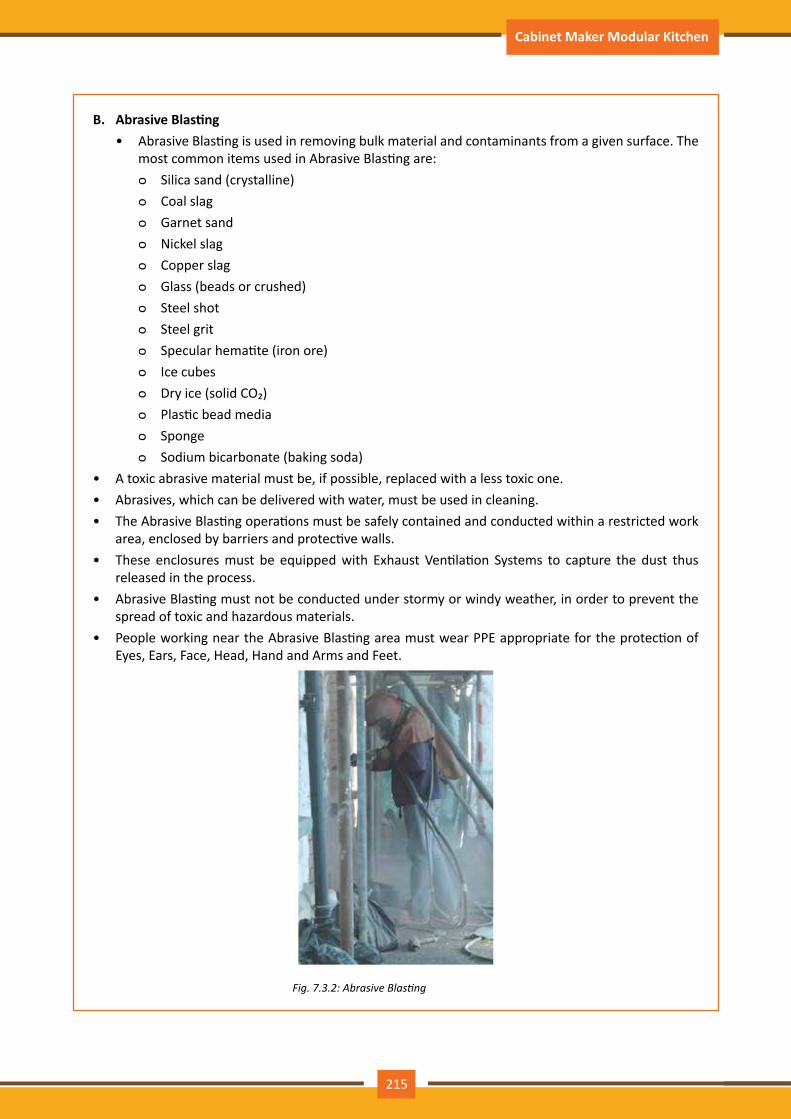
Participant Handbook Cabinet Maker Modular Kitchen
B. Abrasive Blasting • Abrasive Blasting is used in removing bulk material and contaminants from a given surface. The
most common items used in Abrasive Blasting are: ᴑ Silica sand (crystalline) ᴑ Coal slag ᴑ Garnet sand ᴑ Nickel slag ᴑ Copper slag ᴑ Glass (beads or crushed) ᴑ Steel shot ᴑ Steel grit ᴑ Specular hematite (iron ore) ᴑ Ice cubes ᴑ Dry ice (solid CO₂) ᴑ Plastic bead media ᴑ Sponge ᴑ Sodium bicarbonate (baking soda)
• A toxic abrasive material must be, if possible, replaced with a less toxic one.• Abrasives, which can be delivered with water, must be used in cleaning.• The Abrasive Blasting operations must be safely contained and conducted within a restricted work
area, enclosed by barriers and protective walls.• These enclosures must be equipped with Exhaust Ventilation Systems to capture the dust thus
released in the process.• Abrasive Blasting must not be conducted under stormy or windy weather, in order to prevent the
spread of toxic and hazardous materials.• People working near the Abrasive Blasting area must wear PPE appropriate for the protection of
Eyes, Ears, Face, Head, Hand and Arms and Feet.
Fig.7.3.2:AbrasiveBlasting
215
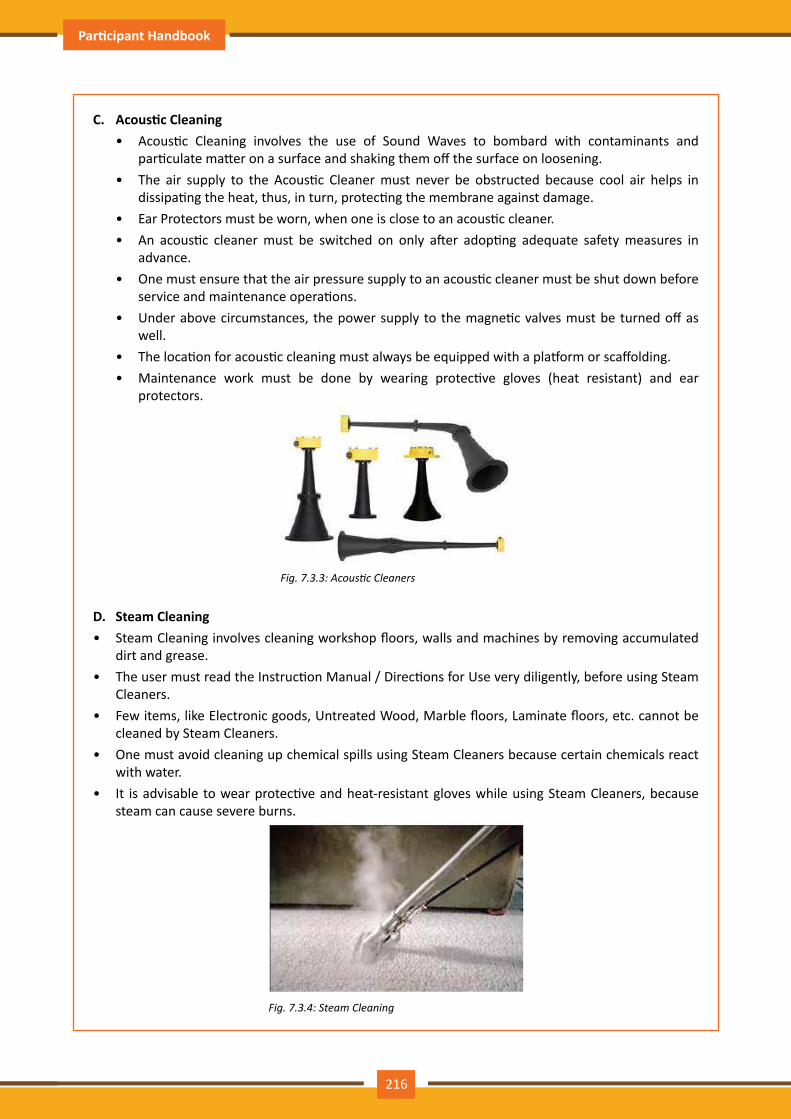
Participant Handbook Cabinet Maker Modular Kitchen
C. Acoustic Cleaning• Acoustic Cleaning involves the use of Sound Waves to bombard with contaminants and
particulate matter on a surface and shaking them off the surface on loosening.• The air supply to the Acoustic Cleaner must never be obstructed because cool air helps in
dissipating the heat, thus, in turn, protecting the membrane against damage.• Ear Protectors must be worn, when one is close to an acoustic cleaner.• An acoustic cleaner must be switched on only after adopting adequate safety measures in
advance.• One must ensure that the air pressure supply to an acoustic cleaner must be shut down before
service and maintenance operations.• Under above circumstances, the power supply to the magnetic valves must be turned off as
well.• The location for acoustic cleaning must always be equipped with a platform or scaffolding.• Maintenance work must be done by wearing protective gloves (heat resistant) and ear
protectors.
Fig.7.3.3:AcousticCleaners
D. Steam Cleaning• Steam Cleaning involves cleaning workshop floors, walls and machines by removing accumulated
dirt and grease.• The user must read the Instruction Manual / Directions for Use very diligently, before using Steam
Cleaners.• Few items, like Electronic goods, Untreated Wood, Marble floors, Laminate floors, etc. cannot be
cleaned by Steam Cleaners.• One must avoid cleaning up chemical spills using Steam Cleaners because certain chemicals react
with water.• It is advisable to wear protective and heat-resistant gloves while using Steam Cleaners, because
steam can cause severe burns.
Fig.7.3.4:SteamCleaning
216

Participant Handbook Cabinet Maker Modular Kitchen
E. Flame Cleaning• Flame Cleaning involves cleaning a structural steel / metal / alloy surface by treating with
intensely hot Oxyfuel gas flame over it, thus removing rust, mill scale, lubricants, grease and accumulated dirt from the surface.
• PPE appropriate for handling Oxyfuel, like Protective Masks, Safety Welding and Gas Cutting Goggles, Heat-resistant safety gloves, Aprons, Respirators (for emergencies), etc. must be worn during Flame Cleaning.
• Adequate ventilation must be provided in the work area, to prevent the accumulation of toxic fumes and explosion and fire hazards.
• The Flame Cleaning apparatus must be checked in advance, in order to avoid Backfeeding and Flashback hazards.
• Inspection, service and maintenance must be done by an experienced and licensed technician with the required training and experience in Gas safety.
• Safety devices, like Flashback Arrestors, Non-return Valve, Vent and Purge device, Pressure Relief device, etc. must be used to prevent hazards like fire and explosion.
• Gas Leakage detecting devices, fire alarm and fire fighting equipment must be kept handy while using Flame Cleaning operations.
F. Sterilization by Autoclaving• Autoclaving is one of the most effective methods of sterilization or the elimination of pathogens
and microorganisms from given equipment or surface.• The process of Autoclaving involves application of pressurized steam to heat and sterilize the
material that require cleaning.• Appropriate PPE, like Apron, heat-resistant gloves, safety eyegear, etc. must be worn during the
Autoclaving process.• Sealed containers must never be autoclaved to prevent explosion hazards.• Before operating an Autoclave, one must thoroughly read the Instruction Manual and learn
about the safety lock-out mechanisms.• The door of an Autoclave must never be opened if there is water getting drained at its bottom;
this may result in accumulation of scalding water and even Superheated Steam.• At the end of the Autoclaving cycle, one must wait for the Autoclave pressure to reach zero and
the temperature at or below 121 degree Celsius, to prevent burns.• Sharps, hazardous chemicals, radioactive materials and biomedical samples must never be
autoclaved.
217

Participant Handbook Cabinet Maker Modular Kitchen
__________________________________________________________________________________
__________________________________________________________________________________
__________________________________________________________________________________
__________________________________________________________________________________
__________________________________________________________________________________
__________________________________________________________________________________
__________________________________________________________________________________
__________________________________________________________________________________
__________________________________________________________________________________
__________________________________________________________________________________
__________________________________________________________________________________
__________________________________________________________________________________
__________________________________________________________________________________
__________________________________________________________________________________
__________________________________________________________________________________
__________________________________________________________________________________
__________________________________________________________________________________
__________________________________________________________________________________
__________________________________________________________________________________
__________________________________________________________________________________
__________________________________________________________________________________
__________________________________________________________________________________
__________________________________________________________________________________
__________________________________________________________________________________
__________________________________________________________________________________
__________________________________________________________________________________
__________________________________________________________________________________
__________________________________________________________________________________
__________________________________________________________________________________
__________________________________________________________________________________
__________________________________________________________________________________
Notes
218
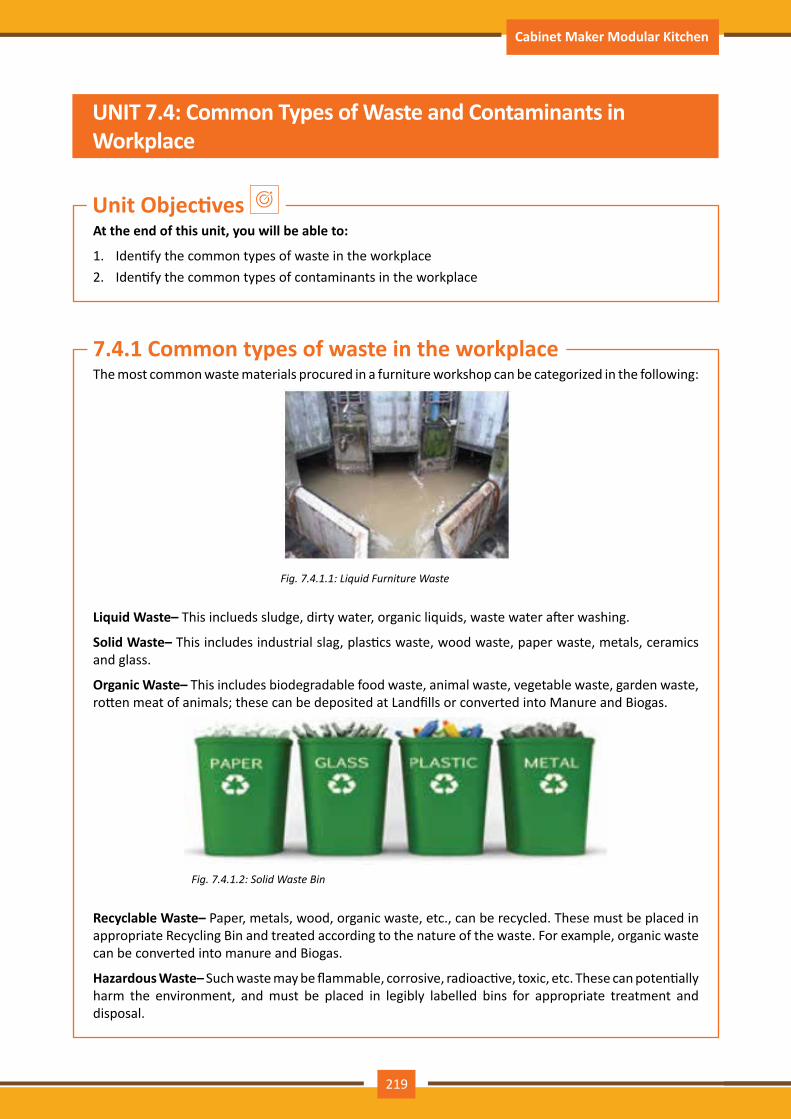
Participant Handbook Cabinet Maker Modular Kitchen
At the end of this unit, you will be able to:
1. Identify the common types of waste in the workplace2. Identify the common types of contaminants in the workplace
Unit Objectives
UNIT 7.4: Common Types of Waste and Contaminants in Workplace
The most common waste materials procured in a furniture workshop can be categorized in the following:
Fig.7.4.1.1:LiquidFurnitureWaste
Liquid Waste– This inclueds sludge, dirty water, organic liquids, waste water after washing.
Solid Waste– This includes industrial slag, plastics waste, wood waste, paper waste, metals, ceramics and glass.
Organic Waste– This includes biodegradable food waste, animal waste, vegetable waste, garden waste, rotten meat of animals; these can be deposited at Landfills or converted into Manure and Biogas.
Fig.7.4.1.2:SolidWasteBin
Recyclable Waste– Paper, metals, wood, organic waste, etc., can be recycled. These must be placed in appropriate Recycling Bin and treated according to the nature of the waste. For example, organic waste can be converted into manure and Biogas.
Hazardous Waste– Such waste may be flammable, corrosive, radioactive, toxic, etc. These can potentially harm the environment, and must be placed in legibly labelled bins for appropriate treatment and disposal.
7.4.1 Common types of waste in the workplace
219
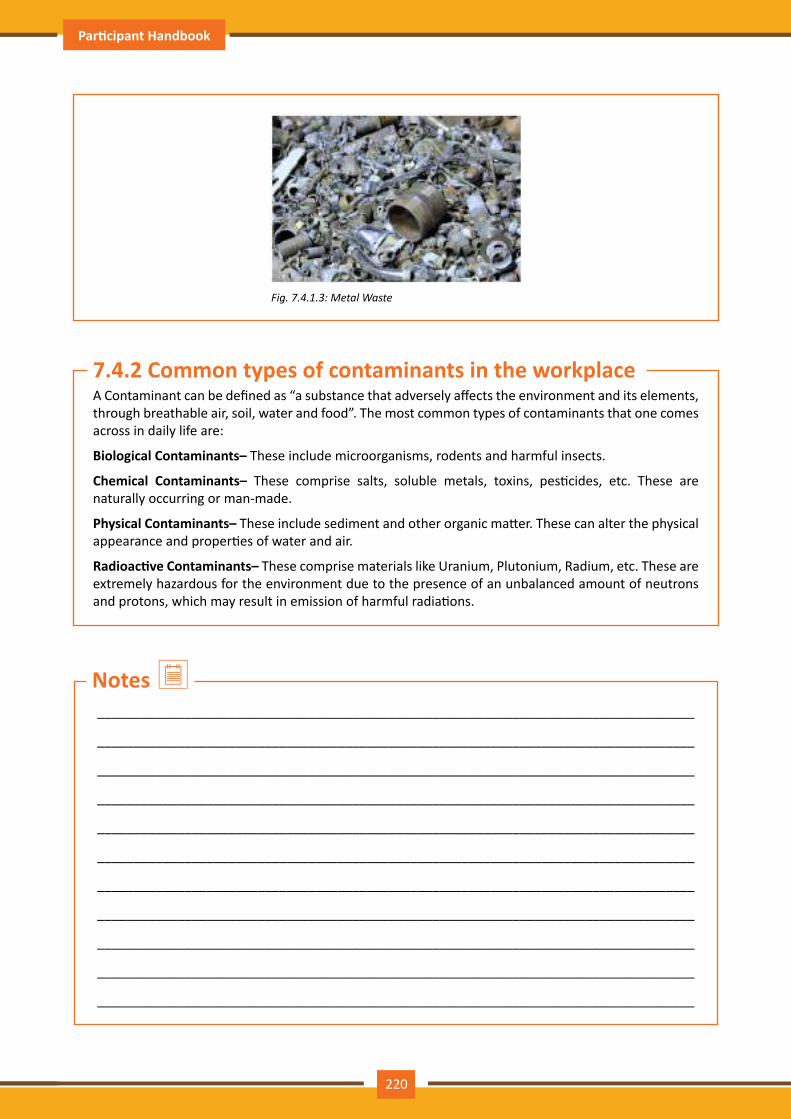
Participant Handbook Cabinet Maker Modular Kitchen
Fig.7.4.1.3:MetalWaste
A Contaminant can be defined as “a substance that adversely affects the environment and its elements, through breathable air, soil, water and food”. The most common types of contaminants that one comes across in daily life are:
Biological Contaminants– These include microorganisms, rodents and harmful insects.
Chemical Contaminants– These comprise salts, soluble metals, toxins, pesticides, etc. These are naturally occurring or man-made.
Physical Contaminants– These include sediment and other organic matter. These can alter the physical appearance and properties of water and air.
Radioactive Contaminants– These comprise materials like Uranium, Plutonium, Radium, etc. These are extremely hazardous for the environment due to the presence of an unbalanced amount of neutrons and protons, which may result in emission of harmful radiations.
7.4.2 Common types of contaminants in the workplace
__________________________________________________________________________________
__________________________________________________________________________________
__________________________________________________________________________________
__________________________________________________________________________________
__________________________________________________________________________________
__________________________________________________________________________________
__________________________________________________________________________________
__________________________________________________________________________________
__________________________________________________________________________________
__________________________________________________________________________________
__________________________________________________________________________________
Notes
220
Participant Handbook Cabinet Maker Modular Kitchen
At the end of this unit, you will be able to:
1. Discuss the effects of common contaminants on furniture
Unit Objectives
UNIT 7.5: Effects of Contamination on Products
Effects of Contamination on Products
The common effects of contamination on furniture products are:
• Effect of Moisture– Wood is hygroscopic in nature, i.e. it readily absorbs and accumulates moisture, leading to multiple defects, including unusual expansion of wood and open joints. This results in variations in size and creation of excessive or inadequate spacing around pre-fitted joints.Metals like Iron may accumulate moisture and rust, thus leading to furniture defects like brittleness and flaking. These allow for chipping of the furniture, resulting in its wear and destruction.
• Effect of Microorganisms, Insects and Rodents– Infestation by Fungi (Molds) lead to discolouration and disfiguration of furniture. Insects like Termites, Carpenter Ants, Wood Borers and Powderpost Beetles cause serious damages to wood (natural wood and its products) furniture by chewing and grinding through the furniture or building nests in it, thus rendering the furniture flimsy. Pests like Rats not only gnaw through wood, but also contaminate them chemically with their urine, faeces and hair. Steel and metallic furniture are usually unaffected by insects and rodents, but Rats can gnaw through aluminium as well. Steel and other metallic furniture are affected by Molds as well.
• Effect of Dust– Accumulation of excessive dust on furniture lead to discolouration. Excessive dust may catch moisture and grease, thus forming greasy grime, which is often difficult to remove.
• Effect of Corrosive Chemicals– Corrosive chemicals, like acids and alkalis, can destroy, disfigure, flake off, discolour, tarnish and eat through metals and wood alike. Certain chemical cleaning agents are suitable for certain types of wood and metals only. Chemicals must be implemented on furniture only after reading the MSDS sheets and Manufacturer's Instructions.
__________________________________________________________________________________
__________________________________________________________________________________
__________________________________________________________________________________
__________________________________________________________________________________
__________________________________________________________________________________
__________________________________________________________________________________
__________________________________________________________________________________
__________________________________________________________________________________
Notes
221
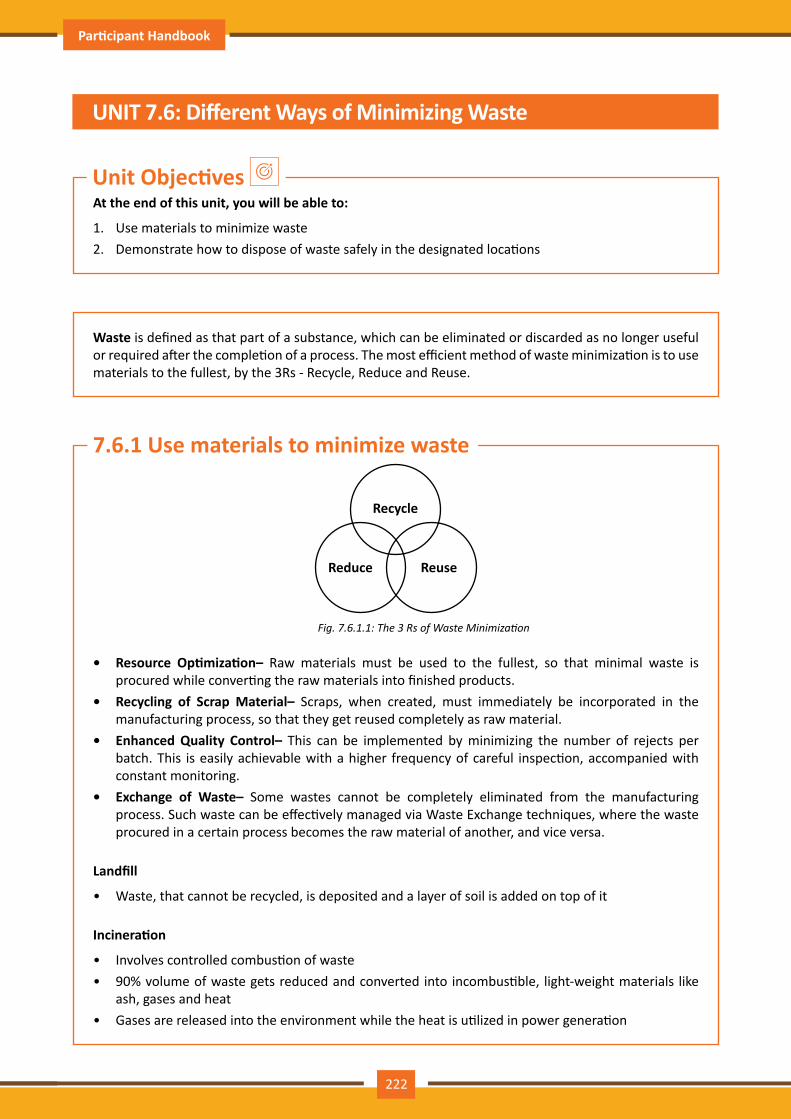
Participant Handbook Cabinet Maker Modular Kitchen
At the end of this unit, you will be able to:
1. Use materials to minimize waste2. Demonstrate how to dispose of waste safely in the designated locations
Unit Objectives
UNIT 7.6: Different Ways of Minimizing Waste
Waste is defined as that part of a substance, which can be eliminated or discarded as no longer useful or required after the completion of a process. The most efficient method of waste minimization is to use materials to the fullest, by the 3Rs - Recycle, Reduce and Reuse.
Recycle
Reduce Reuse
Fig.7.6.1.1:The3RsofWasteMinimization
• Resource Optimization– Raw materials must be used to the fullest, so that minimal waste is procured while converting the raw materials into finished products.
• Recycling of Scrap Material– Scraps, when created, must immediately be incorporated in the manufacturing process, so that they get reused completely as raw material.
• Enhanced Quality Control– This can be implemented by minimizing the number of rejects per batch. This is easily achievable with a higher frequency of careful inspection, accompanied with constant monitoring.
• Exchange of Waste– Some wastes cannot be completely eliminated from the manufacturing process. Such waste can be effectively managed via Waste Exchange techniques, where the waste procured in a certain process becomes the raw material of another, and vice versa.
Landfill
• Waste, that cannot be recycled, is deposited and a layer of soil is added on top of it
Incineration
• Involves controlled combustion of waste• 90% volume of waste gets reduced and converted into incombustible, light-weight materials like
ash, gases and heat• Gases are released into the environment while the heat is utilized in power generation
7.6.1 Use materials to minimize waste
222
Participant Handbook Cabinet Maker Modular Kitchen
Biogas Generation
• Organic waste are biodegradable and can be converted into Biogas in Biogas Plants, with the help of certain fungi and bacteria
• The residue, after generation of Biogas, is used as Manure• Manure Generation and Composting• Organic waste are often left buried under soil beds• They decompose into rich manure, full of nutrients and minerals
Vermicomposting
• Involves the degradation of organic waste into manure, with the help of worms• The worms feed on the organic waste and convert them into manure
__________________________________________________________________________________
__________________________________________________________________________________
__________________________________________________________________________________
__________________________________________________________________________________
__________________________________________________________________________________
__________________________________________________________________________________
__________________________________________________________________________________
__________________________________________________________________________________
__________________________________________________________________________________
__________________________________________________________________________________
__________________________________________________________________________________
__________________________________________________________________________________
__________________________________________________________________________________
__________________________________________________________________________________
__________________________________________________________________________________
__________________________________________________________________________________
__________________________________________________________________________________
__________________________________________________________________________________
__________________________________________________________________________________
__________________________________________________________________________________
__________________________________________________________________________________
Notes
223

Participant Handbook Cabinet Maker Modular Kitchen
At the end of this unit, you will be able to:
1. Discuss the proper procedure of cleaning the work site and tools and equipment2. Comply with the common waste disposal procedures
Unit Objectives
UNIT 7.7: Know-How of Cleaning and Waste Disposal Procedures
Proper Procedure of Cleaning the Work Site and Tools and Equipment
Cleaning the workshop/site, as the cabinet maker proceeds with the assembly and installation processes, is extremely crucial. The following aspects must be taken care of while cleaning the site, tools and equipment:
A. Procedure of choosing cleaning tools and equipment• Powered tools, meant for cleaning the floor, must be equipped with guards and filters.• Powered scrubbing machines should come with appropriate control methods, to regulate the
flow of cleaning fluids.• Cleaning equipment, powered with Propane, are recommended for use only when the site is
vacant and unoccupied, thus allowing for adequate ventilation and air circulation.• Propane-powered cleaning tools should be equipped with ecofriendly, low-emission engines.• All cleaning equipment, especially the powered ones, must not operate at a sound level
exceeding 70 decibels.
B. Procedure of choosing cleaning agents• Cleaning agents and fluids must have a neutral pH value (7 or closer to 7) so that they do not
corrode the surfaces.• Cleaning agents should be ecofriendly and biodegradable.• Cleaning agents with dyes must be avoided, in order to prevent discolouration and staining of
surfaces and products. In case such materials cannot be avoided, the cabinet maker should resort to dyes, which are approved for food and cosmetics.
• Cleaning agents should have a high Ignition Point and the Ignition Point must be clearly mentioned in the Material Safety Data Sheet (MSDS).
• Cleaning agents should have minimum hazard rating (HMIS Rating). The Hazardous Materials Identification System comprises four colour codes, each representing a hazard category.
Colour Code Meaning Rating ScaleBlue Health
0 - 4, with 4 being the most hazardous
Red FlammabilityOrange Physical HazardWhite Personal Protection
224
Participant Handbook Cabinet Maker Modular Kitchen
• For cleaning wood and stone surfaces, cleaning agents should ideally contain water and epoxy-based (comprising epoxides) ingredients.
• For stain and spot removal, the recommended ingredients are citrus-based materials like d-Limonene and Methyl esters.
• Recommended ingredients for scale removal agents are citric, acetic and lactic acids.• Hydrogen peroxide is the most common ingredient in Disinfectants.
Disposal of Solid Waste
• Solid waste, once accumulated, must be labelled appropriately.• Solid waste on the site mainly comprise debris and sharps.• Debris in a furniture workshop comprises wood and timber splinters, saw dust, metal and glass
sharps.• Wood, timber and saw dust can be either treated at Landfill or at the Incinerator.• Metal and Glass sharps are collected in appropriate sharp containers.• Metal sharps are melted for recycling.• Glass sharps are pulverized for recycling.• Sharps, if contaminated, must be autoclaved and deactivated before disposing of into containers.• Ferro-magnetic debris are separated using magnetic filters and treated according to their nature.
Disposal of Chemical Waste
• Common chemical wastes include: ᴑ Paint ᴑ Batteries ᴑ Motor Oil, Oil Filters and Antifreeze ᴑ CFCs and HCFCs in Aerosol Sprays and Coolants
• Paints of all categories must be recycled to the full extent.• Empty paint containers may comprise sediments and debris, which can be separated by allowing
the material to settle for some time, so that the remaining paint can be poured out from the top and the sediment at the bottom removed and treated as per norms.
• Batteries should never be treated at Landfills because they contain toxic chemicals, which may pollute the environment.
• Batteries are generally incinerated, which is a safer option as compared to Landfill.• Hammer mills are used to break the batteries and the electrolytes are treated chemically for
neutralization.• Motor Oil and other oil-based products can be recycled into lubricating oil.• Mercury must be isolated chemically and recycled into:
ᴑ Thermometers ᴑ Paints ᴑ Metal halide lamps ᴑ Mercury Vapor Lamps
7.7.1 Common waste disposal procedures
225

Participant Handbook Cabinet Maker Modular Kitchen
• Lead from batteries can be recovered through controlled temperature processes and later on, refined for resale.
• Batteries containing unknown levels of Mercury are treated at Mercury Retorts.• CFCs (Chlorofluorocarbons) and HCFCs (Hydro-chlorofluorocarbons) are either recycled or
destroyed. Destruction involves one or more of the following techniques: ᴑ Superheated Steam ᴑ Submerged Combustion ᴑ Arc Plasma ᴑ Solid Alkali Reaction ᴑ Incineration ᴑ Electric Furnace
__________________________________________________________________________________
__________________________________________________________________________________
__________________________________________________________________________________
__________________________________________________________________________________
__________________________________________________________________________________
__________________________________________________________________________________
__________________________________________________________________________________
__________________________________________________________________________________
__________________________________________________________________________________
__________________________________________________________________________________
__________________________________________________________________________________
__________________________________________________________________________________
__________________________________________________________________________________
__________________________________________________________________________________
__________________________________________________________________________________
__________________________________________________________________________________
__________________________________________________________________________________
__________________________________________________________________________________
__________________________________________________________________________________
__________________________________________________________________________________
__________________________________________________________________________________
Notes
226
Participant Handbook Cabinet Maker Modular Kitchen
• Housekeeping in a furniture workshop involves operations related to the maintenance and cleaning of the work area, tools and equipment.
• Good housekeeping practices help in reducing accidents.• Different materials in a workshop need to cleaned by different types of cleaning agents.• Cleaning equipment are either operated by hand or powered.• A cabinet maker must know the common wastes and contaminants in the workplace.• Furniture are affected by different types of contamination.• Waste must be minimized using teh 3Rs - Reduce, reuse and Recycle.
Summary
• The trainer provides the students with few contaminated pieces of furniture. They observe the furniture carefully, identify the contaminant, and state preventative measures.
• The trainer shows, from his/her laptop, various ppt slides comprising images of different wastes. The students identify the types of waste shown and state the correct method of disposing them of.
Activity
State True or False:
1. Only designated areas, outside and far from the main work area, must be allowed for smoking. (T/F)2. Detergents and soaps are not required because pure water removes oily, organic soiling. (T/F)3. Washing Soda is useful for emulsifying grease on drainpipes. (T/F)4. Abrasive Blasting is used in removing bulk material and contaminants from a given surface. (T/F)5. Acoustic Cleaning involves the use of heat waves. (T/F)6. Avoid cleaning up chemical spills using Steam Cleaners. (T/F)
Exercise
227

Participant Handbook Cabinet Maker Modular Kitchen
228

Participant Handbook Cabinet Maker Modular Kitchen
8. Work Effectively with Others
Unit 8.1 - Work Effectively with Others
Unit 8.2 - Importance of Effective Communication and Establishing Good Working Relationships
Unit 8.3 - Prepare and Organize Work
Unit 8.4 - Decision Making
Unit 8.5 - Problem Solving
Unit 8.6 - Manage Anger and Stress
Unit 8.7 - Manage Time
Unit 8.8 - Set Goals for Oneself and the Team
Unit 8.9 - Understanding Technical Drawings and Blueprints
FFS/N8801

Participant Handbook Cabinet Maker Modular Kitchen
At the end of this module, you will be able to:
1. Discuss the importance of working effectively with others to achieve organizations goals2. Discuss the importance of effective communication and establishing good working relationships
With other3. Prepare and organize work4. Evaluate the importance of decision making5. Estimate the importance of problem solving6. Manage anger and stress7. Manage time8. Prepare goals for oneself and the team9. Interpret technical drawings and blueprints
Key Learning Outcomes
230

Participant Handbook Cabinet Maker Modular Kitchen
At the end of this unit, you will be able to:
1. Discuss the importance of working effectively with others to achieve organization’s goals2. Identify the responsibilities and objectives of the role3. Estimate their own roles and responsibilities4. Evaluate the importance of having correct understanding of work task and objective5. Recall how to keep work area clean and tidy and its importance6. Abide by the applicable quality standards for assigned work task and objective7. Discuss the principle of furniture and fittings manufacturing and installation8. Understanding the importance of discipline and ethics for professional success9. Underline what constitutes disciplined behavior for a working professional10. Demonstrate responsible and disciplined behaviour at the workplace
Unit Objectives
UNIT 8.1: Work Effectively with Others
It is a common yet important saying that "United we stand, divided we fall". A cabinet maker must work effectively with the other members in the team to achieve the common organizational goals and targets.
A. Best Practices in the Industry• Knowing the areas of strength of each team member and assign roles accordingly• Discussing but never argue• Think out-of-the-box to impart creativity amidst chaos• Accepting and learning from mistakes• Sharing a common mission and vision to align oneself and the team with the organization targets• Staying alert, humble and polite• Respecting diversity and differences• Listening attentively and actively• Staying precise and curt while communicating• Avoiding backstabbing and gossips• Apologizing for mistakes committed by oneself• Avoiding jargons and explaining technical concepts, using real-life examples• Sharing, exchanging and transferring knowledge• Abiding by discipline and decorum
B. Principles of Team WorkTeam work is defined as the “actions of individuals, brought together for a common purpose or goal, which subordinate the needs of the individual to the needs of the group”. Each person on the team puts aside his or her individual needs to work towards the larger group objective. The interaction among
8.1.1 Importance of working effectively with others to achieve organizations goals
231
Participant Handbook Cabinet Maker Modular Kitchen
the members and the work they complete is called teamwork. Team work is extremely important for the cabinet maker to accomplish hi job responsibilities efficiently. The sum of the efforts undertaken by each team member for the achievement of the team's objective is called team work. Every member in a team has to perform and contribute in his best possible way to achieve a common predefined goal. Individual performances do not count in a team and it is the collective performance of the team workers which matters the most.
C. Benefits of Team Work• Promotes Creativity and Learning• Combines Complementary Strengths• Builds Trust• Teaches Conflict Resolution Skills• Promotes a Wider Sense of Ownership• Teaches Effective Risk Management
D. Components of Team Work • Effective Communication • Active Listening• Resolving Conflict• Diversity• Motivation
E. Dos and Don'ts of Effective Team Work Dos:
• Be willing to collaborate• Keep an open mind towards learning from other team members• Control your ego• Step up to be a leader and step down to be a team member when needed
Don'ts:
• Don't take things personally• Don't underestimate a team member• Don't get involved in gossip and grapevine conversation• Don't show your back to criticism
F. Tips to Promote Effective Team Work1. Share information with team wherever and whenever required to enhance quality and
productivity at work place• A team must follow a very effective and strong communication cycle.• Accurate and undistorted information must be shared with the team, so that all members in
the team are perfectly aligned with the task requirements and expectations.• Sharing accurate information eliminates communication gaps between the cabinet maker
and the other members in the team.• This is also effective in managing emergency situations, since it is very crucial to impart
accurate and appropriate instructions while handling such circumstances.
232
Participant Handbook Cabinet Maker Modular Kitchen
2. Work together with co-workers in a synchronized manner• A cabinet maker must be an excellent team player, because it is practically impossible to
accomplish a project or task without proper synchronization.• The various stages in a project must be treated discretely and yet, there must exist a seamless
link or flow between them, in other words, synchronization.• The deadline for delivery of the entire project can be met only if each component of the project
is delivered on time.• The outcomes of each stage of a project become the inputs to the next one and the process
must continue in a synchronized manner until the final product is obtained.
3. Show respect to other and their work• Appreciation for other team members works as "Positive Reinforcement", i.e. it encourages and
rewards them for their performance and contribution towards the project.• Appreciation for others in the team promotes mutual respect, which is one of the most important
aspects in good team work.• Showing respect to others would imply that one shall earn respect and appreciation in return.• Thus habit promotes collaboration in a team to boost productivity and improve quality of work.
4. Respond politely to customer queries and other team members• Customer Centricity is one of the most vital personal attributes that a cabinet maker must have,
since a cabinet maker must interact with innumerable clients in daily life.• A client may have several doubts and queries, which the cabinet maker must listen proactively
and clarify politely.• By responding politely to all queries of clients, a cabinet maker fulfils the following:
ᴑ Understand customer requirements and time lines and respond as per their needs– Answering customer's queries helps in understanding the task requirements very clearly. This, in turn, helps in working with less confusion and interruptions and in delivering the task perfectly on time.
ᴑ Being courteous with customers and ability to handle different types of customers– Different customers have different types of nature. The nature of customers can range between being very polite to extremely demanding and critical of whatever you do.
ᴑ Being aware of different customer cultures/faiths and responding appropriately– Irrespective of the culture, colour, nationality, creed and economic status, a customer is always the King for a cabinet maker. Respecting diversity implies that Customer Centricity should be practised, irrespective of the customer's background. A cabinet maker must always remain neutral and truly professional while dealing with customers from diverse backgrounds.
ᴑ Work and deliver output as per client requirement and satisfaction– The end result of any project is ultimate client delight. Meeting client's requirements about a project and exceeding the client's value expectations help in retaining a client and earning his / her loyalty.
• This behavioural trait must not only be practiced with one's clients, but also with the other team members as well.
233
Participant Handbook Cabinet Maker Modular Kitchen
5. Display courteous behavior at all times• Come what may, one must always display courtesy to clients, supervisors and colleagues alike.• This must be practiced to secure long term working relationship with them.
A cabinet maker has a standard set of responsibilities and objectives, which sometimes may vary between organizations. Although covered in previous sections of the handbook, let us recapitulate the responsibilities and objectives of the role of a cabinet maker.
A. Responsibilities and Objectives• Reading and interpreting AutoCAD and general construction blueprints• Conducting field measurement of a site in preparation for installation• Completing furniture assembly and installation, according to known specifications and blueprints• Conducting post installation inspection, according to the manufacturer's guidelines, for expected
operability of the furniture• Providing instructions and site direction to the team members and subordinates for fulfilling
client's requirements on time• Unloading modules, tools and tackles from the vehicle and deliver the product / modules at the
site for assembly and installation• Assembling and installing all types of modular systems, thus actively participating in operations
like placement and staging, levelling, touch-up and wipe-down of the products at the client's site
• Conducting and attending pre-installation huddles, as and when required• Completing repair services on time• Completing all assembly / installation / service / repair documentation• Adhering to safety procedures and safety drills and training sessions, as laid down by the
employer• Promoting and adhering to safe work practices and behaviour• Reporting accidents and anomalies on site to concerned authorities• Actively spotting out and rectifying unsafe work conditions, which may lead to accidents and
injuries• Adhering to and completing assigned duties by deadline• Completing the designated duties, and others, as assigned from time to time
B. Follow organizational policies and procedures• A good employee is expected to respect and follow the organizational policies and procedures.• Such policies involve adherence to Standard Operating procedures, safety guidelines, Instruction
manuals, HR policies etc.• Adherence to and respect for the organizational mission and vision are mandatory to align a
person with the organizational goals and targets.• Following organizational policies and procedures make a person an integrated part of the
organization, thus making him / her a family member.
8.1.2 Responsibilities and objectives of the role
234
Participant Handbook Cabinet Maker Modular Kitchen
C. Adhere to time lines and quality standards• Deadline, TAT adherence and quality assurance are important aspects of project management.• While working on a project, one must maintain a borderline between the delivery time and the
quality standards required by the client as well as directed by the organization.• It is important to deliver the project on or before the deadline, but care must be taken that one
does not deviate from the client's specifications and quality standards.
D. Follow work place dress code• Dress Code helps a person in identifying himself or herself as an inseparable component of the
organization.• Maintaining the dress code helps in strengthening the security of the organization. Dress code
mandates that only authorized persons are allowed to access and control the premises.• Adhering to the organization's dress code is an important part of Work Ethics in the work area.
Apart from the responsibilities related to the job role, a person working or aspiring to work as a cabinet maker has to fulfill few roles and responsibilities on a personal front. These are:
• Working as a good Team Player, so that one's personal objectives and aspirations align perfectly with those of the team
• Working as a good Team Leader, so that one's leadership skills, instructions and timely reviews help in eliminating errors and delivering the tasks on time
• Working as a good Quality Inspector, so that one is able to identify defects in the products under process (Work-in-progress), to avoid recall of the final and finished products
A cabinet maker must understand the client's requirements thoroughly and have appropriate and correct understanding of the work task, in terms of:
• Objectives of the task / assignment• Specifications as per the Blueprint and AutoCAD drawings• Phase-wise feedback on the task provided by the client• TAT adherence, in terms of phase-wise and final delivery of the finished products• Working with the sole aim of putting in one's best efforts to abide my all client requirements, thus,
in turn, completely satisfying the client and earning appreciations• Ensuring that there is no communication gap between the cabinet maker and the client in
understanding requirements and specifications , by providing the client with daily or weekly (as prescribed by the organization) updates on the different phases of the assignment
8.1.3 Own roles and responsibilities
8.1.4 Importance of having correct understanding of work task and objective
235
Participant Handbook Cabinet Maker Modular Kitchen
As discussed earlier, keeping one's work area clean and tidy carries the following benefits:
• Preventing accidents at the work area and the corresponding injuries• Allowing for easy flow of materials• Reducing a worker's exposure to Occupational Hazards• Improving the worker's control on the various tools and equipment• Improving productivity
Generally speaking, the work area can be kept clean and tidy in the following manner:
A. Keep work area in a tidy and organized state• Control Dust and Debris• Clear Clutter and Spills to avoid Slips, Trips and Falls• Follow a specific frequency of cleaning operations• Maintain a written set of guidelines on cleaning and tidying the work area, in the form of SOPs
(Standard Operating Procedures)• Store tools and equipment appropriately, in their designated storage locations• Store and maintain PPE appropriately• Effectively move waste materials to designated locations and treat them duly
B. Keep work area safe• Encouraging the practice of looking out for signs like "Wet Floor" or "Cleaning Under Progress".• Avoiding storage of heavy objects at high and raised areas• Reporting each incident of spill (oil, grease, chemical, etc.) to the housekeeping staff on time• Encouraging the practice of reading Directions of Use and MSDS sheet before using any chemical• Preventing Fire and Electrical Hazards
Quality, according to the ISO 8402-1986 standard, can be defined as "the totality of features and characteristics of a product or service that bears its ability to satisfy stated or implied needs".
A cabinet maker must implement the applicable quality standards for the assigned work task, via a well- known mechanism called Quality Control or QC.
The primary objectives of Quality Control and management are:
• Eliminating gaps between the specifications of the accomplished tasks and the client's requirements, thus ensuring that the worker has fully understood the client's requirements
• Eliminating chances of product recall (return of the delivered product consignment, partially or wholly, to the workshop, by the client )
• Identifying defects in the process of assembly and installation• Identifying defects in the products (work-in-progress stage)
8.1.5 How to keep work area clean and tidy and its importance
8.1.6 Applicable quality standards for assigned work task and objective
236
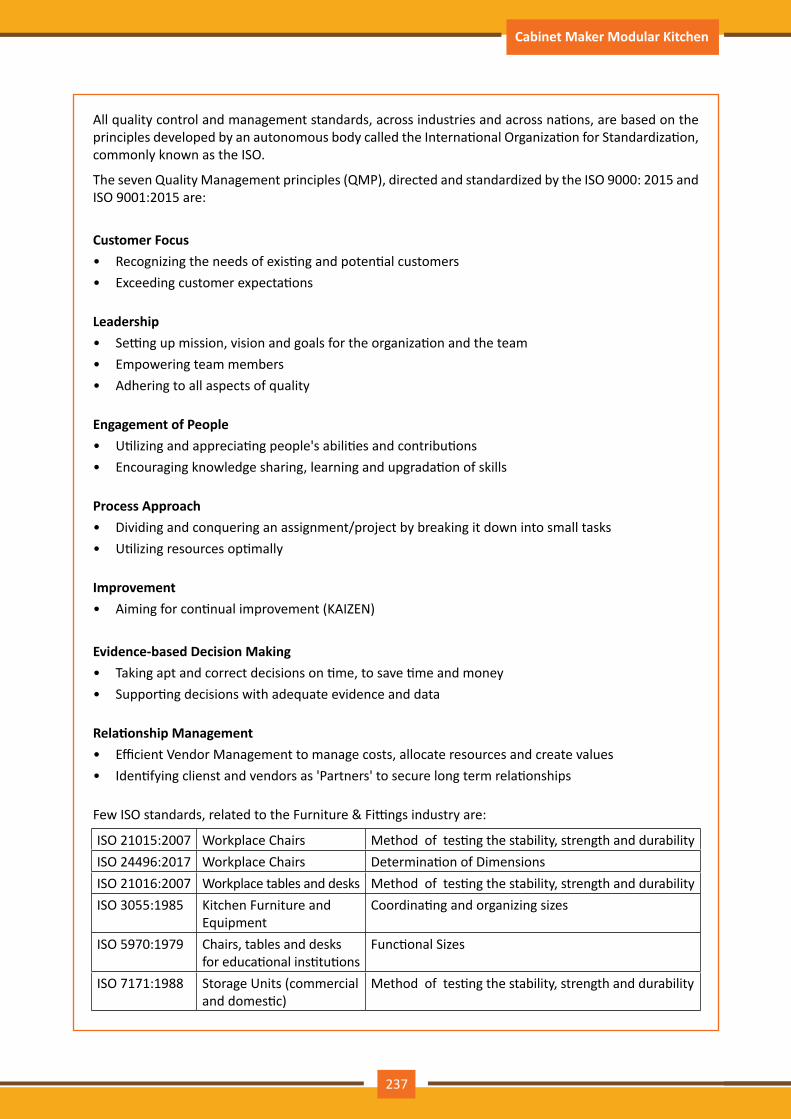
Participant Handbook Cabinet Maker Modular Kitchen
All quality control and management standards, across industries and across nations, are based on the principles developed by an autonomous body called the International Organization for Standardization, commonly known as the ISO.
The seven Quality Management principles (QMP), directed and standardized by the ISO 9000: 2015 and ISO 9001:2015 are:
Customer Focus• Recognizing the needs of existing and potential customers• Exceeding customer expectations
Leadership• Setting up mission, vision and goals for the organization and the team• Empowering team members• Adhering to all aspects of quality
Engagement of People• Utilizing and appreciating people's abilities and contributions• Encouraging knowledge sharing, learning and upgradation of skills
Process Approach• Dividing and conquering an assignment/project by breaking it down into small tasks• Utilizing resources optimally
Improvement• Aiming for continual improvement (KAIZEN)
Evidence-based Decision Making• Taking apt and correct decisions on time, to save time and money • Supporting decisions with adequate evidence and data
Relationship Management• Efficient Vendor Management to manage costs, allocate resources and create values• Identifying clienst and vendors as 'Partners' to secure long term relationships
Few ISO standards, related to the Furniture & Fittings industry are:
ISO 21015:2007 Workplace Chairs Method of testing the stability, strength and durabilityISO 24496:2017 Workplace Chairs Determination of DimensionsISO 21016:2007 Workplace tables and desks Method of testing the stability, strength and durabilityISO 3055:1985 Kitchen Furniture and
EquipmentCoordinating and organizing sizes
ISO 5970:1979 Chairs, tables and desks for educational institutions
Functional Sizes
ISO 7171:1988 Storage Units (commercial and domestic)
Method of testing the stability, strength and durability
237

Participant Handbook Cabinet Maker Modular Kitchen
Like any other job role, in any other industry, a cabinet maker is required and expected to abide by a specific reporting procedure, in case non-compliance or non-conformity occurs in any of the standard operating procedures. Non-compliance or Non-conformity occurs through Protocol Violations and Protocol Deviations.
A Protocol Deviation is said to have occurred, when there is a minor or moderate divergence from the sanctioned design, blueprint, and processes in the organization. Under such circumstances, one must alert certain personnel, holding designated positions, arranged and organized in the form of a hierarchy, known as the “Escalation Matrix”. This Escalation Matrix is segregated into multiple levels and a case of deviation
The principles of Furniture and Fittings Manufacturing and Installation comprise the following:
• Knowledge of: ᴑ The various organizational processes, rules, codes, guidelines and standards and escalation
hierarchy and matrix ᴑ The statutory responsibilities under organizational legislation and regulations ᴑ Information about the organization clients ᴑ The various types of designs of the products ᴑ The about assembly process / product line ᴑ The proper disposal system for waste and by-product
• Adherence with: ᴑ The relevant safety and security procedures to be followed ᴑ The organization procedures and formalities to be completed during work
• Knowledge of: ᴑ About furniture making terminology, abbreviations, symbols, dimension matrix etc. ᴑ These have been explained in details in Chapter 11, under Organizational Context.
8.1.7 Reporting procedure in case of deviations
8.1.8 Principle of furniture and fitti ngs manufacturing and installation
238

Participant Handbook Cabinet Maker Modular Kitchen
The importance of Discipline and Ethics, to achieve professional success can be elaborated with the help of the following elements. These are known as the pillars of workplace discipline and ethics:
Professionalism
• Defined as the competence or skill expected of a professional• Emphasizes on the importance of Grooming, which adds to one's confidence level and enhances
personality• Emphasizes on the importance of Effective Communication Skills and strong Interpersonal Skills,
which help the person in carrying out activities in a team
Respecting others
• Emphasizes on appreciating and admiring other colleagues for their contribution towards a task• Emphasizes on the need of complimenting• This helps in boosting team spirit and improves work culture
Reliability and Accountability
• Measure of how responsible a worker is towards his / her job role and assigned tasks• Dedication and Determination• Measure of how focused , committed and sincere a worker is towards the job role and responsibilities
Integrity
• Having honesty and strong moral principles are very crucial for a worker
Humility
• One must be formal, firm, yet cordial, polite and humble while dealing with peers and colleagues
Discipline can be defined as the "the practice of making people obey rules or standards of behaviour, and punishing them when they do not". The below are examples of Disciplined Behaviour for a worker:
• Working in a team, in a coordinated manner, to achieve common targets and goals• Maintaining confidentiality while working in confidential projects• Maintaining confidentiality about one's appraisal and performance ratings• Promoting the good use of constructive feedback to improve oneself• Accepting criticism on a positive note• Respecting diversities at work
8.1.9 Importance of discipline and ethics for professional success
8.1.10 What constitutes disciplined behaviour for a working professional
239
Participant Handbook Cabinet Maker Modular Kitchen
• Discouraging and condemning the following: ᴑ Aggressive and abusive behaviour like screaming or personal insults ᴑ Harmful gossip ᴑ Physical, mental and sexual harassment ᴑ Impossible targets ᴑ Unrealistic demands and unjust criticism ᴑ Stalking ᴑ Bullying
Learning about discipline alone does not make one disciplined at the workplace. One must implement what has been learned, by demonstrating responsible and disciplined behavior at the workplace.
Such disciplined behaviour includes the following:
• Punctuality– This is the behavioral trait that encourages a person to be always "On Time". Punctuality inculcates the habit of deadline adherence and effective time management, thus completing tasks as per given time and standards. Practising punctuality can be an efficient tool in delighting customers and earning their retention and loyalty.
• Avoiding Wastage– A cabinet maker must stick to the policy of "Zero Wastage". Resources must be properly planned, allocated and utilized to the fullest. Such resources include people, time, raw materials and money. Wastage of time, by loitering unnecessarily, idling and gossiping, etc. must be condemned and prevented.
• Integrity and Honesty– An employee with high standards of ethics, honesty and moral values is considered a valuable asset to the organization.
8.1.11 Demonstrate responsible and disciplined behaviors at the workplace
__________________________________________________________________________________
__________________________________________________________________________________
__________________________________________________________________________________
__________________________________________________________________________________
__________________________________________________________________________________
__________________________________________________________________________________
__________________________________________________________________________________
__________________________________________________________________________________
__________________________________________________________________________________
__________________________________________________________________________________
Notes
240
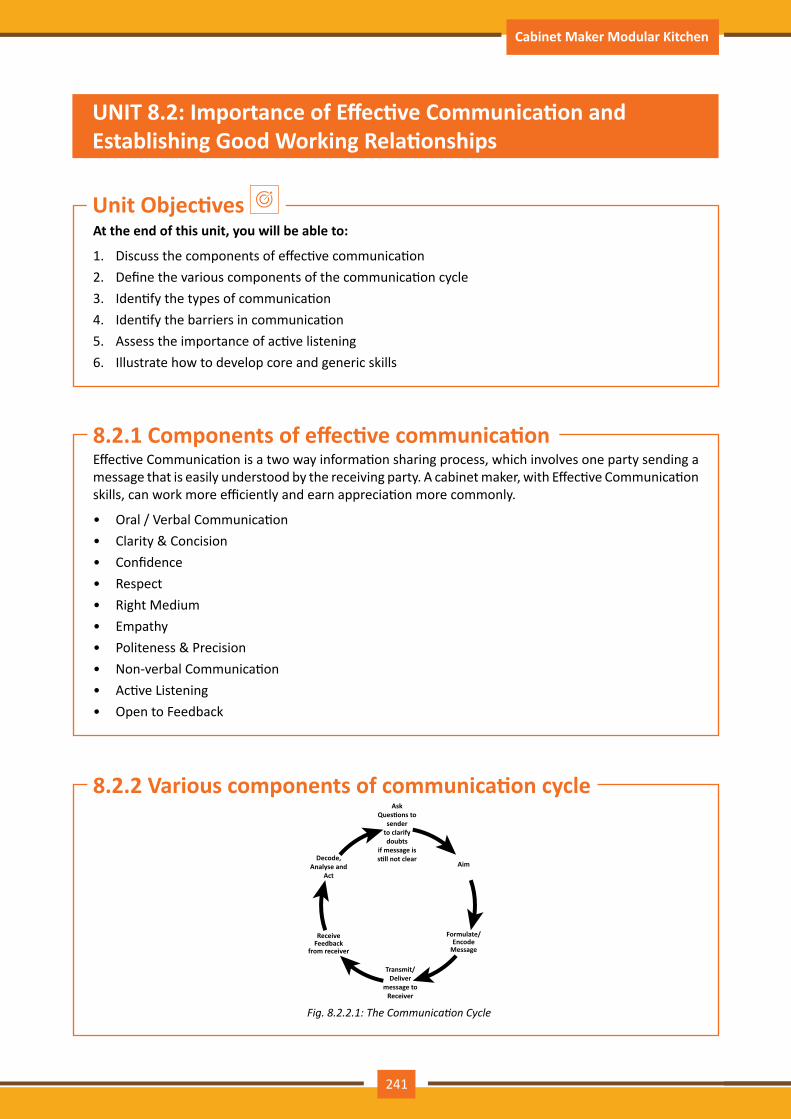
Participant Handbook Cabinet Maker Modular Kitchen
At the end of this unit, you will be able to:
1. Discuss the components of effective communication2. Define the various components of the communication cycle3. Identify the types of communication4. Identify the barriers in communication5. Assess the importance of active listening6. Illustrate how to develop core and generic skills
Unit Objectives
UNIT 8.2: Importance of Effective Communication and Establishing Good Working Relationships
Effective Communication is a two way information sharing process, which involves one party sending a message that is easily understood by the receiving party. A cabinet maker, with Effective Communication skills, can work more efficiently and earn appreciation more commonly.
• Oral / Verbal Communication• Clarity & Concision• Confidence• Respect• Right Medium• Empathy • Politeness & Precision• Non-verbal Communication• Active Listening• Open to Feedback
Fig.8.2.2.1:TheCommunicationCycle
8.2.1 Components of effective communication
8.2.2 Various components of communication cycle
241
Participant Handbook Cabinet Maker Modular Kitchen
Verbal or Oral Communication
• Involves the use of language spoken verbally or orally to convey messages
Written Communication
• Involves the art of writing to convey messages. This includes letters, emails, reports, etc.
Non-verbal Communication
• Involves the use of Body Language and gestures to convey messages
The following factors hinder Effective Communication and are hence called "Barriers".
• Use of Jargon and Technical terms• Lack of attention, interest, distractions, or irrelevance to the receiver• Differences in Perception• Physical disabilities like Hearing Ailments or Impaired Speech• Cultural & Language Differences and Unfamiliar accents• Expectations and prejudices leading to false assumptions or stereotyping
Active Listening is the process by which an individual secures information from another individual or group.
Display active listening skills while interacting with others at work:
• The steps involved in Effective and Active Listening are:• Facing the speaker and maintaining an eye contact• Attentively listen and comprehend the information given by the speaker• Staying attentive yet relaxed• Keeping an open, receiving mind• Listening to the words and trying to visualize what the speaker is saying• Never interrupting or imposing your "solutions"• Waiting for the speaker to pause to ask clarifying questions• Asking questions only to ensure understanding• Communicate clearly on the issues being faced and clarify queries• Trying to empathize with the speaker• Providing the speaker with constructive feedback
8.2.3 Types of communication
8.2.4 Barriers in communication
8.2.5 Importance of active listening
242
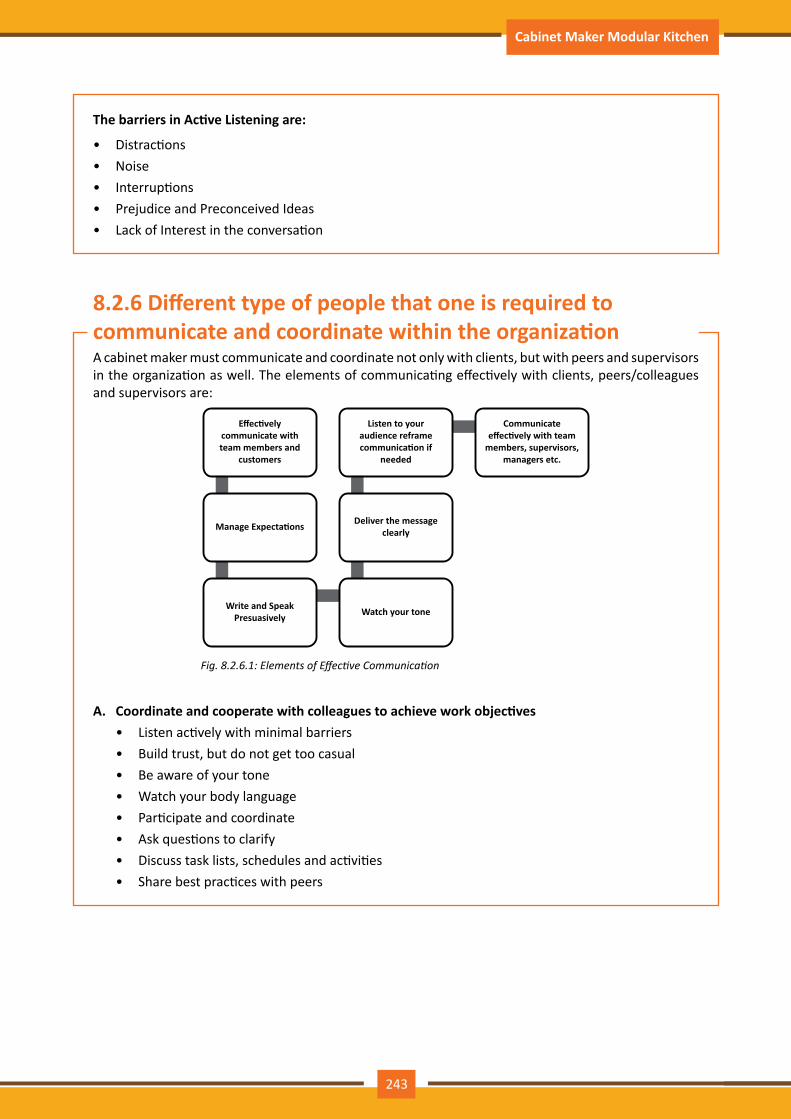
Participant Handbook Cabinet Maker Modular Kitchen
The barriers in Active Listening are:
• Distractions• Noise• Interruptions• Prejudice and Preconceived Ideas• Lack of Interest in the conversation
A cabinet maker must communicate and coordinate not only with clients, but with peers and supervisors in the organization as well. The elements of communicating effectively with clients, peers/colleagues and supervisors are:
Fig.8.2.6.1:ElementsofEffectiveCommunication
A. Coordinate and cooperate with colleagues to achieve work objectives• Listen actively with minimal barriers • Build trust, but do not get too casual • Be aware of your tone• Watch your body language • Participate and coordinate • Ask questions to clarify• Discuss task lists, schedules and activities• Share best practices with peers
8.2.6 Different type of people that one is required to communicate and coordinate within the organization
243
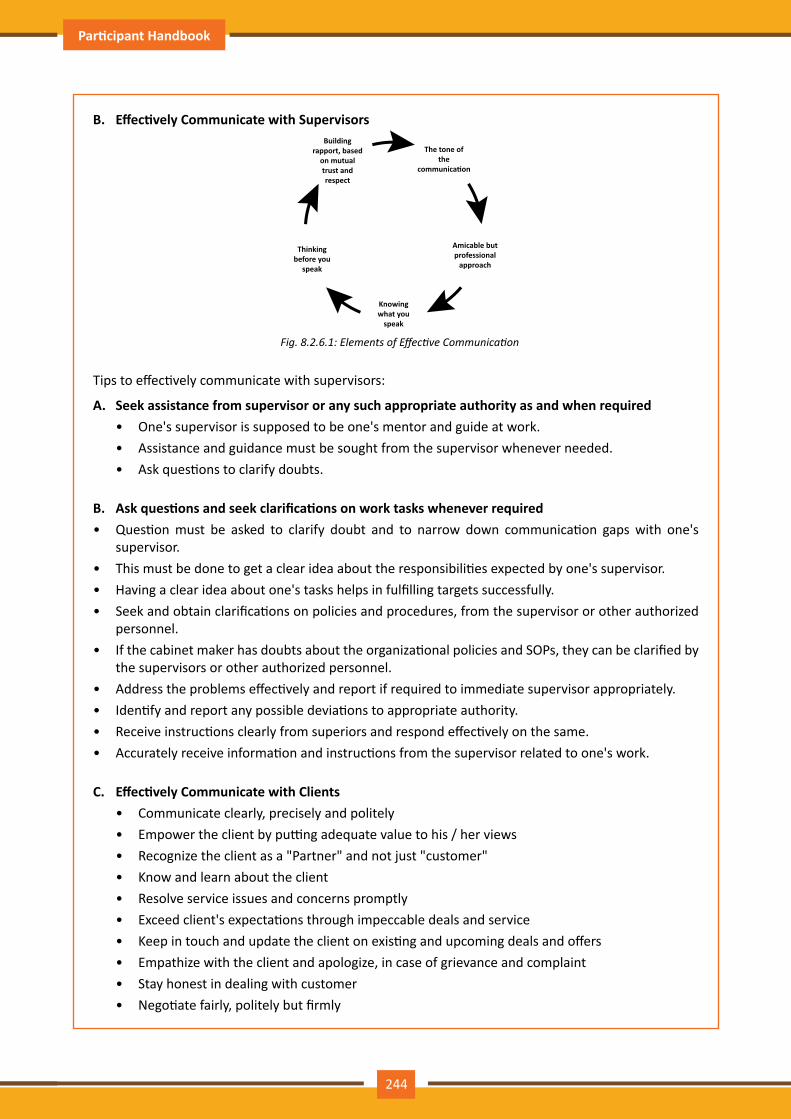
Participant Handbook Cabinet Maker Modular Kitchen
B. Effectively Communicate with Supervisors
Fig.8.2.6.1:ElementsofEffectiveCommunication
Tips to effectively communicate with supervisors:
A. Seek assistance from supervisor or any such appropriate authority as and when required• One's supervisor is supposed to be one's mentor and guide at work.• Assistance and guidance must be sought from the supervisor whenever needed.• Ask questions to clarify doubts.
B. Ask questions and seek clarifications on work tasks whenever required• Question must be asked to clarify doubt and to narrow down communication gaps with one's
supervisor.• This must be done to get a clear idea about the responsibilities expected by one's supervisor.• Having a clear idea about one's tasks helps in fulfilling targets successfully.• Seek and obtain clarifications on policies and procedures, from the supervisor or other authorized
personnel.• If the cabinet maker has doubts about the organizational policies and SOPs, they can be clarified by
the supervisors or other authorized personnel.• Address the problems effectively and report if required to immediate supervisor appropriately.• Identify and report any possible deviations to appropriate authority.• Receive instructions clearly from superiors and respond effectively on the same.• Accurately receive information and instructions from the supervisor related to one's work.
C. Effectively Communicate with Clients• Communicate clearly, precisely and politely• Empower the client by putting adequate value to his / her views• Recognize the client as a "Partner" and not just "customer"• Know and learn about the client• Resolve service issues and concerns promptly• Exceed client's expectations through impeccable deals and service• Keep in touch and update the client on existing and upcoming deals and offers • Empathize with the client and apologize, in case of grievance and complaint • Stay honest in dealing with customer• Negotiate fairly, politely but firmly
244
Participant Handbook Cabinet Maker Modular Kitchen
Grievance, according to the Dictionary, is "a complaint or a strong feeling that one has been treated unfairly".
A. Follow escalation matrix in case of any grievance• Before complaining and expressing grievance, be very clear of the objectives, i.e. why do you
require to complain and what do you want to achieve in the long run• Follow the Escalation Matrix for Internal Grievance Resolution• At each level of the matrix, write an email to the designated official, according to the guidelines
and formats provided.• Follow up with the concerned official, if the complaint or grievance is not addressed within the
standard TAT at that escalation level.• Document all records of emails and phone calls, till the issue is duly addressed and closed.• If the concerned official, at a certain level, does not address the grievance within the TAT,
"escalate" and carry forward the issue to the next level.• Repeat the process from 2-6.• On resolution of the grievance, thank the concerned authority over phone or email, whichever
is applicable.
B. Addressing Worker's Grievance (for the team lead or supervisor; here, the cabinet maker)• Hold a formal yet private meeting with the worker.• Acknowledge the grievance and empathize.• Maintain confidentiality of the entire matter.• Invite witnesses, if deemed absolute necessary.• Depending on the complexity of the grievance, continue with further investigation.• Gather information to support your decision.• Take the final decision.• Convey your decision to the worker.• Escalate the matter to the immediately next level, if the worker is not happy with the decision
taken.
C. Addressing Client's Grievance• Do not contradict with or prevent the client from talking.• Listen actively and patiently.• Apologize (even if you are not wrong) and empathize with the client.• Listen to the grievance/complaint with an open mind.• Promise that you will get back to him/her with a permanent solution, at the earliest. • Keep your promise and respond to the client with a solution within the standard TAT. • If you are unable to resolve the issue on your own, escalate the same to your next level.• Follow up with the concerned officials till the grievance is addressed and the issue resolved.• Inform the client over email or phone that his/her grievance has been taken care of.
8.2.7 Expressing and addressing grievances appropriately and effectively
245

Participant Handbook Cabinet Maker Modular Kitchen
Team Work is extremely crucial for successfully carrying out an assignment. An important aspect of effective team work is supporting co-workers facing problems, for ensuring smooth functioning of the assignment. Supporting a co-worker is vital because:
• Confidence: Going out of one's way to help and support co-workers will have a marked effect on their confidence and give them a sense of pride in their work, but it is likely to improve engagement, productivity and eagerness to maintain high standards at workplace.
• Improved Communication: If you are supportive and friendly towards a colleague, he/she will see you as an approachable person, hence marinating smooth communication and increasing productivity.
• Team Spirit: A supportive environment undoubtedly leads to a better working atmosphere. It helps in creating a sense of community and team spirit, which works as a reminder that everyone is striving towards one unified goal.
• Support from a grateful co-worker, in return: To repay your support and help, the colleagues, who you helped and supported, will help you in your work, as a token of gratitude.
Interpersonal Conflict can be defined as a serious quarrel or disagreement between two or more persons. Conflict Management is extremely crucial in maintaining a good work environment and the standard productivity of the organization.
The five stages involved in resolving a conflict are:
• Identifying a safe place and time to talk• Clarifying individual perceptions involved in the conflict• Arranging for a discussion with witnesses, if required • Adopting an active and empathetic listening approach• Searching for options with the aim of a win-win outcome• Arriving at a conclusion agreed upon by all parties in the conflict
The common strategies involved in managing Interpersonal Conflict are:
• Collaborating • Accommodating • Avoiding• Competing• Compromising• Forcing
8.2.8 Importance and need of supporting co-workers facing problems for smooth functioning of work
8.2.9 Importance and ways of managing interpersonal conflict effectively
246
Participant Handbook Cabinet Maker Modular Kitchen
Core and Generic skills, associated with any profession or job role, comprise of Speaking, Listening, Reading and Writing Skills. The 4 essential components of language skills are:
• Reading • Writing • Speaking • ListeningListening and speaking skills have already been covered under Effective Communication. Let us now discuss the importance of Reading and Writing skills for the profession of cabinet maker. A cabinet maker must develop these skills not only in English, but in Hindi or any other local language of the state.
A. Importance of Reading Skills for cabinet maker• The role and responsibilities of a cabinet makers comprises the following:• Reading and understanding job specifications• Reading and understanding the package details as per company procedures• Reading instructions and interpreting the ones for assembling/installation and for the safe use
of machine and tools• Reading internal information documents sent by internal teams• Reading all organizational and equipment related health and safety manuals and documents• Reading and understanding safety related documents• Reading instructions, provided in Hindi or any other local language, from supervisor, colleague
or client• Reading and understanding manufacturer's instructions• Interpreting pictorial representations and written signs or instructions• Reading and interpreting numbers, written in Hindi or any other local language• Reading and understanding the implication of safety symbols and basic warning signs, wherever
applicable
Tips to develop good reading skills:
• Reading a newspaper daily (English or any local language)• Reading instruction manuals, directions for use, labels, etc. and trying to grasp the meaning• Asking oneself questions while reading and after reading• Discussing with a colleague or family member, to ensure if you have understood the right meaning
of the material thus read• Taking notes while reading newspaper and magazines• Making notes of popular words
B. Importance of Writing Skills for cabinet maker• The role and responsibilities of a cabinet maker comprises the following:• Documenting the information communicated /observations if any related to process and
procedures• Documenting the records related to assembling and installation• Preparing the reports and information documents to internal departments/ internal teams
8.2.10 Core and generic skills
247
Participant Handbook Cabinet Maker Modular Kitchen
• Writing in Hindi or local language• Filling up logs, forms and formats in local language or Hindi for recording quantity and quality of
work figures, defects and other related information, etc. whenever needed
The role and responsibilities of a cabinet maker, in this context, include:
• Document the information communicated /observations if any related to process and procedures• Document records related to assembling and installation• Write reports, information documents to internal departments/ internal teams• Read and understand the package details as per company procedures• Read instructions and interpret such as those for assembling/installation and for the safe use of
machine and tools• Read internal information documents sent by internal teams• Write in Hindi or local language• Fill formats, logs and forms related to work in local language or Hindi/English• Document measurement appropriately whenever required• Read all organizational and equipment related health and safety manuals and documents• Read and comprehend safety related documents• Fill logs, forms and formats in local language or Hindi for recording quantity and quality of work
figures, defects and other related information, etc. whenever needed• Document measurement appropriately whenever required• Read instructions from supervisor provided in local language or Hindi • Read and understand manufacturer's instructions and job specifications • Interpret pictorial representations and written signs or instructions• Read and interpret numbers written in Hindi or local language• Understand safety symbols and basic warning signs wherever needed
__________________________________________________________________________________
__________________________________________________________________________________
__________________________________________________________________________________
__________________________________________________________________________________
__________________________________________________________________________________
__________________________________________________________________________________
__________________________________________________________________________________
__________________________________________________________________________________
__________________________________________________________________________________
__________________________________________________________________________________
__________________________________________________________________________________
Notes
248
Participant Handbook Cabinet Maker Modular Kitchen
At the end of this unit, you will be able to:
1. Discuss the importance and benefits of preparing, planning and organizing work2. Discuss the steps involved in preparing, planning and organizing Work3. Discuss the methods adopted to prepare, plan and organize work
Unit Objectives
UNIT 8.3: Prepare and Organize Work
One must learn the importance of preparing and planning, in advance, an assignment, so that it can be accomplished in a very organized manner. The importance and benefits of the same are:
• Planning helps in making quick and correct decisions by providing a person with adequate guidelines• Planning helps in preparing a person for the worst outcomes and unexpected situations, thus
helping the person in exercising better control in that situation• Preparing and planning helps in optimally allocating resources like raw materials, finances, time and
manpower.• Preparing and planning helps in identifying, quantifying and defining goals, so that appropriate
methods can be adopted to complete the assignment on time and in an organized manner.
The various steps involved in preparing, planning and organizing work are:
• Developing objectives and goals• Designing methods (tasks) to meet these objectives and goals• Determining and allocating resources needed to accomplish tasks• Determining a timeline, over which the entire project / assignment will be carried out• Evaluating each task, according to its outcomes• Monitoring and tracking the evaluation process of each task• Finalizing the plan• Distributing the plan among all concerned people in the team
While assembling and installing different parts of modular furniture
• Plan, organize and prioritize the work order and jobs received • Ability to organize and conduct installation in optimal manner • Plan to utilize time and equipment effectively
8.3.1 Importance of preparing, planning and organizing work
8.3.2 Steps involved in preparing, planning and organizing work
8.3.3 Methods adopted to prepare, plan and organize work
249
Participant Handbook Cabinet Maker Modular Kitchen
• Ability to concentrate on task and ability to complete with time limits• Assist in record keeping and proper documentation• While ensuring health and safety at workplace• Plan and organize own work in a way that all activities are completed in time and as per specifications• Plan word as per job specification• Plan and organize cleaning and maintenance activities
__________________________________________________________________________________
__________________________________________________________________________________
__________________________________________________________________________________
__________________________________________________________________________________
__________________________________________________________________________________
__________________________________________________________________________________
__________________________________________________________________________________
__________________________________________________________________________________
__________________________________________________________________________________
__________________________________________________________________________________
__________________________________________________________________________________
__________________________________________________________________________________
__________________________________________________________________________________
__________________________________________________________________________________
__________________________________________________________________________________
__________________________________________________________________________________
__________________________________________________________________________________
__________________________________________________________________________________
__________________________________________________________________________________
__________________________________________________________________________________
__________________________________________________________________________________
__________________________________________________________________________________
__________________________________________________________________________________
__________________________________________________________________________________
Notes
250
Participant Handbook Cabinet Maker Modular Kitchen
At the end of this unit, you will be able to:
1. Discuss the requirements of decision making2. Identify the steps involved in the decision making process
Unit Objectives
UNIT 8.4: Decision Making
Decisions at workplace must be taken promptly, based on the best available researches and data gathered from relevant field experiences. Such data provide 'Evidence' and help a person in making appropriate decisions.
The requirements of efficient decision making process are:
• One must have adequate yet controlled access to correct and reliable data• One must follow appropriate processes in analyzing data• One must take decisions promptly, based on the analysis of collected data (for example, trend
analysis)• While taking decisions, apart from analyzing the researched data, one must rely on practical
experiences as well
The role and responsibilities of a cabinet maker, in this context, include the following:
• Ability to troubleshoot common concerns faced• Analyze critical points in day to day tasks through experience and observation, and identify control
measures to solve the issue• Find damaged and/or defective products and hardware and perform minor repairs or reject them• Take decisions of once own roles and responsibilities• Decide on to accept or reject a work piece on the basis of quality parameter• Decide on material requirement for related to once work
The steps involved in the general decision making process are evident from the below diagram:
1. Identify the goal, i.e . what needs to be decided2. Gather information from researches and field experiments (evidences)3. Identify the alternatives4. Weigh and measure all evidences against each alternative5. Select the most appropriate alternative (with maximum weightage)6. Take suitable actions to realize the alternative and take decision7. Review the decision in terms of the results achieved
8.4.1 Requirements of decision making
8.4.2 Steps involved in the decision making process
251

Participant Handbook Cabinet Maker Modular Kitchen
__________________________________________________________________________________
__________________________________________________________________________________
__________________________________________________________________________________
__________________________________________________________________________________
__________________________________________________________________________________
__________________________________________________________________________________
__________________________________________________________________________________
__________________________________________________________________________________
__________________________________________________________________________________
__________________________________________________________________________________
__________________________________________________________________________________
__________________________________________________________________________________
__________________________________________________________________________________
__________________________________________________________________________________
__________________________________________________________________________________
__________________________________________________________________________________
__________________________________________________________________________________
__________________________________________________________________________________
__________________________________________________________________________________
__________________________________________________________________________________
__________________________________________________________________________________
__________________________________________________________________________________
__________________________________________________________________________________
__________________________________________________________________________________
__________________________________________________________________________________
__________________________________________________________________________________
__________________________________________________________________________________
__________________________________________________________________________________
__________________________________________________________________________________
__________________________________________________________________________________
__________________________________________________________________________________
Notes
252

Participant Handbook Cabinet Maker Modular Kitchen
At the end of this unit, you will be able to:
1. Identify the steps involved in solving a problem, using analytical and critical thinking abilities2. List the strategies adopted by a cabinet maker for solving problems at workplace
Unit Objectives
UNIT 8.5: Problem Solving
A Problem can be defined as a difficult or unexpected situation, regarded as unwelcome and needing to be dealt with and overcome. In a broader sense, problems can take the form of complex puzzles and riddles.
• Identify the problem• Understand everyone's interests • List the possible solutions (options) • Evaluate the options• Select an option or options• Document the plan• Monitor and evaluate
A. Solving Problems while assembling and installation of different parts of modular furniture• Supporting the supervisor and peers in solving problems, by discussing the possible solutions
(Options)• Quickly identifying the common causes of errors and helping in resolving the same
(Troubleshooting)• Implementing domain knowledge and monitoring the daily tasks through experience and
observation, for identifying control measures to solve issues• Providing the team with suggestions to further streamline the flow of operations at work• Implementing reasoning skills for identifying and resolving basic problems• Utilizing the acquired knowledge of the process and applying the information gathered from
observation, experience, reasoning, or communication to act efficiently
B. Solving Problems while ensuring health and safety at workplace• Identifying defects in materials, tools and equipment and ways to resolve them on time• Ensuring timely correction of errors for minimizing rejection of pieces or rework• Analyzing the situation and taking appropriate actions while dealing with team members• Analyzing, evaluating and deploying the information gathered from observation, experience,
reasoning, or communication to act efficiently
8.5.1 Steps involved in solving a problem
8.5.2 Strategies adopted by a cabinet maker for solving problems at workplace
253

Participant Handbook Cabinet Maker Modular Kitchen
__________________________________________________________________________________
__________________________________________________________________________________
__________________________________________________________________________________
__________________________________________________________________________________
__________________________________________________________________________________
__________________________________________________________________________________
__________________________________________________________________________________
__________________________________________________________________________________
__________________________________________________________________________________
__________________________________________________________________________________
__________________________________________________________________________________
__________________________________________________________________________________
__________________________________________________________________________________
__________________________________________________________________________________
__________________________________________________________________________________
__________________________________________________________________________________
__________________________________________________________________________________
__________________________________________________________________________________
__________________________________________________________________________________
__________________________________________________________________________________
__________________________________________________________________________________
__________________________________________________________________________________
__________________________________________________________________________________
__________________________________________________________________________________
__________________________________________________________________________________
__________________________________________________________________________________
__________________________________________________________________________________
__________________________________________________________________________________
__________________________________________________________________________________
__________________________________________________________________________________
__________________________________________________________________________________
Notes
254

Participant Handbook Cabinet Maker Modular Kitchen
At the end of this unit, you will be able to:
1. Identify the common methods involved in managing anger2. Identify the effects of stress3. Identify how can one manage work stress
Unit Objectives
UNIT 8.6: Manage Anger and Stress
Anger can be defined as a strong feeling of annoyance, displeasure, or hostility. The common reasons for anger are:
• When one is scolded or harshly criticized by one's clients or supervisors• When one does not get due appreciation at work• When one does not get what he / she wants• When someone irritates or provokes without any reason• When things do not go according to the plan
The methods involved in managing anger are:
• Move yourself away from the situation• Divert yourself in other activities like exercise, reading, listening to music• Take a deep breath and think before you speak• Count from 1 to 10 slowly• Use humour or jokes to reduce anger• Exercise, yoga and meditation also help in anger management
Stress can be defined as a state of mental or emotional strain or tension resulting from adverse or demanding circumstances. Stress Management must be learned and practised at all phases of one's work life, especially in fields that involve intensive labour, focus and client interaction.
Effect of Stress on one's mind, body and behaviour are:
A. Body• Lethargy• Palpitation and increased heart rate• Headache• Indigestion• Insomnia or prolonged sleep
8.6.1 Common methods involved in managing anger
8.6.2 Effects of stress
255
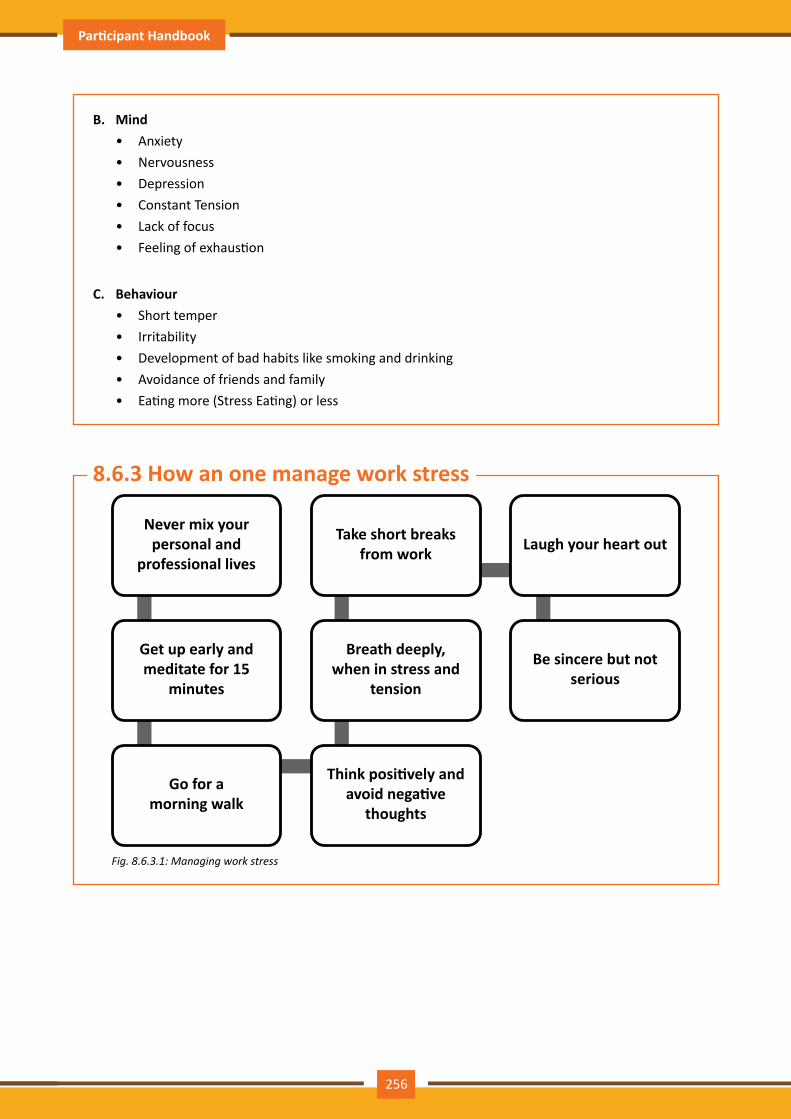
Participant Handbook Cabinet Maker Modular Kitchen
B. Mind• Anxiety• Nervousness• Depression• Constant Tension• Lack of focus• Feeling of exhaustion
C. Behaviour • Short temper • Irritability• Development of bad habits like smoking and drinking• Avoidance of friends and family• Eating more (Stress Eating) or less
Fig.8.6.3.1:Managingworkstress
8.6.3 How an one manage work stress
256

Participant Handbook Cabinet Maker Modular Kitchen
__________________________________________________________________________________
__________________________________________________________________________________
__________________________________________________________________________________
__________________________________________________________________________________
__________________________________________________________________________________
__________________________________________________________________________________
__________________________________________________________________________________
__________________________________________________________________________________
__________________________________________________________________________________
__________________________________________________________________________________
__________________________________________________________________________________
__________________________________________________________________________________
__________________________________________________________________________________
__________________________________________________________________________________
__________________________________________________________________________________
__________________________________________________________________________________
__________________________________________________________________________________
__________________________________________________________________________________
__________________________________________________________________________________
__________________________________________________________________________________
__________________________________________________________________________________
__________________________________________________________________________________
__________________________________________________________________________________
__________________________________________________________________________________
__________________________________________________________________________________
__________________________________________________________________________________
__________________________________________________________________________________
__________________________________________________________________________________
__________________________________________________________________________________
__________________________________________________________________________________
__________________________________________________________________________________
Notes
257

Participant Handbook Cabinet Maker Modular Kitchen
At the end of this unit, you will be able to:
1. Explain the importance of managing time
Unit Objectives
UNIT 8.7: Manage Time
Time Management is about managing yourself. It is about making a commitment to be more organized, maintain your focus and use your time to your best advantage.
The three most important tools for good time management are:
• Attendance • Discipline • Punctuality
Tips to manage one's time effectively:
• Sticking to one's plan• Maintaining a daily To-Do list• Allocating one's time wisely• Adhering to and respecting deadlines• Avoiding wasting time
8.7.1 Importance of managing time
__________________________________________________________________________________
__________________________________________________________________________________
__________________________________________________________________________________
__________________________________________________________________________________
__________________________________________________________________________________
__________________________________________________________________________________
__________________________________________________________________________________
__________________________________________________________________________________
__________________________________________________________________________________
__________________________________________________________________________________
__________________________________________________________________________________
__________________________________________________________________________________
Notes
258
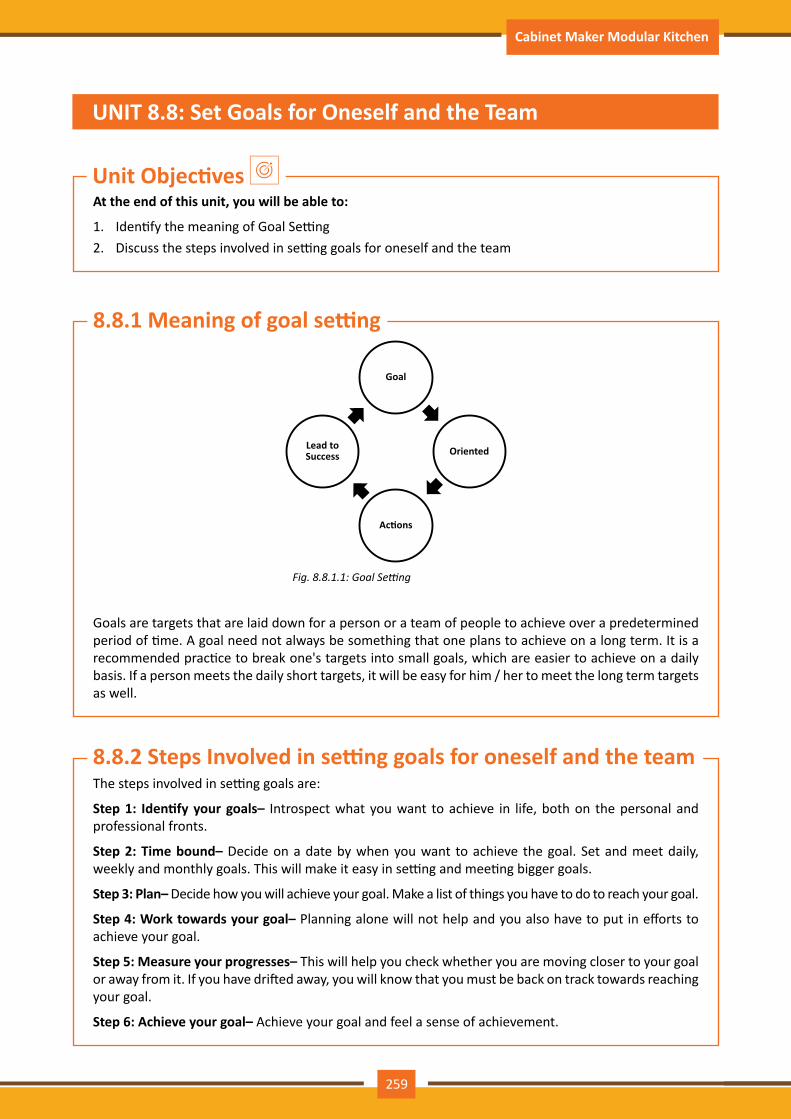
Participant Handbook Cabinet Maker Modular Kitchen
At the end of this unit, you will be able to:
1. Identify the meaning of Goal Setting2. Discuss the steps involved in setting goals for oneself and the team
Unit Objectives
UNIT 8.8: Set Goals for Oneself and the Team
Fig.8.8.1.1:GoalSetting
Goals are targets that are laid down for a person or a team of people to achieve over a predetermined period of time. A goal need not always be something that one plans to achieve on a long term. It is a recommended practice to break one's targets into small goals, which are easier to achieve on a daily basis. If a person meets the daily short targets, it will be easy for him / her to meet the long term targets as well.
The steps involved in setting goals are:
Step 1: Identify your goals– Introspect what you want to achieve in life, both on the personal and professional fronts.
Step 2: Time bound– Decide on a date by when you want to achieve the goal. Set and meet daily, weekly and monthly goals. This will make it easy in setting and meeting bigger goals.
Step 3: Plan– Decide how you will achieve your goal. Make a list of things you have to do to reach your goal.
Step 4: Work towards your goal– Planning alone will not help and you also have to put in efforts to achieve your goal.
Step 5: Measure your progresses– This will help you check whether you are moving closer to your goal or away from it. If you have drifted away, you will know that you must be back on track towards reaching your goal.
Step 6: Achieve your goal– Achieve your goal and feel a sense of achievement.
8.8.1 Meaning of goal setting
8.8.2 Steps Involved in setting goals for oneself and the team
259

Participant Handbook Cabinet Maker Modular Kitchen
__________________________________________________________________________________
__________________________________________________________________________________
__________________________________________________________________________________
__________________________________________________________________________________
__________________________________________________________________________________
__________________________________________________________________________________
__________________________________________________________________________________
__________________________________________________________________________________
__________________________________________________________________________________
__________________________________________________________________________________
__________________________________________________________________________________
__________________________________________________________________________________
__________________________________________________________________________________
__________________________________________________________________________________
__________________________________________________________________________________
__________________________________________________________________________________
__________________________________________________________________________________
__________________________________________________________________________________
__________________________________________________________________________________
__________________________________________________________________________________
__________________________________________________________________________________
__________________________________________________________________________________
__________________________________________________________________________________
__________________________________________________________________________________
__________________________________________________________________________________
__________________________________________________________________________________
__________________________________________________________________________________
__________________________________________________________________________________
__________________________________________________________________________________
__________________________________________________________________________________
__________________________________________________________________________________
Notes
260

Participant Handbook Cabinet Maker Modular Kitchen
At the end of this unit, you will be able to:
1. Discuss basic AutoCAD2. Practise how to read and interpret 2D/3D drawings
Unit Objectives
UNIT 8.9: Understanding Technical Drawings and Blueprints
Computer-aided design, commonly known as CAD, controls the manufacture of parts and accessories, according to specifications given by the client. This software defines the mechanical dimensions, commonly known as “specifications” of furniture accessories, parts or modules. CAD can also be used to enhance the productivity and accuracy of the machines. CAD helps in preparing the blueprint of any modular furniture or module / accessory / part. AutoCAD is one of the most popular software that implements computer-aided design. The latest version of AutoCAD, AutoCAD 23.0, has been released on March 22, 2018.
Important AutoCAD Commands
QSAVE saving the current drawing in default formatARC creating an arcZOOM increasing or decreasing the magnification of view in the current viewpointWBLOCK writing an object or a block to a new drawing fileSTRETCH stretching objects crossed by a selection window or polygonEXPLODE breaking a compound object into its component objectsERASE deleting objects from a drawingDIMSTYLE creating and modifying dimension stylesCIRCLE creating a circleREDRAW refreshing the display in the current viewpointFILLET rounding and filleting (cutting into strips) the edges of objectsVIEW saving and restoring named views, camera views, layout views and preset viewsMTEXT creating a multiline text objectGROUP creating and managing saved sets of objects called "groups"BLOCK creating a block from selected objectsHATCH filling an enclosed area or selected objects with a hatch pattern, sol- id fill or gradient fillJOIN joining similar objects to form a new, single, unbroken object
8.9.1 Basic AutoCAD
261
Participant Handbook Cabinet Maker Modular Kitchen
MOVE moving objects along a specific direction, for a specific distanceINSERT inserting a new block object or drawing into the current drawing / draftOFFSET creating concentric circles, parallel lines and parallel curvesLINE creating straight line segmentsPAN adding a given parameter with grips to a dynamic block definition
The job of a cabinet maker is practically impossible without good skills of reading, studying and interpreting work orders, technical drawings and blueprints.
A. Ability to interpret work specifications and interpret them accuratelyA Work Order is a task, job or assignment, which can be assigned to a person for completion. A work order may be issued from the client's end or circulated internally within the organization. Work Orders comprise details and specifications of a certain job per work-piece. It explains the client's expectations about the assignment.
The essential components of Work Orders are:
• Instructions and Guidelines• Cost Estimates• Forms and Annexures• Date and time to execute the work order• Information about the location and entities to execute the work order• The person to whom the work order is assigned
Job Orders are the work orders circulated internally within the organization. A Job Order is prepared during the initial stages of an assignment / project and is connected with the final Bill of Materials.
The essential components of a Job Order are:
• Quantity of the product to be manufactured, assembled, installed or repaired• Quantity of the raw material to be used, along with its Price per unit and the number of units
required • The types of labour needed (casual or skilled), rate per hour or per unit and amount required
Machine utilization of each machine involved in carrying out the assignment, the rate and the amount.
B. Study the drawing (2D/3D) and designs and understand the requirement• The Blueprint and its Parts
ᴑ The requisite for reading a Blueprint is interpreting 1st and 3rd angle drawings. ᴑ A Blueprint is a 2D (two dimensional) miniature / replica of the actual work piece, prepared
by scaling down the actual measurements. ᴑ A Blueprint is a plan, proportionate with the product to be developed. ᴑ It comprises the required technical specifications as well as the techniques of preparation. ᴑ The essential parts of a Blueprint are:
8.9.2 Reading and interpreting 2D/3D drawings
262
Participant Handbook Cabinet Maker Modular Kitchen
• Elevation View ᴑ Vertical display of one side of the project, from north, south, east or west ᴑ Gives an idea about how the complete structure will look after installation ᴑ Helps in determining the height dimesions
• Plan View ᴑ Horizontal display of the proposed job looking down from above ᴑ This view is usually on a horizontal plane 30 inches (75 centimeters) above the floor ᴑ Helps in determining the length and width dimensions
• Section View ᴑ A cut-through display, showing how an object will be built
C. Steps in Reading a Blueprint• Determining the view
ᴑ The Elevation view must be studied and understood first. This is a representation of the expected outcome of the project. This view indicates the height dimensions of the work piece.
ᴑ The Plan view comes next, which indicates the length and width dimensions of the work piece.
ᴑ The Section view must be read at the last, to get a clear idea about the sequence of the parts to be built, in order to obtain the final product.
• Understand the scale and determine the actual dimensions ᴑ The measurement scale is always exactly proportionate with the final product. ᴑ This proportion is usually 1:2 ratio. ᴑ The Engineering Scale is used, which incorporates a ratio, where one has to follow multiples
of 10.
• Reading the Title Block ᴑ This indicates the context in which the drawing must be perceived. The Title block provides
information about the following: ♦ General tolerances ♦ Projection details for the item . component to be manufactured ♦ Scale used in the drawing ♦ Status of the drawing (Preliminary, Approved, etc.) ♦ Name of the component or assembly ♦ Contact details of the drawing owner ♦ Mass ♦ Units used in the drawing ♦ Sheet number and number of sheets
263
Participant Handbook Cabinet Maker Modular Kitchen
• Reading the Notes ᴑ The notes should lie outside the Title Block. ᴑ The information provided by the notes are preferred to that provided by the Title Block and
hence, the Notes supersede the Title Block information. ᴑ In case of conflicts, the Notes are considered correct over the Title Block.
• Reading the work order or the bill of materials ᴑ The Work Order provides the requisite details of the assignment and the requirements of
the final product. ᴑ The Bill of Materials is a list of the components and the corresponding quantities that make
up the general assembly of the item being manufactured. ᴑ The BOM is usually tabulated on the first page of the Blueprint/Drawing.
• Understanding the differences between the various Lines and interpreting them ᴑ Visible lines indicate an edge is visible in the relevant view ᴑ Hidden lines indicate the edge is behind a face ᴑ Phantom lines indicate edges of structure that are relevant but not included in the drawing ᴑ Phantom lines could also mean a tangent line (where a curve starts or ends) ᴑ Centre lines indicate the geometric center of the assembly
• Understand and interpret the projections, sections and details ᴑ View the drawing itself, regardless of the dimensions, trying to visualise how and what the
assembly looks like in 3D. ᴑ Use the sections and details as a start point and you will soon realise that the details and
sections have been created to highlight important components or features. ᴑ With the aid of the BOM/Work Order, find out the components in the drawing in order to
understand the role each component plays. ᴑ Find out the notes that have arrows pointing towards the assembly. These information are
extremely vital to the assembly and its functionality. ᴑ Use the dimensions in the drawing to comprehend the size of the component/Assembly/
Final product.
• Understanding allowances from the blueprint ᴑ Allowance is the minimum clearance (positive allowance), or maximum interference
(negative allowance) between parts of an Assembly. ᴑ While preparing Blueprints and technical drawings, high degree of diligence is implemented
to incorporate Allowances, thus ensuring "Zero Wastage". ᴑ This helps in reducing the Cost of Production per unit and increasing the productivity of the
assignment.
• Work instructions and specifications and interpret them accurately ᴑ Instructions and specifications provided to the cabinet maker must not be read casually. ᴑ Instead, all sections and preferably every word must be read and understood diligently.
264
Participant Handbook Cabinet Maker Modular Kitchen
ᴑ This helps the cabinet maker and the other team members to fully understand and interpret the client's requirements and the specifications of the work piece or job.
ᴑ This is an important step in the project/assignment since it eliminates chances of miscommunication.
__________________________________________________________________________________
__________________________________________________________________________________
__________________________________________________________________________________
__________________________________________________________________________________
__________________________________________________________________________________
__________________________________________________________________________________
__________________________________________________________________________________
__________________________________________________________________________________
__________________________________________________________________________________
__________________________________________________________________________________
__________________________________________________________________________________
__________________________________________________________________________________
__________________________________________________________________________________
__________________________________________________________________________________
__________________________________________________________________________________
__________________________________________________________________________________
__________________________________________________________________________________
__________________________________________________________________________________
__________________________________________________________________________________
__________________________________________________________________________________
__________________________________________________________________________________
__________________________________________________________________________________
__________________________________________________________________________________
__________________________________________________________________________________
__________________________________________________________________________________
__________________________________________________________________________________
Notes
265
Participant Handbook Cabinet Maker Modular Kitchen
• A cabinet maker must work effectively with the other members in the team to achieve the common organizational goals and targets.
• A cabinet maker, like any other job role, has a standard set of responsibilities and objectives, which sometimes may vary between organizations.
• Apart from the responsibilities related to the job role, a person working or aspiring to work as a cabinet maker has to fulfill few roles and responsibilities on a personal front.
• A cabinet maker must understand the client's requirements thoroughly and have appropriate and correct understanding of the work task.
• A cabinet maker must implement the applicable quality standards for the assigned work task, via a well-known mechanism called Quality Control.
• A Protocol Deviation is said to have occurred, when there is a minor or moderate divergence from the sanctioned design, blueprint, and processes in the organization.
• Discipline can be defined as the "the practice of making people obey rules or standards of behaviour, and punishing them when they do not".
Summary
• The trainer asks the students to play a game, where they sit in a circle / semi-circle and start telling a story in a team. The first person speaks the first sentence in the story, the second one speaks the next one and the process continues till the story is over. This game is aimed at teaching the students effective communication and active listening.
• The trainer asks the students to play a game, where they are divided into two teams, A and B. Both the teams are given a sheet of paper each and common stationery items. Each team has to make a “cantilever bridge” with the help of these resources. This activity is aimed at teaching the students Teamwork.
• The trainer holds up a sample technical drawing / blueprint and explains to the class its different parts, blocks, and their uses. He/she explains what project does the sample drawing represent and helps the class understand the drawing, and how it represents the actual item to be constructed/ assembled/installed.
Activity
266
Participant Handbook Cabinet Maker Modular Kitchen
Fill in the Blanks
1. Non-compliance or Non-conformity occurs through Protocol Violations and ________________.a) Aggression b) Protocol Deviations c) Conformation deviation
A: Protocol Deviations
2. ________________ communication involves the use of language spoken verbally or orally to convey messages.a) Oral b) Physical c) Grievance
A: Oral
3. _____________, according to the Dictionary, is "a complaint or a strong feeling that one has been treated unfairly".a) Grievance b) Conformity c) Complaint
A: Grievance
4. TAT adherence and quality assurance are important aspects of .a) Time management b) Project management c) Company management
A: Project management
Exercise
267
Participant Handbook Cabinet Maker Modular Kitchen
A
Abattant– A French term used to describe a drop front secretary desk, usually with drawers or cabinet doors below
Acanthus– A carving of the acanthus leaf used to decorate furniture. Alder - A light brown hardwood from the Birch family.
Aliphatic Resin Glue– Popular yellow woodworking glue. Antique - An item that is at least 100 years old.
Applique– Term used to describe an applied ornamental piece.
Apron– The board placed below the underside of a chair seat, table top or shelf usually for support; also referred to as the skirt.
Arm Chair– A chair with arm rests attached to each side.
Armoire– A tall wardrobe which originated in France during the 16th century.
Arrow Foot– A cylindrical tapered foot.
Art Deco– A style period from the 1920's and 1930's featuring basic geometric patterns and lines.
Ash– A light colour hardwood used in furniture and cabinet construction.
B
Bachelor's Chest– A small chest of drawers; typically from the 18th century. Bail - The hanging loops or ring which forms a handle.
Baize– A woollen fabric similar to felt; commonly used on gaming tables. Backrest - The back of a chair which supports a person's back while seated. Back Splat - Vertical slat of wood in the centre of the back of a chair.
Baker's Rack– Open, slat back shelving unit with or without a cabinet below used for storing goods in the kitchen.
Ball Foot– A full round turning used as a foot on furniture items. Ball and Claw Foot - Carved or cast furniture foot of a claw holding a ball. Barrel Chair - Semi-circular or barrel shaped low back chair.
Barstool– A high stool used at a bar or high counter.
Bas-Relief– A sculpture or carving that projects minimally from the background.
Bentwood– Wood that has been steam bent into curved shapes; commonly seen on rocking chairs. Bevel - An edge which is cut at a slant to that of a main area such as that of a bevelled mirror.
Biedermeier– A style of furniture commonly produced in Austria or Germany during the early 19th century; features simple marquetry patterns.
Birch– A close grained light colour wood used in furniture and plywood construction.
Bird's Eye– A decorative feature common to Maple features small concentric circles resembling that of a bird's eye.
Blanket Chest– Low storage chest with hinged lid often referred to as a hope chest used during Colonial times.
Block front– A three section chest with the centre section set back from the end sections.
Glossary
268
Participant Handbook Cabinet Maker Modular Kitchen
Bombe– An item of furniture such as a commode or chest with a pronounced outward or convex bulge towards the base.
Book matched– A veneering technique where two slices of veneer are glued next to each other so that grain patterns mirror each other.
Bow front– A convex front of a chest or buffet.
Box Joint– An interlocking joint commonly used to construct cabinet drawers
Bracket Foot– Decorative or plain right angled foot shaped like a bracket placed at each corner of the piece.
Brass– An alloy used for furniture handles, knobs, hinges and fasteners; also used to construct headboards and footboards.
Breakfront– A cabinet with the front centre section that protrudes forward or outward from the end sections.
Buffet– A sideboard used in the dining area for serving food or the storage of silverware and dishes. Bun Foot - A flattened ball foot, which resembles the shape of a bun.
Bureau– A chest of drawers typically used in a bedroom.
Burl– An abnormal growth on trees usually near the base of the trunk or crotch which is usually cut for veneer because of its figured pattern.
Butler's Table– An oval table with four sides hinged upwards that fold out flat when in use.
Butt Joint– A simple but weak joint used to join two boards together at right angles.
C
Cabinet– A cupboard with doors, shelves and or drawers used for storage or display.
Cabriole– Furniture leg which curves outward from where it's attached descending in a reverse curve into an ornamental foot.
Camel Back– The broad curve and rise of the centre section of a sofa back.
Cane Webbing– Pre-woven cane machine made from individual strands of chair cane available in various widths and patterns; held in place using a tapered reed spine pressed into a groove.
Caning– Weaving or interlacing of narrow strips of the skin of the rattan palm to form chair seats, backs or sides.
Captain's Chair– A short backed, rounded arm chair with spindles.
Carnauba Wax– Wax obtained from the leaves of the carnauba palm used in waxes and polishes
Case Goods– Storage pieces typically made of wood such as dressers, bookcases, hutches, chests and desks.
Caster– Small wheel designed to allow furniture to be moved; used on chairs and antique case goods.
Catalyzed Lacquer– A highly durable reactive film finish; a lacquer with an added catalyst to accelerate a chemical reaction during evaporation.
Chaise Lounge– Long chair; sofa with one or two arm in the shape of an elongated chair for reclining. Cherry - Hardwood obtained from the cherry tree used in furniture construction.
269

Participant Handbook Cabinet Maker Modular Kitchen
Chest on Chest– Tall chest consisting of two stacked chest of drawers with the upper chest being narrower than the base chest.
Cheval Mirror– Freestanding full length mirror supported by uprights on each side allowing the mirror to pivot.
Chiffonier– Tall, narrow chest of drawers commonly used to store lingerie.
China Cabinet– Display cabinet placed upon a buffet used to display or store dishes.
Chintz– Brightly coloured and polished fabric.
Chippendale– Ornate, carved style of furniture from the 18th century.
Claw Foot– Carved furniture foot resembling an animal's claw.
Club Chair– Low back upholstered chair with arms.
Coffee Table– Long, low table placed in front of seating.
Coil Spring– A conical coiled spring used in rows for seating support.
Commode– Low chest of drawers or cupboard; originally referred to a nightstand that concealed a chamber pot.
Console Table– Small or narrow table designed to be placed against or fixed to a wall. Contemporary - Modern look or style of furniture.
Corner Blocks– Small blocks of wood glued in place to reinforce or strengthen adjoining pieces of wood.
Corner Cabinet– Triangular shaped cabinet designed for use in a corner.
Couch– Modern adaptation of a daybed; provides seating for more than one individual.
Credenza– Sideboard or buffet with doors used for storage; commonly found in an office behind a desk.
Cross Banding– Veneer applied to the edge of table tops or drawer fronts at a right angle to the face veneer.
Curio Cabinet– Tall, slender, sometimes lighted cabinet with glass doors and panels used to display collectibles.
D
Dacron– Common trade name for polyester fibre; used as a wrap on seat cushions.
Damask– A reversible fabric with design.
Davenport– Compact writing desk features a sloped top above drawers.
Daybed– Seating unit that can double as a bed.
Deck– The foundation of a chair or sofa where the loose cushions are placed.
Density– Reference to the weight of foam used for seat and back cushions; either low density or high density.
Dentil Molding– Decorative molding utilizing evenly spaced blocks.
Dining Chair– Chair used at a dining table; available with or without arms.
Dining Table– A table, where meals are served and eaten.
Distressing– A finishing technique to make the wood appear aged or old by adding rub marks, small holes and indentations.
270
Participant Handbook Cabinet Maker Modular Kitchen
Dovetail Joint– Common interlocking joint noted for it's resistance to pulling apart; typically used on drawer sides.
Dowel– Round wooden pin; usually spiral fluted or reeded, used to join pieces of wood together and strengthen the joint.
Drawer– An open top box or compartment for storage that slides in and out in a cabinet.
Dresser– A chest with drawers for the storage of clothing.
Drop Leaf– A table having hinged extension leaves, supported by a bracket when in use and hang vertically against the table, when not in use.
Dust Cover– The material or fabric used to cover the bottom of a sofa or chair; also called cambric.
E
Ebonized– Wood stained dark and polished to simulate ebony.
Embossed– A low relief raised design such as an ornamental piece made through pressure rather than carving.
Engineered Wood– Man made sheet goods made from wood chips and glue under pressure; commonly referred to as particle board.
Entertainment Centre– Cabinet or shelving unit used to store a television, video and audio components.
Epoxy– A high strength two part adhesive consisting of a resin and hardener.
Escutcheon– A decorative or plain plate that protects the area around a keyhole.
Etagere– An open shelving unit used for display purposes.
F
Fabric– Cloth produced by weaving natural or synthetic textile fibers together.
Fall Front– A hinged door of a secretary desk that drops down to create a writing surface.
Faux Finish– Decorative finish used to imitate the look of a natural material.
Feather Banding– Narrow bands of veneer inlaid in opposing diagonal directions.
Fiberfil– Polyester filling material or cushion wrap.
Fiddle Back– The back splat of a chair that resembles the shape of a fiddle or violin.
Figuring– The natural grain patterns of woods such as curly maple.
Finger Joint– Used to join short pieces of wood at the ends to make a longer one; provides strength through increased glue surface area.
Finish– The protective coating applied to furniture to protect the substrate; common finishes include paint, lacquer and polyurethane.
Fleur De Lis– A French floral emblem or carving in the shape of an Iris or Lily.
Footrest– The brace or bar at the front of a stool for your feet.
Formica– Registered brand name of plastic laminate material.
Frame– The basic structure of an upholstered chair or sofa; usually made from a hardwood.
271
Participant Handbook Cabinet Maker Modular Kitchen
Front Rail– The front cross piece of wood between the legs of a piece of furniture such as a chair.
Four Poster Bed– A bed with posts at each corner; may vary in height.
G
Gallery Rail– Small or low railing used around a shelf or table top.
Gateleg table– Drop leaf table with leaves supported by legs that swing out from the side like a gate.
Gilding– Decorative effect of applying gold leaf or powder to a surface.
Gimp– A fabric fold used to hide upholstery fasteners or tacks.
Glazing– Finishing step of applying and wiping off stain used to highlight wood grain and features such as carvings.
Glide– Applied to the bottom of furniture legs to protect the floor surface and make the piece easier to move around; commonly made from metal, nylon or felt.
Glue Block– A small block of wood used to reinforce a joint. Gold Leaf - Thin leaves of gold used in gilding.
Grain– The natural patterns in wood created by the direction of fibers.
H
Hand Rubbed Finish– An oil finish applied to a piece of furniture by hand.
Hardwood– The wood from deciduous trees (trees that lose their leaves during winter).
Harvest Table– A narrow, rectangular drop leaf table
Headboard– The upright structure attached to the head of the bed frame.
Hepplewhite– An 18th century furniture design.
Highboy– A tall or high chest of drawers upon a lowboy (base) raised on long legs; a two part case piece.
Hope Chest– A hinged top chest for the storage of items in anticipation of marriage.
Huntboard– Originally used to serve food and refreshments after a hunt; light or portable sideboard.
Hutch– An upper cabinet consisting of shelves; with or without doors placed upon a chest, desk or buffet.
I
Inlay– Decorative technique of inserting contrasting wood veneers or materials to create a feature or design.
Intarsia– A form of inlay similar to marquetry; decorative inlaid panel or dimensional image.
272
Participant Handbook Cabinet Maker Modular Kitchen
J
Jacquard– Woven fabric with intricate patterns created on a loom.
Japan Drier– A drying agent or solvent used to speed up the drying time of oil based finishes.
Japanning– A finish imitating oriental lacquer work.
K
Kiln Dried– Lumber dried in a kiln to specified uniform moisture content.
Kneehole Desk– Desk with a recessed central area for a person's knees.
Knock Down Furniture– Unassembled furniture that a consumer assembles after purchase; also known as RTA (Ready to Assemble).
Knot– A hard cross grained piece in a board generally from a branch protrusion; may loosen over time and fall out of the board.
Koa– Acaciakoa; a hardwood endemic to the Hawaiian Islands; commonly used to construct furniture and musical instruments.
L
Lacquer– A synthetic, durable fast drying coating used to finish and protect wood.
Ladderback– A style of chair back with horizontal cross rails resembling a ladder.
Laminate– Composite material used on counter or table tops; provides a heat resistant, wipe clean surface.
Leather– Made from tanning animal hides and used for upholstery.
Linen Press– A cabinet with shelves or shallow drawers behind doors designed to store sheets, tablecloths, napkins, textiles and clothing.
Lingerie Chest– Tall narrow chest designed to store women's undergarments.
Loper– A pullout arm or slide that provides support for a fall front desk or hinged table leaf.
Loveseat– A small version of a couch designed to seat two persons.
Lowboy– A low table or chest with cabriole legs; often used alone or as the base of a Highboy.
M
Maple– Hardwood with a tight grain and blond colour popular in furniture construction.
Marble– A crystalline rock used on various surfaces of furniture such as table tops or desk tops.
Marquetry– Decorative technique of inlaying veneers to create a pattern or picture in furniture.
MDF– Medium Density Fibreboard; engineered wood panel made from wood fibres and adhesive exposed to heat and pressure.
Mission Style– American version of English Arts and Crafts, which emphasizes on simplicity.
273
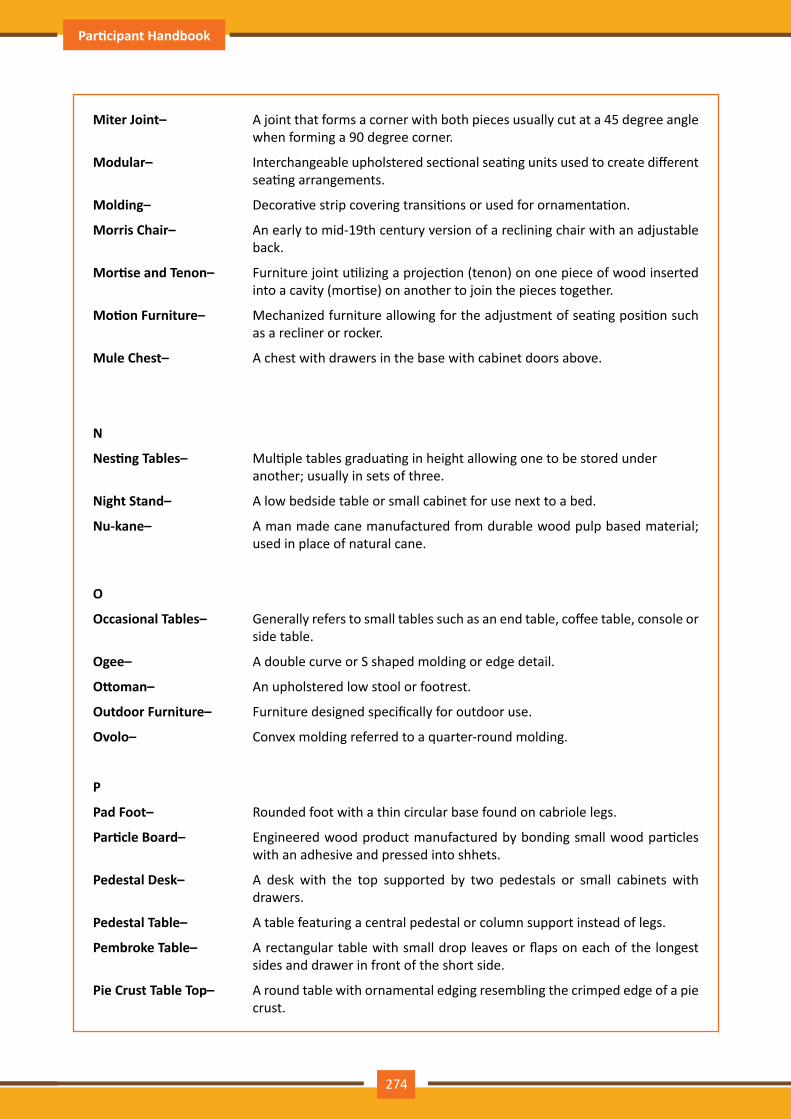
Participant Handbook Cabinet Maker Modular Kitchen
Miter Joint– A joint that forms a corner with both pieces usually cut at a 45 degree angle when forming a 90 degree corner.
Modular– Interchangeable upholstered sectional seating units used to create different seating arrangements.
Molding– Decorative strip covering transitions or used for ornamentation.
Morris Chair– An early to mid-19th century version of a reclining chair with an adjustable back.
Mortise and Tenon– Furniture joint utilizing a projection (tenon) on one piece of wood inserted into a cavity (mortise) on another to join the pieces together.
Motion Furniture– Mechanized furniture allowing for the adjustment of seating position such as a recliner or rocker.
Mule Chest– A chest with drawers in the base with cabinet doors above.
N
Nesting Tables– Multiple tables graduating in height allowing one to be stored under another; usually in sets of three.
Night Stand– A low bedside table or small cabinet for use next to a bed.
Nu-kane– A man made cane manufactured from durable wood pulp based material; used in place of natural cane.
O
Occasional Tables– Generally refers to small tables such as an end table, coffee table, console or side table.
Ogee– A double curve or S shaped molding or edge detail.
Ottoman– An upholstered low stool or footrest.
Outdoor Furniture– Furniture designed specifically for outdoor use.
Ovolo– Convex molding referred to a quarter-round molding.
P
Pad Foot– Rounded foot with a thin circular base found on cabriole legs.
Particle Board– Engineered wood product manufactured by bonding small wood particles with an adhesive and pressed into shhets.
Pedestal Desk– A desk with the top supported by two pedestals or small cabinets with drawers.
Pedestal Table– A table featuring a central pedestal or column support instead of legs.
Pembroke Table– A rectangular table with small drop leaves or flaps on each of the longest sides and drawer in front of the short side.
Pie Crust Table Top– A round table with ornamental edging resembling the crimped edge of a pie crust.
274

Participant Handbook Cabinet Maker Modular Kitchen
Plinth– The squared base or pedestal that supports a cabinet or piece of furniture instead of legs.
Plywood– Manufactured wood made from a series of alternating layers of wood veneer with the grain perpendicular to each other for strength.
Poplar– A soft wood from the Birch family often used as a secondary wood in furniture construction.
Q
Quarter Sawn– Wood cut from a log, which has been quartered lengthwise sometimes exposing distinctive grain patterns such as tiger striped oak.
R
Rattan– The stem of a vine like climbing palm used in the manufacture of wicker and rattan furniture.
Reeding– Carved parallel convex or beaded lines used on bed posts, table and chair legs.
Reproduction– A replica of an original piece.
RTA– (Ready to Assemble) Finished furniture items which require assembly by the consumer.
Rule Joint– A joint used between a table top and drop leaf which leaves no open space between the top and leaf when open.
Runners– Strips of wood on which drawers slide.
Rush Seat– A woven chair seat using twisted stems of marsh grass known as "Rush".
S
Saddle Arm– Chair or sofa arm style which looks like a saddle profile.
Scotch Guard– Trade name for a product to protect fabric from staining.
Seat Rail– Horizontal support directly under the seat connecting the front legs with the back of a chair.
Secretaire– French term for a free standing writing desk with a drop down writing surface with shelves or drawers below; may also have a bookcase above.
Sectional– Modular seating units used in various combinations.
Semainier– A narrow but tall chest of drawers with seven drawers; one for each day of the week.
Serpentine Front– Horizontal compound curve used on the front of case pieces or drawers where there is a centre convex section between two concave sections.
Settee– A long seat or bench with a back and arms at each end to accommodate two or more people.
Shellac– A natural resin refined and dissolved in alcohol and used as a wood finish or sealer.
275

Participant Handbook Cabinet Maker Modular Kitchen
Sideboard– Used in the dining area for serving food or the storage of silverware and dishes.
Side Chair– A traditional dining chair without arms used at the sides of a dining table.
Slat Back– The back of a chair which utilizes vertical slats for the back rest.
Sleeper Sofa– A sofa with a pull out mechanism converting the sofa into a bed.
Sofa– Also known as a couch; an upholstered long seat with back and arms.
Sofa Table– A slender high table placed against the back of a sofa.
Softwood– Wood or lumber from conifers or evergreen trees such as pine or fir.
Solid Wood– Generally refers to furniture that is constructed using solid wood and does not include the use of engineered wood products.
Spindle Back– A chair back consisting of multiple turnings or spindles stretching between the seat and top rail.
Steam Bent– Wood for furniture components that are bent using steam such as a chair back.
Stretchers– The horizontal braces which connect and reinforce the vertical elements together such as chair or table legs.
Swatch– A sample of upholstery fabric.
Swivel Rocker– A rocking chair that also revolves.
T
Tambour– Flexible sliding doors or pull down front for a roll top desk; constructed from narrow pieces of wood glued to a fabric such as canvas.
Tapestry– Fabric with a woven pattern or decorative pictorial design.
Teak– Tropical hardwood popular for ship building and outdoor furniture construction.
Tempered Glass– Glass treated with heat during manufacture which breaks into pebble like pieces instead of shards or sliver, so often used for glass table tops.
Tenon– A projection at the end of a piece of wood which fits into a mortise to join the pieces together.
Trestle Table– Table supported by uprights at the ends with a stretcher between them.
Trundle Bed– A low pull out bed on wheels stored below another bed. Trim - A decorative molding used on case goods.
Tweed– A medium to heavy woollen fabric
Twill– A fabric woven with a diagonal pattern or ribs.
U
Unfinished– Furniture that has not been stained, painted or had a finish applied to it.
Upholstery– The covering including padding, springs, webbing, foam and fabric on furniture.
276
Participant Handbook Cabinet Maker Modular Kitchen
V
Vacuum Press– Used to apply pressure when veneering or gluing together uneven or odd shaped furniture parts.
Varnish– A solvent based transparent film finish used to coat furniture.
Veneer– A thin slice or slices of decorative or exotic wood glued to an inferior wood to create panels, doors and cabinet sides.
W
Walnut– A medium to dark hardwood used for furniture construction and veneering.
Webbing– Strips of elastic or woven fabric used to provide support for upholstered arms, backs and seats.
Wicker– Term given to furnishings woven from willow, reed and rattan.
Windsor Chair– A wooden chair with a bentwood curved top and spindle back pegged into a solid, shaped seat.
Wing Back– High back upholstered chair with wing like protrusions extending above the arms from the sides near the top of the chair.
X, Y, Z
Zig-Zag Spring– A sinuous or S shaped upholstery spring used in chair, ottoman and sofa seats and backrests.
(Source: http://www.furniturecaretips.com)
277

Participant Handbook Cabinet Maker Modular Kitchen
278

Participant Handbook Cabinet Maker Modular Kitchen
9. Employability & Entrepreneurship Skills
Unit 9.1 - Personal Strengths & Value Systems
Unit 9.2 - Digital Literacy: A Recap
Unit 9.3 - Money Matters
Unit 9.4 - Preparing for Employment & Self Employment
Unit 9.5 - Understanding Entrepreneurship
Unit 9.6 - Preparing to be an Entrepreneur
279

Participant Handbook Cabinet Maker Modular Kitchen
At the end of this module, you will be able to:
1. Explain the meaning of health 2. List common health issues 3. Discuss tips to prevent common health issues 4. Explain the meaning of hygiene 5. Discuss the purpose of Swacch Bharat Abhiyan 6. Explain the meaning of habit 7. Discuss ways to set up a safe work environment 8. Discuss critical safety habits to be followed by employees 9. Explain the importance of self-analysis 10. Discuss motivation with the help of Maslow’s Hierarchy of Needs 11. Discuss the meaning of achievement motivation 12. List the characteristics of entrepreneurs with achievement motivation 13. List the different factors that motivate you 14. Discuss the role of attitude in self-analysis 15. Discuss how to maintain a positive attitude 16. List your strengths and weaknesses 17. Discuss the qualities of honest people 18. Describe the importance of honesty in entrepreneurs 19. Discuss the elements of a strong work ethic 20. Discuss how to foster a good work ethic 21. List the characteristics of highly creative people 22. List the characteristics of highly innovative people 23. Discuss the benefits of time management 24. List the traits of effective time managers 25. Describe effective time management technique 26. Discuss the importance of anger management 27. Describe anger management strategies 28. Discuss tips for anger management 29. Discuss the causes of stress 30. Discuss the symptoms of stress 31. Discuss tips for stress management 32. Identify the basic parts of a computer 33. Identify the basic parts of a keyboard 34. Recall basic computer terminology 35. Recall the functions of basic computer keys 36. Discuss the main applications of MS Office 37. Discuss the benefits of Microsoft Outlook 38. Discuss the different types of e-commerce 39. List the benefits of e-commerce for retailers and customers 40. Discuss how the Digital India campaign will help boost e-commerce in India 41. Describe how you will sell a product or service on an e-commerce platform
Key Learning Outcomes
280
Participant Handbook Cabinet Maker Modular Kitchen
42. Discuss the importance of saving money 43. Discuss the benefits of saving money 44. Discuss the main types of bank accounts 45. Describe the process of opening a bank account 46. Differentiate between fixed and variable costs 47. Describe the main types of investment options 48. Describe the different types of insurance products 49. Describe the different types of taxes 50. Discuss the uses of online banking 51. Discuss the main types of electronic funds transfers 52. Discuss the steps to prepare for an interview 53. Discuss the steps to create an effective Resume 54. Discuss the most frequently asked interview questions 55. Discuss how to answer the most frequently asked interview questions 56. Discuss basic workplace terminology 57. Discuss the concept of entrepreneurship 58. Discuss the importance of entrepreneurship 59. Describe the characteristics of an entrepreneur 60. Describe the different types of enterprises 61. List the qualities of an effective leader 62. Discuss the benefits of effective leadership 63. List the traits of an effective team 64. Discuss the importance of listening effectively 65. Discuss how to listen effectively 66. Discuss the importance of speaking effectively 67. Discuss how to speak effectively 68. Discuss how to solve problems 69. List important problem solving traits 70. Discuss ways to assess problem solving skills 71. Discuss the importance of negotiation 72. Discuss how to negotiate 73. Discuss how to identify new business opportunities 74. Discuss how to identify business opportunities within your business 75. Explain the meaning of entrepreneur 76. Describe the different types of entrepreneurs 77. List the characteristics of entrepreneurs 78. Recall entrepreneur success stories 79. Discuss the entrepreneurial process 80. Describe the entrepreneurship ecosystem 81. Discuss the purpose of the Make in India campaign 82. Discuss key schemes to promote entrepreneurs 83. Discuss the relationship between entrepreneurship and risk appetite 84. Discuss the relationship between entrepreneurship and resilience
281
Participant Handbook Cabinet Maker Modular Kitchen
85. Describe the characteristics of a resilient entrepreneur 86. Discuss how to deal with failure 87. Discuss how market research is carried out 88. Describe the 4 Ps of marketing 89. Discuss the importance of idea generation 90. Recall basic business terminology 91. Discuss the need for CRM 92. Discuss the benefits of CRM 93. Discuss the need for networking 94. Discuss the benefits of networking 95. Discuss the importance of setting goals 96. Differentiate between short-term, medium-term and long-term goals 97. Discuss how to write a business plan 98. Explain the financial planning process 99. Discuss ways to manage your risk 100. Describe the procedure and formalities for applying for bank finance 101. Discuss how to manage your own enterprise 102. List important questions that every entrepreneur should ask before starting an enterprise
282
Participant Handbook Cabinet Maker Modular Kitchen
At the end of this unit, you will be able to:
1. Explain the meaning of health 2. List common health issues 3. Discuss tips to prevent common health issues 4. Explain the meaning of hygiene 5. Understand the purpose of Swacch Bharat Abhiyan 6. Explain the meaning of habit 7. Discuss ways to set up a safe work environment 8. Discuss critical safety habits to be followed by employees 9. Explain the importance of self-analysis 10. Understand motivation with the help of Maslow’s Hierarchy of Needs 11. Discuss the meaning of achievement motivation 12. List the characteristics of entrepreneurs with achievement motivation 13. List the different factors that motivate you 14. Discuss how to maintain a positive attitude 15. Discuss the role of attitude in self-analysis 16. List your strengths and weaknesses 17. Discuss the qualities of honest people 18. Describe the importance of honesty in entrepreneurs 19. Discuss the elements of a strong work ethic 20. Discuss how to foster a good work ethic 21. List the characteristics of highly creative people 22. List the characteristics of highly innovative people 23. Discuss the benefits of time management 24. List the traits of effective time managers 25. Describe effective time management technique 26. Discuss the importance of anger management 27. Describe anger management strategies 28. Discuss tips for anger management 29. Discuss the causes of stress 30. Discuss the symptoms of stress 31. Discuss tips for stress management
Unit Objectives
UNIT 9.1: Personal Strengths & Value Systems
283

Participant Handbook Cabinet Maker Modular Kitchen
As per the World Health Organization (WHO), health is a “State of complete physical, mental, and social well-being, and not merely the absence of disease or infirmity.” This means being healthy does not simply mean not being unhealthy – it also means you need to be at peace emotionally, and feel fit physically. For example, you cannot say you are healthy simply because you do not have any physical ailments like a cold or cough. You also need to think about whether you are feeling calm, relaxed and happy.
Common Health Issues
Some common health issues are:
• Allergies• Asthma• Skin Disorders• Depression and Anxiety• Diabetes• Cough, Cold, Sore Throat• Difficulty Sleeping• Obesity
9.1.1 Health, Habits, Hygiene: What is Health
Taking measures to prevent ill health is always better than curing a disease or sickness. You can stay healthy by:
• Eating healthy foods like fruits, vegetables and nuts • Cutting back on unhealthy and sugary foods • Drinking enough water everyday • Not smoking or drinking alcohol • Exercising for at least 30 minutes a day, 4-5 times a week • Taking vaccinations when required • Practicing yoga exercises and meditation
How many of these health standards do you follow? Tick the ones that apply to you.
1. Get minimum 7-8 hours of sleep every night.2. Avoid checking email first thing in the morning and right before you go to bed at night.3. Don’t skip meals – eat regular meals at correct meal times.4. Read a little bit every single day.5. Eat more home cooked food than junk food6. Stand more than you sit.7. Drink a glass of water first thing in the morning and have at least 8 glasses of water through the day.8. Go to the doctor and dentist for regular checkups.9. Exercise for 30 minutes at least 5 days a week.10. Avoid consuming lots of aerated beverages.
9.1.1.1 Tips to Prevent Health Issues
284
Participant Handbook Cabinet Maker Modular Kitchen
As per the World Health Organization (WHO), “Hygiene refers to conditions and practices that help to maintain health and prevent the spread of diseases.” In other words, hygiene means ensuring that you do whatever is required to keep your surroundings clean, so that you reduce the chances of spreading germs and diseases.
For instance, think about the kitchen in your home. Good hygiene means ensuring that the kitchen is always spick and span, the food is put away, dishes are washed and dustbins are not overflowing with garbage. Doing all this will reduce the chances of attracting pests like rats or cockroaches, and prevent the growth of fungus and other bacteria, which could spread disease.
How many of these health standards do you follow? Tick the ones that apply to you.
1. Have a bath or shower every day with soap – and wash your hair with shampoo 2-3 times a week.2. Wear a fresh pair of clean undergarments every day. 3. Brush your teeth in the morning and before going to bed. 4. Cut your fingernails and toenails regularly. 5. Wash your hands with soap after going to the toilet. 6. Use an anti-perspirant deodorant on your underarms if you sweat a lot. 7. Wash your hands with soap before cooking or eating. 8. Stay home when you are sick, so other people don’t catch what you have. 9. Wash dirty clothes with laundry soap before wearing them again. 10. Cover your nose with a tissue/your hand when coughing or sneezing.
See how healthy and hygienic you are, by giving yourself 1 point for every ticked statement! Then take a look at what your score means.
Your Score
• 0-7/20: You need to work a lot harder to stay fit and fine! Make it a point to practice good habits daily and see how much better you feel!
• 7-14/20: Not bad, but there is scope for improvement! Try and add a few more good habits to your daily routine.
• 14-20/20: Great job! Keep up the good work! Your body and mind thank you!
We have already discussed the importance of following good hygiene and health practices for ourselves. But, it is not enough for us to be healthy and hygienic. We must also extend this standard to our homes, our immediate surroundings and to our country as a whole.
The ‘Swachh Bharat Abhiyan’ (Clean India Mission) launched by Prime Minister Shri Narendra Modi on 2nd October 2014, believes in doing exactly this. The aim of this mission is to clean the streets and roads of India and raise the overall level of cleanliness. Currently this mission covers 4,041 cities and towns across the country. Millions of our people have taken the pledge for a clean India. You should take the pledge too, and do everything possible to keep our country clean!
9.1.1.2 What is Hygiene?
9.1.1.3 Swachh Bharat Abhiyan
285
Participant Handbook Cabinet Maker Modular Kitchen
A habit is a behaviour that is repeated frequently. All of us have good habits and bad habits. Keep in mind the phrase by John Dryden: “We first make our habits, and then our habits make us.” This is why it is so important that you make good habits a way of life, and consciously avoid practicing bad habits.
Some good habits that you should make part of your daily routine are:
• Always having a positive attitude• Making exercise a part of your daily routine• Reading motivational and inspirational stories• Smiling! Make it a habit to smile as often as possible• Making time for family and friends• Going to bed early and waking up early
Some bad habits that you should quit immediately are:
• Skipping breakfast • Snacking frequently even when you are not hungry • Eating too much fattening and sugary food • Smoking, drinking alcohol and doing drugs • Spending more money than you can afford • Worrying about unimportant issues • Staying up late and waking up late
9.1.1.4 What are Habits?
1. Following healthy and hygienic practices every day will make you feel good mentally and physically. 2. Hygiene is two-thirds of health – so good hygiene will help you stay strong and healthy!
Every employer is obligated to ensure that his workplace follows the highest possible safety protocol. When setting up a business, owners must make it a point to:
• Use ergonomically designed furniture and equipment to avoid stooping and twisting • Provide mechanical aids to avoid lifting or carrying heavy objects • Have protective equipment on hand for hazardous jobs • Designate emergency exits and ensure they are easily accessible • Set down health codes and ensure they are implemented • Follow the practice of regular safety inspections in and around the workplace • Ensure regular building inspections are conducted • Get expert advice on workplace safety and follow it
9.1.1.5 Tips
9.1.1.4 What are Habits?
286

Participant Handbook Cabinet Maker Modular Kitchen
1. Be aware of what emergency number to call at the time of a workplace emergency 2. Practice evacuation drills regularly to avoid chaotic evacuations
To truly achieve your full potential, you need to take a deep look inside yourself and find out what kind of person you really are. This attempt to understand your personality is known as self-analysis. Assessing yourself in this manner will help you grow, and will also help you to identify areas within yourself that need to be further developed, changed or eliminated. You can better understand yourself by taking a deep look at what motivates you, what your attitude is like, and what your strengths and weaknesses are.
Very simply put, motivation is your reason for acting or behaving in a certain manner. It is important to understand that not everyone is motivated by the same desires – people are motivated by many, many different things. We can understand this better by looking at Maslow’s Hierarchy of Needs.
Every employer is obligated to ensure that his workplace follows the highest possible safety protocol. When setting up a business, owners must make it a point to:
• Immediately report unsafe conditions to a supervisor • Recognize and report safety hazards that could lead to slips, trips and falls • Report all injuries and accidents to a supervisor • Wear the correct protective equipment when required • Learn how to correctly use equipment provided for safety purposes • Be aware of and avoid actions that could endanger other people • Take rest breaks during the day and some time off from work during the week
9.1.2.2 Tips
9.1.3 Self Analysis – Attitude, Achievement Motivation
9.1.3 Self Analysis – Attitude, Achievement Motivation
9.1.2.1 Negotiable Employee Safety Habits
287
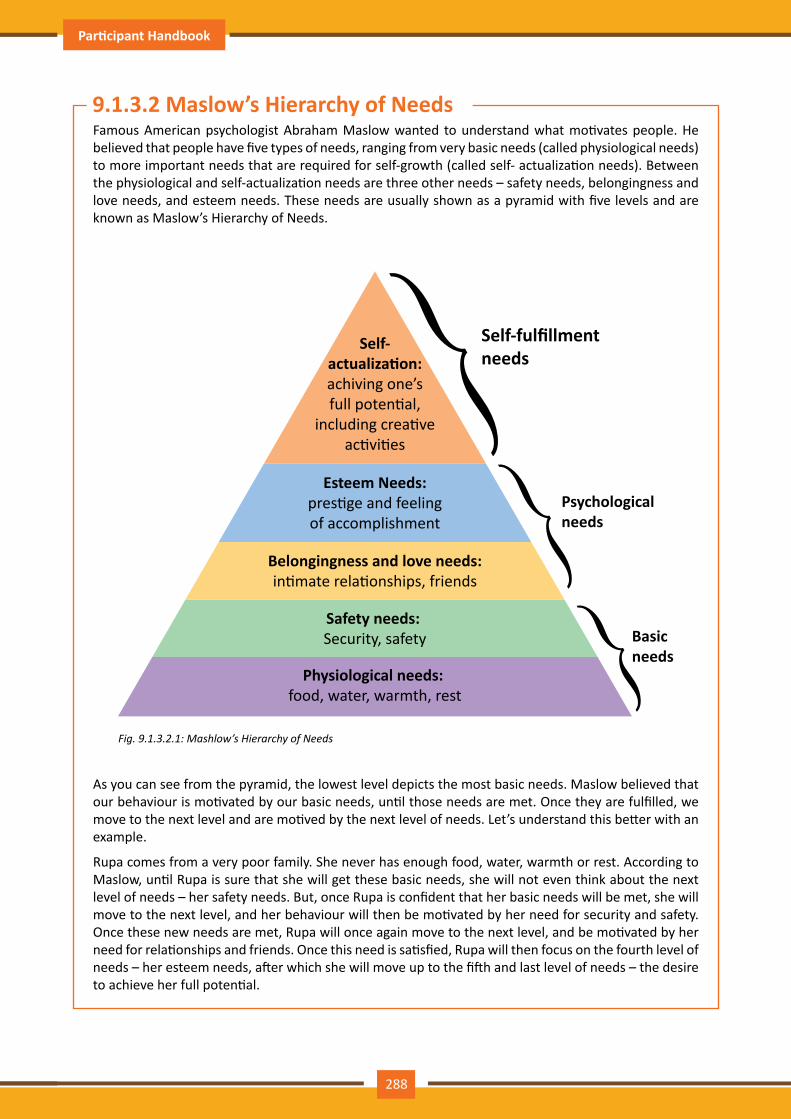
Participant Handbook Cabinet Maker Modular Kitchen
Famous American psychologist Abraham Maslow wanted to understand what motivates people. He believed that people have five types of needs, ranging from very basic needs (called physiological needs) to more important needs that are required for self-growth (called self- actualization needs). Between the physiological and self-actualization needs are three other needs – safety needs, belongingness and love needs, and esteem needs. These needs are usually shown as a pyramid with five levels and are known as Maslow’s Hierarchy of Needs.
Self-actualization:achiving one’sfull potential,
including creativeactivities
Esteem Needs:prestige and feelingof accomplishment
Self-fulfillmentneeds
Psychologicalneeds
Basicneeds
Belongingness and love needs:intimate relationships, friends
Physiological needs: food, water, warmth, rest
Safety needs: Security, safety
Fig.9.1.3.2.1:Mashlow’sHierarchyofNeeds
As you can see from the pyramid, the lowest level depicts the most basic needs. Maslow believed that our behaviour is motivated by our basic needs, until those needs are met. Once they are fulfilled, we move to the next level and are motived by the next level of needs. Let’s understand this better with an example.
Rupa comes from a very poor family. She never has enough food, water, warmth or rest. According to Maslow, until Rupa is sure that she will get these basic needs, she will not even think about the next level of needs – her safety needs. But, once Rupa is confident that her basic needs will be met, she will move to the next level, and her behaviour will then be motivated by her need for security and safety. Once these new needs are met, Rupa will once again move to the next level, and be motivated by her need for relationships and friends. Once this need is satisfied, Rupa will then focus on the fourth level of needs – her esteem needs, after which she will move up to the fifth and last level of needs – the desire to achieve her full potential.
9.1.3.2 Maslow’s Hierarchy of Needs
288
Participant Handbook Cabinet Maker Modular Kitchen
We now know that people are motivated by basic, psychological and self-fulfillment needs. However, certain people are also motivated by the achievement of highly challenging accomplishments. This is known as Achievement Motivation, or ‘need for achievement’.
The level of motivation achievement in a person differs from individual to individual. It is important that entrepreneurs have a high level of achievement motivation – a deep desire to accomplish something important and unique. It is equally important that they hire people who are also highly motivated by challenges and success.
What Motivates You?
What are the things that really motivate you? List down five things that really motivate you. Remember to answer honestly!
I am motivated by:
_____________________________________________________________________________________
_____________________________________________________________________________________
_____________________________________________________________________________________
_____________________________________________________________________________________
_____________________________________________________________________________________
_____________________________________________________________________________________
_____________________________________________________________________________________
_____________________________________________________________________________________
_____________________________________________________________________________________
_____________________________________________________________________________________
_____________________________________________________________________________________
_____________________________________________________________________________________
_____________________________________________________________________________________
_____________________________________________________________________________________
_____________________________________________________________________________________
_____________________________________________________________________________________
_____________________________________________________________________________________
_____________________________________________________________________________________
_____________________________________________________________________________________
_____________________________________________________________________________________
_____________________________________________________________________________________
_____________________________________________________________________________________
_____________________________________________________________________________________
9.1.3.3 Understanding Achievement Motivation
289

Participant Handbook Cabinet Maker Modular Kitchen
Characteristics of Entrepreneurs with Achievement Motivation
• Entrepreneurs with achievement motivation can be described as follows: • Unafraid to take risks for personal accomplishment • Love being challenged Future-oriented Flexible and adaptive • Value negative feedback more than positive feedback • Very persistent when it comes to achieving goals • Extremely courageous • Highly creative and innovative • Restless - constantly looking to achieve more • Feel personally responsible for solving problems
Think about it:
• How many of these traits do you have?• Can you think of entrepreneurs who display these traits?
The good news is attitude is a choice. So it is possible to improve, control and change our attitude, if we decide we want to! The following tips help foster a positive mindset:
• Remember that you control your attitude, not the other way around • Devote at least 15 minutes a day towards reading, watching or listening to something positive • Avoid negative people who only complain and stop complaining yourself • Expand your vocabulary with positive words and delete negative phrases from your mind • Be appreciative and focus on what’s good in yourself, in your life, and in others • Stop thinking of yourself as a victim and start being proactive • Imagine yourself succeeding and achieving your goals
Now that we understand why motivation is so important for self-analysis, let’s look at the role our attitude plays in better understanding ourselves. Attitude can be described as your tendency (positive or negative), to think and feel about someone or something. Attitude is the foundation for success in every aspect of life. Our attitude can be our best friend or our worst enemy. In other words:
“The only disability in life is a bad attitude.”
When you start a business, you are sure to encounter a wide variety of emotions, from difficult times and failures to good times and successes. Your attitude is what will see you through the tough times and guide you towards success. Attitude is also infectious. It affects everyone around you, from your customers to your employees to your investors. A positive attitude helps build confidence in the workplace while a negative attitude is likely to result in the demotivation of your people.
9.1.3.4 How to Cultivate a Positive Attitude
9.1.3.5 What is Attitude?
290
Participant Handbook Cabinet Maker Modular Kitchen
Another way to analyze yourself is by honestly identifying your strengths and weaknesses. This will help you use your strengths to your best advantage and reduce your weaknesses.
Note down all your strengths and weaknesses in the two columns below. Remember to be honest with yourself!
Strengths Weaknesses
Honesty is the quality of being fair and truthful. It means speaking and acting in a manner that inspires trust. A person who is described as honest is seen as truthful and sincere, and as someone who isn’t deceitful or devious and doesn’t steal or cheat. There are two dimensions of honesty – one is honesty in communication and the other is honesty in conduct.
Honesty is an extremely important trait because it results in peace of mind and builds relationships that are based on trust. Being dishonest, on the other hand, results in anxiety and leads to relationships full of distrust and conflict.
Honest individuals have certain distinct characteristics. Some common qualities among honest people are:
• They don’t worry about what others think of them. They believe in being themselves – they don’t bother about whether they are liked or disliked for their personalities.
• They stand up for their beliefs. They won’t think twice about giving their honest opinion, even if they are aware that their point of view lies with the minority.
• They are think skinned. This means they are not affected by others judging them harshly for their honest opinions.
• They forge trusting, meaningful and healthy friendships. Honest people usually surround themselves with honest friends. They have faith that their friends will be truthful and upfront with them at all times.
9.1.3.6 What Are Your Strengths and Weaknesses
9.1.4 Honesty & Work Ethics: What is Honesty?
9.1.4 Honesty & Work Ethics: What is Honesty?
1. Achievement motivation can be learned.2. Don’t be afraid to make mistakes.3. Train yourself to finish what you start.4. Dream big.
9.1.3.7 Tips
291

Participant Handbook Cabinet Maker Modular Kitchen
They are trusted by their peers. They are seen as people who can be counted on for truthful and objective feedback and advice.
• Honesty and employees: When entrepreneurs build honest relationships with their employees, it leads to more transparency in the workplace, which results in higher work performance and better results.
• Honesty and investors: For entrepreneurs, being honest with investors means not only sharing strengths but also candidly disclosing current and potential weaknesses, problem areas and solution strategies. Keep in mind that investors have a lot of experience with startups and are aware that all new companies have problems. Claiming that everything is perfectly fine and running smoothly is a red flag for most investors.
• Honesty with oneself: The consequences of being dishonest with oneself can lead to dire results, especially in the case of entrepreneurs. For entrepreneurs to succeed, it is critical that they remain realistic about their situation at all times, and accurately judge every aspect of their enterprise for what it truly is.
One of the most important characteristics of entrepreneurs is honesty. When entrepreneurs are honest with their customers, employees and investors, it shows that they respect those that they work with. It is also important that entrepreneurs remain honest with themselves. Let’s look at how being honest would lead to great benefits for entrepreneurs.
• Honesty and customers: When entrepreneurs are honest with their customers it leads to stronger relationships, which in turn results in business growth and a stronger customer network.
Being ethical in the workplace means displaying values like honesty, integrity and respect in all your decisions and communications. It means not displaying negative qualities like lying, cheating and stealing.
Workplace ethics play a big role in the profitability of a company. It is as crucial to an enterprise as high morale and teamwork. This is why most companies lay down specific workplace ethic guidelines that must compulsorily be followed by their employees. These guidelines are typically outlined in a company’s employee handbook.
An entrepreneur must display strong work ethics, as well as hire only those individuals who believe in and display the same level of ethical behavior in the workplace. Some elements of a strong work ethic are:
• Professionalism: This involves everything from how you present yourself in a corporate setting to the manner in which you treat others in the workplace.
• Respectfulness: This means remaining poised and diplomatic regardless of how stressful or volatile a situation is.
• Dependability: This means always keeping your word, whether it’s arriving on time for a meeting or delivering work on time.
9.1.4.2 Importance of Honesty in Entrepreneurs
9.1.4.3 What are Work Ethics?
9.1.4.4 Elements of a Strong Work Ethic
292
Participant Handbook Cabinet Maker Modular Kitchen
• Dedication: This means refusing to quit until the designated work is done, and completing the work at the highest possible level of excellence.
• Determination: This means embracing obstacles as challenges rather than letting them stop you, and pushing ahead with purpose and resilience to get the desired results.
• Accountability: This means taking responsibility for your actions and the consequences of your actions, and not making excuses for your mistakes.
• Humility: This means acknowledging everyone’s efforts and had work, and sharing the credit for accomplishments.
As an entrepreneur, it is important that you clearly define the kind of behaviour that you expect from each and every team member in the workplace. You should make it clear that you expect employees to display positive work ethics like:
• Honesty: All work assigned to a person should be done with complete honesty, without any deceit or lies.
• Good attitude: All team members should be optimistic, energetic, and positive.• Reliability: Employees should show up where they are supposed to be, when they are supposed to
be there.• Good work habits: Employees should always be well groomed, never use inappropriate language,
conduct themselves professionally at all times, etc.• Initiative: Doing the bare minimum is not enough. Every team member needs to be proactive and
show initiative.• Trustworthiness: Trust is non-negotiable. If an employee cannot be trusted, it’s time to let that
employee go.• Respect: Employees need to respect the company, the law, their work, their colleagues and
themselves.• Integrity: Each and every team member should be completely ethical and must display above board
behaviour at all times.• Efficiency: Efficient employees help a company grow while inefficient employees result in a waste
of time and resources.
What is Creativity
Creativity means thinking outside the box. It means viewing things in new ways or from different perspectives, and then converting these ideas into reality. Creativity involves two parts: thinking and producing. Simply having an idea makes you imaginative, not creative. However, having an idea and acting on it makes you creative.
9.1.4.5 How to Foster a Good Work Ethic
9.1.5 Creativity & Innovation
1. Don’t get angry when someone tells you the truth and you don’t like what you hear.2. Always be willing to accept responsibility for your mistakes.
9.1.4.6 Tips
293
Participant Handbook Cabinet Maker Modular Kitchen
Characteristics of Highly Creative People
Some characteristics of creative people are:
• They are imaginative and playful • They see issues from different angles • They notice small details• They have very little tolerance for boredom• They detest rules and routine• They love to daydream• They are very curious
What is Innovation?
There are many different definitions of innovation. In simple terms, innovation means turning an idea into a solution that adds value. It can also mean adding value by implementing a new product, service or process, or significantly improving on an existing product, service or process.
Characteristics of Highly Innovative People
• Some characteristics of highly innovative people are:• They embrace doing things differently• They don’t believe in taking shortcuts• They are not afraid to be unconventional• They are highly proactive and persistent• They are organized, cautious and risk-averse
1. Take regular breaks from your creative work to recharge yourself and gain fresh perspective.2. Build prototypes frequently, test them out, get feedback, and make the required changes.
9.1.5.1 Tips
Management is the process organizing your time, and deciding how to allocate your time between different activities. Good time management is the difference between working smart (getting more done in less time) and working hard (working for more time to get more done).
Effective time management leads to an efficient work output, even when you are faced with tight deadlines and high pressure situations. On the other hand, not managing your time effectively results in inefficient output and increases stress and anxiety.
Benefits of Time Management
Time management can lead to huge benefits like:
• Greater productivity • Higher efficiency• Better professional reputation • Reduced stress
9.1.6 Time Management
294

Participant Handbook Cabinet Maker Modular Kitchen
• Higher chances for career advancement • Greater opportunities to achieve goals
Not managing time effectively can result in undesirable consequences like:
• Missing deadlines • Inefficient work output• Substandard work quality • Poor professional reputation• Stalled career • Increase in stress and anxiety
Some traits of effective time managers are:
• They begin projects early They set daily objectives• They modify plans if required, to achieve better results• They are flexible and open-minded• They inform people in advance if their help will be required• They know how to say no• They break tasks into steps with specific deadlines• They continually review long term goals• They think of alternate solutions if and when required• They ask for help when required They create backup plans
You can manage your time better by putting into practice certain time management techniques. Some helpful tips are:
• Plan out your day as well as plan for interruptions. Give yourself at least 30 minutes to figure out your time plan. In your plan, schedule some time for interruptions.
• Put up a “Do Not Disturb” sign when you absolutely have to complete a certain amount of work.• Close your mind to all distractions. Train yourself to ignore ringing phones, don’t reply to chat
messages and disconnect from social media sites.• Delegate your work. This will not only help your work get done faster, but will also show you the
unique skills and abilities of those around you.• Stop procrastinating. Remind yourself that procrastination typically arises due to the fear of failure
or the belief that you cannot do things as perfectly as you wish to do them.• Prioritize. List each task to be completed in order of its urgency or importance level. Then focus on
completing each task, one by one.• Maintain a log of your work activities. Analyze the log to help you understand how efficient you
are, and how much time is wasted every day.• Create time management goals to reduce time wastage.
9.1.6.1 Traits of Effective Time Managers
9.1.6.2 Effective Time Management Techniques
295

Participant Handbook Cabinet Maker Modular Kitchen
1. Always complete the most important tasks first.2. Get at least 7 – 8 hours of sleep every day.3. Start your day early.4. Don’t waste too much time on small, unimportant details.5. Set a time limit for every task that you will undertake.6. Give yourself some time to unwind between tasks.
9.1.6.3 Tips
Anger management is the process of:
1. Learning to recognize the signs that you, or someone else, is becoming angry.2. Taking the best course of action to calm down the situation in a positive way Anger management
does not mean suppressing anger.
Importance of Anger Management
Anger is a perfectly normal human emotion. In fact, when managed the right way, anger can be considered a healthy emotion. However, if it is not kept in check, anger can make us act inappropriately and can lead to us saying or doing things that we will likely later regret.
Extreme anger can:
• Hurt you physically: It leads to heart disease, diabetes, a weakened immune system, insomnia, and high blood pressure.
• Hurt you mentally: It can cloud your thinking and lead to stress, depression and mental health issues.
• Hurt your career: It can result in alienating your colleagues, bosses, clients and lead to the loss of respect.
• Hurt your relationships: It makes it hard for your family and friends to trust you, be honest with you and feel comfortable around you.
This is why anger management, or managing anger appropriately, is so important.
Here are some strategies that can help you control your anger:
Strategy 1: Relaxation: Something as simple as breathing deeply and looking at relaxing images works wonders in calming down angry feelings. Try this simple breathing exercise:
• Take a deep breath from your diaphragm (don’t breathe from your chest)• Visualize your breath coming up from your stomach• Keep repeating a calming word like ‘relax’ or ‘take it easy’ (remember to keep breathing deeply
while repeating the word)• Picture a relaxing moment (this can be from your memory or your imagination)
9.1.7 Anger Management
9.1.7.1 Anger Management Strategies
296

Participant Handbook Cabinet Maker Modular Kitchen
Follow this relaxation technique daily, especially when you realize that you’re starting to feel angry.
Strategy 2: Cognitive Restructuring: Cognitive restructuring means changing the manner in which you think. Anger can make you curse, swear, exaggerate and act very dramatically. When this happens, force yourself to replace your angry thoughts with more logical ones. For instance, instead of thinking ‘Everything is ruined’ change your mindset and tell yourself ‘It’s not the end of the world and getting angry won’t solve this’.
Strategy 3: Problem Solving: Getting angry about a problem that you cannot control is a perfectly natural response. Sometimes, try as you may, there may not be a solution to the difficulty you are faced with. In such cases, stop focusing on solving the problem, and instead focus on handling and facing the problem. Remind yourself that you will do your best to deal with the situation, but that you will not blame yourself if you don’t get the solution you desire.
Strategy 4: Better Communication: When you’re angry, it is very easy to jump to inaccurate conclusions. In this case, you need to force yourself to stop reacting, and think carefully about what you want to say, before saying it. Avoid saying the first thing that enters your head. Force yourself to listen carefully to what the other person is saying. Then think about the conversation before responding.
Strategy 5: Changing Your Environment: If you find that your environment is the cause of your anger, try and give yourself a break from your surroundings. Make an active decision to schedule some personal time for yourself, especially on days that are very hectic and stressful. Having even a brief amount of quiet or alone time is sure to help calm you down.
• The following tips will help you keep your anger in check:• Take some time to collect your thoughts before you speak out in anger.• Express the reason for your anger in an assertive, but non-confrontational manner once you have
calmed down.• Do some form of physical exercise like running or walking briskly when you feel yourself getting
angry.• Make short breaks part of your daily routine, especially during days that are stressful. Focus on how
to solve a problem that’s making you angry, rather than focusing on the fact that the problem is making you angry.
9.1.7.2 Tips for Anger Management
We say we are ‘stressed’ when we feel overloaded and unsure of our ability to deal with the pressures placed on us. Anything that challenges or threatens our well-being can be defined as a stress. It is important to note that stress can be good and bad. While good stress keeps us going, negative stress undermines our mental and physical health. This is why it is so important to manage negative stress effectively.
Causes of Stress
Stress can be caused by internal and external factors.
9.1.8 Stress Management
297
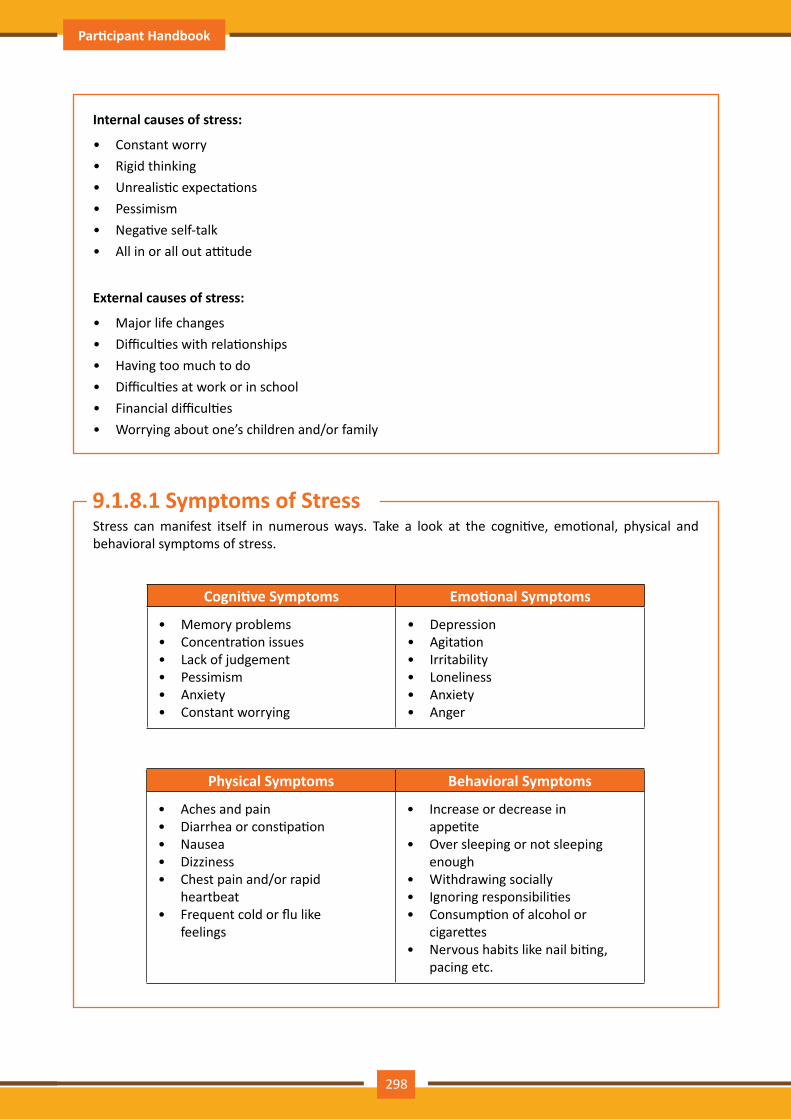
Participant Handbook Cabinet Maker Modular Kitchen
Internal causes of stress:
• Constant worry• Rigid thinking• Unrealistic expectations• Pessimism• Negative self-talk• All in or all out attitude
External causes of stress:
• Major life changes• Difficulties with relationships• Having too much to do• Difficulties at work or in school• Financial difficulties• Worrying about one’s children and/or family
Stress can manifest itself in numerous ways. Take a look at the cognitive, emotional, physical and behavioral symptoms of stress.
Cognitive Symptoms Emotional Symptoms
• Memory problems • Concentration issues • Lack of judgement • Pessimism • Anxiety • Constant worrying
• Depression • Agitation • Irritability • Loneliness • Anxiety • Anger
Physical Symptoms Behavioral Symptoms
• Aches and pain • Diarrhea or constipation • Nausea • Dizziness • Chest pain and/or rapid
heartbeat • Frequent cold or flu like
feelings
• Increase or decrease in appetite
• Over sleeping or not sleeping enough
• Withdrawing socially • Ignoring responsibilities • Consumption of alcohol or
cigarettes • Nervous habits like nail biting,
pacing etc.
9.1.8.1 Symptoms of Stress
298

Participant Handbook Cabinet Maker Modular Kitchen
The following tips can help you manage your stress better:
• Note down the different ways in which you can handle the various sources of your stress. • Remember that you cannot control everything, but you can control how you respond. • Discuss your feelings, opinions and beliefs rather than reacting angrily, defensively or passively. • Practice relaxation techniques like meditation, yoga or tai chi when you start feeling stressed. • Devote a part of your day towards exercise. • Eat healthy foods like fruits and vegetables. Avoid unhealthy foods especially those containing large
amounts of sugar. • Plan your day so that you can manage your time better, with less stress. • Say no to people and things when required. • Schedule time to pursue your hobbies and interests. • Ensure you get at least 7-8 hours of sleep. • Reduce your caffeine intake. • Increase the time spent with family and friends.
9.1.8.2 Tips for Stress Management
299

Participant Handbook Cabinet Maker Modular Kitchen
UNIT 9.2: Digital Literacy: A Recap
At the end of this unit, you will be able to:
1. Identify the basic parts of a computer 2. Identify the basic parts of a keyboard 3. Recall basic computer terminology 4. Recall basic computer terminology 5. Recall the functions of basic computer keys 6. Discuss the main applications of MS Office 7. Discuss the benefits of Microsoft Outlook 8. Discuss the different types of e-commerce 9. List the benefits of e-commerce for retailers and customers 10. Discuss how the Digital India campaign will help boost e-commerce in India 11. Describe how you will sell a product or service on an e-commerce platform
Unit Objectives
Fig.9.2.1.1:ComputerandInternetBasics
9.1.7 Anger Management
300
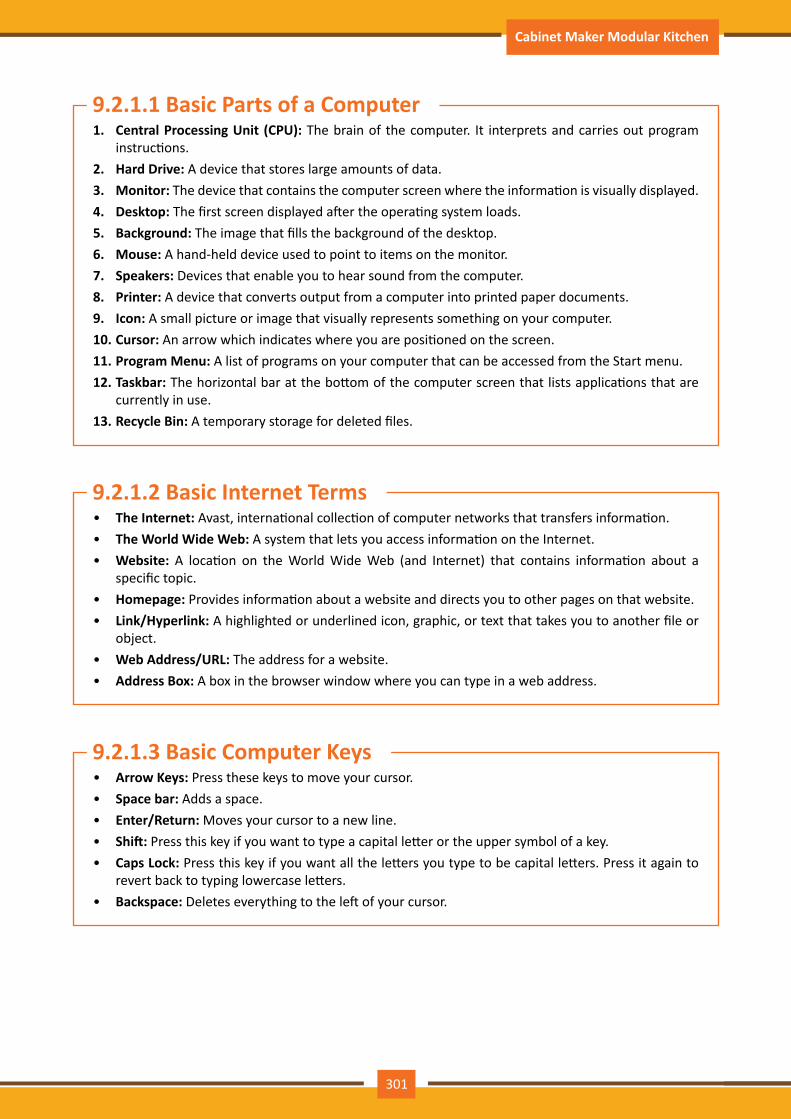
Participant Handbook Cabinet Maker Modular Kitchen
1. Central Processing Unit (CPU): The brain of the computer. It interprets and carries out program instructions.
2. Hard Drive: A device that stores large amounts of data. 3. Monitor: The device that contains the computer screen where the information is visually displayed. 4. Desktop: The first screen displayed after the operating system loads. 5. Background: The image that fills the background of the desktop. 6. Mouse: A hand-held device used to point to items on the monitor. 7. Speakers: Devices that enable you to hear sound from the computer. 8. Printer: A device that converts output from a computer into printed paper documents. 9. Icon: A small picture or image that visually represents something on your computer. 10. Cursor: An arrow which indicates where you are positioned on the screen. 11. Program Menu: A list of programs on your computer that can be accessed from the Start menu. 12. Taskbar: The horizontal bar at the bottom of the computer screen that lists applications that are
currently in use. 13. Recycle Bin: A temporary storage for deleted files.
• The Internet: Avast, international collection of computer networks that transfers information. • The World Wide Web: A system that lets you access information on the Internet. • Website: A location on the World Wide Web (and Internet) that contains information about a
specific topic. • Homepage: Provides information about a website and directs you to other pages on that website. • Link/Hyperlink: A highlighted or underlined icon, graphic, or text that takes you to another file or
object.• Web Address/URL: The address for a website. • Address Box: A box in the browser window where you can type in a web address.
• Arrow Keys: Press these keys to move your cursor. • Space bar: Adds a space. • Enter/Return: Moves your cursor to a new line. • Shift: Press this key if you want to type a capital letter or the upper symbol of a key. • Caps Lock: Press this key if you want all the letters you type to be capital letters. Press it again to
revert back to typing lowercase letters. • Backspace: Deletes everything to the left of your cursor.
9.2.1.1 Basic Parts of a Computer
9.2.1.2 Basic Internet Terms
9.2.1.3 Basic Computer Keys
301
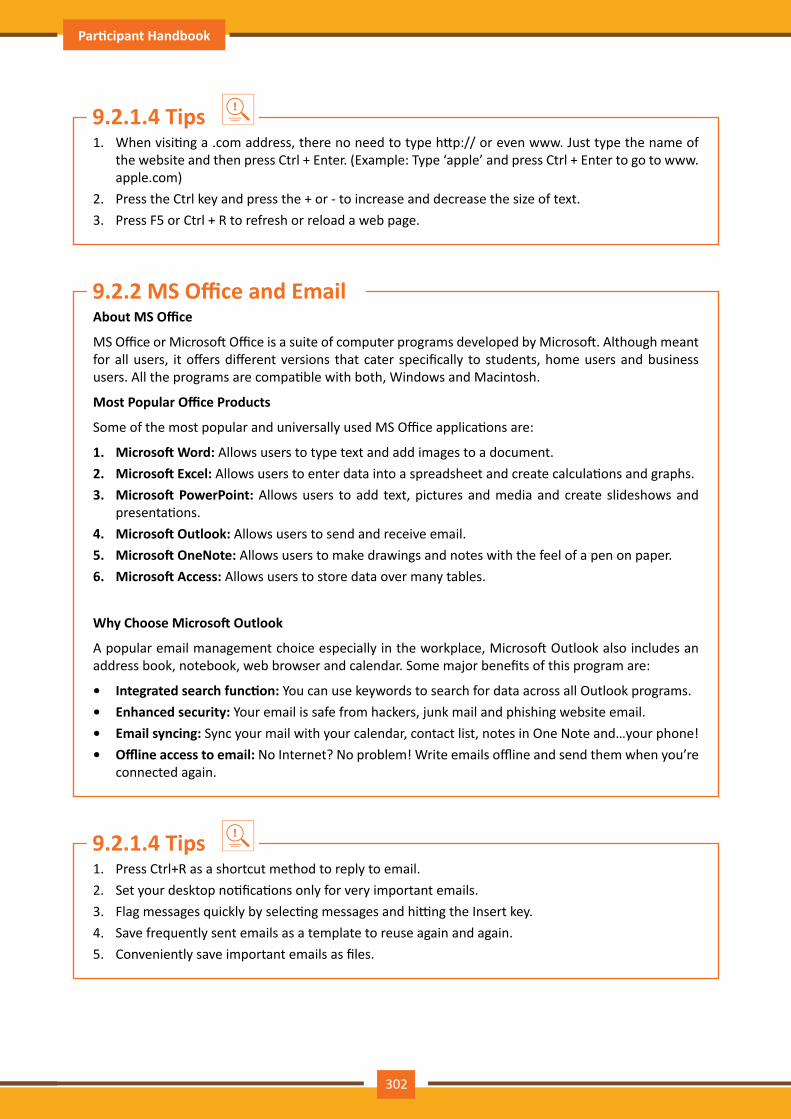
Participant Handbook Cabinet Maker Modular Kitchen
1. When visiting a .com address, there no need to type http:// or even www. Just type the name of the website and then press Ctrl + Enter. (Example: Type ‘apple’ and press Ctrl + Enter to go to www.apple.com)
2. Press the Ctrl key and press the + or - to increase and decrease the size of text. 3. Press F5 or Ctrl + R to refresh or reload a web page.
1. Press Ctrl+R as a shortcut method to reply to email. 2. Set your desktop notifications only for very important emails. 3. Flag messages quickly by selecting messages and hitting the Insert key. 4. Save frequently sent emails as a template to reuse again and again. 5. Conveniently save important emails as files.
9.2.1.4 Tips
9.2.1.4 Tips
About MS Office
MS Office or Microsoft Office is a suite of computer programs developed by Microsoft. Although meant for all users, it offers different versions that cater specifically to students, home users and business users. All the programs are compatible with both, Windows and Macintosh.
Most Popular Office Products
Some of the most popular and universally used MS Office applications are:
1. Microsoft Word: Allows users to type text and add images to a document. 2. Microsoft Excel: Allows users to enter data into a spreadsheet and create calculations and graphs. 3. Microsoft PowerPoint: Allows users to add text, pictures and media and create slideshows and
presentations.4. Microsoft Outlook: Allows users to send and receive email.5. Microsoft OneNote: Allows users to make drawings and notes with the feel of a pen on paper. 6. Microsoft Access: Allows users to store data over many tables.
Why Choose Microsoft Outlook
A popular email management choice especially in the workplace, Microsoft Outlook also includes an address book, notebook, web browser and calendar. Some major benefits of this program are:
• Integrated search function: You can use keywords to search for data across all Outlook programs. • Enhanced security: Your email is safe from hackers, junk mail and phishing website email. • Email syncing: Sync your mail with your calendar, contact list, notes in One Note and…your phone! • Offline access to email: No Internet? No problem! Write emails offline and send them when you’re
connected again.
9.2.2 MS Office and Email
302
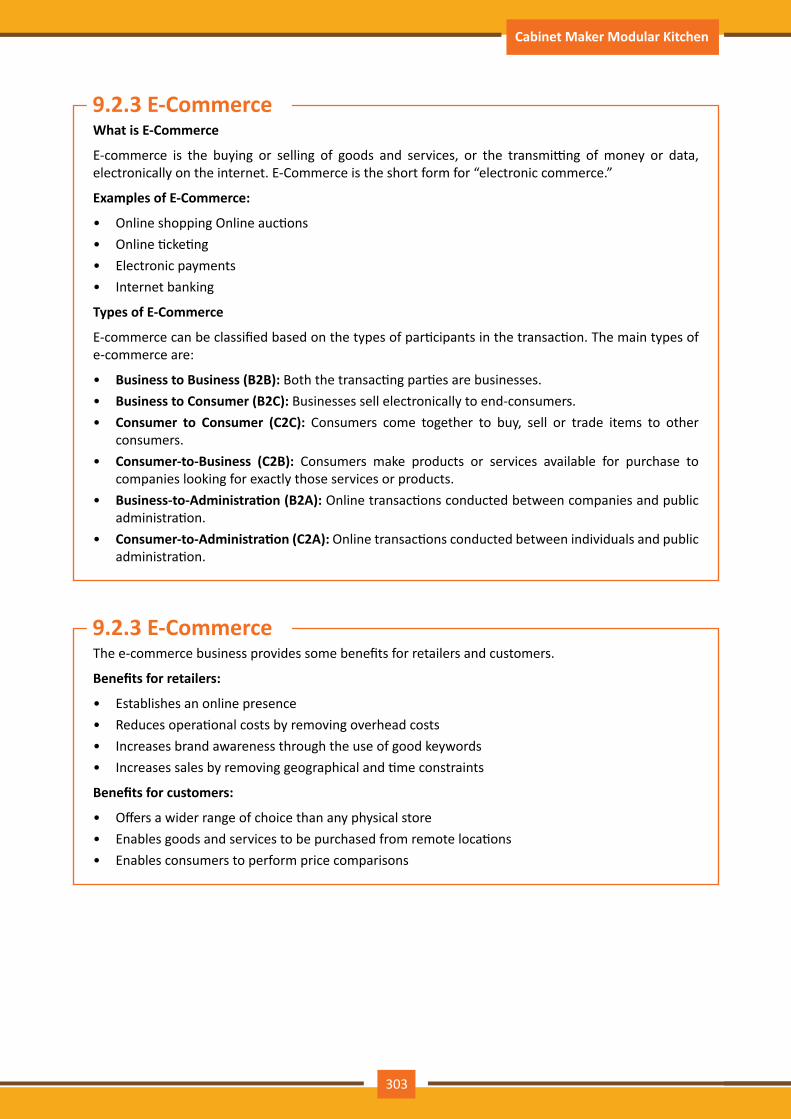
Participant Handbook Cabinet Maker Modular Kitchen
What is E-Commerce
E-commerce is the buying or selling of goods and services, or the transmitting of money or data, electronically on the internet. E-Commerce is the short form for “electronic commerce.”
Examples of E-Commerce:
• Online shopping Online auctions• Online ticketing• Electronic payments• Internet banking
Types of E-Commerce
E-commerce can be classified based on the types of participants in the transaction. The main types of e-commerce are:
• Business to Business (B2B): Both the transacting parties are businesses. • Business to Consumer (B2C): Businesses sell electronically to end-consumers. • Consumer to Consumer (C2C): Consumers come together to buy, sell or trade items to other
consumers.• Consumer-to-Business (C2B): Consumers make products or services available for purchase to
companies looking for exactly those services or products. • Business-to-Administration (B2A): Online transactions conducted between companies and public
administration.• Consumer-to-Administration (C2A): Online transactions conducted between individuals and public
administration.
The e-commerce business provides some benefits for retailers and customers.
Benefits for retailers:
• Establishes an online presence • Reduces operational costs by removing overhead costs • Increases brand awareness through the use of good keywords • Increases sales by removing geographical and time constraints
Benefits for customers:
• Offers a wider range of choice than any physical store • Enables goods and services to be purchased from remote locations • Enables consumers to perform price comparisons
9.2.3 E-Commerce
9.2.3 E-Commerce
303

Participant Handbook Cabinet Maker Modular Kitchen
Prime Minister Narendra Modi launched the Digital India campaign in 2015, with the objective of offering every citizen of India access to digital services, knowledge and information. The campaign aims to improve the country’s online infrastructure and increase internet connectivity, thus boosting the e-commerce industry.
Currently, the majority of online transactions come from tier 2 and tier 3 cities. Once the Digital India campaign is in place, the government will deliver services through mobile connectivity, which will help deliver internet to remote corners of the country. This will help the e-commerce market to enter India’s tier 4 towns and rural areas.
E-Commerce Activity
Choose a product or service that you want to sell online. Write a brief note explaining how you will use existing e-commerce platforms, or create a new e-commerce platform, to sell your product or service.
9.2.3.2 Digital India Campaign
1. Before launching your e-commerce platform, test everything.2. Pay close and personal attention to your social media.
9.2.3.3 Tips
304
Participant Handbook Cabinet Maker Modular Kitchen
Importance of Saving
We all know that the future is unpredictable. You never know what will happen tomorrow, next week or next year. That’s why saving money steadily through the years is so important. Saving money will help improve your financial situation over time. But more importantly, knowing that you have money stashed away for an emergency will give you peace of mind. Saving money also opens the door to many more options and possibilities.
Benefits of Saving
Inculcating the habit of saving leads to a vast number of benefits. Saving helps you:
• Become financially independent: When you have enough money saved up to feel secure you can start making your choices, from taking a vacation whenever you want, to switching careers or starting your own business.
• Invest in yourself through education: Through saving, you can earn enough to pay up for courses that will add to your professional experience and ultimately result in higher paying jobs.
• Get out of debt: Once you have saved enough as a reserve fund, you can use your savings to pay off debts like loans or bills that have accumulated over time.
• Be prepared for surprise expenses: Having money saved enables you to pay for unforeseen expenses like sudden car or house repairs, without feeling financially stressed.
• Pay for emergencies: Saving helps you deal with emergencies like sudden health issues or emergency trips without feeling financially burdened.
• Afford large purchases and achieve major goals: Saving diligently makes it possible to place down payments towards major purchases and goals, like buying a home or a car.
• Retire: The money you have saved over the years will keep you comfortable when you no longer have the income you would get from your job.
9.3.1 Personal Finance – Why to Save
UNIT 9.3: Money Matters
At the end of this unit, you will be able to:
1. Discuss the importance of saving money2. Discuss the benefits of saving money3. Discuss the main types of bank accounts4. Describe the process of opening a bank account5. Differentiate between fixed and variable costs6. Describe the main types of investment options7. Describe the different types of insurance products8. Describe the different types of taxes9. Discuss the uses of online banking10. Discuss the main types of electronic funds transfers
Unit Objectives
305

Participant Handbook Cabinet Maker Modular Kitchen
1. Break your spending habit. Try not spending on one expensive item per week, and put the money that you would have spent into your savings.
2. Decide that you will not buy anything on certain days or weeks and stick to your word.
9.3.1.1 Tips
In India, banks offer four main types of bank accounts. These are:
1. Current Accounts2. Savings Accounts 3. Recurring Deposit Accounts4. Fixed Deposit Accounts
Current Accounts
Current accounts offer the most liquid deposits and thus, are best suited for businessmen and companies. As these accounts are not meant for investments and savings, there is no imposed limit on the number or amount of transactions that can be made on any given day. Current account holders are not paid any interest on the amounts held in their accounts. They are charged for certain services offered on such accounts.
Savings Accounts
Savings accounts are meant to promote savings, and are therefore the number one choice for salaried individuals, pensioners and students. While there is no restriction on the number and amount of deposits made, there are usually restrictions on the number and amount of withdrawals. Savings account holders are paid interest on their savings.
Recurring Deposit Accounts
Recurring Deposit accounts, also called RD accounts, are the accounts of choice for those who want to save an amount every month, but are unable to invest a large sum at one time. Such account holders deposit a small, fixed amount every month for a pre-determined period (minimum 6 months). Defaulting on a monthly payment results in the account holder being charged a penalty amount. The total amount is repaid with interest at the end of the specified period.
Fixed Deposit Accounts
Fixed Deposit accounts, also called FD accounts, are ideal for those who wish to deposit their savings for a long term in return for a high rate of interest. The rate of interest offered depends on the amount deposited and the time period, and also differs from bank to bank. In the case of an FD, a certain amount of money is deposited by the account holder for a fixed period of time. The money can be withdrawn when the period expires. If necessary, the depositor can break the fixed deposit prematurely. However, this usually attracts a penalty amount which also differs from bank to bank.
9.3.2 Types of Bank Accounts
306
Participant Handbook Cabinet Maker Modular Kitchen
1. Select the right type of account. 2. Fill in complete nomination details. 3. Ask about fees. 4. Understand the rules. 5. Check for online banking – it’s convenient! 6. Keep an eye on your bank balance.
9.3.2.2 Tips
Opening a bank account is quite a simple process. Take a look at the steps to open an account of your own:
Step 1: Fill in the Account Opening Form
This form requires you to provide the following information:
• Personal details (name, address, phone number, date of birth, gender, occupation, address) • Method of receiving your account statement (hard copy/email) • Details of your initial deposit (cash/cheque) • Manner of operating your account (online/mobile banking/traditional via cheque, slip books)
Ensure that you sign wherever required on the form.
Step 2: Affix your Photograph
Stick a recent photograph of yourself in the allotted space on the form.
Step 3: Provide your Know Your Customer (KYC) Details
KYC is a process that helps banks verify the identity and address of their customers. To open an account, every individual needs to submit certain approved documents with respect to photo identity (ID) and address proof. Some Officially Valid Documents (OVDs) are:
• Passport • Driving License • Voters’ Identity Card • PAN Card • UIDAI (Aadhaar) Card
Step 4: Submit All your Documents
Submit the completed Account Opening Form and KYC documents. Then wait until the forms are processed and your account has been opened!
What are Fixed and Variable Costs
• Fixed costs and variable costs together make up a company’s total cost. These are the two types of costs that companies have to bear when producing goods and services.
• A fixed cost does not change with the volume of goods or services a company produces. It always remains the same.
9.3.2 Types of Bank Accounts
9.3.3 Costs: Fixed vs Variable
307
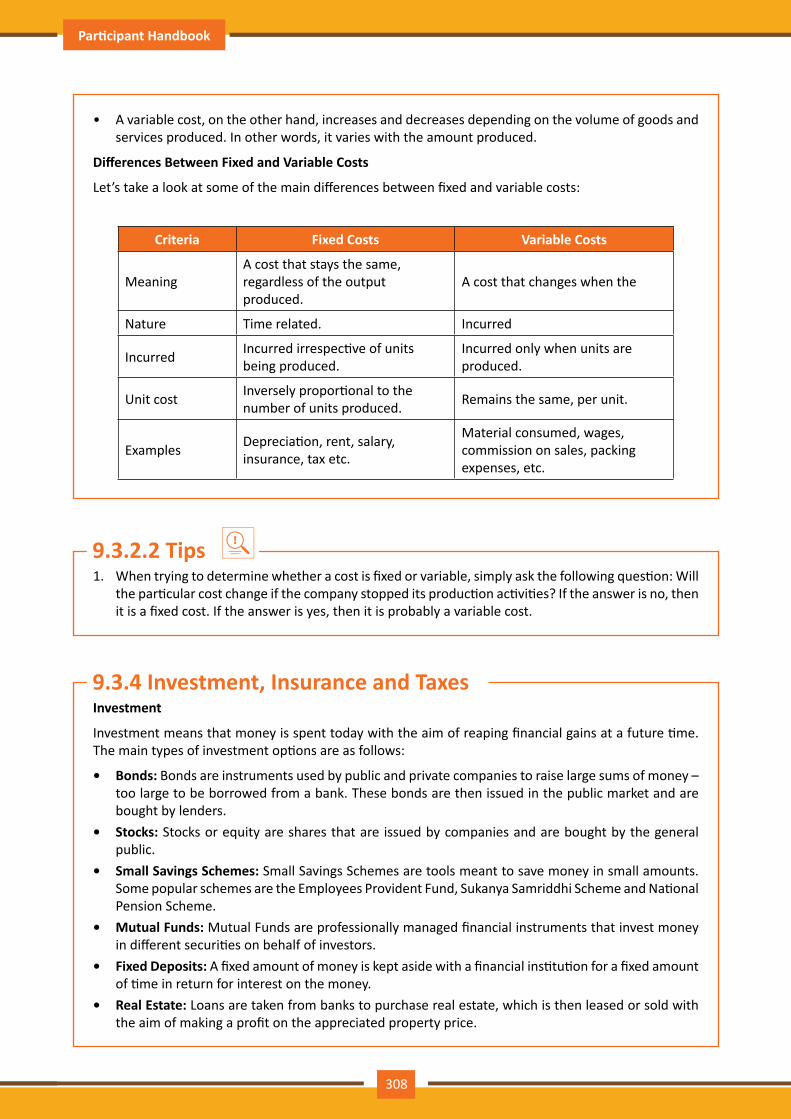
Participant Handbook Cabinet Maker Modular Kitchen
• A variable cost, on the other hand, increases and decreases depending on the volume of goods and services produced. In other words, it varies with the amount produced.
Differences Between Fixed and Variable Costs
Let’s take a look at some of the main differences between fixed and variable costs:
Criteria Fixed Costs Variable Costs
MeaningA cost that stays the same, regardless of the output produced.
A cost that changes when the
Nature Time related. Incurred
Incurred Incurred irrespective of units being produced.
Incurred only when units are produced.
Unit cost Inversely proportional to the number of units produced. Remains the same, per unit.
Examples Depreciation, rent, salary, insurance, tax etc.
Material consumed, wages, commission on sales, packing expenses, etc.
1. When trying to determine whether a cost is fixed or variable, simply ask the following question: Will the particular cost change if the company stopped its production activities? If the answer is no, then it is a fixed cost. If the answer is yes, then it is probably a variable cost.
9.3.2.2 Tips
Investment
Investment means that money is spent today with the aim of reaping financial gains at a future time. The main types of investment options are as follows:
• Bonds: Bonds are instruments used by public and private companies to raise large sums of money – too large to be borrowed from a bank. These bonds are then issued in the public market and are bought by lenders.
• Stocks: Stocks or equity are shares that are issued by companies and are bought by the general public.
• Small Savings Schemes: Small Savings Schemes are tools meant to save money in small amounts. Some popular schemes are the Employees Provident Fund, Sukanya Samriddhi Scheme and National Pension Scheme.
• Mutual Funds: Mutual Funds are professionally managed financial instruments that invest money in different securities on behalf of investors.
• Fixed Deposits: A fixed amount of money is kept aside with a financial institution for a fixed amount of time in return for interest on the money.
• Real Estate: Loans are taken from banks to purchase real estate, which is then leased or sold with the aim of making a profit on the appreciated property price.
9.3.4 Investment, Insurance and Taxes
308
Participant Handbook Cabinet Maker Modular Kitchen
• Hedge Funds: Hedge funds invest in both financial derivatives and/or publicly traded securities. • Private Equity: Private Equity is trading in the shares of an operating company that is not publicly
listed and whose shares are not available on the stock market. • Venture Capital: Venture Capital involves investing substantial capital in a budding company in
return for stocks in that company.
Insurance
There are two types of insurance:
1. Life Insurance2. Non-Life or General Insurance.
Life Insurance Products
The main life insurance products are:
• Term Insurance: This is the simplest and cheapest form of insurance. It offers financial protection for a specified tenure, say 15 to 20 years. In the case of your death, your family is paid the sum assured. In the case of your surviving the term, the insurer pays nothing.
• Endowment Policy: This offers the dual benefit of insurance and investment. Part of the premium is allocated towards the sum assured, while the remaining premium gets invested in equity and debt. It pays a lump sum amount after the specified duration or on the death of the policyholder, whichever is earlier.
• Unit-Linked Insurance Plan (ULIP): Here part of the premium is spent on the life cover, while the remaining amount is invested in equity and debt. It helps develop a regular saving habit.
• Money Back Life Insurance: While the policyholder is alive, periodic payments of the partial survival benefits are made during the policy tenure. On the death of the insured, the insurance company pays the full sum assured along with survival benefits.
• Whole Life Insurance: It offers the dual benefit of insurance and investment. It offers insurance cover for the whole life of the person or up to 100 years whichever is earlier.
General Insurance
General Insurance deals with all insurance covering assets like animals, agricultural crops, goods, factories, cars and so on.
General Insurance Products:
• Motor Insurance: This can be divided into Four Wheeler Insurance and Two Wheeler Insurance. • Health Insurance: The main types of health insurance are individual health insurance, family floater
health insurance, comprehensive health insurance and critical illness insurance. • Travel Insurance: This can be categorised into Individual Travel Policy, Family Travel Policy, Student
Travel Insurance and Senior Citizen Health Insurance.• Home Insurance: This protects the house and its contents from risk. • Marine Insurance: This insurance covers goods, freight, cargo etc. against loss or damage during
transit by rail, road, sea and/or air.
Taxes
There are two types of taxes:
1. Direct Taxes 2. Indirect Taxes.
309

Participant Handbook Cabinet Maker Modular Kitchen
Direct Tax
Direct taxes are levied directly on an entity or a person and are non-transferrable. Some examples of Direct Taxes are:
• Income Tax: This tax is levied on your earning in a financial year. It is applicable to both, individuals and companies.
• Capital Gains Tax: This tax is payable whenever you receive a sizable amount of money. It is usually of two types – short term capital gains from investments held for less than 36 months and long term capital gains from investments held for longer than 36 months.
• Securities Transaction Tax: This tax is added to the price of a share. It is levied every time you buy or sell shares.
• Perquisite Tax: This tax is levied is on perks that have been acquired by a company or used by an employee.
• Corporate Tax: Corporate tax is paid by companies from the revenue they earn.
Indirect Tax
Indirect taxes are levied on goods or services. Some examples of Indirect Taxes are:
• Sales Tax: Sales Tax is levied on the sale of a product. • Service Tax: Service Tax is added to services provided in India. • Value Added Tax: Value Added Tax is levied at the discretion of the state government. The tax is
levied on goods sold in the state. The tax amount is decided by the state. • Customs Duty & Octroi: Customs Duty is a charge that is applied on purchases that are imported
from another country. Octroi is levied on goods that cross state borders within India. • Excise Duty: Excise Duty is levied on all goods manufactured or produced in India.
1. Think about how quickly you need your money back and pick an investment option accordingly.2. Ensure that you are buying the right type of insurance policy for yourself.3. Remember, not paying taxes can result in penalties ranging from fines to imprisonment.
9.3.4.1 Tips
What is Online Banking
Internet or online banking allows account holders to access their account from a laptop at any location. In this way, instructions can be issued. To access an account, account holders simply need to use their unique customer ID number and password.
Internet banking can be used to:
• Find out an account balance • Transfer amounts from one account to another • Arrange for the issuance of cheques • Instruct payments to be made • Request for a cheque book • Request for a statement of accounts • Make a fixed deposit
9.3.5 Online Banking, NEFT, RTGS, etc.
310

Participant Handbook Cabinet Maker Modular Kitchen
Electronic Funds Transfers
Electronic funds transfer is a convenient way of transferring money from the comfort of one’s own home, using integrated banking tools like internet and mobile banking.
Transferring funds via an electronic gateway is extremely convenient. With the help of online banking, you can choose to:
• Transfer funds into your own accounts of the same bank. • Transfer funds into different accounts of the same bank. • Transfer funds into accounts in different banks, using NEFT. • Transfer funds into other bank accounts using RTGS. • Transfer funds into various accounts using IMPS.
NEFT
NEFT stands for National Electronic Funds Transfer. This money transfer system allows you to electronically transfer funds from your respective bank accounts to any other account, either in the same bank or belonging to any other bank. NEFT can be used by individuals, firms and corporate organizations to transfer funds between accounts.
In order to transfer funds via NEFT, two things are required:
• A transferring bank • A destination bank
Before you can transfer funds through NEFT, you will need to register the beneficiary who will be receiving the funds. In order to complete this registration, you will require the following
• Recipient’s name • Recipient’s account number • Recipient’s bank’s name • Recipient’s bank’s IFSC code
RTGS
RTGS stands for Real Time Gross Settlement. This is a real time funds transfer system which enables you to transfer funds from one bank to another, in real time or on a gross basis. The transferred amount is immediately deducted from the account of one bank, and instantly credited to the other bank’s account. The RTGS payment gateway is maintained by the Reserve Bank of India. The transactions between banks are made electronically.
RTGS can be used by individuals, companies and firms to transfer large sums of money. Before remitting funds through RTGS, you will need to add the beneficiary and his bank account details via your online banking account. In order to complete this registration, you will require the following information:
• Name of the beneficiary • Beneficiary’s account number • Beneficiary’s bank address • Bank’s IFSC code
IMPS
IMPS stands for Immediate Payment Service. This is a real-time, inter-bank, electronic funds transfer system used to transfer money instantly within banks across India. IMPS enables users to make instant
311

Participant Handbook Cabinet Maker Modular Kitchen
electronic transfer payments using mobile phones through both, Mobile Banking and SMS. It can also be used through ATMs and online banking. IMPS is available 24 hours a day and 7 days a week. The system features a secure transfer gateway and immediately confirms orders that have been fulfilled.
To transfer money through IMPS, the you need to:
• Register for IMPS with your bank • Receive a Mobile Money Identifier (MMID) from the bank • Receive a MPIN from the bank
Once you have both these, you can login or make a request through SMS to transfer a particular amount to a beneficiary.
For the beneficiary to receive the transferred money, he must:
• Link his mobile number with his respective account • Receive the MMID from the bank
In order to initiate a money transfer through IMPS, you will need to enter the following information:
• The beneficiary’s mobile number • The beneficiary’s MMID • The transfer amount • Your MPIN
As soon as money has been deducted from your account and credited into the beneficiary’s account, you will be sent a confirmation SMS with a transaction reference number, for future reference.
Criteria NEFT RTGS IMPSSettlement Done in Batches Real-Time Real-Time
Full Form national Electronic Fund Transfer
Real Time Gross Settlement
Immediate Payment Service
Timing on Monday to
Friday8.00 am - 6.30 pm 9.00 am - 4.30 pm 24x7
Timing on Saturday 8.00 am - 7.00 p.m. 9.00 am - 1.30 pm 24x7
Minimum amount of
money transfer limit
`1 `2 lacs `1
Maximum amount of
money transfer limit
`10 lacs `10 lacs per day `2 lacs
Maximum charges as per
RBI
Upto 10,000 - `2.5above 10,000 - `1 lac - `5
above 1-2 lacs - `15above 2-5 lacs - `25
above 5-10 lacs - `25
above 2-5 lacs - `25above 5-10 lacs - `50
Upto 10,000 - `5above 10,000 - `1 lac
- `5above 1-2 lacs - `15
9.3.5.1 Differences Between NEFT, RTGS & IMPS
312

Participant Handbook Cabinet Maker Modular Kitchen
1. Never click on any links in any e-mail message to access your online banking website.2. You will never be asked for your credit or debit card details while using online banking.3. Change your online banking password regularly.
9.3.4.1 Tips
313
Participant Handbook Cabinet Maker Modular Kitchen
UNIT 9.4: Preparing for Employment & Self Employment
The success of your getting the job that you want depends largely on how well your interview for that job goes. Therefore, before you go in for your interview, it is important that you prepare for it with a fair amount of research and planning. Take a look at the steps to follow in order to be well prepared for an interview:
1. Research the organization that you are having the interview with.• Studying the company beforehand will help you be more prepared at the time of the interview.
Your knowledge of the organization will help you answer questions at the time of the interview, and will leave you looking and feeling more confident. This is sure to make you stand out from other, not as well informed, candidates.
• Look for background information on the company. Ty and find an overview of the company and its industry profile.
• Visit the company website to get a good idea of what the company does. A company website offers a wealth of important information. Read and understand the company’s mission statement. Pay attention to the company’s products/services and client list. Read through any press releases to get an idea of the company’s projected growth and stability.
• Note down any questions that you have after your research has been completed.2. Think about whether your skills and qualifications match the job requirements.
• Carefully read through and analyze the job description.• Make a note of the knowledge, skills and abilities required to fulfill the job requirements.• Take a look at the organization hierarchy. Figure out where the position you are applying for fits
into this hierarchy.3. Go through the most typical interview questions asked, and prepare your responses.
• Remember, in most interviews a mix of resume-based, behavioral and case study questions are asked.
• Think about the kind of answers you would like to provide to typical questions asked in these three areas.
• Practice these answers until you can express them confidently and clearly.4. Plan your attire for the interview.
• It is always safest to opt for formal business attire, unless expressly informed to dress in business casual (in which case you should use your best judgement).
9.4.1 Interview Preparation: How to Prepare for an Interview
At the end of this unit, you will be able to:
1. Discuss the steps to prepare for an interview2. Discuss the steps to create an effective Resume3. Discuss the most frequently asked interview questions4. Discuss how to answer the most frequently asked interview questions5. Discuss basic workplace terminology
Unit Objectives
314

Participant Handbook Cabinet Maker Modular Kitchen
• Ensure that your clothes are clean and well-ironed. Pick neutral colours – nothing too bright or flashy.
• The shoes you wear should match your clothes, and should be clean and suitable for an interview.• Remember, your aim is to leave everyone you meet with the impression that you are a
professional and highly efficient person.5. Ensure that you have packed everything that you may require during the interview.
• Carry a few copies of your resume. Use a good quality paper for your resume print outs.• Always take along a notepad and a pen.• Take along any information you may need to refer to, in order to fill out an application form.• Carry a few samples of your work, if relevant.
6. Remember the importance of non-verbal communication.• Practice projecting confidence. Remind yourself to smile and make eye contact. Practice giving a firm
handshake.• Keep in mind the importance of posture. Practice sitting up straight. Train yourself to stop
nervous gestures like fidgeting and foot-tapping.• Practice keeping your reactions in check. Remember, your facial expressions provide a good
insight into your true feelings. Practice projecting a positive image.7. Make a list of questions to end the interview with.
• Most interviews will end with the interviewer(s) asking if you have any questions. This is your chance to show that you have done your research and are interested in learning more about the company.
• If the interviewer does not ask you this question, you can inform him/her that you have some queries that you would like to discuss. This is the time for you to refer to the notes you made while studying the company.
• Some good questions to ask at this point are:What do you consider the most important criteria for success in this job?
ᴑ How will my performance be evaluated? ᴑ What are the opportunities for advancement? ᴑ What are the next steps in the hiring process?
• Remember, never ask for information that is easily available on the company website.
1. Ask insightful and probing questions.2. When communicating, use effective forms of body language like smiling, making eye contact, and
actively listening and nodding. Don’t slouch, play with nearby items, fidget, chew gum, or mumble.
9.4.1.1 Tips
A resume is a formal document that lists a candidate’s work experience, education and skills. A good resume gives a potential employer enough information to believe the applicant is worth interviewing. That’s why it is so important to create a résumé that is effective. Take a look at the steps to create an effective resume:
Step 1: Write the Address Section: The Address section occupies the top of your resume. It includes information like your name, address, phone number and e-mail address. Insert a bold line under the
9.4.2 Preparing an Effective Resume
315
Participant Handbook Cabinet Maker Modular Kitchen
section to separate it from rest of your resume.
Example:
Jasmine WattsBreach Candy, mumbai - IndiaContact No. +91 2223678270Email: [email protected]___________________________________________________________________________
Step 2: Add the Profile Summary Section: This part of your resume should list your overall experiences, achievements, awards, certifications and strengths. You can make your summary as short as 2-3 bullet points or as long as 8-10 bullet points.
Example:
Profile Summary• A Content Writer gratuated from University of Strathclyde having 6 years of experience in
writing website copy.• Core expertise lies in content creation for e-learning courses, specifically for the
k-12 segment.
Step 3: Include Your Educational Qualifications: When listing your academic records, first list your highest degree. Then add the second highest qualification under the highest one and so on. To provide a clear and accurate picture of your educational background, it is critical that include information on your position, rank, percentage or CPI for every degree or certification that you have listed.
If you have done any certifications and trainings, you can add a Trainings & Certifications section under your Educational Qualifications section.
Example:
Educetional Qualification• Masters in International Management (2007) from Columbia University with 11.8 CPI.• Bachelor of Management Studios (2004) from Mumbai University with 87% marks.• 10+2 with Math, Stats (2001) from Maharastra Board with 91% marks.• High School (1999) from Maharastra Board with 93% marks.
Step 4: List Your Technical Skills: When listing your technical skills, start with the skills that you are most confident about. Then add the skills that you do not have as good a command over. It is perfectly acceptable to include just one skill, if you feel that particular skill adds tremendous value to your résumé. If you do not have any technical skills, you can omit this step.
Example:
Technical Skills• Flash• Photoshop
Step 5: Insert Your Academic Project Experience
List down all the important projects that you have worked on. Include the following information in this section:
Example:
Project titleContribution
OrganizationDescription
Platform used
316
Participant Handbook Cabinet Maker Modular Kitchen
Academic ProjectsProject Title: Different Communication SkillsOrganization: True Blue SolutionsPlatform used: ArticilateContribution: Content writing and graphic zisualizationDescription: Development of storyboards for corporate induction & training programs.
Step 6: List Your Strengths: This is where you list all your major strengths. This section should be in the form of a bulleted list.
Example:
Strengths• Excellent oral, written and presentation skills• Action-oriented and result-focused• Great time management skills
Step 7: List Your Extracurricular Activities: It is very important to show that you have diverse interests and that your life consists of more than academics. Including your extracurricular activities can give you an added edge over other candidates who have similar academic scores and project experiences. This section should be in the form of a bulleted list.
Example:
Extracurricular Activities• Mamber of the Debate Club• Played tennis at at national level• Won first prizes in the All India Camel Contest, 2010
Step 8: Write Your Personal Details: The last section of your résumé must include the following personal information:
• Date of birth • Gender & marital status • Nationality • Languages known
Example:
Personal Details• Date of Birth: 25th May, 1981• Gender & marital status: Female, Single• Nationality: Indian• Languages known: English, Hindi, Tamil, French
1. Keep your resume file name short, simple and informational.2. Make sure the resume is neat and free from typing errors.3. Always create your resume on plain white paper.
9.4.1.1 Tips
317
Participant Handbook Cabinet Maker Modular Kitchen
Take a look at some of the most frequently asked interview questions, and some helpful tips on how to answer them.
1. Can you tell me a little about yourself? Tips to answer:• Don’t provide your full employment or personal history. • Offer 2-3 specific experiences that you feel are most valuable and relevant. • Conclude with how those experiences have made you perfect for this specific role.
2. How did you hear about the position? Tips to answer:• Tell the interviewer how you heard about the job – whether it was through a friend (name the
friend), event or article (name them) or a job portal (say which one). • Explain what excites you about the position and what in particular caught your eye about this
role. 3. What do you know about the company?
Tips to answer: • Don’t recite the company’s About Us page. • Show that you understand and care about the company’s goals. • Explain why you believe in the company’s mission and values.
4. Why do you want this job? Tips to answer: • Show that you are passionate about the job. • Identify why the role is a great fit for you. • Explain why you love the company.
5. Why should we hire you? Tips to answer: • Prove through your words that you can not only do the work, but can definitely deliver excellent
results. • Explain why you would be a great fit with the team and work culture. • Explain why you should be chosen over any other candidate.
6. What are your greatest professional strengths? Tips to answer: • Be honest – share some of your real strengths, rather than give answers that you think sound
good. • Offer examples of specific strengths that are relevant to the position you are applying for. • Provide examples of how you’ve demonstrated these strengths.
7. What do you consider to be your weaknesses? Tips to answer: • The purpose of this question is to gauge your self-awareness and honesty. • Give an example of a trait that you struggle with, but that you’re working on to improve.
8. What are your salary requirements? Tips to answer: • Do your research beforehand and find out the typical salary range for the job you are applying
for.
9.4.3 Interview FAQs
318
Participant Handbook Cabinet Maker Modular Kitchen
• Figure out where you lie on the pay scale based on your experience, education, and skills. • Be flexible. Tell the interviewer that you know your skills are valuable, but that you want the job
and are willing to negotiate.9. What do you like to do outside of work?
Tips to answer: • The purpose of this question is to see if you will fit in with the company culture. • Be honest – open up and share activities and hobbies that interest and excite you.
10. If you were an animal, which one would you want to be? Tips to answer: • The purpose of this question is to see if you are able to think on your feet. • There’s no wrong answer – but to make a great impression try to bring out your strengths or
personality traits through your answer. 11. What do you think we could do better or differently?
Tips to answer: • The purpose of this question is to see if you have done your research on the company, and to
test whether you can think critically and come up with new ideas. • Suggest new ideas. Show how your interests and expertise would help you execute these ideas.
12. Do you have any questions for us? Tips to answer: • Do not ask questions to which the answers can be easily found on the company website or
through a quick online search. • Ask intelligent questions that show your ability to think critically.
1. Be honest and confident while answering.2. Use examples of your past experiences wherever possible to make your answers more impactful.
9.4.1.1 Tips
Every employee should be well versed in the following terms: • Annual leave: Paid vacation leave given by employers to employees. • Background Check: A method used by employers to verify the accuracy of the information provided
by potential candidates. • Benefits: A part of an employee’s compensation package. • Breaks: Short periods of rest taken by employees during working hours. • Compensation Package: The combination of salary and benefits that an employer provides
to his/her employees. • Compensatory Time (Comp Time): Time off in lieu of pay. • Contract Employee: An employee who works for one organization that sells said employee’s services
to another company, either on a project or time basis. • Contract of Employment: When an employee is offered work in exchange for wages or salary, and
accepts the offer made by the employer, a contract of employment exists.
9.4.4 Work Readiness – Terms & Terminologies
319
Participant Handbook Cabinet Maker Modular Kitchen
• Corporate Culture: The beliefs and values shared by all the members of a company, and imparted from one generation of employees to another.
• Counter Offer/Counter Proposal: A negotiation technique used by potential candidates to increase the amount of salary offered by a company.
• Cover Letter: A letter that accompanies a candidate’s resume. It emphasizes the important points in the candidate’s resume and provides real examples that prove the candidate’s ability to perform the expected job role.
• Curriculum Vitae (CV)/Resume: A summary of a candidate’s achievements, educational background, work experience, skills and strengths.
• Declining Letter: A letter sent by an employee to an employer, turning down the job offer made by the employer to the employee.
• Deductions: Amounts subtracted from an employee’s pay and listed on the employee’s pay slip. • Discrimination: The act of treating one person not as favourably as another person. • Employee: A person who works for another person in exchange for payment. • Employee Training: A workshop or in-house training that an employee is asked to attend by his or
her superior, for the benefit of the employer. • Employment Gaps: Periods of unemployed time between jobs. • Fixed-Term Contract: A contract of employment which gets terminated on an agreed-upon date. • Follow-Up: The act of contacting a potential employer after a candidate has submitted his or her
resume. • Freelancer/Consultant/Independent Contractor: A person who works for him or herself and
pitches for temporary jobs and projects with different employers. • Holiday: Paid time-off from work. • Hourly Rate: The amount of salary or wages paid for 60 minutes of work. • Internship: A job opportunity offered by an employer to a potential employee, called an intern, to
work at the employer’s company for a fixed, limited time period. • Interview: A conversation between a potential employee and a representative of an employer, in
order to determine if the potential employee should be hired. • Job Application: A form which asks for a candidate’s information like the candidate’s name, address,
contact details and work experience. The purpose of a candidate submitting a job application, is to show that candidate’s interest in working for a particular company.
• Job Offer: An offer of employment made by an employer to a potential employee. • Job Search Agent: A program that enables candidates to search for employment opportunities by
selecting criteria listed in the program, for job vacancies. • Lay Off: A lay off occurs when an employee is temporarily let go from his or her job, due to the
employer not having any work for that employee. • Leave: Formal permission given to an employee, by his or her employer, to take a leave of absence from
work.• Letter of Acceptance: A letter given by an employer to an employee, confirming the offer of
employment made by the employer, as well as the conditions of the offer. • Letter of Agreement: A letter that outlines the terms of employment. • Letter of Recommendation: A letter written for the purpose of validating the work skills of a person. • Maternity Leave: Leave taken from work by women who are pregnant, or who have just given birth. • Mentor: A person who is employed at a higher level than you, who offers you advice and guides
you in your career. • Minimum wage: The minimum wage amount paid on an hourly basis.
320
Participant Handbook Cabinet Maker Modular Kitchen
• Notice: An announcement made by an employee or an employer, stating that the employment contract will end on a particular date.
• Offer of Employment: An offer made by an employer to a prospective employee that contains important information pertaining to the job being offered, like the starting date, salary, working conditions etc.
• Open-Ended Contract: A contract of employment that continues till the employer or employee terminates it.
• Overqualified: A person who is not suited for a particular job because he or she has too many years of work experience, or a level of education that is much higher than required for the job, or is currently or was previously too highly paid.
• Part-Time Worker: An employee who works for fewer hours than the standard number of hours normally worked.
• Paternity Leave: Leave granted to a man who has recently become a father. • Recruiters/Headhunters/Executive Search Firms: Professionals who are paid by employers to
search for people to fill particular positions. • Resigning/Resignations: When an employee formally informs his or her employer that he or she is
quitting his or her job. • Self-Employed: A person who has his or her own business and does not work in the capacity of an
employee. • Time Sheet: A form that is submitted to an employer, by an employee, that contains the number of
hours worked every day by the employee.
321
Participant Handbook Cabinet Maker Modular Kitchen
UNIT 9.5: Understanding Entrepreneurship
At the end of this unit, you will be able to:
1. Discuss the concept of entrepreneurship 2. Discuss the importance of entrepreneurship 3. Describe the characteristics of an entrepreneur 4. Describe the different types of enterprises 5. List the qualities of an effective leader 6. Discuss the benefits of effective leadership 7. List the traits of an effective team 8. Discuss the importance of listening effectively 9. Discuss how to listen effectively 10. Discuss the importance of speaking effectively 11. Discuss how to speak effectively 12. Discuss how to solve problems 13. List important problem solving traits 14. Discuss ways to assess problem solving skills 15. Discuss the importance of negotiation 16. Discuss how to negotiate 17. Discuss how to identify new business opportunities 18. Discuss how to identify business opportunities within your business 19. Understand the meaning of entrepreneur 20. Describe the different types of entrepreneurs 21. List the characteristics of entrepreneurs 22. Recall entrepreneur success stories 23. Discuss the entrepreneurial process 24. Describe the entrepreneurship ecosystem 25. Discuss the government’s role in the entrepreneurship ecosystem 26. Discuss the current entrepreneurship ecosystem in India 27. Understand the purpose of the Make in India campaign 28. Discuss the relationship between entrepreneurship and risk appetite 29. Discuss the relationship between entrepreneurship and resilience 30. Describe the characteristics of a resilient entrepreneur 31. Discuss how to deal with failure
Unit Objectives
322
Participant Handbook Cabinet Maker Modular Kitchen
Anyone who is determined to start a business, no matter what the risk, is an entrepreneur. Entrepreneurs run their own start-up, take responsibility for the financial risks and use creativity, innovation and vast reserves of self-motivation to achieve success. They dream big and are determined to do whatever it takes to turn their idea into a viable offering. The aim of an entrepreneur is to create an enterprise. The process of creating this enterprise is known as entrepreneurship.
Some famous entrepreneurs are:
• Bill Gates (Founder of Microsoft)• Steve Jobs (Co-founder of Apple)• Mark Zuckerberg (Founder of Facebook)• Pierre Omidyar (Founder of eBay)
Entrepreneurship is very important for the following reasons:
1. It results in the creation of new organizations2. It brings creativity into the marketplace3. It leads to improved standards of living4. It helps develop the economy of a country
All successful entrepreneurs have certain characteristics in common.
They are all:
1. Extremely passionate about their work2. Confident in themselves3. Disciplined and dedicated4. Motivated and driven5. Highly creative6. Visionaries7. Open-minded8. Decisive
Entrepreneurs also have a tendency to:
1. Have a high risk tolerance 2. Thoroughly plan everything 3. Manage their money wisely 4. Make their customers their priority 5. Understand their offering and their market in detail 6. Ask for advice from experts when required 7. Know when to cut their losses
9.5.1 Concept Introduction
9.5.1.3 Examples of Famous Entrepreneurs
9.5.1 Concept Introduction
9.5.1.2 Characteristics of Entrepreneurs
323

Participant Handbook Cabinet Maker Modular Kitchen
As an entrepreneur in India, you can own and run any of the following types of enterprises:
Sole Proprietorship: In a sole proprietorship, a single individual owns, manages and controls the enterprise. This type of business is the easiest to form with respect to legal formalities. The business and the owner have no separate legal existence. All profit belongs to the proprietor, as do all the losses- the liability of the entrepreneur is unlimited.
Partnership: A partnership firm is formed by two or more people. The owners of the enterprise are called partners. A partnership deed must be signed by all the partners. The firm and its partners have no separate legal existence. The profits are shared by the partners. With respect to losses, the liability of the partners is unlimited. A firm has a limited life span and must be dissolved when any one of the partners dies, retires, claims bankruptcy or goes insane.
Limited Liability Partnership (LLP): In a Limited Liability Partnership or LLP, the partners of the firm enjoy perpetual existence as well as the advantage of limited liability. Each partner’s liability is limited to their agreed contribution to the LLP. The partnership and its partners have a separate legal existence.
Leadership means setting an example for others to follow. Setting a good example means t asking someone to do something that you wouldn’t willingly want to do yourself. Leadership is about figuring out what to do in order to win as a team, and as a company.
Leaders believe in doing the right things. They also believe in helping others to do the right things. An effective leader is someone who:
• Creates an inspiring vision of the future.• Motivates and inspires his team to pursue that vision.
Building a successful enterprise is only possible if the entrepreneur in charge possesses excellent leadership qualities. Some critical leadership skills that every entrepreneur must have are:
1. Pragmatism: This means having the ability to highlight all obstacles and challenges, in order to resolve issues and reduce risks.
2. Humility: This means admitting to mistakes often and early, and being quick to take responsibility for your actions. Mistakes should be viewed as challenges to overcome, not opportunities to point blame.
3. Flexibility: It is critical for a good leader to be very flexible and quickly adapt to change. It is equally critical to know when to adapt and when not to.
4. Authenticity: This means showing both, your strengths and your weaknesses. It means being human and showing others that you are human.
9.5.1.4 Types of Enterprises
9.5.2 Leadership & Teamwork: Leadership and Leaders
9.5.2 Leadership & Teamwork: Leadership and Leaders
1. Learn from others’ failures.2. Be certain that this is what you want.3. Search for a problem to solve, rather than look for a problem to attach to your idea.
9.5.1.5 Tips
324
Participant Handbook Cabinet Maker Modular Kitchen
5. Reinvention: This means refreshing or changing your leadership style when necessary. To do this, it’s important to learn where your leadership gaps lie and find out what resources are required to close them.
6. Awareness: This means taking the time to recognize how others view you. It means understanding how your presence affects those around you.
Effective leadership results in numerous benefits. Great leadership leads to the leader successfully:
• Gaining the loyalty and commitment of the team members• Motivating the team to work towards achieving the company’s goals and objectives• Building morale and instilling confidence in the team members• Fostering mutual understanding and team-spirit among team members• Convincing team members about the need to change when a situation requires adaptability
Teamwork occurs when the people in a workplace combine their individual skills to pursue a common goal. Effective teams are made up of individuals who work together to achieve this common goal. A great team is one who holds themselves accountable for the end result.
For an entrepreneurial leader, building an effective team is critical to the success of a venture. An entrepreneur must ensure that the team he builds possesses certain crucial qualities, traits and characteristics. An effective team is one which has:
1. Unity of purpose: All the team members should clearly understand and be equally committed to the purpose, vision and goals of the team.
2. Great communication skills: Team members should have the ability to express their concerns, ask questions and use diagrams, and charts to convey complex information.
3. The ability to collaborate: Every member should feel entitled to provide regular feedback on new ideas.
4. Initiative: The team should consist of proactive individuals. The members should have the enthusiasm to come up with new ideas, improve existing ideas, and conduct their own research.
5. Visionary members: The team should have the ability to anticipate problems and act on these potential problem before they turn into real problems.
6. Great adaptability skills: The team must believe that change is a positive force. Change should be seen as the chance to improve and try new things.
7. Excellent organizational skills: The team should have the ability to develop standard work processes, balance responsibilities, properly plan projects, and set in place methods to measure progress and ROI.
9.5.2.2 Benefits of Effective Leadership
9.5.2.3 Teamwork and Teams
9.5.2.4 Importance of Teamwork in Entrepreneurial Success
325
Participant Handbook Cabinet Maker Modular Kitchen
1. Don’t get too attached to your original idea. Allow it to evolve and change. 2. Be aware of your weaknesses and build a team that will complement your shortfalls. 3. Hiring the right people is not enough. You need to promote or incentivize your most talented people
to keep them motivated.4. Earn your team’s respect
9.5.1.5 Tips
Listening is the ability to correctly receive and understand messages during the process of communication. Listening is critical for effective communication. Without effective listening skills, messages can easily be misunderstood. This results in a communication breakdown and can lead to the sender and the receiver of the message becoming frustrated or irritated.
It’s very important to note that listening is not the same as hearing. Hearing just refers to sounds that you hear. Listening is a whole lot more than that. To listen, one requires focus. It means not only paying attention to the story, but also focusing on how the story is relayed, the way language and voice is used, and even how the speaker uses their body language. The ability to listen depends on how effectively one can perceive and understand both, verbal and non-verbal cues.
To listen effectively you should:
• Stop talking • Stop interrupting • Focus completely on what is being said • Nod and use encouraging words and gestures • Be open-minded • Think about the speaker’s perspective• Be very, very patient • Pay attention to the tone that is being used • Pay attention to the speaker’s gestures, facial expressions and eye movements • Not try and rush the person • Not let the speaker’s mannerisms or habits irritate or distract you• Be very, very patient • Pay attention to the tone that is being used • Pay attention to the speaker’s gestures, facial expressions and eye movements • Not try and rush the person • Not let the speaker’s mannerisms or habits irritate or distract you
9.5.3 Communication Skills
9.5.3.1 How to Listen Effectively
326

Participant Handbook Cabinet Maker Modular Kitchen
How successfully a message gets conveyed depends entirely on how effectively you are able to get it through. An effective speaker is one who enunciates properly, pronounces words correctly, chooses the right words and speaks at a pace that is easily understandable. Besides this, the words spoken out loud need to match the gestures, tone and body language used.
What you say, and the tone in which you say it, results in numerous perceptions being formed. A person who speaks hesitantly may be perceived as having low self-esteem or lacking in knowledge of the discussed topic. Those with a quiet voice may very well be labelled as shy. And those who speak in commanding tones with high levels of clarity, are usually considered to be extremely confident. This makes speaking a very critical communication skill.
To speak effectively you should:
• Incorporate body language in your speech like eye contact, smiling, nodding, gesturing etc. • Build a draft of your speech before actually making your speech. • Ensure that all your emotions and feelings are under control. • Pronounce your words distinctly with the correct pitch and intensity. Your speech should be crystal
clear at all times. • Use a pleasant and natural tone when speaking. Your audience should not feel like you are putting
on an accent or being unnatural in any way. • Use precise and specific words to drive your message home. Ambiguity should be avoided at all
costs. • Ensure that your speech has a logical flow. • Be brief. Don’t add any unnecessary information. • Make a conscious effort to avoid irritating mannerisms like fidgeting, twitching etc. • Choose your words carefully and use simple words that the majority of the audience will have no
difficulty understanding. • Use visual aids like slides or a whiteboard. • Speak slowly so that your audience can easily understand what you’re saying. However, be careful
not to speak too slowly because this can come across as stiff, unprepared or even condescending. • Remember to pause at the right moments.
9.5.3.2 How to Listen Effectively
9.5.3.3 How to Speak Effectively
1. If you’re finding it difficult to focus on what someone is saying, try repeating their words in your head.
2. Always maintain eye contact with the person that you are communicating with, when speaking as well as listening. This conveys and also encourages interest in the conversation.
9.5.3.4 Tips
327
Participant Handbook Cabinet Maker Modular Kitchen
As per The Concise Oxford Dictionary (1995), a problem is, “A doubtful or difficult matter requiring a solution”
All problems contain two elements:
1. Goals2. ObstaclesThe aim of problem solving is to recognize the obstacles and remove them in order to achieve the goals.
Solving a problem requires a level of rational thinking. Here are some logical steps to follow when faced with an issue:
• Step 1: Identify the problem • Step 2: Study the problem in detail • Step 3: List all possible solutions • Step 4: Select the best solution • Step 5: Implement the chosen solution • Step 6: Check that the problem has really been solved
Highly developed problem solving skills are critical for both, business owners and their employees. The following personality traits play a big role in how effectively problems are solved:
• Being open minded• Asking the right questions• Being proactive• Not panicking• Having a positive attitude• Focusing on the right problem
As an entrepreneur, it would be a good idea to assess the level of problem solving skills of potential candidates before hiring them. Some ways to assess this skill are through:
• Application forms: Ask for proof of the candidate’s problem solving skills in the application form. • Psychometric tests: Give potential candidates logical reasoning and critical thinking tests and see
how they fare. • Interviews: Create hypothetical problematic situations or raise ethical questions and see how the
candidates respond. • Technical questions: Give candidates examples of real life problems and evaluate their thought
process.
9.5.4 Problem Solving & Negotiation skills
9.5.4.1 How to Solve Problems
9.5.4.2 Important Traits for Problem Solving
9.5.4.3 Important Traits for Problem Solving
328
Participant Handbook Cabinet Maker Modular Kitchen
Negotiation is a method used to settle differences. The aim of negotiation is to resolve differences through a compromise or agreement while avoiding disputes. Without negotiation, conflicts are likely to lead to resentment between people. Good negotiation skills help satisfy both parties and go a long way towards developing strong relationships.
Why Negotiate
Starting a business requires many, many negotiations. Some negotiations are small while others are critical enough to make or break a startup. Negotiation also plays a big role inside the workplace. As an entrepreneur, you need to know not only know how to negotiate yourself, but also how to train employees in the art of negotiation.
How to Negotiate
Take a look at some steps to help you negotiate:
Step 1: Pre-Negotiation Preparation: Agree on where to meet to discuss the problem, decide who all will be present and set a time limit for the discussion.
Step 2: Discuss the Problem: This involves asking questions, listening to the other side, putting your views forward and clarifying doubts.
Step 3: Clarify the Objective: Ensure that both parties want to solve the same problem and reach the same goal.
Step 4: Aim for a Win-Win Outcome: Try your best to be open minded when negotiating. Compromise and offer alternate solutions to reach an outcome where both parties win.
Step 5: Clearly Define the Agreement: When an agreement has been reached, the details of the agreement should be crystal clear to both sides, with no scope for misunderstandings.
Step 6: Implement the Agreed Upon Solution: Agree on a course of action to set the solution in motion.
9.5.4.4 What is Negotiation?
1. Know exactly what you want before you work towards getting it 2. Give more importance to listening and thinking, than speaking 3. Focus on building a relationship rather than winning4. Remember that your people skills will affect the outcome 5. Know when to walk away – sometimes reaching an agreement may not be possible
9.5.4.5 Tips
“Theentrepreneuralwayssearchesforchange,respondstoitandexploitsitasanopportunity.”Peter Drucker
The ability to identify business opportunities is an essential characteristic of an entrepreneur.
What is an Opportunity?
The word opportunity suggests a good chance or a favourable situation to do something offered by circumstances.
A business opportunity means a good or favourable change available to run a specific business in a given environment, at a given point of time.
9.5.4.4 What is Negotiation?
329
Participant Handbook Cabinet Maker Modular Kitchen
Common Questions Faced by Entrepreneurs
A critical question that all entrepreneurs face is how to go about finding the business opportunity that is right for them.
Some common questions that entrepreneurs constantly think about are:
• Should the new enterprise introduce a new product or service based on an unmet need? • Should the new enterprise select an existing product or service from one market and offer it in
another where it may not be available? • Should the enterprise be based on a tried and tested formula that has worked elsewhere?
It is therefore extremely important that entrepreneurs must learn how to identify new and existing business opportunities and evaluate their chances of success.
When is an Idea an Opportunity?
An idea is an opportunity when:
• It creates or adds value to a customer • It solves a significant problem, removes a pain point or meets a demand • Has a robust market and profit margin • Is a good fit with the founder and management team at the right time and place
Factors to Consider When Looking for Opportunities
• Consider the following when looking for business opportunities: • Economic trends Changes in funding • Changing relationships between vendors, partners and suppliers • Market trends • Changes in political support • Shift in target audience
Ways to Identify New Business Opportunities
• Identify Market Inefficiencies: When looking at a market, consider what inefficiencies are present in the market. Think about ways to correct these inefficiencies.
• Remove Key Hassles: Rather than create a new product or service, you can innovatively improve a product, service or process.
• Create Something New: Think about how you can create a new experience for customers, based on existing business models.
• Pick a Growing Sector/Industry: Research and find out which sectors or industries are growing and think about what opportunities you can tap in the same.
• Think About Product Differentiation: If you already have a product in mind, think about ways to set it apart from the existing ones.
Ways to Identify Business Opportunities Within Your Business
SWOT Analysis: An excellent way to identify opportunities inside your business is by creating a SWOT analysis. The acronym SWOT stands for strengths, weaknesses, opportunities, and threats. SWOT analysis framework:
330
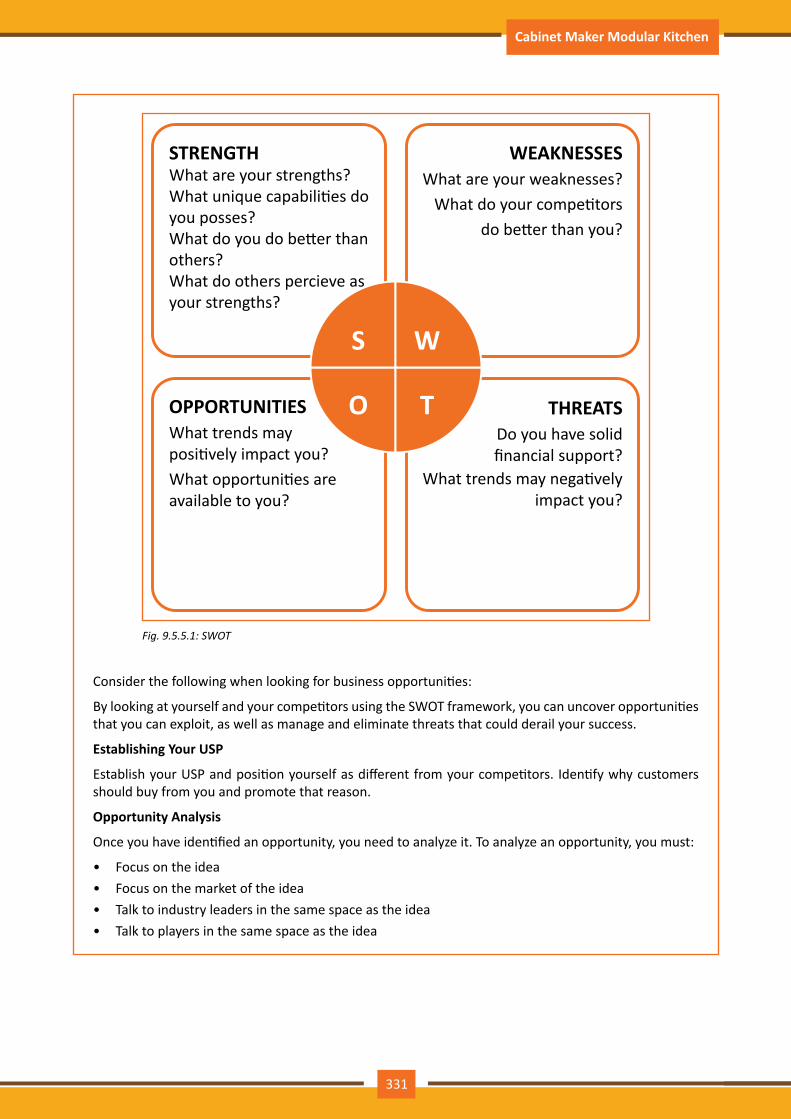
Participant Handbook Cabinet Maker Modular Kitchen
S W
O T
STRENGTHWhat are your strengths?What unique capabilities doyou posses?What do you do better thanothers?What do others percieve asyour strengths?
OPPORTUNITIESWhat trends maypositively impact you?What opportunities areavailable to you?
WEAKNESSESWhat are your weaknesses?
What do your competitorsdo better than you?
THREATSDo you have solidfinancial support?
What trends may negativelyimpact you?
Fig.9.5.5.1:SWOT
Consider the following when looking for business opportunities:
By looking at yourself and your competitors using the SWOT framework, you can uncover opportunities that you can exploit, as well as manage and eliminate threats that could derail your success.
Establishing Your USP
Establish your USP and position yourself as different from your competitors. Identify why customers should buy from you and promote that reason.
Opportunity Analysis
Once you have identified an opportunity, you need to analyze it. To analyze an opportunity, you must:
• Focus on the idea • Focus on the market of the idea • Talk to industry leaders in the same space as the idea • Talk to players in the same space as the idea
331
Participant Handbook Cabinet Maker Modular Kitchen
1. Remember, opportunities are situational.2. Look for a proven track record.3. Avoid the latest craze.4. Love your idea.
9.5.5.1 Tips
An entrepreneur is a person who:
• Does not work for an employee• Runs a small enterprise• Assumes all the risks and rewards of the enterprise, idea, good or service
Types of Entrepreneurs
There are four main types of entrepreneurs:
1. The Traditional Entrepreneur: This type of entrepreneur usually has some kind of skill – they can be a carpenter, mechanic, cook etc. They have businesses that have been around for numerous years like restaurants, shops and carpenters. Typically, they gain plenty of experience in a particular industry before they begin their own business in a similar field.
2. The Growth Potential Entrepreneur: The desire of this type of entrepreneur is to start an enterprise that will grow, win many customers and make lots of money. Their ultimate aim is to eventually sell their enterprise for a nice profit. Such entrepreneurs usually have a science or technical background.
3. The Project-Oriented Entrepreneur: This type of entrepreneur generally has a background in the Arts or psychology. Their enterprises tend to be focus on something that they are very passionate about.
4. The Lifestyle Entrepreneur: This type of entrepreneur has usually worked as a teacher or a office assistant. They are more interested in selling something that people will enjoy, rather than making lots of money.
Characteristics of an Entrepreneur
Successful entrepreneurs have the following characteristics:
• They are highly motivated• They are creative and persuasive • They are mentally prepared to handle each and every task • They have excellent business skills – they know how to evaluate their cash flow, sales and revenue • They are willing to take great risks • They are very proactive – this means they are willing to do the work themselves, rather than wait
for someone else to do it • They have a vision – they are able to see the big picture • They are flexible and open-minded • They are good at making decisions
9.5.6 Entrepreneurship Support Eco-System
332
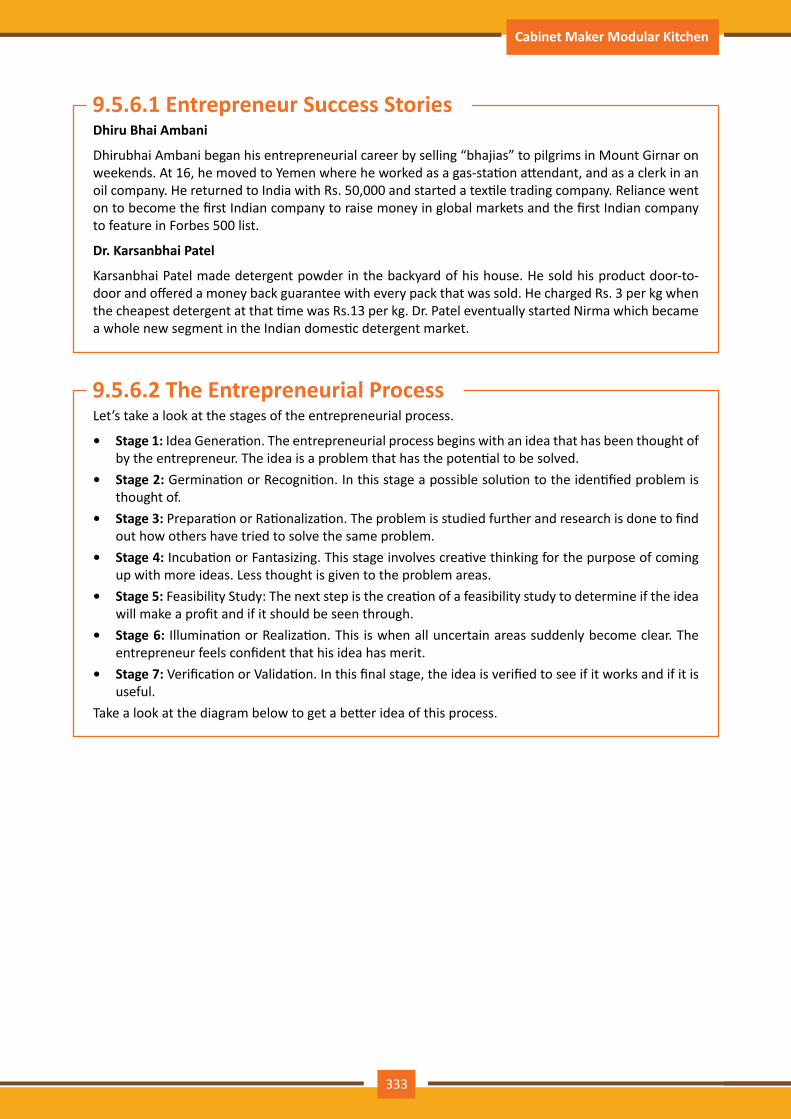
Participant Handbook Cabinet Maker Modular Kitchen
Dhiru Bhai Ambani
Dhirubhai Ambani began his entrepreneurial career by selling “bhajias” to pilgrims in Mount Girnar on weekends. At 16, he moved to Yemen where he worked as a gas-station attendant, and as a clerk in an oil company. He returned to India with Rs. 50,000 and started a textile trading company. Reliance went on to become the first Indian company to raise money in global markets and the first Indian company to feature in Forbes 500 list.
Dr. Karsanbhai Patel
Karsanbhai Patel made detergent powder in the backyard of his house. He sold his product door-to-door and offered a money back guarantee with every pack that was sold. He charged Rs. 3 per kg when the cheapest detergent at that time was Rs.13 per kg. Dr. Patel eventually started Nirma which became a whole new segment in the Indian domestic detergent market.
Let’s take a look at the stages of the entrepreneurial process.
• Stage 1: Idea Generation. The entrepreneurial process begins with an idea that has been thought of by the entrepreneur. The idea is a problem that has the potential to be solved.
• Stage 2: Germination or Recognition. In this stage a possible solution to the identified problem is thought of.
• Stage 3: Preparation or Rationalization. The problem is studied further and research is done to find out how others have tried to solve the same problem.
• Stage 4: Incubation or Fantasizing. This stage involves creative thinking for the purpose of coming up with more ideas. Less thought is given to the problem areas.
• Stage 5: Feasibility Study: The next step is the creation of a feasibility study to determine if the idea will make a profit and if it should be seen through.
• Stage 6: Illumination or Realization. This is when all uncertain areas suddenly become clear. The entrepreneur feels confident that his idea has merit.
• Stage 7: Verification or Validation. In this final stage, the idea is verified to see if it works and if it is useful.
Take a look at the diagram below to get a better idea of this process.
9.5.6.1 Entrepreneur Success Stories
9.5.6.2 The Entrepreneurial Process
333
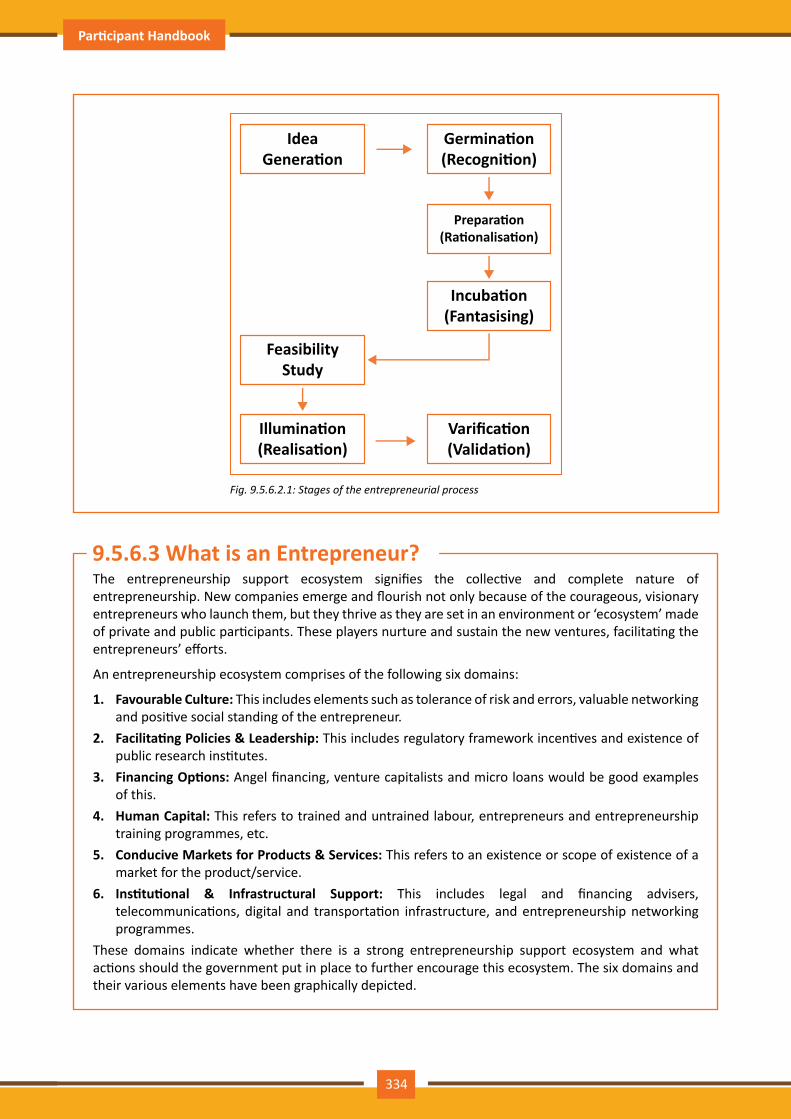
Participant Handbook Cabinet Maker Modular Kitchen
IdeaGenera�on
Germina�on(Recogni�on)
Incuba�on(Fantasising)
FeasibilityStudy
Illumina�on(Realisa�on)
Varifica�on(Valida�on)
Prepara�on(Ra�onalisa�on)
Fig.9.5.6.2.1:Stagesoftheentrepreneurialprocess
The entrepreneurship support ecosystem signifies the collective and complete nature of entrepreneurship. New companies emerge and flourish not only because of the courageous, visionary entrepreneurs who launch them, but they thrive as they are set in an environment or ‘ecosystem’ made of private and public participants. These players nurture and sustain the new ventures, facilitating the entrepreneurs’ efforts.
An entrepreneurship ecosystem comprises of the following six domains:
1. Favourable Culture: This includes elements such as tolerance of risk and errors, valuable networking and positive social standing of the entrepreneur.
2. Facilitating Policies & Leadership: This includes regulatory framework incentives and existence of public research institutes.
3. Financing Options: Angel financing, venture capitalists and micro loans would be good examples of this.
4. Human Capital: This refers to trained and untrained labour, entrepreneurs and entrepreneurship training programmes, etc.
5. Conducive Markets for Products & Services: This refers to an existence or scope of existence of a market for the product/service.
6. Institutional & Infrastructural Support: This includes legal and financing advisers, telecommunications, digital and transportation infrastructure, and entrepreneurship networking programmes.
These domains indicate whether there is a strong entrepreneurship support ecosystem and what actions should the government put in place to further encourage this ecosystem. The six domains and their various elements have been graphically depicted.
9.5.6.3 What is an Entrepreneur?
334
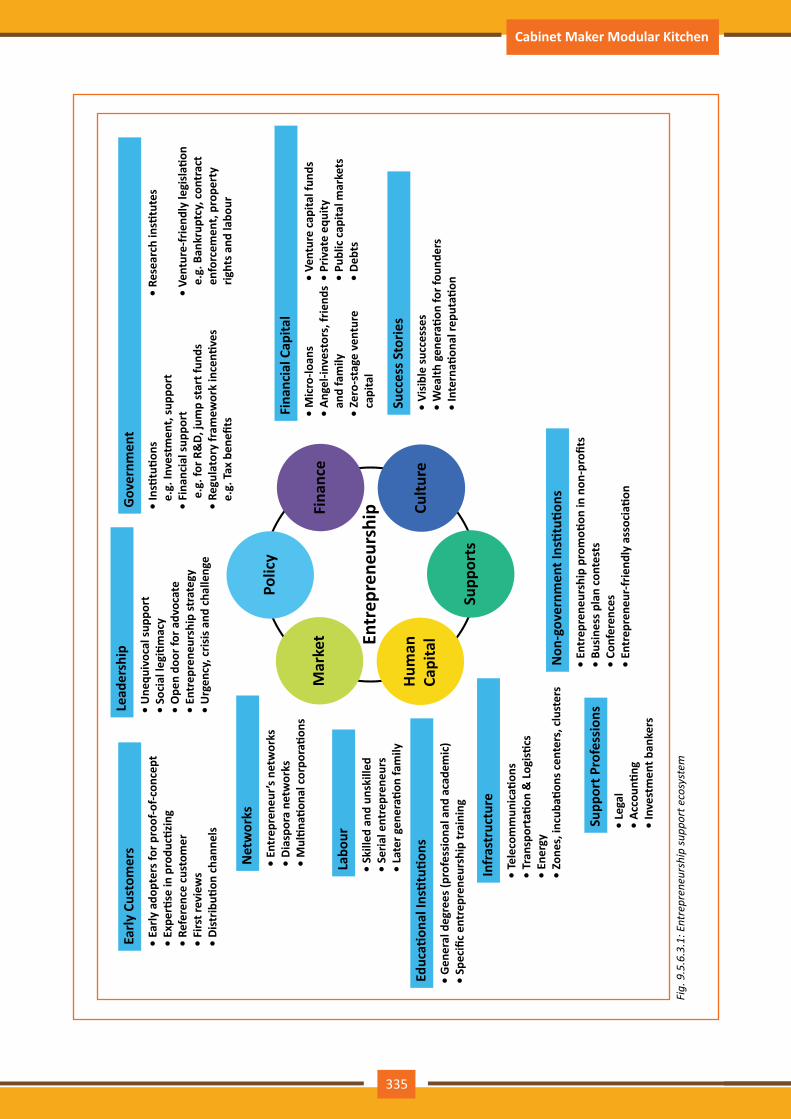
Participant Handbook Cabinet Maker Modular Kitchen
Entr
epre
neur
ship
Polic
y
Fina
nce
Cultu
re
Supp
orts
Hum
anCa
pita
l
Mar
ket
Early
Cus
tom
ers
• Ea
rly a
dopt
ers f
or p
roof
-of-c
once
pt•
Expe
rtise
in p
rodu
ctizi
ng•
Refe
renc
e cu
stom
er•
Firs
t rev
iew
s•
Dist
ributi
on c
hann
els
Net
wor
ks
• En
trep
rene
ur’s
netw
orks
• Di
aspo
ra n
etw
orks
• M
ultin
ation
al c
orpo
ratio
ns
Labo
ur
• Sk
illed
and
uns
kille
d•
Seria
l ent
repr
eneu
rs•
Late
r gen
erati
on fa
mily
Educ
ation
al In
stitu
tions
• G
ener
al d
egre
es (p
rofe
ssio
nal a
nd a
cade
mic
)•
Spec
ific
entr
epre
neur
ship
trai
ning
Infr
astr
uctu
re
• Te
leco
mm
unic
ation
s•
Tran
spor
tatio
n &
Log
istic
s•
Ener
gy•
Zone
s, in
cuba
tions
cen
ters
, clu
ster
s
Supp
ort P
rofe
ssio
ns
• Le
gal
• Ac
coun
ting
• In
vest
men
t ban
kers
Lead
ersh
ip
• U
nequ
ivoc
al su
ppor
t•
Soci
al le
gitim
acy
• O
pen
door
for a
dvoc
ate
• En
trep
rene
ursh
ip st
rate
gy•
Urg
ency
, cris
is a
nd c
halle
nge
Gov
ernm
ent
• In
stitu
tions
e.
g. In
vest
men
t, su
ppor
t•
Fina
ncia
l sup
port
e
.g. f
or R
&D,
jum
p st
art f
unds
• Re
gula
tory
fram
ewor
k in
centi
ves
e.
g. T
ax b
enefi
ts
Fina
ncia
l Cap
ital
• M
icro
-loan
s•
Ange
l-inv
esto
rs, f
riend
s
and
fam
ily•
Zero
-sta
ge v
entu
re
ca
pita
l
Succ
ess S
torie
s
• Vi
sibl
e su
cces
ses
• W
ealth
gen
erati
on fo
r fou
nder
s•
Inte
rnati
onal
repu
tatio
n
Non
-gov
ernm
ent I
nstit
ution
s
• En
trep
rene
ursh
ip p
rom
otion
in n
on-p
rofit
s•
Busi
ness
pla
n co
ntes
ts•
Conf
eren
ces
• En
trep
rene
ur-fr
iend
ly a
ssoc
iatio
n
• Ve
ntur
e ca
pita
l fun
ds•
Priv
ate
equi
ty•
Publ
ic c
apita
l mar
kets
• De
bts
• Re
sear
ch in
stitu
tes
• Ve
ntur
e-fr
iend
ly le
gisl
ation
e
.g. B
ankr
uptc
y, c
ontr
act
e
nfor
cem
ent,
prop
erty
righ
ts a
nd la
bour
Fig.9.5.6.3.1:Entrepren
eurshipsupp
orte
cosystem
335
Participant Handbook Cabinet Maker Modular Kitchen
Every entrepreneurship support ecosystem is unique and all the elements of the ecosystem are interdependent. Although every region’s entrepreneurship ecosystem can be broadly described by the above features, each ecosystem is the result of the hundred elements interacting in highly complex and particular ways.
Entrepreneurship ecosystems eventually become (largely) self-sustaining. When the six domains are resilient enough, they are mutually beneficial. At this point, government involvement can and should be significantly minimized. Public leaders do not need to invest a lot to sustain the ecosystem. It is imperative that the entrepreneurship ecosystem incentives are formulated to be self-liquidating, hence focusing on sustainability of the environment.
Every entrepreneur has certain needs. Some of their important needs are:
• To easily get loans • To easily find investors • To get tax exemptions • To easily access resources and good infrastructure • To enjoy a procedure that is free of hassles and is quick • To be able to easily partner with other firms
The Make in India campaign, launched by Prime Minister Modi aims to satisfy all these needs of young, aspiring entrepreneurs. Its objective is to:
• Make investment easy • Support new ideas • Enhance skill development • Safeguard the ideas of entrepreneurs • Create state-of-the-art facilities for manufacturing goods
The government offers many schemes to support entrepreneurs. These schemes are run by various Ministries/ Departments of Government of India to support First Generation Entrepreneurs.Take a look at a few key schemes to promote entrepreneurship:
Name of the Scheme
1. Pradhan Mantri MUDRA Yojana - Micro Units Development and Refinance Agency (MUDRA), 2. STAND UP INDIA 3. Prime Minister Employment Generation Programme (PMEGP) 4. International Cooperation 5. Performance and Credit Rating 6. Marketing Assistance Scheme7. Reimbursement of Registration Fee for Bar Coding 8. Enable Participation of MSMEs in State/District level Trade Fairs and Provide Funding Support 9. Capital Subsidy Support on Credit for Technology up gradation 10. Credit Guarantee Fund for Micro and SmalI Enterprise (CGFMSE) 11. Reimbursement of Certification Fees for Acquiring ISO Standards
9.5.6.4 Make in India Campaign
9.5.6.5 Key Schemes to Promote Entrepreneurs
336
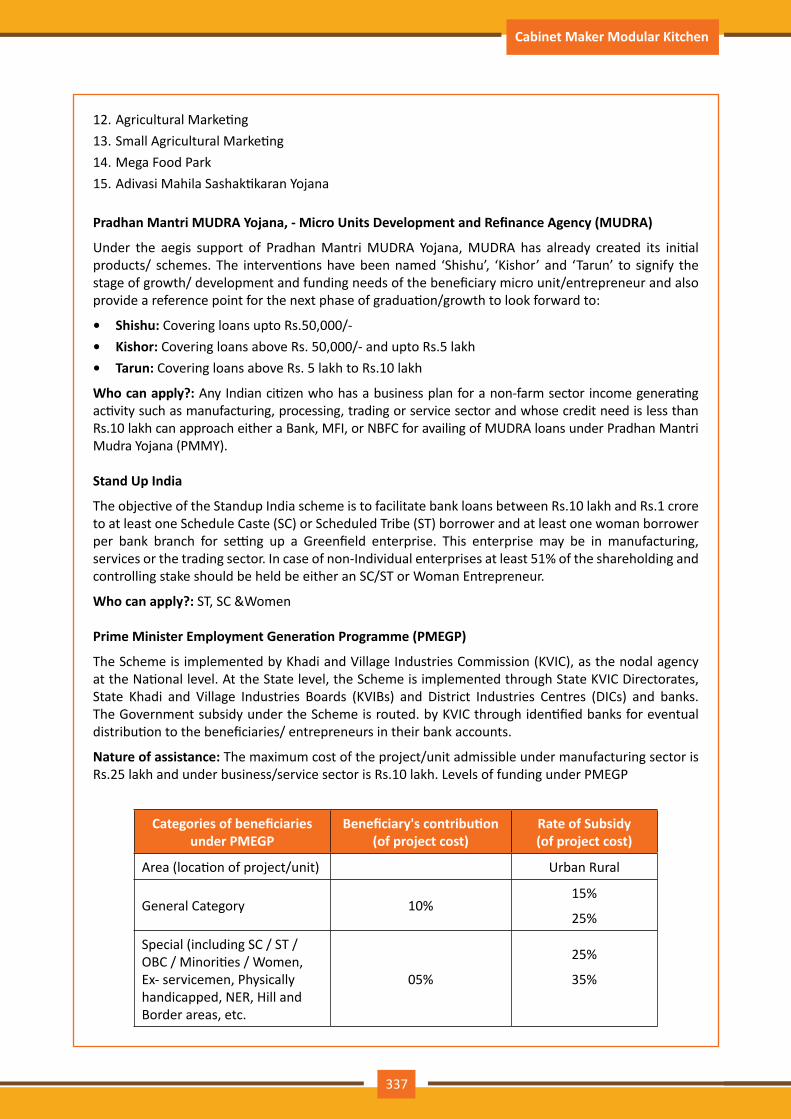
Participant Handbook Cabinet Maker Modular Kitchen
12. Agricultural Marketing 13. Small Agricultural Marketing 14. Mega Food Park 15. Adivasi Mahila Sashaktikaran Yojana
Pradhan Mantri MUDRA Yojana, - Micro Units Development and Refinance Agency (MUDRA)
Under the aegis support of Pradhan Mantri MUDRA Yojana, MUDRA has already created its initial products/ schemes. The interventions have been named ‘Shishu’, ‘Kishor’ and ‘Tarun’ to signify the stage of growth/ development and funding needs of the beneficiary micro unit/entrepreneur and also provide a reference point for the next phase of graduation/growth to look forward to:
• Shishu: Covering loans upto Rs.50,000/- • Kishor: Covering loans above Rs. 50,000/- and upto Rs.5 lakh • Tarun: Covering loans above Rs. 5 lakh to Rs.10 lakh
Who can apply?: Any Indian citizen who has a business plan for a non-farm sector income generating activity such as manufacturing, processing, trading or service sector and whose credit need is less than Rs.10 lakh can approach either a Bank, MFI, or NBFC for availing of MUDRA loans under Pradhan Mantri Mudra Yojana (PMMY).
Stand Up India
The objective of the Standup India scheme is to facilitate bank loans between Rs.10 lakh and Rs.1 crore to at least one Schedule Caste (SC) or Scheduled Tribe (ST) borrower and at least one woman borrower per bank branch for setting up a Greenfield enterprise. This enterprise may be in manufacturing, services or the trading sector. In case of non-Individual enterprises at least 51% of the shareholding and controlling stake should be held be either an SC/ST or Woman Entrepreneur.
Who can apply?: ST, SC &Women
Prime Minister Employment Generation Programme (PMEGP)
The Scheme is implemented by Khadi and Village Industries Commission (KVIC), as the nodal agency at the National level. At the State level, the Scheme is implemented through State KVIC Directorates, State Khadi and Village Industries Boards (KVIBs) and District Industries Centres (DICs) and banks. The Government subsidy under the Scheme is routed. by KVIC through identified banks for eventual distribution to the beneficiaries/ entrepreneurs in their bank accounts.
Nature of assistance: The maximum cost of the project/unit admissible under manufacturing sector is Rs.25 lakh and under business/service sector is Rs.10 lakh. Levels of funding under PMEGP
Categories of beneficiaries under PMEGP
Beneficiary's contribution (of project cost)
Rate of Subsidy (of project cost)
Area (location of project/unit) Urban Rural
General Category 10%15%
25%
Special (including SC / ST / OBC / Minorities / Women, Ex- servicemen, Physically handicapped, NER, Hill and Border areas, etc.
05%
25%
35%
337
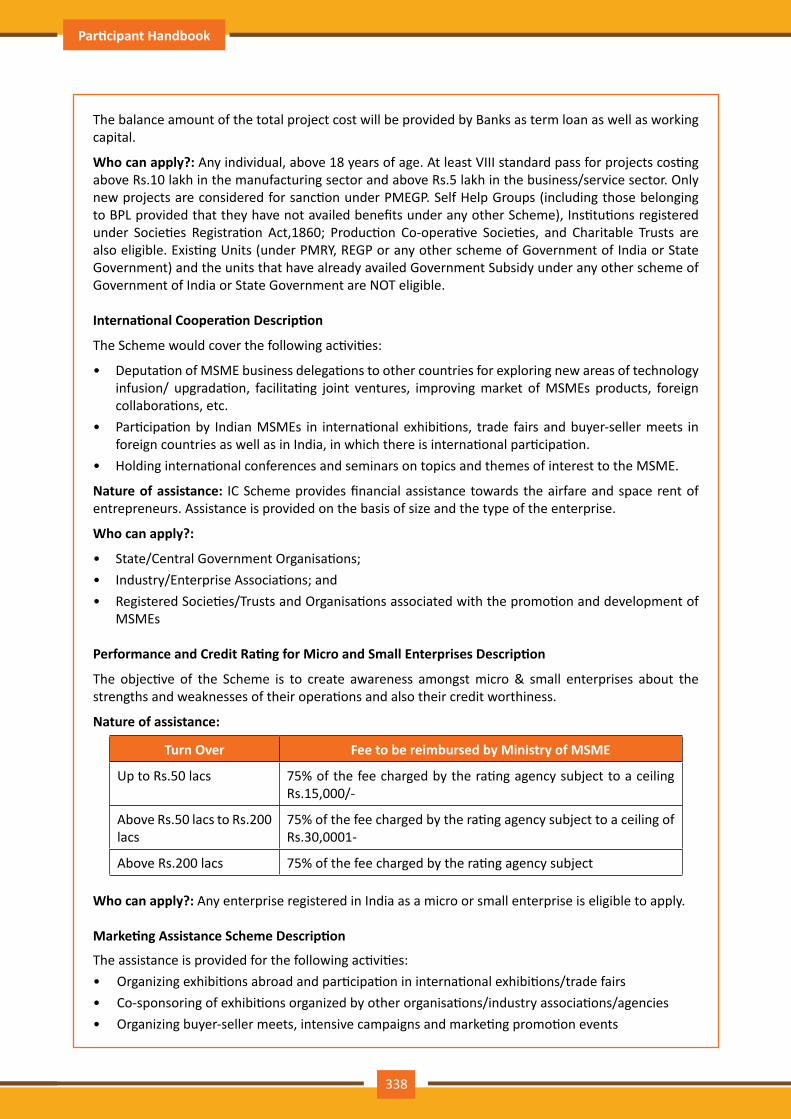
Participant Handbook Cabinet Maker Modular Kitchen
The balance amount of the total project cost will be provided by Banks as term loan as well as working capital.
Who can apply?: Any individual, above 18 years of age. At least VIII standard pass for projects costing above Rs.10 lakh in the manufacturing sector and above Rs.5 lakh in the business/service sector. Only new projects are considered for sanction under PMEGP. Self Help Groups (including those belonging to BPL provided that they have not availed benefits under any other Scheme), Institutions registered under Societies Registration Act,1860; Production Co-operative Societies, and Charitable Trusts are also eligible. Existing Units (under PMRY, REGP or any other scheme of Government of India or State Government) and the units that have already availed Government Subsidy under any other scheme of Government of India or State Government are NOT eligible.
International Cooperation Description
The Scheme would cover the following activities:
• Deputation of MSME business delegations to other countries for exploring new areas of technology infusion/ upgradation, facilitating joint ventures, improving market of MSMEs products, foreign collaborations, etc.
• Participation by Indian MSMEs in international exhibitions, trade fairs and buyer-seller meets in foreign countries as well as in India, in which there is international participation.
• Holding international conferences and seminars on topics and themes of interest to the MSME.
Nature of assistance: IC Scheme provides financial assistance towards the airfare and space rent of entrepreneurs. Assistance is provided on the basis of size and the type of the enterprise.
Who can apply?:
• State/Central Government Organisations;• Industry/Enterprise Associations; and• Registered Societies/Trusts and Organisations associated with the promotion and development of
MSMEs
Performance and Credit Rating for Micro and Small Enterprises Description
The objective of the Scheme is to create awareness amongst micro & small enterprises about the strengths and weaknesses of their operations and also their credit worthiness.
Nature of assistance:
Turn Over Fee to be reimbursed by Ministry of MSME
Up to Rs.50 lacs 75% of the fee charged by the rating agency subject to a ceiling Rs.15,000/-
Above Rs.50 lacs to Rs.200 lacs
75% of the fee charged by the rating agency subject to a ceiling of Rs.30,0001-
Above Rs.200 lacs 75% of the fee charged by the rating agency subject
Who can apply?: Any enterprise registered in India as a micro or small enterprise is eligible to apply.
Marketing Assistance Scheme Description
The assistance is provided for the following activities: • Organizing exhibitions abroad and participation in international exhibitions/trade fairs • Co-sponsoring of exhibitions organized by other organisations/industry associations/agencies • Organizing buyer-seller meets, intensive campaigns and marketing promotion events
338
Participant Handbook Cabinet Maker Modular Kitchen
Nature of assistance: Financial assistance of up to 95% of the airfare and space rent of entrepreneurs. Assistance is provided on the basis of size and the type of the enterprise. Financial assistance for co-sponsoring would be limited to 40% of the net expenditure, subject to maximum amount of Rs.5 lakh.
Who can apply?: MSMEs, Industry Associations and other organizations related to MSME sector.
Reimbursement of Registration Fee for Bar Coding Description
The financial assistance is provided towards 75% reimbursement of only one-time registration fee and 75% of annual recurring fee for first three years paid by MSEs to GS1 India for using bar coding.
Nature of assistance: Funding support for reimbursement of 75% of one time and recurring bar code registration fees.
Who can apply?: All MSMEs with EM registration.
Enabling Participation of MSMEs in State/District Level Trade Fairs and Provide Funding Support
Provide marketing platform to manufacturing MSMEs by enabling their participation in state/district level exhibitions being organized by state/district authorities/associations.
Nature of assistance:
• Free registration for participating in trade fairs. The selection of participants would be done by the MSME-DIs post the submission of application.
• Reimbursement of 50% of to and fro actual fare by shortest distance/direct train (limited to AC II tier class) from the nearest railway station/bus fare to the place of exhibition and 50% space rental charges for MSMEs (General category entrepreneurs).
• For Women/SC/ST entrepreneurs & entrepreneurs from North Eastern Region Govt. of India will reimburse 80% of items listed above in Point (2).
Note: Thetotalreimbursementwillbemax.Rs.30,000/-perunitfortheSC/ST/Women/Physically
Handicapped entrepreneurs, while for the other units the max. limit will be Rs.20,000/- per person per MSME unit.
Note: The participant is required to submit follow-up proofs post attending the event to claimreimbursement.Theproofscanbesubmittedafterlogginginonlineunderthesection“MyApplications”ordirectlycontactingaDIoffice.
Who can apply?: All MSMEs with EM registration.
Capital Subsidy Support on Credit for Technology Upgradation Description
MSMEs can get a capital subsidy (~15%) on credit availed for technology upgradation.
Nature of assistance: Financial assistance for availing credit and loan.
Who can apply?:
• Banks and financial institutions can apply to DC-MSME for availing support. • MSMEs need to directly contact the respective banks for getting credit and capital subsidy. How to apply?: If you are a financial institution, click on the “Apply Now” button or else you can also directly contact the Office of DC-MSME. You can view the contact details of Office of DC-MSME. If you are an MSME, directly contact the respective banks/financial institutions as listed in the scheme guidelines.
Provision of Collateral Free Credit for MSMEs Description
Banks and financial institutions are provided funding assistance under this scheme so that they can in turn lend collateral free credit to MSMEs.
339

Participant Handbook Cabinet Maker Modular Kitchen
Nature of assistance: Funding support to banks and financial institutions for lending collateral-free credit to MSMEs.
Who can apply?: Banks and financial institutions can apply to office of DC-MSME/MSME-DIs for availing support. MSMEs need to directly contact the respective banks for getting credit.
Reimbursement of certification fees for acquiring ISO standards - ISO 9000/ISO 14001 Certification Reimbursement
The GoaI assistance will be provided for one-time reimbursement of expenditure to such MSME manufacturing units which acquire ISO 18000/ISO 22000/ISO 27000 certification.
Nature of assistance: Reimbursement of expenditure incurred on acquiring ISO standards.
Who can apply?: MSMEs with EM registration.
Agricultural Marketing Description
A capital investment subsidy for construction/renovation of rural godowns. Creation of scientific storage capacity and prevention of distress sale.
Nature of assistance: Subsidy @ 25% to farmers, 15% of project cost to companies.
Who can apply?: NGOs, SHGs, companies, co-operatives.
Small Agricultural Marketing Description
Business development description provides venture capital assistance in the form of equity, and arranges training and visits of agri-preneurs
Farmers’ Agriculture Business Consortium: Business development description provides venture capital assistance in the form of equity, and arranges training and visits of agri-preneurs.
Nature of assistance: Financial assistance with a ceiling of Rs.5 lakh.
Who can apply?: Individuals, farmers, producer groups, partnership/propriety firms, SGHs, agri-preneurs, etc.
Mega Food Park Description
Mechanism to link agricultural production and market to maximize value addition, enhance farmers income, create rural employment.
Nature of assistance: One-time capital grant of 50% of project cost with a limit of Rs.50 crore.
Who can apply?: Farmers, farmer groups, SHGs.
Adivasi Mahila Sashaktikaran Yojana Description
Concessional scheme for the economic development of ST women.
Nature of assistance: Term loan at concessional rates upto 90% of cost of scheme.
Who can apply?: Scheduled Tribes Women.
1. Remember, opportunities are situational.2. Look for a proven track record.3. Avoid the latest craze.4. Love your idea.
9.5.6.6 Tips
340
Participant Handbook Cabinet Maker Modular Kitchen
Entrepreneurship and Risk
Entrepreneurs are inherently risk takers. They are path-makers not path-takers. Unlike a normal, cautious person, an entrepreneur would not think twice about quitting his job (his sole income) and taking a risk on himself and his idea.
An entrepreneur is aware that while pursuing his dreams, assumptions can be proven wrong and unforeseen events may arise. He knows that after dealing with numerous problems, success is still not guaranteed. Entrepreneurship is synonymous with the ability to take risks. This ability, called risk-appetite, is an entrepreneurial trait that is partly genetic and partly acquired.
What is Risk Appetite?
Risk appetite is defined as the extent to which a company is equipped to take risk, in order to achieve its objectives. Essentially, it refers to the balance, struck by the company, between possible profits and the hazards caused by changes in the environment (economic ecosystem, policies, etc.). Taking on more risk may lead to higher rewards but have a high probability of losses as well. However, being too conservative may go against the company as it can miss out on good opportunities to grow and reach their objectives.
The levels of risk appetite can be broadly categorized as “low”, “medium” and “high.” The company’s entrepreneur(s) have to evaluate all potential alternatives and select the option most likely to succeed. Companies have varying levels of risk appetites for different objectives. The levels depend on:
• The type of industry • Market pressures • Company objectives
For example, a startup with a revolutionary concept will have a very high risk appetite. The startup can afford short term failures before it achieves longer term success. This type of appetite will not remain constant and will be adjusted to account for the present circumstances of the company.167
Risk Appetite Statement
Companies have to define and articulate their risk appetite in sync with decisions made about their objectives and opportunities. The point of having a risk appetite statement is to have a framework that clearly states the acceptance and management of risk in business. It sets risk taking limits within the company. The risk appetite statement should convey the following:
• The nature of risks the business faces. • Which risks the company is comfortable taking on and which risks are unacceptable. • How much risk to accept in all the risk categories. • The desired tradeoff between risk and reward. • Measures of risk and methods of examining and regulating risk exposures.
Entrepreneurship and Resilience
Entrepreneurs are characterized by a set of qualities known as resilience. These qualities play an especially large role in the early stages of developing an enterprise. Risk resilience is an extremely valuable characteristic as it is believed to protect entrepreneurs against the threat of challenges and changes in the business environment.
What is Entrepreneurial Resilience?
Resilience is used to describe individuals who have the ability to overcome setbacks related to their life and career aspirations. A resilient person is someone who is capable of easily and quickly recovering from setbacks. For the entrepreneur, resilience is a critical trait. Entrepreneurial resilience can be enhanced in the following ways:
9.5.7 Risk Appetite & Resilience
341
Participant Handbook Cabinet Maker Modular Kitchen
• By developing a professional network of coaches and mentors • By accepting that change is a part of life • By viewing obstacles as something that can be overcome
Characteristics of a Resilient Entrepreneur
The characteristics required to make an entrepreneur resilient enough to go the whole way in their business enterprise are:
• A strong internal sense of control • Strong social connections • Skill to learn from setbacks • Ability to look at the bigger picture • Ability to diversify and expand • Survivor attitude • Cash-flow conscious habits • Attention to detail
1. Cultivate a great network of clients, suppliers, peers, friends and family. This will not only help you promote your business, but will also help you learn, identify new opportunities and stay tuned to changes in the market.
2. Don’t dwell on setbacks. Focus on what the you need to do next to get moving again.3. While you should try and curtail expenses, ensure that it is not at the cost of your growth.
9.5.7.1 Tips
Understanding Successes and Failures in Entrepreneurship
Shyam is a famous entrepreneur, known for his success story. But what most people don’t know, is that Shyam failed numerous times before his enterprise became a success. Read his interview to get an idea of what entrepreneurship is really about, straight from an entrepreneur who has both, failed and succeeded.
Interviewer: Shyam, I have heard that entrepreneurs are great risk-takers who are never afraid of failing. Is this true?
Shyam: Ha ha, no of course it’s not true! Most people believe that entrepreneurs need to be fearlessly enthusiastic. But the truth is, fear is a very normal and valid human reaction, especially when you are planning to start your own business! In fact, my biggest fear was the fear of failing. The reality is, entrepreneurs fail as much as they succeed. The trick is to not allow the fear of failing to stop you from going ahead with your plans. Remember, failures are lessons for future success!
Interviewer: What, according to you, is the reason that entrepreneurs fail?
Shyam: Well, there is no one single reason why entrepreneurs fail. An entrepreneur can fail due to numerous reasons. You could fail because you have allowed your fear of failure to defeat you. You could fail because you are unwilling to delegate (distribute) work. As the saying goes, “You can do anything, but not everything!” You could fail because you gave up too easily – maybe you were not persistent enough. You could fail because you were focusing your energy on small, insignificant tasks and ignoring the tasks that were most important. Other reasons for failing are partnering with the wrong people,
9.5.8 Success & Failures
342
Participant Handbook Cabinet Maker Modular Kitchen
not being able to sell your product to the right customers at the right time at the right price… and many more reasons!
Interviewer: As an entrepreneur, how do you feel failure should be looked at?
Shyam: I believe we should all look at failure as an asset, rather than as something negative. The way I see it, if you have an idea, you should try to make it work, even if there is a chance that you will fail. That’s because not trying is failure right there, anyway! And failure is not the worst thing that can happen. I think having regrets because of not trying, and wondering ‘what if’ is far worse than trying and actually failing.
Interviewer: How did you feel when you failed for the first time?
Shyam: I was completely heartbroken! It was a very painful experience. But the good news is, you do recover from the failure. And with every subsequent failure, the recovery process gets a lot easier. That’s because you start to see each failure more as a lesson that will eventually help you succeed, rather than as an obstacle that you cannot overcome. You will start to realize that failure has many benefits.
Interviewer: Can you tell us about some of the benefits of failing?
Shyam: One of the benefits that I have experienced personally from failing is that the failure made me see things in a new light. It gave me answers that I didn’t have before. Failure can make you a lot stronger. It also helps keep your ego in control.
Interviewer: What advice would you give entrepreneurs who are about to start their own enterprises?
Shyam: I would tell them to do their research and ensure that their product is something that is actually wanted by customers. I’d tell them to pick their partners and employees very wisely and cautiously. I’d tell them that it’s very important to be aggressive – push and market your product as aggressively as possible. I would warn them that starting an enterprise is very expensive and that they should be prepared for a situation where they run out of money.
I would tell them to create long term goals and put a plan in action to achieve that goal. I would tell them to build a product that is truly unique. Be very careful and ensure that you are not copying another startup. Lastly, I’d tell them that it’s very important that they find the right investors.
Interviewer: That’s some really helpful advice, Shyam! I’m sure this will help all entrepreneurs to be more prepared before they begin their journey! Thank you for all your insight!
1. Remember that nothing is impossible.2. Identify your mission and your purpose before you start.3. Plan your next steps – don’t make decisions hastily.
9.5.8.1 Tips
343

Participant Handbook Cabinet Maker Modular Kitchen
UNIT 9.6: Preparing to be an Entrepreneur
At the end of this unit, you will be able to:
1. Discuss how market research is carried out 2. Describe the 4 Ps of marketing 3. Discuss the importance of idea generation 4. Recall basic business terminology 5. Discuss the need for CRM 6. Discuss the benefits of CRM 7. Discuss the need for networking 8. Discuss the benefits of networking 9. Understand the importance of setting goals 10. Differentiate between short-term, medium-term and long-term goals 11. Discuss how to write a business plan 12. Explain the financial planning process 13. Discuss ways to manage your risk 14. Describe the procedure and formalities for applying for bank finance 15. Discuss how to manage your own enterprise 16. List important questions that every entrepreneur should ask before starting an enterprise
Unit Objectives
Understanding Market Research
Market research is the process of gathering, analyzing and interpreting market information on a product or service that is being sold in that market. It also includes information on:
• Past, present and prospective customers • Customer characteristics and spending habits • The location and needs of the target market • The overall industry • Relevant competitors
Market research involves two types of data:
• Primary information. This is research collected by yourself or by someone hired by you. • Secondary information. This is research that already exists and is out there for you to find and use.
Primary research
Primary research can be of two types:
• Exploratory: This is open-ended and usually involves detailed, unstructured interviews. • Specific: This is precise and involves structured, formal interviews. Conducting specific research is
the more expensive than conducting exploratory research.
9.5.8 Success & Failures
344
Participant Handbook Cabinet Maker Modular Kitchen
Secondary research
Secondary research uses outside information. Some common secondary sources are:
• Public sources: These are usually free and have a lot of good information. Examples are government departments, business departments of public libraries etc.
• Commercial sources: These offer valuable information but usually require a fee to be paid. Examples are research and trade associations, banks and other financial institutions etc.
• Educational institutions: These offer a wealth of information. Examples are colleges, universities, technical institutes etc.
Understanding Market Research
Market research is the process of gathering, analyzing and interpreting market information on a product or service that is being sold in that market. It also includes information on:
• Past, present and prospective customers • Customer characteristics and spending habits • The location and needs of the target market • The overall industry • Relevant competitors
Market research involves two types of data:
• Primary information. This is research collected by yourself or by someone hired by you.• Secondary information. This is research that already exists and is out there for you to find and use.
Primary research
Primary research can be of two types:
• Exploratory: This is open-ended and usually involves detailed, unstructured interviews. • Specific: This is precise and involves structured, formal interviews. Conducting specific research is
the more expensive than conducting exploratory research.
Secondary research
Secondary research uses outside information. Some common secondary sources are:
• Public sources: These are usually free and have a lot of good information. Examples are government departments, business departments of public libraries etc.
• Commercial sources: These offer valuable information but usually require a fee to be paid. Examples are research and trade associations, banks and other financial institutions etc.
• Educational institutions: These offer a wealth of information. Examples are colleges, universities, technical institutes etc.
9.6.1 Market Study / The 4 Ps of Marketing / Importance of an IDEA
345

Participant Handbook Cabinet Maker Modular Kitchen
The 4 Ps of marketing are:
1. Product,2. Price, 3. Promotion and 4. Place.
Let’s look at each of these 4 Ps in detail.
Product
A product can be:
• A tangible good • An intangible service Whatever your product is, it is critical that you have a clear understanding of what you are offering, and what its unique characteristics are, before you begin with the marketing process.
Some questions to ask yourself are:
• What does the customer want from the product/service? • What needs does it satisfy? • Are there any more features that can be added? • Does it have any expensive and unnecessary features? • How will customers use it? • What should it be called? • How is it different from similar products?• How much will it cost to produce? • Can it be sold at a profit?
Price
Once all the elements of Product have been established, the Price factor needs to be considered. The Price of a Product will depend on several factors such as profit margins, supply, demand and the marketing strategy.
Some questions to ask yourself are:
• What is the value of the product/service to customers? • Do local products/services have established price points? • Is the customer price sensitive? • Should discounts be offered? • How is your price compared to that of your competitors?
Promotion
Once you are certain about your Product and your Price, the next step is to look at ways to promote it. Some key elements of promotion are advertising, public relations, social media marketing, email marketing, search engine marketing, video marketing and more.
Some questions to ask yourself are:
• Where should you promote your product or service? • What is the best medium to use to reach your target audience? • When would be the best time to promote your product? • How are your competitors promoting their products?
9.6.1.1 The 4 Ps of Marketing
346

Participant Handbook Cabinet Maker Modular Kitchen
Place
According to most marketers, the basis of marketing is about offering the right product, at the right price, at the right place, at the right time. For this reason, selecting the best possible location is critical for converting prospective clients into actual clients.
Some questions to ask yourself are:
• Will your product or service be looked for in a physical store, online or both? • What should you do to access the most appropriate distribution channels? • Will you require a sales force? • Where are your competitors offering their products or services? • Should you follow in your competitors’ footsteps? • Should you do something different from your competitors?
Importance of an IDEA
Ideas are the foundation of progress. An idea can be small or ground-breaking, easy to accomplish or extremely complicated to implement. Whatever the case, the fact that it is an idea gives it merit. Without ideas, nothing is possible. Most people are afraid to speak out their ideas, out for fear of being ridiculed. However, if are an entrepreneur and want to remain competitive and innovative, you need to bring your ideas out into the light.173
Some ways to do this are by:
• Establishing a culture of brainstorming where you invite all interested parties to contribute • Discussing ideas out loud so that people can add their ideas, views, opinions to them • Being open minded and not limiting your ideas, even if the idea who have seems ridiculous • Not discarding ideas that you don’t work on immediately, but instead making a note of them and
shelving them so they can be revisited at a later date.
1. Keep in mind that good ideas do not always have to be unique. 2. Remember that timing plays a huge role in determining the success of your idea. 3. Situations and circumstances will always change, so be flexible and adapt your idea accordingly.
9.6.1.2 Tips
If your aim is to start and run a business, it is crucial that you have a good understanding of basic business terms. Every entrepreneur should be well versed in the following terms:
• Accounting: A systematic method of recording and reporting financial transactions. • Accounts payable: Money owed by a company to its creditors. • Accounts Receivable: The amount a company is owed by its clients. • Assets: The value of everything a company owns and uses to conduct its business. • Balance Sheet: A snapshot of a company’s assets, liabilities and owner’s equity at a given moment. • Bottom Line: The total amount a business has earned or lost at the end of a month. • Business: An organization that operates with the aim of making a profit. • Business to Business (B2B): A business that sells goods or services to another business.
9.6.2 Business Entity Concepts: Basic Business Terminology
347
Participant Handbook Cabinet Maker Modular Kitchen
• Business to Consumer (B2C): A business that sells goods or services directly to the end user. • Capital: The money a business has in its accounts, assets and investments. The two main types of
capital are debt and equity. • Cash Flow: The overall movement of funds through a business each month, including income and
expenses. • Cash Flow Statement: A statement showing the money that entered and exited a business during
a specific period of time. • Contract: A formal agreement to do work for pay. • Depreciation: The degrading value of an asset over time. • Expense: The costs that a business incurs through its operations. • Finance: The management and allocation of money and other assets. • Financial Report: A comprehensive account of a business’ transactions and expenses.• Fixed Cost: A one-time expense. • Income Statement (Profit and Loss Statement): Shows the profitability of a business during a
period of time. • Liabilities: The value of what a business owes to someone else. • Marketing: The process of promoting, selling and distributing a product or service. • Net Income/Profit: Revenues minus expenses. • Net Worth: The total value of a business. • Payback Period: The amount of time it takes to recover the initial investment of a business. • Profit Margin: The ratio of profit, divided by revenue, displayed as a percentage. • Return on Investment (ROI): The amount of money a business gets as return from an investment. • Revenue: The total amount of income before expenses are subtracted. • Sales Prospect: A potential customer. • Supplier: A provider of supplies to a business. • Target Market: A specific group of customers at which a company’s products and services are aimed. • Valuation: An estimate of the overall worth of the business. • Variable Cost: Expenses that change in proportion to the activity of a business. • Working Capital: Calculated as current assets minus current liabilities. • Business Transactions: There are three types of business transactions. These are:
ᴑ Simple Transactions – Usually a single transaction between a vendor and a customer. For example: Buying a cup of coffee.
ᴑ Complex Transactions – These transactions go through a number of events before they can be completed. For example: Buying a house.
ᴑ Ongoing transactions – These transactions usually require a contract. For example: Contract with a vendor.
348
Participant Handbook Cabinet Maker Modular Kitchen
Take a look some important accounting formulas that every entrepreneur needs to know.
1. The Accounting Equation: This is value of everything a company owns and uses to conduct its business. Formula: Assets = Liability + Owner’s Equity 2. Net Income: This is the profit of the company. Formula: Net Income = Revenues – Expenses 3. Break-Even Point: This is the point at which the company will not make a profit or a loss. The total
cost and total revenues are equal. Formula: Break-Even = Fixed Costs/Sales Price – Variable Cost per Unit 4. Cash Ratio: This tells us about the liquidity of a company. Formula: Cash Ratio = Cash/Current
Liabilities 5. Profit Margin: This is shown as a percentage. It shows what percentage of sales are left over after
all the expenses are paid by the business. Formula: Profit Margin = Net Income/Sales6. Debt-to-Equity Ratio: This ratio shows how much equity and debt a company is using to finance its
assets, and whether the shareholder equity can fulfill obligations to creditors if the business starts making a loss.
Formula: Debt-to-Equity Ratio = Total Liabilities/Total Equity 7. Cost of Goods Sold: This is the total of all costs used to create a product or service, which has been sold. Formula: Cost of Goods Sold = Cost of Materials/Inventory – Cost of Outputs 8. Return on Investment (ROI): This is usually shown as a percentage. It calculates the profits of an
investment as a percentage of the original cost. Formula: ROI = Net Profit/Total Investment * 100 9. Simple Interest: This is money you can earn by initially investing some money (the principal). Formula: A = P(1 + rt); R = r * 100 Where: A = Total Accrued Amount (principal + interest) P = Principal Amount I = Interest Amount r = Rate of Interest per year in decimal; r = R/100 t = Time Period involved in months or years 10. Annual Compound Interest: The calculates the addition of interest to the principal sum of a loan or
deposit. Formula: A = P (1 + r/n) ^ nt Where, A = the future value of the investment/loan, including interest P = the principal investment amount (the initial deposit or loan amount) r = the annual interest rate (decimal) n = the number of times that interest is compounded per year t = the number of years the money is invested or borrowed for.
9.6.3 Basic Accounting Formulas
349
Participant Handbook Cabinet Maker Modular Kitchen
What is CRM?
CRM stands for Customer Relationship Management. Originally the expression Customer Relationship Management meant managing one’s relationship with customers. However, today it refers to IT systems and software designed to help companies manage their relationships.
The Need for CRM
The better a company can manage its relationships with its customers, the higher the chances of the company’s success. For any entrepreneur, the ability to successfully retain existing customers and expand the enterprise is paramount. This is why IT systems that focus on addressing the problems of dealing with customers on a daily basis are becoming more and more in demand.
Customer needs change over time, and technology can make it easier to understand what customers really want. This insight helps companies to be more responsive to the needs of their customers. It enables them to modify their business operations when required, so that their customers are always served in the best manner possible. Simply put, CRM helps companies recognize the value of their clients and enables them to capitalize on improved customer relations.
Benifits of CRM
CRM has a number of important benefits:
• It helps improve relations with existing customers which can lead to: Increased sales ᴑ Identification of customer needs ᴑ Cross-selling of products ᴑ It results in better marketing of one’s products or services
• It enhances customer satisfaction and retention • It improves profitability by identifying and focusing on the most profitable customers
In business, networking means leveraging your business and personal connections in order to bring in a regular supply of new business. This marketing method is effective as well as low cost. It is a great way to develop sales opportunities and contacts. Networking can be based on referrals and introductions, or can take place via phone, email, and social and business networking websites.
The Need for Networking
Networking is an essential personal skill for business people, but it is even more important for entrepreneurs. The process of networking has its roots in relationship building. Networking results in greater communication and a stronger presence in the entrepreneurial ecosystem. This helps build strong relationships with other entrepreneurs.
Business networking events held across the globe play a huge role in connecting like-minded entrepreneurs who share the same fundamental beliefs in communication, exchanging ideas and converting ideas into realities. Such networking events also play a crucial role in connecting entrepreneurs with potential investors. Entrepreneurs may have vastly different experiences and backgrounds but they all have a common goal in mind – they all seek connection, inspiration, advice, opportunities and mentors. Networking offers them a platform to do just that. Benefits of Networking
Networking offers numerous benefits for entrepreneurs. Some of the major benefits are:
• Getting high quality leads • Increased business opportunities
9.6.4 CRM & Networking
9.6.4.1 What is Networking?
350

Participant Handbook Cabinet Maker Modular Kitchen
• Good source of relevant connections • Advice from like-minded entrepreneurs • Gaining visibility and raising your profile • Meeting positive and enthusiastic people • Increased self-confidence • Satisfaction from helping others • Building strong and lasting friendships
Setting goals is important because it gives you long-term vision and short-term motivation. Goals can be short term, medium term and long term.
Short-Term Goals
• These are specific goals for the immediate future. Example: Repairing a machine that has failed. Medium- Term Goals
• These goals are built on your short term goals. • They do not need to be as specific as your short term goals.
Example: Arranging for a service contract to ensure that your machines don’t fail again.
Long-Term Goals
These goals require time and planning. They usually take a year or more to achieve.
Example: Planning your expenses so you can buy new machinery
Why Create a Business Plan
A business plan is a tool for understanding how your business is put together. It can be used to monitor progress, foster accountable and control the fate of the business. It usually offers a 3-5 year projection and outlines the plan that the company intends to follow to grow its revenues. A business plan is also a very important tool for getting the interest of key employees or future investors.
A business plan typically comprises of eight elements.
Executive Summary
The executive summary follows the title page. The summary should clearly state your desires as the business owner in a short and businesslike way. It is an overview of your business and your plans. Ideally this should not be more than 1-2 pages.
9.6.5 Business Plan: Why Set Goals
9.6.5.1 Elements of a Business Plan
1. Use social media interactions to identify needs and gather feedback. 2. When networking, ask open-ended questions rather than yes/no type questions.
9.6.4.2 Tips
351
Participant Handbook Cabinet Maker Modular Kitchen
Your Executive Summary should include:
• The Mission Statement: Explain what your business is all about. Example: Nike’s Mission Statement Nike’s mission statement is “To bring inspiration and innovation to every athlete in the world.” • Company Information: Provide information like when your business was formed, the names and
roles of the founders, the number of employees, your business location(s) etc. • Growth Highlights: Mention examples of company growth. Use graphs and charts where possible. • Your Products/Services: Describe the products or services provided. • Financial Information: Provide details on current bank and investors. • Summarize future plans: Describe where you see your business in the future.
Business Description
The second section of your business plan needs to provide a detailed review of the different elements of your business. This will help potential investors to correctly understand your business goal and the uniqueness of your offering.
Your Business Description should include:
• A description of the nature of your business • The market needs that you are aiming to satisfy • The ways in which your products and services meet these needs • The specific consumers and organizations that you intend to serve • Your specific competitive advantages
Market Analysis
The market analysis section usually follows the business description. The aim of this section is to showcase your industry and market knowledge. This is also the section where you should lay down your research findings and conclusions.
Your Market Analysis should include:
• Your industry description and outlook • Information on your target market • The needs and demographics of your target audience • The size of your target market • The amount of market share you want to capture • Your pricing structure • Your competitive analysis • Any regulatory requirements
Organization & Management
This section should come immediately after the Market Analysis. Your Organization & Management section should include:
• Your company’s organizational structure • Details of your company’s ownership • Details of your management team
352

Participant Handbook Cabinet Maker Modular Kitchen
• Qualifications of your board of directors • Detailed descriptions of each division/department and its function • The salary and benefits package that you offer your people • The incentives that you offer
Service or Product Line
The next section is the service or product line section. This is where you describe your service or product, and stress on their benefits to potential and current customers. Explain in detail why your product of choice will fulfill the needs of your target audience.
Your Service or Product Line section should include:
• A description of your product/service • A description of your product or service’s life cycle • A list of any copyright or patent filings • A description of any R&D activities that you are involved in or planning
Marketing & Sales
Once the Service or Product Line section of your plan has been completed, you should start on the description of the marketing and sales management strategy for your business.
Your Marketing section should include the following strategies:
• Market penetration strategy: This strategy focuses on selling your existing products or services in existing markets, in order to increase your market share.
• Growth strategy: This strategy focuses on increasing the amount of market share, even if it reduces earnings in the short-term.
• Channels of distribution strategy: These can be wholesalers, retailers, distributers and even the internet.
• Communication strategy: These can be written strategies (e-mail, text, chat), oral strategies (phone calls, video chats, face-to-face conversations), non-verbal strategies (body language, facial expressions, tone of voice) and visual strategies (signs, webpages, illustrations).
Your Sales section should include the following information:
• A salesforce strategy: This strategy focuses on increasing the revenue of the enterprise. • A breakdown of your sales activities: This means detailing out how you intend to sell your products
or services – will you sell it offline or online, how many units do you intend to sell, what price do you plan to sell each unit at, etc.
Funding Request
This section is specifically for those who require funding for their venture. The Funding Request section should include the following information:
• How much funding you currently require. • How much funding you will require over the next five years. This will depend on your long-term
goals. • The type of funding you want and how you plan to use it. Do you want funding that can be used only
for a specific purpose, or funding that can be used for any kind of requirement? • Strategic plans for the future. This will involve detailing out your long-term plans – what these plans
are and how much money you will require to put these plans in motions.
353
Participant Handbook Cabinet Maker Modular Kitchen
• Historical and prospective financial information. This can be done by creating and maintaining all your financial records, right from the moment your enterprise started, to the present day. Documents required for this are your balance sheet which contains details of your company’s assets and liabilities, your income statement which lists your company’s revenues, expenses and net income for the year, your tax returns (usually for the last three years) and your cash flow budget which lists the cash that came in, the cash that went out and states whether you had a cash deficit (negative balance) or surplus (positive balance) at the end of each month.
Financial Planning
Before you begin building your enterprise, you need to plan your finances. Take a look at the steps for financial planning:
• Step 1: Create a financial plan. This should include your goals, strategies and timelines for accomplishing these goals.
• Step 2: Organize all your important financial documents. Maintain a file to hold your investment details, bank statements, tax papers, credit card bills, insurance papers and any other financial records.
• Step 3: Calculate your net worth. This means figure out what you own (assets like your house, bank accounts, investments etc.), and then subtract what you owe (liabilities like loans, pending credit card amounts etc.) the amount you are left with is your net worth.
• Step 4: Make a spending plan. This means write down in detail where your money will come from, and where it will go.
• Step 5: Build an emergency fund. A good emergency fund contains enough money to cover at least 6 months’ worth of expenses.
• Step 6: Set up your insurance. Insurance provides long term financial security and protects you against risk.
Risk Management
As an entrepreneur, it is critical that you evaluate the risks involved with the type of enterprise that you want to start, before you begin setting up your company. Once you have identified potential risks, you can take steps to reduce them. Some ways to manage risks are:
• Research similar business and find out about their risks and how they were minimized. • Evaluate current market trends and find out if similar products or services that launched a while ago
are still being well received by the public. • Think about whether you really have the required expertise to launch your product or service. • Examine your finances and see if you have enough income to start your enterprise. • Be aware of the current state of the economy, consider how the economy may change over time,
and think about how your enterprise will be affected by any of those changes. • Create a detailed business plan.
1. Ensure all the important elements are covered in your plan. 2. Scrutinize the numbers thoroughly. 3. Be concise and realistic. 4. Be conservative in your approach and your projections. 5. Use visuals like charts, graphs and images wherever possible.
9.6.5.2 Tips
354

Participant Handbook Cabinet Maker Modular Kitchen
The Need for Bank Finance
For entrepreneurs, one of the most difficult challenges faced involves securing funds for start-ups. With numerous funding options available, entrepreneurs need to take a close look at which funding methodology works best for them. In India, banks are one of the largest funders of start-ups, offering funding to thousands of start-ups every year.
When approaching a bank, entrepreneurs must have a clear idea of the different criteria that banks use to screen, rate and process loan applications. Entrepreneurs must also be aware of the importance of providing banks with accurate and correct information. It is now easier than ever for financial institutions to track any default behaviour of loan applicants. Entrepreneurs looking for funding from banks must provide banks with information relating to their general credentials, financial situation and guarantees or collaterals that can be offered.
General Credentials
This is where you, as an entrepreneur, provide the bank with background information on yourself. Such information includes:
• Letter(s) of Introduction: This letter should be written by a respected business person who knows you well enough to introduce you. The aim of this letter is set across your achievements and vouch for your character and integrity.
• Your Profile: This is basically your resume. You need to give the bank a good idea of your educational achievements, professional training, qualifications, employment record and achievements.
• Business Brochure: A business brochure typically provides information on company products, clients, how long the business has been running for etc.
• Bank and Other References: If you have an account with another bank, providing those bank references is a good idea.
• Proof of Company Ownership or Registration: In some cases, you may need to provide the bank with proof of company ownership and registration. A list of assets and liabilities may also be required.
Financial Situation
Banks will expect current financial information on your enterprise. The standard financial reports you should be prepared with are:
• Balance Sheet • Profit-and-Loss Account • Cash-Flow Statement • Projected Sales and Revenues • Business Plan • Feasibility Study
Guarantees or Collaterals
Usually banks will refuse to grant you a loan without security. You can offer assets which the bank can seize and sell off if you do not repay the loan. Fixed assets like machinery, equipment, vehicles etc. are also considered to be security for loans.
9.6.6 Procedure and Formalities for Bank Finance
9.6.6.1 What Information Should Entrepreneurs Offer Banks for Funding
355
Participant Handbook Cabinet Maker Modular Kitchen
Your request for funding will have a higher chance of success if you can satisfy the following lending criteria:
• Good cash flow • Adequate shareholders’ funds • Adequate security • Experience in business • Good reputation
The Procedure
To apply for funding the following procedure will need to be followed.
• Submit your application form and all other required documents to the bank. • The bank will carefully assess your credit worthiness and assign ratings by analyzing your business
information with respect to parameters like management, financial, operational and industry information as well as past loan performance.
• The bank will make a decision as to whether or not you should be given funding.
To manage your enterprise effectively you need to look at many different aspects, right from managing the day-to-day activities to figuring out how to handle a large scale event. Let’s take a look at some simple steps to manage your company effectively.
Step 1: Use your leadership skills and ask for advice when required: Let’s take the example of Ramu, an entrepreneur who has recently started his own enterprise. Ramu has good leadership skills – he is honest, communicates well, knows how to delegate work etc. These leadership skills definitely help Ramu in the management of his enterprise. However, sometimes Ramu comes across situations that he is unsure how to handle. What should Ramu do in this case? One solution is for him to find a more experienced manager who is willing to mentor him. Another solution is for Ramu to use his networking skills so that he can connect with managers from other organizations, who can give him advice on how to handle such situations.
Step 2: Divide your work amongst others – realize that you cannot handle everything yourself: Even the most skilled manager in the world will not be able to manage every single task that an enterprise will demand of him. A smart manager needs to realize that the key to managing his enterprise lies in his dividing all his work between those around him. This is known as delegation. However, delegating is not enough. A manager must delegate effectively if he wants to see results. This is important because delegating, when done incorrectly, can result in you creating even more work for yourself. To delegate effectively, you can start by making two lists. One list should contain the things that you know you need to handle yourself. The second list should contain the things that you are confident can be given to others to manage and handle. Besides incorrect delegation, another issue that may arise is over-delegation. This means giving away too many of your tasks to others. The problem with this is, the more tasks you delegate, the more time you will spend tracking and monitoring the work progress of those you have handed the tasks to. This
9.6.6.2 The Lending Criteria of Banks
9.6.7 Enterprise Management - An Overview
1. Get advice on funding options from experienced bankers.2. Be cautious and avoid borrowing more than you need, for longer than you need, at an interest rate
that is higher than you are comfortable with.
9.6.6.3 Tips
356

Participant Handbook Cabinet Maker Modular Kitchen
will leave you with very little time to finish your own work.
Step 3: Hire the right people for the job: Hiring the right people goes a long way towards effectively managing your enterprise. To hire the best people suited for the job, you need to be very careful with your interview process. You should ask potential candidates the right questions and evaluate their answers carefully. Carrying out background checks is always a good practice. Running a credit check is also a good idea, especially if the people you are planning to hire will be handling your money. Create a detailed job description for each role that you want filled and ensure that all candidates have a clear and correct understanding of the job description. You should also have an employee manual in place, where you put down every expectation that you have from your employees. All these actions will help ensure that the right people are approached for running your enterprise.
Step 4: Motivate your employees and train them well: Your enterprise can only be managed effectively if your employees are motivated to work hard for your enterprise. Part of being motivated involves your employees believing in the vision and mission of your enterprise and genuinely wanting to make efforts towards pursuing the same. You can motivate your employees with recognition, bonuses and rewards for achievements. You can also motivate them by telling them about how their efforts have led to the company’s success. This will help them feel pride and give them a sense of responsibility that will increase their motivation.
Besides motivating your people, your employees should be constantly trained in new practices and technologies. Remember, training is not a one-time effort. It is a consistent effort that needs to be carried out regularly.
Step 5: Train your people to handle your customers well: Your employees need to be well-versed in the art of customer management. This means they should be able to understand what their customers want, and also know how to satisfy their needs. For them to truly understand this, they need to see how you deal effectively with customers. This is called leading by example. Show them how you sincerely listen to your clients and the efforts that you put into understand their requirements. Let them listen to the type of questions that you ask your clients so they understand which questions are appropriate.
Step 6: Market your enterprise effectively: Use all your skills and the skills of your employees to market your enterprise in an effective manner. You can also hire a marketing agency if you feel you need help in this area.
Now that you know what is required to run your enterprise effectively, put these steps into play, and see how much easier managing your enterprise becomes!
Questions to Ask Yourself Before Considering Entrepreneurship
• Why am I starting a business? • What problem am I solving? • Have others attempted to solve this problem before? Did they succeed or fail? • Do I have a mentor or industry expert that I can call on?
9.6.7.2 Considering Entrepreneurship
1. Get advice on funding options from experienced bankers. 2. Be cautious and avoid borrowing more than you need, for longer than you need, at an interest rate
that is higher than you are comfortable with.
9.6.7.1 Tips
357

Participant Handbook
• Who is my ideal customer? • Who are my competitors? • What makes my business idea different from other business ideas? • What are the key features of my product or service? • Have I done a SWOT analysis? • What is the size of the market that will buy my product or service? • What would it take to build a minimum viable product to test the market? • How much money do I need to get started? • Will I need to get a loan? • How soon will my products or services be available? • When will I break even or make a profit? • How will those who invest in my idea make a profit? • How should I set up the legal structure of my business? • What taxes will I need to pay? • What kind of insurance will I need? • Have I reached out to potential customers for feedback
1. It is very important to validate your business ideas before you invest significant time, money and resources into it.
2. The more questions you ask yourself, the more prepared you will be to handle to highs and lows of starting an enterprise.
Footnotes:
1. A mentor is a trusted and experienced person who is willing to coach and guide you. 2. A customer is someone who buys goods and/or services. 3. A competitor is a person or company that sells products and/or services similar to your products
and/or services. 4. SWOT stands for Strengths, Weaknesses, Opportunities and Threats. To conduct a SWOT analysis
of your company, you need to list down all the strengths and weaknesses of your company, the opportunities that are present for your company and the threats faced by your company.
5. A minimum viable product is a product that has the fewest possible features, that can be sold to customers, for the purpose of getting feedback from customers on the product.
6. A company is said to break even when the profits of the company are equal to the costs. 7. The legal structure could be a sole proprietorship, partnership or limited liability partnership. 8. There are two types of taxes – direct taxes payable by a person or a company, or indirect taxes
charged on goods and/or services. 9. There are two types of insurance – life insurance and general insurance. Life insurance covers
human life while general insurance covers assets like animals, goods, cars etc.
9.6.7.3 Tips
358

Participant Handbook

Phone: +91 124 4513900
Sikanderpur Gurugram - 122002, Haryana, IndiaAddress: 407-408, 4th Floor, DLF City Court, MG Road
Web: www.ffsc.in Email: [email protected]
Price:
“This book is provided free to students under the PMKVY (Pradhan Mantri Kaushal Vikas Yojana)."