ROOT PAR 4 ROOT PAR 6 - Cameo Lighting
176
CLROOTPAR4: FIRMWARE VERSION 1.2 AND LATER CLROOTPAR6: FIRMWARE VERSION 1.3 AND LATER USER´S MANUAL BEDIENUNGSANLEITUNG MANUEL D´UTILISATION MANUAL DE USUARIO INSTRUKCJA OBSŁUGI MANUALE D´USO ROOT PAR 4 7 X 4 W RGBW PAR CLROOTPAR4(WH) ROOT PAR 6 6 X 12 W RGBWA + UV PAR CLROOTPAR6(WH)
-
Upload
khangminh22 -
Category
Documents
-
view
0 -
download
0
Transcript of ROOT PAR 4 ROOT PAR 6 - Cameo Lighting

CLROOTPAR4: FIRMWARE VERSION 1.2 AND LATERCLROOTPAR6: FIRMWARE VERSION 1.3 AND LATER
USER´S MANUALBEDIENUNGSANLEITUNG MANUEL D´UTILISATIONMANUAL DE USUARIOINSTRUKCJA OBSŁUGIMANUALE D´USO
ROOT PAR 47 X 4 W RGBW PARCLROOTPAR4(WH)
ROOT PAR 66 X 12 W RGBWA + UV PARCLROOTPAR6(WH)

CONTENTS / INHALTSVERZEICHNIS / TABLE DES MATIÈRES / CONTENIDO / SPIS TREŚCI / CONTENUTO
ENGLISHINTENDED USE ........................................................................ 3SAFETY INSTRUCTIONS ........................................................... 3INFORMATION FOR PORTABLE INDOOR DEVICES ..................... 6INTRODUCTION ....................................................................... 7CONNECTIONS, OPERATING, AND DISPLAY ELEMENTS ............. 8OPERATION ............................................................................. 10IR REMOTE CONTROL (OPTIONAL) .......................................... 19INSTALLATION AND MOUNTING ............................................... 20CARE, MAINTENANCE, AND REPAIR ......................................... 22DMX TECHNOLOGY ................................................................. 23TECHNICAL SPECIFICATIONS ................................................... 25DISPOSAL ............................................................................... 27MANUFACTURER’S DECLARATIONS ......................................... 27
DEUTSCHBESTIMMUNGSGEMÄSSER GEBRAUCH .................................... 28SICHERHEITSHINWEISE ........................................................... 28HINWEISE FÜR ORTSVERÄNDERLICHE INDOOR-GERÄTE ........... 32EINFÜHRUNG ........................................................................... 32ANSCHLÜSSE, BEDIEN- UND ANZEIGEELEMENTE ..................... 33BEDIENUNG ............................................................................. 35IR FERNBEDIENUNG (OPTIONAL) .............................................. 46AUFSTELLUNG UND MONTAGE ................................................ 47PFLEGE, WARTUNG UND REPARATUR ....................................... 49DMX TECHNIK ......................................................................... 50TECHNISCHE DATEN ................................................................ 52ENTSORGUNG ......................................................................... 54HERSTELLERERKLÄRUNGEN .................................................... 54
FRANÇAISUTILISATION PRÉVUE ............................................................... 55CONSIGNES DE SÉCURITÉ ....................................................... 55INFORMATIONS SUR LES APPAREILS PORTABLES D’EXTÉRIEUR .......................................................................... 59INTORDUCTION .......................................................................... 59RACCORDEMENTS, ÉLÉMENTS DE COMMANDE ET D’AFFICHAGE .......................................................................... 60UTILISATION ............................................................................ 62TÉLÉCOMMANDE INFRAROUGE (EN OPTION) ........................... 73INSTALLATION ET MONTAGE ................................................... 74ENTRETIEN, MAINTENANCE ET RÉPARATION ............................ 76TECHNIQUE DMX ..................................................................... 77CARACTÉRISTIQUES TECHNIQUES ........................................... 79MISE AU REBUT ...................................................................... 81DÉCLARATIONS DU FABRICANT ............................................... 81
ESPAÑOLUSO PREVISTO ........................................................................ 81INSTRUCCIONES DE SEGURIDAD ............................................. 81INFORMACIÓN SOBRE DISPOSITIVOS PORTÁTILES PARA EXTERIORES ................................................................... 86INTRODUCCIÓN ....................................................................... 86CONEXIONES, ELEMENTOS DE MANEJO Y ELEMENTOSDE VISUALIZACIÓN .................................................................. 87FUNCIONAMIENTO ................................................................... 89MANDO A DISTANCIA POR INFRARROJOS (OPCIONAL) ............. 99INSTALACIÓN Y MONTAJE ........................................................ 101CUIDADO, MANTENIMIENTO Y REPARACIÓN ............................. 102TECNOLOGÍA DMX ................................................................... 104DATOS TÉCNICOS .................................................................... 106ELIMINACIÓN .......................................................................... 108DECLARACIONES DEL FABRICANTE ......................................... 108
POLSKI PREZEZNACZENIEM ................................................................. 109ZASADY BEZPIECZEŃSTWA ...................................................... 109UWAGI DOTYCZĄCE PRZENOŚNEGO SPRZĘTU WEWNĘTRZNEGO .................................................................... 113WPROWADZENIE ..................................................................... 113PRZYŁĄCZA, ELEMENTY OBSŁUGI I WSKAŹNIKI ....................... 114OBSŁUGA ................................................................................ 116PILOT ZDALNEGO STEROWANIA (OPCJONALNY) ...................... 126USTAWIANIE I MONTAŻ ............................................................ 128UTRZYMANIE, KONSERWACJA I NAPRAWY ............................... 129TECHNIKA DMX ....................................................................... 131DANE TECHNICZNE .................................................................. 133UTYLIZACJA ............................................................................ 135DEKLARACJE PRODUCENTA .................................................... 135
ITALIANOUTILIZZO CONFORME .............................................................. 136INDICAZIONE SULLA SICUREZZA .............................................. 136AVVERTENZE PER DISPOSITIVI INDUSTRIALI PORTATILI ............ 140INTRODUZIONE ....................................................................... 140CONNETTORII, ELEMENTI DI COMANDO E DI VISUALIZZAZIONE 141UTILIZZO ................................................................................. 143TELECOMANDO A INFRAROSSI (OPZIONALE) ............................ 153INSTALLAZIONE E MONTAGGIO ................................................ 154CURA, MANUTENZIONE E RIPARAZIONE ................................... 156TECNOLOGIA DMX ................................................................... 157DATI TECNICI ........................................................................... 159SMALTIMENTO ........................................................................ 161DICHIARAZIONI DEL PRODUTTORE ........................................... 161
DMXDMX CONTROL / DMX STEUERUNG / COMMANDE DMX / CONTROL DMX / STEROWANIE DMX / CONTROLLO DMX ........ 162
3
DEUTSC
HEN
GLISH
DMX
FRAN
CAIS
ESPAÑO
LITALIANO
POLSKI
ENGLISH
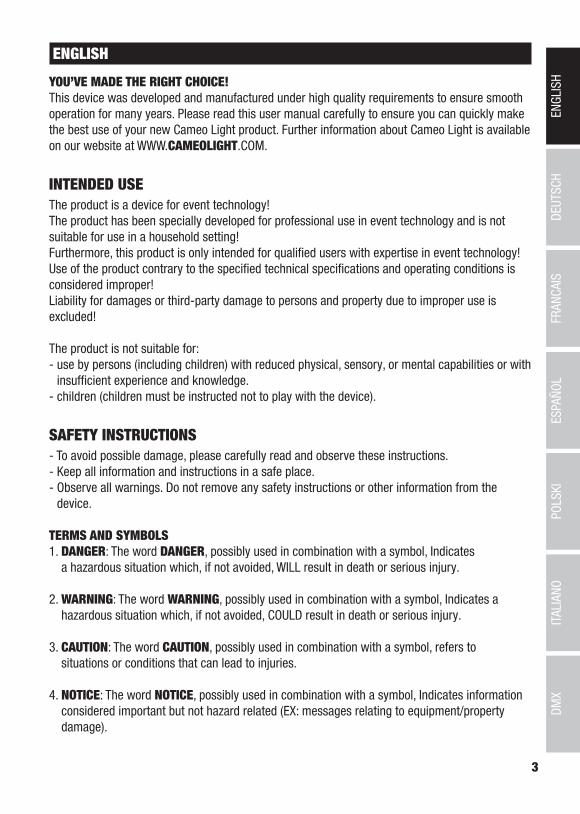
YOU’VE MADE THE RIGHT CHOICE!This device was developed and manufactured under high quality requirements to ensure smooth operation for many years. Please read this user manual carefully to ensure you can quickly make the best use of your new Cameo Light product. Further information about Cameo Light is available on our website at WWW.CAMEOLIGHT.COM.
INTENDED USE The product is a device for event technology!The product has been specially developed for professional use in event technology and is not suitable for use in a household setting!Furthermore, this product is only intended for qualified users with expertise in event technology!Use of the product contrary to the specified technical specifications and operating conditions is considered improper!Liability for damages or third-party damage to persons and property due to improper use is excluded!
The product is not suitable for: - use by persons (including children) with reduced physical, sensory, or mental capabilities or with
insufficient experience and knowledge. - children (children must be instructed not to play with the device).
SAFETY INSTRUCTIONS- To avoid possible damage, please carefully read and observe these instructions. - Keep all information and instructions in a safe place. - Observe all warnings. Do not remove any safety instructions or other information from the
device.
TERMS AND SYMBOLS1. DANGER: The word DANGER, possibly used in combination with a symbol, Indicates
a hazardous situation which, if not avoided, WILL result in death or serious injury.
2. WARNING: The word WARNING, possibly used in combination with a symbol, Indicates a hazardous situation which, if not avoided, COULD result in death or serious injury.
3. CAUTION: The word CAUTION, possibly used in combination with a symbol, refers to situations or conditions that can lead to injuries.
4. NOTICE: The word NOTICE, possibly used in combination with a symbol, Indicates information considered important but not hazard related (EX: messages relating to equipment/property damage).

4
DEUTSCHENGLISH
DMX
ITALIANOPOLSKI
ESPAÑOLFRANCAIS
This symbol indicates an electrical hazard.
This symbol indicates a general hazard.
This symbol indicates danger from hot surfaces.
This symbol indicates danger from intense light sources.
This symbol indicates additional information on the operation of the product.
DANGER:1. Do not open the device or make any modifications to it.
2. If your device stops working properly, if liquids or objects have penetrated the inside of the device, or if the device has been damaged in any other way, switch it off im-mediately and unplug it from the power outlet. Only authorized specialists may repair this device.
3. The protective earth conductor for Class I appliances must be properly connected. Never disconnect the protective earth conductor. Class II appliances do not have a protective earth conductor.
4. Make sure that voltage-conducting cables are not kinked or otherwise mechanically damaged.
5. Never bypass the device fuse.
WARNING:1. The device must not be used if there are obvious signs of damage to the device.
2. The device may only be installed in voltage-free state.
3. Do not operate the device if its power cord is damaged.
4. Only a qualified person may replace permanently connected power cords.
NOTICE:1. Do not operate the device right after it has been subjected to strong temperature
fluctuations (e.g., after transport). Humidity and condensation may have damaged the device. Only switch the device on once it has reached room temperature.
2. Make sure that the voltage and frequency of the power supply correspond to the values specified on the device. If the device has a voltage selector, do not plug in the device until it has been properly set up. Only use suitable power cords.
5
DEUTSC
HEN
GLISH
DMX
FRAN
CAIS
ESPAÑO
LITALIANO
POLSKI
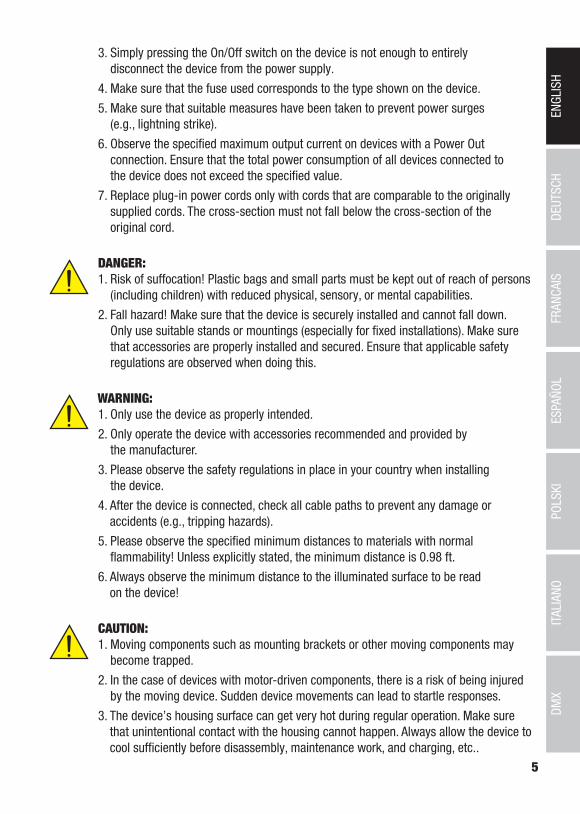
3. Simply pressing the On/Off switch on the device is not enough to entirely disconnect the device from the power supply.
4. Make sure that the fuse used corresponds to the type shown on the device.
5. Make sure that suitable measures have been taken to prevent power surges (e.g., lightning strike).
6. Observe the specified maximum output current on devices with a Power Out connection. Ensure that the total power consumption of all devices connected to the device does not exceed the specified value.
7. Replace plug-in power cords only with cords that are comparable to the originally supplied cords. The cross-section must not fall below the cross-section of the original cord.
DANGER:1. Risk of suffocation! Plastic bags and small parts must be kept out of reach of persons
(including children) with reduced physical, sensory, or mental capabilities.
2. Fall hazard! Make sure that the device is securely installed and cannot fall down. Only use suitable stands or mountings (especially for fixed installations). Make sure that accessories are properly installed and secured. Ensure that applicable safety regulations are observed when doing this.
WARNING:1. Only use the device as properly intended.
2. Only operate the device with accessories recommended and provided by the manufacturer.
3. Please observe the safety regulations in place in your country when installing the device.
4. After the device is connected, check all cable paths to prevent any damage or accidents (e.g., tripping hazards).
5. Please observe the specified minimum distances to materials with normal flammability! Unless explicitly stated, the minimum distance is 0.98 ft.
6. Always observe the minimum distance to the illuminated surface to be read on the device!
CAUTION:1. Moving components such as mounting brackets or other moving components may
become trapped.
2. In the case of devices with motor-driven components, there is a risk of being injured by the moving device. Sudden device movements can lead to startle responses.
3. The device’s housing surface can get very hot during regular operation. Make sure that unintentional contact with the housing cannot happen. Always allow the device to cool sufficiently before disassembly, maintenance work, and charging, etc..

6
DEUTSCHENGLISH
DMX
ITALIANOPOLSKI
ESPAÑOLFRANCAIS
NOTICE:1. Do not install or operate the device near heating elements, heat storage units, stoves,
or other sources of heat. Make sure that the device is always installed so that it is adequately cooled and cannot overheat.
2. Do not put any sources of ignition (e.g., burning candles) near the device.
3. Ventilation slots must be kept uncovered, and fans must not be blocked.
4. Use the original packaging or packaging provided by the manufacturer for transport.
5. Avoid shaking or banging the device.
6. Observe the IP rating as well as the ambient conditions such as the specified tem-perature and humidity.
7. Devices can be subject to ongoing development. If information on operating condi-tions, output, or other device characteristics differs between the user manual and device label, the information provided on the device always takes priority.
8. The device is not suitable for tropical climate zones and operation above 6561 ft above sea level.
9. The device is not suitable for operation under marine conditions.
CAUTION! IMPORTANT INFORMATION ON LIGHT PRODUCTS!1. Never look directly (not even briefly) into the light source.
2. Never look into the light source with optical devices (e.g., magnifying glasses).
3. Strobe effects can trigger epileptic seizures in susceptible individuals!
4. A permanently installed light source is built into this luminaire and cannot be replaced by the user. Please contact your distributor in case of a system failure.
INFORMATION FOR PORTABLE INDOOR DEVICES 1. Temporary operation! Event equipment is designed in general for temporary operation
only.
2. Continuous operation or permanent structural attachment, especially in outdoor areas, can negatively impact functionality, as well as surfaces and seals, and can lead to accelerated material fatigue.

7
DEUTSC
HEN
GLISH
DMX
FRAN
CAIS
ESPAÑO
LITALIANO
POLSKI
INTRODUCTION7 X 4 W RGBW PAR SPOTLIGHTSCLROOTPAR4 (black housing)CLROOTPAR4WH (white housing)
6 X 12 W RGBWA+UV PAR SPOTLIGHTSCLROOTPAR6 (black housing)CLROOTPAR6WH (white housing)
CONTROL FUNCTIONSCLROOTPAR4DMX modes without DMX delay channel: 2-channel, 4-channel 1, 4-channel 2, 5-channel 6, and 9-channel DMX controlDMX modes with DMX delay channel: 3-channel, 5-channel 1, 5-channel 2, 6-channel, 7-channel, and 10-channel DMX controlCLROOTPAR6DMX modes without DMX delay channel: 2-channel, 4-channel 1, 4-channel 2, 5-channel, 6-channel, 8-channel, and 11-channel DMX controlDMX modes with DMX delay channel: 3-channel, 5-channel 1, 5-channel 2, 6-channel, 7-channel, 9-channel, and 12-channel DMX control
Master/slave modeStand-alone functionsControl via IR remote control (remote control optionally available)W-DMX connection possible with optional iDMX stick
PROPERTIES3-pin DMX connectors. Power Twist power connector, IN and OUT. OLED display. Configurable PWM frequency. Connection for iDMX stick. Convection cooling. Tilt screw. Installation double bracket included. 100–240 V AC operating voltage.
CLROOTPAR47 x 4 W RGBW LEDs. Power consumption 38 W
CLROOTPAR66 x 12 W RGBWA+UV LEDs. Power consumption 58 W

8
DEUTSCHENGLISH
DMX
ITALIANOPOLSKI
ESPAÑOLFRANCAIS
CONNECTIONS, OPERATING AND DISPLAY ELEMENTS
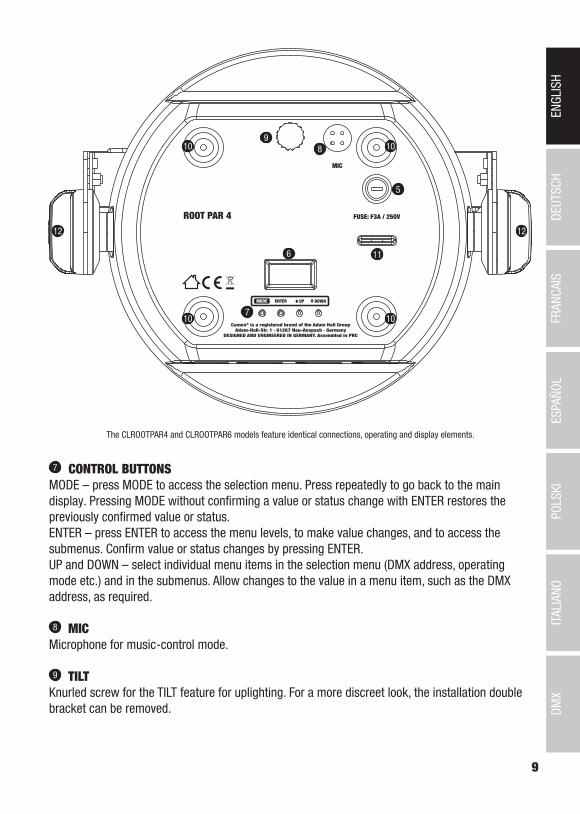
The CLROOTPAR4 and CLROOTPAR6 models feature identical connections, operating and display elements.
1 POWER INBlue Power Twist mains input socket. Operating voltage 100–240 V AC/50–60 Hz. A suitable mains cable with Power Twist plug is included.
2 POWER OUTWhite Power Twist mains output socket for supplying power to additional Cameo spotlights (max. 8 A).
3 DMX INMale 3-pin XLR socket for connection to a DMX control device (e.g. DMX console).
4 DMX OUTFemale 3-pin XLR socket for sending the DMX control signal.
5 FUSEFuse holder for 5 x 20 mm micro fuses. IMPORTANT: Replace the fuse only with a fuse of the same type and value. In the event of repeated fuse failure, please contact an authorised service centre.
6 OLED-DISPLAYThe OLED display shows the currently activated mode (main display), the menu items in the selection menu and the numerical value or operating mode in certain menu items. If there is no input for around two minutes, the display automatically returns to the main display. Note regard-ing the main display in operating modes with external control: As soon as the control signal is interrupted, the characters in the display begin to flash. When there is a control signal again, the flashing stops. Briefly pressing the UP button when in the main display rotates the display by 180°.
1
4 3
2
9
DEUTSC
HEN
GLISH
DMX
FRAN
CAIS
ESPAÑO
LITALIANO
POLSKI
MIC
5
6
7
11
89
10
10
10
10
12 12
The CLROOTPAR4 and CLROOTPAR6 models feature identical connections, operating and display elements.
7 CONTROL BUTTONSMODE – press MODE to access the selection menu. Press repeatedly to go back to the main display. Pressing MODE without confirming a value or status change with ENTER restores the previously confirmed value or status.ENTER – press ENTER to access the menu levels, to make value changes, and to access the submenus. Confirm value or status changes by pressing ENTER.UP and DOWN – select individual menu items in the selection menu (DMX address, operating mode etc.) and in the submenus. Allow changes to the value in a menu item, such as the DMX address, as required.
8 MICMicrophone for music-control mode.
9 TILTKnurled screw for the TILT feature for uplighting. For a more discreet look, the installation double bracket can be removed.

10
DEUTSCHENGLISH
DMX
ITALIANOPOLSKI
ESPAÑOLFRANCAIS
10 RUBBER FEETFour rubber feet for good stability.
11 SECURING LUGSecuring lug for attaching the spotlight for truss installations.
12 HANDLE SCREWSThe two handle screws are for adjusting and fixing the stand and/or mounting bracket.
PORT FOR W-DMX™ CONNECTIONThe USB-A port for the optional iDMX stick is located on the panel on the opposite side of the spotlight.
OPERATIONNOTES• As soon as the spotlight is properly connected to the power supply, “Welcome to Cameo”, the
model name, and then the software version are displayed one after the other on the display as part of the startup process. Once the process is complete, the spotlight is ready for use and resumes whichever mode was most recently activated.
• Hold down the MODE button for approx. two seconds to directly access the main display from the lower menu levels. If there is no input within approx. two minutes, the main display is auto-matically activated. Briefly press MODE to go up one level in the submenus.
• Press MENU and ENTER at the same time to go directly to the last edited menu option.
• Starting from the main display, briefly press UP to rotate the display 180°.
• Press and hold UP or DOWN to quickly change a value (e.g., DMX start address).
MAIN DISPLAY DMX MODEThe DMX Address and the currently configured DMX start address (in the example 001) are shown on the display. If the DMX Delay function is activated, the delay group and the delay time are also displayed.
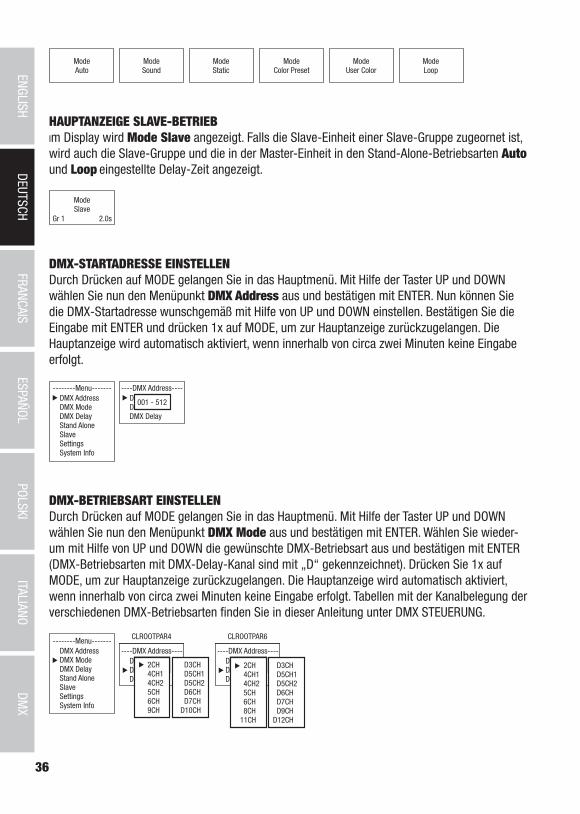
MAIN DISPLAY STAND-ALONE MODEThe display shows the currently activated stand-alone mode (Mode Auto, Mode Sound, Mode Static, Mode Color Preset, Mode User Color, Mode Loop).
ModeAuto
ModeSound
ModeStatic
ModeColor Preset
ModeUser Color
ModeLoop

11
DEUTSC
HEN
GLISH
DMX
FRAN
CAIS
ESPAÑO
LITALIANO
POLSKI
MAIN DISPLAY SLAVE MODEThe display shows Mode Slave. If the slave unit is assigned to a slave group, the slave group and the delay time set in the master unit under the standalone operating modes Auto and Loop are also displayed.
ModeSlave
Gr 1 2.0s
CONFIGURE DMX START ADDRESSPress MODE to access the main menu. Now use UP and DOWN to select the menu item DMX Address and confirm with ENTER. You can now configure the DMX start address with UP and DOWN. Confirm with ENTER and press MODE once to return to the main display. The main display is activated automatically after approximately two minutes of no input.
--------Menu-------DMX AddressDMX ModeDMX DelayStandaloneSlaveSettingsSystem Info
----DMX Address----DMX AddressDMX ModeDMX Delay
001–512
CONFIGURE DMX MODEPress MODE to access the main menu. Now use UP and DOWN to select the menu item DMX Mode and confirm with ENTER. Again use UP and DOWN to select the desired DMX mode and confirm with ENTER (DMX modes with DMX delay channel are marked with “D”). Press MODE once to return to the main display. The main display is activated automatically after approximately two minutes of no input. Tables with the channel assignment of the different DMX modes can be found in these instructions under DMX CONTROL.
--------Menu-------DMX AddressDMX ModeDMX DelayStand AloneSlaveSettingsSystem Info
----DMX Address----DMX AddressDMX ModeDMX Delay
001 - 512001 - 512001 - 5122CH4CH14CH25CH6CH9CH
D3CHD5CH1D5CH2D6CHD7CH
D10CH
CLROOTPAR4
----DMX Address----DMX AddressDMX ModeDMX Delay
001 - 512001 - 512001 - 5122CH4CH14CH25CH6CH8CH
11CH
D3CHD5CH1D5CH2D6CHD7CHD9CH
D12CH
CLROOTPAR6
DMX DELAYThe DMX Delay function allows a chaser light effect to be easily created with any number of spotlights of the same model and software version, which could otherwise only be achieved with a suitable DMX controller and complex programming. All spotlights integrated into the setup are set to the same DMX mode and controlled with the same DMX start address.

12
DEUTSCHENGLISH
DMX
ITALIANOPOLSKI
ESPAÑOLFRANCAIS
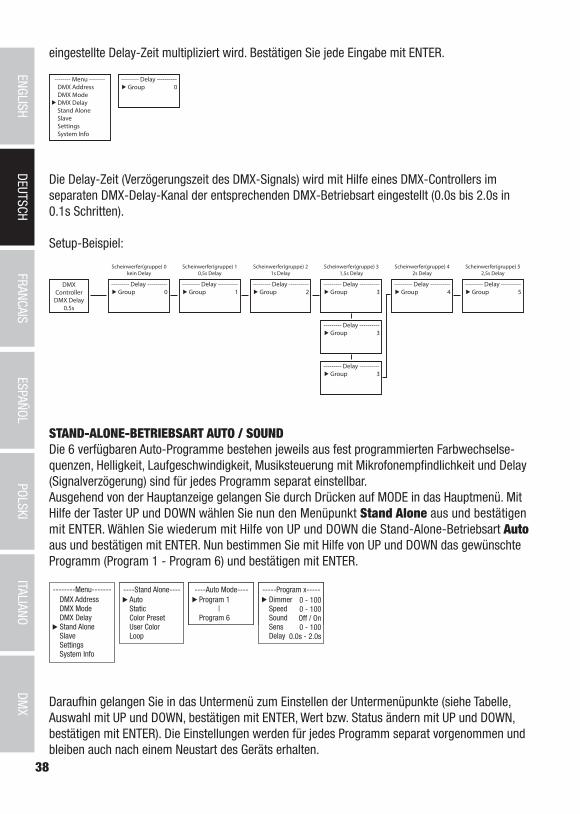
Manually set the DMX delay for DMX operating modes without DMX delay channel:Starting from the main display, press MENU to go to the main menu. Using the and keys, now select the DMX Delay menu option and press enter to confirm your selection. Use and again to select the desired submenu item, press ENTER to confirm, and set the corresponding value as desired. Press ENTER to confirm all entries.
Assign the spotlight to one of 47 groups (maximum number of groups depends on the activated DMX mode). Several spotlights can also be assigned to one group. The group number is also the factor by which the set delay time is multiplied.
The delay time (delay time of the DMX signal) can be set manually on each spotlight separately with different values (0.0 s to 2.0 s in 0.1 s steps).
Setup example:
Setting the DMX delay for DMX modes with DMX delay channel:Starting from the main display, press MENU to go to the main menu. Using the and buttons, now select the DMX Delay menu option and press ENTER twice to confirm your selection.
Assign the spotlight to one of 47 groups (maximum number of groups depends on the activated DMX mode). Several spotlights can also be assigned to one group. The group number is also the factor by which the set delay time is multiplied. Confirm each entry with ENTER.
The delay time (delay time of the DMX signal) is set using a DMX controller in the separate DMX delay channel of the corresponding DMX operating mode (0.0 s to 2.0 s in 0.1 s steps).

13
DEUTSC
HEN
GLISH
DMX
FRAN
CAIS
ESPAÑO
LITALIANO
POLSKI
Setup example:
AUTO / SOUND STAND-ALONE MODEThe 6 available Auto programs each consist of preprogrammed color change sequences; bright-ness, operating speed, music control with microphone sensitivity, and delay (signal delay) are configured separately for each program.Starting from the main display, press MODE to go to the main menu. Using UP and DOWN, now select the Stand Alone menu option and press ENTER to confirm. Use UP and DOWN again to select the Auto stand-alone mode and press ENTER to confirm your selection. Now use UP and DOWN to select the desired program (Program 1 to Program 6) and press ENTER to confirm your selection.
--------Menu-------DMX AddressDMX ModeDMX DelayStand AloneSlaveSettingsSystem Info
----Stand Alone----AutoStaticColor PresetUser ColorLoop
-----Program x-----DimmerSpeedSoundSensDelay
----Auto Mode----Program 1 |Program 6
0–1000–100 Off/On0–100
0.0 s–2.0 s
This will take you to the submenu for setting the submenu items (see table, select with UP and DOWN, confirm with ENTER, change value or status with UP and DOWN, confirm with ENTER). The settings for each programme are made separately and are retained even after restarting the device.
STANDALONE MODE AUTO/SOUND (PROGRAMME 1 to PROGRAMME 6)Dimmer Sets brightness 0–100Speed Sets running speed 0–100Sound Activates/deactivates music-control
OffDeactivates music-control
OnActivates music-control
Sens Sets microphone sensitivity 0–100
Delay Delay time for slave groups0.0 s to 2.0 s

14
DEUTSCHENGLISH
DMX
ITALIANOPOLSKI
ESPAÑOLFRANCAIS
STANDALONE MODE STATICThe standalone mode static allows the dimmer, strobe, R, G, B and W values and the R, G, B, W, A and UV values to be set directly on the device, with values between 000 and 255, in a similar way to with a DMX controller. In this way, an individual scene can be created without an additional DMX controller. Starting from the main display, press MODE to enter the main menu. Now use UP and DOWN to select the menu item Stand Alone and confirm with ENTER. Again use UP and DOWN to select standalone mode Static and confirm with ENTER. Using UP and DOWN, now select the menu item that you wish to edit and confirm with ENTER. You can use UP and DOWN to configure the desired value between 000 and 255. Confirm all entries with ENTER.
--------Menu-------DMX AddressDMX ModeDMX DelayStandaloneSlaveSettingsSystem Info
----Standalone----AutoStaticColor PresetUser ColorLoop
-----Static Mode-----DimmerStrobeRedGreenBlueWhiteAmberUV
----Static Mode----DimmerStrobeRedGreenBlueWhite
0–2550–2550–2550–2550–2550–255
CLROOTPAR4 CLROOTPAR6
0–2550–2550–2550–2550–2550–2550–2550–255
STANDALONE MODE COLOR PRESET15 different color presets, plus Jump and Fade, are available as preset programmes. The bright-ness can be separately set for each preset and the running speed for Jump and Fade. Starting from the main display, press MODE to enter the main menu. Now use UP and DOWN to select the menu item Stand Alone and confirm with ENTER. Again use UP and DOWN to select standalone mode Color Preset and confirm with ENTER. Now use UP and DOWN to select the desired color preset and confirm with ENTER (Off = blackout, Speed refers to Jump and Fade). You can now use UP and DOWN to set the desired brightness between 000 and 100. Confirm with ENTER.
--------Menu-------DMX AddressDMX ModeDMX DelayStand AloneSlaveSettingsSystem Info
----Stand Alone----AutoStaticColor PresetUser ColorLoop
----Color Preset----OffRedAmberYel WarmYellowGreenTurquoise
WhiteCold WhiteUVJumpFadeSpeed
0 - 100 0 - 1000 - 1000 - 1000 - 1000 - 100
ROOTPAR6
WhiteCold WhiteJumpFadeSpeed
ROOTPAR4
0 - 100 0 - 1000 - 1000 - 1000 - 100
0 - 100 0 - 1000 - 1000 - 1000 - 1000 - 100
CyanBlueLavenderMauveMagentaPinkWarm White
0 - 100 0 - 1000 - 1000 - 1000 - 1000 - 1000 - 100
STANDALONE MODE USER COLORThe standalone mode User Color allows you to store four individual color presets of overall brightness, strobe and a color blend of R, G, B and W or R, G, B, W, A and UV directly in the device.Starting from the main display, press MODE to enter the main menu. Now use UP and DOWN to select the menu item Stand Alone and confirm with ENTER. Again use UP and DOWN to select the standalone mode User Color and confirm with ENTER. Using UP and DOWN, now select the desired preset (color 1 to 4) and confirm with ENTER. Using UP and DOWN, now select the menu item that you wish to edit and confirm with ENTER. You can use UP and DOWN to

15
DEUTSC
HEN
GLISH
DMX
FRAN
CAIS
ESPAÑO
LITALIANO
POLSKI
configure the desired value between 000 and 255. The strobe effect values correspond to those in channel 2 of the DMX table 4 CH Mode 1. Confirm all entries with ENTER.
--------Menu-------DMX AddressDMX ModeDMX DelayStandaloneSlaveSettingsSystem Info
----Standalone----AutoStaticColor PresetUser ColorLoop
-------Color x-------DimmerStrobeRedGreenBlueWhiteAmberUV
-------Color x-------DimmerStrobeRedGreenBlueWhite
0–2550–2550–2550–2550–2550–255
CLROOTPAR4 CLROOTPAR6
0–2550–2550–2550–2550–2550–2550–2550–255
----User Color----Color 1 |Color 4
STANDALONE MODE LOOPThe standalone mode Loop allows you to individually configure, store and access up to four different color changing programmes. Brightness, step time, fade time and delay (signal delay) are also separately configurable.Starting from the main display, press MODE to enter the main menu. Now use UP and DOWN to select the menu item Stand Alone and confirm with ENTER. Again use UP and DOWN to select the standalone mode Loop and confirm with ENTER. Using UP and DOWN, now select the desired loop (Loop 1 to 4) and confirm with ENTER.
--------Menu-------DMX AddressDMX ModeDMX DelayStandaloneSlaveSettingsSystem Info
----Standalone----AutoStaticColor PresetUser ColorLoop
----Loop Mode----Loop 1 |Loop 4
---------Loop x---------DimmerStep timeFade timeDelayStep 1Step 2Step 3Step 4
0–1000.1 s to 10.0 s
0% to 100%0.0 s to 2.0 s
RedGreenBlack
-------
This will take you to the submenu for setting the submenu items (see table, select with UP and DOWN, confirm with ENTER, change value or status with UP and DOWN, confirm with ENTER). The settings for each loop are made separately and are retained even after restarting the device.
ROOTPAR4
STANDALONE MODE LOOP (Loop 1–4)
Dimmer Sets brightness 0–100
Step time Sets step time 0.1 s to 10.0 s
Fade time Sets fade time in percent 0% to 100%
Delay Delay time for slave groups 0.0 s to 2.0 s
1st step 15 colors from Color Preset Red to CW (Cold White)
4 colors from User Color User 1 to User 4
Blackout Blackout

16
DEUTSCHENGLISH
DMX
ITALIANOPOLSKI
ESPAÑOLFRANCAIS
2nd step " "
3rd step 15 colors from Color Preset Red to CW (Cold White)
4 colors from User Color User 1 to User 4
Blackout Blackout
------- Skip step
4th step " "
ROOTPAR6
STANDALONE MODE LOOP (Loop 1–4)
Dimmer Sets brightness 0–100
Step time Sets step time 0.1 s to 10.0 s
Fade time Sets fade time in percent 0% to 100%
Delay Delay time for slave groups 0.0 s to 2.0 s
1st step 15 colors from Color Preset Red to CW (Cold White)
4 colors from User Color User 1 to User 4
UV light UV
Blackout Blackout
2nd step " "
3rd step 15 colors from Color Preset Red to CW (Cold White)
4 colors from User Color User 1 to User 4
UV light UV
Blackout Blackout
------- Skip step
4th step " "
SLAVE MODEStandard slave mode: Starting from the main display, press MODE to enter the main menu. Now use UP and DOWN to select the menu item Slave, confirm with ENTER, select Slave Group 0 and again confirm with ENTER. Connect the slave and the master units (same model, same software version) using a DMX cable, and enable one of the standalone modes on the master unit (Auto, Static, Color Preset, User Color, Loop). The slave unit will now exactly follow the master unit.
--------Menu-------DMX AddressDMX ModeDMX DelayStandaloneSlaveSettingsSystem Info
----Slave Group----StandaloneSlaveSettings
Mode Slave0
Main display

17
DEUTSC
HEN
GLISH
DMX
FRAN
CAIS
ESPAÑO
LITALIANO
POLSKI
Advanced slave mode: If, in master/slave mode, you would like to control the slave units via one of the standalone modes Auto or Loop, the control signal can be passed on with a delay in up to 15 steps (ROOTPAR4: Slave Group 1–15, ROOTPAR6: 1–13). The delay is defined in the submenu item Delay in the respective standalone mode and the delay factor in the slave menu of the corresponding spotlight. This is a simple way to create a running light effect with a large number of spotlights that are all the same model and which are all running the same software version. This is otherwise only realisable with a suitable DMX controller and time-consuming programming.
--------Menu-------DMX AddressDMX ModeDMX DelayStandaloneSlaveSettingsSystem Info
----Slave Group----StandaloneSlaveSettings
----Slave Group----StandaloneSlaveSettings
ModeSlaveGr 1 2.0
s
CLROOTPAR4 CLROOTPAR6
1–15 1–13
Main display with group number and delay time in
master unit
Assign the spotlights to one of up to 15 groups as desired (ROOTPAR4: Slave Group 1-15, ROOTPAR6: 1-13). Multiple spotlights may be assigned to a group. The group number is also the factor by which the delay time set in the master unit is multiplied (see setup example).
Mode Slave
Master unitAuto Programme 1
Delay 0.5 s
Slave Group 0No delay
Slave Group 10.5 s delay
Slave Group 21 s delay
Slave Group 31.5 s delay
Slave Group 42 s delay
Slave Group 52.5 s delay
Gr 1 0.5 s
Gr 2 0.5 s
Gr 3 0.5 s
Gr 3 0.5 s
Gr 3 0.5 s
Gr 4 0.5 s
Gr 5 0.5 s
Mode Slave
Mode Slave
Mode Slave
Mode Slave
Mode Slave
Mode Slave
Mode Slave
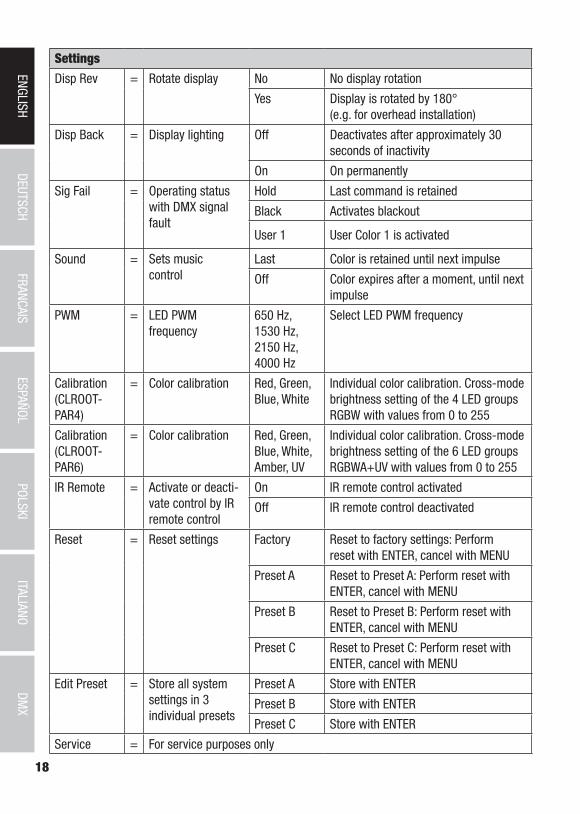
SYSTEM SETTINGS (Settings)Starting from the main display, press MODE to enter the main menu. Use UP and DOWN to select the menu item Settings and confirm with ENTER.
--------Menu-------DMX AddressDMX ModeDMX DelayStandaloneSlaveSettingsSystem Info
This will take you to the submenu for setting the submenu items (see table, select with UP and DOWN, confirm with ENTER, change value or status with UP and DOWN, confirm with ENTER).
18
DEUTSCHENGLISH
DMX
ITALIANOPOLSKI
ESPAÑOLFRANCAIS
Settings
Disp Rev = Rotate display No No display rotation
Yes Display is rotated by 180° (e.g. for overhead installation)
Disp Back = Display lighting Off Deactivates after approximately 30 seconds of inactivity
On On permanently
Sig Fail = Operating status with DMX signal fault
Hold Last command is retained
Black Activates blackout
User 1 User Color 1 is activated
Sound = Sets music control
Last Color is retained until next impulse
Off Color expires after a moment, until next impulse
PWM = LED PWM frequency
650 Hz, 1530 Hz, 2150 Hz, 4000 Hz
Select LED PWM frequency
Calibration (CLROOT-PAR4)
= Color calibration Red, Green, Blue, White
Individual color calibration. Cross-mode brightness setting of the 4 LED groups RGBW with values from 0 to 255
Calibration (CLROOT-PAR6)
= Color calibration Red, Green, Blue, White, Amber, UV
Individual color calibration. Cross-mode brightness setting of the 6 LED groups RGBWA+UV with values from 0 to 255
IR Remote = Activate or deacti-vate control by IR remote control
On IR remote control activated
Off IR remote control deactivated
Reset = Reset settings Factory Reset to factory settings: Perform reset with ENTER, cancel with MENU
Preset A Reset to Preset A: Perform reset with ENTER, cancel with MENU
Preset B Reset to Preset B: Perform reset with ENTER, cancel with MENU
Preset C Reset to Preset C: Perform reset with ENTER, cancel with MENU
Edit Preset = Store all system settings in 3 individual presets
Preset A Store with ENTER
Preset B Store with ENTER
Preset C Store with ENTER
Service = For service purposes only
19
DEUTSC
HEN
GLISH
DMX
FRAN
CAIS
ESPAÑO
LITALIANO
POLSKI
SYSTEM INFORMATION (System Info)Starting from the main display, press MODE to enter the main menu. Now use UP and DOWN to select the menu item System Info and confirm with ENTER.
--------Menu-------DMX AddressDMX ModeDMX DelayStandaloneSlaveSettingsSystem Info
This will take you to the submenu for accessing the system information (see table, selection with UP and DOWN, confirm with ENTER, change status with UP and DOWN, confirm with ENTER).
System Info
Firmware = Displays device firmware
Firmware V1.xx
Tempera-ture
= Displays temperature of LED unit
LED xxx °C / xxx °F
Unit °C (= display in degrees Celsius)
°F (= display in degrees Fahrenheit)
Op Hours = displays operating time
xx:xx h Displays total operating time in hours and minutes
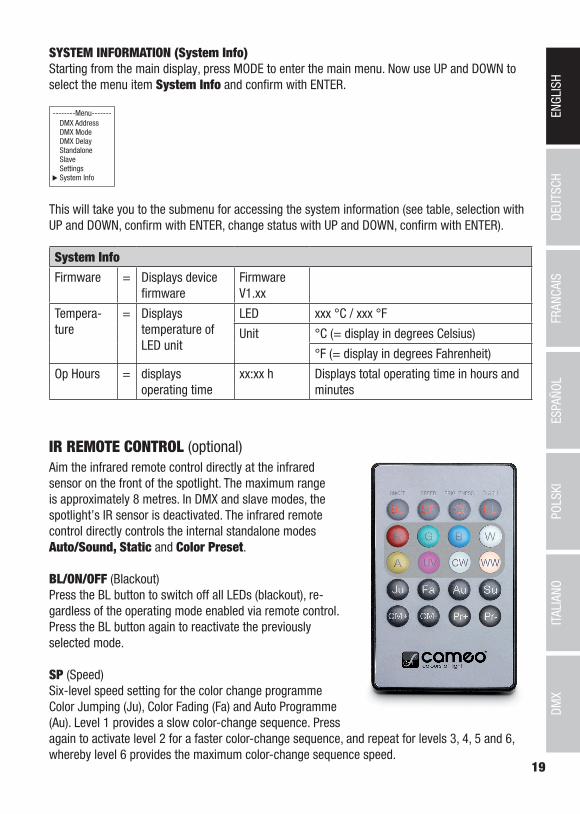
IR REMOTE CONTROL (optional)Aim the infrared remote control directly at the infrared sensor on the front of the spotlight. The maximum range is approximately 8 metres. In DMX and slave modes, the spotlight’s IR sensor is deactivated. The infrared remote control directly controls the internal standalone modes Auto/Sound, Static and Color Preset.
BL/ON/OFF (Blackout)Press the BL button to switch off all LEDs (blackout), re-gardless of the operating mode enabled via remote control. Press the BL button again to reactivate the previously selected mode.
SP (Speed)Six-level speed setting for the color change programme Color Jumping (Ju), Color Fading (Fa) and Auto Programme (Au). Level 1 provides a slow color-change sequence. Press again to activate level 2 for a faster color-change sequence, and repeat for levels 3, 4, 5 and 6, whereby level 6 provides the maximum color-change sequence speed.
20
DEUTSCHENGLISH
DMX
ITALIANOPOLSKI
ESPAÑOLFRANCAIS
(Brightness)Sets the overall brightness in six levels. The different brightness levels can be accessed by re-peatedly pressing this button (level 1 = blackout).
FL (Flash/Stroboscope)Six-level speed setting for the strobe effect. Level 1 deactivates the strobe effect, level 2 produces a slow flash frequency, followed by levels 3 to 5. Level 6 produces the fastest flash frequency. The strobe effect can only be used in the color blending mode (RGBW(A+UV).
R/G/B/W (A and UV only in model CLROOTPAR6, CW and WW without function)Individual color blends can be created with these 4 (6) buttons. The six brightness levels can be accessed by repeatedly pressing the respective color button, whereby the LEDs are switched off at Level 1. Example: Set red and green at the maximum level and the remaining LEDs at the lowest level (i.e. off), and you will achieve a bright yellow color blend.
Ju (color change)Color changes jump (color jumping). The speed at which the colors change is set with the SP (Speed) button.
Fa (Color Fade)Colors fade into each other (color fading). The speed at which the colors change is set with the SP (Speed) button.
Au (Auto Mode)Select the desired color change programme Auto 1–6 by repeatedly pressing the Au button.
Su (Music-controlled color change programme)Select one of six music-controlled programmes Sound 1–6 by repeatedly pressing the Su button. The microphone used for this is found on the back of the spotlight.
CM (Color Macros)Fifteen color presets (sixteen on the ROOTPAR6) can be accessed in succession with the buttons CM+ and CM-.
Pr+/Pr- Select the programme in Auto Mode (Au) and for Music-control (Su).
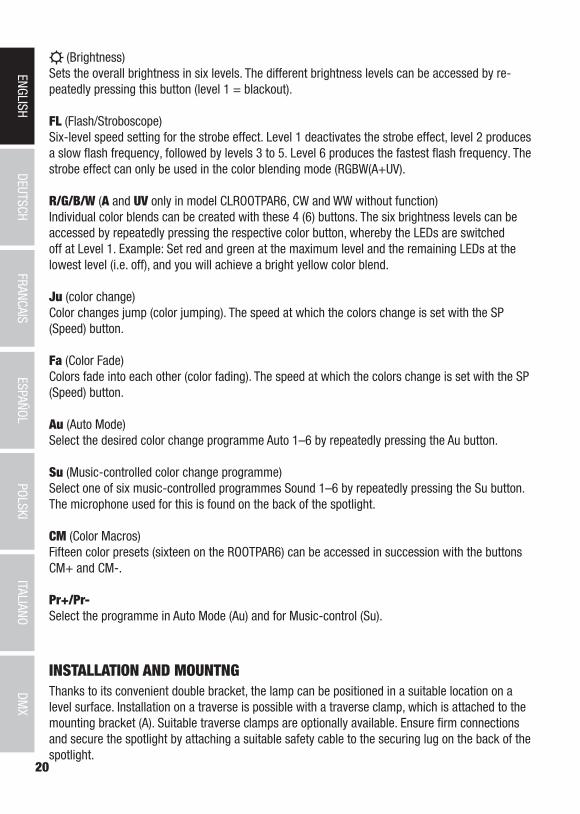
INSTALLATION AND MOUNTNGThanks to its convenient double bracket, the lamp can be positioned in a suitable location on a level surface. Installation on a traverse is possible with a traverse clamp, which is attached to the mounting bracket (A). Suitable traverse clamps are optionally available. Ensure firm connections and secure the spotlight by attaching a suitable safety cable to the securing lug on the back of the spotlight.

21
DEUTSC
HEN
GLISH
DMX
FRAN
CAIS
ESPAÑO
LITALIANO
POLSKI
DANGER: Overhead installation requires extensive experience, including the calculation of the load limit values of the installation material and regular safety inspection of all installation materials and spotlights. If you do not have these qualifications, do not attempt to carry out the installation yourself; contact a professional company. There is a risk that incorrectly mounted or secured devices may come loose and fall down. This may lead to serious injury and even fatalities.
A
B B
To create a more discrete look when using as an uplight, the double mounting bracket can be removed by releasing both handle screws (B).

22
DEUTSCHENGLISH
DMX
ITALIANOPOLSKI
ESPAÑOLFRANCAIS
CARE, MAINTENANCE, AND REPAIRThe device must be maintained and serviced regularly, at least every 3,000 operating hours or at the latest after one year, in order to ensure that it continues to operate properly over the long term.
CARE (user executable)
WARNING! The power supply and, if possible, all device connections must be disconnected before carrying out any care/maintenance measures.
NOTE! Improper care can lead to damage to the device or even destruction.
1. Housing surfaces must be cleaned with a clean, damp cloth. Make sure that no moisture can penetrate the device.
2. Dust and dirt must be regularly removed from air inlets and outlets. If compressed air is used, care must be taken to prevent damage to the device (e.g., fans must be blocked in this case; otherwise they might overwind).
3. Cables and plug-in contacts must be cleaned regularly and dust and dirt must be removed. 4. In general, no cleaning agents or abrasive agents may be used to care for the device as this
could have a negative impact on the surface finish. 5. In general, devices must be stored in a dry place and protected from dust and dirt. 6. All accessible or removable lenses and light emitting apertures must be cleaned on a regular
basis to ensure proper and safe operation.
MAINTENANCE AND REPAIR (by specialists only)
DANGER! The device contains voltage-conducting components. There may still be residual voltage in the device even after it is disconnected from the power supply (e.g., due to charged capacitors).
NOTE! The device contains no user-serviceable components.
NOTE! Maintenance and repair work may only be carried out by sufficiently qualified specialists. In case of doubt, consult a specialist workshop.
NOTE! Improperly carried out maintenance work can affect the warranty claim.
NOTE! Please observe the enclosed installation guide when upgrading or retrofitting kits provided by the manufacturer.
23
DEUTSC
HEN
GLISH
DMX
FRAN
CAIS
ESPAÑO
LITALIANO
POLSKI
DMX TECHNOLOGY
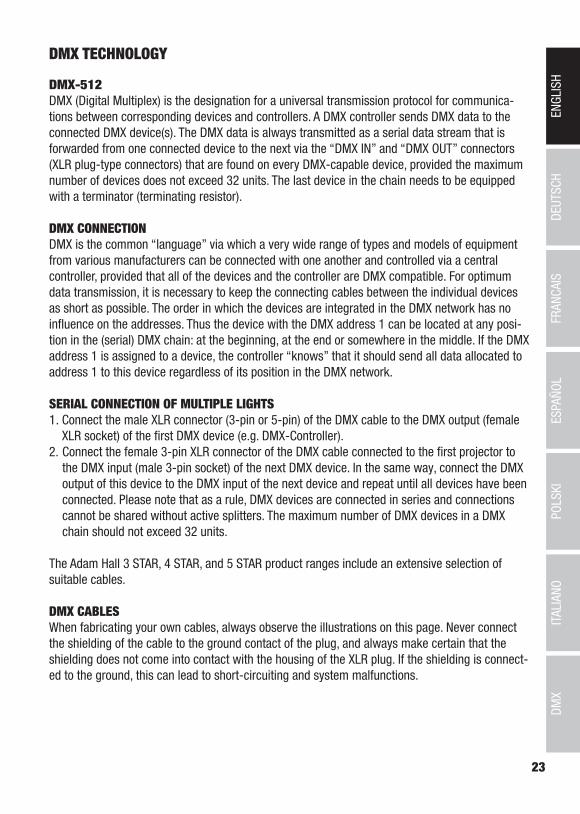
DMX-512DMX (Digital Multiplex) is the designation for a universal transmission protocol for communica-tions between corresponding devices and controllers. A DMX controller sends DMX data to the connected DMX device(s). The DMX data is always transmitted as a serial data stream that is forwarded from one connected device to the next via the “DMX IN” and “DMX OUT” connectors (XLR plug-type connectors) that are found on every DMX-capable device, provided the maximum number of devices does not exceed 32 units. The last device in the chain needs to be equipped with a terminator (terminating resistor).
DMX CONNECTIONDMX is the common “language” via which a very wide range of types and models of equipment from various manufacturers can be connected with one another and controlled via a central controller, provided that all of the devices and the controller are DMX compatible. For optimum data transmission, it is necessary to keep the connecting cables between the individual devices as short as possible. The order in which the devices are integrated in the DMX network has no influence on the addresses. Thus the device with the DMX address 1 can be located at any posi-tion in the (serial) DMX chain: at the beginning, at the end or somewhere in the middle. If the DMX address 1 is assigned to a device, the controller “knows” that it should send all data allocated to address 1 to this device regardless of its position in the DMX network.
SERIAL CONNECTION OF MULTIPLE LIGHTS1. Connect the male XLR connector (3-pin or 5-pin) of the DMX cable to the DMX output (female
XLR socket) of the first DMX device (e.g. DMX-Controller).2. Connect the female 3-pin XLR connector of the DMX cable connected to the first projector to
the DMX input (male 3-pin socket) of the next DMX device. In the same way, connect the DMX output of this device to the DMX input of the next device and repeat until all devices have been connected. Please note that as a rule, DMX devices are connected in series and connections cannot be shared without active splitters. The maximum number of DMX devices in a DMX chain should not exceed 32 units.
The Adam Hall 3 STAR, 4 STAR, and 5 STAR product ranges include an extensive selection of suitable cables.
DMX CABLESWhen fabricating your own cables, always observe the illustrations on this page. Never connect the shielding of the cable to the ground contact of the plug, and always make certain that the shielding does not come into contact with the housing of the XLR plug. If the shielding is connect-ed to the ground, this can lead to short-circuiting and system malfunctions.
24
DEUTSCHENGLISH
DMX
ITALIANOPOLSKI
ESPAÑOLFRANCAIS
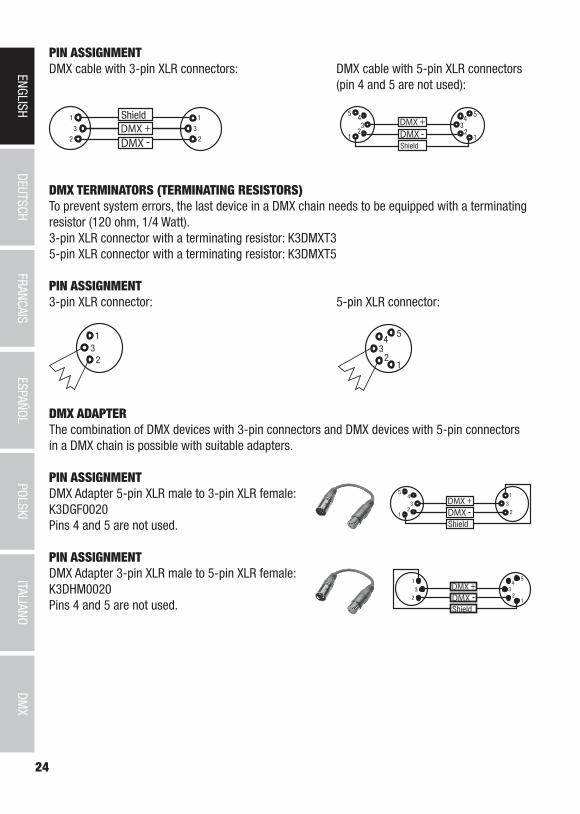
PIN ASSIGNMENTDMX cable with 3-pin XLR connectors: DMX cable with 5-pin XLR connectors (pin 4 and 5 are not used):
Shield
23
1
23
1
123
45
12
34
5
Shield
DMX TERMINATORS (TERMINATING RESISTORS)To prevent system errors, the last device in a DMX chain needs to be equipped with a terminating resistor (120 ohm, 1/4 Watt).3-pin XLR connector with a terminating resistor: K3DMXT35-pin XLR connector with a terminating resistor: K3DMXT5
PIN ASSIGNMENT3-pin XLR connector: 5-pin XLR connector:
23
1
12
34
5
DMX ADAPTERThe combination of DMX devices with 3-pin connectors and DMX devices with 5-pin connectors in a DMX chain is possible with suitable adapters.
PIN ASSIGNMENTDMX Adapter 5-pin XLR male to 3-pin XLR female: K3DGF0020Pins 4 and 5 are not used.
PIN ASSIGNMENTDMX Adapter 3-pin XLR male to 5-pin XLR female: K3DHM0020Pins 4 and 5 are not used.

25
DEUTSC
HEN
GLISH
DMX
FRAN
CAIS
ESPAÑO
LITALIANO
POLSKI
TECHNICAL SPECIFICATIONS
ARTICLE NUMBER:
CLROOTPAR4(WH) CLROOTPAR6(WH)
Product type: LED spotlight LED spotlightType: PAR spotlight PAR spotlightColor spectrum: RGBW RGBWA-UVNumber of LEDs: 7 6LED type: 4 W 12 WLED PWM fre-quency:
650 Hz, 1530 Hz, 2150 Hz, 4000 Hz (adjustable)
650 Hz, 1530 Hz, 2150 Hz, 4000 Hz (adjustable)
Beam angle (half peak angle):
36.5° (19°) 36.0° (20.5°)
DMX input: 3-pin male 3-pin maleDMX output: 3-pin female 3-pin femaleDMX modes: Without DMX delay channel:
2-channel, 4-channel 1, 4-channel 2, 5-channel, 6-channel, 9-channelWith DMX delay channel: 3-channel, 5-channel 1, 5-channel 2, 6-channel, 7-channel, 10-channel
Without DMX delay channel: 2-channel, 4-channel 1, 4-channel 2, 5-channel, 6-channel, 8-channel, 11-channelWith DMX delay channel: 3-channel, 5-channel 1, 5-channel 2, 6-channel, 7-channel, 9-channel, 12-channel
DMX functions: Dimmer, fine dimmer, strobe, red, green, blue, white, color macros, running light selection, DMX delay, sound sensitivity
Dimmer, dimmer fine, strobe, red, green, blue, white, amber, UV, color macros, running light selection, DMX delay, sound sensitivity
Controller: DMX512, IR remote control, W-DMX (via optional iDMX stick)
DMX512, IR remote control, W-DMX (via optional iDMX stick)
Stand-alone functions:
Auto programs, sound programs, static, color presets, user colors, loop function
Auto programs, sound programs, static, color presets, user colors, loop function
Operating ele-ments:
Mode, Enter, Up, Down Mode, Enter, Up, Down
Display elements: OLED display OLED displayOperating voltage:
100–240 V AC / 50–60 Hz 100–240 V AC / 50–60 Hz
Power consump-tion:
38 W 58 W
Illumination intensity (@ 1 m):
7850 lx 10700 lx
Luminous flux: 1350 lm 1800 lm

26
DEUTSCHENGLISH
DMX
ITALIANOPOLSKI
ESPAÑOLFRANCAIS
ARTICLE NUMBER:
CLROOTPAR4(WH) CLROOTPAR6(WH)
Power supply connection:
INPUT: Blue Power Twist power socket OUTPUT: White Power Twist power socket (max. 8 A)
INPUT: Blue Power Twist power socket OUTPUT: White Power Twist power socket (max. 8 A)
Electrical protec-tion class (IP):
1 1
Fuse: F3A / 250 V (5 × 20 mm) F3A / 250 V (5 × 20 mm)Ambient temperature (in operation):
0°C–40°C 0°C–40°C
Relative humidity: < 80%, non-condensing < 80%, non-condensingIP rating IP20 IP20Housing color: Black (CLROOTPAR4)
White (CLROOTPAR4WH)Black (CLROOTPAR6) White (CLROOTPAR6WH)
Housing material: ABS plastic ABS plasticHousing cooling: Convection cooling Convection coolingDimensions (W × H × D, without mounting bracket):
195 x 133 x 195 mm 195 x 133 x 195 mm
Weight (incl. mounting bracket):
1.75 kg 1.975 kg
Additional features:
Power cable included; IR remote control available as optional acces-sory (CLPFLAT1REMOTE).
Power cable included; IR remote control available as optional acces-sory (CLPFLAT1REMOTE).

27
DEUTSC
HEN
GLISH
DMX
FRAN
CAIS
ESPAÑO
LITALIANO
POLSKI
DISPOSALPackaging
1. Packaging can be recycled using the usual disposal methods. 2. Please separate packaging in accordance with the disposal laws and recycling
regulations in your country.
Device:
1. This device is subject to the European Community Directive on waste electrical and electronic equipment (WEEE) in the currently applicable version. WEEE Directive Waste Electrical and Electronic Equipment. Waste equipment does not belong in household waste. Waste equipment must be disposed by a registered waste disposal company or at a municipal disposal facility. Please observe the applicable regulations in your country!
2. Observe all waste disposal laws applicable in your country. 3. Private customers can contact the distributor/retailer from whom the product was
purchased or the relevant local authorities to obtain information on environmentally friendly waste management
MANUFACTURER’S DECLARATIONSMANUFACTURER’S WARRANTY AND LIMITATION OF LIABILITYAdam Hall GmbH, Adam-Hall-Str. 1, D-61267 Neu Anspach, Germany / Email [email protected] / +49 (0)6081 / 9419-0.Our currently valid warranty conditions and limitation of liability are available at: https://cdn-shop.adamhall.com/media/pdf/Manufacturers-Declarations-CAMEO_DE_EN_ES_FR.pdf.Please contact your distributor when servicing is required.
CE CONFORMITYAdam Hall GmbH hereby declares that this product complies with the following guidelines (where applicable): R&TTE (1999/5/EG) or RED (2014/53/EU) as of June 2017 Low-Voltage Directive (2014/35/EU) EMC Directive (2014/30/EU) RoHS (2011/65/EU) The full declaration of conformity can be found at www.adamhall.com. It can also be requested from [email protected].
SUBJECT TO PRINTING ERRORS AND MISTAKES, AS WELL AS TECHNICAL OR OTHER CHANGES!

28
DEUTSCHENGLISH
DMX
ITALIANOPOLSKI
ESPAÑOLFRANCAIS
DEUTSCH
SIE HABEN DIE RICHTIGE WAHL GETROFFEN!Dieses Gerät wurde unter hohen Qualitätsanforderungen entwickelt und gefertigt, um viele Jahre einen reibungslosen Betrieb zu gewährleisten. Bitte lesen Sie diese Bedienungsanleitung sorgfäl-tig, damit Sie Ihr neues Produkt von Cameo Light schnell und optimal einsetzen können. Weitere Informationen über Cameo Light erhalten Sie auf unserer Website WWW.CAMEOLIGHT.COM.
BESTIMMUNGSGEMÄSSER GEBRAUCH Bei dem Produkt handelt es sich um ein Gerät für die Veranstaltungstechnik!Das Produkt ist für den professionellen Einsatz im Bereich der Veranstaltungstechnik entwickelt worden und ist nicht für die Verwendung in Haushalten geeignet!Weiterhin ist dieses Produkt nur für qualifizierte Benutzer mit Fachkenntnissen im Umgang mit Veranstaltungstechnik vorgesehen!Die Benutzung des Produkts außerhalb der spezifizierten technischen Daten und Betriebs-bedingungen gilt als nicht bestimmungsgemäß!Haftung für Schäden und Drittschäden an Personen und Sachen durch nicht bestimmungs-gemäßen Gebrauch ist ausgeschlossen!
Das Produkt ist nicht geeignet für:- Personen (einschließlich Kinder) mit eingeschränkten körperlichen, sensorischen oder geistigen
Fähigkeiten oder mangelnder Erfahrung und Kenntnis. - Kinder (Kinder müssen angewiesen werden, nicht mit dem Gerät zu spielen).
SICHERHEITSHINWEISE- Um mögliche Schäden zu vermeiden, lesen und beachten Sie diese Anleitung bitte sorgfältig. - Bewahren Sie alle Informationen und Anleitungen an einem sicheren Ort auf.- Beachten Sie alle Warnhinweise. Entfernen Sie keine Sicherheitshinweise oder andere
Informationen vom Gerät.
BEGRIFFE UND SYMBOLE1. GEFAHR: Mit dem Wort GEFAHR, evtl. in Kombination mit einem Symbol, wird auf unmittelbar
gefährliche Situationen oder Zustände für Leib und Leben hingewiesen.
2. WARNUNG: Mit dem Wort WARNUNG, evtl. in Kombination mit einem Symbol, wird auf potentiell gefährliche Situationen oder Zustände für Leib und Leben hingewiesen.
3. VORSICHT: Mit dem Wort VORSICHT, evtl. in Kombination mit einem Symbol, wird auf Situationen oder Zustände hingewiesen, die zu Verletzungen führen können.
4. ACHTUNG: Mit dem Wort ACHTUNG, evtl. in Kombination mit einem Symbol, wird auf Situationen oder Zustände hingewiesen, die zu Sach- und / oder Umweltschäden führen können.

29
DEUTSC
HEN
GLISH
DMX
FRAN
CAIS
ESPAÑO
LITALIANO
POLSKI
Dieses Symbol weist auf elektrische Gefährdung hin.
Dieses Symbol weist auf allgemeine Gefährdung hin.
Dieses Symbol kennzeichnet Gefährdung durch heiße Oberflächen.
Dieses Symbol kennzeichnet Gefährdung durch intensive Lichtquellen.
Dieses Symbol kennzeichnet ergänzende Informationen zur Bedienung des Produkts.
GEFAHR:1. Öffnen Sie das Gerät nicht und verändern Sie es nicht.
2. Wenn Ihr Gerät nicht mehr ordnungsgemäß funktioniert, Flüssigkeiten oder Gegen-stände in das Geräteinnere gelangt sind, oder das Gerät anderweitig beschädigt wurde, schalten Sie es sofort aus und trennen es von der Spannungsversorgung. Dieses Gerät darf nur von autorisiertem Fachpersonal repariert werden.
3. Bei Geräten der Schutzklasse 1 muss der Schutzleiter korrekt angeschlossen werden. Unterbrechen Sie niemals den Schutzleiter. Geräte der Schutzklasse 2 haben keinen Schutzleiter.
4. Sorgen Sie dafür, dass spannungsführende Kabel nicht geknickt oder anderweitig mechanisch beschädigt werden.
5. Überbrücken Sie niemals die Gerätesicherung.
WARNUNG:1. Das Gerät darf nicht in Betrieb genommen werden, wenn es offensichtliche
Beschädigungen aufweist.
2. Das Gerät darf nur im spannungsfreien Zustand installiert werden.
3. Wenn das Netzkabel des Geräts beschädigt ist, darf das Gerät nicht in Betrieb genommen werden.
4. Fest angeschlossene Netzleitungen dürfen nur von einer qualifizierten Person ersetzt werden.
ACHTUNG:1. Nehmen Sie das Gerät nicht in Betrieb, wenn es starken Temperaturschwankungen
ausgesetzt war (beispielsweise nach dem Transport). Feuchtigkeit und Kondensat könnten das Gerät beschädigen. Schalten Sie das Gerät erst ein, wenn es Umge-bungstemperatur erreicht hat.

30
DEUTSCHENGLISH
DMX
ITALIANOPOLSKI
ESPAÑOLFRANCAIS
2. Stellen Sie sicher, dass die Spannung und die Frequenz des Stromnetzes mit den auf dem Gerät angegebenen Werten übereinstimmen. Verfügt das Gerät über einen Span-nungswahlschalter, schließen Sie das Gerät erst an, wenn dieser korrekt eingestellt ist. Nutzen sie nur geeignete Netzkabel.
3. Um das Gerät allpolig vom Netz zu trennen genügt es nicht, den Ein-/Aus-Schalter am Gerät zu betätigen.
4. Stellen Sie sicher, dass die eingesetzte Sicherung dem auf dem Gerät abgedruckten Typ entspricht.
5. Stellen Sie sicher, dass geeignete Maßnahmen gegen Überspannung (z.B. Blitzschlag) ergriffen wurden.
6. Beachten Sie den angegebenen maximalen Ausgangsstrom an Geräten mit Power Out Anschluss. Beachten Sie, dass die gesamte Stromaufnahme aller angeschlosse-nen Geräte den vorgegebenen Wert nicht überschreitet.
7. Ersetzen Sie steckbare Netzleitungen nur mit gleichwertigen Leitungen, die dem ursprünglich mitgelieferten Kabel entsprechen. Der Querschnitt darf den Querschnitt der Originalleitung nicht unterschreiten.
GEFAHR:1. Erstickungsgefahr! Kunststoffbeutel und Kleinteile müssen außer Reichweite von
Personen (einschließlich Kindern) mit eingeschränkten körperlichen, sensorischen oder geistigen Fähigkeiten aufbewahrt werden.
2. Gefahr durch Herabfallen! Stellen Sie sicher, dass das Gerät sicher installiert ist und nicht herunterfallen kann. Verwenden Sie ausschließlich geeignete Stative bzw. Be-festigungen (im Besonderen bei Festinstallationen). Stellen Sie sicher, dass Zubehör ordnungsgemäß installiert und gesichert ist. Achten sie dabei darauf, dass geltende Sicherheitsbestimmungen eingehalten werden.
WARNUNG:1. Verwenden Sie das Gerät nur in der vorgesehenen Art und Weise.
2. Betreiben Sie das Gerät nur mit dem vom Hersteller empfohlenen und vorgesehenen Zubehör.
3. Beachten Sie bei der Installation die für Ihr Land geltenden Sicherheitsvorschriften.
4. Überprüfen Sie nach dem Anschluss des Geräts alle Kabelwege, um Schäden oder Unfälle, z. B. durch Stolperfallen zu vermeiden.
5. Beachten Sie unbedingt den angegebenen Mindestabstand zu normal entflammbaren Materialien! Sofern dieser nicht explizit ausgewiesen ist, beträgt der Mindestabstand 0,3 m.
6. Beachten Sie unbedingt den auf dem Gerät abzulesenden Mindestabstand zur beleuchteten Fläche!

31
DEUTSC
HEN
GLISH
DMX
FRAN
CAIS
ESPAÑO
LITALIANO
POLSKI
VORSICHT:1. Bei beweglichen Bauteilen wie Montagebügeln, oder sonstigen beweglichen Bau-
teilen besteht die Möglichkeit sich zu klemmen.
2. Bei Geräten mit motorisch angetriebenen Bauteilen besteht Verletzungsgefahr durch die Bewegung des Gerätes. Plötzliche Gerätebewegungen können zu Schreck-reaktionen führen.
3. Die Gehäuseoberfläche des Geräts kann sich im regulären Betrieb stark erwärmen. Stellen Sie sicher, dass ein versehentliches Berühren des Gehäuses ausgeschlossen ist. Lassen Sie das Gerät vor dem Abbau, vor Wartungsarbeiten und vor dem Aufladen etc. immer ausreichend abkühlen.
ACHTUNG:1. Installieren und betreiben Sie das Gerät nicht in der Nähe von Heizkörpern, Wärme-
speichern, Öfen oder sonstigen Wärmequellen. Sorgen Sie dafür, dass das Gerät immer so installiert ist, dass es ausreichend gekühlt wird und nicht überhitzen kann.
2. Platzieren Sie keine Zündquellen wie z.B. brennende Kerzen in der Nähe des Geräts.
3. Lüftungsöffnungen dürfen nicht abgedeckt und Lüfter nicht blockiert werden.
4. Nutzen Sie zum Transport die Originalverpackung oder vom Hersteller dafür vorgese-hene Verpackungen.
5. Vermeiden Sie, dass Erschütterung oder Schläge auf das Gerät einwirken.
6. Beachten sie die IP-Schutzart, sowie die Umgebungsbedingungen wie Temperatur und Luftfeuchtigkeit entsprechend der Spezifizierung.
7. Geräte können stetig weiterentwickelt werden. Bei abweichenden Angaben zu Betriebsbedingungen, Leistung oder sonstigen Geräteeigenschaften zwischen Bedienungsanleitung und Gerätebeschriftung, hat immer die Angabe auf dem Gerät Priorität.
8. Das Gerät ist nicht für tropische Klimazonen und für den Betrieb oberhalb 2000 m über NN geeignet.
9. Das Gerät ist nicht für den Betrieb unter Marinebedingungen geeignet.
VORSICHT! WICHTIGE HINWEISE IN BEZUG AUF LICHT-PRODUKTE!
1. Blicken Sie niemals, auch nicht kurzzeitig, direkt in die Lichtquelle.
2. Blicken Sie niemals mit optischen Geräten wie Vergrößerungsgläsern in die Lichtquelle.
3. Stroboskopeffekte können bei empfindlichen Menschen epileptische Anfälle auslösen!
4. In dieser Leuchte ist ein fest installiertes Leuchtmittel verbaut, welches nicht durch den Benutzer zu tauschen ist. Im Fehlerfall wenden Sie sich bitte an Ihren Vertriebs-partner.

32
DEUTSCHENGLISH
DMX
ITALIANOPOLSKI
ESPAÑOLFRANCAIS
HINWEISE FÜR ORTSVERÄNDERLICHE OUTDOOR-GERÄTE 1. Temporärer Betrieb! Veranstaltungsequipment ist grundsätzlich nur für den
vorübergehenden Betrieb konzipiert.
2. Dauerbetrieb oder dauerhafte Installation kann zur Beeinträchtigung der Funktion und vorzeitiger Alterung der Geräte führen.
EINFÜHRUNG7 X 4W RGBW PAR SCHEINWERFERCLROOTPAR4 (schwarzes Gehäuse)CLROOTPAR4WH (weißes Gehäuse)
6 X 12W RGBWA+UV PAR SCHEINWERFERCLROOTPAR6 (schwarzes Gehäuse)CLROOTPAR6WH (weißes Gehäuse)
STEUERUNGSFUNKTIONENCLROOTPAR4DMX-Betriebsarten ohne DMX-Delay-Kanal: 2-Kanal, 4-Kanal 1, 4-Kanal 2, 5-Kanal, 6-Kanal und 9-Kanal DMX-SteuerungDMX-Betriebsarten mit DMX-Delay-Kanal: 3-Kanal, 5-Kanal 1, 5-Kanal 2, 6-Kanal, 7-Kanal und 10-Kanal DMX-SteuerungCLROOTPAR6DMX-Betriebsarten ohne DMX-Delay-Kanal: 2-Kanal, 4-Kanal 1, 4-Kanal 2, 5-Kanal, 6-Kanal, 8-Kanal und 11-Kanal DMX-SteuerungDMX-Betriebsarten mit DMX-Delay-Kanal: 3-Kanal, 5-Kanal 1, 5-Kanal 2, 6-Kanal, 7-Kanal, 9-Kanal und 12-Kanal DMX-Steuerung
Master / Slave BetriebStandalone FunktionenSteuerbar via IR-Fernbedienung (Fernbedienung optional erhältlich)W-DMX Anbindung durch optionalen iDMX Stick
EIGENSCHAFTEN3-polige DMX-Anschlüsse. Power Twist Netzanschlüsse IN und OUT. OLED-Display. PWM-Fre-quenz einstellbar. Anschluss für iDMX-Stick. Konvektionskühlung. Tilt-Schraube. Montage-Doppel-bügel inklusive. Betriebsspannung 100-240 V AC.
CLROOTPAR47 x 4 W RGBW LEDs. Leistungsaufnahme 38 W
CLROOTPAR66 x 12 W RGBWA+UV LEDs. Leistungsaufnahme 58 W

33
DEUTSC
HEN
GLISH
DMX
FRAN
CAIS
ESPAÑO
LITALIANO
POLSKI
ANSCHLÜSSE, BEDIEN- UND ANZEIGEELEMENTE
Die Modelle CLROOTPAR4 und CLROOTPAR6 verfügen über identische Anschlüsse, Bedien- und Anzeigeelemente
1 POWER INBlaue Power Twist Netzeingangsbuchse. Betriebsspannung 100 – 240V AC / 50 – 60Hz. Ein geeignetes Netzkabel mit Power Twist Gerätestecker befindet sich im Lieferumfang.
2 POWER OUTWeiße Power Twist Netzausgangsbuchse für die Spannungsversorgung weiterer Cameo Scheinwerfer (max. 8A).
3 DMX INMännliche 3-Pol XLR-Buchse zum Anschließen eines DMX-Kontrollgeräts (z.B. DMX-Pult).
4 DMX OUTWeibliche 3-Pol XLR-Buchse zum Weiterleiten des DMX-Steuersignals.
5 FUSESicherungshalter für 5 x 20mm Feinsicherungen. WICHTIGER HINWEIS: Ersetzen Sie die Sicherung ausschließlich durch eine Sicherung des gleichen Typs und mit gleichen Werten. Sollte die Siche-rung wiederholt auslösen, wenden Sie sich bitte an ein autorisiertes Servicezentrum.
6 OLED-DISPLAYDas OLED-Display zeigt die aktuell aktivierte Betriebsart (Hauptanzeige), die Menüpunkte im Auswahl-Menü und den Zahlenwert bzw. Betriebszustand in bestimmten Menüpunkten an. Erfolgt innerhalb von circa zwei Minuten keine Eingabe, wechselt die Anzeige im Display automatisch zur Hauptanzeige. Hinweis zur Hauptanzeige in den Betriebsarten mit externer Steuerung: Sobald das Steuer-Signal unterbrochen wird, beginnen die Zeichen im Display zu blinken, liegt das Steuer- Signal wieder an, stoppt das Blinken. Ausgehend von der Hauptanzeige kann die Anzeige im Display um 180° gedreht werden, indem Sie kurz auf den Taster UP drücken.
1
4 3
2

34
DEUTSCHENGLISH
DMX
ITALIANOPOLSKI
ESPAÑOLFRANCAIS
MIC
5
6
7
11
89
10
10
10
10
12 12
Die Modelle CLROOTPAR4 und CLROOTPAR6 verfügen über identische Anschlüsse, Bedien- und Anzeigeelemente
7 BEDIENTASTENMODE - Durch Drücken auf MODE gelangen Sie in das Auswahlmenü. Durch wiederholtes Drücken gelangen Sie zurück zur Hauptanzeige. Wenn Sie auf MODE drücken, ohne eine Wert- bzw. Statusänderung durch Drücken auf ENTER zu bestätigen, wird der zuvor bestätigte Wert bzw. Status wiederhergestellt.ENTER - Durch Drücken auf ENTER gelangen Sie auf die Menüebene, auf der Wertänderungen vorgenommen werden können und Sie erreichen die Untermenüs mit Hilfe des ENTER-Tasters. Wert- bzw. Statusänderungen bestätigen Sie ebenfalls durch Drücken auf ENTER.UP und DOWN - Auswählen der einzelnen Menüpunkte im Auswahl-Menü (DMX-Adresse, Betriebsart usw.) und in den Untermenüs ermöglichen es, den Wert in einem Menü-Punkt, wie z.B. die DMX-Adresse, wunschgemäß zu verändern.
8 MICMikrofon für die Betriebsart Musiksteuerung.
9 TILTRändelschraube für die Tilt-Funktion bei der Uplight-Anwendung. Für eine dezentere Optik kann der Montage-Doppelbügel demontiert werden.

35
DEUTSC
HEN
GLISH
DMX
FRAN
CAIS
ESPAÑO
LITALIANO
POLSKI
10 GUMMIFÜSSEVier Gummifüße für sicheren Stand.
11 SICHERUNGSÖSESicherungsöse zum Sichern des Scheinwerfers bei der Traversenmontage.
12 GRIFFSCHRAUBENDie beiden Griffschrauben dienen der Verstellung und Fixierung des Stand- bzw. Montagebügels.
ANSCHLUSS FÜR W-DMX™ ANBINDUNGDer USB-A Anschluss für den optionalen iDMX-Stick befindet sich auf der dem Anschlussfeld gegenüberliegenden Seite des Scheinwerfers.
BEDIENUNGANMERKUNGEN• Sobald der Scheinwerfer korrekt am Stromnetz angeschlossen ist, wird während des Startvor-
gangs nacheinander „Welcome to Cameo“, die Modellbezeichnung und die Softwareversion im Display angezeigt. Nach diesem Vorgang ist der Scheinwerfer betriebsbereit und startet in der Betriebsart, die zuvor aktiviert war.
• Um von den unteren Menüebenen direkt zur Hauptanzeige zu gelangen, halten Sie den Taster MODE für circa 2 Sekunden gedrückt. Die Hauptanzeige wird automatisch aktiviert, wenn inner-halb von circa zwei Minuten keine Eingabe erfolgt. Um in den Untermenüs eine Ebene höher zu gelangen, drücken Sie kurz auf MODE.
• Um direkt zum zuletzt bearbeiteten Menüpunkt zu gelangen, drücken Sie kurz gleichzeitig auf MODE und ENTER.
• Ausgehend von der Hauptanzeige kann die Anzeige im Display um 180° gedreht werden, indem Sie kurz auf den Taster UP drücken.
• Zum schnellen Ändern eines Werts (z.B. DMX Startadresse), halten Sie Taster UP bzw. DOWN gedrückt.
HAUPTANZEIGE DMX-BETRIEBSARTIm Display wird DMX Address und die aktuell eingestellte DMX-Startadresse angezeigt (im Bei-spiel 001). Falls DMX-Delay aktiviert ist, wird auch die Delay-Gruppe und die Delay-Zeit angezeigt.
HAUPTANZEIGE STAND-ALONE-BETRIEBSARTIm Display wird die aktuell aktivierte Stand-Alone-Betriebsart angezeigt (Mode Auto, Mode Sound, Mode Static, Mode Color Preset, Mode User Color, Mode Loop).
36
DEUTSCHENGLISH
DMX
ITALIANOPOLSKI
ESPAÑOLFRANCAIS
ModeAuto
ModeSound
ModeStatic
ModeColor Preset
ModeUser Color
ModeLoop
HAUPTANZEIGE SLAVE-BETRIEBIm Display wird Mode Slave angezeigt. Falls die Slave-Einheit einer Slave-Gruppe zugeornet ist, wird auch die Slave-Gruppe und die in der Master-Einheit in den Stand-Alone-Betriebsarten Auto und Loop eingestellte Delay-Zeit angezeigt.
ModeSlave
Gr 1 2.0s
DMX-STARTADRESSE EINSTELLENDurch Drücken auf MODE gelangen Sie in das Hauptmenü. Mit Hilfe der Taster UP und DOWN wählen Sie nun den Menüpunkt DMX Address aus und bestätigen mit ENTER. Nun können Sie die DMX-Startadresse wunschgemäß mit Hilfe von UP und DOWN einstellen. Bestätigen Sie die Eingabe mit ENTER und drücken 1x auf MODE, um zur Hauptanzeige zurückzugelangen. Die Hauptanzeige wird automatisch aktiviert, wenn innerhalb von circa zwei Minuten keine Eingabe erfolgt.
--------Menu-------DMX AddressDMX ModeDMX DelayStand AloneSlaveSettingsSystem Info
----DMX Address----DMX AddressDMX ModeDMX Delay
001 - 512
DMX-BETRIEBSART EINSTELLENDurch Drücken auf MODE gelangen Sie in das Hauptmenü. Mit Hilfe der Taster UP und DOWN wählen Sie nun den Menüpunkt DMX Mode aus und bestätigen mit ENTER. Wählen Sie wieder-um mit Hilfe von UP und DOWN die gewünschte DMX-Betriebsart aus und bestätigen mit ENTER (DMX-Betriebsarten mit DMX-Delay-Kanal sind mit „D“ gekennzeichnet). Drücken Sie 1x auf MODE, um zur Hauptanzeige zurückzugelangen. Die Hauptanzeige wird automatisch aktiviert, wenn innerhalb von circa zwei Minuten keine Eingabe erfolgt. Tabellen mit der Kanalbelegung der verschiedenen DMX-Betriebsarten finden Sie in dieser Anleitung unter DMX STEUERUNG.
--------Menu-------DMX AddressDMX ModeDMX DelayStand AloneSlaveSettingsSystem Info
----DMX Address----DMX AddressDMX ModeDMX Delay
001 - 512001 - 512001 - 5122CH4CH14CH25CH6CH9CH
D3CHD5CH1D5CH2D6CHD7CH
D10CH
CLROOTPAR4
----DMX Address----DMX AddressDMX ModeDMX Delay
001 - 512001 - 512001 - 5122CH4CH14CH25CH6CH8CH
11CH
D3CHD5CH1D5CH2D6CHD7CHD9CH
D12CH
CLROOTPAR6

37
DEUTSC
HEN
GLISH
DMX
FRAN
CAIS
ESPAÑO
LITALIANO
POLSKI
DMX DELAYMit Hilfe der Funktion DMX-Delay kann auf einfache Weise mit einer beliebig großen Anzahl Scheinwerfern des gleichen Modells und Softwarestands ein Lauflichteffekt realisiert werden, der sonst nur mit einem geeigneten DMX-Controller und aufwändiger Programmierung erreicht werden könnte. Dabei werden alle einbezogenen Scheinwerfer auf die gleiche DMX-Betriebsart eingestellt und auf der gleichen DMX-Startadresse angesteuert.
Manuelles Einstellen des DMX-Delays bei DMX-Betriebsarten ohne DMX-Delay-Kanal:Ausgehend von der Hauptanzeige gelangen Sie durch Drücken auf MENU in das Hauptmenü. Mit Hilfe der Taster und wählen Sie nun den Menüpunkt DMX Delay aus und bestätigen mit ENTER. Wählen Sie wiederum mit Hilfe von und den gewünschten Untermenüpunkt aus, bestätigen mit ENTER und stellen den entsprechenden Wert nach Wunsch ein. Bestätigen Sie alle Eingaben mit ENTER.
Ordnen Sie die Scheinwerfer nach Wunsch einer von bis zu 47 Gruppen zu (maximale Gruppen-anzahl abhängig von der aktivierten DMX-Betriebsart), wobei auch mehrere Scheinwerfer einer Gruppe zugeordnet werden können. Die Gruppennummer ist gleichzeitig der Faktor, mit dem die eingestellte Delay-Zeit multipliziert wird.
Die Delay-Zeit (Verzögerungszeit des DMX-Signals) kann manuell an jedem Scheinwerfer separat mit unterschiedlichen Werten eingestellt werden (0.0s bis 2.0s in 0.1s Schritten).
Setup-Beispiel:
Einstellen des DMX-Delays bei DMX-Betriebsarten mit DMX-Delay-Kanal:Ausgehend von der Hauptanzeige gelangen Sie durch Drücken auf MENU in das Hauptmenü. Mit Hilfe der Taster und wählen Sie nun den Menüpunkt DMX Delay aus und bestätigen 2x mit ENTER.
Ordnen Sie die Scheinwerfer nach Wunsch einer von bis zu 47 Gruppen zu (maximale Gruppen-anzahl abhängig von der aktivierten DMX-Betriebsart), wobei auch mehrere Scheinwerfer einer Gruppe zugeordnet werden können. Die Gruppennummer ist gleichzeitig der Faktor, mit dem die
38
DEUTSCHENGLISH
DMX
ITALIANOPOLSKI
ESPAÑOLFRANCAIS
eingestellte Delay-Zeit multipliziert wird. Bestätigen Sie jede Eingabe mit ENTER.
Die Delay-Zeit (Verzögerungszeit des DMX-Signals) wird mit Hilfe eines DMX-Controllers im separaten DMX-Delay-Kanal der entsprechenden DMX-Betriebsart eingestellt (0.0s bis 2.0s in 0.1s Schritten).
Setup-Beispiel:
STAND-ALONE-BETRIEBSART AUTO / SOUNDDie 6 verfügbaren Auto-Programme bestehen jeweils aus fest programmierten Farbwechselse-quenzen, Helligkeit, Laufgeschwindigkeit, Musiksteuerung mit Mikrofonempfindlichkeit und Delay (Signalverzögerung) sind für jedes Programm separat einstellbar.Ausgehend von der Hauptanzeige gelangen Sie durch Drücken auf MODE in das Hauptmenü. Mit Hilfe der Taster UP und DOWN wählen Sie nun den Menüpunkt Stand Alone aus und bestätigen mit ENTER. Wählen Sie wiederum mit Hilfe von UP und DOWN die Stand-Alone-Betriebsart Auto aus und bestätigen mit ENTER. Nun bestimmen Sie mit Hilfe von UP und DOWN das gewünschte Programm (Program 1 - Program 6) und bestätigen mit ENTER.
--------Menu-------DMX AddressDMX ModeDMX DelayStand AloneSlaveSettingsSystem Info
----Stand Alone----AutoStaticColor PresetUser ColorLoop
-----Program x-----DimmerSpeedSoundSensDelay
----Auto Mode----Program 1 |Program 6
0 - 1000 - 100
Off / On0 - 100
0.0s - 2.0s
Daraufhin gelangen Sie in das Untermenü zum Einstellen der Untermenüpunkte (siehe Tabelle, Auswahl mit UP und DOWN, bestätigen mit ENTER, Wert bzw. Status ändern mit UP und DOWN, bestätigen mit ENTER). Die Einstellungen werden für jedes Programm separat vorgenommen und bleiben auch nach einem Neustart des Geräts erhalten.
39
DEUTSC
HEN
GLISH
DMX
FRAN
CAIS
ESPAÑO
LITALIANO
POLSKI
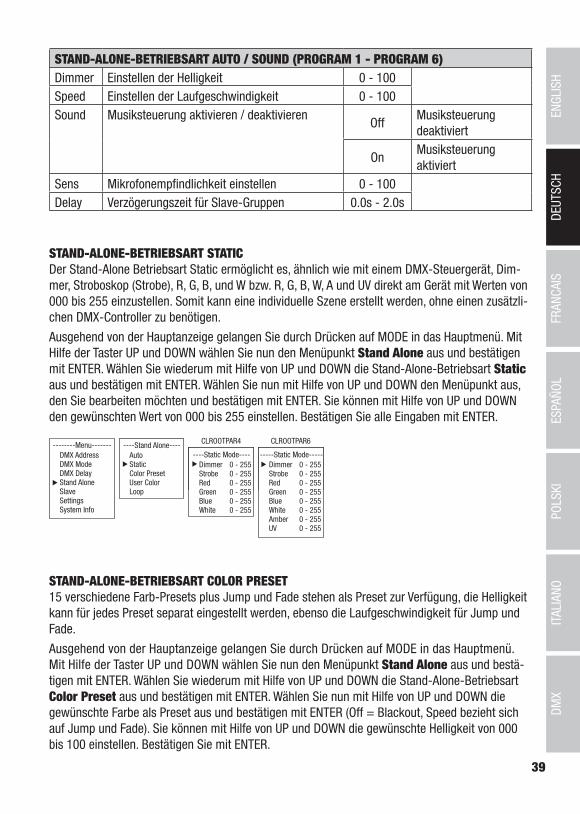
STAND-ALONE-BETRIEBSART AUTO / SOUND (PROGRAM 1 - PROGRAM 6)Dimmer Einstellen der Helligkeit 0 - 100Speed Einstellen der Laufgeschwindigkeit 0 - 100Sound Musiksteuerung aktivieren / deaktivieren
OffMusiksteuerung deaktiviert
OnMusiksteuerung aktiviert
Sens Mikrofonempfindlichkeit einstellen 0 - 100Delay Verzögerungszeit für Slave-Gruppen 0.0s - 2.0s
STAND-ALONE-BETRIEBSART STATICDer Stand-Alone Betriebsart Static ermöglicht es, ähnlich wie mit einem DMX-Steuergerät, Dim-mer, Stroboskop (Strobe), R, G, B, und W bzw. R, G, B, W, A und UV direkt am Gerät mit Werten von 000 bis 255 einzustellen. Somit kann eine individuelle Szene erstellt werden, ohne einen zusätzli-chen DMX-Controller zu benötigen.
Ausgehend von der Hauptanzeige gelangen Sie durch Drücken auf MODE in das Hauptmenü. Mit Hilfe der Taster UP und DOWN wählen Sie nun den Menüpunkt Stand Alone aus und bestätigen mit ENTER. Wählen Sie wiederum mit Hilfe von UP und DOWN die Stand-Alone-Betriebsart Static aus und bestätigen mit ENTER. Wählen Sie nun mit Hilfe von UP und DOWN den Menüpunkt aus, den Sie bearbeiten möchten und bestätigen mit ENTER. Sie können mit Hilfe von UP und DOWN den gewünschten Wert von 000 bis 255 einstellen. Bestätigen Sie alle Eingaben mit ENTER.
--------Menu-------DMX AddressDMX ModeDMX DelayStand AloneSlaveSettingsSystem Info
----Stand Alone----AutoStaticColor PresetUser ColorLoop
-----Static Mode-----DimmerStrobeRedGreenBlueWhiteAmberUV
----Static Mode----DimmerStrobeRedGreenBlueWhite
0 - 2550 - 2550 - 2550 - 2550 - 2550 - 255
CLROOTPAR4 CLROOTPAR6
0 - 2550 - 2550 - 2550 - 2550 - 2550 - 2550 - 2550 - 255
STAND-ALONE-BETRIEBSART COLOR PRESET15 verschiedene Farb-Presets plus Jump und Fade stehen als Preset zur Verfügung, die Helligkeit kann für jedes Preset separat eingestellt werden, ebenso die Laufgeschwindigkeit für Jump und Fade.
Ausgehend von der Hauptanzeige gelangen Sie durch Drücken auf MODE in das Hauptmenü. Mit Hilfe der Taster UP und DOWN wählen Sie nun den Menüpunkt Stand Alone aus und bestä-tigen mit ENTER. Wählen Sie wiederum mit Hilfe von UP und DOWN die Stand-Alone-Betriebsart Color Preset aus und bestätigen mit ENTER. Wählen Sie nun mit Hilfe von UP und DOWN die gewünschte Farbe als Preset aus und bestätigen mit ENTER (Off = Blackout, Speed bezieht sich auf Jump und Fade). Sie können mit Hilfe von UP und DOWN die gewünschte Helligkeit von 000 bis 100 einstellen. Bestätigen Sie mit ENTER.
40
DEUTSCHENGLISH
DMX
ITALIANOPOLSKI
ESPAÑOLFRANCAIS
--------Menu-------DMX AddressDMX ModeDMX DelayStand AloneSlaveSettingsSystem Info
----Stand Alone----AutoStaticColor PresetUser ColorLoop
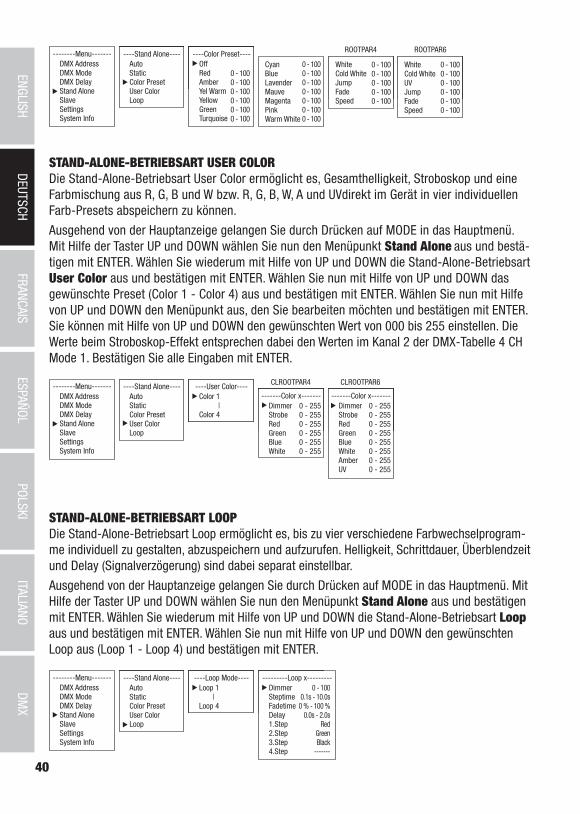
----Color Preset----OffRedAmberYel WarmYellowGreenTurquoise
WhiteCold WhiteUVJumpFadeSpeed
0 - 100 0 - 1000 - 1000 - 1000 - 1000 - 100
ROOTPAR6
WhiteCold WhiteJumpFadeSpeed
ROOTPAR4
0 - 100 0 - 1000 - 1000 - 1000 - 100
0 - 100 0 - 1000 - 1000 - 1000 - 1000 - 100
CyanBlueLavenderMauveMagentaPinkWarm White
0 - 100 0 - 1000 - 1000 - 1000 - 1000 - 1000 - 100
STAND-ALONE-BETRIEBSART USER COLORDie Stand-Alone-Betriebsart User Color ermöglicht es, Gesamthelligkeit, Stroboskop und eine Farbmischung aus R, G, B und W bzw. R, G, B, W, A und UVdirekt im Gerät in vier individuellen Farb-Presets abspeichern zu können.
Ausgehend von der Hauptanzeige gelangen Sie durch Drücken auf MODE in das Hauptmenü. Mit Hilfe der Taster UP und DOWN wählen Sie nun den Menüpunkt Stand Alone aus und bestä-tigen mit ENTER. Wählen Sie wiederum mit Hilfe von UP und DOWN die Stand-Alone-Betriebsart User Color aus und bestätigen mit ENTER. Wählen Sie nun mit Hilfe von UP und DOWN das gewünschte Preset (Color 1 - Color 4) aus und bestätigen mit ENTER. Wählen Sie nun mit Hilfe von UP und DOWN den Menüpunkt aus, den Sie bearbeiten möchten und bestätigen mit ENTER. Sie können mit Hilfe von UP und DOWN den gewünschten Wert von 000 bis 255 einstellen. Die Werte beim Stroboskop-Effekt entsprechen dabei den Werten im Kanal 2 der DMX-Tabelle 4 CH Mode 1. Bestätigen Sie alle Eingaben mit ENTER.
--------Menu-------DMX AddressDMX ModeDMX DelayStand AloneSlaveSettingsSystem Info
----Stand Alone----AutoStaticColor PresetUser ColorLoop
-------Color x-------DimmerStrobeRedGreenBlueWhiteAmberUV
-------Color x-------DimmerStrobeRedGreenBlueWhite
0 - 2550 - 2550 - 2550 - 2550 - 2550 - 255
CLROOTPAR4 CLROOTPAR6
0 - 2550 - 2550 - 2550 - 2550 - 2550 - 2550 - 2550 - 255
----User Color----Color 1 |Color 4
STAND-ALONE-BETRIEBSART LOOPDie Stand-Alone-Betriebsart Loop ermöglicht es, bis zu vier verschiedene Farbwechselprogram-me individuell zu gestalten, abzuspeichern und aufzurufen. Helligkeit, Schrittdauer, Überblendzeit und Delay (Signalverzögerung) sind dabei separat einstellbar.
Ausgehend von der Hauptanzeige gelangen Sie durch Drücken auf MODE in das Hauptmenü. Mit Hilfe der Taster UP und DOWN wählen Sie nun den Menüpunkt Stand Alone aus und bestätigen mit ENTER. Wählen Sie wiederum mit Hilfe von UP und DOWN die Stand-Alone-Betriebsart Loop aus und bestätigen mit ENTER. Wählen Sie nun mit Hilfe von UP und DOWN den gewünschten Loop aus (Loop 1 - Loop 4) und bestätigen mit ENTER.
--------Menu-------DMX AddressDMX ModeDMX DelayStand AloneSlaveSettingsSystem Info
----Stand Alone----AutoStaticColor PresetUser ColorLoop
----Loop Mode----Loop 1 |Loop 4
---------Loop x---------DimmerSteptimeFadetimeDelay1.Step2.Step3.Step4.Step
0 - 1000.1s - 10.0s
0 % - 100 %0.0s - 2.0s
RedGreenBlack
-------
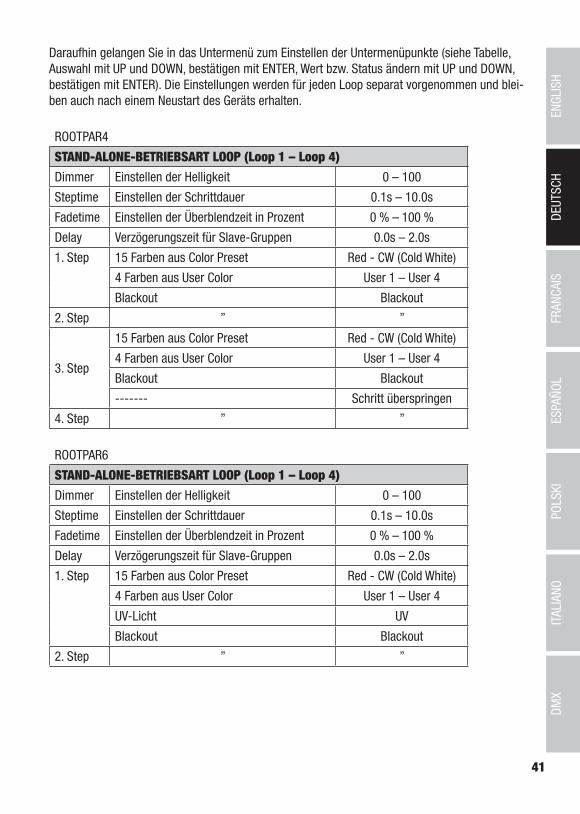
41
DEUTSC
HEN
GLISH
DMX
FRAN
CAIS
ESPAÑO
LITALIANO
POLSKI
Daraufhin gelangen Sie in das Untermenü zum Einstellen der Untermenüpunkte (siehe Tabelle, Auswahl mit UP und DOWN, bestätigen mit ENTER, Wert bzw. Status ändern mit UP und DOWN, bestätigen mit ENTER). Die Einstellungen werden für jeden Loop separat vorgenommen und blei-ben auch nach einem Neustart des Geräts erhalten.
ROOTPAR4
STAND-ALONE-BETRIEBSART LOOP (Loop 1 – Loop 4)
Dimmer Einstellen der Helligkeit 0 – 100
Steptime Einstellen der Schrittdauer 0.1s – 10.0s
Fadetime Einstellen der Überblendzeit in Prozent 0 % – 100 %
Delay Verzögerungszeit für Slave-Gruppen 0.0s – 2.0s
1. Step 15 Farben aus Color Preset Red - CW (Cold White)
4 Farben aus User Color User 1 – User 4
Blackout Blackout
2. Step ” ”
3. Step
15 Farben aus Color Preset Red - CW (Cold White)
4 Farben aus User Color User 1 – User 4
Blackout Blackout
------- Schritt überspringen
4. Step ” ”
ROOTPAR6
STAND-ALONE-BETRIEBSART LOOP (Loop 1 – Loop 4)
Dimmer Einstellen der Helligkeit 0 – 100
Steptime Einstellen der Schrittdauer 0.1s – 10.0s
Fadetime Einstellen der Überblendzeit in Prozent 0 % – 100 %
Delay Verzögerungszeit für Slave-Gruppen 0.0s – 2.0s
1. Step 15 Farben aus Color Preset Red - CW (Cold White)
4 Farben aus User Color User 1 – User 4
UV-Licht UV
Blackout Blackout
2. Step ” ”

42
DEUTSCHENGLISH
DMX
ITALIANOPOLSKI
ESPAÑOLFRANCAIS
3. Step 15 Farben aus Color Preset Red - CW (Cold White)
4 Farben aus User Color User 1 – User 4
UV-Licht UV
Blackout Blackout
------- Schritt überspringen
4. Step ” ”
SLAVE-BETRIEBStandard Slave-Betrieb: Ausgehend von der Hauptanzeige gelangen Sie durch Drücken auf MODE in das Hauptmenü. Mit Hilfe der Taster UP und DOWN wählen Sie nun den Menüpunkt Slave aus, bestätigen mit ENTER, wählen dann die Slave-Gruppe 0 (Slave Group 0) aus und bestätigen wiederum mit ENTER. Verbinden Sie die Slave- und die Master-Einheit (gleiches Modell, gleicher Softwarestand) mit Hilfe eines DMX-Kabels und aktivieren Sie in der Master- Einheit eine der Stand-Alone Betriebsarten (Auto, Static, Color Preset, User Color, Loop). Nun folgt die Slave-Einheit exakt der Master-Einheit.
--------Menu-------DMX AddressDMX ModeDMX DelayStand AloneSlaveSettingsSystem Info
----Slave Group----Stand AloneSlaveSettings
Mode Slave0
Hauptanzeige
Erweiterter Slave-Betrieb: Wenn Sie beim Master / Slave-Betrieb die Steuerung der Slave-Einheiten durch eine der Stand-Alone-Betriebsarten Auto oder Loop durchführen möchten, kann das Steuersignal in bis zu 15 Stufen (ROOTPAR4: Slave Group 1 – 15, ROOTPAR6: 1 – 13) zeitlich verzögert wiedergegeben werden, die Verzögerung wird im Untermenü-punkt Delay in der jeweiligen Stand-Alone-Betriebsart eingestellt, der Verzögerungsfaktor im Slave-Menü des entsprechenden Scheinwerfers. Somit kann auf einfache Weise mit einer beliebig großen Anzahl Scheinwerfern des gleichen Modells und Softwarestands ein Lauflichteffekt realisiert werden, der sonst nur mit einem geeigneten DMX-Controller und aufwändiger Pro-grammierung erreicht werden könnte.
--------Menu-------DMX AddressDMX ModeDMX DelayStand AloneSlaveSettingsSystem Info
----Slave Group----Stand AloneSlaveSettings
----Slave Group----Stand AloneSlaveSettings
ModeSlaveGr 1 2.0s
CLROOTPAR4 CLROOTPAR6
1 - 15 1 - 13
Hauptanzeige mit Gruppennummer und Delay-Zeit in der
Master-Einheit
Ordnen Sie die Scheinwerfer nach Wunsch einer von bis zu 15 Gruppen zu (ROOTPAR4: Slave Group 1 – 15, ROOTPAR6: 1 – 13), wobei auch mehrere Scheinwerfer einer Gruppe zugeordnet

43
DEUTSC
HEN
GLISH
DMX
FRAN
CAIS
ESPAÑO
LITALIANO
POLSKI
werden können. Die Gruppennummer ist gleichzeitig der Faktor, mit dem die in der Master-Einheit eingestellte Delay-Zeit multipliziert wird (siehe Setup-Beispiel).
Mode Slave
Master-EinheitAuto Program 1
Delay 0.5s
Slave Group 0kein Delay
Slave Group 10.5s Delay
Slave Group 21s Delay
Slave Group 31.5s Delay
Slave Group 42s Delay
Slave Group 52.5s Delay
Gr 1 0.5s Gr 2 0.5s Gr 3 0.5s
Gr 3 0.5s
Gr 3 0.5s
Gr 4 0.5s Gr 5 0.5s
Mode Slave
Mode Slave
Mode Slave
Mode Slave
Mode Slave
Mode Slave
Mode Slave
SYTEMEINSTELLUNGEN (Settings)Ausgehend von der Hauptanzeige gelangen Sie durch Drücken auf MODE in das Hauptmenü. Mit Hilfe der Bedienfelder UP und DOWN wählen Sie nun den Menüpunkt Settings aus und bestäti-gen mit ENTER.
--------Menu-------DMX AddressDMX ModeDMX DelayStand AloneSlaveSettingsSystem Info
Daraufhin gelangen Sie in das Untermenü zum Einstellen der Untermenüpunkte (siehe Tabelle, Auswahl mit UP und DOWN, bestätigen mit ENTER, Wert bzw. Status ändern mit UP und DOWN, bestätigen mit ENTER).
Settings
Disp Rev = Display-Anzeige drehen
No Keine Drehung der Display-Anzeige
Yes Drehung der Display-Anzeige um 180° (z.B. Kopfübermontage)
Disp Back = Display-Beleuch-tung
Off Deaktivierung nach ca. 30 Sekunden Inaktivität
On Permanent an
Sig Fail = Betriebszustand bei DMX-Signal- Unterbrechung
Hold letzter Befehl wird gehalten
Black aktiviert Blackout
User 1 User Color 1 wird aktiviert
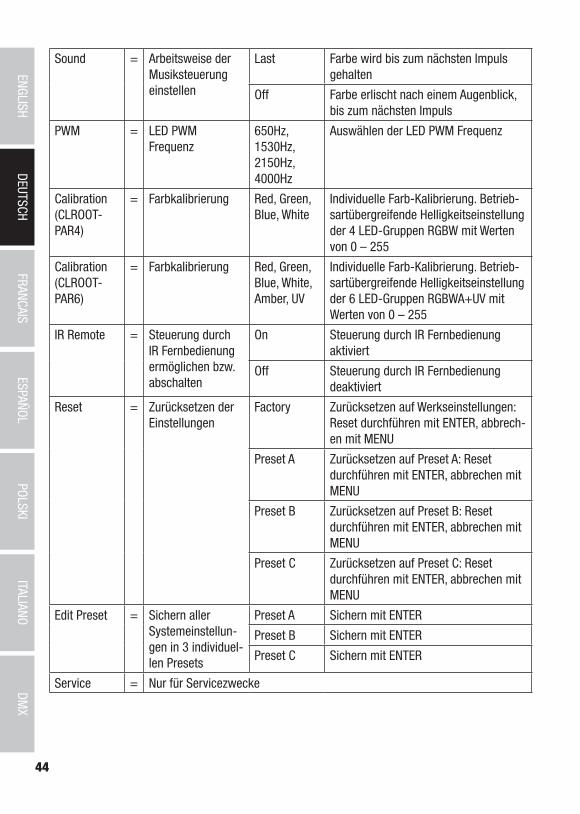
44
DEUTSCHENGLISH
DMX
ITALIANOPOLSKI
ESPAÑOLFRANCAIS
Sound = Arbeitsweise der Musiksteuerung einstellen
Last Farbe wird bis zum nächsten Impuls gehalten
Off Farbe erlischt nach einem Augenblick, bis zum nächsten Impuls
PWM = LED PWM Frequenz
650Hz, 1530Hz, 2150Hz, 4000Hz
Auswählen der LED PWM Frequenz
Calibration (CLROOT-PAR4)
= Farbkalibrierung Red, Green, Blue, White
Individuelle Farb-Kalibrierung. Betrieb-sartübergreifende Helligkeitseinstellung der 4 LED-Gruppen RGBW mit Werten von 0 – 255
Calibration (CLROOT-PAR6)
= Farbkalibrierung Red, Green, Blue, White, Amber, UV
Individuelle Farb-Kalibrierung. Betrieb-sartübergreifende Helligkeitseinstellung der 6 LED-Gruppen RGBWA+UV mit Werten von 0 – 255
IR Remote = Steuerung durch IR Fernbedienung ermöglichen bzw. abschalten
On Steuerung durch IR Fernbedienung aktiviert
Off Steuerung durch IR Fernbedienung deaktiviert
Reset = Zurücksetzen der Einstellungen
Factory Zurücksetzen auf Werkseinstellungen: Reset durchführen mit ENTER, abbrech-en mit MENU
Preset A Zurücksetzen auf Preset A: Reset durchführen mit ENTER, abbrechen mit MENU
Preset B Zurücksetzen auf Preset B: Reset durchführen mit ENTER, abbrechen mit MENU
Preset C Zurücksetzen auf Preset C: Reset durchführen mit ENTER, abbrechen mit MENU
Edit Preset = Sichern aller Systemeinstellun-gen in 3 individuel-len Presets
Preset A Sichern mit ENTER
Preset B Sichern mit ENTER
Preset C Sichern mit ENTER
Service = Nur für Servicezwecke
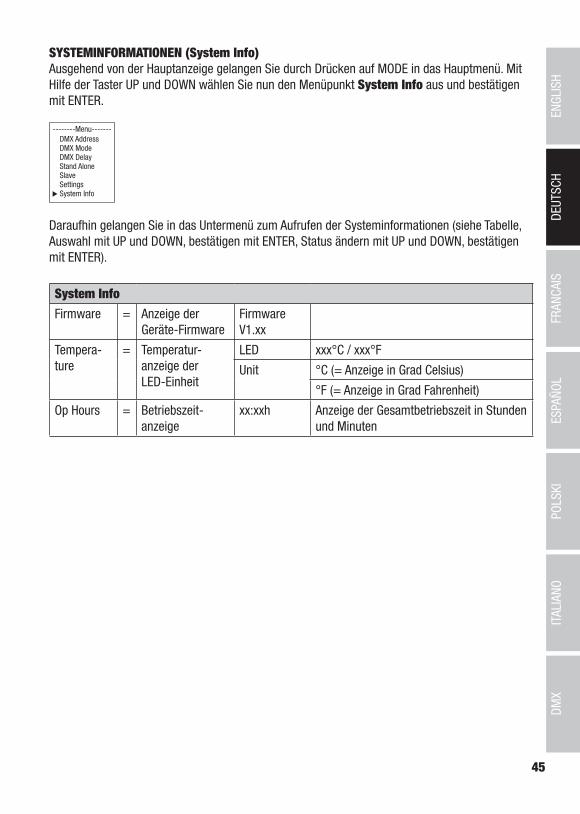
45
DEUTSC
HEN
GLISH
DMX
FRAN
CAIS
ESPAÑO
LITALIANO
POLSKI
SYSTEMINFORMATIONEN (System Info)Ausgehend von der Hauptanzeige gelangen Sie durch Drücken auf MODE in das Hauptmenü. Mit Hilfe der Taster UP und DOWN wählen Sie nun den Menüpunkt System Info aus und bestätigen mit ENTER.
--------Menu-------DMX AddressDMX ModeDMX DelayStand AloneSlaveSettingsSystem Info
Daraufhin gelangen Sie in das Untermenü zum Aufrufen der Systeminformationen (siehe Tabelle, Auswahl mit UP und DOWN, bestätigen mit ENTER, Status ändern mit UP und DOWN, bestätigen mit ENTER).
System Info
Firmware = Anzeige der Geräte-Firmware
Firmware V1.xx
Tempera-ture
= Temperatur-anzeige der LED-Einheit
LED xxx°C / xxx°F
Unit °C (= Anzeige in Grad Celsius)
°F (= Anzeige in Grad Fahrenheit)
Op Hours = Betriebszeit-anzeige
xx:xxh Anzeige der Gesamtbetriebszeit in Stunden und Minuten

46
DEUTSCHENGLISH
DMX
ITALIANOPOLSKI
ESPAÑOLFRANCAIS
IR FERNBEDIENUNG (optional)Richten Sie die Infrarot-Fernbedienung in Sichtverbindung direkt auf den auf der Vorderseite des Scheinwerfers verbauten Infrarot-Sensor. Die maximale Reichweite beträgt circa 8 Meter. In der DMX- und der Slave-Betriebsart ist der Sensor des Scheinwerfers deaktiviert. Die Infrarot-Fern-bedienung kontrolliert direkt die internen Stand-Alone-Be-triebsarten Auto / Sound, Static und Color Preset.
BL / ON/OFF (Blackout)Drücken Sie auf die Taste BL, um alle LEDs abzuschalten (Blackout), unabhängig davon, welche von der Fernbe-dienung kontrollierten Betriebsart aktiviert ist. Bei noch-maligem Drücken der BL-Taste wird die zuvor ausgewählte Betriebsart wieder aktiviert.
SP (Speed)6-stufige Geschwindigkeitseinstellung für die Farbwech-selprogramme Color Jumping (Ju), Color Fading (Fa) und Auto Program (Au). Stufe 1 lässt die Farbwechselsequenz langsam ablaufen, nochmaliges Drücken aktiviert Stufe 2 mit einer schnelle-ren Farbwechselsequenz, gefolgt von Stufe 3, 4, 5 und 6 wobei Stufe 6 die schnellste Abfolge der Farbwechselsequenz bedeutet.
(Brightness)Einstellen der Gesamthelligkeit in 6 Stufen. Die unterschiedlichen Helligkeitsabstufungen können durch mehrmaliges Drücken dieser Taste abgerufen werden (Stufe 1 = Blackout).
FL (Flash / Stroboskop)Geschwindigkeitseinstellung für den Stroboskopeffekt in 6 Stufen. Stufe 1 deaktiviert den Strobo-skopeffekt, Stufe 2 erzeugt eine langsame Frequenz gefolgt von Stufe 3 bis 5. Stufe 6 erzeugt die schnellste Blitzfrequenz. Der Stroboskopeffekt ist ausschließlich im Farbmischungsmodus RGBW(A+UV) anwendbar.
R / G / B / W (A und UV nur Modell CLROOTPAR6, CW und WW ohne Funktion)Mit Hilfe dieser 4 (6) Tasten können individuelle Farbmischungen erstellt werden. Die 6 Hellig-keitsstufen werden durch mehrmaliges Drücken der jeweiligen Farbtaste abgerufen, wobei bei Stufe 1 die LEDs abgeschaltet sind. Beispiel: Stellen Sie Rot und Grün auf die jeweilig höchste Stufe und die übrigen LEDs auf die niedrigste, also aus, erhalten Sie als Farbmischung ein helles Gelb.
Ju (Farbwechsel)Der Farbwechsel geschieht sprunghaft (Color Jumping). Die Geschwindigkeit, mit der die Farben wechseln, kann mit Hilfe der SP-Taste (Speed) eingestellt werden.

47
DEUTSC
HEN
GLISH
DMX
FRAN
CAIS
ESPAÑO
LITALIANO
POLSKI
Fa (Farbüberblenden)Farben werden ineinander übergeblendet (Color Fading). Die Geschwindigkeit, mit der die Farben wechseln, kann mit Hilfe der SP-Taste (Speed) eingestellt werden.
Au (Automatik-Modus)Wählen Sie das gewünschte Farbwechselprogramm Auto 1 – 6 durch wiederholtes Drücken auf die Taste Au aus.
Su (musikgesteuerte Farbwechselprogramme)Wählen Sie eines der 6 musikgesteuerten Programme Sound 1 – 6 durch wiederholtes Drücken auf die Taste Su aus. Das Mikrofon zur Steuerung befindet sich auf der Rückseite des Scheinwer-fers.
CM (Farbmakros)Fünfzehn Farbpresets (bzw. sechzehn bei ROOTPAR6), die mit Hilfe der Tasten CM+ und CM- nacheinander abgerufen werden können.
Pr+ / Pr- Auswählen der Programme im Automatik-Modus (Au) und bei der Musiksteuerung (Su).
AUFSTELLUNG UND MONTAGEDank des komfortablen Doppelbügels kann der Scheinwerfer an einer geeigneten Stelle auf eine ebene Fläche gestellt werden. Die Montage an einer Traverse erfolgt mit Hilfe einer Traver-senklemme, die am Montagebügel befestigt wird (A). Geeignete Traversenklemmen sind optional erhältlich. Sorgen Sie für feste Verbindungen und sichern Sie den Scheinwerfer mit einem geeig-neten Sicherungsseil an der Sicherungsöse auf der Rückseite des Scheinwerfers.
GEFAHR: Überkopfmontage erfordert umfassende Erfahrung, einschließlich der Berechnung der Grenzwerte für die Arbeitslast, des verwendeten Installationsmaterials und der regelmäßigen Sicherheitsüberprüfung aller Installationsmaterialien und Scheinwerfer. Wenn Sie diese Qualifikationen nicht haben, versuchen Sie nicht, eine Installation selbst durchzuführen, sondern nutzen Sie die Hilfe von professionellen Unternehmen. Es besteht die Gefahr, dass sich nicht korrekt montierte und gesicherte Geräte lösen und herabfallen. Dadurch können Personen schwer verletzt oder getötet werden.
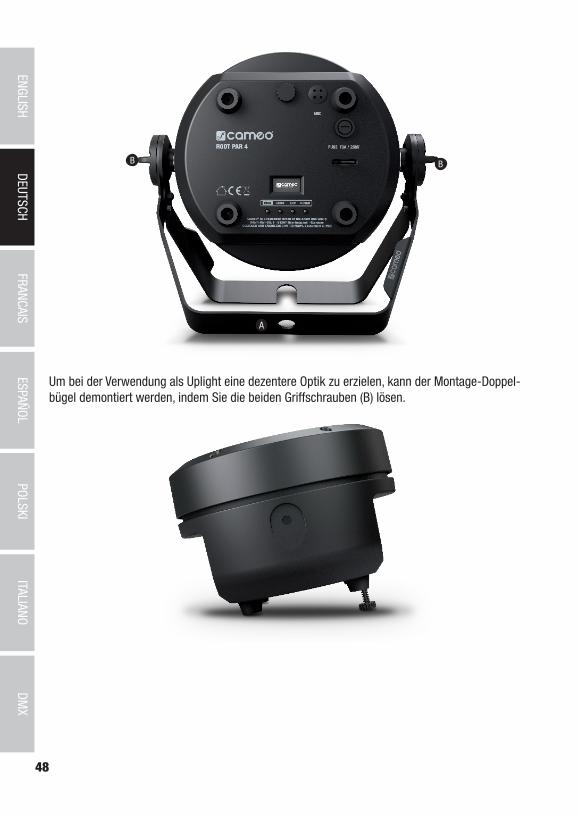
48
DEUTSCHENGLISH
DMX
ITALIANOPOLSKI
ESPAÑOLFRANCAIS
A
B B
Um bei der Verwendung als Uplight eine dezentere Optik zu erzielen, kann der Montage-Doppel-bügel demontiert werden, indem Sie die beiden Griffschrauben (B) lösen.

49
DEUTSC
HEN
GLISH
DMX
FRAN
CAIS
ESPAÑO
LITALIANO
POLSKI
PFLEGE, WARTUNG UND REPARATURUm die einwandfreie Funktion des Gerätes auf Dauer zu gewährleisten, muss es regelmäßig, mindestens alle 3000 Betriebsstunden oder spätestens nach Ablauf eines Jahres gepflegt und gewartet werden.
PFLEGE (vom Anwender durchführbar)
WARNUNG! Vor jeglichen Pflegemaßnahmen müssen die Spannungsversorgung und sofern möglich sämtliche Geräteverbindungen getrennt werden.
HINWEIS! Unsachgemäße Pflege kann zu Beeinträchtigung des Gerätes führen bis hin zur Zerstörung.
1. Gehäuseoberflächen müssen mit einem sauberen, feuchten Tuch gereinigt werden. Dabei ist darauf zu achten, dass keine Feuchtigkeit in das Gerät eindringen kann.
2. Luft Ein- und Austrittsöffnungen müssen regelmäßig von Staub und Schmutz befreit werden. Im Fall des Einsatzes von Druckluft ist darauf zu achten, dass Beschädigungen am Gerät verhindert werden (z.B. müssen Lüfter für diesen Fall blockiert werden, da sie sonst überdrehen könnten).
3. Leitungen und Steckkontakte sind regelmäßig zu reinigen und von Staub und Schmutz zu befreien.
4. Es dürfen generell keine Reinigungsmittel oder Mittel mit schleifender Wirkung zur Pflege verwendet werden, andernfalls ist mit Beeinträchtigung der Oberflächenbeschaffenheit zu rechnen.
5. Geräte sind generell trocken zu lagern und vor Staub und Verschmutzung zu schützen. 6. Um den korrekten und sicheren Betrieb zu gewährleisten, müssen sämtliche zugängliche
oder herausnehmbare Linsen und Lichtaustrittsöffnungen regelmäßig gereinigt werden.
WARTUNG UND REPARATUR (nur durch Fachpersonal)
GEFAHR! Im Gerät befinden sich Spannungsführende Bauteile. Auch nach Trennung der Netzverbindung kann noch Restspannung im Gerät vorhanden sein, z.B. durch geladene Kondensatoren.
HINWEIS! Im Gerät befinden sich keine für den Anwender zu wartenden Baugruppen.
HINWEIS! Wartungs- und Reparaturmaßnahmen dürfen nur von ausreichend qualifiziertem Fach-personal durchgeführt werden. Im Zweifel wenden Sie sich an eine Fachwerkstatt.
HINWEIS! Unsachgemäß ausgeführte Wartungsarbeiten können den Gewährleistungs anspruch beeinträchtigen.
HINWEIS! Bei vom Hersteller vorgesehenen Um- oder Nachrüstsets beachten Sie unbedingt die beiliegende Einbauanleitung.

50
DEUTSCHENGLISH
DMX
ITALIANOPOLSKI
ESPAÑOLFRANCAIS
DMX TECHNIK
DMX-512DMX (Digital Multiplex) ist die Bezeichnung für ein universelles Übertragungsprotokoll für die Kommunikation zwischen entspre-chenden Geräten und Controllern. Ein DMX-Controller sendet DMX-Daten an das/die angeschlossene(n) DMX-Gerät(e). Die DMX-Datenübertragung erfolgt stets als serieller Datenstrom, der über die an jedem DMX-fähigen Gerät vorhandenen DMX IN- und DMX OUT-Anschlüsse (XLR-Steckverbinder) von einem angeschlossenen Gerät an das nächste weitergeleitet wird, wobei die maximale Anzahl der Geräte 32 nicht überschreiten darf. Das letzte Gerät der Kette ist mit einem Abschlussstecker (Terminator) zu bestücken.
DMX-VERBINDUNG:DMX ist die gemeinsame „Sprache“, über die sich die unterschiedlichsten Gerätetypen und Modelle verschiedener Hersteller miteinander verkoppeln und über einen zentralen Controller steuern lassen, sofern sämtliche Geräte und der Controller DMX-kompatibel sind. Für eine optimale Datenübertragung ist es erforderlich, die Verbindungskabel zwischen den einzelnen Geräten so kurz wie möglich zu halten. Die Reihenfolge, in der die Geräte in das DMX-Netz-werk eingebunden sind, hat keinen Einfluss auf die Adressierung. So kann sich das Gerät mit der DMX-Adresse 1 an einer beliebigen Position in der (seriellen) DMX-Kette befinden, am Anfang, am Ende oder irgendwo in der Mitte. Wird einem Gerät die DMX-Adresse 1 zugewie-sen, "weiß" der Controller, dass er alle der Adresse 1 zugeordneten Daten an dieses Gerät senden soll, ungeachtet seiner Position im DMX-Verbund.
SERIELLE VERKOPPLUNG MEHRERER SCHEINWERFER1. Verbinden Sie den männlichen XLR-Stecker (3-Pol oder 5-Pol) des DMX-Kabels mit dem
DMX-Ausgang (weibliche XLR-Buchse) des ersten DMX-Geräts (z.B. DMX-Controller).2. Verbinden Sie den weibliche XLR-Stecker des an den ersten Scheinwerfer angeschlosse-
nen DMX-Kabels mit dem DMX-Eingang (männliche XLR-Buchse) des nächsten DMX-Ge-räts. Verbinden Sie den DMX-Ausgang dieses Geräts in der gleichen Weise mit dem DMX-Eingang des nächsten Geräts und so weiter. Bitte beachten Sie, dass DMX-Geräte grundsätzlich seriell verschaltet werden und die Verbindungen nicht ohne aktiven Splitter geteilt werden können. Die maximale Anzahl der DMX-Geräte einer DMX-Kette darf 32 nicht überschreiten.
Eine umfangreiche Auswahl geeigneter DMX-Kabel finden Sie in den Adam Hall Produktlinien 3 STAR, 4 STAR und 5 STAR.
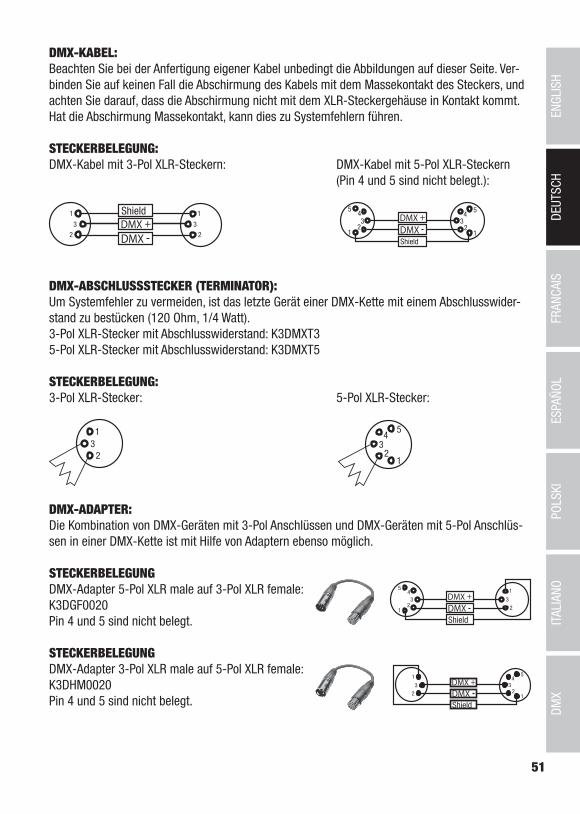
51
DEUTSC
HEN
GLISH
DMX
FRAN
CAIS
ESPAÑO
LITALIANO
POLSKI
DMX-KABEL:Beachten Sie bei der Anfertigung eigener Kabel unbedingt die Abbildungen auf dieser Seite. Ver-binden Sie auf keinen Fall die Abschirmung des Kabels mit dem Massekontakt des Steckers, und achten Sie darauf, dass die Abschirmung nicht mit dem XLR-Steckergehäuse in Kontakt kommt. Hat die Abschirmung Massekontakt, kann dies zu Systemfehlern führen.
STECKERBELEGUNG:DMX-Kabel mit 3-Pol XLR-Steckern: DMX-Kabel mit 5-Pol XLR-Steckern (Pin 4 und 5 sind nicht belegt.):
Shield
23
1
23
1
123
45
12
34
5
Shield
DMX-ABSCHLUSSSTECKER (TERMINATOR):Um Systemfehler zu vermeiden, ist das letzte Gerät einer DMX-Kette mit einem Abschlusswider-stand zu bestücken (120 Ohm, 1/4 Watt).3-Pol XLR-Stecker mit Abschlusswiderstand: K3DMXT35-Pol XLR-Stecker mit Abschlusswiderstand: K3DMXT5
STECKERBELEGUNG:3-Pol XLR-Stecker: 5-Pol XLR-Stecker:
23
1
12
34
5
DMX-ADAPTER:Die Kombination von DMX-Geräten mit 3-Pol Anschlüssen und DMX-Geräten mit 5-Pol Anschlüs-sen in einer DMX-Kette ist mit Hilfe von Adaptern ebenso möglich.
STECKERBELEGUNGDMX-Adapter 5-Pol XLR male auf 3-Pol XLR female: K3DGF0020Pin 4 und 5 sind nicht belegt.
STECKERBELEGUNGDMX-Adapter 3-Pol XLR male auf 5-Pol XLR female: K3DHM0020Pin 4 und 5 sind nicht belegt.

52
DEUTSCHENGLISH
DMX
ITALIANOPOLSKI
ESPAÑOLFRANCAIS
TECHNISCHE DATEN
ARTIKEL-NUMMER:
CLROOTPAR4(WH) CLROOTPAR6(WH)
Produktart: LED-Scheinwerfer LED-ScheinwerferTyp: PAR-Scheinwerfer PAR-ScheinwerferFarbspektrum: RGBW RGBWA-UVLED Anzahl: 7 6LED Typ: 4W 12WLED PWM Fre-quenz:
650 Hz, 1530 Hz, 2150 Hz, 4000 Hz (einstellbar)
650 Hz, 1530 Hz, 2150 Hz, 4000 Hz (einstellbar)
Abstrahlwinkel (Halbstreuwinkel):
36,5° (19°) 36,0° (20,5°)
DMX-Eingang: 3-Pol männlich 3-Pol männlichDMX-Ausgang: 3-Pol weiblich 3-Pol weiblichDMX Modi: Ohne DMX-Delay-Kanal: 2-Kanal,
4-Kanal 1, 4-Kanal 2, 5-Kanal, 6-Kanal, 9-KanalMit DMX-Delay-Kanal: 3-Kanal, 5-Kanal 1, 5-Kanal 2, 6-Kanal, 7-Kanal, 10-Kanal
Ohne DMX-Delay-Kanal: 2-Kanal, 4-Kanal 1, 4-Kanal 2, 5-Kanal, 6-Kanal, 8-Kanal, 11-KanalMit DMX-Delay-Kanal: 3-Kanal, 5-Kanal 1, 5-Kanal 2, 6-Kanal, 7-Kanal, 9-Kanal, 12-Kanal
DMX Funktionen: Dimmer, Dimmer fein, Stroboskop, Rot, Grün, Blue, Weiß, Farbmarkos, Lauflichtwahl, DMX Delay, Sound-empfindlichkeit
Dimmer, Dimmer fein, Stroboskop, Rot, Grün, Blue, Weiß, Amber, UV, Farbmarkos, Lauflichtwahl, DMX Delay, Soundempfindlichkeit
Steuerung: DMX512, IR Fernbedienung, W-DMX (durch optionalen iDMX-Stick)
DMX512, IR Fernbedienung, W-DMX (durch optionalen iDMX Stick)
Standalone Funk-tionen:
Auto Programme, Sound Program-me, Static, Farbpresets, User-Farben, Loopfunktion
Auto Programme, Sound Program-me, Static, Farbpresets, User-Farben, Loopfunktion
Bedienelemente: Mode, Enter, Up, Down Mode, Enter, Up, DownAnzeigeelemente: OLED Display OLED DisplayBetriebs-spannung:
100 – 240 V AC / 50 – 60 Hz 100 – 240 V AC / 50 – 60 Hz
Leistungs-aufnahme:
38W 58 W
Beleuchtungs-stärke (@ 1m):
7850 lx 10700 lx
Lichtstrom: 1350 lm 1800 lm

53
DEUTSC
HEN
GLISH
DMX
FRAN
CAIS
ESPAÑO
LITALIANO
POLSKI
ARTIKEL-NUMMER:
CLROOTPAR4(WH) CLROOTPAR6(WH)
Stromversor-gungsanschluss:
INPUT: Blaue Power Twist Buchse OUTPUT: Weiße Power Twist Buchse (Max. 8A)
INPUT: Blaue Power Twist Buchse OUTPUT: Weiße Power Twist Buchse (Max. 8A)
Elektrische Schutzklasse
1 1
Sicherung: F3A / 250 V (5 x 20 mm) F3A / 250 V (5 x 20 mm)Umgebungstem-peratur (in Betrieb):
0°C – 40°C 0°C – 40°C
Relative Luft-feuchtigkeit:
< 80%, nicht kondensierend < 80%, nicht kondensierend
Schutzart IP20 IP20Gehäusefarbe: Schwarz (CLROOTPAR4)
Weiß (CLROOTPAR4WH)schwarz (CLROOTPAR6) weiß (CLROOTPAR6WH)
Gehäusematerial: ABS Kunststoff ABS KunststoffGehäusekühlung: Konvektionskühlung KonvektionskühlungAbmessungen (B x H x T, ohne Montagebügel):
195 x 133 x 195 mm 195 x 133 x 195 mm
Gewicht (inkl. Montagebügel):
1,75 kg 1,975 kg
Weitere Eigen-schaften:
Netzkabel im Lieferumfang und IR Fernbedienung als optionales Zubehör (CLPFLAT1REMOTE)
Netzkabel im Lieferumfang und IR Fernbedienung als optionales Zubehör (CLPFLAT1REMOTE)

54
DEUTSCHENGLISH
DMX
ITALIANOPOLSKI
ESPAÑOLFRANCAIS
ENTSORGUNGVerpackung:
1. Verpackungen können über die üblichen Entsorgungswege dem Wertstoffkreislauf zugeführt werden.
2. Bitte trennen Sie die Verpackung entsprechend der Entsorgungsgesetze und Wertstoff-verordnungen in Ihrem Land.
Gerät:
1. Dieses Gerät unterliegt der europäischen Richtlinie für Elektro- und Elektronik-Altgeräte in der jeweils geltenden aktuellen Fassung. WEEE-Richtlinie Waste Electrical and Electronical Equipment. Altgeräte gehören nicht in den Hausmüll. Das Altgerät muss über einen zugelassenen Entsorgungsbetrieb oder eine kommunale Entsorgungseinrichtung entsorgt werden. Bitte beachten Sie geltende Vorschriften in Ihrem Land!
2. Beachten Sie alle in Ihrem Land geltenden Entsorgungsgesetze. 3. Als Privatkunde erhalten Sie Informationen zu umweltfreundlichen Entsorgungsmög-
lichkeiten über den Händler, bei dem das Produkt erworben wurde, oder über die entsprechenden regionalen Behörden.
HERSTELLERERKLÄRUNGENHERSTELLERGARANTIE & HAFTUNGSBESCHRÄNKUNGAdam Hall GmbH, Adam-Hall-Str. 1, D-61267 Neu Anspach / E-Mail [email protected] / +49 (0)6081 / 9419-0.Unsere aktuellen Garantiebedingungen und Haftungsbeschränkung finden Sie unter: https://cdn-shop.adamhall.com/media/pdf/Manufacturers-Declarations-CAMEO_DE_EN_ES_FR.pdf.Im Servicefall wenden Sie sich an Ihren Vertriebspartner.
CE-KONFORMITÄTHiermit erklärt die Adam Hall GmbH, dass dieses Produkt folgenden Richtlinien entspricht (soweit zutreffend): R&TTE (1999/5/EG) bzw. RED (2014/53/EU) ab Juni 2017 Niederspannungsrichtlinie (2014/35/EU) EMV-Richtlinie (2014/30/EU) RoHS (2011/65/EU) Die vollständige Konformitätserklärung finden Sie unter www.adamhall.com. Des Weiteren können Sie diese auch unter [email protected] anfragen.
DRUCKFEHLER UND IRRTÜMER, SOWIE TECHNISCHE ODER SONSTIGE ÄNDERUNGEN SIND VORBEHALTEN!

55
DMX
DEUTSC
HFRAN
CAIS
ESPAÑO
LEN
GLISH
ITALIANO
POLSKI
FRANÇAIS
VOUS AVEZ FAIT LE BON CHOIX!Cet appareil a été développé et fabriqué en appliquant des exigences de qualité très élevées : il garantit des années de fonctionnement sans problème.Veuillez lire attentivement ce Manuel Utilisateur : vous apprendrez rapidement à utiliser votre appareil Cameo Light de façon optimale. Vous trouverez davantage d‘informations à propos de Cameo Light sur notre site Web: WWW.CAMEOLIGHT.COM.
UTILISATION PRÉVUE Le produit est un appareil de technologie événementielle.Il a été spécialement conçu pour un usage professionnel dans le domaine de la technologie évé-nementielle et ne convient pas à une utilisation domestique !De plus, ce produit est uniquement destiné à des utilisateurs qualifiés ayant des connaissances de la technologie événementielle !Toute utilisation du produit contraire aux spécifications techniques et aux conditions de fonction-nement spécifiées est considérée comme inappropriée !Nous déclinons toute responsabilité en cas de dommages physiques ou matériels causés par une utilisation incorrecte !
Le produit ne convient pas : - à l’utilisation par des personnes (y compris des enfants) dont les capacités physiques, sensorielles
ou intellectuelles sont réduites ou dont l’expérience et les connaissances sont insuffisantes.- aux enfants (il doit être interdit aux enfants de jouer avec l’appareil).
CONSIGNES DE SÉCURITÉ- Pour éviter tout dommage, veille à lire attentivement et respecter ces instructions. - Conserve toutes les informations et instructions en lieu sûr. - Respecte tous les avertissements. Ne retire aucune consigne de sécurité ou autre information
figurant sur l’appareil.
TERMES ET SYMBOLES1. DANGER : Le terme DANGER, parfois utilisé en combinaison avec un symbole, fait référence
à des situations immédiatement dangereuses ou présentant un risque pour la vie ou l’intégrité physique .
2. AVERTISSEMENT : Le mot AVERTISSEMENT, parfois utilisé en combinaison avec un symbole, fait référence à des situations potentiellement dangereuses ou pouvant présenter un risque pour la vie ou l’intégrité physique .
3. ATTENTION : Le mot ATTENTION, parfois utilisé en combinaison avec un symbole, fait réfé-rence à des situations pouvant entraîner des blessures.

56
DMX
ITALIANOPOLSKI
ESPAÑOLFRANCAIS
DEUTSCHENGLISH
4. AVIS : Le mot AVIS, parfois utilisé en combinaison avec un symbole, fait référence à des situa-tions pouvant entraîner des dommages matériels et/ou environnementaux.
Ce symbole avertit d’un danger électrique.
Ce symbole avertit d’un danger général.
Ce symbole avertit d’un danger lié à des surfaces chaudes.
Ce symbole avertit d’un danger provenant de rayonnements lumineux intenses.
Ce symbole renvoie à des informations supplémentaires sur le fonctionnement du produit.
DANGER :1. N’ouvre pas l’appareil et ne le modifie pas.
2. Si ton appareil ne fonctionne plus correctement, si des liquides ou des objets ont pénétré à l’intérieur ou si l’appareil a été endommagé de quelque autre manière que ce soit, éteins-le immédiatement et débranche-le de l’alimentation électrique. Seuls des spécialistes autorisés peuvent réparer cet appareil.
3. Le conducteur de terre protégeant les appareils de classe I doit être correctement raccordé. Ne débranche jamais le conducteur de terre de protection. Les appareils de classe II ne sont pas équipés d’un conducteur de terre.
4. Vérifie que les câbles conducteurs de tension ne sont pas pliés et ne présentent aucun autre dégât mécanique.
5. Ne contourne jamais le fusible de l’appareil.
AVERTISSEMENT :1. L’appareil ne doit pas être utilisé s’il présente des signes évidents d’endommagement.
2. L’appareil peut être installé uniquement hors tension.
3. N’utilise pas l’appareil si le cordon d’alimentation est endommagé.
4. Seule une personne qualifiée peut remplacer les cordons d’alimentation raccordés en permanence.
AVIS :1. N’utilise pas l’appareil lorsqu’il vient d’être soumis à de fortes fluctuations de
température (p. ex., après le transport). L’humidité et la condensation peuvent avoir endommagé l’appareil. Allume l’appareil uniquement lorsqu’il a atteint la température ambiante.

57
DMX
DEUTSC
HFRAN
CAIS
ESPAÑO
LEN
GLISH
ITALIANO
POLSKI
2. Vérifie que la tension et la fréquence de l’alimentation correspondent aux valeurs spécifiées sur l’appareil. Si l’appareil est équipé d’un sélecteur de tension, ne le branche pas tant qu’il n’a pas été correctement configuré. Utilise uniquement des cordons d’alimentation appropriés.
3. Il ne suffit pas d’appuyer sur l’interrupteur Marche/Arrêt de l’appareil pour couper complètement l’alimentation électrique.
4. Vérifie que le fusible utilisé correspond au type indiqué sur l’appareil.
5. Vérifie que des mesures appropriées ont été prises pour éviter les surtensions (p. ex., la foudre).
6. Respecte le courant de sortie maximal spécifié sur les appareils équipés d’une prise de sortie adaptée. Vérifie que la consommation électrique totale de tous les appareils connectés à l’appareil ne dépasse pas la valeur spécifiée.
7. Remplace les cordons d’alimentation uniquement par des cordons similaires à ceux d’origine. La section ne doit pas être inférieure à la section du cordon d’origine.
DANGER :1. Risque d’étouffement ! Les sacs en plastique et les petites pièces doivent être
conservés hors de portée des personnes (y compris les enfants) aux capacités phy-siques, sensorielles ou intellectuelles réduites.
2. Risque de chute ! Vérifie que l’appareil est correctement installé et ne peut pas tom-ber. Utilise uniquement des supports ou des fixations appropriés (en particulier pour les installations fixes). Assure-toi que les accessoires sont correctement installés et fixés. Veille à ce que les réglementations de sécurité en vigueur soient respectées.
AVERTISSEMENT :1. N’utilise l’appareil que conformément à l’usage prévu.
2. Utilise l’appareil uniquement avec les accessoires recommandés et fournis par le fabricant.
3. Veille à respecter les réglementations de sécurité en vigueur dans ton pays lors de l’installation de l’appareil.
4. Une fois l’appareil connecté, vérifie tous les chemins de câble pour éviter tout dom-mage ou accident (p. ex. risques de trébuchement).
5. Respecte les distances minimales spécifiées par rapport aux matériaux présentant une inflammabilité normale. Sauf indication contraire, la distance minimale est de 30 cm.
6. Respecte toujours la distance minimale par rapport à la surface éclairée figurant sur l’appareil.

58
DMX
ITALIANOPOLSKI
ESPAÑOLFRANCAIS
DEUTSCHENGLISH
ATTENTION !1. Les composants mobiles tels que les supports de montage ou d’autres composants
mobiles peuvent se coincer.
2. Dans le cas de dispositifs dotés de composants motorisés, il existe un risque de blessure occasionnée par le dispositif mobile. Des mouvements brusques du dispositif peuvent entraîner des réactions.
3. La surface du boîtier de l’appareil peut devenir très chaude pendant un fonction-nement normal. Veille à ce qu’aucun contact accidentel avec le boîtier ne puisse se produire. Laisse toujours l’appareil refroidir suffisamment avant le démontage, les travaux de maintenance et la recharge, etc.
AVIS :1. N’installe pas et n’utilise pas l’appareil à proximité d’éléments chauffants, d’unités
de stockage de chaleur, de poêles ou d’autres sources de chaleur. Veille à ce que l’appareil soit toujours installé de manière à pouvoir refroidir suffisamment et ne pas surchauffer.
2. Ne place aucune source d’inflammation (p. ex. bougies allumées) à proximité de l’appareil.
3. Les fentes d’aération doivent être dégagées et les ventilateurs ne doivent pas être bloqués.
4. Utilise l’emballage d’origine ou l’emballage fourni par le fabricant pour le transport.
5. Évite de secouer l’appareil ou de le heurter.
6. Respecte l’indice IP ainsi que les conditions ambiantes telles que la température et l’humidité spécifiées.
7. Les dispositifs peuvent faire l’objet d’un développement continu. Si les informations sur les conditions de fonctionnement, la sortie ou d’autres caractéristiques de l’appa-reil diffèrent entre le manuel d’utilisation et l’étiquette de l’appareil, les informations apposées sur l’appareil prévalent toujours.
8. L’appareil ne convient pas aux zones climatiques tropicales et n’est pas adapté à une utilisation à plus de 2 000 m au-dessus du niveau de la mer.
9. L’appareil ne doit pas être utilisé dans un environnement marin.
ATTENTION ! INFORMATIONS IMPORTANTES SUR LES PRODUITS D’ÉCLAIRAGE !
1. Ne regarde jamais directement (même brièvement) la source lumineuse.
2. Ne regarde jamais la source lumineuse avec des appareils optiques (p. ex., une loupe).
3. Les effets stroboscopiques peuvent déclencher des crises d’épilepsie chez les sujets sensibles.

59
DMX
DEUTSC
HFRAN
CAIS
ESPAÑO
LEN
GLISH
ITALIANO
POLSKI
4. Une source lumineuse est intégrée de manière fixe à ce luminaire et ne peut pas être remplacée par l’utilisateur. Adresse-toi à ton revendeur en cas de défaillance du système.
INFORMATIONS SUR LES APPAREILS PORTABLES D’EXTÉRIEUR 1. Fonctionnement temporaire ! L’équipement événementiel est conçu en général uni-
quement pour un fonctionnement temporaire.
2. Un fonctionnement continu ou une fixation structurelle permanente, particulièrement en extérieur, peut avoir un impact négatif sur le fonctionnement, ainsi que sur les surfaces et les joints, et peut accélérer la fatigue du matériau.
INTRODUCTIONPROJECTEUR PAR RGBW 7 X 4 WCLROOTPAR4 (boîtier noir)CLROOTPAR4WH (boîtier blanc)
PROJECTEUR PAR RGBWA+UV 6 X 12 WCLROOTPAR6 (boîtier noir)CLROOTPAR6WH (boîtier blanc)
FONCTIONS DE PILOTAGECLROOTPAR4Modes de fonctionnement DMX sans canal de décalage DMX : Pilotage DMX sur 2 canaux, 4 ca-naux 1, 4 canaux 2, 5 canaux, 6 canaux et 9 canauxModes de fonctionnement DMX avec canal de décalage DMX : Pilotage DMX sur 3 canaux, 5 ca-naux 1, 5 canaux 2, 6 canaux, 7 canaux et 10 canauxCLROOTPAR6Modes de fonctionnement DMX sans canal de décalage DMX : Pilotage DMX sur 2 canaux, 4 ca-naux 1, 4 canaux 2, 5 canaux, 6 canaux, 8 canaux et 11 canauxModes de fonctionnement DMX avec canal de décalage DMX : Pilotage DMX sur 3 canaux, 5 ca-naux 1, 5 canaux 2, 6 canaux, 7 canaux, 9 canaux et 12 canaux
Mode Master/SlaveFonctions Stand Alone (modes autonomes)Pilotable par télécommande infrarouge (télécommande disponible en option)Connexion W-DMX via le stick iDMX disponible en option
CARACTÉRISTIQUESConnecteurs DMX 3 broches. Raccordements secteur Power Twist IN et OUT. Écran OLED Fré-quence du signal PWM réglable. Connecteur pour stick iDMX. Refroidissement par convection. Vis d’inclinaison. Double étrier de montage inclus. Tension de fonctionnement : 100-240 V CA.
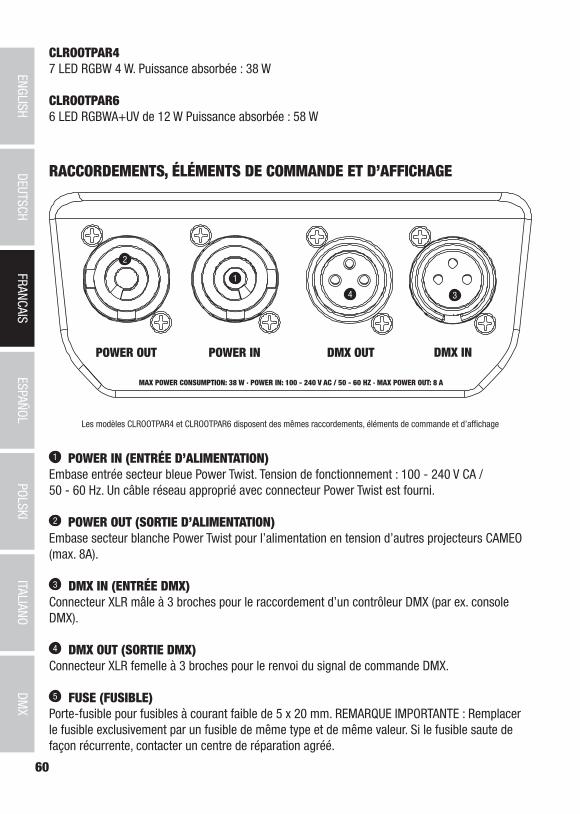
60
DMX
ITALIANOPOLSKI
ESPAÑOLFRANCAIS
DEUTSCHENGLISH
CLROOTPAR47 LED RGBW 4 W. Puissance absorbée : 38 W
CLROOTPAR66 LED RGBWA+UV de 12 W Puissance absorbée : 58 W
RACCORDEMENTS, ÉLÉMENTS DE COMMANDE ET D’AFFICHAGE
Les modèles CLROOTPAR4 et CLROOTPAR6 disposent des mêmes raccordements, éléments de commande et d’affichage
1 POWER IN (ENTRÉE D’ALIMENTATION)Embase entrée secteur bleue Power Twist. Tension de fonctionnement : 100 - 240 V CA / 50 - 60 Hz. Un câble réseau approprié avec connecteur Power Twist est fourni.
2 POWER OUT (SORTIE D’ALIMENTATION)Embase secteur blanche Power Twist pour l’alimentation en tension d’autres projecteurs CAMEO (max. 8A).
3 DMX IN (ENTRÉE DMX)Connecteur XLR mâle à 3 broches pour le raccordement d’un contrôleur DMX (par ex. console DMX).
4 DMX OUT (SORTIE DMX)Connecteur XLR femelle à 3 broches pour le renvoi du signal de commande DMX.
5 FUSE (FUSIBLE)Porte-fusible pour fusibles à courant faible de 5 x 20 mm. REMARQUE IMPORTANTE : Remplacer le fusible exclusivement par un fusible de même type et de même valeur. Si le fusible saute de façon récurrente, contacter un centre de réparation agréé.
1
4 3
2
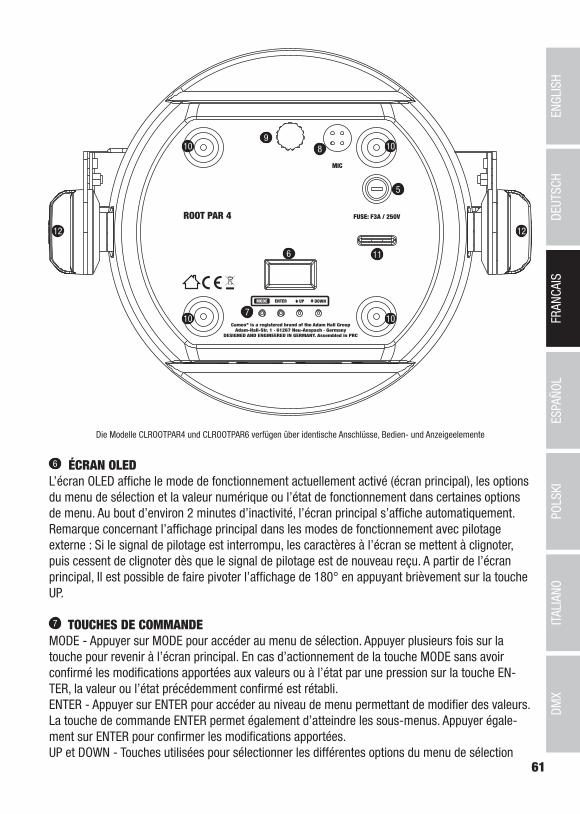
61
DMX
DEUTSC
HFRAN
CAIS
ESPAÑO
LEN
GLISH
ITALIANO
POLSKI
MIC
5
6
7
11
89
10
10
10
10
12 12
Die Modelle CLROOTPAR4 und CLROOTPAR6 verfügen über identische Anschlüsse, Bedien- und Anzeigeelemente
6 ÉCRAN OLEDL’écran OLED affiche le mode de fonctionnement actuellement activé (écran principal), les options du menu de sélection et la valeur numérique ou l’état de fonctionnement dans certaines options de menu. Au bout d’environ 2 minutes d’inactivité, l’écran principal s’affiche automatiquement. Remarque concernant l’affichage principal dans les modes de fonctionnement avec pilotage externe : Si le signal de pilotage est interrompu, les caractères à l’écran se mettent à clignoter, puis cessent de clignoter dès que le signal de pilotage est de nouveau reçu. A partir de l’écran principal, Il est possible de faire pivoter l’affichage de 180° en appuyant brièvement sur la touche UP.
7 TOUCHES DE COMMANDEMODE - Appuyer sur MODE pour accéder au menu de sélection. Appuyer plusieurs fois sur la touche pour revenir à l’écran principal. En cas d’actionnement de la touche MODE sans avoir confirmé les modifications apportées aux valeurs ou à l’état par une pression sur la touche EN-TER, la valeur ou l’état précédemment confirmé est rétabli.ENTER - Appuyer sur ENTER pour accéder au niveau de menu permettant de modifier des valeurs. La touche de commande ENTER permet également d’atteindre les sous-menus. Appuyer égale-ment sur ENTER pour confirmer les modifications apportées.UP et DOWN - Touches utilisées pour sélectionner les différentes options du menu de sélection

62
DMX
ITALIANOPOLSKI
ESPAÑOLFRANCAIS
DEUTSCHENGLISH
(adresse de départ DMX, mode de fonctionnement, etc.) et des sous-menus. Permettent de modifier la valeur d’une option de menu (par ex. adresse de départ DMX) selon les besoins.
8 MICMicrophone intégré utilisé pour le pilotage par la musique.
9 TILT (INCLINAISON)Vis moletée pour la fonction d’inclinaison en cas d’utilisation Uplight. Pour un look plus discret, le double étrier de montage peut être démonté.
10 PIEDS EN CAOUTCHOUCQuatre pieds en caoutchouc pour une bonne stabilité.
11 ŒILLET DE SÉCURITÉŒillet de sécurité pour sécuriser le projecteur lors du montage sur traverse.
12 VIS-POIGNÉESLes deux vis-poignées servent à ajuster et à fixer le support ou l’étrier de montage.
CONNECTEUR POUR LA LIAISON W-DMX™Le connecteur USB-A pour le stick iDMX en option est situé sur le côté du projecteur opposé au panneau de raccordement.
UTILISATIONREMARQUES• Dès que le projecteur est correctement raccordé à l’alimentation secteur, un message de
bienvenue (« Welcome to Cameo »), la désignation du modèle et la version du logiciel s’affichent successivement à l’écran pendant la phase de démarrage. À l’issue de cette phase, le projec-teur est opérationnel et passe au mode précédemment activé.
• Pour accéder directement à l’écran principal à partir des niveaux inférieurs du menu, appuyez sur la touche MODE et maintenez-la enfoncée pendant environ 2 secondes. Si aucune saisie n’est effectuée dans les deux minutes environ, l’affichage retourne à l’écran principal. Appuyer brièvement sur la touche MODE pour remonter d’un niveau dans les sous-menus.
• Pour accéder directement à l’option de menu éditée en dernier, appuyer brièvement et simulta-nément sur MODE et ENTER.
• Depuis l’écran principal, Il est possible de faire pivoter l’affichage de 180° en appuyant briève-ment sur la touche UP.
• Pour modifier rapidement une valeur (par exemple l’adresse de départ DMX), maintenir la touche UP ou DOWN enfoncée.
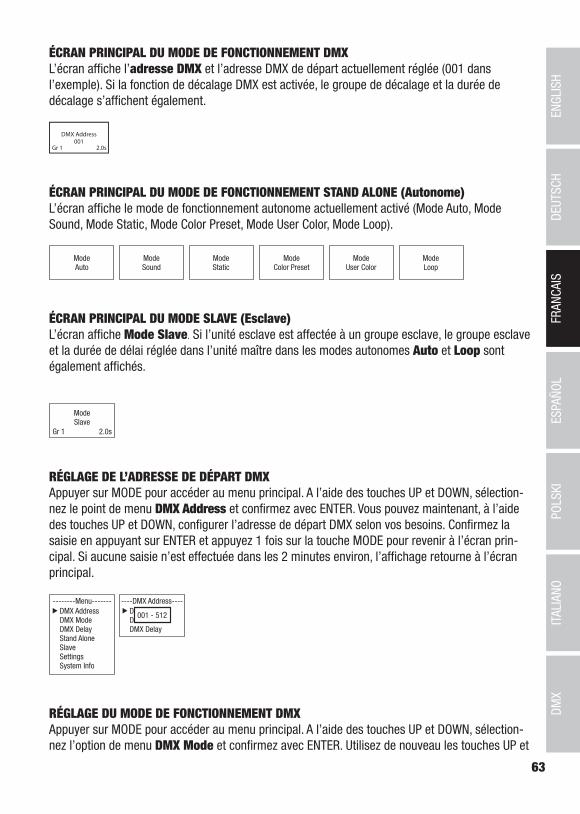
63
DMX
DEUTSC
HFRAN
CAIS
ESPAÑO
LEN
GLISH
ITALIANO
POLSKI
ÉCRAN PRINCIPAL DU MODE DE FONCTIONNEMENT DMXL’écran affiche l’adresse DMX et l’adresse DMX de départ actuellement réglée (001 dans l’exemple). Si la fonction de décalage DMX est activée, le groupe de décalage et la durée de décalage s’affichent également.
ÉCRAN PRINCIPAL DU MODE DE FONCTIONNEMENT STAND ALONE (Autonome)L’écran affiche le mode de fonctionnement autonome actuellement activé (Mode Auto, Mode Sound, Mode Static, Mode Color Preset, Mode User Color, Mode Loop).
ModeAuto
ModeSound
ModeStatic
ModeColor Preset
ModeUser Color
ModeLoop
ÉCRAN PRINCIPAL DU MODE SLAVE (Esclave)L’écran affiche Mode Slave. Si l’unité esclave est affectée à un groupe esclave, le groupe esclave et la durée de délai réglée dans l’unité maître dans les modes autonomes Auto et Loop sont également affichés.
ModeSlave
Gr 1 2.0s
RÉGLAGE DE L’ADRESSE DE DÉPART DMXAppuyer sur MODE pour accéder au menu principal. A l’aide des touches UP et DOWN, sélection-nez le point de menu DMX Address et confirmez avec ENTER. Vous pouvez maintenant, à l’aide des touches UP et DOWN, configurer l’adresse de départ DMX selon vos besoins. Confirmez la saisie en appuyant sur ENTER et appuyez 1 fois sur la touche MODE pour revenir à l’écran prin-cipal. Si aucune saisie n’est effectuée dans les 2 minutes environ, l’affichage retourne à l’écran principal.
--------Menu-------DMX AddressDMX ModeDMX DelayStand AloneSlaveSettingsSystem Info
----DMX Address----DMX AddressDMX ModeDMX Delay
001 - 512
RÉGLAGE DU MODE DE FONCTIONNEMENT DMXAppuyer sur MODE pour accéder au menu principal. A l’aide des touches UP et DOWN, sélection-nez l’option de menu DMX Mode et confirmez avec ENTER. Utilisez de nouveau les touches UP et
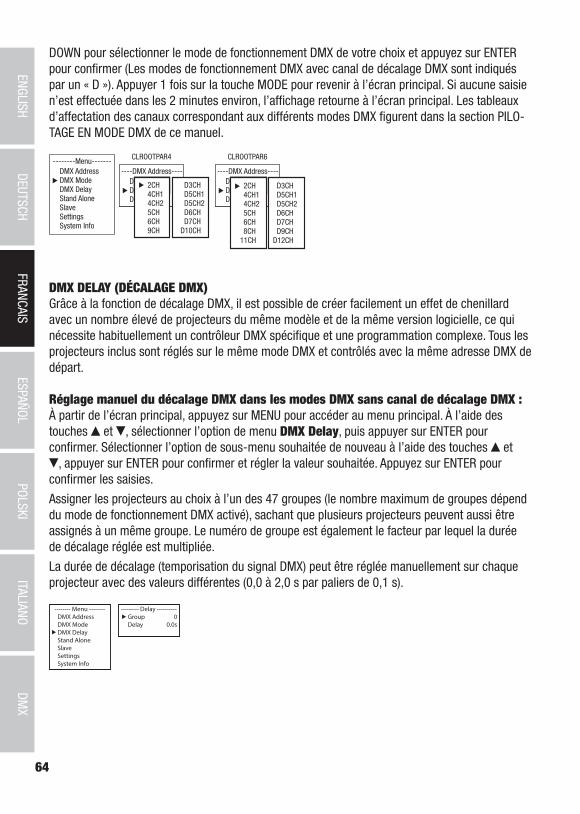
64
DMX
ITALIANOPOLSKI
ESPAÑOLFRANCAIS
DEUTSCHENGLISH
DOWN pour sélectionner le mode de fonctionnement DMX de votre choix et appuyez sur ENTER pour confirmer (Les modes de fonctionnement DMX avec canal de décalage DMX sont indiqués par un « D »). Appuyer 1 fois sur la touche MODE pour revenir à l’écran principal. Si aucune saisie n’est effectuée dans les 2 minutes environ, l’affichage retourne à l’écran principal. Les tableaux d’affectation des canaux correspondant aux différents modes DMX figurent dans la section PILO-TAGE EN MODE DMX de ce manuel.
--------Menu-------DMX AddressDMX ModeDMX DelayStand AloneSlaveSettingsSystem Info
----DMX Address----DMX AddressDMX ModeDMX Delay
001 - 512001 - 512001 - 5122CH4CH14CH25CH6CH9CH
D3CHD5CH1D5CH2D6CHD7CH
D10CH
CLROOTPAR4
----DMX Address----DMX AddressDMX ModeDMX Delay
001 - 512001 - 512001 - 5122CH4CH14CH25CH6CH8CH
11CH
D3CHD5CH1D5CH2D6CHD7CHD9CH
D12CH
CLROOTPAR6
DMX DELAY (DÉCALAGE DMX)Grâce à la fonction de décalage DMX, il est possible de créer facilement un effet de chenillard avec un nombre élevé de projecteurs du même modèle et de la même version logicielle, ce qui nécessite habituellement un contrôleur DMX spécifique et une programmation complexe. Tous les projecteurs inclus sont réglés sur le même mode DMX et contrôlés avec la même adresse DMX de départ.
Réglage manuel du décalage DMX dans les modes DMX sans canal de décalage DMX :À partir de l’écran principal, appuyez sur MENU pour accéder au menu principal. À l’aide des touches et , sélectionner l’option de menu DMX Delay, puis appuyer sur ENTER pour confirmer. Sélectionner l’option de sous-menu souhaitée de nouveau à l’aide des touches et
, appuyer sur ENTER pour confirmer et régler la valeur souhaitée. Appuyez sur ENTER pour confirmer les saisies.
Assigner les projecteurs au choix à l’un des 47 groupes (le nombre maximum de groupes dépend du mode de fonctionnement DMX activé), sachant que plusieurs projecteurs peuvent aussi être assignés à un même groupe. Le numéro de groupe est également le facteur par lequel la durée de décalage réglée est multipliée.
La durée de décalage (temporisation du signal DMX) peut être réglée manuellement sur chaque projecteur avec des valeurs différentes (0,0 à 2,0 s par paliers de 0,1 s).
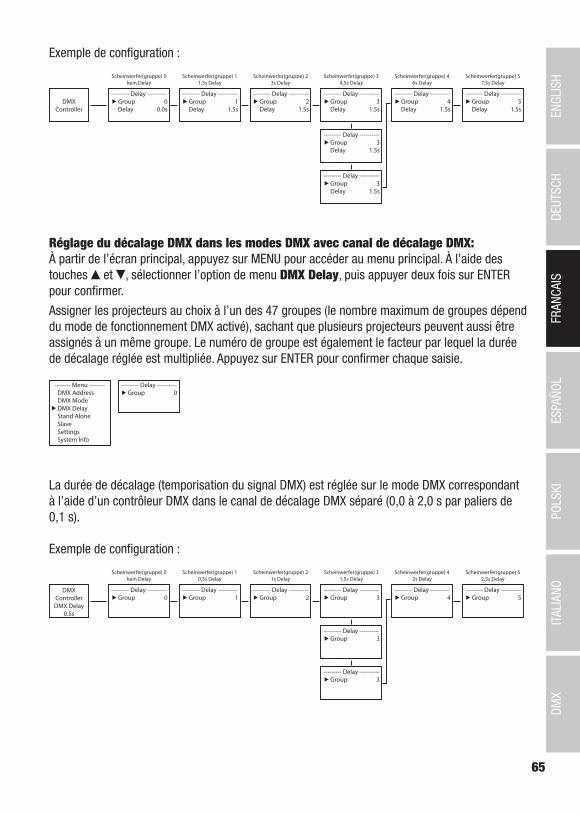
65
DMX
DEUTSC
HFRAN
CAIS
ESPAÑO
LEN
GLISH
ITALIANO
POLSKI
Exemple de configuration :
Réglage du décalage DMX dans les modes DMX avec canal de décalage DMX:À partir de l’écran principal, appuyez sur MENU pour accéder au menu principal. À l’aide des touches et , sélectionner l’option de menu DMX Delay, puis appuyer deux fois sur ENTER pour confirmer.
Assigner les projecteurs au choix à l’un des 47 groupes (le nombre maximum de groupes dépend du mode de fonctionnement DMX activé), sachant que plusieurs projecteurs peuvent aussi être assignés à un même groupe. Le numéro de groupe est également le facteur par lequel la durée de décalage réglée est multipliée. Appuyez sur ENTER pour confirmer chaque saisie.
La durée de décalage (temporisation du signal DMX) est réglée sur le mode DMX correspondant à l’aide d’un contrôleur DMX dans le canal de décalage DMX séparé (0,0 à 2,0 s par paliers de 0,1 s).
Exemple de configuration :

66
DMX
ITALIANOPOLSKI
ESPAÑOLFRANCAIS
DEUTSCHENGLISH
MODE DE FONCTIONNEMENT STAND ALONE AUTO / SOUNDLes 6 programmes automatiques disponibles se composent chacun de séquences de changement de couleur programmées en permanence. La luminosité, la vitesse de défilement, le pilotage par la musique avec sensibilité du microphone et le décalage (retard du signal) peuvent être réglés séparément pour chaque programme.À partir de l’écran principal, appuyer sur MODE pour accéder au menu principal. Sélectionner ensuite l’option de menu Stand Alone à l’aide des touches UP et DOWN et appuyer sur ENTER pour confirmer. Sélectionner à nouveau le mode Stand Alone Auto à l’aide des touches UP et DOWN et appuyer sur ENTER pour confirmer. Utiliser maintenant les touches HAUT et BAS pour sélectionner le programme souhaité (Programme 1 - Programme 6) et appuyer sur ENTER pour confirmer.
--------Menu-------DMX AddressDMX ModeDMX DelayStand AloneSlaveSettingsSystem Info
----Stand Alone----AutoStaticColor PresetUser ColorLoop
-----Program x-----DimmerSpeedSoundSensDelay
----Auto Mode----Program 1 |Program 6
0 - 1000 - 100
Off / On0 - 100
0.0s - 2.0s
Vous accédez alors au sous-menu permettant de régler les options de sous-menu (voir tableau, sélectionner avec UP et DOWN, confirmer avec ENTER, modifier la valeur ou l’état avec UP et DOWN, confirmer avec ENTER). Les réglages sont effectués séparément pour chaque programme et sont conservés même après le redémarrage de l’appareil.
MODE DE FONCTIONNEMENT STAND-ALONE AUTO / SOUND (PROGRAMMES 1 À 6)
Dimmer Réglage de la luminosité 0 - 100
Speed Réglage de la vitesse de défilement 0 - 100
Sound Activer / désactiver la pilotage par la musiqueOff
Pilotage par la mu-sique désactivé
OnPilotage par la mu-sique activé
Sens Réglage de la sensibilité du microphone 0 - 100
Delay Durée de décalage pour les groupes esclaves 0,0 s - 2,0 s
MODE DE FONCTIONNEMENT STAND-ALONE STATICDe façon similaire à un dispositif de commande DMX, le mode de fonctionnement Stand-Alone Static permet de régler les fonctions Dimmer, stroboscope (Strobe) et R, G, B, et W ou R, G, B, W, A et UV directement sur l’appareil, avec des valeurs comprises entre 000 et 255. Il est ainsi possible de créer une scène personnalisée sans recourir à un contrôleur DMX supplémentaire. À partir de l’écran principal, appuyer sur MODE pour accéder au menu principal. Sélectionnez en-suite l’option de menu Stand Alone à l’aide des touches UP et DOWN et appuyez sur ENTER pour confirmer. Sélectionnez à nouveau le mode Stand Alone- Static avec les touches UP et DOWN

67
DMX
DEUTSC
HFRAN
CAIS
ESPAÑO
LEN
GLISH
ITALIANO
POLSKI
et confirmez avec ENTER. Utiliser ensuite les touches UP et DOWN pour sélectionner l’option de menu à modifier et appuyer sur ENTER pour confirmer. Vous pouvez régler la valeur voulue à l’aide des touches UP et DOWN (entre 000 et 255). Pour valider, appuyer sur la touche ENTER.
--------Menu-------DMX AddressDMX ModeDMX DelayStand AloneSlaveSettingsSystem Info
----Stand Alone----AutoStaticColor PresetUser ColorLoop
-----Static Mode-----DimmerStrobeRedGreenBlueWhiteAmberUV
----Static Mode----DimmerStrobeRedGreenBlueWhite
0 - 2550 - 2550 - 2550 - 2550 - 2550 - 255
CLROOTPAR4 CLROOTPAR6
0 - 2550 - 2550 - 2550 - 2550 - 2550 - 2550 - 2550 - 255
MODE DE FONCTIONNEMENT STAND-ALONE COLOR PRESET15 présélections de couleurs différentes plus Jump et Fade sont disponibles comme Presets, la luminosité peut être réglée séparément pour chaque Preset, ainsi que la vitesse de défilement pour Jump et Fade. À partir de l’écran principal, appuyer sur MODE pour accéder au menu principal. Sélectionnez ensuite l’option de menu Stand Alone à l’aide des touches UP et DOWN et appuyez sur ENTER pour confirmer. Sélectionnez à nouveau le mode Stand Alone Color Preset avec les touches UP et DOWN et confirmez avec ENTER. Utiliser ensuite les touches UP et DOWN pour choisir la couleur souhaitée comme Preset et confirmer en appuyant sur ENTER (Off = Blackout, Speed fait référence a Jump et Fade). Vous pouvez régler la luminosité souhaitée entre 000 et 100 à l’aide des touches UP et DOWN. Appuyez sur ENTER pour confirmer.
--------Menu-------DMX AddressDMX ModeDMX DelayStand AloneSlaveSettingsSystem Info
----Stand Alone----AutoStaticColor PresetUser ColorLoop
----Color Preset----OffRedAmberYel WarmYellowGreenTurquoise
WhiteCold WhiteUVJumpFadeSpeed
0 - 100 0 - 1000 - 1000 - 1000 - 1000 - 100
ROOTPAR6
WhiteCold WhiteJumpFadeSpeed
ROOTPAR4
0 - 100 0 - 1000 - 1000 - 1000 - 100
0 - 100 0 - 1000 - 1000 - 1000 - 1000 - 100
CyanBlueLavenderMauveMagentaPinkWarm White
0 - 100 0 - 1000 - 1000 - 1000 - 1000 - 1000 - 100
MODE DE FONCTIONNEMENT STAND-ALONE USER COLORLe mode de Stand Alone User Color permet de sauvegarder directement dans l’appareil la luminosité générale, le stroboscope et un mélange de couleurs R, G, B et W ou R, G, B, W, A et UV dans quatre Presets de couleur personnalisés.À partir de l’écran principal, appuyer sur MODE pour accéder au menu principal. Sélection-nez ensuite l’option de menu Stand Alone à l’aide des touches UP et DOWN et appuyez sur ENTER pour confirmer. Utilisez de nouveau les touches UP et DOWN pour sélectionner le mode de fonctionnement Stand-Alone User Color et appuyez sur ENTER pour confirmer. Utilisez maintenant les touches UP et DOWN pour sélectionner le Preset souhaité (Color 1 - Color 4) et appuyer sur ENTER pour confirmer. Utiliser ensuite les touches UP et DOWN pour sélectionner l’option de menu à modifier et appuyer sur ENTER pour confirmer. Vous pouvez régler la valeur voulue à l’aide des touches UP et DOWN (entre 000 et 255). Les valeurs de l’effet stroboscopique correspondent aux valeurs du Canal 2 de la table DMX en Mode 1 4 CH. Pour valider, appuyer sur la touche ENTER.

68
DMX
ITALIANOPOLSKI
ESPAÑOLFRANCAIS
DEUTSCHENGLISH
--------Menu-------DMX AddressDMX ModeDMX DelayStand AloneSlaveSettingsSystem Info
----Stand Alone----AutoStaticColor PresetUser ColorLoop
-------Color x-------DimmerStrobeRedGreenBlueWhiteAmberUV
-------Color x-------DimmerStrobeRedGreenBlueWhite
0 - 2550 - 2550 - 2550 - 2550 - 2550 - 255
CLROOTPAR4 CLROOTPAR6
0 - 2550 - 2550 - 2550 - 2550 - 2550 - 2550 - 2550 - 255
----User Color----Color 1 |Color 4
MODE DE FONCTIONNEMENT STANDALONE LOOPLe mode de fonctionnement Stand-Alone Loop permet de concevoir, d’enregistrer et d’appeler individuellement jusqu’à quatre programmes différents de changement de couleurs. La lumino-sité, la durée des pas, la durée de fondu et le décalage (retard du signal) sont réglables séparé-ment.À partir de l’écran principal, appuyer sur MODE pour accéder au menu principal. Sélectionnez ensuite l’option de menu Stand Alone à l’aide des touches UP et DOWN et appuyez sur ENTER pour confirmer. Utilisez de nouveau les touches UP et DOWN pour sélectionner le mode de fonc-tionnement Stand-Alone Loop et appuyez sur ENTER pour confirmer. Utiliser ensuite les touches UP et DOWN pour sélectionner la Loop souhaitée (Loop 1 - Loop 4) et appuyer sur ENTER pour confirmer.
--------Menu-------DMX AddressDMX ModeDMX DelayStand AloneSlaveSettingsSystem Info
----Stand Alone----AutoStaticColor PresetUser ColorLoop
----Loop Mode----Loop 1 |Loop 4
---------Loop x---------DimmerSteptimeFadetimeDelay1.Step2.Step3.Step4.Step
0 - 1000.1s - 10.0s
0 % - 100 %0.0s - 2.0s
RedGreenBlack
-------
Vous accédez alors au sous-menu permettant de régler les options de sous-menu (voir tableau, sélectionner avec UP et DOWN, confirmer avec ENTER, modifier la valeur ou l’état avec UP et DOWN, confirmer avec ENTER). Les réglages sont effectués séparément pour chaque Loop et sont conservés même après le redémarrage de l’appareil.
ROOTPAR4
MODE DE FONCTIONNEMENT STAND-ALONE LOOP (Loop 1 - Loop 4)Dimmer Réglage de la luminosité 0 - 100Steptime Réglage de la durée du pas 0,1 s - 10,0 sFadetime Réglage de la durée de fondu en pourcentage 0 % - 100 %Delay Durée de décalage pour les groupes esclaves 0,0 s - 2,0 s1er Pas 15 couleurs de Color Preset Red - CW (Cold White)
4 couleurs de User Color User 1 - User 4Blackout Blackout

69
DMX
DEUTSC
HFRAN
CAIS
ESPAÑO
LEN
GLISH
ITALIANO
POLSKI
2ème Pas ” ”3ème Pas 15 couleurs de Color Preset Red - CW (Cold White)
4 couleurs de User Color User 1 - User 4Blackout Blackout------- Passer l'étape
4ème Pas ” ”
ROOTPAR6
MODE DE FONCTIONNEMENT STAND-ALONE LOOP (Loop 1 - Loop 4)Dimmer Réglage de la luminosité 0 - 100Steptime Réglage de la durée du pas 0,1 s - 10,0 sFadetime Réglage de la durée de fondu en pourcentage 0 % - 100 %Delay Durée de décalage pour les groupes esclaves 0,0 s - 2,0 s1er Pas 15 couleurs de Color Preset Red - CW (Cold White)
4 couleurs de User Color User 1 - User 4Lumière UV UVBlackout Blackout
2ème Pas ” ”3ème Pas 15 couleurs de Color Preset Red - CW (Cold White)
4 couleurs de User Color User 1 - User 4Lumière UV UVBlackout Blackout------- Passer l'étape
4ème Pas ” ”
MODE DE FONCTIONNEMENT SLAVEMode Slave standard : À partir de l’écran principal, appuyer sur MODE pour accéder au menu principal. Sélectionnez ensuite l’option de menu Slave à l’aide des touches UP et DOWN et appuyez sur ENTER pour confirmer, sélectionnez ensuite le groupe Slave 0 (Slave Group 0) et confirmez à nouveau avec ENTER. Reliez les unités Slave et Master (même modèle, même version logicielle) à l’aide d’un câble DMX. Sur l’unité Master, activez l’un des modes Stand-Alone propo-sés (Auto, Static, Color Preset, User Color, Loop). L’unité Slave suit maintenant exactement l’unité Master.
--------Menu-------DMX AddressDMX ModeDMX DelayStand AloneSlaveSettingsSystem Info
----Slave Group----Stand AloneSlaveSettings
Mode Slave0
Hauptanzeige

70
DMX
ITALIANOPOLSKI
ESPAÑOLFRANCAIS
DEUTSCHENGLISH
Fonctionnement Slave étendu : Si, en fonctionnement Master/Slave, vous voulez comman-der les unités Slave au moyen d’un des modes Stand-Alone Auto ou Loop, le signal de com-mande peut être reproduit avec un décalage temporel jusqu’à 15 pas (ROOTPAR4 : Slave Group 1 - 15, ROOTPAR6 : 1 - 13). Le décalage est réglé dans l’option de sous-menu Delay dans le mode Stand-Alone correspondant, le facteur de décalage dans le menu Slave du projecteur corres-pondant. Ainsi, un effet de chenillard peut être facilement créé avec un nombre quelconque de projecteurs du même modèle et de la même version de logiciel, ce qui autrement ne pourrait être réalisé qu’avec un contrôleur DMX approprié et une programmation complexe.
--------Menu-------DMX AddressDMX ModeDMX DelayStand AloneSlaveSettingsSystem Info
----Slave Group----Stand AloneSlaveSettings
----Slave Group----Stand AloneSlaveSettings
ModeSlaveGr 1 2.0s
CLROOTPAR4 CLROOTPAR6
1 - 15 1 - 13
Hauptanzeige mit Gruppennummer und Delay-Zeit in der
Master-Einheit
Assignez les appareils au choix à l’un des 15 groupes (ROOTPAR4 : Slave Group 1 - 15, ROOT-PAR6: 1 - 13), mais plusieurs appareils peuvent aussi être assignés à un même groupe. Le numé-ro de groupe est également le facteur par lequel la durée de décalage réglée dans l’unité Master est multipliée (voir exemple de configuration).
Mode Slave (esclave)
Unité maîtreAuto Program 1
Délai 0,5 s
Slave Group 0pas de délai
Slave Group 1Delay 0,5 s
Slave Group 2Delay 1 s
Slave Group 3Delay 1,5 s
Slave Group 4Delay 2 s
Slave Group 5Delay 2,5 s
Gr 1 0.5s Gr 2 0.5s Gr 3 0.5s
Gr 3 0.5s
Gr 3 0.5s
Gr 4 0.5s Gr 5 0.5s
Mode Slave
Mode Slave
Mode Slave
Mode Slave
Mode Slave
Mode Slave
Mode Slave
PARAMÈTRES DU SYSTÈME (Settings)À partir de l’écran principal, appuyer sur MODE pour accéder au menu principal. Avec les champs de commande UP et DOWN, sélectionner le point de menu Settings et confirmer avec ENTER.
--------Menu-------DMX AddressDMX ModeDMX DelayStand AloneSlaveSettingsSystem Info

71
DMX
DEUTSC
HFRAN
CAIS
ESPAÑO
LEN
GLISH
ITALIANO
POLSKI
Vous accédez alors au sous-menu permettant de régler les options de sous-menu (voir tableau, sélectionner avec UP et DOWN, confirmer avec ENTER, modifier la valeur ou l’état avec UP et DOWN, confirmer avec ENTER).
Paramètres
Disp Rev = Rotation de l’affi-chage de l'écran
No Pas de rotation de l’affichage
Yes Rotation à 180° des éléments affichés à l’écran (par ex. en cas de montage tête en bas)
Disp Back = Éclairage de l’écran
Off Désactivation au bout d’env. 30 sec-ondes d’inactivité
On Allumé en permanence
Sig Fail = État de fonction-nement en cas d'interruption du signal DMX
Hold Maintien de la dernière commande
Black Active la fonction Blackout
User 1 User Color 1 est activé
Sound = Réglage du mode de fonctionnement du pilotage par la musique
Last La couleur est maintenue jusqu'à la prochaine impulsion
Off La couleur disparaît après un moment, jusqu'à la prochaine impulsion
PWM = Fréquence du signal PWM de la LED
650 Hz / 1 530 Hz / 2 150 Hz / 4 000 Hz
Sélection de la fréquence du signal PWM de la LED
Calibration (CLROOT-PAR4)
= Étalonnage des couleurs
Red, Green, Blue, White
Étalonnage spécifique des couleurs. Réglage de la luminosité des 4 groupes de LED RGBW entre 0 et 255 (concerne tous les modes de fonctionnement)
Calibration (CLROOT-PAR6)
= Étalonnage des couleurs
Red, Green, Blue, White, Amber, UV
Étalonnage spécifique des couleurs. Réglage de la luminosité des 6 groupes de LED RGBWA+UV entre 0 et 255 (concerne tous les modes de fonctionnement)
IR Remote = Activer ou désacti-ver le pilotage par la télécommande infrarouge
On Active le pilotage par la télécommande infrarouge
Off Désactive le pilotage par la télécom-mande infrarouge
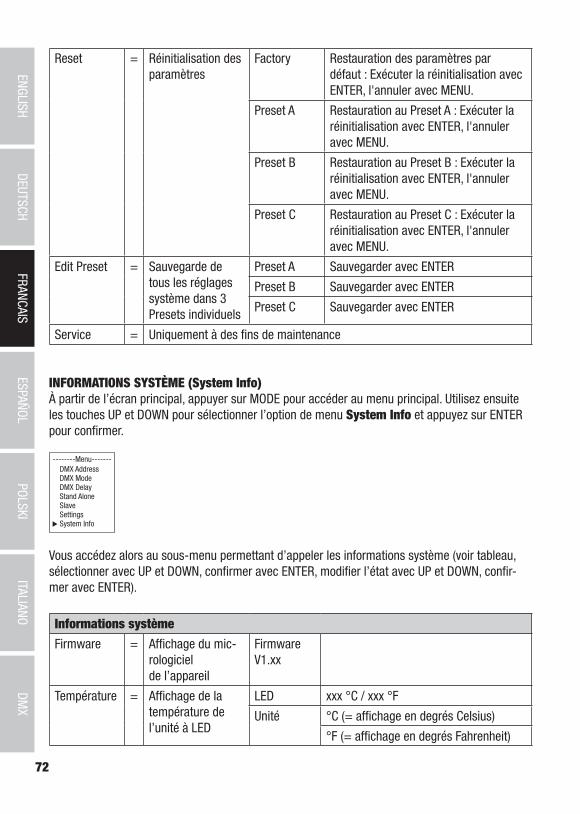
72
DMX
ITALIANOPOLSKI
ESPAÑOLFRANCAIS
DEUTSCHENGLISH
Reset = Réinitialisation des paramètres
Factory Restauration des paramètres par défaut : Exécuter la réinitialisation avec ENTER, l'annuler avec MENU.
Preset A Restauration au Preset A : Exécuter la réinitialisation avec ENTER, l'annuler avec MENU.
Preset B Restauration au Preset B : Exécuter la réinitialisation avec ENTER, l'annuler avec MENU.
Preset C Restauration au Preset C : Exécuter la réinitialisation avec ENTER, l'annuler avec MENU.
Edit Preset = Sauvegarde de tous les réglages système dans 3 Presets individuels
Preset A Sauvegarder avec ENTER
Preset B Sauvegarder avec ENTER
Preset C Sauvegarder avec ENTER
Service = Uniquement à des fins de maintenance
INFORMATIONS SYSTÈME (System Info)À partir de l’écran principal, appuyer sur MODE pour accéder au menu principal. Utilisez ensuite les touches UP et DOWN pour sélectionner l’option de menu System Info et appuyez sur ENTER pour confirmer.
--------Menu-------DMX AddressDMX ModeDMX DelayStand AloneSlaveSettingsSystem Info
Vous accédez alors au sous-menu permettant d’appeler les informations système (voir tableau, sélectionner avec UP et DOWN, confirmer avec ENTER, modifier l’état avec UP et DOWN, confir-mer avec ENTER).
Informations système
Firmware = Affichage du mic-rologiciel de l’appareil
Firmware V1.xx
Température = Affichage de la température de l’unité à LED
LED xxx °C / xxx °F
Unité °C (= affichage en degrés Celsius)
°F (= affichage en degrés Fahrenheit)

73
DMX
DEUTSC
HFRAN
CAIS
ESPAÑO
LEN
GLISH
ITALIANO
POLSKI
Op. Hours = Affichage de la durée de fonctionnement
xx:xxh Affichage de la durée de fonctionnement totale en heures et en minutes
TÉLÉCOMMANDE INFRAROUGE (en option)Diriger la télécommande infrarouge en contact visuel direct vers le capteur infrarouge situé sur la face avant du projecteur. Sa portée maximale est d’environ 8 mètres. En mode DMX et Slave (esclave), le capteur du projecteur est désactivé. La télécommande infrarouge contrôle direc-tement les modes Stand-Alone internes Auto / Sound, Static et Color Preset.
BL / ON/OFF (Blackout)Appuyez sur la touche BL pour éteindre toutes les LED (blackout), quel que soit le mode de fonctionnement actif contrôlé par la télécommande. Appuyer de nouveau sur la touche BL pour revenir au mode de fonctionnement activé précédemment.
SP (Speed)Réglage de la vitesse en 6 niveaux pour les programmes de changement de couleur Jump (Ju), Color Fading (Fa) et Auto Program (Au). Le niveau 1 déroule lentement la séquence de changement de couleur, appuyer une nouvelle fois sur la touche pour activer le niveau 2 et accélérer la séquence de changement de couleur, puis les niveaux 3, 4, 5 et 6, le niveau 6 représentant le déroulement le plus rapide de la séquence de changement de couleur.
(Brightness)Réglage de la luminosité globale sur 6 niveaux. La sélection des différents niveaux de luminosité disponibles s’effectue en appuyant plusieurs fois sur cette touche (niveau 1 = Blackout)
FL (Flash / Stroboscope)Réglage de la vitesse de l’effet stroboscopique en 6 niveaux. Le niveau 1 désactive l’effet strobos-copique, le niveau 2 génère une fréquence lente suivie des niveaux 3 à 5. Le niveau 6 génère la fréquence de flash la plus rapide. L’effet stroboscope ne peut être utilisé qu’en mode mélange de couleurs RGBW(A+UV).
R / G / B / W (A et UV uniquement modèle CLROOTPAR6, CW et WW sans fonction)Utilisez ces 4 (6) touches pour paramétrer individuellement les mélanges de couleur. Les 6 niveaux de luminosité sont appelés en appuyant plusieurs fois sur la touche de couleur corres-pondante, sachant qu’au niveau 1, les LED sont éteintes. Exemple : Si vous réglez le rouge et le

74
DMX
ITALIANOPOLSKI
ESPAÑOLFRANCAIS
DEUTSCHENGLISH
vert au niveau le plus élevé et les autres LED au niveau le plus bas, c’est-à-dire éteintes, vous obtiendrez un mélange de couleurs jaune vif.
Ju (changement de couleurs)Le changement de couleurs se fait par sauts (Color Jumping). La vitesse à laquelle les couleurs changent peut être réglée à l’aide de la touche SP (Speed).
Fa (fondus de couleurs)Les couleurs sont fondues l’une dans l’autre (Color Fading). La vitesse à laquelle les couleurs changent peut être réglée à l’aide de la touche SP (Speed).
Au (mode automatique)Sélectionnez le programme de changement de couleurs souhaité Auto 1 - 6 en appuyant plusieurs fois sur la touche Au.
Su (séquence de changement de couleur pilotée par la musique)Sélectionnez l’un des 6 programmes pilotés par la musique Sound 1 - 6 en appuyant plusieurs fois sur la touche Su. Le microphone pour le pilotage se trouve au dos du projecteur.
CM (macros de couleurs)Quinze presets de couleurs (ou seize pour ROOTPAR6) qui peuvent être rappelés en séquence à l’aide des touches CM+ et CM-.
Pr+ / Pr- Sélection de programmes en mode Automatique (Au) et pilotage par la musique (Su).
INSTALLATION ET MONTAGEGrâce à l’étrier double confortable, le projecteur peut être placé à un endroit approprié sur une surface plane. Le montage sur traverse s’effectue à l’aide d’un dispositif de serrage spécifique fixé sur l’étrier de montage (A). Des pinces de serrage sur traverse adaptées sont disponibles en option. Veiller à ce que l’assemblage soit bien serré et sécuriser le projecteur en insérant un câble de retenue adapté dans l’œillet de sécurité au dos du projecteur.
DANGER : Le montage tête en bas requiert des compétences poussées, notamment pour le calcul des valeurs limites pour la charge de service, le matériel d’installation utilisé et le contrôle de sécurité effectué régulièrement sur l’ensemble du matériel d’installation et sur le projecteur. Sans les qualifications requises, ne pas essayer d’effectuer soi-même l’installation, mais faire appel à une entreprise professionnelle. Des appareils mal montés et mal fixés risquent de se détacher et de tomber. Cela peut causer des blessures graves voire mortelles.

75
DMX
DEUTSC
HFRAN
CAIS
ESPAÑO
LEN
GLISH
ITALIANO
POLSKI
A
B B
Pour obtenir un aspect plus discret lors de l’utilisation en Uplight, le double étrier de montage peut être retiré en desserrant les deux vis-poignées (B).

76
DMX
ITALIANOPOLSKI
ESPAÑOLFRANCAIS
DEUTSCHENGLISH
ENTRETIEN, MAINTENANCE ET RÉPARATIONPour garantir le bon fonctionnement de l’appareil sur la durée, l’entretien et la maintenance doivent être effectués régulièrement, au moins toutes les 3000 heures de service, ou au plus tard à la fin de l’année.
ENTRETIEN (exécutable par l’utilisateur)
AVERTISSEMENT ! L’alimentation électrique et, si possible, toutes les connexions de l’appareil doivent être débranchées avant toute opération d’entretien/maintenance.
REMARQUE ! Un entretien incorrect peut endommager le dispositif, voire le détruire.
1. Les surfaces du boîtier doivent être nettoyées avec un chiffon propre et humide. Veille à empê-cher l’infiltration d’humidité dans l’appareil.
2. La poussière et la saleté doivent être régulièrement éliminées des entrées et des sorties d’air. Si de l’air comprimé est utilisé, fais attention à ne pas endommager l’appareil (dans ce cas, les ventilateurs doivent être bloqués, sinon ils risquent de tourner trop vite).
3. Les câbles et les contacts enfichables doivent être nettoyés régulièrement et la poussière et la saleté doivent être éliminées.
4. En règle générale, aucun agent de nettoyage ou abrasif ne peut être utilisé pour l’entretien de l’appareil, car cela pourrait abîmer la finition de surface.
5. En général, les appareils doivent être stockés dans un endroit sec et à l’abri de la poussière et de la saleté.
6. Toutes les lentilles accessibles ou amovibles et les ouvertures émettant de la lumière doivent être nettoyées régulièrement pour garantir un fonctionnement correct et sûr.
MAINTENANCE ET RÉPARATION (uniquement par du personnel qualifié)
DANGER ! L’appareil renferme des composants sous tension. Même après la décon-nexion du réseau, il peut subsister une tension résiduelle dans l’appareil, p. ex. à cause de condensateurs chargés.
REMARQUE ! L’appareil ne contient aucun élément nécessitant un entretien par l’utilisa-teur.
REMARQUE ! Les travaux de maintenance et de réparation ne doivent être effectués que par du personnel spécialisé et suffisamment qualifié. En cas de doute, adressez-vous à un atelier spécialisé.
REMARQUE ! Des travaux d’entretien effectués de manière non conforme peuvent affecter le droit à la garantie.
REMARQUE ! Pour les kits de transformation ou de postéquipement prévus par le fabri-cant, respectez impérativement la notice de montage jointe.

77
DMX
DEUTSC
HFRAN
CAIS
ESPAÑO
LEN
GLISH
ITALIANO
POLSKI
TECHNIQUE DMX
DMX-512Le terme DMX (Digital Multiplex) désigne un protocole de transport universel permettant la communication entre des appareils et des contrôleurs à ce format. Un contrôleur DMX envoie des données DMX aux appareils DMX qui lui sont connectés. Les données DMX sont transportées sous forme d‘un flux série, renvoyé d‘un ap-pareil au suivant via des connecteurs XLR repérés „DMX IN“ et „DMX OUT“. Le nombre total d‘appareils ainsi connectés ne doit pas dépasser 32. Le dernier appareil de la chaîne doit posséder une résistance de terminaison (Terminator).
PROTOCOLE DMXIl s‘agit d‘un langage universel, permettant d‘interconnecter des appareils DMX de type différents, de marques différentes, et de tous les piloter depuis un contrôleur DMX central. Pour un transport optimal des données, il est recommandé d‘utiliser les câbles les plus courts possibles pour inter-connecter les appareils. L‘ordre dans lequel les différents appareils sont connectés au sein d‘un réseau DMS n‘a aucune influence sur l‘adressage. Autrement dit, vous pouvez placer l‘appareil possédant l‘adresse DMX 1 où vous le désirez dans la chaîne DMX : au début, à la fin, au milieu... Si un appareil s‘est vu affecter l‘adresse DMX 1, le contrôleur „sait“ qu‘il doit lui envoyer toutes les données destinées à l‘adresse 1, quelle que soit la position dudit appareil dans la chaîne DMX.
CONNEXION EN SÉRIE DE PLUSIEURS PROJECTEURS1. Reliez la fiche XLR mâle (3 ou 5 points) du câble DMX à la sortie DMX (embase XLR femelle) du
premier appareil DMX (par exemple, un contrôleur DMX).2. Reliez le connecteur XLR femelle du câble DMX relié au premier projecteur à l‘entrée DMX
(connecteur XLR mâle) de l‘appareil DMX suivant. Reliez la sortie DMX de cet appareil, selon le même méthode, à l‘entrée DMX de l‘appareil DMX suivant, et ainsi de suite. Veillez à ce que tous les appareils DMX soient reliés en série, et n‘oubliez pas que les liaisons ne peuvent être partagées sans utiliser de splitter actif. Ne pas dépasser le nombre maximal d‘appareils par chaîne DMX, soit 32.
Vous trouverez un choix complet de câbles compatibles DMX dans les gammes Adam Hall 3 STAR, 4 STAR et 5 STAR. Si vous fabriquez vous-mêmes vos câbles, respectez les modalités de câblage DMX. En particulier : Ne reliez jamais le blindage du câble à la masse du connecteur, et vérifiez bien qu‘en aucun cas le blindage du câble n‘entre en contact avec le corps du connecteur XLR. Si le blindage entre en contact avec la masse, cela peut provoquer des courts-circuits et des défaillances système.

78
DMX
ITALIANOPOLSKI
ESPAÑOLFRANCAIS
DEUTSCHENGLISH
ASSIGNATION DES CONTACTSCâble DMX avec connecteurs XLR 3 points : Câble DMX avec connecteurs XLR 5 points (les points 4 et 5 ne sont pas câblés):
Shield
23
1
23
1
123
45
12
34
5
Shield
Pour éviter tout dysfonctionnement, le dernier appareil d‘une chaîne DMX doit être équipé d‘une résis-tance de terminaison (120 Ohms, 1/4 Watt).Connecteur XLR 3 points avec résistance de terminaison : K3DMXT3Connecteur XLR 5 points avec résistance de terminaison : K3DMXT5
ASSIGNATION DES CONTACTSConnecteur XLR 3 points Connecteur XLR 5 points
23
1
12
34
5
Pour utiliser des appareils DMX munis de connecteurs 3 points avec des appareils DMX munis de connecteurs 5 points, il faut utiliser un adaptateur.
ASSIGNATION DES CONTACTSAdaptateur XLR 5 points mâle vers XLR 3 points femelle K3DGF0020Les points 4 et 5 ne sont pas connectés.
ASSIGNATION DES CONTACTSAdaptateur XLR 3 points mâle vers XLR 5 points femelle K3DHM0020Les points 4 et 5 ne sont pas connectés.
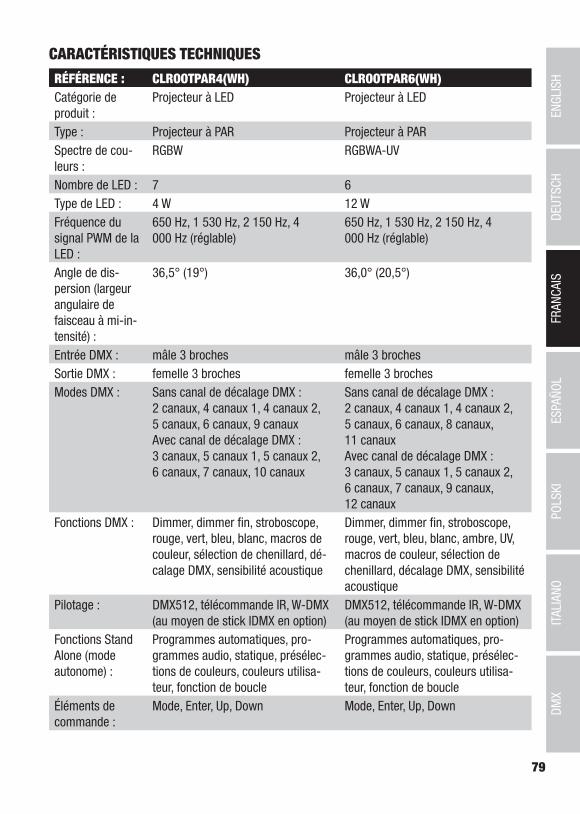
79
DMX
DEUTSC
HFRAN
CAIS
ESPAÑO
LEN
GLISH
ITALIANO
POLSKI
CARACTÉRISTIQUES TECHNIQUES
RÉFÉRENCE : CLROOTPAR4(WH) CLROOTPAR6(WH)Catégorie de produit :
Projecteur à LED Projecteur à LED
Type : Projecteur à PAR Projecteur à PARSpectre de cou-leurs :
RGBW RGBWA-UV
Nombre de LED : 7 6Type de LED : 4 W 12 WFréquence du signal PWM de la LED :
650 Hz, 1 530 Hz, 2 150 Hz, 4 000 Hz (réglable)
650 Hz, 1 530 Hz, 2 150 Hz, 4 000 Hz (réglable)
Angle de dis-persion (largeur angulaire de faisceau à mi-in-tensité) :
36,5° (19°) 36,0° (20,5°)
Entrée DMX : mâle 3 broches mâle 3 brochesSortie DMX : femelle 3 broches femelle 3 brochesModes DMX : Sans canal de décalage DMX :
2 canaux, 4 canaux 1, 4 canaux 2, 5 canaux, 6 canaux, 9 canauxAvec canal de décalage DMX : 3 canaux, 5 canaux 1, 5 canaux 2, 6 canaux, 7 canaux, 10 canaux
Sans canal de décalage DMX : 2 canaux, 4 canaux 1, 4 canaux 2, 5 canaux, 6 canaux, 8 canaux, 11 canauxAvec canal de décalage DMX : 3 canaux, 5 canaux 1, 5 canaux 2, 6 canaux, 7 canaux, 9 canaux, 12 canaux
Fonctions DMX : Dimmer, dimmer fin, stroboscope, rouge, vert, bleu, blanc, macros de couleur, sélection de chenillard, dé-calage DMX, sensibilité acoustique
Dimmer, dimmer fin, stroboscope, rouge, vert, bleu, blanc, ambre, UV, macros de couleur, sélection de chenillard, décalage DMX, sensibilité acoustique
Pilotage : DMX512, télécommande IR, W-DMX (au moyen de stick IDMX en option)
DMX512, télécommande IR, W-DMX (au moyen de stick IDMX en option)
Fonctions Stand Alone (mode autonome) :
Programmes automatiques, pro-grammes audio, statique, présélec-tions de couleurs, couleurs utilisa-teur, fonction de boucle
Programmes automatiques, pro-grammes audio, statique, présélec-tions de couleurs, couleurs utilisa-teur, fonction de boucle
Éléments de commande :
Mode, Enter, Up, Down Mode, Enter, Up, Down
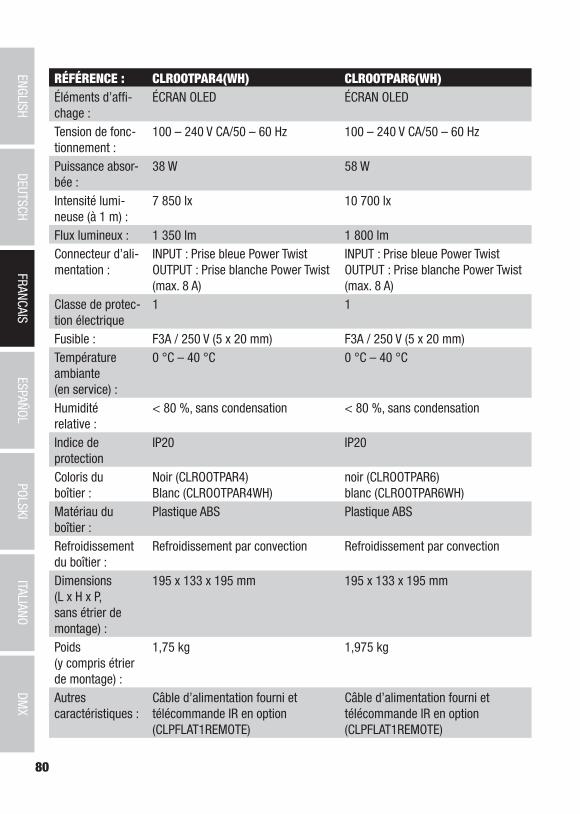
80
DMX
ITALIANOPOLSKI
ESPAÑOLFRANCAIS
DEUTSCHENGLISH
RÉFÉRENCE : CLROOTPAR4(WH) CLROOTPAR6(WH)Éléments d’affi-chage :
ÉCRAN OLED ÉCRAN OLED
Tension de fonc-tionnement :
100 – 240 V CA/50 – 60 Hz 100 – 240 V CA/50 – 60 Hz
Puissance absor-bée :
38 W 58 W
Intensité lumi-neuse (à 1 m) :
7 850 lx 10 700 lx
Flux lumineux : 1 350 lm 1 800 lmConnecteur d’ali-mentation :
INPUT : Prise bleue Power Twist OUTPUT : Prise blanche Power Twist (max. 8 A)
INPUT : Prise bleue Power Twist OUTPUT : Prise blanche Power Twist (max. 8 A)
Classe de protec-tion électrique
1 1
Fusible : F3A / 250 V (5 x 20 mm) F3A / 250 V (5 x 20 mm)Température ambiante (en service) :
0 °C – 40 °C 0 °C – 40 °C
Humidité relative :
< 80 %, sans condensation < 80 %, sans condensation
Indice de protection
IP20 IP20
Coloris du boîtier :
Noir (CLROOTPAR4) Blanc (CLROOTPAR4WH)
noir (CLROOTPAR6) blanc (CLROOTPAR6WH)
Matériau du boîtier :
Plastique ABS Plastique ABS
Refroidissement du boîtier :
Refroidissement par convection Refroidissement par convection
Dimensions (L x H x P, sans étrier de montage) :
195 x 133 x 195 mm 195 x 133 x 195 mm
Poids (y compris étrier de montage) :
1,75 kg 1,975 kg
Autres caractéristiques :
Câble d’alimentation fourni et télécommande IR en option (CLPFLAT1REMOTE)
Câble d’alimentation fourni et télécommande IR en option (CLPFLAT1REMOTE)

81
DMX
DEUTSC
HFRAN
CAIS
ESPAÑO
LEN
GLISH
ITALIANO
POLSKI
MISE AU REBUTEmballage
1. Les emballages peuvent être amenés au circuit de recyclage via les voies de collecte habituelles.
2. Veuillez trier l’emballage conformément à la législation sur l’élimination des déchets et à la réglementation sur les matériaux recyclables de votre pays.
Appareil :
1. Cet appareil est soumis à la directive européenne sur les déchets d’équipements électriques et électroniques dans sa version actuelle. Directive DEEE Déchets d’équi-pements électriques et électroniques. Les appareils usagés ne doivent pas être jetés avec les ordures ménagères. L’appareil usagé doit être éliminé par une entreprise d’élimination des déchets agréée ou par un organisme communal de traitement des déchets. Veuillez respecter les réglementations en vigueur dans votre pays !
2. Veillez à respecter la législation relative à l’élimination des déchets en vigueur dans votre pays.
3. En tant que particulier, vous obtiendrez des informations sur les possibilités de mise au rebut respectueuses de l’environnement en vous rapprochant de la boutique dans laquelle vous avez acheté le produit ou des autorités régionales compétentes.
DÉCLARATIONS DU FABRICANTGARANTIE DU FABRICANT ET LIMITATION DE RESPONSABILITÉAdam Hall GmbH, Adam-Hall-Str. 1, D-61267 Neu Anspach, Allemagne / E-mail [email protected] / +49 (0)6081/9419-0.Vous trouverez nos conditions de garantie et nos clauses de limitation de responsabilité actuelles sur Internet à l’adresse suivante :https://cdn-shop.adamhall.com/media/pdf/Manufacturers-Declarations-CAMEO_DE_EN_ES_FR.pdf.En cas de panne, contactez votre partenaire commercial.
CONFORMITÉ CEPar la présente, Adam Hall GmbH déclare que ce produit est conforme aux directives suivantes (si applicables) : R&TTE (1999/5/CE) ou RED (2014/53/UE) à partir de juin 2017Directive basse tension (2014/35/UE) Directive CEM (2014/30/UE)RoHS (2011/65/UE)Vous trouverez la déclaration de conformité complète sur Internet à l’adresse www.adamhall.com. Vous pouvez en outre la demander par courrier électronique à l’adresse [email protected].
SOUS RÉSERVE DE FAUTES D’IMPRESSION ET D’ERREURS, AINSI QUE DE MODIFICATIONS TECHNIQUES OU AUTRES !

82
DMX
ITALIANOPOLSKI
ESPAÑOLFRANCAIS
DEUTSCHENGLISH
ESPAÑOL
¡GRACIAS POR ELEGIR CAMEO LIGHT!Este equipo está diseñado y fabricado con los estándares de calidad más exigentes, para garan-tizar un correcto funcionamiento durante muchos años.Lea atentamente este manual de usuario para poder aprovechar rápidamente toda la funcionalidad de su nuevo producto de Cameo Light. Más información sobre Cameo Light en la web WWW.CAMEOLIGHT.COM.
USO PREVISTO Este producto es un equipo de tecnología para eventos.El producto ha sido desarrollado para un uso profesional en el sector de la tecnología para eventos y no es apto para el uso doméstico.Además, este producto solo está previsto para su utilización por parte de usuarios cualificados con conocimientos sobre tecnología para eventos.La utilización del producto para aplicaciones más allá de los datos técnicos y las condiciones de servicio especificados se considera fuera del uso previsto.Queda excluida toda responsabilidad por daños y perjuicios a personas y objetos si se utiliza el producto fuera del uso previsto.
El producto no es adecuado para: - personas (incluidos niños) con capacidades físicas, sensoriales o mentales reducidas o sin la
experiencia y los conocimientos necesarios;- niños (se debe advertir a los niños que no jueguen con el equipo).
INSTRUCCIONES DE SEGURIDAD- Lea y siga atentamente estas instrucciones para evitar posibles daños.- Conserve toda la información y el manual de instrucciones en un lugar seguro.- Respete todas las advertencias. No elimine las instrucciones de seguridad ni ninguna otra
información indicadas en el equipo. Términos y símbolos
TÉRMINOS Y SÍMBOLOS1. PELIGRO: La palabra «PELIGRO», que puede ir acompañada de un símbolo, se utiliza para
indicar situaciones o estados de peligro inminente para la vida o la integridad física.
2. ADVERTENCIA: La palabra «ADVERTENCIA», que puede ir acompañada de un símbolo, indica situaciones o estados potencialmente peligrosos para la vida o la integridad física de las personas
3. PRECAUCIÓN: La palabra «PRECAUCIÓN», que puede ir acompañada de un símbolo, indica situaciones o estados que pueden provocar lesiones.
4. ATENCIÓN: La palabra «ATENCIÓN», que puede ir acompañada de un símbolo, indica situaciones o estados que pueden provocar daños materiales o medioambientales.

83
DMX
DEUTSC
HFRAN
CAIS
ESPAÑO
LEN
GLISH
ITALIANO
POLSKI
Este símbolo indica peligro eléctrico.
Este símbolo indica un peligro general.
Este símbolo señala peligro por superficies calientes.
Este símbolo señala peligro debido a fuentes de luz intensas.
Este símbolo señala información complementaria sobre el uso del producto.
PELIGRO:1. No abrir el interior del equipo ni modificarlo.
2. Apagar inmediatamente el equipo y desconectarlo de la red eléctrica si deja de funcionar correctamente o si penetrara algún líquido u otro objeto en su interior o si el equipo sufriera cualquier otro tipo de daño. Este equipo debe repararlo exclusiva-mente personal especializado y autorizado.
3. Los dispositivos con clase de protección 1 deben tener la conexión a tierra correc-tamente conectada. No interrumpir nunca la conexión a tierra. Los dispositivos de la clase de protección 2 no disponen de conexión a tierra.
4. Procurar que los cables con tensión no se doblen ni sufran daños mecánicos.
5. No puentear nunca el fusible del equipo.
ADVERTENCIA:1. No utilizar el equipo si presenta daños evidentes.
2. El equipo solo se puede instalar estando sin tensión.
3. Si el cable de alimentación del equipo está dañado, el equipo no debe utilizarse.
4. Los cables de alimentación fijos solo pueden ser sustituidos por una persona cualificada.
ATENCIÓN:1. No poner en marcha el equipo si ha estado sometido a fuertes fluctuaciones de tem-
peratura (por ejemplo, tras su transporte). La humedad y el agua condensada pueden dañar el equipo. Encender el equipo únicamente después de que su temperatura haya alcanzado la temperatura ambiente.
2. Asegurarse de que la tensión y la frecuencia de la red eléctrica coincidan con los va-lores indicados en el equipo. Si el equipo dispone de un selector de tensión, ajustarlo

84
DMX
ITALIANOPOLSKI
ESPAÑOLFRANCAIS
DEUTSCHENGLISH
bien antes de conectar el equipo a la toma de corriente. Utilizar únicamente cables de alimentación adecuados.
3. Para desconectar totalmente el equipo de la red, no basta con accionar el interruptor de encendido/apagado del equipo.
4. Hay que asegurarse de que el fusible utilizado coincida con el tipo de fusible indicado en el equipo.
5. Hay que asegurarse de que se hayan tomado las medidas adecuadas para evitar cualquier sobretensión (p. ej., en caso de rayos).
6. Tener en cuenta la corriente de salida máxima en los equipos con conexión de salida de alimentación. Comrobar que el consumo eléctrico total de todos los equipos conectados no supere el valor predeterminado.
7. Sustituir los cables de alimentación enchufables únicamente por cables equivalentes al cable original suministrado. La sección transversal no debe ser inferior a la sección transversal del cable original.
PELIGRO:1. ¡Peligro de asfixia! Las bolsas de plástico y las piezas pequeñas deben guardarse
fuera del alcance de las personas (incluidos los niños) con capacidades físicas, sensoriales o mentales reducidas.
2. ¡Peligro por caída! Comprobar que el equipo esté instalado de forma segura y no pue-da caerse. Utilizar exclusivamente soportes o fijaciones adecuados (especialmente en instalaciones fijas). Asegurarse de que los accesorios estén correctamente instalados y fijados. Hay que cumplir las disposiciones de seguridad vigentes.
ADVERTENCIA:1. Utilizar el equipo únicamente de la forma prevista.
2. Utilizar el equipo solo con los accesorios previstos y recomendados por el fabricante.
3. Durante la instalación, hay que tener en cuenta los reglamentos de seguridad vigentes en su país.
4. Una vez conectado el equipo, revisar todo el cableado para evitar daños o accidentes debidos, por ejemplo, a caídas por tropiezos.
5. Hay que tener en cuenta la distancia mínima especificada a materiales inflamables normales. A menos que se indique explícitamente otra, la distancia mínima es de 0,3 m.
6. Hay que tener siempre en cuenta la distancia mínima con la superficie iluminada indicada en el equipo.
¡PRECAUCIÓN!1. Las piezas móviles, como los soportes de montaje u otras piezas, pueden quedarse
atascadas.

85
DMX
DEUTSC
HFRAN
CAIS
ESPAÑO
LEN
GLISH
ITALIANO
POLSKI
2. En equipos con componentes motorizados, existe peligro de lesiones por el movimiento del equipo. Los movimientos repentinos del equipo pueden provocar una reacción brusca.
3. La superficie de la carcasa del equipo puede calentarse mucho durante su funciona-miento normal. Evitar el contacto accidental con la carcasa. Esperar siempre hasta que el equipo se haya enfriado lo suficiente antes de desmontarlo, realizar trabajos de mantenimiento, cargarlo u otras manipulaciones.
ATENCIÓN:1. No instalar ni poner a funcionar el equipo cerca de radiadores, acumuladores
térmicos, hornos u otras fuentes de calor. Asegurarse de que el equipo siempre esté instalado de modo que reciba suficiente refrigeración y no pueda sobrecalentarse.
2. No colocar cerca del equipo ninguna fuente de ignición como, por ejemplo, velas encendidas.
3. No cubrir las aberturas de ventilación ni obstruir los ventiladores.
4. Para el transporte, utilizar el embalaje original o el embalaje indicado por el fabricante.
5. Evitar sacudir o golpear el equipo.
6. Tener en cuenta el tipo de protección IP, así como las condiciones ambientales, como la temperatura y la humedad, de acuerdo con las especificaciones.
7. Los equipos se desarrollan constantemente. Si los datos de funcionamiento,potencia u otras características del equipo del manual de instrucciones no coinciden con la etiqueta del equipo, es importante dar prioridad a lo indicado en el equipo.
8. El equipo no es apto para climas tropicales ni para su uso por encima de los 2000 m sobre el nivel del mar.
9. El equipo no es apto para el uso en condiciones marinas.
¡PRECAUCIÓN! INSTRUCCIONES IMPORTANTES EN RELACIÓN CON LOS PRODUC-TOS DE ILUMINACIÓN
1. Nunca mirar directamente, ni siquiera un instante, a la fuente de luz.
2. Nunca mirar la fuente de luz mediante equipos ópticos, como lentes de aumento.
3. ¡Los efectos de estrobo pueden provocar ataques epilépticos en personas sensibles!
4. Este foco cuenta con una lámpara fija que no debe reemplazar el usuario. En caso de fallo, póngase en contacto con el distribuido.

86
DMX
ITALIANOPOLSKI
ESPAÑOLFRANCAIS
DEUTSCHENGLISH
INFORMACIÓN SOBRE DISPOSITIVOS PORTÁTILES PARA EXTERIORES 1. Funcionamiento temporal. En principio, los equipos para eventos están diseñados
solo para un funcionamiento temporal.
2. El funcionamiento continuo o la instalación permanente puede prerjudicar el funcio-namiento y provocar un envejecimiento prematuro del equipo.
INTRODUCCIÓN7 FOCOS PAR RGBW DE 4 WCLROOTPAR4 (carcasa negra)CLROOTPAR4WH (carcasa blanca)
6 FOCOS PAR RGBWA+UV DE 12 WCLROOTPAR6 (carcasa negra)CLROOTPAR6WH (CARCASA BLANCA)
FUNCIONES DE CONTROLCLROOTPAR4Modos operativos DMX sin canal de DMX Delay: Control DMX de 2 canales, 4 canales 1, 4 canales 2, 5 canales, 6 canales y 9 canalesModos operativos DMX con canal de DMX Delay: Control DMX de 3 canales, 5 canales 1, 5 cana-les 2, 6 canales, 7 canales y 10 canalesCLROOTPAR6Modos operativos DMX sin canal de DMX Delay: Control DMX de 2 canales, 4 canales 1, 4 canales 2, 5 canales, 6 canales, 8 canales y 11 canalesModos operativos DMX con canal de DMX Delay: Control DMX de 3 canales, 5 canales 1, 5 cana-les 2, 6 canales, 7 canales, 9 canales y 12 canales
Modo maestro/esclavoFunciones autónomasControlables mediante mando a distancia por infrarrojos (mando a distancia por infrarrojos opcional)Conexión W-DMX mediante stick iDMX opcional
CARACTERÍSTICASConexiones DMX de 3 pines. Entrada y salida de alimentación con conectores Power Twist. Pan-talla OLED. Frecuencia ajustable de la modulación por ancho de pulsos (PWM). Puerto para stick iDMX. Refrigeración por convección. Tornillo de inclinación. Soporte doble de montaje incluido. Tensión operativa: 100-240 V CA.
CLROOTPAR47 LED RGBW de 4 W. Consumo de potencia: 38 W
CLROOTPAR66 LED RGBWA+UV de 12 W. Consumo de potencia: 58 W

87
DMX
DEUTSC
HFRAN
CAIS
ESPAÑO
LEN
GLISH
ITALIANO
POLSKI
CONEXIONES, ELEMENTOS DE MANEJO Y ELEMENTOS DE VISUALIZACIÓN
Los modelos CLROOTPAR4 y CLROOTPAR6 disponen de conexiones y elementos de mando y visualización idénticos
1 POWER INToma de entrada de alimentación Power Twist azul. Tensión operativa: 100-240 V CA / 50-60 Hz. El volumen de suministro incluye un cable de alimentación adecuado con conector Power Twist.
2 POWER OUTToma de salida de alimentación Power Twist blanca para la alimentación eléctrica de otros focos Cameo (máx. 8 A).
3 DMX INConector XLR macho de 3 pines para conectar un equipo de control DMX (por ejemplo, una mesa DMX).
4 DMX OUTConector XLR hembra de 3 pines para transmitir la señal de control DMX.
5 FUSEPortafusibles para fusibles sensibles de 5 x 20 mm. NOTA IMPORTANTE: El fusible deberá sus-tituirse exclusivamente por otro del mismo tipo y con las mismas características técnicas. Si el fusible salta de forma recurrente, diríjase a un centro de servicio técnico autorizado.
6 PANTALLA OLEDLa pantalla OLED muestra el modo operativo activado actualmente (pantalla principal), las opcio-nes del menú de selección y el valor numérico o el estado operativo en determinadas opciones del menú. Si no se detecta ninguna actividad durante unos dos minutos, la indicación en pantalla cambia automáticamente a la pantalla principal. Aviso sobre la pantalla principal en los modos operativos con control externo: en el momento en que se interrumpe la señal de control, los caracteres de la pantalla comienzan a parpadear. Dejarán de hacerlo al restablecerse la señal de
1
4 3
2
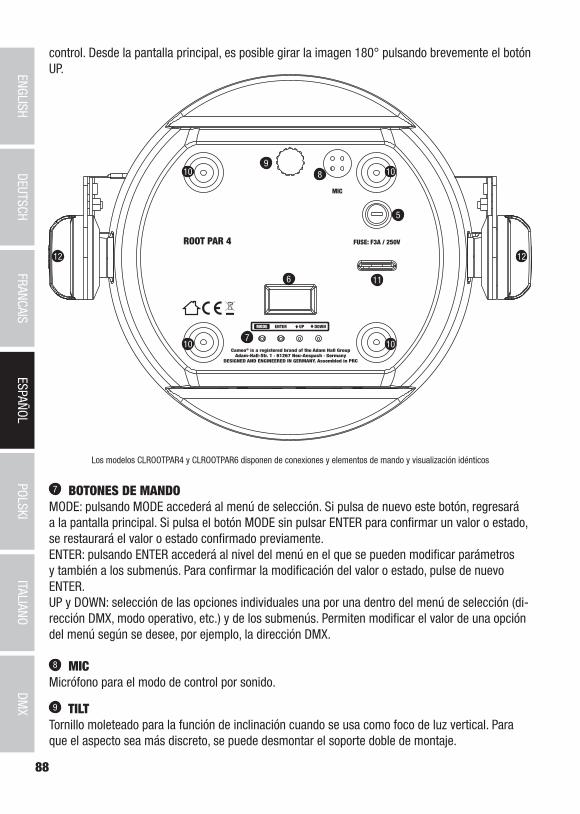
88
DMX
ITALIANOPOLSKI
ESPAÑOLFRANCAIS
DEUTSCHENGLISH
control. Desde la pantalla principal, es posible girar la imagen 180° pulsando brevemente el botón UP.
MIC
5
6
7
11
89
10
10
10
10
12 12
Los modelos CLROOTPAR4 y CLROOTPAR6 disponen de conexiones y elementos de mando y visualización idénticos
7 BOTONES DE MANDOMODE: pulsando MODE accederá al menú de selección. Si pulsa de nuevo este botón, regresará a la pantalla principal. Si pulsa el botón MODE sin pulsar ENTER para confirmar un valor o estado, se restaurará el valor o estado confirmado previamente.ENTER: pulsando ENTER accederá al nivel del menú en el que se pueden modificar parámetros y también a los submenús. Para confirmar la modificación del valor o estado, pulse de nuevo ENTER.UP y DOWN: selección de las opciones individuales una por una dentro del menú de selección (di-rección DMX, modo operativo, etc.) y de los submenús. Permiten modificar el valor de una opción del menú según se desee, por ejemplo, la dirección DMX.
8 MICMicrófono para el modo de control por sonido.
9 TILTTornillo moleteado para la función de inclinación cuando se usa como foco de luz vertical. Para que el aspecto sea más discreto, se puede desmontar el soporte doble de montaje.

89
DMX
DEUTSC
HFRAN
CAIS
ESPAÑO
LEN
GLISH
ITALIANO
POLSKI
10 APOYOS DE GOMACuatro apoyos de goma para mayor estabilidad.
11 ANILLA DE SEGURIDADAnilla de seguridad para fijar el foco si se monta en travesaño.
12 TORNILLOS DE MANEJOAmbos tornillos de manejo sirven para regular y fijar el soporte de apoyo o de montaje.
PUERTO PARA CONEXIÓN W-DMX™El puerto USB-A para el stick iDMX opcional se encuentra en el lado opuesto al panel de conexión del foco.
FUNCIONAMIENTOOBSERVACIONES• En cuanto el foco esté correctamente conectado a la red eléctrica, durante el proceso de
arranque se mostrarán de forma consecutiva en pantalla el mensaje «Welcome to Cameo» (Bienvenidos a Cameo), así como la denominación de modelo y la versión del software. Tras este procedimiento, el foco estará listo para funcionar y se activará en el último modo operativo empleado.
• Para acceder directamente a la pantalla principal desde los niveles inferiores del menú, man-tenga pulsado el botón MODE unos 2 segundos. Tras unos dos minutos de inactividad se vuelve automáticamente a la pantalla principal. Pulse MODE brevemente para subir un nivel desde cualquier submenú.
• Para acceder directamente a la última opción modificada del menú, pulse MODE y ENTER brevemente al mismo tiempo.
• Desde la pantalla principal, es posible girar la imagen 180° pulsando brevemente el botón UP.
• Para modificar un valor rápidamente (p. ej., la dirección de inicio DMX), mantenga pulsado el botón UP o DOWN.
PANTALLA PRINCIPAL DEL MODO DMXEn la pantalla se muestra DMX Address y la dirección inicial DMX ajustada actualmente (en el ejemplo, 001). Si está activada la función DMX Delay, también se muestra el grupo de Delay y el tiempo de Delay.
PANTALLA PRINCIPAL DEL MODO AUTÓNOMOEn la pantalla se muestra el modo autónomo activado actualmente (Mode Auto, Mode Sound, Mode Static, Mode Color Preset, Mode User Color, Mode Loop).

90
DMX
ITALIANOPOLSKI
ESPAÑOLFRANCAIS
DEUTSCHENGLISH
ModeAuto
ModeSound
ModeStatic
ModeColor Preset
ModeUser Color
ModeLoop
PANTALLA PRINCIPAL DEL MODO ESCLAVOEn la pantalla se muestra Mode Slave. Si la unidad esclava está asignada a un grupo de escla-vos, también se muestra el grupo de esclavos y el tiempo de Delay ajustado en la unidad maestra en los modos autónomos Auto y Loop.
ModeSlave
Gr 1 2.0s
CONFIGURACIÓN DE LA DIRECCIÓN INICIAL DMXPulsando MODE accederá al menú principal. Ahora, utilice los botones UP y DOWN para seleccio-nar la opción DMX Address del menú y confirme con ENTER. Ahora puede ajustar la dirección ini-cial DMX con los botones UP y DOWN según lo desee. Confirme los datos introducidos con ENTER y pulse una vez MODE para regresar a la pantalla principal. Tras unos dos minutos de inactividad se vuelve automáticamente a la pantalla principal.
--------Menu-------DMX AddressDMX ModeDMX DelayStand AloneSlaveSettingsSystem Info
----DMX Adress----DMX AddressDMX ModeDMX Delay
001 - 512
CONFIGURACIÓN DEL MODO DMXPulsando MODE accederá al menú principal. Ahora, utilice los botones UP y DOWN para selec-cionar la opción DMX Mode del menú y confirme con ENTER. Nuevamente con los botones UP y DOWN, seleccione el modo DMX deseado y confirme con ENTER (los modos DMX con canal de DMX Delay están señalizados con una «D»). Pulse MODE una vez para regresar a la pantalla principal. Tras unos dos minutos de inactividad se vuelve automáticamente a la pantalla principal. Encontrará tablas con la asignación de canales de los distintos modos DMX en la sección CON-TROL DMX de este manual.
--------Menu-------DMX AddressDMX ModeDMX DelayStand AloneSlaveSettingsSystem Info
----DMX Address----DMX AddressDMX ModeDMX Delay
001 - 512001 - 512001 - 5122CH4CH14CH25CH6CH9CH
D3CHD5CH1D5CH2D6CHD7CH
D10CH
CLROOTPAR4
----DMX Address----DMX AddressDMX ModeDMX Delay
001 - 512001 - 512001 - 5122CH4CH14CH25CH6CH8CH
11CH
D3CHD5CH1D5CH2D6CHD7CHD9CH
D12CH
CLROOTPAR6
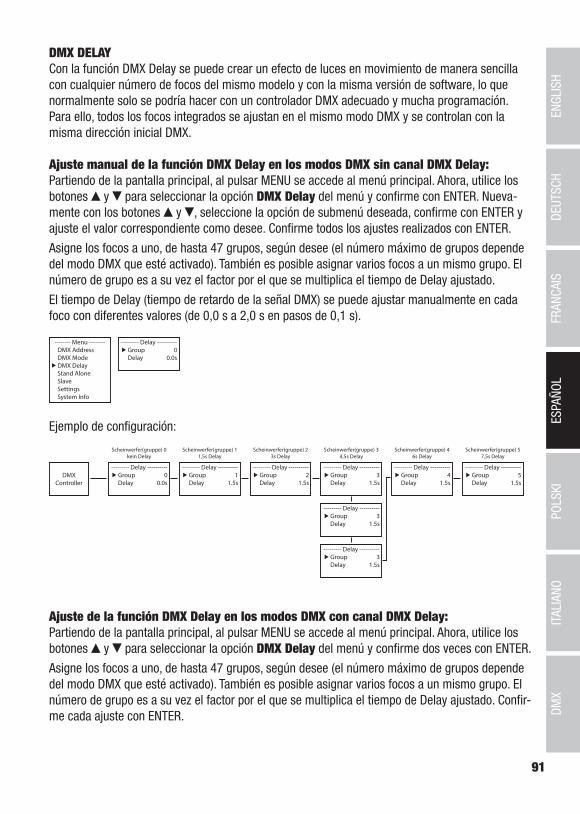
91
DMX
DEUTSC
HFRAN
CAIS
ESPAÑO
LEN
GLISH
ITALIANO
POLSKI
DMX DELAYCon la función DMX Delay se puede crear un efecto de luces en movimiento de manera sencilla con cualquier número de focos del mismo modelo y con la misma versión de software, lo que normalmente solo se podría hacer con un controlador DMX adecuado y mucha programación. Para ello, todos los focos integrados se ajustan en el mismo modo DMX y se controlan con la misma dirección inicial DMX.
Ajuste manual de la función DMX Delay en los modos DMX sin canal DMX Delay:Partiendo de la pantalla principal, al pulsar MENU se accede al menú principal. Ahora, utilice los botones y para seleccionar la opción DMX Delay del menú y confirme con ENTER. Nueva-mente con los botones y , seleccione la opción de submenú deseada, confirme con ENTER y ajuste el valor correspondiente como desee. Confirme todos los ajustes realizados con ENTER.
Asigne los focos a uno, de hasta 47 grupos, según desee (el número máximo de grupos depende del modo DMX que esté activado). También es posible asignar varios focos a un mismo grupo. El número de grupo es a su vez el factor por el que se multiplica el tiempo de Delay ajustado.
El tiempo de Delay (tiempo de retardo de la señal DMX) se puede ajustar manualmente en cada foco con diferentes valores (de 0,0 s a 2,0 s en pasos de 0,1 s).
Ejemplo de configuración:
Ajuste de la función DMX Delay en los modos DMX con canal DMX Delay:Partiendo de la pantalla principal, al pulsar MENU se accede al menú principal. Ahora, utilice los botones y para seleccionar la opción DMX Delay del menú y confirme dos veces con ENTER.
Asigne los focos a uno, de hasta 47 grupos, según desee (el número máximo de grupos depende del modo DMX que esté activado). También es posible asignar varios focos a un mismo grupo. El número de grupo es a su vez el factor por el que se multiplica el tiempo de Delay ajustado. Confir-me cada ajuste con ENTER.

92
DMX
ITALIANOPOLSKI
ESPAÑOLFRANCAIS
DEUTSCHENGLISH
El tiempo de Delay (tiempo de retardo de la señal DMX) se ajusta mediante un controlador DMX en el canal DMX Delay individual del modo operativo DMX correspondiente (de 0,0 s a 2,0 s en pasos de 0,1 s).
Ejemplo de configuración:
MODO AUTÓNOMO AUTO / SOUNDLos 6 programas automáticos disponibles constan de secuencias de cambio de colores fijas, mientras que el brillo, la velocidad operativa, el control por sonido con sensibilidad de micrófono y el Delay (retardo de la señal) se pueden ajustar por separado para cada programa.Partiendo de la pantalla principal, al pulsar MODE, se accede al menú principal. Ahora, utilice los botones UP y DOWN para seleccionar la opción de menú Stand Alone y confirme con ENTER. Nuevamente con los botones UP y DOWN, seleccione el modo autónomo Auto y confirme con ENTER. Ahora, seleccione el programa deseado con los botones UP y DOWN (Program 1 - Program 6) y confirme con ENTER.
--------Menu-------DMX AddressDMX ModeDMX DelayStand AloneSlaveSettingsSystem Info
----Stand Alone----AutoStaticColor PresetUser ColorLoop
-----Program x-----DimmerSpeedSoundSensDelay
----Auto Mode----Program 1 |Program 6
0 - 1000 - 100
Off / On0 - 100
0,0 s - 2,0 s
Seguidamente se abre el submenú que permite ajustar las opciones de submenú (ver tabla; se seleccionan con los botones UP y DOWN y se confirman con ENTER. También los valores o el estado se cambian con los botones UP y DOWN y se confirman con ENTER). Los ajustes se hacen por separado para cada programa y se mantienen incluso después de reiniciar el equipo.

93
DMX
DEUTSC
HFRAN
CAIS
ESPAÑO
LEN
GLISH
ITALIANO
POLSKI
MODO AUTÓNOMO AUTO / SOUND (PROGRAM 1 - PROGRAM 6)
Dimmer Ajuste del brillo 0 - 100
Speed Ajuste de la velocidad operativa 0 - 100
Sound Activar/desactivar el control por sonidoOff
Control por sonido desactivado
OnControl por sonido activado
Sens Ajuste de la sensibilidad del micrófono 0 - 100
Delay Tiempo de retardo para los grupos de esclavos 0.0s - 2.0s
MODO AUTÓNOMO STATICDe forma similar a la configuración con un equipo de control DMX, el modo autónomo Static permite ajustar las funciones de atenuación (Dimmer), estrobo (Strobe), R, G, B y W o R, G, B, W, A y UV directamente en el equipo seleccionando valores entre 000 y 255. De esa forma, se podrá crear un escenario personalizado sin necesidad de un equipo de control DMX adicional. Partiendo de la pantalla principal, si pulsa MODE accederá al menú principal. Ahora, utilice los botones UP y DOWN para seleccionar la opción del menú Stand Alone y confirme con ENTER. Nuevamente con los botones UP y DOWN, seleccione el modo autónomo Static y confirme con ENTER. Ahora, con los botones UP y DOWN, seleccione la opción de menú que desee editar y confirme con ENTER. Puede configurar el valor deseado entre 000 y 255 mediante los botones UP y DOWN. Confirme todos los ajustes realizados con ENTER.
--------Menu-------DMX AddressDMX ModeDMX DelayStand AloneSlaveSettingsSystem Info
----Stand Alone----AutoStaticColor PresetUser ColorLoop
-----Static Mode-----DimmerStrobeRedGreenBlueWhiteAmberUV
----Static Mode----DimmerStrobeRedGreenBlueWhite
0 - 2550 - 2550 - 2550 - 2550 - 2550 - 255
CLROOTPAR4 CLROOTPAR6
0 - 2550 - 2550 - 2550 - 2550 - 2550 - 2550 - 2550 - 255
MODO AUTÓNOMO COLOR PRESETHay 15 presets de colores más Jump y Fade disponibles como preset, el brillo se puede ajustar por separado para cada preset, así como la velocidad operativa para Jump y Fade. Partiendo de la pantalla principal, si pulsa MODE accederá al menú principal. Ahora, utilice los botones UP y DOWN para seleccionar la opción del menú Stand Alone y confirme con ENTER. Nuevamente con los botones UP y DOWN, seleccione el modo autónomo Color Preset y confirme con ENTER. Ahora, utilice los botones UP y DOWN para seleccionar el color deseado como preset y confirme con ENTER (Off = Blackout, Speed se refiere a Jump y Fade). Puede configurar el brillo deseado entre 000 y 100 mediante los botones UP y DOWN. Confirme pulsando ENTER.

94
DMX
ITALIANOPOLSKI
ESPAÑOLFRANCAIS
DEUTSCHENGLISH
--------Menu-------DMX AddressDMX ModeDMX DelayStand AloneSlaveSettingsSystem Info
----Stand Alone----AutoStaticColor PresetUser ColorLoop
----Color Preset----OffRedAmberYel WarmYellowGreenTurquoise
WhiteCold WhiteUVJumpFadeSpeed
0 - 100 0 - 1000 - 1000 - 1000 - 1000 - 100
ROOTPAR6
WhiteCold WhiteJumpFadeSpeed
ROOTPAR4
0 - 100 0 - 1000 - 1000 - 1000 - 100
0 - 100 0 - 1000 - 1000 - 1000 - 1000 - 100
CyanBlueLavenderMauveMagentaPinkWarm White
0 - 100 0 - 1000 - 1000 - 1000 - 1000 - 1000 - 100
MODO AUTÓNOMO USER COLOREl modo autónomo User Color permite guardar el brillo general, estrobo y una mezcla de colo-res de R, G, B y W o R, G, B, W, A y UV directamente en el equipo en cuatro presets de colores individuales.Partiendo de la pantalla principal, si pulsa MODE accederá al menú principal. Ahora, utilice los botones UP y DOWN para seleccionar la opción del menú Stand Alone y confirme con ENTER. Nuevamente con los botones UP y DOWN, seleccione el modo autónomo User Color y confirme con ENTER. Ahora, seleccione el preset deseado con los botones UP y DOWN (Color 1 - Color 4) y confirme con ENTER. Ahora, con los botones UP y DOWN, seleccione la opción de menú que desee editar y confirme con ENTER. Puede configurar el valor deseado entre 000 y 255 me-diante los botones UP y DOWN. Los valores del efecto de estrobo corresponden a los valores del canal 2 de la tabla DMX 4 CH Mode 1. Confirme todos los ajustes realizados con ENTER.
--------Menu-------DMX AddressDMX ModeDMX DelayStand AloneSlaveSettingsSystem Info
----Stand Alone----AutoStaticColor PresetUser ColorLoop
-------Color x-------DimmerStrobeRedGreenBlueWhiteAmberUV
-------Color x-------DimmerStrobeRedGreenBlueWhite
0 - 2550 - 2550 - 2550 - 2550 - 2550 - 255
CLROOTPAR4 CLROOTPAR6
0 - 2550 - 2550 - 2550 - 2550 - 2550 - 2550 - 2550 - 255
----User Color----Color 1 |Color 4
MODO AUTÓNOMO LOOPEl modo autónomo Loop permite organizar, guardar y acceder a hasta cuatro programas de cambio de colores. El brillo, la duración de paso, el tiempo de superposición y el Delay (retardo de la señal) se pueden ajustar por separado.Partiendo de la pantalla principal, si pulsa MODE accederá al menú principal. Ahora, utilice los botones UP y DOWN para seleccionar la opción del menú Stand Alone y confirme con ENTER. Nuevamente con los botones UP y DOWN, seleccione el modo autónomo Loop y confirme con ENTER. Ahora, seleccione el Loop deseado con los botones UP y DOWN (Loop 1 - Loop 4) y confirme con ENTER.
--------Menu-------DMX AddressDMX ModeDMX DelayStand AloneSlaveSettingsSystem Info
----Stand Alone----AutoStaticColor PresetUser ColorLoop
----Loop Mode----Loop 1 |Loop 4
---------Loop x---------DimmerSteptimeFadetimeDelay1.Step2.Step3.Step4.Step
0 - 1000.1s - 10.0s
0 % - 100 %0.0s - 2.0s
RedGreenBlack
-------

95
DMX
DEUTSC
HFRAN
CAIS
ESPAÑO
LEN
GLISH
ITALIANO
POLSKI
Seguidamente se abre el submenú que permite ajustar las opciones de submenú (ver tabla; se seleccionan con los botones UP y DOWN y se confirman con ENTER. También los valores o el estado se cambian con los botones UP y DOWN y se confirman con ENTER). Los ajustes se hacen por separado para cada Loop y se mantienen incluso después de reiniciar el equipo.
ROOTPAR4
MODO AUTÓNOMO LOOP (Loop 1 - Loop 4)
Dimmer Ajuste del brillo 0 - 100
Steptime Ajuste de la duración de paso 0.1s - 10.0s
Fadetime Ajuste del tiempo de superposición en porcentaje 0 % - 100 %
Delay Tiempo de retardo para los grupos de esclavos 0.0s - 2.0s
1. Step 15 colores de Color Preset Red - CW (Cold White)
4 colores de User Color User 1 - User 4
Blackout Blackout
2. Step ” ”
3. Step
15 colores de Color Preset Red - CW (Cold White)
4 colores de User Color User 1 - User 4
Blackout Blackout
------- Saltar paso
4. Step ” ”
ROOTPAR6
MODO AUTÓNOMO LOOP (Loop 1 - Loop 4)
Dimmer Ajuste del brillo 0 - 100
Steptime Ajuste de la duración de paso 0.1s - 10.0s
Fadetime Ajuste del tiempo de superposición en porcentaje 0 % - 100 %
Delay Tiempo de retardo para los grupos de esclavos 0.0s - 2.0s
1. Step 15 colores de Color Preset Red - CW (Cold White)
4 colores de User Color User 1 - User 4
Luz UV UV
Blackout Blackout
2. Step ” ”

96
DMX
ITALIANOPOLSKI
ESPAÑOLFRANCAIS
DEUTSCHENGLISH
3. Step 15 colores de Color Preset Red - CW (Cold White)
4 colores de User Color User 1 - User 4
Luz UV UV
Blackout Blackout
------- Saltar paso
4. Step ” ”
MODO ESCLAVOModo esclavo estándar: Partiendo de la pantalla principal, si pulsa MODE accederá al menú principal. Ahora, con los botones UP y DOWN, seleccione la opción del menú Slave, confirme con ENTER, seleccione el grupo de esclavos 0 (Slave Group 0) y vuelva a confirmar con ENTER. Conecte las unidades esclava y maestra (del mismo modelo y de la misma versión de software) mediante un cable DMX y active en la unidad maestra uno de los modos autónomos (Auto, Static, Color Preset, User Color, Loop). A partir de ese momento, la unidad esclava estará exactamente sincronizada con la unidad maestra.
--------Menu-------DMX AddressDMX ModeDMX DelayStand AloneSlaveSettingsSystem Info
----Slave Group----Stand AloneSlaveSettings
Mode Slave0
Pantalla principal
Modo esclavo ampliado: Si en el modo maestro/esclavo desea controlar las unidades esclavas mediante uno de los modos autónomos Auto o Loop, es posible transmitir la señal de control con retardo en hasta 15 niveles (ROOTPAR4: Slave Group 1 - 15, ROOTPAR6: 1 - 13), el retardo se ajusta en la opción de submenú Delay del modo autónomo correspondiente, el factor de retardo se ajusta en el menú Slave del foco correspondiente. Así se puede crear un efecto de luces en movimiento de manera sencilla con un gran número de focos del mismo modelo y con la misma versión de software, lo que normalmente solo se podría hacer con un controlador DMX adecuado y mucha programación.
--------Menu-------DMX AddressDMX ModeDMX DelayStand AloneSlaveSettingsSystem Info
----Slave Group----Stand AloneSlaveSettings
----Slave Group----Stand AloneSlaveSettings
ModeSlaveGr 1 2.0s
CLROOTPAR4 CLROOTPAR6
1 - 15 1 - 13
Pantalla principal con número de grupo y tiempo de Delay en
la unidad maestra
Asigne los focos a uno de hasta 15 grupos según desee (ROOTPAR4: Slave Group 1 - 15, ROOTPAR6: 1 - 13). También es posible asignar varios focos a un mismo grupo. El número de gru-

97
DMX
DEUTSC
HFRAN
CAIS
ESPAÑO
LEN
GLISH
ITALIANO
POLSKI
po es a su vez el factor por el que se multiplica el tiempo de Delay ajustado en la unidad maestra (ver ejemplo de configuración).
Mode Slave
Unidad maestraAuto Program 1
Delay 0.5s
Slave Group 0sin Delay
Slave Group 1Delay de 0,5 s
Slave Group 2Delay de 1 s
Slave Group 3Delay de 1,5 s
Slave Group 4Delay de 2 s
Slave Group 5Delay de 2,5 s
Gr 1 0.5s Gr 2 0.5s Gr 3 0.5s
Gr 3 0.5s
Gr 3 0.5s
Gr 4 0.5s Gr 5 0.5s
Mode Slave Mode Slave Mode Slave
Mode Slave
Mode Slave
Mode Slave Mode Slave
CONFIGURACIÓN DEL SISTEMA (Settings)Partiendo de la pantalla principal, si pulsa MODE accederá al menú principal. Ahora, utilice los botones UP y DOWN para seleccionar la opción Settings del menú y confirme con ENTER.
--------Menu-------DMX AddressDMX ModeDMX DelayStand AloneSlaveSettingsSystem Info
Seguidamente se abre el submenú que permite ajustar las opciones de submenú (ver tabla; se seleccionan con los botones UP y DOWN y se confirman con ENTER. También los valores o el estado se cambian con los botones UP y DOWN y se confirman con ENTER).
SettingsDisp Rev = Girar la imagen en
pantallaNo Giro de la imagen en pantalla desacti-
vadoYes Giro de 180° de la imagen en pantalla
(por ejemplo, para montajes en altura)Disp Back = Retroiluminación
de la pantallaOff Desactivación tras aproximadamente
30 segundos sin actividadOn Permanentemente activada
Sig Fail = Estado operativo en caso de interrupción de la señal DMX
Hold Se mantendrá la última ordenBlack Activa el Blackout
User 1 Se activa User Color 1

98
DMX
ITALIANOPOLSKI
ESPAÑOLFRANCAIS
DEUTSCHENGLISH
Sound = Ajustar el modo de funcionamiento del control por sonido
Last El color se mantiene hasta el siguiente impulso
Off El color desaparece tras un momento hasta el siguiente impulso
PWM = Frecuencia de la modulación por ancho de pulsos (PWM) de los LED
650Hz, 1530Hz, 2150Hz, 4000Hz
Selección de la frecuencia de la modu-lación por ancho de pulsos (PWM) de los LED
Calibration (CLROOT-PAR4)
= Calibración del color
Red, Green, Blue, White
Calibración individual de colores. Con-figuración del brillo común a los modos operativos de los 4 grupos de LED RGBW con valores de 0 - 255
Calibration (CLROOT-PAR6)
= Calibración del color
Red, Green, Blue, White, Amber, UV
Calibración individual de colores. Con-figuración del brillo común a los modos operativos de los 6 grupos de LED RGBWA+UV con valores de 0 a 255
IR Remote = Activar o desac-tivar el control mediante el mando a distancia por infrarrojos
On Control con mando a distancia por infrarrojos activado
Off Control con mando a distancia por infrarrojos desactivado
Reset = Restablecer los ajustes
Factory Restablecer los ajustes de fábrica: realizar el restablecimiento con ENTER, cancelar con MENU
Preset A Restablecer a Preset A: realizar el restablecimiento con ENTER, cancelar con MENU
Preset B Restablecer a Preset B: realizar el restablecimiento con ENTER, cancelar con MENU
Preset C Restablecer a Preset C: realizar el restablecimiento con ENTER, cancelar con MENU
Edit Preset = Guardar todos los ajustes de sistema en 3 presets indivi-duales
Preset A Guardar con ENTERPreset B Guardar con ENTERPreset C Guardar con ENTER
Service = Solo para tareas de mantenimiento
INFORMACIÓN DEL SISTEMA (System Info)Partiendo de la pantalla principal, si pulsa MODE accederá al menú principal. Ahora, utilice los botones UP y DOWN para seleccionar la opción System Info del menú y confirme con ENTER.

99
DMX
DEUTSC
HFRAN
CAIS
ESPAÑO
LEN
GLISH
ITALIANO
POLSKI
--------Menu-------DMX AddressDMX ModeDMX DelayStand AloneSlaveSettingsSystem Info
A continuación llegará al submenú que permite acceder a la información del sistema (consulte la tabla, selección con los botones UP y DOWN; confirmación con ENTER; modificación del estado con UP y DOWN; confirmación con ENTER).
System Info
Firmware = Visualización de la versión del firmware del equipo
Firmware V1.xx
Tempera-ture
= Visualización de la temperatura de la unidad LED
LED xxx°C / xxx°F
Unit °C (= visualización en grados Celsius)
°F (= visualización en grados Fahrenheit)
Op Hours = Visualización del tiempo de funcio-namiento
xx:xx h Visualización del tiempo de funcionamien-to total en horas y minutos
MANDO A DISTANCIA POR INFRARROJOS (opcional)Apunte con el mando a distancia por infrarrojos direc-tamente a la parte delantera del sensor de infrarrojos incorporado en el foco. El rango de alcance máximo es de unos 8 metros. En el modo DMX y en el esclavo, el sensor del foco estará desactivado. El mando a distancia por infra-rrojos controla directamente los modos autónomos internos Auto / Sound, Static y Color Preset.
BL / ON/OFF (Blackout)Pulse el botón BL para apagar todos los LED (Blackout) independientemente de cuál de los modos operativos con-trolados mediante el mando a distancia esté activado. Si se pulsa de nuevo el botón BL, se reactivará el modo operativo que estaba seleccionado antes.
SP (Speed)Ajuste de la velocidad en 6 niveles para los programas de

100
DMX
ITALIANOPOLSKI
ESPAÑOLFRANCAIS
DEUTSCHENGLISH
cambio de colores Color Jumping (Ju), Color Fading (Fa) y Auto Program (Au). Con el nivel 1, la se-cuencia de cambio de color se realiza lentamente, si se vuelve a pulsar el botón se activa el nivel 2 con una secuencia de cambio de color más rápida, seguida por los niveles 3, 4, 5 y 6, siendo el nivel 6 donde se efectúa la secuencia de cambio de color más rápida de todas.
(Brightness)Ajuste del brillo general en 6 niveles. Se puede acceder a los diferentes niveles de brillo pulsando repetidas veces este botón (nivel 1 = Blackout).
FL (Flash / estrobo)Ajuste de la velocidad en 6 niveles para el efecto de estrobo. El nivel 1 desactiva el efecto de estrobo, el nivel 2 genera una frecuencia lenta que va aumentando con los niveles 3 a 5 hasta el nivel 6, que tiene la frecuencia de destello más rápida. El efecto de estrobo solo se puede utilizar en el modo de mezcla de color RGBW(A+UV).
R / G / B / W (A y UV solo en el modelo CLROOTPAR6, CW y WW sin función)Con estos 4 (6) botones, se pueden crear mezclas de colores individuales. Se puede acceder a los 6 niveles de brillo pulsando repetidas veces el botón de color correspondiente. Los LED están apagados en el nivel 1. Ejemplo: si se ajustan los colores rojo y verde en el nivel más alto y el resto de LED en el nivel más bajo, es decir, apagados, se obtiene un color amarillo claro como mezcla de colores.
Ju (cambio de color)El cambio de color tiene lugar a saltos (Color Jumping). La velocidad con la que cambian los colores se puede ajustar con el botón SP (Speed).
Fa (superposición de colores)Los colores se superponen entre sí (Color Fading). La velocidad con la que cambian los colores se puede ajustar con el botón SP (Speed).
Au (modo automático)Seleccione el programa de cambio de colores deseado Auto 1 - 6 pulsando varias veces el botón Au.
Su (programa de cambio de colores con control por sonido)Seleccione uno de los 6 programas controlados por sonido Sound 1 - 6 pulsando varias veces el botón Su. El micrófono de control se encuentra en la parte trasera del foco.
CM (macros de colores)Quince presets de color (o dieciséis en el ROOTPAR6) a los que se puede acceder consecutiva-mente con los botones CM+ y CM-.
Pr+ / Pr- Selección de los programas en el modo automático (Au) y en el control por sonido (Su).

101
DMX
DEUTSC
HFRAN
CAIS
ESPAÑO
LEN
GLISH
ITALIANO
POLSKI
INSTALACIÓN Y MONTAJEGracias al cómodo soporte doble, el foco puede instalarse en un lugar adecuado sobre una super-ficie nivelada. El montaje en un travesaño se realiza con una abrazadera apta para travesaño. Esta abrazadera se fija en el soporte de montaje (A). Las abrazaderas para travesaño correspondientes se pueden pedir por separado. Asegúrese de acoplar bien el equipo y de fijar el foco con un cable de seguridad adecuado en la anilla de seguridad situada en la parte posterior del foco.
PELIGRO: El montaje en altura requiere mucha experiencia, incluido el cálculo de los valores límite de la carga de trabajo, el material de instalación utilizado y las comproba-ciones de seguridad periódicas de todos los materiales de instalación y focos. Si no está cualificado para ello, no intente realizar la instalación por su cuenta, recurra a una empresa profesional. Riesgo de aflojamiento y caída de equipos montados y asegurados de forma incorrecta. Esto puede provocar lesiones graves o incluso la muerte de personas.
A
B B
Para obtener un aspecto más discreto durante el uso como foco de luz vertical, es posible des-montar el soporte doble de montaje aflojando los dos tornillos de manejo (B).

102
DMX
ITALIANOPOLSKI
ESPAÑOLFRANCAIS
DEUTSCHENGLISH
CUIDADO, MANTENIMIENTO Y REPARACIÓNPara garantizar el correcto funcionamiento del equipo a largo plazo, este se debe revisar y reparar periódicamente, como mínimo cada 3000 horas de servicio o, como máximo, al cabo de un año.
CUIDADOS (que puede realizar el usuario)
¡ADVERTENCIA! Antes de realizar cualquier tarea para mantener cuidado el equipo, desconectar la alimentación eléctrica y, si es posible, todas las conexiones del equipo.
¡AVISO! Un cuidado inadecuado puede provocar daños en el equipo e incluso su destrucción.
1. Limpiar las superficies de la carcasa con un paño limpio y húmedo. Asegurarse de que no pueda penetrar humedad en el equipo.
2. Limpiar periódicamente las aberturas de entrada y salida de aire para evitar que se acumule polvo y suciedad. Si se va a utilizar aire comprimido, hay que asegurarse de que el equipo no sufra daños (p. ej., los ventiladores deben bloquearse en este caso, ya que de lo contrario podrían sobrecalentarse).
3. Los cables y los contactos deben limpiarse regularmente para evitar que acumulen polvo o suciedad.
4. En general, no deben utilizarse detergentes ni agentes abrasivos para el cuidado, ya que podrían dañar el acabado de la superficie.
5. En general, los equipos deben almacenarse en un lugar seco y protegidos del polvo y la suciedad.
6. Para garantizar un funcionamiento correcto y seguro, hay que limpiar con regularidad todas las lentes accesibles o extraíbles y las aberturas de emisión de luz.

103
DMX
DEUTSC
HFRAN
CAIS
ESPAÑO
LEN
GLISH
ITALIANO
POLSKI
MANTENIMIENTO Y REPARACIÓN (solo personal técnico)
¡PELIGRO! Hay piezas conductoras de tensión en el interior del equipo. Incluso después de desconectar la alimentación eléctrica, puede haber tensión residual en el equipo, por ejemplo, por condensadores cargados.
¡AVISO! En el equipo no hay componentes que pueda reparar el usuario.
¡AVISO! El mantenimiento y las reparaciones solo pueden realizados personal técnico cualificado. En caso de duda, consulte a un taller especializado.
¡AVISO! Los trabajos de mantenimiento realizados indebidamente pueden afectar al derecho de garantía.
¡AVISO! En el caso de los sets de conversión o reequipamiento previstos por el fabrican-te, hay que tener en cuenta obligatoriamente las instrucciones de montaje adjuntas

104
DMX
ITALIANOPOLSKI
ESPAÑOLFRANCAIS
DEUTSCHENGLISH
TECNOLOGÍA DMX
DMX512DMX (Digital Multiplex) es el nombre de un protocolo universal utilizado como medio de comunicación entre dispositivos y con-troladores. El controlador DMX envía datos DMX a los equipos DMX conectados. Los datos DMX se envían como datos serie que se transmiten de equipo a equipo a través de los conectores XLR «DMX IN» y «DMX OUT» que se encuentran en todos los equipos DMX, siendo 32 el número máximo de equipos conectados. El último equipo de la cadena irá equipado con una terminación (terminador).
CONEXIONADO DMXDMX es un lenguaje que permite que todas las marcas y modelos de diferentes fabricantes puedan conectarse entre sí y funcionar desde un mismo controlador, siempre y cuando todos los equipos y el controlador sean compatibles con DMX. Para garantizar la correcta transmisión de los datos DMX, el cable de conexión entre los equipos debe mantenerse lo más corto posible. El orden en que se conectan los equipos en una cadena DMX no influye en el direccionamiento DMX. Por ejemplo, un equipo al que se le asigna la dirección DMX 1 puede colocarse en cualquier lugar de la cadena DMX, ya sea al principio, al final, o en cualquier lugar intermedio. Cuando a un equipo se le asigna la dirección DMX 1, el controlador DMX enviará los datos asignados a la dirección 1 a dicho equipo, independientemente de dónde se encuentre en la cadena DMX.
CONEXIÓN EN CADENA DE VARIOS FOCOS1. Conecte el conector XLR macho de (3 o 5 pines) del cable DMX a la salida DMX (conector de
chasis hembra) del primer equipo DMX (p. e. un controlador DMX).2. Conecte ahora el conector XLR hembra del cable DMX del primer foco a la entrada DMX del
equipo siguiente (conector de chasis macho). Conecte la salida DMX de este último equipo a la entrada DMX del equipo siguiente, y así sucesivamente. Tenga en cuenta que los dispositivos DMX están conectados en serie y que las conexiones no se pueden dividir sin un splitter activo. El número máximo de equipos DMX conectados en cadena es de 32.
Las series 3 STAR, 4 STAR y 5 STAR de Adam Hall ofrecen una amplia gama de cables DMX apropiados.
CABLE DMX:Si fabrica sus propios cables, tenga en cuenta las figuras de esta página. No conecte la malla del cable al contacto de masa del conector ni permita que la malla entre en contacto con la carcasa del conector XLR. Si se produce un contacto de la malla con la masa, puede producir un funciona-miento inestable del equipo.

105
DMX
DEUTSC
HFRAN
CAIS
ESPAÑO
LEN
GLISH
ITALIANO
POLSKI
ASIGNACIÓN DE PINES:Cable DMX con XLR de 3 pines: Cable DMX con XLR de 5 pines (los pines 4 y 5 no se utilizan):
Shield
23
1
23
1
123
45
12
34
5
Shield
TERMINACIÓN DMX (TERMINADOR):Para evitar errores de sistema, debe conectarse una resistencia de terminación (120 ohmios, 1/4 W) en el último equipo de la cadena DMX.XLR aéreo de 3 pines con resistencia de terminación: K3DMXT3XLR aéreo de 5 pines con resistencia de terminación: K3DMXT5
ASIGNACIÓN DE PINES:Conector XLR aéreo de 3 pines: Conector XLR aéreo de 5 pines:
23
1
12
34
5
ADAPTADOR DMX:Gracias a los adaptadores, es posible instalar en una misma cadena DMX tanto equipos DMX con conexiones DMX de 3 pines como equipos con conectores de 5 pines.
ASIGNACIÓN DE PINESAdaptador DMX de XLR macho 5 pines a XLR hembra 3 pines: K3DGF0020Los pines 4 y 5 no se utilizan.
ASIGNACIÓN DE PINESAdaptador DMX de XLR macho 3 pines a XLR hembra 5 pines: K3DHM0020Los pines 4 y 5 no se utilizan.

106
DMX
ITALIANOPOLSKI
ESPAÑOLFRANCAIS
DEUTSCHENGLISH
DATOS TÉCNICOS
NÚMERO DE ARTÍCULO:
CLROOTPAR4(WH) CLROOTPAR6(WH)
Clase de producto:
Foco LED Foco LED
Tipo: Foco PAR Foco PAREspectro cromáti-co:
RGBW RGBWA-UV
Cantidad de LED: 7 6Tipo de LED: 4 W 12 WFrecuencia de la modulación por ancho de pulsos (PWM) del LED:
650 Hz, 1530 Hz, 2150 Hz, 4000 Hz (ajustable)
650 Hz, 1530 Hz, 2150 Hz, 4000 Hz (ajustable)
Ángulo de disper-sión (ángulo del haz de luz):
36,5° (19°) 36,0° (20,5°)
Entrada DMX: macho de 3 pines macho de 3 pinesSalida DMX: hembra de 3 pines hembra de 3 pinesModos DMX: Sin canal de DMX Delay: 2 canales,
4 canales 1, 4 canales 2, 5 canales, 6 canales, 9 canalesCon canal de DMX Delay: 3 canales, 5 canales 1, 5 canales 2, 6 canales, 7 canales, 10 canales
Sin canal de DMX Delay: 2 canales, 4 canales 1, 4 canales 2, 5 canales, 6 canales, 8 canales, 11 canalesCon canal de DMX Delay: 3 canales, 5 canales 1, 5 canales 2, 6 canales, 7 canales, 9 canales, 12 canales
Funciones DMX: Atenuación, atenuación fina, estrobo, rojo, verde, azul, blanco, macros de colores, selección de luz en movi-miento, DMX Delay, sensibilidad al sonido
Atenuación, atenuación fina, estrobo, rojo, verde, azul, blanco, ámbar, UV, macros de colores, selección de luz en movimiento, DMX Delay, sensibili-dad al sonido
Control: DMX512, mando a distancia por infrarrojos, W-DMX (mediante stick iDMX opcional)
DMX512, mando a distancia por infrarrojos, W-DMX (mediante stick iDMX opcional)
Funciones autónomas:
Programas Auto, Programas Sound, Static, presets de colores, colores de usuario, función Loop
Programas Auto, Programas Sound, Static, presets de colores, colores de usuario, función Loop
Elementos de manejo:
Mode, Enter, Up, Down Mode, Enter, Up, Down
Elementos de visualización:
Pantalla OLED Pantalla OLED

107
DMX
DEUTSC
HFRAN
CAIS
ESPAÑO
LEN
GLISH
ITALIANO
POLSKI
NÚMERO DE ARTÍCULO:
CLROOTPAR4(WH) CLROOTPAR6(WH)
Tensión operativa: 100-240 V CA / 50-60 Hz 100-240 V CA / 50-60 HzConsumo de potencia:
38 W 58 W
Intensidad de ilu-minación (a 1 m):
7850 lx 10.700 lx
Flujo luminoso: 1350 lm 1800 lmConexión al suministro eléctrico:
ENTRADA: Conector Power Twist azul SALIDA: Conector Power Twist blanco (máx. 8 A)
ENTRADA: Conector Power Twist azul SALIDA: Conector Power Twist blanco (máx. 8 A)
Clase de protec-ción eléctrica
1 1
Fusible: F3A / 250 V (5 x 20 mm) F3A / 250 V (5 x 20 mm)Temperatura ambiente (en funcionamien-to):
de 0 °C a 40 °C de 0 °C a 40 °C
Humedad relativa del aire:
<80 %, sin condensación <80 %, sin condensación
Clase de protección
IP20 IP20
Color de la car-casa:
Negro (CLROOTPAR4) Blanco (CLROOTPAR4WH)
Negro (CLROOTPAR6) Blanco (CLROOTPAR6WH)
Material de la carcasa:
Plástico ABS Plástico ABS
Refrigeración de la carcasa:
Refrigeración por convección Refrigeración por convección
Dimensiones (anchura x altura x profundidad, sin soporte de montaje):
195 x 133 x 195 mm 195 x 133 x 195 mm
Peso (incl. soporte de montaje):
1,75 kg 1,975 kg
Otras características:
Cable de alimentación incluido y mando a distancia por infrarrojos como accesorio opcional (CLPFLAT-1REMOTE)
Cable de alimentación incluido y mando a distancia por infrarrojos como accesorio opcional (CLPFLAT-1REMOTE)

108
DMX
ITALIANOPOLSKI
ESPAÑOLFRANCAIS
DEUTSCHENGLISH
ELIMINACIÓNEmbalaje
1. Los embalajes se pueden llevar a reciclar a través de las vías de eliminación habitua-les.
2. Separe el embalaje conforme a las leyes de eliminación de residuos y las normativas sobre reciclaje de su país
Equipo:
1. Este equipo está sujeto a la Directiva europea sobre residuos de aparatos eléctricos y electrónicos, en su versión actual. Directiva RAEE sobre residuos de aparatos eléctri-cos y electrónicos. Los equipos usados no se tiran a la basura doméstica. Los equipos usados se deben eliminar a través de una empresa de gestión de residuos autorizada o de un sistema municipal de eliminación de residuos. Tenga en cuenta la normativa vigente en su país.
2. Respete todas las leyes de su país relativas a la eliminación de residuos3. Los clientes particulares recibirán información sobre las posibilidades de eliminación
ecológica a través del distribuidor que les haya vendido el producto o bien a través de las correspondientes autoridades regionales.
DECLARACIONES DEL FABRICANTEGARANTÍA DEL FABRICANTE Y EXENCIÓN DE RESPONSABILIDADAdam Hall GmbH, Adam-Hall-Str. 1, D-61267 Neu Anspach, Alemania / Correo electrónico: [email protected] / +49 (0)6081 / 9419-0.Encontrará las condiciones actuales de la garantía y el texto sobre la exención de responsabilidad en la siguiente página web: https://cdn-shop.adamhall.com/media/pdf/Manufacturers-Declarations-CAMEO_DE_EN_ES_FR.pdf.Para reparaciones, póngase en contacto con su distribuidor.
CONFORMIDAD CEAdam Hall GmbH declara que este producto cumple con las siguientes directivas (en la medida en que sean pertinentes): equipos radioeléctricos y equipos terminales de telecomunicación (1999/5/CE) o comercialización de equipos radioeléctricos (2014/53/UE) a partir de junio de 2017Directiva sobre baja tensión (2014/35/UE) Directiva sobre compatibilidad electromagnética (2014/30/UE)Directiva sobre restricciones a la utilización de determinadas sustancias peligrosas en aparatos eléctricos y electrónicos (RoHS) (2011/65/UE)Puede encontrar la declaración de conformidad completa en www.adamhall.com. También puede solicitarla escribiendo a [email protected].
ESTE DOCUMENTO PUEDE ESTAR SUJETO A FALLOS DE IMPRESIÓN O ERRORES, ASÍ COMO A MODIFICACIONES TÉCNICAS O DE OTRO TIPO.

109
DMX
DEUTSC
HFRAN
CAIS
ESPAÑO
LEN
GLISH
ITALIANO
POLSKI
POLSKI
GRATULUJEMY WYBORU!To urządzenie zostało zaprojektowane i wyprodukowane przy zastosowaniu najwyższych kryte-riów jakościowych w celu zapewnienia wieloletniej bezawaryjnej eksploatacji. Proszę starannie przeczytać niniejszą instrukcję obsługi, aby móc jak najszybciej zacząć użytkować ten produkt marki Cameo Light. Więcej informacji na temat Cameo Light znajdą Państwo na naszej stronie internetowej pod adresem WWW.CAMEOLIGHT.COM.
PRZEZNACZENIEM Produkt jest urządzeniem przeznaczonym dla branży eventowej!Produkt jest przeznaczony do profesjonalnych zastosowań w organizacji imprez i nie nadaje się do użytku domowego!Ponadto ten produkt jest przeznaczony wyłącznie dla wykwalifikowanych użytkowników posiada-jących wiedzę w zakresie obsługi technicznej imprez!Użytkowanie produktu niezgodne z wyszczególnionymi danymi technicznymi i warunkami eksplo-atacji uważa się za niezgodne z przeznaczeniem!Wyklucza się odpowiedzialność za szkody i obrażenia osób trzecich spowodowane przez użycie niezgodne z przeznaczeniem!
Produkt nie jest przeznaczony dla:– osób (w tym dzieci) o ograniczonych możliwościach fizycznych, sensorycznych lub umysłowych,
a także osób niemających doświadczenia i wiedzy.– dzieci (należy poinstruować dzieci, aby nie bawiły się urządzeniem).
ZASADY BEZPIECZEŃSTWA– Aby uniknąć ewentualnych uszkodzeń, należy uważnie przeczytać niniejszą instrukcję i stoso-
wać się do zawartych w niej zaleceń.– Przechowywać wszystkie instrukcje i informacje w bezpiecznym miejscu.– Przestrzegać wszystkich wskazówek ostrzegawczych. Nie usuwać wskazówek bezpieczeństwa
ani innych informacji znajdujących się na urządzeniu.
OBJAŚNIENIA i SYMBOLE1. NIEBEZPIECZEŃSTWO: Słowo NIEBEZPIECZEŃSTWO, ewentualnie w połączeniu z symbolem,
wskazuje na bezpośrednie niebezpieczne sytuacje lub stany zagrożenia dla życia i zdrowia.
2. OSTRZEŻENIE: Słowo OSTRZEŻENIE, ewentualnie w połączeniu z symbolem, wskazuje na potencjalnie niebezpieczne sytuacje lub warunki zagrażające zdrowiu lub życiu.
3. OSTROŻNIE: Słowo OSTROŻNIE, ewentualnie w połączeniu z symbolem, wskazuje na sytuacje lub warunki, które mogą prowadzić do obrażeń ciała.
4. UWAGA: Słowo UWAGA, ewentualnie w połączeniu z symbolem, wskazuje na sytuacje lub warunki, które mogą prowadzić do szkód materialnych i/lub środowiskowych.

110
DMX
ITALIANOPOLSKI
ESPAÑOLFRANCAIS
DEUTSCHENGLISH
Ten symbol oznacza zagrożenie elektryczne.
Ten symbol wskazuje zagrożenie ogólne.
Ten symbol oznacza niebezpieczeństwo związane z gorącymi powierzchniami.
Ten symbol oznacza zagrożenie ze strony intensywnych źródeł światła.
Ten symbol wskazuje na dodatkowe informacje dotyczące obsługi urządzenia.
NIEBEZPIECZEŃSTWO:1. Nie otwierać urządzenia i nie modyfikować go.
2. Jeśli urządzenie nie działa prawidłowo, do wnętrza urządzenia dostały się przedmioty lub płyny lub urządzenie zostało uszkodzone w inny sposób. Należy je natychmiast wyłączyć i odłączyć od źródła napięcia. Naprawy urządzenia może przeprowadzać wyłącznie autoryzowany personel.
3. W przypadku urządzeń o klasie ochronności 1 przewód uziemiający musi być pra-widłowo podłączony. Nigdy nie należy odłączać przewodu ochronnego. Urządzenia o klasie ochronności 2 nie mają przewodu ochronnego.
4. Upewnić się, że przewody będące pod napięciem nie są poskręcane ani uszkodzone mechanicznie.
5. Nigdy nie wolno mostkować bezpiecznika urządzenia.
OSTRZEŻENIE:1. Urządzenia nie wolno uruchamiać, gdy jest ono w widoczny sposób uszkodzone.
2. Urządzenie można instalować wyłącznie wtedy, gdy nie jest pod napięciem.
3. Jeśli przewód zasilający jest uszkodzony, nie należy używać urządzenia.
4. Podłączone na stałe przewody zasilające mogą być wymieniane tylko przez wykwali-fikowaną osobę.
UWAGA:1. Nie należy używać urządzenia, jeśli było ono narażone na duże wahania temperatu-
ry (np. po transporcie). Wilgoć lub kondensat mogą uszkodzić urządzenie. Włączyć urządzenie dopiero wtedy, gdy osiągnie ono temperaturę otoczenia.
2. Sprawdzić, czy napięcie i częstotliwość sieci zasilającej są zgodne z parametrami podanymi na urządzeniu. Jeżeli urządzenie jest wyposażone w selektor napięcia, nie podłączać go do źródła zasilania, dopóki nie zostanie ustawione poprawnie. Używać tylko odpowiednich przewodów sieciowych.

111
DMX
DEUTSC
HFRAN
CAIS
ESPAÑO
LEN
GLISH
ITALIANO
POLSKI
3. Aby odłączyć urządzenie od sieci na wszystkich biegunach, nie wystarczy naciśnięcie włącznika/wyłącznika na urządzeniu.
4. Zastosowany bezpiecznik powinien być tego samego typu jak nadrukowany na urządzeniu.
5. Upewnić się, że podjęto odpowiednie działania zapobiegające przepięciu (np. wyłado-wania atmosferyczne).
6. Przestrzegać podanego maksymalnego prądu wyjściowego dla urządzeń ze złączem Power Out. Całkowity pobór prądu wszystkich podłączonych urządzeń nie może przekroczyć zalecanej wartości.
7. Wyjmowane przewody zasilające należy wymieniać tylko na przewody o równoważ-nych parametrach, które odpowiadają pierwotnie dostarczonym. Przekrój przewodu nie może być mniejszy niż przewodu oryginalnego
NIEBEZPIECZEŃSTWO:1. Niebezpieczeństwo uduszenia! Worki z tworzywa sztucznego i małe części należy
przechowywać poza zasięgiem osób (w tym dzieci) z ograniczoną sprawnością fizyczną, sensoryczną i umysłową.
2. Niebezpieczeństwo upadku! Upewnić się, że urządzenie zostało bezpiecznie zain-stalowane i nie może upaść. Używać wyłącznie odpowiednich statywów i mocowań (zwłaszcza w przypadku instalacji stałych). Upewnić się, że akcesoria są prawidłowo zainstalowane i zabezpieczone. Należy przy tym przestrzegać obowiązujących przepi-sów dotyczących bezpieczeństwa.
OSTRZEŻENIE:1. Używać urządzenia tylko zgodnie z przeznaczeniem.
2. Używać urządzenia wyłącznie z akcesoriami zalecanymi i przewidzianymi przez producenta.
3. Podczas instalacji przestrzegać przepisów bezpieczeństwa obowiązujących w danym kraju.
4. Po podłączeniu urządzenia należy sprawdzić wszystkie trasy kablowe, aby uniknąć szkód lub wypadków spowodowanych np. przez potknięcie.
5. Należy bezwzględnie przestrzegać podanej minimalnej odległości od materiałów ła-twopalnych! Jeśli nie zostało to wyraźnie określone, minimalny odstęp wynosi 0,3 m.
6. Należy bezwzględnie przestrzegać minimalnej odległości od oświetlonej powierzchni, z której można odczytać wskazania urządzenia!
OSTROŻNIE:1. Ruchome elementy, takie jak wsporniki montażowe lub inne, mogą ulec zakleszczeniu.
2. W przypadku urządzeń z elementami sterowanymi elektrycznie istnieje niebez-pieczeństwo obrażeń w wyniku ruchów urządzenia. Nagłe ruchy urządzenia mogą wystraszyć użytkownika.

112
DMX
ITALIANOPOLSKI
ESPAÑOLFRANCAIS
DEUTSCHENGLISH
3. Podczas regularnej pracy powierzchnia obudowy urządzenia może się silnie nagrze-wać. Zachować ostrożność, aby przypadkowo nie dotknąć obudowy. Przed demon-tażem, pracami konserwacyjnymi, ładowaniem itp. należy zawsze poczekać, aż urządzenie ostygnie
UWAGA:1. Nie instalować ani nie eksploatować urządzenia w pobliżu grzejników, akumulato-
rów ciepła, pieców ani innych źródeł ciepła. Upewnić się, że urządzenie zawsze jest instalowane w taki sposób, aby zapewnić wystarczające chłodzenie i nie dopuścić do przegrzania.
2. W pobliżu urządzenia nie wolno umieszczać źródeł zapłonu, takich jak płonące świece.
3. Nie należy zakrywać otworów wentylacyjnych ani nie blokować wentylatorów.
4. Do transportu należy używać oryginalnych opakowań lub opakowań przewidzianych do tego celu przez producenta.
5. Nie narażać urządzenia na wstrząsy ani uderzenia.
6. Należy uwzględnić klasę ochrony IP oraz warunki otoczenia, takie jak temperatura i wilgotność zgodnie ze specyfikacją.
7. Urządzenia mogą być stale modernizowane. W przypadku rozbieżności informacji dotyczących warunków pracy, wydajności lub innych właściwości urządzenia w instrukcji obsługi i na oznaczeniu na urządzeniu zawsze pierwszeństwo mają oznaczenia na urządzeniu.
8. Urządzenie nie jest przystosowane do pracy w klimacie tropikalnym oraz do pracy na wysokości powyżej 2000 m n.p.m.
9. Urządzenie nie nadaje się do użytkowania w warunkach morskich.
OSTROŻNIE! WAŻNE WSKAZÓWKI DOTYCZĄCE PRODUKTÓW OŚWIETLENIOWYCH!1. Nigdy nie patrzeć bezpośrednio w źródło światła, nawet przez krótką chwilę.
2. Nigdy nie należy patrzeć w źródło światła za pomocą przyrządów optycznych, takich jak lupy
3. Efekty stroboskopowe mogą wywoływać u podatnych osób ataki epileptyczne!
4. Lampa ta ma zamontowane na stałe źródło światła, którego użytkownik nie może wymienić. W przypadku wystąpienia jakichkolwiek nieprawidłowości należy skontak-tować się z dystrybutorem.

113
DMX
DEUTSC
HFRAN
CAIS
ESPAÑO
LEN
GLISH
ITALIANO
POLSKI
UWAGI DOTYCZĄCE PRZENOŚNEGO SPRZĘTU WEWNĘTRZNEGO1. Działanie tymczasowe! Sprzęt do organizacji imprez zasadniczo przeznaczony jest do
tymczasowego działania.
2. Ciągła eksploatacja lub montaż na stałe może prowadzić do pogorszenia funkcjonal-ności i przedwczesnego starzenia się urządzeń
WPROWADZENIE7 X REFLEKTOR RGBW PAR 4 WCLROOTPAR4 (czarna obudowa)CLROOTPAR4WH (biała obudowa)
6 X REFLEKTOR RGBWA+UV PAR 12 WCLROOTPAR6 (czarna obudowa)CLROOTPAR6WH (biała obudowa)
FUNKCJE STEROWANIACLROOTPAR4Tryby pracy DMX bez kanału DMX Delay: Sterowanie DMX 2-kanałowe, 4-kanałowe 1, 4-kanałowe 2, 5-kanałowe, 6-kanałowe i 9-kanałoweTryby pracy DMX z kanałem DMX Delay: Sterowanie DMX 3-kanałowe, 5-kanałowe 1, 5-kanałowe 2, 6-kanałowe, 7-kanałowe i 10-kanałoweCLROOTPAR6Tryby pracy DMX bez kanału DMX Delay: Sterowanie DMX 2-kanałowe, 4-kanałowe 1, 4-kanałowe 2, 5-kanałowe, 6-kanałowe, 8-kanałowe i 11-kanałoweTryby pracy DMX z kanałem DMX Delay: Sterowanie DMX 3-kanałowe, 5-kanałowe 1, 5-kanałowe 2, 6-kanałowe, 7-kanałowe, 9-kanałowe i 12-kanałowe
Tryb pracy master/slaveFunkcje standaloneSterowanie za pomocą pilota na podczerwień (opcjonalnie dostępny pilot)Połączenie W-DMX przez opcjonalną pamięć iDMX Stick
CHARAKTERYSTYKA3-pinowe złącza DMX. Złącza wejściowe i wyjściowe Power Twist. Wyświetlacz OLED. Regulowa-na częstotliwość modulacji PWM. Złącze do iDMX Stick. Chłodzenie konwekcyjne. Śruba funkcji pochylania. W zestawie podwójny uchwyt montażowy. Napięcie robocze 100-240 V AC.
CLROOTPAR47 diod LED RGBW, każda o mocy 4 W. Pobór mocy 38 W
CLROOTPAR66 x dioda LED RGBWA+UV 12 W. Pobór mocy 58 W

114
DMX
ITALIANOPOLSKI
ESPAÑOLFRANCAIS
DEUTSCHENGLISH
PRZYŁĄCZA, ELEMENTY OBSŁUGI I WSKAŹNIKI
Modele CLROOTPAR4 i CLROOTPAR6 mają identyczne przyłącza, elementy obsługi i wyświetlacze.
1 POWER INNiebieskie wejściowe gniazdo sieciowe Power Twist. Napięcie robocze 100–240 V AC / 50–60 Hz. W zestawie znajduje się także odpowiedni kabel sieciowy z wtyczką Power Twist.
2 POWER OUTBiałe wyjściowe gniazdo sieciowe Power Twist do zasilania sieciowego kolejnych reflektorów CAMEO (maks. 8 A).
3 DMX IN3-stykowe złącze męskie XLR do podłączenia kontrolera DMX (np. pulpitu DMX).
4 DMX OUT3-stykowe złącze żeńskie XLR do przekazywania sygnału sterującego DMX.
5 FUSEOprawa na czułe bezpieczniki 5 x 20 mm. WAŻNA WSKAZÓWKA: Bezpiecznik wymieniaj wyłącz-nie na bezpiecznik tego samego typu i o tych samych parametrach. Jeżeli bezpiecznik zadziała powtórnie, należy zwrócić się do autoryzowanego centrum serwisowego.
6 WYŚWIETLACZ OLEDWyświetlacz OLED pokazuje bieżący tryb pracy (widok główny), pozycje z menu wyboru oraz wartość liczbową lub stan pracy w poszczególnych pozycjach menu. Po ok. dwóch minutach bezczynności wyświetlacz automatycznie wraca do widoku głównego. Wskazówka w widoku głównym w trybach pracy z zewnętrznym sterowaniem: Gdy sygnał sterujący zostanie przerwany, znaki na wyświetlaczu zaczną migać, a gdy sygnał zostanie ponownie włączony, przestaną migać. Jeśli wyświetlany jest ekran główny, można obrócić wyświetlacz o 180° przez krótkie naciśnięcie przycisku UP.
1
4 3
2

115
DMX
DEUTSC
HFRAN
CAIS
ESPAÑO
LEN
GLISH
ITALIANO
POLSKI
MIC
5
6
7
11
89
10
10
10
10
12 12
Modele CLROOTPAR4 i CLROOTPAR6 mają identyczne przyłącza, elementy obsługi i wyświetlacze.
7 PRZYCISKIMODE — Naciśnij przycisk MODE, aby przejść do menu wyboru. Ponowne naciśnięcie przycisku powoduje powrót do widoku głównego. Naciśnięcie przycisku MODE bez zatwierdzenia wprowa-dzonej zmiany przyciskiem ENTER spowoduje przywrócenie wcześniej ustawionej wartości lub statusu.ENTER — Naciskając przycisk ENTER, można przejść do poziomu menu, z którego można doko-nywać zmian wartości. Za pomocą przycisku ENTER można też uzyskiwać dostęp do podmenu. Wprowadzone zmiany ustawień również potwierdzaj przez naciśnięcie przycisku ENTER.UP i DOWN — Wybór poszczególnych pozycji w menu wyboru (adres DMX, tryb pracy itp.) oraz w podmenu. Przyciski te umożliwiają zmianę wartości wybranej pozycji menu, np. adresu DMX.
8 MICMikrofon dla trybu sterowania muzyką.
9 TILTŚruba radełkowana funkcji pochylania przy stosowaniu reflektora Uplight. Aby uzyskać bardziej dyskretny wygląd, można zdjąć podwójny uchwyt montażowy.

116
DMX
ITALIANOPOLSKI
ESPAÑOLFRANCAIS
DEUTSCHENGLISH
10 GUMOWE NÓŻKICztery gumowe nóżki zapewniające stabilność.
11 UCHO ZABEZPIECZAJĄCEUcho do zabezpieczenia reflektora w przypadku montażu na trawersie.
12 ŚRUBY Z POKRĘTŁEMDwie śruby z pokrętłem służą do regulacji i mocowania stojaka lub uchwytu montażowego.
ZŁĄCZE DO POŁĄCZENIA W-DMX™Złącze USB A do opcjonalnej pamięci iDMX Stick znajduje się z boku reflektora po przeciwnej stronie w stosunku do panelu przyłączeniowego.
OBSŁUGAUWAGI• Po prawidłowym podłączeniu reflektora do sieci zasilania podczas uruchamiania jest wyświe-
tlana następująca sekwencja komunikatów: „Welcome to Cameo”, nazwa modelu oraz wersja oprogramowania. Następnie reflektor jest gotowy do pracy i przełącza się na ostatnio wybrany tryb.
• Aby przejść bezpośrednio do głównego wyświetlacza z niższych poziomów menu, należy nacisnąć i przytrzymać przycisk MODE przez około 2 sekund. Jeśli przez około dwóch minut nie nastąpi wprowadzenie żadnych danych, automatycznie włączy się ekran główny. Aby w podme-nu przejść o jeden poziom w górę, należy nacisnąć przycisk MODE.
• Aby przejść bezpośrednio do ostatnio edytowanego punktu menu, należy nacisnąć jednocześnie MODE i ENTER.
• Jeśli wyświetlany jest ekran główny, można przekręcić wyświetlacz o 180° przez krótkie naci-śnięcie przycisku UP.
• Aby szybko zmienić wartość (np. adres startowy DMX), należy przytrzymać wciśnięty przycisk UP lub DOWN.
WIDOK GŁÓWNY: TRYB PRACY DMXNa wyświetlaczu pojawi się DMX Address i aktualnie ustawiony adres startowy DMX (w przy-kładzie 001). Jeśli funkcja DMX Delay jest aktywna, na wyświetlaczu widnieje także numer grupy oraz czas opóźnienia.
EKRAN GŁÓWNY: TRYB PRACY STANDALONENa wyświetlaczu jest pokazywany aktywowany tryb standalone (Mode Auto, Mode Sound, Mode Static, Mode Color Preset, Mode User Color, Mode Loop).
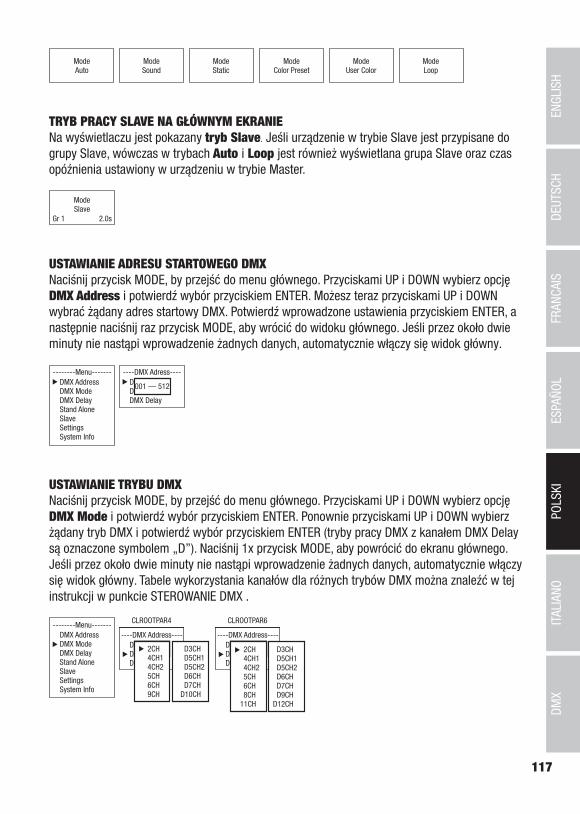
117
DMX
DEUTSC
HFRAN
CAIS
ESPAÑO
LEN
GLISH
ITALIANO
POLSKI
ModeAuto
ModeSound
ModeStatic
ModeColor Preset
ModeUser Color
ModeLoop
TRYB PRACY SLAVE NA GŁÓWNYM EKRANIENa wyświetlaczu jest pokazany tryb Slave. Jeśli urządzenie w trybie Slave jest przypisane do grupy Slave, wówczas w trybach Auto i Loop jest również wyświetlana grupa Slave oraz czas opóźnienia ustawiony w urządzeniu w trybie Master.
ModeSlave
Gr 1 2.0s
USTAWIANIE ADRESU STARTOWEGO DMXNaciśnij przycisk MODE, by przejść do menu głównego. Przyciskami UP i DOWN wybierz opcję DMX Address i potwierdź wybór przyciskiem ENTER. Możesz teraz przyciskami UP i DOWN wybrać żądany adres startowy DMX. Potwierdź wprowadzone ustawienia przyciskiem ENTER, a następnie naciśnij raz przycisk MODE, aby wrócić do widoku głównego. Jeśli przez około dwie minuty nie nastąpi wprowadzenie żadnych danych, automatycznie włączy się widok główny.
--------Menu-------DMX AddressDMX ModeDMX DelayStand AloneSlaveSettingsSystem Info
----DMX Adress----DMX AddressDMX ModeDMX Delay
001 — 512
USTAWIANIE TRYBU DMXNaciśnij przycisk MODE, by przejść do menu głównego. Przyciskami UP i DOWN wybierz opcję DMX Mode i potwierdź wybór przyciskiem ENTER. Ponownie przyciskami UP i DOWN wybierz żądany tryb DMX i potwierdź wybór przyciskiem ENTER (tryby pracy DMX z kanałem DMX Delay są oznaczone symbolem „D”). Naciśnij 1x przycisk MODE, aby powrócić do ekranu głównego. Jeśli przez około dwie minuty nie nastąpi wprowadzenie żadnych danych, automatycznie włączy się widok główny. Tabele wykorzystania kanałów dla różnych trybów DMX można znaleźć w tej instrukcji w punkcie STEROWANIE DMX .
--------Menu-------DMX AddressDMX ModeDMX DelayStand AloneSlaveSettingsSystem Info
----DMX Address----DMX AddressDMX ModeDMX Delay
001 - 512001 - 512001 - 5122CH4CH14CH25CH6CH9CH
D3CHD5CH1D5CH2D6CHD7CH
D10CH
CLROOTPAR4
----DMX Address----DMX AddressDMX ModeDMX Delay
001 - 512001 - 512001 - 5122CH4CH14CH25CH6CH8CH
11CH
D3CHD5CH1D5CH2D6CHD7CHD9CH
D12CH
CLROOTPAR6

118
DMX
ITALIANOPOLSKI
ESPAÑOLFRANCAIS
DEUTSCHENGLISH
DMX DELAYZa pomocą funkcji DMX Delay można w prosty sposób stworzyć efekt ruchomego światła przy użyciu dowolnej liczby reflektorów tego samego modelu i w tej samej wersji oprogramowania, co w innym przypadku byłoby możliwe tylko przy zastosowaniu odpowiedniego kontrolera DMX i skomplikowanego programowania. Wszystkie połączone urządzenia działają w tym samym trybie DMX i są sterowane pod tym samym adresem startowym DMX.
Ręczne ustawianie opóźnienia DMX w trybach pracy DMX bez kanału DMX Delay:Na ekranie głównym naciśnij MENU, aby wejść do menu głównego. Przyciskami i wybierz opcję DMX Delay i potwierdź wybór przyciskiem ENTER. Za pomocą przycisków i wybierz żądane podmenu, naciśnij przycisk ENTER i ustaw wartość lub status zgodnie z wymaganiami. Potwierdź wszystkie wprowadzone dane, naciskając ENTER.
Przypisz reflektor do jednej z maksymalnie 47 grup w zależności od potrzeb (maksymalna liczba grup zależy od aktywnego trybu DMX), przy czym do jednej grupy można przypisać kilka reflekto-rów. Numer grupy jest równocześnie współczynnikiem, przez który mnożony jest ustawiony czas opóźnienia.
Czas opóźnienia (czas opóźnienia sygnału DMX) można ustawić ręcznie na każdym reflektorze na inną wartość (od 0,0 do 2,0 s w krokach co 0,1 s).
Przykład konfiguracji:
Ustawianie opóźnienia DMX w trybach pracy DMX bez kanału DMX Delay:Na ekranie głównym naciśnij MENU, aby wejść do menu głównego. Przyciskami i wybierz opcję DMX Delay i potwierdź wybór, dwukrotnie naciskając przycisk ENTER.
Przypisz reflektor do jednej z maksymalnie 47 grup w zależności od potrzeb (maksymalna liczba grup zależy od aktywnego trybu DMX), przy czym do jednej grupy można przypisać kilka reflekto-rów. Numer grupy jest równocześnie współczynnikiem, przez który mnożony jest ustawiony czas opóźnienia. Każdorazowo potwierdzaj wprowadzane dane przyciskiem ENTER.

119
DMX
DEUTSC
HFRAN
CAIS
ESPAÑO
LEN
GLISH
ITALIANO
POLSKI
Czas opóźnienia (czas opóźnienia sygnału DMX) jest ustawiany za pomocą sterownika DMX w osobnym kanale DMX Delay odpowiedniego trybu DMX (od 0,0 do 2,0 s w krokach co 0,1 s).
Przykład konfiguracji:
TRYB PRACY STANDALONE AUTO/SOUNDKażdy z 6 dostępnych programów automatycznych składa się zaprogramowanych sekwencji zmiany koloru, jasności, prędkości pracy, sterowania muzyką z czułością mikrofonu i opóźnienia (sygnału), które mogą być ustawiane oddzielnie dla każdego programu.Na ekranie głównym naciśnij MODE, aby wejść do menu głównego. Przyciskami UP i DOWN wybierz opcję Stand Alone i potwierdź przyciskiem ENTER. Ponownie przyciskami UP i DOWN wybierz trybstandalone Auto i potwierdź przyciskiem ENTER. Teraz za pomocą przycisków UP i DOWN wybierz żądany program (Program 1 – Program 6) i potwierdź przyciskiem ENTER.
--------Menu-------DMX AddressDMX ModeDMX DelayStand AloneSlaveSettingsSystem Info
----Stand Alone----AutoStaticColor PresetUser ColorLoop
-----Program x-----DimmerSpeedSoundSensDelay
----Auto Mode----Program 1 |Program 6
0-1000-100
Off / On0-100
0,0s-2,0s
Nastąpi przejście do podmenu, w którym można dokonać ustawień punktów podmenu (patrz tabela, wybór przyciskami UP i DOWN, potwierdzenie przyciskiem ENTER, zmiana wartości lub statusu przyciskami UP i DOWN, potwierdzenie przyciskiem ENTER). Ustawienia są wykonywane oddzielnie dla każdego programu i zachowywane nawet po ponownym uruchomieniu urządzenia.

120
DMX
ITALIANOPOLSKI
ESPAÑOLFRANCAIS
DEUTSCHENGLISH
TRYB PRACY STANDALONE AUTO / SOUND (PROGRAM 1 – PROGRAM 6)Dimmer Regulacja jasności 0 — 100Speed Ustaw prędkość ruchu 0 — 100Sound Aktywuj/dezaktywuj sterowanie muzyką
OffDezaktywuj sterowanie muzyką
OnAktywuj sterowanie muzyką
Sens Ustaw czułość mikrofonu 0 — 100Delay Czas opóźnienia dla grup slave 0,0 s — 2,0 s
USTAWIANIE TRYBU PRACY STANDALONE STATICTryb standalone umożliwia, podobnie jak sterownik DMX, ustawienie ściemniacza, strobosko-pu (Strobe) oraz wartości R, G, B i W, a także R, G, B, W, A i UV bezpośrednio w urządzeniu w przedziale od 000 do 255. Dzięki temu można stworzyć indywidualną scenę bez dodatkowego sterownika DMX.
Rozpoczynając od ekranu głównego, należy nacisnąć MODE, aby wejść do menu głównego. Przyciskami UP i DOWN wybierz opcję Stand Alone i potwierdź wybór dwukrotnym naciśnięciem przycisku ENTER. Ponownie przyciskami UP i DOWN wybierz tryb standalone Static i potwierdź wybór przyciskiem ENTER. Przyciskami UP i DOWN wybierz pozycję menu odpowiadającą usta-wieniu, które ma zostać zmienione, a następnie potwierdź przyciskiem ENTER. Przyciskami UP i DOWN można ustawić żądaną wartość z zakresu od 000 do 255. Potwierdź wszystkie zmiany, naciskając ENTER.
--------Menu-------DMX AddressDMX ModeDMX DelayStand AloneSlaveSettingsSystem Info
----Stand Alone----AutoStaticColor PresetUser ColorLoop
-----Static Mode-----DimmerStrobeRedGreenBlueWhiteAmberUV
----Static Mode----DimmerStrobeRedGreenBlueWhite
0 - 2550 - 2550 - 2550 - 2550 - 2550 - 255
CLROOTPAR4 CLROOTPAR6
0 - 2550 - 2550 - 2550 - 2550 - 2550 - 2550 - 2550 - 255
TRYB PRACY STANDALONE COLOR PRESETDostępnych jest 15 różnych wstępnych ustawień kolorów oraz funkcji Jump i Fade; można regu-lować jasność osobno dla każdego z ustawień, a także prędkość ruchu dla funkcji Jump i Fade.
Rozpoczynając od ekranu głównego, należy nacisnąć MODE, aby wejść do menu głównego. Przyciskami UP i DOWN wybierz opcję Stand Alone i potwierdź wybór dwukrotnym naciśnię-ciem przycisku ENTER. Ponownie przyciskami UP i DOWN wybierz tryb standalone Color Preset i potwierdź wybór przyciskiem ENTER. Przyciskami UP i DOWN wybierz żądany, wstępnie ustawio-ny kolor i potwierdź przyciskiem ENTER (Color Off = zaciemnienie, Speed odnosi się do funkcji Jump i Fade). Przyciskami UP i DOWN można ustawić żądaną jasność z zakresu od 000 do 100. Potwierdź, naciskając ENTER.

121
DMX
DEUTSC
HFRAN
CAIS
ESPAÑO
LEN
GLISH
ITALIANO
POLSKI
--------Menu-------DMX AddressDMX ModeDMX DelayStand AloneSlaveSettingsSystem Info
----Stand Alone----AutoStaticColor PresetUser ColorLoop
----Color Preset----OffRedAmberYel WarmYellowGreenTurquoise
WhiteCold WhiteUVJumpFadeSpeed
0 - 100 0 - 1000 - 1000 - 1000 - 1000 - 100
ROOTPAR6
WhiteCold WhiteJumpFadeSpeed
ROOTPAR4
0 - 100 0 - 1000 - 1000 - 1000 - 100
0 - 100 0 - 1000 - 1000 - 1000 - 1000 - 100
CyanBlueLavenderMauveMagentaPinkWarm White
0 - 100 0 - 1000 - 1000 - 1000 - 1000 - 1000 - 100
TRYB PRACY STANDALONE USER COLORTryb standalone User Color umożliwia zapisanie jasności całkowitej, stroboskopu oraz zestawu kolorów R, G, B i W, a także R, G, B, W, A i UV bezpośrednio w urządzeniu w postaci pięciu indywi-dualnych ustawień wstępnych kolorów.
Rozpoczynając od ekranu głównego, należy nacisnąć MODE, aby wejść do menu głównego. Przyciskami UP i DOWN wybierz opcję Stand Alone i potwierdź wybór dwukrotnym naciśnię-ciem przycisku ENTER. Ponownie przyciskami UP i DOWN wybierz tryb standalone User Color i potwierdź wybór przyciskiem ENTER. Teraz za pomocą przycisków UP i DOWN wybierz żądane ustawienie wstępne (Color 1 – Color 4) i potwierdź przyciskiem ENTER. Przyciskami UP i DOWN wybierz pozycję menu odpowiadającą ustawieniu, które ma zostać zmienione, a następnie potwierdź przyciskiem ENTER. Przyciskami UP i DOWN można ustawić żądaną wartość z zakresu od 000 do 255. Wartości dla efektu stroboskopowego odpowiadają wartościom kanału 2 w tabeli DMX 4 CH Mode 1. Potwierdź wszystkie zmiany, naciskając ENTER.
--------Menu-------DMX AddressDMX ModeDMX DelayStand AloneSlaveSettingsSystem Info
----Stand Alone----AutoStaticColor PresetUser ColorLoop
-------Color x-------DimmerStrobeRedGreenBlueWhiteAmberUV
-------Color x-------DimmerStrobeRedGreenBlueWhite
0 - 2550 - 2550 - 2550 - 2550 - 2550 - 255
CLROOTPAR4 CLROOTPAR6
0 - 2550 - 2550 - 2550 - 2550 - 2550 - 2550 - 2550 - 255
----User Color----Color 1 |Color 4
TRYB PRACY STANDALONE LOOPTryb pracy standalone Loop umożliwia indywidualne zaprojektowanie, zapisanie i wywołanie do czterech różnych programów zmiany koloru. Jasność, czas trwania kroku, czas zaniku i opóźnie-nie (sygnału) są regulowane oddzielnie.
Rozpoczynając od ekranu głównego, należy nacisnąć MODE, aby wejść do menu głównego. Przyciskami UP i DOWN wybierz opcję Stand Alone i potwierdź wybór dwukrotnym naciśnięciem przycisku ENTER. Ponownie przyciskami UP i DOWN wybierz tryb standalone Loop i potwierdź wybór przyciskiem ENTER. Teraz za pomocą przycisków UP i DOWN wybierz żądane ustawienie Loop (Loop 1 – Loop 4) i potwierdź przyciskiem ENTER.
--------Menu-------DMX AddressDMX ModeDMX DelayStand AloneSlaveSettingsSystem Info
----Stand Alone----AutoStaticColor PresetUser ColorLoop
----Loop Mode----Loop 1 |Loop 4
---------Loop x---------DimmerSteptimeFadetimeDelay1.Step2.Step3.Step4.Step
0 - 1000.1s - 10.0s
0 % - 100 %0.0s - 2.0s
RedGreenBlack
-------

122
DMX
ITALIANOPOLSKI
ESPAÑOLFRANCAIS
DEUTSCHENGLISH
Nastąpi przejście do podmenu, w którym można dokonać ustawień punktów podmenu (patrz tabela, wybór przyciskami UP i DOWN, potwierdzenie przyciskiem ENTER, zmiana wartości lub statusu przyciskami UP i DOWN, potwierdzenie przyciskiem ENTER). Ustawienia są wykonywane oddzielnie dla każdej pętli i zachowywane nawet po ponownym uruchomieniu urządzenia.
ROOTPAR4
TRYB PRACY STANDALONE LOOP (Loop 1 – Loop 4)
Dimmer Regulacja jasności 0 — 100
Steptime Ustawienie czasu trwania kroku 0,1 s — 10,0 s
Fadetime Ustawienie czasu zaniku w procentach 0% – 100%
Delay Czas opóźnienia dla grup slave 0,0 s — 2,0 s
1. Step 15 kolorów z Color Preset Red – CW (Cold White)
4 kolory z User Color User 1 – User 4
Blackout Blackout
2. Step ” ”
3. Step
15 kolorów z Color Preset Red – CW (Cold White)
4 kolory z User Color User 1 – User 4
Blackout Blackout
------- Pomiń krok
4. Step ” ”
ROOTPAR6
TRYB PRACY STANDALONE LOOP (Loop 1 – Loop 4)
Dimmer Regulacja jasności 0 — 100
Steptime Ustawienie czasu trwania kroku 0,1 s — 10,0 s
Fadetime Ustawienie czasu zaniku w procentach 0% – 100%
Delay Czas opóźnienia dla grup slave 0,0 s — 2,0 s
1. Step 15 kolorów z Color Preset Red – CW (Cold White)
4 kolory z User Color User 1 – User 4
Światło UV UV
Blackout Blackout
2. Step ” ”

123
DMX
DEUTSC
HFRAN
CAIS
ESPAÑO
LEN
GLISH
ITALIANO
POLSKI
3. Step 15 kolorów z Color Preset Red – CW (Cold White)
4 kolory z User Color User 1 – User 4
Światło UV UV
Blackout Blackout
------- Pomiń krok
4. Step ” ”
TRYB SLAVETryb pracy Standard Slave: Rozpoczynając od ekranu głównego, należy nacisnąć MODE, aby wejść do menu głównego. Za pomocą przycisków UP i DOWN wybierz pozycję menu Slave, po-twierdź za pomocą ENTER, a następnie wybierz grupę Slave 0 (Slave Group 0) i potwierdź ponow-nie za pomocą przycisku ENTER. Połącz jednostki slave i master (ten sam model, ta sama wersja oprogramowania) kablem DMX i włącz w jednostce master jeden z trybów pracy standalone (Auto, Static, Color Preset, User Color, Loop). Praca urządzenia slave jest teraz dokładnie dostosowana do pracy urządzenia master.
--------Menu-------DMX AddressDMX ModeDMX DelayStand AloneSlaveSettingsSystem Info
----Slave Group----Stand AloneSlaveSettings
Mode Slave0
Hauptanzeige
Rozszerzony tryb pracy Slave: Jeżeli chcesz sterować urządzeniami Slave w trybie Master/Slave za pomocą jednego z trybów standalone Auto lub Loop, to sygnał sterujący może być odtwarzany z opóźnieniem czasowym w maksymalnie 15 krokach (ROOTPAR4: Slave Group 1–15, ROOTPAR6: 1–13). Opóźnienie ustawia się w podmenu Delay w danym trybie standalone, a współczynnik opóźnienia w menu Slave odpowiedniego reflektora. Można w prosty sposób stworzyć efekt ruchomego światła przy użyciu dużej liczby reflektorów tego samego modelu i tej samej wersji oprogramowania, co w innym przypadku byłoby możliwe tylko przy zastosowaniu odpowiedniego sterownika DMX i skomplikowanego programowania.
--------Menu-------DMX AddressDMX ModeDMX DelayStand AloneSlaveSettingsSystem Info
----Slave Group----Stand AloneSlaveSettings
----Slave Group----Stand AloneSlaveSettings
ModeSlaveGr 1 2.0s
CLROOTPAR4 CLROOTPAR6
1 - 15 1 - 13
Hauptanzeige mit Gruppennummer und Delay-Zeit in der
Master-Einheit
Przypisz reflektor do jednej z maksymalnie 15 grup w zależności od potrzeb (ROOTPAR4: Slave Group 1–15, ROOTPAR6: 1–13), przy czym do jednej grupy można przypisać również kilka re-flektorów. Numer grupy jest również współczynnikiem, przez który mnożony jest czas opóźnienia ustawiony w urządzeniu Master (zobacz przykład ustawienia).

124
DMX
ITALIANOPOLSKI
ESPAÑOLFRANCAIS
DEUTSCHENGLISH
Mode Slave
Master-EinheitAuto Program 1
Delay 0.5s
Slave Group 0kein Delay
Slave Group 10.5s Delay
Slave Group 21s Delay
Slave Group 31.5s Delay
Slave Group 42s Delay
Slave Group 52.5s Delay
Gr 1 0.5s Gr 2 0.5s Gr 3 0.5s
Gr 3 0.5s
Gr 3 0.5s
Gr 4 0.5s Gr 5 0.5s
Mode Slave
Mode Slave
Mode Slave
Mode Slave
Mode Slave
Mode Slave
Mode Slave
USTAWIENIA SYSTEMU (Settings)Rozpoczynając od ekranu głównego, należy nacisnąć MODE, aby wejść do menu głównego. Przy-ciskami UP i DOWN wybierz pozycję menu Settings i potwierdź przyciskiem ENTER.
--------Menu-------DMX AddressDMX ModeDMX DelayStand AloneSlaveSettingsSystem Info
Nastąpi przejście do podmenu, w którym można dokonać ustawień punktów podmenu (patrz tabela, wybór przyciskami UP i DOWN, potwierdzenie przyciskiem ENTER, zmiana wartości lub statusu przyciskami UP i DOWN, potwierdzenie przyciskiem ENTER).
Settings
Disp Rev = obracanie widoku wyświetlacza
No obraz wyświetlacza nie jest obrócony
Yes obrócenie obrazu wyświetlacza o 180° (np. przy montażu urządzenia „do góry nogami”)
Disp Back = oświetlenie wyświetlacza
Off wyłączenie po ok. 30 sekundach bezczynności
On wyświetlacz stale włączony
Sig Fail = tryb pracy w przy-padku przerwania sygnału DMX
Hold zachowuje ostatnie polecenie
Black aktywuje wygaszenie reflektora
User 1 aktywuje funkcję User Color 1
Sound = Ustawianie obsługi sterowania muzyką
Last kolor jest utrzymywany do następnego impulsu
Off kolor znika po chwili aż do następnego impulsu

125
DMX
DEUTSC
HFRAN
CAIS
ESPAÑO
LEN
GLISH
ITALIANO
POLSKI
PWM = częstotliwość PWM lampy LED
650 Hz / 1530 Hz / 2150 Hz / 4000 Hz
regulacja częstotliwości PWM lampy LED
Calibration (CLROOT-PAR4)
= Kalibracja kolorów Red, Green, Blue, White
indywidualna kalibracja kolorów. Ustawienie jasności 4 grup diod LED RGBW dla wszystkich trybów pracy w przedziale 0–255
Calibration (CLROOT-PAR6)
= Kalibracja kolorów Red, Green, Blue, White, Amber, UV
indywidualna kalibracja kolorów. Ustawienie jasności 6 grup diod LED RGBWA+UV dla wszystkich trybów pracy w przedziale 0–255
IR Remote = włączanie/wyłą-czanie sterowania pilotem na podczerwień
On sterowanie pilotem na podczerwień włączone
Off sterowanie pilotem na podczerwień wyłączone
Reset = resetowanie ust-awień wstępnych
Factory Przywracanie ustawień fabrycznych: przywróć ustawienia: ENTER, anuluj: MENU
Preset A Resetowanie do ustawienia A: przywróć ustawienia: ENTER, anuluj: MENU
Preset B Resetowanie do ustawienia B: przywróć ustawienia: ENTER, anuluj: MENU
Preset C Resetowanie do ustawienia C: przywróć ustawienia: ENTER, anuluj: MENU
Edit Preset = zapisanie wszyst-kich ustawień systemowych w 3 indywidualnych ustawieniach wstępnych
Preset A potwierdź przyciskiem ENTER
Preset B potwierdź przyciskiem ENTER
Preset C potwierdź przyciskiem ENTER
Usługa = tylko do celów serwisowych
INFORMACJE O SYSTEMIE (System Info)Rozpoczynając od ekranu głównego, należy nacisnąć MODE, aby wejść do menu głównego. Przy-ciskami UP i DOWN wybierz pozycję menu System Info i potwierdź przyciskiem ENTER.

126
DMX
ITALIANOPOLSKI
ESPAÑOLFRANCAIS
DEUTSCHENGLISH
--------Menu-------DMX AddressDMX ModeDMX DelayStand AloneSlaveSettingsSystem Info
Spowoduje to przejście do podmenu umożliwiającego wywołanie informacji systemowych (patrz tabela) — wybór przyciskami UP i DOWN, potwierdzenie przyciskiem ENTER, zmiana statusu przyciskami UP i DOWN, potwierdzenie przyciskiem ENTER.
System Info
Firmware = Wyświetl oprogramowanie sprzętowe
Firmware V1.xx
Tempera-ture
= Wyświetl temperaturę modułu LED
LED xxx°C / xxx°F
Jednostka °C (= wskazanie w stopniach Celsjusza)
°F (= wskazanie w stopniach Fahrenheita)
Op Hours = Wyświetlanie czasu pracy
xx:xxh całkowity czas pracy urządzenia w godzinach i minutach
PILOT ZDALNEGO STEROWANIA (opcjonalny)Skieruj pilot na podczerwień bezpośrednio na czujnik podczerwieni wbudowany we front reflektora. Maksymalny zasięg wynosi około 8 metrów. W trybie pracy DMX oraz slave czujnik reflektora jest nieaktywny. Pilot zdalnego ste-rowania na podczerwień bezpośrednio steruje wewnętrzny-mi trybami pracy standalone Auto / Sound, Static i Color Preset.
BL / ON/OFF (Blackout)Naciśnij przycisk BL, aby wyłączyć wszystkie diody LED (Blackout), niezależnie od tego, który z trybów pracy ste-rowanych przez pilota jest włączony. Ponowne naciśnięcie przycisku BL spowoduje przywrócenie wcześniej wybrane-go trybu pracy.
SP (Speed)6-stopniowa regulacja prędkości dla programów zmiany koloru: Color Jumping (Ju), Color Fading (Fa) i Auto Program (Au). Stopień 1 umożliwia powolną zmianę sekwencji kolorów. Ponowne naciśnięcie włącza stopień 2 z szybszymi zmianami kolorów.

127
DMX
DEUTSC
HFRAN
CAIS
ESPAÑO
LEN
GLISH
ITALIANO
POLSKI
Kolejne naciśnięcia uruchamiają stopnie 3, 4, 5 i 6, gdzie stopień 6 odpowiada najszybszym zmianom kolorów.
(Brightness)Ustawianie jasności w 6 stopniach. Kilkukrotnie naciskając ten przycisk, można ustawiać różne poziomy jasności (poziom 1 = Blackout).
FL (Flash / Stroboskop)Ustawianie prędkości dla efektu stroboskopu w 6 stopniach. Stopień 1 wyłącza efekt strobosko-powy, stopień 2 odpowiada powolnemu błyskaniu, po którym następują stopnie od 3 do 5. Stopień 6 generuje najszybszą częstotliwość błysków. Efekt stroboskopu może być używany tylko w trybie mieszania kolorów RGBW(A+UV).
R / G / B / W (A i UV — tylko model CLROOTPAR6, modele CW i WW bez funkcji)Za pomocą 4 (6) przycisków R, G, B, W można indywidualnie ustawić mieszanie kolorów. Wybiera-nie 6 stopni jasności następuje po kilkukrotnym naciśnięciu odpowiedniego przycisku koloru, przy czym stopień 1 oznacza wyłączenie diody LED. Przykład: Jeśli kolory czerwony i zielony ustawisz na najwyższym stopniu, a pozostałe diody LED na najniższym, w wyniku zmieszania kolorów otrzymasz kolor jasnożółty.
Ju (zmiany kolorów)Zmiana koloru następuje skokowo (Color Jumping). Prędkość zmiany kolorów można ustawić za pomocą przycisku SP (Speed).
Fa (przenikanie kolorów)Kolory będą się przenikać (Color Fading). Prędkość zmiany kolorów można ustawić za pomocą przycisku SP (Speed).
Au (tryb automatyczny)Wybierz żądany program zmiany koloru Auto 1–6, naciskając wielokrotnie przycisk Au.
Su (programy zmiany kolorów sterowane muzyką)Wybierz jeden z 6 programów sterowanych muzyką, naciskając wielokrotnie przycisk Su. Mikro-fon służący do sterowania znajduje się z tyłu reflektora.
CM (makra kolorów)Piętnaście wstępnych ustawień kolorów (lub szesnaście dla ROOTPAR6), które można wywoływać kolejno za pomocą przycisków CM+ i CM-.
Pr+ / Pr- Wybieranie programów w trybie automatycznym (Au) i sterowanie muzyką (Su).
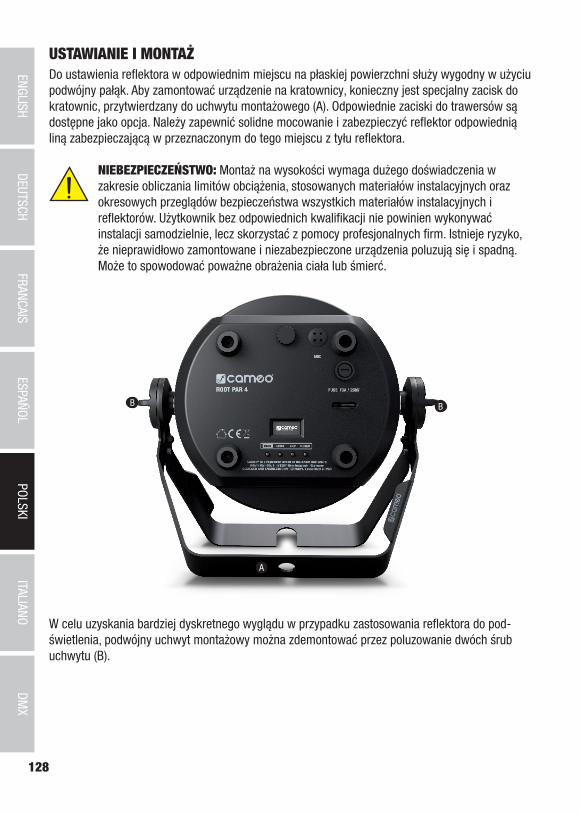
128
DMX
ITALIANOPOLSKI
ESPAÑOLFRANCAIS
DEUTSCHENGLISH
USTAWIANIE I MONTAŻDo ustawienia reflektora w odpowiednim miejscu na płaskiej powierzchni służy wygodny w użyciu podwójny pałąk. Aby zamontować urządzenie na kratownicy, konieczny jest specjalny zacisk do kratownic, przytwierdzany do uchwytu montażowego (A). Odpowiednie zaciski do trawersów są dostępne jako opcja. Należy zapewnić solidne mocowanie i zabezpieczyć reflektor odpowiednią liną zabezpieczającą w przeznaczonym do tego miejscu z tyłu reflektora.
NIEBEZPIECZEŃSTWO: Montaż na wysokości wymaga dużego doświadczenia w zakresie obliczania limitów obciążenia, stosowanych materiałów instalacyjnych oraz okresowych przeglądów bezpieczeństwa wszystkich materiałów instalacyjnych i reflektorów. Użytkownik bez odpowiednich kwalifikacji nie powinien wykonywać instalacji samodzielnie, lecz skorzystać z pomocy profesjonalnych firm. Istnieje ryzyko, że nieprawidłowo zamontowane i niezabezpieczone urządzenia poluzują się i spadną. Może to spowodować poważne obrażenia ciała lub śmierć.
A
B B
W celu uzyskania bardziej dyskretnego wyglądu w przypadku zastosowania reflektora do pod-świetlenia, podwójny uchwyt montażowy można zdemontować przez poluzowanie dwóch śrub uchwytu (B).

129
DMX
DEUTSC
HFRAN
CAIS
ESPAÑO
LEN
GLISH
ITALIANO
POLSKI
UTRZYMANIE, KONSERWACJA I NAPRAWYAby zapewnić długotrwałe, prawidłowe funkcjonowanie urządzenia, należy je regularnie konser-wować i serwisować, przynajmniej co 3000 godzin pracy lub co najmniej co roku.
KONSERWACJA (do wykonania przez użytkownika)
UWAGA! Przed rozpoczęciem wszelkich prac związanych z utrzymaniem urządzenia należy odłączyć zasilanie i w miarę możliwości wszystkie połączenia.
WSKAZÓWKA! Niewłaściwa konserwacja może doprowadzić do uszkodzenia urządzenia, a nawet jego zniszcze.
1. Powierzchnie obudowy należy czyścić czystą, wilgotną ściereczką. Należy przy tym uważać, aby do urządzenia nie dostała się wilgoć.
2. Otwory wlotowe i wylotowe powietrza muszą być regularnie czyszczone z pyłu i brudu. W przypadku zastosowania sprężonego powietrza należy uważać, aby nie dopuścić do uszkodze-nia urządzenia (np. wentylatory muszą być zablokowane, w przeciwnym razie mogą uzyskać nadmierną prędkość obrotową).
3. Przewody i styki wtykowe należy regularnie czyścić i usuwać z nich pył i zabrudzenia.4. Do pielęgnacji nie wolno stosować środków czyszczących ani środków o działaniu ściernym, w
przeciwnym razie może dojść do pogorszenia jakości powierzchni.5. Urządzenia należy przechowywać w suchym miejscu oraz chronić przed kurzem i brudem.6. Aby zapewnić prawidłowe i bezpieczne działanie, wszystkie dostępne lub wyjmowane soczewki
i otwory wyjściowe dla promieniowania świetlnego muszą być regularnie czyszczone.

130
DMX
ITALIANOPOLSKI
ESPAÑOLFRANCAIS
DEUTSCHENGLISH
KONSERWACJA I NAPRAWA (tylko przez wykwalifikowany personel)
NIEBEZPIECZEŃSTWO! W urządzeniu znajdują się elementy będące pod napięciem. Nawet po odłączeniu od sieci w urządzeniu może jeszcze występować napięcie resztkowe, np. z powodu naładowanych kondensatorów.
WSKAZÓWKA! W urządzeniu nie ma żadnych części, które mogą być serwisowane przez użytkownika.
WSKAZÓWKA! Prace konserwacyjne i naprawcze mogą być wykonywane wyłącznie przez odpowiednio wykwalifikowany personel. W razie wątpliwości skontaktować się ze specjalistycznym warsztatem.
WSKAZÓWKA! Nieprawidłowo wykonane czynności konserwacyjne mogą spowodować utratę gwarancji.
WSKAZÓWKA! W przypadku zestawów do przebudowy lub doposażenia dostarczonych przez producenta należy bezwzględnie przestrzegać dołączonej instrukcji montażu.

131
DMX
DEUTSC
HFRAN
CAIS
ESPAÑO
LEN
GLISH
ITALIANO
POLSKI
TECHNIKA DMX
DMX-512DMX (Digital Multiplex) to nazwa uniwersalnego protokołu transmisji do komunikacji między odpowiednimi urządzeniami a kontrolerami. Kontroler DMX wysyła dane DMX do podłączonych urządzeń DMX. Transmisja danych DMX następuje zawsze w formie szeregowego strumienia danych, który jest przekazywany z jednego urządzenia do następnego przez znajdujące się w każdym urządzeniu obsługują-cym standard DMX złącza „DMX IN” i „DMX OUT” (złącza wtykowe XLR), przy czym maksymalna liczba urządzeń nie może przekraczać 32. Ostatnie urządzenie w łańcuchu należy wyposażyć w terminator.
ZŁĄCZE DMX:DMX to wspólny „język”, za pomocą którego różne typy i modele urządzeń różnych producen-tów porozumiewają się ze sobą i mogą być sterowane przy użyciu centralnego kontrolera, o ile wszystkie urządzenia i kontroler obsługują standard DMX. W celu zapewnienia optymalnej transmisji danych wymagane jest, aby kable połączeniowe między poszczególnymi urządzeniami były możliwie jak najkrótsze. Kolejność, w jakiej urządzenia są podłączone do sieci DMX, nie ma znaczenia dla adresowania. I tak urządzenie z adresem DMX 1 może znajdować się w dowolnym miejscu (szeregowego) łańcucha DMX – na początku, na końcu lub gdzieś pośrodku. Po przydzie-leniu urządzeniu adresu DMX 1, kontroler „wie”, że ma on wysyłać wszystkie dane przypisane do adresu 1 do tego urządzenia, niezależnie od jego pozycji w sieci DMX.
POŁĄCZENIE SZEREGOWE KILKU REFLEKTORÓW1. Męską wtyczkę XLR (3-stykową lub 5-stykową) kabla DMX podłączyć do wyjścia DMX (żeńskie
gniazdo XLR) pierwszego urządzenia DMX (np. kontrolera DMX).2. Żeńską wtyczkę XLR kabla DMX podłączonego do pierwszego reflektora podłączyć do wejścia
DMX (męskie gniazdo XLR) następnego urządzenia DMX. Wyjście DMX tego urządzenia podłą-czyć w taki sam sposób do wejścia DMX następnego urządzenia i tak dalej. Należy pamiętać, że urządzenia DMX podłącza się szeregowo, a połączeń nie można rozdzielać bez aktywnego rozdzielacza. Maksymalna liczba urządzeń DMX w łańcuchu DMX nie może przekraczać 32.
Obszerny wybór odpowiednich kabli DMX oferują linie produktów Adam Hall 3 STAR, 4 STAR i 5 STAR.
KABEL DMX:W przypadku stosowania własnych kabli należy bezwzględnie przestrzegać informacji podanych na ilustracjach na tej stronie. W żadnym wypadku nie wolno łączyć osłony kabla z końcówką uziemiającą wtyczki. Należy także pamiętać, aby osłona nie miała kontaktu z obudową wtyczki XLR. Jeśli osłona ma kontakt z uziemieniem, może dojść do awarii systemu.

132
DMX
ITALIANOPOLSKI
ESPAÑOLFRANCAIS
DEUTSCHENGLISH
PRZYPORZĄDKOWANIE WTYCZEK:Kabel DMX z 3-stykowymi wtyczkami XLR: Kabel DMX z 5-stykowymi wtyczkami XLR (pin 4 i 5 są niepodłączone):
Shield
23
1
23
1
123
45
12
34
5
Shield
TERMINATOR DMX:Aby zapobiec awariom systemu, należy wyposażyć ostatnie urządzenie w łańcuchu DMX w termi-nator (120 Ω, 1/4 W).3-stykowa wtyczka XLR z terminatorem: K3DMXT35-stykowa wtyczka XLR z terminatorem: K3DMXT5
PRZYPORZĄDKOWANIE WTYCZEK:3-stykowa wtyczka XLR: 5-stykowa wtyczka XLR:
23
1
12
34
5
ADAPTER DMX:Możliwa jest także kombinacja urządzeń DMX z 3-stykowymi przyłączami i urządzeń DXM z 5-sty-kowymi przyłączami w jednym łańcuchu DMX przy użyciu adapterów.
PRZYPORZĄDKOWANIE WTYCZEKAdapter DMX 5-stykowy XLR, męski, na 3-stykowy XLR, żeński: K3DGF0020Pin 4 i 5 są niepodłączone.
PRZYPORZĄDKOWANIE WTYCZEKAdapter DMX 3-stykowy XLR, męski, na 5-stykowy XLR, żeński: K3DHM0020Pin 4 i 5 są niepodłączone.
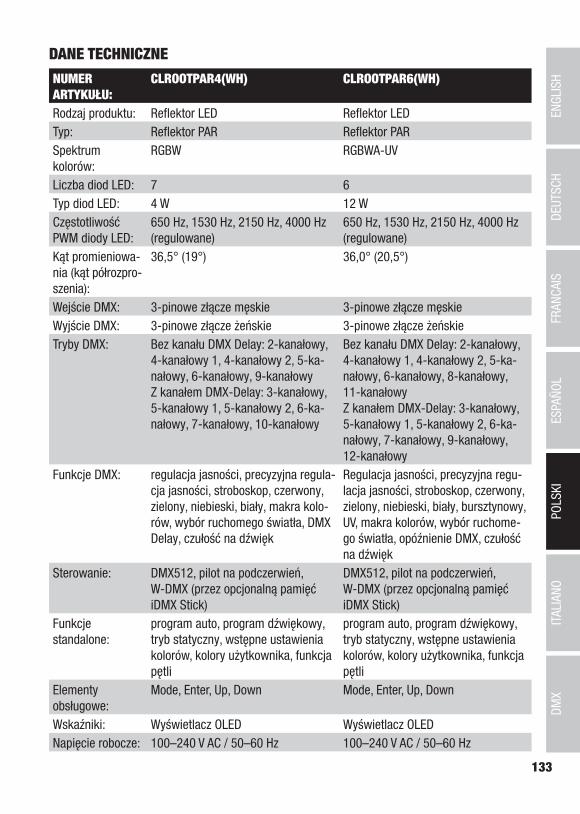
133
DMX
DEUTSC
HFRAN
CAIS
ESPAÑO
LEN
GLISH
ITALIANO
POLSKI
DANE TECHNICZNE
NUMER ARTYKUŁU:
CLROOTPAR4(WH) CLROOTPAR6(WH)
Rodzaj produktu: Reflektor LED Reflektor LEDTyp: Reflektor PAR Reflektor PARSpektrum kolorów:
RGBW RGBWA-UV
Liczba diod LED: 7 6Typ diod LED: 4 W 12 WCzęstotliwość PWM diody LED:
650 Hz, 1530 Hz, 2150 Hz, 4000 Hz (regulowane)
650 Hz, 1530 Hz, 2150 Hz, 4000 Hz (regulowane)
Kąt promieniowa-nia (kąt półrozpro-szenia):
36,5° (19°) 36,0° (20,5°)
Wejście DMX: 3-pinowe złącze męskie 3-pinowe złącze męskieWyjście DMX: 3-pinowe złącze żeńskie 3-pinowe złącze żeńskieTryby DMX: Bez kanału DMX Delay: 2-kanałowy,
4-kanałowy 1, 4-kanałowy 2, 5-ka-nałowy, 6-kanałowy, 9-kanałowyZ kanałem DMX-Delay: 3-kanałowy, 5-kanałowy 1, 5-kanałowy 2, 6-ka-nałowy, 7-kanałowy, 10-kanałowy
Bez kanału DMX Delay: 2-kanałowy, 4-kanałowy 1, 4-kanałowy 2, 5-ka-nałowy, 6-kanałowy, 8-kanałowy, 11-kanałowyZ kanałem DMX-Delay: 3-kanałowy, 5-kanałowy 1, 5-kanałowy 2, 6-ka-nałowy, 7-kanałowy, 9-kanałowy, 12-kanałowy
Funkcje DMX: regulacja jasności, precyzyjna regula-cja jasności, stroboskop, czerwony, zielony, niebieski, biały, makra kolo-rów, wybór ruchomego światła, DMX Delay, czułość na dźwięk
Regulacja jasności, precyzyjna regu-lacja jasności, stroboskop, czerwony, zielony, niebieski, biały, bursztynowy, UV, makra kolorów, wybór ruchome-go światła, opóźnienie DMX, czułość na dźwięk
Sterowanie: DMX512, pilot na podczerwień, W-DMX (przez opcjonalną pamięć iDMX Stick)
DMX512, pilot na podczerwień, W-DMX (przez opcjonalną pamięć iDMX Stick)
Funkcje standalone:
program auto, program dźwiękowy, tryb statyczny, wstępne ustawienia kolorów, kolory użytkownika, funkcja pętli
program auto, program dźwiękowy, tryb statyczny, wstępne ustawienia kolorów, kolory użytkownika, funkcja pętli
Elementy obsługowe:
Mode, Enter, Up, Down Mode, Enter, Up, Down
Wskaźniki: Wyświetlacz OLED Wyświetlacz OLEDNapięcie robocze: 100–240 V AC / 50–60 Hz 100–240 V AC / 50–60 Hz

134
DMX
ITALIANOPOLSKI
ESPAÑOLFRANCAIS
DEUTSCHENGLISH
NUMER ARTYKUŁU:
CLROOTPAR4(WH) CLROOTPAR6(WH)
Pobór mocy: 38 W 58 WNatężenie światła (w odległości 1 m):
7850 lx 10700 lx
Strumień świetlny:
1350 lm 1800 lm
Złącze zasilania: INPUT: niebieskie gniazdo Power Twist OUTPUT: białe gniazdo Power Twist (maks. 8 A)
INPUT: niebieskie gniazdo Power Twist OUTPUT: białe gniazdo Power Twist (maks. 8 A)
Klasa ochrony elektrycznej
1 1
Bezpiecznik: F3 A / 250 V (5 x 20 mm) F3 A / 250 V (5 x 20 mm)Temperatura otoczenia (w czasie pracy):
0°C–40°C 0°C–40°C
Wilgotność względna powie-trza:
< 80%, bez kondensacji < 80%, bez kondensacji
Stopień ochrony IP20 IP20Kolor obudowy: czarny (CLROOTPAR4)
biały (CLROOTPAR4WH)czarny (CLROOTPAR6) biały (CLROOTPAR6WH)
Materiał obudowy: tworzywo sztuczne ABS tworzywo sztuczne ABSChłodzenie obudowy:
Chłodzenie konwekcyjne Chłodzenie konwekcyjne
Wymiary (szer. x wys. x gł., bez uchwytu monta-żowego):
195 x 133 x 195 mm 195 x 133 x 195 mm
Waga (z uchwy-tem montażo-wym):
1,75 kg 1,975 kg
Pozostałe cechy: W zestawie kabel zasilający i pilot na podczerwień jako wyposażenie dodatkowe (CLPFLAT1REMOTE)
W zestawie kabel zasilający i pilot na podczerwień jako wyposażenie dodatkowe (CLPFLAT1REMOTE)

135
DMX
DEUTSC
HFRAN
CAIS
ESPAÑO
LEN
GLISH
ITALIANO
POLSKI
UTYLIZACJAOpakowanie
1. Opakowania można oddać do recyklingu.2. Opakowanie należy oddzielić zgodnie z obowiązującymi w danym kraju przepisami
dotyczącymi utylizacji.
Urządzenie:
1. To urządzenie podlega obowiązującej dyrektywie europejskiej w sprawie zużytego sprzętu elektrycznego i elektronicznego. Dyrektywa WEEE (w sprawie zużytego sprzę-tu elektrycznego i elektronicznego). Nie wyrzucać zużytych urządzeń wraz z odpadami z gospodarstwa domowego. Zużyte urządzenie należy zutylizować w autoryzowanym zakładzie utylizacji odpadów lub w komunalnym zakładzie utylizacji odpadów. Należy przestrzegać przepisów obowiązujących w danym kraju!
2. Przestrzegać wszystkich przepisów dotyczących usuwania odpadów obowiązujących w kraju użytkowania.
3. Klient prywatny otrzyma informacje na temat przyjaznych dla środowiska sposobów usunięcia produktu od sprzedawcy, u którego zakupił produkt, lub od właściwych władz lokalnych.
DEKLARACJE PRODUCENTAGWARANCJA PRODUCENTA I OGRANICZENIE ODPOWIEDZIALNOŚCIAdam Hall GmbH, Adam-Hall-Str. 1, D-61267 Neu Anspach, Niemcy / E-mail [email protected] / +49 (0)6081 / 9419-0.Nasze aktualne warunki gwarancji oraz informację o ograniczeniu odpowiedzialności można znaleźć na stronie internetowej:https://cdn-shop.adamhall.com/media/pdf/Manufacturers-Declarations-CAMEO_DE_EN_ES_FR.pdf.W sprawie serwisu należy skontaktować się z dystrybutorem.
ZGODNOŚĆ CEAdam Hall GmbH oświadcza niniejszym, że produkt spełnia wymogi następujących dyrektyw (o ile dotyczy): R&TTE (1999/5/WE) lub RED (2014/53/UE) od czerwca 2017 r.Dyrektywa niskonapięciowa (2014/35/UE) Dyrektywa EMC (2014/30/UE)RoHS (2011/65/UE)Pełna treść deklaracji zgodności znajduje się tutaj: www.adamhall.com. Można ją także zamówić pod adresem: [email protected].
ZASTRZEGAMY SOBIE PRAWO DO BŁĘDÓW W DRUKU I POMYŁEK ORAZ WPROWADZANIA ZMIAN TECHNICZNYCH I INNYCH MODYFIKACJI!

136
DMX
ITALIANOPOLSKI
ESPAÑOLFRANCAIS
DEUTSCHENGLISH
ITALIANO
AVETE FATTO LA SCELTA GIUSTA!Questo dispositivo è stato sviluppato e prodotto in conformità con elevati standard qualitativi che ne garantiscono il regolare funzionamento per molti anni. Leggete attentamente questo manuale d‘uso per utilizzare al meglio il vostro nuovo prodotto Cameo Light. Per maggiori informazioni su Cameo Light consultare la nostra pagina Web WWW.CAMEOLIGHT.COM.
UTILIZZO CONFORMEIl prodotto è un dispositivo per la tecnologia degli eventi.Il prodotto è stato sviluppato per l’uso professionale nell’ambito della tecnologia per eventi e non è adatto per l’illuminazione domestica.Inoltre, questo prodotto è destinato esclusivamente a utenti qualificati con conoscenze specialisti-che in materia di tecnologia per eventi.L’utilizzo del prodotto al di fuori delle condizioni di esercizio e dei dati tecnici specificati è da considerarsi non conforme all’uso previsto.Si esclude qualsiasi responsabilità per lesioni e danni materiali diretti e indiretti derivanti da un utilizzo non conforme.
Il prodotto non è adatto per: - Persone (compresi i bambini) con capacità fisiche, sensoriali o psichiche ridotte o non provvisti
delle necessarie conoscenze ed esperienze.- Bambini (ai bambini deve essere vietato giocare con il dispositivo).
INDICAZIONI SULLA SICUREZZA- Per evitare possibili danni, leggere e osservare attentamente le presenti istruzioni.- Conservare tutte le indicazioni e le istruzioni in un luogo sicuro.- Rispettare tutte le avvertenze. Non rimuovere dal dispositivo le indicazioni sulla sicurezza o altre
informazioni.
TERMINI E SIMBOLI1. PERICOLO: La parola PERICOLO, eventualmente abbinata a un simbolo, indica situazioni o
condizioni immediatamente pericolose per l’incolumità fisica e personale.
2. AVVERTENZA: La parola AVVERTENZA, eventualmente abbinata a un simbolo, indica situazioni o condizioni potenzialmente pericolose per l’incolumità delle persone.
3. PRUDENZA: La parola PRUDENZA, eventualmente abbinata a un simbolo, indica situazioni o condizioni che possono causare lesioni.
4. ATTENZIONE: La parola ATTENZIONE, eventualmente abbinata a un simbolo, indica situazioni o condizioni che possono provocare danni materiali e/o ambientali.

137
DMX
DEUTSC
HFRAN
CAIS
ESPAÑO
LEN
GLISH
ITALIANO
POLSKI
Questo simbolo indica un rischio elettrico.
Questo simbolo indica un pericolo generico.
Questo simbolo indica un pericolo dovuto a superfici calde.
Questo simbolo indica un pericolo dovuto a fonti luminose intense.
Questo simbolo indica informazioni complementari sull’utilizzo del prodotto.
PERICOLO:1. Non aprire né modificare il dispositivo.
2. Se il dispositivo non funzionasse più correttamente, vi fosse caduto sopra del liquido o un oggetto o fosse stato danneggiato in altro modo, spegnerlo immediatamente e scollegarlo dall’alimentazione elettrica. La riparazione del dispositivo deve essere affidata esclusivamente a personale qualificato autorizzato.
3. In caso di dispositivi con classe di protezione 1, il conduttore di protezione deve esse-re collegato correttamente. Non disattivare mai il conduttore di protezione. I dispositi-vi con classe di protezione 2 non hanno un conduttore di protezione.
4. Assicurarsi che i cavi sotto tensione non siano piegati o danneggiati meccanicamente in altro modo.
5. Non cortocircuitare mai il fusibile del dispositivo.
AVVERTENZA:1. Non utilizzare il dispositivo se presenta evidenti danni.
2. Il dispositivo deve essere installato solo in assenza di tensione.
3. Se il cavo di alimentazione del dispositivo è danneggiato, quest’ultimo non deve essere utilizzato.
4. I cavi di alimentazione collegati in modo permanente devono essere sostituiti solo da personale qualificato.
ATTENZIONE:1. Se sottoposto a forti sbalzi di temperatura (ad esempio dopo il trasporto), aspettare
ad accendere il dispositivo. Umidità e condensa potrebbero danneggiare il dispositivo. Accendere il dispositivo solo quando ha raggiunto la temperatura ambiente.
138
DMX
ITALIANOPOLSKI
ESPAÑOLFRANCAIS
DEUTSCHENGLISH
2. Verificare che la tensione e la frequenza della rete elettrica corrispondano ai valori indicati sul dispositivo. Se il dispositivo è dotato di un selettore di tensione, non col-legarlo finché tale selettore non è impostato correttamente. Utilizzare esclusivamente cavi di alimentazione adatti.
3. Per scollegare tutti i poli del dispositivo dalla rete elettrica, non è sufficiente premere l’interruttore ON/OFF del dispositivo.
4. Assicurarsi che il fusibile utilizzato corrisponda al tipo stampato sul dispositivo.
5. Accertarsi che siano state adottate misure adeguate contro le sovratensioni (ad es. fulmini).
6. Rispettare la corrente di uscita massima indicata sui dispositivi con collegamento Power Out. La corrente assorbita complessivamente da tutti i dispositivi collegati non deve superare il valore indicato.
7. Sostituire i cavi di alimentazione a innesto solo con cavi equivalenti a quelli originali forniti in dotazione. La sezione trasversale non deve essere inferiore alla sezione trasversale della linea originale.
PERICOLO:1. Pericolo di soffocamento! I sacchetti di plastica e componenti minuti devono essere
tenuti fuori dalla portata delle persone (inclusi i bambini) con capacità fisiche, senso-riali o mentali limitate.
2. Pericolo di lesioni per caduta di oggetti! Verificare che il dispositivo sia installato in modo stabile e non possa cadere. Utilizzare esclusivamente stativi e dispositivi di fissaggio adatti (in particolare in caso di impianti fissi). Assicurarsi che gli accessori siano installati e fissati correttamente. Assicurarsi che siano rispettate le norme di sicurezza in vigore.
AVVERTENZA:1. Utilizzare il dispositivo unicamente nelle modalità previste.
2. Azionare il dispositivo esclusivamente con gli accessori consigliati e previsti dal produttore.
3. Durante l’installazione, osservare le normative sulla sicurezza in vigore nel proprio paese.
4. Una volta collegato il dispositivo, verificare tutti i cavi per evitare danni o incidenti, ad esempio per inciampo.
5. Rispettare assolutamente la distanza minima indicata da materiali normalmente infiammabili. Salvo diversa ed esplicita indicazione, la distanza minima è di 0,3 m.
6. È essenziale rispettare la distanza minima dalla superficie illuminata che può essere letta dal dispositivo.

139
DMX
DEUTSC
HFRAN
CAIS
ESPAÑO
LEN
GLISH
ITALIANO
POLSKI
PRUDENZA:1. In caso di componenti mobili, come staffe di montaggio, sussiste il rischio di schiac-
ciamento.
2. Nei dispositivi con componenti azionati a motore sussiste il pericolo di lesioni a causa del movimento del dispositivo. Movimenti improvvisi del dispositivo possono causare reazioni impreviste.
3. Durante il normale funzionamento, la superficie dell’alloggiamento del dispositivo può raggiungere temperature molto elevate. Assicurarsi che non avvenga alcun contatto accidentale con l’alloggiamento. Far raffreddare sempre a sufficienza la lampada prima di smontarla, eseguire lavori di manutenzione, ricaricarla ecc.
ATTENZIONE:1. Non installare né azionare il dispositivo in prossimità di radiatori, accumulatori ter-
mici, stufe o altre fonti di calore. Accertarsi che il dispositivo sia sempre installato in modo che venga raffreddato a sufficienza e non possa surriscaldarsi.
2. Non posizionare fonti di ignizione, come candele accese, nelle vicinanze del disposi-tivo.
3. Le prese di ventilazione non devono essere coperte e le ventole non devono essere bloccate.
4. Per il trasporto utilizzare l’imballaggio originale o gli imballaggi previsti dal produttore.
5. Evitare di scuotere o urtare il dispositivo.
6. Osservare il grado di protezione IP, nonché le condizioni ambientali come la tempera-tura e l’umidità dell’aria in base alla specifica.
7. I dispositivi possono essere soggetti a ulteriori sviluppi. In caso di condizioni di fun-zionamento, prestazioni o altre caratteristiche del dispositivo diverse tra le istruzioni per l’uso e l’etichetta, l’indicazione riportata sul dispositivo ha sempre la priorità.
8. L’unità non è adatta per zone climatiche tropicali e per il funzionamento oltre i 2000 m sul livello del mare.
9. Il dispositivo non è adatto al funzionamento in ambienti marini.
ATTENZIONE! INDICAZIONI IMPORTANTI RELATIVE AI PRODOTTI PER L’ILLUMINAZIONE!1. Non fissare mai direttamente il fascio di luce, nemmeno per brevi istanti.
2. Non guardare mai il fascio di luce con dispositivi ottici come le lenti d’ingrandimento.
3. In alcuni casi, in persone sensibili gli effetti stroboscopici possono causare attacchi epilettici.
4. In questa lampada è installata una lampada fissa che non può essere sostituita dall’utente. In caso di malfunzionamento, contattare il distributore di fiducia.

140
DMX
ITALIANOPOLSKI
ESPAÑOLFRANCAIS
DEUTSCHENGLISH
AVVERTENZE PER DISPOSITIVI INDUSTRIALI PORTATILI 1. Funzionamento temporaneo! Le attrezzature per eventi sono concepite esclusivamen-
te per un uso temporaneo.
2. Il funzionamento continuo o l’installazione permanente possono compromettere il funzionamento e causare l’usura precoce del dispositivo.
INTRODUZIONE7 PROIETTORI PAR RGBW DA 4 WCLROOTPAR4 (alloggiamento nero)CLROOTPAR4WH (alloggiamento bianco)
6 PROIETTORI PAR RGBWA+UV DA 12 WCLROOTPAR6 (alloggiamento nero)CLROOTPAR6WH (ALLOGGIAMENTO BIANCO)
FUNZIONI DI CONTROLLOCLROOTPAR4Modalità di funzionamento DMX senza canale DMX Delay: Controllo DMX a 2 canalI, 4 canali (1), 4 canali (2), 5 canali, 6 canali e 9 canaliModalità di funzionamento DMX con canale DMX Delay: Controllo DMX a 3 canali, 5 canali (1), 5 canali (2), 6 canali, 7 canali e 10 canaliCLROOTPAR6Modalità di funzionamento DMX senza canale DMX Delay: Controllo DMX a 2 canali, 4 canali (1), 4 canali (2), 5 canali, 6 canali, 8 canali e 11 canaliModalità di funzionamento DMX con canale DMX Delay: Controllo DMX a 3 canali, 5 canali (1), 5 canali (2), 6 canali, 7 canali, 9 canali e 12 canali
Funzionamento master/slaveFunzioni stand-aloneComandabile mediante telecomando a infrarossi (telecomando a infrarossi opzionale)Collegamento W-DMX mediante memory stick iDMX opzionale
CARATTERISTICHEConnettori DMX a 3 poli. Connettori di rete Power Twist IN e OUT. Display OLED. Frequenza PWM regolabile. Connessione per memory stick iDMX. Raffreddamento a convezione. Vite Tilt. Staffa doppia di montaggio inclusa. Tensione di esercizio 100-240 V AC.
CLROOTPAR47 LED RGBW da 4 W. Potenza assorbita 38 W
CLROOTPAR66 LED RGBWA+UV da 12 W. Potenza assorbita 58 W
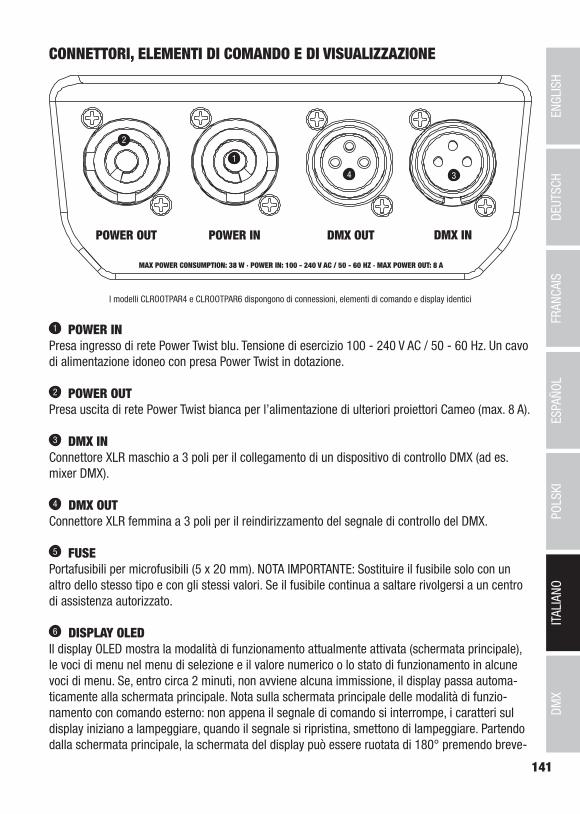
141
DMX
DEUTSC
HFRAN
CAIS
ESPAÑO
LEN
GLISH
ITALIANO
POLSKI
CONNETTORI, ELEMENTI DI COMANDO E DI VISUALIZZAZIONE
I modelli CLROOTPAR4 e CLROOTPAR6 dispongono di connessioni, elementi di comando e display identici
1 POWER INPresa ingresso di rete Power Twist blu. Tensione di esercizio 100 - 240 V AC / 50 - 60 Hz. Un cavo di alimentazione idoneo con presa Power Twist in dotazione.
2 POWER OUTPresa uscita di rete Power Twist bianca per l’alimentazione di ulteriori proiettori Cameo (max. 8 A).
3 DMX INConnettore XLR maschio a 3 poli per il collegamento di un dispositivo di controllo DMX (ad es. mixer DMX).
4 DMX OUTConnettore XLR femmina a 3 poli per il reindirizzamento del segnale di controllo del DMX.
5 FUSEPortafusibili per microfusibili (5 x 20 mm). NOTA IMPORTANTE: Sostituire il fusibile solo con un altro dello stesso tipo e con gli stessi valori. Se il fusibile continua a saltare rivolgersi a un centro di assistenza autorizzato.
6 DISPLAY OLEDIl display OLED mostra la modalità di funzionamento attualmente attivata (schermata principale), le voci di menu nel menu di selezione e il valore numerico o lo stato di funzionamento in alcune voci di menu. Se, entro circa 2 minuti, non avviene alcuna immissione, il display passa automa-ticamente alla schermata principale. Nota sulla schermata principale delle modalità di funzio-namento con comando esterno: non appena il segnale di comando si interrompe, i caratteri sul display iniziano a lampeggiare, quando il segnale si ripristina, smettono di lampeggiare. Partendo dalla schermata principale, la schermata del display può essere ruotata di 180° premendo breve-
1
4 3
2
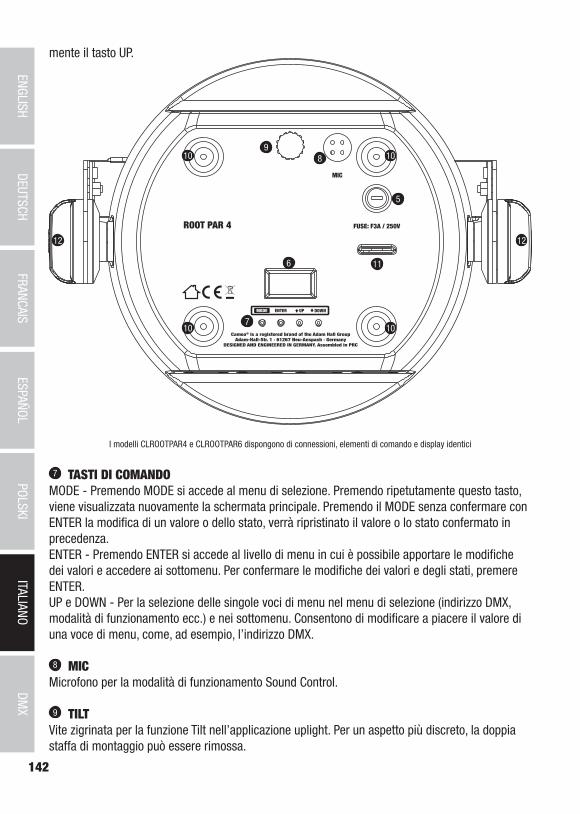
142
DMX
ITALIANOPOLSKI
ESPAÑOLFRANCAIS
DEUTSCHENGLISH
mente il tasto UP.
MIC
5
6
7
11
89
10
10
10
10
12 12
I modelli CLROOTPAR4 e CLROOTPAR6 dispongono di connessioni, elementi di comando e display identici
7 TASTI DI COMANDOMODE - Premendo MODE si accede al menu di selezione. Premendo ripetutamente questo tasto, viene visualizzata nuovamente la schermata principale. Premendo il MODE senza confermare con ENTER la modifica di un valore o dello stato, verrà ripristinato il valore o lo stato confermato in precedenza.ENTER - Premendo ENTER si accede al livello di menu in cui è possibile apportare le modifiche dei valori e accedere ai sottomenu. Per confermare le modifiche dei valori e degli stati, premere ENTER.UP e DOWN - Per la selezione delle singole voci di menu nel menu di selezione (indirizzo DMX, modalità di funzionamento ecc.) e nei sottomenu. Consentono di modificare a piacere il valore di una voce di menu, come, ad esempio, l’indirizzo DMX.
8 MICMicrofono per la modalità di funzionamento Sound Control.
9 TILTVite zigrinata per la funzione Tilt nell’applicazione uplight. Per un aspetto più discreto, la doppia staffa di montaggio può essere rimossa.

143
DMX
DEUTSC
HFRAN
CAIS
ESPAÑO
LEN
GLISH
ITALIANO
POLSKI
10 PIEDINI IN GOMMAQuattro piedini in gomma per conferire stabilità.
11 OCCHIELLO DI SICUREZZAOcchiello di sicurezza per il fissaggio del proiettore durante il montaggio su traversa.
12 VITI A MANOPOLALe due viti a manopola servono per regolare e fissare la staffa di supporto o di montaggio.
CONNESSIONE PER COLLEGAMENTO W-DMX™La connessione USB-A per la chiavetta iDMX opzionale si trova sul lato frontale del proiettore di fronte al pannello dei connettori.
UTILIZZOOSSERVAZIONI• Non appena il proiettore è correttamente allacciato alla rete elettrica, durante il processo di
avvio sul display appaiono in successione il messaggio "Welcome to Cameo", la denominazione del modello e la versione del software. Dopo questo processo il proiettore sarà pronto per l’uso e si avvierà nella modalità di funzionamento precedentemente attivata.
• Per passare direttamente al display principale dai livelli di menu inferiori tenere premuto il tasto MODE per circa 2 secondi. Se entro circa 2 minuti non viene immesso alcun dato si attiva automaticamente la schermata principale. Premere brevemente MODE per salire di un livello nei sottomenu.
• Per accedere direttamente all’ultima voce di menu modificata premere contemporaneamente MODE e ENTER.
• Partendo dalla schermata principale, la schermata del display può essere ruotata di 180° pre-mendo brevemente il tasto UP.
• Per modificare rapidamente un valore (ad es. l'indirizzo di avvio DMX) tenere premuto il tasto UP o DOWN.
SCHERMATA PRINCIPALE MODALITÀ DI FUNZIONAMENTO DMXSul display vengono visualizzati l’indirizzo DMX e l'indirizzo di avvio DMX attualmente impostato (nell'esempio 001). Se la funzione DMX Delay è attivata, vengono visualizzati anche il gruppo e il tempo di ritardo.
SCHERMATA PRINCIPALE MODALITÀ DI FUNZIONAMENTO STAND-ALONESul display viene visualizzata la modalità stand-alone attualmente attiva (Mode Auto, Mode Sound, Mode Static, Mode Color Preset, Mode User Color, Mode Loop).

144
DMX
ITALIANOPOLSKI
ESPAÑOLFRANCAIS
DEUTSCHENGLISH
ModeAuto
ModeSound
ModeStatic
ModeColor Preset
ModeUser Color
ModeLoop
SCHERMATA PRINCIPALE DELLA MODALITÀ SLAVESul display viene visualizzato Mode Slave. Se l’unità slave è assegnata a un gruppo slave, vengono visualizzati anche il gruppo slave e il tempo di ritardo impostato nell’unità master nelle modalità stand-alone Auto e Loop.
ModeSlave
Gr 1 2.0s
IMPOSTAZIONE DELL’INDIRIZZO DI AVVIO DMXPremendo MODE si accede al menu principale. Con i tasti UP e DOWN, selezionare la voce di menu DMX Address e confermare con ENTER. Impostare l’indirizzo di avvio DMX desiderato con i tasti UP e DOWN. Confermare l’inserimento con ENTER e premere una volta il tasto MODE per tornare alla schermata principale. Se entro circa 2 minuti non viene effettuato alcun inserimento, si attiva automaticamente la schermata principale.
--------Menu-------DMX AddressDMX ModeDMX DelayStand AloneSlaveSettingsSystem Info
----DMX Address----DMX AddressDMX ModeDMX Delay
001 - 512
IMPOSTAZIONE DELLA MODALITÀ DI FUNZIONAMENTO DMXPremendo MODE si accede al menu principale. Con i tasti UP e DOWN, selezionare la voce di menu DMX Mode e confermare con ENTER. Con i tasti UP e DOWN selezionare la modalità di fun-zionamento DMX desiderata e confermare con ENTER (le modalità DMX con canale di ritardo DMX sono contrassegnate con „D“). Premere MODE 1 volta per tornare alla schermata principale. Se entro circa 2 minuti non viene effettuato alcun inserimento, si attiva automaticamente la scher-mata principale. Le tabelle con l’assegnazione dei canali delle diverse modalità di funzionamento DMX sono riportate nel presente manuale, alla sezione CONTROLLO DMX.
--------Menu-------DMX AddressDMX ModeDMX DelayStand AloneSlaveSettingsSystem Info
----DMX Address----DMX AddressDMX ModeDMX Delay
001 - 512001 - 512001 - 5122CH4CH14CH25CH6CH9CH
D3CHD5CH1D5CH2D6CHD7CH
D10CH
CLROOTPAR4
----DMX Address----DMX AddressDMX ModeDMX Delay
001 - 512001 - 512001 - 5122CH4CH14CH25CH6CH8CH
11CH
D3CHD5CH1D5CH2D6CHD7CHD9CH
D12CH
CLROOTPAR6

145
DMX
DEUTSC
HFRAN
CAIS
ESPAÑO
LEN
GLISH
ITALIANO
POLSKI
DMX DELAYCon l'ausilio della funzione DMX Delay è possibile creare facilmente un effetto chaser con un numero qualsiasi di proiettori dello stesso modello e della stessa versione software che altrimenti si potrebbe ottenere solo con un idoneo controller DMX e una programmazione complessa. Tutti i proiettori coinvolti sono impostati sulla stessa modalità DMX e controllati tramite lo stesso indiriz-zo di avvio DMX.
Impostazione manuale del DMX Delay nelle modalità di funzionamento DMX senza canale DMX Delay:Premere MENU dalla schermata principale per accedere al menu principale. Usare i tasti e per selezionare la voce di menu DMX Delay e confermare con ENTER. Con l'ausilio di e selezionare nuovamente la voce di sottomenu desiderata, confermare con ENTER e impostare il valore desiderato. Confermare tutti i dati immessi con ENTER.
Assegnare i proiettori a uno dei 47 gruppi (il numero massimo di gruppi dipende dalla modalità DMX attivata); è possibile assegnare più proiettori a uno stesso gruppo. Il numero di gruppo è anche il fattore per cui viene moltiplicato il tempo di ritardo impostato.
Il tempo di ritardo (tempo di ritardo del segnale DMX) può essere impostato manualmente su ciascun proiettore con valori diversi (da 0,0 s a 2,0 s con incrementi di 0,1 s).
Esempio di setup:
Impostazione del DMX Delay nelle modalità di funzionamento DMX con canale DMX Delay:Premere MENU dalla schermata principale per accedere al menu principale. Usare i tasti e per selezionare la voce di menu DMX Delay e confermare 2 volte con ENTER.
Assegnare i proiettori a uno dei 47 gruppi (il numero massimo di gruppi dipende dalla modalità DMX attivata); è possibile assegnare più proiettori a uno stesso gruppo. Il numero di gruppo è an-che il fattore per cui viene moltiplicato il tempo di ritardo impostato. Confermare ogni inserimento premendo ENTER.

146
DMX
ITALIANOPOLSKI
ESPAÑOLFRANCAIS
DEUTSCHENGLISH
Il tempo di ritardo (tempo di ritardo del segnale DMX) viene impostato con l'ausilio di un controller DMX nel canale DMX Delay separato della modalità di funzionamento DMX corrispondente (da 0,0 s a 2,0 s con incrementi di 0,1 s).
Esempio di setup:
MODALITÀ DI FUNZIONAMENTO STAND-ALONE AUTO / SOUNDCiascuno dei 6 diversi programmi automatici è composto da sequenze di cambio colore prefis-sate; luminosità, velocità di esecuzione, Sound Control con sensibilità microfono e ritardo (del segnale) possono essere impostati separatamente.Premere MODE dalla schermata principale per accedere al menu principale. Con i tasti UP e DOWN selezionare la voce di menu Stand Alone e confermare con ENTER. Con i tasti UP e DOWN selezionare la modalità di funzionamento stand-alone Auto e confermare con ENTER. Con i tasti UP e DOWN, selezionare ora il programma desiderato (Program 1 - Program 6) e conferma-re con ENTER.
--------Menu-------DMX AddressDMX ModeDMX DelayStand AloneSlaveSettingsSystem Info
----Stand Alone----AutoStaticColor PresetUser ColorLoop
-----Program x-----DimmerSpeedSoundSensDelay
----Auto Mode----Program 1 |Program 6
0 - 1000 - 100
Off / On0 - 100
0.0 s - 2.0 s
Si accede quindi al sottomenu per l’impostazione delle seguenti voci di sottomenu (v. tabella, se-lezionare con UP e DOWN, confermare con ENTER, modificare il valore o lo stato con UP e DOWN, confermare con ENTER): Le impostazioni vengono effettuate separatamente per ogni programma e vengono mantenute anche dopo il riavvio del dispositivo.

147
DMX
DEUTSC
HFRAN
CAIS
ESPAÑO
LEN
GLISH
ITALIANO
POLSKI
MODALITÀ DI FUNZIONAMENTO STAND-ALONE AUTO / SOUND (PROGRAM 1 - PROGRAM 6)
Dimmer Impostazione della luminosità. 0 - 100
Speed Impostazione della velocità di avanzamento 0 - 100
Sound Attivare/disattivare Sound Control Off Sound Control disattivato
On Sound Control attivato
Sens Impostare la sensibilità del microfono 0 - 100
Delay Tempo di ritardo dei gruppi slave 0.0s - 2.0s
MODALITÀ DI FUNZIONAMENTO STAND-ALONE STATICAnalogamente a quanto avviene in un dispositivo di comando DMX, la modalità stand-alone con-sente di impostare direttamente sul dispositivo le funzioni dimmer, stroboscopio (Strobe), R, G, B e W o R, G, B, W, A e UV con valori da 000 a 255. È quindi possibile creare una scena personalizzata, senza necessità di utilizzare un controller DMX aggiuntivo.
Premere MODE dalla schermata principale per accedere al menu principale. Con i tasti UP e DOWN selezionare la voce di menu Stand Alone e confermare con ENTER. Con i tasti UP e DOWN selezionare la modalità di funzionamento stand-alone Static e confermare con ENTER. Con i tasti UP e DOWN selezionare la voce di menu che si desidera modificare e confermare con ENTER. È possibile impostare il valore desiderato da 000 a 255 tramite i tasti UP e DOWN. Confermare tutti gli inserimenti con ENTER.
--------Menu-------DMX AddressDMX ModeDMX DelayStand AloneSlaveSettingsSystem Info
----Stand Alone----AutoStaticColor PresetUser ColorLoop
-----Static Mode-----DimmerStrobeRedGreenBlueWhiteAmberUV
----Static Mode----DimmerStrobeRedGreenBlueWhite
0 - 2550 - 2550 - 2550 - 2550 - 2550 - 255
CLROOTPAR4 CLROOTPAR6
0 - 2550 - 2550 - 2550 - 2550 - 2550 - 2550 - 2550 - 255
MODALITÀ DI FUNZIONAMENTO STAND-ALONE COLOR PRESETSono disponibili 15 diversi preset di colore più Jump e Fade; la luminosità può essere regolata separatamente per ogni preset, così come la velocità di esecuzione per Jump e Fade.
Premere MODE dalla schermata principale per accedere al menu principale. Con i tasti UP e DOWN selezionare la voce di menu Stand Alone e confermare con ENTER. Con i tasti UP e DOWN selezionare la modalità di funzionamento stand-alone Color Preset e confermare con ENTER. Con UP e DOWN selezionare ora il colore desiderato come preset e confermare con ENTER (Off = Blackout, Speed si riferisce a Jump e Fade). È possibile impostare la luminosità desiderata da 000 a 100 tramite i tasti UP e DOWN. Confermare con ENTER.

148
DMX
ITALIANOPOLSKI
ESPAÑOLFRANCAIS
DEUTSCHENGLISH
--------Menu-------DMX AddressDMX ModeDMX DelayStand AloneSlaveSettingsSystem Info
----Stand Alone----AutoStaticColor PresetUser ColorLoop
----Color Preset----OffRedAmberYel WarmYellowGreenTurquoise
WhiteCold WhiteUVJumpFadeSpeed
0 - 100 0 - 1000 - 1000 - 1000 - 1000 - 100
ROOTPAR6
WhiteCold WhiteJumpFadeSpeed
ROOTPAR4
0 - 100 0 - 1000 - 1000 - 1000 - 100
0 - 100 0 - 1000 - 1000 - 1000 - 1000 - 100
CyanBlueLavenderMauveMagentaPinkWarm White
0 - 100 0 - 1000 - 1000 - 1000 - 1000 - 1000 - 100
MODALITÀ DI FUNZIONAMENTO STAND-ALONE USER COLORLa modalità di funzionamento stand-alone User Color consente di salvare luminosità generale, stroboscopio e mix cromatico di R, G, B e W o R, G, B, W, A e UV direttamente nel dispositivo in quattro preset cromatici individuali.
Premere MODE dalla schermata principale per accedere al menu principale. Con i tasti UP e DOWN selezionare la voce di menu Stand Alone e confermare con ENTER. Con i tasti UP e DOWN selezionare la modalità di funzionamento stand-alone User Color e confermare con ENTER. Con i tasti UP e DOWN, selezionare ora il preset desiderato (Color 1 - Color 4) e confermare con ENTER. Con i tasti UP e DOWN selezionare la voce di menu che si vuole modificare e confermare con ENTER. È possibile impostare il valore desiderato da 000 a 255 tramite i tasti UP e DOWN. I valori dell’effetto stroboscopio corrispondono ai valori del canale 2 della tabella DMX 4 CH Mode 1. Confermare tutti gli inserimenti con ENTER.
--------Menu-------DMX AddressDMX ModeDMX DelayStand AloneSlaveSettingsSystem Info
----Stand Alone----AutoStaticColor PresetUser ColorLoop
-------Color x-------DimmerStrobeRedGreenBlueWhiteAmberUV
-------Color x-------DimmerStrobeRedGreenBlueWhite
0 - 2550 - 2550 - 2550 - 2550 - 2550 - 255
CLROOTPAR4 CLROOTPAR6
0 - 2550 - 2550 - 2550 - 2550 - 2550 - 2550 - 2550 - 255
----User Color----Color 1 |Color 4
MODALITÀ DI FUNZIONAMENTO STAND-ALONE LOOPLa modalità di funzionamento stand-alone Loop permette di configurare, memorizzare e richia-mare fino a quattro diversi programmi di cambio colore. Luminosità, durata del ciclo, tempo di dissolvenza e ritardo (del segnale) sono regolabili separatamente.
Premere MODE dalla schermata principale per accedere al menu principale. Con i tasti UP e DOWN selezionare la voce di menu Stand Alone e confermare con ENTER. Con i tasti UP e DOWN selezionare la modalità di funzionamento stand-alone Loop e confermare con ENTER. Con i tasti UP e DOWN selezionare ora il loop desiderato (Loop 1 - Loop 4) e confermare con ENTER.
--------Menu-------DMX AddressDMX ModeDMX DelayStand AloneSlaveSettingsSystem Info
----Stand Alone----AutoStaticColor PresetUser ColorLoop
----Loop Mode----Loop 1 |Loop 4
---------Loop x---------DimmerSteptimeFadetimeDelay1.Step2.Step3.Step4.Step
0 - 1000.1s - 10.0s
0 % - 100 %0.0s - 2.0s
RedGreenBlack
-------

149
DMX
DEUTSC
HFRAN
CAIS
ESPAÑO
LEN
GLISH
ITALIANO
POLSKI
Si accede quindi al sottomenu per l’impostazione delle seguenti voci di sottomenu (v. tabella, selezionare con UP e DOWN, confermare con ENTER, modificare il valore o lo stato con UP e DOWN, confermare con ENTER): Le impostazioni vengono effettuate separatamente per ogni loop e vengono mantenute anche dopo il riavvio del dispositivo.
ROOTPAR4
MODALITÀ DI FUNZIONAMENTO STAND-ALONE LOOP (Loop 1 - Loop 4)
Dimmer Impostazione della luminosità. 0 - 100
Steptime Impostazione della durata del ciclo 0.1s - 10.0s
FadetimeImpostazione del tempo di dissolvenza in punti percentuali
0 % - 100 %
Delay Tempo di ritardo dei gruppi slave 0.0s - 2.0s
impostare il 1° Step
15 colori da Color Preset Red - CW (Cold White)
4 colori da User Color User 1 - User 4
Blackout Blackout
2. Step ” ”
3. Step
15 colori da Color Preset Red - CW (Cold White)
4 colori da User Color User 1 - User 4
Blackout Blackout
------- Saltare il passaggio
4. Step ” ”
ROOTPAR6
MODALITÀ DI FUNZIONAMENTO STAND-ALONE LOOP (Loop 1 - Loop 4)
Dimmer Impostazione della luminosità. 0 - 100
Steptime Impostazione della durata del ciclo 0.1s - 10.0s
FadetimeImpostazione del tempo di dissolvenza in punti percentuali
0 % - 100 %
Delay Tempo di ritardo dei gruppi slave 0.0s - 2.0s
impostare il 1° Step
15 colori da Color Preset Red - CW (Cold White)
4 colori da User Color User 1 - User 4
Luce UV UV
Blackout Blackout
2. Step ” ”

150
DMX
ITALIANOPOLSKI
ESPAÑOLFRANCAIS
DEUTSCHENGLISH
3. Step 15 colori da Color Preset Red - CW (Cold White)
4 colori da User Color User 1 - User 4
Luce UV UV
Blackout Blackout
------- Saltare il passaggio
4. Step ” ”
MODALITÀ SLAVEModalità Slave Standard: Premere MODE dalla schermata principale per accedere al menu principale. Con i tasti UP e DOWN selezionare la voce di menu Slave e confermare con ENTER; selezionare poi il Gruppo Slave 0 (Slave Group 0) e confermare nuovamente con ENTER. Collegare l’unità slave e master (stesso modello, stessa versione del software) utilizzando un cavo DMX; sull’unità master attivare una delle modalità stand-alone (Auto, Static, Color Preset, User Color, Loop). Ora l’unità slave segue esattamente l’unità master.
--------Menu-------DMX AddressDMX ModeDMX DelayStand AloneSlaveSettingsSystem Info
----Slave Group----Stand AloneSlaveSettings
Mode Slave0
Hauptanzeige
Modalità slave estesa: Se si desidera controllare le unità slave nel funzionamento master/slave con una modalità di funzionamento stand-alone Auto o Loop, il segnale di controllo può essere riprodotto con un ritardo di tempo su fino a 15 livelli (ROOTPAR4: Slave Group 1 - 15, ROOTPAR6: 1 - 13); il ritardo viene impostato nel sottomenu Delay nella rispettiva modalità stand-alone, mentre il fattore di ritardo viene impostato nel menu slave del proiettore corrispon-dente. Così è possibile creare facilmente un effetto chaser con un numero qualsiasi di proiettori dello stesso modello e della stessa versione software, che altrimenti si potrebbe ottenere solo con un idoneo controller DMX e una programmazione complessa.
--------Menu-------DMX AddressDMX ModeDMX DelayStand AloneSlaveSettingsSystem Info
----Slave Group----Stand AloneSlaveSettings
----Slave Group----Stand AloneSlaveSettings
ModeSlaveGr 1 2.0s
CLROOTPAR4 CLROOTPAR6
1 - 15 1 - 13
Hauptanzeige mit Gruppennummer und Delay-Zeit in der
Master-Einheit
Assegnare i proiettori a uno dei 15 gruppi (ROOTPAR4: Slave Group 1 - 15, ROOTPAR6: 1 - 13) a seconda delle esigenze; è possibile assegnare più proiettori a uno stesso gruppo. Il numero di gruppo è anche il fattore per cui viene moltiplicato il tempo di ritardo impostato nell’unità master (v. esempio di configurazione).
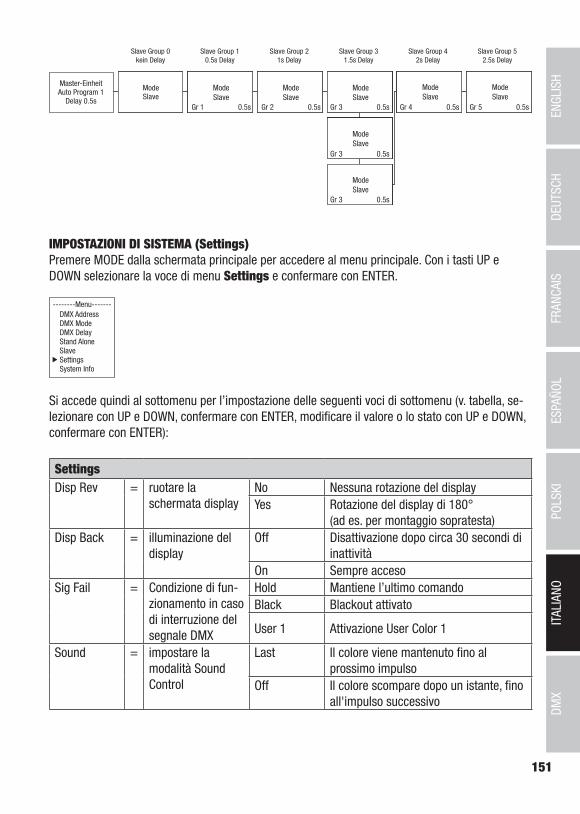
151
DMX
DEUTSC
HFRAN
CAIS
ESPAÑO
LEN
GLISH
ITALIANO
POLSKI
Mode Slave
Master-EinheitAuto Program 1
Delay 0.5s
Slave Group 0kein Delay
Slave Group 10.5s Delay
Slave Group 21s Delay
Slave Group 31.5s Delay
Slave Group 42s Delay
Slave Group 52.5s Delay
Gr 1 0.5s Gr 2 0.5s Gr 3 0.5s
Gr 3 0.5s
Gr 3 0.5s
Gr 4 0.5s Gr 5 0.5s
Mode Slave
Mode Slave
Mode Slave
Mode Slave
Mode Slave
Mode Slave
Mode Slave
IMPOSTAZIONI DI SISTEMA (Settings)Premere MODE dalla schermata principale per accedere al menu principale. Con i tasti UP e DOWN selezionare la voce di menu Settings e confermare con ENTER.
--------Menu-------DMX AddressDMX ModeDMX DelayStand AloneSlaveSettingsSystem Info
Si accede quindi al sottomenu per l’impostazione delle seguenti voci di sottomenu (v. tabella, se-lezionare con UP e DOWN, confermare con ENTER, modificare il valore o lo stato con UP e DOWN, confermare con ENTER):
SettingsDisp Rev = ruotare la
schermata displayNo Nessuna rotazione del displayYes Rotazione del display di 180°
(ad es. per montaggio sopratesta)Disp Back = illuminazione del
displayOff Disattivazione dopo circa 30 secondi di
inattivitàOn Sempre acceso
Sig Fail = Condizione di fun-zionamento in caso di interruzione del segnale DMX
Hold Mantiene l’ultimo comandoBlack Blackout attivato
User 1 Attivazione User Color 1
Sound = impostare la modalità Sound Control
Last Il colore viene mantenuto fino al prossimo impulso
Off Il colore scompare dopo un istante, fino all'impulso successivo
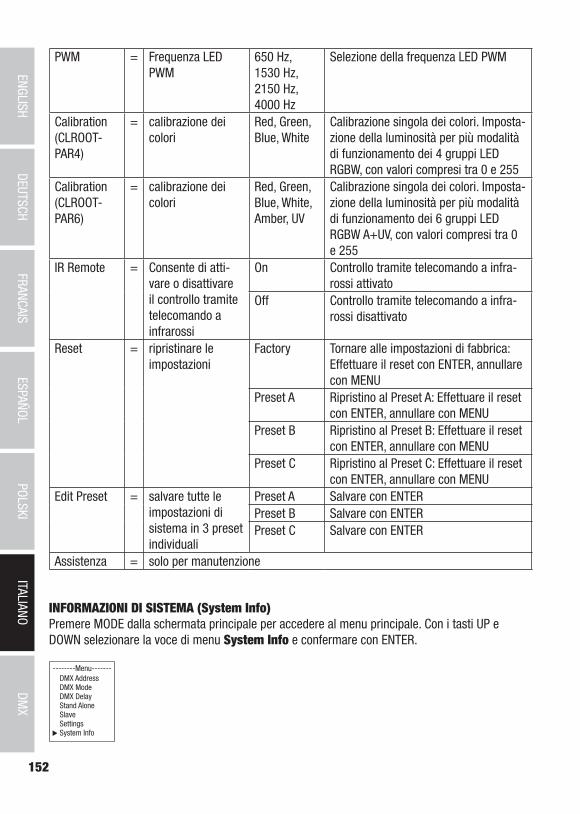
152
DMX
ITALIANOPOLSKI
ESPAÑOLFRANCAIS
DEUTSCHENGLISH
PWM = Frequenza LED PWM
650 Hz, 1530 Hz, 2150 Hz, 4000 Hz
Selezione della frequenza LED PWM
Calibration (CLROOT-PAR4)
= calibrazione dei colori
Red, Green, Blue, White
Calibrazione singola dei colori. Imposta-zione della luminosità per più modalità di funzionamento dei 4 gruppi LED RGBW, con valori compresi tra 0 e 255
Calibration (CLROOT-PAR6)
= calibrazione dei colori
Red, Green, Blue, White, Amber, UV
Calibrazione singola dei colori. Imposta-zione della luminosità per più modalità di funzionamento dei 6 gruppi LED RGBW A+UV, con valori compresi tra 0 e 255
IR Remote = Consente di atti-vare o disattivare il controllo tramite telecomando a infrarossi
On Controllo tramite telecomando a infra-rossi attivato
Off Controllo tramite telecomando a infra-rossi disattivato
Reset = ripristinare le impostazioni
Factory Tornare alle impostazioni di fabbrica: Effettuare il reset con ENTER, annullare con MENU
Preset A Ripristino al Preset A: Effettuare il reset con ENTER, annullare con MENU
Preset B Ripristino al Preset B: Effettuare il reset con ENTER, annullare con MENU
Preset C Ripristino al Preset C: Effettuare il reset con ENTER, annullare con MENU
Edit Preset = salvare tutte le impostazioni di sistema in 3 preset individuali
Preset A Salvare con ENTERPreset B Salvare con ENTERPreset C Salvare con ENTER
Assistenza = solo per manutenzione
INFORMAZIONI DI SISTEMA (System Info)Premere MODE dalla schermata principale per accedere al menu principale. Con i tasti UP e DOWN selezionare la voce di menu System Info e confermare con ENTER.
--------Menu-------DMX AddressDMX ModeDMX DelayStand AloneSlaveSettingsSystem Info

153
DMX
DEUTSC
HFRAN
CAIS
ESPAÑO
LEN
GLISH
ITALIANO
POLSKI
Si accede al sottomenu per richiamare le informazioni di sistema (v. tabella, selezionare con UP e DOWN, confermare con ENTER, modificare lo stato con UP e DOWN, confermare con ENTER).
System InfoFirmware = Visualizzazione
del firmware del dispositivo
Firmware V1.xx
Tempera-ture
= Visualizzazione della temperatura dell’unità LED
LED xxx°C / xxx°FUnit °C (= visualizzazione in gradi centigradi)
°F (= visualizzazione in gradi Fahrenheit)Op Hours = Visualizzazione
del tempo di funzionamento
xx:xxh Visualizzazione del tempo di funzionamen-to complessivo in ore e minuti
TELECOMANDO A INFRAROSSI (opzionale)Dirigere il telecomando a infrarossi direttamente sul senso-re a infrarossi sul pannello frontale della barra LED. Il raggio d’azione massimo è di circa 8 metri. Nelle modalità DMX e slave il sensore del proiettore è disattivato. Il telecomando a infrarossi controlla direttamente le modalità stand-alone interne Auto / Sound, Static e Color Preset.
BL / ON/OFF (blackout)Premere il tasto BL per spegnere tutti i LED (blackout), indipendentemente dalla modalità di funzionamento attivata e controllata con il telecomando. Premendo nuovamente il tasto BL, si riattiva la modalità di funzionamento selezionata in precedenza.
SP (velocità)Impostazione velocità a 6 livelli per i programmi di cambio colore Color Jumping (Ju), Color Fading (Fa) e Auto Program (Au). Al livello 1 la sequenza di cambio colore si svolge lentamente; premendo di nuovo il pulsante, si attiva il livello 2 con una sequenza di cambio colore più rapida, seguita dai livelli 3, 4, 5 e 6, in cui il livello 6 è la sequenza più rapida.
(luminosità)Regolazione della luminosità totale in 6 livelli. Premendo più volte questo pulsante, si modificano i diversi livelli di luminosità (Livello 1 = Blackout).

154
DMX
ITALIANOPOLSKI
ESPAÑOLFRANCAIS
DEUTSCHENGLISH
FL (Flash/stroboscopio)Impostazione della velocità dell’effetto stroboscopico in 6 livelli. Al livello 1 l’effetto stroboscopi-co è disattivato; al livello 2 genera una frequenza lenta e così via con i livelli da 3 a 5. Il livello 6 genera la frequenza di lampeggio più veloce. L’effetto stroboscopio può essere utilizzato solo in modalità di mix cromatico RGBW (A+UV).
R / G / B / W (A e UV solo Modello CLROOTPAR6, CW e WW senza funzione)Questi 4 (6) pulsanti permettono di creare mix di colori individuali. I 6 livelli di luminosità si impo-stano premendo più volte il pulsante corrispondente al colore da regolare, mentre al livello 1 i LED sono spenti. Esempio: Impostando rosso e verde al massimo livello e i rimanenti LED al livello più basso, il mix di colori che si ottiene è giallo chiaro.
Ju (cambio colore)Il cambio colore è istantaneo (Color Jumping). La velocità con cui i colori cambiano può essere impostata con il pulsante SP (velocità).
Fa (dissolvenza colori)I colori si dissolvono l’uno nell’altro (Color Fading). La velocità con cui i colori cambiano può esse-re impostata con il pulsante SP (velocità).
Au (modalità automatica)Selezionare il programma di cambio colore desiderato Auto 1 - 6 premendo ripetutamente il tasto Au.
Su (programma cambio colore con Sound Control)Selezionare uno dei 6 programmi con Sound Control 1 - 6 premendo ripetutamente il tasto Su. Il microfono per il controllo di questa funzione si trova sul retro del proiettore.
CM (macro colori)Quindici preset colori (sedici nel ROOTPAR6), richiamabili in successione con i tasti CM+ e CM-.
Pr+ / Pr- Selezione dei programmi in modalità automatica (Au) e controllo ad attivazione sonora (Sound Control, Su).
INSTALLAZIONE E MONTAGGIOGrazie alla comoda staffa doppia, è possibile sistemare il proiettore in una posizione idonea, su una superficie piana. Il montaggio su una traversa viene effettuato tramite un apposito morsetto per traverse, da fissare alla staffa di montaggio (A). Morsetti per traverse idonei sono disponibili come accessori. Collegare saldamente il tutto e fissare il proiettore con un cavo di sicurezza idoneo nell’occhiello di sicurezza che si trova sul retro del proiettore.

155
DMX
DEUTSC
HFRAN
CAIS
ESPAÑO
LEN
GLISH
ITALIANO
POLSKI
PERICOLO: il montaggio sopratesta richiede una vasta esperienza, incluso il calcolo dei valori limite del carico di lavoro, il materiale di installazione utilizzato e la verifica periodica della sicurezza di tutti i materiali di installazione e dei proiettori. Se non si dispone di queste qualifiche, non tentare di effettuare da soli l‘installazione, ma ricorrere all‘ausilio di aziende professionali. Sussiste il rischio che dispositivi non montati né fissati correttamente si allentino e cadano. Ciò può causare lesioni gravi o mortali alle persone.
A
B B
Per garantire una minore visibilità quando viene utilizzato come uplight, la staffa doppia di mon-taggio può essere rimossa allentando le due viti (B) della maniglia.
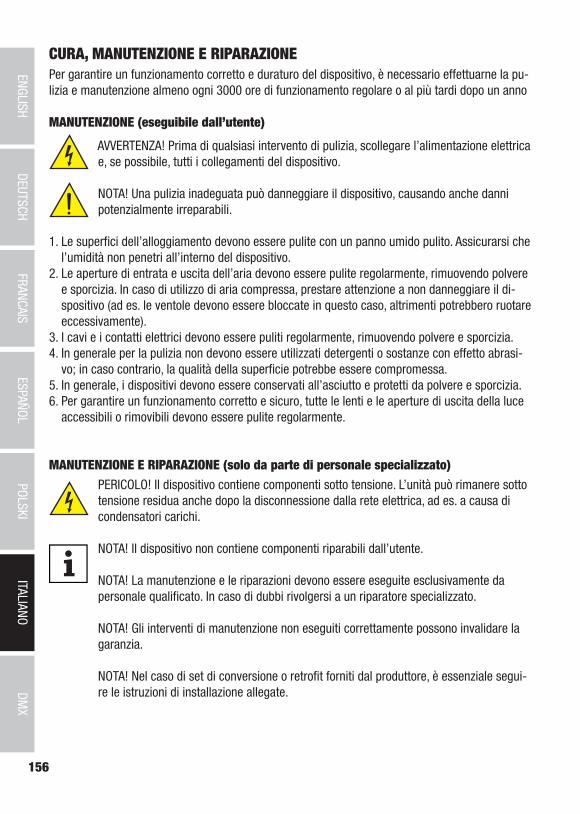
156
DMX
ITALIANOPOLSKI
ESPAÑOLFRANCAIS
DEUTSCHENGLISH
CURA, MANUTENZIONE E RIPARAZIONEPer garantire un funzionamento corretto e duraturo del dispositivo, è necessario effettuarne la pu-lizia e manutenzione almeno ogni 3000 ore di funzionamento regolare o al più tardi dopo un anno
MANUTENZIONE (eseguibile dall’utente)
AVVERTENZA! Prima di qualsiasi intervento di pulizia, scollegare l’alimentazione elettrica e, se possibile, tutti i collegamenti del dispositivo.
NOTA! Una pulizia inadeguata può danneggiare il dispositivo, causando anche danni potenzialmente irreparabili.
1. Le superfici dell’alloggiamento devono essere pulite con un panno umido pulito. Assicurarsi che l’umidità non penetri all’interno del dispositivo.
2. Le aperture di entrata e uscita dell’aria devono essere pulite regolarmente, rimuovendo polvere e sporcizia. In caso di utilizzo di aria compressa, prestare attenzione a non danneggiare il di-spositivo (ad es. le ventole devono essere bloccate in questo caso, altrimenti potrebbero ruotare eccessivamente).
3. I cavi e i contatti elettrici devono essere puliti regolarmente, rimuovendo polvere e sporcizia.4. In generale per la pulizia non devono essere utilizzati detergenti o sostanze con effetto abrasi-
vo; in caso contrario, la qualità della superficie potrebbe essere compromessa.5. In generale, i dispositivi devono essere conservati all’asciutto e protetti da polvere e sporcizia.6. Per garantire un funzionamento corretto e sicuro, tutte le lenti e le aperture di uscita della luce
accessibili o rimovibili devono essere pulite regolarmente.
MANUTENZIONE E RIPARAZIONE (solo da parte di personale specializzato)
PERICOLO! Il dispositivo contiene componenti sotto tensione. L’unità può rimanere sotto tensione residua anche dopo la disconnessione dalla rete elettrica, ad es. a causa di condensatori carichi.
NOTA! Il dispositivo non contiene componenti riparabili dall’utente.
NOTA! La manutenzione e le riparazioni devono essere eseguite esclusivamente da personale qualificato. In caso di dubbi rivolgersi a un riparatore specializzato.
NOTA! Gli interventi di manutenzione non eseguiti correttamente possono invalidare la garanzia.
NOTA! Nel caso di set di conversione o retrofit forniti dal produttore, è essenziale segui-re le istruzioni di installazione allegate.

157
DMX
DEUTSC
HFRAN
CAIS
ESPAÑO
LEN
GLISH
ITALIANO
POLSKI
TECNOLOGIA DMX
DMX512DMX (Digital Multiplex) è la sigla di un protocollo di trasmissione uni-versale per la comunicazione tra dispositivi e controller. Un controller DMX invia dati DMX ai dispositivi DMX collegati. I dati DMX vengono sempre trasmessi come flusso di dati seriale, che viene inoltrato da un dispositivo collegato al successivo attraverso le connessioni (con-nettori XLR) DMX IN e DMX OUT presenti per ogni dispositivo DMX compatibile, per un massimo di 32 dispositivi. L’ultimo dispositivo della catena deve essere dotato di un connettore terminale (terminatore).
COLLEGAMENTO DMX:DMX è il linguaggio condiviso che consente l’accoppiamento tra diversi tipi di dispositivo e modelli di produttori differenti e il controllo da parte di un controller centrale, a condizione che tutti i dispositivi e il controller siano DMX compatibili. Per una trasmissione dei dati ottimale, il cavo che collega i singoli dispositivi deve essere il più corto possibile. L’ordine dei dispositivi nella rete DMX non influisce sull’indirizzamento. Il dispositivo con indirizzo DMX 1 può quindi trovarsi in una posizione qualsiasi della catena DMX (seriale): all’inizio, alla fine o in qualsiasi punto al centro. Se a un dispositivo viene assegnato l’indirizzo DMX 1, il controller „sa” di dover inviare a questo dispositivo tutti i dati attribuiti all’indirizzo 1, indipendentemente dalla sua posizione nella interconnessione DMX.
ACCOPPIAMENTO SERIALE DI PIÙ PROIETTORI1. Collegare il connettore XLR maschio (a 3 o 5 poli) del cavo DMX con l’uscita DMX (presa XLR
femmina) del primo dispositivo DMX (ad esempio controller DMX).2. Collegare il connettore XLR femmina del cavo DMX connesso al primo proiettore DMX con
l’ingresso DMX (presa XLR maschio) del successivo dispositivo DMX. Analogamente, collegare l’uscita DMX di questo dispositivo con l’ingresso DMX del dispositivo seguente e così via. Te-nere presente che in linea di principio i dispositivi DMX sono collegati in serie e i collegamenti non si possono condividere senza uno splitter attivo. In una catena DMX i dispositivi DMX non possono essere più di 32.
Nelle linee di prodotti Adam Hall 3 STAR, 4 STAR e 5 STAR è disponibile un’ampia scelta di cavi DMX.
CAVO DMX:In caso di cavi di propria realizzazione, procedere secondo le figure di questa pagina. Non collegare mai la schermatura dei cavi con il contatto di massa del connettore e assicurarsi che la schermatura non entri in contatto con l’involucro del connettore XLR. Il contatto di massa della schermatura può generare guasti al sistema.

158
DMX
ITALIANOPOLSKI
ESPAÑOLFRANCAIS
DEUTSCHENGLISH
CONFIGURAZIONE DEI CONNETTORI:Cavo DMX con connettori XLR a 3 poli: Cavo DMX con connettori XLR a 5 poli (pin 4 e 5 non assegnati):
Shield
23
1
23
1
123
45
12
34
5
Shield
CONNETTORE TERMINALE DMX (TERMINATORE):Per evitare errori di sistema, l’ultimo dispositivo di una catena DMX deve essere dotato di una resistenza di terminazione (120 ohm, 1/4 W).Connettore XLR a 3 poli con resistenza di terminazione: K3DMXT3Connettore XLR a 5 poli con resistenza di terminazione: K3DMXT5
CONFIGURAZIONE DEI CONNETTORI:Connettore XLR a 3 poli: Connettore XLR a 5 poli:
23
1
12
34
5
ADATTATORE DMX:Se si utilizzano degli adattatori, in una catena DMX si possono anche combinare dispositivi DMX con collegamenti a 3 poli e dispositivi DMX con collegamenti a 5 poli.
CONFIGURAZIONE DEI CONNETTORIAdattatore DMX XLR maschio 5 poli a XLR femmina 3 poli: K3DGF0020Pin 4 e 5 non assegnati.
CONFIGURAZIONE DEI CONNETTORIAdattatore DMX XLR maschio 3 poli a XLR femmina 5 poli: K3DHM0020Pin 4 e 5 non assegnati.

159
DMX
DEUTSC
HFRAN
CAIS
ESPAÑO
LEN
GLISH
ITALIANO
POLSKI
DATI TECNICI
CODICE ARTICOLO:
CLROOTPAR4(WH) CLROOTPAR6(WH)
Tipologia di prodotto:
Proiettore LED Proiettore LED
Tipo: Proiettore PAR Proiettore PARSpettro cromatico:
RGBW RGBWA-UV
Numero di LED: 7 6Tipo di LED: 4 W 12 WFrequenza LED PWM:
650 Hz, 1530 Hz, 2150 Hz, 4000 Hz (regolabile)
650 Hz, 1530 Hz, 2150 Hz, 4000 Hz (regolabile)
Angolo di proiezione (an-golo di diffusione parziale):
36,5° (19°) 36,0° (20,5°)
Ingresso DMX: maschio a 3 poli maschio a 3 poliUscita DMX: femmina a 3 poli femmina a 3 poliModalità DMX: Senza canale DMX Delay: 2 canali,
4 canali (1), 4 canali (2), 5 canali, 6 canali, 9 canaliCon canale DMX Delay: 3 canali, 5 canali (1), 5 canali (2), 6 canali, 7 canali, 10 canali
Senza canale DMX Delay: 2 canali, 4 canali (1), 4 canali (2), 5 canali, 6 canali, 8 canali, 11 canaliCon canale DMX Delay: 3 canali, 5 canali (1), 5 canali (2), 6 canali, 7 canali, 9 canali, 12 canali
Funzioni DMX: Dimmer, dimmer fine, stroboscopio, rosso, verde, blu, bianco, macro colore, selezione chase, DMX Delay, Tint, Hue, Saturation, sensibilità
Dimmer, dimmer fine, stroboscopio, rosso, verde, blu, bianco, ambra, UV, macro colore, selezione chase, DMX Delay, sensibilità
Comando: DMX-512, telecomando IR, W-DMX (mediante memory stick iDMX opzionale)
DMX-512, telecomando IR, W-DMX (mediante memory stick iDMX opzionale)
Funzioni stand-alone:
Programmi Auto, programma a con-trollo sonoro, Static, preset colore, colori utente, funzione loop
Programmi Auto, programma a con-trollo sonoro, Static, preset colore, colori utente, funzione loop
Elementi di comando:
Mode, Enter, Up, Down Mode, Enter, Up, Down
Elementi di visualizzazione:
Display OLED Display OLED
Tensione di esercizio:
100 – 240 V AC / 50 – 60 Hz 100 – 240 V AC / 50 – 60 Hz

160
DMX
ITALIANOPOLSKI
ESPAÑOLFRANCAIS
DEUTSCHENGLISH
CODICE ARTICOLO:
CLROOTPAR4(WH) CLROOTPAR6(WH)
Potenza assorbita:
38 W 58 W
Intensità di illuminazione (a 1 m):
7850 lx 10700 lx
Flusso luminoso: 1350 lm 1800 lmCollegamento alimentazione elettrica:
INPUT: Presa Power Twist blu OUTPUT: Presa Power Twist bianca (max. 8 A)
INPUT: Presa Power Twist blu OUTPUT: Presa Power Twist bianca (max. 8 A)
Classe di protezi-one elettrica
1 1
Fusibile: F3A / 250 V (5 x 20 mm) F3A / 250 V (5 x 20 mm)Temperatura ambiente (in esercizio):
0°C – 40°C 0°C – 40°C
Umidità relativa dell’aria:
< 80%, senza condensa < 80%, senza condensa
Classe di protezione
IP20 IP20
Colore alloggiamento:
Nero (CLROOTPAR4) Bianco (CLROOTPAR4WH)
Nero (CLROOTPAR6) Bianco (CLROOTPAR6WH)
Materiale alloggiamento:
plastica ABS plastica ABS
Raffreddamento alloggiamento:
Raffreddamento a convezione Raffreddamento a convezione
Ingombro (L x H x P, senza staffe di montaggio):
195 x 133 x 195 mm 195 x 133 x 195 mm
Peso (inclusa staffa di montaggio):
1,75 kg 1,975 kg
Altre caratteristiche:
Cavo di alimentazione incluso e telecomando IR come accessorio opzionale (CLPFLAT1REMOTE)
Cavo di alimentazione incluso e telecomando IR come accessorio opzionale (CLPFLAT1REMOTE)

161
DMX
DEUTSC
HFRAN
CAIS
ESPAÑO
LEN
GLISH
ITALIANO
POLSKI
SMALTIMENTOConfezione:
1. Gli imballaggi possono essere conferiti tra i materiali riciclabili tramite i consueti percorsi di smaltimento.
2. Separare l‘imballaggio in conformità alle leggi sullo smaltimento e ai regolamenti sui materiali riciclabili del proprio Paese.
Dispositivo:
1. Questo dispositivo è soggetto alla Direttiva europea sui rifiuti di apparecchiature elett-riche ed elettroniche e successive modifiche. Direttiva RAEE sui rifiuti di apparecchia-ture elettriche ed elettroniche. I dispositivi usati non devono essere smaltiti con i rifiuti domestici. Il dispositivo usato deve essere smaltito tramite un‘azienda di smaltimento autorizzata o presso un centro di smaltimento comunale. Rispettare le normative in vigore nel Paese di installazione.
2. Rispettare le leggi sullo smaltimento in vigore nel Paese di installazione.3. I clienti privati possono richiedere informazioni sulle possibilità di smaltimento ecosos-
tenibile al rivenditore presso il quale è stato acquistato il prodotto o presso le autorità regionali competenti.
DICHIARAZIONI DEL PRODUTTOREGARANZIA DEL PRODUTTORE E LIMITAZIONE DI RESPONSABILITÀAdam Hall GmbH, Adam-Hall-Str. 1, D-61267 Neu Anspach / E-Mail [email protected] / +49 (0)6081 / 9419-0.Le nostre attuali condizioni di garanzia e la limitazione di responsabilità sono consultabili alla pagina:https://cdn-shop.adamhall.com/media/pdf/Manufacturers-Declarations-CAMEO_DE_EN_ES_FR.pdf.Per assistenza rivolgersi al distributore di fiducia.
CONFORMITÀ CEAdam Hall GmbH dichiara che questo prodotto è conforme alle seguenti direttive (se applicabili): R&TTE (1999/5/CE) o RED (2014/53/EU) a partire da giugno 2017.Direttiva bassa tensione (2014/35/UE) Direttiva CEM (2014/30/UE)RoHS (2011/65/UE)La dichiarazione di conformità completa è disponibile all‘indirizzo www.adamhall.com. Inoltre, può essere richiesta inviando un‘e-mail a [email protected].
CON RISERVA DI ERRORI DI STAMPA E REFUSI NONCHÉ DI MODIFICHE TECNICHE O DI ALTRO TIPO.

162
DMX
ITALIANOPOLSKI
ESPAÑOLFRANCAIS
DEUTSCHENGLISH
DMX DMX CONTROL / DMX STEUERUNG / COMMANDE DMX / CONTROL DMX / STEROWANIE DMX / CONTROLLO DMX
ROOTPAR 4 DMX Modes without DMX-Delay Channel
2CH 4CH1 Function Values
1 1 Dimmer 000 - 255 0% to 100%
2Multifunctional
Strobe
000 - 005 Strobe open
006 - 010 Strobe closed
011 - 022 Ramp up/down, slow -> fast
023 - 033 Ramp up/down random, slow->fast
034 - 045 Ramp up, slow -> fast
046 - 056 Ramp up random, slow -> fast
057 - 068 Ramp down, slow -> fast
069 - 079 Ramp down random, slow -> fast
080 - 102 Random Strobe effect, slow -> fast
103 - 127 Strobe Break effect, 5s…..1s (short burst with break)
128 - 250 Strobe slow -> fast <1Hz - 20Hz
251 - 255 Strobe open
2 3
Color Presets & Color Jumping & Color Fading & User Colors
000 - 005 Color off
006 - 013 Red
014 - 021 Amber
022 - 029 Yellow warm
030 - 037 Yellow
038 - 045 Green
046 - 053 Turquoise
054 - 061 Cyan
062 - 069 Blue
070 - 077 Lavender
078 - 085 Mauve
086 - 093 Magenta
094 - 101 Pink
102 - 109 Warm White
110 - 117 White
118 - 125 Cold White
126 - 127 Color Jumping stop
128 - 164 Color Jumping speed slow -> fast / Color 1 -> 12
165 - 201 Color Fading speed slow -> fast / Color 1 -> 12
202 - 207 User Color_1
208 - 213 User Color_2
214 - 219 User Color_3
220 - 225 User Color_4
226 - 255 no function
4
Sound (triggers Strobe, Color Jumping &
Fading)
000 - 005 Sound Control off
006 - 255 Sound Control on, mic sensitivity low -> high
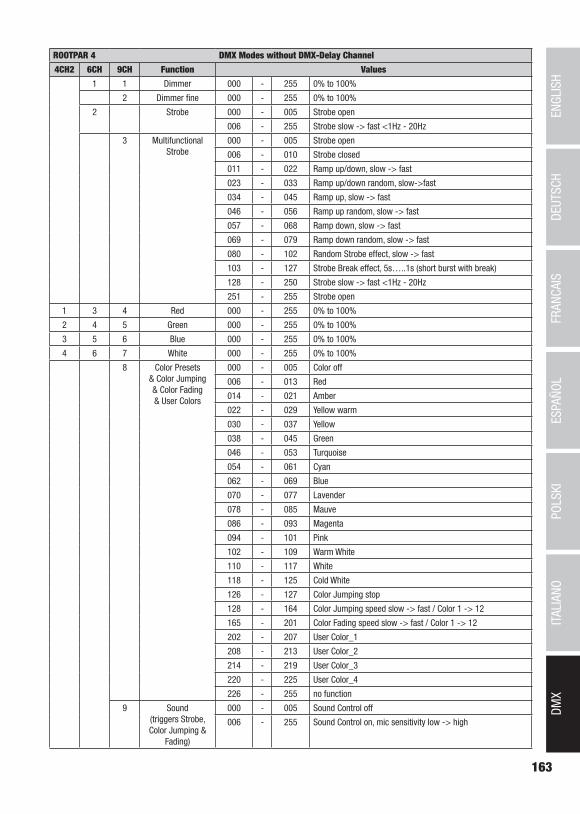
163
DMX
DEUTSC
HFRAN
CAIS
ESPAÑO
LEN
GLISH
ITALIANO
POLSKI
ROOTPAR 4 DMX Modes without DMX-Delay Channel
4CH2 6CH 9CH Function Values
1 1 Dimmer 000 - 255 0% to 100%
2 Dimmer fine 000 - 255 0% to 100%
2 Strobe 000 - 005 Strobe open
006 - 255 Strobe slow -> fast <1Hz - 20Hz
3 Multifunctional Strobe
000 - 005 Strobe open
006 - 010 Strobe closed
011 - 022 Ramp up/down, slow -> fast
023 - 033 Ramp up/down random, slow->fast
034 - 045 Ramp up, slow -> fast
046 - 056 Ramp up random, slow -> fast
057 - 068 Ramp down, slow -> fast
069 - 079 Ramp down random, slow -> fast
080 - 102 Random Strobe effect, slow -> fast
103 - 127 Strobe Break effect, 5s…..1s (short burst with break)
128 - 250 Strobe slow -> fast <1Hz - 20Hz
251 - 255 Strobe open
1 3 4 Red 000 - 255 0% to 100%
2 4 5 Green 000 - 255 0% to 100%
3 5 6 Blue 000 - 255 0% to 100%
4 6 7 White 000 - 255 0% to 100%
8 Color Presets & Color Jumping & Color Fading & User Colors
000 - 005 Color off
006 - 013 Red
014 - 021 Amber
022 - 029 Yellow warm
030 - 037 Yellow
038 - 045 Green
046 - 053 Turquoise
054 - 061 Cyan
062 - 069 Blue
070 - 077 Lavender
078 - 085 Mauve
086 - 093 Magenta
094 - 101 Pink
102 - 109 Warm White
110 - 117 White
118 - 125 Cold White
126 - 127 Color Jumping stop
128 - 164 Color Jumping speed slow -> fast / Color 1 -> 12
165 - 201 Color Fading speed slow -> fast / Color 1 -> 12
202 - 207 User Color_1
208 - 213 User Color_2
214 - 219 User Color_3
220 - 225 User Color_4
226 - 255 no function
9 Sound (triggers Strobe, Color Jumping &
Fading)
000 - 005 Sound Control off
006 - 255 Sound Control on, mic sensitivity low -> high
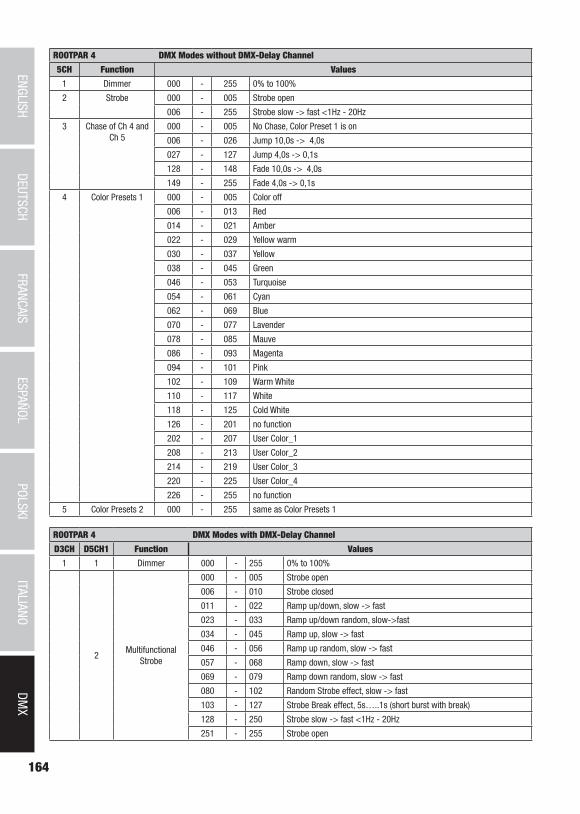
164
DMX
ITALIANOPOLSKI
ESPAÑOLFRANCAIS
DEUTSCHENGLISH
ROOTPAR 4 DMX Modes without DMX-Delay Channel
5CH Function Values
1 Dimmer 000 - 255 0% to 100%
2 Strobe 000 - 005 Strobe open
006 - 255 Strobe slow -> fast <1Hz - 20Hz
3 Chase of Ch 4 and Ch 5
000 - 005 No Chase, Color Preset 1 is on
006 - 026 Jump 10,0s -> 4,0s
027 - 127 Jump 4,0s -> 0,1s
128 - 148 Fade 10,0s -> 4,0s
149 - 255 Fade 4,0s -> 0,1s
4 Color Presets 1 000 - 005 Color off
006 - 013 Red
014 - 021 Amber
022 - 029 Yellow warm
030 - 037 Yellow
038 - 045 Green
046 - 053 Turquoise
054 - 061 Cyan
062 - 069 Blue
070 - 077 Lavender
078 - 085 Mauve
086 - 093 Magenta
094 - 101 Pink
102 - 109 Warm White
110 - 117 White
118 - 125 Cold White
126 - 201 no function
202 - 207 User Color_1
208 - 213 User Color_2
214 - 219 User Color_3
220 - 225 User Color_4
226 - 255 no function
5 Color Presets 2 000 - 255 same as Color Presets 1
ROOTPAR 4 DMX Modes with DMX-Delay Channel
D3CH D5CH1 Function Values
1 1 Dimmer 000 - 255 0% to 100%
2Multifunctional
Strobe
000 - 005 Strobe open
006 - 010 Strobe closed
011 - 022 Ramp up/down, slow -> fast
023 - 033 Ramp up/down random, slow->fast
034 - 045 Ramp up, slow -> fast
046 - 056 Ramp up random, slow -> fast
057 - 068 Ramp down, slow -> fast
069 - 079 Ramp down random, slow -> fast
080 - 102 Random Strobe effect, slow -> fast
103 - 127 Strobe Break effect, 5s…..1s (short burst with break)
128 - 250 Strobe slow -> fast <1Hz - 20Hz
251 - 255 Strobe open

165
DMX
DEUTSC
HFRAN
CAIS
ESPAÑO
LEN
GLISH
ITALIANO
POLSKI
2 3
Color Presets & Color Jumping & Color Fading & User Colors
000 - 005 Color off
006 - 013 Red
014 - 021 Amber
022 - 029 Yellow warm
030 - 037 Yellow
038 - 045 Green
046 - 053 Turquoise
054 - 061 Cyan
062 - 069 Blue
070 - 077 Lavender
078 - 085 Mauve
086 - 093 Magenta
094 - 101 Pink
102 - 109 Warm White
110 - 117 White
118 - 125 Cold White
126 - 127 Color Jumping stop
128 - 164 Color Jumping speed slow -> fast / Color 1 -> 12
165 - 201 Color Fading speed slow -> fast / Color 1 -> 12
202 - 207 User Color_1
208 - 213 User Color_2
214 - 219 User Color_3
220 - 225 User Color_4
226 - 255 no function
4
Sound (triggers Strobe, Color Jumping &
Fading)
000 - 005 Sound Control off
006 - 255 Sound Control on, mic sensitivity low -> high
3 5 DMX Delay000 - 005 No Delay
006 - 255 0,1s -> 2,0s
ROOTPAR 4 DMX Modes with DMX-Delay Channel
D5CH2 D7CH D10CH Function Values
1 1 Dimmer 000 - 255 0% to 100%
2 Dimmer fine 000 - 255 0% to 100%
2 Strobe 000 - 005 Strobe open
006 - 255 Strobe slow -> fast <1Hz - 20Hz
3 Multifunctional Strobe
000 - 005 Strobe open
006 - 010 Strobe closed
011 - 022 Ramp up/down, slow -> fast
023 - 033 Ramp up/down random, slow->fast
034 - 045 Ramp up, slow -> fast
046 - 056 Ramp up random, slow -> fast
057 - 068 Ramp down, slow -> fast
069 - 079 Ramp down random, slow -> fast
080 - 102 Random Strobe effect, slow -> fast
103 - 127 Strobe Break effect, 5s…..1s (short burst with break)
128 - 250 Strobe slow -> fast <1Hz - 20Hz
251 - 255 Strobe open

166
DMX
ITALIANOPOLSKI
ESPAÑOLFRANCAIS
DEUTSCHENGLISH
1 3 4 Red 000 - 255 0% to 100%
2 4 5 Green 000 - 255 0% to 100%
3 5 6 Blue 000 - 255 0% to 100%
4 6 7 White 000 - 255 0% to 100%
8 Color Presets & Color Jumping & Color Fading & User Colors
000 - 005 Color off
006 - 013 Red
014 - 021 Amber
022 - 029 Yellow warm
030 - 037 Yellow
038 - 045 Green
046 - 053 Turquoise
054 - 061 Cyan
062 - 069 Blue
070 - 077 Lavender
078 - 085 Mauve
086 - 093 Magenta
094 - 101 Pink
102 - 109 Warm White
110 - 117 White
118 - 125 Cold White
126 - 127 Color Jumping stop
128 - 164 Color Jumping speed slow -> fast / Color 1 -> 12
165 - 201 Color Fading speed slow -> fast / Color 1 -> 12
202 - 207 User Color_1
208 - 213 User Color_2
214 - 219 User Color_3
220 - 225 User Color_4
226 - 255 no function
9 Sound (triggers Strobe, Color Jumping &
Fading)
000 - 005 Sound Control off
006 - 255 Sound Control on, mic sensitivity low -> high
5 7 10 DMX Delay 000 - 005 No Delay
006 - 255 0,1s -> 2,0s

167
DMX
DEUTSC
HFRAN
CAIS
ESPAÑO
LEN
GLISH
ITALIANO
POLSKI
ROOTPAR 4 DMX Modes with DMX-Delay Channel
D6CH Function Values
1 Dimmer 000 - 255 0% to 100%
2 Strobe 000 - 005 Strobe open
006 - 255 Strobe slow -> fast <1Hz - 20Hz
3 Chase of Ch 4 and Ch 5
000 - 005 No Chase, Color Preset 1 is on
006 - 026 Jump 10,0s -> 4,0s
027 - 127 Jump 4,0s -> 0,1s
128 - 148 Fade 10,0s -> 4,0s
149 - 255 Fade 4,0s -> 0,1s
4 Color Presets 1 000 - 005 Color off
006 - 013 Red
014 - 021 Amber
022 - 029 Yellow warm
030 - 037 Yellow
038 - 045 Green
046 - 053 Turquoise
054 - 061 Cyan
062 - 069 Blue
070 - 077 Lavender
078 - 085 Mauve
086 - 093 Magenta
094 - 101 Pink
102 - 109 Warm White
110 - 117 White
118 - 125 Cold White
126 - 201 no function
202 - 207 User Color_1
208 - 213 User Color_2
214 - 219 User Color_3
220 - 225 User Color_4
226 - 255 no function
5 Color Presets 2 000 - 255 same as Color Presets 1
6 DMX Delay 000 - 005 No Delay
006 - 255 0,1s -> 2,0s

168
DMX
ITALIANOPOLSKI
ESPAÑOLFRANCAIS
DEUTSCHENGLISH
ROOTPAR 6 DMX Modes without DMX-Delay Channel
2CH 4CH1 Function Values
1 1 Dimmer 000 - 255 0% to 100%
2Multifunctional
Strobe
000 - 005 Strobe open
006 - 010 Strobe closed
011 - 022 Ramp up/down, slow -> fast
023 - 033 Ramp up/down random, slow->fast
034 - 045 Ramp up, slow -> fast
046 - 056 Ramp up random, slow -> fast
057 - 068 Ramp down, slow -> fast
069 - 079 Ramp down random, slow -> fast
080 - 102 Random Strobe effect, slow -> fast
103 - 127 Strobe Break effect, 5s…..1s (short burst with break)
128 - 250 Strobe slow -> fast <1Hz - 20Hz
251 - 255 Strobe open
2 3
Color Presets & Color Jumping & Color Fading & User Colors
000 - 005 Color off
006 - 013 Red
014 - 021 Amber
022 - 029 Yellow warm
030 - 037 Yellow
038 - 045 Green
046 - 053 Turquoise
054 - 061 Cyan
062 - 069 Blue
070 - 077 Lavender
078 - 085 Mauve
086 - 093 Magenta
094 - 101 Pink
102 - 109 Warm White
110 - 117 White
118 - 125 Cold White
126 - 127 Color Jumping stop
128 - 164 Color Jumping speed slow -> fast / Color 1 -> 12
165 - 201 Color Fading speed slow -> fast / Color 1 -> 12
202 - 207 User Color_1
208 - 213 User Color_2
214 - 219 User Color_3
220 - 225 User Color_4
226 - 255 UV
4
Sound (triggers Strobe, Color Jumping &
Fading)
000 - 005 Sound Control off
006 - 255 Sound Control on, mic sensitivity low -> high

169
DMX
DEUTSC
HFRAN
CAIS
ESPAÑO
LEN
GLISH
ITALIANO
POLSKI
ROOT PAR 6 DMX Modes without DMX-Delay Channel
4CH2 6CH 8CH Function Values
1 Dimmer 000 - 255 0% to 100%
2 Strobe000 - 005 Strobe open
006 - 255 Strobe slow -> fast <1Hz - 20Hz
1 1 3 Red 000 - 255 0% to 100%
2 2 4 Green 000 - 255 0% to 100%
3 3 5 Blue 000 - 255 0% to 100%
4 4 6 White 000 - 255 0% to 100%
5 7 Amber 000 - 255 0% to 100%
6 8 UV 000 - 255 0% to 100%
ROOTPAR 6 DMX Modes without DMX-Delay Channel
5CH Function Values
1 Dimmer 000 - 255 0% to 100%
2 Strobe000 - 005 Strobe open
006 - 255 Strobe slow -> fast <1Hz - 20Hz
3Chase of Ch 4 and
Ch 5
000 - 005 No Chase, Color Preset 1 is on
006 - 026 Jump 10,0s -> 4,0s
027 - 127 Jump 4,0s -> 0,1s
128 - 148 Fade 10,0s -> 4,0s
149 - 255 Fade 4,0s -> 0,1s
4 Color Presets 1
000 - 005 Color off
006 - 013 Red
014 - 021 Amber
022 - 029 Yellow warm
030 - 037 Yellow
038 - 045 Green
046 - 053 Turquoise
054 - 061 Cyan
062 - 069 Blue
070 - 077 Lavender
078 - 085 Mauve
086 - 093 Magenta
094 - 101 Pink
102 - 109 Warm White
110 - 117 White
118 - 125 Cold White
126 - 201 no function
202 - 207 User Color_1
208 - 213 User Color_2
214 - 219 User Color_3
220 - 225 User Color_4
226 - 255 UV
5 Color Presets 2 000 - 255 same as Color Presets 1
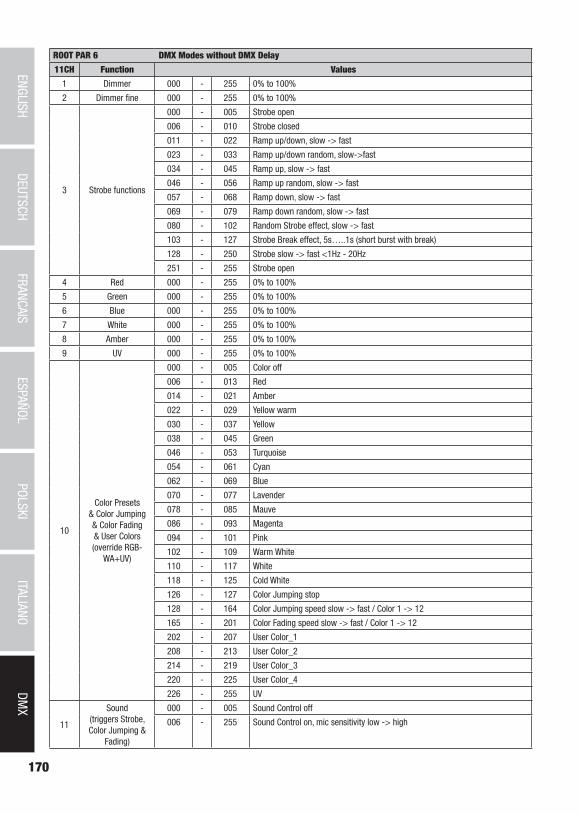
170
DMX
ITALIANOPOLSKI
ESPAÑOLFRANCAIS
DEUTSCHENGLISH
ROOT PAR 6 DMX Modes without DMX Delay
11CH Function Values
1 Dimmer 000 - 255 0% to 100%
2 Dimmer fine 000 - 255 0% to 100%
3 Strobe functions
000 - 005 Strobe open
006 - 010 Strobe closed
011 - 022 Ramp up/down, slow -> fast
023 - 033 Ramp up/down random, slow->fast
034 - 045 Ramp up, slow -> fast
046 - 056 Ramp up random, slow -> fast
057 - 068 Ramp down, slow -> fast
069 - 079 Ramp down random, slow -> fast
080 - 102 Random Strobe effect, slow -> fast
103 - 127 Strobe Break effect, 5s…..1s (short burst with break)
128 - 250 Strobe slow -> fast <1Hz - 20Hz
251 - 255 Strobe open
4 Red 000 - 255 0% to 100%
5 Green 000 - 255 0% to 100%
6 Blue 000 - 255 0% to 100%
7 White 000 - 255 0% to 100%
8 Amber 000 - 255 0% to 100%
9 UV 000 - 255 0% to 100%
10
Color Presets & Color Jumping & Color Fading & User Colors (override RGB-
WA+UV)
000 - 005 Color off
006 - 013 Red
014 - 021 Amber
022 - 029 Yellow warm
030 - 037 Yellow
038 - 045 Green
046 - 053 Turquoise
054 - 061 Cyan
062 - 069 Blue
070 - 077 Lavender
078 - 085 Mauve
086 - 093 Magenta
094 - 101 Pink
102 - 109 Warm White
110 - 117 White
118 - 125 Cold White
126 - 127 Color Jumping stop
128 - 164 Color Jumping speed slow -> fast / Color 1 -> 12
165 - 201 Color Fading speed slow -> fast / Color 1 -> 12
202 - 207 User Color_1
208 - 213 User Color_2
214 - 219 User Color_3
220 - 225 User Color_4
226 - 255 UV
11
Sound (triggers Strobe, Color Jumping &
Fading)
000 - 005 Sound Control off
006 - 255 Sound Control on, mic sensitivity low -> high

171
DMX
DEUTSC
HFRAN
CAIS
ESPAÑO
LEN
GLISH
ITALIANO
POLSKI
ROOTPAR 6 DMX Modes with DMX-Delay Channel
D3CH D5CH1 Function Values
1 1 Dimmer 000 - 255 0% to 100%
2Multifunctional
Strobe
000 - 005 Strobe open
006 - 010 Strobe closed
011 - 022 Ramp up/down, slow -> fast
023 - 033 Ramp up/down random, slow->fast
034 - 045 Ramp up, slow -> fast
046 - 056 Ramp up random, slow -> fast
057 - 068 Ramp down, slow -> fast
069 - 079 Ramp down random, slow -> fast
080 - 102 Random Strobe effect, slow -> fast
103 - 127 Strobe Break effect, 5s…..1s (short burst with break)
128 - 250 Strobe slow -> fast <1Hz - 20Hz
251 - 255 Strobe open
2 3
Color Presets & Color Jumping & Color Fading & User Colors
000 - 005 Color off
006 - 013 Red
014 - 021 Amber
022 - 029 Yellow warm
030 - 037 Yellow
038 - 045 Green
046 - 053 Turquoise
054 - 061 Cyan
062 - 069 Blue
070 - 077 Lavender
078 - 085 Mauve
086 - 093 Magenta
094 - 101 Pink
102 - 109 Warm White
110 - 117 White
118 - 125 Cold White
126 - 127 Color Jumping stop
128 - 164 Color Jumping speed slow -> fast / Color 1 -> 12
165 - 201 Color Fading speed slow -> fast / Color 1 -> 12
202 - 207 User Color_1
208 - 213 User Color_2
214 - 219 User Color_3
220 - 225 User Color_4
226 - 255 UV
4
Sound (triggers Strobe, Color Jumping &
Fading)
000 - 005 Sound Control off
006 - 255 Sound Control on, mic sensitivity low -> high
3 5 DMX Delay000 - 005 No Delay
006 - 255 0,1s -> 2,0s

172
DMX
ITALIANOPOLSKI
ESPAÑOLFRANCAIS
DEUTSCHENGLISH
ROOT PAR 6 DMX Modes with DMX-Delay Channel
D5CH2 D7CH D9CH Function Values
1 Dimmer 000 - 255 0% to 100%
2 Strobe000 - 005 Strobe open
006 - 255 Strobe slow -> fast <1Hz - 20Hz
1 1 3 Red 000 - 255 0% to 100%
2 2 4 Green 000 - 255 0% to 100%
3 3 5 Blue 000 - 255 0% to 100%
4 4 6 White 000 - 255 0% to 100%
5 7 Amber 000 - 255 0% to 100%
6 8 UV 000 - 255 0% to 100%
5 7 9 DMX Delay000 - 005 No Delay
006 - 255 0,1s -> 2,0s
ROOTPAR 6 DMX Modes with DMX-Delay Channel
D6CH Function Values
1 Dimmer 000 - 255 0% to 100%
2 Strobe000 - 005 Strobe open
006 - 255 Strobe slow -> fast <1Hz - 20Hz
3Chase of Ch 4 and
Ch 5
000 - 005 No Chase, Color Preset 1 is on
006 - 026 Jump 10,0s -> 4,0s
027 - 127 Jump 4,0s -> 0,1s
128 - 148 Fade 10,0s -> 4,0s
149 - 255 Fade 4,0s -> 0,1s
4 Color Presets 1
000 - 005 Color off
006 - 013 Red
014 - 021 Amber
022 - 029 Yellow warm
030 - 037 Yellow
038 - 045 Green
046 - 053 Turquoise
054 - 061 Cyan
062 - 069 Blue
070 - 077 Lavender
078 - 085 Mauve
086 - 093 Magenta
094 - 101 Pink
102 - 109 Warm White
110 - 117 White
118 - 125 Cold White
126 - 201 no function
202 - 207 User Color_1
208 - 213 User Color_2
214 - 219 User Color_3
220 - 225 User Color_4
226 - 255 UV
5 Color Presets 2 000 - 255 same as Color Presets 1
6 DMX Delay000 - 005 No Delay
006 - 255 0,1s -> 2,0s

173
DMX
DEUTSC
HFRAN
CAIS
ESPAÑO
LEN
GLISH
ITALIANO
POLSKI
ROOT PAR 6 DMX Modes with DMX Delay
D12CH Function Values
1 Dimmer 000 - 255 0% to 100%
2 Dimmer fine 000 - 255 0% to 100%
3 Strobe functions
000 - 005 Strobe open
006 - 010 Strobe closed
011 - 022 Ramp up/down, slow -> fast
023 - 033 Ramp up/down random, slow->fast
034 - 045 Ramp up, slow -> fast
046 - 056 Ramp up random, slow -> fast
057 - 068 Ramp down, slow -> fast
069 - 079 Ramp down random, slow -> fast
080 - 102 Random Strobe effect, slow -> fast
103 - 127 Strobe Break effect, 5s…..1s (short burst with break)
128 - 250 Strobe slow -> fast <1Hz - 20Hz
251 - 255 Strobe open
4 Red 000 - 255 0% to 100%
5 Green 000 - 255 0% to 100%
6 Blue 000 - 255 0% to 100%
7 White 000 - 255 0% to 100%
8 Amber 000 - 255 0% to 100%
9 UV 000 - 255 0% to 100%
10
Color Presets & Color Jumping & Color Fading & User Colors (override RGB-
WA+UV)
000 - 005 Color off
006 - 013 Red
014 - 021 Amber
022 - 029 Yellow warm
030 - 037 Yellow
038 - 045 Green
046 - 053 Turquoise
054 - 061 Cyan
062 - 069 Blue
070 - 077 Lavender
078 - 085 Mauve
086 - 093 Magenta
094 - 101 Pink
102 - 109 Warm White
110 - 117 White
118 - 125 Cold White
126 - 127 Color Jumping stop
128 - 164 Color Jumping speed slow -> fast / Color 1 -> 12
165 - 201 Color Fading speed slow -> fast / Color 1 -> 12
202 - 207 User Color_1
208 - 213 User Color_2
214 - 219 User Color_3
220 - 225 User Color_4
226 - 255 UV
11
Sound (triggers Strobe, Color Jumping &
Fading)
000 - 005 Sound Control off
006 - 255 Sound Control on, mic sensitivity low -> high
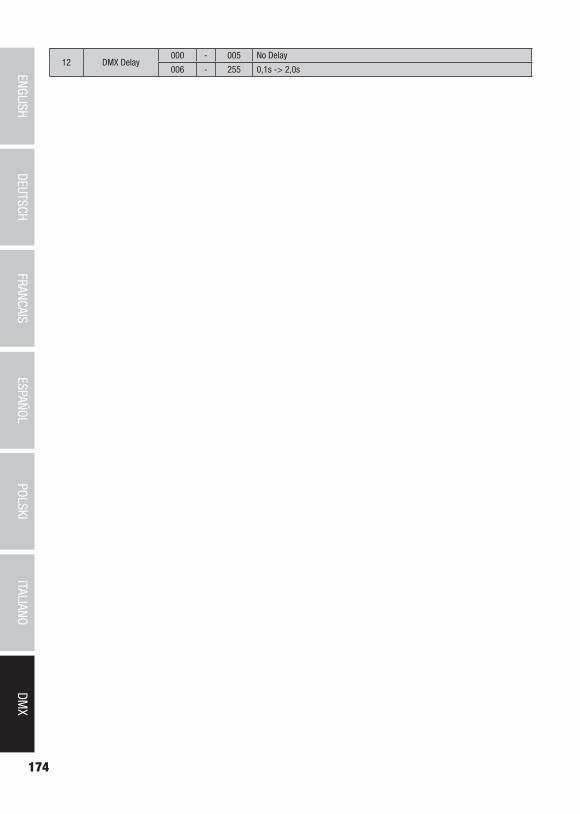
174
DMX
ITALIANOPOLSKI
ESPAÑOLFRANCAIS
DEUTSCHENGLISH
12 DMX Delay000 - 005 No Delay
006 - 255 0,1s -> 2,0s

175
DMX
DEUTSC
HFRAN
CAIS
ESPAÑO
LEN
GLISH
ITALIANO
POLSKI

CAMEOLIGHT.COM
Adam Hall GmbH | Adam-Hall-Str. 1 | 61267 Neu-Anspach | GermanyPhone: +49 6081 9419-0 | adamhall.com