NetCollect 4.0 User Guide - Apian Software
381
NetCollect User Guide Survey Pro 4
-
Upload
khangminh22 -
Category
Documents
-
view
1 -
download
0
Transcript of NetCollect 4.0 User Guide - Apian Software

NetCollect User Guide
SurveyPro4

NetCollect 4.0 User Guide
2January 15, 2007
© 2007 Apian Software, Inc. All Rights Reserved.
NetCollect 4.0 User Guide
Document updated:January 15, 2007
Apian Software, SurveyHost®, SurveyPro4, SurveyPro, Survey Pro®, NetCollect, NetCollect4, Net.Collect®, and QuestionWeb are trademarks of Apian Software, Inc.
Companies, names, and data used in examples herein are fictitious unless otherwise noted. Information in this document is subject to change with-out notice.
All other product and company names mentioned herein are the trade-marks of their respective owners.
Disclaimer
This documentation is meant for use under an Apian NetCollect license agreement. Use outside this agreement is not covered under any explicit or implied warranties.
Apian Software, Inc.115 N 85th StreetSuite 204Seattle, WA 98103www.apian.com

Table of Contents iJanuary 15, 2007
Chapter Summary
Chapter 1 Getting Started . . . . . . . . . . . . . . . . . . . . . . . . . . . . . . . . . . . . . 1Chapter 2 Tutorial: Ten Minute Web Survey . . . . . . . . . . . . . . . . . . . . 18Chapter 3 Server Installation . . . . . . . . . . . . . . . . . . . . . . . . . . . . . . . . . 26Chapter 4 NetCollect Documents . . . . . . . . . . . . . . . . . . . . . . . . . . . . . . 53Chapter 5 Tutorial: Applying Layout Options . . . . . . . . . . . . . . . . . . . . 82Chapter 6 Pages and Skips . . . . . . . . . . . . . . . . . . . . . . . . . . . . . . . . . . . 99Chapter 7 Tutorial: Working with Pages and Skips . . . . . . . . . . . . . . . 114Chapter 8 Dynamic Questions and Text . . . . . . . . . . . . . . . . . . . . . . . 126Chapter 9 Tutorial: Adding Dynamic Elements . . . . . . . . . . . . . . . . . 141Chapter 10 Login Options . . . . . . . . . . . . . . . . . . . . . . . . . . . . . . . . . . . . 152Chapter 11 Tutorial: Defining Logins . . . . . . . . . . . . . . . . . . . . . . . . . . . 175Chapter 12 Embedded Surveys . . . . . . . . . . . . . . . . . . . . . . . . . . . . . . . . 187Chapter 13 Tutorial: Loading Data into a Survey . . . . . . . . . . . . . . . . . 225Chapter 14 Tutorial: Handing Data to Other Systems . . . . . . . . . . . . . 241Chapter 15 Real-Time Reporting . . . . . . . . . . . . . . . . . . . . . . . . . . . . . . 251Chapter 16 Tutorial: Creating Server Reports . . . . . . . . . . . . . . . . . . . . 263Chapter 17 Publish Settings . . . . . . . . . . . . . . . . . . . . . . . . . . . . . . . . . . 275Chapter 18 Tutorial: Publishing and Uploading to Your Server . . . . . . 295Chapter 19 Tutorial: Publishing and Uploading to QuestionWeb . . . . 308Chapter 20 Control Panel Screens . . . . . . . . . . . . . . . . . . . . . . . . . . . . . 319Chapter 21 Managing Data . . . . . . . . . . . . . . . . . . . . . . . . . . . . . . . . . . . 331Chapter 22 Files and Code . . . . . . . . . . . . . . . . . . . . . . . . . . . . . . . . . . . 346
Index . . . . . . . . . . . . . . . . . . . . . . . . . . . . . . . . . . . . . . . . . . . 365
Table of Contents iiJanuary 15, 2007
Table of Contents
Chapter 1R E F E R E N C E Getting Started 1
Using this Guide . . . . . . . . . . . . . . . . . . . . . . . . . . . . . . . . . . . . . . . . . . . . . . 2Additional Resources . . . . . . . . . . . . . . . . . . . . . . . . . . . . . . . . . . . . . . . 2
Key Concept: Essential Terms . . . . . . . . . . . . . . . . . . . . . . . . . . . . . . . . . . . . . 3Server Options . . . . . . . . . . . . . . . . . . . . . . . . . . . . . . . . . . . . . . . . . . . . . . . 4Understanding the NetCollect Processes . . . . . . . . . . . . . . . . . . . . . . . . . . 6
Survey Creation, Testing and Management . . . . . . . . . . . . . . . . . . . . 7Respondent Data and Server Script Interactions . . . . . . . . . . . . . . . . 8
Ten Tips for Effective Web Surveys . . . . . . . . . . . . . . . . . . . . . . . . . . . . . . 91. Put Yourself in Your Respondents’ Shoes . . . . . . . . . . . . . . . . . . . . 92. Keep it Brief . . . . . . . . . . . . . . . . . . . . . . . . . . . . . . . . . . . . . . . . . . . . 93. Use a Clean Layout . . . . . . . . . . . . . . . . . . . . . . . . . . . . . . . . . . . . . 104. Minimize Required Fields and Formatting . . . . . . . . . . . . . . . . . . 105. Test the Questionnaire . . . . . . . . . . . . . . . . . . . . . . . . . . . . . . . . . . 116. Don’t Bog Respondents Down with Instructions . . . . . . . . . . . . . 127. Plan the Server Load . . . . . . . . . . . . . . . . . . . . . . . . . . . . . . . . . . . . 128. Test the Import . . . . . . . . . . . . . . . . . . . . . . . . . . . . . . . . . . . . . . . . 139. Check your Reports . . . . . . . . . . . . . . . . . . . . . . . . . . . . . . . . . . . . . 1310. Change Modes . . . . . . . . . . . . . . . . . . . . . . . . . . . . . . . . . . . . . . . . 13
The Best Way to Mangle Survey Data . . . . . . . . . . . . . . . . . . . . . . . . . . . 14Next Steps . . . . . . . . . . . . . . . . . . . . . . . . . . . . . . . . . . . . . . . . . . . . . . . . . . 15Upgrading from Earlier Versions of NetCollect . . . . . . . . . . . . . . . . . . . . 16
Opening NetCollect 3.0 Files . . . . . . . . . . . . . . . . . . . . . . . . . . . . . . . 16Opening NetCollect 2.0 Files . . . . . . . . . . . . . . . . . . . . . . . . . . . . . . . 17

Apian NetCollect 4.0 User Guide
Table of Contents iiiJanuary 15, 2007
Chapter 2T U T O R I A L Ten Minute Web Survey 18
Chapter 3S E T U P Server Installation 26
Setting Up a NetCollect Survey Server . . . . . . . . . . . . . . . . . . . . . . . . . . . 27Files Needed from the SurveyPro User . . . . . . . . . . . . . . . . . . . . . . . 27Server System Requirements . . . . . . . . . . . . . . . . . . . . . . . . . . . . . . . 28Script Versions . . . . . . . . . . . . . . . . . . . . . . . . . . . . . . . . . . . . . . . . . . . 28Recommended Folder Structures . . . . . . . . . . . . . . . . . . . . . . . . . . . . 29
Installing the DLLs and ASP Library Scripts . . . . . . . . . . . . . . . . . . . . . . 32Setting Permissions for the Survey Folders . . . . . . . . . . . . . . . . . . . . 33
Key Concept: Permissions 101 . . . . . . . . . . . . . . . . . . . . . . . . . . . . . . . . . . . . 37Server Paths for the SurveyPro User . . . . . . . . . . . . . . . . . . . . . . . . . 38Testing the Server Installation . . . . . . . . . . . . . . . . . . . . . . . . . . . . . . 41
Installing a Test Web Server on Your Local System . . . . . . . . . . . . . . . . 42Adding the IIS Windows Component . . . . . . . . . . . . . . . . . . . . . . . . 43Installing the Scripts for a Test Server . . . . . . . . . . . . . . . . . . . . . . . . 44Defining Localhost Server Paths . . . . . . . . . . . . . . . . . . . . . . . . . . . . 48
Server Load for High Volume Surveys . . . . . . . . . . . . . . . . . . . . . . . . . . . 49
Chapter 4R E F E R E N C E NetCollect Documents 53
Layouts and the Nature of HTML . . . . . . . . . . . . . . . . . . . . . . . . . . . . . . . 54Measurements in HTML . . . . . . . . . . . . . . . . . . . . . . . . . . . . . . . . . . . 55Fonts . . . . . . . . . . . . . . . . . . . . . . . . . . . . . . . . . . . . . . . . . . . . . . . . . . . 56Using Graphics on the Web . . . . . . . . . . . . . . . . . . . . . . . . . . . . . . . . 56
Setting Up a NetCollect Document . . . . . . . . . . . . . . . . . . . . . . . . . . . . . . 57Understanding Margins and Backgrounds in NetCollect . . . . . . . . . . . . 58Document Properties Dialog . . . . . . . . . . . . . . . . . . . . . . . . . . . . . . . . . . . 59
General Tab for Document Type . . . . . . . . . . . . . . . . . . . . . . . . . . . . 60Web Page Tab for Margins and Backgrounds . . . . . . . . . . . . . . . . . . 61
Key Concept: Not Applicable and No Answer . . . . . . . . . . . . . . . . . . . . . . . 63Buttons Tab . . . . . . . . . . . . . . . . . . . . . . . . . . . . . . . . . . . . . . . . . . . . . 64Header and Footer Tabs . . . . . . . . . . . . . . . . . . . . . . . . . . . . . . . . . . . 67Autonumber Tab for Question Numbering . . . . . . . . . . . . . . . . . . . . 73
Web Survey Themes Dialog . . . . . . . . . . . . . . . . . . . . . . . . . . . . . . . . . . . 74Web Survey Setup Dialog . . . . . . . . . . . . . . . . . . . . . . . . . . . . . . . . . . . . . 76Previewing your Survey . . . . . . . . . . . . . . . . . . . . . . . . . . . . . . . . . . . . . . . 77Adding Hyperlinks to Surveys . . . . . . . . . . . . . . . . . . . . . . . . . . . . . . . . . . 78Notices, Errors and Buttons . . . . . . . . . . . . . . . . . . . . . . . . . . . . . . . . . . . . 81

Apian NetCollect 4.0 User Guide
Table of Contents ivJanuary 15, 2007
Chapter 5T U T O R I A L Applying Layout Options 82
Chapter 6R E F E R E N C E Pages and Skips 99
Understanding Pages in NetCollect . . . . . . . . . . . . . . . . . . . . . . . . . . . . 100Key Concept: Types of Pages . . . . . . . . . . . . . . . . . . . . . . . . . . . . . . . . . . . 101Page List Dialog . . . . . . . . . . . . . . . . . . . . . . . . . . . . . . . . . . . . . . . . . . . . 102
Individual Page Properties . . . . . . . . . . . . . . . . . . . . . . . . . . . . . . . . 103Automatic Pages for Pause, Errors and Reports . . . . . . . . . . . . . . . 104
Understanding Skips and Branches in NetCollect . . . . . . . . . . . . . . . . . 105Key Concept: Skips and Branches . . . . . . . . . . . . . . . . . . . . . . . . . . . . . . . . 105
Jumping Ahead in a Survey . . . . . . . . . . . . . . . . . . . . . . . . . . . . . . . 106Divergent Paths . . . . . . . . . . . . . . . . . . . . . . . . . . . . . . . . . . . . . . . . . 107Including Pages for an Answer . . . . . . . . . . . . . . . . . . . . . . . . . . . . . 108Rules and Tips for Skips and Branches . . . . . . . . . . . . . . . . . . . . . . 109
Skips and Branches Dialog . . . . . . . . . . . . . . . . . . . . . . . . . . . . . . . . . . . 111Setting GoTos . . . . . . . . . . . . . . . . . . . . . . . . . . . . . . . . . . . . . . . . . . . 113
Chapter 7T U T O R I A L Working with Pages and Skips 114
Chapter 8R E F E R E N C E Dynamic Questions and Text 126
Rearranging Items in Scales and Grids . . . . . . . . . . . . . . . . . . . . . . . . . . 127Randomizing Unordered Scales and Grid Rows . . . . . . . . . . . . . . . 127Manually Rearranging Unordered Scales . . . . . . . . . . . . . . . . . . . . 128Hiding Scale Options and Grid Rows . . . . . . . . . . . . . . . . . . . . . . . . 128Flipping Ordered Scales . . . . . . . . . . . . . . . . . . . . . . . . . . . . . . . . . . 129Applying Scale Layouts to Selected Questionnaires . . . . . . . . . . . . 130Question Dialog’s Advanced Options Tab . . . . . . . . . . . . . . . . . . . 131Grid Dialog’s Rows Tab . . . . . . . . . . . . . . . . . . . . . . . . . . . . . . . . . . . 133Grid Dialog’s Answer Entries Tab . . . . . . . . . . . . . . . . . . . . . . . . . . 133
Answer Tests . . . . . . . . . . . . . . . . . . . . . . . . . . . . . . . . . . . . . . . . . . . . . . 134NetCollect Answer Tests Dialog . . . . . . . . . . . . . . . . . . . . . . . . . . . . 136
Using Hidden Fields . . . . . . . . . . . . . . . . . . . . . . . . . . . . . . . . . . . . . . . . . 137Piping Answers Forward in a Survey . . . . . . . . . . . . . . . . . . . . . . . . . . . 137Repeating Questions Within in a Survey . . . . . . . . . . . . . . . . . . . . . . . . 138

Apian NetCollect 4.0 User Guide
Table of Contents vJanuary 15, 2007
Chapter 9T U T O R I A L Adding Dynamic Elements 141
Chapter 10R E F E R E N C E Login Options 152
Understanding Logins in NetCollect . . . . . . . . . . . . . . . . . . . . . . . . . . . . 153Key Concept: Login Terms . . . . . . . . . . . . . . . . . . . . . . . . . . . . . . . . . . . . . 153
Open Access . . . . . . . . . . . . . . . . . . . . . . . . . . . . . . . . . . . . . . . . . . . . 154Anonymous but Restricted . . . . . . . . . . . . . . . . . . . . . . . . . . . . . . . . 155Unique Passwords and Names + Passwords . . . . . . . . . . . . . . . . . . 156Unique Password File Built on the Fly . . . . . . . . . . . . . . . . . . . . . . . 157Passing Login Information via the URL . . . . . . . . . . . . . . . . . . . . . . 158
Login Dialog . . . . . . . . . . . . . . . . . . . . . . . . . . . . . . . . . . . . . . . . . . . . . . . 158No Password Required — Open Access . . . . . . . . . . . . . . . . . . . . . 159Shared Password(s) — Anonymous but Restricted . . . . . . . . . . . . 160Unique Respondent ID File . . . . . . . . . . . . . . . . . . . . . . . . . . . . . . . . 161Respondent Name and Password File . . . . . . . . . . . . . . . . . . . . . . . 162Outside application launch passes unique ID . . . . . . . . . . . . . . . . . 165Linking Passwords and Resumes to a Question . . . . . . . . . . . . . . . 166Layout Tab . . . . . . . . . . . . . . . . . . . . . . . . . . . . . . . . . . . . . . . . . . . . . 167Notice Text . . . . . . . . . . . . . . . . . . . . . . . . . . . . . . . . . . . . . . . . . . . . . 168
Pausing and Resuming Surveys . . . . . . . . . . . . . . . . . . . . . . . . . . . . . . . 169Login Dialog Resume Controls . . . . . . . . . . . . . . . . . . . . . . . . . . . . . 169
Creating Password Files . . . . . . . . . . . . . . . . . . . . . . . . . . . . . . . . . . . . . 170Legal Values for Passwords . . . . . . . . . . . . . . . . . . . . . . . . . . . . . . . 171Understanding the NetCollect Special Passwords . . . . . . . . . . . . . 171Make PIN File Dialog . . . . . . . . . . . . . . . . . . . . . . . . . . . . . . . . . . . . 172
Updating Live PIN Files . . . . . . . . . . . . . . . . . . . . . . . . . . . . . . . . . . . . . . 173
Chapter 11T U T O R I A L Defining Logins 175
Chapter 12R E F E R E N C E Embedded Surveys 187
Understanding Embedded Surveys in NetCollect . . . . . . . . . . . . . . . . . 188Key Concept: Embedded Survey Terms . . . . . . . . . . . . . . . . . . . . . . . . . . . 189
Example 1: Welcome Jane, Please Confirm Your Address . . . . . . 191Key Concept: Data is Data to NetCollect . . . . . . . . . . . . . . . . . . . . . . . . . . 192
Example 2: Evaluating a Particular Service Experience . . . . . . . . . 192Example 3: Streamlining 360 Surveys . . . . . . . . . . . . . . . . . . . . . . . 193Example 4: Looping the Respondent Through Questions . . . . . . . 194

Apian NetCollect 4.0 User Guide
Table of Contents viJanuary 15, 2007
Key Concept: Watch your Cause and Effect . . . . . . . . . . . . . . . . . . . . . . . . 196NetCollect’s Internal Data Format . . . . . . . . . . . . . . . . . . . . . . . . . . . . . 197Data Piping . . . . . . . . . . . . . . . . . . . . . . . . . . . . . . . . . . . . . . . . . . . . . . . . 199
ASCII vs. SQL . . . . . . . . . . . . . . . . . . . . . . . . . . . . . . . . . . . . . . . . . . 200Piping Information into a Survey . . . . . . . . . . . . . . . . . . . . . . . . . . . 201Piping Answers Out of a Survey . . . . . . . . . . . . . . . . . . . . . . . . . . . . 205Field Matchups for Piping . . . . . . . . . . . . . . . . . . . . . . . . . . . . . . . . . 210
Creating Starting or Ending Handshakes . . . . . . . . . . . . . . . . . . . . . . . . 212Starting a Survey with Data . . . . . . . . . . . . . . . . . . . . . . . . . . . . . . . 213On Exit Completed — Sending Respondents to a URL . . . . . . . . . 215NetCollect’s URL Syntax . . . . . . . . . . . . . . . . . . . . . . . . . . . . . . . . . . 217
Advanced Embedded Survey Topics . . . . . . . . . . . . . . . . . . . . . . . . . . . 219Using Temporary Files to Obscure URL Data . . . . . . . . . . . . . . . . 220On Incomplete for a Custom Error Page . . . . . . . . . . . . . . . . . . . . . 221Resume URLs . . . . . . . . . . . . . . . . . . . . . . . . . . . . . . . . . . . . . . . . . . . 223Piping Status Out . . . . . . . . . . . . . . . . . . . . . . . . . . . . . . . . . . . . . . . . 224
Chapter 13T U T O R I A L Loading Data into a Survey 225
Chapter 14T U T O R I A L Handing Data to Other Systems 241
Chapter 15R E F E R E N C E Real-Time Reporting 251
Understanding NetCollect Server Reports . . . . . . . . . . . . . . . . . . . . . . . 252NetCollect Reports Dialog . . . . . . . . . . . . . . . . . . . . . . . . . . . . . . . . . . . . 254Report Login Dialog . . . . . . . . . . . . . . . . . . . . . . . . . . . . . . . . . . . . . . . . . 255
Login Rules Tab . . . . . . . . . . . . . . . . . . . . . . . . . . . . . . . . . . . . . . . . . 255Notices Tab . . . . . . . . . . . . . . . . . . . . . . . . . . . . . . . . . . . . . . . . . . . . 257
Report Definition Dialog . . . . . . . . . . . . . . . . . . . . . . . . . . . . . . . . . . . . . 257Layout and Access Tab . . . . . . . . . . . . . . . . . . . . . . . . . . . . . . . . . . . 258Questions and Groups Tab . . . . . . . . . . . . . . . . . . . . . . . . . . . . . . . . 260
Report Login Pass Through URLs . . . . . . . . . . . . . . . . . . . . . . . . . . . . . 261

Apian NetCollect 4.0 User Guide
Table of Contents viiJanuary 15, 2007
Chapter 16T U T O R I A L Creating Server Reports 263
Chapter 17R E F E R E N C E Publish Settings 275
Understanding the Publish Process . . . . . . . . . . . . . . . . . . . . . . . . . . . . 276How Surveys Run on a Web Server . . . . . . . . . . . . . . . . . . . . . . . . . 276Publishing the First Time on Your Server . . . . . . . . . . . . . . . . . . . . 277Publishing the First Time on QuestionWeb . . . . . . . . . . . . . . . . . . 278Publish Steps in Detail . . . . . . . . . . . . . . . . . . . . . . . . . . . . . . . . . . . . 279Accessing SP4 Files from Multiple Systems . . . . . . . . . . . . . . . . . . 279
Web Site Definitions for Your Server . . . . . . . . . . . . . . . . . . . . . . . . . . . 280Checking Script Versions on Your Server . . . . . . . . . . . . . . . . . . . . 280Copying, Editing and Deleting Your Server Definitions . . . . . . . . . 281Servers Accessed via LAN Shares (Your Server) . . . . . . . . . . . . . . 282Servers Accessed via FTP (Your Server) . . . . . . . . . . . . . . . . . . . . . 283
Web Site Definitions for QuestionWeb . . . . . . . . . . . . . . . . . . . . . . . . . . 284Understanding QuestionWeb Uploads . . . . . . . . . . . . . . . . . . . . . . 284Finding Your FTP password for QuestionWeb . . . . . . . . . . . . . . . . 284QuestionWeb Accounts with Multiple Folders . . . . . . . . . . . . . . . . 285
Setting Paths for a Survey . . . . . . . . . . . . . . . . . . . . . . . . . . . . . . . . . . . . 285Sharing Survey Folders with Other Files on Your Server . . . . . . . . 288
Between Publish and Upload . . . . . . . . . . . . . . . . . . . . . . . . . . . . . . . . . 289Advanced Upload . . . . . . . . . . . . . . . . . . . . . . . . . . . . . . . . . . . . . . . . . . . 290
Server Selection and Publish Log . . . . . . . . . . . . . . . . . . . . . . . . . . . 291Survey Content and Project Data Files on Your Server . . . . . . . . . 292Uploading for the First Time to Your Server . . . . . . . . . . . . . . . . . . 293Uploading to Live Surveys on Your Server . . . . . . . . . . . . . . . . . . . 294
Chapter 18T U T O R I A L Publishing and Uploading to Your Server 295
Chapter 19T U T O R I A L Publishing and Uploading to QuestionWeb 308
Publishing to a Regular Account . . . . . . . . . . . . . . . . . . . . . . . . . . . . . . . 309Using QuestionWeb Demo Accounts . . . . . . . . . . . . . . . . . . . . . . . . . . . 315

Apian NetCollect 4.0 User Guide
Table of Contents viiiJanuary 15, 2007
Chapter 20R E F E R E N C E Control Panel Screens 319
Your Server vs. QuestionWeb Control Panels . . . . . . . . . . . . . . . . . . . . 320Basic Survey Administration . . . . . . . . . . . . . . . . . . . . . . . . . . . . . . . . . . 320
Change Survey Mode . . . . . . . . . . . . . . . . . . . . . . . . . . . . . . . . . . . . 320Activity Log . . . . . . . . . . . . . . . . . . . . . . . . . . . . . . . . . . . . . . . . . . . . 321
Advanced Options . . . . . . . . . . . . . . . . . . . . . . . . . . . . . . . . . . . . . . . . . . 322Automatic Data Management . . . . . . . . . . . . . . . . . . . . . . . . . . . . . . 323Manage Partially Completed Surveys . . . . . . . . . . . . . . . . . . . . . . . 324Survey and Report Availability . . . . . . . . . . . . . . . . . . . . . . . . . . . . . 326Data Files . . . . . . . . . . . . . . . . . . . . . . . . . . . . . . . . . . . . . . . . . . . . . . 328Maintenance Mode . . . . . . . . . . . . . . . . . . . . . . . . . . . . . . . . . . . . . . 328Server Load Protection . . . . . . . . . . . . . . . . . . . . . . . . . . . . . . . . . . . 329
Chapter 21R E F E R E N C E Managing Data 331
Understanding the Download and Import Process . . . . . . . . . . . . . . . . 332Managing Data Preferences . . . . . . . . . . . . . . . . . . . . . . . . . . . . . . . 333Data Download Options . . . . . . . . . . . . . . . . . . . . . . . . . . . . . . . . . . 333
Best Practices for a Clean Database . . . . . . . . . . . . . . . . . . . . . . . . . . . . 334Get Latest Data Dialog . . . . . . . . . . . . . . . . . . . . . . . . . . . . . . . . . . . . . . . 335Advanced Download Dialog . . . . . . . . . . . . . . . . . . . . . . . . . . . . . . . . . . 337
Server Selection and Publish Log tab . . . . . . . . . . . . . . . . . . . . . . . . 337Archived Data, Backup, and Project tabs . . . . . . . . . . . . . . . . . . . . 339
Manual Imports . . . . . . . . . . . . . . . . . . . . . . . . . . . . . . . . . . . . . . . . . . . . 341Import Logs . . . . . . . . . . . . . . . . . . . . . . . . . . . . . . . . . . . . . . . . . . . . . . . 341Deleting Data . . . . . . . . . . . . . . . . . . . . . . . . . . . . . . . . . . . . . . . . . . . . . . 342Closing and Archiving Surveys . . . . . . . . . . . . . . . . . . . . . . . . . . . . . . . . 344

Apian NetCollect 4.0 User Guide
Table of Contents ixJanuary 15, 2007
Chapter 22R E F E R E N C E Files and Code 346
A Note to Programmers . . . . . . . . . . . . . . . . . . . . . . . . . . . . . . . . . . . . . . 347Files on the Server . . . . . . . . . . . . . . . . . . . . . . . . . . . . . . . . . . . . . . . . . . 348
Files in the Content Folder . . . . . . . . . . . . . . . . . . . . . . . . . . . . . . . . 348Files and Folders in the Project Folder . . . . . . . . . . . . . . . . . . . . . . 350DLLs and Script Files . . . . . . . . . . . . . . . . . . . . . . . . . . . . . . . . . . . . 354
Editing the HTML/ASP Pages . . . . . . . . . . . . . . . . . . . . . . . . . . . . . . . . 355Editing Hidden Fields . . . . . . . . . . . . . . . . . . . . . . . . . . . . . . . . . . . . 357Understanding the NetCollect CSS File . . . . . . . . . . . . . . . . . . . . . . 358Creating New Button Sets and Progress Bars . . . . . . . . . . . . . . . . . 359
Understanding the CFG File . . . . . . . . . . . . . . . . . . . . . . . . . . . . . . . . . . 361Reading the Log Files . . . . . . . . . . . . . . . . . . . . . . . . . . . . . . . . . . . . . . . . 362
Main Project Log . . . . . . . . . . . . . . . . . . . . . . . . . . . . . . . . . . . . . . . . 362Throttle Log . . . . . . . . . . . . . . . . . . . . . . . . . . . . . . . . . . . . . . . . . . . . 363
Index 365

Chapter 1 - Getting Started 1January 15, 2007
Chapter 1R E F E R E N C E Getting Started
NetCollect is the Web survey module for SurveyPro 4.0. One part of Net-Collect installs with your copy of SurveyPro to allow you to design the Web surveys. The other portion is installed on your server to run the live surveys. We recommend starting with this section to learn where to go next.
Chapter Contents:
Using this Guide . . . . . . . . . . . . . . . . . . . . . . . . . . . . . . . . . . . . 2Additional Resources . . . . . . . . . . . . . . . . . . . . . . . . . . . . 2
Key Concept: Essential Terms . . . . . . . . . . . . . . . . . . . . . . . . . . 3Server Options . . . . . . . . . . . . . . . . . . . . . . . . . . . . . . . . . . . . . 4Understanding the NetCollect Processes . . . . . . . . . . . . . . . . . 6
Survey Creation, Testing and Management . . . . . . . . . . . . 7Respondent Data and Server Script Interactions . . . . . . . . 8
Ten Tips for Effective Web Surveys . . . . . . . . . . . . . . . . . . . . . . 91. Put Yourself in Your Respondents’ Shoes . . . . . . . . . . . . 92. Keep it Brief . . . . . . . . . . . . . . . . . . . . . . . . . . . . . . . . . 93. Use a Clean Layout . . . . . . . . . . . . . . . . . . . . . . . . . . . 104. Minimize Required Fields and Formatting . . . . . . . . . . 105. Test the Questionnaire . . . . . . . . . . . . . . . . . . . . . . . . 116. Don’t Bog Respondents Down with Instructions . . . . . . 127. Plan the Server Load . . . . . . . . . . . . . . . . . . . . . . . . . . 128. Test the Import . . . . . . . . . . . . . . . . . . . . . . . . . . . . . . 139. Check your Reports . . . . . . . . . . . . . . . . . . . . . . . . . . . 1310. Change Modes . . . . . . . . . . . . . . . . . . . . . . . . . . . . . . 13
The Best Way to Mangle Survey Data . . . . . . . . . . . . . . . . . . . 14Next Steps . . . . . . . . . . . . . . . . . . . . . . . . . . . . . . . . . . . . . . . 15Upgrading from Earlier Versions of NetCollect . . . . . . . . . . . . 16
Opening NetCollect 3.0 Files . . . . . . . . . . . . . . . . . . . . . . 16Opening NetCollect 2.0 Files . . . . . . . . . . . . . . . . . . . . . . 17

Apian NetCollect 4.0 User Guide
Chapter 1 - Getting Started Using this Guide 2January 15, 2007
Using this Guide
Each of the chapters is identified as “Reference” or “Tutorial.” Reference chapters, introduce new terms, provide advice on the best use of a partic-ular feature, and document the dialog controls. Tutorial sections walk you through setting up a particular feature. Tutorials can usually be completed out of order—any assumptions about your knowledge will be identified at their start. You’ll find the reference and tutorial chapters are grouped around one or more related features or dialogs.
This guide focuses on NetCollect design and publishing. If you are new to SurveyPro, refer to Chapters 1-8 in the SurveyPro User Guide to get acquainted with the basics of working with questions and scales. The SurveyPro User Guide is also your resource for data collection functions beyond the Web SDH data files covered here, and for reporting functions beyond NetCollect’s real-time Web server reports.
If you already know NetCollect 3.0
You’ll find significant changes to the features and dialogs in NetCollect 4.0. We recommend reviewing the sections for any features you use in your projects, and be sure to read Upgrading from Earlier Versions of Net-Collect on page 16.
If you used QuestionWeb with NetCollect 3.0
Many of QuestionWeb’s features, such as the Control Panel, have made their way into NetCollect 4.0. So, rather than documenting QuestionWeb in a separate guide, you’ll find it covered in this manual.
Additional Resources
Discussion List and Newsletter
Apian provides a free discussion list for users to ask questions about SurveyPro and survey research in general. You can opt for either an e-mail or Web-based interface.
We also recommend signing up for the Apian newsletter to stay posted on product updates and workshops, and for the tips from our Support team.
http://apian.com/support/forum/
Knowledge Base This is a searchable resource for how-to questions and problem-solving.
http://apian.com/support/knowledgebase/
Technical Support All new orders and upgrades come with a period of free support. Annual support contracts may be purchased by phone at (800) 237-4565 or online.
http://apian.com/support/ (206) 547-8392

Apian NetCollect 4.0 User Guide
Chapter 1 - Getting Started Using this Guide 3January 15, 2007
Coaching and Training Apian offers public workshops, on-site corporate training, and one-on-one telephone coaching.
http://apian.com/training/
Downloads Updates (patches) to SurveyPro are provided for you to download free of charge.
http://apian.com/downloads/
Key Concept: Essential Terms
Throughout this guide, key concepts will be highlighted in this manner.
HTMLHyperText Markup Language is the format used to define pages on the Web. This includes the layout of tables, fonts, images, and colors. HTML pages are “static” in that they appear the same to each Web site visitor.
ScriptA script is a program—it receives input, follows its rules, and produces output. For your surveys, the input is the definition of your individual survey, such as its passwords and skips, along with the data the respondent supplies. The output is then the next page delivered to the respondent, and the data saved to the server. Server-side scripts are run by the server, and therefore act the same regardless of the browser or operating system a Web visitor is using. Client-side scripts such as JavaScript are downloaded with the HTML page and run within a browser, and therefore may be disabled on an individual’s system. NetCollect’s core functions are all server-side, with JavaScript used as a second layer to make certain features more responsive.
ASPActive Server Pages take the static page definitions in HTML and tailor the content to an individual site visitor. With NetCollect, the survey pages are a mix of both HTML and ASP code, and will have a “.asp” extension on your server. In addition, there are ASP scripts which are referenced by all your surveys as part of the server-side scripting.
DLLIn addition to the ASP scripts which execute your surveys, NetCollect has packaged many of the server functions in DLLs. These are Windows programs which are more efficient than Web scripting for faster processing of survey requests and better server management. DLLs will need to be installed by your server administrator.
SP4 FileWhen you’re designing your survey, you’re working in SurveyPro on your local computer. The file in which you’re defining the questions, importing data, and analyzing results is a .SP4 project file. Just as a Microsoft Access database may include forms, data, and reports, a SP4 includes the questionnaires, data, and reports for one or more related surveys.

Apian NetCollect 4.0 User Guide
Chapter 1 - Getting Started Server Options 4January 15, 2007
Server Options
One size never fits all, so NetCollect is designed to let you post your sur-veys in three server environments. Often users will start with one option, migrate to another, and then use the third for the occasional big project, so we recommend reading through the options so you’re aware of all the possibilities.
Your Company’s Server This is the 100% do-it-yourself approach, where you’ll design the surveys and publish them to your company’s in-house or externally hosted server. If you have the systems and expertise available, this is a great option as it involves no additional costs. It’s also completely within your company’s security setup, and makes it easy to connect your surveys to local SQL databases.
You’ll need to work with your server administrator to do the one-time script install in Chapter 3 and to make sure you have the necessary per-missions to upload and download files (or an IT contact who will upload and download for you).
Apian QuestionWeb Here we have the mostly do-it-yourself option, as you’re still designing the surveys, uploading, testing, and retrieving the data—you just don’t have to worry about setting up or maintaining a server. Generally this is the fastest way to get your first survey online, taking just one business day to set up your account. QuestionWeb was designed with security and uptime in mind, in a top tier data center with redundant connectivity and power supplies, with a high-quality firewall, current operating system patches, and on-site 24/7 staff. Project administration and data downloads are encrypted to further protect your results.
With QuestionWeb, you’ll sign up for one or more “folders,” each one for as many months as you need. Each folder may contain one survey at a time, and you can change the survey as often as you need. For example,
PublishOnce you’ve created a questionnaire in SurveyPro on your local computer, you’ll publish it to a Web server. Publish refers to the process in which SurveyPro generates the .ASP survey pages and individual survey configuration, and then uploads (copies) those files to your server.
DownloadData is collected on the Web server, so periodically you will need to download it to your local computer for import into SurveyPro. NetCollect includes an integrated download and import function for quick updates, as well as Web-based download options.
Key Concept: Essential Terms

Apian NetCollect 4.0 User Guide
Chapter 1 - Getting Started Server Options 5January 15, 2007
in one folder you may launch your employee survey in June, then close it in August, let the folder sit idle for a bit, and then launch a customer sur-vey in October. Or, you could have the original folder run only through August, and then add a new folder in October for a small setup charge.
The vast majority of the survey design and management process is identi-cal for your own servers and QuestionWeb. In general, QuestionWeb sim-plifies things as you don’t need to know server paths to upload, just your account name and which folder you’re using. When there are differences, such as a chapter or section you can skip, it will be mentioned in the beginning of the section, or you’ll see two parallel sections, one labeled “Your Server” and the other “QuestionWeb.”
To sign up for QuestionWeb, go to www.questionweb.com, or if you have questions, call (800) 237-4565. In addition to the one survey per folder limitation, when you’re making real-time connections to external data sources QuestionWeb only allows ASCII file and URL connections, not SQL. Embedded Surveys on page 187 includes a discussion of these differ-ent methods.
Apian SurveyHost Using SurveyHost lets you tap into an experienced Web survey design, programming, and project management team—along with not having to worry about a Web server. Often NetCollect users have their own servers or QuestionWeb for more straightforward surveys, and come to Survey-Host for high volume or custom development projects. Places SurveyHost can help include:
• Advice on the best survey setup for passwords, pause/resume, skips, and answer tests for your survey and respondents
• Creation of your HTML questionnaire and SurveyPro SP4 file when you don’t have time to do it yourself
• Custom layout design to match your company’s site
• Custom programming for functions NetCollect doesn’t include
• Multiple language surveys, including Japanese, Arabic, Russian, etc.
• Projects involving multiple submissions per respondent or multiple survey versions, such as 360 surveys
• Coordinating with your company’s Web team to pass data between your e-commerce system or SQL databases and a survey on SurveyHost
• Custom real-time reporting
• E-mail notifications to your customer service team when someone marks “contact me” or gives a low rating

Apian NetCollect 4.0 User Guide
Chapter 1 - Getting Started Understanding the NetCollect Processes 6January 15, 2007
• Confidentiality buffer, including sending e-mail invitations with unique IDs for anonymous surveys
• High response rates, such as large e-mail drops and spikes in traffic from TV broadcasts
While www.surveyhost.com lists many of the features we offer, if you don’t see what you’re looking for, just call us at (800) 237-4565. After all, that’s the whole point of a full service custom shop.
Understanding the NetCollect Processes
There are two main process flows in NetCollect. The first is the process you will go through to create and manage your surveys. The second is the interaction between an individual respondent and the server. On the next two pages are flowcharts outlining these processes. As you go through developing and then testing your own surveys, referring back to these dia-grams will give you the larger context.

Apian NetCollect 4.0 User Guide
Chapter 1 - Getting Started Understanding the NetCollect Processes 7January 15, 2007
Survey Creation, Testing and Management
While setting up a new survey may look intimidating at first, SurveyPro’s built-in file uploads and downloads and Web-based Control Panel streamline the process.
Keep in mind that there is often more than one revise/upload/test loop in a survey’s development.

Apian NetCollect 4.0 User Guide
Chapter 1 - Getting Started Understanding the NetCollect Processes 8January 15, 2007
Respondent Data and Server Script Interactions
Now that you’ve seen the project management perspective, here’s a look at the micro level as a single respondent completes a typical password protected survey. (Passwords are optional.)
See Files and Code on page 346 for a detailed description of all the files on the server.

Apian NetCollect 4.0 User Guide
Chapter 1 - Getting Started Ten Tips for Effective Web Surveys 9January 15, 2007
Ten Tips for Effective Web Surveys
This list offers some easy ways to help make your surveys a success. Skip-ping these steps can result in problems ranging from reduced response rates to useless data—neither of which does justice to the work you invested in developing your surveys.
1. Put Yourself in Your Respondents’ Shoes
Even if your respondents can be forced to complete your survey, do you really want them to answer it in a bad mood? Respondents are giving you their time and opinions, doing you a tremendous favor by completing the survey. Keep that in mind for a few of the following tips, as well as when planning any incentives you use in the survey.
2. Keep it Brief
As with paper surveys, there is a huge range of “typical” lengths depend-ing on the topic covered and audience involvement. Incentives are a good way to increase involvement, but they’re generally expensive and only go so far. If you want a good response rate:
• Minimize the number and complexity of questions by focusing on the essential data for your business decision
• Be up-front and realistic about how long it will take a typical respondent (not you) to finish
• Include a progress bar
• Allow respondents to pause and return later on long surveys
• Require respondents finish in one sitting on shorter surveys
• Use skips and branching to hide questions not applicable to all respondents
• Minimize the number of HTML pages in the survey
Many people design Web surveys with only one question or grid on each survey page. If your survey has 5 grids and 20 independent questions, this means that the respondent will have to click Next and wait for a page to download 25 times. However, if you break pages at section headings (or where skips require), a survey of that length may require only 6-8 pages. No matter how fast your server or how fast the respondent’s connection, people are generally impatient enough that the 1-5 seconds they’ll have to wait for each page can begin to irritate.

Apian NetCollect 4.0 User Guide
Chapter 1 - Getting Started Ten Tips for Effective Web Surveys 10January 15, 2007
At the other end of the spectrum, putting an entire survey on one very long scrolling page can make it seem longer than it is. Extremely long pages can also cause problems for people on dial-up connections.
3. Use a Clean Layout
Your survey doesn’t have to be plain, but it should have:
• A clear hierarchy of headings, questions, and scales
• Fonts big enough for people to easily read, in colors that are easy on the eyes
• Consistent styles, generally using just one or two typefaces/fonts
• Whitespace between tiles or graphics and/or indentation of scales or sub-questions
• Good contrast between fonts and backgrounds, such as black text on a white background
Any graphics, colors, and additional fonts should enhance the respon-dent’s ability to complete the survey, or at least not intrude with distrac-tions or excessive download times. NetCollect’s defaults are designed to be a good starting point. If you’re working with a survey from a prior ver-sion, you can apply one of the Themes to a survey and see what changes it makes (see page 74).
4. Minimize Required Fields and Formatting
Two of the advantages of a Web survey are that you can require questions be answered and check the formatting of typed answers. At times, researchers will take this ability and go a little power mad, requiring every answer on a survey be completed. Many respondents will not tolerate this.
When considering whether or not to require an answer, ask:
• Will the entire form be useless if I don’t have this one question’s response?
• Will the skips or branches work better if I make it required?
• Will the respondent understand why this field is required?
• If I require all these fields, will the number of people answering carelessly or falsely increase?

Apian NetCollect 4.0 User Guide
Chapter 1 - Getting Started Ten Tips for Effective Web Surveys 11January 15, 2007
When considering whether or not to require a specific format, ask:
• Is entering the “proper” format in this question a hassle for the respondent?
• Can I make the pattern scale more flexible so characters such as hyphens and spaces are optional and ignored by NetCollect?
• How long will it take me to do data cleaning on this write-in if I don’t enforce the format?
• Can I replace the write-in with a drop-down list?
And always ask:
• How likely are respondents to abandon the survey when they get a page back with “fix me” messages?
Whenever you do require a field or format, be sure to notify the respon-dent in the question’s instructions. In the case of required fields, an increasingly common convention is a red asterisk * with a simple note “* = Required” at the start of the survey. Or, if most of the questions are required, then say they all are and flag the exceptions as “Optional.” Also, be clear about required formats, such as dates or numbers, so respon-dents can get it right the first time. For example, a question might read: “Date you purchased (MM/DD/YY).”
5. Test the Questionnaire
A surprising number of surveys do not get even basic testing before launch. Here are a few elements you should be checking for:
• Spelling and grammar—often a fresh set of eyes is needed for this
• Questions fully address your business question (with no extra questions)
• Within questions, scales are comprehensive or give a not applicable or Other option
• Clear instructions
• Functionality of skips, branches, answer tests, pause/resume, password settings, piping, etc.
• Attractive layout in a range of browsers, screen resolutions, and connection speeds (whatever your respondents will be using)
Ideally, there will be at least three testing passes, first on your own, then with a colleague or your client, and finally with a typical respondent.

Apian NetCollect 4.0 User Guide
Chapter 1 - Getting Started Ten Tips for Effective Web Surveys 12January 15, 2007
If you will be editing the HTML pages SurveyPro publishes in FrontPage, Dreamweaver, or another editor, then we recommend doing the testing in two stages. First, upload the survey straight from SurveyPro and test the questions, scales, skips, etc. Then when you’re certain that’s final, edit the page layouts and upload for a final re-test. See Editing the HTML/ASP Pages on page 355.
6. Don’t Bog Respondents Down with Instructions
Respondents have other things on their minds. If you send a 10 paragraph e-mail invitation, they may not find the critical information as they skim through it. Too often, respondents ask “What’s my password?” at the top of an e-mail containing “Enter your password 1234.”
Likewise, many surveys front-load the questionnaire with pages of instructions. Whenever possible, spread instructions throughout the sur-vey and use bullets to facilitate skimming. For most surveys, the following approach works well:
• Invitation—brief description of the survey, deadline, confidentiality assurance, URL, password, and unsubscribe instructions (if applicable)
• Welcome/login page—time needed to finish the survey, pause/resume instructions, and confidentiality assurance (again)
• Survey body pages—put instructions for each type of question at the first instance rather than all together up front
• Pause page—resume instructions and deadline to finish
7. Plan the Server Load
Because NetCollect includes load management functions, you know exactly how many respondents your survey will accept each minute before saying “Try back later.” When you’re working with larger groups of people, you can use this to plan the rate at which you send e-mail invita-tions. Note that these calculations are generally only needed when you do e-mail drops or other mass broadcasts, as they cause a sharp spike in the number of respondents.
By default, NetCollect surveys allow 500 pages to be submitted per minute. This means that if your SurveyPro questionnaire has 10 pages including the Welcome and Thanks, then 50 people can start the survey each minute (people resuming surveys can always get in). If you expect at most a 20% response rate, you could theoretically send out 15,000 survey

Apian NetCollect 4.0 User Guide
Chapter 1 - Getting Started Ten Tips for Effective Web Surveys 13January 15, 2007
invitations per hour without anyone being told it was too busy. In practice, picking a slightly lower e-mail rate is better as it gives you some cushion for the variable click-through rate on any given minute.
The 500 pages per minute default is designed to work on most servers. See Server Load for High Volume Surveys on page 49 for more about deter-mining your server’s capacity. Note: QuestionWeb accounts may have dif-ferent default capacities.
8. Test the Import
If the data won’t import correctly, there isn’t much point to conducting the survey. NetCollect has a significant number of safety checks to make sure that the data collected on your Web server matches your survey (part of the whole Test/Live mode setup), but creative people can still find a way to make analyzing the data impossible. The two favorite methods are changing a survey while it’s collecting data and manipulating the survey pages NetCollect generates. See The Best Way to Mangle Survey Data on page 14 to avoid the former, and direct your Web designer to Editing the HTML/ASP Pages on page 355 to avoid the latter.
While this is unlikely to be a problem on your survey, isn’t it worth a few minutes to make sure?
9. Check your Reports
After bringing in your test data, take a few minutes with the reports to be sure that you can create the figures, filters, and cross-tabs you need to answer your business question. While it’s a hassle to go back to the draw-ing board on a survey at this point, it’s better than discovering you missed a key demographic after the respondents have come and gone.
Time spent on these test reports in SurveyPro is not wasted, as they’ll be populated with the real data as soon as you start downloading and importing it.
10. Change Modes
Your survey will publish and upload in Test mode, which is fully func-tional. It will say “Test” on each page and flag the data files as from testing to remind you which mode you’re in. Before you activate your public link or send those e-mail invites, be sure to switch the survey to Live mode in the Control Panel.

Apian NetCollect 4.0 User Guide
Chapter 1 - Getting Started The Best Way to Mangle Survey Data 14January 15, 2007
Note: It’s better to prematurely switch to Live and have to go back to Test for another edit pass than it is to launch a survey in Test mode.
The Best Way to Mangle Survey Data
NetCollect does its best to protect your data, from the obvious “locking” of your survey when you publish it to your server to more subtle checks it makes behind the scenes. However, if you’re determined, it’s still possible to make your survey responses partially or completely unusable.
When you create a questionnaire in SurveyPro, the software assigns a unique Q number to each question or grid row—you can see them by expanding the Database Questions node of the Object Tree in SurveyPro. As you publish the Web survey pages, the current set of Q numbers is embedded in the HTML pages. As the scripts save respondent data, they associate each value marked with its Q number.
Now imagine you realize you forgot a question, or need to remove one, or want to rearrange a few—just minor edits. So while the survey is still col-lecting data on your server, you unlock the questionnaire in SurveyPro and make the changes. Maybe these changes were in preparation for reporting, and maybe you’ll re-publish them to your Web server for fur-ther data collection. In either case, you now have a problem because the surveys in progress are using different Q numbers than those now in your SurveyPro file. Sometimes users realize they have a problem when SurveyPro balks at the import because the SurveyPro file says Q27 is using a checkbox scale, but the data you’re trying to import into Q27 con-tains comments. Unfortunately, certain types of changes to a SurveyPro file will not produce incompatible data structures, so you’d simply be importing the wrong data.
For example, you start with this grid and collect data using it:
Then you realize that you’d prefer your reports present the items in a dif-ferent order, and change the SurveyPro file to this:

Apian NetCollect 4.0 User Guide
Chapter 1 - Getting Started Next Steps 15January 15, 2007
Because you didn’t change any scales or remove any questions from the SurveyPro file, there’s no way for SurveyPro to know that five of the six questions are now in different places. Responses import by Q number, not by the text of the question. In this case, you’d never receive an import error, just mangled data.
The good news is this is an easy problem to avoid. All you have to do is leave your SurveyPro file locked until you use the Control Panel to Close the survey. Then import all the data, after which you can safely rearrange the grid as above. You can also always use Question Groups and Rescales to make these sorts of reporting adjustments because they’re layers on top of the original survey structure.
Next Steps
If you have older NetCollect surveys, see Upgrading from Earlier Versions of NetCollect on page 16.
Whether you’re new to SurveyPro or a NetCollect 3.0/2.0 user, try the Ten Minute Web Survey on page 18. This tutorial shows you the main dia-logs and flow of creating surveys before the rest of the guide gets into NetCollect’s more detailed options and settings.
If you will be posting the surveys on your own server, you’ll need to work with your server administrator to set up the scripts. All the details are in Chapter 3. Do not leave this step for the last minute. While it can take less than an hour to do the installation, if your server administrator has questions or if your site has an unusual configuration it’s been known to take a week of back-and-forth to sort through all the details. This is because each Web server is slightly unique and may have multi-layer security into which NetCollect has to be incorporated. The good news is you only have to go through this setup once per server.
QuestionWeb users will skip the server installation.

Apian NetCollect 4.0 User Guide
Chapter 1 - Getting Started Upgrading from Earlier Versions of NetCollect 16January 15, 2007
Following the installation instructions are reference and tutorial chapters for the assorted features. These are grouped by topic, with relevant tuto-rial(s) immediately following the reference material.
When your survey is drafted, Publish Settings on page 275 begins the cov-erage of uploading to a server and using the Web-based Control Panel to manage your survey.
Upgrading from Earlier Versions of NetCollect
SurveyPro and NetCollect do their best to preserve the settings from your existing Web surveys. However, due to the many changes to the scripting environment and areas such as passwords, it may not be able to translate all your settings. If you’re going to publish a NetCollect survey which was created in a prior version, be sure to check the skips, passwords, answer tests, and layouts.
Before opening an older file:
1. Conclude any Web surveys that are currently “live” (collecting data on a Web server) and import their data.
2. Create a backup copy identified as the NetCollect 3.0 (or 2.0) version.
3. Open the SP3 or SVA file in SurveyPro 4.0.
When you have multiple questionnaires in an SP4 file the first step may not always be possible. In that case, be sure to carefully review the import of any legacy SDH files you bring into the new project file.
Opening NetCollect 3.0 Files
When you use SurveyPro 4.0 to open an older NetCollect file, you’ll see a warning dialog. The dialogs will prompt you to save to the new .SP4 file extension, so your original copy will be preserved.
Once you have the file converted, open your NetCollect questionnaire document(s) and review your survey’s settings in these dialogs:
Important:Once a file is opened in SurveyPro 4.0, it cannot be opened in an older version of SurveyPro or NetCollect.

Apian NetCollect 4.0 User Guide
Chapter 1 - Getting Started Upgrading from Earlier Versions of NetCollect 17January 15, 2007
Document Properties Use the toolbar button or Document menu, Properties to bring up this dialog. You may be required to add a Web page title for your survey. See Document Properties Dialog on page 59.
Web Survey Setup This new dialog connects you to the various Web survey features. From NetCollect 3.0 to 4.0, there were significant changes in passwords and publishing so you’ll need to review and update the document’s:
• Survey Login Method for passwords, pausing and resuming, etc. (see page 152)
• Server Configuration (see page 275)
The other dialogs accessed through Web Survey Setup will either load all your NetCollect 3.0 settings or are completely new to NetCollect 4.0.
Page List This new dialog manages pages as objects which can be named and re-ordered, unlike NetCollect 3.0 which only implied this structure. See page 102.
Opening NetCollect 2.0 Files
When opening a SurveyPro+NetCollect 2.0 file you will automatically be prompted to Save As to a new .SP4 file name, so you don’t have to worry about backing up your SVA file. There was a tremendous feature jump between NetCollect 2.0 and 3.0, so expect to re-create or check every-thing beyond the basic question text and scale definitions. You may also want to check your scales as NetCollect 4.0 has more features which assume a properly structured survey.
There is a chance your 2.0 SDH files will not import easily into 4.0, so it is highly recommended to wrap up any open surveys before migrating the files.

Chapter 2 - Ten Minute Web Survey 18January 15, 2007
Chapter 2T U T O R I A L Ten Minute Web Survey
One of the wonderful things about NetCollect is it has many options for your survey’s layouts and functionality. Before we dive into the feature details in the rest of this guide, this chapter takes you through the process building and locally previewing a survey in just a few minutes.
In this tutorial you’ll learn how to:
Set a document to the Web formatApply a themeAdd a page breakSet a login typePreview a survey locally
The tutorial assumes you are already familiar with:
Adding questions, grids, and scales
Setting up a Web survey document
1. Launch SurveyPro and enter your initials when prompted.
When SurveyPro starts, it’s with a new empty survey document in the Paper format. The first thing you always want to do is change the docu-ment (questionnaire) type to the Web format, as this activates all the Web-specific controls such as passwords.
2. From the Document menu select Properties, or click its toolbar button .
The Document Properties dialog is where you set layout options for the survey overall, such as margins, colors, headers, and question numbering. Individual question and text tiles can override most of these settings.
3. Change the Questionnaire Medium to HTML for NetCollect.
4. Give your questionnaire the Web page title “Quick Survey.”

Apian NetCollect 4.0 User Guide
Chapter 2 - Ten Minute Web Survey 19January 15, 2007
Your screen should look like the one below. This set the basic document type, so now we can go ahead with a few other options before adding our questions.
Applying a layout theme and editing the header
1. Click the Apply Theme button.
2. Pick the Blue theme.
As you can see from the preview, this loads a header, footer, background colors, and button style for the respondents to click Next or Pause.

Apian NetCollect 4.0 User Guide
Chapter 2 - Ten Minute Web Survey 20January 15, 2007
3. Click Apply to pre-load the layout settings.
4. Back in the Properties dialog, click the Header tab.
5. In the middle of the dialog, click on the placeholder text “Your Survey Title Here.”
Headers and footers are assembled from one or more “cells” with each cell containing graphics or text. Since each cell can have its own colors, fonts, and margins, there’s a secondary dialog to provide the details.
6. Change the text to “Quick Survey”.

Apian NetCollect 4.0 User Guide
Chapter 2 - Ten Minute Web Survey 21January 15, 2007
7. Click OK. Back in the Properties dialog, click OK again to save your settings.
Now instead of a blank paper page, the screen shows three Web pages, each one with a header and footer. SurveyPro starts you off with three pages because most Web surveys have a “welcome” page which provides instructions and perhaps collects a password, then one or more body pages, and finally a confirmation or “thanks” page.
Adding questions
1. Scroll down to Web Page 2 (the page number is just above each page’s gray border). Click the thick blue bar between the progress bar and buttons so it turns orange.
2. On the toolbar, click the Insert button and select Question.

Apian NetCollect 4.0 User Guide
Chapter 2 - Ten Minute Web Survey 22January 15, 2007
3. In the big Questionnaire Text box, type “Is this your first Web survey?” and click Next.
4. From the Scale Selection drop-down list, pick 7: Yes/No (Unordered) and click Finish.
5. Click the blue bar under the first question and Insert another Question.
6. Give it the text “How would you rate this survey?” and click Next.
7. Change the Scale Selection to 9: Excellence -- 4 levels and click Finish.
Adding pages
Web surveys can have any number of questions on a page, though in this case we’re going to add some page breaks and wrap up this quick survey. Because of the nature of Web surveys, pages in NetCollect documents are treated a little differently from those in a paper survey. Rather than think-ing of them as 11 inches in a continuous document flow, try to picture each page as an object—a box in a flowchart.
1. Click once on the second question to select it, and from the Document menu select Edit Page List, or click its toolbar button .
Within the Page Edits dialog, the contents of each page is provided by tile number because you may have a mix of question, graphic, and instruction

Apian NetCollect 4.0 User Guide
Chapter 2 - Ten Minute Web Survey 23January 15, 2007
tiles on a page. Because we had a tile selected when we brought up the dialog, we’re given the option of breaking the page at that point.
2. Click the button Break page 2 at the selected tile 3.
Now the survey has four Web pages. Let’s add one more for some com-ments.
3. In the upper list, click on the page P4 Untitled is done-thanks.
4. Click the button Insert new page between 3 and 4 and check your screen against the one below.
5. Click OK to return to the document screen.

Apian NetCollect 4.0 User Guide
Chapter 2 - Ten Minute Web Survey 24January 15, 2007
6. On the empty Web Page 4, click the thick blue insert bar between the header and buttons.
7. Insert a Question and give it the text “Comments?”
8. Click Next and select scale 3: Non-repeating or Long Memo Written Answer.
9. On the right hand side of the dialog, change the Entry Lines to “4” and click Finish.
Scroll through the survey and take a look at our questionnaire: Welcome, 3 body pages, and Thanks.
Setting the login type
While brief, our survey is now complete. We could peek in the browser now, but there’s one more setting to make the survey functionally com-plete.
1. Scroll up to Web Page 1 and double-click on Log in method undefined; double-click here to setup.
2. Select the second radio button Shared Password(s).

Apian NetCollect 4.0 User Guide
Chapter 2 - Ten Minute Web Survey 25January 15, 2007
3. In the box that appeared below the radio buttons, type for your Password “quick”. Click OK.
Now the survey shows a password entry blank and Start button. While SurveyPro’s design screen approximates a browser display, let’s take a look at how the respondent will view the survey.
Using the local preview
1. Save the survey to a location of your choice (somewhere you don’t mind a sub-folder being created).
2. On the toolbar, click the Preview in browser button .
3. Click OK for the default file location. Click Yes to create the folder if prompted.
In order for a survey to function, for it to check passwords, execute skips, and send data, it has to be running on a Web server. Because this is a lay-out only preview without a Web server behind it, the left side of the sur-vey pages is a panel which lets you navigate among the pages in the survey. Click through the pages to see how your questionnaire will appear to respondents. When SurveyPro does the local browser publish it uses your computer’s default browser. You can also preview in other browsers just by copying and pasting the file path in the browser address bar.
This is a good quick way to check your design, but NetCollect also makes it easy to Publish your surveys to your live Web server as well. If you don’t yet have your organization’s Web server configured, you can use a QuestionWeb demo folder (see page 315) or set up a Localhost server on your computer (see page 42).
Congratulations on your first NetCollect Web survey!
1. Back in SurveyPro, Close the Web Survey Setup dialog.
Now you can exit SurveyPro, create a new file, or continue playing with this survey. Additional tutorials for layouts, passwords, and other features are interspersed with reference sections through this guide.

Chapter 3 - Server Installation 26January 15, 2007
Chapter 3S E T U P Server Installation
If you’re using QuestionWeb or SurveyHost to host your surveys, you can skip this chapter.
The server scripts are installed only once, and we recommend doing the install a week before your first survey. A smooth install takes relatively lit-tle time—a half hour or so—but as this process is dependent on your unique server environment and requires the assistance of your server administrator, it is best to allow time to resolve any permissions or config-uration issues that crop up. If you do encounter problems, it is generally most effective to arrange a conference call between your server adminis-trator and Apian’s Technical Support.
Note: This chapter is written primarily for server administrators. If you are the SurveyPro user, some of the terms will probably be unfami-lar. A few sections are highlighted as for your reference, such as Permis-sions 101.
Chapter Contents:
Setting Up a NetCollect Survey Server . . . . . . . . . . . . . . . . . . 27Files Needed from the SurveyPro User . . . . . . . . . . . . . . . 27Server System Requirements . . . . . . . . . . . . . . . . . . . . . . 28Script Versions . . . . . . . . . . . . . . . . . . . . . . . . . . . . . . . . 28Recommended Folder Structures . . . . . . . . . . . . . . . . . . 29
Installing the DLLs and ASP Library Scripts . . . . . . . . . . . . . . 32Setting Permissions for the Survey Folders . . . . . . . . . . . 33
Key Concept: Permissions 101 . . . . . . . . . . . . . . . . . . . . . . . . 37Server Paths for the SurveyPro User . . . . . . . . . . . . . . . . . 38Testing the Server Installation . . . . . . . . . . . . . . . . . . . . 41
Installing a Test Web Server on Your Local System . . . . . . . . . 42Adding the IIS Windows Component . . . . . . . . . . . . . . . . . 43Installing the Scripts for a Test Server . . . . . . . . . . . . . . . 44Defining Localhost Server Paths . . . . . . . . . . . . . . . . . . . 48
Server Load for High Volume Surveys . . . . . . . . . . . . . . . . . . . 49

Apian NetCollect 4.0 User Guide
Chapter 3 - Server Installation Setting Up a NetCollect Survey Server 27January 15, 2007
Setting Up a NetCollect Survey Server
NetCollect is the Web component of the SurveyPro desktop program. Its Web server setup requires a few steps:
• Setting permissions for survey and data folders
• Running the ASP and DLL installation application
• Sending the file paths to the SurveyPro user
• Testing your setup
This one-time setup requires a server administrator log in via Terminal Services or directly to the server.
After the initial setup, the SurveyPro user will be able to post and manage their surveys through FTP or UNC file shares and the HTTP control panel. When surveys are designed and tested, it is not uncommon for the survey designer to post multiple iterations of the survey, as well as down-loading data multiple times per week. If your network policies restrict FTP or LAN file permissions to IT staff only, QuestionWeb.com may be a more practical option. If you do end up having a different person Publish than the one doing analysis, be sure to send them the latest SP4 file after each Publish—working off a stale file can cause import mismatch (data corrup-tion) problems.
Files Needed from the SurveyPro User
The server setup files are copied to the SurveyPro user’s personal hard drive or to a shared LAN drive for workgroup installations. By default, they’re in this folder:
C:\Program Files\Apian Software\SurveyPro 40\Web Server Install\ASP
The following files are needed by the server administrator:
• InstallNetCollectServer[version].EXE (Send the highest version number if you have more than one.)
• NetCollect40ServerSetup.pdf (this chapter and Publish)
• Server Crib Sheet - FTP.doc
• Server Crib Sheet - LAN.doc
Also send the SurveyPro 4.0 serial number, which can be found in Survey-Pro’s Help, About screen. Make sure it starts with “SP4-”.

Apian NetCollect 4.0 User Guide
Chapter 3 - Server Installation Setting Up a NetCollect Survey Server 28January 15, 2007
Server System Requirements
The ASP+DLL scripts require:
• Windows 2000 or 2003 (Professional or Server editions)
• “Root” or Terminal Services access by an administrator to run the installation program for the initial server setup
• UNC or FTP access by the SurveyPro user to manage surveys
If the server does not have the required VB6 Runtime module installed, the installation program will add it to the system. No SMTP connectivity is required, and the surveys operate under standard HTTP and HTTPS ports (SSL is only used if the survey designer specifies it in the paths).
NetCollect does not require any databases on the server, but it will con-nect via SQL strings to any you specify for a particular survey. See Embed-ded Surveys on page 187.
Script Versions
To minimize server maintenance, the NetCollect server scripts change versions less frequently than the desktop software. Therefore, the version of the server scripts is a different naming scheme from the desktop appli-cation. Visit http://apian.com/downloads/ to see the latest versions.
When the user publishes and uploads their surveys, SurveyPro checks with the Web server to make sure the scripts loaded on the server match those the survey pages are expecting. This is one of the advantages of using the upload and download functions built into SurveyPro rather than a third party FTP program or Windows Explorer.
If you need to update the scripts, then you can install the new version in the same folders as the existing scripts. All the files are named with their version, so they will not over-write earlier scripts, and any surveys cur-rently running will continue to do so on the version for which they were published. If instead you choose to put each script version in its own CGI folder, you’ll need to give the SurveyPro user a fresh Server Crib Sheet for each revision so they can update their publish settings.

Apian NetCollect 4.0 User Guide
Chapter 3 - Server Installation Setting Up a NetCollect Survey Server 29January 15, 2007
Recommended Folder Structures
A NetCollect survey publishes using three folders:
• Survey Content Folder, the front-end to which respondents will navigate in their browsers
• Survey Project Folder (and automatically generated subfolders) where the project’s configuration, password, and data files reside
• ASP Library Scripts folder, typically under /cgi/ which process the surveys and in turn call the DLLs for functions
From an administrative perspective, the easiest approach is to set up folder roots for the Content and Project folders which have the appropri-ate permissions, and then the SurveyPro user can create sub-folders for individual surveys. In the server setup dialog these are referred to as “Nodes” but you can think of them as a root—a base location under which folders for individual surveys are added.
Important: While multiple surveys can work from one Content or Project folder if they have different base filenames, the SurveyPro defaults assume each survey is in its own folder. Two of the files SurveyPro publishes with each survey are “index.htm” and “index.asp.” The “index.htm” file is a simple meta redirect and can be discarded if your server has “index.asp” in its default pages list, or if you’re directly linking to a page rather than the folder. However, “index.asp” initiates a survey session, so while it could be renamed, it cannot be discarded without risking survey errors.
If a user were not allowed to create a new sub-folder for each survey, they would be unable to use the automated uploads in SurveyPro, instead hav-ing to manually rename and then select the files to upload. They would also risk corrupting existing surveys if they were not very careful in their naming schema. For example, if they called files generically “pass-words.pin” or “addressdata.csv” then they may overwrite an earlier sur-vey’s files when they uploaded. Having multiple projects in the same data folder may also cause confusion for the automated data download.

Apian NetCollect 4.0 User Guide
Chapter 3 - Server Installation Setting Up a NetCollect Survey Server 30January 15, 2007
The following three examples represent different ways of configuring fold-ers for the same surveys (two customer, one HR). Remember each survey project has its individual folders under the Content and Project roots.
SurveyPro users are allowed to place surveys under the Web site root
All users share permissions to data folders under “ncprojects”
SurveyPro users are allowed to place surveys under a survey root “surveys”
All users share permissions to data folders under “ncprojects”
SurveyPro users may place surveys under a department survey root “hr” or “marketing”
Departments have individual project data roots with different user or group permissions for “hrprojects” and “mktgprojects”

Apian NetCollect 4.0 User Guide
Chapter 3 - Server Installation Setting Up a NetCollect Survey Server 31January 15, 2007
Folder names and security In the above examples, we use “ncscripts” and “ncprojects” as examples. NetCollect makes no assumptions about the names other than Windows and Web legality, so you have full control over their naming and level within your server’s folder architecture. While these paths are not visible to the respondents completing the surveys, for security purposes we advise using a name other than these examples, just as one will often move IIS from the default path when hardening a server.
If your server has multiple domains running surveys
The DLLs are accessed via the Windows registry, so they only have to be installed once per server. However, you’ll need to use Windows Explorer to copy the ASP library scripts into each Web site’s CGI folder tree. The ASP Library scripts do not contain any path information, so they do not need any modification when copied.
While you can also re-run the installer and simply specify a different folder for the ASP Library scripts, this only works if none of the domains have loaded the DLLs into memory yet. Otherwise, when you run the install, it will attempt to overwrite the DLLs and fail because IIS had locked them. This can be gotten around by unloading the sites or restart-ing IIS and running the install before anyone hits a survey again, but as you can see, a file copy in Windows Explorer is a bit simpler.
If your domains use multiple front-ends or a separate data server
The built-in SurveyPro upload utility accommodates a single front-end server, so users of load balanced front-ends will need to manually upload to the additional servers or use any replication utility you have in place. As long as all the front ends look to the same UNC data path and local CGI path, then no changes need to be made during the copy. Data needs to reside on a single box to properly execute the session tracking and manage individual passwords. The Apian knowledge base includes a more detailed article about load balancing configurations.

Apian NetCollect 4.0 User Guide
Chapter 3 - Server Installation Installing the DLLs and ASP Library Scripts 32January 15, 2007
Installing the DLLs and ASP Library Scripts
InstallNetCollectServer[version].EXE is the only installation pro-gram you need to run on the Web server—SurveyPro itself only resides on the survey designer’s desktop or LAN drive. First make sure you’ve received all the files on page 27 from the SurveyPro user along with their SurveyPro serial number starting with “SP4-”.
1. Log in to the server using an Administrator account, either locally or via Terminal Services.
2. Double-click on InstallNetCollectServer[version].EXE.
3. Click Next past the splash screen.
4. Enter the NetCollect serial number, review the license agreement, indicate you Agree, then click Next.
This next tab is the destination for the DLLs:
5. In most cases, the default path is fine, but if needed change the path and click Next.
In addition to the DLLs, the installer needs to copy some ASP scripts to a folder within your Web site. This screen starts with the default IIS path, but will likely need to be changed. If you specify a folder which does not exist, the installer will create it. If you do change the path, double check it before you click Next (occasionally an extra “cgi” may appear on the end).

Apian NetCollect 4.0 User Guide
Chapter 3 - Server Installation Installing the DLLs and ASP Library Scripts 33January 15, 2007
6. Set the path to suit your server and click Next.
Up to this point, you’ve only been making selections—the installation pro-gram has not yet copied any files.
7. Review the folder settings and click Next to begin the file copy.
8. Click Finish on the confirmation screen, and continue to the next section on setting permissions.
If instead of a confirmation you received an alert, it most likely means that DLLs of the same version have already been installed on this server and are currently loaded into IIS’ memory. Contact Apian Support for assis-tance:
http://apian.com/support/
Setting Permissions for the Survey Folders
Now that you have a basic understanding of the folders needed (on page 29) and have run the installation program, here are final setup details. For the SurveyPro users reading this, start with Key Concept: Permissions 101 on page 37.
Permissions are by far the most common issue for setting up a server, so we recommend following these settings closely. Some of your folders, such as a CGI folder or data area, may have more generous permissions than those specified here. That’s fine by NetCollect, all it cares about is its minimum needs.

Apian NetCollect 4.0 User Guide
Chapter 3 - Server Installation Installing the DLLs and ASP Library Scripts 34January 15, 2007
The following steps assume a typical publicly accessible Web server. If you’re familiar with setting IIS and NTFS permissions, jump ahead to the tables for IIS on page 35 and NTFS on page 36.
Checking the Default Documents List
SurveyPro assumes “index.htm” is a default document on your Web server.
While logged in locally to the server(s) or via Terminal Services:
1. Start, Programs, Administrative Tools, Internet Services Manager.
2. Expand the tree to see your site, right click and Properties.
3. Select the Documents tab.
4. If Enable Default Document is not turned on, cancel out of the dialog, find the person who configured the server, and go over the permissions with them.
5. Assuming it is enabled, make sure the list contains “index.htm.” If not, click Add to provide the new name.
6. Optionally, add “index.asp” to the list.
If you place “index.asp” above “index.htm,” the server will save a couple mips not loading the very tiny redirect page. Do not do this unless you’re in charge of that document hierarchy or wish to be hunted down by an angry server administrator and/or Web designer.
To Set the IIS Permissions
1. Still in the Internet Information Services console, expand the node for the server, then for the specific Web site.
2. Right click on the folder whose permissions you are setting, and select Properties.
3. On the Directory tab, using the checkboxes and Execute Permissions drop-down, set each folder per the second column of the following table.

Apian NetCollect 4.0 User Guide
Chapter 3 - Server Installation Installing the DLLs and ASP Library Scripts 35January 15, 2007
Minimum IIS Permissions Required by NetCollect
Identifying the IIS Anonymous User
1. Still in the Internet Information Services console, right-click on the Web site root and select Properties.
2. Select the Directory Security tab.
3. Under Anonymous access and authentication control, click Edit.
4. Under Anonymous access, click Edit again.
5. Jot down the name of the account.
6. Cancel back to the main IIS console.
To Set the NTFS Permissions
While logged in locally to the server(s) or via Terminal Services:
1. Open Windows Explorer or My Computer.
2. Browse to the folders on your drive which correspond to the sites.
3. Right click on the highest level folder you need to adjust and select Properties.
4. Click the Security tab.
5. At the bottom of the dialog, click Advanced.
6. Set permissions for each folder per the following table.
Folder IIS Permissions
Survey Content ReadExecute Permissions: Scripts only
Survey Project data and configuration
ReadExecute Permissions: None
ASP Library Scripts ReadExecute Permissions: Scripts only

Apian NetCollect 4.0 User Guide
Chapter 3 - Server Installation Installing the DLLs and ASP Library Scripts 36January 15, 2007
Minimum NTFS Permissions Required by NetCollect
This table refers to the Advanced NTFS settings. If you’ve run IIS Lock-down or done similar hardening, watch for Deny permissions set on the Web Anonymous Users group. In particular, the Create/Write/Delete Deny permissions will need to be removed from the Survey Project/Data folder.
Under each folder, you’ll see two columns: IIS User and SP User. The IIS user is the anonymous account under which the Web site operates (see page 35). The SP [SurveyPro] User is the person who will be uploading surveys and downloading data. If your server has more generous settings than these, NetCollect does not need you to tighten access.
NTFS Permission
Minimum Permissions Needed by NetCollect 4.0
Survey ContentSurvey
Project/DataASP Library
ScriptsDLLs under
Program Files
IIS User
SP User
IIS User
SP User
IIS User
SP User
IIS User
SP User
Traverse Folder/ Execute File
Allow Allow Allow Allow
List Folder/ Read Data Allow Allow Allow Allow Allow Allow
Read Attributes Allow Allow Allow Allow Allow Allow
Read Extended Attributes Allow Allow Allow Allow Allow Allow
Create Files/ Write Data Allow Allow Allow
Create Folders/ Append Data
Allow Allow Allow
Write Attributes Allow Allow Allow
Write Extended Attributes Allow Allow Allow
Delete Subfolders and Files Allow Allow
Delete Allow Allow Allow
Read Permissions Allow Allow Allow Allow Allow Allow
Change Permissions
Take Ownership

Apian NetCollect 4.0 User Guide
Chapter 3 - Server Installation Installing the DLLs and ASP Library Scripts 37January 15, 2007
Key Concept: Permissions 101
This is written for the SurveyPro user, so if there are any hitches in your server setup you’ll have a basic understanding of the conversation between your server administrator and Apian Tech Support.
When you use your personal computer, whether you’re aware of it or not, you’re interacting with Windows permissions. For example, in order to install software on your computer, you have to be logged in as a user who has Administrator rights. If you use a network printer, it has been shared to give you permission to print to it. When you access a common data drive, someone has configured the file permissions so that you can access all the folders you need to do your work, but not allow you to access sensitive information such as salaries. Web server permissions are no different than these situations you already deal with every day.
The goal for setting permissions is to allow the absolute minimum access to any user or application (such as the NetCollect scripts). When this is done properly, it’s transparent, because a user only sees “permission denied” when they wander where they shouldn’t. Setting these limited permissions can be complex, and sometimes administrators opt instead to allow broader access to users. While allowing broader access makes administration easier, it also leaves a system vulnerable to tampering. On your home system or within a small company network this may not be an issue, but on a Web server an open system is an invitation to hackers.
On a Windows Web server, permissions are set using three elements:
Users and Groups of UsersWhen you upload files to your Web server via a LAN or FTP, you’re identifying yourself as an individual user. In addition to user accounts which represent individuals, programs such as the NetCollect scripts run on servers under their own user accounts. When you browse to a public Web site, you arrive as an anonymous user. The Web server is frequently configured so that when a visitor comes to a site and doesn’t log in, the Web site will operate under a “Web Anonymous” account with very limited rights. Generally users are placed in Groups based on a common class of permissions, such as Marketing, Accounting or [server] Administrators. This way, when you assign file and folder permissions, you only have to do so once for a group, and then as individual users come and go, you simply add and remove them from the appropriate groups.
File and Folder PermissionsOnce a user account or group is defined, folder and file level permissions can be assigned to it. A NetCollect user will typically be given permission to Read (download) and Write (upload) to the folders where they will be posting surveys and collecting data. There are many nuances to these settings, which is why our installation recommends following our instructions exactly. By default, files and folders in Windows “inherit” permissions. This means that if you have a folder called “surveydata” on your Web server, such as “http://yoursite.com/surveydata/,” during the initial server setup you can give the account running the NetCollect scripts permission to Write respondent data to that folder. Then when you have an individual survey project, you create a sub-folder such as “/surveydata/hr2005/” and it will automatically inherit the same Write permissions from the folder above it.

Apian NetCollect 4.0 User Guide
Chapter 3 - Server Installation Installing the DLLs and ASP Library Scripts 38January 15, 2007
Server Paths for the SurveyPro User
When a SurveyPro user publishes their survey, they need to first define a target Web server, and then in another screen they set sub-folder and file names for that particular survey. The dialog they’ll fill out for the target Web server is this:
As you sort out these fields, use the LAN or FTP “Server Crib Sheet” Word document (see page 27) to record the values and send them to your SurveyPro user.
As you provide this information to the SurveyPro user, the perspective of each field is a critical factor. There are a few general controls on this dia-
IIS PermissionsInternet Information Services is the Web server software that will be delivering pages and surveys to your Web site visitors. In addition to telling the Windows file/folder system that a user may need to write to a folder, you will need to turn on Write permissions for a folder within the IIS site definition. By default, all Web site folders are Read only to protect your server.
Key Concept: Permissions 101

Apian NetCollect 4.0 User Guide
Chapter 3 - Server Installation Installing the DLLs and ASP Library Scripts 39January 15, 2007
log, and then 6 blanks which represent several different perspectives of the Content and Project roots. The Content root is the path (which may be the domain root) under which individual survey folders will be posted—the pages to which respondents will browse. The Project root is the folder which has Write permissions set, under which individual survey data fold-ers will inherit permissions. See page 29.
Remember that this dialog is the generic server information for all the SurveyPro user’s surveys. This means you should not be including any folders here which are specific to just one survey project—everything should be at a level above that.
Revision of server application installed
The scripts on the server need to match the version of SurveyPro/Net-Collect publishing the surveys. See Script Versions on page 28.
Web server Let your user know whether they will be uploading and downloading via UNC paths over a LAN or VPN, or by FTP.
Respondent’s Browser Site URL
These three fields are pieces of URLs from the perspective of a site visi-tor’s browser.
Web Root http or https Simply the base domain for respondents going to the surveys. Any legal URL is allowed, including IP addresses and special ports. Do not include any subfolders in this field.
Survey Contents Node Sub-URL
If you have configured the server so that the SurveyPro users will put all their surveys under a folder, then this field will contain the folder(s) below the domain root, including the survey content root folder but not includ-ing any project-specific folders below that. If users are allowed to post surveys in the domain root, then this will be blank.
Library Script Virtual Sub-URL
Again, this is the folder path below the root where the NetCollect ASP library scripts reside. Because multiple script versions can reside in one folder, it’s best to leave this as shared NetCollect script location, rather than creating a folder specific to each version.
Script File References on Server
This is our second perspective. When you are logged into the server locally (or via Terminal Services), what are the paths you see in Windows Explorer? These are used by the DLLs so they need to be the drive d:\ or UNC \\servername\ paths, not IIS virtual folder paths.
Survey Contents Node Absolute Path
Start with the root of the Web site, and then add any sub-folders you spec-ified in the Survey Contents Node Sub-URL.

Apian NetCollect 4.0 User Guide
Chapter 3 - Server Installation Installing the DLLs and ASP Library Scripts 40January 15, 2007
Project Data Node Absolute Path
This is the full UNC path to the folder which has been set up with the required read/write permissions. This can be a path to another server if you’re running a separate data box, such as when you’re using load bal-anced front-end servers. Any UNC path is acceptable, including ones based on IPs.
File Transfer Upload/Download
Our final perspective is the SurveyPro user’s, and is dependent on whether they’re using LAN shares or FTP to connect. When SurveyPro publishes the survey files, it needs to create folders under both the Con-tent and Project roots on the remote server(s), and then upload the ASP and configuration files.
Local/LAN Disk configurations
These are the UNC or mapped drive paths from the SurveyPro user’s desktop to the Content and Project roots (which may be on different serv-ers). If you have multiple SurveyPro users whose drive mappings differ, you can provide them with the UNC path on the crib sheet. At the same time, if you play musical servers but have good drive mapping standards to maintain paths, then that mapping would be the more stable reference.
FTP configurations Once the SurveyPro user has connected to the FTP server, these are the subfolders which correspond to the Content and Project roots. The SurveyPro user can Browse to these folders once they’ve entered their FTP server information and Connected.
Set FTP Connect
If the Web server type is Remote FTP, the Set FTP Connect button will appear at the bottom of their Web Site Definition dialog. Clicking the but-ton brings up these settings:
Server definitions are saved as part of an individual user’s Windows pro-file, so saving the password in a Web Site Definition does not embed that value in SurveyPro data files.

Apian NetCollect 4.0 User Guide
Chapter 3 - Server Installation Installing the DLLs and ASP Library Scripts 41January 15, 2007
SurveyPro’s FTP assumes the server is using port 21. If your server is using a custom port or requires encryption, your user will need to use a third party FTP application such as WS_FTP Pro.
Testing the Server Installation
Sometimes the SurveyPro software is ordered and installed a while before the first real project. Rather than wait for that acid test (at which time the free support period may have run out), we recommend installing and test-ing immediately.
Using the DLL Test Script
One of the ASP library scripts installed on the Web server is called DllTest_[version].asp. Using a browser, load that page in the CGI folder you used during installation:
This is a simple test verifying the presence of the DLLs and that their per-missions are correct. Once it comes back with a “Test successful” mes-sage, continue with the next testing step to make sure the Content and Project roots have the proper permissions.
404 error Check your paths in the URL you typed against what you see in the IIS console for where the file resides.
403 or 500 error Check the IIS and NTFS permissions tables on page 35.
DLL Install Test reports an error
Try restarting IIS. Note this will briefly interrupt all Web traffic, so you may want to do it after hours.
If the test still fails, contact Apian Technical Support.

Apian NetCollect 4.0 User Guide
Chapter 3 - Server Installation Installing a Test Web Server on Your Local System 42January 15, 2007
Running a Test Survey
To fully test the setup, the SurveyPro user should:
• Define the Web server
• Set sub-folders and files for this survey
• Use the built-in SurveyPro upload function
• Run the Web-based Control Panel to set up the files
• Complete the survey at least once
• Download and import data using the built-in SurveyPro functions
These steps are all in a tutorial in Chapter 18, so if they run that they’ll be set. Completing this full project cycle will verify the paths and permissions are correct both from the SurveyPro user’s and Web server’s perspective.
If you encounter problems, there’s also a Troubleshooting guide. It’s designed to be used during Technical Support conference calls, but you may find it useful on your own as a slightly different perspective.
That finishes configuration of a production Web server. The following sec-tion on Personal Web Server is purely for testing by the SurveyPro user.
Installing a Test Web Server on Your Local System
If you have Windows 2000 or XP Professional (rather than Home edition), you can install a copy of the Windows Web server on your local system. This is very handy if you:
• Don’t have direct access to your production (live) Web servers, and have to ask someone to post your surveys each time they change
• Want to confirm that a problem you’re encountering on your production server is due to an issue on that particular server and not part of your survey design
• Want to try advanced features involving database connections or multiple surveys in one data folder, which are not enabled on QuestionWeb
• Need a test system which works without an Internet connection
The instructions here just walk you through what NetCollect needs to run. If you’d like to tinker more, Microsoft publishes “Pocket Consultant” guides for IIS which address the most common questions. IIS 6 is the ver-sion in Windows XP, and IIS 5 in Windows 2000.

Apian NetCollect 4.0 User Guide
Chapter 3 - Server Installation Installing a Test Web Server on Your Local System 43January 15, 2007
Important These instructions are to set up a testing Web site accessed by you on your local system. If instead you plan to run real Web surveys from your local computer, use the installation instructions earlier in this chapter for a pro-duction server.
Mozilla Firefox Users Firefox sometimes has a problem resolving the http://localhost/ URL used by a local Web server, generating a faux 500 server error. If you get this error, try updating Firefox or using Internet Explorer for localhost access before you conclude you do in fact have a legitimate server error.
Firefox is fully compatible with both the preview in browser mode of SurveyPro and with surveys running on Web servers that are not local-host.
Adding the IIS Windows Component
The following steps are based on a default Windows installation which hides many administrative functions of the operating system. It’s possible that your installation already has one or more of these changes in place, in which case just skip ahead to the next step.
In some cases Windows XP and Windows 2000 have slightly different set-tings, but this will be highlighted either at the section level or for an indi-vidual step.
Show Administrative Tools (Windows XP)
1. Right click on your Windows Start button and select Properties.
2. Select the Start Menu tab and click Customize.
XP style menu users: 3. Select the Advanced tab. In the list of Start menu items, scroll to the end where you’ll find System Administrative Tools and select one of the two Display options if they’re not already selected.
Classic style menu users: 3. At the top of the list of options, check Display Administrative Tools.
4. Click OK to save your settings.
Show Administrative Tools (Windows 2000)
1. Start, Settings, Taskbar and Start Menu.
2. Select the Advanced tab.
3. At the top of the list of options, check Display Administrative Tools.
4. Click OK to save your settings.

Apian NetCollect 4.0 User Guide
Chapter 3 - Server Installation Installing a Test Web Server on Your Local System 44January 15, 2007
Installing the IIS Server
Now that Administrative tools are turned on, we can check to see if the Web server is installed.
1. Start menu, Programs, Administrative Tools.
2. If Internet Information Services is already in the list, skip ahead to the script installation on page 44. If it’s not there, continue here.
3. Insert your Windows system CD, and when the splash screen comes up, select Install Optional Windows Components.
4. In the list of Windows Components, check Internet Information Services (IIS) and click Next.
5. When the installation is complete, click Finish and you can eject your system CD.
Installing the Scripts for a Test Server
When you installed SurveyPro 4.0 on your desktop, the installation copied a file called InstallNetCollectServer[version].EXE to your system. This is the program you need to run to set up your local Web server. Note: You can install the NetCollect scripts on multiple servers even if you have a Single User license of SurveyPro and NetCollect.
The default path where this file is placed is:
C:\Program Files\Apian Software\SurveyPro 40\Web Server Install\ASP\
1. Double-click on InstallNetCollectServer[version].EXE.
2. Click Next past the splash screen.

Apian NetCollect 4.0 User Guide
Chapter 3 - Server Installation Installing a Test Web Server on Your Local System 45January 15, 2007
3. Enter your SurveyPro serial number. If you’ve misplaced it, launch SurveyPro and go to Help, About, and jot down the one starting with “SP4-”
4. Review the license agreement, indicate you Agree, then click Next.
This next screen is the destination for the DLLs:
5. In almost all cases, the default path is fine, but if needed change the path and click Next.
In addition to the DLLs, the installer needs to copy some ASP scripts to a folder within your Web site. This screen starts with a sub-folder on your default IIS path.
6. Click Browse and confirm that your system has IIS at c:\Inetpub\wwwroot\ as in the screen below:

Apian NetCollect 4.0 User Guide
Chapter 3 - Server Installation Installing a Test Web Server on Your Local System 46January 15, 2007
If your screen does not have at least these folders (it’s OK to have subfold-ers), then your installation has been modified. If you weren’t the one set-ting up IIS, you should probably Cancel the installation at this point and speak to your company Help Desk about your setup.
7. Assuming the folders were there, click OK to close the Browse dialog, and Next to continue the installation.
8. Click Next again to copy the files, and then Finish to close the installer.
Adding a Data Folder
By default, folders under IIS are read only. We want to create a “root” data folder for our surveys so we don’t have to set permissions every time we publish a survey. An easy system on test servers is to name folders by their function.
1. Launch Windows Explorer through Start, Programs, Accessories or My Computer.
2. Create a folder under wwwroot called “ReadWrite”
Windows 2000 users, skip ahead to Defining Localhost Server Paths on page 48.
Windows XP users, continue. While you have full control of your sys-tem, IIS isn’t actually running as you. It’s using a different user account, and we need to give that user permission to write data. Actually, we’re going to take a shortcut and give all users of your desktop the ability to write in that folder, which is part of why this section is about setting up a test system, not a production server. If you want to set the minimum per-missions, follow the procedures for a regular server setup.
1. In Windows Explorer, Tools menu, Folder Options.

Apian NetCollect 4.0 User Guide
Chapter 3 - Server Installation Installing a Test Web Server on Your Local System 47January 15, 2007
2. On the View tab, scroll to the very end of the list. Check Use simple file sharing if it’s not on already.
3. Click OK to close the Options dialog.
4. Right click on the ReadWrite folder you just created and select Properties.
5. Select the Web Sharing tab.
6. Select Share this folder.
7. In the dialog that pops up, select Write. Click OK on the security warning.
8. Click OK to save the new permissions. If you get a message about the share name being in use, change the Alias slightly such as making it “ncreadwrite.”
9. Click OK again to close the Properties dialog.
And now your desktop or laptop is a test Web server!

Apian NetCollect 4.0 User Guide
Chapter 3 - Server Installation Installing a Test Web Server on Your Local System 48January 15, 2007
Defining Localhost Server Paths
When you’re ready to publish a survey to your local system, you’ll need to define a Web server within SurveyPro. These are the settings you’ll need if you used the defaults in these instructions:
Be sure to click the Test URLs button to make sure everything is OK.
And now you’re ready to go! For a walk-through of the Publish process, see the tutorial on page 295.

Apian NetCollect 4.0 User Guide
Chapter 3 - Server Installation Server Load for High Volume Surveys 49January 15, 2007
Server Load for High Volume Surveys
What constitutes high volume? There are two ways to generate high load on a survey. The first is to simply have a lot of visitors all the time, such as on a large e-commerce site or a large company’s intranet. The second method is to generate artificial spikes in visitors. The most common approach for surveys is sending e-mail invitations, but any event such as a television broadcast or trade show can generate surges of visitors. Gener-ally e-mail drops produce an immediate response which sharply falls off in the next 24-48 hours. Sending e-mails in batches or even simply sending them in the middle of the night (rather than at 9:30am when all your employees are at their desks) helps manage the inbound traffic.
In contemplating the load on your surveys, you need to think in terms of how many respondents you need to handle per minute. Shorter durations such as two respondents in 1/100th of a second are handled by the scripts. Longer durations, such as an hour, are a useful reference point but don’t represent how NetCollect handles arriving respondents.
This section will help you understand what NetCollect is doing behind the scenes, so you can better assess whether your surveys are high load, and how to check on the performance of your servers.
CPU Management
The NetCollect system uses flat files instead of databases, both to mini-mize server system requirements by making SQL optional, and because some C++ tricks let us read and write very quickly to them. However, IIS tends to be fairly simple minded when two script instances attempt to access the same file at once. Normally when this file contention happens, IIS will hang on to the CPU for all the scripts trying this and jam up the system. Instead of letting this happen, NetCollect forces IIS to let loose of the CPU and then retries in a few milliseconds, keeping traffic moving. These retry requests are logged.
There are also a couple system intensive maintenance routines, such as merging the abandoned survey sessions into a data file (high volume sur-veys may generate over ten thousand). When NetCollect is running these administrative functions, it restricts the amount of CPU used to ~25% so you don’t have to worry about it impacting survey respondents or other processes.

Apian NetCollect 4.0 User Guide
Chapter 3 - Server Installation Server Load for High Volume Surveys 50January 15, 2007
Handling Inbound Respondents
One of the worst things for a server administrator to hear is “Oops, we sent all 100,000 e-mails at once” because once they’re out there, it’s impossible to keep people from trying to hit the server. This is why the first thing NetCollect’s scripts do is check how many people are taking a particular survey, and if necessary, lock out new entrants. Because this function is most critical in high load situations, it was designed to access a minimal number of files and CPU cycles.
Each time a respondent clicks Next on a survey page, the scripts have to handle the request. Some surveys will have 2 pages, some have 30 or more. By default, NetCollect surveys publish with a capacity limit of 500 pages per minute. So if a survey is 10 pages long, NetCollect will allow 50 respondents to start the survey in a rolling 60 second period. The 51st person trying to start the survey in a minute will get a “try back later” message. Respondents resuming a paused survey are always allowed in.
Both the overall limit of 500 pages per minute and the number of pages per respondent may be adjusted in each survey’s Control Panel, which is NetCollect’s Web-based admin utility. Direct your SurveyPro users to the Advanced Options, Server Load Protection page (see page 329).
Depending on your server capacity, you may want to establish a higher or lower pages/minute limit that you tell your SurveyPro users to use. Or you may want to adjust the limit up or down for individual surveys which are particularly straightforward or system intensive (SQL connections, lots of field checks that can produce page reloads, etc.).
While NetCollect knows the number of HTML pages it publishes for each questionnaire and uses that as the default for surveys, in some cases that value isn’t very representative of actual server load. If a survey is very skip/branch intensive, then typical respondents may only complete 10 pages of a 50 page survey. In those cases, the SurveyPro user can adjust the Typical Survey Pages setting to a lower value without jeopardizing performance.
NetCollect File Reads and Writes
NetCollect’s scripts use the best practices possible for fast file opens, reads, and writes. If you have concerns about whether a particularly large file is slowing performance, the best way to discover the impact is to run an experiment. Go through the survey a few times with the full copy of the pipe or other file. Then try completing it another few times with an abbre-viated source file. Note differences in the execution times recorded in the

Apian NetCollect 4.0 User Guide
Chapter 3 - Server Installation Server Load for High Volume Surveys 51January 15, 2007
log, and if necessary, adjust the throttle limit to reflect the heavier hit on the pages which do the piping (not all survey pages would be impacted). In many cases, you may be surprised at the execution times—for example the PIN password files are structured to allow binary searches, letting a million values be used almost as efficiently as a thousand.
With the occasional exception of piping pages, the first and last pages of a survey will be the most system intensive because initiating and closing a respondent session involves more files and modules than middle survey pages.
Adding Capacity
In some cases, the SurveyPro user may say 500 pages per minute just isn’t enough. The best way to handle this is to use a higher performance box, either by upgrading the entire system or by adding processors.
You can also look at load-balanced front-end servers, but keep in mind that all respondents to a particular survey need to be writing to the same data folder. This also only solves the problem of high CPU usage on the IIS server, so if you’re seeing lots of file retries being recorded, this will only exacerbate the problem.
If you are seeing lots of file retries, you can look into faster data writes, either by going for a higher performance hard drive or by upgrading any LAN connections between the IIS server and where data is being written.
Also to address frequent file retries, you can “clone” surveys. This is simi-lar to server mirroring, where a complete copy is made of the survey project, including a copy of the data folders. In this case, you create a switcher page that randomly directs respondents to one of the clones, or you can parse your e-mail list to send respondents to specific clones. Note: Switcher pages do not work with one-time individual passwords as the respondents would be able to access each clone one time. Leave/resume would also be limited to bookmarks with a switcher page, rather than re-entry with a code.
Checking the Logs and Doing the Math
The IIS logs are of limited use in evaluating survey performance. Instead, check the NetCollect logs for particular surveys. The main project log will record execution times for each script request, including file access retries and any errors. The throttle log will reveal the time and number of respon-dents at its peak (handy for convincing users that the 500 pages/minute limit is more then enough).

Apian NetCollect 4.0 User Guide
Chapter 3 - Server Installation Server Load for High Volume Surveys 52January 15, 2007
When you review the logs, you’ll see page submits in milliseconds. With a little math, you can translate that to how much server capacity each page submit is taking.
1. Take at least 4 passes through a survey at the same times respondents will (not midnight). Find the average time it’s taking to submit pages for the survey.
2. Say it’s averaging 50 milliseconds to submit a page. There are 60,000 milliseconds in a minute. This translates to a theoretical capacity of 1,200 pages/minute for the survey. Multiply that 1,200 by the number of load-balanced front-end servers if applicable.
3. Now consider how much of your total processor you want to allot to one application. If it’s 25%, then the maximum you could set this survey to is 300 pages/minute. Generally you’ll want to keep it under 50%.
The allowed processor is generally a safety cut-off, not a fixed slice of the pie. For example, on Apian’s servers, if you totalled “allowed maximum” processor for all the surveys live at any time, you’d be well over 100%. However, very few of those surveys get near their capacity limit. Of the ones that do have high volumes, very few are doing so on a sustained basis. Instead they’re being driven by e-mail invitations which are on stag-gered schedules—and often staggered time zones.
See Reading the Log Files on page 362 for how to decipher the entries of both the main Project log and the Throttle log.

Chapter 4 - NetCollect Documents 53January 15, 2007
Chapter 4R E F E R E N C E NetCollect Documents
All of the basics of adding questions, scales, and instructions are identical between paper, NetCollect, and DirectCollect documents (see the Survey-Pro User Guide for details). Beyond the fundamentals of questions and tiles, NetCollect questionnaires have some special settings to design the survey and set how it behaves on your Web server.
This chapter covers some concepts related to Web surveys, as well as an overview of the dialogs you’ll be working with to set up your NetCollect documents.
Chapter Contents:
Layouts and the Nature of HTML . . . . . . . . . . . . . . . . . . . . . . 54Measurements in HTML . . . . . . . . . . . . . . . . . . . . . . . . . . 55Fonts . . . . . . . . . . . . . . . . . . . . . . . . . . . . . . . . . . . . . . . 56Using Graphics on the Web . . . . . . . . . . . . . . . . . . . . . . . 56
Setting Up a NetCollect Document . . . . . . . . . . . . . . . . . . . . . 57Understanding Margins and Backgrounds in NetCollect . . . . . 58Document Properties Dialog . . . . . . . . . . . . . . . . . . . . . . . . . 59
General Tab for Document Type . . . . . . . . . . . . . . . . . . . . 60Web Page Tab for Margins and Backgrounds . . . . . . . . . . 61
Key Concept: Not Applicable and No Answer . . . . . . . . . . . . . 63Buttons Tab . . . . . . . . . . . . . . . . . . . . . . . . . . . . . . . . . . . 64Header and Footer Tabs . . . . . . . . . . . . . . . . . . . . . . . . . 67Autonumber Tab for Question Numbering . . . . . . . . . . . . 73
Web Survey Themes Dialog . . . . . . . . . . . . . . . . . . . . . . . . . . . 74Web Survey Setup Dialog . . . . . . . . . . . . . . . . . . . . . . . . . . . . 76Previewing your Survey . . . . . . . . . . . . . . . . . . . . . . . . . . . . . 77Adding Hyperlinks to Surveys . . . . . . . . . . . . . . . . . . . . . . . . . 78Notices, Errors and Buttons . . . . . . . . . . . . . . . . . . . . . . . . . . 81

Apian NetCollect 4.0 User Guide
Chapter 4 - NetCollect Documents Layouts and the Nature of HTML 54January 15, 2007
Layouts and the Nature of HTML
While the survey pages you publish will have a .ASP extension, the aspects which display on a respondent’s screen are all coded in HTML. (See Key Concept: Essential Terms on page 3.)
The most important thing to understand about HTML is that it is an interpreted language. This means that while you can say you want a font displayed at 10 points, the browser will interpret your setting and may display it slightly differently in Internet Explorer vs. Navigator vs. Firefox vs. Opera, as well as in Windows vs. Mac. In addition, you never know if the user has set a preference such as “Large Fonts” which will also impact the browser’s interpretation of your setting. Other elements out of your control are the size of the monitor, size of the browser window within the screen, color calibration of the screen, fonts installed on the system, and whether the user has JavaScript enabled.
What all this means to you, the designer, is that you need to accept a little uncertainty in your designs. Unlike paper where you can precisely posi-tion each element, with Web surveys you can’t always be sure where text lines are going to wrap, or whether all the questions will fit on a screen without scrolling. In most cases, these are not problems, but if you’re accustomed to designing precise layouts, recognize that you need to start designing flexible ones instead.
NetCollect helps with some of this. The output conforms to standards that are supported by the vast majority of browsers (version 4 and later). To address the problem of varying screen and window sizes, surveys are laid out within a fixed “body” column that fits most displays. The pre-loaded themes have been color checked on a variety of monitors. Fonts are pub-lished with a “degrading” specification, so even if you pick a typeface the respondent does not have installed, they will still see a similar style. Also, all JavaScript published in NetCollect pages is backed up by server-side scripting that works with any browser or firewall.
Apart from the style issues, you’ll notice some small structural differences in HTML. For example, your multiple answer scales publish with check-boxes, and single answer scales publish as radio buttons which only allow a single selection:

Apian NetCollect 4.0 User Guide
Chapter 4 - NetCollect Documents Layouts and the Nature of HTML 55January 15, 2007
While radio buttons will always let you change an answer, you cannot completely clear the question after making a selection. If you want to give your respondents this option, add a Not Applicable radio (see page 63).
For longer single answer scales, you can also use a drop-down or scrolla-ble list for the layout:
Measurements in HTML
You’ll notice your NetCollect surveys have layout options in pixels rather than inches. This is to be consistent with the screen-based nature of Web surveys, as well as with how images and spacing are specified in the browser.
PC screens typically display around 72 or 96 pixels per inch, with com-mon screen resolutions of SVGA at 800 pixels wide x 600 high, XGA at 1024 x 768, and SXGA at 1280 x 1024. The default margin for the survey body column in NetCollect is 760 pixels, which will fit within a full screen browser window at 800 x 600 (you have to allow for scroll bars and such). Note that even if you knew your respondents were using larger monitors, many people with large displays do not have their browser filling the whole screen. Also, if you make the survey’s body column too wide, the lines of text become very long, and your survey becomes hard to read.
Within this user guide, browser screens were sized to 800 pixels wide before they were captured.

Apian NetCollect 4.0 User Guide
Chapter 4 - NetCollect Documents Layouts and the Nature of HTML 56January 15, 2007
Fonts
NetCollect will list every font installed on your system, but in most cases the best results are achieved by using the Best Sans Serif or Best Serif options. Unlike paper surveys, Web surveys don’t include the fonts you specify with the pages—they simply reference a name which may or may not be installed on your respondent’s system. Because of this, Net-Collect publishes a “degrading” font list in the pages, so if you specify Arial, a Mac user will see Helvetica or another similar font, rather than a completely different typeface.
If your organization has a detailed style specification, set the primary typefaces in your NetCollect Text Style. After publishing the survey, your designer can modify the survey pages and cascading style sheet (CSS file) to match your firm’s requirement. The designer should reference the sec-tion beginning on page 355 to ensure they leave intact the functions the NetCollect server engine requires.
Using Graphics on the Web
Your NetCollect surveys can incorporate graphics in several places:
• As tiled backgrounds to the survey page, either behind the questions or in the panels to the sides (see page 61)
• Within the header and footer as logos, accent images or backgrounds (see page 67)
• Inserted within the question flow as accents (see your SurveyPro documentation)
Page Graphics. which you may use on your paper surveys, are not avail-able in NetCollect questionnaires or HTML reports. Graphics tied to coor-dinates on a page, rather than a point within a text flow, are not consistently supported by browsers.
For best results with your graphics:
• Use GIF files for logo or business graphics, and JPEG (JPG) files for photographs. These formats produce the highest quality image with smallest file sizes for these types of graphics.
• Use a graphics program to shrink the image to the final size before bringing it into SurveyPro. If you import a full screen image and scale it down to a thumbnail in SurveyPro, the respondent will still have to download the full screen image when the page loads.

Apian NetCollect 4.0 User Guide
Chapter 4 - NetCollect Documents Setting Up a NetCollect Document 57January 15, 2007
• Do not try to scale up images which are not solid blocks of colors (such as rule lines). Graphic programs will do there best to produce smooth result, but they can’t create detail from nothing—instead try to locate a higher resolution source file.
Setting Up a NetCollect Document
There are several dialogs which you’ll use to configure your Web surveys. In most cases, you can jump around these dialogs and define things in the order that makes sense to you. The only functions you have to do at the absolute beginning are setting the document to HTML format and the type of server scripts—both in the first tab of Document Properties.
Document Properties This contains document-level layout options, such as the page margins, background colors, button style, and headers and footers. It’s also where you can set up question numbering for your survey. In general, if you don’t find a layout option within an individual question or grid tile, try Document Properties. See page 59.
Web Survey Themes This dialog is accessed from the first tab of Document Properties. It allows you to set the header, footer, backgrounds, and button styles all at once using a pre-designed “theme.” See page 74.
Page List Since an individual page can be any length on the Web, and because of the way skips and branches send respondents to future pages (rather than to specific questions), pages in NetCollect are more like objects than with paper. Use this dialog to add new pages, delete pages, break pages, and set properties such as whether to include the header. The Page List dialog is also where you set messages for pause and error pages. See page 102.
Skips and Branches Once you’ve created your questions and defined the pages in a survey, you can set skips and branching so respondents bypass sections which don’t apply to them. See page 99.
Web Survey Setup While Document Properties contains layout elements, Web Survey Setup is where to go for functional aspects of your survey. This includes the password login setup (see page 152), answer tests for required fields or formatting (see page 134), links to outside data (see page 187), real-time server reports (see page 251), and paths for your Web servers and for this individual survey (see page 275).

Apian NetCollect 4.0 User Guide
Chapter 4 - NetCollect Documents Understanding Margins and Backgrounds in NetCollect 58January 15, 2007
Understanding Margins and Backgrounds in NetCollect
When you visit a Web page, you’ll often see a banner graphic that goes to the very top of a browser screen and across the entire text column. Below that, you’ll have the main body of the page, which has side and top mar-gins. To allow this type of layout, there are several different margins for the survey page and for elements such as headers and buttons.
Controls for these margins and backgrounds are located in the following dialogs:
Both the headers and footers are made up of several building blocks, each of which has its own spacing. Individual question or graphic tiles within the body of the survey also have settings for space above and indentation.
Another way to understand the margins is to apply some of the themes to a survey, and see what settings are used to produce the layout.
To Set Go To
Screen SettingsSurvey Settings
Document Properties Web Page tab (see page 61)
Header Document Properties Header tab (see page 67)
Footer Document Properties Footer tab (see page 67)
Buttons Login dialog Layout Tab (see page 167)

Apian NetCollect 4.0 User Guide
Chapter 4 - NetCollect Documents Document Properties Dialog 59January 15, 2007
Survey page elements and margins
Note that this diagram exaggerates the margins. See also the description of the header and footer blocks on page 67.
Document Properties Dialog
To access the Web layout options:
1. Document menu, Properties dialog
2. Set Questionnaire Medium to HTML for NetCollect
3. Type a Web page title (visible to respondents)
After you switch the survey type, the controls on the main screen and the tabs will change.

Apian NetCollect 4.0 User Guide
Chapter 4 - NetCollect Documents Document Properties Dialog 60January 15, 2007
General Tab for Document Type
Document Name If your project only has one questionnaire document, you can leave this as the default, but if your SP4 file contains several survey versions, a descrip-tive name is very helpful (versus “Copy of Copy of Questionnaire”). The name only appears within SurveyPro, such as on the tabs at the bottom of the design screen and in the Form Select Filter dialog, so as with other named objects, shorter labels are often better.
Questionnaire Medium Switches the document to the HTML format, turning on the Web-specific options. While you can change a survey back and forth between media, certain layout settings are lost when you switch, so you’re better off copy-ing the questionnaire document and having one document per medium.
Target script system Your surveys should be using the ASP scripts as they support features such as enhanced layouts, pause/resume, username+password logins, and piping. If your server administrator has said to use Perl instead, you may want to investigate upgrading your server setup or using Question-Web. This guide does not cover the Perl scripts as they run off the Net-Collect 3.0 feature set.

Apian NetCollect 4.0 User Guide
Chapter 4 - NetCollect Documents Document Properties Dialog 61January 15, 2007
Web page title Use this field to type the survey name respondents will see. In addition to being visible in the browser title bar, it is also inserted in the default notice text for errors and information.
Edit Login Setup Jumps to the login setup dialog, which is covered beginning on page 152.
Apply Theme Applies a set of layout options for colors, buttons, and margins, overwrit-ing any existing settings in your header, footer, and backgrounds. See page 74.
Web Page Tab for Margins and Backgrounds
Use this tab to set document-wide preferences for backgrounds, margins, and colors.
See the explanation of margins and backgrounds on page 58 for help understanding these controls.
Screen Background: Color selection
The Screen Background color is visible to the sides of the survey “body” which contains the tiles. It may also be visible at the bottom of the page when you only have a couple questions on a screen. This can be a solid color, or an image tiled (repeated) across the page.

Apian NetCollect 4.0 User Guide
Chapter 4 - NetCollect Documents Document Properties Dialog 62January 15, 2007
Screen Background: Top space
Sets the gap between the top of the browser window and the main survey body. This gap will have the same color as the Screen Background, and may be set to “0” pixels.
Survey Background: Color selection
The Survey Background can be transparent to show the Screen Back-ground behind or have its own color or image. In general, a light, solid color is best as images or strong colors make it more difficult for respon-dents to read the questions.
Survey Background: Survey width
This is a fixed “page” width for the question and graphic tiles in your sur-vey. Because you can’t be sure whether the respondent will have a browser window 800 pixels wide or 1280+ pixels wide, it can be difficult to design Web pages which display consistently (see Layouts and the Nature of HTML on page 54). Designers frequently deal with this problem by fixing a column width for the page’s contents and letting any space beyond that be empty. NetCollect defaults to 760 pixels wide for this col-umn to fit within 600x800 screen resolutions without a horizontal scroll bar.
Survey Background: Side, Top, Bottom spaces
You can think of the Survey Background as a piece of paper you’re filling with questions. That paper lies on top of a larger desktop which is often a contrasting color (the Screen Background). Within the Survey Back-ground color, you can set margins for the top (above any Header tiles), sides, or bottom (below the Footer). These margins are only really notice-able if you have different colored Screen and Survey Backgrounds.
Survey Background: Position
Aligns the column of questions to the left edge of the browser window or centers them within the window.
Grid Band Tints If you choose the alternating tinted bands style for your question grids (within the Grid dialog), these are the colors used throughout the docu-ment. The tinted bands generally make it easier for respondents to match up the correct set of radio buttons with each rating item.
Online notice colors As a respondent completes a survey, they may resume a paused survey, skip a required answer, or mis-type a password. These actions produce information and error messages which are inserted into the survey pages. In general, you want these messages to stand out from the rest of your survey design, so if you’re using a lot of red or blue in the survey text, you may want to select other colors. See the summary of where to locate assorted messages to customize their text on page 81.
Other Blank When you mark “Add Other Blank” on your scale definition, SurveyPro automatically adds another checkbox or radio button with a type-in box. You can change or translate the label used by SurveyPro for this blank.
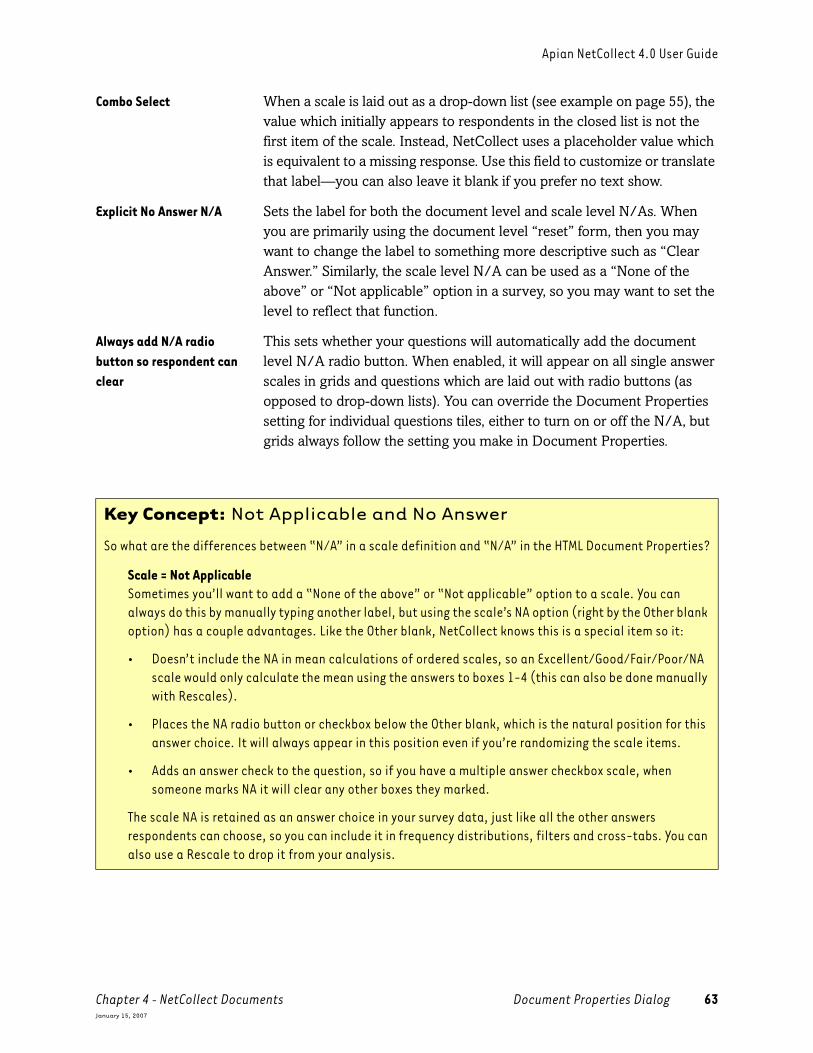
Apian NetCollect 4.0 User Guide
Chapter 4 - NetCollect Documents Document Properties Dialog 63January 15, 2007
Combo Select When a scale is laid out as a drop-down list (see example on page 55), the value which initially appears to respondents in the closed list is not the first item of the scale. Instead, NetCollect uses a placeholder value which is equivalent to a missing response. Use this field to customize or translate that label—you can also leave it blank if you prefer no text show.
Explicit No Answer N/A Sets the label for both the document level and scale level N/As. When you are primarily using the document level “reset” form, then you may want to change the label to something more descriptive such as “Clear Answer.” Similarly, the scale level N/A can be used as a “None of the above” or “Not applicable” option in a survey, so you may want to set the level to reflect that function.
Always add N/A radio button so respondent can clear
This sets whether your questions will automatically add the document level N/A radio button. When enabled, it will appear on all single answer scales in grids and questions which are laid out with radio buttons (as opposed to drop-down lists). You can override the Document Properties setting for individual questions tiles, either to turn on or off the N/A, but grids always follow the setting you make in Document Properties.
Key Concept: Not Applicable and No Answer
So what are the differences between “N/A” in a scale definition and “N/A” in the HTML Document Properties?
Scale = Not ApplicableSometimes you’ll want to add a “None of the above” or “Not applicable” option to a scale. You can always do this by manually typing another label, but using the scale’s NA option (right by the Other blank option) has a couple advantages. Like the Other blank, NetCollect knows this is a special item so it:
• Doesn’t include the NA in mean calculations of ordered scales, so an Excellent/Good/Fair/Poor/NA scale would only calculate the mean using the answers to boxes 1-4 (this can also be done manually with Rescales).
• Places the NA radio button or checkbox below the Other blank, which is the natural position for this answer choice. It will always appear in this position even if you’re randomizing the scale items.
• Adds an answer check to the question, so if you have a multiple answer checkbox scale, when someone marks NA it will clear any other boxes they marked.
The scale NA is retained as an answer choice in your survey data, just like all the other answers respondents can choose, so you can include it in frequency distributions, filters and cross-tabs. You can also use a Rescale to drop it from your analysis.

Apian NetCollect 4.0 User Guide
Chapter 4 - NetCollect Documents Document Properties Dialog 64January 15, 2007
Buttons Tab
Web surveys use buttons when they submit respondent answers and a processing request to the server. In NetCollect, the processing requests take the form of Start, Next, Back, and Finish Later buttons. You have three options for your survey’s “buttons”:
Browser button labels In this case, NetCollect simply tells the Web browser “make a button with this label.” This button style has two advantages: they can be easily cus-tomized including to other languages, and respondents are accustomed to recognizing browser buttons.
NetCollect’s graphical buttons
Web pages also recognize graphics which are identified as buttons. Sev-eral button sets are included with NetCollect and are used by some of the Themes. While you can customize the mouse hover text on graphical but-tons, the images themselves cannot be modified from within NetCollect.
Custom graphical buttons If you have a Web designer, they can create custom button sets for your projects. All they have to do is follow the naming rules on page 359 and place a copy of the files in the Web Images folder under your SurveyPro installation.
Document = No AnswerIn HTML, you can freely turn on and off checkboxes and NetCollect adds an “empty” item at the top of drop-down lists, but while you can change a radio button answer, you can’t clear them. The Document Properties option to “Always add N/A radio button so respondent can clear” adds a radio button to each single answer question. Unlike the scale’s NA which is retained as a specific response, the Document Properties radio for clearing answers is equivalent to a missing response. When the data is received by SurveyPro, it will not distinguish between someone who clicked that radio and someone who never selected an answer at all.
On the Advanced Options tab of an individual question dialog, you can override the document-level setting to include or hide the NA radio button.
Key Concept: Not Applicable and No Answer

Apian NetCollect 4.0 User Guide
Chapter 4 - NetCollect Documents Document Properties Dialog 65January 15, 2007
Dialog controls
When you’re using the standard browser buttons, the dialog lets you type the labels that will appear on each button. When you’re using graphical buttons, those type-in fields let you add descriptions which appear as hints when respondents hover their mouse pointer over buttons. Even if you don’t want to have longer descriptions on mouse hover, you should have some sort of label in those fields for accessibility purposes.
The Buttons tab always displays the full button set, even though some Login types and survey layouts do not use all the buttons. Buttons are clustered by First Login Page, Middle Pages, and Last Page as these often have distinct labels. The Pause Page appears when respondents request a pause by clicking Finish Later. The Returning Page appears when respon-dents enter a resume code for a survey or bring up a bookmark for a sur-vey in progress.
See also the Login dialog’s Layout tab on page 167 for button arrange-ments and border lines, and Key Concept: Types of Pages on page 101 for explanations of Welcome vs. Finishing vs. Pause pages.

Apian NetCollect 4.0 User Guide
Chapter 4 - NetCollect Documents Document Properties Dialog 66January 15, 2007
Button Style Select either the Browser button labels or one of the graphical button sets. NetCollect will list any complete button sets which use the proper naming convention and are placed in the Web Images folder.
First Login Page Labels: Start New
Most questionnaires have a “welcome” page which provides instructions and asks for a password if required. Often this page has a distinct “Start” button reflecting the respondent is beginning a new survey. If your first survey page has questions on it instead of just instructions, you may want to change this label to “Next” for multi-page surveys, or “Submit” for sin-gle page surveys.
Middle & Last Page Labels: Next Page / Last Page / Finished / Pause
These are all the same function to the scripts. They send the current page’s data to be processed and request another page in the survey. In multi-page surveys, you’ll often want to have distinct labels on the “mid-dle” survey pages from the final page(s) where respondents are complet-ing their response.
First Login Page Labels: Continued
When your login uses the 5-digit server-issued return IDs, the first page of the survey will allow respondents to start new surveys and to continue surveys in progress. This is the button which appears under the resume code entry field.
Pause Page Label: Continue On the pause page, respondents have the option of continuing their sur-vey in that moment rather than using a bookmark or resume code to take a break.
Returning Page Labels: Resume
When a respondent loads a bookmark for a paused survey, they see a Resume page which indicates whether there is a survey in progress for that URL or if that session was marked as completed or expired. Depend-ing on your login type, the respondent may be prompted for a password or server issued return ID, or simply prompted to click a button to Resume.
Returning Page Labels: New Survey
Sometimes respondents forward URLs which include a session identifier. In this case, the respondent may see the Resume page when they person-ally have yet to start a survey. This is why the Resume page includes a button giving respondents the option of starting a new survey session.
Report Display Label: Display
When you define instant reports, you’ll often have an access page listing the reports available and prompting for a password. This button submits that selection and password to display a report. See page 251.

Apian NetCollect 4.0 User Guide
Chapter 4 - NetCollect Documents Document Properties Dialog 67January 15, 2007
Header and Footer Tabs
While the headers and footers for paper surveys are limited to text, the NetCollect ones allow you to include graphics as well. They have their own margins, so you can do the banner style headings that go right to the top of a browser window. Or, if your organization has standard heading code, you can paste it straight into the dialog and NetCollect will include it in the final HTML pages.
The sections on HTML measurements (see page 55) and margins (see page 58) are very helpful for understanding how headers and footers are placed within a NetCollect document.
In both Headers and Footers, you’ll use up to 4 “cells” to arrange graphics and text. Each cell has its own width, “padding” margins and background colors. Within each of those cells, you can include a graphic or text, and align that element vertically and horizontally. The overall header or footer section also has a background and optional spacing above, between cells, and below which lets that background show through. Headers let you add a line below their cells, and footers let you add one above.
Very few headers or footers use all 4 cells and all the margin settings—most arrangements are simpler. When in doubt about where some of the margins and backgrounds begin and end, the simplest approach is to experiment. To edit a header or footer, just double-click on it in the survey page. The Themes are a quick way to pre-load a header for playing around (see page 74).

Apian NetCollect 4.0 User Guide
Chapter 4 - NetCollect Documents Document Properties Dialog 68January 15, 2007
How NetCollect determines cell sizes
Remember that these are instructions for the individual browser, not exact specifications. Use Preview in Browser to peek at how some browsers are interpreting the settings.
• Overall, cell sizes are the contents + whatever padding is specified.
• The height of the full-width cell is contents + top/bottom padding.
• In the 3-cell row, NetCollect first blocks out any cells where you specify a width. Then it allocates the remaining survey width to the other cell(s), wrapping text to minimize the row height.
• The height of the second row (containing left/middle/right cells) is based on the tallest cell used, once their contents + padding are added together.
Shared Header and Footer Controls
Most of the dialog elements are the same for both Headers and Footers, so they’re covered together here. If a control only applies to one type, its explanation will start with “Headers:” or “Footers:”.
To add a Header (or Footer) 1. Document menu, Properties dialog
2. Select the Header tab and change the Contents to Text and/or images.
3. Click on any of the cells to begin adding elements in their detail dialogs.
Important:When you apply a Theme to your survey, anything you’ve set in the header or footer will be replaced by the theme. It’s best to apply Themes first and then adjust the layout to your taste rather than the reverse.

Apian NetCollect 4.0 User Guide
Chapter 4 - NetCollect Documents Document Properties Dialog 69January 15, 2007
Contents Use these options to select the type of header or footer you’d like to use. Select None to go directly into the survey’s questions. Use Text and/or images to build a custom header or footer which will appear on both the survey pages and special pages for pausing and resuming. Or, if your firm has “boilerplate” designs for your sites, you can directly paste in the HTML code. Note: You can turn off the Header or Footer on individual pages using the Page Properties dialog on page 103.
The remaining controls are only available with Text and/or images selected. If all you want is a progress bar, you can create a header with all the cells empty.
Background: Color selection Sets the color or tiled image behind the entire header or footer region. This will show in any space you add above, between or below the cell rows. It will also show behind the text or graphic in cells whose back-ground you leave as Transparent. The progress bar and page number will show the header/footer background if they’re placed in the right cell; when placed below the cells they appear on top of the survey back-ground.

Apian NetCollect 4.0 User Guide
Chapter 4 - NetCollect Documents Document Properties Dialog 70January 15, 2007
Background: Space above / Between / Below cells
Within the larger block of the header/footer, you can add bands of spac-ing. These bands let the header or footer background show through. You can also increase the height of a particular cell by increasing its padding. All measurements are in pixels.
Line at top/bottom edge Places a line on the edge of the header/footer block to separate it from your questions. This is adjacent to the header/footer background color if you are adding space next to the cells, or to the closest cell row’s contents. You can set both the color and weight (thickness) of the line.
Space under header Space above footer
This sets the gap between the header (including progress bar) or footer and your survey questions. The Survey Background will show in the gap.
Full-width / Left / Middle / Right Cells
These build a header by stacking cells. The cells do not have to be filled, and the three in cells in the second row do not have to be equally spaced. See the next section for individual cell properties.
Headers: Progress Bar Progress bars let respondents know where they are in a survey, encourag-ing them to hang in a little longer rather than abandon a questionnaire mid-way through. The percentage shown on each page is calculated by the number of pages completed before a respondent arrives at the page. As with the button sets, this list includes any images which follow the proper naming convention (see page 359). You can turn off the progress bar or modify the percentage it shows on a given page through the Page Properties dialog (see page 103). Adjusting the percentage to something which “feels” correct to respondents is most important when you have skips or pages of uneven lengths. The progress bar label appears to the left of the graphic. You can place the progress bar within the lower-right header cell or below the block of header cells. When placed below, it will be on top of the survey background, not the header background.
Footers: Page Number Displays the NetCollect page number in a light gray color and small type. Unlike the progress bar which is an indicator for the respondent, this is a helpful tool for the tester—especially when testing a survey with many skips and branches. Page numbers can be placed inside the right cell or below the footer, in which case they display on top of the survey back-ground rather than the footer background.

Apian NetCollect 4.0 User Guide
Chapter 4 - NetCollect Documents Document Properties Dialog 71January 15, 2007
Properties within Header and Footer Cells
Many of the controls are the same whether a cell contains text or a graphic. At the bottom of the dialog is a reminder about the survey width, as the headers and footers fit within that setting.
Contents Use the Clear cell setting to empty a cell you no longer want to use (not all cells have to be filled). Otherwise, select Text to type headings or Pic-ture to use a logo or decorative graphic.
Background You can set a background color for this particular cell if you like. Other-wise, if it’s left on Transparent you’ll see the next color layer which has been set, which could be the Header/Footer Background, Survey Back-ground, or Screen Background (in that order).
Text: Text Style Sets the style to be used for this cell. As with other Text Styles, editing a definition in this dialog will update all uses of the style.
Text: Typing Area When typing here, the Text Palette will pop up to let you override the color or size of a few words or to insert a special character. If you want to change the style of the entire text block, it’s better to add or edit a Text Style. While the typing area will reflect some character-level overrides, it

Apian NetCollect 4.0 User Guide
Chapter 4 - NetCollect Documents Document Properties Dialog 72January 15, 2007
is not a preview of the full text style. You can add line breaks as needed to control where the text wraps (may also require a Width setting).
Picture: File button and Preview
Click the File button to browse for a picture. The graphic can reside any-where on your system as SurveyPro will grab a copy of the file during Publish and upload it with the survey pages. Once you select a picture, NetCollect will display its dimensions at the top of the preview window, which is helpful if you’re resizing the image. If you do adjust the scale, the preview windows will display the resized graphic. See also Using Graphics on the Web on page 56.
Width With text, the Width sets the length of the cell including padding, which allows you to have unequally sized Left/Center/Right cells and override NetCollect’s automatic cell sizing (see page 68).
For Pictures, the Width setting determines the size of the graphic itself. The overall cell size is the picture size plus any cell padding. If you want to make the cell significantly wider than the image, just use generous pad-ding. Uncheck Keep proportions to scale the Height independently of the Width.
Align Across / Down Aligns the text or image horizontally and vertically within the cell. This alignment is after the padding is applied, so if you want an image off-cen-ter or are trying to align elements which aren’t symmetrical (such as text baselines on a logo and typed text), use asymmetrical padding.
Padding to cell edges Header and footer cells do not pick up any other margins such as the Sur-vey Side Space, which lets you run a graphic right to the edge of the sur-vey width for banner style headers and footers. Below the padding settings you’ll see the current survey width and side margins (see Under-standing Margins and Backgrounds in NetCollect on page 58). If you want your header or footer text or picture to be aligned with the left edge of your questions, just set the cell’s padding to match the side margins. You can also use the padding to fine-tune the alignment of items in different cells. Values are in pixels and must be positive numbers.

Apian NetCollect 4.0 User Guide
Chapter 4 - NetCollect Documents Document Properties Dialog 73January 15, 2007
Autonumber Tab for Question Numbering
There are a few advantages to using SurveyPro’s Autonumber rather than typing your own values:
• It “hangs” the number to the left of the question text, just like the numbered instructions in this guide.
• Each questionnaire version is numbered independently, so if you have the same questions on long and short versions of the survey, each will be numbered properly.
• Randomized grids will keep the autonumber order even as the rows are shuffled.
• If you add or delete questions, it will clean up all the numbering for you.
• Unlike manually typed numbers, Autonumbers will not appear in the default Report labels.
By default, Autonumber “nests” the numbering levels, indenting levels 2 and 3 under level 1 which is a natural layout for sub-question styles. Changing the indent to “0” lets you apply multiple “top level” numbering series in a questionnaire, such as 1, 2, 3 in the main questions, but I, II, III in the demographics.
Note: Surveys with extensive skips and branching should either leave off numbers or use 1, 2, 2a, 2b, 3, etc. styles. “Missing” question numbers can confuse or intrigue respondents.
To turn on Autonumber 1. Document menu, Properties dialog
2. Select the Autonumber tab and select either Standard Choices or Custom Autnumbering.
3. Fine tune the autonumber level in individual question, grid and text graphic tiles.
Defining styles is the same as for other document types, with details in the Help screens and SurveyPro User Guide.

Apian NetCollect 4.0 User Guide
Chapter 4 - NetCollect Documents Web Survey Themes Dialog 74January 15, 2007
Web Survey Themes Dialog
With NetCollect, you can apply a Theme to jump-start your Web survey design. After applying a theme, you can adjust any of the settings as you like. You’ll need to replace some of the placeholder “your title” text.
Themes will replace any existing settings for:
• Margins
• Background colors
• Button style
• Header and footer cell contents
Themes will not change:
• Inline graphic tiles you placed amid your questions
• Browser button labels or mouse hover prompts
• Password login and resume settings
• Any documents other than the one currently selected
• Definitions of Text Styles

Apian NetCollect 4.0 User Guide
Chapter 4 - NetCollect Documents Web Survey Themes Dialog 75January 15, 2007
To apply a Theme 1. Document menu, Properties dialog
2. Select the General tab and click the Apply Theme button.
3. Pick a theme and click the Apply button.
4. Edit placeholder text added to the Header and Footer tabs.

Apian NetCollect 4.0 User Guide
Chapter 4 - NetCollect Documents Web Survey Setup Dialog 76January 15, 2007
Web Survey Setup Dialog
This is a central dialog for many of the NetCollect survey functions. Some of the features, such as the Login controls and Answer Tests, can be accessed through other dialogs or toolbar buttons as well. For each of the features, the main screen will summarize your current settings, and then you simply click Edit to review them in detail or make changes.
Survey Login Method This brings up the login dialog to set passwords, edit notices, and adjust button layouts. See page 158.
Answer Tests Use answer tests to set required responses and customize error messages. See page 134.
Online Reports You can create multiple real-time reports for your survey, with either pub-lic access or restricted by passwords. See page 251.
Embedded Operation Embedded surveys are ones which interact with outside applications or resources, whether it’s mail invitations embedding a password in the URL, saving to or reading from ASCII files, SQL databases, or other hand-offs. See page 187.
Server Configuration Your server configuration consists of general information about your Web server, such as the domain www.yoursite.com, as well as details specific to this survey. See page 275.
Preview Survey Even if you don’t have a Web server ready, you can preview the layouts on your computer. See page 77.

Apian NetCollect 4.0 User Guide
Chapter 4 - NetCollect Documents Previewing your Survey 77January 15, 2007
Publish to Server Once your server configuration is defined, use this button to create the HTML survey pages and upload your files to your Web server. See page 275.
Advanced Upload Sometimes you may need to upload just one or two files, not the entire set of survey pages. See page 290.
Get Latest Data This button will go out to your Web server, download any new data files, and import them into your SP4 file. See page 335.
Advanced Download Lets you selectively pull just a couple files from the Web server as well as checking the server log. See page 337.
Previewing your Survey
Seeing the questionnaire in SurveyPro, even after turning off the borders with the eyeglass button , is slightly different from looking in a browser. For a peek at how the survey would look, use the Preview in Browser button .
When SurveyPro generates the preview files, it defaults to a shared folder which overwrites any prior previews. Generally this is fine as it only takes a moment to generate a fresh preview, but if you’re comparing different survey versions you may need to specify the file locations.
Preview will launch your default browser with three panels: a notice at the top, the page list to the left, and a survey page in the main panel. Click on the page numbers in the left panel to see how each one displays.
Because different browsers display HTML slightly differently, you may want to check in additional browsers on your system. To do this, just copy and paste the file path (in the URL line) from one browser to another. The two most common browsers at this writing are Internet Explorer and Fire-fox, followed by Netscape and Opera.
Note that Preview is just for reviewing layouts as the pages are not con-nected to a Web server. For full functionality including checking answer tests and skips, publish the survey to your live Web server (see page 295), a QuestionWeb account (see page 309) or trial folder (see page 315) or local test server (see page 42).

Apian NetCollect 4.0 User Guide
Chapter 4 - NetCollect Documents Adding Hyperlinks to Surveys 78January 15, 2007
Adding Hyperlinks to Surveys
In NetCollect, you can add hyperlinks to your surveys with a very small bit of HTML code. The following steps walk you through doing this in a way that picks up the NetCollect styles, and do not assume you know HTML coding. What we’ll be doing is creating a tile in SurveyPro which looks like what we want, grabbing the underlying code for that tile, and then adding the link markers in the text.
1. In your survey, Insert a Text Graphic tile, including the text you want to make a hyperlink and any formatting, such as borders and the Text Style.
2. Click the Preview in Browser button and select the page where you want the link.
3. In your browser, right click on the area where the link will be, and view that frame's source.
4. Locate the section of the HTML code which contains your paragraph. Scroll up a few lines and find a line just above that, with "<!-- Tile…"
5. Select the next line after the tile number, and all the following lines through the </table> line:

Apian NetCollect 4.0 User Guide
Chapter 4 - NetCollect Documents Adding Hyperlinks to Surveys 79January 15, 2007
6. Copy this text to the clipboard, and return to SurveyPro.
7. Close the Web Survey Setup dialog, and edit your graphic text tile with the link text.
8. In the upper-right corner, mark the box for Raw HTML code,
9. Highlight what appears, and Paste over that with your HTML code.

Apian NetCollect 4.0 User Guide
Chapter 4 - NetCollect Documents Adding Hyperlinks to Surveys 80January 15, 2007
We now have a tile which is identical to the one SurveyPro created. How-ever, now we can add our link markers. You can make any word or phrase a hyperlink, it doesn’t have to look like a Web address. There are also two types of hyperlinks: Web sites and e-mail addresses, so there are two bits of code here depending on the type you need.
10. Go to the bit of text you want to make a hyperlink—in our example “www.Widgets.org”.
11. Just before the first letter you want clickable, add this text:
For a Web address:<a href="http://www.yoursite.com/">
For e-mail links:<a href="mailto:[email protected]">
12. Just after the last letter you want clickable, add this text for both types of links:
</a>
13. Click OK to save your text graphic.
This will look odd in SurveyPro, but as soon as you Preview in Browser again or Publish, it should be just right. (Note: If you click the link from Preview in Browser, it will open within the frame set.)

Apian NetCollect 4.0 User Guide
Chapter 4 - NetCollect Documents Notices, Errors and Buttons 81January 15, 2007
Notices, Errors and Buttons
In general, NetCollect has placed notices with their associated functions. For many surveys you can leave the defaults in place, but if you need to adjust a message or translate it to another language, here’s where you’ll go.
Notice text for respondents
Login setup, Notice Text tab Set your password and resume options first, as this determines the mes-sages you’ll need to set. See page 168.
Page List dialog This includes text for pause, resume, and error pages. The pause and resume messages can also be accessed through the Login setup screen. See page 103.
Answer Tests dialog You can set a unique message for each question being checked. There is also a global message which will appear at the top of each page. See page 134.
Document Properties, Web Page tab
Here you can set the colors for notices which are inserted within the sur-vey pages. See page 61.
Buttons for the survey pages
Document Properties, Buttons tab
This screen gives you the option of picking a graphical button style or typ-ing your own text for the browser style buttons. See page 64.
You can also define your own custom graphical button sets See page 359.
Login setup, Layout tab The number of elements in a button layout depends on the login style, so button arrangements and backgrounds are set in this screen. See page 167.

Chapter 5 - Applying Layout Options 82January 15, 2007
Chapter 5T U T O R I A L Applying Layout Options
In this tutorial you’ll learn how to:
Modify Text StylesBuild a headerAdd a progress barChange tile widthsEdit scale layoutsSet indentationChange background colorsSet button styles and layouts
The tutorial assumes you are already familiar with:
Editing questions and text graphics
In this tutorial we’re going to be working more with some of the layout options in SurveyPro. We won’t touch on all the options, but we will go into all the dialogs you’ll use to set styles for tiles and documents.
1. Start SurveyPro, enter your initials, and Open the sample file NC4 Tutorial - Layouts.SP4.
2. When prompted, click Yes to open a copy, and save as YourName Layouts Tutorial.SP4.
Tutorial Notes
General You can save your file and take a break any time you’re in the main document screen.
Tutorial Files Are in your SurveyPro Samples folder, by default under:C:\Program Files\Apian Software\SurveyPro 40\
On Finishing This tutorial has:• An “End” sample file• Can be viewed using Preview in Browser

Apian NetCollect 4.0 User Guide
Chapter 5 - Applying Layout Options 83January 15, 2007
3. Close the File History dialog.
4. If needed, select the document tab 1: Widget Web and adjust the Zoom to your preference.
Take a moment to scroll through the survey. It’s very brief, just one page of questions with no graphics or headers.
Changing grid layouts
On Web Page 2 of this survey we have a grid stretching past the right hand margin. This is a common problem when you use longer scales or have dual scale grids, even if the original layout was fine on your paper survey. There are a few ways to deal with this. You can:
• Shrink the fonts—remembering that eyestrain doesn’t encourage completion
• Change the scale labels so they’re shorter
• Reduce the number of levels in the scale (not an option for our ranking, but sometimes an option for rating scales)
• Change the layout of the scale
• Change the page width (see page 55)
In this case, we’re going to change the scale layout.
1. Double-click on the grid to edit it.
2. Click on the Quick Set tab.
3. Change Entry from Checkbox/Radio to Pulldown List.

Apian NetCollect 4.0 User Guide
Chapter 5 - Applying Layout Options 84January 15, 2007
4. Click OK.
Since we can’t see the scale labels any more, let’s take a peek in a browser.
5. Click the Preview in browser toolbar button.

Apian NetCollect 4.0 User Guide
Chapter 5 - Applying Layout Options 85January 15, 2007
6. Click OK for the default file location, or change it to another temporary folder. Click Yes to create the folder if prompted.
7. In the preview, select P2: Questions on the left side and see how the grid will appear to respondents now.
In general, pulldown lists are less desirable than radio buttons because they “hide” the options and each question now takes 2 clicks to answer instead of 1. However, when you have a familiar long scales such as states or a serious space constraint, they can’t be beat.
8. Back in SurveyPro, Close the Web Survey Setup dialog to return to editing.
Adding a header
In Ten Minute Web Survey on page 18 you may have used a Theme to cre-ate its header and footer, but for this tutorial we’re going to show you how to build one from scratch.
1. From the Document menu select Properties, or click its toolbar button .
2. Click the Header tab.
3. Select Text and/or Images.
Headers and footers are composed of “cells” which are stacked next to each other similar to tiles within a survey page. When you first turn on headers and footers, all the cells are empty. Each cell has its own Edit but-ton for adding text or graphics. See Header and Footer Tabs on page 67 for all the details.
4. Click the Edit button for the Left cell (you can also just click in currently empty gray box for the Left cell).
5. Set the cell Contents to Picture.
6. Click the File button and select WidgetAssociation.gif (from the same folder as the sample files). Click Open to return to the cell dialog so we can make more settings.

Apian NetCollect 4.0 User Guide
Chapter 5 - Applying Layout Options 86January 15, 2007
The logo is already a good size for the survey, so we can leave its dimen-sions alone. It’s always best to use a graphics program to resize your images before adding them to your surveys because this produces the best quality and quickest download speeds (see page 56).
Headers use different margins from the survey body, which allows you have a “banner” style graphic across the whole survey. For a logo like this, though, we want it to be indented the same amount as the question text. SurveyPro tells us the settings for the main document at the bottom of the dialog—in this case it tells us “side margins of 10 pixels” as a reference.
7. Under Padding to cell edges, set the Left margin to “10” to match.
8. Set this cell’s Right margin to “30” so it won’t be crowded by what we’re putting next to it.
9. Click OK.
We’re going to leave the middle cell empty and put some text in the right cell. As long as we don’t set specific widths for the cells, SurveyPro will just resize them to fit the contents.
10. Click the Edit button for the Right cell.
11. Set the cell Contents to Text.
12. Type in the text box “User Survey”.
13. Just above the text box, change the Style to T10: Title.

Apian NetCollect 4.0 User Guide
Chapter 5 - Applying Layout Options 87January 15, 2007
14. Change the Right Padding to “10”.
Picture cells default to no padding, but text cells default to small margins. We can leave the top and bottom padding alone.
15. Click OK to save the cell settings, and OK again to close Document Properties.
Checking the layout again with Preview in browser
1. On the toolbar, click the Preview in browser button and click OK for the file location.
2. In your browser, click through the three pages to see how the header looks.
The rule line doesn’t look quite right, and the font in the title could use an adjustment to better match the logo.
3. Close your browser window.
4. Switch back to SurveyPro and Close the Web Survey Setup dialog.
More header tuning
1. Double-click on the header on any page to edit it.
2. Edit the Right cell.
3. Click the Modify button next to Style.
4. Change the TrueType Face to Best Serif.
While we could specify a particular typeface, we don’t know what may be installed on the respondents’ computers. The “Best” settings are generally safest for Web surveys.
5. Check Bold and click OK.
6. Click OK again to save the cell’s settings.
7. Back in the main Header dialog, turn off Draw Line in the upper-right corner.
8. Just below that, let’s put a bit more space between the header and survey body by changing the Space under header Height to “60” pixels.
Normally we’d also set the progress bar to a more compatible color, but with a one page survey it won’t appear so we don’t have to bother.
9. Click OK.
10. Preview in browser again to see the difference, and then return to SurveyPro, closing Web Survey Setup.

Apian NetCollect 4.0 User Guide
Chapter 5 - Applying Layout Options 88January 15, 2007
Changing Text Styles and fonts
Smaller font sizes (10pt and below) are most readable when sans-serif, but we can modify the question text to make it closer to the serif style of the logo. While it can be tempting to tap into all 200 fonts installed on your computer, using just a few faces will produce more polished designs.
1. In the Object Tree to the left of the editing screen expand the Components node with all your reusable items, and then the Text Styles node. (If your Object Tree is missing, turn it on under the View menu.)
2. Double-click 3: Graphic Text.
3. Change it to Best Serif and Bold.

Apian NetCollect 4.0 User Guide
Chapter 5 - Applying Layout Options 89January 15, 2007
4. Click OK to save your changes.
Now the font is different for the welcome message, grid instructions, and thanks message—all the tiles where this style was being used.
5. Again in the object tree, double-click the style 1: Question, change it to Best Serif, set the Height to 12, and click OK.
Scroll through the pages to see how the document changed. Now we can see that we weren’t entirely consistent with our styles when we created the questionnaire. The “question” text above the grid is not in the Ques-tion style used by the rest of the survey. Meanwhile, our grid rows are using the Question style, but would probably look better if they used the Scale style. So now that we have our styles defined, we just have to go into some of the tiles to change the style they reference.
6. On Web Page 2 Questions, double-click on the grid instructions.
7. In the lower-right corner, change the Text Style to T1: Question. Click OK.
8. Now double-click on the grid itself.
9. Select the General tab and change the Setup Level to Advanced option screens.
10. Click on the Rows tab and change the Question and Row Label Text Style to T2: Scale.

Apian NetCollect 4.0 User Guide
Chapter 5 - Applying Layout Options 90January 15, 2007
11. Click OK to save your changes.
12. Check the Preview in browser again to see how the survey is starting to come together, then return to SurveyPro, closing Web Survey Setup.
Indenting and resizing the grid
When we changed the scale layout to pulldown lists we ended up with a big gap between the ends of the labels and the scale. We’re going to change a few settings and tighten up the layout a bit.
1. Double-click on the grid again and select the Layout tab.
2. Set Indent Question Rows to “30” pixels.
While we’re here, we can also remedy the spacing problem between the text and scale. You can either manually resize tiles as we’ll do in a moment, or set an exact width in pixels. The default for NetCollect is to set the body column inside the margins at 740 pixels. The advantage of setting exact widths is that you can have several tiles use the exact same dimensions—which is challenging when manually dragging the edge in. (See Measurements in HTML on page 55.)
3. Set the Tile Width to “600” pixels, or ~81% of the full survey width.

Apian NetCollect 4.0 User Guide
Chapter 5 - Applying Layout Options 91January 15, 2007
4. Click OK to save the grid settings.
Now the big gap between the questions and scales is gone. There’s still a little space after our longest label, but remember we want to leave a little “flex” room in our layouts. Of course if we miscalculate there’s no real problem—the browsers will always wrap the text for us.
Below the grid is a write-in blank for the “Other” attribute. With the grid indented, it’s looking a little like an orphan.
5. Double-click on the entry blank below the grid.
6. Click on the Dimensions tab.
7. Set the Question Text Left Indent to “60” which is double the indent of the grid itself.
8. Set the Scale Entry’s Entry Width to “200” for a larger type-in box.
9. Finally set the Question Text Down from Top to “0” so it’s snug under the grid.

Apian NetCollect 4.0 User Guide
Chapter 5 - Applying Layout Options 92January 15, 2007
10. Click OK to save the layout settings.
If you preview the page again, you can see how the grid, its instructions and the Other blank are a more clearly defined unit within the survey now. And all it took was a few indents and font changes.
Indents and scale layouts for individual questions
Below our grid, we still have some work to deal with the lack of structure in our remaining questions. When tuning your own layouts, there are many different possibilities for polished designs—this is only one approach.
1. Double-click on the next question down, “Which widget brands are familiar to you?”.
2. Select the Dimensions tab again and set the Scale Entry Left Indent to “30” pixels, just like the indent on the grid rows.
3. Select the Scaled Entry tab.
4. Change the Box Columns to “1” and click OK.
The single column looks great—until you notice the very long Other blank at the end.
5. Put your cursor over the right edge of the orange tile outline until it turns to a double-headed arrow.
6. Click and drag to the left until the tile is a little wider than the question text

Apian NetCollect 4.0 User Guide
Chapter 5 - Applying Layout Options 93January 15, 2007
Just like when we narrowed the grid, you don’t want to make it exactly to the edge of the question text as the respondent’s browser may display the text slightly wider than yours.
7. Edit the Age and Gender questions to make them one column and indent the scale 30 pixels.
8. Edit the State question to indent the scale 30 pixels again.
9. On the State question’s Scaled Entry tab, change the Answer Entry Layout setting to Pull-down list of answers, just like with the ranking grid.
10. Click OK to save your settings.

Apian NetCollect 4.0 User Guide
Chapter 5 - Applying Layout Options 94January 15, 2007
11. Preview in browser again to see how the survey has pulled together. Return to the editing screen.
Inserting graphics
The survey switches gears when it starts asking demographics. To help respondents transition between sections, you can add headings, graphics, or page breaks (see Working with Pages and Skips on page 114). In this case, we’ll add a simple graphical rule line created for our mythical Wid-get Association Web site.
1. Click once on the Age question to select it.
2. Insert an Inline Text/Graphic.
3. Set the Content Type to Picture.
4. Click the File button, select WidgetRule.gif and click Open.
5. Click OK to insert the graphic.
Our rule line is only 1/2 as wide as the survey page. Because this is such a simple graphic, we can stretch it a bit. Remember that the Web can’t add pixels to your graphics, so stretching logos and photos will make them larger but reduces their quality.

Apian NetCollect 4.0 User Guide
Chapter 5 - Applying Layout Options 95January 15, 2007
6. Double-click on the line.
7. In the lower-right corner, set the Width to “200” (percent) and click OK.
8. Preview in browser again to check our progress and then return to the editing screen.
Changing background colors
The survey is limited to 760 pixels wide, which keeps it from stretching too far on large displays, but since all the backgrounds are white right now, the survey looks a little adrift. We can give it more form by changing the side margins to another color.
1. Bring up the Document Properties dialog.
2. Select the Web Page tab.
3. Change the Screen Background to Custom Color and select dark gray from the drop-down palette. Click OK.
Backgrounds in NetCollect are layered, and while the survey body is a layer above the screen background, ours defaulted to transparent. That was fine when the screen background was white, but not when it’s show-ing the gray through.
4. Bring up Document Properties again and select the Web Page tab.
5. Set the Survey Background to Custom Color and select white from the palette.
6. While we’re here, change the Grid Band Tints Odd Rows from the light blue to a light gray.

Apian NetCollect 4.0 User Guide
Chapter 5 - Applying Layout Options 96January 15, 2007
7. Click OK.
8. Preview in browser again to see how we’re doing.
If your display is 800x600, you won’t see the gray side bands because your survey page will be filling the screen. For higher resolution monitors, if you don’t see the gray, try dragging the frame divider between the left hand page list and main survey pages to the left.
Setting button layouts
One last change for the button styles.
1. Back in the SurveyPro editing screen, bring up the Document Properties dialog.
2. Select the Buttons tab and set the Button Style to vcr_silver. Click OK.
You can add button sets and progress bars to SurveyPro to match your organization’s style (see page 359).
Since this is a one-page survey we don’t need the pause button.
3. On the toolbar click the Edit Page List button .
4. Select Auto Page: Pausing enabled and click Edit Properties.
5. Check Disable Pause Page.

Apian NetCollect 4.0 User Guide
Chapter 5 - Applying Layout Options 97January 15, 2007
6. Click OK to save the Pause properties, and OK again to close the Page List.
We can also add a little color to the buttons without a custom design. While the button style is set in Document Properties, the layout is set in the Login dialog as it depends on how you’re having respondents start and resume the survey.
7. Double-click on the Start or Send Answers buttons.
8. Select the Layout tab.
9. Under Login Button Area check Top and Bottom Lines.
10. Set the Lines Weight to “4”.
11. Pull down the line color palette and click Other. Select orange and click OK.

Apian NetCollect 4.0 User Guide
Chapter 5 - Applying Layout Options 98January 15, 2007
12. Add the same line settings to the Other Page Button Area.
13. Click OK.
14. Save your survey and Preview in browser one last time.
In addition to lines just around the buttons, you can also run a colored bar across the entire body column. A common layout is to put a box on the first page around a password login, and then have a slightly different but-ton layout style for the rest of the survey.
Congratulations! You’ve successfully tuned the layout of a Web survey. You can keep experimenting with this file’s options, or move on to another tutorial for skips (see page 114), answer tests and randomization (see page 141) or passwords (see page 175).
If you got off track along the way, you can open the sample file NC4 Tutorial - Layouts End.SP4 for comparison.

Chapter 6 - Pages and Skips 99January 15, 2007
Chapter 6R E F E R E N C E Pages and Skips
In NetCollect, pages act a bit differently from the continuous flow of paper surveys. They have assorted attributes, such as descriptions, and trigger actions like as skips and piping.
Chapter Contents:
Understanding Pages in NetCollect . . . . . . . . . . . . . . . . . . . 100Key Concept: Types of Pages . . . . . . . . . . . . . . . . . . . . . . . . 101Page List Dialog . . . . . . . . . . . . . . . . . . . . . . . . . . . . . . . . . . 102
Individual Page Properties . . . . . . . . . . . . . . . . . . . . . . 103Automatic Pages for Pause, Errors and Reports . . . . . . 104
Understanding Skips and Branches in NetCollect . . . . . . . . . 105Key Concept: Skips and Branches . . . . . . . . . . . . . . . . . . . . . 105
Jumping Ahead in a Survey . . . . . . . . . . . . . . . . . . . . . . 106Divergent Paths . . . . . . . . . . . . . . . . . . . . . . . . . . . . . . 107Including Pages for an Answer . . . . . . . . . . . . . . . . . . . . 108Rules and Tips for Skips and Branches . . . . . . . . . . . . . . 109
Skips and Branches Dialog . . . . . . . . . . . . . . . . . . . . . . . . . . 111Setting GoTos . . . . . . . . . . . . . . . . . . . . . . . . . . . . . . . . 113

Apian NetCollect 4.0 User Guide
Chapter 6 - Pages and Skips Understanding Pages in NetCollect 100January 15, 2007
Understanding Pages in NetCollect
In a paper document, pages are reminiscent of a scroll, a long continuous flow of text or questions. The physical form is arbitrarily broken every 11 inches, but the content itself is unbroken to the reader.
On the Web, pages act more like boxes within a flowchart. Some pages contain many questions while others have only one or two. Sometimes respondents progress through the pages in sequence, while at other times respondents will jump ahead on the flowchart, or diverge on exclusive paths.
Within NetCollect, HTML pages have several elements:
Margins and background These are set in the Document Properties dialog, and are the same for all pages within the survey to create a consistent “look.” See page 61.
Headers and footers Again, these are defined in Document Properties (see page 67). You can also turn off the header or footer for an individual page in the page’s Prop-erties dialog (see page 103).
Buttons The style of buttons, such as graphical images or free-form text, is set in Document Properties (see page 64). In addition, you can set borders and backgrounds for the button area. You’ll set the layout in Login dialog as the arrangement of password fields and buttons depends on how the respondent is starting and resuming the survey (see page 167).
Description To make it easier to work with skips and branches, NetCollect lets you give each HTML page an internal name such as “Demographics” or “Product X details.” Use the individual page’s Properties to set the description (see page 103).
Skips and branches You can set skips and branches that trigger as respondents leave a given page. This chapter includes details about how skips work in NetCollect for different respondent situations (see page 105) and details on the dialogs (see page 111).
Data piping If you need to pull data in from an external source, you’ll set the trigger as a respondent leaves a particular HTML page. Information on Embedded Surveys begins on page 187.

Apian NetCollect 4.0 User Guide
Chapter 6 - Pages and Skips Understanding Pages in NetCollect 101January 15, 2007
Key Concept: Types of Pages
When you switch a new questionnaire to HTML for NetCollect, SurveyPro changes the original blank 8.5" x 11" piece of paper into three HTML pages. Or, if you’re copying or converting an existing paper survey, SurveyPro will add empty pages before and after the survey. This is to start you off with the most common survey setup, a Welcome page, one or more survey body pages, and a Thanks page.
Welcome PageThe first page of a survey will typically contain brief instructions and confidentiality assurances and then a password login or simple anonymous Start button. While you can include questions on the Welcome page (such as their language preference), that is a bit unusual so it can confuse respondents.
By default, NetCollect assumes the first page is a Welcome, and uses the Start label for the buttons. You can omit a Welcome page and dive straight into the survey if you prefer (most common with single page surveys). If you prefer a Next label instead of Start, simply change the text used in the Document Properties Buttons tab.
When using a URL with data to start the survey (see page 213), you can jump the respondent past the Welcome page login directly to Page 2.
Survey Body PagesTypically a body page will have questions on it, though you can also have pages which are purely instructions. NetCollect will use the Next and Back buttons on these pages.
Finishing PagesNetCollect assumes the last page before a Thanks page should have a Finish button instead of Next. If your survey has several pages which go to the Thanks page, you can put the Finish button and confirmation pop-up on them in the individual page Properties dialog. See page 103.
Thanks/Done/Exit PageThe last page of a NetCollect survey is assumed to be a Thanks page which informs the respondent their data has been received. If different segments of your respondent base will see different Thanks messages, you can change a body page to a Thanks page in the individual page Properties dialog (see page 103). While you can pipe answers into the text of a Thanks page such as “Thanks Jane for completing the survey. Your coupon code is 12345.” you cannot ask any new questions on these pages as the survey is considered finished and data committed before the respondent sees it.
Exit URLInstead, or in the case of looping surveys, in addition to a NetCollect generated Thanks page, you can send the respondent to a URL when they finish. As with the Thanks pages, data is saved before the page is delivered. This is a good way to return respondents to your primary Web site when the survey is hosted on another server. See page 215.
Auto PagesIn addition to the pages you build in the main document editing screen, NetCollect automatically generates pages for pausing the survey, resuming a saved survey, providing error messages, and logging into real-time server reports. You can set the messages used in these pages in the individual page Properties dialog. See page 103.

Apian NetCollect 4.0 User Guide
Chapter 6 - Pages and Skips Page List Dialog 102January 15, 2007
Page List Dialog
When you switch a new questionnaire to HTML format, SurveyPro will start you off with three pages for a welcome/log in, survey body, and thanks/exit.
Break page at selected tile If you have a tile selected when you enter this dialog, you’ll be given the option to add a page break before the tile.
Delete page Removes a page, including all tiles contained within it. If you want to keep the tiles, either move them off the page first, or use one of the Merge options.
Merge page up / down Because a page can be the target of a skip or branch, it’s important to be clear about which page you’re keeping after merging two together. The one listed as “into” is the one that will be kept. This also determines which page’s individual properties are being retained.
Insert new page Adds a new empty page above the currently selected page.
Move page Rearranges the order of the pages, including fixing up any skips and pip-ing destinations when possible. Be sure to double-check both the skips and piping after rearranging.
Edit Properties Brings up the individual page properties.

Apian NetCollect 4.0 User Guide
Chapter 6 - Pages and Skips Page List Dialog 103January 15, 2007
Individual Page Properties
For a normal page, the dialog looks like the one below, allowing you to override basic attributes for the page.
Description This is an internal description to help you identify the page contents. It will appear in the Page Edits dialog, on the document editing screen, and within the skips and branches dialogs. The description is optional, but very helpful when defining skips for longer surveys.
Header, Use on page By default, every page includes the header but it can be switched off when needed.
Header, Enable progress bar With the exception of the login and thanks pages, the progress bar will appear on each page. Occasionally you may want to disable the progress bar on particular pages. The main progress bar settings are covered on page 70.
Header, Percent completed NetCollect calculates the percentage done for each page based on the pages completed up to that point. When surveys have extensive skips or large variations in the number of questions on each page, this percentage may need adjustment to better reflect the respondent experience.
Footer, Use on page The footer appears on every page by default. To hide it on a particular page, clear this box. The main footer settings are on page 67.
Advanced Navigation In most cases, you can leave this setting on Automatic. The other two set-tings are used for surveys which use skips to send respondents down divergent paths:
Set: Finished button send answersOn a middle survey page which would normally use the Next Page button, this instead tells NetCollect to use the Finished button and pop up the

Apian NetCollect 4.0 User Guide
Chapter 6 - Pages and Skips Page List Dialog 104January 15, 2007
confirming dialog. Only use this when the respondent’s data is being com-mitted by sending them to a thanks page or URL.
Set: Done thanks page with no questions or buttonsBy default, the last page in a survey is set as the Thanks page. If different respondent segments need to see different confirmation messages, you can set additional pages as Thanks pages. This option is disabled if the page has questions on it, as the survey is submitted as finished before this page is sent to the respondent.
Automatic Pages for Pause, Errors and Reports
Below the survey pages you created are several special pages that Net-Collect generates to manage the pause/resume process and provide information to respondents.
Header and Footer overrides
By default, each of these pages includes the Header and Footer you defined in Document Properties (see page 67). If your survey has manu-ally built headers using in-line text and graphics, these automatic pages will appear very plain as they’ll simply show the notice text. When appro-priate, you can hide the Header and/or Footer on each of these page types.
Notice text In the case of the error page, you’ll see several type-in areas for specific situations, such as an incorrect password or a survey which has con-cluded. In the default text, you may see variables, such as _SERVER_SET_SVY_TITLE for the Web page title you set in Document Properties. The title is a safe bit of text to remove, but other code may be necessary to the survey functioning, such as a server issued ID for resum-ing anonymous surveys (see page 169). Also note that the initial message text for pausing and resuming is set by your Login settings, so don’t cus-tomize their content until you’ve finalized your password type.
Notice text can be multiple paragraph (arrow up and down to see the full message). It publishes using the style T3: Graphic Text.
Disabling the Pause page If you don’t want respondents to pause the survey, you can mark Disable Pause Page in its Properties, which will remove the Finish Later button from the survey. Note this does not prevent a respondent from bookmark-ing a survey page and returning to that later—to prevent that from resum-ing, you’ll need to set that to act as a failed login (see page 169).

Apian NetCollect 4.0 User Guide
Chapter 6 - Pages and Skips Understanding Skips and Branches in NetCollect 105January 15, 2007
Understanding Skips and Branches in NetCollect
Skips and branches are one of the greatest features of Web surveys. By having the respondent bypass sections which don’t apply to them, you’re not only shortening and simplifying the survey, you’re also increasing your data quality (as respondents rarely fully read instructions).
In paper surveys, it’s common to tell the respondent “If No, skip to ques-tion 7” where question 7 may be later on the same page of the survey. While you can give this instruction to a respondent and have them com-plete it manually within one HTML page (what we call a “soft” skip), to enforce the skip pattern you’ll send the respondent ahead to another HTML page.
Key Concept: Skips and Branches
These two terms have a very specific meaning in SurveyPro, so even though you may have an understanding of “skip” or “branch” it’s important to understand how the software defines them.
SkipIf Yes, go to page 4. A skip jumps ahead within the survey, either sending some respondents ahead on the same path as everyone else, or diverging respondent groups to completely different paths. Skips can be applied to single answer checkbox or rating scales. A Yes/No question could have up to three destinations: one for Yes, one for No, and one for No Answer.
BranchBranches in NetCollect act as “includes” of one or more pages for a scale option. This lets you include a range of pages for sedan owners, another range for convertible owners, and another for SUV owners. If you set a branch from a multiple answer checkbox scale, a respondent who owns both a sedan and a convertible would be presented detail questions for both types of vehicles. If instead the branch were based on a single answer scale, they would only see the page(s) for the one model selected.
Following are three examples off common applications.
Each survey page can have only one skip or branch trigger question defined, but the question you’re using as a trigger may appear anywhere on that page or earlier in the survey. This means that from page 4, you can skip the respondent ahead based on an answer they provided back on page 2. See Rules and Tips for Skips and Branches on page 109 for more details.
To give you the greatest flexibility possible, NetCollect allows complex patterns of overlapping and nested skips and branches. Be sure to test the skips and branches after uploading to the server to check that you’ve correctly defined the paths.

Apian NetCollect 4.0 User Guide
Chapter 6 - Pages and Skips Understanding Skips and Branches in NetCollect 106January 15, 2007
Jumping Ahead in a Survey
This is the most classic skip, where you’re advancing the respondents past questions which don’t apply to them. In SurveyPro, this can be done with either a skip or a branch.
In either case, you would add a skip or branch for Page 2 testing against the respondent’s answer to question (1). As a Skip, you would set a rule for the answer No to jump ahead to Page 4. As a Branch, you would tell SurveyPro to include Page 3 when the respondent marked Yes.
In this case, the survey is sequentially asking the respondent whether they use each product. This is the way to go when you’re mixing topics, but when you have a set or related products or services there’s an alternate approach. See Including Pages for an Answer on page 108.

Apian NetCollect 4.0 User Guide
Chapter 6 - Pages and Skips Understanding Skips and Branches in NetCollect 107January 15, 2007
Divergent Paths
Screening surveys, such as the simplified example here, are one of the most classic examples of divergent paths. At the beginning of the survey, you might have a series of qualifying questions, any one of which may trigger a skip to send the unqualified respondent to a Thanks page and end their session. If the survey included compensation to qualified respondents, you’d set up a special “Sorry” Thanks page for the unquali-fied respondents. In other cases, you might just jump the unqualified respondents ahead to the same Thanks page as everyone else.
At other times, you may ask employees their division, and diverge the groups down paths tailored for IT, Marketing, Customer Service, Account-ing, etc. At the end of those segments, everyone would converge back for common questions such as rating their manager or comments.
Within each divergent path, you can “nest” other skips or branches, such as skipping a new hire past questions about the Accounting department’s re-organization twelve months before.

Apian NetCollect 4.0 User Guide
Chapter 6 - Pages and Skips Understanding Skips and Branches in NetCollect 108January 15, 2007
Including Pages for an Answer
This is a branch based on a multiple answer checkbox scale, and it’s a great way to shorten a survey for respondents since you don’t have to ask if they use each product as a Yes/No question like we did in the first example (see page 106).
If the respondent marked Gadgets and Gizmos, when they clicked Next they’d first be asked to answer the questions on Page 4 for Gadgets, and Next from there would send them Page 5 for Gizmos, and then send the respondent to Page 7 for general comments.

Apian NetCollect 4.0 User Guide
Chapter 6 - Pages and Skips Understanding Skips and Branches in NetCollect 109January 15, 2007
For your branch, you can have more than one answer in the scale include the same pages. So if you were asking for more detail about the product category rather than an individual brand, you might have the same branch rule defined for both Gadgets and Gizmos.
You can also include no pages for an answer, so Other may or may not ask for elaboration on product attributes. Or, if you do ask for more details, it’s a nice touch to pipe their Other type-in answer ahead to that page so you can ask them to evaluate “Whirligigs” rather than “Other” (see page 137).
Finally, if you have a lot of follow-up questions, the survey may have a range of pages for an answer, such as Pages 5-8 for Gizmos. Within that range of pages for Gizmos, you can also “nest” other skips and branches, so based on the length of use question you might skip the respondent past questions about prior versions.
Rules and Tips for Skips and Branches
While NetCollect gives you a great deal of flexibility in defining skips and branches, there are some constraints so that the script logic doesn’t turn into spaghetti. For example, when a respondent is on Page 7 of the survey, the scripts need to be clear about what to do when the respondent clicks the Back button.
You can define a skip or branch
With one test per page From Page 4, you can define a skip ahead, or you can define a branch, but you can’t define both a skip and a branch or skips based on two questions on one page—the scripts wouldn’t know which one to do in the case of a conflict.
With unique or shared destinations for each scale option
With Yes/No questions, typically the paths will be exclusive, but a Yes/Sometimes/No question may send Yes and Sometimes to the same destination. Also, if you haven’t set the skip to Require Answer, then you can define a destination for respondents who don’t answer the question.
When working with branches, they are defined as “includes” for answer(s), so you don’t have to worry about the respondent leaving it blank—though you could define an explicit None or Not Applicable in the scale and include a page asking them why the question didn’t apply.
From individual question tiles
Within the dialogs, you’ll be given the option to select individual question tiles, but not questions which are part of question grids.
It is possible to manually edit the survey’s configuration file to get around this constraint, but it is far safer to break out the test question as a stand-

Apian NetCollect 4.0 User Guide
Chapter 6 - Pages and Skips Understanding Skips and Branches in NetCollect 110January 15, 2007
alone tile as incorrectly editing a configuration can cause a wide array of problems. (If you’re in a fix, we have a great deal of experience with this type of hand edit and can make the changes for you at our hourly charge.)
On any question collected up to that point
When the skip or branch is direct, such as asking for details on a particular product they use, it’s natural to ask the skip question on the page that has the test. At other times, you may ask a question at the very beginning of the survey, such as their division, then a series of common questions, and then split the respondents to their tailored paths.
Based on visible or hidden questions
Rather than ask the respondent their division, you could pipe that infor-mation into a hidden field based on their individual password (see page 202).
That goes forward Skips and branches always target pages later in the survey.
If you need to loop the respondent through questions more than once, either create copies of the question within the survey (with unique Q numbers, not by cloning the same question or later loops will over-write earlier answers), or by breaking that portion of the questionnaire out as a separate questionnaire, looping the entire survey and using URL hand-offs to connect up the non-looping portions of the questionnaire (see Example 4: Looping the Respondent Through Questions on page 194).
Sending the respondent to a page
All skips and branches work in terms of pages. With HTML, there’s no reliable way to skip the respondent half-way down a page and keep them from scrolling back up and answering questions which do not apply to them. It’s also better to have pages tailored just to the respondent, as this makes the survey appear shorter—they never see the questions they don’t have to answer.
That is nested, but not overlapping
As mentioned in the examples, it’s possible to nest a skip or branch within one segment of another skip or branch.
If the respondent is on a skip path that covers Pages 3-8, you can put a skip on Page 4 which jumps them ahead to Page 12, or a branch on Page 4 which includes Pages 5-6, but you cannot put a branch on Page 4 which includes Pages 5-9. It’s possible to construct an interleaved effect by set-ting test questions based on questions that appeared on prior pages, or by having questions appear more than once within a survey (see page 138). In general, skips will give you greater flexibility than branches for defining complex patterns.

Apian NetCollect 4.0 User Guide
Chapter 6 - Pages and Skips Skips and Branches Dialog 111January 15, 2007
When working with skips and branches, it often helps to
Give each page a description
Pages act like objects in NetCollect, and as such you can define attributes such as a description. When you describe key pages as “Product X rat-ings” or “Demographics” rather than leaving them “Untitled,” setting the skip and branch paths becomes a matter of picking the plain name, rather than recalling whether it was page 23 or 24 that was just for users of Prod-uct X. See page 103.
Adjust the progress bar percentages
By default, SurveyPro calculates the percentage done based on the pages completed so far in the survey, so at the top of page 11 of 20 it would show 50% done. When respondents diverge down distinct paths, or when you have some pages with only one question while others ask 50 ratings, the progress bars may need adjustment to better reflect the respondent experience. See page 103.
Leave off question numbers For the respondent’s survey to jump from question 12 to 20 only makes them wonder what they missed. Alternatively you can use multiple num-bering levels. See page 73.
Use a white board to flowchart complex skip/branch patterns
Especially when working with nested or interleaved skips and branches, it’s critical to make sure you have the all the paths covered. A flowchart, rather than notes on the survey draft, makes it much easier to spot loose ends in the definition stage, as well as to test the survey on the server. Too often, this flowchart is not updated when edits are made, so be sure to keep it current.
Turn on the page number in the footer
This puts a small gray number at the bottom of each page. Most respon-dents don’t notice this number, and it makes testing skips much easier—especially if some of your pages are very similar or identical in content. (Document Properties, Footer tab, Page Number)
Skips and Branches Dialog
The best introduction to skips and branches in NetCollect is the tutorial on page 114. Additional reference material is in the main SurveyPro Help system.
To add a skip or branch 1. Document menu, Skip Patterns
2. Select the page from which paths will diverge (not necessarily the page containing the “test” question)
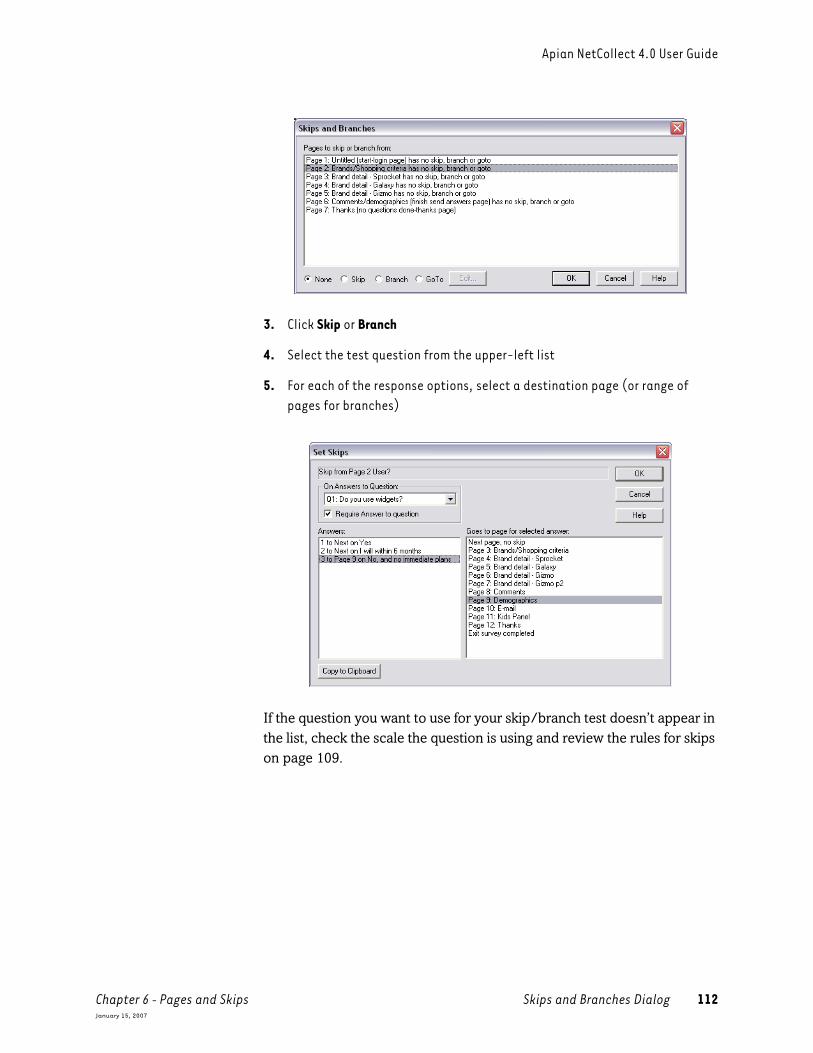
Apian NetCollect 4.0 User Guide
Chapter 6 - Pages and Skips Skips and Branches Dialog 112January 15, 2007
3. Click Skip or Branch
4. Select the test question from the upper-left list
5. For each of the response options, select a destination page (or range of pages for branches)
If the question you want to use for your skip/branch test doesn’t appear in the list, check the scale the question is using and review the rules for skips on page 109.

Apian NetCollect 4.0 User Guide
Chapter 6 - Pages and Skips Skips and Branches Dialog 113January 15, 2007
Setting GoTos
By default every page in a survey continues to the next page. If on your questionnaire pages 3-4 apply to customers, and 5-6 apply to prospects, you’ll set up a page 2 skip that sends people to the right set of pages. However, when the customers are done with page 4, you’ll want them to bypass 5-6 and head straight to page 7.
You can always define another skip on page 4 which uses the same test question to jump customers ahead, or you can simply use a GoTo. All a GoTo does is say that anyone leaving a page will go to another destina-tion—much quicker than a skip to define.

Chapter 7 - Working with Pages and Skips 114January 15, 2007
Chapter 7T U T O R I A L Working with Pages and Skips
Note: The conceptual information on page 105 may be helpful before run-ning this tutorial.
In this tutorial you’ll learn how to:
Add new pagesBreak pages at a particular tileSet skips to jump ahead in the surveySet branches which include pages for particular responses
The tutorial assumes you are already familiar with:
Accessing the Document Properties dialogAdding questions, grids, and scales
In this tutorial we’re going to be applying skips and branching to improve the data quality of a survey while also increasing its usability for respon-dents.
1. Start SurveyPro, enter your initials, and Open the sample file NC4 Tutorial - Skips.SP4.
2. When prompted, click Yes to open a copy, and save as YourName Skips Tutorial.SP4.
3. Close the File History dialog.
Tutorial Notes
General You can save your file and take a break any time you’re in the main document screen.
Tutorial Files Are in your SurveyPro Samples folder, by default under:C:\Program Files\Apian Software\SurveyPro 40\
On Finishing This tutorial has:• An “End” sample file• A live version at http://apian.com/support/tutorials/

Apian NetCollect 4.0 User Guide
Chapter 7 - Working with Pages and Skips 115January 15, 2007
4. If needed, select the document tab 1: Widget Web and adjust the Zoom to your preference.
Our starting survey is written for users of widgets with a straight path from the first page to the end:
We’re going to make a few changes:
• Adding a qualifying question to screen out people who don’t use widgets
• Only asking respondents to rate the brands with which they’re familiar
• Skipping children past the e-mail address to comply with privacy law (COPPA regulates data collection from children—see http://ftc.gov for more).

Apian NetCollect 4.0 User Guide
Chapter 7 - Working with Pages and Skips 116January 15, 2007
All of this adds up to the following finished survey. Don’t worry—we get there step by step!

Apian NetCollect 4.0 User Guide
Chapter 7 - Working with Pages and Skips 117January 15, 2007
Adding a screening question
Right now we don’t ask whether people use widgets, so that’s our first change to the survey.
1. Bring up the Edit Page List dialog .
2. Select P2 Brands/Shopping criteria and click Insert new page between 1 and 2.
Behind the Page List dialog you may see your survey pages go blank—this is normal.
3. Click Edit Properties for the new page and change the Description to “User?”.
4. Click OK to close the Properties dialog, and OK again to close the Page List dialog.
5. Scroll up to the new empty Web Page 2. Click on the thick blue bar between the progress bar and buttons.
6. Insert a Question.
7. Give it the Questionnaire Text “Do you use widgets?” and click Next.
8. Insert a new single answer checkbox scale with the labels:YesI will within 6 monthsNo, and no immediate plans
9. Click OK to save the scale.
10. Back in the question’s Scaled Entry tab, change the Box columns to “1.” Click Next, and Next again.
11. On the Dimensions tab, set the Scale Entry Left Indent to “30” to match the rest of the survey, then click Finish.

Apian NetCollect 4.0 User Guide
Chapter 7 - Working with Pages and Skips 118January 15, 2007
For the people who mark the last scale option, we could skip them all the way to a Thanks page, but in this case we want to see if we can get them to join a panel for other surveys. So we just want to send them past all the widget-specific questions to the demographics. Scroll down to Web Page 7 and check out the destination. Right now, that page has comments in it too, so we need to add a page break.
12. Click once on the instructions just below the comment question.
13. Bring up the Edit Page List dialog by clicking the toolbar button or pressing Ctrl+B.
14. Click the button Break page 7 at the selected tile 20.
15. With P7 still selected, click Edit Properties. Change the Description to “Comments” and click OK.
16. Select P8, Edit Properties, set its Description to “Demographics” and click OK.

Apian NetCollect 4.0 User Guide
Chapter 7 - Working with Pages and Skips 119January 15, 2007
17. Click OK again to close the Page List dialog.
Now we have a destination ready for our skip.
18. In the Document menu, select Skip Patterns.
This first page is the summary of skips and branches from each page. By default each page continues on to the next one in the survey.
19. Select Page 2: User? in the list and click the Skip radio button.
The question list includes all questions on this page or earlier in the sur-vey which can be used for skips (single answer checkboxes and ratings). In our case, it’s already on the question we want.
20. Check the box Require Answer to question.
Normally we’d follow this by putting “required” in the question text, but we’re skipping that nicety to save a few tutorial clicks.
21. On the left, select 3: To next on No, and no immediate plans.
22. Map it to the destination page on the right Page 8: Demographics.

Apian NetCollect 4.0 User Guide
Chapter 7 - Working with Pages and Skips 120January 15, 2007
23. Click OK to save the skip definition.
24. Click OK again to close the main dialog.
Adding a branch for brand details
If you scroll up the survey, you’ll see three “Brand detail” pages which ask how respondents view specific brands of widgets. On Web Page 3 is a question asking respondents which brands are familiar to them which we can use to have respondents comment only on the brands they know.
While a skip jumps ahead to a page, a branch includes one or more pages based on the answer(s) you mark. In this case, we want respondents to see the detail pages for the brands they recognize.
1. In the Document menu, select Skip Patterns.
2. Select Page 3: Brands/Shopping criteria and click the Branch radio button.
3. Leave the question on Q2.

Apian NetCollect 4.0 User Guide
Chapter 7 - Working with Pages and Skips 121January 15, 2007
While you can require an answer for a branching question, it’s possible the respondent may not be familiar with any of the brands. Since we don’t have a “None” box, it’s best to not require an answer in this case.
4. In the left-hand list, select 1 none included on Sprocket. In the right-hand list, select Page 4: Brand detail - Sprocket.
5. Repeat to map the Galaxy and Gizmo brands.
We could also ask about the Other response, including “piping” the answer they type on Page 3 into a Brand detail - Other page to remind them who they’re evaluating. If there were more questions for each brand, we could also select a range of pages to include for an answer.
6. Branches need to know where to go when they finish, so select After branching go to ?? and map it to Page 7: Comments.
7. Click OK to save the branch.
8. Click OK again to close the Skips and Branches dialog.

Apian NetCollect 4.0 User Guide
Chapter 7 - Working with Pages and Skips 122January 15, 2007
Adding breaks and a second finishing page
Right now, the e-mail information is on the same page as the age question. In order to skip under-age respondents past that legally dicey bit of data, we need add another page break.
1. Scroll down the survey to Web Page 8 Demographics.
2. Click once on the text graphic starting with the privacy statement, just under the Zip and Country questions.
3. On the toolbar, click the Edit Page List icon or Ctrl+B.
4. Click Break page 8 at the selected tile 25.
5. Select P9 Untitled, then click Edit Properties.
6. Give the page the Description “E-mail” and click OK. Click OK again to close the Page List dialog.
Take a moment to step back and review the page sequence. For anyone 13 or older, they’ll submit the demographics page, then see the e-mail page, then click Send Answers to get the Thanks page. However, the respondents under 13 will go from clicking Next on the demographics page to getting the Thanks page. While there’s nothing to upset Net-Collect in that arrangement, it’s a little disconcerting for respondents to bypass a Finish or Send Answers button. To make this a little smoother, we’re going to add an intermediate page for children.
7. On the toolbar, click the Edit Page List icon or Ctrl+B.
8. Select P10 Thanks and click Copy page 10 and its tiles.
9. In the page list click <add a survey page> and click Insert copied page 10 at end to add the new page.
Now Page 10 says it finishes, which we want as that’s going to be the mes-sage to children. We also want to put a finish button on the e-mail page.
10. Select P9 E-mail and Edit Properties.
11. Under Navigation, check Enable advanced exit page settings.
12. Select the second option Finished submit button.
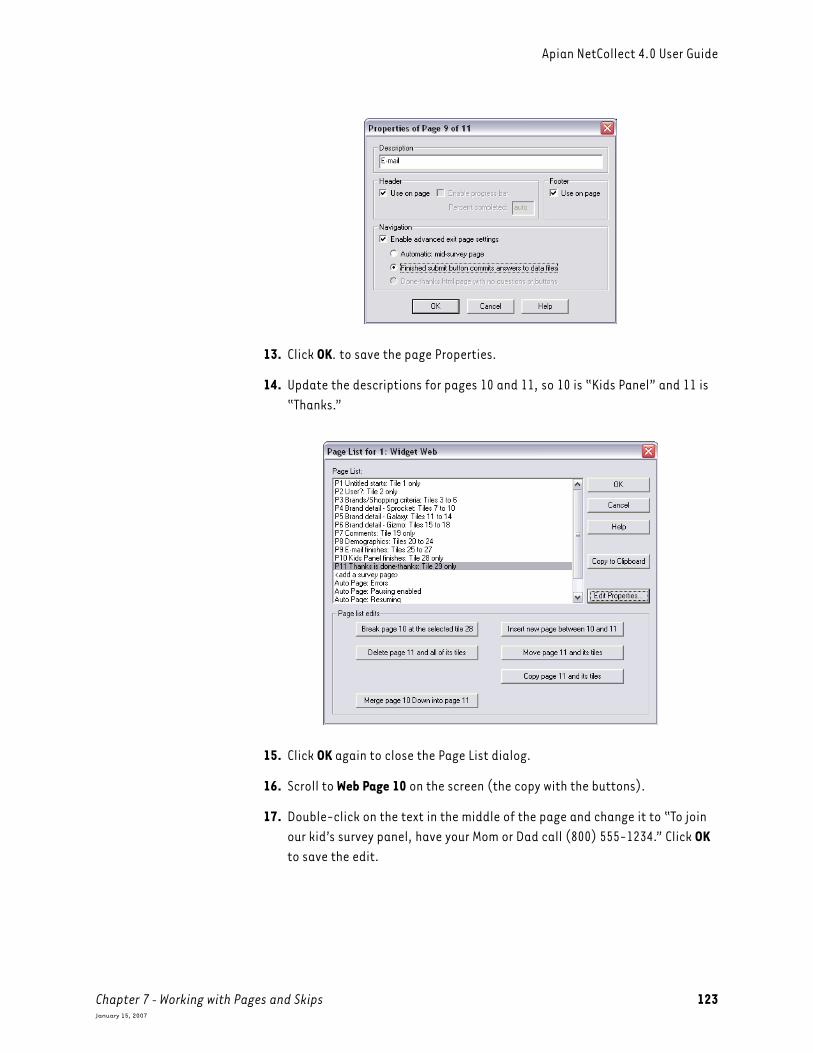
Apian NetCollect 4.0 User Guide
Chapter 7 - Working with Pages and Skips 123January 15, 2007
13. Click OK. to save the page Properties.
14. Update the descriptions for pages 10 and 11, so 10 is “Kids Panel” and 11 is “Thanks.”
15. Click OK again to close the Page List dialog.
16. Scroll to Web Page 10 on the screen (the copy with the buttons).
17. Double-click on the text in the middle of the page and change it to “To join our kid’s survey panel, have your Mom or Dad call (800) 555-1234.” Click OK to save the edit.

Apian NetCollect 4.0 User Guide
Chapter 7 - Working with Pages and Skips 124January 15, 2007
Skipping past the e-mail address
All of that was just prep work for the skip itself. While you can make changes to the number of pages after skips are in place, it’s generally easi-est to get the page order set and then set the skip/branch logic.
1. In the Document menu, select Skip Patterns.
2. Click on Page 8: Demographics, then click the Skip radio button.
3. From the upper-left drop-down list, select Q33: Age.
4. Check the box Require Answer to question.
5. In the left-hand list, click on 1 to Next on Under 13.
6. In the right-hand list, select Page 10: Kids Panel.
7. Click OK. Notice the skip has appeared in the summary list.
Skipping past the Kids Panel page
When you look in the summary list, note that the E-mail page comes just before the Kids Panel page. We don’t want all the people over age 13 to see that notice, so we need to skip them past the Kids finishing page.
There are two ways we can do this. We can use the GoTo setting to send everyone who goes through page 9 ahead to Page 11, or we can use a Skip based on the earlier Age question to jump everyone who didn’t mark the first scale option ahead. The GoTo is simpler in this case, so that’s what we’ll use.
1. Select Page 9: E-mail and click the GoTo radio button.

Apian NetCollect 4.0 User Guide
Chapter 7 - Working with Pages and Skips 125January 15, 2007
2. Select Page11: Thanks from the list
The Exit survey completed option is there for when you want to send respondents to a URL outside the NetCollect pages when they finish. Handing Data to Other Systems on page 241 walks you through that feature.
3. Click OK to save the GoTo.
4. Check your screen against this one to make sure you have all the skips and branches set:
5. Click OK to close the Skips and Branches dialog.
6. Save your SurveyPro file.
If you got lost along the way, there’s an End sample file for this tutorial.
To see the skips in action, go to:
http://apian.com/support/tutorials/
You can also publish your file to your own server (see page 295) or a QuestionWeb Demo folder (see page 315).
As respondents go through the survey, they can back up and change answers on questions which drive skips. NetCollect will remember the answers for both paths until they finish the survey, at which point the data saved will only be their final path.

Chapter 8 - Dynamic Questions and Text 126January 15, 2007
Chapter 8R E F E R E N C E Dynamic Questions and Text
One of the strengths of Web surveys is they minimize data handling. Pages and Skips on page 99 showed some of the ways to increase data accuracy by tailoring surveys at the page level. This chapter covers options within individual question tiles, such as randomizing scale options and setting required questions or formats.
Chapter Contents:
Rearranging Items in Scales and Grids . . . . . . . . . . . . . . . . . 127Randomizing Unordered Scales and Grid Rows . . . . . . . 127Manually Rearranging Unordered Scales . . . . . . . . . . . . 128Hiding Scale Options and Grid Rows . . . . . . . . . . . . . . . 128Flipping Ordered Scales . . . . . . . . . . . . . . . . . . . . . . . . . 129Applying Scale Layouts to Selected Questionnaires . . . 130Question Dialog’s Advanced Options Tab . . . . . . . . . . . . 131Grid Dialog’s Rows Tab . . . . . . . . . . . . . . . . . . . . . . . . . 133Grid Dialog’s Answer Entries Tab . . . . . . . . . . . . . . . . . . 133
Answer Tests . . . . . . . . . . . . . . . . . . . . . . . . . . . . . . . . . . . . 134NetCollect Answer Tests Dialog . . . . . . . . . . . . . . . . . . . 136
Using Hidden Fields . . . . . . . . . . . . . . . . . . . . . . . . . . . . . . . 137Piping Answers Forward in a Survey . . . . . . . . . . . . . . . . . . . 137Repeating Questions Within in a Survey . . . . . . . . . . . . . . . . 138

Apian NetCollect 4.0 User Guide
Chapter 8 - Dynamic Questions and Text Rearranging Items in Scales and Grids 127January 15, 2007
Rearranging Items in Scales and Grids
Sometimes you’ll want respondents to see items in random order to mini-mize order biases or fatigue effects on the database overall. Sometimes different versions of a questionnaire require options to be in a different pre-set order—or even a sub-set of options. SurveyPro and NetCollect have a few tricks for rearranging scales and grids. Following are the changes you can make, and then the three dialog screens you’ll use to make the settings.
Randomizing Unordered Scales and Grid Rows
NetCollect creates a randomized order for each respondent going through your survey. Here are a few nuances of the randomization:
• It can be applied to any unordered scale, whether laid out with checkboxes/radio buttons, or in a drop-down list.
• Within a grid you can randomize either the rows or the scale(s), but not both at the same time.
• Other and Explicit N/A options created as part of the scale structure (not as regular scale labels) will always appear at the end of the scale.
• If you use grid row or scale headings, items will randomize between headings. The headings themselves will stay in the original order.
• Autonumber on grid rows will maintain proper order even as the items within the rows are rearranged.
• The random order is saved for each respondent, so as they go forward and back their scales and grids will appear to be fixed.
• Items of the same length, such as 6 point scales or grids with 6 rows, will share a random order. This means that if you repeat scales or grids through your survey, they too will appear in a consistent order for the respondent. If you prefer each grid be in a different order, rearrange the items in each grid. You can use Question Groups to create a consistent order for reports.
For a question’s scale 1. In the Question’s Advanced Options tab (see page 131) set the Ordering to Randomize.
For a grid’s scale(s) 1. In the Grid’s Answer Entries tab (see page 133), select the Scale Column in the upper-left corner that you want to be randomized
2. At the lower-left corner, set its Entry Order to Randomize.

Apian NetCollect 4.0 User Guide
Chapter 8 - Dynamic Questions and Text Rearranging Items in Scales and Grids 128January 15, 2007
For grid rows 1. In the Grid’s Rows tab (see page 133) mark the box in the lower-right corner to Randomize Each Respondent’s Order.
Manually Rearranging Unordered Scales
If a survey has evolved over time, new options may have been added at the end of the scale list to preserve ongoing data collection. In this case, you might want to drag those new scale items higher in the list.
1. In the Question’s Advanced Options tab (see page 131) set the Ordering to Drag & Drop List Above.
2. As with similar lists in SurveyPro, click on the gray row number in the left column.
3. Once the row is highlighted, click on the gray number again and drag the item up or down until you see a red insert line between the items where you’d like to appear.
Note: This only affects the questionnaire(s) in which you’re making the layout change.
If you want the underlying scale structure to have a new order, first make sure none of the surveys in the SP4 file are collecting data (see The Best Way to Mangle Survey Data on page 14 for why). Then edit the scale and do the same drag-and-drop method to adjust the order of its items. If you do a drag-and-drop, SurveyPro will keep track of the data in each bin as you rearrange the scale. Never simply re-type labels to change order in a file which contains data.
Similarly, if you’re only interested in having the reports in a different order, see Rescales in the SurveyPro documentation.
Hiding Scale Options and Grid Rows
This is generally only an issue when working in multiple questionnaire SurveyPro files, where surveys have evolved over time or are being tai-lored for particular audiences.
1. In either the Question’s Advanced Options tab (see page 131) or Grid’s Rows tab (see page 133) check the Hide box next to any items you do not want to appear.
You can hide items at the same time you’re selecting one of the Ordering options. This does not re-order the database’s scale or question number-ing, it just keeps items from showing on selected documents.

Apian NetCollect 4.0 User Guide
Chapter 8 - Dynamic Questions and Text Rearranging Items in Scales and Grids 129January 15, 2007
Flipping Ordered Scales
Getting a grip on all the data and reporting nuances is a little convoluted, so it’s best to read this conceptual portion rather than jump ahead to the clicks. Let’s start with a typical ordered checkbox scale as it appears in the scale definition dialog:
By default, Strongly Agree will appear as the first option on the survey, either under a question or as the first scale option column in a grid.
The first column in the scale definition, the gray numbers, is the internal box ID. This is used to store the data in SurveyPro and as the default value for data imports and exports—including piping values in and out on your Web server (see page 199). The box ID is also used to calculate the median in reports. Within the scale definition dialog, this is always in ascending order from one.
The last column, Val, is the value used in calculating means and standard deviations in reports. Right now, this scale is set as Ascending from 1 by 1, which produces values that match the box number. With this setting, a mean and median would be fairly similar numbers in your report.
So given this combination of layout and reporting defaults, if we want Strongly Agree to be the first option in the layout, then we end up with a “good” mean being a low number, which is not necessarily intuitive in reports.
One way to address this is to set the scale definition so the values are instead Descending from 1 by 1:
Now you can see the Val column is the opposite of the box ID column. This gets us Strongly Agree as the first box on layouts and it will produce

Apian NetCollect 4.0 User Guide
Chapter 8 - Dynamic Questions and Text Rearranging Items in Scales and Grids 130January 15, 2007
a mean for Agree of 4.0. However, the box ID and internal data still iden-tify Agree as 2, which means any data transfers will not “match” the report values, and a median of Agree would be reported as 2.0, not 4.0.
To get everything to match up with the “high” label and value first in the list, we just rearrange things a touch.
1. Define your scale in the opposite order of how you want it on screen, but matching how you want the data and report values to be saved:
2. In either the Question’s Advanced Options tab (see page 131) or Grid’s Answer Entries tab (see page 133) set the scale’s Entry Order to Reversed.
That’s it! It’s very simple to execute once you understand what’s going on with the data and reports. The same approach can be used to lay out rat-ing scales as 5 to 1 or 3 to -3.
Applying Scale Layouts to Selected Questionnaires
Because all these scale and grid changes are just to the layout and not to the underlying database questions, you can apply them selectively to your questionnaires. This means that if you have surveys tailored to particular clients or which change over time, you can evolve the grids and scales in just one or two questionnaires.
If you are in a multiple questionnaire SurveyPro file, the first tab of the question and grid dialogs will start showing this control:
SurveyPro defaults to editing the question or grid everywhere, which gives you access to all the controls including the scale selection, question text, etc. If you switch the setting to Selected tile(s), then the question and scale controls will be grayed out and you’ll be left with the layout attributes.

Apian NetCollect 4.0 User Guide
Chapter 8 - Dynamic Questions and Text Rearranging Items in Scales and Grids 131January 15, 2007
Caution: Be extremely careful making changes to questionnaires SP4 file while any of that file’s surveys are on a server collecting data. If you were to add a grid item, then all the data on the server would now be “off” a field even if it was added to a separate document. See The Best Way to Mangle Survey Data on page 14 for more.
Question Dialog’s Advanced Options Tab
This dialog is used to set both layout preferences and answer tests. Some controls will be grayed out depending on the scale type—if something you want to mark is unavailable, check the scale definition.
Checkbox in Tile Order Lists the boxes as they will appear in the questionnaire—before one of the Ordering options is applied. Note the list does not include either the Other or Explicit N/A labels which may have been added as part of the scale definition. Those two will always appear at the end of the scale.
Hide Removes a scale option from the survey’s layout. See page 128.
Break For scales laid out in multiple columns below a question, checking a Break box will insert a column break.
Other Blank Full Width If a scale is laid out below a question in multiple columns, by default the Other blank runs the full width of the tile, across all columns. By un-

Apian NetCollect 4.0 User Guide
Chapter 8 - Dynamic Questions and Text Rearranging Items in Scales and Grids 132January 15, 2007
checking this box, you can instead have SurveyPro use a shorter Other blank which only goes across one column.
NetCollect n/a box In HTML, once you select a radio button you can change your answer but you can’t clear the question. In the Document Properties dialog’s Web Page tab, there’s an option to include a N/A which acts to NetCollect like a missing answer. This control here in the Question dialog lets you either go with the Document Properties setting (Auto) or override that to include or remove the radio for this particular tile. See Key Concept: Not Applicable and No Answer on page 63.
Ordering This changes the order in which scale options appear on the survey—not the underlying scale’s definition. Per Scale simply matches the scale defi-nition. Reversed flips the scale from the definition, and is most commonly applied to ordered scales (see page 129). Randomize can be applied to any unordered scales (see page 127). Drag & Drop is again an option for unordered scales (see page 128).
Boxes Checked/ Respondent must answer
In addition to the Answer Tests dialog, you can set required questions in the individual tiles. See Answer Tests on page 134.

Apian NetCollect 4.0 User Guide
Chapter 8 - Dynamic Questions and Text Rearranging Items in Scales and Grids 133January 15, 2007
Grid Dialog’s Rows Tab
If your grid definition only shows two tabs, go to the General tab and change the Setup Level to Advanced option screens. This section only covers NetCollect layout aspects—see the SurveyPro documentation for full coverage of Grids.
Hide Removes a grid row from the survey’s layout. See page 128.
Randomize Rearranges the grid rows for each respondent. See page 127.
Grid Dialog’s Answer Entries Tab
If your grid definition only shows two tabs, go to the General tab and change the Setup Level to Advanced option screens. This section only covers NetCollect layout aspects—see the SurveyPro documentation for full coverage of Grids.
All the layout settings in this screen are based on the scale currently selected in the upper-left corner.

Apian NetCollect 4.0 User Guide
Chapter 8 - Dynamic Questions and Text Answer Tests 134January 15, 2007
Entry Order This changes the order in which scale options appear in their grid column. Per Scale simply matches the scale definition. Reversed flips the scale from the definition, and is most commonly applied to ordered scales (see page 129). Randomize can be applied to any unordered scales (see page 127). You can randomize multiple scales within one grid, but you cannot randomize both scale columns and grid rows at the same time.
Answer Tests
You can have your Web server check the respondent’s answers before accepting them—of course, don’t forget tip #4 on page 10 about the cost of required answers.
When a respondent leaves a required answer blank or uses an invalid answer, NetCollect will send the page back to them with an error notice at the top of the screen and a question-specific message above the problem entry. You can tailor the text of these messages to each question or go with more generic errors which refer the respondent to directions you’ve placed in the question text. See Web Page Tab for Margins and Backgrounds on page 61 to change the colors used in the errors.

Apian NetCollect 4.0 User Guide
Chapter 8 - Dynamic Questions and Text Answer Tests 135January 15, 2007
With answer tests you can check for:
• An answer a question
• Formatting of typed-in answers
• Minimum and maximum number of boxes in a multiple answer checkbox scale
• Minimum and maximum dates and numbers (limits are set in scale definition)
• Following a ranking grid’s rules about skipping levels and ties
• Forced sum total on a grid column
• Minimum/maximum number of questions answered in a grid column
When your question includes an Other blank or Explicit N/A defined in the scale, NetCollect automatically creates JavaScript to manage those entries. For example, if a respondent had marked two boxes in a multiple answer and then decided that None of the Above was a better answer (Explicit N/A), NetCollect would clear the first two boxes they marked. Similarly, when a respondent starts typing in an Other blank, the Java-Script will switch the radio button to Other or mark the checkbox for Other. If a respondent has JavaScript disabled, an automatic server-side check will check for consistency, returning the page if the respondent’s answers don’t make sense or violate a limit on the number of boxes to mark.
You can set required answers tile-by-tile if you prefer or you can use the Answer Tests dialog to do so all at once. Any settings you’ve made in either individual questions or skip/branch definitions will be reflected here, and vice-versa.

Apian NetCollect 4.0 User Guide
Chapter 8 - Dynamic Questions and Text Answer Tests 136January 15, 2007
NetCollect Answer Tests Dialog
To set up Answer Tests: 1. Web Survey Setup dialog
2. Edit the Answer Tests
Must Answer Test With single answer scales, the test is for any answer (other than a docu-ment level NA). Multiple answer checkbox scales and grid columns allow you to specify a range of answers to be marked. If your scale includes an Other blank and the respondent enters text without marking the radio or box, the scripts will mark the Other option before doing the must answer check.
Enable this check By default, SurveyPro checks any answer formats it can while respon-dents are submitting their answers. You can turn this off and allow data to come through to the SDH, but this can cause answers or records to be rejected on import.
Error Line You can tailor the text to each question/test, or you can use a generic message which refers to entry instructions in the question text.
Answer Test For number scales and patterns such as e-mail addresses and Zip codes, you can check the formatting with or without requiring the question be answered. This is also where question grid ranking and forced sum enforcement appears. Again, you can use a generic error message or cus-

Apian NetCollect 4.0 User Guide
Chapter 8 - Dynamic Questions and Text Using Hidden Fields 137January 15, 2007
tomize it for each question. Tests for formatting do not apply to checkbox and rating scales so they’ll be grayed out for these questions.
Top of page notice When a survey page is re-loaded for correction, this notice will appear at the top of the page in addition to the errors above individual questions. The same text is used throughout the survey for consistency. You can change the color used in the Document Properties Web Page tab.
Using Hidden Fields
Hidden fields have two primary applications:
• Setting static information, such as the language version of a survey or other identifier
• Receiving data in certain pipe-in scenarios (see page 201)
Hidden fields act like any other question, including being used to trigger skips and branches. And just like other questions, the scale selection is critical for NetCollect to properly handle your data on the server and SurveyPro to manage it in reports. Don’t put field tests on hidden fields—it’s very confusing for a respondent to be asked to correct a question they were never asked.
To hide a question 1. In the Question dialog, select the Scaled Entry Tab
2. Set Answer Entry Layout to No Visible Entry
Piping Answers Forward in a Survey
Imagine a customer survey where you ask respondents their favorite fea-ture. On the next page you might follow up with the generic question “Why is that feature your favorite?” With an answer pipe, you can copy forward their response and ask instead “Why is Pause/Resume your favorite feature?”
Answer piping can be inserted in any instructions or question text within SurveyPro. Just type a variable in this format including the underscores:
_ANSWER_Q27_
This will pipe forward the label(s) of a checkbox scale, rating number, or text in a written answer. To pipe forward the text in an Other blank, just add a capital “O” after the question number:
_ANSWER_Q27O_
Apian NetCollect 4.0 User Guide
Chapter 8 - Dynamic Questions and Text Repeating Questions Within in a Survey 138January 15, 2007
Because you’re manually typing the question number, you may need to update the variables if you add or delete questions. If you’re not certain what question number to insert there, you can use the Database Ques-tions node of the Object Tree. It will highlight the Q number for the cur-rently selected question.
Repeating Questions Within in a Survey
SurveyPro assumes that each question—as defined by the internal Q number and solitary database field—exists only once in a survey. Some-times you’ll design questionnaires which ask the same question text more than once, perhaps for different divisions, but you want to retain distinct answers for each of those fields.
Normally when you copy paste a question within one SurveyPro docu-ment, it will be assigned a new Q number and have the default report label “copy of…” With NetCollect, you can instead paste in another instance of the same Q number/database field. See NetCollect’s Internal Data Format on page 197 for more about Q numbers.
Important This is a potential way to corrupt your data. If you ask the same respondent the same question more than once, you won’t be saving a data point for each time you ask—you’ll be overwriting their one answer.
Therefore, this should only be used in skip scenarios where it is not possi-ble for one respondent to see the same question more than one time. Applications include:
• Minimizing the number of pages a respondent sees by mixing questions on their distinct skip paths rather than frequently diverging and converging based on distinct and shared questions.
• Multiple language surveys behind a password login. This requires editing the other language paths in an HTML editor to replace the question text (see page 355).
• Sub-setting long grids or scales in conjunction with the Hide feature (see page 128). For example, on one page you can ask an employee their division. This could then skip to one page for each of the 6 divisions, each of which has a different sub-set of the same 150 item organizational code scale.
When working with this feature, it is strongly recommended to keep the Database Questions node of the Object Tree open, as it will keep you focused on the underlying Q codes. It also helps to have clean report labels for your questions.

Apian NetCollect 4.0 User Guide
Chapter 8 - Dynamic Questions and Text Repeating Questions Within in a Survey 139January 15, 2007
To enable this feature: 1. From the Tools menu, select Options
2. Check Allow more than one tile in a questionnaire to refer to a shared question at the bottom of the dialog and OK.
The standard copy and paste shortcuts will still create new questions, not additional instances of the same question, but now you’ll see a couple more controls.
Repeating a single question 1. Select the question tile and Copy it as you normally would
2. Click where you want to insert the clone
3. From the Edit menu, select Paste Same Questions
This works well when you have question sets which are mostly different between skip segments. In other cases, you may have virtually identical pages and it makes more sense to copy the entire page of questions and then make edits.

Apian NetCollect 4.0 User Guide
Chapter 8 - Dynamic Questions and Text Repeating Questions Within in a Survey 140January 15, 2007
Repeating a page of questions
1. Bring up the Page Edits dialog (Document menu).
2. Select the page you want to replicate and click Copy page x using same questions.
3. Close the Page Edits dialog and modify the new pages as needed.
If you need to repeat most of the questionnaire for each respondent, see also Example 4: Looping the Respondent Through Questions on page 194.

Chapter 9 - Adding Dynamic Elements 141January 15, 2007
Chapter 9T U T O R I A L Adding Dynamic Elements
This tutorial adds answer tests, randomized grids, and answer piping to a survey.
In this tutorial you’ll learn how to:
Randomize the rows in a gridRandomize the options in a scaleAdd a None option to a scaleSet required fields and error noticesPipe an answer forward in text
The tutorial assumes you are already familiar with:
Adding questions, grids, and scalesWorking with pages and skips
Tutorial Notes
General You can save your file and take a break any time you’re in the main document screen.
Tutorial Files Are in your SurveyPro Samples folder, by default under:C:\Program Files\Apian Software\SurveyPro 40\
On Finishing This tutorial has:• An “End” sample file• A live version at http://apian.com/support/tutorials/

Apian NetCollect 4.0 User Guide
Chapter 9 - Adding Dynamic Elements 142January 15, 2007
Dynamic question elements can both improve the respondent experience and increase data quality. Like skips and branching, they’re a place where you can tailor a survey to each respondent, but without their being aware they’re singled out in any way.
1. Start SurveyPro, enter your initials, and Open the sample file NC4 Tutorial - Dynamics.SP4.
2. When prompted, click Yes to open a copy, and save as YourName Dynamics Tutorial.SP4.
3. Close the File History dialog.
4. If needed, select the document tab 1: Widget Web and adjust the Zoom to your preference.
Take a minute to scroll through the survey. If you completed the Skips tutorial (on page 114), the basic design will be familiar. On the product-specific rating grids, you’ll see the rows bracketed by letters. The first let-ter is a SurveyPro Autonumber, which will maintain proper order after randomization. The second letter is a static portion of the question text, there only to illustrate the randomization when you see the survey on a server.
Adding a page to ask about Other responses
Right now, the survey follows-up with detail questions when you mark a specific brand, but doesn’t ask respondents about their “Other” brand choice.
1. Bring up the Edit Page List dialog .
2. Select P6: Brand detail - Gizmo and click Copy page 6 and its tiles.
3. Select P7: Comments in the list and click Insert copied page 6 before 7.
4. With the new P7 still selected, click Edit Properties.
5. Change the Description to “Brand detail - Other” and click OK.

Apian NetCollect 4.0 User Guide
Chapter 9 - Adding Dynamic Elements 143January 15, 2007
6. Click OK again to save the Page List changes.
Piping the Other text forward
1. Scroll so Web Page 7 Brand detail - Other is visible on your screen.
Our newly copied page still says “Gizmo Widgets” so we need to update it to match the Other content. We could just type “Other” in place of “Gizmo” but it’s much better to pipe the respondent’s actual answer for-ward. Piping has a few meanings in surveys—in this case we’re referring to making a respondent’s answer appear in later in the survey.
2. In the Object Tree, expand the Database Questions node (if it’s not visible, turn it on ) and scan through the list to check which one asks about the brands they know.
3. Double-click on Page 7’s Gizmo Widgets text graphic.
4. Change the Text Content to “Other Widgets: _ANSWER_Q2O_” where the last portion is Q2 and a capital letter “o” for Other.
Be sure to include the leading and ending underscores “_” as this strict format is required for the server scripts to see the piping command and insert the respondent’s answer.

Apian NetCollect 4.0 User Guide
Chapter 9 - Adding Dynamic Elements 144January 15, 2007
With this text, the respondent will see as the heading “Other Widgets: whatever the respondent types”. If instead we had simply replaced “Gizmo” with the answer pipe command, a respondent who typed “Acme Widgets” as the Other brand would then see “Acme Widgets Widgets.” Any time you’re piping a field the respondent types, you’ll want to make the text as tolerant as possible, including allowing for plurals and empty responses.
5. Click OK to save the heading.
Fixing up the branch for our new page
Since we added a page for Other responses, we need to update the Branch which includes the detail pages.
1. From the Document menu select Skip Patterns.
2. Select Page 3 and click Edit.
3. On the left hand side, select none included on Other, and on the right hand side select Page 7: Brand detail - Other.

Apian NetCollect 4.0 User Guide
Chapter 9 - Adding Dynamic Elements 145January 15, 2007
4. Click OK to save the Branch, and OK again to close the Skips and Branches dialog.
Randomizing grid rows
NetCollect will randomize boxes in an unordered checkbox scale and rows in a grid. It creates and saves a random order for each respondent, so if they go forward and back through a survey they won’t see items re-scramble themselves.
Our survey has several grids. The one on Page 3 could be randomized, but we manually typed that “Other” label at the end, and we don’t want it to end up in the middle. A trick for that it to break Other into its own grid, but instead let’s just focus on the detail page grids.
1. Still on Web Page 7 Brand detail - Other, double-click on the rating grid.
2. First of all, we need to clean up the Report Label—change it to “Brand rating - Other.”
3. Select the Rows tab.
SurveyPro’s grid dialog has two modes, a quick setup level and advanced settings. In your survey’s grids you’ll need to change to Advanced on the General tab to access the randomize controls.
4. At the bottom of the dialog, turn on Randomize Each Respondent’s Order.
5. Click OK to save the changes.

Apian NetCollect 4.0 User Guide
Chapter 9 - Adding Dynamic Elements 146January 15, 2007
That took care of one of the grids, but we’ve got three more brand detail pages in this survey.
6. Turn on Randomize for the grids on pages 4-6.
Because the grids all have 5 rows, not only will the respondents see the same order as they go forward and back, they’ll also see every instance of that grid in the same order.
Adding a None box to a scale
1. Scroll up to Web Page 3 Brands/Shopping criteria.
This is an important question in the survey, so we want to make sure the respondents mark an answer. Of course while some respondents may intend to start using widgets within 6 months, they may not have started researching brands yet so we need to give them a None option.
2. Double-click on the brands question.
3. Select the Scaled Entry tab.
4. Modify the scale.
5. Under the option for an Other blank, mark Add Explicit N/A.
We could have just typed “None” as box number 4, but then it would have been inserted above the Other blank. We’d also then have the same prob-lem as with our ranking grid, in that randomizing the scale would shuffle the None option. By using SurveyPro’s special Explicit N/A, we’re creat-ing a box which will always appear under the Other blank, and which also

Apian NetCollect 4.0 User Guide
Chapter 9 - Adding Dynamic Elements 147January 15, 2007
has some special logic where it won’t let the respondent mark this box in addition to other items—even in multiple answer scales like this.
6. Click OK to save the scale and OK again to close the Question dialog.
Right now the label is “N/A” which is OK, but let’s customize it a little.
7. Bring up Document Properties .
8. Select the Web Page tab.
9. At the bottom of the screen, change the label for Explicit No Answer N/A to “None”.
10. Click OK to save.
Now our scale definition is complete, but we can add a couple more fea-tures.
Setting limits on a multiple answer scale
Sometimes you’ll want to limit the number of boxes a respondent can mark, such as requiring they pick only their top 3 choices. In addition to this upper limit, you can set a minimum number of boxes they must mark.
1. Double-click on the brands question.
2. Select the Advanced Options tab.
The last setting is the one we want to change. It currently allows respon-dents mark none of the boxes up to all of the boxes.
3. Set the Minimum to 1.
We can leave the maximum on All for our shoppers who do a lot of widget shopping. If we were providing a list of 20 brands, each with a detail page, we’d probably want to change the question to “Mark up to 3 brands that you are most familiar with” to keep the survey length tolerable.
Randomizing a question’s scale
NetCollect will randomize unordered scales, either single or multiple answer, in both stand-alone question tiles and in grid columns (just not grid rows and columns at once). As with the grids, it takes only a moment to turn this on—especially since we’re already in the right tab.
1. Set the Ordering to Randomize.
2. Click OK at the “Are you sure” confirmation.

Apian NetCollect 4.0 User Guide
Chapter 9 - Adding Dynamic Elements 148January 15, 2007
Before we save the question, we’ve got one more step.
3. Select the Question tab.
4. Click at the end of the Questionnaire Text, press Enter, and type “(Mark at least one box)”
5. Click OK to save the question.
Setting required answers and error notices
In addition to making a question required in its Advanced Options tab, you can also set required questions and formats in the Answer Tests dia-log. This dialog is where we can also tailor the error notices respondents will see when they answer incorrectly.
1. Bring up the Web Survey Setup dialog .
Under Answer Tests, you can see a summary of the fields which are being tested.
2. Click the Edit button next to Answer Tests.
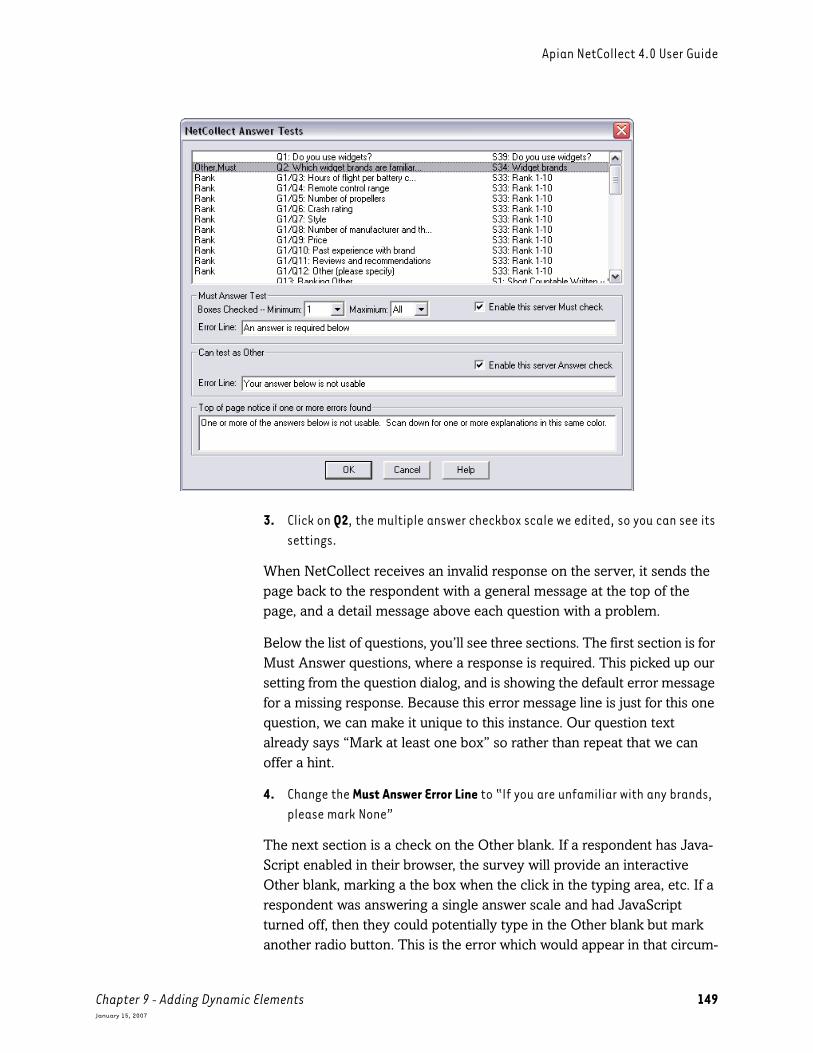
Apian NetCollect 4.0 User Guide
Chapter 9 - Adding Dynamic Elements 149January 15, 2007
3. Click on Q2, the multiple answer checkbox scale we edited, so you can see its settings.
When NetCollect receives an invalid response on the server, it sends the page back to the respondent with a general message at the top of the page, and a detail message above each question with a problem.
Below the list of questions, you’ll see three sections. The first section is for Must Answer questions, where a response is required. This picked up our setting from the question dialog, and is showing the default error message for a missing response. Because this error message line is just for this one question, we can make it unique to this instance. Our question text already says “Mark at least one box” so rather than repeat that we can offer a hint.
4. Change the Must Answer Error Line to “If you are unfamiliar with any brands, please mark None”
The next section is a check on the Other blank. If a respondent has Java-Script enabled in their browser, the survey will provide an interactive Other blank, marking a the box when the click in the typing area, etc. If a respondent was answering a single answer scale and had JavaScript turned off, then they could potentially type in the Other blank but mark another radio button. This is the error which would appear in that circum-

Apian NetCollect 4.0 User Guide
Chapter 9 - Adding Dynamic Elements 150January 15, 2007
stance, but since it’s not really an issue for us, we can leave it be. If you play around with the live “End” version of this file, the Other blank enforcement may become clearer.
The last section is the general notice displayed at the top of each page. In most cases, the generic text is fine because you want the message to work with a variety of problems.
We’re done with our brands question. Following it in the survey is our ranking grid, next to whose questions you can see “Rank” marked. Net-Collect picked up our scale definition which prohibited re-using ranking levels.
5. Scroll through the list of questions until you reach the demographics at the end.
Next to the Zip/Postal Code and E-mail questions you can see a test enabled. These don’t say “Must” like Q2, which means that SurveyPro is checking for a valid pattern in any answers it receives, but will let respon-dents leave the question blank.
6. Select Q42: E-mail.
Now the top Must Answer section is mostly grayed out, but we have the an opportunity to change the pattern error.
7. Change the Pattern Error Line to “Enter your address in the format [email protected]”
8. Select Q41: US Zip code.
The question text already specifies a US Zip or Canadian postal code, so there’s not much elaboration we can do in an error message. In cases like this the default “not usable” message works, so we’ll leave it be. However, we do want to make one change here: setting this as a required answer.
9. Turn on Must Answer Question.
Nothing says error messages can’t be more than information, so let’s put a plea in ours.
10. Change the Must Answer Error Line to “Please enter your location so we know where to open new chapters!”
While you can’t see it in this list, the question text here actually says “required.”
11. Click OK to save your Answer Tests, and Close the Web Survey Setup dialog.

Apian NetCollect 4.0 User Guide
Chapter 9 - Adding Dynamic Elements 151January 15, 2007
12. Save your SurveyPro file.
If you got lost along the way, there’s an End sample file for this tutorial.
To see the randomization and answer tests in action, go to the live sample survey at:
http://apian.com/support/tutorials/
You can also publish your file to your own server (see page 295) or a QuestionWeb Demo folder (see page 315).

Chapter 10 - Login Options 152January 15, 2007
Chapter 10R E F E R E N C E Login Options
This chapter is divided into two main sections. The first, Understanding Logins in NetCollect on page 153, takes you through the overall concepts for different types of logins and passwords. Then Login Dialog on page 158 goes through the dialog controls for the different login types. Options for pausing and resuming surveys are covered after, as are sections on creating passwords and updating live surveys.
Chapter Contents:
Understanding Logins in NetCollect . . . . . . . . . . . . . . . . . . . 153Key Concept: Login Terms . . . . . . . . . . . . . . . . . . . . . . . . . . 153
Open Access . . . . . . . . . . . . . . . . . . . . . . . . . . . . . . . . . 154Anonymous but Restricted . . . . . . . . . . . . . . . . . . . . . . 155Unique Passwords and Names + Passwords . . . . . . . . . . 156Unique Password File Built on the Fly . . . . . . . . . . . . . . . 157Passing Login Information via the URL . . . . . . . . . . . . . 158
Login Dialog . . . . . . . . . . . . . . . . . . . . . . . . . . . . . . . . . . . . 158No Password Required — Open Access . . . . . . . . . . . . . . 159Shared Password(s) — Anonymous but Restricted . . . . . 160Unique Respondent ID File . . . . . . . . . . . . . . . . . . . . . . 161Respondent Name and Password File . . . . . . . . . . . . . . 162Outside application launch passes unique ID . . . . . . . . 165Linking Passwords and Resumes to a Question . . . . . . . 166Layout Tab . . . . . . . . . . . . . . . . . . . . . . . . . . . . . . . . . . 167Notice Text . . . . . . . . . . . . . . . . . . . . . . . . . . . . . . . . . . 168
Pausing and Resuming Surveys . . . . . . . . . . . . . . . . . . . . . . 169Login Dialog Resume Controls . . . . . . . . . . . . . . . . . . . . 169
Creating Password Files . . . . . . . . . . . . . . . . . . . . . . . . . . . . 170Legal Values for Passwords . . . . . . . . . . . . . . . . . . . . . . 171Understanding the NetCollect Special Passwords . . . . . 171Make PIN File Dialog . . . . . . . . . . . . . . . . . . . . . . . . . . . 172
Updating Live PIN Files . . . . . . . . . . . . . . . . . . . . . . . . . . . . 173

Apian NetCollect 4.0 User Guide
Chapter 10 - Login Options Understanding Logins in NetCollect 153January 15, 2007
Understanding Logins in NetCollect
A survey login is as much a part of your questionnaire design as the scales you choose. Your choice will impact:
• Security by letting you restrict survey access and/or multiple submissions
• Respondent convenience, by allowing them to pause a longer survey and finish it later
• Real and perceived anonymity and compliance with privacy law
• Data quantity, by letting you merge data from other sources based on the password entered
Most of the login types are part of the passwords tutorial on page 175.
Key Concept: Login Terms
LoginA login is how a respondent enters your survey. You may require a password or user name, or leave the login unrestricted.
Logins may be done manually by a respondent typing and clicking, or you can create URLs with login information embedded within them (see page 187).
Pause and ResumePausing a survey saves all the answers a respondent has marked and brings up a page with instructions on how they can resume the survey later to finish. All NetCollect logins allow respondents to pause, with the specific methods depending on whether it’s an anonymous or unique password survey. You can also disable the pause function if you want respondents to finish in one sitting (see page 169).
PIN FileSome surveys only use one or two passwords, keeping random visitors from completing the survey. At other times, you may have hundreds or hundreds of thousands of values. NetCollect surveys use a special .PIN file format for checking passwords and managing status (not started, in progress, done). The file may include values you generate from SurveyPro, or it could be a conversion of values from another source such as customer IDs (see page 170).

Apian NetCollect 4.0 User Guide
Chapter 10 - Login Options Understanding Logins in NetCollect 154January 15, 2007
Open Access
Open surveys use no passwords, beginning simply with a “Start” button on the Welcome page. They can also be used to set up surveys with no Welcome page at all, as in this Mini Poll. See the dialog controls on page 159 in addition to the pros and cons listed here.
CookiesWe’re all familiar with bookmarking a page or adding it to our Favorites (same function, different browsers). A cookie acts very similarly to a bookmark, but is created and loaded by a script.
With NetCollect, when the respondent loads the first page of a survey a bit of server-side scripting creates a small file with the survey URL and their session ID and writes the file to the respondent’s temporary browser files. The next time the respondent comes to the first page of the survey, the script checks to see if a cookie exists on their system, and if so, welcomes them back with their partially completed survey.
Cookies are very handy at times, but you should never count on them as cookies can be blocked or deleted in a respondent’s browser. Cookies can also create confusion when your respondents are sharing computers, as they may be welcomed back to someone else’s survey. See Pausing and Resuming Surveys on page 169 for options that you can use in addition to or instead of cookies.
Key Concept: Login Terms

Apian NetCollect 4.0 User Guide
Chapter 10 - Login Options Understanding Logins in NetCollect 155January 15, 2007
Anonymous but Restricted
In this case, respondents will enter one or more global, shared, or com-mon passwords. You can use anywhere from one value to several thou-sand, but each password will be used many times by many respondents. See the dialog controls on page 160.
Pros It is completely anonymous, making it a good solution for sensitive surveys.
It allows for “viral” or “snowball” respondent contact, as you can reach out to a few respondents and they can forward the URL to their friends and colleagues.
Cons Respondents may submit multiple copies of the survey, particularly with short or high-involvement polls.
You can end up with a significant number of unqualified respondents, which is a problem if you’re offering compensation to each respondent. (Be sure to pair this with a response rate cut-off. See page 326.)
Resume Options
Respondents may pause and resume by bookmarking the pause page or adding it to their favorites. You can also have the server mark their system with a cookie (see page 154). You can also have the server issue the respondent an individual code that they can enter to finish later
Pros The survey is anonymous. However, unlike an open survey you’ll have to explain the confidentiality to respondents so they know the password(s) won’t identify them as an individual.
Even a single password will help restrict outsiders from accessing the survey.
If you can segment your population, such as new vs. repeat customers or divisions within a company, you can issue one password per segment. This will allow you to identify the groups in your analysis, as well as giving you the option of using the password to drive a skip pattern.
Cons As with open surveys, respondents may submit the survey multiple times.

Apian NetCollect 4.0 User Guide
Chapter 10 - Login Options Understanding Logins in NetCollect 156January 15, 2007
Unique Passwords and Names + Passwords
When you have a list of employees, students, members or customers, unique or individual passwords are a great option for administering a sur-vey. You can have respondents enter just a password or pair it with a user name for added security. For the values, you can generate passwords from within SurveyPro or use existing values such as customer IDs. See the dia-log controls on page 160 for single values, on page 162 for usernames and passwords, and on page 170 for information on creating password files.
Always have spare passwords! It is very easy to generate spares before the survey begins and then issue them to individuals who lose their password or groups who were missed in the original list (entire divisions are overlooked more often than you’d expect). Creating extra values at the beginning takes almost no work, compared to the several steps required to add values to a live survey (see page 173).
Resume Options
Respondents may resume via bookmark, cookie, and server issued ID as with open surveys. When a respondent resumes, you can prompt them for the password again for extra security, or have the system let them in without it.
Pros Respondents restricted to a single submission by default (can be changed to multiple surveys in sequence).
The status of each respondent is known (not started, in progress, finished), allowing you to send reminders just to those who have not yet completed the survey.
Because you can identify each individual, additional information such as their manager’s name or purchase history can be piped into the survey (see page 187) or merged into the SP4 database with a keyed import.
Cons The survey is not anonymous unless you use a third party such as a consulting firm and/or service such as SurveyHost to issue the passwords or remove them from the data.
Administering the survey is more complex than with global passwords.
Resume Options
Respondents can resume via bookmark and cookie if those are enabled. They may also resume simply by entering their original password again.

Apian NetCollect 4.0 User Guide
Chapter 10 - Login Options Understanding Logins in NetCollect 157January 15, 2007
Unique Password File Built on the Fly
This last option is designed for surveys driven by Web applications or databases such as e-commerce and service ticket systems. For an exam-ple, let’s consider at an e-commerce site where you want to measure satis-faction with the shopping experience. Your Web developer will program your shopping cart software so that the confirmation page includes a sur-vey link along with the normal order summary, or perhaps they’ll have the system issue an e-mail follow-up at the time of expected delivery.
The survey link could use any of the login options, but since you have a unique value in the order number, it’s a natural fit for individual pass-words. If the order numbers you issue are sequential, you could generate a password file in advance with enough values to cover expected sales for the next 6 or 12 months and use the standard Unique Respondent ID File login. However, if you aren’t sure what your sales will be or if your num-bers are non-sequential, pre-building a password file doesn’t work very well. An alternate approach is to have the survey build its password list on the fly, receiving a new password with each respondent. Whenever some-one clicks on a link to the survey, the system will:
• Check whether the password embedded in the link conforms to any pattern requirements
• Check whether the password value has been received already, in which case it will resume the respondent where they left off or let them know a finished survey was already received
• Add a new legal value to the list of known passwords
Note that this login option assumes the respondent will be clicking on a personalized survey link—there is no traditional Welcome screen where they type in a password. In addition to the password, this link could embed the customer’s name, order number, date, and other information you want to pass into the survey. See the dialog controls on page 165, and Embedded Surveys on page 187 for details on embedding data in URLs as well as other ways to pass information into surveys.
Pros No advance password generation is required, yet you can use a unique identifier that restricts respondents to a single submission.
Because you can identify each individual, additional information such as their name and order details can be piped into the survey (see page 187) or merged into the SP4 database with a keyed import.

Apian NetCollect 4.0 User Guide
Chapter 10 - Login Options Login Dialog 158January 15, 2007
Passing Login Information via the URL
In most cases, the respondent will manually enter a password into the first page of the survey. An alternative is to embed the password, as well as other values, in the initiating link. Constructing URLs with embedded information is covered on page 213.
Login Dialog
When you switch a document to HTML, the first page will indicate there is no login defined. The type of login is an integral part of your survey plan, so it’s a good idea to set it sooner rather than later. This will add to your database the question needed to collect a password, as well as giving you the right context for customizing buttons and error notices. Following are the controls for five main types of passwords, their common Pause/Resume controls (see page 169) and then the Layout tab (see page 167), and Notice Text tab (see page 168).
To set your login 1. Double-click on the buttons on any page in the survey
2. Select your Survey Login type in the upper-left section of the dialog
3. Set your Resume preferences
4. If using passwords, type the values or select a file, and create a target question for the values
Cons Surveys are generally not anonymous, though you could have your system issue unique IDs which are not later connected to any personally identifiable information.
Resume Options
Respondents can resume via bookmark and cookie if those are enabled, as well as by clicking their initial invitation link.

Apian NetCollect 4.0 User Guide
Chapter 10 - Login Options Login Dialog 159January 15, 2007
No Password Required — Open Access
This is, naturally, the simplest of the screens. It has no controls other than the resume options, which are covered for all login types on page 169.

Apian NetCollect 4.0 User Guide
Chapter 10 - Login Options Login Dialog 160January 15, 2007
Shared Password(s) — Anonymous but Restricted
With shared passwords you can use a single value to prevent unautho-rized access to the survey, or you can issue multiple codes to categorize respondents.
Type value(s) If you are using one or a couple values, you can type them directly into the dialog box separated by the “pipe” character | which is Shift+\. This allows you to use multiple passwords with spaces.
File of values When you have many values, such as store IDs, it’s often easier to create a PIN file than manually typing the values. Information about creating PIN files, either from your values or by having SurveyPro generate them, is on page 170.
Case Sensitive By default, the password tests are not case sensitive. If you activate this, it’s best to indicate this in the Label. Note that the Apian 4 and 5 digit val-ues are designed to not be case sensitive (see Understanding the NetCollect Special Passwords on page 171).
Shared Password Entry Label
The label built into the button block on the first page of the survey. Gener-ally this is brief—longer instructions can be inserted above the login as a text graphic.

Apian NetCollect 4.0 User Guide
Chapter 10 - Login Options Login Dialog 161January 15, 2007
Link Question For the passwords to be collected, you have to have a question for them in the SP4 database. Occasionally you’ll link the password entry to an exist-ing question (multiple survey files), or you can create a new field. See page 166.
Resume options Descriptions of the shared controls are on page 169.
Unique Respondent ID File
Use this option whenever each value in the PIN file represents one indi-vidual.
Respondent ID File This is the name and location of the PIN file which contains your pass-words. Have SurveyPro create a list of passwords, or convert an existing list of values into a SurveyPro PIN file. See page 170.
One-time use In most cases, this password type is used to limit respondents to a single submission, but you can also allow respondents to submit multiple times by turning off One-time use. Each time the respondent enters their pass-word they will be welcomed back with the survey they paused, or if there is no partial survey, they will be offered the opportunity to start a new sur-vey. If you want respondents to be able to start multiple surveys in paral-lel (rather than sequentially) use Shared Password(s) with a file.

Apian NetCollect 4.0 User Guide
Chapter 10 - Login Options Login Dialog 162January 15, 2007
Case Sensitive By default, the password tests are not case sensitive. If you activate this, it’s best to indicate this in the Label. Note that the Apian 4 and 5 digit val-ues are designed not to check for case.
Respondent ID Entry Label The label built into the button block on the first page of the survey. Gener-ally this is brief—longer instructions can be inserted above as a text graphic.
Link Question For the passwords to be collected, you have to have a question for them in the SP4 database. Occasionally you’ll link the password entry to an exist-ing question (multiple survey files), or you can create a new field. See page 166.
Resume options Descriptions of the shared controls are on page 169.
Respondent Name and Password File
If your respondents have a familiar user name and password, this is a con-venient way to give them access to the survey. It’s best to maintain consis-tent security for this information, so if your respondents usually enter their login via an encrypted page, have your survey also running under SSL.
If your respondents do not have a familiar username and password pair-ing, it is generally better to issue a single new unfamiliar value than to use two unfamiliar ones. The security is comparable, especially if you use the SurveyPro generated passwords which are non-sequential. It is a particu-larly bad idea to create a name and password pairing which combines two familiar yet unrelated values for the respondent.
This is the most complex login to set up, because you need to tell the sys-tem how to handle the user name and password individually, as well as how they’re handled together.

Apian NetCollect 4.0 User Guide
Chapter 10 - Login Options Login Dialog 163January 15, 2007
Respondent Name-Password File
The server requires the names and passwords be in a special format to handle logins quickly and without errors, so you’ll need to take your exist-ing user name/password list and convert it to a SurveyPro PIN file (see page 170). Once the file is built, you’ll link to it here.
One-time use In most cases, this password type is used to limit respondents to a single submission, but you can also allow respondents to submit multiple times by turning off One-time use. Each time the respondent enters their pass-word they will be welcomed back with the survey they paused, or if there is no partial survey, they will be offered the opportunity to start a new sur-vey. If you want respondents to be able to start multiple surveys in paral-lel (rather than sequentially) use Shared Password(s) with a file.
Case Sensitive By default, the password tests are not case sensitive. If you activate this, it’s best to indicate this in the Label. Note that the Apian 4 and 5 digit val-ues are designed not to check for case.
Name or Password unique NetCollect needs to know whether within your list the name is a unique value, the password is unique, or only together do the two make a unique entry.

Apian NetCollect 4.0 User Guide
Chapter 10 - Login Options Login Dialog 164January 15, 2007
Strict match to password / name
When the name or password is unique by itself, you have the option of doing a partial match to the other value. For example, imagine asking respondents to enter their company name along with their customer ID. Because the customer ID is a unique value, you can use the name simply as a confirmation they didn’t make a typo. In this case, you might want to allow “Smith” as the company name even though your PIN file lists “Smith Inc.” as the name. In most cases, though, you do want the strict check on both values, so you would leave this box marked.
Respondent “Name” / “Password” Entry
The labels built into the button block on the first page of the survey. Gen-erally this is brief—longer instructions can be inserted above as a text graphic. Because you can tailor this text, your login can use any two val-ues for entry, not just a name and password.
Link Question For the names and passwords to be collected, you have to have questions for them in the SP4 database. Occasionally you’ll link the password entry to existing questions (multiple survey files), or you can create new fields. See page 166.
Resume options Descriptions of the shared controls are on page 169.

Apian NetCollect 4.0 User Guide
Chapter 10 - Login Options Login Dialog 165January 15, 2007
Outside application launch passes unique ID
This login option is via URL only, so there are no controls for providing respondent instructions. Because the Respondent ID is embedded in a URL, it’s best to have the system remember the value when respondents bookmark the survey to resume later.
Link Question For the passwords to be collected, you have to have a question for them in the SP4 database. Occasionally you’ll link the password entry to an exist-ing question (multiple survey files), or you can create a new field. See page 166.
Resume options Descriptions of the shared controls are on page 169.

Apian NetCollect 4.0 User Guide
Chapter 10 - Login Options Login Dialog 166January 15, 2007
Linking Passwords and Resumes to a Question
Both passwords and server issued codes are saved to fields within your questionnaire. This means there needs to be a question associated to each field to receive the information. If your SP4 file already contains question-naires with password entries, you may be able to re-use an existing ques-tion with the Select Existing control. However, more frequently, you’ll use the Create New option to add a question. Password questions are added as Q1 in your database unless you have multiple questionnaire doc-uments.
As with all questions in SurveyPro, it’s important to make sure you have the right scale type selected. The compatible scales listed are the variants of written answers, including patterns and the special Apian 4 and 5-digit codes. If you’re not sure what type of values you’ll be using for the pass-words, you can temporarily select S1: Short Countable Written and update it later if needed.
Even if your passwords follow a pattern, you don’t need to create a spe-cific pattern for this field because values will be checked against a pre-set list in the PIN file. However, do be sure to pick the appropriate Apian 4 or 5 alphanumeric scales if you’re generating the values from SurveyPro as this will do smart substitutions such as “0” for “o” and “1” for “l.” See Understanding the NetCollect Special Passwords on page 171.

Apian NetCollect 4.0 User Guide
Chapter 10 - Login Options Login Dialog 167January 15, 2007
Layout Tab
The login fields and buttons on your survey are a block of related layout elements, similar to how headers are built. For an overview of their rela-tionship to other elements, see Understanding Margins and Backgrounds in NetCollect on page 58.
On the Layout tab, you can set the colors and borders for the login and button region (button labels and styles are set in the Document Properties Buttons tab on page 64). Sometimes you’ll want a slightly different design on the login page from the other survey pages, so there are two sets of layout options.
Background Transparent lets the survey background show through, or you can select a different color to place behind the buttons.
Width You can stretch the lines or color band for the buttons to the edges of the survey width or you can have SurveyPro size the box more closely around the buttons.
Lines Apply lines to the top, bottom, or sides of the buttons. The line weight can be changed, as can the color.
Space above/below Sets the gaps between the last question and the buttons, and the buttons and the footer. See page 58.

Apian NetCollect 4.0 User Guide
Chapter 10 - Login Options Login Dialog 168January 15, 2007
Layout With some login types, you can arrange the login label, field, and button stacked in three rows, or lined up in one row. This drop-down is disabled for some of the more complex combinations.
Show RID/Pwd not **** As a respondent is typing their password into the login page, they will nor-mally see “*****” to prevent anyone looking over their shoulder seeing the value. This also keeps browsers from automatically caching their entry. Mark this box to display the real text instead—a convenience to respondents when the password value is unfamiliar and the added secu-rity isn’t needed.
Label text style Sets the font used for the labels integrated into the button set. Additional instructions added as text graphics above the buttons may use a different style.
Notice Text
As a respondent goes through the survey, there are error and information notices that will appear in certain situations. This includes entering an invalid password, and resuming a survey. Use this screen to modify the default notices, keeping in mind that shorter notices are generally best.

Apian NetCollect 4.0 User Guide
Chapter 10 - Login Options Pausing and Resuming Surveys 169January 15, 2007
Most of these notices will appear embedded within another page, as with a failed password which will present the login page for another try. Depending on your login type, some of these notices may not appear on this tab.
Survey finished confirmation dialog
When the respondent clicks the Finish or Send Answers button after the last question, a notice will pop up a small browser window asking them to confirm that they are ready to send their information. You can disable this confirmation, as well as editing the text used.
Edit Pause / Resume Page The pause and resume pages are created and managed by NetCollect. These buttons jump to the Page Properties for each one, allowing you to change their notice (see page 104). Note that these pop-up screens do not have scroll bars, so be sure to arrow down through the message text to be sure you see all the content.
Pausing and Resuming Surveys
There are two aspects to pausing and resuming a survey:
• Buttons and pages a respondent uses to save and return
• Server settings for managing partially completed surveys
You’ll define the respondent interface using the Login dialog (see page 158), Page List dialog for pause notices (see page 104), and Buttons tab in Document Properties (see page 64).
By default, partially completed surveys will never expire and their data is saved to a separate PARTIALS file when a survey is closed. This may not make sense for high volume consumer surveys, so you can opt to expire partially completed surveys after they’ve been idle as briefly as a day. When they expire, they will still be saved to a data file, but you can opt not to import those responses. These settings are in the Control Panel, so they can be adjusted as a survey goes on. See page 324.
Login Dialog Resume Controls
Bookmark or favorites There is no way to prevent a respondent from bookmarking a survey page, so you have three options for how NetCollect should behave when it receives a request to load a bookmarked page. Resume paused survey is the default, and is what a respondent will expect in most circumstances. Sends new survey login will simply bring up the survey’s usual welcome page. Acts like failed login will also bring up the welcome page, but with an error notice included in the text.

Apian NetCollect 4.0 User Guide
Chapter 10 - Login Options Creating Password Files 170January 15, 2007
Enable resume from a cookie
This acts similarly to resuming from bookmarks, but doesn’t require respondents take direct action. It is not enabled by default because it’s not a reliable method of resuming surveys. See more about cookies on page 154.
Disable password re-check When using shared passwords with bookmarks or cookies, you can require respondents re-enter their shared password when resuming the survey.
Remember return user ID /Respondent ID /Name and Password
When using bookmarks or cookies, you can have the server “remember” a respondent’s password or server-issued ID when they activate the book-mark or cookie. This does not write the password to the cookie or book-mark (the 11 digit session ID is used instead), but it does load the resume page with their password pre-typed within it.
Server assigned 5-alphanumeric return user ID
When respondents are sharing computers (home use, hospital staff, fac-tory workers), bookmarks and cookies don’t work well for pausing and resuming surveys. Instead, you can have the server issue each respondent a 5-character alphanumeric code which they can write down and then use to continue from another system.
Resume Code Entry If you are using the server-issued resume code, you’ll need to type a label just as you would for a password.
Link Question As with passwords, the server-issued resume codes need to have a ques-tion in which to collect their values. See page 166.
Creating Password Files
Whether you’re having SurveyPro generate your password values or sup-plying your own, you need to create a NetCollect compatible PIN file for your project. PIN files include indicators for status (not started, in progress, done) and a place for the respondent’s 11 digit session ID, as well as the passwords themselves. The list is sorted, allowing your server to look for a value in a list of 1,000,000 almost as quickly as it can search 1,000. As the file is processed, it also makes sure there are no duplicate values.
Always generate spare values! If you’re converting your own list, add extras before converting the file for people who lose their password, lock themselves out by submitting the survey empty, or are overlooked in the original list. You can add values to PINs later, but it’s more complex than planning ahead—see Updating Live PIN Files on page 173.
Important: If your project is going to have e-mail invitations and reminders then you will want to use the Respondent EMailer to generate your .PIN files. See

Apian NetCollect 4.0 User Guide
Chapter 10 - Login Options Creating Password Files 171January 15, 2007
its documentation for how to smoothly weave these two software tools together. The coordination starts at the point where you want to begin testing your draft with a login and proceeds through to the live launch. A flowchart shows several places in the survey development process where you will want SurveyPro and Respondent EMailer to be synchronized.
Legal Values for Passwords
NetCollect’s passwords are quite tolerant, so you can use values which include:
• @ symbols, such as e-mail addresses
• Spaces, such as names
• Mixed case
• Special characters such as punctuation and strong passwords
As always, longer and more complex passwords are a trade-off between security and usability. If you use complex values, you may want to review your survey’s logs to see how often people are having problems logging in (see page 362).
Understanding the NetCollect Special Passwords
If you don’t have a list of passwords you want to use, NetCollect can gen-erate them for you. These are non-sequential values, pulled from a large pool to reduce the chances people will type a valid password. Within the dialog for generating PINs, it will let you know the recommended maxi-mum number of values to generate for each type. The three format options are 4 and 5 digit alphanumeric, and all numbers which are 6 digits with a hyphen in the middle.
For Web surveys, the 4 and 5 digit alphanumeric are the best options. When these values are paired with the matching scale, they are case insensitive and do smart substitutions for common human errors. For example, if a respondent types the letter “o” instead of the number 0 in a password, it will still admit them to the survey. Similar substitutions are done for letters similar to 1 and 5.

Apian NetCollect 4.0 User Guide
Chapter 10 - Login Options Creating Password Files 172January 15, 2007
Make PIN File Dialog
This dialog can be used to generate new PIN files, convert lists of pass-words from other sources, and to add passwords to an existing PIN file. You can access it either from the Login dialog or from the Tools menu.
Fill new PINs You can have NetCollect create a new file using the 4 or 5 character codes that allow special substitutions. The values generated are non-sequential and pulled from a large pool, minimizing chances a respondent will stum-ble across a valid password with either a typo or by trying random values.
Text word list The passwords can be a simple list of words in a text file, separated by spaces, commas, or semicolons. This only works when the passwords themselves do not include spaces or punctuation.
Comma / Tab-delimited file If the passwords are exported from another source, such as an employee database, they will often be in a comma or tab delimited file. Microsoft Excel spreadsheets can also be saved CSV (comma separated value) files which are compatible with the PIN file converter.

Apian NetCollect 4.0 User Guide
Chapter 10 - Login Options Updating Live PIN Files 173January 15, 2007
Output PIN File Name Select the name and location for the PIN file (generally the same place as the SP4 file). When you Publish the survey, a copy of the PIN file will be placed with your locally published files before uploading to the Web server.
PIN Structure When using a username and password combination, NetCollect needs to know which value is unique as that is the one used to sort the file. If you are only using a password with no user name, leave the setting on One field.
Prepare file for case insensitive lookup
This will convert your imported passwords to all uppercase before sorting the list and checking for duplicates. Be sure to pair this with a case insen-sitive setting in the Login dialog.
Source Fields These drop-down lists allow you to select the field within your delimited file that contains the name or password.
Ignore record one Often delimited ASCII files include field names as the first row, which should be excluded to prevent creating a valid password of “Password.”
Match Scale This will check the imported values against a scale, such as e-mail addresses or a pattern you define to match your customer or employee IDs.
Updating Live PIN Files
Sometimes long-running surveys require a password file be expanded. Another common situation is when a respondent group is forgotten and it’s more people than you have spare passwords.
PIN files are not just lists of acceptable values. They’re live files updated on the Web server every time a respondent starts or finishes a survey. Because of this, you need to create a window of time when nobody is starting or finishing a survey to do the update—otherwise the PIN file might miss somebody’s “Done” marker or lose their session ID for resum-ing. The NetCollect Control Panel has a special setting for this called Maintenance Mode.
QuestionWeb users: Because of how QuestionWeb handles file check-ins, you do not have direct access to download and upload a live PIN file. If you need to do a live update, contact Technical Support for assistance.
To update a live PIN file: 1. Using the Control Panel, set the survey to Maintenance Mode (see page 328)
2. Once respondents are locked out, use the Advanced Download dialog to grab your PIN file (see page 337)

Apian NetCollect 4.0 User Guide
Chapter 10 - Login Options Updating Live PIN Files 174January 15, 2007
3. Tools menu, Make PIN File
4. Select the Source just like you did the first time
5. Select the downloaded PIN file as the Output PIN File
6. At the overwrite prompt, select Merge and OK
Part of the Merge process is checking that there are no duplicates created in the file.
7. Use Advanced Upload to re-post just the PIN file (see page 290)
8. Using the Control Panel, turn off Maintenance Mode
Because one has to lock out respondents during this process, it’s best done outside your peak response times. While the PIN update itself can be done in a couple minutes, a graceful shut-down as described under Maintenance Mode takes about half an hour. What you want to avoid is having a respondent click Next between pages 3 and 4 and seeing a “tem-porarily off-line” message.

Chapter 11 - Defining Logins 175January 15, 2007
Chapter 11T U T O R I A L Defining Logins
Your NetCollect Login impacts both the security of your survey and the respondent’s experience. NetCollect supports a variety of password and pause/resume configurations—this tutorial will walk you through both anonymous and password restricted logins. If you’re new to Web surveys and passwords, the conceptual information on page 153 may be helpful before you dive in.
In this tutorial you’ll learn how to:
Specify multiple shared passwordsSet resume options for anonymous surveysEdit the Pause pageChange button layoutsEdit button labelsHide the Pause buttonCreate a password file from within SurveyProConvert a username and password file from another source
The tutorial assumes you are already familiar with:
Using the Document Properties dialog
Tutorial Notes
General You can save your file and take a break any time you’re in the main document screen.
Tutorial Files Are in your SurveyPro Samples folder, by default under:C:\Program Files\Apian Software\SurveyPro 40\
On Finishing Publish to your own server (page 295) or a QuestionWeb Demo folder (page 315)

Apian NetCollect 4.0 User Guide
Chapter 11 - Defining Logins 176January 15, 2007
1. Start SurveyPro and Open the sample file NC4 Tutorial - Passwords.SP4.
2. When prompted, click Yes to open a copy, and save as YourName Passwords Tutorial.SP4.
3. Close the File History dialog.
4. If needed, select the document tab 1: Widget Web and adjust the Zoom to your preference.
Once again we have a Widget Association survey. As we get started, the survey will let respondents enter with no password and the default resume settings. Scan through the survey and note the buttons appearing on the first, middle, and next-to-last pages. Right now, we’re using one of NetCollect’s graphical VCR style button sets—later we’ll change that to the browser button style.
Unlike many of the tutorials which take a linear approach from rough sur-vey to final version, this tutorial is designed to introduce you to multiple variations of the login feature so we’ll change the same settings several times.
Applying a shared password
Shared or “global” passwords keep casual visitors from getting into your survey while maintaining individual anonymity. This can be a single value for everyone or you can use several values reflecting different divisions or customer segments.
1. Bring up the NetCollect Respondent Management dialog by double-clicking on the Start or Next buttons on any Web survey page.
2. Change the Survey Login to Shared Password(s).
It’s important to set the main Login type first as the other options on the dialog depend on your selection.
3. Below the Survey Login, type as the Password “WidgetUSA, WidgetCanada”
Be sure to get the comma between the two values. Because the password a respondent uses is saved with the rest of their answers, selectively assigning values can sometimes save you asking a question or two on the survey. In this case, the USA and Canadian chapters would issue their members the password for their region, letting us track their membership. If you have many values you’d like to use, you can create a PIN file instead of manually typing them. We’ll get to PIN files later as we set up individual respondent passwords.

Apian NetCollect 4.0 User Guide
Chapter 11 - Defining Logins 177January 15, 2007
This survey doesn’t require much in the way of security, so we’ll make it easier on respondents and leave the Case Sensitive box un-marked.
4. Click OK to save your changes.
Now the first page of the survey has a line of instructions and an entry blank for the password.
Setting resume options
NetCollect’s default settings allow respondents to pause and resume sur-veys by clicking the pause button and bookmarking the pause page or adding it to their Favorites. The bookmark resume works in most situa-tions because each respondent will have a personal computer at work or home that they’ll use to start and finish the survey. However, sometimes you’ll have a respondent population using shared computers (such as health care and student environments) and respondents may start the sur-vey on one system, pause, and finish on another computer. For that situa-tion, we can have the server issue a unique code to each respondent, which they can jot down and use to resume later from a different com-puter.
1. Double-click on the login area to bring up the dialog again.

Apian NetCollect 4.0 User Guide
Chapter 11 - Defining Logins 178January 15, 2007
2. In the upper-right corner, check Server assigned 5-alphanumeric return user ID and click OK to save.
The values the server issues are in the special NetCollect format which tolerates common errors such as a lowercase “l” or uppercase “I” for a one “1.” The substitutions are especially handy in this situation where respondents will be resuming off a scribbled note. (See page 171.)
Changing login labels
NetCollect added a second field for the resume ID, but if you were a respondent arriving at this page would you completely understand what was going on? The server-issued code is a great option for surveys, but it’s not a common Web interface so we need to expand on the instructions a bit.
1. Double-click on the login area again.
Our two labels are at the bottom of the screen. While brevity is often good, don’t be afraid to be a little verbose in your instructions.
2. Change the Shared Password Entry Label to “Enter the password to start a new survey”

Apian NetCollect 4.0 User Guide
Chapter 11 - Defining Logins 179January 15, 2007
3. Change the Resume Code Entry Label to “To finish a survey, enter the 5 digit code you received when pausing”
4. Click OK to see the changes.
That’s better for clarity, but the button labels are blending into the instruc-tions above. We can make them stand apart a little more by adjusting the borders and font.
Changing the login layout
1. Bring up the login dialog again.
2. Select the Layout tab.
3. For the Login Button Area on the left side of the dialog, turn on Top and Bottom lines, 3 pixels wide, in gray.
4. At the bottom of the dialog, change the Label text style to T2: Scale.
5. Click OK to save your changes.
Now the login area is easily distinguished from the rest of the Welcome page message.
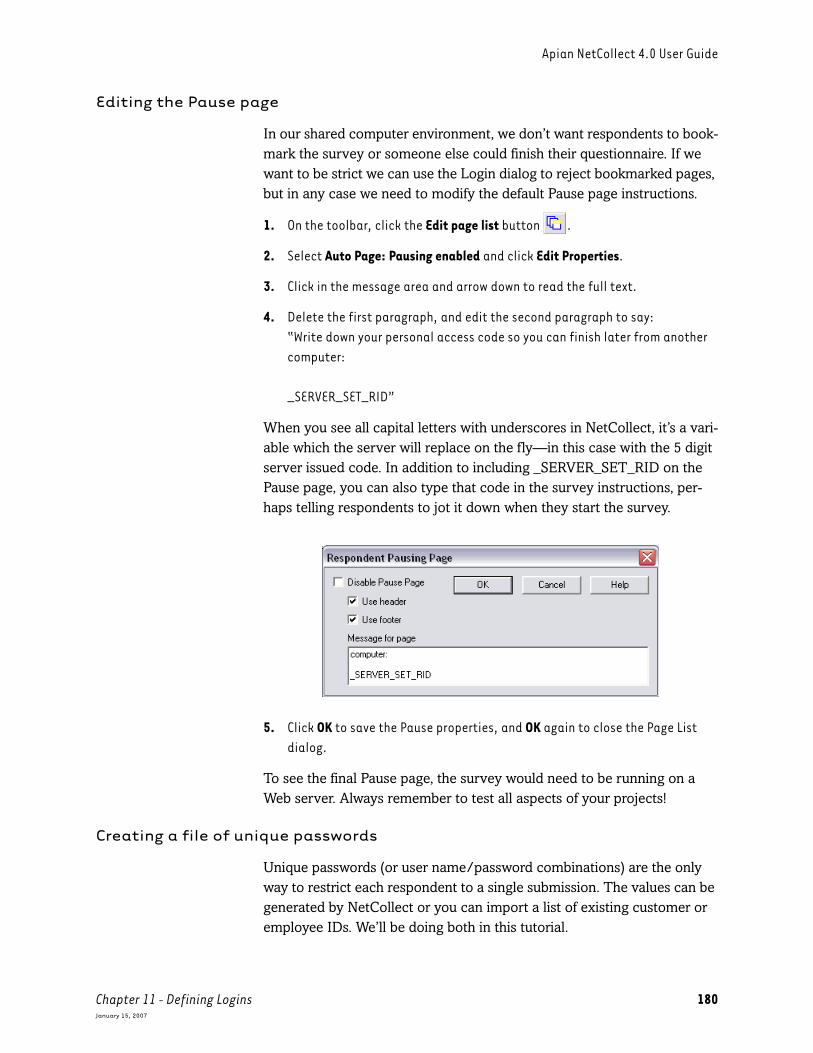
Apian NetCollect 4.0 User Guide
Chapter 11 - Defining Logins 180January 15, 2007
Editing the Pause page
In our shared computer environment, we don’t want respondents to book-mark the survey or someone else could finish their questionnaire. If we want to be strict we can use the Login dialog to reject bookmarked pages, but in any case we need to modify the default Pause page instructions.
1. On the toolbar, click the Edit page list button .
2. Select Auto Page: Pausing enabled and click Edit Properties.
3. Click in the message area and arrow down to read the full text.
4. Delete the first paragraph, and edit the second paragraph to say:“Write down your personal access code so you can finish later from another computer:
_SERVER_SET_RID”
When you see all capital letters with underscores in NetCollect, it’s a vari-able which the server will replace on the fly—in this case with the 5 digit server issued code. In addition to including _SERVER_SET_RID on the Pause page, you can also type that code in the survey instructions, per-haps telling respondents to jot it down when they start the survey.
5. Click OK to save the Pause properties, and OK again to close the Page List dialog.
To see the final Pause page, the survey would need to be running on a Web server. Always remember to test all aspects of your projects!
Creating a file of unique passwords
Unique passwords (or user name/password combinations) are the only way to restrict each respondent to a single submission. The values can be generated by NetCollect or you can import a list of existing customer or employee IDs. We’ll be doing both in this tutorial.

Apian NetCollect 4.0 User Guide
Chapter 11 - Defining Logins 181January 15, 2007
1. Double-click on the login buttons.
2. Change the Survey Login to Unique Respondent ID file.
Under Resume, our server assigned ID option just disappeared because respondents can resume with their password instead.
3. Under Respondent ID File click the Make File button.
The dialog defaults to generating passwords from scratch and to a PIN file in the same location as our SP4 file, which is just what we want. You may be tempted to mark the case insensitive option, but if you’re using scale 30 or 31 the Apian passwords, it will automatically be case insensitive (see Understanding the NetCollect Special Passwords on page 171).
4. Our association has 1500 members but we want plenty of spares, so in the lower right area, enter as the Number to make “2000”
5. Click OK to generate the file and OK again on the confirmation.
Selecting a question for the password
1. Our new file is selected in the Login dialog, so click OK to save your settings.
Oops, we have an error notice. When we set up the initial login, Net-Collect automatically created some questions to manage the password and resume codes. Because we’ve been mucking around a bit, it wants us to be more specific about the field we use.
2. Click Cancel on the error notice.
3. On the lower-left, click the Link Question button.
4. Leave the setting on Create New and select S30: Apian 4-alphanumeric user ID which matches the values we generated.
If instead you used S1: Short Countable Written, NetCollect wouldn’t be able to do the smart substitutions and would be much more strict on the entries.

Apian NetCollect 4.0 User Guide
Chapter 11 - Defining Logins 182January 15, 2007
5. Click OK to save the new question
6. Do a quick fix on the password Label, changing it to “Enter your password” click OK to close the Login dialog.
7. Save your SurveyPro file.
Hiding the pause button
Respondents who pause don’t always come back to finish, so in some cases the best response rate is achieved by not giving them a pause option.
1. On the toolbar, click the Edit page list button .
2. Select Auto Page: Pausing enabled and click Edit Properties.
3. Check Disable Pause Page, OK and OK again.
Now as you scroll through the survey, the middle pages only have two buttons for forward and back.
Changing button text
Earlier we changed the login labels, but now we’ll go ahead and change the button text itself.
1. On the toolbar, click the Document Properties button .
2. Select the Buttons tab.
3. Change the Button Style to Browser Button labels.
Note that the buttons are grouped by type, with the login page, middle pages, and next to last page each having their own label settings.
4. Change a couple of the labels to your preference and click OK.

Apian NetCollect 4.0 User Guide
Chapter 11 - Defining Logins 183January 15, 2007
If you have a graphic designer, you can have them create new graphical button sets for your surveys (see page 359). Otherwise, the browser but-tons will let you tailor the text or translate it to other languages.
Converting a list of user names and passwords
We’re down to the last section!
The Widget Association has a Web site where its members log in to see member-only information. Rather than issue respondents a fresh pass-word for the survey, instead they exported the login list from their site.
Creating password files is just like importing other data files into Survey-Pro. You’ll need to know whether the first row is data or field names, and what data is in which column. In this case, our file is quite simple:

Apian NetCollect 4.0 User Guide
Chapter 11 - Defining Logins 184January 15, 2007
1. Bring up the Login dialog.
2. Set the Survey Login to Respondent Name and Password file.
3. Our file uses the member’s e-mail address for the “Name” so in the lower-left corner change the Respondent “Name” Entry Label to “Enter your e-mail address”
SurveyPro has defaulted to a new question for the password which is fine, but we need to link to one for the e-mail address.
4. Under Respondent “Name” Entry click Link Question.
5. Leave it on the defaults and click OK.
6. Under Respondent Name-Password File click Make File.
Again, most of the defaults are just what we need. The Source is set on Comma-delimited file which is the same type as our CSV file.
7. Next to the ASCII File blank at the top, click the Browse button .
8. Select NC4 Tutorial - Passwords.csv from your SurveyPro Samples folder and click Open.
9. Leaving the rest of the path alone, change the Output PIN File Name to “Yourname namepassword.pin”
The next few fields relate to the contents of your particular list. In many cases, the Name is the unique field, but the Passwords may repeat as mul-

Apian NetCollect 4.0 User Guide
Chapter 11 - Defining Logins 185January 15, 2007
tiple people use “fluffy” as their favorite pet name. At other times the password may be unique, or only the combination of the two fields. In our file, the “Name” or e-mail address is the unique field, so the default is cor-rect.
10. Check Prepare file for case insensitive lookup so people who habitually capitalize their e-mail address won’t be rejected.
11. Set the Name Source Field to Field 1, and the ID Source Field to Field 2.
12. Check Ignore record one so nobody can enter with “E-mail address” and “Password,” our column headings.
13. Click OK to build the password PIN file, and OK on the success notice.
When SurveyPro converts your CSV file into a PIN file, it’s adding fields for the session ID and status (not started, in progress, done), sorting the fields for fast searches, and checking for duplicate entries. This is why you can’t simply rename your CSV file with a PIN extension.
14. The rest of the definition is good, so click OK to close the Login dialog.

Apian NetCollect 4.0 User Guide
Chapter 11 - Defining Logins 186January 15, 2007
And on the first page of the survey, we have yet another login blank and button arrangement:
That’s it for your whirlwind tour of passwords! If you’re linking to a survey from a Web site or e-mail invitation you may also want to see Embedded Surveys on page 187 for information on embedding the password in the starting link.
If you want to play with your final login, you can publish your file to your own server (page 295) or a QuestionWeb Demo folder (page 315).

Chapter 12 - Embedded Surveys 187January 15, 2007
Chapter 12R E F E R E N C E Embedded Surveys
What’s an embedded survey?
It can be as simple as embedding the respondent’s password in their start-ing URL, asking the respondent to confirm the address you have on file for them, or saving the data out to ASCII format as well as SDH.
Or it can be a sophisticated custom Web application developed around your surveys which delivers the proper questionnaire versions to 360 respondents based on their language preference, division, and position in the organization chart.
Chapter Contents:
Understanding Embedded Surveys in NetCollect . . . . . . . . . 188Key Concept: Embedded Survey Terms . . . . . . . . . . . . . . . . . 189
Example 1: Welcome Jane, Please Confirm Your Address 191Key Concept: Data is Data to NetCollect . . . . . . . . . . . . . . . 192
Example 2: Evaluating a Particular Service Experience . 192Example 3: Streamlining 360 Surveys . . . . . . . . . . . . . . 193Example 4: Looping the Respondent Through Questions 194
Key Concept: Watch your Cause and Effect . . . . . . . . . . . . . 196NetCollect’s Internal Data Format . . . . . . . . . . . . . . . . . . . . 197Data Piping . . . . . . . . . . . . . . . . . . . . . . . . . . . . . . . . . . . . . 199
ASCII vs. SQL . . . . . . . . . . . . . . . . . . . . . . . . . . . . . . . . . 200Piping Information into a Survey . . . . . . . . . . . . . . . . . . 201Piping Answers Out of a Survey . . . . . . . . . . . . . . . . . . . 205Field Matchups for Piping . . . . . . . . . . . . . . . . . . . . . . . 210
Creating Starting or Ending Handshakes . . . . . . . . . . . . . . . 212Starting a Survey with Data . . . . . . . . . . . . . . . . . . . . . 213On Exit Completed — Sending Respondents to a URL . . . 215NetCollect’s URL Syntax . . . . . . . . . . . . . . . . . . . . . . . . 217
Advanced Embedded Survey Topics . . . . . . . . . . . . . . . . . . . 219Using Temporary Files to Obscure URL Data . . . . . . . . . . 220On Incomplete for a Custom Error Page . . . . . . . . . . . . . 221Resume URLs . . . . . . . . . . . . . . . . . . . . . . . . . . . . . . . . . 223Piping Status Out . . . . . . . . . . . . . . . . . . . . . . . . . . . . . 224

Apian NetCollect 4.0 User Guide
Chapter 12 - Embedded Surveys Understanding Embedded Surveys in NetCollect 188January 15, 2007
Understanding Embedded Surveys in NetCollect
Embedded surveys were developed to give a you great deal of flexibility in creating interactive questionnaires, from both respondent and data/systems perspectives.
Unless you’re 100% certain all you want to do is embed a password in your starting URL (see page 213), this arena has a lot of new information to absorb. Here’s one approach for building a solid foundation of Net-Collect’s embedded features:
1. Read the descriptions of key terms on page 189.
2. Work through the two tutorials following this chapter, and don’t worry if you don’t understand everything as clearly as you might have with other lessons. At first you’re after the big picture.
3. Read the conceptual information in this chapter, all the way through the page turner NetCollect’s Internal Data Format on page 197. While some of the information will not apply to your surveys, even the examples you won’t use will help raise your awareness of the features and issues.
4. Zero in on the specific features you’re planning on using from the latter part of this chapter.
5. Consider taking a second pass through the tutorials to firm up what you’ve learned, as well as to use them as a framework for trying out variants.

Apian NetCollect 4.0 User Guide
Chapter 12 - Embedded Surveys Understanding Embedded Surveys in NetCollect 189January 15, 2007
This may seem excessive, but embedded surveys are the border in Net-Collect between point-and-click features and custom Web development—and in this chapter we start throwing around fun terms like hexadecimal encoding. If you invest the time in really understanding the options, you may discover you can enhance your respondent experience and simplify your data handling more than you ever imagined with your surveys. You may also discover ways to minimize or eliminate custom programming fees if that was a direction you were heading. Finally, the more familiar you are with some of the underlying dynamics, the better you’ll be able to configure and test your surveys to avoid costly data errors.
Key Concept: Embedded Survey Terms
“Piping” is one of those terms in surveys which is used in many different ways. Before we go too far, here are some common terms and how they relate to NetCollect’s embedded surveys.
Pipe InPulling data from an outside source into your survey. The source may be ASCII data files or a SQL compatible database. The data pulled into the survey may be based on a demographic or other category question, such as pulling in a department name and manager when the respondent enters a department code. It can also be specific to a particular respondent, such as a reminder of the last product they purchased. One survey may have multiple Pipe Ins defined.
Pipe OutAll NetCollect surveys generate SDH data files which are what download and import when you Get Latest Data in SurveyPro. In addition, you can generate ASCII data files containing answers to some or all of the questions. You can also write data directly to a SQL database. One survey may have multiple Pipe Outs.
Pipe Answer ForwardOn page 2 the respondent may say their favorite brand is Gadget, but your survey may not get to brand-specific questions until page 6. Answer piping can be used to copy their response forward in the survey, either within a text comment or setting a starting value in a later editable question. This is not considered an embedded survey function as it doesn’t access any external files or systems. See page 137.
ASCII Data FileThis is an easily generated and widely usable data format. With embedded surveys ASCII files can be used for bringing information into a survey (such as the respondent’s address) or saving data out for use by people without SurveyPro.
SQL Compatible DatabaseWhen many people see SQL (pronounced “sequel”) they think of a particular database such as Microsoft SQL Server, MySQL, Oracle or Microsoft Access. In fact, SQL stands for Structured Query Language and is a database format to which these specific applications conform. NetCollect’s data piping works at this fundamental level so you can connect your surveys to a wide range of databases.

Apian NetCollect 4.0 User Guide
Chapter 12 - Embedded Surveys Understanding Embedded Surveys in NetCollect 190January 15, 2007
Within the Embedded feature set, most NetCollect users will be working with the following functions:
• Piping In from ASCII files, such as using the respondent’s individual password to bring in demographic data, either as a visible information for confirmation or hidden fields. See page 201.
• Piping Out to ASCII files to save either the whole data file or sub-sets such as address changes. While you can always export this information from SurveyPro after importing the SDH file, this lets you create a file which can be downloaded and exchanged directly from the Web server. See page 205.
• Building a starting survey URL that contains information such as the respondent’s password or name. See page 213.
• Sending the finished respondent to a page on another site instead of a NetCollect Thanks page. See page 215.
In addition, some surveys will use these functions:
• Sending data out in the exiting URL for use by another Web application—or even to loop a respondent through the same survey again. See page 215.
• Piping In information from a SQL database such as a CRM program or employee database. See page 204.
• Piping Out data to a SQL database to update respondent information or survey status. See page 208.
There are two reasons these last three features are less frequently used. First, they are simply not needed as frequently as the ASCII piping or launching the survey with a password in the URL. Second, they tend to require technical assistance from a programmer or database administra-tor. See ASCII vs. SQL on page 200 for pros and cons of the two methods.
URL with DataWe’re accustomed to typing simple URLs such as: http://questionweb.com/11706/ but when looking at embedded surveys, we’re often using more complex addresses: http://questionweb.com/11706/Piping.asp?P1=EL0&Q1=12URLs with data embedded—either starting a survey or coming from a finished questionnaire—are a relatively straightforward way to pass information between Web applications. See Starting a Survey with Data on page 213 and NetCollect’s URL Syntax on page 217.
Key Concept: Embedded Survey Terms

Apian NetCollect 4.0 User Guide
Chapter 12 - Embedded Surveys Understanding Embedded Surveys in NetCollect 191January 15, 2007
Before we get into the specific features and their dialogs, we’ve described several typical applications and what you’d use to implement them. If after reading the examples you’re not sure which features to combine to get the particular effect you want, Apian Tech Support or the discussion list (http://apian.com/lists/) may be able to point you in the right direction. In more complex projects, you may prototype a few different options to see which one produces the best combination of respondent experience, data collection and analysis.
Example 1: Welcome Jane, Please Confirm Your Address
Any time you use individual passwords, you have an opportunity to bring in information for that particular respondent. With customers, this can be an excellent time to update your database.
The tutorial on page 225 uses a two-step process to confirm contact infor-mation. It pipes the address data into hidden fields and displays that infor-mation in text for the respondent to see. The respondent then indicates whether or not they need to make changes, and if not, they’re skipped ahead. For those who do need to update their information, the data appears on the next page in editable fields.
The advantage of this approach is that you now have an explicit field indi-cating whether information was updated. If you don’t need that, if instead you’ll be updating your database with all respondent submissions, then you could have skipped the hidden fields and “make changes?” question, piping straight to the editable questions.

Apian NetCollect 4.0 User Guide
Chapter 12 - Embedded Surveys Understanding Embedded Surveys in NetCollect 192January 15, 2007
Example 2: Evaluating a Particular Service Experience
Most of us have seen “Please rate your experience” pages or e-mails after a customer service contact or on-line purchase. Very often, the feedback URL is not just a simple link, but embeds information about our transac-tion such as a ticket number or order ID. With NetCollect, you can set up this type of feedback system without any custom coding.
• Set up the survey to launch only when it gets a password embedded in the URL (see page 213).
• Use the Outside application launch survey login method that lets you build a password list on the fly (see page 165):
This way, you don’t have to create a PIN file in advance with all the possible ticket or order numbers. However, once NetCollect receives
Key Concept: Data is Data to NetCollect
As you design your embedded surveys, keep in mind two concepts:
All data needs a question to hold itEven if you don’t want a respondent to act on or see the data you’re pulling in, or even if it’s just to display information in a text graphic, SurveyPro’s database needs fields to hold it. The mechanism to create a database field in SurveyPro is to add a question. See Using Hidden Fields on page 137 for how to create invisible questions within a survey. You’ll also work with hidden questions in the piping tutorial on page 225.
Once an answer is in a question, you can act on it like any other questionThe scripts don’t care whether the information was entered by a respondent or brought in from a SQL database. They also don’t care whether the data is in a visible, editable question or a hidden one. This means you can set up skips and branches based on piped in information. You can even get creative and do something like pass a demographic code in the starting URL, and later use that hidden value to trigger a data pipe.
Tip: If you’re not seeing your hidden questions appear in the skip dialog, check their scales.

Apian NetCollect 4.0 User Guide
Chapter 12 - Embedded Surveys Understanding Embedded Surveys in NetCollect 193January 15, 2007
a password, it will act just like a pre-set value in resuming partial surveys and restricting the respondent to a single submission.
• Optionally, use the password to trigger a SQL or ASCII pipe that brings in details such as the contact date, customer service representative, contact reason, order total, etc. (see page 204). This can be visible data to remind the respondent what they’re evaluating, or tucked away in hidden fields.
• Also optionally, when the respondent finishes you can embed their customer or ticket ID in the exit URL, handing them back to the Web application running the support site or e-commerce system (see page 215).
Example 3: Streamlining 360 Surveys
360 surveys provide tremendously valuable feedback, but can be a bit of a headache to administer. In their simpler forms, you can leave it up to the respondent to supply the name of who they’re evaluating and indicate the relationship on each form they submit. This is a fairly straightforward pro-cess, perhaps with some skips to handle questions specific to certain rela-tionships.
However, pre-building all the relationship lists can produce higher quality data, making the process easier for respondents and removing selection biases when respondents evaluate only a portion of their peers or direct reports. So if you know John needs to evaluate his manager Jane, peers Bob and Nancy, and direct reports Linda and Peter, how do you construct the 360?
You build a portal. The link you send respondents includes a URL and password which log them into a personal “home page” for the 360 sur-veys. This page is a list of the relationships they need to evaluate, each one with a survey link behind it. When the respondent completes a sur-vey, they don’t stop at a Thanks page, but instead are sent back to the por-tal to complete another evaluation.
This is a custom Web application, and like any development project can be very simple or very elaborate—and sometimes making things simple to respondents requires very elaborate code. A few issues to consider in your development:
• How do you restrict respondents to a single submission for each relationship?

Apian NetCollect 4.0 User Guide
Chapter 12 - Embedded Surveys Understanding Embedded Surveys in NetCollect 194January 15, 2007
• Will you show respondents the status on each survey (not started, in progress, finished)?
• Do the different relationships require different questionnaires?
• Can you handle respondents with exceptions like two managers?
• Can you add missed respondents after the survey launches? (We’ve seen entire departments be overlooked.)
• How will you deal with incorrect relationships after the survey launches? With large organizations the relationship list can take weeks to build, and people move in that time.
• Do the respondents need to pick a language for their surveys?
• How many respondents will be able to log into the portal at once?
• Can you generate a status list so you can send a reminder e-mail to respondents who haven’t finished all their surveys?
This sort of setup can also be used with other multiple-survey situations, such as market research respondent panels. In that case, you would want to allow surveys to drop off the portal as they expire and new ones to be added.
To hook the assorted survey copies into the portal, the primary tools are initiating surveys with data in the URLs and passing data back out in the URL on exit (see page 212). The portal itself may be a combination of flat files and databases to manage the respondents and the surveys they’re to complete—you can also tap into the status notification in SQL pipe-outs.
Example 4: Looping the Respondent Through Questions
What if you want respondents to rate all their equipment vendors using the same twenty questions for each one? Smaller organizations may only have two vendors, while a large firm may have a dozen.
Or what if you’re using a Web survey as a data entry mechanism, and you don’t know whether your mystery shoppers will be entering one evalua-tion or dozens in a stint?
You could simply set the Done URL to the start of the survey, but then the respondent has to identify themselves repeatedly, which is irritating enough with just a password, and going to kill your response rate if the survey has more substantial one-time questions like their criteria for selecting vendors or demographics.

Apian NetCollect 4.0 User Guide
Chapter 12 - Embedded Surveys Understanding Embedded Surveys in NetCollect 195January 15, 2007
You could also pick a worst case total of the questions and make dupli-cates of the questions. Unfortunately that has some reporting headaches because you may end up with Caterpillar evaluations in the first and third set of ratings, and John Deere in the first, second and fourth.
So, the best approach both for the respondent and analysis is a loop. To construct a looping survey, you’ll need to:
• Set the survey to an optional embedded URL launch—this lets respondents manually log in the first time, but then the scripts can loop them through later passes.
• Select Unique Respondent ID File for the passwords, but un-check One-time use. What the scripts will do in this case is resume a respondent in whatever iteration of the survey they’re completing, without the need for a separate resume code and without locking them out after one submission. You’ll also end up with a unique identifier for each respondent in all their records.
• Be sure you have a page break before and after the looping portions of the survey. The following bullets assume the one-time questions precede the looping section, but you could reverse that order or put the loops in the middle by playing around with your skips.
• Put a hidden question on the login page which will be used to identify whether or not this is the respondent’s first time through.
• Add a yes/no or single checkbox question at the end of the looping portion asking respondents whether they need to do another evaluation.
• From the last page of the survey, set a skip on that question that sends respondents either to the Thanks page or to an exit URL (the tutorial on page 241 sets up an exit skip).
• Send data out in the exit URL, including their password and a fixed portion of the URL which identifies the later initiations as loops. You’ll also want to send out any data which you want to appear in every record, such as the company name. Be very cautious sending one-time ratings or demographics through the loop. You may need some answers to appear in each record to do filtering or cross-tabs on the looped questions, but when you tabulate the demographics or ratings themselves be sure to apply a Form Select which only includes records from the first time a respondent went through. (If you don’t forward the values and then discover you did need them, you can quickly fix it up with an export and keyed import in SurveyPro.) See Creating Starting or Ending Handshakes on page 212 for more, including pros and cons of using URLs and files for passing the data.

Apian NetCollect 4.0 User Guide
Chapter 12 - Embedded Surveys Understanding Embedded Surveys in NetCollect 196January 15, 2007
• Set a skip based on that hidden question to jump looping respondents past the pages containing one-time questions.
Note: You can also set up loops in anonymous surveys. In that case, you’ll need to create some sort of unique ID to identify all the submissions from one respondent. You could use the first submission’s Respondent ID if you pipe it out into an additional field, but watch your causes and effects (see page 196) on that one. The pause settings should also be bookmark only, as the server would be issuing a new 5-digit resume code for each loop, and the respondents are likely to be confused by that and get errors when they try to resume using a prior loop’s code.
Key Concept: Watch your Cause and Effect
Within your embedded surveys, you’ll set up trigger events on particular pages—sometimes with multiple events between survey pages. The normal order of operations is:
1.Respondent clicks Next2.Field checks confirm their responses are clean3.Pipe-ins for that page execute to bring in additional data4.Skips and branches execute using both respondent supplied and piped in data5.The next page is sent to the respondent
What happens if the respondent answers a trigger question, but then decides to back up a few pages and changes their answer? A big part of NetCollect’s development was making these events work “naturally” and you should be conscious of what it’s doing so you can properly construct and test your surveys. With any survey testing, it’s always good to ponder “How can a respondent misbehave?” and try everything they might do incorrectly along with the things they should be doing. In our experience, respondents back up a lot.
If you pipe information into an editable field (as in the tutorial on page 225) the respondent may change the data and then back up. Even if they go back past the page containing the piping trigger, NetCollect will keep the changes they made to the information and will not re-do the piping as they go forward again.
However, if a respondent changes their answer to the trigger question, the piping or skip will re-execute when they go forward. With piping, the new information will overwrite any original data brought in, including respondent changes. But what if different fields were filled in based on different triggers? While a respondent is going through a survey, all their answers are saved, including skip paths they abandon after backing up. On the data commit, their session is tidied so that only answers to the pages of their final skip path are saved. This may not clean up orphan values in hidden fields in certain piping setups, so check what data comes in to your SP4 file if you’ve got multiple pipings to hidden fields. You may need to do some data cleaning (Form Select based Mass Replaces) or add Form Selects to certain report figures.
If your survey has points where you really don’t want the respondent backing up, one tactic is to remove the Back button from key pages. See Editing the HTML/ASP Pages on page 355.

Apian NetCollect 4.0 User Guide
Chapter 12 - Embedded Surveys NetCollect’s Internal Data Format 197January 15, 2007
NetCollect’s Internal Data Format
Before you define embedded operations, it’s important to understand how NetCollect works with data internally.
Each question is tied to a unique data field identified with a Q number, such as Q59. If you have a single questionnaire document in your survey, the Q numbers will probably be in the same order as the questions on the page. With multiple questionnaire documents, Q numbers will increment as you insert new questions, even though the additions may be in the mid-dle of the questionnaire. In some cases, the Q numbers will display in the HTML code with leading zeros, such as Q0059.
Scales set the data structure for each question. Data piping has an option of mapping SurveyPro’s checkbox values to different values in your ASCII files or SQL database (both piping tutorials go through this), but other scales and the URL passes require native NetCollect formats.
Certain layout options like random and reverse will rearrange the box labels in a survey (see page 127), so be sure you’re referencing the correct underlying scale box numbers or values if you’re handing a data transfer spec to your programmer.
Remember that the following categories are the underlying scale types, and that any of these scales can be placed on a questionnaire in a hidden or type-in format.
Single Answer Checkboxes When you create a checkbox scale, you type a series of labels. The first label is in row 1 (the gray number just to the left, not the Val column), the second is row 2, and so forth. These box numbers are the internal value stored for that checkbox label, and therefore are also the default value used in embedded data transfers.
Multiple Answer Checkboxes As with single answer checkboxes, each label is identified with a box num-ber starting from 1. You also have to watch whether the displayed order is being modified.
Many databases treat multiple answer checkboxes as a series of data fields, one per checkbox and each one either on or off. NetCollect, how-ever, uses a single data field to hold all the boxes marked on a question. When doing pipe ins and outs, you’ll have the option to map NetCollect’s single field to multiple fields, but those multiple fields have to be in the same order as the checkbox labels.

Apian NetCollect 4.0 User Guide
Chapter 12 - Embedded Surveys NetCollect’s Internal Data Format 198January 15, 2007
When embedding multiple answer checkbox data in a URL, use the box number separated by semicolons. The semicolons will need to be encoded as %3B.
Ratings Stores the numeric rating, whether -3 to 3, 1-5, etc.
Forced Rank As with checkboxes, stores a number associated with the ranking label. Again, be sure not to mix up the label number and the Pts column (which is used for reporting in SurveyPro).
Numbers These are stored as a straight number, with or without decimals. % and $ symbols are not stored.
Without answer checking, NetCollect will accept invalid answers such as “~5” in a survey, and then catch them for a cleaning pass on import. How-ever, if this question is part of an embedded operation, you’ll want to enable the answer tests so a clean value is captured from the respondent (see page 134). You can also apply patterns to number scales if you want to limit entries to a range or to collect a consistent decimal format.
Dates The scale defines the format, whether it’s mm/dd/yyyy; Month Day, Year; or another format. As with number values, be sure to turn on answer tests to pass a clean value. Note that certain close but unambiguous values will generally work, such as Apr 13, 2006 for the above format. However, test carefully any time you don’t have an exact pattern match for your piping.
Written Answers There are a couple types of written answers in NetCollect.
Short written answers are limited to a single line and 200 characters. This is the format used by the Other blanks associated with checkbox scales, as well as for user-defined questions for names, cities, etc. Single answer short writtens expect one value per field. Multiple answer short writtens have the same total character limit, but will parse responses separated by semicolons “CRM; project management”.
You can apply patterns on top of short written answers to enforce a for-mat, such as a telephone number, ID, etc. Be sure to enable the server side answer test (see page 134) to get a clean submission. Defining patterns is covered in the main SurveyPro Help file.
In addition to the short format, NetCollect has long comments, often referred to as “memo” fields in databases. These entries can have up to 10,000 characters per response, and may include line or paragraph breaks.

Apian NetCollect 4.0 User Guide
Chapter 12 - Embedded Surveys Data Piping 199January 15, 2007
NetCollect generated fields
In addition to the questions you create, a couple additional fields are saved with each survey response and available for embedded operations. The abbreviation in parentheses after each one is how it would appear in a URL string.
NetCollect Pages (FPAGES) This field includes all the pages the respondent submitted in their final path through the survey such as “1; 2; 3; 4; 5; Done”. It can be used to dis-tinguish respondents who finished the survey from those who stopped mid-way through, as well as for seeing whether there was a pattern in where partial surveys stopped.
Form’s Questionnaire Number (FDOC)
The questionnaire document number as it appears on the tabs in your SP4 file.
Form’s Origination Date (FDT)
The date and time each respondent completed the survey, saved in the format “Dec 23, 05 08:10”. If you open a CSV in Excel it will translate this entry to its own default date/time format.
Form’s Unique ID (FID) This is the session ID used by the Web server scripts to manage each sur-vey response. It is designed to be unique to one submission, retired on completion of a questionnaire and generated on each new survey start. While the server engine uses these IDs heavily, you are unlikely to refer to them. The occasional application for a survey manager is investigating respondent problems by cross-checking individual responses against sur-vey log entries (see page 362).
Session IDs are 11 digit values with two hyphens such as “2m7j-r8hx-v2x” in your data files, and in a URL you may see the hyphens replaced with a “%2D” encoding.
Data Piping
Whether you’re piping data in or out of your survey, the next section ASCII vs. SQL is a useful summary of the strengths of each approach. Fol-lowing that is Piping Information into a Survey on page 201 with an over-view of Pipe Ins and then details on the ASCII and SQL dialog controls. Or, if you’re piping out, see Piping Answers Out of a Survey on page 205, again with general information and then specific dialog controls for each format. The last section, Field Matchups for Piping on page 210, covers the shared matchup dialog and its related scale value mapping.

Apian NetCollect 4.0 User Guide
Chapter 12 - Embedded Surveys Data Piping 200January 15, 2007
ASCII vs. SQL
There are two basic ways to pipe data in and out of a survey. You can work with ASCII files, using a format such as a CSV file to read and write information. Or you can connect respondents to a SQL compatible data-base such as Microsoft Access, MySQL, Microsoft SQL Server, or Oracle. Each technology has its strengths, and even if you have information in a SQL database already, you may opt to use ASCII for a given project.
To compare the two options, let’s look at a customer service satisfaction survey. We want to e-mail the customers for whom we have e-mail addresses, send a postcard to the others, and have everyone confirm their contact information within the survey.
If you’re conducting the survey quarterly, you go to your database admin-istrator and have them export the names and addresses for all the custom-ers who contacted you in the last quarter. In a spreadsheet or other program, you sift through the data file checking for duplicates and clean-ing entries where customers said their e-mail address was “[email protected].” Once the master contact list is clean, you add a unique ID (if there wasn’t one already), split the file, and send one part to your e-mail list administrator and the other to your mailing house for the postcards. For the survey, you put a copy of the address data in ASCII for-mat on your local hard drive with your SurveyPro SP4 file. Then you cre-ate the embedded survey instructions and when you publish NetCollect uploads your ASCII file along with the survey pages. As the data is col-lected, you pass the updated addresses to a data entry clerk to make cor-rections in your customer database.
But what if the satisfaction survey is conducted continuously instead of quarterly? The easiest trigger for sending the invitation would be closing a service ticket, which happens around the clock in many call centers. So even if you had the spare time to do daily or weekly updates of the ASCII file, that wouldn’t be fast enough for the invites going out via e-mail. In this case, you’d sit down with your database administrator and Web server administrator. You’d need to decide what fields will be accessed and writ-ten to by NetCollect, and sort out permissions between the two applica-tions—or in some cases two servers. Once the data procedures are designed and tested, you set up the embedded survey instructions to pull the address data real-time from the customer database and then to update changed addresses real-time as well.

Apian NetCollect 4.0 User Guide
Chapter 12 - Embedded Surveys Data Piping 201January 15, 2007
ASCII Files Key advantages: Straightforward, QuestionWeb compatible
Most of us have experience working with CSV and other ASCII files, so this isn’t completely new territory. The files are managed as part of the NetCollect survey, so you don’t have to worry about special uploads and permissions. Using ASCII pipes on a survey may add less than a day to your setup and testing time. Generally there’s no need to involve server administrators.
SQL Connections Key advantage: Real-time
SQL requires more of an up-front investment, but is worth it any time you want to give multiple parties—whether human or server—up to the minute access to the same data set. Because there’s no opportunity for data cleaning between the database and your survey, it’s critical to get the data formatted properly on both sides. Not all IT setups will let a public Web server speak to an in-house database such as a CRM program, so be sure to involve your IT people early in the planning. Any time you get into server permissions and live data updates, add at least a week to your launch timeline for design and testing—more if it takes a few days to get meetings with your IT staff. SQL connections are not supported in QuestionWeb folders.
Piping Information into a Survey
In some ways, piping in acts like a skip. It executes as the respondent sub-mits a particular page, and uses a “Key” question which is similar to the test question in a skip. The key value may have appeared on the page being submitted or earlier in the survey, including in hidden fields or via the starting URL. This is very similar to SurveyPro’s keyed imports, so if you’ve used that feature some of the controls will be familiar.
A pipe in may write the same source field into one or more questions in your survey (the tutorial on page 225 does a double write). You can have several pipe ins for a survey, such as pulling product descriptions from an ASCII pipe in file while the survey also grabs contact information from a SQL database. A pipe in may write to the next page being loaded, or it may also seed questions on future pages.
Be very careful of your data formats.
Test thoroughly.
Start by double-checking the scale definitions for both the key and receiv-ing questions. Make sure you’re enforcing server answer tests if the key value is a type-in response. Then confirm your data source—whether

Apian NetCollect 4.0 User Guide
Chapter 12 - Embedded Surveys Data Piping 202January 15, 2007
ASCII or SQL—matches that structure. If it doesn’t, you either need to manipulate the inbound data to make it match, or in the case of checkbox scales, add a value map (see page 211).
To define Pipe Ins: 1. Web Survey Setup dialog
2. Edit Embedded Operation
3. Data Piping tab
4. Insert, Modify, Delete or Duplicate the Pipe Ins in the upper half of the dialog
Pipe ins execute first based on the trigger page, then based on the order they appear in this dialog (top of the list first). The order of the Pipe Ins only matters if they cascade, such as the respondent’s password acting as the key to bring in a car buyer’s history, and then the model they pur-chased keying a second pipe to list the vehicle details.
Specific dialog controls for ASCII follow, SQL is covered on page 204, and their shared Field Matchups tab is on page 210.
ASCII Pipe-In file format
While ASCII is a “standard” format, there are several common flavors to the files. The first tab of ASCII Pipe-Ins lets you specify the attributes of your source file. See also Field Matchups for Piping on page 210.

Apian NetCollect 4.0 User Guide
Chapter 12 - Embedded Surveys Data Piping 203January 15, 2007
Pipe Name This is an internal name for reference in the piping dialog—as with other internal labels, concise is best.
Source/Target Specify ASCII and browse to the source file you’re using. During Publish, NetCollect will copy this file and then upload it to the Web server with your survey pages, so it doesn’t have to be in the same spot as your SP4 file.
Delimiter Comma is the most frequent delimiter, the one used in CSV file created by Excel and other programs. You can also select Tab, a pipe character “|” or a semi-colon. Any time a record contains one of these delimiter charac-ters, the field must be enclosed in straight double quotes, such as "Jane Smith, PhD".
Multiple-answer checkboxes are
If any of the fields you’re piping are multiple answer checkbox data, the answers may be in a single field “1;2;5” or in a series of on/off fields “1,1,0,0,1” or “T,T,F,F,T” or “Y,Y,N,N,Y”.
First record Many ASCII files have field names in the first row, in which case Net-Collect will ignore its information.
Pipe from Page This is the page after which data needs to appear in your survey (see the order of operations on page 196). These page numbers are the same ones which appear in SurveyPro’s design screen, so in most cases Page 1 will be a password/welcome page. If you are launching a survey with data in the URL, you can execute a pipe before page 1 loads using the 0=EL selection.

Apian NetCollect 4.0 User Guide
Chapter 12 - Embedded Surveys Data Piping 204January 15, 2007
SQL Pipe-In database settings
You’ll need some assistance from your database administrator to fill in this dialog. See also Field Matchups for Piping on page 210.
Pipe Name This is an internal name for reference in the piping dialog—as with other internal labels, concise is best.
Source/Target Table Specify SQL and type the name of the table you want to access. Each SQL pipe-in will only look in a single database table, so if you need to bring in data from several tables you’ll need to use multiple pipe-ins.
Connection String This is the “handshake” between the NetCollect survey on your Web server and the SQL database. Your database administrator will need to provide the exact syntax, and errors in this string are the most common problem in configuring SQL piping.
Multiple-answer checkboxes are
If any of the fields you’re piping are multiple answer checkbox data, the answers may be in a single field “1;2;5” or in a series of on/off fields “1,1,0,0,1” or “T,T,F,F,T” or “Y,Y,N,N,Y”.
Pipe from Page This is the page after which data needs to appear in your survey (see the order of operations on page 196). These page numbers are the same ones which appear in SurveyPro’s design screen, so in most cases Page 1 will be a password/welcome page. If you are launching a survey with data in the URL, you can execute a pipe before page 1 loads using the 0=EL selection.

Apian NetCollect 4.0 User Guide
Chapter 12 - Embedded Surveys Data Piping 205January 15, 2007
Piping Answers Out of a Survey
Piping out to ASCII is an easy way to pass data files to people who don’t have a copy of SurveyPro—without your having to import and export every time they want an update. The files can be accessed from the server via the survey’s Control Panel, direct FTP/LAN permissions, or down-loaded by the SurveyPro user with Advanced Download (see page 337). If you have a big survey, remember to stay within any limits of the receiving software, such as 256 columns/fields for Microsoft Excel.
SQL piping, while also sending data to other users, has the advantage of updating an individual’s record in real time. With SQL you can also pipe out status information for a respondent (covered on page 224 under Advanced Embedded Survey Topics).
Answers are “piped out” or saved from your survey when a respondent’s data is committed. This happens just before a respondent is sent their done/thanks page or directed to an outside exit URL. Prior to data com-mit, each respondent’s answers are saved in a temporary file and consid-ered to be indefinite because the respondent may back up and make changes. Partially completed surveys are committed when they expire (see page 324) and when you change modes from Test to Live or Live to Closed. Part of the Pipe-Out definition is whether or not you want to include partials.
Each survey can have multiple pipe-outs defined, and they will execute in the order they appear in the Data Piping tab of the Embedded NetCollect dialog (top row first). Execution order doesn’t matter for ASCII, but could be an issue when you have multiple SQL pipe-outs.
Except with the Key field in SQL you cannot “filter” the pipe-outs to only save selected records. However, the tutorial Loading Data into a Survey on page 225 shows one way to construct a survey with designated update fields. Other options may exist by adding an transition table between the two systems or via custom coding.
The tutorial Handing Data to Other Systems on page 241 is the best intro-duction to piping out. While it only covers ASCII, it does walk you through the matchup process including scale value mappings.

Apian NetCollect 4.0 User Guide
Chapter 12 - Embedded Surveys Data Piping 206January 15, 2007
To define Pipe-Outs: 1. Web Survey Setup dialog
2. Edit Embedded Operation
3. Data Piping tab
4. Insert, Modify, Delete or Duplicate the Pipe-Outs in the lower half of the dialog
Piping out to ASCII data files
The first tab of ASCII Pipe-Outs lets you specify the attributes of the data file you want to create. See also Field Matchups for Piping on page 210.
Pipe Name This is an internal name for reference in the piping dialog—as with other internal labels, concise is best.
Source/Target ASCII is the most convenient option for most data exchanges. See ASCII vs. SQL on page 200.
File Name Type the name of the file you’d like created. If the file will be archived, this will become a “base” file name and the actual data files on the server will

Apian NetCollect 4.0 User Guide
Chapter 12 - Embedded Surveys Data Piping 207January 15, 2007
be in the format MemberAddresses_YYYYMMDD_HHMMSS.csv as well as including the “TEST” and “PARTIALS” flags like the SDH data files.
Do not archive this file Mark this box if you want all responses from the entire run of the survey to collect in one file of the exact name you type. This is typically done for shorter-running surveys where you don’t have to worry about people downloading and importing records more than once. It’s also used when the pipe-out from one survey is being used as a pipe-in source on another, or for similar real-time exchanges between applications.
Do not add partial completions
Mark this option if you don’t want partials included in the data file when they expire or at mode changes. You can always import the SDH files con-taining partials and export them later if needed.
Delimiter Comma is the most frequent delimiter, the one used in CSV file created by Excel and other programs. You can also select Tab, a pipe character “|” or a semi-colon.
Multiple-answer checkboxes are
If any of the questions you’re piping out are multiple answer checkbox data, you have two formatting options for the data. You can save responses in a single field “1;2;5” or in a series of on/off fields “1,1,0,0,1”. Test this if you are uncertain what your receiving application(s) require.
First record Many ASCII files have field names in the first row. Given survey data tends to include a lot of indistinguishable ratings by respondents “1,2,5,3,1,1,2,” including the field names greatly increases your chances the data will end up in the right fields when it’s imported.
Checkbox and rating answers export as
See NetCollect’s Internal Data Format on page 197 for a full explanation on how data is stored in SurveyPro and NetCollect. Here you have the option of saving responses as 1/2/3/4 or Excellent/Good/Fair/Poor. This is a preference of the receiving individuals or applications. Choosing Label text will also significantly increase the file sizes created, though ASCII of any format is usually of modest size and unlikely to be an issue. In addi-tion to this general setting for the file, you can also override the values used on a question-by-question basis (see page 211).
Put quotes around answers You can opt to enclose written answers with quotes only when they include a delimiter, paragraph break, or other special character as with "Jane Smith, PhD". This works well with Excel and many other applica-tions. Some other programs are more rigid, and may not see text fields properly without every one being enclosed in double quotes.
One blank character in empty written answers
Many applications will treat a single space in a field as “empty” while some will not see fields with absolutely no content. This is a critical set-ting to test if your written answers will be used to update fields in another file.

Apian NetCollect 4.0 User Guide
Chapter 12 - Embedded Surveys Data Piping 208January 15, 2007
Piping out to SQL databases
As this function involves writing to a shared database, these settings will likely require some detailed conversations and careful testing with your database administrator. Empty fields are very common with survey data, so be sure that you are either requiring a response in every question piped out or your database allows Nulls in those optional questions. See Answer Tests on page 134 for details on requiring answers and specific response formats.
The settings for this dialog tend to be update or skip with no option to error out. This is designed to minimize respondent confusion by not pre-senting them with an error they cannot fix. In addition, a survey’s SDH data files are always saved to before any pipe-outs, so if there is a problem writing to the SQL the respondent’s data is still captured in full.
See also Field Matchups for Piping on page 210.
Pipe Name This is an internal name for reference in the piping dialog—as with other internal labels, concise is best.
Source/Target Table Specify SQL and type the name of the table you want to access. Each SQL pipe-out will only look in a single database table, so if you need to write data to several tables you’ll need to use multiple pipe-outs.
Connection String This is the “handshake” between the NetCollect survey on your Web server and the SQL database. Your database administrator will need to provide the exact syntax, and errors in this string are a common problem in configuring SQL piping.

Apian NetCollect 4.0 User Guide
Chapter 12 - Embedded Surveys Data Piping 209January 15, 2007
Multiple-answer checkboxes are
If any of the questions you’re piping out are multiple answer checkbox data, you have two formatting options for the data. You can save responses in a single field “1;2;5” or in a series of on/off fields “1,1,0,0,1”.
Checkbox and rating answers export as
See NetCollect’s Internal Data Format on page 197 for a full explanation on how data is stored in SurveyPro and NetCollect. Here you have the option of saving responses as 1/2/3/4 or Excellent/Good/Fair/Poor. In addition to this general setting for the file, you can also override the values used on a question-by-question basis (see page 211).
If answer to key is missing in SQL
Each respondent’s data will match up to a record in your database via a key field such as a customer ID. If a respondent enters their ID as “1234” but you have no entry for that ID in your SQL database, do you want to Add a record for them or Skip output for that individual?
If answer to key is missing in survey
If your survey is a mix of existing customers and prospects, you may be keying off the Customer ID question but it may not be a required field. If someone doesn’t enter a value, do you want to Add a record for the pros-pect, or for the system to Skip output for them as the tables only reflect existing customers?
If key matches more than one field in SQL target
If a customer enters the ID “1234” and your SQL table has three records with that ID, do you want it to Update all the records or Skip the output? Generally key fields for piping out are unique in the destination database, so skipping is the conservative setting for an “improper” situation.
Replace target answer In this setting you’re determining how information is written based on conditions in the SQL database. Use Always if you know the respondent will be providing the most recent data, such as an address update. Use Only if empty in target [SQL database] when you are using the survey to collect supplemental information.
Apply answers Here you’re setting overwrite rules based on the data in the NetCollect survey. Use Always if you want the NetCollect response used even if it’s blank. Only if not empty in survey will only attempt to write in the SQL database when a response is provided—a better fit if these fields are skipped by some respondents.

Apian NetCollect 4.0 User Guide
Chapter 12 - Embedded Surveys Data Piping 210January 15, 2007
Field Matchups for Piping
The Field Matchups tab is almost identical for both ASCII and SQL piping in both directions. In all cases, the Question and Scale columns provide a reference to the contents of your survey, and you use the Field, Key and Map columns to tell SurveyPro how to match data to your outside data-base or file.
Field Number (ASCII In) Type the field (column) number where the data appears in your ASCII file. You can bring data from the same field into multiple questions in your SurveyPro file—see the tutorial on page 225 for an example.
Field Name (ASCII Out) Type a field name for each question you want saved in the ASCII pipe out. Fields are saved in the same order as the questions appearing here, and only fields with a name will be saved. So, even if you’ve set First Record to normal data on the first tab, you need to type something in the first col-umn for the fields you want.
Field Name (SQL) Type the field name exactly as it appears within the source SQL table next to the question(s) into which you want to bring the data.
Key (ASCII In and SQL) Specifies the question which will be used to match data between the respondent’s answers (or prior pipe-ins) and this particular pipe-in. In some cases the key will be a unique identifier such as a customer ID used to pull in an individual’s address. In other cases, the key may be a product code which would pull in details on a particular model for many respon-dents. Each key value must be unique within the ASCII or SQL data source.

Apian NetCollect 4.0 User Guide
Chapter 12 - Embedded Surveys Data Piping 211January 15, 2007
Question The question which will receive the data, listed by internal Q number (see also NetCollect’s Internal Data Format on page 197). If you’ve set multiple answer checkboxes to separate fields on the first tab, you’ll see these questions listed as one “question” for each answer option.
Its Scale Lists the scale being used for that SurveyPro question. This must be a direct match to the source data or have a Map which translates—other-wise the ASCII pipe-ins and SQL interfaces will fail.
Map This column indicates whether you’ve defined a scale value map to trans-late inbound data to NetCollect’s format. Since mapping is only an option on checkbox data, this column will be grayed out next to some of your questions. See the next section.
Fill Next When you click the Fill Next button, it will set the next question with the next higher field number. This is very handy when saving all the data out to ASCII.
Piping scale value mapping
While you’re in the Matchup screen of a Pipe In or Pipe Out, you’ll see a drop-down list below the questions labeled Scale Mapping. The control will be grayed out unless you’ve clicked on a checkbox or rating ques-tion—other scale types require a direct data match (see NetCollect’s Inter-nal Data Format on page 197). What this control lets you do is select or create a scale mapping that translates NetCollect’s scale box values into the answers to be read from or written to your external sources.

Apian NetCollect 4.0 User Guide
Chapter 12 - Embedded Surveys Creating Starting or Ending Handshakes 212January 15, 2007
To create a scale mapping: 1. Select the question you want to map on the Field Matchups tab
2. Insert a mapping
3. Type the value which is used in your ASCII file or SQL database next to every scale item (rows left blank will not save an answer)
4. Give the map a Name and click OK to save
As with all named objects in SurveyPro, once a scale map is created you can apply it to other questions with the same scale. However, remember that any edits will also ripple to all uses, so if you’re using a mapping that was defined by someone else for an import, you may want to duplicate the mapping as a copy to be preserved just for the data piping.
Creating Starting or Ending Handshakes
With NetCollect you can connect a survey to other programs, smoothly handing a respondent from one Web application to another. This has three advantages:
• A better respondent experience as they don’t have to manually type in log-ins
• Passing data into the survey to seed visible or hidden information, or handing it off to your Web application after they finish
• Transferring data between different servers, such as from a Unix server’s Perl shopping cart to your Windows based NetCollect survey
While the most common applications are creating starting and ending URLs, you can also control the resume URL. See page 223.
Understanding URLs with data
Most often, these handshakes are done by embedding data in URLs—just like the long URLs you may notice when you’re in shopping sites. A few issues to be aware of with URLs:
• Even if a survey is executing via SSL, the URL itself is not encrypted in transit. Do not use this method to pass sensitive information such as Social Security Numbers.
• The maximum length of a URL is somewhat vague, though 2,000 characters is a reasonably safe upper bound in desktop browsers.
• Many e-mail applications will insert line breaks at 70 or 80 characters in plain text messages, which will break longer URLs. HTML

Apian NetCollect 4.0 User Guide
Chapter 12 - Embedded Surveys Creating Starting or Ending Handshakes 213January 15, 2007
messages should maintain long URLs if you’re coding the destination with an <a href=...> tag.
• Special characters in a URL must be encoded in hexadecimal, so a hyphen becomes %2D, a space is %20, etc. If you’re using a standard e-mail merge program to embed the respondent’s password in their invitation, you’ll want to stick with passwords that contain no spaces or special characters.
• Every Web application has a particular syntax for its URLs, so you may need to have a programmer code a small translator script to re-format the information between systems.
• URLs can be hacked. If you’re offering a per-respondent compensation, try to set up your hand-offs with some cross checks. This can include checking the referrer page of the server passing the URL, making sure a given password/order ID was issued for survey completion, and checking whether a response was already received for that ID.
Because of the limitations of URLs, many surveys will pass just a key value in the URL, such as a password, order ID, or employee ID. Then you can use that key value to pull additional information from an ASCII or SQL pipe. For transient and sensitive hand-offs, you can also use tempo-rary files to pass data behind the scenes (see page 220). Some of these methods of passing data require a trusted relationship between the serv-ers and applications (preferably encrypted) so you may need some help from your server administrator as well as your Web developer—plan your timeline accordingly.
Starting a Survey with Data
Most often this feature is used to embed a password in a starting URL, which is also covered in the tutorial Loading Data into a Survey on page 225. If that’s all you plan to do with your embedded launch, that’s the best place to start. If you plan to pass other information into the survey or want to understand more of the inner workings, review these sections in addition to the dialog controls:
• NetCollect’s Internal Data Format on page 197
• Creating Starting or Ending Handshakes on page 212
• NetCollect’s URL Syntax on page 217
Unlike piping where you can define several pipe-ins and outs, you can only have one embedded launch setup. You can, however, make the

Apian NetCollect 4.0 User Guide
Chapter 12 - Embedded Surveys Creating Starting or Ending Handshakes 214January 15, 2007
embedded launch optional so respondents have the ability to start the survey manually. Just make sure you test both methods thoroughly so they’re smooth for respondents, such as not putting important instruc-tions only on a login page that embedded entrants would bypass.
To define an embedded Launch:
1. Web Survey Setup dialog
2. Edit Embedded Operation
3. Launch tab, set to Optional or Only
Launch with Preload If you make this Optional, then respondents can come to the usual survey start page to enter their password or just click Start depending on your login settings. If you set this to Only, then any respondent attempting to access the survey without the proper embedded URL will see a “No sur-vey found” message.
Pass values via In most cases, you’ll use URL query to pass the data. If you need to pass sensitive values or more characters than a URL can accommodate, see Using Temporary Files to Obscure URL Data on page 220.
Require EL1 for Resume You can tell NetCollect to distinguish between URLs for launch (EL0) and resume (EL1). If you’re going to use an embedded URL for an e-mail invi-tation, you’ll generally want to turn this option off, allowing respondents to click the same EL0 link to start and resume their survey.
Process login When NetCollect handles passwords, there are a series of checks it makes to see if the value is OK and whether it has already been used to start or finish a survey. If you select On launch, NetCollect will do those checks as

Apian NetCollect 4.0 User Guide
Chapter 12 - Embedded Surveys Creating Starting or Ending Handshakes 215January 15, 2007
soon as it receives the URL. If you select At page one submit, it will receive the pre-loaded information and load page 1, but will wait until the respondent clicks Start or Next to process the password.
Do page one skip… Key Concept: Watch your Cause and Effect on page 196 lists the order of operations on embedded surveys. You can set up a questionnaire so that the embedded URL triggers a pipe-in which in turn triggers a skip. Leave this option marked unless for some reason you have a page 1 skip defined that you want to execute on a manual log-in, but not an embedded one.
If launch login ok… When you embed the password in the starting URL and the first page of the survey is just a Welcome/login page, it’s natural for the respondent to skip ahead to the first “survey” page with is page 2 in your NetCollect file. At other times, the first page of the survey may include questions other than the login, in which case you want to pre-load the embedded data but leave the respondents on Page 1 until they click Submit or Next.
Preload questions For each of the fields you’re passing in at launch, specify whether the value will be Opt (Optional), Rqd (Required) or Eq (Equal). Equal is essen-tially another authentication test, as every URL will be checked to ensure it has exactly the value that you type in the last column. Required and Equal are only enforced during an embedded launch, so if you want to ensure these values are always present you need to set Launch with Pre-load to Only.
On Exit Completed — Sending Respondents to a URL
There are four options for finishing a survey:
• One or more “Thanks” pages within the SurveyPro document (see page 101)
• A script-generated message confirming data was received, which is enabled by default and will appear in the absence of other exit instructions (but which has a plain layout).
• A simple URL for respondents, such as a static page on your site
• A dynamic URL with embedded data
You can combine in-survey Thanks pages with a static or dynamic URL in the Embedded NetCollect dialog. The best introduction to this type of setup—complete with skip for conditional exits—is Handing Data to Other Systems on page 241. If you plan to pass data from your survey to another

Apian NetCollect 4.0 User Guide
Chapter 12 - Embedded Surveys Creating Starting or Ending Handshakes 216January 15, 2007
application or want to understand more of the inner workings, review these sections in addition to the dialog controls:
• NetCollect’s Internal Data Format on page 197
• Creating Starting or Ending Handshakes on page 212
• NetCollect’s URL Syntax on page 217
To define an embedded Launch:
1. Web Survey Setup dialog
2. Edit Embedded Operation
3. On Exit Completed tab
4. Turn off Default survey done message, and if needed, turn on Pass back answers
Default survey done message
This is an extremely plain server message saying simply “The [YourSur-veyName] is complete.” If you’re not sending the finished respondents outside the NetCollect survey, you’re far better off adding a Thanks page within your questionnaire document.
URL to your page If the page you want to send respondents to is in the same folder as the survey, you can just enter the name such as finished.html. If the page resides elsewhere, use a full URL beginning with http:// or https://. When you are just handing respondents off to a simple page, you can use a root URL such as http://apian.com, but if you’re handing off data you must include a specific script name as in the screen capture here. What-

Apian NetCollect 4.0 User Guide
Chapter 12 - Embedded Surveys Creating Starting or Ending Handshakes 217January 15, 2007
ever approach you take, it’s always best to explicitly tell respondents that they successfully finished the survey.
Pass back answers Turn on this option if you’re going to be handing the respondent and some of their data off to another Web script. If you’re simply trying to save data out to a file, use piping instead (see page 199).
Pass values via In most cases you’ll use the URL. If this isn’t a fit due to security or length, you may want to consider using pipe-outs for the bulk of the data (see page 205) or passing values via a Temporary file (see page 220).
Question / Send Check the Send column next to each of the questions whose data you want to send to the receiving script.
Send as an embedded launch
Use this option to loop within one survey or to chain multiple NetCollect surveys together. This adds P1=EL0 to the query string, which is the com-mand a NetCollect survey expects to launch with data embedded in the starting URL. See Example 4: Looping the Respondent Through Questions on page 194.
Include a fixed part in every query
This allows you to type a bit of code to include in every exit URL. In the case of a looping NetCollect survey, you may have a hidden question which identifies whether it’s the first time the respondent is going through or the second (or fourth or eighth). In that case, you’d use the NetCollect syntax for that question, something like Q0002=1 to mark a Yes/No scale as a loop. NetCollect will add a leading & to whatever you type, but you’ll need to include separators within your string if it includes multiple param-eters.
NetCollect’s URL Syntax
Some of the following information is general URL syntax. A few of the points are specific to building strings for a NetCollect embedded launch or understanding the strings it will create in an exit URL. Let’s start by break-ing apart a URL:
http://yoursite.com/surveys/survey.asp?P1=EL0&Q0001=1234&Q0013=Jane+Doe&Q0015=janedoe%40domain%2Ecom

Apian NetCollect 4.0 User Guide
Chapter 12 - Embedded Surveys Creating Starting or Ending Handshakes 218January 15, 2007
Field IDs Within the URL, a data field is identified by its internal NetCollect Q num-ber. Outbound URL strings will always use 4 digit field numbers, such as Q0001 and will list all fields even ones left blank by the respondent. Inbound URLs will accept either the 4 digit syntax or with the leading zeros dropped as for Q1.
Field order Outbound URLs will follow the embedded launch command with any static URL text you set and then the questions in Q number order. Inbound URLs will tolerate Q numbers being out of order.
Data values Unlike data piping where you have the option of mapping checkbox val-ues (such as saving out a state name rather than box number), URL and temporary file hand-offs use only the native values. See NetCollect’s Inter-nal Data Format on page 197 to understand how the values are stored for each scale type. If your sending or receiving system requires a different syntax, you’ll need to have a translator script coded.
Encoding special characters Special characters in any URL must be encoded in hexadecimal for proper translation across the Internet. This includes some “standard” punctua-
survey.asp In order to handle the inbound data, the basic Web address (http://…) needs to end at a specific Web page which is a script, not simply at a folder. The script could be an ASP page, or it could be Perl, PHP, or another language.
? A question mark after a the script page indicates that the rest of the URL is query data to be processed by the script.
P1=EL0 This tells NetCollect that the string is to be handled as an embedded survey launch. The last character is a zero.
& URLs use ampersands to separate values within a string.
Q0001=1234 In this example, we’re sending the respondent’s password “1234” as a value for Q1.
Q0013=Jane+Doe In addition to the password, we’re sending the respondent’s name for Q13. The plus symbol in a URL is used to encode a space.
Q0015=janedoe%40domain%2Ecom
Jane’s e-mail address is [email protected]. Because special characters are used as commands within a URL (such as a plus and ampersand as you’ve seen), they need to be encoded. In this case, @=%40 and .=%2E.

Apian NetCollect 4.0 User Guide
Chapter 12 - Embedded Surveys Advanced Embedded Survey Topics 219January 15, 2007
tion—not just extended or accented characters. One encoded character translates to a two digit code preceded by a % in a URL. There are also a few characters which may appear in a couple formats. For example, spaces may be encoded as a + or %20 and hyphens may appear as a nor-mal dash or %2D. When in doubt test thoroughly or you can always use the hex. For a full list of values you can use the last two digits of the Uni-code in Windows Character Map or see the Hx column at:
http://www.asciitable.com
Embedded launch indicator When creating an embedded launch, you must include P1=EL0 (zero) immediately after the question mark in your string. If you’re creating a looping survey or handing off a respondent between two surveys, you just need to mark the Embedded Launch box on the dialog. When you want the URL to resume a survey rather than start a new one, use P1=EL1 (one) instead. If you want NetCollect to use the same link for both launch and resume, then be sure to turn off Require EL1 for Resume in the Launch tab.
Maximum length There is no clear standard in URLs for a maximum number of characters. Plain text e-mails will break lines at 70-80 characters, requiring very short strings. Between servers, you may be safe at up to 2000 characters. If you’re using longer strings, check the specs for all the servers and brows-ers involved. NetCollect does not have a maximum length.
Advanced Embedded Survey Topics
The following sections generally only apply to developers writing custom applications around NetCollect surveys or tightly integrating them with other Web software.

Apian NetCollect 4.0 User Guide
Chapter 12 - Embedded Surveys Advanced Embedded Survey Topics 220January 15, 2007
Using Temporary Files to Obscure URL Data
Sometimes URLs aren’t the best option for passing data between systems, either due to the need for security, quantity of data being handed-off, or wanting to obscure the pass from respondents. In this case you can use temporary files to pass the information. There are four scenarios:
• Web application such as an e-commerce site or 360 survey portal creates temporary files
• Two NetCollect surveys pass data via temporary files
• Looping within one NetCollect survey
• NetCollect survey creates temporary files for use by an outside Web application
The primary dialogs and settings are the same as for URL data passes (see page 212). Because of how paths and folders are managed in Question-Web, only the looping scenario can be used with that service.
In the case of two NetCollect surveys exchanging information or a loop, one survey would have an On Exit Completed defined with the fields selected and Pass values via set to Temporary file. The second survey (or same one for a loop) would then have a corresponding embedded Launch again set to Temporary file.
Even if you plan to use an outside application, the easiest way to under-stand the hand-offs and syntax is to experiment with a pass between two NetCollect surveys.
URL syntax
Where a URL pass would have a long query string with all the data encoded (see page 217), the temporary file URLs only contain one value: the name of the file to pull.
When a NetCollect survey generates the URL, it combines the base file-name set during Publish with a unique value:
http://yoursite.com/surveys/survey.asp?SF0=basefilename-goto12345
When you send NetCollect a file from an outside application you can use any names you like, so long as each file name is unique.
http://yoursite.com/surveys/survey.asp?SF0=individualfilename
The receiving survey does not have to know your naming system—it just goes and pulls the exact file name you give it in the URL. If you are con-

Apian NetCollect 4.0 User Guide
Chapter 12 - Embedded Surveys Advanced Embedded Survey Topics 221January 15, 2007
tinuing a survey instead of launching a new session, use SF1 instead of SF0 (zero), paralleling the EL0-El1 system for URL launches.
File contents
The temporary file should contain the query just as if it had been sent through the URL (see page 217) including strict compliance with Net-Collect’s Internal Data Format on page 197. The only difference is you can use extra white space to format the file contents as you wish. All white space and line breaks will be removed before the file is processed.
File extension and path
Files must have a .tmp extension even though the URL does not show it.
By default, the temporary files are stored in a sub-folder of the Project data folder called Embedded. You can change this location by editing the .CFG file’s line:
Embedded_Path c:\wherever you need\
As with other paths, this is any UNC or drive letter location relative to the IIS server writing or reading the temp file. Make sure all involved applica-tions have appropriate read/write/delete permissions. The .CFG is modi-fied during New Project setup, so if you are going to tinker with it you’re best off pulling the live copy from the server and making a backup. (See page 361.)
As soon as a NetCollect survey receives the temporary file pass, the new session incorporates the file’s contents and deletes it so the launch cannot be mimicked or repeated. In the case of two NetCollect surveys passing files or looping this means that temporary files will never accumulate on the server. Configurations with outside applications may require a mainte-nance routine to remove stale files.
On Incomplete for a Custom Error Page
This is similar to On Exit Completed for finished respondents (see page 215), but instead of sending them to a success page it is used to direct them to a special failure page for custom error handling. In addition to the regular fields you can send out with completion, a few additional ones appear at the end of the list.

Apian NetCollect 4.0 User Guide
Chapter 12 - Embedded Surveys Advanced Embedded Survey Topics 222January 15, 2007
Not all of the values are present for every failure, so code your error page accordingly. The fastest way to create a custom page is to publish a project and start from the code NetCollect generates. All “normal” errors such as invalid passwords and surveys off-line can be customized by the SurveyPro user—see Notices, Errors and Buttons on page 81. Errors are also logged in the main project log (see page 362) if your concern is a review of problems.
If you use the fixed URL setting to encode a survey ID or name, you can create a generic error handler for your site rather than re-creating it for each questionnaire.
Item URL Field ID Details
Error code ERR_NUM= This is the internal NetCollect error code such as “106-0009.” Within NetCollect’s standard error pages, these only appear in survey failure situations, not normal operation.
Login error ERR_LOGIN= “T” when the problem is an invalid login due to the password being invalid or already used.
Nested error code ERR_NESTING= Additional codes for callers.
Error description ERR_DESCR= A short description of the problem.
Error may be temp ERR_TEMP= “T” if the rejection may not be a permanent condition.
Time of exit ERR_TIME= Time the respondent was errored out.

Apian NetCollect 4.0 User Guide
Chapter 12 - Embedded Surveys Advanced Embedded Survey Topics 223January 15, 2007
Resume URLs
In most cases, you’ll leave pause/resume up to NetCollect, letting it man-age the resume process. This includes error handling for when the respon-dent tries a login which is invalid or has been completed.
However, if you want to create your own link for the resume, you can do so in this format:
http://yoursite.com/surveys/survey.asp?P1=EL1&Q0001=1234&UID=r65c-4rn3-8v6
This is very similar to the initiation URL we have on page 217. There are two key differences:
• Instead of P1=EL0 it’s EL1. This indicates a resume instead of an initiation.
• The only value other than the individual password (or server issued resume code) is the session ID, the 11 digit UID code.
Any other survey data will result in an error—this command is only for resuming a survey in progress. EL1 is also required for resume rather than EL0, thus putting an EL0 in an email makes it a one-time entry only item. The EL0-El1 system was designed for use from other applications. A com-bination launch suitable for email invitations may be available in a future release; check the Knowledge Base. Extra parameters with names starting with C are permitted for custom module coding. These are not checked against the EL1 instructions as they’re outside the main NetCollect pro-cesses.
Offline reason OFFLINE= “Maint,” “Before,” “After,” “Count,” or “Closed.” See Control Panel Screens on page 319 for details about setting a survey to Maintenance mode, Availability times for a survey, or limits on the number of respondents.
Project is live LIVE_MODE= “T” if the survey is currently in Live mode; otherwise it is in Test mode (best used in conjunction with Offline reason to cover the other states).
Capacity limit THROTTLED= This is not in the dialog list, because checks on the survey capacity (see page 49) happen before the remainder of the script engine kicks in. In this case the only parameter that would appear in the query is “THROTTLED=T” indicating the respondent had exceeded the allowed number of slots that minute.
Item URL Field ID Details

Apian NetCollect 4.0 User Guide
Chapter 12 - Embedded Surveys Advanced Embedded Survey Topics 224January 15, 2007
If there is an open session underway the Welcome notice appears. How-ever any exceptions, such as an invalid login, will cause an error exit which you can handle if you wish. See page 217. Your resume script should either monitor completion messages or check the PIN file for sta-tus so it only issues an EL1 when appropriate. See page 352.
Piping Status Out
As each survey page is sent to the respondent, you have the option of pip-ing out the respondent status to a SQL database. This is done through the Data Piping tab, by clicking Add on Pipe Status Out. The dialogs for pip-ing status out are quite similar to those for other SQL pipes (see page 208).
On the Field Matchups tab, above the questions, you’ll see Page Status Code. This is a number (positive or negative) indicating the respondent’s position in the survey.
Note the -7 will not appear for respondents told to “try back later” due to survey capacity limits as those messages are processed long before any SQL handling to minimize their use of server resources.
The Status Out function lets you know exactly where a respondent is at any time. If instead all you need is whether they have started or finished the survey and are using unique passwords, this information is also avail-able in the .PIN file. In the first column of the PIN a “0” indicates not started, a “1” means in progress, and a “2” means done. If you have an external application querying the PIN, just be sure you code it to do a non-exclusive read or you’ll create contention problems for respondents.
Value Details
0 or NULL Field’s default value before starting the survey
1+ Survey page number last sent to the respondent
-1 Pause page
-2 Returning page
-3 Done, data committed
-4,-5,-6 Reserved
-7 Error exit

Chapter 13 - Loading Data into a Survey 225January 15, 2007
Chapter 13T U T O R I A L Loading Data into a Survey
One of the wonderful things about Web surveys is their ability to person-alize a questionnaire for a respondent. This may be as simple as the skips and branches covered earlier in this guide, or as complex as embedding a questionnaire in a familiar intranet or shopping Web site. In this tutorial, we’ll be applying some of NetCollect’s “embedded survey” features in a member survey. The respondents will be asked to confirm their contact information, and we’ll also set up a behind-the-scenes skip based on their membership status.
Important: Read Understanding Embedded Surveys in NetCollect on page 188 before you dive into this tutorial.
In this tutorial you’ll learn how to:
Pipe data from a file into text stringsPipe data from a file into questionsAdd a hidden fieldSkip based on hidden dataEmbed a password in a starting URL
The tutorial assumes you are already familiar with:
Editing questions and textSkips and branchesLogin dialog
Tutorial Notes
General You can save your file and take a break any time you’re in the main document screen.
Tutorial Files Are in your SurveyPro Samples folder, by default under:C:\Program Files\Apian Software\SurveyPro 40\
On Finishing This tutorial has:• An “End” sample file• A live version at http://apian.com/support/tutorials/

Apian NetCollect 4.0 User Guide
Chapter 13 - Loading Data into a Survey 226January 15, 2007
1. Start SurveyPro, enter your initials, and Open the sample file NC4 Tutorial - Piping.SP4.
2. When prompted, click Yes to open a copy, and save as YourName Piping Tutorial.SP4.
3. Close the File History dialog.
4. If needed, select the document tab 1: Questionnaire and adjust the Zoom to your preference.
The first page of questions will probably be familiar, but the rest of this survey is tailored to touching base with the Widget Association member-ship. Scroll through the survey. Note there’s a page where it provides the current contact information, then a page where the member can update that data. The last two pages are both set up as Thanks pages (Page List dialog, Page Properties), and we’ll be sending respondents to one page or the other based on the membership status in our data file.
Taking a look at our address data file
In most cases, you’ll be pulling survey data in from an ASCII file. Data-base connections can also be used, but they’re a bit more complex and require assistance from your database administrator. Whenever possible, you want the ASCII file to contain only the data you need. In our case the sample is all ready, so we just need to take a peek to see what’s in it.
1. Start Microsoft Excel or another spreadsheet program.
2. From the same folder as the other sample files, Open NC4 Tutorial - Piping.csv. You may need to change the Files of type drop-down to All Files (*.*) before it will appear in the Open dialog.

Apian NetCollect 4.0 User Guide
Chapter 13 - Loading Data into a Survey 227January 15, 2007
In our file, we have basic information for 11 Widget Association members. When you look at a data file, it’s important to note:
• Whether the first row has field names or data
• If data in each column directly matches the SurveyPro scale into which it will be piped (if applicable)
• Any partial or duplicate records which may need repair
• Excess fields which could be deleted
• The order of the fields
Some of this will make more sense as we map the file into our survey. In this example, the first row does have field labels, there are no duplicates, but the state data of 2-letter abbreviations doesn’t match SurveyPro’s state scale which would automatically take either a box number or the full state name label.
3. Close Excel and switch back to SurveyPro. Do not save changes if prompted.
Setting up our login method
In order to bring in the right information for each respondent, we need to set the survey up to use the passwords in our data file.
1. Scroll up to the first page of the survey and double-click on the Start button.
2. Change the Survey Login to Unique Respondent ID File.
3. In the middle left of the dialog, turn off One-time use
Most of the time you do want unique passwords to restrict people to one submission—we’re just turning it off to make the sample file easier to play with.
4. Near that setting, click the Make File button.
NetCollect lets you generate new passwords for surveys, or convert val-ues in an existing data file. In this case, the values we need are in the first field of our address data file.
5. For PIN or Password Source select Comma-delimited file.
6. Click the Browse button that just appeared. Select NC4 Tutorial - Piping.csv and click Open.
That selected the source file for our passwords, but we need to tell Net-Collect where in the file to find the values. It will then extract them from

Apian NetCollect 4.0 User Guide
Chapter 13 - Loading Data into a Survey 228January 15, 2007
the .CSV, check for duplicates, sort, and output a .PIN file for use on your Web server.
7. Set the Source Field to Field 1, and check Ignore record one so we don’t make the column label “Password” a valid entry code
8. Leaving the folder path intact, set the Output PIN File Name to “Piping.pin”.
9. Click OK to create the PIN file. Click OK again on the confirmation that it wrote 11 values.
One last step and we’ll be set with the password. We need to tell Survey-Pro which question to use for collecting the logins.
10. In the lower-left corner, click the Link Question button.
11. Leaving all the defaults as they are, click OK in the Link Question dialog.
12. Check your screen against the one below, then click OK.

Apian NetCollect 4.0 User Guide
Chapter 13 - Loading Data into a Survey 229January 15, 2007
Collecting the membership status
In addition to reflecting piped data back to respondents like we’ll do for the address, we can also pull in and act on information which the respon-dents never see. In this case, we want to thank current members for their support, and remind past members that their subscription has expired. Because we had this data in our file, we can use this to drive a skip, just like skips based on respondent-provided answers.
1. Scroll to Web Page 2 Ranking.
2. Click once on the instructions “When shopping for widgets…” and Insert a Question above it.
3. Leave the Questionnaire Text blank so nothing shows on the page to the respondent. Set the Label for Report Figures as “Member Status” and click Next.
4. Select for the scale 7: Yes/No (Unordered).
5. On the right hand side of the dialog, set the Entry Style to No visible entry.
That’s the key piece to have NetCollect create a data field but not put a checkbox or entry blank on the screen for the respondent.
6. Click Finish.

Apian NetCollect 4.0 User Guide
Chapter 13 - Loading Data into a Survey 230January 15, 2007
Right now all it says is [HIDDEN] which lets you know there’s a question there, but not which one. To find out what question it is, you can open up the edit dialog or you can use the Object Tree to see where you are.
7. If the Object Tree isn’t showing on your screen, turn it on with the View menu.
8. Expand the Database Questions node.
9. Click on the Hidden question and note that a red outline appears around the box for Q2: Member Status.
Adding hidden fields for the address data
Scroll to Web Page 3 of the survey. In the text for the respondent we have placeholder text for their contact information. However, plain text doesn’t give NetCollect any place to store the data we’re bringing in, so we need to create some hidden questions to hold the information. Then the visible text on this page becomes a reflection of those hidden questions. These fields will always contain the original data from the ASCII file, as we’re not giving the respondent the ability to change them. The next page of the survey contains questions for the respondent to make corrections.
1. Scroll down to Web Page 4 where we have fields already set up for the address updates.

Apian NetCollect 4.0 User Guide
Chapter 13 - Loading Data into a Survey 231January 15, 2007
2. Click once on E-mail address and Shift+click on the Zip question.
3. All five questions should now be selected. Copy the questions using Ctrl+C or the toolbar button (right-clicking to access that menu will de-select the questions).
4. Scroll up to Web Page 3 and click once to select the instructions “Our records currently show…”
5. Paste the questions above the instructions.
When working with hidden fields it’s important to remember that the underlying scale structure is just as important as for anything a respon-dent answers. Because we picked up copies of questions which already had the right assortment of address scales, we saved ourselves some time versus adding new questions as the hidden ones. Now we just have to remove the visible aspects of these questions.
6. Double-click on the E-mail address question.
7. Change the Label for Report Figures to “E-mail on file”
8. Delete the Questionnaire Text.
9. Select the Scaled Entry tab.
10. Change the Entry Style to No visible entry and click OK.
11. Repeat for the remaining questions.

Apian NetCollect 4.0 User Guide
Chapter 13 - Loading Data into a Survey 232January 15, 2007
Don’t worry about the white space showing inside SurveyPro. As long as the Questionnaire Text field is empty, NetCollect will truly hide the fields when it publishes the HTML pages.
Mapping the data file into our questions
Now that we have all our questions ready to receive the data, we can tell NetCollect how to bring in the information. This is very similar to data-base imports in SurveyPro, so some of the concepts and screens may be familiar to you.
1. Bring up the Web survey setup dialog .
2. Next to Embedded Operation click Edit.
In NetCollect, Embedded Operations are functions that hook into a stand-alone survey. This could include passing data via the starting URL (which we’ll get to in a bit), saving data directly out to ASCII as well as Net-Collect’s SDH format, or truly embedding the surveys as a module within a larger Web application.
3. Select the Data Piping tab.

Apian NetCollect 4.0 User Guide
Chapter 13 - Loading Data into a Survey 233January 15, 2007
This screen handles all data transfers into or out of a NetCollect survey. The top half is Pipe Ins, data coming into the questionnaire from an out-side source, while the lower portion is Pipe Outs for when you’re handing data out of the survey to an ASCII file or database (see the tutorial on page 241). You can have multiple Pipe Ins and Pipe Outs for a single ques-tionnaire.
4. Insert a new Pipe In.
5. Type for the Pipe Name “Contact Info from File.”
6. Click the Browse button next to the File Name field.
7. Select NC4 Tutorial - Piping.csv and click Open.
All the other defaults are just what we need, including the comma delim-iter and that the first record has field names rather than data. Now that the basics of the data file are set, we just need to map its fields to our ques-tions.
8. Select the Field Matchups tab.
Look back on page 226 and note the order of the fields. The password is the value which will be entered in the survey, and then be used to pull that respondent’s value into the file. As with SurveyPro imports, that value is referred to as the Key, and must be unique within the data file.
9. In the first row, next to Q1, set the Field Number to “1” and click the radio button to make it the Key.
Part of why we defined the login earlier in this tutorial was so that Survey-Pro would create the password question for us. In general, you’ll want to define embedded operations after the rest of the survey is complete.
10. For Q2, set the Field Number to “7”—the membership status is the last column in our data file.
11. Scroll down, and map the remaining fields to our hidden “on file” questions Q15-19:

Apian NetCollect 4.0 User Guide
Chapter 13 - Loading Data into a Survey 234January 15, 2007
Now if you look back again on page 226 at the contents of the CSV file, you’ll see that it contains two letter state abbreviations. The scale we’re using in SurveyPro has the full state names as labels. Now we could go back and do a mass replace in our data to put in either the state names or checkbox numbers, but we can also add a data map which NetCollect will use to match up the values.
12. Click under the Map column for Q18: State on file.
13. This activated the Scale Mapping controls under the list of questions. Insert a new mapping.
For the sake of this tutorial, we’re going to take a little shortcut here. Our data file happens to only have data for Oregon and Washington so those are the two mappings we’ll create. In your surveys, it’s very important to have a perfect match or translation between the data and scale, because if NetCollect can’t make a match it can’t bring in that answer.
14. Scroll down the list until you see Oregon.
15. Click in the Import-Export File column and type “OR” as the value NetCollect should expect in the CSV file.
16. Set the value for Washington to “WA”.
17. Set the Map Name to “State Abbreviations” and check your screen against the one below:

Apian NetCollect 4.0 User Guide
Chapter 13 - Loading Data into a Survey 235January 15, 2007
18. Click OK to save the mapping.
We’ve now set the piping into our hidden fields, Q15-19, which will be used to show respondents the address information we have on file. For the respondents who say they need to update their information, we could give them empty blanks to type into, but it’s nicer to pre-fill those questions with the current data in case they only have to change one or two items.
19. Repeat the field matchups for the visible questions, including selecting from the list the scale value mapping we just created for the states:
20. Click OK to save the Pipe In definition. Click OK to close the Embedded NetCollect dialog, and Close the Web Survey Setup dialog.

Apian NetCollect 4.0 User Guide
Chapter 13 - Loading Data into a Survey 236January 15, 2007
Showing the current address information in a text graphic
Right now, the address information will be copied into the hidden fields, but we also want to reflect that data in text for the respondent to see. This can be done with other information as well, such as piping forward the product name a respondent indicated in a checkbox or text field.
1. If you closed your Object Tree, open it back up (View menu) and expand the Database Questions node again.
The commands we’re about to type use the internal SurveyPro Q num-bers, so having that tree open is a good quick reference about where we are.
2. Scroll to Web Page 3 and double-click on our placeholder text tile beginning with “E-mail.”
What we’re going to do is replace the five words currently in this tile with their corresponding hidden question numbers, This means you’ll want to leave the comma when you replace “City” with its piping command, as well as the space between “State” and “Zip.” For the answer piping to work, you need to get the underscores and Q numbers just right (see page 137).
3. Typing very carefully, set the Text Content for the tile as follows:
_ANSWER_Q15__ANSWER_Q16__ANSWER_Q17_, _ANSWER_Q18_ _ANSWER_Q19_

Apian NetCollect 4.0 User Guide
Chapter 13 - Loading Data into a Survey 237January 15, 2007
When the NetCollect scripts run the survey on the server, they look for the _ANSWER_Q_ strings and replace them with the data provided. Because these commands are entered manually, it’s important to test carefully, and you’ll need to update the Q numbers after any edits to the survey.
4. Click OK to save the text.
Setting the skips for address updates and membership status
By default, respondents always go through every page of the survey. In this case, we’re asking respondents if their address information is current, and if it is, we want to skip them past the update fields.
Also, since we have the membership status in our hidden question, we can skip respondents to the right Thanks page. Scroll down to the end of the survey to take a look at the two versions.
As always when working with skips and branches, giving the Web Pages names when you create them—rather than leaving them “Untitled”—makes things much easier (Page List dialog, Properties).
1. From the Document menu select Skip Patterns.
2. Click on Page 3: Address - Current and click the Skip radio button.
3. Leave the question on Q20 and check Require Answer to question.
4. Under the Answers list, select 1 to Next on Yes and set its Goes to page to Page 5: Comments.
This will send respondents with current information past the update page.
5. Click OK to save the skip.
Now we need to set the skip to the correct Thanks page. While the hidden membership information was piped into Web Page 2, we need to set the skip on the last page of questions in the survey.
6. Click on Page 5: Comments and click the Skip radio button.
7. Set On Answers to Question to Q2: Member Status.
We do not want to require this answer because there’s no way for respon-dents to correct the data in a hidden question. While our 11 record file is pristine, it’s not uncommon for this type of data file to have missing or incorrectly formatted values. If our file had missing values, we could add to the survey a third Thanks page which didn’t mention a specific mem-bership status.

Apian NetCollect 4.0 User Guide
Chapter 13 - Loading Data into a Survey 238January 15, 2007
8. In the Answers list select 2 to Next on No and send those respondents ahead to Page 7: Thanks - Non member.
9. Click OK to save the skip, and check your settings:
10. Click OK to close the Skips and Branches dialog.
Embedding the password in the starting URL
Our piping and skips are now complete! We could publish the survey as it is and respondents could complete the survey by typing in their pass-words. However, there’s one other nice trick you can use when sending respondents e-mail invitations or providing customized hyperlinks within a Web application. In addition to pulling data in from an ASCII file or database like we did for the address, you can also pre-load data into a sur-vey through the starting URL. Theoretically we could have embedded all the address information in the URL, but that can get messy so we’re just going to include the password (see page 212).
1. Bring up the Web survey setup dialog .
2. Next to Embedded Operation click Edit.
This is the same dialog we were in for the piping, but this time we’re work-ing in the Launch tab.
3. Set Launch with Preload to Optional.
If we were passing more than just the password we might make it required, but setting the launch to Optional lets us also have respondents start the survey by entering their password manually. Most of the defaults are perfect for a simple embedded password, since that’s most common application.
4. Set Q1: Login Shared Password to Rqd (Required).

Apian NetCollect 4.0 User Guide
Chapter 13 - Loading Data into a Survey 239January 15, 2007
5. Click OK to save the Launch settings and Close the Web Survey Setup dialog.
6. Save your SurveyPro file.
If you got lost along the way, you can open the End sample file for this tutorial.
To see the piping in action see our sample live at: http://apian.com/support/tutorials/.
In addition to clicking the link and manually entering the password, this survey can be initiated with the password already in the URL. Type the address below into your browser, replacing “PWD” with a number from 10-20 (our passwords):
http://questionweb.com/11706/Piping.asp?P1=EL0&Q1=PWD
The end portion is P1 (one), EL0 (zero), and Q1 (one).
If you publish this to your own server, you’ll replace http://questionweb.com/11706/with the location to which you publish. “Piping” is the base filename set during Publish, so either use the same name for your file or replace that portion with your name. Full syntax for embedded URLs is on page 213.
As you go through the survey, note how changing the address information doesn’t affect the page listing what’s currently on file. This is because we piped the data into hidden fields specially for the current data. If instead we’d only used one set of fields, changing the entries on Page 4 would rip-

Apian NetCollect 4.0 User Guide
Chapter 13 - Loading Data into a Survey 240January 15, 2007
ple back to the values shown on Page 3 if a respondent backed up in the survey.
Note: The live sample treats each login as a new session (shared pass-words) rather than resuming any surveys in progress like your file does.

Chapter 14 - Handing Data to Other Systems 241January 15, 2007
Chapter 14T U T O R I A L Handing Data to Other Systems
You can always bring your SDH files into SurveyPro and export the data to a variety of formats, but sometimes a direct approach is better. Using the embedded survey tools, you can have the NetCollect scripts save responses to ASCII files on the Web server. You can also have the scripts send data out in the final URL, handing the respondent off to another Web application when they finish the survey. We’ll be setting up both these functions in this tutorial.
Important: Read Understanding Embedded Surveys in NetCollect on page 188 before you dive into this tutorial.
In this tutorial you’ll learn how to:
Save selected fields to an ASCII file on the Web serverSet field names for the ASCII fileMap the SurveyPro scale values to custom values for the ASCIISkip to an exit URLEmbed data in the exit URL
The tutorial assumes you are already familiar with:
Skips and branches
Tutorial Notes
General You can save your file and take a break any time you’re in the main document screen.
Tutorial Files Are in your SurveyPro Samples folder, by default under:C:\Program Files\Apian Software\SurveyPro 40\
On Finishing This tutorial has:• An “End” sample file• A live version at http://apian.com/support/tutorials/

Apian NetCollect 4.0 User Guide
Chapter 14 - Handing Data to Other Systems 242January 15, 2007
1. Start SurveyPro, enter your initials, and Open the sample file NC4 Tutorial - DataOut.SP4.
2. When prompted, click Yes to open a copy, and save as YourName DataOut Tutorial.SP4.
3. Close the File History dialog.
4. If needed, select the document tab 1: Widget Web and adjust the Zoom to your preference.
Take a moment to scroll through the survey. It’s very brief, just one page of survey questions and then a page of contact information. The question-naire requires both the name and follow-up questions be answered as they’re used to drive some of features we’re using in this tutorial.
Our Thanks page promises that respondents wanting follow-up will be contacted within 24 hours. Importing and exporting the data every day would become a tedious hassle for the SurveyPro user, especially since the survey designer is generally more interested in the ranking questions anyway. So instead, we’ll define a Pipe Out to ASCII of the contact infor-mation. This way, the customer service team can simply pull their file every morning without bothering the survey designer.
Saving direct to ASCII on the Web server
1. Bring up the Web survey setup dialog .
2. Next to Embedded Operation click Edit.
In NetCollect, Embedded Operations are functions which hook into a stand-alone survey. In this case, we’re dealing with the outbound data functions.
3. Select the Data Piping tab.
If you completed the tutorial Loading Data into a Survey on page 225, you worked with inbound data using the top half of the dialog, the Pipe Ins. Now we’re going to add rules to the lower half for Pipe Outs. You could have several pipe-outs, such as a data sub-set of contact information, as well as the full question set if you were handing responses to an analyst who didn’t have SurveyPro.
4. In the lower half of the dialog, Insert a Pipe Out.

Apian NetCollect 4.0 User Guide
Chapter 14 - Handing Data to Other Systems 243January 15, 2007
Setting the basic ASCII format
If you’ve done exports from SurveyPro, the next couple screens will be somewhat familiar. Our first tab is setting properties of the ASCII file we’re creating, independent of the fields we’re selecting.
1. Give it the Pipe Name “Contact Data Out”.
As you can see, you have an option of ASCII or SQL. Pros and cons of the two methods are covered on page 200.
2. Type for the File Name “SurveyEntrants.csv”.
Our next two options are whether to archive the file or add partials. While a survey is live on a Web server, it’s accumulating data in an active file which you can see in the data file list, but which you can’t download. To download data, you “archive” it and NetCollect gives it a unique name with the date and time. Because we want the customer service team to download the data files every day, we do want this file to archive.
Because these files will be used for the final survey drawing as well as fol-low-up, we do not want the partial responses because those are not quali-fied respondents.
3. Check Do not add partial completions.
Most of the defaults are fine, but a couple changes will make the file more accessible.
4. Set Checkbox and ranking answers export as to Label Text.
5. Set Put quotes around answers to All written answers.
Now our basic ASCII settings are complete.

Apian NetCollect 4.0 User Guide
Chapter 14 - Handing Data to Other Systems 244January 15, 2007
Selecting fields and setting their names
1. Select the Field Matchups tab.
In this tab we tell NetCollect which fields to save, and type a field name which will appear in the first row of the ASCII data files.
2. Scroll down until you have Q13: Name at the top of the dialog.
3. Click in the column to the left of Q13, type “Name” and press Enter.
4. Continue adding field names as shown here:

Apian NetCollect 4.0 User Guide
Chapter 14 - Handing Data to Other Systems 245January 15, 2007
In addition to the basic contact information, we’re including two other fields to help the customer service representatives. The first is whether the respondent is requesting follow-up, and the second is when the form was submitted. A common error in this type of data hand-off is forgetting a field someone needs, so it’s important to include all data recipients in your testing cycle to make sure their needs are being met.
That’s it for the basic field selection. When the first record is field names, NetCollect will only save named fields. If instead the file had data in the first record, that first column would instead have been a series of check-boxes to select the fields. Note that the fields will always save in the same order as the internal Q list, which is usually the same order as the ques-tions on the survey.
Changing the checkbox values saved
Within SurveyPro, checkbox data is stored as box numbers beginning from 1. When importing and exporting data, you can automatically match and save data using either this box number or the checkbox labels. How-ever, there are times when you may need something a little more custom-ized. In this case, our State scale lists the long state names. Our fictional customer service team, however, is using a database which expects the two letter abbreviations. Using what SurveyPro calls a Scale Mapping, we can set our Pipe Out to save with the abbreviations.
1. Click anywhere in the row for Q18: State.

Apian NetCollect 4.0 User Guide
Chapter 14 - Handing Data to Other Systems 246January 15, 2007
2. Below the field list, Insert a Scale Mapping.
3. Set the Map Name to “2 Letter States”.
All you have to do here is type a value for each scale label. Whenever you use scale mappings, it’s important to type a value for every label, because if you leave a row blank SurveyPro will save a blank for that answer.
4. Click in the second column next to Alabama, type “AL” and press Enter.
5. Continue setting as many labels as you like (the “End” sample file for this lesson has a full mapping if you plan to Publish this file to your server).
6. Click OK to save the scale map.
Now back in the field matchups screen, we can see that Q18 has a “1” in the Map column, and shows a mapping in the drop-down list. Once a map is defined for a scale in your SP4 file, you can use it repeatedly. While you’re unlikely to ask State multiple times, this is handy if you’re using a key like “SA” for every rating marked “Strongly Agree.”
Sending finished respondents to another Web site
1. Click OK to save the Pipe Out, and OK again to close the Embedded NetCollect dialog, and Close the Web Survey Setup dialog.
That’s it for a basic Pipe Out. Right now, even with the Pipe Out our sur-vey is a stand-alone application, with the respondent and scripts interact-ing only within the survey pages. However, we can also send respondents out to another Web site when they finish, or better yet, hand a respondent off to another Web application with some data.
2. Scroll down through the survey until you see the Thanks page.

Apian NetCollect 4.0 User Guide
Chapter 14 - Handing Data to Other Systems 247January 15, 2007
Right now, this page applies to all respondents. We’re going to send those requesting contact to the Association’s site instead, so we can remove the text about being contacted from the NetCollect Thanks page.
3. Double-click on the Thanks text, and delete the second paragraph “If…”. Click OK to save the tile.
First we’re going to keep it simple. We’ll use a skip and send respondents to a static Web page on the association’s site with the “you’ll be con-tacted” message.
4. Bring up the Web survey setup dialog .
5. Next to Embedded Operation click Edit.
6. Select the On Exit Completed tab.
7. Un-check Default survey done message.
If there is no Thanks page in a survey, the NetCollect scripts will generate a generic “Thanks” message. We want something a little fancier, since we’re keeping our in-survey Thanks page, as well as setting an exit URL.
8. Type for the URL “http://apian.com”
Always be sure this is a complete URL starting with “HTTP.” That’s all it takes to send a respondent to a Web page.
9. Click OK to save the exit URL, and Close the Web Survey Setup dialog.
Using a skip to select who goes to the URL
Right now we have two “exits,” a Thanks page within the NetCollect doc-ument and a URL. When both are present, NetCollect will default to dis-playing the in-document Thanks. We could delete the Thanks page and send everyone to the URL, but instead let’s use a skip to direct some of our respondents to each destination. In this survey, we want to send the respondents wanting follow-up to the outside Web site.
1. From the Document menu select Skip Patterns.
2. Select Page 3 and click Skip.
While there’s only one page after 3, the Thanks page, we actually have two destinations in the right-hand side of the dialog. The second one is our URL.
3. Leave the Question on Q20, and map 1 to Next on Yes to Exit survey completed.

Apian NetCollect 4.0 User Guide
Chapter 14 - Handing Data to Other Systems 248January 15, 2007
4. Click OK to save the skip, and OK again to close the Skips and Branches dialog.
Now our thanks URL can be tailored to include the follow-up message because only those respondents requesting contact will see it.
Sending data out as part of the exit URL
Now imagine if we were sending respondents to a script instead of a static HTML page. Instead of a generic “you’ll be contacted” message, we can thank the respondent by name. If we wanted to, we could tailor the page based on their contact request, but since we’ve already got that skip defined we’ll leave that be.
5. Bring up the Web survey setup dialog .
6. Next to Embedded Operation click Edit.
7. Select the On Exit Completed tab.
8. Change the URL so it’s now “http://apian.com/demos/widgetsurveyhandler.asp”
Before, we could send respondents to a URL without a specific page name at the end. However, whenever you’re sending data out to a script, you need to specify an actual page.
9. Select Pass back answers.
10. In the list, check the Send box for Q13: Name.

Apian NetCollect 4.0 User Guide
Chapter 14 - Handing Data to Other Systems 249January 15, 2007
While you could select more answers to send out in the URL, most serv-ers have a limit on the length of the string. Also, anything in the URL is sent via un-encrypted Web traffic, so even if the survey were running under SSL you wouldn’t want to embed sensitive information such as a Social Security Number in the URL. When you need to pass large amounts of data or sensitive information, you can use one of the other methods in Embedded Surveys on page 187.
In this case, we’re just passing a little bit of information through the URL, enough for a Web developer to personalize the destination page with a “Welcome Jane Doe!” message.
If you were running a survey with this type of one day follow-up promise, you could have the customer service lead log into the Control Panel and manually archive each morning. However, you could also set up an auto-matic archive for each morning at 8am or so. In the Control Panel, this setting is under Advanced Options, Automatic Data Management.
Or, if you have a little more time with that Web developer, you could send out the e-mail address and a couple other details in the URL, but instead of sending them to a personalized page you could also run them through an e-mail function which would alert customer service real-time. With embedded surveys, you have many possibilities!
11. Click OK to save our settings, and Close the Web Survey Setup dialog.
12. Save your SurveyPro file.

Apian NetCollect 4.0 User Guide
Chapter 14 - Handing Data to Other Systems 250January 15, 2007
If you got lost along the way or didn’t complete the list of state abbrevia-tions, open the End sample file for this tutorial.
To see the ASCII Pipe Out in action, publish the survey to your server and give it a try.
To see the exit URL with the page customized to the data handshake, see our sample live at: http://apian.com/support/tutorials/.

Chapter 15 - Real-Time Reporting 251January 15, 2007
Chapter 15R E F E R E N C E Real-Time Reporting
In addition to the detailed reports you create in SurveyPro after down-loading your data, NetCollect lets you generate reports on your Web server with up to the minute results. You can group several reports under one login page for easy access by managers or clients, as well as creating a public report for respondents.
If you’re interested in publishing your SurveyPro reports to HTML, see the SurveyPro Help file or just dive in to the Document menu, Publish Report, Web HTML dialog.
Chapter Contents:
Understanding NetCollect Server Reports . . . . . . . . . . . . . . 252NetCollect Reports Dialog . . . . . . . . . . . . . . . . . . . . . . . . . . 254Report Login Dialog . . . . . . . . . . . . . . . . . . . . . . . . . . . . . . . 255
Login Rules Tab . . . . . . . . . . . . . . . . . . . . . . . . . . . . . . . 255Notices Tab . . . . . . . . . . . . . . . . . . . . . . . . . . . . . . . . . . 257
Report Definition Dialog . . . . . . . . . . . . . . . . . . . . . . . . . . . 257Layout and Access Tab . . . . . . . . . . . . . . . . . . . . . . . . . 258Questions and Groups Tab . . . . . . . . . . . . . . . . . . . . . . . 260
Report Login Pass Through URLs . . . . . . . . . . . . . . . . . . . . . . 261

Apian NetCollect 4.0 User Guide
Chapter 15 - Real-Time Reporting Understanding NetCollect Server Reports 252January 15, 2007
Understanding NetCollect Server Reports
Within SurveyPro, you can create custom reports which delve into your results with an array of figure types, Form Select Filters, Rescales, Crosstabs, Banners, as well as commentary and headings. Your full set of analysis options is available once you download and import your Web sur-vey responses. (This takes a couple clicks using Get Latest data. See page 335.)
You may also have worked with the Executive Summary automatic report within SurveyPro. With NetCollect, you can create reports very like the Executive Summary which are updated every time a respondent finishes the survey. These real-time server reports provide a great quick look at the data while the survey is in progress.
As with custom reports in SurveyPro, you can have several server reports, each with different settings:

Apian NetCollect 4.0 User Guide
Chapter 15 - Real-Time Reporting Understanding NetCollect Server Reports 253January 15, 2007
For the Executive Summary style server reports you have the following options:
• Which questions are visible
• Reporting on grids as individual questions or a group
• Counts, Percents, Mean, Replies, No Answers, and Other text
• Layout including Table or Table+Bar, bar color, and left/center alignment
• Captions for each table
• Minimum number of replies before results will display
You can also create reports with the Activity Log information. It’s just like the log you see as a survey administrator through the Control Panel (see page 321), simply with a different header and password.
Defining a report involves two pieces: the report itself and the login method. The above images show an initial login page as well as the three reports associated with it. This type of setup is a handy way to group results for managers or clients who will see detailed information.
You can also create public reports which appear without the sum-mary/login page. In this case you still have a login defined, but when it has no password and only one report associated with it, viewers will go straight to the results.
The tutorial Creating Server Reports on page 263 walks you through build-ing both private detail reports and a public version.
By default the reports will show your survey header, footer, and title. You can override the header and footer settings in the Page List dialog (see page 104).
Note: Server reports must be defined and published with the rest of a sur-vey’s features, just like answer tests or piping. You cannot add reports to a live survey.

Apian NetCollect 4.0 User Guide
Chapter 15 - Real-Time Reporting NetCollect Reports Dialog 254January 15, 2007
NetCollect Reports Dialog
When you first bring up the NetCollect Reports dialog you’ll see a report and login already defined. If you don’t plan to use the reports at all, you can simply ignore this report—you don’t need to delete it.
The initial Activity Report is separate from the one in the Control Panel, so changing or removing it will not impact your administrator logs.
To add an online report: 1. Web Survey Setup dialog
2. Edit Online Reports
3. Insert a new Report in the lower half of the dialog and set its contents
4. Select or Insert a report Login in the upper half of the dialog
Login pages to access reports
This upper list contains all the login pages used to access your reports, listing both the description you provide and the page name (file). Next to the list is the usual set of Insert, Modify, Delete, and Duplicate buttons. If a login page has only one report associated with it and no password, view-ers will go straight to the report itself. See Report Login Dialog on page 255.
Reports In the lower list are the individual reports. The first column is the Name of the report, which will appear to viewers on the login summary page. The Login column shows the access page to which the report is bound. Again, the familiar Insert, Modify, Delete, and Duplicate buttons are next to the list for managing the reports. See Report Definition Dialog on page 257

Apian NetCollect 4.0 User Guide
Chapter 15 - Real-Time Reporting Report Login Dialog 255January 15, 2007
Report Login Dialog
The Report Login is very similar to that of surveys, but has a couple unique elements. Because of the overlap, only the elements specific to reports are covered here. The survey login chapter has additional details, including:
• Understanding Logins in NetCollect on page 153 for an overview of different login configurations
• Layout Tab on page 167 for details on button arrangements (identical for reports)
• Creating Password Files on page 170 if you’re going to be using individual passwords for report viewers
Login Rules Tab
Report Logins are very similar to those of surveys, so if you skipped that portion of the NetCollect documentation you may want to start with the reference material on page 152 or tutorial on page 175.
Each of the password restricted options can be set to allow an embedded launch for handy linking straight to the report. The setting is in the Report Definition Dialog on page 257.

Apian NetCollect 4.0 User Guide
Chapter 15 - Real-Time Reporting Report Login Dialog 256January 15, 2007
Report Login Method You have several options for the report login:
Login Designer’s Name This is an internal reference name for use in the Reports dialog. It does not appear to report viewers.
File/URL Name Type the name of the file you want to use as the report login gateway. This will be placed in the same folder as the survey pages and given a .ASP extension, so the final URL for accessing the associated reports becomes:
http://yoursite.com/yoursurveypath/reportname.asp
Same as for taking the survey
This is a great option for reports accessed by respondents as it picks up the exact settings as your survey.
No password Use this for public reports. It’s also handy for ones which are used as Thanks pages.
Shared Password(s)
The most common choice for management access to reports. See Shared Password(s) — Anonymous but Restricted on page 160 for details on the access settings.
Unique Viewer ID file
If you want to provide report viewers with individual passwords, you can use this option. See Unique Respondent ID File on page 161 for a description of the controls.
Viewer Name and Password file
For even greater security you can issue user name and password combinations to report viewers. See Respondent Name and Password File on page 162.

Apian NetCollect 4.0 User Guide
Chapter 15 - Real-Time Reporting Report Definition Dialog 257January 15, 2007
Notices Tab
The notices for reports are unique to their purpose. These will appear in the automatically generated report login page (see page 104).
Login Instructions -- Single Report
When a login page only has one report associated with it, this is the mes-sage which will appear. Note that single report logins which do not require a password will completely skip the access page.
Login Instructions -- Report Selection
Login pages with multiple reports instruct the viewer to make a selection from the list and then enter their password.
Message on Invalid Login This will appear when the viewer provides an invalid password.
Message on too few responses
In the report definition (see page 257) you can specify a minimum number of responses before a report will appear. This is generally done to protect anonymity and obscure the number of respondents.
Report Definition Dialog
For each report you can select the level of detail to include, whether it’s to hide the response rate counts, show comments, or leave off 5,000 Zip codes. As with SurveyPro reports, only the statistics applicable to a par-ticular question will be displayed on the server.

Apian NetCollect 4.0 User Guide
Chapter 15 - Real-Time Reporting Report Definition Dialog 258January 15, 2007
Layout and Access Tab
Name This name will appear on a report login page, so make sure it’s friendly to the end user.
Report Type Set the report type as Instant Online, which is similar to the Executive Summary in SurveyPro, or Activity Log which shows the timing of responses just like the version in the Control Panel (see page 321).
Introductory Remark Any comments you type here will appear below the page header (if you’re displaying it) and above the first figure. You have access to the usual for-matting overrides in the Text Palette.
Show Percent, Count… statistics
As with SurveyPro reports, only statistics applicable to a particular ques-tion’s scale will appear in its figure. See the SurveyPro documentation for descriptions of the statistics.
Show Other blank writtens This will include the Other blank responses along with a count of the cat-egory. Note that these are not automatically tabulated in the server reports, so you will probably want to turn this option off when you have larger response rates.
Center figures Aligns the figures in the center of the report page. Reports pick up the same margin settings as your survey.
Line between figures Draws a thin horizontal line between the figures.

Apian NetCollect 4.0 User Guide
Chapter 15 - Real-Time Reporting Report Definition Dialog 259January 15, 2007
Figure Types Select either straight tables or tables with bars at the ends. You can spec-ify the bar color used for stand-alone questions with the drop-down. If your report shows grids as a single table (set in the Questions and Groups tab) then the bars for those figures will be red and blue.
Figure Text Style Sets the style used within the tables.
Access Required responses You can specify a minimum number of responses in order for the reports to appear. This is enforced during Test mode as well as in Live mode.
Access Enable login pass thru URL
Mark this box to have NetCollect accept a URL with the password embed-ded, bypassing the login page. This is an optional login method, and does not lock out the normal manual login method. The syntax for these URLs is on page 261.
Figure Captions Select whether you want no captions, or to place them above or below the figures. The captions themselves can be tailored in the Questions and Groups tab.
Caption Text Style Sets the style used for the captions and Introductory Remark.

Apian NetCollect 4.0 User Guide
Chapter 15 - Real-Time Reporting Report Definition Dialog 260January 15, 2007
Questions and Groups Tab
When selecting which questions to display, keep in mind that the server reports don’t include SurveyPro’s Autopostcode. This means that Other blank responses, short written answers, dates, and numbers will be listed individually instead of counted as they are in SurveyPro.
Show grid questions as You can either show grids grouped into a single table or break them out as separate figures for each question.
Show All Marks all the checkboxes in the Show column.
Show Tabs Marks all the checkboxes in the Show column except those for written answers. This is a good choice for most reports.
Show None Clears all the checkboxes in the Show column, giving you a blank slate to pick just a couple questions.
Questions and Groups Lists the questions in the survey, including hidden fields. Depending on your setting for grid questions you’ll see either one line for each grid, or a line for each question within it.
Show Mark each question which you want to appear in this report.

Apian NetCollect 4.0 User Guide
Chapter 15 - Real-Time Reporting Report Login Pass Through URLs 261January 15, 2007
Fig Indicates the figure number for the question or grid. This is based on the order of the internal Q numbers and cannot be shuffled.
Figure Caption Displays the current caption for the figure. To override this, select Cus-tomize in the Caption Edit controls below the list of questions.
Report Login Pass Through URLs
As we discussed on page 252, a particular server report is associated with a login page. To create a URL which will launch a specific report, you need to include:
• Name of the report login page
• Report login number
• Password (if required)
• Specific report number
Remember, if you have a login with no password and only one report associated with it, viewers going to the login page will just go straight to the report. These URLs are only needed when you want to create a link which takes a viewer straight to a particular report without having to man-ually type their password. You also need to have configured the report to allow these URLs (see page 258).
To make this a little more understandable, we’re going to use URLs which work for the reporting tutorial example live on QuestionWeb.com. The tutorial has an End file you can open to look at the SurveyPro side of this, but is also a good introduction to building reports. See page 263.
This survey has three report versions associated with a login page at:
http://questionweb.com/29107/widgetdata.asp
They’re protected by the password “tutorial.”
When the survey was published, a configuration .CFG file was created in the Project folder on your local drive. It includes these lines to describe the two report logins and four reports:

Apian NetCollect 4.0 User Guide
Chapter 15 - Real-Time Reporting Report Login Pass Through URLs 262January 15, 2007
RptLogin_1 Name="Private Access - tutorial",HtmlFile="widgetdata",Rpts=1|2|3,Pwd="tutorial"
Report_1 Name="Activity Report",Type=Activity,Login=1,URL_Ok=F,MinResp=0Report_2 Name="Detail Report",Type=Instant,Login=1,URL_Ok=F,MinResp=0Report_3 Name="Comments",Type=Instant,Login=1,URL_Ok=F,MinResp=0
RptLogin_2 Name="Public access",HtmlFile="report",Rpts=4Report_4 Name="Widget Survey Results",Type=Instant,Login=2,URL_Ok=T,MinResp=20
The login we’re going to look at is the one called “Private Access.” We need to note its login number and HTML page:
RptLogin_1widgetdata
We also need to note the login’s password, or “PWD”:
tutorial
If we want to build a URL for the “Detail Report,” when we scan the list of report numbers we can see that is:
Report_2
To create our full URL, we need to assemble all this with the address of the survey itself:
http://yourdomain.com/surveyfolder/reportloginpage.asp?Login#,Rpt#,Pwd
For our sample project, this becomes:
http://questionweb.com/29107/widgetdata.asp?1,2,tutorial
If your project uses a user name and password PIN file to access the reports, then the unique value goes first, then the non-unique value such as “namepassword” in one field. Or if the combination is what you’ve set as unique, then you will use the name first, then the password.
ImportantWhen you peek at the configuration file to note the values you need, do not make or save any changes!

Chapter 16 - Creating Server Reports 263January 15, 2007
Chapter 16T U T O R I A L Creating Server Reports
SurveyPro gives you great reporting flexibility to delve into your data. However, sometimes you’ll want to give clients or managers a peek at the results as the survey is live, which is what NetCollect’s real-time server reports can provide.
In this tutorial you’ll learn how to:
Create multiple real-time server reportsCreate an additional activity log (outside the control panel)Password protect reportsSet a report as the Thanks page of a survey
The tutorial assumes you are already familiar with:
Logins and passwords dialog
If you are not yet familiar with the login controls you can complete this tutorial, but you may find the section on restricting access to be short on explanations. See the password reference chapter on page 152 and tuto-rial on page 175 for a better understanding.
Instant reports are maintained on your Web server, and their data is updated every time a respondent completes the survey. They can include some or all of the questions and basic statistics. For more sophisticated
Tutorial Notes
General You can save your file and take a break any time you’re in the main document screen.
Tutorial Files Are in your SurveyPro Samples folder, by default under:C:\Program Files\Apian Software\SurveyPro 40\
On Finishing This tutorial has:• An “End” sample file• A live version at http://apian.com/support/tutorials/

Apian NetCollect 4.0 User Guide
Chapter 16 - Creating Server Reports 264January 15, 2007
reports you can also export any SurveyPro report to HTML, though those reports are not managed with NetCollect’s upload and passwords.
First, we’re going to create a couple of detailed reports with restricted access. These are typically used by the survey project managers and their clients to monitor response rates, demographic splits, etc. Then we’ll add a briefer report and set it as the Thanks page of the survey so respondents can get a picture of their fellow respondents.
1. Start SurveyPro, enter your initials, and Open the sample file NC4 Tutorial - Reports.SP4.
2. When prompted, click Yes to open a copy, and save as YourName Reports Tutorial.SP4.
3. Close the File History dialog.
4. If needed, select the document tab 1: Widget Web and adjust the Zoom to your preference.
This file is another variant of the Widget survey you’ve used in other tuto-rials. It has a variety of question types so we can see how they appear in the reports. Take a skim through the document to see what it contains.
Setting up an activity log
1. On the toolbar, click the Web Survey Setup icon .
2. In the middle of the dialog, next to Online Reports and their Login Pages, click Edit.
For each NetCollect questionnaire in your SurveyPro file, you can have multiple server reports which are accessed through one or more login pages. The top half of the dialog lists the login pages, while the lower half lists the reports you’ve defined and which login they’re using.

Apian NetCollect 4.0 User Guide
Chapter 16 - Creating Server Reports 265January 15, 2007
NetCollect automatically generates an initial login page with a random password and an activity log style report when a NetCollect document is created. You can edit or delete these as needed.
1. In the lower half of the dialog click the Modify button (middle of the pencil).
Activity logs show the number of people who have completed the survey at any time. While you can access this report through the Control Panel, you often don’t want to give your colleagues and clients the full adminis-trative access that comes with the Control Panel, so you can set up a sep-arate login for them.
For a real report you’d probably want to add an introductory remark explaining the completed and in progress portions of the table. However, for now we’re set with the defaults.
2. Click Cancel.
Modifying the Default Login
We could leave the password with the random value NetCollect gener-ated, but often you’ll want to set your own values.
1. In the upper half of the dialog click the Modify button (middle of the pencil) to edit the report Login.
If you’ve set up a survey login, this dialog will be very familiar. The options for report logins are just like the ones for questionnaires, it’s just the resume aspects which differ.
2. Change the Password to “tutorial” and check Case Sensitive.

Apian NetCollect 4.0 User Guide
Chapter 16 - Creating Server Reports 266January 15, 2007
3. We want to let users know this, so change the Shared Password Entry Label to “Enter password (case sensitive).”
4. In the upper-right corner, change the Login Designer’s Name to “Private access - tutorial.”
This name is for internal use within the dialogs only, and will not appear on any documents.
For each report login, you need to set the name of the ASP page.
5. Set the File/URL Name for Login Web Page to “widgetdata”.
6. Check your screen against the one below and click OK.
Back in the report management screen, our activity log is now updated with the new login name. It also indicates the name of the file it’s using for the login as a reminder.
Creating a detailed report
In addition to the activity log, we want to be able to see all the answers respondents have provided. The server reports are excellent for this type of quick view, with SurveyPro’s off-line reporting for in-depth analysis. Note that the off-line reporting can be very quickly updated once defined with the Get Latest Data button.
1. In the lower half of the dialog click the Insert button (pencil point) for a new report.

Apian NetCollect 4.0 User Guide
Chapter 16 - Creating Server Reports 267January 15, 2007
2. Give the report the Name “Detail Report.”
3. Set the Report Type to Instant Online.
While you can certainly select all the statistics (SurveyPro will only show valid calculations for each question), too many tend to clutter up a figure. Also, with any kind of significant response rate, written answers will end up dominating the report. Answers to Other blanks and comments are most valuable after they’ve been cleaned, coded, and tabulated in Survey-Pro.
4. In the center of the screen, un-check Percent, Replies, Sorted and Other blank writtens.
That sets the general preferences, and now we need to select the ques-tions. As this is our detailed report, we just want to leave out the written answers.
5. Click the Questions and Groups tab.
By default, NetCollect picks up the report labels you defined when creat-ing your questionnaire as the captions. While the current ones are a bit terse, they make sense for an internal user of the report. We’ll modify them on the version the respondent sees.

Apian NetCollect 4.0 User Guide
Chapter 16 - Creating Server Reports 268January 15, 2007
To keep this particular report from growing to 50+ pages, we want to leave off any written answers.
6. At the top of the dialog, click the Show Tabs button which selects only the questions which it can tabulate (Tabs) and clears any typed-in answers.
7. Click OK.
Our new report is showing in the list, but needs to have the login set.
8. Next to Detail Report, click <pick a login page> and select the Private Access page.
Whenever you have multiple reports referencing one login page, Net-Collect will create a selection menu along with the password entry field.
Creating a comment report
While the comments are a distraction amid the tabulations, it can be nice to peek at what people are saying as the survey goes along.
1. Again under Reports in the lower half of the dialog, Insert a new report (click in the left column to un-gray the Insert button).
2. Give it the Name “Comments” and set it to Instant Online.

Apian NetCollect 4.0 User Guide
Chapter 16 - Creating Server Reports 269January 15, 2007
Most of the other settings don’t apply because we’re just going to include comments, so we don’t have to worry about tuning the statistics.
3. Select the Questions and Groups tab.
4. Click the Show None button to clear all the questions, then mark the box next to Q19: Comments.
5. Click OK, then set the Login to our Private Access page again.
That’s it for our private reports. Now when clients or colleagues go to the widgetdata.asp page, they’ll be prompted to enter a password and to select which of these three reports they’d like to view.
Creating a brief public report
Now that our colleagues and clients are taken care of with the detail reports, we want to add a report which is visible to respondents. This is a nice no cost compensation to respondents when the data isn’t sensitive. We could set up another login page, but it’s simpler to set this up as the Thanks page to the survey.
1. In the lower half of the dialog, Insert another Report (click in the left column again to un-gray the buttons).
2. Set the Name to “Widget Survey Results” and set the Report Type to Instant Online.
Since this is our Thanks page, we want an introductory comment thank-ing the respondents.
3. For the Introductory Remark type “Thank you for completing the Widget User Survey!”

Apian NetCollect 4.0 User Guide
Chapter 16 - Creating Server Reports 270January 15, 2007
In this case, we want a very simple report as we want to give respondents an idea of the results, but not reveal the number of respondents or their identities.
4. Among the statistics, un-check Count, Mean, Replies, Sorted, and Other blank writtens.
5. Under Access, set Required responses to “20.”
This is useful both for obscuring the number of respondents and for pro-tecting individual anonymity. Respondents 1 through 19 will see a notice asking them to check back later. (See page 104.)
6. Set Figure Captions to Above figures.
7. Click the Questions and Groups tab.
In this case, we just want to provide a peek at a few answers. Remember for your surveys that by default all questions will display—including confi-dential information such as e-mail addresses.
8. At the top of the dialog click Show Tabs.
As before, that cleared all the type-in fields.
9. Click on the second row, the Ratings grid.
Below the questions, the gray caption box should now say QG1: Ratings.

Apian NetCollect 4.0 User Guide
Chapter 16 - Creating Server Reports 271January 15, 2007
10. Change the Caption setting to Customize and type as the label “How people pick their widgets.”
As you typed, the caption in the list of questions was also being updated for your reference. For a real report we’d go through all the labels and cus-tomize them, but that gets a bit tedious in a tutorial.
11. Un-check the Age, Gender and Country questions.
12. Click OK to save the report.
Creating a second login page
We want to add second login method for the respondent report, which will have no password. When you have an unrestricted login with only one report behind it, viewers will completely bypass the login page and just see the figures.
1. In the upper half of the dialog, Insert a new Login page.
2. Set the Report Login Method to No Password.
3. Type for the Login Designer’s Name “Public access”.
4. In this case the default URL is fine, so click OK.
5. Now that the login is defined, set the Widget Survey Results report to use it.

Apian NetCollect 4.0 User Guide
Chapter 16 - Creating Server Reports 272January 15, 2007
And that’s it for defining our reports and logins. Now we just need to set the public report as the Thanks page for the survey.
6. Click OK to close the NetCollect Reports dialog.
Setting a report as the thanks page
We’re now back in the Web Survey Setup dialog, which is where we can set a Thanks URL for a survey, rather than the page within the document.
1. Under Embedded Operation, click Edit.
2. Click the On Exit Completed tab.
3. Un-check Default survey done message.
Now instead of a Thanks page within the NetCollect survey document, we can send people to any location on the Internet. For some surveys, this may be a page in an intranet or marketing Web site. In our case, we want to send respondents to the public report we just defined. If you look back in this tutorial, you’ll see the public report has the file name “report”. This
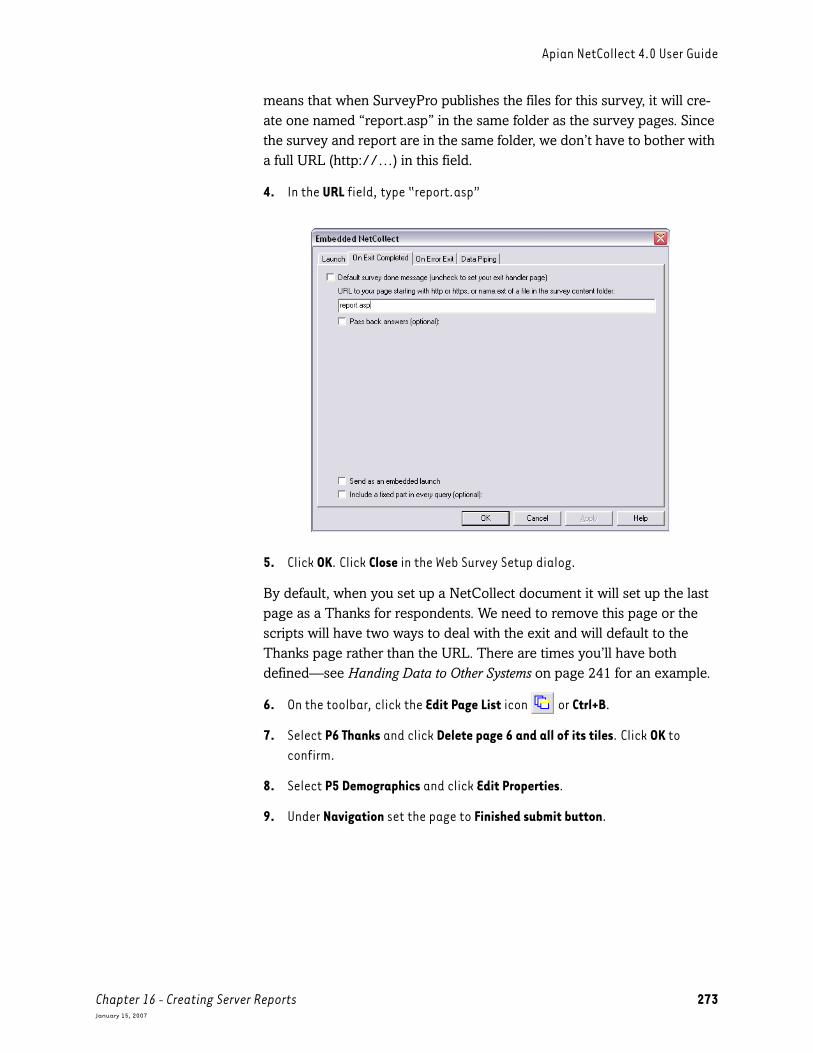
Apian NetCollect 4.0 User Guide
Chapter 16 - Creating Server Reports 273January 15, 2007
means that when SurveyPro publishes the files for this survey, it will cre-ate one named “report.asp” in the same folder as the survey pages. Since the survey and report are in the same folder, we don’t have to bother with a full URL (http://…) in this field.
4. In the URL field, type “report.asp”
5. Click OK. Click Close in the Web Survey Setup dialog.
By default, when you set up a NetCollect document it will set up the last page as a Thanks for respondents. We need to remove this page or the scripts will have two ways to deal with the exit and will default to the Thanks page rather than the URL. There are times you’ll have both defined—see Handing Data to Other Systems on page 241 for an example.
6. On the toolbar, click the Edit Page List icon or Ctrl+B.
7. Select P6 Thanks and click Delete page 6 and all of its tiles. Click OK to confirm.
8. Select P5 Demographics and click Edit Properties.
9. Under Navigation set the page to Finished submit button.

Apian NetCollect 4.0 User Guide
Chapter 16 - Creating Server Reports 274January 15, 2007
10. Click OK to save the page properties, and OK again to close the Page List dialog.
11. Save your SurveyPro file.
And now we have a survey with two sets of reports: one password pro-tected for administrators, and one public for interested respondents.
If you got lost along the way, there’s an End sample file for this tutorial.
To see the reports in action, go to:
http://apian.com/support/tutorials/
You can also publish your file to your own server (see page 295) or a QuestionWeb Demo folder (see page 315).

Chapter 17 - Publish Settings 275January 15, 2007
Chapter 17R E F E R E N C E Publish Settings
Now that your survey is complete—or at least drafted—you’ll need to publish the pages and upload them to a Web server.
Chapter Contents:
Understanding the Publish Process . . . . . . . . . . . . . . . . . . . 276How Surveys Run on a Web Server . . . . . . . . . . . . . . . . . 276Publishing the First Time on Your Server . . . . . . . . . . . . 277Publishing the First Time on QuestionWeb . . . . . . . . . . . 278Publish Steps in Detail . . . . . . . . . . . . . . . . . . . . . . . . . 279Accessing SP4 Files from Multiple Systems . . . . . . . . . . 279
Web Site Definitions for Your Server . . . . . . . . . . . . . . . . . . . 280Checking Script Versions on Your Server . . . . . . . . . . . . 280Copying, Editing and Deleting Your Server Definitions . . 281Servers Accessed via LAN Shares (Your Server) . . . . . . . 282Servers Accessed via FTP (Your Server) . . . . . . . . . . . . . 283
Web Site Definitions for QuestionWeb . . . . . . . . . . . . . . . . . 284Understanding QuestionWeb Uploads . . . . . . . . . . . . . . 284Finding Your FTP password for QuestionWeb . . . . . . . . . 284QuestionWeb Accounts with Multiple Folders . . . . . . . . 285
Setting Paths for a Survey . . . . . . . . . . . . . . . . . . . . . . . . . . 285Sharing Survey Folders with Other Files on Your Server . . 288
Between Publish and Upload . . . . . . . . . . . . . . . . . . . . . . . . 289Advanced Upload . . . . . . . . . . . . . . . . . . . . . . . . . . . . . . . . 290
Server Selection and Publish Log . . . . . . . . . . . . . . . . . . 291Survey Content and Project Data Files on Your Server . . 292Uploading for the First Time to Your Server . . . . . . . . . . 293Uploading to Live Surveys on Your Server . . . . . . . . . . . . 294
Note:Sections that apply only to one server type will be titled with “Your Server” or “QuestionWeb”. All other sections apply to both setups.

Apian NetCollect 4.0 User Guide
Chapter 17 - Publish Settings Understanding the Publish Process 276January 15, 2007
Understanding the Publish Process
Publishing is simply the process of creating survey pages which will work on your server and then getting them to that server. The first time you go through the process can take a little time—especially when it’s part of your server script installation—but after that it takes just a minute to pub-lish a new or revised survey.
If you’re not certain what type of server you want to use, see Server Options on page 4. The QuestionWeb one day trial accounts are also a great option if you’re just playing around with a survey (see page 315).
How Surveys Run on a Web Server
Each survey you run expects to have two folders all to itself on your Web server.
The “Content” folder is the one where your survey pages reside, and is the place respondents will browse to on your site. Here, the Content folder is “JunePoll”:
http://yoursite.com/surveys/JunePoll/
The “Project” folder is where your data will accumulate, as well as where files like your passwords and logs reside. For security, Project folders are usually in a different location from the Content folders, such as:
http://yoursite.com/surveydata/JunePoll/
The final folder name can be the same for a survey’s Content and Project as long as they’re on different paths. You can also use friendly names for Content, paired with a code such as client IDs for the Project folders.
Above the final Content and Project folders are locations called the Con-tent Node or Root, and Project Node or Root. Those paths are set during the initial script installation with your server administrator. See Recom-mended Folder Structures on page 29 for some common approaches.
Once those roots are sorted out and saved as part of a Web Site Definition in SurveyPro, all you do for an individual project is say what you want the final two Content and Project folders to be named. Developing that defini-tion the first time requires the assistance of your server administrator, and sometimes requires a few tries to get everything just right. The server setup chapter on page 26 is what your server administrator will need to do the initial setup, and that chapter is available as a separate PDF docu-

Apian NetCollect 4.0 User Guide
Chapter 17 - Publish Settings Understanding the Publish Process 277January 15, 2007
ment either installed with SurveyPro or from http://apian.com/downloads/.
QuestionWeb users skip the “sorting out” part of this and just use one of the folders associated with their account.
You can re-use folders as surveys conclude, but having two active surveys at the same location at the same time makes life much more complicated (see page 288).
Publishing the First Time on Your Server
The good news is once you successfully publish a survey, every one after that is very easy. Figuring it out the first time can involve a bit of a learn-ing curve though.
1. Start your setup as soon as you get NetCollect, before you need to have your first survey go live and while you still have support coverage.
2. Work with your server administrator to get the scripts installed and decide where you want your Content and Project Roots located (see page 276). Server Installation on page 26 is what your server administrator will need to do the initial setup, and that chapter is available as a separate PDF document either installed with SurveyPro or from http://apian.com/downloads/.
3. Get a draft of the Server Crib Sheet (see page 38) from your server administrator with all the paths SurveyPro needs to Publish.
4. As part of testing your server setup, use the tutorial on page 295 to create your first Web Site definition and Publish a survey. For the first time, using one of the NetCollect sample files is a good way to test the setup.
5. Revise the Server Crib Sheet and Web Site definition as needed until a survey successfully goes all the way through downloading and importing data.
6. Take a screen capture (PrtScrn) of the final working Web Site definition, paste it into Word, and stash it somewhere safe!
After this first time, all you’ll do is pick that saved Web Site definition within SurveyPro, set your Content and Project paths, and upload—just a minute or two.
Resources while sorting all this out the first time:
Server Installation on page 26
The best place for any problems related to folders/paths, permissions errors, etc. If you start having problems, we highly recommend your server administrator read from the very first page of the server installa-

Apian NetCollect 4.0 User Guide
Chapter 17 - Publish Settings Understanding the Publish Process 278January 15, 2007
tion chapter through Testing the Server Installation on page 41. Often the information your server administrator needs is in there, just under a sec-tion heading they thought didn’t apply.
Web Site Definitions for Your Server on page 280
Information about copying and modifying Web Site definitions, as well as details about FTP and LAN uploads and downloads.
Setting Paths for a Survey on page 285
Details about the fields which are specific to each survey, the final Con-tent and Project folders.
Technical Support If you get really stuck, Apian Technical Support has a troubleshooting walk-through process. This requires both you, the SurveyPro user, and your server administrator be on a conference call with support. During the call, you’ll need to be able to log into the Web server to check settings and make changes, as well as having a system with SurveyPro available for Publishing surveys. These calls can take an hour, and must be sched-uled in advance by contacting [email protected].
Publishing the First Time on QuestionWeb
With QuestionWeb you’ll have an account which manages one or more “folders”. You can change surveys within a folder as often as you like, but each folder can contain only one active survey at a time. The folders under your account can have a mix of expiration dates and special ser-vices such as encrypted survey submissions and high capacity.
1. Sign up for a QuestionWeb account at http://www.QuestionWeb.com at least one business day before you need it for a survey.
2. Use the tutorial on page 308 to go through the Publish process the first time, including saving your account information and doing a test download and import.
QuestionWeb account information comes from [email protected]. To avoid delays, add that address to your Contacts or approved senders list. On rare occasion, there may be a problem connecting to the Question-Web servers for uploads. If your IT department tends to have very restric-tive settings on the firewall and applications, we recommend setting up your QuestionWeb account a week before you need it.
Resources while sorting all this out the first time:
Web Site Definitions for QuestionWeb on page 284
Information about finding your FTP password and working with multiple folders.
Setting Paths for a Survey on page 285
Details about the fields which are specific to each survey, the final Con-tent and Project folders.

Apian NetCollect 4.0 User Guide
Chapter 17 - Publish Settings Understanding the Publish Process 279January 15, 2007
Technical Support QuestionWeb accounts include support on the Publish process, even if you don’t have a support contract for SurveyPro itself. Contact [email protected].
Publish Steps in Detail
You may want to refresh your memory of the big picture view on page 7. When you publish your NetCollect surveys, the software goes through a few steps:
1. Checking the survey is ready for publish (no missing login definitions or piping files)
2. Checking your server definition and survey paths are complete
3. Creating a local copy of your survey’s ASP pages, configuration and other files as they will appear on the server
4. Generating a Publish log
5. Prompting you to upload the pages
6. Uploading those survey files to the server
7. Prompting you to launch the Web-based Control Panel
8. Opening a browser and loading the Control Panel
If you’re going to be modifying the survey pages in an HTML editor (see page 355), then you can halt the process by clicking Later at step 5. If it’s just a quick change you’re making yourself, you can leave SurveyPro at the prompt, edit the pages, and then return to SurveyPro. If you’re going to be passing the files to a designer for the changes, you can cancel the process at that point and use the advanced upload later (see page 290).
Accessing SP4 Files from Multiple Systems
If you share SP4 files with co-workers or access them yourself from both a laptop and desktop, this information will make your life easier.
Sharing Web site definitions
While the details of a Web Site are saved as part of your user account on just one computer, what SurveyPro stores in the SP4 file is the name of the definition. If all the users in your company use identical names to refer to the same server settings, then you’ll never see warning notices about server definitions being missing.

Apian NetCollect 4.0 User Guide
Chapter 17 - Publish Settings Web Site Definitions for Your Server 280January 15, 2007
Saving SP4 files to common shares
Often one user will Publish the survey, but another person will be down-loading data. When SurveyPro Publishes, you give it a location on your local system or LAN share where it will be creating copies of your Web pages (see page 279). Later, when you use Get Latest Data (see page 335) it looks for that same set of folders to download the files.
When you e-mail SP4 files around and everyone is saving them to a differ-ent location, Get Latest Data can’t find its local folders and will give an error. However, if the SP4 file and those Publish sub-folders are stored on a LAN data share that everyone accesses with the same drive letter, everything will work beautifully.
Likewise on a desktop/laptop setup, be sure you’re using the same drive and path locations for your files, and synchronize not just the SP4 files but also the sub-folders created during Publish.
Web Site Definitions for Your Server
If you don’t have your Server Crib Sheet (see page 38), now is the time to track it down from your server administrator.
To define a Web Site: 1. Web Survey Setup dialog
2. Edit Server Configuration
3. Define New Site button
The fields in the Web Site Definition dialog are covered on page 38 as they’re tightly intertwined with the folders your server administrator cre-ates. Therefore, this section is less about determining the specific paths you’ll type than about working with Web Site definitions in general.
Checking Script Versions on Your Server
When publishing, you have to have a script match between your version of SurveyPro and the scripts on the server. Any “old” script versions must be left on your server until you’re absolutely certain there are no surveys referencing them. Likewise you should keep Web Site definitions on your system as long as you’re pulling data for projects published under them. Updated server scripts can be installed in parallel on a server and are a quick update if your administrator followed our installation recommenda-tions (see page 28).

Apian NetCollect 4.0 User Guide
Chapter 17 - Publish Settings Web Site Definitions for Your Server 281January 15, 2007
To check for a script version without looking on the server itself:
1. Web Survey Setup dialog
2. Edit Server Configuration
3. Define New Site button, or Edit All Sites button to check an existing definition
4. Fill in the fields for a new site or select your site from the list
5. Click Test URLs
Copying, Editing and Deleting Your Server Definitions
To edit Web Site definitions:
1. Web Survey Setup dialog
2. Edit Server Configuration
3. Edit All Sites button
4. Select a Site from the list and Modify , Delete or Duplicate
First, remember that the Web Sites are named objects that multiple sur-veys will reference. Unlike your Rescales and Text Styles which are saved within one SP4 file and only used by its documents, Web Sites are saved in your computer’s registry and used by multiple SP4 files. While it is possi-ble to re-create a Web Site definition after it’s been removed, it’s more of a hassle than being conservative with your edits and deletions.
There are a few common situations for editing and copying sites:
Debugging your initial definition
It’s not uncommon for one to spend a couple rounds fixing typos or adjusting a server configuration when doing the initial installation. In this case, there are no real surveys using the Web Site definitions yet, so mod-ify freely.
Updating script versions If you update your SurveyPro, it may now want a newer version of the scripts for new projects. At the same time, live surveys will be referencing older script generations. In this case, duplicate your current definition and then change the Revision in the copy to match the notice “This Net-Collect is.” Use the Test URLs button to confirm your server administrator properly updated the server side.
Creating a similar site with new Project or Content roots
In most cases, a server will have one Project and one Content root which all SurveyPro users to post their surveys. However, some firms may cre-ate multiple roots for different departments, such as marketing and human resources. In this case, you may end up duplicating one

Apian NetCollect 4.0 User Guide
Chapter 17 - Publish Settings Web Site Definitions for Your Server 282January 15, 2007
department’s settings and updating a few fields for the additional depart-ment.
Other than these situations, you’ll rarely need to modify your definitions. If you find yourself making changes regularly, there may be a way to change your base definition so the frequently changed portions are in your survey paths instead.
Renaming a server definition
Server definitions are saved centrally on your computer and referenced by name from a SP4 file. If you rename the settings while in one survey, other SP4 files sharing that definition will not be able to find their server any more and will generate errors when you try to upload or download. If you attempt to rename a server definition, you’ll see a warning dialog with the options to cancel, create a copy of the server definition with the new name, or rename the original version.
Housecleaning When you no longer need a server definition for Publishing or data downloads, you can delete it from your system.
Servers Accessed via LAN Shares (Your Server)
When you’re working with intranet servers, local test systems, or produc-tion servers accessed through a VPN, the drives of the Web servers may be accessible through Windows Explorer just like your C:\ drive or a shared network data drive. There are two types of paths:
In some organizations, there are standardized drive mappings so you can tell anyone in the company to use the “W drive” to access a Web server, or “S drive” to get to shared data files. Not all companies have these stan-dards, though, so while the UNC paths appear messier, using them can be
UNC paths A universal (or uniform) naming convention path which consists of:
\\servername\sharename\\serverIPaddress\sharename
A share name may be something like Marketing or Clients or simply C$ for that server’s C drive. Whenever you see a share with a $ at the end, that means it’s a hidden share—you can connect to it if you know the exact name, but it won’t appear when you browse the system.
Drive letter mappings
All a drive letter mapping does is make an entry in your computer that says:
\\servername\sharename\subfolders\ = W:\

Apian NetCollect 4.0 User Guide
Chapter 17 - Publish Settings Web Site Definitions for Your Server 283January 15, 2007
a lot simpler than figuring out that your W drive is different from someone else’s.
Whenever a Windows system tries to connect to another computer, the first thing it does is pass along your network username and password. If it finds a match on the other system, it will let you access the share with no notices. However, if it doesn’t find a match to your username, then Win-dows will pop up a dialog box for you to enter other credentials.
If your Web server shares require that separate authentication box, you need to establish the connection and authenticate yourself before upload-ing from SurveyPro (going to Windows Start, Run and putting the share in works). Once a connection is established, SurveyPro can upload and download with no problems.
Servers Accessed via FTP (Your Server)
SurveyPro’s FTP function works for the majority of server configurations, but it does make a couple assumptions:
• You’re connecting via port 21 (the FTP default)
• Both the Content and Project roots are available as sub-folders after you connect via FTP
If either of those is not true for you, or if you require an encrypted FTP connection, you’ll need to use a third-party FTP utility for uploads. (In some cases a simple port change can be specified with ftp://your-site.com:portnumber.)
If you are using a separate FTP application, you’ll need to define a Web Site with false upload connection information (SurveyPro won’t let you save a definition with missing fields), and only go partially through the steps on page 279. If you cancel at step 5, then SurveyPro will have gen-erated the survey pages and configuration files on your local drive, but not yet attempted to upload them. At this point you can open up your FTP program and do the upload.
Similarly, you will not be able to use SurveyPro’s integrated data down-load. Use the Control Panel’s data page (see page 328) to archive the work in progress WIP file, and then download either from the Control Panel or using your FTP application.
Next section for Your Server: Setting Paths for a Survey on page 285.

Apian NetCollect 4.0 User Guide
Chapter 17 - Publish Settings Web Site Definitions for QuestionWeb 284January 15, 2007
Web Site Definitions for QuestionWeb
QuestionWeb takes care of script versions and server paths for you, so all you need is your account information to Publish.
To define a Web Site: 1. Web Survey Setup dialog
2. Edit Server Configuration
3. Define New Site button
In addition to the regular paid QuestionWeb accounts, Apian now offers one day trial accounts. To sign up for a regular account, go to www.QuestionWeb.com and click the Order Now link—accounts are acti-vated within 1 business day. To request a demo folder, select that server type within SurveyPro and click the Get Demo Folder button.
Both types of accounts are covered in the QuestionWeb publish tutorial on page 308.
Understanding QuestionWeb Uploads
QuestionWeb’s folder upload and file check-in process is slightly different from on your own server. While an upload to your own server places files in the location respondents go to, uploads to QuestionWeb go to a tempo-rary holding location.
Once you upload your survey to a folder and log in to the Control Panel, you need to tell QuestionWeb to check for your new files. For the folder you used, click the Set Up New Project button, then click Set Up Project on the next screen. This tells the server to go check the files you uploaded, insert the QuestionWeb server paths, and copy them to their final location.
Finding Your FTP password for QuestionWeb
If you have a one-day demo account, all the information you need is in the automated e-mail you received on sign-up.
If you have a regular QuestionWeb account, log in to your account Con-trol Panel at:
https://questionweb.com/controlpanel/

Apian NetCollect 4.0 User Guide
Chapter 17 - Publish Settings Setting Paths for a Survey 285January 15, 2007
On the first page, QuestionWeb displays a list of the folders in your account. In the pale blue banner across the top of the page you’ll see your FTP password, which is different from your Control Panel password.
QuestionWeb Accounts with Multiple Folders
When publishing to QuestionWeb, SurveyPro will let you browse to a folder within your account and will warn you if you’re uploading to a folder which already has content. What it won’t tell you from within SurveyPro is which survey is in that folder. Because of this, it’s helpful to be logged into the QuestionWeb Control Panel during Publish so you can confirm you’ve picked the right destination.
Setting Paths for a Survey
Web Sites definitions let you enter all the information which is generic to your Web server, so after that you only need to enter the subfolders and file names specific to one survey.
To enter fields for a survey: 1. Web Survey Setup dialog
2. Edit Server Configuration
3. Select a Site from the list and click Use Site
The fields in the Survey Project dialog depend on whether you’re using your own server or QuestionWeb. Both versions are documented together here, so skip any field names you don’t see on your screen.

Apian NetCollect 4.0 User Guide
Chapter 17 - Publish Settings Setting Paths for a Survey 286January 15, 2007
Edit All Sites This button brings up the Web Site definition dialog, allowing you to review the settings for a site, create a new site, or edit an existing site.
Local Directory The Local Directory is where NetCollect will create your survey pages before uploading them to the server. By default, it creates a subfolder where your SP4 file is saved, and names that folder with the SP4 file name plus the server definition name. Nobody but you will ever see that path, so generally the default is fine. You do want to have a folder for each survey though, so if you have multiple Web questionnaires in one SP4 file you may need to modify the path.
Base Filename Base Filename sets the name of the .ASP pages, and defaults to the SP4 file name. While you generally won’t include this in the link you send to respondents (unless you’re using an embedded launch), it will be visible in their browser’s address as soon as they start the survey. Good names are short and either consistent with the survey or generic.
QuestionWeb Folder Either type or Browse to select the 5 digit QuestionWeb folder which you’re using for the survey. When you Publish, SurveyPro will warn you if the folder has a survey in it, but won’t give any details, so it can help to log into the QuestionWeb Control Panel to confirm you’ve got the right folder.

Apian NetCollect 4.0 User Guide
Chapter 17 - Publish Settings Setting Paths for a Survey 287January 15, 2007
Survey Content Sub-path (Your Server)
This builds on top of paths in the Web Site definition, and is part of the address you’ll ask respondents to go to. The Survey Content folder should be unique to this project. Let’s say your Web Site definition included these entries:
If you were conducting a survey on widgets, you could use as your Survey Content Sub-path “widget,” which would combine with your Web Root and Survey Contents Node to make this URL for respondents:
http://www.yoursite.com/surveys/widget/
Some Web site definitions don’t have a specific Survey Contents Node, in which case your Survey Content Sub-Path might be “widgetsurvey” instead to distinguish it from other widget information on the site. As with the base filename, shorter folder names are best. While spaces are allowed, they’ll often appear in a browser as “%20” so try hyphens or underscores in their place.
Project Data Sub-path (Your Server)
Like the Survey Content Sub-path, this should be a unique folder for this survey. Unlike the Content folder, this location is hidden from respondents though it is visible to anyone else with file access to your server. In most cases, your survey data will be going to a folder path specifically for Net-Collect projects—the Project Data Node in the Web Site definition. If you’re the only one posting surveys, you can use any naming scheme which makes sense to you. However, if there are multiple NetCollect users posting many surveys, you may want to work out a system where the path includes your department, name, date, or other information which would short-cut conversations about “Who the heck posted this?” Because the files within the Content and Project folders refer to each other, you don’t have to worry about embedding this sort of information in the path visible to respondents.
Control Panel Password (Your Server)
Enter at least 8 characters using at least one number or special character. This is used to access the Control Panel published with your survey in the Content folder as “basefilename-cp.asp.” If you forget your password, it’s always here in the SP4 file for your reference.
Custom Script (Your Server) This is a very rarely used field—most users will leave it blank. Part of the NetCollect script engine is a file called “NC_Custom.” When answers are submitted by respondents, the data runs through this script along with the normal processors for skips, etc. In the version of the script Apian ships with NetCollect, the data just does a U-turn through the NC_Custom
Web Root http://www.yoursite.com
Survey Contents Node surveys/

Apian NetCollect 4.0 User Guide
Chapter 17 - Publish Settings Setting Paths for a Survey 288January 15, 2007
script, with no actions taken. On rare occasion, an organization will require a special function which cannot be handled with custom Java-Script or ASP code in the survey pages, so they will add server-side code to this module. Unless your server administrator has given you an entry for this field, ignore it.
Sharing Survey Folders with Other Files on Your Server
We strongly recommend against this practice, as SurveyPro’s automatic publish and upload systems assume each survey resides in its own folder (directory) on the server. If you want to place multiple surveys in a Web Site folder or place a survey in a folder with general Web pages, you’ll need to:
• Use the Advanced Upload in SurveyPro or a separate file transfer mechanism to copy the published files up to your Web server
• Keep track of your base filenames and image names to make sure they’re distinct among your different surveys
• Replace the index.htm redirect page with other content
• Rename the index.asp survey initiation page for each questionnaire, and link directly to that renamed page to initiate the survey (not to the basefilename.asp page)
QuestionWeb does not allow multiple surveys at one time in a folder.
See also Files in the Content Folder on page 348.
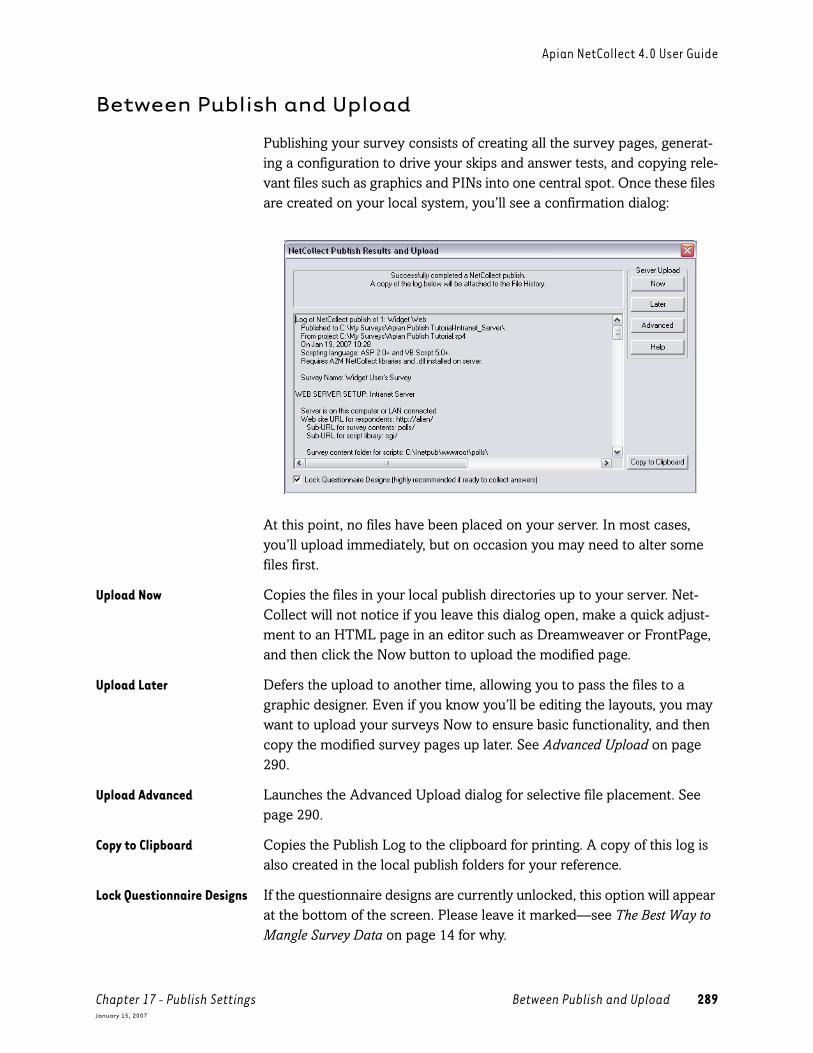
Apian NetCollect 4.0 User Guide
Chapter 17 - Publish Settings Between Publish and Upload 289January 15, 2007
Between Publish and Upload
Publishing your survey consists of creating all the survey pages, generat-ing a configuration to drive your skips and answer tests, and copying rele-vant files such as graphics and PINs into one central spot. Once these files are created on your local system, you’ll see a confirmation dialog:
At this point, no files have been placed on your server. In most cases, you’ll upload immediately, but on occasion you may need to alter some files first.
Upload Now Copies the files in your local publish directories up to your server. Net-Collect will not notice if you leave this dialog open, make a quick adjust-ment to an HTML page in an editor such as Dreamweaver or FrontPage, and then click the Now button to upload the modified page.
Upload Later Defers the upload to another time, allowing you to pass the files to a graphic designer. Even if you know you’ll be editing the layouts, you may want to upload your surveys Now to ensure basic functionality, and then copy the modified survey pages up later. See Advanced Upload on page 290.
Upload Advanced Launches the Advanced Upload dialog for selective file placement. See page 290.
Copy to Clipboard Copies the Publish Log to the clipboard for printing. A copy of this log is also created in the local publish folders for your reference.
Lock Questionnaire Designs If the questionnaire designs are currently unlocked, this option will appear at the bottom of the screen. Please leave it marked—see The Best Way to Mangle Survey Data on page 14 for why.

Apian NetCollect 4.0 User Guide
Chapter 17 - Publish Settings Advanced Upload 290January 15, 2007
Advanced Upload
Most of the time, SurveyPro’s simple “Upload Now” is what you’ll use right after Publish. Sometimes, though, you’ll need a little more control for uploading:
• Survey pages after your designer gives them a tweak
• An updated logo file (make sure it’s the same pixel dimensions)
• A password file to replace your test version
• An expanded pipe-in file
The Advanced Upload dialog has three tabs. The first is a summary page which shows the most recent Publish and lets you launch the Control Panel, the second is used to access the survey’s Content folder, and the third is used to access the Project folder. Both the Content and Project tabs have two views, with the left list showing your local system’s files, and the right showing your Web server.
In these views, you cannot browse to other folders on your system or change your mind about where surveys will reside on the server—if you need to adjust those paths, you’ll have to re-publish.
Important If you revise your survey and re-publish, you need to re-upload all the sur-vey pages and the CFG file together. NetCollect checks that the publish date and time matches within all these files (not the file modified time stamp).
QuestionWeb users The Server view of Advanced Uploads is the upload area, not the final file locations. Any time you upload files you’ll need to click Set Up New Project in the Control Panel to check in the revised files. Every time you use Set Up New Project, it copies all the files from your FTP folder, not just updated ones, and also re-sets all your data files and logs. Because of this, the function is not available while a survey is in Live mode.
To access Advanced Upload 1. Web Survey Setup dialog
2. Advanced Upload button
You can also reach the dialog right after publishing your files by clicking the Advanced button at the screen with the publish log.

Apian NetCollect 4.0 User Guide
Chapter 17 - Publish Settings Advanced Upload 291January 15, 2007
Server Selection and Publish Log
The first tab shows a summary of the most recent Publish (the only one that ever matters). In addition to this information, there are a few controls you can use.
Local and Server times In the upper-right corner are times for your local system and the Web server, which are often set to different time zones. Keep these in mind as you’re trying to determine which files are more “recent” between the two locations.
Archive Now This sends a command to the Control Panel to Archive the current work in progress data file. You’ll rarely use it when doing Uploads—it’s mostly there because this screen is also used in the Advanced Download dialog.
Launch Opens a browser window with the survey’s Control Panel.
Lock Questionnaire Designs If the questionnaire designs are currently unlocked, this option will appear at the bottom of the screen. Please leave it marked—see The Best Way to Mangle Survey Data on page 14 for why.

Apian NetCollect 4.0 User Guide
Chapter 17 - Publish Settings Advanced Upload 292January 15, 2007
Survey Content and Project Data Files on Your Server
When you select the Survey Content or Project Data tabs, SurveyPro dis-plays your local system’s files on the left side and your Web server’s on the right side.
Understanding the “Extra” Files
On both the Content and Project sides you’ll probably see far more files than you expected. Every file has a purpose, so don’t skip uploading one or two that you think is superfluous. See also Files on the Server on page 348 and Closing and Archiving Surveys on page 344.
On the Content side In addition to the survey pages themselves you’ll see index pages which are used to direct respondents to the survey and initiate sessions. Graphic files starting with “nc” are used either for survey buttons, progress bars, or within the Control Panel. Certain ASP pages are created to manage the survey via the Control Panel and SurveyPro. Within the Content folder, your local system and the Web server should always match.
On the Project side In this case, your local system will only show a handful of files, but the Web Site side will show a proliferation of files. Some of these are data, others are logs, and others are control files for managing respondent traf-fic. Again, every file exists for a reason, and while some will re-generate if removed, you really don’t want to “tidy” an active survey—ever.

Apian NetCollect 4.0 User Guide
Chapter 17 - Publish Settings Advanced Upload 293January 15, 2007
Uploading for the First Time to Your Server
If you’ve never uploaded after publishing, the folders won’t exist yet on your Web server (assuming you’re not sharing the folder with other con-tent). In this case, all the files on the left side will be selected for upload, but the Upload button itself will be grayed out.
1. Click the Make Folder button to create it on the Web server
2. Click the Upload button to copy the files to the server
3. Select the Server tab and Launch the Control Panel to set up your survey

Apian NetCollect 4.0 User Guide
Chapter 17 - Publish Settings Advanced Upload 294January 15, 2007
Uploading to Live Surveys on Your Server
Sometimes long-running surveys may require an update to their pipe-in files, or a quick fix needs to be made. Updating live surveys is always risky, so even if you’re an experienced NetCollect user, take a lot of care through this process and watch your survey for errors afterward.
1. Using the Control Panel, set the survey to Maintenance Mode (see page 328)
2. Once respondents are locked out, download any copies of files you’re modifying (see page 337)
3. Upload just the modified files back up to the server
4. Using the Control Panel switch Maintenance Mode back off
SurveyPro won’t let you upload unless a survey is in Test mode or Mainte-nance mode, so you can’t just sneak files in from within its system. This is to prevent “file in use” errors which you may see in copying and a respon-dent may see in clicking Submit.
The most common reason for doing this is updating a password file, which is covered on page 173.

Chapter 18 - Publishing and Uploading to Your Server 295January 15, 2007
Chapter 18T U T O R I A L Publishing and Uploading
to Your Server
QuestionWeb users go to the tutorial on page 308.
This tutorial is a little different from all the rest. In addition to walking you through your own survey files to publish, it is also often used during test-ing of the initial script installation. Because you’ll be filling in dialogs with your server’s unique information there are times we’ll provide examples, but we cannot provide exactly what to type at each stage. This means the explanations between numbered steps are much more impor-tant in this tutorial than in other lessons.
If this is part of your initial server installation
At this point you’ll need to have completed at least steps 1-3 on page 277. If you have problems along the way, the two most common culprits are paths and permissions. For the paths, check for typos and have your server administrator check that the paths patch the three server perspec-tives in Server Paths for the SurveyPro User on page 38. For permissions, have your server administrator check both the IIS and NTFS permissions in the section starting on page 33.
If you have a working Web Site Definition
If you have a reliable Server Crib Sheet (see page 38) then you’ll follow all the sections, simply typing in your values as you go. If instead you already have a tested Web Site defined, the tutorial skips you past that portion.
Everyone You can use this lesson to post a real project in its “live” location on your server. Or you can use a sample file to post a survey for learning the pro-cess or testing your server. Any of the NetCollect tutorial files with “End” in the name are ready for Publish, though you may want to pick a lesson you’ve completed for familiarity during testing.
If at any point you get an error instead of a success notice, you’ll need to stop the tutorial and work with your server administrator to either correct the path or fix the server setup.

Apian NetCollect 4.0 User Guide
Chapter 18 - Publishing and Uploading to Your Server 296January 15, 2007
In this tutorial you’ll learn how to:
Define a Web Server in NetCollectSet paths for a survey on that serverUpload your survey pages to the serverRun the Web-based Control Panel to set up and manage the surveyDownload data
The tutorial assumes you are already familiar with:
No specific NetCollect features
1. Start SurveyPro, enter your initials, and Open either your survey file or any sample file with “End” in the name.
2. If you opened a sample file, click Yes to open a copy, and save as YourName Publish Tutorial.SP4.
3. Close the File History dialog.
4. Make sure the questionnaire you’re publishing is the active document tab.
Defining a Web Site
What we’re going to do is define a Web Site for your server and then select it for this particular survey. The Web Site definition is the part that requires your crib sheet and may require a “debugging” round with your server administrator the first time you publish. However, the good news is that once it’s defined, it’s saved to your computer and you can use it for all your NetCollect surveys.
1. Bring up the Web Survey Setup dialog
2. In the last section, Server Configuration, click the Edit button.
If you already have a Web Site defined, jump ahead to Setting this sur-vey’s paths on page 298.
3. Click the Define New Site button.
4. Give the Web Site a descriptive Name, such as “Intranet,” “Test Server,” etc.
When SurveyPro lists the site it will include the type of connection and script version, so you don’t need to put them in the name.
Tutorial Notes
General You can save your file and take a break any time you’re in the main document screen.

Apian NetCollect 4.0 User Guide
Chapter 18 - Publishing and Uploading to Your Server 297January 15, 2007
5. Select either Local/LAN Disk or Remote FTP according to your crib sheet.
6. Fill in the paths according to your crib sheet, being careful of the punctuation (/ vs. \) and matching each path to the right blank.
Remote FTP sites 7. Click the Set FTP Connect button and complete those fields as well. When the fields are entered, click the Connect button to verify they work, and then Close (don’t disconnect).
The Web Site definitions are tied to your personal profile (your Windows login) on this one computer. So, even if you save your FTP password it can’t be revealed to someone else when you send them the SP4 file.
Your finished dialog should look something like this:

Apian NetCollect 4.0 User Guide
Chapter 18 - Publishing and Uploading to Your Server 298January 15, 2007
8. Click the Test URLs button.
This checks the URLs you entered and that the server scripts match your version of NetCollect. You should see a success message:
9. Click OK to close the test notice.
10. Your definition is now complete, so click OK to save it.
Setting this survey’s paths
Now that we’ve defined the Web Site—the piece we’ll use for many sur-veys—we’re ready to define the paths for this particular project. Because we just defined a site, NetCollect assumed we wanted to use it.
Everyone who already had a Web Site defined, select your saved server from the drop-down list at the top of the dialog and click Use Site.
Once you select a Web Site for a survey, NetCollect fills in a few defaults:

Apian NetCollect 4.0 User Guide
Chapter 18 - Publishing and Uploading to Your Server 299January 15, 2007
The Local Directory is where NetCollect will create your survey pages before uploading them to the server. By default, it creates a subfolder where your SP4 file is saved, and names that folder with the SP4 file name plus the server definition name. Nobody but you will ever see that path, so generally the default is fine. You do want to have a folder for each survey though, so if you have multiple Web questionnaires in one SP4 file you may need to modify the path.
1. If needed, edit the Local Directory field.
Next we have two fields which will be visible to respondents on the server. The Base Filename sets the name of the .ASP pages, and defaults to the SP4 file name. The Survey Content Sub-path is the folder where this sur-vey will reside. Both of these reside on top of the Web Site’s Web Root and Survey Contents Node Sub-URL, which in this tutorial’s screen captures are http://alien/polls/.
2. Change the Base Filename to something which is short, has no spaces, and will not confuse respondents who notice it in their browser address bar.
3. Type a folder name in the Survey Content Sub-path which respondents will use to browse to the questionnaire.
You want this Content folder to be reserved for just this survey, with no other Web pages or surveys in it. You can type a new folder name here and NetCollect will take care of creating it during Publish. Note this entry can be more than one level deep, such as “marketing/survey/”. (See Sharing Survey Folders with Other Files on Your Server on page 288 for why we recommend a folder just for this survey.)

Apian NetCollect 4.0 User Guide
Chapter 18 - Publishing and Uploading to Your Server 300January 15, 2007
In the example we’re showing here, the respondents would be asked to go to this intranet address:
http://alien/polls/december05/
As soon as they load that address, they will be immediately redirected to the main survey page complete with Base Filename:
http://alien/polls/december05/survey.asp
The next field isn’t visible to respondents, but is visible to anyone else with file access to your server. In most cases, your survey data will be going to a folder path specifically for NetCollect projects—the Project Data Node in the Web Site definition. If you’re the only one posting sur-veys, you can use any naming scheme which makes sense to you. How-ever, if there are multiple NetCollect users posting many surveys, you may want to work out a system where the path includes your department, name, date, or other information which would short-cut conversations about “Who the heck posted this?” As long as someone can figure out who the Project folder belongs to, they can use the configuration file it contains to locate the associated Content folder.
4. Type a Project Data Sub-path with no spaces (hyphens and underscores are OK).
5. Type a Control Panel Password which you’ll use to manage the survey on-line. You have to mix in at least one number or special character with the letters.

Apian NetCollect 4.0 User Guide
Chapter 18 - Publishing and Uploading to Your Server 301January 15, 2007
Don’t worry if you forget the password; it’s always here for your reference.
The Custom Script field is very rarely used. Don’t worry about it unless your server administrator has done custom development on top of the NetCollect scripts and told you to put something there.
Your completed screen should look something like this:
6. Click OK to save your survey’s publish settings.

Apian NetCollect 4.0 User Guide
Chapter 18 - Publishing and Uploading to Your Server 302January 15, 2007
Publishing the survey
We’re back in the Web Survey Setup dialog, now with a note in the Server Configuration about our settings:
1. Click the Publish to Server button.
2. You should see a prompt to create the local publish folder; click Yes.
3. The next prompt is to save your SP4 file. Click Yes again.

Apian NetCollect 4.0 User Guide
Chapter 18 - Publishing and Uploading to Your Server 303January 15, 2007
NetCollect just created all the local pages, complete with the filenames and paths you entered in the Web Site definition. All of this is summarized in the Publish log:
At this point, we haven’t uploaded anything to the server. If you were going to have a graphic designer modify the pages you could click the Later button to stop the process at this point. However, in most cases, you’ll upload right now.
At the bottom of this dialog is an option to “Lock” the questionnaires. This prevents anyone from accidentally modifying your questionnaires (you can unlock via the Edit menu). See The Best Way to Mangle Survey Data on page 14 to understand why we recommend leaving that box marked.
Local/LAN Disk sites Some LAN paths will automatically pick up your network ID and authenti-cate you to the receiving server. Other LAN shares pop up a “connect as” dialog when you try to access them. If the upload paths you set in the Web Site require separate authentication, take care of that outside of Survey-Pro now.
Everyone 4. Under Server Upload, click the Now button.
5. You’ll see two prompts to create the Content and Project folders. Click Yes for both.
If instead you saw warnings about the folders already having content, you should double-check what’s in those locations and/or back up and change your selections before proceeding.

Apian NetCollect 4.0 User Guide
Chapter 18 - Publishing and Uploading to Your Server 304January 15, 2007
After NetCollect copies the files to your server, it tells you it succeeded and asks if you want to launch the Control Panel. At this point, while the files are present on the server, the survey itself won’t run—you need to check in the files first.
6. Click Yes to launch the Control Panel (leave SurveyPro open).
At this point, even though you successfully tested your paths and uploaded, you may get an error on opening the Control Panel. The most common cause for this is that your Web server doesn’t have permission to write in your data folder. (Check the “IIS User” columns on page 36.)
You may want to bookmark the Control Panel page if this is a real project.
7. Type the survey administrator password you set in the dialog with the Content and Project paths and click Log In.
The Control Panel knows you just did a new upload, so it’s prompting you to check in the files.
8. Click Set Up New Project.
Now the survey is ready to run.
Testing your survey
When you set up a survey, it starts off in Test mode. As you go through the survey, the only difference between Test and Live is the footer that appears—otherwise all the passwords, skips, piping, etc. are working. While the survey is in Test mode, you will be able to upload revised ques-tionnaires (this is locked out in Live mode) and all data you entered is flagged as “TEST” in the file name. When you switch to Live mode, the passwords you used are made available once again and the activity logs and report counts are cleared.
1. Click on the Survey URL link at the top of the Control Panel.
This opens the survey in a separate browser window. Leave the Control Panel open—we’ll be returning to it in just a minute.
2. Go through the survey a couple times to generate a little data.

Apian NetCollect 4.0 User Guide
Chapter 18 - Publishing and Uploading to Your Server 305January 15, 2007
Your survey probably ends with a SurveyPro generated “Thanks” page. To restart the survey from there, just wipe out everything below the folder name from the URL, removing the page name and session ID such as:
survey.asp?P1=3pv1%2D7rv3%2Dyfd
A common error is copying the full link including a session ID and using that as the hyperlink to send respondents to a survey. Make sure you only use the folder path!
3. Once you have a couple forms entered, switch back to the Control Panel window.
4. Under Basic Survey Administration, select Activity Log and click Go.
This is a handy tool for seeing how many people have completed the sur-vey and how many partial responses you’re accumulating. If you want to make this information visible to clients or colleagues without giving them full administrative access, just use an Online Report (see page 251).
5. Click the Back to Home link that appears at the top and bottom of the page.
Downloading and importing data
A survey which works beautifully on the server is useless if there’s a flaw in the data. Never skip the full testing loop of pulling and checking data. There’s also one last permissions gotcha that hides until this point.
1. Under Advanced Options, select Data Files and click Go.
The only file listed is a “work in progress” WIP file that is actively collect-ing data. To prevent overlap in data files, NetCollect requires you Archive your files to download them, which will rename the current WIP file with the current date and time, and create a new working file. While we can archive and download straight from the Control Panel (handy for ASCII Pipe Outs), we’re going to use SurveyPro instead.
2. Switch back to SurveyPro, where the Web Survey Setup dialog is still open.
3. Click the Get Latest Data button.

Apian NetCollect 4.0 User Guide
Chapter 18 - Publishing and Uploading to Your Server 306January 15, 2007
SurveyPro goes out and checks with the server, listing the current status of your project in the top half of the dialog. You can see it relies some on your Import Log History, so if you tend to purge that aggressively, you may want to change your habits.
In our case, there are no archived files to download, so we need to create one first.
4. Set the download option to The present, after doing a new archive.
Below that are options to import the completed surveys and partial responses. The partial surveys mentioned here are ones which have “expired” on the server, either because you set the partials to expire in the Control Panel, or because you switched the survey from Test to Live or Live to Closed modes. Right now, even though you may have created a partial response or two, they’re still active on the server for respondents to come back and finish.
5. Click OK to download and import the data.
6. Review the messages that appeared in the lower half of the dialog.
7. Close the Download and Import dialog and Close Web Survey Setup as well.
8. Click on the File History toolbar button .

Apian NetCollect 4.0 User Guide
Chapter 18 - Publishing and Uploading to Your Server 307January 15, 2007
9. Select the Imports tab.
Here you’ll see two logs. One is the general download and import log that was displayed in the dialog we just used. The second log is a detailed report for each SDH file you downloaded—it’s always a good idea to check those.
10. Select the Publishing tab.
Here we have a copy of the Publish log. This is a handy reference for the assorted survey and Control Panel paths, as well as your administrator password.
Congratulations! You just published a survey. Once everyone is done revising and testing the survey, you just need to switch the Control Panel to Live mode and you’re ready to go.

Chapter 19 - Publishing and Uploading to QuestionWeb 308January 15, 2007
Chapter 19T U T O R I A L Publishing and Uploading
to QuestionWeb
For publishing to your own server go to the tutorial on page 295.
This tutorial is a little different from the others. Unlike the layout or skips tutorials which require you use our sample file, in this lesson you can use any finished survey. You’ll also see places where we offer suggestions about what to type, but where you’ll have to decide for your own situation the best names and paths.
If you have a real project ready to go, this tutorial can be used to post it on the server and walk you through the testing process for the first time.
If you don’t have your own survey ready yet, you can use any of the Net-Collect tutorial files with “End” in the name.
Regular QuestionWeb accounts
New accounts take one business day to process, so you’ll need to have that taken care of before running the tutorial. In the meantime, the pro-cess of publishing to QuestionWeb demo folders is almost identical so you can give that a try.
QuestionWeb demo folders Jump ahead to Using QuestionWeb Demo Accounts on page 315 for your tutorial.
In this tutorial you’ll learn how to:
Define a QuestionWeb Server in NetCollectUpload your survey pages to the serverRun the Web-based Control Panel to set up and manage the surveyDownload data
The tutorial assumes you are already familiar with:
No specific NetCollect features

Apian NetCollect 4.0 User Guide
Chapter 19 - Publishing and Uploading to QuestionWeb Publishing to a Regular Account 309January 15, 2007
Publishing to a Regular Account
1. Start SurveyPro, enter your initials, and Open either your survey file or any sample file with “End” in the name.
2. If you opened a sample file, click Yes to open a copy, and save as YourName Publish Tutorial.SP4.
3. Close the File History dialog.
4. Make sure the questionnaire you’re publishing is the active document tab.
Defining a Web Site
What we’re going to do is define a Web Site for your QuestionWeb account and then select it for this particular survey. Once the account is defined, it’s saved to your computer and you can use it for all your Net-Collect surveys.
1. Bring up the Web Survey Setup dialog
2. In the last section, Server Configuration, click the Edit button.
3. Click the Define New Site button.
4. Give the site a Name, such as “QuestionWeb.”
In the list of Web Sites, SurveyPro will include the account’s user name for your reference.
5. For the Web Server type select QuestionWeb.
6. At the bottom of the screen, enter the User ID which you selected when you signed up (it will be in the confirmation message you received).
7. Next to it, enter your FTP password.
Your FTP password is different from the one you use to log into the QuestionWeb Control Panel. You’ll find the password in the pale blue ban-ner at the top of the Control Panel’s Folder List page.
8. If you like, click Save Password.
Tutorial Notes
General You can save your file and take a break any time you’re in the main document screen.

Apian NetCollect 4.0 User Guide
Chapter 19 - Publishing and Uploading to QuestionWeb Publishing to a Regular Account 310January 15, 2007
Like the rest of your Web Site definition, this information is only saved to your computer under your Windows login, so you don’t have to worry about e-mailing someone the SP4 file and giving them access to your account. In addition, the FTP password is only used for uploads, so it can’t be used to access survey data.
9. Click the Test Connection button to verify your entries.
If your typing was correct, “Connection test successful” will appear to the left of the button.
10. Click OK to save your Web Site definition.
Setting this survey’s information
Now back in the Survey Project dialog, the Web Site you just defined is selected for the project. There are only a couple fields you need to fill out.
The Local Directory is where NetCollect will create your survey pages before uploading them to the server. By default, it creates a subfolder where your SP4 file is saved, and names that folder with the SP4 file name plus the server definition name. Nobody but you will ever see that path, so generally the default is fine. You do want to have a folder for each survey though, so if you have multiple Web questionnaires in one SP4 file you may need to modify the path.
1. If needed, edit the Local Directory field.

Apian NetCollect 4.0 User Guide
Chapter 19 - Publishing and Uploading to QuestionWeb Publishing to a Regular Account 311January 15, 2007
The Base Filename sets the name of the .ASP pages, and defaults to the SP4 file name.
2. Change the Base Filename to something which is short, has no spaces, and will not confuse respondents who notice it in their browser address bar.
Our last field is the QuestionWeb Folder, where you type or select one of the folders associated with your account.
3. Click the Browse button for SurveyPro to go look up your account.
4. Select one of your folders and click OK.
It’s always good to double-check what’s in a folder before publishing to it.
5. Leave SurveyPro where it is, launch your browser and go to http://questionweb.com/controlpanel/
6. Enter your ID and password (the one you set, not the FTP password).
7. Check what’s listed in that folder and make sure you weren’t about to overwrite something useful (the Control Panel won’t let you overwrite a Live mode survey).
8. Switch back to SurveyPro and click OK to save your settings.
Publishing and uploading
The server settings are now saved on your computer and as part of the Web questionnaire. If you still had more design work to do on the survey

Apian NetCollect 4.0 User Guide
Chapter 19 - Publishing and Uploading to QuestionWeb Publishing to a Regular Account 312January 15, 2007
you could wrap that up now, but in our case we’re ready to publish and upload to the server.
We’re now back in the Web Survey Setup dialog, but now under Server Configuration it gives a summary of your settings.
1. Click the Publish To Server button.
2. If you’re prompted to create a folder for the local files, click Yes.
3. Click Yes again to approve saving your SP4 file.
This next screen shows the publish information for the survey. Now just one more step to upload the files.
4. In the upper-right corner under Server Upload, click Now.
5. After the files are all uploaded you’ll see a confirmation screen. Click No unless you closed your browser earlier.
Checking in your files
While the survey pages and configuration file are now uploaded to QuestionWeb, we haven’t yet told the server to look for the new files.
1. Switch back to your browser with the Control Panel open and click the Set Up New Project button for that folder.
2. We’ve already uploaded the files, so on the next screen click Set Up Project.
3. When QuestionWeb displays the Setup Results screen, scroll to the end of the page and click the survey address link.
This opens the survey in another window—leave the Control Panel open for a minute.
Testing your survey
When you set up a survey, it starts off in Test mode. When you go through the survey, the only difference between Test and Live is the “Test Mode” notice in the footer. Otherwise all the passwords, skips, piping, etc. are working. While the survey is in Test mode, you will be able to upload revised questionnaires (this is locked out in Live mode) and all data you entered is flagged as “TEST” in the file name. When you switch to Live mode, the passwords you used are made available once again and the activity logs and report counts are cleared.
1. Go through the survey a couple times to generate a little data.

Apian NetCollect 4.0 User Guide
Chapter 19 - Publishing and Uploading to QuestionWeb Publishing to a Regular Account 313January 15, 2007
Your survey probably ends with a SurveyPro generated “Thanks” page. To restart the survey from there, just wipe out everything below the folder name from the URL, removing the page name and session ID such as:
survey.asp?P1=3pv1%2D7rv3%2Dyfd
A common error is copying the full link including a session ID and using that as the hyperlink to send respondents to a survey. Make sure you only use the folder path!
2. Once you have a couple forms entered, switch back to the Control Panel window.
3. Click the Folder List link at the top or bottom of the screen.
4. For the folder you’re using, click Manage Project.
5. Under Basic Survey Administration, select Activity Log and click Go.
This is a handy tool for seeing how many people have completed the sur-vey and how many partial responses you’re accumulating. If you want to make this information visible to clients or colleagues without giving them full administrative access, just use an Online Report (see page 251).
6. Click the Project Home link that appears at the top and bottom of the page.
Downloading and importing data
A survey which works beautifully on the server is useless if there’s a flaw in the data. Never skip the full testing loop of pulling and checking data.
1. Under Advanced Options, select Data Files and click Go.
The only file listed is a “work in progress” WIP file that is actively collect-ing data (unless you posted to a folder still containing a prior survey’s data). To prevent overlap in data files, NetCollect requires you Archive your files to download them, which will rename the current WIP file with the current date and time, and create a new working file. While we can archive and download straight from the Control Panel (handy for ASCII Pipe Outs), we’re going to use SurveyPro instead.
2. Switch back to SurveyPro, where the Web Survey Setup dialog is still open.
3. Click the Get Latest Data button.

Apian NetCollect 4.0 User Guide
Chapter 19 - Publishing and Uploading to QuestionWeb Publishing to a Regular Account 314January 15, 2007
SurveyPro goes out and checks with the server, listing the current status of your project in the top half of the dialog. You can see it relies some on your Import Log History, so if you tend to purge that aggressively, you may want to change your habits.
In our case, there are no archived files to download, so we need to create one first.
4. Set the download option to The present, after doing a new archive.
Below that are options to import the completed surveys and partial responses. The partial surveys mentioned here are ones which have “expired” on the server, either because you set the partials to expire in the Control Panel, or because you switched the survey from Test to Live or Live to Closed modes. Right now, even though you may have created a partial response or two, they’re still active on the server for respondents to come back and finish.
5. Click OK to download and import the data.
6. Review the messages that appeared in the lower half of the dialog.
7. Close the Download and Import dialog and Close Web Survey Setup as well.
8. Click on the File History toolbar button .

Apian NetCollect 4.0 User Guide
Chapter 19 - Publishing and Uploading to QuestionWeb Using QuestionWeb Demo Accounts 315January 15, 2007
9. Select the Imports tab.
Here you’ll see two logs. One is the general download and import log that was displayed in the dialog we just used. The second log is a detailed report for each SDH file you downloaded—it’s always a good idea to check those.
10. Select the Publishing tab.
Here we have a copy of the Publish log. This is a handy reference for the assorted survey and Control Panel paths, as well as your administrator password.
Congratulations! You just published and tested a survey. Once everyone is done revising and testing the survey, you just need to switch the Control Panel to Live mode and you’re ready to go.
Using QuestionWeb Demo Accounts
The QuestionWeb demo accounts are a great way to do a quick publish when you don’t have a regular server or QuestionWeb account ready. Demo accounts are live from the time you sign up to Midnight Pacific time that night, and you’re limited to one account per day per e-mail address.
1. Start SurveyPro, enter your initials, and Open either your survey file or any sample file with “End” in the name.
2. If you opened a sample file, click Yes to open a copy, and save as YourName Publish Tutorial.SP4.
3. Close the File History dialog.
4. Make sure the questionnaire you’re publishing is the active document tab.
Requesting a QuestionWeb demonstration folder
1. Bring up the Web Survey Setup dialog
This dialog is used to define a number of Web survey functions, including the password, answer tests for required fields and formatting, server reports, and piping. In this case, we’re going to go straight to the server settings, but you may want to revisit this screen in playing around with the program.
2. Next to the Server Configuration section, click Edit.

Apian NetCollect 4.0 User Guide
Chapter 19 - Publishing and Uploading to QuestionWeb Using QuestionWeb Demo Accounts 316January 15, 2007
3. From the drop-down list at the top of the screen, select One-day Demo QuestionWeb and click Use Site.
4. At the bottom of the screen, click Get Demo Folder.
This launched a browser with the sign-up form on QuestionWeb.com.
5. Complete the form, making sure you enter the right e-mail address so you receive your sign-up information.
6. Check your e-mail for a message from [email protected] with the subject “QuestionWeb demo folder information” and open the message.
Defining your folder settings
1. Leave the e-mail open and switch back to SurveyPro.
There are just three fields we need to set, and two of them are in the e-mail from QuestionWeb.
2. Check the Local Directory which defaulted to a sub-folder of where you saved the SurveyPro file. This is where the HTML pages are created before they’re uploaded. If needed, adjust the path by typing or browsing .
The Base Filename sets the name of the .ASP pages, and defaults to the SP4 file name.
3. Change the Base Filename to something which is short, has no spaces, and will not confuse respondents who notice it in their browser address bar.
4. From the e-mail, copy the QuestionWeb Demo Folder and paste it in that field in SurveyPro.
5. Again from the e-mail, copy your Folder Password and paste it in SurveyPro.

Apian NetCollect 4.0 User Guide
Chapter 19 - Publishing and Uploading to QuestionWeb Using QuestionWeb Demo Accounts 317January 15, 2007
Your screen should look something like this:
6. Click OK to save your server settings.
Uploading the files
1. Back in the Web Survey Setup dialog, click the Publish To Server button.
2. If you’re prompted to create a folder for the local files, click Yes.
3. Click Yes if you’re prompted to save the file.
This next screen shows the publish information for the survey. Now just one more step to upload the files.
4. In the upper-right corner under Server Upload, click Now.
5. After the files are all uploaded you’ll see a confirmation screen. Click Yes to bring up the Web-based survey Control Panel.
Checking in your files
1. Using the same demo## folder ID and password you copied into SurveyPro, log into the Control Panel.
2. In the table with the folder ID, click the Set Up New Project button.
3. We’ve already uploaded the files, so on the next screen click Set Up Project.

Apian NetCollect 4.0 User Guide
Chapter 19 - Publishing and Uploading to QuestionWeb Using QuestionWeb Demo Accounts 318January 15, 2007
4. When QuestionWeb displays the Setup Results screen, scroll to the end and click the link for your survey.
That’s it!
For a walk-through of testing your survey and downloading data, go to Testing your survey on page 312.
Chapter 20 - Control Panel Screens 319January 15, 2007
Chapter 20R E F E R E N C E Control Panel Screens
While SurveyPro and NetCollect allow you to design your survey, the Control Panel lets you manage it once it’s on your Web server. Before div-ing into the Control Panel, you may want to review the flowcharts for sur-vey management on page 7 and about respondent submissions on page 8.
When you’re logged into the Control Panel, you can also access its Help screens for a review.
Chapter Contents:
Your Server vs. QuestionWeb Control Panels . . . . . . . . . . . . . 320Basic Survey Administration . . . . . . . . . . . . . . . . . . . . . . . . 320
Change Survey Mode . . . . . . . . . . . . . . . . . . . . . . . . . . . 320Activity Log . . . . . . . . . . . . . . . . . . . . . . . . . . . . . . . . . . 321
Advanced Options . . . . . . . . . . . . . . . . . . . . . . . . . . . . . . . . 322Automatic Data Management . . . . . . . . . . . . . . . . . . . . 323Manage Partially Completed Surveys . . . . . . . . . . . . . . . 324Survey and Report Availability . . . . . . . . . . . . . . . . . . . 326Data Files . . . . . . . . . . . . . . . . . . . . . . . . . . . . . . . . . . . 328Maintenance Mode . . . . . . . . . . . . . . . . . . . . . . . . . . . . 328Server Load Protection . . . . . . . . . . . . . . . . . . . . . . . . . 329

Apian NetCollect 4.0 User Guide
Chapter 20 - Control Panel Screens Your Server vs. QuestionWeb Control Panels 320January 15, 2007
Your Server vs. QuestionWeb Control Panels
For the most part, the Control Panel is identical between your server and QuestionWeb. Once you get to the main menu of management options, you’ll find the two screens are the same.
With NetCollect on your own server, a Control Panel is published with each survey’s pages to the same folder and with the name “basefilename-cp.asp.” You’ll go to that specific page to administer a sur-vey, entering that survey’s administrative password.
With QuestionWeb, instead you go to a central Control Panel for your account, and when you log in it displays a list of your folders. When you click the Manage Project button for a folder, you’re dropped into the Con-trol Panel screens specific to that survey.
Also, while the survey-specific NetCollect Control Panel automatically prompts you to Set Up new uploads, the QuestionWeb version needs to be told to check in new files with the Set Up New Project button.
Basic Survey Administration
The Control Panel is broken between Basic functions you’ll definitely use, and Advanced functions which you can change or leave with the defaults.
Change Survey Mode
The current mode for your survey is listed in the table at the top of the page. Normal survey projects progress from Test to Live to Closed mode (see page 7). Even if you use the timed shut-down option (Survey and Report Availability on page 326), it’s important to Close a survey to wrap-up all the partial data files. SurveyPro will also not let you upload a new survey to a folder unless you’ve Closed the prior survey.
Note: All mode changes (except Maintenance) create a fresh start in terms of password files and reports.
Troubleshooting—Returning to Test after you switch to Live
Sometimes a survey is switched to Live mode before everybody has reviewed it and signed off. In general, it’s better to prematurely switch to Live mode than it is to launch a survey in Test mode, so this isn’t a prob-lem unless you’ve gotten “real” responses already.

Apian NetCollect 4.0 User Guide
Chapter 20 - Control Panel Screens Basic Survey Administration 321January 15, 2007
If no real respondents have completed the survey yet:
1. Switch the survey back to Test mode
2. On the Data page, note any files which say “Live” but which are in fact test data—delete if appropriate or download and rename
3. Get a final sign-off on the survey
4. Switch back to Live mode
If the survey is receiving submissions from real respondents:
1. When submitting test forms, use text fields or a pattern of answers (such as all the first radio button) to unambiguously flag test records
2. If appropriate, notify parties that the on-server reports and activity logs now include test submissions
3. Once data is imported into SurveyPro, locate and delete the test records (Answer Entry, Form menu, Find Form Select)
Troubleshooting—Restarting a Closed survey
If the survey is truly in Closed mode, not just shut down from a time or response limit, then you have a couple options:
• On your own server, you can switch back to Live mode
• On QuestionWeb, you will need to re-publish, set up the files, and switch from Test to Live mode
Because a mode change re-sets the passwords, logs and reports, restoring that information after switching to Closed requires some careful timing and manual file shuffling. If this is important for your project, contact Technical Support for a coaching/data recovery session. It is generally not possible to restore the partial survey sessions unless you had opted to save the raw files on the Partially Completed Surveys page.
Activity Log
Activity logs provide up-to-the moment status on your survey's response rate. This is broken down into two tables:
Completed Survey Log Shows the number of respondents who have finished the survey. This is broken down for the prior 2 weeks, with a line for earlier weeks. If you need to generate a breakdown of responses per day for the entire survey duration, you can do so with a table in SurveyPro’s reports.

Apian NetCollect 4.0 User Guide
Chapter 20 - Control Panel Screens Advanced Options 322January 15, 2007
Unfinished Survey Log Not everyone who starts a survey finishes it, so this shows the number of open sessions. To help you distinguish between people actively complet-ing a survey and those who have paused or abandoned sessions, the table is broken down by the last time a respondent clicked Next or Back on a page. By default, partial sessions do not expire—see Manage Partially Completed Surveys on page 324 for how to adjust the setting.
All log breakdowns are based on the server’s local time, which is dis-played at the top of the page.
Understanding Expired empty starts
Even if the first page of your survey has no questions (such as a Welcome page or password log-in) a session has already been initiated for the respondent. It's not uncommon for respondents to see the first page and decide to come back later or not to complete the survey. These “empty starts” will be kept on the system and listed as an Open Session for 12 hours, after which the server removes them as abandoned.
Accessing activity logs without entering the Control Panel
At times you may want to let clients and other parties see the response rate but not access all the management functions or data files in the Con-trol Panel. In this case, you can configure an Online Report which is an Activity Log instead of a tabulation. See page 251.
Online Reports will also allow you to create demographic counts or other breakdowns which may be helpful in addition to the number of comple-tions.
Advanced Options
You can run a survey without ever changing the Advanced Option defaults, though it’s a good idea to know what the possibilities are. Net-Collect always defaults to the more conservative settings, such as always retaining partial survey sessions.

Apian NetCollect 4.0 User Guide
Chapter 20 - Control Panel Screens Advanced Options 323January 15, 2007
Automatic Data Management
As each completed survey response is saved, it's placed in a work in progress “WIP” SDH file along with any ASCII pipe outs you've defined. These files are listed on the Data Files page, but are not available for download. To make the files available for download, either use the auto-matic archive settings or prompt the server via SurveyPro's Get Latest Data screen or the Data Files Control Panel page. During the archive pro-cess, the WIP files are renamed with the date and time they're archived.
Archiving data does not impact counts in either the server reports or activity logs.
Using automatic archiving
If you have a routine for updating your SurveyPro reports, you can have the server automatically archive your data files each week. Otherwise, you can disable the feature and pull data whenever you need. If it's important that you maintain one file per week, be sure to tell anyone with access to the Control Panel or your SurveyPro file not to use the manual archive features.
The time settings are based on the server local time (which is also used for the time stamp within respondent records). If you don't know your server's time zone, check the Activity Log page.
Setting up files that don't archive
Part of the reason for the archiving process is it makes non-overlapping data files. When you define ASCII Pipe Outs, you can opt to have the files not archive. This is handy if you want to pull SDH data periodically for your SurveyPro reports, but are also generating a separate ASCII file for the entire survey, such as for a drawing. The non-archiving file can be accessed through SurveyPro's Advanced Download screen (on your server only, see page 337) or after the project is switched to Closed mode.
When using non-archiving files, it's possible to end up with duplicate records if you download and import the file more than once. To avoid this, you’ll need to “key” any imports based on a unique ID in the file, updating existing records instead of adding copies.

Apian NetCollect 4.0 User Guide
Chapter 20 - Control Panel Screens Advanced Options 324January 15, 2007
Manage Partially Completed Surveys
If your survey is more than one page long, some of your respondents will probably abandon their questionnaires partway through. This screen lets you set rules about how those partially completed surveys are handled. For your reference, the screen starts with a copy of the partial surveys activity log—you may not decide until the survey has been running a month to start expiring sessions.
When you switch modes from Test to Live to Closed, all partial sessions are expired regardless of your expiration setting. If you need to tempo-rarily suspend the survey without affecting any of the partial surveys, use Maintenance Mode (see page 328).
Deciding whether to expire sessions
Leave Keep unfinished surveys on Always if your survey:
• Is only running for a few weeks
• Includes a pause/resume option
• Has respondents who can be sent reminder notices
Consider changing the Keep setting to one of the time expiration options if your survey:
• Is long-running
• Is high volume
• Has respondents who are unlikely to return after a certain period
The shortest expiration period is 12 hours. While you may be accustomed to sessions which expire more quickly, this is set so even respondents interrupted by conference calls, meetings, and fire drills can return to their open browser window and finish their survey. If for security reasons you require a shorter period, contact Apian Technical Support for infor-mation on how to hand-edit the setting.
Discarding partial survey responses
By default, all expired partial sessions are saved in data files flagged with _PARTIALS_. If you have no interest in the partial survey responses, there are a couple things to do:
• Define any ASCII Pipe Outs to exclude partials (see page 205)
• When using the Get Latest Data command, make sure the Partial results box is un-marked (see page 335).

Apian NetCollect 4.0 User Guide
Chapter 20 - Control Panel Screens Advanced Options 325January 15, 2007
When the survey concludes, we recommend downloading or archiving the _PARTIALS_ files just in case. Even if you don't include them in your primary analysis, these respondents can provide clues about possible non-response sampling errors, as well as possibly highlighting survey design issues (such as everyone bailing when they see page 4). You can use either SurveyPro's Advanced Download or the Control Panel Data Files page to pull the files from the server without importing them into SurveyPro. See Closing and Archiving Surveys on page 344.
Keep a copy of the raw RSP files
Generally you'll leave this option on No.
As a respondent goes through your survey, every move they make is recorded in a RSP file named with their 11 digit session ID. For example, in going through a survey, a respondent may take this page path:
12skip5back up2pauseresume2 (change answer)different skip destination34skip6…
When the respondent completes their survey or their partial session expires, the individual RSP files are processed into SDH data files. Incom-plete sessions are saved separate _PARTIALS_ files, just as test records are flagged. Whether finished or not, part of this file save involves tidying up the respondent's path through the survey, leaving only their final route. When the above RSP is saved to a SDH data file, it wouldn’t save any answers the respondent put on page 5 because when they backed up they changed their skip trigger answer and bypassed the page.
On occasion, you might want to preserve raw RSP files for usability analy-sis. Essentially it gives you a peek over the respondent's shoulder as they went through the survey, showing how often they went forward and back (likely more than you think). It also shows whether people clicked Pause

Apian NetCollect 4.0 User Guide
Chapter 20 - Control Panel Screens Advanced Options 326January 15, 2007
before abandoning their session or just closed the browser and went away. This setting only applies to the incomplete RSP files, not to ones which were completed. RSP files cannot be imported—any analysis you would do is by opening the files in Notepad and manually reviewing them.
Prompting to clean up expired sessions
The Clean Up Now function is primarily for when you shorten the expira-tion period. Otherwise, the server will check for expired partial survey responses and sweep them to the working _PARTIALS_ data file when-ever a respondent submits a survey page.
Survey and Report Availability
The Availability settings will not switch your survey from Test to Live mode, so be sure to make that change yourself (see page 320).
Likewise, when the survey reaches the Off time or respondent limit, it does not perform any of the Close functions. So if you decide to extend the time, you can switch it back on with no interruption, including letting respondents finish paused surveys. Once you are certain the survey is done, switch it to Closed mode to pull the remaining data.
You can use both the timed shut-down and response limit together—the server will shut off the survey based on the limit it reaches first.
Turning a survey or report On or Off at a specific time
Test a timed start/end just like you’d test a skip or password on your sur-vey. Remember all times are based on the server local time, which is dis-played on this page.
1. While still in Test mode, un-check No limit, set dates which would lock you out today and click Change Settings
2. Start the survey or report and check the message you see
3. Repeat steps 1-2 for the start or end date if you're using both
4. If necessary, correct the message(s) in SurveyPro and re-publish (see page 327)
5. Disable the time limits and finish your survey testing
6. Switch the survey to Live mode using the Change Survey Mode page
7. Set your proper start/end dates and times in the Availability page and click Change Settings

Apian NetCollect 4.0 User Guide
Chapter 20 - Control Panel Screens Advanced Options 327January 15, 2007
Limiting the number of respondents
Generally this function is used when there is a per-respondent cost associ-ated with the project, whether it's compensation to the respondent or a handling charge for data cleaning. If you're wanting to manage the rate at which respondents come through, see Server Load Protection (see page 329).
1. Un-check No limit
2. Type the number of respondents you want to allow
3. Click Change Settings
Hiding reports until enough respondents have answered
Depending on who will have access to the reports and the level of ano-nymity you’ve promised, you may want to hide the results until 5, 10, or even 500 people have responded. This is done not in the Control Panel, but in your Online Report definition (see page 251) so you’ll need to re-publish your survey to make the change.
Because this will also lock you out of the report, you may want to make a copy your report without the minimum and put it under a separate pass-word-protected login.
Customizing the notices to respondents
You can customize this message in SurveyPro before you Publish:
1. Bring up the Page List dialog
2. Select in the list Auto Page: Errors
3. Click Edit Properties
4. There are several messages related to availability which you may want to modify
In the default messages, the scripts replace “_SERVER_SET_SVY_TITLE” with the title you gave in Document Prop-erties. You can either work around the wildcard or remove it and com-pletely tailor the message.

Apian NetCollect 4.0 User Guide
Chapter 20 - Control Panel Screens Advanced Options 328January 15, 2007
Data Files
Most of the time, you’ll pull data from within SurveyPro. The Get Latest Data button inside the program takes just a couple clicks to download and import responses (see page 335). Where the Control Panel download is helpful is for letting other users pull ASCII Pipe Out files that are being used outside of SurveyPro. You can also download the ASCII Pipe Outs with SurveyPro’s Advanced Download (own server only, see page 337).
Changing your automatic archiving settings
Automatic Archiving simply creates a new data file at a certain time. It does not restrict your ability to archive the file and pull up-to-the-minute data between times. See page 323.
Changing settings for partially completed surveys
By default, partially completed surveys are kept active on the server until the survey is switched from Test to Live or Live to Closed mode. See page 324.
Downloading multiple data files at once
Use the SurveyPro Advanced Download function to select several files to download at once (own server only, see page 337).
Maintenance Mode
This is a rarely used function. It takes a Live mode survey and provides a “temporarily offline” message. This can be used for updates such as expanding a password file (see page 173), though in general surveys should not be modified while they’re live. If you’re trying to repair a prob-lem on the survey, Apian Technical Support may be able to help you find the safest approach.
Making a graceful shut-down
Whenever possible, we recommend a two-stage shutdown. This will first restrict new entrants (either new respondents or people resuming a paused survey) and then close out all activity.
1. Select Close survey to new logins only and click Change Offline Status.
2. On the Activity Log page, watch the Partially Completed Surveys table to see when the <20 minute section (or longer) contains 0 sessions. You can use F5 to refresh the log periodically.

Apian NetCollect 4.0 User Guide
Chapter 20 - Control Panel Screens Advanced Options 329January 15, 2007
3. When you're comfortable that people actively completing the survey are done, switch the Maintenance Mode to Close survey to all activity.
Immediately pulling the plug
If something truly disastrous is going on, go straight to Close survey to all activity. This will restrict not only new entrants to the survey, but also the person on page 2 from clicking Next to submit their answers and move ahead to page 3.
Testing after you make changes
Certain modification require testing after they're done, and the only way to do so is by turning the survey back on. Do so quickly yet thoroughly, and be sure to identify the records you submit in some way so you can delete them after import (“TEST” in comments, or marking all the first radio button). The test records will become part of the Activity Log and any Online Reports, just like the other responses.
Server Load Protection
NetCollect surveys have capacity set on the number of respondents start-ing each minute. This is done to protect servers, for example if someone accidentally sends 100,000 e-mails at once for another survey, that traffic can’t flood the server and hurt the performance of your surveys. There are no overall limits on the number of respondents to a survey.
The default limit on your own server is 500 pages per minute. On QuestionWeb the limits are either 250 pages per minute for a standard folder, or 500 per minute for a high capacity folder. The pages per minute is divided by the number of pages in your survey to produce the number of new respondents allowed per minute.
At first glance this often appears to be a low number, but if you multiply it by 60 you'll see the possible throughput in an hour. If your survey had 10 pages and the folder a 500 page limit, then 50 new respondents would be allowed to start in any minute (resuming respondents are always allowed in). This translates to 3,000 possible respondents per hour. So, if you expect a 10% response rate, this would mean you could send 30,000 e-mails out per hour—though 20,000 might be better as it would give you a safety cushion.
In this example, if a 51st person attempted to access the survey in a minute, they would receive a “Try back later” message.

Apian NetCollect 4.0 User Guide
Chapter 20 - Control Panel Screens Advanced Options 330January 15, 2007
Customizing the Survey Busy Message
You can customize this message in SurveyPro before you Publish:
1. Bring up the Page List dialog
2. Select in the list Auto Page: Errors
3. Click Edit Properties
4. The very first message is the one respondents would see
In the default messages, the scripts replace “_SERVER_SET_SVY_TITLE” with the title you gave in Document Prop-erties. You can either work around the wildcard or remove it and com-pletely tailor the message.
Adjusting the limits on Your Server
To determine the best pages per minute limit, you and your server admin-istrator should review Server Load for High Volume Surveys on page 49.
If your survey has a lot of skips and branches, you may want to adjust the Typical Survey Pages setting. For example, in a 40 page survey, respon-dents may diverge at several points, and on average respondents may only complete 15 pages each.
Upgrading a folder's capacity on QuestionWeb
Standard QuestionWeb folders have a 250 pages per minute capacity. You can double this by upgrading a folder to high capacity.
Important: This increases the capacity for new survey setups in the folder. If you have an urgent need to increase capacity on a live survey, call Support at (206) 547-8392.
1. Use the link at the top of the page to return to the main Folder List
2. Note the folder ID(s) you'd like to modify
3. Click the Extend Time/Add Folders button
4. The order form will allow you to change the settings on selected folders
5. You'll receive an e-mail confirmation that the change was made (typically one business day)
6. Upload a new survey and click Set Up New Project to take advantage of the new limit

Chapter 21 - Managing Data 331January 15, 2007
Chapter 21R E F E R E N C E Managing Data
NetCollect makes routine data downloads very easy—most of this chap-ter deals with the occasional exceptions.
The two Publish tutorials, Publishing and Uploading to Your Server on page 295 and Publishing and Uploading to QuestionWeb on page 308 include data downloads and imports as part of the upload and test process.
In addition to this chapter, your SurveyPro documentation covers the full set of import controls, data cleaning, and mass deleting forms—all of which may be needed for NetCollect projects.
Chapter Contents:
Understanding the Download and Import Process . . . . . . . . 332Managing Data Preferences . . . . . . . . . . . . . . . . . . . . . 333Data Download Options . . . . . . . . . . . . . . . . . . . . . . . . 333
Best Practices for a Clean Database . . . . . . . . . . . . . . . . . . 334Get Latest Data Dialog . . . . . . . . . . . . . . . . . . . . . . . . . . . . 335Advanced Download Dialog . . . . . . . . . . . . . . . . . . . . . . . . . 337
Server Selection and Publish Log tab . . . . . . . . . . . . . . . 337Archived Data, Backup, and Project tabs . . . . . . . . . . . 339
Manual Imports . . . . . . . . . . . . . . . . . . . . . . . . . . . . . . . . . . 341Import Logs . . . . . . . . . . . . . . . . . . . . . . . . . . . . . . . . . . . . . 341Deleting Data . . . . . . . . . . . . . . . . . . . . . . . . . . . . . . . . . . . 342Closing and Archiving Surveys . . . . . . . . . . . . . . . . . . . . . . . 344

Apian NetCollect 4.0 User Guide
Chapter 21 - Managing Data Understanding the Download and Import Process 332January 15, 2007
Understanding the Download and Import Process
While your survey is running on your Web server, it’s accumulating data and log files on that server. Those files include:
• Individual respondent RSP files (one per survey in progress)
• SDH data files, the native NetCollect format for import into SurveyPro
• Any ASCII pipe-outs you’ve defined (see page 187)
• A unique password PIN file if used (see page 153)
• Detailed project log (see page 362)
As a respondent goes through their survey, their individual answers are saved to their RSP file—including all the forward and back and skip path changes they may make. When they finish the survey, that RSP is cleaned up to only their final path through the survey and saved to a “work in progress” SDH file with “WIP” in the name. This WIP file is locked from download access, so to pull the responses you’ll need to Archive the files. All Archiving does is rename the WIP file(s) to include the current date and time and create a new empty WIP file. The reason NetCollect handles data this way is to prevent you from repeatedly downloading the same active data file, which would involve importing responses from the same respondents multiple times.
SDH files have a few special characteristics:
• Each response embeds the Q numbers and scale IDs, so SurveyPro can automatically match up the fields and balk at import if it finds inconsistencies (see The Best Way to Mangle Survey Data on page 14)
• They include the questionnaire number so answers go into the correct document in your SP4 file
• The unique session ID is included for each form (different from any passwords you set) which is used to ensure each response only shows up in the database once—even if you accidentally double-import a SDH file
Important Even if you’re bypassing the SurveyPro reporting, saving ASCII or SQL pipe-outs for use in SPSS or another program, do not discard the SDH files! There’s a reason you have no option to turn them off—it’s because they’re a fail-safe. If your ASCII pipe-out was incorrectly configured or your SQL server went down at some point, those SDH files will always be there, complete and reliable. Even if you fully tested and everything was fine, the files take too few bytes to throw away your safety net.

Apian NetCollect 4.0 User Guide
Chapter 21 - Managing Data Understanding the Download and Import Process 333January 15, 2007
Managing Data Preferences
In the Control Panel on your Web server, there are a couple options for managing your data files:
• Automatic archiving of the WIP data file(s), which defaults to 2am every Monday. You can adjust the schedule or turn off the automatic archive and just pull data on demand. See page 323.
• Managing partially completed responses, which defaults to the most conservative setting of leaving respondent sessions open for the entire survey duration. See page 324.
Both these settings can be changed while a survey is Live.
Data Download Options
There are four routes to your data depending on your needs and server configuration.
Get Latest Data This button in the Web Survey Setup dialog is perfect for at least 99.9% of SDH downloads. It goes out to the server, grabs the latest data, and imports the files in just a couple clicks. See page 335.
Advanced Download If you need to pull a particular SDH file, want to access supporting files such as the PIN or log, you can use the Advanced Download to selectively pull files. This is also useful for archiving survey projects after they close. Advanced Download can be used for QuestionWeb projects to view sta-tus, but not to access project files. See page 337.
Control Panel Data Files screen
In the Control Panel, you can download both SDH files and any ASCII pipe-outs. This is very handy for colleagues who need the ASCII data or a quick peek at a file while you’re on the road. See page 328.
Direct server access When you’re running surveys on your own server, you can browse to the file locations via your LAN shares or a FTP program. If you’re grabbing a data file, remember to go through the Archive process either in SurveyPro of the Control Panel first—do not pull files flagged as WIP for anything but a peek in Notepad.

Apian NetCollect 4.0 User Guide
Chapter 21 - Managing Data Best Practices for a Clean Database 334January 15, 2007
Best Practices for a Clean Database
The last thing you want to discover is that a test record was left in the database or that you missed some responses. To avoid costly problems, take the following steps before launch and after close with your surveys.
Toss test data from pre-launch drafts
It’s common while in Test mode to adjust the survey and publish a new versions as you check the questionnaire or receive feedback. Sometimes these changes don’t impact the questionnaire structure (Q numbers and scale IDs), but often they do. Unless you are absolutely certain you didn’t change the structure and need the older test files for some reason, delete the data files from prior survey drafts. Generally don’t even keep archive copies of those draft data files as it just gets confusing later figuring out what’s “final.” See Deleting Data on page 342.
Delete test data from the SP4 file
After you make sure your test data is compatible with your SurveyPro file, you want to get rid of it again. Within SurveyPro, go to Database, Answer Entry and use either Mass Delete or delete individual forms. Just be sure you’re only removing test forms! See the SurveyPro Help system for details.
Tidy the import and publish logs from testing
While you’re developing a survey and testing, you may publish and import numerous times. In Tools, File History there are tabs for Imports and Publishing which list every time you’ve done either action. If this is a bit cluttered, you may want to remove the pre-launch import logs or the publish logs before the final version.
Important Only remove test import logs, not those from real respondent data. NetCollect references the import logs when you click Get Latest Data to determine which files to download. Likewise, leave the final Publish log as it’s a handy reference when you forget your Control Panel URL or admin-istrator’s password.
Audit your imports when a survey closes
It’s a good idea to check for gaps in the imports, just in case! Print the Data Files screen from your Control Panel—assuming you haven’t deleted from the server—and compare that list to the import logs in Tools, File History. For ongoing surveys you may want to check quarterly.

Apian NetCollect 4.0 User Guide
Chapter 21 - Managing Data Get Latest Data Dialog 335January 15, 2007
Get Latest Data Dialog
For most projects, you’ll be able to use this dialog exclusively. When you use Get Latest Data, NetCollect will download and import any new SDH data files in the current Test or Live mode. To determine which files to import, NetCollect looks at:
• What answers were collected since the most recent switch to Test or Live mode
• Which of those files have already been imported (according to the import logs in File History)
• The preferences you set in this dialog about archiving and partials
This means that once you switch your survey to Live mode, you don’t have to worry about NetCollect downloading any test data files.
If you got a little too tidy and deleted all your Import logs, NetCollect will re-import responses you already have in your SP4 file. However, during the import process NetCollect uses the unique session ID for each response as a “key,” so you won’t end up with multiple copies of records to the database. Remember the session ID is the identifier for that survey submission, and is separate from any passwords you’re using. If you already coded some responses or made other changes which you don’t want overwritten by a re-import of the original response, you can use the Advanced Download to selectively pull new data files instead (see page 337) as well as modify the keyed import settings (SurveyPro Help).
Get Latest Data also downloads any new files it finds in the DataArchive and Backup folders, so you have copies of them on your local system.
To download and import responses:
1. Web Survey Setup dialog
2. Get Latest Data button
Most of this dialog is providing you information about your project status. There are only a couple preferences to set for the download.

Apian NetCollect 4.0 User Guide
Chapter 21 - Managing Data Get Latest Data Dialog 336January 15, 2007
Status on server To generate this status information, NetCollect goes out on the server, looking at the data files and your current configuration file. Be sure to read this before proceeding with the import so you know what to expect.
For this download and import use all files…
For a description of “archiving” see Understanding the Download and Import Process on page 332. Leave the setting on The last archive opera-tion if you’re managing your data files on a specific schedule. Change it to The present if you want to pull up-to-the-minute responses.
Survey Data Import While a survey is in Live mode, you’ll generally be importing the Archived data from completed surveys. Once a survey Closes (or mid-survey if you’re expiring partial responses) you may want to download and import the Partial Results from abandoned surveys.
Results log Once you make your selections and click OK, SurveyPro downloads and imports your data files. The lower portion of the dialog shows real-time status, but also summarizes the results. Read this log. Make sure all the files you expected imported (and only the ones you expected). A copy will be stored in the File History dialog for later reference. Also check the indi-vidual SDH import logs in File History to make sure there were no errors. See the SurveyPro Help system for more on reading import logs.
Copy to Clipboard This copies the results log to your Windows clipboard. From there, you can paste its contents into Notepad or a word processor.
View Online Log Use this button to display the real-time page-by-page project log on the server. See page 362.

Apian NetCollect 4.0 User Guide
Chapter 21 - Managing Data Advanced Download Dialog 337January 15, 2007
Advanced Download Dialog
Use the Advanced Download dialog to:
• View the project’s activity log on the server (see page 362)
• Selectively download data files
• Selectively download other project files, including the current password file and logs
The dialog is broken into four tabs, each one a different view of the project.
On the first tab, Server Selection and Publish Log, you can see the cur-rent status of the project, as well as accessing logs of recent activity. You can also jump to the Control Panel if you need to make adjustments to your settings there. See page 337.
The other three tabs are all for downloading files, with each one repre-senting a specific folder on the server. Because they have the same con-trols, they’re documented together on page 339. These tabs are not available for QuestionWeb projects.
Server Selection and Publish Log tab
The first tab of the NetCollect Download dialog provides you with infor-mation about the current project status.

Apian NetCollect 4.0 User Guide
Chapter 21 - Managing Data Advanced Download Dialog 338January 15, 2007
Archive Now This button sends a command to the server to package up the current work in progress data file for download. While you are able to download WIP files through this dialog, it is not recommended as this can result in file confusion (multiple files with the same name but different contents, multiple imports of the same records, etc.). See Understanding the Down-load and Import Process on page 332.
Launch Control Panel A handy button to bring up the Control Panel for this project (see page 319).
Current Times It is very common for your local computer’s clock to be using a different time and time zone from your Web server. When this dialog opens, Net-Collect asks both systems what they think the current time is, and as long as the dialog is open it will keep incrementing this notice. NetCollect’s data files and project logs use the server’s local time for recording transac-tions, such as when a respondent finishes their survey or when you archive a data file. If your local system and server are using different time zones, be sure to keep that in mind on the download tabs when you’re deciding whether the local or server file is more recently updated.
Server Status This first view is the current project status, including its mode (Test, Live, Closed), number of recent responses, and recent download and import activity.
This Download Log Any downloads from your current session will be displayed here.
Last Download Log Brings up the most recent download log in your File History, either from using Get Latest Data or Advanced Download.
Last Import Log Displays the most recent import log from your File History. See the SurveyPro Help for details on reading import logs.
Online NetCollect Log Accesses your Web server to display the real-time page-by-page project log. See page 362.
Copy to Clipboard This copies the log currently on view to your Windows clipboard. From there, you can paste its contents into Notepad or a word processor.

Apian NetCollect 4.0 User Guide
Chapter 21 - Managing Data Advanced Download Dialog 339January 15, 2007
Archived Data, Backup, and Project tabs
For projects on your own Web server, these tabs let you download all the “back end” project and data files on the server. Unlike the Advanced Upload dialog you don’t have access to the survey pages because they are not updated as respondents go through the survey.
All three tabs have the same general view, with your computer’s local view on the left, and your server’s files on the right. The only difference between the tabs is which folders they’re accessing:
Project Contains WIP data files (see page 332), logs, passwords and your configu-ration. This is the folder location you specified during Publish.
Archived Data Files A sub-folder under your Project, and contains SDH and ASCII data files which are ready for download and import.
Backup Another sub-folder of Project, and contains copies of both data files and logs—just in case. Unless you’re doing some sort of data recovery, you should not need to access the files this tab.
For more details, see Files on the Server on page 348.
To download files: 1. Web Survey Setup dialog
2. Advanced Download button
3. Select the tab you need
4. Click the Copy column next to files you want to download
5. Optionally click the Completed or Partial import options
6. Click the Download button

Apian NetCollect 4.0 User Guide
Chapter 21 - Managing Data Advanced Download Dialog 340January 15, 2007
To directory on this computer
For each of the three tabs, the left hand list is a folder on your computer which corresponds to the Project, Archive or Backup folders on the server. This is based on the local file location you specified during Publish. Dates in this list are based on your local computer’s time.
From directory on the server The right hand list shows the files on your Web server—likely more than you realized existed. Mark the Copy column next to any files you want to download to your local system. Remember to keep in mind any time zone differences between the two systems when you decide which computer contains the more recent files.
Notice about files marked When you click on a tab, you may see some files with their Copy box already marked. Between the list of server files and the Download button is a notice which will explain the rules used to select the files.
After download import new If you want NetCollect to import the data files you’re downloading, mark the options for Completed survey forms and/or Partial incomplete forms.
Refresh Lists Click this button to have NetCollect check with your local computer and Web server to see if any files have been changed.
Download Once you use the Copy button to select files and mark your import prefer-ences, click the Download button to pull the files from the server.

Apian NetCollect 4.0 User Guide
Chapter 21 - Managing Data Manual Imports 341January 15, 2007
Manual Imports
The Get Latest Data dialog automatically imports any new SDH files it finds, and the Advanced Download dialog also has an import option. However, there are times when you might want to use the standard SurveyPro import dialogs. These give you more control, including:
• The questionnaire document into which you’re importing
• Adjusting field matchups or not importing certain fields
• Using a different “key” field for the import, such as a customer ID instead of the response’s session ID
• Data cleaning tools to code written answers (also available in Answer Entry)
When using the full import wizard, SDH imports are very like those of CSV and other standard data files.
To import data files: 1. Database menu
2. Import from, NetCollect
3. Select the file you’re importing
4. Set your file type, field, key, and data cleaning preferences
The SurveyPro User Guide includes an import tutorial, and its Help screens cover details of the dialogs.
Import Logs
Every import, even those done for you through Get Latest Data, generates an import log which is saved in your SP4 file. The log contains several important pieces of information:
• Number of forms added to the SP4 file
• Number of forms already in the SP4 file which were updated by the import
• Mismatched answers (bad phone format, etc.) ignored during import
• Forms rejected due to missing required answers
NetCollect data files generally enforce any required answers and formats at the time data is collected, and they automatically match up fields, so there are rarely problems with the imports. If you’re seeing mismatches,

Apian NetCollect 4.0 User Guide
Chapter 21 - Managing Data Deleting Data 342January 15, 2007
either the enforcement was turned off or your survey was modified after Publish, which can be very dangerous (see page 14).
When the survey is a good match, reviewing the logs takes only a minute. Go to the File History dialog and the Imports tab. Remember that a single Get Latest Data transaction can import several files at once, you be sure you check all the new logs.
For more details on reading the logs, see the SurveyPro Help.
Deleting Data
Since a survey is a waste of effort if the data gets discarded, a little caution is warranted even if you’re certain you know which files you want to delete. See also Best Practices for a Clean Database on page 334 and Closing and Archiving Surveys on page 344 for the complete picture.
• Backup first
• Make sure you have an archive copy stashed away
• Check your results after deleting
Deleting forms from your SurveyPro database
After you import test records into your SurveyPro database, you’ll need to delete them so they’re not in your final data set.
This is extremely simple if the test submissions are the only ones in your database. In SurveyPro:
1. Database menu, Answer Entry
2. Database menu, Mass Delete
3. Remove All Forms in Database
If you also have real forms in the database, you’ll need to selective about the deletions. All submissions from a single data file will be in a continu-ous range of forms, but be cautious if you had test imports interleaved with real data files.
You can use the range of form numbers by looking at the log from your test data imports—this lists the number of records in the database before import, and the number added. Warning: This is not a safe method if anyone has deleted forms before the test records in the database, as this would have re-numbered the forms since the import (unless they used Void instead of Delete when removing data).

Apian NetCollect 4.0 User Guide
Chapter 21 - Managing Data Deleting Data 343January 15, 2007
If the form number range doesn’t work, you may need to look at the indi-vidual records in Answer Entry to see whether they were test submis-sions. While the import files are flagged as “TEST” in the name, the file source saved in the Form Created By field is truncated on import, so that portion of the name is likely not in your file. In many cases, test answers are glaringly obvious, with ratings in a pattern or gibberish in the text fields.
If all else fails, open the test SDH data files in Notepad and look at the portion beginning “FID=”. These are the unique IDs for each submission of the survey (hyphens are encoded as “%2D”). This field is available for searches inside Answer Entry, and is also displayed in the status bar at the bottom of the screen.
As you can see, the best approach is to delete the test records as soon as you’re certain the import worked! Mass Delete is covered in the Survey-Pro Help file.
Deleting data files from your Web server
With the exception of test data from survey drafts that never launched, we strongly recommend you keep the original test and live SDH files in an archive—even after successful import. The Apian staff has pulled files more than once from client archives when SP4 files were lost, or it was discovered a couple test forms were in fact real data, or someone got a lit-tle creative with a mass replace or delete, etc.
When you do a Get Latest Data download, NetCollect automatically cop-ies the raw data files down to sub-folders on your computer, labeled DataArchive and Backup. These folders are under the “Project” folder where you told Publish to create the local files. The DataArchive folder contains all the data files; Backup contains copies as well as snapshots of assorted logs. Check your computer’s DataArchive folder to make sure you have local copies of your SDH and/or ASCII files before removing them from the Web server. If instead of Get Latest Data you’ve been using Advanced Download or downloading manually from the Control Panel, you may not have a complete set of files on your local system.
Never delete WIP files. These files have not been imported into your database so you will be discarding respondent answers. Likewise there are a number of other files necessary to your survey’s operation—see Files on the Server on page 348.
Deleting files from a Web server is generally a permanent action. Even via a Windows share, they generally do not go into any kind of Recycle bin, they’re just gone.

Apian NetCollect 4.0 User Guide
Chapter 21 - Managing Data Closing and Archiving Surveys 344January 15, 2007
From Your Server — LAN setups
Use Windows Explorer or Start, Run to browse to the folder with your sur-vey data. If you’ve forgotten where this is, look in File History at your Publish log. The path will be next to “Project data file upload destination.” Go to the DataArchive sub-folder, and delete any SDH or ASCII data files you need.
From Your Server — FTP setups
Use a FTP program such as WS_FTP Pro to connect to your Web server. Go to the folder where you told NetCollect to publish the Project files, and to the DataArchive folder underneath it. Delete the data files you need.
From QuestionWeb Log into the Control Panel, click Manage Project for the folder, and then select Data Files. Mark the Delete column next to any files you want to remove. This is the only place to access data files on QuestionWeb because your FTP login uploads to a different location.
Closing and Archiving Surveys
When a survey has finished its run, you need to switch it to Closed mode even if you had an automatic shut-off set for a particular day or number of submissions. Apart from telling new respondents the survey is off-line, the Closed setting will archive any remaining WIP files, packages up any par-tial survey responses, and clears your logs.
Once you Close a survey, take care of any final data downloads and imports, and audit your file (Best Practices for a Clean Database on page 334).
After that final import, you can immediately remove the survey from the server or you can leave it on the server for 30 days or so. The reason for leaving the files on the server after Close is so that any laggards see a “Survey Closed” notice rather than “404 Page not found.”
If you used Get Latest Data to download and import files throughout the survey, your local system will already have a good archive snapshot, including copies of the project log in the Backup folder.
If instead you used Advanced Download, the Control Panel data screen, or outside FTP or file management programs to download data, make sure you have a complete snapshot of the DataArchive and Backup fold-ers from the server. The simplest approach is the Get Latest Data com-mand, but first make sure you understand what it’s doing. See page 335.

Apian NetCollect 4.0 User Guide
Chapter 21 - Managing Data Closing and Archiving Surveys 345January 15, 2007
Once you have copies of everything locally and a full data set in your SP4 file, you no longer need the working files. At this point you can safely:
• Delete the survey pages and Project files from your Web server (see page 342)
• Archive the local Content and Project folders on your local system
Do not delete the local Content and Project folders—much less the DataArchive and Backup sub-folders. If you no longer want them on your local system, just tuck them away on a backup drive or CD.

Chapter 22 - Files and Code 346January 15, 2007
Chapter 22R E F E R E N C E Files and Code
This chapter details aspects of NetCollect which are of interest to a Web designer, Web developer, or server administrator. Manipulating any of the survey or script files requires an investment in time to understand what can be safely changed, and mistakes can cause a survey to malfunction in dramatic and—much worse—subtle ways. Be sure to adjust your launch timeline to allow for extra testing! For projects involving developing custom functions, you may want to consider SurveyHost, whose staff is already up to speed with extending the system.
Chapter Contents:
A Note to Programmers . . . . . . . . . . . . . . . . . . . . . . . . . . . . 347Files on the Server . . . . . . . . . . . . . . . . . . . . . . . . . . . . . . . . 348
Files in the Content Folder . . . . . . . . . . . . . . . . . . . . . . . 348Files and Folders in the Project Folder . . . . . . . . . . . . . . 350DLLs and Script Files . . . . . . . . . . . . . . . . . . . . . . . . . . . 354
Editing the HTML/ASP Pages . . . . . . . . . . . . . . . . . . . . . . . . 355Editing Hidden Fields . . . . . . . . . . . . . . . . . . . . . . . . . . 357Understanding the NetCollect CSS File . . . . . . . . . . . . . 358Creating New Button Sets and Progress Bars . . . . . . . . . 359
Understanding the CFG File . . . . . . . . . . . . . . . . . . . . . . . . . 361Reading the Log Files . . . . . . . . . . . . . . . . . . . . . . . . . . . . . . 362
Main Project Log . . . . . . . . . . . . . . . . . . . . . . . . . . . . . . 362Throttle Log . . . . . . . . . . . . . . . . . . . . . . . . . . . . . . . . . 363

Apian NetCollect 4.0 User Guide
Chapter 22 - Files and Code A Note to Programmers 347January 15, 2007
A Note to Programmers
The core functions of NetCollect are designed to work as a “black box.” The survey engine, consisting of both DLLs and shared ASP scripts, is a complex layering of C, C++, Visual Basic and ASP which interacts with a number of files within each survey project. Modifying (and then testing) the thousands of lines of core code is unwise—even at Apian, custom cli-ent projects are executed without editing the core engine.
At the same time, Apian’s SurveyHost group routinely adds functionality beyond what NetCollect provides. We do this by:
• Tweaking layouts in Dreamweaver, Homesite or similar editors. See page 355.
• Adding JavaScript and custom ASP code to the survey pages themselves.
• Inserting hidden fields in SurveyPro for static values, piping or custom scripting. See page 357.
• Using the SQL pipe-in or pipe-out features, URL hand-offs, and other Embedded NetCollect tools to develop a shell around one or more surveys. See page 187.
• Referencing the .ST3 file published with each survey to access information about scale labels and question text. See page 350.
• Modifying the NC_Custom ASP script. As shipped with the product, this script is a series of commented stubs. When you replace those stubs with your own functions, it allows you to intercept inbound and outbound data. Rather than editing this module for all projects, the best approach is to create a copy and instruct the NetCollect user to reference the custom script name during Publish (see page 285). Note: Embedded surveys will likely do what you need (see page 187).
• Changing the values associated with fields. NetCollect expects certain types of values with certain scale types so you need to be careful with these edits—see NetCollect’s Internal Data Format on page 197. A typical trick would be to create a question in SurveyPro as a type-in blank, but then manually code a drop-down list of answers which have text values in the HTML.
• Hand editing the .CFG configuration file which tells the survey engine how to handle this particular project. This includes putting answer tests and skips on questions within grids, or changing the destination of data saves. See page 361.

Apian NetCollect 4.0 User Guide
Chapter 22 - Files and Code Files on the Server 348January 15, 2007
It is always faster and more reliable to work within the core NetCollect functionality when possible. Most SurveyPro/NetCollect users are not aware of the full scope of the built-in features, so if you have any questions about how to achieve a particular effect, contact Apian Technical Support or try the Survey Talk discussion list http://apian.com/lists/.
Files on the Server
Each survey project works with three main folders:
During Publish, the Content and Project folders are created on the SurveyPro user’s local system, with those generic folder names. When using the integrated FTP or LAN uploads, the folders are automatically renamed when copied up to the Web server.
Generally Content and Project folders will be placed under parent folders which the server administrator configures during installation—see Setting Up a NetCollect Survey Server on page 27.
The recommended setup is to have a Content and Project folder specific to each project, with no other Web pages or data files in them. As you will see in the following sections, there are a lot of files involved in a Net-Collect survey, and surveys are much easier to manage when you have one pair of folders dedicated to a survey. See Sharing Survey Folders with Other Files on Your Server on page 288.
Files in the Content Folder
Because NetCollect assumes a Content folder will have one NetCollect survey and only that survey, it creates and publishes a couple pages which could over-write other content. See Sharing Survey Folders with Other Files on Your Server on page 288 for how to work around this. The base file
Content This is the folder with the survey pages themselves, the address to which respondents will browse. It also contains any real-time reports for the survey. See the next section.
Project Configuration settings for the survey, passwords, and data files are stored in this folder. The system will also create a few sub-folders automatically. See page 350.
CGI In addition to the DLLs referenced from the Windows registry, NetCollect surveys use a set of shared ASP/VB6 library scripts. See page 354.

Apian NetCollect 4.0 User Guide
Chapter 22 - Files and Code Files on the Server 349January 15, 2007
name, or “[bf]” as abbreviated here, is set during Publish and the scripts reference it in many places—do not manually rename files.
In addition to the survey pages, there may be one or more reports. Those files are named based on the report login page used to access each report version (see page 252) and abbreviated here as “[report]”.
Content files are not modified by the Web scripts, so the copies on the SurveyPro user’s system will always match those on the Web server. The system will check that the Content and Project files contain the same Pub-lish date/time, but they do this by looking at an internal marker, not at the modified time stamp on the file.
In general, you will only modify the Content files to make layout adjust-ments (see page 355) or to add minor JavaScript or ASP functionality.
Files in …\Content\
index.htm A simple meta redirect to index.asp, since the latter is not always in the default pages list. Can be removed, but generally not worth the bother unless a survey is in a folder with other content.
index.asp This initiates the survey, so while you can rename this file, you cannot skip it. If you link to a particular file rather than to the survey folder, this is the file you should use (unless it’s an embedded launch).
[bf].asp The main ASP page for the survey, it calls the library CGI scripts and individual individual survey pages. This is the only page the respondent will see in the address bar.
[bf]-1.asp A series of numbered files will be in the folder. Each one represents a page in the survey, as numbered within SurveyPro.
[bf]-error.asp Displays any error messages which appear on a stand-alone page. Other errors, such as missing responses, are displayed within the survey pages. Error messages can be customized within SurveyPro (see page 81) and are also contained in the CFG file (see page 361).
[bf]-resume.asp Page seen by respondents when resuming a paused survey.
[bf]-index.asp Used in some pause/resume scenarios. Does not contain visible layout elements.
[bf]-cp.asp The Control Panel for the survey, protected by the administrator password for the survey. Do not modify this page. See page 319.
[bf]-cp-download.asp A script used by the Control Panel during data downloads. This page shows no visible or useful source content if browsed to. Do not modify this page.

Apian NetCollect 4.0 User Guide
Chapter 22 - Files and Code Files on the Server 350January 15, 2007
Files and Folders in the Project Folder
Project files are actively updated while a survey is running, so the files published to the SurveyPro user’s local system are only a starting point for what ends up on the server. Modifying any of the files in the Project folder should only be done with extreme care, preferably after contacting sup-port and allowing for an extended testing period. Modifying Project files while a survey is live is a recipe for breakdowns.
While NetCollect assumes only one survey will be in a Project folder, you can share folders if needed as long as you use different base file names and are careful with other naming for PIN files and piping. However, only do this if you need to be exchanging data between multiple surveys, such
[bf]-sp-download.asp A script used by SurveyPro to download data directly into the program. This page shows a visible error and no useful source content if browsed to. Do not modify this page.
[bf].css CSS sheet for the survey and report pages, based on the styles used in SurveyPro. See page 358.
[bf].js JavaScript used within the survey. All NetCollect JavaScript is “icing” backed up by server-side checks.
ncbtn_[bf]_[several].gif Graphical Next/Back/Submit buttons for the survey—will not be present for projects using browser buttons. See page 359.
nccp.css CSS sheet for the Control Panel. No need to modify as it’s only used by the survey administrator.
nccp_[several].gif Graphics used in the Control Panel.
ncpb_[bf]_[several].gif Progress bar graphics for the survey—will not be present for surveys with no progress bar. See page 359.
ncspacer.gif Transparent 1 x 1 pixel graphic used in the NetCollect page layouts.
[report].asp The page to which report viewers will browse. Like the main [bf].asp page for surveys, this script will include the login page and individual report pages so it is the only page seen in the browser address bar.
[report]-rpt-1.asp A specific report.
[report]-rpt-login-1.asp Report selection and password entry page.
svr-local-to-utc.asp Script used by SurveyPro and the Control Panel to check a server’s local time. Displays non-sensitive information when browsed to. Do not modify this page.
[varies].gif / .jpg Any graphics used within the survey layouts, such as logos and accent images. These retain their original file names.

Apian NetCollect 4.0 User Guide
Chapter 22 - Files and Code Files on the Server 351January 15, 2007
as the ASCII pipe out of one questionnaire being the data source for a pipe in to another survey. Be extremely cautious with this sort of file shar-ing, as the scripts may be using the files in ways you don’t realize. (QuestionWeb users are restricted to one survey per folder.)
Folders created on the server
When you first Publish on the local SurveyPro system, only a Project folder will appear. However, on the server, three sub-folders will be cre-ated to help manage the project. (An “Embedded” folder will also appear under some rare configurations—see page 220.)
…\Project\ Contains configuration files, passwords, and the active data files and logs.
…\Project\Backup\ Copies of data files and logs, with snapshots taken at mode changes (Test to Live) and during Archive. If all goes well on a survey, these files can be ignored. Files in this folder are downloaded to your local system when you use Get Latest Data. This folder can be accessed using the Advanced Download dialog (see page 337).
…\Project\DataArchive\ SDH and ASCII files which have been “Archived” or packaged up for download. It will often contain files which have not yet been imported into SurveyPro. Get Latest Data will pull all new files from this folder to your local system. You can also access the folder using Advanced Down-load (see page 337).
…\Project\Respondents\ Files for respondents who are currently going through the survey, have paused, or have abandoned the survey. Files are “housecleaned” regularly based on your settings in the Control Panel (see page 324). Until these respondent sessions expire or the survey Closes, they are not included in any data files. Let NetCollect manage this folder to avoid generating respondent errors.
File naming conventions
The base file name, or “[bf]” as abbreviated here, is set during Publish and the scripts reference it in many places—do not manually rename files. In addition, you’ll see the files named with these elements:
TEST Indicates files were generated while the survey was in Test mode.
PARTIALS Contains data from partially completed surveys.
WIP A “work in progress” file to which the system is actively writing. WIP data files are not available for download until they are Archived via the Control Panel (see page 328), a SurveyPro download dialog (see page 332), or an automated weekly Archive setting (see page 323).

Apian NetCollect 4.0 User Guide
Chapter 22 - Files and Code Files on the Server 352January 15, 2007
Date/Time The server’s local date and time when the file was Archived or a snapshot was taken for the Backup folder. Format is “YYYYMMDD_HHMMSS.”
Session ID An 11 digit value such as “58g6-18c8-ptv.” This is an individual survey session ID, generated by the server with an algorithm that creates unique values. It is used in URLs, PIN files, logs, active respondent data files, and archived data files to track a particular response through the system.
Files in …\Project\
index.htm “No survey found” page to prevent directory file listings.
[bf].cfg Configuration file which tells the survey engine how to handle the skips, answer tests, piping, and other functions of a particular survey. See page 361.
[bf].st3 Contains all the scale labels and structures, question text, and report labels in the survey. This is in a format very like XML, including Hex encoding of special characters, and can be referenced by custom script extensions. NetCollect uses it for the real-time server reports.
[bf]_WIP.log Active project log for the survey. There may also be one flagged “TEST” from the last time the survey was in Test mode. See page 362.
[bf]_Throttle.log A log used in managing inbound respondents. See page 363.
[bf]_HitsOnDone.log Tally of completed surveys by day, used by the Activity Log in the Control Panel or in a real-time server report.
[bf]_Project.lock At various times in processing requests, the system needs to briefly “lock” common files such as the PIN file while a single respondent session updates them (others such as data files are managed with a simple append). This file is used as part of the locking process.
[varies].pin Password file for projects restricting access with a file of values. (Shared passwords typed in the login dialog are listed in the CFG.) For one-time use passwords, the first column indicates status, with 0=not started, 1=in progress, and 2=finished. The third column is the session ID for that respondent. See also Updating Live PIN Files on page 173.
[bf]_WIP.sdh Active SDH data file. Its contents are made accessible by Archiving, at which time a new empty WIP file will be created.

Apian NetCollect 4.0 User Guide
Chapter 22 - Files and Code Files on the Server 353January 15, 2007
[bf]_D.tab Counts of answers to each question from completed surveys. Used by the real-time server reports.
[bf]_W.tab Copies of the written answers from completed surveys, including Other entries. Used by the real-time server reports.
[varies].csv /.tab /.txt ASCII files used for piping in or piping out. Pipe out files may include WIP in their name, in which case they will be time stamped for download after Archiving. While these are the most common extensions, others may have been specified in the piping setup.
Files in …\Project\Backup\
index.htm “No survey found” page to prevent directory file listings.
[bf]_[Date/time].sdh.bak Copy of an archived SDH data file.
[bf]_[Date/time].csv.bak Copies of any Pipe out ASCII files (extension may vary).
[bf]_[Date/time].log.bak Snapshot of the main project log file. These are sub-sets of the WIP log up one level, as that file does not Archive but instead accumulates entries for as long as the survey is in Test or Live mode.
[bf]_HitsOnDone_[Date/time].log.bak
Snapshot of the log counting survey completions.
[bf]_RemovedRSPs_[Date/time].log.bak
Snapshot of the log listing session IDs which have been completed or expired.
Files in …\Project\DataArchive\
index.htm “No survey found” page to prevent directory file listings.
[bf]_[Date/time].sdh SDH data file ready for import into SurveyPro. Each file contains a unique set of responses, with no overlap or duplication between files.
[bf]_[Date/time].csv ASCII Pipe Out data file ready for download via the Control Panel (see page 328) or Advanced Download dialog (see page 337). Each file contains a unique set of responses, with no overlap or duplication between files.

Apian NetCollect 4.0 User Guide
Chapter 22 - Files and Code Files on the Server 354January 15, 2007
DLLs and Script Files
The DLLs are installed outside of IIS (Microsoft Internet Information Ser-vices Web server). By default the location is C:\Program Files\Apian Software\NetCollectServer. This location is recorded in the server’s regis-try, which is how the ASP scripts find them.
Within the IIS site, a CGI folder is created during the server installation which contains ASP utility scripts. These scripts are shared among all the survey projects and their location determined by the server administrator.
Both the DLLs and ASP scripts are named with a version, such as “A2L.” This version is referenced in the server definition (see page 280). Because each file is identified by version, you can have multiple script generations running on the same server, from the same CGI folder.
For more about the DLLs and CGI scripts, see Setting Up a NetCollect Sur-vey Server on page 27.
Files in …\Project\Respondents\
index.htm “No survey found” page to prevent directory file listings.
[SessionID].rsp File containing all the answers submitted so far by a particular respondent. RSP files with a size of 0 bytes have been created by someone loading the first page of the survey, but not entering a password or submitting any answers (these are removed after 12 hours). By default, these raw files are deleted when a respondent finishes the survey and their answers are written to a SDH file. If you want to preserve the session files complete with information about when respondents paused or how often they backed up, see Manage Partially Completed Surveys on page 324.
[bf]_RemovedRSPs.log List of session IDs removed from the system. A “d” after an ID indicates it was Done, an “a” indicates it was a partial response archived during a cleanup pass. The date and time a cleanup pass was taken appears like “@20060125185158.” The total number of expired 0 byte sessions is counted at the end of the log.

Apian NetCollect 4.0 User Guide
Chapter 22 - Files and Code Editing the HTML/ASP Pages 355January 15, 2007
Editing the HTML/ASP Pages
For an overview of the basic page structure of NetCollect surveys, see Understanding Margins and Backgrounds in NetCollect on page 58. The sur-vey pages use tables for general positioning and an external CSS file for text formatting. Before editing the pages:
• Try to get the layouts and formatting as close as possible in SurveyPro first. While this does involve a learning curve with SurveyPro (versus your HTML editor which you already know) it is much more efficient over the long run as you end up with fewer elements to tweak.
• Upload the survey pages and run a test pass straight from SurveyPro first. This lets you ensure the survey functionality is right before editing the pages, so after the modified pages are uploaded it’s easier to isolate any problems.
• Start a log for all the changes you make to the files. This way, if the survey has to be published again, you have a crib sheet to re-do the edits more efficiently the second (or third) time around.
Understanding the code structure
Before you start working with the ASP pages and CSS sheet, pick a couple representative pages. Using a survey that is active on a server, look at the HTML source as it is delivered to a browser by the server and compare that to the ASP code as published from SurveyPro. For example, in the locally published ASP pages, you’ll see code such as:
<%= NC_Notice( ) %>
This is a placeholder for error and information notices for the respondent. When one of these messages is inserted in a page by the scripts, it becomes significantly more code:
<div class="ncauto-noticeerr"><hr size="1" noshade class="ncauto-noticeerr"><span class="ncauto-noti-ceerr">One or more of the answers below is not usable. Scan down for one or more explanations in this same color.</span><hr size="1" noshade class="ncauto-noti-ceerr"> <br></div>
In addition to the general notice inserted just below the Header on survey pages, notices are also inserted above each question which had a prob-lem, such as a missing response or improper format. All notice text can be customized in SurveyPro (see page 81) and is also contained in the CFG

Apian NetCollect 4.0 User Guide
Chapter 22 - Files and Code Editing the HTML/ASP Pages 356January 15, 2007
file for last minute tweaks. The “ncauto-noticeerr” style used is in the project’s CSS sheet, and can be edited as you need.
In addition to this sort of placeholder code, you’ll see a variety of com-ments about how to edit the pages. The comments with a tile number refer to the question/text/graphic “tiles” which are the building blocks in SurveyPro. When the project is open in SurveyPro, you can identify its tile number by clicking on a question and looking for a red highlight in the folder tree:
What to edit and what to leave alone
Within the pages, you are relatively safe editing visible elements such as:
• Colors and fonts
• Table widths, indentation, etc.
• Sizes of entry blanks
• Modest rearranging of questions/entry blanks, being sure to bring any error notice placeholders along
While software generates less elegant code than a human can, we recom-mend you not start “tidying up” elements such as the nested tables. Unless you’re working with a very short survey which is going to be online for a very long time, your effort and risk are not worth whatever satisfaction you achieve. The one exception to this is optimizing for screen readers, in which case we recommend having two versions of the survey, one for visual browsers and one for auditory.
While you can also edit visible text—an extra “the” or similar oversight—be very cautious changing either question or scale text. If you change the meaning of an element, such as the text on a checkbox, it will no longer match the SP4 file into which data is being imported or the ST3 file driv-ing the real-time server reports.

Apian NetCollect 4.0 User Guide
Chapter 22 - Files and Code Editing the HTML/ASP Pages 357January 15, 2007
Do not make any changes to:
• Any form elements, whether it’s the action line, input field names, or values
• Any code containing “NC_”
• File names
Changing functional elements of the survey tends to generate errors for respondents or stop collecting key bits of data. We’ve seen truly cata-strophic results from edited pages where field names were copied or changed, and the survey failed to collect 3/4 of its data. While it is frus-trating to realize a survey needs a question added or scale edited after a couple hours of layout tweaks have been made, re-publishing and then re-doing the layout changes is the safest approach to take.
Editing Hidden Fields
This applies to hidden questions added by the SurveyPro user. Do not modify the hidden fields generated automatically by NetCollect. First, see:
• Using Hidden Fields on page 137
• Key Concept: Data is Data to NetCollect on page 192
• NetCollect’s Internal Data Format on page 197
You can set a hidden field to a static value, such as “French,” or use it to hold an answer piped forward in the survey (see page 137). In either case, the values that end up in the field need to match the scale type. Hidden fields are identified with a Name such as “Q0014S003W.” This is the inter-nal question number followed by the scale number and type:
W = Written
C = Checkbox (single or multiple answer)
CO = Checkbox Other entry blank
R = Rating (single answer)
K = Forced Ranking (single answer)
D = Date
N = Number

Apian NetCollect 4.0 User Guide
Chapter 22 - Files and Code Editing the HTML/ASP Pages 358January 15, 2007
Some scales include pattern tests, such as an e-mail address, maximum value, or date format, so check the specific scale’s definition in SurveyPro and test carefully.
Understanding the NetCollect CSS File
NetCollect publishes a CSS style sheet with each survey, named with the project’s base filename (ignore nccp.css which is the Control Panel’s sheet). The appearance of any style may be changed, though if you can get the SurveyPro file as close as possible you’ll find the editing goes much more quickly.
Before making changes to the CSS sheet, see Editing the HTML/ASP Pages on page 355.
The sheet is broken down into four sections:
Tag styles While several standard HTML tags are defined in the first section, they’re really not used in the page layouts. Unless you are re-tagging elements, perhaps to add heading hierarchies for accessibility reasons, you can ignore the settings for headings and paragraphs and just focus on the class styles in the rest of the sheet. You may want to edit the link styles, though most surveys will not contain any hyperlinks.
NetCollect function styles The next section is s series of styles beginning with “ncauto.” You can edit these styles as needed, but do not delete them as some are inserted by the scripts on the server and are not present in the pages you’re able to edit.
.ncauto-input-text Font face and size of browser button text.
.ncauto-input-select Font face and size of a drop-down or multiple-select list.
.ncauto-scale-space Height of the spacing row between items in a radio button or checkbox scale. Increase font-size to add space between scale items.
.ncauto-rpt-colhdrcell Layout for column headers in a real-time server report.
.ncauto-rpt-rowcell Layout for table cells in a server report.
.ncauto-activitytable Layout for the table generated in the activity log report.
.ncauto-activitycell-4 Font settings for the individual cells within the activity log report table.

Apian NetCollect 4.0 User Guide
Chapter 22 - Files and Code Editing the HTML/ASP Pages 359January 15, 2007
Color and layout styles The next section lists a few color and spacing styles which are based on the Document Properties page settings. See Understanding Margins and Backgrounds in NetCollect on page 58.
SurveyPro styles The final section of the style sheet is the one with the most impact on the appearance of the survey pages. Each of the style names refers to a Text Style in SurveyPro, and is used to format <p> and <td> tags within the survey. Names of some styles will reflect their default usage, such as “question” for the question text and “report-figure” for bar graph labels. However, because SurveyPro does not dictate the usage of a style and allows copying and modifying of styles, do not count on the name indicat-ing how it was used in the survey.
Creating New Button Sets and Progress Bars
NetCollect has a very simple system for incorporating your own Next/Back/Submit buttons and progress bars. If you create a set of images with the right names and put them in the correct folder, then they’ll appear in the SurveyPro dialogs where you can select them for your survey. All images must be GIFs and have transparent backgrounds. The default location of the buttons and progress bars is:
C:\Program Files\Apian Software\SurveyPro 40\Web Images\
.ncauto-noticeinfo Font and color definition for non-error notices such as “Welcome back.” SurveyPro user has control over the color in Document Properties (see page 61).
.ncauto-noticeerr Style for error notices at the top of the page, such as a missing answer. This color is also set in Document Properties.
.ncauto-anserr Settings for the error notices inserted immediately above a particular question. The default top of page message tells people to look for places to correct “in this same color” so either make them match or change the top of page error (see page 136).
.ncauto-pagenum An optional page number which appears at the bottom right of the survey pages (see page 67).
.ncauto-progress Formatting for the progress bar label and graphic (see page 67).
.ncauto-one-pixel This is used throughout the ASP pages for spacing purposes.

Apian NetCollect 4.0 User Guide
Chapter 22 - Files and Code Editing the HTML/ASP Pages 360January 15, 2007
Button sets
You need to generate a complete set of images even though you may not use all the buttons on your surveys. In the Document Properties dialog, NetCollect will pick up the middle portion of the name you use, including any underscores or hyphens you include (see page 64). The naming con-vention for buttons is:
ncbtn_[NameForDialogList]_[ButtonID].gif
For a description of the different page types, see Key Concept: Types of Pages on page 101.
Button ID Default Text Label Used on Pages
loginnew New Survey Login All login pages to start new surveys
loginresume Continuing Login Login pages where respondents have an option of resuming with a server issued ID
next Next Page >> Middle survey pages
midlast << Prior Page Middle survey pages
endlast << Prior Page Thanks page (rarely appears)
midpause Finish Later Middle survey pages
endpause Finish Later Thanks page (rarely appears)
finished Finished Logout To commit data on finishing page
contnow Continue Now Pause pages, to resume a survey
rtngnew New Survey Returning page, offering new blank survey instead of resume
rtngcont Continue Returning page, to continue paused survey

Apian NetCollect 4.0 User Guide
Chapter 22 - Files and Code Understanding the CFG File 361January 15, 2007
Progress bars
Progress bars are assembled on each survey page by combining several image segments. For example, these are the images for the red_slider style included with NetCollect:
In the middle of a survey, it would be assembled by scaling the done and togo segments, while the other three images are used at 100%:
All the progress bar images in a set must be the same height and have a transparent background. You can make each one any width you’d like. The slider is optional, so your set may be either 4 or 5 images named as:
ncpb_[NameForDialogList]_[ImageSegment].gif
Understanding the CFG File
Modifying the CFG file qualifies as “hacking” a project and it’s one way to modify the functionality of your NetCollect survey. It’s also a way to make the survey fail in obvious and subtle ways—the latter often appearing after the survey goes Live. If you are considering modifying the CFG file:
• Contact Technical Support first—there may be a way to do what you need in a SurveyPro dialog
• Make backup copies and add lots of time to your testing schedule
• Try the Survey Talk discussion list http://apian.com/lists/
• Consider SurveyHost where they’ve been hacking NetCollect configurations since 1997
The CFG is a plain text file, and we strongly recommend opening it only in Notepad. While programs such as Microsoft Word have an option to save in plain text, they are not as reliable about leaving the file untouched as Notepad.
start done slider togo end

Apian NetCollect 4.0 User Guide
Chapter 22 - Files and Code Reading the Log Files 362January 15, 2007
As you look in the configuration, you’ll see it is broken down into several sections. We do not recommend editing any of them, and in particular do not make any changes below the “EndCfg” line. The sections you may refer to are:
URLs and passwords General information about the survey address, administrator password, and respondent login settings. QuestionWeb configurations will show “_QW_” entries in place of final paths as the address is inserted after you upload the files.
Messages These are the error and notice messages set by the user in SurveyPro (see page 81).
Survey pages The file names, skip instructions, and answer tests on each survey page.
Reports Names of the report login pages and individual server reports (see page 261).
Piping Descriptions of any ASCII and/or SQL piping.
Publish time This must match the published time embedded in the survey pages. If they don’t match, do not simply “fix” one or the other—find or re-publish a full set of files instead.
Reading the Log Files
There are three log files maintained for each survey project. Each file has a specific format which is optimized for how it’s used by the server scripts. All are in a plain text format, so you can associate .LOG with Notepad for easy review if needed. The two logs covered here are the main project log and the throttle log. The log of removed RSP files is briefly covered on page 354.
Main Project Log
This log records every transaction of the survey, from login attempts to each page submitted as a respondent goes through the survey. It also cap-tures survey failures (abnormal failures, not simply incorrect passwords) including an internal error code for Apian diagnosis. The only transac-tions it does not record are respondents told to “Try back later” due to the survey being over capacity (see page 363).

Apian NetCollect 4.0 User Guide
Chapter 22 - Files and Code Reading the Log Files 363January 15, 2007
You can access the log through the first tab of the Advanced Download dialog (see page 337). This is a comma delimited file, where an entry for a respondent starting a survey would be:
20060213,144144,44,192.168.15.100,0.063,"ppxc-68xg-fdx","Ok: Send P1",0.031,0.047,0.047,0.047,0.047,0.000,0.063,""
Throttle Log
The throttle log contains a set number of “slots” which are used by respondents as they begin the survey. Once a slot is more than 60 sec-onds old, it’s available for another respondent. The total number of slots is determined by the number of pages allowed per minute on your project, divided by the number of expected pages each respondent will complete. See Server Load for High Volume Surveys on page 49 and Server Load Protec-tion on page 329 for more information.
From a human perspective, the throttle log is good for just one thing. If you’re sending e-mail drops, and aren’t sure whether you’re nearing your
20060213 Date
144144 Time
44 Internal Apian code—ignore.
192.168.15.100 Internal IP of the server processing the request. Only of interest in multiple server configurations.
0.063 Seconds to process the request and send out the next survey page.
"ppxc-68xg-fdx" Session ID for the respondent. In the log, you’ll see a series of entries for a given session ID as they go through the pages. This is the same ID you’ll see appear in a PIN file and used for naming RSP files. For admin functions, this field will be empty.
"Ok: Send P1" Action taken, such as sending the next page, re-sending a page to the respondent for corrections, or performing an admin function. Passwords attempted and used will appear in this field.
0.031,0.047,0.047,0.047,0.047,0.000,0.063
Breakdown of time to process the request. Only used by Apian developers.

Apian NetCollect 4.0 User Guide
Chapter 22 - Files and Code Reading the Log Files 364January 15, 2007
survey’s capacity, you can peek in the log and see the number of slots which were in use at the minute of highest load.
Use Advanced Download to download the throttle log (see page 339), then open it in Notepad. You’ll see something like this:
00000000000000000000000006220060328101800200602280950032006012916250820060129162432200601281144152006012811441920060128114422000000000000000000000000000000000000000000...
Ignore the first two lines.
The third line “00062” indicates this survey allows 62 people to start in a 60 second period.
What you want to do is look at the last line which doesn’t have zeroes in it. In this snippet, it’s 20060128114422. This means that on January 28, 2006 at 11:44 server time, this survey reached its peak. If we count down the number of slots used (after the 00062 capacity line), we can see that this peak was at only 7 respondents. The next highest peak was at only 4 respondents on January 29th at 16:24.
Given this survey allows 62 people in at a time, a peak of 7 respondents means you could be sending much larger e-mail drops. If instead the throttle log showed all the slots had been issued at some point, you might want to manage your traffic differently.

Index 365January 15, 2007
Symbols**** for passwords 168
Numerics360 employee surveys 5, 193403 permissions error 34, 41404 page not found error 41500 server execution error 41, 43
Aabandoned surveys 321, 324access controls 8, 152–174, 175
for reports 255active server pages 3activity logs 252, 258, 263, 321
URLs 261, 272address piping 226Advanced Download dialog 333, 337Advanced Options tab, Question dialog 131Advanced Upload dialog 290anonymous surveys 154–155, 159, 160, 175Answer Entries tab, Question Grid dialog 133answer piping 137, 141, 143, 236Answer Tests dialog 134–137, 148ANSWER_Q#_ 137, 236API 157, 165, 187, 192, 212, 215, 246, 347Arabic 5Archived Data tab, Advanced Download dialog 339archiving data files 291, 305, 313, 323, 333ASCII data files 189, 200, 201, 205, 210, 225, 241ASP 3, 347Auto Pages 96, 101, 104, 175Automatic Data Management screen 323automatic start/end for survey 326Autonumber tab, Document Properties 73
BBack button 64backgrounds 58–59, 61, 67, 82, 95, 167, 175Backup folder 350Backup tab, Advanced Download dialog 339bookmarks 169
branches 57, 105–113, 114–125breaks
pages 102scale columns 131
browsers 8buttons 64, 81, 82, 96, 167, 359cookies 154Firefox 43layouts 54–57previewing survey 25, 77title bar 61
buttons on survey pages 64, 81, 82, 96, 359layouts 167, 175
Buttons tab, Document Properties 64
Ccapacity of server 12, 49–52, 329capping number of respondents 326case sensitive password 160, 162, 163, 173CFG configuration file 8, 361CGI folder 348, 354changing surveys 14Closed mode 320, 344coaching 3colors 58–59, 61, 67, 82, 95completed date/time 199completed pages 199completed surveys 321Content folder 285, 298, 348Control Panel 7, 319–330
accessing 291cookies 154, 170CSS file 355, 358custom features 347
Ddata export 197, 199, 200, 205, 210, 241
Index

Apian NetCollect 4.0 User Guide
Index 366January 15, 2007
data files 328, 331–345, 348archiving 291, 305, 313, 323, 333deleting 342downloading 305, 313, 333, 337importing 341test 334
data import 191, 197, 199, 200, 201, 210, 225, 335data piping 241DataArchive folder 350databases 189, 197, 200, 201, 205, 210, 224, 225date scales 135, 198default documents in IIS 34discussion list 2DLLs 3, 354
installing 32testing 41
DllTest_[version].asp 41Document Properties dialog 57, 59–73domains, multiple 31downloading data 335, 337downloading files 4, 7, 328, 332, 333drop down lists 63, 85duplicating questions 138–140, 194
Ee-commerce integration 157, 192, 212, 213editing HTML in surveys 78, 289, 293, 355editing surveys 14EL0 218EL0 launch code 217EL1 223e-mail invitations 12, 157, 158, 165, 170, 190, 212,
213, 225e-mail links 78embedded surveys 241encryption 28, 212, 249Error pages 101, 104errors
403 permissions 34, 41404 page not found 41500 server execution 41, 43data download 279log for project 362messages for respondents 81, 104, 136, 148,
168, 221, 257Executive Summary 258Executive Summary report 252Exit pages 101, 103, 272Exit URL 101, 215, 246expired survey sessions 321, 324export 197, 199, 200, 205, 210, 241
FFavorites 169
FDOC 199FDT 199FID 199fields
hidden 137, 192, 230, 347, 357requiring 10, 132, 134–137, 141, 148values 197, 211, 232, 245
file flows 7, 8files 348
ASCII data 189, 200, 201, 205, 210, 225, 241ASP survey pages 355CFG configuration 8, 361CSS 355, 358GIF graphics 56index.asp 34index.htm 34JPEG graphics 56PIN password 8, 153, 170–174, 351RSP data 8, 324, 332, 351SDH data 7, 8, 328, 332, 351server installation 27SP4 survey project 3ST3 351WIP 323, 332, 333, 351
Finish Later button 64hiding 96, 104, 175
finished surveys 321Finishing pages 101, 103Firefox browser 43folders
permissions 33–36recommended hierarchy 29–31
fonts 56, 82, 88, 358Footer tab, Document Properties 67footers 103, 104forced rank scales 135, 198foreign language surveys 5form date/time submitted 199forums 2FPAGES 199FTP server connections 7, 40, 283
GGeneral tab, Document Properties 60Get Latest Data dialog 305, 313, 333, 335GIF files 56GoTos 113graphics 56, 94grids 90, 133
hiding items 128, 133layouts 83randomizing 127, 133, 141, 145row colors 61

Apian NetCollect 4.0 User Guide
Index 367January 15, 2007
HHeader tab, Document Properties 67headers 56, 82, 85, 103, 104hexadecimal encoding 217hidden questions 137, 192, 230, 347, 357hiding scale and grid items 128, 131, 133hosting options 4–6href links 78HTML 3
editing 78, 289, 293layouts 54–57
HTML editing 355hyperlink 78
IIDHH_MAKEPINFILE 172IIS
anonymous user account 35, 37default documents 34permissions 34, 38
images 56, 94import 191, 197, 199, 200, 201, 210, 225, 305,
313, 328, 332, 335, 341log files 341logs 334
inches 55incomplete surveys 321, 324indentation 55, 82, 90, 92index.asp 34, 348index.htm 34, 288, 348installation
server scripts 26–42testing scripts 41–42
InstallNetCollectServer[version].EXE 32Instant Online reports 104, 251–262, 263
URLs 261, 272instructions 12
JJapanese 5JavaScript 3, 347JPEG files 56
Kknowledgebase 2
LLAN server connections 40, 282Layout and Access tab, Report Definition dialog 258Layout tab, Login dialog 167layout tips 10, 54–57, 82–98length of surveys 9Library Script Virtual Sub-URL 39limiting number of respondents 326
link password question 166links 78Live mode 320live surveys
changing 294load balanced servers 31, 51LocalHost server 42–48log files 51, 362, 363
accessing 291import 334, 341publish 334
Login dialog 158–170Login Rules tab, Report Login dialog 255logins 8, 152–174, 175
for reports 255logos 56, 67, 94
Mmailto links 78Maintenance Mode 173Maintenance mode 328Manage Partially Completed Surveys screen 324margins 55, 58–59, 61, 67Mass Delete 342maximum number of respondents 326memo fields 198messages 136messages for respondents 81, 104, 148, 168, 221,
257monitor resolutions 55Mozilla Firefox 43multiple language surveys 5, 138–140multiple questionnaire documents 130, 199must answer questions 10, 132, 134–137, 141, 148
NN/A 63, 132, 135, 141, 146NetCollect
upgrading 16–17version 2.0 17version 3.0 16–17
NetCollect 3.0 2Next button 64no answer 63, 132, 135No password required 159none of the above 63, 132, 135, 141, 146not applicable 11, 63, 132, 135, 141, 146Notice Text tab, Login dialog 168notices for respondents 81, 104, 148, 168, 221, 257Notices tab, Report Login dialog 257NTFS permissions 35, 37Nulls 208number scales 135, 198

Apian NetCollect 4.0 User Guide
Index 368January 15, 2007
numberingpages 111questions 73
Oorder of operations 196Other blanks 62, 131, 135, 143
Ppage breaks 102Page List dialog 57, 96, 101, 102–104, 117page numbers 67, 70, 111pages submitted 199partially completed surveys 321, 324passwords 8, 152–174, 175
files of values 153, 170–174for reports 255generating 171, 172, 175importing 171, 172, 175in URL 157, 158, 165, 190, 212, 213, 225updating 173
patching SurveyPro 3pattern scales 135, 136Pause button 64, 153, 169–170
hiding 96, 104, 175Pause pages 101, 104, 175pausing surveys 153, 169–170
disabling 96, 104, 175permissions 33–36, 37
IIS 34, 38NTFS 35, 37
Personal Web Server 42–48photographs 56, 94PIN password files 8, 153, 170–174, 351Pipe In 189, 191, 201, 210, 220, 225Pipe Out 189, 205, 210, 220, 241piping 189, 191, 197, 199, 201, 205, 210, 220, 225,
241answers forward 137, 141, 143, 236respondent status 224
pixels 55Preview in browser 25, 77processes 7, 8programming 347progress bars 9, 67, 70, 82, 103, 111, 359Project Data Files tab, Advanced Upload dialog 292Project Data Node 40Project folder 285, 298, 348, 350Project tab, Advanced Download dialog 339Properties of pages 103publishing reports 251–262publishing surveys 4, 7, 38–41, 275–287
QuestionWeb 278, 284, 308Your Server 277, 280, 295
pull down lists 63, 85
QQ numbers 197query strings 157, 158, 165, 190, 212, 213, 225
syntax 217Question and Groups tab, Report Definition dialog
260Question dialog 131Question Grid dialog 133question grids 90
hiding items 128, 133layouts 83randomizing 127, 133, 141, 145row colors 61
questionnaire version 199questions
hidden 137, 192, 230, 347, 357must answer 10, 132, 134–137, 141, 148numbering 73, 111repeating 138–140, 194resizing 82
QuestionWeb 2, 4demo accounts 315FTP password 284publish 278, 284, 308
Rrandomize 127, 133, 141, 145, 147ranking grids 135, 198redirect on exit 101, 215, 246repeating questions 138–140, 194Report Definition dialog 257–261Report Login dialog 255–257reports
publishing SurveyPro’s to HTML 251real-time server 104, 251–262, 263URLs 261, 272
Reports management dialog 254required fields 10, 132, 134–137, 141, 148Respondent EMailer 170Respondent Management dialog 158–170Respondent Name and Password file 162respondent status 224respondents 8, 9
limiting number 326log of number see activity logs
Respondents folder 350response rate 321response rates 12, 49–52, 329Resume pages 101, 104, 175resuming saved surveys 153, 169–170revision of server application 28, 39, 280Rows tab, Question Grid dialog 133

Apian NetCollect 4.0 User Guide
Index 369January 15, 2007
RSP session files 8, 324, 332, 351Russian 5
Ssaving surveys 153, 169–170scales 197, 211, 232, 245
column breaks 131date 135, 198forced rank 135, 198hiding items 128, 131, 133layouts 133multiple answer checkbox 147N/A 63, 132, 135, 141, 146number 135, 198Other blanks 62, 131, 135, 143pattern 135, 136randomizing 127, 141, 147reordering 128, 132reversing order 129values 197, 211, 232, 245written answer 198
screen resolutions 55script 3, 347script versions 28, 280scripts 354SDH data files 7, 8, 328, 332, 351Select One label 63Send Answers button 64Server Crib Sheet 38server errors
403 permissions 34, 41404 page not found 41500 server execution 41, 43
Server Load Protection screen 329server reports 104, 251–262, 263
URLs 261, 272Server Selection and Publish Log tab, Advanced
Download dialog 337Server Selection and Publish Log tab, Advanced Up-
load dialog 291SERVER_SET_RID 180SERVER_SET_SVY_TITLE 104servers
high load 12, 49–52, 329hosting options 4–6installing scripts 26–42load balanced 31, 51local test Web server 42–48multiple domain 31permissions 33–36, 37, 38posting surveys see publishing surveys
service ticket integration 157, 192, 212, 213session IDs 199, 362setting up surveys 7
Shared Password(s) 160skips 57, 105–113, 114–125, 138–140Skips and Branches dialog 111SP4 project file 3SQL databases 189, 197, 200, 201, 205, 210, 224,
225SSL encryption 28, 212, 249ST3 files 351status of respondent 224styles 358Submit button 64submitted date/time 199submitted pages 199support 2Survey and Report Availability screen 326Survey Content Files tab, Advanced Upload dialog
292Survey Contents Node 39SurveyHost 5surveys
archiving 344changing when live 294editing 14HTML edits 78, 289, 293, 355instructions 12layouts 10, 54–57, 58–59, 82–98, 130, 167length 9looping 194multiple questionnaires 130, 199numbering questions 73publishing see publishing surveyssetup process 7testing 11, 304, 312
SurveyTalk list 2system requirements 28, 49–52
Ttechnical support 2templates 68, 74temporary piping files 220temporary shut-down 328Test mode 320testing surveys 11, 304, 312testing Web server 42–48text fields 198Text Styles 56, 82, 88Thanks pages 101, 103, 272Thanks URL 101, 215, 246themes for layouts 19, 68, 74throttle log 51, 363tiles
resizing 82timed start for surveys 326title in browser 61

Apian NetCollect 4.0 User Guide
Index 370January 15, 2007
training 3troubleshooting
server installation 41–42typefaces 56, 82, 88
UUNC paths 40, 282unfinished surveys 321, 324Unique Respondent ID file 161Untitled pages 103updating SurveyPro 3upgrading NetCollect 16–17uploading files 7, 289, 290, 291, 292, 293
to live surveys 294URLs 285, 298
custom resume 223password embedded 157, 158, 165, 190, 212,
213, 225reports on server 261, 272security 212syntax 217
username+password 156, 162
Vvalues 197, 211, 232, 245verbatims 198versions 28, 280
WWeb anonymous user 35, 37Web Page tab, Document Properties 61Web Root 39Web Site definitions
multiple SurveyPro users 279QuestionWeb 284, 308Your Server 280, 295
Web Site Definitions dialog 38–41Web site links 78Web Survey Setup dialog 57, 76Web Survey Themes dialog 19, 57, 68, 74Welcome pages 101Windows permissions 35, 37Windows users 35, 37WIP files 323, 332, 333, 351written answer scales 198