MEGANE 100% ELECTRIC - Renault
414
vehicle user manual MEGANE 100% ELECTRIC
-
Upload
khangminh22 -
Category
Documents
-
view
0 -
download
0
Transcript of MEGANE 100% ELECTRIC - Renault

vehicle user manual
MEGANE 100% ELECTRIC


welcome aboard your vehicle ...................(current page)information and general advice
welcome aboard your vehicle ..............(current page)
0.1
ENG_UD69794_1Bienvenue (BCB - Renault)
Welcome to your new electric vehicle
Translated from French. Copying or translation, in part or in full, is forbidden unless prior written permission has been obtained from the car manufacturer.
The descriptions of the models given in this handbook are based on the technical specifications at the time of writing. This hand- book covers all items of equipment (both standard and optional) available for these models but whether or not these are fitted to the vehicle depends on the version, options selected and the country where the vehicle is sold.This handbook may also contain information about items of equipment to be introduced later in the model year.The diagrams in the user manual are provided as examples.
Enjoy driving your new vehicle.
This driver’s handbook contains the information necessary:– for you to familiarise yourself with your vehicle, to use it to its best advantage and to benefit fully from the all the functions and
the technical developments it incorporates.– to ensure that it always gives the best performance by following the simple, but comprehensive advice concerning regular main-
tenance.– to enable you to deal quickly with minor faults not requiring specialist attention.It is well worth taking a few minutes to read this handbook to familiarise yourself with the information and guidelines it contains about the vehicle and its functions and new features. If certain points are still unclear, our Network technicians will be only too pleased to provide you with any additional information.To help you, you will find the following symbols:
and These appear in the vehicle and indicate that you should consult the manual for detailed information and/or limits on operations with respect to your vehicle’s equipment.
➥ anywhere in the manual indicates a transfer to a page.
anywhere in the manual indicates a hazard, danger or a safety recommendation.

access vehicle ..................................................(current page)
lightingexterior .................................................(current page)
tyres ...........................................................(current page)rear view mirrors ........................................(current page)windows .....................................................(current page)
0.2
ENG_UD69795_1Extérieur (BCB - Renault)
EXTERIOR
Electric windows ➥ 3.23Windscreen wipers ➥ 1.121 and ➥ 1.126Demisting ➥ 3.6 and ➥ 3.11
Lights: operation ➥ 1.112Lights: replacement ➥ 5.10
Charging ➥ 1.8
Tyres ➥ 5.6
Bodywork maintenance ➥ 4.11
Rear view mirrors ➥ 1.81
Map ➥ 1.21 Locking/unlocking the doors ➥ 1.33

children ......................................................(current page)interior........................................................(current page)driving position
settings.................................................(current page)
storage/organisation ..................................(current page)child safety.................................................(current page)seats ..........................................................(current page)
0.3
ENG_UD69796_1Habitacle (BCB - Renault)
PASSENGER COMPARTMENT
Adjusting your driving po- sition ➥ 1.44
Front headrests ➥ 1.37Front seats ➥ 1.38
Child safety ➥ 1.62
Passenger compartment storage, fit- tings ➥ 3.27
Transporting objects in the lug- gage compartment ➥ 3.37
Rear headrests ➥ 3.32Rear bench seat ➥ 3.33

controls ......................................................(current page)dashboard..................................................(current page)driver’s position .........................................(current page)instrument panel ........................................(current page)
0.4
ENG_UD69797_1Poste de conduite (BCB - Renault)
DRIVER’S POSITION
Instrument panel ➥ 1.92
Engine start/stop button ➥ 2.2
Trip computer controls ➥ 1.100
Cruise control ➥ 2.78Speed limiter ➥ 2.74
Bonnet release ➥ 4.2
Exterior lights ➥ 1.112
Steering wheel adjust- ment ➥ 1.79
Heating/Air con-ditioning system ➥ 3.6
Multimedia screen ➥ 3.21
Gear control ➥ 2.5
Electronic parking brake ➥ 2.10
Heated seat(s) ➥ 1.38
Centre console storage compartment/Induction charging zone ➥ 3.27

driving aids ................................................(current page)driver assistance........................................(current page)driving ........................................................(current page)
0.5
ENG_UD75196_2Aides à la conduite (BCB - Renault)
DRIVING AIDS
ABS (anti-lock braking system)ESC (electronic stability program)Braking assistanceHill start assistance ➥ 2.27
Tyre pressure monitoring system ➥ 2.22
Speed limiter ➥ 2.74
Lane departure warning ➥ 2.32
Blind spot warning ➥ 2.43Parking exit warning ➥ 2.129
Detection of road signs ➥ 2.71
Cruise control ➥ 2.78Stop and Go adaptive cruise con- trol ➥ 2.83
Parking distance control ➥ 2.120
Reversing camera ➥ 2.133360° camera ➥ 2.135
Automatic parking ➥ 2.146
Lane departure prevention ➥ 2.37Emergency lane departure pre- vention ➥ 2.52Active emergency braking ➥ 2.52Active emergency braking in re- verse gear ➥ 2.126
Safe vehicle exit ➥ 2.152
Safe distance alert ➥ 2.49Driver vigilance warning ➥ 2.69

air bag........................................................(current page)seat belts ...................................................(current page)passenger safety .......................................(current page)
0.6
ENG_UD76846_2Sécurité à bord (BCB - Renault)
SAFETY ON BOARD
Front Airbags ➥ 1.49Deactivating the passen- ger’s front airbag ➥ 1.58 ➥ 1.76
Side Airbags ➥ 1.56
Seat belts ➥ 1.44
Curtain Airbags ➥ 1.56
Central Airbag ➥ 1.56

engine identification ...................................(current page)vehicle identification ..................................(current page)vehicle identification number (VIN) ............(current page)vehicle identification plates ........................(current page)tyre pressure..............................................(current page)
0.7
ENG_UD69800_1Identification (BCB - Renault)
IDENTIFYING A VEHICLE - LABELS
Engine identification ➥ 6.4
Review of a vehicle identification number ➥ 6.2
Tyre pressure label ➥ 2.22 ➥ 4.7
Vehicle identification plate ➥ 6.2
Technical Information for the emergency services ➥ 6.3

battery........................................................(current page)engine
access to the engine ............................(current page)
levels .........................................................(current page)
0.8
ENG_UD69801_1Compartiment moteur (BCB - Renault)
THE ENGINE COMPARTMENT (routine maintenance)
Opening the bonnet ➥ 4.2
Coolant level ➥ 4.4
400 V electrical circuits ➥ 1.2
Windscreen washer fluid ➥ 4.4
Brake fluid ➥ 4.4
Battery ➥ 4.9

wiper blades ..............................................(current page)puncture.....................................................(current page)breakdown recovery .................................(current page)fuses ..........................................................(current page)bulbs
changing ..............................................(current page)
towing ........................................................(current page)
0.9
ENG_UD69802_1Dépannage (BCB - Renault)
BREAKDOWN RECOVERY
Replacing windscreen wiper blade(s) ➥ 5.20
Replacing headlight bulbs ➥ 5.10
Front towing point ➥ 5.22
Replacing the rear screen wiper blade ➥ 5.20
Replacing rear light bulbs ➥ 5.11 Fuses ➥ 5.17
Puncture ➥ 5.2Tools ➥ 5.5
Rear towing point ➥ 5.22

0.10
ENG_UD69803_1Filler NU (BCB - Renault)

0.11
ENG_UD69804_1Sommaire Général (BCB - Renault)
Getting to know your vehicle ...............................
Driving ...................................................................
Your comfort .........................................................
Maintenance .........................................................
Practical advice ....................................................
Technical specifications ......................................
Alphabetical index ...............................................
Sections
1
C O N T E N T S
2
3
4
5
6
7

0.12
ENG_UD69805_1Filler NU (BCB - Renault)

1.1
ENG_UD76848_4Sommaire 1 (BCB - Renault)
Section 1: Getting to know your VehicleElectric vehicle: presentation, important recommendations, charging, programming . . . . . . . . . . . . 1.2Card: general information, use, deadlocking . . . . . . . . . . . . . . . . . . . . . . . . . . . . . . . . . . . . . . . . . . . 1.21Opening and closing the doors . . . . . . . . . . . . . . . . . . . . . . . . . . . . . . . . . . . . . . . . . . . . . . . . . . . . . 1.30Locking, unlocking the opening elements . . . . . . . . . . . . . . . . . . . . . . . . . . . . . . . . . . . . . . . . . . . . . 1.34Automatic locking when driving . . . . . . . . . . . . . . . . . . . . . . . . . . . . . . . . . . . . . . . . . . . . . . . . . . . . . 1.36Headrests, seats . . . . . . . . . . . . . . . . . . . . . . . . . . . . . . . . . . . . . . . . . . . . . . . . . . . . . . . . . . . . . . . . 1.37Seat belts. . . . . . . . . . . . . . . . . . . . . . . . . . . . . . . . . . . . . . . . . . . . . . . . . . . . . . . . . . . . . . . . . . . . . . 1.44Additional methods of restraint . . . . . . . . . . . . . . . . . . . . . . . . . . . . . . . . . . . . . . . . . . . . . . . . . . . . . 1.49
in addition to the front seat belts . . . . . . . . . . . . . . . . . . . . . . . . . . . . . . . . . . . . . . . . . . . . . . 1.49to the rear seat belts . . . . . . . . . . . . . . . . . . . . . . . . . . . . . . . . . . . . . . . . . . . . . . . . . . . . . . . 1.55side protection . . . . . . . . . . . . . . . . . . . . . . . . . . . . . . . . . . . . . . . . . . . . . . . . . . . . . . . . . . . . 1.56passenger detection system . . . . . . . . . . . . . . . . . . . . . . . . . . . . . . . . . . . . . . . . . . . . . . . . . 1.58
Child safety: General information . . . . . . . . . . . . . . . . . . . . . . . . . . . . . . . . . . . . . . . . . . . . . . . . . . . 1.62choosing a child seat mounting . . . . . . . . . . . . . . . . . . . . . . . . . . . . . . . . . . . . . . . . . . . . . . . 1.65fitting a child seat . . . . . . . . . . . . . . . . . . . . . . . . . . . . . . . . . . . . . . . . . . . . . . . . . . . . . . . . . . 1.68
Child seats: attachment by seat belt or by ISOFIX system . . . . . . . . . . . . . . . . . . . . . . . . . . . . . . . . 1.70Child safety: deactivating, activating the front passenger AIRBAG . . . . . . . . . . . . . . . . . . . . . . . . . . 1.76Steering wheel/power-assisted steering . . . . . . . . . . . . . . . . . . . . . . . . . . . . . . . . . . . . . . . . . . . . . . 1.79Rear view mirrors, camera rear view . . . . . . . . . . . . . . . . . . . . . . . . . . . . . . . . . . . . . . . . . . . . . . . . . 1.81Driving position . . . . . . . . . . . . . . . . . . . . . . . . . . . . . . . . . . . . . . . . . . . . . . . . . . . . . . . . . . . . . . . . . 1.88Warning lights . . . . . . . . . . . . . . . . . . . . . . . . . . . . . . . . . . . . . . . . . . . . . . . . . . . . . . . . . . . . . . . . . . 1.92Displays and indicators . . . . . . . . . . . . . . . . . . . . . . . . . . . . . . . . . . . . . . . . . . . . . . . . . . . . . . . . . . . 1.96Trip computer . . . . . . . . . . . . . . . . . . . . . . . . . . . . . . . . . . . . . . . . . . . . . . . . . . . . . . . . . . . . . . . . . . 1.100Vehicle settings personalisation menu . . . . . . . . . . . . . . . . . . . . . . . . . . . . . . . . . . . . . . . . . . . . . . . 1.108Clock and outdoor temperature . . . . . . . . . . . . . . . . . . . . . . . . . . . . . . . . . . . . . . . . . . . . . . . . . . . . . 1.110Audible and visual signals . . . . . . . . . . . . . . . . . . . . . . . . . . . . . . . . . . . . . . . . . . . . . . . . . . . . . . . . . 1.111Exterior lighting and signals. . . . . . . . . . . . . . . . . . . . . . . . . . . . . . . . . . . . . . . . . . . . . . . . . . . . . . . . 1.112Headlight beam adjustment . . . . . . . . . . . . . . . . . . . . . . . . . . . . . . . . . . . . . . . . . . . . . . . . . . . . . . . . 1.119Washers, wipers . . . . . . . . . . . . . . . . . . . . . . . . . . . . . . . . . . . . . . . . . . . . . . . . . . . . . . . . . . . . . . . . 1.121

12 volt battery ............................................(up to the end of the DU)traction battery ...........................................(up to the end of the DU)«400 volt» electrical circuit ........................(up to the end of the DU)charging socket .........................................(up to the end of the DU)electric vehicle
introduction ..........................................(up to the end of the DU)
1.2
ENG_UD75070_2Véhicule électrique : Présentation (BCB - Renault)
Electric vehicle: presentation, important recommendations, charging, programming
1 Electric charging connection (passenger side)
2 400 V traction battery3 Electric motor4 Orange electrical power cables5 Secondary 12 V battery
ELECTRIC VEHICLE: introduction (1/5)
13
5
2
4

connected services ....................................(current page)
1.3
ENG_UD75070_2Véhicule électrique : Présentation (BCB - Renault)
ELECTRIC VEHICLE: introduction (2/5)Electric vehicles have special features, but operate in a similar manner to con- ventional vehicles.The main difference in electric vehicles is the exclusive use of electric energy instead of fuel, as used in convention vehicles.We therefore recommend that you read these instructions describing your elec-tric vehicle carefully.
Connected servicesYour electric vehicle has connected services that provide information and/or control:– your vehicle’s charging status with
low battery warning;– the traction battery charging pro-
gramming, based on certain choices on offer;
– remaining vehicle range;– ...
You can subscribe to a connected service or extend it at any time by consulting an authorised dealer.
6 7
8
You can access these services by:– external digital devices (mobile tele-
phones 7, tablets 8 etc.);– the vehicle multimedia screen 6.For more information, refer to the mul- timedia equipment instructions or con- tact an Approved Dealer.

1.4
ENG_UD75070_2Véhicule électrique : Présentation (BCB - Renault)
BatteriesYour electric vehicle has two types of battery:– a 400V traction battery;– secondary 12 V battery.
400 V traction batteryThis battery stores the energy neces-sary to operate the motor in your elec-tric vehicle properly. As with any bat-tery, it discharges after use, and must be regularly recharged.You do not have to wait until the traction battery hits the reserve level in order to recharge it.Charging times vary depending on the type of specific wall unit socket or public terminal you connect to.Your vehicle range will depend on the charge level of the traction battery, and also on your driving style ➥ 2.20.
Secondary 12V batteryThe second battery on your vehicle is a secondary 12 V battery: this supplies the energy required to operate vehicle equipment (lights, windscreen wipers, ABS, etc).
ELECTRIC VEHICLE: introduction (3/5)

1.5
ENG_UD75070_2Véhicule électrique : Présentation (BCB - Renault)
The vehicle drive system in an electric vehicle uses a direct voltage of approxi- mately 400 volts.
This system can get hot during and after switching off the ignition. Respect warning messages given on the labels in the vehicle.All interventions or modifications to the 400V electrical system (com-ponents, cables, connectors, trac-tion battery) are strictly prohibited due to the risks they present to your safety. Please contact an authorised dealer.The risk of serious burns or elec-tric shocks can lead to death.
A
ELECTRIC VEHICLE: introduction (4/5)
The A symbol denotes the electrical el-ements of your vehicle which may pres-ent health risks.
“400 volt” electrical circuitThe 400 V electrical circuit is denoted by orange cables 9 and parts bearing the ṑ symbol.
9

warning pedestrian sound warning ....................(current page)
electric vehiclenoise ....................................................(current page)
electric vehicledriving ..................................................(current page)
1.6
ENG_UD75070_2Véhicule électrique : Présentation (BCB - Renault)
DrivingAs with a car with an automatic gear- box, you will have to get used to not using your left foot, and not using this foot to brake.When driving, if you lift your foot off the accelerator pedal or depress the brake pedal, the motor generates electrical current during deceleration, and this energy is used to brake the vehicle and recharge the traction battery ➥ 2.17.Bad weather, flooded roads:
Do not drive through floods if the depth of water is above the lower edge of the wheel rims.
ELECTRIC VEHICLE: introduction (5/5)
Your electric vehicle is silent. Before leaving it, with your foot on the brake, stop the engine.
RISK OF SERIOUS INJURYThe engine brake should under no circumstances be used as a substitute for the brake pedal.
NoiseElectric vehicles are particularly quiet. You will not yet necessarily be used to it, and neither will other road users. It is difficult for them to hear the vehicle when it is moving.As the motor is silent, you will hear noises that you are not used to hearing (aerodynamic noises, tyre noise, etc.).Each time the ignition is switched off, the ventilation will be switched off after about ten seconds.
Obstructions to the driverOn the driver’s side, only use mats suitable for the vehicle, attached with the
pre-fitted components, and check the fitting regularly. Do not lay one mat on top of another.There is a risk of wedging the pedals
Pedestrian hornThe pedestrian horn enables you to warn others of your presence – espe- cially pedestrians and cyclists.When the engine is started, the pedes- trian horn is activated automatically. The sound is triggered when the vehi- cle speed is between about 1 and 19 mph (1 and 30 km/h).For further information on the pedes- trian horn, refer to the multimedia in- structions.In the event of a fault with the pedes-
trian horn, the warning light is displayed on the instrument panel, together with the message “Failure Outside sound”.Consult an approved dealer.

presentation of electric vehicleimportant guidelines .............................(current page)
electric vehicleimportant guidelines .............................(current page)
1.7
ENG_UD74592_2Recommandations importantes (BCB - Renault)
ELECTRIC VEHICLE: important recommendations
Please read these instructions carefully. Failure to follow these instructions may lead to a risk of fire, serious injury or electric shock which may present a risk to life.
In the event of an accident or impactIn the event of an accident or an impact to the underside of the vehicle (e.g.: striking a post, raised kerb or other street furni- ture), this may damage the electric circuit or the traction battery.Have the vehicle checked by an authorised dealer.Never touch the “400 volt” components or orange cables which are exposed and visible inside or outside the vehicle.In the event of serious damage to the traction battery, leaks may occur:– never touch the liquids (fluids, etc.) coming from the traction battery;– in the event of contact with the body, wash the affected area with plenty of water and consult a doctor as soon as possible.In the event of an impact, even slight, against the charging flap and/or valve, have them checked by an authorised dealer as soon as possible.
In the event of fireIn the event of fire, make everyone evacuate the vehicle immediately and contact the emergency services, informing them that this is an electric vehicle.Only use extinguishing agents ABC or BC that are permitted for use with electrical fires. Do not use water or other extinguish- ing agents.In the event of damage to the electrical circuit, please call an authorised dealer.
All towing operations➥ 5.22.
Washing the vehicleNever wash the engine compartment, the charging connection or the traction battery with a high-pressure jet.This risks damaging the electric circuit.Never wash the vehicle while it is charging. Risk of electric shock and a risk to life.

traction battery charge ...............................(up to the end of the DU)charging cord .............................................(up to the end of the DU)charging socket .........................................(up to the end of the DU)charging flap ..............................................(up to the end of the DU)electric vehicle
charging ...............................................(up to the end of the DU)
1.8
ENG_UD73926_2Véhicule électrique : charge (BCB - Renault)
ELECTRIC VEHICLE: charging (1/12)Charging schematic diagram1 Specific wall socket or recharging ter-
minal2 Charging cord3 Electric charging connection
(passenger side)
If you have any questions regarding the equipment needed for charging, please ask an authorised dealer.
1
3
2

1.9
ENG_UD73926_2Véhicule électrique : charge (BCB - Renault)
ELECTRIC VEHICLE: charging (2/12)
Important recommendations for charging your vehiclePlease read these instructions carefully. Failure to follow these instructions may lead to a risk of fire, serious injury or electric shocks which could result in death.
ChargingDo not do anything to the vehicle during charging (washing, working in the engine compartment, etc.).In the event of the presence of water, signs of corrosion or foreign bodies in the charging cord connector or in the vehicle charg- ing socket, do not charge the vehicle. Fire hazard.Do not attempt to touch the cord contacts, the domestic socket or the vehicle charging socket, or introduce objects into them.Never plug the charging cord into an adapter, multiple socket or extension lead.The use of generators is prohibited.Do not remove or change the vehicle charging socket or the charging cord. Fire hazard.Do not modify or perform any action on the installation during charging.In the event of an impact, even slight, against the charging socket or valve, have them checked by an authorised dealer as soon as possible.Take care of the cord: do not tread on it, immerse it in water or pull on it or let anything knock against it. Check regularly that the charging lead is in good condition.In the event of damage to the charging lead (corrosion, browning, cuts, etc.), to the unit or to the vehicle's electrical charging socket, do not use them. Please see an authorised dealer to replace them.In the event of non-activation of the charging flap locking mechanism and/or unlocking of the vehicle's electric charging socket, please contact an approved dealer.

1.10
ENG_UD73926_2Véhicule électrique : charge (BCB - Renault)
Charging cord AThis lead is specific to your vehicle and designed for connecting to wall sockets or public terminals to enable standard charging of the traction battery.
A
ELECTRIC VEHICLE: charging (3/12)
Always read the charging cord instruc- tions carefully before using it B.
B
Charging cord BThis cord allows:– in normal use, on a socket used only
for the vehicle (14 A/16 A charge);– occasional charge using a domestic
socket, (8 A charge) when you are not at home, for example.
Sockets must be fitted as stated in the instructions in the instructions supplied with the charging cord B.
C
B
D
If a charging cord malfunctions during the charging process (red warning light on the unit D), stop charging immediately. Please refer to the cord instructions.
We recommend that you use a charging cord that enables a stand- ard charge to charge the traction battery.
Each charging lead is stored in the luggage compartment of the vehicle ➥ 3.34.
Never leave the socket hanging by the cord. Use the hooks C to attach it.

1.11
ENG_UD73926_2Véhicule électrique : charge (BCB - Renault)
Important recommendations for charging your vehiclePlease read these instructions carefully. Failure to follow these instructions may lead to a risk of fire, serious injury or electric shocks which could result in death.
Choice of charging cordThe standard charging cords supplied with the vehicle have been designed specifically for this vehicle. It is designed to protect you against the risks of electric shock that can lead to death or fire.Do not use with the charging leads of previous vehicles as they are not adapted.For safety reasons, the use of a charging cord not recommended by the manufacturer is strictly forbidden. Failure to follow this instruction can lead to risks of fire or electric shock that can prove fatal. For information on a charging cord suited to your vehicle, please consult an authorised dealer.Using the charging lead BPlease read the instructions that come with the charging lead carefully to learn about the precautions you must take when using the product and the technical specifications required for fitting the socket.
InstallationPower supply systemsOnly use charging terminals which conform to the IEC 61851-1 standard and connecting points protected by:– a type A 30 mA residual differential current system specific to the socket used;– an overcurrent protection device;– protection against overvoltage relating to lightning in exposed areas (IEC 62305-4).
Wall socketHave a special wall socket installed by a qualified professional.
In the case of domestic chargingHave a qualified professional check that each socket to which you will connect the charging cord complies with the standards and regulations in force in your country and that it complies with the specifications described previously in the information on “Power supply systems”.
ELECTRIC VEHICLE: charging (4/12)

1.12
ENG_UD73926_2Véhicule électrique : charge (BCB - Renault)
ELECTRIC VEHICLE: charging (5/12)
Charging type Alternating current (AC)
Connection Charging terminal 1/Charging lead 4 Vehicle 3/Charging lead 5
Charging types that conform to European standards (for all other cases, please consult an approved dealer).
413
5
3 51 4Charging types that conform to European standardsAlternating current (AC)If the information is displayed on the vehicle charging flap, follow the instruc- tions below.Before plugging in a charging lead, check that:– the colour and one of the letters of
the inlet socket 1 correspond to the colour and one of the letters on the end 4 of the lead;
– the colour and one of the letters of the inlet socket 3 correspond to the colour and one of the letters on the end 5 of the lead.

1.13
ENG_UD73926_2Véhicule électrique : charge (BCB - Renault)
ELECTRIC VEHICLE: charging (6/12)
Charging type Direct current (DC)
Connection Vehicle 3/Charging lead 5
Charging types that con- form to European stand- ards (for all other cases, please consult an ap- proved dealer).
3 5Charging types that conform to European standards (continued)Direct current (DC)If the information is displayed on the vehicle charging flap, follow the instruc- tions below.Before plugging in a charging lead, make sure that the colour and one of the letters of the inlet socket 3 corre- spond to the colour and one of the let- ters on the end 5 of the charging lead.
5
3

1.14
ENG_UD73926_2Véhicule électrique : charge (BCB - Renault)
ELECTRIC VEHICLE: charging (7/12)The vehicle is equipped with two charg- ing connections located on the passen- ger side at the front of the vehicle:– E socket for charging up to 22 kW;– F socket, depending on the vehicle,
for rapid charging.There are also two buttons located inside the charging flap:
– the button 6 unlocks the charging cable;
– the button 7 launches imme- diate charging of the vehicle.
3E
F6
7
Electric charging connection 3Note: if in a snowy environment, remove snow from the vehicle charg- ing area on the passenger side before plugging in or disconnecting.Snow in the socket may block the inser- tion of the charging cord plug.

1.15
ENG_UD73926_2Véhicule électrique : charge (BCB - Renault)
ELECTRIC VEHICLE: charging (8/12)PrecautionsFor daily use, it is recommended that you charge your vehicle to 80% full to improve the battery service life.Avoid charging and parking your ve-hicle in extreme temperatures (hot or cold).Under extreme conditions, charging may take several minutes before start- ing (time required for the traction bat- tery to cool down or warm up).When the vehicle is parked for more than seven days in temperatures below about -25°C, charging the traction bat- tery can become impossible.When the vehicle is parked for more than three months with near zero charge, charging the battery can become impossible.
In the absence of any protection against overvoltage, you are recom-mended not to charge the vehicle in stormy weather (lightning, etc).
The energy level available depends on the battery temperature. It may there- fore vary between stopping and restart- ing the vehicle if the battery is cold or warm.To preserve the service life of your trac- tion battery, avoid parking the vehi- cle for more than one month with high charge, especially when the weather is very hot.Favour charging the traction battery after driving and/or in mild tempera- tures. Otherwise, charging may take a longer period of time or even become impossible.It is preferable to recharge the vehicle after driving if the charge level is low (< 25%) and when temperatures are negative.
Recommendations– In high temperatures, try to park and
recharge the vehicle in a shaded/ covered location;
– charging can be performed in the rain or snow;
– activating the air-conditioning in- creases the charging time required.

1.16
ENG_UD73926_2Véhicule électrique : charge (BCB - Renault)
– after you hear a locking click, check that the charging cord is properly plugged in. To check the locking, pull gently on the handle 10;
– if you have programmed a deferred charge and you wish to start charg- ing immediately, press the button 7 to start charging ➥ 3.17.
The charging cord is automatically locked with the vehicle. This will make it impossible to unplug the cord from your vehicle.
ELECTRIC VEHICLE: charging (9/12)
Recharging the traction batteryVehicle stationary, ignition off:– take the charging cable 2 located in
the storage compartment in your ve- hicle's luggage compartment;
– press the charging flap 8 to unlock it.
Make sure you fully uncoil the charg-ing cord to limit its heating.
10
Do not use an extension lead, multiple socket or adapter.Fire hazard.
9
8
2
If you have just accepted a system update via the multimedia system, the traction battery charging will be delayed or cancelled.Wait for the update to be completed before connecting the charging lead to the vehicle. For more information on system updates, please refer to the multimedia instructions.
Do not use the charging flap 8 to suspend the charging cord 2 while recharging the vehicle.
A message appears on the instrument panel to indicate that the charging flap is open. The 9 warning light is white:– plug in the end of the cord to the
power supply;– grab the handle 10;– plug in the vehicle cord. The warning
light 9 flashes in yellow;

1.17
ENG_UD73926_2Véhicule électrique : charge (BCB - Renault)
During charging, the warning light 9 flashes in blue.When charging starts, the following information is displayed on the instru- ment panel:– the energy level on the battery warn-
ing light 12;– the battery refill rate;
ELECTRIC VEHICLE: charging (10/12)
– an estimate of the remaining charg- ing time (this is not displayed after about 95% charge);
– the warning light 11 indicates that the vehicle is connected to a power supply;
– your vehicle range will vary accord- ing to the charge level.
The display on the instrument panel disappears after a few seconds. It reap- pears on the instrument panel when a door is opened.Once charging is complete, the warning light 9 appears continuously in green.You do not need to wait until the charge is at reserve levels to recharge your ve-hicle.
Operating faultsIf the warning light 9 appears contin- uously in red, please contact an ap- proved dealer.
The traction battery charging time depends on the amount of energy remaining and the power delivered by the charging terminal. The information is displayed on the instrument panel during charging ➥ 1.96.In the event of a problem, we recommend that you replace it with an identical cord. Please see an authorised dealer.
11
12
9

1.18
ENG_UD73926_2Véhicule électrique : charge (BCB - Renault)
Note: immediately after a long charge of the traction battery, the cable may be hot. Please use the handles.
– unplug the charging lead 2 from the vehicle;
– you must close the 8 charging flap and press on it in order to lock it;
– unplug the lead 2 from the power supply 1;
– store the cord 2 in the storage com- partment of your luggage compart- ment.
After pressing the charging cable release button, you will have around 30 seconds to unplug it before it is locked once again.
ELECTRIC VEHICLE: charging (11/12)
Precautions to take when removing from the socket
– Press the 6 button or press and hold the door unlocking button on the card in order to release the vehi- cle charging lead;
– grab the handle 10;
It is imperative to follow the unplug- ging steps in order.
10
2
2
8
6

1.19
ENG_UD73926_2Véhicule électrique : charge (BCB - Renault)
ELECTRIC VEHICLE: charging (12/12)
Label 13The label 13 located on the charg- ing flap 8 displays details on how the charging operation is indicated by the status of the warning light 9:– flash in yellow: the lead is plugged
into the vehicle and the system car- ries out its checks;
– flashing in blue: charging is in pro- gress;
– illuminated continuously in blue: charge programming is activated;
– illuminated continuously in green: the vehicle is fully charged;
– flashing in red: operating fault.
– connect to a domestic socket, an al- ternating voltage charging terminal or a quick charging terminal;
– for any information on charging, please consult your vehicle user manual.
13
The label 13 located on the right-hand side reminds you of the following in- structions:– do not wash the charging flap using
a high-pressure water jet;– with the vehicle stationary, the valve
and the charging flap can be open;– when the vehicle is being driven, the
valve and the charging flap must be closed;
– open the flap to connect the charging lead;
– close the flap again once discon- nected;
8
9

charging cord .............................................(up to the end of the DU)charge programming .................................(up to the end of the DU)
1.20
ENG_UD69810_1Véhicule électrique : programmation de la charge (BCB - Renault)
Charging programmingWith the vehicle stationary, engine run- ning, “Vehicle” 2 Mode of the multime- dia screen 1, select “Electric” 3 menu, then the “Charge & Climate” tab set up charging for your vehicle.
ELECTRIC VEHICLE: programming charging
1
For safety reasons, carry out these operations when the vehicle is stationary.
2
3
You can choose from several charging modes:– “Instant charge”;– “Delayed charge”;– “Program”.Please refer to the multimedia instruc- tions for further information.
When the programming is confirmed,
the indicator light lights up on the instrument panel.Note: charging will start if the engine is shut down and the vehicle is connected to a power supply and access is author- ised.
If you have just accepted a system update via the multimedia system, the traction battery charging will be delayed or cancelled.Wait for the update to be completed before connecting the charging lead to the vehicle.For more information on system up- dates, please refer to the multime- dia instructions.

access vehicle ..................................................(up to the end of the DU)
card ...........................................................(up to the end of the DU)map
use .......................................................(up to the end of the DU)
tailgate .......................................................(up to the end of the DU)central door locking ...................................(up to the end of the DU)unlocking the doors ...................................(up to the end of the DU)closing the doors .......................................(up to the end of the DU)daytime running lights................................(up to the end of the DU)tailgate .......................................................(up to the end of the DU)doors/tailgate .............................................(up to the end of the DU)
remote control card ......................................................(up to the end of the DU)
remote control map ......................................................(up to the end of the DU)
locking the doors .......................................(up to the end of the DU)locking/unlocking the opening elements ....(up to the end of the DU)
1.21
ENG_UD73928_2Carte : généralités (BCB - Renault)
Card: general information, use, deadlocking
CARDS: general information (1/3)
1 Unlocking the doors and luggage compartment.
2 Locks all the opening elements.3 Unlocking/locking the boot.4 Switching on the lighting remotely.
The card is used for:– locking/unlocking of opening ele-
ments (doors, luggage compart- ment) and folding out or in of front door handles;
– the unlocking of the charging flap ➥ 1.8;
– switching on the vehicle lighting re- motely (refer to the following pages);
– automatic remote closing of the elec- tric windows ➥ 1.33;
– automatic remote opening of the electric windows ➥ 1.33.
Battery lifeMake sure that the correct battery type is being used, and that the battery is in good condition and inserted correctly. Its service life is approximately two years: it should be replaced when the message “Keycard Battery Low” ap- pears on the instrument panel ➥ 5.14.
When the battery is flat, you can still lock/unlock and start your vehicle. ➥ 2.2 ➥ 1.33 ➥ 5.14.
1
23
4
card operating range This varies according to the environ- ment: take care not to accidentally lock or unlock the vehicle by inadvertently pressing the buttons on the card.Note: if a door or the boot is open or not properly shut, locking is not carried out. A beep sounds and the hazard warning lights and side repeaters do not flash.

lightingdistance lighting ...................................(current page)
1.22
ENG_UD73928_2Carte : généralités (BCB - Renault)
CARDS: general information (2/3)
AdviceAvoid leaving the card in hot, cold or humid areas.Do not keep the card in a place where it could be bent or dam- aged accidentally, such as in a back pocket of a garment.
4
Driver’s responsibility when parking or stopping the vehicleNever leave an animal,
child or adult who is not self-suffi- cient alone in your vehicle, even for a short time.They may pose a risk to themselves or to others by starting the engine, activating equipment such as the electric windows or locking the doors, for example.Also, in hot and/or sunny weather, please remember that the tempera- ture inside the passenger compart- ment increases very quickly.RISK OF DEATH OR SERIOUS INJURY.
InterferenceInterference by factors in the immediate vicinity (external installations or the use of equipment operating on the same frequency as the remote control) may affect the operation of the remote con- trol.
Distance lighting functionPressing button 4 switches on the dipped beam headlights and the exte- rior lighting for approximately 20 sec- onds. This can be used, for example, to identify the vehicle from a distance when parked in a car park. Pressing and holding the 4 button for approxi- mately two seconds activates the exte- rior lighting and a sound is emitted.Note: pressing button 4 again switches off the lighting.
Replacement: need for an additional cardIf you lose your card or require an- other, you can obtain one from an authorised dealer.If a card is replaced, it will be neces- sary to take the vehicle and all its cards to an approved Dealer to ini- tialise the system.You may use up to four cards per vehicle.

1.23
ENG_UD73928_2Carte : généralités (BCB - Renault)
CARDS: general information (3/3)
Insert the hand strap into the 8 com- ponent and pass the end of the strap through the buckle.Position the strap at the 6 opening and close the cartridge.Note: check that the diameter of the strap cord 7 will fit the opening 6.
Fitting a strap 7Slide the rear casing 5 downwards while pressing on zone A.
A5
7
6
8

access vehicle ..................................................(up to the end of the DU)
«hands-free» card: use..............................(up to the end of the DU)controls
doors/opening elements ......................(up to the end of the DU)
opening/closingdoors ....................................................(up to the end of the DU)
opening/closingluggage compartment ..........................(up to the end of the DU)
opening/closingsunroof .................................................(up to the end of the DU)
doors and tailgate .....................................(up to the end of the DU)doors/tailgate .............................................(up to the end of the DU)locking the doors .......................................
(up to the end of the DU)
1.24
ENG_UD73930_2Carte mains libres : utilisation (BCB - Renault)
Deactivating/activating the “hands-free” modeDepending on the vehicle, you can de- activate/activate unlocking when ap- proaching and locking when moving away from the vehicle.You can also disable/activate the sound signal that is emitted upon locking when moving away from the vehicle ➥ 1.108.
There are two ways to unlock/lock the vehicle: – “hands-free”, when approaching and
moving away from the vehicle;– using the card in remote control
mode.
“HANDS-FREE” CARD: use (1/5)
Do not store the card anywhere it may come into contact with other electronic equipment (computer, phone etc.) as this could hinder its operation.
Driver’s responsibility when parking or stopping the vehicleNever leave an animal,
child or adult who is not self-suffi- cient alone in your vehicle, even for a short time.They may pose a risk to themselves or to others by starting the engine, activating equipment such as the electric windows or locking the doors, for example.Also, in hot and/or sunny weather, please remember that the tempera- ture inside the passenger compart- ment increases very quickly.RISK OF DEATH OR SERIOUS INJURY.
Never leave your vehicle with the card inside.

1.25
ENG_UD73930_2Carte mains libres : utilisation (BCB - Renault)
“HANDS-FREE” CARD: use (2/5)
1
2
Hands-free unlocking, when approaching the vehicle;With the card in access zone 1, the ve- hicle will unlock. The front handles are folded out and the hazard lights and side repeaters flash once to indicate that the doors have unlocked and, on some vehicles, the door mirrors fold out automatically.
Remote “Hands-free” lockingWith the card on you, doors and lug- gage compartment door closed, move away from the vehicle: it will lock auto- matically once you have left the access zone 1. The front handles are folded in and the hazard lights flash twice then remain illuminated for about four sec- onds, a beep sounds to indicate that the doors have locked and, on some vehicles, the door mirrors fold in auto- matically.Note: the distance at which the vehicle locks depends on the surroundings.
If the card has been within the detection area 1 for approximately 15 minutes, remote locking is disabled. To lock the vehicle, press button 3 on the card.The vehicle cannot be remotely locked if the card is within the area 2.
1 3

1.26
ENG_UD73930_2Carte mains libres : utilisation (BCB - Renault)
“HANDS-FREE” CARD: use (3/5)Special features of the unlocking systemUnder certain circumstances, approach unlocking is deactivated:– after eight days of no use of the vehi-
cle;– if the card remains close to the 1
area of the vehicle for approximately five minutes after the vehicle has been locked;
– after several passes in the vicinity of the 1 area of the vehicle and without the door being unlocked.
Press the luggage compartment open- ing button 4 or use the card as a remote control (see following pages) to unlock the vehicle and reactivate “hands-free” mode.
4
“Hands-free” unlocking by opening the luggage compartmentWith the card in the area 1 and the ve- hicle locked, pressing the 4 button un- locks the entire vehicle.The front handles are folded out and the side indicator lights and hazard warning lights flash once to indicate that the doors have unlocked.
Special features relating to “hands-free” lockingAfter locking in “hands-free” mode, you have to wait approximately three sec- onds to be able to unlock the vehicle again. During these three seconds, the door handles can be tried to make sure that the vehicle is locked properly.Note: if a door or the boot is open or not properly shut, locking is not carried out. A beep sounds but the hazard warning lights and side repeaters do not flash.

maphands-free ............................................(up to the end of the DU)
mapuse .......................................................(up to the end of the DU)
1.27
ENG_UD73930_2Carte mains libres : utilisation (BCB - Renault)
Using the card as a remote controlUnlocking with the card Press button 5.The front handles are folded out and the side indicator lights and hazard warning lights flash once to indicate that the doors have unlocked.
Locking using the cardWith the doors and boot closed, press button 3: the vehicle locks.The front handles fold in and the hazard lights and side repeaters flash twice to indicate that the doors have locked and, on some vehicles, the door mirrors fold in automatically.Depending on the vehicle, pressing the button 3 twice locks the vehicle. Press and hold the 3 button to close the front and rear windows.Note:– the maximum distance at which the
vehicle locks depends on the sur- roundings;
– if a door or the boot is open or not properly shut, locking is not carried out. A beep sounds but the hazard warning lights and side repeaters do not flash.
The card buttons are deactivated when the engine is running.
5
“HANDS-FREE” CARD: use (4/5)
If, while the engine is running, a door is opened and closed, and the card is no longer in the zone 2, the message “Keycard Not Detected” indicates that the card is not inside the vehicle. This will, for example, prevent you from driv- ing away after dropping off a passenger who has kept the card on them.The warning disappears when the card is detected again.
2
3

1.28
ENG_UD73930_2Carte mains libres : utilisation (BCB - Renault)
“HANDS-FREE” CARD: use (5/5)
6 Driver’s responsibility when parking or stopping the vehicleNever leave an animal,
child or adult who is not self-suffi- cient alone in your vehicle, even for a short time.They may pose a risk to themselves or to others by starting the engine, activating equipment such as the electric windows or locking the doors, for example.Also, in hot and/or sunny weather, please remember that the tempera- ture inside the passenger compart- ment increases very quickly.RISK OF DEATH OR SERIOUS INJURY.
Locking/unlocking only the bootPress the button 6 to lock/unlock the boot only.
Unlocking the charging cordPress button 5 to unlock the charging cable from the vehicle.5

access vehicle ..................................................(up to the end of the DU)
mapdeadlocking ..........................................(current page)
maplocking/unlocking the opening ele-ments ...................................................(current page)
card: use ....................................................(up to the end of the DU)central door locking ...................................(up to the end of the DU)doors/tailgate .............................................(up to the end of the DU)child safety.................................................(current page)deadlocking the doors ...............................(current page)locking the doors .......................................(up to the end of the DU)
locking/unlocking the opening elementsdoors ....................................................(current page)
1.29
ENG_UD69813_1Carte : super condamnation (BCB - Renault)
If the vehicle is equipped with a dead- locking function, this allows you to lock the opening elements and to prevent the doors from being unlocked using the interior handles (for example, by breaking the window and then trying to open the door from the inside).
Never use deadlocking if someone is still inside the vehicle.
To activate deadlockingPress button 2 twice in quick succes- sion.The hazard lights and side repeaters flash twice slowly and flash three times quickly to indicate that the doors are locked and, depending on the ve- hicle, the door mirrors fold in automat- ically.
To deactivate deadlockingUnlock the vehicle using button 1 on the card.The hazard warning lights flash once to indicate that the doors have been un- locked.
CARD: deadlocking
1
2

access vehicle ..................................................(up to the end of the DU)
warning buzzer ..........................................(up to the end of the DU)card ...........................................................(up to the end of the DU)children ......................................................(up to the end of the DU)closing the doors .......................................(up to the end of the DU)opening the doors ......................................(up to the end of the DU)opening/closing
doors and tailgate ................................(up to the end of the DU)
doors..........................................................(up to the end of the DU)doors/tailgate .............................................(up to the end of the DU)locking the doors .......................................(up to the end of the DU)
locking/unlocking the opening elements ....(up to the end of the DU)
1.30
ENG_UD75350_2Ouverture et fermeture des portes (BCB - Renault)
Opening and closing the doors
OPENING AND CLOSING THE DOORS (1/3)
Opening the doors from the outsideFront doorsThe front doors are equipped with han- dles that fold out and in automatically according to the vehicle status:– when unlocking the vehicle, the han-
dles fold out to allow access to the vehicle;
– when locking the vehicle, the han- dles fold in;
– above 3 mph (5 km/h), the handles fold in;
– when reversing, the handles fold in.
1
As a safety precaution, the doors should only be opened or closed when the vehicle is stationary.
2
3
When the vehicle is unlocked, a few minutes after exiting the vehicle or if the ignition is on, slight pressure on the handle 1 fold out the handles electri- cally.Once deployed, the handles fold in au- tomatically after about 3 minutes if no action is performed on the opening el- ements.The handle can be brought out man- ually as well as electrically To do this, move the lock cover 2 and grip the end A of the handle 1 with your finger.
Rear doorsWith the doors unlocked, slide your hand into the handle 3 and pull towards you.
1 2
A

1.31
ENG_UD75350_2Ouverture et fermeture des portes (BCB - Renault)
OPENING AND CLOSING THE DOORS (2/3)
4
Opening from the insidePull handle 4.From inside the vehicle, the front exte- rior handles can be folded out:– by opening a door;– by pressing the central locking button
once when the vehicle is locked or twice when it is unlocked.
When driving, the handles fold away automatically:– as soon as the vehicle speed ex-
ceeds around 3 mph (5 km/h);– when reversing.
Lights-on reminder buzzerA warning beep sounds when the driv- er’s door is opened to warn you that the lights are still on.
Door/tailgate open buzzer
When stationary, the 7 warning light indicates when an opening ele- ment (door, luggage compartment or charging flap) is open or not properly closed. The warning light 5 indicates that the door or the boot is open or not properly closed.When the vehicle reaches a speed of approximately 12 mph (20 km/h), the
7 and 5 warning lights and are accompanied by a message 6 indicat- ing that the opening element is open or not properly closed.
7
56

of warning soundlight reminder alarm .............................(up to the end of the DU)
of warning sounddoor/luggage compartment open reminder alarm .....................................(up to the end of the DU)
child safety.................................................(current page)
1.32
ENG_UD75350_2Ouverture et fermeture des portes (BCB - Renault)
OPENING AND CLOSING THE DOORS (3/3)
Driver’s responsibility when parking or stopping the vehicleNever leave an animal,
child or adult who is not self-suffi- cient alone on your vehicle, even for a short time.They may pose a risk to themselves or to others by starting the engine, activating equipment such as the electric windows or by locking the doors.Also, in hot and/or sunny weather, please remember that the tempera- ture inside the passenger compart- ment increases very quickly.RISK OF DEATH OR SERIOUS INJURY.
Special noteOnce the engine has been switched off, the lights and accessories (radio, etc.) will continue to operate until the driver’s door is opened.
Child safetyTo make it impossible for the rear doors to be opened from the inside, move the lever 8 and check from the inside that the doors are securely locked.
8

access vehicle ..................................................(up to the end of the DU)
card ...........................................................(up to the end of the DU)map
operating faults ....................................(up to the end of the DU)
mapcard emergency key ............................(up to the end of the DU)
mapengine not starting in hands-free mode (up to the end of the DU)
central door locking ...................................(up to the end of the DU)unlocking the doors ...................................(up to the end of the DU)closing the doors .......................................(up to the end of the DU)opening the doors ......................................(up to the end of the DU)
opening/closing doors and tailgate ................................(up to the end of the DU)
doors/tailgate .............................................(up to the end of the DU)locking the doors .......................................(up to the end of the DU)locking/unlocking the opening elements ....(up to the end of the DU)
1.33
ENG_UD75351_2Verrouillage / Déverrouillage des portes (BCB - Renault)
LOCKING, UNLOCKING THE DOORS (1/3)If the card does not work:In certain cases, the card may not work:– when the card battery is drained, flat
battery etc;– due to the use of electronic devices
near to the remote control (e.g. mobile telephone);
– vehicle located in a high electromag-netic radiation zone.
It is then possible:– to use the key that is built into the
card;– to lock each of the doors manually;– to use the interior door locking/un-
locking control (refer to the following pages).
The card’s built-in keyThe integrated 2 key is used to lock or unlock the front left-hand door if the card does not work.
Access with key 2Slide the rear casing 1 downwards while pressing on zone A.
2A1

1.34
ENG_UD75351_2Verrouillage / Déverrouillage des portes (BCB - Renault)
Locking, unlocking the opening elements
LOCKING, UNLOCKING THE DOORS (2/3)
Using the key integrated in the cardMove the lock cover 3 by pressing the left part and insert the 2 key into the lock and lock or unlock the driver’s door.
Locking the doors manuallyTurn screw 4 with the door open (using the end of the key) and close the door.This means that the doors are then locked from the outside.The doors may then only be opened from the inside or by using the key in the front left-hand door.
4
2
3

1.35
ENG_UD75351_2Verrouillage / Déverrouillage des portes (BCB - Renault)
Locking the doors without the cardFor example, in the event of a dis- charged battery or the card temporarily not working, etc.With the engine switched off and an opening (door or boot) open, press and hold the switch 5 for more than five seconds.When the door is closed, all the doors and tailgate will be locked.Note: unlocking the vehicle from the outside is only possible with the card in the vehicle’s access zone or using the key integrated in the card.
LOCKING, UNLOCKING THE DOORS (3/3)
Interior locking/unlocking door controlSwitch 5 simultaneously controls the doors and the tailgate.If a door or the tailgate is open or not closed properly, the doors and tailgate lock/unlock quickly.If transporting an object with the tail- gate open, you can still lock the doors: with the ignition off, press and hold switch 5 for more than five seconds to lock the other opening elements.
Door and tailgate status indicatorWhen the ignition is on, the 5 switch warning light indicates the locking status of the opening elements:– indicator light on, the doors and tail-
gate are locked,– indicator light off, the doors and tail-
gate are unlocked.If the ignition is off, when you lock the doors the warning light remains lit for some time before disappearing.
Never leave your vehicle with the card inside.
After locking/unlocking the vehi- cle using the buttons on the card, remote locking and hands-free un- locking are deactivated.To reactivate the “hands-free” mode: restart the vehicle.
Driver’s responsibilityIf you decide to keep the doors locked when you are driving, remember that it
may be more difficult for those as- sisting you to gain access to the pas- senger compartment in the event of an emergency.
5

operating faults ..........................................(up to the end of the DU)automatic locking of the doors while driving ........................................................(up to the end of the DU)central door locking ...................................(up to the end of the DU)unlocking the doors ...................................(up to the end of the DU)closing the doors .......................................(up to the end of the DU)opening the doors ......................................(up to the end of the DU)doors..........................................................(up to the end of the DU)doors/tailgate .............................................(up to the end of the DU)locking the doors .......................................(up to the end of the DU)
1.36
ENG_UD73937_2Condamnation automatique des ouvrants en roulage (BCB - Renault)
NB: if a door is opened or closed, it will automatically lock again when the vehicle reaches a speed of 6 mph (10 km/h).
Activating/deactivating the functionTo activate: with the vehicle station- ary and the engine running, press the 1 switch for at least five seconds until a beep sounds.To deactivate: with the vehicle station- ary and the engine running, press the 1 switch for at least five seconds until you hear two beeps.The function can also be activated and deactivated via the multimedia screen (depending on the vehicle) ➥ 1.108.
Automatic locking when driving
AUTOMATIC LOCKING WHEN DRIVING
Operating principleAfter the vehicle is started, the system automatically locks the doors when you are driving at approximately 6 mph (10 km/h) and over.The door can be unlocked:– by pressing the central door unlock-
ing switch 1;– at a standstill, by opening a front
door from inside the vehicle. Driver’s responsibilityIf you decide to keep the doors locked when you are driving, remember that it
may be more difficult for those as- sisting you to gain access to the pas- senger compartment in the event of an emergency.
1
Operating faultsIf you experience an operating fault (no central locking, the indicator light 1 does not light up when trying to lock the doors and luggage compartment etc.), make sure that central locking has not been deactivated by mistake and check that the doors and luggage compart- ment are properly closed. If they are properly closed, contact an approved dealer.

headrest.....................................................(up to the end of the DU)adjusting your driving position ...................(up to the end of the DU)front seats
adjustment ...........................................(up to the end of the DU)
1.37
ENG_UD75352_2Appuis-tête avant (BCB - Renault)
Headrests, seats
FRONT HEADRESTS
To raise the headrestPull the headrest upwards to the de- sired height. Check that it is correctly locked.
To lower the headrestPress button 2 and guide the headrest down to the desired height. Check that the bonnet is correctly locked.
A
2
To raise the headrestRaise it to its highest position (tilt the seatback backwards). Press button 2 and lift the headrest to release it.
To refit the headrestCheck that the headrest rods are clean 3.Insert the headrest rods into the holes 1 (tilt the seatback backwards). Lower the headrest until it locks and press button 2 to adjust to the desired height. Check that each rod 3 on the seatback is securely locked.
The headrest is important for safety. Ensure that it is in place and in the correct po- sition: the top of the head-
rest should be as close as possible to the top of the head and there must be a minimal distance between the head and the headrest A.
31

front seat adjustment .................................(up to the end of the DU)front seats
with manual controls ............................(current page)
front seatsadjustment ...........................................(up to the end of the DU)
1.38
ENG_UD73939_2Sièges avant à commandes manuelles (BCB - Renault)
To raise or lower the seat baseMove lever 3 as many times as neces- sary upwards or downwards.
To tilt the seatbackLift handle 4 as far as possible and tilt the seatback to the desired position. Release the handle at the desired po- sition and make sure that it is locked.
1
2 3
FRONT SEATS WITH MANUAL CONTROL (1/2)
To move the seat forwards or backLift handle 1 to release. Release the handle at the desired position and make sure that it is locked.
Adjusting the lumbar support on the driver’s seat(depending on the vehicle)Push the 2 switch forwards or back- wards to adjust the lumbar pad.
After making adjustments, make sure that the seat-backs are correctly locked in place.
For safety reasons, carry out any adjustments while the vehicle is stationary.
We would advise you not to recline the seatbacks too far to ensure that the effectiveness of the seat belts is not reduced.Nothing should be placed on the floor area in front of the driver as such objects may slide under the pedal during braking manoeuvres, thus obstructing its use.
4

1.39
ENG_UD73939_2Sièges avant à commandes manuelles (BCB - Renault)
Heated seatsDepending on the vehicle, with the ig- nition on, you can activate the heated seats via the multimedia screen 5:
– pressing the ð pictogram on the required seat for the first time ac- tivates the heating system at maxi- mum power. Three integrated switch warning lights come on;
– a second press decreases the heat- ing to medium power. Two integrated warning lights come on;
– a third press decreases the heating to minimum power. One integrated warning light comes on;
– a fourth press turns the heating off.In order to avoid unnecessary energy consumption, the heated passenger seat can be deactivated automatically in the absence of an occupant.
6
FRONT SEATS WITH MANUAL CONTROL (2/2)
5
“Favourites” functionDepending on the vehicle, by pressing the steering wheel control 6, you can activate the heated seats according to the stored use settings that you have previously defined.For more information on programming this function, please refer to the multi- media instructions.

seatsadjustment ...........................................(up to the end of the DU)
front seatswith electric controls.............................(up to the end of the DU)
1.40
ENG_UD73940_2Sièges avant à commandes électriques (BCB - Renault)
1 23
FRONT SEATS WITH ELECTRIC CONTROL (1/2)
On vehicles that are equipped, the switch 1 can be used to access the “Seats” menu on the multimedia screen (see following pages).
Adjusting the seatbackTo tilt the seatback, move the top of switch 2 forwards or backwards.
Adjusting the lumbar support on the driver’s seatMove the switch 3 forwards, back- wards, up or down.
4
Adjusting the seat positionTo move the seat forwards or backMove switch 4 forwards or backwards.To raise or lower the seat baseMove the back of switch 4 up or down.
For safety reasons, carry out any adjustments when the vehicle is not being driven.
We would advise you not to recline the seatbacks too far to ensure that the effectiveness of the seat belts is not reduced.No object should be placed on the floor (in front of the driver). such objects may slide under the pedals during sudden braking manoeuvres and obstruct their use.

heated seats ..............................................(current page)
1.41
ENG_UD73940_2Sièges avant à commandes électriques (BCB - Renault)
FRONT SEATS WITH ELECTRIC CONTROL (2/2)
Heated seatsDepending on the vehicle, with the ig- nition on, you can activate the heated seats via the multimedia screen 5:
– pressing the ð pictogram on the required seat for the first time ac- tivates the heating system at maxi- mum power. Three integrated switch warning lights come on;
– a second press decreases the heat- ing to medium power. Two integrated warning lights come on;
– a third press decreases the heating to minimum power. One integrated warning light comes on;
– a fourth press turns the heating off.In order to avoid unnecessary energy consumption, the heated passenger seat can be deactivated automatically in the absence of an occupant.
5
6
“Favourites” functionDepending on the vehicle, by pressing the steering wheel control 6, you can activate the heated seats according to the stored use settings that you have previously defined.For more information on programming this function, please refer to the multi- media instructions.

massage: seat massage............................(current page)front seat adjustment .................................(up to the end of the DU)massage seat ............................................(current page)seats
front seat with electric controls.............(up to the end of the DU)
seatsfront seat with massage .......................(current page)
seatsfront seat settings.................................(up to the end of the DU)
1.42
ENG_UD74504_2Siège avant : fonctionnalités (BCB - Renault)
FRONT SEATS: Functions (1/2)
A number of seat functions are avail- able from the multifunction screen, de- pending on the vehicle.On equipped vehicles, the switch 1 pro- vides direct access to the “Seats” menu on the multimedia screen.
Massage seatsYou can activate the “Massage” func- tion on the driver’s seat or the front pas- senger seat.
1
Seats
Driver Passenger
Massage
Lumbar
Relaxing
Dynamic
Intensity
Seat Easy access
Visual feedback
Driving postureSeat and driving equipment
Save Recall
With the ignition on, from the multime- dia screen select “Vehicle” 2, “Seats” world, then “Massage”.Browse menu “Driver” or “Passenger” to:– select the massage type (“Lumbar”,
“Relaxing”, “Dynamic”);– adjust the intensity;– activate/deactivate the massage
seat.Pressing and holding the switch 1 of the desired seat activates the “Massage” function directly according to the set- tings defined.
SettingsRefer to the multimedia instructions for information on accessing the settings.You can activate or deactivate the fol- lowing elements:– easy driver/passenger access;– visual feedback of current move-
ment.Note: if the user profile is “Guest”, the automatic adjustment functions will not be available.
Easy driver/passenger accessWhen this function is activated, the seat automatically moves back when the driver and/or passenger leaves the ve- hicle, and returns to its position the next time the vehicle starts.Note:– deactivate this function when fitting
a child seat in the front passenger seat;
– the function is deactivated if one of the adjustment buttons is pressed while the seat is moving.
2

front seatdriver’s position memory ......................(current page)
1.43
ENG_UD74504_2Siège avant : fonctionnalités (BCB - Renault)
FRONT SEATS: Functions (2/2)PositionIt is possible to save the driving posi- tion for the driver’s seat and/or passen- ger seat.The driving position includes the set- tings for the seat base and seatback as well as the door mirrors.The driving position can be stored and recalled by pressing the buttons:– by changing the user profile;– by pressing the “Recall” button for
the driver’s seat;– by pressing the 6 buttons for the pas-
senger seat.
3
Recalling the driving positionFor more information on storing the driving position, please refer to the mul- timedia instructions.Note: recall of the stored driving po- sition is interrupted if one of the seat adjustment buttons is pressed during recall.
4
5
For safety reasons, carry out any adjustments when the vehicle is stationary.
Storing your driving position– Adjust the driver seat using
switches 3, 4 and 5 (refer to previous page);
– adjust the door mirrors.Refer to the multimedia instructions for information on accessing the stored driving position.The positions of the exterior rear view mirrors when driving forwards, in re- verse and of the driver seat are saved.
Seats
Driver Passenger
Massage
Lumbar
Relaxing
Dynamic
Intensity
Seat Easy access
Visual feedback
Seat position
Save Recall
6

seat belts ...................................................(up to the end of the DU)driving position
settings ................................................(up to the end of the DU)
adjusting your driving position ...................(current page)front seats
adjustment ...........................................(up to the end of the DU)
1.44
ENG_UD74594_2Ceintures de sécurité (BCB - Renault)
Seat belts
Incorrectly adjusted or twisted seat belts may cause injuries in the event of an accident.
Use one seat belt per person, whether child or adult.Even pregnant women should wear a seat belt. In this case, ensure that the lap belt is not exerting too much pressure on the abdomen, but do not allow any slack.
SEAT BELTS (1/5)
Make sure that the rear bench seat is locked in position correctly so that the rear seat belts will operate cor- rectly. ➥ 3.33.
Always wear your seat belt when trav- elling in your vehicle. You must also comply with the legislation of the par- ticular country you are in.Before starting, first adjust your driv-ing position, then ask all occupants to adjust their seat belts to ensure optimum protection.
Adjusting your driving position– Sit well back in your seat (having
first removed your coat or jacket). This is essential to ensure your back is positioned correctly;
– adjust the distance between the seat and the pedals. Your seat should be as far back as possible while still allowing you to fully de- press the pedals. The seatback should be adjusted so that your arms are slightly bent when you hold the steering wheel;
– adjust the position of your head- rest. For maximum safety, your head must be as close as possible to the headrest;
– adjust the height of the seat. This adjustment allows you to select the seat position which offers you the best possible view;
– adjust the position of the steering wheel.

locking .......................................................(current page)
1.45
ENG_UD74594_2Ceintures de sécurité (BCB - Renault)
SEAT BELTS (2/5)
1
53
45
Adjusting the seat beltsSit with your back firmly against the seatback.Shoulder strap 1 should be as close as possible to the base of the neck but not on it.Lap belt 2 should be worn flat over the thighs and against the pelvis.The belt should be worn so that it is as close as possible to your body, i.e.: avoid wearing heavy clothing or keep-ing bulky objects under the belts, etc.
LockingUnwind the belt slowly and smoothly and ensure that buckle 3 locks into catch 5 (check that it is locked by pull-ing on buckle 3).If the belt jams, allow it to return slightly before attempting to unwind it again.If your seat belt is completely jammed, pull slowly, but firmly, so that just over 3 cm unwinds. Allow it to return slightly before attempting to unwind it again.If there is still a problem, contact an ap- proved dealer.
UnlockingPress button 4 and the seat belt will be rewound by the inertia reel. Guide the belt.
2

1.46
ENG_UD74594_2Ceintures de sécurité (BCB - Renault)
SEAT BELTS (3/5)
ß Driver’s seat belt reminder and, depending on the vehi-
cle, front passenger seat belt re- minderThis appears on the central display when the ignition is switched on and if the driver’s or front passenger’s seat belt (as long as the passenger seat is occupied) is not fastened.Depending on the vehicle, if the seat is occupied and one of these seat belts is not fastened or becomes unfastened while the vehicle is moving at a speed over approximately 12 mph (20 km/h),
the ß warning light flashes and a beep sounds for approximately 120 seconds.Note: an object placed on the passen- ger seat may activate the warning light in some cases, depending on the ve- hicle.Rear seat belt reminder (depending on vehicle)The 6 graphic is displayed on the in- strument panel when the ignition is switched on. This informs the driver of the fastening status of each of the rear seat belts every time:– the ignition is switched on;– a door is opened;– fastening or unfastening of a rear
seat belt.
6Understanding the graphic 6:– indicator green: seatbelt fastened;– indicator in red: the seat is occupied
and the seat belt is not fastened;– indicator grey: seat not occupied.
The ß warning light on the central display also appears when the ignition is switched on, if a rear seat is occupied and the seat belt is not fastened.When the vehicle speed is less than approximately 12 mph (20 km/h), the
ß warning light on the central dis- play appears if a rear seat is occupied and the seat belt is not fastened.
It is accompanied by the 6 symbol which appears for approximately 60 seconds each time one of the rear seat belts is fastened or unfastened.When the vehicle speed exceeds ap- proximately 12 mph (20 km/h), if one of the rear seat belts is or becomes unfas- tened during the journey:
– the ß warning light flashes on the central display;
and– a beep sounds for around 120 sec-
onds;and– the 6 symbol is displayed for approx-
imately 180 seconds and the symbol for the seat concerned changes to red.
Always make sure that the rear pas- sengers are properly fastened and that the number of fastened seat belts in- dicated corresponds to the number of rear seats occupied.Note: in some cases the alerts may be activated if an object is placed on one of the rear seats, depending on the ve- hicle.

rear seats...................................................(current page)
1.47
ENG_UD74594_2Ceintures de sécurité (BCB - Renault)
Rear centre seat belt 9Slowly unwind belt 9.Fasten the tongue 10 in the red buckle 11.
SEAT BELTS (4/5)
8
7
9
11
9
10
Adjusting the height of the front seat beltsUse button 7 to adjust the seat belt height so that the shoulder strap is worn as shown previously. Press the button 7 and raise or lower the seat belt. Make sure that the seat belt is locked in posi- tion correctly after you have adjusted it.
Rear side seat belts 8The belts are locked, unlocked and adjusted in the same way as the front belts.
Check that the rear seat belts are positioned and operating correctly each time the rear bench seat is
moved.

1.48
ENG_UD74594_2Ceintures de sécurité (BCB - Renault)
The following information applies to the vehicle’s front and rear seat belts.
SEAT BELTS (5/5)
– No modification may be made to the component parts of the originally fitted restraint system: seat belts, seats and their mountings. For special operations (e.g. fitting child seats), contact an authorised dealer.
– Do not use devices which allow any slack in the belts (e.g. clothes pegs, clips, etc.): a seat belt which is worn too loosely may cause injury in the event of an accident.
– Never wear the shoulder strap under your arm or behind your back.– Never use the same belt for more than one person and never hold a baby or child on your lap with your seat belt around
them.– The belt should never be twisted.– Following an accident, have the seat belts checked and replaced if necessary. Always replace your seat belts as soon as
they show any signs of wear.– When the rear bench seat is being put back, make sure that the seat belts and buckles are correctly positioned so that they
can be used properly.– Make sure that the buckle is inserted into the appropriate catch.– Ensure that no objects are placed in the area around the seat belt catch as they could prevent it from being properly se-
cured.– Make sure the seat belt catch is properly positioned (it should not be hidden away, crushed or flattened by people or ob-
jects).

air bag........................................................(up to the end of the DU)seat belts ...................................................(up to the end of the DU)air bag........................................................(up to the end of the DU)additional methods of restraint ..................(up to the end of the DU)additional methods of restraint
to the rear seat belts ............................(up to the end of the DU)
additional methods of restraintto the front seat belts ...........................(up to the end of the DU)
pretensioners .............................................(up to the end of the DU)seat belt pretensioners
front seat belt .......................................(up to the end of the DU)
seat belt pretensioners ..............................(up to the end of the DU)methods of restraint in addition to the seat
belts ...........................................................(up to the end of the DU)
1.49
ENG_UD75353_2Dispositifs complémentaires à la ceinture avant (BCB - Renault)
Additional methods of restraintin addition to the front seat belts
METHODS OF RESTRAINT IN ADDITION TO THE FRONT SEAT BELTS (1/6)
– Have the entire restraint system checked following an accident.
– No operation whatso- ever is permitted on any part of the system (pretensioners, airbags, computers, wiring) and the system components must not be reused on any other vehicle, even if identical.
– Only qualified personnel from our Network may work on the airbags; otherwise the system may trigger accidentally and cause injury.
– The electric trigger system may only be tested by a specially trained technician using special equipment.
– When the vehicle is scrapped, contact an approved dealer for disposal of the pretensioner and airbags gas generators.
These are made up of:– seat belt inertia reel pretension-
ers;– central seat belt pretensioners;– chest-level load limiters;– airbags driver and passenger
front.These systems are designed to act in-dependently or together when the vehi-cle is subjected to a frontal impact.Depending on the severity of the impact, the system can trigger:– seat belt locking;– the seat belt inertia reel pretensioner
(which engages to correct seat belt slack);
– lap seat belt pretensioners to hold the occupant in their seat;
– the front airbag.
12
PretensionersThe pretensioners hold the seat belt against the body, holding the occupant more securely against the seat, thus in- creasing the seat belt’s efficiency.In the event of a severe frontal impact and if the ignition is switched on, the system may engage the following de- pending on the force of the impact:– the seat belt inertia reel preten-
sioner 1 which instantly retracts the seat belt;
– the lap seat belt inertia reel preten- sioner 2 on the front seats.

1.50
ENG_UD75353_2Dispositifs complémentaires à la ceinture avant (BCB - Renault)
METHODS OF RESTRAINT IN ADDITION TO THE FRONT SEAT BELTS (2/6)Load limiterAbove a certain severity of impact, this mechanism is used to limit the force of the belt against the body so that it is at an acceptable level.
driver and passenger front AirbagsFitted to the driver and passenger sides.A symbol on the lower section of the windscreen indicates if this equipment is present (depending on the vehicle).Each airbag system consists of:– an airbag and gas generator fitted on
the steering wheel for the driver and in the dashboard for the passenger;
– an electronic unit for monitoring the system controlling the gas generator electrical trigger;
– remote sensors;– control warning lights, displayed on
the roof console 3:
– lit up, passenger airbag activated;
– ¹ lit up, passenger airbag disabled.
The airbag system uses py- rotechnic principles. This explains why, when the airbag inflates, it will gener-
ate heat, produce smoke (this does not mean that a fire is about to start) and make a banging noise. In a situ- ation where an airbag is required, it will inflate immediately and this may cause some minor, superficial graz- ing to the skin or other problems.
3

operating faults ..........................................(current page)
1.51
ENG_UD75353_2Dispositifs complémentaires à la ceinture avant (BCB - Renault)
METHODS OF RESTRAINT IN ADDITION TO THE FRONT SEAT BELTS (3/6)
OperationThis system is only operational when the ignition is switched on.In a severe frontal impact, the airbags inflate rapidly, cushioning the impact of the driver's head and chest against the steering wheel and of the front pas- senger against the dashboard. The air bags then deflate immediately so that the passengers are not in any way hin- dered from leaving the vehicle.
Operating faults
å This warning light comes on when the engine is started and then goes out after approximately 65 sec- onds.If it does not come on when the ignition is switched on or if it stays on, there is a fault in the system.Contact your approved Dealer as soon as possible.Your protection will be reduced until this fault is rectified.

1.52
ENG_UD75353_2Dispositifs complémentaires à la ceinture avant (BCB - Renault)
METHODS OF RESTRAINT IN ADDITION TO THE FRONT SEAT BELTS (4/6)
The following conditions will trigger the pretensioners or airbags.In a frontal impact against a rigid (non-deformable) surface at an impact speed equal to or greater than 16 mph (25 km/h).
In a frontal impact with another vehi- cle of an equivalent or higher category, with an impact area equal to or greater than 40%, where the speed of both ve- hicles is equal to or greater than 25 mph (40 km/h).
In a side impact with another vehicle of an equivalent or higher category, at an impact speed equal to or greater than 31 mph (50 km/h).

1.53
ENG_UD75353_2Dispositifs complémentaires à la ceinture avant (BCB - Renault)
METHODS OF RESTRAINT IN ADDITION TO THE FRONT SEAT BELTS (5/6)
In the following examples, the pre- tensioners or the airbags could op- erate:– impact under vehicle such as pave-
ment;– potholes;– drop or hard landing;– stones;– ...
In the following examples, the pre- tensioners or airbags might not op- erate:– rear impact, however severe;– the vehicle overturning;
– side impact to the front or rear of the vehicle;
– frontal impact, under the tail of a lorry;
– frontal impact against an obstacle with a sharp angle;
– ...

child safety.................................................(current page)
1.54
ENG_UD75353_2Dispositifs complémentaires à la ceinture avant (BCB - Renault)
METHODS OF RESTRAINT IN ADDITION TO THE FRONT SEAT BELTS (6/6)All of the warnings below are given so that the airbag is not obstructed in any way when it is inflated and also to prevent the risk of serious injuries caused by items which may be dislodged when it inflates.
Warnings concerning the driver’s airbag– Do not modify the steering wheel or the steering wheel boss.– Do not cover the steering wheel boss under any circumstances.
– Do not attach any objects (badge, logo, clock, telephone holder, etc.) to the steering wheel boss.– The steering wheel must not be removed (except by qualified personnel from our Network).– Do not sit too close to the steering wheel when driving: sit with your arms slightly bent (see “Adjusting your driving position”
➥ 1.44). This will allow sufficient space for the airbag to deploy correctly and be fully effective.
Warnings concerning the passenger airbag– Fitting seat covers is prohibited in the front seats as this could affect the operation of the airbag passenger.– Do not attach or glue any objects (badge, logo, clock, telephone holder, etc.) to the dashboard on or near the airbag.– Do not place anything between the dashboard and the passenger (pet, umbrella, walking stick, parcels, etc.).– The passenger must not put his or her feet on the dashboard or seat as there is a risk that serious injuries may occur. In
general, parts of the body should be kept away from the dashboard (knees, hands, head, etc.).

air bag........................................................(up to the end of the DU)additional methods of restraint
to the rear seat belts ............................(up to the end of the DU)
seat belt pretensioners ..............................(current page)methods of restraint in addition to the seat belts ...........................................................(up to the end of the DU)
1.55
ENG_UD69820_1Dispositifs complémentaires aux ceintures arrière latérales (BCB - Renault)
to the rear seat belts
METHODS OF RESTRAINT IN ADDITION TO THE REAR SEAT BELTSThese are made up of:– side seat belt inertia reel preten-
sioners;– chest force limiters.These systems are designed to act in-dependently or together when the vehi-cle is subjected to a frontal impact.Depending on the severity of the impact, the system can trigger:– seat belt locking;– the seat belt inertia reel pretensioner
(which engages to correct seat belt slack).
Force limiterAbove a certain severity of impact, this mechanism is used to limit the force of the belt against the body so that it is at an acceptable level.
1
Side seat belt pretensionersThe pretensioners hold the seat belt against the body, holding the occupant more securely against the seat, thus in- creasing the seat belt’s efficiency.With the ignition on, following a signif- icant frontal impact and depending on the severity of the impact, the system may trigger the seat belt inertia reel pretensioner 1, which instantly retracts the seat belt.
– Have the entire restraint system checked following an accident.
– No operation whatso- ever is permitted on any part of the system (pretensioners, airbags, computers, wiring) and the system components must not be reused on any other vehicle, even if identical.
– Only qualified personnel from our Network may work on the airbags; otherwise the system may trigger accidentally and cause injury.
– The electric trigger system may only be tested by a specially trained technician using special equipment.
– When the vehicle is scrapped, contact an approved dealer for disposal of the pretensioner and airbags gas generators.

air bag........................................................(up to the end of the DU)seat belts ...................................................(up to the end of the DU)air bag........................................................(up to the end of the DU)side protection devices ..............................(up to the end of the DU)additional methods of restraint
side protection .....................................(up to the end of the DU)
methods of restraint in addition to the seat belts ...........................................................(up to the end of the DU)
1.56
ENG_UD69821_1Dispositifs de protection latérale (BCB - Renault)
Side AirbagThis airbag is fitted to each of the front seats and is activated at the sides of the seats (door side) to protect the oc- cupants in the event of a severe side impact.
Curtain AirbagThese are airbags fitted along the sides of the vehicle in the ceiling which trigger along the front and rear door side win- dows to protect the passengers in case of a severe side impact.
Central AirbagThis airbag is fitted to the driver's seat and is deployed between the driver's seat and the passenger seat in order to protect the driver and their passenger in the event of a severe side impact.It also spreads out to protect the driver, if they are the only one in the front, in the event of a severe side impact.
side protection
SIDE PROTECTION DEVICES
Warning regarding the side airbag and central airbag– Fitting seat covers is prohibited in the front seats as this could affect the operation of the airbag passenger.
– Do not place any accessories, objects or even pets between the seatback, the door and the internal fittings. Do not cover the seatback with objects such as clothes or accessories. This may prevent the airbag from operating correctly or cause injury when the airbag is deployed.
– Do not drive with the central armrest in the open position, this could affect the correct operation of the central airbag and/or cause injury when it is deployed.
– Do not place any objects on the cover of the central armrest storage compart- ment, this could affect the correct operation of the central airbag and/or cause injury when it is deployed.
– Do let any objects hang out of the central armrest storage compartment, this could affect the correct operation of the central airbag and/or cause injury when it is deployed.
– No work or modification whatsoever may be carried out on the seat or internal fittings, except by qualified personnel from an approved dealer.
– The airbags deploys through the slits in the front seatbacks (door side and centre console side): never insert any objects into these slits.

air bag........................................................(up to the end of the DU)seat belts ...................................................(up to the end of the DU)air bag........................................................(up to the end of the DU)additional methods of restraint ..................(up to the end of the DU)methods of restraint in addition to the seat belts ...........................................................(up to the end of the DU)
1.57
ENG_UD69822_1Dispositifs de retenue complémentaire (BCB - Renault)
ADDITIONAL METHODS OF RESTRAINT
The airbag is designed to complement the action of the seat belt. Both the airbag and the seat belt are integral parts of the same protection system. It is therefore essential to wear seat belts at all times. If seat belts are not worn, the oc- cupants are exposed to the risk of serious injury in the event of an accident. It may also increase the risk of minor su- perficial injuries occurring when the airbag is deployed, although such minor injuries are always possible with airbags.
If the vehicle should overturn or suffer a rear impact, however severe, the pretensioners and airbags are not always triggered. Shocks to the underbody of the vehicle, from pavements, potholes, stones etc. can all trigger these systems.– Work and modifications on the complete airbag system (airbags, pretensioners, ECU, wiring harness, etc.), are strictly pro-
hibited (except by qualified Network personnel).– To ensure that the system is in good working order and to avoid accidental triggering of the system which may cause injury,
only qualified Network personnel may work on the airbag system.– As a safety precaution, have the airbag system checked if your vehicle has been involved in an accident, or is stolen or
broken into.– When selling or lending the vehicle, inform the user of these points and hand over this driver’s handbook with the vehicle.– When scrapping your vehicle, contact your approved dealer for disposal of the gas generator(s).
All of the warnings below are given so that the airbag is not obstructed in any way when it is inflated and also to prevent the risk of serious injuries caused by items which may be dislodged when it inflates.

airbagfront passenger airbag deactivation .....(current page)
front passenger air bag deactivation .........(current page)child restraint/seat .....................................(up to the end of the DU)child safety.................................................(up to the end of the DU)passenger detection system ......................(up to the end of the DU)child restraint/seat .....................................(up to the end of the DU)transporting children ..................................(up to the end of the DU)
1.58
ENG_UD74704_2Système de détection de passager (BCB - Renault)
After the initialisation phase, if the system detects a change of status (e.g. passenger seat occupied when the ig- nition is switched on, then not occu- pied), the following messages are dis- played on the instrument panel:– “Passenger airbag on” accompanied
by the warning light;or– “Passenger airbag off” accompanied
by the ¹ warning light.
passenger detection system
OperationAfter an initialisation phase of approxi- mately 5 seconds, the 1 and 2 warning lights let you check the activation status of the passenger airbag:
– ¹ 1 warning light on, the pas- senger airbag is disabled. In this case, the warning light stays on con- tinuously;
– 2 warning light on, the pas- senger airbag is activated. In this case, the warning light stays on for approximately 65 seconds.
1 2
PASSENGER DETECTION SYSTEM (1/4)Depending on the vehicle, the pas- senger detection system automatically manages the activation and deactiva- tion of the passenger airbag according to whether the front passenger seat is occupied.The passenger airbag is automatically disabled if a child seat is fitted in the front passenger seat or if the seat is not occupied.Before fitting a child seat on the front passenger seat, consult the different types of seats ➥ 1.64 and fitting meth- ods ➥ 1.68.To find out the type of child seat author- ised for use on the front passenger seat ➥ 1.70 ➥ 1.73.
DANGERAfter fitting a rear-facing child seat, check that the airbag is disabled (1 warn-
ing light on).

1.59
ENG_UD74704_2Système de détection de passager (BCB - Renault)
The markings on the dashboard and the labels A on each side of the pas- senger sun visor 3 (such as the label above) remind you that you must not place a child in a rear-facing seat when the passenger airbag is activated.
A
A
PASSENGER DETECTION SYSTEM (2/4)
3

air bagactivating the front passenger air bags (current page)
1.60
ENG_UD74704_2Système de détection de passager (BCB - Renault)
PASSENGER DETECTION SYSTEM (3/4)
If the activation warning light is on when a rear-facing child seat is fitted:– switch off the ignition;– remove the child seat from the pas-
senger seat;– remove any additional elements that
may be located between the child seat and the passenger seat;
– refit the child seat according to the instructions of the child seat manu- facturer;
– start the vehicle.If the problem persists, position the child seat at the rear and contact an ap- proved dealer.
If the ¹ deactivation warning light is on while an adult passenger is seated in the front passenger seat, it may not be correctly fitted.Perform the following actions to allow the system to detect the passenger:– remove any additional elements
from the seat base, such as beach towels, seat covers, etc.;
– make sure that the seat back is not tilted too far back;
– have the passenger sit straight on the seat, centred on the seat cush- ion, with their legs comfortably ex- tended;
– leave the passenger seated in this position for two to three minutes after the activation warning light comes on.
If the problem persists, have the pas- senger sit in the rear and contact an ap- proved dealer.Never switch off the igni-
tion before the vehicle has stopped completely. Once the engine has stopped, the
brake servo, power-assisted steer- ing, etc., and the passive safety de- vices such as the airbags and pre- tensioners will no longer operate.
DANGERAfter fitting a rear-facing child seat, check that the airbag is disabled (1 warn-
ing light on).

1.61
ENG_UD74704_2Système de détection de passager (BCB - Renault)
PASSENGER DETECTION SYSTEM (4/4)Additional factors affecting the operation of the systemSeat belts help keeping the passenger in position on the seat during vehicle manoeuvring and braking. This helps the passenger detection system main- tain the passenger airbag status.A thick layer of additional material (thick coat, cushion, large object placed in the passenger’s rear pocket, heating or massage device) may hinder the cor- rect operation of the passenger detec- tion system.Note: an object placed on the passen- ger seat base may activate the warning light in some cases.
A wet seat may affect the effectiveness of the passenger detection system. If the front passenger seat is wet, dry it immediately.
Warning concerning the passenger airbag: fitting of seat covers prohibited in the front seats.

child restraint/seat .....................................(up to the end of the DU)children ......................................................(up to the end of the DU)child restraint/seat .....................................(up to the end of the DU)child safety.................................................(up to the end of the DU)child seats..................................................(up to the end of the DU)child restraint/seat .....................................(up to the end of the DU)transporting children ..................................(up to the end of the DU)
1.62
ENG_UD76527_2Sécurité enfants : généralités (BCB - Renault)
Child safety: General information
CHILD SAFETY: General information (1/2)Carrying childrenPlease ensure that you comply with the legislation of your country.Children, and adults, must be correctly seated and strapped in for all journeys. The children being carried in your vehi- cle are your responsibility.A child is not a miniature adult. Children are at risk of specific injuries as their muscles and bones have not yet fin- ished growing. The seat belt alone would not provide suitable protection. Use an approved child seat and ensure you use it correctly.
A collision at 31 mph (50 km/h) is the same as falling a distance of 10 metres.
Transporting a child without a restraint is the equivalent of allow-ing him or her to play on a fourth-floor balcony without railings.Never travel with a child held in your arms.In the event of an accident, you will not be able to keep hold of the child, even if you yourself are wearing a seat belt.If your vehicle has been involved in a road accident, replace the child seat and have the seat belts and ISOFIX anchorage points checked.
To prevent the doors being opened, use the “Child lock” feature. ➥ 1.30.
Driver’s responsibility when parking or stopping the vehicleNever leave an animal,
child or adult who is not self-suffi- cient alone on your vehicle, even for a short time.They may pose a risk to themselves or to others by starting the engine, activating equipment such as the electric windows or by locking the doors.Also, in hot and/or sunny weather, please remember that the tempera- ture inside the passenger compart- ment increases very quickly.RISK OF DEATH OR SERIOUS INJURY.

1.63
ENG_UD76527_2Sécurité enfants : généralités (BCB - Renault)
Before fitting a child seat, read the manual and respect its instructions. If you experience any difficulties during installation, contact the manufacturer of the equipment. Keep the instructions with the seat.
CHILD SAFETY: General information (2/2)Using a child seatThe level of protection offered by the child seat depends on its ability to re- strain your child and on its installation. Incorrect installation compromises the protection it offers the child in the event of harsh braking or an impact.Before purchasing a child seat, check that it complies with the regulations for the country you are in and that it can be fitted in your vehicle. Consult an ap- proved dealer to find out which seats are recommended for your vehicle.The regulations on transporting chil- dren are specific to each country. The use of a child seat during transport de- pends on the age and/or the size and/ or weight of the child.For children who do not need to be transported in a child seat, make sure that the seat belt is correctly adjusted and fastened.In all cases, you must comply with the regulations of the particular country you are in.
Set a good example by always fas- tening your seat belt and teaching your child:– to strap themselves in correctly;– to always get in and out of the car
at the kerb, away from busy traf- fic.
Do not use a second-hand child seat or one without an instruction manual.Check that there are no objects in the vicinity of the child seat which could impede its operation.
Never leave a child unat- tended in the vehicle.Check that your child is always strapped in and that
the belt or safety harness used is correctly set and adjusted. Avoid wearing bulky clothing which could cause the belts to slacken.Never let your child put their head or arms out of the window.Check that the child is in the correct position for the entire journey, espe- cially if asleep.

child restraint/seat .....................................(up to the end of the DU)children ......................................................(up to the end of the DU)child restraint/seat .....................................(up to the end of the DU)child safety.................................................(up to the end of the DU)child seats..................................................(up to the end of the DU)child restraint/seat .....................................(up to the end of the DU)transporting children ..................................(up to the end of the DU)
1.64
ENG_UD69824_1Sécurité enfants : choix du siège enfant (BCB - Renault)
CHILD SAFETY: choosing a child seat
Rear-facing child seatsA baby’s head is, proportionally, heavier than that of an adult and its neck is very fragile. Transport the child in this po- sition for as long as possible (until the age of 2 at the very least). It supports both the head and the neck.Choose a bucket type seat for best side protection and change it as soon as the child’s head is higher than the shell.
Forward-facing child seatsUp to 18 kg or 4 years, the child may travel on a forward-facing seat.Choose your seat according the child’s size: their head and abdomen are the areas which must be most protected. A forward-facing child seat which is firmly attached to the vehicle will reduce the risk of impact to the head. Ensure your child travels in a forward-facing seat with a harness for as long as their size permits.Choose a bucket type seat for optimum side protection.
Booster cushionsFrom 15 kg or 4 years, the child can travel using a booster seat, which will enable the seat belt to be adapted to suit his/her size and shape. The booster seat cushion must be fitted with guides to position the seat belt on the child’s thighs rather than the stomach. It is recommended that you use a seat- back fitted with a belt strap guide which can be adjusted in terms of height to position the seat belt in the centre of the shoulder. It must never rest on the neck or on the arm.Choose a bucket type seat for optimum side protection.

towing rings ...............................................(up to the end of the DU)child restraint/seat .....................................(up to the end of the DU)child restraint/seat .....................................(up to the end of the DU)child safety.................................................(up to the end of the DU)child seats..................................................(up to the end of the DU)child restraint/seat .....................................(up to the end of the DU)transporting children ..................................(up to the end of the DU)
1.65
ENG_UD69825_1Sécurité enfants : choix de la fixation du siège enfant (BCB - Renault)
choosing a child seat mounting
CHILD SAFETY: choosing a child seat mounting (1/3)There are two ways of attaching child seats: via the seat belt or using the ISOFIX system.
Attachment via the seat beltThe seat belt must be adjusted to ensure that it is effective in the event of harsh braking or an impact.Ensure that the strap paths indicated by the child seat manufacturer are re- spected.Always check that the seat belt is cor- rectly fastened by pulling it up, then pulling it out fully whilst pressing on the child seat.Check that the seat is correctly held by moving it from side to side and back to front: the seat should remain firmly fixed.Check that the child seat has not been installed at an angle and that it is not resting against a window.
The seat belt must never be twisted or the tension re- lieved.Never pass the shoulder
strap under the arm or behind the back.Check that the seat belt has not been damaged by sharp edges.If the seat belt does not operate nor- mally, it will not protect the child. Consult an approved dealer.Do not use this seat until the seat belt has been repaired.
Do not use the child seat if it may unfasten the seat belt restraining it: the base of the seat must not rest on
the buckle and/or catch of the seat belt.

1.66
ENG_UD69825_1Sécurité enfants : choix de la fixation du siège enfant (BCB - Renault)
CHILD SAFETY: choosing a child seat mounting (2/3)
No modifications may be made to the component parts of the restraint system (ISOFIX seat belts, seats
and their mountings) originally fitted.
Before using an ISOFIX child seat that you purchased for another vehi- cle, check that its installation is authorised. Consult the list of vehicles which can be fitted with the seat from the equipment manufacturer.
Attach the child seat with the ISOFIX locks, if these are provided. The ISOFIX system allows quick, easy, safe fitting.The ISOFIX system consists of two rings and, in some cases, a third ring.
Attachment using the ISOFIX systemApproved child seats ISOFIX are stand- ardised in accordance with current reg- ulations if any of the four cases below applies:– ISOFIXuniversal 3-point forward-fac-
ing seat;– ISOFIXsemi-universal 2-point seat;– specific;– i-Size which has either: – a strap which attaches to the third
ring of the seat concerned; – or a strut that rests on the vehi-
cle floor, compatible with the ap- proved seat i-Size, the role of which is to prevent the child seat from moving in the event of a col- lision.
In the latter three cases check that your child seat can be installed by consulting the list of compatible vehicles.
The ISOFIX anchorage points have been exclu- sively designed for child seats with the ISOFIX
system.Never fit a different type of child seat, seat belt or other objects to these fittings.Check that nothing is obstructing the anchorage points.If your vehicle has been involved in a road accident, have the ISOFIX anchorage points checked and re- place your child seat.
1
The two rings 1 are located between the seatback and the seat base of the seat
and are identified by a symbol.

1.67
ENG_UD69825_1Sécurité enfants : choix de la fixation du siège enfant (BCB - Renault)
CHILD SAFETY: choosing a child seat mounting (3/3)
The child seat strap must be attached to the corre- sponding ring.
Check that the seatback of the forward-facing child seat is in contact with the seatback of the vehicle
seat. In this case, the child seat may not always rest on the seat base of the vehicle seat.
The ISOFIX anchorage points have been exclu- sively designed for child seats with the ISOFIX
system. Never fit a different type of child seat, seat belt or other objects to these anchorage points.Check that nothing is obstructing the anchorage points.If your vehicle has been involved in a road accident, have the ISOFIX anchorage points checked and re- place your child seat.
23
4
Attachment using the ISOFIX system (continued)The third ring 4 is used to attach the upper strap 2 on some child seats.
Rear seatsThe upper strap 2 should be positioned between the seatback and the rear parcel shelf. To do so, remove the rear parcel shelf ➥ 3.34.Attach the 3 hook on one of the 4 rings marked with the symbol.
2
3
4
Front passenger seatAttach the 3 hook of the upper strap 2 to the ring 4 marked with the symbol.
All seatsPull the upper strap 2 so that the back of the child seat comes into contact with the back of the vehicle seat.

child restraint/seat .....................................(up to the end of the DU)child restraint/seat .....................................(up to the end of the DU)child safety.................................................(up to the end of the DU)child seats..................................................(up to the end of the DU)child restraint/seat .....................................(up to the end of the DU)transporting children ..................................(up to the end of the DU)
1.68
ENG_UD76841_2Sécurité enfants : installation du siège enfant (BCB - Renault)
Some seats are not suitable for fitting child seats.The diagrams on pages ➥ 1.70 and ➥ 1.73 show you where to fit a child seat.
fitting a child seat
CHILD SAFETY: fitting a child seat: general information (1/2)
RISK OF DEATH OR SERIOUS INJURY: after fit- ting a rear-facing child seat in this seat, make sure that
the airbag is disabled ➥ 1.58 ➥ 1.76.
After installing the child seat, when this is possible, you can move the vehi- cle seat forward if necessary (so as to leave enough space in the rear seats for passengers or other child seats). For a rear-facing child seat, do not let it touch the dashboard or move it to the furthest forward position.Do not change other settings after in- stalling the child seat.
The types of child seat indicated may not be available. Before using a differ- ent child seat, check with the manufac- turer that it can be fitted.
In the front seatThe laws concerning children travel- ling in the front passenger seat differ in every country. Consult the legislation in force and follow the indications on the diagram on the following page.Before fitting a child seat in this seat (if authorised):– lower the seat belt as far as possible;– move the seat as far back as possi-
ble;– gently tilt the seatback away from
vertical (approximately 25°);– on equipped vehicles, raise the seat
base as far as possible.Always fully raise the seat headrest so that it does not interfere with the child seat ➥ 1.37.
Fit the child seat in a rear seat wherever possible.Make sure the child seat or the child’s feet do not pre-
vent the front seat from locking cor- rectly ➥ 1.38.Check that when installing the child seat in the vehicle it is not at risk of coming loose from its base.If you have to remove the headrest, check that it is correctly stored so that it does not come loose under harsh braking or impact.Always attach the child seat to the vehicle even if it is not in use so that it does not come loose under harsh braking or impact.

1.69
ENG_UD76841_2Sécurité enfants : installation du siège enfant (BCB - Renault)
Always remove the headrest from the rear seat on which the child seat is positioned ➥ 3.32. If necessary, posi- tion the rear seat as far back as pos- sible. This must be done before fitting the child seat. Check that the child seat is resting against the back of the rear seat.
Rear centre seatCheck that the belt is suitable for se- curing your child seat. Consult an ap- proved dealer.
Make sure the child seat or the child’s feet do not pre- vent the front seat from locking correctly ➥ 1.38.
A child seat with a floor sup- port must never be installed on the rear centre seat.RISK OF DEATH OR
SERIOUS INJURY.
CHILD SAFETY: fitting a child seat: general information (2/2)
When fitting a child seat (group 2 or 3 booster seat), check that the seat belts operate (wind) correctly
➥ 1.44. If necessary, adjust the posi- tion of the vehicle seat.
In the rear side seatA carrycot can be installed across the vehicle and will take up at least two seats. Position the child with his or her feet nearest the door.Move the front seat as far forward as possible to install a rear-facing child seat, then move back the seat in front as far as it will go, although without al- lowing it to come into contact with the child seat.For the safety of the child in the for- ward-facing position:– move the relevant seat backwards
as far as possible;– move the seat in front of the child
forwards, and set the position of the seatback to avoid contact between the seat and the child’s legs.
Fit the child seat in a rear seat wherever possible.To install an ISOFIX seat in this seat, detach the central
seat belt by hand before engaging the bolts.

child restraint/seat .....................................(up to the end of the DU)child restraint/seat .....................................(up to the end of the DU)child safety.................................................(up to the end of the DU)child seats..................................................(up to the end of the DU)child restraint/seat .....................................(up to the end of the DU)transporting children ..................................(up to the end of the DU)
1.70
ENG_UD76842_3Sièges enfant : fixation par ceinture de sécurité (BCB - Renault)
Five-seater version
Type of child seat Weight of the child
Front passenger seatRear side
seatsRear centre
seatWith airbag disabled With airbag activated
Carrycot f i t ted across the vehicleGroup 0
< 10 kg X X U (2) U (2)
Rear-facing shell seatGroups 0 or 0 +
< 10 kg and < 13 kg U (1) (5) X U (3) U (3) (6)
Shell seat/rear-facing seatGroups 0+ and 1
< 13 kg and 9 to 18 kg U (1) (5) X U (3) U (3) (6)
Forward-facing seatGroup 1 9 to 18 kg U (5) X U (4) U (4) (6)
Booster seatGroups 2 and 3
15 to 25 kg and 22 to 36 kg U (5) X U (4) U (4)
Child seats: attachment by seat belt or ISOFIX system
CHILD SEATS: attachment by seat belt (1/3)The table below summarises the information already shown on the diagram on the next page, to ensure the regulations in force are respected.
(1) RISK OF DEATH OR SERIOUS INJURY: after fitting a rear-facing child seat in this seat, make sure that the front passenger airbag is disabled ➥ 1.58 ➥ 1.76.

1.71
ENG_UD76842_3Sièges enfant : fixation par ceinture de sécurité (BCB - Renault)
CHILD SEATS: attachment by seat belt (2/3)X = Seat not suitable for fitting child seats of this type.U = Seat allowing a child seat with “Universal” approval to be attached by the seat belt; check that it can be fitted.(2) A carrycot can be installed across the vehicle and will take up at least two seats. Position the child with his or her feet nearest
the door.(3) If necessary, position the vehicle seat as far back as possible. In order to install a rear-facing child seat, move the front seat
as far forward as possible, then move the front seat back as far as it will go, without allowing it to come into contact with the child seat.
(4) In all situations, remove the rear headrest of the seat on which the child seat is positioned. This must be done before fitting the child seat ➥ 3.32. Move the seat in front of the child forwards, move the seatback forward to avoid contact between the seat and the child’s legs.
(5) Raise the seat to the maximum and position it as far back as possible, tilting the seatback slightly (approximately 25°).
(6) RISK OF DEATH OR SERIOUS INJURY: a child seat with a floor support must never be fitted.

1.72
ENG_UD76842_3Sièges enfant : fixation par ceinture de sécurité (BCB - Renault)
Using a child safety system which is not approved for this vehicle will not correctly protect the baby or child.
They risk serious or even fatal injury.
CHILD SEATS: attachment by seat belt (3/3)
³ Check the status of the airbag before fitting a child seat or allowing a passenger to use the seat.
² Seat not suitable for fitting child seats.
Child seat attached using the belt
¬ Seat which allows a child seat with “Universal” approval to be attached by a seat belt.
RISK OF DEATH OR SERIOUS INJURY: after fit- ting a rear-facing child seat in this seat, make sure that
the front passenger airbag is disa- bled ➥ 1.58 ➥ 1.76.
Do not fit a child seat when the large seat back is in the folded position.

towing rings ...............................................(up to the end of the DU)child restraint/seat .....................................(up to the end of the DU)Isofix ..........................................................(up to the end of the DU)child restraint/seat .....................................(up to the end of the DU)child safety.................................................(up to the end of the DU)child seats..................................................(up to the end of the DU)child restraint/seat .....................................(up to the end of the DU)transporting children ..................................(up to the end of the DU)
1.73
ENG_UD76843_5sieges enfant : fixation par système isofix (BCB - Renault)
CHILD SEATS: attachment using the ISOFIX SYSTEM (1/3)
Using a child safety system which is not approved for this vehicle will not correctly protect the baby or child.
They risk serious or even fatal injury.
RISK OF DEATH OR SERIOUS INJURY:after fitting a rear facing child seat on the front pas-
senger seat, check that the airbag has been deactivated ➥ 1.58 ➥ 1.76.
Fit the child seat in a rear seat wherever possible.To install an ISOFIX seat in this seat, unbuckle the seat
belt by hand before engaging the bolts.
² Seat which does not allow a child seat to be fitted.
Child seat fitted using the ISOFIX mounting
Seat which allows a ISOFIX or i-Size child seat to be attached.
± The front and rear seats are equipped with an anchorage point al- lowing a universal forward-facing child seat ISOFIX to be attached. The an- choring points are located on the pas- senger seatback for the front seat and on the bench seatback for the rear seats.
Fitting a seat ISOFIX in the rear-left seat means the middle seat cannot be used. The central seat belt
will no longer be either accessible or useable.
For the front passenger seat, the use of a child seat with a floor sup- port is recommended to avoid trig- gering the seat belt warning signal.
Do not fit a child seat when the large seat back is in the folded position.

1.74
ENG_UD76843_5sieges enfant : fixation par système isofix (BCB - Renault)
CHILD SEATS: attachment using the ISOFIX SYSTEM (2/3)The table below summarises the information already shown on the diagram on the previous page, to ensure the regula- tions in force are respected.
Type of child seat Weight of the child
Size of seat [fixture]
Front passenger seat
Rear side seats
Rear centre seatWith airbag
disabledWith airbag activated
Carrycot f i t ted across the vehicleGroup 0
< 10 kgF, G
[L1, L2]X X IL (2) X
Rear-facing shell seatGroups 0 or 0 +
< 13 kgE
[R1]IL (1) (3) X IL (4) X
Rear-facing seatGroups 0+ and 1
< 13 kg and 9 to 18 kg
C, D[R3, R2]
IL (1) (3) X IL (4) X
Forward-facing seatGroup 1 9 to 18 kg A, B, B1 [F3,
F2, F2X]IUF - IL
(3)X
IUF - IL (4) (5)
X
Booster seatGroups 2 and 3
15 to 25 kg and 22 to 36 kg [B2]
IUF - IL (3)
XIUF - IL(4) (5)
X
Seat i-Size I - U (1) (3) X I - U (4) (5) X

1.75
ENG_UD76843_5sieges enfant : fixation par système isofix (BCB - Renault)
X = Seat not suitable for fitting child seats.U = Seat allowing a child seat with “Universal” approval to be attached by the seat belt; check that it can be fitted.IUF/IL = On equipped vehicles, seat which allows a child seat with “Universal/Semi-universal or vehicle-specific” approval to be
fitted using the ISOFIX system; check that it can be fitted.(2) A carrycot can be installed across the vehicle and will take up at least two seats. Position the child with his or her feet nearest
the door.(3) Raise the seat to the maximum and position it as far back as possible, tilting the seatback slightly (approximately 25°).(4) If necessary, position the vehicle seat as far back as possible. In order to install a rear-facing child seat, move the front seat
as far forward as possible, then move the front seat back as far as it will go, without allowing it to come into contact with the child seat.
(5) In all situations, remove the rear headrest of the seat on which the child seat is positioned. This must be done before fitting the child seat. Move the seat in front of the child forwards, move the seatback forward to avoid contact between the seat and the child's legs.
The size of the ISOFIX child seat is indicated by a letter:– A, B, B1 [F3, F2,F2X]: for forward-facing seats in Group 1 (9 to 18 kg);– [B2]: boosters in groups 2 and 3 (15 to 25 kg and 22 to 36 kg);– C and D [R3 and R2]: rear-facing seats or shell seats in group 0+ (less than 13 kg) or group 1 (9 to 18 kg);– E [R1]: rear-facing shell seats in group 0 (less than 10 kg) or 0+ (less than 13 kg);– F, G [L1, L2]: carrycots in group 0 (less than 10 kg).
CHILD SEATS: attachment using the ISOFIX SYSTEM (3/3)
(1) RISK OF DEATH OR SERIOUS INJURY: after fitting a rear-facing child seat in this seat, make sure that the front passenger airbag is disabled ➥ 1.58 ➥ 1.76.

air bagactivating the front passenger air bags (up to the end of the DU)
airbagfront passenger airbag deactivation .....(up to the end of the DU)
air bag........................................................(up to the end of the DU)airbags
child safety ...........................................(up to the end of the DU)
1.76
ENG_UD75071_1Sécurité enfants : désactivation, activation AIRBAG passager avant (BCB - Renault)
Child safety: deactivating, activating the front passenger AIRBAG
CHILD SAFETY: deactivating, activating AIRBAG front passenger (1/3)
Deactivating the front passenger airbag(depending on the vehicle)Before installing a child seat on the front passenger seat:– check that the child seat can be in-
stalled on this seat;– it is essential to deactivate the
airbagfor a rear-facing child seat.
To deactivate the airbag: with the vehicle stationary and the ignition switched off, push and turn lock 1 to the OFF position.When the ignition is switched on, it is essential to check that the warning
light ¹ is illuminated on the dis- play 2.This light remains permanently lit to let you know that you can fit a child seat.
2
The passenger airbag may only be activated or deacti- vated when the vehicle is stationary with the igni-
tion off.If it is interfered with when the ve- hicle is being driven, indicator lights
å and © will come on.Switch the ignition off then on again to reset the airbag in accordance with the lock position.
DANGERSince operation of the front passenger airbag is not compatible with the po-
sition of a rear-facing child seat, NEVER fit a rear-facing child re- straint system in a seat protected by an ACTIVATED front AIRBAG. This can lead to the DEATH of the CHILD or SERIOUS INJURY.
1

1.77
ENG_UD75071_1Sécurité enfants : désactivation, activation AIRBAG passager avant (BCB - Renault)
CHILD SAFETY: deactivating, activating AIRBAG front passenger (2/3)
3
DANGERSince operation of the front passenger airbag is not compatible with the po-
sition of a rear-facing child seat, NEVER fit a rear-facing child re- straint system in a seat protected by an ACTIVATED front AIRBAG. This can lead to the DEATH of the CHILD or SERIOUS INJURY.
The markings on the dashboard and labels A on each side of the passen- ger sun visor 3 (example: label shown above) remind you of these instruc- tions.
A
A

1.78
ENG_UD75071_1Sécurité enfants : désactivation, activation AIRBAG passager avant (BCB - Renault)
CHILD SAFETY: deactivating, activating AIRBAG front passenger (3/3)
Activating the front passenger airbag(depending on the vehicle)You should reactivate the airbag as soon as you remove the child seat from the front passenger seat to ensure the protection of the front passenger in the event of an impact.
The passenger airbag may only be activated or deacti- vated when the vehicle is stationary with the igni-
tion off.If it is interfered with when the ve-hicle is being driven, indicator lights
å and © will come on.Switch the ignition off then on again to reset the airbag in accordance with the lock position.
Operating faultsIt is forbidden to fit a rear-facing child seat to the front passenger seat if the airbag activation/deactivation system is faulty.Allowing any other passenger to sit in that seat is not recommended.Contact your approved dealer as soon as possible.
To restart the airbag: vehicle stopped, ignition switched off, press and turn the lock to 1 position ON.When the ignition is switched on, you must check that the warning light
¹ is off and that the warning light
lights up on the display 2 after each start-up for around 1 minute.The front passenger airbag is activated.
21

driving positionsettings ................................................(current page)
steering wheeladjustment ...........................................(up to the end of the DU)
heated steering wheel ...............................(current page)
1.79
ENG_UD73476_2Volant de direction (BCB - Renault)
Adjusting the steering wheel height and depthLower the lever 1 and position the steering wheel in the required position.Then, raise the lever fully, beyond the point of resistance to lock the steering wheel.Make sure that the steering wheel is correctly locked.
Steering wheel/power-assisted steering
For safety reasons, only adjust the steering wheel when the vehicle is station- ary.
1
STEERING WHEEL (1/2)
2
34
Steering wheel heating(depending on vehicle)This function heats the steering wheel 4.
Operating principleWhen the temperature is reached, the function regulates the temperature of the heated areas for approximately 30 minutes and then switches off auto-matically.
Activating the functionWith the ignition on, press the 5 button on the multimedia screen 2.
Deactivating the function– Automatic:The function switches off automatically after the regulation phase of approxi- mately 30 minutes.– Manually:To deactivate the function during the regulation phase, press the 5 button on the multimedia screen 2.Note: the function is also accessible via the 3 “Favourites” button on the steer- ing wheel 4.
5

power-assisted steering.............................(current page)
1.80
ENG_UD73476_2Volant de direction (BCB - Renault)
Power-assisted steeringThe variable power-assisted steering system is equipped with an electronic control system which alters the level of assistance to suit the vehicle speed.Steering is made easier during parking manoeuvres (for added comfort) while the force needed to steer increases progressively as the speed rises (for enhanced safety at high speeds).
Never switch off the igni- tion when travelling down- hill, and avoid doing so in normal driving (assistance
is not provided).
Never leave the steering wheel on full lock when the vehicle is station- ary.With the engine switched off, or if there is a system fault, it is still pos- sible to turn the steering wheel. The force required will be greater.A noise may be heard when the steering wheel is moved quickly. This is normal.
STEERING WHEEL (2/2)
“Favourites” functionDepending on the vehicle, by pressing the steering wheel control 6, you can activate the heated steering wheel ac- cording to the stored use settings that you have previously defined.For more information on programming this function, please refer to the multi- media instructions.
6

rear view mirrors ........................................(up to the end of the DU)
1.81
ENG_UD74502_2Rétroviseurs (BCB - Renault)
Electrical folding mirrorsThe door mirrors will fold-out automati- cally when the vehicle is unlocked. The door mirrors fold in when the vehicle is locked.You can deactivate/activate automatic folding of the door mirrors ➥ 1.108.You can force folding by pressing the 1 switch. In this situation, the door mirrors will remain folded until the 1 button is pressed again, regardless of automatic folding.
Special caseWhen the rear view mirror has been manually deployed or folded back, it is possible to reset it to a usage position.To do this, press the 1 switch. A me- chanical tapping noise can be heard from the door mirror.If a tapping noise cannot be heard, press once again on 1 switch until the tapping noise can be heard from the door mirror.
Rear view mirrors, camera rear view
REAR VIEW MIRRORS (1/3)
Door mirrors with electrical adjustment:Select the rear view mirror using on of the switches 3, then use the 2 switch to adjust it to the desired position.
Heated door mirrorsWhen the engine is started, mirror de- icing is activated with the rear screen de-icing/demisting.
Objects observed in the door mirror glass are actu- ally closer than they appear. For your safety, take this
into account in order to correctly assess the distance before any ma- noeuvre.For safety reasons, carry
out any adjustments when the vehicle is stationary.
2
3
1

1.82
ENG_UD74502_2Rétroviseurs (BCB - Renault)
Recalling the memorised positionRefer to the multimedia manual to access recall of the saved position.Select “ Call back”.The positions of the door mirrors in forward gear, reverse and of the front seats are recalled.
Returning to the driving positionMoving from reverse gear to a forward gear is done:– approximately 9 seconds after re-
verse gear has been disengaged when the speed is lower than 6 mph (10 km/h);
– forward gear engaged when the speed is greater than 6 mph (10 km/h);
– when the engine is stopped.
Position memory– Adjust the door mirrors (see previous
paragraphs);– refer to the multimedia instructions
to access the settings memory. Save the settings.
The positions of the door mirrors in forward and reverse gear, and the po- sition of the driver’s seat are saved si- multaneously.
REAR VIEW MIRRORS (2/3)
Rear view mirrors which tilt in reverse gearFor vehicles equipped with the driver’s seat with position memory, you can enter a specific setting for the door mir- rors when reversing and store the po- sition.With the vehicle stationary and reverse gear engaged, select the rear view mirror using one of the switches 3 then, with the 2 switch, adjust it to the re- quired position.
For safety reasons, carry out any adjustments when the vehicle is not being driven.
2
3

1.83
ENG_UD74502_2Rétroviseurs (BCB - Renault)
Interior rear view mirrorIts position can be adjusted.
Rear view mirror with lever 4When driving at night, to avoid being dazzled by the headlights of the vehicle behind, depress the little lever located behind rear view mirror 4.
4
REAR VIEW MIRRORS (3/3)
Auto-dimming rear view mirror 5The rear view mirror automatically dark- ens when you are being followed by a vehicle using main beam headlights or in very bright lighting.
Camera rear viewDepending on the vehicle, your rear view mirror may be fitted with a dis- play of the rear surroundings transmit- ted by the camera fitted behind the rear screen.For more information ➥ 1.84.
5

camera rear view .......................................(up to the end of the DU)
1.84
ENG_UD75249_2Rétrovision par caméra (BCB - Renault)
CAMERA REAR VIEW (1/4)
When the ignition is switched on, the rear view mirror 2 mounted on the roof centre console displays the view behind the vehicle that is transmitted by the camera 1.Note:– the camera display 1 is transmit-
ted only if the rear view mirror is in “screen” mode. For more informa- tion, see the “Operation” paragraph on the following pages;
– the rear view mirror 2 can be posi- tioned left to right and upwards and downwards.
Depending on the vehicle, the rear view can be displayed by the camera 1. Direct rear view by mirror remains avail- able at all times.The 1 camera is installed behind the rear screen in the wiper area.Make sure that the 1 camera is not ob- scured (by dirt, mud, snow, condensa- tion etc.).
This function is an additional aid. It cannot, therefore, under any circumstances replace the vigilance or the
responsibility of the driver.The driver should always be ready for sudden incidents while driv- ing: always ensure that there are no small, narrow moving obstacles (such as a child, animal, pushchair, bicycle, stone, post, etc.) in the blind spot when manoeuvring.
2
1

1.85
ENG_UD75249_2Rétrovision par caméra (BCB - Renault)
OperationThe camera’s field of vision does not cover the entire area behind the vehi- cle, particularly the blind spot area A.
Switching off the functionThe display switches off immediately after the ignition is switched off.Note: mirror mode remains available by activating the lever 3.
CAMERA REAR VIEW (2/4)
Depending on your vision, an ad- aptation time may be necessary to focus on the camera view display.Objects which appear on the edge of rear view mirror 2 may be appear distorted.In very bright light (snow, vehicle in sunshine, etc.), the camera view may be partially disturbed.In low brightness or poor weather, the image on the screen may be dis- torted.
A
2
3

1.86
ENG_UD75249_2Rétrovision par caméra (BCB - Renault)
OperationUse the lever 3 to switch between the mirror and the “screen” mode.The green LED 4 as well as the pic- togram displayed at the top right of the rear view mirror indicates that the screen mode is operating properly. It goes out if you switch change to mirror mode or in the event of a fault.
Adjusting the display and the cameraPress the 5 “menu” button once to access the settings menu. Repeatedly press the 6 and 7 buttons to scroll through the settings options. Press the 8 “OK” button to access the desired setting.Use the 6 and 7 buttons to adjust or ac- tivate/deactivate the desired setting.
Selecting the settings:a) adjusting the brightness;b) adjusting the vertical viewing angle;c) adjusting the horizontal viewing
angle;d) adjusting the angle of rotation;e) activating/deactivating the settings
menu display on the rear view mirror;f) selecting a language;g) activating/deactivating button back-
lighting.Exit from the settings menu occurs au- tomatically after approximately five sec- onds if no button is pressed.
5 6 7
Each time the vehicle is started, the function returns to the settings saved at the last engine stop.
CAMERA REAR VIEW (3/4)
For safety reasons, carry out any adjustments while the vehicle is sta- tionary.
Adjust the system field of vision and the door mirrors before driving. Be sure to adjust the central rear view mirror before switching to “screen” mode.
3 4 8

1.87
ENG_UD75249_2Rétrovision par caméra (BCB - Renault)
CAMERA REAR VIEW (4/4)
2
Operating faultsWhen the system detects an operating fault, the rear view mirror 2 turns black, the pictogram displayed at the top right of the rear view mirror disappears and the LED 4 goes out. This may be caused by a fault affecting the camera or screen (clearness, fixed image, de- layed communication etc.).If the black background persists, switch to mirror mode and consult an ap- proved dealer.
4
9
Special features related to the reverse gearWhen the vehicle is reversing, consider the images transmitted by the rear view camera (multimedia screen 9) in addi- tion to the information available through the rear view mirror as there remains a rear view blind spot ➥ 2.133.

display .......................................................(up to the end of the DU)controls ......................................................(up to the end of the DU)dashboard..................................................(up to the end of the DU)driver’s position .........................................(up to the end of the DU)
1.88
ENG_UD75197_2Poste de conduite à gauche (BCB - Renault)
Driving position
DRIVING POSITION: LEFT-HAND DRIVE (1/2)
1 2 3 5 76
202325
2627
4
12
9
13
7 110
15
11
8
21
2224
141718
19
8
16
8

1.89
ENG_UD75197_2Poste de conduite à gauche (BCB - Renault)
DRIVING POSITION: LEFT-HAND DRIVE (2/2)The equipment fitted, described below, DEPENDS ON THE VERSION AND COUNTRY.
1 Side air vents. 2 Stalk for:
– direction indicator lights;– exterior lights;– rear fog lights.
3 Instrument panel. 4 Driver airbag and horn location. 5 Electronic selector lever. 6 Steering column stalk for wind-
screen and rear screen wash/ wiper.
7 Centre air vents. 8 Demister outlet. 9 Multimedia screen. 10 Passenger airbag location. 11 Fuse box. 12 Glovebox 13 Controls for:
– heating or air conditioning;– hazard warning lights;– electric door locking;– ...
14 Accessories socket. 15 Cup holder. 16 Centre console storage compart-
ment USB-C sockets. 17 Hands-free card holder. 18 Induction charging zone or centre
console storage compartment. 19 Engine start/stop button. 20 Radio remote control. 21 Control MULTI-SENSE. 22 Controls for:
– on-board computer information read-out and vehicle settings customisation menu,
– remote radio and navigation system.
23 Control for adjusting steering wheel height and reach.
24 Main switch and controls for cruise control/speed limiter and Stop and Go adaptive cruise control.
25 Bonnet release control. 26 Controls for:
– activating/deactivating the elec- tronic parking brake;
– activation/deactivation of the AUTOHOLD function;
– ... 27 Controls for:
– lighting rheostat for control instru- ments;
– activation/deactivation of the “Lane keeping system” function (lane departure warning, lane departure prevention, lane cen- tring);
– luggage compartment opening control;
– ...

display .......................................................(up to the end of the DU)controls ......................................................(up to the end of the DU)dashboard..................................................(up to the end of the DU)driver’s position .........................................(up to the end of the DU)
1.90
ENG_UD74705_1Poste de conduite direction à droite (BCB - Renault)
DRIVER’S POSITION RIGHT-HAND DRIVE (1/2)
1 2 4 35
141813
1211
3
26
7
20
8 19
22
27
5
151617
2124
25 19
6
23
5
10

1.91
ENG_UD74705_1Poste de conduite direction à droite (BCB - Renault)
DRIVER’S POSITION RIGHT-HAND DRIVE (2/2)The equipment fitted, described below, DEPENDS ON THE VERSION AND COUNTRY.
1 Side air vents. 2 Passenger airbag location. 3 Centre air vents. 4 Multimedia screen. 5 Demister outlets. 6 Stalk:
– direction indicator lights;– exterior lights;– rear fog lights.
7 Instrument panel. 8 Driver airbag and horn location. 9 Electronic selector lever. 10 Steering column stalk for wind-
screen and rear screen wash/ wiper.
11 Controls for:– lighting rheostat for control
instru- ments;– activation/deactivation of the
“Lane keeping system” function (lane departure warning, lane departure prevention, lane cen- tring);
– luggage compartment opening control;
– ...
18 Control for adjusting steering wheel height and reach.
19 Engine start/stop button. 20 Controls for:
– heating or air conditioning;– hazard warning lights;– electric door locking;– ...
21 Accessories socket. 22 Cup holder. 23 Centre console storage compart-
ment USB-C sockets. 24 “Hands-free” card holder. 25 Induction charging zone or centre
console storage compartment. 26 Glovebox. 27 Fuse box.
12 Controls for:– activating/deactivating the elec-
tronic parking brake;– activation/deactivation of the
AUTOHOLD function;– ...
13 Bonnet release control. 14 Radio remote control. 15 Control MULTI-SENSE. 16 Controls for:
– on-board computer information read-out and vehicle settings customisation menu,
– remote radio and navigation system.
17 Main switch and controls for cruise control/speed limiter and Stop and Go adaptive cruise control.

display .......................................................(up to the end of the DU)control instruments ....................................(up to the end of the DU)lights:
fog lights ..............................................(current page)
lights:dipped beam headlights .......................(current page)
lights:direction indicators ...............................(current page)
lights:main beam headlights ..........................(current page)
indicators:instrument panel ..................................(up to the end of the DU)
driver’s position .........................................(up to the end of the DU)instrument panel ........................................
(up to the end of the DU)warning lights.............................................(up to the end of the DU)
1.92
ENG_UD76844_3Témoins lumineux (BCB - Renault)
In some cases, the appearance of a warning light is accompanied by a mes- sage.
Side light tell-tale light
k Dipped beam headlight tell-tale light
á Main beam headlight tell-tale light
Automatic main beam head- light indicator light ➥ 1.112
Rear fog light tell-tale light
c Left-hand direction indicator tell-tale light
b Right-hand direction indica- tor tell-tale light
Bad weather warning light ➥ 1.112
“Adaptive Vision” headlight fault warning light ➥ 1.112
Warning lights
WARNING LIGHTS (1/4)
Warning light © means you should drive very carefully to an authorised dealer as soon as possible. If you fail to follow this recommendation, you risk damag- ing your vehicle.
A
If no lights or sounds are ap- parent, this indicates a fault in the instrument panel. This indicates that it is essential
to stop immediately (as soon as traf- fic conditions allow). Ensure that the vehicle is correctly immobilised and contact an approved Dealer.
The presence and operation of the warning lights DEPEND ON THE EQUIPMENT AND COUNTRY.
Instrument panel A: lights up when the driver's door is opened. Press or lift the 1 switch as many times as required to adjust the intensity.
Door status warning light ➥ 1.30
Handbrake or electronic parking brake warning light
➥ 2.10
“AUTOHOLD” system warn- ing light ➥ 2.14
Pedestrian horn fault warn- ing light
å Driver and passenger front airbags fault warning light
➥ 1.49 ➥ 1.76
Low windscreen washer level warning light
1

battery........................................................(current page)seat belts ...................................................(current page)speed limiter ..............................................(current page)cruise control .............................................(current page)
1.93
ENG_UD76844_3Témoins lumineux (BCB - Renault)
WARNING LIGHTS (2/4)
® Urgent stop warning lightThis lights up when the ignition
is switched on and goes out as soon as the engine is started. It comes on with other warning lights and/or messages, and is accompanied by a beep.It requires you to stop immediately, for your own safety, as soon as traffic con- ditions allow. Switch off the engine and do not restart it.Contact an approved Dealer.
© Warning lightThis lights up when the ignition
is switched on and goes out as soon as the engine is started. It can light up in conjunction with other warning lights and/or messages on the instrument panel.It means you should drive very care- fully to an approved dealer as soon as possible. If you fail to follow this recom- mendation, you risk damaging your ve- hicle.
Warning lightIf it appears in red during driv-
ing and is accompanied by the ® indicator light, you must, for your safety, stop as soon as traffic conditions allow. Switch off the engine and do not restart it.Call an approved Dealer.If it appears in yellow during driving and is accompanied by the © warn- ing light, visit an approved dealer as soon as possible. Meanwhile, drive with care. If you fail to follow this rec- ommendation, you risk damaging your vehicle.
The presence and operation of the warning lights DEPEND ON THE EQUIPMENT AND COUNTRY.
The ® warning light requires you to stop imme- diately, for your own safety, as soon as traffic conditions
allow. Switch off the engine and do not restart it. Call an approved Dealer.
Electrotechnical system warning light
It appears when the temperature of the electrical assembly is too high. Stop the vehicle without switching off the igni- tion. The temperature should lower and the warning light should disappear. If this is not the case, please consult an Authorised Dealer.The warning light may be accompa- nied by a reduction in vehicle perfor- mance.
Electrotechnical system fault warning light
When it comes on, this indicates an electrotechnical fault related to the electrical assembly (traction battery and electric motor). Contact your ap- proved Dealer straight away.

1.94
ENG_UD76844_3Témoins lumineux (BCB - Renault)
Electric motor fault warning light
When it comes on, this indicates a fault with the electrotechnical system linked to the electric motor. Contact your ap- proved Dealer straight away.
Traction battery gauge indi- cator light
This lights up in yellow when the trac- tion battery charge level has reached the reserve threshold ➥ 1.96.
Traction battery fault warn- ing light
If it appears, accompanied by the © warning light, this indicates a fault related to the operation of the trac- tion battery. Contact your approved Dealer straight away.
WARNING LIGHTS (3/4)The presence and operation of the warning lights DEPEND ON THE EQUIPMENT AND COUNTRY.
Ú Secondary 12 V battery charge warning light
If it comes on, accompanied by the ® warning light and a beep, this means that the electrical cir- cuit is overcharged or discharged ➥ 1.8.
Limited performance warn- ing light
This appears when the traction battery temporarily does not deliver its nominal power. During this period, vehicle per- formance is reduced.Opt for a smoother driving style until the warning light disappears.
x Anti-lock braking warning light
This lights up when the ignition is switched on and goes out after a few seconds.If it does not go out after the ignition is switched on, or lights up when driving, there is a fault with the ABS. Braking will then be as normal, without the ABS. Contact an approved Dealer as soon as possible.
Warning light for the elec- tronic stability program
(ESC) and traction control systemThere are several reasons for the warn- ing light to appear ➥ 2.27.
Warning light for non-availa- bility of the electronic stabil-
ity program (ESC) and traction con- trol system
Tyre pressure monitoring system ➥ 2.22.
”Automatic Parking” func- tion warning light ➥ 2.146

1.95
ENG_UD76844_3Témoins lumineux (BCB - Renault)
Variable power assisted steering warning light
It lights up when the ignition or the engine is switched on and goes off after a few seconds.If it comes on while driving, alongside the warning light ®, this means there is a system fault.Contact an authorised dealer.
D Brake circuit fault warning light
It lights up when the ignition or the engine is switched on and goes off after a few seconds.If it comes on during braking and is ac- companied by the ® warning light and a beep, it indicates that the fluid level in the circuit is low or that there is a braking system fault.Stop as soon as traffic conditions allow and consult an approved dealer.
Ó Brake pedal warning lightThis lights up when the brake
pedal should be depressed ➥ 2.5.
WARNING LIGHTS (4/4)The presence and operation of the warning lights DEPEND ON THE EQUIPMENT AND COUNTRY.
Lane departure system warning light ➥ 2.32
Lane departure prevention system warning light ➥ 2.37
Lane centring system warn- ing light ➥ 2.105
”Advanced safety” function fault or non-availability
warning light ➥ 2.52
Overspeed warning light ➥ 1.96
Cruise control and speed limiter indica-
tor lights ➥ 2.74 ➥ 2.78
Adaptive cruise control warning light Stop and Go
➥ 2.83
Charging programme indi- cator lights ➥ 1.20
Warning lights for air condi- tioning programming ➥ 3.17
”Hands off steering wheel” detection warning light
➥ 2.37 ➥ 2.52 ➥ 2.105
On the display B
Passenger Airbag ON ➥ 1.58 ➥ 1.76
¹ Passenger Airbag OFF ➥ 1.58 ➥ 1.76
ß Front seat belt reminder warning light ➥ 1.44
B

display .......................................................(up to the end of the DU)control instruments ....................................(up to the end of the DU)energy consumption ..................................(up to the end of the DU)indicators:
instrument panel ..................................(up to the end of the DU)
instrument panel ........................................(up to the end of the DU)
1.96
ENG_UD75354_2Afficheurs et indicateurs (BCB - Renault)
Displays and indicators
DISPLAYS AND INDICATORS (1/4)
A
Instrument panel Alights up when the driver’s door is opened. In some cases, the appear- ance of a warning light is accompanied by a message.Depending on the vehicle, you can cus- tomise your instrument panel with the content and colours of your choice.
Selection of viewsDepending on the vehicle, browse using the control 1 to select the various views on the instrument panel A.Several views are proposed:– charging view: displays the range,
battery percentage and remain- ing charging time on the instrument panel only when the vehicle is charg- ing;
– classic view: displays the speed, active driving aids, information area and, depending on the vehicle, the power meter on the instrument panel;
– navigation view: displays the speed, active driving aids and the informa- tion area on the instrument panel. It also duplicates the road map from the multimedia system on the entire instrument panel;
1
– realistic scene: displays the speed, active driving aids, information area as well as your vehicle and its sur- roundings (lanes, vehicles around you, etc.) on the instrument panel;
– minimum view: displays only essen- tial information, the speed, active driving aids and the information area on the instrument panel.

charge meter .............................................(current page)
1.97
ENG_UD75354_2Afficheurs et indicateurs (BCB - Renault)
Ready to drive message 3.The READY message appears when the engine starts and disappears when the vehicle speed exceeds 3 mph (5 km/h).Navigation in progress informa- tion 4.Power meter 5.Regenerative braking level warning light 7.Information on driving aids 8.Battery Information 9 (traction bat- tery charge rate, estimated range).
3 4 5 6
789Information area 6, depending on the vehicle, browse using the control 10 to select various widgets on the instru- ment panel A:– on-board computer information
(mileage recorder, consumption, etc.);
– telephone, multimedia (audio source currently playing, etc.) information;
– vehicle information (warning mes- sages, etc.);
– ...
2
Speedometer 2.The vehicle speed is limited to approx- imately 93 mph (150 km/h) (or 99 mph (160 km/h) depending on the vehicle).Overspeed buzzerDepending on the vehicle and country,
the warning light is displayed and a beep sounds. This beep sounds as soon as the vehicle is travelling at over 75 mph (120 km/h).This warning light remains lit for as long as the vehicle is travelling at over 74 mph (120 km/h).
DISPLAYS AND INDICATORS (2/4)
10

1.98
ENG_UD75354_2Afficheurs et indicateurs (BCB - Renault)
DISPLAYS AND INDICATORS (3/4)Reserve thresholdWhen the traction battery charge reaches approximately 7% or, depend- ing on the vehicle, approximately 12%,
the gauge and indicator light 15 appear in yellow, accompanied by a beep.To optimise your range ➥ 2.20.
Immobilisation threshold imminentWhen the charge level reaches 4.5% or, depending on the vehicle, approx- imately 6%, a beep is heard and the gauge illuminates in red.When the charge level reaches 3.5% or, depending on the vehicle, approxi- mately 5%, the range value is no longer displayed. Engine performance gradu- ally decreases until the vehicle comes to a halt ➥ 5.22.
Remaining charge time 13
Traction battery charge rate 14
11 12
131415
Charging cable “Plugged In” warning light 11This comes on when the charging cord is plugged into the vehicle.
Charge level 12The gauge indicates the level of energy remaining.

1.99
ENG_UD75354_2Afficheurs et indicateurs (BCB - Renault)
Instrument panel in miles(option to switch to km/h)With the vehicle stationary and the engine switched on, from the multi- media screen 16, select the “Vehicle” Mode, press the “Settings” menu, “Units”, then “Distance”.Choose from kilometres or miles.Note: in both cases, once the battery is switched off, the on-board computer automatically returns to the original unit of measurement.
To return to the previous mode, repeat the same operation.Please refer to the multimedia instruc- tions for more information.
DISPLAYS AND INDICATORS (4/4)
16
For safety reasons, carry out any adjustments when the vehicle is not being driven.

control instruments ....................................(up to the end of the DU)indicators:
instrument panel ..................................(up to the end of the DU)
instrument panel messages.......................(up to the end of the DU)trip computer and warning system.............(up to the end of the DU)instrument panel ........................................(up to the end of the DU)warning lights.............................................(up to the end of the DU)
1.100
ENG_UD74788_2Ordinateur de bord : généralités (BCB - Renault)
Trip computer
TRIP COMPUTER: general information (1/2)
A
Trip computer ADepending on the vehicle, this includes the following functions:– distance travelled;– journey settings;– information messages;– operating fault messages (associ-
ated with the © warning light);– warning messages (connected to the ® warning light).
All these functions are described in the following pages.
Repeatedly press up/down on the 1 switch to browse functions.
On the instrument panel A:a) journey settings:
– average energy consumption since the last reset and current energy consumption;
– distance travelled since last reset.b) reset the tyre pressure;c) service interval;d) trip log, operating faults and informa-
tion message readout.1
Resetting the journey parameters (reset button)With one of the trip parameters se- lected as the display, press and hold the switch 1 downwards until the dis- play resets to zero.
Automatic resetting of the journey parametersResetting occurs automatically when the maximum value of any of the pa-rameters is exceeded.

1.101
ENG_UD74788_2Ordinateur de bord : généralités (BCB - Renault)
Resetting the estimated rangeAfter a full recharge of the traction bat- tery, you can select two types of reset- ting: manual or automatic.
Manual resetSelect the journey setting to reset, then press and hold the 1 switch to reset the range.
Automatic resetThe range is automatically reset at the end of a full recharge of the traction battery to a value calculated based on the energy consumption over the last 125 miles (200 km).
TRIP COMPUTER: general information (2/2)
Reading energy consumption valuesSome vehicle equipment items con- sume energy: the energy consumed by the vehicle may therefore differ from the energy consumed on the electric counter.
Interpreting some of the values displayed after resettingThe values showing average energy consumption and range will become more stable and reliable the further you have travelled since the last time the Reset button was pressed.For the first few miles after pressing the reset key you will notice that the range increases as you travel. This is because the average energy consump- tion since the last reset is taken into ac- count. However, the average energy consumption may fall when:– the vehicle stops accelerating;– when driving from an urban area
onto the open road.
Some on-board computer information appears on the navigation system display.The trip settings mileage recorder is reset simultaneously in the on-board com- puter and the navigation system.
1

instrument panel messages.......................(up to the end of the DU)trip computer and warning system.............(up to the end of the DU)instrument panel ........................................(up to the end of the DU)
1.102
ENG_UD74802_2Ordinateur de bord : paramètres de voyage (BCB - Renault)
TRIP COMPUTER AND WARNING SYSTEM: journey parameters (1/3)
Examples of selections Interpreting the display selected
Consumption a) Trip settings.
Current energy consumption.+ 13,4kWh
Average energy consumption.The value is displayed after having travelled at least 400 metres since the last reset.12,8
kWh/100 km
JourneyDistance travelled since the last reset.1284,7
km
b) Tyre pressure reset ➥ 2.22
The display of information shown below DEPENDS ON THE VEHICLE EQUIPMENT AND COUNTRY.

1.103
ENG_UD74802_2Ordinateur de bord : paramètres de voyage (BCB - Renault)
TRIP COMPUTER AND WARNING SYSTEM: journey parameters (2/3)
Examples of selections Interpreting the display selected
Service inc) Service interval.
Distance remaining until the next service (displayed in miles/kilo-metres), then when the service nears, several scenarios are possible:– range less than 930 miles (1,500 km) or one month: the message
“Service in” is displayed accompanied by the distance or the time;– when a service is due, the message “Service due” is displayed ac- companied by the nearest term (distance or time);– range equal to 0 miles (0 km) or date of service reached: the
message “Service Required” is displayed accompanied by the warning light ©.
The vehicle requires a service as soon as possible.
1,200 miles (1,936 km)or 3 months
Resetting the display after the service in accordance with the maintenance schedule.The service interval must only be reset after a service which complies with the recommendations in the maintenance schedule.To reset the distance before service, press the up/down buttons to scroll through the trip computer information (steering wheel control) until the mileage before oil change is displayed permanently.Special note: To reset the service interval, press and hold one of the display reset buttons for approximately 10 seconds until the display shows the mileage permanently.
The display of information shown below DEPENDS ON THE VEHICLE EQUIPMENT AND COUNTRY.

1.104
ENG_UD74802_2Ordinateur de bord : paramètres de voyage (BCB - Renault)
TRIP COMPUTER AND WARNING SYSTEM: journey parameters (3/3)The display of information shown below DEPENDS ON THE VEHICLE EQUIPMENT AND COUNTRY.
Examples of selections Interpreting the display selected
Settings(OK)
d) Vehicle settings personalisation menu ➥ 1.108.
Tailgate open e) Trip log.Successive display:– information messages;– operating fault messages.

instrument panel messages.......................(up to the end of the DU)trip computer and warning system.............(up to the end of the DU)instrument panel ........................................(up to the end of the DU)
1.105
ENG_UD75198_2Ordinateur de bord : messages d’information (BCB - Renault)
TRIP COMPUTER AND WARNING SYSTEM: information messages
Examples of messages Interpreting the display selected
“Disconnect cable to start” Indicates that the charging cord is still plugged into the vehicle.
“Steering not locked” Indicates that the steering column has not been locked.
“Check connections”Unplug, then plug in the vehicle.If the message still shows, this may be caused by the external charging conditions or by the home installation.
“Check charging station” Indicates a possible electrical fault or a defective charging cable: change the charg- ing terminal or location or have the cable checked.
“Power cut while charging” Indicates an electrical fault while charging. Restart charging.If this does not work, have the electrical installation checked.
“Charging refused no contract” Charging prohibited by your battery rental organisation. Rectify the situation.
These can help in the vehicle starting phase, or give information about a selection or a driving status.Examples of information messages are given in the following pages.

operating faults ..........................................(up to the end of the DU)instrument panel messages.......................(up to the end of the DU)trip computer and warning system.............(up to the end of the DU)instrument panel ........................................(up to the end of the DU)
1.106
ENG_UD69838_1Ordinateur de bord : messages d’anomalie de fonctionnement (BCB - Renault)
TRIP COMPUTER AND WARNING SYSTEM: operating fault messagesThese appear with the © warning light and mean that you should drive very carefully to an authorised dealer as soon as possible. If you fail to follow this recommendation, you risk damaging your vehicle.They disappear when the display selection key is pressed or after several seconds and are stored in the computer log. The © warning light stays on. Examples of operating fault messages are given in the following pages.
Examples of messages Interpreting the display selected
«WARNING: Check Airbag» Indicates a fault in the restraint system in addition to the seat belts. In the event of an accident, it is possible that they may not be triggered.
«Check vehicle» Indicates a fault on one of the pedal sensors or in the secondary 12 V battery man- agement system.
«WARNING: Check Braking System» Indicates wear or the need to check the braking system.
«Check Vehicle plug» Indicates overheating at the vehicle-side charging socket. Wait for approximately 20 minutes then try again. If this does not work, contact an approved dealer.
«Check Electric System» Indicates a fault in the traction system.
«Battery charging impossible» Indicates a fault on the traction battery recharge system.

instrument panel messages.......................(up to the end of the DU)trip computer and warning system.............(up to the end of the DU)instrument panel ........................................(up to the end of the DU)
1.107
ENG_UD69839_1Ordinateur de bord : messages d’alerte (BCB - Renault)
TRIP COMPUTER AND WARNING SYSTEM: warning messageThese appear with the ® warning light and require you to stop immediately, for your own safety, as soon as traffic conditions allow. Stop your engine and do not restart it. Call an approved Dealer.Examples of warning messages are given in the following pages. Note: the messages appear on the display either individually or alternately (when there are several messages to be displayed), and may be accompanied by a warning light and/or a beep.
Examples of messages Interpreting the display selected
“WARNING: Braking System” Indicates a fault in the braking system.
“WARNING: Power Steering” Indicates a fault in the steering.
“Electric motor failure” Indicates that the vehicle is losing power.
« WARNING: Electric System » Indicates a fault in the electric system.
“Puncture” Indicates a puncture on the tyre displayed on the instrument panel.

central door locking ...................................(current page)driving ........................................................(current page)lighting:
see-me-home .......................................(current page)
multimedia equipment ...............................(current page)windscreen washer/wiper ..........................(current page)configuration menu ....................................(up to the end of the DU)menu for customising the vehicle settings .(up to the end of the DU)customising the vehicle settings ...............(up to the end of the DU)doors..........................................................(current page)settings
configuration menu ..............................(up to the end of the DU)
settings ......................................................(up to the end of the DU)customised vehicle settings ......................(up to the end of the DU)locking the doors .......................................(current page)
1.108
ENG_UD74503_2Menu de personnalisation des réglages du véhicule (BCB - Renault)
d) “Wiping”: – “Rear wiper when in reverse
gear”; – “Automatic front wiper”; – ...Depending on the function, select:– “ON” or “OFF” to activate or deacti-
vate;or– a time period to adjust the time during
which the headlights are illuminated (e.g. for the “Follow me home” func- tion).
Please refer to the multimedia instruc- tions for further information.
Vehicle settings personalisation menu
VEHICLE SETTINGS CUSTOMISATION MENU (1/2)
Depending on the vehicle equipment, this function allows you to activate/de- activate and adjust some of the vehi- cle’s functions.
Accessing the settings menuWith the vehicle stationary, engine run- ning, from the multimedia screen 1 select the “Vehicle” Mode, press on the “Vehicle” menu, then the “Outside” tab to access the various settings.
For safety reasons, carry out any adjustments when the vehicle is not being driven.
Adjusting the settingsSelect a tab then the function to be modified (the display depends on the vehicle equipment and country):a) “Access”: – “Auto door lock while driving”; – “Hands-free lock/unlock”; – “access and start by phone”; – ...b) “Welcome”: – “External lighting sequence”; – “Internal sequence sound”; – “Automatic fold-out of the door
mirrors”; – “Internal light function”; – ...c) “Driving lights”: – “Adaptive Vision”; – “Driving side selection”; – ...
1

1.109
ENG_UD74503_2Menu de personnalisation des réglages du véhicule (BCB - Renault)
VEHICLE SETTINGS CUSTOMISATION MENU (2/2)
“Favourites” functionDepending on the vehicle, by pressing the steering wheel control 2, you can activate the following functions accord- ing to the stored use settings that you have previously defined:– heated seats;– heated steering wheel;
2
– setting selection (access, welcome, lighting, wiper, etc.);
– “Automated park assist” function;– ECO mode;– 360° camera;– ...For more information on programming this function, please refer to the multi- media instructions.
For safety reasons, carry out any adjustments when the vehicle is not being driven.

clock ..........................................................(up to the end of the DU)indicators:
exterior temperature indicator ..............(current page)
clock ..........................................................(up to the end of the DU)external temperature .................................(up to the end of the DU)
1.110
ENG_UD69841_1Heure et température extérieure (BCB - Renault)
Clock and outdoor temperature
CLOCK AND OUTDOOR TEMPERATURE
Setting the timeThe time and exterior temperature are displayed on the multimedia screen 1.To set the time, from the 1 multime- dia screen, select the “Vehicle” mode, press the “Settings” menu then “Date and time”.
1
External temperature indicatorAs ice formation is related to climatic exposure, local
air humidity and temperature, the external temperature alone is not sufficient to detect ice.
You can access various settings:– “Date format”;– “Time format”;– “Select country time zone”;– “Set the time zone”;– ...Please refer to the multimedia instruc- tions for further information.
External temperature indicatorSpecial note:When the external temperature is be- tween –3°C and +3°C, the °C figures flash (indicates risk of ice formation).
If the power supply is cut (battery disconnected, supply wire cut, etc.), the clock must be reset.We recommend that you do not adjust these settings while driving.

warning buzzer ..........................................(up to the end of the DU)horn:
flash .....................................................(current page)
horn:sounding the horn ................................(current page)
headlight flashers ......................................(up to the end of the DU)horn ...........................................................(up to the end of the DU)audible and visual signals..........................(up to the end of the DU)indicators ...................................................(up to the end of the DU)lights:
hazard warning ....................................(up to the end of the DU)
lights:direction indicators ...............................(up to the end of the DU)
indicators:direction indicators ...............................(up to the end of the DU)
horn ...........................................................(current page)hazard warning lights signal ......................(up to the end of the DU)hazard warning lights signal ......................(up to the end of the DU)
1.111
ENG_UD75199_2Avertisseurs sonore et lumineux (BCB - Renault)
Audible and visual signals
AUDIBLE AND VISUAL SIGNALS
A
1
HornPress the steering wheel boss A to ac- tivate the horn.
Headlight flasherPull stalk 1 towards you then release it to flash the headlights.
Direction indicatorsMove the stalk 1 in the same direc- tion as you want to move the steering wheel.
One-touch modeBriefly shift the stalk 1 upwards or downwards, not exceeding the point of resistance, then release it: the stalk will return to its original position and the direction indicator light concerned will flash three times.
é Hazard warning lightsPressing switch 2 illuminates
all four direction indicators and the side-mounted indicator lights simulta- neously.It must only be used in an emergency to warn drivers of other vehicles that you have had to stop in an area where stop- ping is prohibited or unexpected, or that you are obliged to drive under special conditions.
2

lighting:exterior .................................................(up to the end of the DU)
lighting:instrument panel ..................................(current page)
lights:dipped beam headlights .......................(current page)
lights:side lights .............................................(current page)
daytime running lights................................(current page)hazard warning lights signal ......................(current page)signals and lights .......................................(up to the end of the DU)instrument panel ........................................(current page)
1.112
ENG_UD74501_2Éclairages et signalisations extérieurs (BCB - Renault)
Exterior lighting and signals
EXTERIOR LIGHTING AND SIGNALS (1/7)
Before driving at night, check that the electrical equipment is operating correctly and adjust the headlight beams (if your vehicle is not carrying its normal load). As a general precaution, check that the lights are not ob- scured (by dirt, mud, snow or objects being transported).
1
1
23
Daytime running lightsTurn ring 3 until the AUTO symbol is op- posite mark 2.The daytime running lights come on au- tomatically with no action on the stalk 1 when the engine is started, and they go off once the engine is switched off.
Side lightsTurn ring 3 until the symbol is
opposite mark 2. This indicator light on the instrument panel comes on.
k Dipped beam headlights
Manual operationTurn ring 3 until the symbol is opposite mark 2. This indicator light on the in- strument panel comes on.
Automatic operationTurn the ring 3 until the AUTO symbol is opposite the mark 2: with the engine running, the dipped beam headlights switch on or off automatically depend- ing on the brightness of the light out- side, without any action on stalk 1.Depending on the vehicle, the dipped beam headlights will appear automati- cally after several sweeps of the wind- screen wiper blades.

1.113
ENG_UD74501_2Éclairages et signalisations extérieurs (BCB - Renault)
EXTERIOR LIGHTING AND SIGNALS (2/7)Adaptive front lighting system(depending on the vehicle)This function automatically adjusts the width and range of the dipped beam headlights according to the speed and weather conditions.Turn the ring 3 until the symbol AUTO is opposite the mark 2: engine running. This function can be deactivated, refer to the multimedia instructions.Operating faultsWhen the message “Check Automatic Lighting” appears on the instrument panel, the system is deactivated. Consult an approved dealer. Poor weather function
(depending on the vehicle)This function is part of the adaptive front lighting system. It replaces the use of the front fog lights. It may be ac- tivated in foggy or snowy weather or in any other case of poor visibility.To activate this function, turn the ring 3 until the symbol AUTO is aligned with the mark 2, then align the mark 4 with the symbol 5.
Switching off the lightsTurn the central ring to align the mark 4 with the symbol 5. The corresponding indicator light on the instrument panel goes out.The poor weather lights switch off when the exterior lights are switched off.
Additional cornering lighting(depending on the vehicle)In forward gear, if the dipped beam or main beam headlights are on and de- pending on the steering wheel angle, this function adapts the beam width to improve visibility on a bend or at a junc- tion.
3 2
4 5

1.114
ENG_UD74501_2Éclairages et signalisations extérieurs (BCB - Renault)
The main beam headlights come on au- tomatically if:– exterior light is weak;– no other vehicles or lighting are de-
tected;– the vehicle speed is above approxi-
mately 25 mph (40 km/h).If any of the above conditions are not fulfilled, the system switches to dipped beam headlights.Note: make sure the windscreen is not obscured (dirt, mud, snow, condensa- tion, etc.).
Activation/deactivationTo activate the automatic main beam headlightsTurn the ring 3 until the symbol AUTO is aligned with the mark 2, then press the switch 6.
The indicator light on the instru- ment panel lights up if the dipped beam headlights are on.
To deactivate automatic main beam headlights:Press the switch 6, the warning light
on the instrument panel goes out.
Automatic main beam headlights
Depending on the vehicle, this system switches the main beam headlights on and off automatically. It uses a camera located behind the interior rear-view mirror to detect vehicles that are being followed and those coming in the oppo- site direction.Note: at night, in urban areas with street lighting, the automatic main beam headlights automatically switch off.
EXTERIOR LIGHTING AND SIGNALS (3/7)
á Main beam headlightsWith the engine running and
the dipped beam headlights on, push the stalk 1 (movement A). This indica- tor light on the instrument panel comes on.To return to the dipped headlight posi- tion, push the stalk 1 again.
6 3 2
11A

warning buzzer ..........................................(current page)see-me-home lighting ................................(current page)lights:
main beam headlights ..........................(current page)
1.115
ENG_UD74501_2Éclairages et signalisations extérieurs (BCB - Renault)
EXTERIOR LIGHTING AND SIGNALS (4/7)Automatic main beam headlights (continued)Note: by pushing the stalk 1, the auto- matic main beam headlights function is
deactivated, the warning light on the instrument panel goes out and the vehicle activates the main beam head- lights.Operating faultsWhen the message “Check Automatic Lighting” appears on the instrument panel, the system is deactivated.Consult an approved dealer.
The system may encounter difficul- ties under certain conditions, includ- ing:– extreme weather conditions (rain,
snow, fog, etc.);– obstruction in front of the wind-
screen or camera;– when a following or oncoming ve-
hicle has weak or hidden lighting;– incorrect settings for the front
headlights;– reflective systems;– ...
Using the portable naviga-tion system at night in the windscreen area below the camera may disturb the op-
eration of the “automatic main beam headlights” system (risk of reflection on the windscreen).
The “automatic main beam headlights” system should under no circumstances be used to replace driver atten-
tion and responsibility with regard to vehicle lighting and adapting to light, visibility and traffic conditions.

1.116
ENG_UD74501_2Éclairages et signalisations extérieurs (BCB - Renault)
EXTERIOR LIGHTING AND SIGNALS (5/7)
1
3
Switching off the lightsThe lights will go out automatically when the driver’s door is opened or the vehicle is locked, or one minute after the engine is switched off. In this case, the next time the engine is started the lights will be switched back on accord- ing to the position of the ring 3.
Lights-on reminder buzzerIf the lights are on after the engine is switched off, a warning beep sounds when the driver’s door is opened to warn you that the lights are still on.
Operating faultsDepending on the vehicle, when the message “WARNING: Check Lighting” with warning light © is displayed
and/or the warning light k flashes on the instrument panel, this indicates that there is a lighting fault.Consult an authorised dealer.
Welcome and goodbye function(depending on the vehicle)Once the function is activated, the day- time running lights and the rear side lights will light up automatically upon detection of the card or when the vehi- cle is unlocked.They switch off automatically:– approximately fifteen seconds after
they are switched on;– when starting the engine based on
the position of the lighting stalk;or– upon locking the vehicle.
Activating/deactivating the functionFor activation or deactivation of the ex- ternal reception, refer to the multimedia manual.

lights:fog lights ..............................................(current page)
1.117
ENG_UD74501_2Éclairages et signalisations extérieurs (BCB - Renault)
EXTERIOR LIGHTING AND SIGNALS (6/7)
“See-me-home lighting” functionThis function enables you to briefly switch on the side lights and dipped beam headlights (e.g. to provide light when opening a gate).
With the engine stopped and the lights switched off, after opening the driver’s door, the ring 3 in posi- tion AUTO, pull the stalk 1 towards you: the side lights and dipped beam head- lights will switch on for approximately 30 seconds along with the warning
lights š and k on the instru- ment panel.To increase this duration, you may pull the stalk up to four times (total time re- stricted to approximately two minutes).The message “ _ _ _” along with the time the lights will be on for is displayed on the instrument panel to confirm this action. You can then lock your vehicle.
Deactivating the “see-me-home lighting” featureTo switch off the lights before they go out automatically, turn ring 3 to any po- sition, then return it to position AUTO.Note: if the Welcome and Goodbye function is activated, once the engine is switched off, the procedure for deacti- vating the “See-me-home lighting” func- tion must be carried out before pulling the stalk (otherwise the lights remain lit by the Welcome and Goodbye func- tion).
1
3

1.118
ENG_UD74501_2Éclairages et signalisations extérieurs (BCB - Renault)
Rear fog lightTurn the central ring on the
stalk until the symbol 7 is aligned with the mark 4, then release it.Operation of the fog lights depends on the exterior lighting selected, and an in- dicator light will light up on the instru- ment panel.To avoid inconveniencing other road users, remember to switch off the rear fog light when it is no longer needed.
When driving in fog or snow, or when transporting objects which are higher than the roof, the headlights do not come on automatically.The fog lights are controlled by the driver: indicator lights on the instru- ment panel inform you whether they are on (indicator light on) or off (indi- cator light off).
Switching off the lightsTurn the central ring to align the mark 4 with the symbol 7. The corresponding indicator light on the instrument panel goes out.The rear fog lights switch off when the exterior lights are switched off.
74
EXTERIOR LIGHTING AND SIGNALS (7/7)

see-me-home lighting ................................(up to the end of the DU)lights:
adjusting ..............................................(up to the end of the DU)
lightsadjustment ...........................................(up to the end of the DU)
headlight beam adjustment .......................(up to the end of the DU)electric beam height adjustment ................(up to the end of the DU)signals and lights .......................................(up to the end of the DU)
1.119
ENG_UD74814_2Réglage des faisceaux (BCB - Renault)
Examples of positions for adjusting
control A according to the load
Driver alone or with front passenger 0
All seats occupied 1
Driver with passengers and luggage (or load) reaching the maximum permissible all-up weight
2
Driver without passengers and luggage (or load) reaching the maximum permissible all-up weight
3
The table below gives some examples. In all cases, adjust control A accord- ing to the vehicle load so that the road can be seen and other drivers are not dazzled.
Headlight beam adjustment
HEADLIGHT BEAM ADJUSTMENT (1/2)
Depending on the vehicle, the A switch can be used to adjust the height of the headlight beams according to the load.With the dipped beam headlights lit, press or lift switch A as many times as is necessary to select the required position on the instrument panel. The position selected is displayed on the instrument panel for approximately 15 seconds.Note: lights on, at each engine start-up the selected position is displayed on the instrument panel for approximately 15 seconds.
A

1.120
ENG_UD74814_2Réglage des faisceaux (BCB - Renault)
Temporary adjustmentOpen the bonnet and identify the mark- ing B next to one of the front headlight projectors.Using a screwdriver or similar, turn the bolt 1 a half turn towards the - symbol to lower the beams.Return to the original position once your trip is over: turn the bolt 1 by a half turn towards the + symbol to raise the beams.
HEADLIGHT BEAM ADJUSTMENT (2/2)
B
1
If driving on the left in a left-hand drive vehicle (or vice versa), drivers must have the lights adjusted by an authorised dealer for the duration of the trip.

wipers ........................................................(up to the end of the DU)windscreen washer/wiper ..........................(up to the end of the DU)windscreen washer ....................................(up to the end of the DU)
1.121
ENG_UD74499_2Essuie-vitre / lave-vitre avant (BCB - Renault)
Special noteWhen driving the vehicle, the wiping speed slows down whenever the ve- hicle stops. For example, fast wiping speed will slow to normal wiping speed. As soon as the vehicle moves off, wiping will return to the speed originally selected.If stalk 1 is operated, it overrides and cancels the automatic function.
Washers, wipers
WINDSCREEN WASH, WIPE (1/5)
Vehicle fitted with intermittent windscreen wipers
A single sweepA short push will trigger one sweep of the wipers.
B stop C intermittent wiping
The wipers will pause for several seconds between sweeps. It is possible to change the time be- tween sweeps by turning ring 2.
D slow continuous wiping E fast continuous wiping
1 A
BC
DE
1 2

headlight washer .......................................(current page)
1.122
ENG_UD74499_2Essuie-vitre / lave-vitre avant (BCB - Renault)
Vehicle fitted with front windscreen wiper rain sensorThe rain sensor is located on the winds- creen, in front of the interior rear-view mirror.
A single sweepA short push will trigger one sweep of the wipers.
B stop
WINDSCREEN WASH, WIPE (2/5)
1
C automatic wiper functionWhen this position is selected, the system detects water on the wind- screen and triggers the wipers at a suitable wiping speed. It is possi- ble to change the triggering thresh- old and the time sweeps by turn-ing ring 2:
– F: minimum sensitivity – G: maximum sensitivityThe higher the sensitivity, the quicker the wipers will react and the faster the wipe.
When activating automatic wiping or when increasing sensitivity, one sweep of the blades is performed.
Note:– the rain sensor is only intended as a
driving aid. In the event of reduced visibility, the driver should manually activate the wipers. In foggy weather or during snowfalls, wiping is not au- tomatically triggered and remains under the driver’s control;
– in the event of temperatures below zero, automatic wiping is not acti- vated when the vehicle is started. It is automatically activated as soon as the vehicle exceeds a certain speed (approximately 5 mph (8 km/h));
– do not activate automatic wiping in dry weather;
– fully de-ice the windscreen before activating automatic wiping;
– when washing using a roller type car wash, return the ring 1 on the stalk B to the stop position to deactivate au- tomatic wiping.
A
BC
DE
2F
G
1

1.123
ENG_UD74499_2Essuie-vitre / lave-vitre avant (BCB - Renault)
WINDSCREEN WASH, WIPE (3/5)Operating faultsIn the event of a malfunction of the au- tomatic wiping, the wiper is set to inter- mittent wiping. Contact an authorised dealer.The operation of the rain sensor can be disturbed in the event of:– damaged windscreen wipers; a film
of water or traces left by a blade in the sensor’s detection zone may in- crease the response time of the au- tomatic wiper, or increase the wiping frequency;
– a windscreen with any chip or crack level with the sensor, or a windscreen covered in dust, dirt, insects, ice, the use of washing wax and water-repel- lent chemicals; the windscreen wiper will be less sensitive or may even not react at all.
Special noteWhen driving the vehicle, the wiping speed slows down whenever the vehi- cle stops. For example, fast wiping speed will slow to normal wiping speed. As soon as the vehicle moves off, wiping will return to the speed originally selected.If stalk 1 is operated, it overrides and cancels the automatic function.
Precautions– In the event of ice, check whether the
blades are stuck to the windscreen before operating the wiping mecha- nism. If you activate the wipers while the blades are stuck down with ice, you may risk damaging both the blade and the wiper motor.
– Do not activate the wipers on a dry screen. This will lead to premature wear or damage to the blades.
D slow continuous wiping
E fast continuous wiping
1 A
BC
DE

1.124
ENG_UD74499_2Essuie-vitre / lave-vitre avant (BCB - Renault)
WINDSCREEN WASH, WIPE (4/5)Specific front wiper position (service position)This position enables the blades to be lifted to remove them from the winds- creen.It may be useful to:– to clean the blades;– to release the blades from the winds-
creen in winter;– replace the blades ➥ 5.20.With the engine stopped or started, lift the stalk twice 1 to position A (single sweep). The blades stop slightly away from the bonnet.To return the blades to low position, with the ignition on, ensure that the wipers have folded down onto the wind- screen, then move the stalk 1 to posi- tion A (single sweep).Before switching on the ignition, place the wipers on the windscreen. Otherwise, there may a risk of damage to the bonnet or the wipers when they are switched on.
Before any action involving the windscreen (washing the vehicle, de-icing, cleaning the windscreen,
etc.) return stalk 1 to position B (stop).Risk of injury and/or damage.
In the event of obstacles on the windscreen (dirt, snow, ice etc.), clean the windscreen (including the central area located behind the inte- rior rear view mirror) before starting the wipers (risk of motor overheat- ing).If an object is preventing a blade from moving, it may stop functio- ning. Remove the obstacle and reactivate the wiper using the wiper stalk.
1 A
BC
DE

1.125
ENG_UD74499_2Essuie-vitre / lave-vitre avant (BCB - Renault)
WINDSCREEN WASH, WIPE (5/5)
Windscreen washerWith the ignition on, pull stalk 1 then release.A longer pull will trigger, in addition to the windscreen washer, two sweeps of the wipers followed, a few seconds later, by a third.
Note: in temperatures below zero, the washer liquid may freeze on the wind- screen, reducing visibility. Heat the windscreen using the demister control before cleaning.
Efficiency of a wiper bladeCheck the condition of the wiper blades. How long they last depends on you:– it must remain clean: clean the
blade and the screen regularly with soapy water;
– do not use it when the screen is dry;
– free it from the screen when it has not been used for a long time.
In all cases, replace it as soon as it begins to lose efficiency: approxi- mately once a year ➥ 5.20.
Precaution for using the wipers– In freezing or snowy weather
conditions, clear the screen before starting the wipers (risk of motor overheating);
– ensure that no objects are ob- structing the travel of the blade.
When working in the engine compartment, ensure that the windscreen wiper stalk is in position B (stop).
Risk of injury.
1 A
BC
DE

screen wash/wipe ......................................(up to the end of the DU)wipers ........................................................(up to the end of the DU)windscreen washer ....................................(up to the end of the DU)
1.126
ENG_UD74500_2Essuie-vitre / lave-vitre arrière (BCB - Renault)
REAR SCREEN WASH, WIPE (1/2)
Efficiency of a wiper bladeCheck the condition of the wiper blades. How long they last depends on you:– it must remain clean: clean the
blade and the screen regularly with soapy water;
– do not use it when the screen is dry;
– free it from the screen when it has not been used for a long time.
In all cases, replace it as soon as it begins to lose efficiency: approxi- mately once a year ➥ 5.20.
Precautions for using the wipers– In freezing or snowy weather
conditions, clear the screen before starting the wipers (risk of motor overheating);
– ensure that no objects are ob- structing the travel of the blade.
To stop the operation, pivot ring 3 again.Note: when washing using a roller type car wash, return the ring 3 on the stalk 1 to the stop position to deactivate automatic wiping.Follow usage recommendations.At the end of use, remember to return the rear wiper control to the stop posi- tion, so that wiping is not inadvertently activated during the next use.
Y Rear screen wiperWith the ignition on, turn ring 3
on stalk 1 to align the symbol with mark 2.– stop;– intermittent wiping; The wipers will pause for several
seconds between sweeps. Wiping frequency varies with vehicle speed;
– slow continuous wiping.
Do not use the wiper arm to open or close the tailgate.
Before any action involving the rear screen (washing the vehicle, de-icing, clean- ing, etc.) return stalk 1 to
the stop position.Risk of injury and/or damage.
31 2

1.127
ENG_UD74500_2Essuie-vitre / lave-vitre arrière (BCB - Renault)
REAR SCREEN WASH, WIPE (2/2)Activation/deactivation of the rear screen wiper Engaging reverse gear triggers inter- mittent wiping (if the front wipers are in operation). If your vehicle is equipped with a vehicle settings customisation menu, you can opt to activate or deacti- vate this function ➥ 1.108. For vehicles not fitted with a settings customisation menu, you can have this function deactivated by an authorised dealer.
In the event of obstacles present on the rear window (dirt, snow, etc.), the wiper will try to sweep away all the obstacles. If an obstacle prevents the blade from moving, it can be stopped. Remove the obstacle, wait for around 30 seconds and reactivate the wiper using the wiper stalk.
Precautions– In the event of ice, check that the
blades are not stuck to the wind- screen before operating the wipers. If you activate the wiper while the blade is blocked by ice, you risk dam- aging both the blade and the wiping motor.
– Do not operate the wipers on a dry screen. This will lead to the prema- ture wear or damage to the blades.
p Rear screen wash/wipeWith the ignition on, push and
hold stalk 1, then release.Holding the stalk for longer will trigger (in addition to the windscreen washer) two sweeps of the rear wiper followed, a few seconds later, by a third (drip wiping function).When the stalk is released, it returns to the rear wipe position.
1

1.128
ENG_UD72525_1Filler NU (BCB - Renault)

2.1
ENG_UD76849_4Sommaire 2 (BCB - Renault)
Section 2: DrivingStarting, stopping the engine . . . . . . . . . . . . . . . . . . . . . . . . . . . . . . . . . . . . . . . . . . . . . . . . . . . . . . . 2.2Gear control, electronic lever. . . . . . . . . . . . . . . . . . . . . . . . . . . . . . . . . . . . . . . . . . . . . . . . . . . . . . . 2.5Regenerative braking system . . . . . . . . . . . . . . . . . . . . . . . . . . . . . . . . . . . . . . . . . . . . . . . . . . . . . . 2.9Electronic parking brake . . . . . . . . . . . . . . . . . . . . . . . . . . . . . . . . . . . . . . . . . . . . . . . . . . . . . . . . . . 2.10“AUTOHOLD” function . . . . . . . . . . . . . . . . . . . . . . . . . . . . . . . . . . . . . . . . . . . . . . . . . . . . . . . . . . . . 2.14Environment . . . . . . . . . . . . . . . . . . . . . . . . . . . . . . . . . . . . . . . . . . . . . . . . . . . . . . . . . . . . . . . . . . . 2.16Driving advice, Eco-driving . . . . . . . . . . . . . . . . . . . . . . . . . . . . . . . . . . . . . . . . . . . . . . . . . . . . . . . . 2.17Vehicle range: advice . . . . . . . . . . . . . . . . . . . . . . . . . . . . . . . . . . . . . . . . . . . . . . . . . . . . . . . . . . . . 2.20Tyre pressure monitoring system . . . . . . . . . . . . . . . . . . . . . . . . . . . . . . . . . . . . . . . . . . . . . . . . . . . 2.22Driver correction devices and aids . . . . . . . . . . . . . . . . . . . . . . . . . . . . . . . . . . . . . . . . . . . . . . . . . . 2.27Lane departure warning. . . . . . . . . . . . . . . . . . . . . . . . . . . . . . . . . . . . . . . . . . . . . . . . . . . . . . . . . . . 2.32Lane departure prevention . . . . . . . . . . . . . . . . . . . . . . . . . . . . . . . . . . . . . . . . . . . . . . . . . . . . . . . . 2.37Blind spot warning . . . . . . . . . . . . . . . . . . . . . . . . . . . . . . . . . . . . . . . . . . . . . . . . . . . . . . . . . . . . . . . 2.43Safe distance alert . . . . . . . . . . . . . . . . . . . . . . . . . . . . . . . . . . . . . . . . . . . . . . . . . . . . . . . . . . . . . . . 2.49Advanced Safety . . . . . . . . . . . . . . . . . . . . . . . . . . . . . . . . . . . . . . . . . . . . . . . . . . . . . . . . . . . . . . . . 2.52Driver vigilance warning . . . . . . . . . . . . . . . . . . . . . . . . . . . . . . . . . . . . . . . . . . . . . . . . . . . . . . . . . . 2.69Detection of road signs . . . . . . . . . . . . . . . . . . . . . . . . . . . . . . . . . . . . . . . . . . . . . . . . . . . . . . . . . . . 2.71Speed limiter . . . . . . . . . . . . . . . . . . . . . . . . . . . . . . . . . . . . . . . . . . . . . . . . . . . . . . . . . . . . . . . . . . . 2.74Cruise control . . . . . . . . . . . . . . . . . . . . . . . . . . . . . . . . . . . . . . . . . . . . . . . . . . . . . . . . . . . . . . . . . . 2.78Stop and Go adaptive cruise control . . . . . . . . . . . . . . . . . . . . . . . . . . . . . . . . . . . . . . . . . . . . . . . . . 2.83Active Driver Assist . . . . . . . . . . . . . . . . . . . . . . . . . . . . . . . . . . . . . . . . . . . . . . . . . . . . . . . . . . . . . . 2.105Parking distance control . . . . . . . . . . . . . . . . . . . . . . . . . . . . . . . . . . . . . . . . . . . . . . . . . . . . . . . . . . 2.120Active emergency braking in reverse gear . . . . . . . . . . . . . . . . . . . . . . . . . . . . . . . . . . . . . . . . . . . . 2.126Parking exit warning . . . . . . . . . . . . . . . . . . . . . . . . . . . . . . . . . . . . . . . . . . . . . . . . . . . . . . . . . . . . . 2.129Reversing camera . . . . . . . . . . . . . . . . . . . . . . . . . . . . . . . . . . . . . . . . . . . . . . . . . . . . . . . . . . . . . . . 2.133360° camera . . . . . . . . . . . . . . . . . . . . . . . . . . . . . . . . . . . . . . . . . . . . . . . . . . . . . . . . . . . . . . . . . . . 2.135Automatic parking . . . . . . . . . . . . . . . . . . . . . . . . . . . . . . . . . . . . . . . . . . . . . . . . . . . . . . . . . . . . . . . 2.146Safe passenger exit . . . . . . . . . . . . . . . . . . . . . . . . . . . . . . . . . . . . . . . . . . . . . . . . . . . . . . . . . . . . . . 2.152Emergency call . . . . . . . . . . . . . . . . . . . . . . . . . . . . . . . . . . . . . . . . . . . . . . . . . . . . . . . . . . . . . . . . . 2.155

driving ........................................................(up to the end of the DU)starting .......................................................(up to the end of the DU)starting the engine .....................................(up to the end of the DU)starting the engine .....................................(up to the end of the DU)
2.2
ENG_UD69850_1Démarrage, arrêt du moteur (BCB - Renault)
Starting, stopping the engine
STARTING, STOPPING THE ENGINE (1/3)
Starting the engineThe card must be inserted in detection zone 1.
To start:– depress the brake pedal;– press button 2. The message
READY comes on, on the instrument panel, along with a beep.
The message disappears when the ve- hicle speed is above approximately 3.1 mph (5 km/h).
1
Special features– If any one of the starting conditions
is not applied, the message “Apply brake + START” is displayed on the instrument panel;
– in some cases, it will be necessary to move the steering wheel whilst pressing the start button 2 to help unlock the steering column; the message “Turn Steering Wheel + START” will warn you of this.
The vehicle can only be started if the charging cord is unplugged from the vehicle.
2
During a system update via the mul- timedia system it will not be possible to start the vehicle.Wait for the update to be completed before starting the vehicle.For more information on system up- dates, please refer to the multime- dia instructions.

2.3
ENG_UD69850_1Démarrage, arrêt du moteur (BCB - Renault)
Operating faultsIn certain cases, the hands-free card may not work:– the card battery is flat, the secondary
12 V battery is discharged etc.;– near to appliances operating on the
same frequency as the card (moni-tor, mobile phone, video game, etc.);
– vehicle located in a high electromag-netic radiation zone.
STARTING, STOPPING THE ENGINE (2/3)
“Hands-free” starting with the tailgate openIn this case, the card should not be lo- cated in the luggage compartment, to prevent the risk of loss.
Accessories function(switching on the ignition)Once you have gained access to your vehicle, you may use some of its func- tions (radio, navigation, wipers, etc.).To use the other functions, with the card in the passenger compartment, press the 2 button without pressing the pedals.
2
3
4
The message “Place card on zone + START” appears on the instrument panel.Press the brake pedal, then place the 4 card (button side) in the place- ment area 3 (upper console A or lower console B depending on the vehicle). Press the 2 button to start the vehicle. The message goes out.
3
4
A B

stopping the engine ...................................(current page)
2.4
ENG_UD69850_1Démarrage, arrêt du moteur (BCB - Renault)
Stopping the engineThe vehicle must be at a standstill.Press the 2 button: the engine stops, the READY message goes out on the instrument panel and the assisted parking brake is applied. The steering column is locked when the driver's door is opened or the vehicle is locked.
STARTING, STOPPING THE ENGINE (3/3)If the card is no longer in the passenger compartment when you try to switch the engine off, the message “Keycard absent : press/hold START” appears on the instrument panel: press button 2 for longer than two seconds.With the engine switched off, any ac- cessories being used (radio, etc.) will continue to function for approximately 45 minutes.When the driver’s door is opened, the accessories stop working.
Never switch off the igni- tion before the vehicle has stopped completely. Once the engine has stopped,
the power-assisted steering and the passive safety devices such as the airbags and pretensioners will no longer operate.
Driver’s responsibility when parking or stopping the vehicleNever leave an animal,
child or adult who is not self-suffi- cient alone in your vehicle, even for a short time.They may pose a risk to themselves or to others by starting the engine, activating equipment such as the electric windows or locking the doors, for example.Also, in hot and/or sunny weather, please remember that the tempera- ture inside the passenger compart- ment increases very quickly.RISK OF DEATH OR SERIOUS INJURY.
2

changing gear ............................................(up to the end of the DU)speed control .............................................(up to the end of the DU)driving ........................................................(up to the end of the DU)gear lever...................................................(up to the end of the DU)operation....................................................(current page)
2.5
ENG_UD75611_2Commande de vitesse, levier électronique (BCB - Renault)
Gear control, electronic lever
Electronic selector lever 1R: reverseN: NeutralD: automatic modeP: park, button 2The gear engaged is displayed on the instrument panel as a reminder.
2
1
One-touch selectorMove the selector lever 1 one or two notches upwards or downwards to engage the desired position (R, N or D) then release the lever and it will return to the stable position.The position engaged lights up on the instrument panel.If certain conditions prevent shifting from one position to another, the cur- rent position flashes on the instrument panel.
GEAR CONTROL, ELECTRONIC LEVER (1/4)
2

2.6
ENG_UD75611_2Commande de vitesse, levier électronique (BCB - Renault)
Check that the P warn- ing light on the instrument panel is activated before leaving the vehicle.
Risk of loss of immobilisation of the vehicle.
To disengage position PWith the vehicle stationary and the engine running, press the brake pedal and, move the 1 selector lever upwards or downwards according to the position desired.If the brake pedal is not fully depressed, the message “Press brake pedal” and
the warning light Ó are displayed on the instrument panel.
To engage neutralWith the vehicle stationary and the engine running, to engage the N po- sition, it is necessary to depress the brake pedal before moving the selec- tor lever 1 one notch upwards or down- wards.
To engage P positionWith the vehicle at a standstill, engine running or ignition on, press button 2 to engage position P.
GEAR CONTROL, ELECTRONIC LEVER (2/4)
1
2

operation....................................................(current page)
2.7
ENG_UD75611_2Commande de vitesse, levier électronique (BCB - Renault)
Driving in automatic modeWith the vehicle stationary and the run- ning and the brake pedal depressed, tilt the selector lever 1 two notches down- wards to engage the D position.If one of the conditions is not applied, the current position flashes for around 5 seconds and the message “Press brake pedal” is displayed on the instru-ment panel for approximately 5 sec-onds.In most traffic conditions, you will not have to touch the gear lever.Note: with the engine running and the vehicle travelling at between 0 and 5 mph (0 and 8 km/h), in position N or R, it is necessary to depress the brake pedal to engage position D.
To select reverse gearWith the vehicle stationary and the engine running, move the 1 selector lever two notches upwards to engage position R.If the brake pedal is not depressed, a beep will sound, the display of the cur- rent position flashes for around 5 sec- onds in the grid shown on the instru- ment panel, and a message “Press brake pedal” is displayed for around 5 seconds.Note: with the engine running and the vehicle travelling at between 0 and 5 mph (0 and 8 km/h), in position N or D, it is necessary to depress the brake pedal to engage R.
GEAR CONTROL, ELECTRONIC LEVER (3/4)

2.8
ENG_UD75611_2Commande de vitesse, levier électronique (BCB - Renault)
As position P is automatically en- gaged when the engine is stopped, in some situations (e.g. when using some car washes) it may be necessary to engage position N:– With the engine running, press the
P button, move the selector lever 1 one notch upwards or downwards to change to position N, then stop the engine;
– with the engine off and the ignition on, move the selector lever 1 one notch upwards or downwards then switch off the ignition.
The next time the engine is restarted, position P is engaged automatically ac- cording to the cases described earlier.
Parking the vehiclePosition P is engaged automatically and, if fitted, the electronic parking brake is applied when:– the engine is stopped;– the driver’s seatbelt is unbuckled and
the vehicle is stopped;and– the driver’s door is opened and the
vehicle is stopped.P is displayed on the instrument panel.
For safety reasons, do not switch off the ignition before the vehicle has come to a complete standstill.
GEAR CONTROL, ELECTRONIC LEVER (4/4)Operating faultsIn the event of an engine fault or an electrical fault (battery fault, etc.), make sure that the vehicle is properly immo- bilised.
An impact to the under- side of the vehicle while manoeuvring (e.g.: strik- ing a post, raised kerb or
other street furniture) may result in damage to the vehicle (e.g.: defor- mation of an axle).To avoid any risk of accident, have your vehicle checked by an ap- proved Dealer.
P position must only be engaged when the vehicle is stationary.

2.9
ENG_UD72141_1Système de freinage régénératif (BCB - Renault)
Regenerative braking system
Driving with paddlesBy releasing the accelerator, the vehi- cle uses regenerative braking to slow down the vehicle.Some of this energy is converted to electricity to recharge the traction bat- tery.The paddles behind the steering wheel can be used to increase or decrease re- generative braking.
Regenerative braking change paddles 1 and 2Depending on the vehicle, you can use paddles 1 and 2 to change regenera- tive braking level when the lever is in position D.1 : Increasing regenerative braking.2 : Decreasing regenerative braking.The paddles can only be operated in the D position.
1 2
REGENERATIVE BRAKING SYSTEM
3
Regenerative braking levelsThe 3 warning light informs you of the regenerative braking level:– A: “Free-wheel” level, for gentle,
economical driving. Requires driving with anticipation;
– B: low regenerative braking level;– C: average regenerative braking
level;– D: maximum regenerative braking
level.
A
B
C
D
The engine brake should under no circumstances be used as a substitute for the brake pedal.

stopping the engine ...................................(up to the end of the DU)driving ........................................................(up to the end of the DU)ignition switch ............................................(up to the end of the DU)handbrake..................................................(current page)parking brake .............................................(up to the end of the DU)electronic parking brake ............................(up to the end of the DU)indicators:
instrument panel ..................................(up to the end of the DU)
instrument panel messages.......................(up to the end of the DU)instrument panel ........................................(up to the end of the DU)
2.10
ENG_UD75200_2Frein de parking assisté (BCB - Renault)
Electronic parking brake
ELECTRONIC PARKING BRAKE (1/4)
Assisted operationApplying the electronic parking brakeWith the vehicle stationary, the elec- tronic parking brake can be used to im- mobilise the vehicle:– by pressing the engine start/stop
button 1;or– when the driver’s seat belt is un-
fastened;or– when the driver’s door is opened;
In all other instances, the electronic parking brake is not applied automati- cally. Manual mode must be used.For certain country-specific model ver- sions, the assisted brake application function is not activated. Refer to the information on “Manual operation”.To confirm that the electronic park- ing brake is applied, the warning light
} on the instrument panel and warning light 2 on the switch 3 light up.After the engine is switched off, indi- cator light 2 goes out several minutes after the assisted parking brake has
been applied and indicator light } goes out when the vehicle is locked.
The electronic parking brake can be used to immobilise the vehicle. Before leaving the vehicle, check that the electronic parking brake is fully
applied. Warning light 2 on switch 3 and warning light } on the in- strument panel illuminate to show that the parking brake is applied but switch off when the doors are locked. Depending on the vehicle, a sticker is located on the upper section of the windscreen to remind you of this.
1
3
2
or– when position P is engaged.

2.11
ENG_UD75200_2Frein de parking assisté (BCB - Renault)
ELECTRONIC PARKING BRAKE (2/4)
Manually releasing the electronic parking brakePress switch 1 without pressing the pedals to switch the ignition on. Press the brake pedal then press switch 3: in- dicator light 2 on the switch and indica-
tor light } displayed on the instru- ment panel go out.
Manual operationYou can apply the electronic parking brake manually.
Manually applying the electronic parking brakePull switch 3. Warning light 2 and warn-
ing light } on the instrument panel light up.
Assisted operation (continued)Note: in some situations (electronic parking brake failure, manual release of the parking brake, etc.), a beep sounds and the message “WARNING: Apply Parking Brake” appears on the instru- ment panel to warn you that the elec- tronic parking brake has been released.– with the engine running: when the
driver’s door is opened;– with the engine off: when a front door
is opened.In this case, pull and release switch 3 to apply the assisted parking brake.
Assisted release of the parking brakeThe parking brake is released:– once the vehicle starts to accelerate;or– when shifting from position P.
1
3
2
The electronic parking brake can be used to immobilise the vehicle. Before leaving the vehicle, check that the elec-
tronic parking brake is fully applied. Warning light 2 on switch 3 and warning light } on the instrument panel illu- minate to show that the parking brake is applied but switch off when the doors are locked. Depending on the vehicle,
a sticker is located on the upper section of the windscreen to remind you of this.

2.12
ENG_UD75200_2Frein de parking assisté (BCB - Renault)
ELECTRONIC PARKING BRAKE (3/4)
Brief stopTo apply the electronic parking brake manually (when stopping at a red light, or stopping when the engine is running, etc.): pull and release the switch 3. The brake is released as soon as the vehi- cle is started up again.
Special casesTo park on a slope or while towing a trailer, for example, pull switch 3 for a few seconds to gain the maximum braking.
To park, without applying the electronic parking brake (if there is a risk of freez- ing, for example):– engage position P: the drive wheels
will be mechanically locked by the driveshaft;
– stop the engine by pressing the engine Start/Stop button 1;
– release the driver’s seat belt;– open the driver’s door;
1
3
2
– manually release the electronic park- ing brake (please see the informa- tion on “Manually releasing the elec- tronic parking brake” on the previous page);
– depending on the vehicle, the park- ing brake is applied automatically. You will have to release it manually.

operating faults ..........................................(current page)automatic gearbox (use) ............................(current page)faults
operating faults ....................................(current page)
2.13
ENG_UD75200_2Frein de parking assisté (BCB - Renault)
For safety reasons, automatic release is deactivated when the driver’s door is open or not shut properly and the engine is running (in order to prevent the vehicle from moving without the driver). The “Release Parking Brake” message appears on the instrument panel when the driver depresses the accelerator.
Operating faults– If there is a fault, the © warning
light illuminates on the instrument panel accompanied by the mes-sage “Check Parking Brake” and in
some cases the } warning light appears. Contact your approved Dealer straight away.
– If there is an assisted parking brake fault, the warning light ® comes on, along with the message “WARNING: Braking System”, a beep and, in some cases, the warn-
ing light }. This means that you must stop as
soon as traffic conditions allow.
Never leave your vehicle without moving the selec- tor lever to position P, ap- plying the handbrake and
switching off the engine. This is be- cause when the vehicle is stationary with the engine running and a gear engaged, the vehicle may begin to move if you accelerate.There is a risk of accidents.
If no lights or sounds are ap- parent, this indicates a fault in the instrument panel. This indicates that it is essential
to stop immediately (as soon as traf- fic conditions allow). Ensure that the vehicle is correctly immobilised and contact an approved Dealer.
ELECTRONIC PARKING BRAKE (4/4)
If the message “WARNING: Electric System” or “Check battery” or “WARNING: Braking System”, is dis-
played, you must immobilise the vehicle by engaging position P or by pulling the switch 3 for approxi- mately 10 seconds.If the conditions and the slope re- quire it, chock the wheels of the ve- hicle.Risk of loss of immobilisation of the vehicle.Call an approved Dealer.

stopping the engine ...................................(up to the end of the DU)driving ........................................................(up to the end of the DU)ignition switch ............................................(up to the end of the DU)handbrake..................................................(current page)parking brake .............................................(up to the end of the DU)electronic parking brake ............................(up to the end of the DU)indicators:
instrument panel ..................................(up to the end of the DU)
instrument panel messages.......................(up to the end of the DU)instrument panel ........................................(up to the end of the DU)
2.14
ENG_UD69865_1Autohold (BCB - Renault)
“AUTOHOLD” function
“AUTOHOLD" FUNCTION (1/2)Vehicle stopped (e.g. at a red light, an intersection, a traffic jam, etc.), the func- tion ensures braking force even when the driver releases the brake pedal.The braking force is released as soon as the driver accelerates sufficiently with a gear engaged.
ActivationPress the switch 1.The switch warning light 1 illuminates to confirm that the function is activated.
DeactivationPress the 1 switch, if your vehicle is maintained by braking force, also press the brake pedal.The switch warning light 1 turns off, confirming that the function is deacti- vated.
1
2
If the braking force is maintained, the parking brake is applied automatically when:– the driver opens the door;or– the driver unbuckles their seat belt;or– the vehicle is immobilised for more
than approximately three minutes.
The electronic parking brake can be used to im- mobilise the vehicle. Before leaving the vehicle, check
that the electronic parking brake is fully applied. The indicator light on
switch 2 and the warning light } on the instrument panel illuminate to show that the parking brake is ap- plied and switch off when the doors are locked. Depending on the vehi- cle, a sticker is located on the upper section of the windscreen to remind you of this.
Upon each start-up, the function continues the mode set at the time the engine was last switched off.

2.15
ENG_UD69865_1Autohold (BCB - Renault)
“AUTOHOLD" FUNCTION (2/2)Conditions for interrupting the braking forceThe following conditions must be met:– the driver accelerates sufficiently
with a gear engaged;or– the driver disables the function.
Warning light goes out on the in- strument panel.
Conditions for maintaining the braking forceThe following conditions must be met:– the driver’s door is closed;and– the seat belt for the driver is fas-
tened;and– the electronic parking brake is re-
leased;and– the vehicle is not stationary on a very
steep slope.The maintained braking force is con-
firmed by the warning light on the instrument panel.

environment ...............................................(up to the end of the DU)
2.16
ENG_UD69853_1Environnement (BCB - Renault)
Environment
ENVIRONMENTPlease make your own contribution towards protecting the environment too.– Parts and vehicles at the end of their
life must not be thrown away. They must be handed to a legal entity that complies with environmental stand- ards.
– Worn parts replaced in the course of routine vehicle maintenance (vehicle battery, batteries, etc.) must be dis- posed of through dedicated collec- tion points.
– To optimise the recycling of your ve- hicle at the end of its life, you can contact an authorised dealer or visit the manufacturer’s website to be di- rected to collection points that guar- antee respect for the environment complying with local laws.
RecyclingYour vehicle is 85% recyclable and 95% recoverable.To achieve these objectives, many of the vehicle components have been de- signed to enable them to be recycled.The materials and structures have been carefully designed to:– allow these components to be easily
removed and reprocessed by spe- cialist companies;
– promote a circular economy (re-use, recycling, recovery, etc.)
This is particularly true for electrified vehicle batteries.In order to preserve raw material re- sources, your vehicle also includes many parts made from recycled plas- tics or renewable materials.
Your vehicle has been designed with respect for the environment in mind for its entire service life: during production, use and at the end of its life.
ManufactureYour vehicle has been manufactured at an industrial site which uses a progress policy to reduce environmental impacts on rivers and natural areas (reduc- tion of water and energy consumption, visual and noise pollution, atmospheric emissions and waste water, sorting and reusing waste).

range of the traction battery.......................(up to the end of the DU)vehicle range .............................................(up to the end of the DU)driving recommendations ..........................(up to the end of the DU)ECO driving ...............................................(up to the end of the DU)charge meter .............................................(current page)energy saving ............................................(up to the end of the DU)energy
range ....................................................(up to the end of the DU)
energycharge meter (function) ........................(current page)
2.17
ENG_UD69854_1Conseils de conduite, ECO conduite (BCB - Renault)
Range is accredited according to a standard regulatory method. Identical for all manufacturers, this enables vehi- cles to be compared with one another.Range in real time depends on vehi- cle usage conditions, equipment fitted and the user’s driving style. To opti- mise range, please refer to the follow- ing advice.Depending on the versions, you will be provided with functions which enable you to lower energy consumption:– on the instrument panel: – the power meter; – the driving style indicator;– on the multimedia screen: – data relating to your energy con-
sumption; – an energy consumption graph; – scores based on your driving
style; – Eco driving advice; – a route planner; – an ECO driving mode.
Driving advice, Eco-driving
DRIVING ADVICE, ECO-DRIVING (1/3)Optimum use zone 0Indicates nil consumption.
“Recommended consumption” usage zone BThe traction battery supplies the elec- trical energy required for the motor to move the vehicle.
“Consumption not recommended” usage zone CIndicates high energy consumption.
Power meter(on the instrument panel)The power meter gives the driver a re- al-time view of the vehicle’s energy consumption.
“Energy recovery” usage zone AWhen driving, if you lift your foot off the accelerator pedal or apply the brake, the motor generates electrical current during deceleration, and this energy is used to slow down the vehicle and re- charge the traction battery. ➥ 2.9.
The presence and display of this in- formation depends on the type of ambiance selected ➥ 1.96.
A
B
C
0

2.18
ENG_UD69854_1Conseils de conduite, ECO conduite (BCB - Renault)
Driving style indicatorInforms you about the driving style adopted in real time. This is shown by the 1 warning light.You can display the driving style indica- tor by repeatedly pressing up/down on the switch 2.
DRIVING ADVICE, ECO-DRIVING (2/3)
1
The larger the circle 1 in the green area, the better your speed, accelera- tion and anticipation is: your driving is economical.The smaller the circle 1 in the orange area, the poorer your speed, accelera- tion and anticipation is: your driving is not economical.If you regularly follow this indicator, you will increase your vehicle’s electrical range.
2

energy«ECO» mode .......................................(current page)
«ECO» mode function ...............................(current page)ECO mode .................................................(current page)
2.19
ENG_UD69854_1Conseils de conduite, ECO conduite (BCB - Renault)
ECO modeECO mode is a function that optimises vehicle range. It acts on certain ener- gy-consuming systems (air condition- ing, etc.) and on the vehicle's behaviour (acceleration, cruise control, decelera- tion, etc.)
Activation/deactivation from the multimedia screen 3To activate or deactivate the function, refer to the multimedia instructions.
The cruise control switches to standby each time the ECO mode is activated or deactivated ➥ 2.78.
DRIVING ADVICE, ECO-DRIVING (3/3)
While driving, it is possible to exit the ECO mode temporarily in order to im- prove engine performance.To do this, press the accelerator pedal firmly and fully. ECO mode is reacti- vated when you take pressure off the accelerator pedal.
With ECO mode on, the vehicle speed is limited to approximately 62 mph (100 km/h).
3
Journey recordFor vehicles fitted with this, once the engine is switched off, a Journey Record is displayed on the multimedia screen 3. This record shows the infor- mation relating to your last journey:– average energy consumption;– number of miles/kilometres travelled;– an overall grade taking into account
acceleration, braking anticipation and your skill in managing speed;
– advice to enable you to improve your rating.
Please refer to the multimedia instruc- tions for further information.
Navigation systemUsing the information available on your navigation system (traffic information, nearest charging station, etc.) makes it easy to manage your journey.

vehicle range .............................................(up to the end of the DU)driving ........................................................(up to the end of the DU)driving recommendations ..........................(up to the end of the DU)practical advice ..........................................(up to the end of the DU)energy consumption ..................................(up to the end of the DU)energy saving ............................................(up to the end of the DU)energy
saving ..................................................(current page)
energy recovery .........................................(current page)electric vehicle
vehicle range .......................................(up to the end of the DU)
electric vehicledriving ..................................................
(up to the end of the DU)
2.20
ENG_UD69855_1Autonomie du véhicule : conseils (BCB - Renault)
Vehicle range: advice
VEHICLE RANGE: recommendations (1/2)
A “sporty” driving style reduces your vehicle range: opt for a “lighter” driving style.Advice:– drive at a constant speed;– keep an eye on the tools available
to you to view the road conditions (charge meter, current consumption, journey record, etc.) ➥ 2.17 ;
– adapt your driving style to avoid ex- cessive energy consumption;
– favour power recovery: anticipate traffic changes by lifting your foot off the accelerator pedal or by braking gradually.
Road typeDo not try to maintain the same speed up a hill, accelerate no more than you would on the level. Keep your foot in the same position on the accelerator pedal.
In real usage, the range of an electric vehicle may vary depending on several factors over which you have partial con- trol, which may make a considerable difference to the vehicle range.These factors are:– speed and driving style;– type of road;– heating level;– tyres;– use of electrical accessories;– vehicle loading.Furthermore, activating ECO mode en- ables the vehicle to automatically take charge of all energy consumers (engine power etc.) to reduce their consumption to the fullest possible extent ➥ 2.17.
Speed and driving styleHigh speeds will reduce your vehicle’s range.

heating, air conditioning: programming .....(current page)
2.21
ENG_UD69855_1Autonomie du véhicule : conseils (BCB - Renault)
VEHICLE RANGE: recommendations (2/2)
TyresAn under-inflated tyre increases energy consumption. Comply with the speci- fied tyre pressures for your vehicle.When driving, use tyres made by the same manufacturer, with the same di- mensions, type and structure as the original tyres. The use of non-regula- tion tyres significantly reduces vehicle range ➥ 4.7.
Vehicle loadingAvoid pointlessly overloading your ve- hicle.
Heating levelsThe use of heating or air-conditioning reduces vehicle range.To maintain your vehicle range, you are recommended to select “programming” mode before using the vehicle ➥ 3.17.

driving ........................................................(up to the end of the DU)tyres ...........................................................(up to the end of the DU)tyre pressure..............................................(up to the end of the DU)tyre pressure monitor.................................(up to the end of the DU)
2.22
ENG_UD74817_2Système de surveillance de pression des pneumatiques (BCB - Renault)
Tyre pressure monitoring system
TYRE PRESSURE MONITOR (1/5)
If the vehicle is equipped with the func- tion, this system monitors the tyre pres- sure.
Operating principleEach wheel has a sensor in the inflation valve which periodically measures the tyre pressure.The system displays the current pres- sures on the instrument panel 1 and alerts the driver in the event of insuffi- cient pressure.
Resetting the standard level for the tyre pressuresThis should be done:– when the standard tyre pressure
needs to be changed to adapt to usage conditions (empty, carrying a load, motorway driving, etc.);
– after swapping a wheel (however this practice is not recommended);
– after changing a wheel.It should always be done after checking the tyre pressure of all four tyres when cold.Tyre pressures must correspond to the current usage of the vehicle (empty, carrying a load, motorway driving, etc.).
If the vehicle is equipped with a nav- igation system, the resetting proce- dure may also be carried out using the multimedia screen: please see the equipment instructions.
1
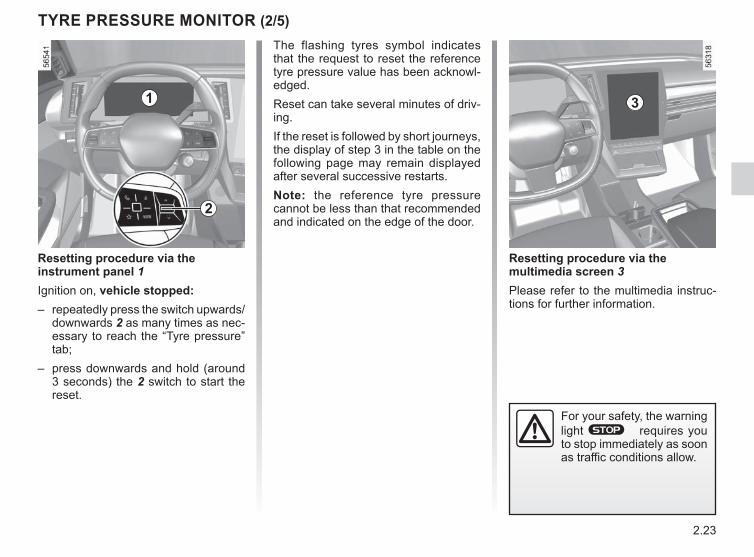
2.23
ENG_UD74817_2Système de surveillance de pression des pneumatiques (BCB - Renault)
Resetting procedure via the multimedia screen 3Please refer to the multimedia instruc- tions for further information.
TYRE PRESSURE MONITOR (2/5)
Resetting procedure via the instrument panel 1Ignition on, vehicle stopped:– repeatedly press the switch upwards/
downwards 2 as many times as nec- essary to reach the “Tyre pressure” tab;
– press downwards and hold (around 3 seconds) the 2 switch to start the reset.
The flashing tyres symbol indicates that the request to reset the reference tyre pressure value has been acknowl- edged.Reset can take several minutes of driv- ing.If the reset is followed by short journeys, the display of step 3 in the table on the following page may remain displayed after several successive restarts.Note: the reference tyre pressure cannot be less than that recommended and indicated on the edge of the door.
For your safety, the warning light ® requires you to stop immediately as soon as traffic conditions allow.
2
31

2.24
ENG_UD74817_2Système de surveillance de pression des pneumatiques (BCB - Renault)
TYRE PRESSURE MONITOR (3/5)
Steps Displays Readings
1 With the ignition on and the vehicle stationary, to start resetting the pressure of all four tyres, press downwards and hold the 2 switch.
2 The “---” quote marks in front of each wheel will flash to indicate that the system has reg- istered the tyre pressure reset for all four wheels.
3
The “---” quote marks in front of each wheel will remain lit. This system resets the tyre pressure of all four tyres. You can now drive. The message may remain displayed during short journeys.Note: during the reset, tyre pressure monitoring remains in operation.
4 The pressure value of the four tyres is displayed: the resetting procedure is complete and successful.
The table below shows the possible messages related to the tyre resetting procedure.

2.25
ENG_UD74817_2Système de surveillance de pression des pneumatiques (BCB - Renault)
Readjustment of tyre pressuresThe pressure of the four tyres must be set when cold (refer to the label lo- cated on the edge of the driver’s door). If the tyre pressures cannot be checked when the tyres are cold, the recom- mended pressures should be increased by 0.2 to 0.3 bar (3 PSI).Never deflate a hot tyre.
Replacing wheels/tyresContact an Approved Dealer to replace the tyres and to find out about acces- sories compatible with the system that are available from your dealer network: using any other accessory could affect the correct operation of the system.
Changing a wheelThe system may take sev- eral minutes depending on use for the new wheel po-
sitions and pressures to be recog- nised; check the tyre pressures after all operations.
This function is an addi- tional driving aid.The function does not take the place of the driver. It
cannot, therefore, under any cir- cumstances replace the vigilance or the responsibility of the driver. Check the tyre pressures once a month.
Tyre repair product and inflation kitAs the valves are specifically designed, only use equipment approved by the network. Please see the section on ➥ 5.2.
Tyre pressure faultsThe table on the following page lists the warning messages which appear on the instrument panel 1 when the system detects a tyre pressure fault.
TYRE PRESSURE MONITOR (4/5)
1

2.26
ENG_UD74817_2Système de surveillance de pression des pneumatiques (BCB - Renault)
Indicator lights
Messages Displays(depending on
the vehicle)
Readings
Adjust Tyre Pressure
The wheel and associated pressure value are dis- played in yellow.This indicates that tyre under-inflation has been de- tected. Check and adjust the pressure of the four tyres then reset the system.
+ ® Puncture
The wheel and associated pressure value are dis- played in red.This indicates that the tyre concerned is punctured or severely underinflated. Adjust the pressure of the four tyres while cold and reset the system if the tyre is deflated. Replace the tyre (or have it replaced) if it is punctured.
+ © Check Tyre Pressure SensorsA wheel is no longer displayed.This indicates that at least one wheel is not fitted with a sensor or that the sensor is faulty. Consult an ap- proved dealer.
Tyre Detection Failure
This indicates that the system has not been able to determine the pressure of each tyre. This may be caused by the use of a sensor not recommended by an approved dealer. The tyre pressure sensor moni- toring system remains in operation.
The information on the instrument panel signals any potential tyre pressure faults (e.g. deflated or punctured tyre). For your safety, the warning light ® requires you to stop immediately as soon as traffic conditions allow.
TYRE PRESSURE MONITOR (5/5)

ABS ...........................................................(up to the end of the DU)traction control ...........................................(up to the end of the DU)emergency brake assist.............................(up to the end of the DU)driving ........................................................(up to the end of the DU)electronic stability control: ESC .................(up to the end of the DU)ESC: electronic stability control .................(up to the end of the DU)emergency braking ....................................(up to the end of the DU)anti-lock braking system: ABS ...................(up to the end of the DU)
2.27
ENG_UD74813_2Dispositifs de correction et d’assistance à la conduite (BCB - Renault)
ABS (anti-lock braking system)Under heavy braking, the ABS prevents the wheels from locking, allowing the stopping distance to be managed and keeping control of the vehicle.Under these circumstances, the vehi- cle can be steered to avoid an obstacle whilst braking. In addition, this system can increase stopping distances, par- ticularly on roads with low surface grip (wet ground etc.).You will feel a pulsation through the brake pedal each time the system is activated. The ABS does not in any way improve the vehicle’s physical perform- ance relating to the road surface and roadholding. It is still essential to follow the rules of good driving practice (such as driving at a safe distance from the vehicle in front etc.).
Driver correction devices and aids
Depending on the vehicle, they com- prise:– the ABS (anti-lock braking
system);– the electronic stability program
ESC with understeer control and traction control;
– emergency braking assistance with (depending on the vehicle) braking anticipation;
– hill start assist;– regenerative braking system.Other driving assistance systems are detailed on the following pages.
In an emergency, apply firm and continuous pressure to the brake pedal. There is no need to pump it repeatedly. The ABS will modu- late the force applied in the braking system.
These functions are an ad- ditional aid in the event of critical driving conditions, enabling the vehicle behav-
iour to be adapted to suit the driving conditions.However, the functions do not take the place of the driver. They do not increase the vehicle’s limits and should not encourage you to drive more quickly. Therefore, they can under no circumstances replace the vigilance or responsibil- ity of the driver when manoeuvring the vehicle (the driver must always be ready for sudden incidents which may occur when driving).
DRIVER CORRECTION DEVICES, AIDS (1/5)

2.28
ENG_UD74813_2Dispositifs de correction et d’assistance à la conduite (BCB - Renault)
Electronic stability program ESC with understeer control and traction controlElectronic stability control ESCThis system helps you to keep control of the vehicle in critical driving condi- tions (avoiding an obstacle, loss of grip on a bend, etc.).
Operating principleA sensor in the steering wheel detects the direction selected by the driver.Other sensors throughout the vehicle measure the actual direction.The system compares driver input to the actual trajectory of the vehicle and corrects the trajectory if necessary by controlling the braking of certain wheels and/or engine power. In the event that the system is engaged, indicator light
flashes on the instrument panel.
Understeer controlThis system optimises the action of the ESC in the case of pronounced under- steer (loss of front axle road holding).
Traction controlThis system helps to limit wheelspin of the drive wheels and to control the ve- hicle when pulling away accelerating or decelerating.Operating principleUsing the wheel sensors, the system measures and compares the speed of the drive wheels at all times and slows down their over-rotation. If a wheel is starting to slip, the system brakes au- tomatically until the drive supplied be- comes compatible with the level of grip under the wheel again.
DRIVER CORRECTION DEVICES, AIDS (2/5)Operating faults
– © and x are lit on the in- strument panel accompanied, de- pending on the vehicle, by the mes- sages “Check ABS”, “WARNING: Check Braking System” and “Check ESC”: the ABS, the ESC and the emergency brake assist are deacti- vated. Braking is always enabled;
– x, D, © and ® lit on the instrument panel accom- panied by the message “WARNING: Braking System”: this indicates a fault with the braking system.
In both cases, please consult an Authorised Dealer.
Your braking systems are partially operational. However, it is dangerous to brake suddenly and
it is essential to stop immediately, as soon as traffic conditions allow. Contact an approved dealer.

2.29
ENG_UD74813_2Dispositifs de correction et d’assistance à la conduite (BCB - Renault)
Operating faultsWhen the system detects an operat- ing fault the message “Check ESC” and
warning light © and appear on the instrument panel. In this case, the ESC and traction control system are deactivated.Consult an approved dealer.
Emergency brake assistThis system supplements the ABS and helps reduce vehicle stopping dis- tances.
Operating principleThe system is for detecting an emer- gency braking situation. In this case, the braking system immediately devel- ops maximum power and may trigger ABS regulation.ABS braking is maintained as long as the brake pedal is applied.
Brake lights come onDepending on the vehicle, these may flash in the event of sudden decelera- tion.
Braking anticipationDepending on the vehicle, when you rapidly release the accelerator, the system anticipates the braking ma- noeuvre in order to reduce stopping distances.
Special casesWhen using the cruise control:– if you use the accelerator, when you
release it, the system may be trig- gered;
– if you do not use the accelerator, the system will not be triggered.
DRIVER CORRECTION DEVICES, AIDS (3/5)
These functions are an ad- ditional aid in the event of critical driving conditions, enabling the vehicle behav-
iour to be adapted to suit the driving conditions.These functions do not take the place of the driver. They do not increase the vehicle’s limits and should not encourage you to drive more quickly. Therefore, they can under no circumstances replace the vigilance or responsibil- ity of the driver when manoeuvring the vehicle (the driver must always be ready for sudden incidents which may occur when driving).
Operating faultsWhen the system detects an operating fault the message “WARNING: Check Braking System” appears on the instru- ment panel along with the © warn- ing light.Consult an approved dealer.

2.30
ENG_UD74813_2Dispositifs de correction et d’assistance à la conduite (BCB - Renault)
The hill start assistance system cannot completely prevent the vehicle from rolling backwards in all sit-
uations (extremely steep gradients, etc.).In all cases, the driver may depress the brake pedal to prevent the vehi- cle from rolling backwards.The hill start assistance function should not be used for prolonged stops: use the brake pedal.This function is not designed to im- mobilise the vehicle permanently.If necessary, use the brake pedal to stop the vehicle.The driver must remain particularly vigilant when driving on slippery or low-grip surfaces.Risk of serious injury.
Hill start assistanceDepending on the gradient of the in- cline, this system assists the driver when starting on a hill. It prevents the vehicle from rolling backwards by au- tomatically applying the brakes when the driver lifts his/her foot off the brake pedal to depress the accelerator pedal.
System operationIt only operates when the gear lever is in a position other than N and the ve- hicle is completely stationary (brake pedal depressed).The system holds the vehicle for ap- proximately 2 seconds. The brakes are then gradually released (the vehicle will move according to the slope).
DRIVER CORRECTION DEVICES, AIDS (4/5)

2.31
ENG_UD74813_2Dispositifs de correction et d’assistance à la conduite (BCB - Renault)
Regenerative braking systemWhen braking, the regenerative brak- ing system can convert the energy pro- duced by the vehicle deceleration into electric energy.This will recharge the 400 V traction battery and provide greater vehicle range.
Operating faults– © lit on the instrument panel
accompanied by the message “WARNING: Check Braking System “: braking assistance is still oper- ational.Under these conditions, the feel of applying the brake pedal may be dif- ferent.You are recommended to apply strong continuous pressure to the pedal.Please see an authorised dealer.
– ® lit on the instrument panel accompanied by the message “WARNING: Braking System”: this indicates a fault with the braking system.Please call an authorised dealer.
DRIVER CORRECTION DEVICES, AIDS (5/5)
The ® warning light requires you to stop imme- diately, for your own safety, as soon as traffic conditions
allow. Switch off the engine and do not restart it. Call an approved Dealer.

driving aids ................................................(up to the end of the DU)lane departure warning ..............................(up to the end of the DU)driver assistance........................................(up to the end of the DU)driving ........................................................(up to the end of the DU)
2.32
ENG_UD75195_2Alerte de sortie de voie (BCB - Renault)
Lane departure warning
LANE DEPARTURE WARNING (1/5)
Using information from the camera 1, the function warns the driver if they cross a (continuous or broken) line without activating the direction indica- tor lights.
This function is an addi- tional driving aid. This func- tion is not under any cir- cumstances intended to
replace the due care and attention of the driver, who should at all times be in control of the vehicle.The lane departure warning func- tion does not correct the vehi- cle’s trajectory.
1 Location of the camera 1Make sure the windscreen is not ob- scured (dirt, mud, snow, condensation etc.).

2.33
ENG_UD75195_2Alerte de sortie de voie (BCB - Renault)
LANE DEPARTURE WARNING (2/5)
Press the 3 switch to activate the func- tion.The message “Lane keeping system
activated” and the “ ” warning light are displayed on the instrument panel and the 3 switch warning light il- luminates.If no side function is selected in the “Lane keeping system” menu, when the 3 switch is pressed the message “Lane keeping system not configured” is displayed on the instrument panel.
To deactivate the function, press the 3 switch or deselect “Lane departure warning” in the “Lane keeping system “ menu.
Warning light goes out on the in- strument panel.If the lane departure warning was the only side function selected, the switch warning light 3 goes out and the mes- sage “”Lane keeping system deacti- vated “ is displayed.If the “ Lane crossing prevention “ func- tion is activated, deselecting the lane departure warning will not affect system operation.
3
Each time the vehicle is started, the function continues the mode saved the last time the engine was stopped.
Activation/deactivationBefore activating the function, from the “Vehicle” mode on the multimedia screen 2, press the “Driving assistance” menu then the “Lane keeping system” menu and select “Lane departure warn- ing”.
2

2.34
ENG_UD75195_2Alerte de sortie de voie (BCB - Renault)
OperationWhen the function is activated, the
warning light and the left and right lines 4 are displayed in grey on the instrument panel.The function is set to notify the driver if:– the speed is between 40 mph (65
km/h) and 93 mph (150 km/h) (or 99 mph (160 km/h) depending on the vehicle);
and
– the warning light and left/right line indicators 4 are coloured white.
The function triggers an alert if a line is crossed without the direction indica- tors being activated.The function alerts the driver:– by a vibration in the steering wheel;and
– the warning light and 4 the in- dicator for the crossed line turn red.
4
LANE DEPARTURE WARNING (3/5)

operating faults ..........................................(current page)faults
operating faults ....................................(current page)
2.35
ENG_UD75195_2Alerte de sortie de voie (BCB - Renault)
LANE DEPARTURE WARNING (4/5)
2
Temporarily not availableThe system will cease to be available if:– very fast lane departure;– driving continuously on a line;– four seconds approximately after
changing lanes;– tight bends;– impaired visibility;– activation of one of the direction indi-
cator lights;– strong acceleration;– the lane width changes;– the active emergency braking
system is triggered.When the function is not available, the
warning light and the left/right in- dicators turn to grey on the instrument panel.
Conditions for non-activation of the systemThe system cannot be activated when:– reverse gear is engaged;– the field of vision of the camera is ob-
structed;
– the û warning light is displayed.
The warning light and the left/ right line indicators turn to grey on the instrument panel.
AdjustmentTo access the multimedia screen func- tion settings 2, refer to the multimedia instructions:– “Alert vibration”: adjust the steering
wheel vibration level;
– “Lane departure anticipation”: adjust the line detection sensitivity level. To do this select:
– “Late”: line detected when cross- ing;
– “Standard”: line detected on ap- proach;
– “Early”: line detected nearby.Please refer to the multimedia instruc- tions for further information.

2.36
ENG_UD75195_2Alerte de sortie de voie (BCB - Renault)
LANE DEPARTURE WARNING (5/5)
This function is an additional driving aid. This function is not under any circumstances intended to replace the due care and attention of the driver, who should at all times be in control of the vehicle.
System servicing/repairs– In the event of an impact, the camera alignment may be changed, and its op-
eration may consequently be affected. Deactivate the function, then consult an authorised dealer.
– Any work in the area where the camera is located (repairs, replacements, windscreen modifications etc.) must be carried out by a qualified professional.
Only an authorised dealer is qualified to service the system.
In the event of system disturbanceSome conditions can disturb or damage the operation of the system, such as:– windscreen obscured (by dirt, ice, snow, condensation etc.);– a complex environment (tunnel etc.);– poor weather conditions (snow, rain, hail, black ice etc.) ;– poor visibility (night, fog etc.);– the road markings are irregular or difficult to distinguish (e.g. partially erased,
excessive spacing, distorted road surface, etc.) ;– being dazzled (glaring sun, lights of vehicles travelling in the opposite direction
etc.);– the road is narrow, winding or undulating (tight bends etc.);– closely following a vehicle travelling in the same lane.Risk of false alarms or absence of warnings
Operating faultsIn the event of a malfunction, the left and right line indicators (and, depend-
ing on display style, the warning light) stay grey on the instrument panel.In some cases, they are accompanied by the “Driving assist unavailable” mes- sage or the © warning light on the instrument panel and the “Check Driving assist” or “Check Front camera” message.Consult an approved dealer.

driving aids ................................................(up to the end of the DU)lane departure warning ..............................(up to the end of the DU)driver assistance........................................(up to the end of the DU)driving ........................................................(up to the end of the DU)lane departure prevention..........................(up to the end of the DU)
2.37
ENG_UD74865_2Prévention sortie de voie (BCB - Renault)
Using information from the camera 1, the function triggers a corrective action on the vehicle steering system if a con- tinuous or broken line is crossed with- out the direction indicator lights having been activated.
Location of the camera 1Make sure the windscreen is not ob- scured (dirt, mud, snow, condensation etc.).
Lane departure prevention
LANE DEPARTURE PREVENTION (1/6)
This function is an addi- tional driving aid. This func- tion is not under any circum- stances intended to replace
the due care and attention of the driver, who should at all times be in control of the vehicle.You can retake control of the ve-
hicle at any time by operating the steering wheel.
1

2.38
ENG_UD74865_2Prévention sortie de voie (BCB - Renault)
If no side function is selected in the “Lane keeping system” menu, when the 3 switch is pressed the message “Lane keeping system not configured” is displayed on the instrument panel. The 3 switch warning light remains switched off.To deactivate the function, press the 3 switch or deselect “Lane crossing pre- vention” in the “Lane keeping system” menu.
Warning light goes out on the in- strument panel.The 3 switch warning light goes out and the message “Lane keeping system deactivated” is displayed on the in- strument panel when the 3 switch is pressed or when all of the side func- tions are deselected in the “Lane keep- ing system” menu.
LANE DEPARTURE PREVENTION (2/6)
Each time the vehicle is started, the function continues the mode saved the last time the engine was stopped.
Press the 3 switch to activate the func- tion.The message “Lane keeping system
activated” and the “ ” warning light are displayed on the instrument panel and the 3 switch warning light il- luminates.When lane departure prevention is acti- vated, it incorporates the function “Lane departure warning”, even if it is not se- lected on the multimedia screen ➥ 2.32.
3
Activation/deactivationBefore activating the function, from the “Vehicle” mode on the multimedia screen 2, press the “Driving assistance” menu then the “Lane keeping system” menu and select “Lane crossing pre- vention”.
2

2.39
ENG_UD74865_2Prévention sortie de voie (BCB - Renault)
LANE DEPARTURE PREVENTION (3/6)
You can interrupt the trajectory cor- rection at any time by moving the steering wheel.
4
OperationWhen the function is activated, the
warning light and the left and right lines 4 are displayed in grey on the instrument panel.The function is set to operate when the vehicle speed is between approxi- mately 40 mph (65 km/h) and 93 mph (150 km/h) or 99 mph (160 km/h), de-
pending on the vehicle, and the warning light and the left-hand or right- hand line indicators 4 appear in white.The function reacts when the vehi- cle crosses a line without the indicator lights having been activated.
In these cases:– the function triggers an action on the
vehicle’s steering system to correct the vehicle trajectory;
– the warning light and the indi- cator 4 on the side of the breached line turns to yellow on the instrument panel.
Note: on bends, the function allows for slightly cutting the bend.If the corrective action on the steer-
ing system is not sufficient, the warning light and the indicator 4 on the side of the breached line turn to red on the instrument panel, accompanied by a vibration on the steering wheel.
Special casesWhen using the function:– If the system can no longer detect
any action by the driver on the steer-
ing wheel, the warning light appears in orange on the instrument panel, accompanied by the message “Keep control” and an audible warn- ing.
The audible warning is emitted along with the warning light and message until the driver takes control;
– if the system is active for too long, a warning sound is emitted, the 4 indi- cator light on the side of the line con-
cerned flashes and the warn- ing light shows orange until control is taken of the vehicle again.

operating faults ..........................................(current page)faults
operating faults ....................................(current page)
2.40
ENG_UD74865_2Prévention sortie de voie (BCB - Renault)
LANE DEPARTURE PREVENTION (4/6)Temporarily not availableThe system will cease to be available if:– very fast lane departure;– driving continuously on a line;– four seconds approximately after
changing lanes;– tight bends;– impaired visibility;– activation of one of the direction indi-
cator lights;– strong acceleration;– emergency braking;– the lane width changes;– the active emergency braking
system is triggered.
If the function is unavailable, the warning light and the left/right correc- tion warning lights 3 appear in grey on the instrument panel.
Conditions for non-activation of the systemThe system cannot be activated when:– reverse gear is engaged;– the field of vision of the camera is ob-
structed;
– the û warning light is displayed.
The warning light and the left/ right line warning lights are displayed in grey on the instrument panel.

2.41
ENG_UD74865_2Prévention sortie de voie (BCB - Renault)
LANE DEPARTURE PREVENTION (5/6)Operating faultsWhen the system detects an operating fault, the left-hand and right-hand line
indicators and the warning light remain in grey on the instrument panel.In some cases, they are accompanied by:– the message “Driving assist unavail-
able”;
– the warning light and the message “Check Driving assist” or the message “Check Front camera”.
Consult an approved dealer.
2
– “Lane departure anticipation”: adjust the line detection sensitivity level. To do this, select:
– “Late”: line detected when cross- ing;
– “Standard”: line detected on ap- proach;
– “Early”: line detected nearby.Please refer to the multimedia instruc- tions for further information.
AdjustmentTo access the multimedia screen func- tion settings 2, refer to the multimedia instructions:– “Alert vibration”: adjust the “Lane de-
parture warning” function steering wheel vibration level;

2.42
ENG_UD74865_2Prévention sortie de voie (BCB - Renault)
LANE DEPARTURE PREVENTION (6/6)
This function is an additional driving aid. This function is not under any circumstances intended to replace the due care and attention of the driver, who should at all times be in control of the vehicle.
System servicing/repairs– In the event of an impact, the camera alignment may be changed, and its operation may consequently be affected. Deactivate
the function and consult an authorised dealer.– Any work in the area where the camera is located (repairs, replacements, windscreen modifications etc.) must be carried
out by a qualified professional.Only an authorised dealer is qualified to service the system.
In the event of system disturbanceSome conditions can disturb or damage the operation of the system, such as:– windscreen obscured (by dirt, ice, snow, condensation etc.);– a complex environment (tunnel etc.);– poor weather conditions (snow, rain, hail, black ice etc.) ;– poor visibility (night, fog etc.);– the road markings are irregular or difficult to distinguish (e.g. partially erased, excessive spacing, uneven road surface, etc.)
;– being dazzled (glaring sun, lights of vehicles travelling in the opposite direction etc.);– the road is narrow, winding or undulating (tight bends etc.);– closely following a vehicle travelling in the same lane.In this case, the function “Lane crossing prevention” may trigger incorrectly or not at all.Risk of unwanted, incorrect correction or no correction of trajectory.Deactivating the functionYou must disable the function if:– the area of the camera has been damaged (on the windscreen side or the interior rear-view mirror side);– the road is slippery (snow, black ice, aquaplaning, gravel etc.) ;– poor visibility (night, fog etc.);– the windscreen is cracked or distorted (do not carry out windscreen repairs in this area; have it changed by an Authorised
Dealer);– the vehicle is towing a trailer or a caravan;– the vehicle is entering an area with several surface markings (an area with road works etc.).

driving aids ................................................(up to the end of the DU)blind spot: warning signal ..........................(up to the end of the DU)driver assistance........................................(up to the end of the DU)blind spot warning signal ...........................(up to the end of the DU)driving ........................................................(up to the end of the DU)
2.43
ENG_UD69861_1Avertisseur d’angle mort (BCB - Renault)
Blind spot warning
BLIND SPOT WARNING (1/6)
A
A B
B
Using information from the sensors in- stalled on each side of the rear bumper (area C), the function warns the driver:– when another vehicle is in the blind
spot area A and travelling in the same direction as your vehicle;
and/or– when there is a risk of collision with a
vehicle that is in the B area and driv- ing faster than you on an adjoining lane.
The function warns you when your ve- hicle is travelling at a speed above ap- proximately 9 mph (15 km/h).
Special featureEnsure that the C area around the radars on each side of the rear bumper are not obstructed (by dirt, mud, snow etc.)If a radar is obscured, the message “Side radars no visibility” will appear on the instrument panel. Clean the area where the sensors are located.This function is an addi-
tional driving aid. This func- tion is not under any cir- cumstances intended to
replace the due care and attention of the driver, who should at all times be in control of the vehicle.
The function does not notify the driver if the other vehicles are not moving.
C

multifunction screen...................................(current page)indicators ...................................................(current page)
2.44
ENG_UD69861_1Avertisseur d’angle mort (BCB - Renault)
BLIND SPOT WARNING (2/6)
D
3
21
Activation/deactivationTo activate or deactivate the function via the multimedia screen 1, refer to the multimedia instructions.Select ON or OFF.
The system’s detection range oper- ates according to a standard lane width. When driving in a narrow lane, the function can warn you when a vehicle is detected beyond the adjacent lane.
Indicator 2An indicator light 2 is located on each rear view mirror 3.Note: – clean the rear view mirrors 3 regu-
larly, so that the indicator lights 2 can be seen properly;
– if you overtake another vehicle, the 2 indicator will only come on if that ve- hicle remains in your vehicle’s blind spot A long enough.

2.45
ENG_UD69861_1Avertisseur d’angle mort (BCB - Renault)
Conditions for non-function– When driving on a road with tight
bends;– in reverse. If the vehicle is equipped with a towbar recognised by the system, the mes- sage “Trailer: blind spot warning off” is displayed on the instrument panel in- forming you that the function is not op- erational. For information on the range of equip- ment adapted to your vehicle, we advise you to consult an approved Dealer.
Display DFirst warning: direction indicator not activated, the 2 warning light indicates that a vehicle is detected in the blind spot area and/or that a vehicle is rap- idly approaching from the rear in an ad- jacent lane.
BLIND SPOT WARNING (3/6)
2
D
E
Display EDirection indicator activated, the 2 warning light flashes when the func- tion detects a vehicle in the blind spot warning area and/or a vehicle is rapidly approaching from the rear on the side towards which you will turn the wheel. If you cancel the direction indicator, the function will return to the initial warning (display D).
When the engine is started, the system adopts the last status saved before the ignition was switched off (refer to the previous pages).

2.46
ENG_UD69861_1Avertisseur d’angle mort (BCB - Renault)
Operating faultsIf the system detects a fault, the mes- sage “Side radars to check” is displayed on the instrument panel. Consult an ap- proved dealer.
Due to the presence of sensors behind the bumper, it is advisable to entrust any operation on the bumper (repair, replacement, paintwork, etc.) to a qualified professional.
– The system’s detection range operates according to a standard lane width. If you are driving in wide traf-
fic lanes, the system might not be able to detect a vehicle in the blind spot.
– The system might be disrupted momentarily if it is exposed to strong electromagnetic waves (as beneath high-tension power lines) or to very poor weather conditions (heavy rain, snow etc.). Remain aware of driving conditions.
There is a risk of accidents.
BLIND SPOT WARNING (4/6)

2.47
ENG_UD69861_1Avertisseur d’angle mort (BCB - Renault)
BLIND SPOT WARNING (5/6)
This function is an additional driving aid. This function is not under any circumstances intended to replace the due care and attention of the driver, who should at all times be in control of the vehicle.The driver should always adapt their speed to the traffic conditions, regardless of the system indications.
The system should under no circumstances be taken to be an obstacle detector or an anti-collision system.
System servicing/repairs– In the event of an impact, radar alignment may be changed, and its operation will consequently be affected. Deactivate the
function and consult an authorised dealer.– Any work in the area where the radars are located (repairs, replacements, etc.) must be carried out by a qualified profes-
sional.Only an authorised dealer is qualified to service the system.
System disturbanceSome conditions can disturb or damage the operation of the system, such as:– complex surroundings (metal bridges, tunnels, roads with barriers at the edge, etc.);– poor weather conditions (snow, hail, black ice, etc.).Risk of false alarms or absence of warningsIn the event of the system behaving abnormally, deactivate it and consult an authorised dealer.

2.48
ENG_UD69861_1Avertisseur d’angle mort (BCB - Renault)
BLIND SPOT WARNING (6/6)
Limitation of the system operation– The radar area should be kept clean and free of any modifications in order to ensure the proper operation of the system.
– Small objects moving close to the vehicle (motorcycles, bicycles, pedestrians, etc.) may not be recognised by the system.– When turning into a bend, the radars may temporarily cease to detect vehicles in adjacent lanes.– The function may warn you late if two other vehicles are approaching from the rear, driving side by side in the adjacent lanes
(i.e. driving on a 3-lane road) at a much higher speed than your vehicle.– The system may not provide a warning when the other vehicles are travelling at a significantly different speed.– If the vehicle is being overtaken by a long vehicle (e.g. heavy goods vehicle overtaking at a similar speed to the vehicle) the
system may interrupt the warning before the end of the manoeuvre.– The vehicle is travelling on a winding road.
Deactivating the functionYou must disable the function if:– the radar area has been damaged (rear bumper);– the vehicle is fitted with a towbar that is not recognised by the system.

driving aids ................................................(up to the end of the DU)safety distance warning .............................(up to the end of the DU)driver assistance........................................(up to the end of the DU)driving ........................................................(up to the end of the DU)safety distances .........................................(up to the end of the DU)screens
multimedia screen ................................(current page)
2.49
ENG_UD75413_2Alerte distances de sécurité (BCB - Renault)
Safe distance alert
SAFE DISTANCE ALERT (1/3)
This function is an addi- tional driving aid. This func- tion is not under any cir- cumstances intended to
replace the due care and attention of the driver, who should at all times be in control of the vehicle.
1
2
Using the information from the radar 2 and camera 1, this function informs the driver of the time interval between their vehicle and the vehicle in front so that a safe stopping distance between the two vehicles can be maintained.The function is activated when the ve- hicle speed is between about 19 and 93 mph or 99 mph (30 and 150 or 160 km/h), depending on the vehicle.
Location of the camera 1Make sure the windscreen is not ob- scured (by dirt, mud, snow, condensa- tion etc.).
Location of the radar 2Ensure that the radar area is not ob- structed (by dirt, mud, snow, a badly fitted front number plate), impacted, modified (including painting) or hidden by any accessory fitted on the front of the vehicle (on the grille or logo etc.).
Activation/deactivation from the multimedia screen 3From the “Vehicle” World of your 3 mul- timedia screen, press the “Driving as- sistance” menu.Activate or deactivate the “Following distance” function.
3
Each time the vehicle is started, the function continues the mode saved the last time the engine was stopped.

2.50
ENG_UD75413_2Alerte distances de sécurité (BCB - Renault)
OperationWith the function activated, the 8 in- dicator is displayed on the instrument panel and informs the driver of the dis- tance between their vehicle and the ve- hicle in front.– A (grey): function not operational;– A (green): no vehicle detected;– B (green): the time interval is greater
than or equal to around two seconds (distance between the two vehicles adapted to your speed);
SAFE DISTANCE ALERT (2/3)
The measurement is dis- played for information: the system does not carry out any action on the vehicle.
This function is not designed for use in urban conditions or for a dynamic driving style (sudden cornering, ac- celeration, braking, etc.), but rather for stable driving conditions.The function does not interact with the braking system.The radar and camera zones must be kept clean and free of any tam- pering in order to ensure the proper operation of the system.Any work carried out in the area where the radar or camera is lo- cated (repairs, replacements, wind- screen and/or bumper modifica- tions, etc.) must be carried out by a qualified professional.
– C (orange): the time interval falls be- tween around 1 and 2 seconds (in- sufficient distance between the two vehicles);
– D (red): the time interval is less than or equal to around one second (very insufficient distance between the two vehicles).
If the interval between the two vehicles is less than around 0.5 seconds, notifi- cation 8, display D, will remain lit red on the instrument panel.Under certain conditions, the time inter- val may not be displayed:– while cornering;– when changing lane;– if the vehicle in front is sufficiently far
or outside the range of the radar or camera.
8A
B
C
D

2.51
ENG_UD75413_2Alerte distances de sécurité (BCB - Renault)
This function is an additional driving aid. This function is not under any circumstances intended to replace the due care and attention of the driver, who should at all times be in control of the vehicle.
System servicing/repairs– In the event of an impact, the radar and/or camera alignment may be changed and its operation may consequently be af-
fected. Deactivate the function and consult an authorised dealer.– Any work carried out in the area where the radar and/or camera is located (replacements, repairs, windscreen and/or
bumper modifications, etc.) must be carried out by a qualified professional.Only an authorised dealer is qualified to service the system.
In the event of system disturbance– obstruction of the windscreen or the bumper (by dirt, glass, snow, condensation, etc.);– a complex environment (metal bridge, tunnel etc.);– poor weather conditions (snow, hail, black ice etc.);– poor visibility (night, fog etc.);– poor contrast between the vehicle preceding it and the surrounding area (e.g. white vehicle in a snowy area etc.) ;– being dazzled (glaring sun, lights of vehicles travelling in the opposite direction etc.);– the road is narrow, winding and undulating (tight bends etc.)Risk of erroneous false alarms.
SAFE DISTANCE ALERT (3/3)

driving aids ................................................(up to the end of the DU)driver assistance........................................(up to the end of the DU)driving ........................................................(up to the end of the DU)emergency active braking..........................(up to the end of the DU)emergency lane departure prevention .......(current page)advanced safety ........................................(up to the end of the DU)
2.52
ENG_UD72633_2Sécurité avancée (BCB - Renault)
Advanced Safety
ADVANCED SAFETY (1/17)The “Advanced safety” system com- prises:– active emergency braking;and– emergency lane departure preven-
tion.The “Advanced safety” system uses information from the camera 1, front radar 2 and, depending on the vehicle, side radars 3.
Location of the camera 1Make sure the windscreen is not ob- scured (by dirt, mud, snow, condensa- tion etc.).
Location of the front radar 2Ensure that the radar area is not ob- structed (dirt, mud, snow, a badly fitted/attached front number plate), im- pacted, modified (including paintwork) or hidden by any accessory fitted on the front of the vehicle (on the front bumper, logo, etc.)
Location of the side radars 3Ensure that the radar area is not ob- structed (by dirt, mud, snow etc.), im- pacted or modified (including paintwork etc.).
1
2
This system provides an additional driving aid. This system is not, under any circumstances, in-
tended to replace the due care and attention of the driver, who should at all times be in control of the vehicle.
Depending on the sensitivity setting selected, the “Lane crossing pre- vention” function may operate prior to operation of the “Emergency lane departure prevention” system.
3

2.53
ENG_UD72633_2Sécurité avancée (BCB - Renault)
Activating, deactivating the system from the multimedia screen 4From the “Vehicle” World on your multi- media screen 4, press the “Driving as- sistance” menu, then the “Advanced safety” menu to access the activation/ deactivation of the function.
The warning light appears in yellow on the instrument panel when the system is deactivated.When the system is activated, the warning light disappears.
This system is reactivated each time the ignition is switched on.
ADVANCED SAFETY (2/17)
4

2.54
ENG_UD72633_2Sécurité avancée (BCB - Renault)
The system informs the driver if there is a risk of head-on collision to enable appropriate emergency manoeuvres (pressing the brake pedal and/or turn- ing the steering wheel).Depending on the reactivity of the driver, the system can assist with brak- ing in order to limit damage or prevent a collision.
Active emergency brakingThe system uses information from the radar 2 and the camera 1 to determine the distance from your vehicle:– from the vehicle ahead in the same
lane;or– from any oncoming vehicles in the
context of a manoeuvre to change direction;
or– surrounding pedestrians and cy-
clists.
This function is an addi- tional driving aid.This function is not under any circumstances in-
tended to replace the due care and attention of the driver, who should at all times be in control of the vehicle.
This system can apply maximum braking to the vehicle until it is completely stationary if necessary.For safety reasons, always wear your seat belt when travelling in your vehicle and make sure that it is loaded so that no items can be thrown forward and hit the occu- pants.
ADVANCED SAFETY (3/17)
1
2

2.55
ENG_UD72633_2Sécurité avancée (BCB - Renault)
Active emergency braking(continued)
Detection of vehiclesWhen driving, from approximately 5 mph (8 km/h), if there is a risk of col-lision with the vehicle in front or with a vehicle moving in the opposite direc-tion when changing direction or with a stationary vehicle, the system will warn you of a risk of collision or may trigger braking.
In the event of emergency manoeu- vre, you can stop braking at any moment by:– tapping the accelerator pedal;or– turning the steering wheel as a
collision avoidance manoeuvre.
Collision risk alert
The red warning light or, de- pending on the vehicle, the display 5 and the “Brake” message appears on the instrument panel, accompanied by a beep and a haptic warning (micro braking according to the sensitivity level and speed).If the driver presses the brake pedal and the system still detects a risk of collision, the braking force may be in- creased if it is not sufficient to prevent the collision.
Triggering of brakingIf the driver fails to react following the alert and collision becomes imminent.If active emergency braking has caused the vehicle to stop, the vehicle is kept stationary for a short time. Beyond this time limit, the vehicle must be held sta- tionary by the driver keeping their foot on the brake pedal.
5
Note: if the driver uses the vehicle con- trols (steering wheel, pedals, etc.) the system may delay certain operations or not activate.
ADVANCED SAFETY (4/17)

2.56
ENG_UD72633_2Sécurité avancée (BCB - Renault)
Special features of stationary vehiclesStationary vehicles are detected when your vehicle is being driven at a speed between approximately 5 mph (8 km/h) and 50 mph (80 km/h). The system is not active and does not emit a warning for stationary vehicles when you exceed approximately 50 mph (80 km/h).
Special features of warningsDepending on the speed, the warning and braking may be activated simulta- neously.
Active emergency braking(continued)
Special features of oncoming vehicles in the context of a manoeuvre to change directionWhen you wish to change direction (e.g. A), oncoming vehicles travelling at approximately 18 mph (30 km/h) to 35 mph (55 km/h) are detected by the system when:– your vehicle is travelling at a speed
between approximately 5 mph (8 km/h) to 12 mph (20 km/h);
– you have activated the direction indi- cator light.
The system is otherwise inactive and does not trigger an alert.
A
ADVANCED SAFETY (5/17)
This function is an addi- tional driving aid.This function is not under any circumstances in-
tended to replace the due care and attention of the driver, who should at all times be in control of the vehicle.

2.57
ENG_UD72633_2Sécurité avancée (BCB - Renault)
Active emergency braking(continued)
Detection of pedestrians and cyclistsWhen driving at a speed between ap- proximately 5 mph (8 km/h) and 53 mph (85 km/h), if there is a risk of collision with a cyclist or pedestrian, the system:– warns you of a collision risk:
the red warning light, or, de- pending on the vehicle, the display 5 and the message “Brake” appear on the instrument panel, accompanied by a beep.
If the driver presses the brake pedal and the system still detects a risk of collision, the braking force may be increased if it is not sufficient to pre- vent the collision;
– may trigger braking: if the driver fails to react following
the alert and collision becomes im- minent.
Note: if the driver uses the vehicle con- trols (steering wheel, pedals, etc.) the system may delay certain operations or not activate.
In the event of emergency manoeu- vre, you can stop braking at any moment by:– tapping the accelerator pedal;or– turning the steering wheel as a
collision avoidance manoeuvre.
If active emergency braking has caused the vehicle to stop, the vehicle is kept stationary for a short time. Beyond this time limit, the vehicle must be held sta- tionary by the driver keeping their foot on the brake pedal.
ADVANCED SAFETY (6/17)
5

2.58
ENG_UD72633_2Sécurité avancée (BCB - Renault)
Active emergency braking(continued)SettingsFrom the "Vehicle” World on your mul- timedia screen 4, press the “Driving as- sistance” menu, then the “Advanced safety” menu to access the following settings:“Warning anticipation”: adjust the alert sensitivity level. To do this select:– “Late”;– “Standard”;– “Early”.
ADVANCED SAFETY (7/17)Temporarily not availableIf the system detects a temporary fault
the warning light illuminates, or
depending on the vehicle, the warning light illuminates in yellow on the instrument panel.The possible causes are:– the system is temporarily blinded
(glare from the sun, dipped beam headlights, bad weather conditions etc.). The system will be operational again when visibility conditions are better;
– the system is temporarily interrupted (e.g. the windscreen, front or rear bumper or logo is obscured by dirt, mud, snow, condensation, etc.). In this case, park the vehicle and switch off the engine. Clean the windscreen and front bumper. The next time the engine is started, after five or ten minutes of driving, the warning light and the message disappear.
If this is not the case, this may arise from another cause; contact an Approved Dealer.
Operating faultsWhen the function detects an operat- ing fault, the warning lights © and
or, depending on the vehicle,
© and , appear in yellow on the instrument panel accompanied by the message “Check Front camera” or “Front radar to check” or “Check Driving assist “.Consult an approved dealer.
4

2.59
ENG_UD72633_2Sécurité avancée (BCB - Renault)
Active emergency brakingThis function is an additional driving aid. This function is not under any circumstances intended to replace the due care and attention of the driver, who should at all times be in control of the vehicle. The triggering of this function may be delayed or prevented when the system detects clear signs of control of the vehicle by the driver (action on the steer-
ing wheel, pedals etc.).The system cannot be activated:– if the gear control is in neutral position;– when the parking brake is activated;– when the Electronic Stability Program (ESC) has been triggered.
System servicing/repairs– In the event of an impact, the radar and/or camera alignment may be changed and its operation may consequently be af-
fected. Deactivate the function and consult an authorised dealer.– Any work in the area where the radar and/or camera is located (repairs, replacements, windscreen modifications, etc.) must
be carried out by a qualified professional.Only an authorised dealer is qualified to service the system.
ADVANCED SAFETY (8/17)

2.60
ENG_UD72633_2Sécurité avancée (BCB - Renault)
System disturbanceSome conditions can disturb or damage the operation of the system, such as:– a complex environment (metal bridge, tunnel etc.);– poor weather conditions (snow, rain, hail, black ice etc.);
– poor visibility (night, fog etc.);– poor contrast between the object (vehicle, pedestrian etc.) and the surrounding area (e.g. pedestrian dressed in white lo-
cated in a snowy area etc.) ;– being dazzled (glaring sun, lights of vehicles travelling in the opposite direction etc.);– windscreen obscured (by dirt, ice, snow, condensation etc.);– ...In these conditions, the system may not react, may warn the driver or may brake inadvertently.
Limitation of the system operation– Each time the vehicle is started, the system carries out a calibration according to the vehicle surroundings and may be in-
active for a length of time between approximately two to five minutes of driving;– an oncoming vehicle will not trigger any warning or system action if the conditions in the paragraph “Special features of on-
coming vehicles in the context of a manoeuvre to change direction” are not met (see previous pages);– the radar and camera zones must be kept clean and free of any modifications in order to ensure the proper operation of the
system;– the system may not respond to small vehicles such as motorbikes as effectively as to other vehicles;– the system may not operate properly when the road surface is slippery (rain, snow, black ice, etc.);– to ensure correct operation, the system needs to distinguish the complete outline of the pedestrian. So the system cannot
detect: – pedestrians in the darkness or in poor lighting conditions; – partially visible pedestrians: – pedestrians less than approximately 80 cm tall; – pedestrians carrying large objects; – ...In these conditions, the system may not react, may warn the driver or may brake inadvertently.
ADVANCED SAFETY (9/17)

2.61
ENG_UD72633_2Sécurité avancée (BCB - Renault)
Deactivating the functionYou must disable the function if:– the brake lights are not functioning;
– the area of the camera has been damaged (e.g. on the inside or outside of the windscreen);– the front of the vehicle was damaged (impact, distortion, scratch on the radar etc.);– the vehicle is being towed (breakdowns);– the windscreen is cracked or distorted (do not carry out windscreen repairs in this area; have it changed by an approved
dealer);– you are not driving on a paved road;– the vehicle is on a roller bench in a workshop.In the event of the system behaving abnormally, deactivate it and consult an authorised dealer.
Halting the functionYou can halt the active braking function at any time by tapping the accelerator pedal or by turning the steering wheel in a col- lision avoidance manoeuvre.
ADVANCED SAFETY (10/17)

emergency lane departure prevention .......(up to the end of the DU)
2.62
ENG_UD72633_2Sécurité avancée (BCB - Renault)
Depending on the vehicle, using in- formation from the radars 3 and the camera 1, the function triggers cor- rective action on the vehicle steering system. In the event of a risk of colli- sion with a vehicle moving at the same speed or a higher speed, located in the detection area of the rear radars (emer- gency lane departure prevention in case of overtaking).
Emergency lane departure preventionUsing information from the camera 1, the function triggers corrective action on the vehicle steering system when approaching the roadside (divider, bar- rier, pavement, embankment etc.) with- out the direction indicator light having been activated.
You can retake control of the ve- hicle at any time by operating the steering wheel.
Using information from the radar 2 and the camera 1, the function triggers cor- rective action on the vehicle steering system in the event of a risk of collision with a vehicle coming from the opposite direction in the adjacent lane, without the direction indicator having been ac- tivated.
This system provides an additional driving aid. This system is not, under any circumstances, in-
tended to replace the due care and attention of the driver, who should at all times be in control of the vehicle.
ADVANCED SAFETY (11/17)
1
2
3

2.63
ENG_UD72633_2Sécurité avancée (BCB - Renault)
Emergency lane departure prevention(continued)
Roadside detectionWhen driving from approximately 5 mph (8 km/h), when approaching the roadside (central reservation, barrier, pavement, embankment, etc.), without the direction indicator having been acti-vated, the system:– warns you of a collision risk: the 6 symbol lights up on the instru-
ment panel accompanied by the message “Lane departure”;
and– triggers corrective action on the
steering system.
Special featureIn the event the function operates re- peatedly when approaching the road- side, if the system does not detect any
hands on the steering wheel, the warning light appears in yellow on the instrument panel accompanied by the “Keep control” message.
This function is an addi- tional driving aid. This function is not under any circumstances in-
tended to replace the due care and attention of the driver, who should at all times be in control of the vehicle.
ADVANCED SAFETY (12/17)
6

2.64
ENG_UD72633_2Sécurité avancée (BCB - Renault)
B
B
You can interrupt the trajectory cor- rection at any time by moving the steering wheel.
Emergency lane departure prevention(continued)
Detection of an oncoming vehicleWhen driving at a speed between ap-proximately 40 mph (65 km/h) and 68 mph (110 km/h), if there is a risk of collision with a vehicle coming from the opposite direction in an adjacent lane and within the detection zone B, with-out the direction indicator having been activated, the system:– warns you of a collision risk:
the red warning light and the display 6 light up on the instrument panel accompanied by the message “Risk of collision” and a beep;
and– triggers corrective action on the
steering system.
ADVANCED SAFETY (13/17)
This function is an addi- tional driving aid.This function is not under any circumstances in-
tended to replace the due care and attention of the driver, who should at all times be in control of the vehicle.
6

2.65
ENG_UD72633_2Sécurité avancée (BCB - Renault)
C
D
Emergency lane departure prevention (continued)If case of overtaking(depending on the vehicle)While driving from approximately 5 mph (8 km/h), when approaching a line (con- tinuous or broken) and there is a risk of collision with a vehicle located in the blind spot C moving in the same direc- tion as your vehicle or with a vehicle that is rapidly approaching from behind in an adjacent lane that is in the detec- tion area D, the system:– warns you of the risk of colli-
sion: the 7 warning light flashes, the
warning light appears in red and the 6 symbol lights up on the in- strument panel accompanied by the “Lateral obstacle detected” message and a beep;
and– triggers corrective action on the
steering system.
ADVANCED SAFETY (14/17)
7
6

operating faults ..........................................(current page)screens
multimedia screen ................................(up to the end of the DU)
faultsoperating faults ....................................(current page)
2.66
ENG_UD72633_2Sécurité avancée (BCB - Renault)
Emergency lane departure prevention(continued)
Temporarily not availableThe system will cease to be available if:– very fast lane departure;– driving continuously on a line;– four seconds approximately after
changing lanes;– tight bends;– impaired visibility;– activation of the direction indicator
(in the case of roadside detection and detection of a vehicle coming from the opposite direction);
– strong acceleration;– emergency braking;– changing the lane width;– operation of the active emergency
braking system;– ...
ADVANCED SAFETY (15/17)Depending on the vehicle, if one of the side radars is obscured the message “Check Side radars” will appear on the instrument panel.When the front radar is obscured, the “Front radar no visibility” message is displayed on the instrument panel.When the front camera is obscured, the “Front camera no visibility” message is displayed on the instrument panel.

2.67
ENG_UD72633_2Sécurité avancée (BCB - Renault)
ADVANCED SAFETY (16/17)If the vehicle is equipped with a towbar that is recognised by the system, the
warning light lights up yellow accompanied by the message “Trailer: side radars unavailable” to inform you that the emergency lane departure pre- vention function is not operational.If the vehicle is towing a trailer or car- avan, unexpected or unnecessary cor- rections may occur. You can deactivate the “Advanced safety” function to avoid unexpected or unnecessary correc- tions.
Conditions for non-activation of the systemThe system cannot be activated when:– reverse gear is engaged;– the field of vision of the camera is ob-
structed;– the front radar is obscured;– depending on the vehicle, the rear
radars are obscured;
– the û warning light is displayed.If one of the side speed cameras is
obscured, the warning light ap- pears in yellow accompanied by the “Side radars no visibility” message.
If the front radar is obscured, the warning light appears in yellow accom- panied by the “Front radar no visibility” message.If the front camera is obscured, the
warning light appears in yellow accompanied by the “Front camera no visibility” message.Clean the area where the sensors are located.
Operating faultsWhen the function detects an oper- ating fault, the warning lights ©
and appear in yellow on the in- strument panel accompanied by the “Check Front camera” or “Front radar to check” or “Check Driving assist” or, depending on the vehicle “Check Side radars” messages.Consult an approved dealer.

2.68
ENG_UD72633_2Sécurité avancée (BCB - Renault)
This function is an additional driving aid. This function is not under any circumstances intended to replace the due care and attention of the driver, who should at all times be in control of the vehicle.
System servicing/repairs– In the event of an impact, the alignment of the camera or radar(s) may be altered and its operation may consequently be
affected. Deactivate the function and consult an authorised dealer.– Any work in the area where the camera or radars are located (replacements, repairs, windscreen modifications etc.) must
be carried out by a qualified professional.Only an authorised dealer is qualified to service the system.
In the event of system disturbanceSome conditions can disturb or damage the operation of the system, such as:– windscreen obscured (by dirt, ice, snow, condensation etc.);– a complex environment (tunnel etc.);– poor weather conditions (snow, rain, hail, black ice etc.) ;– poor visibility (night, fog etc.);– the road markings are irregular or difficult to distinguish (e.g. partially erased, excessive spacing, distorted road surface) ;– being dazzled (glaring sun, lights of vehicles travelling in the opposite direction etc.);– the road is narrow, winding or undulating (tight bends etc.);– closely following a vehicle travelling in the same lane.In this case, the “Advanced Safety” function may react incorrectly or not at all.Risk of unwanted, incorrect correction or no correction of trajectory.Deactivating the functionYou must disable the function if:– the camera area (on the windscreen side or the interior rear-view mirror side) or radar area(s) have been damaged;– the windscreen is cracked or distorted (do not carry out windscreen repairs in this area; have it changed by an Authorised
Dealer);– the vehicle is being towed (breakdowns);– you are not driving on a paved road.
ADVANCED SAFETY (17/17)

driver vigilance warning .............................(up to the end of the DU)
2.69
ENG_UD75201_2Alerte vigilance conducteur (BCB - Renault)
The driver vigilance warning is a func- tion that analyses the behaviour of the driver (driving style, direction of the ve- hicle, etc.) and alerts them if there is a risk of fatigue or impaired attention.It takes into account indicators such as:– steering wheel movements;– driver actions on other systems (indi-
cators, windscreen washers, etc.)
Driver vigilance warning
DRIVER VIGILANCE WARNING (1/2)
This function is an addi- tional driving aid in case of risk of fatigue or impaired attention. The function does
not take the place of the driver.Under no circumstances should this function replace the driver’s care or responsibility whilst driving.
OperationThe function is ready to warn you if the speed is above approximately 37 mph (60 km/h).If there is a risk of fatigue or impaired attention, the 1 “Vigilance alert Have a break” message is displayed on the instrument panel, accompanied by a beep.It is advisable to stop as soon as possi- ble for a break.
The driver vigilance warning con- stantly monitors the driver’s atten- tion and can provide several warn- ings per journey.The system resets every time the engine is started.
1

2.70
ENG_UD75201_2Alerte vigilance conducteur (BCB - Renault)
Activation/deactivation from the multimedia screen 2To activate or deactivate the function, refer to the multimedia instructions.Select “ON” or “OFF”.
DRIVER VIGILANCE WARNING (2/2)
2Note:– the system is deactivated automati-
cally when the “Active Driver Assist” is activated. Deactivating the “Active Driver Assist” reactivates the system;
– the system is activated by default every time the vehicle is started.
Operating faultsIf the system detects a fault, the “Check Fatigue Warning System” message is displayed on the instrument panel and the system is deactivated automatically.Have the system checked by an author- ised dealer.
The limits of the driver vigilance warning The driver vigilance warning may not react in the following conditions:– road in poor condition;– strong side wind;– dynamic driving style with high-
speed cornering or high accelera- tion;
– frequent lane changes or changes of vehicle speed.
The driver vigilance warning may not provide a warning in the following con- ditions:– brief lapses of attention;– sudden distractions, such as a falling
object, etc.

driving aids ................................................(up to the end of the DU)overspeed warning ....................................(up to the end of the DU)driver assistance........................................(up to the end of the DU)Detection of road signs ..............................(up to the end of the DU)
2.71
ENG_UD74821_2Détection des panneaux de signalisation routière (BCB - Renault)
Detection of road signs
DETECTION OF ROAD SIGNS (1/3)Special situationsThe system does not take into account exceptional speed limit measures, such as peak pollution days.
1
The system detects speed limit signs on the side of the road and displays the speed limit on the instrument panel.It mainly uses information taken from the camera 1, attached to the wind- screen behind the rear view mirror.Note: make sure the windscreen is not obscured (dirt, mud, snow, condensa- tion etc.).
For vehicles which are equipped with it, the system also uses information from the navigation system.Once the speed limiter or cruise con- trol is activated, you can adjust the speed limiter indication displayed by the system.If the limit speed is exceeded, the dis- play panel is modified to warn the driver.For vehicles with a subscription and if the vehicle is travelling in a country where the speed units differ from those of the vehicle, the system displays the speed limit sign in the unit of the coun- try, alongside the speed limit converted to the unit used by the vehicle’s instru- ment panel.For countries where the speed limit is reduced during rainy weather on some types of roads, on vehicles with a sub- scription, the system can modify the limited speed after a few seconds of wiping the windscreen.
Road sign detection is associated with a subscription.If there is no subscription, the system will be limited to taking into account the speed limit signs when they are detected by the camera.The system will no longer take into account information relating to the navigation system map.The speed limit availability may be affected.To manage the subscription, please refer to the multimedia in- structions.

2.72
ENG_UD74821_2Détection des panneaux de signalisation routière (BCB - Renault)
DETECTION OF ROAD SIGNS (2/3)
OperationWarning lightsThe function displays the following warning lights:3 Speed limit signs and additional
speed limit signs (speed on exit ramp with arrow, speed with a caravan, speed limit with length of application, etc.)
4 Additional road signs (start of no overtaking zone).
If the speed limit is exceeded, the circle around the panel flashes (warn- ing light 3) along with a sound signal to warn the driver.
Varying the limit speedIf the speed limiter, cruise control or adaptive cruise control setting differs from the speed detected, change the speed value by pressing the 5 switch.
5
3 4
For safety reasons, carry out any adjustments while the vehicle is stationary.

operating faults ..........................................(current page)faults
operating faults ....................................(current page)
2.73
ENG_UD74821_2Détection des panneaux de signalisation routière (BCB - Renault)
This function is an additional driving aid. This function is not under any circumstances intended to replace the due care and attention of the driver, who should at all times be in control of the vehicle.The driver should always adapt their speed to the traffic conditions, re-
gardless of the system indications.The system detects speed limit signs and does not detect other signs (e.g. entry/ exit to/from urban areas, etc.).The system may not detect all speed limit signs or may interpret them incorrectly.The driver should not ignore signs that are not detected by the system and should, as a priority, comply with the traffic signage and the highway code.In the event of poor visibility (fog, snow, frost, etc.), it is possible that the system may not indicate the correct speed to the driver.The driver should always adapt their speed to the traffic conditions, regardless of the system indications.
Operating faultsThe system cannot detect the speed limit if:– the windscreen is not clean;– the camera is blinded by the sun;– there is insufficient visibility (night,
fog etc.);– the signs are not legible (snow, etc.)
or are hidden (by another vehicle or by trees);
– the information taken from the navi- gation system is not up to date.
DETECTION OF ROAD SIGNS (3/3)

driving ........................................................(up to the end of the DU)speed limiter ..............................................(up to the end of the DU)cruise control .............................................(up to the end of the DU)cruise control-speed limiter........................(up to the end of the DU)
2.74
ENG_UD75202_2Limiteur de vitesse (BCB - Renault)
Speed limiter
Controls1 Start/Stop speed limiter switch
.
2 Cruise control On/Off switch .3 Depending on the vehicle, road sign
detection activation switch .4 Activation switch: – upwards: speed increased or
reminder of stored limit speed (RES/+);
– downwards: limited speed de- creased (SET/-).
5 Speed limiter function standby (with limited speed memory) (0).
The speed limiter function controls the engine and braking system to help you not to exceed a driving speed that you have chosen, known as the limit speed.The speed limiter function can be acti- vated from 0 to 93 mph (150 km/h) or, depending on the vehicle, to 100 mph (160 km/h).
SPEED LIMITER (1/4)
2
1
4
5
3
Depending on the vehicle, you can link the speed limiter function to the “Road sign detection” function ➥ 2.71 by pressing switch 3.
DrivingWhen a limit speed has been set but not yet reached, driving is similar to driving a vehicle without the speed lim- iter function.Once you have reached the stored speed, no effort on the accelera-tor pedal will allow you to exceed the programmed speed except in an emergency (refer to information on “Exceeding the limit speed”).

2.75
ENG_UD75202_2Limiteur de vitesse (BCB - Renault)
SPEED LIMITER (2/4)
Switching onPress the switch 1. The 6 warning light appears in grey. The “Speed limiter OK SET to activate” message appears on the instrument panel accompanied by dashes to indicate that the speed lim- iter function is in operation, waiting to store a limit speed.
To store the current speed, press the 4 control upwards on (RES/+) or down- wards on (SET/-): the limit speed re- places the dashes and, depending on the vehicle, the 6 warning light appears in white.The minimum stored speed is 19 mph (30 km/h).
1
4 6

2.76
ENG_UD75202_2Limiteur de vitesse (BCB - Renault)
Exceeding the limit speedIt is possible to exceed the limit speed at any time. To do this: press the accel- erator pedal firmly and fully (beyond the resistance point).While the speed is being exceeded, the speed limiter flashes red on the instru- ment panel. Then, release the accelera- tor pedal: the speed limiter function will return as soon as you reach a speed lower than the memorised speed.
If the speed limiter is not available (after several at- tempts to activate), contact an approved dealer.
SPEED LIMITER (3/4)
Varying the limit speedYou can vary the limit speed by pushing the 4 control:– upwards on (RES/+) to increase the
speed;– downwards on (SET/-) to decrease
the speed.
You must keep your feet near the pedals to be ready to react in an emer- gency.
4

2.77
ENG_UD75202_2Limiteur de vitesse (BCB - Renault)
SPEED LIMITER (4/4)
Putting the function on standbyThe speed limiter function is suspended when you press switch 5 (0). The limit speed is stored and displayed in grey on the instrument panel.
Recalling the limit speedIf a speed has been stored, it can be re- called by pushing the 4 switch upwards.
Switching off the functionThe speed limiter function is inter- rupted:– when you press the 1 switch. In this
case, the speed is no longer stored;– when you press the 2 switch. In this
case the cruise control is selected and there is no stored speed.
The 6 warning light disappears to con- firm that the function is deactivated.
When the speed limiter is set to standby, pressing the 4 control downwards reactivates the func- tion without taking into account the stored speed: it is the speed at which the vehicle is moving that is taken into account.
2
1
4
5
6

driving ........................................................(up to the end of the DU)cruise control .............................................(up to the end of the DU)cruise control-speed limiter........................(up to the end of the DU)
2.78
ENG_UD75203_2Régulateur de vitesse (BCB - Renault)
Cruise control
The cruise control function controls the engine and braking system to help you to maintain a driving speed that you have chosen, known as the cruising speed.This cruising speed can be adjusted continuously from 19 mph to 93 mph (30 km/h to 150 km/h) or, depending on the vehicle, to 100 mph (160 km/h).
Depending on the vehicle, the symbol on the 2 control informs you that you are equipped with adaptive cruise control Stop and Go ➥ 2.83.
This function is an addi- tional driving aid. The func- tion does not take the place of the driver.
Therefore, it can under no circum- stances replace the driver’s respon- sibility to respect speed limits and to be vigilant (the driver must always be ready to brake).Cruise control must not be used in heavy traffic, on undulating or slip- pery roads (black ice, aquaplan-ing, gravel) and during bad weather (fog, rain, side winds etc.).There is a risk of accidents.
CRUISE CONTROL (1/5)
2
1
4
5
3
Controls1 Start/Stop speed limiter switch
.
2 Cruise control On/Off switch .3 Depending on the vehicle, road sign
detection activation switch .4 Activation switch: – upwards: increase cruising speed
or reminder of the memorised cruising speed (RES/+);
– downwards: decrease cruising speed (SET/-).
5 Switch the function to standby (with cruising speed saved) (0).
Depending on the vehicle, you can link the cruise control function to the "Road sign detection" function ➥ 2.71 by pressing switch 3.

2.79
ENG_UD75203_2Régulateur de vitesse (BCB - Renault)
DrivingOnce a cruising speed is registered and the cruise control function is active, you may lift your foot off the accelera- tor pedal.
Please note that you must keep your foot close to the pedals in order to react in an emergency.
Activating cruise controlAt a steady speed above approximately 19 mph (30 km/h), push the 4 control upwards on (RES/+) or downwards on (SET/-) : the function is activated and the current speed is taken into ac- count. The cruising speed replaces the dashes.Cruise control is confirmed when the memorised speed and warning light appear in green 6.If you try to activate the function below 19 mph (30 km/h), the message “Invalid Speed” will be displayed and the func- tion will remain inactive.
Switching onPress switch 2.The 6 warning light appears in grey.The "Cruise Cont. OK SET to activate" message appears on the instrument panel accompanied by dashes to indi- cate that the cruise control function is in operation and waiting to memorise a cruising speed.
CRUISE CONTROL (2/5)
2
4 6

2.80
ENG_UD75203_2Régulateur de vitesse (BCB - Renault)
CRUISE CONTROL (3/5)Exceeding the cruising speedThe cruising speed may be exceeded at any time by depressing the accelera- tor pedal. While it is being exceeded, the cruising speed flashes on the instrument panel.Then, release the accelerator pedal: after a few seconds, the vehicle will automatically return to its set cruising speed.
Adjusting the cruising speedYou can vary the cruising speed by pushing the control 4:– upwards on (RES/+) to increase the
speed;– downwards on (SET/-) to decrease
the speed.Note: pressing and holding up or down on the 4 control allows you to change the speed by successive increments.
If the cruise control is no longer available (after sev- eral attempts to activate it), contact an Approved
Dealer.
You must keep your feet near the pedals to be ready to react in an emer- gency.
4

2.81
ENG_UD75203_2Régulateur de vitesse (BCB - Renault)
Returning to the cruising speedIf a speed is stored, it can be recalled, once you are sure that the road condi- tions are suitable (traffic, road surface, weather conditions, etc.). Push the 4 control upwards on (RES/+) if the ve- hicle speed is above 19 mph (30 km/h).When you see a reminder of the stored speed, cruise control activation is con- firmed by the display in green of the cruising speed and, depending on the vehicle, the 6 warning light coming on.
Putting the function on standbyThe function is set to standby if you:– 5 switch (0);– the brake pedal;– move to the neutral position.The cruising speed is stored and dis- played in grey on the instrument panel.
CRUISE CONTROL (4/5)NB: if the speed previously stored is much higher than the current speed, the vehicle will accelerate more rapidly to reach this threshold.When the cruise control is set to standby, push the 4 control downwards on (SET/-) to reactivate the cruise con- trol function without taking into ac- count the stored speed – it is the speed at which the vehicle is moving that is taken into account.
4
5
6

2.82
ENG_UD75203_2Régulateur de vitesse (BCB - Renault)
CRUISE CONTROL (5/5)
Putting the cruise control on standby or switching it off does not cause a rapid reduction in speed: you
must brake by depressing the brake pedal.
Switching off the functionThe cruise control function is inter- rupted:– when you press the 2 switch. In this
case, there is no stored speed;– when you press the 1 switch. In this
case the speed limiter is selected and there is no stored speed.
The warning light 6 disappears from the instrument panel to confirm that the function is no longer active.
2
1
6

driving aids ................................................(up to the end of the DU)driver assistance........................................(up to the end of the DU)driving ........................................................(up to the end of the DU)safe distance .............................................(up to the end of the DU)cruise control .............................................(up to the end of the DU)adaptive cruise control...............................(up to the end of the DU)
2.83
ENG_UD75204_2Régulateur de vitesse adaptatif Stop and Go (BCB - Renault)
Note: – the driver must observe the maxi-
mum speed limit and safe distances in the country where they are driving;
– the adaptive cruise control can brake the vehicle up to around a third of the braking capacity. Depending on the situation, the driver may need to brake harder.
Stop and Go adaptive cruise control
ADAPTIVE CRUISE CONTROL STOP AND GO (1/22)Based on information from a radar or camera, the Stop and Go adaptive cruise control function gives you the option of maintaining a selected speed, known as the cruising speed, while keeping a safe distance from the vehi- cle in front in the same lane.Depending on the vehicle, when the “Road sign detection” function is ac- tivated ➥ 2.71, the system can adjust your vehicle’s speed according to the speed limit signs recognised by the camera.Depending on the subscription, using the camera and the map, the system adjusts the vehicle speed in advance according to the context and road inci- dents (roundabouts, bends, next signs or speed limit zones).
If the vehicle in front stops, the Stop and Go adaptive cruise control may brake your vehicle to a complete stop before setting off again.The system controls acceleration and deceleration of your vehicle using the engine and braking system.The system’s maximum range is ap- proximately 130 metres. This may vary according to the road conditions (ground relief, weather conditions, etc.).The Stop and Go adaptive cruise con- trol function can be activated from 0 to 93 mph or 99 mph (0 to 150 km/h or 160 km/h) according to road conditions (traffic, weather etc.).
The function is indicated by the symbol.
The Stop and Go adaptive cruise control does not trigger an emer- gency stop and its braking capabil- ity is limited.

2.84
ENG_UD75204_2Régulateur de vitesse adaptatif Stop and Go (BCB - Renault)
This function is an additional driving aid. The function does not take the place of the driver.Therefore, it can under no circumstances replace the driver’s responsibility to respect speed limits and safe distances or to be vigilant (the driver must always be ready to brake).
The driver must always be in control of the vehicle.The driver must always adapt their speed according to the surroundings and traffic conditions.Use the adaptive cruise control Stop and Go outside built-up areas, on wide roads with visible lines.The cruise control may have limited operation on very winding or slippery roads (black ice, aquaplaning, gravel) or during bad weather (fog, rain, side winds, etc.)There is a risk of accidents.
ADAPTIVE CRUISE CONTROL STOP AND GO (2/22)

2.85
ENG_UD75204_2Régulateur de vitesse adaptatif Stop and Go (BCB - Renault)
Controls3 – Upwards: activates, increases
cruising speed or reminds of the memorised cruising speed (RES/+).
– Downwards: activates, decreases cruising speed or stores current speed (SET/-).
4 Switch the function to standby (with cruising speed saved) (0).
5 Adjusting the following distance.6 Adaptive cruise control main Stop/
Start switch .7 Contextual button (depending on the
vehicle).
ADAPTIVE CRUISE CONTROL STOP AND GO (3/22)
Location of the camera 1Make sure the windscreen is not ob- scured (by dirt, mud, snow, etc.).
Location of the radar 2Ensure that the radar protection plate is not obstructed (dirt, mud, snow, a badly fitted number plate), impacted, modi- fied (including painting) or hidden by any accessory fitted on the front of the vehicle (on the grille or logo, etc.).
1
2
The radar and camera zones must be kept clean and free of any tampering in order to ensure the proper
operation of the system.
3
4
7 6
5

2.86
ENG_UD75204_2Régulateur de vitesse adaptatif Stop and Go (BCB - Renault)
Switching onPress switch 6.
Warning light appears in grey, and the message “Adaptive cruise con- trol ON” appears on the instrument panel, accompanied by dashes to indi- cate that the cruise control function is activated and waiting to store a cruising speed.This function cannot be activated when:– the parking brake is applied;– the “Automated park assist” function
is already activated ➥ 2.146.The message Adaptive Cruise Ctl una- vailable is displayed on the instrument panel.
ADAPTIVE CRUISE CONTROL STOP AND GO (4/22)
Important: you should keep your feet near the pedals at all times to prepare for any event.
Displays8 Stop and Go adaptive cruise con-
trol warning light.9 Stored cruising speed.10 Vehicle in front.11 Stored safe distance.
8 9
10 11
12
Note: for vehicles fitted with the “Active Driver Assist” system ➥ 2.105, when the “Lane centering assist.” function, previously selected in the multimedia system or by pressing the switch 12 (switch warning light 12 on), adaptive cruise control is activated automatically when the “Lane centering assist.” func- tion is activated ➥ 2.105.

2.87
ENG_UD75204_2Régulateur de vitesse adaptatif Stop and Go (BCB - Renault)
The cruising speed 9 replaces the dashes and cruise control is confirmed by the appearance of the cruising speed
in green and warning light .If you try to activate the function above 93 mph (150 km/h) or, depending on the vehicle, 99 mph (160 km/h), the “Invalid Speed” message is displayed and the function will remain inactive.Once a cruising speed is memorised and the cruise control function is active, you may lift your foot off the accelera- tor pedal.Note: if your vehicle speed is lower than about 19 mph (30 km/h), the func- tion uses a default cruising speed of 19 mph (30 km/h). The vehicle will accel- erate until it reaches the stored cruising speed.
ADAPTIVE CRUISE CONTROL STOP AND GO (5/22)
9
Activating cruise controlWhen stationary or at a steady speed, push the 3 control upwards (RES/+) or downwards (SET/-): the function is ac- tivated and the current speed is stored.The minimum cruising speed is 19 mph (30 km/h).

2.88
ENG_UD75204_2Régulateur de vitesse adaptatif Stop and Go (BCB - Renault)
ADAPTIVE CRUISE CONTROL STOP AND GO (6/22)
Activating cruise control with speed limit sign recognition (display A)(depending on the vehicle)When the vehicle is equipped with the “Road sign detection” function ➥ 2.71, press the contextual button 7 to adapt the vehicle speed to the speed limits 13 detected by the camera.When passing the sign, the cruising speed 9 adopts the value of the de- tected speed 13.
A
Activating cruise control with advance speed limit sign recognition (display B)(depending on subscription)Using the camera, the “Road sign de- tection” function ➥ 2.71 and the map associated with the subscription, the system anticipates automatic adjust- ment of the vehicle speed until the next speed limit sign identified 14.
9
14
B
139
AdjustmentYou can choose to apply to cruising speed 9 a systematic speed devia- tion in relation to the detected speed limits 13.From the multimedia screen, in the “Vehicle” World, select “Driving assis-tance”. Then, on the “Speed manage-ment” menu, activate the “Adjust speed limitations” field and select the de-sired difference (from -6 mph (10 km/h) to +6 mph (10 km/h), above 30 mph (50 km/h)).

2.89
ENG_UD75204_2Régulateur de vitesse adaptatif Stop and Go (BCB - Renault)
ADAPTIVE CRUISE CONTROL STOP AND GO (7/22)Activating cruise control with advance speed limit sign recognition (display B) (continued)Activation/deactivationFrom the multimedia screen, in the “Vehicle” World, select “Driving assis- tance”. Then, in the “Speed manage- ment” menu, select “To speed limita- tions” in the “Adaptive regulation” field.The letter “A” 15 displayed on the in- strument panel confirms the activa- tion of the cruise control with advance speed limit sign recognition.Note: activation/deactivation is also possible by pressing and holding the contextual button 7.
Cruise control with advance speed limit sign recognition is associated with a subscription. If there is no subscription, this function cannot be activated.To manage the subscription, please refer to the multimedia in- structions.
B
15

2.90
ENG_UD75204_2Régulateur de vitesse adaptatif Stop and Go (BCB - Renault)
Activating cruise control with advance speed limit sign recognition (display B) (continued)OperationWith the function activated, the follow- ing speeds are displayed on the instru- ment panel:– cruising speed 9;– the current speed limit detected by
the system on the section of road on which the vehicle is travelling 13;
9
14
B
13
– the speed detected by the system on the next road section or speed limit zone 14.
The detected speed 14 is taken into ac- count by the system. The vehicle speed adjusts gradually, until it becomes the cruising speed 9, without any action from the driver. The speed indicated on 14 is displayed on 13 when passing the sign or zone identified.The driver must always stay vigilant regarding the speed applied by the system and remains responsible for the vehicle speed.When the function is not activated or the subscription is no longer active, op- eration is the same as setting the cruis- ing speed with speed limit sign recog- nition (display A, refer to the previous page).
AdjustmentYou can choose to apply to cruising speed 9 a systematic speed devia- tion in relation to the detected speed limits 13.From the multimedia screen, in the “Vehicle” World, select “Driving assis-tance”. Then, on the “Speed manage-ment” menu, activate the “Adjust speed limitations” field and select the de-sired difference (from -6 mph (10 km/h) to +6 mph (10 km/h), above 30 mph (50 km/h)).
ADAPTIVE CRUISE CONTROL STOP AND GO (8/22)

2.91
ENG_UD75204_2Régulateur de vitesse adaptatif Stop and Go (BCB - Renault)
If the vehicle is approaching a bend or roundabout, a 16 symbol appears on the instrument panel. The vehicle ad- justs its speed to a speed appropriate to the feature detected.The driver must always stay vigilant regarding the speed applied by the system and remains responsible for the vehicle speed.
Activation/deactivationFrom the multimedia screen, in the “Vehicle” World, select “Driving assis- tance”. Then, from the “Speed man- agement” menu, select “Display speed limiations”.In the “Adaptive regulation” menu, select “To road context”.
ADAPTIVE CRUISE CONTROL STOP AND GO (9/22)
Activating cruise control with advance recognition of the road layout (display C)(depending on subscription)Using the camera, the “Road sign de- tection” function ➥ 2.71 and the map associated with the subscription, the system can anticipate and manage automatic adjustment of the cruising speed 9, when the vehicle is approach- ing a roundabout or bend.
Cruise control with advance recog- nition of the road layout is associ- ated with a subscription.If there is no subscription, this func- tion cannot be activated.To manage the subscription, please refer to the multimedia in- structions.
16
C
9
(When the function is not activated or the subscription is no longer active, op- eration is the same as setting the cruis- ing speed with speed limit sign recog- nition (display A, refer to the previous pages) or, depending on the subscrip- tion, setting the cruising speed with speed limit sign recognition (display B, refer to the previous pages).The following symbols show the fea- tures taken into account by the system:
– roundabout;
– bend.

2.92
ENG_UD75204_2Régulateur de vitesse adaptatif Stop and Go (BCB - Renault)
ADAPTIVE CRUISE CONTROL STOP AND GO (10/22)If the system detects a vehicle in your lane, an outline of a vehicle 10 appears above the distance gauge 11 on the in- strument panel.Your vehicle adapts its speed to that of the vehicle in front and applies the brakes if necessary (the brake lights come on) in order to maintain the dis- tance displayed on the instrument panel.Note: the size of the 10 outline varies according to the distance separating you from the vehicle in front. The larger the outline, the closer the vehicle in front.
Setting the cruising speedYou can vary the speed by pressing re- peatedly (for low variation) or pressing and holding (for high variation) the con- trol 3:– downwards: “SET/-" to decrease the
speed;– upwards on “RES/+" to increase the
speed.
3
When automatically adapting the speed to the signs and/or road layout, it is possible to ignore these events. Press the 3 control:– upwards (RES/+) to return to the
stored cruising speed;– downwards (SET/-) to store and
maintain the current speed.
Safe distance control activationAs soon as cruise control is activated, the default safe distance 11 is displayed in green on the instrument panel. The default safe distance corresponds to approximately two seconds (see follow- ing pages).
Controlling cruising speed 9You can resume control of the vehicle speed at any time by:– putting the function on standby: – by pressing the brake pedal;or – by pressing the switch 4 (0).– deactivation of the function by press-
ing the general Start/Stop switch 6.
4
6

2.93
ENG_UD75204_2Régulateur de vitesse adaptatif Stop and Go (BCB - Renault)
– distance gauge F: intermediate dis- tance 1 (corresponding to approxi- mately 1.6 seconds);
– distance gauge G: short distance (corresponding to approximately 1.2 seconds).
The selected distance gauge appears in green on the instrument panel. The other gauges remain in grey.Note: the distance must be set accord- ing to the traffic level, local regulation and weather conditions.
DEFG
Adjusting the following distanceYou can vary the safe distance from the vehicle in front at any time by pressing switch 5 repeatedly.
The safe distance is adjusted by de- fault on the distance gauge E.
ADAPTIVE CRUISE CONTROL STOP AND GO (11/22)
5
The horizontal distance gauge on the instrument panel indicates the various available safe distances:– distance gauge D: long distance
(corresponding to approximately 2.4 seconds);
– distance gauge E: intermediate dis- tance 2 (corresponding to approxi- mately 2 seconds);

2.94
ENG_UD75204_2Régulateur de vitesse adaptatif Stop and Go (BCB - Renault)
Exceeding the cruising speedThe cruising speed may be exceeded at any time by applying the accelerator pedal.If it is exceeded, the cruising speed 9 appears in yellow.The distance gauge flashes if the dis- tance between your vehicle and the vehicle in front is less than the safe distance selected: the Safe Distance Control function is no longer active.
ADAPTIVE CRUISE CONTROL STOP AND GO (12/22)Then, release the accelerator pedal: the cruise control and safe distance control will automatically resume the speed and distance instructions that you had previously selected.
Overtaking manoeuvreIf you wish to overtake the vehicle in front, activating the indicator will tem- porarily cancel the safe distance con- trol and enable an acceleration speed sufficient to complete overtaking.
Stopping the vehicle and setting offIf the vehicle in front slows down, the system adapts its speed to bring the vehicle to a complete stop if necessary (e.g. in heavy traffic). The vehicle stops a few metres from the vehicle in front.When the vehicle in front sets off again:– if the stop lasts for less than thirty
seconds, the vehicle will start again without any action required from the driver.
9
Note: the driver should always be ready for sudden incidents while driving and remains responsible for controlling the vehicle: if the system detects a pedestrian in the vehicle environment, automatic restart will be inhibited until the next stop;
– if the stop exceeds around thirty sec- onds, you must apply the accelera- tor pedal or press button 3 (RES/+) upwards for the vehicle to set off again. The message "Press RES or accelerate to restart Cruise Control" appears on the instrument panel to confirm.
If the stop exceeds around three min- utes, the electronic parking brake is au- tomatically applied and the Stop and Go adaptive cruise control is deacti- vated.
The indicator light goes out to confirm that the function is deactivated.

2.95
ENG_UD75204_2Régulateur de vitesse adaptatif Stop and Go (BCB - Renault)
In all circumstances, the standby is con- firmed when the warning lights appear in grey and the message “Adaptive Cruise Ctl Disconnected” appears on the instrument panel.
ADAPTIVE CRUISE CONTROL STOP AND GO (13/22)
Putting the Stop and Go adaptive cruise control in standby or switching it off does not cause a rapid re-
duction in speed: you must brake by applying the brake pedal if nec- essary.
Putting the function on standbyYou can set the function to standby when:– you press switch 4 (0);– you apply the brake pedal while the
vehicle is moving.The function is deactivated by the system if:– you put the gearbox control in P, R or
N;– you unbuckle the driver’s seatbelt;– you open one of the opening ele-
ments;– you press the engine start/stop
button;– the slope is too steep;– certain driving aids and correction
devices are triggered (active emer- gency braking, ABS, ESC, etc.)
4
Note: depending on the vehicle, if the reception of the connected data is not optimal, the system automati- cally switches on standby the advance speed limit sign recognition and/or ad- vance recognition of the road layout functions.The two functions are automatically reactivated as soon as reception of the connected data becomes optimal again.

2.96
ENG_UD75204_2Régulateur de vitesse adaptatif Stop and Go (BCB - Renault)
Depending on the situation, the system sounds a beep associated with:– the orange alert H if the situation re-
quires the driver’s attention;or– the red alert J accompanied by the
message “Brake” if the situation re- quires the driver’s immediate atten- tion.
In all situations, react accordingly and perform the appropriate ma- noeuvres.
ADAPTIVE CRUISE CONTROL STOP AND GO (14/22)
H
J
“Take control of the vehicle” warningsIn some situations (e.g. coming upon a much slower vehicle, vehicle in front changing lanes quickly etc.), the system may not have time to react.
Exit from standbyBased on the stored cruising speedIf a speed is stored, it can be recalled, once you are sure that the road condi- tions are suitable (traffic, road surface, weather conditions, etc.). Press the 3 (RES/+) switch upwards in the range of valid speeds.When the stored speed is recalled, acti- vation of the cruise control is confirmed by the illumination of the cruising speed in green.Note: if the stored speed is higher than the current speed, the vehicle will ac- celerate to reach that speed.
Based on the current speedWhen the cruise control is set to standby, pressing switch 3 (SET/-) downwards reactivates the cruise con- trol function without taking into ac- count the stored speed: it is the speed at which the vehicle is moving that is taken into account.

operating faults ..........................................(current page)
2.97
ENG_UD75204_2Régulateur de vitesse adaptatif Stop and Go (BCB - Renault)
ADAPTIVE CRUISE CONTROL STOP AND GO (15/22)
6
Temporary unavailability (radar)The radar is able to detect vehicles in front of your vehicle. The system cannot operate correctly if the radar de- tection area is obscured or if its signal is disrupted.If the radar detection area is obstructed or the radar signal is disrupted, the message “Front radar no visibility” is displayed on the instrument panel and the Stop and Go adaptive cruise control is interrupted.
The green warning light disap- pears to confirm that the function has been automatically deactivated.Ensure that the radar area remains clean and is not obstructed by snow, mud, a badly fitted number plate or by any accessory fitted on the front of the vehicle (on the grille), or hidden by any accessory fitted on the front of the vehi- cle (on the grille or logo, etc.).
Conditions in certain geographical areas may hinder the function, for ex- ample:– arid zones, tunnels, long bridges or
lightly used roads without road lines, without signs or trees nearby;
– a military or airport zone.You must leave such areas in order for the function to work.In all cases, if the message is not erased after the engine is restarted, please contact an authorised dealer.
Switching off the functionThe adaptive cruise control function Stop and Go is deactivated when you press the general Start/Stop switch 6.
The warning light disappears from the instrument panel to confirm that the function is no longer active.

2.98
ENG_UD75204_2Régulateur de vitesse adaptatif Stop and Go (BCB - Renault)
ADAPTIVE CRUISE CONTROL STOP AND GO (16/22)Operating faultsIf an adaptive cruise control function Stop and Go operating fault is detected, the "Check adaptive cruise control" message appears on the instrument panel and the adaptive cruise control Stop and Go functions is suspended.If an operating fault is detected on one or more components of the system, the Stop and Go adaptive cruise control function is deactivated.The © warning light appears on the instrument panel along with, de- pending on the malfunction, one of the following messages:– “Front camera to check”;– “Front radar to check”;– “Camera/Radar to check”;– “Check vehicle”.Consult an approved dealer.
Temporary unavailability (camera)The system cannot operate if the camera is obscured (by dirt, mud, snow, condensation, etc.).In the event of decreased visibility of the camera, the performance of the adaptive cruise control Stop and Go will be reduced. Remain vigilant.

2.99
ENG_UD75204_2Régulateur de vitesse adaptatif Stop and Go (BCB - Renault)
The system cannot detect:– vehicles arriving at intersections: slip
road (e.g. L) etc.;– vehicles driving on the wrong side of
the road or reversing towards you.
ADAPTIVE CRUISE CONTROL STOP AND GO (17/22)
Limitations of system operationVehicle detectionThe system detects only vehicles (cars, trucks, motorbikes) that are moving in the same direction as your vehicle.A vehicle turning into the same lane (e.g. K) will be taken into account by the system only once it enters the camera and radar detection areas.The system may trigger inappropri- ate or delayed braking.
Detection during corneringWhen entering a corner or bend, the radar and/or camera may temporarily not be able to detect the vehicle in front (e.g. M).The system may trigger an accelera- tion.When exiting a bend, the system’s de- tection of the vehicle in front may be disrupted or delayed.The system may trigger inappropri- ate or delayed braking.
K L M
The adaptive cruise control Stop and Go must be used outside built-up areas, on wide roads with visible lines.

2.100
ENG_UD75204_2Régulateur de vitesse adaptatif Stop and Go (BCB - Renault)
Detection of vehicles in adjacent lanesThe system may detect vehicles driving on an adjacent lane when:– you drive into a bend (e.g. N);– you are driving on a road with narrow
lanes;– the speed of the vehicle on the ad-
jacent lane is slower and if one of these vehicles is located too close to the lane of the other.
The system may incorrectly trigger vehicle slowing or braking.
ADAPTIVE CRUISE CONTROL STOP AND GO (18/22)
Vehicles hidden due to variations in ground reliefThe system will not detect vehicles hidden due to variations in ground relief or those located outside of the camera and radar detection areas when driving uphill or downhill.
Vehicles outside the camera and radar detection areas.The system will react late or not at all if the detected vehicles are outside the camera and radar detection areas, par- ticularly in the following cases:
– vehicles transporting long objects which exceed the line;
– the actual length of tall vehicles (e.g. P) outside the radar detection area (construction machine, agricul- tural equipment towing vehicle, etc.);
– vehicles insufficiently centred in the lane;
– narrow vehicles which are very close (e.g. Q).
N P Q

2.101
ENG_UD75204_2Régulateur de vitesse adaptatif Stop and Go (BCB - Renault)
Stationary and slow moving vehiclesWhen your speed is over approximately 31 mph (50 km/h), the system does not detect:– stationary vehicles (e.g R);– very slow moving vehicles.When your speed is less than approxi- mately 31 mph (50 km/h), the system may not react or may react very late to:– stationary vehicles (e.g R);– very slow moving vehicles;
R– vehicles in front 17 that change lane,
discovering a stationary vehicle 18 (e.g. S);
– when the vehicle is stationary 19, when you change lane (e.g. T).
ADAPTIVE CRUISE CONTROL STOP AND GO (19/22)
17
18S T 19
Always be ready to respond in all circumstances.The driver must always be in con- trol of the vehicle.The Stop and Go adaptive cruise control does not trigger an emer- gency stop and its braking capabil- ity is limited.

2.102
ENG_UD75204_2Régulateur de vitesse adaptatif Stop and Go (BCB - Renault)
ADAPTIVE CRUISE CONTROL STOP AND GO (20/22)
This function is an additional driving aid. It can under no circumstances replace the driver’s responsibility to respect speed limits and safe dis- tances and to be vigilant.The driver must always be in control of the vehicle.
Apart from the speed limit signs and road map information from the mapping (ve- hicles fitted with the “Road sign detection” function and a subscription), other traf- fic information (traffic lights, pedestrian crossings, etc.) is not taken into account by the system. The driver must always adapt their speed to the surroundings and driving conditions, regardless of system indications.The system should under no circumstances be taken to be an obstacle detector or an anti-collision system.Use the adaptive cruise control Stop and Go outside built-up areas, on wide roads with visible lines.System servicing/repairs– In the event of an impact, the radar and/or camera alignment may be changed
and its operation may consequently be affected. Deactivate the system and consult an authorised dealer.
– Any work in the proximity of the radar and/or camera (replacements, repairs, windscreen modifications, paintwork etc.) must be carried out by a qualified professional.
Only an authorised dealer is qualified to service the system.
Non-detection of fixed obstacles and objects of a small sizeThe system cannot detect:– pedestrians, bikes, scooters, etc. ;– animals;– fixed obstacles (toll barriers, walls,
etc.) (e.g. U).These are not taken into account by the system. They do not trigger any alert or reaction by the system.
U

2.103
ENG_UD75204_2Régulateur de vitesse adaptatif Stop and Go (BCB - Renault)
ADAPTIVE CRUISE CONTROL STOP AND GO (21/22)
Deactivating the functionYou must disable the function if:– the vehicle is being towed (breakdowns);
– the vehicle is towing a trailer or a caravan;– the vehicle is being driven in a tunnel or close to a metallic structure;– the vehicle arrives at a toll point, a roadwork area or on a narrow lane;– the vehicle is driven on a very winding road (mountain road, etc.) ;– the vehicle is being driven up or down a very steep slope;– the visibility is poor (glaring sun, fog, etc.) ;– the vehicle is being driven on a slippery road surface (rain, snow, gravel, etc.) ;– the weather conditions are poor (rain, snow, side winds, etc.) ;– the radar area has been damaged (impacts etc.) ;– the area of the camera has been damaged (e.g. on the inside or outside of the windscreen);– the windscreen is cracked or distorted.In the event of the system behaving abnormally, deactivate it and consult an authorised dealer.

2.104
ENG_UD75204_2Régulateur de vitesse adaptatif Stop and Go (BCB - Renault)
In the event of system disturbanceSome conditions can disturb or damage the operation of the system, such as:– the windscreen or bumper is obscured in the area of the radar (by dirt, ice, snow, condensation, number plate etc.);
– a complex environment (tunnel etc.);– poor weather conditions (snow, heavy rain, hail, black ice, etc.);– poor visibility (night, fog etc.);– being dazzled (glaring sun, lights of vehicles travelling in the opposite direction etc.);– narrow, winding or undulating road (tight bends etc.) ;– a vehicle with a significant difference in speed;– use of mats not adapted to the vehicle. On the driver’s side, only use mats suitable for the vehicle, attached with the pre-fit-
ted components, and check the fitting regularly. Do not lay one mat on top of another. There is a risk of wedging the pedals.
In this case, the system may brake or accelerate unintentionally.Many unforeseen situations may affect the system operation. Certain objects or vehicles that can appear in the camera or radar detection zone may be interpreted by the system incorrectly, possibly leading to inappropriate acceleration or braking.You should always be attentive to sudden events that might occur while you are driving. Always keep your vehicle under control by keeping your feet near the pedals, so that you are ready to act in any event.
ADAPTIVE CRUISE CONTROL STOP AND GO (22/22)

Active driver assist ....................................(up to the end of the DU)driving aids ................................................(up to the end of the DU)
2.105
ENG_UD74829_2Active driver assist (BCB - Renault)
The Stop and Go adaptive cruise control function.Based on information from a radar or camera or map data sent via a GSM connection, the adaptive cruise con- trol Stop and Go gives you the option of maintaining a selected speed, known as the cruising speed, while keeping a safe distance from the vehicle in front in the same lane. The cruising speed can be adjusted automatically to a speed limit change (available by subscription).If the vehicle in front stops, the Stop and Go adaptive cruise control may brake your vehicle to a complete stop before setting off again.
Active Driver Assist
The system controls acceleration and deceleration of your vehicle using the engine and braking system.The Stop and Go adaptive cruise con- trol function can be activated from 0 to 93 mph or 99 mph (0 to 150 km/h or 160 km/h) according to road conditions (traffic, weather etc.)It is represented by the following symbol
➥ 2.83.Note: – the driver must observe the maxi-
mum speed limit and safe distances in the country where they are driving;
– the adaptive cruise control can brake the vehicle up to a third of the brak- ing capacity. Depending on the situ- ation, the driver may need to brake harder.
ACTIVE DRIVER ASSIST (1/15)The “Active Driver Assist” is a driv- ing aid system for use outside built-up areas, on wide roads and with visible lines.Depending on the vehicle, this system comprises the “Adaptive cruise con- trol Stop and Go” function ➥ 2.83 and the “Lane centering assist.” function.When these two functions are activated simultaneously, the system allows the driver to:– maintain vehicle speed based on a
previously saved speed;– adjust the distance between this ve-
hicle and the vehicle in front;– direct the vehicle to the centre of the
lane;– adapt the vehicle speed to the speed
shown on the road signs, automat- ically or after confirmation by the driver.
Important: you should keep your feet near the pedals and your hands on the steering wheel at all times
to prepare for any event.The Stop and Go adaptive cruise control does not trigger an emer- gency stop and its braking capabil- ity is limited.

2.106
ENG_UD74829_2Active driver assist (BCB - Renault)
ACTIVE DRIVER ASSIST (2/15)The “Lane centering assist.” functionUsing information from a camera, the “Lane centering assist.” function uses the steering system to direct the vehi- cle to the middle of the lane. This func- tion is only available while the Stop and Go adaptive cruise control is activated. ➥ 2.83.If the conditions allow it, the function is available between:– 0 mph and 99 mph (0 and 160 km/h)
approximately with a vehicle in front;or– 37 mph (60 km/h) et 99 mph (160
km/h) approximately without a vehi- cle in front.
The “Lane centering assist.” function is a comfort feature. It is represented by
the symbol .Note: in the event of a sharp bend, the function’s lateral retention capaci- ties are limited and require the driver to take immediate action on the steering wheel.
Additional informationDepending on the vehicle, the “Active Driver Assist” function may be used with other driving aid functions.Please note that:– activating the speed limiter causes
deactivation of the system;– the system cannot be activated when
the “Automated park assist” function is active;
– Activating the “Lane centering assist.” function suspends the “Lane departure warning” or “Lane cross- ing prevention” functions if they have been activated. They will be reacti- vated when the driver decides to stop the “Lane centering assist.” function.

2.107
ENG_UD74829_2Active driver assist (BCB - Renault)
ACTIVE DRIVER ASSIST (3/15)
2
3
6
7
1
9
8
5
4

2.108
ENG_UD74829_2Active driver assist (BCB - Renault)
Radar 8 continuedThe system’s maximum range is ap- proximately 150 metres. This may vary according to the road conditions (ground relief, weather conditions, etc.).Ensure that the radar area is not ob-structed (dirt, mud, snow, a badly fitted front number plate), impacted, modified (including painting) or hidden by any accessory fitted on the front of the vehi-cle (on the grille or logo etc.).
Active vehicle control 9This system provides information on vehicle dynamics to the computer 1 (speed, lateral acceleration etc.) and acts on the braking system to control deceleration and to keep the vehicle stationary.
Computer 1Receives information from the radar and camera to determine the vehi- cle trajectory and speed (acceleration or braking). Amongst other things, it controls activation/deactivation of the system (door opening, etc.).
Camera 2Detects markings on the ground, road signs and the position of vehicles in the various traffic lanes. It complements the information transmitted by the 7 radar.Make sure the windscreen is not ob- scured (by dirt, mud, snow, etc.).
Aerial and maps 3Road maps and certain driving con- ditions (roundabouts and cornering) are downloaded according to the jour- ney taken by the vehicle. The system can anticipate deceleration following a change of the speed limit indicated on road signs, depending on the parame- ters selected by the driver.
Aerial and maps 3 continuedThe system can also adjust the vehi- cle’s speed when approaching a bend or roundabout.
Electronic parking brake 4It the vehicle stationary under certain conditions.
Capacitive sensor 5Depending on the vehicle, it detects hands on the steering wheel.
Power-assisted steering 6Operates the front wheels to assist the trajectory of your vehicle according to details transmitted by the 1 computer.
Engine computer 7It controls and directs the engine to carry out the required acceleration.
Radar 8Calculates the distance between your vehicle and the vehicle in front.
The radar and camera zones must be kept clean and free of any tampering in order to ensure the proper
operation of the system.
ACTIVE DRIVER ASSIST (4/15)

2.109
ENG_UD74829_2Active driver assist (BCB - Renault)
ACTIVE DRIVER ASSIST (5/15)
10
11
12
14
15
23
16
22
1718
13
20
21
19

2.110
ENG_UD74829_2Active driver assist (BCB - Renault)
Controls10 Push upwards: puts the func-
tion on standby or increases the stored cruising speed (RES/+).
10 Push downwards: activates, stores and decreases cruising speed (SET/-).
11 Set active functions to standby (with cruising speed saved) (0).
12 Speed limiter activation/deacti-
vation .13 Adjusting the following distance.14 Adaptive cruise control main
Stop/Start switch Stop and Go.15 Contextual button.16 “Lane keeping system” function
activation/deactivation switch.
Displays on the instrument panel17 Stop and Go adaptive cruise con-
trol function warning light .18 Stored cruising speed.19 Vehicle in front.20 Stored safe distance21 Left-hand and right-hand line indi-
cators22 “Lane centering assist.” function
warning light.
Steering wheel 23The driver must always keep their hands on the steering wheel. If too much force is applied when turning the steering wheel, the “Lane center- ing assist.” function is put on standby so the driver can regain control of the vehicle.Under certain conditions (sharp bends, etc.) a vibration may be triggered on the steering wheel to warn the driver that they must regain control of the vehicle. If the driver does not handle the steer- ing wheel (no hands are detected) the “Lane centering assist.” function is de- activated after several warnings.
ACTIVE DRIVER ASSIST (6/15)

lane centring ..............................................(up to the end of the DU)
2.111
ENG_UD74829_2Active driver assist (BCB - Renault)
16
22 21 21
ACTIVE DRIVER ASSIST (7/15)
Activating the “Lane centering assist.” functionThe “Lane centering assist.” function must be previously selected via the multimedia screen to be activated.From the “Vehicle” World, select to the “Driving assistance” tab then the “Lane keeping system” menu.Select “Lane centering assist.”.This selection remains stored when the vehicle is stopped.
The warning light 22 is displayed in green and the left-hand and right- hand line indicators 21 are displayed on the instrument panel to confirm that the function is activated and directing your vehicle to the centre of the lane.You can interrupt the “Lane centering assist.” function at any time by moving the steering wheel. As soon as you stop turning the steering wheel, the “Lane centering assist.” function is reacti- vated.Note: you must keep your hands on the steering wheel when using the “Lane centering assist.” function.
The “Lane keeping system” must be activated. If the warning light of the 16 button is not lit, press the
button 16 .The message “Lane keeping system activated” appears on the instrument panel to confirm that the function is ac- tivated.This status remains stored when the vehicle is stopped.The adaptive cruise control Stop and Go must be switched on.To do this, press the 14 button to ac- tivate it. The message “Active driver assist ready: SET to activate” (or, de- pending on the vehicle, “Road assist ready: SET to activate”) will appear on the instrument panel.
The warning light 22 is displayed in grey on the instrument panel.Now push the steering wheel control 10 downwards (SET/-).The “Active Driver Assist” consisting of the adaptive cruise control Stop and Go and the “Lane centering assist.” func- tion is then activated.

2.112
ENG_UD74829_2Active driver assist (BCB - Renault)
22 21 21
ACTIVE DRIVER ASSIST (8/15)
Once the conditions are met, the func- tion again directs the vehicle to the
centre of the lane. The 22 warn- ing light and left-hand and right-hand line indicators 21 are displayed in green on the instrument panel.
– the system is temporarily disrupted (for example: camera obscured by dirt, mud, snow,condensation, etc.).
Certain actions carried out by the driver also suspend the “Lane centering assist.” function:– activating the indicators;– too much force is used when han-
dling the steering wheel.Standby of the function is confirmed by
the 22 warning light and the left- hand and right-hand line indicators 21 appearing in grey on the instrument panel.
You can affect the vehicle trajec-tory at any point by turning the steering wheel.
Important: you should keep your feet near the pedals and your hands on the steering wheel at all times
to prepare for any event.
Putting the “Lane centering assist.” function on standbyThe “Lane centering assist.” function is put on standby automatically when:– the Stop and Go adaptive cruise con-
trol is put on standby ➥ 2.83 ;– the system no longer detects the
lines or only one line is detected in your lane;
– the lane is too narrow or too wide;– the system does not detect any
hands on the steering wheel;– the bend is too sharp;– in some driving conditions (rounda-
bout, intersection, etc.);– the vehicle speed is greater than
approximately 93 mph or 100 mph (150 km/h or 160 km/h), depending on the vehicle;
– the vehicle speed is below approx-imately 37 mph (60 km/h), without any vehicle in front;
– the vehicle touches or breaches a line;

2.113
ENG_UD74829_2Active driver assist (BCB - Renault)
If the driver does not put their hands on the steering wheel after the warning is displayed, a beep sounds and the 24
warning light flashes on the in- strument panel.The brakes are then briefly applied re- peatedly to inform the driver that they must retake control of the vehicle by putting their hands on the steering wheel.If the driver does not respond, the “Active Driver Assist” activates the hazard warning lights and slows down the vehicle until it comes to a complete stop.The driver can interrupt the manoeu- vre, and the Active Driver Assist, at any time by putting their hands on the steer- ing wheel, braking or deactivating the “Lane centering assist.” function or the adaptive cruise control function Stop and Go.
“Hands on steering wheel” alertWhen the “Lane centering assist.” func- tion no longer detects your hands on the steering wheel, several warning levels will be triggered:– after 15 seconds, the “Keep hands
on steering wheel” message ap- pears in yellow on the instrument panel;
– after approximately 30 seconds, the “Keep hands on steering wheel”
message and the 24 , warning light appear in red on the instrument panel, accompanied by a beep that gets gradually louder;
– after approximately 45 seconds, the audio sources go on standby, the beep sounds continually, the 24
warning light goes off and the “Lane centering deactivated” mes- sage appears in red on the instru- ment panel: the “Lane centering assist.” function is deactivated.
In the first two alert levels, when the system again detects the presence of the driver’s hands on the steering wheel, the system stops the alerts. The function continues to direct the vehicle to the centre of the lane.
24
ACTIVE DRIVER ASSIST (9/15)

2.114
ENG_UD74829_2Active driver assist (BCB - Renault)
ACTIVE DRIVER ASSIST (10/15)“Hands on steering wheel” alert continuedNote: in some situations, the “Lane centering assist.” function may no longer detect your hands on the steer- ing wheel and may sound a signal:– the driver is holding the steering
wheel very lightly;– the driver is wearing gloves;– ...
If the “Lane centering assist.” func- tion is deactivated due to the driv- er’s hands not being detected on the steering wheel, the adaptive cruise control function Stop and Go remains in operation.
Warning concerning the capacitive sensor: the fit- ting of any accessory on the steering wheel is pro-
hibited (protective cover, etc.)

2.115
ENG_UD74829_2Active driver assist (BCB - Renault)
If the vehicle crosses a line com- pletely and moves out of its lane or if the bend is too sharp, the “Lane centering assist.” function is put on standby.Standby of the function is confirmed by
the 22 warning light and the left- hand and right-hand line indicators 21 appearing in grey on the instrument panel.
In the case of a sharp bendIn the case of a sharp band, and de- pending on the vehicle speed, the func- tion’s side retaining capacities will be limited and require the driver to carry out immediate action on the steering wheel so that the vehicle remains in the centre of the lane.
If the driver does not intervene, the function triggers the vibration of the steering wheel to signal that the vehi-cle is about to breach a line and that the driver needs to carry out immediate action.
The 22 warning light and the left-hand or right-hand line indicator 21 appear in red on the instrument panel.
22 21 21
ACTIVE DRIVER ASSIST (11/15)
The “Lane centering assist.” func- tion cannot assist the driver when negotiating a roundabout or an in- tersection and may automatically switch to standby (see previous pages).In all cases, the driver must always turn the steering wheel to manage the vehicle trajectory under these driving conditions.

2.116
ENG_UD74829_2Active driver assist (BCB - Renault)
Deactivating the “Lane centering assist.” functionThe “Lane centering assist.” function is deactivated if:– you press switch 16. The function’s
deactivation is confirmed by the ap- pearance of the message: “Lane keeping system deactivated” on the instrument panel.
Note: pressing the 16 switch deac- tivates the “Lane centering assist.” function but does not affect opera- tion of the adaptive cruise control Stop and Go;
– the Stop and Go adaptive cruise con- trol is deactivated ➥ 2.83.
Note: pressing button 14 si- multaneously deactivates the adap- tive cruise control function Stop and Go and the “Lane centering assist.” function;
– the system will no longer detect the driver’s hands on the steering wheel for a period over 45 seconds approx- imately;
– the “Lane centering assist.” func- tion is deselected via the multime- dia screen (from the World “Vehicle”, select the tab “Driving assistance”, then the menu “Lane keeping system”).
The 22 warning light and the left- hand and right-hand line indicators 21 disappear from the instrument panel.
Operating faultsIf a “Lane centering assist.” function op- erating fault is detected, the message “Check Lane Centring” is displayed on the instrument panel and the function is disabled.The Stop and Go adaptive cruise con- trol function remains in operation.Consult an approved dealer.
16 14
ACTIVE DRIVER ASSIST (12/15)

2.117
ENG_UD74829_2Active driver assist (BCB - Renault)
The “Active Driver Assist” is an additional driving aid. it can under no circumstances replace the driver’s responsibility to respect speed limits and safe distances and to be vigilant.The driver must always be in control of the vehicle.
The driver must always adapt their trajectory and speed according to the surroundings and driving conditions, regardless of system indications.Except for lines delimiting lanes and the speed limit signs within the limits of the system’s detection capacity, the road sign in- formation (other traffic signs, traffic lights, pedestrian crossings, etc.) are not recognised by the system. These do not trigger any alert or reaction by the system.The “Active Driver Assist” uses the “Adaptive cruise control Stop and Go” and “Lane centering assist.” functions. The system should under no circumstances be taken to be an obstacle detector or an anti-collision system.Use the “Active Driver Assist” exclusively outside built-up areas, on wide roads with visible lines.It must not be used in heavy traffic, on winding or slippery roads (black ice, aquaplaning, gravel) or during bad weather (fog, rain, side winds etc.).There is a risk of accidents.System servicing/repairs– In the event of an impact, the radar and/or camera alignment may be changed and its operation may consequently be af-
fected. Deactivate the system and consult an authorised dealer.– Any work in the proximity of the radar and/or camera (replacements, repairs, windscreen modifications, paintwork etc.) must
be carried out by a qualified professional.Only an authorised dealer is qualified to service the system.
ACTIVE DRIVER ASSIST (13/15)

2.118
ENG_UD74829_2Active driver assist (BCB - Renault)
Deactivating the systemYou must deactivate the system if:– the vehicle is travelling on a windy road;
– the vehicle is being towed (breakdowns);– the vehicle is towing a trailer or a caravan;– the vehicle is being driven in a tunnel or close to a metallic structure;– the vehicle arrives at a toll point, a roadwork area or on a narrow lane;– the vehicle is being driven up or down a very steep slope;– the visibility is poor (glaring sun, fog etc.);– the weather conditions are poor (rain, snow, side winds, etc.);– the vehicle is being driven on a slippery road surface (rain, snow, gravel, etc.);– the camera area has been damaged (e.g. interior or exterior windscreen area); the windscreen is cracked or distorted;– the radar area has been damaged (impacts, etc.) ;– the surface of the steering wheel is damaged or damp. In the event of the system behaving abnormally, deactivate it and consult an authorised dealer.
ACTIVE DRIVER ASSIST (14/15)

2.119
ENG_UD74829_2Active driver assist (BCB - Renault)
Some conditions can disrupt or damage the operation of the system, for example:– obstruction of the windscreen or the radar area (by dirt, ice, snow, condensation etc.) Frequently check the cleanli- ness and condition of the windscreen, front wiper blades and front bumper;– a complex environment (tunnel etc.);
– poor weather conditions (snow, heavy rain, hail, black ice, etc.);– poor visibility (night, fog etc.);– poor contrast between the vehicle preceding it and the surrounding area (e.g. white vehicle in a snowy area etc.) ;– being dazzled (glaring sun, lights of vehicles travelling in the opposite direction etc.);– narrow, winding or undulating road (tight bends etc.);– the tar lines detected as a line by the system;– narrowing/widening lanes;– road markings which are worn, lacking in contrast or very widely spaced from one another (lines partially erased etc);– multiple markings on the road (roadworks area, slip roads connecting to adjacent motorways, hard shoulder etc.);– road signs that do not include an arrow, located in a motorway exit;– an area with low connectivity that makes it impossible to geolocate the vehicle or maps that are not up-to-date;– a vehicle with a significant difference in speed;– use of mats not adapted to the vehicle. On the driver’s side, only use mats suitable for the vehicle, attached with the pre-
fitted components, and check the fitting regularly. Do not lay one mat on top of another. There is a risk of wedging the pedals.
In these cases:– Risk of unwanted braking or acceleration.– Risk of unwanted, incorrect correction or no correction of trajectory.Many unforeseen situations may affect the system operation. Certain objects or vehicles that can appear in the camera or radar detection zone may be interpreted by the system incorrectly, possibly leading to inappropriate acceleration or braking.You should always be attentive to sudden events that might occur while you are driving. Always maintain your vehi- cle under control by keeping your feet near the pedals and your hands on the steering wheel, so that you are ready to act in any event.
ACTIVE DRIVER ASSIST (15/15)

parking distance control.............................(up to the end of the DU)driving ........................................................(up to the end of the DU)reversing sensor ........................................(up to the end of the DU)
2.120
ENG_UD74827_2Aide au parking (BCB - Renault)
Parking distance control
PARKING DISTANCE CONTROL (1/6)
1
Operating principleUltrasonic sensors, indicated by arrows 1, are fitted in the bumpers to measure the distance between the ve- hicle and an obstacle.This measurement is indicated by beeps which become more frequent the closer you come to the obstacle, until they become a continuous beep when the vehicle is approximately 20 to 30 centimetres from the obstacle.Depending on the configuration of the vehicle, the system detects obstacles to the front, the rear and the sides of the vehicle.The parking distance control system is only activated when the vehicle is driven at a speed below approximately 6 mph (10 km/h).The function does not take into account towing or carrying systems that are not recognised by the system.
Location of the ultrasonic sensors 1Ensure that the ultrasonic sensors indi- cated by the arrows 1 are not obscured (by dirt, mud, snow, a badly fitted/at- tached number plate), impacted, mod- ified (including paintwork) or obstructed by any accessory fitted to the rear and/ or, depending on the vehicle, to the front or sides of your vehicle.
This function is an addi- tional driving aid.Under no circumstances should it replace the driv-
er’s care or responsibility whilst re- versing.The driver should always be ready for sudden incidents while driv- ing: always ensure that there are no small, narrow moving obstacles (such as a child, animal, pushchair, bicycle, stone, post, etc.) in the blind spot when manoeuvring.

display .......................................................(current page)
2.121
ENG_UD74827_2Aide au parking (BCB - Renault)
PARKING DISTANCE CONTROL (2/6)
C
A B
2Note: for vehicles fitted with the “360° Camera” function ➥ 2.135, analysis of the vehicle surroundings (areas A and B) is not displayed in “Bird’s eye view” or “Side view” mode.
OperationMost objects located less near the front, rear and sides of the vehicle are detected.Depending on the distance of the ob- stacle, the frequency of the beep will be higher while approaching it, and will become a continuous beep around 20 cm away for obstacles to the sides, and around 30 cm for obstacles to the front or rear. The green, orange (or yellow depending on the vehicle) and red zones will be shown on the C dis- play.Note: in the event of a change in tra- jectory during a manoeuvre, the risk of collision with an obstacle may be sig- nalled late.
Note: the display 2 shows the vehicle surroundings and emits beeps.It is necessary to travel a few metres before the side detection is activated.If all areas have a grey background, the whole area around the vehicle is being monitored:– A: analysis of the vehicle surround-
ings in progress;– B: analysis of the vehicle surround-
ings carried out.
An impact to the under- side of the vehicle while manoeuvring (e.g. strik- ing a post, raised kerb or
other street furniture) may result in damage to the vehicle (e.g. defor- mation of an axle).To avoid any risk of accident, have your vehicle checked by an ap- proved dealer.

2.122
ENG_UD74827_2Aide au parking (BCB - Renault)
D
PARKING DISTANCE CONTROL (3/6)
3
4
Detection of obstacles to the sideDepending on the direction of the wheels, the system determines the tra- jectory of the vehicle and notifies the driver of any risk or otherwise of a col- lision with an obstacle 3 to the side of the vehicle.
If a side obstacle is detected:– the beeps become faster and then
sound continuously as the obstacle gets nearer. Green, orange and red zones will be displayed on the dis- play D;
– if there is no risk of collision, no beep will sound when approaching the ob- stacle. Green, orange and red zones will be displayed interspersed on the display D.
Note: in the event of a change in tra- jectory during a manoeuvre, the risk of collision with an obstacle may be sig- nalled late.
Activation/deactivationTo activate or deactivate the various zones covered by the ultrasonic detec- tors, please refer to the multimedia in- structions.Select “ON” or “OFF”.
An impact to the underside of the vehicle while manoeuvring (e.g. striking a post, raised kerb or other street furniture) may result in damage to the vehicle (e.g. deformation of an axle).To avoid any risk of accident, have your vehicle checked by an approved Dealer.

2.123
ENG_UD74827_2Aide au parking (BCB - Renault)
PARKING DISTANCE CONTROL (4/6)AdjustmentDepending on the vehicle, with the ve- hicle stationary, engine running, some settings can be adjusted from the multi- media screen 4.Please refer to the multimedia instruc- tions for further information.Select “Settings”, “Parking assistance”.
Parking distance control audio volumeSelect “Settings”, “Parking assistance”, “Sound”. Adjust the volume of the park- ing distance control by pressing + or -.
System soundEnables the system sound to be chosen. Select “Settings”, “Parking as- sistance”, “Sound”.
Deactivating the system soundActivate or deactivate the parking dis- tance control sound.Note: if you deactivate the sound, you will no longer be notified with beeps when approaching an obstacle.
Deactivating the parking distance control manuallyYou must disable the function if:– if towing, carrying or trailer equip-
ment that is unrecognised by the system is present in front of the ul- trasonic detectors;
– in the event of damage to the ultra- sonic sensors.
Parking distance control automatic deactivationThe system deactivates:– when the vehicle speed is above ap-
proximately 6 mph (10 km/h);– depending on the model, when the
vehicle is stationary for more than approximately 5 seconds and an ob- stacle is detected (such as when in a traffic jam, etc.);
– when you are in position N;
When the vehicle is travelling at a speed below approximately 6 mph (10 km/h), some noises (motorcy- cle, lorry, pneumatic drill etc.) may trigger the beeping sound of the parking distance control.
– when an operating fault is detected.Note: if the vehicle is fitted with a towbar recognised by the system, only the rear Park Assist function is deacti- vated.
Operating faultsWhen the system detects an operating fault, a beep sounds for approximately three seconds the first time reverse gear is selected and is accompanied by the message “Check Parking sensors” shown on the instrument panel. Check that your ultrasonic sensors are clean. If the message remains, contact an ap- proved dealer.

2.124
ENG_UD74827_2Aide au parking (BCB - Renault)
PARKING DISTANCE CONTROL (5/6)
System servicing/repairs– In the event of an impact, the alignment of the sensors may be altered and their operation may consequently be affected.
Deactivate the function and consult an authorised dealer.– Any work in the area where the sensors are located (repairs, replacements, etc.) must be carried out by a qualified profes-
sional.Only an authorised dealer is qualified to service the system.
System disturbanceSome conditions can disrupt or damage the operation of the system, for example:– poor weather conditions (rain, snow, hail, black ice, etc.);– in the event of exposure to strong electromagnetic waves (under high-voltage lines, etc.);– some types of noise (motorcycle, lorry, pneumatic drill etc.);– fitting an unsuitable towing ball or hook.Risk of false alarms or absence of warningsIn the event of the system behaving abnormally, deactivate it and consult an authorised dealer.

2.125
ENG_UD74827_2Aide au parking (BCB - Renault)
PARKING DISTANCE CONTROL (6/6)
Limitation of the system operation– The area around the sensors must be kept clean and free of any modifications in order to ensure the proper operation of the
system.– Small objects moving close to the vehicle (motorcycles, bicycles, pedestrians, etc.) may not be recognised by the system.– The system may not detect objects that are too close to the vehicle.– The system may not provide a warning when the other vehicles or objects are travelling at a significantly different speed.– During a change in trajectory during a manoeuvre, the system may report obstacles with a delay.– When the vehicle is towing a trailer, the rear Park Assist system must be deactivated.
Deactivating the functionYou must disable the function if:– the area around the sensors has been damaged;– the vehicle is equipped with a towing device that is not recognised by the system (ball, hook, adapter, etc.).

driving aids ................................................(up to the end of the DU)active emergency braking in reverse gear (up to the end of the DU)
2.126
ENG_UD74822_2Freinage actif d’urgence en marche arrière (BCB - Renault)
Active emergency braking in reverse gear
ACTIVE EMERGENCY BRAKING IN REVERSE GEAR (1/3)
1
In addition to the “Parking distance control” function ➥ 2.120 and using in- formation from the four central sensors located at the rear of the vehicle, the system detects fixed obstacles located behind your vehicle. If there is a signif- icant risk of collision, the system auto- matically causes the vehicle to brake.Note: make sure that the four central sensors located at the rear of the ve- hicle are not obscured (by dirt, mud, snow, etc.)
This function is an addi- tional driving aid. This func- tion is not under any circum- stances intended to replace
the due care and attention of the driver, who should at all times be in control of the vehicle.
An impact to the under- side of the vehicle while manoeuvring (e.g. strik- ing a post, raised kerb or
other street furniture) may result in damage to the vehicle (e.g. defor- mation of an axle).To avoid any risk of accident, have your vehicle checked by an ap- proved dealer.
OperationFixed rear obstacle detectionIn reverse gear (at speeds of between 2 mph and 6 mph (3 km/h and 10 km/h), if there is a risk of collision with a fixed obstacle, the system automatically causes the vehicle to brake. Visual
feedback 2 is displayed on the multimedia screen 1, accompanied by a beep.Once the vehicle has stopped, the vehi- cle must be held stationary by the driver keeping their foot on the brake pedal.

2.127
ENG_UD74822_2Freinage actif d’urgence en marche arrière (BCB - Renault)
ACTIVE EMERGENCY BRAKING IN REVERSE GEAR (2/3)
Activating or deactivating the systemTo activate or deactivate the function via the multimedia screen, refer to the mul- timedia screen 1, select the “Vehicle” World then “Parking assistance”. Select “Rear Active Emergency Braking”.If the function is deactivated, the symbol
3 is displayed on the multimedia screen.
Operating faultsWhen the system detects an operating fault, active emergency braking in re- verse gear is automatically deactivated.The messages “Parking sensors una- vailable” or “Check Parking sensors” or “Driving assist unavailable” or “Check Driving assist” are displayed on the in- strument panel using the service key
, depending on the fault.They are accompanied by the symbol
3, displayed on the multimedia screen, depending on the fault.Clean the ultrasonic sensors. If there is still a problem, contact an approved dealer.
32Parking assistance
Front
Side
Rear
Sound
Rear Cross Parking AlertRear Active Emergency Braking
Occupant Safe Exit
If the vehicle is fitted with a towbar rec- ognised by the system and a trailer has been connected, active emergency braking in reverse gear is automatically deactivated and the following message is displayed on the instrument panel: “Trailer: parking sensors off” along with
the symbol 3 displayed on the multimedia screen.

2.128
ENG_UD74822_2Freinage actif d’urgence en marche arrière (BCB - Renault)
ACTIVE EMERGENCY BRAKING IN REVERSE GEAR (3/3)
Active emergency braking in reverse gearThis function is an additional driving aid. This function cannot, under any circumstances, replace the vigilance and re- sponsibility of the driver.
Some climatic and environmental conditions can disrupt or damage the system. As a consequence, the driver should always be ready for sudden incidents while driving: always ensure that there are no small, narrow moving obstacles (such as a child, animal, pushchair, bicycle, stone, post, etc.) in the blind spot when manoeuvring.The triggering of this function may be delayed or prevented when the system detects clear signs of control of the vehicle by the driver (action on the steering wheel, pedals etc.).
System servicing/repairs– In the event of an impact, the rear sensors and their performances may be affected. Deactivate the function and consult an
authorised dealer.– Any work in the area where the sensors are located (repairs, replacements, bumper modifications etc.) must be carried out
by a qualified professional.Only an authorised dealer is qualified to service the system.
Deactivating the functionYou must deactivate the function if the vehicle is being towed (breakdown recovery) or if the vehicle is fitted with a towbar that is not recognised by the system.In the event of the system behaving abnormally, deactivate it and consult an authorised dealer.

driving aids ................................................(up to the end of the DU)warning
parking exit...........................................(up to the end of the DU)
parking: parking aid ...................................(up to the end of the DU)
2.129
ENG_UD74823_2Avertisseur de sortie de stationnement (BCB - Renault)
Parking exit warning
PARKING EXIT WARNING (1/4)
Using information from the radars in- stalled on each side of the rear bumper (area A), the system notifies the driver when another vehicle appears in the detection zone B.The function is activated if:– reverse gear is engaged;and– the vehicle is stationary or driving at
a low speed.
This function is an addi- tional driving aid. This func- tion is not under any cir- cumstances intended to
replace the due care and attention of the driver, who should at all times be in control of the vehicle.
The system’s detection capability depends on the vehicle’s surround- ings (static objects etc.) and the condition of the bumper etc.
BB B
B
Special featureMake sure that the radar area A is not obscured (by stickers, mud, snow etc.).If a radar is obscured, the message “Side radars no visibility” will appear on the instrument panel. Clean the area where the sensors are located.
A

screensmultimedia screen ................................(current page)
2.130
ENG_UD74823_2Avertisseur de sortie de stationnement (BCB - Renault)
PARKING EXIT WARNING (2/4)
Activation/deactivation from the multimedia screen 1To activate or deactivate the function, refer to the multimedia instructions.Select “ON” or “OFF”.
OperationThe function warns you if a vehicle is in area B and is approaching your vehicle.When a vehicle is detected, the indica- tors 2 illuminate on both door mirrors 3.Note: clean the rear view mirrors 3 reg- ularly so that the indicators 2 can be seen.
The indicators 4 on the multimedia screen show you on which side the ap- proaching vehicle has been detected.Note: clean the camera regularly so that it is not obscured.Indicators 2 and 4 are accompanied by an audible signal when your vehicle is reversing.
1
3
42

operating faults ..........................................(current page)
2.131
ENG_UD74823_2Avertisseur de sortie de stationnement (BCB - Renault)
PARKING EXIT WARNING (3/4)Operating faultsIf the vehicle is fitted with a towbar rec- ognised by the system and a trailer has been connected, the parking exit warn- ing is automatically deactivated and the following message is displayed on the instrument panel “Driving assist una- vailable”.If the system detects a fault, the mes- sage “Check Side radars” is displayed on the instrument panel. Consult an ap- proved dealer.
Due to the presence of sensors behind the bumper, it is advisable to entrust any operation on the bumper (repair, replacement, paintwork, etc.) to a qualified professional.
Limitation of the system operation– The radar area should be kept clean and free of any modifications in order to ensure the proper operation of the system.
– Small objects (motorcycles, bicycles, pedestrians etc.) moving towards to the vehicle may not be recognised by the system.
Deactivating the functionYou must disable the function if:– the radar area A has been damaged (rear bumper);– the vehicle is fitted with a towbar that is not recognised by the system.

2.132
ENG_UD74823_2Avertisseur de sortie de stationnement (BCB - Renault)
PARKING EXIT WARNING (4/4)
This function is an additional driving aid. This function is not under any circumstances intended to replace the due care and attention of the driver, who should at all times be in control of the vehicle.The system should under no circumstances be taken to be an obstacle detector or an anti-collision system.
System servicing/repairs– In the event of a impact, the position of the radars may be changed, affecting the function. Deactivate the function and con-
sult an authorised dealer.– Any work in the area where the radars are located (repair, replacement, bodywork etc.) must be carried out by a qualified
professional.Only an authorised dealer is qualified to service the system.
System disturbanceSome conditions can disrupt or damage the operation of the system, for example:– a complex environment (underground car park, steel structures etc.) ;– poor weather conditions (snow, heavy rain, hail, black ice etc.).Deactivating the functionYou must deactivate the function if the vehicle is being towed (breakdown recovery) or if the vehicle is fitted with a towbar that is not recognised by the system.In the event of the system behaving abnormally, deactivate it and consult an authorised dealer.

parking distance control.............................(up to the end of the DU)rear view camera .......................................(up to the end of the DU)
2.133
ENG_UD75381_2Caméra de recul (BCB - Renault)
Reversing camera
REVERSING CAMERA (1/2)
3
C
B
A
4
2
1
OperationWhen reverse gear is engaged, the camera 1 located at the rear of the ve- hicle shows a view of the area behind the vehicle on the multimedia display 2, accompanied by one to three guide lines 3, 4 or 5 (fixed, moving and trailer).This system uses several guidelines for its operation (mobile for trajectory and fixed for distance). When the red zone is reached, use the bumper image to stop accurately.
Fixed clearance gauge 3The fixed clearance gauge comprises coloured markers A, B and C indicating the distance behind the vehicle:– A(red) approximately 30 centimetres
from the vehicle;– B(yellow) approximately 70 centime-
tres from the vehicle;– C(green) approximately 150 centi-
metres from the vehicle.This gauge remains fixed and indicates the vehicle trajectory if the wheels are in line with the vehicle.Moving guide line 4This is shown in blue on the multime- dia screen 2. It indicates the vehicle tra- jectory according to the position of the steering wheel.
Trailer guide line 5This is shown in blue on the multimedia screen 2. This indicates the trajectory of the trailer towbar according to the steering wheel position. It allows the driver to position the towbar as close as possible to the trailer’s towing head.
“Trailer view”In forward gear, if a trailer is at- tached, press the “Camera” menu in the “Vehicle” World of your multimedia screen 2 so that the camera 1 transmits a view of the rear environment for ap- proximately 30 seconds.
5

2.134
ENG_UD75381_2Caméra de recul (BCB - Renault)
REVERSING CAMERA (2/2)
2
This function is an additional aid. It cannot, therefore, under any circumstances replace the vigilance or the
responsibility of the driver.The driver should always be ready for sudden incidents while driv- ing: always ensure that there are no small, narrow moving obstacles (such as a child, animal, pushchair, bicycle, stone, post, etc.) in the blind spot when manoeuvring.
The screen shows a reverse mirror image.The frames are a representation projected on a flat surface. This in- formation is to not be taken into ac- count when superimposed on a vertical object or an object on the ground.Objects which appear on the edge of the screen may be deformed.In very bright light (snow, vehicle in sunshine, etc.), the camera vision may be adversely affected.If the luggage compartment is open or incorrectly closed, the message “Tailgate open” appears.
SettingsFrom the multimedia screen, when reverse gear is engaged, press the “Settings” button to add or remove the guide lines and adjust the camera image settings (brightness, contrast, etc.)Please refer to the multimedia instruc- tions for further information.
Make sure that the camera is not obscured (by dirt, mud, snow, con- densation etc.).
“Zoom auto” functionIf an obstacle is detected behind the ve- hicle, the function “Zoom auto” switches the current display to a top rear view.To activate/deactivate the “Zoom auto” function, refer to the multimedia instruc- tions.

driving aids ................................................(up to the end of the DU)driver assistance........................................(up to the end of the DU)360° camera ..............................................(up to the end of the DU)driving ........................................................(up to the end of the DU)screens
multimedia screen ................................(up to the end of the DU)
2.135
ENG_UD75382_2Caméra 360° (BCB - Renault)
360° camera
360° CAMERA (1/11)
1
2 2
3
4
Using information from cameras 1, 2, and 3 located in the front bumper, door mirrors and on the tailgate, as well as ultrasonic detectors 4 located in the ve- hicle bumpers, the feature assists with difficult manoeuvres (e.g. parking) by displaying the vehicle surroundings.Note: make sure that the cameras are not obscured (by dirt, mud, snow etc.).
5
OperationThe cameras transmit several separate views to the multimedia screen 5.They enable you to view the vehicle surroundings:– front view (using the camera 1):
standard front view and panoramic front view;
– rear view (using the camera 3): standard rear view and panoramic front view;
– bird’s eye view (using the 1, 2, and 3 cameras): standard bird’s eye view and pop-up bird’s eye view (when an obstacle is detected);
– side view (using the camera 2): front side view and rear side view;
– 3D view;– trailer view.The ultrasonic detectors detect obsta- cles at the front, rear and (depending on the vehicle) side of the vehicle.

2.136
ENG_UD75382_2Caméra 360° (BCB - Renault)
360° CAMERA (2/11)
Front camera 1The view of the front camera is dis- played on the multimedia screen 5.
Rear camera 3The view of the rear camera is dis- played on the multimedia screen 5.
In front view or rear view: when manoeuvring on a slope, objects shown on the multimedia screen may
be closer or further away than they seem.Take this into account in order to correctly assess the distance before any manoeuvre.
13
5
This function is an additional aid. It cannot, therefore, under any circum- stances replace the vigilance or the responsibility of the driver.The driver should always be ready for sudden incidents while driving: always ensure that there are no small, narrow moving obstacles (such
as a child, animal, pushchair, bicycle, stone, post, etc.) in the blind spot when manoeuvring.
For the rear views, the multimedia screen 5 shows a reverse image of the rear view as in a rear view mirror.

2.137
ENG_UD75382_2Caméra 360° (BCB - Renault)
360° CAMERA (3/11)
The front, rear and side view guide- lines are a representation projected onto flat ground; this information must not be taken into account when superimposed on a vertical object or an object on the ground.Objects displayed on the edge of the multimedia screen may appear distorted.In very bright light (snow, vehicle in sunshine etc.), the camera vision may be adversely affected.
The “front” or “rear” view transmitted to the multimedia screen 5 is displayed with one, two or three guide lines 6, 7 and 8.This system is initially used with the aid of several gauges (mobile and trailer for trajectory and fixed for distance). In the combined represen-
tation from the cameras:– raised objects (pavement, vehicle, etc.) may appear
distorted in bird’s eye view;– any objects on top of the vehicle
are not displayed.
Fixed clearance gauge 6The fixed clearance gauge comprises coloured markers A, B and C indicating the distance behind the vehicle:– A(red) approximately 30 centimetres
from the vehicle;– B(yellow) approximately 70 centime-
tres from the vehicle;– C(green) approximately 150 centi-
metres from the vehicle.Moving guide line 7This is shown in blue on the multime- dia screen 5. It indicates the vehicle tra- jectory according to the position of the steering wheel in the front and the rear view.Trailer guide line 8This is shown in blue on the multimedia screen 5. This indicates the trajectory of the trailer towbar according to the steering wheel position.It allows the driver to position the towbar as close as possible to the trail- er’s towing head.
6
C
B
A
7
8

2.138
ENG_UD75382_2Caméra 360° (BCB - Renault)
360° CAMERA (4/11)
Bird’s eye viewThe bird’s eye view is a combined rep- resentation from cameras 1, 2 and 3.It displays a view of the top of the vehi- cle and its surroundings.This can be used to confirm a view of the vehicle position in relation to its im- mediate surroundings (front, rear and side).
2
Driver’s side front side camera 2The 2camera, fitted in the door mirror, transmits a side view to the multimedia screen 5.Depending on the vehicle, you can use the multimedia screen to change the bird’s eye view to the front side view. Please refer to the multimedia instruc- tions for further information.
In “bird’s eye view” mode, the ob- jects displayed on the multimedia screen are actually further away than they seem.Take this into account in order to correctly assess the distance before any manoeuvre.

2.139
ENG_UD75382_2Caméra 360° (BCB - Renault)
360° CAMERA (5/11)
360° Camera
9
Look in all directions
Side viewsOn the multimedia screen, by pressing the dedicated button 9, you get a view combining a bird’s eye view and two side views.
Front panoramic view or rear panoramic viewOn the multimedia screen, by pressing the dedicated button 10, you get a pan- oramic front view.When reverse gear is engaged, the front panoramic view is replaced by a rear panoramic view.Note: the front view or the rear view varies depending on the steering wheel angle to improve the driver’s vision.
360° Camera
10
Look in all directions
View 3DOn the multimedia screen, by press- ing the dedicated button 11, you get a 3D view allowing you to view the vehi- cle and its surroundings in three dimen- sions.
360° Camera
11
Look in all directions

2.140
ENG_UD75382_2Caméra 360° (BCB - Renault)
In addition to the sound alert, these in- dicator lines show the proximity of ob- stacles via different colours:– green: obstacle between approxi-
mately 50 and 70 cm;– yellow: obstacle between approxi-
mately 30 and 50 cm;– red: obstacle within approximately
30 cm.These indicator lines also show the location where the obstacles are de- tected, as indicated by their positions in relation to the “Vehicle” symbol.For more information ➥ 2.120.
360° CAMERA (6/11)
12
Look in all directions
Tailgate open
Trailer view
“Trailer view”In forward gear, if a trailer is attached, press the “360° Camera” menu in the “Vehicle” World of your multimedia screen 5 so that the camera 3 transmits a view of the rear environment for ap- proximately 30 seconds.
From the multimedia screen, when the “360° Camera” system is displayed, you can change the views (e.g. Replace the rear view with the panoramic rear view).
Obstacle detectionWhile the system is activated, if the “Park Assist” function detects one or more obstacles around the vehicle, the 12 indicator line is displayed on the various views.

2.141
ENG_UD75382_2Caméra 360° (BCB - Renault)
360° CAMERA (7/11)
“Zoom auto" functionIf an obstacle is detected in the vicinity of the front or rear of the vehicle, the “Zoom auto” function switches the cur- rent display to a specific display (top, front or rear view).
360° Camera
Look in all directions
To activate or deactivate the “Zoom auto" function, please refer to the multi- media instructions.

2.142
ENG_UD75382_2Caméra 360° (BCB - Renault)
360° CAMERA (8/11)
Activation/deactivationAutomatic modeWith the vehicle stationary and the engine running, automatic mode is ac- tivated when the reverse gear is en- gaged. The rear view and the bird’s eye view appear on the 5 multimedia screen.When the reverse gear is quickly shifted to forward gear, the rear view and bird’s eye view are replaced by the front view and bird’s eye view on the 5 multimedia screen.
Automatic mode is disabled:– when the gear lever is in position
N or P for approximately three sec- onds;
– when the vehicle speed moving for- ward exceeds 6 mph (10 km/h).
Manual modeTo activate manual mode, with the ve- hicle stationary and the engine running, from the “Vehicle” World on your 5 multi- media screen, press the “360° Camera” menu, the front view and bird’s eye view appear on the multimedia screen.Manual mode is disabled:– when the vehicle speed moving for-
ward reaches 6 mph (10 km/h);– when the gear lever has not been
used for approximately three min- utes.
– Do not use this function while the door mirrors are in folded position.
– Ensure that the luggage com-partment door is properly closed before using the function.
– Do not place any objects on or in front of the cameras.
5

2.143
ENG_UD75382_2Caméra 360° (BCB - Renault)
13
360° CAMERA (9/11)
Difference between the estimated distance and actual distanceDriving or reversing towards a steep uphill slopeThe fixed guidelines 13 show the dis- tances as closer than they actually are.The objects shown on the screen are actually further away on the slope.For example, if the screen displays an object at D, the actual distance of the object is at E.
Driving or reversing towards a protruding objectPosition H seems further than posi- tion J on the screen. However, posi- tion H is at the same distance as posi- tion K.The trajectory indicated by the fixed and mobile guidelines do not take into account the height of the object. So there is a risk that the vehicle may col- lide with the object when reversing to- wards position K.
Driving or reversing towards a steep downhill slopeThe fixed guidelines 13 show the dis- tances as further than they actually are. Therefore, the objects shown on the screen are actually closer on the slope.For example, if the screen displays an object at G, the actual distance of the object is at F.
13H J
JK
K
D E
H
F G
FG
D E

2.144
ENG_UD75382_2Caméra 360° (BCB - Renault)
360° CAMERA (10/11)
Limitation of the system operationThe system is unable to display objects located in certain areas.In the front or rear view mode, the system cannot be used to view an object in area L.In bird’s eye view mode, the system cannot be used to view a large object in area M (near the edge of the displayed area).
J
For safety reasons, carry out any adjustments when the vehicle is not being driven.
L L
M
5
Adjusting the displayFrom the multimedia screen, when the “360° Camera” system is displayed, you can change the views (e.g. Replace the rear view with the panoramic rear view).

2.145
ENG_UD75382_2Caméra 360° (BCB - Renault)
If the gear lever is in the R position, the following views are available:– screen split between the rear view/
bird’s eye view;or– panoramic rear view;or– side view/bird’s eye view (depending
on the vehicle);or– 3D view (depending on the vehicle).When shifting from reverse gear to P position, the views available are:– screen split between the rear view/
bird’s eye view;or– panoramic rear view (depending on
the vehicle);or– side views/bird’s eye view (depend-
ing on the vehicle);or– 3D view (depending on the vehicle).
360° CAMERA (11/11)When shifting from reverse gear to D position, the views available are:– screen split between the front view/
bird’s eye view;or– front panoramic view;or– side views/bird’s eye view;or– 3D view.
Adjusting the camera settingsFrom the multimedia screen, when the “” system is displayed, press the “360° Camera” button Settings to add or remove the guide lines and adjust the camera image settings (brightness, contrast, etc.)Please refer to the multimedia instruc- tions for further information.Note: for safety reasons, the views are not displayed in the “Settings” menu while the vehicle is moving.

parking assistance: assisted parking .........(up to the end of the DU)driving aids ................................................(up to the end of the DU)driver assistance........................................(up to the end of the DU)driving ........................................................(up to the end of the DU)automatic parking ......................................(up to the end of the DU)
2.146
ENG_UD74825_2Parking automatique (BCB - Renault)
Automatic parking
AUTOMATIC PARKING (1/6)
This function assists you in parking ma- noeuvres by taking control of the steer- ing wheel, brakes, engine and gear control.Throughout the manoeuvre, you must put pressure on the accelerator pedal (to keep the function working) and take your hands off the steering wheel.
1
You can take back control of the vehicle at any time by:– turning the steering wheel;– releasing the accelerator pedal;– or by pressing the brake pedal.
Special featuresEnsure that the ultrasonic sensors and the cameras indicated by the arrows 1 are not obscured (by dirt, mud, snow, a badly fitted/attached number plate etc.), impacted, modified (including paintwork etc.) or obstructed by any ac- cessory fitted to the front or rear of your vehicle.
This function is an addi- tional driving aid.Therefore, it can under no circumstances replace the
driver’s vigilance and responsibility during manoeuvres (the driver must always be ready to brake).
1
1
1

2.147
ENG_UD74825_2Parking automatique (BCB - Renault)
AUTOMATIC PARKING (2/6)
Choice of manoeuvreThe system can perform three types of manoeuvre:– parallel parking 4;– perpendicular parking 5;– moving out of a parallel parking
space 6.From the multimedia screen, select the manoeuvre you wish to perform.Note: the other types of parking are not supported by the system.
Switching onWith the vehicle stationary or driving at less than approximately 19 mph (30 km/h), there are several ways to access the function:– Via the “Vehicle” World 2, press the
“Automated park assist” menu 3;– via the “Automated park assist”
widget (if configured by the cus- tomer);
– via the “Favourites” button on the steering wheel (if configured by the customer);
– Via the “Automated park assist” shortcut in the 360° camera view.
Automated park assist
Look in all directions
2
4 5 6
360° Camera Automated park assist
Electric
Driving assis- tance
SettingsVehicle
Configure
Air quality Driving Eco
Seats
3
Parking assis- tance
Start
Drive forward

2.148
ENG_UD74825_2Parking automatique (BCB - Renault)
The “Manoeuvre completed” message appears on the multimedia screen to in- dicate the end of the manoeuvre. The assisted parking brake is applied and the P position is engaged.You can release the accelerator pedal.
AUTOMATIC PARKING (3/6)
When manoeuvring, the steering wheel may turn quickly: do not put your hands inside, and make
sure that nothing is caught inside.
OperationParkingAs long as the vehicle speed is less than 20 mph (30 km/h), the system looks for available parking spaces on both sides of the vehicle.Once a space has been found, it is dis- played on the multimedia screen, in- dicated by the letter “P". Drive slowly until the "STOP" message appears ac- companied by a beep. If more than one space is detected, you must select the desired space by touching the screen.
The spaces turns green on the multi- media screen and is marked with the letter “P".– Stop the vehicle;– press the “START” button.
Warning light lights up on the in- strument panel, along with a beep.– Release the steering wheel;– press the accelerator pedal gently;– follow the system instructions on the
multimedia screen.Maintain pressure on the accelerator pedal throughout the manoeuvre even when the gears are changing.The vehicle will start to move. The system then controls the steering wheel, engine, brakes and gear changes.Depending on the pressure on the ac- celerator pedal, speed varies between 0 and 4 mph (0 and 7 km/h) maxi- mum.
This function is an addi- tional driving aid.Therefore, it can under no circumstances replace the
driver’s vigilance and responsibility during manoeuvres (the driver must always be ready to brake).
Automated park assist
Look in all directions
Stop
Press Start Button

2.149
ENG_UD74825_2Parking automatique (BCB - Renault)
Parking exit– Activate the “Automated park assist”
function;– Select the “Exit parallel parking
space” mode;– activate the direction indicators on
the side you wish to go out of;– press the “START” button;
Warning light lights up on the in- strument panel, along with a beep.– Release the steering wheel;– press the accelerator pedal gently;– follow the system instructions on the
multimedia screen.Maintain pressure on the accelerator pedal throughout the manoeuvre even when the gears are changing.The vehicle will start to move. The system then controls the steering wheel, engine, brakes and gear changes.
AUTOMATIC PARKING (4/6)
When manoeuvring, the steering wheel may turn quickly: do not put your hands inside, and make
sure that nothing is caught inside.
This function is an addi- tional driving aid.Therefore, it can under no circumstances replace the
driver’s vigilance and responsibility during manoeuvres (the driver must always be ready to brake).
The “Manoeuvre completed” message appears on the multimedia screen to in- dicate the end of the manoeuvre. You can retake control of the vehicle by re- leasing the accelerator pedal or brak- ing.Note: when the manoeuvre is com- plete, if, after releasing the accelera- tor, the driver does not act for a certain period of time, the electronic parking brake is applied and the P position is engaged.
Special features– The system does not mount high
kerbs.– The manoeuvre is impossible if the
slope is too steep.
Suspending the manoeuvreThe manoeuvre is suspended in the fol- lowing circumstances:– you depress the accelerator pedal
beyond the point of resistance;– a passenger door or the boot is
opened;– the vehicle has been stationary for
more than approximately one minute.
The indicator light goes out on the instrument panel, accompanied by an audible warning. The vehicle is now immobilised.A message notifies you that the ma- noeuvre has been suspended and tells you what you need to do to resume the manoeuvre.Release the accelerator pedal then press it again to continue the manoeu- vre.

2.150
ENG_UD74825_2Parking automatique (BCB - Renault)
AUTOMATIC PARKING (5/6)Cancelling the manoeuvreThe manoeuvre is cancelled in the fol- lowing cases:– you press the “STOP” button;– you open the driver’s door;– you release the seat belt on the driv-
er’s side;– you apply the electronic parking
brake;– the vehicle has moved too far from
the planned trajectory;– you have performed more than about
ten forwards/backwards movements in one manoeuvre;
– you turn the steering wheel;– you move the gear lever;– the vehicle wheels have skidded;– the engine torque electronic regula-
tor has started
The indicator light goes out on the instrument panel, accompanied by an audible warning.The vehicle stops.Note: if there is a fault with the func- tion, the vehicle is not immobilised. Take control of the vehicle again. The “Take back control” message appears on the instrument panel, accompanied by a beep.
Function unavailableWhen you press on one of the system activation methods, if the operating conditions are not met, the message “Automatic Parking unavailable” ap- pears on the multimedia screen to inform your that the feature is unavail- able.
Operating faultsWhen the function detects an operating fault, the following messages are dis- played on the instrument panel:– “Check Park Assist”, accompanied
by the symbol ; or– “Check Parking sensors”, accompa-
nied by the symbol ©; or– “Check Parking assist”, accompa-
nied by the symbol ©.Clean the ultrasonic sensors. If there is still a problem, contact an approved dealer.Note: if there is a fault with the function, the vehicle is not immobilised.Take control of the vehicle again imme- diately.The message “Take back control” ac-
companied by the symbol ap- pears on the instrument panel.

2.151
ENG_UD74825_2Parking automatique (BCB - Renault)
AUTOMATIC PARKING (6/6)
This function is an additional driving aid. This function is not under any circumstances intended to replace the due care and attention of the driver, who should at all times be in control of the vehicle. Make sure that the manoeuvre complies with the applicable traffic regulations in your location.The driver should always be ready for sudden incidents while driving: always ensure that there are no small, narrow
moving obstacles (such as a child, animal, pushchair, bicycle, stone, post, towing equipment, etc.) in the blind spot when ma- noeuvring.
System servicing/repairs– In the event of an impact, the operation of the sensors may be affected. Deactivate the function and consult an authorised
dealer.– Any work in the area where the sensors are located (repairs, replacements, exterior trim modifications, etc.) must be carried
out by a qualified professional.Only an authorised dealer is qualified to service the system.
In the event of system disturbanceCertain conditions may disrupt or impair operation of the system, such as poor weather conditions (snow, hail, ice, etc.).In the event of the system behaving abnormally, deactivate it and consult an authorised dealer.Risk of erroneous false alarms.
Limitations of the system operation– The system cannot detect objects located in the sensor blind spots.– Always look to check that the parking space suggested by the system is actually still available and free from obstacles before
and during the entire manoeuvre.– The system should not be used when towing a trailer or when there is a towing or load carrying system on the vehicle or on
surrounding vehicles.
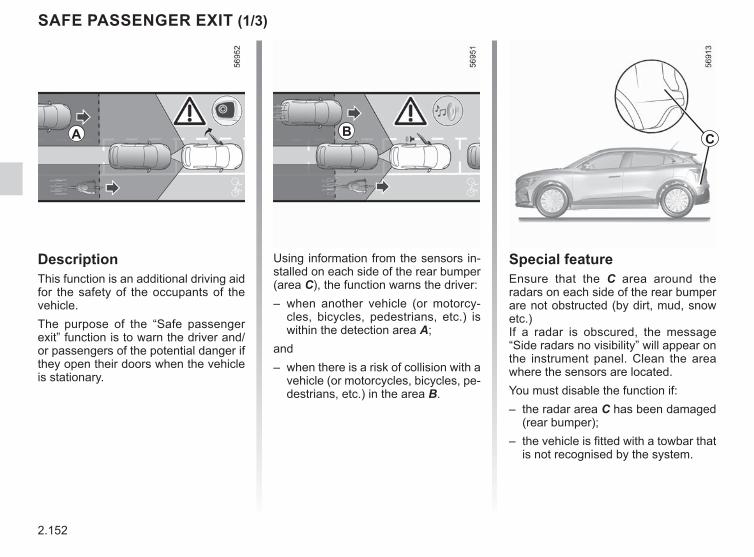
driving aids ................................................(up to the end of the DU)safe vehicle exit .........................................(up to the end of the DU)
2.152
ENG_UD74824_2Sortie sécurisée des occupants (BCB - Renault)
Safe passenger exit
SAFE PASSENGER EXIT (1/3)
DescriptionThis function is an additional driving aid for the safety of the occupants of the vehicle.The purpose of the “Safe passenger exit” function is to warn the driver and/ or passengers of the potential danger if they open their doors when the vehicle is stationary.
Special featureEnsure that the C area around the radars on each side of the rear bumper are not obstructed (by dirt, mud, snow etc.)If a radar is obscured, the message “Side radars no visibility” will appear on the instrument panel. Clean the area where the sensors are located.You must disable the function if:– the radar area C has been damaged
(rear bumper);– the vehicle is fitted with a towbar that
is not recognised by the system.
Using information from the sensors in- stalled on each side of the rear bumper (area C), the function warns the driver:– when another vehicle (or motorcy-
cles, bicycles, pedestrians, etc.) is within the detection area A;
and– when there is a risk of collision with a
vehicle (or motorcycles, bicycles, pe- destrians, etc.) in the area B.
A B C

2.153
ENG_UD74824_2Sortie sécurisée des occupants (BCB - Renault)
12
OperationWhen a door is opened, when a moving object is detected, the warning light 1 is displayed on the exterior rear view mirror 2 and, depending on the vehicle, the ambient lights on front door come on.Note: clean the rear view mirror 2 regu- larly so that the display of the 1 warning light is always visible.
When the detected object is very close, a beep will sound, along with the warn- ing message 3 “Lateral obstacle de- tected” on the instrument panel.Note: the system remains active for ap- proximately 45 minutes after the igni- tion has been switched off.
SAFE PASSENGER EXIT (2/3)
3

2.154
ENG_UD74824_2Sortie sécurisée des occupants (BCB - Renault)
Operating faultsIf the system detects a fault, the mes- sage “Check Side radars” is displayed on the instrument panel. Consult an ap- proved dealer.
SAFE PASSENGER EXIT (3/3)Conditions for non-function– the vehicle is moving and is not com-
pletely stationary;– the vehicle is locked from the out-
side;– there are moving objects (motor-
bikes, bicycles, pedestrians, vehi- cles, etc.) moving towards or near your vehicle at a low speed that is not considered a risk by the system;
– the range of the sensors located inside the rear bumper is hidden by objects, such as other particularly wide parked vehicles those parked very close to your vehicle.
If the vehicle is equipped with a towbar recognised by the system, the “Driving assist unavailable” message displayed on the instrument panel informs you that the function is not operational.For information on the range of equip- ment adapted to your vehicle, we advise you to consult an approved Dealer.
Activating/deactivating the function from the multimedia screen4To activate or deactivate the function, refer to the multimedia instructions.
4
When the vehicle is unlocked, the function returns to the last saved status on the multimedia screen.
This function is an addi- tional driving aid and may not detect certain vehicles or objects in movement
in the vicinity of your vehicle. This function is not in any way a substi- tute for the vigilance and responsi- bility of the driver and the occupants of the vehicle, who are always re- sponsible for paying particular at- tention to the traffic situation and checking the area before leaving the vehicle.In the event of system distur- banceCertain conditions (complex envi- ronment, poor weather conditions, etc.) may disrupt or damage the op- eration of the system, with the risk of false alarms.

driving aids ................................................(up to the end of the DU)emergency call ..........................................(up to the end of the DU)driver assistance........................................(up to the end of the DU)driving ........................................................(up to the end of the DU)
2.155
ENG_UD75205_2Appel d’urgence (BCB - Renault)
Emergency call
EMERGENCY CALL (1/3)
A call is always made as follows:– the call is set up with the emergency
services;– send data related to the incident (ve-
hicle identification plate, local time of the call, last positions, direction of the vehicle) ;
– voice communication with the emer- gency services;
– if necessary, emergency assistance is called.
Emergency call has two modes:– automatic mode;– Manual mode.
1
2 3
4
51 System operation warning light: – green: operational (network available); – off: non-operational (network unavailable); – red: operating fault; – green flashing: call in progress.2 Automatic mode warning light.3 SOS button.4 Microphone.5 Speaker.
If the vehicle is equipped, the emer- gency call function can be used to call the emergency services (without charge) automatically or manually in the event of an accident or illness, re- ducing the time it takes for the emer- gency services to arrive.Note: the emergency call operates:– in countries covered by the associ-
ated telematics emergency services and infrastructure compatible with the system;
– depending on the network coverage in the geographical region where the vehicle is being driven.
If you use the emergency call function to report an accident which you have witnessed, this implies stopping where traffic conditions allow in order for the emergency services to locate your ve- hicle and therefore the location of the reported accident.In all cases, comply with local legisla- tion.
Use the emergency call only in the event of an emergency you are in- volved in, if you witness an accident or if you feel ill.

2.156
ENG_UD75205_2Appel d’urgence (BCB - Renault)
EMERGENCY CALL (2/3)In the event of unintended operation, it is possible to cancel the call by press- ing the 3 button for around two sec- onds, before the call is connected to the call centre.Once a call is established, only the call centre can end the call.
Test mode(depending on local laws)Test mode is reserved exclusively for Approved Dealers to check that the emergency call feature is working prop- erly.To activate test mode:– briefly press the 3 button three times;– wait approximately 15 seconds;– briefly press the 3 button three times.Exit from test mode is automatic.
Automatic modeIf the automatic mode 2 warning light appears in green this confirms that the automatic system is activated.The emergency call starts automati- cally in the event of an accident that has required the activation of the pro- tective equipment (seat belt pretension- ers, airbag etc.).
Manual modeThe emergency call is carried out by:– pressing and holding the 3 button for
at least three seconds;or– pressing the 3 button five times
within ten seconds.
1
2 3
In the event of an acci- dent, if the location and traf- fic conditions permit, stay close to the vehicle in order
to be able answer the call centre quickly if necessary.

operating faults ..........................................(current page)faults
operating faults ....................................(current page)
2.157
ENG_UD75205_2Appel d’urgence (BCB - Renault)
EMERGENCY CALL (3/3)
Operating faultsIn some cases, the emergency call may not work (e.g. low battery).If the system detects an operating fault, the 1 warning light illuminates in red for more than 30 minutes. Contact your ap- proved Dealer as soon as possible;
The system operates with a dedi- cated battery. The battery serv- ice life is approximately four years (the 1 warning light lights up in red to warn you when approaching expiry).Consult an approved dealer.
To guarantee your safety and the proper operation of the system, any operation carried out on the battery
(removal, disconnection, etc.) must be carried out by a qualified special- ist.Risk of serious burns or electric shocks.You must respect the replacement intervals (without exceeding them) as stated in the maintenance docu- ment.The battery is a specific type. Please ensure it is replaced with the same type.Call an approved Dealer.
Without the emergency call feature, the system is not trackable and will not be under constant surveillance. Data is automatically and constantly erased, and the system stores only the last three positions of the vehi- cle.According to legislation relevant to the country, data is only sent in the event of an emergency call. Data sent to the call centre is treated ac- cording to the personal data protec- tion laws applicable in the country where you are located. The system stores activity history data for 13 hours only.The vehicle owner has the right of access to their data. They can re- quest that the data be corrected, deleted or locked.
1

2.158
ENG_UD69803_1Filler NU (BCB - Renault)

3.1
ENG_UD76850_4Sommaire 3 (BCB - Renault)
Section 3: Your Comfort
Multi-Sense . . . . . . . . . . . . . . . . . . . . . . . . . . . . . . . . . . . . . . . . . . . . . . . . . . . . . . . . . . . . . . . . . . . . 3.2Air vents: air outlets . . . . . . . . . . . . . . . . . . . . . . . . . . . . . . . . . . . . . . . . . . . . . . . . . . . . . . . . . . . . . . 3.3Manual air conditioning . . . . . . . . . . . . . . . . . . . . . . . . . . . . . . . . . . . . . . . . . . . . . . . . . . . . . . . . . . . 3.6Automatic climate control . . . . . . . . . . . . . . . . . . . . . . . . . . . . . . . . . . . . . . . . . . . . . . . . . . . . . . . . . 3.11Air conditioning: programming . . . . . . . . . . . . . . . . . . . . . . . . . . . . . . . . . . . . . . . . . . . . . . . . . . . . . . 3.17Air conditioning: information and advice on use . . . . . . . . . . . . . . . . . . . . . . . . . . . . . . . . . . . . . . . . 3.19Multimedia equipment . . . . . . . . . . . . . . . . . . . . . . . . . . . . . . . . . . . . . . . . . . . . . . . . . . . . . . . . . . . . 3.21Electric windows . . . . . . . . . . . . . . . . . . . . . . . . . . . . . . . . . . . . . . . . . . . . . . . . . . . . . . . . . . . . . . . . 3.23Interior lighting, sun visor. . . . . . . . . . . . . . . . . . . . . . . . . . . . . . . . . . . . . . . . . . . . . . . . . . . . . . . . . . 3.25Passenger compartment storage, fittings . . . . . . . . . . . . . . . . . . . . . . . . . . . . . . . . . . . . . . . . . . . . . 3.27Accessories socket . . . . . . . . . . . . . . . . . . . . . . . . . . . . . . . . . . . . . . . . . . . . . . . . . . . . . . . . . . . . . . 3.31Rear headrests . . . . . . . . . . . . . . . . . . . . . . . . . . . . . . . . . . . . . . . . . . . . . . . . . . . . . . . . . . . . . . . . . 3.32Rear bench seat: functions . . . . . . . . . . . . . . . . . . . . . . . . . . . . . . . . . . . . . . . . . . . . . . . . . . . . . . . . 3.33Luggage compartment, rear parcel shelf . . . . . . . . . . . . . . . . . . . . . . . . . . . . . . . . . . . . . . . . . . . . . . 3.34Transporting objects in the luggage compartment . . . . . . . . . . . . . . . . . . . . . . . . . . . . . . . . . . . . . . 3.37Transporting objects: towbar . . . . . . . . . . . . . . . . . . . . . . . . . . . . . . . . . . . . . . . . . . . . . . . . . . . . . . . 3.38Roof bars, spoiler . . . . . . . . . . . . . . . . . . . . . . . . . . . . . . . . . . . . . . . . . . . . . . . . . . . . . . . . . . . . . . . 3.39

driving aids ................................................(current page)driver assistance........................................(current page)driving ........................................................(current page)screens
multimedia screen ................................(current page)
Multi-Sense................................................(up to the end of the DU)
3.2
ENG_UD70665_1Multi-Sense (BCB - Renault)
Multi-Sense
MULTI-SENSEDepending on the vehicle, the MULTI- SENSE system enables you to choose from several driving modes that affect driving, ambient lighting, comfort and driving position:– all the modes are preconfigured and
can be customised (ambient lighting, etc.);
– the “Perso” mode is customisable.The driving modes influence:– steering force;– electronic stability program;– engine responsiveness.They also affect the:– the lighting in the passenger com-
partment and of the instrument panel;
– the presentation of the instrument panel and the multimedia screen;
– depending on the vehicle, the driving position.
Engine settings are specific to each of the driving modes and cannot be customised except for “Perso” mode.
Accessing the menu You can access MULTI-SENSE, de- pending on the vehicle:– from the multimedia screen 1;– using the steering column control 2.Please refer to the multimedia instruc- tions for further information.
2
1 “Eco” mode“Eco” mode focuses on energy saving. Engine management and heating level allow reduced consumption ➥ 2.17.
“Sport” modeThis mode authorises increased engine responsiveness. The steering is firmer.
“Comfort” modeUsing standard vehicle settings, this mode gives you the best compromise between comfort and dynamism.
“Perso” modeThis mode allows the complete configu- ration of the driving elements, including engine responsiveness.
Each time the vehicle is used, the last selected mode will be retained.
You can reset the mode by mode settings.

air vents .....................................................(up to the end of the DU)
3.3
ENG_UD69871_1Aérateurs (sorties d’air) (BCB - Renault)
Air vents: air outlets
AIR VENTS: air outlets (1/3)
1 Driver’s position air vents.2 Windscreen demisting vent.3 Passenger air vents.4 Side window demister outlet.5 Footwell heater outlets for front passengers.6 Footwell heater outlets for rear passengers.
7 Rear passenger central air vents.8 Control panel
4
4
5
5
8 6
6 7
31 2

3.4
ENG_UD69871_1Aérateurs (sorties d’air) (BCB - Renault)
Driver’s position air vents 1DirectionTo direct the air flow, turn the 1 air vents using the cursors 9.To close: move the cursor 10 away from the steering wheel beyond the re- sistance point.To open: move the cursor 10 towards the steering wheel.
AIR VENTS: air outlets (2/3)
Air flowTo check the flow of the 1 and 3 air vents, press or lift the 12 control ac- cording to the desired opening.To remove bad odours from your ve- hicles, only use the systems designed for this purpose. Consult an approved Dealer.
Do not add anything to the vehicle’s ventilation circuit (for example, to remove bad odours).
There is a risk of damage or of fire.
Passenger air vents 3DirectionTo direct the air flow, turn the air vents using the cursors 11.To close: move the cursor 11 towards the outside facade beyond the resist- ance point.To open: move the cursor 11 towards the inside of the facade.
93
12
Do not attach any objects to the air vents (e.g. telephone mounting).Risk of damage.
1010
11 11
1 1

3.5
ENG_UD69871_1Aérateurs (sorties d’air) (BCB - Renault)
Rear seats(depending on the vehicle)
DirectionTo direct the air flow, turn the air vents 7 using the cursors.
Air flowTo check the flow of the air vents 7 turn the knob 13 according to the desired opening:– to the right: maximum air flow;– to the left: closed.
7
13
Do not attach any objects to the air vents (e.g. telephone mounting).Risk of damage.
Do not add anything to the vehicle’s ventilation circuit (for example, to remove bad odours).
There is a risk of damage or of fire.
AIR VENTS: air outlets (3/3)

air conditioning ..........................................(up to the end of the DU)heating system ..........................................(up to the end of the DU)air conditioning ..........................................(up to the end of the DU)temperature regulation ..............................(up to the end of the DU)ventilation ..................................................(up to the end of the DU)
3.6
ENG_UD74439_2Air conditionné manuel (BCB - Renault)
Manual air conditioning
MANUAL AIR CONDITIONING (1/5)
Some buttons have an operating tell-tale which indicates the operat- ing status.
15 14 13 12 11 10 9 8 7
1 2 3 4 5 6
7 System off control.8 Passenger compartment air distribu-
tion adjustment.9 Activationcontrolforthe“A/CMAXˮ
function.10 Air recirculation.11 Air-conditioning activation control.
12 De-icing/demisting of the rear screen and, depending on the vehi- cle, the rear view mirrors.
13 “Clear View” function.14 Adjusting the ventilation speed and
stopping the system.15 Adjusting the driver’s air tempera-
ture.
The controls1 Driver’s heating temperature indica-
tor.2 Ventilation speed indicator.3 Driver’s heated seat activation con-
trol.4 Heated steering wheel activation
control.5 Passenger’s heated seat activation
control.6 Distribution of air in the passenger
compartment indicator.

3.7
ENG_UD74439_2Air conditionné manuel (BCB - Renault)
The air conditioning system is used for:– lowering the temperature inside the
passenger compartment;– eliminating condensation more
quickly.Advice: to optimize vehicle range, de-activate the air conditioning when the outside temperature is comfortable.
Adjusting the ventilation speedPress or lift the 14 control to adjust the ventilation power according to the level of comfort desired.
Switching air conditioning on or offThe 11 control authorises the activation (warning light on) or deactivation (warn- ing light off) of the air-conditioning.The system cannot be switched on if the ventilation power is zero.
MANUAL AIR CONDITIONING (2/5)Activating the systemWhen the vehicle is started, the system returns to the last programme used.The system is also functional when parked.Lift the 14 control to the desired venti- lation speed, then on the 11 control to activate the system.
Stopping the systemPress the 7 button:– the air conditioning switches off auto-
matically;– the ventilation speed of air in the
passenger compartment is zero;– there is, however, a slight flow of air
when the vehicle is moving.This position should not normally be used.
14 11 7

3.8
ENG_UD74439_2Air conditionné manuel (BCB - Renault)
The positions are in the following order:
‚ All the air is then directed to the windscreen and front side
window demisting vents.
The air flow is distributed be- tween front side window de-
misting vents, the windscreen demist- ing vents and the footwells.
The air flow is distributed be- tween the front side window
demisting vents, the windscreen de- misting vents, the dashboard air vents and the footwells.
ô The air flow is mainly directed to the dashboard air vents.
ö The air flow is directed towards the dashboard vents and to-
wards the footwells.
ó The air flow is directed mainly towards the footwells.
MANUAL AIR CONDITIONING (3/5)
Adjusting the air temperaturePress the 15 button, then use the cursor on the multimedia screen to adjust the air temperature. The further towards the red the slide is, the higher the tem- perature will be.When the air conditioning system is used for long periods, it may begin to feel cold. To increase the temperature, press 15, then raise the cursor upwards on the multimedia screen.
Adjusting the distribution of air in the passenger compartmentPress 8 one or more times to select the air distribution. The air distribution se- lected 6 is displayed on the multimedia screen.
15 8
6

3.9
ENG_UD74439_2Air conditionné manuel (BCB - Renault)
MANUAL AIR CONDITIONING (4/5)
Clear View functionPress the 13 button: the integrated indi- cator light comes on.This system quickly demists and de-ices the windscreen and the front side windows. It requires the automatic usage of the air-conditioning or the heating.To exit this function, press the 13 button again or select the setting (dis- tribution, ventilation speed, recycling) required.
Rear screen de-icing/demistingPress the 12 button: the integrated indi- cator light comes on. This function ena- bles rapid demisting/de-icing of the rear screen and the rear view mirrors (on equipped vehicles).To exit this function, press button 12 again. Demisting automatically stops.
RecommendationsIn the event of freezing, manu- ally de-ice the windscreen using a scraper rather than the de-icing/de- misting function in order to reduce your energy consumption.
“A/C MAX” functionThe “A/C MAX” function enables the user to feel the maximum power of their air conditioning system without any constraint or compromise related to the acoustics and the feeling of the air being too cold on the hands and face.This function involves automatic mod- ifications:– temperature programmed to fully
cold;– distribution of air to the occupants;– air flow at its maximum power;– activation of the air conditioning;– air recirculation.Press the 9 button to activate the func- tion. Deactivate ECO mode to make the most of it.
13 12 9

3.10
ENG_UD74439_2Air conditionné manuel (BCB - Renault)
ECO modeFrom the MULTI-SENSE menu acces- sible from the multimedia screen 16 or by pressing the 17 switch, you can acti- vate the ECO mode, which affects the heating level and reduces the vehicle's fuel consumption.A ECO warning light located under the temperature display on the multimedia screen 16 informs you that ECO mode is activated.
Switching the air recirculation onPress the 10 button: the integrated indi- cator light comes on. Under these con- ditions, air is taken from the passenger compartment and is recirculated, with no air being taken from outside the ve- hicle.Air recirculation is for:– isolating the vehicle from the exter-
nal atmosphere (driving in polluted areas, etc.);
– lowering the passenger compart- ment temperature as quickly as pos- sible.
MANUAL AIR CONDITIONING (5/5)
Prolonged use of air recirculation can lead to condensation forming on the side windows and windscreen, and discomfort due to the use of non-renewed air in the passenger compartment. We therefore advise you to return to normal mode (exter- nal air) as soon as the air recircula- tion function is no longer required, by pressing the button 10 again.
17
16
The demisting/de-icing will still take priority over the air recirculation.
10

air conditioning ..........................................(up to the end of the DU)heating system ..........................................(up to the end of the DU)air conditioning ..........................................(up to the end of the DU)temperature regulation ..............................(up to the end of the DU)ventilation ..................................................(up to the end of the DU)
3.11
ENG_UD74440_2Air conditionné automatique (BCB - Renault)
Automatic climate control
7 Heated steering wheel activation control.
8 Distribution of air in the passenger compartment indicator.
9 Passenger heating temperature indi- cator.
10 Adjusting the passenger’s air tem- perature.
11 Passenger compartment air distribu- tion adjustment.
12 Activation control for the “A/C MAX” function.
13 Air recirculation.
AUTOMATIC CLIMATE CONTROL (1/6)14 Air-conditioning activation control in
AUTO mode.15 De-icing/demisting of the rear screen
and, depending on the vehicle, the rear view mirrors.
16 “Clear View” function.17 Adjusting the ventilation speed and
stopping the system.18 Adjusting the driver’s air tempera-
ture.
The controls1 Driver’s heating temperature indica-
tor.2 Ventilation speed indicator.3 “Synchronisation” SYNC mode acti-
vation/deactivation control.4 Driver’s heated seat activation con-
trol.5 Air-conditioning activation control.6 Passenger’s heated seat activation
control.
18 17 16 15 14 13 12 11 10
1 2 3 4 5 6 7 8 9

3.12
ENG_UD74440_2Air conditionné automatique (BCB - Renault)
Activating the systemWhen the vehicle is started, the system returns to the last programme used.The system is also functional when parked.Press the 14 control to activate the system or set the 17 control to the de- sired ventilation speed.
Stopping the systemPress the 17 control until it reaches the “OFF” position.
Switching the air conditioning on or offIn automatic mode, the system man- ages activation of the air conditioning. It is still possible to activate or deactivate the system by pressing the 5 control.
Automatic modeThe automatic climate control system guarantees comfort in the passenger compartment and good visibility (except in the event of extreme conditions), while optimising fuel consumption.
The system controls the ventilation speed, air distribution, air recirculation, and starting and stopping the air condi- tioning and air temperature.This mode consists of a choice of three programmes:AUTO: allows the selected comfort level to be best attained, depending on the exterior conditions. Press button 14.SOFT: reaches the desired comfort level more gently and silently. Press the 14 button, then press downwards to activate SOFT mode.
FAST: increases the flow of air in the passenger compartment. This mode is recommended in particular to opti-mise comfort in the rear seats. Press the 14 button, then press upwards to activate FAST mode.When the air conditioning starts in au- tomatic mode, the system returns to the last programme used.
Any action on a button other than the AUTO button disables auto- matic mode.
AUTOMATIC CLIMATE CONTROL (2/6)
17 14
5

3.13
ENG_UD74440_2Air conditionné automatique (BCB - Renault)
Independent adjustment of the passenger compartmentUse the 10 and 18 controls to adjust the left-hand and right-hand sides inde- pendently.
SYNC function settingPress SYNC 3 on your multimedia screen to synchronise the passenger side temperature with that on the driv- er’s side.To exit this function, press SYNC again or adjust the temperature on the passenger side.
AUTOMATIC CLIMATE CONTROL (3/6)
ö The air flow is directed towards the dashboard vents and to-
wards the footwells.
ó The air flow is directed mainly towards the footwells.
Adjusting the air temperatureThere are two types of settings:– independent adjustment of the pas-
senger compartment;– adjustment in SYNC mode to syn-
chronise the passenger's side and the driver's side.
Adjusting the distribution of air in the passenger compartmentPress 11 one or more times to select the air distribution. The air distribution selected 8 is displayed on the multime- dia screen. The positions are in the fol- lowing order:
‚ All the air is then directed to the windscreen and front side
window demisting vents.
The air flow is distributed be- tween front side window de-
misting vents, the windscreen demist- ing vents and the footwells.
The air flow is distributed be- tween the front side window
demisting vents, the windscreen de- misting vents, the dashboard air vents and the footwells.
ô The air flow is mainly directed to the dashboard air vents.
18 11 10
3 8

3.14
ENG_UD74440_2Air conditionné automatique (BCB - Renault)
“A/C MAX” functionThe “A/C MAX” function enables the user to feel the maximum power of their air conditioning system without any constraint or compromise related to the acoustics and the feeling of the air being too cold on the hands and face.
Rear screen de-icing/demistingPress the 15 button: the integrated in- dicator light comes on. This function enables rapid demisting or de-icing of the rear screen and de-icing of the rear view mirrors (on equipped vehicles).To exit this function, press button 15 again. Demisting automatically stops.
AUTOMATIC CLIMATE CONTROL (4/6)
Some buttons have an operating tell-tale which indicates the operat- ing status.
Adjusting the ventilation speed.In automatic mode, the system uses the most suitable amount of air to reach and maintain the desired comfort level.You can still adjust the ventilation speed by pressing the 17 control to increase or reduce the ventilation speed.
Clear View functionPress the 16 button: the integrated indi- cator light comes on.This function quickly de-mists the wind- screen, rear screen, front side windows and door mirrors (depending on the vehicle). The air conditioning and rear screen de-icing functions must be ac- tivated.To exit this function, press button 14 or 16.
17 16 15 14 12

3.15
ENG_UD74440_2Air conditionné automatique (BCB - Renault)
AUTOMATIC CLIMATE CONTROL (5/6)
The demisting/de-icing will still take priority over the air recirculation.
Manual usePress the 13 button: the integrated indi- cator light comes on.Prolonged use of this position may lead to odours, caused by non-renewal of air, and the formation of condensation on the windows.We therefore advise you to return to au- tomatic mode as soon as air recircula- tion is no longer needed, by pressing button 13.
Air recirculation (isolation of the passenger compartment)This function is managed automatically, but you can also activate it manually. In this case the operation is confirmed by a warning light on button 13).
13
“A/C MAX” function (continued)This function involves automatic mod- ifications:– temperature programmed to fully
cold;– distribution of air to the occupants;– air flow at its maximum power;– activation of the air conditioning;– air recirculation.Press the 12 button to activate the func- tion. Deactivate ECO mode to make the most of it.
12

3.16
ENG_UD74440_2Air conditionné automatique (BCB - Renault)
AUTOMATIC CLIMATE CONTROL (6/6)
“Favourites” functionDepending on the vehicle, by pressing the steering wheel control 19, you can activate the following functions accord- ing to the stored use settings that you have previously defined:– heated steering wheel;– heated seats;– heated rear screen;– heated rear view mirrors.For more information on programming this function, please refer to the multi- media instructions.
19
ECO modeFrom the MULTI-SENSE menu acces- sible from the multimedia screen 20 or by pressing the 21 switch, you can acti- vate the ECO mode, which affects the heating level and reduces the vehicle's fuel consumption.A ECO warning light located under the temperature display on the multimedia screen 20 informs you that ECO mode is activated.
21
20

heating system ..........................................(up to the end of the DU)heating, air conditioning: programming .....(up to the end of the DU)heating/air conditioning programming .......(up to the end of the DU)
3.17
ENG_UD74922_2Conditionnement d’air : programmation (BCB - Renault)
Air conditioning: programming
AIR CONDITIONING: programming (1/2)
Driver’s responsibility when parking or stopping the vehicleNever leave an animal,
child or adult who is not self-suffi-cient alone on your vehicle, even for a short time.In hot and/or sunny weather, please remember that the temperature inside the passenger compartment increases very quickly.RISK OF DEATH OR SERIOUS INJURY.
Air conditioning programmingWith the vehicle stationary, engine run- ning, from the “Vehicle” 2 World on the multimedia screen 1, select the “Electric” menu 3 then the “Charge & Climate” tab to access the settings.
1
You can save several comfort pro- grammes by activating the following settings:– temperature adjustment;– programming the time at which the
vehicle must be ready;– selecting days when the programme
must be repeated.You can activate/deactivate the saved programmes.Note: you can program the air condi- tioning using a smartphone application.Please refer to the multimedia instruc- tions for further information.
2
3

3.18
ENG_UD74922_2Conditionnement d’air : programmation (BCB - Renault)
Stopping the programmed air conditioningThe air conditioning stops automati-cally around ten minutes after the set end time.However, the function can be deacti- vated if:– the engine is running;– the traction battery charging level is
lower than 7%;– the bonnet is open;– you press one of the switches on the
control panel;– the driver is in the passenger com-
partment for approximately 20 sec- onds.
Note: these conditions are also appli- cable for the immediate deactivation of the air-conditioning.If the vehicle is parked for a long time without opening a door with at least one active pre-conditioning schedule, then the function will be deactivated from the third pre-conditioning launch included. The function will be available when one of the doors of the vehicle is opened.
AIR CONDITIONING: programming (2/2)“Programme” activationThe function launches before the time scheduled by the customer, so that the vehicle reaches a comfortable temper- ature by the time they arrive, if:– the bonnet is closed;– the traction battery charge level is
over 7.5%;– the engine is stopped;– the driver is not in the vehicle.
Warning light comes on the in- strument panel.
Immediate activation of the air-conditioningIt is possible to carry out immediate starting of the air conditioning, if:– the bonnet is closed;– the traction battery charge level is
over 7.5%;– the engine is stopped;– the driver is not in the vehicle.The operation of the immediate activa- tion of the air-conditioning is different from programming:– it must be launched from your smart-
phone;– steering wheel and seat heating, if
your vehicle is equipped with it, is activated automatically;
– the function stops after approxi- mately 10 minutes.
Please refer to the multimedia instruc- tions for further information.

air conditioning ..........................................(up to the end of the DU)heating and air conditioning system ..........(current page)air conditioning ..........................................(up to the end of the DU)
3.19
ENG_UD69875_1Air conditionné : informations et conseils d’utilisation (BCB - Renault)
Recommendations to limit energy consumption and maintain the vehicle rangeDrive with the air vents open and the windows closed. If the vehicle has been parked in the sun, open the doors for a few moments to let the hot air escape before starting the engine.It is preferable, before setting off, to use of the programmed air conditioning ➥ 3.17.
Operating faultsAs a general rule, contact your ap- proved dealer in the event of an oper- ating fault.– Reduction in de-icing, demisting
or air conditioning performance. This may be caused by the passen- ger compartment filter cartridge be- coming clogged.
– No hot or cold air is being pro-duced. Check that the controls are set correctly and that the fuses are sound. Otherwise, switch off the system.
Note: to view the other operating faults ➥ 5.25.
Presence of water under the vehicleAfter prolonged use of the air condi- tioning system, it is normal for water to be present under the vehicle. This is caused by condensation.
Air conditioning: information and advice on use
AIR CONDITIONING: information and operating instructions (1/2)
Do not open the refriger- ant fluid circuit. The fluid may damage eyes or skin.
Advice on useIn some situations, (air conditioning off, air recirculation activated, ventila- tion speed at zero or low, etc.) you may notice that condensation starts to form on the windows and windscreen.If there is condensation, use the “Clear View” function to remove it, then use the air conditioning in automatic mode to stop it forming again.
MaintenanceRefer to the Maintenance Document for your vehicle for the inspection fre- quency.
RangeIt is normal to notice an increase in energy usage when the air conditioning is operating.
Use the air conditioning system reg- ularly, even in cold weather, running it at least once a month for approxi- mately 5 minutes.
Do not add anything to the vehicle’s ventilation circuit (for example, to remove bad odours).
There is a risk of damage or of fire.

3.20
ENG_UD69875_1Air conditionné : informations et conseils d’utilisation (BCB - Renault)
AIR CONDITIONING: information and operating instructions (2/2)
The refrigerant fluid circuit (of which some components are hermetically sealed) may contain fluorinated green- house gases.Depending on the vehicle, you will find the following information on label A af- fixed inside the engine compartment.The presence and location of the infor- mation on label A depends on the ve- hicle.
A A
Do not open the refrigerant fluid circuit. The fluid may damage eyes or skin.
Ñ Type of refrigerant fluid
Type of oil in the air condi- tioning circuit
Inflammable product
Consult the driver’s hand- book
Maintenance
Quantity of refrigerant fluid present in the ve- hicle.
x.xxx kg
Globa l Warming Potential (CO2 equiv-alent).
GWP xxxxx
Quantity in weight and in CO2 equivalent.
CO2 eq x.xx t
Before carrying out any action in the engine com- partment, you must switch off the ignition. ➥ 2.2.
A

display .......................................................(current page)hands-free telephone integrated control ....(up to the end of the DU)multimedia equipment ...............................(up to the end of the DU)multimedia (equipment) .............................(up to the end of the DU)navigation ..................................................(up to the end of the DU)radio...........................................................(up to the end of the DU)navigation system ......................................(up to the end of the DU)telephone ...................................................(up to the end of the DU)
3.21
ENG_UD74438_2Equipement Multimédia (BCB - Renault)
Multimedia equipment
The presence and location of this equip- ment depends on the vehicle version.1 Multimedia screen.2 Multimedia sockets USB-C in the
upper A and lower B central console.3 Steering column control.4 Voice command.5 Multimedia sockets USB-C for the
rear passengers.
Please refer to the multimedia in- structions for further information.
MULTIMEDIA EQUIPMENT (1/2)
1
4
23
Connect accessories with a maximum power of 15 watts only.Fire hazard.
2
A B 1
4
3
Multimedia sockets “USB- C” 2 and 5The multimedia sockets USB-C 2 and 5 enable accessories approved by our Technical Department to be recharged, providing the power does not exceed 15 watts (5 V) per socket.Note: the multimedia USB-C 2 ports also allow for data transfer.
5

3.22
ENG_UD74438_2Equipement Multimédia (BCB - Renault)
Induction charging area 7➥ 3.27
Microphone 6(for the phone and voice assistant)
Using the telephoneWe remind you of the need to conform to the legislation in force concerning the use
of such equipment.
6
MULTIMEDIA EQUIPMENT (2/2)
7

children (safety) .........................................(up to the end of the DU)electric windows ........................................(up to the end of the DU)child safety.................................................(up to the end of the DU)
3.23
ENG_UD74434_2Lève-vitres électriques (BCB - Renault)
Electric windows
ELECTRIC WINDOWS (1/2)These systems operate with the igni- tion on or off, until one of the front doors is opened (limited to about 3 minutes).
Driver’s responsibilityNever leave your vehicle with the card or key inside, with a child, adult who is not
self-sufficient or a pet in the vehicle, even for a short while. They may pose a risk to themselves or to others by starting the engine or activating equipment (such as the gear lever or electric windows).If any part of the body becomes trapped, reverse the direction of the window immediately by pressing the relevant switch.Risk of serious injury.
One-touch electric windowsBriefly press or pull a window switch as far as it will go: the window will be raised or lowered fully. Pressing the switch again stops the window moving.Note: the rear windows do not open fully.From the driver’s seat, use switch: 1 for the driver’s side; 2 for the front passenger side; 3 and 5 for the rear passengers.From the passenger seats, use switch 6.
1
2
34
56
Avoid resting any objects against a half-open window: there is a risk that the electric window could be damaged.
Passenger safetyThe driver can disable the operation of the rear pas- senger electric windows by
pressing the 4 switch. A confirma- tion message is displayed on the in- strument panel.

3.24
ENG_UD74434_2Lève-vitres électriques (BCB - Renault)
ELECTRIC WINDOWS (2/2)One-touch electric windows (continued)Note: if the window detects resistance when closing (e.g. tree branch etc.), it stops and then lowers again by a few centimetres.
Impossible to operate the one-touch electric windowThe one-touch electric window is equipped with heat protection: if you press the switch for the window more than 16 consecutive times it goes into protection mode (locking the window).You can:– use the electric window switch briefly
and with intervals of approximately 30 seconds;
– with the engine running, the window will be unlocked after approximately 20 minutes of inaction on the electric window switch.
Remote control window opening/closingWhen unlocking the doors from the out- side, if you press and hold the card unlocking button, all the windows equipped with a one-touch electric window will open automatically.When locking the doors from the out- side, if you press and hold the card locking button, all the windows equipped with a one-touch electric window will close automatically.It is recommended that the user only operates the system when the vehi- cle can be seen clearly and no one is inside.
Operating faultsIn case of a fault when closing a window, the system reverts to normal mode: pull the switch concerned up as often as necessary to fully close the window (the window will close gradu- ally), hold the switch (still on the clos- ing side) for one second then lower and raise the window fully to reinitialise the system.If necessary, contact an approved Dealer.
When closing the windows, ensure that no part of the body (arm, hand, etc.) is protruding from the vehicle.Risk of serious injury.

lighting:interior ..................................................(up to the end of the DU)
courtesy mirrors .........................................(current page)sun visor ....................................................(current page)courtesy light .............................................(up to the end of the DU)map reading lights .....................................(up to the end of the DU)
3.25
ENG_UD69877_1Eclairage intérieur, pare-soleil (BCB - Renault)
Interior lighting, sun visor
INTERIOR LIGHTING, SUN VISOR (1/2)
When the doors are unlocked and opened, the courtesy and footwell lights come on temporarily.
Reading lights(depending on the vehicle)Press the 1, 2 or 3 spots to get:– permanent lighting;– lighting switches off immediately.Note: it is possible to deactivate/acti- vate the reading lights coming on when the doors are opened from the multime- dia screen ➥ 1.108.
2
13

3.26
ENG_UD69877_1Eclairage intérieur, pare-soleil (BCB - Renault)
INTERIOR LIGHTING, SUN VISOR (2/2)
65
7
4
Luggage compartment lightLight 4 comes on when the luggage compartment is opened.
Sun visorLower the sun visor 5 over the wind- screen or unclip it and turn it over the side window.
Courtesy mirrorsLift the cover 6.The light 7 switches on automatically.

fittings ........................................................(up to the end of the DU)storage compartments ...............................(up to the end of the DU)storage compartment.................................(up to the end of the DU)
3.27
ENG_UD74437_2Rangements / aménagements habitacle (BCB - Renault)
Centre console storage compartment or induction charging zone 2Depending on the vehicle, this is used to charge your phone without the need for a cable. Please refer to the multime- dia instructions for further information.
Passenger compartment storage, fittings
Front door storage compartments 1
PASSENGER COMPARTMENT STORAGE SPACE AND FITTINGS (1/4)
1
No object should be placed on the floor (in front of the driver). Such objects may slide under the pedals
during sudden braking manoeuvres and obstruct their use.
2
Objects left in the induction charg- ing area 2 may overheat. You are advised to place them in the areas provided for this purpose (storage compartment, sun visor compart- ment etc.).
It is essential not to leave any ob- jects (start-up card, USB drive, SD card, credit card, jewellery, keys, coins, etc.) in the induction charging area 2 whilst charging your phone. Remove all magnetic cards or credit cards from the case before position- ing your telephone in the induction charging area 2.

3.28
ENG_UD74437_2Rangements / aménagements habitacle (BCB - Renault)
Centre armrest storage compartment 8Depending on the vehicle, lift the cover of the sliding armrest by pushing the 7 button.
PASSENGER COMPARTMENT STORAGE SPACE AND FITTINGS (2/4)
Central storage compartment 3A divider 6 can be used to adjust the centre console storage (various options available depending on the position of the divider in the fitting grooves 4).
Cup holders 5Using two separators 6 you can create an area which can hold another cup.The two separators can be removed to obtain a empty storage space.
When turning corners, accelerating or braking, ensure that the recepta- cle being held by the cup
holder is not dislodged.There is a risk of burning if hot liquid escapes.
3 45
6
7
8
Do not drive with the cen- tral armrest 8 in the open position, this could affect the correct operation of the
central airbag and/or cause injury when it is deployed.
Do not place any objects on the central armrest storage compartment 8, this could affect the correct operation
of the central airbag and/or cause injury when it is deployed.
Ensure that no hard, heavy or pointed objects are placed in the “open” storage compartments in such a
way that they may fall onto passen- gers during sudden turning, braking or in the event of an accident.

armrestfront ......................................................(current page)
3.29
ENG_UD74437_2Rangements / aménagements habitacle (BCB - Renault)
PASSENGER COMPARTMENT STORAGE SPACE AND FITTINGS (3/4)
Sun blind storage compartment 9Can be used to hold motorway toll tick- ets, maps, etc.
9
Glove boxTo open, press the catch 10.It can hold a box of tissues, a bottle of water, etc.
10

glove box ...................................................(current page)
3.30
ENG_UD74437_2Rangements / aménagements habitacle (BCB - Renault)
PASSENGER COMPARTMENT STORAGE SPACE AND FITTINGS (4/4)
Ensure that no hard, heavy or pointed objects are placed in the “open” storage compartments in such a
way that they may fall onto passen- gers during sudden turning, braking or in the event of an accident.
Rear door storage compartment 12
13 storage pocket(depending on the vehicle)
Grab handle 11This offers support and can be held when the vehicle is being driven.Do not use it for getting into or out of the vehicle.
11
12
13

ashtray .......................................................(up to the end of the DU)accessories socket ....................................(up to the end of the DU)
3.31
ENG_UD69879_1Prise accessoires (BCB - Renault)
Accessories socket
ACCESSORIES SOCKET
Accessories socket 1It is provided for the purpose of con- necting accessories approved by our Technical Department.It can be used for the compressor of your tyre inflation kit, for example ➥ 5.2.
1
Connect accessories with a maximum power of 120 watts (12 V) only.When several accessory
sockets are used at the same time, the total power of the connected accessories must not exceed 180 watts.Fire hazard.

headrest.....................................................(up to the end of the DU)
3.32
ENG_UD75384_2Appuis-tête arrière (BCB - Renault)
Rear headrests
REAR HEADRESTS
The headrest is a safety component; check that it is fitted and in the correct po-sition. The top of the head-
rest should be as close as possible to the top of the head.
Position for useRaise the headrest as far as possible to use it in the high position. Check that it is correctly locked.
To remove the headrestTilt the bench seat forwards, raise the headrest as much as possible, then press button 1 and remove the head- rest.
To refit the headrestTilt the bench seat forwards, then insert the rods into the holes, push in the headrest until it locks to use it in the high position. Check that the bonnet is correctly locked.
Folding positions 2 for the headrestPress the button 1 and lower the head- rest completely.
When the headrest is set at the lowest position, this is for storage only. It should not be in this position when a seat is occupied.
2
1

rear bench seat..........................................(current page)rear seats
functions ..............................................(current page)
3.33
ENG_UD69881_1Banquette arrière : fonctionnalités (BCB - Renault)
Pull the vane 1 and lower the seat- back A.Note: for safety reasons, the seat- back A is equipped with a retaining system. You may experience resist- ance when handling.To replace the seatback, proceed in the reverse order to removal.Raise the seatback again until it reaches the locking joint of the seat- back. Be careful not to jam the safety strap between the backrest and the parcel shelf.Check the operation of the seat belt.
Rear bench seat: functions
REAR BENCH SEAT: functions
A
1
When moving the rear seats, ensure that nothing obstructs the anchorage points (passenger’s arm or
leg, a pet, gravel, cloth, toys, etc.).
When refitting the seat- back, make sure it is cor- rectly locked in place.If seat covers are fitted,
make sure these do not prevent the seatback latch from locking in.Make sure that the seat belts are positioned correctly.Reposition the headrests.
To fold down the seatbackEnsure that the front seats are far enough forward.Before folding down a seat back, lower the headrests as far as possible.Before folding down any side rear seat, fasten the seat belt buckle of the seat concerned into its corresponding catch.This will prevent the seat belt becoming trapped when the seat is returned to its position for use.In all cases, check that the seat belts are operating correctly.

spoiler ........................................................(current page)tailgate .......................................................(up to the end of the DU)tailgate .......................................................(up to the end of the DU)transporting objects
in the luggage compartment ................(current page)
3.34
ENG_UD74435_2Coffre à bagages, tablette arrière (BCB - Renault)
Luggage compartment, rear parcel shelf
LUGGAGE COMPARTMENT, REAR PARCEL SHELF (1/3)
OpeningPress button 1 and lift the tailgate.
ClosingLower the luggage compartment lid, depending on the vehicle, initially using the inside handle to assist you.
1
Opening manually from inside the vehicleIf it is impossible to unlock the tailgate, it can be done manually from inside:– access the luggage compartment by
folding forward the seatback(s) of the rear bench seat;
– insert a flat-blade screwdriver or sim- ilar at the emergency opening lever 2 and slide it to the left as shown on the drawing;
– push the boot lid to open it.
2
The attaching of any carry- ing device (bike rack, lug- gage box, etc.) resting on the luggage compartment
lid is prohibited. To install a carrying device on your vehicle, contact an Approved Dealer.
Never use the struts to close the luggage compartment door.

3.35
ENG_UD74435_2Coffre à bagages, tablette arrière (BCB - Renault)
Charging lead storage trayThis tray is for charging leads. The maximum permissible load for the tray is 10 kg.To access it, open the luggage com- partment, then lift up the luggage com- partment carpet using the handle 3.
3
If there is water in the charging lead storage tray, signs of corrosion or foreign bodies in the charging lead
connector or in the vehicle charging socket, do not charge the vehicle.Fire hazard.Take care of the cord: do not tread on it, immerse it in water, pull on it or let anything knock against it.Check and clean the storage tray regularly.
LUGGAGE COMPARTMENT, REAR PARCEL SHELF (2/3)

3.36
ENG_UD74435_2Coffre à bagages, tablette arrière (BCB - Renault)
LUGGAGE COMPARTMENT, REAR PARCEL SHELF (3/3)
Rear parcel shelfTo remove:– lower the rear headrests;– unhook the two cords 4;– lift the shelf 5 upwards to unclip;
Maximum weight on rear parcel shelf: 2 kg, evenly distributed.
4
Do not place any objects, especially heavy or hard objects, on the parcel shelf.These may pose a risk to
the vehicle occupants if the driver has to brake suddenly or if the vehi- cle is involved in an accident.
5
– push the shelf 5 in and turn;– pull the shelf towards you.To refit, proceed in the reverse order to removal.

towing rings ...............................................(current page)transporting objects
in the luggage compartment ................(up to the end of the DU)
3.37
ENG_UD69885_1Transports d’objets dans le coffre (BCB - Renault)
Transporting objects in the luggage compartment
TRANSPORTING OBJECTS IN THE LUGGAGE COMPARTMENT
Always position the heavi- est items directly on the floor. Use the lashing points 1 on the boot floor, if
these are fitted to the vehicle. The luggage should be loaded in such a way that no items will be thrown for- ward and strike the occupants if the driver has to brake suddenly. Fasten the rear seat belts, even if the seats are not occupied.
Always position the objects transported so that the largest surface is against:
– The rear bench seatback for normal loads (example A).
– The front seatbacks with the rear seatbacks folded down, as is the case for maximum loads (example B).
If you have to place objects on the folded seatback, it is necessary that you lower the headrests before folding the seat- back so that it can be folded as flat as possible against the seat.
A
B
1

equipmentfitting ....................................................(up to the end of the DU)
towing a caravan .......................................(up to the end of the DU)towing
towing equipment .................................(up to the end of the DU)
3.38
ENG_UD76657_2Transport d’objets : attelage (BCB - Renault)
Transporting objects: towbar
Permissible nose weight, maxi- mum permissible towing weight braked and unbraked: ➥ 6.6.Choice and fitting of towing equipmentMaximum weight of towing equip- ment: 25 kg.It is not permitted to fit a mechanical towing device (ball, hook, etc.) that is removable without tools or retract- able if it cannot be easily removed or repositioned when not in use.For fitting and conditions of use, refer to the equipment’s fitting in- structions.Please keep these instructions with the rest of the vehicle documenta- tion.
TRANSPORTING OBJECTS towbar
A
Maximum dimension A: 838 mm.
Any towing device must not ob- struct any lighting component or the number plate when not in use. Mechanical towing devices (ball, hook, etc.) which can be removed without tools or which are retract- able must be removed or reposi- tioned when they are not in use.In all cases, you must comply with the regulations of the particular country you are in.

roof bars ....................................................(up to the end of the DU)spoiler ........................................................(up to the end of the DU)roof rack
roof bars ...............................................(up to the end of the DU)
3.39
ENG_UD70245_1Barres de toit / Becquet (BCB - Renault)
For information on the range of equipment adapted to your vehi- cle, we advise you to consult an ap- proved Dealer.Refer to the manufacturer’s instruc- tions for information on how to fit and use the roof rack bar.Please keep these instructions with the rest of the vehicle documenta- tion.Permissible load on roof bars ➥ 6.6.
Precautions during useHandling the tailgateBefore handling the tailgate, check the objects and/or accessories (bike rack, roof box, etc.) fitted to the roof bars: these must be correctly positioned and secured, so as not to hinder the opera- tion of the tailgate.
Roof bars, spoiler
ROOF BARS, SPOILER
Spoiler AIt is forbidden to attach objects and/or accessories (bike rack, etc.) to spoil- er A.
Roof barsAccessing the mounting pointsOpen the doors to access the mount- ing points 1.
If original roof bars, ap- proved by our Technical Department, are supplied with screws, only use these
screws for attaching the roof bars to the vehicle.
1
It is prohibited to attach any carrying equipment (bike rack, luggage box etc.) resting against the spoiler
or tailgate. To install a carrying device on your vehicle, contact an Approved Dealer.
A

3.40
ENG_UD69803_1Filler NU (BCB - Renault)

4.1
ENG_UD76851_4Sommaire 4 (BCB - Renault)
Section 4: Maintenance
Bonnet . . . . . . . . . . . . . . . . . . . . . . . . . . . . . . . . . . . . . . . . . . . . . . . . . . . . . . . . . . . . . . . . . . . . . . . . 4.2Levels . . . . . . . . . . . . . . . . . . . . . . . . . . . . . . . . . . . . . . . . . . . . . . . . . . . . . . . . . . . . . . . . . . . . . . . . 4.4
coolant . . . . . . . . . . . . . . . . . . . . . . . . . . . . . . . . . . . . . . . . . . . . . . . . . . . . . . . . . . . . . . . . . . 4.4brake fluid . . . . . . . . . . . . . . . . . . . . . . . . . . . . . . . . . . . . . . . . . . . . . . . . . . . . . . . . . . . . . . . . 4.6windscreen washer reservoir . . . . . . . . . . . . . . . . . . . . . . . . . . . . . . . . . . . . . . . . . . . . . . . . . 4.6
Tyre pressure. . . . . . . . . . . . . . . . . . . . . . . . . . . . . . . . . . . . . . . . . . . . . . . . . . . . . . . . . . . . . . . . . . . 4.7Secondary 12 V battery . . . . . . . . . . . . . . . . . . . . . . . . . . . . . . . . . . . . . . . . . . . . . . . . . . . . . . . . . . . 4.9Bodywork maintenance . . . . . . . . . . . . . . . . . . . . . . . . . . . . . . . . . . . . . . . . . . . . . . . . . . . . . . . . . . . 4.11Interior trim maintenance . . . . . . . . . . . . . . . . . . . . . . . . . . . . . . . . . . . . . . . . . . . . . . . . . . . . . . . . . . 4.14

bonnet........................................................(up to the end of the DU)maintenance:
mechanical ...........................................(up to the end of the DU)
4.2
ENG_UD75385_2Capot moteur (BCB - Renault)
To open, pull handle 1, located on the left-hand side of the dashboard.
Bonnet
BONNET (1/2)
In the event of even a slight impact involving the radia- tor grille or bonnet, have the bonnet lock checked by an
authorised dealer as soon as pos- sible.
Do not do any work under the bonnet when the vehicle is charging or when the igni- tion is switched on.
Unlocking the bonnet catchLift the bonnet by several centimetres and push lever 2 to the left.
The vehicle drive system in an electric vehicle uses a direct voltage of approxi- mately 400 volts.
This system can get hot during and after switching off the ignition.Respect warning messages given on the labels in the vehicle.Any intervention or modification on the vehicle’s 400 V electrical system (components, cables, connectors, traction battery) is strictly prohibited.The risk of serious burns or elec- tric shocks can lead to death.The engine cooling fan may also
start at any moment. The label in the engine compartment re- minds you of this.Risk of injury.
Do not press down on the bonnet: there is a risk that the bonnet may accidentally close.
1 2

4.3
ENG_UD75385_2Capot moteur (BCB - Renault)
Ensure that the bonnet is properly locked.Ensure that nothing is pre- venting locking (grit, cloths,
etc.).
BONNET (2/2)
4
3
5
Closing the bonnetBefore closing the bonnet, make sure that nothing has been left in the engine compartment.To close the bonnet, replace the stay 4 in its holder 3. Hold the middle of the bonnet and guide it down to one foot (30 cm) above the closed position, then release. It will latch automatically under its own weight.
Opening the bonnetLift the bonnet up and release the stay 4 from its holder 3. For your own safety, it is very important to fit the stay into its retainer 5.
After any procedure in the engine compartment, make sure that you do not forget anything (cloth, tools, etc.).
These may damage the engine or cause a fire.
3
4
When working in the engine compartment, ensure that the windscreen wiper stalk is in the park position.
Risk of injury.

coolant .......................................................(current page)levels:
coolant .................................................(current page)
tankCoolant ................................................(current page)
4.4
ENG_UD75612_2Niveaux (BCB - Renault)
CoolantDepending on the vehicle, the location of the coolant reservoirs may vary:– the 1 reservoir is used for engine
cooling;or– the 1 reservoir is used for engine
cooling and the 2 reservoir is used for cooling the traction battery;
or– the 2 reservoir is used to cool the
engine and the traction battery.
Levelscoolant
LEVELS (1/3)The level should be read with the engine switched off and on level ground. For each reservoir, the level when cold must be between the “MINI” and “MAXI” marks on the coolant reser- voirs 1 and 2.Top this level up when cold before the “MINI” mark is reached.Note: for a new vehicle in the running in phase: the fluid level may be higher than the “MAXI” mark on the tank, then drop between the level “MINI” and “MAXI”. This does not present a risk.
No operations should be carried out on the cooling circuit when the engine is hot.
Risk of burns.
If there is an abnormal or repeated drop in the fluid level, please consult an authorised dealer.
1
2
The vehicle drive system in an electric vehicle uses a direct voltage of approxi- mately 400 volts.
This system can get hot during and after switching off the ignition.Respect warning messages given on the labels in the vehicle.Any intervention or modification on the vehicle’s 400 V electrical system (components, cables, connectors, traction battery) is strictly prohibited.The risk of serious burns or elec- tric shocks can lead to death.The engine cooling fan may also
start at any moment. The label in the engine compartment re- minds you of this.Risk of injury.

4.5
ENG_UD75612_2Niveaux (BCB - Renault)
Checking intervalsCheck the coolant levels regularly (very severe damage is likely to be caused to the engine and battery if there is insufficient coolant).If the level needs to be topped up, only use products approved by our Technical Department which ensure:– protection against freezing;– anticorrosion protection of the cool-
ing system.
Replacement intervalsRefer to the Maintenance Document for your vehicle.
When working in the engine compartment, ensure that the windscreen wiper stalk is in the park position.
Risk of injury.
Do not do any work under the bonnet when the vehicle is charging or when the igni- tion is switched on.
LEVELS (2/3)

windscreen washer ....................................(current page)brake fluid ..................................................(current page)levels:
brake fluid ............................................(current page)
levels:windscreen washer reservoir ...............(current page)
tanks and reservoirs:windscreen washer ..............................(current page)
tankBrake fluid ............................................(current page)
4.6
ENG_UD75612_2Niveaux (BCB - Renault)
brake fluidwindscreen washer reservoir
Windscreen washer reservoirTopping upOpen cap 3, fill until you can see the fluid, then refit the cap.
LiquidScreen wash product (product with an-tifreeze in winter).
3
Brake fluidThe level should be read with the engine switched off and on level ground. This should be checked frequently, and im- mediately if you notice even the slight- est loss in braking efficiency.
Replacement intervalsRefer to the maintenance document for your vehicle.
Topping upAfter any operation on the hydraulic circuit, a specialist must replace the fluid. Only use fluids approved by our Technical Department (and taken from a sealed container).
Level 2It is normal for the level to drop as the brake shoes become worn, but it must never drop lower than the warning line “MINI”.If you wish to check the disc wear your- self, you should obtain the document explaining the checking procedure from our Network or from the manufacturer’s website.
If there is an abnormal or repeated drop in the fluid level, please consult an authorised dealer.
LEVELS (3/3)
2

tyre pressures ............................................(up to the end of the DU)tyres ...........................................................(up to the end of the DU)tyre pressure..............................................(up to the end of the DU)
4.7
ENG_UD69891_1Pression de gonflage des pneumatiques (BCB - Renault)
Tyre pressure
TYRE PRESSURE (1/2)
B : dimension of the tyres fitted to the vehicle.
C : tyre pressures for the front wheels.D : tyre pressures for the rear wheels.
C D
A
A
Label AOpen the driver’s door to read it.Tyre pressures should be checked when the tyres are cold.If the tyre pressures cannot be checked when the tyres are cold, increase the pressures by 0.2 to 0.3 bar (or 3 PSI). Never deflate a hot tyre.
B
C DB
Vehicle fitted with a tyre pressure monitoring systemIn the event of under-inflation (punc-
tures, etc.), the warning light appears on the instrument panel ➥ 2.22.
Vehicle used fully laden (Maximum Permissible All-up Weight) and towing a trailer
The maximum speed must be lim- ited to 62 mph (100 km/h) and the tyre pressure increased by 0.2 bar (3 psi) ➥ 6.6.Risk of tyre blowouts.

4.8
ENG_UD69891_1Pression de gonflage des pneumatiques (BCB - Renault)
Tyre safety and chain fitting: for information on servicing conditions and, depending on the vehicle ver- sion, the use of chains ➥ 5.6.
For your safety, please re- spect the speed limit.When they need to be re- placed, only tyres of the
same make, size, type and profile should be used on a single axle.They must: either have a load ca- pacity and speed rating at least equal to those of the original tyres, or conform to those recom- mended by an authorised dealer.Failure to heed these instructions could endanger your safety and affect your vehicle’s roadworthi- ness.Risk of loss of control of the ve- hicle.
TYRE PRESSURES (2/2)

12 volt batterymaintenance ........................................(up to the end of the DU)
12 volt battery ............................................(up to the end of the DU)
4.9
ENG_UD76332_2Batterie secondaire 12 volts (BCB - Renault)
The secondary battery is a 12 V battery: it supplies the energy required to op- erate vehicle equipment (lights, wind- screen wipers, windows, audio system, etc.) and certain safety systems such as braking assistance.You should not open it or add any fluid.
Secondary 12 V battery
SECONDARY 12 V BATTERY (1/2)
Do not do any work under the bonnet when the vehicle is charging or when the igni- tion is switched on.
For your own safety and to ensure the proper oper-ation of the vehicle’s elec-trical equipment (lights,
windscreen wipers, ABS etc.), any intervention on the secondary “12 V” battery (removal, disconnec-tion, etc.) must ALWAYS be per-formed by a specialist professional.Risk of serious burns or electric shocks.Respect categorically the replace- ment intervals (without exceeding them) as stated in the maintenance document.The battery is a specific type. Please ensure it is replaced with the same type.Call an approved Dealer.
Maintenance/replacementThe charge status of the 12 volt bat- tery 1 can decrease, especially if you use your vehicle:– when the outside temperature drops;– after extended use of energy-con-
suming devices with the engine switched off.
1
The vehicle drive system in an electric vehicle uses a direct voltage of approxi- mately 400 volts.
This system can get hot during and after switching off the ignition.Respect warning messages given on the labels in the vehicle.Any intervention or modification on the vehicle’s 400 V electrical system (components, cables, connectors, traction battery) is strictly prohibited.The risk of serious burns or elec- tric shocks can lead to death.The engine cooling fan may also
start at any moment. The label in the engine compartment re- minds you of this.Risk of injury.

4.10
ENG_UD76332_2Batterie secondaire 12 volts (BCB - Renault)
SECONDARY 12 V BATTERY (2/2)Breakdown recovery
To avoid damaging your vehicle, do not recharge the secondary 12 V battery using:– an external battery charger;– a battery from another vehicle.Please contact an Authorised Dealer.
Do not disconnect the sec- ondary 12 V battery.Risk of serious burns or electric shocks.
Do not use your electric vehicle to restart the 12 volt battery in another vehicle. The 12 volt electric power of an electric vehicle is not enough to perform such an operation.Risk of damage to the vehicle.
A 2 3 4
567Label AObserve the indications on the battery.2 Naked flames and smoking are for
bidden.3 Eye protection required.4 Keep away from children.5 Explosive materials.6 See the user manual.7 Corrosive materials.

maintenance:bodywork .............................................(up to the end of the DU)
washing .....................................................(up to the end of the DU)paint
maintenance ........................................(up to the end of the DU)
anti-corrosion protection ............................(current page)
4.11
ENG_UD69892_1Entretien de la carrosserie (BCB - Renault)
Bodywork maintenance
BODYWORK MAINTENANCE (1/3)A well-maintained vehicle will last longer. It is therefore recommended to maintain the exterior of the vehicle reg-ularly.Your vehicle has been treated with very effective anti-corrosion products. It is nevertheless subject to various outside influences.
Corrosive agents in the atmosphere– atmospheric pollution (built-up and
industrial areas);– saline atmospheres (near the sea,
particularly in hot weather);– seasonal and damp weather condi-
tions (e.g. road salt in winter, water from road cleaners, etc.).
Minor impacts
Abrasive actionDust and sand in the air, mud, road grit thrown up by other vehicles, etc.You should take a number of minor pre- cautions in order to safeguard your ve- hicle against such risks.
You shouldWash your car frequently, with the engine off, using cleaning prod- ucts recommended by our Technical Department (never use abrasive prod- ucts). Rinse thoroughly beforehand with a jet:– spots of tree resin and industrial
grime;– mud in the wheel arches and under-
neath the body which forms damp patches;
– bird droppings, which cause a chemical reaction with the paint that rapidly discolours paintwork and may even cause the paint to peel off.
wash the vehicle immediately to remove these marks since it is im- possible to remove them by polish- ing;
– salt, particularly in the wheel arches and underneath the body after driv- ing in areas where the roads have been gritted.
Withdraw the vegetable falls (resin, film etc.) from the vehicle regularly.
Observe the vehicle stopping distances when driving on gravelled surfaces to prevent paint damage.Repair, or have repaired quickly, areas where the paint has been damaged, to prevent corrosion spreading.Remember to visit the body shop pe-riodically in order to maintain your an-ti-corrosion warranty. Refer to the Maintenance Document.Respect local regulations about wash- ing vehicles (e.g. do not wash your ve- hicle on a public highway).If it is necessary to clean mechani-cal components, hinges, etc., spray them with products approved by our Technical Department to protect them after they have been cleaned.
We have selected special products to care for your vehicle and you can obtain these from the manufactur- er’s accessory outlets.

4.12
ENG_UD69892_1Entretien de la carrosserie (BCB - Renault)
BODYWORK MAINTENANCE (2/3)
Degrease or clean using high-pressure cleaning equipment or by spray- ing products not ap- proved by our Technical Department:
– mechanical components (e.g.: engine compartment);
– the wheels (e.g. braking system components such as brake calli- pers);
– the underbody;– the parts with hinges (e.g. inside the
doors);– the painted plastic external fittings
(e.g. bumpers).Doing this could give rise to corrosion or operational faults.
What you should not doWash the vehicle in bright sunlight or freezing temperatures.Do not scrape off mud or dirt without pre-wetting.Allow dirt to accumulate on the exterior.Allow rust to form following minor im-pacts.Using solvents not approved by our Technical Department to remove stains may damage the paintwork.Do not drive in snow or muddy condi- tions without washing the vehicle, par- ticularly under the wheel arches and body.

4.13
ENG_UD69892_1Entretien de la carrosserie (BCB - Renault)
Using a roller type car washReturn the wiper stalk to the park posi- tion ➥ 1.121. Check the mounting of ex- ternal accessories, additional lights and rear view mirrors, and ensure that the wiper blades are secured with adhesive tape.Remove the radio aerial mast if your vehicle is fitted with this equipment. Remember to remove the tape and refit the antenna after washing.
BODYWORK MAINTENANCE (3/3)Cleaning the headlights, sensors and camerasUse a soft cloth or cotton wool. If this does not clean them properly, moisten the cloth with soapy water, then wipe clean using a soft damp cloth or cotton wool.Finally, dry off carefully with a soft dry cloth.Do not use cleaning products con- taining alcohol or utensils (e.g.: a scraper).
Washing the vehicleNever wash the engine compartment, the charging connection or the traction
battery with a high-pressure jet.This risks damaging the electric circuit.Never wash the vehicle while it is charging.Risk of electric shock and a risk to life.
Vehicles with a matte paint finishThis type of paint requires certain pre- cautions.
You should do the followingWash the vehicle by hand using plenty of water, using a soft cloth or a gentle sponge.
Do not do the followingUse wax-based products (polishing).Rub too hard.Wash the vehicle in a roller-type car wash.Attach stickers to the paintwork (risk of leaving marks).
Wash the vehicle using a high-pressure cleaning device.

maintenance:interior trim ...........................................(up to the end of the DU)
interior trimmaintenance ........................................(up to the end of the DU)
cleaning:inside the vehicle .................................(up to the end of the DU)
4.14
ENG_UD69893_1Entretien des garnitures intérieures (BCB - Renault)
Interior trim maintenance
Glass instrument panel(e.g. instrument panel, clock, exterior temperature display etc.)Use a soft cloth (or cotton wool).If this does not clean them properly, use a soft cloth (or cotton wool) slightly moistened with soapy water and then wipe clean using another soft damp cloth or cotton wool.Finally, dry off carefully with a soft dry cloth.Do not use products containing alco- hol and/or spray fluids on the area.
Seat beltsThese must be kept clean.Use products selected by our Technical Department (approved outlets) or warm, soapy water and a sponge and wipe with a dry cloth.Detergents or dyes must not be used under any circumstances.
INTERIOR TRIM MAINTENANCE (1/2)Textiles (seats, door trim, etc)Vacuum-clean the textiles regularly.
Liquid stainUse soapy water.Dab lightly (never rub) with a soft cloth, rinse and remove the excess.
Solid or pasty stainCarefully remove the excess solid or pasty material immediately using a spatula (working from the edges to the centre to avoid spreading the stain).In the case of a liquid stain, clean as indicated.
Special instructions for sweets or chewing gumPlace an ice cube on the stain to solid- ify it then proceed as for a solid stain.
A well-maintained vehicle will last longer. It is therefore recommended to maintain the interior of the vehicle regu- larly.A stain should always be dealt with swiftly.Whatever type of stain is on the trim, use cold (or tepid) soapy water with natural soap.Detergents (washing-up liquid, pow- dered products, alcohol-based prod- ucts) should not be used.Use a soft cloth.Rinse and wipe up excess water.
Multimedia screenMaintenance of the screen may depend on the type of multimedia equipment. Please refer to the multimedia instruc- tions for further information.
For further recommendations on maintaining the interior and/or in the event of unsatisfactory results, please consult an approved dealer.

4.15
ENG_UD69893_1Entretien des garnitures intérieures (BCB - Renault)
You should not:Position objects such as deodorants, scents etc. near air vents as this could damage your dashboard trim.
Use high-pressure cleaning equipment or sprays inside the pas- senger compartment:
without careful use, this equipment could impair the correct functioning of the electrical or electronic compo- nents in the vehicle, or have other detrimental effects.
INTERIOR TRIM MAINTENANCE (2/2)Removal/replacing removable equipment originally fitted in the vehicleIf you need to remove equipment in order to clean the passenger com- partment (for example, mats), always ensure that they are correctly refitted and are the right way around (the driv- er’s mat should be fitted on the driver’s side, etc.) and fit them with the compo- nents supplied with the equipment (for example, the driver mat should always be fixed using the pre-fitted mounting components).With the vehicle stationary, always ensure that nothing will impede driving (anything obstructing the pedals, heel wedged by the mat etc.).

4.16
ENG_UD69894_1Filler NU (BCB - Renault)

5.1
ENG_UD76852_4Sommaire 5 (BCB - Renault)
Section 5: Practical Advice
Tyre inflation kit . . . . . . . . . . . . . . . . . . . . . . . . . . . . . . . . . . . . . . . . . . . . . . . . . . . . . . . . . . . . . . . . . 5.2Tool kit . . . . . . . . . . . . . . . . . . . . . . . . . . . . . . . . . . . . . . . . . . . . . . . . . . . . . . . . . . . . . . . . . . . . . . . . 5.5Tyres (tyre and wheel safety, use in winter) . . . . . . . . . . . . . . . . . . . . . . . . . . . . . . . . . . . . . . . . . . . 5.6Headlights (changing bulbs) . . . . . . . . . . . . . . . . . . . . . . . . . . . . . . . . . . . . . . . . . . . . . . . . . . . . . . . 5.10Rear lights (changing bulbs) . . . . . . . . . . . . . . . . . . . . . . . . . . . . . . . . . . . . . . . . . . . . . . . . . . . . . . . 5.11Indicator lights (changing bulbs) . . . . . . . . . . . . . . . . . . . . . . . . . . . . . . . . . . . . . . . . . . . . . . . . . . . . 5.12interior lighting: changing bulbs . . . . . . . . . . . . . . . . . . . . . . . . . . . . . . . . . . . . . . . . . . . . . . . . . . . . . 5.13“Hands-free” card: battery . . . . . . . . . . . . . . . . . . . . . . . . . . . . . . . . . . . . . . . . . . . . . . . . . . . . . . . . . 5.14Accessories . . . . . . . . . . . . . . . . . . . . . . . . . . . . . . . . . . . . . . . . . . . . . . . . . . . . . . . . . . . . . . . . . . . . 5.16Fuses . . . . . . . . . . . . . . . . . . . . . . . . . . . . . . . . . . . . . . . . . . . . . . . . . . . . . . . . . . . . . . . . . . . . . . . . . 5.17Wipers (replacing blades) . . . . . . . . . . . . . . . . . . . . . . . . . . . . . . . . . . . . . . . . . . . . . . . . . . . . . . . . . 5.20Towing . . . . . . . . . . . . . . . . . . . . . . . . . . . . . . . . . . . . . . . . . . . . . . . . . . . . . . . . . . . . . . . . . . . . . . . . 5.22Operating faults . . . . . . . . . . . . . . . . . . . . . . . . . . . . . . . . . . . . . . . . . . . . . . . . . . . . . . . . . . . . . . . . . 5.25

tyre inflation kit...........................................(up to the end of the DU)
5.2
ENG_UD69897_1Kit de gonflage des pneumatiques (BCB - Renault)
Tyre inflation kit
TYRE PRESSURE KIT (1/3)
The kit is only approved for inflating the tyres of the ve- hicle originally equipped with the kit.
It must never be used to inflate the tyres of another vehicle, or any other inflatable object (rubber ring, rubber boat, etc.).Avoid spillage on skin when han- dling the repair product bottle. If droplets do leak out, rinse them off with plenty of water.Keep the repair kit away from chil- dren.Do not dispose of the empty bottle in the countryside. Return it to your approved dealer or to a recycling or- ganisation.The bottle has a limited service life which is indicated on its label. Check the expiry date.Contact an approved dealer to re- place the inflation tube and repair product bottle.
A
B
The kit repairs tyres when tread A has been dam- aged by objects smaller than 6 mm. It cannot repair
all types of puncture, such as cuts larger than 6 mm, or cuts in tyre sidewall B.Ensure also that the wheel rim is in good condition.Do not pull out the foreign body causing the puncture if it is still in the tyre.
Do not attempt to use the inflation kit if the tyre has been damaged as a result of driving with a puncture.
You should therefore carefully check the condition of the tyre sidewalls before any operation.Driving with underinflated, flat or punctured tyres can be dangerous and may make the tyre impossible to repair.This repair is temporary.A tyre which has been punctured should always be inspected (and re-paired, where possible) as soon as possible by a specialist.When taking a tyre which has been repaired using this kit to be replaced, you must inform the specialist.When driving, vibration may be felt due to the presence of the repair product injected into the tyre.

5.3
ENG_UD69897_1Kit de gonflage des pneumatiques (BCB - Renault)
TYRE PRESSURE KIT (2/3)
In the event of a puncture, use the kit located in the boot.Vehicle fitted with a tyre pressure monitoring systemIn the event of under-inflation (punc-
tures, etc.), the warning light appears on the instrument panel ➥ 2.22.
With the engine running and hand- brake applied:– disconnect any accessories previ-
ously connected to the vehicle’s ac- cessories sockets;
– refer to the information on the in- flation kit compressor located in the luggage compartment of the ve- hicle and follow the instructions;
– inflate the tyre to the recommended pressure ➥ 4.7;
– after a maximum of 15 minutes, stop inflating and read the pressure (on pressure gauge 2);
Note: while the bottle is emptying (ap- proximately 30 seconds), the pressure gauge 2 will indicate briefly a pressure of 6 bar, then the pressure drops.– Adjust the pressure: to increase
it, continue inflation with the kit; to reduce it, press button 1.
2
Before using this kit, park the vehicle at a sufficient distance from traffic, switch on the hazard warning
lights, apply the handbrake, ask all passengers to leave the vehicle and keep them away from traffic.
If the vehicle is parked on the hard shoulder, you must warn other road users of your vehicle’s presence
with a warning triangle or with other devices as per the legislation apply- ing to the country you are in.
1
If a minimum pressure of 1.8 bar is not reached after 15 minutes, repair is not possible; do not drive the ve- hicle but contact an approved dealer.

5.4
ENG_UD69897_1Kit de gonflage des pneumatiques (BCB - Renault)
TYRE PRESSURE KIT (3/3)
Once the tyre is correctly inflated, remove the kit: unscrew the inflation adapter slowly from the container 3 to prevent any product spatter and store the container in plastic packaging to prevent product leaks.– Affix the driving recommendation
label (located under the container) to the dashboard where the driver can see it.
– Put the kit away.– At the end of this initial inflation op-
eration, air will still escape from the tyre. You must drive a short distance in order to seal the hole.
– Start immediately and drive at a speed between 12 to 37 mph (20 to 60 km/h) in order to distribute the product evenly in the tyre; after driv-ing a distance of 2 miles (3 km), stop and check the pressure.
– If the pressure is higher than 1.3 bar but lower than the recommended pressure (refer to the label affixed to the edge of the driver’s door), adjust it. Otherwise, contact an approved dealer: the tyre cannot be repaired.
Precautions when using the kitThe kit should not be operated for more than 15 consecutive minutes.The container must be replaced after the first use even if liquid remains inside.
Nothing should be placed around the driver’s feet as such objects may slide under the pedals during
sudden braking manoeuvres and obstruct their use.
3
Please be aware that a poorly tightened or miss- ing valve cap can make the tyres less airtight and may
lead to pressure loss.Always use valve caps identical to those fitted originally and tighten them fully.
Following repair with the kit, do not travel further than 124 miles (200 km).In addition, reduce your
speed and under no circumstances exceed 50 mph (80 km/h). The sticker, which you must affix in a prominent position on the dash- board, reminds you of this.Depending on the country or local legislation, a tyre repaired with the inflation kit may need to be replaced.

towing hitch................................................(current page)tool kit ........................................................(up to the end of the DU)hubcap tool ................................................(current page)
5.5
ENG_UD75387_2Bloc outils (BCB - Renault)
Tool kit
The tools included in the tool kit depend on the vehicle.The tool kits A and B are located in the luggage compartment side pockets.Open the flaps of the side pockets to access the tools.The tool kit A consists of the tyre infla- tion kit compressor 1 ➥ 5.2 and the towing eye 2 ➥ 5.22.The tool kit B includes the bottle of an- ti-puncture product 3 ➥ 5.2.
TOOL KIT
A
Do not leave the tools un- secured inside the vehicle as they may come loose under braking. After use,
check that all the tools are correctly clipped into the tool kit, then position it correctly in its housing to reduce the risk of injury.
B
After use, ensure the tools are correctly stored.1 2 3

tyres ...........................................................(up to the end of the DU)wheels (safety) ..........................................(up to the end of the DU)
5.6
ENG_UD76571_2Pneumatiques (BCB - Renault)
Tyres (tyre and wheel safety, use in winter)
TYRES (1/4)
Maintaining the tyresThe tyres must be in good condition and the tread form must have sufficient depth; tyres approved by our Technical Department have tread wear indica- tors 1, which are wear warning strips moulded into the tread at several points.
The tyres are the only contact between the vehicle and the road, so it is essen- tial to keep them in good condition.You must make sure that your tyres comply with the local regulations set out in the Highway Code.
When the tyre tread has been worn to the level of the wear indicators, they become visible 2: it is then necessary to replace your tyres because the tread rubber is no more than 1.6 mm deep, resulting in poor roadholding on wet roads.An overloaded vehicle, long journeys by motorway, particularly in very hot weather, or continual driving on poorly surfaced minor roads will lead to more rapid tyre wear and affect safety.
Incidents which occur when driving, such as striking the kerb, may damage the tyres and wheel rims, and could
also lead to misalignment of the front or rear axle geometry. In this case, have the condition of these checked by an approved dealer.
2
1

tyre pressure..............................................(current page)
5.7
ENG_UD76571_2Pneumatiques (BCB - Renault)
TYRES (2/4)Tyre pressuresAdhere to the tyre pressures. The tyre pressures should be checked at least once a month and additionally before any long journey (refer to the label af- fixed to the edge of the driver’s door) ➥ 4.7.
Pressures should be checked when the tyres are cold; ignore higher pressures which may be reached in hot weather or following a journey at high speed.If tyre pressures cannot be checked when the tyres are cold, the normal pressures must be increased by 0.2 to 0.3 bar (or 3 PSI).Never deflate a hot tyre.
Incorrect tyre pressures lead to abnormal tyre wear and unusually hot running. These are factors which
may seriously affect safety and lead to:– poor road holding;– risk of bursting or tread separa-
tion.The pressure depends on the load and the speed of use. Adjust the pressure according to the condi-tions of use (refer to the label affixed to the edge of the driver’s door).
Please be aware that a poorly tightened or miss- ing valve cap can make the tyres less airtight and lead
to pressure loss.Always use valve caps identical to those fitted originally and tighten them fully.
Vehicle fitted with a tyre pressure monitoring system In the event of under-inflation (punc-
tures, etc.), the warning light appears on the instrument panel ➥ 2.22.
It is not permissible to ex- change the 18” and 20” front wheels (tyres and/or rims) with the rear wheels.

5.8
ENG_UD76571_2Pneumatiques (BCB - Renault)
Snow or Winter tyresWe would recommend that these be fitted to all four wheels to ensure that your vehicle retains maximum adhe- sion.Warning: These tyres sometimes have a specific direction of rotation and a maximum speed index which may be lower than the maximum speed of your vehicle.
TYRES (3/4)Fitting new tyresTo fit new tyres, consult an approved dealer.
Use in winterChainsFor safety reasons, fitting snow chains to the rear axle is strictly for- bidden.Chains cannot be fitted to tyres which are larger than those originally fitted to the vehicle.One-way tyresAn one-way tyre must only be fitted in one direction. You must observe this di- rection.If an one-way tyre must be fitted in the opposite to its direction of rotation fol- lowing a puncture, drive with caution, particularly on a wet road, because the tyre specifications will not be adapted.
Chains may only be fitted to tyres of the same size as those originally fitted to your vehicle.
Chains may be fitted, provided that they are specific chains. We would advise you to consult an approved dealer.
For your safety, please re- spect the speed limit.When they need to be re- placed, only tyres of the
same make, size, type and profile should be used on a single axle.They must: either have a load ca- pacity and a speed capacity at least equal to the original tyres, or correspond to those recom- mended by your authorised dealer.Failure to heed these instructions could endanger your safety and affect your vehicle’s roadworthi- ness.Risk of loss of control of the ve- hicle. Vehicles fitted with 20”
wheels.The use of chains or other specific equipment (snow
socks, etc.) is strictly forbidden.

5.9
ENG_UD76571_2Pneumatiques (BCB - Renault)
Studded tyresThis type of equipment may only be used for a limited period and as laid down by local legislation. It is neces- sary to observe the speed specified by current legislation.These tyres must, at a minimum, be fitted to the two front wheels.Note: the use of snow tyres, winter tyres or studded tyres significantly re- duces the vehicle range.
In all cases, we would recommend that you contact an approved Dealer who will be able to advise you on the choice of equipment which is most suitable for your vehicle.
TYRES (4/4)

indicators ...................................................(up to the end of the DU)lights:
dipped beam headlights .......................(up to the end of the DU)
lights:direction indicators ...............................(up to the end of the DU)
lights:main beam headlights ..........................(up to the end of the DU)
daytime running lights................................(up to the end of the DU)indicators:
direction indicators ...............................(up to the end of the DU)
5.10
ENG_UD69899_1Projecteurs avant : remplacement des lampes (BCB - Renault)
Headlights (changing bulbs)
FRONT HEADLIGHTS: replacing the bulbs
LED dipped beam/main beam headlights 1Please see an authorised dealer.
LED daytime running lights/side lights/direction indicators 2Please see an authorised dealer.
Any operation on (or modi- fication to) the electrical system must be performed by an approved dealer
since an incorrect connection might damage the electrical equipment (harness, components and in partic- ular the alternator). In addition, your Dealer has all the parts required for fitting these units.
1
2

bulbschanging ..............................................(up to the end of the DU)
changing a bulb .........................................(up to the end of the DU)lights:
fog lights ..............................................(current page)
lights:direction indicators ...............................(current page)
lights:side lights .............................................(current page)
lights:reversing lights .....................................(current page)
lights:brake lights ..........................................(current page)
bulbschanging ..............................................
(up to the end of the DU)
5.11
ENG_UD69900_1Feux arrière et latéraux : remplacement des lampes (BCB - Renault)
Rear lights (changing bulbs)
High-level LED brake light 1Consult an approved dealer.
LED reversing lights and rear fog lights 2Consult an approved dealer.
REAR LIGHTS AND SIDE LIGHTS: changing bulbs (1/2)
2
1
3
LED direction indicator/brake and side lights 3Consult an approved dealer.

lights:number plate lights ..............................(current page)
lights:indicator lights ......................................(current page)
5.12
ENG_UD69900_1Feux arrière et latéraux : remplacement des lampes (BCB - Renault)
LED number plate lights 4Consult an approved dealer.
Indicator lights (changing bulbs)
REAR AND SIDE LIGHTS: changing bulbs (2/2)
4
Indicator lights 5Consult an approved dealer.
5

lighting:interior ..................................................(up to the end of the DU)
courtesy light .............................................(up to the end of the DU)
5.13
ENG_UD69901_1Eclairage intérieur : remplacement des lampes (BCB - Renault)
interior lighting: changing bulbs
INTERIOR LIGHTING: changing bulbs
Reading lights 1 and 2Consult an authorised dealer.
3
12 4
Luggage compartment light 4Consult an authorised dealer.
Courtesy mirror lights 3Please consult an authorised dealer.

«hands-free» card: battery ........................(up to the end of the DU)«hands-free» card: use..............................(up to the end of the DU)card: battery...............................................(up to the end of the DU)
5.14
ENG_UD69902_1Carte mains libres : piles (BCB - Renault)
“Hands-free” card: battery
“HANDS-FREE” CARD: battery (1/2)
Replacing the batteryWhen the message “Keycard Battery Low” appears on the instrument panel, replace the battery in the card:– slide the rear casing 1 downwards
while pressing on zone A;– remove the battery cover 2;– remove the battery by pressing on
one side and lifting the other;– replace it according to the direction
and template indicated inside the cover.
When refitting, proceed in the reverse order, then press one of the buttons on the card four times, close to the vehicle: the next time the vehicle is started, the message will disappear.Check that the cover is clipped shut.Note: Do not touch the electronic circuit or contacts on the card when replacing the battery.
2
A
1
If they need to be replaced, be sure to use the same or equivalent type of bat- tery (consult an Approved
Dealer).
When replacing:– make sure that the batter-
ies are correctly inserted.Risk of explosion.
– if the flap does not close cor- rectly, do not use the card and keep out of reach of children.
The batteries are available from ap- proved Dealers, and their service life approximately two years. Check that there is no dye on the battery: risk of an incorrect electrical con-tact.

«hands-free» card: battery ........................(up to the end of the DU)«hands-free» card: use..............................(up to the end of the DU)card: battery...............................................(up to the end of the DU)
5.15
ENG_UD69902_1Carte mains libres : piles (BCB - Renault)
“HANDS-FREE” CARD: battery (2/2)
Do not throw away your used bat- teries; give them to an organisation responsible for collecting and recy- cling batteries.
Precautions relating to batteries:– keep (new or used) bat-
teries out of reach of chil- dren;
– do not swallow batteries;Risk of chemical burns which may lead to death.
– if ingested or inserted into any part of the body, consult a doctor as soon as possible.
Operating faultsIf the battery is too weak to ensure cor- rect operation, you will still be able to start and lock/unlock the vehicle ➥ 1.33.

accessories................................................(up to the end of the DU)
5.16
ENG_UD74862_2Accessoires (BCB - Renault)
Accessories
ACCESSORIES
Electrical and electronic accessoriesBefore installing this type of accessory (particularly for transmitters/receivers: frequency bandwidth, power level, po- sition of the aerial, etc.), make sure it is compatible with your vehicle. You can get advice from an authorised dealer.Before connecting an accessory to a socket, please ensure that you do not exceed the maximum power authorised for
the socket ➥ 3.21 ➥ 3.31. Fire hazard.No work may be carried out on the vehicle’s electrical or radio circuits, except by approved Dealers: an incorrectly connected system may result in damage being caused to the electrical equipment and/or the components connected to it.If the vehicle is fitted with any aftermarket electrical equipment, make sure that the installation is correctly protected by a fuse. Establish the rating and position of this fuse.
Using the diagnostic socketThe use of electronic accessories on the diagnostic socket may cause serious disturbance to the vehicle’s electronic systems. For your safety we recommend that you use only electronic accessories approved by the manufacturer, consult an Approved Dealer. Serious accident risk.
Use of transmission/receiving devices (telephones, CB equipment etc.).Telephones and CB equipment with integrated aerials may cause interference to the electronic systems originally fitted to the vehicle: it is advisable only to use equipment with an external aerial. Furthermore, we remind you of the need to conform to the legislation in force concerning the use of such equipment.
Fitting after-market accessoriesIf you wish to install accessories on the vehicle: please contact an authorised dealer. Also, to ensure the correct operation of your vehicle, and to avoid any risk to your safety, we recommend that you use only accessories specifically designed for your vehicle, which are the only accessories for which the manufacturer will provide a warranty.If you are using an anti-theft device, only attach it to the brake pedal.Obstructions to the driverOn the driver’s side, only use mats suitable for the vehicle, attached with the pre-fitted components, and check the fitting reg-ularly. Do not lay one mat on top of another. There is a risk of wedging the pedals

fuses ..........................................................(up to the end of the DU)
5.17
ENG_UD74444_2Fusibles (BCB - Renault)
Fuse boxIf any electrical component does not work, check the condition of the fuses.The fuses are accessible behind the storage compartment A. Open the stor- age compartment door A using the open button 1.
Fuses
FUSES (1/3)
A
1
Once open, turn the stops 2 a quarter of a turn (movements B and C) to remove them.
Unhook the 3 wire to release the stor- age compartment door to access the fuse box.
3
2
B C

5.18
ENG_UD74444_2Fusibles (BCB - Renault)
Tweezers 5Remove the fuse using the tweezers 5 located on the fuse plate.To remove the fuse from the tweezers, slide the fuse to the side.It is not advisable to use the free fuse locations.
5
In accordance with local legislation or as a precautionary measure:Obtain an emergency kit containing a set of spare bulbs and fuses from an approved Dealer.
Check the fuse in question and replace it, if neces- sary, by a fuse of the same rating.
If a fuse is fitted where the rating is too high, it may cause the electrical circuit to overheat (risk of fire) in the event of an item of equipment using an excessive amount of current.
FUSES (2/3)
4
Tilt the storage compartment door A downwards as far as it will go.You have direct access to the fuse com- partment 4.

5.19
ENG_UD74444_2Fusibles (BCB - Renault)
FUSES (3/3)
Check the fuse in question and replace it, if neces- sary, by a fuse of the same rating.
If a fuse is fitted where the rating is too high, it may cause the electrical circuit to overheat (risk of fire) in the event of an item of equipment using an excessive amount of current.
Allocation of fuses(the presence of certain fuse depends on the vehicle equipment level)
Symbol Allocation
D Direction indicator lights, hazard warning lights
× Brake lights
f Rear windscreen wiper
One-touch electric windows
Ý Towbar socket
î Multimedia accessories socket, multimedia screen
Æ Cigarette lighter, front and rear second row accessories sockets
Use the fuse allocation label in the storage compartment to identify the fuses.Certain fuses should only be re- placed by a qualified professional. These fuses are not listed on the label.Only change the fuses represented on the label.

wiper blades ..............................................(up to the end of the DU)wipers
blades ..................................................(up to the end of the DU)
5.20
ENG_UD69906_1Balais d’essuie-vitres : remplacement (BCB - Renault)
Wipers (replacing blades)
WIPER BLADES: replacement (1/2)
Replacing windscreen wiper blades 2To replace the wipers, first put them in the service position B.With the ignition on and the engine
stopped:– set the stalk 1 to position A twice in
succession (single sweep): the wiper blades will stop in the service posi- tion B away from the bonnet;
– press the button 4 firmly then remove the blade upwards.
Keep monitoring the condition of the wiper blades. How long they last de- pends on you:– clean the blades and the wind-
screen regularly with soapy water;
– do not use them when the wind- screen is dry;
– free them from the windscreen when they have not been used for a long time.
A
To refitTo refit the wiper blade 2, insert it in its housing in the arm 3, then clip it until you hear a click. Make sure that the blade is correctly locked in position.To return the blades to lowered posi- tion, make sure that the blades are folded down onto the windscreen then set the 1 stalk to position A (single sweep): the windscreen wiper blades will fold into the bonnet when the igni- tion is switched on.
B
3
4
2
1

wiper blades ..............................................(up to the end of the DU)wipers
blades ..................................................(up to the end of the DU)
5.21
ENG_UD69906_1Balais d’essuie-vitres : remplacement (BCB - Renault)
WIPER BLADES: replacement (2/2)
Keep monitoring the condition of the wiper blades. How long they last de- pends on you:– clean the blades and the wind-
screen regularly with soapy water;
– do not use them when the wind- screen is dry;
– free them from the windscreen when they have not been used for a long time.
– In frosty weather, make sure that the wiper blades are not stuck by ice (to avoid the risk of the motor
overheating).– Check the condition of the wiper
blades.They should be replaced as soon as they become less efficient: ap- proximately once a year.
When changing the blade, when it has been removed, do not let the wiper arm fall against the window: risk of breaking the window.
5
6
C
Rear screen wiper blade 5Stalk in stop position (deactivated):– lift the wiper arm 6;– pivot the rear screen wiper blade 5
(C movement) until it unclips;– release rear screen wiper blade 5 by
pulling on it.
To refitTo refit the wiper blade, proceed in re- verse order to removal. Make sure that the blade is correctly locked in position.
Before changing the rear wiper blade, make sure the stalk is in the stop position (deactivated).
Risk of injury.

towing hitch................................................(up to the end of the DU)towing
breakdown ...........................................(up to the end of the DU)
5.22
ENG_UD74445_2Remorquage : dépannage (BCB - Renault)
Towing
TOWING: breakdown (1/3)Before any towing, including on a flat- bed truck, put the gear control in N po- sition, unlock the steering column and release the parking brake.The speed specified by current legis- lation for towing must always be ob- served.If you are driving the towing vehicle, do not exceed the permissible towing weight for your vehicle ➥ 6.6.To carry out breakdown recovery on a flatbed or to tow the vehicle using a towing point (see the next page), ob- serve the following instructions:– card in the passenger compartment,
press the engine start button;– set the gear control to position N
➥ 2.5: the steering column unlocks and the parking brake is released;
Choice of towingIt is strictly forbidden to tow the vehicle with the front wheels on the ground.
– press the engine Start button for more than two seconds. The acces- sories functions are supplied: you can use the vehicle lighting functions (hazard warning lights, brake lights, etc.). At night the vehicle lights must be on;
– once you have finished towing, press the engine start button for more than two seconds (risk of discharging the battery).
Leave the card in the vehi- cle during towing.Risk of the steering column locking.
Do not leave the tools unse- cured inside the vehicle as they may come loose under braking.

5.23
ENG_UD74445_2Remorquage : dépannage (BCB - Renault)
Access to towing pointsOnly use the front 2 and rear 5 towing points (never use the driveshafts or any other part of the vehicle). These towing points may only be used for pulling. They must never be used for lifting the vehicle directly or indirectly.Screw in the tow eye 3 by hand as far as possible.You must only use the towing eye 3.
Standard versionFront towing pointPress the upper section of the flap 1 to tilt it.
Rear towing pointPress and hold the area A while pulling area B (using a flat-blade screwdriver or similar) to open the flap 4.
2
5
3
Ensure that the towing eye is bolted correctly.Risk of losing the towed object.
TOWING: breakdown (2/3)
A
B
4
3
When the engine is stopped, steering and braking assist- ance are not operational.
1
– Use a rigid towing bar. If a rope or cable is used (where the law allows this), the vehicle being towed must be able to brake.– A vehicle must not be towed if it is not fit to be driven.– Avoid accelerating or braking suddenly when towing, as this may result
in damage being caused to the vehicle.– In all cases, it is advisable not to exceed 15.5 mph (25 km/h).

5.24
ENG_UD74445_2Remorquage : dépannage (BCB - Renault)
TOWING: breakdown (3/3)
5
3
8
6
2
3Rear towing pointInsert a flat-blade screwdriver or simi- lar in the recess provided, then pull to open the flap 8.
Sport versionFront towing pointInsert a finger through a hole in the front bumper grille and push the clip 7 upwards to unclip the part 6.
Pull the part 6 to remove it and access the front towing point 2. The part 6 is held by a link in prevent it from being lost.
7
6

operating faults ..........................................(up to the end of the DU)faults
operating faults ....................................(up to the end of the DU)
5.25
ENG_UD74441_2Anomalies de fonctionnement (BCB - Renault)
Operating faults
OPERATING FAULTS (1/6)The following advice will enable you to carry out quick, temporary repairs. For safety reasons you should always contact an approved dealer as soon as possible.
FAULTS POSSIBLE CAUSES WHAT TO DO
Impossible to charge the traction bat- tery.The charging flap warning light flashes red.
The outdoor temperature is lower than -26°C.
Recharge your vehicle in a more suitable environment. If necessary ➥ 5.22.
No electrical current in the wall socket or poor connection of the cable in the domestic socket.
Check your installation (circuit breaker, pro-grammer, etc.).Check the connections (charging socket, etc.) ➥ 1.8.
The cord is defective. Please see an authorised dealer to replace it.
Impossible to charge the traction bat- tery.The charging flap warning light flashes blue.
The charging cord is not correctly locked to the vehicle.
Plug the charging cable correctly in to the vehicle ➥ 1.8.

5.26
ENG_UD74441_2Anomalies de fonctionnement (BCB - Renault)
OPERATING FAULTS (2/6)
FAULTS POSSIBLE CAUSES WHAT TO DO
The card does not lock or unlock the doors.
Card battery is flat. Replace the battery or have it replaced. You will still be able to lock, unlock, and start your vehicle ➥ 1.33 and ➥ 2.2.
Use of appliances operating on the same frequency as the remote con- trol (mobile phone, etc.).
Stop using the devices or use the key provided ➥ 1.33.
Vehicle located in a high electro- magnetic radiation zone.Secondary 12 volt battery dis- charged.
Use the key that is built into the card ➥ 1.33.
Desynchronisation of the card. Unlock the driver’s door by inserting the key in- tegrated in the card into the door lock ➥ 1.33 then place the card in the placement area ➥ 2.2 and press the “START” button to synchronise the card.
The message “Place the card near the START button” appears on the instrument panel.
The card battery is flat or the card is out of synch.
Check the card battery status or place the card in the placement area ➥ 2.2 provided for this pur- pose.

5.27
ENG_UD74441_2Anomalies de fonctionnement (BCB - Renault)
FAULTS POSSIBLE CAUSES WHAT TO DO
Steering becomes heavy. Assistance overheating. Drive carefully at reduced speed, be aware of the level of force in the steering wheel needed to turn the wheels.
Fault with the electric assistance motor.Fault in the assistance system.
Consult an authorised dealer.
The steering column remains locked.
Steering wheel locked. Move the steering wheel while pressing the engine start button ➥ 2.2.
OPERATING FAULTS (3/6)

5.28
ENG_UD74441_2Anomalies de fonctionnement (BCB - Renault)
Electrical equipment POSSIBLE CAUSES ACTION REQUIREDVibrations. Tyres not inflated to correct pressures,
incorrectly balanced or damaged.Check the tyre pressures. If this is not the problem, have them checked by an ap- proved Dealer.
The wipers do not work. Wiper blades stuck. Free the blades before using the wipers.
Broken windscreen wiper fuse. Consult an approved dealer.
Blown rear screen wiper fuse (intermit- tent, permanently stopped).
Replace the fuse or have it replaced ➥ 5.17.
Motor fault. Consult an approved dealer.
The wiper does not stop. Faulty electrical controls. Consult an approved dealer.
Direction indicators flashing more quickly. LED blown. Consult an approved dealer.
The indicators are not working.
On one side only: LED blown. Consult an approved dealer.
On both sides: – blown fuse; Replace the fuse or have it replaced ➥ 5.17.
– faulty flasher unit. Needs replacing: please see an autho- rised dealer.
OPERATING FAULTS (4/6)

5.29
ENG_UD74441_2Anomalies de fonctionnement (BCB - Renault)
OPERATING FAULTS (5/6)
Electrical equipment POSSIBLE CAUSES ACTION REQUIREDThe headlightsare not working.
Only one: – LED blown; Consult an approved dealer.
– disconnected wire or incorrectly-posi- tioned connector.
Check and reconnect the wire or the con- nector.
Both: the circuit is fused. Check and replace if necessary.
The headlights do not switch off. Faulty electrical controls. Consult an approved dealer.
Traces of condensation in the headlights or rear lights.
Traces of condensation may be a natu- ral phenomenon caused by variations in temperature and humidity.In this case, the traces will disappear slowly once the lights are switched on.

5.30
ENG_UD74441_2Anomalies de fonctionnement (BCB - Renault)
Stopped POSSIBLE CAUSES ACTION REQUIREDThe air conditioning and ventilation fan switch on after the ignition is switched off or when the vehicle is being charged.
This is not necessarily a fault, the air con- ditioning compressor and the ventilation fan switch on to regulate the temperature of the system when the exterior tempera- ture is low.
The air conditioning compressor and the ventilation fan switch on for more than 30 minutes when the ignition is switched off.
Consult an approved dealer.
The programmable air conditioning fails to work.
One of the usage conditions is not com- plied with (the traction battery is not charged, etc).
➥ 3.17.
The passenger compartment air con- ditioning and the heating functions are switched off with no action by the user, even if the battery is sufficiently charged.
This is not necessarily a fault, the system switches off by default to preserve battery autonomy or optimise recharging.
To enter the extended life on board mode, press the Start button without pressing the brake pedal. The air conditioning nev- ertheless stops after a few minutes.You can always reactivate the system by pressing the air conditioning controls ➥ 3.6 ➥ 3.11.
Electrical fault. Consult an approved dealer.
OPERATING FAULTS (6/6)

6.1
ENG_UD76853_4Sommaire 6 (BCB - Renault)
Section 6: Technical Specifications
Vehicle identification plates . . . . . . . . . . . . . . . . . . . . . . . . . . . . . . . . . . . . . . . . . . . . . . . . . . . . . . . . 6.2Technical Information for the emergency services . . . . . . . . . . . . . . . . . . . . . . . . . . . . . . . . . . . . . . 6.3Engine identification, engine specification . . . . . . . . . . . . . . . . . . . . . . . . . . . . . . . . . . . . . . . . . . . . . 6.4Dimensions . . . . . . . . . . . . . . . . . . . . . . . . . . . . . . . . . . . . . . . . . . . . . . . . . . . . . . . . . . . . . . . . . . . . 6.5Weights . . . . . . . . . . . . . . . . . . . . . . . . . . . . . . . . . . . . . . . . . . . . . . . . . . . . . . . . . . . . . . . . . . . . . . . 6.6
Towing weights . . . . . . . . . . . . . . . . . . . . . . . . . . . . . . . . . . . . . . . . . . . . . . . . . . . . . . . . . . . . 6.6Replacement parts and repairs . . . . . . . . . . . . . . . . . . . . . . . . . . . . . . . . . . . . . . . . . . . . . . . . . . . . . 6.7Service sheets . . . . . . . . . . . . . . . . . . . . . . . . . . . . . . . . . . . . . . . . . . . . . . . . . . . . . . . . . . . . . . . . . . 6.8Anticorrosion check . . . . . . . . . . . . . . . . . . . . . . . . . . . . . . . . . . . . . . . . . . . . . . . . . . . . . . . . . . . . . . 6.14

6.2
ENG_UD76646_2Plaques d’identification véhicule (BCB - Renault)
Vehicle identification plates
VEHICLE IDENTIFICATION PLATES
B
A
The information shown on the ve- hicle identification plate should be quoted on all correspondence or orders.The presence and location of the in- formation depends on the vehicle.
Vehicle identification plate A 1 Manufacturer name. 2 EC design number or approval
number. 3 Identification number.
Depending on the vehicle, this information is also given on marking B.
4 MMAC (Maximum permissible all-up weight).
5 MTR (Gross train weight: vehicle fully loaded, with trailer).
6 MMTA (Maximum Permissible Weight) front axle.
7 MMTA rear axle. 8 Area reserved for related or addi-
tional entries. 9 Paint reference (colour code).
78
9 65432
1
A

QR Code ...................................................(up to the end of the DU)
6.3
ENG_UD76528_2Informations techniques pour les secours (BCB - Renault)
Technical Information for the emergency services
TECHNICAL INFORMATION FOR THE EMERGENCY SERVICES
The QR Code on the A label allows emergency workers using a tablet or smartphone to immediately access the technical information useful for working on the vehicle in the event of an acci- dent.Ensure that the A label is always visible and present on the windscreen as well as the rear screen.Any modification or damage would prevent access to the information.
AA

engine specifications .................................(current page)
6.4
ENG_UD74433_2Identification moteur (BCB - Renault)
Engine identification, engine specification
ENGINE IDENTIFICATION, ENGINE SPECIFICATION
Please quote the information on the engine plate or label A in all corre- spondence or orders.(Location varies depending on engine)
1 Engine type.
2 Engine suffix.
3 Engine serial number.
A2
3
1
Engine specificationEngine type: 6AM
A

6.5
ENG_UD76564_2Dimensions (BCB - Renault)
Dimensions
DIMENSIONS (in metres)
0,800 2,685 0,715 1,555 to 1,565
4,200
1,505*
1,545 to 1,555
1,768 to 1,782*** Unladen
** 2,055 with rear view mirrors open 1,860 with rear view mirrors folded away

technical specifications ..............................(up to the end of the DU)towing a caravan .......................................(up to the end of the DU)load permitted on the roof..........................(up to the end of the DU)towing weights ...........................................(up to the end of the DU)weights ......................................................(up to the end of the DU)transporting objects
on the roof ............................................(up to the end of the DU)
6.6
ENG_UD76647_2Masses (en kg) (BCB - Renault)
WeightsTowing weights
WEIGHTS (in kg)
The weights indicated for a basic vehicle without options: they vary depending on your vehicle’s equipment. Consult your approved Dealer.
Maximum Permissible All-Up Weight (MMAC)Maximum Permissible Weight (MMTA)Gross Train Weight (MTR)
Weights indicated on the vehicle identification plate ➥ 6.2
Braked Trailer Weight* found by calculating: MTR - MMACUnbraked Trailer Weight* 500 kg
Permissible nose weight* 75 kg
Maximum permissible load on roof 80 kg (including carrying device)
* Towing weight (towing a caravan, boat, etc.)Towing is prohibited when the MTR - MMAC calculation is equal to zero, or when the MTR is equal to zero (or is not listed) on the identification plate.– It is important to respect local towing regulations in force, specifically those set out in the Highway Code. Contact an approved
Dealer for any modifications to towing equipment.– When towing, under no circumstances may the total train weight (vehicle + trailer) be exceeded. However the following is
permitted:– rear MMTA exceeded by no more than 15%;– maximum MMAC exceeded by no more than 10% or 100 kg (whichever is reached first).
In either case, the maximum speed of the towing assembly must not exceed 62 mph (100 km/h) and the tyre pressure must be increased by 0.2 bar (3 PSI).
– The engine output and climbing capability are reduced with altitude. We recommend that the maximum load be reduced by 10% at an altitude of 1,000 metres and by an additional 10% for each 1,000 metres thereafter.

technical specifications ..............................(up to the end of the DU)replacement parts ......................................(up to the end of the DU)
6.7
ENG_UD69915_1Pièces de rechange et réparations (BCB - Renault)
Replacement parts and repairs
Original parts are based on strict specifications and are subject to highly-specialised tests. Therefore, they are of at least the same level of quality as the parts fitted originally.If you always fit genuine replacement parts to your vehicle, you will ensure that it performs well. Furthermore, repairs carried out within the manufacturer’s Network using original parts are guaranteed according to the conditions set out on the reverse of the repair order.
REPLACEMENT PARTS AND REPAIRS

6.8
ENG_UD69916_1Justificatif d’entretien (BCB - Renault)
Service sheets
Date: Miles (Km): Invoice number: Comments/miscellaneousType of operation: StampService□.......................................□Anti-corrosion check:OK□ NotOK*□*See specific page
Date: Miles (Km): Invoice number: Comments/miscellaneousType of operation: StampService□.......................................□Anti-corrosion check:OK□ NotOK*□*See specific page
Date: Miles (Km): Invoice number: Comments/miscellaneousType of operation: StampService□.......................................□Anti-corrosion check:OK□ NotOK*□
*See specific page
VIN: ..................................................................................
SERVICE SHEETS (1/6)

6.9
ENG_UD69916_1Justificatif d’entretien (BCB - Renault)
SERVICE SHEETS (2/6)
VIN: ..................................................................................
Date: Miles (Km): Invoice number: Comments/miscellaneousType of operation: StampService□.......................................□Anti-corrosion check:OK□ NotOK*□*See specific page
Date: Miles (Km): Invoice number: Comments/miscellaneousType of operation: StampService□.......................................□Anti-corrosion check:OK□ NotOK*□*See specific page
Date: Miles (Km): Invoice number: Comments/miscellaneousType of operation: StampService□.......................................□Anti-corrosion check:OK□ NotOK*□
*See specific page

6.10
ENG_UD69916_1Justificatif d’entretien (BCB - Renault)
SERVICE SHEETS (3/6)
VIN: ..................................................................................
Date: Miles (Km): Invoice number: Comments/miscellaneousType of operation: StampService□.......................................□Anti-corrosion check:OK□ NotOK*□*See specific page
Date: Miles (Km): Invoice number: Comments/miscellaneousType of operation: StampService□.......................................□Anti-corrosion check:OK□ NotOK*□*See specific page
Date: Miles (Km): Invoice number: Comments/miscellaneousType of operation: StampService□.......................................□Anti-corrosion check:OK□ NotOK*□
*See specific page

6.11
ENG_UD69916_1Justificatif d’entretien (BCB - Renault)
SERVICE SHEETS (4/6)
VIN: ..................................................................................
Date: Miles (Km): Invoice number: Comments/miscellaneousType of operation: StampService□.......................................□Anti-corrosion check:OK□ NotOK*□*See specific page
Date: Miles (Km): Invoice number: Comments/miscellaneousType of operation: StampService□.......................................□Anti-corrosion check:OK□ NotOK*□*See specific page
Date: Miles (Km): Invoice number: Comments/miscellaneousType of operation: StampService□.......................................□Anti-corrosion check:OK□ NotOK*□
*See specific page

6.12
ENG_UD69916_1Justificatif d’entretien (BCB - Renault)
SERVICE SHEETS (5/6)
VIN: ..................................................................................
Date: Miles (Km): Invoice number: Comments/miscellaneousType of operation: StampService□.......................................□Anti-corrosion check:OK□ NotOK*□*See specific page
Date: Miles (Km): Invoice number: Comments/miscellaneousType of operation: StampService□.......................................□Anti-corrosion check:OK□ NotOK*□*See specific page
Date: Miles (Km): Invoice number: Comments/miscellaneousType of operation: StampService□.......................................□Anti-corrosion check:OK□ NotOK*□
*See specific page

6.13
ENG_UD69916_1Justificatif d’entretien (BCB - Renault)
VIN: ..................................................................................
Date: Miles (Km): Invoice number: Comments/miscellaneousType of operation: StampService□.......................................□Anti-corrosion check:OK□ NotOK*□*See specific page
Date: Miles (Km): Invoice number: Comments/miscellaneousType of operation: StampService□.......................................□Anti-corrosion check:OK□ NotOK*□*See specific page
Date: Miles (Km): Invoice number: Comments/miscellaneousType of operation: StampService□.......................................□Anti-corrosion check:OK□ NotOK*□
*See specific page
SERVICE SHEETS (6/6)

anti-corrosion check ..................................(up to the end of the DU)
6.14
ENG_UD69917_1Contrôle anticorrosion (BCB - Renault)
Anticorrosion check
ANTICORROSION CHECK (1/5)
If the continuation of the warranty is subject to repair, it is indicated below.
VIN: ..........................................................
Corrosion repair operation to be carried out:
Stamp
Date of repair:
Repair to be carried out: Stamp
Date of repair:
Repair to be carried out: Stamp
Date of repair:

6.15
ENG_UD69917_1Contrôle anticorrosion (BCB - Renault)
ANTICORROSION CHECK (2/5)
If the continuation of the warranty is subject to repair, it is indicated below.
VIN: ..........................................................
Corrosion repair operation to be carried out:
Stamp
Date of repair:
Repair to be carried out: Stamp
Date of repair:
Repair to be carried out: Stamp
Date of repair:

6.16
ENG_UD69917_1Contrôle anticorrosion (BCB - Renault)
ANTICORROSION CHECK (3/5)
If the continuation of the warranty is subject to repair, it is indicated below.
VIN: ..........................................................
Corrosion repair operation to be carried out:
Stamp
Date of repair:
Repair to be carried out: Stamp
Date of repair:
Repair to be carried out: Stamp
Date of repair:

6.17
ENG_UD69917_1Contrôle anticorrosion (BCB - Renault)
ANTICORROSION CHECK (4/5)
If the continuation of the warranty is subject to repair, it is indicated below.
VIN: ..........................................................
Corrosion repair operation to be carried out:
Stamp
Date of repair:
Repair to be carried out: Stamp
Date of repair:
Repair to be carried out: Stamp
Date of repair:

6.18
ENG_UD69917_1Contrôle anticorrosion (BCB - Renault)
ANTICORROSION CHECK (5/5)
If the continuation of the warranty is subject to repair, it is indicated below.
VIN: ..........................................................
Corrosion repair operation to be carried out:
Stamp
Date of repair:
Repair to be carried out: Stamp
Date of repair:
Repair to be carried out: Stamp
Date of repair:

7.1
FRA_UD76854_4Index (BCB - Renault)
1212 volt battery
maintenance ...........................................................4.9 – 4.1012 volt battery .............................................1.2→1.6,4.9–4.10
360360° camera .........................................................2.135→2.145
400«400 volt» electrical circuit ...........................................1.2→1.6
AABS ..........................................................................2.27→2.31access
vehicle .........................................................0.2,1.21→1.35accessories .....................................................................5.16
accessories socket ................................................................3.31Active driver assist ..............................................2.105→2.119active emergency braking in reverse gear ...........2.126→2.128adaptive cruise control ...........................................2.83→2.104additional methods of restraint
side protection .................................................................1.56to the front seat belts ..........................................1.49→1.54to the rear seat belts ..........................................1.49→1.55additional methods of restraint ..................1.49→1.54,1.57
adjusting your driving position......................................1.37, 1.44advanced safety .......................................................2.52→2.68air bag
activating the front passenger air bags .....1.60,1.76→1.78air bag .........................................0.6,1.49→1.57,1.76→1.78air conditioning .......................................3.6→3.16,3.19–3.20air vents ........................................................................3.3→3.5airbag
front passenger airbag deactivation ..........1.58,1.76→1.78
airbags child safety .........................................................1.76→1.78
anti-corrosion check .................................................6.14→6.18anti-corrosion protection .......................................................4.11anti-lock braking system: ABS .................................2.27→2.31armrest
front .................................................................................3.29ashtray ...................................................................................3.31audible and visual signals ................................................... 1.111automatic gearbox (use) .......................................................2.13automatic locking of the doors while driving .........................1.36automatic parking .................................................2.146→2.151
Bbattery ............................................................................0.8, 1.93blind spot warning signal ..........................................2.43→2.48blind spot: warning signal .........................................2.43→2.48bonnet ............................................................................4.2 – 4.3brake fluid ................................................................................4.6breakdown recovery ...............................................................0.9bulbs
changing ........................................................0.9, 5.11 – 5.12
Ccamera rear view......................................................1.84→1.87card ...................................................1.21→1.23,1.30→1.35card: battery ..................................................... 5.14 – 5.15, 5.15card: use................................................................................1.29central door locking ........1.21→1.23,1.29,1.33→1.36,1.108changing a bulb ..........................................................5.11 – 5.12changing gear ..............................................................2.5→2.8charge meter ................................................................1.97, 2.17charge programming .............................................................1.20charging cord .............................................................1.8→1.20charging flap ...............................................................1.8→1.19
ALPHABETICAL INDEX (1/7)

7.2
FRA_UD76854_4Index (BCB - Renault)
charging socket ........................................1.2→1.6,1.8→1.19child restraint/seat ....................................................1.58→1.75child safety ........0.3,1.29,1.32,1.54,1.58→1.75,3.23–3.24child seats ................................................................1.62→1.75children ........................................0.3,1.30→1.32,1.62→1.64children (safety) ..........................................................3.23 – 3.24cleaning:
inside the vehicle ..................................................4.14 – 4.15clock ....................................................................................1.110closing the doors ................................1.21→1.23,1.30→1.36configuration menu ............................................... 1.108 – 1.109connected services .................................................................1.3control instruments .................................................1.92→1.101controls
doors/opening elements .....................................1.24→1.28controls ..............................................................0.4,1.88→1.91coolant .....................................................................................4.4courtesy light .................................................... 3.25 – 3.26, 5.13courtesy mirrors ....................................................................3.25cruise control .................................................1.93,2.74→2.104cruise control-speed limiter ......................................2.74→2.82customised vehicle settings ................................. 1.108 – 1.109customising the vehicle settings .......................... 1.108 – 1.109
Ddashboard .........................................................0.4,1.88→1.91daytime running lights ..........................1.21→1.23,1.112,5.10deadlocking the doors ...........................................................1.29Detection of road signs ............................................2.71→2.73display ..................................................1.88→1.99,2.121,3.21doors ....................................................1.30→1.32,1.36,1.108doors and tailgate ....................................................1.24→1.28doors/tailgate ............................................................1.21→1.36driver assistance 0.5,2.32→2.68,2.71→2.73,2.83→2.104,2.135→2.151,2.155→2.157,3.2
driver vigilance warning .............................................2.69 – 2.70driver’s position .................................................0.4,1.88→1.95driving ............0.5,1.108,2.2→2.8,2.10→2.15,2.20→2.68,2.74→2.104,2.120→2.125,2.135→2.151,2.155→2.157,3.2driving aids .........0.5,2.32→2.68,2.71→2.73,2.83→2.119,2.126→2.132,2.135→2.157,3.2driving position
settings ...............................................0.3,1.44→1.48,1.79driving recommendations .........................................2.17→2.21
EECO driving ..............................................................2.17→2.19ECO mode ............................................................................2.19«ECO» mode function...........................................................2.19electric beam height adjustment ............................1.119 – 1.120electric vehicle
charging ................................................................1.8→1.19driving ........................................................... 1.6, 2.20 – 2.21important guidelines ..........................................................1.7introduction .............................................................1.2→1.6noise ..................................................................................1.6vehicle range ........................................................2.20 – 2.21
electric windows .........................................................3.23 – 3.24electronic parking brake ...........................................2.10→2.15electronic stability control: ESC ...............................2.27→2.31emergency active braking ........................................2.52→2.68emergency brake assist ...........................................2.27→2.31emergency braking ..................................................2.27→2.31emergency call .....................................................2.155→2.157emergency lane departure prevention ............2.52,2.62→2.68energy
charge meter (function) ...................................................2.17«ECO» mode ..................................................................2.19range ..................................................................2.17→2.19
ALPHABETICAL INDEX (2/7)

7.3
FRA_UD76854_4Index (BCB - Renault)
saving ..............................................................................2.20energy consumption .............................1.96→1.99,2.20–2.21energy recovery ....................................................................2.20energy saving ...........................................................2.17→2.21engine
access to the engine .........................................................0.8engine identification ................................................................0.7engine specifications ...............................................................6.4environment ..........................................................................2.16equipment
fitting ................................................................................3.38ESC: electronic stability control ...............................2.27→2.31external temperature ...........................................................1.110
Ffaults
operating faults ............... 2.13, 2.35, 2.40, 2.66, 2.73, 2.157, 5.25→5.30
fittings .......................................................................3.27→3.30front passenger air bag deactivation.....................................1.58front seat
driver’s position memory .................................................1.43front seat adjustment ............................ 1.38 – 1.39, 1.42 – 1.43front seats
adjustment ......................................1.37–1.39,1.44→1.48with electric controls .............................................1.40 – 1.41with manual controls .......................................................1.38
fuses ..................................................................0.9,5.17→5.19
Ggear lever .....................................................................2.5→2.8glove box ...............................................................................3.30
Hhandbrake ....................................................................2.10, 2.14
hands-free telephone integrated control ....................3.21 – 3.22«hands-free» card: battery ............................... 5.14 – 5.15, 5.15«hands-free» card: use .............. 1.24→1.28,5.14–5.15,5.15hazard warning lights signal................................... 1.111 – 1.112headlight beam adjustment ....................................1.119 – 1.120headlight flashers ................................................................ 1.111headlight washer .................................................................1.122headrest .......................................................................1.37, 3.32heated seats ..........................................................................1.41heated steering wheel ...........................................................1.79heating and air conditioning system .....................................3.19heating system ...........................................................3.6→3.18heating, air conditioning: programming ........... 2.21, 3.17 – 3.18heating/air conditioning programming .......................3.17 – 3.18horn ..................................................................................... 1.111horn:
flash ............................................................................... 1.111sounding the horn ......................................................... 1.111
hubcap tool ..............................................................................5.5
Iignition switch ...........................................................2.10→2.15indicators ...........................................................1.111, 2.44, 5.10indicators:
direction indicators ............................................... 1.111, 5.10exterior temperature indicator .......................................1.110instrument panel .........................1.92→1.101,2.10→2.15information and general advicewelcome aboard your vehicle ...........................................0.1
instrument panel.............0.4,1.92→1.107,1.112,2.10→2.15instrument panel messages ...........1.100→1.107,2.10→2.15interior .....................................................................................0.3interior trim
maintenance .........................................................4.14 – 4.15Isofix .........................................................................1.73→1.75
ALPHABETICAL INDEX (3/7)

7.4
FRA_UD76854_4Index (BCB - Renault)
Llane centring ..........................................................2.111→2.119lane departure prevention ........................................2.37→2.42lane departure warning ............................................2.32→2.42levels .......................................................................................0.8levels:
brake fluid ..........................................................................4.6coolant ...............................................................................4.4windscreen washer reservoir ............................................4.6
lightingdistance lighting...............................................................1.22exterior...............................................................................0.2
lighting:exterior............................................................ 1.112→1.118instrument panel ............................................................1.112interior ......................................................... 3.25 – 3.26, 5.13see-me-home ................................................................1.108
lightsadjustment ........................................................1.119 – 1.120
lights:adjusting ...........................................................1.119 – 1.120brake lights ......................................................................5.11dipped beam headlights ..............................1.92, 1.112, 5.10direction indicators ........................... 1.92, 1.111, 5.10 – 5.11fog lights ......................................................1.92, 1.117, 5.11hazard warning .............................................................. 1.111indicator lights .................................................................5.12main beam headlights .................................1.92, 1.115, 5.10number plate lights ..........................................................5.12reversing lights ................................................................5.11side lights ............................................................. 1.112, 5.11
load permitted on the roof .......................................................6.6locking ...................................................................................1.45locking the doors ...........................................1.21→1.36,1.108
locking/unlocking the opening elementsdoors................................................................................1.29
locking/unlocking the opening elements .................1.21→1.23,1.30→1.35
Mmaintenance:
bodywork ............................................................4.11→4.13interior trim ...........................................................4.14 – 4.15mechanical ...........................................4.2–4.3,6.8→6.13
mapcard emergency key ...........................................1.33→1.35deadlocking .....................................................................1.29engine not starting in hands-free mode .............1.33→1.35hands-free ............................................................1.27 – 1.28locking/unlocking the opening elements .........................1.29operating faults ...................................................1.33→1.35use ..................................................1.21→1.23,1.27–1.28
map reading lights ......................................................3.25 – 3.26massage seat ........................................................................1.42massage: seat massage .......................................................1.42menu for customising the vehicle settings ............ 1.108 – 1.109methods of restraint in addition to the seat belts .....1.49→1.57multifunction screen ..............................................................2.44multimedia (equipment) .............................................3.21 – 3.22multimedia equipment .................................... 1.108, 3.21 – 3.22Multi-Sense .............................................................................3.2
Nnavigation ...................................................................3.21 – 3.22navigation system ......................................................3.21 – 3.22
Oof warning sound
door/luggage compartment open reminder alarm ..........1.32
ALPHABETICAL INDEX (4/7)

7.5
FRA_UD76854_4Index (BCB - Renault)
light reminder alarm ........................................................1.32opening the doors ....................................................1.30→1.36opening/closing
doors...................................................................1.24→1.28opening/closing
doors and tailgate ...............................................1.30→1.35opening/closingluggage compartment ........................................1.24→1.28sunroof ...............................................................1.24→1.28
operating faults ...1.36, 1.51, 1.106, 2.13, 2.35, 2.40, 2.66, 2.73, 2.97,2.131,2.157,5.25→5.30operation ..........................................................................2.5, 2.7overspeed warning ...................................................2.71→2.73
Ppaint
maintenance .......................................................4.11→4.13parking assistance: assisted parking ...................2.146→2.151parking brake ...........................................................2.10→2.15parking distance control .............. 2.120→2.125,2.133–2.134parking: parking aid ..............................................2.129→2.132passenger detection system ....................................1.58→1.61passenger safety .....................................................................0.6power-assisted steering ........................................................1.80practical advice ..........................................................2.20 – 2.21presentation of electric vehicle
important guidelines ..........................................................1.7pretensioners ...........................................................1.49→1.54puncture ..................................................................................0.9
QQR Code ................................................................................6.3
Rradio ...........................................................................3.21 – 3.22
range of the traction battery .....................................2.17→2.19rear bench seat .....................................................................3.33rear seats
functions ..........................................................................3.33rear seats ..............................................................................1.47rear view camera................................................... 2.133 – 2.134rear view mirrors ...............................................0.2,1.81→1.83remote control
card .....................................................................1.21→1.23map.....................................................................1.21→1.23
replacement parts ...................................................................6.7reversing sensor...................................................2.120→2.125roof bars ................................................................................3.39roof rack
roof bars ..........................................................................3.39
Ssafe distance ..........................................................2.83→2.104safe vehicle exit ....................................................2.152→2.154safety distance warning ...........................................2.49→2.51safety distances .......................................................2.49→2.51screen wash/wipe ................................................. 1.126 – 1.127screens
multimedia screen .........................2.49,2.66→2.68,2.130,2.135→2.145,3.2
seat belt pretensionersfront seat belt ......................................................1.49→1.54
seat belt pretensioners .............................................1.49→1.55seat belts ............................. 0.6,1.44→1.54,1.56–1.57,1.93seats
adjustment ............................................................1.40 – 1.41front seat settings .................................................1.42 – 1.43front seat with electric controls .............................1.42 – 1.43front seat with massage ..................................................1.42
seats ........................................................................................0.3
ALPHABETICAL INDEX (5/7)

7.6
FRA_UD76854_4Index (BCB - Renault)
see-me-home lighting .................................1.115, 1.119 – 1.120service sheets ............................................................6.8→6.13settings
configuration menu .......................................... 1.108 – 1.109settings .................................................................. 1.108 – 1.109side protection devices .........................................................1.56signals and lights ..................................................1.112→1.120speed control ................................................................2.5→2.8speed limiter ....................................................1.93,2.74→2.77spoiler ...........................................................................3.34, 3.39starting ..........................................................................2.2→2.4starting the engine........................................................2.2→2.4steering wheel
adjustment ............................................................1.79 – 1.80stopping the engine ...........................................2.4,2.10→2.15storage compartment ...............................................3.27→3.30storage compartments .............................................3.27→3.30storage/organisation ...............................................................0.3sun visor ................................................................................3.25
Ttailgate ................................................1.21→1.23,3.34→3.36tank
Brake fluid .........................................................................4.6Coolant ..............................................................................4.4
tanks and reservoirs:windscreen washer ...........................................................4.6
technical specifications ..................................................6.6 – 6.7telephone ...................................................................3.21 – 3.22temperature regulation ...............................................3.6→3.16tool kit ......................................................................................5.5towing
breakdown ..........................................................5.22→5.24towing equipment ............................................................3.38
towing ......................................................................................0.9
towing a caravan ............................................................3.38, 6.6towing hitch .......................................................5.5,5.22→5.24towing rings ...............................1.65→1.67,1.73→1.75,3.37towing weights .........................................................................6.6traction battery .............................................................1.2→1.6traction battery charge ...............................................1.8→1.19traction control ..........................................................2.27→2.31transporting children ................................................1.58→1.75transporting objects
in the luggage compartment ..................................3.34, 3.37on the roof .........................................................................6.6
trip computer and warning system .......................1.100→1.107tyre inflation kit .............................................................5.2→5.4tyre pressure ..............................0.7,2.22→2.26,4.7–4.8,5.7tyre pressure monitor ...............................................2.22→2.26tyre pressures ................................................................4.7 – 4.8tyres .................................0.2,2.22→2.26,4.7–4.8,5.6→5.9
Uunlocking the doors ............................1.21→1.23,1.33→1.36
Vvehicle identification ................................................................0.7vehicle identification number (VIN) .........................................0.7vehicle identification plates .....................................................0.7vehicle range ............................................................2.17→2.21ventilation ...................................................................3.6→3.16
Wwarning
parking exit .....................................................2.129→2.132pedestrian sound warning .................................................1.6
warning buzzer ................................... 1.30→1.32,1.111,1.115warning lights ...................................1.92→1.95,1.100–1.101washing ....................................................................4.11→4.13
ALPHABETICAL INDEX (6/7)

7.7
FRA_UD76854_4Index (BCB - Renault)
weights ....................................................................................6.6welcome aboard your vehicle ................................................0.1wheels (safety) .............................................................5.6→5.9windows ..................................................................................0.2windscreen washer .......................................1.121→1.127,4.6windscreen washer/wiper .........................1.108,1.121→1.125wiper blades .............................................. 0.9, 5.20 – 5.21, 5.21wipers
blades ......................................................... 5.20 – 5.21, 5.21wipers ...................................................................1.121→1.127
ALPHABETICAL INDEX (7/7)

7.8
ENG_UD69803_1Filler NU (BCB - Renault)


RENAULT S.A.S. SOCIÉTÉ PAR ACTIONS SIMPLIFIÉE AU CAPITAL DE 533 941 113 € / 13-15, QUAI LE GALLO92100 BOULOGNE-BILLANCOURT R.C.S. NANTERRE 780 129 987 — SIRET 780 129 987 03591 / renaultgroup.com
NU 1402-2 – 99 91 099 27S – 02/2022 – Edition anglaiseà999109927Sêñòä G8