Mastering Entity Framework Core 2.0
376
Dive into entities, relationships, querying, performance optimization, and more, to learn efficient data-driven development Prabhakaran Anbazhagan Mastering Entity Framework Core 2.0
-
Upload
khangminh22 -
Category
Documents
-
view
0 -
download
0
Transcript of Mastering Entity Framework Core 2.0

Mastering Entity Framework Core 2.0
Being able to create and maintain data-oriented applications has become crucial in modern programming. This is why Microsoft came up with Entity Framework so architects can optimize storage requirements while also writing effi cient and maintainable application code. This book is a comprehensive guide that will show how to utilize the power of Entity Framework to build effi cient .NET Core applications.
At the beginning of the book, we focus on building entities and relationships. Here you will also learn about different mapping techniques, which will help you choose the technique best suited for your application design. Once the fundamentals are learned, you will move on to learn about validation and querying. It will also teach you how to execute raw SQL queries and extend Entity Framework to leverage Query Objects using the Query Object Pattern. Finally, we will learn about performance optimization and how to manage the security of your application. You will learn how to implement failsafe mechanisms using concurrency tokens. The book also explores row-level security and multitenant databases.
By the end of the book, you will be profi cient in implementing Entity Framework on your .NET Core applications.
Things you will learn:
• Create databases and perform CRUD operations on them
• Understand and build relationships (related to entities, keys, and properties)
• Understand in-built, custom, and remote validation (both client and server side)
• Learn to handle concurrency to build responsive applications
• Handle transactions and multi-tenancy while also improving performance
www.packtpub.com
Masterin
g E
ntity Fram
ewo
rk Co
re 2.0P
rabh
akaran A
nb
azhag
an
Dive into entities, relationships, querying, performance optimization, and more, to learn effi cient data-driven development
Prabhakaran Anbazhagan
MasteringEntity Framework Core 2.0

Mastering Entity Framework Core2.0
Dive into entities, relationships, querying, performanceoptimization, and more, to learn efficient data-drivendevelopment
Prabhakaran Anbazhagan
BIRMINGHAM - MUMBAI

Mastering Entity Framework Core 2.0Copyright © 2017 Packt Publishing
All rights reserved. No part of this book may be reproduced, stored in a retrieval system, ortransmitted in any form or by any means, without the prior written permission of thepublisher, except in the case of brief quotations embedded in critical articles or reviews.
Every effort has been made in the preparation of this book to ensure the accuracy of theinformation presented. However, the information contained in this book is sold withoutwarranty, either express or implied. Neither the author, nor Packt Publishing, and itsdealers and distributors will be held liable for any damages caused or alleged to be causeddirectly or indirectly by this book.
Packt Publishing has endeavored to provide trademark information about all of thecompanies and products mentioned in this book by the appropriate use of capitals.However, Packt Publishing cannot guarantee the accuracy of this information.
First published: December 2017
Production reference: 1141217
Published by Packt Publishing Ltd.Livery Place35 Livery StreetBirminghamB3 2PB, UK.
ISBN 978-1-78829-413-3
www.packtpub.com

Credits
AuthorPrabhakaran Anbazhagan
Copy EditorSafis Editing
ReviewersJason De Oliveira Alvin Ashcraft
Project CoordinatorPrajakta Naik
Commissioning EditorMerint Mathew
ProofreaderSafis Editing
Acquisition EditorChaitanya Nair
IndexerFrancy Puthiry
Content Development EditorLawrence Veigas
GraphicsJason Monteiro
Technical EditorTiksha Sarang
Production CoordinatorDeepika Naik

About the AuthorPrabhakaran Anbazhagan is a Microsoft Solution Architect living in Chennai, India. Hispassion for programming started while creating a website for his school, and that's wherethe never-ending journey started. He became the secretary of a technology group in college,creating websites yet again, automating symposiums, and much more.
He started his career at a prestigious product-based company; his knowledge was respectedand recognized by his seniors, who let him develop tools and automation to sharpen histalents. Lucky guy! People hardly ever get to nurture their talent, but he got a handful ofopportunities to sharpen his skills and become a Solution Architect, becoming a jack of alltrades but still an expert in .NET.
Prabhakaran has more than 12 years of IT experience in architecting, designing, anddeveloping mission-critical desktop, web, and mobile applications. He has experience infull-stack development spanning ASP.NET MVC, Web API, C#, Mobility expert in Swift,Objective-C, Blackberry Cascades, hybrid apps, SharePoint, JavaScript, jQuery, andMEAN.JS.
I would like to thank my lovely wife, Girija, for standing beside me when I took the decisionto write this book. She compromised a lot of quality time and was there beside methroughout this journey, and I dedicate this book to her. I also want to thank my wonderfulchildren, Venba and Inba. They were my stress busters in hectic weekends, and I hope oneday they will understand why I was busy with my laptop instead of playing with them. I'dlike to thank my parents for taking care of the kids along with my wife while I was hookedon my laptop. My family, including my in-laws, have always supported me in authoringthis book, and I really appreciate it.

About the ReviewersJason De Oliveira works as a CTO for MEGA International (http:/ /www. mega. com), asoftware company in Paris (France), providing modeling tools for business transformation,enterprise architecture, and enterprise governance, risk, and compliance management. He isan experienced manager and senior solutions architect, with high skills in softwarearchitecture and enterprise architecture.
He loves sharing his knowledge and experience via his blog, speaking at conferences,writing technical books, writing articles in the technical press, giving software courses asMCT, and coaching co-workers in his company. He frequently collaborates with Microsoftand can often be found at the Microsoft Technology Center (MTC) in Paris.
Microsoft has awarded him for more than 6 years with the Microsoft® Most ValuableProfessional (MVP C#/.NET) award for his numerous contributions to the Microsoftcommunity. Microsoft seeks to recognize the best and brightest from technologycommunities around the world with the MVP Award. These exceptional and highlyrespected individuals come from more than 90 countries, serving their local online andoffline communities and having an impact worldwide.
Feel free to contact him via his blog if you need any technical assistance or want to talkabout technical subjects (http:/ /www. jasondeoliveira. com).
Jason has worked on the following books:
.NET 4.5 Expert Programming Cookbook (English)WCF 4.5 Multi-tier Services Development with LINQ to Entities (English).NET 4.5 Parallel Extensions Cookbook (English)WCF Multi-layer Services Development with Entity Framework (English)Visual Studio 2013: Concevoir, développer et gérer des projets Web, les gérer avec TFS2013 (French)
I would like to thank my lovely wife, Orianne, and my beautiful daughters, Julia andLéonie, for supporting me in my work and for accepting long days and short nights duringthe week, and, sometimes, even during the weekend. My life would not be the same withoutthem!

Alvin Ashcraft is a software developer living near Philadelphia, PA. He has dedicated his22-year career to building software with C#, Visual Studio, WPF, ASP.NET,HTML/JavaScript, UWP, and Xamarin apps and SQL Server. He has been awarded as aMicrosoft MVP nine times; once for Software Architecture, seven times for C# and VisualStudio & Tools, and for Windows Dev in 2018-2019. You can read his daily links for .NETdevelopers on his blog at alvinashcraft.com and UWP App Tips blog at www.uwpapp.tips.
He currently works as a Principal Software Engineer for Allscripts, developing clinicalhealthcare software. He has previously been employed with several large softwarecompanies, including Oracle, Genzeon, and Corporation Service Company. There, hehelped create software solutions for financial, business, and healthcare organizations usingMicrosoft platforms and solutions.
He was a technical reviewer for NuGet 2 Essentials and Mastering ASP.NET Core 2.0 byPackt.
I would like to thank my wonderful wife, Stelene, and our three amazing daughters fortheir support. They were very understanding while I read and reviewed these chapters onevenings and weekends to help deliver a useful, high-quality book for the ASP.NET Coredevelopers.
www.PacktPub.comFor support files and downloads related to your book, please visit www.PacktPub.com.
Did you know that Packt offers eBook versions of every book published, with PDF andePub files available? You can upgrade to the eBook version at www.PacktPub.com and as aprint book customer, you are entitled to a discount on the eBook copy. Get in touch with usat [email protected] for more details.
At www.PacktPub.com, you can also read a collection of free technical articles, sign up for arange of free newsletters and receive exclusive discounts and offers on Packt books andeBooks.
www.packtpub.com/mapt
Get the most in-demand software skills with Mapt. Mapt gives you full access to all Packtbooks and video courses, as well as industry-leading tools to help you plan your personaldevelopment and advance your career.
Why subscribe?Fully searchable across every book published by PacktCopy and paste, print, and bookmark contentOn demand and accessible via a web browser

Customer FeedbackThanks for purchasing this Packt book. At Packt, quality is at the heart of our editorialprocess. To help us improve, please leave us an honest review on this book's Amazon pageat https://www.amazon. com/ dp/ 1788294130.
If you'd like to join our team of regular reviewers, you can e-mail us [email protected]. We award our regular reviewers with free eBooks andvideos in exchange for their valuable feedback. Help us be relentless in improving ourproducts!

To my lovely wife Girija, wonderful kids Venba and Inba

Table of ContentsPreface 1
Chapter 1: Kickstart - Introduction to Entity Framework Core 7
Prerequisites 8Creating a new project 11
The Start page 11The File menu 12Structuring the web app 15
Installing Entity Framework 17Data models 19
Post entity 19Database context 20Registering the context in services (.NET Core DI) 21Creating and seeding databases 22CRUD operations 26Summary 34
Chapter 2: The Other Way Around – Database First Approach 35
Preparing the database 36Blog entity script 36Post entity script 36
Creating new project 40Installing Entity Framework 40
Reverse engineering the database 42Configuring data context 43Working with the Blog entity 44Working with the Post entity 45
Registering context in services (.NET Core DI) 45Refactoring the OnConfiguring() method 46Refactoring the ConfigureServices method 46The appsettings.json setting 47
Performing CRUD operations 48Creating controller action 51Edit controller action 53The Delete view 55

Table of Contents
[ ii ]
Summary 57
Chapter 3: Relationships – Terminology and Conventions 58
Understanding relationship terms 59Data models 59
Blog entity 59The Post entity 59
Principal entity 60Principal key 61Dependent entity 63Foreign key 64Navigation property 65
Collection navigation property 66Reference navigation property 67Inverse navigation property 68
Conventions in a relationship 69Fully-defined relationships 69
Fully-defined relationships - under the hood 70No foreign key property 75
No foreign key property - under the hood 76Single navigation property 77Foreign key 78Inverse property 79
Summary 80
Chapter 4: Building Relationships – Understanding Mapping 81
Relationships 82The one-to-one relationship 83
Building one-to-one relationships using the Fluent API 85The one-to-many relationship 88The many-to-many relationship 94
Building many-to-many relationship using the Fluent API 97Fluent API 99
Identifying navigation property and inverse navigation 99Identifying the single navigation property 100Relationship-building techniques 102
Building relationship using a foreign key 102Building relationships using a principal key 103Building relationships using the IsRequired method 104
Cascade delete 105Data migration issue with EF Core 2.0 107
Summary 109

Table of Contents
[ iii ]
Chapter 5: Know the Validation – Explore Inbuilt Validations 110
Diving into built-in validations 111Required field validation 112
Incorporating the Required validation in blogging system models 118EmailAddress field validation 118
Incorporating EmailAddress validation in blogging system models 124Compare field validation 124
Incorporating the Compare validation in blogging system models 126Url field validation 127
Incorporating Url validation in blogging system models 130MinLength field validation 131MaxLength field validation 133RegularExpression field validation 135Summary 137
Chapter 6: Save Yourself – Hack Proof Your Entities 138
Client-side validation 139Validating data without client-side scripting 140
Server-side validation 144Manual validation 146
Custom validation 147Creating client-side logic for custom validation 153
Remote validation 158Summary 164
Chapter 7: Going Raw – Leveraging SQL Queries in LINQ 165
Basic raw SQL queries 166Building parameterized queries 171Composing with LINQ 177Executing SQL query without a DBSet or POCO 184Summary 189
Chapter 8: Query Is All We Need – Query Object Pattern 190
Introduction to query objects 191Improving repositories with the query object pattern 194
Introduction to repositories 194Solution to the repository assignment 196
Incorporating the query object pattern into repositories 198List query object support in the repository 198Single query object support in the repository 201Solution to the repository with the queries assignment 205

Table of Contents
[ iv ]
Composing queries with commands 206Solution to the command queries assignment 214
Enhancing queries with expression trees 214Solution to the expression trees assignment 216
Summary 218
Chapter 9: Fail Safe Mechanism – Transactions 219
Default behavior of a transaction 220Adding tags support in the blogging system 220Leveraging default transaction behavior 222
Creating a simple transaction 228Creating a cross-context transaction 231
File upload support to the blogging system 231Limitations to the transaction scope 237Custom transaction scope support 239Adding date picker support to the blogging system 243
Leveraging transactions between multiple technologies 245Recent posts support to the blogging system 245Anonymous posts list and individual blog post 246Listing comments 248Adding comments using external database transactions 250
Summary 254
Chapter 10: Make It Real – Handling Concurrencies 255
Handling concurrency in EF 256Understanding the concurrency conflicts 257
Optimistic concurrency 260Pessimistic concurrency 261
Introducing concurrency tokens 262Non-timestamp based concurrency tokens 265
Configuring non-timestamp tokens through data annotation 265Configuring non-timestamp tokens through Fluent API 272
Timestamp-based concurrency tokens 272Configuring timestamp tokens through data annotation 273Configuring timestamp tokens through Fluent API 280
Handling concurrency conflicts 281Applying optimistic concurrency 281
Database wins 282Client wins 283User-specific custom resolution 284
Applying pessimistic concurrency 287

Table of Contents
[ v ]
Summary 292
Chapter 11: Performance – It's All About Execution Time 293
The AsNoTracking() method 294How does tracking work? 294
No-tracking queries 295Projections 298
Detecting changes 299Asynchronous operations 300
Transactions leveraging asynchronous operations 302Unnecessary volume returned 304The N+1 Select problem 306More data than required 312Mismatched data types 316Missing indexes 320Summary 330
Chapter 12: Isolation – Building a Multi-Tenant Database 331
Authentication in the blogging system 332Row-Level Security 338
Filter predicate 341Block predicate 342
Multi-tenancy 344Standalone 344Database-per-tenant 345Shared multi-tenant 347Dive into multi-tenancy 348Blocking cross-tenant write operation 351
Summary 356
Index 357

PrefaceBeing able to create and maintain data-oriented applications has become crucial in modernprogramming. This is why Microsoft came up with Entity Framework (EF), so architects canoptimize storage requirements while also writing efficient and maintainable applicationcode. This book is a comprehensive guide that will show you how to utilize the power ofthe EF to build efficient .NET Core applications. It not only teaches all the fundamentals ofEF Core, but also demonstrates how to use it practically so you can implement it in yoursoftware development.
This book is divided into three modules. The first module focuses on building entities andrelationships. Here, you will also learn about different mapping techniques, which will helpyou choose the one best suited to your application design. Once you have understood thefundamentals of EF, you will move on to learn about validation and querying in the secondmodule. It will also teach you how to execute raw SQL queries and extend the EF toleverage Query Objects using the Query Object Pattern. The final module of the bookfocuses on performance optimization and managing the security of your application. Youwill learn to implement fail-safe mechanisms using concurrency tokens. The book alsoexplores row-level security and multitenant databases in detail.
By the end of the book, you will be proficient in implementing EF on your .NET Coreapplications.
What this book coversChapter 1, Kickstart – Introduction to Entity Framework Core, teaches you aboutinstalling/configuring Entity Framework Core in .NET Core applications. It guides usthrough performing CRUD (Create/Read/Update/Delete) operations.
Chapter 2, The Other Way Around – Database First Approach, explains about reverseengineering and existing database using EF Core. It guides us through performingmigrations and also helps us in retaining model changes that won't be lost duringmigrations.
Chapter 3, Relationships – Terminology and Conventions, provides knowledge aboutrelationship terms related to entities, keys, and properties. We will also see differentconventions available with respect to relationships.

Preface
[ 2 ]
Chapter 4, Building Relationships – Understanding Mapping, helps you explore multiplerelationship techniques and explains how to leverage them in your application design. Wewill also explore how to create relationships using Fluent API.
Chapter 5, Know the Validation – Explore Inbuilt Validations, teaches you about howvalidation works in the framework, explores built-in validations, shows how they should beconfigured, covers the patterns each validation expects from the user, and shows how thevalidation error is rendered by the MVC engine.
Chapter 6, Save Yourself – Hack Proof Your Entities, helps us with adding validations,explains why we need validations on both the client side and server side, and shows how toachieve it. It also introduces custom validation, and how to create client-side logic forvalidation and remote validation.
Chapter 7, Going Raw – Leveraging SQL Queries in LINQ, teaches you about executing RawSQL Queries while also teaching you how to execute parameterized queries, compose withLINQ, and, finally, execute without a DbSet or POCO object.
Chapter 8, Query Is All We Need – Query Object Pattern, helps you understand the QueryObject pattern, and extend EF to leverage query objects.
Chapter 9, Fail Safe Mechanism – Transactions, helps you understand the existing behavior oftransactions, how to create regular/cross-context transactions, and how to use externalDBTransactions.
Chapter 10, Make It Real – Handling Concurrencies, elaborates on how concurrency is wiredin EF and how to handle it. It explains concurrency tokens in detail and shows how tocreate a fail-safe mechanism using it.
Chapter 11, Performance – It's All About Execution Time, teaches you how to improve EF'sperformance by properly utilizing the framework, reducing abuses, and much more.
Chapter 12, Isolation – Building a Multi-Tenant Database, explores row-level security andmulti-tenant databases in detail.
What you need for this bookTo work with this text, we assume you are familiar with .NET Core and C#.

Preface
[ 3 ]
You require the following tools to successfully execute the code in this book:
Visual Studio 2017 ExpressSQL Server 2017 ExpressSQL Server 2017 Developer
Who this book is forThis book is for .NET Core developers who would like to integrate EF Core in theirapplication. Prior knowledge of .NET Core and C# is assumed.
ConventionsIn this book, you will find a number of text styles that distinguish between different kindsof information. Here are some examples of these styles and an explanation of their meaning.
Code words in a text, database table names, folder names, filenames, file extensions,pathnames, dummy URLs, and user input are shown as follows: "The new column shouldbe included in the Edit method of PostController."
A block of code is set as follows:
public interface IPostDetailQueryHandler { Task<Post> Handle(PostDetailQuery query); }
When we wish to draw your attention to a particular part of a code block, the relevant linesor items are set in bold:
public async Task<IActionResult> Index() { return View(await _context.Blogs.FromSql("Select * from dbo.Blog").ToListAsync()); }

Preface
[ 4 ]
New terms and important words are shown in bold. Words that you see on the screen, forexample, in menus or dialog boxes, appear in the text like this: "We can see from thefollowing screenshot that the Url value is unchanged."
Warnings or important notes appear like this.
Tips and tricks appear like this.
Reader feedbackFeedback from our readers is always welcome. Let us know what you think about thisbook—what you liked or disliked. Reader feedback is important for us as it helps usdevelop titles that you will really get the most out of.
To send us general feedback, simply email [email protected], and mention thebook's title in the subject of your message.
If there is a topic that you have expertise in and you are interested in either writing orcontributing to a book, see our author guide at www.packtpub.com/authors.
Customer supportNow that you are the proud owner of a Packt book, we have a number of things to help youto get the most from your purchase.
Downloading the example codeYou can download the example code files for this book from your account at http:/ /www.packtpub.com. If you purchased this book elsewhere, you can visit http:/ /www. packtpub.com/support and register to have the files e-mailed directly to you.

Preface
[ 5 ]
You can download the code files by following these steps:
Log in or register to our website using your e-mail address and password.1.Hover the mouse pointer on the SUPPORT tab at the top.2.Click on Code Downloads & Errata.3.Enter the name of the book in the Search box.4.Select the book for which you're looking to download the code files.5.Choose from the drop-down menu where you purchased this book from.6.Click on Code Download.7.
Once the file is downloaded, please make sure that you unzip or extract the folder using thelatest version of:
WinRAR / 7-Zip for WindowsZipeg / iZip / UnRarX for Mac7-Zip / PeaZip for Linux
The code bundle for the book is also hosted on GitHub at https:/ / github. com/PacktPublishing/Mastering- Entity- Framework- Core. We also have other code bundlesfrom our rich catalog of books and videos available at https:/ /github. com/PacktPublishing/. Check them out!
Downloading the color images of this bookWe also provide you with a PDF file that has color images of the screenshots/diagrams usedin this book. The color images will help you better understand the changes in the output.You can download this file from https:/ / www. packtpub. com/ sites/ default/ files/downloads/MasteringEntityFrameworkCore20_ ColorImages. pdf.

Preface
[ 6 ]
ErrataAlthough we have taken every care to ensure the accuracy of our content, mistakes dohappen. If you find a mistake in one of our books—maybe a mistake in the text or thecode—we would be grateful if you could report this to us. By doing so, you can save otherreaders from frustration and help us improve subsequent versions of this book. If you findany errata, please report them by visiting http:// www.packtpub. com/ submit- errata,selecting your book, clicking on the Errata Submission Form link, and entering the detailsof your errata. Once your errata are verified, your submission will be accepted and theerrata will be uploaded to our website or added to any list of existing errata under theErrata section of that title.
To view the previously submitted errata, go to https:/ /www. packtpub. com/ books/content/support and enter the name of the book in the search field. The requiredinformation will appear under the Errata section.
PiracyPiracy of copyrighted material on the Internet is an ongoing problem across all media. AtPackt, we take the protection of our copyright and licenses very seriously. If you comeacross any illegal copies of our works in any form on the Internet, please provide us withthe location address or website name immediately so that we can pursue a remedy.
Please contact us at [email protected] with a link to the suspected piratedmaterial.
We appreciate your help in protecting our authors and our ability to bring you valuablecontent.
QuestionsIf you have a problem with any aspect of this book, you can contact us [email protected], and we will do our best to address the problem.

1Kickstart - Introduction to Entity
Framework CoreI still remember the days when we were spending quite a lot of time on workingwith relational databases rather than just focusing on solving business problems; those daysare definitely gone. To elaborate, let's jot down the issues we had before ORM:
Data access layers were not portable, which made it hard to change from oneplatform to another.There were no abstractions, which forced us to write manual mapping betweenobjected-oriented objects and data entities.Vendor-specific SQL statements, which requires knowledge to port betweendifferent RDBMS systems.Relied heavily on triggers and stored procedures.
The entire product development process shifted towards tools and open source platforms,and even Microsoft took that path from .NET Core onward. If we keep spending time onwriting code which could be achieved through tools, we might end up looking likecavemen.
The Entity Framework was created to address this concern; it was not introduced with theinitial .NET framework but rather was introduced in .NET Framework 3.5 SP1.

Kickstart - Introduction to Entity Framework Core Chapter 1
[ 8 ]
If we look closely, it was obvious that the .NET team built it for the following reasons:
To minimize the time spent by the developers/architects on stuff like abstractionsand the portable data access layerSo that the developers do not require vendor specific SQL knowledgeSo that we can build object-oriented business logic by eradicating triggers andSPs
This book uses Visual Studio 2017 (the latest at the time of writing) andASP.NET Core 2.0 MVC with Entity Framework 2.0. Even though EntityFramework 2.0 is the latest version, it is still an evolving one, so it wouldtake time for the .NET team to develop all the existing features of EntityFramework 6.2 based on the full .NET Framework.
We will cover the following topics here:
PrerequisitesCreating a new projectInstalling Entity Framework 2.0Data modelsDatabase contextRegistering the context in services (.Net Core DI)Creating and seeding databasesPerforming CRUD operations
Prerequisites.NET Core, the open source platform, paved the way for multi-platform support in VisualStudio 2017. The editors came in different flavors, supporting both platform-specific andcross-platform IDEs:
Visual Studio: An exclusive edition for Windows with Community, Professionaland Enterprise editions:

Kickstart - Introduction to Entity Framework Core Chapter 1
[ 9 ]
Visual Studio 2017 IDE can be downloaded directly from https:/ /www.visualstudio. com.
Visual Studio for Mac: An exclusive edition for macOS, which was actuallyinherited from Xamarin Studio (Xamarin was acquired by Microsoft):

Kickstart - Introduction to Entity Framework Core Chapter 1
[ 10 ]
Visual Studio for Mac can be downloaded from https:/ /www. visualstudio. com/vs/visual- studio- mac/ .
Visual Studio Code: The cross-platform editor from Microsoft for Windows,Linux, and macOS:
Download the desired version/edition of Visual Studio Code from https:/ /www.visualstudio. com/ downloads/ .
The Visual Studio 2017 installer is segregated into workloads, individual components, andlanguage packs. We will be installing and using Visual Studio Community 2017 with theworkloads ASP.NET and web development and .NET Core cross-platform development.The workload is a combination of one or more individual components which can also beinstalled from the Individual components tab of the installer, as follows:

Kickstart - Introduction to Entity Framework Core Chapter 1
[ 11 ]
New Visual Studio installer with workloads
We have looked at the different flavors/editions of Visual Studio available to us, and wewill be using Visual Studio Community on our journey, which is free of charge for privateand test purposes. It is up to the reader to pick an edition which suits their needs (the toolsand scaffolding available in the IDE might differ).
Creating a new projectOpen Visual Studio and create a new project either from the File menu or from theStart page.
The Start pageFrom the New Project section, create a new project using any one of the followingapproaches:
Select Create new project.... On the left pane, select Templates | Visual C# |1..NET Core. Select the ASP.NET Core Web Application template from the list.

Kickstart - Introduction to Entity Framework Core Chapter 1
[ 12 ]
Search the project templates for the ASP.NET Core Web Application and select2.it. As displayed in the following screenshot, enter MasteringEFCore.Web as theName and MasteringEFCore as the Solution name and click OK:
New project
The File menuFrom the File menu, perform the following steps:
Select New | Project.1.On the left pane, select Templates | Visual C# | .NET Core.2.Select the ASP.NET Core Web Application template from the list.3.

Kickstart - Introduction to Entity Framework Core Chapter 1
[ 13 ]
As displayed in the previous screenshot, enter4.MasteringEFCore.CodeFirst.Starter as the Name andMasteringEFCore as the Solution name and click OK.
Irrespective of the previous two approaches, the selected template willprovide New ASP.NET Web Application (.NET Core) dialog, to let us choosefrom the following:
EmptyWeb API: Creates a Web API projectWeb Application (Model-View-Controller): Creates an MVC Webapplication which also allows us to create APIs
We will be selecting Web Application (Model-View-Controller) from the dialogas shown here:
New ASP.NET web project dialog

Kickstart - Introduction to Entity Framework Core Chapter 1
[ 14 ]
In our case, select .NET Core, ASP.NET Core 2.0, and the Web Application5.(Model-View-Controller) template, and also keep the Authentication set to NoAuthentication. Click OK:
ASP.NET Core web application
The generated web application displays a tabbed interface which is new to us (instead ofdisplaying index.cshtml). It allows us to access documentation, connect to any service oreven decide on publishing options right from the start page.
If we look closely, we will notice that Visual Studio was silently restoringthe packages, and almost everything was part of a package in .NET Core.No more heavyweight framework which always loads tons of DLLs eventhough we don't require them! Now everything is broken into lighterpackages which we could utilize based on our requirements.
I know getting into MVC would be a little outside of the scope of this chapter, but let's diginto a few details before we deep dive into the Entity Framework.

Kickstart - Introduction to Entity Framework Core Chapter 1
[ 15 ]
Structuring the web appA .NET Core web application is composed of the following folders:
Dependencies: SDK, server, and client-side dependencieswwwroot: All static resources should reside hereConnected Services: To connect external services available in MarketplacelaunchSettings.json: Settings required to launch a web applicationappSettings.json: Configurations such as logging and connection stringsbower.json: Client-side dependencies should be configured herebundleConfig.json: Bundling is moved to the JSON configuration nowProgram.cs: Everything starts from Main() and any program can be made intoa web application using the WebHostBuilder APIStartup.cs: For adding and configuring startup services like MVC support,logging, static files support and so onControllers, Views: Part of MVC and contains actions and correspondingviews
The structure we had discussed so far is illustrated in the following screenshot:
ASP.NET Core Web Application structure

Kickstart - Introduction to Entity Framework Core Chapter 1
[ 16 ]
The following highlighted sections in Views\Shared\_Layout.cshtml should bemodified with the desired application name:
<!DOCTYPE html> <html> <head> <meta charset="utf-8" /> <meta name="viewport" content="width=device-width, initial-scale=1.0" /> <title>@ViewData["Title"] - MasteringEFCore.Web</title> ... </head> <body> <nav class="navbar navbar-inverse navbar-fixed-top"> <div class="container"> <div class="navbar-header"> ... <a asp-area="" asp-controller="Home" asp-action="Index" class="navbar-brand">MasteringEFCore.Web</a> ... <div class="container body-content"> ... <footer> <p>© 2017 - MasteringEFCore.Web</p> </footer> ... </body>
We have created a .NET Core web application with no authentication and explored thestructure of the project, which might help us understand MVC in .NET Core. If we expandthe dependencies, it is evident that we don't have built-in support for Entity Framework(EF) Core. We will look at the different ways of identifying and installing the packages.

Kickstart - Introduction to Entity Framework Core Chapter 1
[ 17 ]
Installing Entity FrameworkThe Entity Framework package should be installed as part of the NuGet package, and canbe done in the following ways:
Go to the Package Manager Console (Tools | NuGet Package Manager |1.Package Manager Console), select the project where the package should beinstalled:
Add the following command in the PM Console to install the package on the selectedproject:
Install-Package Microsoft.EntityFrameworkCore.SqlServer
The Package Manager Console will be opened as shown in the following screenshot, Kindly use this space toinstall the package using the preceding command:
PM console
Go to the Package Management tab (either from Tools or from2.Dependencies/Project).
For a solution-wide installation, and availability for all projects that arepart of the solution, go to Tools | NuGet Package Manager | ManageNuGet Packages for Solution... or right-click on the solution fromSolution Explorer and select Manage NuGet Packages for Solution...For project wise installation, right-click on dependencies fromthe desired project or right-click on the desired project andselect Manage NuGet Packages...

Kickstart - Introduction to Entity Framework Core Chapter 1
[ 18 ]
Search for Microsoft.EntityFrameworkCore.SqlServer, select the stable3.version 2.0.0 and install the package. It contains all the dependent packages aswell (key dependencies such as System.Data.SqlClient andMicrosoft.EntityFrameworkCore.Relational):
NuGet package manager window
We have looked at different ways of using the Package Manager console so far, andinstalled packages related to EF Core. In the next section, we will start building the schemaand later consume the created entities using EF.

Kickstart - Introduction to Entity Framework Core Chapter 1
[ 19 ]
Data modelsWhen we think about creating data models in the .NET world way before creating thedatabase, we are a little bit off the legacy track, and yes, it's been widely called the Code-First approach. Let's create entity classes using code-first for the Blogging application, andput them into the Models folder under the project.
Blog entityCreate a Blog.cs class file and include the following properties:
public class Blog { public int Id { get; set; } public string Url { get; set; } public ICollection<Post> Posts { get; set; } }
The Entity Framework will look for any property with the name Id or TypeNameId andmarks them as the primary key of the table. The Posts property is a navigation propertywhich contains Post items related to this Blog entity. It doesn't matter whether we useICollection<T> or IEnumerable<T> for the navigation property, EF will create acollection for us, HashSet<T> by default. We could also create a concrete collection usingList<T>.
Post entityCreate a Post.cs class file and include the following properties:
public class Post { public int Id { get; set; } public string Title { get; set; } public string Content { get; set; } public DateTime PublishedDateTime { get; set; } public int BlogId { get; set; } public Blog Blog { get; set; } }

Kickstart - Introduction to Entity Framework Core Chapter 1
[ 20 ]
The BlogId property is a foreign key created for the corresponding Blog navigationproperty. As you may notice in this case, we have an individual item as the navigationproperty, as opposed to a list in the Blog entity. This is where relationship type comes intothe picture, which we will be exploring more in Chapter 3, Relationships – Terminology andConventions.
EF will allow us to create an individual navigation property without anyforeign key in the entity. In those cases, EF will create a foreign key for usin the database table using the BlogId pattern (the Blog navigationproperty along with its Id primary key). EF will generate themautomatically for all navigational properties against the Id primary key,but it also allows us to name it differently and decorate it via a customattribute.
We have built the schema required for the application so far, but it was not configured inEF, so let's see how the data models get connected/configured with EF using databasecontext.
Database contextThe main entry point for EF would be any class that inherits theMicrosoft.EntityFrameworkCore.DbContext class. Let's create a class calledBlogContext and inherit the same. We will keep the context and other EF relatedconfigurations inside the Data folder. Create a Data folder in the project, and also createBlogContext.cs inside this folder:
public class BlogContext: DbContext { public BlogContext(DbContextOptions<BlogContext> options) : base(options) { }
public DbSet<Blog> Blogs { get; set; } public DbSet<Post> Posts { get; set; } }
EF interprets DbSet<T> as a database table; we have created a DbSet<T> property for allthe entities for our blogging system. We usually name the properties in plural form as theproperty will hold list of entities, and EF will be using those property names while creatingtables in the database.

Kickstart - Introduction to Entity Framework Core Chapter 1
[ 21 ]
Creating a DbSet for a parent entity is enough for EF to identify thedependent entities and create corresponding tables for us. EF will be usingplural form while deciding table names.
.NET developers and SQL developers debate plural table names and often end up creatingentities with two different conventions. As a framework, EF supports those scenarios aswell. We could override the default plural naming behavior using Fluent API. Refer to thefollowing Fluent API code:
public class BlogContext: DbContext { ... protected override void OnModelCreating(ModelBuilder modelBuilder) { modelBuilder.Entity<Blog>().ToTable("Blog"); modelBuilder.Entity<Post>().ToTable("Post"); } }
We have created a database context and configured the data models in it. You may noticewe cannot see any connection string pointing to the database. It could have been done usingthe OnConfiguring() method with a hard-coded connection string, but it would not be anideal implementation. Rather, we will use built-in dependency injection support from .NETCore to configure the same in the next section.
Registering the context in services (.NETCore DI)The dependency injection support in the ASP.NET framework came too late for the .NETdevelopers/architects who were seeking shelter from third-party tools such as Ninject,StructureMap, Castle Windsor, and so on. Finally, we gained support from ASP.NET Core.It has most of the features from the third-party DI providers, but the only difference is theconfiguration should happen inside the Startup.cs middleware.
First thing's first, let's configure the connection string in our new appSettings.json:
"ConnectionStrings": { "DefaultConnection": "Server (localdb)\\mssqllocaldb;Database=MasteringEFCoreBlog; Trusted_Connection=True;MultipleActiveResultSets=true" },

Kickstart - Introduction to Entity Framework Core Chapter 1
[ 22 ]
Then configure the context as a service (all service configuration goes into Startup.cs). Tosupport that, import MasteringEFCore.Web.Dataand Microsoft.EntityFrameworkCore in the Startup class. Finally, add the DbContextto the services collection by creating and including DbContextOptionsBuilder usingUseSqlServer():
public void ConfigureServices(IServiceCollection services) { // Add framework services. services.AddDbContext<BlogContext>(options => options.UseSqlServer(Configuration.GetConnectionString(" DefaultConnection"))); services.AddMvc(); }
We will be using a lightweight version of SQL Server called LocalDB fordevelopment. This edition was created with the intention of development,so we shouldn't be using it in any other environments. It runs with veryminimal configuration, so it's invoked while running the application. The.mdf database file is stored locally.
We have configured the database context using dependency injection, and at this stage, weare good to go. We are almost there. As of now, we have the schema required for thedatabase and the context for EF and services being configured. All of these will end upproviding an empty database with literally no values in it. Run the application and see thatan empty database is created. It will be of no use. In the next section, let's see how we canseed the database with master data/create tables with sample data, which can be consumedby the application.
Creating and seeding databasesWe have created an empty database, and we should have a mechanism by which we can seed the initial/master data that might be required by the web application. In our case,we don't have any master data, so all we can do is create a couple of blogs andcorresponding posts. We need to ensure whether the database was created or not before westart adding data to it. The EnsureCreated method helps us in verifying this. Create anew DbInitializer.cs class file inside the Data folder and include the following code:
public static void Initialize(BlogContext context) { context.Database.EnsureCreated(); // Look for any blogs.

Kickstart - Introduction to Entity Framework Core Chapter 1
[ 23 ]
if (context.Blogs.Any()) { return; // DB has been seeded } var dotnetBlog = new Blog { Url = "http://blogs.packtpub.com/dotnet" }; var dotnetCoreBlog = new Blog { Url = "http://blogs.packtpub.com/dotnetcore" }; var blogs = new Blog[] { dotnetBlog, dotnetCoreBlog }; foreach (var blog in blogs) { context.Blogs.Add(blog); } context.SaveChanges(); var posts = new Post[] { new Post{Id= 1,Title="Dotnet 4.7 Released",Blog = dotnetBlog, Content = "Dotnet 4.7 Released Contents", PublishedDateTime = DateTime.Now}, new Post{Id= 1,Title=".NET Core 1.1 Released",Blog= dotnetCoreBlog, Content = ".NET Core 1.1 Released Contents", PublishedDateTime = DateTime.Now}, new Post{Id= 1,Title="EF Core 1.1 Released",Blog= dotnetCoreBlog, Content = "EF Core 1.1 Released Contents", PublishedDateTime = DateTime.Now} }; foreach (var post in posts) { context.Posts.Add(post); } context.SaveChanges(); }
In Program.cs, initialize DbInitializer in Main() by creating the BlogContext usingdependency injection and pass the same to the DbInitializer.Initialize():
public static void Main(string[] args) { var host = BuildWebHost(args); using (var scope = host.Services.CreateScope())

Kickstart - Introduction to Entity Framework Core Chapter 1
[ 24 ]
{ var services = scope.ServiceProvider; try { var context = services.GetRequiredService<BlogContext>(); DbInitializer.Initialize(context); } catch (Exception ex) { var logger = services.GetRequiredService<ILogger<Program>>(); logger.LogError(ex, "An error occurred initializing the database."); } } host.Run(); }
One last piece of the puzzle is missing; we need to add migration whenever weadd/manipulate data models, without which EF doesn't know how the database needs to becreated/updated. The migration can be performed with the NuGet Package Managerconsole:
Add-Migration InitialMigration
The preceding statement allows EF to create a migration file with tables created from themodels configured in the DbContext. This can be done as follows:
Update-Database
The preceding statement applies the migration created to the database. At this moment weare almost done with the EF configuration. We should run the application and verify thedatabase regarding whether or not the proper schema and seed data were updated.

Kickstart - Introduction to Entity Framework Core Chapter 1
[ 25 ]
We could verify the table whether it contains seeded data using the following SQL ServerObject Explorer:
Database created successfully
We can see that the schema was created properly inside the MSSQLLocalDB instance, andwe should expand the tables and verify whether the seed data was updated or not. The seeddata of the Blog entity was updated properly, which was verified with the followingscreenshot:
Blog table created with configured schema and seed data

Kickstart - Introduction to Entity Framework Core Chapter 1
[ 26 ]
The seed data of the Post entity was updated properly, which was verified with thefollowing screenshot.
Post table created with configured schema and seed data
We have ensured that the database was created with the proper schema and seed data, andnow we should start consuming the entities. In the next section, let's see how we canconsume the entities in MVC using scaffolding rather than building everything on our own.
CRUD operationsCreating CRUD (Create/Read/Update/Delete) operations manually would take quite a longtime. It's a repetitive operation that could be automated. The process of automating thisCRUD operation is referred to as scaffolding:
Right-click on the Controllers folder and select Add | New Scaffolded Item.1.A dialog box will be shown to Add MVC Dependencies.2.Select Minimal Dependencies from the dialog box.3.Visual Studio adds the NuGet packages required to scaffold the MVC Controllerand includes the Microsoft.EntityFrameworkCore.Design and theMicrosoft.EntityFrameworkCore.SqlServer.Design packages. It alsoincludes ScaffoldingReadme.txt, which is not required. We could just deleteit.
Once the minimal setup is completed, we need to build/rebuild theapplication otherwise the same Add MVC Dependencies dialog will bedisplayed instead of the Add Scaffold dialog.
Kickstart - Introduction to Entity Framework Core Chapter 1
[ 27 ]
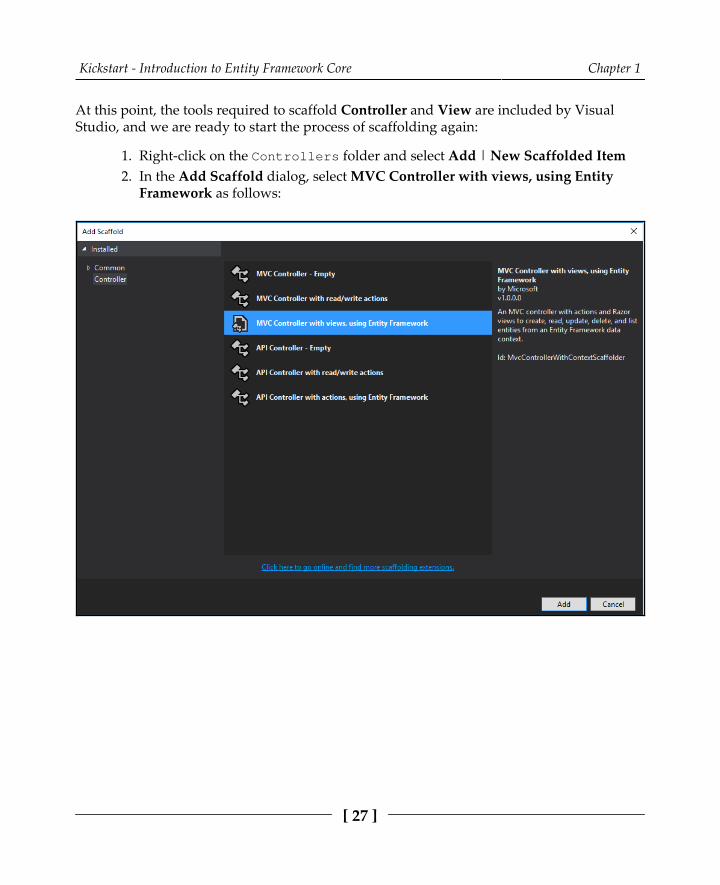
At this point, the tools required to scaffold Controller and View are included by VisualStudio, and we are ready to start the process of scaffolding again:
Right-click on the Controllers folder and select Add | New Scaffolded Item1.In the Add Scaffold dialog, select MVC Controller with views, using Entity2.Framework as follows:

Kickstart - Introduction to Entity Framework Core Chapter 1
[ 28 ]
In the Add Controller dialog, select the appropriate Model and Data context3.class (Blog and BlogContext in our case), along withthe BlogsController auto-generated controller name:

Kickstart - Introduction to Entity Framework Core Chapter 1
[ 29 ]
Click Add, shown as follows:4.
Scaffolded items
The scaffolded code includes the CRUD operation in the MVC Controllers and5.Views. Examining the scaffolded MVC code would be out of the scope of thischapter, so we will focus on the EF scaffolded part alone:
public class BlogsController : Controller { private readonly BlogContext _context; public BlogsController(BlogContext context) { _context = context; } // GET: Blogs public async Task<IActionResult> Index() { return View(await _context.Blogs.ToListAsync()); } ... }

Kickstart - Introduction to Entity Framework Core Chapter 1
[ 30 ]
In the preceding code block, you may notice that the dependency injection was6.used when passing the BlogContext (MasteringEFCoreBlog database context)to the controller, which was also used in the Index() action:
<div class="navbar-collapse collapse"> <ul class="nav navbar-nav"> <li><a asp-area="" asp-controller="Home" asp-action="Index">Home</a></li> <li><a asp-area="" asp-controller="Blogs" asp-action="Index">Blogs</a></li> ...
We need to update the navigation, as displayed in the preceding code, in7.Views\Shared\_Layout.cshtml, without which we won't be able to view theCRUD operations in the Blogs module. All set. Let's run and see the CRUDoperations in action:
Updated navigation menu with Blogs
The preceding screenshot is the home page of the ASP.NET Core web application. We havehighlighted the Blogs hyperlink in the navigation menu. The Blogs hyperlink would takethe user to the Index page, which would list all the blog items:

Kickstart - Introduction to Entity Framework Core Chapter 1
[ 31 ]
Blogs list
Let's try to create a blog entry in the system, as follows:
Creating a Blog

Kickstart - Introduction to Entity Framework Core Chapter 1
[ 32 ]
The Create page provides input elements required to populate the entity which needs to becreated, so let's provide the required data and verify it:
Blog detail page
The Details page displays the entity, and the preceding screenshot displays the entity thatwas just created. The Edit page provides input elements required and also pre-populateswith existing data, which could be edited by using and updating the data:
Editing a Blog

Kickstart - Introduction to Entity Framework Core Chapter 1
[ 33 ]
The Delete page provides a confirmation view that lets the users confirm whether or notthey would like to delete the item:
Deleting a Blog
This Delete page will be displayed when the user selectsthe Delete hyperlink in the item row on the list page. Instead of deletingthe blog directly from the action, we will be routing the user to the Deletepage to get confirmation before performing the action.
We have identified how to perform CRUD operations using EF Core; since exploring MVCwas out of the scope of this book. We stuck to analyzing scaffolding related to EF only.

Kickstart - Introduction to Entity Framework Core Chapter 1
[ 34 ]
SummaryWe started our journey with Entity Framework by knowing what difference it made whencompared with the legacy approach at a high level. We also looked at building the .NETenvironment and creating and configuring the .NET Core web application with EntityFramework. We explored NuGet packages and package manager, which will be extensivelyused in the entire book. We also identified and installed the packages required for theEntity Framework in this chapter. Using the Code-First approach, we built the schema,configured them with EF and created and seeded the database with schema and seed data.Finally, we consumed the built schema in our MVC application using the scaffolding tool(which was installed along the way), and also looked at the usage of the database context inthe controllers. The Code-First approach can be used for building new systems, but we needa different approach for existing systems. That's where the Database-First approach comesinto the picture. Let's explore this in Chapter 2, The Other Way Around – Database FirstApproach.

2The Other Way Around –Database First Approach
In Chapter 1, Kickstart - Introduction to Entity Framework Core, we were exposed to the EntityFramework (EF) Code-First approach, which might not be useful in all scenarios. We need aprovision to reverse engineer existing databases using EF Core, which guides us inperforming migrations and helps us in retaining model changes that won't be lost duringmigrations.
When EF was first released, it supported only the database-first approach, which means wecould use the framework only on the existing database. As opposed to the Code-First approach discussed in the previous chapter, the database-first approach will be widelyused while we decide to use EF in the existing system.
The topics we will cover here are:
Preparing the databaseCreating a new projectInstalling Entity FrameworkReverse engineering the databaseRegistering context in services (.Net Core DI)Performing CRUD operations

The Other Way Around – Database First Approach Chapter 2
[ 36 ]
Preparing the databaseWe will use the same blogging system used in Chapter 1, Kickstart - Introduction to EntityFramework Core. In this case, we will create SQL queries required for the existing databaseand then we will build our blogging system using the database-first approach. Let's writethe SQL query of Blog and Post, which were required for the blogging system.
Blog entity scriptWe will create a Blog table, then alter it to add a primary key constraint, and finally, insert some dummy data into the table. The complete script is available in the GitHub repositoryat https://github. com/ PacktPublishing/ Mastering- Entity- Framework- Core/ blob/master/Chapter%202/ Final/ MasteringEFCore. DatabaseFirst. Final/ dbo. Blog. sql.
The script required for creating the Blog table and inserting the data is displayed asfollows:
// Code removed for brevity CREATE TABLE [dbo].[Blog] ( [Id] INT IDENTITY (1, 1) NOT NULL, [Url] NVARCHAR (MAX) NULL ); GO // Code removed for brevity INSERT INTO [Blog] (Url) VALUES ('http://blogs.packtpub.com/dotnet'), ('http://blogs.packtpub.com/dotnetcore'), ('http://blogs.packtpub.com/signalr') GO
We have looked at the Blog table SQL script, now let's look at the Post table script that willintroduce a non-clustered index and foreign key.
Post entity scriptWe will create a Post table and a non-clustered index for better performance, later alter them to add a primary key and foreign key constraints, and finally, insert some dummydata into the table. The complete script is available in the GitHub repository at https:/ /github.com/PacktPublishing/ Mastering- Entity- Framework- Core/ blob/ master/Chapter%202/Final/ MasteringEFCore. DatabaseFirst. Final/ dbo. Post. sql.

The Other Way Around – Database First Approach Chapter 2
[ 37 ]
The script required for creating the Post table and inserting the data is displayed below:
// Code removed for brevity CREATE TABLE [dbo].[Post] ( [Id] INT IDENTITY (1, 1) NOT NULL, [BlogId] INT NOT NULL, [Content] NVARCHAR (MAX) NULL, [PublishedDateTime] DATETIME2 (7) NOT NULL, [Title] NVARCHAR (MAX) NOT NULL ); GO // Code removed for brevity INSERT INTO [Post] ([BlogId], [Title], [Content], [PublishedDateTime]) VALUES (1, 'Dotnet 4.7 Released', 'Dotnet 4.7 Released Contents', '20170424'), (2, '.NET Core 1.1 Released', '.NET Core 1.1 Released Contents', '20170424'), (2, 'EF Core 1.1 Released', 'EF Core 1.1 Released Contents', '20170424') GO
While inserting data time values, we should use the YYYYMMDD format,such as 20170424, and if we are tuned with the DD-MM-YYYY hh:mm:ssxm format, then we need to perform an explicit conversion, suchas convert(datetime,'24-04-2017 01:34:09 PM',5), otherwise wewould get the message, the conversion of a varchar data type to adatetime data type resulted in an out-of-range value.
We need to figure out how to execute the previous script using LocalDB:
Open the SQL Server Object Explorer from the View menu.1.Expand SQL Server and (localdb)\MSSQLLocalDB.2.Right-click on Databases and select Add New Database.3.In the Create Database dialog box, provide the Database Name as4.MasteringEFCoreDbFirst and Database Location as your project path, andclick OK.Expand Databases, right-click on the MasteringEFCoreDbFirst database, and5.select New Query.

The Other Way Around – Database First Approach Chapter 2
[ 38 ]
Copy the Blog.sql content and paste it into the New Query window, and click6.the execute icon or Ctrl+Shift+E:
The script execution of the Blog script is shown as follows:
Execute Blog.sql on the New Query window
Copy the Post.sql content and paste it in the New Query window, and click the7.execute icon or Ctrl+Shift+E:

The Other Way Around – Database First Approach Chapter 2
[ 39 ]
The script execution of the Post script is shown here:
Execute Post.sql on New Query window
We have prepared the database for the Database-First approach; now let's see how we couldleverage Entity Framework on the existing database.

The Other Way Around – Database First Approach Chapter 2
[ 40 ]
Creating new projectWe have exhaustively seen how to create a new project in Chapter 1, Kickstart - Introductionto Entity Framework Core. Kindly refer to the steps involved in creating the project and usethe following project information:
Project name: MasteringEFCore.DatabaseFirst
Solution name: MasteringEFCore
Installing Entity FrameworkThe Entity Framework package inclusion and the steps involved were alsodiscussed extensively in Chapter 1, Kickstart - Introduction to Entity Framework Core. So let'sfocus on the packages that are required for the reverse engineering (database-firstapproach). The basic package required for the Entity Framework to integrate with SQLServer is as follows:
Add the following command in the PM Console to install the following package:
Install-Package Microsoft.EntityFrameworkCore.SqlServer
We could also search and install the Microsoft.EntityFrameworkCore.SqlServerpackage using NuGet Package Manager window:
Microsoft.EntityFrameworkCore.SqlServer NuGet package
The packages required for the reverse engineering (auto-generating the models from thedatabase) are listed below, we could add the following command in the PM Console toinstall these packages:

The Other Way Around – Database First Approach Chapter 2
[ 41 ]
Install-Package Microsoft.EntityFrameworkCore.Tools Install-Package Microsoft.EntityFrameworkCore.SqlServer.Design
We could also search and install the preceding listed packages using NuGet PackageManager window as shown here:
Microsoft.EntityFrameworkCore.Tools NuGet package
Install the Microsoft.EntityFrameworkCore.Tools package. This package exposes theEntity Framework commands to the NuGet Package Manager console, with which wecould perform certain operations such as scaffolding database context:
Microsoft.EntityFrameworkCore.SqlServer.Design NuGet package

The Other Way Around – Database First Approach Chapter 2
[ 42 ]
Install the Microsoft.EntityFrameworkCore.SqlServer.Design package. Thispackage lets us scaffold the models from the SQL Server database.
At the time of writing,Microsoft.EntityFrameworkCore.SqlServer.Design 2.0.0 wasavailable only as a preview release.
We have installed the packages required to reverse engineer the existing database entities inEF Core. In the next section, we will start reverse engineering to configure EF Core againstthe database.
Reverse engineering the databaseReverse engineering can be performed on the NuGet Package Manager console. We have already seen how to open it, so just execute the following command to scaffold the contextand models files:
Scaffold-DbContext "Server (localdb)\mssqllocaldb;Database=MasteringEFCoreDbFirst; Trusted_Connection=True;" Microsoft.EntityFrameworkCore.SqlServer -OutputDir Models
Sometimes we might get errors stating that The package could not belocated. The workaround would be opening the project in a separatesolution. If we get an Unable to open the database error, then providingaccess in the SQL Management Studio (connecting the locals from thestudio) would resolve the issue. SQL Server Management Studio (SSMS)is a free version and can be downloaded from https:/ /docs. microsoft.com/en- us/ sql/ ssms/ download- sql- server- management- studio- ssms.

The Other Way Around – Database First Approach Chapter 2
[ 43 ]
Please refer to the following screenshot:
The scaffolding process generates database context files and corresponding data models (inour case, three files in total).
Configuring data contextThe auto-generated database context (which is presented in the following code) willinclude:
Virtual properties of the tables/entities to hold corresponding data.The OnConfiguring method, which will configure EF with the database.The OnModelCreating method, which will ensure certain constraints andrelationships are built while creating the database. It would not be used in ourdatabase-first approach as we already have them in place.
The database context should contain the following configuration:
public partial class MasteringEFCoreDbFirstContext : DbContext { public virtual DbSet<Blog> Blog { get; set; } public virtual DbSet<Post> Post { get; set; } protected override void OnConfiguring(DbContextOptionsBuilder optionsBuilder) { if (!optionsBuilder.IsConfigured) { // Move this connection string to config file later

The Other Way Around – Database First Approach Chapter 2
[ 44 ]
ptionsBuilder.UseSqlServer(@"Server= (localdb)\mssqllocaldb;Database=MasteringEFCoreDbFirst; Trusted_Connection=True;"); } } protected override void OnModelCreating(ModelBuilder modelBuilder) { modelBuilder.Entity<Post>(entity => { entity.HasIndex(e => e.BlogId).HasName("IX_Post_BlogId"); entity.Property(e => e.Title).IsRequired(); entity.HasOne(d => d.Blog).WithMany(p => p.Post) .HasForeignKey(d => d.BlogId); }); } }
In case you have noticed the warning, we need to remove the section using dependencyinjection, which will be performed in the Registering Context in Services (.NET CoreDI) section.
Working with the Blog entityWe have discussed in detail the Blog model in Chapter 1, Kickstart - Introduction to EntityFramework Core, but still, the following highlighted part looks pretty new to us:
The Blog() constructor initializes the Post property, which ensures that thecollection has a concrete HashSet list created and ready to accept any new itemsThe Post property has a virtual keyword, which instructs EF to lazy load thenavigational property Post:
public partial class Blog { public Blog() { Post = new HashSet<Post>(); } public int Id { get; set; } public string Url { get; set; } public virtual ICollection<Post> Post { get; set; } }

The Other Way Around – Database First Approach Chapter 2
[ 45 ]
There is nothing much to explore in the Blog class so, let's move on to the Post class.
Working with the Post entityIn Chapter 1, Kickstart - Introduction to Entity Framework Core, even the Post model wasdiscussed in detail, except we have a virtual Blog property, which is nothing but anavigational property:
public partial class Post { public int Id { get; set; } public int BlogId { get; set; } public string Content { get; set; } public DateTime PublishedDateTime { get; set; } public string Title { get; set; } public virtual Blog Blog { get; set; } }
We have seen the differences between the model created manually in Chapter 1, Kickstart -Introduction to Entity Framework Core, and the auto-generated models. Let's see how thedatabase context configuration could be made generic rather than hardcoding theconnection string inside the code.
Registering context in services (.NET CoreDI)The warning displayed inthe OnConfiguring(DbContextOptionsBuilder optionsBuilder) method needs tobe addressed. So let's remove that method (highlighted in the following code) and performconfiguration inside the Startup.cs file using dependency injection.

The Other Way Around – Database First Approach Chapter 2
[ 46 ]
Refactoring the OnConfiguring() methodIf we recap on how we have configured the database context, the auto-generated code had ahardcoded connection string used for configuration. To avoid it, we should have amechanism to pass on the database context options to the DbContext base class; let's seehow to do it:
public partial class MasteringEFCoreDbFirstContext : DbContext { public virtual DbSet<Blog> Blog { get; set; } public virtual DbSet<Post> Post { get; set; } protected override void OnConfiguring(DbContextOptionsBuilder optionsBuilder) { // Move this connection string to config file later optionsBuilder.UseSqlServer(@"Server= (localdb)\mssqllocaldb;Database=MasteringEFCoreDbFirst; Trusted_Connection=True;"); } }
Also include a constructor for the MasteringEFCoreDbFirstContext class, which willinitialize the DbContext through dependency injection from the Startup class:
public MasteringEFCoreDbFirstContext( DbContextOptions<MasteringEFCoreDbFirstContext> options) : base(options) { }
We have seen how to pass on the options to the database context base class, now we will seehow the options were configured with a connection string.
Refactoring the ConfigureServices methodWe will use the ConfigureServices() method to include the database context frameworkservice to the service collection. Add the following using statements to configure theDbContext options and to add database context to the services list:
using Microsoft.EntityFrameworkCore; using MasteringEFCore.DatabaseFirst.Final.Models;

The Other Way Around – Database First Approach Chapter 2
[ 47 ]
As we did in Chapter 1, Kickstart - Introduction to Entity Framework Core, we will configurecontext as a service and add DbContext (created usingUseSqlServer() through DbContextOptionsBuilder) to the services collection:
public void ConfigureServices(IServiceCollection services) { // Add framework services. services.AddDbContext<MasteringEFCoreDbFirstContext>(options => options.UseSqlServer(Configuration.GetConnectionString( "DefaultConnection"))); services.AddMvc(); }
We have configured the database context in the framework, but if we watch closely, we seethat the connection string is coming from a configuration. Next, we will see how theconfiguration is included in appsettings.json.
The appsettings.json settingThe application settings, as we explored earlier, are based on JSON, and in order to includea setting, we need to add a JSON key-value pair. In our case, ConnectionStrings is thekey and the value is again a JSON object that defines DefaultConnection:
{ "ConnectionStrings": { "DefaultConnection": "Server= (localdb)\\mssqllocaldb;Database=MasteringEFCoreDbFirst; Trusted_Connection=True;MultipleActiveResultSets=true" }, "Logging": { "IncludeScopes": false, "LogLevel": { "Default": "Warning" } } }

The Other Way Around – Database First Approach Chapter 2
[ 48 ]
In this section, we have configured the database context in the ConfigureServices()method and also leveraged appsettings.json to make the connection configurable. Atthis point, all the configuration necessary is completed and EF is ready to consume thedatabase for further implementation. Let's see how the CRUD operations could beperformed using EF (we have already seen them in Chapter 1, Kickstart - Introduction toEntity Framework Core, but still, we will explore a few parts with respect to rendering thatwhich were not covered earlier).
Performing CRUD operationsWe have already seen how to create CRUD operations right from scaffolding controllersto their corresponding views for the Blog model, so we will create them for the Post modelin this section:
Right-click on the Controllers folder and select Add | New Scaffolded Item.1. Add Scaffold dialog box, select MVC Controller with views, using Entity2.Framework:

The Other Way Around – Database First Approach Chapter 2
[ 49 ]
In the Add Controller dialog box, select the appropriate Model class and Data3.Context class (Post and MasteringEFCoreDbFirstContext in our case) alongwith the auto-generated controller name, PostsController:

The Other Way Around – Database First Approach Chapter 2
[ 50 ]
Next click Add as shown in the following screenshot:4.
Scaffolded items
The Blog URL should be displayed instead of the Blog ID, which was partof the scaffolding. As displaying the ID raises security issues and usabilityconcerns, let's change this mapping to URL.
Let's start our changes from the Index.cshml file, where we have listed Blog.Id insteadof Blog.Url:
@foreach (var item in Model) { <tr> ... <td> //@Html.DisplayFor(modelItem => item.Blog.Id) @Html.DisplayFor(modelItem => item.Blog.Url) </td> </tr> }

The Other Way Around – Database First Approach Chapter 2
[ 51 ]
The changes are reflected on the screen, where we can see Blog URLs rendered instead ofthe IDs that were listed before:
Posts list view
We have scaffolded CRUD operations and modified Blog ID usage to URLs in the Postindex action. Let's update the same on the other actions as well.
Creating controller actionThe changes we made in the previous section need to be updated inthe SelectList collection, which will be used by MVC to render the drop-down list. Bydefault, MVC scaffolding provides a SelectList (we have commented on that line) thathas Id in the Value field and needs to be modified to Url, otherwise it will display onlynumeric values on the screen (a serious security issue and not so user-friendly):
public IActionResult Create() { //ViewData["BlogId"] = new SelectList(_context.Blog, "Id", "Id"); ViewData["BlogId"] = new SelectList(_context.Blog, "Id", "Url"); return View(); }
The following screenshot shows the Url mapped to the BlogId control, but there issomething additional that needs to be fixed. The BlogId should be either just Blog or BlogURL.

The Other Way Around – Database First Approach Chapter 2
[ 52 ]
I will leave this part as an exercise, kindly make changes to all the labels associated with theBlogId column:
Posts create view
The same change needs to be applied to the Post action of Create as well:
[HttpPost] [ValidateAntiForgeryToken] public async Task<IActionResult> Create([Bind("Id,BlogId,Content,PublishedDateTime,Title")] Post post) { ... ViewData["BlogId"] = new SelectList(_context.Blog, "Id", "Url", post.BlogId); return View(post); }
The Other Way Around – Database First Approach Chapter 2
[ 53 ]
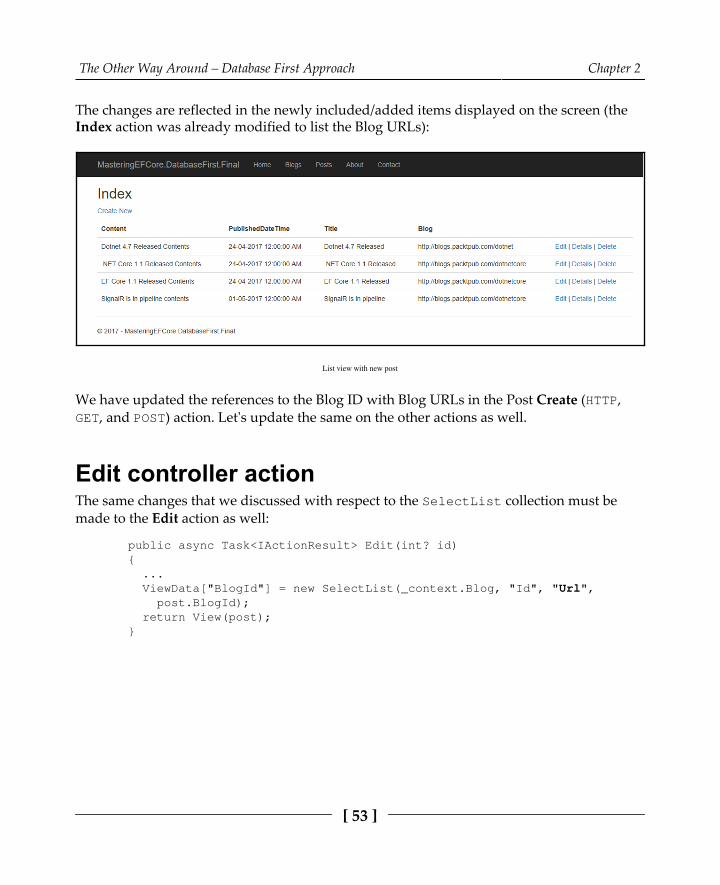
The changes are reflected in the newly included/added items displayed on the screen (theIndex action was already modified to list the Blog URLs):
List view with new post
We have updated the references to the Blog ID with Blog URLs in the Post Create (HTTP,GET, and POST) action. Let's update the same on the other actions as well.
Edit controller actionThe same changes that we discussed with respect to the SelectList collection must bemade to the Edit action as well:
public async Task<IActionResult> Edit(int? id) { ... ViewData["BlogId"] = new SelectList(_context.Blog, "Id", "Url", post.BlogId); return View(post); }

The Other Way Around – Database First Approach Chapter 2
[ 54 ]
The following screenshot shows the URL mapped to the BlogId control, and as part ofthe exercise, kindly make changes to the BlogId label with the literal changes you made inthe Creating controller action section:
Edit a post
The same change needs to be applied to the Post action of Edit as well:
[HttpPost] [ValidateAntiForgeryToken] public async Task<IActionResult> Edit(int id, [Bind("Id,BlogId,Content,PublishedDateTime,Title")] Post post) { ... ViewData["BlogId"] = new SelectList(_context.Blog, "Id", "Url", post.BlogId); return View(post); }

The Other Way Around – Database First Approach Chapter 2
[ 55 ]
The changes were reflected in the updated item that was displayed on the screen:
List view with edited post
We have updated the references to the Blog ID with Blog URLs in the Post Edit (HTTP, Get,and Post) action. Let's update this on the remaining DELETE action.
The Delete viewBlog.Url should be displayed instead of Blog ID in the Delete view as well:
<dl class="dl-horizontal"> ... <dd> @Html.DisplayFor(model => model.Blog.Url) </dd> </dl>

The Other Way Around – Database First Approach Chapter 2
[ 56 ]
The changes were reflected on the Delete confirmation screen that now displays the BlogURL instead of the Blog ID:
Delete a post
The Post list page doesn't display the deleted item, which ensures that the data has beendeleted from the table:
List view after deleting a post

The Other Way Around – Database First Approach Chapter 2
[ 57 ]
We have identified certain missing pieces of the puzzle in the CRUD operations that werecovered in Chapter 1, Kickstart - Introduction to Entity Framework Core because there is no specific change that needs to be addressed in the database-first approach.
SummaryWe have learned how to leverage Entity Framework on an existing system that has a livedatabase (for illustrative purposes, we have created SQL scripts to create and simulate anexisting database). We have explored NuGet packages that expose the APIs required toreverse engineer the database (including database context and corresponding data models).Finally, we have consumed the existing database in our MVC application using thescaffolding tool (which was installed on the way), and have also seen the changesrequired to the auto-generated code (which were not covered in Chapter 1, Kickstart -Introduction to Entity Framework Core). The database-first approach was just a mechanismused for building existing systems (leveraging EF in the existing system). So far, we haveused relationships (new or existing ones), but haven't figured out the relationshipssupported by Entity Framework. Let's explore them in Chapter 3, Relationships –Terminology and Conventions.

3Relationships – Terminology
and ConventionsIn Chapter 2, The Other Way Around – Database First Approach, we re-engineered the existingdatabase using Entity Framework's Database-First approach. Let's now start to understandthe terminologies and conventions used in relationships.
Entities are of no use if we don't give them an identity. The relationship terms we will beexploring in this chapter will provide an identity for the entities, which not only describesthem, but also helps us in creating relationships between different entities.
The topics we will cover in this chapter are:
Understanding relationship terms:Data modelsPrincipal entityPrincipal keyDependent entityForeign keyNavigation property
Conventions in a relationship:Fully-defined relationshipsNo foreign key propertySingle navigation propertyForeign keyInverse property

Relationships – Terminology and Conventions Chapter 3
[ 59 ]
Understanding relationship termsWe have created and used data models or entities so far, but we haven't figured out howthey are related. Let's understand how they are related and the terminologies used for thoserelationships.
Data modelsWe will revisit the data models we created and consumed in Chapter 1, Kickstart -Introduction to Entity Framework Core (using the Code-First approach), which could be usedto understand the relationship terminologies. For illustration purposes, we will tweak thoseobjects to understand different terminologies that were not used in the system.
Blog entityThe Blog entity/data model we created using the Code First approach is displayed asfollows:
public class Blog { public int Id { get; set; } public string Url { get; set; } public ICollection<Post> Posts { get; set; } }
We will be using the Blog model to understand the following:
Principal entityPrincipal keyNavigational property
The Post entityThe Post entity/data model we created using the Code-First approach is displayed asfollows:
public class Post { public int Id { get; set; } public string Title { get; set; } public string Content { get; set; }

Relationships – Terminology and Conventions Chapter 3
[ 60 ]
public DateTime PublishedDateTime { get; set; } public int BlogId { get; set; } public Blog Blog { get; set; } }
We will be using the Post model to understand the following:
Dependent entityForeign keyNavigational propertyReference navigation propertyInverse navigation property
As part of the Data model section, we captured key relationship terms in their appropriatemodels, now we will focus on each one of them in detail.
Principal entityThe entity that will serve as a parent in a relationship is termed a principal entity. In thedatabase world, this entity holds the primary key that will be used by the dependententities in building relationships. Consider the following diagram:
In our blogging system, the Blog entity serves as a parent to the Post entity, hence wecould conclude Blog is the principal entity. The relationship we have between the two entities could be termed as an Association. Consider the following diagram:

Relationships – Terminology and Conventions Chapter 3
[ 61 ]
In our blogging system, the Person entity serves as a parent to the User entity, hence wecould conclude Person is the Principal entity. The relationship we have between the two entities could be termed a Containment. Consider the following diagram:
We have seen the principal entity; let's explore the key of the relationships built using aprincipal entity in the next section.
Principal keyThe parent entity needs a unique key to associate itself with the child, and the key used forthis purpose is termed as the principal key. In our blogging system, the Id property of theBlog entity would be the unique key/principal key of the blog entry/item that will be usedby the dependent Post entity to build a relationship with the Blog entity:
public class Blog { public int Id { get; set; } public string Title { get; set; } public string Subtitle { get; set; } public string Url { get; set; } public string Description { get; set; } public DateTime CreatedAt { get; set; } public DateTime ModifiedAt { get; set; } public int CreatedBy { get; set; } public int ModifiedBy { get; set; } public ICollection<Post> Posts { get; set; } }
The Blog table design is shown as follows. In the table design, the highlighted Id fieldwould be the unique primary key of the table:

Relationships – Terminology and Conventions Chapter 3
[ 62 ]
Apart from the primary key, there is a possibility that a non-primary key could be used inbuilding relationships, which could be termed an alternate key. In our blogging system, theUrl property of the Blog entity could be an alternate key for building relationships:
We have seen the principal key, which defines the relationships built using the principalentity; let's explore the dependent entity in the next section.

Relationships – Terminology and Conventions Chapter 3
[ 63 ]
Dependent entityThe entity that cannot survive on its own (always dependent on its parent) ends up being achild. In a relationship, this would be termed a Dependent entity. Consider the followingdiagram:
In our blogging system, the Post entity depends on the Blog entity (posts are made for thecorresponding blog, so without a blog entry the post wouldn't exist), hence we couldconclude Post is the dependent entity. In the database world, this entity holds a foreign keythat will hold the reference to the primary entity in the relationships. This is depicted in thefollowing diagram:
In our blogging system, the User entity depends on the Person entity, hence we couldconclude User is the dependent entity. This is depicted in the following diagram:

Relationships – Terminology and Conventions Chapter 3
[ 64 ]
We have seen the dependent entity; let's explore the key of the relationships built using thedependent entity in the next section.
Foreign keyThe child entity needs a unique key to associate itself with the parent. The key usually holdsthe value of the principal key to mark its relationship with the parent and is termed aforeign key. In our blogging system, the BlogId property of the Post entity holds thereference to the parent unique key/principal key to denote the relationship with the Blogentity:
public class Post { public int Id { get; set; } public string Title { get; set; } public string Content { get; set; } public string Summary { get; set; } public DateTime PublishedDateTime { get; set; } public string Url { get; set; } public long VisitorCount { get; set; } public DateTime CreatedAt { get; set; } public DateTime ModifiedAt { get; set; } public int CreatedBy { get; set; } public int ModifiedBy { get; set; } public int BlogId { get; set; } public Blog Blog { get; set; } public int AuthorId { get; set; } public User Author { get; set; } public int CategoryId { get; set; } public Category Category { get; set; } public ICollection<TagPost> TagPosts { get; set; } public ICollection<Comment> Comments { get; set; } }

Relationships – Terminology and Conventions Chapter 3
[ 65 ]
In database terminology, we would still call the property a foreign key. The Post tabledesign is shown as follows. In the design, the highlighted BlogId field would be theforeign key of the table:
We have seen the foreign key, which defines the relationships built using the dependententity. Let's explore navigation properties, which define the direction or nature ofrelationships, in the next section.
Navigation propertyA property that can be defined as either a principal entity or dependent entity, whether it'sreferring to its parent or holding one or many dependent entities to it, is called thenavigation property. We can see that it just holds the references to both parent and childbut in a different way, so we could categorize them as the following:
Collection navigation propertyReference navigation propertyInverse navigation property
Let's explore the types of navigation property in detail.

Relationships – Terminology and Conventions Chapter 3
[ 66 ]
Collection navigation propertyWe can work out what it actually does from its name, it holds a collection of dependententities (or references to a list of dependent items) and it always holds references tomultiple items. In our blogging system, the Posts property of the Blog entity could betreated as a collection navigation property:
public class Blog { ... // code removed for brevity public ICollection<Post> Posts { get; set; } }
The Blog and Post class diagrams are displayed as follows. In the design, the highlightedPosts field in the Blog entity would be the collection navigation property:
We have seen the property that holds the child collection; let's explore how the dependententity holds a reference to its parent in the next section.

Relationships – Terminology and Conventions Chapter 3
[ 67 ]
Reference navigation propertyWe can work out what it actually does from its name. Yes, it holds a reference to its parententity and it always holds a reference to a single item. In our blogging system, the Blogproperty of the Post entity could be treated as a reference navigation property:
public class Post { ... // code removed for brevity public int BlogId { get; set; } public Blog Blog { get; set; } }
The Blog and Post class diagrams are shown as follows. In the design, the highlightedBlog field in the Post entity would be the reference navigation property:
We have seen the property that holds the reference to its parent, and it causes someconfusion as to what the inverse navigation property will be.

Relationships – Terminology and Conventions Chapter 3
[ 68 ]
Inverse navigation propertyYou guessed it, this is a little bit tricky as it always refers to the other end of therelationship. In our blogging system, the Blog property of the Post entity could be treatedas an inverse navigation property of the Posts property of the Blog entity:
public class Post { ... // code removed for brevity public Blog Blog { get; set; } }
This is also true vice versa, which means the Posts property of the Blog entity could betreated as an inverse navigation property of the Blog property of the Post entity:
public class Blog { ... // code removed for brevity public ICollection<Post> Posts { get; set; } }
The Blog and Post class diagrams are shown as follows. In the design, the highlightedBlog field in the Post entity and the Posts field in the Blog entity would be the inversenavigation properties:

Relationships – Terminology and Conventions Chapter 3
[ 69 ]
We have explored different relationship terms so far; let's explore the conventions availablein a relationship in the next section.
Conventions in a relationshipBy now, we should be able to say that relationships are identified by Entity Frameworkwhile it is analyzing our data model. So, from the preceding section, it is evident that weshould have a navigation property in both the entities for a relationship.
While analyzing the relationship, Entity Framework can only identify aprimary key on its own. But, if we use an alternate key for a relationship,then explicitly we should mark it as the principal key using the FluentAPI. In our blogging system, the implementation in OnModelCreatingwould be as follows:modelBuilder.Entity<Post>().HasOne(p => p.Blog).WithMany(b => b.Posts).HasForeignKey(p => p.BlogUrl).HasPrincipalKey(b => b.Url);
It's also evident that, for any relationship, we need a property that should be against a datamodel and not a scalar datatype (it would be ignored by EF for relationships).
Fully-defined relationshipsA relationship that contains all properties/terminologies seen in the previous section couldbe termed a fully-defined relationship. To be precise, it should have navigationalproperties on both entities involved in a relationship, and the dependent entity should havea foreign key property as well:
public class Blog { ... // code removed for brevity public ICollection<Post> Posts { get; set; } } public class Post { ... // code removed for brevity public int BlogId { get; set; } public Blog Blog { get; set; } }

Relationships – Terminology and Conventions Chapter 3
[ 70 ]
The Blog and Post class diagrams are shown as follows. In the design, the highlightedproperties would be the navigational properties:
The Blog field in the Post entity and the Posts field in the Blog entity would bethe inverse navigation propertiesThe Blog field in the Post entity would be the reference navigation propertyThe preceding two navigation properties complete the relationship, so it's called afully-defined relationship
The following diagram illustrates fully-defined relationship between Blog and Postentities:
The data models we have used so far have a fully-defined relationship. We will tweak thesedata models to illustrate the other conventions in future sections.
Fully-defined relationships - under the hoodThe EF Core uses the mechanism internally for creating relationship between entities basedon the following scenarios:

Relationships – Terminology and Conventions Chapter 3
[ 71 ]
If the two entities have navigation properties pointing to each other; EF willconfigure them as inverse navigation properties
In the following code, the Posts property of the Blog entity andthe Blog property of the Post entity would be configured as inverse navigationproperties:
public class Blog{ // Code removed for brevity public ICollection<Post> Posts { get; set; }}public class Post{ // Code removed for brevity public Blog Blog { get; set; }}
The following image illustrates the relationship created based on the navigationalproperties:
EF will consider the property a foreign key if the naming convention usesprincipal entity name with primary key property name:

Relationships – Terminology and Conventions Chapter 3
[ 72 ]
In the following code, the principal entity Blog, with its primary key Id, will havethe foreign key BlogId in the Post entity:
public class Blog{ public int Id { get; set; } // Code removed for brevity}public class Post{ // Code removed for brevity public int BlogId { get; set; }}
The following image illustrates the how a foreign key is created in Post entity:
EF will create a foreign key relationship if the principal entity primary keymatches the dependent entity reference key.

Relationships – Terminology and Conventions Chapter 3
[ 73 ]
In the following code, the primary key BlogId of the Blog entity will have the foreignkey BlogId in the Post entity:
public class Blog { public int BlogId { get; set; } // code removed for brevity } public class Post { // code removed for brevity public int BlogId { get; set; } }
The following image illustrates foreign key is related with its matching principal entity'sidentifier:
EF will create a foreign key

Relationships – Terminology and Conventions Chapter 3
[ 74 ]
In the following code, the SomeBlog navigation property of the Post entity with theprimary key Id of the Blog entity will have the foreign key SomeBlogId in the Post entity:
public class Blog{ public int Id { get; set; } // code removed for brevity}public class Post{ // code removed for brevity public Blog SomeBlog { get; set; } public int SomeBlogId { get; set; }}
The following image illustrates foreign key is based on dependent entity's navigationproperty name:
We have explored a fully-defined relationship with the different naming conventionsexpected by EF on identifying the relationship; let us see about other conventions in thecoming sections.

Relationships – Terminology and Conventions Chapter 3
[ 75 ]
No foreign key propertyWe usually create entities using fully-defined relationships, but this is not expected byEntity Framework. In a relationship, the foreign key is not required, but it is recommended to have one:
The following code does not contain foreign key in the Post entity and still the relationshipis formed:
public class Blog { // code removed for brevity public ICollection<Post> Posts { get; set; } } public class Post { // code removed for brevity // Foreign key BlogId was removed from here public Blog Blog { get; set; } }
The following image illustrates that without foreign key, the relationship is built:

Relationships – Terminology and Conventions Chapter 3
[ 76 ]
We have removed the BlogId foreign key from the Post entity, and it still works asexpected.
No foreign key property - under the hoodThe relationship works even if the foreign key is not available because Entity Frameworkcreates a shadow property for us. It follows the naming convention of navigationalproperty with primary key name:
In the following code the foreign key in the Post entity is injected by the framework:
public class Blog { ... // code removed for brevity public ICollection<Post> Posts { get; set; } } public class Post { ... // code removed for brevity public int BlogId { get; set; } // shadow property created by EF public Blog Blog { get; set; } }
The following image illustrates that foreign key is injected by the framework:

Relationships – Terminology and Conventions Chapter 3
[ 77 ]
We did something different from the conventional entities removed the foreign key fromthe navigational properties, but still, the relationship worked as expected. Let us see whatother parts can be removed in the coming sections.
Single navigation propertyIn the same way we removed the foreign key from the entity, we could remove a navigationproperty completely from an entity and the relationship would still work. In a relationship,the navigation property is not required in the dependent entity, meaning that having asingle navigation property on a principal entity is more than sufficient:
In the following code, both the foreign key and navigation property were removed and stillrelationship works as expected:
public class Blog { ... // code removed for brevity public ICollection<Post> Posts { get; set; } } public class Post { ... // code removed for brevity // Foreign key "BlogId" and navigation property "Blog" was removed here }
The following image illustrates that both foreign key and navigation key were removedfrom the entity:

Relationships – Terminology and Conventions Chapter 3
[ 78 ]
We have removed the Blog navigation property from the Post entity, and it still works asexpected.
Foreign keyWe could use a different naming convention for a foreign key and still map that foreign key against the navigation property (using the ForeignKey data annotation does the trick). In arelationship, a navigation property is not required in the dependent entity, meaning thathaving a single navigation property on a principal entity is more than sufficient:
In the following code, the custom foreign key is mapped against the navigation property:
public class Blog { ... // code removed for brevity public ICollection<Post> Posts { get; set; } } public class Post { ... // code removed for brevity public int BlogSomeId { get; set; } [ForeignKey("BlogSomeId")] public Blog Blog { get; set; } }

Relationships – Terminology and Conventions Chapter 3
[ 79 ]
The following image illustrates that the custom foreign key is mapped against thenavigation property:
We have modified the foreign key to BlogSomeId and configured it against the navigationproperty which is the Blog of the Post entity, and it still works as expected.
Inverse propertyIf we have more than one navigation property in an entity, it makes sense to use an inverseproperty to pair the navigational properties for a relationship. There will be occurrenceswhere even though we have a fully-defined relationship, we still need an inverse propertyin order to pair up the navigational properties due to custom naming conventions that don'tfall into any of EF's discovery mechanisms:
In the following code, the custom foreign key and navigation property were configured inthe inverse navigation property:
public class Blog { ... // code removed for brevity [InverseProperty("SomeBlog")] public ICollection<Post> SomePosts { get; set; } } public class Post { ... // code removed for brevity public int SomeBlogId { get; set; } public Blog SomeBlog { get; set; } }

Relationships – Terminology and Conventions Chapter 3
[ 80 ]
The following image illustrates that the custom foreign key and navigation property wereconfigured in the inverse navigation property:
We have introduced the SomeBlog inverse property in the Blog entity, which pairs withthe SomeBlog navigation property of the Post entity.
SummaryIn this chapter, we were introduced to the terminologies and conventions used forrelationships in Entity Framework. We started right from a fully-defined relationship, andfrom there we started trimming the relationship, but still made the relationship work.Finally, we customized and paired up navigational properties with customized properties,and still made the relationship work. This chapter has introduced us to relationships (wealso had a peek at the Fluent API), but we didn't get the chance to understand differentrelationships. Let's explore them in Chapter 4, Building Relationships – UnderstandingMapping.

4Building Relationships –Understanding Mapping
In Chapter 3, Relationships – Terminology and Conventions, we studied terminologies andconventions used in a relationship; let's start using them in building relationships. We havebeen using only Blog and Post entities so far, which doesn't do any good to the bloggingsystem. Let's expand them to other entities such as Comment, Tag, and so on, and we willleverage them to understand the relationships as well.
The relationship was introduced right from the initial Entity Framework (EF) version, butthere was a limitation on the bi-directional relationship. In the matured framework, wehave support for multiplicity, enabling that multiple entities can be related together.
The topics we will cover in this chapter are:
Relationships:One-to-oneOne-to-manyMany-to-many
Fluent API:Identifying navigation property and inverse navigationIdentifying single navigation propertyRelationship-building techniquesCascade delete
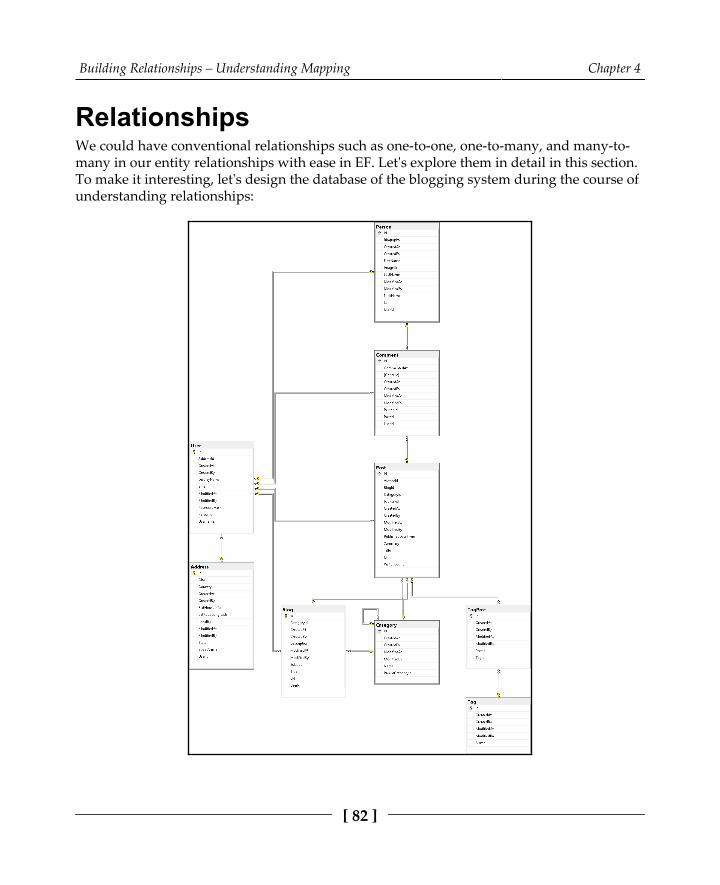
Building Relationships – Understanding Mapping Chapter 4
[ 82 ]
RelationshipsWe could have conventional relationships such as one-to-one, one-to-many, and many-to-many in our entity relationships with ease in EF. Let's explore them in detail in this section.To make it interesting, let's design the database of the blogging system during the course ofunderstanding relationships:

Building Relationships – Understanding Mapping Chapter 4
[ 83 ]
We have seen the proposed design of the blogging system; now let's learn about therelationships and how they could be built using the same design.
The one-to-one relationshipWe need a new entity to explain the one-to-one relationship, as the existing entities don'thave the provision to explain the same. So let's pick the Address entity from the proposed design and see how the one-to-one relationship is built:
The code illustrating one-to-one relationship between User and Address entities was listedas follows:
public class User { public int Id { get; set; } public string DisplayName { get; set; } public string Username { get; set; } public string PasswordHash { get; set; } public string Email { get; set; } public DateTime CreatedAt { get; set; } public DateTime ModifiedAt { get; set; } public int CreatedBy { get; set; } public int ModifiedBy { get; set; } public ICollection<Blog> Blogs { get; set; } public ICollection<Post> Posts { get; set; } public ICollection<Comment> Comments { get; set; } public int? AddressId { get; set; } public Address Address { get; set; } public int PersonId { get; set; } public Person Person { get; set; } }
public class Address { public int Id { get; set; } public string FlatHouseInfo { get; set; } public string StreetName { get; set; } public string Locality { get; set; } public string City { get; set; } public string State { get; set; } public string Country { get; set; } public string LatitudeLongitude { get; set; } public DateTime CreatedAt { get; set; } public DateTime ModifiedAt { get; set; } public int CreatedBy { get; set; }

Building Relationships – Understanding Mapping Chapter 4
[ 84 ]
public int ModifiedBy { get; set; } public int UserId { get; set; } public User User { get; set; } }
As you will notice, we have only a reference navigation property on both the User andAddress entities, and additionally, a foreign key is introduced to allow EF to differentiatebetween the principal and dependent entities.
In the following diagram, the foreign key UserId is mapped against the Id primary keywhich has one-to-one relationship:
The User entity's Id primary key highlighted below is used as a foreign key in Addressentity to form one-to-one relationship:

Building Relationships – Understanding Mapping Chapter 4
[ 85 ]
We have identified the provision, the UserId field that will allow the entity to configure therelationship. Let us build the relationship using the Fluent API in the next section.
Building one-to-one relationships using the Fluent APIWe could configure the relationship using the Fluent API with the HasOne, WithOne, andHasForeignKey methods. The HasForeignKey method needs to be generic in a one-to-onerelationship (a one-to-many relationship doesn't require this) since we need to explicitlymark the dependent type. In our case, we have specified the Address entity for the foreignkey:
protected override void OnModelCreating(ModelBuilder modelBuilder) { modelBuilder.Entity<Blog>().ToTable("Blog"); modelBuilder.Entity<Post>().ToTable("Post"); modelBuilder.Entity<User>() .ToTable("User") .HasOne(x=>x.Address) .WithOne(x=>x.User) .HasForeignKey<Address>(x=>x.UserId); modelBuilder.Entity<Address>().ToTable("Address"); }

Building Relationships – Understanding Mapping Chapter 4
[ 86 ]
The Fluent API configuration will provide us with the expected relationship, which isreflected in the following database diagram. The one-to-one relationship is now builtbetween the User and Address entities, except the AddressId field would be optional asit's not mandatory while creating a user, but a user is required to create an address:
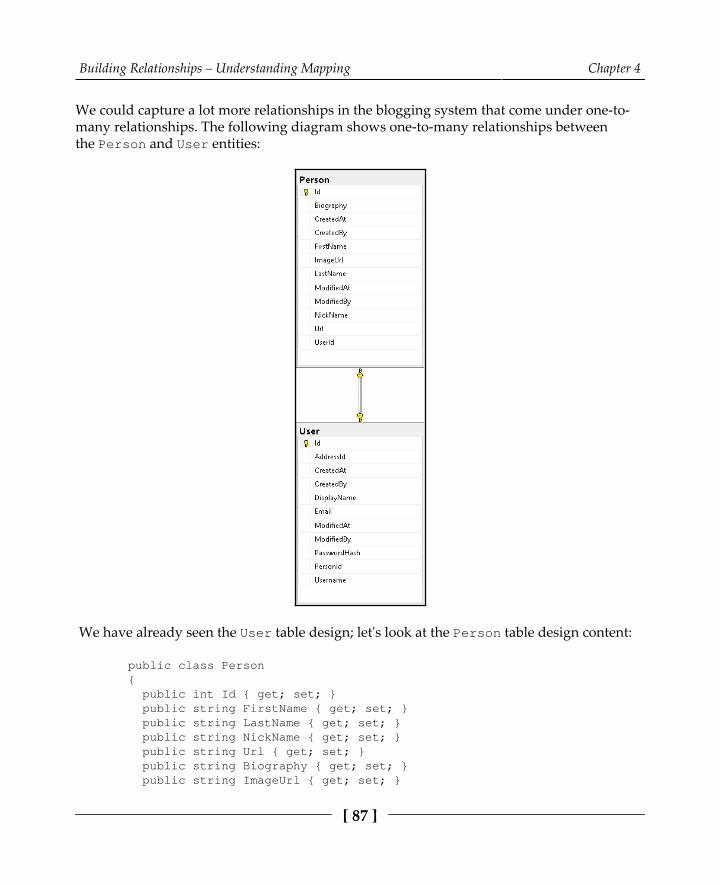
Building Relationships – Understanding Mapping Chapter 4
[ 87 ]
We could capture a lot more relationships in the blogging system that come under one-to-many relationships. The following diagram shows one-to-many relationships betweenthe Person and User entities:
We have already seen the User table design; let's look at the Person table design content:
public class Person { public int Id { get; set; } public string FirstName { get; set; } public string LastName { get; set; } public string NickName { get; set; } public string Url { get; set; } public string Biography { get; set; } public string ImageUrl { get; set; }

Building Relationships – Understanding Mapping Chapter 4
[ 88 ]
public DateTime CreatedAt { get; set; } public DateTime ModifiedAt { get; set; } public int CreatedBy { get; set; } public int ModifiedBy { get; set; } public int? UserId { get; set; } public User User { get; set; } public ICollection<Comment> Comments { get; set; } }
We have looked at the one-to-one relationship in this section. Let us explore the one-to-many relationship in the next section.
The one-to-many relationshipSo far, the illustrations carried out between the Blog and Post entities have had a one-to-many relationship. If we watch closely, we might be able to figure it out; the Blog entity is the principal entity and the Post entity is the dependent entity where the Blog entity cancontain one or more posts (violà! one-to-many was already in place):
public class Blog { public int Id { get; set; } public string Title { get; set; } public string Subtitle { get; set; } public string Url { get; set; } public string Description { get; set; } public DateTime CreatedAt { get; set; } public DateTime ModifiedAt { get; set; } public int CreatedBy { get; set; } public int ModifiedBy { get; set; } public ICollection<Post> Posts { get; set; } }
public class Post { public int Id { get; set; } public string Title { get; set; } public string Content { get; set; } public string Summary { get; set; } public DateTime PublishedDateTime { get; set; } public string Url { get; set; } public long VisitorCount { get; set; } public DateTime CreatedAt { get; set; } public DateTime ModifiedAt { get; set; } public int CreatedBy { get; set; }

Building Relationships – Understanding Mapping Chapter 4
[ 89 ]
public int ModifiedBy { get; set; } public int BlogId { get; set; } public Blog Blog { get; set; } public int AuthorId { get; set; } public User Author { get; set; } public int CategoryId { get; set; } public Category Category { get; set; } public ICollection<TagPost> TagPosts { get; set; } public ICollection<Comment> Comments { get; set; } }
The preceding fully-defined relationship in the model would provide the followingrelationship. It doesn't require Fluent API configuration unless we have a lot of navigationproperties:
Since we have a one-to-many relationship, and it is clearly evident that Blog is a principalentity and Post is a dependent entity, EF doesn't need any explicit configuration to definethe nature of the relationship, and hence it is done implicitly.

Building Relationships – Understanding Mapping Chapter 4
[ 90 ]
We could capture a lot more relationships in the blogging system that comes under one-to-many relationships. The following diagram shows other one-to-many relationships in theblogging system:

Building Relationships – Understanding Mapping Chapter 4
[ 91 ]
The other one-to-many relationships were between the following entities:
Blog and PostBlog and UserBlog and Category
From the preceding entities, we have already seen all the table designs except the Categoryclass. Let's look at its design content:
public class Category { public int Id { get; set; } public string Name { get; set; } public DateTime CreatedAt { get; set; } public DateTime ModifiedAt { get; set; } public int CreatedBy { get; set; } public int ModifiedBy { get; set; } public int? ParentCategoryId { get; set; } public Category ParentCategory { get; set; } public ICollection<Category> Subcategories { get; set; } public ICollection<Blog> Blogs { get; set; } public ICollection<Post> Posts { get; set; } }
We have seen three relationships so far in the blogging system design; the followingdiagram shows couple of other one-to-many relationships in the blogging system:

Building Relationships – Understanding Mapping Chapter 4
[ 92 ]
The couple of other one-to-many relationships were between the following entities:
Post and CommentUser and CommentPerson and Comment

Building Relationships – Understanding Mapping Chapter 4
[ 93 ]
From the preceding entities, we have already seen all the table designs except Comment.Let's look at its design content:
public class Comment { public int Id { get; set; } public string Content { get; set; } public DateTime CommentedAt { get; set; } public DateTime CreatedAt { get; set; } public DateTime ModifiedAt { get; set; } public int CreatedBy { get; set; } public int ModifiedBy { get; set; } public int PostId { get; set; } public Post Post { get; set; } public int? PersonId { get; set; } public Person Person { get; set; } public int? UserId { get; set; } public User User { get; set; } }
We have come across the Comment entity that has some different relationships. It has a self-referencing relationship (to be blunt, it points to itself), it also falls under the one-to-manyrelationship, and the only difference is that the parent and the dependent entities were thesame in this case:
We have covered the one-to-many relationship along with the blogging system design. Letus explore the many-to-many relationship in the next section.

Building Relationships – Understanding Mapping Chapter 4
[ 94 ]
The many-to-many relationshipThe many-to-many relationship is a tricky one; we need to understand how these kinds ofrelationships are built. Usually, we will build two different entities that require a many-to-many relationship, create an entity that will be purely used to join the first two entities, andthen map one-to-many between this entity (created to join two separate one-to-manyrelationships) and the two entities (created first) separately:
public class Post { public int Id { get; set; } public string Title { get; set; } public string Content { get; set; } public string Summary { get; set; } public DateTime PublishedDateTime { get; set; } public string Url { get; set; } public long VisitorCount { get; set; } public DateTime CreatedAt { get; set; } public DateTime ModifiedAt { get; set; } public int CreatedBy { get; set; } public int ModifiedBy { get; set; } public int BlogId { get; set; } public Blog Blog { get; set; } public int AuthorId { get; set; } public User Author { get; set; } public int CategoryId { get; set; } public Category Category { get; set; } public ICollection<TagPost> TagPosts { get; set; } public ICollection<Comment> Comments { get; set; } }
public class Tag { public int Id { get; set; } public string Name { get; set; } public DateTime CreatedAt { get; set; } public DateTime ModifiedAt { get; set; } public int CreatedBy { get; set; } public int ModifiedBy { get; set; } public ICollection<TagPost> TagPosts { get; set; } }
public class TagPost { public int Id { get; set; } public DateTime CreatedAt { get; set; } public DateTime ModifiedAt { get; set; }

Building Relationships – Understanding Mapping Chapter 4
[ 95 ]
public int CreatedBy { get; set; } public int ModifiedBy { get; set; } public int TagId { get; set; } public Tag Tag { get; set; } public int PostId { get; set; } public Post Post { get; set; } }
The Post and Tag entities require many-to-many relationships for which the TagPostentity is created, and its only job is to join the Post and Tag entities.
The following diagram, illustrates many-to-many between Post and Tag entities throughTagPost entity:

Building Relationships – Understanding Mapping Chapter 4
[ 96 ]
The Tag entity table diagram is displayed as follows
The TagPost entity which will contain PostId and TagId to form many-to-many relationship is displayedas follows
In order to have a many-to-many relationship between the Post and Tag entities, wecreated a TagPost (a kind of walk down table) entity purely to allow EF to join the Postand Tag entities. It is achieved by having a one-to-many relationship betweenthe Tag and TagPost and Post and TagPost entities.

Building Relationships – Understanding Mapping Chapter 4
[ 97 ]
Building many-to-many relationship using the FluentAPIWe should configure the relationship in the Fluent API in two different one-to-many relationships between the Tag and TagPost and Post and TagPost entities. TheHasForeignKey method doesn't need to be generic, since one-to-many relationships don'tneed to mark the dependent type explicitly:
The many-to-many relationship between Tag and Post entities require the followingconfiguration:
protected override void OnModelCreating(ModelBuilder modelBuilder) { modelBuilder.Entity<Blog>().ToTable("Blog"); modelBuilder.Entity<Post>().ToTable("Post"); modelBuilder.Entity<User>() .ToTable("User") .HasOne(x=>x.Address) .WithOne(x=>x.User) .HasForeignKey<Address>(x=>x.UserId); modelBuilder.Entity<Address>().ToTable("Address"); modelBuilder.Entity<Tag>().ToTable("Tag"); modelBuilder.Entity<TagPost>() .ToTable("TagPost") .HasOne(x => x.Tag) .WithMany(x => x.TagPosts) .HasForeignKey(x => x.TagId); modelBuilder.Entity<TagPost>() .ToTable("TagPost") .HasOne(x => x.Post) .WithMany(x => x.TagPosts) .HasForeignKey(x => x.PostId); }

Building Relationships – Understanding Mapping Chapter 4
[ 98 ]
The Fluent API configuration would provide us with the expected relationship, which isreflected in the following database diagram. The many-to-many relationship is now builtbetween the Post and Tag entities through the TagPost entity:
We have learned about the many-to-many relationship in this section. Let us explore moreabout the Fluent API in the next section.

Building Relationships – Understanding Mapping Chapter 4
[ 99 ]
Fluent APIWe already had a sneak peek into the Fluent API, without which the relationship can neverbe complete (in a few cases, it is mandatory).
Identifying navigation property and inversenavigationWe used the Fluent API in one-to-one and many-to-many relationships. We will use thesame method to leverage the terminologies we have seen so far. The HasOne and HasManymethods allow us to identify the navigation property in the dependent entity or simply areference navigation property.
The following code configures the foreign key explicitly in the one-to-many relationship:
modelBuilder.Entity<TagPost>() .ToTable("TagPost") .HasOne(x => x.Tag) .WithMany(x => x.TagPosts) .HasForeignKey(x => x.TagId);
The following diagram, the TagId highlighted is required for the foreign key of therelationship:

Building Relationships – Understanding Mapping Chapter 4
[ 100 ]
The HasOne method identifies the Tag navigation in the TagPost entity. The WithOne andWithMany methods allow us to identify the inverse navigation in the principal entity orsimply a collection navigation property.
The code required for inverse navigation property configuration is shown below:
modelBuilder.Entity<TagPost>() .ToTable("TagPost") .HasOne(x => x.Tag) .WithMany(x => x.TagPosts) .HasForeignKey(x => x.TagId);
The following diagram illustrates that we require an inverse navigation property for therelationship:
The HasOne method identifies the TagPosts inverse navigation in the Tag entity.
We have seen Fluent API identification and usages from a many-to-many relationship; let'suse the same approach to identify the usage in terminologies.
Identifying the single navigation propertyIn the single navigation property, we will never have a navigation property in a dependententity, which makes it hard for us in identifying the reference navigation property. This iswhere HasMany comes into the picture, helping us to identify the relationship:

Building Relationships – Understanding Mapping Chapter 4
[ 101 ]
The following code contains entity and its configuration of single navigation property,where Blog entity contains the navigation property and configuration uses HasOne() tocomplete the relationship:
public class Blog { public int Id { get; set; } public string Url { get; set; } public ICollection<Post> Posts { get; set; } } public class Post { public int Id { get; set; } public string Title { get; set; } public string Content { get; set; } public DateTime PublishedDateTime { get; set; } // Foreign key "BlogId" and navigation property "Blog" was removed here }
// onModelCreating method implementation inside context class modelBuilder.Entity<Blog>() .HasMany(x => x.Posts) .WithOne()
The following diagram, illustrates the relationship built between entities with singlenavigation property:

Building Relationships – Understanding Mapping Chapter 4
[ 102 ]
As you may have guessed, we started with HasMany and ended up with WithOne and, ofcourse, we don't have any overload for WithOne as we don't have any reference property,and EF will configure against the dependent entity internally.
Relationship-building techniquesLet's build a relationship using the same approach and see the usages for the followingterminologies as well.
Building relationship using a foreign keyWe have seen that the foreign key property was applied using a data annotation approach,but what if we had to apply the same thing from the Fluent API? It is still possible. Withthe HasForeignKey Fluent API method exposed to us, we could use it in configuration toachieve the same:
The code required for custom foreign key mapping in entity and configuration weredisplayed here:
public class Blog { public int Id { get; set; } public string Url { get; set; } public ICollection<Post> Posts { get; set; } } public class Post { public int Id { get; set; } public string Title { get; set; } public string Content { get; set; } public DateTime PublishedDateTime { get; set; } public int SomeBlogId { get; set; } [ForeignKey("SomeBlogId")] public Blog Blog { get; set; } }
// onModelCreating method implementation inside context class modelBuilder.Entity<Post>() .HasOne(x => x.Blog) .WithMany(x => x.Posts) .HasForeignKey(x => x.SomeBlogId);

Building Relationships – Understanding Mapping Chapter 4
[ 103 ]
We have modified the foreign key as SomeBlogId and configured against the Blognavigation property of the Post entity, and it is configured using the Fluent API.
Building relationships using a principal keyThe principal key doesn't require a Fluent API configuration if it's a primary key, but whatif we had to apply a relationship against an alternate key? Then, we need the Fluent API tocomplete the configuration. We could achieve the same using the HasPrincipalKey FluentAPI method exposed to us:
The code required for custom foreign key mapping in entity and configuration usingprincipal key instead of primary key were displayed as follows:
public class Blog { public int Id { get; set; } public string Url { get; set; } public ICollection<Post> Posts { get; set; } } public class Post { public int Id { get; set; } public string Title { get; set; } public string Content { get; set; } public DateTime PublishedDateTime { get; set; } public int SomeBlogId { get; set; } [ForeignKey("SomeBlogId")] public Blog Blog { get; set; } }
// onModelCreating method implementation inside context class modelBuilder.Entity<Post>() .HasOne(x => x.Blog) .WithMany(x => x.Posts) .HasForeignKey(x => x.SomeBlogId) .HasPrincipalKey(x => x.Url); // not a valid relationship in real time
We have created a relationship using the modified foreign key BlogSomeId against thealternate key Url from Blog. This was achieved using the HasPrincipalKey Fluent APImethod.

Building Relationships – Understanding Mapping Chapter 4
[ 104 ]
Building relationships using the IsRequired methodWe can configure the relationship as required or optional using the same Fluent API withthe IsRequired method. We can use the same approach to define whether a relationship ismandatory or optional:
public class Blog { public int Id { get; set; } public string Url { get; set; } public ICollection<Post> Posts { get; set; } } public class Post { public int Id { get; set; } public string Title { get; set; } public string Content { get; set; } public DateTime PublishedDateTime { get; set; } public int BlogSomeId { get; set; } [ForeignKey("BlogSomeId")] public Blog Blog { get; set; } }
// onModelCreating method implementation inside context class modelBuilder.Entity<Blog>() .Property(x => x.Url) .IsRequired() modelBuilder.Entity<Post>() .HasOne(x => x.Blog) .WithMany(x => x.Posts) .IsRequired();
The first configuration applies the Url property on the Blog entity to be amandatory/required field, and the second configuration enforces the relationship asmandatory.

Building Relationships – Understanding Mapping Chapter 4
[ 105 ]
Cascade deleteThe relationship we have created so far allows us to build the data with relationship, andthe deletion mechanism need to be configured as well. What would happen if we try todelete a principal entity row? Would that do nothing on dependent elements or removethem as well? Let's see the different ways available to perform those operations:
Cascade: If we delete the principal entity row, the dependent entity rows getdeleted as wellThe following code would configure that the dependent rows would be deletedas well if the primary row is deleted:
public class Blog { public int Id { get; set; } public string Url { get; set; } public ICollection<Post> Posts { get; set; } } public class Post { public int Id { get; set; } public string Title { get; set; } public string Content { get; set; } public DateTime PublishedDateTime { get; set; } public int BlogSomeId { get; set; } [ForeignKey("BlogSomeId")] public Blog Blog { get; set; } }
// onModelCreating method implementation inside context class modelBuilder.Entity<Post>() .HasOne(x => x.Blog) .WithMany(x => x.Posts) .OnDelete(DeleteBehavior.Cascade);
This enforces EF to delete Post elements if a Blog element is deleted.
SetNull: If we delete the principal entity row, the dependent entity row's foreignkey will be set to null values:The following code would configure the dependent rows to be set to null if theprimary row is deleted:
public class Blog { public int Id { get; set; }

Building Relationships – Understanding Mapping Chapter 4
[ 106 ]
public string Url { get; set; } public ICollection<Post> Posts { get; set; } } public class Post { public int Id { get; set; } public string Title { get; set; } public string Content { get; set; } public DateTime PublishedDateTime { get; set; } public int BlogSomeId { get; set; } [ForeignKey("BlogSomeId")] public Blog Blog { get; set; } }
// onModelCreating method implementation inside context class modelBuilder.Entity<Post>() .HasOne(x => x.Blog) .WithMany(x => x.Posts) .OnDelete(DeleteBehavior.SetNull);
This enforces EF to set null values on the Blog column of the Post entity elementsif a Blog element is deleted:
Restrict: If we delete the principal entity row, the dependent entity's rowsremain untouched:The following code would configure that the dependent rows would retain theirvalues even though the primary row is deleted:
public class Blog { public int Id { get; set; } public string Url { get; set; } public ICollection<Post> Posts { get; set; } } public class Post { public int Id { get; set; } public string Title { get; set; } public string Content { get; set; } public DateTime PublishedDateTime { get; set; } public int BlogSomeId { get; set; } [ForeignKey("BlogSomeId")] public Blog Blog { get; set; } }
// onModelCreating method implementation inside context class modelBuilder.Entity<Post>()

Building Relationships – Understanding Mapping Chapter 4
[ 107 ]
.HasOne(x => x.Blog) .WithMany(x => x.Posts) .OnDelete(DeleteBehavior.Restrict);
This does nothing on the Post entity elements if a Blog element is deleted.
We have seen different scenarios of delete behavior on dependent entities if a principalentity gets deleted, and this completes the relationship configuration.
Data migration issue with EF Core 2.0In Chapter 1, Kickstart - Introduction to Entity Framework Core, we saw that data migrationhas to be performed whenever we add/update the data model. The data migration usingthe Add-Migration command stopped working in EF Core 2.0. As a workaround, we needto leverage .NET Command Line Interface (CLI) commands to achieve the same.
The first problem is that we were unable to add theMicrosoft.EntityFrameworkCore.Tools.DotNet package; it throws the error Package'Microsoft.EntityFrameworkCore.Tools.DotNet.2.0.1' has a package type 'DotnetCliTool'that is not supported by project 'MasteringEFCore.BuildRelationships.Final' displayed inthe following screenshot:
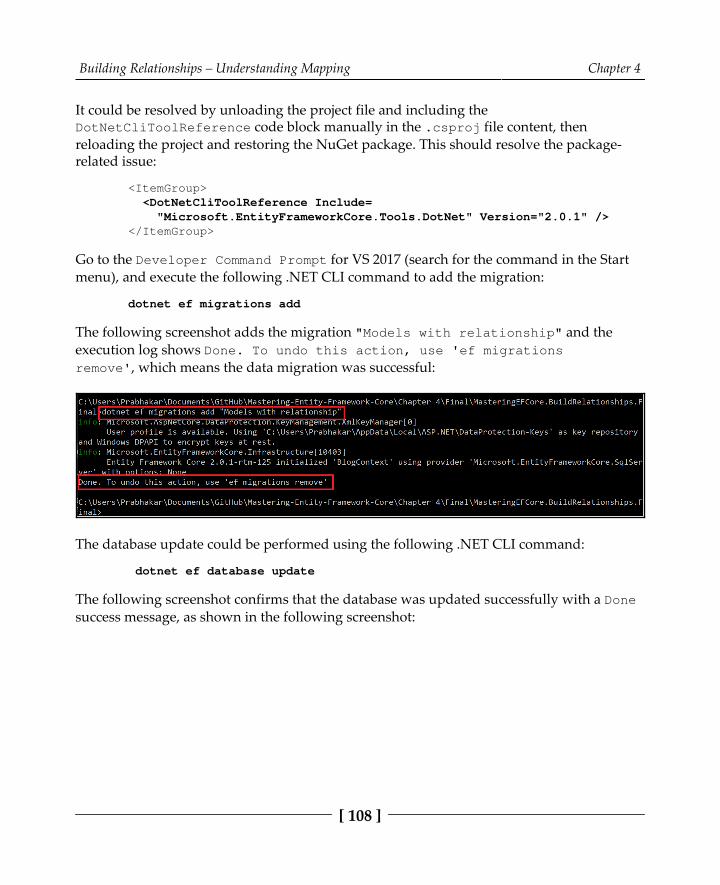
Building Relationships – Understanding Mapping Chapter 4
[ 108 ]
It could be resolved by unloading the project file and including theDotNetCliToolReference code block manually in the .csproj file content, thenreloading the project and restoring the NuGet package. This should resolve the package-related issue:
<ItemGroup> <DotNetCliToolReference Include= "Microsoft.EntityFrameworkCore.Tools.DotNet" Version="2.0.1" /> </ItemGroup>
Go to the Developer Command Prompt for VS 2017 (search for the command in the Startmenu), and execute the following .NET CLI command to add the migration:
dotnet ef migrations add
The following screenshot adds the migration "Models with relationship" and theexecution log shows Done. To undo this action, use 'ef migrationsremove', which means the data migration was successful:
The database update could be performed using the following .NET CLI command:
dotnet ef database update
The following screenshot confirms that the database was updated successfully with a Donesuccess message, as shown in the following screenshot:

Building Relationships – Understanding Mapping Chapter 4
[ 109 ]
I love to fool people in the beginning and then provide them with a solution, and thatmakes sure that they never forget it. Let me break the ice, the migration issue could besimply resolved by removing and adding the Microsoft.EntityFrameworkCore.ToolsNuGet package.
Yes, we have explored .NET CLI commands within the context of a data migration issue,and also learned how to resolve it using both CLI and package update in this section.
SummaryWe have learned and built different kinds of relationships supported by EF in this chapter.We started with regular one-to-one, one-to-many, and many-to-many relationships,and from there applied a few Fluent API methods to achieve relationships. Then, wecovered different usages of the Fluent API on the terminologies we saw in Chapter 3,Relationships – Terminology and Conventions. Finally, we have seen the behavior of Deleteoperations on dependent entities if a principal entity gets deleted. These sections dealtwith relationships, but never looked at validations, except where required. Let's explorethem in the next chapter.

5Know the Validation – Explore
Inbuilt ValidationsWe have learned and built different kinds of relationships supported by EF in this chapter.We started with regular one-to-one, one-to-many, and many-to-many relationships,and from there applied a few Fluent API methods to achieve relationships. Then, wecovered different usages of the Fluent API on the terminologies we saw in Chapter 3,Relationships – Terminology and Conventions. Finally, we have seen the behavior of Deleteoperations on dependent entities if a principal entity gets deleted. These sections dealtwith relationships, but never looked at validations, except where required. Let's explorethem in the next chapter.
We have explored about different kind in-built relationships, leveraged Fluent API methodsin creating relationships. We have also looked at the use of the Fluent API on navigationalproperties, mandating certain fields using isRequired(), implementing principal andforeign keys using HasPrincipalKey() and HasForeignKey() methods, and muchmore.
In this chapter, we will address the following concerns with respect to data security:
What should be done to the data before we send it over the network?Add certain rules/conditions to the data (defined in the model)Validate the models both on the client-side and server-side(supported out of the box)

Know the Validation – Explore Inbuilt Validations Chapter 5
[ 111 ]
How are the validations handled in ASP.NET?We started with JavaScript-based validation, then control-drivenvalidations were performed and finally from MVC we startedusing data model-driven validationsWe will be exploring how MVC handles validation through thedata model
Do we need to explicitly use HTML5 validation?Not required, as rendering the MVC engine internally convertsthe data-model driven validations into HTML5 data-attributedriven validations
We will be covering all built-in validations in this chapter, listed as follows:
Built-in validationsRequired field validationEmailAddress field validationCompare field validationUrl field validationMinLength field validationMaxLength field validationRegularExpression field validation
Diving into built-in validationsData security plays a vital role in any application's development, as almost everythingrevolves around data. So it is crucial that we store valid data in the database, ensuring thatthe data passed on from the user to the application server is safely transmitted; the datareaching the server also should contain valid data (probably having a valid datatype,length, and so on).

Know the Validation – Explore Inbuilt Validations Chapter 5
[ 112 ]
We started performing validations using JavaScript in ASP.NET Web Forms initially; sadly,most of the ASP.NET developers in the initial days used JavaScript only for validations.Then we moved onto control-driven validation which wraps up all the scripting inside ASPcontrols accepting parameters required for validation. Finally, we were exposed to datamodel-driven validation, which allows developers to configure validation through dataannotation, automatically handling both client-side (using jQuery unobtrusive validation)and server-side (using MVC model binder validation).
The Entity Framework (EF) allows us to achieve the same, using annotation/attributevalidation, which reduces a lot of coding with respect to security (client-side and server-side validations are simplified due to this requirement). EF provides us with certain built-invalidations:
Required
EmailAddress
Compare
Url
MinLength
MaxLength
RegularExpression
The preceding list briefly covers most of the validators. If you would like to take a look at acomplete list of validators, please visit https:/ /msdn. microsoft. com/ en- us/library/system.componentmodel. dataannotations(v= vs. 110). aspx. Let's take a look at each of thevalidators listed in detail.
Required field validationWe will start with the Required built-in validation which allows validators to checkwhether the field has a value or not. The required validation is necessary to ensure that themandatory fields are filled in or updated by the user before transmitting the data to theserver for further processing.
The following steps will help us in understanding how validation works:
The Required field validator is added using data annotation in the model.1.
The MVC engine performs validation on both client-side and server-side using2.this configuration.
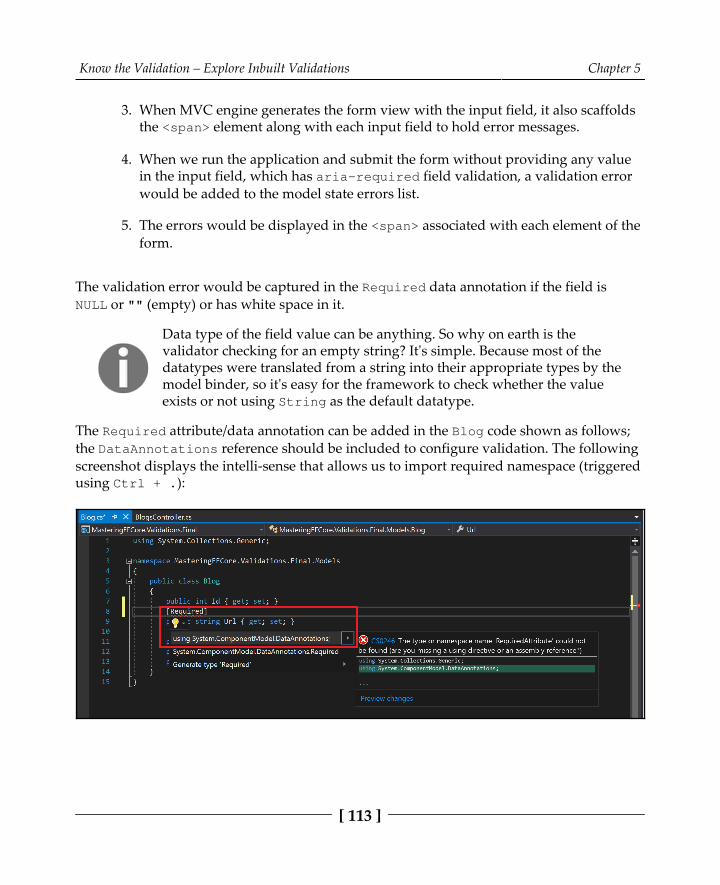
Know the Validation – Explore Inbuilt Validations Chapter 5
[ 113 ]
When MVC engine generates the form view with the input field, it also scaffolds3.the <span> element along with each input field to hold error messages.
When we run the application and submit the form without providing any value4.in the input field, which has aria-required field validation, a validation errorwould be added to the model state errors list.
The errors would be displayed in the <span> associated with each element of the5.form.
The validation error would be captured in the Required data annotation if the field isNULL or "" (empty) or has white space in it.
Data type of the field value can be anything. So why on earth is thevalidator checking for an empty string? It's simple. Because most of thedatatypes were translated from a string into their appropriate types by themodel binder, so it's easy for the framework to check whether the valueexists or not using String as the default datatype.
The Required attribute/data annotation can be added in the Blog code shown as follows;the DataAnnotations reference should be included to configure validation. The followingscreenshot displays the intelli-sense that allows us to import required namespace (triggeredusing Ctrl + .):

Know the Validation – Explore Inbuilt Validations Chapter 5
[ 114 ]
The source code required to add Required validation is shown here; it consumes built-invalidation and throws a default error message:
public class Blog { public int Id { get; set; } [Required] public string Url { get; set; } public ICollection<Post> Posts { get; set; } public int AuthorId { get; set; } public User Author { get; set; } }
The scaffolded HTML code has data-attribute driven validation which is consumed byjQuery validate unobtrusive library, the highlighted scaffolded HTML content inthe following screenshot is consumed by the library:

Know the Validation – Explore Inbuilt Validations Chapter 5
[ 115 ]
The preceding method would force EF to emit the standard validation error message, TheUrl field is required, if the field contains invalid data during validation. The scaffolded<span> element is used for populating the validation error as displayed in the followingscreenshot:
We can also perform validation using a custom error message using the ErrorMessagefield; the configuration is highlighted as follows:
public class Blog{ public int Id { get; set; } [Required] public string Url { get; set; } public ICollection<Post> Posts { get; set; } [Required(ErrorMessage = "Author is required, kindly pick one!")] public int AuthorId { get; set; } public User Author { get; set; }}
The preceding configuration would use the custom error message in the data-val-required attribute instead of the standard validation error message:

Know the Validation – Explore Inbuilt Validations Chapter 5
[ 116 ]
The MVC scaffolding engine, for a <select> field, would not include the <span> elementrequired to display the error message, so kindly include the following section:
<form asp-action="Create"> <div asp-validation-summary="ModelOnly" class="text-danger"> </div> // Code removed for brevity <div class="form-group"> <label asp-for="AuthorId" class="control-label"></label> <select asp-for="AuthorId" class ="form-control" asp-items="ViewBag.AuthorId </select> <span asp-validation-for="AuthorId" class="text-danger"> </span> </div> // Code removed for brevity </form>

Know the Validation – Explore Inbuilt Validations Chapter 5
[ 117 ]
The preceding method would force EF to emit a custom error message, Author is required,kindly pick one!, if the field contains invalid data during validation, which is shown in thefollowing screenshot:
The displayed error message will be cleared once the user starts typing any value into thefield.
The client-side validation logic works based on the jQuery validate libraryand is performed on the fly when the user types the value by usingthe jQuery validate unobtrusive library.
We have explored Required field validation by configuring it in the Blog entity; let'sconfigure the validation for the remaining entities of the blogging system in the nextsection.

Know the Validation – Explore Inbuilt Validations Chapter 5
[ 118 ]
Incorporating the Required validation in bloggingsystem modelsWe will update our blogging system models to accommodate the Required field validationin the following entities:
Data model entities: Address, Blog, Category, Comment, Person, Post, Tag,TagPost, and UserView model entities: RegistrationViewModel and LoginViewModel
The preceding listed implementation is performed and available at the following Gitrepository commit—https:/ /goo. gl/ 4jyHa2.
We have introduced a couple of view models in this commit which will be used in theauthentication mechanism. We have looked, exhaustively, at Required field validations;let's explore the EmailAddress validation in the next section.
EmailAddress field validationThe Required validation was straightforward, but email validation is a little bit different;each developer would adopt different approaches for the validation. The emergence ofjQuery validation provided consistent behavior for most of the validations. Later, thestandard set by the HTML5 team is not adopted widely by all browsers and developmentteams.
Let's explore the EmailAddress built-in validation which would allow us to validatewhether the value is a valid email or not. The following steps will help us in understandinghow validation works:
The data annotation was already discussed; we will be using1.the EmailAddress attribute in this section.
The MVC engine scaffolding part, the validations, populating model state errors,2.and displaying errors on the screen, almost the entire process, would be the samefor the remaining of the chapters. We can additionally cover how the validation isperformed in each section as each of the in-built validation follow differentpatterns.

Know the Validation – Explore Inbuilt Validations Chapter 5
[ 119 ]
The validation error can be captured in the EmailAddress data annotation in the followingscenarios:
If the field does not have the @ symbol followed by one or more character(s) (forinstance, a or a@), then the validation error will be reported to the user
After providing the @ symbol following one or more character, if we introduce a .(period) then the validation engine will expect the field value to be followed byone or more characters, and if not satisfied it will throw a validation error (forinstance, a@a.)
The EmailAddress attribute/data annotation can be configured as follows:
public class User { // Code removed for brevity [EmailAddress] public string Email { get; set; } }
As seen in the previous section, the scaffolded HTML code follows the same data attribute-driven approach for validation. The highlighted section in the following screenshotillustrates that the validation is performed using data-attribute driven validation:

Know the Validation – Explore Inbuilt Validations Chapter 5
[ 120 ]
The preceding method will force EF to emit a standard validation error message, The Emailfield is not a valid e-mail address., if the field contains invalid data during validation, asshown in the following screenshot:
We can see that just after providing a value after the @ symbol, the error is removed, eventhough the email is not yet complete, as shown in the following screenshot:

Know the Validation – Explore Inbuilt Validations Chapter 5
[ 121 ]
Introducing a . (period) symbol would again throw an error as the email is not completewithout the complete domain name in the email, as shown in the following screenshot:
We can also see that after providing one or more characters, the error is removed, and nowwe have a valid email value, shown as follows:

Know the Validation – Explore Inbuilt Validations Chapter 5
[ 122 ]
We can configure the custom error message for each model field, shown as follows:
public class User { // Code removed for brevity [Required(ErrorMessage = "Email is required"] [EmailAddress(ErrorMessage = "Provide a valid email address")] public string Email { get; set; } // Code removed for brevity }
The preceding method will force EF to emit the custom error message, Provide a valid email address, if the field contains invalid data during validation, shown as follows:

Know the Validation – Explore Inbuilt Validations Chapter 5
[ 123 ]
The custom error would still work or be consumed for throwing invalid domain validationerrors as well:
The displayed error message will be cleared once the user starts typing a valid email valueinto the field.
The valid email value was decided by checking the @ symbol of the value;mysteriously, it clears the validation (test@somedomain) before the usercompletes the email with a valid domain name (gmail.com or yahoo.com).Once the . value is provided again, it displays the error message,expecting the user to provide any domain extension value such as.com or.net (it works perfectly, even if we provide .abc).

Know the Validation – Explore Inbuilt Validations Chapter 5
[ 124 ]
Incorporating EmailAddress validation inblogging system modelsWe will update our blogging system model to accommodate the EmailAddress fieldvalidation in the View model:
public class RegistrationViewModel { // Code removed for brevity [Required(ErrorMessage = "Email is required")] [EmailAddress(ErrorMessage = "Provide a valid email address")] public string Email { get; set; } [Required(ErrorMessage = "Email is required")] [EmailAddress(ErrorMessage = "Provide a valid email address")] public string ConfirmEmail { get; set; } }
We have looked, exhaustively, at EmailAddress field validations; let's explore theCompare validation in the next section.
Compare field validationWe will be exploring Compare validation in this section, and since the steps are common forall the built-in validations except the pattern, we will be covering only the validationpattern in the other validation sections. The compare validation will avoid the round-tripbetween the UI and the service, providing client-side validation for comparing passwords,emails, or even sensitive information such as bank account numbers, which require thiscompare validation to be in place.
The validation error can be captured in the Compare data annotation in the followingscenarios:
If the field is NULL or empty or a whitespace
If the field has a value which doesn't match the configured field value
The Compare attribute/data annotation can be configured as follows:
public class RegistrationViewModel { // Code removed for brevity

Know the Validation – Explore Inbuilt Validations Chapter 5
[ 125 ]
[Required(ErrorMessage = "ConfirmPassword is required")] [Compare("Password")] public string ConfirmPassword { get; set; } }
We can verify that if the Password and ConfirmPassword fields don't match thenthe standard validation error message 'ConfirmPassword' and 'Password' do not match.appears:
We can configure the custom error message for each model field, shown as follows:
public class RegistrationViewModel { // Code removed for brevity [Required(ErrorMessage = "ConfirmPassword is required")] [Compare("Password", ErrorMessage = "Password does not match")] public string ConfirmPassword { get; set; } }

Know the Validation – Explore Inbuilt Validations Chapter 5
[ 126 ]
We can also conclude that compare validation consumes the custom validation errormessage as well. Our test scenario would emit the Password does not match validationerror message, shown as follows:
The displayed error message will be cleared once the user starts typing a valid passwordvalue in the field.
Incorporating the Compare validation in bloggingsystem modelsWe will update our blogging system model to accommodate the Compare field validation inthe View model:
public class LoginViewModel { [Required(ErrorMessage = "Username is required")] public string Username { get; set; } [Required(ErrorMessage = "Password is required")] public string Password { get; set; } [Required(ErrorMessage = "ConfirmPassword is required")] [Compare("Password", ErrorMessage = "Password does not match")] public string ConfirmPassword { get; set; } }

Know the Validation – Explore Inbuilt Validations Chapter 5
[ 127 ]
We have looked, exhaustively, at the Compare field validations. Let's explore the Urlvalidation in the next section.
Url field validationWe will look into Url validation, how it should be configured, and how it works with theMVC engine. It does the basic syntax check on the URL value rather than verifying the URLitself, so it would be ideal to have a consistent mechanism to perform, such as verification,to have uniform behavior between systems. The Url validation is performed based onthe pattern -
<protocol>://<domain-name>.<extension> . Let's explore the pattern in detail:
Protocol: It should be HTTP, https, or FTPDomain name: It should be one or more charactersExtension: It should be two or more characters (for instance, http://a.bc isvalid since it follows the preceding pattern)
The Url attribute/data annotation can be used in the following ways:
public class Blog { // Code removed for brevity [Required(ErrorMessage = "Url is required")] [Url] public string Url { get; set; } }

Know the Validation – Explore Inbuilt Validations Chapter 5
[ 128 ]
The Url validation reports the following value as the error The Url field is not a validfully-qualified http, https, or ftp URL. since the value contains only the protocol and doesnot satisfy the URL pattern:
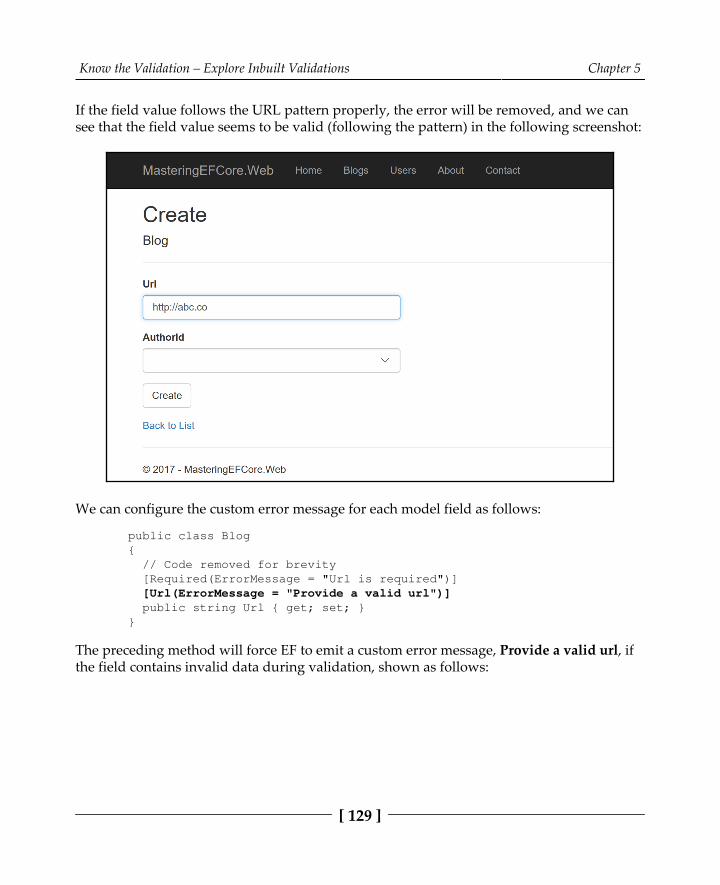
Know the Validation – Explore Inbuilt Validations Chapter 5
[ 129 ]
If the field value follows the URL pattern properly, the error will be removed, and we cansee that the field value seems to be valid (following the pattern) in the following screenshot:
We can configure the custom error message for each model field as follows:
public class Blog { // Code removed for brevity [Required(ErrorMessage = "Url is required")] [Url(ErrorMessage = "Provide a valid url")] public string Url { get; set; } }
The preceding method will force EF to emit a custom error message, Provide a valid url, ifthe field contains invalid data during validation, shown as follows:

Know the Validation – Explore Inbuilt Validations Chapter 5
[ 130 ]
The displayed error message will be cleared once the user starts typing a valid URL valueinto the field.
Incorporating Url validation in blogging systemmodelsWe will update our blogging system model to accommodate Url field validation, the datamodel driven Url validation is performed in the below entities:
public class Blog { // Code removed for brevity [Required(ErrorMessage = "Url is required")] [Url(ErrorMessage = "Provide a valid url")] public string Url { get; set; } }
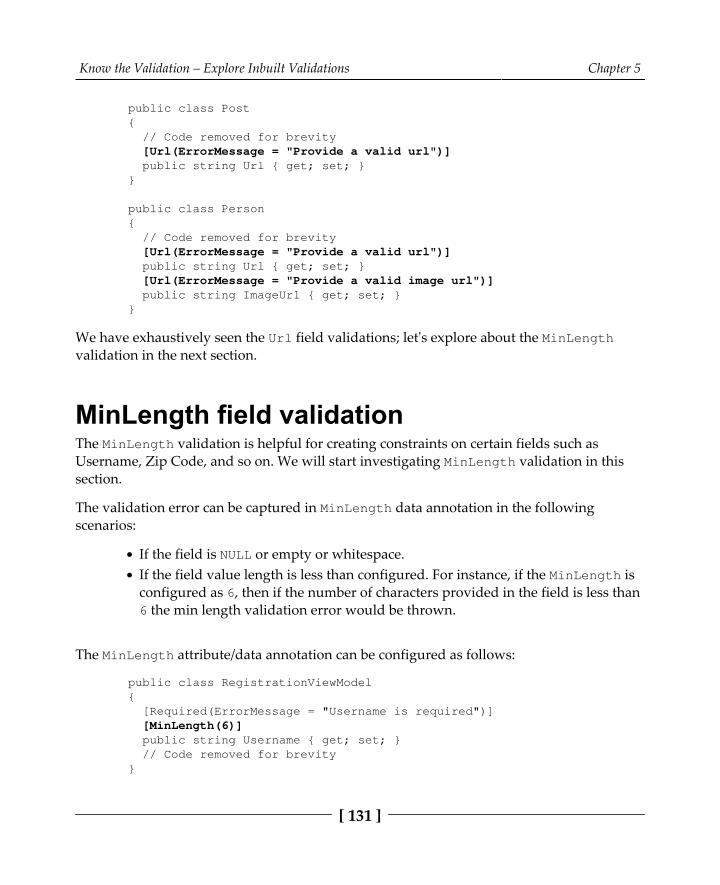
Know the Validation – Explore Inbuilt Validations Chapter 5
[ 131 ]
public class Post { // Code removed for brevity [Url(ErrorMessage = "Provide a valid url")] public string Url { get; set; } }
public class Person { // Code removed for brevity [Url(ErrorMessage = "Provide a valid url")] public string Url { get; set; } [Url(ErrorMessage = "Provide a valid image url")] public string ImageUrl { get; set; } }
We have exhaustively seen the Url field validations; let's explore about the MinLengthvalidation in the next section.
MinLength field validationThe MinLength validation is helpful for creating constraints on certain fields such asUsername, Zip Code, and so on. We will start investigating MinLength validation in thissection.
The validation error can be captured in MinLength data annotation in the followingscenarios:
If the field is NULL or empty or whitespace.If the field value length is less than configured. For instance, if the MinLength isconfigured as 6, then if the number of characters provided in the field is less than6 the min length validation error would be thrown.
The MinLength attribute/data annotation can be configured as follows:
public class RegistrationViewModel { [Required(ErrorMessage = "Username is required")] [MinLength(6)] public string Username { get; set; } // Code removed for brevity }

Know the Validation – Explore Inbuilt Validations Chapter 5
[ 132 ]
If field value does not meet the minimum length requirement, then the validation error Thefield Username must be a string or array type with a minimum length of '6' would bethrown, whereas the field name and length of the error message is based on the field nameand configuration, shown as follows:
Once satisfied with the length constraint, the error message will be removed from the userinterface, shown as follows:

Know the Validation – Explore Inbuilt Validations Chapter 5
[ 133 ]
We can configure the custom error message for each model field as follows:
public class RegistrationViewModel { [Required(ErrorMessage = "Username is required")] [MinLength(6, ErrorMessage = "Username needs minimum 6 characters")] public string Username { get; set; } // Code removed for brevity }
The preceding method will force EF to emit a custom error message, Username needsminimum 6 characters, if the field contains invalid data during validation, shown asfollows:
We have looked, exhaustively, at MinLength field validation; let's explore MaxLengthvalidation in the next section.
MaxLength field validationThe MaxLength validation is helpful for creating constraints on certain fields such asUsername, Zip code, and so on. We will investigate MaxLength validation in this section.
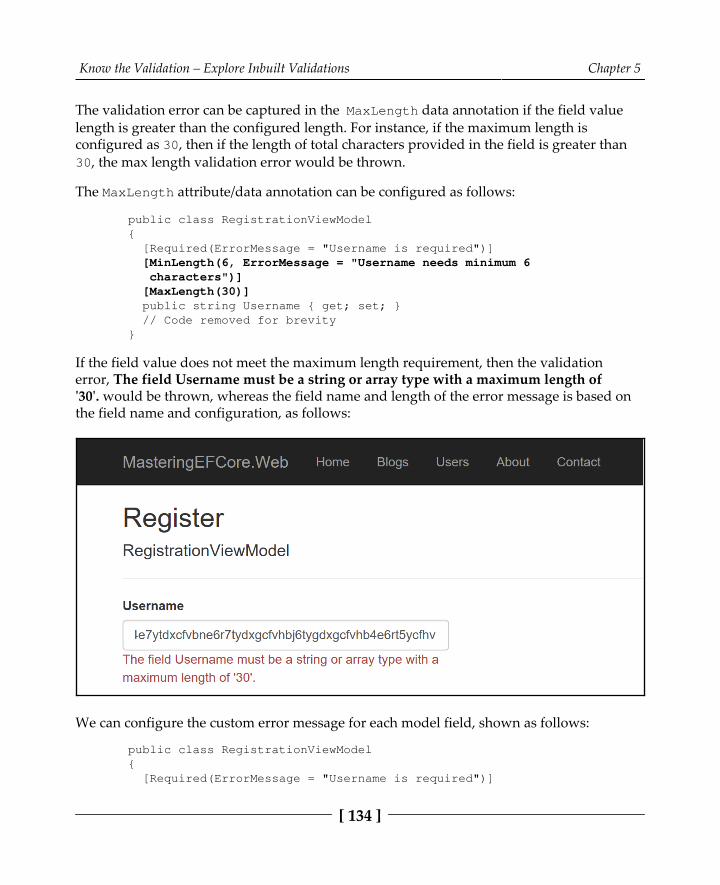
Know the Validation – Explore Inbuilt Validations Chapter 5
[ 134 ]
The validation error can be captured in the MaxLength data annotation if the field valuelength is greater than the configured length. For instance, if the maximum length isconfigured as 30, then if the length of total characters provided in the field is greater than30, the max length validation error would be thrown.
The MaxLength attribute/data annotation can be configured as follows:
public class RegistrationViewModel { [Required(ErrorMessage = "Username is required")] [MinLength(6, ErrorMessage = "Username needs minimum 6 characters")] [MaxLength(30)] public string Username { get; set; } // Code removed for brevity }
If the field value does not meet the maximum length requirement, then the validationerror, The field Username must be a string or array type with a maximum length of'30'. would be thrown, whereas the field name and length of the error message is based onthe field name and configuration, as follows:
We can configure the custom error message for each model field, shown as follows:
public class RegistrationViewModel { [Required(ErrorMessage = "Username is required")]
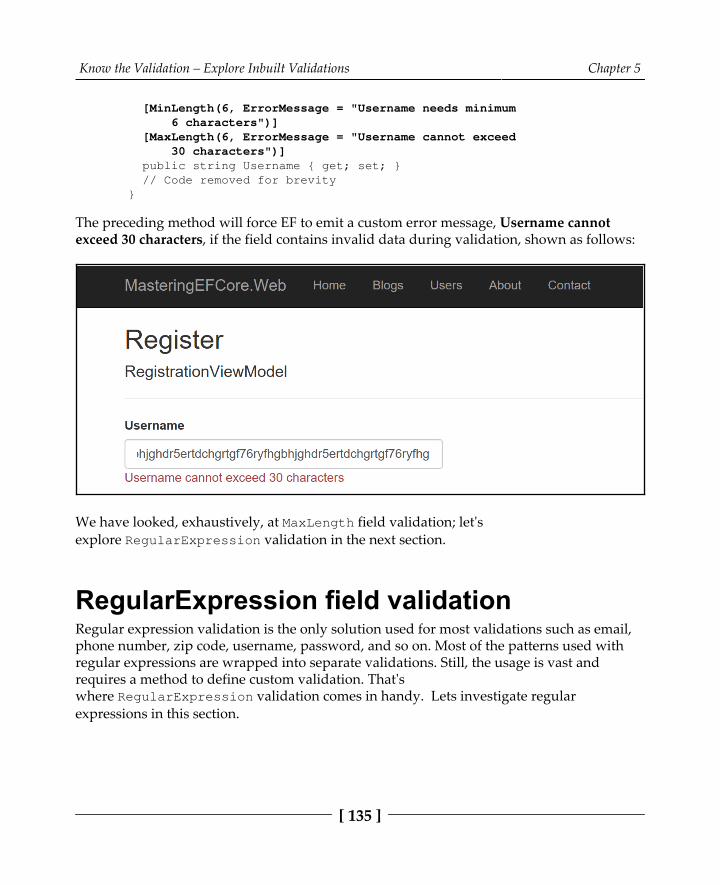
Know the Validation – Explore Inbuilt Validations Chapter 5
[ 135 ]
[MinLength(6, ErrorMessage = "Username needs minimum 6 characters")] [MaxLength(6, ErrorMessage = "Username cannot exceed 30 characters")] public string Username { get; set; } // Code removed for brevity }
The preceding method will force EF to emit a custom error message, Username cannotexceed 30 characters, if the field contains invalid data during validation, shown as follows:
We have looked, exhaustively, at MaxLength field validation; let'sexplore RegularExpression validation in the next section.
RegularExpression field validationRegular expression validation is the only solution used for most validations such as email,phone number, zip code, username, password, and so on. Most of the patterns used withregular expressions are wrapped into separate validations. Still, the usage is vast andrequires a method to define custom validation. That'swhere RegularExpression validation comes in handy. Lets investigate regularexpressions in this section.

Know the Validation – Explore Inbuilt Validations Chapter 5
[ 136 ]
If the field value doesn't follow the defined regular expression pattern, then a validationerror would be returned by the engine. For instance, if the regular expression is configuredto contain only letters of the alphabet, then any other character inclusion would throw avalidation error.
The RegularExpression attribute/data annotation can be configured as follows:
public class Person { public int Id { get; set; } [Required(ErrorMessage = "First Name is required")] [RegularExpression("^[a-zA-Z]+$")] public string FirstName { get; set; } // Code removed for brevity }
If the field value does not match the regular expression, then the validation error, The fieldUsername must match the regular expression '^[a-zA-Z]+$'.", would be thrown, which isshown as follows:
We can configure the custom error message on each model field, as follows:
public class Person { public int Id { get; set; } [Required(ErrorMessage = "First Name is required")] [RegularExpression("^[a-zA-Z]+$", ErrorMessage = "Only alphabets were allowed")]

Know the Validation – Explore Inbuilt Validations Chapter 5
[ 137 ]
public string FirstName { get; set; } // Code removed for brevity }
The preceding method will force EF to emit a custom error message, Only alphabets wereallowed, if the field contains invalid data during validation, which is shown as follows:
We have looked, exhaustively, at RegularExpression field validation and other built -invalidations in this chapter. We also built validations for the blogging system we arebuilding along the way.
SummaryWe have explored various built-in validations provided by EF in this chapter. We startedwith the Required field validator which was widely used, then looked into the emailaddress validator, and then we covered other validators such as compare, MinLength,MaxLength and RegularExpression field validators. Finally, we configured these fieldvalidators for the blogging system we are building in this book. This chapter dealt onlywith built-in validations but never discussed how client-side validations are performed orcustom validations handled. Let's explore this and a few other things in Chapter 6, SaveYourself – Hack Proof Your Entities.

6Save Yourself – Hack Proof
Your EntitiesIn Chapter 5, Know the Validation – Explore Inbuilt Validations, we understood about in-builtvalidations available in the Entity Framework Core. We explored each one of the validationin detail by starting with how the validation were handled earlier, the way how frameworkhandles it, the configurations required and the rendering performed by the framework.
In this chapter, we will address the following concerns with respect to data security:
What should be done to the data before we send it over the network?Could you make a wild guess on what should be performed beforewe send the data over the network?
What if someone hacks the client-side validation? Or the scripting stops working?We could shield ourselves by introducing server-side validation.
Beyond client-side and server-side validations, do we need anything in addition?Yes, usual server-side validations would look for any errorsand validators of all properties of the model would be taken intoaccount by manual validations.
Hoping we have custom implementations of validations as well?Yeah, we do have provision to create custom validators and .NETCore's data-attribute approach for custom validators as well.
Damn, we should have covered almost everything. Guess we didn't leave behindanything else?
Except for one thing—remote validation. For instance, checkingusername availability could be done using remote validation fromthe client-side without adding any client-side code.

Save Yourself – Hack Proof Your Entities Chapter 6
[ 139 ]
After addressing the concerns, we have a fair idea of what we will be covering in thischapter:
Client-side validationConsequences if the client-side scripting stops workingServer-side validationManual validationCustom validationCreate client-side logic for custom validationRemote validation
Client-side validationThe client-side validation is really a boon to modern web applications. There were manyinstances that proved jQuery is helpful on both the development and the user experiencefront. The client-side validations were the biggest advantage we had in saving multipleround trips between client/browser to the server just to perform basic validations.
The jQuery, jQuery Validate, and jQuery Validate Unobtrusive libraries helped us inperforming those basic validations on the client (browser) end rather than relying on theserver in performing the same. There were multiple discussions or even argumentsregarding validating the models at the client-side, which opens security considerations. Thefollowing sections will address this issue.
The task to enable client-side validation is just to provide a section for MVC to injectvalidation errors in the user interface, which has nothing to do with validation-relatedattributes (as it will be available in the model):
<div class="form-group"> <label asp-for="Title" class="col-md-2 control-label"></label> <div class="col-md-10"> <input asp-for="Title" class="form-control" /> <span asp-validation-for="Title" class="text-danger"></span> </div> </div>

Save Yourself – Hack Proof Your Entities Chapter 6
[ 140 ]
The MVC templating engine will generate the HTML tags with data- attributes, which willhave the same behavior for both built-in and custom validations. The rendered HTMLcontent for the previously mentioned Title field with the Required validation isdisplayed as follows:
<div class="form-group"> <label class="col-md-2 control-label" for="Title">Title</label> <div class="col-md-10"> <input class="form-control" type="text" data-val="true" data-val- required="Title is required" id="Title" name="Title" value="" /> <span class="text-danger field-validation-valid" data-valmsg-for="Title" data-valmsg-replace="true"></span> </div> </div>
The validation is performed when the user tries to submit the form, which will end up inpopulating the error messages using client-side validation. Further, when we try to edit themessages, the Unobtrusive Validation library kicks in and does the validation way beforethe user submits the form again.
We have seen what client-side validation does; now, let's see what happens if the JavaScriptstops working in the next section.
Validating data without client-side scriptingWe live in a world that recognizes the open source, performance-oriented, single pageapplications (reducing server round trips) as professional applications. Microsoft was toocomfortable to move beyond server-side development. Later, they started experimentingclient-side validations mainly, thanks to MVC2. Now, with MVC Core, they're back in thegame!
This brings us to the million dollar question—is the client-side programming really safe?How long will it take for the hacker to break the client-side validation and get into theserver? In today's world, even a dummy who has just started to learn how to hack could dothat in minutes. To be blunt, we have no control on the client, and we cannot blindly trustthe data we receive from the client (which could be hacked/injected by anybody using toolssuch as Fiddler, REST Client, and many more).

Save Yourself – Hack Proof Your Entities Chapter 6
[ 141 ]
Knowing that the data we receive may not be authentic, why do we still need client-sidevalidation? Simple. We need better user experience, and we cannot simply ignore amechanism that will provide us with a mechanism to achieve it. Not only authenticity, butalso if somebody disables the JavaScript in their client, then we may be processing unsafedata (not validated) received from the client.
The JavaScript could be disabled using the browser settings. The following screenshotshows how that can be performed using Chrome settings (Content | JavaScript):

Save Yourself – Hack Proof Your Entities Chapter 6
[ 142 ]
It will enable users to submit any form without client-side validation, so the following formwill be submitted without any issues despite not having values in Title, Content,Summary, and so on:

Save Yourself – Hack Proof Your Entities Chapter 6
[ 143 ]
The model that reaches the server without validation is still processed, which opens upsecurity issues. However, we have additional control over the model at the web server. Wecould see that the values in Title, Content, and Summary were bound as null at the server:

Save Yourself – Hack Proof Your Entities Chapter 6
[ 144 ]
The model needs to be validated before we persist the data back to the data store, and thevalidation of the posted model is performed by the MVC engine while model binderperforms its operation. We should make sure that the model state is IsValid and thenproceed with the data persistence; it ensures that invalid data doesn't get persisted in thesystem:
We have figured out how the data is validated without client-side validation; now let's lookat the server-side validation in the next section.
Server-side validationHow can we protect our application, even though we are still leveraging client-side logicwhile retaining the security of the application? The problem can be resolved in two ways:one is to perform anti-forgery token verification (making sure that the transmitted data hasnot been tampered with) and the other is to validate the model again in the server side(double-checking ensures that the model is still safe).

Save Yourself – Hack Proof Your Entities Chapter 6
[ 145 ]
A pure MVC Core web application that uses an MVC templating engine can perform theanti-forgery verification in a straightforward manner. MVC generates the anti-forgery tokenby default for us and all we have to do is verify it at the server side. We could still configurethe view to support anti-forgery token generation by enabling asp-antiforgery in the<form> tag, as follows:
<form asp-action="Create" asp-antiforgery="true"> <div class="form-horizontal"> ...
The old-fashioned way of generating an anti-forgery token is still available and can be donein the following way:
<form asp-action="Create"> @Html.AntiForgeryToken() <div class="form-horizontal"> ...
The anti-forgery token can be validated in the server side by configuring it using thecustom ValidateAntiForgeryToken attribute on the action level:
[ValidateAntiForgeryToken] public async Task<IActionResult> Create(User user)
The anti-forgery token can be validated in the server side by configuring it using the customAutoValidateAntiForgeryToken attribute on the controller level:
[AutoValidateAntiForgeryToken] public class UsersController : Controller
The same verification can also be done on a global level usingAutoValidateAntiforgeryTokenAttribute configured in StartUp.cs inside theConfigureServices() method, as follows:
public void ConfigureServices(IServiceCollection services) { // Add framework services. services.AddDbContext<BlogContext>(options => options.UseSqlServer(Configuration.GetConnectionString ("DefaultConnection"))); services.AddMvc(options => options.Filters.Add(new AutoValidateAntiforgeryTokenAttribute())); services.AddAuthorization(options => { options.AddPolicy("Administrators", policy => policy.RequireRole("Administrators"));

Save Yourself – Hack Proof Your Entities Chapter 6
[ 146 ]
}); }
An AngularJS templating engine works a little different in processing the anti-forgery; ituses the XSRF-TOKEN cookie to address the issue. We have a provision in MVC toconfigure and send the information that would be leveraged by the AngularJS $httpservice. Exploring those details would be out of context for this book, so just know that wehave a provision to use them in a pure JavaScript templating engine as well.
We have figured out how the client-side validation is shielded from attacks; now let's lookat the manual validation in the next section.
Manual validationThere may be instances that require manual intervention before we persist something to thedatabase, such as mapping the view model back to the data model. We need a provision inEF to achieve the manual validation to the model in addition to validations performedduring model binding of the action invoker (in layman's terms, when the data bindinghappens in action parameters from request context).
The manual validation can be performed using two ways (ValidateModel andTryValidateModel) in Entity Framework; however, in EF Core, we could use only oneand it is TryValidateModel.
We can leverage TryValidateModel() with the user registration module, which containsa view model rather than presenting the actual model itself. We were supposed to validatethe data before persisting the view model data into the datastore; in our case, mapping thedata between view model to data model and then persisting them into a database:
public async Task<IActionResult> Register(RegistrationViewModel registrationViewModel) { var user = new User { Username = registrationViewModel.Username, Email = registrationViewModel.Email, PasswordHash = Cryptography.Instance.HashPassword( registrationViewModel.Password) }; if (TryValidateModel(user)) { await _context.Users.AddAsync(user); ViewBag.Message = "User created successfully";

Save Yourself – Hack Proof Your Entities Chapter 6
[ 147 ]
return RedirectToAction("Index"); } else { ViewBag.Message = "Error occurred while validating the user"; }
return View(user); }
The preceding implementation illustrates how we perform manual validation, and it doesthe following:
Maps the data from Registration View Model to User Data ModelWe should always suspect that the mapped data may not be validIt is always safer to validate the mapped data manually before we persist the databack to the data storeIf we have any validation errors, we would be publishing the information to theuser through the ViewBag message
The IsValid property of the model would be false before we trigger TryValidateModel,and later it will be updated based on validation. We have seen how to perform manualvalidation, and now we will move to custom validation in the next section.
Custom validationThe built-in validations exposed in the framework may be solving most of our technicalvalidation problems, but there may be some business needs/requirements that requireadditional provision on top of built-in validations.
The custom validation can be performed at two levels:
Field levelClass level
The field-level custom validator can be created using the following:
Inherit the custom validation class from the ValidationAttribute base typeOverride the IsValid method and handle your business validationThe IsValid method accepts two parameters—value and validationContext

Save Yourself – Hack Proof Your Entities Chapter 6
[ 148 ]
The value field is the actual field value against which the attribute is configuredThe validationContext field would have ObjectInstance of the model thatcontains the configured field
In our blogging system, we can provide a business validation to the publication date; itneeds a validation that prohibits the user from publishing the post in a past date. Let's callthe custom validation attribute FutureOnly and perform the following validation in theoverridden IsValid method:
public class FutureOnlyAttribute : ValidationAttribute { protected override ValidationResult IsValid(object value, ValidationContext validationContext) { var post = (Post) validationContext.ObjectInstance; return post.PublishedDateTime.CompareTo(DateTime.Now) < 0 ? new ValidationResult("Publishing Date cannot be in past, kindly provide a future date") : ValidationResult.Success; } }
public class Post { public int Id { get; set; } [Required(ErrorMessage = "Title is required")] public string Title { get; set; } [Required(ErrorMessage = "Content is required")] public string Content { get; set; } public string Summary { get; set; } [FutureOnly] public DateTime PublishedDateTime { get; set; } [Url(ErrorMessage = "Provide a valid url")] public string Url { get; set; } public long VisitorCount { get; set; } public DateTime CreatedAt { get; set; } public DateTime ModifiedAt { get; set; } public int CreatedBy { get; set; } public int ModifiedBy { get; set; } [Required(ErrorMessage = "Blog is required")] public int BlogId { get; set; } public Blog Blog { get; set; } [Required(ErrorMessage = "Author is required")] public int AuthorId { get; set; } public User Author { get; set; } [Required(ErrorMessage = "Category is required")]

Save Yourself – Hack Proof Your Entities Chapter 6
[ 149 ]
public int CategoryId { get; set; } public Category Category { get; set; } public ICollection<TagPost> TagPosts { get; set; } public ICollection<Comment> Comments { get; set; } }
The preceding implementation will verify whether the publication date is future only, and,if it encounters any past date, it will throw a Publishing Date cannot be in past, kindlyprovide a future date validation error.
Let's provide an invalid value in the FutureOnly attribute field and see how the validationis performed:
The IsValid parameter deals with the actual value passed on both the value andvalidationContext parameters; as mentioned earlier, both of them will have the valueprovided by the user. We are considering validationContext in our implementation andit is evident that the provided value is in a past date (when compared to the current date),hence the validation error will be thrown; it is shown as follows:
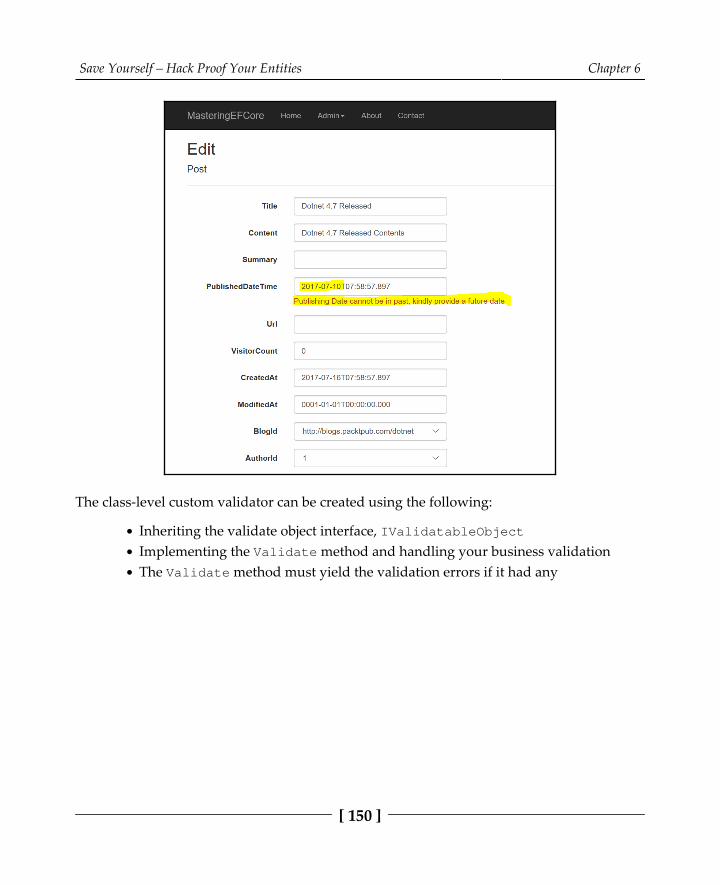
Save Yourself – Hack Proof Your Entities Chapter 6
[ 150 ]
The class-level custom validator can be created using the following:
Inheriting the validate object interface, IValidatableObjectImplementing the Validate method and handling your business validationThe Validate method must yield the validation errors if it had any

Save Yourself – Hack Proof Your Entities Chapter 6
[ 151 ]
In our blogging system, we can remove the FutureOnly attribute included in the modeland replace it with class-level validation. The business validation will be triggeredautomatically (during model binding), and, as it happened in the field-level validation, itupdates the model state and error collection. The business validation usingIValidatableObject is furnished as follows:
public class Post : IValidatableObject { public int Id { get; set; } [Required(ErrorMessage = "Title is required")] public string Title { get; set; } [Required(ErrorMessage = "Content is required")] public string Content { get; set; } public string Summary { get; set; } public DateTime PublishedDateTime { get; set; } [Url(ErrorMessage = "Provide a valid url")] public string Url { get; set; } public long VisitorCount { get; set; } public DateTime CreatedAt { get; set; } public DateTime ModifiedAt { get; set; } public int CreatedBy { get; set; } public int ModifiedBy { get; set; } [Required(ErrorMessage = "Blog is required")] public int BlogId { get; set; } public Blog Blog { get; set; } [Required(ErrorMessage = "Author is required")] public int AuthorId { get; set; } public User Author { get; set; } [Required(ErrorMessage = "Category is required")] public int CategoryId { get; set; } public Category Category { get; set; } public ICollection<TagPost> TagPosts { get; set; } public ICollection<Comment> Comments { get; set; }
public IEnumerable<ValidationResult> Validate(ValidationContext validationContext) { var post = (Post)validationContext.ObjectInstance; if (post.PublishedDateTime.CompareTo(DateTime.Now) < 0) yield return new ValidationResult("Publishing Date cannot be in past, kindly provide a future date", new []{ "PublishedDateTime" }); } }
// One way to consume manual business validation

Save Yourself – Hack Proof Your Entities Chapter 6
[ 152 ]
var results = new List<ValidationResult>(); var isBusinessValid = Validator.TryValidateObject(post, new ValidationContext(post, null, null), results, false);
The IValidatableObject implementation also does business validation, and updates theerror collection with the validation error, Publishing Date cannot be in past, kindlyprovide a future date, if it encounters any business validation issues.
The same scenario was present in the earlier FutureOnly attribute validation. Providing apast date would be validated in the Validate method. The only difference in both of theapproaches was the former does the implementation once and applies to all applicablefields, whereas the latter requires implementation for each field done on the class level. Inlayman's terms, if we need to include one more field for the validation, we will need toperform the validation for the field again in the Validate method:
We explored custom validation that is performed at server side; now, let's explore thecustom validation that could be leveraged at a client side as well in the next section.

Save Yourself – Hack Proof Your Entities Chapter 6
[ 153 ]
Creating client-side logic for custom validationThe custom validator we created in this chapter should provide client-side validationsupport as well. By default, EF will only perform server-side validation (out of the box), butthe client-side validation should be performed manually. The framework has provision toinject custom validation and its errors in the context attributes. However, we need toperform/implement client-side validation on our own.
The FutureOnly custom validation attribute can be configured to support client-sidevalidation using IClientModelValidator, which expects us to implementthe AddValidation method. We should be injecting the required custom validation valuesin the context attributes; the required implementation is displayed as follows:
public class FutureOnlyAttribute : ValidationAttribute, IClientModelValidator { protected override ValidationResult IsValid(object value, ValidationContext validationContext) { var post = (Post) validationContext.ObjectInstance; return post.PublishedDateTime.CompareTo(DateTime.Now) < 0 ? new ValidationResult("Publishing Date cannot be in past, kindly provide a future date") : ValidationResult.Success; }
public void AddValidation(ClientModelValidationContext context) { if (context == null) { throw new ArgumentNullException(nameof(context)); } context.Attributes["data-val"] = "true"; context.Attributes["data-val-futureonly"] = "Publishing Date cannot be in past, kindly provide a future date"; } }

Save Yourself – Hack Proof Your Entities Chapter 6
[ 154 ]
The context attributes don't have the custom attributes unless we manually configure theminside the element's context; the following screenshot shows that the context doesn't havethose custom attributes:
The MVC rendering engine will render HTML content with the data attributes required forclient-side validation, and the values that we injected in AddValidation were added asattributes to the element context:

Save Yourself – Hack Proof Your Entities Chapter 6
[ 155 ]
This injected data attribute will be leveraged while implementing the client-side validation,the rendered HTML code required for validation is highlighted as follows:
<div class="form-group"> <label class="col-md-2 control-label"for="PublishedDateTime">PublishedDateTime</label> <div class="col-md-10"> <input name="PublishedDateTime" class="form-control valid"id="PublishedDateTime" aria-invalid="false" aria-required="true" aria-describedby="PublishedDateTime-error" type="datetime" value="" data-val-required="The PublishedDateTime field is required." data-val="true" data-val-futureonly="Publishing Date cannot be in past, kindly provide a future date"><span class="text-danger field-validation-valid" data-valmsg-replace="true" data-valmsg-for="PublishedDateTime"></span> </div></div>
The client-side validation should be performed by configuring them in the jQueryvalidator, which also requires an unobtrusive adaptor. The implementation required for theFutureOnly custom field validation is furnished below, which will be processed inPublishedDate, which consumes the FutureOnly custom validation:
@section Scripts { @{await Html.RenderPartialAsync("_ValidationScriptsPartial");} <script> $(function () { jQuery.validator.addMethod('futureonly', function (value, element, params) { return (new Date($(params[0]).val())) > (new Date()); }); jQuery.validator.unobtrusive.adapters.add('futureonly', [ 'element' ], function (options) { var element = $(options.form).find('input#PublishedDateTime')[0]; options.rules['futureonly'] = [element]; options.messages['futureonly'] = options.message; }); }(jQuery)); </script> }

Save Yourself – Hack Proof Your Entities Chapter 6
[ 156 ]
The preceding implementation will let the JavaScript engine embed unobtrusive validationto the custom attribute element during the page load, which lets the application performclient-side validation. We could verify in the below screenshot that the client-side validationis executed before sending the data over the network:
When the user moves over to the other control, unobtrusive validation kicks in, whichvalidates the control using custom JavaScript implementation, shown as follows:

Save Yourself – Hack Proof Your Entities Chapter 6
[ 157 ]
The validation outcome would either let the user continue with his input operation ordisplay an error and stop the user from submitting the form (without reaching the server).In the following example, it was an invalid date and the custom error message is populatedin the error collection, which was also displayed in the view as shown in the followingscreehshot:

Save Yourself – Hack Proof Your Entities Chapter 6
[ 158 ]
We explored the complete configuration and implementation required for the client-side validation of custom validator; now, let's explore the remote validation feature availablewith us that will perform something in addition to the custom validation.
Remote validationThe validations we have done so far were configured at model level, and when we saymodel, it happens within its own domain. We may have a requirement where we need tooperate across models. Entity Framework has a provision to achieve the same since it is datadriven and the validation required outside the model is not available in Entity Framework.To fill this gap, MVC has a provision to achieve the same using RemoteAttribute, whichallows the user to consume the controller action that follows a certain pattern in theimplementation.
The remote validation requires the following boundary conditions:
RemoteAttribute requires two properties—controller and actionConfigured field name should be used as the action parameter nameThe action should return a Json dataThe returned data must have a boolean value
The blogging system has a similar requirement that requires remote validation:
Validation should be performed without submitting the entire formUsername can be verified on the fly when the user types in the valueThe remote validation should verify the value against the database and respondwhether the username is available or not
RemoteAttribute should be implemented in the user model described as follows:
Create an action named IsUsernameAvailable in the Users controller.The action should have the parameter name as username and type as String.Perform the validation on the username value against the users table and capturethe result in a boolean variable.

Save Yourself – Hack Proof Your Entities Chapter 6
[ 159 ]
Return the boolean value in the Json method against the data parameter. This isshown in the following code snippet:
public async Task<IActionResult> IsUsernameAvailable(string username) { var usernameAvailable = await _context.Users.AnyAsync(x => x.Username.Equals(username, StringComparison.OrdinalIgnoreCase)); return Json(data: !usernameAvailable ); }
Configure RemoteAttribute in the User model against the Username property.The validation should pass the parameter's controller as Users and action asIsUsernameAvailable
The following code would configure the remote validation in the User entity:
public class User { public int Id { get; set; } [Required(ErrorMessage = "Display Name is required")] public string DisplayName { get; set; } [Required(ErrorMessage = "Username is required")] [Remote(action: "IsUsernameAvailable", controller:"Users")] public string Username { get; set; } [Required(ErrorMessage = "Password is required")] public string PasswordHash { get; set; } [Required(ErrorMessage = "Email is required")] [EmailAddress(ErrorMessage = "Provide a valid email address")] public string Email { get; set; } public DateTime CreatedAt { get; set; } public DateTime ModifiedAt { get; set; } public int CreatedBy { get; set; } public int ModifiedBy { get; set; } public ICollection<Blog> Blogs { get; set; } public ICollection<Post> Posts { get; set; } public ICollection<Comment> Comments { get; set; } public int? AddressId { get; set; } public Address Address { get; set; } public int PersonId { get; set; } public Person Person { get; set; } }

Save Yourself – Hack Proof Your Entities Chapter 6
[ 160 ]
It would be wise to perform unit testing on the remote validation since we are relying on anexternal functionality to validate a model field. Let's validate the code against a successscenario by providing a username that is available (the highlighted watch console window,as you can see in the following screenshot, shows that the username "prabhakaran" is stillavailable):

Save Yourself – Hack Proof Your Entities Chapter 6
[ 161 ]
The valid username will not be throwing any validation errors on the Create User screen.We can see the username on the screen and then highlight on the very next field and thereare still no validation errors; it means that the username is available (displaying the contentin the Username field is old-fashioned EF!). This is shown in the following screenshot:

Save Yourself – Hack Proof Your Entities Chapter 6
[ 162 ]
Let's validate the code against a failure scenario by providing a username that is notavailable (the highlighted watch console window, as you can see in the followingscreenshot, shows that the username "prabhakar" is not available):

Save Yourself – Hack Proof Your Entities Chapter 6
[ 163 ]
This invalid username will be throwing a validation error in the Create User screen. We cansee that the username furnished in the text field is not available in the database and thecorresponding validation error is displayed next to the text field:
One last thing, in the boundary condition, we mentioned that the parameter name shouldmatch the field name configured for the remote validation. Do we need to know whatwould happen if there is a deviation? If the parameter name is different from the nameconfigured? Well, the value binding will not happen, instead the value would be null.

Save Yourself – Hack Proof Your Entities Chapter 6
[ 164 ]
We never discussed assignment as of now, so let's take that as a task and get the propervalidation performed as displayed in the following screenshot:
We learned about remote validation in this chapter, and that wraps up the customvalidations we can perform beyond the built-in validations available in the framework.
SummaryWe learned about custom validations that were provided by Entity Framework and MVC inthis chapter. We started with client-side validation, which changed the user experiencecompletely, then looked at what would happen if somebody hacks in and bypasses theclient-side validation. We overcame those issues by applying second-level validation at theserver side. We saw the urge in performing manual validation rather than the frameworkdoing it for us out of the box; we then performed some custom validation that was requiredbeyond the built-in validations. We also applied the same validation to the client side byleveraging IClientModelValidator. Finally, we performed a remote validation that wasnot even a part of Entity Framework but was available in the MVC Framework.
So far, we were accessing the data only through data context, and we have never writtenany plain SQL queries. In a few valid scenarios, we had a need for the provision to bypassthe data context for better performance or to avoid heavy lifting tasks done by theframework. We will figure this out in Chapter 7, Going Raw – Leveraging SQL Queries inLINQ.

7Going Raw – Leveraging SQL
Queries in LINQWe have learned about custom validations, leveraging client-side validation, responding ifsomebody hacks into the system and bypasses the client-side validation, and additionallayer security at the server side. Finally, we performed remote validation from the MVCframework.
In this chapter, we will address the following concerns with respect to data security:
Do we have a provision in Entity Framework (EF) to control SQL queries?We can perform or execute inline SQL queries directly from EF.
What if someone hacks the system and performs SQL injection? Do SQL queriesactually open up those security issues?
We could use parametrized queries to avoid SQL injection.If we go down the plain SQL queries route, can we leverage LINQ queries?
Yes, we can still leverage them in LINQ queries.Can we execute the queries without the DBSet class or POrtable COmponents(POCO) object?
Yes, we do have a provision to execute queries without DBSet or aPOCO object.

Going Raw – Leveraging SQL Queries in LINQ Chapter 7
[ 166 ]
After addressing these concerns, we have a fair idea of what we will be covering in thischapter:
Basic raw SQL queriesBuilding parameterized queriesComposing with LINQExecuting SQL query without a DBSet class or POCO
Basic raw SQL queriesThe main idea of abstracting SQL queries from the framework is to perform implementationirrespective of the data source that we will be using in the application. We might think thatcreating raw SQL queries must be defeating the very purpose of EF Core's existence. Thereare a few valid requirements that might need raw SQL instead of leaving Entity to do thework for us.
It could be anything, something that could not be achieved through LINQ queries orperformance that was not optimized by Entity-generated queries. The reason could beanything, but, at the end of the day, we all work for an outcome, an optimized outcomewith better performance. We might be ready to take extreme measures in not aligning withthe framework/APIs, provided the reason is substantiated more than the API usage.
We could perform basic SQL queries or execute stored procedures or functions from EF inraw mode. The framework has a provision in the DBSet through the FromSql method thatdoes the job for us, allowing us to execute raw SQL using EF. It also allows us to createLINQ queries based on SQL queries; because was made possible since it has been exposedfrom the DBSet type.
Let's extend the blogging system by making the blogs controller execution into raw SQLqueries, and we will begin with the Index action using a raw SQL query, displayed asfollows:
public async Task<IActionResult> Index() { return View(await _context.Blogs.FromSql("Select * from dbo.Blog").ToListAsync()); }

Going Raw – Leveraging SQL Queries in LINQ Chapter 7
[ 167 ]
The preceding listed implementation produces the following output in the view, and itdoesn't make much difference to the existing rendered view:
We will create a new action just to illustrate the stored procedure (SP) GetLatestBlogsexecution using raw SQL query EF. The implementation of an SP using FromSql is listed asfollows:
public async Task<IActionResult> LatestBlogs() { return View("Index", await _context.Blogs.FromSql("EXEC [dbo].[GetLatestBlogs]").ToListAsync()); }
The preceding listed implementation produces the following output in the view. All it doesis render the SP's outcome within an existing Index view:
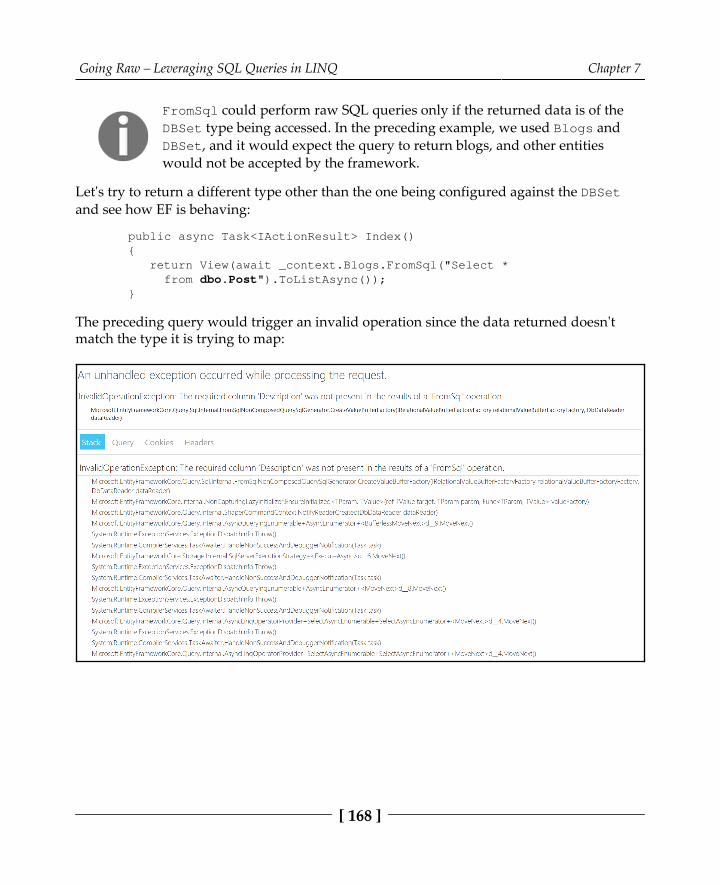
Going Raw – Leveraging SQL Queries in LINQ Chapter 7
[ 168 ]
FromSql could perform raw SQL queries only if the returned data is of theDBSet type being accessed. In the preceding example, we used Blogs andDBSet, and it would expect the query to return blogs, and other entitieswould not be accepted by the framework.
Let's try to return a different type other than the one being configured against the DBSetand see how EF is behaving:
public async Task<IActionResult> Index() { return View(await _context.Blogs.FromSql("Select * from dbo.Post").ToListAsync()); }
The preceding query would trigger an invalid operation since the data returned doesn'tmatch the type it is trying to map:

Going Raw – Leveraging SQL Queries in LINQ Chapter 7
[ 169 ]
With the preceding displayed error, it is evident that something beyond the type mismatchis happening here since the error doesn't specify anything about the type mismatch.
FromSql expects that the column names returned from the databasematch with the ones available in the mapping object. If there is a mismatchin the object then an invalid operation exception would be thrown by theframework.
If we have any requirement to consume anonymous types in the raw SQL queries usingFromSql, we definitely won't get them until EF Core 2.0, and the same is available on thefollowing shared link at https:/ /github. com/aspnet/ EntityFramework/ issues/ 1862,which says:
"This is something we are still trying to get in 2.0, but the schedule is tight and there is ahigh risk that we will need to punt it to the next minor release after 2.0." - Diego Vega.
"Unfortunately, we don't have time to do this for the 2.0 release. We are considering it ahigh priority for post 2.0." - Arthur Vickers
The preceding listed responses were from a Entity Framework GitHub repository ownerand member, so it's official that we might not get this feature this year.
Let's try to limit the columns returned from the database and see whether we have anyimpact on the application. The SELECT statement is tweaked with limited columns from theBlog entity:
public async Task<IActionResult> Index() { return View(await _context.Blogs.FromSql("Select [Id],[Title], [Subtitle],[Description],[Url] from dbo.Blog").ToListAsync()); }

Going Raw – Leveraging SQL Queries in LINQ Chapter 7
[ 170 ]
The framework doesn't support inline queries that don't provide data to all theproperties/fields of the data model. It would start throwing errors, as follows, until all thefields were satisfied in the SQL query:
We have seen queries or SPs without any parameters so far, and only a few cases use themin real-time applications. We will explore inline queries that accept parameters and see howwe could utilize them safely in the next section.

Going Raw – Leveraging SQL Queries in LINQ Chapter 7
[ 171 ]
Building parameterized queriesBuilding and executing parameterless queries would have fewer usages, whereas mostusages in any application would be based on parameters/conditions. Introducingparameters in flat/raw queries would expose us to a threat of SQL injection. How are wegoing to protect our application from such a threat? We cannot ignore them in a real-worldapplication, as we have applications that are hugely dependent on inline queries.
SQL injection is a technique used by hackers to exploit any system, and itwould shake it to its core in terms of security. It could be performed byembedding user inputs blindly with inline SQL queries.
The most commonly injected value would be OR 1 = 1 , which wouldpump an entire record set instead of using the input value for filtering. Forinstance, in our blogging system, if a hacker tries to retrieve userinformation he could tweak the following query (assuming we have sucha query in the system):
SELECT * FROM USERS WHERE Id = + userId +. userId could be afield storing the user input value.
Considering the userId passed as 5 from the application, it could beconstructed as follows:SELECT * FROM USERS WHERE Id = 5
The preceding query displays or returns only one user matching the Id as5.
If the hacker injects the previously mentioned value, it would be asfollows:
SELECT * FROM USERS WHERE Id = 5 OR 1 = 1
The preceding SQL injection would return all users' information, ratherthan returning only the user matching ID 5. This is a simple SQL injection.

Going Raw – Leveraging SQL Queries in LINQ Chapter 7
[ 172 ]
Parameterized queries are the mechanism used to protect us from such threats. They ensurethat the SQL injection doesn't happen, and the previously mentioned injection problemwould not happen with the parameterized queries:
public async Task<IActionResult> Details(int? id) { if (id == null) { return NotFound(); }
var blog = await _context.Blogs.FromSql("Select * from dbo.Blog WHERE Id = {0}", id).FirstOrDefaultAsync(); if (blog == null) { return NotFound(); }
return View(blog); }
Instead of directly passing the input value as a parameter in the FromSql method, we couldalso use the SqlParameter object to construct the parameter, which also ensures that thequery is safe from SQL injection. The following code would illustrate parameterised queryexecution in EF Core:
public async Task<IActionResult> Details(int? id) { if (id == null) { return NotFound(); }
var blog = await _context.Blogs.FromSql("Select * from dbo.Blog WHERE Id = @id", new SqlParameter("id", id)).FirstOrDefaultAsync(); if (blog == null) { return NotFound(); }
return View(blog); }

Going Raw – Leveraging SQL Queries in LINQ Chapter 7
[ 173 ]
The following screenshot displays a blog item as usual without any changes to its previousstate. The only difference is its rendering through a parameterized query:
If we try to inject the value through any of the following means, the system would still behandling the injection of the model binder itself since we are dealing with identifiers thatwere exposed as an integer. Let's visit the following paths:
http://localhost:54346/Blogs/Details/1OR1=1
http://localhost:54346/Blogs/Details?id=1OR1=1

Going Raw – Leveraging SQL Queries in LINQ Chapter 7
[ 174 ]
Trying to access anyone of the preceding link would throw the following error:
For the sake of argument, let's change the parameter type of the identifier to a string and tryinjecting the value again to the Details action to see how SQL injection is really handledby parameterized queries. It is evident in the following screenshot that the parameterizedquery is trying to convert the value to an integer that actually fails and the execution isstopped, thereby protecting the application against SQL injection:

Going Raw – Leveraging SQL Queries in LINQ Chapter 7
[ 175 ]
Still not convinced? Me neither. Unless we handle injection for a string column, I won't beconvinced. Let's tweak the system just for the purpose of illustration by adding thefollowing action, which would filter blogs using a wildcard search in the Title column,returning the first item from the result set and finally rendering them in an existingDetails view:
public async Task<IActionResult> GetBlogByTitle(string keyword) { if (keyword == null) { return NotFound(); }
var blog = await _context.Blogs.FromSql("Select * from dbo.Blog WHERE Title like '%' + @keyword + '%'", new SqlParameter("keyword", keyword)).FirstOrDefaultAsync(); if (blog == null) { return NotFound(); }
return View("Details", blog); }
Try to inject the values as we did earlier, by visiting the following paths:
http://localhost:54346/Blogs/GetBlogByTitle/keyword=core OR 1=1http://localhost:54346/Blogs/GetBlogByTitle?keyword=core OR 1=1
Still, the system would be handling the injection, but now at the database end as it would betreated as a string value. The query fails to return any records, therebyreturning NotFound() from the action:

Going Raw – Leveraging SQL Queries in LINQ Chapter 7
[ 176 ]
We have exhaustively seen the inline parameterized queries. Let us explore them usingstored procedures, which are also one of the techniques in handling SQL injections. The SPexecution looks similar to the parameterized inline query, still protecting the applicationfrom SQL injection. Let's tweak the system just for the purpose of illustration by adding thefollowing action which would filter blogs by category, return the list of blog items, andfinally render them in an existing Index view:
public async Task<IActionResult> BlogsByCategory(int categoryId) { return View("Index", await _context.Blogs.FromSql("EXEC [dbo].[GetBlogsByCategory] @categoryId = {0}", categoryId).ToListAsync()); }
The preceding query could be tweaked to accommodate the SqlParameter object, whichstreamlines the parameterized query in a more readable manner. The following wouldconsume SqlParameter in the parameterised SQL execution:
public async Task<IActionResult> BlogsByCategory(int categoryId) { return View("Index", await _context.Blogs.FromSql("EXEC [dbo].[GetBlogsByCategory] @categoryId = @Id", new SqlParameter("id", categoryId)).ToListAsync()); }
The following screenshot displays a list of filtered blog items in the Index view; only it isprocessed from a different action and mainly uses parameterized queries:
We have seen parameterized inline queries or SPs so far, which satisfy the use cases in real-time applications. We will further explore leveraging them with the LINQ queries tofilter/process data in the Composing with LINQ section.
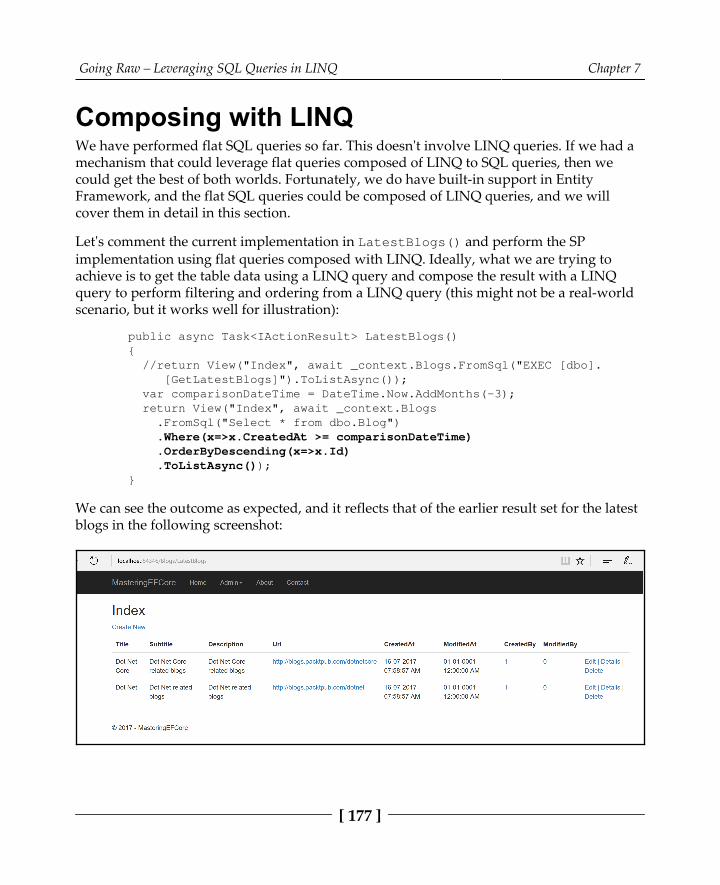
Going Raw – Leveraging SQL Queries in LINQ Chapter 7
[ 177 ]
Composing with LINQWe have performed flat SQL queries so far. This doesn't involve LINQ queries. If we had amechanism that could leverage flat queries composed of LINQ to SQL queries, then wecould get the best of both worlds. Fortunately, we do have built-in support in EntityFramework, and the flat SQL queries could be composed of LINQ queries, and we willcover them in detail in this section.
Let's comment the current implementation in LatestBlogs() and perform the SPimplementation using flat queries composed with LINQ. Ideally, what we are trying toachieve is to get the table data using a LINQ query and compose the result with a LINQquery to perform filtering and ordering from a LINQ query (this might not be a real-worldscenario, but it works well for illustration):
public async Task<IActionResult> LatestBlogs() { //return View("Index", await _context.Blogs.FromSql("EXEC [dbo]. [GetLatestBlogs]").ToListAsync()); var comparisonDateTime = DateTime.Now.AddMonths(-3); return View("Index", await _context.Blogs .FromSql("Select * from dbo.Blog") .Where(x=>x.CreatedAt >= comparisonDateTime) .OrderByDescending(x=>x.Id) .ToListAsync()); }
We can see the outcome as expected, and it reflects that of the earlier result set for the latestblogs in the following screenshot:

Going Raw – Leveraging SQL Queries in LINQ Chapter 7
[ 178 ]
Let's dig in further and see what is happening internally and how Entity Framework isprocessing these queries. We might be thinking that EF Core would be retrieving blogentries and does a LINQ query with in-memory data. The following SQL Server Profilertrace will prove us wrong. If we closely watch the highlighted part of the trace, it is evidentthat Entity Framework is performing a LINQ to an SQL query by translating the LINQquery into the required SQL query and executing it in one shot in the database. Cool, right?The following screenshot would illustrate that the parameterised execution is translatedinto SQL statement:
We have looked at the mechanism to compose flat SQL queries with LINQ, but we haven'tcovered the Include() data, which is a powerful feature of Entity Framework. Youguessed it right, we could perform the Include() operation on flat SQL queries composedof LINQ queries as well. All we need to do is have the .Include() method as usual beforethe .ToList() call, which translates the LINQ queries into SQL queries. The followingcode would consume the .Include() functionality:
public async Task<IActionResult> LatestBlogs() { //return View("Index", await _context.Blogs.FromSql("EXEC [dbo]. [GetLatestBlogs]").ToListAsync());

Going Raw – Leveraging SQL Queries in LINQ Chapter 7
[ 179 ]
var comparisonDateTime = DateTime.Now.AddMonths(-3); return View("Index", await _context.Blogs .FromSql("Select * from dbo.Blog") .Where(x=>x.CreatedAt >= comparisonDateTime) .OrderByDescending(x=>x.Id) .Include(x => x.Posts) .ToListAsync()); }
We can see the outcome of the query in the following screenshots. The first screenshotshows that the total blogs returned has a count of 2, out of which the first blog has a total oftwo posts. We can see the blog Id used in the post matching with the Id field of the firstblog:

Going Raw – Leveraging SQL Queries in LINQ Chapter 7
[ 180 ]
The same is applied to the second post item inside the first blogs Posts array, which ensuresthat the Include() method worked as expected, returning corresponding posts to the blogitem:

Going Raw – Leveraging SQL Queries in LINQ Chapter 7
[ 181 ]
As an additional check, we could verify the second blog item and its corresponding singlepost, which was included as well:

Going Raw – Leveraging SQL Queries in LINQ Chapter 7
[ 182 ]
We have seen how the Include() functionality worked with the flat SQL query composedwith LINQ; let's see how it has been translated into an SQL query (LINQ to SQL). Thefollowing screenshot shows us that there were two SQL statements executed, out of whichthe first statement was similar to the earlier one that retrieves data from the Blog table:
The second statement does the trick for us, executing the code required to include the posttable data with the LINQ query. This is depicted in the following screenshot:

Going Raw – Leveraging SQL Queries in LINQ Chapter 7
[ 183 ]
We have seen how to consume flat SQL queries with LINQ to SQL queries in this section,and so far we have seen the execution of flat SQL queries with respect to DBSet or a POCOobject. Let's investigate whether the same could be achieved anonymously in the ExecutingSQL query without a DBSet or POCO section.

Going Raw – Leveraging SQL Queries in LINQ Chapter 7
[ 184 ]
Executing SQL query without a DBSet orPOCOWe need to investigate whether Microsoft supports flat SQL execution anonymously without requiring a DBSet or POCO object. Since it's open source, it is easy for us toinvestigate this. We could directly get into their source code in the GitHub repository(https://github.com/ aspnet/ EntityFramework) and investigate whether they have anyimplementation of the expected behavior.
Microsoft does have a couple of extension methods for a relational database as a façade,which is available at https:/ / github. com/ aspnet/ EntityFramework/ blob/0024373adae7e331ed217de2b4bd12be5eedf925/ src/ EFCore. Relational/RelationalDatabaseFacadeExtensions. cs.
The extension method located in the preceding GitHub location is illustrated as follows. Weneed to capture it, as we will be discussing the implementation in this section:

Going Raw – Leveraging SQL Queries in LINQ Chapter 7
[ 185 ]
They have an implementation for raw SQL queries, but it is a limited implementation. It hasExecuteSqlCommand that supports only ExecuteNonQuery functionality, which means wecouldn't use this method for processing SQL queries that return result sets:

Going Raw – Leveraging SQL Queries in LINQ Chapter 7
[ 186 ]
The same implementation is available in an asynchronous way as well, which instructs us toperform two implementations if we are planning to have an extension of ourrequirement. The following screenshot will have asynchronous implementation:
The EF Core community has an open issue created with respect to our requirement, whichis available at https:/ /github. com/ aspnet/ EntityFramework/ issues/ 1862#issuecomment-220787464.
In the preceding issue thread, a user sirentek provided us with a workaround untilMicrosoft fixes the same for us in the framework. Let's implement the extension methodsrequired for the anonymous SQL query execution:
Create a DatabaseExtensions static class that holds the extension methods.1.

Going Raw – Leveraging SQL Queries in LINQ Chapter 7
[ 187 ]
Implement ExecuteSqlQuery for an SQL query that returns a result set as2.opposed to ExecuteSqlCommand, which doesn't return anything.Implement ExecuteSqlQueryAsync for asynchronous operations matching3.the ExecuteSqlCommandAsync implementation from Microsoft.
Microsoft has no plans to include them at the present time, not even in EF Core 2.0. It issimilar to the earlier discussion we had for anonymous types support:
public static class DatabaseExtensions { public static RelationalDataReader ExecuteSqlQuery(this DatabaseFacade databaseFacade, string sql, params object[] parameters) { var concurrencyDetector = databaseFacade.GetService<IConcurrencyDetector>(); using (concurrencyDetector.EnterCriticalSection()) { var rawSqlCommand = databaseFacade .GetService<IRawSqlCommandBuilder>() .Build(sql, parameters);
return rawSqlCommand .RelationalCommand .ExecuteReader( databaseFacade.GetService<IRelationalConnection>(), parameterValues: rawSqlCommand.ParameterValues); } }
public static async Task<RelationalDataReader> ExecuteSqlQueryAsync(this DatabaseFacade databaseFacade, string sql, CancellationToken cancellationToken = default(CancellationToken), params object[] parameters) { var concurrencyDetector = databaseFacade.GetService<IConcurrencyDetector>(); using (concurrencyDetector.EnterCriticalSection()) { var rawSqlCommand = databaseFacade .GetService<IRawSqlCommandBuilder>() .Build(sql, parameters);
return await rawSqlCommand .RelationalCommand

Going Raw – Leveraging SQL Queries in LINQ Chapter 7
[ 188 ]
.ExecuteReaderAsync( databaseFacade.GetService<IRelationalConnection>(), parameterValues: rawSqlCommand.ParameterValues, cancellationToken: cancellationToken); } } }
The following code usage is pretty simple; all it does is pass the SQL query required forthe ExecuteSqlQueryAsync extension method and return a result set in the form ofDbDataReader:
var results = await _context.Database .ExecuteSqlQueryAsync(@"select b.Title as BlogTitle, p.* from Post p join Blog b on b.Id = p.BlogId"); while (results.DbDataReader.Read()) { Console.Write( $"Blog Title: '{results.DbDataReader["BlogTitle"]}', Post Title: '{results.DbDataReader["Title"]}'"); }
We have iterated the DbDataReader, which prints the post along with its blog title. Thefollowing screenshot proves that anonymous types were returned from flat SQL queriesfrom Entity Framework using our own extension method:
As an additional check, let us verify the second item being returned in the result set, and itsmatching with the .NET Core entry available in the Post table, the following screenshotconfirms that the post entries were from .NET core blog only:

Going Raw – Leveraging SQL Queries in LINQ Chapter 7
[ 189 ]
We have investigated the availability of raw SQL execution without DBSet or POCO objectsin Entity Framework. It was proven that Microsoft doesn't have any support at the presenttime. So, we had a workaround suggested by a user in the community to create anextension method to achieve the same. Then we were able to execute flat SQL queriesdirectly on a database (without a DBSet) and return anonymous types (without a POCOobject).
SummaryWe have explored how to execute raw SQL queries in EF Core without providing directADO.NET implementation, and have a consistent implementation of the Data Access layer.We started with a simple SQL query, then looked at the security threats (SQL injection) itwould expose us to. We have overcome those threats by using parameterized queries andstored procedures. We saw the ways available to marry (composing with LINQ) EntityFramework with raw SQL query execution, leveraging the same with Includefunctionality. Finally, we executed raw SQL queries without DBSet and the POCO model,even though there is no built-in support in EF Core.
So far, we have been accessing the data through LINQ to SQL or raw SQL queries withoutany pattern applied. In Chapter 8, Query Is All We Need – Query Object Pattern, we willfigure out how to apply query-related patterns.

8Query Is All We Need – Query
Object PatternWe have covered raw SQL query execution in Entity Framework (EF), which might berequired in a few valid scenarios to have control over queries or to improve performance.We have seen a simple SQL query, the security threat it could pose, and also a solution forthis. Then we covered different ways of executing raw SQL queries in Entity Framework. Finally, we created an extension method to execute raw SQL queries without a DBSet andPOCO model.
Let's discuss the repository pattern currently used in the Object Relational Mapping(ORM) layer, looking at its design issues, and we'll see how the query object pattern helps us in achieving this efficiently. The following design issues will be addressed in thischapter:
The repository pattern started to abstract the ORM layer, but lately, the methodsincluded in the repository were growing drastically, which defeats its purpose:
The necessity to simplify the data access layer led to the queryobject pattern
We have been creating multiple methods in repositories that differ only by thenature of queries:
The query object pattern generalizes and improvises the repositorymethods
Queries alone would not be sufficient in simplifying the data access layer:Composing queries with generic commands extends the pattern toall CRUD operations

Query Is All We Need – Query Object Pattern Chapter 8
[ 191 ]
The query object pattern still doesn't let the user extend the queries dynamically:The simple query objects perform implementation inside queries,but expression trees delegate the implementation to the user,providing the required extendibility to the user
Ideally, we will be covering the following topics:
Introduction to query objectsImproving repositories with the query object patternComposing queries with commandsEnhancing queries with expression trees
Introduction to query objectsThe query object pattern could be incorporated by introducing a query type and processingthe query through the type, instead of processing it directly. Please perform the followingapproach we need to follow in order to incorporate the pattern in any application:
Create a query type with the fields required for the query, as follows:1.Have a parameterized constructor that enforces the type instance to becreated only if mandatory field values were providedThe mandatory fields required for the query must be included in theconstructor
Let's create a query type that filters posts by Id; we need a query type that has anId field and a constructor that populates the Id field:
public class PostDetailQuery { public PostDetailQuery(int? id) { this.Id = id; } public int? Id { get; set; } }
The query type is ready for implementation; let's proceed to the next step, creatinghandlers.

Query Is All We Need – Query Object Pattern Chapter 8
[ 192 ]
Create a query handler interface that enforces the type to handle queries, create2.Handle() in the interface that would enforces type to implement it.
The handler must be created in two folds; first, an interface should be created withthe provision required for handling the execution:
public interface IPostDetailQueryHandler { Task<Post> Handle(PostDetailQuery query); }
The provision is in place; let's create the implementation with a concrete queryhandler type.
Create a query handler type that performs queries using data context, inject the3.database context using a constructor
The BlogContext database context is injected into the handler through theconstructor, shown as follows:
public class PostDetailQueryHandler : IPostDetailQueryHandler { private readonly BlogContext _context; public PostDetailQueryHandler(BlogContext context) { _context = context; } }
The data context is now available; let's use the context of the query object toperform the query execution:
Implement Handle() with actual queries using the data context
The query handler implementation consumes the query type created earlier, andthe data context creates a filter using the data available in the query object andperforms its execution:
public class PostDetailQueryHandler : IPostDetailQueryHandler { // Code removed for brevity public async Task<Post> Handle(PostDetailQuery query) { return await _context.Posts .Include(p => p.Author)

Query Is All We Need – Query Object Pattern Chapter 8
[ 193 ]
.Include(p => p.Blog) .Include(p => p.Category) .FirstOrDefaultAsync(x => x.Id == query.Id); } }
Now the query handler implementation is complete, but it's still not consumedanywhere in the application. Let's see how it could be consumed in our controller.
Consume the query handler in the controller, inject the query handler using a4.constructor
The PostDetailQueryHandler type is injected through the constructor againstthe IPostDetailQueryHandler interface using the dependency injection (as wepreviously did for BlogContext) supported in .NET Core:
public class PostsController : Controller { private readonly BlogContext _context; private readonly IPostDetailQueryHandler _postDetailQueryHandler;
public PostsController(BlogContext context, IPostDetailQueryHandler postDetailQueryHandler) { _context = context; _postDetailQueryHandler = postDetailQueryHandler; } // Code removed for brevity }
The query handler is available in the constructor now; let's consume this toperform the required execution in the action that requires it, identify the action(from the controller) that requires the query and consume the query handler toperform the execution
The Details action in the controller requires a query execution based on the postId, so let's consume the query using PostDetailQuery created for thisrequirement. The following code would consume the query handler inthe controller:
public async Task<IActionResult> Details(int? id) { // Code removed for brevity var post = await _postDetailQueryHandler.Handle(new PostDetailQuery(id));

Query Is All We Need – Query Object Pattern Chapter 8
[ 194 ]
// Code removed for brevity }
The preceding implementation would trigger a post filter based on the id passedon to the query object, thus wrapping the core implementation to the query type,satisfying the query object pattern:
Finally, do not forget to support the constructor execution in the dependency injection in Startup.cs inside the ConfigureServicesmethod:
services.AddScoped<IPostDetailQueryHandler, PostDetailQueryHandler>();
We have seen how to create query objects and handlers, and how to consume them incontrollers. In Chapter 9, Fail Safe Mechanism – Transactions, we'll see how to leverage orimprovise the repositories by consuming query objects.
Improving repositories with the query objectpatternWe need a provision to explain the necessity of a query object pattern, so let's create such arequirement and then we will look into query objects. We will create a repository for blogsin our system, we will see the advantages and disadvantages it brings to the application,and finally, we will see what are query objects and how they help us in improvisingrepositories.
Introduction to repositoriesWe have been performing CRUD operations in the controller directly with the data context;we could incorporate a repository in our application first, and later, query objects could beimplemented in the repository.
Let us start with creating the interface required for the repository. It includes basic retrieval,business-specific retrievals, and the remaining CRUD operations. The following codecontains the methods required for the IPostRepository:
public interface IPostRepository { IEnumerable<Post> GetAllPosts();

Query Is All We Need – Query Object Pattern Chapter 8
[ 195 ]
Task<IEnumerable<Post>> GetAllPostsAsync(); Post GetPostById(int? id, bool includeData = true); Task<Post> GetPostByIdAsync(int? id, bool includeData = true); IEnumerable<Post> FindPostByTitle(string title); IEnumerable<Post> FindPostByAuthor(string author); IEnumerable<Post> FindPostByPublishedYear(int year); IEnumerable<Post> FindPostByHighestVisitors(); IEnumerable<Post> FindPostByCategory(string category); IEnumerable<Post> FindPost(string keyword, int pageCount, int pageSize); int AddPost(Post item); Task<int> AddPostAsync(Post item); int UpdatePost(Post item); Task<int> UpdatePostAsync(Post item); int DeletePost(int? id); Task<int> DeletePostAsync(int? id); }
The repository implementation starts with the database context injection, BlogContext inour case. Then the interface implementation starts with FindPost, which takes keyword,pageCount, and pageSize, which were consumed by the LINQ query in filtering postsusing those parameters. The keyword was used as a wildcard search across all fieldsavailable in the Post entity:
public class PostRepository : IPostRepository { private readonly BlogContext _context; public PostRepository(BlogContext context) { _context = context; }
public IEnumerable<Post> FindPost(string keyword, int pageCount, int pageSize) { return _context.Posts .Where(x => x.Title.ToLower().Contains(keyword.ToLower()) || x.Blog.Title.ToLower().Contains(keyword.ToLower()) || x.Blog.Subtitle.ToLower().Contains(keyword.ToLower()) || x.Category.Name.ToLower().Contains(keyword.ToLower()) || x.Content.ToLower().Contains(keyword.ToLower()) || x.Summary.ToLower().Contains(keyword.ToLower()) || x.Author.Username.ToLower().Contains(keyword.ToLower()) || x.Url.ToLower().Contains(keyword.ToLower())) .Skip(pageCount-1).Take(pageSize); }

Query Is All We Need – Query Object Pattern Chapter 8
[ 196 ]
We could have the assignment to cover the remaining implementations (as well as newactions required to filter posts by category, author, and so on) required in the controller, aswe mostly port the controller implementations into a repository method; for instance, theaction implementation of the Get action gets into the GetAllPosts method of therepository. In this chapter, since we are working on an assignment that is required toproceed to the next section, we will have the solutions captured as well, just to ensure wehave everything implemented before we move on to the next section.
Solution to the repository assignmentWe could come up with the following URI that could be used in the application for filteringposts. We should definitely need provision to filter posts by category, author, visitor count,and so on, and these URIs should serve a response in a JSON format that will be consumedby AJAX calls. The following actions would server JSON data which could be consumed bythe AJAX calls:
Posts/FindPostsByAuthor
Posts/FindPostByCategory
Posts/FindPostByHighestVisitors
Posts/FindPostByPublishedYear
Posts/FindPostByTitle
Let's start building those JSON endpoints first, and then we will move on to porting existingactions into the repository.
The following steps need to be followed to implement JSON-driven HTTP action:
Set the appropriate HTTP verb, [HttpGet] in our case.1.Set the return type as JSON using [Produces("application\json")].2.The method implementation is straightforward:3.
Define the controller action with the appropriate return type and an1.input parameter.Filter the data context using the input parameter and return the filtered2.data.
The code for the action is listed as follows:4.
[HttpGet] [Produces("application/json")] public IEnumerable<Post> FindPostByAuthor(string author) {

Query Is All We Need – Query Object Pattern Chapter 8
[ 197 ]
return _context.Posts .Where(x => x.Author.Username.ToLower(). Contains(author.ToLower())); }
This implementation alone would not be enough, as we are deviating from the regularMVC content negotiation. This action requires us to return JSON, so we need to configurethe services to support this. Additionally, we will ignore the ReferenceLoopHandling toavoid unnecessary data included in the response.
In startup.cs, add the following configuration insidethe ConfigureServices method:
services.AddMvc().AddJsonOptions(options => { options.SerializerSettings.ContractResolver = new DefaultContractResolver(); options.SerializerSettings.ReferenceLoopHandling = Newtonsoft.Json.ReferenceLoophandling.Ignore; });
Similar changes are required for the remaining URIs; let's take it up as an assignment:
Posts/FindPostByCategory
Posts/FindPostByHighestVisitors
Posts/FindPostByPublishedYear
Posts/FindPostByTitle
The same pattern should be followed for the remaining JSON actions andalso for the remaining actions that need to be ported into a repository. Thesolution for this is available in the following Git repository:https:/ /goo. gl/ DGBZMK
The repository implementation is far more complete now. In the next section, we will startincorporating the query object pattern into the repository.

Query Is All We Need – Query Object Pattern Chapter 8
[ 198 ]
Incorporating the query object pattern intorepositoriesIn the Introduction to query objects section of this chapter, the query object pattern we hadexplored need to be incorporated into the repository. Since we know the steps that need tobe followed in creating query objects, let's start creating the required types.
List query object support in the repositoryWe have seen the GetAllPosts method, which includes related data for allimplementations. Since we are creating a common query, which could be consumed inmultiple places, we need to include this as a filter in the GetAllPostsQuery object:
public class GetAllPostsQuery { public GetAllPostsQuery(bool includeData) { this.IncludeData = includeData; } public bool IncludeData { get; set; } }
The GetAllPostsQuery consumes only the IncludeData filter in the type, which doesn'tfilter any data from the result set, but only excludes/includes related data. The followingcode would create a contract to enforce consumers to implement handle methods:
public interface IPostQueryHandler<T> where T : class { IEnumerable<Post> Handle(T query); Task<IEnumerable<Post>> HandleAsync(T query); }
The generic query handler interface now supports both synchronous and asynchronousoperations, which returns a list of Posts. The GetAllPostsQueryHandler would performthe concrete implementation which will yield a list of Posts in synchronous andasynchronous manner as displayed in the following code:
public class GetAllPostsQueryHandler : IPostQueryHandler<GetAllPostsQuery> { private readonly BlogContext _context; public GetAllPostsQueryHandler(BlogContext context) { this._context = context;

Query Is All We Need – Query Object Pattern Chapter 8
[ 199 ]
}
public IEnumerable<Post> Handle(GetAllPostsQuery query) { return query.IncludeData ? _context.Posts.Include(p => p.Author).Include(p => p.Blog).Include(p => p.Category).ToList() : _context.Posts.ToList(); } public async Task<IEnumerable<Post>> HandleAsync(GetAllPostsQuery query) { return query.IncludeData ? await _context.Posts.Include(p => p.Author).Include(p => p.Blog).Include(p => p.Category).ToListAsync() : await _context.Posts.ToListAsync(); } }
The GetAllPostsQuery consumes the generic query handler to return all posts with orwithout including related data. The IPostRepositoryWithQueries will create a contractwith Get() and GetAsync() method to retrieve list of Posts with the following code:
public interface IPostRepositoryWithQueries { IEnumerable<Post> Get<T>(BlogContext context, T query) where T : class; Task<IEnumerable<Post>> GetAsync<T>(BlogContext context, T query) where T : class; }
The PostRepositoryWithQueries repository is created to accommodate the query objectswith generic methods to accept any query type for its execution, thereby reducing themultiple methods created in the repository earlier. The concrete implementation of therepository is displayed below which delegates the query execution based on the query type:
public class PostRepositoryWithQueries : IPostRepositoryWithQueries { private readonly BlogContext _context;
public PostRepositoryWithQueries(BlogContext context) { _context = context; }
public IEnumerable<Post> Get<T>(BlogContext context, T query) where T : class

Query Is All We Need – Query Object Pattern Chapter 8
[ 200 ]
{ switch(typeof(T).Name) { case "GetAllPostsQuery": var getAllPostsQueryHandler = new GetAllPostsQueryHandler(context); return getAllPostsQueryHandler.Handle(query as GetAllPostsQuery); } }
public async Task<IEnumerable<Post>> GetAsync<T>(BlogContext context, T query) where T : class { switch (typeof(T).Name) { case "GetAllPostsQuery": var getAllPostsQueryHandler = new GetAllPostsQueryHandler(context); return await getAllPostsQueryHandler.HandleAsync(query as GetAllPostsQuery); } } }
The repository's Get generic method changes its implementation based on the type passedduring its invocation, and that reduces the repository implementation to one for all post listretrievals. The PostRepositoryWithQueries were consumed in the PostsControlleras shown in the following code:
public class PostsController : Controller { private readonly BlogContext _context; private readonly IPostRepositoryWithQueries _repositoryWithQueries;
public PostsController(BlogContext context, IPostRepositoryWithQueries repositoryWithQueries) { _context = context; _repositoryWithQueries = repositoryWithQueries; }
// GET: Posts public async Task<IActionResult> Index() { return View(await _repositoryWithQueries.GetAsync(_context,

Query Is All We Need – Query Object Pattern Chapter 8
[ 201 ]
new GetAllPostsQuery(true))); }
// Code removed for brevity }
We can see the controller started using the new repository through dependency injectionand corresponding the Get action being called using the appropriate query object. In thepreceding scenario, we have been using the GetAllPostsQuery object that was passed onto the GetAsync method of the new repository. In the next section, let's explore theimplementation required to return an individual post object from the repository.
Single query object support in the repositoryWe have seen how a list of objects was returned from the repository in a generic fashion.Let's have a provision to return a single object from the repository:
public interface IPostRepositoryWithQueries { // Code removed for brevity Post GetSingle<T>(T query) where T : class; Task<Post> GetSingleAsync<T>(T query) where T : class; }
The preceding code adds synchronous and asynchronous methods to return a single Postobject from the repository, still retaining the generic implementation since it could be usedby multiple query objects that might return individual Post objects:
public class GetPostByIdQuery { public GetPostByIdQuery(int? id, bool includeData) { this.Id = id; this.IncludeData = includeData; }
public int? Id { get; set; } public bool IncludeData { get; set; } }

Query Is All We Need – Query Object Pattern Chapter 8
[ 202 ]
The query type we have created now has one more filter by Id, apart from retainingIncludeData from the previous query type. The handler interface required to return singlePost type is defined below:
public interface IPostQuerySingleHandler<T> where T : class { Post Handle(T query); Task<Post> HandleAsync(T query); }
We have a corresponding generic query handler to handle a single object from the handlerimplementation, which has synchronous and asynchronous support as well. The followingcode provides concrete implementation required for the GetPostByIdQueryHandler tofilter Posts by identifier:
public class GetPostByIdQueryHandler : IPostQuerySingleHandler<GetPostByIdQuery> { private readonly BlogContext _context;
public GetPostByIdQueryHandler(BlogContext context) { this._context = context; }
public Post Handle(GetPostByIdQuery query) { return query.IncludeData ? _context.Posts.Include(p => p.Author) .Include(p => p.Blog) .Include(p => p.Category).SingleOrDefault(x => x.Id.Equals(query.Id)) : _context.Posts .SingleOrDefault(x => x.Id.Equals(query.Id)); }
public async Task<Post> HandleAsync(GetPostByIdQuery query) { return query.IncludeData ? await _context.Posts.Include(p => p.Author) .Include(p => p.Blog) .Include(p => p.Category).SingleOrDefaultAsync(x => x.Id.Equals(query.Id)) : await _context.Posts .SingleOrDefaultAsync(x => x.Id.Equals(query.Id)); } }

Query Is All We Need – Query Object Pattern Chapter 8
[ 203 ]
The query handler now ports the filter by id implementation to the handler; additionally, itincludes/excludes related data based on the IncludeData filter:
public class PostRepositoryWithQueries : IPostRepositoryWithQueries { private readonly BlogContext _context;
public PostRepositoryWithQueries(BlogContext context) { _context = context; }
public Post GetSingle<T>(BlogContext context, T query) where T : class { //switch (typeof(T).Name) //{ // case "GetPostByIdQuery": // var getPostByIdQueryHandler = new GetPostByIdQueryHandler(context); // return getPostByIdQueryHandler.Handle(query as GetPostByIdQuery); //}
var getPostByIdQueryHandler = new GetPostByIdQueryHandler(context); return getPostByIdQueryHandler.Handle(query as GetPostByIdQuery); }
public async Task<Post> GetSingleAsync<T>(BlogContext context, T query) where T : class { //switch (typeof(T).Name) //{ // case "GetPostByIdQuery": // var getPostByIdQueryHandler = new GetPostByIdQueryHandler(context); // return await getPostByIdQueryHandler.HandleAsync(query as GetPostByIdQuery); //}
var getPostByIdQueryHandler = new GetPostByIdQueryHandler(context); return await getPostByIdQueryHandler.HandleAsync(query

Query Is All We Need – Query Object Pattern Chapter 8
[ 204 ]
as GetPostByIdQuery); } }
We have commented code in the repository implementations since, currently, it supportsonly one query handler for returning a single object and having a switch case doesn't makeany sense. Once we start adding new implementations for handling single objects, we willbe using commented code instead, which supports multiple queries through a single action:
public class PostsController : Controller { // Code removed for brevity
// GET: Posts/Details/5 public async Task<IActionResult> Details(int? id) { if (id == null) { return NotFound(); }
var post = await _repositoryWithQueries.GetSingleAsync(_context, new GetPostByIdQuery(id, true)); if (post == null) { return NotFound(); }
return View(post); }
// GET: Posts/Edit/5 public async Task<IActionResult> Edit(int? id) { if (id == null) { return NotFound(); }
var post = await _repositoryWithQueries.GetSingleAsync(_context, new GetPostByIdQuery(id, false));
// Code removed for brevity } }

Query Is All We Need – Query Object Pattern Chapter 8
[ 205 ]
In the controller code, it is obvious that GetSingleAsync is used in multiple actions, but inthe preceding highlighted usages one was including related data and the other wasexcluding it. We can also see the following code which provides the Delete actionimplementation along with include related data as it will be rendered in the Deleteconfirmation screen:
// GET: Posts/Delete/5 public async Task<IActionResult> Delete(int? id) { if (id == null) { return NotFound(); }
var post = await _repositoryWithQueries.GetSingleAsync(_context, new GetPostByIdQuery(id, true)); if (post == null) { return NotFound(); }
return View(post); }
We have explored how query objects need to be incorporated inside the repository andimplemented this for one single and list operation. Let's again take the remainingimplementations as an assignment and complete the repository incorporation.
Solution to the repository with the queries assignmentThe solution to the query objects' implementation to the remaining modules is available inthe following Git repository path:
https://goo.gl/iZb1Pg
The solution to the query handler implementations to the remaining modules is available inthe following Git repository path:
https://goo.gl/XbXCM6
The controller implementation with the remaining queries from the repository is listed asfollows:
https://goo.gl/yV474G

Query Is All We Need – Query Object Pattern Chapter 8
[ 206 ]
In this section, we have incorporated query objects inside the repository. In the next section,we will see how we can compose queries with commands.
Composing queries with commandsWe will streamline the implementation while implementing commands in our repository.The following code will allow us to create an interface which enforces IncludeData to beset for all queries:
public interface IQueryRoot { bool IncludeData { get; set; } }
We will use IQueryRoot as a base interface for the query handler, which returns genericreturn typed data. The following code extends the IQueryRoot and provide two interfacesto support synchronous and asynchronous operations:
public interface IQueryHandler<out TReturn> : IQueryRoot { TReturn Handle(); } public interface IQueryHandlerAsync<TReturn> : IQueryRoot { Task<TReturn> HandleAsync(); }
Let's keep creating multiple generic interfaces required for different queries that inherit thequery handler with a configured return type, and additionally define the fields required ineach query type.
We will be using Variant Generic Interfaces. Even though they are out ofscope, let's discuss them briefly to understand thecode. The covariant generic interface expects the type to implementmethods that have a return type specified in the generic type parametersusing the out keyword. The contravariant generic interface expects thetype to accept method arguments as the type specified in the generic typeparameters using the in keyword.

Query Is All We Need – Query Object Pattern Chapter 8
[ 207 ]
We will be using the contravariant generic interface in the following example, whereas thecovariant generic interfaces were used widely in this chapter:
public interface IGetAllPostsQuery<in T> : IQueryHandler<IEnumerable<Post>>, IQueryHandlerAsync<IEnumerable<Post>> { } public interface IGetPaginatedPostByKeywordQuery<in T> : IQueryHandler<IEnumerable<Post>>, IQueryHandlerAsync<IEnumerable<Post>> { string Keyword { get; set; } int PageNumber { get; set; } int PageCount { get; set; } } public interface IGetPostByAuthorQuery<T> : IQueryHandler<IEnumerable<Post>>, IQueryHandlerAsync<IEnumerable<Post>> { string Author { get; set; } } public interface IGetPostByCategoryQuery<T> : IQueryHandler<IEnumerable<Post>>, IQueryHandlerAsync<IEnumerable<Post>> { string Category { get; set; } } public interface IGetPostByHighestVisitorsQuery<T> : IQueryHandler<IEnumerable<Post>>, IQueryHandlerAsync<IEnumerable<Post>> { } public interface IGetPostByIdQuery<T> : IQueryHandler<Post>, IQueryHandlerAsync<Post> { int? Id { get; set; } } public interface IGetPostByPublishedYearQuery<T> : IQueryHandler<IEnumerable<Post>>, IQueryHandlerAsync<IEnumerable<Post>> { int Year { get; set; } } public interface IGetPostByTitleQuery<T> : IQueryHandler<IEnumerable<Post>>, IQueryHandlerAsync<IEnumerable<Post>>

Query Is All We Need – Query Object Pattern Chapter 8
[ 208 ]
{ string Title { get; set; } }
Let's create a command handler that would handle a command execution similar to thequery handler interface that orchestrates the query execution. The following commandhandler code will create a generic interface which provides handle mechanism with genericreturn type:
public interface ICommandHandler<out TReturn> { TReturn Handle(); } public interface ICommandHandlerAsync<TReturn> { Task<TReturn> HandleAsync(); }
Let's keep creating multiple generic interfaces required for different commands that inheritthe command handlers. The following code will create interfaces required the Post CRUDoperation using commands:
public interface ICreatePostCommand<TReturn> : ICommandHandler<TReturn>, ICommandHandlerAsync<TReturn> { } public interface IDeletePostCommand<TReturn> : ICommandHandler<TReturn>, ICommandHandlerAsync<TReturn> { } public interface IUpdatePostCommand<TReturn> : ICommandHandler<TReturn>, ICommandHandlerAsync<TReturn> { }
We need a QueryBase, which allows database context to be injected through theconstructor, and this will be used by all queries that inherit QueryBase. The following codewill create QueryBase which consumes BlogContext used by all queries accessing thedata context:
public class QueryBase { internal readonly BlogContext Context; public QueryBase(BlogContext context) { this.Context = context;
Query Is All We Need – Query Object Pattern Chapter 8
[ 209 ]
} }
The GetAllPostsQuery inherits QueryBase and IGetAllPostsQuery, it enforces thedeveloper to define IncludeData field and implement the Handle and HandleAsyncmethods that consume data context from the QueryBase type. The following code providesthe concrete implementation of GetAllPostsQuery consuming QueryBase type:
public class GetAllPostsQuery : QueryBase, IGetAllPostsQuery<GetAllPostsQuery> { public GetAllPostsQuery(BlogContext context) : base(context) { }
public bool IncludeData { get; set; } public IEnumerable<Post> Handle() { return IncludeData ? Context.Posts .Include(p => p.Author).Include(p => p.Blog).Include(p => p.Category) .ToList() : Context.Posts .ToList(); } public async Task<IEnumerable<Post>> HandleAsync() { return IncludeData ? await Context.Posts .Include(p => p.Author).Include(p => p.Blog).Include(p => p.Category) .ToListAsync() : await Context.Posts .ToListAsync(); } }
We could take up an assignment to implement the remaining queries we had earlier usingthe new approach.

Query Is All We Need – Query Object Pattern Chapter 8
[ 210 ]
Similar to QueryBase, CommandBase is a base required for all commands that expose thedata context for all consumers. The following code will create CommandBase whichconsumes BlogContext consumed by all command objects:
public class CommandBase { internal readonly BlogContext Context; public CommandBase(BlogContext context) { Context = context; } }
The CreatePostCommand inherits CommandBase and ICreatePostCommand, it enforcesdevelopers to define all the fields necessary to create a Post object and implementthe Handle and HandleAsync methods that consume the data context from theCommandBase type. The following code creates concrete implementation ofCreatePostCommand consuming CommandBase type:
public class CreatePostCommand : CommandBase, ICreatePostCommand<int> { public CreatePostCommand(BlogContext context) : base(context) { } public string Title { get; set; } public string Content { get; set; } public string Summary { get; set; } public int BlogId { get; set; } public int AuthorId { get; set; } public int CategoryId { get; set; } public DateTime PublishedDateTime { get; set; } public int Handle() { Context.Add(new Post { Title = Title, Content = Content, Summary = Summary, BlogId = BlogId, AuthorId = AuthorId, CategoryId = CategoryId, PublishedDateTime = PublishedDateTime, CreatedAt = DateTime.Now, CreatedBy = AuthorId, Url = Title.Generate()

Query Is All We Need – Query Object Pattern Chapter 8
[ 211 ]
}); return Context.SaveChanges(); } public async Task<int> HandleAsync() { Context.Add(new Post { Title = Title, Content = Content, Summary = Summary, BlogId = BlogId, AuthorId = AuthorId, CategoryId = CategoryId, PublishedDateTime = PublishedDateTime, CreatedAt = DateTime.Now, CreatedBy = AuthorId, Url = Title.Generate() }); return await Context.SaveChangesAsync(); } }
We could take up an assignment to implement the Update and Delete commands andproceed with configuring the queries and commands in the new repository. The interfacecode required for the repository is listed below, which has provisions to query single or alist of data and also to execute any commands; every one of them is implemented in ageneric fashion:
public interface IPostRepositoryWithCommandsQueries { IEnumerable<Post> Get<T>(T query) where T : IQueryHandler<IEnumerable<Post>>; Task<IEnumerable<Post>> GetAsync<T>(T query) where T : IQueryHandlerAsync<IEnumerable<Post>>; Post GetSingle<T>(T query) where T : IQueryHandler<Post>; Task<Post> GetSingleAsync<T>(T query) where T : IQueryHandlerAsync<Post>; int Execute<T>(T command) where T : ICommandHandler<int>; Task<int> ExecuteAsync<T>(T command) where T : ICommandHandlerAsync<int>; }

Query Is All We Need – Query Object Pattern Chapter 8
[ 212 ]
The generic implementation of the new repository is listed as follows as well. At this point,the repository doesn't know which query or command it's executing as it's resolved at run-time, the following code would create concrete implementation ofPostRepositoryWithCommandQueries consuming command handling statements aswell:
public class PostRepositoryWithCommandsQueries : IPostRepositoryWithCommandsQueries { private readonly BlogContext _context; public PostRepositoryWithCommandsQueries(BlogContext context) { _context = context; } public IEnumerable<Post> Get<T>(T query) where T : IQueryHandler<IEnumerable<Post>> { return query.Handle(); } public async Task<IEnumerable<Post>> GetAsync<T>(T query) where T : IQueryHandlerAsync<IEnumerable<Post>> { return await query.HandleAsync(); } public Post GetSingle<T>(T query) where T : IQueryHandler<Post> { return query.Handle(); } public async Task<Post> GetSingleAsync<T>(T query) where T : IQueryHandlerAsync<Post> { return await query.HandleAsync(); } public int Execute<T>(T command) where T : ICommandHandler<int> { return command.Handle(); } public async Task<int> ExecuteAsync<T>(T command) where T : ICommandHandlerAsync<int> { return await command.HandleAsync(); } }

Query Is All We Need – Query Object Pattern Chapter 8
[ 213 ]
The controller update to accommodate the new repository is listed as follows:
public class PostsController : Controller { private readonly BlogContext _context; private readonly IPostRepositoryWithCommandsQueries _postRepositoryWithCommandsQueries; public PostsController(BlogContext context, IPostRepositoryWithCommandsQueries repositoryWithCommandsQueries) { _context = context; _postRepositoryWithCommandsQueries = repositoryWithCommandsQueries; } }
The Index method that executes GetAllPostsQuery is updated, as follows:
// GET: Posts public async Task<IActionResult> Index() { return View(await _postRepositoryWithCommandsQueries.GetAsync( new GetAllPostsQuery(_context) { IncludeData = true })); }
The Create command replaces the data context manipulation, as follows:
public async Task<IActionResult> Create([Bind("Id,Title, Content,Summary,PublishedDateTime,Url,VisitorCount,CreatedAt, ModifiedAt,BlogId,AuthorId,CategoryId")] Post post) { // code removed for brevity await _postRepositoryWithCommandsQueries.ExecuteAsync( new CreatePostCommand(_context) { Title = post.Title, Summary = post.Summary, Content = post.Content, PublishedDateTime = post.PublishedDateTime, AuthorId = post.AuthorId, BlogId = post.BlogId, CategoryId = post.CategoryId }); // code removed for brevity }

Query Is All We Need – Query Object Pattern Chapter 8
[ 214 ]
We have covered exhaustively how commands are created and consumed along withqueries in repositories and controllers. Let's visit the solution required for the previousassignment in the next section to proceed with the missing implementations.
Solution to the command queries assignmentThe solution to the command queries assignment starts with the implementation of queryobjects, and is available in the following Git repository path:
https://goo.gl/RFKed5
The solution to the implementation of the remaining commands is available in thefollowing Git repository path:
https://goo.gl/6aW15n
The solution to the controller implementation for the commands and queries is available inthe following Git repository path:
https://goo.gl/ysNyc7
We have seen the exhaustive coverage of composing commands with queries. In the nextsection, let's explore enhancing the queries using expression trees.
Enhancing queries with expression treesAn expression tree is a mechanism that allows developers to create expressions that arenecessary for the filters in the queries. In .NET, we have Func<T, TResult> to wrap aWhere predicate and use it in multiple occurrences. We could use the same mechanism tocreate expression trees and leverage them in query objects.
The generic IQueryExpression interface has a provision to create an expression throughFunc, the following code creates contract for AsExpression().
public interface IQueryExpression<T> { Expression<Func<T, bool>> AsExpression(); }

Query Is All We Need – Query Object Pattern Chapter 8
[ 215 ]
The concrete expression class implements IQueryExpression with concrete methods andtheir interface counterpart and wraps the Where predicate inside the AsExpressionmethod, which returns a Func object. The following code provides a wildcard search on allfields from the Post entity using the expression approach:
public class GetPaginatedPostByKeywordQueryExpression : IQueryExpression<Post> { public string Keyword { get; set; } public Expression<Func<Post, bool>> AsExpression() { return (x => x.Title.ToLower().Contains(Keyword.ToLower()) || x.Blog.Title.ToLower().Contains(Keyword.ToLower()) || x.Blog.Subtitle.ToLower().Contains(Keyword.ToLower()) || x.Category.Name.ToLower().Contains(Keyword.ToLower()) || x.Content.ToLower().Contains(Keyword.ToLower()) || x.Summary.ToLower().Contains(Keyword.ToLower()) || x.Author.Username.ToLower().Contains(Keyword.ToLower()) || x.Url.ToLower().Contains(Keyword.ToLower())); } }
The expression tree is used in the query object, as shown. It is obvious that the expressionobject is constructed and used as a parameter to the Where condition in the LINQ query.The below GetPaginatedPostByKeywordQuery implementation consumes the expressionrequired for wild card search:
public class GetPaginatedPostByKeywordQuery : QueryBase, IGetPaginatedPostByKeywordQuery<GetPaginatedPostByKeywordQuery> { // Code removed for brevity public IEnumerable<Post> Handle() { var expression = new GetPaginatedPostByKeywordQueryExpression { Keyword = Keyword }; return IncludeData ? Context.Posts.Include(p => p.Author).Include(p => p.Blog).Include(p => p.Category) .AsQueryable() .Where(expression.AsExpression()) .Skip(PageNumber - 1).Take(PageCount) .ToList() : Context.Posts .AsQueryable()
Query Is All We Need – Query Object Pattern Chapter 8
[ 216 ]
.Where(expression.AsExpression()) .Skip(PageNumber - 1).Take(PageCount) .ToList(); } public async Task<IEnumerable<Post>> HandleAsync() { var expression = new GetPaginatedPostByKeywordQueryExpression { Keyword = Keyword }; return IncludeData ? await Context.Posts.Include(p => p.Author).Include(p => p.Blog).Include(p => p.Category) .AsQueryable() .Where(expression.AsExpression()) .Skip(PageNumber - 1).Take(PageCount) .ToListAsync() : await Context.Posts .AsQueryable() .Where(expression.AsExpression()) .Skip(PageNumber - 1).Take(PageCount) .ToListAsync(); } }
Here, the controller code remains intact as it has nothing to do with expression treeimplementation, as it's the responsibility of the query object and the controller usage is notaffected due to this change.
Solution to the expression trees assignmentThe solution to the expression concrete classes required for the remaining queries isavailable in the following Git repository path:
https://goo.gl/gE6ZBK

Query Is All We Need – Query Object Pattern Chapter 8
[ 217 ]
The author, category, published year, and title-related query expressions are shared in thepreceding repository path, as shown in the following screenshot:
The solution to the remaining queries with expressions are available in the following Gitrepository path:
https://goo.gl/2tz9d9
The author, category, published year, and title-related query implementations usingexpressions are shared in the preceding repository path, which is shown in the followingscreenshot:

Query Is All We Need – Query Object Pattern Chapter 8
[ 218 ]
The expression trees were incorporated in commands and queries and we have seen thehuge difference this brings up with respect to reusable code.
SummaryWe have explored how to create query objects and applied patterns that would provideneat separation between queries and commands. We started with a simple query object,then created a repository that would wrap complete CRUD operations, followed byleveraging query objects in the repositories. Later, we created commands and objects, whichwere also incorporated into the repositories. Finally, we created expression trees to simplifyand reuse the conditions and Where predicates in the query execution.
We have been working on an application that cannot be recovered from any failure. InChapter 9, Fail Safe Mechanism – Transactions, we will revisit the application and handlecode from any failures, using transactions.

9Fail Safe Mechanism –
Transactions
We have applied query object patterns to isolate query objects from the repository, whichmaintains query logic in one single place. We created a simple query object, then invented arepository to illustrate how query objects could be accommodated in the repositories. Wethen moved from queries to commands to perform real transactions using a similar pattern.Finally, we worked with expression trees to simplify and configure the conditions in aquery execution.
Let's discuss how we could handle failure scenarios using transactions, how thetransaction could be accessed between contexts, and also between different data accesstechnologies:
Is there any complex system that performs more than one data manipulationactivity, then handles failures to maintain atomicity?
Transactions allow us to handle atomicity in failure scenarios.Do we need to handle transactions in simple applications?
Not required. The default behavior in EF would handletransactions only if all the changes were committed throughSaveChanges.
What if we need transactions to be maintained between multiple contexts in acomplex system?
We do have provision to maintain transactions between multipledatabase contexts.

Fail Safe Mechanism – Transactions Chapter 9
[ 220 ]
What if we need transactions to be maintained between multiple technologies (EFand ADO.NET) in a complex system?
We do have provision to maintain transactions between EF andADO.NET data manipulations.
The following topics will be covered to handle transactions in multiple scenarios:
Default behavior of a transactionCreating a simple transactionCreating a cross-context transactionLeveraging transactions between multiple technologies
Default behavior of a transactionEF supports transactions out of the box, all we need to do is perform SaveChanges() onlyonce; it saves changes only if the transaction has been executed successfully, otherwise, thetransactions will be rolled back automatically.
Let's investigate how we could practically leverage the default transactional behavior in ourblogging system:
We need two entities that need to be updated in a single web requestBoth the entities should be added/updated in the data contextWith a single SaveChanges(), both entities will be updated in the data store
In the blogging system, let's include support to add one or more tags in posts and learnabout default transaction support in parallel with the Tags integration in posts.
Adding tags support in the blogging systemThe fields required in the Post entity to incorporate Tags support in posts will be coveredin this section. Let's start the activity by including the fields required to persist taginformation in the Post model, as follows:
public class Post { // Code removed for brevity [NotMapped] public ICollection<Tag> Tags { get; set; }

Fail Safe Mechanism – Transactions Chapter 9
[ 221 ]
[NotMapped] public ICollection<int> TagIds { get; set; } [NotMapped] public string TagNames { get; set; } }
The tag information required in the Posts list view is listed as follows:
Tags : This tag information is a filtered list of tags associated with the PostTagNames : This tag information is a filtered tag name in a comma-separated string
Let's incorporate the code required to expose the filtered Tag list flattened to a string namedTagNames in the GetAllPostsQuery object. The flattened string value will be flattenedusing string.Join() as shown in the following code:
public class GetAllPostsQuery : QueryBase, IGetAllPostsQuery<GetAllPostsQuery> { // Code removed for brevity public IEnumerable<Post> Handle() { // Code removed for brevity posts.ForEach(x => { var tags = (from tag in Context.Tags join tagPost in Context.TagPosts on tag.Id equals tagPost.TagId where tagPost.PostId == x.Id select tag).ToList(); x.TagNames = string.Join(", ", tags.Select(y => y.Name).ToArray()); }); return posts; }
public async Task<IEnumerable<Post>> HandleAsync() { // Code removed for brevity posts.ForEach(x => { var tags = (from tag in Context.Tags join tagPost in Context.TagPosts on tag.Id equals tagPost.TagId where tagPost.PostId == x.Id select tag).ToList();
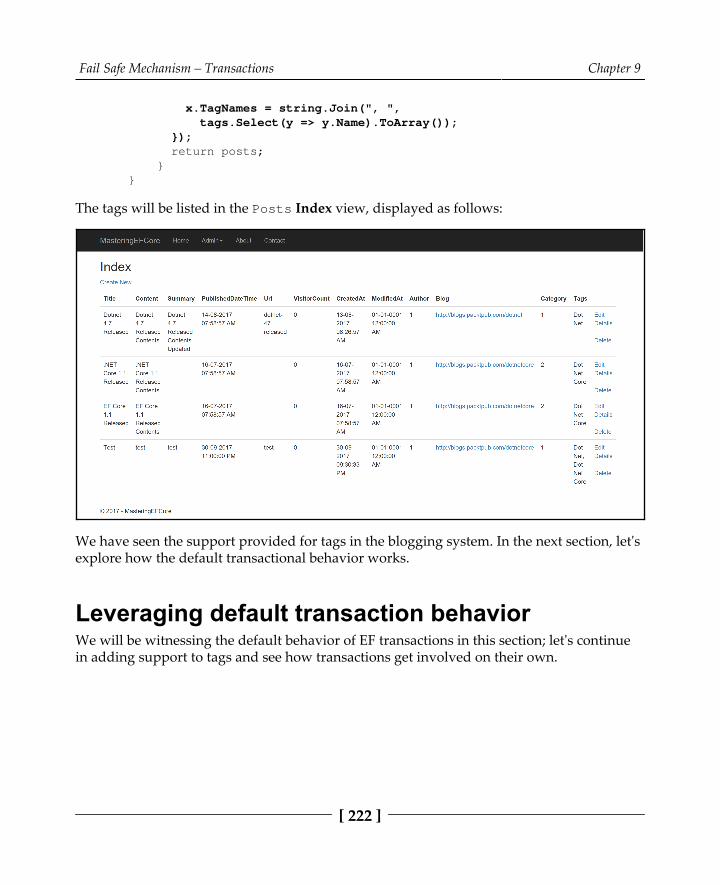
Fail Safe Mechanism – Transactions Chapter 9
[ 222 ]
x.TagNames = string.Join(", ", tags.Select(y => y.Name).ToArray()); }); return posts; } }
The tags will be listed in the Posts Index view, displayed as follows:
We have seen the support provided for tags in the blogging system. In the next section, let'sexplore how the default transactional behavior works.
Leveraging default transaction behaviorWe will be witnessing the default behavior of EF transactions in this section; let's continue in adding support to tags and see how transactions get involved on their own.
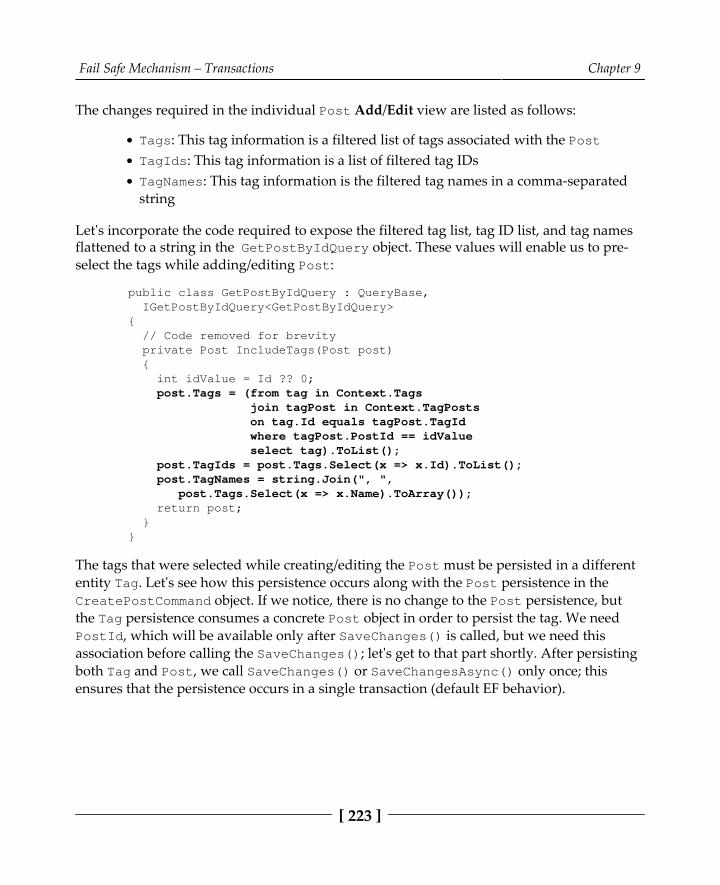
Fail Safe Mechanism – Transactions Chapter 9
[ 223 ]
The changes required in the individual Post Add/Edit view are listed as follows:
Tags: This tag information is a filtered list of tags associated with the PostTagIds: This tag information is a list of filtered tag IDsTagNames: This tag information is the filtered tag names in a comma-separatedstring
Let's incorporate the code required to expose the filtered tag list, tag ID list, and tag namesflattened to a string in the GetPostByIdQuery object. These values will enable us to pre-select the tags while adding/editing Post:
public class GetPostByIdQuery : QueryBase, IGetPostByIdQuery<GetPostByIdQuery> { // Code removed for brevity private Post IncludeTags(Post post) { int idValue = Id ?? 0; post.Tags = (from tag in Context.Tags join tagPost in Context.TagPosts on tag.Id equals tagPost.TagId where tagPost.PostId == idValue select tag).ToList(); post.TagIds = post.Tags.Select(x => x.Id).ToList(); post.TagNames = string.Join(", ", post.Tags.Select(x => x.Name).ToArray()); return post; } }
The tags that were selected while creating/editing the Post must be persisted in a differententity Tag. Let's see how this persistence occurs along with the Post persistence in theCreatePostCommand object. If we notice, there is no change to the Post persistence, butthe Tag persistence consumes a concrete Post object in order to persist the tag. We needPostId, which will be available only after SaveChanges() is called, but we need thisassociation before calling the SaveChanges(); let's get to that part shortly. After persistingboth Tag and Post, we call SaveChanges() or SaveChangesAsync() only once; thisensures that the persistence occurs in a single transaction (default EF behavior).

Fail Safe Mechanism – Transactions Chapter 9
[ 224 ]
Usually, we will perform SaveChanges() twice, one for Post andanother for the Tag object. The first SaveChanges() will insert Post andallow us to fetch the auto-generated PostId that will be used in Tag rowcreation. We could leverage the default transaction by making only oneSaveChanges() call and still fill the PostId data by passing the wholePost object to the Tag object, and EF ensures that it fills the PostId oncethe Post row is created.
EF ensures that even if any one of the transactions fails, the changes will be rolled back, asEF covers our back by default and we need to ensure that we make only oneSaveChanges() to leverage this transaction behavior. The following implementationperforms write operations in Post and Tag entities, yet having only one SaveChanges()ensures that transaction is maintained:
public class CreatePostCommand : CommandBase, ICreatePostCommand<int> { // Code removed for brevity public ICollection<int> TagIds { get; set; } public int Handle() { Post post = new Post { // Code removed for brevity }; Context.Add(post); foreach (int tagId in TagIds) { Context.Add(new TagPost { TagId = tagId, Post = post }); } return Context.SaveChanges(); }
public async Task<int> HandleAsync() { Post post = new Post { // Code removed for brevity }; Context.Add(post); foreach (int tagId in TagIds)

Fail Safe Mechanism – Transactions Chapter 9
[ 225 ]
{ Context.Add(new TagPost { TagId = tagId, Post = post }); } return await Context.SaveChangesAsync(); } }
The tags will be listed in the Posts Add view, displayed as follows:
Similar changes are required for the UpdatePostCommand and DeletePostCommandobjects; let's take it up as an assignment.

Fail Safe Mechanism – Transactions Chapter 9
[ 226 ]
The solution to the assignment is available in the Git repository, at thefollowing links:https:/ /goo. gl/ feBh9g
https:/ /goo. gl/ q5fXRi
We haven't covered the updates required in the Controller and View for the previousfunctionality. Even though it seems out of scope, let's quickly cover the same. The viewchanges (including the Tags column) required for the Posts list view are displayed asfollows:
// Code removed for brevity <table class="table"> <thead> <tr> // code removed for brevity <th> @Html.DisplayNameFor(model => model.Tags) </th> // Code removed for brevity </tr> </thead> <tbody> @foreach (var item in Model) { <tr> // Code removed for brevity <td> @Html.DisplayFor(modelItem => item.TagNames) </td> // Code removed for brevity </tr> } </tbody> </table> // Code removed for brevity
The Tags list required for the Create screen to populate tag drop-down is persisted inViewData as a MultiSelectList object, which allows the user to map multiple tags to anindividual post. The code which sets the MultiSelectList field with data is shown below:
public IActionResult Create() { // Code removed for brevity ViewData["TagIds"] = new MultiSelectList(_context.Tags, "Id", "Name"); }

Fail Safe Mechanism – Transactions Chapter 9
[ 227 ]
The tags were populated in the view as a select control assigning source from ViewBag.Also, we need to ensure the multiple attribute is enabled; otherwise, the control will notlet the user select multiple tags, the multiple attribute is set as shown below:
<form asp-action="Create"> <div class="form-horizontal"> // Code removed for brevity <div class="form-group"> <label asp-for="TagIds" class="col-md-2 control-label"></label> <div class="col-md-10"> <select asp-for="TagIds" class="form-control" asp-items="ViewBag.TagIds" multiple="multiple"></select> </div> </div> // Code removed for brevity </div> </form>
In the Post action, we still persist the MultiSelectList, but this time we pass on theselected TagIds along with the source data. This ensures that if there were any modelerrors while repopulating the view, the tags control will be pre-selected with the valuesfrom the model. The TagIds field should be included in the view model white-listing andfinally the MultiSelectList is populated with the TagIds as shown in the followingcode:
public async Task<IActionResult> Create([Bind("Id,Title,Content,Summary,PublishedDateTime,Url, VisitorCount,CreatedAt,ModifiedAt,BlogId,AuthorId, CategoryId,TagIds")] Post post) { // Code removed for brevity ViewData["TagIds"] = new MultiSelectList(_context.Tags, "Id", "Name", post.TagIds); return View(post); }
Similar changes are required for the Update and Delete operations of posts. Let's take it upas an assignment; the solution to the assignment is available in the Git repository. Thisconcludes the default behavior of transactions in this section; let's explore creating a simpletransaction in the next section.

Fail Safe Mechanism – Transactions Chapter 9
[ 228 ]
Creating a simple transactionWe have seen the default behavior of a transaction if the multiple persistence occurs withina single SaveChanges(), what if we have a business requirement where multipleSaveChanges() are required and we still need to maintain the transaction scope? We havea provision to explicitly define a transaction and bring in the changes required inside thisscope; EF exposes the Database type in Context, which has the BeginTransaction()functionality.
Let's try to achieve the aforementioned functionality in our CreatePostCommand type andstill maintain the transaction scope. We could perform the same by retrieving thetransaction object using the BeginTransaction() function; the retrieved object could beused either to commit or roll back the changes. The following code commits the changesafter persisting the Post and Tag objects:
public class CreatePostCommand : CommandBase, ICreatePostCommand<int> { // Code removed for brevity public int Handle() { int returnValue; using (var transaction = Context.Database.BeginTransaction()) { // Code removed for brevity Context.Add(post); returnValue = Context.SaveChanges(); foreach (int tagId in TagIds) { Context.Add(new TagPost { TagId = tagId, Post = post }); } returnValue = Context.SaveChanges();
transaction.Commit(); } return returnValue; } public async Task<int> HandleAsync() { int returnValue; using (var transaction = Context.Database.BeginTransaction()) {
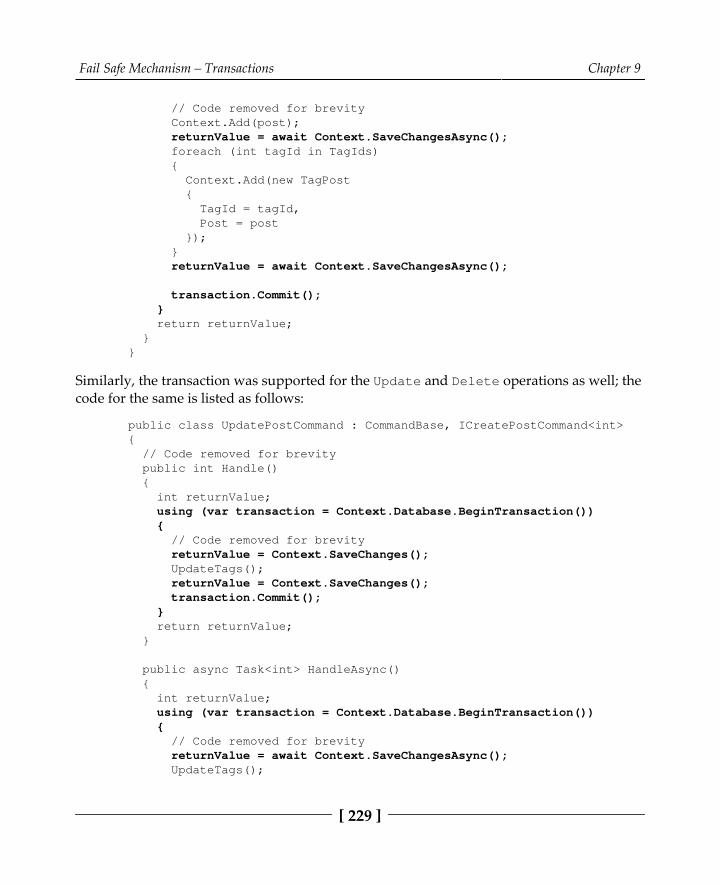
Fail Safe Mechanism – Transactions Chapter 9
[ 229 ]
// Code removed for brevity Context.Add(post); returnValue = await Context.SaveChangesAsync(); foreach (int tagId in TagIds) { Context.Add(new TagPost { TagId = tagId, Post = post }); } returnValue = await Context.SaveChangesAsync();
transaction.Commit(); } return returnValue; } }
Similarly, the transaction was supported for the Update and Delete operations as well; thecode for the same is listed as follows:
public class UpdatePostCommand : CommandBase, ICreatePostCommand<int> { // Code removed for brevity public int Handle() { int returnValue; using (var transaction = Context.Database.BeginTransaction()) { // Code removed for brevity returnValue = Context.SaveChanges(); UpdateTags(); returnValue = Context.SaveChanges(); transaction.Commit(); } return returnValue; }
public async Task<int> HandleAsync() { int returnValue; using (var transaction = Context.Database.BeginTransaction()) { // Code removed for brevity returnValue = await Context.SaveChangesAsync(); UpdateTags();

Fail Safe Mechanism – Transactions Chapter 9
[ 230 ]
returnValue = await Context.SaveChangesAsync(); transaction.Commit(); } return returnValue; } // Code removed for brevity }
The code required for the Delete operation is listed as follows:
public class DeletePostCommand : CommandBase, ICreatePostCommand<int> { // Code removed for brevity public int Handle() { int returnValue; using (var transaction = Context.Database.BeginTransaction()) { DeletePost(); returnValue = Context.SaveChanges(); DeleteTag(); returnValue = Context.SaveChanges(); transaction.Commit(); } return returnValue; }
public async Task<int> HandleAsync() { int returnValue; using (var transaction = Context.Database.BeginTransaction()) { DeletePost(); returnValue = await Context.SaveChangesAsync(); DeleteTag(); returnValue = await Context.SaveChangesAsync(); transaction.Commit(); } return returnValue; } // Code removed for brevity }

Fail Safe Mechanism – Transactions Chapter 9
[ 231 ]
We have seen how to create a simple transaction in this section. Let's dive deep in thecoming sections. We will be exploring cross-context transactions in the next section.
Creating a cross-context transactionWe have seen transactions within a single context so far. Let's now explore how transactionscould be maintained between different data contexts. We still have only one data context in the blogging system; let's introduce file upload functionality that will be maintained in adifferent database, thereby requiring us to create a different data context.
File upload support to the blogging systemThe file upload functionality will be introduced in the Posts section, where we couldupload an image against a post. To start with, let's create a File type, which is inheritedfrom IFormFile. It will be used as a base type while uploading the file content to thecontroller action, the following code implementation would provide support for file uploadfunctionality:
public class File : IFormFile { public Guid Id { get; set; } public string ContentType { get; set; } string ContentDisposition { get; set; } public byte[] Content { get; set; } [NotMapped] public IHeaderDictionary Headers { get; set; } public long Length { get; set; } public string Name { get; set; } public string FileName { get; set; } public void CopyTo(Stream target) { throw new NotImplementedException(); } public Task CopyToAsync(Stream target, CancellationToken cancellationToken = default(CancellationToken)) { throw new NotImplementedException(); } public Stream OpenReadStream() { throw new NotImplementedException(); }

Fail Safe Mechanism – Transactions Chapter 9
[ 232 ]
}
We need the command interface, ICreateFileCommand, to define handles required forCreateFileCommand execution. We will be consuming the existing ICommandHandler andICommandHandleAsync as base types as shown below:
public interface ICreateFileCommand<TReturn> : ICommandHandler<TReturn>, ICommandHandlerAsync<TReturn> { }
We require a separate CommandFileBase with the blog file's data context since theCommandBase uses the blog context, the BlogFilesContext was consumed by theCommandFileBase as shown in the following code:
public class CommandFileBase { internal readonly BlogFilesContext Context; public CommandFileBase(BlogFilesContext context) { Context = context; } }
The CreateFileCommand type performs file persistence, which maintains the transactionand also consumes the transaction that was passed on to it through the constructor, thetransaction shared through constructor and its usage is displayed in the following code:
public class CreateFileCommand : CommandFileBase, ICreateFileCommand<int> { private readonly DbTransaction _dbTransaction; public CreateFileCommand(BlogFilesContext context) : base(context) { } public CreateFileCommand(BlogFilesContext context, DbTransaction dbTransaction) : this(context) { _dbTransaction = dbTransaction; } public Guid Id { get; set; } public string ContentType { get; set; } public string ContentDisposition { get; set; } public byte[] Content { get; set; } public long Length { get; set; } public string Name { get; set; }

Fail Safe Mechanism – Transactions Chapter 9
[ 233 ]
public string FileName { get; set; } public int Handle() { int returnValue = 0; using (var transaction = _dbTransaction != null ? Context.Database.UseTransaction(_dbTransaction) : Context.Database.BeginTransaction()) { try { AddFile(); returnValue = Context.SaveChanges(); transaction.Commit(); } catch (Exception exception) { transaction.Rollback(); ExceptionDispatchInfo.Capture (exception.InnerException).Throw(); } } return returnValue; } private void AddFile() { File file = new File() { Id = Guid.NewGuid(), Name = Name, FileName = FileName, Content = Content, Length = Length, ContentType = ContentType }; Context.Add(file); } public async Task<int> HandleAsync() { int returnValue = 0; using (var transaction = _dbTransaction != null ? Context.Database.UseTransaction(_dbTransaction) : Context.Database.BeginTransaction()) { try { AddFile(); returnValue = await Context.SaveChangesAsync(); transaction.Commit();

Fail Safe Mechanism – Transactions Chapter 9
[ 234 ]
} catch (Exception exception) { transaction.Rollback(); ExceptionDispatchInfo.Capture( exception.InnerException).Throw(); } } return returnValue; } }
Similar changes are required for the Update and Delete operations; let's take it up as anassignment.
The solution to the assignment is available in the Git repository, and thecore implementation of file persistence is available at https:/ /goo. gl/CUxFs9. The concrete implementation of file persistence is available at https:/ /goo.gl/ 1fEbCa.
The CreatePostCommand receives the file along with the Post content. It creates atransaction and performs Post persistence, and passes on its transaction to the filecommand where the files get persisted and the transaction is reused as highlighted in thefollowing code:
public class CreatePostCommand : CommandBase, ICreatePostCommand<int> { // Code removed for brevity public CreatePostCommand(BlogContext context, BlogFilesContext blogFilesContext) : this(context) { _blogFilesContext = blogFilesContext; } // Code removed for brevity public ICollection<int> TagIds { get; set; } public File File { get; set; } public int Handle() { // Code removed for brevity } public async Task<int> HandleAsync() { int returnValue = 0;using (var transaction = Context.Database.BeginTransaction())

Fail Safe Mechanism – Transactions Chapter 9
[ 235 ]
{ try { CreateFileCommand createFileCommand = new CreateFileCommand(_blogFilesContext, transaction.GetDbTransaction()) { Id = Guid.NewGuid(), Name = File.Name, FileName = File.FileName, Content = File.Content, Length = File.Length, ContentType = File.ContentType, ContentDisposition = File.ContentDisposition }; returnValue = await createFileCommand.HandleAsync(); Post post = new Post { // Code removed for brevity FileId = File.Id }; // Code removed for brevity foreach (int tagId in TagIds) { Context.Add(new TagPost { TagId = tagId, Post = post }); } returnValue = await Context.SaveChangesAsync(); transaction.Commit(); } catch (Exception exception) { transaction.Rollback(); ExceptionDispatchInfo. Capture(exception.InnerException).Throw(); } } return returnValue; } }

Fail Safe Mechanism – Transactions Chapter 9
[ 236 ]
Similar changes are required for the Update and Delete operations; let's take it up as anassignment.
The solution to the assignment is available in the Git repository at https://goo. gl/ fDP1q4.
The Create action supports the file upload functionality, where the file content is passedon to the create command to persist the file content to the file context. The following codeprovides file upload support in the controller Create action:
public async Task<IActionResult> Create([Bind("Id,Title,Content, Summary," + "PublishedDateTime,Url,VisitorCount,CreatedAt, ModifiedAt,BlogId," + "AuthorId,CategoryId,TagIds")] Post post, IFormFile headerImage) { if (ModelState.IsValid) { Models.File file = null; if (headerImage != null || headerImage.ContentType.ToLower().StartsWith("image/")) { MemoryStream ms = new MemoryStream(); headerImage.OpenReadStream().CopyTo(ms); file = new Models.File() { Id = Guid.NewGuid(), Name = headerImage.Name, FileName = headerImage.FileName, Content = ms.ToArray(), Length = headerImage.Length, ContentType = headerImage.ContentType }; } await _postRepository.ExecuteAsync( new CreatePostCommand(_context, _filesContext) { // Code removed for brevity TagIds = post.TagIds, File = file }); return RedirectToAction("Index"); } // Code removed for brevity }

Fail Safe Mechanism – Transactions Chapter 9
[ 237 ]
Similar changes are required for the Update and Delete operations; let's take it up as anassignment.
The solution to the assignment is available in the Git repository at https://goo. gl/ HWZXkC.
We have seen the file upload functionality and shared the database transaction betweencontext persistence; let's see whether it works as expected.
Limitations to the transaction scopeThere is a limitation with EF Core with respect to multiple data contexts that work betweentwo different connections. We will get the following error if we try to execute the currentcode, throwing the message, "The specified transaction is not associated with the currentconnection. Only transactions associated with the current connection may be used":
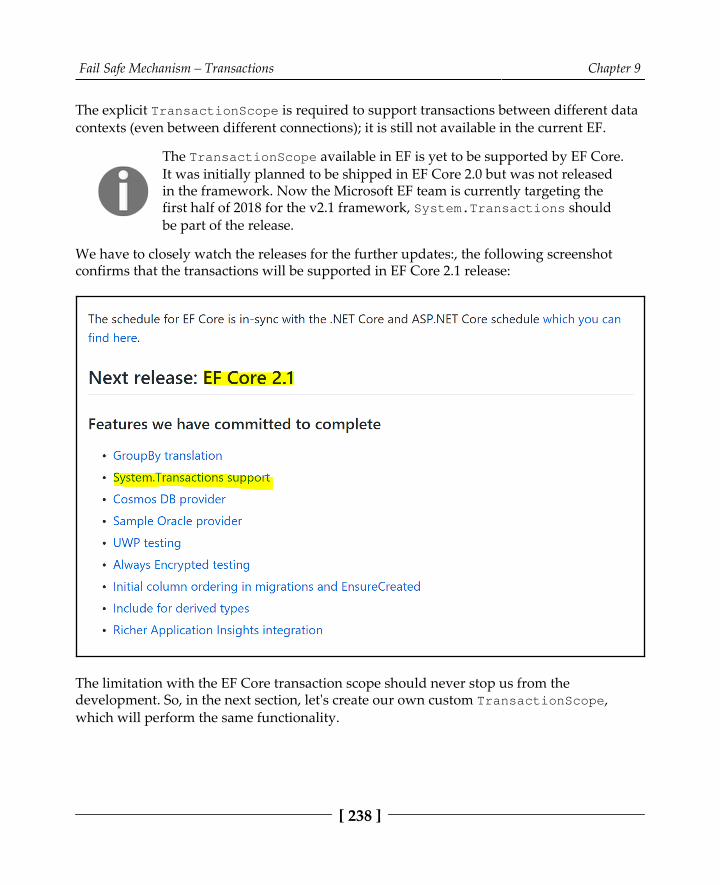
Fail Safe Mechanism – Transactions Chapter 9
[ 238 ]
The explicit TransactionScope is required to support transactions between different datacontexts (even between different connections); it is still not available in the current EF.
The TransactionScope available in EF is yet to be supported by EF Core.It was initially planned to be shipped in EF Core 2.0 but was not releasedin the framework. Now the Microsoft EF team is currently targeting thefirst half of 2018 for the v2.1 framework, System.Transactions shouldbe part of the release.
We have to closely watch the releases for the further updates:, the following screenshotconfirms that the transactions will be supported in EF Core 2.1 release:
The limitation with the EF Core transaction scope should never stop us from thedevelopment. So, in the next section, let's create our own custom TransactionScope,which will perform the same functionality.

Fail Safe Mechanism – Transactions Chapter 9
[ 239 ]
Custom transaction scope supportThe transaction scope could be created by defining an interface, which requires us to eitherCommit() or Rollback(). The contract required for the custom transaction interface codeis shown in the following code:
public interface ITransactionScope { void Commit(); void Rollback(); }
The database transactions were maintained/logged in a transaction list, which is then usedto either Commit() or Rollback() for the entire set of transaction objects. In order to useTransactionScope within a using statement, we need to inherit and implementIDisposable as well. The custom TransactionScope implementation which maintainsthe Commit() and Rollback() is shown in the following code:
public class TransactionScope : ITransactionScope, IDisposable { // Flag: Has Dispose already been called? private bool disposed = false; public TransactionScope() { Transactions = new List<IDbContextTransaction>(); } ~TransactionScope() { Dispose(false); } public List<IDbContextTransaction> Transactions { get; set; } public void Commit() { Transactions.ForEach(item => { item.Commit(); }); } public void Rollback() { Transactions.ForEach(item => { item.Rollback(); }); } public void Dispose()

Fail Safe Mechanism – Transactions Chapter 9
[ 240 ]
{ Dispose(true); GC.SuppressFinalize(this); } protected virtual void Dispose(bool disposing) { if (disposed) return; if (disposing) { // Free any other managed objects here. // } // Free any unmanaged objects here. // disposed = true; } }
We have seen the Files implementation/support for the blogging system, and we couldstart creating a repository that will allow us to perform persistence. For now, let's supportExecute() and ExecuteAsync() in the repository, the contract required for the interfaceis defined in the following code:
public interface IFileRepository { int Execute<T>(T command) where T : ICommandHandler<int>; Task<int> ExecuteAsync<T>(T command) where T : ICommandHandlerAsync<int>; }
The concrete implementation of the FileRepository will consume the blog file contextand invoke file commands created for the persistence operation, and the controllerconsumes the repository to achieve the functionality as shown in the following code:
public class FileRepository : IFileRepository { private readonly BlogFilesContext _context; public FileRepository(BlogFilesContext context) { _context = context; } public int Execute<T>(T command) where T : ICommandHandler<int> { return command.Handle(); } public async Task<int> ExecuteAsync<T>(T command)

Fail Safe Mechanism – Transactions Chapter 9
[ 241 ]
where T : ICommandHandlerAsync<int> { return await command.HandleAsync(); } }
The repository injection could happen only if we provide support for the FileRepositoryin the ConfigureServices(), which injects the concrete object wherever required. Thefollowing configuration would inject the concrete object wherever the type is required:
public void ConfigureServices(IServiceCollection services) { // Code removed for brevity services.AddScoped<IFileRepository, FileRepository>(); }
We can see the code implementation in the below PostsController, which consumes theFileRepository through the dependency injection using contructor:
public class PostsController : Controller { // Code removed for brevity private readonly IFileRepository _fileRepository; public PostsController(BlogContext context, BlogFilesContextfilesContext, IPostRepository repository, IFileRepository fileRepository) { // Code removed for brevity _fileRepository = fileRepository; } }
The injected repository will then be used in the post CRUD operations. The main focus forus is the custom TransactionScope usage to which multiple transactions were added. Onsuccessful execution of both the files and posts repositories, we commit the transactionscope, otherwise we roll back the changes. The code required for the custom transactionscope implementation is highlighted in the following code:
public async Task<IActionResult> Create([Bind("Id,Title, Content,Summary," + "PublishedDateTime,Url,VisitorCount, CreatedAt, ModifiedAt,BlogId," + "AuthorId,CategoryId,TagIds")] Post post, IFormFile headerImage) { if (ModelState.IsValid) { // Code removed for brevity var transactions = new TransactionScope();

Fail Safe Mechanism – Transactions Chapter 9
[ 242 ]
try { transactions.Transactions.Add (_filesContext.Database.BeginTransaction()); await _fileRepository.ExecuteAsync( new CreateFileCommand(_filesContext) { // Code removed for brevity Id = file.Id }); transactions.Transactions.Add( _context.Database.BeginTransaction()); await _postRepository.ExecuteAsync( new CreatePostCommand(_context) { // Code removed fore brevity FileId = file.Id }); transactions.Commit(); } catch (Exception exception) { transactions.Rollback(); ExceptionDispatchInfo.Capture( exception.InnerException).Throw(); } return RedirectToAction("Index"); } // Code removed for brevity }
Similar changes are required for the Update and Delete operations; let's take it up as anassignment.
The solution to the assignment is available in the following Git repositorycommit:https:/ /goo. gl/ yLubPh
We have seen the transaction scope between different contexts and looked at, its limitations,and we created our own custom transaction scope as well. In the next section, we will addsomething we should have done long ago. Let's add a date picker to the solution, withoutwhich it's always difficult for us to perform repeated testing.

Fail Safe Mechanism – Transactions Chapter 9
[ 243 ]
Adding date picker support to the bloggingsystemWe can add the date picker to the system by importing moment and datetimepicker,which requires style sheets and JavaScript. The required libraries were included in the_Layout.cshtml as displayed below:
// Code removed for brevity <head> // Code removed for brevity <environment names="Development"> // Code removed for brevity <link rel="stylesheet" href="~/lib/eonasdan-bootstrap- datetimepicker/build/css/bootstrap-datetimepicker.css" /> </environment> <environment names="Staging,Production"> // Code removed for brevity <link rel="stylesheet" href="~/lib/eonasdan-bootstrap- datetimepicker/build/css/bootstrap-datetimepicker.min.css" /> </head> <body> // Code removed for brevity <environment names="Development"> // Code removed for brevity <script src="~/lib/moment/moment.js"></script> <script src="~/lib/eonasdan-bootstrap-datetimepicker/src/ js/bootstrap-datetimepicker.js"></script> </environment> <environment names="Staging,Production"> // Code removed for brevity <script src="~/lib/moment/min/moment.min.js"></script> <script src="~/lib/eonasdan-bootstrap-datetimepicker/build/ js/bootstrap-datetimepicker.min.js"></script> </environment> </body>
The datepicker class is added to the input control, which requires datepicker to beimplemented, and the datepicker initialization is performed in the JavaScript code. Withrespect to this section, dealing with file uploading functionality, we have included the inputfile type, which allows us to upload the file content from UI to the controller action:
// Code removed for brevity <form asp-action="Create" enctype="multipart/form-data"> <div class="form-horizontal"> // Code removed for brevity

Fail Safe Mechanism – Transactions Chapter 9
[ 244 ]
<div class="form-group"> <label class="col-md-2 control-label">Header Image</label> <div class="col-md-10"> <input type="file" id="headerImage" name="headerImage" /> </div> </div> // Code removed for brevity <div class="form-group"> <label asp-for="PublishedDateTime" class="col-md-2 control-label"></label> <div class="col-md-10"> <input asp-for="PublishedDateTime" class="form-control datepicker" /> <span asp-validation-for="PublishedDateTime" class="text-danger"></span> </div> </div> // Code removed for brevity <div class="form-group"> <label asp-for="TagIds" class="col-md-2 control-label"></label> <div class="col-md-10"> <select asp-for="TagIds" class="form-control" asp-items="ViewBag.TagIds" multiple="multiple"></select> </div> </div> // Code removed for brevity </div> </form> // Code removed for brevity @section Scripts { // Code removed for brevity <script> // Code removed for brevity $('.datepicker').datetimepicker(); </script> }
We have seen the datepicker incorporation and the file upload input type included inthe Post view. In the next section, we will see how transactions could be maintainedbetween multiple technologies.

Fail Safe Mechanism – Transactions Chapter 9
[ 245 ]
Leveraging transactions between multipletechnologiesTo illustrate the transactions between multiple technologies, let's implement a few of themissing features in the blogging system. In that way, we will have a mature, deployableblogging system towards the end of the book, and at the same time we will learn theconcepts along the way. The features that we could consider for this section are:
Recent Posts (anonymous)Post View (anonymous)Comments list to a blog postAdding comments to a blog post
Let's see how we will be using these features in the current section.
Recent posts support to the blogging systemThe recent posts feature could be added to the system by performing the following steps:
Create an IGetRecentPostQuery query object interface.1.Create a GetRecentPostQuery concrete query object.2.Create a RecentPostsViewComponent View component.3.Create a Default.cshtml view under Shared | Components | RecentPosts.4.Perform a component invoke using the View component name and its parameter.5.
To reduce more code footprint where we just add features to the blogging system, let'smaintain and share the code from Git repository commits. The previously listedimplementation is performed and available in the following Git repository commit:
https://goo.gl/kcWD3P

Fail Safe Mechanism – Transactions Chapter 9
[ 246 ]
We will be using View components to render the recent posts. It is a new concept thatreplaces the child actions in ASP.NET MVC Core, and it would be out of scope to explainthem in detail, so kindly refer to the following official documentation for more information:
https://docs.microsoft. com/ en- us/ aspnet/ core/ mvc/ views/ view- components
The following screenshot will render the Recent Posts as a view component:
We have seen the changes required to include recent posts to the system. In the next section,let's focus on how anonymous posts were listed and an individual anonymous post wasdisplayed.
Anonymous posts list and individual blog postThe anonymous posts list and individual blog post View feature could be added to thesystem by performing the following steps:
Change the current posts listing route to admin route.1.Change the current display post route to admin route as well.2.

Fail Safe Mechanism – Transactions Chapter 9
[ 247 ]
Create an IGetPaginatedPostQuery query object interface.3.Create a GetPaginatedPostQuery concrete query object.4.Create an action to list blogs anonymously, GetPostsBlogHome().5.Create an action to display blog anonymously, Display().6.Create a layout exclusively for a blog, since most of the sites have different7.layouts between landing pages and blogs.Create a view, GetPostsBlogHome.cshtml, under the Posts View folder.8.Create a view, Display.cshtml, under the Posts View folder as well.9.Provide an appropriate hyperlink and its updates.10.
The preceding listed implementation is performed and available in the following Gitrepository commit:
https://goo.gl/VPVJBg
We have to show the posts to the anonymous users and let only authorized users see theadministrator view of editing posts. In order to achieve this functionality, we have modifiedthe route of the posts controller to wrap inside Admin, and the anonymous post listing wasmoved to the root (the tilde ~ symbol is used to redefine the API route) using attributerouting, as shown in the following screenshot:

Fail Safe Mechanism – Transactions Chapter 9
[ 248 ]
The anonymous post listing view would consume the preceding listed action, which wouldbe rendered, as shown in the following screenshot, in the highlighted configured ~/blogroute:
We have seen the changes required to include the anonymous posts list, and similarchanges required for displaying an individual blog post are also available in the samerepository commit page. In the next section, let's focus on how comments are listed.
Listing commentsThe comments list feature could be added to the system by performing the following steps:
Create a repository interface, ICommentRepository.1.Create a repository object, CommentRepository.2.

Fail Safe Mechanism – Transactions Chapter 9
[ 249 ]
Create a query object interface, IGetCommentsByPostQuery.3.Create a concrete query object, GetCommentsByPostQuery.4.Configure the CommentRepository injection in the Startup file.5.Create a View component, CommentsListViewComponent.6.Create a View, Default.cshtml, under7.Shared | Components | CommentsList.Include the current library in the _ViewImports.cshtml to support the custom8.tag helper.Add components using the custom tag helper, <vc:comments>.9.
The preceding listed implementation is performed and available in the following Gitrepository commit:
https://goo.gl/HqznNF
The View component rendering of the comments list is displayed in the followingscreenshot:

Fail Safe Mechanism – Transactions Chapter 9
[ 250 ]
The comments list that gets rendered using the View component in the anonymous blog isdisplayed in the following screenshot:
We have seen the changes required to include Post comments to the system. In the nextsection, let's focus on how comments are added.
Adding comments using external databasetransactionsThe comments list feature could be added to the system by performing the following steps:
Inject the IConfigurationRoot from the Startup file.1.Add Execute methods in the ICommentRepository interface. 2.Add Execute methods in the CommentRepository concrete type.3.

Fail Safe Mechanism – Transactions Chapter 9
[ 251 ]
Create a query object interface, ICreateCommentCommand.4.Create a concrete query object, CreateCommentCommand.5.Inject ICommentRepository and IConfigurationRoot in the comments6.controller.Create a View model, CommentViewModel.7.Create an action to add comments anonymously, CreatePostComment(), to a8.blog post.Create an action to display or add comments to the View component9.anonymously, GetCommentsListViewComponent().Create a View component, AddCommentViewComponent.10.Create a Default.cshtm view under Shared | Components | AddComment.11.Update the Display.cshtml view under the Posts View folder:12.
Add components using the <vc:add-comment> custom tag helper.Add jQuery and other JavaScript-based libraries that were missed in the blog13.layout.
In step 5, while implementing Handle(), we will be implementing a transaction betweenmultiple technologies, but it should be executed in the same connection.
The transaction was created between an ADO.NET implementation and an EF contextimplementation. It was made possible due to two things:
Sharing connections between technologiesSharing transactions between technologies
The connection is passed to SqlCommand (for ADO.NET) and DbContextOptionsBuilder(for EF). The transaction is assigned to the SqlCommand Transaction field (for ADO.NET)and consumed using Database.UseTransaction(for EF). The connection shared betweendifferent technologies and maintaining the transaction scope is highlighted in the followingimplementation:
public class CreateCommentCommand: CommandBase, ICreateCommentCommand<int> { // Code removed for brevity public int Handle() { int returnValue = 0; using (SqlConnection connection = new SqlConnection(_configuration.GetConnectionString(" DefaultConnection")))

Fail Safe Mechanism – Transactions Chapter 9
[ 252 ]
{ connection.Open(); using (var transaction = connection.BeginTransaction()) { try { using (SqlCommand sqlCommand = new SqlCommand( "INSERT INTO Person(Nickname) " + "output INSERTED.ID VALUES(@Nickname)", connection)) { sqlCommand.Parameters.AddWithValue("@FirstName", Nickname); sqlCommand.Transaction = transaction; int personId = (int)sqlCommand.ExecuteScalar();
var options = new DbContextOptionsBuilder<BlogContext>() .UseSqlServer(connection) .Options; using (var context = new BlogContext(options)) { Comment comment = new Comment { Content = Content, PostId = PostId, CreatedAt = DateTime.Now, ModifiedAt = DateTime.Now, CommentedAt = DateTime.Now, PersonId = personId, CreatedBy = personId, ModifiedBy = personId };
context.Database.UseTransaction(transaction); context.Comments.Add(comment); returnValue = context.SaveChanges(); } transaction.Commit(); if (connection.State == System.Data.ConnectionState.Open) connection.Close(); return returnValue; } } catch (Exception exception) { transaction.Rollback(); ExceptionDispatchInfo.Capture( exception.InnerException).Throw(); }

Fail Safe Mechanism – Transactions Chapter 9
[ 253 ]
} } return returnValue; } // Code removed for brevity }
The preceding listed implementation is performed and available in the following Gitrepository commit:
https://goo.gl/1CJDLv
The implementation required to add comments to the blog post is available in the precedingshared Git repository commit, and the View component rendering of the Add Commentview is displayed in the following screenshot:

Fail Safe Mechanism – Transactions Chapter 9
[ 254 ]
We have seen the transaction created and maintained between multiple technologies in thissection, which wraps up the implementation of transactions between multiple technologies.
SummaryWe have explored how to leverage the default transaction behavior in EF, which could beleveraged only if multiple operations are performed using a single SaveChanges(). Thenwe created a simple transaction, which allowed us to maintain transactions betweenmultiple SaveChanges() commits. Later, we created cross-context transactions, identifiedtheir limitations, and overcame them with the custom TransactionScope that we built inthis chapter. Finally, we created a transaction that was maintained between multipletechnologies, provided it shares the connection and transaction objects. The different waysof handling transactions ensure that if anything goes wrong, they will be handled, ensuringwe have built a fail-safe mechanism within single or between different data contexts, evenbetween different technologies.
So far, we have been working with a single user and haven't factored in what will happen ifwe have concurrent users. In Chapter 10, Make It Real – Handling Concurrencies, we willrevisit the application and handle concurrencies in all the transactions we have performedso far.

10Make It Real – Handling
ConcurrenciesWe have explored transactions, without which real-world transactions are not possible. Westarted with the default behavior and then went on to creating a transaction. Later, welearned about how a transaction could be shared between contexts, and finally weconcluded by learning how external transactions were handled.
Let's identify the real-world problems available with respect to concurrencies, and we willsee how we could handle them using the EF Core Framework:
In a real-world application, the same data store might be accessed by differentmodules at the same time. How does EF Core handle those persistences?
EF Core has a few concurrency techniques that help us in creating afail-safe mechanism.
In which mechanism does EF Core expose concurrency techniques?It exposes them using the usual techniques—data annotation andFluent API.
Do we need to add anything to the design to support concurrency?It's a paradox; yes and no. If we are marking a column forconcurrency checks then no schema change is required; otherwise,we need to introduce a timestamp/date row version column.

Make It Real – Handling Concurrencies Chapter 10
[ 256 ]
Do we have any provision in not having such a column in a data model but stillsupport concurrency tokens?
Yeah, it's quite possible. In the No foreign key property section ofChapter 3, Relationships - Terminology and Conventions, wediscussed shadow properties. The same concept could be appliedhere where EF Core does internal concurrency checks withoutexposing them in the data model in a context.
Nothing is fail-safe. Even if we build the mechanism to handle concurrencies,what control do we have if we face this conflict? What would be the action itemand how do we ensure that the application is really fail-safe?
We could capture concurrency issues, and deal with current,original, and database values to resolve them.
The sections we will be including in this chapter are:
Handling concurrency in EFIntroducing concurrency tokensConcurrency tokens through shadow propertiesConcurrency tokens based on timestamp/row versionHandling concurrency conflicts
Handling concurrency in EFImagine we were the developers assigned to develop/handle concurrency in the bloggingsystem, what would be the starting point for us? The analysis would provide us with ananswer for what is required to handle concurrency. Most importantly, it would help usunderstand the concurrency conflict and how it needs to be handled.
We will explore how concurrency conflict occurs and what needs to be done to handle it.Finally, we will see how it has been handled by the EF Core team.

Make It Real – Handling Concurrencies Chapter 10
[ 257 ]
Understanding the concurrency conflictsWe need to visualize where we would be facing this issue, in general, when the user tries toupdate data that is stale, which means the underlying data in the database has changedsince the object was filled. Then we have a problem that needs to be addressed before we golive. If we don't handle concurrency, then the user who updates it last would retain hischange, overwriting the data updated by other users.
In a real-world application, no single user accesses the application at a single point in time,multiple users use the application and it complicates the persistence of the data store.
Let's look at some scenarios that occur in such an application:
Two users try to update the same entity at the same timeIf one of the users succeeds in the first persistence, then we end up overwritingthe same entity by the second user
This is our point of interest, which could be coined as concurrency conflict. To replicate theissue, open the Edit Post page in two tabs. Assume the first user in the first tab is updatingthe post information, such as editing a blog post's Title and Content:

Make It Real – Handling Concurrencies Chapter 10
[ 258 ]
Another user in the second tab tries to modify the Post Content, who is unaware of thechange performed in the Post Title and content by the other user (from the first tab):

Make It Real – Handling Concurrencies Chapter 10
[ 259 ]
The change committed by the first user is no longer available in the model, whichoverwrites the data from the second user. Further execution with the highlighted data in thebelow screenshot would overwrite the data from second user:

Make It Real – Handling Concurrencies Chapter 10
[ 260 ]
The Post list displays that the changes performed by the first user are overwritten by thesecond user:
The change committed by the first user should not be removed/overwritten with the newdata without considering the data updated in the database. This is a concurrency issue thatwe will be discussing further in the next section.
Optimistic concurrencyOptimistic concurrency allows the concurrency conflict to occur and the application shouldrespond appropriately, as mentioned in the following list:
Tracking the changes on every property/column of an entity, which allows us topersist changes without affecting the stale data in the database, provided both thechanges were performed in different properties

Make It Real – Handling Concurrencies Chapter 10
[ 261 ]
Prevents the changes from being updated, by highlighting the current value fromthe data store and allowing the user to revisit his data for further persistenceOverwrite the changes with the latest ones, and ignore the updated data in thedata store
Optimistic concurrency could be adopted in an application that is more focused onperformance and only during conflicts; the user would be spending additional time. Thisensures that the time is spent wisely on most occasions, since we do not have any overheadfor regular operations. The trade-off in the optimistic concurrency approach is that we areleaving the developers and the users to handle conflicts and store appropriate data stored inthe database.
We have learnt about optimistic concurrency; let's look into pessimistic concurrency in thenext section.
Pessimistic concurrencyAs the name suggests, we perform locks at the data store that prevent users from updatingstale data at the cost of performance. Yes, managing those locks by a data store consumesmore resources, which in turn affects the performance. This could be achieved in thefollowing way:
While reading/updating the data from/into the data store, we will request a lockfor other read-only or update access:
Locking a row for read-only access will allow other users to gain alock for read-only but not for updateLocking a row for an update access will not let any other userseither lock for read-only or update
Pessimistic concurrency could be adopted in the application where the users were toospecific with the data and they do not compromise how the data was dealt with against theperformance. The persisted data will always be valid, or in other words, we might neverrun into conflicts, but with a huge cost, performance. Every persistence will involve anoverhead that ensures that we never run into conflicts with data persistence. In mostscenarios, we will never compromise performance, and taking this approach would be veryrare.

Make It Real – Handling Concurrencies Chapter 10
[ 262 ]
The ASP.NET Core Microsoft documentation (https:/ /docs. microsoft. com/ en- us/aspnet/core/data/ ef- mvc/ concurrency) highlights the disadvantages of pessimisticconcurrency:
"Managing locks has disadvantages. It can be complex to program. It requires significant databasemanagement resources, and it can cause performance problems as the number of users of anapplication increases. For these reasons, not all database management systems support pessimisticconcurrency. Entity Framework Core provides no built-in support for it, and this tutorial doesn'tshow you how to implement it."
Even though EF Core does not support pessimistic lock, we could leverage the same usingflat SQL queries. We have learnt about pessimistic concurrency in this section; let's move onto start applying these concurrency tokens in the next section.
Introducing concurrency tokensThe concurrency token would be the benchmark value used by EF to identify whether thetransaction has a conflict or not. We will be exploring different types of concurrency tokensavailable and, if modified, how they stop the other user from updating the same.
The concept should be pretty simple, and we will keep ourselves in the shoes of theMicrosoft developers and see what algorithm should be adopted for the implementation.
The following algorithm is required at the higher level:
The entity should identify at least one column (concurrency check column) to let'svalidate whether the row is updated or notThe identified column will be used in any update operation performed by theframework to check whether the update is valid or not:
The column is concluded as valid if the previous value in theupdating model and the original value fed to the data store match,otherwise it would be marked as invalid
If the concurrency column has invalid data then an exception should be thrown:A new concurrency exception should be created that will allowusers to handle themWe should give a provision to the user to handle concurrencyissues, and that's the reason we should throw an exception insteadof a graceful exit

Make It Real – Handling Concurrencies Chapter 10
[ 263 ]
If the concurrency column has valid data, then the update could be performed
The algorithm could be visualized using the following flow chart:
Let's visualize the preceding algorithm to resolve the concurrency conflict we faced whileupdating the post:
The Post entity identifies and configures the Timestamp column as a concurrencycheck columnThe concurrency implementation expects the Timestamp column to be valid:
The Post model, which we send to the framework to update, willhave:
Current Timestamp value as a byte arrayOriginal Timestamp value fetched from the databasebefore presenting to the update screen

Make It Real – Handling Concurrencies Chapter 10
[ 264 ]
The Timestamp value's original value should match with theexisting database value in the Timestamp value for the given rowIf the value doesn't match, concurrency exception should bethrownIf the value matches, then the update is considered as valid and theframework allows the data store to be updated
We will explore the way in which the Microsoft team actually implemented the concurrencytoken mechanism:
EF Core introduced a custom Timestamp attribute. Developers should mark oneof the columns as the concurrency columnThe framework treats this column especially by marking the data loaded on theconcurrency column in the context as the original value of the concurrency tokenWhen the user tries to update the record, it would check the original valueagainst the value available in the databaseIf the values don't match, then the framework throws a concurrency exceptionIf both the values match, then the update is allowed by the framework
The concurrency token mechanism previously discussed matches with the flow diagram weused in this section. The concurrency is handled using the Timestamp property of the Postmodel, displayed as follows:
public class Post { // Code removed for brevity [Timestamp] public string Timestamp { get; set; } }
We have exhaustively learnt about what is a concurrency conflict, how it could be handled,and how Microsoft has supported concurrency in EF Core. In the next section, we will learnhow to configure and use them in applications.

Make It Real – Handling Concurrencies Chapter 10
[ 265 ]
Non-timestamp based concurrency tokensThe knowledge we gained about concurrency tokens and how the implementation wasperformed in the EF Core Framework would be useful in introducing concurrency tokens inthis section.
Introducing the usages of concurrency tokens would be a meager topic, so we willimplement them in the blogging system and see them in action. After all, talking aboutalgorithms and scenarios would not be sufficient. In order to understand and grasp thetopic, we need to handle them in action, so let's do it.
The concurrency token could be configured in the following ways:
Data annotationsFluent API
We will see how the configurations were performed using both the approaches in ourblogging system in the next two sections.
Configuring non-timestamp tokens through dataannotationThe data annotation configuration is straightforward; we have already seen the annotationin the Introducing concurrency tokens section of this chapter and it is not something new tous. Let's see how the ConcurrencyCheck attribute is configured:
public class Post { // Code removed for brevity [ConcurrencyCheck] public string Url { get; set; } // Code removed for brevity }
The preceding configuration will let EF Core consider the Url column as the concurrencycheck column, and any further update to this column will restrict users from performingparallel updates.

Make It Real – Handling Concurrencies Chapter 10
[ 266 ]
We have already seen the concurrency conflicts while trying to edit posts in different tabs,which is kind of a simulation of a real-time concurrency conflict. Since we have handled theconcurrency, let's now see how it stops the user from persisting values into the data store.
The post highlighted in the following screenshot will have a Url value of test-1, and if thevalue is changed, then any other new persistence will be rejected by the framework:

Make It Real – Handling Concurrencies Chapter 10
[ 267 ]
Again, we were following the same simulation of having two tabs of the same blog Editpage; the first tab updates the post data with the same URL, which will allow thepersistence. The following screenshot is the data populated and updated from the first user:

Make It Real – Handling Concurrencies Chapter 10
[ 268 ]
If the second tab retains the Url value, EF Core will persist the updated post data into thedata store:

Make It Real – Handling Concurrencies Chapter 10
[ 269 ]
We can see from the following screenshot that the Url value is unchanged. This ensures thatthe record we were searching for of an update exists, thereby allowing EF to persist theentity:

Make It Real – Handling Concurrencies Chapter 10
[ 270 ]
The second tab will try to change the Url value, which causes EF Core to stop thepersistence of post data into the data store, which throws the error Database operationexpected to affect 1 row(s) but actually affected 0 row(s):
We can see that the error is thrown as explained, which says that the records don't existanymore, which is supposed to update one row(s):

Make It Real – Handling Concurrencies Chapter 10
[ 271 ]
There is an internal operation carried out by EF to finalize whether the update is valid ornot; that's the reason it says 1 row(s) is expected but 0 row(s) affected.
EF will translate the update into an SQL query that will contain the whereclause, including the identity column and the concurrency check column.If the value is changed, then obviously no record would be available forthe update operation (which was supposed to exist), and that's the reasonit simply responds back saying it expected 1 row(s) to be updated but 0row(s) were affected.
We have seen how non-timestamp concurrency works, along with annotationconfiguration. In the next section, let's see how the same concurrency token could beconfigured through Fluent API.

Make It Real – Handling Concurrencies Chapter 10
[ 272 ]
Configuring non-timestamp tokens throughFluent APIThe Fluent API configuration is made possible because Microsoft has exposed a series ofextension methods, which allows us to execute appropriate functionality against theproperty of the model that supports it. In our blogging system, we will configure the Url ofthe Post entity as the concurrency token by enabling the property usingIsConcurrencyToken() as shown in the following code:
protected override void OnModelCreating(ModelBuilder modelBuilder) { // Code removed for brevity modelBuilder.Entity<Post>() .ToTable("Post") .Property(x=>x.Url) .IsConcurrencyToken(); // Code removed for brevity }
The preceding configuration will let EF Core consider the Url column as the concurrencytoken, and any further update to this column will restrict users from performing parallelupdates, as it did in the data annotation configuration.
We have exhaustively seen how this concurrency token works, so let's move on to the nextsection that explores timestamp-based concurrency tokens.
Timestamp-based concurrency tokensWe have already explored Timestamp-based concurrency tokens in the Introducingconcurrency tokens section. We can jump directly into the configuration, consider the same scenario and see how the conflicts were handled using the Timestamp concurrency token.
As we did with the non-timestamp based concurrency token, timestamp-based concurrencytokens could also be configured in the following ways:
Data annotationsFluent API
We will see how the configurations were performed using both the approaches in ourblogging system, and later we will see them in action.

Make It Real – Handling Concurrencies Chapter 10
[ 273 ]
Configuring timestamp tokens through dataannotationWe have already seen how data annotation configuration works. For timestamp-basedtokens, we need a property that will have a byte array, and it should be marked usingthe Timestamp data annotation. This is the only configuration required from our end; EFwill take care of the rest:
public class Post { // Code removed for brevity [Timestamp] public byte[] Timestamp { get; set; } }
The preceding configuration will let EF Core consider the Timestamp column as theconcurrency column, and any further update to this column will restrict users fromperforming parallel updates.
Since we are introducing a new column to the entity, related commands should be updatedas well. In our scenario, we need to update the UpdatePostCommand type with new bytearray Timestamp property and its usage as shown in the following code:
public class UpdatePostCommand : CommandBase, ICreatePostCommand<int> { // Code removed for brevity public byte[] Timestamp { get; set; } // Code removed for brevity public async Task<int> HandleAsync() { var post = new Post { // Code removed for brevity Timestamp = Timestamp }; // Code removed for brevity } }

Make It Real – Handling Concurrencies Chapter 10
[ 274 ]
The new column should be included in the Edit method of PostController:
public async Task<IActionResult> Edit( int id, [Bind("Id,Title,Content,Summary," + "PublishedDateTime, Url,VisitorCount,CreatedAt,ModifiedAt,BlogId,AuthorId," + "CategoryId,TagIds,FileId,Timestamp")] Post post, IFormFile headerImage) { // Code removed for brevity if (ModelState.IsValid) { var transactions = new TransactionScope(); try { Models.File file = null; if (headerImage == null || (headerImage != null && !headerImage.ContentType.ToLower().StartsWith("image/"))) { await _postRepository.ExecuteAsync( new UpdatePostCommand(_context) { // Code removed for brevity Timestamp = post.Timestamp }); return RedirectToAction("Index"); } // Code removed for brevity transactions.Transactions.Add (_context.Database.BeginTransaction()); await _postRepository.ExecuteAsync( new UpdatePostCommand(_context) { // Code removed for brevity Timestamp = post.Timestamp }); transactions.Commit(); } catch (DbUpdateConcurrencyException exception) { // Code removed for brevity } return RedirectToAction("Index"); } // Code removed for brevity }

Make It Real – Handling Concurrencies Chapter 10
[ 275 ]
Finally, the Timestamp column should be configured as a hidden column, just like wewould perform for an identity column. This is required since the UI should retain thetimestamp value on the Post:
// Code removed for brevity <form asp-action="Edit"> <div class="form-horizontal"> <// Code removed for brevity <input type="hidden" asp-for="Timestamp" /> // Code removed for brevity </div> </form> // Code removed for brevity
We are not there yet; we have updated the entity, but we are supposed to update thedatabase. So, we need to update the schema as shown in the following screenshot, byadding migration and updating the database:

Make It Real – Handling Concurrencies Chapter 10
[ 276 ]
Let's get back to the same scenario, which will have two tabs and will try to perform theupdate at the same time. The following Post list page screenshot is highlighted with theexisting values which will be modified by users for testing:

Make It Real – Handling Concurrencies Chapter 10
[ 277 ]
In the first tab, we are retaining the value and performing an update that will update thevalues, since EF will allow one update to happen irrespective of the values updated in anyof the columns (except Timestamp, which should not be updated by the user):
The Post entity data will be persisted without any issues since the Timestamp value doesn'tchange and it matches the value from the database.

Make It Real – Handling Concurrencies Chapter 10
[ 278 ]
The non-timestamp based concurrency token stops the update fromhappening if the concurrency check column value is changed, whereas thetimestamp-based concurrency token will track the changes performed inthe entity and will allow the change to be persisted if the timestamp valuematches with the database value. Before persisting, it will increment thetimestamp value.
The first tab operation works fine as expected; we can see the modified column wasupdated with the new value, confirming that the data was updated properly in thefollowing screenshot:

Make It Real – Handling Concurrencies Chapter 10
[ 279 ]
The second tab will try to update the Post entity, but it will fail irrespective of the columnthat was updated during this Edit operation. This behavior is expected since theTimestamp value was changed during the previous update, which makes the Timestampvalue stale. The data in the following screenshot is updated by the second user which willbe posted to the service:

Make It Real – Handling Concurrencies Chapter 10
[ 280 ]
We can see from the following error that the concurrency conflict has occurred and EF hasthrown the error, which restricts the user from persisting the stale record. The data updateis restricted due to stale data and the same is highlighted in the following image:
We have exhaustively seen how the timestamp-based concurrency token works and how itcan be configured using data annotation. In the next section, let's see how we can configurethe same token using Fluent API.
Configuring timestamp tokens through Fluent APIThe Fluent API configuration is made possible because Microsoft has exposed suchfunctionality against any property in the model. In our blogging system, we will configurethe Timestamp of the Post entity as a concurrency token by enabling the propertyusing IsConcurrencyToken() along with ValueGeneratedOnAddOrUpdate(). Thefollowing code would add a new property Timestamp as discussed in this section:
public class Post { // Code removed for brevity public byte[] Timestamp { get; set; } }

Make It Real – Handling Concurrencies Chapter 10
[ 281 ]
We have revisited the Post type and included the byte array timestamp property that willbe used in the Fluent API configuration. The following configuration code would enforcethe property value to be added or updated during persistence and marked as a concurrencytoken:
protected override void OnModelCreating(ModelBuilder modelBuilder) { // Code removed for brevity modelBuilder.Entity<Post>() .ToTable("Post") .Property(x=>x.Timestamp) .ValueGeneratedOnAddOrUpdate() .IsConcurrencyToken(); // Code removed for brevity }
The preceding configuration will let EF Core consider the Timestamp column as theconcurrency token, and any further update to this column will restrict users fromperforming parallel updates, as it did in the data annotation configuration.
We have exhaustively seen how this concurrency token works, so let's move on to the nextsection, which explores how concurrency conflicts were handled.
Handling concurrency conflictsWe have seen how to configure concurrency tokens and the errors it throws whenever thereis a concurrency conflict. In this section, we will discuss different approaches available forhandling concurrency conflicts.
The preceding configuration will let EF Core consider the ModifiedAt column as theconcurrency check column, and any further update to this column will restrict users fromperforming parallel updates.
We have seen the approaches available for handling conflicts, let's discuss them in detail.
Applying optimistic concurrencyThe optimistic concurrency will let the user try to update the entity. EF handles theoverhead operations to ensure whether there is any concurrency conflict or not. Thisoperation does not hurt performance, as pessimistic concurrency hurts, but it does handleconcurrency in different ways.

Make It Real – Handling Concurrencies Chapter 10
[ 282 ]
The different approaches for handling optimistic concurrency are:
Database winsClient winsUser-specific custom resolution
We will be investigating further each of the approaches, one by one, in the next section.
Database winsThe database wins approach would allow the system/application to discard the client/UIchanges and override the update operation using the latest data loaded from the database.
The following code shows how the concurrency conflicts are handled in the database winsapproach. It reloads the entries from the database using Reload(), discards the client datain favor of the database, and performs the SaveChanges() operation to persist the updatedchanges from the database. The following code performs handles database first concurrencyin the Post persistence:
public async Task<IActionResult> Edit(int id, [Bind("Id,Title,Content, Summary," + "PublishedDateTime,Url,VisitorCount,CreatedAt, ModifiedAt, BlogId,AuthorId," + "CategoryId,TagIds,FileId, Timestamp")] Post post, IFormFile headerImage) { if (id != post.Id) { return NotFound(); } if (ModelState.IsValid) { var transactions = new TransactionScope(); try { // Code removed for brevity } catch (DbUpdateConcurrencyException dbUpdateConcurrencyException) { if (!PostExists(post.Id)) { return NotFound(); } else { try

Make It Real – Handling Concurrencies Chapter 10
[ 283 ]
{ dbUpdateConcurrencyException.Entries.Single().Reload(); await _context.SaveChangesAsync(); return RedirectToAction("Index"); } catch (Exception exception) { ExceptionDispatchInfo.Capture (exception.InnerException).Throw(); } } } } // Code removed for brevity }
We have seen how the database wins approach handles the concurrency conflict. In the nextsection, let's explore how the client wins approach handles the concurrency conflict.
Client winsThe client wins approach allows the system/application to override the database changeswith the client/UI changes and update the data into the database.
The following code shows how the concurrency conflicts are handled in the client winsapproach. It just updates the original values from the database, which will avoidconcurrency conflict. It also allows the system/application to persist the changesfrom client/UI to be updated in the database without any issues:
public async Task<IActionResult> Edit(int id, [Bind("Id,Title,Content, Summary," + "PublishedDateTime,Url,VisitorCount,CreatedAt,ModifiedAt, BlogId,AuthorId," + "CategoryId,TagIds,FileId,Timestamp")] Post post, IFormFile headerImage) { if (id != post.Id) { return NotFound(); } if (ModelState.IsValid) { var transactions = new TransactionScope(); try { // Code removed for brevity } catch (DbUpdateConcurrencyException dbUpdateConcurrencyException)

Make It Real – Handling Concurrencies Chapter 10
[ 284 ]
{ if (!PostExists(post.Id)) { return NotFound(); } else { try { var entry = dbUpdateConcurrencyException.Entries.Single(); entry.OriginalValues.SetValues(entry.GetDatabaseValues()); await _context.SaveChangesAsync(); return RedirectToAction("Index"); } catch (Exception exception) { ExceptionDispatchInfo.Capture (exception.InnerException).Throw(); } } } } // Code removed for brevity }
We have seen how the client wins approach handles the concurrency conflict. In the nextsection, let's explore how the user-specific custom resolution approach handles theconcurrency conflict.
It would be helpful to read Client Wins and Database Wins as LastIn Wins and First In Wins respectively. This is a metaphor of thewarehousing practices of FIFO (First in First out) and LIFO (Last in Firstout).
User-specific custom resolutionThe user-specific custom resolution highlights the latest changes from the database in theclient/UI changes and updates the timestamp value so that on next SaveChanges(), theuser could either consider the latest changes from the database and update them inclient/UI, or just ignore them and proceed with saving the changes from the client/UI.

Make It Real – Handling Concurrencies Chapter 10
[ 285 ]
The following code shows how the concurrency conflicts are handled in the user-specificcustom resolution approach. It just adds the model state error on to the conflicting fieldswith the current value, which gets displayed in the client/UI. The following code wouldhandle concurrency and update the model state errors based on validation errors:
public async Task<IActionResult> Edit(int id, [Bind("Id,Title, Content,Summary," + "PublishedDateTime,Url,VisitorCount, CreatedAt,ModifiedAt, BlogId,AuthorId," +"CategoryId,TagIds, FileId,Timestamp")] Post post, IFormFile headerImage) { if (id != post.Id) { return NotFound(); } if (ModelState.IsValid) { var transactions = new TransactionScope(); try { // Code removed for brevity } catch (DbUpdateConcurrencyException dbUpdateConcurrencyException) { if (!PostExists(post.Id)) { return NotFound(); } else { try { foreach (var entry in dbUpdateConcurrencyException.Entries) { if (entry.Entity is Post) { var postEntry = entry.GetDatabaseValues(); var postFromDatabase = (Post)postEntry.ToObject(); var postToBeUpdated = (Post)entry.Entity; if (postFromDatabase.Title != postToBeUpdated.Title) { ModelState.AddModelError("Title", $"Current value: {postFromDatabase.Title}"); } if (postFromDatabase.Content != postToBeUpdated.Content) { ModelState.AddModelError("Content", $"Current value:

Make It Real – Handling Concurrencies Chapter 10
[ 286 ]
{postFromDatabase.Content}"); } ModelState.AddModelError(string.Empty, "The record was modified by another user" + " after the page was loaded. The save operation was canceled and the" + " updated database values were displayed. If you still want to edit" + " this record, click the Save button again."); post.Timestamp = (byte[])postFromDatabase.Timestamp; ModelState.Remove("Timestamp"); } else { throw new NotSupportedException("Don't know how to handle concurrency conflicts for " + entry.Metadata.Name); } } } catch (Exception exception) { ExceptionDispatchInfo.Capture (exception.InnerException).Throw(); } } } } // Code removed for brevity }
The custom resolution will handle the conflict displayed as follows, which will highlight theissue in the validation summary, and also displays the current value against eachconflicting field:

Make It Real – Handling Concurrencies Chapter 10
[ 287 ]
We have seen how the user-specific custom resolution approach handles the concurrencyconflict. In the next section, let's explore how pessimistic concurrency handles the conflict.
Applying pessimistic concurrencyThe pessimistic concurrency lets the user block everyone from accessing the entity until theread/write operation is complete. This might not give a good performance, but it ensuresthat nobody accesses the system with stale data. The following code would performpessimistic lock which avoids conflict at the datastore itself:
public async Task<IActionResult> Edit(int id, [Bind("Id,Url,Title,Subtitle,Description,CategoryId")] Blog blog) { // Code removed for brevity if (ModelState.IsValid) { try {

Make It Real – Handling Concurrencies Chapter 10
[ 288 ]
using (var transaction = _context.Database.BeginTransaction()) { try { var blogToUpdate = await _context.Blogs.FromSql($"Select * from dbo.Blog with (xlock) where id={id}") .FirstOrDefaultAsync();
if (blogToUpdate == null) return NotFound();
blogToUpdate.Title = blog.Title; blogToUpdate.Subtitle = blog.Subtitle; blogToUpdate.Description = blog.Description; blogToUpdate.CategoryId = blog.CategoryId; blogToUpdate.Url = blog.Url; blogToUpdate.ModifiedAt = DateTime.Now; _context.Update(blogToUpdate); await _context.SaveChangesAsync(); transaction.Commit(); } catch (Exception) { transaction.Rollback(); } } } // Code removed for brevity } // Code removed for brevity }

Make It Real – Handling Concurrencies Chapter 10
[ 289 ]
The xlock used in the preceding query will ensure that no other read/write operations canbe performed against the entity. Let's test the functionality by refactoring the Edit methodusing transactions, which also uses xlock before performing the update:

Make It Real – Handling Concurrencies Chapter 10
[ 290 ]
We can see that just before transaction.commit(), a breakpoint was set, which will stillhave an active xlock against the Blog entity. Meanwhile, if we try to fetch the records fromthe Blog entity, the operation will wait for the lock to be released, and that is why thefollowing screenshot shows Executing query... until it gets access to the read operation:

Make It Real – Handling Concurrencies Chapter 10
[ 291 ]
Once the transaction is committed, the select query executes as expected with the list ofblogs as an outcome. This is the expected behavior in the pessimistic lock, and we haveachieved the same using xlock in our code. In the following screenshot, the query whichwas loading during the persistence now executed completely as the lock is released after thepersistence:
The pessimistic concurrency conflict was identified and resolved in this section, whichconcludes the concurrency handling in this chapter.

Make It Real – Handling Concurrencies Chapter 10
[ 292 ]
SummaryWe started by exploring what is a concurrency conflict, and how Microsoft would havehandled them in the Entity Framework implementation. We have seen how the concurrencytoken implementation would solve our issue, and then started with using concurrencytokens with the non-timestamp approach. Later, we used the timestamp-based concurrencytoken to catch the conflicts. Finally, we have found ways to handle those concurrencyconflicts using both optimistic and pessimistic approaches. We can choose between the twobased on our priority; if performance is vital to the project then pick optimistic concurrency,or if the business users are keen on data and are ready to have a trade-off with performance,then pick pessimistic concurrency. We have built the blogging system to illustrate certainfeatures covered in the book, but it was not created to provide better performance. Wemight have used approaches that would yield better performance through muscle memory,but it's time to explore all possible options available in the framework to improve theapplication's performance. Let's explore them in Chapter 11, Performance – It's All AboutExecution Time.

11Performance – It's All About
Execution TimeWe have created transactions to ensure every transaction will be committed only if all thetransactions were successful. We have started with identifying conflicts, resolved themusing the built-in/default transactions supported by Entity Framework (EF), then worked with simple transactions. Then we covered handling transactions using timestamp and non-timestamp fields. Finally, we created transactions that could handle different data contextsand different technologies.
Let's discuss the performance issues we commonly face in EF, or any other data access layerimplementation, and a way to address those performance concerns.
In this chapter, we will be covering the following:
AsNoTracking() methodDetecting changesAsynchronous operationsUnnecessary volume returnedN + 1 Select problemMore data than requiredMismatched datatypesMissing indexes
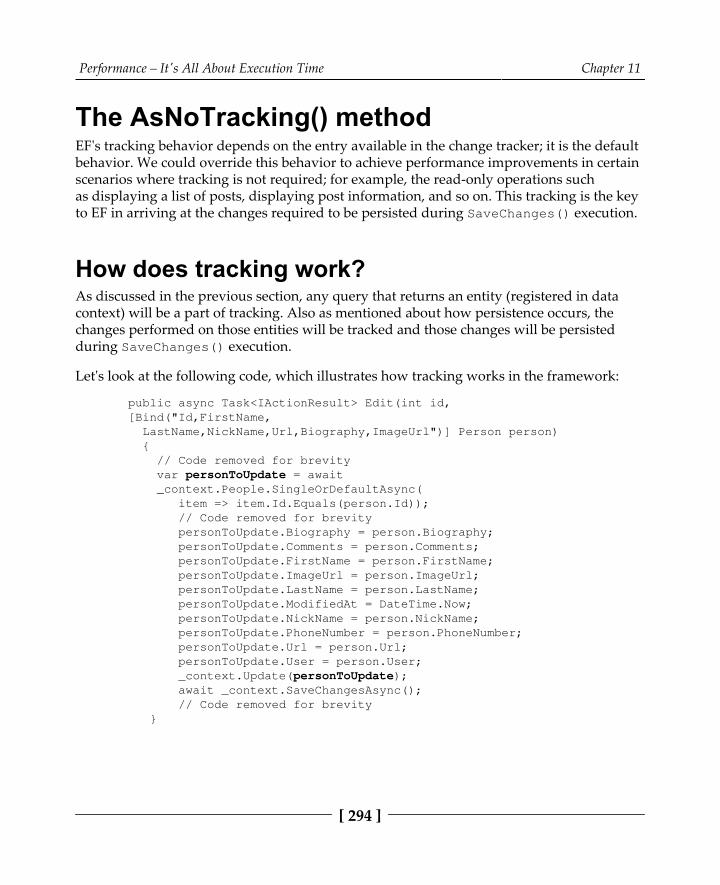
Performance – It's All About Execution Time Chapter 11
[ 294 ]
The AsNoTracking() methodEF's tracking behavior depends on the entry available in the change tracker; it is the defaultbehavior. We could override this behavior to achieve performance improvements in certainscenarios where tracking is not required; for example, the read-only operations suchas displaying a list of posts, displaying post information, and so on. This tracking is the keyto EF in arriving at the changes required to be persisted during SaveChanges() execution.
How does tracking work?As discussed in the previous section, any query that returns an entity (registered in datacontext) will be a part of tracking. Also as mentioned about how persistence occurs, thechanges performed on those entities will be tracked and those changes will be persistedduring SaveChanges() execution.
Let's look at the following code, which illustrates how tracking works in the framework:
public async Task<IActionResult> Edit(int id, [Bind("Id,FirstName, LastName,NickName,Url,Biography,ImageUrl")] Person person) { // Code removed for brevity var personToUpdate = await _context.People.SingleOrDefaultAsync( item => item.Id.Equals(person.Id)); // Code removed for brevity personToUpdate.Biography = person.Biography; personToUpdate.Comments = person.Comments; personToUpdate.FirstName = person.FirstName; personToUpdate.ImageUrl = person.ImageUrl; personToUpdate.LastName = person.LastName; personToUpdate.ModifiedAt = DateTime.Now; personToUpdate.NickName = person.NickName; personToUpdate.PhoneNumber = person.PhoneNumber; personToUpdate.Url = person.Url; personToUpdate.User = person.User; _context.Update(personToUpdate); await _context.SaveChangesAsync(); // Code removed for brevity }

Performance – It's All About Execution Time Chapter 11
[ 295 ]
The personToUpdate retrieved from the data context will be part of tracking as it isreturning the Person entity that is registered in the data context. The following coderegisters the Person entity to enable tracking in the framework:
public class BlogContext: DbContext { // Code removed for brevity public DbSet<Person> People { get; set; } // Code removed for brevity }
Since the entity is part of the data context, any changes performed in the returned item(s)will be tracked by EF Core irrespective of its usages, which could be read-only or mightperform a write operation as well.
No-tracking queriesIn the blogging system, the Person index screen will load a list of people available in thedata store, which will not perform any write operation. In this use case, the code doesn'trequire any tracking as once the data is rendered in the View, the scope is complete. Havingtracking over here is an overhead.
The following code would allow us to disable tracking in the executing query:
public async Task<IActionResult> Index() { var people = await _context.People .AsNoTracking() .ToListAsync(); // Code removed for brevity }
The tracking could be disabled using AsNoTracking(), as used in the preceding queryagainst the navigational property of data context in the LINQ query. This instructs EF Corethat we do not require an overhead tracking operation as we are not intending to performany changes with the result set.

Performance – It's All About Execution Time Chapter 11
[ 296 ]
The mock data should be generated to illustrate the performance impact inthe application, the script we have used in this chapter to generate themock data is available in the following Git commit:https:/ /goo. gl/ Fg2YMFKindly use this script to mock thousands/millions of records in the tables,the file in the preceding commit contains script for the Person, User, andPost tables mocking. This has been included to help you evaluateperformance in the DB.
The previous query, before optimization, took 170,294ms to execute in a table with a millionrecords, as illustrated in the following image:
The LINQ query, after optimization, took only 59,017ms to execute, which improved totalexecution time by 65%, as shown in following image:
This optimization is just a first step towards performance improvement; there is lot of scopeto improve the application performance and we will visit each aspect of them in othersections of this chapter.

Performance – It's All About Execution Time Chapter 11
[ 297 ]
The million records we had inserted in the Person table would affect thepreceding illustrated Index() action, which would return a list of people,it would throw a timeout error instead of rendering the list. We couldavoid this issue by handling pagination implemented in Chapter 8, QueryIs All We Need – Query Object Pattern, which is available inthe GetPaginatedPostByKeywordQuery.cs of the following Gitrepository path:https:/ /goo. gl/ SwvVcC.The same approach of Skip() and Take() could be used here to avoidtimeout issue, a quick fix would be limiting to 100 records as shown,which should be a paginated query in the future.var people = await _context.People.Take(100).AsNoTracking().ToListAsync();
If the tracking is not required for the entire controller, we could disable it on a context levelusing QueryTrackingBehavior of the ChangeTracker type. Since the blogging systeminitializes the context on each request, we could disable tracking on the constructor usingQueryTrackingBehavior as shown in the following code:
public PeopleController(BlogContext context) { _context = context; _context.ChangeTracker.QueryTrackingBehavior = QueryTrackingBehavior.NoTracking; }
We have seen how the tracking could be disabled at the query level or context level usingtwo approaches. Kindly use them wisely to avoid running into updating/deletion issues, asthose operations require tracking.

Performance – It's All About Execution Time Chapter 11
[ 298 ]
ProjectionsThere is another built-in support from EF Core that provides tracking over projections(anonymous types or custom types that project the entity) as well. In the following example,we are projecting the Person model as PersonViewModel, which will contain both thetype and an additional NoOfComments field. In this case, EF Core will track changesperformed over the Person property of PersonViewModel, since it is part of the datacontext and the NoOfComments will not be tracked. The following code provides the abovediscussed projection:
public async Task<IActionResult> Index() { return View(await _context.People .AsNoTracking() .Select(item => new PersonViewModel { Person = item, NoOfComments = item.Comments.Count }).ToListAsync()); }
There is one more projection that will never perform any tracking. If the projection takesonly the fields rather than the entity itself, then it will not track changes to the projectedentity. Let's see them in action by introducing an About panel, which will be displayedacross the public post that displays author information. A component is created to displayauthor details, and its View implementation creates a projection that takes only Name andBiography from the Person entity. Since it's not projecting the entire entity, theAboutViewModel will not be tracked.
The following projection ensures that the data will never be tracked, as it does not containany entities registered in the data context:
public class AboutViewComponent : ViewComponent { private readonly BlogContext _context; private readonly IPersonRepository _repository; public AboutViewComponent(IPersonRepository repository, BlogContext context) { _repository = repository; _context = context; }
public IViewComponentResult Invoke(int id)

Performance – It's All About Execution Time Chapter 11
[ 299 ]
{ var aboutViewModel = _context.People .Where(item => item.Id.Equals(id)) .Select(item => new AboutViewModel { Name = item.FirstName, Biography = item.Biography }).SingleOrDefault();
return View(aboutViewModel); } }
We have seen how tracking works, ways to disable it, and also explored projections andtheir tracking behavior in EF Core. In the next section, let's investigate how detectingchange behavior could be modified.
Detecting changesWe might run into performance issue while trying to perform bulk insertion that might beimporting data from other sources or migrating content from another blogging system. Inthose scenarios, if we have AutoDetectChangesEnabled, then we might run intoperformance issues since EF Core's ObjectStateManager.DetectChanges() performstoo costly operations on each insert operation.
For illustration, we could handle the bulk insert/update detect changes partly in ourCreatePost code, which will perform a bulk tag insertion. We could handle this issue bydisabling AutoDetectChangesEnabled just before adding the entities and enabling themback before calling SaveChanges(). The following little highlighted change would providea huge performance improvement against the execution time:
public class CreatePostCommand : CommandBase, ICreatePostCommand<int> { // Code removed for brevity public int Handle() { // Code removed for brevity Context.ChangeTracker.AutoDetectChangesEnabled = false; foreach (int tagId in TagIds) { Context.Add(new TagPost { TagId = tagId,

Performance – It's All About Execution Time Chapter 11
[ 300 ]
Post = post }); } Context.ChangeTracker.AutoDetectChangesEnabled = true; // Code removed for brevity } // Code removed for brevity }
We have seen how DetectChanges() affects the performance of bulk insert/updateoperations and the solution to the issue. In the next section, let's focus on asynchronousoperations.
Asynchronous operationsWe could call it a muscle memory, as we could notice that an asynchronous operation isalready in place; we perform all operations in an asynchronous way. Even though it's beencovered, let's reiterate how the asynchronous operations were handled in our bloggingsystem and see the simplicity when we used async/await syntactic sugar implementationsfor asynchronous operations.
The asynchronous execution helps us in supporting multiple requests in parallel, withoutlocking a thread against a long-running process. To understand how the threads should bemanaged properly, let's go through the following execution process:
The request reaching the ASP.NET pipeline will be allocated to a thread, whichtakes care of the executionThe thread will be occupied until the request is completeIf the action consumes any long-running process in a synchronous way, then thethread will be blocked until the process execution is complete. If all the threads inthe thread pool is occupied, then it cannot serve additional requestsIf the long-running process is implemented in an asynchronous way, then oncethe action is triggered, the thread will be released back to the thread pool, thereleased thread would be allocated to new requestOnce the long-running process is complete, a new thread will be allocated tocomplete the request execution

Performance – It's All About Execution Time Chapter 11
[ 301 ]
Since we already have an asynchronous implementation in place, we will start examiningthem right from the controller up to the data context execution. Let's take a look at the postcontroller Index action that is decorated with the async keyword, which also requires areturn type to be wrapped inside the Task<> generic type. The asynchronous methodshould be invoked using the await keyword as shown in the following code:
public async Task<IActionResult> Index() { var posts = await _postRepository.GetAsync( new GetAllPostsQuery(_context) { IncludeData = true }); // Code removed for brevity }
Let's dig in deep and investigate how this GetAsync() is implemented. It is a genericimplementation that invokes HandleAsync() using the async/await keywords as shownhere:
public async Task<IEnumerable<Post>> GetAsync<T>(T query) where T : IQueryHandlerAsync<IEnumerable<Post>> { return await query.HandleAsync(); }
The HandleAsync() method is again implemented inside GetAllPostsQuery (in ourscenario), which consumes the EF Core asynchronous ToListAsync() method, whichwraps up our asynchronous implementation. This ensures that the database executionhappens in an asynchronous way, and the operation continues after the data is returnedfrom the data store. The following code performs asynchronous executions onToListAsync() methods which will perform database operation:
public class GetAllPostsQuery : QueryBase, IGetAllPostsQuery<GetAllPostsQuery> { // Code removed for brevity public async Task<IEnumerable<Post>> HandleAsync() { var posts = IncludeData ? await Context.Posts .Include(p => p.Author).Include(p => p.Blog) .Include(p => p.Category).Include(p=>p.TagPosts) .ToListAsync() : await Context.Posts .ToListAsync();

Performance – It's All About Execution Time Chapter 11
[ 302 ]
// Code removed for brevity } }
We have explored how asynchronous operations are implemented consuming EF Coreasync methods. In the next section, let's move on a little further and see how transactionsare leveraged.
Transactions leveraging asynchronousoperationsThe transaction implementation still honors the asynchronous implementation; it doesn'tbother even if the execution is performed using different threads, all it cares about is thatthe executions should happen within a given transaction. We can see that there is nothing inaddition performed to support asynchronous operations for transactions; the asyncoperation is simply performed within the transaction scope and it simply takes care of therest.
Done. The asynchronous operations are still valid with the transactions we have createdand used in the posts controller; the create action implements ExecuteAsync() usingasync and await keywords are highlighted as follows:
` public async Task<IActionResult> Create([Bind("Id,Title, Content,Summary," + "PublishedDateTime,Url,VisitorCount,CreatedAt, ModifiedAt,BlogId," + "AuthorId,CategoryId,TagIds")] Post post, IFormFile headerImage) { if (ModelState.IsValid) { // Code removed for brevity var transactions = new TransactionScope(); try { if (file != null) { transactions.Transactions.Add(_filesContext.Database .BeginTransaction()); await _fileRepository.ExecuteAsync( new CreateFileCommand(_filesContext) { Content = file.Content, ContentDisposition = file.ContentDisposition,

Performance – It's All About Execution Time Chapter 11
[ 303 ]
ContentType = file.ContentType, FileName = file.FileName, Id = file.Id, Length = file.Length, Name = file.Name }); } transactions.Transactions.Add(_context. Database.BeginTransaction()); await _postRepository.ExecuteAsync( new CreatePostCommand(_context) { Title = post.Title, Summary = post.Summary, Content = post.Content, PublishedDateTime = post.PublishedDateTime, AuthorId = post.AuthorId, BlogId = post.BlogId, CategoryId = post.CategoryId, TagIds = post.TagIds, FileId = file.Id }); transactions.Commit(); } catch (Exception exception) { transactions.Rollback(); ExceptionDispatchInfo.Capture (exception.InnerException).Throw(); } return RedirectToAction("Index"); } // Code removed for brevity }
We have seen how async operations provide performance improvement for ourapplication and its support in transactions. In the next section, let's focus on the volume ofdata returned.

Performance – It's All About Execution Time Chapter 11
[ 304 ]
Unnecessary volume returnedWe have been using data luxuriously so far without keeping usage in mind. One fineexample is the delete operation, which we can see in all the CRUD operations. If we take alook at the Person delete operation, we can see that the entire Person entity wasreturned from the context and it was used for the deletion. The following code retrieves thePerson entity and uses the entity for delete operation:
public async Task<IActionResult> DeleteConfirmed(int id) { var person = await _context.People.SingleOrDefaultAsync(m => m.Id == id); _context.People.Remove(person); await _context.SaveChangesAsync(); return RedirectToAction("Index"); }
The pitfall for the preceding approach was, first a database call was made to retrieve theentire Person object, which is an overhead. After that, the required delete operation wasperformed using the Id of the person, which was available before the Person retrieval. Thefollowing screenshot is highlighted with the discussed two queries:

Performance – It's All About Execution Time Chapter 11
[ 305 ]
We could simplify the approach by removing the person retrieval and creating a Personobject using just the Id value, and updating the state of the entity as Deleted wouldinstruct EF Core to perform a delete operation directly without retrieving the object fromthe data store. The following code reduces the query into one which performs deleteoperation alone:
[HttpPost, ActionName("Delete")] [ValidateAntiForgeryToken] public async Task<IActionResult> DeleteConfirmed(int id) { Person person = new Person() { Id = id }; _context.Entry(person).State = EntityState.Deleted; await _context.SaveChangesAsync(); return RedirectToAction("Index"); }
We can see that the preceding approach does not make any Person retrievals yet. Still, thedelete operation was performed successfully, as shown in the following screenshot:

Performance – It's All About Execution Time Chapter 11
[ 306 ]
We have seen ways to avoid retrieving unnecessary data from the data store. In the nextsection, we will explore the N + 1 Select problem.
The N+1 Select problemThe N + 1 Select problem arises due to an internal data store call made by any ORMframework to perform a single operation. The problem could be outlined as follows:
A list of entities was returned that will be further iterated to perform some1.additional operation.Assuming a navigational property is accessed inside the iteration:2.
Each time an iteration tries to access the navigational property, adatabase hit occursThe hits will happen N times for N number of items returned in the firststep
This makes the application perform N+1 Select (N for the iterations and 1 for3.the first call that retrieves the list), which should have been performed in a singledatabase call.
This behavior is often termed as lazy loading in any ORM frameworks, which loads thesubsequent/dependent data only when required. The lazy loading is yet to be supported byEF Core. This can be verified in the EF Core road map, which lists it as Stretch goals, asshown in the following screenshot:

Performance – It's All About Execution Time Chapter 11
[ 307 ]
The issue (lazy loading support) created in the EF Core repository is also listed as follows:
https://github.com/ aspnet/ EntityFrameworkCore/ issues/ 3797
Even though the framework currently does not support the feature, it would be ideal toanalyze the issue and study the solutions for lazy loading. For discussion's sake, if EF Coresupports lazy loading in the future, the following implementation will create the N + 1Select issue, which will perform individual data store calls whenever the Commentsnavigational property is accessed.
The following highlighted code would trigger individual data store calls for populatingthe NoOfComments property:
var people = await _context.People .AsNoTracking() .ToListAsync(); var peopleViewModel = new List<PersonViewModel>(); people.ForEach(item => { peopleViewModel.Add(new PersonViewModel { Person = item, NoOfComments = item.Comments != null ? item.Comments.Count : 0 }); });

Performance – It's All About Execution Time Chapter 11
[ 308 ]
In EF Core 2.0, the preceding code will return the navigational Comments property as NULL,assuming we were not accessing the property, since it is not eager-loaded. The followingscreenshot would highlight that the comment was not eager loaded:
It would strangely perform an additional database call to retrieve the count from the datastore, even though the navigational property was returned as NULL:

Performance – It's All About Execution Time Chapter 11
[ 309 ]
When we include the Comments navigational property in the LINQ query, it would performeager loading of the Comments entity to serve its request. The following code would let theEF Core to perform eager loading the comments:
var people = await _context.People .Include(item => item.Comments) .AsNoTracking() .ToListAsync(); var peopleViewModel = new List<PersonViewModel>(); people.ForEach(item => { var comment = item.Comments; peopleViewModel.Add(new PersonViewModel { Person = item, NoOfComments = item.Comments != null ? item.Comments.Count : 0 }); });
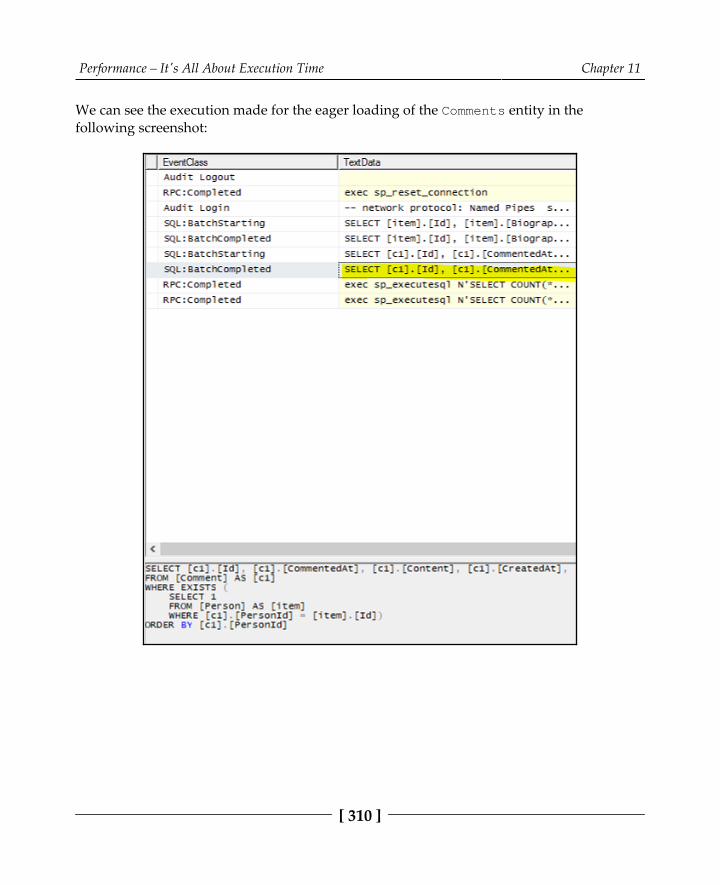
Performance – It's All About Execution Time Chapter 11
[ 310 ]
We can see the execution made for the eager loading of the Comments entity in thefollowing screenshot:

Performance – It's All About Execution Time Chapter 11
[ 311 ]
The eager loading will now return appropriate comments for the person who hascommented on the blog posts. Now we can perform our operation of listing the number ofcomments the user has posted in the listing page as in the following highlighted image thecomments were available:
The number of comments is now listed as expected in the People list page, shown as in thefollowing screenshot:

Performance – It's All About Execution Time Chapter 11
[ 312 ]
We have discussed the N + 1 Select problem, and then saw how the current EF CoreFramework handles the scenario and the solution we could provide to resolve the issue. Inthe next section, we will explore how the data returned from the service or controller couldbe limited to only the fields that were consumed by the views.
More data than requiredThe About component we were creating consumes the Person entity, which contains a lotof information that is not necessary for the component, but still it is processed and returnedto the View. We can see in the following code, the AboutComponent consumes theGetPersonByIdQuery and returns the entire Person entity to the View:
public IViewComponentResult Invoke(int id) { var user = _repository.GetSingle( new GetPersonByIdQuery(_context) { IncludeData = true, Id = id }); return View(user); }
The preceding View component renders only the Name and Biography properties of theuser entity. We can see them in the following view component code:
<h2>About @Model.Name</h2> <p> @Model.Biography </p>
The View component then consumes the data to render only the FirstName andBiography of the Person entity. It is obvious that we need to address this problem, as weare returning unnecessary data to the view.

Performance – It's All About Execution Time Chapter 11
[ 313 ]
We can visualize the rendered view from the following screenshot and see that it does notconsume any other property from the user entity:

Performance – It's All About Execution Time Chapter 11
[ 314 ]
If we try to profile the data store call, we can see that there are a lot of columns included inthe particular call, which consumes only two-column data:
We can now narrow down the data returned using projection and a View model, whichrestricts the data only to Name and Biography:
public IViewComponentResult Invoke(int id) { var aboutViewModel = _context.People .Where(item => item.Id.Equals(id)) .Select(item => new AboutViewModel {

Performance – It's All About Execution Time Chapter 11
[ 315 ]
Name = item.FirstName, Biography = item.Biography }).SingleOrDefault();
return View(aboutViewModel); }
Now, the profiler highlights the database call that contains only two columns required forthe rendering of the database, thereby reducing the content that was retrieved from thedatabase, as shown in the following screenshot:
This addresses our problem of returning too much data from the data store. In the nextsection, let's look into mismatched data types.

Performance – It's All About Execution Time Chapter 11
[ 316 ]
Mismatched data typesThe mismatched data type would hurt the performance. This might look obvious at first,but if we take a closer look, it is evident that we should be addressing the concern. Thefollowing tweaked About view component illustrates the retrieval of data usingPhoneNumber rather than Id:
var aboutViewModel = _context.People .Where(item => item.PhoneNumber.Equals("9876543210")) //.Where(item => item.Id.Equals(id)) .Select(item => new AboutViewModel { Name = item.FirstName, Biography = item.Biography }).SingleOrDefault();
The preceding LINQ query would be translated into the following SQL query: enableActual Execution plan with the query execution, and it would be evident that something iswrong here. Whenever we have mismatched data types in a query, the data typeconversion would enforce an index scan operation. In the following screenshot, we can seethat the Clustered Index Scan is happening rather than performing a seek operation,which further affects the performance:

Performance – It's All About Execution Time Chapter 11
[ 317 ]
If we hover on the execution plan, we can see more information, such as the number ofrecords, the cost of the operation, the number of execution, rows affected, and so on, whichcan be visualized in the following screenshot:
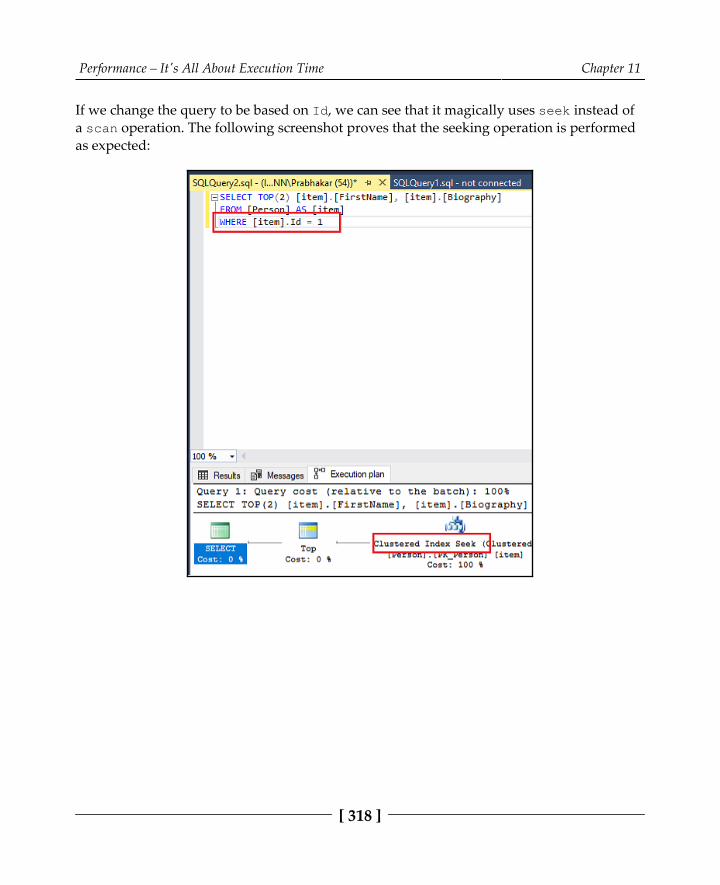
Performance – It's All About Execution Time Chapter 11
[ 318 ]
If we change the query to be based on Id, we can see that it magically uses seek instead ofa scan operation. The following screenshot proves that the seeking operation is performedas expected:
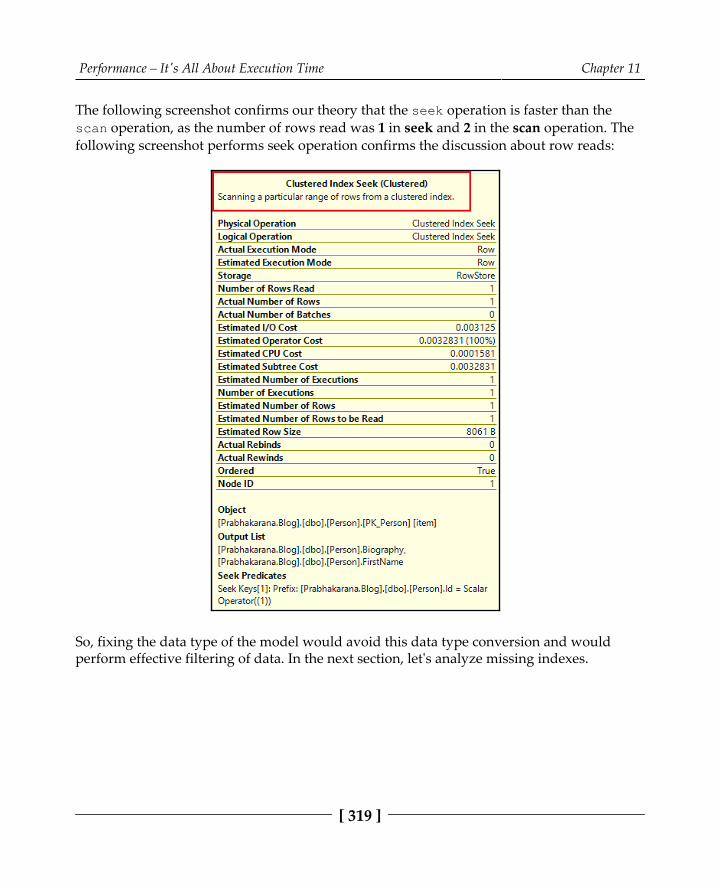
Performance – It's All About Execution Time Chapter 11
[ 319 ]
The following screenshot confirms our theory that the seek operation is faster than thescan operation, as the number of rows read was 1 in seek and 2 in the scan operation. Thefollowing screenshot performs seek operation confirms the discussion about row reads:
So, fixing the data type of the model would avoid this data type conversion and wouldperform effective filtering of data. In the next section, let's analyze missing indexes.

Performance – It's All About Execution Time Chapter 11
[ 320 ]
Missing indexesWe will modify the About View component with FirstName and LastName filter, usingwhich we should have an index in the data store. If we analyse the data store, we don't havesuch an index in the following screenshot; it would be wise to create one for betterperformance:
Let's start working on improvising SQL query performance, and the starting point would betracing the query using a SQL profiler. So, copy the translated SQL query of translatedAbout View component LINQ query from the right-click the SQL Server Profiler, paste it inthe SQL Query Analyzer window, and select Trace Query in SQL Server Profiler,highlighted as shown in the following screenshot:

Performance – It's All About Execution Time Chapter 11
[ 321 ]
Once the profiler is attached, execute the query in the Query Analyzer Window, whichshould be displaying the following results, enable and see the actual execution plan as well:

Performance – It's All About Execution Time Chapter 11
[ 322 ]
The SQL profiler will capture anything that occurs in the database. Since we are queryingthe Person entity, it is capturing all queries with respect to that entity operation, which isevident in the following screenshot:

Performance – It's All About Execution Time Chapter 11
[ 323 ]
The query should be optimized using a tuning advisor and it requires the trace data toperform its analysis, so we need to save this profiler data for performance tuning analysis,as shown in the following screenshot:

Performance – It's All About Execution Time Chapter 11
[ 324 ]
The data required for the performance tuning is now ready. The next step would be toconsume it in a tuning advisor. Right-click the SQL query and select Analyze Query inDatabase Engine Tuning Advisor for further operations, as shown in the followingscreenshot:
Surprisingly, it throws the following error: The argument type 'server type = Sql, servername = (localdb)\mssqllocaldb, timeout = 30, database = <DatabaseName>, protocol =NotSpecified, workstation = , integrated security = True' cannot be converted intoparameter type 'Microsoft.SqlServer.Management.Common.SqlConnectionInfo'.(mscorlib), which means that we are using a tuning advisor against the SQL ExpressEdition, and it is not supported:

Performance – It's All About Execution Time Chapter 11
[ 325 ]
We need at least the Developer Edition to consume a tuning advisor; let's download theDeveloper Edition (https:/ /www. microsoft. com/ en- in/sql- server/ sql-server-downloads), as shown in the following screenshot, configure it, and then proceed with theperformance tuning:
Once the Developer Edition is installed and the database is configured, open the tuningadvisor from the query window, and it should now open properly. Then, create a newsession with the following details such as Session name, Workload as File type, and itslocation. Select the Database for workload analysis, and finally select the databases weneed to tune, as shown in the following screenshot:
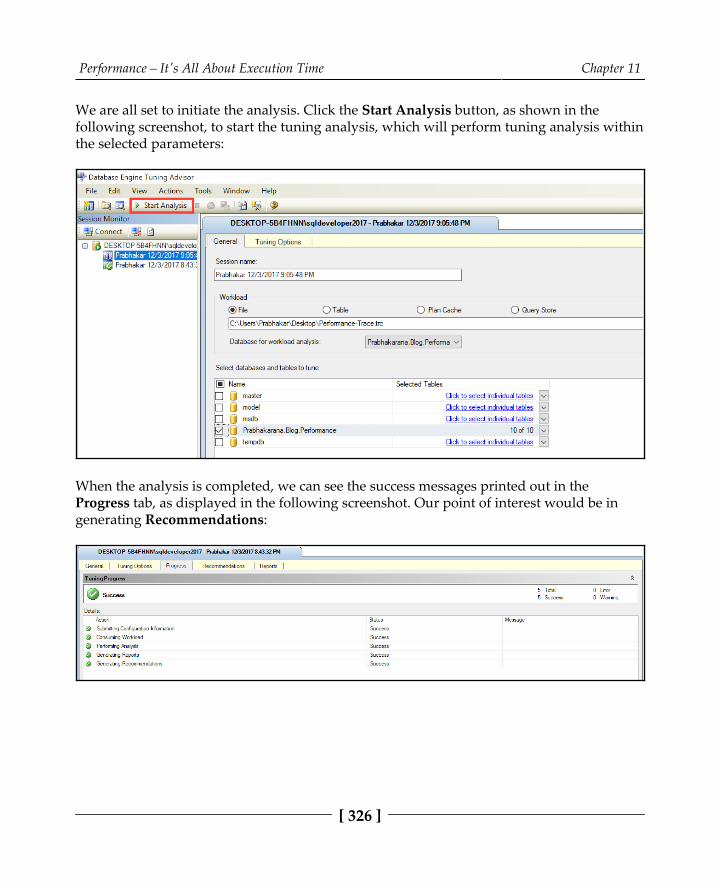
Performance – It's All About Execution Time Chapter 11
[ 326 ]
We are all set to initiate the analysis. Click the Start Analysis button, as shown in thefollowing screenshot, to start the tuning analysis, which will perform tuning analysis withinthe selected parameters:
When the analysis is completed, we can see the success messages printed out in theProgress tab, as displayed in the following screenshot. Our point of interest would be ingenerating Recommendations:

Performance – It's All About Execution Time Chapter 11
[ 327 ]
Open the Recommendations tab and it will list the recommendations, as shown in thefollowing screenshot. It allows us to tune the performance of the database, which is a SQLquery in our scenario:
Click the definition entry inside the Recommendations tab, which opens the following SQLScript Preview, to fix the performance issue. In a regular application, we would be copyingthis query and executing it in the database. Since we are using the ORM framework, weneed to perform the same task using the framework instead, and the crux of the message isthat we need an index to fine-tune the SQL query:
The HasIndex() Fluent API method would do the trick for us. It would use the markedcolumn(s) and create a non-clustered index in the data store, and the code required for ourexample is shown as follows:
protected override void OnModelCreating(ModelBuilder modelBuilder) { // Code removed for brevity modelBuilder.Entity<Person>() .HasIndex(p => new { p.FirstName, p.LastName }); }

Performance – It's All About Execution Time Chapter 11
[ 328 ]
The migration added and updated to the database would create the required non-clusteredindex, as shown in the following screenshot:
Let's run the same query with execution plan enabled. We can prove that the operation nowconsumes only one row to retrieve the record for us, as shown in the following screenshot:

Performance – It's All About Execution Time Chapter 11
[ 329 ]
We have seen how to create an index required to optimize our retrieval query, whichconcludes our analysis and solution towards better performance.

Performance – It's All About Execution Time Chapter 11
[ 330 ]
SummaryWe have explored multiple performance issues that we might run into, and the solutionsrequired to tackle those issues. We started with the tracking behavior of EF Core and itsprojection behavior, then we explored detecting changes with bulk insert/updates, and howto handle them. We enhanced the application by supporting asynchronous operations,which allow us to handle threads effectively. Then we analyzed/fixed the data that wasretrieved and transmitted over the network, right from volume, and columns until anumber of database calls made to the data store. Finally, we saw how the data typemismatch affects us, also how the missing indexes affect our retrieval performance, and theway to improvise in those scenarios. The performance improvement measures we havebeen investigating in this chapter would help us in improving a system with worstperformance (10,000ms+) to a system with best performance (<=1000 ms) which will be theperformance Service Level Agreement (SLA) of most systems. So far, we have been dealingwith only one tenant in the data store. In Chapter 12, Isolation – Building a Multi-TenantDatabase, we will be dealing with a multi-tenant database and its row-level security.
12Isolation – Building a Multi-
Tenant DatabaseWe explored multiple performance issues that we might run into, and the solution requiredto tackle those issues. We started with the tracking behavior of EF Core, its projectionbehavior, and then we explored detecting change issues with bulk insert/updates and howto handle them. We enhanced the application by supporting asynchronous operations thatallow us to handle threads effectively. Then, we analyzed/fixed the data that was retrievedand transmitted over the network, right from volume and columns, up until the number ofdatabase calls made to the data store. Finally, we saw how the datatype mismatch affectedus, also how the missing indexes affected our retrieval performance, and the way toimprovise in those scenarios.
Let's discuss the authentication implementation required, and then row-level security, andlater multi-tenancy in this chapter.
The sections we will be including in this chapter are as follows:
Authentication in the blogging systemRow-Level Security:
Filter predicateBlock predicate
Multi-tenancy:StandaloneDatabase-per-tenantShared multi-tenantDive into multi-tenancy

Isolation – Building a Multi-Tenant Database Chapter 12
[ 332 ]
Authentication in the blogging systemThe authentication mechanism is the foundation required to support row-level security ormulti-tenancy in the system, so we have to start building authentication in our application.There are various forms of authentication available, but we will be implementing cookie-based authentication in our blogging system.
The following code block will add cookie-based authentication as a service insidethe ConfigureServices() method of Startup.cs:
public void ConfigureServices(IServiceCollection services) { // Code removed for brevity services.AddAuthentication(o => { o.DefaultAuthenticateScheme = CookieAuthenticationDefaults.AuthenticationScheme; o.DefaultChallengeScheme = CookieAuthenticationDefaults.AuthenticationScheme; }) .AddCookie(); }
The configuration required to use the cookie-based authentication service must beperformed inside the Configure() method of Startup.cs, as shown here:
public void Configure(IApplicationBuilder app, IHostingEnvironment env, ILoggerFactory loggerFactory, BlogContext blogContext) { // Code removed for brevity app.UseAuthentication(); }
The authentication could be applied globally to all controllers byadding AuthorizeFilter to the configuration Filters collection. The requiredconfiguration should be performed inside the ConfigureServices() methodof Startup.cs, as shown here:
public void ConfigureServices(IServiceCollection services) { // Code removed for brevity services.AddMvc(configuration => { var authorizationPolicy = new AuthorizationPolicyBuilder() .RequireAuthenticatedUser()

Isolation – Building a Multi-Tenant Database Chapter 12
[ 333 ]
.Build(); configuration.Filters.Add(new AuthorizeFilter(authorizationPolicy)); }).AddJsonOptions(options => { options.SerializerSettings.ContractResolver = new DefaultContractResolver(); options.SerializerSettings.ReferenceLoopHandling = Newtonsoft.Json.ReferenceLoopHandling.Ignore; }); }
Enabling authorization across the controllers would enforce the authentication API toredirect the user to Account/Login, which is the default route in authentication. Since theLogin action also requires authorization, we may end up in an infinite redirect to the sameaction that would throw the following error message: HTTP Error 404.15 - Not Found. Therequest filtering module is configured to deny a request where the query string is too long.Please refer to the following screenshot:

Isolation – Building a Multi-Tenant Database Chapter 12
[ 334 ]
We can solve this issue by enabling the anonymity using the following code snippet thatincludes the AllowAnonymous attribute to the Login action method:
[AllowAnonymous] public IActionResult Login(string redirectUrl) { ViewBag.RedirectUrl = redirectUrl; return View(); }
We will also need the Login HttpPost action to be anonymous since the user will not beauthenticated while sending his login credentials to the server, so add AllowAnonymous tothe following action as well:
[AllowAnonymous] [HttpPost] public async Task<IActionResult> Login(LoginViewModel loginViewModel) { // Code removed for brevity var claims = new List<Claim> { new Claim(ClaimTypes.Name, loginViewModel.Username) };
var claimsIdentity = new ClaimsIdentity( claims, CookieAuthenticationDefaults.AuthenticationScheme);
await HttpContext.SignInAsync( CookieAuthenticationDefaults.AuthenticationScheme, new ClaimsPrincipal(claimsIdentity)); return RedirectToAction("Index", "Home"); }
The authentication-related implementation is committed to the Git repository and isavailable in the following URL:
goo.gl/XudiqY

Isolation – Building a Multi-Tenant Database Chapter 12
[ 335 ]
We can run and see how the authentication and authorization works in the bloggingsystem. From the following illustration, we can see that the Register and Loginfunctionality is included, the other admin hyperlinks were hidden from the user, and,finally, Blog and Recent Posts were made anonymous so that any user could see the blogposts. Please refer to the following screenshot:

Isolation – Building a Multi-Tenant Database Chapter 12
[ 336 ]
The Blog page displays the list of blog posts created in the system and is anonymouslyavailable to the user to read them. The following image shows the posts from differentblogs listed on the same page anonymously, as expected:
Opening any one of the posts will show the following blog post display page, whichdisplays a post with corresponding comments, a provision to add comments (evenanonymously), and, finally, an About section that briefs us about the author:

Isolation – Building a Multi-Tenant Database Chapter 12
[ 337 ]
If we would like to access the Admin screens, we need to login to the system. Let's use thefollowing Login screen to get authentication to access the authorized section of the system.On successful authentication, the system will generate a cookie for the user that will be usedby the system to ensure that the user is authenticated in his concurrent requests:

Isolation – Building a Multi-Tenant Database Chapter 12
[ 338 ]
On successful authentication, we will be seeing the following highlighted modules visibleon the screen, the first one is the Welcome message of the user and the other is the adminlinks visible in the navigation bar:
Now we are good to go, the system can now support row-level security, which is discussedin the next section.
Row-Level SecurityThe Row-Level Security (RLS) will allow us to maintain data from all users in a singledatabase, but still ensure that only data related to the user is shared and the other user'scontent is kept hidden. The underlying logic could be implemented in any approach, whichis left to the developer's creativity, but we will stick with tenants since we will be dealingwith multi-tenancy in the system. Let's create a Tenant type using the following codesnippet that can accommodate a person's information along with their tenant ID and name:
public class Tenant { public Guid Id { get; set; } public string Name { get; set; } public Person Person { get; set; } }

Isolation – Building a Multi-Tenant Database Chapter 12
[ 339 ]
We have included two tenants to test the row-level security in our implementation, and wehave used two people available in the system to have tenants mapped to them; now,configure the tenants as shown here:
We had three entries in the Person entity, one was an anonymous user and the other twowere registered users, the registered users having ids 1 and 2003 shown in the followingscreenshot were configured while creating tenants:
The Blog entity does not have a provision to segregate the contents based on the tenants.We need to support tenant in the Blog entity; include the following code lines to haveTenantId property to have tenant support in the Blog entity:
public class Blog { // Code removed for brevity public Guid TenantId { get; set; } }

Isolation – Building a Multi-Tenant Database Chapter 12
[ 340 ]
The migration should be added and the database should be updated to have the blog entitysupport tenants. Once you complete modifying the blog data to contain appropriate tenantIDs based on the author information, it should have the following data in the datastore:
The Post entity does not have tenant support either. We should follow the same approachof adding the following code snippet to support tenants in the Post entity:
public class Post { // Code removed for brevity public Guid TenantId { get; set; } }
Once migration is added and updated to the datastore, we should be performing the samedata modification as we did to blogs that will have the following posts data in the datastore:
The system now supports tenants. Let's move on and perform the configuration required toensure that tenant information was properly maintained.

Isolation – Building a Multi-Tenant Database Chapter 12
[ 341 ]
Filter predicateWe will start with creating the tenant predicate using the following code that will allow theuser to perform read operations based on the given tenant id or return all data if no tenantid is provided:
CREATE FUNCTION dbo.TenantPredicate (@TenantIduniqueidentifier) RETURNS TABLE WITH SCHEMABINDINGAS RETURN SELECT 1 AS TenantPredicateResult WHERE (@TenantId = CAST(SESSION_CONTEXT(N'TenantId') AS uniqueidentifier))OR (SESSION_CONTEXT(N'TenantId') = convert(nvarchar(50),cast(cast(0 as binary) as uniqueidentifier)))
The preceding TenantPredicate function will accept tenant id as an input parameter andreturns a bit value as a table if the tenant id matches with the one from the session, or if it'sempty. The tenant id will be matched for the authorized users and the empty tenant id willbe used to display all posts for admins or anonymous users (anonymous user do not have atenant id).
Once the predicate is created, we can use them in creating security policies, and, since weare dealing with filter predicate, let's create a tenant policy for read operations. Thefollowing piece of code will create a filter predicate on blogs and posts, and whenever aread operation is performed on those entities, the predicate kicks in and verifies and filtersdata based on the session value:
CREATE SECURITY POLICY dbo.TenantPolicy ADD FILTER PREDICATE dbo.TenantPredicate(TenantId) ON dbo.Blog, ADD FILTER PREDICATE dbo.TenantPredicate(TenantId) ON dbo.Post GO
The session context of TenantId could be set using the following SQL query that passeskey and value to the sp_set_session_context stored procedure. The code sets thePrabhakar-Tenant in the session context, which means it will serve data only specific tothat tenant unless and until the session is changed or cleared:
EXEC sp_set_session_context @key=N'TenantId', @value='743302BD- C230-4BB9-9358-0F4D68F4E820'

Isolation – Building a Multi-Tenant Database Chapter 12
[ 342 ]
Once the session is set, any read operation will yield result based on the session tenantconfiguration. The following screen displays that the Prabhakar-Tenant is set in thesession, then the posts retrieved were only related to that tenant which ensures that thefilter predicate is working as expected:
If we change the tenant to a Test tenant, then the post related to Test tenant alone will bereturned as shown here:
We explored the filter predicate right from configuration up until verifying it through aread operation. Now, we will explore the block predicate in the next section.
Block predicateThe block predicate is similar to the filter predicate with respect to configuration, only itrestricts the user from performing write operations on other tenant's data. As mentioned,the configuration remains the same with a few changes, as shown in the following piece ofcode, instead of allowing anonymous users to access. We will restrict it only to theadministrators, as highlighted here:
CREATE FUNCTION dbo.TenantPredicate (@TenantId uniqueidentifier) RETURNS TABLE WITH SCHEMABINDINGAS RETURN SELECT 1 AS TenantPredicateResult WHERE (@TenantId = CAST(SESSION_CONTEXT(N'TenantId') ASuniqueidentifier))OR -- Add administrator support once roles were implemented

Isolation – Building a Multi-Tenant Database Chapter 12
[ 343 ]
The security policy creation is also similar, as displayed here. The only difference will be thepredicate used in the policy, which will be the block predicate in our case:
CREATE SECURITY POLICY dbo.TenantPolicy ADD BLOCK PREDICATE dbo.TenantPredicate(TenantId) ON dbo.Blog, ADD BLOCK PREDICATE dbo.TenantPredicate(TenantId) ON dbo.Post GO
The write operations should be performed in a similar way, where the session contextshould be set first with the tenant id, based on that the write operation should beperformed. The following illustration shows that the session context is set to Prabhakar-Tenant and a write operation is performed:
We never discussed failure scenarios when a user tries to write record in another tenant.The following screenshot shows that an error, The attempted operation failed because thetarget object 'Prabhakarana.Blog.dbo.Blog' has a block predicate that conflicts with thisoperation. If the operation is performed on a view, the block predicate might be enforcedon the underlying table. Modify the operation to target only the rows that are allowed bythe block predicate., would be returned if there is any violation to the predicate:
We explored row-level security using both filter and block predicates. Now, we will moveon to the multi-tenant databases in the next section.

Isolation – Building a Multi-Tenant Database Chapter 12
[ 344 ]
Multi-tenancyThe people living in a gated community could be easily related with the term multi-tenancy. We will be having multiple families living in their own flat/home (a user) within abuilding/phase (a tenant); together, they will form a gated community that is nothing butmulti tenancy. In software terminology, a system supporting a set of users grouped togetheras a tenant (based on roles) would have their data stored in a single or shared database, andstill serving data based on the tenant is called multi-tenancy.
The multi-tenancy application can be classified as follows:
StandaloneDatabase-per-tenantShared multi-tenant
We will explore each one of the applications individually in the next sub-sections.
StandaloneThe standalone model deals with an individual application and its own database, isolatingeverything from different tenants, right from database to the application. It helps thedevelopers to customize the application and have different schema for different customers,which will be widely used in product-based companies. Nowadays, companies weredrifting toward this approach due to microservices architecture. Also, the need arises basedon the volume of the transactions and the sensitivity of data.
The following diagram explains the standalone model, where each application has its owndatabase:

Isolation – Building a Multi-Tenant Database Chapter 12
[ 345 ]
If we watch closely, there is one more thing: the application will never interact with eachother. In the multi-tenancy terminology, each application instance is owned by a tenant andthe tenant has ownership to the complete the database. The financial institutions will havethe standalone model due to sensitivity and volume of data. It would be easy for thedevelopers to provide access to the vendors if they want to customize, have control overtheir data, scale the application or database without affecting others, and more, yet, still, itsa costly solution since it deals with multiple database from a software company'sperspective.
We explored the standalone model in this section. Now, let's move on to database-per-tenant in the next section.
Database-per-tenantThe database-per-tenant model deals with a single/shared application, but with its owndatabase (tenant, have their own database), isolating the database alone. It will helpdevelopers have a single code base for the application having customization kept in thedatabase; if they do not move all their customization to the database, they end up affectingevery vendor whenever any new features/product support is included in the system. Thedatabase isolation will help the companies have control over data, even though the codebase is shared across the vendors.

Isolation – Building a Multi-Tenant Database Chapter 12
[ 346 ]
The following diagram explains the database-per-tenant model where one application hasits multiple databases (one per tenant):
The main drawback in sharing a common application is that if any one of the vendor hasmore threshold, then the entire application has to be scaled-up. In the multi-tenancyterminology, one application instance is shared by all the tenants and the tenant hascomplete ownership to its own database. The insurance companies providing customizedpackages to vendor companies could be having this model, which would let them havecontrol over functionality, yet still would let the vendors have control over their data. Itwould be easy to deploy any vendor customization, but any feature deployment wouldbecome difficult since the code base or the application has been shared across.
We explored the database-per-tenant model in this section. Now, let's move on to sharedmulti-tenant in the next section.
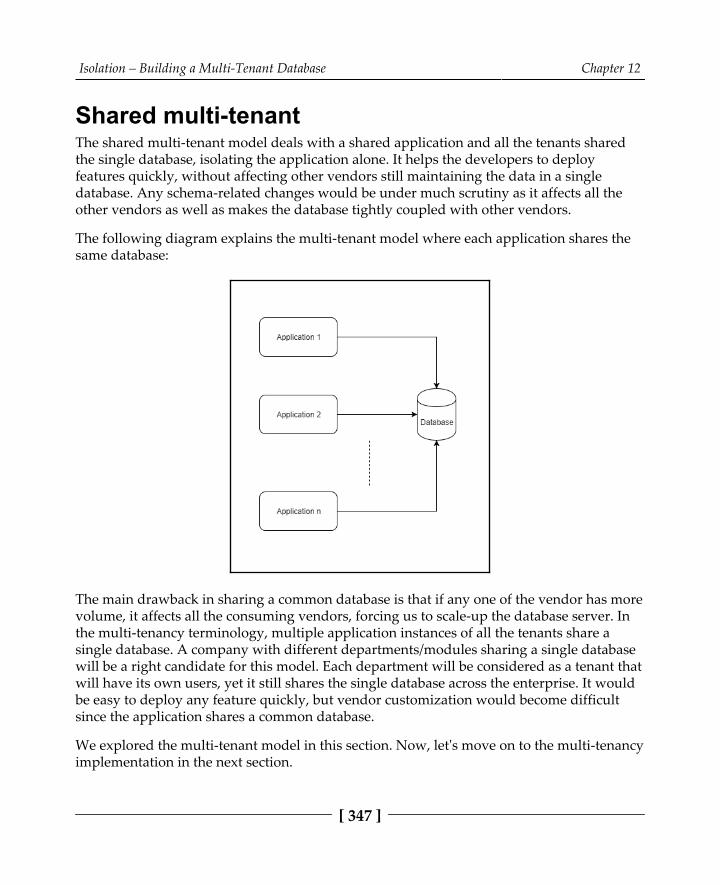
Isolation – Building a Multi-Tenant Database Chapter 12
[ 347 ]
Shared multi-tenantThe shared multi-tenant model deals with a shared application and all the tenants shared the single database, isolating the application alone. It helps the developers to deployfeatures quickly, without affecting other vendors still maintaining the data in a singledatabase. Any schema-related changes would be under much scrutiny as it affects all theother vendors as well as makes the database tightly coupled with other vendors.
The following diagram explains the multi-tenant model where each application shares thesame database:
The main drawback in sharing a common database is that if any one of the vendor has morevolume, it affects all the consuming vendors, forcing us to scale-up the database server. Inthe multi-tenancy terminology, multiple application instances of all the tenants share asingle database. A company with different departments/modules sharing a single databasewill be a right candidate for this model. Each department will be considered as a tenant thatwill have its own users, yet it still shares the single database across the enterprise. It wouldbe easy to deploy any feature quickly, but vendor customization would become difficultsince the application shares a common database.
We explored the multi-tenant model in this section. Now, let's move on to the multi-tenancyimplementation in the next section.

Isolation – Building a Multi-Tenant Database Chapter 12
[ 348 ]
Dive into multi-tenancyThe multi-tenancy implementation is completely dependent on the tenant configurationthat was built in the row-level security section in this chapter. The Entity Framework Coreeradicates the necessity of any custom implementation or any third-party package to handletenant handling in the system. EF Core 2.0 provides query-filtering features that allows usto filter the tenant based on the configured ID right in the data-context level.
The code required to implement the tenant configuration in the data context is highlightedhere:
public class BlogContext: DbContext { // Code removed for brevity public Guid TenantId { get; set; } protected override void OnModelCreating(ModelBuilder modelBuilder) { modelBuilder.Entity<Blog>() .ToTable("Blog") .HasQueryFilter(item => item.TenantId.Equals(TenantId)); modelBuilder.Entity<Post>() .ToTable("Post") .HasQueryFilter(item => item.TenantId.Equals(TenantId)); // Code removed for brevity } }
The controller implementation required for tenant handling is pretty straightforward:
The User identity name is used to retrive the Person information from the datastoreFrom the Person entity, the tenant id is retrievedThe retrieved identity is then configured in the data context, which will be usedin the corresponding data context operations
The preceding implementation steps were followed in this piece of code to configuretenants in the data context from a controller:
public class BlogsController : Controller { // Code removed for brevity public async Task<IActionResult> Index() { SetTenantId();

Isolation – Building a Multi-Tenant Database Chapter 12
[ 349 ]
return View(await _context.Blogs.FromSql("Select * from dbo.Blog").ToListAsync()); }
private void SetTenantId() { if (this.User == null) return; var person = _context.People.FirstOrDefault(item => item.User.Username.Equals(this.User.Identity.Name)); if (person != null) { _context.TenantId = person.TenantId.HasValue ? person.TenantId.Value : Guid.Empty; } return; }
Do not forget to drop the predicates included in the previous section, otherwise, theapplication may not yield any results from the Blog or Post entities. Execute the followingSQL query to remove predicates from the tenant policy:
ALTER SECURITY POLICY dbo.TenantPolicy DROP FILTER PREDICATE ON dbo.Blog, DROP FILTER PREDICATE ON dbo.Post, DROP BLOCK PREDICATE ON dbo.Blog, DROP BLOCK PREDICATE ON dbo.Post GO
The Blog listing page looks like the following screenshot before the tenant configuration isin place, which contains all the blog information even though the user from Prabhakar-Tenant tenant is logged in:

Isolation – Building a Multi-Tenant Database Chapter 12
[ 350 ]
Once the tenant implementation is completed, the following screenshot proves that thesame user who logged in the preceding scenario will now have only two records from thedatabase to which the user from Prabhakar-Tenant will have access to:
The user from Test-Tenant has logged in the following screenshot and the data is limitedto only one to which the tenant user will have access to:
We explored the multi-tenancy and the different models available in them, and then wefinally configured and used multi-tenancy in our blogging system.

Isolation – Building a Multi-Tenant Database Chapter 12
[ 351 ]
Blocking cross-tenant write operationThe multi-tenant implementation does not restrict users from performing cross-tenantupdates like we handled in the row-level security section. We should add this support inour blogging system through multi-tenant implementation. The current code base does notallow us to extend the behavior. So far, the information of tenants was stored only in theentities that do not let's validate them generically on data context. We have a strongrequirement to get a taste of Domain-driven design (DDD) so we can start usingEntityBase in our application. The following entity code has Id and TenantId fields thatcontain entity identifier and tenant identifier of the user who owns the entity:
public class EntityBase { public int Id { get; set; } public Guid TenantId { get; set; } }
The EntityBase class should be consumed by the entities that should be a part of a tenantimplementation; this enforcement will help us in handling cross-tenant updates. This doesnot stop the user to implement tenants without inheriting from EntityBase, it just doesnot handle cross-tenant updates out of the box. The Blog entity should inherit EntityBase;this enforces us to remove the redundant Id and TenantId fields as shown here:
public class Blog : EntityBase { // Remove the Id and TenantId fields // Code removed for brevity }
The cross-tenant update should be handled in BlogContext, which will allow us tooverride the SaveChanges() method. The EntityBase type is the key in differentiatingentities that support tenants from the others. The following piece of code filtersChangeTracker entries based on EntityBase and projects TenantId as a distinct list,which would allow us to validate and throw an exception if there are more than one tenantspresent in the filtered tenantIds:
public class BlogContext: DbContext { public override int SaveChanges() { ValidateMultiTenantPersistence(); return base.SaveChanges(); } // Override other save changes as well

Isolation – Building a Multi-Tenant Database Chapter 12
[ 352 ]
private void ValidateMultiTenantPersistence() { var tenantIds = ChangeTracker.Entries() .Where(item => item.Entity is EntityBase) .Select(item => ((EntityBase)item.Entity).TenantId) .Distinct(); if (!tenantIds.Any()) return; if (tenantIds.Count() > 1 || !(tenantIds.Count().Equals(1) && tenantIds.First().Equals(TenantId))) { throw new MultiTenantException("Invalid tenant id(s) found: " + string.Join(", ", tenantIds)); } } }
We have used a custom exception in the preceding implementation, but we haven'timplemented it, so let's do it now. The custom exception is expected to inheritan Exception type, and it should also have a provision to contain the error message to passit on or the data required to build the error message. In the following code snippet, we arereceiving a custom error message injected by the consuming code that throws it:
public class MultiTenantException : Exception { public string ErrorMessage { get; private set; } public MultiTenantException(string errorMessage) { ErrorMessage = errorMessage; } }
The last piece of the puzzle, TenantId, must be set in the controller that consumes the datacontext, and the following piece of code will set the tenant information. The userinformation is retrieved using the logged in user's identity. Get TenantId from the datastore and finally update it in the data context:
public async Task<IActionResult> Create(Blog blog) { SetTenantId(); blog.TenantId = _context.TenantId; // Code removed for brevity } private void SetTenantId() { if (this.User == null) return; var person = _context.People.FirstOrDefault(item =>

Isolation – Building a Multi-Tenant Database Chapter 12
[ 353 ]
item.User.Username.Equals(this.User.Identity.Name)); if (person != null) { _context.TenantId = person.TenantId.HasValue ? person.TenantId.Value : Guid.Empty; }
return; }
We have completed our cross-tenant update handling, and the blog creation will let us seethem in action. The blog create operation will set TenantId from the logged in userprabhakar, who is a part of the tenant, Prabhakar-Tenant, with the {743302BD-C230-4BB9-9358-0F4D68F4E820} identifier, as illustrated in this screenshot:

Isolation – Building a Multi-Tenant Database Chapter 12
[ 354 ]
The tenant id could not be modified, but for illustration purpose, let's modify the tenantinformation and see how the update is handled in the data context. The TenantId that ismodified in the Immediate Window, from {743302BD-C230-4BB9-9358-0F4D68F4E820} (Prabhakar-Tenant) to {EC6875CA-21EF-4649-AA95-119EFDF7D55E} (Test-Tenant), is highlighted in the following screenshot:
If we further process with the updated TenantId, we will get the following highlightedexception since the Blog entity is marked with EntityBase. The exception is thrown ashighlighted here, because TenandId retrieved from the change tracker does not matchTenantId from the data context:
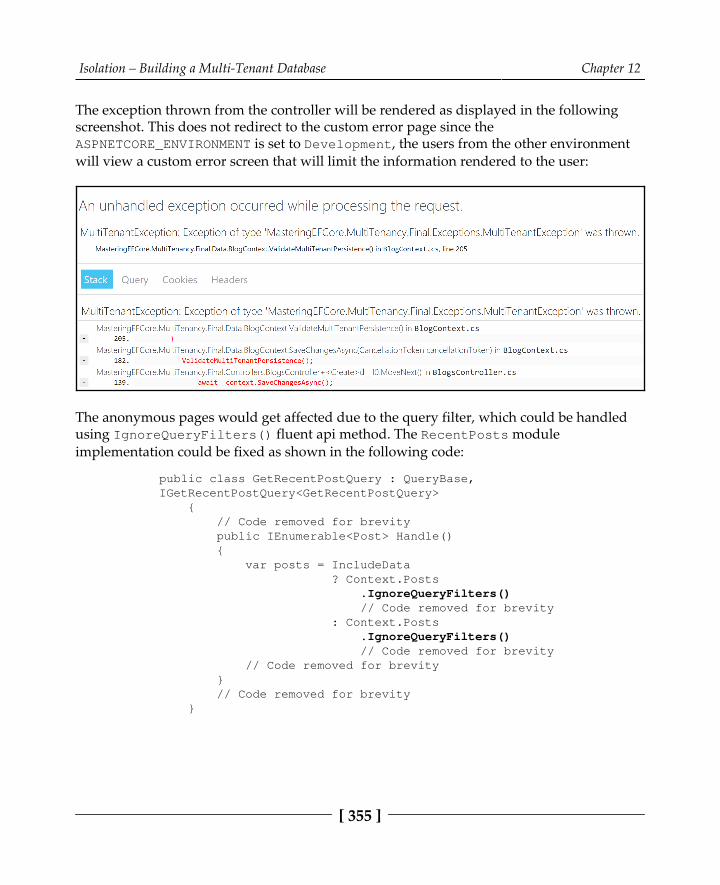
Isolation – Building a Multi-Tenant Database Chapter 12
[ 355 ]
The exception thrown from the controller will be rendered as displayed in the followingscreenshot. This does not redirect to the custom error page since theASPNETCORE_ENVIRONMENT is set to Development, the users from the other environmentwill view a custom error screen that will limit the information rendered to the user:
The anonymous pages would get affected due to the query filter, which could be handledusing IgnoreQueryFilters() fluent api method. The RecentPosts moduleimplementation could be fixed as shown in the following code:
public class GetRecentPostQuery : QueryBase,IGetRecentPostQuery<GetRecentPostQuery> { // Code removed for brevity public IEnumerable<Post> Handle() { var posts = IncludeData ? Context.Posts .IgnoreQueryFilters() // Code removed for brevity : Context.Posts .IgnoreQueryFilters() // Code removed for brevity // Code removed for brevity } // Code removed for brevity }

Isolation – Building a Multi-Tenant Database Chapter 12
[ 356 ]
The same approach could be applied on GetPostByUrlQuery andGetPaginatedPostQuery to render posts anonymously.
The cross-tenant update is handled using multi-tenant implementation with data contextvalidation in this section. This makes the behavior consistent with the implementation weperformed in the row-level security section as well.
SummaryWe started with authentication implementation, which is the foundation for row-levelsecurity and multi-tenancy. Then, we explored row-level security and how we couldmanage them using filter and block predicates. Finally, we started exploring multi-tenancyand its different models and deep dived into the implementation in our blogging system.We have come to a conclusion in our EF Core journey, along with building a completeecosystem for the blogging system.
We had explored Entity Framework Core by building a blogging system, the features wereincluded in the system with the intention of covering topics. So ideally we could leveragethe knowledge we had acquired so far to build a complete blogging ecosystem. We coulddevelop our own .NET Core blogging system which could be deployed in any operatingsystem, which saves our hosting cost a lot since we have a lot cheaper hosting options usingLinux operating system. Glad I could help you in acquiring EF Core knowledge, the usecase is not limited to blogging system but it is vast, you could now build any system youhave in mind rapidly using EF Core ORM now. Happy coding!

Index
Aanonymous posts list adding 246appsettings.json setting 47AsNoTracking() method about 294 projections 298 tracking, disabling 295 working 294asynchronous operation about 300 transaction, leveraging 302authentication reference link 334
Bblock predicate 342blog entity script about 36 reference link 36blog entity about 19 post entity 19 working with 44blogging system models Compare field validation, incorporating 126 EmailAddress field validation, incorporating 124 Required field validation, incorporating 118 Url field validation, incorporating 130blogging system authentication 332, 334 date picker support, adding 243 file upload functionality 231 recent posts feature, adding 245 tags support, adding 220
built-in validations 111
Ccascade delete 105changes detecting 299client wins 283client-side logic creating, for custom validation 153, 154, 155,
156, 158client-side validation 139Code-First approach 19Command Line Interface (CLI) 107command queries assignment, solution 214 used, for composing queries 206, 211, 214comments list feature 248compare field validation about 124, 126 incorporating, in blogging system models 126concurrency conflict about 257, 260 handling 281 optimistic concurrency 260 optimistic concurrency, applying 281 pessimistic concurrency 261 pessimistic concurrency, applying 287, 291concurrency tokens 262, 264concurrency handling, in EF 256ConfigureServices method refactoring 46contravariant generic interface 207controller action creating 51, 53 editing 53, 55

[ 358 ]
conventions, relationship about 69 foreign key 78 fully-defined relationship 69, 70 inverse property 79, 80 no foreign key property 75 single navigation property 77, 78covariant generic interface 207cross tenant write operation blocking 351, 352cross-context transaction blogging system, file upload functionality 231 creating 231 custom transaction scope support 239 date picker support, adding to blogging system
243
transaction scope, limitation 237CRUD (Create/Read/Update/Delete) operations about 26, 29, 32, 33 controller action, creating 51, 53 controller action, editing 53, 55 creating 26 Delete view 55, 57 performing 48, 51custom transaction scope support 239custom validation about 147, 149, 151, 152 client-side logic, creating for 153, 154, 155, 156,
158
Ddata annotation non-timestamp concurrency tokens, configuring
through 265, 271 timestamp-based concurrency tokens, configuring
through 273, 277, 280data context configuring 43data migration issue with EF Core 2.0 107data model about 19, 59 blog entity 19 Blog entity 59 Post entity 59
data validating, without client-side scripting 140, 142,
143, 144database context 20database wins 282database-per-tenant model 345databases blog entity script 36 blog entity, working with 44 creating 22, 24, 26 data context, configuring 43 post entity script 36, 39 post entity, working with 45 preparing 36 reverse engineering 42 seeding 22, 24, 26date picker support adding, to blogging system 243DBSet avoiding, for SQL query execution 184default transaction behavior about 220 leveraging 222, 225 tags support, adding in blogging system 220Delete view 56, 57dependent entity 63, 64
EEF Core 2.0 used, for data migration issue 107EF Core community reference link 186EmailAddress field validation about 118, 120, 122 incorporating, in blogging system models 124Entity Framework (EF) about 16, 35, 81, 112, 165, 190, 293 concurrency, handling 256 installing 17, 18, 40 reference link 307Entity Framework Core prerequisites 8expression trees assignment, solution 216, 218 used, for enhancing queries 214
[ 359 ]
external databaseTransactions used, for adding comments list feature 250
FFIFO (First in First out) 284filter predicate 341Fluent API about 99 Data migration issue, with EF Core 2.0 107 inverse navigation, identifying 99 navigation property, identifying 99 non-timestamp concurrency tokens, configuring
through 272 relationship, building techniques 102 single navigation property, identifying 100 timestamp-based concurrency tokens, configuring
through 280 used, for implementing many-to-many
relationship 97foreign key 64, 65, 78fully-defined relationship 69, 70
GGit commit reference link 295Git repository commit reference link 118, 242, 245, 247, 249, 253Git repository reference link 197, 205, 214, 216, 217, 226,
234, 236, 237GitHub repository reference link 184
Iindexes missing 320, 327individual blog post adding 246inverse navigation identifying 99inverse property 79, 80
Llazy loading 306Leverage Query Object Pattern reference link 297LIFO (Last in First out) 284LINQ composing with 177, 178, 182, 183LocalDB 22
Mmanual validation 146many-to-many relationship about 94, 96 building, with Fluent API 97MaxLength field validation 133, 135MinLength field validation 131, 133mismatched data type 316, 319multi-tenancy about 344 cross tenant write operation, blocking 351, 353 database-per-tenant model 345 implementation 348 shared multi-tenant model 347 standalone model 344
NN+1 Select problem 306, 312navigation property about 65 collection navigation property 66 identifying 99 inverse navigation property 68, 69 reference navigation property 67no foreign key property 75non-timestamp based concurrency tokens about 265 configuring through data annotation 265, 271 configuring, through Fluent API 272
OObject Relational Mapping (ORM) 190OnConfiguring() method refactoring 46

[ 360 ]
one-to-many relationship 88, 92one-to-one relationship about 83 building, with Fluent API 85, 88optimistic concurrency about 260 applying 281 client wins 283 database wins 282 user-specific custom resolution 284
Pparameterized queries building 171, 173, 174, 176pessimistic concurrency about 261 applying 287, 291 reference link 262POrtable COmponents (POCO) about 165 avoiding, for SQL query execution 184post entity script about 36, 39 reference link 36post entity working with 45principal entity 60principal key 61project creating 11, 40 Entity Framework, installing 40 File menu 12 Start page 11 Web App structure 15, 16
Qqueries composing, with commands 206, 211, 213 enhancing, with expression trees 214query object pattern about 191, 192, 194 incorporating, into repositories 198 used, for improving repositories 194
Rraw SQL queries about 166 reference link 169recent posts feature adding, to blogging system 245RegularExpression field validation 135, 137relational database facade extension reference link 184relationship terms about 59 alternate key 62 Association 60 Containment 61 data models 59 dependent entity 63, 64 foreign key 64, 65 navigation property 65 principal entity 60 principal key 61relationships about 82 building techniques 102 building, with foreign key 102 building, with principal key 103 building, with required method 104 many-to-many relationship 94, 96 one-to-many relationship 88, 93 one-to-one relationship 83remote validation 158, 160, 163, 164repositories about 194, 196 assignment, solution 196, 197 improving, with query object pattern 194 list query object support 198, 201 query object pattern, incorporating into 198 single query object support 201, 205 solution, with queries assignment 205Required field validation about 112 incorporating, in blogging system models 118reverse engineering on database 42Row-Level Security (RLS)

about 338, 340 block predicate 342 filter predicate 341
Sscaffolding 26server-side validation 144, 146services (.NET Core DI) appsettings.json, setting 47 ConfigureServices method, refactoring 46 context, registering in 21, 45 OnConfiguring() method, refactoring 46shared multi-tenant model 347single navigation property about 77, 78 identifying 100SQL query executing, without DBSet 184 executing, without POCO 184SQL Server 2017 URL, for downloading 325SQL Server Management Studio (SSMS) about 42 reference link 42standalone model 344stored procedure (SP) 167
Ttags support adding, in blogging system 220timestamp-based concurrency tokens about 272 configuring, through data annotation 273, 277,
280
configuring, through Fluent API 280
transaction scope limitation 237transactions anonymous posts list, adding 246 comments list feature 248 comments list feature, adding with external
databaseTransactions 250 creating 228, 229, 231 individual blog post, adding 246 leveraging, between multiple technologies 245 recent posts feature, adding to blogging system
245
UUrl field validation about 127 incorporating, in blogging system models 130 pattern 127user-specific custom resolution 284
VVariant Generic Interfaces 206View components reference link 246Visual Studio Code about 10 URL, for downloading 10Visual Studio for Mac about 9 URL, for downloading 10Visual Studio about 8 URL 9volume returning 304