Kentico CMS on Amazon Web Services - IS MUNI
63
MASARYK UNIVERSITY FACULTY OF INFORMATICS Kentico CMS on Amazon Web Services Bachelor Thesis Andrej Galád Blacksburg, spring 2014
-
Upload
khangminh22 -
Category
Documents
-
view
2 -
download
0
Transcript of Kentico CMS on Amazon Web Services - IS MUNI
MASARYK UNIVERSITY
FACULTY OF INFORMATICS
Kentico CMS on
Amazon Web Services
Bachelor Thesis
Andrej Galád
Blacksburg, spring 2014

Author’s Claim (in Czech)
Prohlašuji, že tato bakalářská práce je mým původním autorským dílem, které jsem vy-
pracoval samostatně. Všechny zdroje, prameny a literaturu, které jsem při vypracování
používal nebo z nich čerpal, v práci řádně cituji s uvedením úplného odkazu na přísluš-
ný zdroj.
Andrej Galád
Thesis supervisor: Mgr. Štěpán Kozák
Acknowledgments
I would like to thank my thesis supervisor Mgr. Štěpán Kozák as well as my consultant
Ing. RNDr. Barbora Buhnová for their suggestions and help with the thesis structure.
Additionally, I would like to thank Ing. Dominik Pinter for his guidance regarding the
requirements and used technologies. Finally, I would like to thank my mother Mária
Galádová for her time and patience dedicated to the review of my thesis.
Summary
The goal of my thesis is to create a software solution that would allow an automatic in-
tegration of Kentico CMS with various Amazon Web Services. A significant portion of
this process involves researching the possibilities that Amazon Web Services offer, sug-
gesting potential solutions and implementing a set of tools that will provide said func-
tionality.

Keywords
Amazon Web Services, Cloud computing, Kentico CMS, Automation, Integration, Win-
dows Presentation Foundation, AWS SDK for .NET
Table of Contents
1 Introduction................................................................................................................................. 1
2 Thesis Structure .......................................................................................................................... 2
2.1 Practical part ......................................................................................................................... 2
2.2 Theoretical part .................................................................................................................... 3
3 Kentico CMS ................................................................................................................................ 3
3.1 Content Management System ............................................................................................ 3
3.2 Kentico ................................................................................................................................... 3
4 Cloud Computing ...................................................................................................................... 4
4.1 Origins ................................................................................................................................... 4
4.2 SaaS vs. PaaS vs. IaaS ........................................................................................................... 5
5 Amazon Web Services ................................................................................................................ 7
5.1 Introduction to AWS ............................................................................................................ 7
5.2 Regions and Availability Zones ......................................................................................... 9
6 Identity and Access Management ............................................................................................ 9
6.1 Overview ............................................................................................................................... 9
6.2 IAM in Kentico AWS Manager ......................................................................................... 11
7 Elastic Cloud Compute ............................................................................................................ 12
7.1 Overview ............................................................................................................................. 12
7.2 EC2 in Kentico AWS Manager .......................................................................................... 14
7.3 CMS installation with Kentico AWS Installer ................................................................ 18
7.4 Communication with Kentico AWS API ......................................................................... 20
8 Relational Database Service .................................................................................................... 23
8.1 Overview ............................................................................................................................. 23
8.2 RDS in Kentico AWS Manager ......................................................................................... 25
9 Simple Storage Service and CloudFront ............................................................................... 26
9.1 S3 Overview ........................................................................................................................ 26
9.2 CloudFront Overview ....................................................................................................... 27
9.3 S3 and CloudFront in Kentico AWS Manager ............................................................... 28
10 CloudWatch ............................................................................................................................. 30
10.1 Overview ........................................................................................................................... 30
10.2 CloudWatch in Kentico AWS Manager ......................................................................... 31
11 DynamoDB .............................................................................................................................. 32
11.1 Overview ........................................................................................................................... 32
11.2 DynamoDB in Kentico AWS Analytics ......................................................................... 33
12 Conclusion ............................................................................................................................... 34
13 Sources ..................................................................................................................................... 36
14 Attachments ............................................................................................................................ 39
A Kentico AWS Manager – IAM Views ................................................................................ 39
B Kentico AWS Manager – Main menu ................................................................................ 41
C Kentico AWS Manager – EC2 Views ................................................................................. 42
D Kentico AWS Manager – RDS Views ................................................................................ 49
E Kentico AWS Manager – S3 Views ..................................................................................... 51
F Kentico AWS Manager – CloudFront Views ..................................................................... 53
G Kentico AWS Manager – CloudWatch Views .................................................................. 55

1
1 Introduction
The world of technology is in constant flux, never stagnating, always changing.
New technologies arise almost every day, rendering the ones that have been well estab-
lished for years obsolete. This drive to evolve, progress and innovate is deeply enrooted
in human nature, which becomes even more apparent in such a vibrant domain as tech-
nology is. During the past few years, there has been a massive shift in software devel-
opment from classic, standalone desktop applications towards network-centric software
and cloud computing targeting the multitude of devices varying from desktop comput-
ers to mobile devices. Nowadays, software is being treated much less as a product
(SaaP1) and much more as a service (SaaS2), which brings numerous benefits and ad-
vantages to both selling and buying parties. For software vendors, this new approach
helps eliminate distribution costs for new software and expand its customer base; re-
duces its piracy; enables its usage monitoring and greatly facilitates its support mainly
because all the software is being installed, upgraded and in case of software bugs fixed
by its supplier without user’s knowledge. For user, the major advantages of SaaS include
much higher availability of software, no installation and administration inconveniences;
and no compatibility issues [1]. Because of these benefits but also out of fear of being left
behind by competition most of the software companies were forced to embrace the
change and adjust their products for network-centric use to handle more efficiently in-
creasingly more demanding requirements that the evolution in technology necessarily
brings. In recent years, the qualities that have been the most demanded by customers are
high availability and scalability for reasonable price, which is why many companies turn
to cloud computing to meet them. Kentico Software has long recognized the potential
behind the investment in cloud technologies and as such has been offering a possibility
to deploy its product – ASP.NET-based CMS3 – on Windows Azure, Microsoft cloud
platform, since 2011 [2]. However, in order to cover a bigger portion of the market and
offer variability to its customers, the company decided to extend its cloud coverage to
Amazon Web Services (AWS), one of the first and the most advanced publicly available
cloud computing infrastructure service on the market [3].
1 Software as a Product 2 Software as a Service 3 Content Management System

2
2 Thesis Structure
2.1 Practical part
The practical part of my thesis consists of two Visual Studio solutions. Kentico
AWS Manager is the main deliverable of these two. KAM is a Windows Presentation
Foundation project, which is a graphical subsystem for rendering user interfaces in
Windows desktop application [4]. WPF uses xml-like markup language - XAML4 - to
generate and display graphical controls, as well as regular C# classes which serve as
code-behind. Just like WinForms, WPF predecessor and another popular framework by
Microsoft for desktop application development, WPF also allows the developer to man-
age controls and their attributes and respond to potential events. One of the most popu-
lar design patterns usually associated with WPF desktop applications is Model View
ViewModel pattern. Bearing many similarities with Model View Controller design pat-
tern from whom it was derived, it clearly distinguishes and separates application logic
from presentation logic. Although at this point Kentico AWS Manager can’t be consid-
ered a pure MVVM application, it was written with this concept in mind and as such
could be very easily transformed should the situation require so. Another factor that
was taken into account is the fact that this is an interactive application. Therefore, all the
KAM’s operations are run asynchronously, which prevents blocking UI thread5. In order
to achieve this, KAM relies on Task Parallel Library, a framework that provides powerful
abstraction built on top of low-level system threading.
The second deliverable is Kentico AWS Utilities. This .NET solution contains
three independent projects where each one serves a different purpose. Kentico AWS In-
staller is a console application that is run with administrator privileges. It is mainly re-
sponsible for automating environment configuration and software installation. Much
like in the case of Kentico AWS Manager, KAI also runs its operations asynchronously
and thus fully benefits from fast Amazon infrastructure by running. Kentico AWS API is
a web application that primarily serves as a message passing service between Amazon
virtual machine and Kentico AWS Manager. KAA’s messages are provided in JSON6
format. Final project in Kentico AWS Utilities solution is Kentico AWS Analytics. This
project contains both implementation and tests for Amazon NoSQL database provider.
4 Extensible Application Markup Language 5 User Interface 6 JavaScript Object Notation
3
2.2 Theoretical part
The text of my thesis has also its own structure. It starts with a problem statement
and the presentation of the concepts and technologies that will be used and referred to
throughout the thesis. Each chapter then typically corresponds to one Amazon Web Ser-
vice. Chapters are also internally structured, starting with service overview – descrip-
tion of the service – and following up with implementation details. This second part de-
scribes how and where each service is used, however it can also mention potential sug-
gestions or issues if these apply.
3 Kentico CMS
3.1 Content Management System
To gain a better understanding of what exactly Kentico CMS is, we first need to
establish the term “content management system”. As the name suggests CMS refers to a
system, typically a web-based application, whose purpose is to manage the content of a
web site by allowing its user publishing, editing and modifying the content from a cen-
tral interface. And although content management systems differ from one to another in
both complexity and features, they usually provide format management, revision (ver-
sion) control, indexing and search. Each CMS contains two primary elements, which
enables to better separate the responsibilities – CMA7 and CDA8. CMA serves as a front-
end interface for the content manager or user who might not be knowledgeable in the
use of HTML to easily manage creation, modification and removal of the web site’s con-
tent. CDA then enables to compile these content modifications to update the web site.
CMSs are mostly used with web sites featuring blogs, articles, news and shopping how-
ever they also tend to be fairly popular in corporate world. Some of them, like Word-
Press, Joomla and Drupal for instance, are freely available while others, such as Dot-
NetNuke or Kentico CMS, first require purchasing a license [5].
3.2 Kentico
Kentico CMS is a web content management system built with Microsoft ASP.NET
framework and Microsoft SQL Server. Meant primarily for corporate world, Kentico co- 7 Content management application 8 Content delivery application
4
vers five main areas: content management, e-commerce, social networking, intranet and
online marketing. For its user Kentico provides two ways of managing the content, ei-
ther through CMS portal engine offering straight-forward, Microsoft Word-like WYSI-
WYG9 editor, or through Microsoft Visual Studio for even deeper control over the site’s
content [6]. Additionally, Kentico offers many other features for web site development
such as mobile device support including responsive behavior, banner management and
chat module, third-party app integration (Salesforce.com, Data.com), web analytics and
even extension of CMS in form of EMS10 which adds functionality for campaign delivery,
contact management and seamless creation and deployment of marketing emails [7].
Internally, Kentico CMS installer allows for the creation of three categories of projects:
web site project, web application project and Windows Azure project. Additionally, it
provides the user with an option to customize Kentico by specifying web server config-
uration and database settings, selecting components and choosing web site templates.
Moreover, Kentico allows the user to include his own code, pages and templates to CMS
and thus to extend its core functionality.
4 Cloud Computing
4.1 Origins
Although cloud computing, in the way we recognize it today, has only been
around for couple of years (since 1999), its origins lie in much older history, with the
very introduction of the Internet and business technology. First attempts of “cloud com-
puting” can be technically dated to the early 1950s when the introduction of CPU time
sharing enabled multiple clients to use large-scale mainframe computers with much
greater efficiency. However, more accurate concepts only appeared in 1960s when Amer-
ican computer scientist John McCarthy introduced the idea of “computation being de-
livered as a public utility”. Moreover, it is during these years that ARPANET, the fore-
runner of the Internet and ultimately modern cloud, was being developed and conse-
quently released in 1969. Since 1970 the development of Internet has picked up rapidly
with increasingly more companies becoming part of global network which created an
essential starting ground for the development of modern cloud computing [8]. Then, at
the end of 90s it was American company Salesforce.com that had become one of the ma-
9 "What You See Is What You Get" 10 Enterprise Marketing Solution
5
jor movers in cloud area by delivering their business products to their customers
through web interface. Shortly after this, Amazon took over by introducing its massive
web-based shopping and retail services in 2002. Additionally, it was Amazon that start-
ed to put considerable resources into the development of cloud technology and modern-
ization of its datacenters. This effort reached its climax in 2006 with Amazon launching
its large-scale web-based infrastructure – Amazon Web Services. Early on other compa-
nies began to follow in Amazon footsteps. Google released its cloud computing platform
Google App Engine in 2008 and closely afterwards in 2010, Microsoft’s platform Win-
dows Azure was introduced. Then in 2011, IBM announced its proprietary IBM Smart-
Cloud and in 2012 Oracle followed with Oracle Cloud [9].
4.2 SaaS vs. PaaS vs. IaaS
Cloud, in a larger context, is a very general term that can refer to any kind of
software or hardware available through some kind of network (not necessarily the In-
ternet) as a service. For this reason three major forms of cloud computing were estab-
lished, Software as a Service, Platform as a Service and Infrastructure as a Service, based
on the type of service that is predominant. Additionally, each of these introduces a dif-
ferent level of abstraction from underlying architecture, simplicity of usage and degree
of control over applications.
Software as a Service or “on-demand software” is the basic and the most regular
form of cloud computing. It refers to software applications distributed over the Internet
in one-to-many fashion as opposed to the traditional one-to-one. These apps are man-
aged by a third-party vendor – application service provider – and are accessed directly
through a web browser. Users of SaaS usually don’t possess any control over the appli-
cation or its resources, on the other hand they are shielded from its complexity and
maintenance as SaaS eliminates the need of software installation on individual machines
and takes care of potential updates and patches. Individual software can be either avail-
able for free, as it is in case of Google Docs, Dropbox or SkyDrive, or is offered through
pay-as-you-go model just the way at it is with Platform as a Service and Infrastructure
as a Service. The good example of popular paid SaaS would be Salesforce.com.
Platform as a Service is the second most frequent segment of cloud computing
and can be thought as a computing platform providing developers with proprietary
API11 that allows them an easy creation and deployment of their applications without
11 Application programming interface
6
the need of buying and managing underlying software and hardware infrastructure.
PaaS provides developers with integrated development, test and deployment environ-
ment which makes their application development process quicker and more efficient.
And although control over the application and its data is given to developers, it is still
vendors who are responsible for managing runtime, middleware, OS12, networking and
virtualization. Additionally, as in the case of SaaS, PaaS users are guaranteed regular
updates and hotfixes by vendors. Moreover, PaaS allows for better stability through scal-
ing (or auto scaling), which essentially allows the user to cope promptly and efficiently
with sudden increases and decreases in application usage and load. Windows Azure
(Web Sites and Cloud Services) as well as Google App Engine are among the most popu-
lar proprietary PaaS on the market. In addition to paid cloud platforms, there exist sev-
eral free alternatives as OpenStack from Rackspace or OpenShift from Red Hat.
Last but not least is Infrastructure as a Service. This form of cloud computing de-
livers and offers control over whole infrastructure including servers, storage and net-
working. With IaaS the users don’t purchase hardware, establish networks and install
software such as OS but are given fully outsourced solution and are only billed for the
amount of resources they use. Moreover, IaaS enables them to create and delete virtual
machines on demand, to scale them, to manage access and networking, to add addition-
al storage, to exploit highly scalable database systems (both relational and non-relational)
and to store unstructured data as well as obtain various statistics on individual services.
As such IaaS represents the most complete solution, however at the cost of greater com-
plexity in management and limited platform maintenance from vendor since now it is
user’s responsibility to maintain and update his software. Internally, IaaS can be divided
into public cloud (where resources are shared and accessed over the Internet) and pri-
vate cloud (where resources are only available on private network). Companies such as
Microsoft and Google offer IaaS as a counterpart to their PaaS, however the largest pro-
vider of internet based infrastructure services is by far Amazon with its Amazon Web
Services [11][12][12].
12 Operating system
7
5 Amazon Web Services
5.1 Introduction to AWS
Amazon Web Services is IaaS that provides on demand computing resources and
services that can be used to build and run applications quickly and cost-efficiently. In-
troduced in 2006 their birth can be attributed to rapidly growing enthusiasm for cloud
computing as well as introduction of Amazon.com, world’s largest online retailer at the
beginning of 21st century. After launching its online shopping platform, each year Ama-
zon kept spending large amount of money on expansion and maintenance of underlying
infrastructure in order to provide for short-termed spikes in purchasing throughout the
year. These spikes mainly exhibited themselves before Christmas when millions of peo-
ple were using the platform to purchase gifts, which resulted in considerable amount of
strain on Amazon servers. However, for the rest of the year majority of this massive in-
frastructure remained idle, forcing Amazon to pay for hardware the company wasn’t
using. For this reason Amazon decided to eliminate this maintenance cost by renting its
infrastructure for highly affordable prices to other companies or individuals. Hence
Amazon EC213, the first service in AWS, was introduced in 2006. And shortly afterwards
other services like Amazon S314 followed. Today AWS feature more than 30 different
cloud services [13].
Most of Amazon Web Services are not exposed directly, but instead offer func-
tionality that end users can use in their applications. Currently Amazon provides as
much as four different ways of interacting with AWS. The fastest and for AWS beginners
the easiest way is using AWS management console. This approach doesn’t require any
previous technical knowledge or any installation as a user can manage AWS through
rich graphical user interface. However, not all the services are available through man-
agement console, which is why other approaches are needed. Second way of controlling
AWS, popular mainly among system administrators, is AWS command line interface.
Unlike management console, AWS CLI requires installation, after which a user can con-
trol AWS with the use of simple commands (command prompt/PowerShell on Windows
machines, shell on Linux machines). The remaining two ways are mainly for developers.
Query API represents a series of low-level actions exposed through service-specific end-
13 Elastic Cloud Compute 14 Simple Storage Service
8
points, which a user can exploit by using HTTP15 requests. Query API still supports
SOAP16 although it is being slowly deprecated and replaced with newer and easier-to-
use protocol – REST17. Query API is mainly to be used with programming and scripting
languages that don’t have SDK18 written for them, which is the last way of interacting
with AWS. This approach refers to class libraries and tools that are meant for controlling
AWS resources and are written for great variety of languages such as C#/.NET, Java,
PHP, Ruby, Python, and JavaScript and even for mobile platforms such as iOS and An-
droid. The SDKs are the easiest way to program for AWS, since they offer a level of ab-
straction on top of Query API and provide built-in functions/methods to authenticate
connection to AWS [14]. For these very reasons my project uses AWS SDK for .NET.
To start using AWS a user must first sign up for the service by creating an AWS
account. After filling up registration form with his information and details and authenti-
cating himself with his credit/debit card the user can start using the services. As already
mentioned the user only pays for services and resources that he uses. Total price for ser-
vices is calculated from the amount of usage based on AWS pricing guide and the bill is
available monthly. Additionally, AWS feature AWS Simple Monthly Calculator applica-
tion to provide rough estimate of the costs for a specific user.
When a new customer account is created, AWS automatically make it eligible for
so called free usage tier. This feature is introduced to help new customers to start with
AWS. Free usage tier applies to majority of Amazon services and allows to use them (in
a limited way) free of charge for the duration of one year [15]. Originally, it was my in-
tention to use Amazon Web Services only to the extent the free usage tier would allow
me. However, this decision proved to be highly inefficient in development and insuffi-
cient in terms of necessary resources. For this reason a contract was established between
Kentico Software and me. As part of this contract my AWS account was added to a con-
solidated billing account managed by Kentico Software. This AWS feature has allowed
Kentico to take responsibility for my charges and has granted me much wider access to
AWS.
15 Hypertext Transfer Protocol 16 Simple Object Access Protocol 17 Representational State Transfer 18 Software Development Kit
9
5.2 Regions and Availability Zones
To gain a deeper insight into how AWS operate the concept of regions and availa-
bility zones must be established. Most of the services are hosted world-wide; however
they are constraint to separate geographic locations. These locations are called regions
and each region is composed of multiple isolated areas known as availability zones. By
default, services and resources of one region cannot be replicated into another region.
This independence of regions was introduced to achieve high availability of services,
fault tolerance and stability. Availability zones within the same region are also isolated;
however they are interconnected through the network of fast, low-latency links. Cur-
rently, AWS have eight regions covering America, Europe and East Asia each of them
corresponding to a location of one of Amazon’s data centers – US East (Northern Virgin-
ia), US West (Oregon), US West (Northern California), EU (Ireland), Asia Pacific (Singa-
pore), Asia Pacific (Tokyo), Asia Pacific (Sydney) and South America (Sao Paolo). When
a resource is being created, for example an instance is being launched, it makes sense to
do so in a region that is as close to a customer as possible so that he can benefit from the
lowest possible latency. Additionally, running requests against AWS API, whether
through Query API or with the user of SDKs, requires from developers to specify the
region where resources are present or are to be created. And if the performance is abso-
lutely crucial the user can go as far as to choose a specific availability zone based on his
location [16].
6 Identity and Access Management
6.1 Overview
To create, alter or delete resources and use web services, a user must have rights
and permissions to do so. IAM19 is a web service that allows managing both user ac-
counts and their permissions. Usage of every other Amazon Web Service relies heavily
on rules and restriction established via IAM. Additionally, IAM allows addressing issues
such as collective usage of AWS through one AWS account as well as collective billing
and restriction for specific users, which is often a scenario with bigger organizations.
This is achieved by creating user accounts under one AWS account (also called root ac-
count), each one of them with individual security credentials, that only allows them to
19 Identity and Access Management

10
use those services that are necessary for their work. Also, with IAM it is possible to cre-
ate hierarchies within one AWS account by establishing logical boundaries and delegat-
ing permissions, which can be achieved by creation of user groups with specific privi-
leges and assignment of user accounts to these groups.
Users and applications interact with AWS by using security credentials. These are
associated with every AWS account whether it is root or IAM user account. Upon crea-
tion of new AWS account a user uses his email address and password to log in and get
full access to every resource AWS offer. This AWS account is known as user’s root ac-
count and it is usually a good practice not to use its credentials directly but instead to
create an IAS account/s with administrator privileges. When a new IAM account is cre-
ated, it is given its own login, password, sign-in URL, permissions and security creden-
tials. These can be used to access services in applications and also from AWS manage-
ment console (since it is technically just an application with web UI20) [17].
By default, every newly-created IAM user doesn’t possess any permission. There-
fore, it is necessary to have root account or another user with permissions to control
IAM to assign him permissions before he can start using AWS. Generally, there are two
ways of assigning permissions to a user – either by attaching permission to specific user
or group (user-based permissions) or by attaching it to specific resource (resource-based
permissions). To be able to assign permission for Amazon Web Service, a policy must be
created. Policy refers to a JSON document explicitly listing permissions. It contains ei-
ther one or multiple statements that usually specify what kind of actions can be/cannot
be performed for a particular resource. Later, the policy can be assigned to a user or
group [16, Permissions and Policies]. In each policy, both Amazon resources and users
(groups …) are uniquely identified by their Amazon Resource Names (ARN). ARN is
just a user-friendly name that can be used to reference any entity on AWS because of its
unique format (arn:aws:service:region:account:resource), [17].
To ensure security, each individual call to Amazon Web Service uses an encrypted
communication protocol. To use this protocol, each request must be signed by user’s
access keys, which is a generated pair of unique keys belonging to one AWS account (it
doesn’t matter whether it is a root AWS account or an IAM user account). Access keys
can be generated via management console and consist of access key ID and secret access
key. A user can generate as many pairs of access keys as he wants, however he can only
use them to call those services his user account is entitled to use. Any attempt to use any
20 User Interface

11
other service results either in an unauthorized access response or in a corresponding
exception [18].
6.2 IAM in Kentico AWS Manager
As mentioned before, requests to Amazon Web Services are encrypted. This ap-
plies to every form of interacting with AWS let it be AWS Management Console, Query
API or SDKs. Since Kentico AWS Manager uses AWS SDK for .NET it is required for all
the requests to be signed by user’s access keys. Since SDKs function as higher layer of
abstraction by offering developers high-level function/method calls and by shielding
them from low-level API calls, .NET SDK greatly simplifies the task of signing individu-
al requests. Instead of adding access keys to the header of every single API call, these are
only required to specify when a new service client is created. AWS SDK for .NET pro-
vide factory methods to create clients for every Amazon service, which serve to encap-
sulate usage of service’s corresponding actions. Therefore, each time a new client needs
to be created it suffices to pass user’s access key ID and secret access key to factory
method. More preferable approach however is to store access key ID and secret access
key for each application in its Web.config file (for web applications) or App.config file
(for other applications). SDK’s overloaded factory methods automatically locate both
keys, which greatly improves code’s maintainability since this way when access key
change, I no longer need to modify various parts of my code. Additionally, this ap-
proach allows me to modify access keys while application is running.
Since the application is meant to serve many users using different AWS accounts
it would be highly impractical to have every user modify configuration files before they
can start using it. For this very reason on the first launch KAM prompts its user to speci-
fy both access keys. These are verified and stored to the configuration file by the applica-
tion itself and are used for any consecutive API call. Also, the next time KAM is
launched it offers a choice to the user to either utilize previously stored credentials or to
enter new ones. After credentials are confirmed the application asks the user to choose
his default region. As mentioned, AWS regions function as independent environments
encapsulating services and resources both logically and geographically. Once a region is
specified, it is stored in application’s configuration file and just as access keys it is re-
membered for any consecutive run. Additionally, the region can be changed from main
window of the application.
One issue I encountered while working with IAM API was the inability to verify
permissions for every IAM account. Since permissions for every account may vary, there
12
is no insurance that provided credentials can access IAM to determine whether these
credentials are sufficient for calling Amazon services upon which KAM relies. Moreover,
if the user is unauthorized to make certain API call, SDK throws an exception. Since
KAM is a wizard-like application we cannot wait for the application to fail in order to
determine whether current credentials are enough. And even if permissions to access
IAM API are in place it can be tedious and time-consuming to verify if the credentials
satisfy all the conditions since an IAM user can also belong to IAM groups. That is why
it would be necessary to obtain every single policy a user account is associated with,
parse every policy’s JSON document and at the end aggregate results to unambiguously
determine whether all conditions were met. Because of this complexity my current im-
plementation only allows root credentials to be used with KAM as each root account can
access any resource or service. I believe that this verification is a feature that should be
implemented on server side rather than on client side. Each user account should be al-
lowed to query Amazon server to learn which resources and services it can access. Re-
sult of this query could be a JSON document containing an aggregated list of all the
available actions and resources no matter where the permissions originated from.
7 Elastic Cloud Compute
7.1 Overview
Elastic Cloud Compute or EC2 was the very first service that Amazon introduced
in 2006 as part of AWS. It allows the user to launch and manage virtual server instances
in Amazon’s data centers. EC2 provides resizable computing capacity and eliminates the
costs of purchasing hardware. With EC2 it is possible to launch as many instances as the
user wants, configure security and networking and manage storage. Additionally, Ama-
zon EC2 enables to scale instances up and down based on the fluctuation in network
traffic. EC2 instances are essentially virtual computing environments and are available
in different sizes and configurations in order to meet customer’s specific needs. Current-
ly, AWS offer five types of instances based on their size – micro, small, medium, large
and xlarge. These are additionally split into several categories based on whether the in-
stances are general purpose instances, compute-optimized instances, memory-optimized
instances, GPU instances or storage-optimized instances. Micro instance belongs to its
own category and is usually associated with free tier usage of AWS. Once the user
launches new instance, he gets complete control over and he is able to interact with it as
13
he would do with a physical machine. He has a root access to it, he can add additional
storage, he can log in to it, he can stop or reboot it and ultimately he can terminate it.
Because EC2 belongs to the family of AWS it benefits from the same features as the rest
of services. As such EC2 provides the ability to launch instances in multiple locations,
across multiple regions and availability zones, and also provides very secure and stable
environment by enabling configuration of firewall settings and managing access to the
instances. To preserve instance data when it is not running each instance, upon its crea-
tion, has associated persistence storage volumes called Amazon Elastic Block Store (EBS)
volumes. Exposed as standard block devices EBS offers much greater durability that
over local Amazon EC2 local stores volumes that can’t retain information after instance
termination. Moreover, EBS are automatically replicated by AWS and can have snap-
shots created out of them. These snapshots can be later used as starting points for new
EBS volumes. Another benefit that EC2 offers is to associate EC2 instances with Elastic
IP addresses. These public static IP addresses enable overriding of cloud computing’s
default, dynamic association of IP address to resource each time it is being used, by as-
sociating themselves with AWS account rather than particular resource. Elastic IP ad-
dresses can be quickly remapped among instances and because of these customers using
EC2 can be shielded from potential failures. On top of these features EC2 offers Auto
Scaling and Elastic Load Balancing. With Auto Scaling, AWS take control of managing
increases and decreases in computational capacity based on user-defined configuration.
Elastic Load Balancing employs a set of fault-tolerant, scaled load balancers that auto-
matically spread requests among running instances based on their current load [19].
In order to launch an EC2 instance, several steps are needed to take. First of all, it
is necessary to select an underlying Amazon Machine Image or AMI. AMI is an encrypt-
ed machine image stored in Amazon Simple Storage Services that contains configuration
necessary to boot new instances. Vaguely speaking, AMI is a snapshot of an operating
system containing information about all the software that is installed on that operating
system. AMIs are either public (available on Amazon Resource Center) or private (only
available to their creators and users with rights to access them). They can also be paid or
freely available. Amazon already offers great variety of AMIs that can be used to launch
instances of many popular enterprise Linux distributions such as Amazon Linux, Red
Hat Enterprise Linux, SUSE Linux Enterprise Server or Ubuntu Server, as well as in-
stances of Microsoft Windows Servers (2003, 2008 and 2012). Additionally, AWS Mar-
ketplace offer many other custom AMIs created either by Amazon itself or community
of developers that can contain various preinstalled software. This can be anything from
14
database servers, application servers, web servers and frameworks to individual appli-
cations. Once an AMI is chosen, a user is free to specify the type and number of instanc-
es he wants and optionally an availability zone. Afterwards, the user has an option to
add additional storage to his new instance. By default, each instance possesses one EBS
volume called root. This volume stores all the information about OS and installed soft-
ware. The user can increase root volume’s initial capacity and optionally add other vol-
umes. Following the storage, access to the instance must be configured. For this purpose
Amazon Web Services introduced the concept of security groups. Each EC2 instance is
protected by Amazon EC2 firewall. Security groups contain list of rules that enable to
user-specified IP addresses to access instances through user-specified ports. Thus each
rule permits to choose TCP, UDP or ICMP protocol, select port range and, finally, limit
sources – IP addresses can access the instance. By default, each security group should
have at least one rule allowing the user to connect to the instance it is associated with. In
order to connect to Linux instances, SSH21 is used (port 22) while in order to connect to
Windows instances, we use RDP22 (port 3389). Finally, so that the user can securely con-
nect to the instance it is necessary to select either an existing key pair or to create a new
one. This key pair refers to a couple, which is composed of user-owned private key and
public key that is stored on Amazon server. Public key is then used by Amazon server to
generate the administrator password for newly created instance and once this instance is
fully configured and running, the password is encrypted and sent to the user. Upon its
reception the user uses his private key to decrypt the password and proceeds to log in to
the instance [20].
7.2 EC2 in Kentico AWS Manager
Once the access credentials and the default region are successfully stored, the
main window of KAM is loaded. Here the user can decide which action he wants to take.
Each individual action corresponds to a different Amazon service. As such the menu
allows the user to create an EC2 instance with the latest Kentico CMS installed, to create
and configure scalable relational databases with Kentico, to enable object storage and
fast delivery network for Kentico or to see monitored statistics. Additionally, the user
can decide to change his default region on the main screen. Every action leads to a
unique set of consecutive steps that guide the user through customization process in a
21 Secure Shell 22 Remote Desktop
15
wizard-like fashion. One step of this wizard corresponds to one WPF page. To provide
seamless navigation among the steps, I am using navigation window as an embedding
container for individual pages. This way I can rely on navigation service that is an inter-
nal part of navigation window, exposed through one of its properties, to allow for asyn-
chronous transition between pages. Another perk of using the navigation service is that
it keeps the history of navigation steps and as such provides out-of-box methods for
checking navigation entries (steps) as well as going back and forward between these
entries. Much as simple navigate method these are all asynchronous. Moreover, each
page contains a reference to the navigation service that was injected by the navigation
window upon the page’s creation. This means that pages themselves can control the
flow of navigating without the need of referencing their parent window, which adds
additional simplicity.
In order to transfer messages between pages efficiently as well as reduce memory
usage, I decide to introduce a concept of session in the application. Session refers to a
semi-permanent interactive information interchange and is mostly used in computer
networking and web applications. This technique allows keeping state with typically
stateless HTTP protocol [21]. Unlike cookies, another state-retaining technique, session
rather resides on the server side instead of client side. In my application, each individual
page has access to the session object. This functionality is implemented by extending the
page class and creating a new class with session property – so called abstract view. Ad-
ditionally, each action (set of wizard-like steps) has associated a unique session, which
works in conjunction with how navigation service is implemented. This behavior allows
every action step, or view, to access session resources without interfering with another
action’s session. The session itself is implemented as a disposable object that keeps track
of existing resources and can create new ones on-demand. Individual views can then ask
the session for necessary resources by invoking its generic get method with specific re-
source type. If the resource already exists it is injected in the view, otherwise the session
creates the resource based on the provided type via reflection and provides it to the view.
This distribution of responsibilities corresponds to what we know as Inversion of Con-
trol design pattern. The idea behind IoC is that classes don’t create their necessary re-
sources but only ask for them. Then it is a responsibility of IoC container to create these
resources and provide them to classes. In this way different components of applications
are decoupled, which allows for better flexibility and supportability.
To be able to create EC2 instance with Kentico CMS installed and then to turn it
into an AMI, several steps are required to take. First of all, it is essential to choose an
16
underlying AMI. For our purposes it only makes sense to choose from Windows AMIs.
Additionally, we want to make sure to have an AMI that support Microsoft SQL Server
as this as well is the requirement for Kentico CMS. Since the supported version of .NET
framework for Kentico CMS is 4.0 and higher only Windows Server 2008 R2 and Win-
dows Server 2012 AMI satisfy this requirement. As far as database server goes the user
can choose from Standard, Web or Express edition for both SQL Server 2008 and SQL
Server 2012. In order to exploit benefits of PaaS, I decided to choose from Amazon-
maintained AMI as these receive regular updates. Additionally, although AWS SDK
for .NET offers utility methods enabling quick querying of Amazon images, I decided to
write my own code, which would be asynchronous and also better suited to achieve
above-mentioned combinations of OS and database servers. This code is part of
EC2Manager, a service that encapsulates all the code necessary to configure and launch
a new instance. This service exposes powerful API through several straight-forward
methods while effectively hiding the complexity of this API and only exposing what is
necessary. This way application logic (AWS calls, results pruning, multithreading) is
nicely separated from presentation logic.
Once the underlying AMI is chosen, the application takes the user to another
screen where he is allowed to configure both access to his soon-to-be-launched instance
as well as an administrator password. As it was mentioned before, Amazon Elastic
Cloud provides security groups as a mean of configuring AWS firewall access rights. In
this case there are only four permissions that we need, each of them corresponding to
one communication protocol. First two of them are HTTP protocols. Port 80 is generally
used to by webserver, in this case Microsoft IIS23, to access running web sites. Here it
will be used to access Kentico CMS. Port 8080 serves as a communication port with
Kentico AWS API and is mainly used for progress messaging during installation of CMS.
Port 1433 is generally reserved for MS SQL server that is bundled with the operating
system, while port 3389 allows the user to connect to the running instance through Re-
mote Desktop. KAM allows its user to specify for every individual port whether anyone
can connect to it (IP address 0.0.0.0) or just user’s public address (and thus only his
computer) will be allowed. In second step the user has an option to enter an administra-
tor password with whom he will be able to connect to the instance once it launches. This
password has to satisfy all the security criteria for typical Windows Server administrator
23 Internet Information Services
17
password. If the password field remains empty a random password is generated and
displayed to the user at the end of the installation.
Once both of these steps are completed, KAM lets the user to customize his
Kentico CMS installation. By now all the essential choices for launching an instance
were made and thus the rest of wizard focuses strictly on CMS installer. However, this
customization is optional and user can decide to proceed to launching and installation
process at any time. As such, this particular step was implemented with slightly differ-
ent structure. This view is internally divided into several subviews. Subview class inher-
its from view class and thus has access to the session object. However, it benefits from
separate navigation service that allows it to easily navigate to another subview or to re-
turn to previous one. Each subview remembers its immediate state and stores it in the
session object. This way even if the user skips some steps his choices are remembered.
With regards to CMS customization two subviews are of particular interest. First one
allows the user to select a template for his Kentico site. The default option here is Corpo-
rate Site. Second subview enables modification of default IIS and database settings. Here
the user can specify whether he wants to have Kentico CMS installed as a root applica-
tion of IIS or specify target location if this is not the case. Additionally, he has power to
choose the type of web project, which can be either a web site project or a web applica-
tion project, and optionally to enable performance counters and health monitoring for
Kentico. As far as database is concerned, the user can enter a name for his Kentico data-
base.
After all these steps are completed new instance can finally be launched. In order
to launch new instance, following information is passed to the EC2Manager – underly-
ing AMI id, security group permissions as well as number of launching instances and
their types. These last two options are currently hardcoded since they don’t play any
significant role in Kentico AMI creation, but they are also editable, which could be ex-
ploited in the future. The rest of the user-provided information such as CMS installation
details and administrator passwords are passed to the launching instance in form of us-
er data. User data refers to a base-64 encoded script passed to the launching instance in
order to be executed shortly after the instance has started running. In our case, this can
be either a command prompt executable file or a PowerShell cmdlet. Since the latter pos-
sesses much more flexibility I decided to use it in my application. My user data thus
consists of two PowerShell functions. First one uses native PowerShell libraries to set the
user-specified administrator password. This approach eliminates the need to associate
AWS public key with new instance in order to generate a temporary administrator
18
password to use with Remote Desktop. As such, it reduces the complexity as well as im-
proves speed of the launch process. Second PowerShell function is responsible for
downloading, unpacking and launching Kentico AWS Installer with user-specified data.
KAI is then responsible for configuration of the environment and installation of Kentico
CMS. Because of the lack of backward compatibility in SQL Server administration librar-
ies there are actually two versions Kentico AWS Utilities. Launching instance is then re-
sponsible for downloading the right one based on its version of SQL Server. Once the
new instance is successfully running, control over the installation process is handed
over to KAI.
7.3 CMS installation with Kentico AWS Installer
After the user data script downloads the right version of KAI based on installed
SQL Server Kentico AWS Installer begins to set up the environment and commences
with the installation of all the necessary tools along with Kentico CMS. The first step in
installation is to decode and deserialize user data in order to obtain values based on
which Kentico silent auto-installer can be formed. Afterwards, it is necessary to verify
whether Microsoft webserver, IIS, is installed on the machine. Most of the Amazon AMIs
don’t come with preinstalled IIS and as such this task is left to KAI. Luckily, on Win-
dows Servers (as well as standard Windows distributions) IIS can be easily enabled as a
server feature. One of the easiest ways of automating this task is through PowerShell
Cmdlet. After this operation is complete, it is still necessary to install IIS management
tools. This yet another Windows Server feature exposes a set of tools and libraries that
can be used to manage IIS web sites, application pools and managed runtime versions.
Once both IIS and management tools are successfully enabled and configured, it is final-
ly possible to proceed with the installation of Kentico CMS.
One big issue associated with installation of IIS and management tools is the
overall duration of this whole process as both of these tasks are very time-costly. Moreo-
ver, since installation of management tools depends on successful configuration of IIS
these two tasks can’t run in parallel. This is why I decided to run as many necessary con-
figuration tasks in parallel as possible. Since the preparation of IIS followed by CMS in-
stallation are delimiting factors in terms of duration of the execution we can have other
tasks running on separate threads. As such, while IIS is being configured on one thread
Kentico installer is being downloaded on another. This way KAI is effectively using re-
sources at its disposal to distribute responsibilities and reduce total execution time.
19
To install Kentico silently, an auto installer file must be generated. This file is es-
sentially just an xml document containing configuration information for the soon-to-be-
installed CMS. Each element corresponds to one installation step with each element’s
attribute corresponding to one property. As such Kentico auto installer contains infor-
mation on IIS configuration, SQL configuration, installation location, type of project,
additional modules and templates, logging and even license details. After successful
configuration of IIS and generation of auto installer the installation itself can finally
commence. The process itself takes around ten to fifteen minutes. Once it is over, there
are several other steps that need to be done in order to make Kentico run properly. Some
of these are necessary only if the user decides to use Windows Server 2008 as an under-
lying AMI. By default, this distribution of OS only comes with .NET 3.5 preinstalled,
which is not sufficient for Kentico CMS 7. For this reason, KAI uses Windows batch
script to register ASP.NET 4.0 as well as sets the default IIS managed runtime to v4.0.
Another necessary step, this time common to any distribution, is to create a user account
with its own login that enables Kentico CMS to access SQL Server database by using
Windows authentication. This is actually an issue with Kentico, which I believe should
be incorporated in its native installer. The problem is that Kentico allows two types of
connection to the database, one of them being Windows authentication. During the in-
stallation process, if the user specifies this option Kentico will use his Windows creden-
tials in order to create Kentico database and populate it with all the objects necessary to
run Kentico website. After the installer finishes new website is successfully deployed to
IIS and started. Once the websites attempts to connect to the database, it fails with an
error. This behavior is a result of how IIS implements access rights for deployed web
applications and websites. In order to assure security and prevent unauthorized access
of 3rd party to machine’s resources, each and every application is deployed within an
application pool. Application pools are basically sets of URLs that are served by IIS
worker process (or multiple processes). On top of that, each application or website is
completely contained within its application pool allowing multiple applications to coex-
ist without affecting each other. OS then treats these applications as separate users with
separate access rights (which are usually only limited to directories containing the ap-
plications). As such, even though the user specifies to use Windows authorization i.e. his
Windows account (presumably with administrator rights) to create a database, once the
application is deployed and running, it can no longer use this account to access the da-
tabase. For this reason, it is necessary to have KAI (running with administrator privileg-
es) to create new database login (with user) for our new website and to give it explicit
20
rights to access the database created by the installer. In order to achieve this result, I rely
on management library that comes bundled with SQL Server encapsulating the com-
plexity of configuring SQL Server by exposing simple yet powerful API. After the login
is created our new website is loaded without a crash.
Once we have Kentico up and running, we are still required to install the latest
hotfix. Under usual circumstances the user utilizes KIM24, a desktop application that is
installed along with CMS itself, to fetch information about the latest hotfix and then has
KIM to take care of updating database and CMS version. However, as there is no way to
automate this way of hotfixing, I had to use less frequent alternative – hotfixing Kentico
CMS manually. As far as obtaining the latest hotfix goes, KAI makes use of WCF25 ser-
vice provided directly by Kentico Software. This service allows us to query server for the
list of available hotfixes. Each hotfix item contains information such as hotfix name,
number and endpoint URL. Once the most recent hotfix is downloaded on local ma-
chine, it can be launched silently, which is the way of automating this task. In a first step,
hotfix feature unpacks all the necessary files and scripts to chosen destination. In a sec-
ond step, KAI launches hotfixing process from command line. Afterwards, it uses bun-
dled SQL scripts to update the database and CMS has been successfully hotfixed. How-
ever, there is one minor issues present in the hotfixing procedure. Even when launched
from the command line, hotfixing feature still launches as a desktop application and
user interference is required in order to return control back to the calling program – KAI.
To cope up with this situation, I had to hard-code how long should KAI wait for the hot-
fixing procedure to finish. Even though this work-around allows us to deal with the
problem of process starvation, we have no guarantee that the hotfixing finished or that it
was successful.
7.4 Communication with Kentico AWS API
As it was mentioned before, the installation process is rather lengthy. For this rea-
son, we want to have the user to have the ability to follow it as it progresses. Additional-
ly, in case of failure of automated installation, we want to have a way to inspect what
went wrong and possibly salvage the instance as it costs both money and time. For these
very reasons, a logging service has been put in place.
24 Kentico Installation Manager 25 Windows Communication Foundation
21
After EC2Manager launches new instance with user data the control on client
side, KAM, is transferred to InstanceManager, an asynchronous service running in the
background that is responsible for monitoring newly-created instance and notifying us-
er about current installation status. In order to achieve this goal, InstanceManager uses
three different ways of obtaining information. The very first step is to query instance
status, which can be accomplished with AWS API and thus with our SDK for .NET. Up-
on its launch every instance’s status says pending, which is why InstanceManager re-
peats the query every ten seconds until the instance is running. Once this occurs, AWS
begin to prepare the instance, configure software and its environment, generate firewall
rules, generate administrator password and execute user scripts. Unfortunately, as of
now, there is no direct way to track user data execution progress with AWS API. For
Windows instances Amazon only creates a snapshot after the instance has finished pre-
paring and can be logged into. Once this happens, InstanceManager notifies the user
that CMS installation is in progress. For the last part, displaying installation status, it is
needed to propagate the information from KAI to KAM. In order to achieve this, we
need Kentico AWS API.
KAA is yet another tool from Kentico AWS Utilities and a necessary part of CMS
installation process. It serves as messaging service relaying current status of configura-
tion and installation. Kentico AWS API is downloaded asynchronously by Kentico AWS
Installer and deployed on IIS (once the feature is enabled) after which it starts listening
to incoming traffic from KAI. Every single action that KAI performs is being logged both
in memory (using concurrent queue) and in the main log file. Once KAA is successfully
deployed, Kentico AWS Installer begins sending it all the messages that have been add-
ed to the queue while retaining the ordering. This background task transfers every log
from KAI to KAA and also takes care of potential network failures by resending the
batch until it receives confirmation from KAA. At the end of the transfer a control token
is sent to KAA. This token is not meant to be displayed to the user but rather notify
KAA that installation of Kentico has either succeeded or failed. Additionally, to make
sure that KAA doesn’t get attacked by a third party by having someone else than KAI
sending messages to it, Kentico AWS API only accepts POST requests from local ULR.
As the messages are being successfully transferred and stored by Kentico AWS
API, they are safe to be accessed by InstanceManager in Kentico AWS Manager. In order
to allow this, however, one additional step has to be taken. While launching new in-
stance the user defines port 8080 as a permission in EC2 security group. This indicates to
AWS firewall that it should allow traffic flowing through this port. However, Windows
22
Server native firewall is set by default to block any communication port other then 80
(HTTP), 1433 (MS SQL Server) and 3389 (RDP). As such, an exception has to be made by
adding an incoming firewall rule. This can be easily accomplished with a simple netsh
command (performed by KAI), which enables InstanceManager to finally start receiving
installation status messages. To keep the impression of real-time installation, In-
stanceManager doesn’t display all the messages at once but uses buffer to store them
first. Then, based on the buffer size, it calculates speed with which the messages are be-
ing displayed on screen. This way KAM copies the speed of CMS installation process on
EC2 virtual machine and minimizes the delay between these two operations. Last mes-
sage that InstanceManager receives is our control token. Upon receiving it, Instance-
Manager determines that the installation process is over and based on its value it trans-
fers control to one of the two views. This is the very last step in the whole EC2 scenario.
In a rare case of failure (failure token received), the application displays fail
screen. Because the installation failed, our new instance can’t be relied on and as such
the application doesn’t allow creating AWS AMI out of it. On the other hand, KAM of-
fers the user two options. He can decide to terminate the instance on the spot or he can
try to log in the instance in order to salvage it manually (if possible). To achieve the lat-
ter, KAM displays a panel with instance access information for Remote Desktop. This
panel contains instance’s public DNS26 (endpoint), user name – Administrator – and
password (either the one the user specified or a randomly generated one). To make it
even simpler, KAM allows the user to download RDP script, an executable file with all
the necessary information already predefined. Upon its execution, this script automati-
cally connects the user to his instance without requiring any additional steps.
In the much more common case of success, a different view is displayed. Here,
the user is informed that the installation has succeeded and exposes URL under which
the user can access his first CMS website. Much like in the case of failure, this view also
displays the panel with Remote Desktop access information and downloads a script op-
tion. And most importantly, it allows the user to turn his new instance into an AMI. If
the user decides to use this option he is required to specify a name for his AMI as well as
brief description. Then EC2Manager begins the process of creating a new AMI by stop-
ping the running instance and creating a snapshot of the operating system as well as
storage volume. Once the AMI is created, KAM redirects the user to its main view and
26 Domain Name System
23
the scenario finishes. Newly-created AMI is then available for the user and can be used
to launch new instances with Kentico CMS at any time in the future.
8 Relational Database Service
8.1 Overview
Amazon Relational Database Service is a web service making it easy for a user to
set up, manage and scale relational database in the cloud. RDS mostly shields the user
from common, complex administration tasks by passing this responsibility to the cloud
environment and its administrators. On top of database server RDS also adds CPU,
memory and storage, manages backups, software patching, automatic failure detection
and recovery and offers scalability and fault tolerance by enabling the user to start mul-
tiple database instances and replicate them. Amazon RDS is also one of the most com-
prehensive web services with regard to its competition (Azure SQL Database, Google
Cloud SQL) offering a great variety of popular database servers such as MySQL, Post-
greSQL, Oracle and Microsoft SQL Server.
DB instances are basic building blocks of Amazon RDS. Very much like in case of
EC2, DB instances are deployed in the isolated cloud environment and can contain mul-
tiple user-defined databases within one database engine. In order to connect and man-
age these databases, the user can use the very same tools he uses with regular, stand-
alone database servers (for instance SQL Server Management Studio with MS SQL Serv-
er, MySQL Workbench with MySQL). Moreover, DB instance allows setting the compu-
tation and memory capacity as well as specifying associated storage capacity. Each data-
base engine has its specific requirements for its minimum and maximum storage capaci-
ty. Additionally, DB instances can be of two types – standard instances or provisioned
IOPS27 instances. Both of these types use Amazon EBS volumes as their storage provider
however in case of provisioned IOPS instances RDS provides additional, dedicated ca-
pacity for input/output operations. These types of instances are typically used in heavy-
load applications or environments with massive database communication.
Like with EC2 instances, an access to DB instances is also managed with use of
security groups, however in this case, other than specifying allowed IP ranges they are
also used to allow access for running Amazon EC2 instances. This way the user can have
his DB instance linked to his EC2 instance without explicitly specifying access for its IP
27 Input/Output Operations Per Second
24
address, which allows to cope with dynamic nature of EC2 addressing (unless public
static IP address is used). Moreover, in order to manage various DB servers configura-
tions, DB parameters groups are used. These groups contain configurations for different
DB engines and can be used with DB instances of the same type. These configurations
usually contain several key/value tags used to specify rules and settings such as file
stream access level, lightweight pooling, automatic updates, locks, maximum of worker
threads and many others. Usually, when no parameter group is found upon instance
creation, AWS generate a default one with default values for the specific database engine
[22].
When creating a SQL Server DB instance, several steps are needed. The first and
arguably the most important one is to select SQL Server edition. Much like with Oracle,
there are several versions of SQL Server that are specific tailored for various user needs.
AWS support at total four SQL Server editions: Express Edition, Web Edition, Standard
Edition and Enterprise Edition. In this order, each consecutive edition adds up on new
features that were unavailable to its predecessor [23]. Once the user chooses the right
edition, he can determine the type of SQL Server. AWS support both 2008 R2 as well as
newer 2012. Next step is to choose instance size. Instance sizes are very similar to EC2
instance types varying from small to xlarge. These types aren’t used for DB engines
themselves but rather for virtual instances the servers run on. Another very important
step is to specify allocated storage size. As already mentioned, the user can only choose
within allowed minimum and maximum. These two values differ by server editions
(Express Edition – 20GB, 1024GB; Enterprise Edition – 200GB, 1024GB). Then the user
can decide to allocate additional storage for IO operations by enabling creation of provi-
sioned IOPS instance. Another step is to specify an identifier for his DB Instance as well
as Master Username and Master Password. These credentials will belong to a user with
administrator rights to database server. As such, once the instance is launched, it is a
good policy not to use them directly from an application but to create separate SQL user
accounts with individual logins instead.
Other configurations are available for the user as well. As such, he can specify DB
instance port (native port is 1433), choose default availability zone and associate one or
multiple DB security groups with the new instance. Finally, he has an option to enable
automatic backups, schedule backups and choose when AWS should perform mainte-
nance. After these are configured and set, AWS proceed to allocate necessary resources
and launch the new DB instance.
25
8.2 RDS in Kentico AWS Manager
Just like with Kentico AMI creation, the user can access RDS management win-
dow from the main screen of Kentico AWS Manager. After selecting this option, KAM
redirects the user to new view containing table with RDS DB instance details. After this
action is performed, KAM tries to asynchronously load all the existing DB instances and
display them to the user. As Kentico can only run with SQL Server, these are the only
instances we are interested in. This means that once the results are obtained, a filtering
has to be performed. If no such instances exist, KAM proceeds to display an informative
message.
All the manipulation with RDS in Kentico AWS Manager is done through RDS-
Manager class that encapsulates all web service calls. Although KAM only attempts to
load the information once, it offers an option to the user to repeat the query by refresh-
ing the view. This can be done as many times as the user desires. If any instance is found,
its information is processed by KAM and passed to DB instance table bundled in an ob-
ject – a wrapper. This model is then used by instance table to populate a template and
new selectable data item is rendered in the view.
In addition to query existing instances, KAM also offer to the user an option to
create new instances. In the current form this functionality is implemented in a separate
view that embeds web browser control. Upon its selection, the user is redirected to AWS
management console wizard for launch of new DB instance. I decided to choose this ap-
proach because of two reasons. Firstly, the creation of new DB instance is a lengthy pro-
cess that requires many parameters. Since this process has already been encapsulated in
AWS management console, I didn’t deem necessary to reinvent the wheel by implement-
ing it again in KAM. Secondly, unlike EC2 launch process, the integration of Kentico
CMS with RDS doesn’t depend on DB instance creation. This means that Kentico CMS
only requires a running instance. As such, the creation process is unimportant. Once the
new instance begins to launch, the user is once again redirected to the RDS view where
he can observe his new instance being configured.
Kentico CMS can be configured to use RDS instance through EC2 instance crea-
tion wizard. This occurs in the step where the user defines configuration details for IIS
and database. KAM gives the user the chance to choose either local database server (de-
fault option) that comes with the underlying AMI or to use Amazon RDS instead. If the
user selects this option, he is once again redirected to RDS view with DB instance details.
This time, however, new options are available. In addition to refreshing the view and
26
creating new DB instance, the user can select any running instance in order to use with
Kentico CMS. Only those instances whose status says running are selectable. Once an
instance of this type is selected, KAM automatically populates Master Username field
based on its data and prompts the user for Master Password. And here lies yet another
issue with AWS. The problem is that Amazon purposely doesn’t allow any API call that
would return instance’s Master Password. As such, KAM has no way of determining this
password for selected instance and must ask the user for it. Moreover, it is extremely
difficult to test this password correctness. This is because access to DB instance is being
regulated by security groups and by default nothing has permissions to access new in-
stances. As such, to fully test provided password, KAM would have to add the user’s
public IP address in the security group and after the password has been tested, KAM
would have to remove it. As this behavior would be both tedious and lengthy, there are
currently no mechanisms in place to verify the password.
After the user approves an instance, some of its information is stored in the ses-
sion object. Then, as a new EC2 instance is being created, this information is pulled out
of session and together with EC2 security group details is used by RDSManager to au-
thorize instance’s access to RDS DB instance. Authorization is executed in several steps.
KAM doesn’t alter the security group of chosen DB instance but rather creates a new one.
Then it authorizes EC2 security group by adding its unique identifier to the newly creat-
ed RDS security group and as it creates a new permission. In the last step, this security
group is added to user-chosen DB instance by RDSManager. This way, all the previous
access rights (described in original security groups) are retained and only the new secu-
rity rule (access for EC2 instance is added). Once our EC2 instance launches, DB instance
endpoint along with Master Username and Master Password are passed to it in a form
of user data which Kentico installer uses to create and prepopulate CMS database.
9 Simple Storage Service and CloudFront
9.1 S3 Overview
Simple Storage Service is a web service for storing and retrieving data from any-
where and at any time. S3 allows to store any kind of data, both structured and unstruc-
tured. Amazon itself uses S3 as a primary storage to store many kinds of data such as
EC2 AMIs, RDS backups, configuration files, MapReduce scripts and logs. Additionally,
27
S3 can even be used to host a static website on. AWS give total control over S3 to the us-
er through minimalistic interface that promotes simplicity and robustness.
Data on S3 is organized as objects and stored in containers called buckets. Each
object is contained in a bucket. This offers many advantages such as simple and user-
friendly addressing, organization of namespaces, common access control for the objects
as well as common usage reporting. Each bucket has to have unique name and can be
created in a specific region. Then, every time a new object is added to the bucket, it can
be accessed with the URL of the bucket and its object key (typically file name). Addi-
tionally, Amazon S3 allows the user to configure buckets to generate unique version IDs
for every added object and that way to obtain higher granularity in distinguishing ob-
jects. S3 objects are the fundamental entities containing both object data and metadata.
Although AWS can’t access object data, it stores information about objects in a form of
name-value pairs. This information can be anything from the last modification date to
Content-Type. As mentioned before, each object has associated a key that uniquely iden-
tifies it. Each object address is then formed with the following format – (bucket
name).s3.amazonaws.com/(key) – which simulates standard file system. S3 even allows
folder nesting by mapping paths to the files in the way operating systems do.
Any update operations (PUT, DELETE requests) are atomic even though they
might not be instantaneous. This means that the user won’t ever receive corrupted data,
however it might take a little while to propagate changes and as such a read operation
closely following an update might still return old data. Additionally, by default only an
account used to create the bucket has access rights to it. As such, the user has to explicit-
ly specify which accounts can access its content [24].
The process of bucket creation is relatively straight-forward. First the user has to
specify bucket name and choose bucket region. S3 verifies whether the name is available
and if so, new bucket is created. Optionally, the user can specify whether he wants to
enable logging for his bucket. If he chooses to do so, he has to specify target bucket and
target prefix where logs are to be stored. Logs cannot be stored in the same bucket they
refer to. Once the bucket is created, it becomes available for manipulation. The user is
free to start uploading objects, creating folder structures or granting access rights.
9.2 CloudFront Overview
CloudFront is another web service that greatly increases distribution speed of
both static and dynamic content. CloudFront is essentially a type of Content Delivery
Network that uses Amazon data centers spread worldwide in order to deliver content
28
while minimizing delay. This is achieved by forwarding the content to the data center,
otherwise also known as edge point, with the lowest possible latency. If his content al-
ready resides in such an edge point CloudFront can deliver it instantaneously. Other-
wise it has to be first fetched from an Amazon S3 bucket or HTTP server where the
source content is stored.
In order to speed up content delivery using CloudFront, an initial configuration
is necessary. The first step is to specify origin server. These are essentially the servers
containing actual content. They store the original, definitive version of the content and
can be either Amazon S3 buckets or EC2 hosted HTTP servers. After origin server is
specified, CloudFront allows choosing from two types of delivery method based on the
distribution protocol. Web delivery method being default option enables speed up of
static or dynamic content through both HTTP and HTTPS protocol. It additionally sup-
ports real time streaming. RTMP delivery method on the other hand corresponds to fast
distribution of live media using Adobe Flash Media Server’s RTMP protocol. Once the
user chooses both origin server and delivery method, CloudFront is prepared to create
new distribution. The user can first configure additional settings such as allowed HTTP
methods, type of object caching, cookies and query strings management, security certifi-
cates and request logging. Once everything is set and a new distribution is built, Cloud-
Front proceeds to send its configuration to all its edge location. From now on, every sin-
gle object within the distribution is available to the user both under its original URL as
well as CloudFront domain name.
Once the user submits a request for specific object, DNS server routes the request
to the nearest CloudFront edge location in order to maximize delivery performance. If
the requested object cannot be found in edge location’s cache, user request is forwarded
to the origin server (for example S3 bucket). This server responds to the request by send-
ing object to the CloudFront edge location. Once the data begins to arrive, it is immedi-
ately being redirected to the user. Next time the user requests the same object from the
edge location the response is immediate as now the requested file also resides in loca-
tion’s internal cache [25].
9.3 S3 and CloudFront in Kentico AWS Manager
Both S3 and CloudFront management windows are accessible from the main
menu of Kentico AWS Manager. Once the user selects any of these, KAM redirects him
to a separate view containing table with respective service details. For Simple Storage
Service view the user can list all his buckets belonging to his currently defined region.
29
Similar to RDS, this view contains information about bucket names and dates of creation
and allows the user to refresh this information. Once again all the operations are asyn-
chronous and provided by S3Manager object. This view additionally allows the user to
manage his buckets. By selecting Create Bucket option a window is opened that lets the
user specify bucket name. After this action is performed, the wizard verifies that pro-
vided name is unique as this is a requirement by AWS and a new bucket is successfully
launched and configured. Additionally, S3Manager allows the user to perform cleanup
by deleting user-specified buckets.
CloudFront view is in many aspects similar to S3 view. As mentioned before,
CloudFront distributions use S3 buckets as their origin servers and as such they require
more configuration and store more information than S3. As such, the user can view id,
domain name, status, state and origin for every single of his distributions. These are
asynchronously provided by KAM’s CloudFrontManager and can be actualized by the
user at any time. Since the process of creating the distribution is quite complex and re-
quires several steps, I decided to use embedded web browser control to take care of new
distribution creation process for now. This way the user has free hand to fully customize
his distributions and thus benefit from rich interface that Amazon provides. Once the
distribution is created, the main CloudFront view gets updated to reflect the current
state of distributions. Since CloudFront service also enables to configure HTTP servers
as origin servers for data CloudFrontManager filters the results of queries and only dis-
plays those distributions that have S3 bucket as their origin. Only these can be used by
Kentico CMS to store web content to. In order to delete a distribution, it has to be disa-
bled first. KAM, through CloudFrontManager, provides an option to disable a distribu-
tion, which causes every edge location on AWS network to ignore all requests for distri-
bution’s content. Once this operation is performed, the distribution can be easily re-
moved.
In order to use S3 storage with CloudFront delivery network, several keys need to
be added to Kentico CMS Web.config. KAM provides the user with an option to associ-
ate S3 bucket to new EC2 instance of Kentico CMS and optionally specify CloudFront
distribution to provide the bucket’s content. Both of these features are available as part
of CMS configuration process. First the user chooses his bucket. Once this action is per-
formed, both bucket name and bucket URL are stored in the session object to be passed
to the newly-launched instance as user data. Then the user can decide to use CloudFront
to distribute content of the bucket instead of doing so directly with bucket URL. KAM
lets the user to choose any distribution that has his chosen bucket set as origin server.
30
Once he chooses the right distribution, its domain name is also stored in the session.
Additionally, both access keys are also passed to the new instance as these are required
to run AWS API from Kentico CMS. Once the instance is launched and Kentico CMS is
installed, it is KAI’s responsibility to create respective keys with user-provided values in
CMS Web.config. As such, KAI creates keys for S3 bucket name, Amazon endpoint, ac-
cess key id and secret key as well as specifies CMS.AmazonStorage to be used as pro-
vider class by Kentico CMS. After this is done, CMS possesses everything that is neces-
sary to use Amazon storage.
10 CloudWatch
10.1 Overview
Amazon CloudWatch is a web service for monitoring of Amazon resources, other
services and applications that run in real-time. CloudFront collects data and displays it
in forms of metrics that are essentially variables used to quantify various aspects of
measured resources. Additionally, CloudFront provides means to set thresholds, alarms
and also automatically notify users as well as make changes to monitored resources.
Available metrics typically vary from one resource to another. For example for Elastic
Cloud Compute CloudFront tracks statistics about CPU usage, memory usage, disk
read/write operations, instance health and others. Optionally, CloudFront allows the
user to define his own metrics to monitor. These can be then sent to AWS server with the
use of AWS API where they can be transformed into statistics, graphed and published.
To prevent data clutter and not to overwhelm the user, CloudFront introduces
other concepts that can be used to narrow down vast metric set. The most fundamental
concept is naturally a metric. Metric is essentially just a time-ordered set of data points.
These data points represent values of monitored variable in specific time instants and
are used to generate statistics by CloudWatch. Each metric is uniquely defined by its
name and namespace. Namespaces can be thought of as isolation containers for metrics.
In order to use a metric, its namespace must be specified as there is no such thing as de-
fault template. Namespace name is characteristic to individual service and has a unique
format. For AWS service that can be monitored by CloudWatch the namespace is formed
with AWS/ prefix followed by service name. Other than by namespaces, metrics are also
uniquely identified by dimensions. Dimensions allow the user to associate name/value
31
pairs with metrics upon their creation. This approach enables to create entirely new
metrics as well as associate custom data with existing metrics.
Finally, Amazon CloudWatch supports several units that allow expressing statis-
tics obtained from metrics. The most common are seconds, bytes, percent and count.
Metric data is turned into statistics with the help of aggregation methods such as mini-
mum, maximum or average and displayed over time period. Once statistics are obtained,
they can be used to automatically notify users about sudden changes in values, which
will enable them to promptly react to the peaks in monitored data [26].
10.2 CloudWatch in Kentico AWS Manager
As with other services, the main CloudWatch window is accessible from the main
view. In order to start monitoring, KAM uses CloudWatchManager class to asynchro-
nously obtain a list of all available metrics. Once results are obtained from AWS server,
KAM groups them together based on their namespace and proceeds to display them in
the view. Since there is just too many ways of visualizing data and AWS management
console already has many tools to achieve this, KAM doesn’t graph the statistics that are
based on metrics but instead redirects the user to specific website in AWS management
console. This is once again achieved with the use of WPF web browser control once the
user clicks on metrics within a namespace.
CloudWatch already monitors most of the statistics for many AWS services; how-
ever, in certain cases detailed monitoring can be enabled. This option makes Cloud-
Watch collect and record additional metrics. Since RDS detailed monitoring is enabled
upon instance creation (which is done by AWS management console page) and S3 ser-
vice stores detailed logs in buckets, the only service that requires manual approval of
detailed monitoring is EC2. For this purpose I created a subview in CMS configuration
subviews that are part of EC2 instance creation wizard. Once the user enables detailed
monitoring, this information is passed to EC2Manager and used in launch configuration
of new instance.
On top of monitoring AWS metrics, CloudWatch enables the user to upload his
custom-defined metrics to AWS server where they can be turned into statistics. KAM (or
KAI) currently doesn’t support this functionality; however it could be easily implement-
ed to work in conjunction with Kentico Health Monitoring windows service, which
stores Kentico-specific data (such as cache size) in performance counters. These metrics
could be then sent to AWS server with the help of AWS SDK and processed by the server.
32
11 DynamoDB
11.1 Overview
Amazon DynamoDB is a full-fledged NoSQL database service that uses vast AWS
edge network to provide fast and reliable service. Just like other NoSQL databases (such
as MongoDB, Cassandra), DynamoDB forsakes some costly features of classic relational
database systems such as transaction management or joins in order to provide fast and
predictable performance with seamless scalability, which allows it to serve any level of
request traffic. DynamoDB automatically spreads and replicates data among multiple
servers within the same region and as such can handle any user-defined request capaci-
ty while retaining fast performance.
DynamoDB enables the user to take control over scalability of the database by
specifying provisioned throughput for every single table that is created. AWS requires
the user to give estimate throughput for both reads and writes. DynamoDB then re-
serves the necessary amount of resources – servers – to meet specified requirements.
Read and write capacities are expressed in number of item reads/writes per second for
items of 4 KB. Larger items are split among multiple reads/writes. DynamoDB allows
the user to change these values at will to accommodate for increases (decreases) in over-
all throughput. Additionally, AWS doesn’t impose any limits on the amount of data that
is stored in DynamoDB as it can automatically allocate more storage (or deallocate) if
the situation requires so. Additionally, on top of described functionality, DynamoDB
offers two types of reads for the user. Each time a write request is executed by the ser-
vice, it takes a certain amount of time to entirely propagate updates. This could mean
that a read operation issued immediately after this write might not return the latest
changes. This approach is called eventually consistent read and is usually supported by
most of the NoSQL database servers on the market. DynamoDB however also provides
another type of read – strongly consistent read. Since consistency across all copies of the
data is typically reached within one second, strongly consistent read makes sure that the
user really gets the most up-to-date data reflecting updates by all write operations.
Strongly consistent read can be enabled by modifying each read request configuration.
Since DynamoDB is NoSQL database, it doesn’t enforce any schema for its tables.
However, even without this feature there are still enough similarities with relational da-
ta model. DynamoDB data model concepts include tables, items and attributes. Each
database is essentially a collection of tables. Each table has its primary key and arbitrary
33
number of other attributes (limited to 64 KB per record). DynamoDB supports two types
of primary keys. Hash type primary key consists of only one attribute and has unor-
dered hash index built on this primary attribute. Hash and range type primary key is
made by two attributes. As before the first attribute is indexed with unordered hash in-
dex however the second, ranged attribute comes with sorted range index. Additionally,
DynamoDB enables the user to build secondary indexes on other attributes in tables,
which is a necessity if these attributes are to be used in database queries. Table attributes
are just ordinary key/value pairs however each one of them has a data type. Amazon
DynamoDB supports two categories of data types. Scalar data types are used by attrib-
utes with only one value and they can be number, string and binary. Multi-valued types
are reserved for attributes with several values and can be string set, number set and bi-
nary set. Like many other NoSQL databases DynamoDB uses JSON syntax to represent
database records.
Amazon DynamoDB is integrated with other AWS services. Operational metrics
can are monitored and displayed by CloudWatch service, data tables can be loaded into
Amazon Redshift, a fully managed data warehouse, and complex analytics on large data
sets can be simplified with Amazon Elastic MapReduce service [27].
11.2 DynamoDB in Kentico AWS Analytics
Integration of DynamoDB with Kentico CMS is the only part of the project that
needs to be embedded in CMS source code. Although I can see the implementation, I
don’t have access to it. As such, I decided to create a module as a part of Kentico AWS
Utilities project that could later become part of CMS. This module, Kentico AWS Analyt-
ics, in fact comprises of two projects where one of them provides functionality whereas
the other tests this implementation.
The main purpose of using DynamoDB with Kentico CMS was to change current
behavior of logging. Kentico CMS automatically collects data and turns it onto web ana-
lytics that can be displayed to the user on demand. Although various modules in CMS
generate unique web analytics, the main class that is responsible for collecting these ana-
lytics is HitLogProvider in CMS.WebAnalytics namespace. This is where all web analyt-
ics end up being processed and stored to the database. Storing process however happens
in two phases. In the first phase, all the analytics data gets serialized and turned into log
files residing in ~/App_Data/WebModules/WebAnalytics directory. Then, in the second
phase, a scheduled task running each minute processes these files, stores their data in
34
the database and removes them. This approach has been chosen as the amount of log
data would certainly overwhelm database server the data was stored in one step.
Kentico AWS Analytics contains utility classes encapsulating interactions with
DynamoDB server. KAAn enables to create new tables, list tables, get table information
update tables and delete tables. In order to implement these CRUD operations, Amazon
provides low-level API that allows to specify partial schema (even though NoSQL is
schema-less) for new tables. As such create table method takes data model schema object
that contains information about primary key(s), their data types and provisioned
throughput. Even though there is only one way of managing tables, Amazon provides
several for handling data. Just like with table operations the most basic approach is to
use low-level API. This approach builds write and reads requests with data stored in a
dictionary. Additionally, it allows creating batch operations for both reads and writes
that can run several requests at the same time. Other approaches build on this low-level
API while providing higher level of abstraction. Second approach uses helper classes to
introduce type checking in database item operations. As such, the user can bind a table
to an object and make use of methods such as GetItem or PutItem to update its records.
With this approach request data can be wrapped in “dynamic” Document object (im-
plemented as indexer) and passed to these methods. Third approach is referred to as
Object Persistence Model since it bears uncanny resemblance to classic object-relation
mappers. With this approach the user creates entities (strongly-typed objects with prop-
erties holding data) and annotates them with attributes, which allows binding object to
specific table or telling the runtime how to serialize and deserialize properties. Then
with the help of DynamoDBContext class that represents server context, these entities
can be easily turned into or build from table records. Because of its simplicity and high
level of abstraction, I am using this approach of data management in Kentico AWS Ana-
lytics.
12 Conclusion
The ultimate result of my work is the implementation of several tools that pro-
vide seamless configuration of Kentico CMS with various Amazon services. The most
important of these tools is likely Kentico AWS Manager, a WPF application that enables
to extensively exploit powerful Amazon API in order to perform numerous tasks such as
creation of Kentico AMI, configuration with AWS RDS, management of storage and con-
tent delivery with the use AWS S3 and CloudFront and monitoring. Kentico AWS Utili-
35
ties then feature several projects that are essential for runtime environment preparation
and service configuration.
Overall, I am glad that I have had a chance to work on this project. Amazon Web
Services is an extremely powerful product with countless features and possibilities. Ad-
ditionally, I have to admit that it has been a delight for me as a developer to work with
AWS mainly thanks to vast and detailed documentation, abundance of tutorials and
samples and tools such as AWS Toolkit for Microsoft Visual Studio and AWS Tools for
Windows PowerShell. Having a chance to work with other cloud solutions – both infra-
structures and platforms such as Windows Azure, OpenShift and Heroku – I can claim
without any hesitation that Amazon provides one of the very best cloud services on the
market and clearly deserves his current first place in so-called “Cloud Wars”. Moreover,
I believe that with this project I have only managed to scrape the surface of what Ama-
zon has to offer and I would really like to encourage Kentico to expand its current cloud
coverage and embrace AWS.
36
13 Sources
[1] Prof. BALCI, Osman. Introduction to Network-Centric Software Engineering. CS3704
Intermediate Software Design and Engineering, Department of Computer Science,
Virginia Tech. 3. April 2001 [cit. 15. March 2014].
[2] BOYE, Janus. Kentico CMS arrives in the Windows Azure Marketplace. J.Boye’s Blog
[online]. 9. March 2011 [cit. 15. March 2014]. Available at:
http://jboye.com/blogpost/kentico-cms-arrives-in-the-windows-azure-
marketplace
[3] ARIF, Mohamed. A history of cloud computing. ComputerWeekly.com [online].
March 2009 [cit. 15. March 2014]. Available at:
http://www.computerweekly.com/feature/A-history-of-cloud-computing
[4] Wikipedia Contributors. Windows Presentation Foundation. Wikipedia, The Free
Encyclopedia [online]. Version: 24. February 2014, 00:03 [cit. 15. March 2014].
Available at: http://en.wikipedia.org/wiki/Windows_Presentation_Foundation
[5] Wikipedia Contributors. Content management system. Wikipedia, The Free Ency-
clopedia [online]. Version: 12. March 2012, 08:05 [cit. 15. March 2014]. Available at:
http://en.wikipedia.org/wiki/Content_management_system
[6] Wikipedia Contributors. Kentico CMS. Wikipedia, The Free Encyclopedia [online].
Version: 17. December 2013, 19:31 [cit. 15. March 2014]. Available at:
http://en.wikipedia.org/wiki/Kentico_CMS
[7] Kentico CMS Team. Kentico CMS for ASP.NET. Kentico CMS Brochure [online].
c2014 [cit. 15. March 2014]. Available at:
https://www.kentico.com/Product/Resources/Brochures/Kentico-CMS-
brochure/Kentico-cms-brochure-english
[8] Salesforce Team. A Complete History of Cloud Computing. Social Success, Salesforce
[online]. c2014 [cit. 16. March 2014]. Available at:
http://www.salesforce.com/uk/socialsuccess/cloud-computing/the-complete-
history-of-cloud-computing.jsp
[9] Wikipedia Contributors. Cloud Computing. Wikipedia, The Free Encyclopedia
[online]. Version: 16. March 2014, 17:50 [cit. 16. March 2014]. Available at:
http://en.wikipedia.org/wiki/Cloud_computing
[10] Apprenda Team. IaaS, PaaS, SaaS (Explained and compared). Apprenda [online].
c2014 [cit. 22. March 2014]. Available at: http://apprenda.com/library/paas/iaas-
paas-saas-explained-compared

37
[11] CloudClickware Team. Cloud Computing: SaaS vs. PaaS vs. IaaS. Official Blog of
CloudClickware [online]. 5. June 2013 [cit. 22. March 2014]. Available at:
http://blog.cloudclickware.com/2013/06/05/cloud-computing-saas-vs-paas-vs-iaas
[12] Skytap. Demystifying SaaS, PaaS and IaaS. Skytap [online]. 22. March 2011 [cit. 22.
March 2014]. Available at: http://www.skytap.com/blog/demystifying-saas-paas-
and-iaas
[13] Wikipedia Contributors. Amazon Web Services. Wikipedia, The Free Encyclopedia
[online]. Version: 12. March 2014, 20:12 [cit. 22. March 2014]. Available at:
http://en.wikipedia.org/wiki/Amazon_Web_Services
[14] AWS Team. How Do I Interact with AWS? AWS Documentation [online]. c2014 [cit.
22. March 2014]. Available at:
http://docs.aws.amazon.com/gettingstarted/latest/awsgsg-intro/gsg-aws-what-
tools.html
[15] AWS Team. AWS Free Usage Tier. AWS [online]. c2014 [cit. 22. March 2014]. Avail-
able at: http://aws.amazon.com/free
[16] AWS Team. Region and Availability Zones. AWS Documentation [online]. c2014 [cit.
22. March 2014]. Available at:
http://docs.aws.amazon.com/AWSEC2/latest/UserGuide/using-regions-
availability-zones.html
[17] AWS Team. AWS Identity and Access Management. AWS Documentation [online].
c2014 [cit. 29. March 2014]. Available at:
http://docs.aws.amazon.com/IAM/latest/UserGuide/
[18] AWS Team. IAM API Reference. Developer Guide, AWS Documentation [online].
c2014 [cit. 29. March 2014]. Available at:
http://docs.aws.amazon.com/IAM/latest/APIReference/Welcome.html
[19] AWS Team. Introduction to Amazon Elastic Cloud Compute Cloud. Developer Guide,
AWS Documentation [online]. c2014 [cit. 30. March 2014]. Available at:
http://docs.aws.amazon.com/AWSEC2/2009-07-15/DeveloperGuide/
[20] AWS Team. Getting Started with Amazon EC2 Windows Instances. AWS Documenta-
tion [online]. c2014 [cit. 30. March 2014]. Available at:
http://docs.aws.amazon.com/AWSEC2/latest/WindowsGuide/EC2Win_GetStarte
d.html
[21] Wikipedia Contributors. Session (computer science). Wikipedia, The Free Encyclo-
pedia [online]. Version: 1. March 2014, 09:00 [cit. 5. April 2014]. Available at:
http://en.wikipedia.org/wiki/Session_(computer_science)
38
[22] AWS Team. What is Amazon Relational Database Service? AWS Documentation
[online]. c2014 [cit. 19. April 2014]. Available at:
http://docs.aws.amazon.com/AmazonRDS/latest/UserGuide/
[23] MSDN. Features Supported by the Editions of SQL Server 2012, MSDN [online].
c2014 [cit. 19. April 2014]. Available at: http://msdn.microsoft.com/en-
us/library/cc645993.aspx
[24] AWS Team. Introduction to Amazon S3. Developer Guide, AWS Documentation
[online]. c2014 [cit. 20. April 2014]. Available at:
http://docs.aws.amazon.com/AmazonS3/latest/dev/
[25] AWS Team. What Is Amazon CloudFront? Developer Guide, AWS Documentation
[online]. c2014 [cit. 20. April 2014]. Available at:
http://docs.aws.amazon.com/AmazonCloudFront/latest/DeveloperGuide/
[26] AWS Team. What Is Amazon CloudWatch? Developer Guide, AWS Documentation
[online]. c2014 [cit. 3. May 2014]. Available at:
http://docs.aws.amazon.com/AmazonCloudWatch/latest/DeveloperGuide/
[27] AWS Team. What Is Amazon DynamoDB? Developer Guide, AWS Documentation
[online]. c2014 [cit. 3. May 2014]. Available at:
https://docs.aws.amazon.com/amazondynamodb/latest/developerguide/
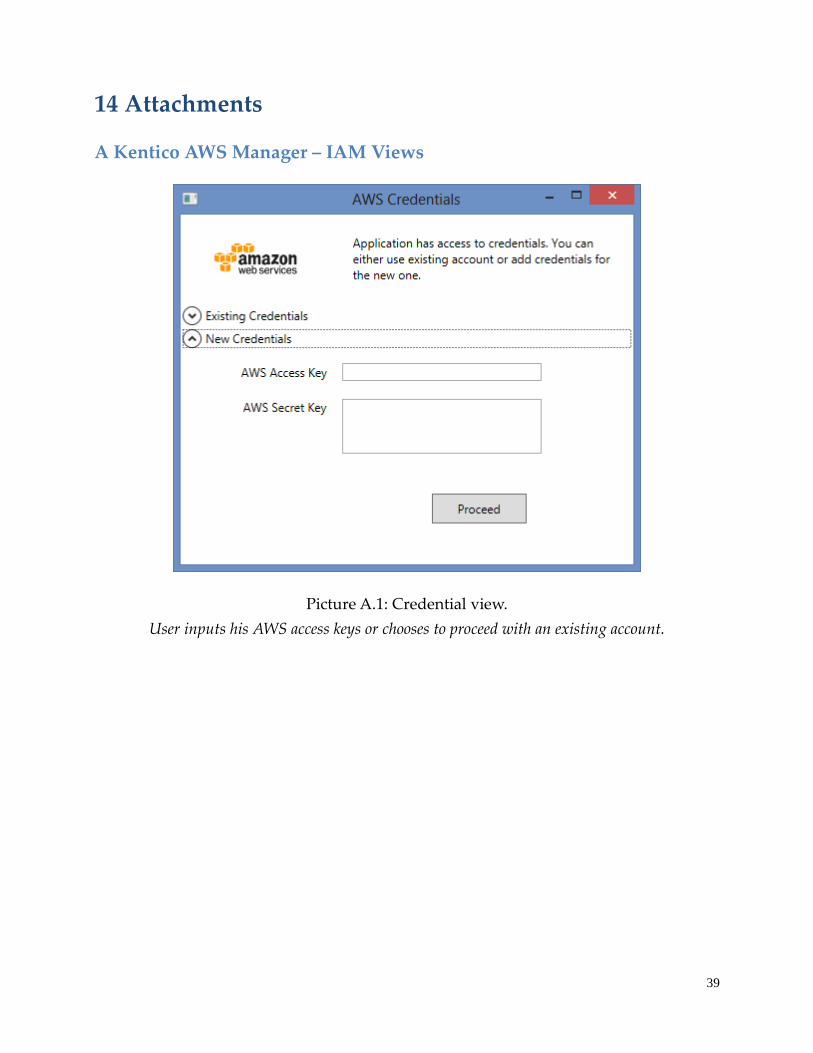
39
14 Attachments
A Kentico AWS Manager – IAM Views
Picture A.1: Credential view.
User inputs his AWS access keys or chooses to proceed with an existing account.
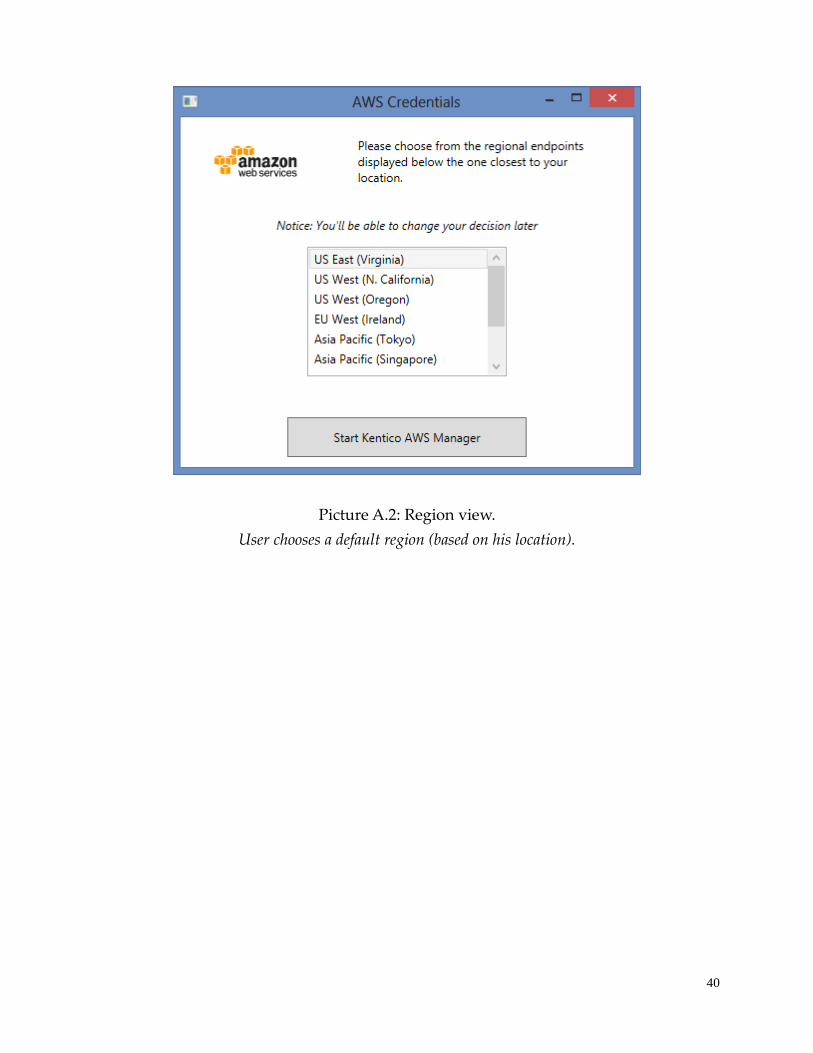
40
Picture A.2: Region view.
User chooses a default region (based on his location).
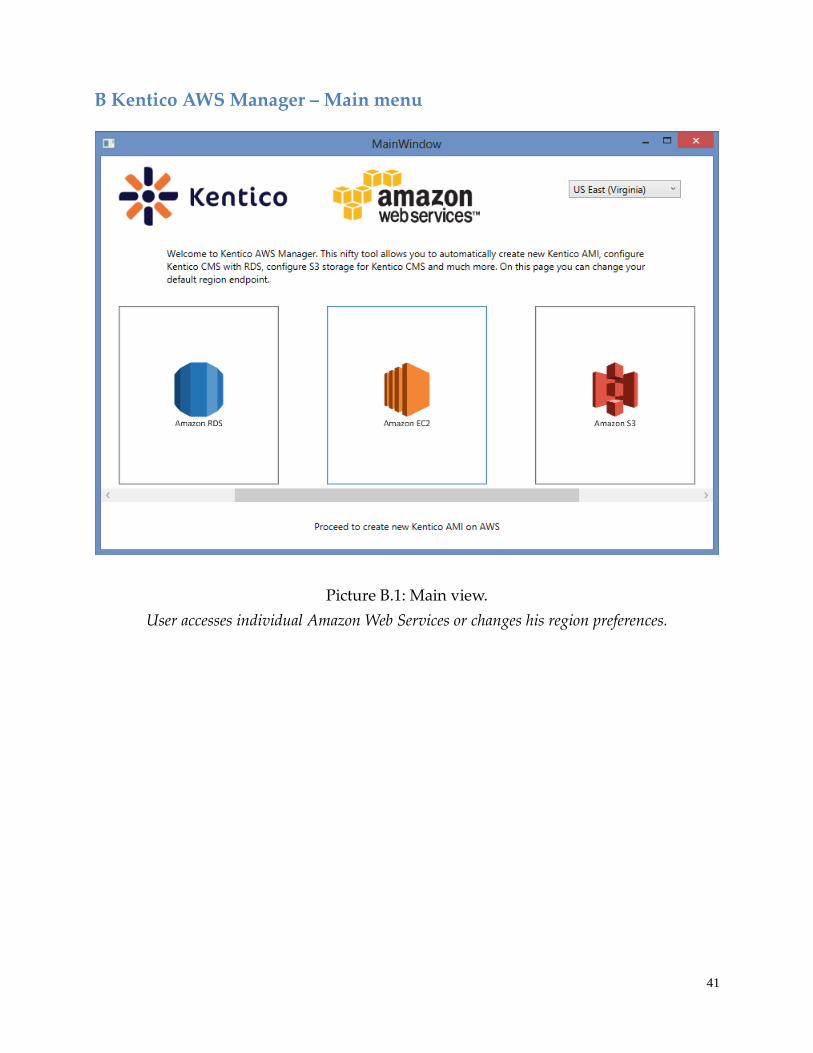
41
B Kentico AWS Manager – Main menu
Picture B.1: Main view.
User accesses individual Amazon Web Services or changes his region preferences.
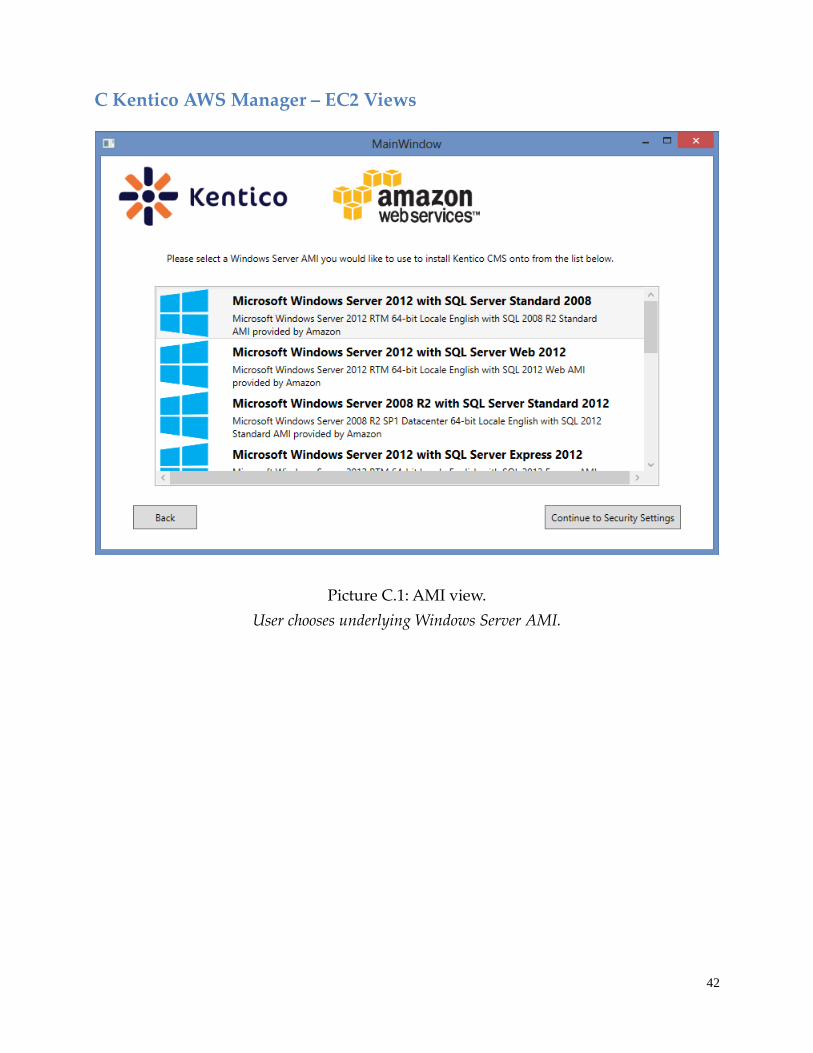
42
C Kentico AWS Manager – EC2 Views
Picture C.1: AMI view.
User chooses underlying Windows Server AMI.

43
Picture C.2: Security view.
User specifies administrator password and sets protocol access rights.
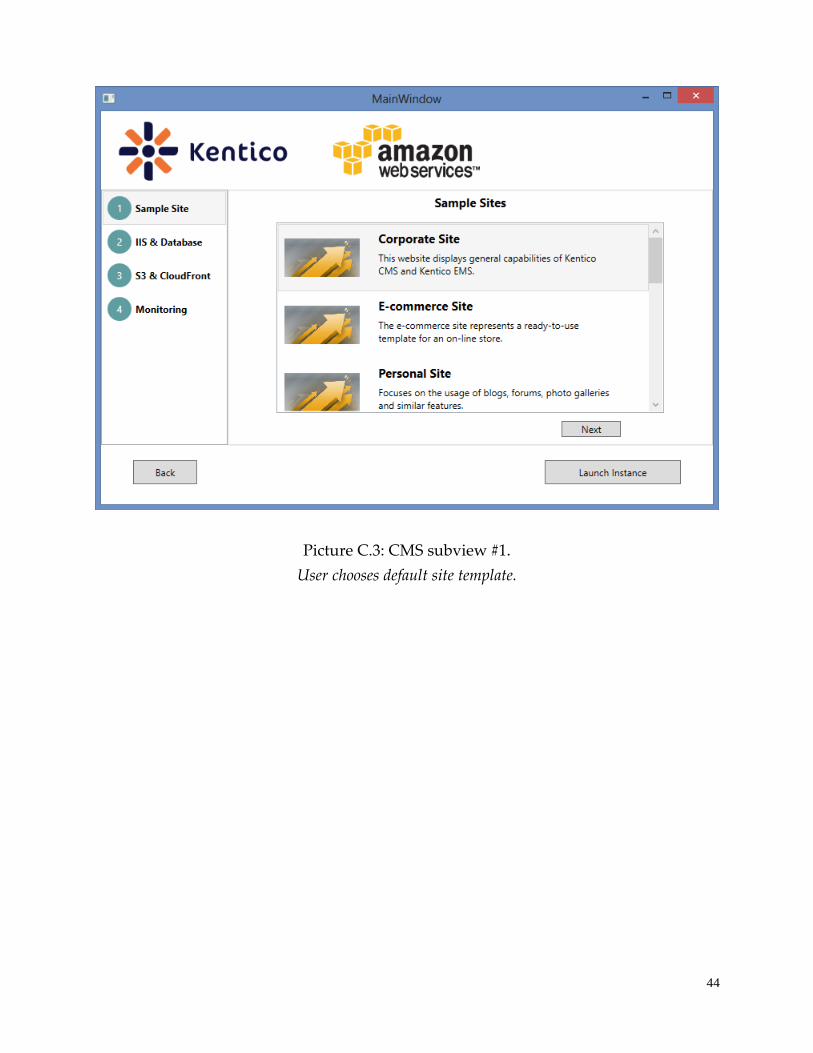
44
Picture C.3: CMS subview #1.
User chooses default site template.
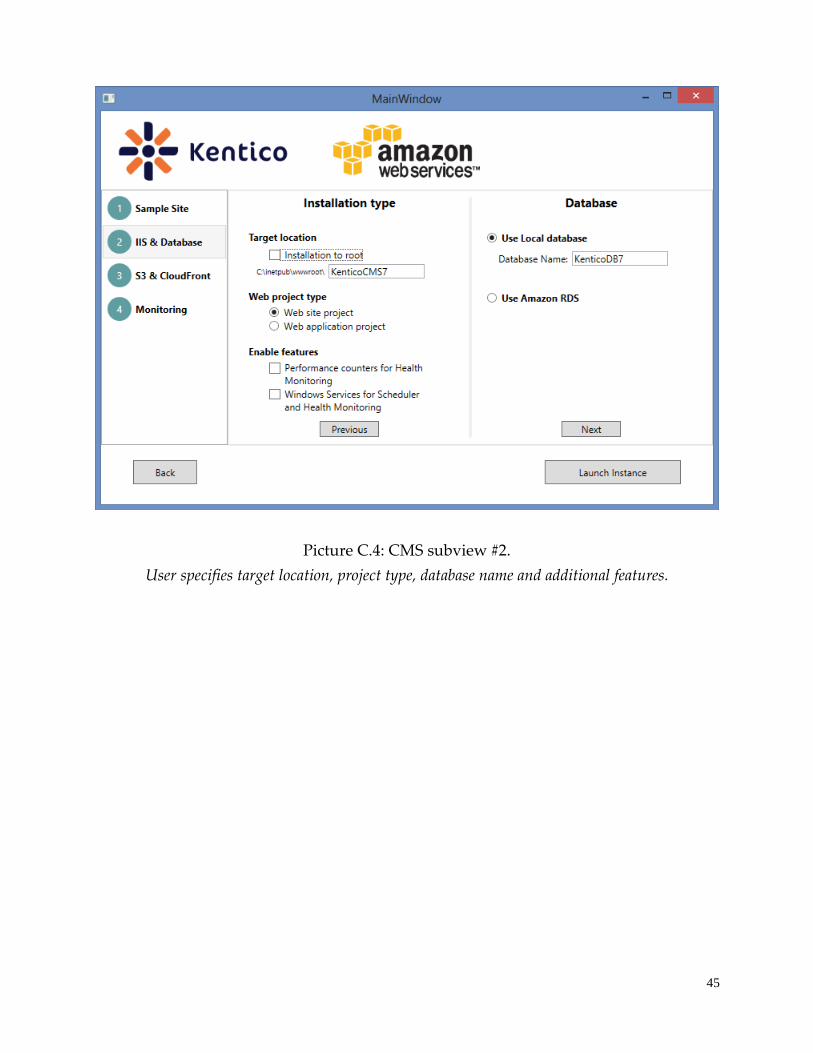
45
Picture C.4: CMS subview #2.
User specifies target location, project type, database name and additional features.
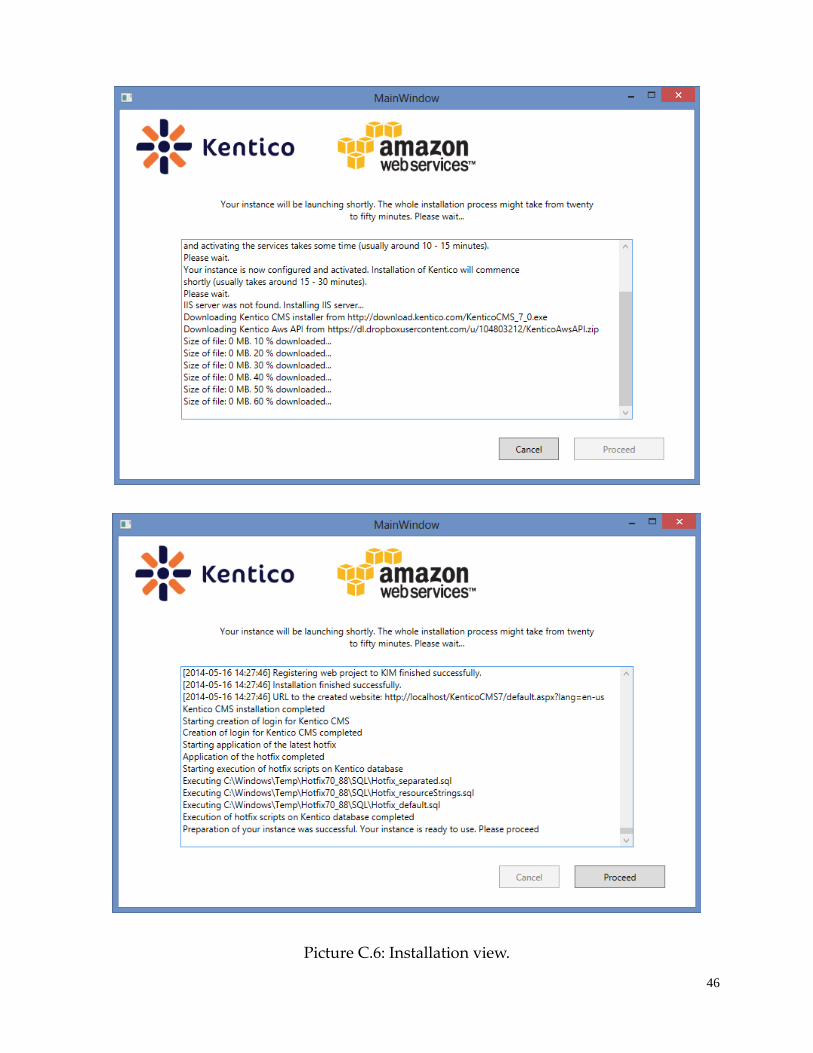
46
Picture C.6: Installation view.
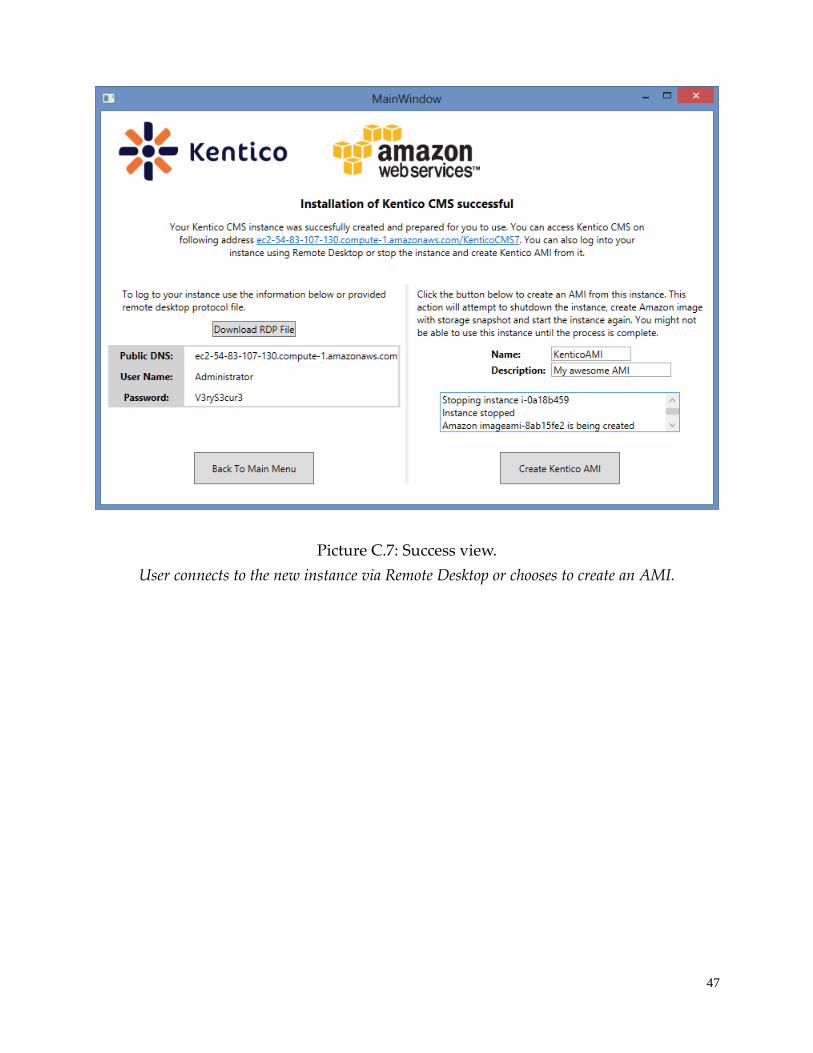
47
Picture C.7: Success view.
User connects to the new instance via Remote Desktop or chooses to create an AMI.
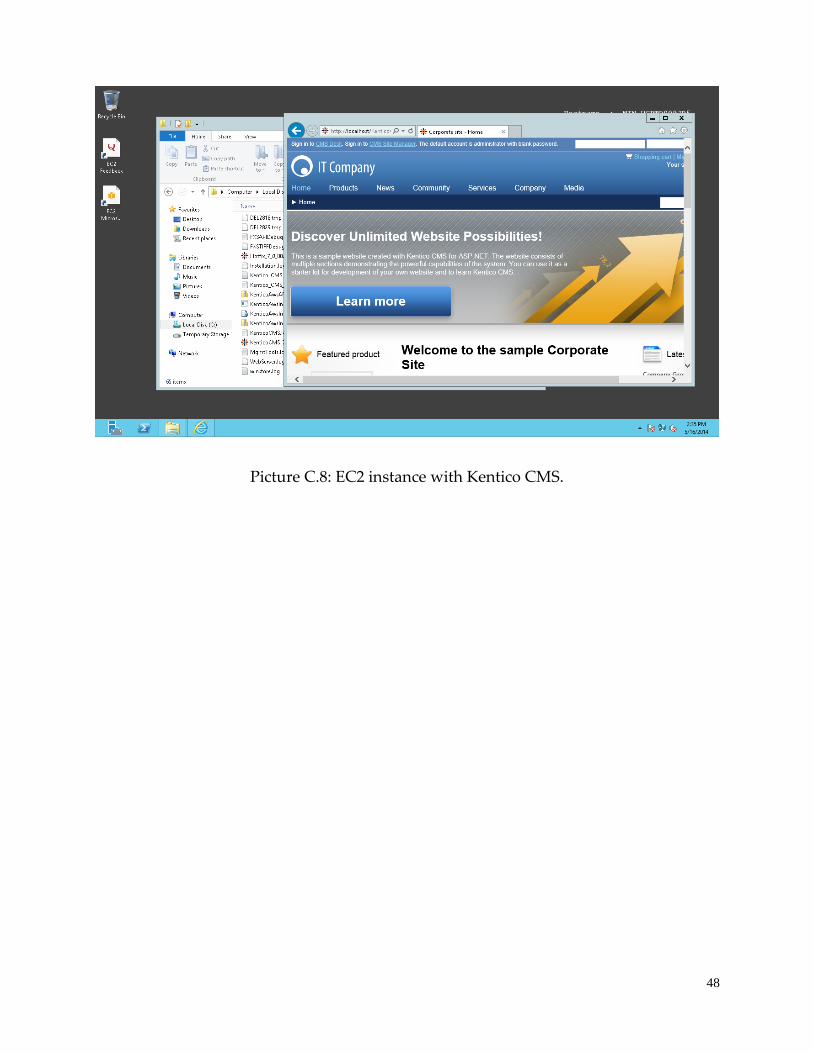
48
Picture C.8: EC2 instance with Kentico CMS.
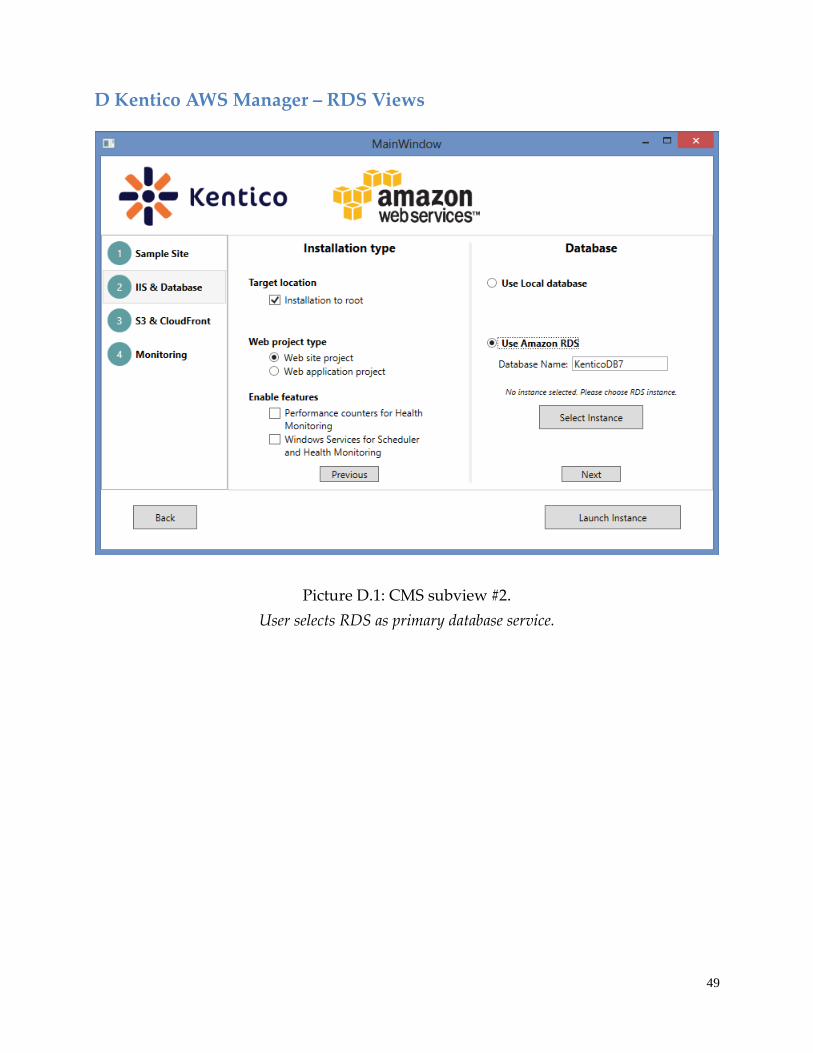
49
D Kentico AWS Manager – RDS Views
Picture D.1: CMS subview #2.
User selects RDS as primary database service.
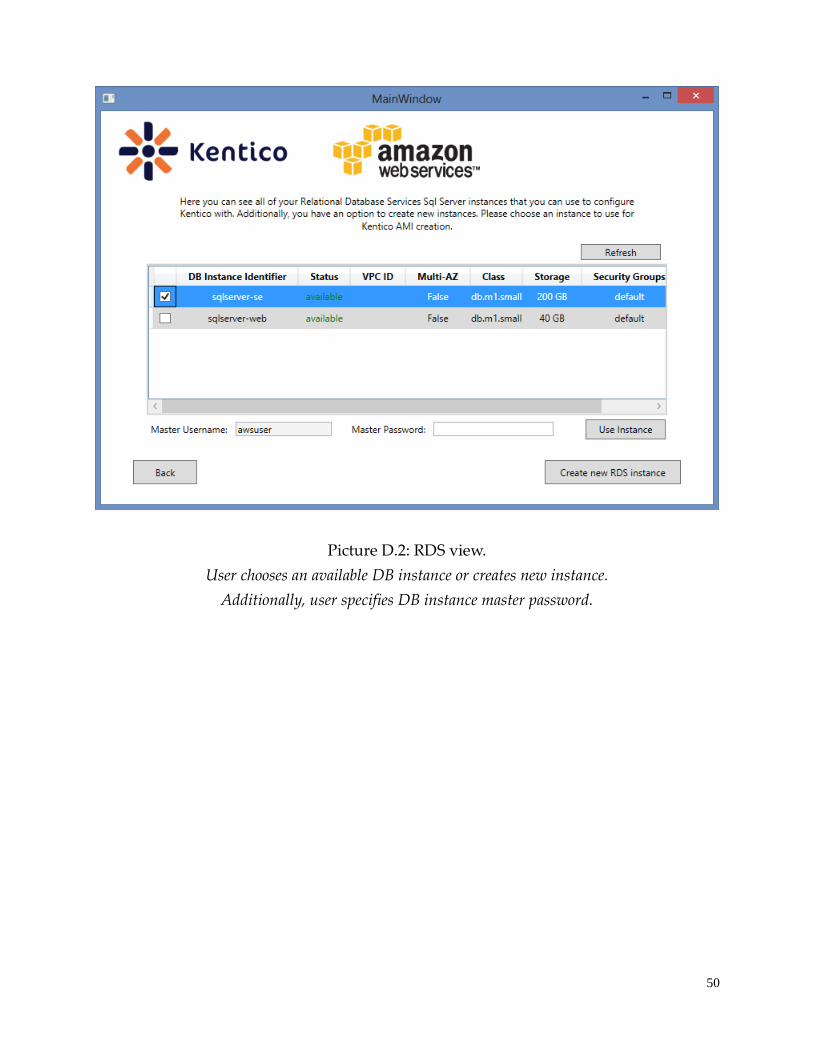
50
Picture D.2: RDS view.
User chooses an available DB instance or creates new instance.
Additionally, user specifies DB instance master password.
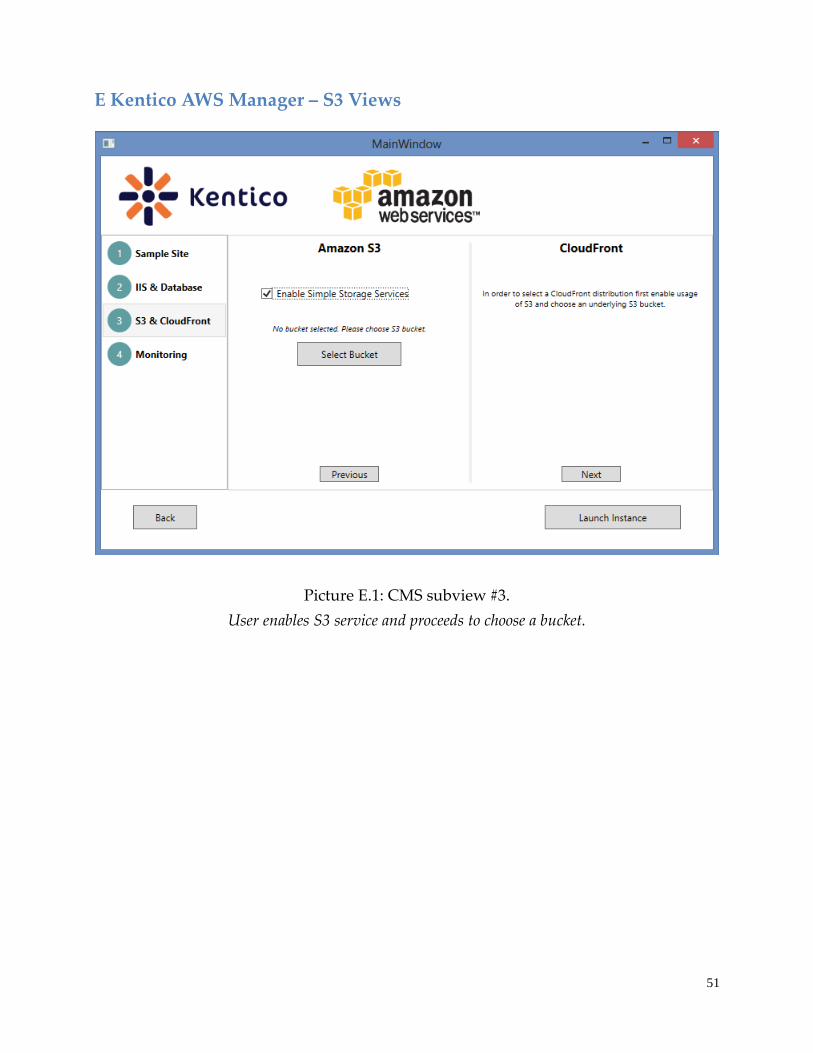
51
E Kentico AWS Manager – S3 Views
Picture E.1: CMS subview #3.
User enables S3 service and proceeds to choose a bucket.
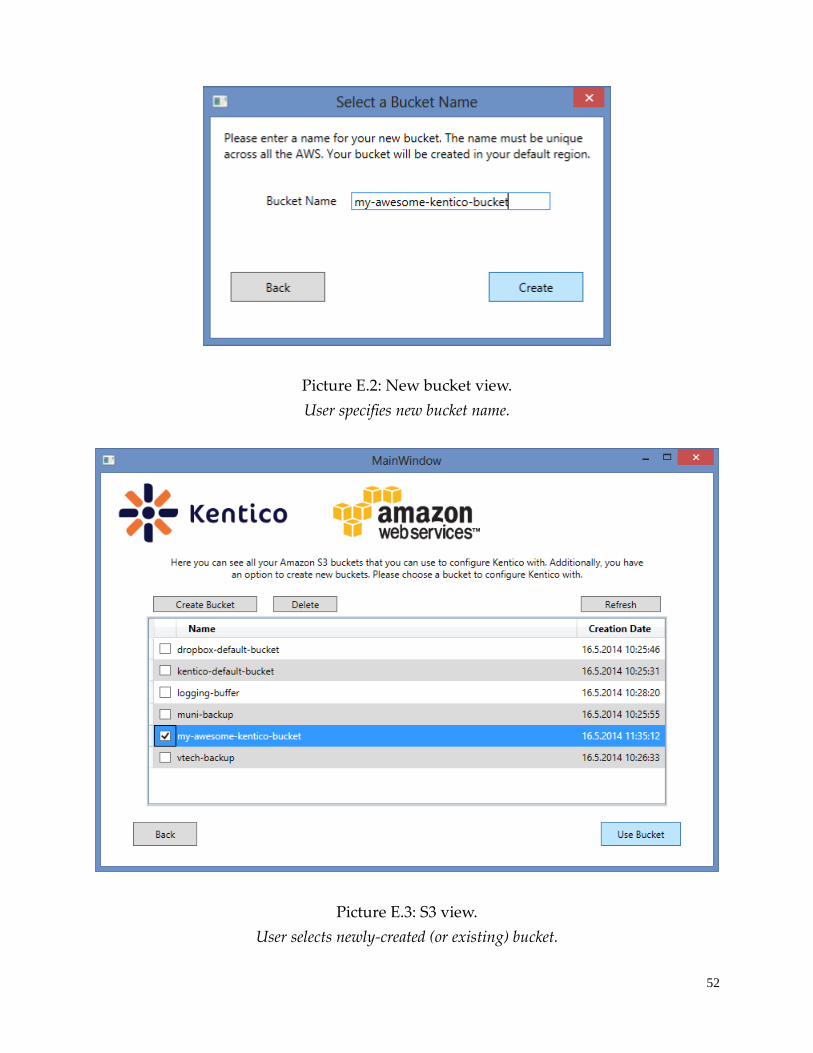
52
Picture E.2: New bucket view.
User specifies new bucket name.
Picture E.3: S3 view.
User selects newly-created (or existing) bucket.
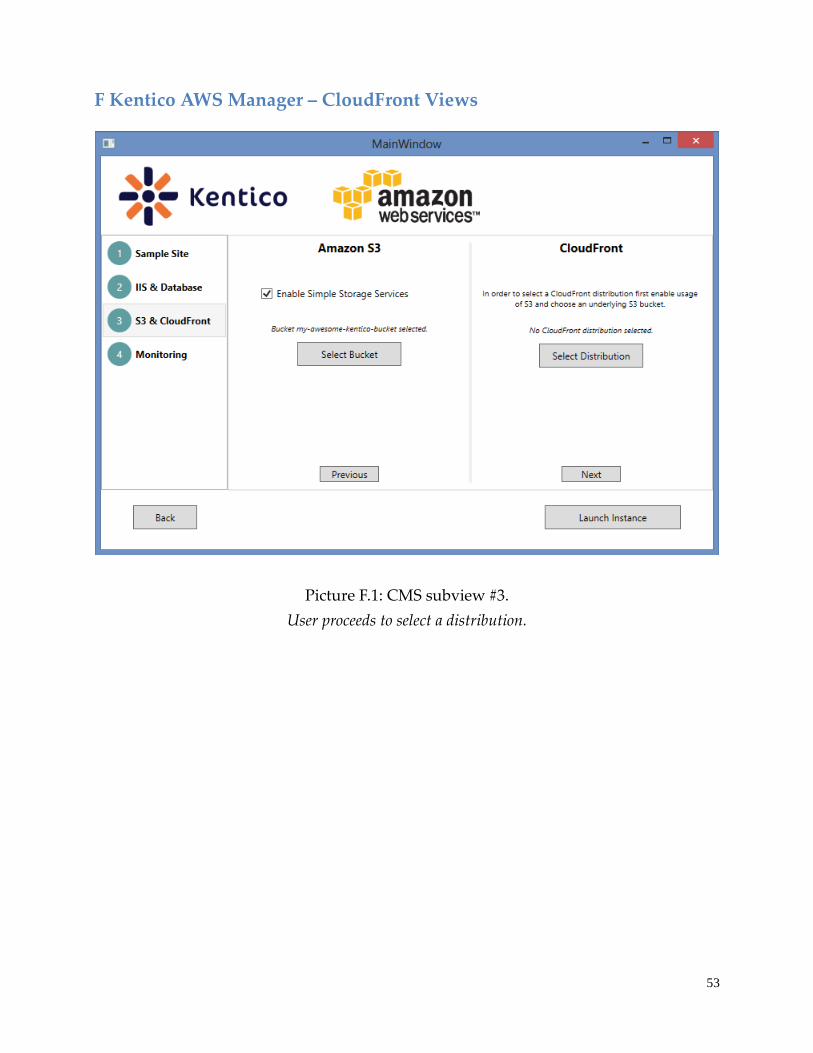
53
F Kentico AWS Manager – CloudFront Views
Picture F.1: CMS subview #3.
User proceeds to select a distribution.
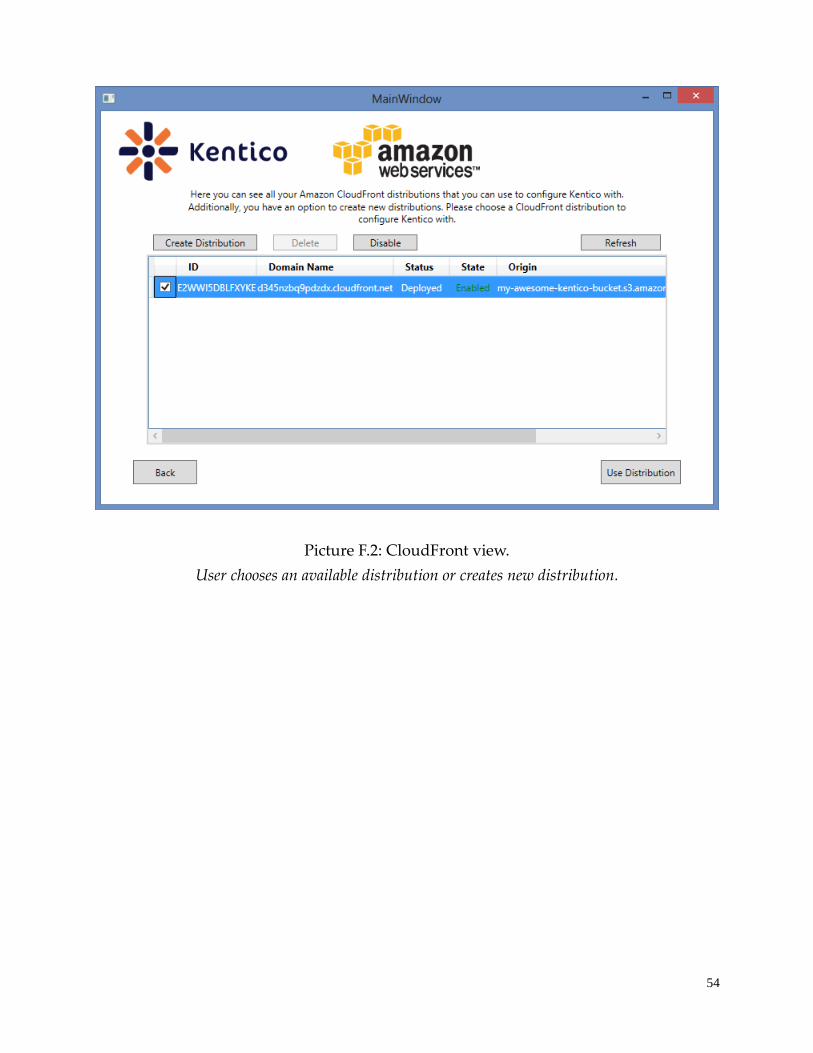
54
Picture F.2: CloudFront view.
User chooses an available distribution or creates new distribution.
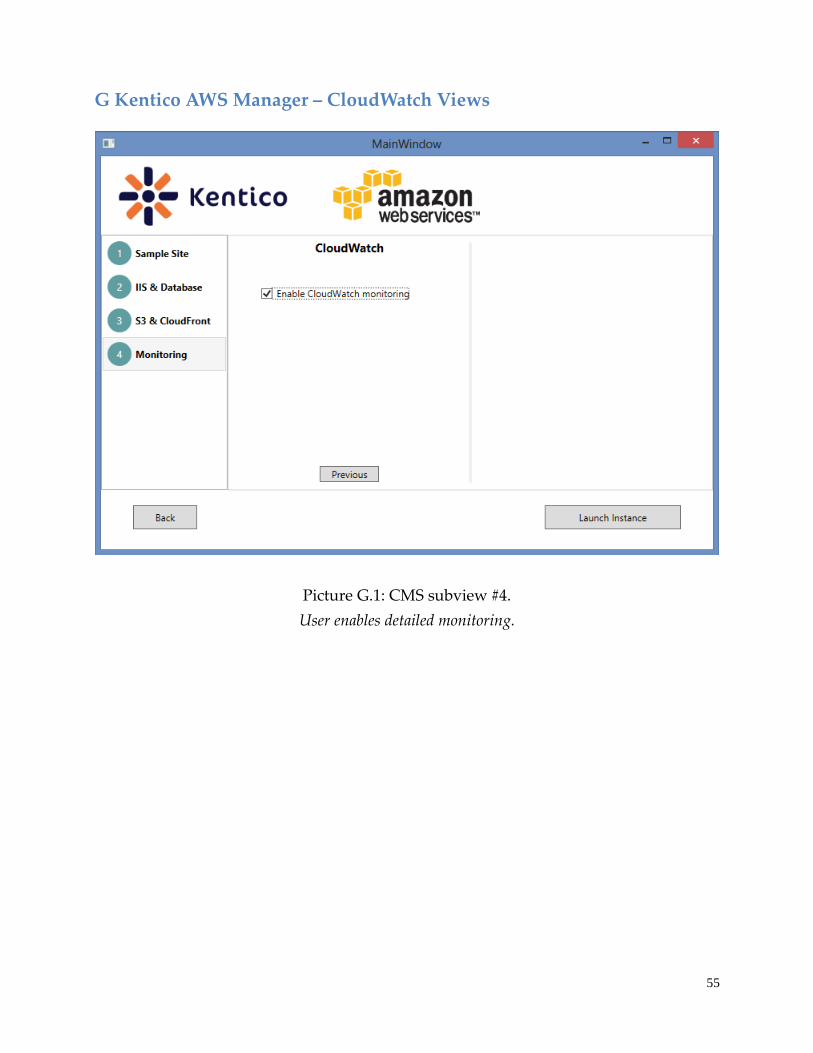
55
G Kentico AWS Manager – CloudWatch Views
Picture G.1: CMS subview #4.
User enables detailed monitoring.
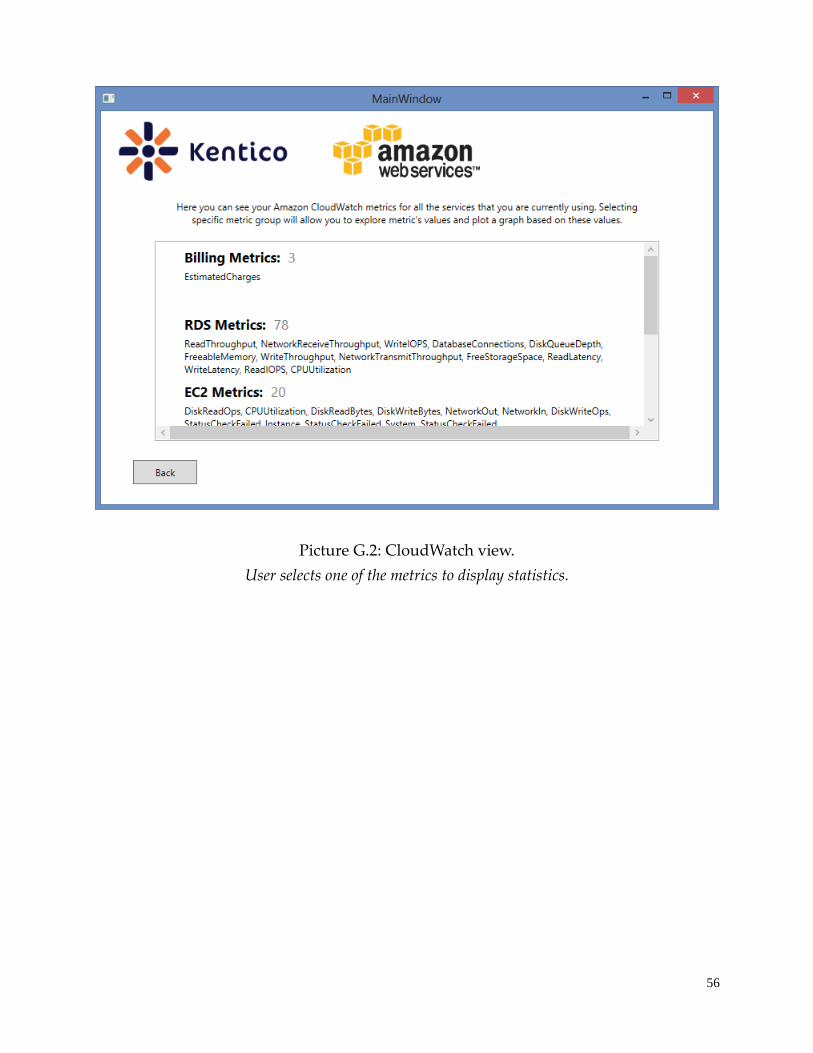
56
Picture G.2: CloudWatch view.
User selects one of the metrics to display statistics.