ISIS/AFS Online Features Guide
74
TABLE OF CONTENTS ISIS/AFS Online Features Guide Chapter 1 - Introduction .........................................................1 Purpose and Organization of this Guide.................................... 1 Organization................................................................................. 1 What is AFS? ............................................................................... 1 Online Data Entry ......................................................................... 2 Types of Data Entered into AFS .................................................. 3 Original Entry of Transaction Data ............................................. 3 Transaction Input Forms .............................................................. 5 Related Terms ............................................................................. 5 Processing in Batches or Documents .......................................... 6 Batch Input Form............................................................................ 6 Transaction Processing ................................................................. 7 Document Suspense...................................................................... 7 Transaction Error Correction........................................................ 8 Reasons for Rejections .................................................................. 9 Transaction Listing ....................................................................... 9 Master Table Maintenance Actions ............................................ 9 Master Table Structure .............................................................. 10 Master Table Maintenance Screens .......................................... 10 AFS Security and Approval System Security .......................... 11 Introduction to the Approval ....................................................... 12 Approval Schemes for Specific Agencies and Organizations .... 12 Reviewing Approval Histories .................................................... 12 How to Determine Which Approvals You Are Authorized to Perform ...................................................................................... 13 Chapter 2 - Your Link to AFS ...............................................15 The Terminal ............................................................................... 15 The Display Screen.................................................................... 15 The Cursor ................................................................................. 15 Formatted Screens and Fields ................................................... 15 The Keyboard ............................................................................. 16 Cursor Positioning Keys............................................................. 16 Special Editing Keys .................................................................. 17 Signing on to the System .......................................................... 18 Chapter 3 – Menu Processing .............................................19 ISIS/AFS ONLINE FEATURES (03/03) i
-
Upload
khangminh22 -
Category
Documents
-
view
0 -
download
0
Transcript of ISIS/AFS Online Features Guide
TABLE OF CONTENTS
ISIS/AFS Online Features Guide Chapter 1 - Introduction.........................................................1
Purpose and Organization of this Guide....................................1 Organization.................................................................................1 What is AFS?...............................................................................1
Online Data Entry .........................................................................2 Types of Data Entered into AFS ..................................................3
Original Entry of Transaction Data .............................................3 Transaction Input Forms..............................................................5 Related Terms .............................................................................5 Processing in Batches or Documents ..........................................6
Batch Input Form............................................................................ 6 Transaction Processing ................................................................. 7 Document Suspense...................................................................... 7
Transaction Error Correction........................................................8 Reasons for Rejections.................................................................. 9
Transaction Listing.......................................................................9 Master Table Maintenance Actions ............................................9
Master Table Structure ..............................................................10 Master Table Maintenance Screens ..........................................10
AFS Security and Approval System Security ..........................11 Introduction to the Approval .......................................................12 Approval Schemes for Specific Agencies and Organizations ....12 Reviewing Approval Histories ....................................................12 How to Determine Which Approvals You Are Authorized to Perform ......................................................................................13
Chapter 2 - Your Link to AFS...............................................15
The Terminal...............................................................................15 The Display Screen....................................................................15 The Cursor .................................................................................15 Formatted Screens and Fields...................................................15
The Keyboard .............................................................................16 Cursor Positioning Keys.............................................................16 Special Editing Keys ..................................................................17
Signing on to the System ..........................................................18
Chapter 3 – Menu Processing .............................................19
ISIS/AFS ONLINE FEATURES (03/03) i

TABLE OF CONTENTS
Using AFS Menus.......................................................................19 Signing On .................................................................................19
Commands for Leafing Through Menus ..................................20
Discussion of AFS Menu Options.............................................20 General Messages.....................................................................22 Agency Messages......................................................................22 Main Menu .................................................................................23
Document Processing.................................................................. 24 Online Inquiries ............................................................................ 24 Reference Data Maintenance/Inquiry........................................... 25 Online Print Requests .................................................................. 26 User Assistance (HELP) .............................................................. 26
Sample AFS Session .................................................................27
Chapter 4 - Document Processing ......................................34
Introduction ................................................................................34 Conventions ...............................................................................34 Terminology ...............................................................................35
Basic Concepts ..........................................................................36 The Processing Cycle ................................................................36 Accessing Batches and Documents ..........................................38
Leaf From MTI.............................................................................. 38 Use SUSF .................................................................................... 38 Use DDM ..................................................................................... 39
Choosing Between SUSF, SUS2, and DDM..............................40 SUSF Screen Areas...................................................................40 DDM Screen Areas ....................................................................42
Field Descriptions For SUSF and DDM Screens .....................44 SUSF and SUS2 ...................................................................44 DDM...........................................................................................47
Using SUSF and DDM ................................................................50 Creating a New Batch or Document ..........................................50
New Command ............................................................................ 50 Copy Command ........................................................................... 52
Completing the First DDM Screen .............................................52 Continuation Screens.................................................................53 Save and Discard Commands ...................................................53 Processing Batches and Documents .........................................54 Read-Only Mode........................................................................54
Function Commands for SUSF and DDM.................................55 SUSF FUNCTION COMMANDS................................................ 56 DDM FUNCTION COMMANDS................................................. 57
ii ISIS/AFS ONLINE FEATURES (03/03)

TABLE OF CONTENTS
Special Features.........................................................................60 Function Key Definitions ............................................................60 Approval System........................................................................61
Chapter 5 - Master Table Inquiry .........................................62
Accessing MTI ............................................................................62
Formatted Screens.....................................................................62
Actions for Displaying Table Entries........................................63 Get Action ..................................................................................63 Scan Action................................................................................64 Leaf Action .................................................................................66
Actions for Modifying Table Entries.........................................67 Adding Table Entries..................................................................67 Changing Table Entries .............................................................67 Deleting Table Entries................................................................67 Retrieving Table Records ..........................................................68
Miscellaneous Actions ..............................................................68 Getting the Next Screen.............................................................68 Displaying Screen Messages.....................................................68 Pausing out of the Session ........................................................68 Ending the Session....................................................................68
Information and Error Messages ..............................................69
MTI Default Actions....................................................................69
Enhanced MTI Action Codes.....................................................70
Appendix A Appendix B
ISIS/AFS ONLINE FEATURES (03/03) iii

TABLE OF CONTENTS
This page intentionally left blank.
iv ISIS/AFS ONLINE FEATURES (03/03)

INTRODUCTION
Chapter 1 - Introduction Purpose and Organization of this Guide This guide describes online data entry procedures for the Advantage Financial System (AFS). It is designed for anyone in your installation - data entry, accounting or computer operations personnel - who will enter data online for AFS. Purpose This manual explains procedures for:
• the online entry and correction of transaction data (e.g., purchase orders, payment vouchers) at the Document Data Maintenance (DDM) level - see ISIS/AFS User Guide for detailed entry and correction procedures by individual transaction type.
• the online entry, correction and inquiry of the detailed data and codes stored in AFS
master tables (e.g., the chart of accounts). Organization
Data entry may be performed in offline or online modes. This guide gives a discussion of online data entry. A discussion of offline data entry can be found in the ISIS/AFS Operations Guide.
The first chapter deals with basic concepts that are common to all AFS installations. Accessing AFS through a terminal is discussed in Chapter 2; the AFS Menu System in Chapter 3. Document processing is described in Chapter 4. Chapter 5 discusses detailed master table inquiry. Finally, a set of appendices provides the keying instructions, screen layouts, and input forms through which data is entered into AFS.
What is AFS?
AFS is an automated financial management system that accommodates accounting, budgeting and planning events. Various employees in purchasing, payroll, billing, budget, and related offices specify the data to be stored in AFS. Throughout the remainder of this manual these employees are called "users," since they "use" the system and code the AFS input forms. AFS rigorously validates data as it is entered and then performs various accounting and bookkeeping functions. In addition, AFS selects, formats, and summarizes its data into reports which are used by accountants and financial management personnel in carrying out their daily responsibilities.
Figure 1-1 illustrates the AFS system and how its various components affect each other. This guide is concerned with the transaction data entry cycle (entry and corrections), master table updates, and master table data searches.
ISIS/AFS ONLINE FEATURES (03/03) 1

INTRODUCTION Figure 1-1 AFS Components
Fill out input form s
Enter dailytransactions
Enter master tablem ainta inance actions
AFS Com puterProgram s
Correct re jectedtransactions Master tables
Produce reportAccepted transactionsstored in AFS files
Online Data Entry
Online data entry means using a terminal to interact with computer programs. In AFS, input screens are displayed on a terminal and users fill in the necessary information during the data entry process. AFS programs tell the computer which screen to display, what to do with the data that is entered, and how to format the data to make it acceptable to the AFS processing programs. Some of these actions are controlled by the person entering the data, some are performed automatically by AFS programs.
In addition to online data entry, AFS offers online data processing. This means that the data is submitted to the AFS processing programs and is tested for validity immediately after the data is keyed. You can find out whether the data you have just entered is valid, before you finish a data entry session. If data is rejected, error messages are displayed on the screen so you can correct invalid data and reprocess it.
2 ISIS/AFS ONLINE FEATURES (03/03)
INTRODUCTION
In comparison, offline data processing means that the keyed data is processed at a later time (usually at night) and error messages are printed on computer listings. The procedures for offline data entry and processing can be found in the ISIS/AFS Operations Guide.
Types of Data Entered into AFS
Two types of data are entered into AFS:
Transaction data Master table data.
A transaction is data about a single financial activity, such as information concerning one purchase order (i.e., the item ordered, the office/department doing the ordering, the price, etc.).
Master tables contain centralized information used by AFS during processing and reporting. For example, one master table contains all fund codes and their associated names; another contains all valid agency codes and names.
Procedures for entering these two data types are different and are described separately. Associated with these data types are three different categories of data entry actions:
original entry of transaction data transaction data error correction master table maintenance.
Original Entry of Transaction Data
Figure 1-2 lists the different types of transactions in AFS. Since it is important for AFS to know which type of transaction it is processing, each transaction has an associated transaction code. These codes are used extensively to identify the processing requirements of a specific transaction.
ISIS/AFS ONLINE FEATURES (03/03) 3

INTRODUCTION FIGURE 1-2 TRANSACTION CODES
4
FUNCTIONAL AREA
TRANS CODE
TRANSACTION DESCRIPTION
Budgeting AP Appropriation EB Expense Budget RB Revenue Budget Expenditures/ Disbursements
CX II
Check Cancellation Internal Voucher
MW Manual Warrant PV Payment Voucher P1 Vendor Payment Voucher P3 P-Card Vendor Payment Voucher PVQ Quick Payment Voucher Revenues CR Cash Receipt C1 Alternate Cash Receipt CRQ Quick Cash Receipt DS Deposit Suspense Purchasing PO Purchase Order General Accounting
JV J1
Journal Voucher Alternate Journal Voucher
J2 Fiscal Year Journal Voucher J3 Special Revenue Journal Voucher J4 Inter-agency Journal Voucher J6 Agency Journal Voucher WV Warrant Voucher Payroll J5 Interface Journal Voucher Federal Aid FM Federal Aid Master FM2 Alternate Federal Aid Master FX Federal Aid Charges Projects NP Non-Payable Invoice PJ Project Master PX Project Charges
ISIS/AFS ONLINE FEATURES (03/03)

INTRODUCTION Transaction Input Forms
Transaction data is commonly submitted to data entry personnel by using Transaction Input Forms.
Each type of transaction listed in Figure 1-2 has its own specially designed input screen. To aid data entry personnel, transaction input forms that closely correspond to the input screens are often used. Figure 1-3 shows a sample input screen.
Most screens consist of two parts:
• Header - The header is general information that applies to all lines coded on the
screen. Most header information appears at the top of the screen.
• Lines - Each accounting entry appears as one line in the body of the screen. FIGURE 1-3 SAMPLE TRANSACTION INPUT SCREEN
FUNCTION: DOCID: PO 107 PO000000105 09/18/01 11:22:55 AM STATUS: BATID: ORG: 000-000 OF 000 H- PURCHASE ORDER INPUT FORM PO DATE: ACCTG PRD: BUDGET FY: ACTION: ORDER TYPE: PART/FINAL: COMMENTS: VENDOR: NAME: INT IND: SELLER FUND: SELLER AGENCY: CALCULATED DOC TOTAL: DOC TOTAL: LN REF RQ JOB NO NUMBER LN FUND AGY ORG/SUB APPR UNIT ACTV FUNC OBJ/SUB NUMBER -- ------------------ ---- --- ------- --------- ---- ---- ------- -------- TEXT RPTG UNITS DESCRIPTION AMOUNT I/D ---- ---- ------- --------------------------- -------------- --- 01- 02- 03-
Related Terms
Remember that a transaction input screen consists of a header section and a line section. A document is a unit of information consisting of header data and all lines that are summarized by the header data. The user enters the document total as part of the header on the first page of the document. Most documents may have an unlimited number of lines, but they must have at least one. If all lines in a document do not fit on one input screen, the user continues the lines on another screen.
ISIS/AFS ONLINE FEATURES (03/03) 5

INTRODUCTION
A group of documents of the same type (the same transaction code) is called a batch. For example, a batch consists of only purchase orders or only expense budget documents. Different transaction types may not be included in the same batch. Figure 1-4 illustrates the batch concept.
FIGURE 1-4 THE BATCH CONCEPT
Processing in Batches o
AFS can procesystem at the existing docum
When batchintransactions mprocessed indi
When individuerror on one li
When documeinto the systemamount for thnumber of docthe system wil
Batch Input Form
The batch is completed by Input Form.
6
DOCUMENT
BATCH INPUT FORM
r Documents
ss batches or individual documents. The method to be used is specified to the point of data entry. In the State of Louisiana, batching is used to modify ents (for example, changing the coding or amount on a line).
g is not desired or required for control purposes, transactions or a group of ay be submitted without a batch ticket. These transactions will then be vidually by the system.
al documents are submitted, each document is either accepted or rejected. An ne in the document can cause the entire document to be rejected.
nts are batched, some summary information about the batch must be entered . Generally, the number of documents, and for accounting documents, the net
e entire batch are required. The system will compute the net amount and uments based on the documents entered in the batch. If there is a discrepancy, l issue an error message and reject the batch.
entered on a special screen called a Batch Input Form, which should be the user responsible for the batch's input forms. Figure 1-5 is a sample Batch
ISIS/AFS ONLINE FEATURES (03/03)

INTRODUCTION FIGURE 1-5 SAMPLE BATCH INPUT FORM
FUNCTION: DOCID: 09/21/01 09:16:22 AM STATUS: BATID: PO xxx xxxxxx ORG: B- PURCHASE ORDER BATCH FORM BATCH DATE: NUMBER OF DOCUMENTS: NET AMOUNT: ACTUAL BATCH COUNT: ACTUAL BATCH AMOUNT:
Transaction Processing
Documents are entered into the system following the instructions in Chapter 4. When documents have been entered, the system checks the data against information stored in the computer and either accepts or rejects the documents based on various accounting standards and other criteria. If the AFS program accepts a document, then that information is used to update the AFS database. Rejected transactions do not update the database. Refer to the section on Transaction Error Correction later in this chapter and Chapter 4 for information on handling rejected transactions.
Document Suspense
All documents and batches are stored in a file called Document Suspense (SUSF). Document Suspense (SUSF) is a holding file for held and rejected transactions in their input format. It provides the following functions:
• stores documents from the time they are entered until they are processed
• stores rejected documents without affecting the AFS data base until the errors are
corrected
• stores documents needing approval (these documents have a pending status even though they have been accepted by the document processor)
• allows the user access to rejected documents for online correction or approval, and
then resubmits them for processing
• allows the user to scan accepted documents for a limited number of days after acceptance (accepted documents cannot be changed). The specific number of days that accepted documents remain on Document Suspense (SUSF) is controlled by a system parameter set by the system administrator based on the needs of your installation.
ISIS/AFS ONLINE FEATURES (03/03) 7

INTRODUCTION
For both online and offline entry, the original entry of transactions and any subsequent corrections can be executed through Document Suspense (SUSF). Figure 1-6 displays sample screens for SUSF and SUS2.
FIGURE 1-6 DOCUMENT SUSPENSE (SUSF and SUS2)
ACTION: S SCREEN: SUSF USERID: IS03T32 09/21/01 09:25:26 AM FUNCTION: ORG: D O C U M E N T S U S P E N S E S BATCH DOCUMENT PROCESS E ---------------- ---------------------- LAST LAST DATE L TYPE AGCY NUMBER TYPE AGCY NUMBER STAT APPRV DATE USER (YYMMDD) - ---- ---- ------ ---- ---- ------------ ----- ----- ------ -------- --------
ACTION: S SCREEN: SUS2 USERID: IS03T32 09/21/01 09:26:04 AM FUNCTION: ORG: D O C U M E N T S U S P E N S E ( P A R T 2 ) S BATCH DOCUMENT E ---------------- ---------------------- ENTRY LAST L TYPE AGCY NUMBER TYPE AGCY NUMBER STATUS APPRV DATE TERMINAL - ---- ---- ------ ---- ---- ------------ ------ ----- ------ --------
Transaction Error Correction
AFS rejects documents in one of two ways: • As part of a rejected batch • As an individually rejected document.
8 ISIS/AFS ONLINE FEATURES (03/03)

INTRODUCTION Reasons for Rejections
If the batch is rejected, all documents in the batch are rejected. If a batch is not rejected or if a document is not processed as part of a batch, a document can be rejected individually because of: • Keying errors. For example, header data was omitted or typing errors were made. • Coding errors on the input form. For example, an invalid account code was
recorded on the form. • Accounting inconsistencies. For example, an accounting entry caused a fund to
exceed its budgeted limits. When a document is rejected, it is flagged with error messages. All error messages are documented on Error Message Explanation (EMEX). You can tell whether the document or batch was accepted or rejected from the transaction listing or error report described in the next section. If you are using online processing, there are additional ways which you can use to tell if the batch or document was accepted. (See Chapter 4.) Rejected transactions are set aside by AFS. You can access them, make corrections to them, and resubmit them for processing. If they still contain errors, they will be set aside again and the correction cycle must be repeated.
Transaction Listing
A transaction listing can be generated daily by the system. The transaction listing shows all documents processed and accepted since the last time the listing was printed. There will be documents and batches from many users in one listing. You can identify your documents or batches by the document numbers and batch numbers that were assigned through automatic document numbering.
Master Table Maintenance Actions
The Master Tables are an important part of AFS. They contain centralized information used by the system during processing and reporting. Master tables contain such things as agency codes and associated names and system controls.
ISIS/AFS ONLINE FEATURES (03/03) 9

INTRODUCTION Definition There are two types of master tables as explained below:
• User-maintained reference tables. These are updated by the system's users. Procedures for updating these tables are called master table maintenance actions.
• System-maintained application tables. These are updated automatically by AFS as a
result of transactions processing. Users can not directly update these tables.
There is no error file and no special error correction cycle for master table maintenance actions. If a user realizes that an incorrect entry was made to a master table, the "correction" must be submitted to data entry as a new maintenance action.
Master Table Structure
Figure 1-7 illustrates how a master table is structured in the computer. Information is stored in lines, and all information on one line is related. Information within a line is divided into fields. Special fields, called key fields, identify a line and distinguish lines from each other. A table can have more than one key field, but all the key field values for a line are combined to get a unique identification for that line. This means that two lines in a table cannot have identical values in all their key fields. For example, a vendor is uniquely identified in Vendor (VEN2) by its vendor code. In the example below, a line is uniquely identified by the fiscal year and object fields.
FIGURE 1-7 SAMPLE MTI TABLE
ACTION: S SCREEN: OBJ2 USERID: IS03T32 09/21/01 09:37:52 AM O B J E C T 01- FISCAL YEAR= OBJECT= NAME: SHORT NAME: CLASS: CATEGORY: TYPE: GROUP: 1099 TYPE OF RETURN: 1099 TYPE OF INCOME: EL: PS IND: OPER/NON-OPER IND: FASB CLASS: 02- FISCAL YEAR= OBJECT= NAME: SHORT NAME: CLASS: CATEGORY: TYPE: GROUP: 1099 TYPE OF RETURN: 1099 TYPE OF INCOME: EL: PS IND: OPER/NON-OPER IND: FASB CLASS:
Master Table Maintenance Screens
Users enter additions, deletions, and changes to the user-maintained reference tables on master table maintenance screens. A sample screen for each table is included in the appendices.
10 ISIS/AFS ONLINE FEATURES (03/03)
INTRODUCTION
Each line contains special values called keys which are used to identify an individual line in a table. Each line in a table must have a unique combination of keys. There are usually several keys for each table and the system cannot process a line if one of the key values is missing. Specific instructions for performing master reference table maintenance actions are described in Chapter 5.
AFS Security and Approval System Security
AFS includes the ability for implementing extremely strict security for data entry and data access. Each installation can use as many of the security features as desired to achieve the necessary level of restrictions. All security restrictions are implemented through the user ID. The user ID defines the following types of restrictions: • online actions:
• scan Document Suspense file • enter data • correct data • delete data • approve documents/batches • schedule documents/batches • hold documents/batches
• approvals restrictions (approval levels the user can apply)
Restrictions on document entry and approvals are enforced at the security group level. A user ID's membership in security groups is defined on Security (STAB). Users may not update the Security entry for their own user ID. There is one agency code that is explicitly coded in the SEC1 field on Security (STAB) for each user ID. This code is required for all STAB entries. The agency used on Document Suspense (SUSF) may be linked to the agency and organization codes used on the transactions being submitted through line level security. For example, if a user is authorized to enter transactions for only agency 107, he must use 107 as the agency on SUSF, and through line level security, he may be restricted to only enter transactions affecting agency 107.
ISIS/AFS ONLINE FEATURES (03/03) 11

INTRODUCTION Introduction to the Approval
The approvals feature requires authorized individuals to approve a document before it will be accepted by the system. When a document does not contain errors, messages explaining which approvals are required will appear on the screen. A user approves a document by accessing the document and typing the "Approve Doc" command. A user can only apply the level of approval to a document for which he or she has authorization. Other commands for approving a document are covered in Chapter 4 on "Document Processing". The user ID controls whether an individual is authorized to approve documents (including which documents, for which agencies and organizations).
Approval Schemes for Specific Agencies and Organizations
The approval requirements that apply to a document or batch are determined as follows:
1. The situation may exist where no approvals are required.
2. An approval scheme may be set up for a specific transaction type. The approval scheme must be coded in Approval (APRV), with transaction type (e.g., AP, EB, PO, etc.) as the key. The same set of approval requirements will apply to all documents and batches of that transaction type, unless it is overridden as described in item 3, below.
3. An approval scheme may be set up for a specific transaction type and agency. The
controlling agency in this case is the agency entered on Document Suspense. The approval scheme would be coded in Approval, with transaction type and SEC1 as keys. SEC1 must be a valid agency code in Agency (AGC2), and the approval code for that agency in Agency must be "Y". When the SEC1 agency is used as agency on Document Suspense (for the appropriate transaction type), this approval scheme will apply.
Reviewing Approval Histories
Approval Log (ALOG) maintains a record for each approval action performed on a document. By viewing records on this table, a user may view the complete approval history for a document. With each approval action, the following information is recorded: batch and document ID, current user's ID and their approval authority (from STAB), last user's ID, before and after approval levels, and the date and time of the approval action.
12 ISIS/AFS ONLINE FEATURES (03/03)

INTRODUCTION How to Determine Which Approvals You Are Authorized to Perform
The following steps outline how you can determine which approvals you are authorized to give:
1. Ask your Security Administrator to look in Security (STAB), under your user ID,
and tell you what your approval profiles are. (You will probably not be authorized to look at Security (STAB) yourself.) You will have different security profiles for each security group under your user ID. A security group may be a specific transaction type (such as PO) or it may be an arbitrary name for a group of transaction types (such as EXPD for RQ, PO, PV, and MW). The security group field in Format Definition Summary (FORM) defines which security groups a transaction type belongs in. A transaction type can belong in more than one security group.
The approval profile is a five character field of Ys and Ns. For example, an approval profile might look like this: YYNNN or NYNNN. The five characters correspond to five levels of approvals. Approval levels are represented from left to right. A "Y" indicates that you can approve that level. For example, the YYNNN profile allows the user to approve levels 1 and 2, but not levels 3 through 5. Figure 1-8 shows a sample entry in Security (STAB). It shows that the user Z107A01 can approve level 1 only on POs and PVs.
2. Now you have to determine what the levels are. (For example, what does level 1
mean for a PO and for a PV?). This information is recorded in Approval (APRV). Figure 1-9 shows that POs below $500.00 need level 1 approval. Our user Z107A01 could approve those POs. He can also approve POs up to $1,000.00. For POs over $1,000.00 his approval would not be accepted.
3. You may be restricted to providing approvals for specific agency and/or
organization codes through the FORWHOM TEST TYPES field in Security (STAB). For example, the FORWHOM TEST TYPES field in STAB defines the limitation, as follows:
"O" means that you can approve documents in that security group for all
agencies in the system. Only users who have a FORWHOM TEST TYPE of "O" may establish other user ids with a FORWHOM TEST TYPE of "O".
"1" means that you can only approve documents in that security group
for the agency shown at the top of Security (STAB) , in the SEC1 field.
"2" - "8" defines more complicated approval schemes that your System
Administrator can interpret for you.
ISIS/AFS ONLINE FEATURES (03/03) 13

INTRODUCTION FIGURE 1-8 SAMPLE SECURITY (STAB)
FIGURE 1-9 SAMPLE APPROVAL (APRV)
ACTION: S SCREEN: STAB USERID: IS03T32 09/21/01 09:53:13 AM S E C U R I T Y USER ID= Z107A01 SEC1 CODE: 107 SEC2 CODE: NAME: BRANDON DAVE TITLE: CLERK 1 2 3 4 5 6 7 8 9 SECURITY GROUP: PO PV SCAN ACTION: Y Y APPROVAL ACTION: R R ENTER ACTION: Y Y CORRECT ACTION: Y Y DELETE ACTION: Y Y SCHEDULE ACTION: Y Y EDIT ONLY ACTION: Y Y HOLD ACTION: Y Y QUEUE ACTION: Y Y RUN ACTION: Y Y FORWHOM TEST TYPE: 1 0 WHERE TEST TYPE: 0 0 WHERE CODE: OVERRIDE: 0 0 APPROVALS: YNNNN YNNNN
14
ACTION: G SCREEN: APRV USERID: IS03T32 09/21/01 09:58:46 AM A P P R O V A L TRAN CODE SEC1 SEC2 MAXDOLLARS/CODES MAXDOLLARS/CODES MAXDOLLARS/CODES ==== ==== ========== ---------------- ---------------- ---------------- 01- PO 0000000500 YNNNN 0000001000 YNNNN 0000001000 YNNNN 9999999999 YNNNN 02- 03- 04- 05- 06- 07-
ISIS/AFS ONLINE FEATURES (03/03)

YOUR LINK TO AFS
Chapter 2 - Your Link to AFS The Terminal
Before we discuss AFS specifics, it may be useful to review your online link to AFS - the computer terminal. Generally, you will be using an IBM terminal or IBM-equivalent model to access the AFS system. The main ON/OFF switch controls power to the terminal in all models. Some models include additional controls that allow you to adjust the intensity and contrast of the display screen. Consult the operator's manual for your particular terminal to determine the location and operation of these controls.
The Display Screen
The display screen can hold up to 24 lines of data, and each line can contain up to 80 characters. All control information and messages generated during AFS operations are displayed on the screen. Commands and data that you enter are also displayed as they are typed at the keyboard.
The Cursor
The cursor is an underline (or a blinking box) that is always present somewhere on the display screen. It is positioned where the next character typed will appear on the screen. It moves automatically when you type a character. It can be moved to positions on the screen with the cursor positioning keys or a mouse. These keys are explained in more detail later in the chapter. There are keys that move the cursor one space at a time, and others that move the cursor to the beginning of the next field.
When you are entering data, the cursor moves automatically to the beginning of the next field if you fill up the previous field. If you are in the last field on the screen and fill it up, the cursor moves automatically to the top of the screen. If you do not fill up a field (i.e., you do not use up all the space allocated for that field), you will have to use a tab key to advance the cursor to the beginning of the next field.
Formatted Screens and Fields
Data is entered into AFS with the help of blank forms, called screens, that are displayed on your terminal. Figure 2-1 shows a sample screen.
ISIS/AFS ONLINE FEATURES (03/03) 15

YOUR LINK TO AFS FIGURE 2-1 SAMPLE ENTRY SCREEN
FUNCTION: DOCID: PO 107 PO000000105 09/18/01 11:22:55 AM STATUS: BATID: ORG: 000-000 OF 000 H- PURCHASE ORDER INPUT FORM PO DATE: ACCTG PRD: BUDGET FY: ACTION: ORDER TYPE: PART/FINAL: COMMENTS: VENDOR: NAME: INT IND: SELLER FUND: SELLER AGENCY: CALCULATED DOC TOTAL: DOC TOTAL: LN REF RQ JOB NO NUMBER LN FUND AGY ORG/SUB APPR UNIT ACTV FUNC OBJ/SUB NUMBER -- ------------------ ---- --- ------- --------- ---- ---- ------- -------- TEXT RPTG UNITS DESCRIPTION AMOUNT I/D ---- ---- ------- --------------------------- -------------- --- 01- 02- 03-
The Keyboard
The majority of the keys on the keyboard are character keys. These include the 26 alphabetic characters as well as the ten numerics and all punctuation and other symbol included in the character set. They operate in the same manner as typewriter keys, except that your terminal may type only uppercase letters. If there are two characters indicated on the key itself, the upper character is displayed with the <SHIFT> key.
Cursor Positioning Keys
The keys most often used during a session are as follows:
Home Returns the cursor to either the first screen position or the beginning of the ACTION field.
Cursor Right Moves the cursor to the right. If the cursor is moved off the right
of the screen, it will reappear one line lower on the left side. If the cursor is in the last position (last line, far right side), it will reappear in the first position of the top line.
Cursor Left Moves the cursor to the left. If the cursor is moved off the left side
of the screen, it will reappear in the last position of the next higher line. If the cursor is in the first position of the first line, it will reappear in the last position of the last line.
Cursor Up Moves the cursor up (without moving either left or right), one line
at a time. If the cursor is in the first line of the screen, it will reappear in the same character position, at the bottom of the screen.
Cursor Down Moves the cursor down (without moving either left or right), one
line at a time. If the cursor is on the last line of the screen, it will reappear in the same character position at the top of the screen.
16 ISIS/AFS ONLINE FEATURES (03/03)

YOUR LINK TO AFS
Forward Tab Moves the cursor to the first character position of the next input field. If the cursor is currently in the last field on the screen, this key moves the cursor to the first character position of the first input field on the screen.
Back Tab Moves the cursor back to the first character position of the prior
input field. If the cursor is currently in the first field on the screen, this key moves the cursor to the last character position of the last input field on the screen.
Enter This key transmits data to the computer. When you depress
<ENTER>, you are signaling the computer that you are finished with the work on the current screen.
Special Editing Keys
The Special Editing keys make data correction easier. These keys are described as follows:
Delete Deletes the character in the position underlined by the cursor. All characters in the field to the right of that position (and on the same line) are shifted left one position.
Insert Allows you to insert a character or characters into the middle of a
field without disturbing the information that is already displayed there. As characters are inserted, all characters to the right of the cursor are shifted into the blank character positions to the right of the last displayed character. Blanks are characters, so if you fill up a field with blanks, you will not be able to insert more characters in that field. If you attempt to insert more characters than the field will hold, the keyboard will lock.
ISIS/AFS ONLINE FEATURES (03/03) 17

YOUR LINK TO AFS
Signing on to the System
Before you can perform any AFS function, you must sign on to the system. The System Administrator in your installation will provide you with the procedures you will need to do this, as well as with your system password. When you have signed on successfully, the following ISIS screen will display:
IIIIIIIII SSSSSSS IIIIIIIII SSSSSSS IIIIIIIII SSSSSSSSS IIIIIIIII SSSSSSSSS III SSSS III SSSS III SSSSSSSS III SSSSSSSS III SSSSSSSS III SSSSSSSS III SSSS III SSSS IIIIIIIII SSSSSSSSS IIIIIIIII SSSSSSSSS IIIIIIIII SSSSSSS IIIIIIIII SSSSSSS I N T E G R A T E D S T A T E W I D E I N F O R M A T I O N S Y S T E M 1. FINANCIAL MANAGEMENT APPLICATION 2. BUNDL *** MUST TYPE VIEW ON NEXT SCREEN *** 3. PURCHASING / CONTRACT APPLICATION X. EXIT CHOOSE OPTION: USERID: IS03T32
Select 1. Financial Management Application to access AFS. Once you are signed on to the system, you may begin one of the AFS functions, as described in Chapter 3.
18 ISIS/AFS ONLINE FEATURES (03/03)

MENU PROCESSING
Chapter 3 – Menu Processing Using AFS Menus
Menus permit you to follow a logical path to master table inquiry or transaction processing. They allow the user to scan, modify, add and delete entries from master tables and enter or correct transactions on the terminal.
Signing On
To use AFS via the menu system, the following sign-on steps must have been completed.
1. Sign on to ISIS . 2. Type a 1 for Financial Management Application at the ISIS screen. 3. Press <ENTER> . 4. Type ‘N’ in ACTION and >AFS1' in SCREEN field. Press <ENTER>.
The AFS Startup Screen shown in Figure 3-1 should now be displayed on your terminal. This is the first in a series of menu screens designed to lead the AFS user to the Main Menu, from which the user can utilize any of the system's applications. Other system access codes will take you directly to the different areas of the AFS system without the aid of the system's menus. However, these menu screens will enable you to learn how the AFS system is organized and what options you have at every point. Once you become familiar with AFS, it will be more efficient to not use the system's menus.
FIGURE 3-1 AFS STARTUP SCREEN ACTION: H SCREEN: AFS1 USERID: IS03T32 09/21/01 10:24:16 AM AAAAAA DDDDDD VV VV AAAAAA NN NN TTTTTTTT AAAAAA GGGGG EEEEEE AA AA DD DD VV VV AA AA NNN NN TT AA AA GG GG EE AA AA DD DD VV VV AA AA NNNN NN TT AA AA GG EE AAAAAAAA DD DD VV VV AAAAAAAA NN NN NN TT AAAAAAAA GG GGGG EEEEEE AA AA DD DD VV VV AA AA NN NNNN TT AA AA GG GG EE AA AA DDDDDD V AA AA NN NNN TT AA AA GGGGG EEEEEE FFFFFFFF IIIIIIII NN NN AAAAAA NN NN CCCCCCC IIIIIIII AAAAAA LL TM FF II NNN NN AA AA NNN NN CC II AA AA LL FFFFFF II NNNN NN AA AA NNNN NN CC II AA AA LL FF II NN NN NN AAAAAAAA NN NN NN CC II AAAAAAAA LL FF II NN NNNN AA AA NN NNNN CC II AA AA LL FF IIIIIIII NN NNN AA AA NN NNN CCCCCCC IIIIIIII AA AA LLLLLLLL R E L E A S E 2 . 0 PLEASE ENTER YOUR USERID ABOVE TO BEGIN. TYPE AN X NEXT TO THE OPTION YOU WISH TO PERFORM: ( ) MAIN - MAIN MENU ( ) GMSS - GENERAL MESSAGES ( ) AMSS - AGENCY MESSAGES
ISIS/AFS ONLINE FEATURES (03/03) 19

MENU PROCESSING
Commands for Leafing Through Menus
At the top of every menu screen there are three fields. The ACTION field is used for single-character commands that communicate to the system which type of action the user wishes the system to perform. When a menu screen appears on the screen, the ACTION field will contain an >H=. With the >H= present, pressing <ENTER> will provide the user with helpful information about the portion of the system the user is currently in. When choosing menu options the >H= is left as it appears in the ACTION field. The SCREEN field contains the four-character name of the current menu screen. For menu operations, no change is made in this field. The USERID field will contain the USERID entered when signing on to ISIS. There are two different MTI commands which you can use to move within menus. Each of these is described below. Select In order to select the next menu screen, simply enter any valid character
next to the menu choice you desire and press <ENTER>. Back The Back command displays the menu screen previous to the current menu
screen. This command is useful when the user desires to return to the parent menu screen after performing some action at a lower menu screen. To use this command, enter >B= in the ACTION field, and then press <ENTER>. MTI will retrieve the previous screen and display it. You may now choose a menu item or follow the chain further back by using the back command again.
Discussion of AFS Menu Options
The AFS Start-up Screen is the starting point of the AFS menu system. The menus are organized in a hierarchical structure which branches out from the Start-up Screen to successively lower level menu screens. This hierarchical structure is illustrated in Figure 3-2, the AFS Menu Structure. Many of the areas shown in the hierarchical structure are not used with ISIS (e.g., Fixed Assets) at this time.
20 ISIS/AFS ONLINE FEATURES (03/03)
MENU PROCESSING FIGURE 3-2 AFS MENU STRUCTURE
AFS1 AFS Start-up
Screen
GMSS General
Messages
MAIN Main Menu
AMSS Agency
Messages
GMSS General
Messages
INQY Online Mgmt
REFE
Ref Data Maint.
ONPR Online Print
HELP User
Assist.
-General Acctg -Budgeting -Purchasing -Expenditure -Revenue -Flexible Planning -Extended Purch -Budget Prep -Fleet Mgmt -Advanced Grants -Perf Measurement -Grants Mgmt -Job Costing -Fixed Assets -Investment Mgmt -Inventory -Work Order -Proj Mgmt -Adv Receivables -Federal Aid Mgmt
-Online Inq (2) -Grants Acctg -Perf Measurement -Job Cost Acctg -Fixed Assets -Investments -Inventory -Adv Budget Prep -Work Order -Financial Info -General Acctg -Budget v. Actual -Budget Prep -Open Items Acctg -Cost Allocation -Extended Purch -Report Control -Vendor History -Fleet Mgmt -Projects
-Chart of Accounts -Grant/Project -Vend and Commod -Orgn Structure -Reporter -Control Ref -Core Tables -Work Order -Fleet Mgmt
-ODPO -STPO -ODCK -PRNT -REPT
When the AFS Start-up Screen first appears, you have the option of going directly to the Main Menu, reading General Messages, or your Agency Messages. You will be taken to your choice by simply typing an 'X' next to the desired option and pressing <ENTER>.
ISIS/AFS ONLINE FEATURES (03/03) 21

MENU PROCESSING General Messages
If you choose the General Messages option, you will see the message screen shown in Figure 3-3. This screen will contain messages that pertain to all AFS users such as scheduled down-time, new procedures and other useful information. Messages appear in reverse date order, so that the most recent messages appear at the top of the list. You should always read these messages to be aware of changes in the system. The back command will return the user to the start-up screen.
FIGURE 3-3 GENERAL MESSAGES SCREEN ACTION: R SCREEN: GMSS USERID: IS03T32 09/21/01 02:19:45 PM A D V A N T A G E F I N A N C I A L R E L E A S E 2 . 0 GENERAL MESSAGES (ACTION = B TO RETURN) DATE: 11 / 21 / 98 SCREEN NO: 02 _______________________________________________________________________________ THIS IS TEST NEW 2.....
Agency Messages
The second option pertains to Agency specific messages. You may choose this option by typing an >X= next to Agency Messages and pressing <ENTER>. The Agency Messages Screen (Figure 3-4) will then be displayed for you. Agency messages are stored by agency in reverse date order, so that the most recent messages appear at the top of the list. Agency messages should be reviewed daily for any information that may affect your use of the system. The back command will return the user to the start-up screen. At this time, the State of Louisiana is not using the Agency Messages Option.
22 ISIS/AFS ONLINE FEATURES (03/03)
MENU PROCESSING FIGURE 3-4 AGENCY MESSAGES SCREEN
Main Menu
A third option on the Startup Screen is Main Menu. When you type an >X= next to this option and press <ENTER>, you will see the Main Menu Screen as shown in Figure 3-5. At this point you have five options:
1. Transaction Types 2. Online Inquiry Categories 3. Ref Data Maintenance/Inquiry 4. Online Print Requests 5. Help - User Assistance
Each of these options is explained separately in the following sections.
FIGURE 3-5 MAIN MENU SCREEN
ACTION: S SCREEN: AMSS USERID: IS03T32 09/21/01 04:07:03 PM A D V A N T A G E F I N A N C I A L R E L E A S E 2 . 0 AGENCY MESSAGES (ACTION = B TO RETURN) DATE: / / AGENCY: SCREEN NO: ______________________________________________________________________________
ACTION: L SCREEN: MAIN USERID: IS03T32 09/21/01 04:09:26 PM ---------------------------------------------------------------------------- MAIN MENU ---------------------------------------------------------------------------- SELECT DESIRED SCREEN BY ENTERING ANY NON-BLANK CHARACTER ( ) TRANSACTION TYPES ( ) ONLINE INQUIRY CATEGORIES ( ) REF DATA MAINTENANCE/INQUIRY ( ) ONLINE PRINT REQUESTS ( ) HELP - USER ASSISTANCE ( ) ( ) ( ) ( ) ( ) USE LEAF (L) ACTION WITH MENU CHOICES
ISIS/AFS ONLINE FEATURES (03/03) 23

MENU PROCESSING Document Processing
You should choose the Transaction Types (DOCU) option when you wish to enter a transaction (e.g., payment voucher, cash receipt). If you choose this option, the Transaction Types Screen shown in Figure 3-6 will be displayed. This screen gives you the choice of several categories of transaction documents available in AFS. Each category when chosen will lead to another menu screen for that category, from which the user can choose the particular transaction type that is desired.
FIGURE 3-6 TRANSACTION TYPES SCREEN
ACTION: L SCREEN: DOCU USERID: IS03T32 09/21/01 04:11:48 PM ---------------------------------------------------------------------------- TRANSACTION TYPES ---------------------------------------------------------------------------- SELECT DESIRED SCREEN BY ENTERING ANY NON-BLANK CHARACTER ( ) GENERAL ACCTG TRANSACTIONS ( ) PERFORMANCE MEASUREMENT ( ) BUDGETING TRANSACTIONS ( ) GRANTS MANAGEMENT ( ) PURCHASING TRANSACTIONS ( ) JOB COSTING ( ) EXPENDITURE TRANSACTIONS ( ) FIXED ASSETS ( ) REVENUE TRANSACTIONS ( ) INVESTMENT MANAGEMENT ( ) FLEXIBLE PLANNING TRANSACTIONS ( ) INVENTORY ( ) EXTENDED PURCHASING ( ) WORK ORDER TRANSACTIONS ( ) BUDGET PREP TRANSACTIONS ( ) PROJ MANAGEMENT TRANSACTIONS ( ) FLEET MGMT INQ/TRANS ( ) ADVANCED RECEIVABLES ( ) ADVANCED GRANTS ( ) FEDERAL AID MANAGEMENT USE LEAF (L) ACTION WITH MENU CHOICES
After selecting a category from DOCU, the system displays the appropriate sub-menu for the selected category. From this sub-menu, the system takes you to the available transactions.
To return to the Main Menu (MAIN) from DOCU, type B (Back) in the Action field and press <ENTER>.
Online Inquiries
You should choose the Online Inquiry Categories option from the Main Menu Screen when you want to view the system-maintained application tables. System-maintained tables are master tables that are updated by AFS transactions and are only for user inquiry. If you choose this option, the Online Inquiry Categories Screen shown in Figure 3-7 will be displayed. By choosing one of the inquiry categories, you will be taken to a final menu screen which details the specific inquiries available under the chosen category. You may then choose the desired inquiry and the system will display the specific application table selected.
24 ISIS/AFS ONLINE FEATURES (03/03)

MENU PROCESSING FIGURE 3-7 ONLINE INQUIRY SCREEN
Reference Data Maintenance/Inquiry
You should choose the Ref Data Maintenance/Inquiry option from the Main Menu Screen when you want to view or update user-maintained master reference tables. These are the tables that AFS uses to validate and infer system options and control parameters. As such, they must be kept up to date with regular maintenance. Choosing this option will lead to the Ref Data Maintenance/Inquiry Screen shown in Figure 3-8. Like the Inquiry Categories Screen, the Ref Data Maintenance/Inquiry Screen displays categories of reference tables. Each of these categories has an associated table reference screen which lists all the reference tables in that chosen category. When you select a specific reference table from a category menu, the system will display the chosen master reference table. You may then perform any master table maintenance actions as needed. (See Chapter 5 of this manual for a discussion of master table maintenance.)
FIGURE 3-8 REFERENCE DATA MAINTENANCE/INQUIRY SCREEN
ACTION: L SCREEN: INQY USERID: IS03T32 09/21/01 04:13:41 PM ---------------------------------------------------------------------------- ONLINE INQUIRY CATEGORIES ---------------------------------------------------------------------------- SELECT DESIRED SCREEN BY ENTERING ANY NON-BLANK CHARACTER ( ) ONLINE INQUIRIES SCREEN - 2 ( ) GENERAL ACCOUNTING INQUIRIES ( ) GRANT ACCOUNTING INQUIRIES ( ) BUDGET VS. ACTUAL INQUIRIES ( ) PERF MEASUREMENT INQUIRIES ( ) BUDGET PREPARATION INQUIRIES ( ) JOB COST ACCOUNTING INQUIRIES ( ) OPEN ITEMS ACCOUNTING INQ ( ) FIXED ASSETS INQUIRIES ( ) COST ALLOCATION ( ) INVESTMENTS ( ) EXTENDED PURCHASING ( ) INVENTORY ( ) REPORT CONTROL SYSTEM ( ) ADVANCED BUDGET PREPARATION ( ) VENDOR HIST/DOCUMENT TRACKING ( ) WORK ORDER INQUIRIES ( ) FLEET MGMT INQ/TRANS ( ) FINANCIAL INFORMATION SYSTEM ( ) PROJECT INQUIRIES USE LEAF (L) ACTION WITH MENU CHOICES
ACTION: L SCREEN: REFE USERID: IS03T32 09/21/01 04:15:44 PM ---------------------------------------------------------------------------- REF DATA MAINTENANCE/INQUIRY
SELECT DESIRED SCREEN BY ENTERING ANY NON-BLANK CHARACTER ( ) CHART OF ACCTS REF DATA MAINT ( ) GRANT/PROJECT TABLES ( ) VEND AND COMMODITY INFORMATION ( ) ORGN STRUCTURE REF DATA MAINT ( ) REPORTER TABLES ( ) CONTROL REF DATA MAINTENANCE ( ) CORE TABLES ( ) WORK ORDER REFERENCE DATA ( ) FLEET MANAGEMENT REF DATA ( ) USE LEAF (L) ACTION WITH MENU CHOICES
----------------------------------------------------------------------------
ISIS/AFS ONLINE FEATURES (03/03) 25

MENU PROCESSING Online Print Requests
The choice of this option on the Main Menu Screen allows the user to put in requests for various printed reports. When the option is chosen, a list of the types of available reports is displayed through the Online Print Requests Screen. To obtain a report the user simply selects the type of report desired and AFS will lead the user through the necessary steps to produce the desired report. The Online Print Requests Screen is shown in Figure 3-9.
FIGURE 3-9 ONLINE PRINT REQUESTS SCREEN
ACTION: L SCREEN: ONPR USERID: IS03T32 09/21/01 04:17:35 PM ---------------------------------------------------------------------------- ONLINE PRINT REQUESTS ---------------------------------------------------------------------------- SELECT DESIRED SCREEN BY ENTERING ANY NON-BLANK CHARACTER ( ) ODPO - EPS ON DEMAND PO PRINT ( ) STPO - STD ON DEMAND PO PRINT ( ) ODCK - ON DEMAND CHECK PRINT ( ) PRNT - PRINTER CONTROL ( ) REPT - REPORT TABLE ( ) ( ) ( ) ( ) ( ) USE LEAF (L) ACTION WITH MENU CHOICES
User Assistance (HELP)
You should choose the User Assistance option from the Main Menu Screen when you need information about the use of specific categories in AFS or the terminal. This screen is designed to give you an introduction to AFS and basic instruction before you actually choose any other options on the Main Menu Screen. It is recommended that you scan through these categories before using the system.
The help facility may also be accessed by keying >H= into the ACTION field on any master table or into the FUNCTION field on any transaction screen. The system will then access the help system and display information about the current screen. Figure 3-10 shows the basic structure of an AFS Help Screen.
26 ISIS/AFS ONLINE FEATURES (03/03)

MENU PROCESSING FIGURE 3-10 HELP SCREEN
ACTION: R SCREEN: HELP USERID: IS03T32 09/21/01 04:19:58 PM FOR THE INDEX OF THIS CATEGORY : FOR THE GENERAL INDEX : HELP CATEGORY: TOPIC: *NOTHERE 00000005 02-*L009 HEADER CHANGE
Sample AFS Session
The following example illustrates the ease with which menu processing allows the new user to work with AFS. In the example, we will use the menu system to perform an inquiry to Open Purchase Order Line (OPOL) and then enter a Purchase Order transaction to modify that entry. Through the example, you will become familiar with the concepts of using menu screens to make a table inquiry, following the chain of menus backwards, using menu screens to enter a document, and accessing the help facility from a master table.
Our example comprises the steps listed below. They will take the user from the Main Menu to Open Purchase Order Line back to the Main Menu, accessing the help facility along the way. After returning to the Main Menu, the example will proceed to the Purchase Order transaction input screen and finally back to the ISIS screen.
ISIS/AFS ONLINE FEATURES (03/03) 27

MENU PROCESSING FIGURE 3-11 AFS START-UP SCREEN
Step 1 At the AFS Startup Screen, type an “X” by Main Menu. Press <ENTER>. FIGURE 3-12 MAIN MENU SCREEN
ACTION: H SCREEN: AFS1 USERID: IS03T32 09/25/01 12:52:10 PM AAAAAA DDDDDD VV VV AAAAAA NN NN TTTTTTTT AAAAAA GGGGG EEEEEE AA AA DD DD VV VV AA AA NNN NN TT AA AA GG GG EE AA AA DD DD VV VV AA AA NNNN NN TT AA AA GG EE AAAAAAAA DD DD VV VV AAAAAAAA NN NN NN TT AAAAAAAA GG GGGG EEEEEE AA AA DD DD VV VV AA AA NN NNNN TT AA AA GG GG EE AA AA DDDDDD V AA AA NN NNN TT AA AA GGGGG EEEEEE FFFFFFFF IIIIIIII NN NN AAAAAA NN NN CCCCCCC IIIIIIII AAAAAA LL TM FF II NNN NN AA AA NNN NN CC II AA AA LL FFFFFF II NNNN NN AA AA NNNN NN CC II AA AA LL FF II NN NN NN AAAAAAAA NN NN NN CC II AAAAAAAA LL FF II NN NNNN AA AA NN NNNN CC II AA AA LL FF IIIIIIII NN NNN AA AA NN NNN CCCCCCC IIIIIIII AA AA LLLLLLLL R E L E A S E 2 . 0 PLEASE ENTER YOUR USERID ABOVE TO BEGIN. TYPE AN X NEXT TO THE OPTION YOU WISH TO PERFORM: ( X ) MAIN - MAIN MENU ( ) GMSS - GENERAL MESSAGES ( ) AMSS - AGENCY MESSAGES
ACTION: L SCREEN: MAIN USERID: IS03T32 09/25/01 12:56:05 PM ---------------------------------------------------------------------------- MAIN MENU ---------------------------------------------------------------------------- SELECT DESIRED SCREEN BY ENTERING ANY NON-BLANK CHARACTER ( ) TRANSACTION TYPES ( X ) ONLINE INQUIRY CATEGORIES ( ) REF DATA MAINTENANCE/INQUIRY ( ) ONLINE PRINT REQUESTS ( ) HELP - USER ASSISTANCE ( ) ( ) ( ) ( ) ( ) USE LEAF (L) ACTION WITH MENU CHOICES
Step 2 On the Main Menu Screen select the option for Online Inquiries Categories and press
<ENTER>.
28 ISIS/AFS ONLINE FEATURES (03/03)

MENU PROCESSING FIGURE 3-13 ONLINE INQUIRES CATEGORIES SCREEN
Step 3 Next select the category Open Items Accounting Inquiries. Press <ENTER>. FIGURE 3-14 OPEN ITEMS ACCOUNTING INQUIRY SCREEN
ACTION: L SCREEN: INQY USERID: IS03T32 09/25/01 01:00:59 PM ---------------------------------------------------------------------------- ONLINE INQUIRY CATEGORIES ---------------------------------------------------------------------------- SELECT DESIRED SCREEN BY ENTERING ANY NON-BLANK CHARACTER ( ) ONLINE INQUIRIES SCREEN - 2 ( ) GENERAL ACCOUNTING INQUIRIES ( ) GRANT ACCOUNTING INQUIRIES ( ) BUDGET VS. ACTUAL INQUIRIES ( ) PERF MEASUREMENT INQUIRIES ( ) BUDGET PREPARATION INQUIRIES ( ) JOB COST ACCOUNTING INQUIRIES ( X ) OPEN ITEMS ACCOUNTING INQ ( ) FIXED ASSETS INQUIRIES ( ) COST ALLOCATION ( ) INVESTMENTS ( ) EXTENDED PURCHASING ( ) INVENTORY ( ) REPORT CONTROL SYSTEM ( ) ADVANCED BUDGET PREPARATION ( ) VENDOR HIST/DOCUMENT TRACKING ( ) WORK ORDER INQUIRIES ( ) FLEET MGMT INQ/TRANS ( ) FINANCIAL INFORMATION SYSTEM ( ) PROJECT INQUIRIES USE LEAF (L) ACTION WITH MENU CHOICES
ACTION: L SCREEN: OPEN USERID: IS03T32 09/25/01 01:02:59 PM ---------------------------------------------------------------------------- OPEN ITEMS ACCOUNTING INQ ---------------------------------------------------------------------------- SELECT DESIRED SCREEN BY ENTERING ANY NON-BLANK CHARACTER ( ) OPEN ITEMS ACCOUNT INQ 2 ( ) OPRQ - OPEN REQUISITION INQ ( ) OPOH - OPEN PO HEADER INQ ( X ) OPOL - OPEN PO LINE INQ ( ) OPOD - OPEN PO BY DOC ID INQ ( ) PRPO - PRINTED PURCHASE ORDER ( ) OPVH - OPEN PV HEADER INQUIRY ( ) OPVV - OPEN PV BY VENDOR NAME ( ) POTX - PURCHASE ORDER TEXT ( ) OPVD - OPEN PV BY DOC ID INQ ( ) OINH - OPEN INVOICE HEADER INQ ( ) OPVL - OPEN PV LINE INQUIRY ( ) PAYD - PAYMENT DETAIL INQUIRY ( ) OINL - OPEN INVOICE LINE INQ ( ) WREC - WARRANT RECONCILIATION ( ) PRIN - PRINTED INVOICE TABLE ( ) WSUM - WARRANT SUMMARY INQUIRY ( ) OINW - OPEN INVOICE WRITE OFF ( ) INTX - INVOICE TEXT TABLE ( ) OINP - OPEN INVOICE/PROVIDER USE LEAF (L) ACTION WITH MENU CHOICES
Step 4 From the list of Open Items tables select Open PO Line Inquiry (OPOL) and press
<ENTER>.
ISIS/AFS ONLINE FEATURES (03/03) 29

MENU PROCESSING FIGURE 3-15 OPEN PURCHASE ORDER LINE INQUIRY SCREEN
Step 5 The first entry in OPOL is displayed. To obtain help at this point input >H= in the ACTION
field and press <ENTER>. FIGURE 3-16 HELP SCREEN FOR OPOL
ACTION: H SCREEN: OPOL USERID: IS03T32 09/25/01 01:05:29 PM O P E N P U R C H A S E O R D E R L I N E I N Q U I R Y VENDOR= NONE PO NUMBER= 107 01300442400 LINE NO= 01 FUND: 107 AGENCY: 107 ORG/SUB-ORG: 0001 APPR UNIT: 100 ACTIVITY: FUNCTION: OBJ/SUB-OBJ: 2700 REPT CAT: JOB NUMBER: PROJECT: LINE AMT: 500.00 INTERNAL REF FUND/AGCY: 811 / 811 CLOSED AMT: 0.00 LAST REF TRANS NO: EXPENDED AMT: 0.00 LAST REF TRANS DATE: OUTSTANDING AMT: 500.00 TEXT IND: DESCRIPTION:
ACTION: R SCREEN: HELP USERID: IS03T32 09/25/01 01:06:49 PM FOR THE INDEX OF THIS CATEGORY : FOR THE GENERAL INDEX : HELP CATEGORY: SCREENS TOPIC: OPOL 00000005 OPEN PURCHASE ORDER LINE INQUIRY (OPOL) 00000010 00000015 Open Purchase Order Line Inquiry (OPOL) contains details about all 00000020 outstanding and some recently closed purchase order lines. Most 00000025 of the information comes from the line level of the purchase order 00000030 (PO) input form. In addition, the amount closed and the amount 00000035 remaining outstanding are included for each line. 00000040 00000045 This table is organized by vendor number, so that all POs for a 00000050 particular vendor can be accessed sequentially from the table. 00000055 00000060 This is a read-only table. Lines are added to this table when new 00000065 purchase order lines are accepted by AFS, and lines in the table 00000070 are changed when modifications are accepted on purchase order 00000075 lines. Several fields are updated when payment vouchers or manual
Step 6 This the first in a series of Help Screens for OPOL. Press <ENTER> to view the remainder
of the series. When done, input >B= for Back in the ACTION field and press <ENTER>.
30 ISIS/AFS ONLINE FEATURES (03/03)

MENU PROCESSING FIGURE 3-17 HELP SCREEN FOR OPOL
Step 7 Enter an action of >B= for Back and press <ENTER> several times until you return to the Main
Menu. FIGURE 3-18 MAIN MENU SCREEN
ACTION: B SCREEN: HELP USERID: IS03T32 09/25/01 01:06:49 PM FOR THE INDEX OF THIS CATEGORY : FOR THE GENERAL INDEX : HELP CATEGORY: SCREENS TOPIC: OPOL 00000005 OPEN PURCHASE ORDER LINE INQUIRY (OPOL) 00000010 00000015 Open Purchase Order Line Inquiry (OPOL) contains details about all 00000020 outstanding and some recently closed purchase order lines. Most 00000025 of the information comes from the line level of the purchase order 00000030 (PO) input form. In addition, the amount closed and the amount 00000035 remaining outstanding are included for each line. 00000040 00000045 This table is organized by vendor number, so that all POs for a 00000050 particular vendor can be accessed sequentially from the table. 00000055 00000060 This is a read-only table. Lines are added to this table when new 00000065 purchase order lines are accepted by AFS, and lines in the table 00000070 are changed when modifications are accepted on purchase order 00000075 lines. Several fields are updated when payment vouchers or manual
ACTION: L SCREEN: MAIN USERID: IS03T32 09/25/01 03:01:57 PM ---------------------------------------------------------------------------- MAIN MENU ---------------------------------------------------------------------------- SELECT DESIRED SCREEN BY ENTERING ANY NON-BLANK CHARACTER ( X ) TRANSACTION TYPES ( ) ONLINE INQUIRY CATEGORIES ( ) REF DATA MAINTENANCE/INQUIRY ( ) ONLINE PRINT REQUESTS ( ) HELP - USER ASSISTANCE ( ) ( ) ( ) ( ) ( ) USE LEAF (L) ACTION WITH MENU CHOICES
Step 8 On the Main Menu select Transaction Types and press <ENTER>.
ISIS/AFS ONLINE FEATURES (03/03) 31

MENU PROCESSING FIGURE 3-19 TRANSACTION TYPES SCREEN
Step 9 The Transaction Types (DOCU) menu screen is displayed. Move the cursor to the
check-box for the Purchasing option, type X and press <ENTER>. FIGURE 3-20 PURCHASING TRANSACTIONS SCREEN
ACTION: L SCREEN: DOCU USERID: IS03T32 09/25/01 03:03:21 PM ---------------------------------------------------------------------------- TRANSACTION TYPES ---------------------------------------------------------------------------- SELECT DESIRED SCREEN BY ENTERING ANY NON-BLANK CHARACTER ( ) GENERAL ACCTG TRANSACTIONS ( ) PERFORMANCE MEASUREMENT ( ) BUDGETING TRANSACTIONS ( ) GRANTS MANAGEMENT ( X ) PURCHASING TRANSACTIONS ( ) JOB COSTING ( ) EXPENDITURE TRANSACTIONS ( ) FIXED ASSETS ( ) REVENUE TRANSACTIONS ( ) INVESTMENT MANAGEMENT ( ) FLEXIBLE PLANNING TRANSACTIONS ( ) INVENTORY ( ) EXTENDED PURCHASING ( ) WORK ORDER TRANSACTIONS ( ) BUDGET PREP TRANSACTIONS ( ) PROJ MANAGEMENT TRANSACTIONS ( ) FLEET MGMT INQ/TRANS ( ) ADVANCED RECEIVABLES ( ) ADVANCED GRANTS ( ) FEDERAL AID MANAGEMENT USE LEAF (L) ACTION WITH MENU CHOICES
ACTION: L SCREEN: PUTR USERID: IS03T32 09/25/01 03:07:54 PM ---------------------------------------------------------------------------- PURCHASING TRANSACTIONS ---------------------------------------------------------------------------- SELECT DESIRED SCREEN BY ENTERING ANY NON-BLANK CHARACTER ( ) REQUISITION ( X ) PURCHASE ORDER ( ) ( ) ( ) ( ) ( ) ( ) ( ) ( ) USE LEAF (L) ACTION WITH MENU CHOICES
Step 10 The Purchasing Transactions (PUTR) menu screen is displayed. Move the cursor to the
check-box for the Purchase Order option, type X and press <ENTER>.
32 ISIS/AFS ONLINE FEATURES (03/03)

MENU PROCESSING FIGURE 3-21 PURCHASE ORDER SCREEN
FUNCTION: NEW DOCID: PO 09/25/01 03:20:56 PM STATUS: BATID: ORG: 000-000 OF 000 H- PURCHASE ORDER INPUT FORM PO DATE: ACCTG PRD: BUDGET FY: ACTION: ORDER TYPE: PART/FINAL: COMMENTS: VENDOR: NAME: INT IND: SELLER FUND: SELLER AGENCY: CALCULATED DOC TOTAL: DOC TOTAL: LN REF RQ JOB NO NUMBER LN FUND AGY ORG/SUB APPR UNIT ACTV FUNC OBJ/SUB NUMBER -- ------------------ ---- --- ------- --------- ---- ---- ------- -------- TEXT RPTG UNITS DESCRIPTION AMOUNT I/D ---- ---- ------- --------------------------- -------------- --- 01- 02- 03- A--*HD37-TYPE BATID/DOCID & PRESS ENTER
Step 11 The first screen of the PO document is displayed. Processing the document from this point is
the same as if it had been created on Document Suspense (SUSF).
If you have not entered a new document, you can return to the menu system by typing End in the Function field and pressing <ENTER>.
ISIS/AFS ONLINE FEATURES (03/03) 33

DOCUMENT PROCESSING
Chapter 4 - Document Processing Introduction
This chapter describes specific procedures for batch and document processing in AFS. It includes detailed instructions for entering and correcting document data online using both Document Suspense (SUSF and SUS2) screens and Document Data Maintenance (DDM) screens.
Conventions
The following conventions are used in this chapter:
• Batches and documents are sometimes referred to as transactions.
• Document Suspense screens, SUSF and SUS2, are referred to repeatedly throughout this chapter. Unless otherwise stated, all references to SUSF are understood to be references to both SUSF and SUS2.
• The term "processing" takes into account any action affecting the status of a batch or
document on the suspense file. This includes approving, deleting, holding, overriding, queuing, running, scheduling, unapproving and undeleting one or more batches or documents.
• New conventions are used in this chapter to identify field names. Field names are now
spelled out, and they are bold with the first letter of the first word of the field capitalized. For example, the ORG field will be referred to as the Organization field.
• The terms "suspense file" and "document suspense table (DST)" are used inter-
changeably.
The following items consist of information you should be aware of when using this chapter, though these are not necessarily "conventions" used in preparing this chapter:
• With the exception of the ACCESS command, all of the SUSF function commands
described in this chapter are dependent upon an action of S (Scan) or R (Refill) being entered in the Action field. Whenever ACCESS is used an action of S (Scan) must be entered in the Action field.
In any case, if any actions other than S or R are entered in the Action field, that action will take precedence and the function command will be ignored.
• SUSF allows you to select one or more batches or documents for most function
commands. Type X in the Selection field next to each batch or document in which you are interested.
34 ISIS/AFS ONLINE FEATURES (03/03)

DOCUMENT PROCESSING Terminology
The following terms will be used throughout this chapter. Definitions are provided for a clear understanding of the AFS terminology being used.
• Batch. A group of like documents controlled by a batch header.
• Batch ID. This ID uniquely identifies an input batch and is composed of three parts:
Batch Type (3 Characters) Agency Code (3 Characters) Batch Number (1-6 Characters)
• Batch Header. A special screen identifying and controlling an entire batch.
A batch header usually contains the batch number, the number of documents that make up the batch, and the total dollar amount associated with those documents. A batch header usually appears as a separate screen.
• Document. A single input form containing a number of related entries.
• Document Data Maintenance (DDM). The facility that enables batch and document data
entry, correction, and processing.
• Document Header. The section of the input form containing information common to all line entries on the form. The document header appears at the top of the form, and also appears at the top of the screen.
• Document ID. This ID uniquely identifies an input document and is composed of three
parts:
Document Type (3 Characters) Agency Code (3 Characters) Document Number (1-11 Characters)
• Document Suspense Table (DST). A system table used for storing documents in process,
facilitating data entry and correction.
• Function. A process executed by entering a command in the Function field of the SUSF and DDM screens. The types of functions vary from screen navigation commands to document entry, correction and processing commands.
• Line Entry. A single line item entered on an input form. Each entry usually contains a
number of data fields (e.g., account number, amount).
• Master Table Interface (MTI). The facility that allows you to view and modify the contents of application and system control tables.
ISIS/AFS ONLINE FEATURES (03/03) 35

DOCUMENT PROCESSING
• Transaction Code. Document Type and Batch Type are often referred to by this name. This is the two character definition defining a type of batch or document. For example, the transaction code for a payment voucher is PV.
Basic Concepts
The following sections cover some of the basic concepts behind AFS batch and document processing.
The Processing Cycle
Figure 4-1 presents an overview of the transaction processing cycle. Events in this process are identified with circled numbers and explained below:
1. Data entry can begin as soon as you are signed on to an online AFS session.
2. The data entered through DDM is stored in the Document Suspense Table (DST).
Different transactions remain on the suspense files for different lengths of time. Accepted transactions and those marked for deletion remain on the suspense file until the next time the Database Archive utility (DBARC) runs (with specified date parameters). DBARC archives all accepted and deleted records and removes them from the suspense file. Rejected transactions remain on the suspense file with associated error messages until they are corrected and accepted or until they are processed and marked for deletion.
3. Transactions are processed by Document Transaction Programs (DTP’s) (either
online using the RUN command or offline through the nightly cycle process (NCP)). Transactions are either accepted or rejected.
4. Accepted transactions update the database and the Base Ledger. Accepted
transactions also remain in the DST for a time period specified by your organization. These transactions can then be accessed but not modified.
5. Accepted transactions are processed by the Daily Ledger Update Process (SPLT or
BSPT). This process is more commonly referred to as "Split" or "Base Split."
6. The Daily Ledger Update Process updates the various system ledgers, as appropriate.
36 ISIS/AFS ONLINE FEATURES (03/03)

DOCUMENT PROCESSING FIGURE 4-1 BATCH AND DOCUMENT PROCESSING CYCLE
DocumentTransactionProgram (DTP)
Edit / ProcessTransactions
LedgersUpdated
1
2
3
4
5
Base Ledger
Daily LedgerUpdateProcess
DocumentSuspenseTable (DST)
Database
ISIS/AFS ONLINE FEATURES (03/03) 37

DOCUMENT PROCESSING Accessing Batches and Documents
DDM is used to create, correct and process batches and documents. You can access DDM in the following ways:
• Use the menus. Most AFS documents can be accessed via the menu system.
See the "Menu Processing" chapter of this manual for more information about the delivered menu system.
• Leaf from MTI. You can leaf from any MTI screen directly to the first screen of a new
batch or document.
• Use SUSF. SUSF is the interface for the Document Suspense Table (DST). It allows you to interact with the DST in the following ways:
a. Select batches or documents for editing, copying or processing. b. Select transactions for processing. c. Create a new batch or document.
• Use DDM. You can access any existing batch or document from the command area of
any DDM screen.
Once you access DDM, you can access any existing transaction or create a new batch or document by entering the appropriate data in the command area. Each of the methods of accessing DDM are described in detail in the following sections.
Leaf From MTI
If you are currently at any screen in MTI, you can use the L (Leaf) action to display a blank batch or document screen in DDM. Once in DDM, you have the option of creating either a new batch or document.
To use the MTI leaf feature to create either a new unbatched document or a new batch, move the cursor to the Action field, type L (Leaf), type a valid transaction type in the Screen field, and press <ENTER>. DDM will automatically display a blank batch or document header and will place the function command NEW into the Function field. For information on creating a new batch or document from the Function field of a DDM transaction screen see the "Creating a New Batch or Document Using DDM" section of this chapter.
Use SUSF
You can either specify the ID of the batch or document you want to change, or you can select from the list displayed on SUSF. Both methods are explained below.
To access a batch or document with a known ID, move the cursor to the Function field, type access, press <TAB> to move the cursor to the selection line, type the exact document ID and press <ENTER>. If a batch is selected, the specified batch header will be displayed. Otherwise, the first screen of the specified document will be displayed.
38 ISIS/AFS ONLINE FEATURES (03/03)

DOCUMENT PROCESSING
If you are not sure of the exact transaction ID, you will want to use the selection line to scroll through the transactions listed on the Document Suspense File (DSF). To do this, move the cursor to the selection line (the first row ) and enter either a full or partial key. If a full key is entered, SUSF will automatically display the transaction referred to in the selection line. If a partial key is entered, SUSF will automatically display the first transaction ID matching your key on the first row.
After locating a specific document on SUSF, there are two ways to access existing documents for correction:
• Type S (Scan) in the Action field, move the cursor to the Selection field of the
document to be modified and press <ENTER>. In this case, DDM automatically assumes the ACCESS command in the Function field of SUSF.
• Type access in the Function field and either type X in the Selection field of the
document to be selected, or enter the exact batch ID and/or document ID in the selection line and press <ENTER>.
In either case, you will automatically leaf to the document selected on SUSF.
Use DDM
Any existing batch or document can be accessed from the command area of a current DDM screen using the GET function command.
To use the GET command, move the cursor to the Function field and type G (Get). Specify the ID of the batch or document to be accessed using the following criteria:
• If an unbatched document is being accessed, only enter the document ID.
• If a batched document is being accessed, enter both a batch ID and a document ID.
Getting an unbatched document. After entering the document ID, DDM displays the document header screen of the document entered, ready for you to edit the existing data.
Getting a batched document. After entering the batch ID and the document ID, DDM displays the document header screen of the document entered, ready for you to edit the existing data.
In either case, if the document has been accepted (a status of ACCPT) the header screen of the document will be displayed in read-only mode.
Note: If you are currently using a new document, DDM will require you to save or discard that document before using the GET command.
ISIS/AFS ONLINE FEATURES (03/03) 39

DOCUMENT PROCESSING Choosing Between SUSF, SUS2, and DDM
SUSF, SUS2 and DDM allow you to perform a variety of document handling and scheduling actions through the use of the Function field displayed on all of these screens. While SUSF and SUS2 access document screens in exactly the same way, there are advantages in choosing between these screens which display slightly different information found on the suspense file. Use the following list as a guide to choosing between working with SUSF and SUS2:
• Use SUSF for:
Finding the last update date for a specific batch or document finding the user ID of the last user updating a specific batch or document setting the future processing date of a batch or document.
• Use SUS2 for:
Finding the original entry date for a specific batch or document finding the last terminal used to update a specific batch or document.
In addition to this, there are features available on SUSF and SUS2 which are not available on DDM, and there are features which can only be used on DDM. Use the following list as a guide to choosing between working with SUSF and DDM.
• Use SUSF for:
Accessing a specific batch or document without entering the ID, executing the same command against multiple documents and/or batches at once, or copying the data from an existing document to a new document ID
• Use DDM for:
Creating a single new batch or document from any DDM screen, modifying a single, existing, document of batch from any DDM screen, "edit"ing a batch or document displaying batch approvals, overriding batch approvals, setting verification on batches and documents, copying, deleting, and inserting detail lines in a document, or adding text to a document.
SUSF Screen Areas
The SUSF and SUS2 screens are organized into five distinct areas: The action line area, the extended action area, the selection area, the detail line area and the message area. Figure 4-2 is an example of the SUSF screen. Descriptions of these areas follow Figure 4-2.
40 ISIS/AFS ONLINE FEATURES (03/03)

DOCUMENT PROCESSING FIGURE 4-2 SUSF SCREEN AREAS
ACTION: R SCREEN: SUSF USERID: IS03T32 09/27/01 03:46:41 PM FUNCTION: ORG: D O C U M E N T S U S P E N S E S BATCH DOCUMENT PROCESS E ---------------- ---------------------- LAST LAST DATE L TYPE AGCY NUMBER TYPE AGCY NUMBER STAT APPRV DATE USER (YYMMDD) - ---- ---- ------ ---- ---- ------------ ----- ----- ------ -------- -------- PO 100 640980 . . . ACCPT 00000 010919 Z107B44 010919 PO 100 640980 PO 100 023176418 ACCPT 00000 010919 Z107B44 010919 PO 100 641448 . . . ACCPT 00000 010919 Z107E32 010919 PO 100 641448 PO 100 023195647 ACCPT 00000 010919 Z107E32 010919 PO 100 641455 . . . ACCPT 00000 010919 Z107E32 010919 PO 100 641455 PO 100 023145726 ACCPT 00000 010919 Z107E32 010919 PO 100 641461 . . . ACCPT 00000 010919 Z107E32 010919 PO 100 641461 PO 100 023195531 ACCPT 00000 010919 Z107E32 010919 PO 100 642980 . . . ACCPT 00000 010919 Z100A23 010919 PO 100 642980 PO 100 023196008 ACCPT 00000 010919 Z100A23 010919 PO 100 643243 . . . ACCPT 00000 010920 Z100A23 010920
Action Line Area:
• The action line area is used to specify MTI actions to be performed. All MTI actions except A (Add), C (Change), D (Delete) and G (Get) are valid. These actions are excluded on SUSF because documents are added, modified and processed using the Function field. An MTI action of S (Scan) or R (Refill) must be entered whenever a function command is specified.
• A special case exists when the MTI action is S (Scan) and the cursor is placed in the
selection field next to a batch or document. In this case, the access command is put into the Function field and the selected batch or document will be accessed.
Extended Action Area:
• The Function field is used to specify commands for data entry, correction and
processing of batches and documents. • The Organization field must be completed if your authority for entering documents is
restricted to certain organizations. Whenever the Organization field is completed on SUSF, it is validated against Organization (ORG2) and, if valid, will be put into the Organization field of the batch or document. The State of Louisiana does not restrict access to organizations using SUSF.
Selection Line Area: • The selection line (the first row) is reserved for user input and is always left blank by
the system. This row is used to:
$ specify a particular batch or document $ specify the starting point for the list of transactions displayed $ restrict the transactions displayed to those with a specific status.
ISIS/AFS ONLINE FEATURES (03/03) 41

DOCUMENT PROCESSING
• Enter the full key (i.e. the entire ID) of a specific batch or document to display a list of specific transactions or to start the list at a particular point. For example, the full key for the transaction listed on the second line of Figure 4-2 would be PO 107 PO 107 97503119.
• Enter a partial key to start the list at a particular point. For example, partial keys for the transaction on the second line of Figure 4-2 include PO (which would start the list with the first PO) and PO 107 (which would start the list with the first PO document with an agency of 107).
• The Status (STAT) field can be used independently or in combination with any partial key entered to display documents with a common status. For example, you can display all PO documents with a particular status, such as HELD, or you can display all HELD documents currently on DST.
Detail Line Area: • This area is used to display batch and document identification and status information.
With the exception of the Selection (SEL) and Process Date fields, this information is display-only and can be updated only by using SUSF function commands.
• When you enter a function command, you can specify the batch or document(s) to be selected by typing X in the corresponding Selection (SEL) field.
Message Area: • The system may display messages at the bottom of the screen. Up to three message lines
(i.e. six messages) can be displayed at one time. DDM Screen Areas
Document Data Maintenance (DDM) screens have a standard format consisting of up to five distinct areas: the batch header area, the command area, the document header area, the document line area, and the message area.
Figure 4-3 and Figure 4-4 indicate where each of these areas appears on a typical DDM screen. Descriptions for each of the five areas follow.
42 ISIS/AFS ONLINE FEATURES (03/03)

DOCUMENT PROCESSING FIGURE 4-3 DDM SCREEN AREAS: BATCH HEADER SCREEN
Command Area:
• The first two lines of any DDM screen are referred to as the command area. These lines are used for accepting user functions and displaying status and control information.
Batch Header Area:
• The batch header is a separate screen which stores statistics about a specific batch.
These statistics include: batch number, number of documents currently in the batch and the total amount obligated by those documents.
FIGURE 4-4 DDM SCREEN AREAS: DOCUMENT SCREEN
FUNCTION: DOCID: 09/27/01 03:51:59 PM STATUS: ACCPT BATID: PO 100 640980 ORG: B- PURCHASE ORDER BATCH FORM BATCH DATE: 09 19 01 NUMBER OF DOCUMENTS: 1 NET AMOUNT: 43.23 ACTUAL BATCH COUNT: 1 ACTUAL BATCH AMOUNT: 43.23
FUNCTION: DOCID: PO 100 023176418 09/27/01 03:54:12 PM STATUS: ACCPT BATID: PO 100 640980 ORG: 000-000 OF 001 H- PURCHASE ORDER INPUT FORM PO DATE: 09 19 01 ACCTG PRD: BUDGET FY: 02 ACTION: M ORDER TYPE: 6 PART/FINAL: COMMENTS: HEWLETT PACK VENDOR: 941081436 31 NAME: HEWLETT PACKARD COMPANY INT IND: SELLER FUND: SELLER AGENCY: CALCULATED DOC TOTAL: 43.23 DOC TOTAL: 43.23 LN REF RQ JOB NO NUMBER LN FUND AGY ORG/SUB APPR UNIT ACTV FUNC OBJ/SUB NUMBER -- ------------------ ---- --- ------- --------- ---- ---- ------- -------- TEXT RPTG UNITS DESCRIPTION AMOUNT I/D ---- ---- ------- --------------------------- -------------- --- 01- 02 100 100 1004 100 3100 43.23 I 02- 03-
Document Header Area:
• The next block of lines on the document screen is the document header. Document header lines display information about the document as a whole. A document usually consists of a document header and one or more detail lines. The number of lines on the screen making up the document header vary from one document screen to another.
ISIS/AFS ONLINE FEATURES (03/03) 43

DOCUMENT PROCESSING
• When the document displays too many detail lines to fit on one screen, document header
data will automatically be carried forward to subsequent screens. If the document header alone occupies the entire screen, the detail lines will appear on separate screens without the header.
Document Lines Area:
• Each input document can contain space for the entry of detail lines, or accounting line
entries, each of which can occupy one or more physical lines on the screen. The size of the detail line area will vary from one document to another, but in all cases this area is considered by DDM to be a separate area from the document header area. If a document requires more lines than are available on a single screen, another blank screen will be displayed so that you can continue entering data.
• The relative position of the line within the current screen is indicated by a number at the
left end of the line.
Message Area:
• After a document has been processed and errors are detected, or after you have pressed <ENTER>, the system may display messages on the last three available lines of the screen. There are two types of messages:
-- Error messages related to the batch or document. These messages will appear only
after a batch or document has been processed. -- Messages relating to your actions during the online data entry session.
These messages may tell you that you are trying to do something that is not permitted or that your last action was successfully performed with the given results.
Field Descriptions For SUSF and DDM Screens SUSF and SUS2
The following sections provide sample screen prints and field descriptions for Document Suspense (SUSF and SUS2) screens and for DDM screens.
Layouts for both SUSF and SUS2 are displayed in Figure 4-5 and Figure 4-6 and complete field descriptions for each screen follow.
44 ISIS/AFS ONLINE FEATURES (03/03)

DOCUMENT PROCESSING FIGURE 4-5 DOCUMENT SUSPENSE (SUSF)
FIGURE 4-6 DOCUMENT SUSPENSE (SUS2)
ACTION: S SCREEN: SUSF USERID: IS03T32 09/27/01 03:59:16 PM FUNCTION: ORG: D O C U M E N T S U S P E N S E S BATCH DOCUMENT PROCESS E ---------------- ---------------------- LAST LAST DATE L TYPE AGCY NUMBER TYPE AGCY NUMBER STAT APPRV DATE USER (YYMMDD) - ---- ---- ------ ---- ---- ------------ ----- ----- ------ -------- --------
ACTION: S SCREEN: SUS2 USERID: IS03T32 09/27/01 04:00:17 PM FUNCTION: ORG: D O C U M E N T S U S P E N S E ( P A R T 2 ) S BATCH DOCUMENT E ---------------- ---------------------- ENTRY LAST L TYPE AGCY NUMBER TYPE AGCY NUMBER STATUS APPRV DATE TERMINAL - ---- ---- ------ ---- ---- ------------ ------ ----- ------ --------
Field Name/Description
FUNCTION The Function field is used to enter commands beginning data entry, correction, or processing of batches and documents, or modifying the status of batches and documents. See the function commands section of this chapter for a complete list of valid commands.
ORG The Organization field must be completed if your authority for
entering batches and documents is restricted to certain organizations. Whenever the Organization field is completed on SUSF, it is validated against Organization (ORG2) and, if valid, is automatically placed in the Organization field of the batch or document. The State of Louisiana does not restrict access to organizations when using SUSF.
ISIS/AFS ONLINE FEATURES (03/03) 45

DOCUMENT PROCESSING
SEL When you enter a function command, specify the batch(es) or document(s) to be selected by typing x in the corresponding Selection field(s). Multiple batches and documents can be selected by marking more than one Selection field.
When a Selection (SEL) field is marked next to a document, or batch, that transaction is selected. When a Selection field is marked on a row displaying a batch header, all eligible documents in that batch are selected.
BATCH TYPE The batch ID uniquely identifies each batch of documents. The
Batch Type is the first part of the batch ID. It identifies the document transaction type of the batch.
BATCH AGCY The Batch Agency field is the second part of the batch ID. It is
used in security validation and corresponds to an entry in the Agency (AGC2) table.
BATCH NUMBER The Batch Number is the third part of the batch ID. In
combination with transaction type and agency, this number uniquely identifies the batch.
DOCUMENT TYPE The document ID uniquely identifies each document. The document Document Type is the first part of the document ID. It identifies the transaction type of the document.
DOCUMENT AGCY The Document Agency field is the second part of the document ID.
It is used in security validation and corresponds to an entry on Agency (AGC2).
DOCUMENT The Document Number is the third part of the document ID. If NUMBER you are using automatic document numbering, type the document
type followed by a # in this field. Otherwise, you must supply this number in order to uniquely identify the document.
APPRV The approval flags are displayed for each transaction listed on the
screen.
[SELECTION LINE] The selection line (the first row) is reserved for user input and is always left blank by the system. For more information on using the selection line, see the "SUSF Screen Areas" section of this chapter.
46 ISIS/AFS ONLINE FEATURES (03/03)

DOCUMENT PROCESSING
SUSF ONLY:
STAT The status of the batch or document is displayed in the Status field. You can enter a specific status in the selection line to limit the display to batches and documents with a specific status. For example, you can specify a status of ACCPT in the selection line (with all other data entry fields being left blank), and the system will display only batches and documents that have a status of ACCPT.
LAST DATE The last update date is displayed for each transaction listed on the
screen. LAST USER The user ID of the last user to update that batch or document is
displayed in this field.
PROCESS DATE The process date is used to establish the future processing date of a batch or document by the nightly cycle process (NCP). Updates to this field are only valid when a CHANGE command is entered. This date is entered and displayed in YYMMDD format.
SUS2 ONLY: STATUS The status of the batch or document is displayed in the Status field.
You can enter a specific status in the selection line to limit the display to batches and documents with a specific status. For example, you can specify a status of ACCPT in the selection line (with all other data entry fields being left blank), and the system will display only batches and documents that have a status of ACCPT.
ENTRY DATE The original entry date is displayed for each transaction listed on
the screen. LAST TERMINAL The last update terminal is displayed for each transaction listed on
the screen. DDM
All DDM screens share a basic layout like the payment voucher (PV) input form screens displayed in Figure 4-6a. Complete field descriptions for DDM screens follow Figure 4-6a.
ISIS/AFS ONLINE FEATURES (03/03) 47

DOCUMENT PROCESSING FIGURE 4-6A SAMPLE AFS DOCUMENT HEADER SCREEN
FIGURE 4-6B AMPLE AFS DOCUMENT LINE SCREEN
FUNCTION: DOCID: PV 107 PV000001701 09/28/01 08:25:09 AM STATUS: BATID: ORG: H- PAYMENT VOUCHER INPUT FORM PV DATE: ACCTG PRD: BUDGET FY: ACTION: PV TYPE: ACT DEL DT: SCH PAY DATE: OFF LIAB ACCT: FA IND: DOCUMENT TOTAL: EFT IND: APPLICATION TYPE: USE TAX AMT: CALC DOC TOTAL: VENDOR CODE: CHECK CATEGORY: SINGLE CHECK FLAG: VENDOR NAME: TAX CODE: ADDR1: ADDR2: ADDR3: FREIGHT IND: FREIGHT TOT: FREIGHT I/D: TOTAL AMT: TOT AMT I/D: CALC TOT AMT: TOTAL QTY: TOT QTY I/D: CALC TOT QTY: SELLER: FUND: AGCY: ORG: SUB-ORG: APPR UNIT: ACTV: FUNC: REV SRC: SUB-REV: JOB NO: RCAT: OBJECT: SUB-OBJ: OFF REC ACCT: BS ACCT:
FUNCTION: DOCID: PV 107 PV000001701 09/28/01 08:25:53 AM STATUS: BATID: ORG: 000-000 OF 000 LN REFERENCE COM VENDOR INV NO CD NUMBER LN LN INVOICE LN DESCRIPTION -- -- --------------- -- --- ------------ --- ---------------- D SUB FUNC SUB REV SUB T FUND AGCY ORG ORG APPR UNIT ACTV TION OBJ OBJ SRC REV JOB NO - ---- ---- ------- --------- ---- ---- ------- ------- -------- BS REPT CAT ACCT QUANTITY I/D FREIGHT AMOUNT I/D AMOUNT I/D -------- ---- -------------- - -------------- - -------------- - TAX CODE TAX AMOUNT TOTAL AMOUNT P/F -------- -------------- -------------- - 01- 02-
48 ISIS/AFS ONLINE FEATURES (03/03)

DOCUMENT PROCESSING
Field Name/Description
FUNCTION The Function field is used to enter commands requesting actions against a batch or document. These commands are processed by DDM. See the function commands section of this chapter for a complete list of valid commands.
DOCID The document ID is made up of the following sections:
The document ID uniquely identifies each document. The Document Type is the first part of the document ID. It identifies the type of document.
The Document Agency field is the second part of the document ID. It is used in security validation and corresponds to an entry in Agency (AGC2).
The Document Number is the third part of the document ID. If you are using automatic document numbering, type document type followed by a # in this field. Otherwise, you must supply this number in order to uniquely identify the document.
[DATE/TIME] Display only. This field displays the current system date and time. STATUS Display only. Used to display the status of a batch header or
document.
BATID The batch ID uniquely identifies each batch of documents. It is made up of the following three sections:
The Batch Type is the first part of the batch ID. It identifies the document transaction type of the batch.
The Batch Agency field is the second part of the batch ID. It is used in security validation and corresponds to an entry in Agency (AGC2).
The Batch Number is the third part of the batch ID. In combination with transaction type and agency, this number uniquely identifies the batch. You must enter this number.
ISIS/AFS ONLINE FEATURES (03/03) 49

DOCUMENT PROCESSING
ORG This field must be completed when new batches or documents are created if your authority for entering batches and documents is restricted to certain organizations. Whenever the Organization field is completed on SUSF, it is validated against Security (STAB) and is placed in the Organization field of the batch or document, if it is valid. The State of Louisiana does not restrict access to organizations when using SUSF.
[DETAIL LINES/ Display only. This field displays the total number of detail lines in DISPLAY STATUS] the batch or document and which detail lines are being displayed.
For example, if the document has 15 detail lines and the screen can display only 7, the first screen will display 001-007 OF 015 indicating that detail lines 1 through 7 of 15 are being displayed.
Using SUSF and DDM
The following topics are covered in this section:
• creating a new batch or document • completing the first screen • continuation screens for DDM • saving and discarding batches and documents • processing batches and documents • read-only mode.
Creating a New Batch or Document
New batches and documents can be created using the following methods:
• the NEW function command • the COPY function command.
Once you have initiated either new document entry or new batch header entry, the procedures for entering transaction data are the same. All of the methods listed above are described in the following sections.
New Command
The NEW command can be used to create both new batches and new unbatched documents. To use the NEW command, move the cursor to the Function field and type new. Specify the ID of the batch or document to be created, using the following criteria: • If a new unbatched document is being created, only enter a new document ID
(Note: to use auto document numbering, you must type the document type followed by a # in the Document Number field). DDM will display a blank document header screen for you to begin entering data. Figure 4-7 shows a completed SUSF screen for creating a new unbatched purchase order. Figure
50 ISIS/AFS ONLINE FEATURES (03/03)

DOCUMENT PROCESSING
4-8 shows a completed command area for creating a new unbatched purchase order from a DDM screen.
• If either a new batch is being created, or a new document within a batch is being
created, enter both a batch ID and a document ID. After entering both the complete batch ID and the document ID, DDM will display a blank batch header for you to begin entering data.
Note that if a new document is currently displayed in DDM, you must type either save or discard in the Function field before using the NEW command to create another unique document.
FIGURE 4-7 CREATING A NEW DOCUMENT FROM SUSF
FIGURE 4-8 CREATING A NEW DOCUMENT FROM A DDM SCREEN
ACTION: S SCREEN: SUSF USERID: IS03T32 09/28/01 08:34:30 AM FUNCTION: NEW ORG: D O C U M E N T S U S P E N S E S BATCH DOCUMENT PROCESS E ---------------- ---------------------- LAST LAST DATE L TYPE AGCY NUMBER TYPE AGCY NUMBER STAT APPRV DATE USER (YYMMDD) - ---- ---- ------ ---- ---- ------------ ----- ----- ------ -------- -------- PO 107 PO#
FUNCTION: NEW DOCID: PO 107 PO# 09/28/01 08:35:56 AM STATUS: ACCPT BATID: ORG: 000-000 OF 001 H- PURCHASE ORDER INPUT FORM PO DATE: 09 21 01 ACCTG PRD: BUDGET FY: 02 ACTION: E ORDER TYPE: 6 PART/FINAL: COMMENTS: TEST TEXT SC VENDOR: 160484732 00 NAME: OCCIDENTAL CHEMICAL CORP INT IND: SELLER FUND: SELLER AGENCY: CALCULATED DOC TOTAL: 240.00 DOC TOTAL: 240.00 LN REF RQ JOB NO NUMBER LN FUND AGY ORG/SUB APPR UNIT ACTV FUNC OBJ/SUB NUMBER -- ------------------ ---- --- ------- --------- ---- ---- ------- -------- TEXT RPTG UNITS DESCRIPTION AMOUNT I/D ---- ---- ------- --------------------------- -------------- --- 01- 01 107 107 0001 100 BETH 2700 240.00 I 02- 03- A--*HS60-DOCUMENT MARKED FOR READ ONLY
ISIS/AFS ONLINE FEATURES (03/03) 51

DOCUMENT PROCESSING
Copy Command
The COPY function command can be used to copy all of the transaction data from a selected document, batched or unbatched, into a blank document on SUSF or SUS2. To use the COPY function command, move the cursor to the Function field and type copy. Next, enter a unique document ID on the Selection Line (the first row), type x in the Selection (SEL) field of the document being copied and press <ENTER>. DDM will display the header screen of the newly copied document. All of the document data will be copied, and the Document ID field will be filled with the newly assigned transaction ID.
Completing the First DDM Screen
Once a document screen is displayed in DDM, you can begin to enter new data. While several documents display both header and line information on the same screen, most documents display the header and line screens separately. On any header screen, regardless of whether all of the lines have been filled, if you press <ENTER>, DDM will display the next logical screen for that document. If all of the lines on a detail line screen have been filled and <ENTER> is pressed, DDM will display a new detail line screen for that document. Other useful commands for navigating batches and documents are: BACK Displays the screen immediately preceding the current screen. BOTTOM BAT Displays the last document header in the current batch. BOTTOM DOC Displays the last screen of detail lines in the current document
(batched or unbatched). TOP BAT Displays the batch header of the current batch. TOP DOC Displays the document header of the current document. When you have completed entering transaction data on the current screen, you can either enter a function command, or leave the Function field blank and press <ENTER>. If a function command is entered, that command will be executed. If the Function field is left blank, then the next logical screen is displayed. DDM stores accepted and corrected documents in a temporary document work area. Each time you press the <ENTER> key, the document work area is updated. The document work area is written to the Document Suspense Table (DST) only when a function is entered that specifically causes this action to be taken, such as the SAVE command.
52 ISIS/AFS ONLINE FEATURES (03/03)

DOCUMENT PROCESSING Continuation Screens
The system recognizes that you are entering data and will display a series of blank data entry screens, or continuation screens, as long as:
• the last line on the current data entry screen contains data
• no commands other than [blank], NEW, and SAVE are currently entered in the Function
field.
(Note: If the current data entry screen is a document header all you need to do is press <ENTER> to continue to the next screen.)
The screen displayed to the user is based on specific transaction type and the following criteria:
• New batch. (Assuming both the BATCH ID and the DOC ID were entered during batch
creation) Only after <ENTER> is pressed will the blank document header for the document be displayed.
• New batch. (Assuming that only the BATCH ID was entered during batch creation)
When <ENTER> is pressed while the batch header is displayed, the system defaults the NEW command in the Function field. To display the first blank document screen in the batch, enter the DOC ID and press <ENTER>. The next screen displayed will be a blank document header screen.
• New document. (Assuming that the document header resides on a screen without detail
lines) When <ENTER> is pressed, the system saves the document header in the document work area. If the Function field is left blank, a blank screen containing detail lines is displayed.
• New document. (Assuming that the document header resides on a screen with detail
lines) When <ENTER> is pressed, the next screen of detail lines is displayed.
• Detail lines. (For all transactions) When detail lines are being entered (either on a screen with the document header or on a screen by themselves) the system displays another blank screen of the same type if the last detail line contains data.
Save and Discard Commands
If you attempt to exit DDM while a new document is displayed, DDM prompts you to use either the SAVE or DISCARD command before leaving that document.
The DISCARD function command clears the document work area. All work since the last time the suspense file was updated is lost. If no command has been entered in the Function field causing the document to be written to the suspense file, then this action effectively cancels the document entry. If the document has been previously saved on the DST then it still exists there in its previous state.
ISIS/AFS ONLINE FEATURES (03/03) 53

DOCUMENT PROCESSING
The SAVE function command updates the document work area and saves the entire document on the suspense file.
Processing Batches and Documents
SUSF processing function commands include APPROVE, UNAPPROVE, DELETE, UNDELETE, HOLD, OVERRIDE, RUN and SCHEDULE.
On SUSF, processing commands are executed by typing x in the Selection field of one or more batches or documents, typing the processing command to be used in the Function field and pressing <ENTER>. There are exceptions, which include the RUN command, where only one batch or document can be selected at one time. Also, the header or line screen of batches or documents must be accessed to perform the APPROVE and UNAPPROVE commands. The DDM processing function commands include APPROVE DOC, UNAPPROVE DOC, DELETE BAT, DELETE DOC, UNDELETE BAT, UNDELETE DOC, HOLD BAT, HOLD DOC, OVERRIDE BAT, OVERRIDE DOC, RUN BAT, RUN DOC, SCHEDULE BAT and SCHEDULE DOC.
On DDM, all processing commands are executed by typing the processing command to be used in the Function field of the current batch or document and pressing <ENTER>.
Read-Only Mode
Read-only mode allows you to view a batch or document but does not allow you to change information. There are two ways to view a batch or document using read-only mode: you can either use the VIEW function command, or you can access a document with a status barring updates and receive read-only access automatically.
Users have the option of viewing batch or document data in read-only mode using the VIEW function command. To use the VIEW command, move the cursor to the Function field on SUSF, type V (View), move the cursor to the Selection field of the batch or document to be viewed in read-only mode, type X and press <ENTER>. The header screen for the batch or document selected will be displayed.
When the function command ACCESS or GET is entered on the SUSF screen, and the transaction being accessed has a status barring updates (for example: accepted), or if you have read-only authority, the system will automatically grant read-only access. If you attempt to make a change to a document in read-only mode, the system will reject the change and issue the message UPDATES IGNORED/READ ONLY MODE.
54 ISIS/AFS ONLINE FEATURES (03/03)

DOCUMENT PROCESSING Function Commands for SUSF and DDM
The following section lists valid function commands for SUSF and DDM. These commands are organized in a table with the following headings: • function command • short command • description • multiple batches and documents (SUSF only) • function key (DDM only).
The Function Command column lists the actual commands recognized by the system. These function commands are entered in the Function field of SUSF and DDM screens. While all of the commands in this column are valid entries in the Function field, most users will prefer to use the commands listed in the Short Command column.
The Short Command column lists all of the short, or abbreviated, commands delivered with AFS for each function command.
The Description column lists a short definition of what the function command actually does.
The Multiple Batches and Documents column for SUSF indicates whether you can select multiple batches and/or documents for that specific command.
The Function Key column for DDM lists the function key assigned to each command.
Short commands and function keys can be assigned to any function command, or combination of function commands. For information on adding or changing these assignments, refer to the description of Program Function Definition (PFDF) in the System Control Tables manual. DDM commands affecting an entire batch have the same effect as selecting all eligible documents within that batch. Note that a batch must be edited (to insure a balanced batch) before the individual documents within that batch can be scheduled.
ISIS/AFS ONLINE FEATURES (03/03) 55

DOCUMENT PROCESSING SUSF FUNCTION COMMANDS
Function Command
Short Command
Description
Multiple
[blank] N/A When the Function field is blank, any of the following actions can be performed:
- If all Selection (SEL) fields are also blank, and an Action of S (Scan) is entered, the first screen of the suspense file will be displayed. If an Action of R (Refill) is entered, the suspense file display scrolls forward.
- If the cursor is moved to the Selection field of a batch or
document, and an Action of S (Scan) is entered, DDM automatically infers the ACCESS command into the Function field and the selected batch or document will be accessed.
- If the selection line contains a partial key, the display changes
based on the provided data.
ACCESS G Displays the header screen of the document selected. If a batch header is accessed, then the batch header will be displayed.
- If the current status is ACCPT (accepted), you can view the transaction data, but you cannot change anything. If the current status is DELET (marked for deletion), you cannot access the batch or document. Otherwise, you have full access to update the accessed batch or document.
APPROVE A+ Applies your approval authority to the selected batches and/or documents. CHANGE DT SUSF Only. Enter a new processing date into the Process Date field of
selected batches and documents. The processing date will change to the date entered.
COPY C Allows you to begin data entry on a new batch or document by copying data from an existing batch or document. The selection line must be filled in with the new document ID and the Selection field next to the document being copied must be filled to use the COPY command.
DELETE D Marks selected batches or documents for deletion from the suspense file. HOLD H+ Changes the status of all selected batches and/or documents to HELD. NEW N Displays a blank data entry screen for a new batch header or document
(Either a blank document header screen or a blank batch header can be created, depending on the key specified). The selection line must be completed for this function and no other selections are allowed.
OVERRIDE OV Applies your error override authority to all selected batches and documents. RUN R
W Submits the selected batch or document for foreground processing. If the batch or document is processed without errors, SUSF is redisplayed. If errors are detected, the first screen of the first transaction with errors is displayed.
SCAN V Displays the header for the selected batch or document and read-only access is granted.
SCHEDULE S Changes the status of all selected batches or documents to SCHED. The next time the nightly cycle process (NCP) runs, all batches and documents with a status of SCHED will be selected for processing.
UNAPPROVE A- Removes the applied approvals from the selected batches and documents, based upon your authority.
UNDELETE UD Changes the status of all selected batches and documents that have been previously marked for deletion, and still remain on the suspense file, to HELD.
56 ISIS/AFS ONLINE FEATURES (03/03)

DOCUMENT PROCESSING DDM FUNCTION COMMANDS
Function Command
Short Command
Description
Function Key
N/A [blank] DDM will update the document work area and display the next logical screen within the current batch or document depending on the following riteria: c
- On any header screen, regardless of whether all of the lines have been filled, if you press ENTER>, DDM advances to the first detail line screen of the current document.
- If data has not been keyed into all of the lines of a detail line
screen and <ENTER> is pressed, redisplays the same data entry screen.
- If all of the lines on a detail line screen have been filled and
<ENTER> is pressed, DDM will display a new detail line screen for the document.
APPROVE BAT AB+ Applies your approval authority to the current batch. 24 APPROVE DOC
A+ AD+
Applies your approval authority to the current document. 12
BACK < Displays the screen immediately preceding the current screen. BOTTOM BAT BB Displays the last document header in the current batch. 18 BOTTOM DOC B
BD Displays the last screen of detail lines in the current document (batched or unbatched).
6
DELETE BAT DB Changes the status of all documents within the current batch to DELET. Batches marked as DELET will be removed from the system and archived at a later date.
19
DELETE DOC D Changes the status of the current document to DELET. Documents marked as DELET will be removed from the system and archived at a later date.
7
DELETE LINE DL Deletes single lines within an existing document. To use this command you must place the cursor on the detail line to be deleted and press <ENTER>. Blank lines cannot be deleted with this command.
DISCARD X Clears the document work area. All work since the last time SUSF was updated is lost. If no function has been entered causing the document to be written to SUSF, this action will cancel document entry. If the document has previously been saved on SUSF, then it must be accessed and deleted to remove it from SUSF.
4
DUP LINE CL Duplicates one detail line of the current document. To use this command you must place the cursor on the detail line to be duplicated and press <ENTER>. The new detail line is inserted immediately after the duplicated line.
EDIT ES Interactive editing is performed on the current batch or document. All screen areas within the batch or document, since the last time that the EDIT command was used, are edited. If no errors are detected and all detail lines on the screen contain data, the next logical screen is displayed. If errors are detected, the first screen with errors in the current document is displayed. If a detail line on the screen does not contain data, an EDIT DOC function is performed.
EDIT BAT EB Edits all screen areas within the current batch. If no errors are detected, the batch header is displayed with a message indicating a successful edit. If errors are detected, the screen with the first error detected within the batch is displayed.
20
EDIT DOC ED Edits all screen areas within the current document. If no errors are detected, the top of the document is displayed and the status is updated. If errors are detected, the screen with the first error detected within the document is displayed.
8
ISIS/AFS ONLINE FEATURES (03/03) 57

DOCUMENT PROCESSING
END screen id E The system exits DDM and returns to MTI. If you entered DDM from the SUSF screen, the system would return to SUSF. If you leafed to DDM from MTI, the system returns to the MTI screen where the leaf was entered. If you enter an END function command and specify a screen ID in the Screen field, the system exits DDM and leafs to the MTI screen specified. For example, if you type e in the Function field and you type fund in the Screen field, the system would return to MTI and display the FUND screen. If you have not saved the latest changes to the document, the system prompts you to either save or discard those changes before allowing the END function command.
3
ERRORS EL Displays the next screen of detail lines within the current batch or document with error messages.
FIRST FL Displays the first screen of detail lines in the current document. 13 FREE When a batch or document header is accessed, a flag is set on the Document
Suspense Table (DST) marking it as "in use". The system does not allow other users access to the batch or document while the first user is still working on it. When the user exits the batch or document, the DST is updated to remove the "in use" flag. If a user is disconnected while accessing a batch or document, it could be listed as "in use", even though no other user is accessing it. When this occurs, you can reset the "in use" flag on the DST by using the FREE command. The FREE command is used on the SUS2 screen. NOTE: Make sure that no other user is accessing the batch or document before using the FREE command.
GET G Displays the first screen of the selected document. The document ID must be entered in the Document ID field on the screen (to use auto document numbering, you must type the document type followed by # in the Document Number field). If the current status is ACCPT (accepted), you can view the transaction data, but you cannot change anything. If the current status is DELET (marked for deletion), you cannot "get" the batch or document. Otherwise, you have full access to update the accessed batch or document. If you have not saved the latest changes to the document, the system prompts you to either save or discard those changes before allowing the GET function command.
HELP H The system returns to MTI and leafs to the HELP table for that screen. When an action of E (End) is specified within MTI, the system returns to the document screen where the HELP command was entered.
1
HOLD BAT HB+ Changes the statuses for all documents within the current batch to HELD. 23 HOLD DOC HD+ Changes the status for the current batch or document to HELD. 11 IGNORE IG Interactive editing is performed on the current batch or document.
All screen areas within the batch or document, since the last time that the IGNORE command was used are edited. DDM will continue in data entry mode whether or not errors have been detected.
LAST LL Displays the last screen of the current document. 14 MORE Refills the error message area of the current document screen. This
command is only valid when the error message area on the current screen overflows. The system automatically defaults this command into the Function field when the overflow condition is detected.
NEW N Displays a blank data entry screen for a new batch header or document (Either a blank document header screen or a blank batch header can be created be displayed, depending on the key specified). If the NEW command is used while scanning or accessing a document, DDM prompts you to either save or discard the current document first.
58 ISIS/AFS ONLINE FEATURES (03/03)

DOCUMENT PROCESSING
NEW LINE IL Creates new lines, one at a time, within the current document. To use this command you must place the cursor on the detail line that the new line should follow and press <ENTER>. A blank data entry screen will be displayed. You can continue to enter new data as long as all detail lines on the screen contain data. If the cursor is not placed on a specific detail line, the new line will be inserted before the first detail line on the screen.
NEXT DOC ND Displays the first screen of the next document in the current batch. 16 NEXT n + n The NEXT command can be used to either display the next line or to move a
set number of lines forward where n is equal to the number of lines to move. The number entered for n must be within the range of 1 to 999. If no value is entered for n, the default is equal to 1. If the number entered for n follows the last line, then the last line will be displayed. For example, if you enter NEXT 5, the display will advance forward five lines.
OVERRIDE BAT
OVB Applies your override authority to the current batch.
OVERRIDE DOC
OV OVD
Applies your override authority to the current document.
PAUSE screen id
When a PAUSE function command is entered the system returns to MTI and leafs to a specific screen. You can specify the screen paused to either on EasyDoc Parameters (EZPM), OR you can enter the four character screen ID as a destination (AFS is delivered with SUSF as the destination screen for the PAUSE command). For example, if you type Z in the Function field and agcy in the Screen field, the system would return to MTI displaying the AGCY screen. From within MTI, you are free to perform any valid MTI actions such as scanning data, updating tables, and moving around from one screen to another. When an action of E (End) is specified within MTI, the system returns to the document screen where the PAUSE command was entered.
PREV DOC PD Displays the first screen of the previous document header in the current batch. Errors will be issued if this command is executed in an unbatched document or if this command is issued from the batch header.
15
PREV n - n The PREV command can be used to either display the previous line or to move a set number of lines backward where n is equal to the number of lines to move. The number entered for n must be within the range of 1 to 999. If no value is entered for n, the default is equal to 1. If the number entered for n precedes the first line, then the first line will be displayed. For example, if you enter PREV 5, the display will move back 5 lines.
RUN BAT RB Submits the current batch for foreground processing. the document work area is saved before the batch runs. If no errors are detected, DDM displays the batch header with a message indicating a successful run. If errors are detected, the screen with the first error detected within the batch is displayed.
21
RUN DOC R RD
Submits the current document for foreground processing. The document work area is saved before the document runs. If no errors are detected, DDM displays the top of the document with a message indicating a successful run. If errors are detected, the screen with the first error detected within the document is displayed.
9
SAVE US DDM updates the suspense file. The status of the batch or document is changed to either SCHED or HELD depending on how that specific screen is setup on EasyDoc Parameters (EZPM).
2
SCHEDULE BAT
SB Changes the status of the current batch header to SCHED and the document work area is saved. The next time the nightly cycle process (NCP) runs, all batches with a status of SCHED will be selected for processing.
22
SCHEDULE DOC
S SD
Changes the status of the current document to SCHED and the document work area is saved. The next time the nightly cycle process (NCP) runs, all documents with a status of SCHED will be selected for processing.
10
SHOW APPROVALS
A The system determines the approvals that are pending on the transaction and produces error messages indicating the current approval status.
TOP BAT TB Displays the batch header of the current batch. 17 TOP DOC T
TD Displays the document header of the current document. 5
ISIS/AFS ONLINE FEATURES (03/03) 59

DOCUMENT PROCESSING
UNAPPROVE BAT
AB- Removes your level of approval, as obtained from Security (STAB), from the current batch.
UNAPPROVE DOC
A- AD-
Removes your level of approval, as obtained from STAB, from the current document.
UNDELETE BAT
UDB Changes the status of the current batch to HELD. This command can only be used on batches or documents with a current status of DELET.
UNDELETE DOC
UD UDD
Changes the status of the current document to HELD. This command can only be used on batches or documents with a current status of DELET.
UP Moves the display "up" from the current screen. If the document header is displayed, UP moves the display to the batch header. If detail lines are displayed, UP moves the display to the document header.
VERIFY V Sets the verify flag on the current document. This flag serves as a confirmation to the user that the document has been reviewed. Documents requiring verification will not be accepted without this flag.
Special Features
The following topics are discussed in this section:
• Function key definitions • Approval system
Function Key Definitions
Most computer keyboards will have either ten, twelve or twenty four function keys across either the top or one side of the keyboard. Both DDM and SUSF support the use of function key assignments for function commands. This means that any command which can be entered in the Function field on SUSF or DDM can be mapped, or assigned, to any function key. Assigning commands to function keys can greatly increase speed and efficiency in document processing.
To view current function key settings, move the cursor to the Action field of any MTI screen, type N (Next), type pfdf in the Screen field and press <ENTER>. The Program Function Definition (PFDF) screen will be displayed as shown in Figure 4-9. PFDF stores all of the current short commands assigned to DDM and SUSF commands AND all of the function keys assigned to DDM and SUSF commands.
The Translation Group field is used to differentiate between the different groups of definitions stored on PFDF. Valid entries for this screen, as it is delivered are DDM (DDM functions and function key assignments), SUSF (SUSF and SUS2 functions and function key assignments) and GEN (functions and function key assignments for the document generation screens). Entering SUSF in this field will display all of the definitions for SUSF, whereas entering DDM or GEN will display all of the definitions for DDM and the document generation screens respectively. The To Field 1 lists the first command. The To Field 2 field lists the second command if applicable. The first and second command (if applicable) result from a single key stroke. The From Field lists the short command or function key assigned to a specific command.
60 ISIS/AFS ONLINE FEATURES (03/03)

DOCUMENT PROCESSING FIGURE 4-9 PROGRAM FUNCTION DEFINITION (PFDF)
ACTION: R SCREEN: PFDF USERID: IS03T32 02/10/01 03:20:27 PM P R O G R A M F U N C T I O N D E F I N I T I O N
FROM TO ---------------------- ---------------------------------------- TYPE FIELD TYPE FIELD 1 FIELD 2 ==== =============== ---- --------------- --------------- 01- PFK 01 FUNI HELP 02- PFK 02 FUNI SAVE END 03- PFK 03 FUNI END 04- PFK 04 FUNI DISCARD END 05- PFK 05 FUNI TOP DOC 06- PFK 06 FUNI BOTTOM DOC 07- PFK 07 FUNI DELETE DOC 08- PFK 08 FUNI EDIT DOC 09- PFK 09 FUNI RUN DOC 10- PFK 10 FUNI SCHEDULE DOC END 11- PFK 11 FUNI HOLD DOC END
TRANSLATION GROUP= DDM
In Figure 4-9, function key 01 is assigned to the DDM command HELP. This means that while a DDM screen is displayed, if you press the <F1> key on your keyboard this will have the same effect as typing H (Help) in the Function field and pressing <ENTER>. To change existing PFDF definitions, move the cursor to the field being modified, type in the modification, move the cursor to the Action field, type C (Change) and press <Enter>. PFDF can be changed only by users with the correct security access. DDM commands cannot be entered on Extended Begin Day (Part 2) (XBG2), and any settings stored on XBG2 automatically have precedence over any settings on PFDF. To properly use the function key assignments established on PFDF, the online control function keys section of XBG2 MUST remain blank.
Approval System
The approvals feature enables authorized individuals to approve a document before it is accepted by the system. The entire approval system is optional. Up to five levels of approval are available. The number of approvals required before a transaction is accepted depends on the setup used by your installation. Normally, batches and documents must pass the edit process successfully before they can be approved. Each installation has the option to allow pre-approvals on batches and documents by setting the Pre-Approval Allowed flag on EasyDoc Parameters (EZPM) to Y. This option allows batches and documents to be approved, regardless of errors, as long as the user has proper approval authority.
ISIS/AFS ONLINE FEATURES (03/03) 61

MASTER TABLE INQUIRY
Chapter 5 - Master Table Inquiry Accessing MTI
The Master Table Inquiry (MTI) module permits you to display and modify entries from master tables at the terminal. The entries will be displayed to you on formatted screens similar to the screens used for entering and correcting financial transactions. Appendix B contains a complete list of all AFS tables along with pictures of each table's input screen.
Once you have signed on to the system, Master Table Inquiry can be invoked with the following access command.
1. Sign on to ISIS.
2. Type 1 for Financial Management Application at the ISIS screen.
3. Press <ENTER> 4. Type "N" for NEXT in the ACTION field. 5. Type "XXXX" for the applicable table in the SCREEN field (e.g., "OBJ2" for
Object). 6. Press <ENTER>. The formatted screen for the table you requested will be
displayed. Formatted Screens
The first line of the screen is the action line. The action line consists of three fields. The first field is the ACTION field, which is used to enter MTI action commands. The second field is the SCREEN field which displays the current table ID. The last field falls under the label USERID. The USERID field provides the means for restricting access to certain tables and table data. Following the action line, are the table screen constants and data fields. Screen constants are displayed at normal intensity, while data fields are highlighted. The key fields for each table are specified with double underlines or an = sign. These key fields are unique in that there can only be one entry per unique key in each table. In retrieving table entries it is necessary to specify the key of the desired table entry. The remaining fields which follow the key fields in the table entry are referred to as result fields. These fields simply contain the information that accompanies each key.
62 ISIS/AFS ONLINE FEATURES (03/03)

MASTER TABLE INQUIRY
At least one line at the bottom of the screen will be reserved for error messages. A list of all MTI messages is contained in the Error Message Explanation (EMEX). Figure 5-1 shows a sample formatted screen for Account Type (ACCT).
FIGURE 5-1 ACCOUNT TYPE TABLE
ACTION: S SCREEN: ACCT USERID: IS03T32 09/28/01 10:14:08 AM A C C O U N T T Y P E ACCOUNT TYPE NAME SHORT NAME ======= ------------------------------ ------------ 01- 02- 03- 04- 05- 06- 07- 08- 09- 10- 11- 12- 13- 14-
Actions for Displaying Table Entries
There are three different MTI actions which you can use to display entries from the table you have selected. Each of these is described as follows.
Get Action
The Get action finds and displays one or more entries from the current table. To use this action, enter G in the ACTION field, enter data into each key column field of the table entries which you wish to display, and then press the <ENTER> key. MTI will retrieve and display the complete entries for the selection criteria entered in the key fields. Figures 5-2 illustrates the sequence of displays that would occur for a Get action on Account Type. In the upper screen the user enters the account codes for Account Type entries he wishes to display. When the <ENTER> key is depressed, the complete table entries are displayed, as shown in the lower screen.
ISIS/AFS ONLINE FEATURES (03/03) 63

MASTER TABLE INQUIRY FIGURE 5-2 EXAMPLE USING GET
ACTION: G SCREEN: ACCT USERID: IS03T32 09/28/01 10:14:08 AM A C C O U N T T Y P E ACCOUNT TYPE NAME SHORT NAME ======= ------------------------------ ------------ 01- 01 02- 22 03- 31 04- 05- 06- 07- 08- 09- 10- 11- 12- 13- 14-
ACTION: G SCREEN: ACCT USERID: IS03T32 09/28/01 10:17:12 AM A C C O U N T T Y P E ACCOUNT TYPE NAME SHORT NAME ======= ------------------------------ ------------ 01- 01 ASSETS ASSETS 02- 22 EXPENDITURES/EXPENSES EXPEND/EXP 03- 31 REVENUE REVENUE 04- 05- 06- 07- 08- 09- 10- 11- 12- 13- 14-
Scan Action
The Scan action is similar to the Get action in operation. However, instead of displaying only specified table entries, it will retrieve and display enough successive entries to fill the screen, starting with the entry that matches the specified key value. If no match is found, then the display begins with the first entry whose key value follows the specified key value in sequence. Thus the Scan action uses the specified key value as a starting point and displays successive entries starting at that point in the file. To use the Scan action, enter S in the ACTION field and optionally enter data into the first set of key fields. Figure 5-3 shows the entries that would be displayed from the Account Type Table if 01 was specified as the key field.
64 ISIS/AFS ONLINE FEATURES (03/03)

MASTER TABLE INQUIRY FIGURE 5-3 EXAMPLE USING SCAN
ACTION: S SCREEN: ACCT USERID: IS03T32 09/28/01 10:24:41 AM A C C O U N T T Y P E ACCOUNT TYPE NAME SHORT NAME ======= ------------------------------ ------------ 01- 01 02- 03- 04- 05- 06- 07- 08- 09- 10- 11- 12- 13- 14-
ACTION: R SCREEN: ACCT USERID: IS03T32 09/28/01 10:25:00 AM A C C O U N T T Y P E ACCOUNT TYPE NAME SHORT NAME ======= ------------------------------ ------------ 01- 01 ASSETS ASSETS 02- 02 LIABILITIES LIABILITIES 03- 03 FUND BALANCE FUND BALANCE 04- 11 ASSETS OFFSET TO EXPENSES ASSET OFF EX 05- 18 MEMO PRE-ENCUMBRANCE MEMO PRE-ENC 06- 19 MEMO ENCUMBRANCE MEMO ENC 07- 20 PRE-ENCUMBRANCES PRE-ENCUM 08- 21 ENCUMBRANCES ENCUMBS 09- 22 EXPENDITURES/EXPENSES EXPEND/EXP 10- 23 EXPENDITURES EXPENDITURES 11- 24 EXPENSES EXPENSES 12- 31 REVENUE REVENUE 13- 32 REVENUE COLLECTED REV COLLECT 14- 41 BUDGETED OBLIGATIONS BUD OBLIG
If a Scan action fills a screen with entries and more entries remain to be displayed, MTI will place an R (for Refill) in the ACTION field. If you wish to continue scanning, merely depress the <ENTER> key, and the screen will be refilled with more entries. A variation of the Scan action exists that will automatically scan from the beginning of the table regardless of the value of the key fields. To use this action, enter T in the ACTION field. Then press the <ENTER> key. There are two additional features of the Scan action. A < in the ACTION field will display the previous screen scanned. To scan forward to the screen you came from, a > is entered in the ACTION field. You are limited to five screens when scanning backward and forward using these actions.
ISIS/AFS ONLINE FEATURES (03/03) 65
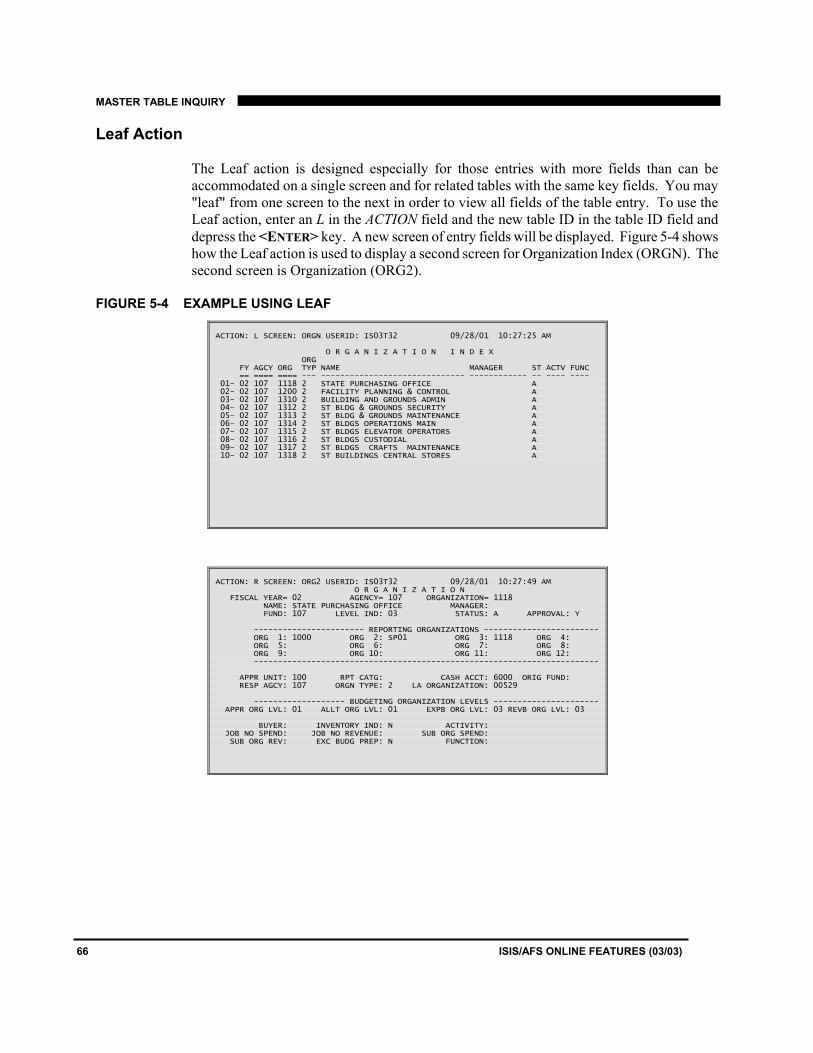
MASTER TABLE INQUIRY Leaf Action
The Leaf action is designed especially for those entries with more fields than can be accommodated on a single screen and for related tables with the same key fields. You may "leaf" from one screen to the next in order to view all fields of the table entry. To use the Leaf action, enter an L in the ACTION field and the new table ID in the table ID field and depress the <ENTER> key. A new screen of entry fields will be displayed. Figure 5-4 shows how the Leaf action is used to display a second screen for Organization Index (ORGN). The second screen is Organization (ORG2).
FIGURE 5-4 EXAMPLE USING LEAF
ACTION: L SCREEN: ORGN USERID: IS03T32 09/28/01 10:27:25 AM O R G A N I Z A T I O N I N D E X ORG FY AGCY ORG TYP NAME MANAGER ST ACTV FUNC == ==== ==== --- ------------------------------ ------------ -- ---- ---- 01- 02 107 1118 2 STATE PURCHASING OFFICE A 02- 02 107 1200 2 FACILITY PLANNING & CONTROL A 03- 02 107 1310 2 BUILDING AND GROUNDS ADMIN A 04- 02 107 1312 2 ST BLDG & GROUNDS SECURITY A 05- 02 107 1313 2 ST BLDG & GROUNDS MAINTENANCE A 06- 02 107 1314 2 ST BLDGS OPERATIONS MAIN A 07- 02 107 1315 2 ST BLDGS ELEVATOR OPERATORS A 08- 02 107 1316 2 ST BLDGS CUSTODIAL A 09- 02 107 1317 2 ST BLDGS CRAFTS MAINTENANCE A 10- 02 107 1318 2 ST BUILDINGS CENTRAL STORES A
ACTION: R SCREEN: ORG2 USERID: IS03T32 09/28/01 10:27:49 AM O R G A N I Z A T I O N FISCAL YEAR= 02 AGENCY= 107 ORGANIZATION= 1118 NAME: STATE PURCHASING OFFICE MANAGER: FUND: 107 LEVEL IND: 03 STATUS: A APPROVAL: Y ----------------------- REPORTING ORGANIZATIONS ------------------------ ORG 1: 1000 ORG 2: SP01 ORG 3: 1118 ORG 4: ORG 5: ORG 6: ORG 7: ORG 8: ORG 9: ORG 10: ORG 11: ORG 12: ------------------------------------------------------------------------ APPR UNIT: 100 RPT CATG: CASH ACCT: 6000 ORIG FUND: RESP AGCY: 107 ORGN TYPE: 2 LA ORGANIZATION: 00529 ------------------- BUDGETING ORGANIZATION LEVELS ---------------------- APPR ORG LVL: 01 ALLT ORG LVL: 01 EXPB ORG LVL: 03 REVB ORG LVL: 03 BUYER: INVENTORY IND: N ACTIVITY: JOB NO SPEND: JOB NO REVENUE: SUB ORG SPEND: SUB ORG REV: EXC BUDG PREP: N FUNCTION:
66 ISIS/AFS ONLINE FEATURES (03/03)

MASTER TABLE INQUIRY
Actions for Modifying Table Entries
The Add, Change, and Delete actions, described below, are used to modify tables. Adding Table Entries
The Add action adds new entries to the current table. To use this action, enter an A in the ACTION field, enter all of the data field values for all new entries, and press the <ENTER> key. Note that the entry is not actually added to the table until you strike the <ENTER> key. This means that you can check data and correct any obvious keying errors as long as the screen is still displayed; press the <ENTER> key only when you are satisfied that the entry is correct. Once <ENTER> is pressed, any necessary editing of the data fields takes place. If any fields have been entered incorrectly, the program will respond with an error message and the cursor will reappear, allowing the user to correct the fields. MTI will not add a record if any of its fields have not passed the necessary edits. For repeating detail lines, only those lines with no errors will be added; lines with errors will be redisplayed so that the user may correct them. Upon successfully adding all lines, MTI will display an L030 ALL LINES ADDED message.
Changing Table Entries
The Change action is used to modify result columns in existing table entries. In order to use the Change action, first display the line or lines to be changed with a Get or Scan action. Next enter a C in the ACTION field and make the desired changes in the result column fields. Press the <ENTER> key to execute the change. Old entries will be replaced by the entries currently displayed on the screen. Note: a key field cannot be changed. A delete followed by an add must be done to change key fields. When the <ENTER> key is pressed, all of the attempted changes are subjected to the necessary edits just like entries added with the Add action are edited. Before any changes are accepted, the user must correct any errors detected by the system.
Deleting Table Entries
The Delete action deletes entries from the current table. To use this action, enter G in the ACTION field, enter data into the key fields of all entries to be retrieved, and then press the <ENTER> key. Next, enter a D in the ACTION field and then press the <ENTER> key. The deleted line or lines will remain on the screen.
Thus, if you erroneously delete an entry, simply key in an ACTION of A and depress the <ENTER> key to restore the entry. Upon executing a successful Delete action, MTI will display a *L032 ALL LINES DELETED message.
ISIS/AFS ONLINE FEATURES (03/03) 67
MASTER TABLE INQUIRY Retrieving Table Records
Occasionally during table maintenance, a screen will contain entries (resulting from a Scan or Get) which are not to be modified. You can tell MTI to ignore these entries by blanking the first character of each entry. Therefore, when MTI actions are performed, the actions will only be applied to entries with non-blank first characters.
Miscellaneous Actions
There are four miscellaneous actions recognized by MTI; these are described below. Getting the Next Screen
The Next action allows you to go from one table to another. To use the next action, enter an N in the ACTION field, and the new screen ID in the SCREEN field, and depress the <ENTER> key. The formatted screen for the table you requested will be displayed. The next action can also be used to produce an empty screen on the master table you are currently viewing.
Displaying Screen Messages
When there are more MTI error messages associated with a screen than can be displayed on the screen, MTI prompts the user to display additional messages with the Message action. When prompted by MTI with the Message action (i.e., M in ACTION field), simply press the <ENTER> key to scroll through all the messages.
Pausing out of the Session
The Pause action ends the MTI session and saves the current screen contents. The next time that you sign on to MTI, the screen contents at the time of the Pause action will be displayed. To use the Pause action, enter a P in the ACTION field and press the <ENTER> key. The screen will be cleared and you may initiate another system transaction.
Ending the Session The End action ends the MTI session without saving the current screen contents. To use the End action, enter an E in the ACTION field and press the <ENTER> key. The screen will be cleared and you may initiate another system transaction.
68 ISIS/AFS ONLINE FEATURES (03/03)

MASTER TABLE INQUIRY
Information and Error Messages
MTI error messages consist of three parts. The first part is the line identifier. The line identifier associates the message with a line on the screen. If the message applies to the action line, the line identifier will be 'A-' otherwise, the line identifier will be the number of the entry on the screen in error. The second part of the error message is the error code. All error codes begin with a letter or an '*' and a letter followed by a number. Following the error code is the error message text. Example: A - - *L003 REQUESTED TABLE NOT FOUND See Error Message Explanation (EMEX) for a detailed listing of all MTI error messages.
MTI Default Actions
As you enter actions and process entries, MTI automatically fills in the ACTION field with the most logical action that would follow the action you just entered. If the action thus displayed by MTI matches the action you want to take next, then you need not fill in the ACTION field. Figure 5-5 summarizes the actions automatically displayed by MTI:
FIGURE 5-5 MTI DEFAULT ACTIONS
NpCbe
ISIS/AFS ONLINE FEAT
After this Action : MTI will display: A Add A C Change C D Delete D E Exit Blank Screen G Get G L Leaf R (Scans on leaf-to table First) N Next Table S R Refill R S Scan R
one of the actions is actually executed until you press the <ENTER> key. This is articularly important when you are using the actions that modify tables (e.g. the Add, hange, and Delete actions). You can check data and correct any obvious errors at any point efore pressing the <ENTER> key. The current displayed action can also be canceled by ntering a different action before pressing the <ENTER> key.
URES (03/03) 69

MASTER TABLE INQUIRY
Enhanced MTI Action Codes
Code/Action Description A Add & Leaf Adds all entries displayed on the screen to the related table. To
prevent an entry on the screen from being added, blank out the first character on the line. If no errors are found, MTI will leaf to the default leaf-to screen for the current screen.
B Back-Specific Returns to screen specified in the Back Screen field of Format
Definition for Tables (Part 2) (FOR2). C Change & Leaf Changes non-key fields in all screen entries on the screen to the
values currently displayed. To prevent a line on the screen from being changed, blank out the first character on the line. If no errors are found, MTI will leaf to the default leaf-to screen for the current screen.
F Forward Leafs forward in the leaf chain. Should only be used to go forward
after a Back action has been issued. N. Next Screens Clears the current screen. T Scan from Top Starts a Scan on the first record of the current table. X Partial Screen Clears the current screen except for fields defined in Leaf Data Clear Carry Forward Definition (LEAF) to be carried forward when
leafing to other screens. Y Full Screen Clears all fields on the current screen including those fields
defined Clear in the Leaf Data Carry Forward Definition (LEAF). Z Stacked Leaf Transfers control from one MTI TP transaction to another. 1-9 PF Keys Equate sequentially to the actions that are defined to PF keys 1-9. < Previous Screen Same as 'B.' described above. Can be used up to five times in a
row. > Next Screen Scans the next screen in the stack that was saved for this action.
70 ISIS/AFS ONLINE FEATURES (03/03)