Inventory User Guide - Oracle Help Center
111
Oracle® Retail Merchandising Foundation Cloud Service Inventory User Guide Release 19.3.000 F44152-01 August 2021
-
Upload
khangminh22 -
Category
Documents
-
view
0 -
download
0
Transcript of Inventory User Guide - Oracle Help Center
Oracle® Retail MerchandisingFoundation Cloud ServiceInventory User Guide
Release 19.3.000F44152-01August 2021
Oracle Retail Merchandising Foundation Cloud Service Inventory User Guide, Release 19.3.000
F44152-01
Copyright © 2021, Oracle and/or its affiliates.
Primary Author:
Contributing Authors:
Contributors:
This software and related documentation are provided under a license agreement containing restrictions onuse and disclosure and are protected by intellectual property laws. Except as expressly permitted in yourlicense agreement or allowed by law, you may not use, copy, reproduce, translate, broadcast, modify, license,transmit, distribute, exhibit, perform, publish, or display any part, in any form, or by any means. Reverseengineering, disassembly, or decompilation of this software, unless required by law for interoperability, isprohibited.
The information contained herein is subject to change without notice and is not warranted to be error-free. Ifyou find any errors, please report them to us in writing.
If this is software or related documentation that is delivered to the U.S. Government or anyone licensing it onbehalf of the U.S. Government, then the following notice is applicable:
U.S. GOVERNMENT END USERS: Oracle programs (including any operating system, integrated software,any programs embedded, installed or activated on delivered hardware, and modifications of such programs)and Oracle computer documentation or other Oracle data delivered to or accessed by U.S. Government endusers are "commercial computer software" or "commercial computer software documentation" pursuant to theapplicable Federal Acquisition Regulation and agency-specific supplemental regulations. As such, the use,reproduction, duplication, release, display, disclosure, modification, preparation of derivative works, and/oradaptation of i) Oracle programs (including any operating system, integrated software, any programsembedded, installed or activated on delivered hardware, and modifications of such programs), ii) Oraclecomputer documentation and/or iii) other Oracle data, is subject to the rights and limitations specified in thelicense contained in the applicable contract. The terms governing the U.S. Government’s use of Oracle cloudservices are defined by the applicable contract for such services. No other rights are granted to the U.S.Government.
This software or hardware is developed for general use in a variety of information management applications.It is not developed or intended for use in any inherently dangerous applications, including applications thatmay create a risk of personal injury. If you use this software or hardware in dangerous applications, then youshall be responsible to take all appropriate fail-safe, backup, redundancy, and other measures to ensure itssafe use. Oracle Corporation and its affiliates disclaim any liability for any damages caused by use of thissoftware or hardware in dangerous applications.
Oracle and Java are registered trademarks of Oracle and/or its affiliates. Other names may be trademarks oftheir respective owners.
Intel and Intel Inside are trademarks or registered trademarks of Intel Corporation. All SPARC trademarks areused under license and are trademarks or registered trademarks of SPARC International, Inc. AMD, Epyc,and the AMD logo are trademarks or registered trademarks of Advanced Micro Devices. UNIX is a registeredtrademark of The Open Group.
This software or hardware and documentation may provide access to or information about content, products,and services from third parties. Oracle Corporation and its affiliates are not responsible for and expresslydisclaim all warranties of any kind with respect to third-party content, products, and services unless otherwiseset forth in an applicable agreement between you and Oracle. Oracle Corporation and its affiliates will not beresponsible for any loss, costs, or damages incurred due to your access to or use of third-party content,products, or services, except as set forth in an applicable agreement between you and Oracle.
Contents
Send Us Your Comments
Preface
Audience ix
Documentation Accessibility ix
Customer Support ix
Improved Process for Oracle Retail Documentation Corrections ix
Oracle Help Center (docs.oracle.com) x
Conventions x
1 Inventory Overview
2 View Inventory
View Inventory by Location 2-1
Sales/Issues by Location 2-2
Unavailable Inventory 2-3
Sellable Pack Inquiry 2-4
3 Transfers
Create a Transfer 3-1
Transfer Header 3-2
Locations 3-3
Comments 3-3
Transfer - More Actions Menu 3-3
Transfer Details 3-4
Items 3-5
Transfer Details - More Actions Menu 3-7
Currency View 3-7
Unit of Measure View 3-8
iii
Add a Work Order 3-8
Add an Item Activity 3-8
Manage Work Order Templates and Activities 3-10
Define Item Packaging 3-12
Item Packing 3-13
Packing Results 3-13
Define Item Transformations 3-15
Transform Item 3-16
Transformation Results 3-17
Transform an Item 3-17
Manage Up Charges 3-18
Items 3-19
Up Charges 3-19
Manage Transfers 3-19
Search for a Transfer 3-20
Search for a Transfer Through the Basic Search Criteria 3-20
Search for a Transfer Through the Advanced Search Criteria 3-21
Create a Transfer from Existing 3-22
Edit a Transfer 3-23
Maintaining Transfer Details 3-23
Approve a Transfer 3-24
Submit a Transfer for Approval 3-24
Approve a Transfer 3-25
Ship a Transfer 3-25
Close a Transfer 3-25
4 Mass Return Transfers
Create a Mass Return 4-1
Create with an RTV 4-3
Add Items 4-4
Add Locations 4-5
Mass Return Transfer - More Actions Menu 4-6
Manage Mass Return Transfers 4-6
Search for Mass Return Transfer 4-7
Search for an MRT Through the Basic Search Criteria 4-7
Search for an MRT Through the Advanced Search Criteria 4-8
Edit an MRT 4-10
Mass Update 4-10
Advanced Delete 4-11
iv
Edit Locations on the Mass Return Transfer 4-11
5 Return to Vendor
Create a Return to Vendor 5-1
Return to Vendor 5-1
Add Items 5-3
Supplier Details 5-4
Manage Returns To Vendor 5-5
Search for an RTV 5-5
Search for an RTV Through the Basic Search Criteria 5-6
Search for an RTV Through the Advanced Search Criteria 5-7
Edit an RTV 5-7
Edit Items 5-8
Mass Update 5-8
6 Shipments and Receipts
Ship a Purchase Order 6-1
Ship a Transfer 6-2
Create a Bill of Lading 6-3
Items 6-3
Add Items 6-4
Manage Bills of Lading 6-4
Searching for Bill of Lading 6-5
Edit a BOL 6-7
Receive a Shipment 6-7
Search for a Shipment 6-8
Search for a Shipment Through the Basic Search Criteria 6-9
Search for a Shipment Through Advanced Search Criteria 6-9
Shipment 6-10
Receive a Shipment by Item 6-13
Shipment 6-13
Items 6-14
Receiving Shipments by Item 6-14
Receive a Shipment by Carton 6-16
Shipment 6-16
Receive Cartons 6-17
Carton Contents 6-17
Receive Shipments by Carton 6-17
Receipt Adjustment by Units 6-17
v
Shipment 6-18
Adjust Units 6-18
Adjust Units Received 6-18
Reconcile Transfers and Allocations 6-19
Searching for a Shipment 6-19
Stock Order Exceptions 6-20
Carton Level Dispositions 6-20
Upload Stock Order Reconciliation 6-20
7 Inventory Adjustments
Inventory Status and Adjustment Reasons 7-1
Create an Inventory Adjustment by Item 7-5
Adjusting Inventory by Item 7-5
Editing Location and Adjustment Quantity 7-6
Create an Inventory Adjustment by Location 7-7
Adding Items and Adjustment Quantities 7-8
Editing Items or Quantities 7-9
Break Sellable Pack 7-9
Product Transformation 7-10
Add Items for the Product Transformation 7-11
8 Stock Counts
Schedule a Stock Count 8-2
Add Stock Count Schedules 8-3
Edit Stock Count Schedule 8-4
Request a Stock Count 8-5
Add a Merchandise Hierarchy 8-6
Add Locations 8-7
Rebuild Item List 8-7
Manage Stock Counts 8-8
Search for a Stock Count 8-8
Search for a Stock Count Through the Basic Search Criteria 8-9
Search for a Stock Through Advanced Search Criteria 8-10
Review and Update Stock Count Results 8-11
Items 8-11
Count Locations 8-12
Edit the Result of a Stock Count 8-12
Review Unit Variances and Accepting Unit Counts 8-13
Stock Count 8-13
vi
Details 8-13
Adjust the Stock on Hand after a Stock Count 8-14
Redistribute Count Results within a Physical Warehouse 8-14
Physical Warehouse/Item 8-15
Virtual Warehouses 8-15
Redistributing Stock within a Physical Warehouse 8-15
Review Value Variances and Accept Value Counts 8-16
Adjust the Cost or Retail Value after a Stock Count 8-17
vii
Send Us Your Comments
Oracle Retail Merchandising Foundation Cloud Service Inventory User Guide, Release19.3.000
Oracle welcomes customers' comments and suggestions on the quality andusefulness of this document.
Your feedback is important, and helps us to best meet your needs as a user of ourproducts. For example:
• Are the implementation steps correct and complete?
• Did you understand the context of the procedures?
• Did you find any errors in the information?
• Does the structure of the information help you with your tasks?
• Do you need different information or graphics? If so, where, and in what format?
• Are the examples correct? Do you need more examples?
If you find any errors or have any other suggestions for improvement, then please tellus your name, the name of the company who has licensed our products, the title andpart number of the documentation and the chapter, section, and page number (ifavailable).
Note:
Before sending us your comments, you might like to check that you have thelatest version of the document and if any concerns are already addressed. Todo this, access the Online Documentation available on the Oracle HelpCenter Web site. It contains the most current Documentation Library plus alldocuments revised or released recently.
Send your comments to us using the electronic mail address: [email protected]
Please give your name, address, electronic mail address, and telephone number(optional).
If you need assistance with Oracle software, then please contact your supportrepresentative or Oracle Support Services.
If you require training or instruction in using Oracle software, then please contact yourOracle local office and inquire about our Oracle University offerings. A list of Oracleoffices is available on our Web site at http://www.oracle.com.
Send Us Your Comments
viii
Preface
This document describes the Oracle Retail Merchandising user interface. It provides step-by-step instructions to complete most tasks that can be performed through the user interface.
AudienceThis document is for users and administrators of Oracle Retail Merchandising. This includesmerchandisers, buyers, business analysts, and administrative personnel.
Documentation AccessibilityFor information about Oracle's commitment to accessibility, visit the Oracle AccessibilityProgram website at http://www.oracle.com/pls/topic/lookup?ctx=acc&id=docacc.
Access to Oracle Support
Oracle customers that have purchased support have access to electronic support through MyOracle Support. For information, visit http://www.oracle.com/pls/topic/lookup?ctx=acc&id=info or visit http://www.oracle.com/pls/topic/lookup?ctx=acc&id=trs if youare hearing impaired.
Customer SupportTo contact Oracle Customer Support, access My Oracle Support at the following URL:
https://support.oracle.com
When contacting Customer Support, please provide the following:
• Product version and program/module name
• Functional and technical description of the problem (include business impact)
• Detailed step-by-step instructions to re-create
• Exact error message received
• Screen shots of each step you take
Improved Process for Oracle Retail Documentation CorrectionsTo more quickly address critical corrections to Oracle Retail documentation content, OracleRetail documentation may be republished whenever a critical correction is needed. Forcritical corrections, the republication of an Oracle Retail document may at times not beattached to a numbered software release; instead, the Oracle Retail document will simply be
ix
replaced on the Oracle Help Center Web site, or, in the case of Data Models, to theapplicable My Oracle Support Documentation container where they reside.
Oracle Retail product documentation is available on the following web site:
https://docs.oracle.com/en/industries/retail/index.html
An updated version of the applicable Oracle Retail document is indicated by Oraclepart number, as well as print date (month and year). An updated version uses thesame part number, with a higher-numbered suffix. For example, part numberE123456-02 is an updated version of a document with part number E123456-01.
If a more recent version of a document is available, that version supersedes allprevious versions.
Oracle Help Center (docs.oracle.com)Oracle Retail product documentation is available on the following web site:
https://docs.oracle.com/en/industries/retail/index.html
(Data Model documents can be obtained through My Oracle Support.)
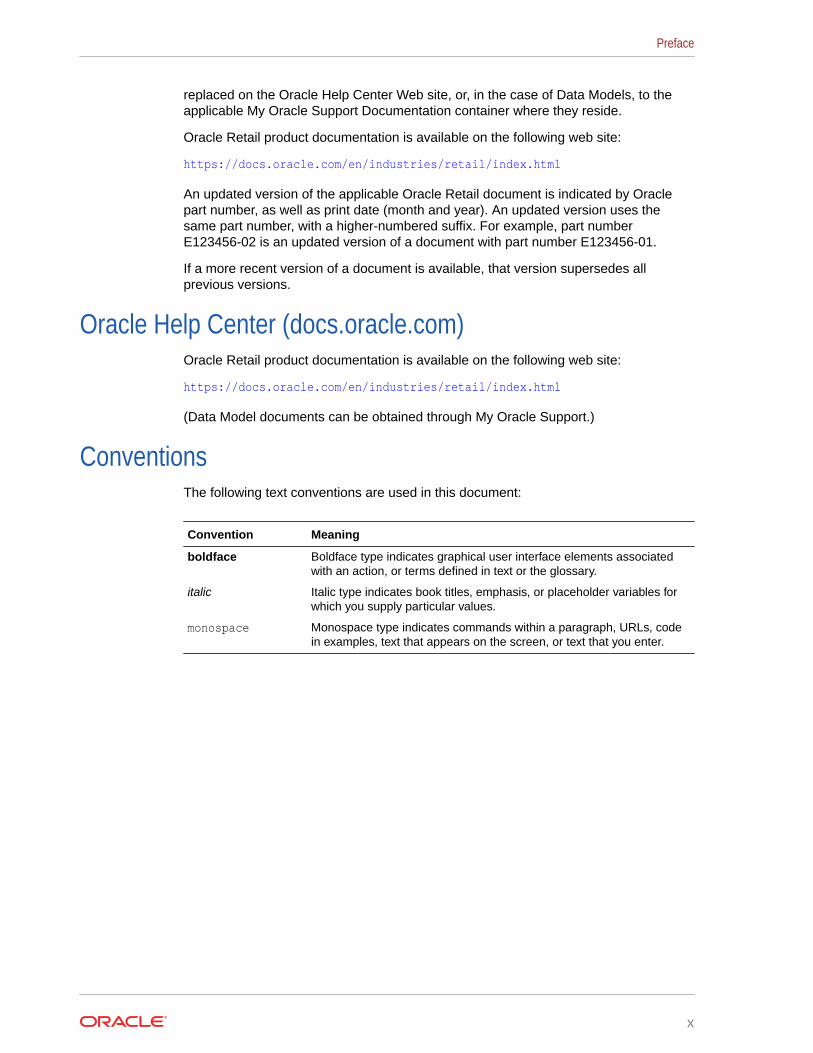
ConventionsThe following text conventions are used in this document:
Convention Meaning
boldface Boldface type indicates graphical user interface elements associatedwith an action, or terms defined in text or the glossary.
italic Italic type indicates book titles, emphasis, or placeholder variables forwhich you supply particular values.
monospace Monospace type indicates commands within a paragraph, URLs, codein examples, text that appears on the screen, or text that you enter.
Preface
x
1Inventory Overview
Inventory Control is one of the foremost functions of Merchandising. Proper inventory controlallows the retailer to have optimum and accurate inventory at various entities of business likestores and warehouses. Span of inventory control ranges from receiving merchandise fromsuppliers and managing it during the time it is on retailer's premises to supplying to franchisepartners and returning to vendors.
Merchandising facilitates end to end management of inventory including receiving, transfers,adjustments, reconciliation, mass return transfers, return to vendor, franchise ordermanagement, stock counts, item transformation, and work order maintenance.
This book helps you to understand and manage inventory control in Merchandising.
1-1

2View Inventory
This chapter outlines the ways that inventory levels can be viewed in various pages in theapplication. This includes a view of inventory by location in different inventory buckets trackedby Merchandising, as well as a view of the number of sellable packs that could be createdfrom component items in a location. This chapter also includes details on the page where youcan see sales for an item/store by week and issues for an item/warehouse by week. For otherinventory related transactions, see the View Transaction Data page in the Oracle RetailMerchandising Finance User Guide.
View Inventory by LocationThe Inventory by Location page provides a view of inventory for an item by store andwarehouse, including the amount on hand, reserved, on inbound transactions, andunavailable. To view inventory by location:
1. From the Tasks menu, select Inventory > Item Inventory by Location. The Inventory byLocation page appears.
2. In the Item field, enter the item number or search for the item. The UOM is populated bydefault.
3. In the Location field, select the location.
4. Click Search. The store sales and warehouse issue details appear in the Sales andIssues section. The inventory details appear in the table.
Figure 2-1 Inventory by Location Page
2-1
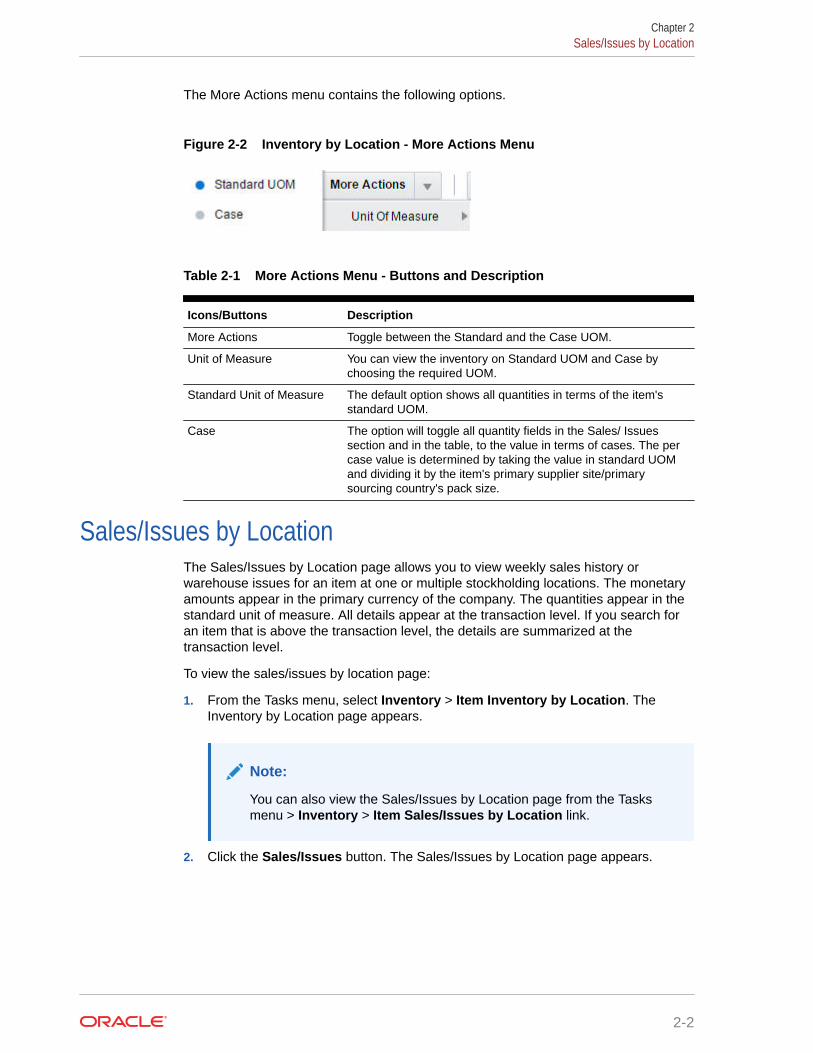
The More Actions menu contains the following options.
Figure 2-2 Inventory by Location - More Actions Menu
Table 2-1 More Actions Menu - Buttons and Description
Icons/Buttons Description
More Actions Toggle between the Standard and the Case UOM.
Unit of Measure You can view the inventory on Standard UOM and Case bychoosing the required UOM.
Standard Unit of Measure The default option shows all quantities in terms of the item'sstandard UOM.
Case The option will toggle all quantity fields in the Sales/ Issuessection and in the table, to the value in terms of cases. The percase value is determined by taking the value in standard UOMand dividing it by the item's primary supplier site/primarysourcing country's pack size.
Sales/Issues by LocationThe Sales/Issues by Location page allows you to view weekly sales history orwarehouse issues for an item at one or multiple stockholding locations. The monetaryamounts appear in the primary currency of the company. The quantities appear in thestandard unit of measure. All details appear at the transaction level. If you search foran item that is above the transaction level, the details are summarized at thetransaction level.
To view the sales/issues by location page:
1. From the Tasks menu, select Inventory > Item Inventory by Location. TheInventory by Location page appears.
Note:
You can also view the Sales/Issues by Location page from the Tasksmenu > Inventory > Item Sales/Issues by Location link.
2. Click the Sales/Issues button. The Sales/Issues by Location page appears.
Chapter 2Sales/Issues by Location
2-2
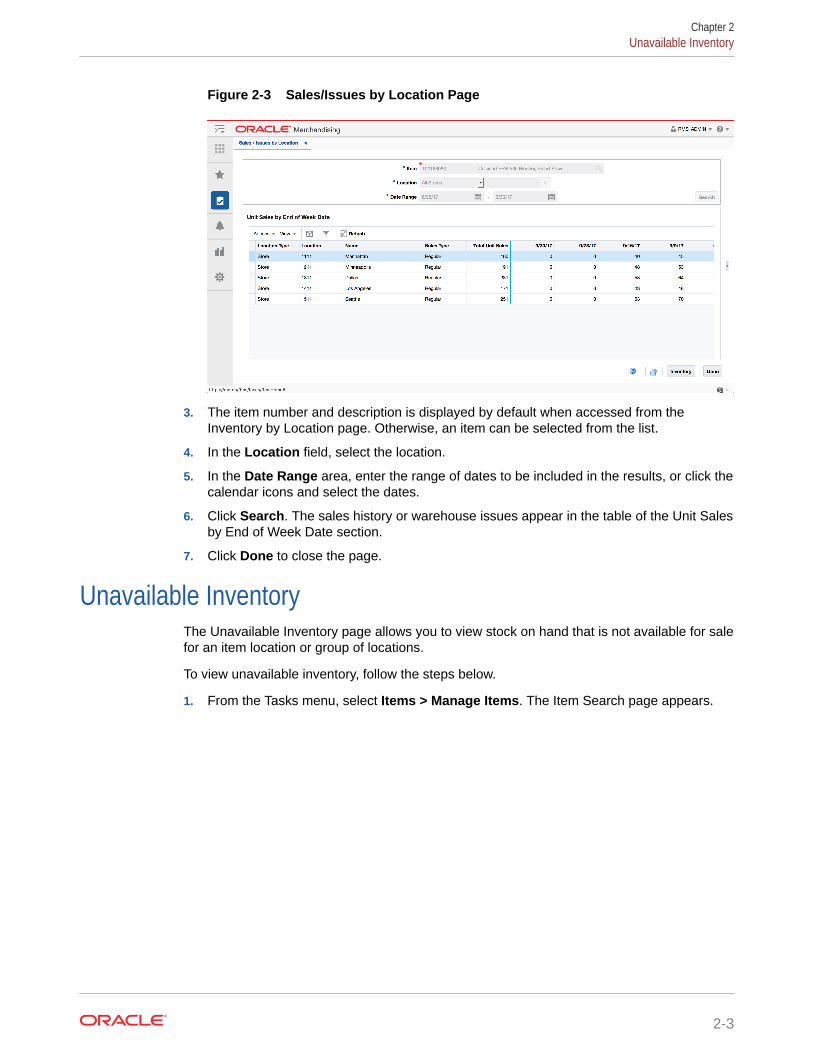
Figure 2-3 Sales/Issues by Location Page
3. The item number and description is displayed by default when accessed from theInventory by Location page. Otherwise, an item can be selected from the list.
4. In the Location field, select the location.
5. In the Date Range area, enter the range of dates to be included in the results, or click thecalendar icons and select the dates.
6. Click Search. The sales history or warehouse issues appear in the table of the Unit Salesby End of Week Date section.
7. Click Done to close the page.
Unavailable InventoryThe Unavailable Inventory page allows you to view stock on hand that is not available for salefor an item location or group of locations.
To view unavailable inventory, follow the steps below.
1. From the Tasks menu, select Items > Manage Items. The Item Search page appears.
Chapter 2Unavailable Inventory
2-3
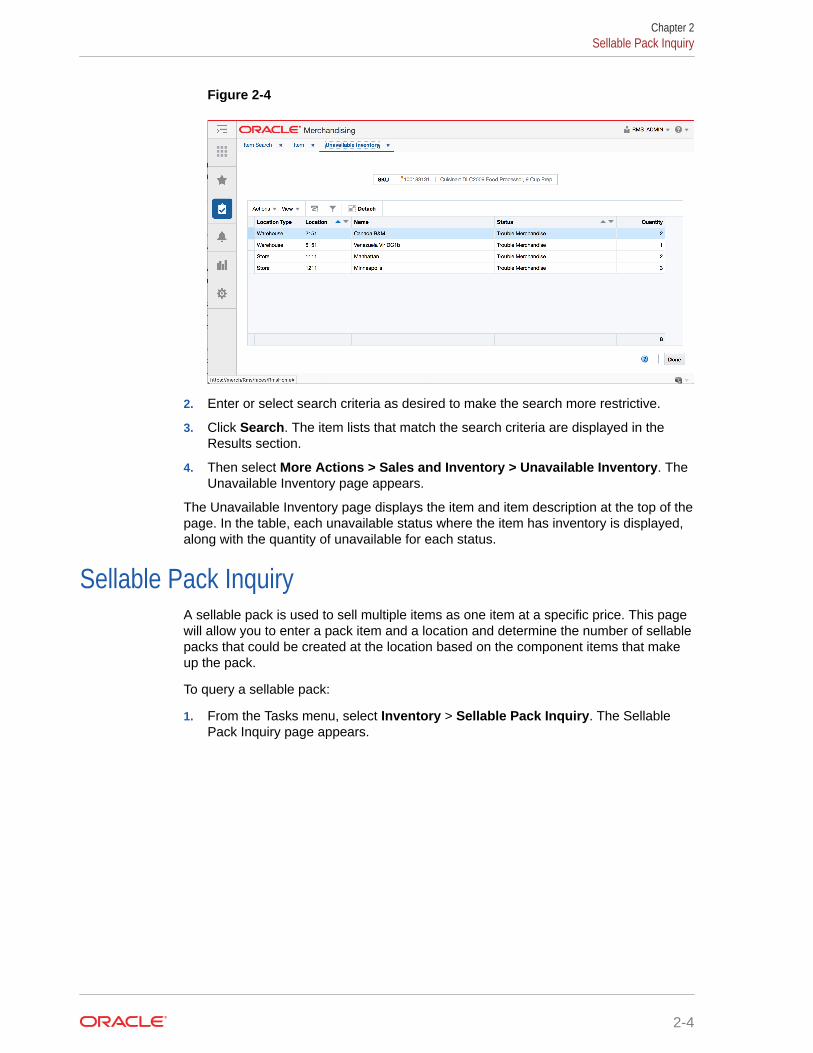
Figure 2-4
2. Enter or select search criteria as desired to make the search more restrictive.
3. Click Search. The item lists that match the search criteria are displayed in theResults section.
4. Then select More Actions > Sales and Inventory > Unavailable Inventory. TheUnavailable Inventory page appears.
The Unavailable Inventory page displays the item and item description at the top of thepage. In the table, each unavailable status where the item has inventory is displayed,along with the quantity of unavailable for each status.
Sellable Pack InquiryA sellable pack is used to sell multiple items as one item at a specific price. This pagewill allow you to enter a pack item and a location and determine the number of sellablepacks that could be created at the location based on the component items that makeup the pack.
To query a sellable pack:
1. From the Tasks menu, select Inventory > Sellable Pack Inquiry. The SellablePack Inquiry page appears.
Chapter 2Sellable Pack Inquiry
2-4
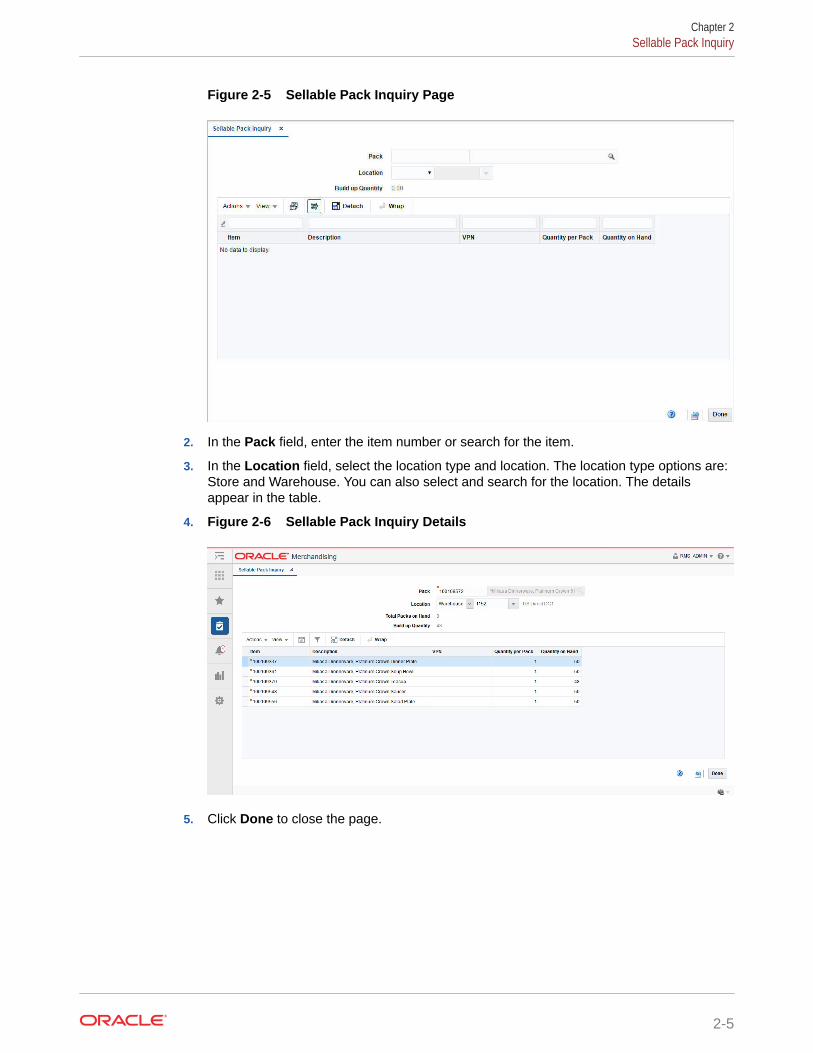
Figure 2-5 Sellable Pack Inquiry Page
2. In the Pack field, enter the item number or search for the item.
3. In the Location field, select the location type and location. The location type options are:Store and Warehouse. You can also select and search for the location. The detailsappear in the table.
4. Figure 2-6 Sellable Pack Inquiry Details
5. Click Done to close the page.
Chapter 2Sellable Pack Inquiry
2-5
3Transfers
Transfers are an inventory transaction that moves one or more items from one location toanother. In some cases, transfers can also be created to pass through a finisher location tohave activities performed on the items being transferred, such as ticketing, re-packing, oritem transformations.
Create a TransferTo create a transfer:
1. From the Tasks menu, select Inventory > Transfers > Create Transfer. The CreateTransfer pop-up appears.
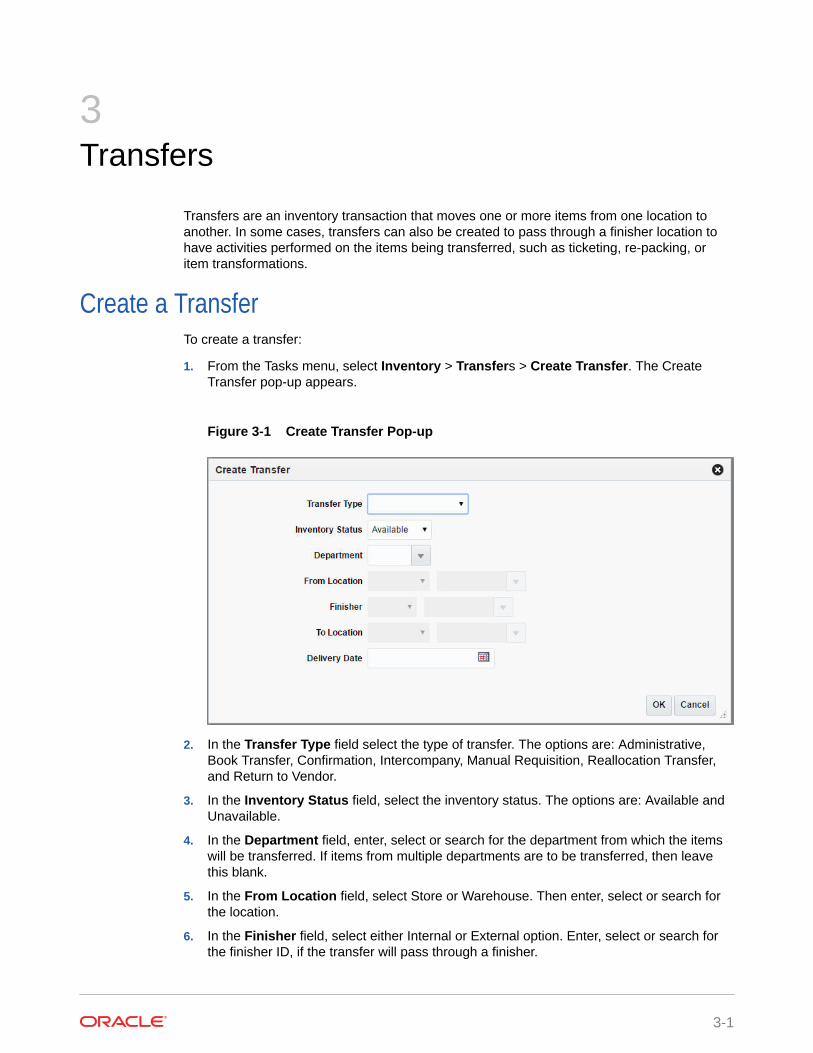
Figure 3-1 Create Transfer Pop-up
2. In the Transfer Type field select the type of transfer. The options are: Administrative,Book Transfer, Confirmation, Intercompany, Manual Requisition, Reallocation Transfer,and Return to Vendor.
3. In the Inventory Status field, select the inventory status. The options are: Available andUnavailable.
4. In the Department field, enter, select or search for the department from which the itemswill be transferred. If items from multiple departments are to be transferred, then leavethis blank.
5. In the From Location field, select Store or Warehouse. Then enter, select or search forthe location.
6. In the Finisher field, select either Internal or External option. Enter, select or search forthe finisher ID, if the transfer will pass through a finisher.
3-1
Note:
Finishers are required for transfer that will have work orders,transformations, or packaging instructions.
7. In the To Location field, select Store or Warehouse. Then enter, select or searchfor the location.
8. In the Delivery Date field, enter the earliest date that the transfer can be deliveredto the store or warehouse or use the Calendar icon to select a date.
9. Click OK to save any changes. The Transfer page appears.
10. Click Cancel to return to the Tasks menu without saving changes.
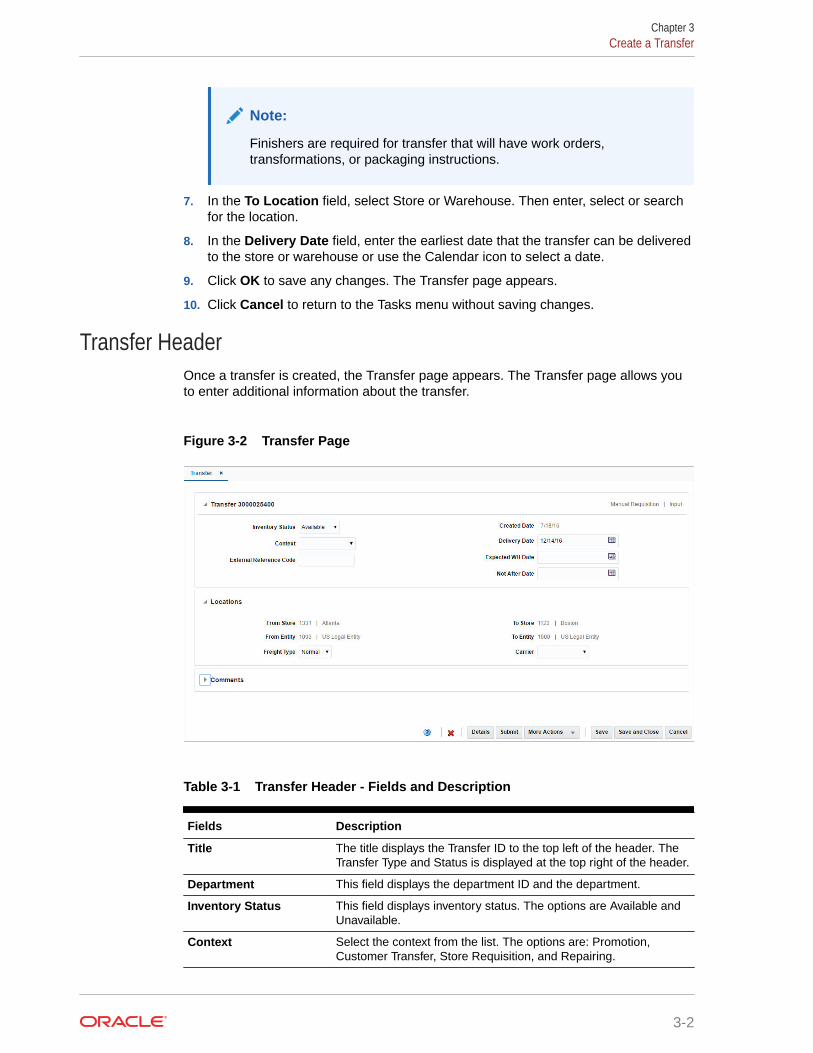
Transfer HeaderOnce a transfer is created, the Transfer page appears. The Transfer page allows youto enter additional information about the transfer.
Figure 3-2 Transfer Page
Table 3-1 Transfer Header - Fields and Description
Fields Description
Title The title displays the Transfer ID to the top left of the header. TheTransfer Type and Status is displayed at the top right of the header.
Department This field displays the department ID and the department.
Inventory Status This field displays inventory status. The options are Available andUnavailable.
Context Select the context from the list. The options are: Promotion,Customer Transfer, Store Requisition, and Repairing.
Chapter 3Create a Transfer
3-2
Table 3-1 (Cont.) Transfer Header - Fields and Description
Fields Description
External ReferenceNumber
Enter the external reference number. This can be used to specifyaudit trail reference to external system when an externaltransaction initiates master record creation in Merchandising.
Created Date This field displays the date on which the transfer was created.
Delivery Date The date on which the transfer is expected to be delivered at thelocation.
Expected WH Date The date on which the transfer is expected to be delivered at thewarehouse.
Not After Date The last day upon which a location can ship the requestedmerchandise.
Note:
The Delivery Date, Expected WH Date, and Not After Date fields are editable.However, the remaining fields are displayed based on the information entered in theCreate Transfer pop-up.
LocationsThe Locations section includes the following fields.
Table 3-2 Locations - Fields and Description
Field Description
From Store/Warehouse This field displays the ID and description of the source location on thetransfer.
From Entity This field displays the transfer entity ID and description.
Freight Type This field displays the type of freight. The options are: Normal, Expedite,and Hold.
To Store/Warehouse This field displays the ID and description of the destination location onthe transfer.
To Entity This field displays the transfer entity ID and description.
Carrier Select the carrier type from the list.
CommentsIn the comments section, enter your comments.
Transfer - More Actions MenuUse the More Actions menu to navigate to the following pages. The More Actions menucontains the following options.
Chapter 3Create a Transfer
3-3
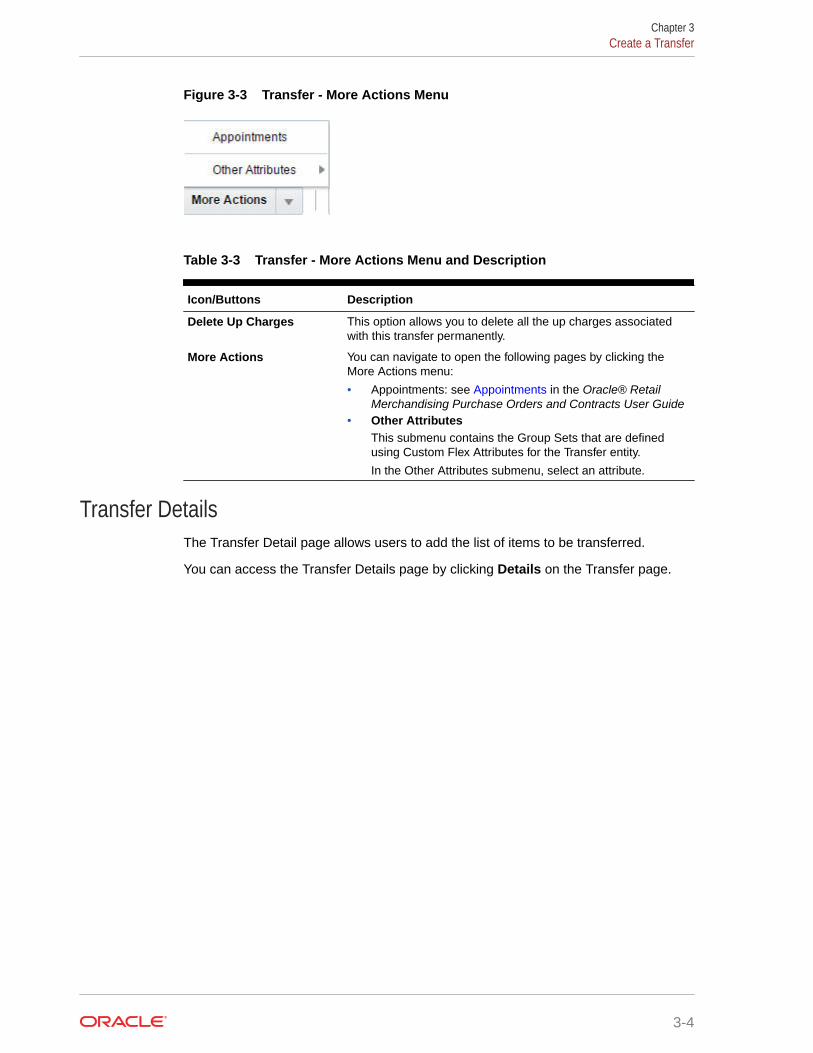
Figure 3-3 Transfer - More Actions Menu
Table 3-3 Transfer - More Actions Menu and Description
Icon/Buttons Description
Delete Up Charges This option allows you to delete all the up charges associatedwith this transfer permanently.
More Actions You can navigate to open the following pages by clicking theMore Actions menu:
• Appointments: see Appointments in the Oracle® RetailMerchandising Purchase Orders and Contracts User Guide
• Other AttributesThis submenu contains the Group Sets that are definedusing Custom Flex Attributes for the Transfer entity.
In the Other Attributes submenu, select an attribute.
Transfer DetailsThe Transfer Detail page allows users to add the list of items to be transferred.
You can access the Transfer Details page by clicking Details on the Transfer page.
Chapter 3Create a Transfer
3-4
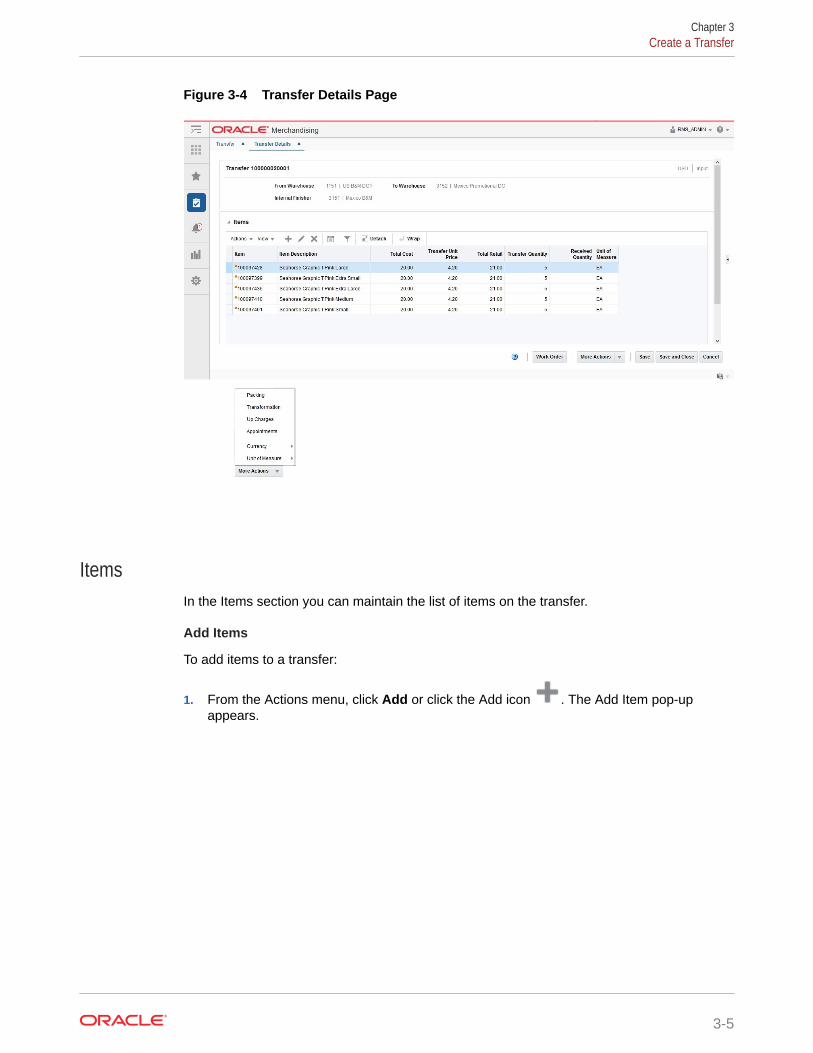
Figure 3-4 Transfer Details Page
ItemsIn the Items section you can maintain the list of items on the transfer.
Add Items
To add items to a transfer:
1. From the Actions menu, click Add or click the Add icon . The Add Item pop-upappears.
Chapter 3Create a Transfer
3-5
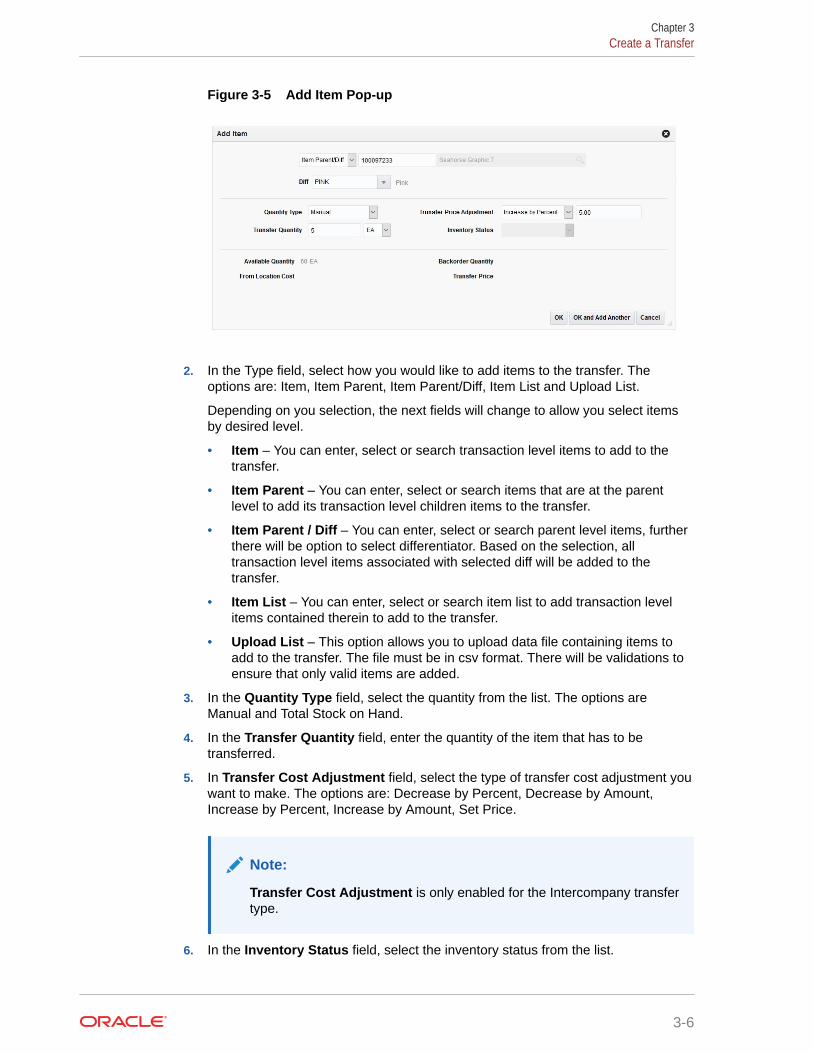
Figure 3-5 Add Item Pop-up
2. In the Type field, select how you would like to add items to the transfer. Theoptions are: Item, Item Parent, Item Parent/Diff, Item List and Upload List.
Depending on you selection, the next fields will change to allow you select itemsby desired level.
• Item – You can enter, select or search transaction level items to add to thetransfer.
• Item Parent – You can enter, select or search items that are at the parentlevel to add its transaction level children items to the transfer.
• Item Parent / Diff – You can enter, select or search parent level items, furtherthere will be option to select differentiator. Based on the selection, alltransaction level items associated with selected diff will be added to thetransfer.
• Item List – You can enter, select or search item list to add transaction levelitems contained therein to add to the transfer.
• Upload List – This option allows you to upload data file containing items toadd to the transfer. The file must be in csv format. There will be validations toensure that only valid items are added.
3. In the Quantity Type field, select the quantity from the list. The options areManual and Total Stock on Hand.
4. In the Transfer Quantity field, enter the quantity of the item that has to betransferred.
5. In Transfer Cost Adjustment field, select the type of transfer cost adjustment youwant to make. The options are: Decrease by Percent, Decrease by Amount,Increase by Percent, Increase by Amount, Set Price.
Note:
Transfer Cost Adjustment is only enabled for the Intercompany transfertype.
6. In the Inventory Status field, select the inventory status from the list.
Chapter 3Create a Transfer
3-6
7. In the Available Quantity field, the quantity that is available for transfer is displayed.
8. The From Location Cost field displays the cost for transferring an item from the location.
9. The Backorder Quantity field displays the customer back-orders for an item.
10. The Transfer Cost field displays the transfer cost and the cost varies based on theselected Transfer Cost Adjustment Type and the Adjustment Value.
11. Then choose one of the following options.
• Click OK to add the item to the table and close the pop-up.
• Click OK and Add Another to add additional items.
• Click Cancel to reject all entries and close the pop-up.
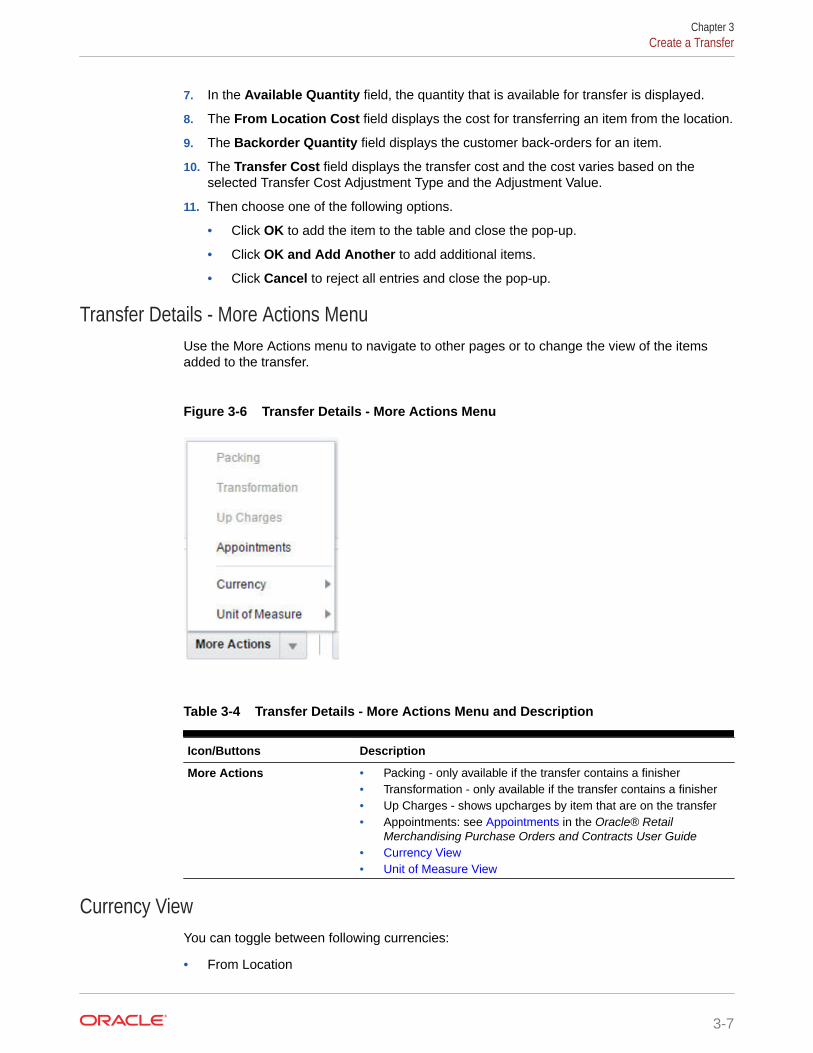
Transfer Details - More Actions MenuUse the More Actions menu to navigate to other pages or to change the view of the itemsadded to the transfer.
Figure 3-6 Transfer Details - More Actions Menu
Table 3-4 Transfer Details - More Actions Menu and Description
Icon/Buttons Description
More Actions • Packing - only available if the transfer contains a finisher• Transformation - only available if the transfer contains a finisher• Up Charges - shows upcharges by item that are on the transfer• Appointments: see Appointments in the Oracle® Retail
Merchandising Purchase Orders and Contracts User Guide• Currency View• Unit of Measure View
Currency ViewYou can toggle between following currencies:
• From Location
Chapter 3Create a Transfer
3-7
• To Location
• Primary
The currency toggle determines that the monetary values on the screen will be shownin From Location's currency or To Location's currency or Primary Currency.
Unit of Measure ViewYou can toggle between the following units of measure:
• Unit of Transfer - indicates the multiple of the standard UOM used for transferring
• Standard UOM - is the unit of measure used for inventory for the item, such aseaches, meters, or pounds.
The UOM toggle determines weather the quantities on the screen will be shown instandard UOM or Transfer UOM.
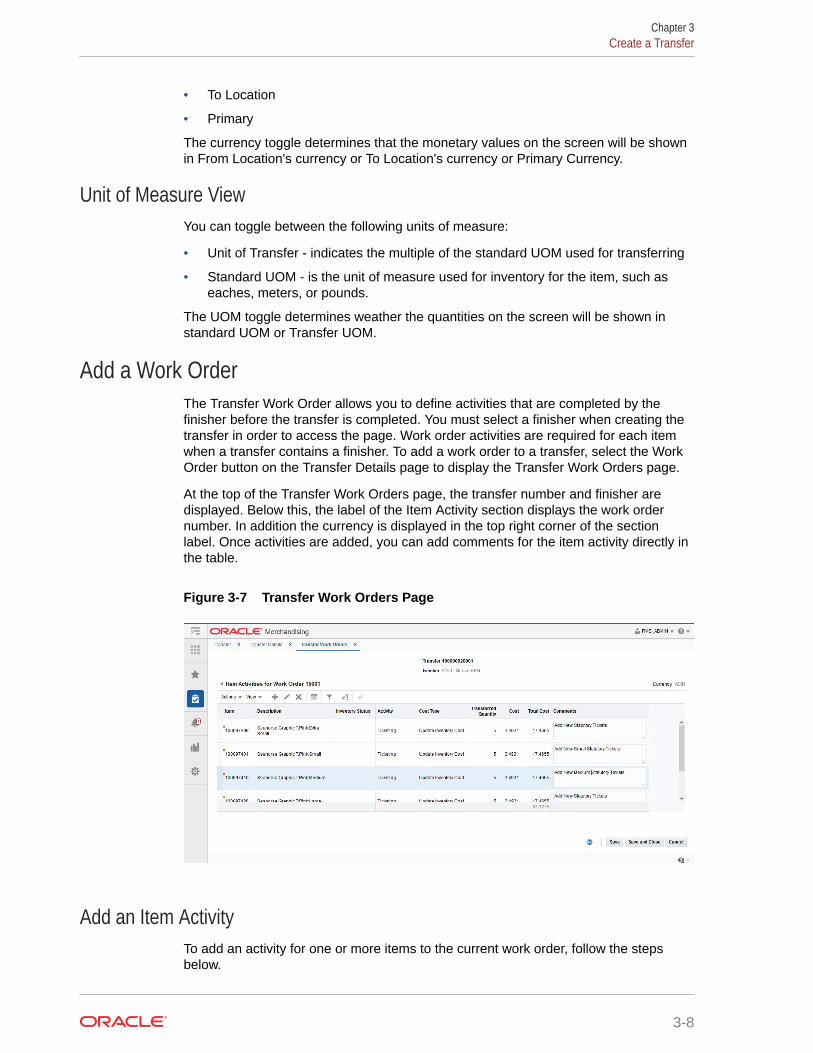
Add a Work OrderThe Transfer Work Order allows you to define activities that are completed by thefinisher before the transfer is completed. You must select a finisher when creating thetransfer in order to access the page. Work order activities are required for each itemwhen a transfer contains a finisher. To add a work order to a transfer, select the WorkOrder button on the Transfer Details page to display the Transfer Work Orders page.
At the top of the Transfer Work Orders page, the transfer number and finisher aredisplayed. Below this, the label of the Item Activity section displays the work ordernumber. In addition the currency is displayed in the top right corner of the sectionlabel. Once activities are added, you can add comments for the item activity directly inthe table.
Figure 3-7 Transfer Work Orders Page
Add an Item ActivityTo add an activity for one or more items to the current work order, follow the stepsbelow.
Chapter 3Create a Transfer
3-8

1. In the Item Activity section, select Actions > Add, or use the Add icon . The AddItem pop-up appears.
Figure 3-8 Transfer Work Order Add Items Pop-up
2. Select an item type from the list. Then enter or search for the item.
3. In the Diff field, enter, select or search for the diff.
Note:
This field is only enabled, if you select the item type Item Parent/Diff.
4. Select if you want to add an activity or template (a template is a pre-defined set of workorder activities). Then select the corresponding activity or template.
5. In the Cost Type field, select the cost type from the list.
6. In the Activity Cost field, enter the costs.
7. In the Comments field, enter a comment, if necessary.
8. Then choose one of the following options.
• Click OK to add the item activity/template to the table and close the pop-up.
• Click OK and Add Another to add additional item activities/templates.
• Click Cancel to reject all entries and close the pop-up.
9. In the Transfer Work Order page, save your changes.
Chapter 3Create a Transfer
3-9
Edit an Item Activity
To edit an item activity previously added, follow the steps below.
1. In the Item Activities section, select Actions > Edit, or use the Edit icon . TheEdit Item pop-up appears.
2. Edit the activity cost and/or the comments.
3. Then choose one of the following options.
• Click OK to add your changes to the table and close the pop-up.
• Click Cancel to reject all entries and close the pop-up.
4. In the Transfer Work Order page, save your changes.
Manage Work Order Templates and ActivitiesWork orders in Merchandising are used to specify the tasks that are to be performedby the internal or external finisher for items on a transfer. These are used to describethe tasks in detail and are used for both basic tasks (e.g. re-ticketing, ironing, etc.) andmore complicated tasks that require other mapping in Merchandising such as itemtransformation and repacking. Any transfer that involves a finisher must have at leastone work order task associated with each item on the transfer. Various activities canbe pre-defined along with cost in Merchandising and templates can also be createdinvolving multiple activities. Work order templates and activities are created,maintained or deleted in Merchandising through spreadsheet upload and downloadprocesses. These processes are accessed through the main Merchandising task listunder Foundation Data > Download Foundation Data and Foundation Data > UploadFoundation Data.
To add or update work order templates and activities, you will select the template typeof Inventory from the Download Data screen and then the template Work Orders. Clickthe Download button and when prompted, choose to either open the .ods file that isgenerated or save the file and open it separately in the spreadsheet application of yourchoice. Once opened, there will be five sheets that can be modified - Transfer WOActivities, Transfer WO Activities Trans, Work Order Templates, Work Order TemplateTrans, Work Order Template Details.
Add a Work Order Activity
To add a new activity, start in the Transfer WO Activities tab, and, in a blank line in thetemplate, select the action type of Create. Next enter a unique activity code (up to 10characters) and the description for the activity in the primary language (as defined inthe Merchandising system options) of up to 250 characters. Next, cost for this activitycan be specified optionally. A cost is not required for an activity until it is applied to thetransfer. Finally, select the accounting method, which determines how the cost for thisactivity should be handled when a transfer occurs; Post to Financials, which meansthe work order cost will only impact Stock Ledger and not the weighted average cost ofthe item, or Update Inventory Cost, which means it will impact both Stock Ledger andthe weighted average cost of the item. The valid values for cost type are held in Codeand Descriptions under code type ACTP. (e.g., adding the cost to the value of the item,or expensing the cost of the activity). Valid values for this field are 'Post to Financial'and 'Update Inventory Cost' and are stored on the code tables for code type ACTP.
Chapter 3Create a Transfer
3-10
Next, if you wish to add translations for the activity description in languages other than theprimary language, this can be done in the Transfer WO Activities Trans tab. Navigate to ablank row and select the action type of Create and the language in which the translateddescription will be entered. Then, enter the activity code for which the translation applies.Finally, enter the translated description. The translated description can also be up to 250characters long. This is an optional step.
Add a Work Order Template
To add a new work order template, start in the Work Order Templates tab, and, in a blank linein the template, select the action type of Create. Next enter a unique work order template ID(up to 10 characters) and the description for the template in the primary language (as definedin the Merchandising system options) of up to 120 characters.
Next, if you wish to add translations for the work order template in languages other than theprimary language, this can be done in the Work Order Template Trans tab. Navigate to ablank row and select the action type of Create and the language in which the translateddescription will be entered. Then, enter the work order template ID for which the translationapplies. Finally, enter the translated description. The translated description can also be up to120 characters long. This is an optional step.
Next, the activities that belong to this template must be added. To do this, move to the WorkOrder Template Details tab in the spreadsheet. Again, navigate to a blank row in the sheetand select an action type of Create. Enter the work order template ID that you added in theWork Order Templates tab. Then add a valid activity code. Next, specify the cost for theactivity. This cost can be different than the activity cost defined earlier. Finally comments canbe added optionally of up to 2000 characters. If you are adding a new detail to an existingtemplate, this same process would apply, just using the existing template instead.
Update Work Order Activity or Template
If you would like to update any details for existing work order activity or template, a similarprocess will be followed as that described above for creating new activity or templaterespectively. First, download the spreadsheet, and then navigate to the tab where you wouldlike to make your updates.
The following columns can be updated in each tab:
• Transfer WO Activities - Activity Description, Unit Cost
• Transfer WO Activities Trans - Activity Description
• Work Order Templates - Work Order Template Description
• Work Order Template Trans - Work Order Template Description
• Work Order Template Details - Activity Cost, Comments
In the tab where you are going to make your updates, select the action type of Update, andthen correct the value in the spreadsheet.
Deleting a Work Order Activity or Template
If you wish to delete a work order activity or template, update the action column to selectDelete in each of the tabs where it occurs. A work order activity cannot be deleted if it's a partof work order on a transfer or template. Similarly if a work order template is associated with atransfer then it can't be deleted.
Chapter 3Create a Transfer
3-11
Uploading Changes
For all actions defined above, once all the updates have been made to the data in thespreadsheet, save the file and close it. Then, return to the Merchandising screens andselect Foundation Data > Upload Foundation Data from the main task list. In thisscreen, select the template type Inventory and the template Work Orders. This willgenerate a process description automatically, but this can be updated if desired. Lastly,select the Browse button and navigate to the directory where you saved the updatedspreadsheet.
To review the status of the upload and check whether any errors occurred, select theFoundation Data > Review Status task from the main task list.
See also Download/Upload Data from Spreadsheets and View Data Loading Status.
Define Item PackagingThe Transfer Item Packing page allows you to send instructions to the finisher to tellthem how items and packs should be shipped to the final location. For example, youmay elect to have the finisher take individual bulk items and have them re-packed intospecific pre-pack configurations.
The following packaging combinations may occur:
Pack to Components
Pack 1 becomes Item 1
Item 2
Item 3
Pack to Pack
Complete Packs:
Pack 1 madeup of:
2 of Item 1 becomes Pack 2 made up of: 2 of Item 1
3 of Item 2 2 of Item 2
3 of Item 3 2 of Item 3
Packs with Remainders:
Pack 1 madeup of:
2 of Item 1 becomes Pack 2 made up of: 2 of Item 1
3 of Item 2 2 of Item 2
3 of Item 3 1 of Item 3
Remaining items 1 of item 2
2 of item 3
Components to Pack
Item 1 becomes Pack 1
Chapter 3Create a Transfer
3-12
Item 2
Item 3
At the top of the page, the transfer number, from and to locations, and the finisher aredisplayed. The page also contains:
• Header
The header displays the transfer number, the from/to location and the finisher.
• Item Packing
• Packing Results
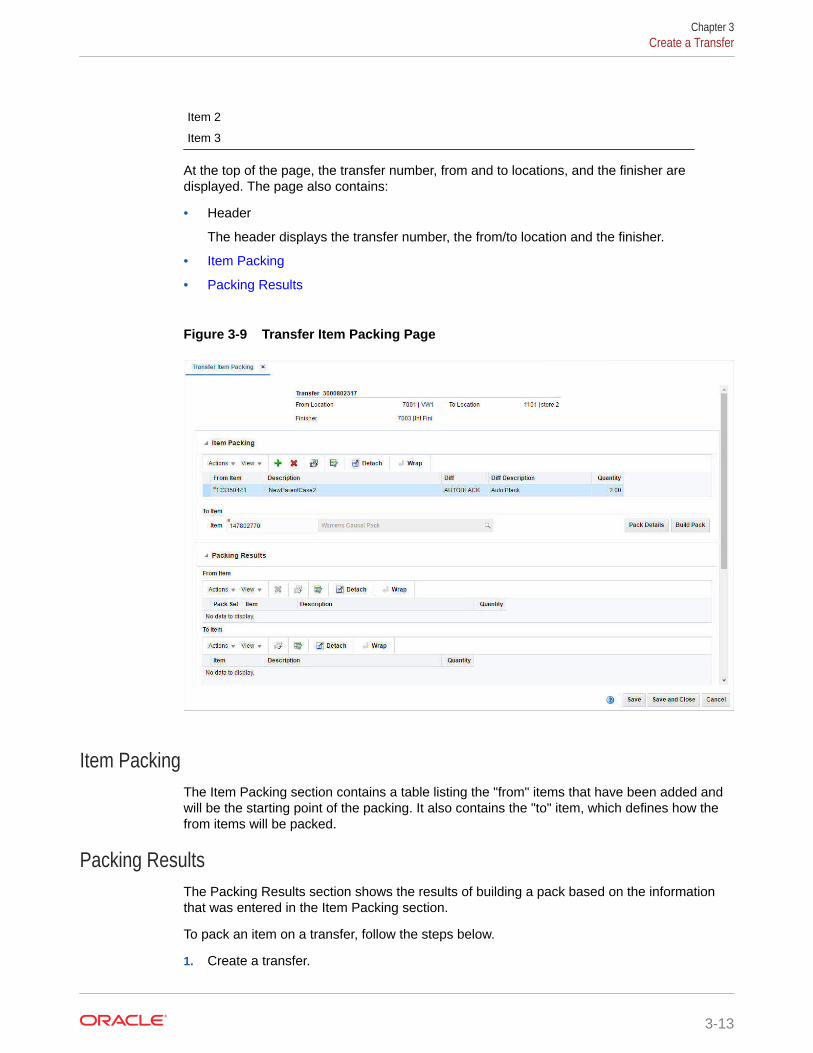
Figure 3-9 Transfer Item Packing Page
Item PackingThe Item Packing section contains a table listing the "from" items that have been added andwill be the starting point of the packing. It also contains the "to" item, which defines how thefrom items will be packed.
Packing ResultsThe Packing Results section shows the results of building a pack based on the informationthat was entered in the Item Packing section.
To pack an item on a transfer, follow the steps below.
1. Create a transfer.
Chapter 3Create a Transfer
3-13
For more information about how to create a transfer, see the start of the Transferschapter.
2. Add a transfer work order activity.
For more information about how to add a transfer work order activity, see the Adda Work Order section.
3. In the Transfer Details page, select More Actions > Packing. The Transfer ItemPacking page appears.
Add Items and Explode Pack
To add a pack and explode the pack item to its components, follow the steps below.
1. In the Item Packing section, select Actions > Add, or use the Add icon . TheAdd Item pop-up appears.
2. In the From Item field, enter or search for the from pack.
3. Select the Explode Pack checkbox, to explode the pack.
The pack item will be exploded to its component items and displayed as a newpack set in the Packing Results section.
4. Then choose one of the following options.
• Click OK to add the item and close the pop-up.
• Click OK and Add Another to add additional items.
• Click Cancel to reject all entries and close the pop-up.
To change the pack, follow the steps below.
1. In the Item Packing section, select Actions > Add, or use the Add icon . TheAdd Item pop-up appears.
2. In the From Item field, enter or search for the from pack.
3. Select the Explode Pack checkbox, to explode the pack.
The pack item will be exploded to its component items and displayed as a newpack set in the Packing Results section.
4. Then choose one of the following options.
• Click OK to add the item and close the pop-up.
• Click OK and Add Another to add additional items.
• Click Cancel to reject all entries and close the pop-up.
5. In the To Item area, enter or search for the to pack item that is on the transfer.
6. Then click Build Pack. The new pack is created and displayed in the PackingResults section.
• To view the pack details, click Pack Details. The Pack Item Details aredisplayed.
7. Then save your entries.
Chapter 3Create a Transfer
3-14
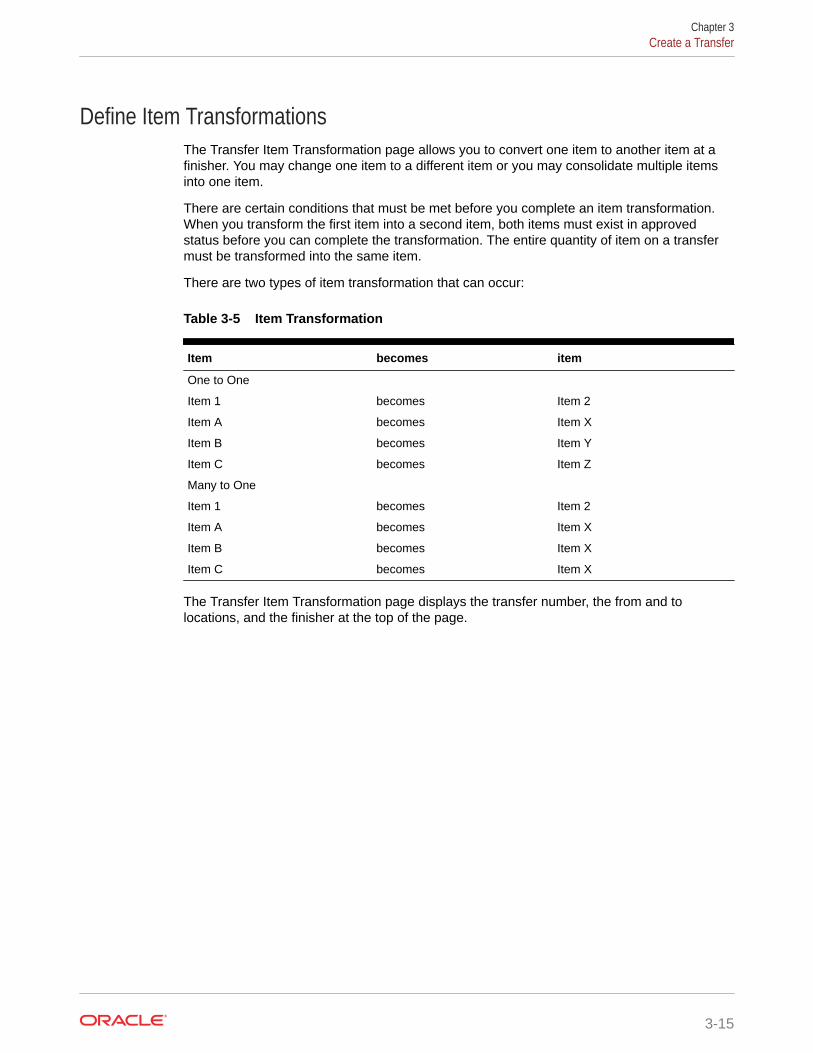
Define Item TransformationsThe Transfer Item Transformation page allows you to convert one item to another item at afinisher. You may change one item to a different item or you may consolidate multiple itemsinto one item.
There are certain conditions that must be met before you complete an item transformation.When you transform the first item into a second item, both items must exist in approvedstatus before you can complete the transformation. The entire quantity of item on a transfermust be transformed into the same item.
There are two types of item transformation that can occur:
Table 3-5 Item Transformation
Item becomes item
One to One
Item 1 becomes Item 2
Item A becomes Item X
Item B becomes Item Y
Item C becomes Item Z
Many to One
Item 1 becomes Item 2
Item A becomes Item X
Item B becomes Item X
Item C becomes Item X
The Transfer Item Transformation page displays the transfer number, the from and tolocations, and the finisher at the top of the page.
Chapter 3Create a Transfer
3-15
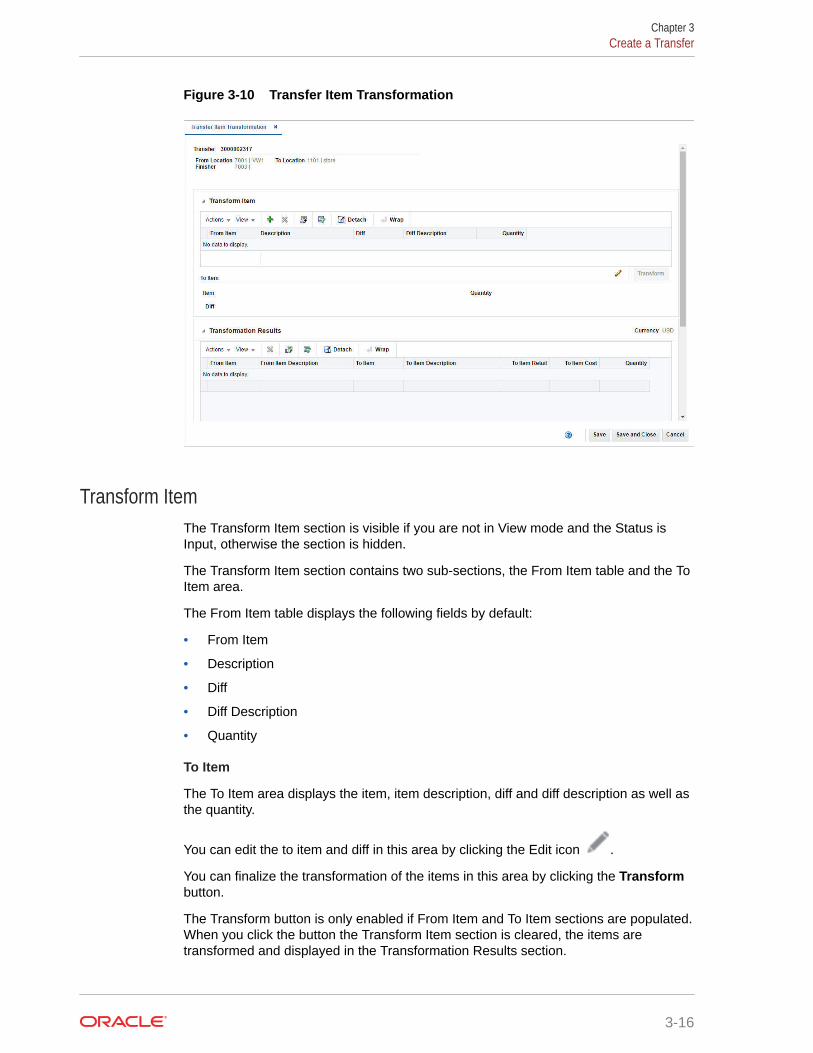
Figure 3-10 Transfer Item Transformation
Transform ItemThe Transform Item section is visible if you are not in View mode and the Status isInput, otherwise the section is hidden.
The Transform Item section contains two sub-sections, the From Item table and the ToItem area.
The From Item table displays the following fields by default:
• From Item
• Description
• Diff
• Diff Description
• Quantity
To Item
The To Item area displays the item, item description, diff and diff description as well asthe quantity.
You can edit the to item and diff in this area by clicking the Edit icon .
You can finalize the transformation of the items in this area by clicking the Transformbutton.
The Transform button is only enabled if From Item and To Item sections are populated.When you click the button the Transform Item section is cleared, the items aretransformed and displayed in the Transformation Results section.
Chapter 3Create a Transfer
3-16

Transformation ResultsThe From Item table displays the following fields by default:
• From Item
• Description
• To Item
• To Item Description
• To Item Retail
• To Item Cost
• Quantity
Transform an ItemTo transform an item, follow the steps below.
1. Create a transfer.
For more information about how to create a transfer, see the start of the Transferschapter.
2. Add a transfer work order activity.
For more information about how to add a transfer work order activity, see the Add a WorkOrder section.
3. In the Transfer Details page, select More Actions > Transformation. The Transfer ItemTransformation page appears.
Add and Transform an Item
To add a from item, follow the steps below.
1. In the Transform Item section, select Actions > Add, or use the Add icon . The AddItem pop-up appears.
2. In the From Item pop-up:
a. In the Item field, enter or search for an item. This field is a required field.
b. In the Diff field, enter, select or search for the diff. This field is only available if theparte item has diff.
3. In the To Item section:
a. In the Item field, enter or search for an item or parent item that you want the fromitem to become.
Note:
The to item you select must be an approved item.
b. In the Diff field, enter, select or search for the diff. This field is only available if the toitem is a parent item.
Chapter 3Create a Transfer
3-17
4. Then choose one of the following options.
• Click OK to add the from/to item and close the pop-up.
• Click OK and Add Another to add additional from/to items.
• Click Cancel to reject all entries and close the pop-up.
5. Then click Transform. The items that have been transformed for the transfer aredisplayed in the Transformation Results section.
6. Save your entries.
Edit the To Item
To edit the "to" item before transforming, follow the steps below.
1. In the To Item area, click the Edit icon . The Edit Item pop-up appears.
2. Edit the fields as necessary.
3. Then choose one of the following options.
• Click OK to add your change to the table and close the pop-up.
• Click Cancel to reject the entries and close the pop-up.
Manage Up ChargesAn up charge is a cost associated with moving items between locations in theMerchandising. Up charges may be included to account for work associated with thetransfer of goods (for example, cost that the origin location incurs to prepare the itemsfor shipping).
Each up charge has a calculation basis of value or specific, a cost basis of eitherweighted average cost (when using average cost method) or unit cost (when usingstandard cost method), component currency, and up charge group, which is used togroup up charge components together to show a total sum on the Transfer Up Chargepage.
The Transfer Up Charges page allows you to view the up charges that are associatedwith a specific transfer/item/from location/to location combination. Up charge groupsare a combination of up charge components.
Chapter 3Create a Transfer
3-18
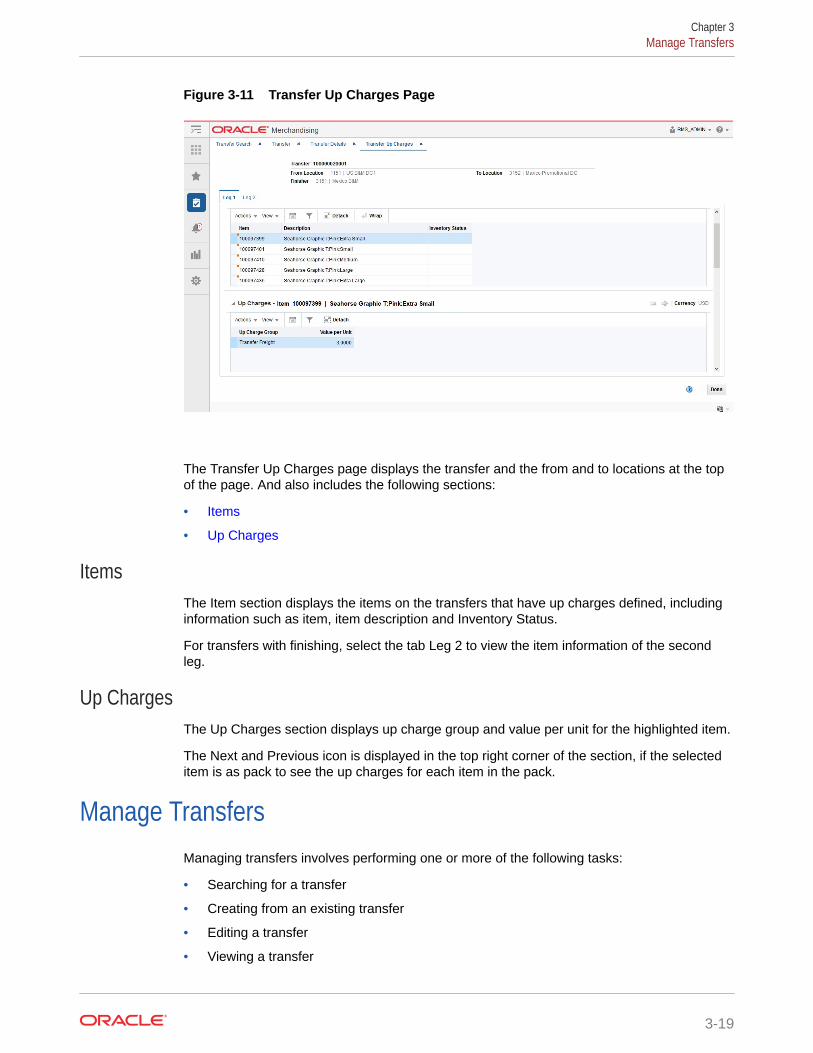
Figure 3-11 Transfer Up Charges Page
The Transfer Up Charges page displays the transfer and the from and to locations at the topof the page. And also includes the following sections:
• Items
• Up Charges
ItemsThe Item section displays the items on the transfers that have up charges defined, includinginformation such as item, item description and Inventory Status.
For transfers with finishing, select the tab Leg 2 to view the item information of the secondleg.
Up ChargesThe Up Charges section displays up charge group and value per unit for the highlighted item.
The Next and Previous icon is displayed in the top right corner of the section, if the selecteditem is as pack to see the up charges for each item in the pack.
Manage TransfersManaging transfers involves performing one or more of the following tasks:
• Searching for a transfer
• Creating from an existing transfer
• Editing a transfer
• Viewing a transfer
Chapter 3Manage Transfers
3-19

To manage transfers, access the Transfer Search page by selecting Inventory >Transfers > Manage Transfers, the Transfer Search page appears.
Figure 3-12 Transfer Search Page
Search for a TransferTo search for a transfer:
1. Provide search criteria in the search section. The criteria can be provided either inBasic or Advanced mode, depending on the requirement. Basic is the defaultmode when the search page is entered.
Click Advanced to access the search panel in advanced mode. You can return toBasic mode by clicking Basic.
Search for a Transfer Through the Basic Search CriteriaTo search for a transfer through the basic search criteria.
1. Enter or select one or all of the following basic search criteria.
Table 3-6 Transfer Search - Basic Search Criteria
Field Description
Match option Check radio button All or Any.
All - only transfer matching all entered search criteria areshown.
Any - transfer matching any of the entered search criteria areshown.
Chapter 3Manage Transfers
3-20
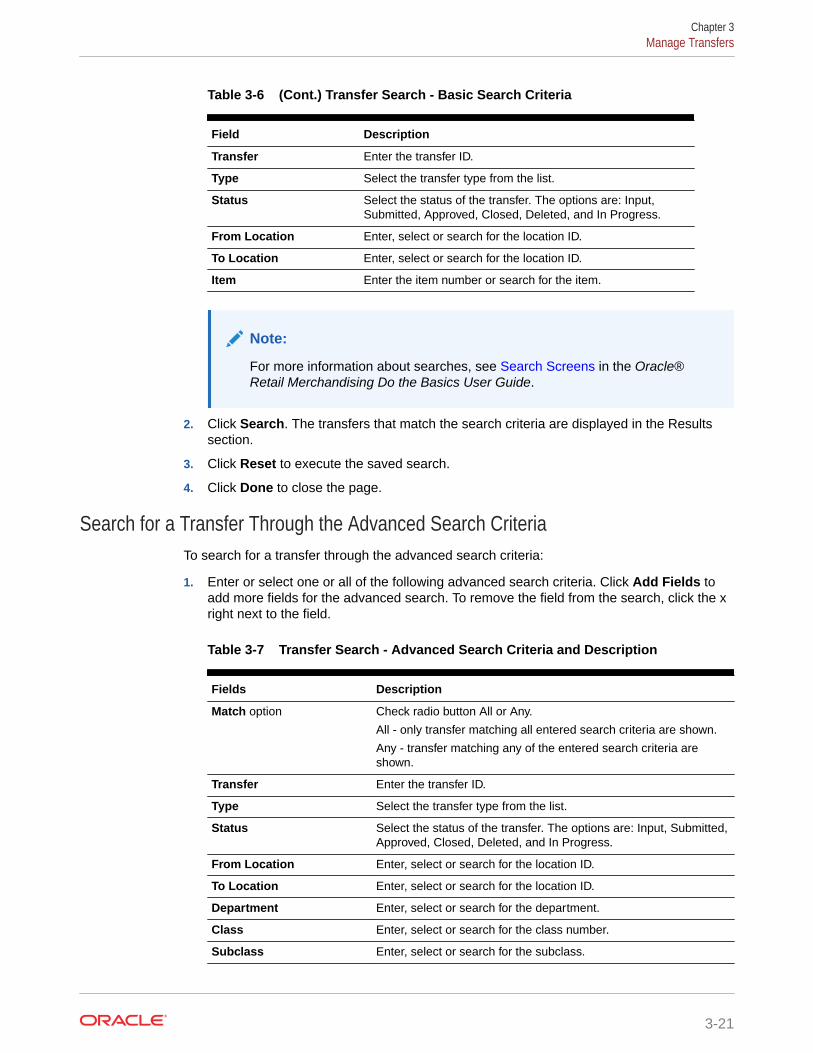
Table 3-6 (Cont.) Transfer Search - Basic Search Criteria
Field Description
Transfer Enter the transfer ID.
Type Select the transfer type from the list.
Status Select the status of the transfer. The options are: Input,Submitted, Approved, Closed, Deleted, and In Progress.
From Location Enter, select or search for the location ID.
To Location Enter, select or search for the location ID.
Item Enter the item number or search for the item.
Note:
For more information about searches, see Search Screens in the Oracle®Retail Merchandising Do the Basics User Guide.
2. Click Search. The transfers that match the search criteria are displayed in the Resultssection.
3. Click Reset to execute the saved search.
4. Click Done to close the page.
Search for a Transfer Through the Advanced Search CriteriaTo search for a transfer through the advanced search criteria:
1. Enter or select one or all of the following advanced search criteria. Click Add Fields toadd more fields for the advanced search. To remove the field from the search, click the xright next to the field.
Table 3-7 Transfer Search - Advanced Search Criteria and Description
Fields Description
Match option Check radio button All or Any.
All - only transfer matching all entered search criteria are shown.
Any - transfer matching any of the entered search criteria areshown.
Transfer Enter the transfer ID.
Type Select the transfer type from the list.
Status Select the status of the transfer. The options are: Input, Submitted,Approved, Closed, Deleted, and In Progress.
From Location Enter, select or search for the location ID.
To Location Enter, select or search for the location ID.
Department Enter, select or search for the department.
Class Enter, select or search for the class number.
Subclass Enter, select or search for the subclass.
Chapter 3Manage Transfers
3-21
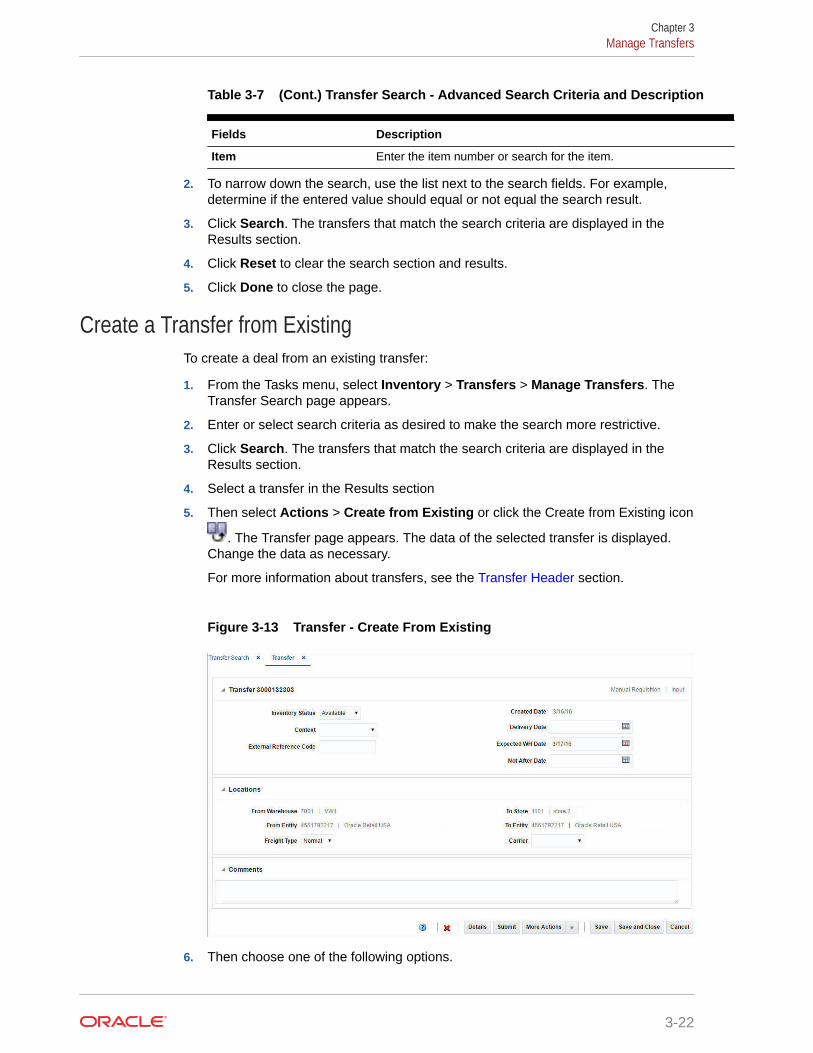
Table 3-7 (Cont.) Transfer Search - Advanced Search Criteria and Description
Fields Description
Item Enter the item number or search for the item.
2. To narrow down the search, use the list next to the search fields. For example,determine if the entered value should equal or not equal the search result.
3. Click Search. The transfers that match the search criteria are displayed in theResults section.
4. Click Reset to clear the search section and results.
5. Click Done to close the page.
Create a Transfer from ExistingTo create a deal from an existing transfer:
1. From the Tasks menu, select Inventory > Transfers > Manage Transfers. TheTransfer Search page appears.
2. Enter or select search criteria as desired to make the search more restrictive.
3. Click Search. The transfers that match the search criteria are displayed in theResults section.
4. Select a transfer in the Results section
5. Then select Actions > Create from Existing or click the Create from Existing icon
. The Transfer page appears. The data of the selected transfer is displayed.Change the data as necessary.
For more information about transfers, see the Transfer Header section.
Figure 3-13 Transfer - Create From Existing
6. Then choose one of the following options.
Chapter 3Manage Transfers
3-22
• Click Save to save to create the transfer.
• Click Save and Close to create the transfer and close the page.
• Click Cancel to reject all entries and return to Transfer Search page.
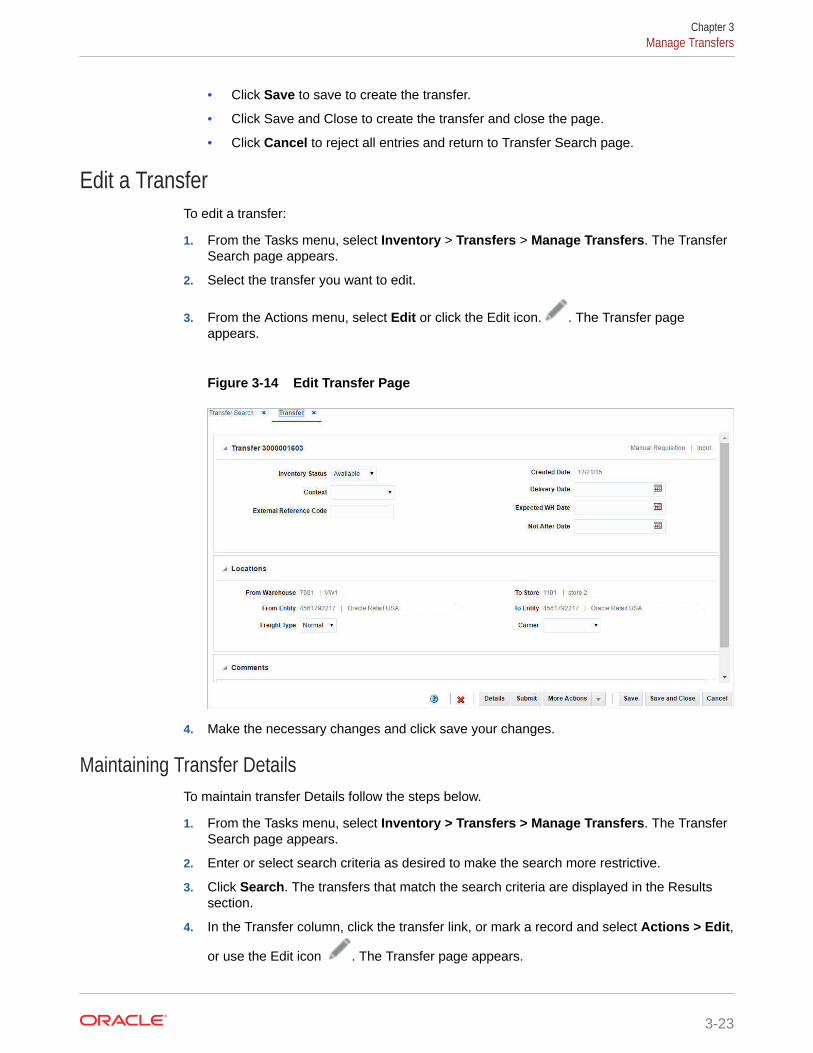
Edit a TransferTo edit a transfer:
1. From the Tasks menu, select Inventory > Transfers > Manage Transfers. The TransferSearch page appears.
2. Select the transfer you want to edit.
3. From the Actions menu, select Edit or click the Edit icon. . The Transfer pageappears.
Figure 3-14 Edit Transfer Page
4. Make the necessary changes and click save your changes.
Maintaining Transfer DetailsTo maintain transfer Details follow the steps below.
1. From the Tasks menu, select Inventory > Transfers > Manage Transfers. The TransferSearch page appears.
2. Enter or select search criteria as desired to make the search more restrictive.
3. Click Search. The transfers that match the search criteria are displayed in the Resultssection.
4. In the Transfer column, click the transfer link, or mark a record and select Actions > Edit,
or use the Edit icon . The Transfer page appears.
Chapter 3Manage Transfers
3-23
Editing Transfer Details Items
To edit transfer details items:
1. In the Items section, select the transfer details of the item you want to edit.
2. From the Actions menu, click Edit or click the Edit icon .
3. Edit the quantity type and the transfer quantity as necessary.
4. Then choose one of the following options.
• Click OK to save the changes and close the page.
• Click Cancel to reject your entries and close the page.
Approve a TransferWhen a transfer is added to the system, it must go through a series of checks before itcan be executed. Depending on your user role, you may not be able to move thetransfer to the next status. A transfer may be in any of the following statuses.
Table 3-8 Transfer Approval Process - Status and Definition
Status Definition
Input The transfer has been started, but not completed.
Submitted The transfer has been completed and is pending in review.
Approved The transfer has been reviewed and has been approved.
In Progress The transfer has been shipped to the next receiver in thetransfer.
Deleted The transfer is marked for deletion. It will be deleted by aregularly scheduled batch program.
Closed The transfer has been received at the final location and iscomplete.
Submit a Transfer for ApprovalTo submit a transfer for approval, follow the steps below.
1. From the Tasks menu, select Inventory > Transfers > Manage Transfers. TheTransfer Search page appears.
2. Restrict your search to transfers in Input status.
3. Click Search. The transfer that match the search criteria are displayed in theResults section.
4. In the Transfer column, click the Transfer link, or mark a record and select Actions
> Edit, or use the Edit icon . The Transfer page appears.
5. Click the Submit button. The status of the transfer changes to Submitted.
6. Save your changes.
Chapter 3Manage Transfers
3-24
Approve a TransferTo approve a transfer, follow the steps below.
1. From the Tasks menu, select Inventory > Transfers > Manage Transfers. The TransferSearch page appears.
2. Restrict your search to transfers in Submitted status.
3. Click Search. The transfer that match the search criteria are displayed in the Resultssection.
4. In the Transfer column, click the Transfer link, or mark a record and select Actions >
Edit, or use the Edit icon . The Transfer page appears.
5. Click the Approve button. The status of the transfer changes to Approved.
6. Save your changes.
Ship a TransferTo ship a transfer, follow the steps below.
1. From the Tasks menu, select Inventory > Transfers > Manage Transfers. The TransferSearch page appears.
2. Enter criteria to find the transfer you wish to ship. Only transfers in Approved status canbe shipped. Click Search. The transfers that match the search criteria are displayed inthe Results section.
3. In the Transfer column, click the Transfer link, or select Actions > Edit, or use the Edit
icon ( ). The Transfer page appears.
4. Click the Ship button. The status of the transfer changes to In Progress and the BOLnumber that has been created for the shipment is displayed.
5. Click Save and Close to save your changes and close the page.
Note:
This option is available only when the system options Allow Shipping /Receiving at Stores (for store sourced transfers) and/or Allow Shipping /Receiving at Warehouses (for warehouse sourced transfers) are set to Yes.
Close a TransferTo close a transfer, follow the steps below.
1. From the Tasks menu, select Inventory > Transfers > Manage Transfers. The TransferSearch page appears.
2. Restrict your search to transfers in In Progress status.
3. Click Search. The transfer that match the search criteria are displayed in the Resultssection.
Chapter 3Manage Transfers
3-25
4. In the Transfer column, click the Transfer link, or mark a record and select Actions
> Edit, or use the Edit icon . The Transfer page appears.
5. Click the Close button. The status of the transfer changes to Closed.
6. Save your changes.
Chapter 3Manage Transfers
3-26
4Mass Return Transfers
Mass return transfers (or MRTs) allow you to transfer a set of items from multiple locationsback to a single location. A return to vendor (RTV) can also be included as part of the MRT.This may be used for end of season when pulling inventory back from stores to a warehouse,or for product recalls.
Create a Mass ReturnThe Mass Return Transfer (MRT) page allows you to create a transfer of multiple items andlocations back to a single location by specifying the following information:
• Mass return transfer details
• RTV
• Items
• Locations
From the Tasks menu, select Inventory > Transfers > Create Mass Return Transfer. TheMass Return Transfer page appears.
4-1
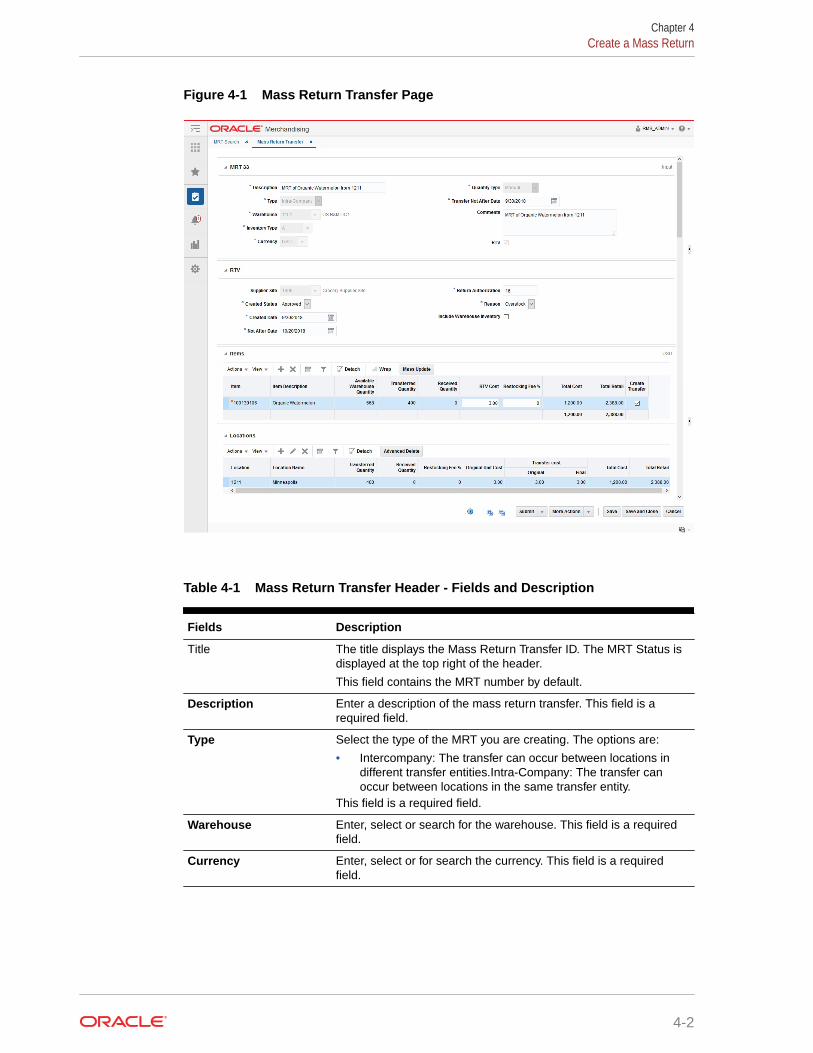
Figure 4-1 Mass Return Transfer Page
Table 4-1 Mass Return Transfer Header - Fields and Description
Fields Description
Title The title displays the Mass Return Transfer ID. The MRT Status isdisplayed at the top right of the header.
This field contains the MRT number by default.
Description Enter a description of the mass return transfer. This field is arequired field.
Type Select the type of the MRT you are creating. The options are:
• Intercompany: The transfer can occur between locations indifferent transfer entities.Intra-Company: The transfer canoccur between locations in the same transfer entity.
This field is a required field.
Warehouse Enter, select or search for the warehouse. This field is a requiredfield.
Currency Enter, select or for search the currency. This field is a requiredfield.
Chapter 4Create a Mass Return
4-2
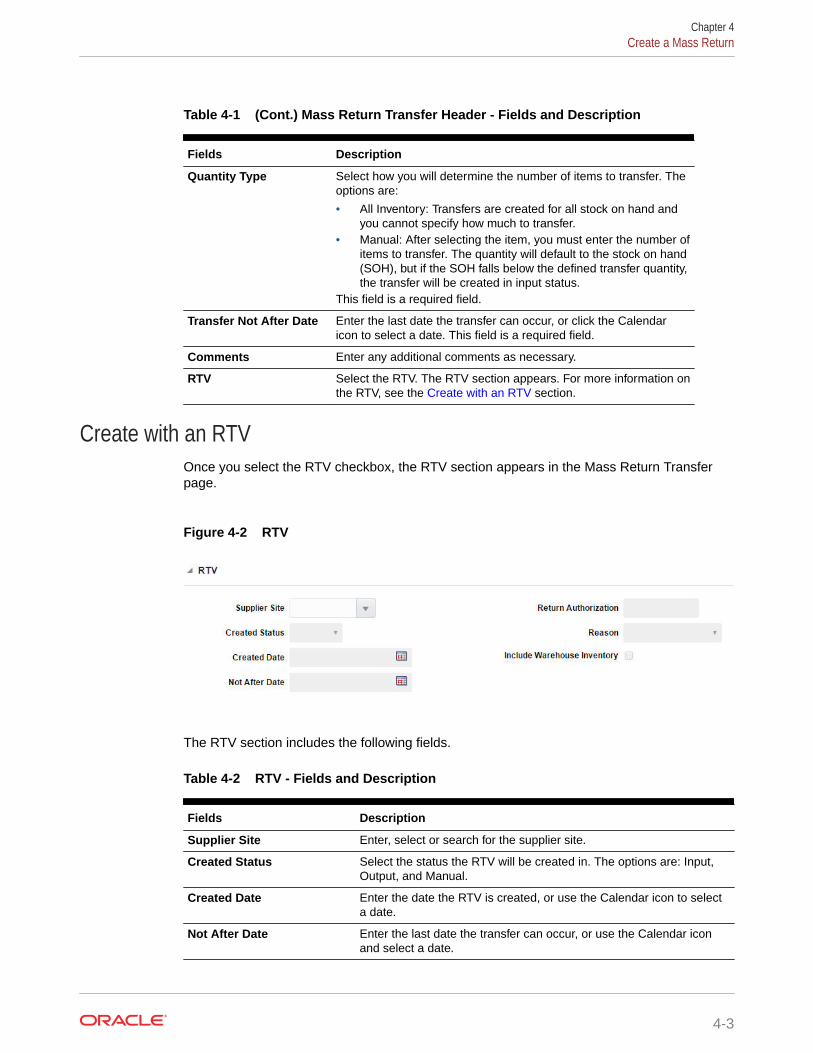
Table 4-1 (Cont.) Mass Return Transfer Header - Fields and Description
Fields Description
Quantity Type Select how you will determine the number of items to transfer. Theoptions are:
• All Inventory: Transfers are created for all stock on hand andyou cannot specify how much to transfer.
• Manual: After selecting the item, you must enter the number ofitems to transfer. The quantity will default to the stock on hand(SOH), but if the SOH falls below the defined transfer quantity,the transfer will be created in input status.
This field is a required field.
Transfer Not After Date Enter the last date the transfer can occur, or click the Calendaricon to select a date. This field is a required field.
Comments Enter any additional comments as necessary.
RTV Select the RTV. The RTV section appears. For more information onthe RTV, see the Create with an RTV section.
Create with an RTVOnce you select the RTV checkbox, the RTV section appears in the Mass Return Transferpage.
Figure 4-2 RTV
The RTV section includes the following fields.
Table 4-2 RTV - Fields and Description
Fields Description
Supplier Site Enter, select or search for the supplier site.
Created Status Select the status the RTV will be created in. The options are: Input,Output, and Manual.
Created Date Enter the date the RTV is created, or use the Calendar icon to selecta date.
Not After Date Enter the last date the transfer can occur, or use the Calendar iconand select a date.
Chapter 4Create a Mass Return
4-3
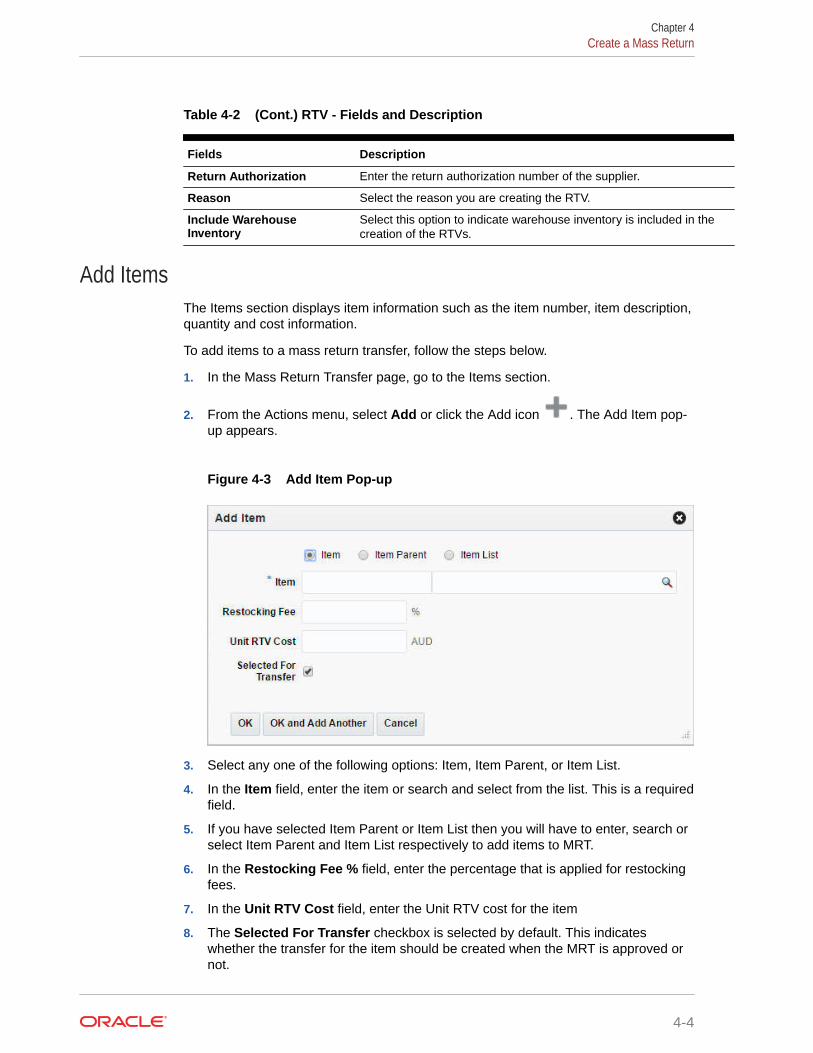
Table 4-2 (Cont.) RTV - Fields and Description
Fields Description
Return Authorization Enter the return authorization number of the supplier.
Reason Select the reason you are creating the RTV.
Include WarehouseInventory
Select this option to indicate warehouse inventory is included in thecreation of the RTVs.
Add ItemsThe Items section displays item information such as the item number, item description,quantity and cost information.
To add items to a mass return transfer, follow the steps below.
1. In the Mass Return Transfer page, go to the Items section.
2. From the Actions menu, select Add or click the Add icon . The Add Item pop-up appears.
Figure 4-3 Add Item Pop-up
3. Select any one of the following options: Item, Item Parent, or Item List.
4. In the Item field, enter the item or search and select from the list. This is a requiredfield.
5. If you have selected Item Parent or Item List then you will have to enter, search orselect Item Parent and Item List respectively to add items to MRT.
6. In the Restocking Fee % field, enter the percentage that is applied for restockingfees.
7. In the Unit RTV Cost field, enter the Unit RTV cost for the item
8. The Selected For Transfer checkbox is selected by default. This indicateswhether the transfer for the item should be created when the MRT is approved ornot.
Chapter 4Create a Mass Return
4-4
9. Then choose one of the following option.
• Click OK to add the item and close the page.
• Click OK and Add Another to add additional items.
• Click Cancel to reject all entries and close the page.
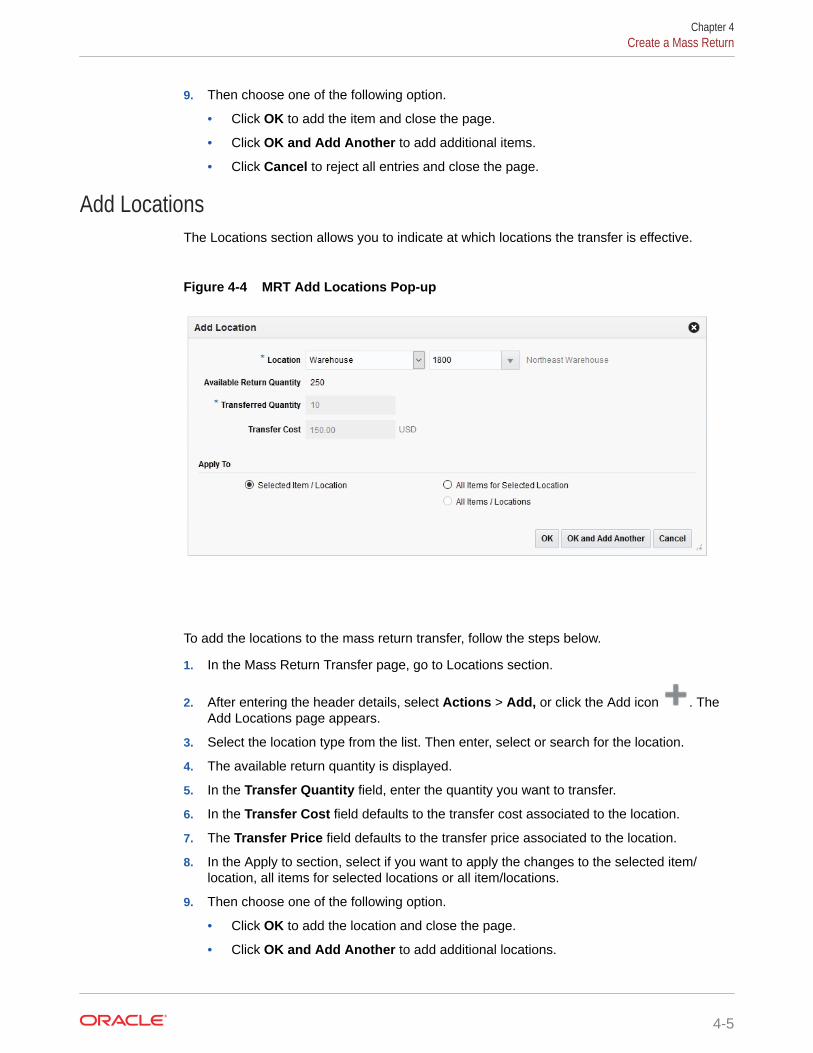
Add LocationsThe Locations section allows you to indicate at which locations the transfer is effective.
Figure 4-4 MRT Add Locations Pop-up
To add the locations to the mass return transfer, follow the steps below.
1. In the Mass Return Transfer page, go to Locations section.
2. After entering the header details, select Actions > Add, or click the Add icon . TheAdd Locations page appears.
3. Select the location type from the list. Then enter, select or search for the location.
4. The available return quantity is displayed.
5. In the Transfer Quantity field, enter the quantity you want to transfer.
6. In the Transfer Cost field defaults to the transfer cost associated to the location.
7. The Transfer Price field defaults to the transfer price associated to the location.
8. In the Apply to section, select if you want to apply the changes to the selected item/location, all items for selected locations or all item/locations.
9. Then choose one of the following option.
• Click OK to add the location and close the page.
• Click OK and Add Another to add additional locations.
Chapter 4Create a Mass Return
4-5
• Click Cancel to reject all entries and close the page.
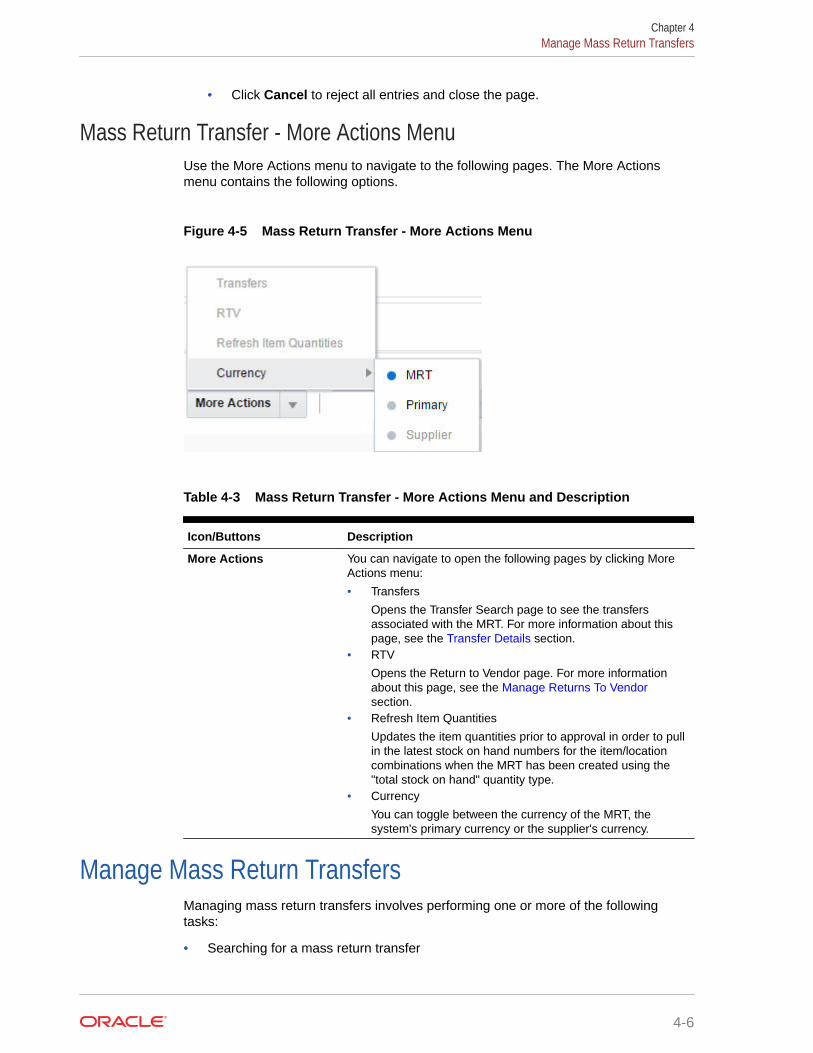
Mass Return Transfer - More Actions MenuUse the More Actions menu to navigate to the following pages. The More Actionsmenu contains the following options.
Figure 4-5 Mass Return Transfer - More Actions Menu
Table 4-3 Mass Return Transfer - More Actions Menu and Description
Icon/Buttons Description
More Actions You can navigate to open the following pages by clicking MoreActions menu:
• Transfers
Opens the Transfer Search page to see the transfersassociated with the MRT. For more information about thispage, see the Transfer Details section.
• RTV
Opens the Return to Vendor page. For more informationabout this page, see the Manage Returns To Vendorsection.
• Refresh Item Quantities
Updates the item quantities prior to approval in order to pullin the latest stock on hand numbers for the item/locationcombinations when the MRT has been created using the"total stock on hand" quantity type.
• Currency
You can toggle between the currency of the MRT, thesystem's primary currency or the supplier's currency.
Manage Mass Return TransfersManaging mass return transfers involves performing one or more of the followingtasks:
• Searching for a mass return transfer
Chapter 4Manage Mass Return Transfers
4-6

• Editing a mass return transfer
• Viewing a mass return transfer
Search for Mass Return TransferYou can access the MRT Search page from the Task menu, select Inventory > Transfers >Manage Mass Return Transfer. The MRT Search page appears.
In the MRT Search page you can search for mass return transfers by specifying varioussearch criteria. You can choose to access mass return transfers in the search results in editor view mode depending on security privileges. There are also options for creating a newmass return transfer.
Figure 4-6 MRT Search Page
To search for an MRT:
1. From the Tasks menu, select Inventory > Transfers > Manage Mass Return Transfer.The MRT Search page appears.
2. You can search for a mass return transfer by providing search criteria in the searchsection. The criteria can be provided either in Basic or Advanced mode, depending onthe requirement. Basic is the default mode when the search page is entered. ClickAdvanced to access search panel in advanced mode. You can return to Basic mode byclicking Basic.
Search for an MRT Through the Basic Search CriteriaTo search for an MRT through the basic search criteria:
Chapter 4Manage Mass Return Transfers
4-7
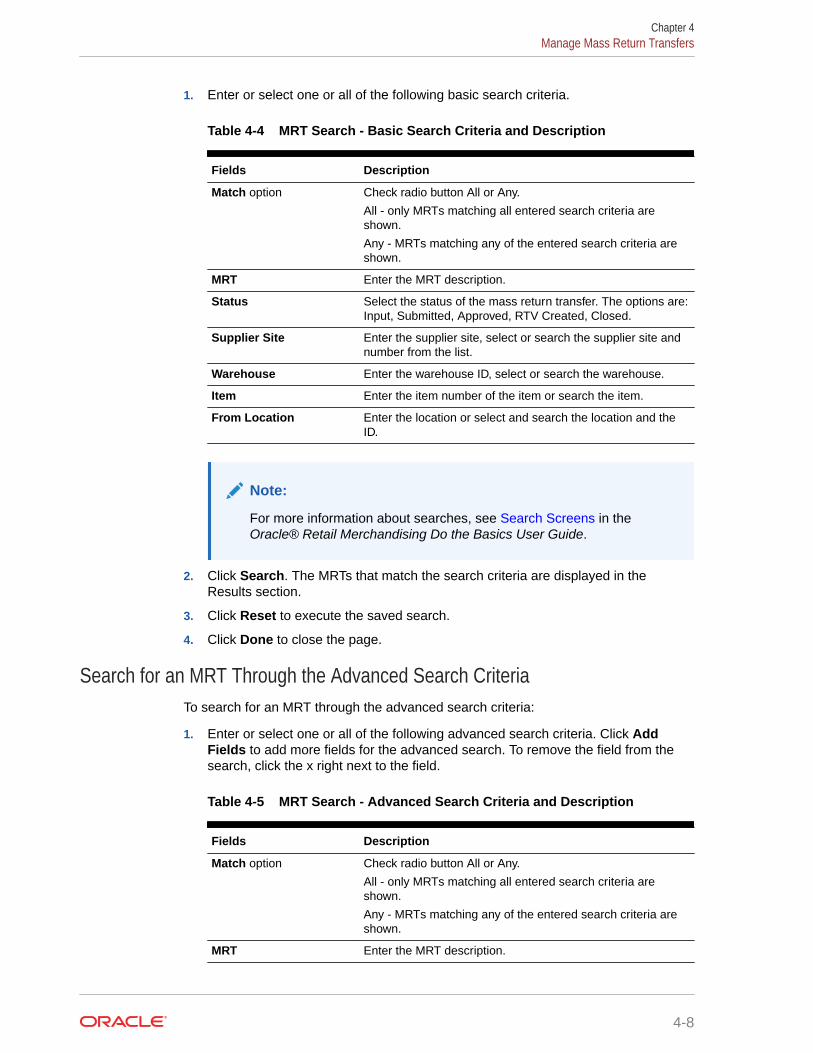
1. Enter or select one or all of the following basic search criteria.
Table 4-4 MRT Search - Basic Search Criteria and Description
Fields Description
Match option Check radio button All or Any.
All - only MRTs matching all entered search criteria areshown.
Any - MRTs matching any of the entered search criteria areshown.
MRT Enter the MRT description.
Status Select the status of the mass return transfer. The options are:Input, Submitted, Approved, RTV Created, Closed.
Supplier Site Enter the supplier site, select or search the supplier site andnumber from the list.
Warehouse Enter the warehouse ID, select or search the warehouse.
Item Enter the item number of the item or search the item.
From Location Enter the location or select and search the location and theID.
Note:
For more information about searches, see Search Screens in theOracle® Retail Merchandising Do the Basics User Guide.
2. Click Search. The MRTs that match the search criteria are displayed in theResults section.
3. Click Reset to execute the saved search.
4. Click Done to close the page.
Search for an MRT Through the Advanced Search CriteriaTo search for an MRT through the advanced search criteria:
1. Enter or select one or all of the following advanced search criteria. Click AddFields to add more fields for the advanced search. To remove the field from thesearch, click the x right next to the field.
Table 4-5 MRT Search - Advanced Search Criteria and Description
Fields Description
Match option Check radio button All or Any.
All - only MRTs matching all entered search criteria areshown.
Any - MRTs matching any of the entered search criteria areshown.
MRT Enter the MRT description.
Chapter 4Manage Mass Return Transfers
4-8
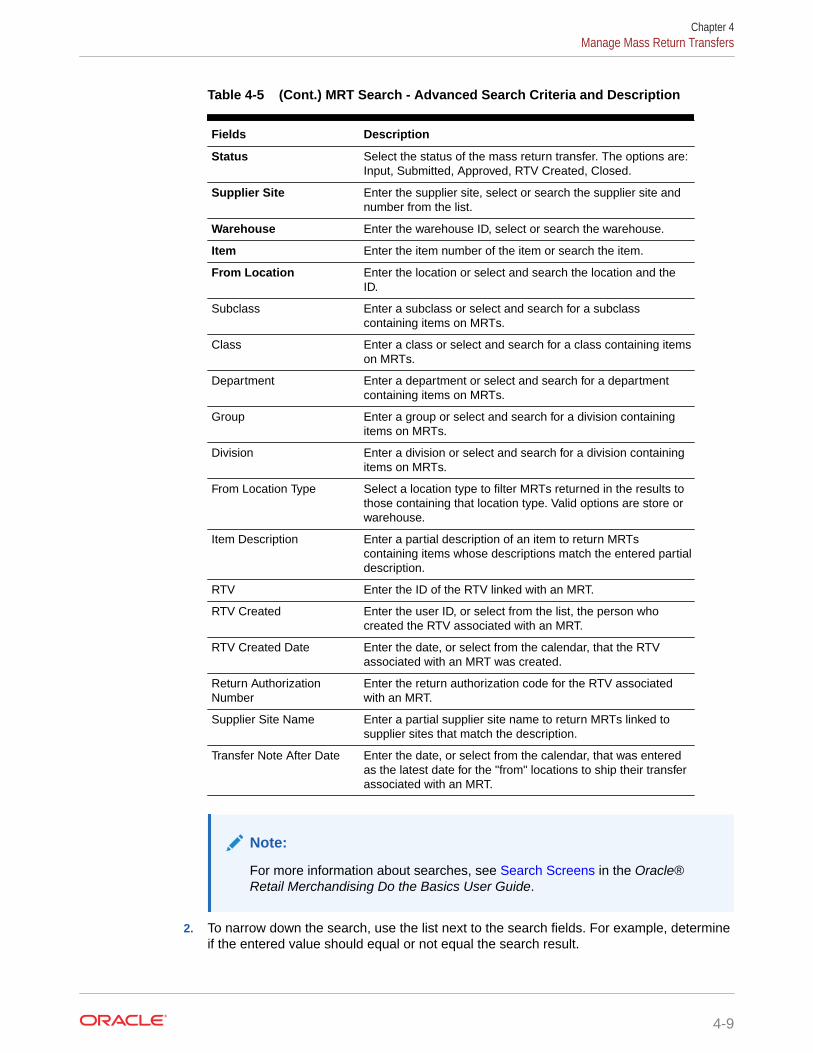
Table 4-5 (Cont.) MRT Search - Advanced Search Criteria and Description
Fields Description
Status Select the status of the mass return transfer. The options are:Input, Submitted, Approved, RTV Created, Closed.
Supplier Site Enter the supplier site, select or search the supplier site andnumber from the list.
Warehouse Enter the warehouse ID, select or search the warehouse.
Item Enter the item number of the item or search the item.
From Location Enter the location or select and search the location and theID.
Subclass Enter a subclass or select and search for a subclasscontaining items on MRTs.
Class Enter a class or select and search for a class containing itemson MRTs.
Department Enter a department or select and search for a departmentcontaining items on MRTs.
Group Enter a group or select and search for a division containingitems on MRTs.
Division Enter a division or select and search for a division containingitems on MRTs.
From Location Type Select a location type to filter MRTs returned in the results tothose containing that location type. Valid options are store orwarehouse.
Item Description Enter a partial description of an item to return MRTscontaining items whose descriptions match the entered partialdescription.
RTV Enter the ID of the RTV linked with an MRT.
RTV Created Enter the user ID, or select from the list, the person whocreated the RTV associated with an MRT.
RTV Created Date Enter the date, or select from the calendar, that the RTVassociated with an MRT was created.
Return AuthorizationNumber
Enter the return authorization code for the RTV associatedwith an MRT.
Supplier Site Name Enter a partial supplier site name to return MRTs linked tosupplier sites that match the description.
Transfer Note After Date Enter the date, or select from the calendar, that was enteredas the latest date for the "from" locations to ship their transferassociated with an MRT.
Note:
For more information about searches, see Search Screens in the Oracle®Retail Merchandising Do the Basics User Guide.
2. To narrow down the search, use the list next to the search fields. For example, determineif the entered value should equal or not equal the search result.
Chapter 4Manage Mass Return Transfers
4-9
3. Click Search. The MRTs that match the search criteria are displayed in theResults section.
4. Click Reset to clear the search section and results.
5. Click Done to close the page.
Edit an MRTTo edit an MRT, follow the steps below.
1. From the Tasks menu, select Inventory > Transfers > Manage Transfers >Manage Mass Return Transfer. The MRT Search page appears.
2. Select the mass return transfer you want to edit.
3. From the Actions menu, select Edit or click the Edit icon. . The Mass ReturnTransfer page appears.
4. Make the necessary changes.
For more information about the Mass Return Transfer page, see the Mass ReturnTransfers chapter.
5. Save your changes.
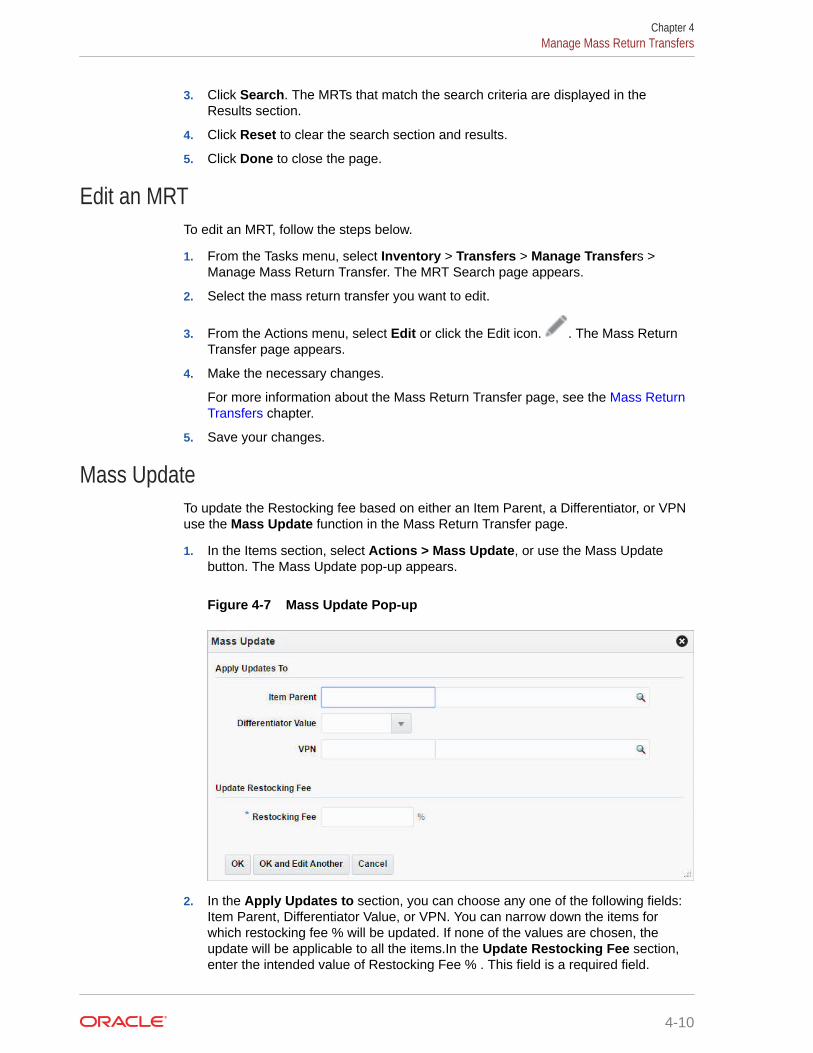
Mass UpdateTo update the Restocking fee based on either an Item Parent, a Differentiator, or VPNuse the Mass Update function in the Mass Return Transfer page.
1. In the Items section, select Actions > Mass Update, or use the Mass Updatebutton. The Mass Update pop-up appears.
Figure 4-7 Mass Update Pop-up
2. In the Apply Updates to section, you can choose any one of the following fields:Item Parent, Differentiator Value, or VPN. You can narrow down the items forwhich restocking fee % will be updated. If none of the values are chosen, theupdate will be applicable to all the items.In the Update Restocking Fee section,enter the intended value of Restocking Fee % . This field is a required field.
Chapter 4Manage Mass Return Transfers
4-10
3. Then choose one of the following options.
• Click OK to commit the mass update and close the pop-up.
• Click OK and Edit Another to commit the changes and edit an additional massupdate.
• Click Cancel to reject all entries and close the pop-up.
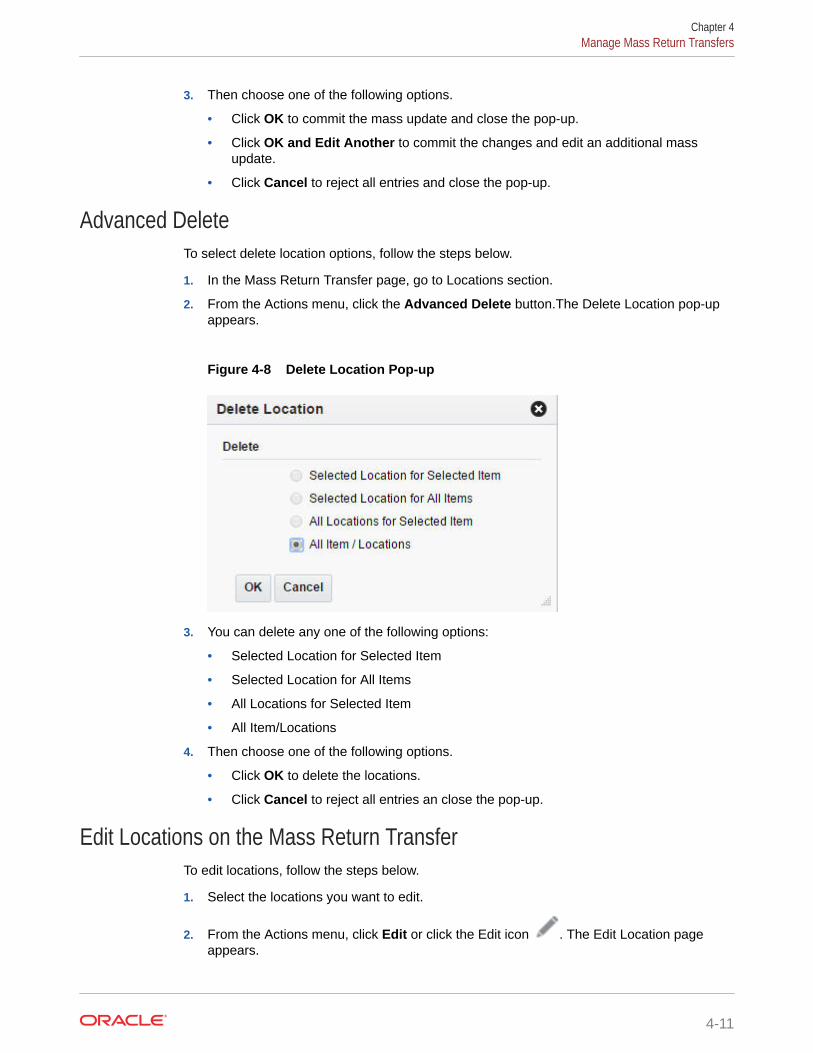
Advanced DeleteTo select delete location options, follow the steps below.
1. In the Mass Return Transfer page, go to Locations section.
2. From the Actions menu, click the Advanced Delete button.The Delete Location pop-upappears.
Figure 4-8 Delete Location Pop-up
3. You can delete any one of the following options:
• Selected Location for Selected Item
• Selected Location for All Items
• All Locations for Selected Item
• All Item/Locations
4. Then choose one of the following options.
• Click OK to delete the locations.
• Click Cancel to reject all entries an close the pop-up.
Edit Locations on the Mass Return TransferTo edit locations, follow the steps below.
1. Select the locations you want to edit.
2. From the Actions menu, click Edit or click the Edit icon . The Edit Location pageappears.
Chapter 4Manage Mass Return Transfers
4-11
3. Edit the enabled fields as necessary.
4. Click OK to return to Mass Return Transfer page.
Chapter 4Manage Mass Return Transfers
4-12

5Return to Vendor
Depending on your supplier agreements, you may be able to return product at that has notsold at the end of a season or based on other issues with the product. This is done using theReturn to Vendor transaction in Merchandising.
Create a Return to VendorTo create a return to vendor (RTV) order:
1. From the Tasks menu, select Inventory > Create Return to Vendor. The Create Returnto Vendor pop-up appears.
Figure 5-1 Create Return to Vendor Pop-up
2. In the Supplier Site field, enter, select or search for the supplier site. This field is arequired field.
3. In the Location field, select the location type from the list. Possible options are Store andWarehouse. Then enter, select or search for the location. This field is a required field.
4. In the Return Authorization field, enter the supplier's return authorization number asnecessary. This is a required field.
5. Then choose one of the following options.
• Click OK to create the return to vendor order. The Return to Vendor page appears.
For more information about the RTV page, see the Manage Returns To Vendorsection.
• Click Cancel reject all entries and close the page.
Return to VendorThe Return to Vendor (RTV) page allows you to create and maintain RTV orders. Whencreating an RTV, the details that you entered in the pop-up are defaulted into the page. Youcan then add the items that will be returned.
5-1
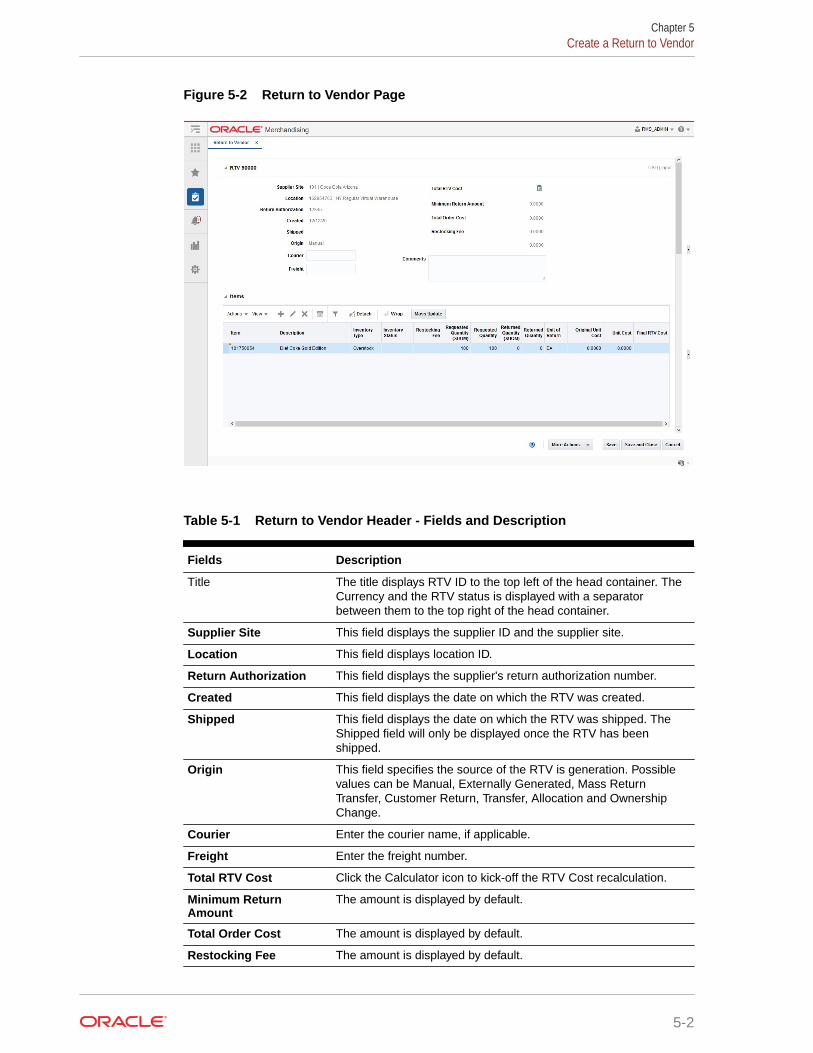
Figure 5-2 Return to Vendor Page
Table 5-1 Return to Vendor Header - Fields and Description
Fields Description
Title The title displays RTV ID to the top left of the head container. TheCurrency and the RTV status is displayed with a separatorbetween them to the top right of the head container.
Supplier Site This field displays the supplier ID and the supplier site.
Location This field displays location ID.
Return Authorization This field displays the supplier's return authorization number.
Created This field displays the date on which the RTV was created.
Shipped This field displays the date on which the RTV was shipped. TheShipped field will only be displayed once the RTV has beenshipped.
Origin This field specifies the source of the RTV is generation. Possiblevalues can be Manual, Externally Generated, Mass ReturnTransfer, Customer Return, Transfer, Allocation and OwnershipChange.
Courier Enter the courier name, if applicable.
Freight Enter the freight number.
Total RTV Cost Click the Calculator icon to kick-off the RTV Cost recalculation.
Minimum ReturnAmount
The amount is displayed by default.
Total Order Cost The amount is displayed by default.
Restocking Fee The amount is displayed by default.
Chapter 5Create a Return to Vendor
5-2
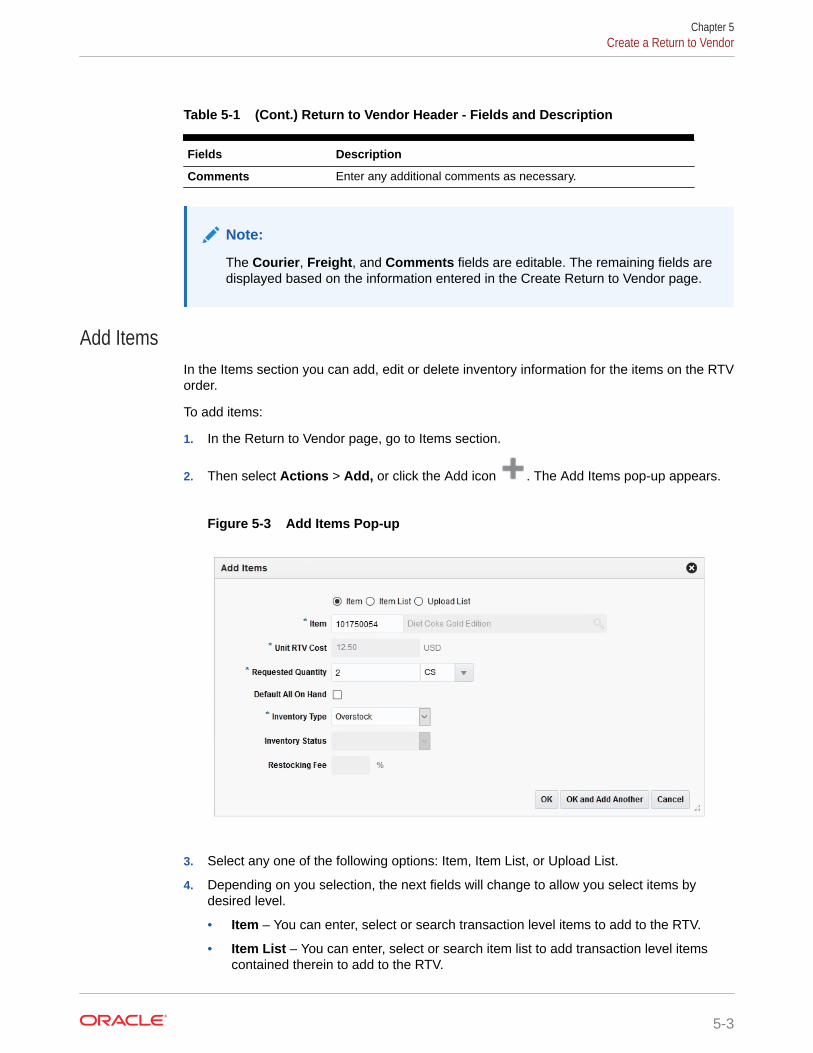
Table 5-1 (Cont.) Return to Vendor Header - Fields and Description
Fields Description
Comments Enter any additional comments as necessary.
Note:
The Courier, Freight, and Comments fields are editable. The remaining fields aredisplayed based on the information entered in the Create Return to Vendor page.
Add ItemsIn the Items section you can add, edit or delete inventory information for the items on the RTVorder.
To add items:
1. In the Return to Vendor page, go to Items section.
2. Then select Actions > Add, or click the Add icon . The Add Items pop-up appears.
Figure 5-3 Add Items Pop-up
3. Select any one of the following options: Item, Item List, or Upload List.
4. Depending on you selection, the next fields will change to allow you select items bydesired level.
• Item – You can enter, select or search transaction level items to add to the RTV.
• Item List – You can enter, select or search item list to add transaction level itemscontained therein to add to the RTV.
Chapter 5Create a Return to Vendor
5-3

• Upload List – This option allows you to upload data file containing items toadd to the RTV. The file must be in csv format. There will be validations toensure that only valid items are added.
5. In the Unit RTV Cost field, defaults to the item's unit RTV cost, adjust the cost asnecessary.
This field is a required field when you add an item. This field is not available whenyou add an item list.
6. If you add a dynamic item list, the Rebuild checkbox is displayed. If you select thecheckbox, the item list is rebuild by a background process, once you click OK.
7. In the Requested Quantity field, enter the return quantity. When you add an item,enter, select or search for the unit of the return quantity. This field is a requiredfield.
8. You can check the Default All On Hand checkbox to return all the stock on handvalue to the supplier.
9. In the Inventory Type fields, select either of the following inventory type:Overstock, Unavailable Inventory. This field is a required field.
10. In the Restocking fee % field, enter the percentage that is applied for restockingfees.
11. Then choose one of the following options.
• Click OK to add the items to the table and close the pop-up.
• Click OK and Add Another to add additional items.
• Click Cancel to all entries and close the pop-up.
Supplier DetailsTo view the supplier details:
1. From the Tasks menu, select Inventory > Manage Returns to Vendor. The RTVSearch page appears.
2. Enter or select search criteria as desired to make the search more restrictive.
3. Click Search. The RTVs that match the search criteria are displayed in the Resultssection.
4. In the RTV column, click the RTV link, or mark a record and select Actions > Edi/View or use corresponding icons. The Return to Vendor page appears.
5. From the More Actions menu, click Supplier Details. The Supplier Details pop-upappears.
Chapter 5Create a Return to Vendor
5-4
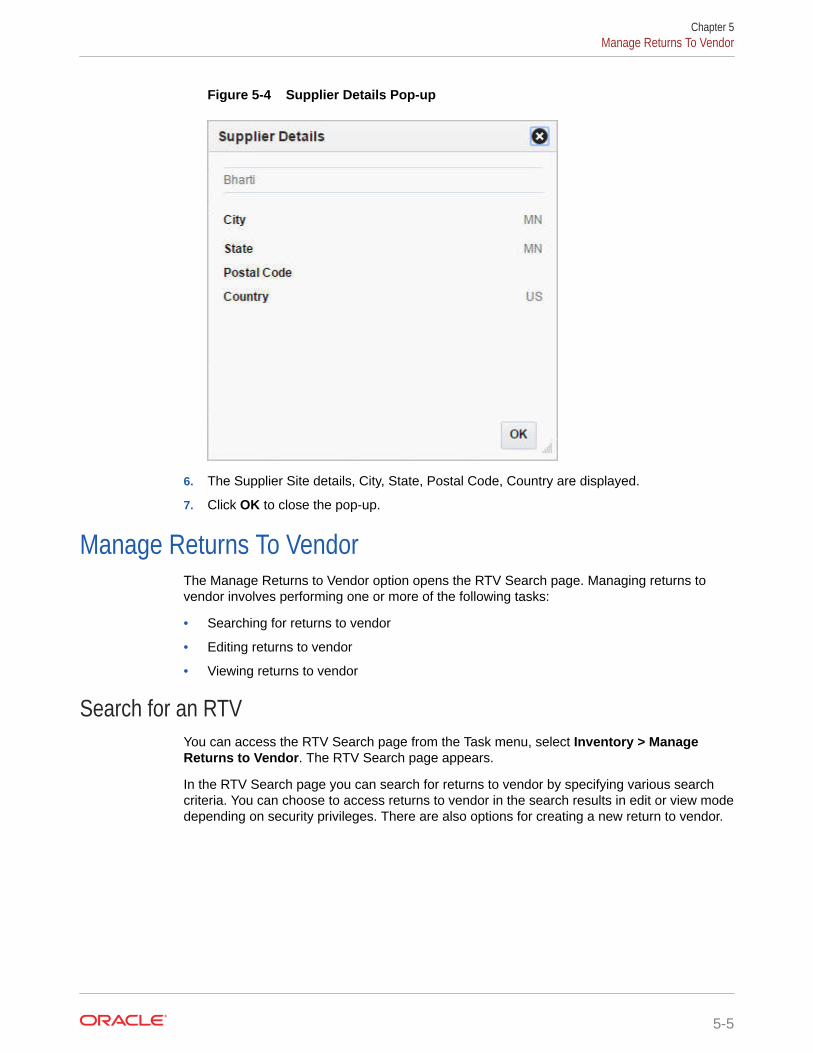
Figure 5-4 Supplier Details Pop-up
6. The Supplier Site details, City, State, Postal Code, Country are displayed.
7. Click OK to close the pop-up.
Manage Returns To VendorThe Manage Returns to Vendor option opens the RTV Search page. Managing returns tovendor involves performing one or more of the following tasks:
• Searching for returns to vendor
• Editing returns to vendor
• Viewing returns to vendor
Search for an RTVYou can access the RTV Search page from the Task menu, select Inventory > ManageReturns to Vendor. The RTV Search page appears.
In the RTV Search page you can search for returns to vendor by specifying various searchcriteria. You can choose to access returns to vendor in the search results in edit or view modedepending on security privileges. There are also options for creating a new return to vendor.
Chapter 5Manage Returns To Vendor
5-5
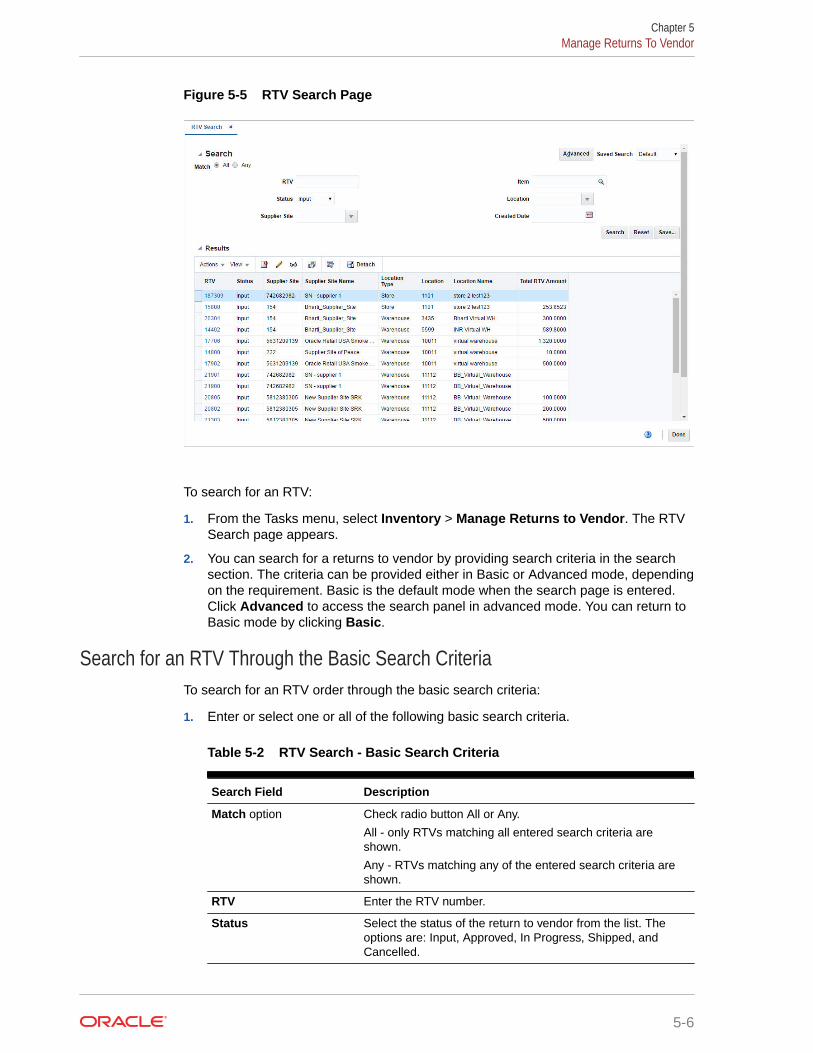
Figure 5-5 RTV Search Page
To search for an RTV:
1. From the Tasks menu, select Inventory > Manage Returns to Vendor. The RTVSearch page appears.
2. You can search for a returns to vendor by providing search criteria in the searchsection. The criteria can be provided either in Basic or Advanced mode, dependingon the requirement. Basic is the default mode when the search page is entered.Click Advanced to access the search panel in advanced mode. You can return toBasic mode by clicking Basic.
Search for an RTV Through the Basic Search CriteriaTo search for an RTV order through the basic search criteria:
1. Enter or select one or all of the following basic search criteria.
Table 5-2 RTV Search - Basic Search Criteria
Search Field Description
Match option Check radio button All or Any.
All - only RTVs matching all entered search criteria areshown.
Any - RTVs matching any of the entered search criteria areshown.
RTV Enter the RTV number.
Status Select the status of the return to vendor from the list. Theoptions are: Input, Approved, In Progress, Shipped, andCancelled.
Chapter 5Manage Returns To Vendor
5-6
Table 5-2 (Cont.) RTV Search - Basic Search Criteria
Search Field Description
Supplier Site Enter, select or search for the supplier site.
Item Enter or search for the item.
Location Enter, select or search for the location.
Created Date Enter the date the RTV is created or use the Calendar icon toselect a date.
Note:
For more information about searches, see Search Screens in the Oracle®Retail Merchandising Do the Basics User Guide.
2. Click Search. The RTV orders that match the search criteria are displayed in the Resultssection.
3. Click Reset to execute the saved search.
4. Click Done to close the page.
Search for an RTV Through the Advanced Search CriteriaTo search for an RTV through the advanced search criteria:
1. Enter or select one or all of the following advanced search criteria. Click Add Fields toadd more fields for the advanced search. To remove the field from the search, click the xright next to the field.
Note:
For more information about searches, see Search Screens in the Oracle®Retail Merchandising Do the Basics User Guide.
2. To narrow down the search, use the list next to the search fields. For example, determineif the entered value should equal or not equal the search result.
3. Click Search. The RTV orders that match the search criteria are displayed in the Resultssection.
4. Click Reset to clear the search section and results.
5. Click Done to close the page.
Edit an RTVTo edit an RTV order, follow the steps listed below.
1. From the Tasks menu, select Inventory > Manage Returns to Vendor. The RTV Searchpage appears.
2. Enter or select search criteria as desired to make the search more restrictive.
Chapter 5Manage Returns To Vendor
5-7
3. In the Results section, select the return to vendor you want to edit.
4. Then select Actions > Edit, or click the Edit icon. . The Return to Vendor pageappears in Edit mode.
5. Edit the RTV as necessary.
For more information about the Return to Vendor page, see the Manage ReturnsTo Vendor section.
6. Save your changes.
Edit ItemsTo edit items, follow the steps below.
1. In the Return to Vendor page, go to Items section.
2. Select a record in the table.
3. Then select Actions > Edit, or click the Edit icon . The Edit Items pop-upappears.
4. Edit the fields as necessary.
5. Then choose one of the following options.
• Click OK to add your changes to the table and close the pop-up.
• Click OK and Edit Another to edit additional items.
• Click Cancel to all entries and close the pop-up.
Mass UpdateTo update the restocking fee for all items displayed in the Items section, follow thesteps below.
1. In the Items section, select Actions > Mass Update, or use the Mass Updatebutton The Mass Update page appears.
2. In the Restocking Fee field, enter the percentage that is applied for restockingfees.
3. Then choose one of the following options.
• Click OK to apply the restocking fee percentage for all items in the table andclose the page.
• Click Cancel to all entries and close the page.
Chapter 5Manage Returns To Vendor
5-8
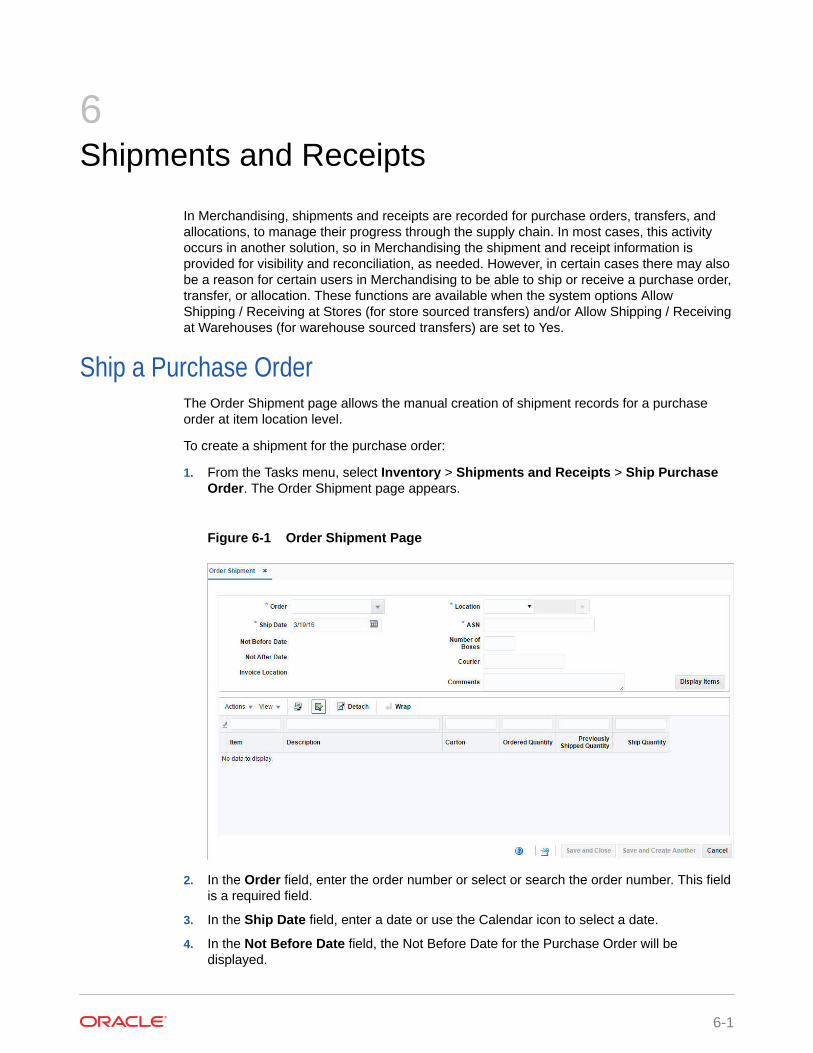
6Shipments and Receipts
In Merchandising, shipments and receipts are recorded for purchase orders, transfers, andallocations, to manage their progress through the supply chain. In most cases, this activityoccurs in another solution, so in Merchandising the shipment and receipt information isprovided for visibility and reconciliation, as needed. However, in certain cases there may alsobe a reason for certain users in Merchandising to be able to ship or receive a purchase order,transfer, or allocation. These functions are available when the system options AllowShipping / Receiving at Stores (for store sourced transfers) and/or Allow Shipping / Receivingat Warehouses (for warehouse sourced transfers) are set to Yes.
Ship a Purchase OrderThe Order Shipment page allows the manual creation of shipment records for a purchaseorder at item location level.
To create a shipment for the purchase order:
1. From the Tasks menu, select Inventory > Shipments and Receipts > Ship PurchaseOrder. The Order Shipment page appears.
Figure 6-1 Order Shipment Page
2. In the Order field, enter the order number or select or search the order number. This fieldis a required field.
3. In the Ship Date field, enter a date or use the Calendar icon to select a date.
4. In the Not Before Date field, the Not Before Date for the Purchase Order will bedisplayed.
6-1
5. In the Not After Date field, the Not After Date of the Purchase Order will bedisplayed.
6. In the Invoice Location field, the invoice location for the purchase order will bedisplayed.
7. In the Location field, select the location type from the list. The options are: Storeand Warehouse. Then enter, select or search for the location. This field is arequired field.
8. In the ASN field, enter an ASN number. This field is a required field.
9. In the Number of Boxes field, enter the number of boxes.
10. In the Courier field, enter the courier name, if applicable.
11. In the Comments field, enter any additional comments as necessary.
12. Click Display Items to populate the table below with the items associated to theselected order/location.
13. In the Ship Quantity columns, enter the quantity you want to ship for each item.
Note:
If a ship quantity is entered the item will be shipped, upon saving thedata. If no ship quantity is entered the item will not be shipped.
14. In the Carton columns, enter the cartons for each item.
15. To process the entered data, save your entries.
Ship a TransferTransfers are normally shipped using a warehouse management system or a storeinventory management system, not in Merchandising; however in some cases, theremay be a reason to do so. This can be done in two ways:
• The Transfers page allows you to ship the transfer as a single shipment with allquantity being shipped at once. See Ship a Transfer in Transfers for additionalinformation.
• By creating a Bill of Lading (BOL), which allows you to create shipment thatincludes multiple transfers and allocations that are all shipping from the samelocation, to the same location.
Note:
The option to ship transfers and allocations is available only when thesystem options Allow Shipping / Receiving at Stores (for store sourcedtransfers) and/or Allow Shipping / Receiving at Warehouses (for warehousesourced transfers) are set to Yes.
Chapter 6Ship a Transfer
6-2
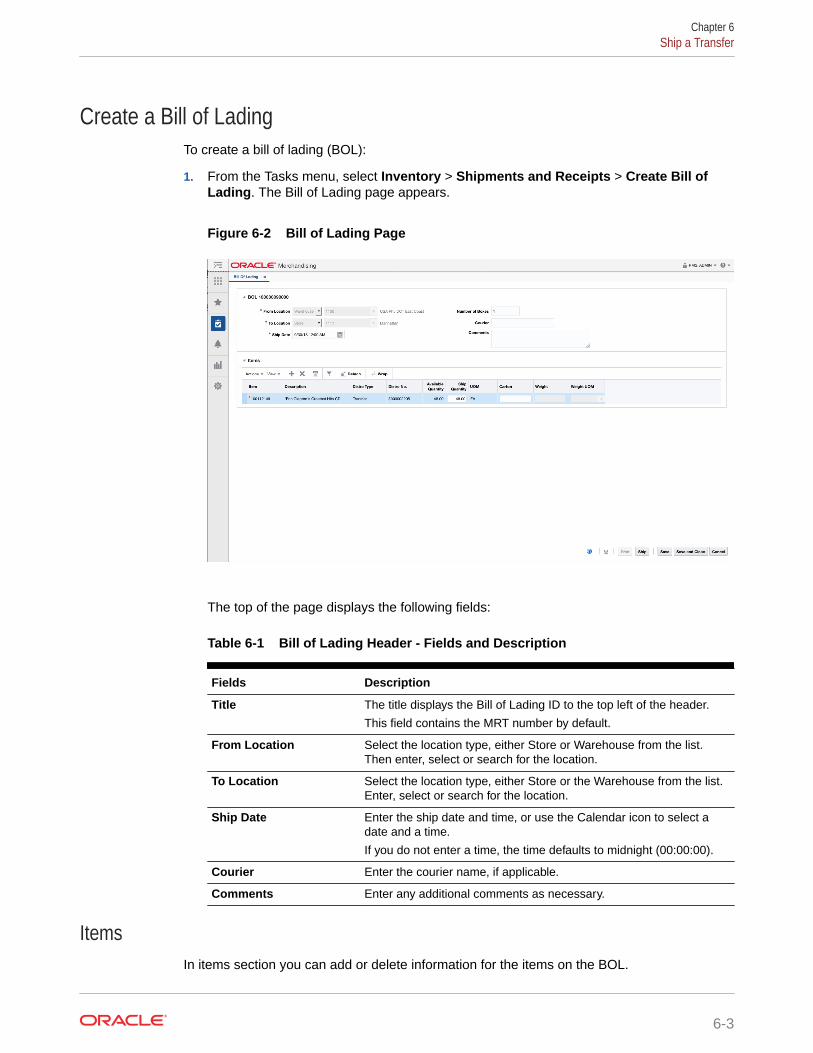
Create a Bill of LadingTo create a bill of lading (BOL):
1. From the Tasks menu, select Inventory > Shipments and Receipts > Create Bill ofLading. The Bill of Lading page appears.
Figure 6-2 Bill of Lading Page
The top of the page displays the following fields:
Table 6-1 Bill of Lading Header - Fields and Description
Fields Description
Title The title displays the Bill of Lading ID to the top left of the header.
This field contains the MRT number by default.
From Location Select the location type, either Store or Warehouse from the list.Then enter, select or search for the location.
To Location Select the location type, either Store or the Warehouse from the list.Enter, select or search for the location.
Ship Date Enter the ship date and time, or use the Calendar icon to select adate and a time.
If you do not enter a time, the time defaults to midnight (00:00:00).
Courier Enter the courier name, if applicable.
Comments Enter any additional comments as necessary.
ItemsIn items section you can add or delete information for the items on the BOL.
Chapter 6Ship a Transfer
6-3
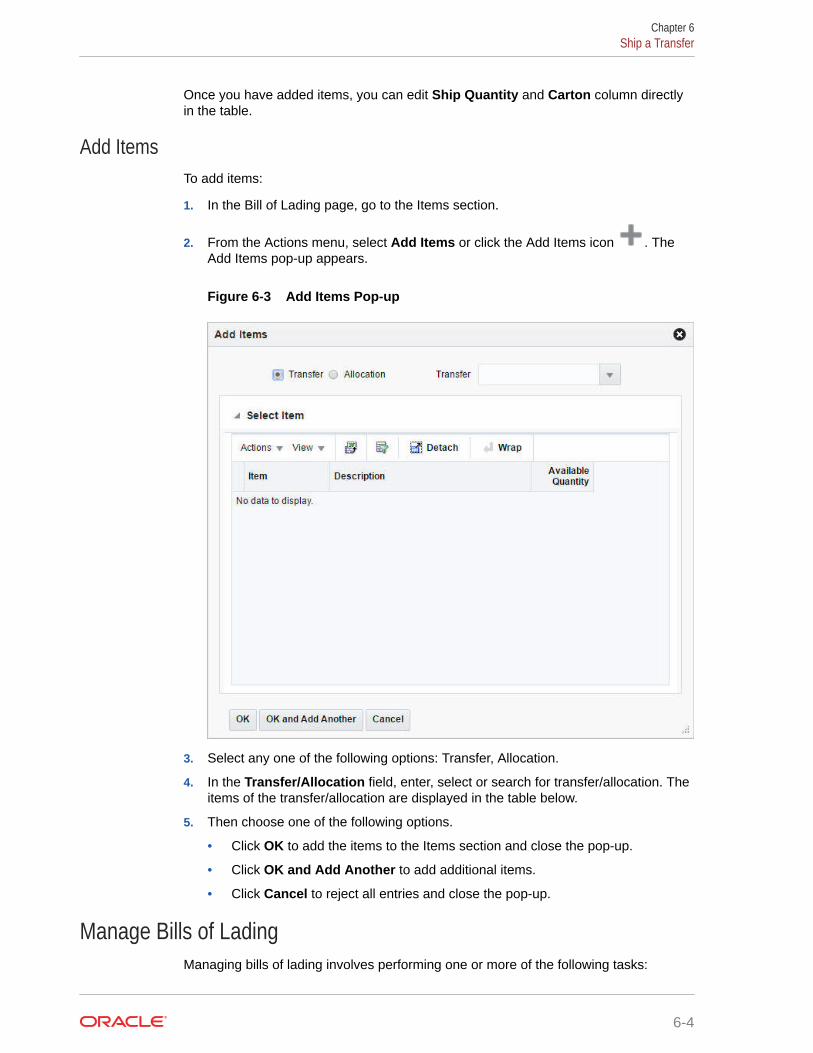
Once you have added items, you can edit Ship Quantity and Carton column directlyin the table.
Add ItemsTo add items:
1. In the Bill of Lading page, go to the Items section.
2. From the Actions menu, select Add Items or click the Add Items icon . TheAdd Items pop-up appears.
Figure 6-3 Add Items Pop-up
3. Select any one of the following options: Transfer, Allocation.
4. In the Transfer/Allocation field, enter, select or search for transfer/allocation. Theitems of the transfer/allocation are displayed in the table below.
5. Then choose one of the following options.
• Click OK to add the items to the Items section and close the pop-up.
• Click OK and Add Another to add additional items.
• Click Cancel to reject all entries and close the pop-up.
Manage Bills of LadingManaging bills of lading involves performing one or more of the following tasks:
Chapter 6Ship a Transfer
6-4
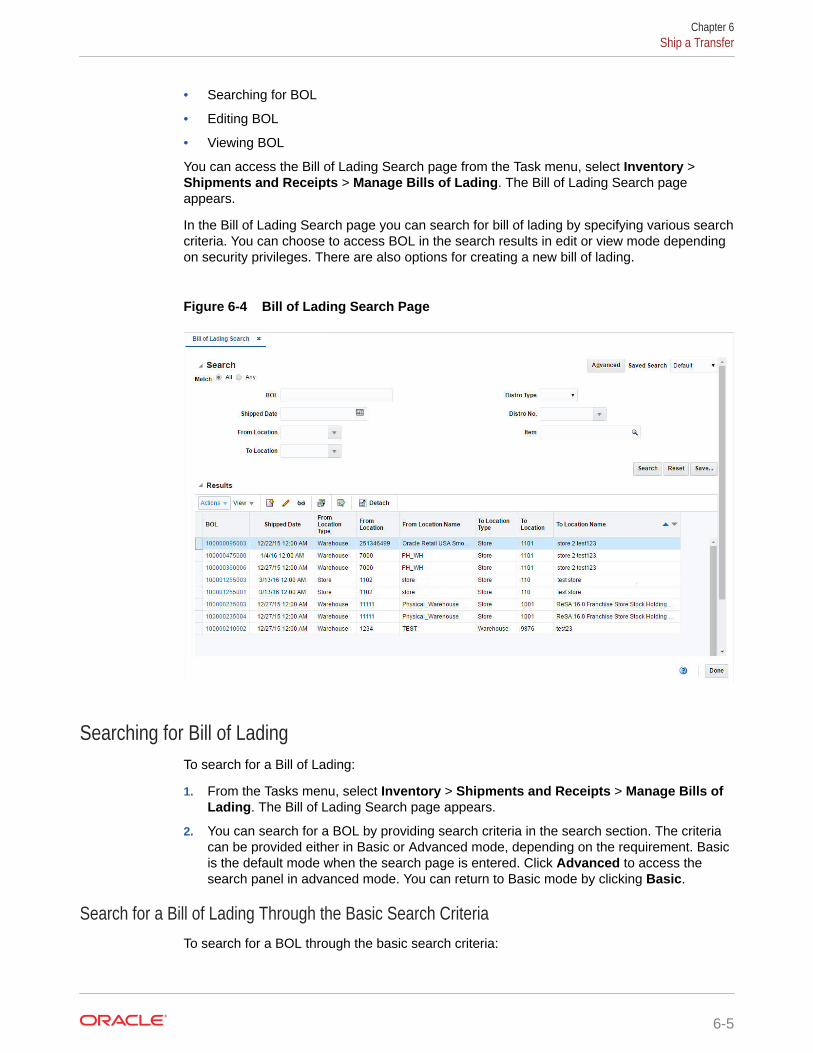
• Searching for BOL
• Editing BOL
• Viewing BOL
You can access the Bill of Lading Search page from the Task menu, select Inventory >Shipments and Receipts > Manage Bills of Lading. The Bill of Lading Search pageappears.
In the Bill of Lading Search page you can search for bill of lading by specifying various searchcriteria. You can choose to access BOL in the search results in edit or view mode dependingon security privileges. There are also options for creating a new bill of lading.
Figure 6-4 Bill of Lading Search Page
Searching for Bill of LadingTo search for a Bill of Lading:
1. From the Tasks menu, select Inventory > Shipments and Receipts > Manage Bills ofLading. The Bill of Lading Search page appears.
2. You can search for a BOL by providing search criteria in the search section. The criteriacan be provided either in Basic or Advanced mode, depending on the requirement. Basicis the default mode when the search page is entered. Click Advanced to access thesearch panel in advanced mode. You can return to Basic mode by clicking Basic.
Search for a Bill of Lading Through the Basic Search CriteriaTo search for a BOL through the basic search criteria:
Chapter 6Ship a Transfer
6-5
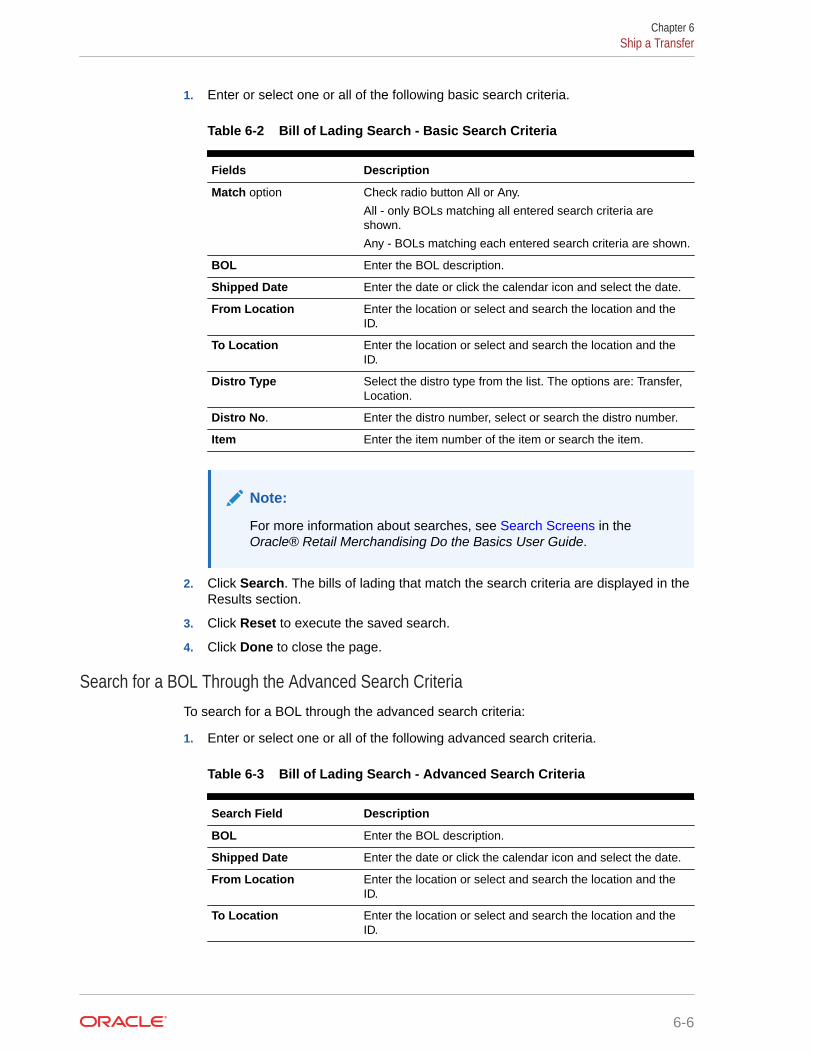
1. Enter or select one or all of the following basic search criteria.
Table 6-2 Bill of Lading Search - Basic Search Criteria
Fields Description
Match option Check radio button All or Any.
All - only BOLs matching all entered search criteria areshown.
Any - BOLs matching each entered search criteria are shown.
BOL Enter the BOL description.
Shipped Date Enter the date or click the calendar icon and select the date.
From Location Enter the location or select and search the location and theID.
To Location Enter the location or select and search the location and theID.
Distro Type Select the distro type from the list. The options are: Transfer,Location.
Distro No. Enter the distro number, select or search the distro number.
Item Enter the item number of the item or search the item.
Note:
For more information about searches, see Search Screens in theOracle® Retail Merchandising Do the Basics User Guide.
2. Click Search. The bills of lading that match the search criteria are displayed in theResults section.
3. Click Reset to execute the saved search.
4. Click Done to close the page.
Search for a BOL Through the Advanced Search CriteriaTo search for a BOL through the advanced search criteria:
1. Enter or select one or all of the following advanced search criteria.
Table 6-3 Bill of Lading Search - Advanced Search Criteria
Search Field Description
BOL Enter the BOL description.
Shipped Date Enter the date or click the calendar icon and select the date.
From Location Enter the location or select and search the location and theID.
To Location Enter the location or select and search the location and theID.
Chapter 6Ship a Transfer
6-6
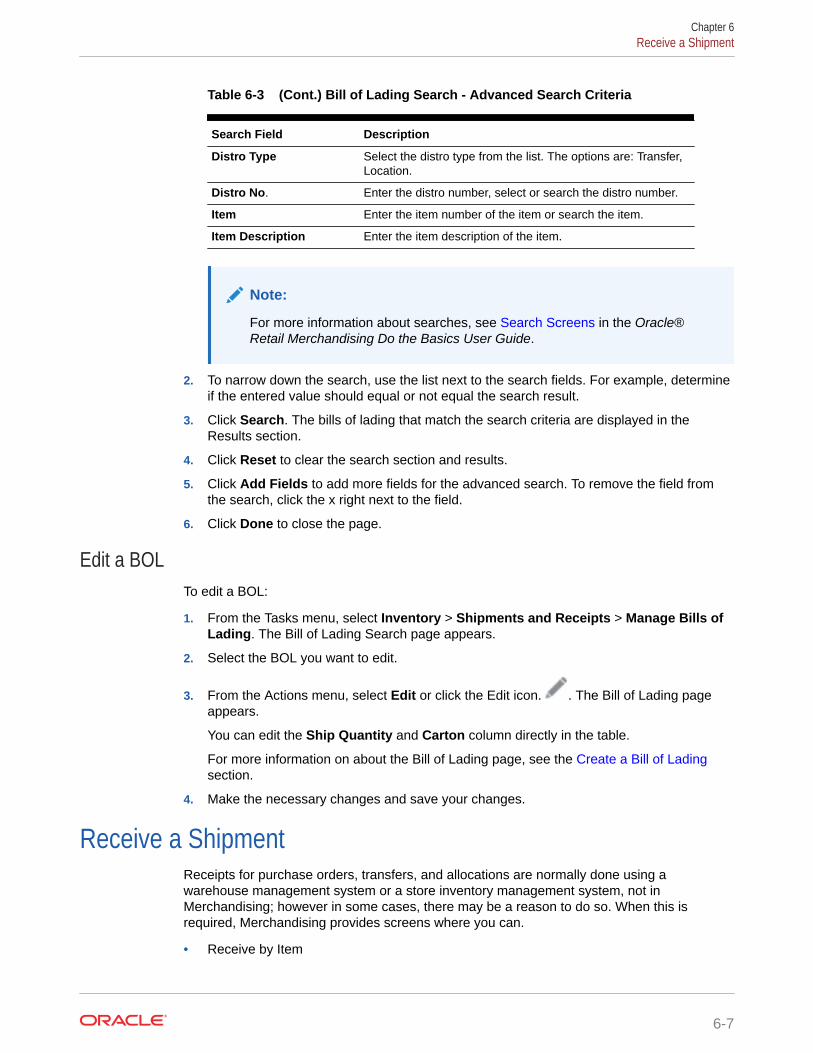
Table 6-3 (Cont.) Bill of Lading Search - Advanced Search Criteria
Search Field Description
Distro Type Select the distro type from the list. The options are: Transfer,Location.
Distro No. Enter the distro number, select or search the distro number.
Item Enter the item number of the item or search the item.
Item Description Enter the item description of the item.
Note:
For more information about searches, see Search Screens in the Oracle®Retail Merchandising Do the Basics User Guide.
2. To narrow down the search, use the list next to the search fields. For example, determineif the entered value should equal or not equal the search result.
3. Click Search. The bills of lading that match the search criteria are displayed in theResults section.
4. Click Reset to clear the search section and results.
5. Click Add Fields to add more fields for the advanced search. To remove the field fromthe search, click the x right next to the field.
6. Click Done to close the page.
Edit a BOLTo edit a BOL:
1. From the Tasks menu, select Inventory > Shipments and Receipts > Manage Bills ofLading. The Bill of Lading Search page appears.
2. Select the BOL you want to edit.
3. From the Actions menu, select Edit or click the Edit icon. . The Bill of Lading pageappears.
You can edit the Ship Quantity and Carton column directly in the table.
For more information on about the Bill of Lading page, see the Create a Bill of Ladingsection.
4. Make the necessary changes and save your changes.
Receive a ShipmentReceipts for purchase orders, transfers, and allocations are normally done using awarehouse management system or a store inventory management system, not inMerchandising; however in some cases, there may be a reason to do so. When this isrequired, Merchandising provides screens where you can.
• Receive by Item
Chapter 6Receive a Shipment
6-7
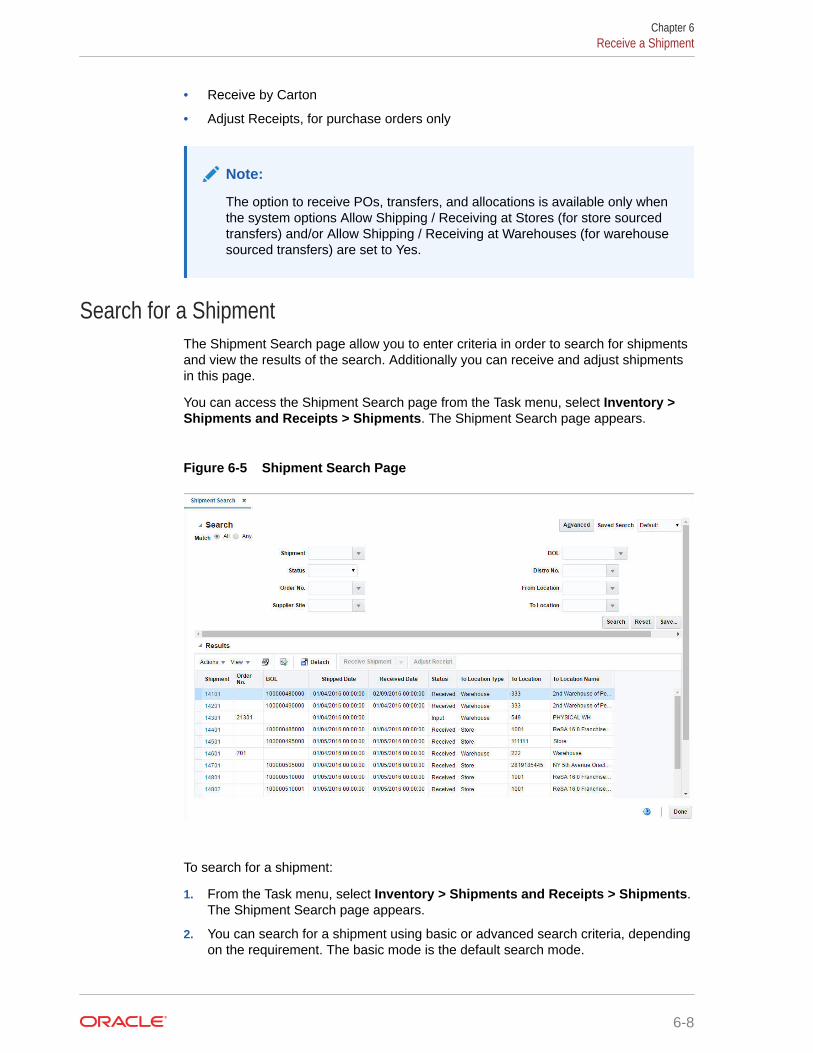
• Receive by Carton
• Adjust Receipts, for purchase orders only
Note:
The option to receive POs, transfers, and allocations is available only whenthe system options Allow Shipping / Receiving at Stores (for store sourcedtransfers) and/or Allow Shipping / Receiving at Warehouses (for warehousesourced transfers) are set to Yes.
Search for a ShipmentThe Shipment Search page allow you to enter criteria in order to search for shipmentsand view the results of the search. Additionally you can receive and adjust shipmentsin this page.
You can access the Shipment Search page from the Task menu, select Inventory >Shipments and Receipts > Shipments. The Shipment Search page appears.
Figure 6-5 Shipment Search Page
To search for a shipment:
1. From the Task menu, select Inventory > Shipments and Receipts > Shipments.The Shipment Search page appears.
2. You can search for a shipment using basic or advanced search criteria, dependingon the requirement. The basic mode is the default search mode.
Chapter 6Receive a Shipment
6-8
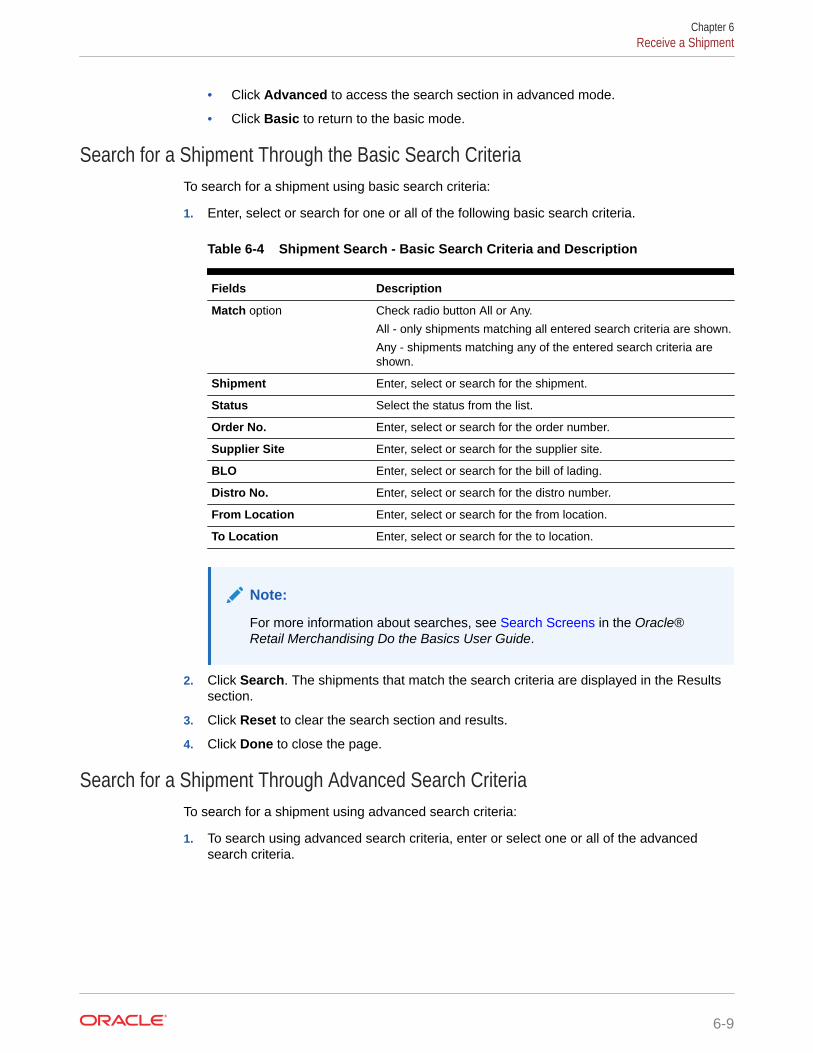
• Click Advanced to access the search section in advanced mode.
• Click Basic to return to the basic mode.
Search for a Shipment Through the Basic Search CriteriaTo search for a shipment using basic search criteria:
1. Enter, select or search for one or all of the following basic search criteria.
Table 6-4 Shipment Search - Basic Search Criteria and Description
Fields Description
Match option Check radio button All or Any.
All - only shipments matching all entered search criteria are shown.
Any - shipments matching any of the entered search criteria areshown.
Shipment Enter, select or search for the shipment.
Status Select the status from the list.
Order No. Enter, select or search for the order number.
Supplier Site Enter, select or search for the supplier site.
BLO Enter, select or search for the bill of lading.
Distro No. Enter, select or search for the distro number.
From Location Enter, select or search for the from location.
To Location Enter, select or search for the to location.
Note:
For more information about searches, see Search Screens in the Oracle®Retail Merchandising Do the Basics User Guide.
2. Click Search. The shipments that match the search criteria are displayed in the Resultssection.
3. Click Reset to clear the search section and results.
4. Click Done to close the page.
Search for a Shipment Through Advanced Search CriteriaTo search for a shipment using advanced search criteria:
1. To search using advanced search criteria, enter or select one or all of the advancedsearch criteria.
Chapter 6Receive a Shipment
6-9
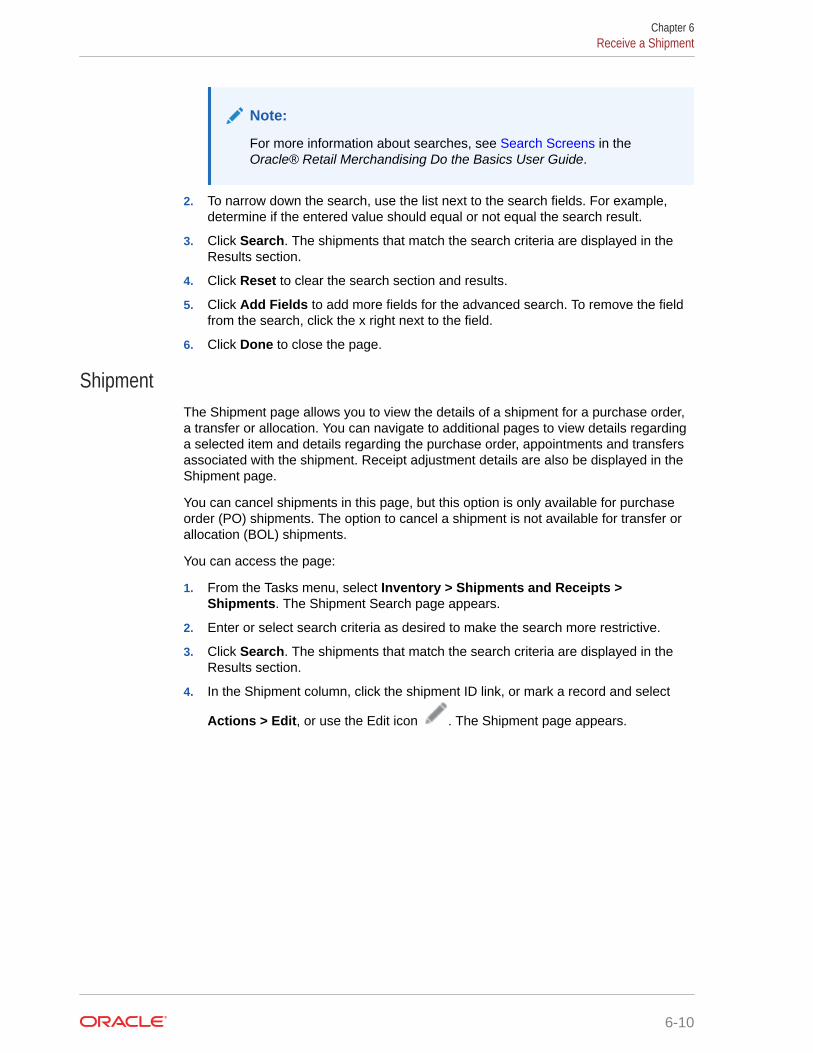
Note:
For more information about searches, see Search Screens in theOracle® Retail Merchandising Do the Basics User Guide.
2. To narrow down the search, use the list next to the search fields. For example,determine if the entered value should equal or not equal the search result.
3. Click Search. The shipments that match the search criteria are displayed in theResults section.
4. Click Reset to clear the search section and results.
5. Click Add Fields to add more fields for the advanced search. To remove the fieldfrom the search, click the x right next to the field.
6. Click Done to close the page.
ShipmentThe Shipment page allows you to view the details of a shipment for a purchase order,a transfer or allocation. You can navigate to additional pages to view details regardinga selected item and details regarding the purchase order, appointments and transfersassociated with the shipment. Receipt adjustment details are also be displayed in theShipment page.
You can cancel shipments in this page, but this option is only available for purchaseorder (PO) shipments. The option to cancel a shipment is not available for transfer orallocation (BOL) shipments.
You can access the page:
1. From the Tasks menu, select Inventory > Shipments and Receipts >Shipments. The Shipment Search page appears.
2. Enter or select search criteria as desired to make the search more restrictive.
3. Click Search. The shipments that match the search criteria are displayed in theResults section.
4. In the Shipment column, click the shipment ID link, or mark a record and select
Actions > Edit, or use the Edit icon . The Shipment page appears.
Chapter 6Receive a Shipment
6-10
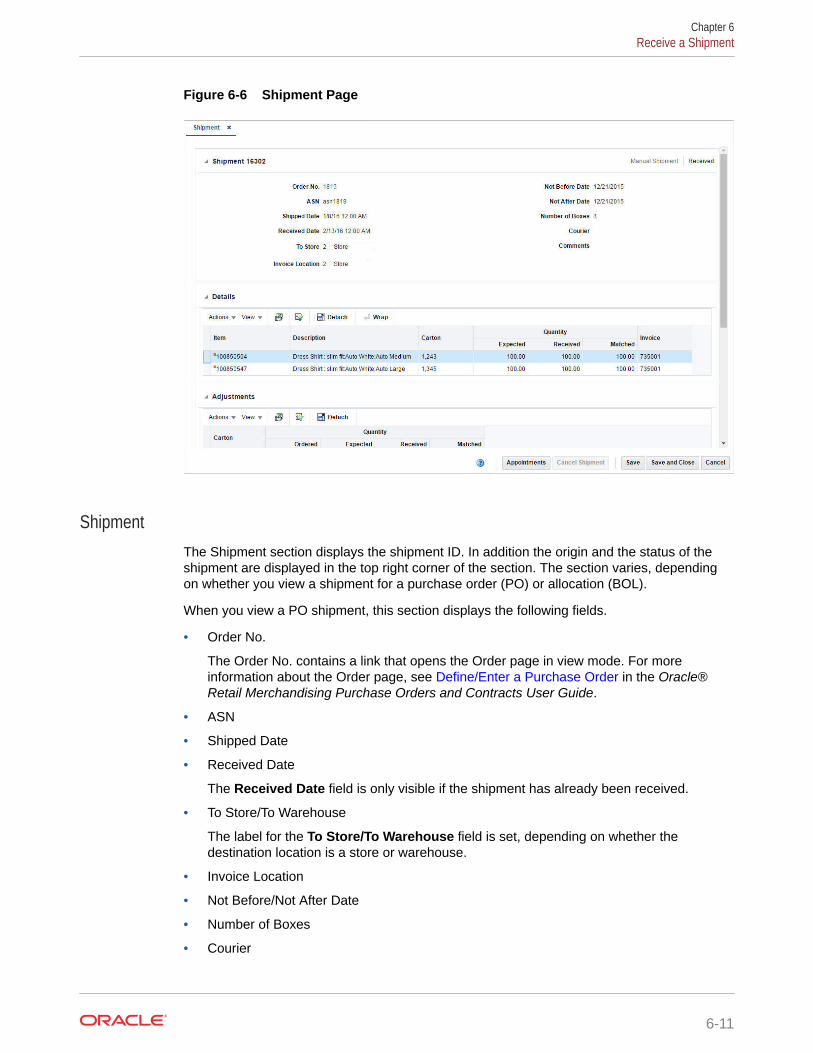
Figure 6-6 Shipment Page
ShipmentThe Shipment section displays the shipment ID. In addition the origin and the status of theshipment are displayed in the top right corner of the section. The section varies, dependingon whether you view a shipment for a purchase order (PO) or allocation (BOL).
When you view a PO shipment, this section displays the following fields.
• Order No.
The Order No. contains a link that opens the Order page in view mode. For moreinformation about the Order page, see Define/Enter a Purchase Order in the Oracle®Retail Merchandising Purchase Orders and Contracts User Guide.
• ASN
• Shipped Date
• Received Date
The Received Date field is only visible if the shipment has already been received.
• To Store/To Warehouse
The label for the To Store/To Warehouse field is set, depending on whether thedestination location is a store or warehouse.
• Invoice Location
• Not Before/Not After Date
• Number of Boxes
• Courier
Chapter 6Receive a Shipment
6-11
• Comments
When you view an allocation (BOL) shipment, this section displays the following fields.
• BOL
• Shipped Date
• Received Date
The Received Date field is only visible if the shipment has already been received.
• To Store/To Warehouse
The label for the To Store/To Warehouse field is set, depending on whether thedestination location is a store or warehouse.
• From Store/From Warehouse
The label for the From Store/From Warehouse field is set, depending on whetherthe destination location is a store or warehouse.
• Number of Boxes
• Courier
• Comments
DetailsThe Details section displays receipt details. The fields displayed in this section vary,depending whether you view a purchase order or allocation shipment.
When you view a PO shipment, the following are displayed by default:
• Item
• Description
• Carton
• Invoice
• Quantity - Expected, Received, Matched
The Shipment page only allows users to view parent shipments online. It is expectedthat the shipment quantities displayed for the parent shipment are an aggregate of theparent shipment and child shipment quantities.
When you view an allocation (BOL) shipment, the following fields are displayed bydefault:
• Item
• Description
• Distro No.
• Carton
• Tampered
• Quantity - Expected, Received
• Inventory Status
The Distro No. column can contain either an Allocation or Transfer ID.
Chapter 6Receive a Shipment
6-12
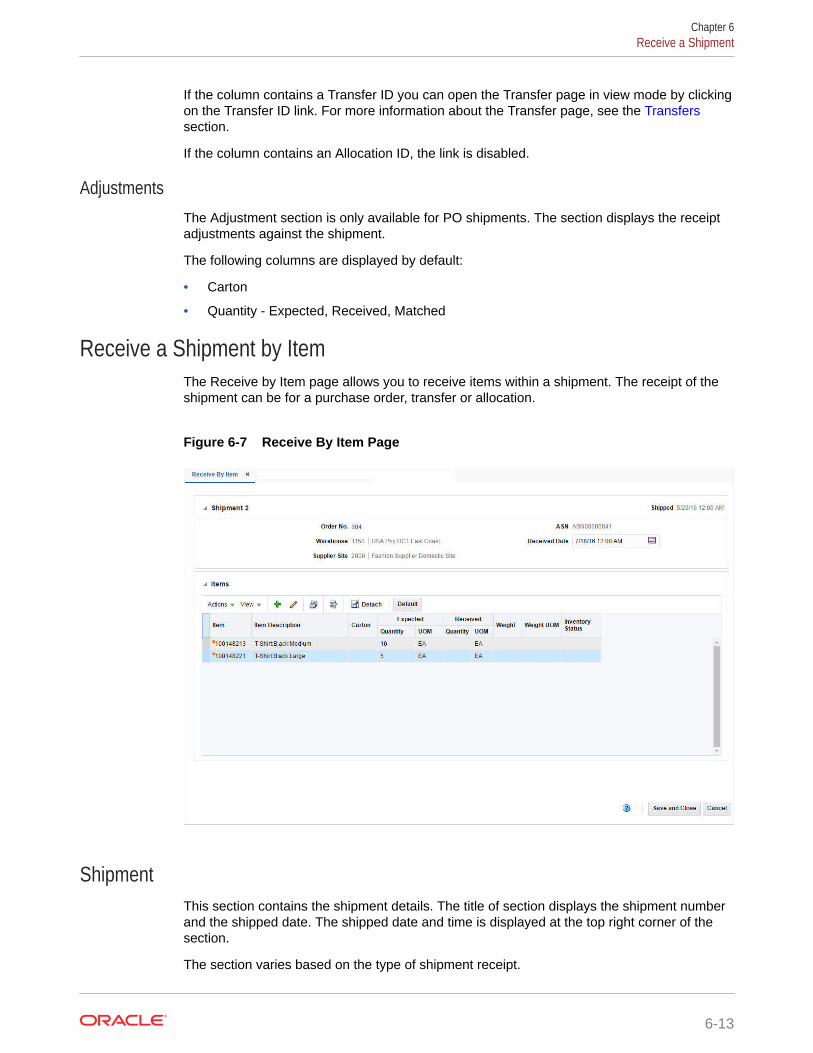
If the column contains a Transfer ID you can open the Transfer page in view mode by clickingon the Transfer ID link. For more information about the Transfer page, see the Transferssection.
If the column contains an Allocation ID, the link is disabled.
AdjustmentsThe Adjustment section is only available for PO shipments. The section displays the receiptadjustments against the shipment.
The following columns are displayed by default:
• Carton
• Quantity - Expected, Received, Matched
Receive a Shipment by ItemThe Receive by Item page allows you to receive items within a shipment. The receipt of theshipment can be for a purchase order, transfer or allocation.
Figure 6-7 Receive By Item Page
ShipmentThis section contains the shipment details. The title of section displays the shipment numberand the shipped date. The shipped date and time is displayed at the top right corner of thesection.
The section varies based on the type of shipment receipt.
Chapter 6Receive a Shipment
6-13
When you receive a purchase order shipment, the section displays the following fields.
• Order No.
The Order No. field contains a link that opens the Order page in view mode. Formore information about the Order page, see Define/Enter a Purchase Order in theOracle® Retail Merchandising Purchase Orders and Contracts User Guide.
• Warehouse/Store
• Supplier Site
• ASN
• Received Date
Enter the date and time of receipt or use the Calendar icon to select a date andtime.
When you receive a transfer shipment, the section displays the following fields.
• Transfer
The Transfer field contains link that opens the Transfer page in view mode. Formore information about the Transfer page, see the Transfer Details section.
• Warehouse/Store
• BOL
• Received Date
Enter the date and time of receipt or use the Calendar icon to select a date andtime.
When you receive a allocation (BOL) shipment, the section displays the followingfields.
• Allocation
• Warehouse/Store
• BOL
• Received Date
Enter the date and time of receipt or use the Calendar icon to select a date andtime.
ItemsThe Items section displays all the items in the shipment by default.
Receiving Shipments by ItemTo receive shipments by item, follow the steps below.
1. From the Tasks menu, select Inventory > Shipments and Receipts >Shipments. The Shipment Search page appears.
2. Enter or select search criteria as desired to make the search more restrictive.
3. Click Search. The shipments that match the search criteria are displayed in theResults section.
4. Select a record in the Results table.
Chapter 6Receive a Shipment
6-14

5. Then select Actions > Receive Shipment > by Item, or click the Receive Shipmentbutton > by Item. The Receive By Item page appears.
6. In the Shipment section, enter the receive date and time or use the Calendar icon toselect a date and time.
7. Then select an item in the table.
8. Select Actions > Edit, or use the Edit icon . The Receive Item page appears. Theitem, the expected quantity and standard UOM are displayed.
9. In the Receipt Quantity field, enter the quantity. This field is a required field.
Then enter, select or search for the unit of measure in which the receipt quantity hasbeen entered.
10. For catch weight items, enter the receipt weight.
11. In the Inventory Status field, select the inventory status from the list.
12. Then choose one of the following options.
• Click OK to receive the current item and close the page.
• Click OK and Receive Another to receive additional items.
• Click Cancel to reject all entries and close the page.
13. In the Receive By Item page, save your entries.
Note:
If you want to default the expected quantity as received for all items in the table,select the Default button.
Add Items to a Shipment to ReceiveYou can add items to a shipment you want to receive.
1. In the Items section, select Actions > Add, or use the Add icon . The Add Item pageappears.
2. In the Item field, enter or search for an item. This field is a required field.
3. In the Receipt Quantity field, enter the received quantity. Then select the unit ofmeasure for the item.
4. For catch weight items, enter the received weight.
5. In the Inventory Status field, select the inventory status from the list.
6. Then choose one of the following options.
• Click OK to add the current item and close the page.
• Click OK and Add Another to add additional items.
• Click Cancel to reject all entries and close the page.
Chapter 6Receive a Shipment
6-15
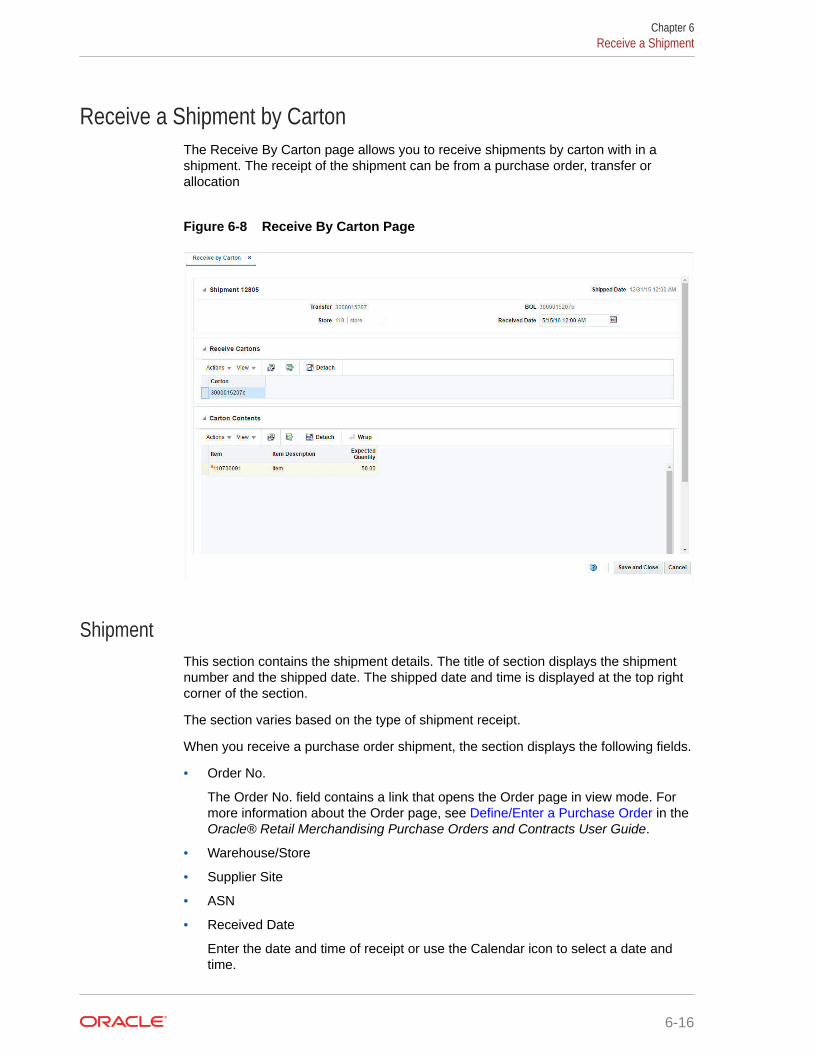
Receive a Shipment by CartonThe Receive By Carton page allows you to receive shipments by carton with in ashipment. The receipt of the shipment can be from a purchase order, transfer orallocation
Figure 6-8 Receive By Carton Page
ShipmentThis section contains the shipment details. The title of section displays the shipmentnumber and the shipped date. The shipped date and time is displayed at the top rightcorner of the section.
The section varies based on the type of shipment receipt.
When you receive a purchase order shipment, the section displays the following fields.
• Order No.
The Order No. field contains a link that opens the Order page in view mode. Formore information about the Order page, see Define/Enter a Purchase Order in theOracle® Retail Merchandising Purchase Orders and Contracts User Guide.
• Warehouse/Store
• Supplier Site
• ASN
• Received Date
Enter the date and time of receipt or use the Calendar icon to select a date andtime.
Chapter 6Receive a Shipment
6-16
When you receive a transfer shipment, the section displays the following fields.
• Transfer
The Transfer field contains link that opens the Transfer page in view mode. For moreinformation about the Transfer page, see the Transfer Details section.
• Warehouse/Store
• BOL
• Received Date
Enter the date and time of receipt or use the Calendar icon to select a date and time.
When you receive a allocation (BOL) shipment, the section displays the following fields.
• Allocation
• Warehouse/Store
• BOL
• Received Date
Enter the date and time of receipt or use the Calendar icon to select a date and time.
Receive CartonsThe Receive Carton section displays the list of carton in the shipment.
Carton ContentsThe Receive Carton section displays the list of carton in the shipment.
Receive Shipments by CartonTo receive shipments by carton, follow the steps below.
1. From the Tasks menu, select Inventory > Shipments and Receipts > Shipments. TheShipment Search page appears.
2. Enter or select search criteria as desired to make the search more restrictive.
3. Click Search. The shipments that match the search criteria are displayed in the Resultssection.
4. Select a record in the Results table.
5. Then select Actions > Receive Shipment > by Carton, or click the Receive Shipmentbutton > by Carton. The Receive By Carton page appears.
6. In the Shipment section, enter the receive date and time or use the Calendar icon toselect a date and time.
7. In the Receive Carton section, select the cartons you want to receive.
8. Then click Save and Close.
Receipt Adjustment by UnitsThe Receiver Unit Adjustment page allows you to adjust the number of units already receivedby shipment or order.
Chapter 6Receive a Shipment
6-17
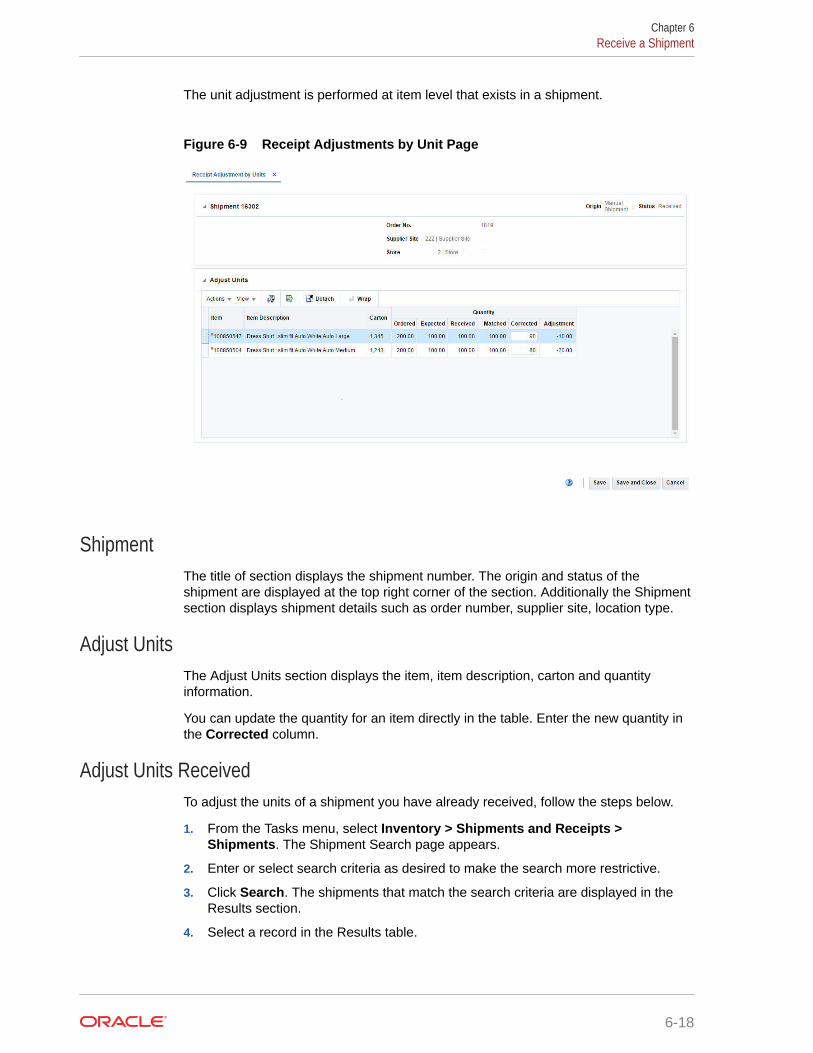
The unit adjustment is performed at item level that exists in a shipment.
Figure 6-9 Receipt Adjustments by Unit Page
ShipmentThe title of section displays the shipment number. The origin and status of theshipment are displayed at the top right corner of the section. Additionally the Shipmentsection displays shipment details such as order number, supplier site, location type.
Adjust UnitsThe Adjust Units section displays the item, item description, carton and quantityinformation.
You can update the quantity for an item directly in the table. Enter the new quantity inthe Corrected column.
Adjust Units ReceivedTo adjust the units of a shipment you have already received, follow the steps below.
1. From the Tasks menu, select Inventory > Shipments and Receipts >Shipments. The Shipment Search page appears.
2. Enter or select search criteria as desired to make the search more restrictive.
3. Click Search. The shipments that match the search criteria are displayed in theResults section.
4. Select a record in the Results table.
Chapter 6Receive a Shipment
6-18

5. Then select Actions > Adjust Receipt, or click the Adjust Receipt button. The ReceiptAdjustment by Units page appears. The shipment details and received items aredisplayed.
6. In the Corrected column, enter the revised number of units received for each item. TheAdjustment column displays the adjusted quantity.
7. Then save your adjustments.
Reconcile Transfers and AllocationsThe Stock Order Reconciliation page allows you to edit and view shipment receipts where theitem quantity does not match the actual quantity received or the shipments that are yet to bereceived. All open stock orders where the shipped quantity could not be reconciled to thereceived quantity appear in the results. Once you have searched for receipts you can createadjustments to account for the differences.
Figure 6-10 Stock Order Reconciliation
Searching for a ShipmentTo search for a shipment to reconcile:
1. From the Task menu, select Inventory > Transfers > Stock Order Reconciliation. TheStock Order Reconciliation page appears.
2. Enter, select or search for one or all of the following search criteria.
Chapter 6Reconcile Transfers and Allocations
6-19

Table 6-5 Stock Order Reconciliation Search - Basic Search Criteria andDescription
Fields Description
BOL Enter, select or search for the BOL.
Carton Enter, select or search for the carton.
Shipped Date Enter the shipped date or use the Calendar icon to select adate..
Received Date Enter a received date or use the Calendar icon to select adate.
From Location Enter, select or search for the from location.
To Location Enter, select or search for the to location.
Distro Type Select the distro type from the list.
Distro No. Enter, select or search for the Distro No.
3. Click Search. The shipment that match the search criteria are displayed in theStock Order Exceptions and Carton Level Dispositions section.
4. Click Reset to clear the search section and results.
Stock Order ExceptionsAll open stock orders where the shipped quantity could not be reconciled to thereceived quantity appear in this section. The over/short quantity and the costinformation are displayed.
The Shipment column contains a link which opens the Shipments page, where canview the Shipment Details. For more information about this page, see the Shipmentsection.
In the Adjustment Type column, select an adjustment type from the list.
Carton Level DispositionsThis section displays the carton, over/short quantity and cost information.
In the Adjustment Type column, select an adjustment type from the list.
Upload Stock Order ReconciliationIf you have several shipments that need reconciliation, these can be mass updatedthrough a spreadsheet upload. To do this, you'll first need to download the template touse for this process. This can be accessed in the task list under Data Loading > BlankTemplate. Select the template type of Stock Order Reconciliation and the templateStock Order Reconciliation and then click Download. When prompted, choose to eitheropen the file or save it locally and open in the spreadsheet application of your choice.
Chapter 6Upload Stock Order Reconciliation
6-20
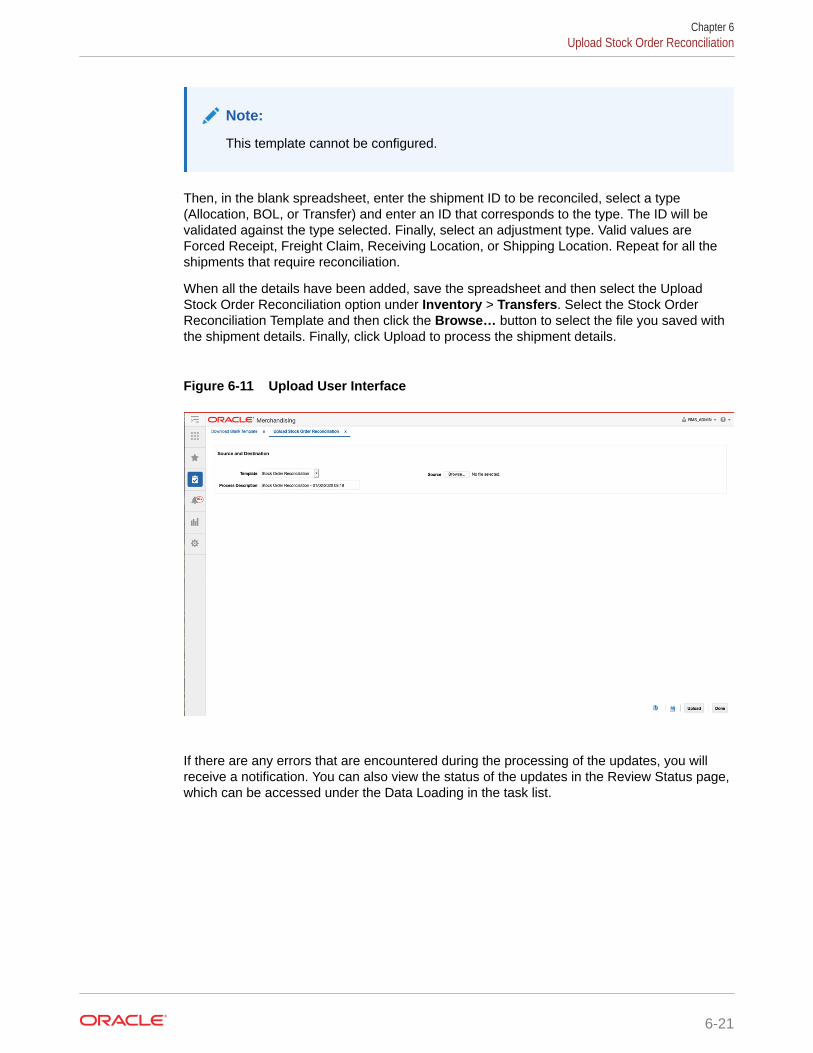
Note:
This template cannot be configured.
Then, in the blank spreadsheet, enter the shipment ID to be reconciled, select a type(Allocation, BOL, or Transfer) and enter an ID that corresponds to the type. The ID will bevalidated against the type selected. Finally, select an adjustment type. Valid values areForced Receipt, Freight Claim, Receiving Location, or Shipping Location. Repeat for all theshipments that require reconciliation.
When all the details have been added, save the spreadsheet and then select the UploadStock Order Reconciliation option under Inventory > Transfers. Select the Stock OrderReconciliation Template and then click the Browse… button to select the file you saved withthe shipment details. Finally, click Upload to process the shipment details.
Figure 6-11 Upload User Interface
If there are any errors that are encountered during the processing of the updates, you willreceive a notification. You can also view the status of the updates in the Review Status page,which can be accessed under the Data Loading in the task list.
Chapter 6Upload Stock Order Reconciliation
6-21
7Inventory Adjustments
Inventory adjustments can be made online or they can be received from an external system,such as a warehouse management system. There are two types of adjustments that can bemade to inventory:
• Stock on Hand: The quantity of stock on hand, or salable stock, is increased ordecreased. Both the quantity and value of the stock on hand are adjusted in the stockledger.
• Unavailable Inventory: The quantity of stock on hand does not change, but the quantityof unavailable stock, or non-salable stock, is increased or decreased. In the stock ledger,the adjustment is recorded as a transfer between stock on hand and unavailableinventory. No adjustment is made to the stock value.
Prior to using the inventory adjustment functionality, status types and reasons for adjustmentsmust be set up in the system. The Total Stock on Hand status type is reserved foradjustments made to salable goods. Any additional status types are user-defined and arereserved for adjustments made to non-salable goods. The user-defined status types indicatewhy the goods are non-salable. When adjusting total stock on hand, you must select areason for the adjustment. The reason indicates why the total stock on hand must beadjusted.
Inventory Adjustments covers the following sections:
• Inventory Status and Adjustment Reasons
• Create an Inventory Adjustment by Item
• Create an Inventory Adjustment by Location
• Break Sellable Pack
• Product Transformation
Inventory Status and Adjustment ReasonsFor effective management of inventory, Merchandising provides the option to classifyunavailable inventory by user defined inventory buckets called inventory status types. Thisfacilitates segregation of inventory that is not available to sell into specific purpose bucketssuch as customer returns or damaged. Inventory status types are mapped to inventory statuscodes, which are used in the stores and warehouses, in order to manage inventory updatessent from those solutions in Merchandising. The values that you enter for this inMerchandising should be coordinated with your store and warehouse inventory managementsolutions.
While creating inventory adjustments, users will also need to specify a reason for carrying outsuch adjustments. These inventory adjustment reason codes are also configurable and eachreason code can further be specified to affect cost of goods sold or not. This may be useful ifyou use budgeted shrink, but wish to post some known shrinkage to the stock ledgerseparately.
7-1
Additionally, there are some situations where Merchandising creates an inventoryadjustment automatically. For example, when transfers are reconciled or when theunits on a stock count are approved. You can configure which of the reason codesyou've created should be used by each of these transaction types.
These statuses, codes, reasons, and reason code configurations are created andmaintained in Merchandising through spreadsheet upload and download processes.These processes are accessed through the main Merchandising task list underFoundation Data > Download Foundation Data and Foundation Data > UploadFoundation Data.
To add or update inventory statuses, inventory codes, and reason codes, you willselect the template type of Inventory from the Download Data screen and then thetemplate Inventory Status and Adjustment Reasons. Click the Download button andwhen prompted, choose to either open the .ods file that is generated or save the fileand open it separately in the spreadsheet application of your choice. Once opened,there will be seven sheets that can be modified - Inventory Status Types, InventoryStatus Type Trans, Inventory Status Codes, Inventory Status Code Trans, InventoryAdjustment Reasons, Inventory Adjustment Reason Tran, and Inventory AdjustmentTran Data.
Note:
Inventory statuses, codes, and reasons cannot be deleted. If you wish to nothave certain values displayed, then the Used flag should be set to No for thestatus, code, or reason. Additionally, the inventory adjustment tran dataconfiguration cannot be added or deleted, only updated.
Add an Inventory Status Type
To add a new inventory status type, start in the Inventory Status Types tab, and, in ablank line in the template, select the action type of Create. Next enter a uniquenumeric status type code (up to 2 characters) and the description for the status type inthe primary language (as defined in the Merchandising system options) of up to 120characters. Next, the Used column indicates whether or not you are using this statusactively in the system; valid values are Yes and No. If left blank, Yes is taken asdefault.
Next, if you wish to add translations for the status type in languages other than theprimary language, this can be done in the Inventory Status Type Trans tab. Navigate toa blank row and select the action type of Create and the language in which thetranslated description will be entered. Then, enter the status code for which thetranslation applies. Finally, enter the translated description. The translated descriptioncan also be up to 120 characters long. This is an optional step.
Add an Inventory Status Code
To add a new inventory status code, start in the Inventory Status Codes tab, and, in ablank line in the template, select the action type of Create. Next enter a uniqueinventory status code (up to 10 characters). Next, optionally enter the inventory statustype associated with this inventory status code in the Inventory Status column. Ifentered, then when an inventory update is made using this code and received from thestore or warehouse, Merchandising will place the inventory in the indicated status. Ifno status type is assigned, then inventory will not be assigned to a non-sellable status.
Chapter 7Inventory Status and Adjustment Reasons
7-2
Then enter the description for the status code in the primary language (as defined in theMerchandising system options) of up to 120 characters. Next, the Used column indicateswhether or not you are using this status code actively in the system; valid values are Yes andNo. If left blank, Yes is taken as default.
If you wish to add translations for the status code in languages other than the primarylanguage, this can be done in the Inventory Status Code Trans tab. Navigate to a blank rowand select the action type of Create and the language in which the translated description willbe entered. Then, enter the inventory status and status code combination for which thetranslation applies. Finally, enter the translated description. The translated description canalso be up to 120 characters long. This is an optional step.
Add an Inventory Adjustment Reason
To add a new inventory adjustment reason, start in the Inventory Adjustment Reasons tab,and, in a blank line in the template, select the action type of Create. Next enter a uniquenumeric inventory adjustment reason code (up to 4 characters) and the description for theadjustment reason code in the primary language (as defined in the Merchandising systemoptions) of up to 120 characters. Next, specify if the inventory adjustments carried out withthis reason code will affect cost of goods sold or not. Possible values are Yes and No. Lastly,the Used column indicates whether or not you are using this reason actively in the system;valid values are Yes and No. If left blank, Yes is taken as default.
If you wish to add translations for the adjustment reason code in languages other than theprimary language, this can be done in the Inventory Adjustment Reason Trans tab. Navigateto a blank row and select the action type of Create and the language in which the translateddescription will be entered. Then, enter the reason code combination for which the translationapplies. Finally, enter the translated description. The translated description can also be up to120 characters long. This is an optional step.
Update Inventory Status Type or Code or Inventory Adjustment Reason
If you would like to update any details for existing inventory status type or code or inventoryadjustment reason, a similar process will be followed as that described above for creatingnew status type, code or adjustment reason respectively. First, download the spreadsheet,and then navigate to the tab where you would like to make your updates.
The following columns can be updated in each tab:
• Inventory Status Types - Description, Used
• Inventory Status Type Trans - Description
• Inventory Status Codes - Inventory Status, Description, Used
• Inventory Status Code Trans - Description
• Inventory Adjustment Reasons - Description, Used
• Inventory Adjustment Reason Tran - Description
In the tab where you are going to make your updates, select the action type of Update, andthen correct the value in the spreadsheet.
Update Inventory Adjustment Tran Data
If you would like to update the reason codes used for different transaction types, a similarprocess will be followed as that described above for creating updating status types, codesand adjustment reasons respectively. First, download the spreadsheet, and then navigate tothe tab where you would like to make your updates. In the row where you are making your
Chapter 7Inventory Status and Adjustment Reasons
7-3
update, select an action type of Update and then make the changes as needed. Thetransaction types that can have reason codes configured for them are:
• Wastage Adjustment
• Stock Count Unit Variance
• Item Transformation at Finisher
• Transfer Overage Sending Location
• Transfer Overage Receiving Location
• Transfer Short Sending Location
• Transfer Short Receiving Location
• Transfer Short/Close Sending Location
• Transfer Short/Close Receiving Location
• Late Posting: Sale
• Late Posting: Return
• Late Posting: Transfer Out Sending Location
• Late Posting: Transfer Receipt
• Late Posting: PO Receipt
• Late Posting: RTV
• Late Posting: Inventory Adjustment
• Customer Order Return Without Inventory
• Wholesale Franchise Destroy On Site Return
For each of the above transaction types a different reason code can be configured forpositive and negative adjustments, as desired. The following can be updated for eachtransaction type:
• Reason - enter the reason code that corresponds to the transaction type andwhether the adjustment is a positive or negative adjustment.
• Used Ind - this indicates whether or not this configuration row should be used. Ifnot used, then any transactions of this type written will not have a reason codeassociated to it.
In the tab where you are going to make your updates, select the action type of Update,and then correct the value in the spreadsheet.
Uploading Changes
For all actions defined above, once all the updates have been made to the data in thespreadsheet, save the file and close it. Then, return to the Merchandising screens andselect Foundation Data > Upload Foundation Data from the main task list. In thisscreen, select the template type Inventory and the template Inventory Status andAdjustment Reasons. This will generate a process description automatically, but thiscan be updated if desired. Lastly, select the Browse button and navigate to thedirectory where you saved the updated spreadsheet.
To review the status of the upload and check whether any errors occurred, select theFoundation Data > Review Status task from the main task list.
See also Download/Upload Data from Spreadsheets and View Data Loading Status.
Chapter 7Inventory Status and Adjustment Reasons
7-4
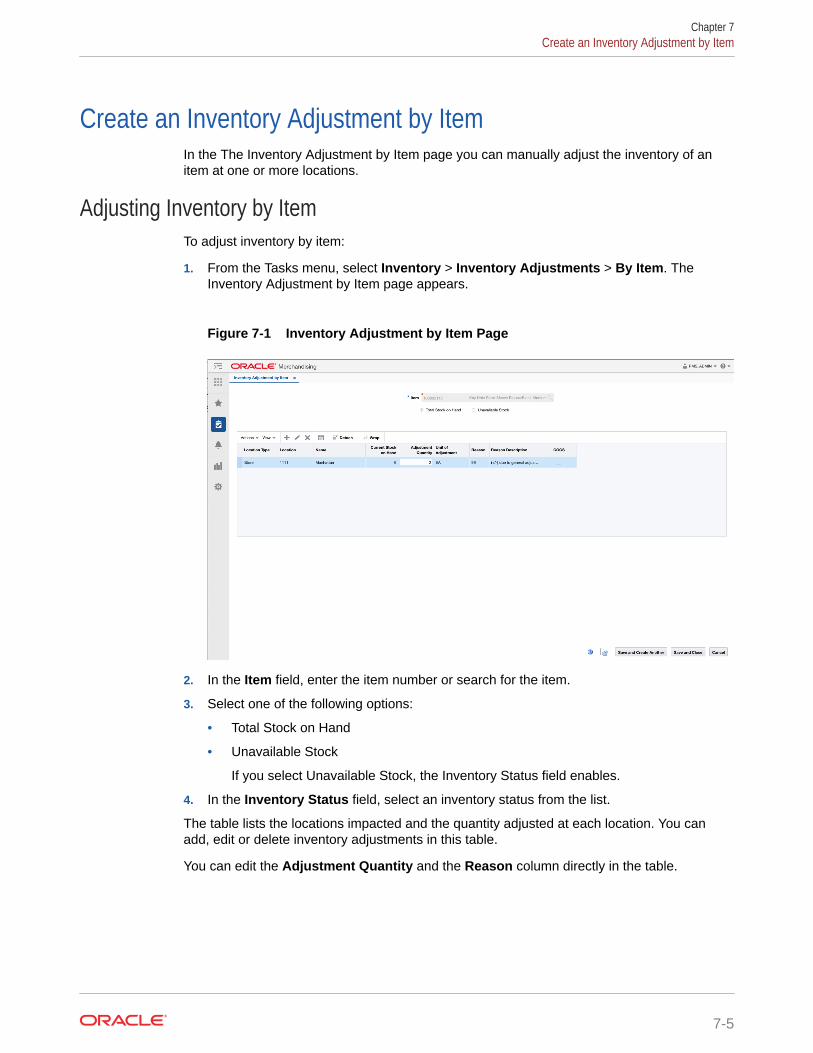
Create an Inventory Adjustment by ItemIn the The Inventory Adjustment by Item page you can manually adjust the inventory of anitem at one or more locations.
Adjusting Inventory by ItemTo adjust inventory by item:
1. From the Tasks menu, select Inventory > Inventory Adjustments > By Item. TheInventory Adjustment by Item page appears.
Figure 7-1 Inventory Adjustment by Item Page
2. In the Item field, enter the item number or search for the item.
3. Select one of the following options:
• Total Stock on Hand
• Unavailable Stock
If you select Unavailable Stock, the Inventory Status field enables.
4. In the Inventory Status field, select an inventory status from the list.
The table lists the locations impacted and the quantity adjusted at each location. You canadd, edit or delete inventory adjustments in this table.
You can edit the Adjustment Quantity and the Reason column directly in the table.
Chapter 7Create an Inventory Adjustment by Item
7-5
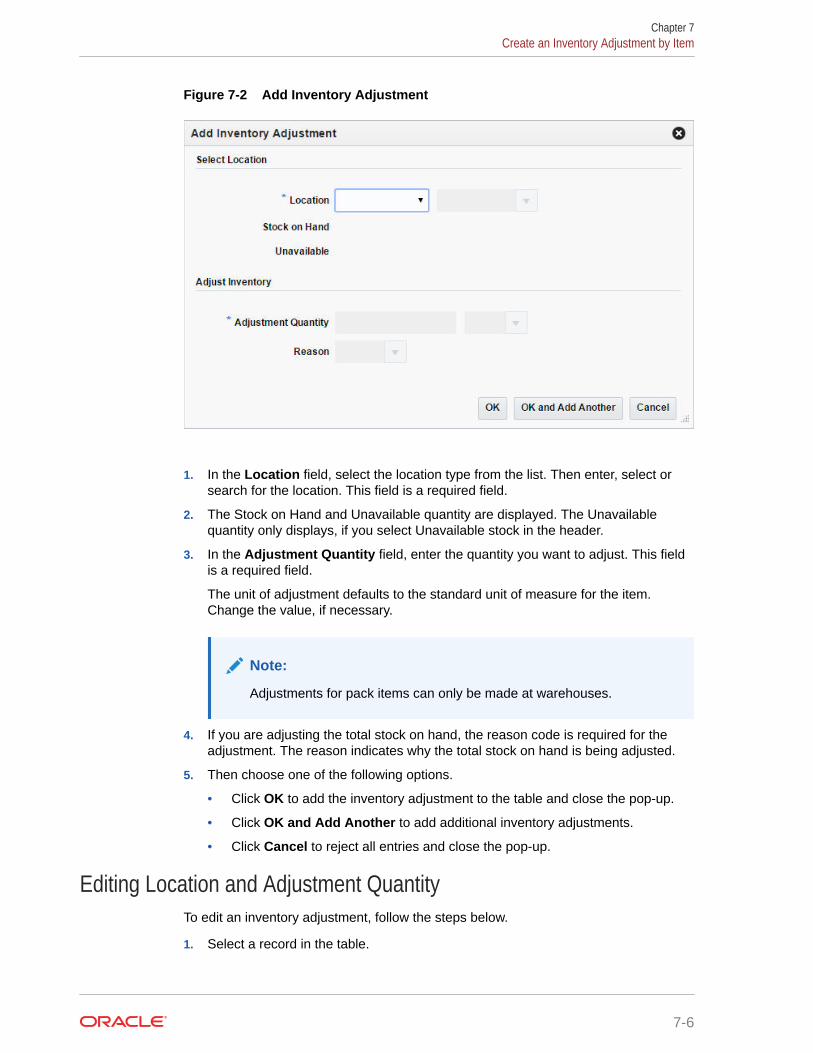
Figure 7-2 Add Inventory Adjustment
1. In the Location field, select the location type from the list. Then enter, select orsearch for the location. This field is a required field.
2. The Stock on Hand and Unavailable quantity are displayed. The Unavailablequantity only displays, if you select Unavailable stock in the header.
3. In the Adjustment Quantity field, enter the quantity you want to adjust. This fieldis a required field.
The unit of adjustment defaults to the standard unit of measure for the item.Change the value, if necessary.
Note:
Adjustments for pack items can only be made at warehouses.
4. If you are adjusting the total stock on hand, the reason code is required for theadjustment. The reason indicates why the total stock on hand is being adjusted.
5. Then choose one of the following options.
• Click OK to add the inventory adjustment to the table and close the pop-up.
• Click OK and Add Another to add additional inventory adjustments.
• Click Cancel to reject all entries and close the pop-up.
Editing Location and Adjustment QuantityTo edit an inventory adjustment, follow the steps below.
1. Select a record in the table.
Chapter 7Create an Inventory Adjustment by Item
7-6
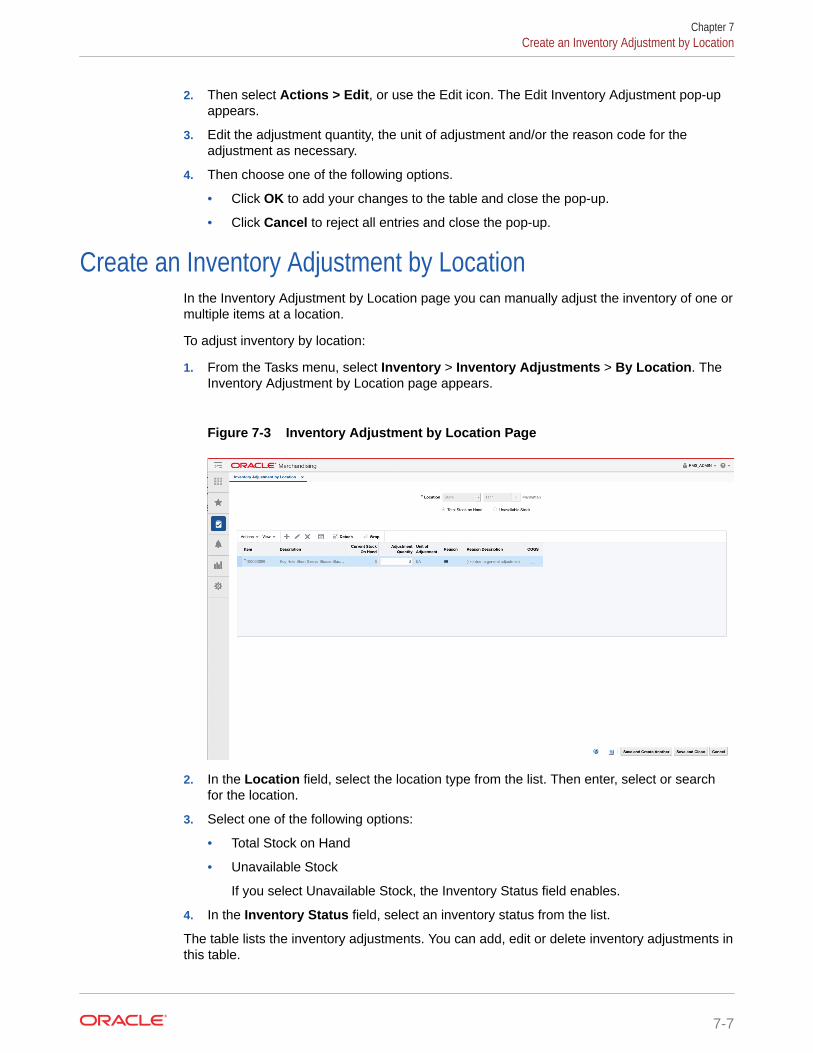
2. Then select Actions > Edit, or use the Edit icon. The Edit Inventory Adjustment pop-upappears.
3. Edit the adjustment quantity, the unit of adjustment and/or the reason code for theadjustment as necessary.
4. Then choose one of the following options.
• Click OK to add your changes to the table and close the pop-up.
• Click Cancel to reject all entries and close the pop-up.
Create an Inventory Adjustment by LocationIn the Inventory Adjustment by Location page you can manually adjust the inventory of one ormultiple items at a location.
To adjust inventory by location:
1. From the Tasks menu, select Inventory > Inventory Adjustments > By Location. TheInventory Adjustment by Location page appears.
Figure 7-3 Inventory Adjustment by Location Page
2. In the Location field, select the location type from the list. Then enter, select or searchfor the location.
3. Select one of the following options:
• Total Stock on Hand
• Unavailable Stock
If you select Unavailable Stock, the Inventory Status field enables.
4. In the Inventory Status field, select an inventory status from the list.
The table lists the inventory adjustments. You can add, edit or delete inventory adjustments inthis table.
Chapter 7Create an Inventory Adjustment by Location
7-7
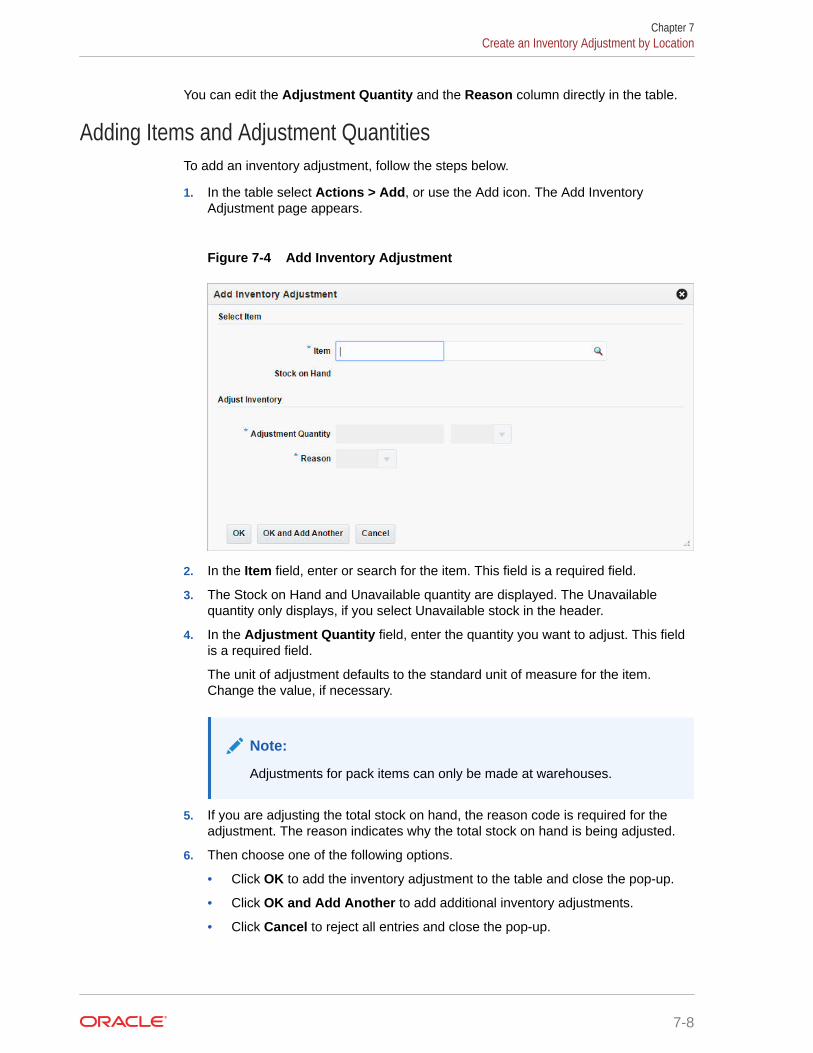
You can edit the Adjustment Quantity and the Reason column directly in the table.
Adding Items and Adjustment QuantitiesTo add an inventory adjustment, follow the steps below.
1. In the table select Actions > Add, or use the Add icon. The Add InventoryAdjustment page appears.
Figure 7-4 Add Inventory Adjustment
2. In the Item field, enter or search for the item. This field is a required field.
3. The Stock on Hand and Unavailable quantity are displayed. The Unavailablequantity only displays, if you select Unavailable stock in the header.
4. In the Adjustment Quantity field, enter the quantity you want to adjust. This fieldis a required field.
The unit of adjustment defaults to the standard unit of measure for the item.Change the value, if necessary.
Note:
Adjustments for pack items can only be made at warehouses.
5. If you are adjusting the total stock on hand, the reason code is required for theadjustment. The reason indicates why the total stock on hand is being adjusted.
6. Then choose one of the following options.
• Click OK to add the inventory adjustment to the table and close the pop-up.
• Click OK and Add Another to add additional inventory adjustments.
• Click Cancel to reject all entries and close the pop-up.
Chapter 7Create an Inventory Adjustment by Location
7-8
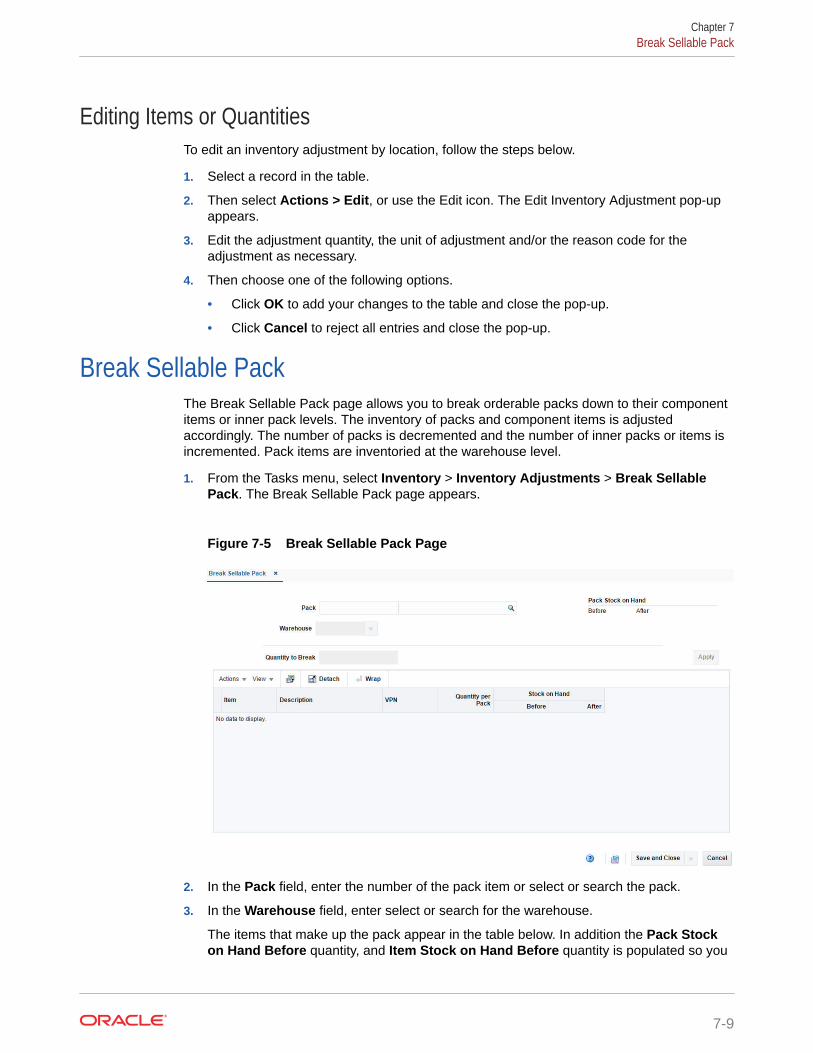
Editing Items or QuantitiesTo edit an inventory adjustment by location, follow the steps below.
1. Select a record in the table.
2. Then select Actions > Edit, or use the Edit icon. The Edit Inventory Adjustment pop-upappears.
3. Edit the adjustment quantity, the unit of adjustment and/or the reason code for theadjustment as necessary.
4. Then choose one of the following options.
• Click OK to add your changes to the table and close the pop-up.
• Click Cancel to reject all entries and close the pop-up.
Break Sellable PackThe Break Sellable Pack page allows you to break orderable packs down to their componentitems or inner pack levels. The inventory of packs and component items is adjustedaccordingly. The number of packs is decremented and the number of inner packs or items isincremented. Pack items are inventoried at the warehouse level.
1. From the Tasks menu, select Inventory > Inventory Adjustments > Break SellablePack. The Break Sellable Pack page appears.
Figure 7-5 Break Sellable Pack Page
2. In the Pack field, enter the number of the pack item or select or search the pack.
3. In the Warehouse field, enter select or search for the warehouse.
The items that make up the pack appear in the table below. In addition the Pack Stockon Hand Before quantity, and Item Stock on Hand Before quantity is populated so you
Chapter 7Break Sellable Pack
7-9
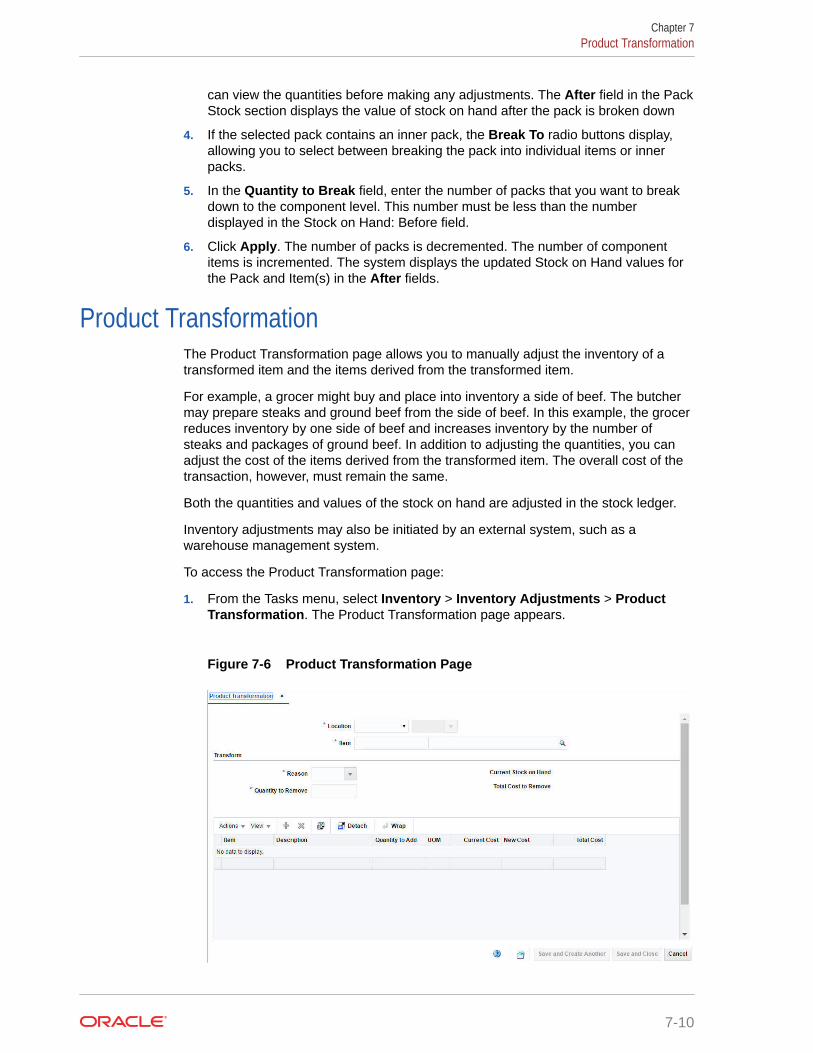
can view the quantities before making any adjustments. The After field in the PackStock section displays the value of stock on hand after the pack is broken down
4. If the selected pack contains an inner pack, the Break To radio buttons display,allowing you to select between breaking the pack into individual items or innerpacks.
5. In the Quantity to Break field, enter the number of packs that you want to breakdown to the component level. This number must be less than the numberdisplayed in the Stock on Hand: Before field.
6. Click Apply. The number of packs is decremented. The number of componentitems is incremented. The system displays the updated Stock on Hand values forthe Pack and Item(s) in the After fields.
Product TransformationThe Product Transformation page allows you to manually adjust the inventory of atransformed item and the items derived from the transformed item.
For example, a grocer might buy and place into inventory a side of beef. The butchermay prepare steaks and ground beef from the side of beef. In this example, the grocerreduces inventory by one side of beef and increases inventory by the number ofsteaks and packages of ground beef. In addition to adjusting the quantities, you canadjust the cost of the items derived from the transformed item. The overall cost of thetransaction, however, must remain the same.
Both the quantities and values of the stock on hand are adjusted in the stock ledger.
Inventory adjustments may also be initiated by an external system, such as awarehouse management system.
To access the Product Transformation page:
1. From the Tasks menu, select Inventory > Inventory Adjustments > ProductTransformation. The Product Transformation page appears.
Figure 7-6 Product Transformation Page
Chapter 7Product Transformation
7-10
2. In the Location field, select the location type from the list. Then enter, select or searchfor the location. This field is a required field.
3. In the Item field, enter the item number to be transformed or search for the item. Thisfield is a required field.
4. In the Reason field of the Transform section, enter, select or search for the ID of thereason code for the adjustment.
5. In the Quantity to Remove field of the Transform section, enter the number of unitssubtracted from stock on hand. This field is a required field.
6. When the item is selected, the Current Stock on Hand field is populated to view thestock on hand quantity for the selected item before making any adjustments.
7. The Total Cost to Remove field is auto populated with the value based on the quantity toremove.
Add Items for the Product TransformationIn the table you must add the items that you will create from the transformed item.
Once added, the items and their attributes appear in the table. The Total Cost in theSummary Row will be updated. The Total Cost to Remove must equal the Total Cost to Addbefore an adjustment can be made. Therefore, you can adjust the Quantity to Add and theNew Cost columns directly in the table.
To add items you want to create from the transformed item, follow the steps.
1. From the Actions menu after entering the required details, click Add or click the Add icon.The Add Item page appears.
2. In the Item field, enter, select or search for the item you want to create. This field is arequired field.
3. In the Quantity to Add field, enter the quantity for the item. This field is a required field.
4. In the New Cost field displays the current costs of the item. Edit the costs, if necessary.This field is a required field.
5. Then choose one of the following options.
• Click OK to create the item and add it to the table and close the pop-up.
• Click OK and Add Another to create additional items.
• Click Cancel to reject all entries and close the pop-up.
Chapter 7Product Transformation
7-11
8Stock Counts
Inventory accuracy is a critical and highly sensitive area affecting retailers. Inventory recordaccuracy has a significant impact on increasing levels of customer service, reducing costs,and increasing productivity. Stock counts verify the inventory figures kept withinMerchandising, which makes reporting, planning, and ordering more accurate.
In order to reconcile inventory levels in the system with actual inventory on-hand, retailersperform physical inventory stock counts, which also serve to make stock ledger adjustments.These stock counts assist retailers in budgeting and accounting for shrinkage.
Merchandising system plays an active role in freezing inventory in a manner that allowscounts to be accurate by considering activities that take place while the count is under way,such as receipts in the back room while stock is being counted in the display areas. Physicalstock counts are integrated with the stock ledger to bring book stock into agreement withactual stock. You can request stock counts as needed by creating a stock count request orcreate a series of count request using the stock count schedule functionality.
There are two types of stock counts supported in Merchandising:
• Unit
• Unit and Value
Unit
A Unit type stock count is performed when the retailer wants to keep the stock on hand in linewith the actual on hand. It can be ad hoc or a scheduled process. The unit type of stock countcan be set up in Merchandising using an item list or by selecting one or more departments,classes or subclasses. Unit only counts can also be created for all departments. The ensuingadjustments affect inventory similar to an inventory adjustment - stock on hand quantities areupdated and stock adjustments are written to the stock ledger.
Unit and Value
A Unit and Value stock count is often an annual count that can be used to adjust the stockledger, in addition to updating inventory positions. Unit & Value type stock counts are doneeither for an entire location or by product hierarchy (such as department, class or subclasslevel). Unlike Unit counts, Unit & Value counts have a two-step approval process wherebyfirst stock on hand is adjusted based on the count results and then shrinkage is calculatedbased on the difference between the expected value of inventory in the stock ledger and thevalue of the count.
For both types of counts, Merchandising assumes that the stock count date is as of the closeof business of the location. Therefore the physical count can be done anytime between thelast transactions for the stock count date until the next day's transactions start.
One or more locations can be added to both types of stock counts, but a stock count can onlycontain stores or warehouses, not both. Additionally, for warehouses, counting is done at aphysical warehouse level, so all stockholding virtual warehouses within a physicalwarehouse, including internal finishers, must be added to a count together.
8-1
All counts are assumed to occur when a location is closed for all inventory transactionson the end of the business day on which the count is scheduled. That night, asnapshot of inventory positions is captured that will be compared to the actual countresults once the count is complete. After the count results are received, you will haveseveral options available to review the count results, adjust as needed, and accept theresults.
• Unit Variance and Adjustment – this page allows you to view by location thecount variances for each item. Only items that are outside the variance tolerancedefined in system option will displayed. This is also the screen where you canaccept the results sent from the store or warehouse so that the inventoryadjustments are applied in Merchandising.
• Stock Count Results – this page allows you to adjust the unit results from thecount, if errors in the data are identified based on the variances seen in the UnitVariance and Adjustment page.
• Virtual Warehouse Distribution – if the count is for a warehouse, then this pageallows for adjustments to be made to how the results were distributed to virtualwarehouses.
• Value Variance and Adjustment – this page allows you to view the calculatedvalue of the count results (cost or retail) by subclass/location and applyadjustments, as needed. The calculated value will be displayed only after the unitvariances have been applied, however adjustments can be made and accepted inthis page prior to that calculation occurring.
See the Oracle® Retail Merchandising System Stock Counts Overview Release 16.0white paper in the Oracle Retail Merchandising Functional Library (Doc ID 1585843.1)
Schedule a Stock CountThe Stock Count Schedule page allows you to maintain schedules for stock counts.You can schedule stock counts for a stockholding store, a warehouse, or all locationson a location list. The stock can be counted in units or in units and monetary value.Depending on system options, the monetary value may be either retail or cost. Youcan schedule stock counts for every day, every week, or every two or more weeks.You can also designate the dates on which a schedule becomes effective and expires.
To access the Stock Count Schedule page:
1. From the Tasks menu, select Inventory > Stock Counts > Stock CountSchedule. The Stock Count Schedule page appears.
Chapter 8Schedule a Stock Count
8-2
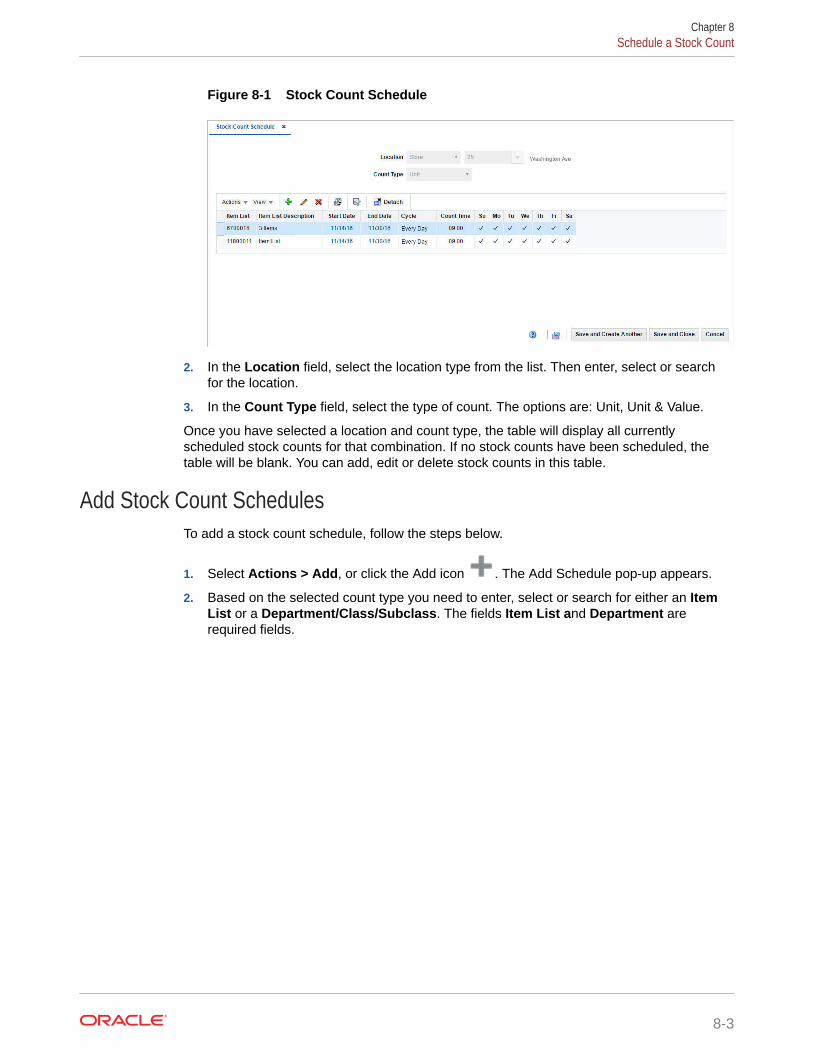
Figure 8-1 Stock Count Schedule
2. In the Location field, select the location type from the list. Then enter, select or searchfor the location.
3. In the Count Type field, select the type of count. The options are: Unit, Unit & Value.
Once you have selected a location and count type, the table will display all currentlyscheduled stock counts for that combination. If no stock counts have been scheduled, thetable will be blank. You can add, edit or delete stock counts in this table.
Add Stock Count SchedulesTo add a stock count schedule, follow the steps below.
1. Select Actions > Add, or click the Add icon . The Add Schedule pop-up appears.
2. Based on the selected count type you need to enter, select or search for either an ItemList or a Department/Class/Subclass. The fields Item List and Department arerequired fields.
Chapter 8Schedule a Stock Count
8-3
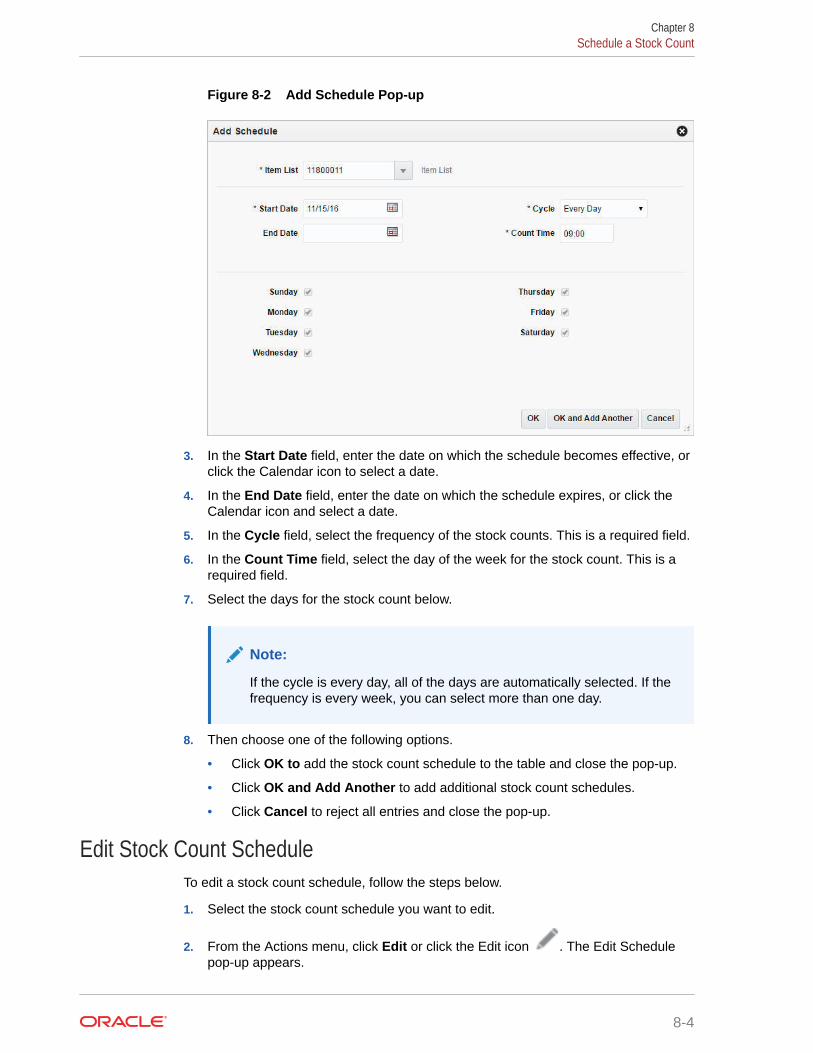
Figure 8-2 Add Schedule Pop-up
3. In the Start Date field, enter the date on which the schedule becomes effective, orclick the Calendar icon to select a date.
4. In the End Date field, enter the date on which the schedule expires, or click theCalendar icon and select a date.
5. In the Cycle field, select the frequency of the stock counts. This is a required field.
6. In the Count Time field, select the day of the week for the stock count. This is arequired field.
7. Select the days for the stock count below.
Note:
If the cycle is every day, all of the days are automatically selected. If thefrequency is every week, you can select more than one day.
8. Then choose one of the following options.
• Click OK to add the stock count schedule to the table and close the pop-up.
• Click OK and Add Another to add additional stock count schedules.
• Click Cancel to reject all entries and close the pop-up.
Edit Stock Count ScheduleTo edit a stock count schedule, follow the steps below.
1. Select the stock count schedule you want to edit.
2. From the Actions menu, click Edit or click the Edit icon . The Edit Schedulepop-up appears.
Chapter 8Schedule a Stock Count
8-4

3. Edit the enabled fields as necessary.
4. Then choose one of the following options.
• Click OK to add your changes to the table and close the pop-up.
• Click Cancel to reject all entries and close the pop-up.
Request a Stock CountThe Create Stock Count Request option opens the Stock Count Request page. In the StockCount Request page you can request stock counts. You can create unit counts by item listlevel or product group level (all departments, department, class, or subclass) and unit & valuecounts by product group level. If a department, class or subclass is selected for either of thecount types, one or more departments, classes or subclasses can be added to the count.
Note:
For unit counts, you can only select the option All Departments for the productgroup level for warehouse.
Locations are added to the count individually or by selecting a group of locations, such as alocation list or all stores. A count can be for either stores or warehouses, but not both. Anystockholding store can be added to a count, including both company and franchise stores. Ifmultiple locations are added to the count, then the count will only be able to be finalized oncethe counts for all locations are completed.
To request a stock count:
1. From the Task menu, select Inventory > Stock Counts > Create Stock Count Request.The Stock Count Request page appears.
2. In the Description field, enter a description for the stock count. This field is a requiredfield.
3. In the Date field, enter the scheduled date for the stock count, or use the Calendar iconto select a date.
4. In the Type field, select the stock count type from the list. Possible options are Unit andUnit & Value.
5. In the Select Item By section, select either the Item List or Merchandise Hierarchyoption.
• If you select Unit > Item List:
The Item List field appears. Enter, select or search for the item list for the count.
• If you select Unit > Merchandise Hierarchy:
The Hierarchy Level field appears. Select the hierarchy level from the list.
• If you select Unit and Value:
The Select Item By section defaults to Merchandise Hierarchy. In the HierarchyLevel field, select the hierarchy level from the list.
Chapter 8Request a Stock Count
8-5
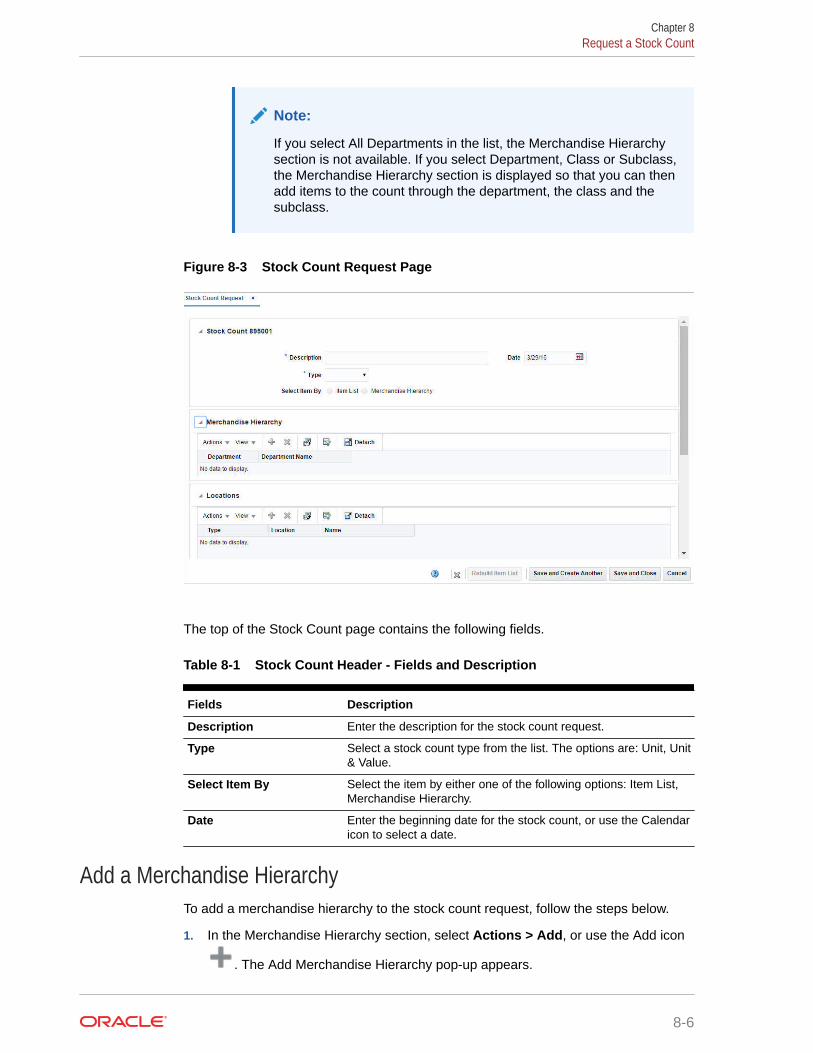
Note:
If you select All Departments in the list, the Merchandise Hierarchysection is not available. If you select Department, Class or Subclass,the Merchandise Hierarchy section is displayed so that you can thenadd items to the count through the department, the class and thesubclass.
Figure 8-3 Stock Count Request Page
The top of the Stock Count page contains the following fields.
Table 8-1 Stock Count Header - Fields and Description
Fields Description
Description Enter the description for the stock count request.
Type Select a stock count type from the list. The options are: Unit, Unit& Value.
Select Item By Select the item by either one of the following options: Item List,Merchandise Hierarchy.
Date Enter the beginning date for the stock count, or use the Calendaricon to select a date.
Add a Merchandise HierarchyTo add a merchandise hierarchy to the stock count request, follow the steps below.
1. In the Merchandise Hierarchy section, select Actions > Add, or use the Add icon
. The Add Merchandise Hierarchy pop-up appears.
Chapter 8Request a Stock Count
8-6
2. In the Department field, enter, select or search for the department. If you select thehierarchy level Department, Class, or Subclass, this field is a required field.
3. In the Class field, enter, select or search for the class. If you select the hierarchy levelClass, or Subclass, this field is a required field.
4. In the Subclass field, enter, select or search for the subclass. If you select the hierarchylevel Subclass, this field is a required field.
5. Then choose one of the following sections.
• Click OK to add the merchandise hierarchy and close the pop-up.
• Click OK and Add Another to add additional merchandise hierarchy levels.
• Click Cancel to reject all entries and close the pop-up.
Add LocationsTo add locations to the stock count request, follow the steps listed below.
1. In the Locations section, select Actions > Add, or use the Add icon . The AddLocations pop-up appears.
2. In the Location field, select a location type from the list. Then enter, select or search forthe location. This field is a required field.
3. Then choose one of the following sections.
• Click OK to add the location to the table and close the pop-up.
• Click OK and Add Another to add additional locations to the stock count request.
Note:
Stores, Warehouses and External Finishers cannot be added to the sameCount.
• Click Cancel to reject all entries and close the pop-up.
Rebuild Item ListYou can also request to rebuild an item list. The Rebuild Item List button enables when youenter the description, select the stock count type, and enter the item list.
To rebuild an item list, follow the steps listed below.
1. Click Rebuild Item List. The Item List Rebuild page appears.
Chapter 8Request a Stock Count
8-7

Figure 8-4 Item List Rebuild Page
2. Click Execute and Close to rebuild the item list based on the criteria for the itemlist. This button is not available for static item lists.
3. Click Cancel to close the pop-up.
Manage Stock CountsThe Manage Stock Counts option opens the Stock Count Search page. Managingstock counts involves performing one or more of the following tasks:
• Searching for a stock count
• Editing a stock count
• Viewing a stock count
• Results
• Unit Variance and Adjustment
• Virtual WH Adjustment
• Value Variance and Adjustment
Search for a Stock CountYou can access the Stock Count Search page from the Task menu, select Inventory >Stock Counts > Manage Stock Count. The Stock Count Search page appears.
In the Stock Count Search page you can search for a stock count by specifyingvarious search criteria. You can choose to access a stock count in the search results inedit or view mode depending on security privileges.
Chapter 8Manage Stock Counts
8-8
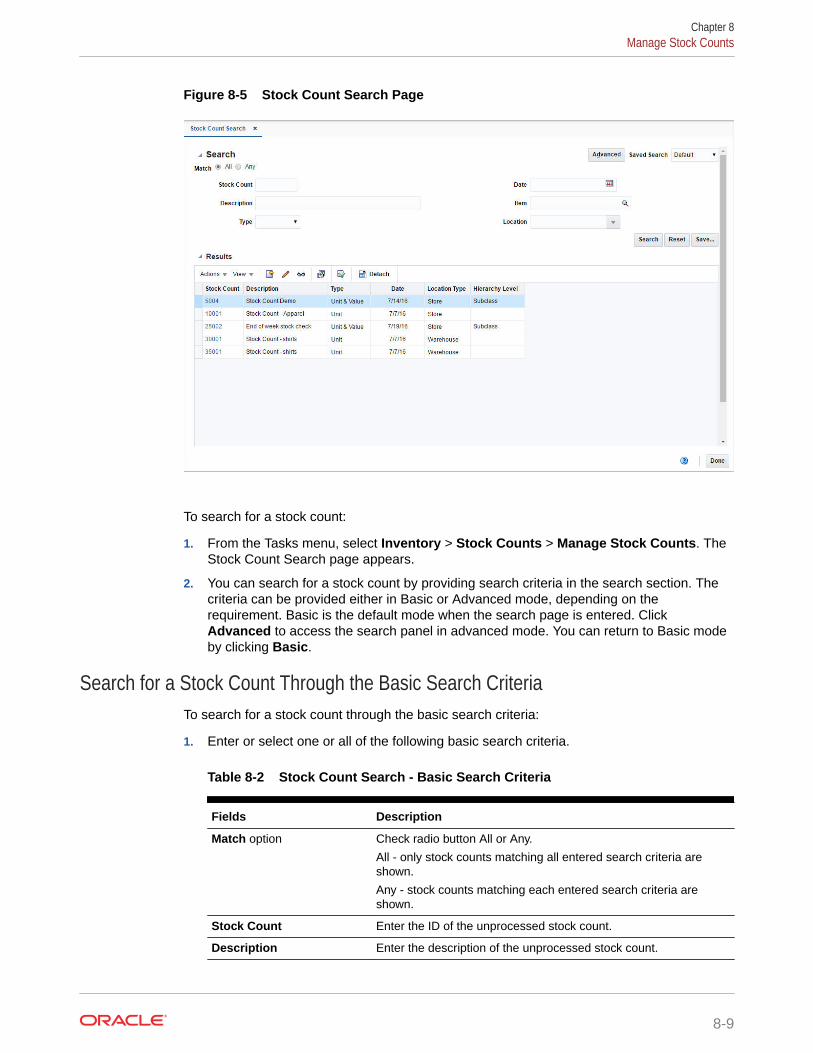
Figure 8-5 Stock Count Search Page
To search for a stock count:
1. From the Tasks menu, select Inventory > Stock Counts > Manage Stock Counts. TheStock Count Search page appears.
2. You can search for a stock count by providing search criteria in the search section. Thecriteria can be provided either in Basic or Advanced mode, depending on therequirement. Basic is the default mode when the search page is entered. ClickAdvanced to access the search panel in advanced mode. You can return to Basic modeby clicking Basic.
Search for a Stock Count Through the Basic Search CriteriaTo search for a stock count through the basic search criteria:
1. Enter or select one or all of the following basic search criteria.
Table 8-2 Stock Count Search - Basic Search Criteria
Fields Description
Match option Check radio button All or Any.
All - only stock counts matching all entered search criteria areshown.
Any - stock counts matching each entered search criteria areshown.
Stock Count Enter the ID of the unprocessed stock count.
Description Enter the description of the unprocessed stock count.
Chapter 8Manage Stock Counts
8-9
Table 8-2 (Cont.) Stock Count Search - Basic Search Criteria
Fields Description
Type Select the type of the stock count. The options are: Unit, Unit &Value.
Date Enter the date or click the Calendar icon to select a date.
Item Enter the item number or search for the item.
Location Enter, select or search for the location.
Note:
For more information about searches, see Search Screens in theOracle® Retail Merchandising Do the Basics User Guide.
2. Click Search. The stock counts that match the search criteria are displayed in theResults section.
3. Click Reset to execute the saved search.
4. Click Done to close the page.
Search for a Stock Through Advanced Search CriteriaTo search for a stock count using advanced search criteria:
1. To search using advanced search criteria, enter or select one or all of theadvanced search criteria.
Note:
For more information about searches, see Search Screens in theOracle® Retail Merchandising Do the Basics User Guide.
2. To narrow down the search, use the list next to the search fields. For example,determine if the entered value should equal or not equal the search result.
3. Click Search. The stock counts that match the search criteria are displayed in theResults section.
4. Click Reset to clear the search section and results.
5. Click Add Fields to add more fields for the advanced search. To remove the fieldfrom the search, click the x right next to the field.
6. Click Reorder to change the order of the available search fields. The ReorderSearch Fields page appears.
• Select the desired search field and use the up and down arrows to rearrangethe order of the fields.
• Click OK to confirm the new order of the fields and close the page.
• Click Cancel to reject any changes and close the page.
Chapter 8Manage Stock Counts
8-10
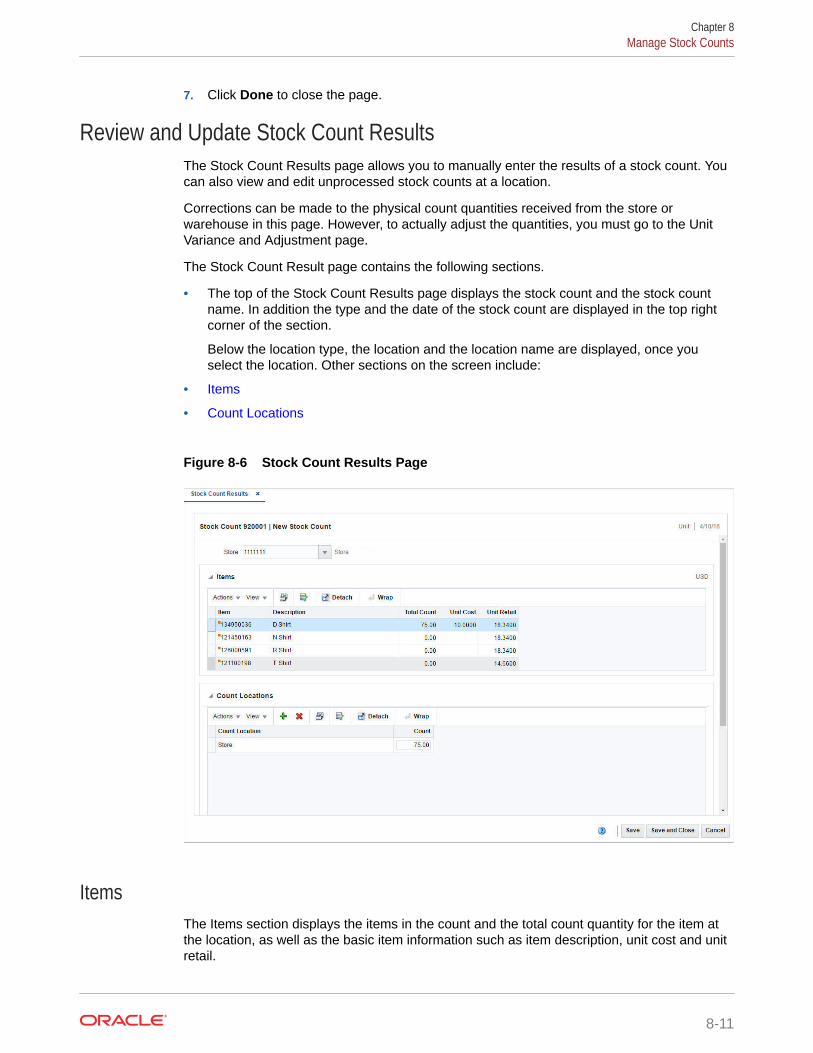
7. Click Done to close the page.
Review and Update Stock Count ResultsThe Stock Count Results page allows you to manually enter the results of a stock count. Youcan also view and edit unprocessed stock counts at a location.
Corrections can be made to the physical count quantities received from the store orwarehouse in this page. However, to actually adjust the quantities, you must go to the UnitVariance and Adjustment page.
The Stock Count Result page contains the following sections.
• The top of the Stock Count Results page displays the stock count and the stock countname. In addition the type and the date of the stock count are displayed in the top rightcorner of the section.
Below the location type, the location and the location name are displayed, once youselect the location. Other sections on the screen include:
• Items
• Count Locations
Figure 8-6 Stock Count Results Page
ItemsThe Items section displays the items in the count and the total count quantity for the item atthe location, as well as the basic item information such as item description, unit cost and unitretail.
Chapter 8Manage Stock Counts
8-11
Count LocationsThe Count Locations section displays the location inside the store or warehouse wherethe item was counted and the quantity counted at this location.
You can edit the Count column directly in the table to update the count quantity for acount location. If the count quantity for a location is updated, the Total Count columnin the first table is updated to reflect the new total.
Edit the Result of a Stock CountTo edit the result of a stock count, follow the steps below.
1. From the Tasks menu, select Inventory > Stock Counts > Manage StockCounts. The Stock Count Search page appears.
2. Enter or select search criteria as desired to make the search more restrictive.
3. Click Search. The stock counts that match the search criteria are displayed in theResults section.
4. Select a stock count in the table.
5. Then select Actions > Results. The Stock Count Results page appears.
Note:
You can also access the Stock Count Results page through the UnitVariance and Adjustment page.
The stock count ID, description, type, date, location type and location ofthe selected stock count are displayed. In addition all of the items at thelocation appear in the tables by default.
For more information about this page, see the Review Unit Variancesand Accepting Unit Counts section.
6. The stock count ID, description, type and date are displayed. The location typedefaults to either Store or Warehouse. Enter, select or search for the location.
7. In the items section select an item. The count locations and counts for the selecteditem are displayed in the Count Locations section.
8. In the Count column, update the count quantity as necessary.
9. Save your changes.
Add Count LocationsTo add count locations for an item, follow the steps below.
1. In the Count Locations section, select Actions > Add, or use the Add icon .The Add Count Location pop-up appears.
2. In the Count Location field, enter the location. This is a required field.
3. In the Quantity field, enter the quantity. This field is a required field.
Chapter 8Manage Stock Counts
8-12
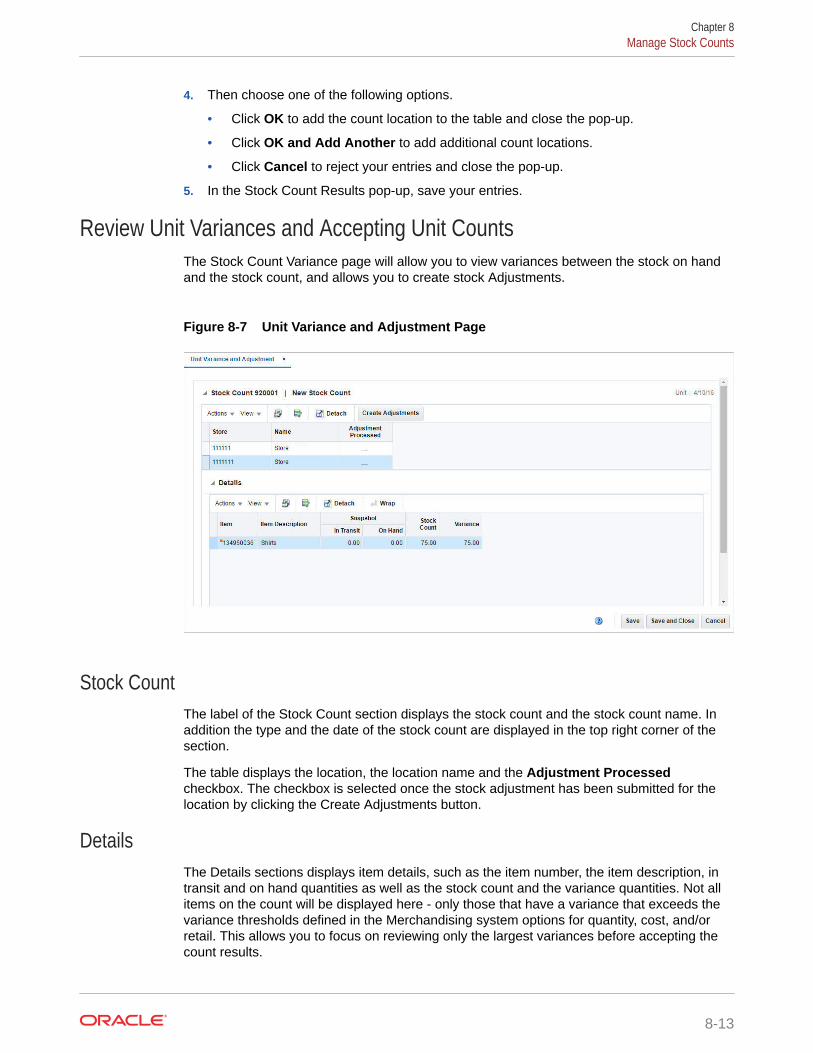
4. Then choose one of the following options.
• Click OK to add the count location to the table and close the pop-up.
• Click OK and Add Another to add additional count locations.
• Click Cancel to reject your entries and close the pop-up.
5. In the Stock Count Results pop-up, save your entries.
Review Unit Variances and Accepting Unit CountsThe Stock Count Variance page will allow you to view variances between the stock on handand the stock count, and allows you to create stock Adjustments.
Figure 8-7 Unit Variance and Adjustment Page
Stock CountThe label of the Stock Count section displays the stock count and the stock count name. Inaddition the type and the date of the stock count are displayed in the top right corner of thesection.
The table displays the location, the location name and the Adjustment Processedcheckbox. The checkbox is selected once the stock adjustment has been submitted for thelocation by clicking the Create Adjustments button.
DetailsThe Details sections displays item details, such as the item number, the item description, intransit and on hand quantities as well as the stock count and the variance quantities. Not allitems on the count will be displayed here - only those that have a variance that exceeds thevariance thresholds defined in the Merchandising system options for quantity, cost, and/orretail. This allows you to focus on reviewing only the largest variances before accepting thecount results.
Chapter 8Manage Stock Counts
8-13
Adjust the Stock on Hand after a Stock CountTo adjust the stock on hand after a stock count, follow the steps below.
1. From the Tasks menu, select Inventory > Stock Counts > Manage StockCounts. The Stock Count Search page appears.
2. Enter or select search criteria as desired to make the search more restrictive.
3. Click Search. The stock counts that match the search criteria are displayed in theResults section.
4. Select a stock count in the table.
5. Then select Actions > Unit Variance and Adjustment. The Unit Variance andAdjustment page appears.
6. In the Stock Count section select a location. The item information is displayed inthe Details section.
7. Select Actions > Create Adjustment, or use the Create Adjustment button.
8. You are prompted, if you want to create a stock adjustment for the selectedlocation. Confirm with Yes.
9. The adjustment are made during the nightly batch process.
10. Save your entries.
Redistribute Count Results within a Physical WarehouseWhen a stock count is performed for a warehouse, an adjustment can be made if thedistribution of inventory to the virtual warehouse performed during the upload of thecount to Merchandising was incorrect. You can carry out this adjustment in the VirtualWH Distribution page.
The Virtual WH Distribution page displays the stock count ID and description at the topof the page, along with the type of count and the count date. It also includes thefollowing sections:
• Physical Warehouse/Item
• Virtual Warehouses
Chapter 8Manage Stock Counts
8-14
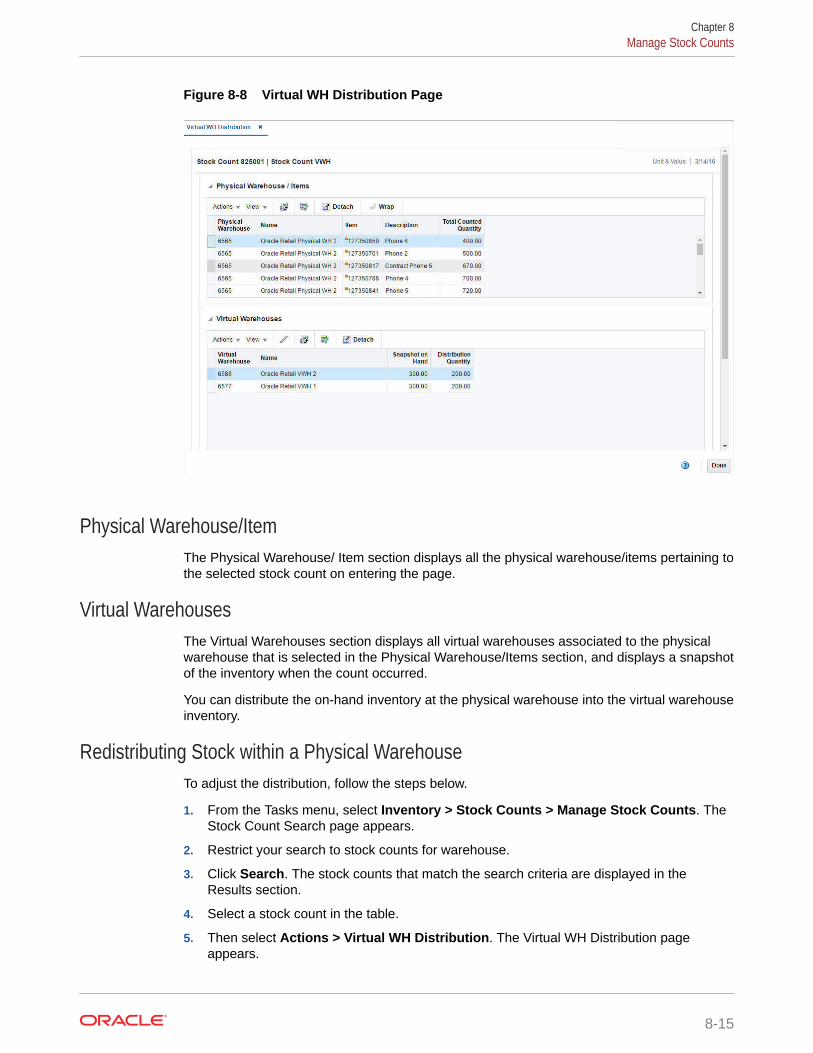
Figure 8-8 Virtual WH Distribution Page
Physical Warehouse/ItemThe Physical Warehouse/ Item section displays all the physical warehouse/items pertaining tothe selected stock count on entering the page.
Virtual WarehousesThe Virtual Warehouses section displays all virtual warehouses associated to the physicalwarehouse that is selected in the Physical Warehouse/Items section, and displays a snapshotof the inventory when the count occurred.
You can distribute the on-hand inventory at the physical warehouse into the virtual warehouseinventory.
Redistributing Stock within a Physical WarehouseTo adjust the distribution, follow the steps below.
1. From the Tasks menu, select Inventory > Stock Counts > Manage Stock Counts. TheStock Count Search page appears.
2. Restrict your search to stock counts for warehouse.
3. Click Search. The stock counts that match the search criteria are displayed in theResults section.
4. Select a stock count in the table.
5. Then select Actions > Virtual WH Distribution. The Virtual WH Distribution pageappears.
Chapter 8Manage Stock Counts
8-15
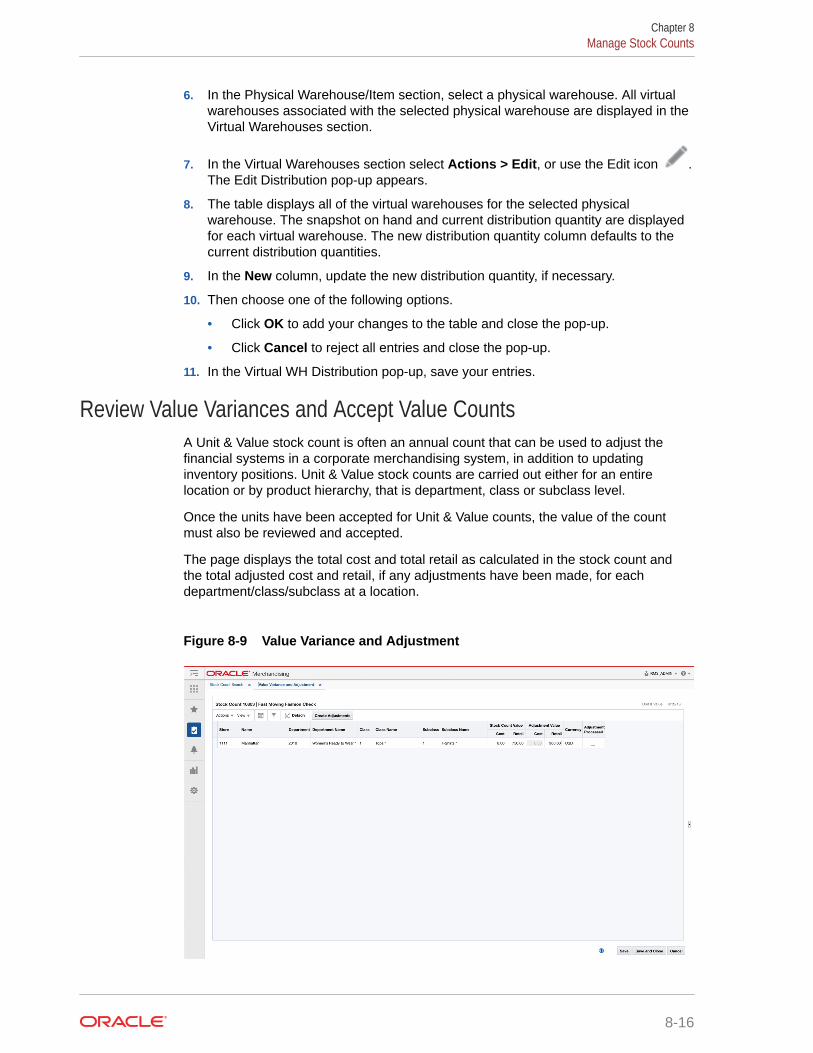
6. In the Physical Warehouse/Item section, select a physical warehouse. All virtualwarehouses associated with the selected physical warehouse are displayed in theVirtual Warehouses section.
7. In the Virtual Warehouses section select Actions > Edit, or use the Edit icon .The Edit Distribution pop-up appears.
8. The table displays all of the virtual warehouses for the selected physicalwarehouse. The snapshot on hand and current distribution quantity are displayedfor each virtual warehouse. The new distribution quantity column defaults to thecurrent distribution quantities.
9. In the New column, update the new distribution quantity, if necessary.
10. Then choose one of the following options.
• Click OK to add your changes to the table and close the pop-up.
• Click Cancel to reject all entries and close the pop-up.
11. In the Virtual WH Distribution pop-up, save your entries.
Review Value Variances and Accept Value CountsA Unit & Value stock count is often an annual count that can be used to adjust thefinancial systems in a corporate merchandising system, in addition to updatinginventory positions. Unit & Value stock counts are carried out either for an entirelocation or by product hierarchy, that is department, class or subclass level.
Once the units have been accepted for Unit & Value counts, the value of the countmust also be reviewed and accepted.
The page displays the total cost and total retail as calculated in the stock count andthe total adjusted cost and retail, if any adjustments have been made, for eachdepartment/class/subclass at a location.
Figure 8-9 Value Variance and Adjustment
Chapter 8Manage Stock Counts
8-16
If adjustments need to be made, you can make adjustments to the total cost or retail value ofthe count, based on the accounting method for the department, for each subclass/location.You can also accept the value of the count.
The label at the top of the page displays the stock count and the stock count name. Inaddition the type and the date of the stock count are displayed in the top right corner of thesection.
The table displays the location and stock count value information. The table contains eachlocation and department/class/ subclass combination of the stock count.
Based on the used accounting method for the Department, you can either edit the Cost orRetail column directly in the table.
To save the adjustments, click the Save/Save and Close button. This will check theAdjustment Processed checkbox for all selected locations and disable the AdjustmentValue – Cost or Retail field.
Adjust the Cost or Retail Value after a Stock CountTo adjust the cost or retail after a stock count, follow the steps below.
1. From the Tasks menu, select Inventory > Stock Counts > Manage Stock Counts. TheStock Count Search page appears.
2. Enter or select search criteria as desired to make the search more restrictive.
3. Click Search. The stock counts that match the search criteria are displayed in theResults section.
4. Select a stock count in the table.
5. Then select Actions > Value Variance and Adjustment. The Value Variance andAdjustment page appears.
6. In Cost or Retial column update the values of the locations as necessary.
7. Select one or more records in the table.
8. Then select Actions > Create Adjustment, or use the Create Adjustment button.
9. You are prompted, if you want to create adjustments for the selected location(s). Confirmwith Yes.
10. The adjustment are made during the nightly batch process.
11. Save your entries.
Chapter 8Manage Stock Counts
8-17