INFUSION PUMP - User Manual
45
INFUSION PUMP User Manual Version: 3.1
-
Upload
khangminh22 -
Category
Documents
-
view
0 -
download
0
Transcript of INFUSION PUMP - User Manual
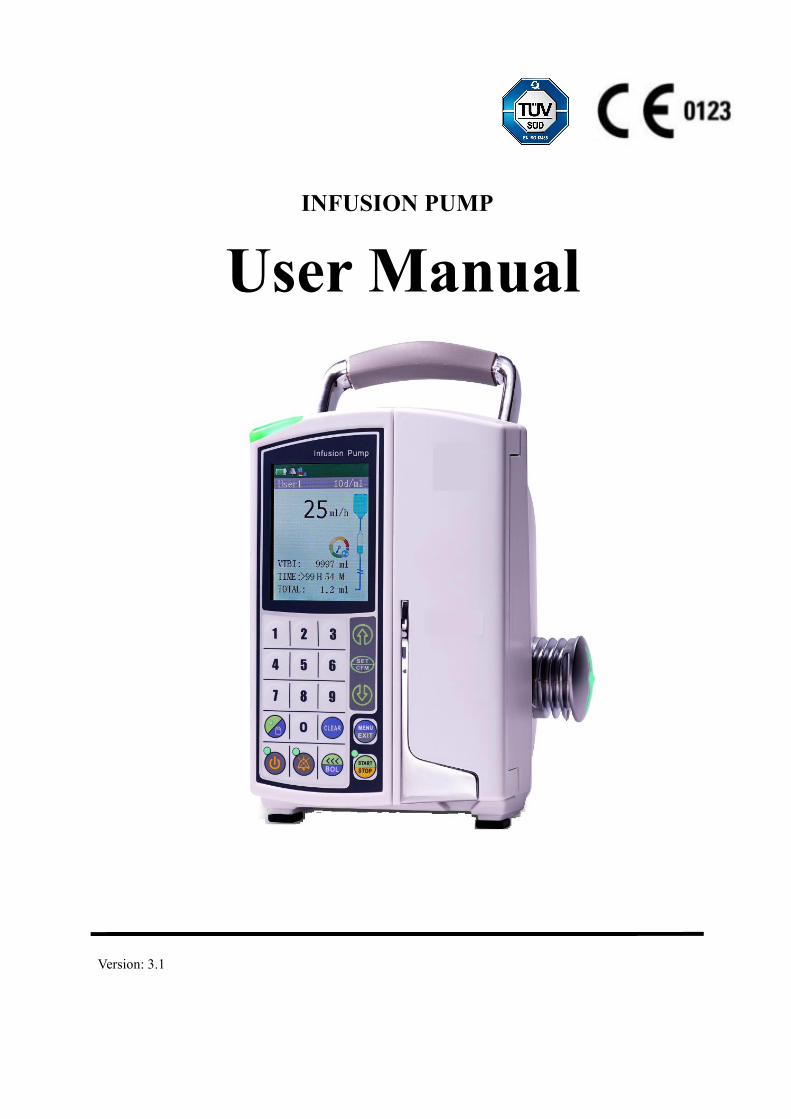
INFUSION PUMP
User Manual
Version: 3.1

- 1 -
CONTENTSIntroduction............................................................................................................................................................... - 3 -Safety Tips................................................................................................................................................................. - 3 -Chapter 1 Overview................................................................................................................................................- 5 -
1.1 Scope of application.................................................................................................................................... - 5 -1.2 Technical Parameters...................................................................................................................................- 5 -1.3 Product specifications................................................................................................................................. - 6 -1.4 Work environment....................................................................................................................................... - 6 -
Chapter 2 Components description........................................................................................................................ - 7 -Exterior components names description........................................................................................................... - 7 -Infusion tube parts description.......................................................................................................................... - 7 -Main information displayed on LCD................................................................................................................ - 8 -Infusion pump structure.................................................................................................................................... - 8 -
Chapter 3 AssemblingPacking list........................................................................................................................................................ - 9 -Pump Installation...............................................................................................................................................- 9 -IV Set Installation............................................................................................................................................- 12 -
Chapter 4 Operation............................................................................................................................................. - 13 -Function key description................................................................................................................................. - 13 -Operation Flowchart........................................................................................................................................- 14 -Volume mode operation...................................................................................................................................- 15 -VTBI/Rate/Time..............................................................................................................................................- 15 -Rate/Time........................................................................................................................................................ - 16 -Simple Rate..................................................................................................................................................... - 16 -Program mode................................................................................................................................................. - 17 -Dose/weight mode...........................................................................................................................................- 19 -Drug library mode........................................................................................................................................... - 20 -
Chapter 5 Special functions..................................................................................................................................- 22 -Bolus................................................................................................................................................................- 22 -Auto Bolus.......................................................................................................................................................- 22 -Manual Bolus.................................................................................................................................................. - 22 -IV set management.......................................................................................................................................... - 23 -Add IV set........................................................................................................................................................- 26 -Remove IV Set................................................................................................................................................ - 27 -
Chapter 6 General operation................................................................................................................................ - 28 -Stop..................................................................................................................................................................- 28 -Power off......................................................................................................................................................... - 28 -Standby............................................................................................................................................................ - 28 -(Piggyback)..................................................................................................................................................... - 28 -Purge................................................................................................................................................................- 28 -Mute.................................................................................................................................................................- 28 -Clear alarm...................................................................................................................................................... - 28 -Clear the VI..................................................................................................................................................... - 29 -Battery life check.............................................................................................................................................- 29 -Setting fluid warmer........................................................................................................................................- 29 -
- 2 -
Pre-alarm setting of infusion completion........................................................................................................- 29 -Bottom occlusion pre-alarm setup.................................................................................................................. - 29 -key lock (auto).................................................................................................................................................- 29 -key lock (manual)............................................................................................................................................- 29 -
Chapter 7 History record check............................................................................................................................- 32 -Check history records in machine................................................................................................................... - 32 -Export history record.......................................................................................................................................- 32 -
Chapter 8 Security characteristic and alarm........................................................................................................ - 33 -Trouble shooting..............................................................................................................................................- 33 -
Chapter 9 Routine check...................................................................................................................................... - 35 -Chapter 10 Machine performance parameter General specifications..................................................................- 36 -
Response time of occlusion alarm...................................................................................................................- 36 -Chapter 11 Electrical specification...................................................................................................................... - 37 -Chapter 12 Storage and transport......................................................................................................................... - 38 -
User's Guide and Manufacturer’s Statement of Anti-electromagnetic Interference I............................ - 39 -User’s guide and manufacturer’s statement of anti-electromagnetic interference II............................. - 40 -Infusion accuracy characteristic..............................................................................................................- 42 -System statement.....................................................................................................................................- 43 -
Product and service information............................................................................................................................. - 44 -

- 3 -
IntroductionThank you for choose our company product Infusion Pump. Please carefully read and understand thismanual before use. Regularly check and maintain the pump to avoid possible injury or risks.
Safety Tips1. Infusion Pump is not explosion proof type or portable device.
2. Infusion Pump cannot be used in the condition with mixed gases of flammable anesthetic gases,oxygen, or ammonia.
3. Infusion Pump can only be used by professional. Patients are not allowed to use.
4. Prevent patients from excessive or insufficient flow induced injury by the following methods: setinfusion parameters correctly, use the calibrated infusion device.
5. If there is any anomaly, suspend using should be taken as the preferred safety measure.
6. To avoid malfunction, keep the device away from strong electromagnetic source or noise when using,such as NMR equipment, microwave generating devices, radiation equipment (X-ray, CT, etc).
7. To avoid malfunction, keep this device away from the high-frequency surgical instruments (such asrack, cable, electrode feeder plates, etc.), the distance should be at least 25cm; at least 1m away fromthe cell phone.
8. Do not use other voltages. Only use the specified voltages on nameplate of Infusion Pump, or maycause damage or fire.
9. Do not throw batteries into fire or heat them, otherwise it will result in electrolyte leakage, fire, orexplosion.
10. Do not tear up the shell of batteries; otherwise it will cause an explosion or chemical burn hazard.
11. When plugging or unplugging the AC power, grip the plug firmly. Do not touch it with wet hands.
12. It is not recommended to share an outlet with other electrical equipments.
13. Never disassemble or modify the device arbitrarily.
14. Check the device daily. If not used for a long time, be sure that the functions are normal beforere-use.
15. If any anomaly or function loss, discontinue use and contact the supplier in a timely manner.Otherwise the user shall take sole responsibility for any consequences.
16. Avoid vibration, bumps, direct sunlight or strong light.
17. Avoid direct contact with blowing hot, wet air from heating, electric stove or humidifier.
18. Avoid using the device in the following places: chemical storage place, dusty place,vibration/shaking and damp places.
19. Infusion pump is class IIb in electrical safety classification. When in doubt in wiring the protectiveearth conductor, it must be operated by the internal power supply.20. Infusion pump cannot be used in parallel with other brands of pumps.21. The alarm sound pressure range of the pump is 47-71 db, and the noise in the operatingenvironment cannot exceed 60 db.
22. Strictly in accordance with User’s Manual of infusion pump in use and maintenance.23. Infusion pump using infrared drop sensor, does not apply to dark infusion tubing.

- 4 -
24 The infusion pump is apply to 20d/ml, 60d/ml tubing, if the tubing type was set in Abnormal, there isa big risk of accuracy deviation. Please make sure the tubing type settings are correct!
25. If not be adjusted based on different tubing type and different drug liquid, it may cause largedeviations in infusion accuracy.
26. if alarms are presented, the related medical personnel should be take the related solutions in timeand restart the infusion pump.
27. In clinical use, what kind of drugs can be used for heating fluids, how many degrees Celsius intemperature should be rise, you must consult your doctor and strictly follow the doctor's advice
- 5 -
Chapter 1 Overview
1.1 Scope of application
It is applicable to accurate, constant and continuous intravenous infusion in medical institutions.
1.2 Technical Parameters
IV Set Options /Size: Open System for common widely-used brand of 10d/ml、15d/ml、20d/ml、60d/ml
(3.4mm~4.5mm), Also can be customized for dedicated IV set
Infusion Mode:
KVO: Adjustable from 1ml/h - 20ml/hInfusion Rate: 20 d/ml IV set: 0.1~1200ml/h; 1.0~400d/min
60 d/ml IV set :0.1~150ml/h; 1.0~150d/min0.1 ml/h increments; 1d/min increments
Infusion mode Description Operation Remark
Volume mode(ml/h) Choose mode needed
VTBI/time/rate
VTBI / rate
VTBI / time
Time / rate
Simple rate mode
Rate:0.1 ~1200ml/h
VTBI:0~9999ml
Time:1min~99h59min
VOL:0.1~9999ml
Drop mode(Drops/min)
Only For OptionChoose mode needed
VTBI / time / rate
VTBI / rate
VTBI / time
Time / rate
Simple rate mode
Rate: 1d/min ~ 400d/min
(10d/ml、15d/ml、20d/ml)
Rate: 1d/min ~ 150d/min
(60 d /ml)
VTBI:0~9999ml
Time:1min~99h59min
VOL:0.1~9999ml
Program modeChoose mode needed VTBI / rate
Pause time
8 stages of programming
Can stop infusion to program
Weight modeChoose mode needed Dose/weight
Drug Library mode Choose mode needed
Dose/ rate
Rate
Can import drug library
49 kinds of drugs inside
machine
Bolus
Automatic VTBI / rate Rate:0.1~1200ml/h adjustable
VTBI:1~9999ml adjustable
Default 600ml/h,2ml Manual VTBI / rate
KVO Opens automatically as
infusion is completed
Whether displays KVO
volume and rate setting
1~20ml/h adjustable
1ml/h default
- 6 -
Bolus: Two way: 1) Short Press Bolus Key to into setup menu (adjustable from 1.0~1200ml/h)2) Long Press Bolus key to automatic running last time setup rate.
Accuracy: Infusion rate accuracy: ±2% (after drops 150 drips)Infusion Flow rate accuracy: ±5% (using calibrated standard PVC IV set)
Occlusion Pressure: Up position: -100mmhg~-300mmgh; ±20%; 3 level optionDown position: 200mmhg~1200mmhg;±20%; 21 level option
Preset Volume Range: 1-9999mlPurge: 600ml/hBubble Detection: Detected by ultrasonic sensor with adjust setting , 50μL ~ 800μL.Alarm: Bubble, Door open, Finish, Pause overtime, Leakage, Empty, low Battery, Battery damage, Motorreverse, IV Set size Error, Pressure failure, Motor failure, Flow Rate Error, Fluid Warmer failure, DownOcclusion, Up Occlusion,internal communication failCPU: DualLock Key: By manual lock to avoid misuseProgrammable: Infusion can be programmed in 8 segmentsLibrary : Built-in 49 common drugs, could up to 1000 kinds of drugHistory Record: 1500 event records, 200 modified records;
Records can be exported in LANPiggyback: User changes parameters without switching offFluid Warmer(optional): Relieve uncomfortable such as pain, vessel convulsion when infuse cold fluid
1.3 Product specifications
Power dissipation: 25VA
Display: Color LCD
Power supply: AC100-240V, 50Hz/60Hz (not recommended to share an outlet with other electricalequipment, household power outlet is applicable.)
Battery: Ni-MH battery, DC9.6V, 2000mAh (after fully charged, it can last about 6 hours at 25ml/h.)
Protection: Class IIb, Type CF, IPX4, with internal power supply
Net weight: 2.0Kg
Dimensions: 130mm × 120mm × 195mm (not including protrusions)
1.4 Work environment
Operating temperature: +5℃ ~ +40℃
Relative humidity: 20~90% (Non-condensing)
Atmospheric pressure: 70kPa ~106kPa
- 7 -
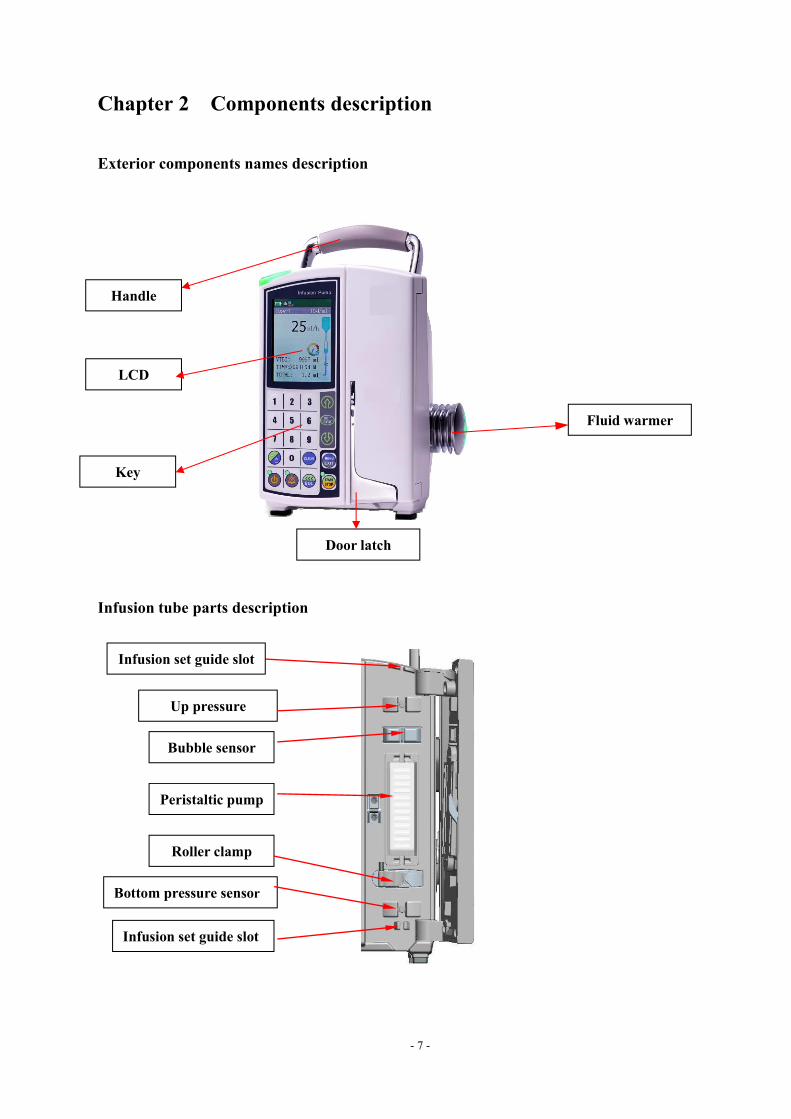
Chapter 2 Components description
Exterior components names description
Infusion tube parts description
Handle
LCD
Key
Fluid warmer
Infusion set guide slot
Bubble sensor
Bottom pressure sensor
Infusion set guide slot
Up pressure
Peristaltic pump
Roller clamp
Door latch
- 8 -
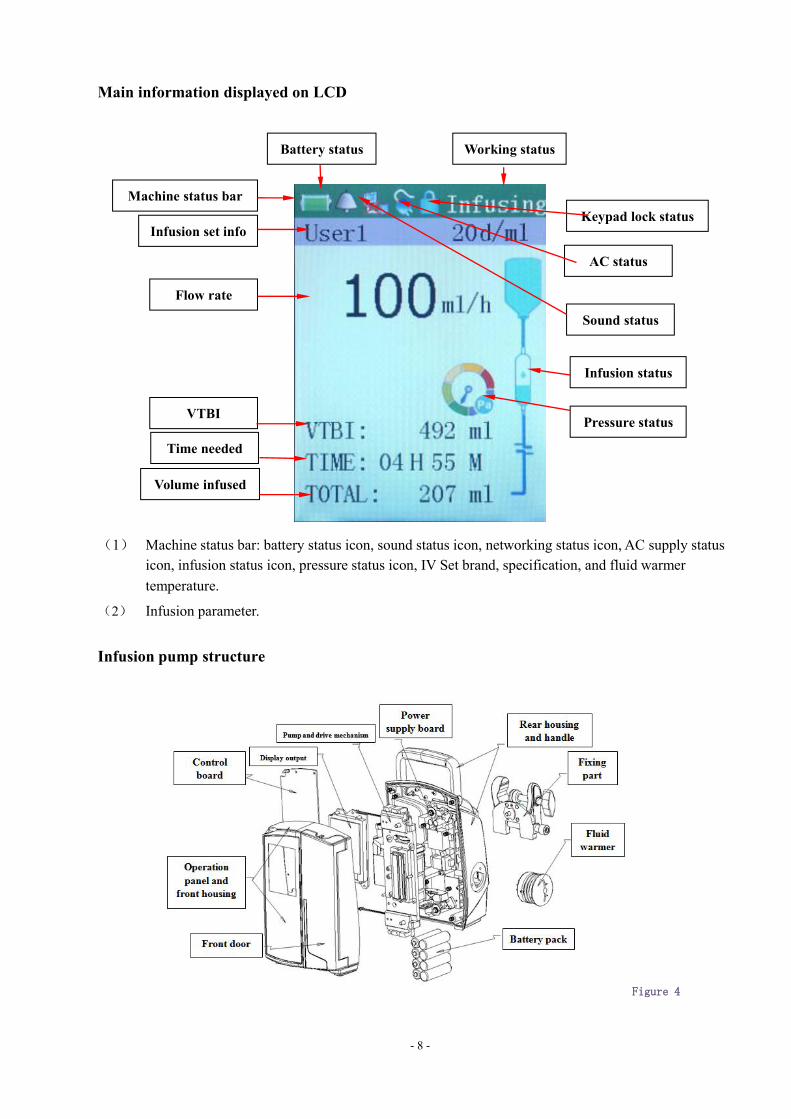
Main information displayed on LCD
(1) Machine status bar: battery status icon, sound status icon, networking status icon, AC supply statusicon, infusion status icon, pressure status icon, IV Set brand, specification, and fluid warmertemperature.
(2) Infusion parameter.
Infusion pump structure
Figure 4
Machine status bar
Battery status
Infusion set info
Flow rate
VTBI
Volume infused
Sound status
AC status
Working status
Keypad lock status
Infusion status
Pressure status
Time needed
- 9 -
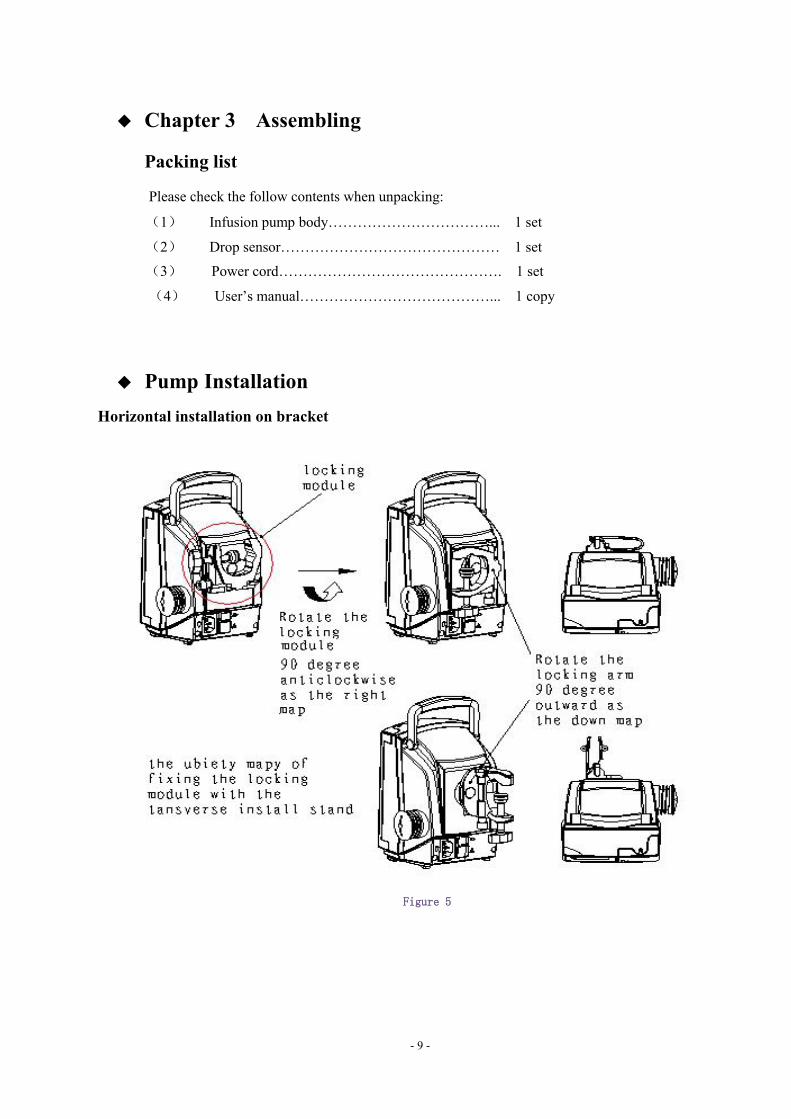
Chapter 3 Assembling
Packing list
Please check the follow contents when unpacking:
(1) Infusion pump body……………………………... 1 set
(2) Drop sensor……………………………………… 1 set
(3) Power cord………………………………………. 1 set
(4) User’s manual…………………………………... 1 copy
Pump InstallationHorizontal installation on bracket
Figure 5
- 10 -
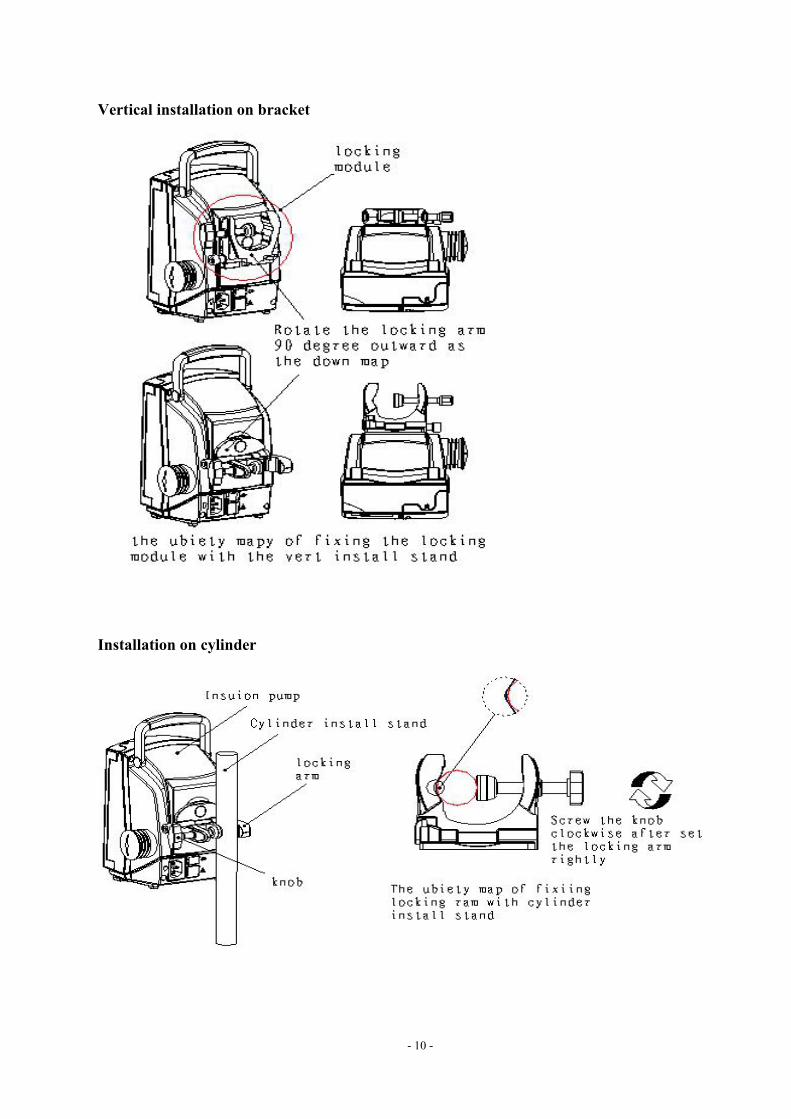
Vertical installation on bracket
Installation on cylinder
- 11 -
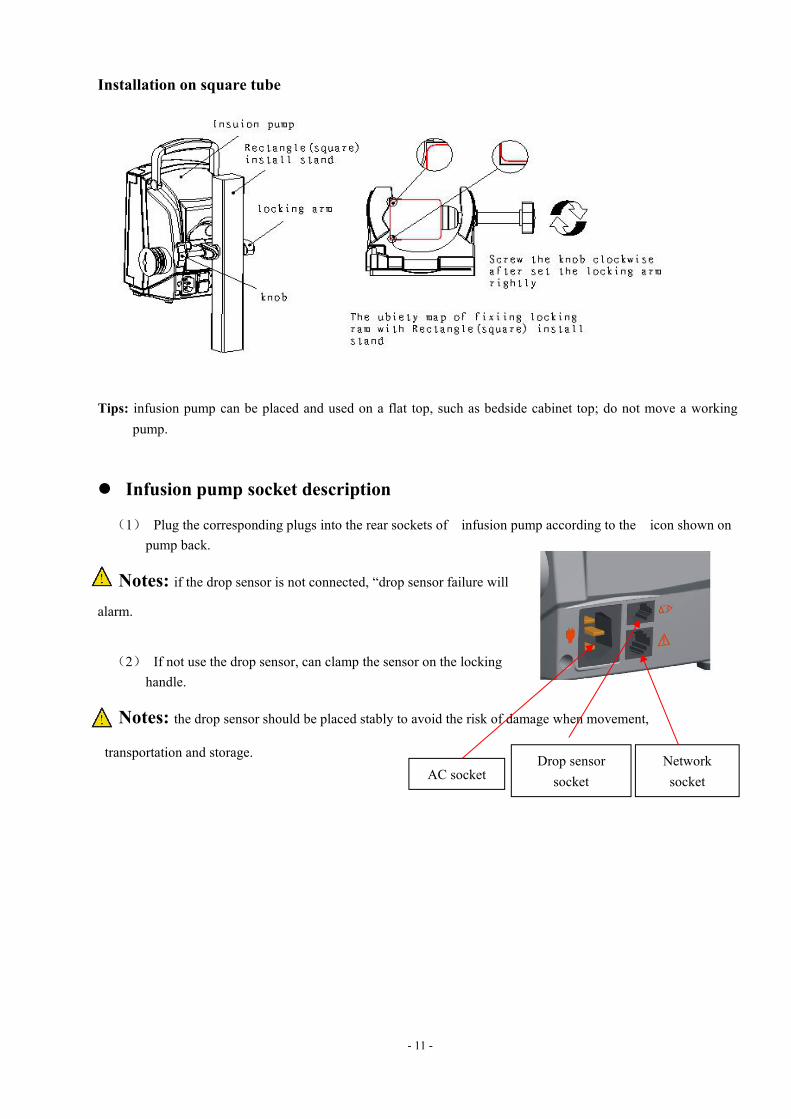
Installation on square tube
Tips: infusion pump can be placed and used on a flat top, such as bedside cabinet top; do not move a workingpump.
Infusion pump socket description
(1) Plug the corresponding plugs into the rear sockets of infusion pump according to the icon shown onpump back.
Notes: if the drop sensor is not connected, “drop sensor failure willalarm.
(2) If not use the drop sensor, can clamp the sensor on the lockinghandle.
Notes: the drop sensor should be placed stably to avoid the risk of damage when movement,
transportation and storage.AC socket
Networksocket
Drop sensorsocket
- 12 -
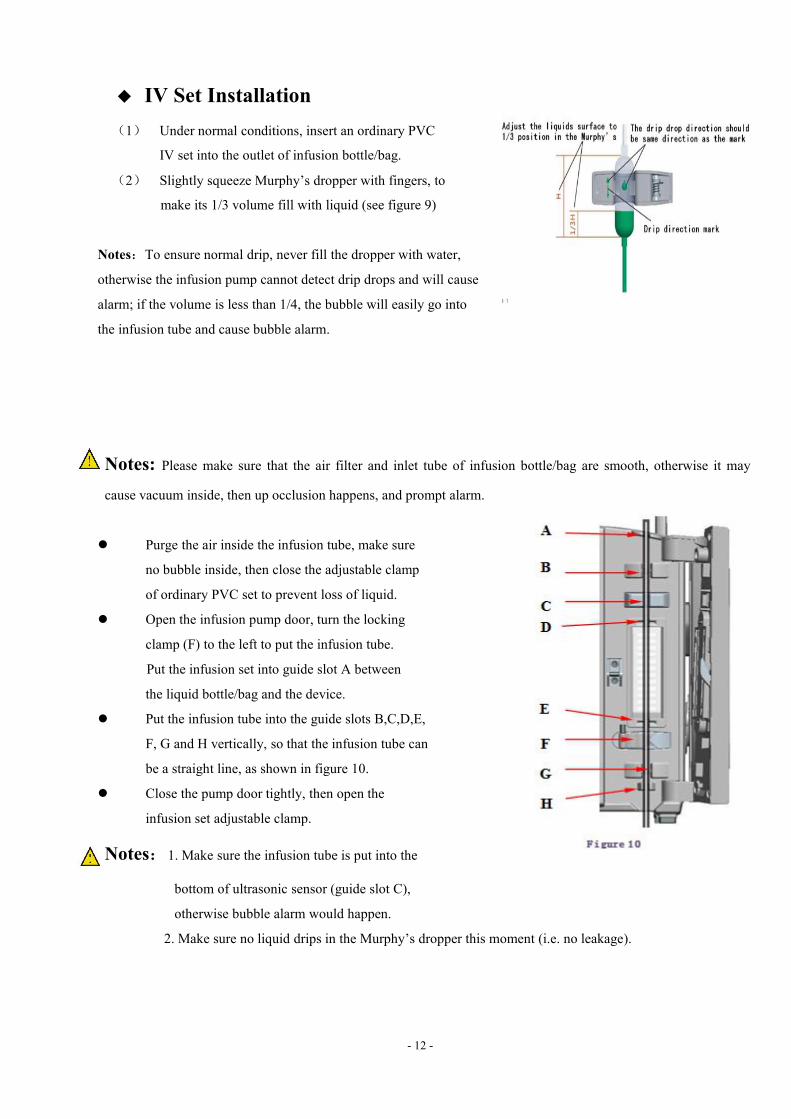
IV Set Installation(1) Under normal conditions, insert an ordinary PVC
IV set into the outlet of infusion bottle/bag.
(2) Slightly squeeze Murphy’s dropper with fingers, to
make its 1/3 volume fill with liquid (see figure 9)
Notes:To ensure normal drip, never fill the dropper with water,
otherwise the infusion pump cannot detect drip drops and will cause
alarm; if the volume is less than 1/4, the bubble will easily go into
the infusion tube and cause bubble alarm.
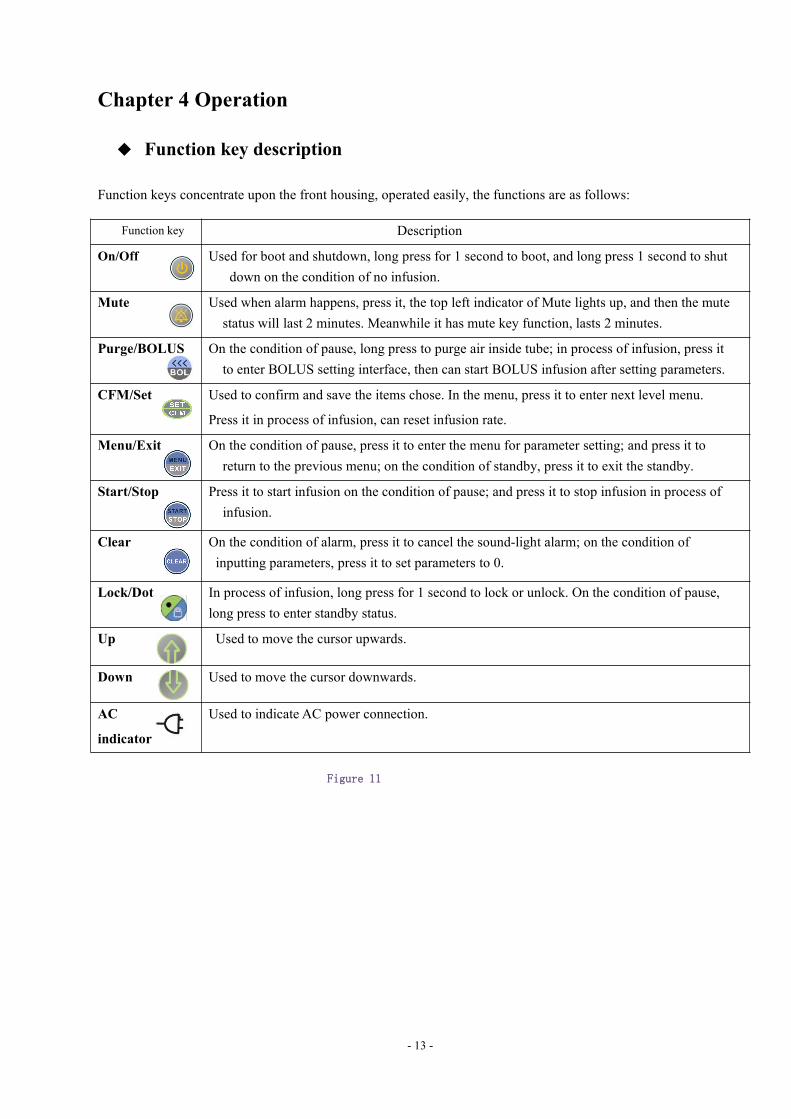
Notes: Please make sure that the air filter and inlet tube of infusion bottle/bag are smooth, otherwise it may
cause vacuum inside, then up occlusion happens, and prompt alarm.
Purge the air inside the infusion tube, make sure
no bubble inside, then close the adjustable clamp
of ordinary PVC set to prevent loss of liquid.
Open the infusion pump door, turn the locking
clamp (F) to the left to put the infusion tube.
Put the infusion set into guide slot A between
the liquid bottle/bag and the device.
Put the infusion tube into the guide slots B,C,D,E,
F, G and H vertically, so that the infusion tube can
be a straight line, as shown in figure 10.
Close the pump door tightly, then open the
infusion set adjustable clamp.
Notes:1. Make sure the infusion tube is put into the
bottom of ultrasonic sensor (guide slot C),
otherwise bubble alarm would happen.
2. Make sure no liquid drips in the Murphy’s dropper this moment (i.e. no leakage).
- 13 -
Chapter 4 Operation
Function key description
Function keys concentrate upon the front housing, operated easily, the functions are as follows:
Function key Description
On/Off Used for boot and shutdown, long press for 1 second to boot, and long press 1 second to shutdown on the condition of no infusion.
Mute Used when alarm happens, press it, the top left indicator of Mute lights up, and then the mutestatus will last 2 minutes. Meanwhile it has mute key function, lasts 2 minutes.
Purge/BOLUS On the condition of pause, long press to purge air inside tube; in process of infusion, press itto enter BOLUS setting interface, then can start BOLUS infusion after setting parameters.
CFM/Set Used to confirm and save the items chose. In the menu, press it to enter next level menu.
Press it in process of infusion, can reset infusion rate.
Menu/Exit On the condition of pause, press it to enter the menu for parameter setting; and press it toreturn to the previous menu; on the condition of standby, press it to exit the standby.
Start/Stop Press it to start infusion on the condition of pause; and press it to stop infusion in process ofinfusion.
Clear On the condition of alarm, press it to cancel the sound-light alarm; on the condition ofinputting parameters, press it to set parameters to 0.
Lock/Dot In process of infusion, long press for 1 second to lock or unlock. On the condition of pause,long press to enter standby status.
Up Used to move the cursor upwards.
Down Used to move the cursor downwards.
AC
indicator
Used to indicate AC power connection.
Figure 11
- 14 -
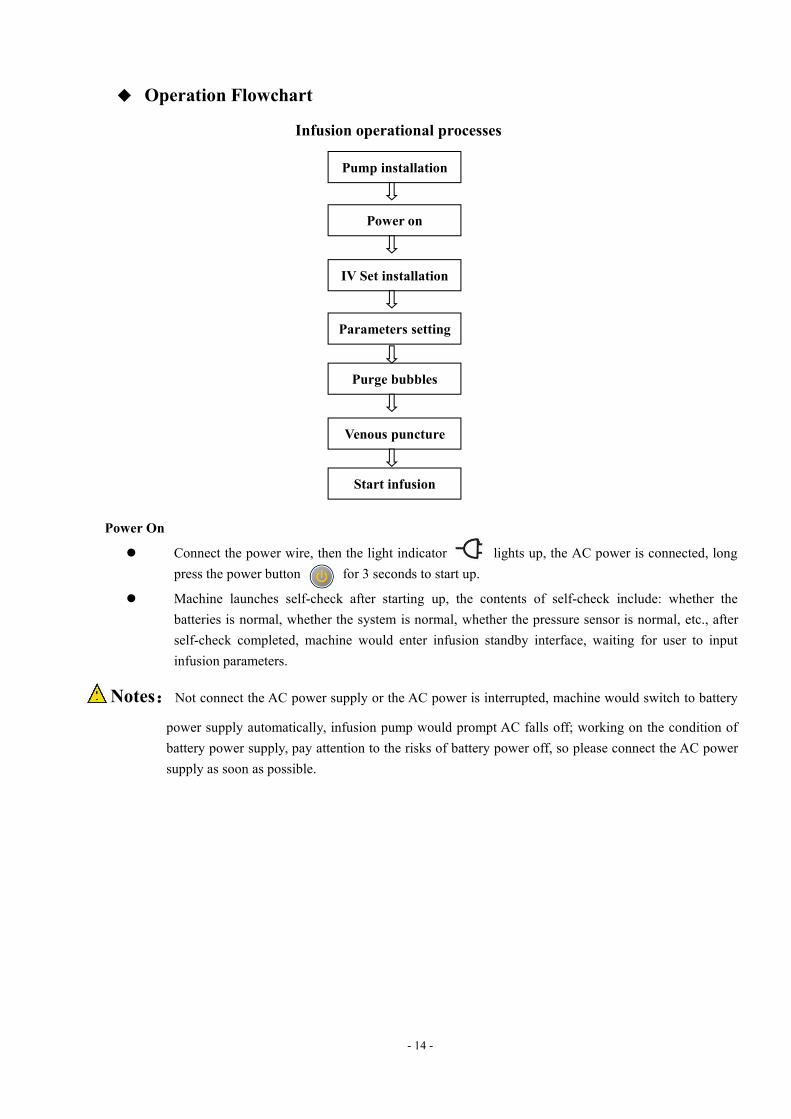
Operation Flowchart
Infusion operational processes
Power On
Connect the power wire, then the light indicator lights up, the AC power is connected, longpress the power button for 3 seconds to start up.
Machine launches self-check after starting up, the contents of self-check include: whether thebatteries is normal, whether the system is normal, whether the pressure sensor is normal, etc., afterself-check completed, machine would enter infusion standby interface, waiting for user to inputinfusion parameters.
Notes:Not connect the AC power supply or the AC power is interrupted, machine would switch to battery
power supply automatically, infusion pump would prompt AC falls off; working on the condition ofbattery power supply, pay attention to the risks of battery power off, so please connect the AC powersupply as soon as possible.
Pump installation
Power on
IV Set installation
Parameters setting
Purge bubbles
Venous puncture
Start infusion
- 15 -
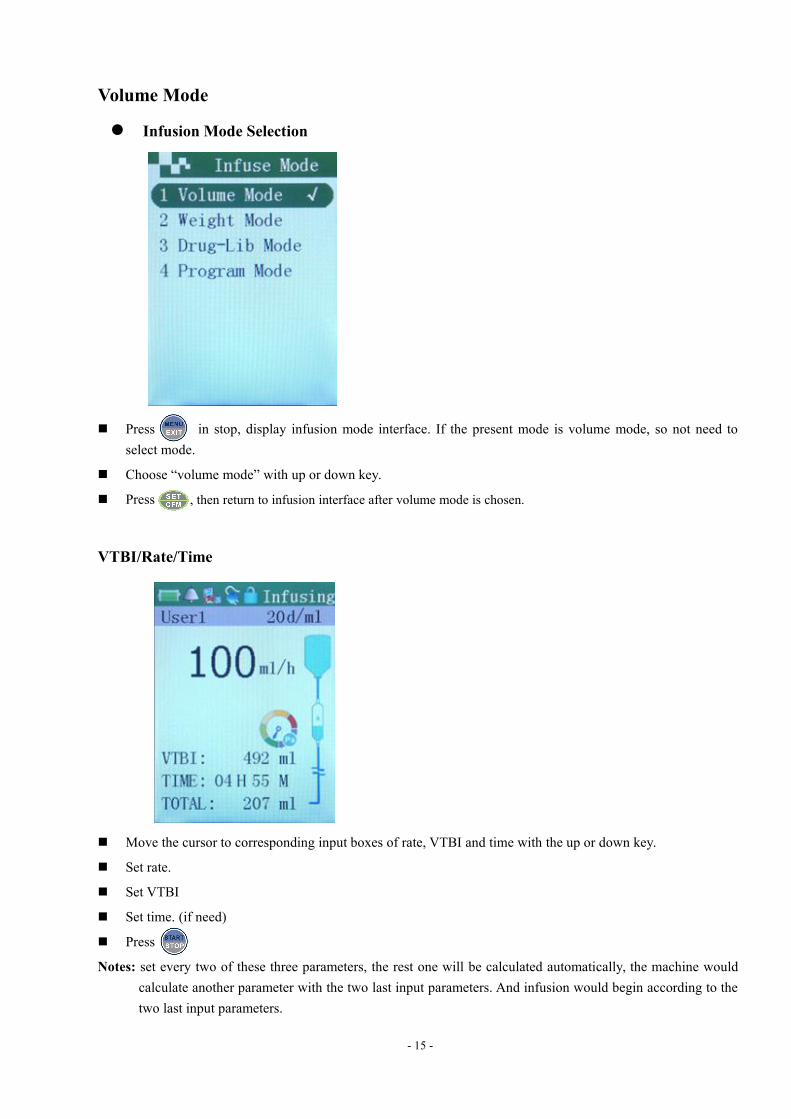
Volume Mode
Infusion Mode Selection
Press in stop, display infusion mode interface. If the present mode is volume mode, so not need toselect mode.
Choose “volume mode” with up or down key.
Press , then return to infusion interface after volume mode is chosen.
VTBI/Rate/Time
Move the cursor to corresponding input boxes of rate, VTBI and time with the up or down key.
Set rate.
Set VTBI
Set time. (if need)
Press
Notes: set every two of these three parameters, the rest one will be calculated automatically, the machine wouldcalculate another parameter with the two last input parameters. And infusion would begin according to thetwo last input parameters.
- 16 -
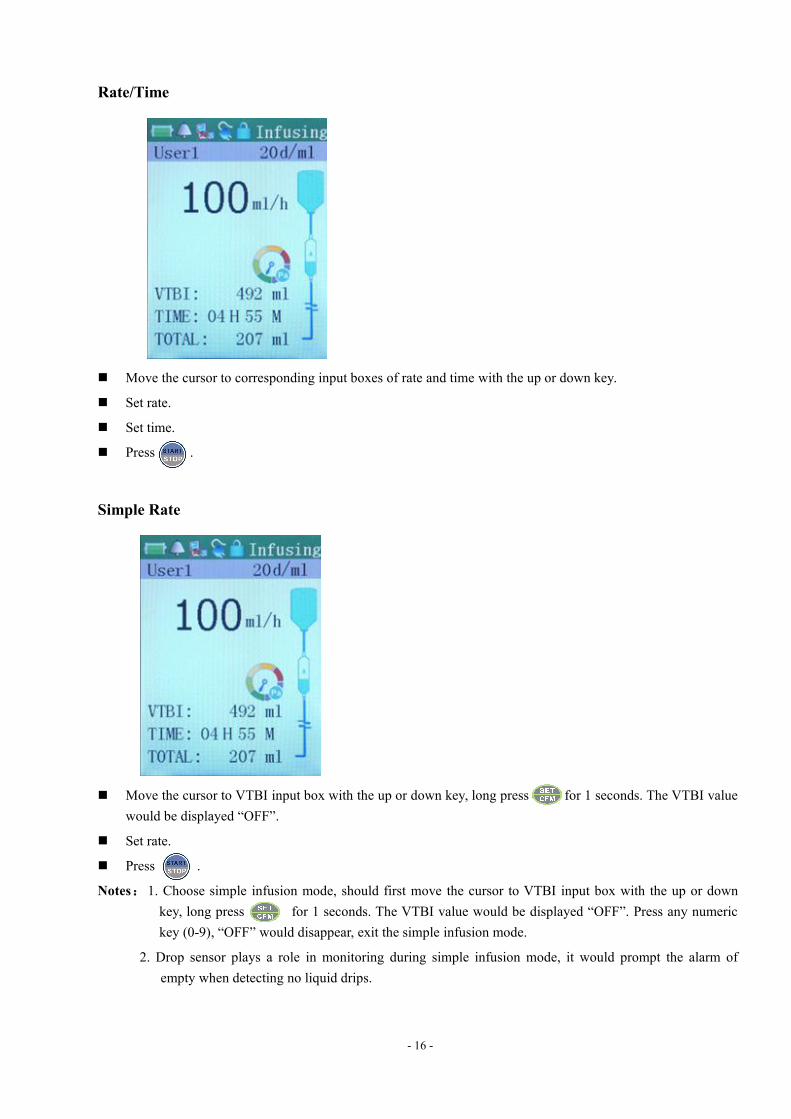
Rate/Time
Move the cursor to corresponding input boxes of rate and time with the up or down key.
Set rate.
Set time.
Press .
Simple Rate
Move the cursor to VTBI input box with the up or down key, long press for 1 seconds. The VTBI valuewould be displayed “OFF”.
Set rate.
Press .
Notes:1. Choose simple infusion mode, should first move the cursor to VTBI input box with the up or downkey, long press for 1 seconds. The VTBI value would be displayed “OFF”. Press any numerickey (0-9), “OFF” would disappear, exit the simple infusion mode.
2. Drop sensor plays a role in monitoring during simple infusion mode, it would prompt the alarm ofempty when detecting no liquid drips.
- 17 -
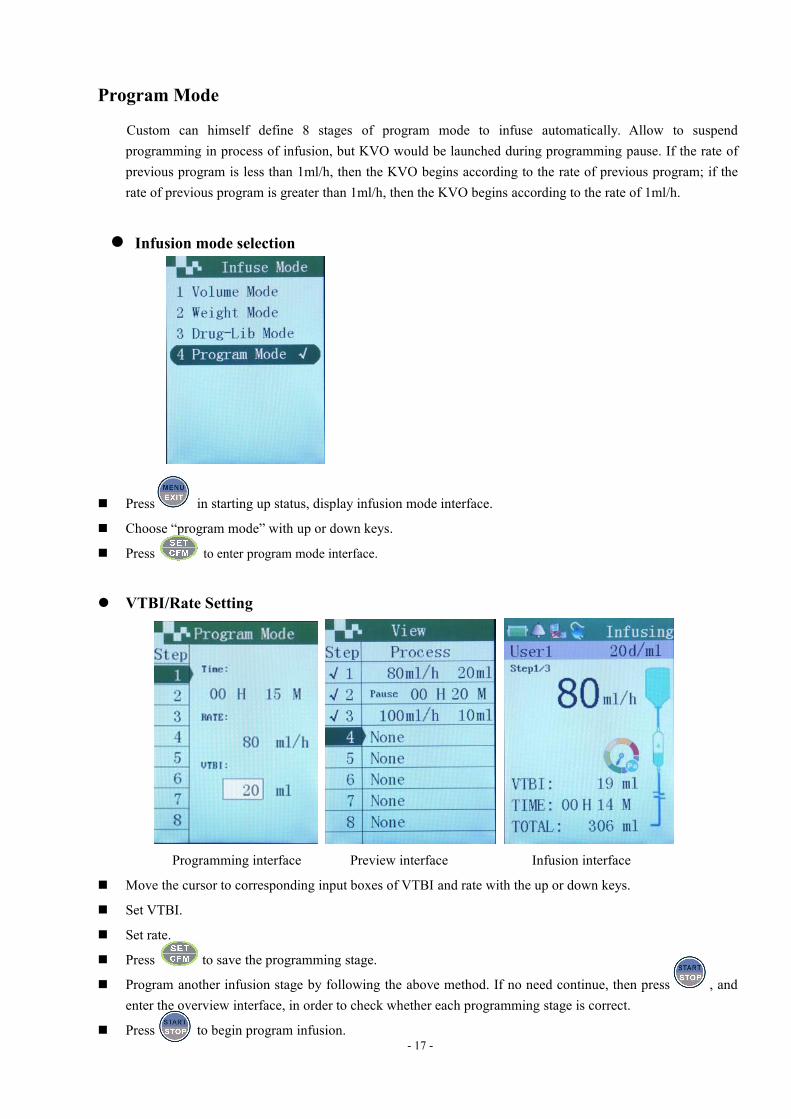
Program Mode
Custom can himself define 8 stages of program mode to infuse automatically. Allow to suspendprogramming in process of infusion, but KVO would be launched during programming pause. If the rate ofprevious program is less than 1ml/h, then the KVO begins according to the rate of previous program; if therate of previous program is greater than 1ml/h, then the KVO begins according to the rate of 1ml/h.
Infusion mode selection
Press in starting up status, display infusion mode interface.
Choose “program mode” with up or down keys.
Press to enter program mode interface.
VTBI/Rate Setting
Programming interface Preview interface Infusion interface
Move the cursor to corresponding input boxes of VTBI and rate with the up or down keys.
Set VTBI.
Set rate.
Press to save the programming stage.
Program another infusion stage by following the above method. If no need continue, then press , andenter the overview interface, in order to check whether each programming stage is correct.
Press to begin program infusion.
- 18 -
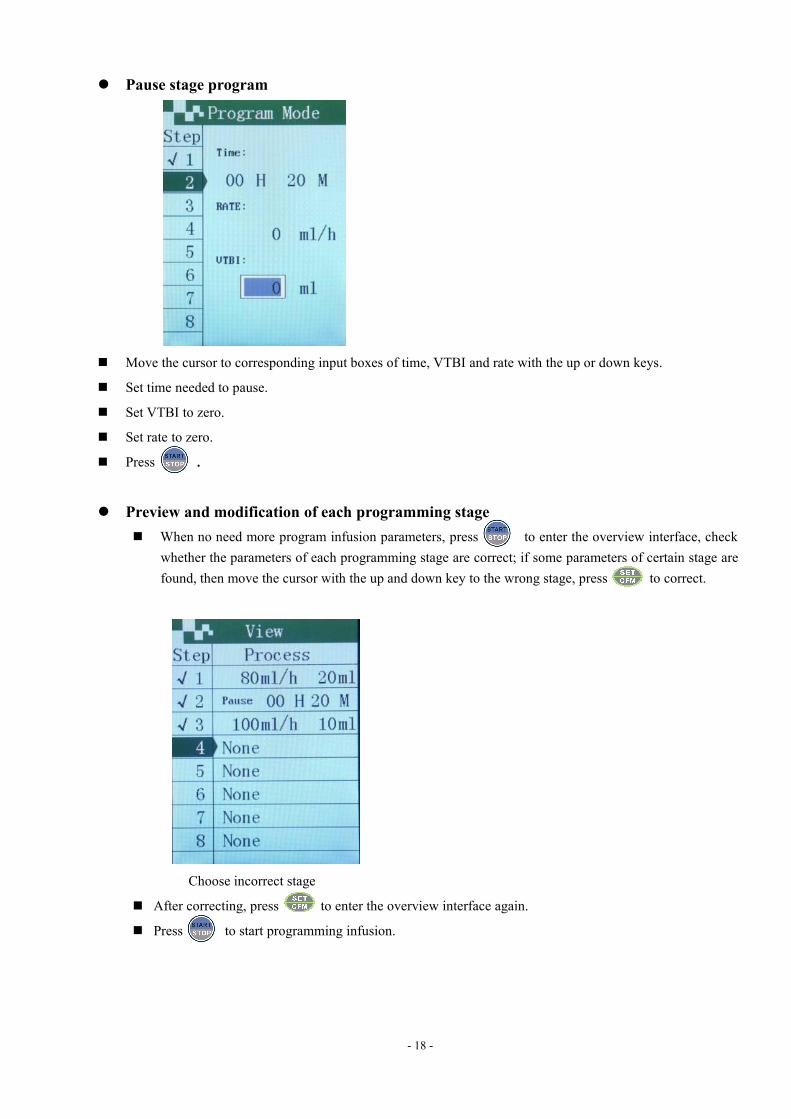
Pause stage program
Move the cursor to corresponding input boxes of time, VTBI and rate with the up or down keys.
Set time needed to pause.
Set VTBI to zero.
Set rate to zero.
Press .
Preview and modification of each programming stage When no need more program infusion parameters, press to enter the overview interface, check
whether the parameters of each programming stage are correct; if some parameters of certain stage arefound, then move the cursor with the up and down key to the wrong stage, press to correct.
Choose incorrect stage
After correcting, press to enter the overview interface again.
Press to start programming infusion.

- 19 -
Dose/weight mode
Infusion mode selection
Press in starting up status, display infusion mode interface.
Use the up and down keys to choose “weight mode”. Press key.
Notes:If the present interface is weight mode, can press directly to enter parameters input interface ofweight mode.
Parameters input in weight mode
Move the cursor to corresponding input boxes with the up or down keys.
Dose unit selection. When dose unit flashes, press to choose the dose needed with the up and downkey.
Input dose value, press or the down key.
Input weight. Press or the down key.
Chose drug unit. The box of drug unit flashes, use upward and downward keys to choose unit needed, thenpress .
Input drug amount. First input value, press or down key.
Input drug concentration (if needed). First input value, then press or down key.
Input the VTBI. Press .
Press to begin weight mode infusion.
Notes:VTBI ≤ DRUG+SOL.VOL
- 20 -
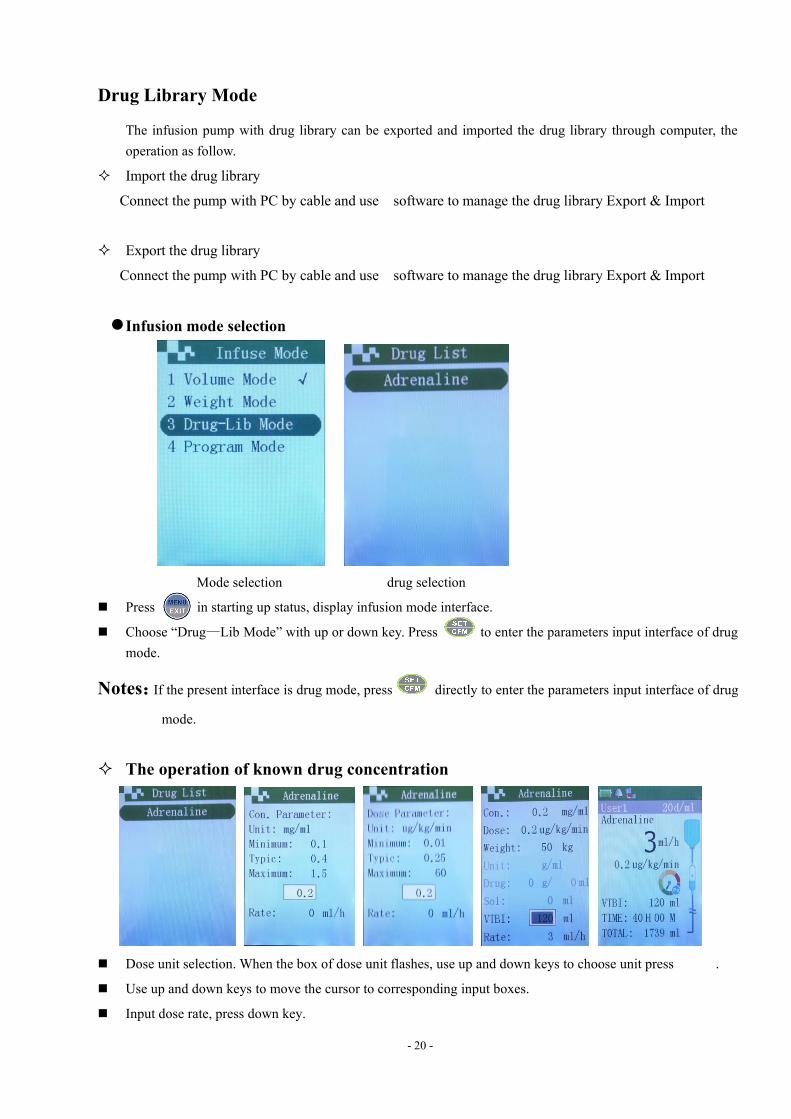
Drug Library Mode
The infusion pump with drug library can be exported and imported the drug library through computer, theoperation as follow.
Import the drug library
Connect the pump with PC by cable and use software to manage the drug library Export & Import
Export the drug library
Connect the pump with PC by cable and use software to manage the drug library Export & Import
Infusion mode selection
Mode selection drug selection
Press in starting up status, display infusion mode interface.
Choose “Drug—Lib Mode” with up or down key. Press to enter the parameters input interface of drugmode.
Notes:If the present interface is drug mode, press directly to enter the parameters input interface of drug
mode.
The operation of known drug concentration
Dose unit selection. When the box of dose unit flashes, use up and down keys to choose unit press .
Use up and down keys to move the cursor to corresponding input boxes.
Input dose rate, press down key.
- 21 -
Input drug concentration. Press down key.
Input weight (if needed). Press down key.
Input VTBI, Press key.
Press to begin drug mode infusion.
The operation of unknown drug concentration
Drug selection. Use up or down keys to choose drug needed, press .
At concentration input box, press then the concentration will displayed “N/A” ,which means theunknown drug concentration .
Input dose rate, then press .
Input weight (if needed). Press .
Choose drug unit, then choose the unit with the up or down keys, and press .
Input drug parameter, press down key.
Input solution parameter, press down key.
Input VTBI, Press down key.
Press to begin drug mode infusion.
Notes:VTBI ≤ DRUG + SOL.VOL
- 22 -
Chapter 5 Special functions
Bolus
Auto Bolus
Parameters setting of Bolus Bolus
Press in process of infusion
Set Bolus rate
Set Bolus VTBI
Press to begin Bolus.
Return to normal infusion after Bolus completed.
Manual Bolus
Long press in process of infusion.
Machine would infuse according to the preset Bolus rate.
Free to stop Bolus infusion.
Return to normal infusion automatically.
- 23 -
IV Set Management
IV set selection
Infusion set management Infusion set selection Brand selection
Choose infusion set type Exit to main interface
Press .
Choose “IV Set” menu, press .
Choose “Brand” menu, press .
Choose IV Set brand needed, press .
Choose IV Set type needed, press .
Press to exit to main interface.
- 24 -
IV Set Calibration
Prepare for calibration
Because there is a large size deviation among different brands or different types of infusion set, Our pump
working with diameter 3.4mm~ 4.5mm IV set, and its should employ 0.9% saline or pure water to
calibrate, set the infusion rate to normal infusion rate, like certain department often employs the infusionrate as 60ml/h-120ml/h, then can take the median 90ml/h as the calibration rate, so can guarantee theaccuracy in the condition of normal infusion after calibration, the steps for calibration as follows:
1. Hang a bottle or a bag which contains saline or pure water (60ml is suggested);
2. Prepare one electronic balance or measuring cup (if choose electronic balance, should put a vesselupon), and reset the electronic balance before use.
3. Close the adjustable clamp of infusion set waiting to be calibrated. (make sure no leakage)
4. insert the infusion set waiting to be calibrated into bottle, close the pump door after correct infusion setinstallation( make sure the Murphy’s dropper no liquid drips), at the same time open the adjustableclamp of infusion set;
5. Press to purge the bubbles inside tube, then put the other end of infusion set into the measuringcup or the vessel;
6. Read the value on the measuring cup or on the electronic balance, then input the value on cue line of thecalibration interface.
Calibration operation
IV Set management IV Set calibration IV Set calibration
Choose the brand Choose tube type Input favorite rate
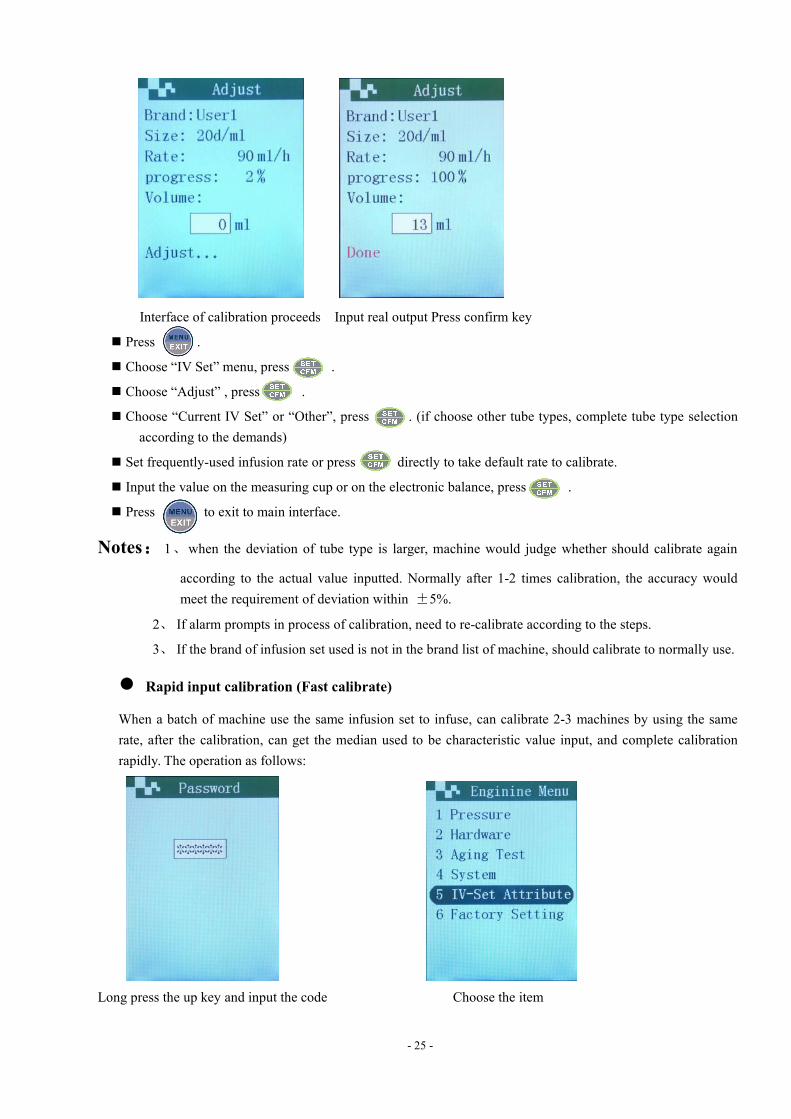
- 25 -
Interface of calibration proceeds Input real output Press confirm key
Press .
Choose “IV Set” menu, press .
Choose “Adjust” , press .
Choose “Current IV Set” or “Other”, press . (if choose other tube types, complete tube type selectionaccording to the demands)
Set frequently-used infusion rate or press directly to take default rate to calibrate.
Input the value on the measuring cup or on the electronic balance, press .
Press to exit to main interface.
Notes:1、when the deviation of tube type is larger, machine would judge whether should calibrate again
according to the actual value inputted. Normally after 1-2 times calibration, the accuracy wouldmeet the requirement of deviation within ±5%.
2、 If alarm prompts in process of calibration, need to re-calibrate according to the steps.
3、 If the brand of infusion set used is not in the brand list of machine, should calibrate to normally use.
Rapid input calibration (Fast calibrate)
When a batch of machine use the same infusion set to infuse, can calibrate 2-3 machines by using the samerate, after the calibration, can get the median used to be characteristic value input, and complete calibrationrapidly. The operation as follows:
Long press the up key and input the code Choose the item
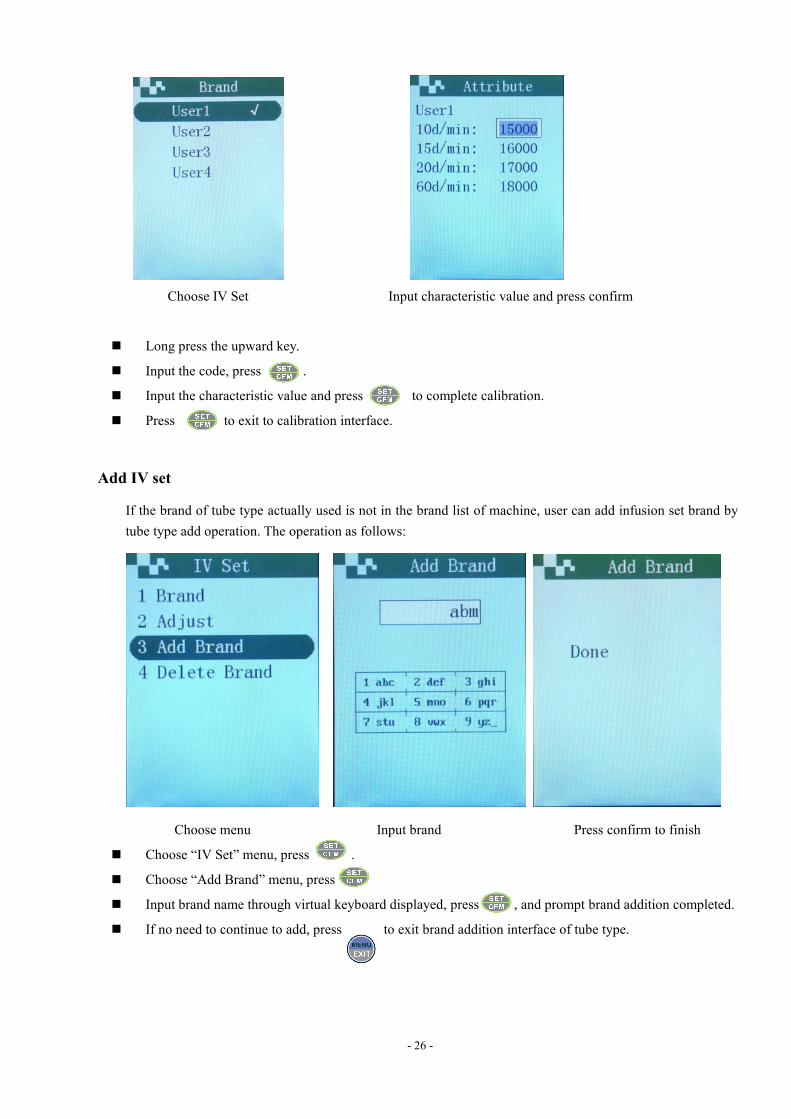
- 26 -
Choose IV Set Input characteristic value and press confirm
Long press the upward key.
Input the code, press .
Input the characteristic value and press to complete calibration.
Press to exit to calibration interface.
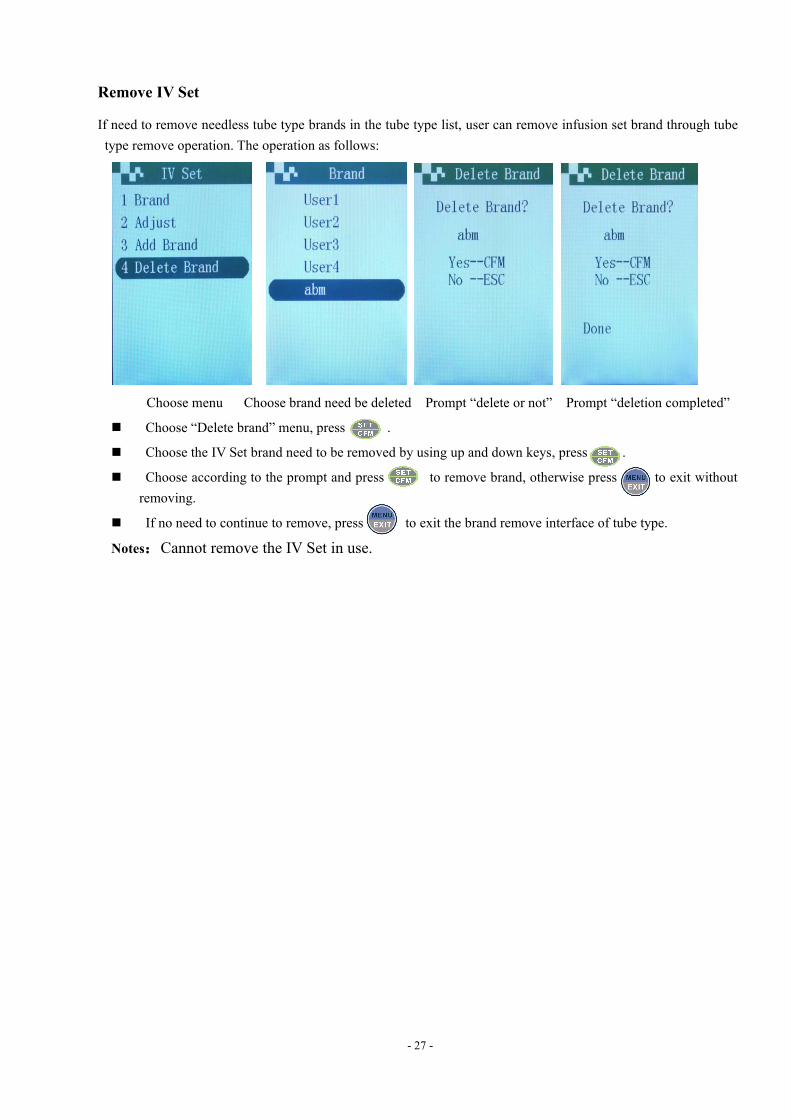
Add IV set
If the brand of tube type actually used is not in the brand list of machine, user can add infusion set brand bytube type add operation. The operation as follows:
Choose menu Input brand Press confirm to finish
Choose “IV Set” menu, press .
Choose “Add Brand” menu, press
Input brand name through virtual keyboard displayed, press , and prompt brand addition completed.
If no need to continue to add, press to exit brand addition interface of tube type.
- 27 -
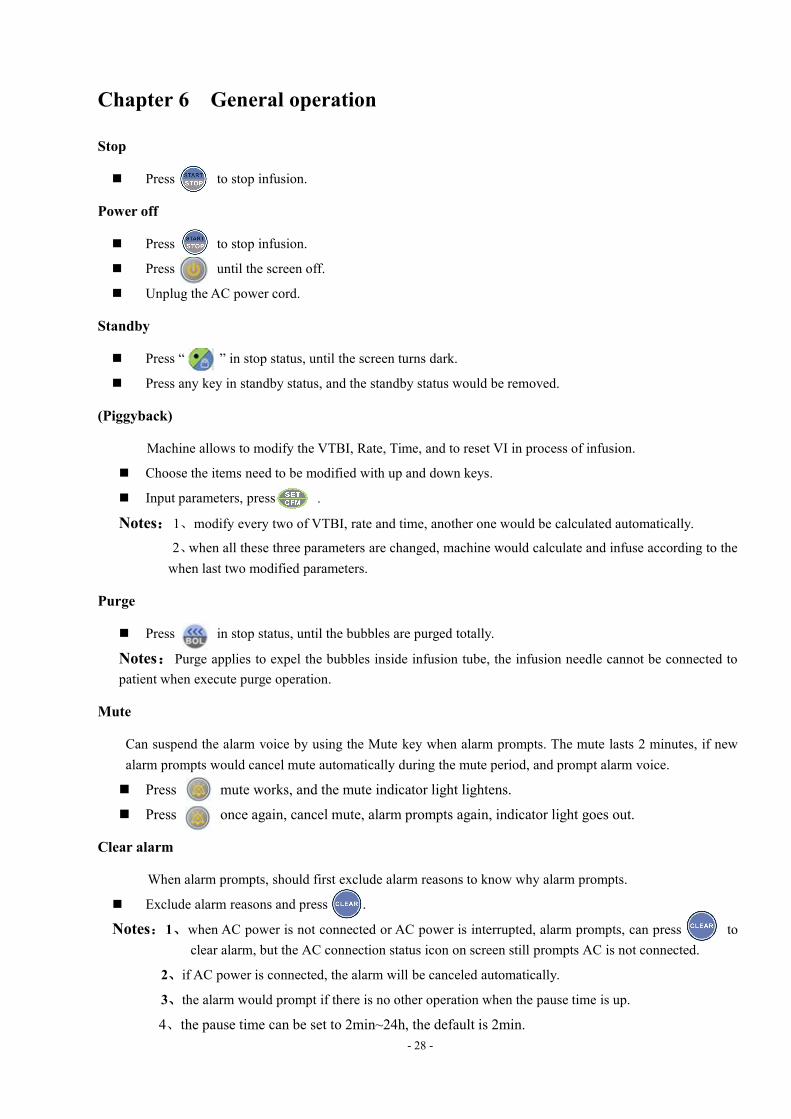
Remove IV Set
If need to remove needless tube type brands in the tube type list, user can remove infusion set brand through tubetype remove operation. The operation as follows:
Choose menu Choose brand need be deleted Prompt “delete or not” Prompt “deletion completed”
Choose “Delete brand” menu, press .
Choose the IV Set brand need to be removed by using up and down keys, press .
Choose according to the prompt and press to remove brand, otherwise press to exit withoutremoving.
If no need to continue to remove, press to exit the brand remove interface of tube type.
Notes:Cannot remove the IV Set in use.
- 28 -
Chapter 6 General operation
Stop
Press to stop infusion.
Power off
Press to stop infusion.
Press until the screen off.
Unplug the AC power cord.
Standby
Press “ ” in stop status, until the screen turns dark.
Press any key in standby status, and the standby status would be removed.
(Piggyback)
Machine allows to modify the VTBI, Rate, Time, and to reset VI in process of infusion.
Choose the items need to be modified with up and down keys.
Input parameters, press .
Notes:1、modify every two of VTBI, rate and time, another one would be calculated automatically.
2、when all these three parameters are changed, machine would calculate and infuse according to thewhen last two modified parameters.
Purge
Press in stop status, until the bubbles are purged totally.
Notes:Purge applies to expel the bubbles inside infusion tube, the infusion needle cannot be connected topatient when execute purge operation.
Mute
Can suspend the alarm voice by using the Mute key when alarm prompts. The mute lasts 2 minutes, if newalarm prompts would cancel mute automatically during the mute period, and prompt alarm voice.
Press mute works, and the mute indicator light lightens.
Press once again, cancel mute, alarm prompts again, indicator light goes out.
Clear alarm
When alarm prompts, should first exclude alarm reasons to know why alarm prompts.
Exclude alarm reasons and press .
Notes:1、when AC power is not connected or AC power is interrupted, alarm prompts, can press toclear alarm, but the AC connection status icon on screen still prompts AC is not connected.
2、if AC power is connected, the alarm will be canceled automatically.
3、the alarm would prompt if there is no other operation when the pause time is up.
4、the pause time can be set to 2min~24h, the default is 2min.
- 29 -
Clear the VI
Move the cursor to the VI box, press . The VI is reset.
Battery life check
In process of infusion, can check the runtime of battery under present infusion rate.
Press .
Choose “battery life”, press .
Press to exit.
Notes:Because the runtime of battery depends on the working environment and the aging degree ofbattery, there may be a deviation between the runtime checked and the real runtime, so medical staffshould pay attention at any time to the working status of machine when in use without ACconnection. In case of near empty of battery, should dispose in time.
Setting fluid warmer
Press in progress of infusion.
Choose the menu of fluid warmer, press .
Choose the menu of heating range, press .
Press to return to infusion interface.
Pre-alarm setting of infusion completion
Press during infusion.
Choose the menu of infusion completion pre-alarm, press .
Input the time need be advanced(5~30mins or input 0 to turn off pre-alarm), press .
Press to return to infusion interface.
Bottom occlusion pre-alarm setup
Press during infusion
Choose the menu of bottom pressure pre-alarm, press .
Choose “ON” or “OFF” pressure pre-alarm, press .
Press to return to infusion interface.
key lock (auto)
Press in pause status.
Choose the menu of system parameters, press .
Choose the menu of keypad lock setting, press .
Input the time of automatic keypad lock (input 0 to cancel automatic keypad lock), press .
Press to return to infusion interface.
key lock (manual)
Long press key.then the keypad will lock,
- 30 -
press key again.then the keypad will unlock,
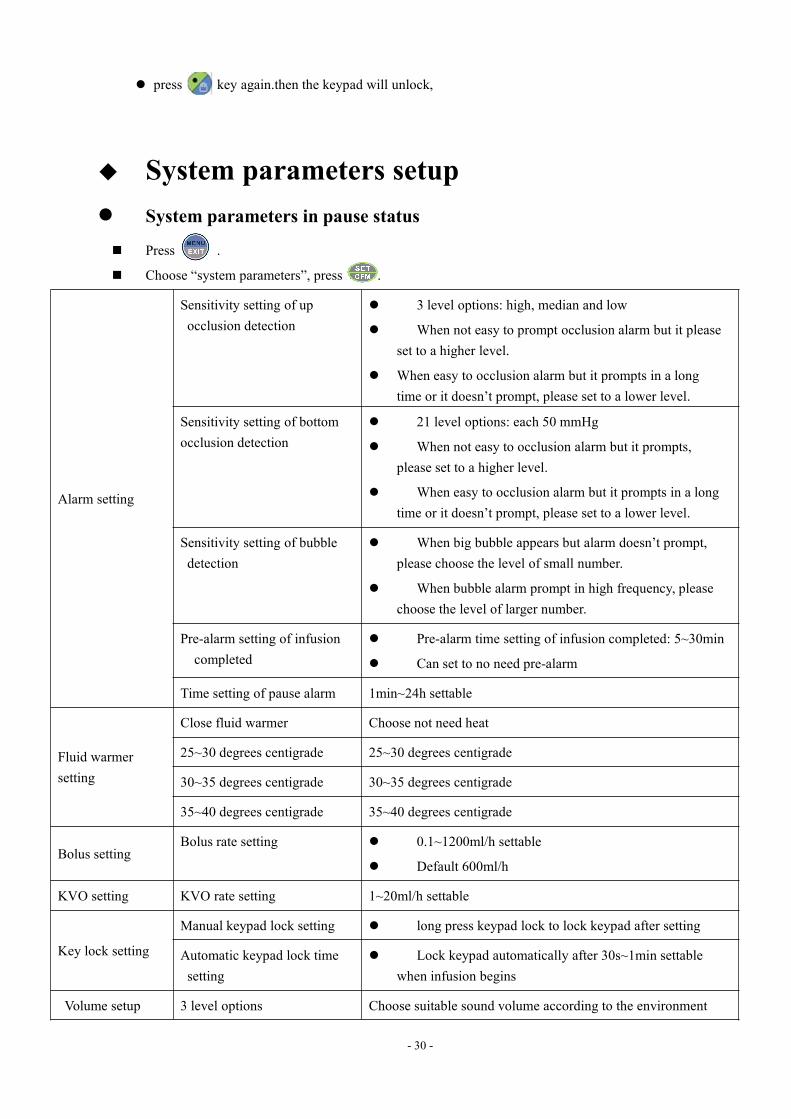
System parameters setup System parameters in pause status
Press .
Choose “system parameters”, press .
Alarm setting
Sensitivity setting of upocclusion detection
3 level options: high, median and low
When not easy to prompt occlusion alarm but it pleaseset to a higher level.
When easy to occlusion alarm but it prompts in a longtime or it doesn’t prompt, please set to a lower level.
Sensitivity setting of bottomocclusion detection
21 level options: each 50 mmHg
When not easy to occlusion alarm but it prompts,please set to a higher level.
When easy to occlusion alarm but it prompts in a longtime or it doesn’t prompt, please set to a lower level.
Sensitivity setting of bubbledetection
When big bubble appears but alarm doesn’t prompt,please choose the level of small number.
When bubble alarm prompt in high frequency, pleasechoose the level of larger number.
Pre-alarm setting of infusioncompleted
Pre-alarm time setting of infusion completed: 5~30min
Can set to no need pre-alarm
Time setting of pause alarm 1min~24h settable
Fluid warmersetting
Close fluid warmer Choose not need heat
25~30 degrees centigrade 25~30 degrees centigrade
30~35 degrees centigrade 30~35 degrees centigrade
35~40 degrees centigrade 35~40 degrees centigrade
Bolus settingBolus rate setting 0.1~1200ml/h settable
Default 600ml/h
KVO setting KVO rate setting 1~20ml/h settable
Key lock setting
Manual keypad lock setting long press keypad lock to lock keypad after setting
Automatic keypad lock timesetting
Lock keypad automatically after 30s~1min settablewhen infusion begins
Volume setup 3 level options Choose suitable sound volume according to the environment

- 31 -
Time setting Set system time of machine Can input year, month, date; hour, minute, second
TFT settingBrightness adjustment ofLCD
Use up and down keys to adjust the brightness
- 32 -
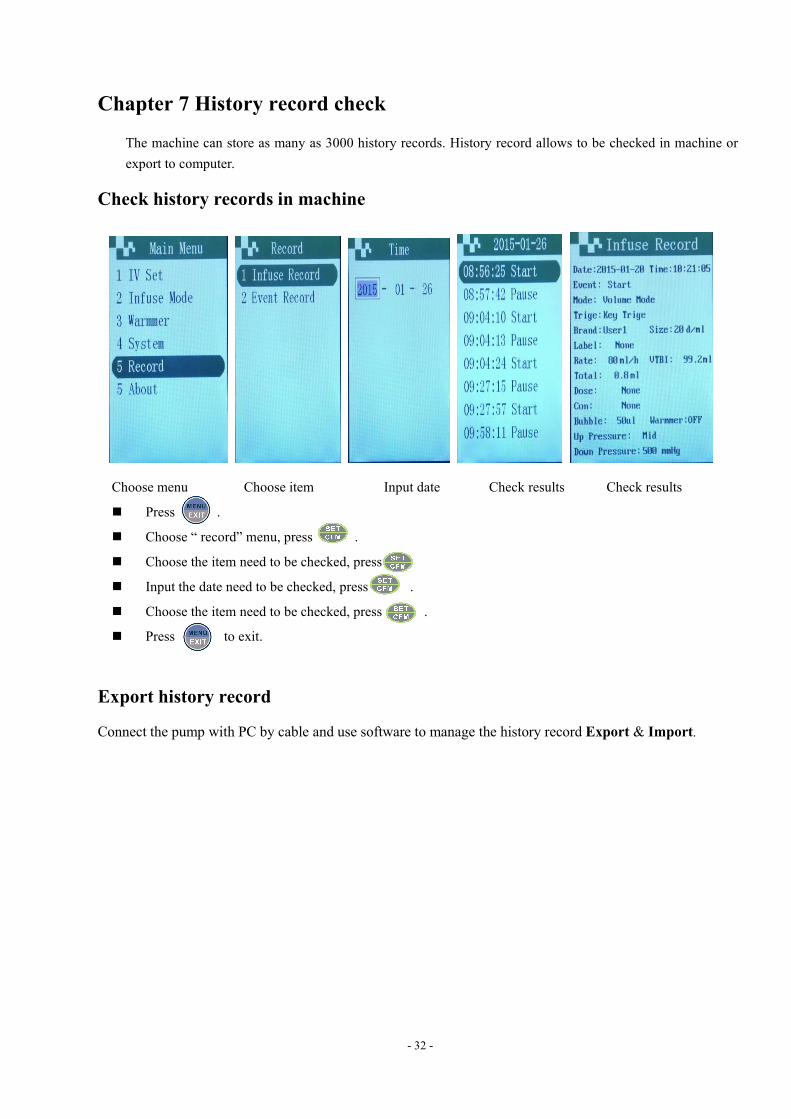
Chapter 7 History record check
The machine can store as many as 3000 history records. History record allows to be checked in machine orexport to computer.
Check history records in machine
Choose menu Choose item Input date Check results Check results
Press .
Choose “ record” menu, press .
Choose the item need to be checked, press
Input the date need to be checked, press .
Choose the item need to be checked, press .
Press to exit.
Export history record
Connect the pump with PC by cable and use software to manage the history record Export & Import.
- 33 -
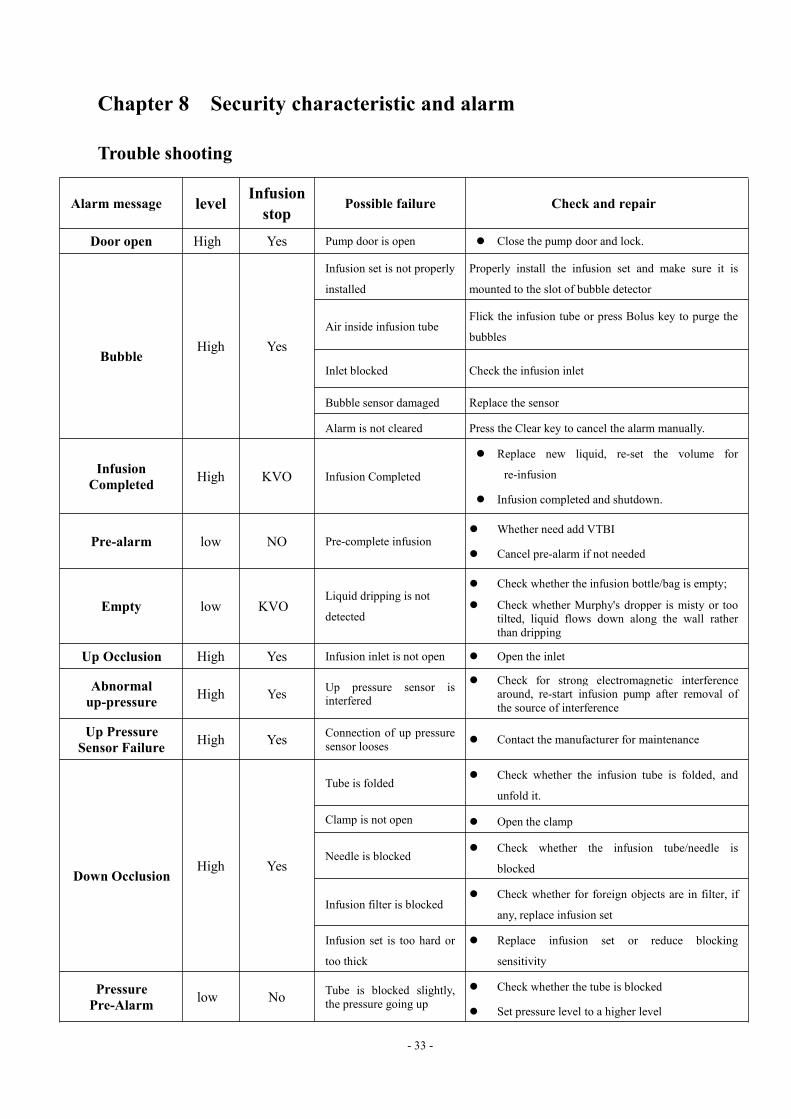
Chapter 8 Security characteristic and alarm
Trouble shooting
Alarm message level Infusionstop
Possible failure Check and repair
Door open High Yes Pump door is open Close the pump door and lock.
BubbleHigh Yes
Infusion set is not properly
installed
Properly install the infusion set and make sure it is
mounted to the slot of bubble detector
Air inside infusion tubeFlick the infusion tube or press Bolus key to purge the
bubbles
Inlet blocked Check the infusion inlet
Bubble sensor damaged Replace the sensor
Alarm is not cleared Press the Clear key to cancel the alarm manually.
InfusionCompleted High KVO Infusion Completed
Replace new liquid, re-set the volume for
re-infusion
Infusion completed and shutdown.
Pre-alarm low NO Pre-complete infusion Whether need add VTBI
Cancel pre-alarm if not needed
Empty low KVOLiquid dripping is not
detected
Check whether the infusion bottle/bag is empty;
Check whether Murphy's dropper is misty or tootilted, liquid flows down along the wall ratherthan dripping
Up Occlusion High Yes Infusion inlet is not open Open the inlet
Abnormalup-pressure High Yes Up pressure sensor is
interfered
Check for strong electromagnetic interferencearound, re-start infusion pump after removal ofthe source of interference
Up PressureSensor Failure High Yes Connection of up pressure
sensor looses Contact the manufacturer for maintenance
Down OcclusionHigh Yes
Tube is folded Check whether the infusion tube is folded, and
unfold it.
Clamp is not open Open the clamp
Needle is blocked Check whether the infusion tube/needle is
blocked
Infusion filter is blocked Check whether for foreign objects are in filter, if
any, replace infusion set
Infusion set is too hard or
too thick
Replace infusion set or reduce blocking
sensitivity
PressurePre-Alarm low No Tube is blocked slightly,
the pressure going up Check whether the tube is blocked
Set pressure level to a higher level

- 34 -
Can close pressure pre-alarm if not needed
Abnormal downpressure High Yes
Bottom pressure sensor is
interfered
Check for strong electromagnetic interference
around, re-start infusion pump after removal of
the source of interference
Bottom pressure sensor
fails
Pressure sensor is damaged, contact the
manufacturer for maintenance
Down PressureSensor Failure High Yes connection of bottom
pressure sensor looses Contact the manufacturer for maintenance
IV set noncalibrated High Yes IV set has not been
calibrated Re-calibrate the IV set according to user’s manual
Abnormal rate High Yes
Tube type setting errorNot re-set the rateparameters after replacingthe tube
Set correctly the tube type Set correctly the parameters
Drop SensorFailure High Yes
Connection of drop sensor
is off or looses Reconnect the sensor
Connection is damaged Contact the manufacturer for maintenance
Abnormal DropSensor High Yes Sensor is not properly
clipped Clip it properly on Murphy’s dropper according
to User’s Manual
Leakage High Yes Infusion tube is skew
Check the infusion line is installed correctly
Check whether the drip rate sensor is subjected tostrong interference/shaking
Check whether the door pressing plate is loose
Fluid WarmerFailure High Yes Fluid warmer connection
looses Reconnect heater
Contact the manufacturer for maintenance
Battery
Failure “ ”High Yes
Battery power is low andcannot be chargednormally
Replace batteries
Battery off High Yes Battery connection looses Install the batteries correctly
Low battery
flashing)low No Battery power is low Connect AC supply to charge the battery
Motor error High Yes Abnormal motor rotation Contact the manufacturer for maintenance
Motor Stop High Yes Stepper motor cannot runnormally
Infusion set is not properly installed, so that the
motor cannot drive the peristaltic pump normally.
Infusion pump fails, contact the manufacturer formaintenance.
Pause Overtime High Yes Infusion suspended over 2min
Press "Clear" key to cancel the alarm and press"Start" to continue the infusion
AC supply isinterrupted low No AC supply is not
connected correctly Plug the AC supply correctly
Technical error High Yes Device failure Contact the manufacturer for maintenance
PS: if there is a single fault, the reason may be the infusion volume is less than 0.7m
- 35 -
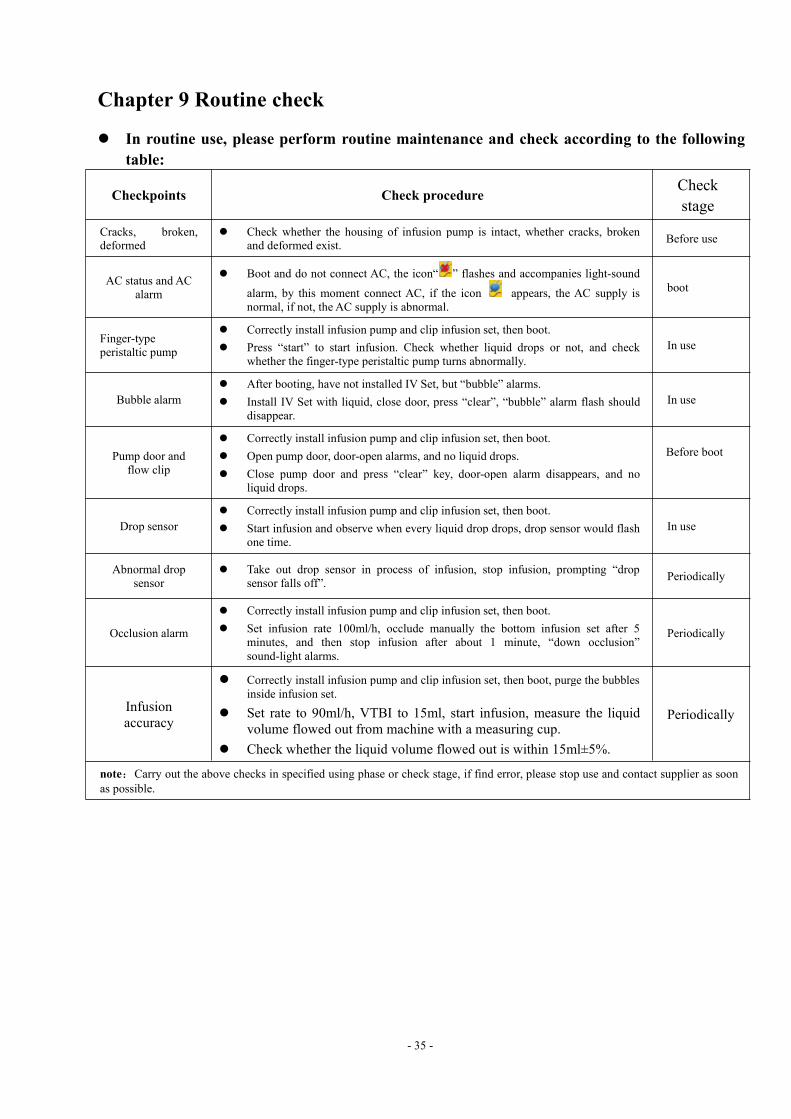
Chapter 9 Routine check
In routine use, please perform routine maintenance and check according to the followingtable:
Checkpoints Check procedureCheckstage
Cracks, broken,deformed
Check whether the housing of infusion pump is intact, whether cracks, brokenand deformed exist. Before use
AC status and ACalarm
Boot and do not connect AC, the icon“ ” flashes and accompanies light-soundalarm, by this moment connect AC, if the icon appears, the AC supply isnormal, if not, the AC supply is abnormal.
boot
Finger-typeperistaltic pump
Correctly install infusion pump and clip infusion set, then boot. Press “start” to start infusion. Check whether liquid drops or not, and check
whether the finger-type peristaltic pump turns abnormally.In use
Bubble alarm After booting, have not installed IV Set, but “bubble” alarms. Install IV Set with liquid, close door, press “clear”, “bubble” alarm flash should
disappear.In use
Pump door andflow clip
Correctly install infusion pump and clip infusion set, then boot. Open pump door, door-open alarms, and no liquid drops. Close pump door and press “clear” key, door-open alarm disappears, and no
liquid drops.
Before boot
Drop sensor Correctly install infusion pump and clip infusion set, then boot. Start infusion and observe when every liquid drop drops, drop sensor would flash
one time.In use
Abnormal dropsensor
Take out drop sensor in process of infusion, stop infusion, prompting “dropsensor falls off”. Periodically
Occlusion alarm
Correctly install infusion pump and clip infusion set, then boot. Set infusion rate 100ml/h, occlude manually the bottom infusion set after 5
minutes, and then stop infusion after about 1 minute, “down occlusion”sound-light alarms.
Periodically
Infusionaccuracy
Correctly install infusion pump and clip infusion set, then boot, purge the bubblesinside infusion set.
Set rate to 90ml/h, VTBI to 15ml, start infusion, measure the liquidvolume flowed out from machine with a measuring cup.
Check whether the liquid volume flowed out is within 15ml±5%.
Periodically
note:Carry out the above checks in specified using phase or check stage, if find error, please stop use and contact supplier as soonas possible.
- 36 -
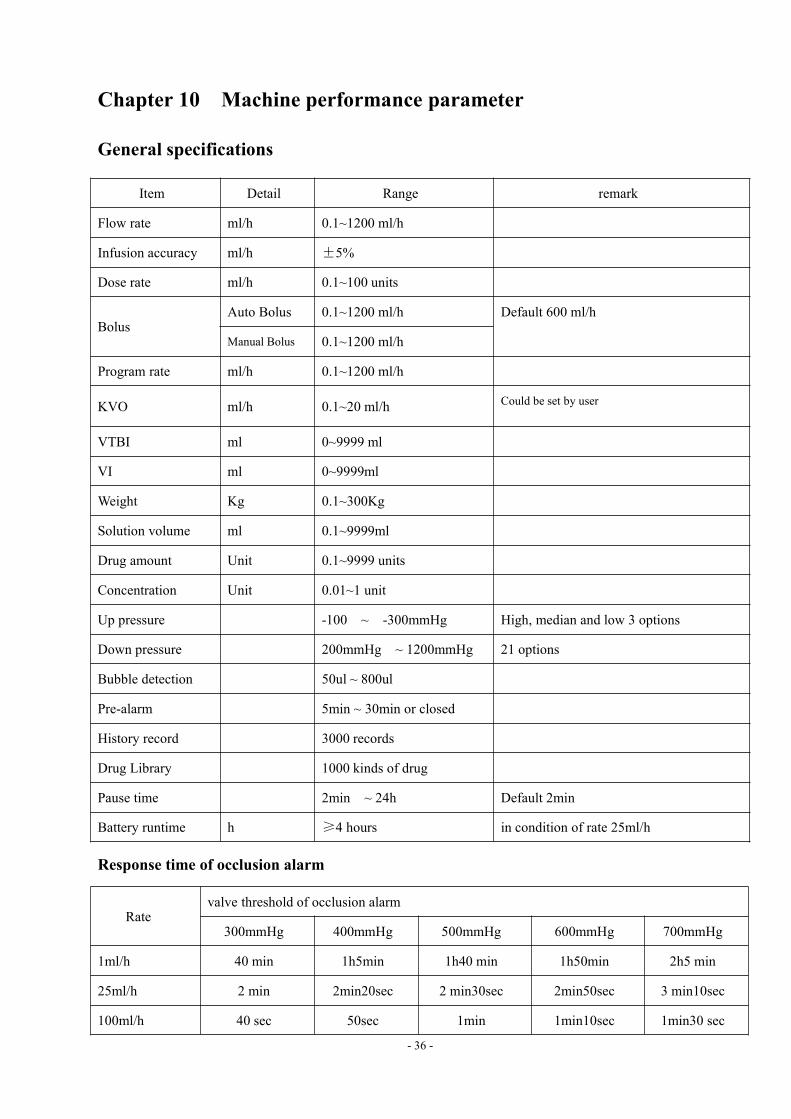
Chapter 10 Machine performance parameter
General specifications
Item Detail Range remark
Flow rate ml/h 0.1~1200 ml/h
Infusion accuracy ml/h ±5%
Dose rate ml/h 0.1~100 units
BolusAuto Bolus 0.1~1200 ml/h Default 600 ml/h
Manual Bolus 0.1~1200 ml/h
Program rate ml/h 0.1~1200 ml/h
KVO ml/h 0.1~20 ml/h Could be set by user
VTBI ml 0~9999 ml
VI ml 0~9999ml
Weight Kg 0.1~300Kg
Solution volume ml 0.1~9999ml
Drug amount Unit 0.1~9999 units
Concentration Unit 0.01~1 unit
Up pressure -100 ~ -300mmHg High, median and low 3 options
Down pressure 200mmHg ~ 1200mmHg 21 options
Bubble detection 50ul ~ 800ul
Pre-alarm 5min ~ 30min or closed
History record 3000 records
Drug Library 1000 kinds of drug
Pause time 2min ~ 24h Default 2min
Battery runtime h ≥4 hours in condition of rate 25ml/h
Response time of occlusion alarm
Ratevalve threshold of occlusion alarm
300mmHg 400mmHg 500mmHg 600mmHg 700mmHg
1ml/h 40 min 1h5min 1h40 min 1h50min 2h5 min
25ml/h 2 min 2min20sec 2 min30sec 2min50sec 3 min10sec
100ml/h 40 sec 50sec 1min 1min10sec 1min30 sec
- 37 -
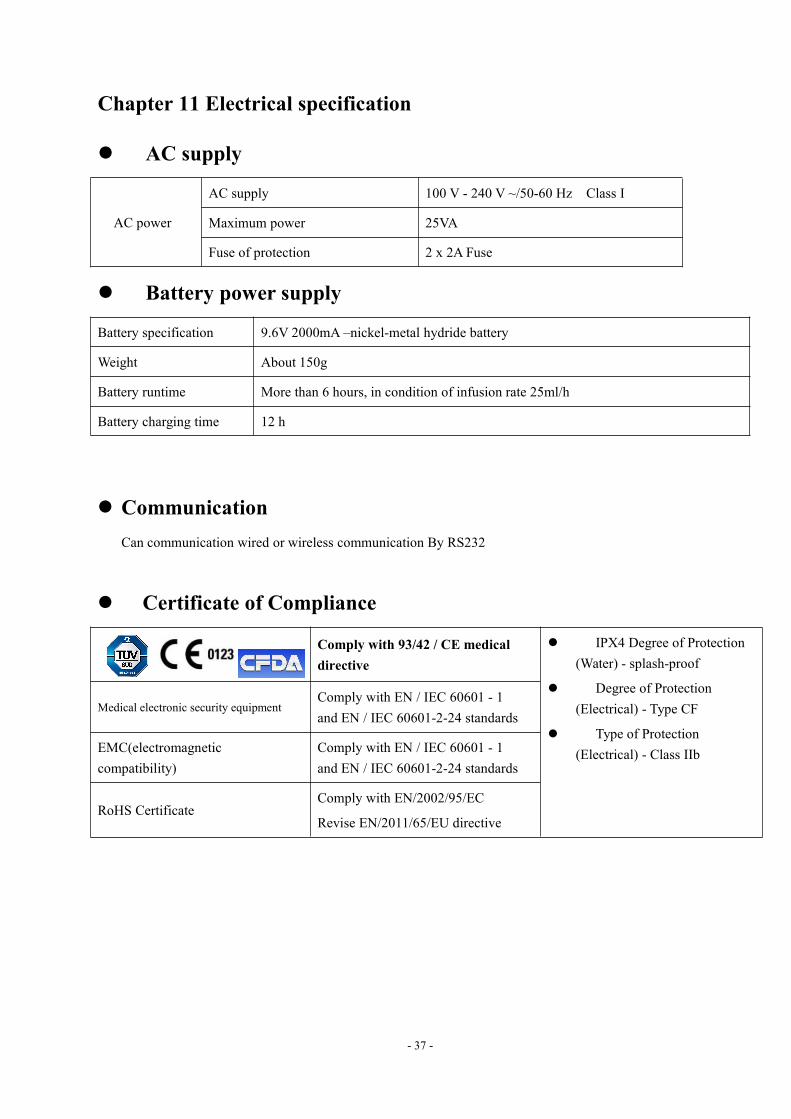
Chapter 11 Electrical specification
AC supply
AC power
AC supply 100 V - 240 V ~/50-60 Hz Class I
Maximum power 25VA
Fuse of protection 2 x 2A Fuse
Battery power supply
Battery specification 9.6V 2000mA –nickel-metal hydride battery
Weight About 150g
Battery runtime More than 6 hours, in condition of infusion rate 25ml/h
Battery charging time 12 h
CommunicationCan communication wired or wireless communication By RS232
Certificate of Compliance
Comply with 93/42 / CE medicaldirective
IPX4 Degree of Protection(Water) - splash-proof
Degree of Protection(Electrical) - Type CF
Type of Protection(Electrical) - Class IIb
Medical electronic security equipmentComply with EN / IEC 60601 - 1and EN / IEC 60601-2-24 standards
EMC(electromagneticcompatibility)
Comply with EN / IEC 60601 - 1and EN / IEC 60601-2-24 standards
RoHS CertificateComply with EN/2002/95/EC
Revise EN/2011/65/EU directive
- 38 -
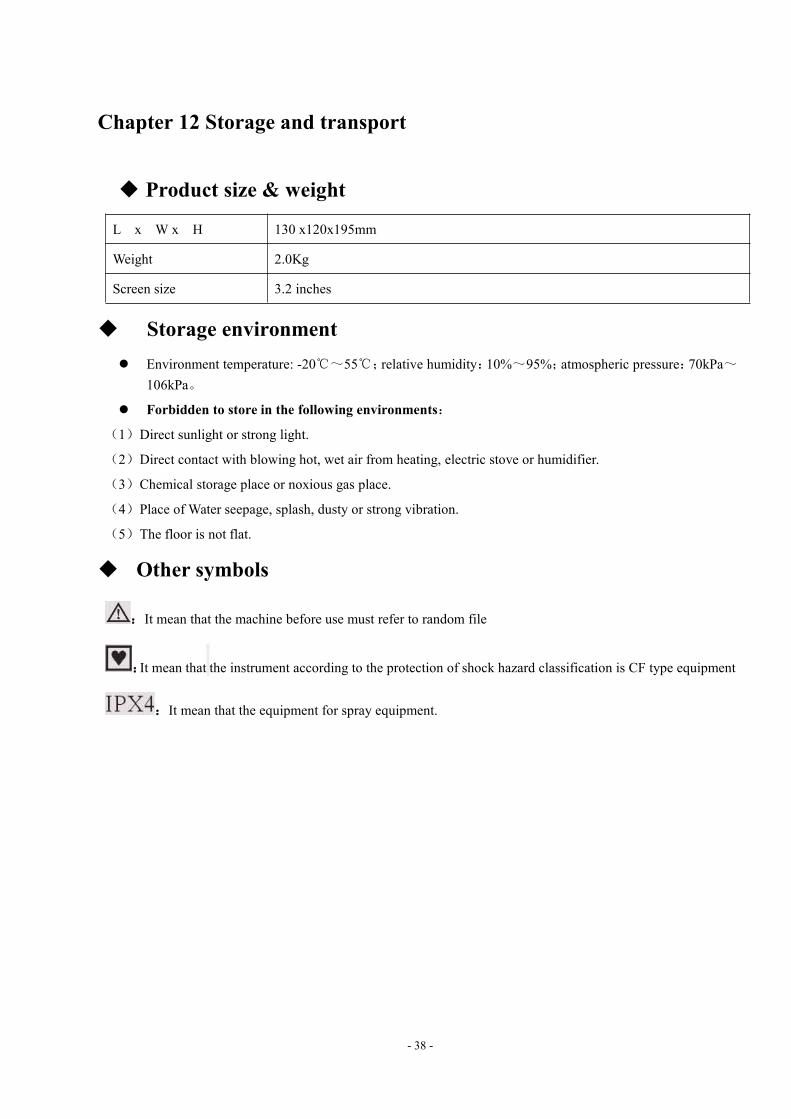
Chapter 12 Storage and transport
Product size & weight
L x W x H 130 x120x195mm
Weight 2.0Kg
Screen size 3.2 inches
Storage environment Environment temperature: -20℃~55℃;relative humidity:10%~95%;atmospheric pressure:70kPa~
106kPa。
Forbidden to store in the following environments:
(1)Direct sunlight or strong light.
(2)Direct contact with blowing hot, wet air from heating, electric stove or humidifier.
(3)Chemical storage place or noxious gas place.
(4)Place of Water seepage, splash, dusty or strong vibration.
(5)The floor is not flat.
Other symbols
:It mean that the machine before use must refer to random file
:It mean that the instrument according to the protection of shock hazard classification is CF type equipment
:It mean that the equipment for spray equipment.
- 39 -
Appendix User's Guide and Manufacturer’s Statement of Anti-electromagnetic Interference I
1User's Guide and Manufacturer’s Statement of Anti-electromagnetic Interference:
apply to all the equipments and systems
2Infusion Pump is intended to be used in the following specified electromagnetic environments. Buyers orusers should ensure that the pump is used in such environments.
3 Emission test Compliance Guide to electromagnetic environment
4 RF emission CLSPR 11 Group 1Infusion Pump’s RF energy only acts in the device. As aresult, the RF emission is very low and would not interferewith nearby electronic equipment.
5 RF emission CLSPR 11 Class B
6 IEC 61000-3-2harmonic current
Class A
7 IEC 61000-3-3 voltagefluctuation and flicker
Complies
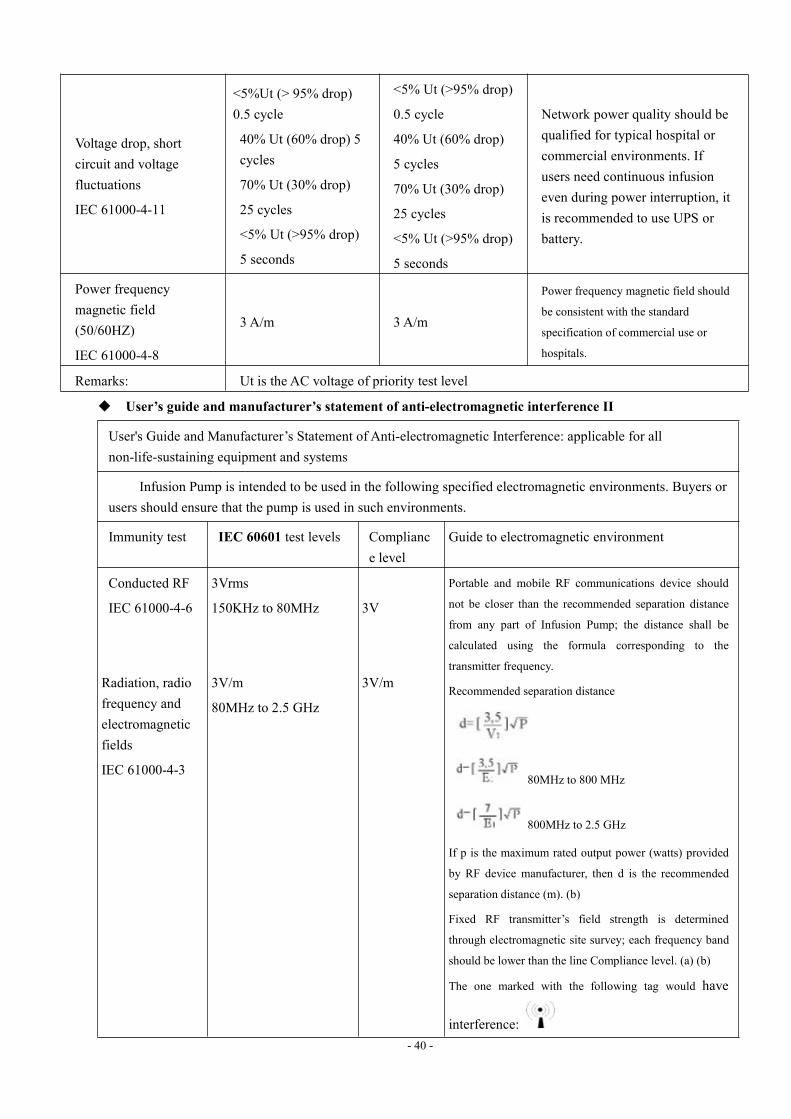
User's Guide and Manufacturer’s Statement of Anti-electromagnetic Interference: apply to all theequipments and systems
Infusion Pump is intended to be used in the following specified electromagnetic environments. Buyers or usersshould ensure that the pump is used in such environments.
Immunity testIEC 60601
Test levelCompliance
Guide to electromagneticenvironment
Electrostatic discharge(ESD)
IEC 61000-4-2
± 6 kV contact-type
± 8 kV air-type
± 6 kV contact-type
± 8 kV air-type
Wooden, concrete or ceramic tileflooring preferred. If compositematerial flooring is used, therelative humidity should not beless than 30%.
Electrical fasttransient/burstIEC61000-4-4
± 2kV power cord
± 1kV input/output
± 2kV power cord
± 1kV input/output
Network power quality should bequalified for typical hospital orcommercial environments.
Surge IEC 61000-4-5± 1kV differentialmode
± 2kV common mode
± 1kV differentialmode
± 2kV commonmode
Network power quality should bequalified for typical hospital orcommercial environments.
- 40 -
Voltage drop, shortcircuit and voltagefluctuations
IEC 61000-4-11
<5%Ut (> 95% drop)0.5 cycle
40% Ut (60% drop) 5cycles
70% Ut (30% drop)
25 cycles
<5% Ut (>95% drop)
5 seconds
<5% Ut (>95% drop)
0.5 cycle
40% Ut (60% drop)
5 cycles
70% Ut (30% drop)
25 cycles
<5% Ut (>95% drop)
5 seconds
Network power quality should bequalified for typical hospital orcommercial environments. Ifusers need continuous infusioneven during power interruption, itis recommended to use UPS orbattery.
Power frequencymagnetic field(50/60HZ)
IEC 61000-4-8
3 A/m 3 A/m
Power frequency magnetic field should
be consistent with the standard
specification of commercial use or
hospitals.
Remarks: Ut is the AC voltage of priority test level
User’s guide and manufacturer’s statement of anti-electromagnetic interference II
User's Guide and Manufacturer’s Statement of Anti-electromagnetic Interference: applicable for allnon-life-sustaining equipment and systems
Infusion Pump is intended to be used in the following specified electromagnetic environments. Buyers orusers should ensure that the pump is used in such environments.
Immunity test IEC 60601 test levels Compliance level
Guide to electromagnetic environment
Conducted RF
IEC 61000-4-6
Radiation, radiofrequency andelectromagneticfields
IEC 61000-4-3
3Vrms
150KHz to 80MHz
3V/m
80MHz to 2.5 GHz
3V
3V/m
Portable and mobile RF communications device should
not be closer than the recommended separation distance
from any part of Infusion Pump; the distance shall be
calculated using the formula corresponding to the
transmitter frequency.
Recommended separation distance
80MHz to 800 MHz
800MHz to 2.5 GHz
If p is the maximum rated output power (watts) provided
by RF device manufacturer, then d is the recommended
separation distance (m). (b)
Fixed RF transmitter’s field strength is determined
through electromagnetic site survey; each frequency band
should be lower than the line Compliance level. (a) (b)
The one marked with the following tag would have
interference:
- 41 -
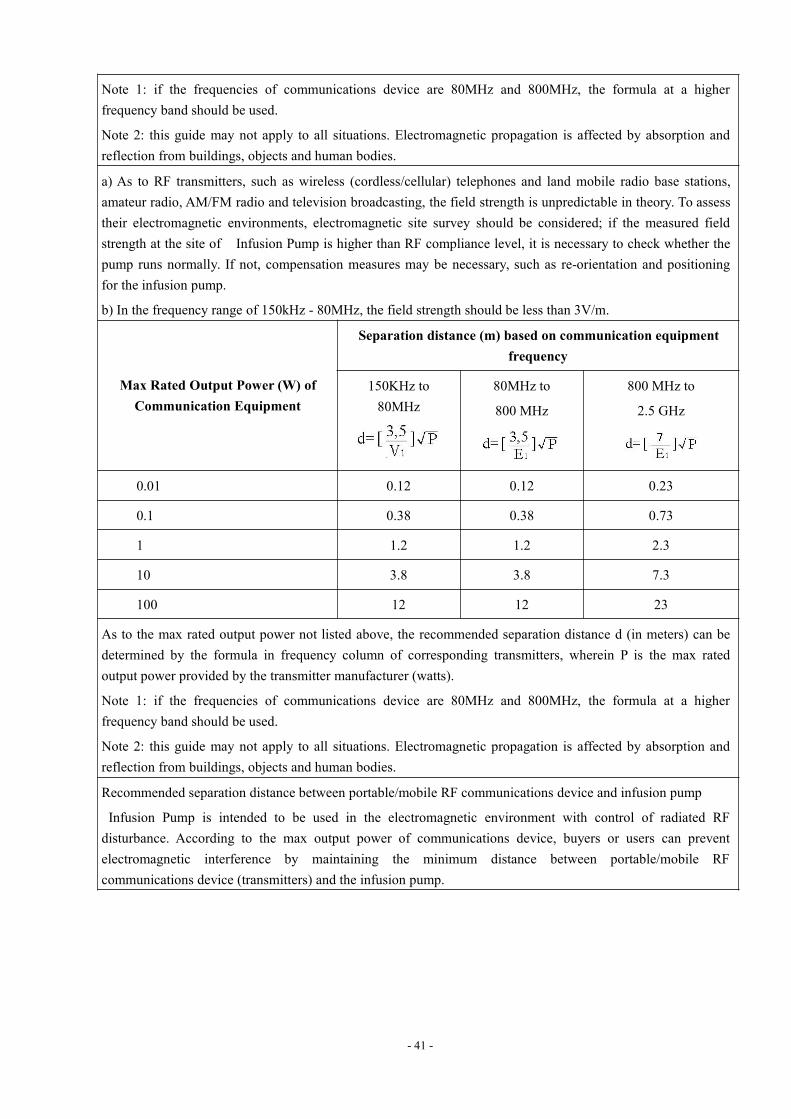
Note 1: if the frequencies of communications device are 80MHz and 800MHz, the formula at a higherfrequency band should be used.
Note 2: this guide may not apply to all situations. Electromagnetic propagation is affected by absorption andreflection from buildings, objects and human bodies.
a) As to RF transmitters, such as wireless (cordless/cellular) telephones and land mobile radio base stations,amateur radio, AM/FM radio and television broadcasting, the field strength is unpredictable in theory. To assesstheir electromagnetic environments, electromagnetic site survey should be considered; if the measured fieldstrength at the site of Infusion Pump is higher than RF compliance level, it is necessary to check whether thepump runs normally. If not, compensation measures may be necessary, such as re-orientation and positioningfor the infusion pump.
b) In the frequency range of 150kHz - 80MHz, the field strength should be less than 3V/m.
Max Rated Output Power (W) ofCommunication Equipment
Separation distance (m) based on communication equipmentfrequency
150KHz to80MHz
80MHz to
800 MHz
800 MHz to
2.5 GHz
0.01 0.12 0.12 0.23
0.1 0.38 0.38 0.73
1 1.2 1.2 2.3
10 3.8 3.8 7.3
100 12 12 23
As to the max rated output power not listed above, the recommended separation distance d (in meters) can bedetermined by the formula in frequency column of corresponding transmitters, wherein P is the max ratedoutput power provided by the transmitter manufacturer (watts).
Note 1: if the frequencies of communications device are 80MHz and 800MHz, the formula at a higherfrequency band should be used.
Note 2: this guide may not apply to all situations. Electromagnetic propagation is affected by absorption andreflection from buildings, objects and human bodies.
Recommended separation distance between portable/mobile RF communications device and infusion pump
Infusion Pump is intended to be used in the electromagnetic environment with control of radiated RFdisturbance. According to the max output power of communications device, buyers or users can preventelectromagnetic interference by maintaining the minimum distance between portable/mobile RFcommunications device (transmitters) and the infusion pump.
- 42 -
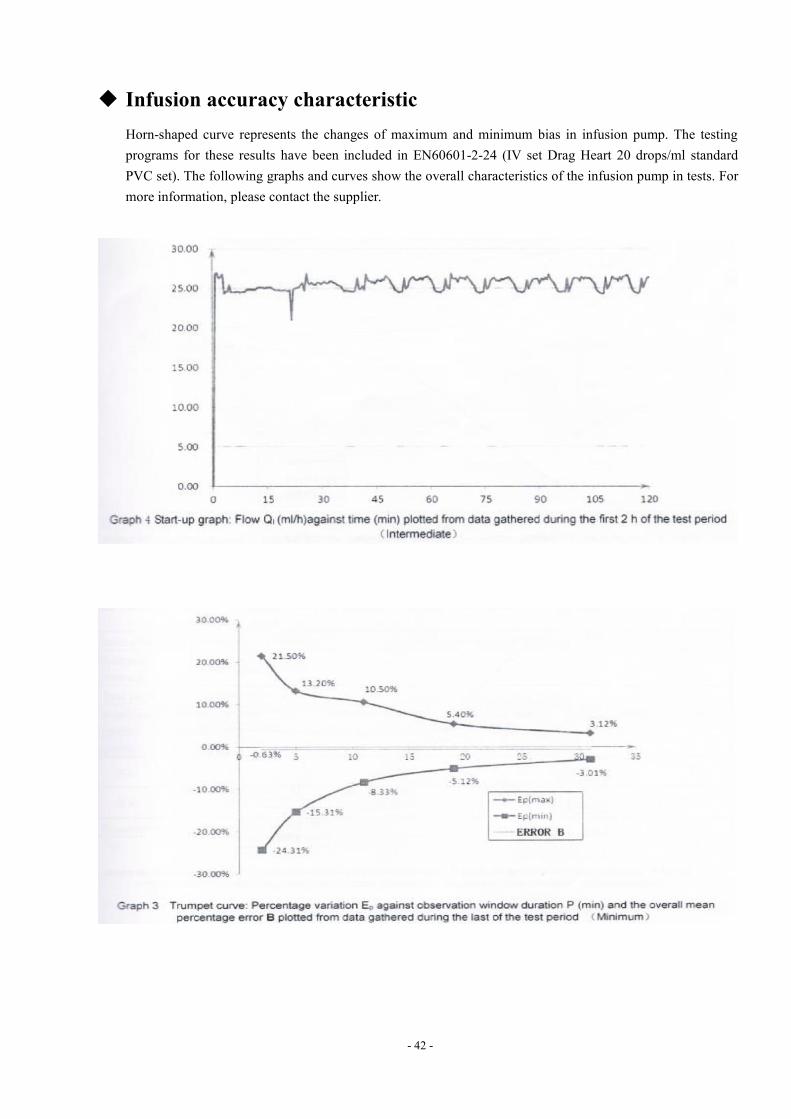
Infusion accuracy characteristicHorn-shaped curve represents the changes of maximum and minimum bias in infusion pump. The testingprograms for these results have been included in EN60601-2-24 (IV set Drag Heart 20 drops/ml standardPVC set). The following graphs and curves show the overall characteristics of the infusion pump in tests. Formore information, please contact the supplier.
- 43 -
System statement
The product can be attached to other medical electronic equipments, the person who composes this medical
electronic system should be responsible for the requirement of compliance.
The equipments connected with the pump should comply with their respective IEC or ISO standards (i.e.
information processing equipment IEC60950), and the whole equipment should comply with the requirement of
medical equipment system (see IEC60601-1-1 or IEC60601-1 Chapter 16 Version 3).
If you have doubts, please consult your local representative or technical support department.

- 44 -
Product and service information
Product name: Infusion PumpProduct standard: EN/IEC 60601-1, 60601-2-24
EN/IEC 60601-1-2, 60601-1-8
Distributor By: